

Page 1
Personal
Component
System
3-044-713-13 (1)
Operating Instructions page 2
Manual de instrucciones página 2
GB
GB
ES
ES
PMC-DR45L
© 2000 Sony Corporation
Page 2
Warning
To prevent fire or shock hazard, do
not expose the player to rain or
moisture.
To avoid electrical shock, do not open
the cabinet. Refer servicing to
qualified personnel only.
Information
For customers in Europe
This Compact Disc player is classified as a
CLASS 1 LASER product.
The CLASS 1 LASER PRODUCT label is
located at the rear of the player.
Warning
Do not install the appliance in a confined
space, such as a bookcase or built-in cabinet.
CAUTION
• You can use this player on AC power
source only. You cannot use it on batteries.
When you use this player for the first time,
or when you have not used it for a long
time, leave it connected to AC power
source for about one hour to charge the
built-in backup battery for the clock, timer,
preset radio stations, etc. You can use the
player during charging. The player will
charge the battery automatically as long as
it is connected to a power source.
When you disconnect the mains lead after
charging, be sure to turn the power off
first. Once fully charged, the backup
battery will last for about 30 minutes
without being connected to any power
sources.
If the stored data are erased, reenter them
when you use the player again.
• The speakers and player are designed to be
used as a single unit. Never connect the
speakers and player to different
equipment. Doing so may cause the
connected equipment to malfunction.
Notice for customers in the United
Kingdom
A moulded plug complying with BS 1363 is
fitted to this equipment for your safety and
convenience.
Should the fuse in the plug supplied need to
be replaced, same rating fuse approved by
ASTA or BSI to BS 1362, (i.e. marked with
or mark) must be used.
If the plug supplied with this equipment has
a detachable fuse cover, be sure to attach the
fuse cover after you change the fuse. Never
use the plug without the fuse cover. If you
should lose the fuse cover, please contact
your nearest Sony service station.
GB
Introduction2
Page 3

Table of contents
Basic Operations
4 Playing a CD
6 Listening to the radio
8 Playing a tape
10 Recording on a tape
The CD Player
13 Using the display
14 Locating a specific track
15 Playing tracks repeatedly
(Repeat Play)
16 Playing tracks in random order
(Shuffle Play)
17 Creating your own programme
(Programme Play)
The Radio
19 Presetting radio stations
20 Playing preset radio stations
21 Using the Radio Data System
(RDS)
The Tape Player
27 Finding the beginning of a track
The Timer
29 Setting the clock
31 Waking up to music
34 Timer-recording radio
programmes
37 Falling asleep to music
Setting Up
38 Hooking up the system
43 Saving power
44 Connecting optional components
Additional Information
47 Precautions
49 Troubleshooting
52 Maintenance
53 Specifications
54 Index
Basic Operations
GB
The Audio Emphasis
28 Selecting the audio emphasis
(SOUND/MEGA BASS)
Introduction
GB
3
Page 4
Basic Operations
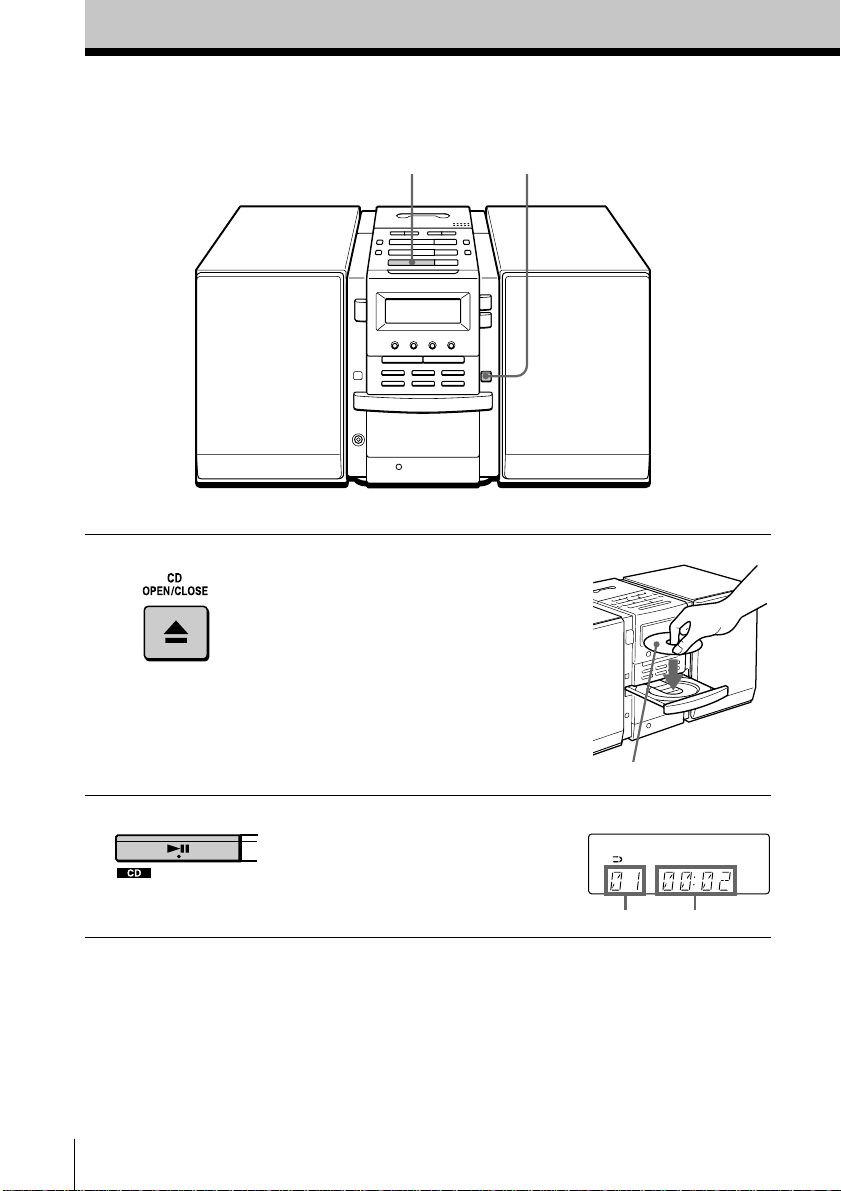
Playing a CD
21
For hookup instructions, see pages 38 - 42.
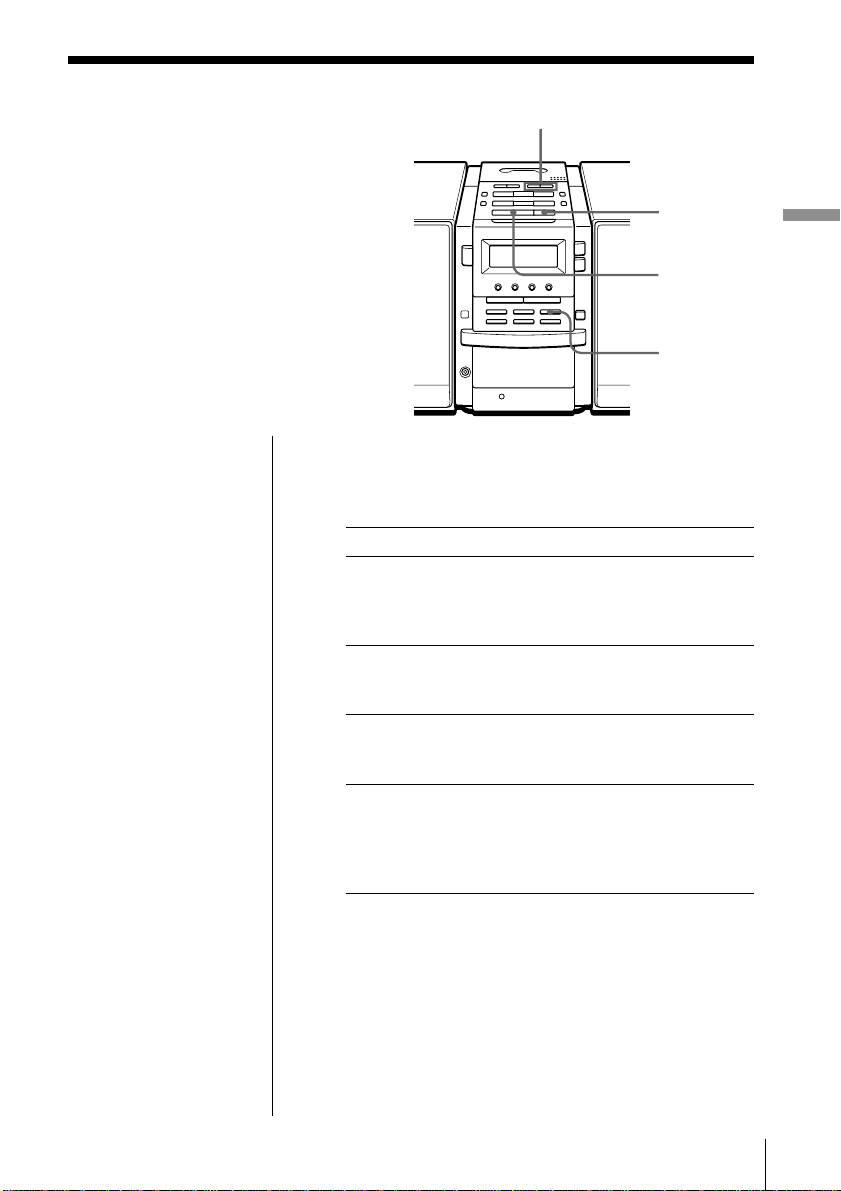
1 Press Z CD OPEN/CLOSE
(direct power-on) and place the
CD on the CD tray.
2 Press u.
GB
Basic Operations4
With the label side up
(On the remote, press N on the
CD section.)
The CD tray closes and the player
plays all the tracks once.
Display
Playing timeTrack number
Page 5
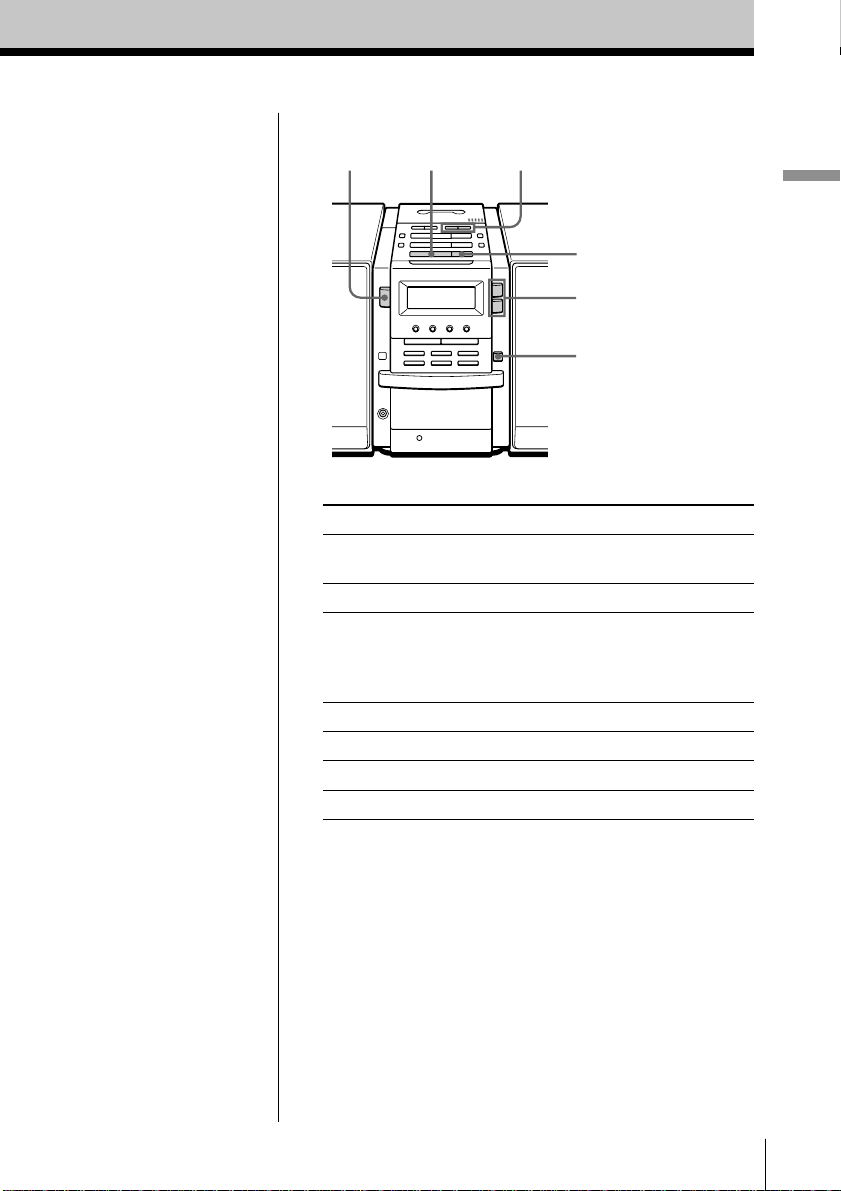
Use these buttons for additional operations
Tip
Next time you want to
listen to a CD, just press
u. The player turns on
automatically and starts
playing the CD.
OPERATE
To Press
adjust the volume VOLUME +, –
stop playback x
pause playback u
go to the next track >
go back to the previous track .
remove the CD Z CD OPEN/CLOSE
turn on/off the player OPERATE
u
., >
x
VOLUME +, –
Z CD
OPEN/CLOSE
(VOL +, – on the remote)
(X on the remote)
Press again to resume play
after pause.
Basic Operations
Basic Operations
GB
5
Page 6
Listening to the radio
1
For hookup instructions, see pages 38 - 42.
2
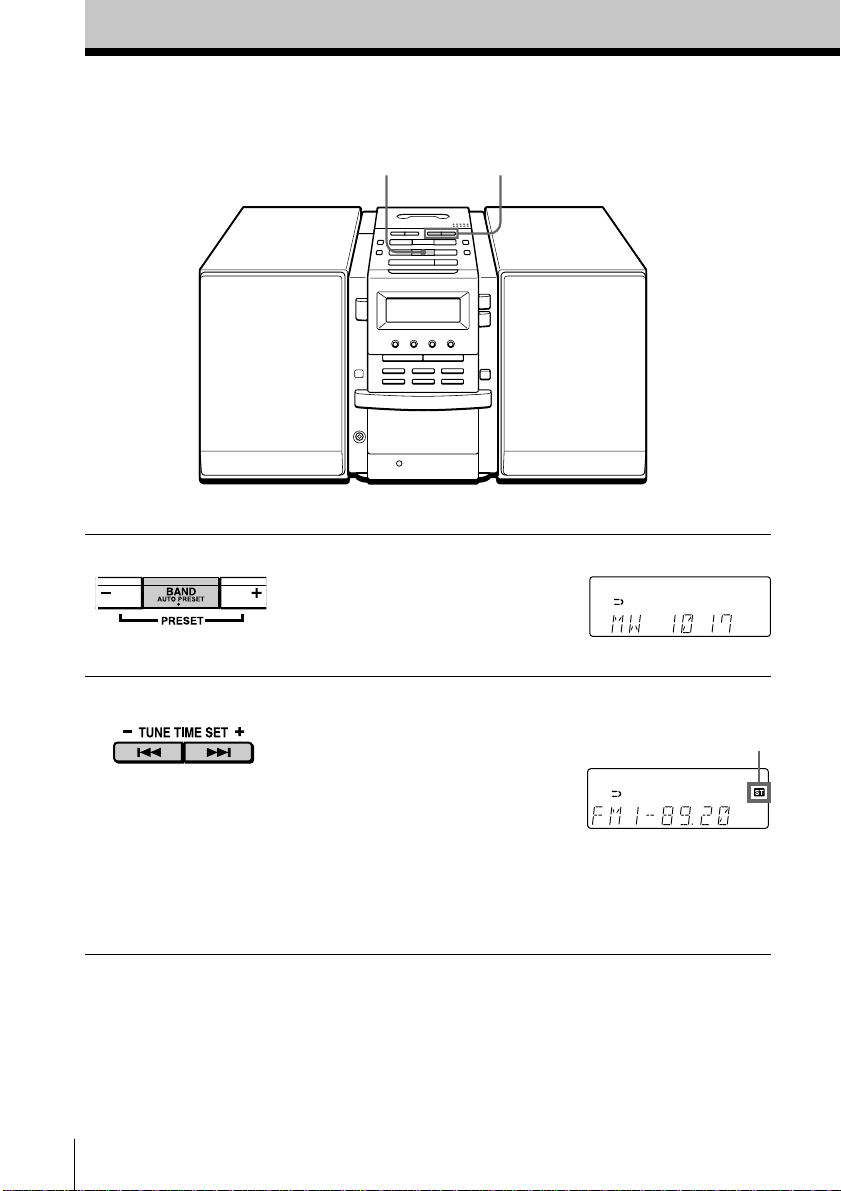
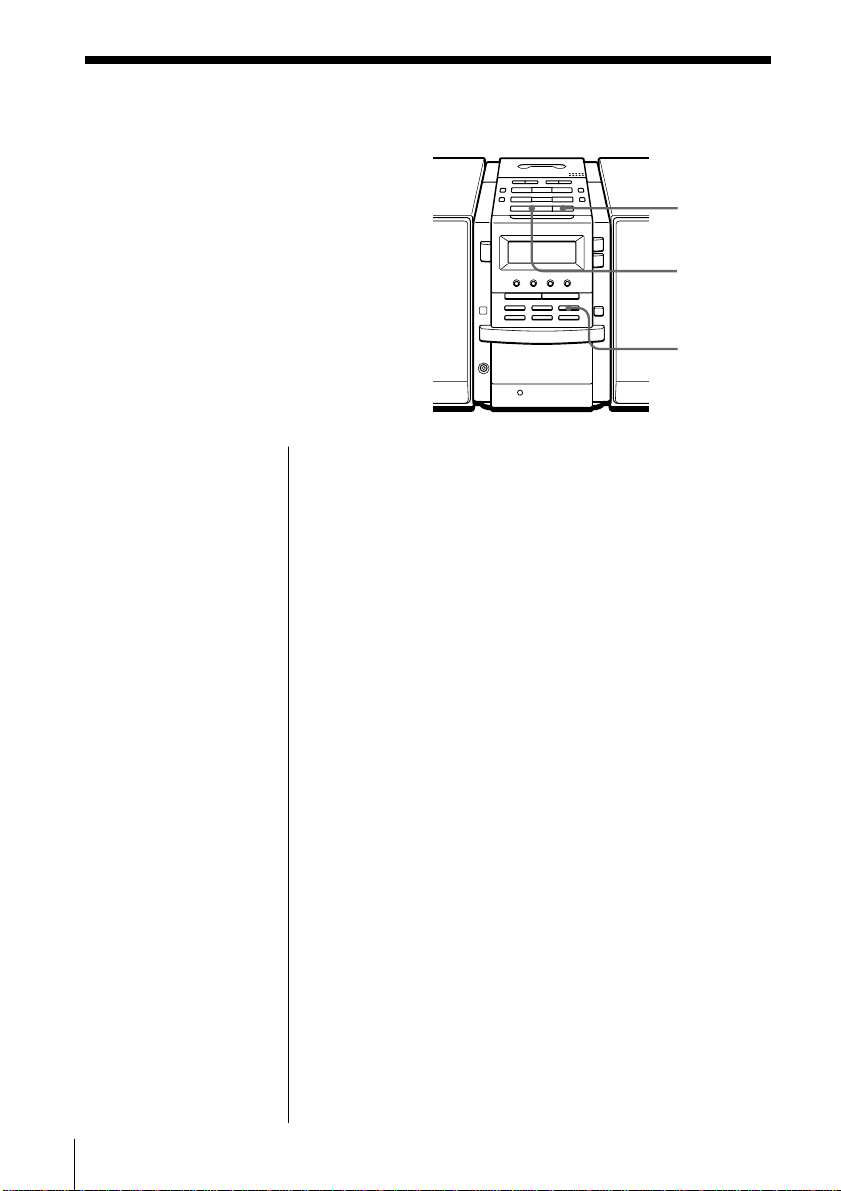
1 Press BAND•AUTO PRESET
until the band you want appears
in the display (direct power-on).
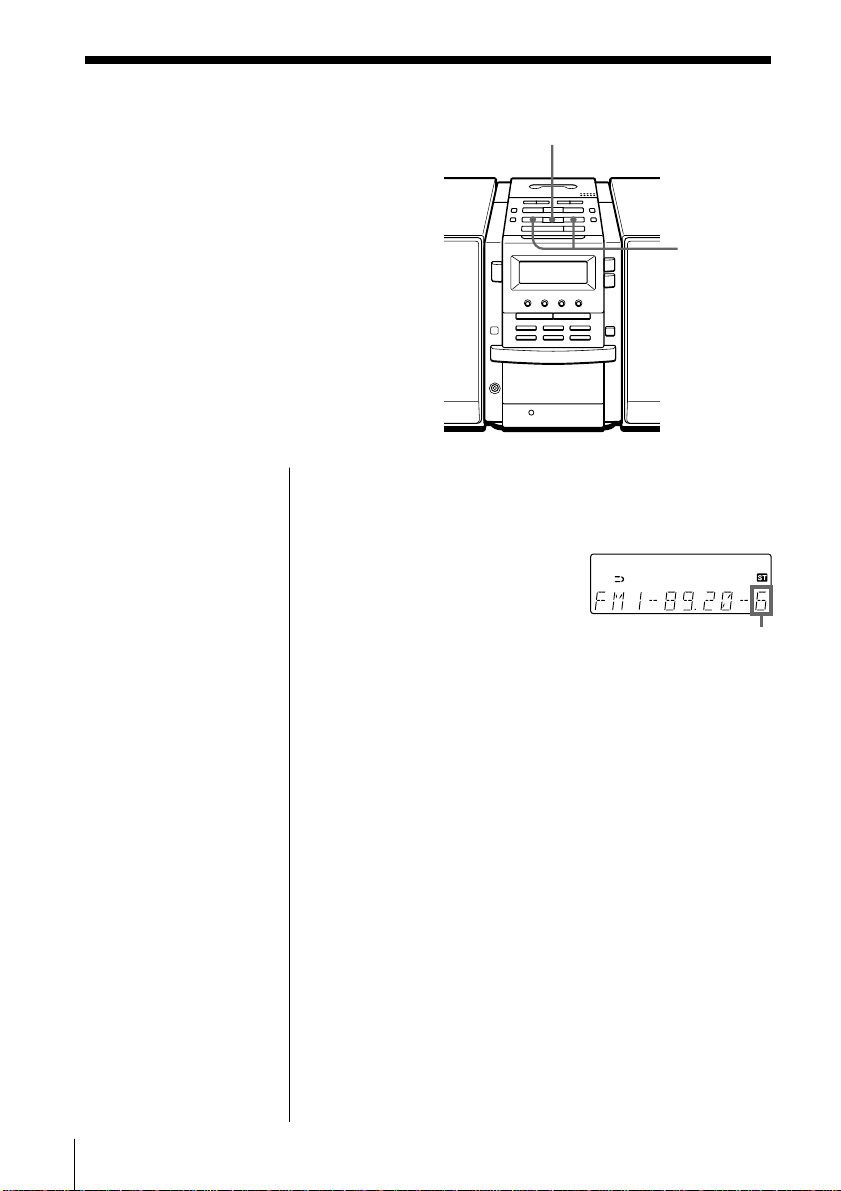
2 Hold down TUNE TIME SET + or
– (TUNE + or – on the remote)
until the frequency digits begin to
change in the display.
The player automatically scans
the radio frequencies and stops
when it finds a clear station.
If you cannot tune in a station,
press the button repeatedly to
change the frequency step by
step.
Display
Indicates an FM
stereo broadcast.
GB
Basic Operations6
Page 7
Use these buttons for additional operations
OPERATE
MODE
VOLUME +, –
Basic Operations
Tips
• The “FM1” and “FM2”
bands have the same
functions. You can store
the stations you want
separately in “FM1” and
“FM2”.
• If the FM broadcast is
noisy, press MODE until
“MONO” appears in the
display and the radio
will play in monaural.
• Next time you want to
listen to the radio, just
press the BAND•AUTO
PRESET button. The
player turns on
automatically and starts
playing the previous
station.
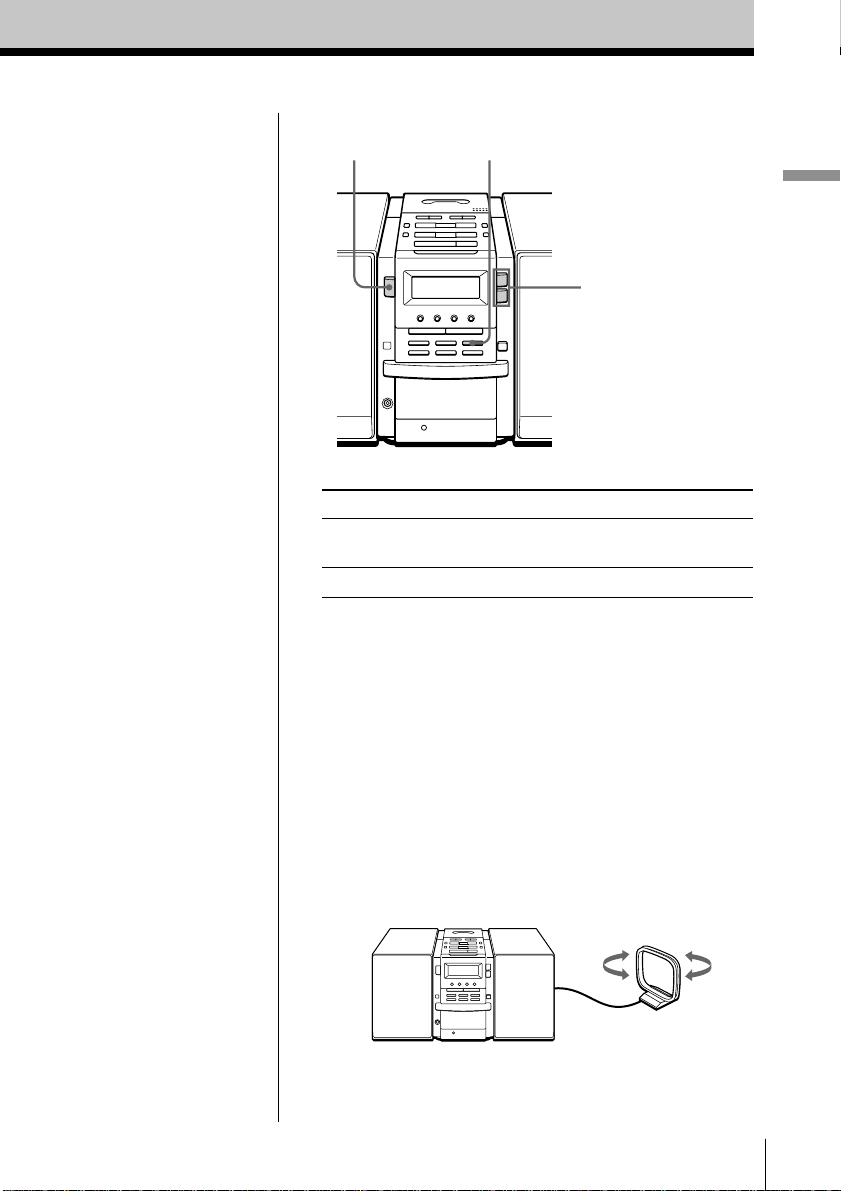
To Press
adjust the volume VOLUME +, –
(VOL +, – on the remote)
turn on/off the radio OPERATE
To improve broadcast reception
FM:
Keep the FM lead aerial as horizontal as possible and
reorient it.
If the FM broadcast is still noisy, disconnect the FM
lead aerial and connect the FM outdoor aerial
(not supplied) (page 42).
MW/LW:
Keep the MW/LW loop aerial as far as possible from
the player and reorient it.
Basic Operations
GB
7
Page 8
Playing a tape
For hookup instructions, see pages 38 - 42.
3
1, 2
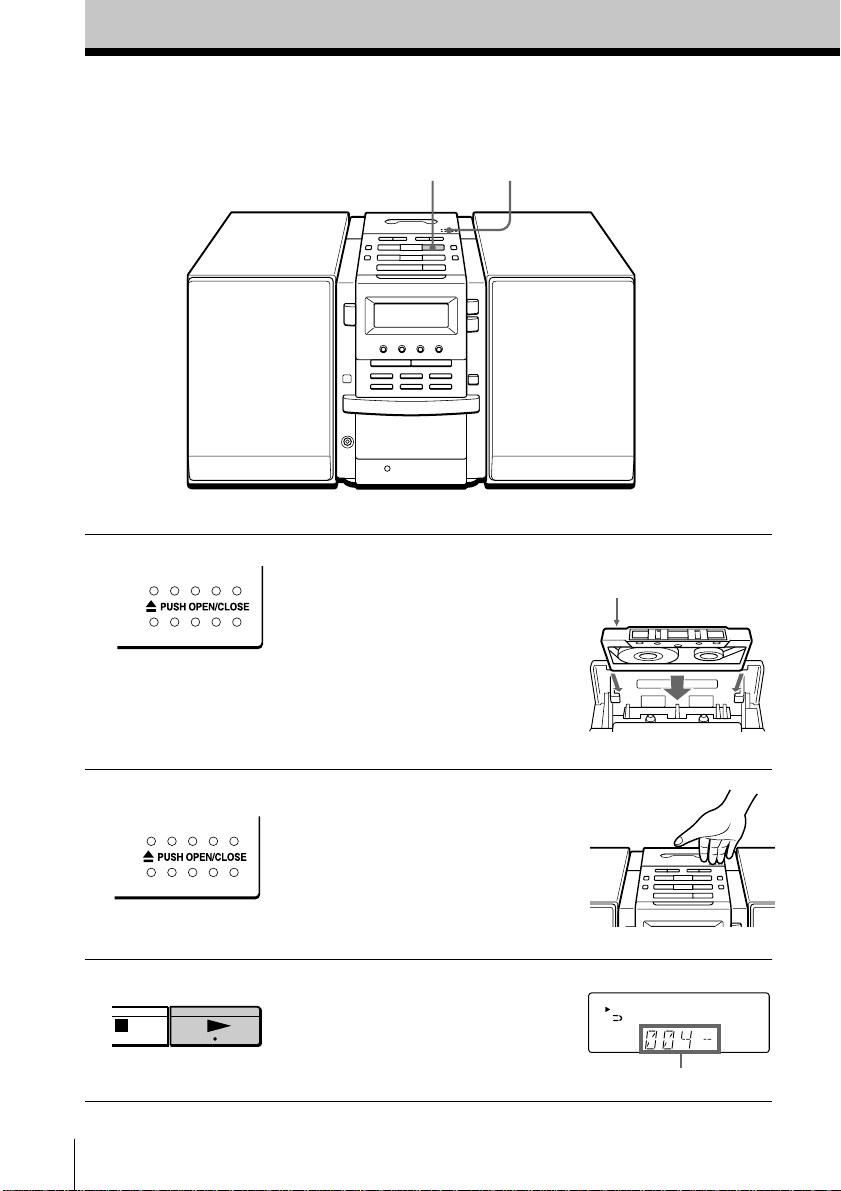
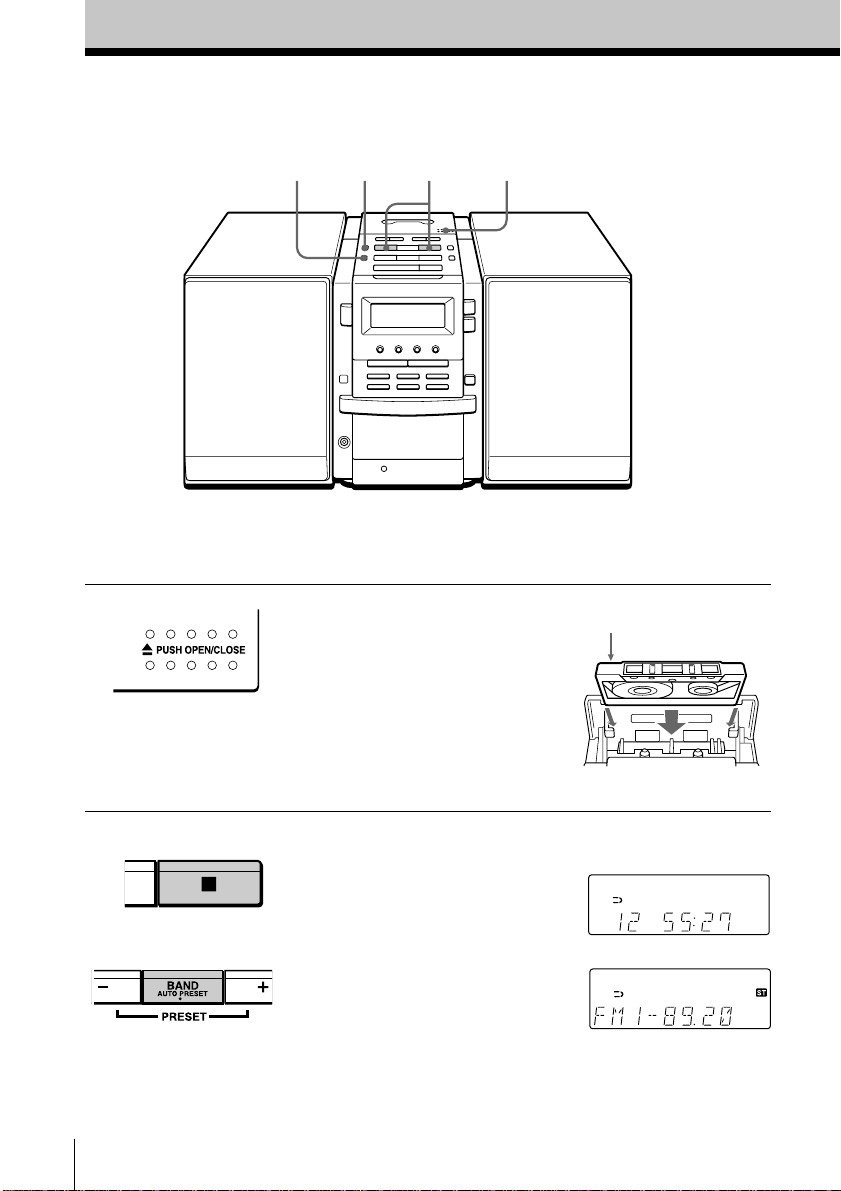
1 Press Z PUSH OPEN/CLOSE to
open the tape compartment and
insert a recorded tape. Use TYPE I
(normal), TYPE II (high position)
and TYPE IV (metal) tapes.
2 Press Z PUSH OPEN/CLOSE to
close the compartment.
3 Press N.
(On the remote, press TAPE N.)
The player turns on (direct
power-on) and starts playing.
GB
Basic Operations8
With the side you want
to play facing up
Display
Tape counter
Page 9
Use these buttons for additional operations
OPERATE Z PUSH OPEN/CLOSE
TAPE m, M
x
n
VOLUME +, –
COUNTER RESET
DIR MODE
Basic Operations
Tips
• Press COUNTER RESET
to reset the counter to
“000”.
• Next time you want to
listen to a tape, just
press N or n. The
player turns on
automatically and starts
playing the tape.
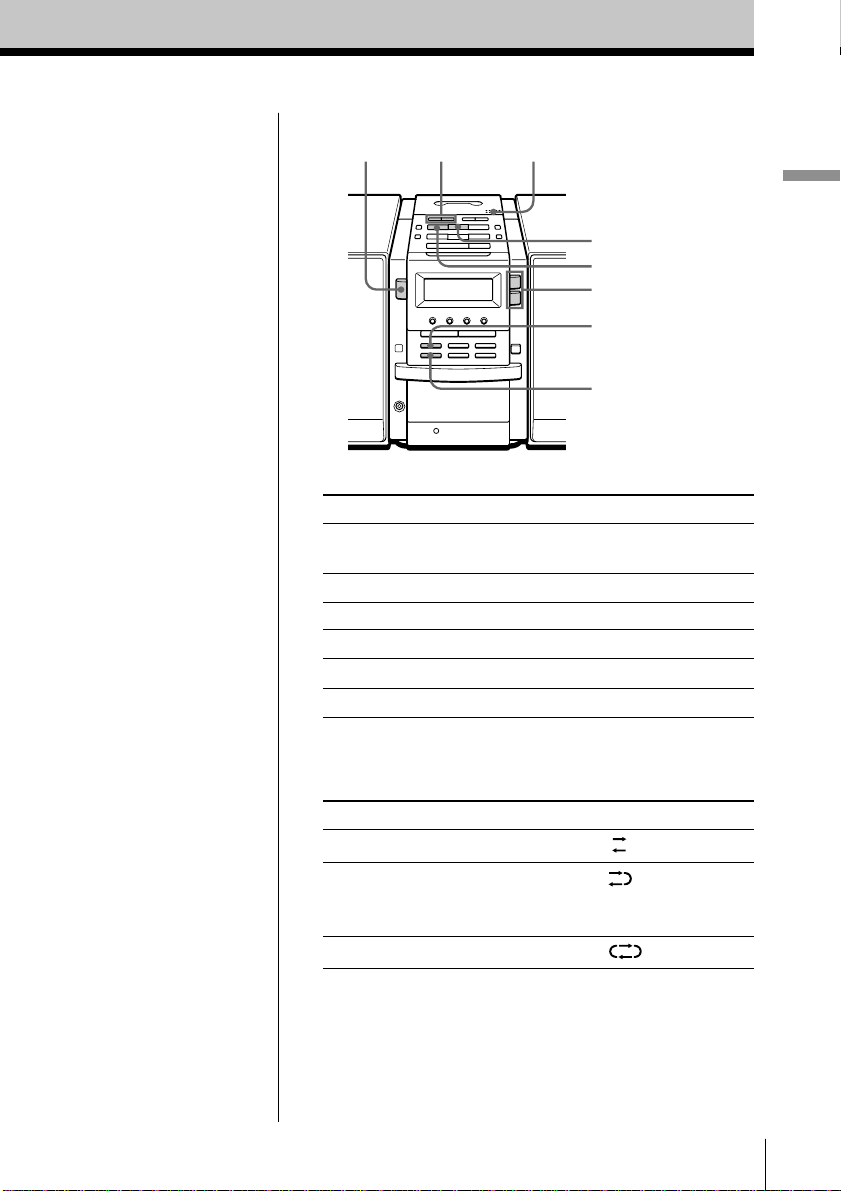
To Press
adjust the volume VOLUME +, –
(VOL +, – on the remote)
stop playback x
play the reverse side n
fast-forward or rewind the tape TAPE M or m
eject the cassette Z PUSH OPEN/CLOSE
turn on/off the player OPERATE
To select the direction mode of the tape
Press DIR MODE repeatedly.
To play Display shows
one side of the tape
both sides of the tape
from the upper side to reverse
side only
both sides of the tape repeatedly
Basic Operations
GB
9
Page 10
Recording on a tape
3
For hookup instructions, see pages 38 - 42. To record on a
MiniDisc or DAT recorder, connect the component (see
page 44).
3 3
1
1 Press Z PUSH OPEN/CLOSE to
open the tape compartment, and
insert a blank tape. Use TYPE I
(normal) tape only.
Press Z PUSH OPEN/CLOSE
again to close the compartment.
With the side you want
to record on facing up
2 Select the programme source you
want to record.
To record from the CD player:
Insert a CD (see page 4) and press
x on the CD section.
To record from the radio:
Tune in the station you want (see
page 6).
GB
Basic Operations10
Display
Page 11
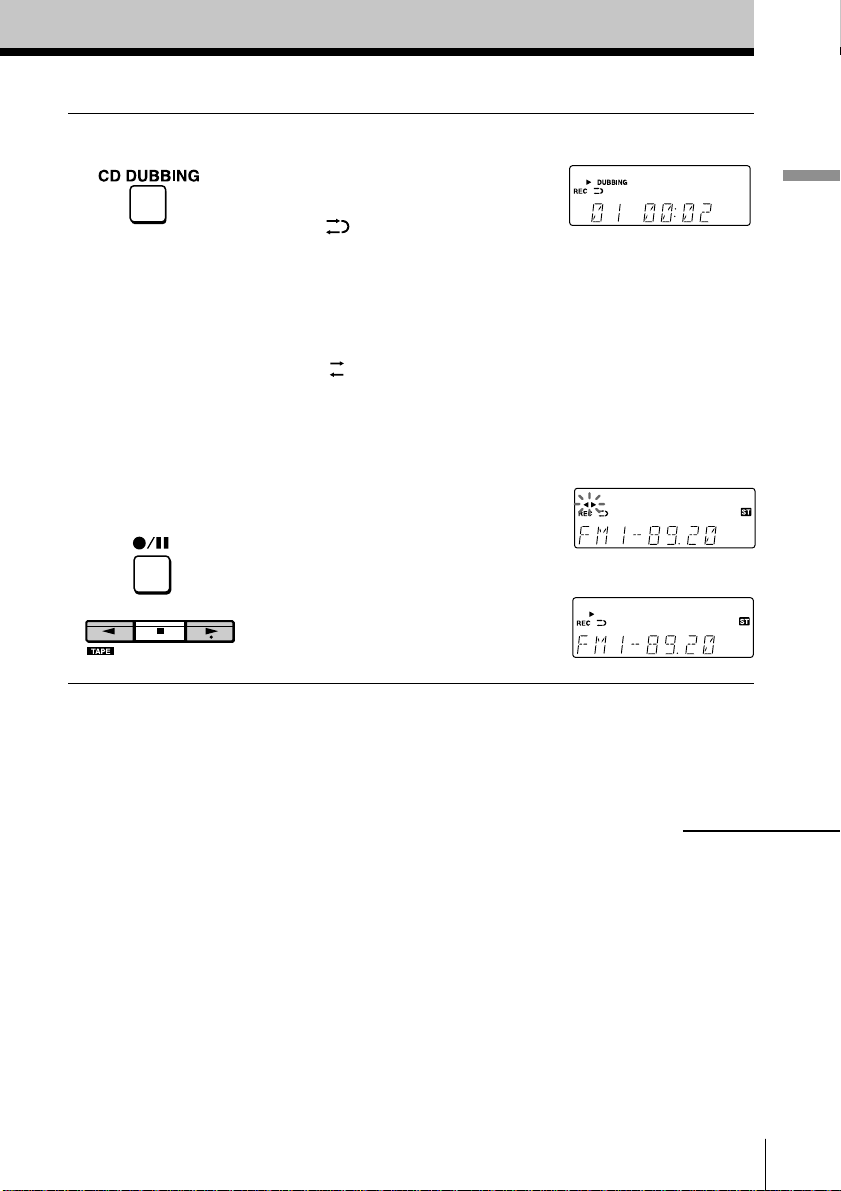
3 Start recording.
To record the whole CD
Press CD DUBBING.
When
If the tape is reversed with the
recording of the track unfinished,
the player will record the track
again from its beginning on the
reverse side.
When
If the tape reaches to its end, the
player stops.
To record the radio
(You can also record the CD
according to the following
procedure. Play the CD after the
tape starts recording.)
Press z/X and then N.
To record on the reverse side,
press n.
(On the remote, while keeping
z/X pressed, press TAPE N or
n.)
is displayed:
is displayed:
Basic Operations
m
continued
Basic Operations
11
GB
Page 12
Recording on a tape (continued)
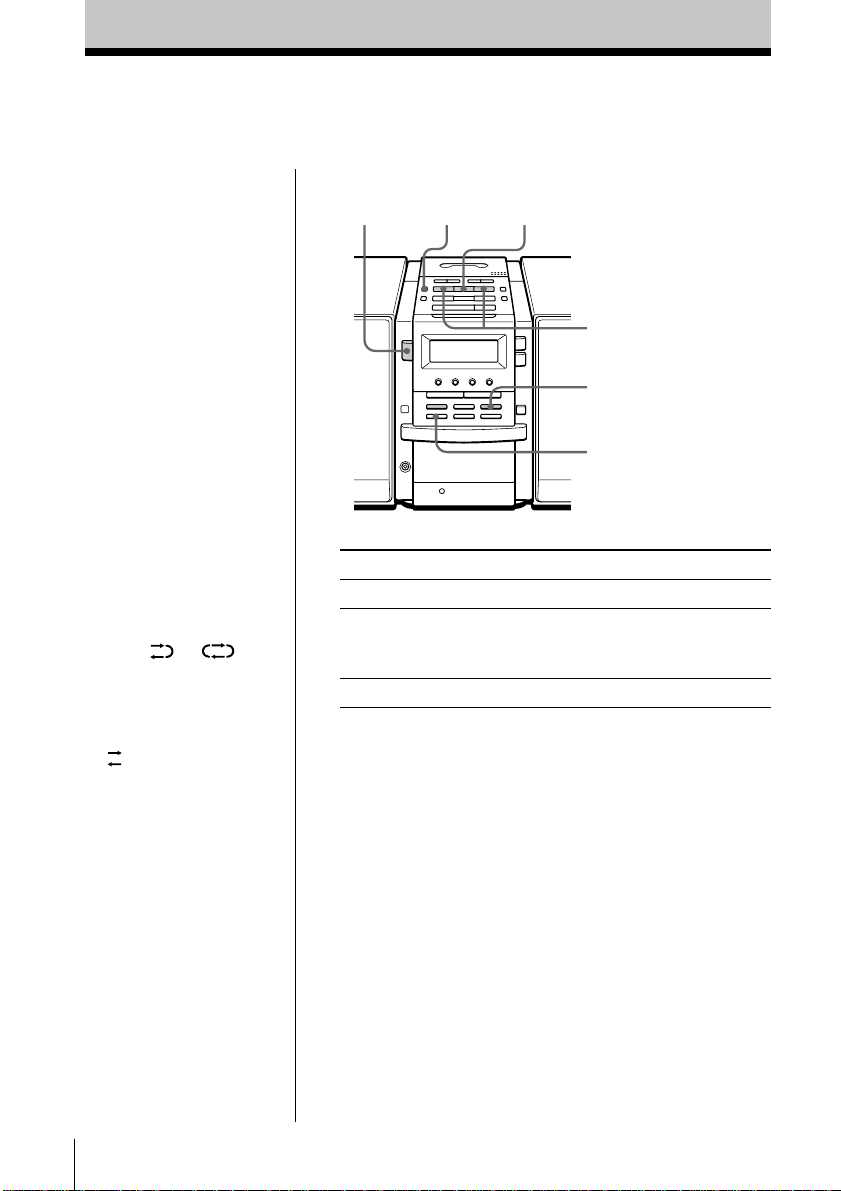
Use these buttons for additional operations
Tips
• Adjusting the volume or
the audio emphasis
(page 28) will not affect
the recording level.
• When or is
displayed, recording
will be made on both
sides of the tape. To
record on one side, press
DIR MODE to display
.
• If the MW/LW radio
makes a whistling
sound after you’ve
pressed z/X in step 3,
press MODE to select
the position that most
decreases the noise.
OPERATE
To Press
stop recording x on the tape section
pause recording z/X
turn on/off the player OPERATE
To erase a recording, proceed as follows:
1 Insert a tape you want to erase its recording into the tape
deck and press x on the tape section.
2 On the player: press z/X and then N.
On the remote: While keeping z/X pressed, press
TAPE N.
z/X
x
n,
N
MODE
DIR MODE
Press the button again to
resume recording.
Note
When you start
recording using CD
DUBBING, you cannot
set the player in pause.
GB
Basic Operations12
Page 13

The CD Player
Using the display
You can check information about the CD
using the display.
Checking the total track number and playing
time
Press DISPLAY in stop mode.
DISPLAY
The CD Player
Total track number
Total playing time
Checking the remaining time
Press DISPLAY while playing a CD.
To display Press DISPLAY
the current track number once
and the remaining time
on the current track*
the number of tracks left twice
and remaining time on the CD
the current track number three times
and playing time
* For a track whose number is more than 20 the remaining
time appears as “– –:– –”.
The CD Player 13
GB
Page 14
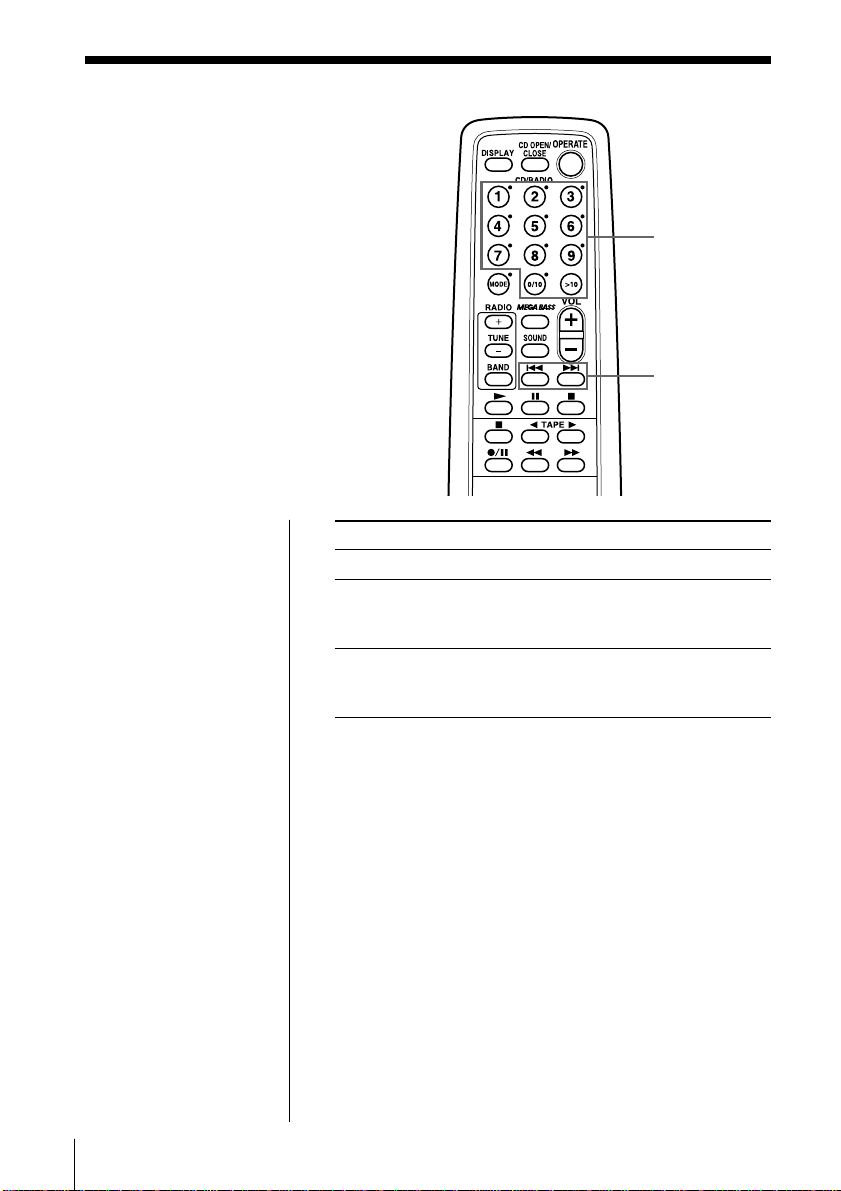
Locating a specific track
You can quickly locate any track using
the number buttons. You can also find a
specific point in a track while playing a
CD.
Number
buttons
., >
Note
You cannot locate a
specific track if
“SHUF” or “PGM” is lit
in the display. Turn off
the indication by
pressing x on the CD
section.
Tip
When you locate a
track numbered over
10, press >10 first, then
the corresponding
number buttons.
Example:
To play track number
23, press >10 first, then
2 and 3.
To locate Press
a specific track directly number button of the track.
a point while listening to . or > while playing
the sound and hold down until you
find the point.
a point while observing . or > in pause and
the display hold down until you find
the point.
GB
The CD Player14
Page 15
Playing tracks
repeatedly
(Repeat Play)
., >
You can play tracks repeatedly in
normal, single, shuffle or programme
play modes (see pages 16 - 18).
On the remote
• Use N instead of u.
• When you’ve selected
“REP 1”, select the
track by pressing the
number buttons.
1 Press x on the CD section.
“CD” appears in the display.
2 Proceed as follows:
To repeat Do this
a single track 1 Press MODE until “REP 1”
all the tracks 1 Press MODE until
tracks in random order 1 Press MODE until “REP”
programmed tracks 1 Press MODE until “REP”
x
The CD Player
u
MODE
appears.
2 Select the track by pressing
. or >, then press u.
“REP ALL” appears.
2 Press u.
and “SHUF” appear.
2 Press u.
and “PGM” appear.
2 Program tracks (see step 3 on
page 17).
3 Press u.
To cancel Repeat Play
Press MODE until “REP” disappears from the display.
The CD Player 15
GB
Page 16
Playing tracks in
random order
(Shuffle Play)
You can play tracks in random order.
x
u
MODE
On the remote
Use N instead of u.
1 Press x on the CD section.
“CD” appears in the display.
2 Press MODE until “SHUF” appears in the display.
3 Press u.
To cancel Shuffle Play
Press MODE until “SHUF” disappears from the
display.
GB
The CD Player16
Page 17
Creating your
own programme
(Programme Play)
u
., >
You can arrange the playing order of up
to 20 tracks on a CD.
On the remote
1 Press x.
2 Press MODE until
“PGM” appears in
the display.
3 Press the number
buttons for the tracks
you want to
programme in the
order you want.
4 Press N.
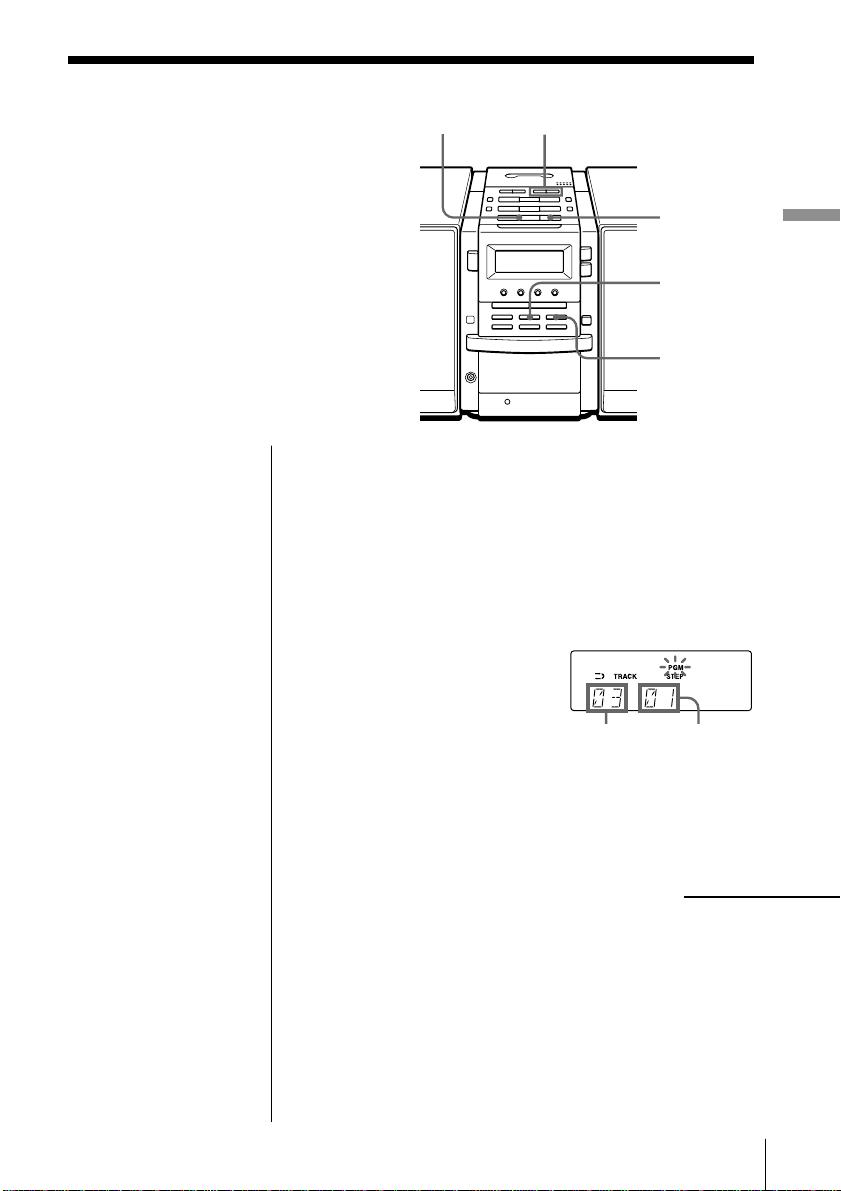
1 Press x on the CD section.
“CD” appears in the display.
2 Press MODE until “PGM” appears in the display.
3 Press . or > to select the track you want to
programme, and press ENTER MEMORY.
Repeat this step.
4 Press u.
x
ENTER
MEMORY
MODE
Track number Playing order
The CD Player
continued
The CD Player 17
GB
Page 18

Creating your own programme (Programme Play) (continued)
Tips
• If you open the CD
tray, the programme is
erased.
• You can record your
own programme.
1 After you have
created the
programme, insert a
blank tape into the
tape compartment.
2 Press CD DUBBING.
To cancel Programme Play
Press MODE until “PGM” disappears from the
display.
To check the order of tracks before play
Press ENTER MEMORY on the player.
Every time you press the button, the track number
appears in the programmed order.
To change the current programme
Press x on the CD section once if the CD is stopped
and twice if the CD is playing. The current
programme will be erased. Then create a new
programme following the programming procedure.
GB
The CD Player18
Page 19
The Radio
Presetting radio stations
You can store radio stations into the
player's memory. You can preset up to
40 radio stations, 10 for each band in any
order.
BAND
AUTO PRESET TUNE TIME SET –, +
PRESET –, +
The Radio
ENTER
MEMORY
Tip
If you automatically
preset the “FM1” or
“FM2” band, 10 radio
stations are stored in
“FM1” band and 10
more radio stations are
stored in “FM2” band.
On the remote
1 Press BAND to select
the band.
2 Press TUNE + or – to
set the frequency to
the station you want.
3 Press and hold the
number button that
you want to preset
the new station on
for 2 seconds.
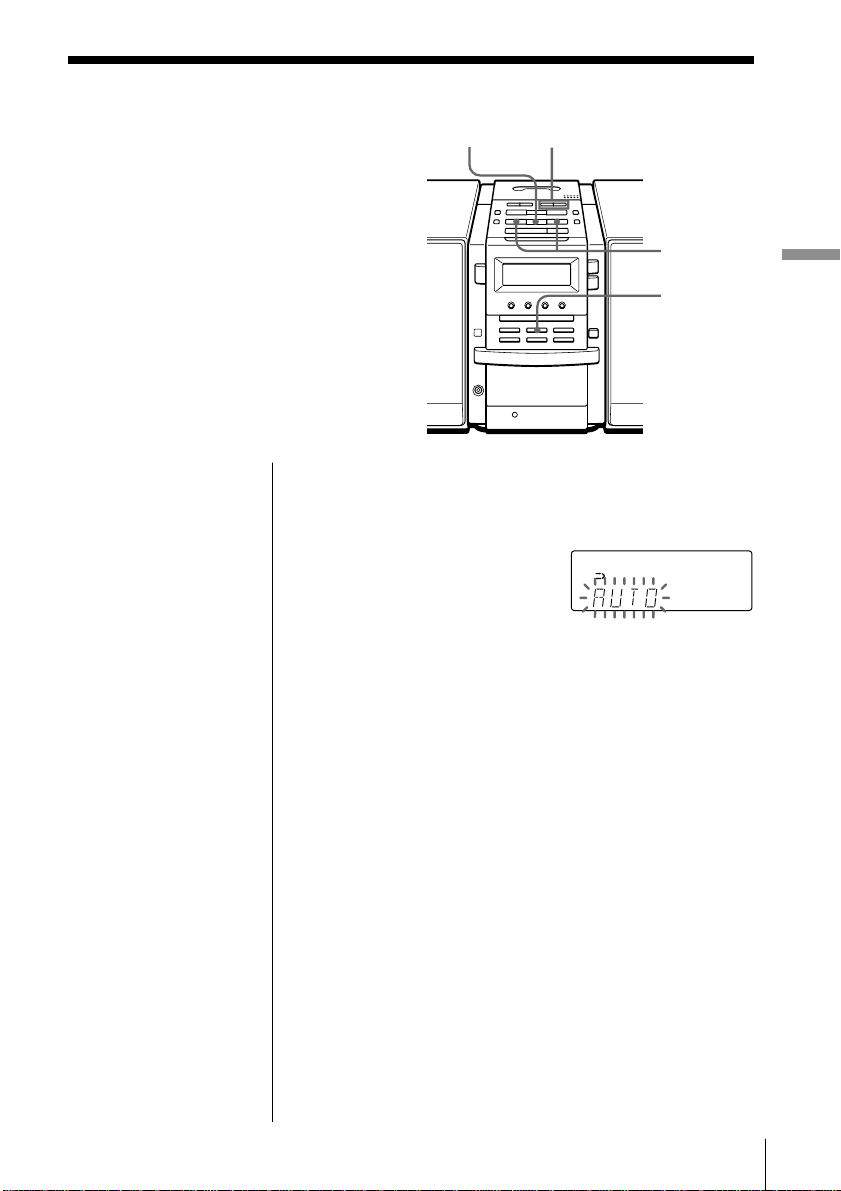
1 Press BAND•AUTO PRESET to select the band.
2 Hold down BAND•AUTO PRESET for 2 seconds
until “AUTO” flashes in the display.
3 Press ENTER MEMORY.
The stations are stored in memory from the lower
frequencies to the higher ones.
If a station cannot be preset automatically
You need to preset a station with a weak signal
manually.
1 Press BAND•AUTO PRESET until the band you
want appears in the display.
2 Press TUNE TIME SET + or – to set the frequency to
the station you want.
3 Press and hold ENTER MEMORY for 2 seconds.
4 Press PRESET + or – until the preset number (1 to
10) you want for the station flashes in the display.
5 Press ENTER MEMORY again.
The Radio
19
GB
Page 20
Playing preset radio stations
Once you've preset the stations, use
PRESET +, – on the player or the number
buttons on the remote to tune in your
favorite stations.
BAND
AUTO PRESET
PRESET –, +
On the remote
1 Press BAND to select
the band.
2 Press the number
button to display the
preset number of the
station you want.
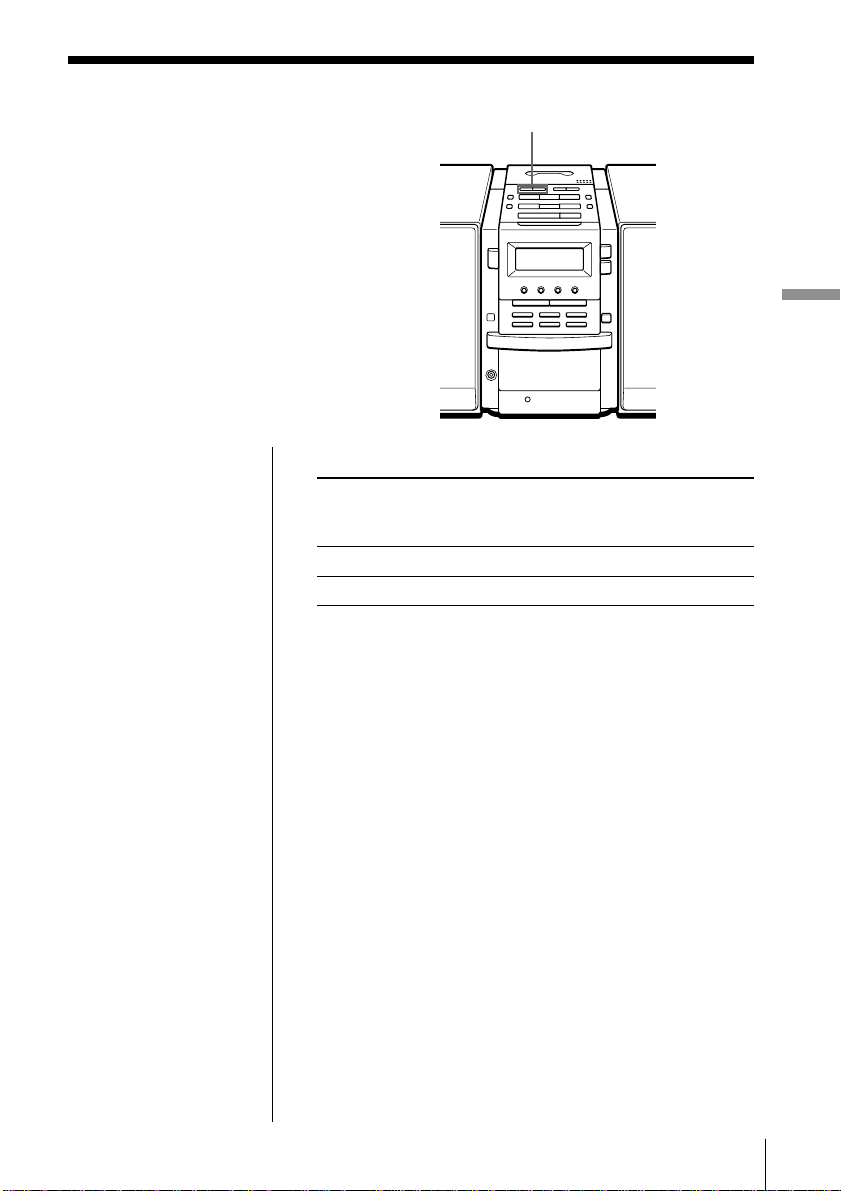
1 Press BAND•AUTO PRESET to select the band.
2 Press PRESET + or – to display the preset number
of the station you want.
Preset number
GB
The Radio20
Page 21
Using the Radio Data System (RDS)
Radio Data System (RDS) is a
broadcasting service that allows radio
stations to send additional information
along with the regular programme
signal. This player offers convenient RDS
features like station name display,
location of stations by programme type,
etc. RDS is available only on FM stations.
BAND
AUTO PRESET
., >
RDS
The Radio
ENTER
MEMORY
DISPLAY
Notes
• Not all FM stations
provide RDS services,
nor do they provide the
same type of services. If
you are not familiar
with the RDS system,
check with your local
radio stations for
details on RDS services
in your area.
• RDS may not work
properly if the station
you tuned in is not
transmitting the RDS
signal properly or if the
signal intensity is weak.
Before receiving RDS broadcasts
Be sure to preset the FM stations according to the
procedure on page 19.
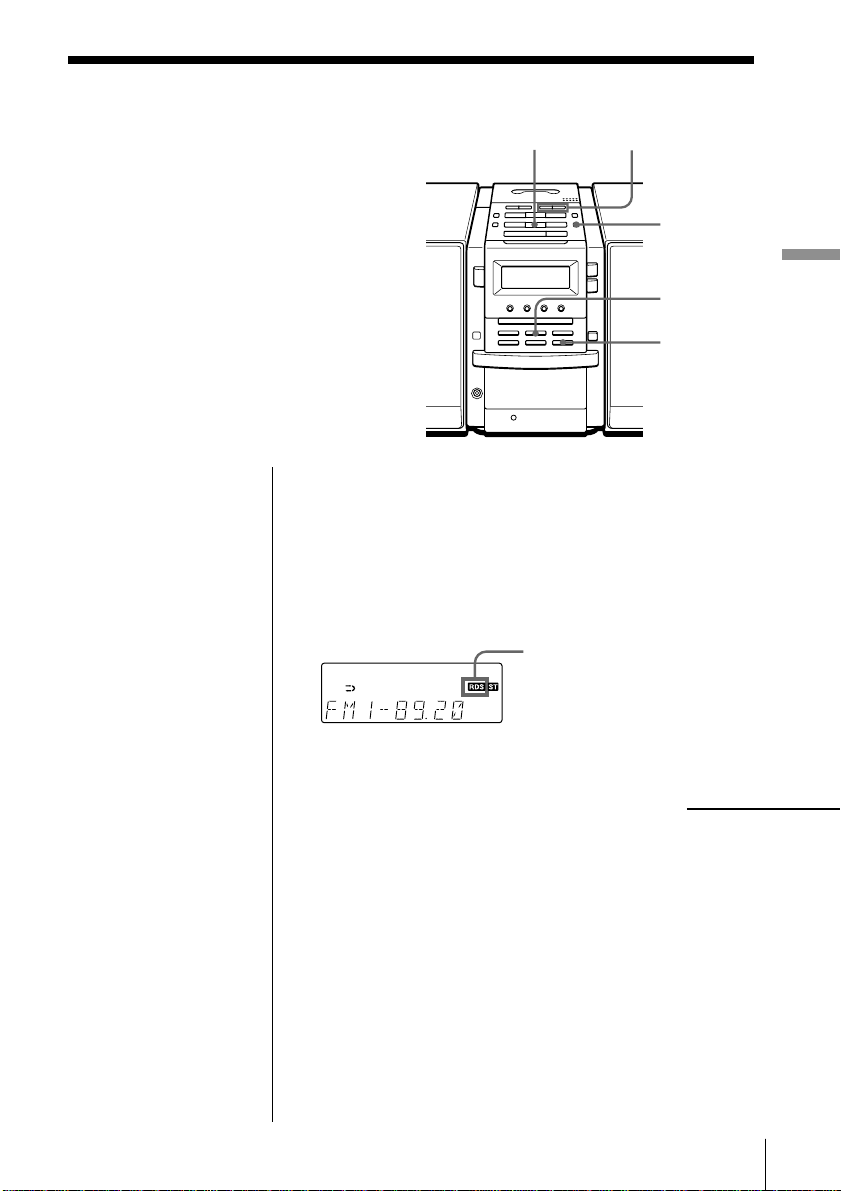
Receiving RDS broadcasts
Simply select a station from the FM band.
When you tune in a
station that provides
RDS services, “RDS” will
be displayed.
continued
The Radio
21
GB
Page 22

Using the Radio Data System (RDS) (continued)
Notes
• If the RDS broadcast is
not received, the station
name, programme type
and radio text may not
appear in the display.
In addition, if the
receiving conditions are
not good, the above
information may not
appear in the display
properly.
• When receiving a
station that does not
provide the station
name information,
“NO PS” will be
displayed when you
select “PS DISP”.
• When receiving a
station that does not
provide the programme
type information,
“NO PTY” will be
displayed when you
select “PTY DISP”.
• When receiving a
station that does not
provide the radio text
information, “NO RT”
will be displayed when
you select “RT DISP“.
• Certain characters (!, ?,
&, etc.) will not be
displayed. Blanks are
inserted in place of
these characters.
To check the RDS information
Press DISPLAY.
Each time you press the button, the indication in the
display changes as follows:
Indication
PS DISP Station name,
PTY DISP Programme type
RT DISP Radio text,
(normal display) —
What information it shows
up to 10 characters
up to 64 characters
GB
The Radio22
Page 23
Notes
• During recording the
EON function does not
work.
• The player can switch
to the preset EON
stations only.
Tip
To turn off the EON
function, press RDS for
2 seconds or longer.
Monitoring traffic information, news, or
weather information (EON)
Using the Enhanced Other Networks (EON) function,
the player can automatically switch to a network
station broadcasting traffic information, news, or
weather information. After the programme ends, the
player switches back to the station you were listening
to.
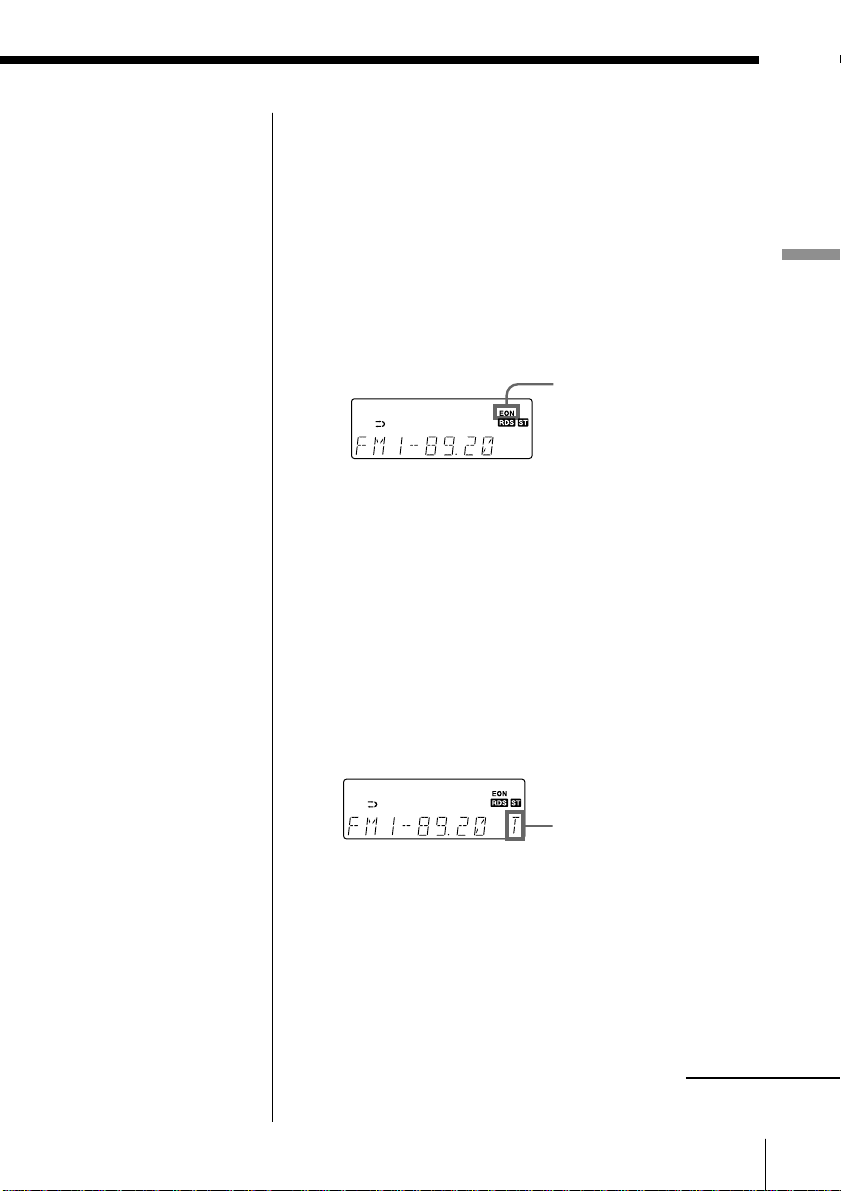
1 Tune in the station that provides the EON
function.
When receiving
an EON station,
“EON” is
displayed.
2 Press RDS until “EON WAIT” appears in the
display.
3 Press ENTER MEMORY.
4 Press . or > until the information you want
appears in the display.
The display changes as follows: “TRAFFIC” t
“NEWS” t “WEATHER” t “OFF”
5 Press ENTER MEMORY.
The player stands by for the EON stations to start
broadcasting the information you selected.
The Radio
Lights up while standing
by for the information
you selected, and then
starts flashing when
receiving the
information.
“T” for “TRAFFIC”
“N” for “NEWS”
“W” for “WEATHER”
When receiving no EON
station, “*” is displayed.
When a certain network station starts broadcasting
the information you selected, it switches to that
station automatically.
continued
The Radio
23
GB
Page 24

Using the Radio Data System (RDS) (continued)
Notes
•“NOT FOUND”
appears when the
programme type that
you selected is not
currently being
broadcast.
• The player can locate
the preset stations only.
Locating a station by programme type (PTY)
You can locate a station you want by selecting a
programme type.
1 Press RDS until “PTY SEARCH” appears in the
display.
2 Press ENTER MEMORY.
3 Press . or > until the programme type you
want appears in the display.
See the list of programme types (PTY) on pages 25
and 26.
4 Press ENTER MEMORY.
The player starts searching the preset RDS stations
for the programme. “PTY SEARCH” is flashing
during searching.
When the player finds the programme type you
want, it stops searching.
GB
The Radio24
Page 25

List of programme types (PTY)
Characters in parentheses show the indications in the display.
News (NEWS)
Short accounts of facts, events and
publicly expressed views, reportage and
actuality.
Current affairs (AFFAIRS)
Topical programme expanding or
enlarging upon the news, generally in
different presentation style or concept,
including debate, or analysis.
Information (INFO)
Programme the purpose of which is to
impart advice in the widest sense.
Sport (SPORT)
Programme concerned with any aspect of
sport.
Education (EDUCATE)
Programme intended primarily to
educate, of which the formal element is
fundamental.
Drama (DRAMA)
All radio plays and serials.
Culture (CULTURE)
Programmes concerned with any aspect
of national or regional culture, including
language, theater, etc.
Science (SCIENCE)
Programmes about the natural sciences
and technology.
Varied (VARIED)
Used for mainly speech-based
programmes usually of lightentertainment nature, not covered by
other categories. Examples include:
quizzes, panel games, personality
interviews.
Pop Music (POP M)
Commercial music, which would
generally be considered to be of current
popular appeal, often featuring in
current or recent record sales charts.
Rock Music (ROCK M)
Contemporary modern music, usually
written and performed by young
musicians.
M.O.R. Music (MOR M)
(Middle of the Road Music). Common
term to describe music considered to be
“easy-listening”, as opposed to Pop,
Rock or Classical. Music in this category
is often but not always, vocal, and
usually of short duration.
Light classics (LIGHT M)
Classical Musical for general, rather than
specialist appreciation. Examples of
music in this category are instrumental
music, and vocal or choral works.
Serious classics (CLASSICS)
Performances of major orchestral works,
symphonies, chamber music, etc., and
including Grand Opera.
Other Music (OTHER M)
Musical styles not fitting into any of the
other categories. Particularly used for
specialist music of which Rhythm &
Blues and Reggae are examples.
Weather (WEATHER)
Weather reports and forecasts and
Meteorological information.
Finance (FINANCE)
Stock Market reports, commerce, trading,
etc.
The Radio
continued
The Radio
25
GB
Page 26

Using the Radio Data System (RDS) (continued)
Children’s programmes (CHILDREN)
For programmes targeted at a young
audience, primarily for entertainment and
interest, rather than where the objective is
to educate.
Social Affairs (SOCIAL)
Programmes about people and things that
influence them individually or in groups.
Includes: sociology, history, geography,
psychology and society.
Religion (RELIGION)
Any aspect of beliefs and faiths, involving
a God or Gods, the nature of existence
and ethics.
Phone In (PHONE IN)
Involving members of the public
expressing their views either by phone or
at a public forum.
Travel (TRAVEL)
Features and programmes concerned with
travel to near and far destinations,
package tours and travel ideas and
opportunities. Not for use for
Announcements about problems,
delays, or roadworks affecting
immediate travel where TP/TA should
be used.
Leisure (LEISURE)
Programmes concerned with recreational
activities in which the listener might
participate. Examples include, Gardening,
Fishing, Antique collecting, Cooking,
Food & Wine, etc.
Jazz Music (JAZZ)
Polyphonic, syncopated music
characterised by improvisation.
Country Music (COUNTRY)
Songs which originate from, or continue
the musical tradition of the American
Southern States. Characterized by a
straightforward melody and narrative
story line.
National Music (NATION M)
Current Popular Music of the Nation or
Region in that country’s language, as
opposed to International ‘Pop’ which is
usually US or UK inspired and in
English.
Oldies Music (OLDIES)
Music from the so-called “golden age” of
popular music.
Folk Music (FOLK M)
Music which has its roots in the musical
culture of a particular nation, usually
played on acoustic instruments. The
narrative or story may be based on
historical events or people.
Documentary (DOCUMENT)
Programme concerned with factual
matters, presented in an investigative
style.
Traffic announcement (TRAFFIC)
Traffic information.
PTY undefined (NONE)
Any programmes not defined above.
GB
The Radio26
Page 27
The Tape Player
Finding the beginning of a track
The player detects a blank between the
tracks, and locates the beginning of the
next/following track.
TAPE m, M
The Tape Player
Notes
• To find the beginning
of a track correctly,
a blank of approx.
4 seconds between
tracks is necessary.
• If a soft sound like
pianissimo continues
for some seconds in a
track, the player may
start to play as the next
track.
• If you press the TAPE
M or m when there
is no sound in the track,
this function does not
operate correctly.
While playing a tape, press TAPE M or m.
Playing side The beginning The beginning
of the next track of the current
track
Upper side (N) Mm
Reverse side (n) mM
The tape is wound or rewound to the beginning of the
next or current track, and play will start automatically.
The Tape Player
27
GB
Page 28
The Audio Emphasis
Selecting the
audio emphasis
(SOUND/MEGA BASS)
You can adjust the audio emphasis of the
sound you are listening to.
Selecting the sound characteristic
Press SOUND to select the audio emphasis you want.
Choose To get
ROCK powerful, clean sounds, emphasizing
PO P light, bright sounds emphasizing
JAZZ percussive sounds, emphasizing bass
VOCAL the presence of vocals, stressing
OF F the whole dynamic range for music
MEGA BASS SOUND
low and high range audio
high and middle range audio
audio
middle range audio
such as classical music
GB
The Audio Emphasis
28
Reinforcing the bass sound
Press MEGA BASS.
”MEGA BASS” appears in the display. To return to
normal sound, press the button again.
Page 29
The Timer
Setting the clock
“– –:– –” indication appears in the
display until you set the clock.
CLOCK
TUNE TIME SET –, +
ENTER
MEMORY
SUMMER
TIME
Audio Emphasis/The Timer
The Timer
Tip
The time display
system of this player is
the 24-hour system.
Before you begin, hook up the system (see pages 38 -
42).
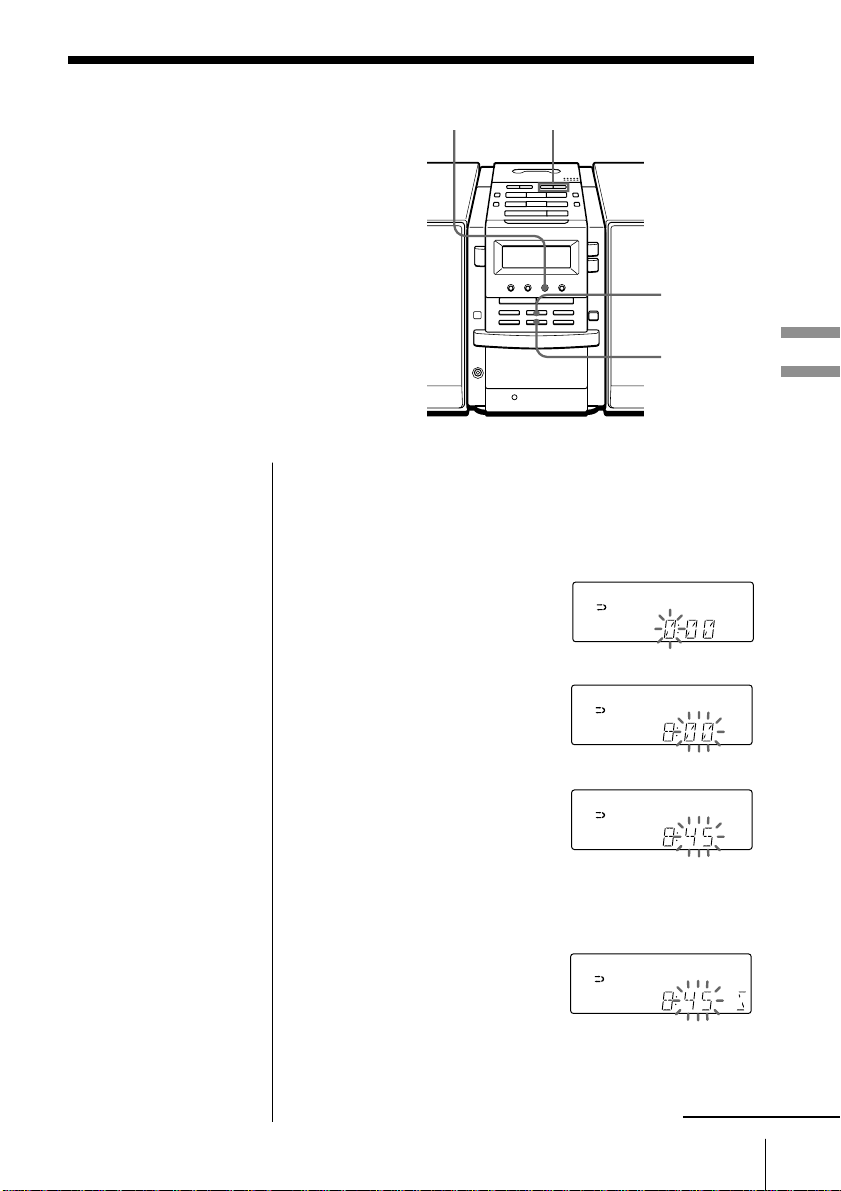
1 Press and hold CLOCK until the hour digit flashes.
2 Set the clock.
1 Press TUNE TIME SET
+ or – to set the hour
and press ENTER
MEMORY.
2 Press TUNE TIME SET
+ or – to set the
minutes.
m
3 If you are on daylight saving time, press SUMMER
TIME.
4 Press ENTER MEMORY.
The clock starts from 00 seconds.
continued
The Timer 29
GB
Page 30

Setting the clock (continued)
To change the display to the daylight saving time
(summer time) indication
Press and hold SUMMER TIME for 2 seconds.
“SUMMER ON” appears in the display for a few
seconds.
To cancel the summer time indication
Press and hold SUMMER TIME again.
“SUMMER OFF” appears in the display for a few
seconds.
GB
The Timer30
Page 31

Waking up to music
You can wake up to music or a radio
programme at a preset time. Make sure
you have set the clock (see “Setting the
clock” on page 29).
Before you begin, make sure the (clock) indication
is not lit in the display. If it is lit, press STANDBY.
1 Prepare the music source you want to play.
Source Do this
CD Insert a CD.
RADIO Tune in a station.
TAPE Insert a tape.
LINE Turn on the equipment connected
SNOOZE
TUNE TIME SET –, +
to LINE IN.
STANDBY
TIMER
ENTER
MEMORY
The Timer
2 Press TIMER to display the indication.
Do the following operations by checking the
display.
3 Press TUNE TIME SET + or – until the music
source you want to play (“CD”, “TAPE”,
“RADIO” or “LINE”) appears in the display, and
press ENTER MEMORY.
continued
The Timer 31
GB
Page 32

Waking up to music (continued)
4 Set the timer to the hour and the minutes you want
the music to go on.
1 Press TUNE TIME SET
+ or – to set the hour
and press ENTER
MEMORY.
2 Press TUNE TIME SET + or – to set the minutes,
and press ENTER MEMORY.
5 Set the timer to the hour and the minutes you want
the music to go off. (Do as step 4.)
6 Press TUNE TIME SET + or – to set the volume
you want, and press ENTER MEMORY.
Tips
• To exit the standby
mode, press STANDBY
to make the
indication disappear.
• The preset settings
remain until you reset
them.
7 Press STANDBY.
The indication lights up and the power goes off;
the player enters the standby mode.
At the preset time, the power will go on and music
will play. Then the power will go off at the preset
time, and the player will enter the standby mode
again.
To check/change the waking up timer settings
Press TIMER, then ENTER MEMORY. Each time you
press ENTER MEMORY, a stored setting is displayed
in the set order. To change the setting, display the
setting you want to change and re-enter it.
To use the player before a timer playback starts
If you turn on the player, you can use it as usual ( in
case of the radio, if you listen to the station which is
different from the one you tuned in step 1 on page 31,
you will hear that station at the preset time.) Turn off
the player before the preset time.
GB
The Timer32
Page 33

To stop play
Turn off the power.
Note
To activate the snooze
function, make sure
that 6 or more minutes
are left before the
preset time for the
music to go off.
To doze for a few more minutes
Press SNOOZE.
“SNOOZE” appears in the display and the power goes
off. The player turns on automatically after about 5
minutes. You can repeat this process by pressing
SNOOZE.
To cancel the snooze function
Press OPERATE to turn on the power.
The Timer
The Timer 33
GB
Page 34

Timer-recording radio programmes
You can set timer to record the radio at
a certain time. You can also record the
sound of the component connected to the
LINE IN jack, using the timer. Make sure
you have set the clock (see “Setting the
clock” on page 29).
DIR MODE
TUNE TIME SET –, +
STANDBY
TIMER
ENTER
MEMORY
Note
You cannot preset
recording timer and
waking up timer (page
31) at the same time.
Tip
When you receive the
MW/LW programme
in step 1, press z/X to
check if the noise is
heard. If so, press
MODE to select the
position that most
decreases the noise.
Before you begin, make sure the (clock) indication is
not lit in the display. If it is lit, press STANDBY.
1 Tune in the radio station and insert a blank tape
into the tape compartment with the side you want
to record on facing up.
2 Press DIR MODE to
select recording
direction of the tape.
One side
Both sides
Display
3 Press TIMER to display the indication.
Do the following operations by checking the
display window.
4 Press TUNE TIME SET + or – to display “RADIO”
“REC”, and press ENTER MEMORY.
GB
The Timer34
Page 35

5 Set the timer to the hour and the minutes you want
to start recording.
1 Press TUNE TIME SET + or – to set the hour
and press ENTER MEMORY.
2 Press TUNE TIME SET + or – to set the minutes,
and press ENTER MEMORY.
6 Set the timer to the hour and the minutes you want
to stop recording. (Do as step 5.)
7 Press TUNE TIME SET + or – to set the volume
you want, and press ENTER MEMORY.
The Timer
Tips
• To exit the standby
mode, press STANDBY
twice to make the
indication disappear.
• The preset settings
remain until you reset
them.
• When you select both
sides recording, the
recording will stop
after the both sides
recording finishes so
that accidental
recording will not be
made.
8 Press STANDBY.
The power goes off and the player enters the
standby mode. The
side of the tape (upper side N or reverse side
n) appear in the display. If the n indication
appears, press STANDBY to change the recording
side to N.
At the preset time, the power will go on and the
recording will start. Then the power will go off at
the preset time, and the player will enter the
standby mode again.
indication and the recording
continued
The Timer 35
GB
Page 36

Timer-recording radio programmes (continued)
To check/change the recording timer settings
Press TIMER, then ENTER MEMORY. Each time you
press ENTER MEMORY, a stored setting is displayed
in the set order. To change the setting, display the
setting you want to change and re-enter it.
To use the player before a timer-recording starts
If you turn on the player, you can use it as usual.
Before the preset time, tune in the station you want to
record and turn off the power.
Note
During timer-recording,
the SNOOZE function
does not work.
To stop timer-recording
Turn off the power.
GB
The Timer36
Page 37

Falling asleep to music
You can set the player to turn off
automatically after 10, 20, 30, 60, 90 and
120 minutes, allowing you to fall asleep
while listening to music.
SLEEP
The Timer
Tips
• The display window
dims while the sleeping
timer is on.
• You can combine the
waking up timer with
the sleeping timer. Set
the waking up timer
first (page 31), turn on
the power, and then set
the sleeping timer.
• You can prepare the
different music for the
waking up timer and
the sleeping timer.
However, you cannot
store different radio
stations.
• You can set different
volume for the waking
up timer and the
sleeping timer. For
instance, you can sleep
at lower volume and
wake up at higher
volume.
1 Play the music source you want.
2 Press SLEEP to display “SLEEP.”
3 Press SLEEP to select the minutes until the player
goes off automatically.
Each time you press
the button, the
indication changes as
follows:
“60” t “90” t “120” t no indication t “10”
t “20” t “30”.
If 4 seconds have passed after you pressed SLEEP,
the minutes in the display are stored in memory.
When the preset time has passed, music stops and
the player goes off automatically.
To cancel the sleep function
Press SLEEP to make “SLEEP” disappear from the
display.
To change the preset time
Do the steps 2 and 3 again.
The Timer 37
GB
Page 38

Setting Up
Hooking up the system
According to the illustrations,
connect the cords firmly. Wrong
connections cause malfunctions.
Connect the mains lead last.
Right
speaker
to the mains
2 MW/LW loop aerial
1 Power cord
2 FM lead aerial
Left
speaker
Notes
• Be sure to turn off the
power of the player
before connecting/
disconnecting the
mains lead.
• Connect the supplied
speakers to this player.
If you connect any
other speakers or
equipment, a
malfunction may occur.
GB
Setting Up38
1 Audio connecting cord
1 Speaker cord
3 Mains lead
1 Hooking up the speakers
1 Connect the power cord of the POWER OUTPUT
on the left speaker to the POWER IN jack of the
player.
Page 39

2 Connect the audio connecting cord (supplied) to
the SIGNAL OUTPUT jacks of the player and the
SIGNAL INPUT jacks of the left speaker.
Connect the white plugs to the L (left) jacks and
the red plugs to the R (right) jacks.
3 Connect the speaker cord of the right speaker to
the SPEAKER OUTPUT R-ch terminals of the left
speaker.
1 Press and hold the tab of the terminal.
2 Connect the red wire to the (+) plus terminal,
and the black wire to the (–) minus terminal.
3 Release the tab of the terminal.
Setting Up
continued
Setting Up 39
GB
Page 40

Hooking up the system (continued)
Note
Keep the MW/LW loop
aerial away as far as
possible from the
player. If you do not,
noise may be heard.
2 Hooking up the aerials
1 For the MW/LW loop aerial only: Strip the coating
from the end of the cable and twist the wires.
2 Connect the wires of the MW/LW loop aerial and
the FM lead aerial to the terminals.
Connect the MW/LW loop aerial according to the
following procedure.
1 Press and hold the tab of the terminal.
2 Connect the wires to the terminal.
3 Release the tab of the terminal.
MW/LW loop aerial*
(supplied)
FM aerial** (supplied)
* Reorient the aerial to improve broadcast reception.
** Keep the aerial as horizontal as possible.
Setting up the MW/LW loop aerial
GB
Setting Up40
Page 41

Tip
The sound quality may
be changed depending
on the polarity of the
mains lead plug.
Change the direction of
inserting the plug and
check the sound
quality.
3 Connecting the mains lead
Connect the mains lead of the left speaker to the
mains.
Setting Up
to the mains
4 Inserting batteries into the remote
Insert two R6 (size AA) batteries (not supplied)
Replacing batteries
With normal use, the batteries should last for about six
months. When the remote no longer operates the
player, replace all the batteries with new ones.
continued
Setting Up 41
GB
Page 42

Hooking up the system (continued)
Important
When you use an
outdoor aerial, be sure
to connect the terminal
to earth against
lightning. To prevent a
gas explosion, do not
connect the ground
wire to a gas pipe.
To improve the FM reception
Connect the FM outdoor aerial (not supplied). If you
use a distributor, you can also use the TV aerial.
FM outdoor aerial
(not supplied)
IEC standard socket
connector (not supplied)
Earth
To improve the MW/LW reception
Connect a 6- to 15-meter (20- to 50 feet) insulated wire
(not supplied) to the MW/LW antenna terminal. Keep
the wire as horizontal as possible near the window or
outdoor. You do not need to disconnect the supplied
MW/LW loop aerial.
Insulated wire
(not supplied)
GB
Setting Up42
Earth
Page 43

Saving power
Even when power is turned off, this
player consumes about 7.4 W for time
indication, timer operation and remote
control reception. If you use the saving
power function, you can reduce power
consumption to less than 1W.
When power is turned off, press and hold DISPLAY for
about 2 seconds.
The player enters the lower power consumption
standby mode.
To make the time indication appear, press and hold
DISPLAY for about 2 seconds when the player is
turned off.
DISPLAY
Setting Up
Setting Up 43
GB
Page 44

Connecting optional components
You can record a CD on a MiniDisc or
enjoy the sound from a VCR, TV or
MiniDisc player/recorder through the
speakers of this player.
Be sure to turn off the power of each
component before making connections.
For details, refer to the instruction
manual of the component to be
connected.
LINE
Note
Connect the cables
firmly to avoid any
malfunction.
Recording a CD on a MiniDisc recorder and
DAT recorder
to OPTICAL DIGITAL
OUT (CD) jack
Digital Connecting
cable* POC-5AB
(not supplied)
* Select a connecting cable depending on the type of the
digital input jack of the recorder to be connected. For
details, refer to the instruction manual of the component to
be connected. The OPTICAL DIGITAL OUT (CD) jack of
this player is square-shaped jack.
The type of the jack Model number of
of the component the connecting cable
to be connected
Optical miniplug POC-5AB, POC-10AB,
(MiniDisc recorder, etc.) POC-15AB
L-type 7-pin connector POC-DA12P
(DAT recorder, etc.)
Square-shaped optical POC-10A, POC-15A
connector (MiniDisc
recorder, DAT recorder, etc.)
MiniDisc
recorder, DAT
recorder, etc.
to digital
input jack
GB
Setting Up44
Page 45

Notes
• As long as “CD”
appears in the display,
the optical digital
output jack is in
operation and the jack
lights even if the CD is
in stop mode.
• If you play a CD-ROM
that is not for audio
use, noise may be
heard.
1 Remove the jack cover from the OPTICAL
DIGITAL OUT (CD) jack of this player and
connect the jack with the digital input jack of the
MiniDisc recorder or other component using the
digital connecting cable (not supplied) .
2 Turn on the power of this player and the
connected component.
3 Make the connected component ready for
recording.
4 Start playing a CD on this player.
Tip
You can record the
sound of the connected
component. Insert a
blank tape into the tape
compartment, and
press z/X then N
(page 11).
Listening to TV, VCR and MiniDisc player/
recorder
to LINE IN jack
TV, VCR,
MiniDisc player/
recorder, etc.
Audio connecting cable
For MiniDisc recorder:
RK-G136 (1.5 m)
(not supplied)
For TV, VCR recorder:
RK-G129 (1.5 m)
(not supplied)
to line
output jack
1 Connect the LINE IN jack of this player with the
line output jack of the MiniDisc player or other
component using the audio connecting cable (not
supplied) .
2 Turn on the power of this player and the
connected component.
3 Press LINE and start playing sound on the
connected component.
The sound from the connected component is
output from the speakers.
Setting Up
continued
Setting Up 45
GB
Page 46

Connecting optional components (continued)
Listening through the speakers of other audio
equipment
Amplifier
to LINE OUT
jack
Audio connecting
cable RK-G129
(1.5 m) (not
supplied)
to analog line
input jack
1 Connect the LINE OUT jack of this player with the
analog line input jack of the amplifier using the
audio connecting cable (not supplied) .
2 Turn on the power of this player and the amplifier
and start playing sound on this player.
GB
Setting Up46
Page 47

Additional Information
Precautions
On safety
• As the laser beam used in the CD
player section is harmful to the eyes,
do not attempt to disassemble the
casing. Refer servicing to qualified
personnel only.
• Should any solid object or liquid fall
into the player, unplug the player, and
have it checked by qualified personnel
before operating it any further.
On power sources
• The player is not disconnected from
the AC power source (mains) as long
as it is connected to the wall outlet,
even if the player itself has been
turned off.
• When the batteries are not to be used,
remove them to avoid damage that
can be caused by battery leakage or
corrosion.
• The nameplate indicating operating
voltage, power consumption, etc. is
located at the rear of the left speaker.
On placement
• Do not leave the player in a location
near heat sources, or in a place subject
to direct sunlight, excessive dust or
mechanical shock.
• Do not place the player on an inclined
or unstable place.
• Do not place anything within 10 mm
of the side of the cabinet. The
ventilation holes must be
unobstructed for the player to operate
properly and prolong the life of its
components.
• If the player is left in a car parked in
the sun, be sure to choose a location in
the car where the player will not be
subjected to the direct rays of the sun.
• Since a strong magnet is used for the
speakers, keep personal credit cards
using magnetic coding or springwound watches away from the player
to prevent possible damage from the
magnet.
On operation
• If the player is brought directly from a
cold to a warm location, or is placed in
a very damp room, moisture may
condense on the lenses inside the CD
player section. Should this occur, the
player will not operate properly. In
this case, remove the CD and wait
about an hour for the moisture to
evaporate.
• If the player has not been used for a
long time, set it in the playback mode
to warm it up for a few minutes before
inserting a cassette.
If you have any questions or problems
concerning your player, please consult
your nearest Sony dealer.
continued
Additional Information 47
GB
Page 48

Precautions (continued)
Notes on CDs
• Before playing, clean the CD with a
cleaning cloth. Wipe the CD from the
center out.
• Do not use solvents such as benzine,
thinner, commercially available
cleaners or anti-static spray intended
for vinyl LPs.
• Do not expose the CD to direct
sunlight or heat sources such as hot
air ducts, nor leave it in a car parked
in direct sunlight as there can be a
considerable rise in temperature
inside the car.
• Do not stick paper or sticker on the
CD, nor scratch the surface of the CD.
• After playing, store the CD in its case.
If there is a scratch, dirt or fingerprints
on the CD, it may cause tracking error.
Notes on cassettes
• Break off the cassette tab from side A
or B to prevent accidental recording. If
you want to reuse the tape for
recording, cover the broken tab with
adhesive tape.
Side A
Tab for side B Tab for side A
• Take care not to cover the detector
slots on TYPE II (high position) or
TYPE IV (metal) cassettes. If the slots
are covered, the automatic tape
selection system will not operate
correctly.
TYPE II (high
position)
detector slots
TYPE IV (metal)
detector slots
• The use of a cassette with more than
90 minutes of play time is not
recommended except for long,
continuous recording or playback.
GB
Additional Information48
Page 49

Troubleshooting
Symptom
There is no audio.
General
Noise is heard.
“NO DISC“ lights in the display
even when a CD is in place.
The CD does not play.
CD Player
The sound drops out.
Remedy
• Press OPERATE to turn on the player.
• Connect the mains lead to a wall outlet securely.
• Connect the power cord to the POWER IN of
the player (see page 38).
• Connect the audio connecting cord correctly
(see page 39).
• Adjust the volume.
• Unplug the headphones when listening through
speakers.
• Someone is using a portable telephone or other
equipment that emits radio waves near the
player. t Move the portable telephone, etc.,
away from the player.
• Insert the CD with the label surface up.
• Make sure that the CD tray is closed.
• Place the CD with the label surface up.
• Clean the CD.
• Take out the CD and leave the CD tray open for
about an hour to dry moisture condensation.
• Press x on the CD section to switch the function
of the player to “CD”.
• Reduce the volume.
• Clean the CD, or replace it if the CD is badly
damaged.
• Place the player in a location free from
vibration.
• The sound may drop out or noise may be heard
if the CD is recorded using a personal computer
(CD-R, etc.).
continued
Additional Information 49
GB
Page 50

Troubleshooting (continued)
Symptom
The audio is weak or has poor
quality.
The audio is not stereo.
The picture of your TV becomes
Radio
unstable.
The station name does not appear in
the display though you are listening
to an FM programme.
The tape does not move when you
press an operation button.
The z/X button does not function/
The tape does not play.
The tape does not erase completely.
The tape does not record.
Tape Player
The audio is weak/The audio
quality is poor.
The tape player cannot be paused
during playback.
Remedy
• Move the player away from the TV.
• If you are using the remote while listening to
MW/LW radio, noise may be heard. This is
unavoidable.
• Press MODE on the player until “STEREO”
appears.
• If you are listening to an FM programme near
the TV with an indoor aerial, move the player
away from the TV.
• The RDS function of this player will not be
activated if the station you are tuning in does
not provide RDS services.
• Close the cassette compartment securely.
• Make sure the safety tab on the cassette is in
place.
• Press x on the TAPE section to switch the
function of the player to “TAPE”.
• Clean the erase head (see page 52).
• The source which was recorded on TYPE II
(high position) or TYPE IV (metal) tape using
this unit is being played. Record on TYPE I
(normal) tape and play.
• Make sure the tape is inserted properly.
• Make sure the safety tab of the cassette is in
place.
• Clean the heads, pinch rollers and capstans
(see page 52).
• Demagnetize the heads using a demagnetizer
(see page 52).
• The tape player can be paused during recording
only.
GB
Additional Information50
Page 51

Symptom
The timer does not operate.
Remedy
• Make sure the time on the clock is correct.
• Check to see if the AC power had been cut off.
Timer
• Make sure the tape has not wound to the end.
• Make sure the (clock) indication is displayed.
The remote does not function.
• Replace all the batteries in the remote with new
ones if they are weak.
• Make sure that you are pointing the remote at
the remote sensor on the player.
• Remove any obstacles in the path of the remote
and the player.
Remote
• Make sure the remote sensor is not exposed to
strong light such as direct sunlight or
fluorescent lamp light.
• Move closer to the player when using the
remote.
After trying the above remedies, if the problem persists, please consult your nearest Sony dealer.
Additional Information 51
GB
Page 52

Maintenance
Cleaning the tape heads and tape
path
Wipe the heads, the pinch rollers and
the capstans with a cleaning swab
slightly moistened with cleaning fluid or
alcohol after every 10 hours of operation
for optimum playback and recording
quality. To make the best possible
recording, however, we recommend that
you clean all surfaces over which tape
travels before each recording.
Pinch roller
Capstan
Erase head
Record/Playback head
Demagnetizing the tape heads
After 20 to 30 hours of use, enough
residual magnetism will have built up
on the tape heads to begin to cause loss
of high frequency sound and hiss. At
this time, you should demagnetize the
heads and all metal parts in the tape
path with a commercially available tape
head demagnetizer.
Cleaning the cabinet
Clean the cabinet, panel and controls
with a soft cloth slightly moistened with
a mild detergent solution. Do not use
any type of abrasive pad, scouring
powder, or solvent, such as alcohol or
benzine.
After cleaning, insert a tape when the
areas cleaned are completely dry.
GB
Additional Information52
Page 53

Specifications
CD player section
System
Compact disc digital audio system
Laser diode properties
Material: GaAlAs
Wave length: 780 nm
Emission duration: Continuous
Laser output: Less than 44.6 µW (This output is the
value measured at a distance of about 200 mm from
the objective lens surface on the optical pick-up
block with 7 mm aperture.)
Spindle speed
200 r/min (rpm) to 500 r/min (rpm) (CLV)
Number of channels
2
Frequency response
20 - 20,000 Hz +0/–1 dB
Wow and flutter
Below measurable limit
Radio section
Frequency range
FM 87.5 - 108 MHz
MW 531 - 1,602 kHz
LW 153 - 279 kHz
IF
FM: 10.7 MHz
MW/LW: 450 kHz
Aerials
FM: Lead aerial
MW/LW: Loop aerial
Cassette-corder section
Recording system
4-track 2 channel stereo
Fast winding time
Approx. 120s (sec.) with Sony cassette C-60
Frequency response
TYPE I (normal): 50 - 14,000 Hz
General
Speaker
Full range: 8 cm (3
cone type x 2
Input
LINE IN jack (stereo minijack)
Minimum input level 440 mV
Outputs
Headphones jack (stereo minijack)
For 16 - 64 ohms impedance headphones
LINE OUT jack (stereo minijack)
Rated output level 330 mV at load impedance
47 kilohms
OPTICAL DIGITAL OUT (CD) (optical output
connector)
Wavelength: 760 - 880 nm
Maximum power output
15 W + 15 W
Power requirements
For personal component system:
230V AC, 50 Hz
For remote control:
3 V DC, 2 R6 (size AA) batteries
Power consumption
AC 45 W
Dimensions
Mass
Supplied accessories
Design and specifications are subject to change without
notice.
(incl. projecting parts)
Player: approx. 137 × 202 × 212 mm (w/h/d)
(5
Left speaker: approx. 137 × 202 × 212 mm
(w/h/d) (5
Right speaker: approx. 137 × 202 × 180 mm
(w/h/d) (5
Player: approx. 1.8 kg (3 lb. 15 oz.)
Left speaker: approx. 3 kg (6 lb. 10 oz.)
Right speaker: approx. 1.5 kg (3 lb. 5 oz.)
Remote control (1)
FM lead aerial (1)
MW/LW loop aerial (1)
Audio connecting cord (1)
1
⁄4 in.) dia., 4 ohms,
1
⁄2 × 8 × 8 3⁄8 inches)
1
⁄2 × 8 × 8 3⁄8 inches)
1
⁄2 × 8 × 7 1⁄8 inches)
Optional accessories
Sony MDR headphone series
Additional Information 53
GB
Page 54

Index
A
Audio emphasis 28
B
Batteries for remote 41
C
CD player 13
Cleaning
cabinet 52
tape heads and tape
path 52
Connecting
mains lead 41
optional components
44
the system. See
Hooking up the system
Creating your own
programme 17
D
Demagnetizing the tape
heads 52
Display 13
E
EON 23
F, G
Finding
the beginning of a track
27
H
Hooking up
aerials 40
speakers 38
system 38
I, J, K
Improving broadcast
reception 7
L
Listening
through the speakers of
other audio equipment 46
to the radio 6
to the TV, VCR and MD
player 45
Locating
a specific track 5, 14
M, N, O
MEGA BASS 28
P, Q
Playing
a CD 4
a tape 8
preset radio stations 20
tracks in random order 16
tracks repeatedly 15
Presetting radio stations 19
Programme Play 17
PTY 24
R
Radio stations
playing 6
presetting 19
RDS 21
Recording
all the tracks on CD 11
on a tape 10
on an MD or a DAT 44
programmed tracks 18
timer-recording radio
programmes 34
Repeat Play 15
S
Selecting
audio emphasis 28
direction of the tape 9
Setting the clock 29
Setting up 38
Shuffle Play 16
SNOOZE 33
SOUND 28
SUMMER TIME 29
T
Tape player 27
Timer
Falling asleep to music
37
Timer-recording radio
programmes 34
Waking up to music 31
Troubleshooting 49
U, V, W, X, Y, Z
Using the display 13
GB
Additional Information54
Page 55

Page 56

Advertencia
Para evitar el riesgo de incendios o
electrocución, no exponga el
reproductor a la lluvia ni a la
humedad.
Para evitar descargas eléctricas, no
abra el aparato. Solicite asistencia
técnica únicamente a personal
especializado.
Información
Para los clientes que se encuentren en
Europa
Este reproductor de discos compactos está
clasificado como producto LÁSER DE CLASE
1.
La etiqueta CLASS 1 LASER PRODUCT está
situada en la parte posterior del reproductor.
ADVERTENCIA
No instale el aparato en un espacio cerrado,
como una estantería para libros o un armario
empotrado.
PRECAUCIÓN
• Sólo es posible utilizar este reproductor
con fuente de alimentación de CA. No es
posible alimentarlo con pilas.
Cuando utilice este reproductor por
primera vez, o si no lo ha utilizado durante
mucho tiempo, déjelo conectado a la
fuente de alimentación de CA durante una
hora aproximadamente para que se cargue
la pila incorporada de reserva destinada al
reloj, temporizador, emisoras de radio
memorizadas, etc. Es posible emplear el
reproductor durante la carga. El
reproductor cargará la pila
automáticamente mientras esté conectado
a la fuente de alimentación.
Cuando desconecte el cable de corriente
después de la carga, asegúrese de
desactivar primero la alimentación. Una vez
cargada por completo, la duración de la
pila de reserva será de unos 30 minutos
cuando la unidad no se encuentre
conectada a ninguna fuente de
alimentación.
Si los datos almacenados se borran, vuelva
a introducirlos cuando utilice el
reproductor de nuevo.
• Los altavoces y el reproductor están
diseñados para emplearse como una sola
unidad. No conecte nunca dichos
componentes a un equipo diferente. Si lo
hace, es posible que el equipo conectado
funcione incorrectamente.
ES
Introducción2
Page 57

Índice
Operaciones básicas
4 Reproducción de CD
6 Recepción de la radio
8 Reproducción de cintas
10 Grabación en cintas
Reproductor de CD
13 Uso del visor
14 Localización de una pista
específica
15 Reproducción de pistas de forma
repetida
(Reproducción repetida)
16 Reproducción de pistas en orden
aleatorio
(Reproducción aleatoria)
17 Creación de su propio programa
(Reproducción de programa)
Radio
19 Memorización de emisoras de
radio
20 Sintonización de emisoras
memorizadas
21 Empleo del sistema de datos de
radio (RDS)
Énfasis de sonido
28 Selección del énfasis de sonido
(SOUND/MEGA BASS)
Temporizador
29 Ajuste del reloj
31 Activación automática del
sistema
34 Grabación de programas de
radio con el temporizador
37 Desactivación automática del
sistema
Instalación
38 Conexión del sistema
43 Ahorro de energía
44 Conexión de componentes
opcionales
Operaciones básicas
ES
Reproductor de cintas
27 Localización del principio de las
pistas
Información
complementaria
47 Precauciones
49 Solución de problemas
52 Mantenimiento
53 Especificaciones
54 Índice alfabético
Introducción
ES
3
Page 58

Operaciones básicas
Reproducción de CD
2
Para obtener instrucciones sobre las conexiones, consulte las
páginas 38 a 42.
1 Pulse Z CD OPEN/CLOSE
(activación directa) y coloque el
CD en la bandeja de CD.
1
2 Pulse u.
ES
Operaciones básicas4
(En el mando a distancia, pulse
N en la sección de CD.)
La bandeja de CD se cierra y el
reproductor reproduce todas las
pistas una vez.
Con el lado de la
etiqueta hacia arriba
Visor
Número de
pista
Tiempo de
reproducción
Page 59

Utilice estos botones para realizar operaciones
adicionales
Sugerencia
La próxima vez que
desee escuchar un CD,
bastará con pulsar u.
El reproductor se
encenderá
automáticamente y
comenzará a
reproducirlo.
OPERATE
Para Pulse
ajustar el volumen VOLUME +, –
detener la reproducción x
introducir pausas durante la u
reproducción(X en el mando a distancia).
pasar a la pista siguiente >
retroceder a la pista anterior .
extraer el CD Z CD OPEN/CLOSE
encender/apagar el OPERATE
reproductor
u., >
x
VOLUME +, –
Z CD
OPEN/CLOSE
(VOL +, – en el mando a
distancia)
Vuelva a pulsarlo para
reanudar la reproducción
después de la pausa.
Operaciones b
ásicas
Operaciones básicas
ES
5
Page 60

Recepción de la radio
1
Para obtener instrucciones sobre las conexiones, consulte las
páginas 38 a 42.
2
1 Pulse BAND•AUTO PRESET
hasta que el visor muestre la
banda que desee (activación
directa).
2 Mantenga pulsado TUNE TIME
SET + o – (TUNE + o – en el
mando a distancia) hasta que los
dígitos de la frecuencia
comiencen a cambiar en el visor.
El reproductor explorará las
frecuencias de radio y se detendrá
automáticamente cuando
encuentre una emisora de señal
nítida.
Si no puede sintonizar alguna
emisora, pulse el botón varias
veces para que la frecuencia
cambie intervalo a intervalo.
Visor
Indica emisiones
de FM en estéreo.
ES
Operaciones básicas6
Page 61

Utilice estos botones para realizar operaciones
adicionales
Sugerencias
• Las bandas “FM1” y
“FM2” tienen las
mismas funciones.
Puede almacenar las
emisoras que desee por
separado en “FM1” y
“FM2”.
• Si la emisión de FM se
recibe con ruido, pulse
MODE hasta que
“MONO” aparezca en el
visor (la emisión se
escuchará con sonido
monofónico).
• La próxima vez que
desee escuchar la radio,
bastará con pulsar el
botón BAND•AUTO
PRESET. El reproductor
se encenderá
automáticamente y
sintonizará la emisora
anterior.
MODEOPERATE
VOLUME +, –
Para Pulse
ajustar el volumen VOLUME +, –
(VOL +, – en el mando a
distancia)
encender/apagar la radio OPERATE
Para mejorar la recepción de la emisión
FM:
Mantenga la antena de cable de FM lo más horizontal
posible y reoriéntela.
Si la emisión de FM se sigue recibiendo con ruido,
desconecte la antena de cable de FM y conecte la
antena exterior de FM (no suministrada) (página 42).
MW/LW:
Mantenga la antena cerrada de MW/LW lo más
alejada posible del reproductor y reoriéntela.
Operaciones b
ásicas
Operaciones básicas
ES
7
Page 62

Reproducción de cintas
1, 23
Para obtener instrucciones sobre las conexiones, consulte las
páginas 38 a 42.
1 Pulse Z PUSH OPEN/CLOSE
para abrir el compartimento de
cintas e inserte una cinta grabada.
Emplee cintas TYPE I (normales),
TYPE II (posición alta) y TYPE IV
(de metal).
2 Pulse Z PUSH OPEN/CLOSE
para cerrar el compartimento.
3 Pulse N.
(En el mando a distancia, pulse
TAPE N.)
El reproductor se encenderá
(activación directa) e iniciará la
reproducción.
ES
Operaciones básicas8
Con la cara que desee
reproducir hacia arriba
Visor
Contador de cinta
Page 63

Utilice estos botones para realizar operaciones
adicionales
OPERATE
TAPE m, M
Z PUSH OPEN/CLOSE
x
n
VOLUME +, –
COUNTER RESET
DIR MODE
Operaciones b
ásicas
Sugerencias
• Pulse COUNTER RESET
para reajustar el
contador a “000”.
• La próxima vez que
desee escuchar una
cinta, bastará con pulsar
N o n. El reproductor
se encenderá
automáticamente y
comenzará a
reproducirla.
Para Pulse
ajustar el volumen VOLUME +, –
(VOL +, – en el mando a
distancia)
detener la reproducción x
reproducir la cara inversa n
avanzar rápidamente la cinta TAPE M o m
o rebobinarla
expulsar el cassette Z PUSH OPEN/CLOSE
encender/apagar el reproductor OPERATE
Para seleccionar el modo de sentido de la cinta
Pulse DIR MODE varias veces.
Para reproducir El visor muestra
una cara de la cinta
las dos caras de la cinta, de
la superior a la inversa solamente
las dos caras de la cinta de
forma repetida
Operaciones básicas
ES
9
Page 64

Grabación en cintas
3 3
Para obtener instrucciones sobre las conexiones, consulte las
páginas 38 a 42. Para grabar en minidiscos o en grabadoras
DAT, conecte el componente (consulte la página 44).
31
1 Pulse Z PUSH OPEN/CLOSE
para abrir el compartimento de
cintas e inserte una cinta virgen.
Utilice solamente cintas TYPE I
(normales).
Pulse Z PUSH OPEN/CLOSE de
nuevo para cerrar el
compartimento.
Con la cara en la que
desee grabar hacia arriba
2 Seleccione la fuente de programa
que desee grabar.
Para grabar del reproductor de
CD: Inserte un CD (consulte la
página 4) y pulse x en la sección
de CD.
Para grabar de la radio: Sintonice
la emisora que desee (consulte la
página 6).
ES
Operaciones básicas10
Visor
Page 65

3 Inicie la grabación.
Para grabar el CD completo
Pulse CD DUBBING.
Si aparece
Si se invierte el sentido de la cinta
sin haberse finalizado la
grabación de la pista, el
reproductor volverá a grabar
dicha pista desde el principio en
la cara inversa.
Si aparece
Si la cinta llega al final, el
reproductor se parará.
Para grabar de la radio
(También es posible grabar el
CD según el siguiente
procedimiento. Reproduzca el
CD una vez haya comenzado a
grabarse la cinta.)
Pulse z/X y, a continuación, N.
Para grabar en la cara inversa,
pulse n.
(En el mando a distancia, pulse
TAPE N o n mientras
mantiene pulsado z/X.)
:
:
Operaciones b
ásicas
m
continúa
Operaciones básicas
11
ES
Page 66

Grabación en cintas (continuación)
Utilice estos botones para realizar operaciones
adicionales
Sugerencias
• El ajuste del volumen o
del énfasis de sonido
(página 28) no afectará
al nivel de grabación.
• Si aparece o ,
la grabación se realizará
en las dos caras de la
cinta. Para grabar en
una cara, pulse DIR
MODE para que
aparezca .
• Si la emisión de MW/
LW se recibe con un
sonido silbante después
de haber pulsado z/X
en el paso 3, pulse
MODE para seleccionar
la posición en la que el
ruido disminuya en
mayor medida.
OPERATE
Para Pulse
detener la grabación x en la sección de cintas
introducir pausas durante la z/X
grabación Vuelva a pulsar el botón
encender/apagar el OPERATE
reproductor
Para borrar grabaciones, realice lo siguiente:
1 Inserte la cinta cuya grabación desee borrar en la platina
de cintas y pulse x en la sección de cintas.
2 En el reproductor: pulse z/X y, a continuación, N.
En el mando a distancia: Mientras mantiene pulsado
z/X, pulse TAPE N.
z/X
x
n,
N
MODE
DIR MODE
para reanudar la grabación.
Nota
Si inicia la grabación
utilizando CD
DUBBING, no podrá
ajustar el reproductor en
el modo de pausa.
ES
Operaciones básicas12
Page 67

Reproductor de CD
Uso del visor
Es posible comprobar información sobre
el CD mediante el visor.
Comprobación del número de pistas y tiempo
de reproducción totales
Pulse DISPLAY en el modo de parada.
DISPLAY
Reproductor de CD
Número total de pistas
Tiempo total de
reproducción
Comprobación del tiempo restante
Pulse DISPLAY mientras se reproduce el CD.
Para visualizar Pulse DISPLAY
el número de la pista actual una vez
y el tiempo restante e dicha pista*
el número de pistas restantes dos veces
y el tiempo restante del CD
el número de la pista actual tres veces
y el tiempo de reproducción
* Para las pistas cuyos números sean superiores a 20, el
tiempo restante aparece como “– –:– –”.
Reproductor de CD 13
ES
Page 68

Localización de una pista específica
Es posible localizar rápidamente
cualquier pista mediante los botones
numéricos. También es posible localizar
un punto específico de una pista
mientras se reproduce un CD.
Nota
No será posible
localizar pistas
específicas si “SHUF” o
“PGM” está iluminado
en el visor. Desactive la
indicación pulsando x
en la sección de CD.
Sugerencia
Para localizar una pista
de número superior a
10, pulse >10 primero
y, a continuación, los
botones numéricos
correspondientes.
Ejemplo:
Para reproducir la pista
número 23, pulse >10
primero y, a
continuación, 2 y 3.
Para localizar Pulse
una pista específica el botón numérico de la pista.
directamente
un punto mientras escucha . o > durante la
el sonido reproducción y manténgalo
un punto mientras observa . o > durante la pausa
el visor y manténgalo pulsado hasta
Botones
numéricos
., >
pulsado hasta que encuentre
el punto.
que encuentre el punto.
ES
Reproductor de CD14
Page 69

Reproducción de
pistas de forma
repetida
(Reproducción repetida)
., >
x
Reproductor de CD
Es posible reproducir pistas de forma
repetida en los modos de reproducción
normal, de una sola pista, aleatoria o de
programa (consulte las páginas 16 a 18).
En el mando a distancia
• Utilice N en lugar de
u.
• Si ha elegido “REP 1”,
seleccione la pista
pulsando los botones
numéricos.
1 Pulse x en la sección de CD.
“CD” aparece en el visor.
2 Realice lo siguiente:
Para repetir Realice lo siguiente
una sola pista 1 Pulse MODE hasta que
todas las pistas 1 Pulse MODE hasta que
pistas en orden 1 Pulse MODE hasta que
pistas programadas 1 Pulse MODE hasta que
u
MODE
aparezca “REP 1”.
2 Seleccione la pista pulsando
. o > y, a continuación,
pulse u.
aparezca “REP ALL”.
2 Pulse u.
aparezca “REP” y “SHUF”.
2 Pulse u.
aparezca “REP” y “PGM”.
2 Pistas del programa (consulte
el paso 3 en la página 17).
3 Pulse u.
Para cancelar la reproducción repetida
Pulse MODE hasta que “REP” desaparezca del visor.
Reproductor de CD 15
ES
Page 70

Reproducción de
pistas en orden
aleatorio
(Reproducción aleatoria)
x
Es posible reproducir pistas en orden
aleatorio.
En el mando a distancia
Utilice N en lugar de
u.
1 Pulse x en la sección de CD.
“CD” aparece en el visor.
2 Pulse MODE hasta que “SHUF” aparezca en el
visor.
3 Pulse u.
Para cancelar la reproducción aleatoria
Pulse MODE hasta que “SHUF” desaparezca del visor.
u
MODE
ES
Reproductor de CD16
Page 71

Creación de su
propio programa
(Reproducción de programa)
u., >
Puede crear un programa compuesto por
un máximo de 20 canciones en el orden
que desee reproducirlas.
En el mando a distancia
1 Pulse x.
2 Pulse MODE hasta que
“PGM” aparezca en el
visor.
3 Pulse los botones
numéricos de las pistas
que desee programar
en el orden deseado.
4 Pulse N.
1 Pulse x en la sección de CD.
“CD” aparece en el visor.
2 Pulse MODE hasta que “PGM” aparezca en el
visor.
3 Pulse . o > para seleccionar la pista que
desee programar, y pulse ENTER MEMORY.
Repita este paso.
x
ENTER
MEMORY
MODE
Número de pista Orden de
reproducción
Reproductor de CD
4 Pulse u.
continúa
Reproductor de CD 17
ES
Page 72

Creación de su propio programa (Reproducción de programa)
(continuación)
Sugerencias
• Si abre la bandeja de
CD, el programa se
borrará.
• Es posible grabar su
propio programa.
1 Una vez creado el
programa, inserte una
cinta virgen en el
compartimento de
cintas.
2 Pulse CD DUBBING.
Para cancelar la reproducción de programa
Pulse MODE hasta que “PGM” desaparezca del visor.
Para comprobar el orden de las pistas antes de la
reproducción
Pulse ENTER MEMORY en el reproductor.
Cada vez que pulse el botón, el número de la pista
aparecerá en el orden programado.
Para cambiar el programa actual
Pulse x en la sección de CD una vez si el CD está
parado y dos si está reproduciéndose. El programa
actual se borrará. A continuación, cree un programa
nuevo. Para ello, realice el procedimiento de
programación.
ES
Reproductor de CD18
Page 73

Radio
Memorización de emisoras de radio
Es posible almacenar emisoras de radio
en la memoria del reproductor. Puede
memorizar un máximo de 40 emisoras,
10 para cada banda en el orden que
desee.
BAND
AUTO PRESET
TUNE TIME
SET –, +
PRESET –, +
ENTER
MEMORY
Radio
Sugerencia
Si memoriza
automáticamente la
banda “FM1” o “FM2”,
se almacenarán 10
emisoras en la banda
“FM1” y 10 más en la
banda “FM2”.
En el mando a distancia
1 Pulse BAND para
seleccionar la banda.
2 Pulse TUNE + o –
para ajustar la
frecuencia en la
emisora que desee.
3 Pulse y mantenga
pulsado durante 2
segundos el botón
numérico en el que
desee memorizar la
nueva emisora.
1 Pulse BAND•AUTO PRESET para seleccionar la
banda.
2 Mantenga pulsado BAND•AUTO PRESET
durante 2 segundos hasta que “AUTO” parpadee
en el visor.
3 Pulse ENTER MEMORY.
Las emisoras se almacenan en la memoria a partir
de las frecuencias inferiores hasta las superiores.
Si no es posible memorizar una emisora
automáticamente
Deberá memorizar manualmente la emisora de señal
débil.
1 Pulse BAND•AUTO PRESET hasta que el visor
muestre la banda que desee.
2 Pulse TUNE TIME SET + o – para ajustar la
frecuencia en la emisora que desee.
3 Pulse y mantenga pulsado ENTER MEMORY
durante 2 segundos.
4 Pulse PRESET + o – hasta que el número de
memorización (1 a 10) que desee asignar a la
emisora parpadee en el visor.
5 Pulse ENTER MEMORY de nuevo.
Radio
19
ES
Page 74

Sintonización de emisoras memorizadas
BAND
AUTO PRESET
Una vez memorizadas las emisoras,
utilice PRESET +, - del reproductor o los
botones numéricos del mando a
distancia para sintonizar las emisoras
que desee.
En el mando a distancia
1 Pulse BAND para
seleccionar la banda.
2 Pulse el botón
numérico para que
aparezca el número
de memorización de
la emisora que desee.
1 Pulse BAND•AUTO PRESET para seleccionar la
banda.
2 Pulse PRESET + o – para que aparezca el número
de memorización de la emisora que desee.
PRESET –, +
Número de memorización
ES
Radio20
Page 75

Empleo del sistema de datos de radio (RDS)
El sistema de datos de radio (RDS) es un
servicio de radiodifusión que permite a
las emisoras de radio enviar información
complementaria junto con la señal
normal de programas. Este reproductor
ofrece útiles funciones RDS, como la
visualización del nombre de las
emisoras, localización de emisoras
mediante el tipo de programa, etc. El
sistema RDS sólo se encuentra
disponible en las emisoras de FM.
BAND
AUTO PRESET
., >
RDS
Radio
ENTER
MEMORY
DISPLAY
Notas
• No todas las emisoras
de FM ofrecen servicios
RDS ni proporcionan el
mismo tipo de
servicios. Si no está
familiarizado con el
sistema RDS, consulte
con las emisoras de
radio locales para
obtener información
detallada sobre los
servicios RDS
disponibles en su zona.
• El sistema RDS puede
no funcionar
correctamente si la
emisora sintonizada no
transmite la señal RDS
adecuadamente o si la
señal no es lo
suficientemente
potente.
Antes de recibir emisiones RDS
Asegúrese de memorizar las emisoras de FM según el
procedimiento de la página 19.
Recepción de emisiones RDS
Basta con seleccionar una emisora de la banda de FM.
Al sintonizar emisoras
que proporcionen
servicios RDS, aparecerá
“RDS”.
continúa
Radio
21
ES
Page 76

Empleo del sistema de datos de radio (RDS) (continuación)
Notas
• Si no se recibe la
emisión RDS, el
nombre de la emisora,
el tipo de programa y el
texto de radio pueden
no aparecer en el visor.
Además, si las
condiciones de
recepción no son
buenas, la anterior
información puede no
aparecer correctamente
en el visor.
• Al recibirse una
emisora que no ofrezca
la información de
nombre de emisora,
aparecerá “NO PS” al
seleccionar “PS DISP”.
• Al recibirse una
emisora que no ofrezca
la información de tipo
de programa, aparecerá
“NO PTY” al
seleccionar “PTY
DISP”.
• Al recibirse una
emisora que no ofrezca
la información de texto
de radio, aparecerá
“NO RT” al seleccionar
“RT DISP”.
• Ciertos caracteres (!, ?,
&, etc.) no aparecen. Se
mostrarán espacios en
blanco en el lugar de
dichos caracteres.
Para comprobar la información RDS
Pulse DISPLAY.
Cada vez que pulse el botón, la indicación del visor
cambiará de la siguiente forma:
Indicación Información mostrada
PS DISP Nombre de la emisora,
máximo de 10 caracteres
PTY DISP Tipo de programa
RT DISP Texto de radio,
máximo de 64 caracteres
(indicación normal) —
ES
Radio22
Page 77

Notas
• La función EON no se
activa durante las
grabaciones.
• El reproductor puede
cambiar a las emisoras
EON memorizadas
solamente.
Sugerencia
Para desactivar la
función EON, pulse
RDS durante 2
segundos o más.
Recepción de información sobre el tráfico,
noticias o información meteorológica (EON)
Mediante el empleo de la función EON (Enhanced
Other Networks), el reproductor puede cambiar
automáticamente a una emisora que emita
información sobre el tráfico, noticias o información
meteorológica. Una vez finalizado el programa, el
reproductor volverá a la emisora que estaba
escuchando.
1 Sintonice una emisora que ofrezca la función EON.
Al recibirse una
emisora EON,
aparecerá
“EON”.
2 Pulse RDS hasta que el visor muestre “EON
WAIT”.
3 Pulse ENTER MEMORY.
4 Pulse . o > hasta que el visor muestre la
información que desee.
La indicación cambia de la siguiente forma:
“TRAFFIC” t “NEWS” t “WEATHER”
t “OFF”
5 Pulse ENTER MEMORY.
El reproductor esperará a que las emisoras EON
comiencen a emitir la información seleccionada.
Radio
Se ilumina mientras el
reproductor espera a que
se emita la información
seleccionada, y después
comienza a parpadear al
recibirse dicha información.
“T” de “TRAFFIC” (Tráfico)
“N” de “NEWS” (Noticias)
“W” de “WEATHER”
(Información
meteorológica)
Si no se recibe ninguna
emisora EON, aparecerá
“*”.
Si alguna emisora de la red comienza a emitir la
información seleccionada, se sintonizará esa
emisora automáticamente.
continúa
Radio
23
ES
Page 78

Empleo del sistema de datos de radio (RDS) (continuación)
Notas
• Aparecerá “NOT
FOUND” si el tipo de
programa seleccionado
no se emite
actualmente.
• El reproductor sólo
puede localizar las
emisoras memorizadas.
Localización de emisoras mediante el tipo de
programa (PTY)
Es posible localizar las emisoras que desee mediante
la selección de un tipo de programa.
1 Pulse RDS hasta que el visor muestre “PTY
SEARCH”.
2 Pulse ENTER MEMORY.
3 Pulse . o > hasta que el visor muestre el tipo
de programa que desee.
Consulte la lista de tipos de programa (PTY) en las
páginas 25 y 26.
4 Pulse ENTER MEMORY.
El reproductor comenzará a buscar las emisoras
RDS memorizadas correspondientes al programa.
“PTY SEARCH” parpadea durante la búsqueda.
El reproductor deja de buscar cuando encuentra el
tipo de programa deseado.
ES
Radio24
Page 79

Lista de tipos de programa (PTY)
Las palabras entre paréntesis son las indicaciones que aparecen en el visor.
Noticias (NEWS)
Avances informativos, acontecimientos y
puntos de vista públicamente
expresados, reportajes y temas de
actualidad.
Temas de actualidad (AFFAIRS)
Programas en los que se amplían las
noticias, generalmente con estilos o
conceptos de presentación diferentes, en
los que se incluyen debates o análisis.
Información (INFO)
Programas cuyo propósito es ofrecer
consejos en el más amplio sentido.
Deportes (SPORT)
Programas en los que se tratan todos los
aspectos del deporte.
Educativos (EDUCATE)
Programas de temas principalmente
educativos, en los que el elemento formal
es fundamental.
Drama (DRAMA)
Todas las obras y seriales de radio.
Cultura (CULTURE)
Programas en los que se trata cualquier
aspecto de la cultura nacional o regional,
incluidos el idioma, el teatro, etc.
Ciencia (SCIENCE)
Programas sobre tecnología y ciencias
naturales.
Variedades (VARIED)
Empleado para programas basados en el
diálogo principalmente, normalmente de
entretenimiento ligero y que no cubren
las demás categorías. Se incluyen, por
ejemplo: concursos, juegos de panel,
entrevistas a personalidades.
Música “pop” (POP M)
Música comercial, que podría
generalmente considerarse como popular
actual, a menudo presente en las listas de
ventas de discos actuales o recientes.
Música “rock” (ROCK M)
Música moderna contemporánea,
normalmente compuesta e interpretada
por músicos jóvenes.
Música fácil de escuchar (MOR M)
(Música fácil de escuchar). Término
común utilizado para describir a la
música considerada como “fácil de
escuchar”, opuesta a la música pop, rock
o clásica. La música incluida en esta
categoría es con frecuencia, aunque no
siempre, vocal, y normalmente de corta
duración.
Clásica ligera (LIGHT M)
Música clásica destinada principalmente
a todos los públicos en vez de a
especialistas. Ejemplos de este tipo de
música son la música instrumental y la
vocal o las obras corales.
Clásica (CLASSICS)
Interpretaciones de principales obras
orquestales, sinfonías, música de cámara,
etc., incluidas las grandes óperas.
Música de otros tipos (OTHER M)
Estilos de música que no encaja en
ninguna de las demás categorías. Se usa
particularmente para música de
especialistas, como por ejemplo “Rhythm
& Blues” y “Reggae”.
Información meteorológica (WEATHER)
Información y previsiones
meteorológicas.
Economía (FINANCE)
Información sobre la Bolsa, comercio, etc.
Radio
continúa
Radio
25
ES
Page 80

Empleo del sistema de datos de radio (RDS) (continuación)
Programas infantiles (CHILDREN)
Programas destinados a una audiencia
infantil, principalmente con fines de
entretenimiento e interés general, en los
que el objetivo no es educativo en general.
Temas sociales (SOCIAL)
Programas sobre personas y cosas que les
influyen de forma individual o en grupo.
Incluyen sociología, historia, geografía,
psicología y sociedad.
Religión (RELIGION)
Aspectos de creencias y fe, en los que hay
presente un Dios o varios, la naturaleza
de la existencia y la ética.
Conversación telefónica (PHONE IN)
En estos programas, miembros del
público expresan sus puntos de vista por
teléfono o en un foro público.
Viajes (TRAVEL)
Asuntos y programas cuyo tema principal
son los viajes de destino cercano y lejano,
paquetes de viaje e ideas sobre viajes, y
oportunidades. No se utiliza para
realizar anuncios sobre problemas,
retrasos o carreteras en obras que
afecten a los viajes inmediatos, en cuyo
caso debe utilizarse la función TP/TA.
Placer (LEISURE)
Programas cuyo tema son las actividades
recreativas en los que puede participar el
oyente. Como ejemplos se incluyen
jardinería, pesca, antigüedades, cocina,
comidas y vinos, etc.
Música “jazz” (JAZZ)
Música polifónica y sincopada
caracterizada por la improvisación.
Música “country” (COUNTRY)
Canciones originarias de la tradición
musical de los estados del Sur de Estados
Unidos, o que continúan dicha tradición.
Se caracterizan por una línea narrativa
de la historia y una melodía directas.
Música nacional (NATION M)
Música popular de hoy en día nacional o
regional en el idioma de ese país, como
oposición a la música “pop”
internacional, normalmente inspirada en
Estados Unidos o en el Reino Unido y en
inglés.
Melodías de ayer (OLDIES)
Música popular de los llamados “años
dorados”.
Música “folk” (FOLK M)
Música cuyas raíces se encuentran en la
cultura musical de una determinada
nación, normalmente interpretada con
instrumentos acústicos. La narrativa o la
historia puede estar basada en personajes
o acontecimientos históricos.
Documentales (DOCUMENT)
Programas en los que se tratan temas
reales, presentados con un estilo de
investigación.
Anuncios de tráfico (TRAFFIC)
Información sobre tráfico.
PTY no definido (NONE)
Cualquier programa no definido
anteriormente.
ES
Radio26
Page 81

Reproductor de cintas
Localización del principio de las pistas
El reproductor detecta los espacios en
blanco existentes entre las pistas, y
localiza el principio de la pista siguiente.
TAPE m, M
Reproductor de cintas
Notas
• Para encontrar el
principio de las pistas
correctamente, es
necesario que el espacio
en blanco existente
entre las pistas sea de
aproximadamente 4
segundos.
• Si una pista presenta
un sonido suave como
“pianissimo” durante
algunos segundos, es
posible que el
reproductor inicie la
reproducción como si
se tratase de la pista
siguiente.
• Si pulsa TAPE M o
m cuando no hay
sonido en la pista, esta
función no se activará
correctamente.
Pulse TAPE M o m mientras se reproduce una
cinta.
Cara de reproducción Principio de Principio de
la pista siguiente la pista actual
Cara superior (N) Mm
Cara inversa (n) mM
La cinta avanza rápidamente o se rebobina hasta el
principio de la pista siguiente o de la actual, y la
reproducción se inicia automáticamente.
Reproductor de cintas
27
ES
Page 82

Énfasis de sonido
Selección del énfasis de sonido
(SOUND/MEGA BASS)
Es posible ajustar el énfasis del sonido
que escuche.
Selección de la característica de sonido
Pulse SOUND para seleccionar el énfasis de sonido
que desee.
Elija Para obtener
ROCK sonidos potentes y limpios, enfatizando
POP sonidos ligeros y brillantes, enfatizando
JAZZ sonidos de percusión, enfatizando los
VOCAL la presencia de música vocal, enfatizando
OFF la gama dinámica completa para música
MEGA BASS
el audio de gama baja y alta
el audio de gama alta y media
graves
el audio de gama media
como la clásica
SOUND
Potenciación de los graves
Pulse MEGA BASS.
El visor mostrará “MEGA BASS”. Para recuperar el
sonido normal, vuelva a pulsar el botón.
ES
Énfasis de sonido28
Page 83

Temporizador
Ajuste del reloj
La indicación “– –:– –” aparecerá en el
visor hasta que ajuste el reloj.
CLOCK
TUNE TIME SET –, +
ENTER
MEMORY
SUMMER
TIME
Énfasis de sonido/Temporizador
Temporizador
Sugerencia
El sistema de
presentación de la hora
de este reproductor es
de 24 horas.
Antes de comenzar, conecte el sistema (consulte las
páginas 38 - 42).
1 Pulse y mantenga pulsado CLOCK hasta que
parpadeen los dígitos de la hora.
2 Ajuste el reloj.
1 Pulse TUNE TIME SET
+ o – para ajustar la
hora y pulse ENTER
MEMORY.
2 Pulse TUNE TIME SET
+ o – para ajustar los
minutos.
m
3 Si la hora actual es la de verano, pulse SUMMER
TIME.
4 Pulse ENTER MEMORY.
El reloj se pondrá en funcionamiento a partir de 00
segundos.
continúa
Temporizador 29
ES
Page 84

Ajuste del reloj (continuación)
Para que aparezca la indicación de hora de verano
Pulse y mantenga pulsado SUMMER TIME durante 2
segundos.
“SUMMER ON” aparecerá en el visor durante unos
segundos.
Para cancelar la indicación de hora de verano
Pulse y mantenga pulsado SUMMER TIME de nuevo.
“SUMMER OFF” aparecerá en el visor durante unos
segundos.
ES
Temporizador30
Page 85

Activación automática del sistema
SNOOZE
TUNE TIME SET –, +
Es posible despertarse con música o con
un programa de radio a una hora
programada. Compruebe que ha
ajustado el reloj (consulte “Ajuste del
reloj”, página 29).
Antes de comenzar, compruebe que la indicación
(reloj) no esté iluminada en el visor. Si lo está, pulse
STANDBY.
1 Prepare la fuente de música que desee reproducir.
Fuente Realice lo siguiente
CD Inserte un CD.
RADIO Sintonice alguna emisora.
TAPE Inserte una cinta.
LINE Encienda el equipo conectado a LINE IN.
2 Pulse TIMER para que aparezca la indicación .
Realice las siguientes operaciones comprobando el
visor.
STANDBY
TIMER
ENTER
MEMORY
Temporizador
3 Pulse TUNE TIME SET + o – hasta que el visor
muestre la fuente de música que desee reproducir
(“CD”, “TAPE”, “RADIO” o “LINE”), y pulse
ENTER MEMORY.
continúa
Temporizador 31
ES
Page 86

Activación automática del sistema (continuación)
4 Ajuste el temporizador a la hora y los minutos a
los que desee que comience a reproducirse la
música.
1 Pulse TUNE TIME SET
+ o – para ajustar la
hora y pulse ENTER
MEMORY.
2 Pulse TUNE TIME SET + o – para ajustar los
minutos y pulse ENTER MEMORY.
5 Ajuste el temporizador a la hora y los minutos a
los que desee que la música se desactive. (Realice
la misma operación del paso 4.)
6 Pulse TUNE TIME SET + o – para ajustar el
volumen que desee, y pulse ENTER MEMORY.
Sugerencias
• Para salir del modo de
espera, pulse
STANDBY para que
desaparezca la
indicación .
• Los ajustes
programados se
conservan hasta que
vuelva a ajustarlos.
ES
Temporizador32
7 Pulse STANDBY.
La indicación
desactiva. A continuación, el reproductor entra en
el modo de espera.
A la hora programada, la alimentación se activará
y la música comenzará a reproducirse. Después,
dicha alimentación se desactivará a la hora
programada, y el reproductor entrará de nuevo en
el modo de espera.
Para comprobar/cambiar los ajustes del
temporizador de activación
Pulse TIMER y después ENTER MEMORY. Cada vez
que pulse ENTER MEMORY, aparecerá un ajuste
almacenado en el orden definido. Para cambiar el
ajuste, muestre el que desee modificar y vuelva a
introducirlo.
se ilumina y la alimentación se
Page 87

Nota
Para activar la función
“Snooze”, asegúrese de
que quedan 6 minutos
o más antes de la hora
programada para que
la música se desactive.
Para emplear el reproductor antes de que se inicie
la reproducción con temporizador
Si enciende el reproductor, puede emplearlo con
normalidad (en el caso de la radio, si escucha una
emisora diferente a la sintonizada en el paso 1 de la
página 31, se sintonizará esa emisora a la hora
programada). Apague el reproductor antes de la hora
programada.
Para detener la reproducción
Desactive la alimentación.
Temporizador
Para que la función “Snooze” se mantenga
activada durante unos minutos más
Pulse SNOOZE.
“SNOOZE” aparece en el visor y la alimentación se
desactiva. El reproductor se enciende
automáticamente transcurridos unos 5 minutos. Puede
repetir este proceso pulsando SNOOZE.
Para cancelar la función “Snooze”
Pulse OPERATE para activar la alimentación.
Temporizador 33
ES
Page 88

Grabación de
programas de
radio con el
DIR MODE
TUNE TIME SET –, +
temporizador
Es posible ajustar el temporizador para
grabar programas de radio a una hora
determinada. También es posible grabar
el sonido del componente conectado a la
toma LINE IN, mediante el
temporizador. Compruebe que ha
ajustado el reloj (consulte “Ajuste del
reloj” en la página 29).
Nota
No es posible
programar el
temporizador de
grabación y el de
activación (página 31) a
la misma hora.
Sugerencia
Cuando reciba el
programa de MW/LW
en el paso 1, pulse
z/X para comprobar
si se oye ruido. Si es así,
pulse MODE para
seleccionar la posición
en la que el ruido
disminuya en mayor
medida.
Antes de comenzar, compruebe que la indicación
(reloj) no esté iluminada en el visor. Si lo está, pulse
STANDBY.
1 Sintonice la emisora de radio e inserte una cinta
virgen en el compartimento de cintas con la cara en
la que desee grabar hacia arriba.
2 Pulse DIR MODE para
seleccionar el sentido de
grabación de la cinta.
3 Pulse TIMER para que aparezca la indicación .
Realice las siguientes operaciones comprobando el
visor.
STANDBY
TIMER
ENTER
MEMORY
Indicación
Una cara
Ambas caras
4 Pulse TUNE TIME SET + o – para que aparezca
“RADIO” “REC”, y pulse ENTER MEMORY.
ES
Temporizador34
Page 89

5 Ajuste el temporizador a la hora y los minutos a
los que desee que comience la grabación.
1 Pulse TUNE TIME SET + o – para ajustar la
hora y pulse ENTER MEMORY.
2 Pulse TUNE TIME SET + o – para ajustar los
minutos y pulse ENTER MEMORY.
6 Ajuste el temporizador a la hora y los minutos a
los que desee que la grabación se detenga. (Realice
la misma operación del paso 5.)
7 Pulse TUNE TIME SET + o – para ajustar el
volumen que desee, y pulse ENTER MEMORY.
Temporizador
Sugerencias
• Para salir del modo de
espera, pulse
STANDBY dos veces
para que desaparezca
la indicación .
• Los ajustes
programados se
conservan hasta que
vuelva a ajustarlos.
• Si selecciona el modo
de grabación de las dos
caras, la grabación se
detendrá una vez
grabadas ambas caras
de forma que no se
produzcan grabaciones
accidentales.
8 Pulse STANDBY.
La alimentación se desactivará y el reproductor
entrará en el modo de espera. El visor mostrará la
indicación
(cara superior N o cara inversa n). Si aparece la
indicación n, pulse STANDBY para cambiar la
cara de grabación a N.
A la hora programada, la alimentación se activará
y se iniciará la grabación. Después, dicha
alimentación se desactivará a la hora programada,
y el reproductor entrará de nuevo en el modo de
espera.
y la cara de grabación de la cinta
Temporizador 35
continúa
ES
Page 90

Grabación de programas de radio con el temporizador
(continuación)
Para comprobar/cambiar los ajustes del
temporizador de grabación
Pulse TIMER y después ENTER MEMORY. Cada vez
que pulse ENTER MEMORY, aparecerá un ajuste
almacenado en el orden definido. Para cambiar el
ajuste, muestre el que desee modificar y vuelva a
introducirlo.
Para emplear el reproductor antes de que se inicie
la grabación con temporizador
Si enciende el reproductor, puede emplearlo con
normalidad. Antes de la hora programada, sintonice la
emisora que desee grabar y desactive la alimentación.
Nota
La función SNOOZE
no se activa durante la
grabación con
temporizador.
Para detener la grabación con temporizador
Desactive la alimentación.
ES
Temporizador36
Page 91

Desactivación
automática del
sistema
Puede programar el reproductor para
que se apague automáticamente
transcurridos 10, 20, 30, 60, 90 o 120
minutos, de forma que pueda quedarse
dormido escuchando música.
SLEEP
Temporizador
Sugerencias
• El visor se atenúa
mientras el
temporizador de
desactivación se
encuentra en
funcionamiento.
• Es posible combinar el
temporizador de
activación con el de
desactivación. Ajuste
primero el
temporizador de
activación (página 31),
active la alimentación
y, a continuación, ajuste
el de desactivación.
• Puede preparar
músicas diferentes para
el temporizador de
activación y para el de
desactivación. No
obstante, no es posible
almacenar emisoras de
radio diferentes.
• Puede definir niveles
de volumen diferentes
para el temporizador
de activación y para el
de desactivación. Por
ejemplo, puede
quedarse dormido con
un nivel de volumen
bajo y despertarse con
uno mayor.
1 Reproduzca la fuente de música que desee.
2 Pulse SLEEP para que aparezca “SLEEP”.
3 Pulse SLEEP para seleccionar los minutos tras los
cuales el reproductor se apagará automáticamente.
Cada vez que pulse el
botón, la indicación
cambiará de la siguiente
forma:
“60” t “90” t “120” t ninguna indicación
t “10” t “20” t “30”.
Si transcurren 4 segundos después de pulsar
SLEEP, los minutos mostrados en el visor se
almacenarán en la memoria.
Una vez transcurrido el espacio de tiempo
programado, la música dejará de oírse y el
reproductor se apagará automáticamente.
Para cancelar la función de desactivación
Pulse SLEEP para que “SLEEP” desaparezca del visor.
Para cambiar el espacio de tiempo programado
Vuelva a realizar los pasos 2 y 3.
Temporizador 37
ES
Page 92

Instalación
Conexión del sistema
De acuerdo con las
ilustraciones, conecte los cables
firmemente. Si realiza las
conexiones incorrectamente, se
producirán fallos de
funcionamiento. Conecte el
cable de corriente en último
lugar.
2 Antena cerrada
de MW/LW
1 Cable de
alimentación
2 Antena de
cable de FM
Notas
• Asegúrese de
desactivar la
alimentación del
reproductor antes de
conectar/desconectar el
cable de corriente.
• Conecte los altavoces
suministrados a este
reproductor. Si conecta
otro tipo de altavoces o
equipos, pueden
producirse fallos de
funcionamiento.
Altavoz
derecho
a la toma de
corriente
1 Cable de conexión
de audio
1 Cable de altavoz
3 Cable de corriente
1 Conexión de los altavoces
1 Conecte el cable de alimentación de la salida
POWER OUTPUT del altavoz izquierdo a la toma
POWER IN del reproductor.
Altavoz
izquierdo
ES
Instalación38
Page 93

2 Conecte el cable de conexión de audio
(suministrado) a las tomas SIGNAL OUTPUT del
reproductor y a las tomas SIGNAL INPUT del
altavoz izquierdo.
Conecte los enchufes blancos a las tomas L
(izquierdo) y los rojos a las tomas R (derecho).
3 Conecte el cable del altavoz derecho a los
terminales SPEAKER OUTPUT R-ch del altavoz
izquierdo.
1 Mantenga presionada la lengüeta del terminal.
2 Conecte el hilo rojo al terminal más (+), y el
negro al terminal menos (–).
3 Deje de presionar la lengüeta del terminal.
Instalaci
ón
continúa
Instalación 39
ES
Page 94

Conexión del sistema (continuación)
Nota
Mantenga la antena
cerrada de MW/LW lo
más alejada posible del
reproductor. En caso
contrario, es posible
que se oiga ruido.
2 Conexión de las antenas
1 Para la antena cerrada de MW/LW solamente:
Retire el revestimiento del extremo del cable y
retuerza los hilos.
2 Conecte los hilos de la antena cerrada de MW/LW
y la antena de cable de FM a los terminales.
Conecte la antena cerrada de MW/LW de acuerdo
con el siguiente procedimiento.
1 Mantenga presionada la lengüeta del terminal.
2 Conecte los hilos al terminal.
3 Deje de presionar la lengüeta del terminal.
Antena cerrada de
MW/LW* (suministrada)
Antena de FM**
(suministrada)
* Reoriente la antena para mejorar la recepción de la
emisión.
** Mantenga la antena en posición horizontal en la
medida de lo posible.
Instalación de la antena cerrada de MW/LW
ES
Instalación40
Page 95

Sugerencia
La calidad del sonido
puede cambiar en
función de la polaridad
del enchufe del cable
de corriente. Cambie el
sentido de inserción del
enchufe y compruebe la
calidad del sonido.
3 Conexión del cable de corriente
Conecte el cable de corriente del altavoz derecho a la
toma de corriente.
Instalaci
a la toma de corriente
4 Inserción de las pilas en el mando a
distancia
Inserte dos pilas R6 (tamaño AA) (no suministradas)
Sustitución de las pilas
Con un uso normal, las pilas deben durar
aproximadamente seis meses. Cuando el reproductor
no responda al mando a distancia, sustituya todas las
pilas por unas nuevas.
ón
continúa
Instalación 41
ES
Page 96

Conexión del sistema (continuación)
Importante
Si utiliza una antena
exterior, asegúrese de
conectar el terminal a
tierra contra descargas
eléctricas. Para evitar
explosiones de gas, no
conecte el cable de
puesta a tierra a una
tubería de gas.
Para mejorar la recepción de las emisiones de
FM
Conecte una antena exterior de FM (no suministrada).
Si emplea un distribuidor, también podrá utilizar la
antena del TV.
Antena exterior
de FM (no
suministrada)
Conector de clavija
estándar IEC (no
suministrado)
Tierra
Para mejorar la recepción de las emisiones de
MW/LW
Conecte un cable aislado de 6 a 15 metros (no
suministrado) al terminal de antena MW/LW.
Mantenga el cable lo más horizontal posible cerca de
una ventana o del exterior. No es preciso desconectar
la antena cerrada de MW/LW suministrada.
Cable aislado
(no suministrado)
ES
Instalación42
Tierra
Page 97

Ahorro de energía
Incluso con la alimentación desactivada,
este reproductor consume unos 7,4 W
para indicación de hora, operación de
temporizador y recepción de mando a
distancia. Si utiliza la función de ahorro
de energía, podrá reducir el consumo de
energía a menos de 1W.
Cuando desactive la alimentación, mantenga pulsado
DISPLAY durante unos 2 segundos.
El reproductor entra en el modo de espera de
consumo de energía inferior.
Para que aparezca la indicación de hora, mantenga
pulsado DISPLAY durante unos 2 segundos al apagar
el reproductor.
DISPLAY
Instalaci
ón
Instalación 43
ES
Page 98

Conexión de componentes opcionales
Es posible grabar un CD en un minidisco
o disfrutar del sonido de una
videograbadora, TV o reproductor/
grabadora de minidiscos mediante los
altavoces de este reproductor.
Asegúrese de desactivar la alimentación
de todos los componentes antes de
realizar las conexiones.
Para obtener más información, consulte
el manual de instrucciones del
componente que vaya a conectar.
LINE
Nota
Conecte los cables
firmemente con el fin
de evitar fallos de
funcionamiento.
Grabación de un CD en una grabadora de
minidiscos y DAT
a la toma
OPTICAL DIGITAL
OUT (CD)
Cable de conexión
digital* POC-5AB
(no suministrado)
* Seleccione el cable de conexión en función del tipo de toma
de entrada digital de la grabadora que vaya a conectar. Para
obtener más información, consulte el manual de
instrucciones del componente que vaya a conectar. La toma
OPTICAL DIGITAL OUT (CD) de este reproductor es de
forma cuadrada.
Tipo de toma del componente Número de modelo del
que vaya a conectarse cable de conexión
Minienchufe óptico POC-5AB, POC-10AB,
(grabadora de minidiscos, etc.) POC-15AB
Conector tipo L de 7 pines POC-DA12P
(grabadora DAT, etc.)
Conector óptico de forma POC-10A, POC-15A
cuadrada (grabadora de
minidiscos, grabadora DAT, etc.)
Grabadora de
minidiscos,
grabadora
DAT, etc.
a la toma de
entrada digital
ES
Instalación44
Page 99

Notas
• Mientras el visor
muestre “CD”, la toma
de salida digital óptica
se encontrará en
funcionamiento y la
toma se iluminará
aunque el CD esté en el
modo de parada.
• Si reproduce un CDROM que no sea de
audio, es posible que se
oiga ruido.
1 Extraiga la cubierta de la toma OPTICAL DIGITAL
OUT (CD) de este reproductor y conéctela con la
toma de entrada digital de la grabadora de
minidiscos o de otro componente mediante el cable
de conexión digital (no suministrado).
2 Active la alimentación de este reproductor y del
componente conectado.
3 Prepare el componente conectado para grabar.
4 Inicie la reproducción del CD en este reproductor.
Sugerencia
Es posible grabar el
sonido del componente
conectado. Inserte una
cinta virgen en el
compartimento de
cintas, pulse z/X y, a
continuación, N
(página 11).
Escucha del sonido de un TV, videograbadora
y reproductor/grabadora de minidiscos
a la toma
LINE IN
Cable de conexión de audio
Para grabadora de minidiscos:
RK-G136 (1,5 m)
(no suministrado)
Para TV, videograbadora:
RK-G129 (1,5 m)
(no suministrado)
a la toma de salida
de línea
TV,
videograbadora,
reproductor/
grabadora de
minidiscos, etc.
1 Conecte la toma LINE IN de este reproductor con
la toma de salida de línea del reproductor de
minidiscos o de otro componente mediante un
cable de conexión de audio (no suministrado) .
2 Active la alimentación de este reproductor y del
componente conectado.
3 Pulse LINE y comience a reproducir el sonido en el
componente conectado.
Los altavoces emitirán el sonido procedente del
componente conectado.
Instalaci
ón
continúa
Instalación 45
ES
Page 100

Conexión de componentes opcionales (continuación)
Escucha del sonido a través de los altavoces
de otro equipo de audio
Amplificador
a la toma
LINE OUT
Cable de conexión
de audio RK-G129
(1,5 m) (no
suministrado)
a la toma de
entrada de línea
analógica
1 Conecte la toma LINE OUT de este reproductor
con la toma de entrada de línea analógica del
amplificador mediante un cable de conexión de
audio (no suministrado).
2 Active la alimentación de este reproductor y del
amplificador y comience a reproducir el sonido en
este reproductor.
ES
Instalación46
 Loading...