

Sony PEGNX70V Clié, PEGNX60 Clié User Manual
A-BDX-100-11 (1)
Sony CLIÉ™ Handheld basic
operations
Entering data in your Sony CLIÉ™
Handheld
Exchanging and updating data using
a HotSync® operation
Customizing your Sony CLIÉ Handheld
(Preferences)
Handbook
© 2002 Sony Corporation
Exchanging and updating data using a HotSync®
operation (Other HotSync
Using “Memory Stick®” media
Beaming
Using the Calculator and finding records
Backing up your Sony CLIÉ™ Handheld data
Protecting your data with a password
Enhancing features with add-on applications
Using data with another Sony CLIÉ™
Handheld
®
operations)

Introduction
This “Handbook” explains the basic operations and useful
features of your CLIÉ™ handheld.
When using CLIÉ handheld for the first time
The basic features and operations are explained in detail
(pages 9-65).
Sony CLIÉ™ Handheld basic operations
Explains the basic operations of your CLIÉ handheld and how to use the
applications.
Entering data in your Sony CLIÉ™ Handheld
Explains how to enter data in your CLIÉ handheld.
Exchanging and updating data using a HotSync
Explains how to use your CLIÉ handheld with your computer.
CLIÉ handheld advanced operations
The convenient features and how to make full use of your CLIÉ
handheld are explained in detail (pages 66-172).
Customizing your Sony CLIÉ Handheld (Preferences)
Explains how to customize your CLIÉ handheld in a way to suit you.
Exchanging and updating data using a HotSync
(Other HotSync® operations)
Explains the methods of HotSync® operations.
Using “Memory Stick
Explains how to use data stored on “Memory Stick” media.
Beaming
Explains how to exchange data with another CLIÉ handheld by beaming.
Using the Calculator and finding records
Explains the calculator and how to find records.
Backing up your Sony CLIÉ™ Handheld data
Explains how to back up the data of your CLIÉ handheld.
Protecting your data with a password
Explains how to assign a password to restrict the use of your CLIÉ handheld
or to protect your data.
Enhancing features with add-on applications
Explains how to install additional applications in your CLIÉ handheld.
Using data with another Sony CLIÉ™ Handheld
Explains how to transfer data from your CLIÉ handheld to another CLIÉ
handheld.
®
” media
®
operation
®
operation
2

Refer to the following with this manual together.
Read This First (Operating Instructions)
Please read this manual at the beginning.
The manual explains about what you need to prepare prior to operating your
CLIÉ handheld, basic operations, or supplied applications in your CLIÉ
handheld.
CLIÉ Application Manual (HTML format: Start up on a computer)
The manual explains about how to use the supplied applications in detail.
For details on using the manual, refer to “Using CLIÉ Application Manual”
in “Read This First (Operating Instructions).”
Troubleshooting Q&A
The manual helps in solving problems that you may face while using your
CLIÉ handheld.
Note
Some of the illustrations in this manual (Handbook) may not be consistent with your
Sony CLIÉ handheld.
b For details on your CLIÉ handheld, refer to “Read This First (Operating
Instructions).”
3

Table of Contents
Sony CLIÉ™ Handheld basic operations
Basic operations . . . . . . . . . . . . . . . . . . . . . . . . . . . . . . . . . . . . . 10
Using the stylus . . . . . . . . . . . . . . . . . . . . . . . . . . . . . . . . . . . . . . . . 10
Using the Jog Dial™ navigator . . . . . . . . . . . . . . . . . . . . . . . . . . . . 12
Starting an application . . . . . . . . . . . . . . . . . . . . . . . . . . . . . . . . 14
Starting an application in the Application Launcher screen
(“CLIE Launcher”) . . . . . . . . . . . . . . . . . . . . . . . . . . . . . . . . . . . . . . 14
Quitting an application . . . . . . . . . . . . . . . . . . . . . . . . . . . . . . . . . . 15
Using “CLIE Launcher”. . . . . . . . . . . . . . . . . . . . . . . . . . . . . . . . 16
Locating the components . . . . . . . . . . . . . . . . . . . . . . . . . . . . . . . . 16
CLIE Launcher group . . . . . . . . . . . . . . . . . . . . . . . . . . . . . . . . . . . . 17
Using Favorite Applications (shortcuts). . . . . . . . . . . . . . . . . . . . . . . 21
Application manager icon . . . . . . . . . . . . . . . . . . . . . . . . . . . . . . . . 23
Displaying information about applications . . . . . . . . . . . . . . . . . . . . 24
Menu List . . . . . . . . . . . . . . . . . . . . . . . . . . . . . . . . . . . . . . . . . . . . 25
Using the Palm OS® standard screen . . . . . . . . . . . . . . . . . . . . . 27
Switching to the Palm OS standard screen . . . . . . . . . . . . . . . . . . . . 27
Starting an application . . . . . . . . . . . . . . . . . . . . . . . . . . . . . . . . . . 29
Changing the display style of the Palm OS standard screen . . . . . . . 33
Displaying application by category. . . . . . . . . . . . . . . . . . . . . . . . . . 35
Changing fonts . . . . . . . . . . . . . . . . . . . . . . . . . . . . . . . . . . . . . 37
Common menus . . . . . . . . . . . . . . . . . . . . . . . . . . . . . . . . . . . . 38
Continued on next page
• • • • • • • • • • • • • • • • • • •
4

Entering data in your Sony CLIÉ™ Handheld
Entering data in your Sony CLIÉ™ Handheld . . . . . . . . . . . . . . . 41
Practicing entering data using the on-screen keyboard. . . . . . . . 42
Entering data . . . . . . . . . . . . . . . . . . . . . . . . . . . . . . . . . . . . . . . . . 42
Using Graffiti® writing to enter data . . . . . . . . . . . . . . . . . . . . . 45
What is Graffiti writing? . . . . . . . . . . . . . . . . . . . . . . . . . . . . . . . . . 45
Entering characters with Graffiti . . . . . . . . . . . . . . . . . . . . . . . . . . . 53
Using Navigation stroke and shortcuts. . . . . . . . . . . . . . . . . . . . . . . 55
Exchanging and updating data using a
HotSync® operation
What is a HotSync® operation? . . . . . . . . . . . . . . . . . . . . . . . . . 58
®
Performing a HotSync
Performing a HotSync® operation with the cradle
(Local HotSync
®
Using the Palm™ Desktop for CLIÉ software . . . . . . . . . . . . . . . 62
Starting the Palm™ Desktop for CLIÉ software . . . . . . . . . . . . . . . . 62
Locating the Palm™ Desktop for CLIÉ software components . . . . . . 63
Basic operations of the Palm™ Desktop for CLIÉ software . . . . . . . . 64
operation . . . . . . . . . . . . . . . . . . . . . . . 60
) . . . . . . . . . . . . . . . . . . . . . . . . . . . . . . . . . . . . . . . 60
Continued on next page
• • • • • • • • • • • • • • • • • • •
5

Customizing your Sony
CLIÉ Handheld
(Preferences)
What you can do with
Preferences . . . . . . . . . . . . . . . . . . 67
Adding/Changing the preference for
the modem . . . . . . . . . . . . . . . . . . 69
Changing the Network
preferences . . . . . . . . . . . . . . . . . . 71
Selecting a service template . . . 71
Entering a user name . . . . . . . . 72
Entering a password . . . . . . . . . 72
Selecting a connection . . . . . . . 73
Adding telephone settings . . . . 74
Adding detailed information to a
service template . . . . . . . . . . . . 75
Creating additional service
templates . . . . . . . . . . . . . . . . . 77
Creating log in scripts. . . . . . . . 78
Using the Network preferences
menus . . . . . . . . . . . . . . . . . . . 81
Assigning applications to application
buttons . . . . . . . . . . . . . . . . . . . . . 82
Customizing the full-screen pen stroke
activities. . . . . . . . . . . . . . . . . . . . . 83
Assigning applications to HotSync
buttons . . . . . . . . . . . . . . . . . . . . . 84
Creating Graffiti
Setting the display format of the time,
date, and numbers. . . . . . . . . . . . . 86
Selecting a regional default. . . . 86
Customizing your own settings for
each unit . . . . . . . . . . . . . . . . . 87
Setting the Date & Time
preferences . . . . . . . . . . . . . . . . . . 88
Setting the date . . . . . . . . . . . . 88
Setting the time . . . . . . . . . . . . 89
Setting the time zone and daylight
saving time. . . . . . . . . . . . . . . . 90
®
ShortCuts. . . . . . 85
Setting the automatic power-off
time . . . . . . . . . . . . . . . . . . . . . . . .91
Setting sounds. . . . . . . . . . . . . . . . .92
Turning the Alarm LED on or off . . .93
Turning the Beam Receive feature on or
off. . . . . . . . . . . . . . . . . . . . . . . . . .94
Adjusting the Digitizer. . . . . . . . . . . 95
Exchanging and updating
data using a HotSync
operation (Other HotSync
®
®
operations)
Customizing HotSync® application
settings (Conduit) . . . . . . . . . . . . . .97
Synchronizing with external data
(File Link). . . . . . . . . . . . . . . . . . . . .99
Customizing how to start HotSync
Manager and the HotSync
options . . . . . . . . . . . . . . . . . . . . .100
Performing an IR HotSync
operation . . . . . . . . . . . . . . . . . . .101
Performing a HotSync
modem . . . . . . . . . . . . . . . . . . . . .104
Performing a HotSync
network . . . . . . . . . . . . . . . . . . . .110
Performing a HotSync
LAN (LANSync) . . . . . . . . . . . . . . .115
®
®
®
operation via a
®
operation via a
®
operation via
setup
®
Continued on next page
• • • • • • • • • • • • • • • • • • •
6
Using “Memory Stick®”
media
Using “Memory Stick®” media. . . 119
What is “Memory Stick”
media? . . . . . . . . . . . . . . . . . . 119
Inserting and removing a
“Memory Stick” media . . . . . . 120
Protecting the data in
“Memory Stick” media . . . . . . 122
Starting an application in
“Memory Stick” media . . . . . . 123
Viewing information of a “Memory
Stick” media (Card Info) . . . . . 124
Assigning a name to a
“Memory Stick” media . . . . . . 125
Formatting “Memory Stick”
media. . . . . . . . . . . . . . . . . . . 126
Exchanging data via “Memory Stick”
media. . . . . . . . . . . . . . . . . . . . . . 128
Starting CLIE Files . . . . . . . . . . 128
Copying your CLIÉ handheld data to
a “Memory Stick” media . . . . 130
Copying data in “Memory Stick”
media to your CLIÉ
handheld . . . . . . . . . . . . . . . . 133
Deleting data in “Memory Stick”
media. . . . . . . . . . . . . . . . . . . 135
CLIE Files menus . . . . . . . . . . . 136
Exchanging data without using the
CLIE Files application. . . . . . . . 137
Notes on starting applications from
a “Memory Stick” media . . . . 138
Beaming
Beaming between your Sony CLIÉ
Handheld and another Palm OS
PDA. . . . . . . . . . . . . . . . . . . . . . . .140
What you can do with
beaming . . . . . . . . . . . . . . . . .140
Beaming information. . . . . . . .141
Tips on beaming
information . . . . . . . . . . . . . . .142
®
Using the Calculator and
finding records
Using the Calculator (Calc) . . . . . .144
Calculating with the
Calculator . . . . . . . . . . . . . . . .144
The functions of the Calculator
buttons . . . . . . . . . . . . . . . . . .145
Using the Calculator menus . . .146
Finding records . . . . . . . . . . . . . . .147
Using the Find option . . . . . . .147
Backing up your Sony
CLIÉ™ Handheld data
Backing up your Sony CLIÉ™ Handheld
data . . . . . . . . . . . . . . . . . . . . . . .150
Backing up data to your computer
through a HotSync
operation. . . . . . . . . . . . . . . . .150
Backing up data to a “Memory
Stick” media using the Memory
Stick Backup application . . . . .151
®
Continued on next page
• • • • • • • • • • • • • • • • • • •
7
Protecting your data with a
password
Using data with another
Sony CLIÉ™ Handheld
Entering personal information . . . 155
Locking your CLIÉ handheld with a
password (Data protection). . . . . . 157
Turn off your CLIÉ handheld after
locking . . . . . . . . . . . . . . . . . . 157
Setting your CLIÉ handheld to be
locked automatically. . . . . . . . 159
Protecting data. . . . . . . . . . . . . . . 160
Assigning a password . . . . . . . 160
Changing or deleting a
password . . . . . . . . . . . . . . . . 161
Hiding or masking private
data . . . . . . . . . . . . . . . . . . . . 162
Enhancing features with
add-on applications
Enhancing features with add-on
applications . . . . . . . . . . . . . . . . . 164
Installing . . . . . . . . . . . . . . . . . . . 165
Installing from your
computer . . . . . . . . . . . . . . . . 165
Installing applications in a
“Memory Stick” media . . . . . . 167
Installing from the Internet . . . 167
Deleting the installed add-on
applications . . . . . . . . . . . . . . 168
Using data with another Sony CLIÉ™
Handheld . . . . . . . . . . . . . . . . . . .170
Transferring data using the Palm™
Desktop for CLIÉ software . . . .170
INDEX. . . . . . . . . . . . . . . . . . .173
8

Sony CLIÉ™ Handheld basic operations
This chapter explains the basic operations of your
CLIÉ handheld such as using the stylus, using the
Jog Dial™ navigator, locating the components,
and how to start the applications.
Menus that are common to the applications, and
how to select the font of characters displayed on
the screen are also explained.
Basic operations . . . . . . . . . . . . . . . . . . . . . . 10
Starting an application . . . . . . . . . . . . . . . . . . 14
Using “CLIE Launcher” . . . . . . . . . . . . . . . . . 16
Using the Palm OS
Changing fonts . . . . . . . . . . . . . . . . . . . . . . . 37
Common menus . . . . . . . . . . . . . . . . . . . . . . 38
®
standard screen. . . . . . . . .27
Basic operations
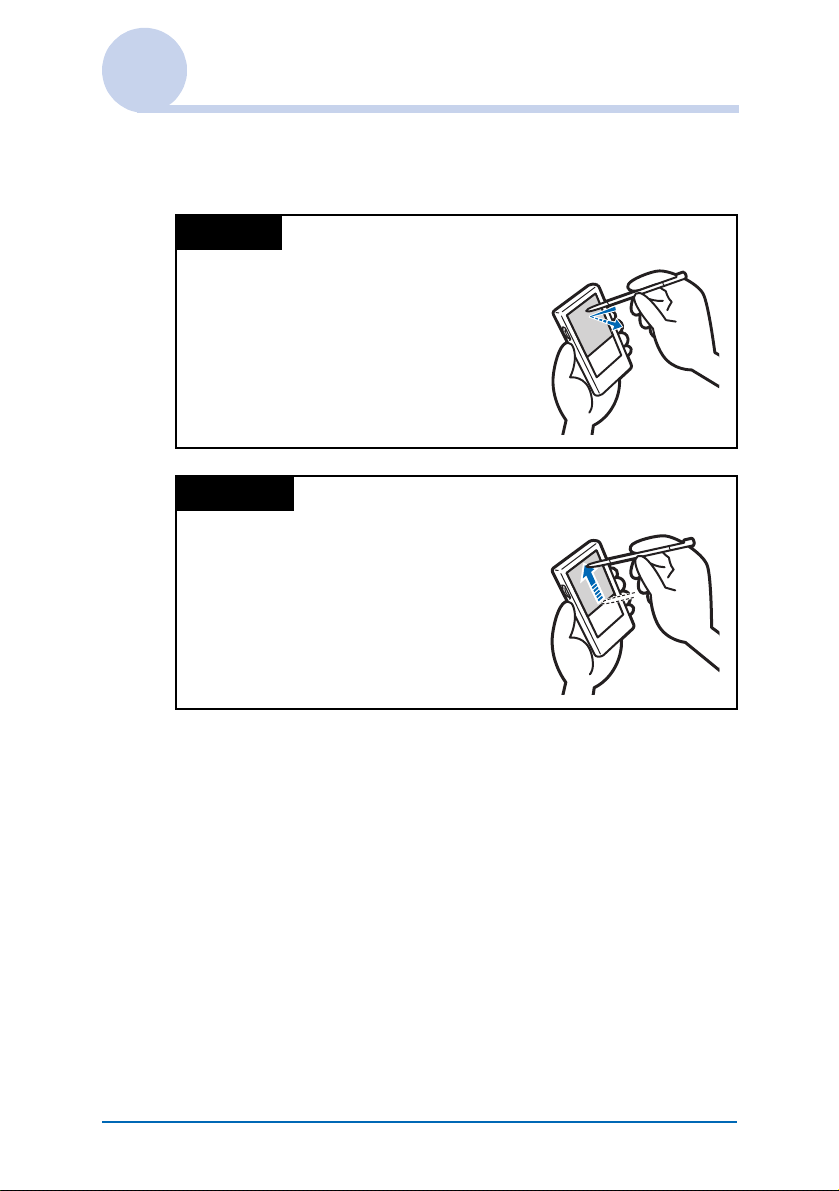
Operating using the stylus and Jog Dial™ navigator.
Using the stylus
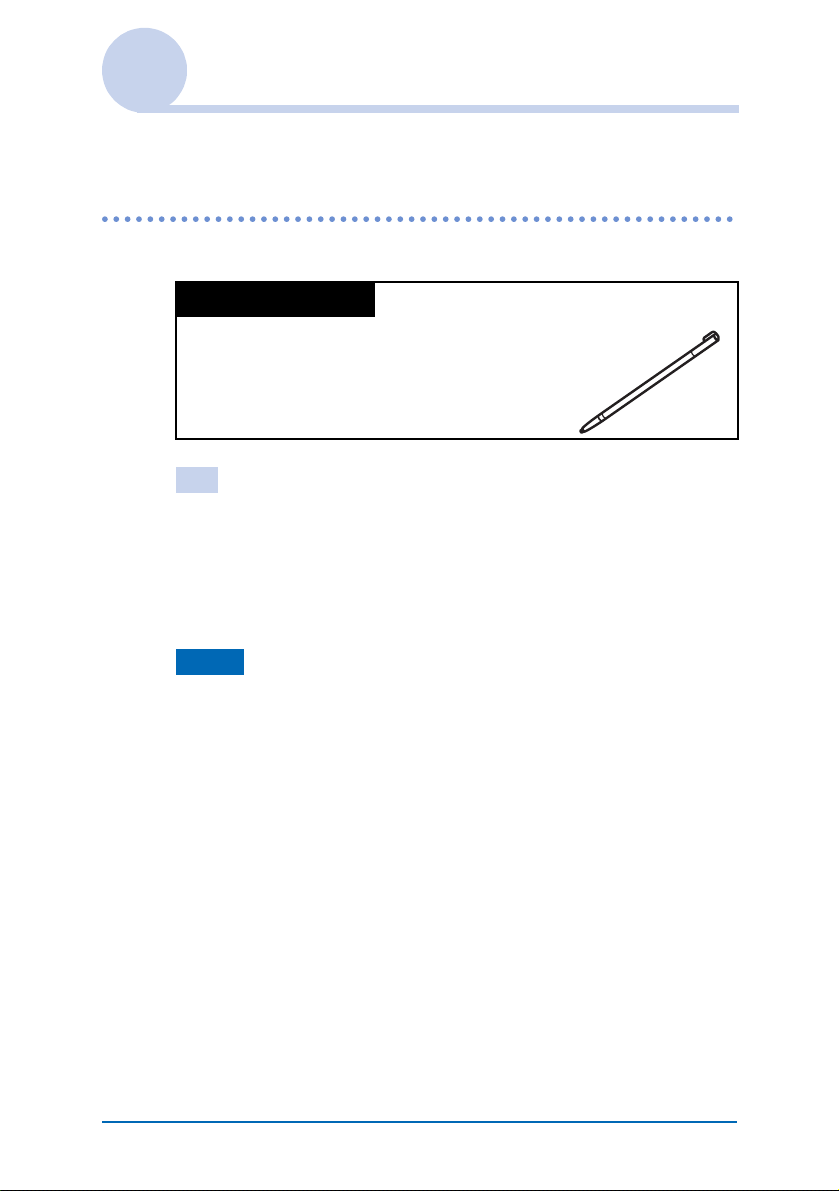
What is a stylus?
A stylus is a pen for operating your CLIÉ
handheld by directly touching the screen.
Tip
Where is the stylus located?
The stylus is stored in your CLIÉ handheld.
The exact location of the storage varies depending on the model.
b For details, refer to “Sony CLIÉ™ Handheld components” of
“Read This First (Operating Instructions).”
Note
To prevent losing the stylus, always put it back in its holder on your
CLIÉ handheld after use.
Continued on next page
• • • • • • • • • • • • • • • • • • •
Sony CLIÉ™ Handheld basic operations 10
Basic operations
You can operate your CLIÉ handheld using the stylus in the
following ways.
Tapping
Lightly pressing the desired item on the
screen with the stylus is called “Tapping.”
When entering data with the on-screen
keyboard or starting an application, “tap”
the desired button or icon with the stylus.
Dragging
Touching the desired item on the screen
with the stylus and moving it along the
screen surface is called “Dragging.”
Just as you “drag” the mouse on your
computer, use the stylus to “drag” the
scroll bar to scroll the screen or “drag”
characters to highlight them.
Sony CLIÉ™ Handheld basic operations 11
Basic operations
Using the Jog Dial™ navigator
What is the Jog Dial™
navigator?
Your CLIÉ handheld is equipped with a
Jog Dial™ navigator (Jog Dial™ navigator
is a dial located at the left side of your
CLIÉ handheld), which enables you to
perform major operations one-handed
without the stylus.
Rotating the Jog Dial™ navigator
Rotate the Jog Dial™ navigator to select
various items or applications to start.
Continued on next page
• • • • • • • • • • • • • • • • • • •
Sony CLIÉ™ Handheld basic operations 12
Basic operations
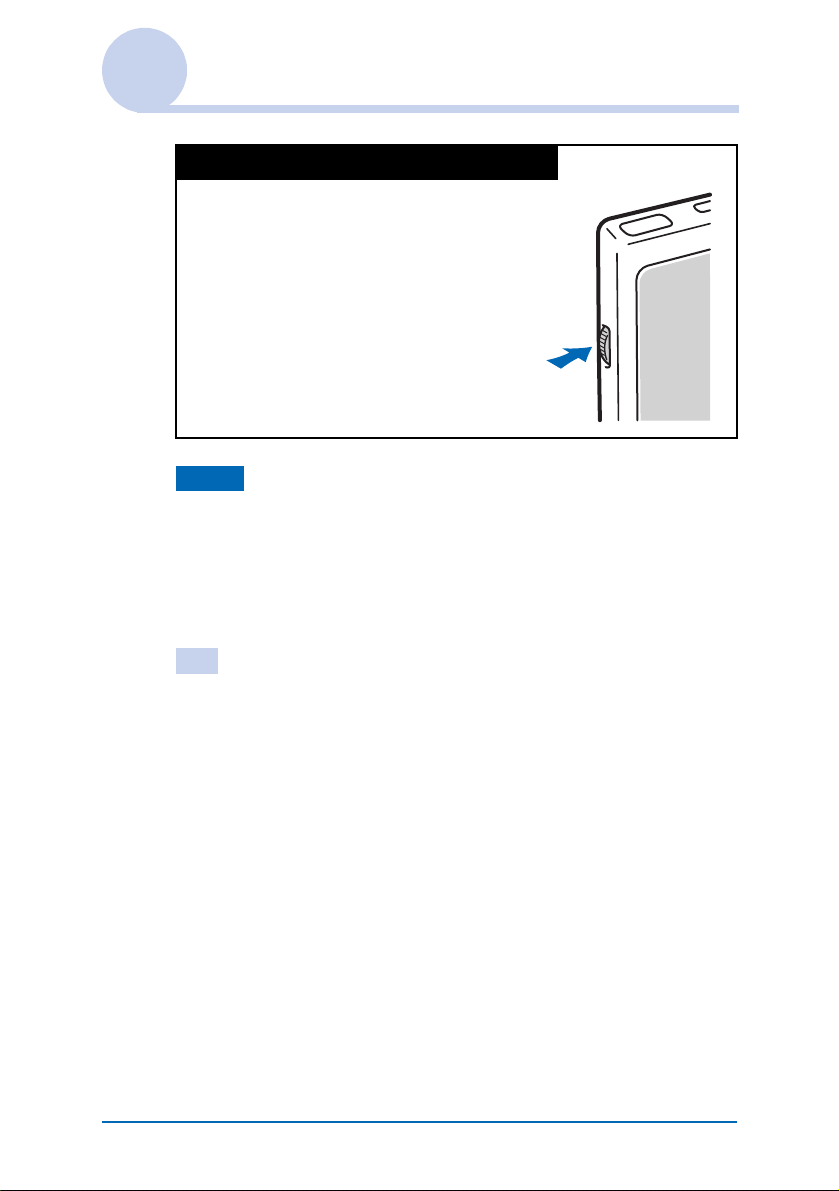
Pressing the Jog Dial™ navigator
Press the Jog Dial™ navigator to
determine the item selected or to run the
selected application.
Note
The operations you can perform by using the Jog Dial™ navigator vary
depending on the application.
b For details on the operations of each application, refer to the “CLIÉ
Application Manual” on your computer.
Tip
To rotate while holding down the Jog Dial™ navigator
Some applications support operations executed by pressing and
rotating the Jog Dial™ navigator.
Sony CLIÉ™ Handheld basic operations 13
Starting an application
Software that operates on your CLIÉ handheld to execute a task,
such as Date Book, To Do List, or e-mail software, is called
“application.” You need to start an application when operating
your CLIÉ handheld.
Note
For details on starting applications in “Memory Stick”
media, refer to page 123.
There may be some system limitations to start applications in “Memory
Stick” media in the Application Launcher screen.
Tip
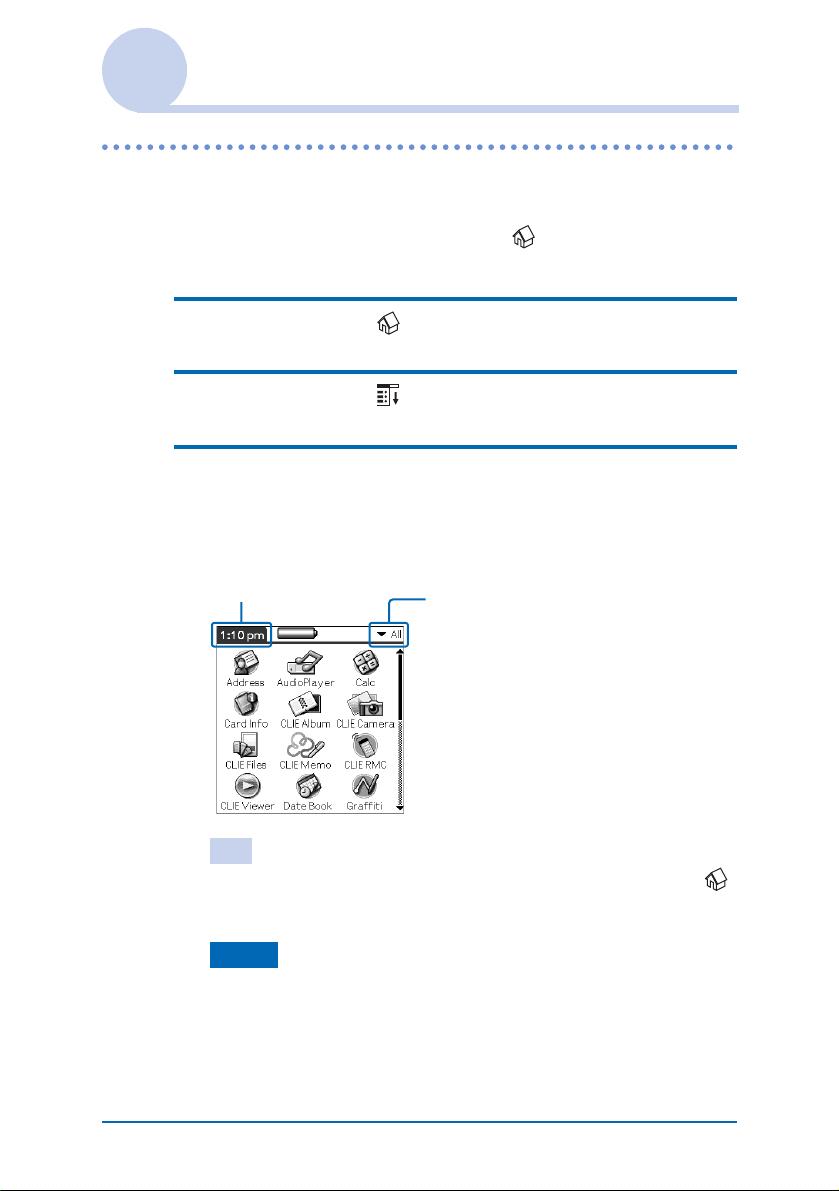
What is the CLIE Launcher screen?
The screen displayed by turning on power and tapping the Home
icon is called the Application Launcher screen.
The CLIÉ specific screen “CLIE Launcher” is displayed by the default
setting.
Starting an application in the Application Launcher screen (“CLIE Launcher”)
1 Tap the Home Icon to display the CLIE
Launcher screen.
Continued on next page
• • • • • • • • • • • • • • • • • • •
Sony CLIÉ™ Handheld basic operations 14
Starting an application
2 Rotate the Jog Dial™ navigator to select an
application icon and press the Jog Dial™
navigator to start the application.
Tip
You can also tap an application icon in the CLIE Launcher screen to
start the application.
Quitting an application
Only one application can be opened and active at a time on your
CLIÉ handheld.
The operation to save data is not required when you quit an
application.
All work done while working in an application is automatically
saved when the application is closed. When you restart the
application, the last-saved data will be displayed automatically.
Note
For some applications, you need to operate Finish or Save.
b For details, refer to “CLIÉ Application Manual” on your computer.
Tip
You can return to the CLIE Launcher screen by keeping pressing the
BACK button.
Sony CLIÉ™ Handheld basic operations 15
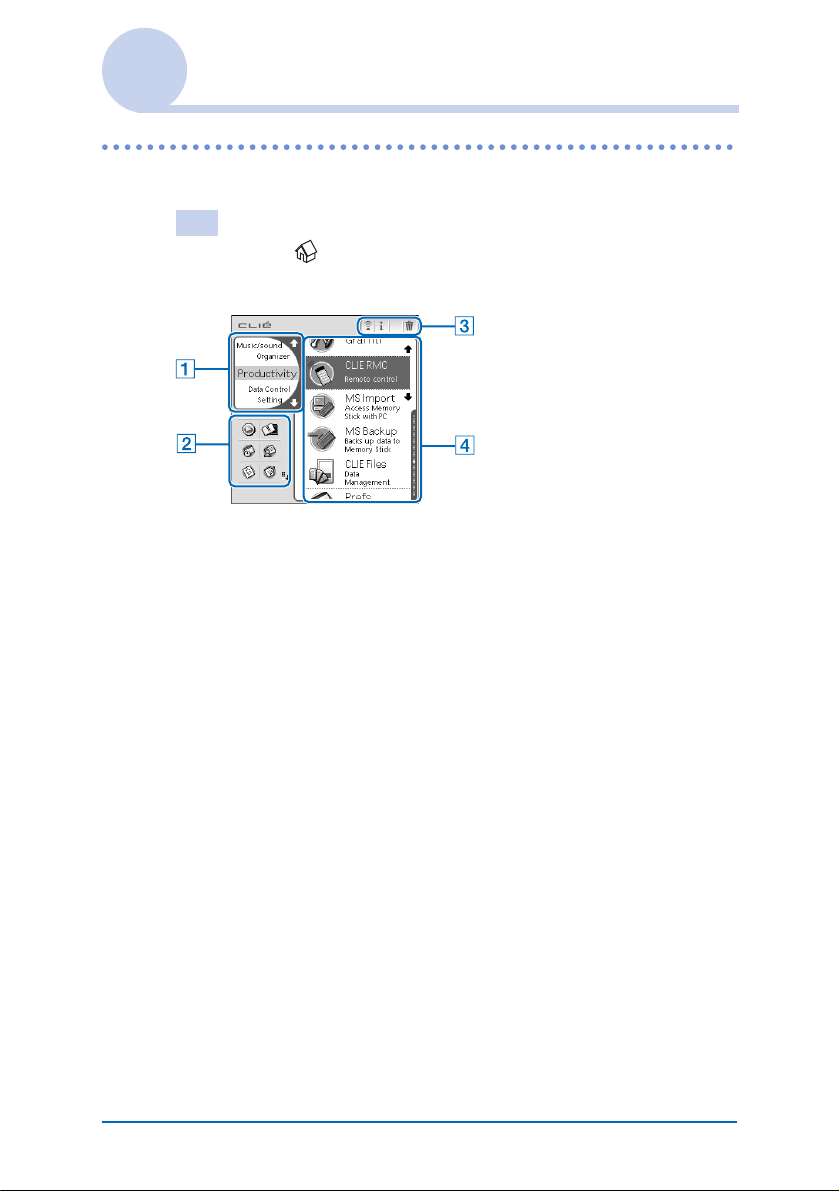
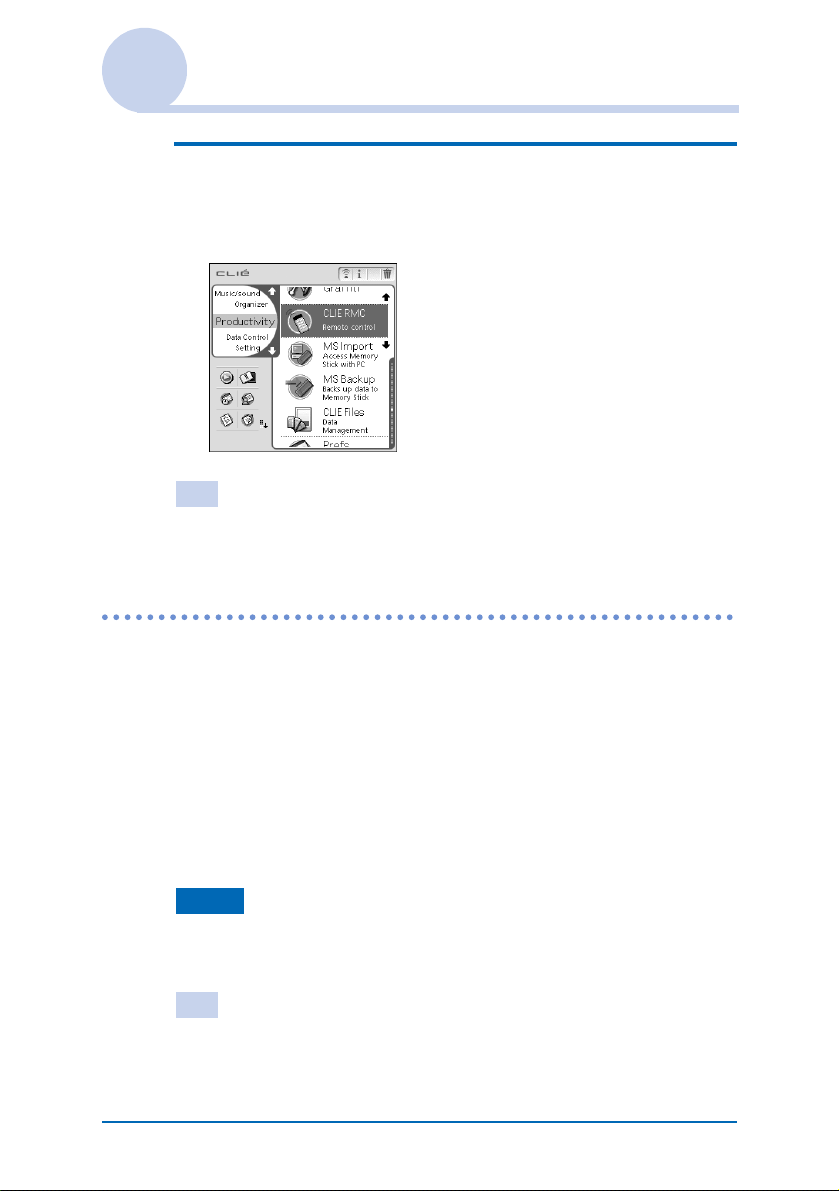
Using “CLIE Launcher”
Locating the components
Tip
Tap the Home icon to display the CLIE Launcher screen if it is not
displayed.
A CLIE Launcher group list (Page 17)
Displays the list of the CLIE Launcher groups.
B Favorite Applications (shortcuts) (Page 21)
You can create shortcuts to applications used frequently.
C Application manager icon (Page 23)
You can manage your applications. Functions may be added
when you install some applications.
D Application icon list
Displays application names and icons.
Sony CLIÉ™ Handheld basic operations 16
Using “CLIE Launcher”
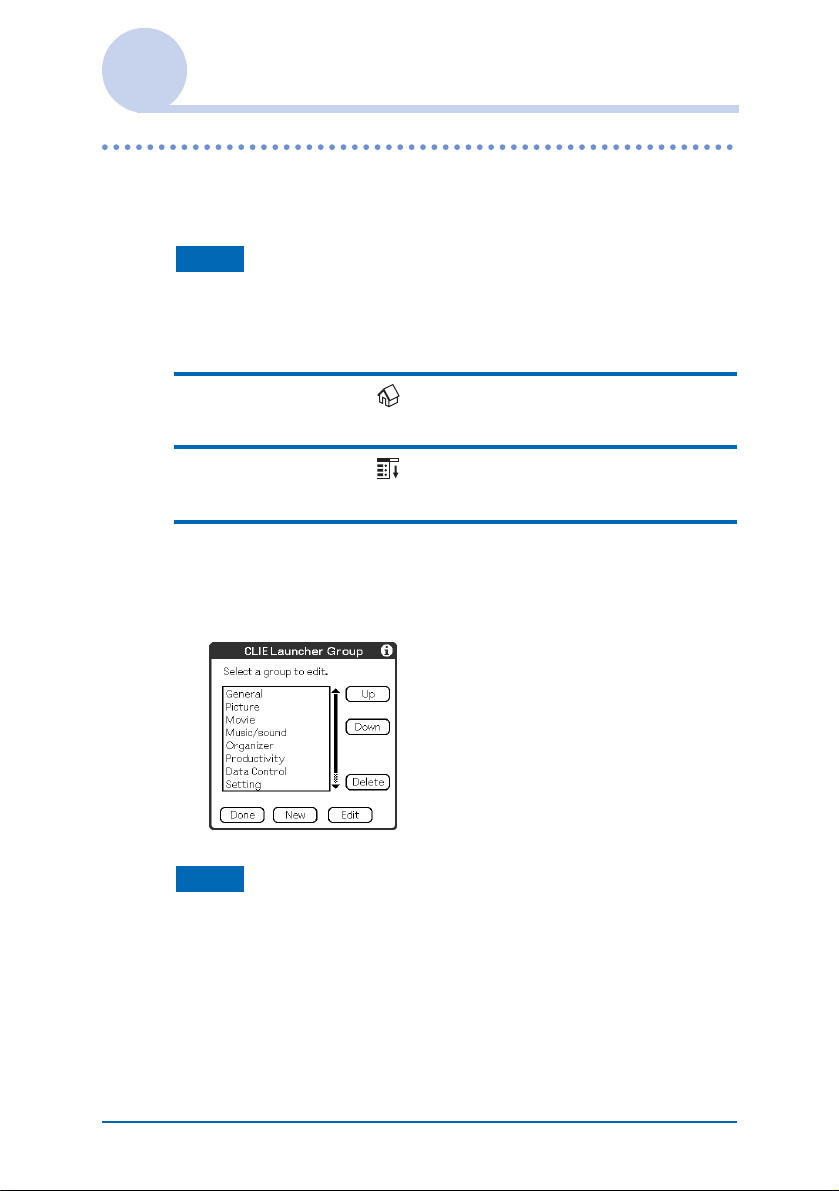
CLIE Launcher group
You can sort applications by grouping them.
Note
Applications in a “Memory Stick” media cannot be grouped.
Editing groups
1 Tap the Home icon.
2 Tap the Menu icon.
3 Select Edit CLIE Launcher Group from the
CLIE Launcher menu.
The CLIE Launcher Group setting screen is displayed.
Note
CLIE Launcher groups differ from Palm OS® standard screen
categories.
Continued on next page
• • • • • • • • • • • • • • • • • • •
Sony CLIÉ™ Handheld basic operations 17
Using “CLIE Launcher”
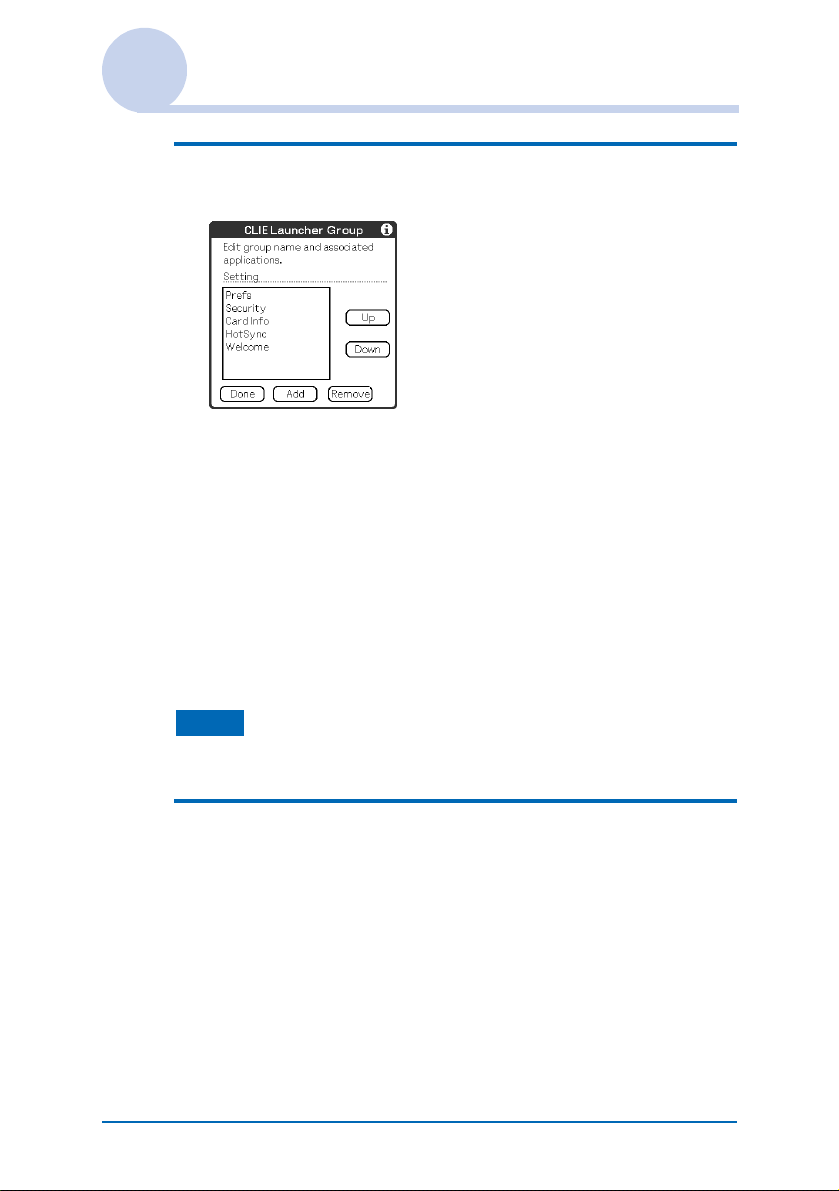
4 Select a group to edit and tap Edit.
The CLIE Launcher Group screen is displayed.
Name: You can rename group names.
Ordering applications listed: Select the application and
tap Up or Down to order applications in the CLIE
Launcher screen.
Adding applications: Tap Add to display the list and
select an application to add.
Removing applications: Select an application to remove
and tap Remove. Applications removed will be listed in
the Unfiled group.
Note
The Unfiled group cannot be renamed.
5 Tap Done.
The CLIE Launcher Group setting screen is displayed.
Continued on next page
• • • • • • • • • • • • • • • • • • •
Sony CLIÉ™ Handheld basic operations 18
Using “CLIE Launcher”
6 Tap Done.
The CLIE Launcher screen is displayed.
Tip
You can add an application to a group by dragging an icon and
dropping it in the group on the CLIE Launcher screen when the Use
Drag&Drop check box on the CLIE Launcher Preferences screen
(Page 26) is on.
Ordering listed groups
1 Select a group on the CLIE Launcher Group
setting screen.
2 Tap Up or Down.
The order of listed groups in the CLIE Launcher screen is
changed.
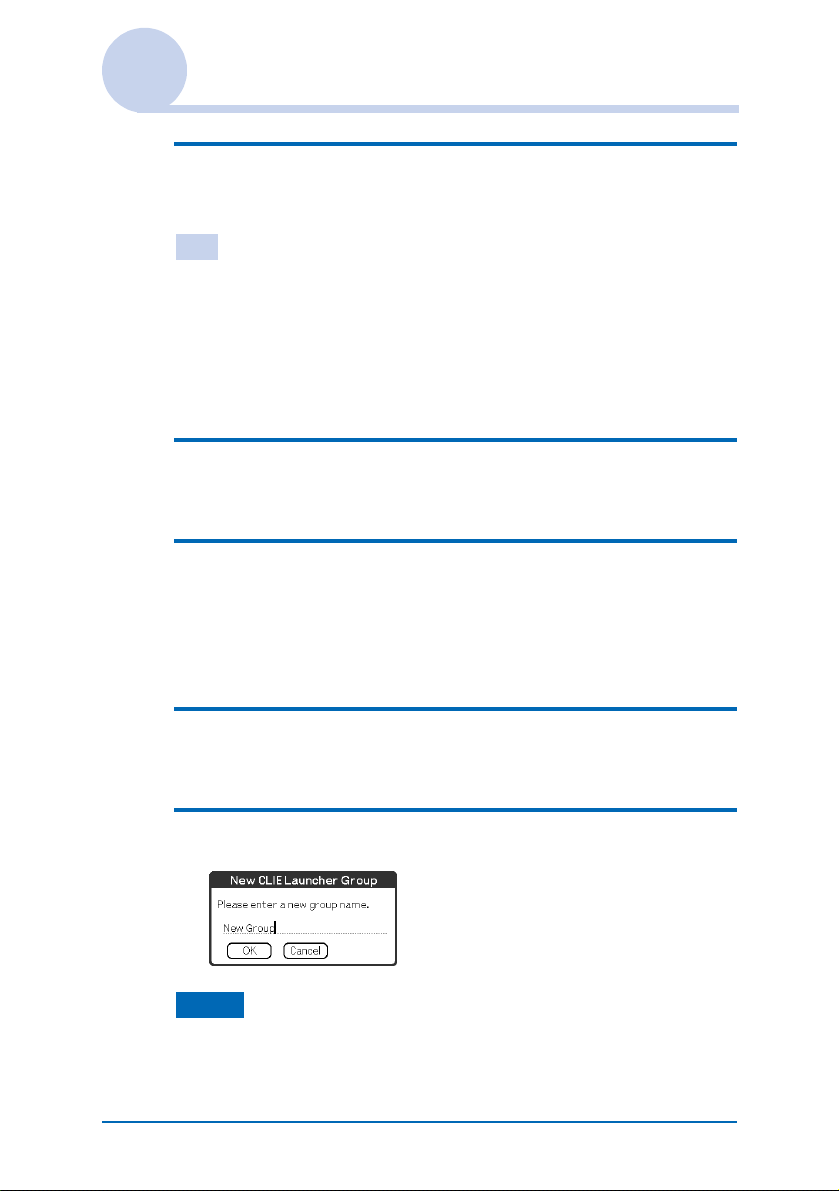
Creating a new group
1 Tap New on the CLIE Launcher Group setting
screen.
2 Enter a new group name and then tap OK.
Note
Groups including no application are not listed in the main screen.
Sony CLIÉ™ Handheld basic operations 19
Using “CLIE Launcher”
Deleting a group
1 Select a group name you want to delete and
tap Delete on the CLIE Launcher Group
setting screen.
If the group to be deleted includes an application, the
Delete CLIE Launcher Group dialog box will be
displayed. In the dialog box, tap Yes to delete the group.
The applications included in the deleted group will be listed
in the Unfiled group.
Note
You cannot delete the Unfiled group.
Selecting a group
1 Tap the Home icon.
2 Press the BACK button.
You can now perform operations on the CLIE Launcher
Group List screen with the Jog Dial™ navigator.
3
Rotate the Jog Dial™ navigator to select a group.
The application icon at the top of the list in the group will be
highlighted.
If you press the Jog Dial™ navigator, the application icon
list is displayed.
Tips
• The applications saved in the “Memory Stick” media will be
listed in the
• You can select the next group by tapping the Home icon.
You can also tap the F/f icon or group names on the screen to
select a group.
Sony CLIÉ™ Handheld basic operations 20
Card group.
Using “CLIE Launcher”
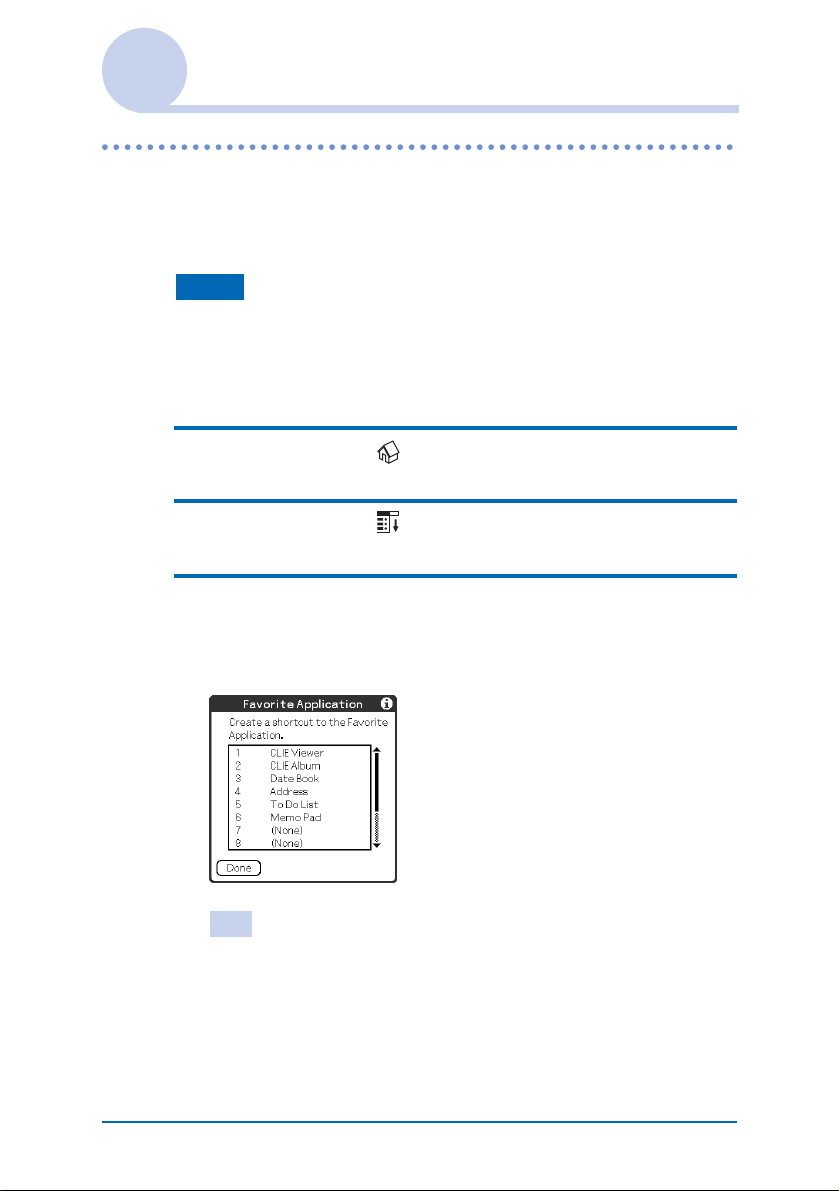
Using Favorite Applications (shortcuts)
You can create a Favorite Application (shortcut) for frequently
used applications.
Note
You cannot create a Favorite Application (shortcut) for an application
in a “Memory Stick” media.
Creating a Favorite Application (shortcut)
1 Tap the Home icon.
2 Tap the Menu icon.
3 Select Edit Favorite Applications from the
CLIE Launcher menu.
The Favorite Application screen is displayed.
Tip
On the CLIE Launcher screen, you can also tap the empty Favorite
Application (shortcut) area to display the Favorite
Application screen.
Continued on next page
• • • • • • • • • • • • • • • • • • •
Sony CLIÉ™ Handheld basic operations 21
Using “CLIE Launcher”
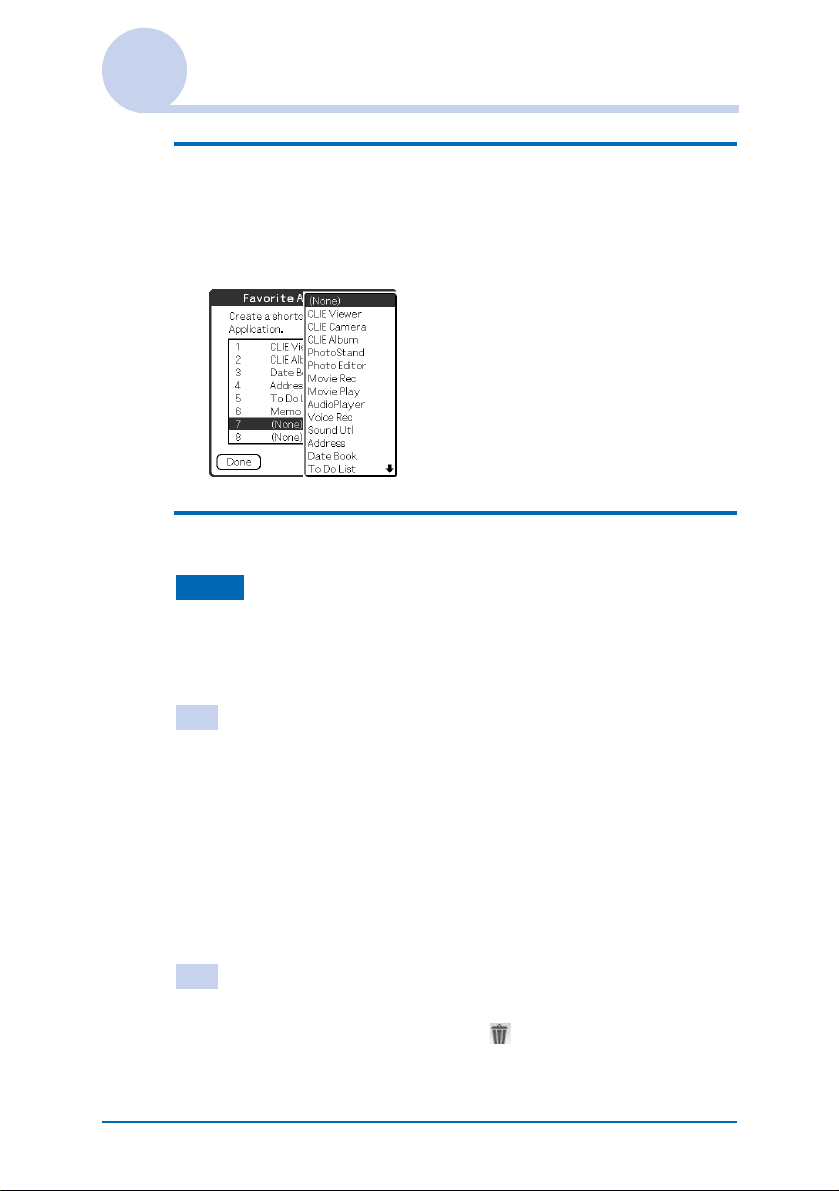
4 Tap a Favorite Application (shortcut) number
that you want to assign to an application.
The list of applications will be displayed. Tap the application
name to create a Favorite Application (shortcut).
5 Tap Done.
Note
When the application added on the Favorite Application (shortcut) is
deleted, the Favorite Application (shortcut) will be deleted from the list
at the same time.
Tip
You can also create a Favorite Application (shortcut) for an application
by dragging an icon and dropping it in the empty shortcut area when
the Use Drag&Drop check box on the CLIE Launcher
Preferences screen (Page 26) is on.
To delete a Favorite Application (shortcut)
In step 4, tap a Favorite Application (shortcut) number that you
want to delete and select (None) at the top of the list.
Tip
You can also delete a Favorite Application (shortcut) for an application
by dragging an icon and dropping it in in the upper right of the
screen (Page 168) when the Use Drag&Drop check box on the
CLIE Launcher Preferences screen (Page 26) is on.
Sony CLIÉ™ Handheld basic operations 22

Using “CLIE Launcher”
Application manager icon
You can manage your applications with the application manager
icons.
The followings are featured as standard functions.
: Transferring applications
Displays the Beam screen (Page 140)
: Displaying the application information (Page 24)
: Deleting applications (Page
Tips
• Functions may be added when you install some applications.
• You can also manage an application by dragging an icon and
dropping it in the each application manager icon when the Use
Drag&Drop check box on the CLIE Launcher Preferences
screen (Page 26) is on.
168)
Sony CLIÉ™ Handheld basic operations 23
Using “CLIE Launcher”
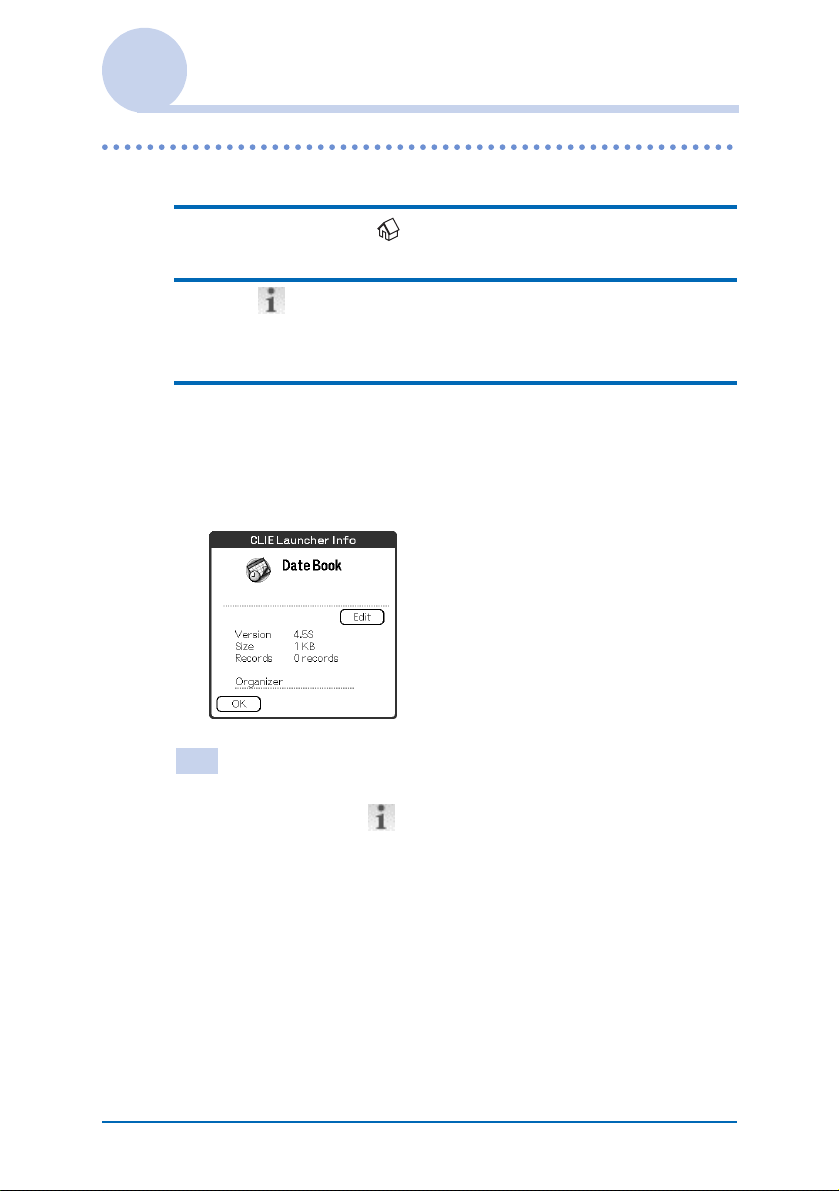
Displaying information about applications
1 Tap the Home icon.
2 Tap .
The list of applications is displayed.
3 Tap an application name whose information
you want to display.
The CLIE Launcher Info screen is displayed.
Tap OK to close the screen.
Tip
You can also display information about an application by dragging an
icon and dropping it in at the upper right of the CLIE Launcher
screen when the Use Drag&Drop check box on the CLIE Launcher
Preferences screen (Page 26) is on.
Sony CLIÉ™ Handheld basic operations 24
Using “CLIE Launcher”
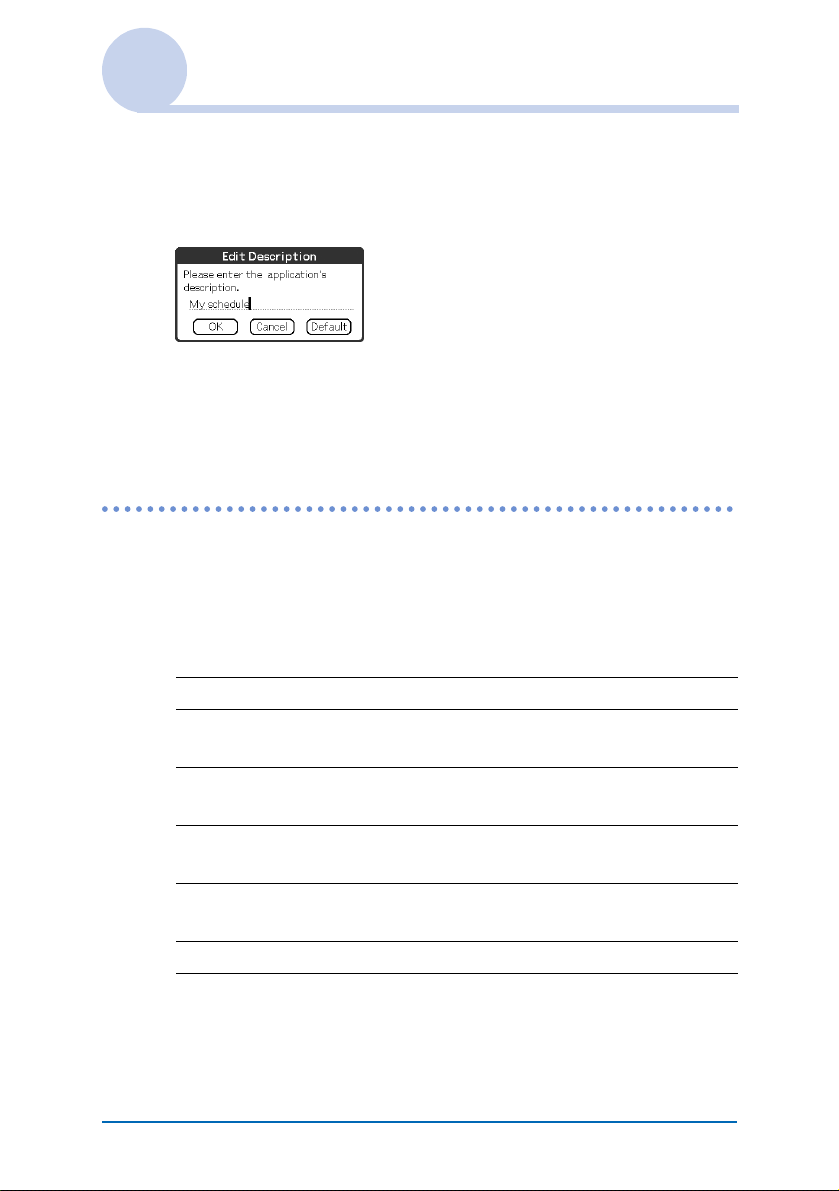
Editing Description
Tap Edit to display the Edit Description screen and enter
the new description.
OK button: Change to the description entered.
Cancel button: Cancel the description entered.
Default button: Restore the default description.
Menu List
The following list describes the functions of each menu in the
CLIE Launcher screen.
Menus in the CLIE Launcher screen
Delete… Delete an application. (Page 168)
Beam… Send an application to another Palm OS PDA
device via the IR port. (Page 140)
Edit CLIE Launcher
Group
Edit Favorite
Applications
Info… Display the version, memory size, and the
Copy… Copy an application.
Sony CLIÉ™ Handheld basic operations 25
Edit a group of applications. (Page 17)
Creating a shortcut to an application.
(Page 21)
number of records of an application.

Using “CLIE Launcher”
Options menu in the CLIE Launcher screen
Preferences… Set CLIE Launcher.
Show Expansion Cards
Check the box to display the applications in
the “Memory Stick” media.
(Default: On)
Display Animation
Check the box to smooth the on-screen
motion such as scrolling operation.
(Default: On)
Use Drag&Drop
Check the box to enable Drag & Drop
operation.
(Default: Off)
Use Beam Icon To Beam Only
(available only when there is a
communication facility other than beaming)
Check the box to display the Beam screen
automatically when you tap the Beam icon.
(Default: Off)
Display
Icon: Displays a simple description for any
application.
Icon (Small): Displays a simple description
for an application that is highlighted.
(Default: Icon)
Go To Standard
View
About
Applications
Sony CLIÉ™ Handheld basic operations 26
Switch to the Palm OS standard screen.
(Page 27)
Displays information about the version of the
CLIE Launcher application.
Using the Palm OS® standard screen
Switching to the Palm OS standard screen
Your CLIÉ handheld is initially set to display the CLIE
Launcher screen when you tap Home icon. To switch to the
Palm OS standard screen, follow the procedure below.
1 Tap the Home icon.
2 Tap the Menu icon.
3 Tap Go To Standard View from the Options
menu.
The screen will be switched to the Palm OS standard screen.
Tap to display
menus.
Tap to select a
category to be
displayed.
Tip
You can display categories in sequence by tapping the Home
icon.
Note
Palm OS standard screen categories differ from CLIE Launcher
groups.
Sony CLIÉ™ Handheld basic operations 27

Using the Palm OS® standard screen
Switching to the CLIE Launcher screen
1 Tap the Home icon.
2 Tap the Menu icon.
3 Tap Go To CLIE Launcher View from the
Options menu.
The screen will be switched to the CLIE Launcher screen.
Sony CLIÉ™ Handheld basic operations 28

Using the Palm OS® standard screen
Starting an application
Note
For details on starting applications in “Memory Stick”
media, refer to page 123.
There may be some system limitations to start applications in “Memory
Stick” media in the Application Launcher screen.
Starting an application by selecting with
the Jog Dial™ navigator
1 Tap the Home icon to display the Palm OS
standard screen.
2 Rotate the Jog Dial™ navigator to select the
application you want to start and press the Jog
Dial™ navigator.
®
Sony CLIÉ™ Handheld basic operations 29
Using the Palm OS® standard screen
Changing the preferences of the start-up
screen for the Jog Dial™ navigator
operation
Set the preferences so that rotating the Jog Dial™ navigator
displays a list of applications on the left side of the screen.
1 Tap the Menu icon on the Palm OS standard
screen.
The menu is displayed.
2 Tap Preferences from the Options menu.
The Preferences screen is displayed.
Continued on next page
• • • • • • • • • • • • • • • • • • •
Sony CLIÉ™ Handheld basic operations 30
 Loading...