

Page 1

3-865-006-11(1)
Media Communicator
Version 1.0E
Operating Instructions
Owner’s Record
The serial number is located on the card. Record the serial number in
the space provided below. Refer to this number whenever you call
upon your Sony dealer regarding this product.
Model No. PCLK-PX1
Serial No. .
PCLK-PX1
1999 by Sony Corporation
Page 2

• Duplication of any or all of the contents of
this software and instruction manual or
lending of this software to third parties
without the express permission of the
copyright holder is strictly prohibited by
copyright law.
• Sony cannot be held liable in any way for
monetary losses, lost profits or claims from
third parties arising from the use of this
software.
• Should any manufacturing defects occur,
Sony’s responsibility shall be limited solely
to replacing said defective merchandise.
• This software is approved for use only with
the specified equipment.
• Sony reserves the right to change software
specifications without prior notice.
Program © 1998-1999 Sony Corporation
Documentation © 1999 Sony
Corporation
© 1999 Sony Corporation All right
reserved.
• Media Communicator is the registered
trademark of Sony Corporation.
• Microsoft, MS-DOS and Windows are the
registered trademarks of Microsoft
Corporation.
• IBM and PC/AT are the registered
trademarks of International Business
Machines Corporation.
• Other companies and product names are
the trademarks or the registered
trademarks of each company.
WARNING
This equipment has been tested and found to
comply with the limits for a Class B digital
device, pursuant to Part 15 of the FCC Rules.
These limits are designed to provide
reasonable protection against harmful
interference in a residential installation. This
equipment generates, uses, and can radiate
radio frequency energy and, if not installed
and used in accordance with the instructions,
may cause harmful interference to radio
communications. However, there is no
guarantee that interference will not occur in a
particular installation. If this equipment does
cause harmful interference to radio or
television reception, which can be determined
by turning the equipment off and on, the user
is encouraged to try to correct the interference
by one or more of the following measures:
– Reorient or relocate the receiving antenna.
– Increase the separation between the
equipment and receiver.
– Connect the equipment into an outlet on a
circuit different from that to which the
receiver is connected.
– Consult the dealer or an experienced
radio/TV technician for help.
This device complies with Part 15 of the FCC
Rules. Operation is subject to the following
two conditions: (1) This device may not cause
harmful interference, and (2) this device must
accept any interference received, including
interference that may cause undesired
operation.
For Customers in the U.S.A.
CAUTION
You are cautioned that any changes or
modifications not expressly approved in this
manual could void your authority to operate
this equipment.
2
Page 3

Table of contents
Getting started
Overview .............................................. 5
System requirements ..................6
Notes ............................................. 7
Preparation
Checking the supplied items..............8
Connections .......................................... 9
About this manual .............................10
How to use Help........................10
Installing the software ......................11
Uninstalling the software .........13
Starting the software ......................... 14
Starting the software for the first
time .....................................14
Starting the software for the
second and subsequent times
............................................. 14
Names and functions of screen........ 15
Main Bar .....................................15
Tool Bar .......................................16
CD Bar ......................................... 17
CD Window ............................... 18
MD Bar ........................................20
MD Window ..............................21
TUNER Bar................................. 24
TUNER Window ....................... 25
CD to MD Window ...................26
TUNER to MD Window ...........26
OTHER to MD Window ...........27
TIMER Window (DHC-MD555
and DHC-MD777 only) ....27
Quitting the software ........................ 28
Operating a CD
Listening to a CD ...............................29
Listening to a CD using the CD
Bar .......................................29
Listening to a CD using the CD
Window ..............................29
Assigning names to CDs................... 30
Operating an MD
Listening to an MD ............................31
Listening to an MD using the MD
Bar .......................................31
Listening to an MD using the MD
Window ..............................31
Assigning names to MDs.................. 32
Assigning a disc (or track) name
.............................................32
To use the text data input by
other application ............... 33
Recording on an MD .........................34
Setting up the recording mode
.............................................34
Recording from a CD to an MD
.............................................35
Recording from the TUNER to an
MD ......................................36
Recording from OTHER to an
MD ......................................36
(continued)
3
Page 4

Table of contents (continued)
Editing recorded MDs....................... 37
Moving recorded tracks (MOVE
function) ............................. 37
Dividing recorded tracks
(DIVIDE function) .............39
Combining recorded tracks
(COMBINE function)........ 40
Erasing a part of a track (A-B
ERASE function) ...............41
Erasing recordings (ERASE
function) ............................. 43
Printing MD labels............................. 44
Operating the Tuner
Listening to the radio ........................ 46
Listening to the radio using the
TUNER Bar ........................46
Listening to the radio using the
TUNER Window ...............46
Assigning a name to a station ..........47
Editing the contents of a preset ....... 48
Operating the Timers
Using timers (DHC-MD555 and DHC-
MD777 only)............................... 50
Setting the time ..........................50
Setting up the play timer ..........50
Setting up the record timer ......51
Enabling timers .......................... 53
Additional Information
Troubleshooting .................................54
Index ....................................................56
4
Page 5

Getting started
Overview
When you connect a Sony DHC-MD555, DHC-MD777, or MDS-SD1
with CMT-SD1/SD3 that includes a CONTROL I jack to your
computer, you can use this software to operate them from the
computer.
• Operate the CD and MD player (playback) from the computer.
• Input disc names and track names using the computer’s keyboard.
• Edit MDs while viewing the computer’s display.
• Enjoy easy recording by performing a drag and drop from a 5CD
changer to a 5MD changer (DHC-MD555 and DHC-MD777 only).
• Select a radio station from the computer.
• Enjoy easy recording from a radio onto an MD.
• Call a station’s home page while listening to the radio.
• Set up the playback timer and record timer (DHC-MD555 and DHCMD777 only).
Note
You can control the stereo systems (DHC-MD555/777 and MDS-SD1
with CMT-SD1/SD3) using this software. However, you cannot control
any optional equipment connected to the stereo system.
Getting started
5
Page 6

System requirements
The following hardware and software are necessary to use the Media
Communicator (Ver. 1.0E) software.
π System stereo: DHC-MD555, DHC-MD777, MDS-SD1 with CMT-
π IBM PC/AT or compatibles (This software does not run on
π Video board and display driver:
π Hard disc space: 5 MB or more
π CD-ROM drive
π Serial port: 1 or more
π OS : Windows95/Windows98 (This software does not
π Video monitor: VGA (640 x 480 pixels), 65,536 colors or more
SD1/SD3
Macintosh.)
VGA (640 x 480 pixels), 65,536 colors or more
displayable.
run on Microsoft Windows3.1 or WindowsNT.)
displayable.
6
Page 7

Notes
Getting started
• Control I communicates the control signals with the stereo system
and does not communicate audio data. You cannot record music
data from the CD-ROM drive in your computer onto your stereo
system using this kit. Also you cannot save music data from your
stereo system to your computer with this kit.
• You cannot connect the Control I jack of this kit to the Control A1
terminal. Use PCLK-MD1 with any equipment that has a Control A1
terminal.
• Set up the serial port that is to be used for this kit so that it is
unavailable to the other software.
• To verify that the serial ports of your computer are enabled, call the
vendor of your computer.
7
Page 8
Preparation
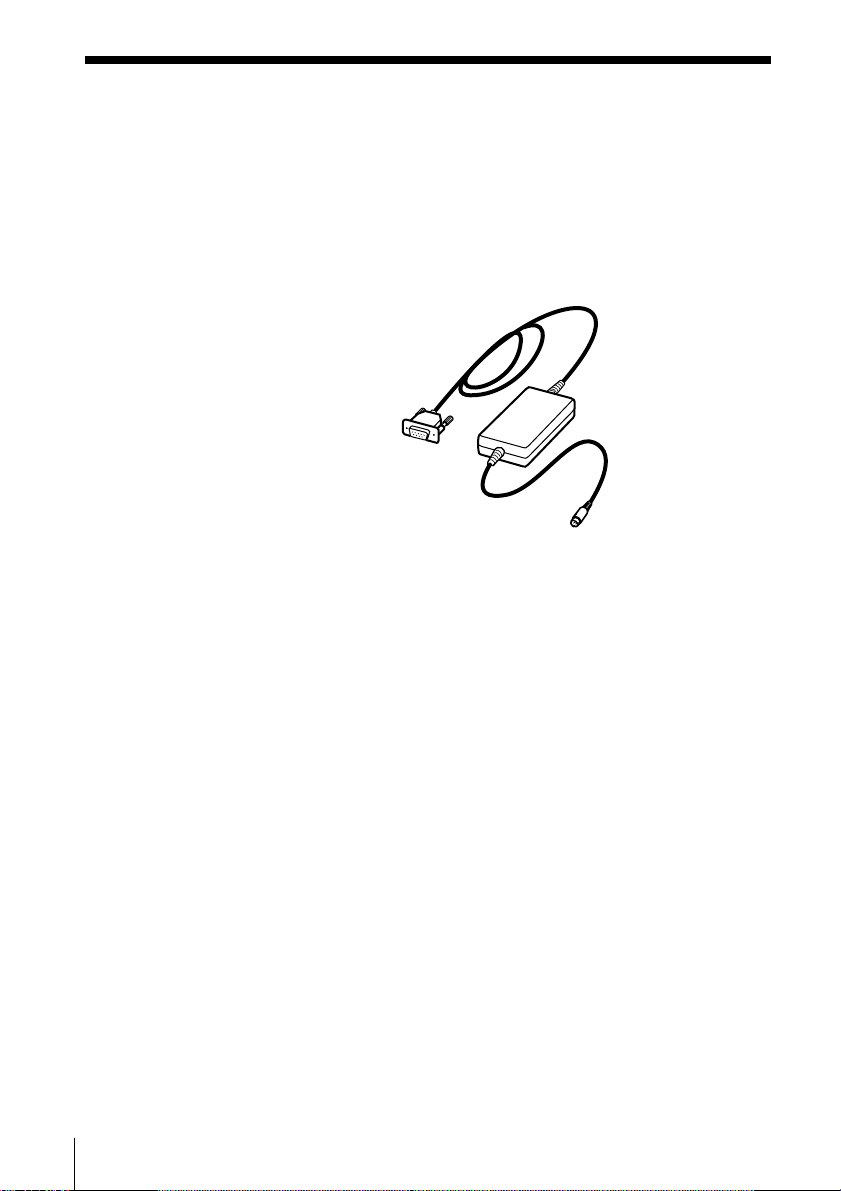
Checking the supplied items
Check to make sure that you have received the following supplied
items with the PCLK-PX1. If anything is missing, please contact the
shop where you purchased this unit or your nearest Sony dealer.
• Personal computer adaptor CAV-PX1 (RS-232C˜CONTROL I)
RS-232C connector
(D-sub9P)
CONTROL I connector
(Mini DIN 6P)
• Media Communicator CD-ROM (1)
• Operating instructions
• Warranty card
8
Page 9
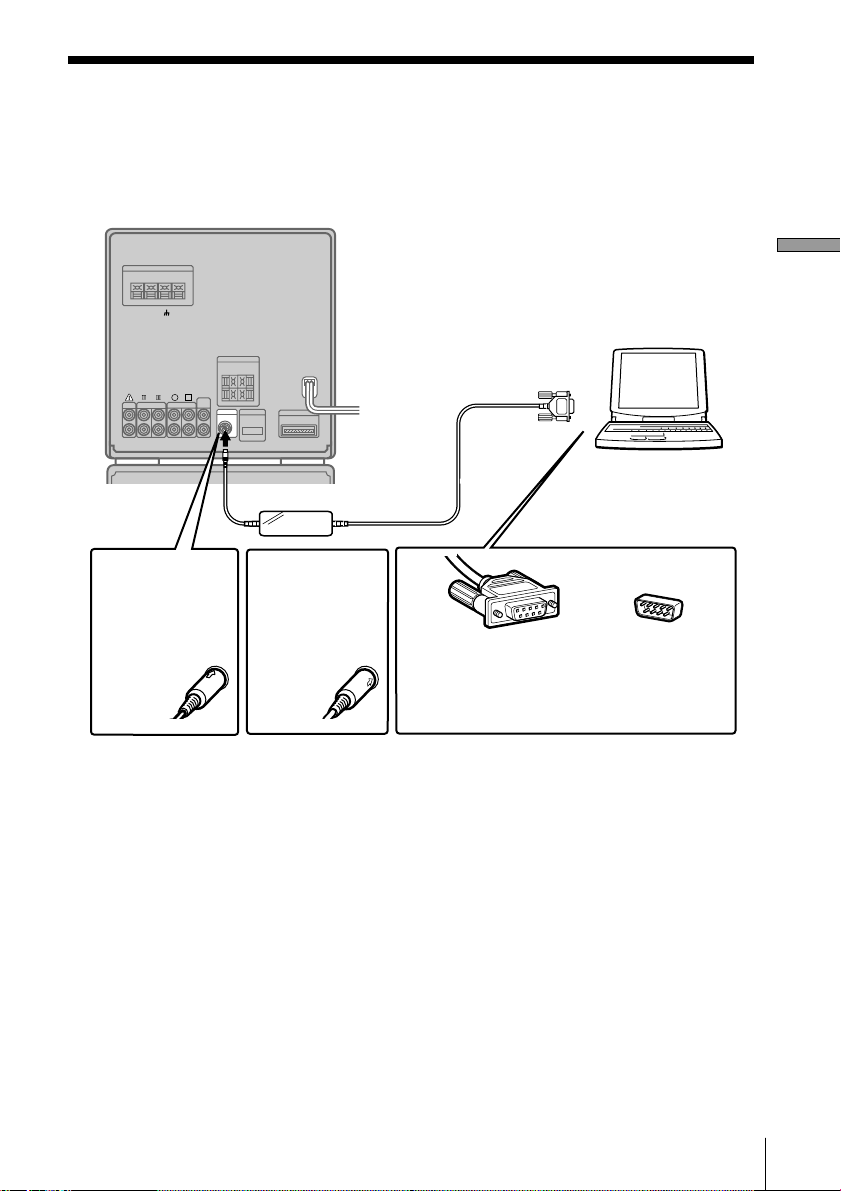
Connections
Connect this kit to your computer using the CAV-PX1 adaptor.
Example: Connecting the DHC-MD777
+
A
B
–
Preparation
Computer
?
To CONTROL I
jack
Insert the plug
deeply into the
matching jack
with the arrow
mark facing up.
DHC-MD777
MDS-SD1
Computer adaptor
Insert the plug
Computer
deeply into the
matching jack
with the arrow
mark facing
side.
Match the orientation of the connectors
and insert the plug deeply into the
matching connector then secure the plug
?
with the retaining screws on both sides of
the plug.
DHC-MD555
To the computer’s RS-232C serial connector
Notes
• Different brands of personal computers refer to their RS-232C serial terminals
with different terminal names. For further information, refer to the
instruction manual of your computer.
• Match the orientation of the cable plug with that of the connector on the main
unit when plugging the cable into the computer. The orientation of a
connector differs from computer to computer.
• Plug the cord in straight when connecting. Plugging the cord in at an angle
may result in damage.
• Do not insert any metal objects into the connection jacks. Shorting may occur
resulting in damage.
9
Page 10
About this manual
This manual explains how to use the basic functions of Media
Communicator. The screen snapshots used in this manual are for the
DHC-MD777. The contents of the screens differ according to the
model of the stereo system connected.
The latest information about this software can be found in the
“Readme.txt” file in the supplied CD-ROM.
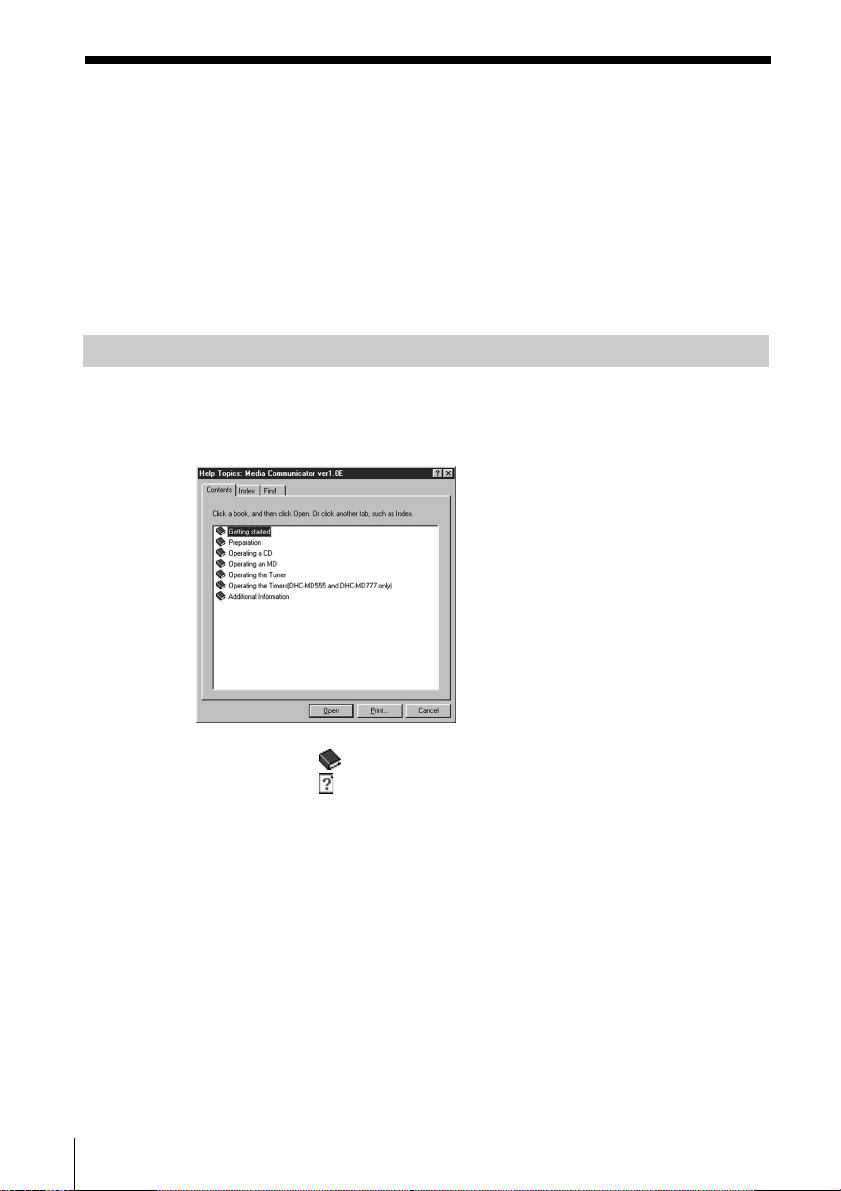
How to use Help
Opening the table of contents of Help
Click the Help button on the Main Bar (page 15), and a table of contents
of Media Communicator will be opened.
10
• Double-click
• Double-click
• Click an underline in the explanation, and the page of the related
explanation is displayed.
• Click the displayed image of the picture above “Item,” and the
pertinent item is displayed in a balloon.
, and the titles of the items contained in it appear.
, and an explanation of that item is displayed.
Searching by Keywords
Click the “Index” tab in the above search topic dialog box, and the table
of contents disappear and a list of keywords are displayed.
To search for a keyword, enter the word by which you want to search
or scroll the list of keywords.
To view the explanation on a keyword, select the keyword from the list
of keywords and click “Display”.
Page 11
Installing the software
Use this procedure to install this software onto your computer’s hard
disc. Set the computer to the operation mode before proceeding.
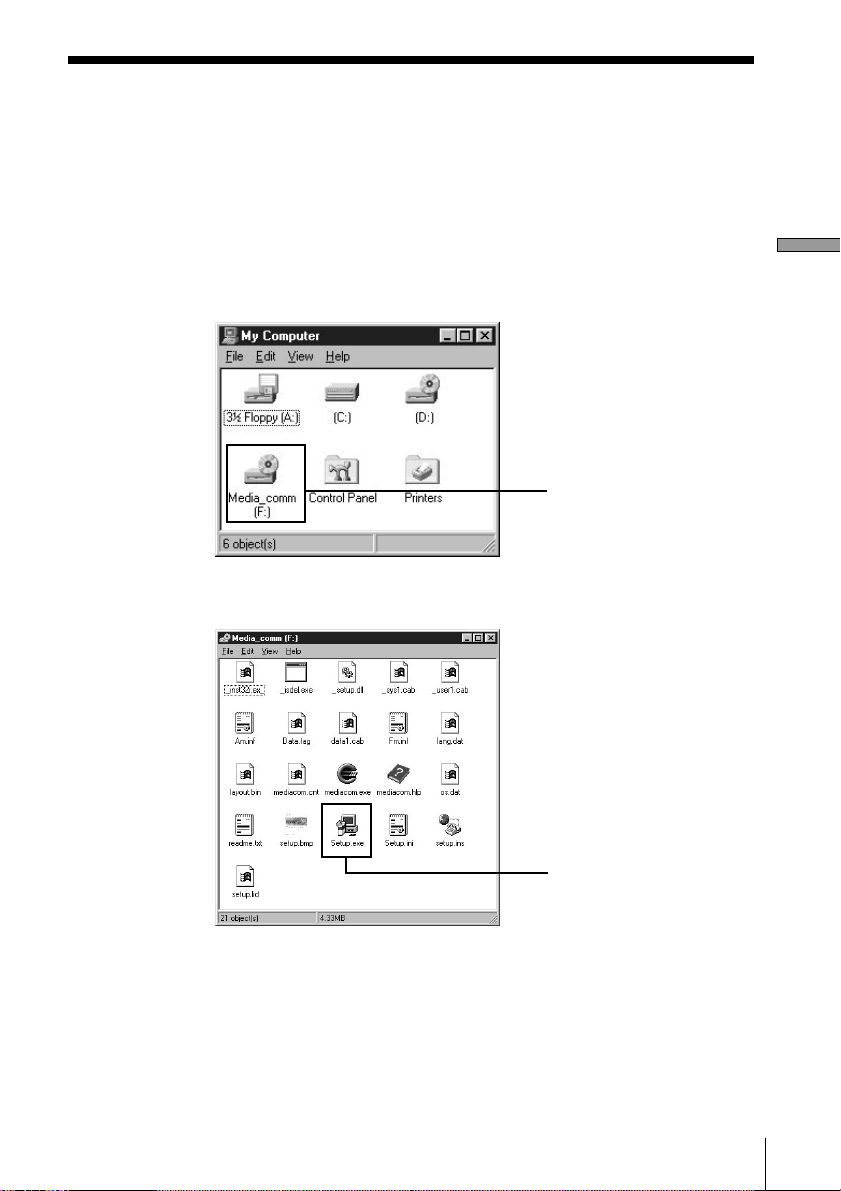
1 Insert the supplied CD-ROM into the computer.
2 Double-click “My Computer”.
“My Computer” is opened.
3 Double-click the CD-ROM’s icon.
The “Setup.exe” appears.
Preparation
(This window appears when
you have selected “Large Icons”
from “View” in advance.)
CD-ROM’s icon
Setup.exe
If “.exe” is not shown, select “Options” or “Folder Options” from
“View” and uncheck “Hide MS-DOS file extensions for file types
that are registered” in “View”.
(continued)
11
Page 12
Installing the software (continued)
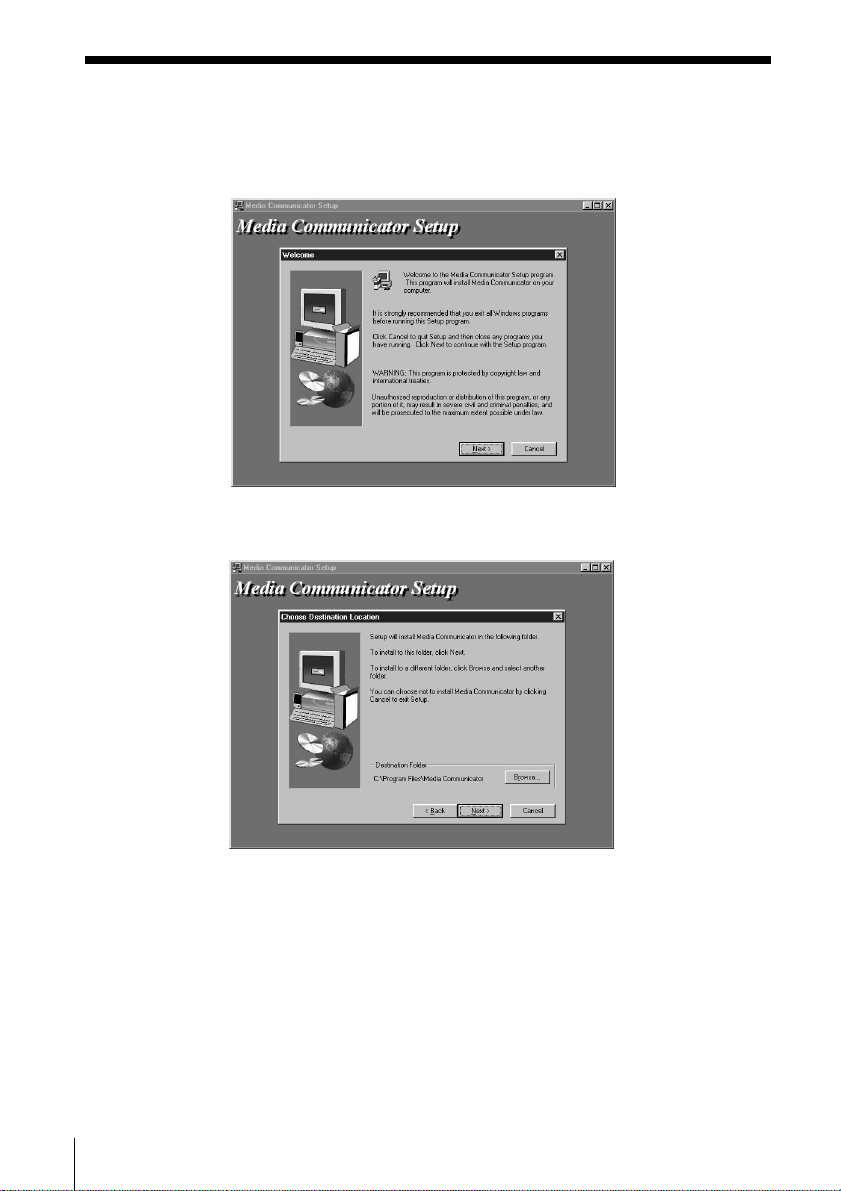
4 Double-click the “Setup. exe” to start installation.
The setup program is started and a welcome dialog box is opened.
Carefully read the precautions which appear.
5 Click “Next”.
The dialog box for selecting the destination appears.
12
To change the destination folder, click “Browse ...” and select the
folder in which you want to install this software.
Page 13
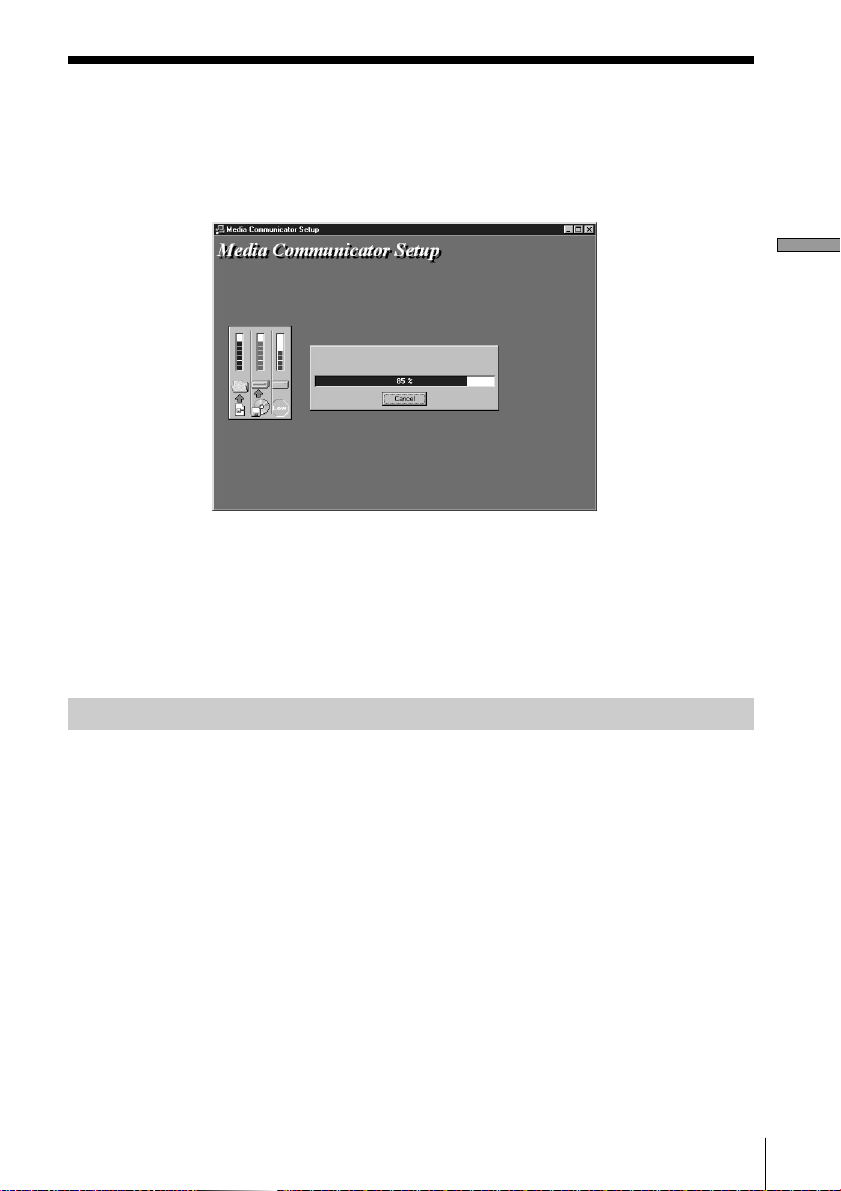
6 Click “Next”.
The process of installing the software on the hard disk starts.
The Media Communicator folder is created in the folder in which
this software is installed.
7 This completes the setup process.
Eject the CD-ROM when installation is finished.
Note
Installing the software creates a folder. Because this software uses this
folder, please do not erase, move, or change the contents of this folder.
Preparation
Uninstalling the software
If you do not need the Media Communicator software, uninstall the
software as follows:
1 Select a control panel and display it.
Select and click “Start,” “Settings,” “Control Panel” menu to open
the control panel.
2 Double-click the “Add/Remove Programs”.
The “Add/Remove Programs Properties” dialog box appears.
3 Select and click “Media Communicator” from the program list
below.
4 Click “Add/Remove”.
Uninstaller starts and the software deletes automatically.
13
Page 14
Starting the software
Starting the software for the first time
/ Click “Start” and position the pointer over “Programs”,
click “Media Communicator”.
This software is then started and the Media Communicator Main
Bar (page 15) appears.
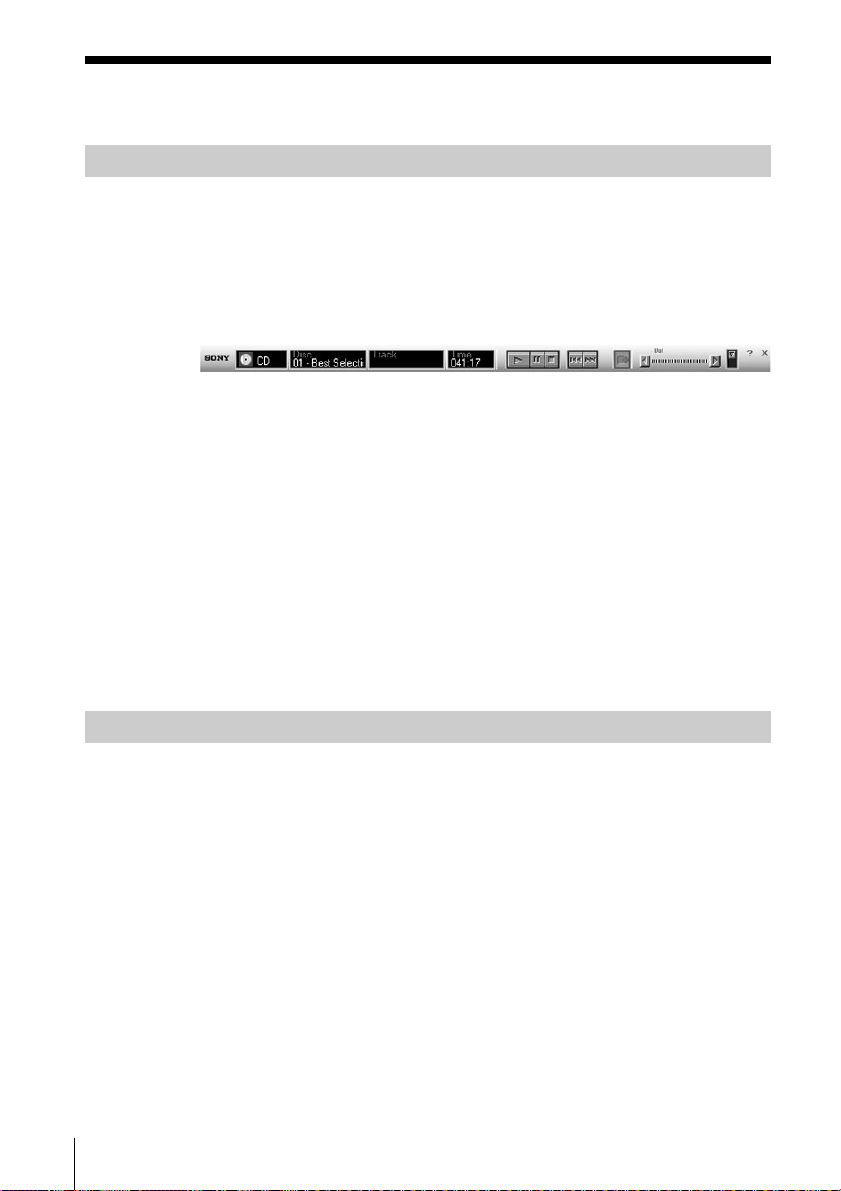
When you start the software, the following display appears (when
the stereo system function is set to CD):
If a dialog appears instead of the Main Bar, select a serial
port.
On the serial port selection dialog box, select one of options COM1,
COM2, COM3, and COM4 that is available for your computer. Also
check that your stereo system is connected to the serial port you
selected.
Notes
• Set up the serial port that is to be used for this kit so that it is
unavailable to the other software.
• To verify that the serial ports of your computer are enabled, call the
vendor of your computer.
Starting the software for the second and subsequent times
/ Click “Start” and position the pointer over “Programs”,
click “Media Communicator”.
The software is started and the Media Communicator Main Bar
appears.
Notes
• When you start Media Communicator, the function of your stereo
system is automatically set to “CD”, then reset to the original
function. The CD or MD that is in play mode is stopped. If your
stereo system is set to another function, the sound is interrupted
during the startup process. If you are recording to an MD, you can
select the option to stop recording and start Media Communicator, or
to stop the software start up.
• If “Media Communicator already started” is displayed when
attempting start-up, cancel the start-up procedure.
14
Page 15
Names and functions of screen
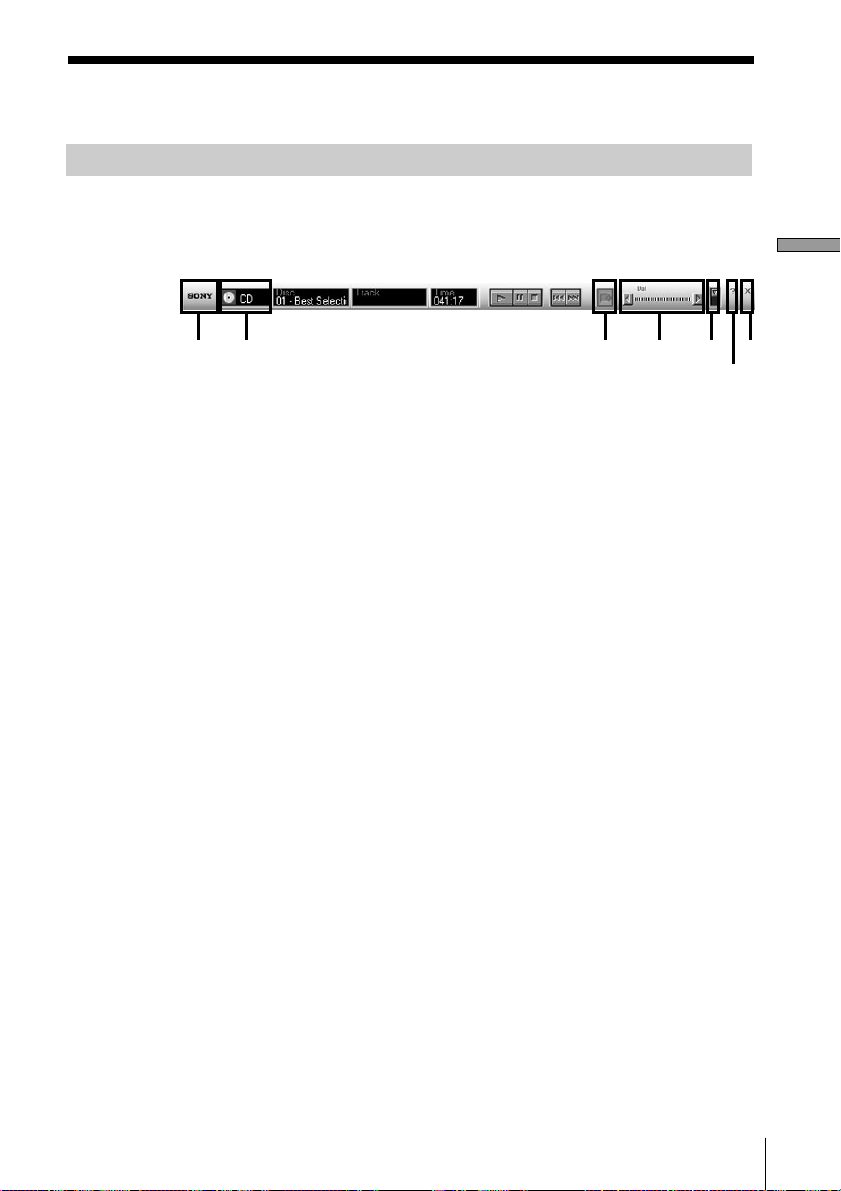
Main Bar
This bar is referred to as the CD Bar (page 17) if the function that is
selected on “2 Function name display” is CD, as the MD Bar (page 20)
if MD is selected, and as the TUNER Bar (page 24) if TUNER is selected.
1 2 3 5674
1 SONY logo
Dragging this logo with the left mouse button moves the Main Bar
up and down. Right-clicking this logo pops up a menu.
2 Function name display
Click this display and select a function. You can select one from
CD, MD, TUNER, and OTHER (DVD
TAPE, MD WALKMAN).
*1
DHC-MD555 and DHC-MD777 only
*2
DHC-MD777 only
3 MD Window button
Click this button to open the MD Window (page 21).
*1
, VIDEO*1, OPTICAL IN*2,
Preparation
4 Sound volume
5 Tool Bar switch
Clicking this switch shows and hides the Tool Bar (page 16).
6 Help button
Click this button to open Help (page 10).
7 Exit button
Click this button to exit Media Communicator.
15
Page 16
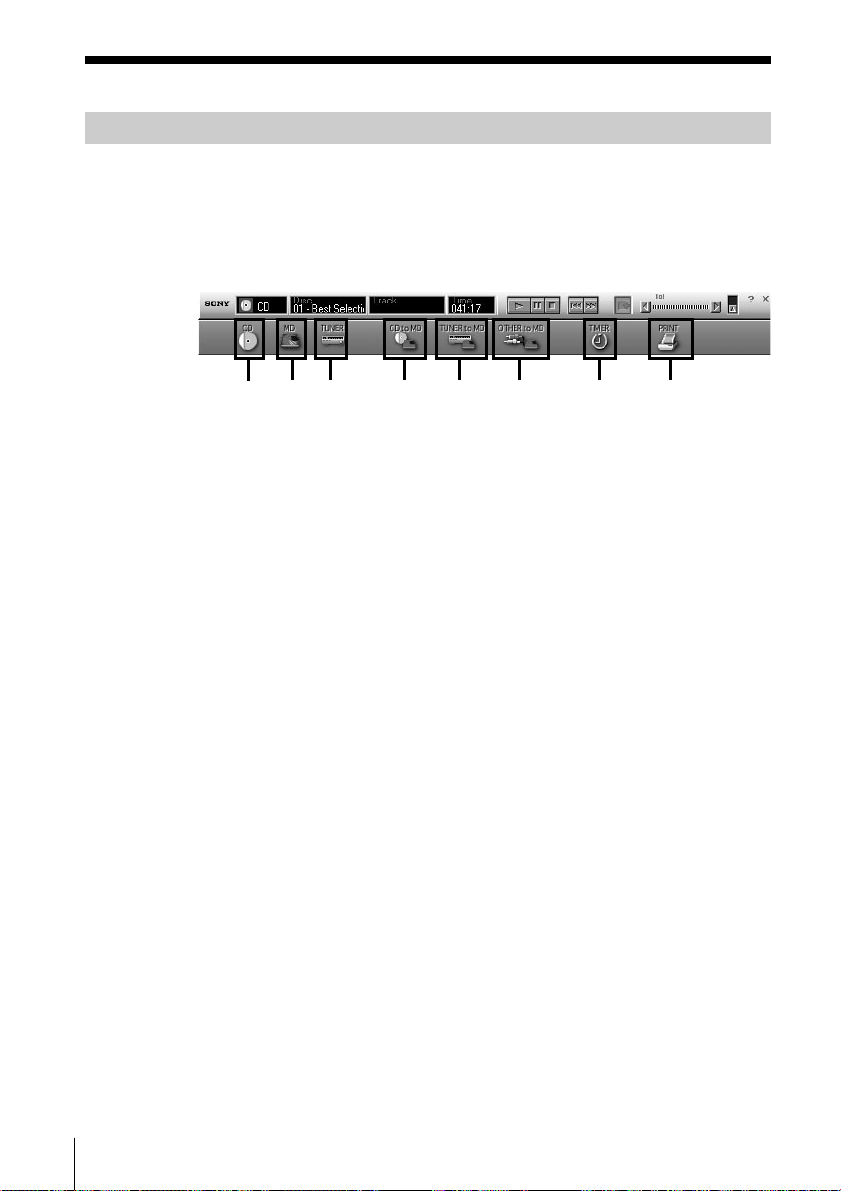
Tool Bar
To show the Tool Bar, click the Tool Bar switch (page 15) on the Main
Bar.
When you click an icon on the Tool Bar, the active function is switched
and the corresponding window appears on the screen. Note that you
can open only one Tool Bar window at a time.
1
23 4 5 6 7 8
1 CD icon
Clicking on this icon displays the CD Window (page 18).
2 MD icon
Clicking on this icon displays the MD Window (page 21).
3 TUNER icon
Clicking on this icon displays the TUNER Window (page 25).
4 CD to MD icon
Clicking on this icon displays the CD to MD Window (page 26).
5 TUNER to MD icon
Clicking on this icon displays the TUNER to MD Window (page 26).
16
6 OTHER to MD icon
Clicking on this icon displays the OTHER to MD Window (page 27).
7 TIMER icon (DHC-MD555 and DHC-MD777 only)
Clicking on this icon displays the TIMER Window (page 27).
8 PRINT icon
Clicking on this icon displays the printing dialog box (page 45).
Page 17
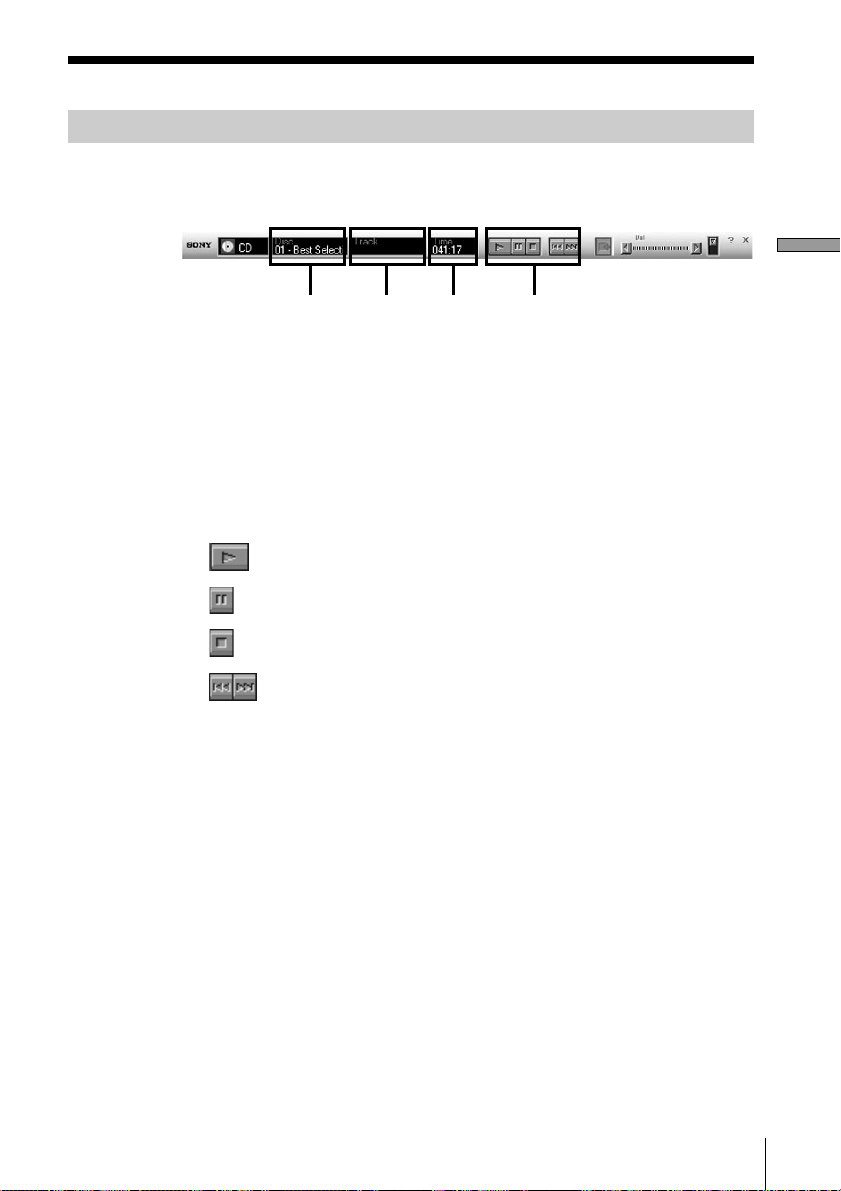
CD Bar
1 2 3 4
To show the CD Bar, select CD in the Function name display (page 15)
on the Main Bar. Use this bar to operate a CD (page 29).
1 Disk number/Disk name display
Left-click to select the CD you are going to play.
2 Track number/Track name display
Left-click to select a track you are going to play.
3 Time display
Shows the playback time of the current track.
4 CD operation buttons
: Play button
: Pause button
: Stop button
: AMS*1 (PREV, NEXT) button
*1
AMS = Automatic Music Sensor
This function searches for the beginning of tracks.
Preparation
17
Page 18

CD Window
2
1
6
5
4
3
To show the CD Window, click the CD icon on the Tool Bar (Page 16).
Use this window to operate a CD (page 29).
18
1 Display switching button (DHC-MD555 and DHC-MD777 only)
Clicking this button alternates the display on the “5 Disc
information display” between the “5-disc display mode” and “1disc display mode”.
2 Reload button
Clicking this button shows the information about the CD currently
inserted in the stereo system on the “4 Track name display” and
“5 Disc information display”.
Page 19

3 CD operation panel
: EJECT button
: AMS*1 (PREV, NEXT) button
: Reverse/Fast forward button
: Play button
: Pause button
: Stop button
*1
AMS = Automatic Music Sensor
This function searches for the beginning of tracks.
4 Track name display
Click here to rename a track (page 30).
5 Disc information display
Indicates either 5-disc or 1-disc display mode.
[a] [c] [c][a] [b][b]
5-disc display mode
[a] CD disc icon
Flashes while changing CDs. Do not operate the Media
Communicator while the CD disc icon is flashing.
[b] Disc Name display
Click here to rename the disc (page 30).
[c] Time display
Click
in the 1-disc display mode to select a time display
mode.
Preparation
1-disc display mode
Display mode Meaning
Total Time Total time required to play all the tracks on the
CD.
Elapsed Time Time elapsed playing the current track.
Track Remain Time required to complete the playback of the
current track.
Only Total Time is shown in the 5-disc display mode.
6 Quit button
Click this button to close the CD Window.
19
Page 20

MD Bar
To show the MD Bar, select MD in the Function name display (page 15)
on the Main Bar. Use this bar to operate an MD (page 31).
1 2 3 4
1 Disc number/Disc name display
Left-click to select the MD you are going to play.
2 Track number/Track name display
Left-click to select a track you are going to play.
3 Time display
Shows the playback time of the current track.
4 MD operation button
: Play button
: Pause button
: Stop button
: AMS*1 (PREV, NEXT) button
*1
AMS = Automatic Music Sensor
This function searches for the beginning of tracks.
20
Page 21

MD Window
To show the MD Window, click the MD Window button on the Main
Bar (page 15) or the MD icon on the Tool Bar (Page 16). Use this
window to operate an MD (page 31).
Note
You cannot operate the MD from the stereo system while the MD
Window is opened. Also, if the MD Window is opened after playback
has been executed from the stereo system, the playback is stopped.
1
2
3
6
5
4
Preparation
1 Display switching button (DHC-MD555 and DHC-MD777 only)
Clicking this button alternates the display on the “5 Disc
information display” between the “5-disc display mode” and “1disc display mode”.
2 Reload button
Clicking this button shows the information about the MD currently
inserted in the stereo system on the “4 Track name display” and
“5 Disc information display”.
(continued)
21
Page 22

MD Window (continued)
3 MD operation panel
: EJECT button
: AMS
: Reverse/Fast forward button
: Play button
: Pause button
: Stop button
: Record button
: REC MODE button (page 34)
: MOVE button
Clicking on this button displays the MOVE dialog box
(page 37).
: DIVIDE button
Clicking on this button displays the DIVIDE dialog box
(page 39).
: COMBINE button
Clicking on this button displays the COMBINE dialog
box (page 40).
*1
(PREV, NEXT) button
22
: A-B ERASE button
Clicking on this button displays the A-B ERASE dialog
box (page 41).
: ERASE (trash) button
Clicking on this button displays the ERASE dialog box
(page 43).
*1
AMS = Automatic Music Sensor
This function searches for the beginning of tracks.
4 Track Name display
Click a track number to set the corresponding track.
Left-click to rename a track (page 32).
Page 23

5 Disc information display
[a] [c] [c][a] [b][b]
5-disc display mode
1-disc display mode
[a] MD disc icon
Flashes while changing MDs. Do not operate the Media
Communicator while the MD disc icon is flashing.
[b] Disc Name display
Click here to rename the disc (page 32).
[c] Time display
Click
in the 1-disc display mode to select a time display
mode.
Display mode Meaning
Remain Time Total time to be able to record the tracks on the
MD.
Total Time Total time required to play all the tracks on the
MD.
Elapsed Time Time elapsed playing the current track.
Track Remain Time required to complete the playback of the
current track.
Only Total Time is shown in the 5-disc display mode.
[d] Disc capacity display
[d]
Preparation
Size of free space
Size of recorded
space
Size of space scheduled
to be recorded
6 Quit button
Click this button to close the MD Window.
23
Page 24

TUNER Bar
To show the TUNER Bar, select TUNER in the Function name display
(page 15) on the Main Bar. Use this bar to operate the tuner (page 46).
(The contents of the items on the TUNER Bar differ according to the model.)
1 Band display
2 Preset number/Station name display
3 Frequency display
4 Tuner control buttons
1 2 3 4
Click here to select the band.
Click here to select a preset station.
: Band selector button
: Preset station selector button
: URL button
Click here to open the home page that is assigned to the
current preset number (page 48).
24
Notes
• Use either Microsoft Internet Explorer Ver.4.0 or higher
or Netscape Navigator Ver.4.0 or higher as the
browser.
• To open an Internet home page, your computer needs
to be connected to the Internet. For instructions to
connect your computer to the Internet, call the vender
of your computer.
Page 25

TUNER Window
To show the TUNER Window, click the TUNER icon on the Tool Bar
(Page 16). Use this window to operate the tuner (page 46).
1
2
3
(The contents of the items in the TUNER Window
differ according to the model.)
1 Band selector button
Clicking this button alternates the band.
5
Preparation
4
2 Reload button
Click this button, and the preset information currently being stored
in the stereo system is shown on “4 Preset display”.
3 EDIT dialog button
Click this button to open the EDIT dialog box (page 48).
You can edit the preset information in the EDIT dialog box.
4 Preset display
Double-click a preset number to select preset information.
When you click a station name, you can change the station name
(page 47).
5 Quit button
Click this button to close the TUNER Window.
25
Page 26

CD to MD Window
To show the CD to MD Window, click the CD to MD icon on the Tool
Bar (Page 16). Use this window to record from a CD to an MD (page
35).
TUNER to MD Window
To show the TUNER to MD Window, click the TUNER to MD icon on
the Tool Bar (Page 16). Use this window to record from the radio to an
MD (page 36).
26
(The contents of the items in the TUNER to MD Window differ according to
the model.)
Page 27

OTHER to MD Window
To show the OTHER to MD Window, click the OTHER to MD icon on
the Tool Bar (Page 16). Use this window to record from DVD/VIDEO
OPTICAL (IN)
*1
DHC-MD555 and DHC-MD777 only
*2
DHC-MD777 only
*2
, TAPE, or MD WALKMAN to an MD (page 36).
TIMER Window (DHC-MD555 and DHC-MD777 only)
To show the TIMER Window, click the TIMER icon on the Tool Bar
(Page 16). Use this window to set up the timer (page 50).
*1
,
Preparation
1
1 TIMER SET dialog button
Click this button to open the TIMER SET dialog box (pages 51, 52).
2 PLAY TIMER display
3 REC TIMER display
2
3
27
Page 28

Quitting the software
/ Click on the Main Bar (page 15).
The Media Communicator terminates.
28
Page 29

Operating a CD
Listening to a CD
Listening to a CD using the CD Bar
1 Show the CD Bar (page 17).
2 Click Disc number/Disc name display on the CD Bar.
A list of CDs appear.
3 Click the CD you want to play from the CD list box.
The CD appears on the Disc number/Disc name display.
4 Click Track number/Track name display on the CD Bar.
A list of tracks appear.
5 Click the track you want to play from the track list box.
Playback starts at the track you clicked.
Listening to a CD using the CD Window
1 Open the CD Window (page 18).
Operating a CD
2 Select the CD you want to play from the Disc Name display in the
CD Window.
A list of tracks in the selected CD appear.
3 Click the track number of the track you want to play from the
Track Name display.
Double-clicking the track number starts the playback of the track.
4 Click in the CD Window (valid only when you clicked a
track number in step 3).
Playback starts at the track you clicked in step 3.
29
Page 30

Assigning names to CDs
Note
When you assign a name to a CD which contains less than 10 tracks, be
sure to click the Reload button before inputting the name.
1 Open the CD Window (page 18).
2 Click Disc Name display (or Track Name display) on the CD (or
track) to which you want to assign a name.
You are brought into the edit mode in which you can enter disc (or
track) names.
3 Input the desired name.
You can cut and paste an existing string using the menu which
appears when you right-click in the edit mode.
4 Press the Enter key.
The disc (or track) name you entered is saved and you are ready to
enter another track name.
Notes
• Input names are stored in the folder on the computer’s hard disk. Do
not erase, move, or change the contents of this folder.
• You can view the names you entered here are only from the Media
Communicator; they are not reflected in the stereo system.
The names you entered from the stereo system (Disc memo) are
shown only on the stereo system and not reflected in the Media
Communicator.
• (DHC-MD555 and DHC-MD777 only) If you assign a name to a CD
to which a CD text is assigned, you cannot see the CD text
information in the Media Communicator. To show the CD text
information, click the Reload button in the CD Window (page 18).
The disc and track names assigned to the CD disappear when you
click the Reload button.
30
Page 31

Operating an MD
Listening to an MD
Listening to an MD using the MD Bar
1 Show the MD Bar (page 20).
2 Click Disc number/Disc name display on the MD Bar.
A list of MDs appear.
3 Click the MD you want to play from the MD list box.
The MD appears on the Disc number/Disc name display.
4 Click Track number/Track name display on the MD Bar.
A list of tracks appear.
5 Click the track you want to play from the track list box.
Playback starts at the track you clicked.
Listening to an MD using the MD Window
1 Open the MD Window (page 21).
2 Select the MD you want to play from the Disc Name display in the
MD Window.
A list of tracks in the selected MD appear.
3 Click the track number of the track you want to play from the
Track Name display.
Double-clicking the track number starts the playback of the track.
4 Click in the MD Window (valid only when you clicked a
track number in step 3).
Playback starts at the track you clicked in step 3.
Operating an MD
31
Page 32

Assigning names to MDs
Notes
• You can only input alphanumeric characters, and the following
symbols:
! " # $ % & ' ( ) * + , – . / : ; < = > ? @ _ `
If an MD encoded with the letters other than those above is played
back, the correct letters will not be displayed.
• If the disc’s write protect tab is set to protect, character input,
recording, editing etc., will not be possible. Slide the record-protect
tab so that recording is possible.
Assigning a disc (or track) name
1 Open the MD Window (page 21).
2 Click Disc Name display (or Track Name display) on the MD (or
track) to which you want to assign a name.
You are ready to enter disc (or track) names.
3 Input the desired name.
You can cut and paste an existing string using the menu which
appears when you right-click in the edit mode.
32
4 Press the Enter key.
The disc (or track) name you entered is saved and you are ready to
enter another track name.
Page 33

To use the text data input by other application
If you input track name beforehand using other text editing software,
you can assign all names with one copy and paste operation.
1 Input the track name by using other text editing softwares.
Delimit each name by pressing the Enter key on the computer’s
keyboard.
(ex.)
track 3 name <Enter>
track 4 name <Enter>
track 5 name <Enter>
:
track 8 name <Enter>
2 Select all text and copy it into the clipboard.
The actions you must take in this step varies according to the text
editing software you are using. For the procedure to copy text,
refer to the instruction manual for the text editing software.
3 Click the Track Name display on the track to which you want to
assign a name.
You are ready to enter track names.
Click the third track name if you entered track names as shown in
(ex.).
4 Select “Paste” from the displayed edit menu by right-clicking.
The track names are pasted in the same way as they are entered
with the text editing software.
In the example given above, from the third track name to the eighth
track name are entered in the same way as they are entered with
the text editing software.
Operating an MD
33
Page 34

Recording on an MD
Notes
• If the disc’s write protect tab is set to protect, you cannot record on
the MD. Slide the record-protect tab so that recording is possible.
• Before recording, click all the MD icons to be recorded. The TOC
information necessary for recording will be read.
• You cannot click any icon on the Tool Bar while the Media
Communicator is recording on an MD. To stop recording, click the
Stop button.
Setting up the recording mode
1 Open the MD Window (page 21).
2 Click in the MD Window.
The REC MODE dialog box appears.
Select the recording mode and number of disks.
34
MONO : Record in the monaural
STEREO : Record in the stereo
*1
The time you can record in the
monaural mode is almost double the
time you can record in the stereo mode.
(DHC-MD555 and DHC-MD777 only)
1disc : Record on one MD
ALL discs*2: Record on two or more
*2
When “ALL discs” is selected, recording
is automatically performed sequentially
on MDs set in the stereo system if all
tracks cannot be recorded on one MD.
Before recording, remove any unwanted
Note
When recording with “ALL discs”, follow the procedure below:
MDs to prevent recording.
*1
mode
mode
MDs sequentially
1 Open the CD to MD Window, and click .
2 Select “ALL discs” in the REC MODE dialog box, and close the REC
MODE dialog box.
3 Perform steps 3 to 5 of “Recording from OTHER to an MD” on page 36.
3 Click in the REC MODE dialog box.
The REC MODE dialog box closes.
Page 35

Recording from a CD to an MD
1 Open the CD to MD Window (page 26).
2 Select the MD from the Disc Name display in the MD Window.
The tracks recorded on the MD appear on the Track Name display
in the MD Window.
3 Select the CD from the Disc Name display in the CD Window.
The tracks recorded on the CD appear on the Track Name display
in the CD Window.
4 Drag the track number of a track you want to record from the Track
Name display in the CD Window and drop it into the MD
Window.
The dropped track is shown in red in the MD Window as a
candidate for recording.
Repeat steps 3 and 4 if you have another track you want to record.
You can also select two or more tracks at a time by clicking the
desired track numbers while holding down the Ctrl key.
To select all tracks in the CD as candidates, drag and drop the CD
disc icon (page 19) into the MD Window.
Note
The dragging operation is canceled and displays the message “Insufficient
free recording space” if it finds that the track you have just dropped do not
fit on a single MD.
Operating an MD
5 Click or in the MD Window.
Recording starts.
Notes
• If you record a CD which contains many tracks on the nearly full MD,
the Media Communicator may not function properly after recording.
In this case, restart the Media Communicator.
• If the CD or MD information is not displayed properly after
recording, click the Reload button. The information is updated.
• If the track number or name which has been recorded is displayed in
red, restart the Media Communicator. Otherwise, the Media
Communicator may not function properly.
35
Page 36

Recording from the TUNER to an MD
1 Open the TUNER to MD Window (page 26).
2 Listen to the radio program you want to record using the TUNER
Window (page 46).
3 Select the destination MD from the Disc Name display in the MD
Window.
4 Click in the MD Window.
The MD enters the pause state.
5 Click in the MD Window.
Recording starts.
To stop recording, click in the MD Window.
Recording using drag & drop
1 Open the TUNER to MD Window (page 26).
2 Drag the Station Name from the TUNER Window.
3 Drop it on the destination MD in the MD Window.
4 Click
Recording starts and the Station Name is also recorded on the MD.
in the MD Window.
Recording from OTHER to an MD
1 Open the OTHER to MD Window (page 27).
2 Click the button next to the function name to be recorded.
The clicked button is pressed down.
3 Click in the MD Window.
The MD enters the pause state.
4 Click in the MD Window.
Recording starts.
5 Start playing the source you want to record.
To stop recording, click
36
in the MD Window.
Page 37

Editing recorded MDs
Note
You cannot undo any edit functions you performed on an MD.
Moving recorded tracks (MOVE function)
You can rearrange the order of tracks on an MD. You cannot move a
track from one MD to another MD, however.
1 Open the MD Window (page 21).
2 Click the track number of the track you want to move from the
Track Name display in the MD Window.
The track name’s color you clicked changes.
Note
You can move only one track in a single move operation. The move
function is disabled if you select more than one track.
3 Click on the MD operation panel.
The MOVE dialog box appears.
Operating an MD
To cancel the MOVE function, click
.
4 Select the track number of the location you are moving the track to.
5 Click .
The selected track is moved to the designated location.
To move a track by dragging
1 Open the MD Window (page 21).
2 Drag the track number of the track you want to move from the
Track Name display in the MD Window.
3 Drop it to the desired location.
(continued)
37
Page 38

Moving recorded tracks (continued)
To move a track during playback
1 Open the MD Window (page 21).
2 Playback the track you want to move (page 31).
3 Click
The MOVE dialog box appears.
To cancel the MOVE function, click
Note
Check the track you are going to move in the MOVE dialog box.
4 Select the track number of the location you are moving the track to.
5 Click
The track in playback moves to the designated location.
on the MD operation panel.
.
Note
To deselect a track, click at a blank background in the MD Window.
For example, click below the ERASE (trash) icon on the MD operation
panel.
.
38
Page 39

Dividing recorded tracks (DIVIDE function)
1 Open the MD Window (page 21).
2 Playback the track you want to divide (page 31).
3 During playback, click on the MD operation panel at the
position where you want to divide the track.
The position is temporarily set.
The DIVIDE dialog box appears, and rehearsal playback starts from
the position you clicked.
To cancel the DIVIDE function, click
.
4 Adjust the position to divide.
Click
position in 1 step (= approximately 0.06 second) increments and
can also drag
Rehearsal playback starts from the shifted position.
/ in the DIVIDE dialog box. You can shift the dividing
to the left or right for adjustment.
5 Click when the rehearsal playback proves satisfactory.
The track is divided.
Operating an MD
39
Page 40

Combining recorded tracks (COMBINE function)
1 Open the MD Window (page 21).
2 Select two tracks you want to combine from MD Window.
Click the track number of the first track, then, while holding down
the Ctrl key, click the track number of the latter track.
Note
You can select a track and the subsequent track by proceeding to step 3
immediately after selecting one track.
3 Click on the MD operation panel.
The COMBINE dialog box appears.
At the same time, the last 2 seconds part of the first track and the
first 2 seconds part of the latter track are put together, and starts a
rehearsal playback of approximately 4 seconds.
40
To cancel the COMBINE function, click
.
4 If the displayed tracks are correct, click .
The selected tracks are joined.
If the indicated track order is found incorrect, transpose the tracks
by clicking
clicking .
or restart the steps starting at step 2 after
Page 41

Combining the track in playback and the immediately
following track
1 Open the MD Window (page 21).
2 Playback the first track (page 31).
3 Click
The COMBINE dialog box appears.
At the same time, the last 2 seconds part of the first track and the
first 2 seconds part of the latter track are put together, and starts a
rehearsal playback of approximately 4 seconds.
To cancel the COMBINE function, click
4 If the displayed tracks are correct, click .
The selected tracks are joined.
If the indicated track order is found incorrect, transpose the tracks
by clicking or restart the steps starting at step 2 after clicking
on the MD operation panel.
.
.
Notes
• To deselect a track, click at a blank background in the MD Window.
For example, click below the ERASE (trash) icon on the MD operation
panel.
• You cannot combine the track in playback with any track other than
the one that immediately follows the current track.
Operating an MD
Erasing a part of a track (A-B ERASE function)
1 Open the MD Window (page 21).
2 Playback the track of which you want to erase a part (page 31).
(continued)
41
Page 42

Erasing a part of a track (continued)
3 During playback, click on the MD operation panel when
the playback of the part you want to erase starts (point A).
The starting point (point A) is temporarily set.
The A-B ERASE dialog box appears and starts the rehearsal
playback of approximately 2 seconds up to point A.
To cancel the A-B ERASE function, click
.
4 Adjust the position of point A.
Click
position in 1 step (= approximately 0.06 second) increments and can
also drag
/ in the A-B ERASE dialog box. You can adjust the
to the left or right for adjustment.
5 After the adjustment, click .
Playback then starts at point A.
6 Continue playback, or click or to go to the point
where you want the erase to stop (point B), and click
The ending point (point B) is temporarily set. Then the 2-second
part up to point A and the 2-second part from point B are put
together, and a rehearsal playback of approximately 4 seconds
starts.
.
7 Adjust the position of point B.
Click
position in 1 step (= approximately 0.06 second) increments and can
also drag
/ in the A-B ERASE dialog box. You can adjust the
to the left or right for adjustment.
8 After the adjustment, click .
The specified A-B part is erased.
42
Page 43

Erasing recordings (ERASE function)
Note
Erased tracks cannot be recalled.
1 Open the MD Window (page 21).
2 Click the track number of the track you want to erase from the
Track Name display in the MD Window.
When selecting more than one track, click the numbers while
holding down the Ctrl key.
To erase all tracks, click the MD disc icon (page 23).
To erase the current track, skip to step 3, selecting no track.
3 Click on the MD operation panel.
The ERASE dialog box appears.
Operating an MD
To cancel the ERASE function, click
.
4 If it is ok to erase the track(s), click .
The selected track(s) is erased. The current track is erased if no
track is selected.
To erase by dragging to
1 Open the MD Window (page 21).
2 Click the track number of the track you want to erase from the
Track Name display in the MD Window.
When selecting more than one track, click the numbers while
holding down the Ctrl key.
3 Drag the selected track(s) into
The tracks you selected are all erased.
on the MD operation panel.
(continued)
43
Page 44

Erasing recordings (continued)
Erasing all tracks
You can erase all tracks that are recorded on an MD and all the tracks
that are registered with that MD in a single operation.
1 Open the MD Window (page 21).
2 Drag the MD disc icon (page 23) into
panel.
Note
To deselect a track, click at a blank background in the MD Window.
For example, click below the ERASE (trash) icon on the MD operation
panel.
Printing MD labels
You can print up to 20 names on Disc Name display and Track Name
display in the MD Window as MD labels.
on the MD operation
44
For MD container For MD side panel
Best Selection
1. Armor Plate
2. Bugbear
3. Ceramic Art
4. Entourage
5. Fox Tail
6. Great is Great
7. Green Iguana
8. Hatching Time
9. Historical Present
10. India Rubber
Best Selection
For MD
Best Selection
1. Armor Plate
2. Bugbear
3. Ceramic Art
4. Entourage
5. Fox Tail
6. Great is Great
7. Green Iguana
8. Hatching Time
9. Historical Present
10. India Rubber
Note
Stick labels only to designated parts; never stick a label to a vicinity of,
for example, the shutter. Be sure to place a label in a recessed area
reserved for a label. The shape of the recessed area varies from disc to
disc.
Page 45

Before start printing, make sure that a printer is connected to your
computer.
1 Load paper for label printing in the printer.
2 Show the MD Bar (page 20).
3 Select the MD to which you want to print a label from the Disc
Name display on the MD Bar.
4 Click on the Tool Bar.
The Print dialog box appears.
Operating an MD
5 Click .
Start printing a label for the MD you selected in step 3.
Notes
• You cannot select “Print to file” in the printing dialog box in step 4.
• You cannot print on a label that is already stuck to an MD.
45
Page 46

Operating the Tuner
Listening to the radio
Listening to the radio using the TUNER Bar
1 Open the TUNER Bar (page 24).
2 Click the Band display on the TUNER Bar.
A list of available bands appear.
3 Click to select the band you want to listen in the band list box.
The name of the band you clicked is shown on the Band Display.
4 Click Preset number/Station name display on the TUNER Bar.
A list of preset stations appears. If you have assigned a name to a
preset station (page 47), the station name is displayed, and if not,
the preset number is displayed.
5 Click the desired preset.
The tuner starts receiving the broadcast that is registered in the
preset you clicked.
Listening to the radio using the TUNER Window
1 Open the TUNER Window (page 25).
2 Select the desired band.
Click
in the TUNER Window to switch the band.
3 Double-click the desired preset on the preset display.
The tuner starts receiving the broadcast that is registered in the
preset you double-clicked.
46
Page 47

Assigning a name to a station
Notes
• Input names are stored in the folder on the computer’s hard disk. Do
not erase, move, or change the contents of this folder.
• You can view the names you entered here are only from the Media
Communicator; they are not reflected in the stereo system.
The names you entered from the stereo system are shown only on the
stereo system and not reflected in the Media Communicator.
1 Open the TUNER Window (page 25).
2 Click the station name on the preset display in the TUNER
Window.
You are brought into the edit mode in which you can enter a
station name.
3 Enter a station name.
You can cut and paste an existing string using the menu which
appears when you right-click in the edit mode.
4 Press the Enter key.
The station name you entered is saved.
Operating the Tuner
47
Page 48

Editing the contents of a preset
1 Open the TUNER Window (page 25).
2 Click in the TUNER Window.
The EDIT dialog box appears.
1
2
7
(The contents of the items in the EDIT dialog
box differ according to the model.)
3 Set up the items.
1 Select the band.
Click and select the band you want to listen.
2 Select the base preset number.
Click
The frequency, station name, stereo/mono, and URL associated
with the selected preset number are shown in the respective
displays.
on the click of the Preset display.
3
4
5
6
48
Note
The number of the preset that is to be associated with the settings you
made in the EDIT dialog box is the preset memory number you selected
in 7, not the preset number you selected here.
Page 49

3 Set the frequency.
Click
The Tuned indicator lights up if the tuner is receiving a
broadcast normally.
When you press and hold
broadcast with a sufficient signal strength is automatically
tuned in.
When a broadcast with a sufficient signal strength is received or
click at a blank background in the TUNER Window, the tunes
automatically stops.
4 Select the reception mode (valid only if you selected FM in
item 1).
Click and select either Stereo or Mono.
5 Enter the station name associated with the preset number.
Click the station name, and you are brought into the edit mode
in which you can enter a broadcast station name.
To cancel entering the station name, click
6 Enter the URL associated with the preset number.
When you click, you are brought into the edit mode in which
you can enter an URL (the address of a home page).
To cancel entering the URL, click
on the rightmost part of the Frequency display.
for more than 2 seconds, a
.
.
7 Select the preset memory number in which the settings
are to be saved.
Select the preset memory number of the preset memory in
which the preset settings you defined in the EDIT dialog box
are to be saved.
4 Click .
The 3 frequency, 4 reception mode (FM only), 5 station name,
and 6 URL are registered with the preset memory number that
you selected in 7 and that associated with the band you selected
in 1.
Operating the Tuner
49
Page 50

Operating the Timers
Using timers (DHC-MD555 and DHC-MD777 only)
Setting the time
1 Right-click on the Main Bar.
2 Select “Clock Set” from the displayed edit menu.
The CLOCK SET dialog box appears.
1 2
1 Set the day of week.
Set “day of week” using
2 Set the time.
Set “minutes” using .
Then, position the cursor before : and set “hours” using
The clock is on a 24-hour system for the European model, and a
12-hour system for other models.
.
.
3 Click .
Setting up the play timer
By setting up the play timer, the stereo system will automatically turn
on and off at a preset time every day.
1 Open the TIMER Window (page 27).
2 Click the PLAY TIMER entry in the TIMER Window.
50
Page 51

3 Click in the TIMER Window.
The TIMER SET dialog box appears.
1 23
To abort the play timer set up, click .
4 Set up the items.
1 Set the time to start playing.
Set “minutes” using .
Then, position the cursor before : and set “hours” using .
The clock is on a 24-hour system for the European model, and a
12-hour system for other models.
2 Set the time to stop playing.
Set “minutes” using
Then, position the cursor before : and set “hours” using .
3 Select the function you want to play.
Click
function.
on the rightmost part of the Source display and select a
.
Operating the Timers
5 Click .
The settings you made in step 4 are stored in the entry you clicked
in step 2.
Enable the timer before running the timer (page 53).
Setting up the record timer
You can record programs from the TUNER to MD (or TAPE) at a
specified time using the record timer. You can also record from
OPTICAL IN as well as TUNER.
1 Open the TIMER Window (page 27).
2 Click the REC TIMER entry in the TIMER Window.
(continued)
51
Page 52

Setting up the record timer (continued)
1 23456
3 Click in the TIMER Window.
The TIMER SET dialog box appears.
To abort the record timer set up, click
.
4 Set up the items.
1 Select either Once, Daily, or Weekly.
Click
Display Meaning
Once Record only once at the specified time on the
Daily Record at the specified time every day.
Weekly Record at the specified time on the specified
2 Set the day of week and time at which you want to start
recording.
Set “day of week” and “minutes” using
Then, position the cursor before : and set “hours” using .
You do not set the day of week if the recording mode is set to
“Daily.”
The clock is on a 24-hour system for the European model, and a
12-hour system for other models.
3 Set the day of week and time at which you want to stop
recording.
Set “day of week” and “minutes” using
Then, position the cursor before : and set “hours” using .
You do not set the day of week if the recording mode is set to
“Daily”.
4 Select the function from which you want to record.
Click
the function.
To record a radio broadcast, you can select the band and the
preset number.
on the rightmost part of the Mode display and select.
specified day of week.
day of week every week.
.
.
on the rightmost part of the Source display and select
52
Page 53

5 Select either MD or TAPE.
6 Select either stereo or mono (valid only when you select MD1 -
5 Click .
The settings you made in step 4 are stored in the entry you selected
in step 2.
Enable the timer before running the timer (page 53).
Enabling timers
Click
destination function.
Function Meaning
MD Record on all MDs sequentially starting at
MD1 - MD5 Record on only one MD.
TAPE Record on tape.
MD5 in 5).
Recording mode
STEREO Record in stereo mode.
MONO Record in monaural mode.
Note
The time you can record in the monaural mode is almost double the
time you can record in the stereo mode.
on the rightmost part of the Rec display and select the
MD1.
Meaning
Operating the Timers
You can run two or more timers at the same time.
1 Open the TIMER Window (page 27).
2 Press down the entry for which you want to run a timer by
clicking it.
The timer associated with the pressed entry is enabled.
The function is played or recorded according to the settings
defined in this entry when the predefined conditions are met.
Notes
• You cannot run a play timer and a record timer at the same time.
• Whenever you run a timer, be sure to switch off the stereo system.
The function is played as it is set up but cannot record a function if
the timer’s starting time is reached when the stereo system is on.
Also the stereo system will not turn off power whenever the ending
time is reached.
53
Page 54

Additional Information
Troubleshooting
If you experience any of the following difficulties while using this
software, use this troubleshooting guide to remedy the problem.
Should any problem persist, consult your nearest Sony dealer.
Please also refer to your computer’s manual, as well as the
“Readme.txt” file installed on the hard disc with the software.
Problem Cause/countermeasure
The message “Communication port Another application may be using the serial port.
cannot be opened.” appears. n Quit the other application.
The message “Port not registered in You selected a port that is not available on your
System was used.” appears. computer during serial port setup.
The message “No RS-232C cable is The RS-232C cable from the computer adapter is not
connected.” appears. connected properly to the serial port of the computer, or
The message “CONTROL I cable is The CONTROL I cable from the computer adapter is not
not connected.” appears. connected properly to the stereo system, or system
No screen response or screen error. n Turn the power of the stereo system off and on, and
Character input, recording, editing The disc’s protect tab may be set for write protect.
etc., cannot be done. n Slide the tab so that recording is possible.
n Select a valid port while referring to the instruction
manual for your computer.
connected to a port that is not selected during serial port
setup.
n Check the RS-232C cable for normal connection.
stereo power cord is not connected to a power outlet.
n Check the CONTROL I cable for normal connection.
n Make sure that the power cord from the system
stereo is connected to a power outlet.
then restart the Media Communicator.
n Start up another application often used and check if
computer functions properly.
n After uninstalling (page 13), try re-installing
(page 11).
The MD may probably be a commercial playback-only
MD (an MD with prerecorded tracks).
n Character input, recording, editing, etc., are not
possible on commercial playback MDs.
54
Page 55

Problem Cause/countermeasure
The stereo system does not respond n Check that cables are connected properly (page 9).
as a whole. n Check that “Serial Setup” has been done properly
Displayed name of MD or CD does n Click the Reload button (pages 18, 21).
not match the disc’s data. n Restart the Media Communicator.
(page 14).
n Disconnect connection cables and then reconnect
them.
Additional Information
55
Page 56

Index
A, B
A-B ERASE dialog box ......42
AMS ..................................... 17
Assigning a name to a station
....................................... 47
Assigning names to CDs or
MDs ........................ 30, 32
C
CD Bar ................................. 17
CD to MD Window ........... 26
CD Window ........................18
COMBINE dialog box ....... 40
Combining recorded tracks
(COMBINE function)
....................................... 40
Connections .......................... 9
D
DIVIDE dialog box ............ 39
Dividing recorded tracks
(DIVIDE function) ...... 39
E, F, G, H
Editing recorded MDs....... 37
Editing the contents of a
preset ............................ 48
Enabling a timer ................. 53
ERASE dialog box.............. 43
Erasing a part of a track (A-B
ERASE function) ......... 41
Erasing recordings (ERASE
function) .......................43
I, J, K
Installing software ............. 11
L
Listening to the radio ........ 46
M, N
Main Bar ..............................15
MD Bar ................................ 20
MD Window .......................21
Monaural recording .......... 34
MOVE dialog box .............. 37
Moving recorded tracks
(MOVE function) ........ 37
O
Opening a home page ....... 24
OTHER to MD Window ... 27
P
Playing a CD....................... 29
Playing an MD ................... 31
Printing labels .................... 44
Q
Quitting ............................... 28
R
Recording
From a CD to an MD ..35
From OTHER to an MD
....................................... 36
From the radio to an MD
....................................... 36
Recording from a CD ........ 35
Recording from OTHER to
an MD ...........................36
Recording from the radio
....................................... 36
S
Screen
CD Bar .......................... 17
CD to MD Window .... 26
CD Window................. 18
Main Bar ....................... 15
MD Bar ......................... 20
MD Window ................ 21
OTHER to MD Window
....................................... 27
TIMER Window ..........27
Tool Bar ........................ 16
TUNER Bar .................. 24
TUNER to MD Window
....................................... 26
TUNER Window ........ 25
Serial port setup ................. 14
Setting the time .................. 50
Setting up timers ...........50,51
Software
Erasing .........................13
Installing ...................... 11
Quitting ........................ 28
Starting up ................... 14
Uninstalling ................. 13
Starting up software .......... 14
Stereo recording .................34
T
TIMER Window ................. 27
Tool Bar ............................... 16
TUNER Bar ......................... 24
TUNER to MD Window ... 26
TUNER Window................ 25
U, V, W, X, Y, Z
Uninstalling software ........13
Sony Corporation Printed in Japan
 Loading...