

Sony PCGA-DVD51 User Manual
4-647-113-11(1)
DVD-ROM Drive
Operating Instructions
PCGA-DVD51
2000 Sony Corporation

WARNING
To prevent fire or shock
hazard, do not expose the unit
to rain or moisture.
Dangerously high voltages are
present inside the unit. Do not
open the cabinet. Refer servicing
to qualified personnel only.
Pour prévenir tout risque
d’incendie ou d’électrocution,
garder cet appareil à l’abri de
la pluie et de l’humidité.
Pour prévenir tout risque
d’électrocution, ne pas ouvrir
le boîtier. Confier l’entretien
de cet appareil exclusivement
au personnel qualifié.
For customers in the U.S.A.
Owner’s Record
The model number and the serial number
are located on the bottom of the drive.
Record the serial number in the space
provided below. Refer to this number
whenever you call your Sony dealer
regarding this product.
Model No. PCGA-DVD51
Serial No.
FCC Notice
This equipment has been tested and found to
comply with the limits for a Class B digital
device, pursuant to Part 15 of the FCC Rules.
These limits are designed to provide
reasonable protection against harmful
interference in a residential installation. This
equipment generates, uses, and can radiate
radio frequency energy and, if not installed
and used in accordance with the instructions,
may cause harmful interference to radio
communications. However, there is no
guarantee that interference will not occur in a
particular installation. If this equipment does
cause harmful interference to radio or
television reception, which can be determined
by turning the equipment off and on, the user
is encouraged to try to correct the interference
by one or more of the following measures:
– Reorient or relocate the receiving antenna.
– Increase the separation between the
equipment and receiver.
– Connect the equipment into an outlet on a
circuit different from that to which the
receiver is connected.
– Consult the dealer or an experienced
radio/TV technician for help.
The shielded interface cable (audio cable)
recommended in this manual must be used
with this equipment in order to comply with
the limits for a digital device pursuant to
subpart B of Part 15 of FCC.
You are cautioned that any changes or
modifications not expressly approved in this
manual could void your authority to operate
this equipment.
For questions regarding your product or for
the Sony Service Center nearest you, call
1-888-476-6972 in the United States or
1-800-961-7669 in Canada.
The number below is for FCC related matters
only.
Regulatory Information
Declaration of Conformity
Trade Name: SONY
Model No.: PCGA-DVD51
Responsible Party: Sony Electronics Inc.
Address: 1 Sony Drive,
Park Ridge, NJ 07656
USA
Telephone No.: 201-930-6972
This device complies with Part 15 of the
FCC Rules. Operation is subject to the
following two conditions: (1) This device
may not cause harmful interference, and
(2) this device must accept any
interference received, including
interference that may cause undesired
operation.
CAUTION - VISIBLE AND INVISIBLE
LASER RADIATION WHEN OPEN. DO
NOT STARE INTO BEAM OR VIEW
DIRECTLY WITH OPTICAL
INSTRUMENTS.
2

Caution:
The use of optical instruments with this
product will increase eye hazard.
As the laser beam used in this product is
harmful to eyes, do not attempt to
disassemble the cabinet. Refer to servicing to
qualified personnel only.
Laser diode properties
Laser output 30.2 µW
Wave Length 785 nm and 650 nm
For customers in Canada
This Class B digital apparatus complies with
Canadian ICES-003.
Pour les utilisateurs au
Canada
Cet appareil numérique de la classe B est
conforme à la norme NMB-003 du Canada.
Before using the PCGA-DVD51, be sure to
read the End User Software License
Agreement that accompanies it.
• Copyright laws prohibit reproducing the
software or the manual accompanying it in
whole or in part, or renting the software
without the permission of the copyright
holder.
• In no event will SONY be liable for any
financial damages, or loss of profits,
including claims made by third parties,
arising out of the use of the software
supplied with this drive.
• In the event a problem occurs with this
product as a result of defective
manufacturing, SONY will replace it.
However, SONY bears no other
responsibility.
• The software provided with this drive
cannot be used with other drives.
• Please note that, due to continued efforts to
improve quality, the software specifications
may be changed without notice.
• Operation of this drive with software other
than that provided is not covered by the
warranty.
Welcome!
Thank you for purchasing the Sony
DVD-ROM drive PCGA-DVD51. Before
operating the drive, be sure to read this
manual thoroughly and retain it for
future reference.
This DVD-ROM drive is designed for
use with your Sony PCG-505, N505,
Z505, SR, C1 Series* Notebook
Computer, check your computer.
* As of June, 2000
Caution
This DVD-ROM drive is compatible with
WindowsR 98, and WindowsR 2000
Professional. Display windows appearing
when you use this drive may vary
depending on the operating system you use.
Sony, VAIO and the VAIO logo are
registered trademarks of Sony Corporation.
DirectCD and the logo of Adaptec, Inc. are
trademarks of Adaptec, Inc.
Microsoft, MS, MS-DOS, Windows and the
Windows logo are registered trademarks of
Microsoft Corporation.
Intel, Pentium and Celeron are trademarks
and registered trademarks of Intel
corporation.
Copyright 1999, 2000 Adaptec, Inc. All rights
reserved. Adaptec, the Adaptec logo, and
DirectCD are trademarks of Adaptec, Inc.
All other trademarks are trademarks of
their respective owners.
This product incorporates copyright
protection technology that is protected by
method claims of certain U.S. patents and
other intellectual property rights owned by
Macrovision Corporation and other rights
owners. Use of this copyright protection
technology must be authorized by
Macrovision Corporation, and is intended
for home and other limited viewing uses
only unless otherwise authorized by
Macrovision Corporation. Reverse
engineering or disassembly is prohibited.
3

Table of Contents
Overview........................................................ 5
Usable discs......................................................6
Unpacking the DVD-ROM drive.................... 7
Locating the controls and connectors .......... 8
Setting up the DVD-ROM drive .................... 9
Installing the driver (WindowsR 98) ...................... 9
Installing the driver
Using the DVD-ROM drive .......................... 13
Connecting the DVD-ROM drive
Removing the DVD-ROM drive
Transporting ........................................................... 16
Inserting a disc ....................................................... 17
Playing a DVD-VIDEO .......................................... 19
Notes about DVD-VIDEO discs ........................... 22
Playing an audio CD ............................................. 23
Reinstalling ............................................................. 24
Precautions.................................................... 25
Notes on Discs.............................................. 27
Specifications ............................................... 28
Getting Help................................................. 30
Troubleshooting............................................ 31
(WindowsR 2000 Professional) ...................... 12
to the notebook computer .............................. 13
from the notebook computer ......................... 15
4

Overview
The DVD-ROM disc is a data memory medium that
can be used to read a program or other data for a
computer only. You cannot save your own data on it.
The data capacity of a single-layer and single-sided
DVD-ROM disc, at 4.7 GB (Giga Byte), is 7 times that
of a CD-ROM disc.
Furthermore, the data capacity of a dual-layer and
single-sided DVD-ROM disc is 8.5 GB, a single-layer
and double-sided disc, 9.4 GB, and a dual-layer and
double-sided disc, 17 GB.
Features of the PCGA-DVD51 are as follows:
• Enables the reading of DVD-ROM disc data at a speed of
8× max. (about 11000 KB/s) and CD-ROM data at a speed
of 24 × max. (3600KB/s) with the supplied AC adapter.
• Even without the supplied AC adapter, it enables the
reading of DVD-ROM disc data at a speed of about 2× max.
(about 2200 KB/s) and CD-ROM data at a speed of 12 ×
max. (1800KB/s).
• You can enjoy DVD-VIDEO discs by installing the
supplied software (with limited models). See page 19.
• You can enjoy Audio CD discs from the speakers of your
notebook computer which are suitable for digital Audio
CD disc play. See page 23.
• You can reinstall the operating system on your notebook
computer by a recovery CD-ROM disc using the DVDROM drive easily. See page 24.
• This drive supports a PC card interface function
compatible with both the CardBus and 16-bit mode. If you
use this DVD-ROM drive with the supplied AC adapter,
the drive is set to the CardBus mode automatically. If you
use the drive without the supplied AC adapter (with the
electric power from the connection to your notebook
computer), the drive is set to the 16-bit mode
automatically.
• The CardBus mode enables high speed copying of data.
• The PC card and cable can be stowed in the bottom of the
DVD-ROM drive. This is convenient when transporting
the drive.
• The supplied compact and lightweight AC adapter
supports the following power requirements.
AC-CDR51 :100~240 V
5
Usable discs
1)
To play CD-R discs
written using
“DirectCD“ software,
close the operation
when the writing is
finished.
2)
If you use a Windows
98 models and play
CD-RW discs written
using “DirectCD“
software, “UDF
Reader“ software must
be installed in your
notebook computer.
To check if “UDF
Reader“ software is
installed, click the
[Start] button, point to
[Settings], click
[Control Panel], and
then double-click
[Add/Remove
Programs]. If “Adaptec
DirectCD Reader“ is in
the list, “UDF Reader“
software has already
been installed.
Notes
• Only use circular discs.
Do not use discs with
any other shape (star,
heart, etc.), as this may
damage the DVD-ROM
drive.
• Do not use scratched or
damaged discs, as
doing so may damage
the DVD-ROM drive.
• When using a video
CD, an MPEG playback
video card or playback
application software
must be installed.
• When using discs,
search application
software or playback
application software
must be installed.
6
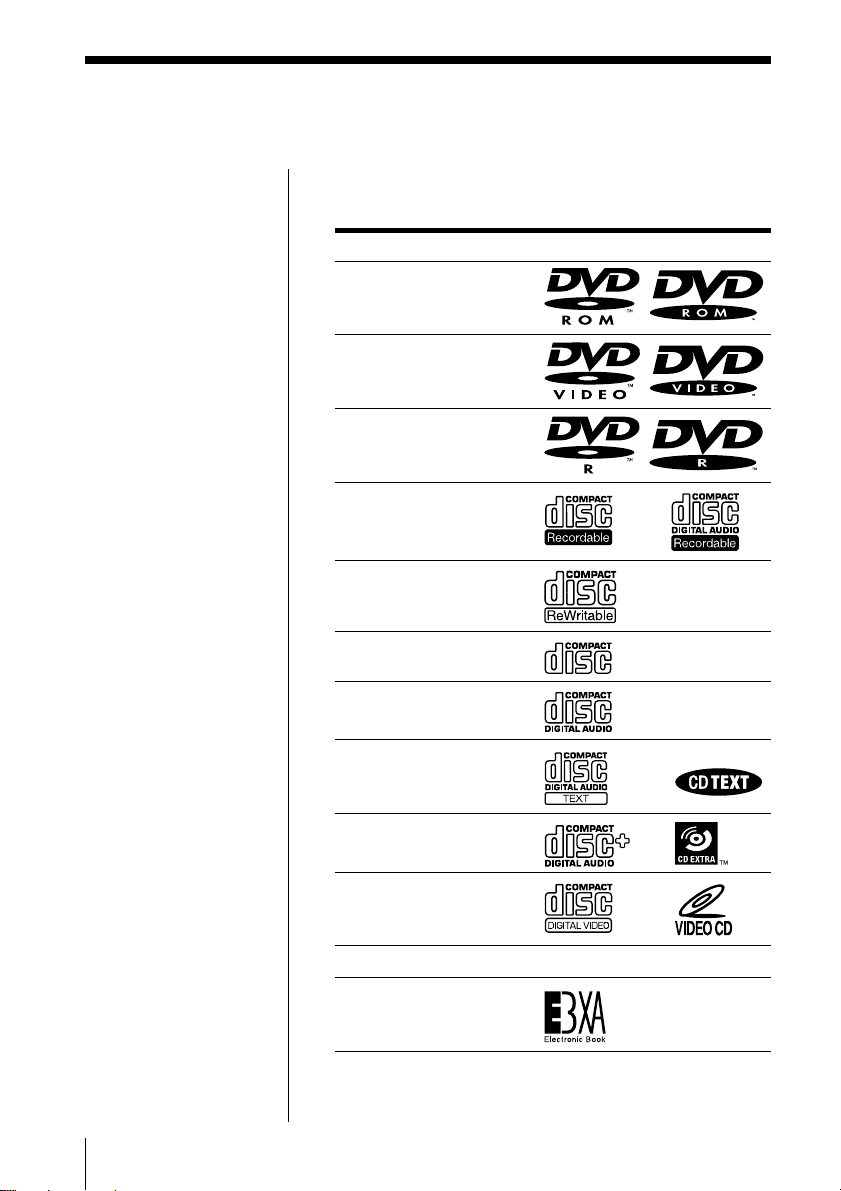
Your DVD-ROM drive can use all discs with the
following icons.
This drive can play Icon
R
DVD-ROMs
DVD-VIDEOs
DVD-Rs (reading only)
CD-Rs1) (reading only)
CD-RWs2) (reading only)
CD-ROMs
Audio CDs
CD TEXTs
CD EXTRAs
VIDEO CDs
Photo CDs ————
Electronic Books
You cannot use any of the following discs.
• DVD-RAMs
• DVD-RWs
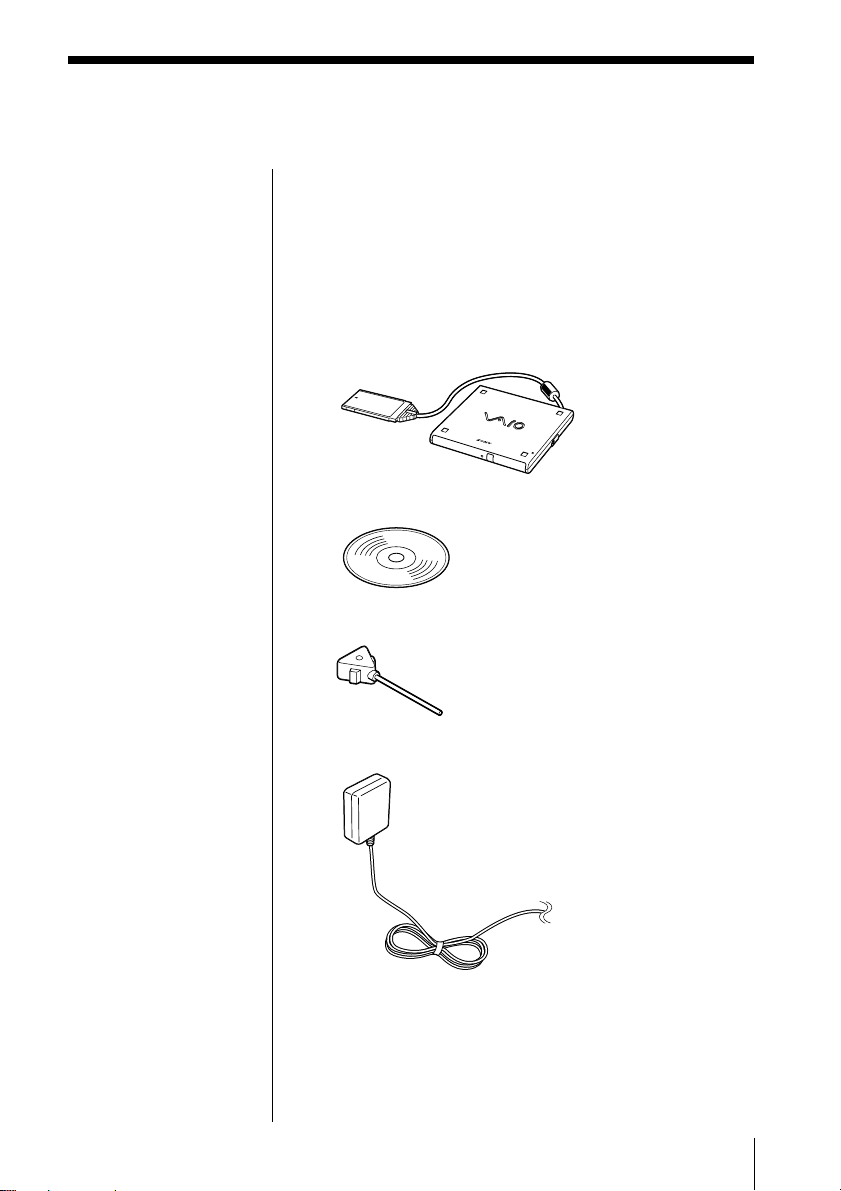
Unpacking the
DVD-ROM drive
After taking the DVD-ROM drive out of the box,
check that the package contains the components listed
below.
If anything is missing, contact the Sony dealer where
you purchased this product or a Sony service
representative serving your area.
• PCGA-DVD51 DVD-ROM drive (1)
• Software CD-ROM (1)
• Manual eject pin (1, stowed in the back of the drive)
• AC adapter AC-CDR51 (1)
• Installation disk (1, 3.5 inch floppy disk)
• DVD-ROM Drive Operating Instructions
(1, this manual)
• Warranty card (1)
7
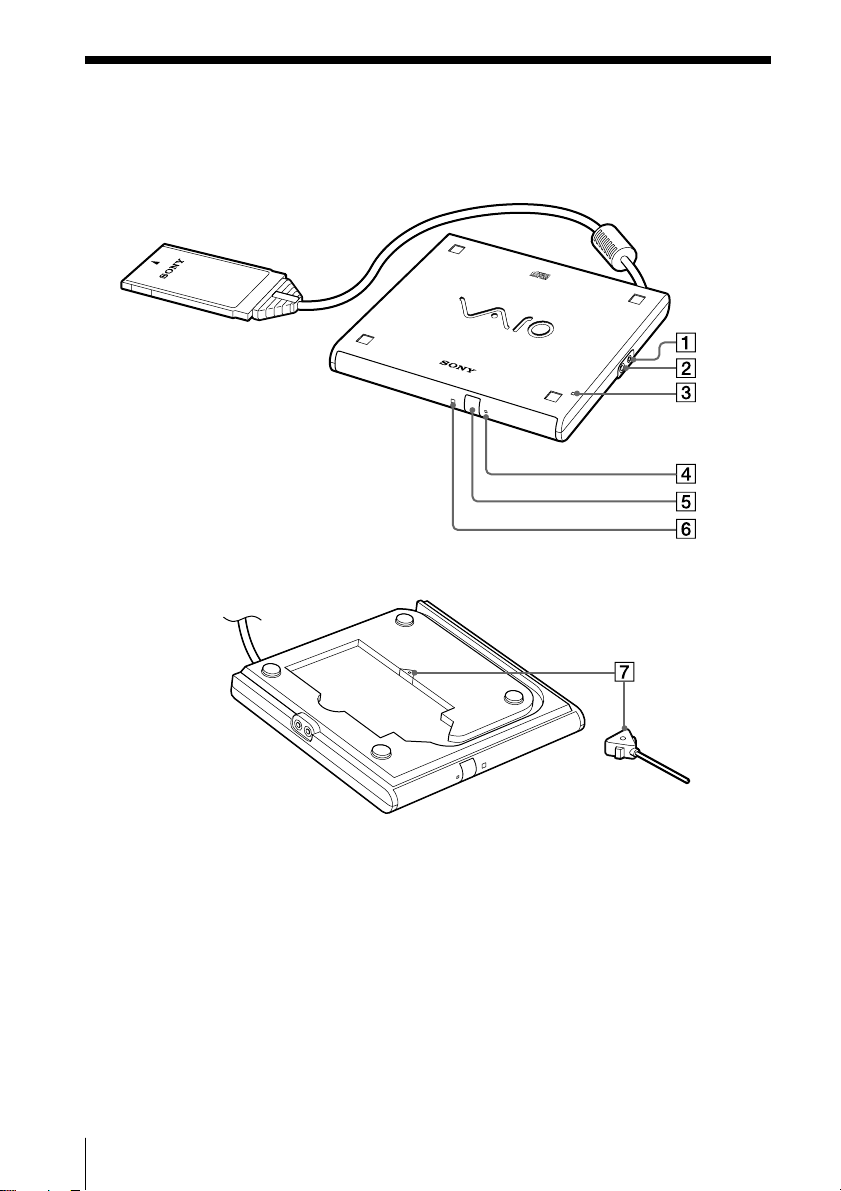
Locating the controls
and connectors
1 DC IN connector
2 LINE OUT connector
3 POWER indicator
4 Manual eject hole
5 Eject button
6 BUSY indicator
7 Manual eject pin (P. 18)
8

Setting up the
DVD-ROM drive
If you are using one of the following models
PCG-505GX, 505G, 505FX, 505F, 505TX, 505TS, 505TR,
Z505SX, Z505S, Z505HSK, PCG-C1X
Before installing the DVD-ROM drive, the required
driver must be installed in the notebook computer.
If you are using other than those above,
you do not need to install the driver. Follow the
procedure on page 13 to connect the DVD-ROM drive
to the notebook computer.
Installing the driver (WindowsR 98)
Make sure you connect the supplied AC adapter to
the drive before installing the device.
1 Connect the floppy disk drive to the computer.
2 Turn on the computer.
If you use a USB floppy disk drive, it can be
connected after the computer has been turned on.
Do not attempt to operate the computer until
Windows is functioning.
Note
Make sure to connect the
supplied AC adapter to
the drive before installing
the driver. The driver
cannot be installed
without the AC adapter.
3 Insert the supplied installation disk in the floppy
disk drive.
4 Connect the AC adapter included in the package,
to the DVD-ROM drive and an AC outlet, and then
insert the PC card into the PC card slot on the
notebook computer.
For details, see “Connecting the DVD-ROM drive
to the notebook computer” on page 13.
The “Add New Hardware Wizard” dialog box
appears.
5 Click [Next].
6 Ensure that “Search for the most appropriate
driver for using a device (Recommendation)” is
selected and then click [Next].
(Continued)
9

Setting up the DVD-ROM drive (continued)
7 Ensure that “Floppy disk drive” is checked and the
supplied floppy disk is inserted in the floppy disk
drive. Then, click [Next].
8 Wait until the search is complete and the window
changes.
9
Click [Next].
Copying starts.
Wait until copying is finished and the window
changes.
10
Click [Finish].
The driver installation is finished.
In step 11, confirm the installation.
11
Click the [Start] button, point to [Settings], and
then click [Control Panel].
12
Double-click [PC card].
[PC card (PCMCIA)] opens.
If “Sony CardBus ATAPI-Socket 1” appears on the
list, the driver is installed correctly.
If you use any of the following models, follow
the steps below to complete the installation
PCG-505GX, 505G, 505FX, 505F, 505TX, 505TS, 505TR,
C1X
Remove the connected PC card and keep the supplied
installation disk in the floppy disk drive.
10
1 Click the [Start] button, point to [Settings], and
then click [Control Panel].
2 Double-click [Add New Hardware].
The “Add New Hardware Wizard” window appears.
3 Click [Next].
4 Click [Next].
Wait until the search is completed and the screen
display changes.
5 Select “No” and click [Next].

Note
When confirming the
system settings, connect
the PC card of the DVDROM drive without the
supplied AC adapter.
6 Select “SCSI controllers” from “Hardware types”
and then click [Next].
7 Click [Have Disk].
8 Check that the supplied installation disk is in the
floppy disk drive, ensure that “Copy manufacturer’s
files from” is “A:\” and then click [OK].
9 Ensure that “Sony 16Bit ATAPI PC Card” appears
on the “Model” item and then click [Next].
10
Click [Next].
11
Click [Finish].
In step 12, confirm the system settings.
12
Confirm the system settings.
To confirm the system settings
When the DVD-ROM drive is connected to the
computer after installing the driver, click the Start
button, select [Settings] , click [Control Panel],
double-click [System], click [Device Manager] and
then double-click [SCSI controllers]. If “PCMCIA
ATA Card” appears in the “System Properties”
window, you must perform the following procedure:
1 Click “PCMCIA ATA Card” and then click
[Remove].
The “Confirm” window appears.
2 Click [OK].
3 Remove the DVD-ROM drive from the
computer.
4 Reconnect the DVD-ROM drive to the
computer.
5 Ensure that “SCSI controllers” shows “Sony
16Bit ATAPI PC Card” in the “System
Properties” window.
11
 Loading...