

Page 1
4-674-548-11 (1)
DVD±RW Drive
Operating Instructions
Bedienungsanleitung
Mode d’emploi
S400
GB
DE
FR
PCGA-DDRW1
2003 Sony Corporation
Page 2

WARNING
To prevent fire or shock hazard,
do not expose the unit to rain or
moisture.
Dangerously high voltages are
present inside the unit. Do not
open the cabinet. Refer servicing
to qualified personnel only.
DANGER - VISIBLE AND
INVISIBLE LASER RADIATION
WHEN OPEN.
AVOID DIRECT EXPOSURE TO
BEAM.
•
Use this product only with the supplied AC adapter.
• To disconnect this product completely from mains
voltage, unplug the AC adapter.
• Make sure that the socket outlet is easily accessible.
For customers in the U.S.A.
Owner’s Record
The model number and the serial number are located
on the bottom of the drive. Record the serial number
in the space provided below. Refer to this number
whenever you call your Sony dealer regarding this
product.
Model No. PCGA-DDRW1
Serial No. ________________________________
FCC Notice
This equipment has been tested and found to comply
with the limits for a Class B digital device, pursuant
to Part 15 of the FCC Rules. These limits are
designed to provide reasonable protection against
harmful interference in a residential installation. This
equipment generates, uses, and can radiate radio
frequency energy and, if not installed and used in
accordance with the instructions, may cause harmful
interference to radio communications. However, there
is no guarantee that interference will not occur in a
particular installation. If this equipment does cause
harmful interference to radio or television reception,
which can be determined by turning the equipment
off and on, the user is encouraged to try to correct the
interference using one or more of the following
measures:
– Reorient or relocate the receiving antenna.
– Increase the separation between the equipment and
receiver.
– Connect the equipment into an outlet on a circuit
different from that to which the receiver is
connected.
– Consult the dealer or an experienced radio/TV
technician for help.
The shielded interface cable recommended in this
manual must be used with this equipment in order to
comply with the limits for a digital device pursuant to
subpart B of Part 15 of FCC.
You are cautioned that any changes or modifications
not expressly approved in this manual could void
your authority to operate this equipment.
For questions regarding your product or for the Sony
Customer Information Service Center nearest you,
call 1-888-476-6972 in the United States or 1-800961-7669 in Canada.
The number below is for FCC related matters only.
Declaration of Conformity
Trade Name: SONY
Model No.: PCGA-DDRW1
Responsible Party: Sony Electronics Inc.
Address: 680 Kinderkamack Road
Telephone No.: 201-930-6972
This device complies with Part 15 of the FCC
Rules. Operation is subject to the following two
conditions: (1) This device may not cause harmful
interference, and (2) this device must accept any
interference received, including interference that
may cause undesired operation.
Oradell,
NJ 07649 USA
Caution
The use of optical instruments with this product will
increase eye hazard.
As the laser beam used in this product is harmful to
eyes, do not attempt to disassemble the cabinet. Refer
servicing to qualified personnel only.
For customers in Canada
This Class B digital apparatus complies with
Canadian ICES-003.
For customers in Europe
This product conforms with the following European
Directives: 73/23/EEC (Low Voltage Directive), 89/
336/EEC, 92/31/EEC (EMC Directives), 93/68/EEC
(CE-Marking Directive)
This equipment complies with EN 55022 Class B and
EN 55024 for use in the following areas: residential,
commercial and light-industrial.
Audio and picture distortion may occur if this
equipment is positioned in close proximity to any
equipment emitting electromagnetic radiation.
GB
2
Page 3

This equipment has been tested and found to comply
with the limits set forth in the EMC Directive for
using connection cables not longer than 3 metres (9,8
feet).
• Both a UK and continental power cord are supplied
with this product.
• Use the UK version only in the United Kingdom.
The continental one can be used in all other
countries.
This DVD±RW drive is classified as a CLASS 1
LASER PRODUCT and complies with the Laser
Products Safety Standard EN 60825-1.
Repair and maintenance only by authorized Sony
technicians.
Improper use and repairs can create a safety hazard.
CLASS 1
LASER PRODUCT
TO EN 60825-1
Before using the PCGA-DDRW1, be sure to read the
End User Software License Agreement that
accompanies it.
• Copyright laws prohibit reproducing the software or
the manual accompanying it in whole or in part, or
renting the software without the permission of the
copyright holder.
• In no event will SONY be liable for any financial
damages, or loss of profits, including claims made
by third parties, arising out of the use of the
software supplied with this drive.
• In the event a problem occurs with this product as a
result of defective manufacturing, SONY will
replace it. However, SONY bears no other
responsibility.
• The software provided with this drive cannot be
used with other drives.
• Please note that, due to continued efforts to improve
quality, the software specifications may be changed
without notice.
• Making copies of and using CD-ROMs,
DVD-ROMs, DVD video discs, or music CDs may
violate copyright laws or the terms of the End-user
Licenses provided with such discs. Be sure to
comply with the copyright laws and terms of the
End User Software License when making or using
original CDs and DVDs.
If you have any questions regarding the copyright
laws or the terms of the End-user Software License,
please consult with the appropriate legal experts.
• Operation of this drive with software other than that
provided is not covered by the warranty.
AVVERTENZA
Per evitare rischi di incendio o
scariche elettriche, non esporre
l’apparecchio a pioggia o
umidità.
Gli alti voltaggi presenti
all’interno dell’apparecchio
costituiscono un pericolo. Non
aprire il rivestimento. Per gli
interventi di manutenzione,
rivolgersi esclusivamente a
personale qualificata.
• Utilizzare il presente apparecchio solo con
l’alimentatore CA in dotazione.
• Per scollegare completamente l’apparecchio dalla
corrente domestica, scollegare l’alimentatore CA.
• Accertarsi che la presa di rete sia facilmente
accessibile.
Per i clienti in Europa
Questo prodotto è conforme alle seguenti Direttive
europee: 73/23/CEE (Direttiva sul basso voltaggio),
89/336/CEE, 92/31/CEE (Direttive EMC), 93/68/CEE
(Direttiva relativa al marchio CE)
Questo apparecchio è conforme a EN 55022 Class B
e EN 55024 per un utilizzo nei seguenti campi:
residenziale, commerciale ed industria leggera.
Se il presente apparecchio viene posizionato in
prossimità di dispositivi che emettono radiazioni
elettromagnetiche, è possibile che l’audio e
l’immagine risultino disturbati.
Questo apparecchio è stato sottoposto a controlli ed è
in conformità con i limiti stabiliti nella direttiva EMC
sull’uso di cavi di collegamento di lunghezza non
superiore a 3 metri.
• In dotazione con il presente apparecchio, vengono
forniti sia un cavo di alimentazione per il Regno
Unito che un cavo di alimentazione per l’Europa
continentale.
• Utilizzare il cavo per il Regno Unito esclusivamente
in tale paese. È possibile utilizzare il cavo di
alimentazione per l’Europa in tutti gli altri paesi.
La presente unità DVD±RW è stata classificata come
CLASS 1 LASER PRODUCT (prodotto laser di
classe 1) ed è conforme allo standard sulla sicurezza
relativa ai prodotti laser EN 60825-1.
Per gli interventi di riparazione e manutenzione,
rivolgersi esclusivamente a tecnici Sony autorizzati.
L’utilizzo e le riparazioni impropri possono costituire
un pericolo per la sicurezza.
GB
GB
3
Page 4

CLASS 1
LASER PRODUCT
TO EN 60825-1
Prima di utilizzare il PCGA-DDRW1, accertarsi di
leggere il contratto di licenza del software per l’utente
finale in dotazione con l’apparecchio.
• Le leggi sul Copyright proibiscono la riproduzione
sia in parte che completa del software o del manuale
allegato nonché l’affitto del software senza il
permesso del detentore del copyright.
• In nessun caso SONY sarà responsabile di danni
finanziari o perdite di profitto, inclusi i reclami
presentati da terzi dovuti all’utilizzo del software
fornito con la presente unità.
• Nel caso in cui il prodotto presenti problemi dovuti
a difetti di fabbrica, SONY lo sostituirà. SONY
esclude ogni altra responsabilità.
• Il software fornito con la presente unità non può
essere utilizzato con altri apparecchi.
• Si noti che, a causa dei continui tentativi volti al
miglioramento del prodotto, le specifiche del
software potrebbero venire modificate senza
preavviso.
• La duplicazione e l’utilizzo di CD-ROM, DVDROM, dischi DVD video o CD musicali potrebbe
violare le leggi sul copyright o i termini del
contratto di licenza del software per l’utente finale
fornito con tali dischi. Durante la creazione o
l’utilizzo di CD e DVD originali, assicurarsi di non
violare le leggi sul copyright e i termini del
contratto di licenza del software per l’utente finale.
Consultare l’esperto legale appropriato nel caso di
dubbi relativi alle leggi sul copyright o ai termini
del contratto di licenza del software per l’utente
finale.
• Il funzionamento della presente unità con software
diversi da quello in dotazione non è garantito.
WAARSCHUWING
Om het gevaar van brand of
elektrische schokken te
voorkomen, mag het apparaat
niet worden blootgesteld aan
regen of vocht.
De binnenkant van dit toestel
staat onder gevaarlijke
hoogspanning. Open de
behuizing nooit. Laat het toestel
alleen nakijken door bevoegd
vakpersoneel.
• Gebruik dit produkt alleen met de meegeleverde
netspanningsadapter.
• Ontkoppel de netspanningsadapter als u de
verbinding met het lichtnet geheel wilt verbreken.
• Zorg dat het stopcontact gemakkelijk toegankelijk
is.
Voor klanten in Europa
Dit produkt beantwoordt aan de volgende Europese
Richtlijnen: 73/23/EEG (Laagspanningsrichtlijn), 89/
336/EEG, 92/31/EEG (EMC Richtlijnen), 93/68/EEG
(CE Markeringsrichtlijn)
Dit toestel beantwoordt aan de normen EN 55022
Klasse B en EN 55024 voor gebruik in de volgende
omgevingen: residentieel, commercieel en licht
industrieel.
Wanneer dit toestel te dicht bij apparatuur wordt
geplaatst die elektromagnetische straling produceert,
kunnen beeld en/of geluid worden gestoord.
Dit toestel werd getest en is conform de limieten
bepaald in de EMC Richtlijn over verbindingskabels
niet langer dan 3 meter.
• Bij dit produkt worden een netsnoer voor GrootBrittannië en een netsnoer voor Europa geleverd.
• Gebruik het netsnoer voor Groot-Brittannië alleen
daar. Het netsnoer voor Europa kan in de andere
landen worden gebruikt.
Deze DVD±RW drive is geklasseerd als CLASS 1
LASER PRODUKT en beantwoordt aan de Laser
Products Safety Standard EN 60825-1.
Dit toestel mag uitsluitend door erkende Sony
technici worden gerepareerd en nagekeken.
Onoordeelkundige aanwending en reparaties kunnen
de veiligheid in het gedrang brengen.
GB
4
Page 5

CLASS 1
LASER PRODUCT
TO EN 60825-1
Alvorens de PCGA-DDRW1 in gebruik te nemen,
moet u de bijgaande software licentieovereenkomst
voor eindgebruikers lezen.
• De wet op de auteursrechten verbiedt het geheel of
gedeeltelijk reproduceren van de software of de
handleiding, alsook het verhuur van de software
zonder toestemming van de eigenaar van de
auteursrechten.
• SONY kan in geen geval aansprakelijk worden
gesteld voor financiële verliezen noch winstderving,
met inbegrip van claims ingediend door derden, ten
gevolge van het gebruik van de software die bij
deze drive wordt geleverd.
• Indien dit produkt problemen geeft door
constructiefouten, zal SONY het vervangen. SONY
draagt echter geen enkele andere
verantwoordelijkheid.
• De software die bij deze drive wordt geleverd, kan
niet met andere drives worden gebruikt.
• Merk op dat in het kader van ons permanent streven
naar kwaliteitsverbetering de software specificaties
steeds kunnen worden gewijzigd zonder
voorafgaande kennisgeving.
• Het kopiëren en gebruiken van CD-ROM’s, DVDROM’s, DVD’s of muziek-CD’s gaat wellicht in
tegen de wetgeving op het gebied van copyright of
tegen de voorwaarden van de
eindgebruikerslicenties die bij dergelijke discs
worden geleverd. Zorg dat u de wetgeving op het
gebied van copyright en de voorwaarden in de
softwarelicenties voor eindgebruikers naleeft
wanneer u CD’s en DVD’s maakt en gebruikt.
Indien u vragen hebt omtrent de wet op de
auteursrechten of de bepalingen van de
softwarelicentie voor eindgebruikers, raadpleeg dan
de nodige juridische experts terzake.
• Gebruik van deze drive met andere software dan de
bijgeleverde is niet gedekt door de waarborg.
GB
5
Page 6

Table of Contents
Overview ................................................ 7
Compatible notebooks..................... 8
Compatible discs ............................. 9
Supplied Accessories............................ 12
Locating the Controls and Connectors... 13
Setting up the Drive.............................. 14
Vertical installation ....................... 14
Connecting the Drive............................ 15
Connecting the drive to your
notebook with the supplied
peripheral cable ........................... 17
Connecting the drive to your
notebook with the supplied i.LINK
cable ............................................ 19
Connecting a Digital Video Camera
Recorder ...................................... 21
Limitations (wrong connection
example)...................................... 26
Disconnecting the drive from the
notebook...................................... 26
Basic Operation .................................... 27
Power management information ... 27
Inserting a disc .............................. 27
Removing a disc ............................ 29
Transporting the unit (using the
cable clip)................................... 30
Installing the software .......................... 32
About the supplied software.......... 32
Installing........................................ 33
Precautions before use .......................... 36
Precautions when writing data ...... 36
Playing an Audio CD............................ 40
Playing a DVD video............................ 40
Notes about playing a DVD
video............................................ 40
Notes about DVD video discs ....... 41
Performing a System Recovery on a
Notebook........................................... 42
Precautions ........................................... 43
Maintenance ......................................... 44
Getting Help ......................................... 45
Specifications ....................................... 46
Troubleshooting.................................... 48
• VAIO and are trademarks of Sony
Corporation.
• Microsoft and Windows are registered
trademarks of Microsoft Corporation in the
United States and/or other countries.
• i.LINK™ is a designation referring to IEEE
1394-1995 and IEEE 1394a-2000. i.LINK and
the i.LINK logo “ ” are trademarks of Sony
Corporation.
• Click to DVD is a trademark of Sony
Corporation.
• Copyright © 2001 DigiOn Inc. and Easy
Systems Japan Ltd. All rights reserved. Drag’n
Drop CD+DVD is a trademark of Easy Systems
Japan Ltd and DigiOn Inc.
• All other names of systems, products and
services are trademarks of their respective
owners. In the manual, the ™ or ® marks are
not specified.
In this manual, Microsoft® Windows® XP Home
Edition and Microsoft® Windows® XP
Professional are referred to as Windows XP.
GB
6
Page 7

Overview
This product is a DVD±RW drive compatible with i.LINK™ (IEEE 1394)
interface. The drive has the following features.
• Supports 2× writing speed for DVD+R discs (2700 KB/s).
• Supports 2× writing speed for DVD+RW discs (2700 KB/s).
• Supports 1× writing speed for DVD-R discs (1350 KB/s).
• Supports 1× writing speed for DVD-RW discs (1350 KB/s).
• Supports 16× writing speed for CD-R discs (2400 KB/s).
• Supports 8× writing speed for CD-RW discs (1200 KB/s).
• Reads DVD+R, DVD+RW, DVD-R, DVD-RW, DVD-ROM, CD-R,
CD-RW, and CD-ROM discs. DVD-ROM discs are read at a speed of 5×
max. (6750 KB/s), and CD-ROM discs at a speed of 24× max. (3600 KB/s).
• Can be used either horizontally or vertically (see page 14).
• If the notebook you are using comes equipped with a VAIO
peripheral device DC OUT connector, by connecting the VAIO notebook
peripheral cable (80 cm) you can use this drive with power supplied from
the notebook (see page 15).
• Can connect a Digital Video Camera Recorder equipped with a DV
terminal to the drive, and use the video captured with the Digital Video
Camera Recorder to create your own original DVD videos (Using the
supplied DVD video software) (see page 32).
• Can play back digital audio CD using the notebook speakers, if the
notebook supports this function (see page 40).
• Can easily reinstall the operating system on the notebook using a
recovery disc, if the notebook supports this function (see page 42).
®
notebook
Note
This drive is only for use in the country of purchase.
z What is i.LINK™?
i.LINK is a digital serial interface supporting very high transfer rates. It facilitates the
exchange of high-volume digital audio and video data between components equipped
with an i.LINK connector, and enables the control of other components. For details, refer
to the manuals provided with your Sony notebook.
Continued on next page
7
GB
Page 8

Compatible notebooks
You can use the drive with Sony VAIO notebooks* with the Microsoft
®
Windows® XP operating system.
(As of June, 2003)
* Except those with a built-in DVD-RW or DVD±RW drive.
Notes
• This drive cannot be used with computers other than the Sony VAIO series computers.
• This drive does not support Microsoft® Windows® Millennium Edition, Microsoft
Windows® 2000 Professional, Microsoft® Windows® 98 Second Edition or earlier
versions of the Windows® operating system.
• This drive does not support DTLA copy protection. It cannot be used in conjunction
with digital CS tuners, D-VHS recorders, or other equipment using the DTLA copy
protection system.
• The connection method for this drive differs depending on the notebook model. For
details, see “Connecting the Drive” on page 15.
• This drive can be used for performing a system recovery on a notebook using a
recovery disc. See “Performing a System Recovery on a Notebook” on page 42 for
devices with which recovery is possible.
®
GB
8
Page 9

Compatible discs
• DVD+R
Write-once discs for storing computer programs and data, video data, etc.
Note that DVD+R and DVD-R are distinct standards. DVD+R discs can
store up to 4.7 GB of data, roughly 7 times that of a CD-R.
• DVD+RW
Discs for storing computer programs and data, video data, etc. These discs
can be erased and rewritten many times. Note that DVD+RW and
DVD-RW are distinct standards. DVD+RW discs can store up to 4.7 GB of
data, roughly 7 times that of a CD-RW.
• DVD-R
Write-once discs for storing computer programs and data, video data, etc.
DVD-R discs can store up to 4.7 GB of data, roughly 7 times that of a
CD-R.
• DVD-RW
Discs for storing computer programs and data, video data, etc. These discs
can be erased and rewritten many times. DVD-RW discs can store up to 4.7
GB of data, roughly 7 times that of a CD-RW.
• DVD-ROM
Read-only discs with a high data capacity.
• CD-R
Write-once discs for storing computer programs and data. After having
been written, data cannot be erased from these discs. However, data can be
added to them, depending on the writing method and if there is enough
space.
• CD-RW
Rewritable discs for storing computer programs and data. The contents of
these discs can be erased and rewritten many times.
• CD-ROM
Read-only discs on which you cannot write your data. Many computer
programs, games, etc., are delivered on CD-ROM discs.
Continued on next page
GB
9
Page 10
On this drive, you can use all the discs with the following icons.
Disc type Icon
*1 *3
DVD+R
DVD+RW
*1 *2 *3
DVD-R
DVD-RW
DVD-ROM
DVD-Video
CD-R
*4
CD-RW
CD-ROM
Audio CD
*1 *3
*1 *2 *3
10
CD EXTRA
CD TEXT
Photo CD ————
GB
Page 11

*1 Replay may not be possible, depending on the disc, settings and system used.
*2 When using DVD-R discs, use DVD-R for general ver.2.0 or later.
DVD-R for Authoring is not compatible.
When using DVD-RW discs, use DVD-RW ver.1.1 or later.
*3 Recording in DVD video format is possible. The Video Recording (VR) format is not
supported.
*4 Ultra Speed CD-RW not supported.
The following discs cannot be used in this drive:
• DVD-RAM
• Double Density CD-R/CD-RW (DDCD)
Notes
• Use only circular discs in this drive. Do not use discs with any other shape (star, heart,
etc.), as this may damage the drive.
• Do not use scratched or damaged discs, as this may damage the drive.
• To use photo CDs, special front-end software to search or access such discs must be
installed on the notebook.
• Some types of CD players do not play music CDs created on CD-R discs.
Music CDs created on CD-RW discs cannot be played in conventional CD players. To
play these discs, use a drive that supports CD-RW.
• To play discs containing program material, the playback software installed on the
notebook must support the type of disc. For details, refer to the documentation of the
playback software.
• Some types of DVD players do not play DVD videos created on DVD+R, DVD+RW,
DVD-R, or DVD-RW discs.
• This drive uses special software to play DVD video discs. Depending on the type of
disc used, some operations or functions may be limited, and normal playback may not
be possible.
11
GB
Page 12
Supplied Accessories
After unpacking the unit, make sure that the accessories listed below are
present. If anything is missing, contact the Sony dealer where you
purchased this product or a Sony service representative in your area.
• DVD±RW drive (1) • Software CD-ROM (1)
• VAIO notebook peripheral cable • i.LINK cable (1)
(80 cm) (1)
• AC adapter (1)
12
• Vertical installation base (1) • Cable clip (1)
• Manual eject pin (1)
(stored at bottom of drive)
* A suitable power cord is supplied for your country or region. If the package contains
two power cords, use whichever matches your power outlet.
GB
• AC power cord (1 or 2*)
• DVD±RW drive Operating
Instructions (this document) (1)
• Warranty Card (1)
Page 13
Locating the Controls and Connectors
Front
1 POWER indicator
2 Manual eject hole
3 Eject button
4 BUSY indicator
Rear
5 DC IN connector
6 VAIO notebook peripheral cable
screw hole
7 VAIO notebook peripheral device
DC IN connector
Bottom
8 i.LINK connector
9 i.LINK connector
0 Manual eject pin (see page 30)
13
GB
Page 14
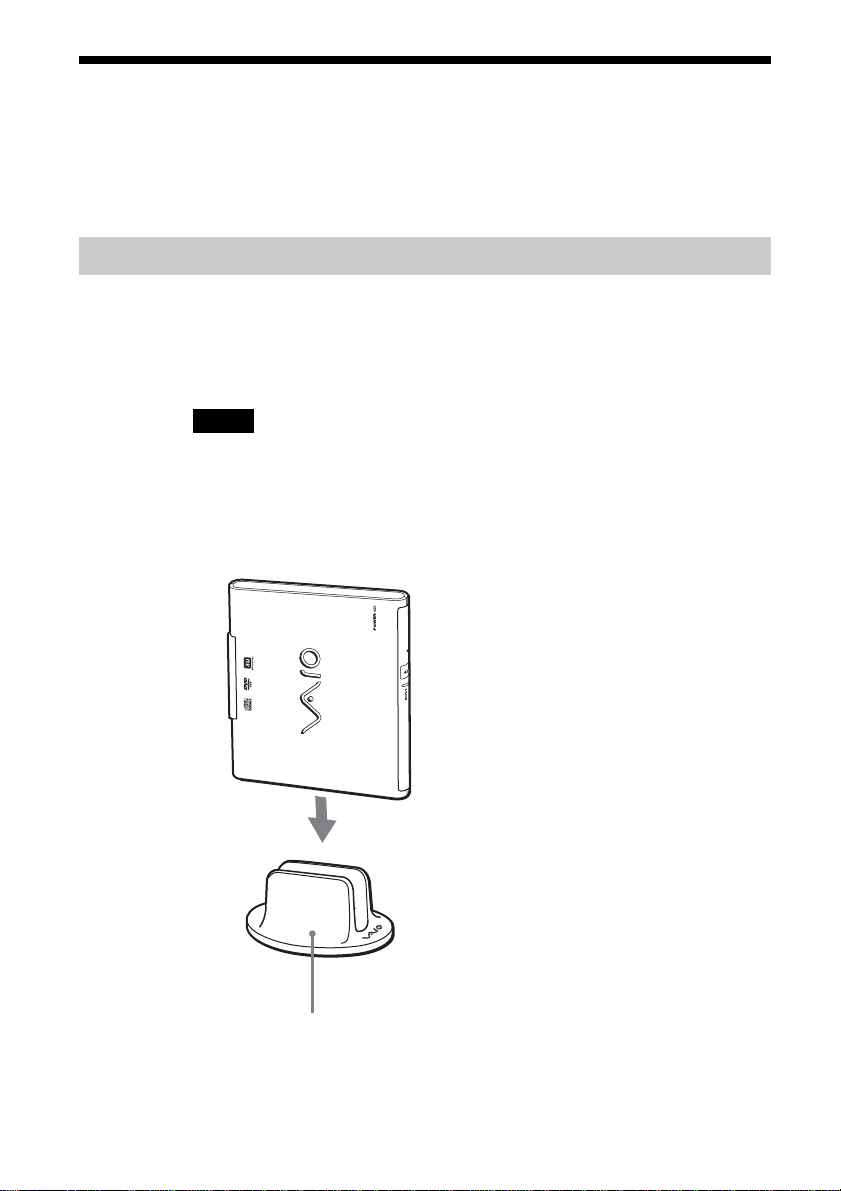
Setting up the Drive
This drive can be used in either a horizontal or a vertical position.
Positioning the drive vertically may help to save space.
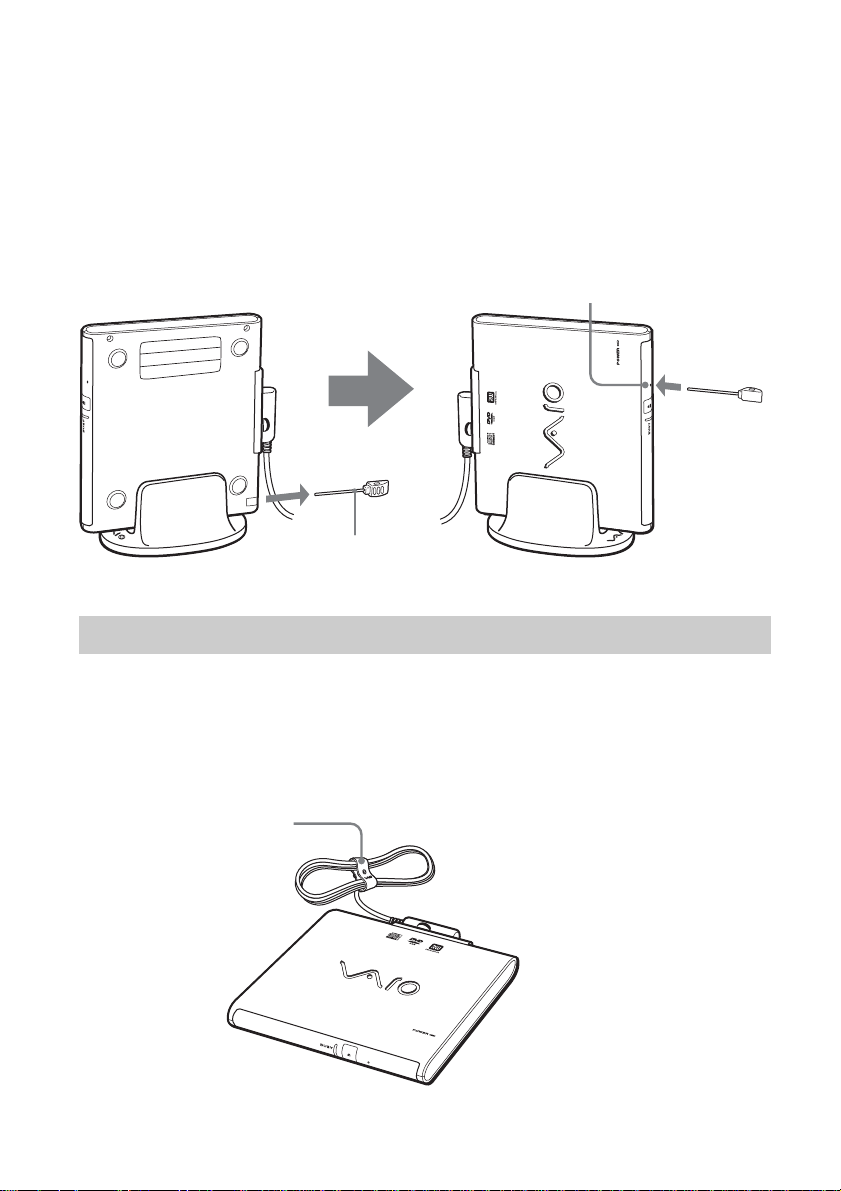
Vertical installation
To use the drive in a vertical position, the supplied vertical installation base
is used. Positioning the drive as illustrated below, place it into the vertical
installation base. Push the drive all the way to the bottom of the vertical
installation base.
Notes
• To use this drive in a vertical position, always attach the supplied base. To attach the
drive in the vertical position, first position the vertical installation stand with the
“VAIO” logo facing forward. Insert the drive into the stand with its front facing
forward and the POWER indicator up, as illustrated below.
• Install the drive on a flat, stable surface.
14
Vertical installation base
GB
Page 15
Connecting the Drive
The procedure for connecting this drive varies depending on what notebook
you are using.
• If the notebook is equipped with a VAIO notebook peripheral
device DC OUT connector (see page 17)
If the notebook is equipped with a VAIO notebook peripheral device DC
OUT connector, use the supplied VAIO notebook peripheral cable (80
cm) to connect the drive to the notebook. If this method is used, power
for the drive is supplied by the notebook, allowing you to use the drive in
locations without a power outlet.
If you use a Digital Video Camera Recorder, you can connect it to the
drive using the supplied i.LINK cable (see page 21).
VAIO notebook peripheral device
DC OUT connector
i.LINK connector
• If the notebook is not equipped with a VAIO notebook
peripheral device DC OUT connector (see page 19)
If your notebook is not equipped with a VAIO notebook peripheral
device DC OUT connector, use the supplied i.LINK cable to connect the
drive to the notebook. In this case, the supplied AC adapter and AC
power cord must be used.
If you use a Digital Video Camera Recorder, you can connect it to the
drive using an i.LINK cable available separately (see page 21).
Continued on next page
15
GB
Page 16

Notes
• If your notebook is not equipped with a VAIO notebook peripheral device DC OUT
connector, use the supplied i.LINK cable to connect the drive to the notebook. For
details about connection, see page 19.
• Whenever an i.LINK device is connected, disconnected, or powered on or off, the
computer performs processing that is referred to as a “bus reset”. If this happens while
data is being read or written, data could be erased or corrupted. Before connecting or
disconnecting this drive, be sure to close any active applications.
16
GB
Page 17
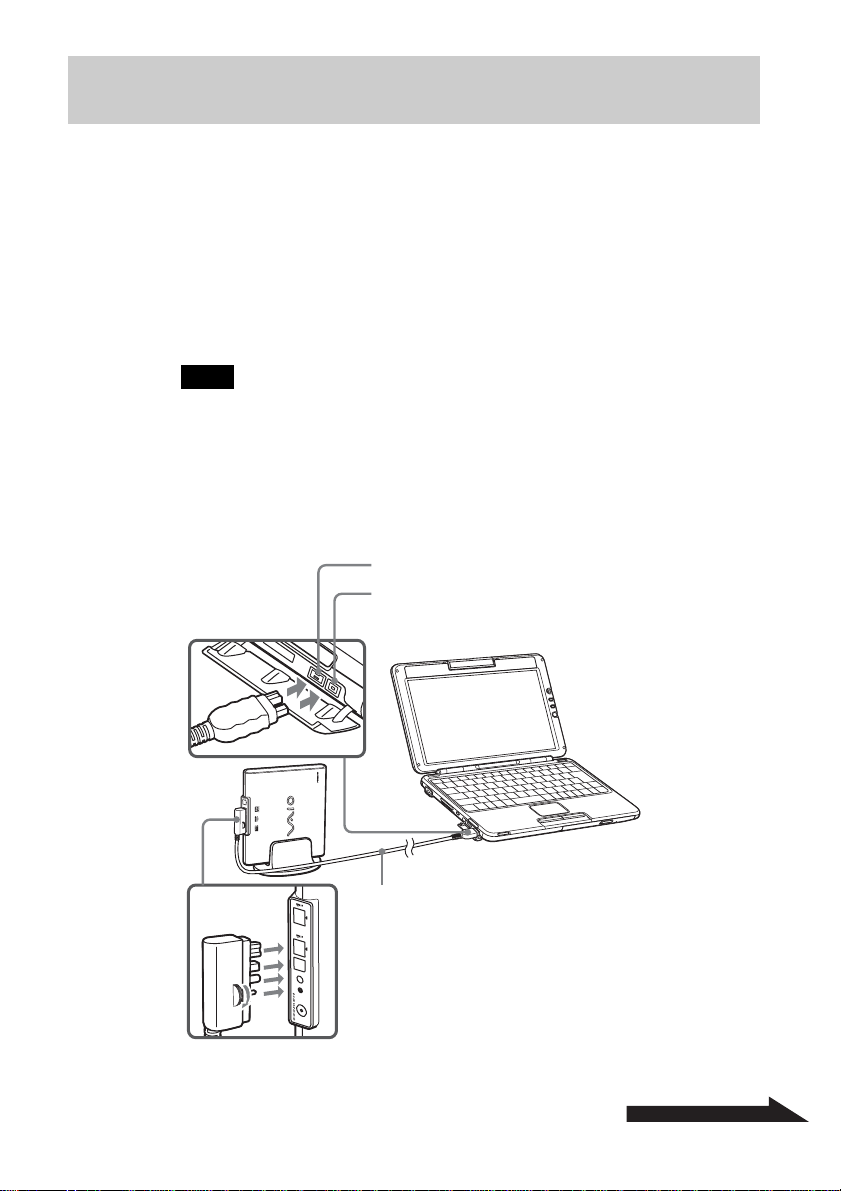
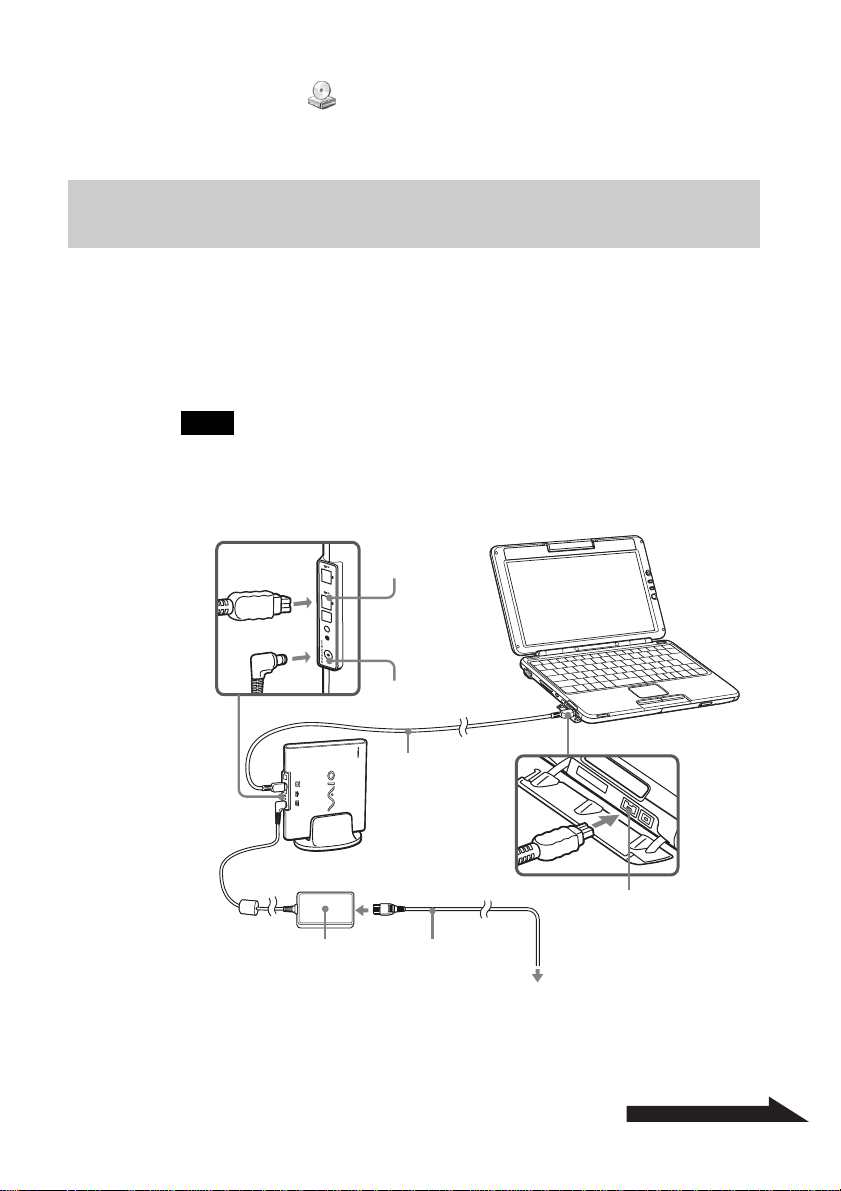
Connecting the drive to your notebook with the supplied peripheral cable
If your notebook has a VAIO notebook peripheral device DC OUT
connector, use the supplied VAIO notebook peripheral cable to connect the
drive to the notebook.
If your notebook is not equipped with a VAIO notebook peripheral device
DC OUT connector, use the supplied i.LINK cable to connect the drive to
the notebook (see page 19).
If you use a Digital Video Camera Recorder, you can connect it to the drive
using the supplied i.LINK cable (see page 21).
Note
When connecting this drive to a notebook that has multiple i.LINK connectors, please do
not connect other i.LINK devices together with this drive. Furthermore, disconnect this
drive before connecting any other i.LINK devices to your notebook.
z Hint
Also refer to the manuals provided with your notebook.
i.LINK connector
VAIO notebook peripheral device
DC OUT connector
VAIO notebook peripheral
cable (80 cm)
Continued on next page
GB
17
Page 18
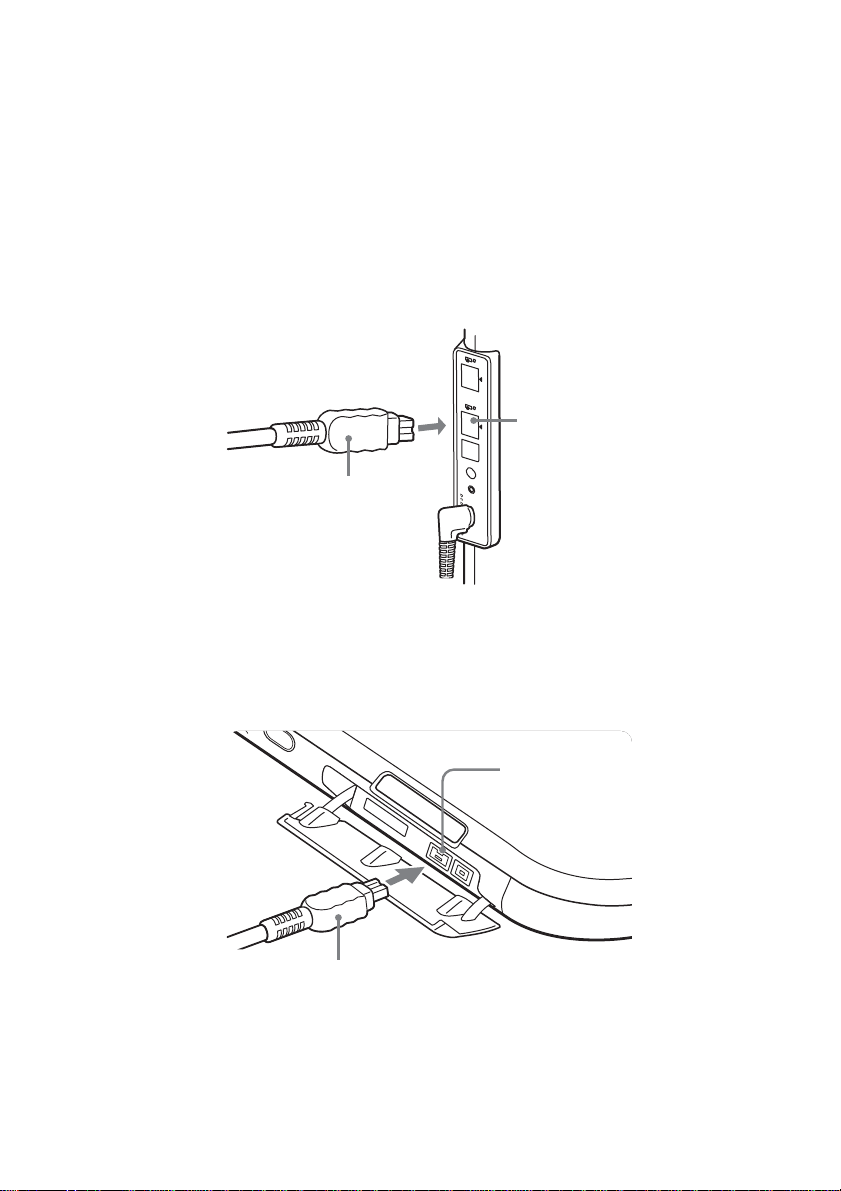
1 Turn on the power of the notebook.
2 Insert the L-shaped plug of the supplied VAIO
notebook peripheral cable (80 cm) into the matching
connector on the rear of the drive, and secure the plug
with the screw.
Turn the screw until it is fully fastened.
3 Insert the straight-shaped plug of the supplied VAIO
notebook peripheral cable (80 cm) into the i.LINK
connector on the notebook and into the VAIO
notebook peripheral device DC OUT connector.
The green POWER indicator of the drive lights up, and the
drive is detected and identified by the notebook.
18
i.LINK connector
VAIO notebook peripheral
device DC OUT connector
z Hint
When connecting this drive to your notebook for the first time, it takes a
moment for the drive to be detected.
GB
Page 19
4 Click the [Start] button, and then click [My Computer] to
verify that (E: or other drive name) has been added in
the “My Computer” window.
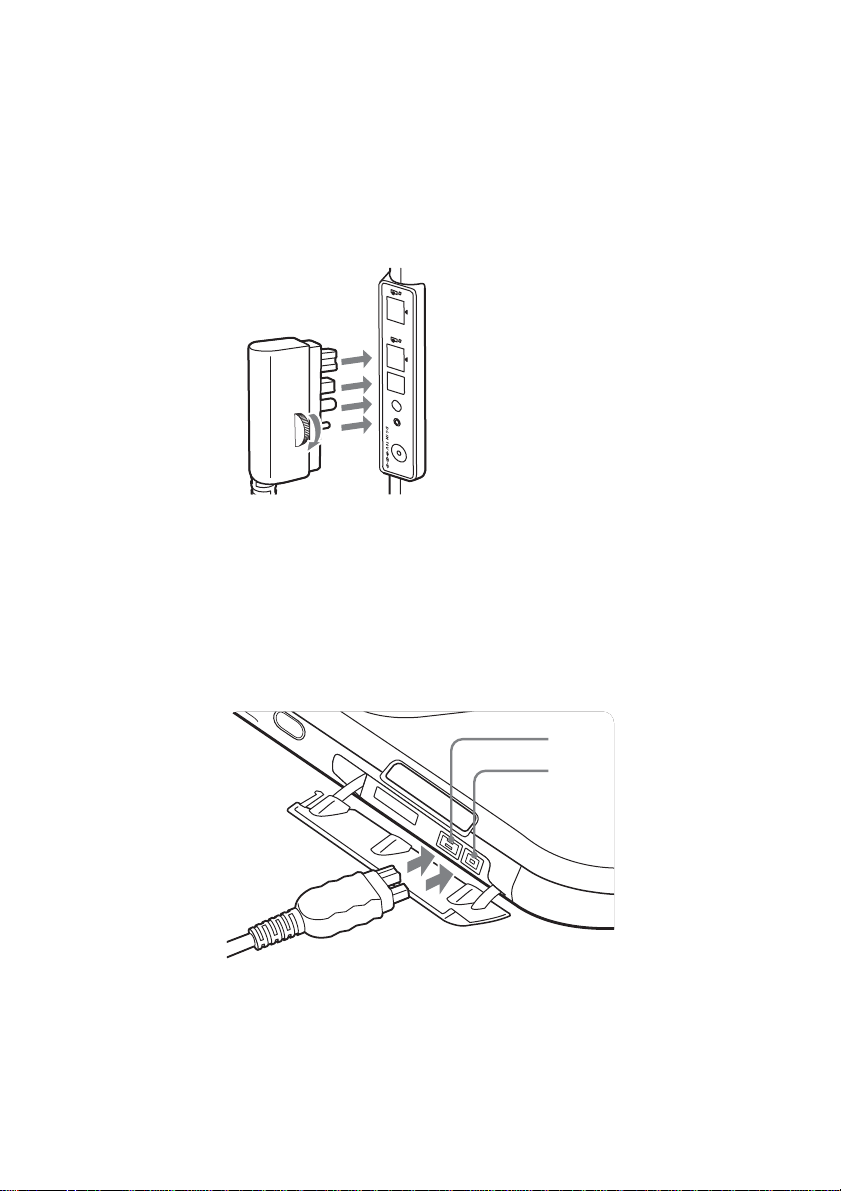
Connecting the drive to your notebook with the supplied i.LINK cable
If your notebook is not equipped with a VAIO notebook peripheral device
DC OUT connector use the supplied i.LINK cable to connect the drive to
the notebook.
If you use a Digital Video Camera Recorder, you can connect it to the drive
using a separately sold i.LINK cable (see page 21).
Note
When connecting this drive to a notebook that has multiple i.LINK connectors, please do
not connect other i.LINK devices together with this drive. Furthermore, disconnect this
drive before connecting any other i.LINK devices to your notebook.
i.LINK connector
DC IN connector
i.LINK cable
AC adapter AC power cord
To AC outlet
i.LINK connector
* Connect the cable directly
to the i.LINK connector on
the notebook.
Continued on next page
GB
19
Page 20
1 Turn on the power of the notebook.
2 Connect the AC power cord to the supplied AC adapter then
plug the AC power cord into an AC outlet and plug the cable
of the adapter into the DC IN connector on the drive.
The green POWER indicator of the drive lights up.
3 Connect the supplied i.LINK cable to the i.LINK connector on
the rear of the drive.
i.LINK connector
i.LINK cable
4 Connect the other end of the supplied i.LINK cable to the
i.LINK connector on the notebook.
The drive is detected and identified by the notebook.
20
i.LINK connector
i.LINK cable
z Hint
When connecting this drive to your notebook for the first time, it takes a moment for
the drive to be detected.
GB
Page 21

5 Click the [Start] button, and then click [My Computer] to
verify that (E: or other drive name) has been added in
the “My Computer” window.
Connecting a Digital Video Camera Recorder
Using the Click to DVDTM software provided, you can connect a Digital
Video Camera Recorder to the drive and use video from the Digital Video
Camera Recorder to create DVD videos. The procedure for connecting a
Digital Video Camera Recorder to the drive is different than that for a
notebook.
The Digital Video Camera Recorder that you can connect to the drive must
be a Sony Digital Video Camera Recorder that:
• Can record video in DV or MICROMV formats.
• Is equipped with a DV output terminal, and can be connected to a
notebook using an i.LINK cable (a DV cable).
Note
The drive does not support analog format and some types of Digital Video Camera
Recorder formats.
The following models cannot be used.
(As of June, 2003)
For Customers in the U.S.A. and Canada
– DCR-VX1000
– DCR-VX700 (versions with an upgraded DV terminal)
For Customers in Europe
– DCR-VX1000E
– DCR-VX700E
Use the supplied “Click to DVD” software to create DVD videos using the
video captured with your Digital Video Camera Recorder. To install the
supplied software, see “Installing the Software” (page 32).
Continued on next page
21
GB
Page 22
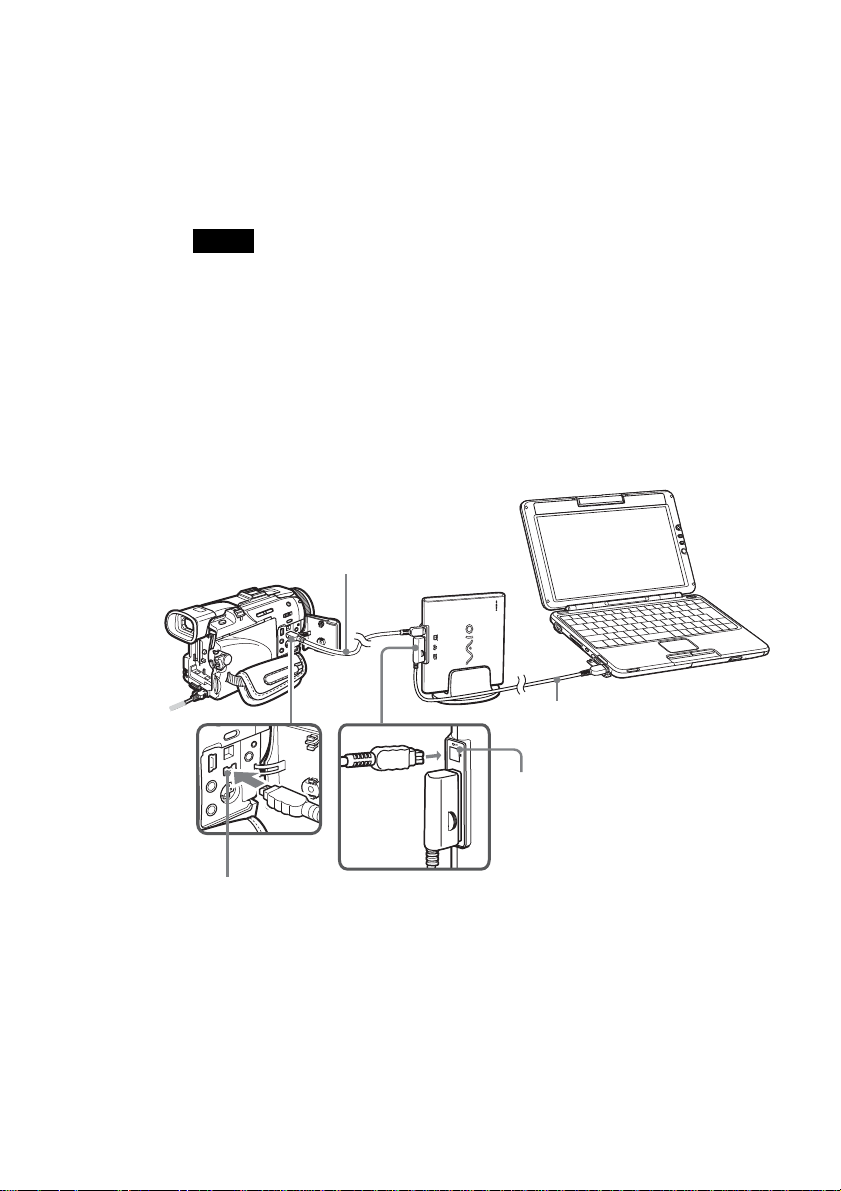
■ When connecting the drive to your notebook with the supplied
peripheral cable
To use the supplied “Click to DVD” software with the drive connected to
your notebook using the supplied VAIO notebook peripheral cable, connect
your Digital Video Camera Recorder to the drive’s i.LINK connector using
the supplied i.LINK cable, as shown below.
Notes
• Connect the drive to your notebook before connecting the Digital Video Camera
Recorder (see page 17).
• When connecting a Digital Video Camera Recorder to the drive, connect the Digital
Video Camera Recorder’s AC adapter/charger to the Digital Video Camera Recorder
and set the AC adapter/charger mode switch to “VCR/Camera/Player” before
connecting the AC adapter/charger to a power outlet.
z Hint
Also refer to the manual for the Digital Video Camera Recorder you want to connect.
i.LINK cable
22
VAIO notebook peripheral
cable (80 cm)
i.LINK connector
DV input/output terminal
* The connection diagram shows the DCR-TRV50 model Digital Video Camera
Recorder as an example.
GB
Page 23

1 Turn the Digital Video Camera Recorder’s power on, and set
it to video playback mode.
For details of Digital Video Camera Recorder operations, refer to your
Digital Video Camera Recorder manual.
2 Connect the supplied i.LINK cable to the DV input/output
terminal on the Digital Video Camera Recorder.
DV input/output terminal
i.LINK cable
3 Connect the other end of the i.LINK cable to the i.LINK
connector on the back of the drive.
i.LINK cable
Digital Video
Camera Recorder
VAIO notebook peripheral
cable (80 cm)
Notebook
Note
Do not connect any i.LINK equipment other than a Digital Video Camera Recorder
to the i.LINK connector on the drive.
i.LINK connector
4 Click the [Start] button, and then click [My Computer] to
verify that (Sony DV camcorder or other equipment) has
been added in the “My Computer” window.
Continued on next page
23
GB
Page 24
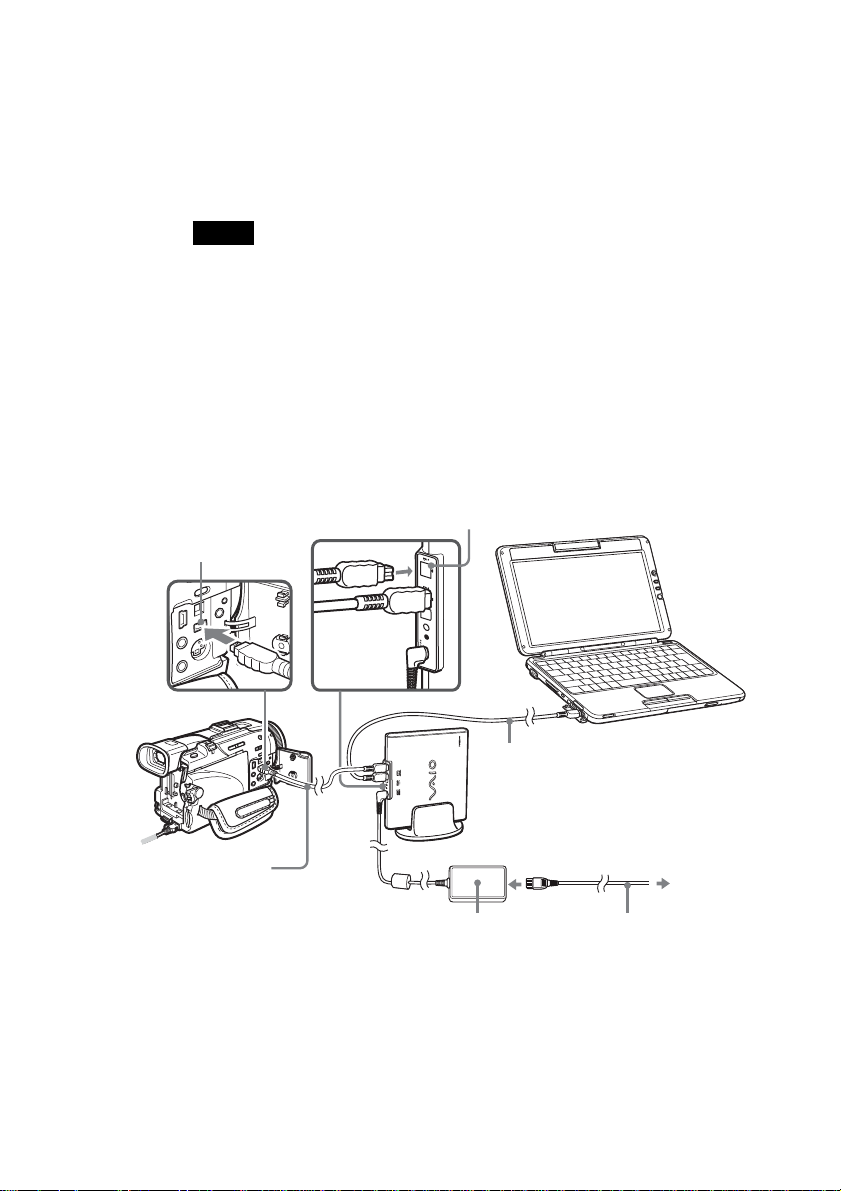
■ When connecting the drive to your notebook with the supplied
i.LINK cable
To use the supplied “Click to DVD” software with the drive connected to
your notebook using the supplied i.LINK cable, connect your Digital Video
Camera Recorder to the drive’s i.LINK connector using another i.LINK
cable (available separately), as shown below.
Notes
• To connect your Digital Video Camera Recorder, purchase an i.LINK cable.
• Connect the drive to your notebook before connecting the Digital Video Camera
Recorder (see page 19).
• When connecting a Digital Video Camera Recorder to the drive, connect the Digital
Video Camera Recorder’s AC adapter/charger to the Digital Video Camera Recorder
and set the AC adapter/charger mode switch to “VCR/Camera/Player” before
connecting the AC adapter/charger to a power outlet.
z Hint
Refer also to the manual for the Digital Video Camera Recorder you want to connect.
DV input/output
terminal
i.LINK cable
(available separately)
* The connection diagram shows the DCR-TRV50 model Digital Video Camera as an
example.
i.LINK connector
i.LINK cable
(supplied)
To AC outlet
AC adapter AC power cord
24
GB
Page 25

1 Turn the Digital Video Camera Recorder’s power on, and set
it to video playback mode.
For details of Digital Video Camera Recorder operations, refer to the
Digital Video Camera Recorder manual.
2 Connect the sold separately i.LINK cable to the DV
input/output terminal on the Digital Video Camera Recorder.
DV input/output terminal
i.LINK cable
3 Connect the other end of the i.LINK cable to the i.LINK
connector on the back of the drive.
i.LINK cable (available separately)
Digital Video
Camera
Recorder
Notebook
i.LINK cable
(supplied)
Note
Do not connect any i.LINK equipment other than a Digital Video Camera Recorder
to the i.LINK connector on the drive.
i.LINK connector
4 Click the [Start] button, and then click [My Computer] to
verify that (Sony DV camcorder or other equipment) has
been added in the “My Computer” window.
Continued on next page
25
GB
Page 26
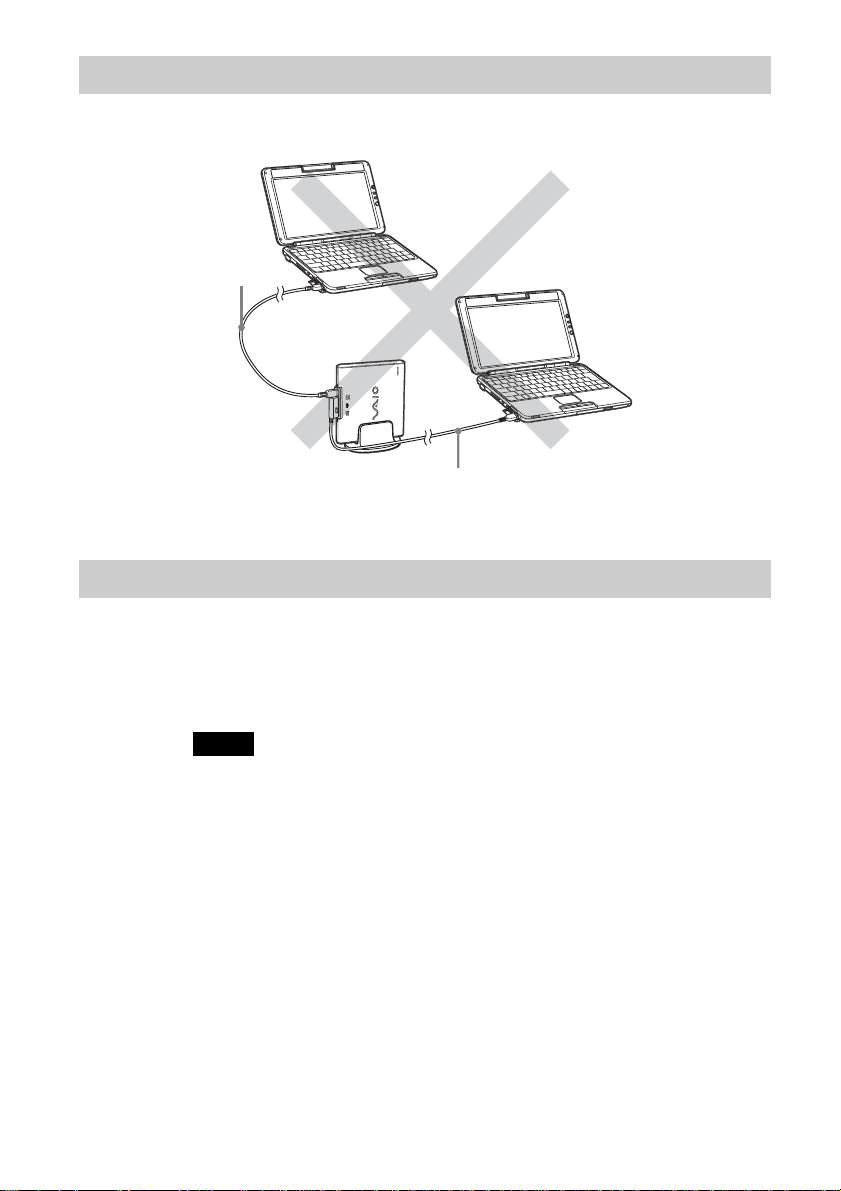
Limitations (wrong connection example)
Do not connect this drive to two notebooks as shown below.
i.LINK cable
VAIO notebook peripheral
cable (80 cm)
Disconnecting the drive from the notebook
With the Windows XP operating system, no special procedures are needed
to disconnect the drive. Simply make sure that no application programs are
active and that the drive’s BUSY indicator is not on, then disconnect the
VAIO notebook peripheral cable (80 cm) or i.LINK cable.
26
Notes
• Before disconnecting the drive, close any running software.
• When a Digital Video Camera Recorder is connected to the drive, disconnect the
i.LINK cable from the Digital Video Camera Recorder before turning off the Digital
Video Camera Recorder’s power.
z Hint
To use the drive again after disconnecting the VAIO notebook peripheral cable (80 cm) or
i.LINK cable, perform the steps described in the section “Connecting the Drive” on page
15. The drive will be detected automatically by your Windows operating system.
GB
Page 27
Basic Operation
Power management information
When using the power management function of the notebook, observe the
following points:
• Ensure that the power saving modes will not be activated while the
BUSY indicator of the drive is flashing. For details, refer to the manuals
provided with your notebook.
• Before activating the power saving modes of the notebook, verify that the
BUSY indicator of the drive is not on and close all running software
applications.
• While the notebook is in a power saving mode, do not connect or
disconnect the VAIO notebook peripheral cable (80 cm), i.LINK cable or
AC adapter.
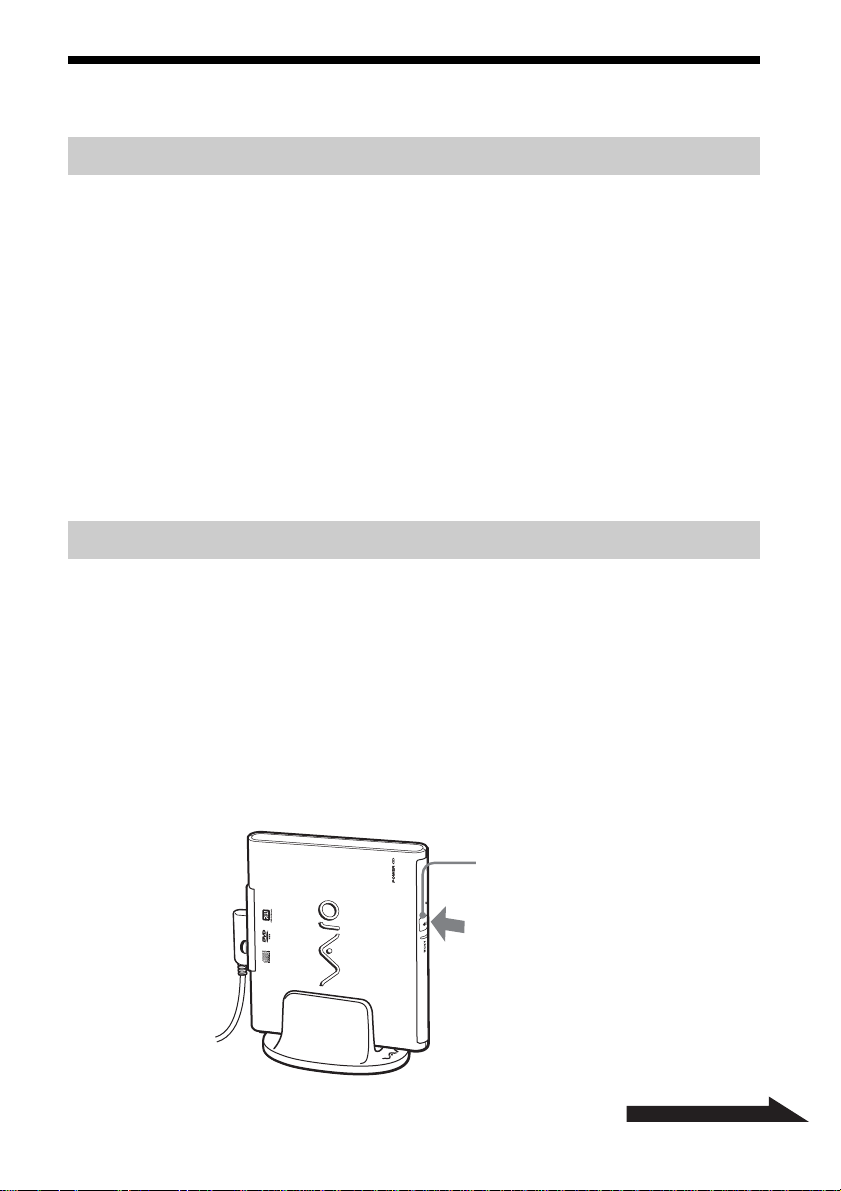
Inserting a disc
Turn on the power of the notebook and connect this drive before inserting a
disc.
z Hint
The illustrations show the drive in a vertical position, but operation is the same when the
drive is positioned horizontally.
1 Press the eject button.
The tray pops out.
Eject button
Continued on next page
GB
27
Page 28
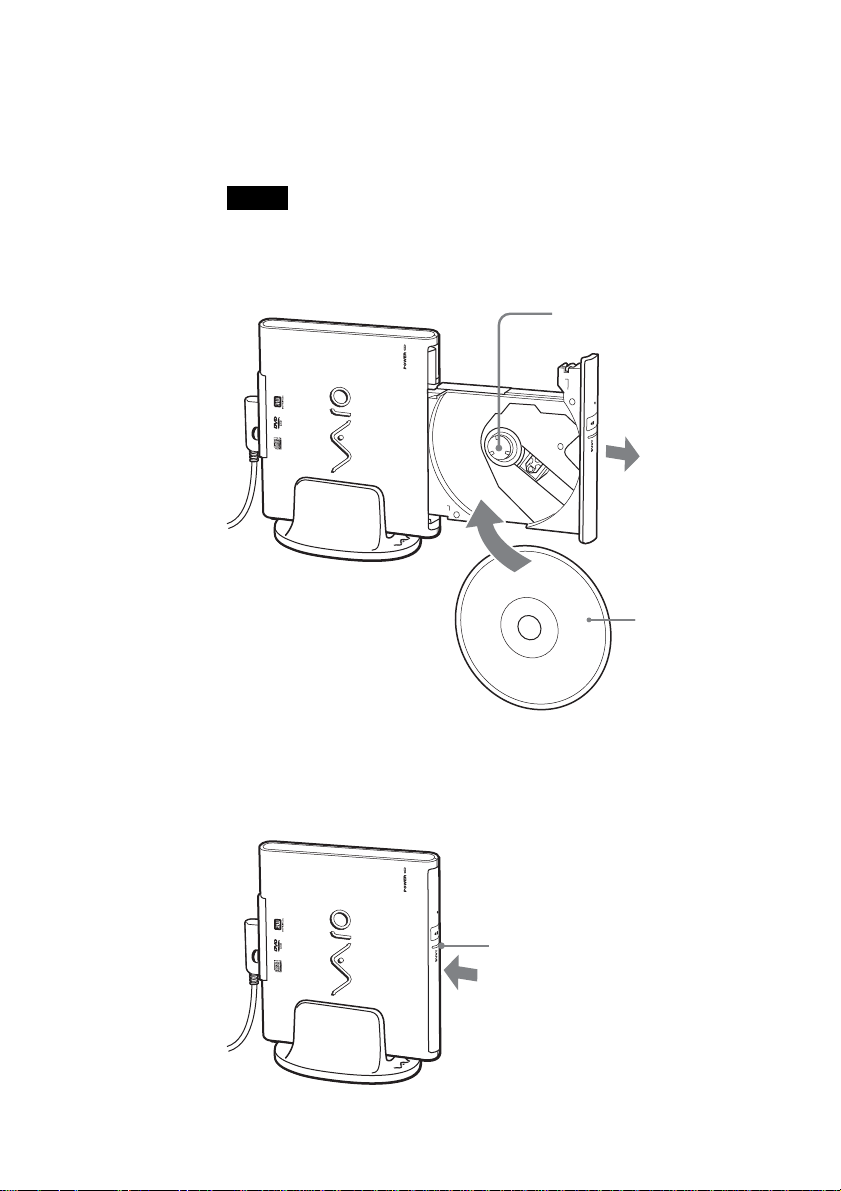
2 Pull the tray fully out until it stops. While supporting the tray
with your hand from the other side, place the disc on the hub
in the center of the tray.
Make sure that the disc audibly clicks into place and is firmly seated.
Notes
• Do not touch the lens assembly in the tray or the metal section on the rear.
• If you close the tray while the disc is not properly seated, the disc may be damaged
and the tray may jam.
Hub
Disc
28
3 Close the disc tray by gently pushing it.
While data is being read, the BUSY indicator flashes.
BUSY indicator
GB
Page 29
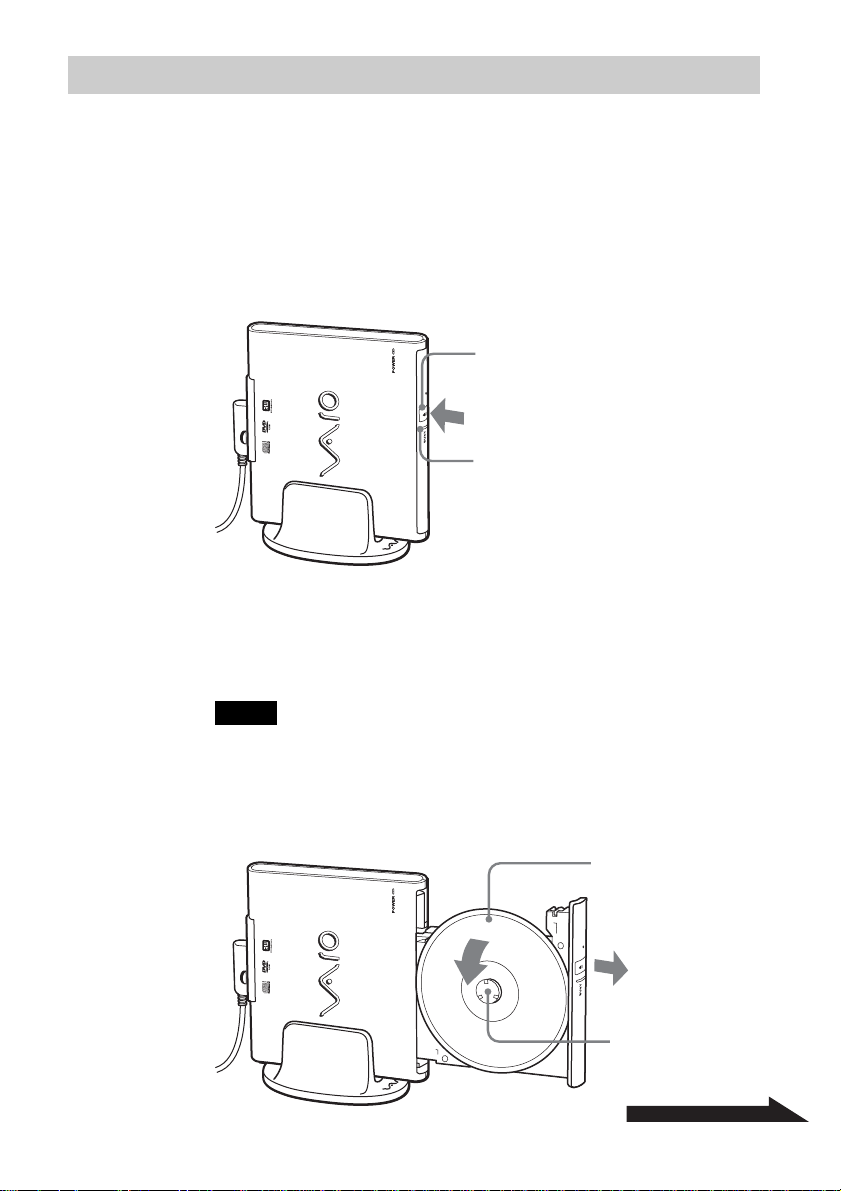
Removing a disc
z Hint
The illustrations show the drive in a vertical position, but operation is the same when the
drive is positioned horizontally.
1 Verify that the BUSY indicator is not flashing and press the
eject button.
The tray pops out.
2 Pull the tray fully out until it stops. While supporting the tray
with your hand, remove the disc.
To release the disc, push on the hub in the center.
Eject button
BUSY indicator
Notes
• Do not touch the lens assembly in the tray or the metal section on the rear.
• When using writing software or DVD playback software, you may not be able to
eject discs simply by pressing the eject button. For details, refer to Help or the
Quick Reference manual provided with the writing software or DVD playback
software.
Disc
Hub
Continued on next page
29
GB
Page 30
If the disc does not eject
1 Confirm that the BUSY indicator is not flashing.
2 Detach the manual eject pin from the holder at the bottom of
the drive, and insert the pin in the manual eject hole.
The tray pops out and you can remove the disc.
Manual eject hole
Manual eject pin
Transporting the unit (using the cable clip)
30
With the supplied cable clip, you can quickly and easily coil the VAIO
notebook peripheral cable (80 cm) or i.LINK cable into a neat loop for
transport as described below. When the drive is connected using the VAIO
notebook peripheral cable (80 cm), you only have to remove the connector
from the notebook. You can transport the drive with the cable attached.
Cable clip
GB
Page 31

Using the cable clip
1 Coil the VAIO notebook peripheral cable (80 cm) or i.LINK
cable as shown and slip the coil into the cable clip.
2 Push the sides of the cable clip together from the top and
bottom to lock the cable into the sides of the clip.
31
GB
Page 32

Installing the software
About the supplied software
The software below is installed from the supplied CD-ROM.
■ Click to DVD
Software that enables you to create your own original DVDs using video
captured with a Digital Video Camera Recorder or pictures and videos
stored on your notebook.
■ Drag’n Drop CD+DVD
This software is used to create data CD/DVD, music CDs, and CD/DVD
backups.
Installing and using Drag’n Drop CD+DVD
This software must only be used in conjunction with the product with
which this software is shipped.
If you attempt to use this software with other previously installed or add-on
products, we cannot guarantee the performance of the software, nor provide
support.
Before using this product, please first carefully read the software license
agreement.
32
■ SonicStage Ver.1.x DVD±RW Drive Support Update Program
Makes it possible to write a CD-R or CD-RW disc from SonicStage using
this drive.
GB
Page 33

Installing
Follow the procedure below to install the software.
Notes
• Log on to the computer as an “administrator” before installing the software.
• In order to use Click to DVD, you must first install Drag’n Drop CD+DVD.
• The SonicStage Ver.1.x DVD±RW Drive Support Update Program can only be
installed if Drag’n Drop CD+DVD and the SonicStage CD-R Writing Module are
already installed. The SonicStage CD-R Writing Module can be found on the Sony
applications CD-ROM supplied with your notebook.
• Shut down all other Windows applications before installing the software. Otherwise
installation may not complete normally.
• During installation, the notebook may seem to have stopped, but if the access indicator
on the drive or the hard disk indicator of the notebook is lit or flashing, the installation
is still in progress. Do not attempt to stop the installation or shut down the notebook.
Otherwise it may become impossible to install the software the next time and a
reinstallation of the operating system may become necessary.
• Before installing Drag’n Drop CD+DVD on a notebook where Drag’n Drop CD is
already installed, you must uninstall Drag’n Drop CD. To do this, proceed as follows.
On the [Start] menu, click [Control Panel] and click [Add or Remove Programs]. Select
Drag’n Drop CD from the list and click [Remove].
• The SonicStage Ver.1.x DVD±RW Drive Support Update Program will not be installed
if the existing SonicStage on the notebook is a newer version.
For Customers in the U.S.A. and Canada
1 Turn your notebook on, and prepare the drive for installation
as necessary.
To install the drive, see “Connecting the Drive” (page 15), and connect
the drive to your notebook.
2 Insert the supplied software CD-ROM into the drive you
prepared in step 1.
3 On the [Start] menu, click [My Computer], double-click
[Drive E*], open “Click to DVD”, and then double-click
“Setup.exe”.
* Drive E may have a different name depending on the notebook you are using.
4 Follow the on-screen instructions.
Continued on next page
33
GB
Page 34

5 On the [Start] menu, click [My Computer], double-click
[Drive E*], open “Drag’n Drop CD+DVD”, and then doubleclick “Setup.exe”.
* Drive E may have a different name depending on the notebook you are using.
6 Follow the on-screen instructions.
7 Restart your notebook after installing “Click to DVD” and
“Drag’n Drop CD+DVD” software.
8 On the [Start] menu, click [My Computer], double-click [Drive
E*], open “SonicStage Update Program”, and then doubleclick “Setup.exe”.
* Drive E may have a different name depending on the notebook you are using.
9 Click the [Start] button, point to [All Programs] and check
that “Click to DVD” and “Drag’n Drop CD+DVD” are
displayed.
For Customers in Europe
1 Turn on your notebook and prepare the drive for installation
as necessary.
To install the drive, see “Connecting the Drive” (page 15).
34
2 Insert the supplied software CD-ROM into the drive that you
prepared in step 1.
The installer starts.
Note
If the installer does not start automatically, on [Start] menu, click [My Computer],
and then double-click the drive labeled [PCGA-DDRW1].
3 Click [English].
4 Click [Install Drag’n Drop CD+DVD].
The Drag’n Drop CD+DVD setup starts.
GB
Page 35

5 Select [English] and click [OK].
Follow the instructions on the screen to proceed.
6 When it is displayed, click [Yes] to accept the license
agreement.
Follow the instructions on the screen to complete the setup.
7 When you are prompted, restart your notebook.
8 When your notebook restarts, on the [Start] menu, click
[My Computer], and then double-click the drive labeled
[PCGA-DDRW1].
9 Click [English].
10
Click [Install Click to DVD].
The Click to DVD setup starts. Follow the instructions on the screen to
complete the setup.
11
When the Click to DVD setup is complete, click [SonicStage
Update Program].
The installation wizard starts.
12
Click [Next].
Follow the instructions on the screen to complete the procedure.
13
When the procedure is complete, click [Exit] to close the
installer.
35
GB
Page 36

Precautions before use
Precautions when writing data
Please observe the following precautions when writing data to DVD+R,
DVD+RW, DVD-R, DVD-RW, CD-R, or CD-RW discs.
• Be sure to power the notebook from its AC adapter. Do not run the
computer on battery power.
• When inserting discs, do not touch the recording surface. Dirt on the
recording surface can impair data writing.
• While writing data and while inserting or removing discs, protect the
drive and the notebook from shocks and vibrations.
• Turn off the screen saver of the notebook. If the screen saver is activated
while writing data, the data transfer rate will drop considerably, which
can lead to loss of data.
• Make sure that your notebook’s power management function is not
enabled during data writing. Otherwise data transfer rate will become
extremely slow, resulting in data loss. For details of your notebook’s
power management settings, refer to the manuals provided with your
notebook.
• Do not disconnect or manually operate any devices (such as a Digital
Video Camera Recorder) connected to this drive while writing data to
DVD+R, DVD+RW, DVD-R, or DVD-RW discs.
• Installing or updating the driver during data writing can result in
operating problems.
• Do not disconnect devices such as USB equipment or PC cards while
writing data.
• Do not switch users while writing data. This may result in data loss.
• Avoid using any resident disc management utilities or utilities to speed
up disc access as these can impair operation stability and cause data loss.
• Writing to a CD-R or CD-RW with an operating speed of 1× or 2× is not
supported.
• Use CD-R discs that support a data writing speed of 8× or higher.
• Use CD-RW discs that support a data writing speed of 4× or higher.
• The use of High Speed CD-RW discs is supported.
36
GB
Page 37

• DVD+R, DVD+RW, DVD-R, DVD-RW, CD-R, or CD-RW discs
formatted with packet writing software such as “DirectCD” (including
commercially available preformatted discs) cannot be read in this drive.
• The use of Sony DVD+R, DVD+RW, DVD-R, DVD-RW, CD-R, or
CD-RW discs is recommended.
Precautions for using “Click to DVD”
• Close any other software (including software running in the background)
before using “Click to DVD” and “Drag’n Drop CD+DVD” to write
data.
• You should have at least 256 MB of RAM in your notebook when using
“Click to DVD” to write data. For details on expanding memory, refer to
the manuals provided with your notebook.
• To write data using “Click to DVD”, log on as a user with computer
administrator privileges.
• When writing data to DVD+R, DVD+RW, DVD-R, or DVD-RW discs,
the discs are written using the “Disc-at-once” function. Therefore, it is
not possible to add data to the disc later. For DVD+RW or DVD-RW
discs, you can rewrite the disc once you have deleted all the data on it.
• Writing to DVD+R, DVD+RW, DVD-R, or DVD-RW discs can vary
from a few hours to several dozen hours. The actual writing time depends
on the notebook model and the length of the source material.
• Because data is temporarily stored on your notebook’s hard disk when
using “Click to DVD Automatic Mode” to create a DVD video, there
must be enough free space on the hard disk. The values below are a
general guide for the amount of hard disk space used to create a DVD
video for different video recording lengths. Further, the video bit rate is
automatically adjusted according to the length of the recording.
Length of recording Hard disk space used Bit rate
30 minutes 6 GB 9 Mbps
60 minutes 10 GB 8 Mbps
80 minutes 10 GB 6 Mbps
120 minutes 10 GB 4 Mbps
Continued on next page
37
GB
Page 38

• With Click to DVD you can use the following file formats. For details,
refer to the Click to DVD help.
Video files: DV-AVI, MPEG1, MPEG2
Picture files: Bitmap, JPEG, TIFF
To display “Click to DVD” help, click the [Start] button, point to [All
Programs] and select [Click to DVD Help] from [Click to DVD].
• Because data is temporarily stored on your notebook’s hard disk when
using “Click to DVD” to create a DVD video, there must be enough free
space on the hard disk. The amount of hard disk space required varies
according to the length of the video and the video bit rate, as listed
below. (The values listed are not applicable to “Click to DVD Automatic
Mode”.)
When creating a DVD video from MPEG files
Time (4.6 Mbps) (6.4 Mbps) (8.1 Mbps)
60 minutes 5 GB 7 GB 10 GB
90 minutes 7 GB 10 GB –
120 minutes 10 GB ––
When creating a DVD video with video captured from a Digital Video
Camera Recorder
Time (4.6 Mbps) (6.4 Mbps) (8.1 Mbps)
30 minutes 9.75 GB 11.4 GB 12.3 GB
60 minutes 19.5 GB 22.8 GB 24.6 GB
90 minutes 29.25 GB 34.2 GB 36.9 GB
Bit rate Long Play Standard Play High Quality
Bit rate Long Play Standard Play High Quality
• Generally, the length of video file you can record on a single disc
depends on the video bit rate, as shown below.
Bit rate Approximate maximum recording time
4 Mbps About 120 minutes
6 Mbps About 90 minutes
8 Mbps About 60 minutes
38
GB
Page 39

Precautions for using “Drag’n Drop CD+DVD”
• Close any other writing software before using “Drag’n Drop CD+DVD”
to write data.
• When using “Drag’n Drop CD+DVD” to write data, you cannot use
DVD+R, DVD+RW, DVD-R, DVD-RW, CD-R, or CD-RW discs
preformatted with packet writing software such as “DirectCD” (including
commercially available preformatted discs). However, it is possible to
use preformatted DVD+RW, DVD-RW, and CD-RW discs by deleting
the format with the [Erase RW disc...] function in “Drag’n Drop
CD+DVD”. To use this function, right-click one of the “Drag’n Drop
CD+DVD” boxes, and select [Erase RW disc...] from the menu that
appears.
• When backing up rewritable DVD media, it is recommended that you use
the same DVD media type as a target. For details, refer to the Drag’n
Drop CD+DVD online help or the website.
• To play music CDs created on CD-R or CD-RW, equipment is required
that supports the playback of these types of media.
• When using DVD+R, DVD+RW, DVD-R, DVD-RW, DVD-ROM,
CD-R, CD-RW, or CD-ROM discs to copy data, only copy works for
which you own the copyright or have permission from the copyright
holder to duplicate the data.
z Registering Users
Follow the procedure below to register users in “Drag’n Drop CD+DVD”. Registering
users enables you to acquire more detailed information.
Click the [Start] button, point to [All Programs] and select [User registration & Support]
from [Drag’n Drop CD+DVD] (your notebook must be connected to the Internet to
register users).
“Drag’n Drop CD+DVD” Enquiries:
Easy Systems Japan Ltd.
Website: http://www.ddcd.jp/dd3e/sony/cd/
39
GB
Page 40

Playing an Audio CD
For users of notebooks with a built-in CD-ROM drive
Play the audio CD with the built-in drive of the notebook. For details, refer
to the manuals provided with your Sony computer.
For users of notebooks without a built-in CD-ROM drive
Audio CDs can be played through the speakers or headphone jack of the
notebook, simply by connecting this drive.
Playing a DVD video
Please refer to the manuals provided with your notebook for how to play
back DVD videos.
Notes about playing a DVD video
• Depending on the disc, there may be functional limitations, sound
interruptions, or dropped frames. Some discs may not play at all.
• During playback of DVD video discs, do not attempt to modify display
settings such as the resolution or colors. Doing so could destabilize the
operation of the notebook or make it impossible to modify settings. Always
close the DVD playback software before modifying display settings.
• During playback of some DVD video discs with high sound quality (20bit or 24-bit sampling), noise during playback or other problems may
occur. When playing such discs via the notebook connected to an audio
system, turn down the volume and test for normal playback first, in order
to prevent the possibility of damage to the speakers.
• When a DVD video disc is inserted in the drive, you cannot use the Jog
Dial™ control or the <Fn> key + <F7> or <F8> key combinations to
toggle between the LCD and a television monitor or other type of display.
• When using a PCG-C1M series notebook, a part of the image may be cut
off with some DVD video discs.
• When playing back a DVD video disc, use the software that is
preinstalled on the notebook.
• Do not press the eject button during playback of DVD video discs.
• Do not use a screen saver while playing a DVD video with DVD
playback software.
GB
40
Page 41

Notes about DVD video discs
Region code of playable DVD videos
Region code indications such as 1 are labeled on some DVD videos to
indicate which type of drive or player can play the discs. If this regional
code indication contains a number other than the one for your region or
you cannot play the disc in this drive. If you try to do so, a message will
appear indicating that playback is prohibited due to area limits.
Depending on the DVD video, there may be no region code indication
printed on the label even though playing the DVD video is prohibited due
to the area limits.
Note on playback operations of DVD videos
Some playback operations of DVD videos may be intentionally limited
by software producers. Since this drive plays DVD videos according to
the disc contents provided by the software producers, some playback
features may not be available. Also refer to the instructions supplied
with the DVD videos.
Symbols on DVD video discs
The following symbols are labeled on DVD video discs or their packages.
Each symbol details the contents or features recorded on the disc.
Depending on the DVD video, there may be no symbols or indications
printed on the label even though the disc has some contents or features.
For more information about these marks, see the instructions on the DVD
video discs.
ALL
,
Mark Meaning
Indicates the number of audio tracks.
Indicates the number of subtitles.
Indicates the number of angles.
Indicates the ratio of display aspects you can select.
Indicates region code.
16:9
3
2
3
LB
1
41
GB
Page 42

Performing a System Recovery on a Notebook
To reset your notebook using the drive, use the recovery disc provided with
the notebook.
About notebooks that you can recover
Notebooks that can be reset using this drive are Sony notebooks with the
Windows XP operating system preinstalled. However, if your notebook has
an integrated drive, use that drive to reset the notebook. (As of June, 2003)
For more details about resetting your notebook, refer to the manuals
provided with your notebook.
Notes
• Be sure to power the notebook from its AC adapter when performing a system
recovery. Do not run the notebook on battery power.
• If you use a notebook that cannot be reset using the VAIO notebook peripheral cable,
connect the supplied i.LINK cable and AC adapter to reset the notebook. See page 15
for connection details.
• Disconnect all other peripherals from the notebook and the drive before performing this
installation.
42
GB
Page 43

Precautions
Usage and storage
locations
Do not use or store this drive in locations
subject to high humidity, high
temperatures, strong vibrations, or direct
sunlight.
Operation
•
Do not move the drive during operation,
to prevent the possibility of
malfunctions.
• Place the drive on a level surface for
operation.
• Do not place any objects on top of the
drive.
• Protect the drive from sudden
temperature changes. Do not use the
drive immediately after moving it from
a cold to a warm location or after the
ambient temperature has risen
drastically. Otherwise, condensation
inside the drive can occur. If the
temperature changes drastically during
operation, stop using the drive while
keeping power to the drive turned on
and let it stand for about an hour, then
turn the power off.
Transportation
Bus Reset
The computer constantly monitors the
i.LINK connection status. When an
i.LINK compatible component is
connected to or disconnected from the
computer, or when power to an i.LINK
compatible component is turned on or off,
a bus reset is carried out to accommodate
the new condition. If a bus reset occurs
while data are being transferred to this
drive, the data may be corrupted or lost.
Be sure to avoid this condition.
Lens
Do not touch the lens in this drive.
Furthermore, to avoid dust sticking to the
lens, do not open the tray other than to
remove or insert the disc.
Notes on discs
Note the following in order to protect data
stored on discs.
• Do not stick any labels on the disc nor
scratch or otherwise damage the disc.
• Do not touch the data side of the disc
(opposite the label), and hold the disc as
shown below.
• When you transport the drive, use the
original box and packing materials.
• Before moving the drive, make sure you
remove the disc from the drive.
Continued on next page
GB
43
Page 44

• Do not store the disc in locations subject
to high humidity, high temperatures,
direct sunlight, or high levels of dust.
• Take care not to spill any liquid on the
disc.
• Return the disc to its case when not in
use in order to prevent data damage.
• Use an oil-based felt pen when writing
on a disc.
• Do not use a disc with tape, seals, or
paste on it, as the disc may damage the
drive.
Maintenance
Cleaning the cabinet
Wipe the outside of the drive with a soft,
dry cloth. To remove stubborn stains,
moisten the cloth with a mild, neutral
detergent. Do not use solvents, cleaning
alcohol, benzine or other substances that
may damage the finish.
Cleaning the lens
If you accidentally touch the lens with
dirty fingers or if dust on the lens prevents
the drive from operating properly, clean
the lens.
44
Lens
GB
Page 45

Cleaning the disc
• Fingerprints and other contamination on
the disc surface can lead to reading
errors. Always keep the disc clean.
• To clean the disc, lightly wipe it from
the center outwards.
• To remove stubborn stains, lightly
moisten the cloth before wiping the
disc, and use a dry cloth afterwards.
• Do not use benzine, record cleaning
liquid, antistatic fluids or other
substances that may damage the surface
of the disc.
• Never use cleaners on an unused disc.
Use specific CD cleaners to take off
dust.
• You may not be able to write on the
discs if there are scratches or dust on the
unrecorded area. Be careful not to
damage the discs.
Getting Help
This section provides information on how
to get help and support from Sony, and on
troubleshooting tips for your DVD±RW
drive.
About Sony’s support
options
Sony provides several support options for
your DVD±RW drive. When you have
questions about your DVD±RW drive or
the software, refer to the following:
❑This guide explains how to use your
DVD±RW drive.
For customers in the United
States and Canada
❑The Sony Customer Information
Service Center offers information
about your notebook and other Sony
products that work with your notebook.
To contact Sony Customer Information
Service Center, call 1-888-4SONYPC
(1-888-476-6972).
❑The Sony fax-back service provides
you with answers to frequently asked
questions. You can use this automated
service to request a list of available
topics and then select the topics that you
want to receive. To contact the Sony
fax-back service, call
1-888-4SONYPC (1-888-476-6972).
Continued on next page
GB
45
Page 46

❑The Sony e-mail support service
answers your questions by electronic
mail. Just send your question in an
e-mail message, and a customer service
representative will send you a reply. To
send a question to Sony e-mail support,
address the message to
SOS@info.sel.sony.com.
For customers in Europe
❑VAIO-Link. For addresses and
numbers, refer to your Customer
Service Guide.
For customers in other regions
❑VAIO Website provides Frequently
Asked Questions and solutions.
vaio-online.sony.com/
Specifications
Compatible discs
DVD+R
DVD+RW
DVD-R
DVD-RW
DVD-ROM
DVD-Video
CD-R
CD-RW (Ultra Speed CD-RW not supported)
CD-ROM
CD-DA (audio CD)
CD Extra (CD+)
CD TEXT
Photo CD
Disc diameter: 12 cm
8 cm (reading only)
Drive performance
Data transfer rate
Data read
DVD+R/DVD+RW: max. 2× speed
DVD-R/DVD-RW: max. 2× speed
DVD-ROM: max. 5× speed
CD-R/CD-ROM: max. 24× speed
Data write
DVD+R/DVD+RW: max. 2× speed
DVD-R/DVD-RW: 1× speed
CD-R: max. 16× speed
CD-RW: max. 8× speed
(DVD: 1× speed = 1350 KB/s, CD: 1× speed =
150 KB/s)
Multi-session supported, 12/8 cm tray type
Laser diode properties
Laser output CD: 180 µW
DVD: 74.1 µW
Wavelength CD: 784 nm
DVD: 658 nm
46
GB
Page 47

Connectors
Other specifications
i.LINK (IEEE 1394) S400 (4-pin) connector (2)
S400 = 400 Mbps
DC IN (1)
VAIO Notebook peripheral device DC IN (1)
Operating environment
Operating temperature
41°F to 95°F (5°C to 35°C)
(temperature gradient less than 18°F (10°C)/hour)
Operating humidity
20% to 80% (no condensation),
provided that humidity is less than 65% at 95°F
(35°C)
(hygrometer reading of less than 84°F (29°C))
Storage temperature
–4°F to 140°F (–20°C to 60°C)
(temperature gradient less than 18°F (10°C)/hour)
Storage humidity
20% to 90% (no condensation),
provided that humidity is less than 20% at 140°F
(60°C)
(hygrometer reading of less than 95°F (35°C))
Power consumption
Read/write: approx. 8 W
Dimensions
Approx. 5.7 × 0.9 × 6.1 inches
(144 × 21 × 154 mm) (w × h × d)
(maximum dimensions including protruding parts)
Mass
Approx. 14.5 oz. (410 g) (main unit only)
Design and specifications are subject to change
without notice.
AC adapter*
Power requirements
100-240 V AC, 50/60 Hz
Output voltage and current
10 V, 1.5 A (max.)
* Not included in some product configurations
47
GB
Page 48

Troubleshooting
If a problem occurs during operation of the unit, refer to the information
provided in this section and in your Sony notebook documentation. If the
problem persists, consult your nearest Sony dealer. For contact information,
see “Getting Help” on page 45. Also refer to the manuals provided with
your notebook.
Symptom Cause/Remedy
Tray does not open
when eject button on
unit is pressed.
Tray does not open
when eject button in
software application is
clicked.
Tray is not locked.
Tray locks then opens
again.
c If the drive is connected with the VAIO notebook
peripheral cable (80 cm), make sure that the cable is
connected correctly to the connector on the notebook, and
the notebook is turned on.
c If the drive is connected with an i.LINK cable, make sure
that the AC adapter and i.LINK cable are connected
correctly, and the notebook is turned on.
c In some cases, the tray does not open when the eject
button is pressed. For information on how to remove the
disc, see “Removing a disc” on page 29.
c The software may be inhibiting disc access. For
information on how to remove the disc, see “Removing a
disc” on page 29.
c Push tray in fully.
c Make sure that the disc is inserted with the label side
facing up.
c The disc or lens may be dirty. Clean as described on page
44.
c The disc may be damaged. To confirm that the drive is not
malfunctioning, insert another disc.
c There may be condensation in the drive or the disc.
Remove the disc and allow the unit to stand for
approximately one hour.
48
GB
Page 49

Symptom Cause/Remedy
Drive is not detected
by the notebook.
No sound from audio
CD.
Sound skips during
audio CD playback.
c The drive may not be connected correctly to the notebook
via i.LINK. See “Connecting the Drive” on page 15.
c The operating system is not Windows XP.
c To reset the i.LINK interface, shut down your Windows
operating system, turn the notebook off, disconnect the
power cord, and then reconnect and turn the power back on.
c If there are notebooks connected to both i.LINK connectors
on the drive, the drive may not function properly and data
reading and writing may not be possible. Disconnect the
unused notebook from the drive, and reconnect correctly
(see page 26).
c Some types of notebook cannot exchange data with the
drive. For details, see “Compatible notebooks” (page 8)
and the manuals provided with your Sony notebook.
c Disconnect the i.LINK cable and then reconnect it. If there
is still no communication with the drive, restart the
notebook.
c Depending on network settings, communications with the
drive may be cut after the notebook is released from sleep
mode. If this happens, configure your notebook so that it
does not switch into sleep mode. (For details, refer to the
manuals provided with your Sony notebook.)
c The volume control of the notebook may be set to “Mute”.
(For details, refer to the manuals provided with your Sony
notebook.)
c The volume control of the computer may be set too low.
(For details, refer to the manuals provided with your Sony
notebook.)
c The disc may be scratched or dirty. Clean the disc or use
another disc (see page 45).
c Another application may be running. Shut down the other
application.
c The power management function of the notebook may be
active. Check the CPU speed setting. (For details, refer to
the manuals provided with your Sony notebook.)
Continued on next page
GB
49
Page 50

Symptom Cause/Remedy
Disc is inserted but
sound skips or data
cannot be read.
Data transfer rate is
low.
Notebook to which
this drive is connected
does not go into power
saving mode.
DVD+R, DVD+RW,
DVD-R, DVD-RW,
CD-R, or CD-RW
data reading or data
writing failure.
c Make sure that the disc is inserted with the label side facing
up.
c The type of disc may not be compatible with this drive.
c
The disc or lens may be dirty. Clean as described on page 44.
c The disc may be damaged. To confirm that the drive is not
malfunctioning, insert another disc.
c The disc tray may be dirty.
c There may be condensation in the drive or the disc.
Remove the disc and allow the unit to stand for
approximately one hour.
c The power management function of the notebook may be
active.
Check the CPU speed setting. (For details, refer to the
manuals provided with your Sony notebook.)
c When the drive is operating, the notebook may not go into
power saving mode.
To ensure a stable operation of the drive, set up the
notebook so that power saving modes will not be enabled.
(For details, refer to the manuals provided with your Sony
notebook.)
c See “Precautions when writing data” on page 36.
c A bus reset may have occurred during the writing process.
For information, see “Bus Reset” on page 43.
c If writing fails due to a shortage of virtual memory in your
notebook, increase the amount of virtual memory, and then
rewrite the data.
To increase the amount of virtual memory, do the following:
1 On the [Start] menu, click [Control Panel], click
[Performance and Maintenance], and then click
[System].
2 Click the [Advanced] tab, and then click [Settings] in
[Performance].
3 Click the [Advanced] tab, and then click [Change] in
[Virtual Memory].
4 Increase the value of [Custom size].
c Frame drop may can occur if your hard disk is not
optimized. If this happens, optimize your hard disk.
To optimize your hard disk, do the following:
1 Click the [Start] button, and then click [My Computer].
2 Right-click the icon for the drive you want to optimize,
and then click [Properties].
3 Click the [Tools] tab, and click [Defragmentation].
50
GB
Page 51

Symptom Cause/Remedy
Cannot write data.
c If this drive has not been recognized correctly by the
notebook, normal read/write operation is not possible.
See the section “Drive is not detected by notebook” on
page 49.
c If the supplied software has not been installed correctly,
writing is not possible.
c If the drive was brought from a cold to a warm location,
condensation may have formed inside the drive. Allow
the unit to stand for a while.
c If a CD-R or CD-RW was written with “Drag’n Drop
CD+DVD”, it is not possible to add data after:
• Creating a music CD with the “Music” box.
• Creating a DVD or CD backup with the “DISC
Backup” box.
• Selecting “Close disc” in the “DATA DISC Options”.
c The DVD+R, DVD+RW, DVD-R, DVD-RW, CD-R, or
CD-RW disc may already be full. If a disc is full, you
cannot add data.
c You cannot write data to DVD+RW, DVD-RW, or CD-R
discs to which data writing ended in failure. Delete the
data and then rewrite the disc.
Follow the procedure below to delete data from
DVD+RW, DVD-RW, or CD-RW disc (Use “Drag’n
Drop CD+DVD”).
1 Close all applications other than “Drag’n Drop CD”,
then insert the disc that you want to clear into the
drive.
2 Right-click over the “Drag’n Drop CD+DVD” box,
and then select “Erase RW disc”.
3 Select “Quick erase” or “Full erase”, and then click the
“OK” button.
c You cannot reuse DVD+R, DVD-R, or CD-R discs to
which data writing ended in failure.
c Make sure that the disc has been inserted correctly, with
the side to be played facing down.
Continued on next page
GB
51
Page 52

Symptom Cause/Remedy
Cannot play
DVD-ROM or
DVD video.
Cannot perform
notebook recovery.
Dropped frames
during DVD playback.
The video control
button on the Digital
Video Camera
Recorder does not
work.
Nothing happens even
with the camera power
switch set to “Video”
or “Camera”.
The Digital Video
Camera Recorder %
or icons flash, and
nothing works except
the cassette eject
switch.
c The region code of the DVD does not match the region
code of the drive. This drive is set to region code 1 (USA,
Canada) or 2 (Europe) at the factory. It can play only discs
with the region codes “1”, “2” or “ALL”. For details, see
“Notes about DVD video discs” on page 41.
c If the DVD-ROM is dirty, carefully wipe it with a soft
cloth. For information on disc maintenance, see “Cleaning
the disc” on page 45.
c The notebook model may not support recovery of the
operating system using this drive. For details, see
“Performing a System Recovery on a Notebook” on page
42.
c Make sure that the inserted disc is the recovery CD that
came with the notebook.
c The power management function of the notebook may be
active.
Check the CPU speed setting. (For details, refer to the
manuals provided with your Sony notebook.)
c Set the power switch to “Video”. (For details, refer to the
manual provided with your Digital Video Camera
Recorder.)
c The AC adapter/charger may be unplugged from the power
outlet. Confirm that the plug is correctly inserted into the
power outlet.
c Set the AC adapter/charger mode switch to “VCR/Camera/
Player”. (For details, refer to the manual provided with
your Digital Video Camera Recorder.)
c There might not be a battery in the camera, or the battery
has run out or nearing the end of its charge. Replace the
battery with a fully charged one.
c There might be condensation in the Digital Video Camera
Recorder. Remove the cassette, leave the Digital Video
Camera Recorder for one hour, and then replace the
cassette.
52
GB
Page 53

Symptom Cause/Remedy
The Digital Video
Camera Recorder
connected to this drive
cannot be used. Or, a
message appears on
the notebook
indicating that the
Digital Video Camera
Recorder is either
powered off or is not
operating.
c Make sure the Digital Video Camera Recorder’s power is
turned on and the cables are properly connected. For
details, see “Connecting a Digital Video Camera Recorder”
(page 21) or the manuals provided with your notebook.
c The i.LINK interface is designed to support multiple
connection of peripheral devices, but some devices can
cause instability when there is more than one device
connected. Turn off the power to all connected devices,
unplug any unstable devices, check the cable connections
and then turn the power back on.
c Disconnect the i.LINK cable, turn off the Digital Video
Camera Recorder’s power, then turn the power back on.
Preinstalled notebook software may not recognize
MICROMV or analog type cameras. For details, see
“Connecting a Digital Video Camera Recorder” (page 21)
or the manuals provided with your notebook.
Click to DVD
Symptom Cause/Remedy
Cannot capture video
from an external
device.
Cannot use video files.
c Make sure the device is properly connected to your
notebook. (For details, refer to the manuals provided with
the device and your notebook.) With a Digital Video
Camera Recorder to the drive, see “Connecting a Digital
Video Camera Recorder” (page 21) .
c Disconnect all devices, restart the notebook and then
reconnect correctly.
c Because video data captured from an external device with
“Click to DVD” is temporarily stored on your hard disk,
capturing video data might not be possible if there is not
enough free space on the hard disk. To avoid this, check
your hard disk and delete any unnecessary files. Also,
change the “Click to DVD” settings so that the temporary
files are saved in a different location. Refer to “Click to
DVD” help for details.
c With Click to DVD you can only use the following video
file formats: DV-AVI, MPEG1, MPEG2.
c You cannot use combinations of video files in different
formats. Write different file formats separately.
Continued on next page
GB
53
Page 54

Symptom Cause/Remedy
Cannot write to DVD
disc
Music tracks on DVD
discs you create do not
replay.
Frame drop occurs
when playing a DVD
that you have created.
Cannot start Click to
DVD.
Unable to install Click
to DVD.
c The DVD+R, DVD+RW, DVD-R, or DVD-RW disc you
are using may already contain data. You cannot add data to
such discs.
c You should have at least 256 MB of RAM in your
notebook when using “Click to DVD” to write data. For
details on expanding memory, refer to the manuals
provided with your notebook.
c You cannot add data to DVD+R, DVD+RW, DVD-R, or
DVD-RW discs that already have data on them.
c To write data using “Click to DVD”, log on as a user with
computer administrator privileges.
c If you create a DVD that contains only a small amount of
video/picture data, the music tracks specified when you
created the DVD might not play normally.
c Frame drop can occur if there is too much workload on
your notebook. To solve the problem, do the following:
• Disconnect all external devices except your digital video
camera recorder.
• Close all applications except “Click to DVD and “Drag’n
Drop CD+DVD”.
• Optimize (defragment) all available hard disk.
For details, refer to “Click to DVD” help.
c An old version of PXEngine (the burning engine) is being
used. Please install Drag’n Drop CD+DVD in order to
install an updated version of the engine.
c PXEngine (the burning engine) is missing. Install Drag’n
Drop CD+DVD before installing Click to DVD.
54
GB
Page 55

Page 56

ACHTUNG
Zur Vermeidung von Feuer und
elektrischen Schlägen das Gerät
weder Regen noch Feuchtigkeit
aussetzen.
Zur Vermeidung eines
elektrischen Schlags das
Gehäuse nicht öffnen.
Reparaturarbeiten sind
ausschliesslich von Fachpersonal
durchzuführen.
• Verwenden Sie dieses Produkt ausschließlich mit
dem mitgelieferten Netzteil.
• Zur vollständigen Trennung dieses Geräts vom Netz
ist der Netzadapter aus der Netzsteckdose zu
ziehen.
• Bitte achten Sie darauf, daß die Netzsteckdose
leicht zugänglich ist.
Vorsicht
Die Verwendung optischer Instrumente zusammen
mit diesem Produkt stellt ein Gesundheitsrisiko
für die Augen dar.
Der Laser-Strahl, den dieses Gerät erzeugt, kann
die Augen schädigen. Versuchen Sie daher nicht,
das Gerät zu zerlegen. Überlassen Sie
Wartungsarbeiten stets nur qualifiziertem
Fachpersonal.
GEFAHR - SICHTBARE UND
UNSICHTBARE LASERSTRAHLUNG BEI GEÖFFNETEM
GEHÄUSE.
NICHT DIREKT DEM LASERSTRAHL AUSSETZEN.
Für Kunden in Europa
Dieses Produkt entspricht den folgenden
europäischen Richtlinien: 73/23/EWG
(Niederspannungs-Richtlinie), 89/336/EWG, 92/
31/EWG (EMV-Richtlinien), 93/68/EWG (CEZeichen).
Dieses Gerät entspricht den europäischen Normen
EN55022 Klasse B und EN55024 für die
Verwendung in folgenden Gebieten:
Wohngebiete, Gewerbegebiete und
Leichtindustriegebiete.
Bild-und Tonstörungen können auftreten, wenn
das Gerät in der Nähe von elektromagnetischen
Störquellen betrieben wird.
Anhand von Tests wurde sichergestellt, dass
dieses Gerät bei einem Anschlusskabel, das kürzer
als 3 m ist, die EMV-Richtlinien erfüllt.
• Das Netzteil wird mit einem Netzkabel für
Großbritannien und einem Netzkabel für
Kontinentaleuropa geliefert.
• Verwenden Sie das Netzkabel für Großbritannien
nur in Großbritannien. Das Netzkabel für
Kontinentaleuropa können Sie in allen anderen
europäischen Ländern verwenden.
Das DVD±RW-Laufwerk wurde als
LASERPRODUKT KLASSE 1 eingestuft und
entspricht dem europäischen Sicherheitsstandard
für Laserprodukte EN 60825-1.
Reparatur und Wartung dürfen nur vom SonyKundendienst durchgeführt werden. Nicht
ordnungsgemäß ausgeführte Reparaturen können
Ihre Sicherheit gefährden.
CLASS 1
LASER PRODUCT
TO EN 60825-1
Bevor Sie mit dem PCGA-DDRW1 arbeiten, lesen
Sie bitte unbedingt den mitgelieferten
Endbenutzerlizenzvertrag.
• Die Software und das mitgelieferte Handbuch
sind urheberrechtlich geschützt. Ohne die
Zustimmung des Urheberrechtsinhabers dürfen
sie weder ganz noch auszugsweise reproduziert
werden, und die Software darf nicht verliehen
werden.
• Unter keinen Umständen haftet SONY für
irgendwelche finanziellen Schäden oder
entgangenen Gewinn, einschließlich aller
Ansprüche Dritter, die auf die Verwendung der
mit dem Laufwerk gelieferten Software
zurückgehen.
DE
2
Page 57

• Wenn an diesem Produkt aufgrund eines
Fabrikationsfehlers ein Problem auftritt, wird
das Produkt von SONY ersetzt. Weitergehende
Haftungsansprüche gegenüber SONY bestehen
nicht.
• Die mit diesem Laufwerk gelieferte Software
kann nicht mit anderen Laufwerken eingesetzt
werden.
• Wir sind um eine stetige Verbesserung unserer
Produkte bemüht. Beachten Sie deshalb bitte,
dass sich die Software-Spezifikationen ohne
Ankündigung ändern können.
• Das Erstellen von Kopien von CD-ROMs,
DVD-ROMs, DVD-Videos oder Musik-CDs
bzw. deren Verwendung kann einen Verstoß
gegen Urheberrechte oder Bestimmungen der
mit den CDs/DVDs gelieferten
Endbenutzerlizenzverträge darstellen. Achten
Sie beim Erstellen von CDs und DVDs bzw.
beim Verwenden von Original-CDs und -DVDs
darauf, nicht gegen das Urheberrecht oder die
Bestimmungen des Endbenutzerlizenzvertrags
zu verstoßen.
Wenn Sie Fragen zum Urheberrecht bzw. zu den
Bestimmungen des Endbenutzerlizenzvertrags
haben, wenden Sie sich bitte an einen
Rechtsexperten.
• Der Betrieb des Laufwerks mit anderer als der
mitgelieferten Software ist durch die Garantie
nicht abgedeckt.
• VAIO und sind eingetragene
Warenzeichen der Sony Corporation.
• Microsoft und Windows sind eingetragene
Warenzeichen der Microsoft Corporation in den
USA und/oder anderen Ländern.
• i.LINK™ bezieht sich auf IEEE 1394-1995 und
IEEE 1394a-2000. i.LINK und das i.LINKLogo „ “ sind Warenzeichen der Sony
Corporation.
• Click to DVD ist ein Warenzeichen der Sony
Corporation.
• Copyright © 2001 DigiOn, Inc., und Easy
Systems Japan, Ltd. Alle Rechte vorbehalten.
Drag’n Drop CD+DVD ist ein Warenzeichen
der Easy Systems Japan, Ltd., und DigiOn, Inc.
• Alle anderen System-, Produkt- und
Dienstleistungsnamen sind Warenzeichen der
jeweiligen Eigentümer. In diesem Handbuch
sind die Warenzeichen nicht mit dem Zeichen
™ bzw. ® markiert.
In dieser Anleitung werden Microsoft® Windows
XP Home Edition und Microsoft® Windows® XP
Professional als Windows XP bezeichnet.
®
DE
DE
3
Page 58

Inhalt
Übersicht................................................. 5
Kompatible Notebooks .................. 6
Geeignete Datenträger.................... 7
Mitgeliefertes Zubehör ......................... 10
Lage und Funktion der Teile und
Bedienelemente................................ 11
Aufstellen des Laufwerks ..................... 12
Vertikale Aufstellung ................... 12
Anschließen des Laufwerks.................. 13
Anschließen des Laufwerks an das
Notebook mit dem mitgelieferten
Peripheriegerätekabel ............... 15
Anschließen des Laufwerks an das
Notebook mit dem mitgelieferten
i.LINK-Kabel............................ 17
Anschließen einer digitalen
Videokamera............................. 19
Einschränkungen (Beispiel für
fehlerhafte Anschlüsse) ............ 24
Abnehmen des Laufwerks vom
Notebook .................................. 24
Grundfunktionen................................... 25
Informationen zur
Energiesparfunktion ................. 25
Einlegen einer CD/DVD .............. 25
Herausnehmen einer CD/DVD .... 27
Transportieren des Geräts
(mit der Kabelklemme)............. 28
Installieren der Software....................... 30
Die mitgelieferte Software ........... 30
Installation.................................... 31
Sicherheitshinweise zur Verwendung.... 34
Sicherheitshinweise zum Schreiben
von Daten.................................. 34
Wiedergeben einer Audio-CD .............. 38
Wiedergeben eines DVD-Videos ......... 38
Hinweise zur Wiedergabe von
DVD-Videos............................. 38
Hinweise zu DVD-Videos............ 39
Ausführen einer Systemwiederherstellung
auf einem Notebook......................... 41
Sicherheitsmaßnahmen......................... 42
Wartung ................................................ 43
Hilfeinformationen und technische
Unterstützung................................... 44
Technische Daten ................................. 45
Störungsbehebung ................................ 47
DE
4
Page 59

Übersicht
Bei diesem Produkt handelt es sich um ein DVD±RW-Laufwerk, das mit
i.LINK
zeichnet sich durch folgende Merkmale und Funktionen aus:
• Unterstützt 2fache Schreibgeschwindigkeit bei DVD+Rs (2700 KB/s).
• Unterstützt 2fache Schreibgeschwindigkeit bei DVD+RWs (2700 KB/s).
• Unterstützt 1fache Schreibgeschwindigkeit bei DVD-Rs (1350 KB/s).
• Unterstützt 1fache Schreibgeschwindigkeit bei DVD-RWs (1350 KB/s).
• Unterstützt 16fache Schreibgeschwindigkeit bei CD-Rs (2400 KB/s).
• Unterstützt 8fache Schreibgeschwindigkeit bei CD-RWs (1200 KB/s).
• Kann DVD+Rs, DVD+RWs, DVD-Rs, DVD-RWs, DVD-ROMs,
CD-Rs, CD-RWs, und CD-ROMs lesen. DVD-ROMs werden maximal
mit 5facher Geschwindigkeit gelesen (6750 KB/s), CD-ROMs maximal
mit 24facher Geschwindigkeit (3600 KB/s).
• Horizontal und vertikal aufstellbar (siehe Seite 12).
• Wenn das verwendete Notebook mit einem Anschluss DC OUT für
VAIO
Laufwerk über das VAIO Notebook-Peripheriegerätekabel (80 cm)
anschließen, so dass es über das Notebook mit Strom versorgt wird (siehe
Seite 13).
• Eine digitale Videokamera mit einem DV-Anschluss kann an das
Laufwerk angeschlossen und das mit dem digitale Videokamera
aufgenommene Bild kann zum Erstellen eigener Original-DVD-Videos
verwendet werden. Die entsprechende DVD-Videosoftware wird
mitgeliefert (siehe Seite 30).
•Über die Lautsprecher des Notebooks können digitale Audio-CDs
wiedergegeben werden, sofern das Notebook dies unterstützt (siehe Seite
38).
• Das Laufwerk ermöglicht die problemlose Neuinstallation des
Betriebssystems auf dem Notebook mit Hilfe einer WiederherstellungsDisc, sofern das Notebook dies unterstützt (siehe Seite 41).
TM
- (IEEE 1394) Schnittstelle kompatibel ist. Das Laufwerk
®
Notebook-Peripheriegeräte ausgestattet ist, können Sie das
Hinweis
Dieses Laufwerk ist nur für den Gebrauch in dem Land bestimmt, in dem Sie es erworben
haben.
Bitte wenden
DE
5
Page 60

z Was ist i.LINK™?
i.LINK ist eine digitale, serielle Schnittstelle, die sehr hohe Übertragungsraten unterstützt.
Sie erleichtert den Austausch umfangreicher digitaler Audio- und Videodaten zwischen
Komponenten, die mit einem i.LINK-Anschluss ausgestattet sind, und ermöglicht die
Steuerung angeschlossener Komponenten. Einzelheiten dazu finden Sie in der
Dokumentation zu Ihrem Notebook von Sony.
Kompatible Notebooks
Dieses Laufwerk kann mit Sony VAIO-Notebooks* mit dem
Betriebssystem Microsoft
®
Windows® XP verwendet werden.
(Stand: Juni 2003)
* Dies gilt nicht fur Modelle mit integrierten DVD-RW- oder DVD±RW-Laufwerken.
Hinweise
• Dieses Laufwerk ist ausschließlich für Computer der VAIO-Serie von Sony geeignet.
• Dieses Laufwerk unterstützt nicht Microsoft® Windows® Millennium Edition,
Microsoft® Windows® 2000 Professional, Microsoft® Windows® 98 Second Edition
oder frühere Versionen des Windows®-Betriebssystems.
• Dieses Laufwerk unterstützt den DTLA-Kopierschutz nicht. Es kann nicht zusammen
mit digitalen CS-Tunern, D-VHS-Recordern oder anderen Geräten verwendet werden,
die mit dem DTLA-Kopierschutzsystem arbeiten.
• Wie dieses Laufwerk angeschlossen wird, hängt jeweils vom Modell des Notebooks ab.
Einzelheiten dazu finden Sie unter „Anschließen des Laufwerks“ auf Seite 13.
• Dieses Laufwerk kann unter Verwendung einer Wiederherstellungs-Disc für eine
Systemwiederherstellung verwendet werden. Informationen zu Modellen, bei denen
eine Wiederherstellung möglich ist, finden Sie unter „Ausführen einer
Systemwiederherstellung auf einem Notebook“ auf Seite 41.
DE
6
Page 61

Geeignete Datenträger
• DVD+R
Einmal beschreibbare Datenträger zum Speichern von Computerprogrammen, Daten, Videodaten usw. Beachten Sie bitte, dass DVD+R und
DVD-R jeweils einen eigenen Standard darstellen. Auf einer DVD+R
können bis zu 4,7 GB Daten gespeichert werden, etwa 7 Mal mehr als auf
einer CD-R.
• DVD+RW
Datenträger zum Speichern von Computerprogrammen, Daten, Videodaten
usw. Der Inhalt dieser Datenträger kann viele Male gelöscht und
überschrieben werden. Beachten Sie bitte, dass DVD+RW und DVD-RW
jeweils einen eigenen Standard darstellen. Auf einer DVD+RW können bis
zu 4,7 GB Daten gespeichert werden, etwa 7 Mal mehr als auf einer
CD-RW.
• DVD-R
Einmal beschreibbare Datenträger zum Speichern von Computerprogrammen, Daten, Videodaten usw. Auf einer DVD-R können bis zu 4,7
GB Daten gespeichert werden, etwa 7 Mal mehr als auf einer CD-R.
• DVD-RW
Datenträger zum Speichern von Computerprogrammen, Daten, Videodaten
usw. Der Inhalt dieser Datenträger kann viele Male gelöscht und
überschrieben werden. Auf einer DVD-RW können bis zu 4,7 GB Daten
gespeichert werden, etwa 7 Mal mehr als auf einer CD-RW.
• DVD-ROM
Nur-Lese-Datenträger mit einer hohen Datenkapazität.
• CD-R
Einmal beschreibbare Datenträger zum Speichern von Computerprogrammen und Daten. Von diesen Datenträgern können Daten nach dem
Schreiben nicht mehr gelöscht werden. Je nach Schreibmethode können
Daten jedoch hinzugefügt werden, sofern noch genug Platz vorhanden ist.
• CD-RW
Wiederbeschreibbare Datenträger zum Speichern von Computerprogrammen und Daten. Der Inhalt dieser Datenträger kann viele Male
gelöscht und überschrieben werden.
Bitte wenden
DE
7
Page 62

• CD-ROM
Datenträger, die nur gelesen werden können und auf denen Sie keine Daten
schreiben können. Viele Computerprogramme, Spiele usw. werden auf
solchen CD-ROMs geliefert.
Mit diesem Laufwerk können Sie alle Datenträger mit folgenden
Kennzeichnungen verwenden.
Datenträgertyp Kennzeichnung
*1 *3
DVD+R
DVD+RW
*1 *2 *3
DVD-R
DVD-RW
DVD-ROM
DVD-Video
CD-R
*4
CD-RW
CD-ROM
Audio CD
*1 *3
*1 *2 *3
CD EXTRA
CD TEXT
Foto-CD ————
DE
8
Page 63

*1 Je nach dem Datenträger, den Einstellungen und dem System ist die Wiedergabe
unter Umständen nicht möglich.
*2 Bei DVD-Rs verwenden Sie bitte DVD-R, Version 2.0 oder höher.
DVD-R für Authoring ist nicht kompatibel.
Bei DVD-RWs verwenden Sie bitte DVD-RW, Version 1.1 oder höher.
*3 Aufnahmen im DVD-Videoformat sind möglich. Das VR-Format (Video Recording)
wird nicht unterstützt.
*4 Ultra Speed-CD-RWs werden nicht unterstützt.
Die folgenden Datenträger sind für dieses Laufwerk nicht geeignet:
• DVD-RAM
• DDCD (CD-R/CD-RW mit doppelter Dichte)
Hinweise
• Verwenden Sie in diesem Laufwerk ausschließlich runde Discs. Verwenden Sie keine
anders geformten Discs, zum Beispiel Discs in Form eines Sterns oder Herzens.
Andernfalls kann das Laufwerk beschädigt werden.
• Verwenden Sie keine zerkratzten oder beschädigten Discs. Andernfalls kann das
Laufwerk beschädigt werden.
• Wenn Sie Foto-CDs verwenden wollen, muss eine spezielle Front-end-Software zum
Suchen oder Zugreifen auf solche Datenträger auf dem Notebook installiert werden.
• Auf CD-Rs erstellte Musik-CDs können auf einigen Typen von CD-Playern nicht
wiedergegeben werden. Auf CD-RWs erstellte Musik-CDs können auf herkömmlichen
CD-Playern nicht wiedergegeben werden. Verwenden Sie zur Wiedergabe solcher CDs
ein Laufwerk, das CD-RWs unterstützt.
• Wenn Sie Datenträger mit Programmdaten wiedergeben lassen wollen, muss die auf
dem Notebook installierte Wiedergabesoftware den Datenträgertyp unterstützen.
Einzelheiten dazu finden Sie in der Dokumentation zu der Wiedergabesoftware.
• Auf einigen Typen von DVD-Playern können auf DVD+Rs, DVD+RWs, DVD-Rs
bzw. DVD-RWs erstellte DVD-Videos nicht wiedergegeben werden.
• Dieses Laufwerk verwendet zur Wiedergabe von DVD-Videos spezielle Software. Je
nach Typ der verwendeten Datenträger sind bestimmte Funktionen möglicherweise
eingeschränkt und eine normale Wiedergabe ist unter Umständen nicht möglich.
DE
9
Page 64

Mitgeliefertes Zubehör
Vergewissern Sie sich nach dem Auspacken, dass alle unten aufgeführten
Zubehörteile mitgeliefert wurden. Sollten Teile fehlen, wenden Sie sich
bitte an den Sony-Händler, bei dem Sie dieses Produkt erworben haben,
oder an den örtlichen Sony-Kundendienst.
• DVD±RW-Laufwerk (1) • Software-CD-ROM (1)
• VAIO Notebook-Peripheriegerätekabel • i.LINK-Kabel (1)
(80 cm) (1)
• Netzteil (1)
10
• Ständer für vertikale Aufstellung (1) • Kabelklemme (1)
• Auswurfstift (1)
(angebracht an der Unterseite
des Laufwerks)
* Ein geeignetes Netzkabel ist für Ihr Land bzw. Ihre Region mitgeliefert. Wenn die
Packung zwei Netzkabel enthält, verwenden Sie das, welches der vorhandenen
Netzsteckdose entspricht.
DE
• Netzkabel (1 oder 2*)
• Bedienungsanleitung zum
DVD±RW-Laufwerk (1)
• Garantiekarte (1)
Page 65

Lage und Funktion der Teile und Bedienelemente
Vorderseite
1 Netzanzeige POWER
2 Öffnung zum manuellen
Auswerfen
3 Auswurftaste
4 Anzeige BUSY
Rückseite
5 Gleichstromeingang DC IN
6 Bohrung für VAIO Notebook-
Peripheriegerätekabel
7 Anschluss DC IN für VAIO
Notebook-Peripheriegeräte
Unterseite
8 i.LINK-Anschluss
9 i.LINK-Anschluss
0 Auswurfstift (siehe Seite 28)
11
DE
Page 66

Aufstellen des Laufwerks
Dieses Laufwerk kann horizontal oder vertikal aufgestellt werden. Wenn
Sie das Laufwerk vertikal aufstellen, können Sie möglicherweise Platz
sparen.
Vertikale Aufstellung
Verwenden Sie zum vertikalen Aufstellen des Laufwerks den für diesen
Zweck mitgelieferten Ständer. Richten Sie das Laufwerk wie in der
Abbildung unten gezeigt aus und setzen Sie es in den Ständer für vertikale
Aufstellung ein. Schieben Sie das Laufwerk im Ständer für vertikale
Aufstellung ganz nach unten.
Hinweise
• Bringen Sie zum vertikalen Aufstellen dieses Laufwerks immer den mitgelieferten
Ständer an. Zum vertikalen Aufstellen des Laufwerks stellen Sie zunächst den Ständer
für die vertikale Aufstellung so auf, dass das „VAIO“-Logo nach vorn weist. Setzen Sie
das Laufwerk wie unten abgebildet so in den Ständer ein, dass die Vorderseite nach
vorn und die Anzeige POWER nach oben weist.
• Stellen Sie das Laufwerk auf eine ebene, stabile Fläche.
12
Ständer für vertikale Aufstellung
DE
Page 67

Anschließen des Laufwerks
Wie Sie dieses Laufwerk anschließen, hängt davon ab, welches Notebook
Sie verwenden.
• Wenn das Notebook mit einem Anschluss DC OUT für VAIO
Notebook-Peripheriegeräte ausgestattet ist (siehe Seite 15)
Wenn das Notebook mit einem Anschluss DC OUT für VAIO NotebookPeripheriegeräte ausgestattet ist, schließen Sie das Laufwerk über das
mitgelieferte VAIO Notebook-Peripheriegerätekabel (80 cm) an das
Notebook an. Bei dieser Verbindung wird das Laufwerk über das
Notebook mit Strom versorgt, so dass Sie das Laufwerk an Orten ohne
Netzsteckdose verwenden können.
Wenn Sie eine digitale Videokamera verwenden, können Sie sie über das
mitgelieferte i.LINK-Kabel an das Laufwerk anschließen (siehe Seite
19).
Anschluss DC OUT für VAIO NotebookPeripheriegeräte
i.LINK-Anschluss
• Wenn das Notebook nicht mit einem Anschluss DC OUT für
VAIO Notebook-Peripheriegeräte ausgestattet ist (siehe Seite
17)
Schließen Sie das Laufwerk über das mitgelieferte i.LINK-Kabel an das
Notebook an. In diesem Fall benötigen Sie auch das mitgelieferte
Netzteil und das Netzkabel.
Wenn Sie eine digitale Videokamera verwenden, können Sie sie über ein
gesondert erhältliches i.LINK-Kabel an das Laufwerk anschließen (siehe
Seite 19).
Bitte wenden
13
DE
Page 68

Hinweise
• Wenn das Notebook nicht über einen Anschluss DC OUT verfügt, verwenden Sie zum
Anschließen des Laufwerks ein i.LINK-Kabel. Wie Sie die Anschlüsse vornehmen, ist
auf Seite 17 erläutert.
• Jedesmal, wenn Sie ein i.LINK-Gerät anschließen, abnehmen bzw. ein- oder
ausschalten, erfolgt eine sogenannte „Bus-Zurücksetzung“. Wenn dies geschieht,
während Daten gelesen oder geschrieben werden, werden die Daten möglicherweise
beschädigt oder gehen verloren. Beenden Sie unbedingt alle aktiven Anwendungen,
bevor Sie das Laufwerk anschließen bzw. abnehmen.
14
DE
Page 69

Anschließen des Laufwerks an das Notebook mit dem mitgelieferten Peripheriegerätekabel
Wenn das Notebook mit einem Anschluss DC OUT für VAIO
Notebook-Peripheriegeräte ausgestattet ist, schließen Sie das
Laufwerk über das mitgelieferte VAIO NotebookPeripheriegerätekabel (80 cm) an das Notebook an.
Wenn das Notebook nicht mit einem Anschluss DC OUT für VAIO
Notebook-Peripheriegeräte ausgestattet ist, schließen Sie das
Laufwerk über das i.LINK-Kabel an das Notebook an (siehe Seite
17).
Wenn Sie eine digitale Videokamera verwenden, können Sie sie
über das mitgelieferte i.LINK-Kabel an das Laufwerk anschließen
(siehe Seite 19).
Hinweis
Wenn Sie dieses Laufwerk an ein Notebook mit mehreren i.LINK-Anschlüssen
anschließen, schließen Sie bitte außer diesem Laufwerk keine weiteren i.LINKGeräte an. Nehmen Sie außerdem dieses Laufwerk ab, bevor Sie ein anderes
i.LINK-Gerät an das Notebook anschließen.
z Tipp
Schlagen Sie dazu auch in der Dokumentation zu Ihrem Notebook nach.
i.LINK-Anschluss
Anschluss DC OUT für VAIO Notebook-
Peripheriegeräte
VAIO NotebookPeripheriegerätekabel (80 cm)
Bitte wenden
DE
15
Page 70

1 Schalten Sie das Notebook ein.
2
Stecken Sie den L-förmigen Stecker des mitgelieferten VAIO
Notebook-Peripheriegerätekabels
Anschluss an der Rückseite des Laufwerks, und sichern Sie
den Stecker mit der Schraube.
Drehen Sie die Schraube bis zum Anschlag.
(80 cm)
in den passenden
3 Stecken Sie den geraden Stecker des mitgelieferten VAIO
Notebook-Peripheriegerätekabels (80 cm) in den i.LINK
Anschluss am Notebook und in den Anschluss DC OUT für
VAIO Notebook-Peripheriegeräte.
Die grüne Netzanzeige POWER des Laufwerks leuchtet auf, und das
Laufwerk wird vom Computer erkannt und identifiziert.
16
i.LINK-Anschluss
Anschluss DC OUT für VAIO
Notebook-Peripheriegeräte
z Tipp
Wenn Sie das Laufwerk zum ersten Mal anschließen, dauert es eine Weile, bis das
Laufwerk erkannt wird.
DE
Page 71

4 Doppelklicken Sie auf [Arbeitsplatz], und vergewissern Sie
sich, dass ein Symbol für dieses Laufwerk (E: oder ein
anderer Laufwerksname) im „Arbeitsplatz“ - Fenster
hinzugefügt wurde.
Anschließen des Laufwerks an das Notebook mit dem mitgelieferten i.LINK-Kabel
Wenn das Notebook nicht mit einem Anschluss DC OUT für VAIO
Notebook-Peripheriegeräte ausgestattet ist, schließen Sie das Laufwerk
über das mitgelieferte i.LINK-Kabel an das Notebook an.
Wenn Sie eine digitale Videokamera verwenden, können Sie sie über ein
anderes, gesondert erhältliches i.LINK-Kabel an das Laufwerk anschließen
(siehe Seite 19).
Hinweis
Wenn Sie dieses Laufwerk an ein Notebook mit mehreren i.LINK-Anschlüssen
anschließen, schließen Sie bitte außer diesem Laufwerk keine weiteren i.LINK-Geräte an.
Nehmen Sie außerdem dieses Laufwerk ab, bevor Sie ein anderes i.LINK-Gerät an das
Notebook anschließen.
i.LINK-Anschluss
Gleichstromeingang
DC IN
i.LINK-Kabel
Netzteil Netzkabel
an Netzsteckdose
i.LINK-Anschluss
* Schließen Sie das Kabel
direkt an den i.LINKAnschluss am Notebook an.
Bitte wenden
17
DE
Page 72

1 Schalten Sie das Notebook ein.
2 Schließen Sie das Netzkabel an das mitgelieferte Netzteil
an, verbinden Sie das Netzkabel dann mit einer
Netzsteckdose, und stecken Sie das Kabel vom Netzteil in
den Anschluss DC IN am Laufwerk.
Die grüne POWER-Anzeige des Laufwerks beginnt zu leuchten.
3 Schließen Sie das mitgelieferte i.LINK-Kabel an den i.LINK-
Anschluss an der Rückseite des Laufwerks an.
i.LINK-Anschluss
i.LINK-Kabel
18
4 Schließen Sie das andere Ende des mitgelieferten i.LINK-
Kabels an den i.LINK-Anschluss am Notebook an.
Das Laufwerk wird vom Computer erkannt und identifiziert.
i.LINK-Anschluss
i.LINK-Kabel
z Tipp
Wenn Sie das Laufwerk zum ersten Mal anschließen, dauert es eine Weile, bis das
Laufwerk erkannt wird.
DE
Page 73

5 Doppelklicken Sie auf [Arbeitsplatz], und vergewissern Sie
sich, dass ein Symbol für dieses Laufwerk (E: oder ein
anderer Laufwerksname) im „Arbeitsplatz“ - Fenster
hinzugefügt wurde.
Anschließen einer digitalen Videokamera
Sie können eine digitale Videokamera an das Laufwerk anschließen und
dann mit Hilfe der mitgelieferten Click to DVDTM-Software mit Videos von
der digitalen Videokamera eigene DVD-Videos erstellen. Das Vorgehen
beim Anschließen einer digitalen Videokamera an das Laufwerk ist anders
als beim Anschließen eines Notebooks.
Sie können ausschließlich digitale Videokameras von Sony an das
Laufwerk anschließen, die:
• Aufnahmen im DV- oder MICROMV-Format unterstützen.
• Mit einem DV-Ausgang ausgestattet sind und über ein i.LINK-Kabel
(DV-Kabel) an ein Notebook angeschlossen werden können.
Hinweis
Das analoge Format und einige Arten von digitalen Videokameraformaten werden von
diesem Laufwerk nicht unterstützt.
Die folgenden Modelle können nicht verwendet werden.
(Stand: Juni 2003)
Für Kunden in den USA und Kanada
– DCR-VX1000
– DCR-VX700 (Versionen mit aufgerüstetem DV-Anschluss)
Für Kunden in Europa
– DCR-VX1000E
– DCR-VX700E
Zum Erstellen von DVD-Videos mit den von einer digitalen Videokamera
aufgenommenen Videos verwenden Sie die mitgelieferte „Click to DVD“-
Software. Informationen zur Installation der mitgelieferten Software finden
Sie unter „Installieren der Software“ (Seite 30).
Bitte wenden
19
DE
Page 74

■ Bei Anschluss des Laufwerks an das Notebook mit dem
mitgelieferten Peripheriegerätekabel
Wenn Sie das Laufwerk mit dem mitgelieferten VAIO NotebookPeripheriegerätekabel an das Notebook angeschlossen haben und die
mitgelieferte „Click to DVD“-Software verwenden wollen, schließen Sie
die digitale Videokamera wie in der Abbildung gezeigt mit dem
mitgelieferten i.LINK-Kabel an den i.LINK-Anschluss des Laufwerks an.
Hinweise
• Schließen Sie das Laufwerk an das Notebook an, bevor Sie die digitale Videokamera
anschließen (siehe Seite 15).
• Wenn Sie eine digitale Videokamera an das Laufwerk anschließen, schließen Sie das
Netzteil/Ladegerät der digitalen Videokamera an die digitale Videokamera an und
stellen den Betriebsschalter des Netzteils/Ladegeräts auf „VCR/Camera/Player“, bevor
Sie das Netzteil/Ladegerät an eine Netzsteckdose anschließen.
z Tipp
Einzelheiten finden Sie außerdem in der Dokumentation zu der digitalen Videokamera,
die Sie anschließen wollen.
i.LINK-Kabel
20
VAIO NotebookPeripheriegerätekabel (80 cm)
i.LINK-Anschluss
DV-Eingang/-Ausgang
* Das Anschlussdiagramm zeigt die digitale Videokamera DCR-TRV50 als Beispiel.
DE
Page 75

1 Schalten Sie die digitale Videokamera ein und schalten Sie
sie in den Videowiedergabemodus.
Einzelheiten zum Betrieb der digitalen Videokamera finden Sie in der
Dokumentation zu der digitalen Videokamera.
2 Schließen Sie das mitgelieferte i.LINK-Kabel an den DV-
Eingang/-Ausgang der digitalen Videokamera an.
DV-Eingang/-Ausgans
i.LINK-Kabel
3 Verbinden Sie das andere Ende des i.LINK-Kabels mit dem
i.LINK-Anschluss an der Rückseite des Laufwerks.
i.LINK-Kabel
Digitale
Videokamera
VAIO NotebookPeripheriegerätekabel
(80 cm)
Notebook
Hinweis
Schließen Sie kein anderes i.LINK-Gerät als eine digitale Videokamera an den
i.LINK-Anschluss am Laufwerk an.
i.LINK-Anschluss
4 Klicken Sie auf die Schaltfläche [Start] und dann auf
[Arbeitsplatz], um zu überprüfen, ob im Fenster
„Arbeitsplatz“ angezeigt wird.
Bitte wenden
DE
21
Page 76

■ Bei Anschluss des Laufwerks an das Notebook mit dem
mitgelieferten i.LINK-Kabel
Wenn Sie das Laufwerk mit dem mitgelieferten i.LINK-Kabel an das
Notebook angeschlossen haben und die mitgelieferte „Click to DVD“-
Software verwenden wollen, schließen Sie die digitale Videokamera wie in
der Abbildung gezeigt mit einem weiteren i.LINK-Kabel (gesondert
erhältlich) an den i.LINK-Anschluss des Laufwerks an.
Hinweise
• Zum Anschließen einer digitalen Videokamera erwerben Sie ein i.LINK-Kabel.
• Schließen Sie das Laufwerk an das Notebook an, bevor Sie die digitale Videokamera
anschließen (siehe Seite 17).
• Wenn Sie eine digitale Videokamera an das Laufwerk anschließen, schließen Sie das
Netzteil/Ladegerät der digitalen Videokamera an die digitale Videokamera an und
stellen den Betriebsschalter des Netzteils/Ladegeräts auf „VCR/Camera/Player“, bevor
Sie das Netzteil/Ladegerät an eine Netzsteckdose anschließen.
z Tipp
Einzelheiten finden Sie außerdem in der Dokumentation zu der digitalen Videokamera,
die Sie anschließen wollen.
DV-Eingang/Ausgang
i.LINK-Anschluss
22
i.LINK-Kabel
(mitgeliefert)
i.LINK-Kabel
(gesondert erhaltlich)
Netzteil Netzkabel
* Das Anschlussdiagramm zeigt die digitale Videokamera DCR-TRV50 als Beispiel.
DE
An
Netzsteckdose
Page 77

1 Schalten Sie die DV-Kamera ein und schalten Sie sie in den
Videowiedergabemodus.
Einzelheiten zum Betrieb der DV-Kamera finden Sie in der
Dokumentation zu der DV-Kamera.
2 Verbinden Sie ein gesondert erhältliches i.LINK-Kabel mit
dem DV-Eingang/-Ausgang der DV-Kamera.
DV-Eingang/-Ausgang
i.LINK-Kabel
3 Verbinden Sie das andere Ende des i.LINK-Kabels mit dem
i.LINK-Anschluss an der Rückseite des Laufwerks.
i.LINK-Kabel (gesondert erhaltlich)
Digitale
Videokamera
Notebook
i.LINK-Kabel
(mitgeliefert)
Hinweis
Schließen Sie kein anderes i.LINK-Gerät als eine digitale Videokamera an den
i.LINK-Anschluss am Laufwerk an.
i.LINK-Anschluss
4 Klicken Sie auf die Schaltfläche [Start] und dann auf
[Arbeitsplatz], um zu überprüfen, ob im Fenster
„Arbeitsplatz“ angezeigt wird.
Bitte wenden
DE
23
Page 78

Einschränkungen (Beispiel für fehlerhafte Anschlüsse)
Schließen Sie dieses Laufwerk nicht wie unten gezeigt an zwei Notebooks
an.
i.LINK-Kabel
VAIO NotebookPeripheriegerätekabel (80 cm)
Abnehmen des Laufwerks vom Notebook
Beim Betriebssystem Windows XP sind zum Abnehmen des Laufwerks
keine besonderen Maßnahmen erforderlich. Stellen Sie einfach sicher, dass
keine Anwendungsprogramme aktiv sind und dass die Anzeige BUSY des
Laufwerks nicht leuchtet. Lösen Sie dann das VAIO NotebookPeripheriegerätekabel (80 cm) bzw. das i.LINK-Kabel.
24
Hinweise
• Beenden Sie vor dem Abnehmen des Laufwerks alle laufenden Software-Programme.
• Wenn eine digitale Videokamera an das Laufwerk angeschlossen ist, lösen Sie das
i.LINK-Kabel von der digitalen Videokamera, bevor Sie die DV-Kamera ausschalten.
z Tipp
Wenn Sie das Laufwerk nach dem Lösen des VAIO Notebook-Peripheriegerätekabels (80
cm) bzw. des i.LINK-Kabels wieder verwenden wollen, führen Sie die im Abschnitt
„Anschließen des Laufwerks“ auf Seite 13 erläuterten Schritte aus. Das Laufwerk wird
vom Windows-Betriebssystem automatisch erkannt.
DE
Page 79

Grundfunktionen
Informationen zur Energiesparfunktion
Wenn Sie mit der Energiesparfunktion des Notebooks arbeiten, beachten
Sie bitte folgende Punkte.
• Stellen Sie sicher, dass der Energiesparmodus nicht aktiviert wird,
solange die Anzeige BUSY des Laufwerks blinkt. Einzelheiten dazu
finden Sie in der Dokumentation zu Ihrem Notebook.
• Vergewissern Sie sich vor dem Aktivieren des Energiesparmodus am
Notebook, dass die Anzeige BUSY des Laufwerks nicht leuchtet, und
beenden Sie alle laufenden Software-Anwendungen.
• Solange sich das Notebook in einem Energiesparmodus befindet, dürfen
Sie das VAIO Notebook-Peripheriegerätekabel (80 cm), das i.LINKKabel und das Netzteil nicht anschließen oder trennen.
Einlegen einer CD/DVD
Schalten Sie das Notebook ein, und schließen Sie dieses Laufwerk an,
bevor Sie eine CD/DVD einlegen.
z Tipp
Auf den Abbildungen wird das Laufwerk in vertikaler Aufstellung gezeigt. Das Vorgehen
ist dasselbe, wenn das Laufwerk horizontal aufgestellt wird.
1 Drücken Sie die Auswurftaste.
Das Fach springt heraus.
Auswurftaste
Bitte wenden
DE
25
Page 80

2 Ziehen Sie das Fach bis zum Anschlag heraus. Stützen Sie
das Fach von der anderen Seite mit der Hand, und setzen
Sie die CD/DVD auf die Nabe in der Mitte des Fachs.
Achten Sie darauf, dass die CD/DVD hörbar einrastet und fest sitzt.
Hinweise
• Berühren Sie nicht die Linsengruppe im Fach oder den Metallbereich an der
Rückseite.
• Wenn die CD/DVD nicht richtig sitzt und Sie das Fach schließen, kann die CD/
DVD beschädigt werden und das Fach klemmen.
Nabe
CD/DVD
26
3 Schließen Sie das CD/DVD-Fach, indem Sie es vorsichtig
hineinschieben.
Solange Daten gelesen werden, blinkt die Anzeige BUSY.
Anzeige BUSY
DE
Page 81

Herausnehmen einer CD/DVD
z Tipp
Auf den Abbildungen wird das Laufwerk in vertikaler Aufstellung gezeigt. Das Vorgehen
ist dasselbe, wenn das Laufwerk horizontal aufgestellt wird.
1 Vergewissern Sie sich, dass die Anzeige BUSY nicht blinkt,
und drücken Sie die Auswurftaste.
Das Fach springt heraus.
2 Ziehen Sie das Fach bis zum Anschlag heraus. Stützen Sie
das Fach mit der Hand, und nehmen Sie die CD/DVD heraus.
Damit sich die CD/DVD löst, drücken Sie auf die Nabe in der Mitte.
Auswurftaste
Anzeige BUSY
Hinweise
• Berühren Sie nicht die Linsengruppe im Fach oder den Metallbereich an der
Rückseite.
• Wenn Sie Schreibsoftware oder DVD-Wiedergabesoftware verwenden, lässt sich
die CD/DVD möglicherweise nicht durch Drücken der Auswurftaste auswerfen.
Nähere Informationen finden Sie in der Hilfe oder der Kurzreferenz zu der
verwendeten Schreib- bzw. DVD-Wiedergabesoftware.
CD/DVD
Nabe
Bitte wenden
27
DE
Page 82

Wenn die CD/DVD nicht ausgeworfen wird
1 Vergewissern Sie sich, dass die Anzeige BUSY nicht blinkt.
2 Nehmen Sie den Auswurfstift aus dem Halter an der
Unterseite des Laufwerks, und stecken Sie den Stift in die
Öffnung zum manuellen Auswerfen.
Das CD/DVD-Fach springt heraus, und Sie können die CD/DVD
herausnehmen.
Auswurfstift
Öffnung zum manuellen Auswerfen
Transportieren des Geräts (mit der Kabelklemme)
Mit der mitgelieferten Kabelklemme können Sie das VAIO NotebookPeripheriegerätekabel (80 cm) bzw. das i.LINK-Kabel für den Transport
schnell und mühelos aufwickeln und bündeln. Wenn das Laufwerk über das
VAIO Notebook-Peripheriegerätekabel (80 cm) angeschlossen ist, müssen
Sie den Stecker nur aus dem Notebook ziehen. Sie können das Laufwerk
mit eingestecktem Kabel transportieren.
Kabelklemme
DE
28
Page 83

Die Kabelklemme
1 Wickeln Sie das VAIO Notebook-Peripheriegerätekabel
(80 cm) bzw. das i.LINK-Kabel wie abgebildet auf, und
führen Sie es durch die Kabelklemme.
2 Drücken Sie die Kabelklemme in der Mitte zusammen, so
dass das Kabel an beiden Seiten der Klemme gehalten wird.
29
DE
Page 84

Installieren der Software
Die mitgelieferte Software
Die unten beschriebene Software wird von der mitgelieferten CD-ROM
installiert.
■ Click to DVD
Mit dieser Software können Sie mit Videos von einer digitalen
Videokamera oder auf dem Notebook gespeicherten Bildern und Videos
eigene Original-DVDs erstellen.
■ Drag’n Drop CD+DVD
Mit dieser Software können Sie Daten-CDs/DVDs, Musik-CDs und
Sicherungskopien von CDs/DVDs erstellen.
Installation und Gebrauch von Drag’n Drop CD+DVD
Diese Software darf nur in Verbindung mit dem Erzeugnis verwendet
werden, mit dem die Software geliefert wurde.
Wenn Sie versuchen, diese Software mit anderen präinstallierten oder
Zusatzprodukten zu verwenden, können wir weder deren ordnungsgemäße
Funktion garantieren, noch Ihnen Kundendienst anbieten.
Bitte lessen Sie vor Gebrauch dieses Produktes den Lizenzvertrag für diese
Software sorgfältig durch.
30
■ SonicStage Ver.1.x DVD±RW Drive Support Update Program
Ermöglicht auf diesem Laufwerk das Schreiben einer CD-R oder CD-RW
mit SonicStage.
DE
Page 85

Installation
Gehen Sie zur Installation der Software wie unten erläutert vor.
Hinweise
• Melden Sie sich am Computer als „Administrator“ an, wenn Sie die Software
• Um „Click to DVD“ verwenden zu können, müssen Sie zuerst „Drag’n Drop
•„SonicStage Ver.1.x DVD±RW Drive Support Update Program“ kann nur installiert
• Schließen Sie vor der Installation der Software alle anderen Windows-Anwendungen.
• Während der Installation kann der Eindruck enstehen, der Computer sei abgestürzt.
• Bevor Sie „Drag’n Drop CD+DVD“ auf einem Notebook installieren können, auf dem
•„SonicStage Ver.1.x DVD±RW Drive Support Update Program“ wird nicht installiert,
installieren wollen.
CD+DVD“ installieren.
werden, wenn „Drag’n Drop CD+DVD“ und das SonicStage CD-R-Schreibmodul
bereits installiert sind. Das SonicStage CD-R-Schreibmodul befindet sich auf der
CD-ROM mit den Sony-Anwendungen, die mit Ihrem Notebook mitgeliefert wird.
Andernfalls wird die Software möglicherweise nicht ordnungsgemäß installiert.
Solange die Zugriffsanzeige am Laufwerk bzw. die Festplattenanzeige am Computer
leuchtet oder blinkt, läuft die Installation jedoch noch. Versuchen Sie nicht, die
Installation abzubrechen oder den Computer herunterzufahren. Andernfalls lässt sich
die Software bei einem erneuten Versuch möglicherweise nicht installieren und es kann
sogar erforderlich werden, das Betriebssystem erneut zu installieren.
„Drag’n Drop CD“ bereits installiert ist, müssen Sie „Drag’n Drop CD“ deinstallieren.
Gehen Sie dazu folgendermaßen vor. Klicken Sie im Menü [Start] auf
[Systemsteuerung] und dann auf [Software]. Wählen Sie „Drag’n Drop CD“ in der
Liste aus und klicken Sie auf [Entfernen].
wenn es sich bei der auf dem Notebook vorhandenen Kopie von SonicStage um eine
neuere Version handelt.
Für Kunden in den USA und Kanada
1 Schalten Sie das Notebook ein und bereiten Sie das
Laufwerk bei Bedarf auf die Installation vor.
„Anschließen des Laufwerks“ (Seite 13). Schließen Sie das Laufwerk
an das Notebook an.
2 Legen Sie die mitgelieferte Software-CD-ROM in das in
Schritt 1 vorbereitete Laufwerk ein.
3 Klicken Sie im Menü [Start] auf [Arbeitsplatz], doppelklicken
Sie auf [Laufwerk E*], öffnen Sie „Click to DVD“ und
doppelklicken Sie auf „Setup.exe“.
* Je nach dem verwendeten Laufwerk müssen Sie anstelle von Laufwerk E
möglicherweise ein anderes Laufwerk auswählen.
Bitte wenden
31
DE
Page 86

4 Gehen Sie nach den Anweisungen auf dem Bildschirm vor.
5 Klicken Sie im Menü [Start] auf [Arbeitsplatz], doppelklicken
Sie auf [Laufwerk E*], öffnen Sie „Drag’n Drop CD+DVD“
und doppelklicken Sie auf „Setup.exe“.
* Je nach dem verwendeten Laufwerk müssen Sie anstelle von Laufwerk E
möglicherweise ein anderes Laufwerk auswählen.
6 Gehen Sie nach den Anweisungen auf dem Bildschirm vor.
7 Starten Sie das Notebook nach der Installation von „Click to
DVD“ und „Drag’n Drop CD+DVD“ neu.
8 Klicken Sie im Menü [Start] auf [Arbeitsplatz], doppelklicken
Sie auf [Laufwerk E*], öffnen Sie „SonicStage Update
Program“ und doppelklicken Sie auf „Setup.exe“.
* Je nach dem verwendeten Laufwerk müssen Sie anstelle von Laufwerk E
möglicherweise ein anderes Laufwerk auswählen.
9 Klicken Sie auf die Schaltfläche [Start], zeigen Sie auf [Alle
Programme] und überprüfen Sie, ob „Click to DVD“ und
„Drag’n Drop CD+DVD“ angezeigt werden.
32
Für Kunden in Europa
1 Schalten Sie das Notebook ein und bereiten Sie das
Laufwerk bei Bedarf auf die Installation vor.
Informationen zum Installieren des Laufwerks finden Sie unter
„Anschließen des Laufwerks“ (Seite 13).
2 Legen Sie die mitgelieferte Software-CD-ROM in das in
Schritt 1 vorbereitete Laufwerk ein.
Das Installationsprogramm wird gestartet.
Hinweis
Wenn das Installationsprogramm nicht automatisch gestartet wird, klicken Sie im
Menü [Start] auf [Arbeitsplatz] und doppelklicken dann auf das Laufwerk mit dem
Namen [PCGA-DDRW1].
DE
Page 87

3 Klicken Sie auf [Deutsch].
Klicken Sie auf [Drag’n Drop CD+DVD installieren].
4 Die Installation von „Drag’n Drop CD+DVD“ wird gestartet.
5 Wählen Sie [Deutsch] und klicken Sie auf [OK].
Befolgen Sie die Anweisungen auf dem Bildschirm.
6 Wenn die Lizenzvereinbarung angezeigt wird, klicken Sie
zum Akzeptieren auf [Ja].
Gehen Sie nach den Anweisungen auf dem Bildschirm vor, um die
Installation fortzusetzen.
7 Wenn Sie dazu aufgefordert werden, starten Sie das
Notebook neu.
8 Klicken Sie nach dem Neustart des Notebooks im Menü
[Start] auf [Arbeitsplatz] und doppelklicken dann auf das
Laufwerk mit dem Namen [PCGA-DDRW1].
9 Klicken Sie auf [Deutsch].
10
Klicken Sie auf [Click to DVD installieren].
Die Installation von „Click to DVD“ wird gestartet. Gehen Sie nach
den Anweisungen auf dem Bildschirm vor, um die Installation
fortzusetzen.
11
Wenn die Installation von „Click to DVD” beendet ist, klicken
Sie auf [SonicStage Patch installieren].
Der Installationsassistent wird gestartet.
12
Klicken Sie auf [Weiter].
Gehen Sie nach den Anweisungen auf dem Bildschirm vor, um den
Vorgang fortzusetzen.
13
Wenn der Vorgang beendet ist, klicken Sie auf [Beenden],
um das Installationsprogramm zu schließen.
33
DE
Page 88

Sicherheitshinweise zur Verwendung
Sicherheitshinweise zum Schreiben von Daten
Beachten Sie bitte die folgenden Sicherheitshinweise, wenn Sie Daten auf
DVD+Rs, DVD+RWs, DVD-Rs, DVD-RWs, CD-Rs oder CD-RWs
schreiben wollen.
• Das Notebook muss über das dazugehörige Netzteil mit Strom versorgt
werden. Betreiben Sie den Computer nicht mit dem Akku.
• Berühren Sie beim Einlegen von CDs/DVDs nicht die Oberfläche für die
Aufzeichnung. Verschmutzungen auf der Oberfläche für die
Aufzeichnung können das Schreiben von Daten beeinträchtigen.
• Schützen Sie das Laufwerk und das Notebook beim Schreiben von Daten
und beim Einlegen und Herausnehmen von CDs/DVDs vor Stößen und
Vibrationen.
• Schalten Sie den Bildschirmschoner des Notebooks aus. Wenn der
Bildschirmschoner beim Schreiben von Daten aktiviert wird, fällt die
Datenübertragungsrate erheblich ab. Dies kann zu Datenverlust führen.
• Achten Sie darauf, die Energiesparfunktion des Notebooks beim
Schreiben von Daten zu deaktivieren. Andernfalls wird die
Datenübertragungsrate sehr niedrig und es kann zu Datenverlusten
kommen. Einzelheiten zur Energiesparfunktion des Notebooks finden Sie
in der Dokumentation zu Ihrem Notebook.
• Während Daten auf eine DVD+R, DVD+RW, DVD-R oder DVD-RW
geschrieben werden, dürfen Sie keine an dieses Laufwerk
angeschlossenen Geräte, wie z. B. eine ditigale Videokamera, vom
Laufwerk trennen oder von Hand bedienen.
• Wenn Sie den Treiber beim Schreiben von Daten installieren oder
aktualisieren, kann es zu Problemen beim Betrieb kommen.
• Lösen Sie Geräte wie USB-Geräte oder PC-Karten nicht, solange Daten
geschrieben werden.
• Wechseln Sie beim Schreiben von Daten nicht den Benutzer. Andernfalls
kann es zu Datenverlusten kommen.
• Verwenden Sie keine residenten Dienstprogramme zur Plattenverwaltung
oder Dienstprogramme zum Beschleunigen des Plattenzugriffs.
Andernfalls wird der Betrieb möglicherweise instabil und es kann zu
Datenverlusten kommen.
• Das Schreiben auf CD-Rs oder CD-RWs mit 1facher oder 2facher
Geschwindigkeit wird nicht unterstutzt.
• Verwenden Sie CD-Rs, die zum Schreiben von Daten mindestens eine
34
DE
8fache Geschwindigkeit unterstützen.
Page 89

• Verwenden Sie CD-RWs, die zum Schreiben von Daten mindestens eine
4fache Geschwindigkeit unterstützen.
• Hochgeschwindigkeits-CD-RWs werden unterstützt.
• DVD+Rs, DVD+RWs, DVD-Rs, DVD-RWs, CD-Rs oder CD-RWs, die
mit einer Packet-Writing-Software wie z.B. „DirectCD“ formatiert
wurden, (einschließlich handelsüblicher, vorformatierter CD-RWs)
können mit diesem Laufwerk nicht gelesen werden.
• Es empfiehlt sich, DVD+Rs, DVD+RWs, DVD-Rs, DVD-RWs, CD-Rs
oder CD-RWs von Sony zu verwenden.
Sicherheitshinweise zur Verwendung von „Click to DVD“
• Schließen Sie alle anderen Programme (einschließlich im Hintergrund
laufender Software), bevor Sie mit „Click to DVD“ oder „Drag’n Drop
CD+DVD“ Daten schreiben.
• Das Notebook sollte über mindestens 256 MB RAM verfügen, wenn Sie
mit „Click to DVD“ Daten schreiben wollen. Einzelheiten zum Erweitern
des Hauptspeichers finden Sie in der Dokumentation zu Ihrem Notebook.
• Wenn Sie Daten mit „Click to DVD“ schreiben wollen, melden Sie sich
als Benutzer mit Administratorrechten an.
• Beim Schreiben von Daten auf DVD+Rs, DVD+RWs, DVD-Rs oder
DVD-RWs wird das Verfahren „Disc-at-once“ verwendet. Sie können
deshalb später keine Daten zum Datenträger hinzufügen. DVD+RWs
oder DVD-RWs können Sie allerdings neu beschreiben, sobald Sie alle
darauf enthaltenen Daten gelöscht haben.
• Das Schreiben auf DVD+Rs, DVD+RWs, DVD-Rs oder DVD-RWs
kann von einigen Stunden bis zu mehreren Dutzend Stunden dauern. Die
tatsächliche Schreibdauer hängt vom Notebook-Modell und vom Umfang
des Ausgangsmaterials ab.
• Wenn Sie mit „Click to DVD-Automatikmodus“ ein DVD-Video erstellen,
werden die Daten zeitweilig auf der Festplatte des Notebooks gespeichert.
Auf der Festplatte muss daher ausreichend Speicherplatz frei sein. Die
Werte unten sind Richtlinien für den Festplattenspeicher, der zum Erstellen
von DVD-Videos unterschiedlicher Länge benötigt wird. Außerdem wird
die Videobitrate automatisch je nach Länge der Aufnahme angepasst.
Länge der Aufnahme Verwendeter Festplattenspeicher Bitrate
30 Minuten 6 GB 9 Mbps
60 Minuten 10 GB 8 Mbps
80 Minuten 10 GB 6 Mbps
120 Minuten 10 GB 4 Mbps
Bitte wenden
35
DE
Page 90

•„Click to DVD“ unterstutzt die folgenden Dateiformate. Einzelheiten
finden Sie in der Hilfe zu „Click to DVD“.
Videodateien: DV-AVI, MPEG1, MPEG2
Bilddateien: Bitmap, JPEG, TIFF
Um die Hilfe zu „Click to DVD“ aufzurufen, klicken Sie auf die
Schaltfläche [Start], zeigen auf [Alle Programme] und wählen [Hilfe zum
Click to DVD] unter [Click to DVD] aus.
• Wenn Sie mit „Click to DVD“ ein DVD-Video erstellen, werden die
Daten zeitweilig auf der Festplatte des Notebooks gespeichert. Auf der
Festplatte muss daher ausreichend Speicherplatz frei sein. Wie viel
Festplattenspeicher benötigt wird, hängt wie unten aufgeführt von der
Länge des Videos und der Videobitrate ab. Die hier genannten Werte
gelten nicht für „Click to DVD-Automatikmodus“.
Beim Erstellen eines DVD-Videos aus MPEG-Dateien
Länge wiedergabe wiedergabe Qualität
der Aufnahme (4.6 Mbps) (6.4 Mbps) (8.1 Mbps)
60 Minuten 5 GB 7 GB 10 GB
90 Minuten 7 GB 10 GB –
120 Minuten 10 GB ––
Beim Erstellen eines DVD-Videos aus Videoaufnahmen, die mit einer
digitalen Videokamera aufgenommen wurden
Länge wiedergabe wiedergabe Qualität
der Aufnahme (4.6 Mbps) (6.4 Mbps) (8.1 Mbps)
30 Minuten 9,75 GB 11,4 GB 12,3 GB
60 Minuten 19,5 GB 22,8 GB 24,6 GB
90 Minuten 29,25 GB 34,2 GB 36,9 GB
Bitrate Langzeit- Standard- Hohe
Bitrate Langzeit- Standard- Hohe
• Generell hängt die Länge der Videodatei, die Sie auf einem Datenträger
aufzeichnen können, wie unten aufgeführt von der Videobitrate ab.
Bitrate Ungefähre maximale Aufnahmedauer
4 Mbps ca. 120 Minuten
6 Mbps ca. 90 Minuten
8 Mbps ca. 60 Minuten
36
DE
Page 91

Sicherheitshinweise zur Verwendung von „Drag’n Drop CD+DVD“
• Schließen Sie alle anderen Schreibanwendungen, bevor Sie mit
„Drag’n Drop CD+DVD“ Daten schreiben.
• Wenn Sie mit „Drag’n Drop CD+DVD“ Daten schreiben wollen, können
Sie keine DVD+Rs, DVD+RWs, DVD-Rs, DVD-RWs, CD-Rs oder
CD-RWs (einschließlich handelsüblicher vorformatierter CDs/DVDs)
verwenden, die mit Paketschreibsoftware wie „DirectCD“ vorformatiert
wurden. Sie können jedoch vorformatierte DVD+RWs, DVD-RWs und
CD-RWs verwenden, sofern Sie zunächst das Format mit der Funktion
[Lösche RW-Medium] in „Drag’n Drop CD+DVD“ löschen. Wenn Sie
diese Funktion verwenden wollen, klicken Sie mit der rechten Maustaste
auf eines der „Drag’n Drop CD+DVD“-Felder und wählen [Lösche RWMedium] in dem Menü, das daraufhin angezeigt wird.
• Wenn Sie Sicherungskopien von wiederbeschreibbaren DVDDatenträgern erstellen möchten, empfiehlt es sich, als Ziel denselben
DVD-Datenträgertyp zu verwenden. Nähere Informationen finden Sie in
der Online-Hilfe zu „Drag’n Drop CD+DVD“ oder auf der Website.
• Wenn Sie auf CD-Rs oder CD-RWs erstellte Musik-CDs wiedergeben
lassen wollen, benötigen Sie Geräte, die die Wiedergabe dieser
Datenträgertypen unterstützen.
• Wenn Sie DVD+Rs, DVD+RWs, DVD-Rs, DVD-RWs, DVD-ROMs,
CD-Rs, CD-RWs oder CD-ROMs zum Kopieren von Daten verwenden,
dürfen Sie nur Daten kopieren, deren Urheberrechtsinhaber Sie sind.
Andernfalls müssen Sie die Genehmigung des Urheberrechtsinhabers
zum Kopieren der Daten einholen.
z Registrieren von Benutzern
Gehen Sie wie im Folgenden erläutert vor, um sich als Benutzer von „Drag’n Drop
CD+DVD“ zu registrieren. Durch das Registrieren von Benutzern erhalten Sie Zugriff auf
detailliertere Informationen.
Klicken Sie auf die Schaltfläche [Start], zeigen Sie auf [Alle Programme] und wählen Sie
[Benutzerregistrierung & Technischen Support] unter [Drag’n Drop CD+DVD] aus.
Hierzu muss das Notebook mit dem Internet verbunden sein.
Fragen zu „Drag’n Drop CD+DVD“:
Easy Systems Japan, Ltd.
Website: http://www.ddcd.jp/dd3g/sony/cd/
DE
37
Page 92

Wiedergeben einer Audio-CD
Bei Notebooks mit eingebautem CD-ROM-Laufwerk
Geben Sie Audio-CDs mit dem eingebauten Laufwerk des Notebooks
wieder. Einzelheiten dazu finden Sie in der Dokumentation zu Ihrem
Notebook von Sony.
Bei Notebooks ohne eingebautes CD-ROM-Laufwerk
Audio-CDs können über die Lautsprecher oder die Kopfhörerbuchse des
Notebooks wiedergegeben werden, indem Sie einfach dieses Laufwerk
anschließen.
Wiedergeben eines DVD-Videos
Informationen zur Wiedergabe von DVD-Videos finden Sie in den
Handbüchern zu Ihrem Notebook.
Hinweise zur Wiedergabe von DVD-Videos
38
• Bei einigen DVDs kann es funktionale Einschränkungen oder Ton- oder
Bildaussetzer geben. Einige DVDs werden möglicherweise gar nicht
wiedergegeben.
•Ändern Sie Anzeigeeinstellungen wie Auflösung und Farbanzahl nicht
während der Wiedergabe eines DVD-Videos. Andernfalls wird der
Betrieb des Notebooks möglicherweise instabil oder es lassen sich keine
Einstellungen mehr ändern. Schließen Sie immer die
DVD-Wiedergabesoftware, bevor Sie Anzeigeeinstellungen ändern.
• Während der Wiedergabe einiger DVD-Videos mit hoher Tonqualität
(20-Bit- oder 24-Bit-Abtastung) können Störgeräusche oder andere
Probleme auftreten. Wenn das Notebook an eine Audioanlage
angeschlossen ist und solche DVDs wiedergegeben werden, drehen Sie
die Lautstärke herunter und testen zuerst die normale Wiedergabe, um
mögliche Schäden an den Lautsprechern zu verhindern.
• Wenn ein DVD-Video in dieses Laufwerk eingelegt ist, können Sie mit
dem Jog-Dial™-Regler oder der Tastenkombination <Fn> + <F7> bzw.
<F8> nicht zwischen dem LCD-Display und einem Fernsehmonitor oder
einem anderen Bildschirm umschalten.
DE
Page 93

• Wenn Sie ein Notebook der PCG-C1M-Serie haben, wird bei einigen
DVD-Videos möglicherweise ein Teil des Bildes abgeschnitten.
• Bei der Wiedergabe eines DVD-Videos verwenden Sie bitte die
Software, die auf dem Notebook vorinstalliert ist.
• Drücken Sie während der Wiedergabe eines DVD-Videos nicht die
Auswurftaste.
• Verwenden Sie während der Wiedergabe eines DVD-Videos mit DVDWiedergabesoftware keinen Bildschirmschoner.
Hinweise zu DVD-Videos
Regionalcode abspielbarer DVD-Videos
Auf einigen DVD-Videos finden Sie Regionalcodemarkierungen wie 2 ,
die angeben, auf welchem Laufwerk- oder Player-Typ diese DVD-Videos
abgespielt werden können. Wenn die Regionalcodemarkierung einen
anderen Regionalcode als den in Ihrem Land gültigen angibt oder
lautet, können Sie die DVD nicht mit diesem Laufwerk wiedergeben. Wenn
Sie dies versuchen, erscheint eine Meldung, die besagt, dass die
Wiedergabe aufgrund von Einschränkungen hinsichtlich des Regionalcodes
nicht zulässig ist.
Einige DVD-Videos sind möglicherweise nicht mit einem Regionalcode
gekennzeichnet, können aber trotzdem nicht auf allen Playern
wiedergegeben werden.
ALL
Hinweis zu Wiedergabefunktionen bei DVD-Videos
Einige Wiedergabefunktionen von DVD-Videos können von den
Software-Herstellern absichtlich eingeschränkt werden. Dieses
Laufwerk gibt DVD-Videos so wieder, wie es von den SoftwareHerstellern vorgegeben ist. Deshalb stehen möglicherweise einige
Wiedergabefunktionen nicht zur Verfügung. Lesen Sie dazu bitte
auch die Anweisungen, die mit den DVD-Videos geliefert wurden.
Bitte wenden
DE
39
Page 94

Markierungen auf DVD-Videos
Die folgenden Markierungen sind auf DVD-Videos oder deren
Verpackungen zu finden. Jede Markierung gibt Aufschluss über den Inhalt
oder die Funktionen der DVD.
Bei einigen DVD-Videos sind keine Markierungen usw. aufgedruckt, auch
wenn entsprechende Inhalte oder Funktionen zur Verfügung stehen.
Weitere Informationen zu diesen Markierungen finden Sie in den
Anweisungen zu den DVD-Videos.
Markierung Bedeutung
3
2
Gibt die Anzahl der Tonspuren an.
Gibt die Anzahl der Untertitel an.
16:9
3
LB
2
Gibt die Anzahl der Blickwinkel an.
Gibt die Bildformate an, die Sie wählen können.
Gibt den Regionalcode an.
40
DE
Page 95

Ausführen einer Systemwiederherstellung auf einem Notebook
Zum Zurücksetzen des Notebooks mit diesem Laufwerk verwenden Sie die
mit dem Notebook gelieferte Wiederherstellungs-Disc.
Hinweis zu Notebooks, die wiederhergestellt werden können
Mithilfe dieses Laufwerks können Sie Notebooks von Sony mit
vorinstalliertem Betriebssystem Windows XP zurücksetzen. Wenn Ihr
Notebook über ein integriertes Laufwerk verfügt, verwenden Sie zum
Zurücksetzen des Notebooks dagegen das integrierte Laufwerk (Stand: Juni
2003).
Einzelheiten zum Zurücksetzen des Notebooks finden Sie in der
Dokumentation zu Ihrem Notebook.
Hinweise
• Das Notebook muss über das dazugehörige Netzteil mit Strom versorgt werden, wenn
Sie eine Systemwiederherstellung ausführen. Betreiben Sie das Notebook nicht mit dem
Akku.
• Bei einem Notebook, das nicht über das VAIO Notebook-Peripheriegerätekabel
zurückgesetzt werden kann, schließen Sie das mitgelieferte i.LINK-Kabel und das
Netzteil an, um das Notebook zurückzusetzen. Einzelheiten zu den Anschlüssen finden
Sie auf Seite 13.
• Trennen Sie alle anderen Peripheriegeräte vom Notebook, bevor Sie eine solche
Neuinstallation ausführen.
41
DE
Page 96

Sicherheitsmaßnahmen
Geeignete Umgebung für
Betrieb und Lagerung
Verwenden oder lagern Sie dieses
Laufwerk nicht an Orten, an denen es
hoher Luftfeuchtigkeit, hohen
Temperaturen, starken Vibrationen oder
direktem Sonnenlicht ausgesetzt ist.
Transport
• Wenn Sie das Laufwerk transportieren
müssen, verpacken Sie es mit Hilfe der
Originalverpackungsmaterialien wieder
im Originalkarton.
• Nehmen Sie vor dem Transportieren des
Laufwerks unbedingt die CD/DVD aus
dem Laufwerk.
Bus-Zurücksetzung
Betrieb
• Bewegen Sie das Laufwerk während des
Betriebs nicht. Andernfalls könnte es zu
Fehlfunktionen kommen.
• Stellen Sie das Laufwerk während des
Betriebs auf eine ebene Oberfläche.
• Stellen Sie keine Gegenstände auf das
Laufwerk.
• Schützen Sie das Laufwerk vor starken
Temperaturschwankungen. Verwenden
Sie das Laufwerk nicht unmittelbar,
nachdem Sie es von einem kalten an
einen warmen Ort gebracht haben oder
nachdem die Umgebungstemperatur
drastisch angestiegen ist. Andernfalls
kann sich im Laufwerk Feuchtigkeit
niederschlagen. Wenn sich die
Temperatur während des Betriebs
drastisch ändert, verwenden Sie das
Laufwerk nicht weiter. Lassen Sie das
Laufwerk eingeschaltet etwa eine
Stunde lang stehen, und schalten Sie es
dann aus.
Der Computer überwacht ununterbrochen
den i.LINK-Verbindungsstatus. Wenn
eine i.LINK-kompatible Komponente an
den Computer angeschlossen oder davon
getrennt wird oder wenn eine i.LINKkompatible Komponente ein- oder
ausgeschaltet wird, erfolgt eine BusZurücksetzung, um das System an die
neue Situation anzupassen. Wenn eine
Bus-Zurücksetzung erfolgt, während
Daten an dieses Laufwerk übertragen
werden, können die Daten beschädigt
werden oder verloren gehen. Vermeiden
Sie eine solche Situation unbedingt.
Linse
Berühren Sie nicht die Linse im Laufwerk.
Öffnen Sie das Fach ausschließlich zum
Einlegen bzw. Herausnehmen von CDs/
DVDs, um zu vermeiden, dass sich Staub
auf der Linse ablagert.
42
DE
Page 97

Hinweise zu CDs
Beachten Sie zum Schutz der auf CDs/
DVDs gespeicherten Daten die folgenden
Punkte.
• Kleben Sie keine Aufkleber auf CDs/
DVDs, und achten Sie darauf, CDs/
DVDs nicht zu beschädigen.
• Berühren Sie nicht die Datenseite (Seite
ohne Aufkleber) von CDs/DVDs, und
halten Sie CDs/DVDs immer wie in der
Abbildung gezeigt.
• Verwenden oder lagern Sie CDs/DVDs
nicht an Orten, an denen sie hoher
Luftfeuchtigkeit, hohen Temperaturen,
direktem Sonnenlicht oder übermäßig
viel Staub ausgesetzt sind.
• Verschütten Sie keine Flüssigkeiten auf
CDs/DVDs.
• Bewahren Sie zum Schutz der Daten
CDs/DVDs nach Gebrauch immer in
deren Hülle auf.
• Verwenden Sie zum Beschriften von
CDs/DVDs ausschließlich einen
Filzstift auf Ölbasis.
• Verwenden Sie keine CD/DVD, auf der
sich Aufkleber, Klebstoff o. ä. befindet.
Andernfalls kann das Laufwerk
beschädigt werden.
Wartung
Reinigen des Gehäuses
Reinigen Sie das Gehäuse des Laufwerks
mit einem weichen, trockenen Tuch. Zum
Entfernen hartnäckiger Verschmutzungen
feuchten Sie das Tuch mit einem milden,
neutralen Reinigungsmittel an. Verwenden
Sie keine Lösungsmittel wie Alkohol,
Benzin oder andere Substanzen, die die
Oberfläche angreifen könnten.
Reinigen der Linse
Wenn Sie die Linse versehentlich mit
schmutzigen Fingern berühren oder wenn
das Laufwerk nicht mehr richtig
funktioniert, weil sich Staub auf der Linse
abgelagert hat, reinigen Sie die Linse.
Linse
Bitte wenden
DE
43
Page 98

Reinigen von CDs/DVDs
• Fingerabdrücke und Schmutz auf der
Oberfläche von CDs/DVDs können zu
Lesefehlern führen. Halten Sie CDs/
DVDs immer sauber.
• Zum Reinigen von CDs/DVDs wischen
Sie sie vorsichtig von der Mitte nach
außen ab.
Hilfeinformationen und technische Unterstützung
In diesem Abschnitt finden Sie
Informationen dazu, wie Sie von Sony
Hilfeinformationen und technische
Unterstützung erhalten können, sowie
Tipps zur Fehlerbehebung bei diesem
DVD±RW-Laufwerk.
Möglichkeiten zur
technischen
Unterstützung von Sony
• Zum Entfernen hartnäckiger
Verschmutzungen feuchten Sie das
Tuch vor dem Abwischen der CD/DVD
an und trocknen die CD/DVD hinterher
mit einem trockenen Tuch ab.
• Verwenden Sie nicht Benzin,
Reinigungsflüssigkeit für Schallplatten,
Antistatikflüssigkeit oder andere
Substanzen, die die Oberfläche von
CDs/DVDs beschädigen könnten.
• Verwenden Sie bei nicht benutzten
CDs/DVDs auf keinen Fall
Reinigungsmittel. Verwenden Sie zum
Entfernen von Staub speziell für CDs/
DVDs entwickelte CD-Reiniger.
• Wenn sich auf unbespielten Bereichen
einer CD/DVD Kratzer oder Staub
befinden, ist das Schreiben auf die CD/
DVD möglicherweise nicht möglich.
Achten Sie darauf, CDs/DVDs nicht zu
beschädigen.
Sony bietet für das DVD±RW-Laufwerk
verschiedene Möglichkeiten zur
Unterstützung. Sollten Fragen zum
DVD±RW-Laufwerk und der Software
auftreten, stehen folgende
Informationsquellen zur Verfügung:
❑Diese Anleitung enthält
Erläuterungen zum Betrieb des
DVD±RW-Laufwerks.
Für Kunden in den USA und
Kanada
❑Unter der Nummer des Sony-
Kundeninformationscenters
erhalten Sie Informationen zum
Notebook und anderen Sony-Produkten,
die mit dem Computer eingesetzt
werden können. Das SonyKundeninformationscenter erreichen Sie
unter +1-888-4SONYPC (+1-888-476-
6972).
44
DE
Page 99

❑Beim Fax-Service von Sony
erhalten Sie Antworten auf häufig
gestellte Fragen. Bei diesem
automatischen Service können Sie eine
Liste der verfügbaren Themen
anfordern und die Themen, die Sie
wünschen, auswählen. Den Fax-Service
von Sony erreichen Sie unter +1-8884SONYPC (+1-888-476-6972).
❑Beim E-Mail-Support-Service von
Sony werden Ihre Fragen per E-Mail
beantwortet. Senden Sie Ihre Frage
einfach als E-Mail, und Sie erhalten
eine Antwort von einem
Kundendienstmitarbeiter. Wenn Sie
eine Frage an den E-Mail-Support von
Sony stellen wollen, schicken Sie die
Nachricht an SOS@info.sel.sony.com.
Für Kunden in Europa
❑Wenden Sie sich an VAIO-Link.
Adressen und Telefonnummern finden
Sie in Ihrem Kundendiensthandbuch.
Technische Daten
Kompatible CDs/DVDs
DVD+R
DVD+RW
DVD-R
DVD-RW
DVD-ROM
DVD-Video
CD-R
CD-RW (Ultra Speed-CD-RWs werden nicht
unterstützt)
CD-ROM
CD-DA (Audio CD)
CD TEXT
CD Extra (CD+)
Foto-CD
Durchmesser der CD/DVD:
12 cm
8 cm (nur Lesen möglich)
Systemleistung des Laufwerks
Für Kunden in anderen
Regionen
❑Auf der VAIO-Online-Website finden
Sie Antworten auf häufig gestellte
Fragen (FAQs).
vaio-online.sony.com/
Datenübertragungsrate
Lesen von Daten
DVD+R/DVD+RW:
2fache Geschwindigkeit (max.)
DVD-R/DVD-RW:
2fache Geschwindigkeit (max.)
DVD-ROM: 5fache Geschwindigkeit (max.)
CD-R/CD-ROM:
24fache Geschwindigkeit (max.)
Schreiben von Daten
DVD+R/DVD+RW:
2fache Geschwindigkeit (max.)
DVD-R/DVD-RW: 1fache Geschwindigkeit
CD-R: 16fache Geschwindigkeit (max.)
CD-RW: 8fache Geschwindigkeit (max.)
(DVD: 1fache Geschwindigkeit = 1350 KB/s,
CD: 1fache Geschwindigkeit = 150 KB/s)
Unterstützung von Multi-Session-CDs, Fach für
12/8-cm-CDs/DVDs
Bitte wenden
45
DE
Page 100

Eigenschaften der Laserdiode
Laseremission CD: 180 µW
DVD: 74,1 µW
Wellenlänge CD: 784 nm
DVD: 658 nm
Anschlüsse
i.LINK-Anschluss (IEEE 1394) S400 (4polig) (2)
S400 = 400 Mbps
Gleichstromeingang DC IN (1)
Dedizierter Gleichstromeingang DC IN (1)
Umgebungsbedingungen
für Betrieb
Betriebstemperatur
5ºC bis 35ºC (Temperaturschwankungen von unter
10ºC/Stunde)
Luftfeuchtigkeit bei Betrieb
20 bis 80% (nicht kondensierend)
bei einer Temperatur von 35°C muss die
Luftfeuchtigkeit unter 65% liegen
(Hygrometerstand unter 29°C)
Lagertemperatur
–20ºC bis +60ºC (Temperaturschwankungen von
unter 10ºC/Stunde)
Luftfeuchtigkeit bei Lagerung
20 bis 90% (nicht kondensierend), bei einer
Temperatur von 60°C muss die Luftfeuchtigkeit
unter 20% liegen (Hygrometerstand unter 35°C)
Sonstiges
Leistungsaufnahme
Lesen/Schreiben: ca. 8 W
Abmessungen
ca. 144 × 21 × 154 mm (B × H × T)
(maximal, einschließlich vorstehender Teile)
Gewicht
ca. 410 g (nur Hauptgerät)
Änderungen, die dem technischen Fortschritt
dienen, bleiben vorbehalten.
Netzteil*
Betriebsspannung
100 - 240 V Wechselstrom, einstellbar, 50/60 Hz
Ausgangsspannung und Stromstärke
10 V, max.1,5 A
* Nicht bei allen Produktkonfigurationen
mitgeliefert
DE
46
 Loading...