

Sony NWZ-S544, NWZ-S544BLK, NWZ-S544PNK, NWZ-S544RED, NWZ-S544VLT Operating Instruction
...Page 1

Table of
Contents
Home
Menu
Index
Click! You can directly jump
Transferring Music
Transferring Videos/Photos
Troubleshooting
Operation Guide
NWZ-S544 / S545
©2009 Sony Corporation
4-154-416-12(1)
Page 2
2
Table of
Contents
Home
Menu
Index
2
Note
Depending on the country/region in which you have purchased the player, some models
may not be available.
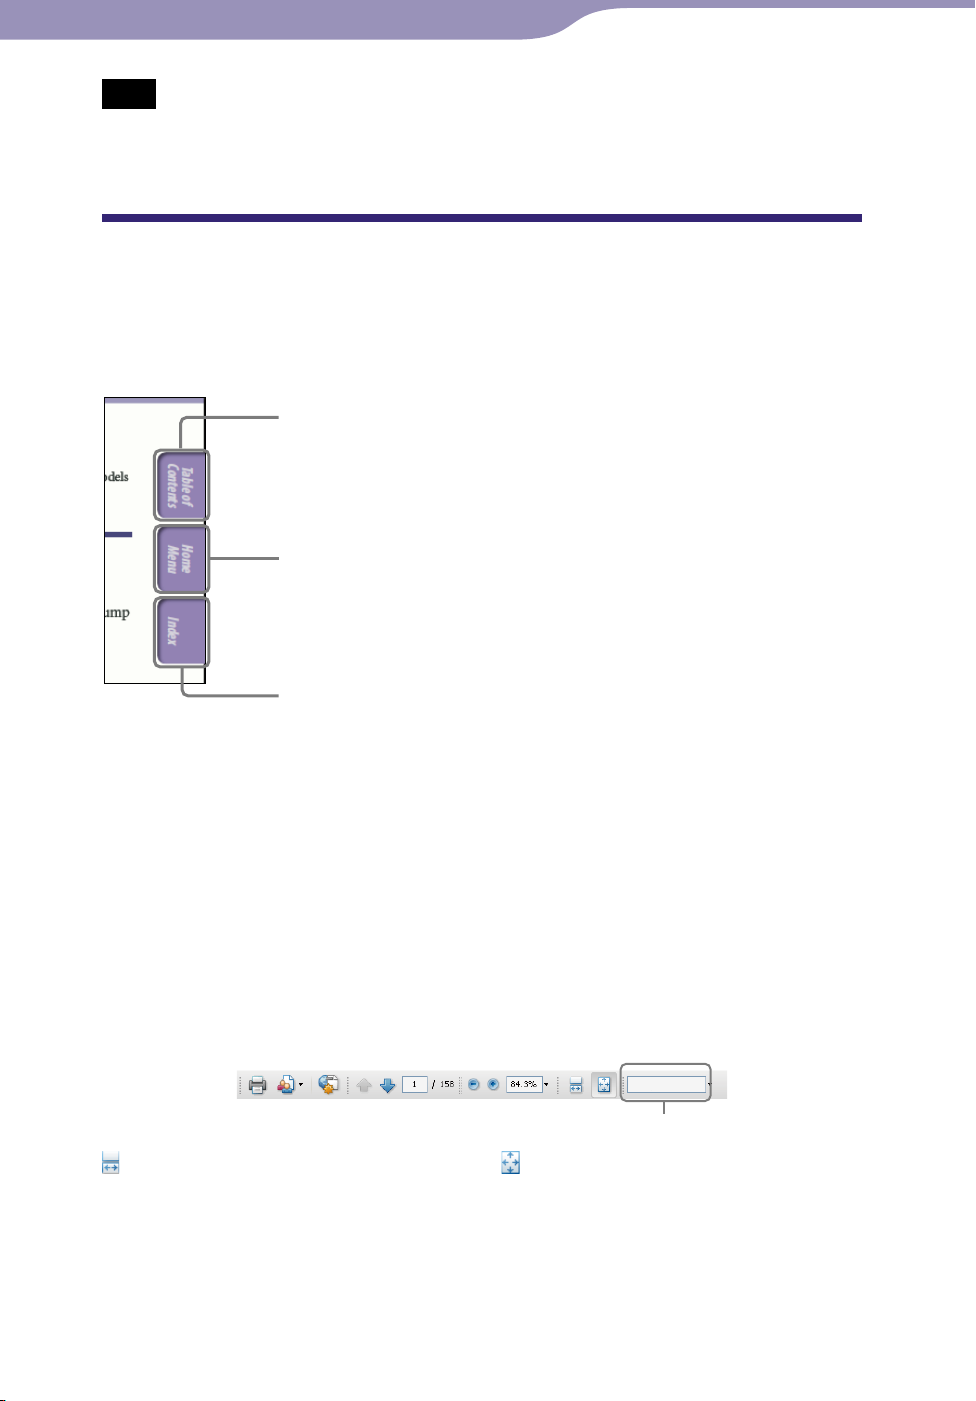
Browsing the Operation Guide
To use the buttons in the Operation Guide
Click the buttons located in the upper right of the pages of this manual to jump
to “Table of Contents,” “About the Home Menu” or “Index.”
Jumps to the table of contents
Find what you are looking for from a list of topics in the manual.
Jumps to the [Home] menu list
Find what you are looking for from a list of the option items in the player’s menu.
Jumps to the index
Find what you are looking for from a list of key words mentioned in the manual.
Hint
You can jump to the indicated page by clicking a page number in the table of contents or
in the index.
ou can jump to the indicated page by clicking a page reference indication (e.g., p
Y
on each page.
To search for a reference page by keyword, enter the keyword into the find text field on
the Adobe Reader window.
peration procedures may differ, depending on your Adobe Reader version.
O
. 5)
To change the page layout
The buttons on the Adobe Reader window enable you to select how pages are
displayed.
Text field to find text
Continuous
Pages are displayed as a continuous
roll of pages, fitting the page width
inside the window. When you scroll,
the previous or next pages scroll up
Single Page
Pages are displayed one at a time,
fitting the page into the window.
When you scroll, the display changes
to the previous or next page.
or down continuously.
Page 3

3
Table of
Contents
Home
Menu
Index
3
Table of Contents
Basic Operations and Screens
Parts and Controls ...................................5
Switching the output between
the headphones and built-in speakers ........7
Turning the Player On and Off ...............8
About the Home Menu ............................9
How to Use the Home Menu .................12
How to Use the Option Menu ................15
About the Software ................................17
Bundled Software ...........................................17
Compatible Software .....................................17
Preparing the Player
Charging the Battery .............................18
Selecting the Display Language
............20
Setting the Date and Time .....................21
Transferring Music
Selecting the Way to Transfer Music .....22
Transferring Music Using Windows
Media Player 11 ...................................23
Importing music from CDs ..........................23
Transferring Music ........................................25
Transferring Music Using Content
Transfer ...............................................27
Transferring Music Using Windows
Explorer ...............................................29
Transferring Videos/Photos
Selecting the Way to Transfer
Videos/Photos .....................................31
Transferring Videos/Photos Using
Content Transfer .................................32
Transferring Videos/Photos Using
Windows Explorer ...............................34
Playing Music
Playing Music [Music] .............................36
Music playback screen ...................................37
Music list screen .............................................38
Searching for Songs ...............................39
Playing a playlist .............................................40
Playing All Songs in Random Order.....41
Deleting Songs .......................................42
Using the Music Option Menu ..............43
Displaying the detailed information screen
[Detailed Information] .......................................45
Displaying the cover art screen
[Cover Art] .......................................................45
Changing the Music Settings .................46
Setting the play mode [Play Mode] ..................46
Setting the sound quality
Listening with Clear Stereo
Adjusting the volume level
[Dynamic Normalizer] .......................................49
Optimizing the quality of the sound output
from the built-in speakers
[Built-in SP Optimizer] ......................................49
[Equalizer] ..............47
[Clear Stereo] ......48
Watching Videos
Playing a Video [Videos] ..........................50
Video playback screen ...................................51
Deleting Videos .....................................52
Using the Video Option Menu ..............53
Changing the Video Settings .................54
Setting the zoom function [Zoom Settings] ....54
Setting the display of the video screen
[Display] ..........................................................56
Setting the video orientation
[Video Orientation] .......................................................57
Continued
Page 4

4
Table of
Contents
Home
Menu
Index
4
Viewing Photos
Viewing Photos [Photos] .........................58
Photo display screen ......................................59
Playing a Slide Show ..............................60
Deleting Photos .....................................61
Using the Photo Option Menu ..............62
Changing the Photo Settings .................63
Photo orientation [Photo Orientation] ..............63
Setting the display of the photo screen
[Display] ..........................................................64
Setting the slide show play mode
[Slide Show Repeat] ...........................................64
Setting the interval of a slide show
[Slide Show Interval] ..........................................65
Listening and Recording FM Radio
Listening to FM Radio ...........................66
FM Radio screen ............................................67
Presetting broadcast stations
automatically
Presetting broadcast stations manually .......69
Deleting preset broadcast stations ...............69
Recording FM Radio .............................70
Playing Back Recorded FM Radio
Programs .............................................72
Deleting Recorded FM Radio
Programs .............................................73
Using the FM Radio Option Menu ........74
Changing the FM Radio Settings ..........76
Setting the reception [Scan Sensitivity] ............76
Setting monaural/stereo
[Auto Preset] ............................68
[Mono/Auto] ............76
Common Settings
Changing the Common Settings ...........87
Displaying the player information
[Unit Information] .............................................87
Limiting the volume
Turning off the beep sound
Setting a screensaver type
Adjusting the brightness of the screen
[Brightness] ......................................................89
Setting the current time
Setting the date format
[Date Display Format] ........................................91
Setting the time format
[Time Display Format] .......................................91
Returning to the factory settings
[Reset all Settings] .............................................92
Formatting memory
[AVLS (Volume Limit)] ....88
[Beep Settings] ....88
[Screensaver] .........89
[Set Date-Time] .........90
[Format] .........................92
Selecting the Display Language
[Language Settings] ...................................93
Useful Facts
About Battery Life .................................94
What are Format and Bit Rate? .............95
What is audio format? ...................................95
What is video format? ...................................96
What is photo format? ...................................96
Storing Data ...........................................97
Upgrading the Player’s Firmware .........98
Troubleshooting
Troubleshooting ....................................99
Messages ..............................................111
Recording/Listening Voice
Recording Voice .....................................77
Playing Back Recorded Voice Files .......79
Deleting Recorded Voice Files ..............80
Using the Voice Recording
Option Menu .......................................81
Changing the Recording Settings .........83
Selecting a level of recording quality
[Bit Rate Settings] ..............................................83
Using the Timer
Setting the Timer ...................................84
Setting the alarm [Alarm] ................................85
Setting the sleep timer
[Sleep Timer] ...............86
Additional Information
Precautions ..........................................113
License and Trademark Notice ...........122
Specifications.......................................125
Index ....................................................132
Page 5

5
Table of
Contents
Home
Menu
Index
5
Basic Operations and Screens
Basic Operations and Screens
Parts and Controls
Front
Built-in speakers
See p
. 7.
BACK/HOME button
Press to go up one list screen level, or
to return to the previous menu.
Press and hold the BACK/HOME
button to display the [Home] menu
. 9).
( p
5-way button*
Starts playback and enables
navigation of the player’s on-screen
menus ( p
1
. 12, 15).
Display
See p
VOL +*
Adjusts the volume.
You can adjust the volume of sound
from the headphones and the builtin speakers respectively ( p
. 9.
1
/− button
. 7).
Output switch
Switches the output between the
headphones and the built-in speakers
of the player ( p
. 7).
HOLD switch
You can protect the player against
accidental operation during
transportation by setting the HOLD
switch. By sliding the HOLD switch
in the direction of the arrow ,
all operation buttons except the
output switch are disabled. If you
slide the HOLD switch in the
opposite position, the HOLD
function is released.
OPTION/PWR OFF button
Press to display the option menu (
p. 15, 43, 53, 62, 74, 81).
If you press and hold the OPTION/
PWR OFF button, the screen turns
off and the player enters standby
mode ( p
. 8).
*1 There are tactile dots. Use them to help with
button operations.
Continued
Page 6
6
Table of
Contents
Home
Menu
Index
6
Basic Operations and Screens
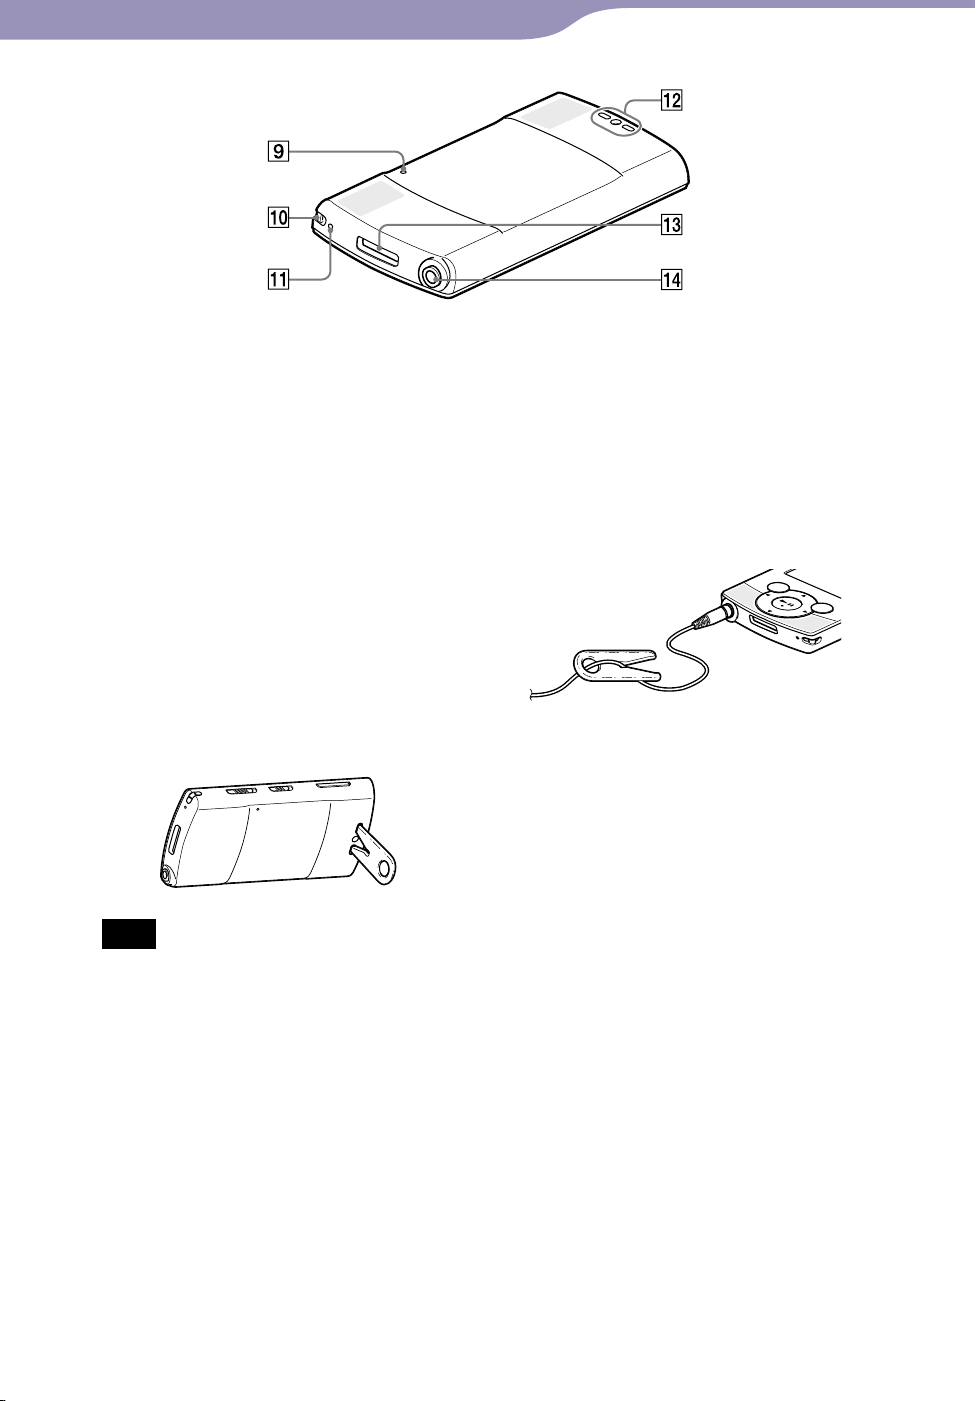
Rear
RESET button
Press the RESET button with a small
pin, etc., to reset the player (
. 99).
p
Strap hole
This is used to attach a strap (sold
separately).
Microphone
See p
. 77.
Stand hole
This is used to attach the supplied
stand.
Note
When standing the player with the
stand, be careful not to press down on
or knock the player.
About carrying the supplied stand
Carry so as not to lose the stand as
follows.
Insert the headphone cord through
the hole of the stand, and push the
headphone cord into the base of the
V-shaped notch to secure the stand
to the headphone cord.
WM-PORT jack
Connect the supplied USB cable, or
optional peripheral devices.
Headphone jack
Insert the headphone plug until it
clicks into place. If the headphones
are connected improperly, the sound
from the headphones will be
impaired.
Page 7

7
Table of
Contents
Home
Menu
Index
7
Basic Operations and Screens
Switching the output between the headphones and built-in speakers
You can switch the output between the headphones and the built-in speakers
by sliding the output switch. You can adjust the volume of sound from the
headphones and the built-in speakers respectively.
Output switch
Note
When you switch the output to the built-in speakers, the output sound is not turned up
at once.
o not place credit cards or ATM cards, etc. (magnetic coded cards) near the holes of
D
built-in speakers, as damage to the magnetic coding on the cards may result.
Set the output switch to (speaker) or (headphones).
Press the VOL +/- button to adjust the volume.
The volume indicator appears on the screen. The (headphones) or
(speaker) icon (depending on the current setting) is displayed to the left of
the volume indicator.
Hint
You can set [Built-in SP Optimizer] to output sound from the built-in speakers (
p
. 49).
Page 8

8
Table of
Contents
Home
Menu
Index
8
Basic Operations and Screens
Turning the Player On and Off
OPTION/PWR OFF
button
To turn on the player
Press any button to turn the player on.
Hint
If [On hold... Cancel HOLD function to activate controls.] appears on the screen, slide
the HOLD switch on the right of the player in the opposite direction of the arrow
to release the HOLD function.
To turn off the player
Press and hold the OPTION/PWR OFF button. [POWER OFF] appears, then
the player enters standby mode, and the screen turns off.
Hint
Set the date and time on the player before using it ( p
D
uring pause, if there is no operation for more than 3 minutes, the player automatically
enters standby mode to save battery power, and the screen turns off.
hile the player is in standby mode, if there is no operation for about 4 hours, the player
W
completely turns off automatically. The batteries are consumed a little in this status.
Note
You cannot operate the player when it is connected to a computer. Disconnect the USB
cable before operating the player.
e player consumes battery power very slightly even when it is in standby mode.
Th
Therefore, the player might turn completely off unexpectedly depending on the power
remaining in the battery.
. 21, 90).
Page 9
9
Table of
Contents
Home
Menu
Index
9
Basic Operations and Screens
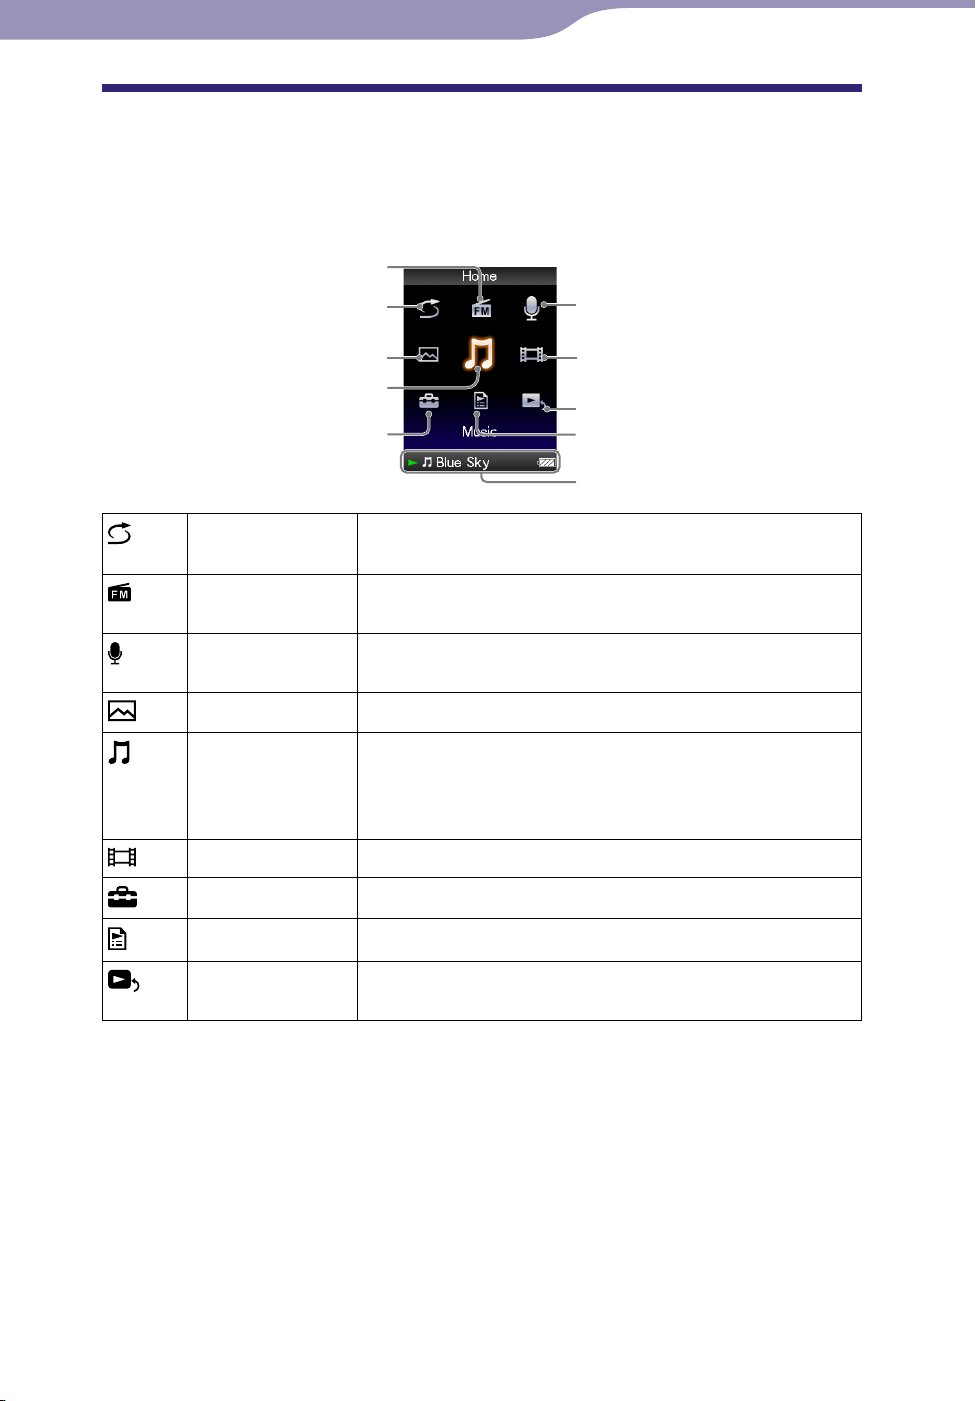
About the Home Menu
The following table shows the items of the [Home] menu. For details on the
item list of each menu, see p
For details about each menu item, refer to the specified reference page.
[FM Radio]
. 10.
[Shuffle All]
[Photos]
[Music]
[Settings]
[Shuffle All] Listen to all the songs stored on the player in random
order ( p
[FM Radio] Listen to FM radio broadcasting, and also record the
currently received FM radio program ( p
[Voice Recording]
[Photos]
[Music] Listen to songs transferred to the player. You can also
[Videos]
Record voice using the player’s built-in microphone (
p
. 77).
View photos transferred to the player ( p
listen to voice recorded on the player using [Voice
Recording] function, and FM radio programs recorded on
the player ( p
Watch videos transferred to the player ( p
. 41).
. 36).
[Voice Recording]
[Videos]
[Now Playing]
[Playlists]
Information area
. 66).
. 58).
. 50).
[Settings]
[Playlists]
[Now Playing] Display the playback or display screen of the currently
Set up the player and its applications ( p
Listen to songs in the playlists ( p
playing content.
. 87).
. 40).
Continued
Page 10
10
Table of
Contents
Home
Menu
Index
10
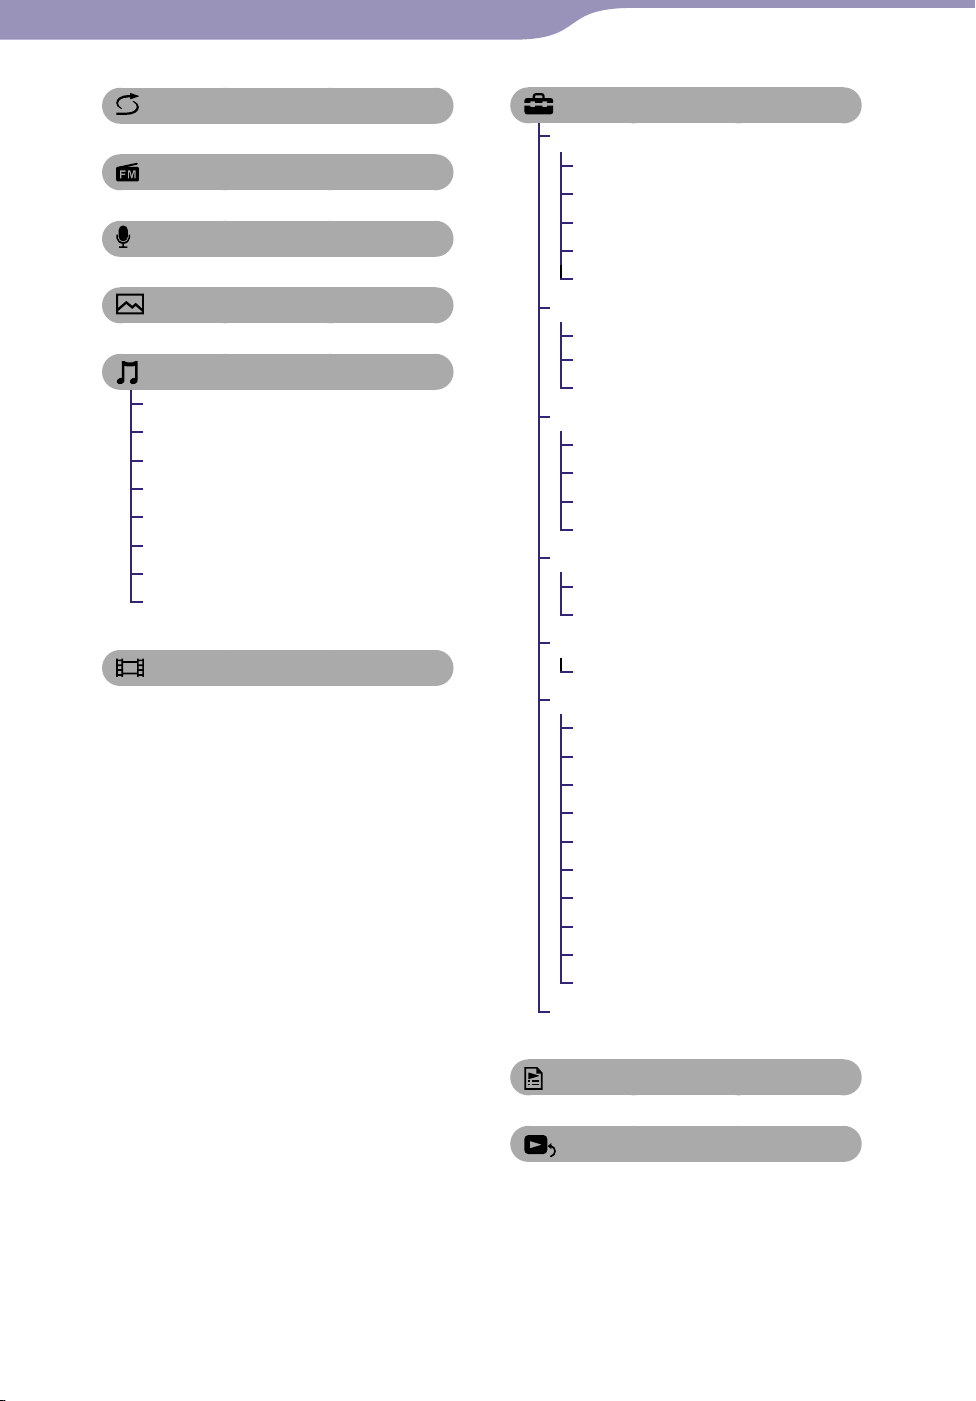
Basic Operations and Screens
[Shuffle All] ............................. 41
[FM Radio] ............................... 66
[Voice Recording] ....................... 77
[Photos] ................................. 58
[Music]
[All Songs]...................................39
[Album] .......................................39
[Artist] ......................................... 39
[Genre] ........................................39
[Release Year] .............................39
[Folder] ........................................ 39
[Voice Recording] ................39, 79
[FM Recording] ....................39, 72
[Videos] .................................. 50
[Settings]
[Music Settings]
[Play Mode] ...........................46
[Equalizer].............................. 47
[Clear Stereo] ......................... 48
[Dynamic Normalizer] ......... 49
[Built-in SP Optimizer] ........ 49
[Video Settings]
[Zoom Settings]..................... 54
[Video Orientation] .............. 57
[Display] ................................. 56
[Photo Settings]
[Photo Orientation] .............. 63
[Display] ................................. 64
[Slide Show Repeat] .............. 64
[Slide Show Interval] ............ 65
[FM Radio Settings]
[Scan Sensitivity] ................... 76
[Mono/Auto] .........................76
[Recording Settings]
[Bit Rate Settings] .................83
[Common Settings]
[Unit Information] ................ 87
[AVLS (Volume Limit)] ........ 88
[Beep Settings] ....................... 88
[Screensaver] .........................89
[Brightness] ............................ 89
[Set Date-Time] ............... 21, 90
[Date Display Format] .......... 91
[Time Display Format] ......... 91
[Reset all Settings] ................. 92
[Format] .................................92
[Language Settings] .............20, 93
[Playlists]. ................................ 40
[Now Playing]
Continued
Page 11

11
Table of
Contents
Home
Menu
Index
11
Basic Operations and Screens
About the information area
The icons, shown in the table below, appear in the information area. The icons
vary according to the playback status, setting or the screen.
For details about the icons, see each reference page.
Icons Description
, , , ,
, ,
, , etc
Playback status ( p
. 37, 51, 59)
,
, , , , ,
, , etc
, etc
,
1
, *
*1 If the optional peripheral device to be able to enable volume adjustment is connected to the WM-
PORT jack of the player, may be displayed.
Recording status ( p
Song name, artist name, video title, photo title, file name of
recorded voice, or file name of recorded FM radio program
FM radio
Play mode ( p
Equalizer ( p
Zoom setting ([Auto] or [Full]) ( p
Sleep timer ( p
Remaining battery power ( p
Headphones or speaker ( p
. 71, 78)
. 46)
. 47)
. 54)
. 86)
. 18)
. 7)
Page 12
12
Table of
Contents
Home
Menu
Index
12
Basic Operations and Screens
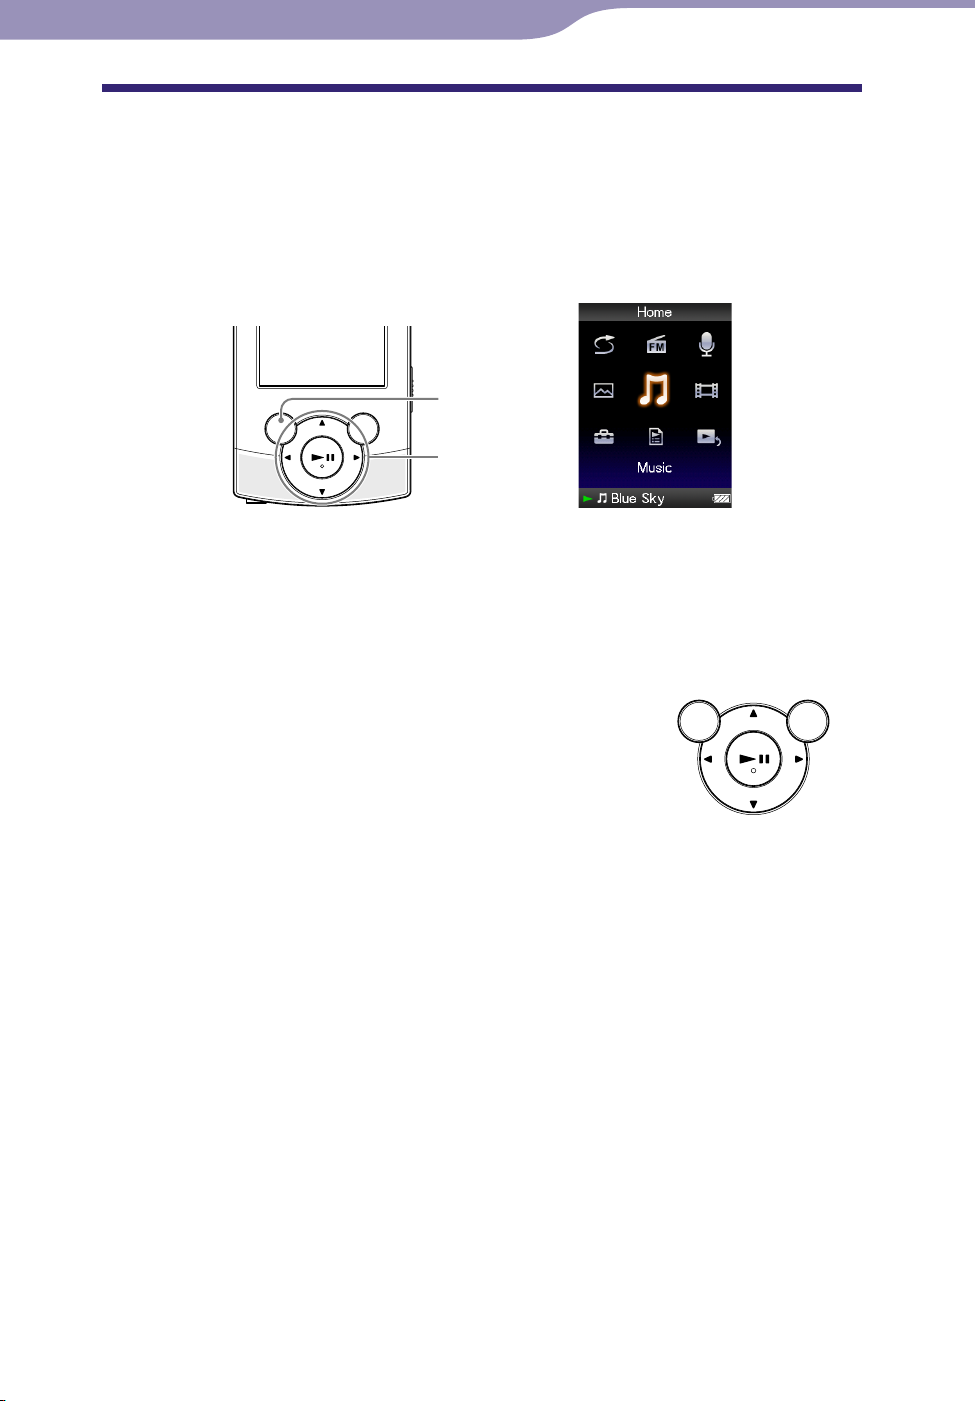
How to Use the Home Menu
The [Home] menu is the starting point of each application, such as searching
for songs, changing settings, etc.
You can display the [Home] menu by pressing and holding the BACK/HOME
button of the player.
BACK/HOME
button
5-way button
From the [Home] menu, you can select the desired item on the screen by using
the 5-way button.
1
Press the /// button to select an item, and then press the *
confirm.
*1 There are tactile dots. Use them to help with button operations.
button to
/// button: Selects an item.
button: Confirms an item.
Continued
Page 13
13
Table of
Contents
Home
Menu
Index
13
Basic Operations and Screens
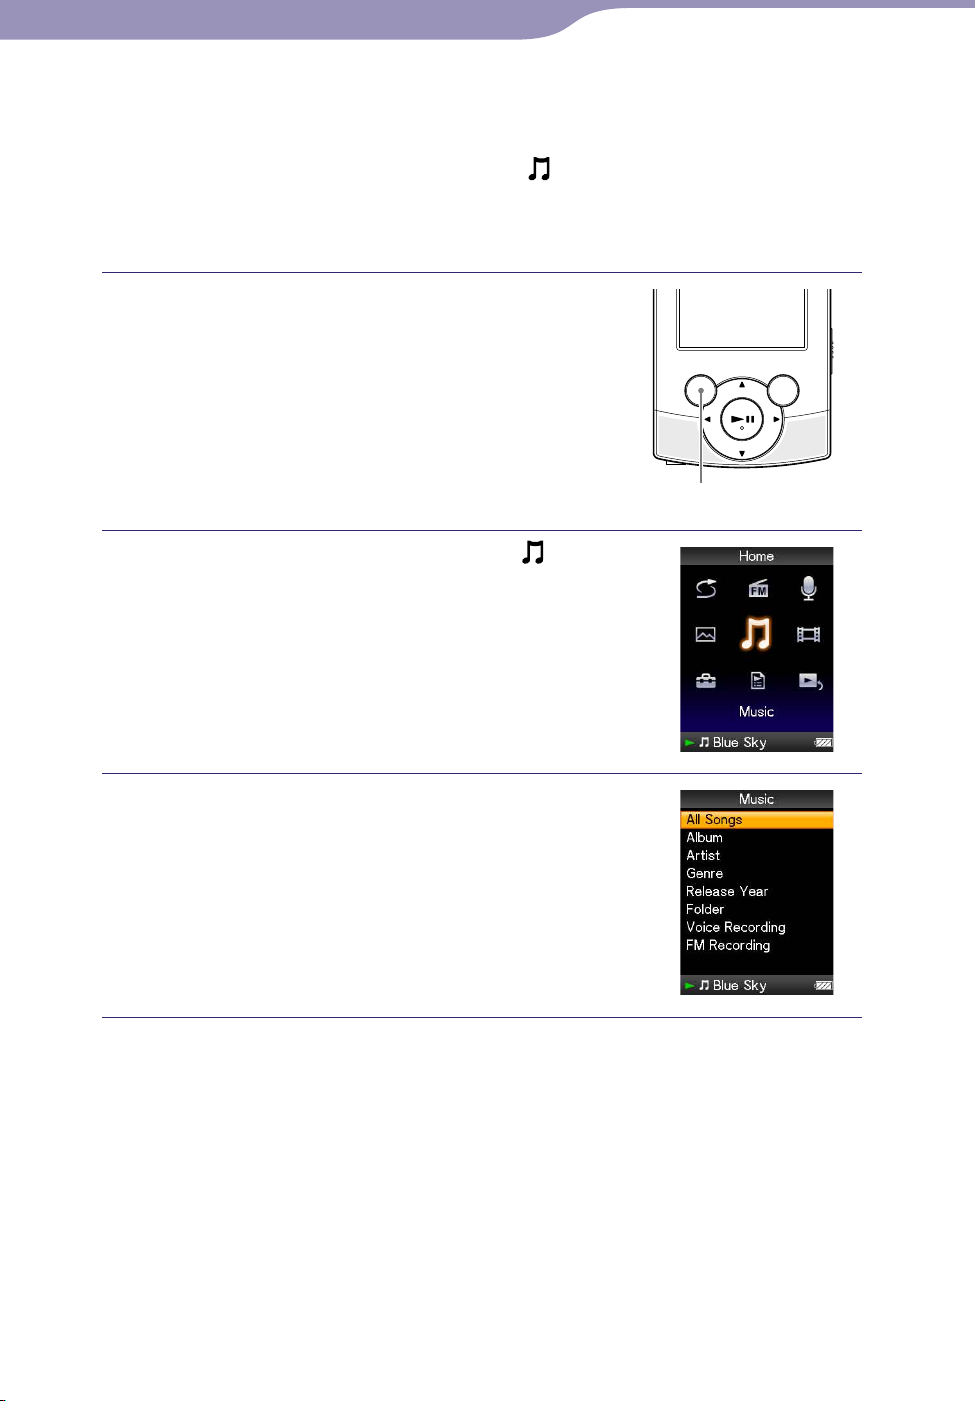
In this manual, operating instructions from the [Home] menu are described as
below.
Example:
The actual operations for the example above are shown below.
From the [Home] menu, select
album
desired song.
[Music] [Album] desired
Press and hold the BACK/HOME button.
The [Home] menu appears.
BACK/HOME button
Press the /// button to select
[Music], and then press the button
to confirm.
The search menu appears.
Press the /// button to select
[Album], and then press the button
to confirm.
The album list appears.
Continued
Page 14

14
Table of
Contents
Home
Menu
Index
14
Basic Operations and Screens
Press the /// button to select an
album, and then press the button to
confirm.
The song list for the selected album appears.
ou can scroll the list by pressing the /
Y
button.
Press the /// button to select a
song, and then press the button to
confirm.
The music playback screen appears and
playback begins.
To return to the [Home] menu during operation
Press and hold the BACK/HOME button.
To return to the previous screen during operation
Press the BACK/HOME button.
Page 15
15
Table of
Contents
Home
Menu
Index
15
Basic Operations and Screens
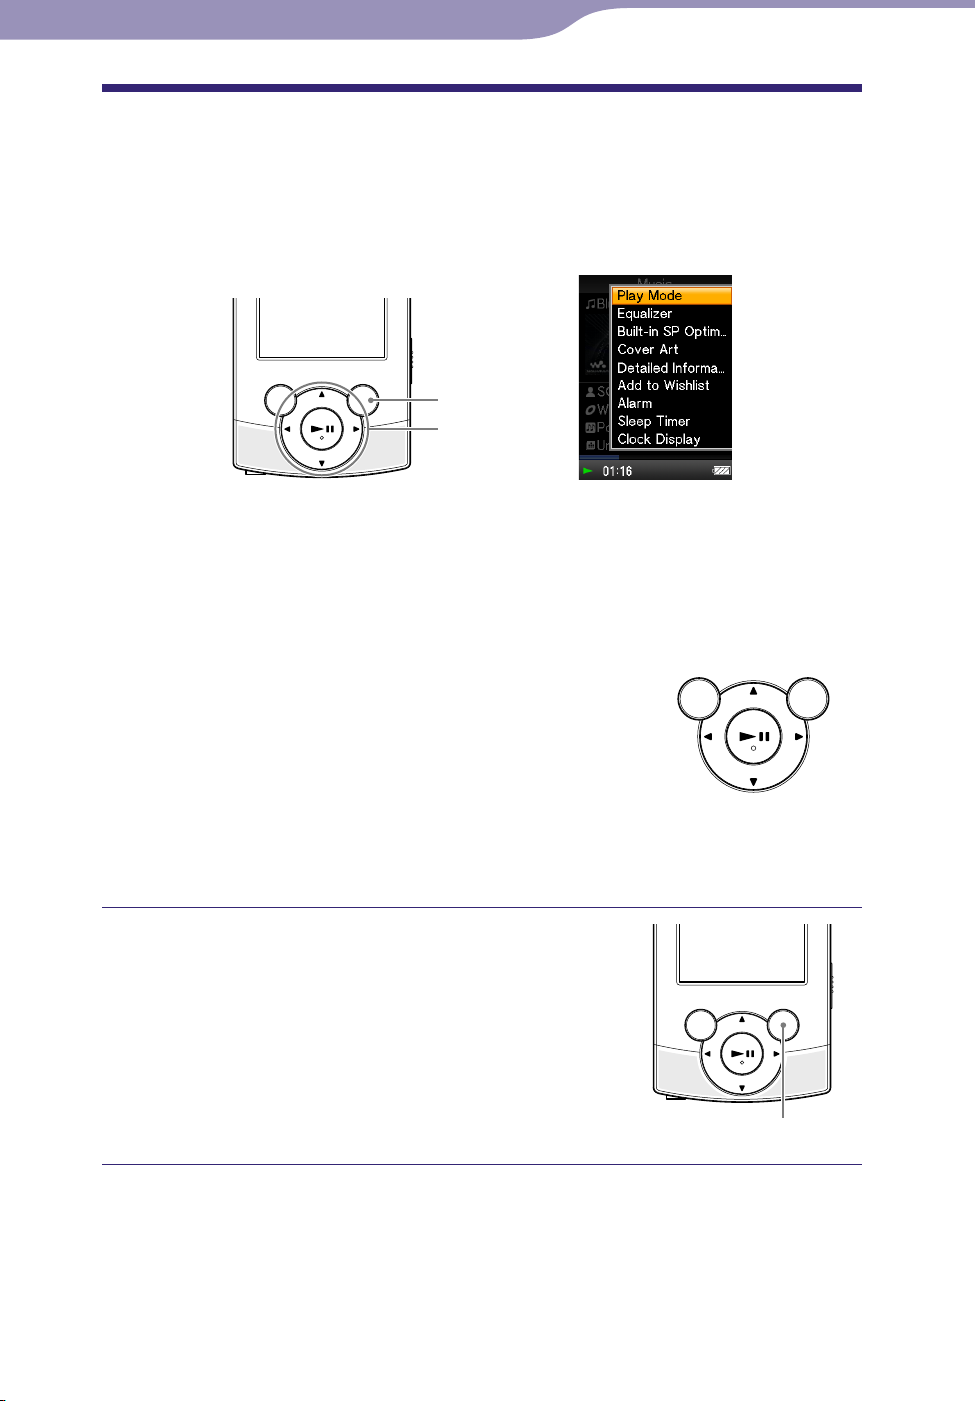
How to Use the Option Menu
The option menu items vary function-to-function, allowing you to change the
settings of each application.
You can display the option menu by pressing the OPTION/PWR OFF button.
OPTION/PWR OFF
button
5-way button
From the option menu, you can select the desired item on the screen by using
the 5-way button.
1
Press the /// button to select an item, and then press the *
confirm.
*1 There are tactile dots. Use them to help with button operations.
button to
/// button: Selects an item.
button: Confirms an item.
For example, the operations for setting [Play Mode] option to [Shuffle] are
shown below.
From the music playback screen, press
the OPTION/PWR OFF button.
The option menu appears.
OPTION/PWR OFF button
Continued
Page 16
16
Table of
Contents
Home
Menu
Index
16
Basic Operations and Screens
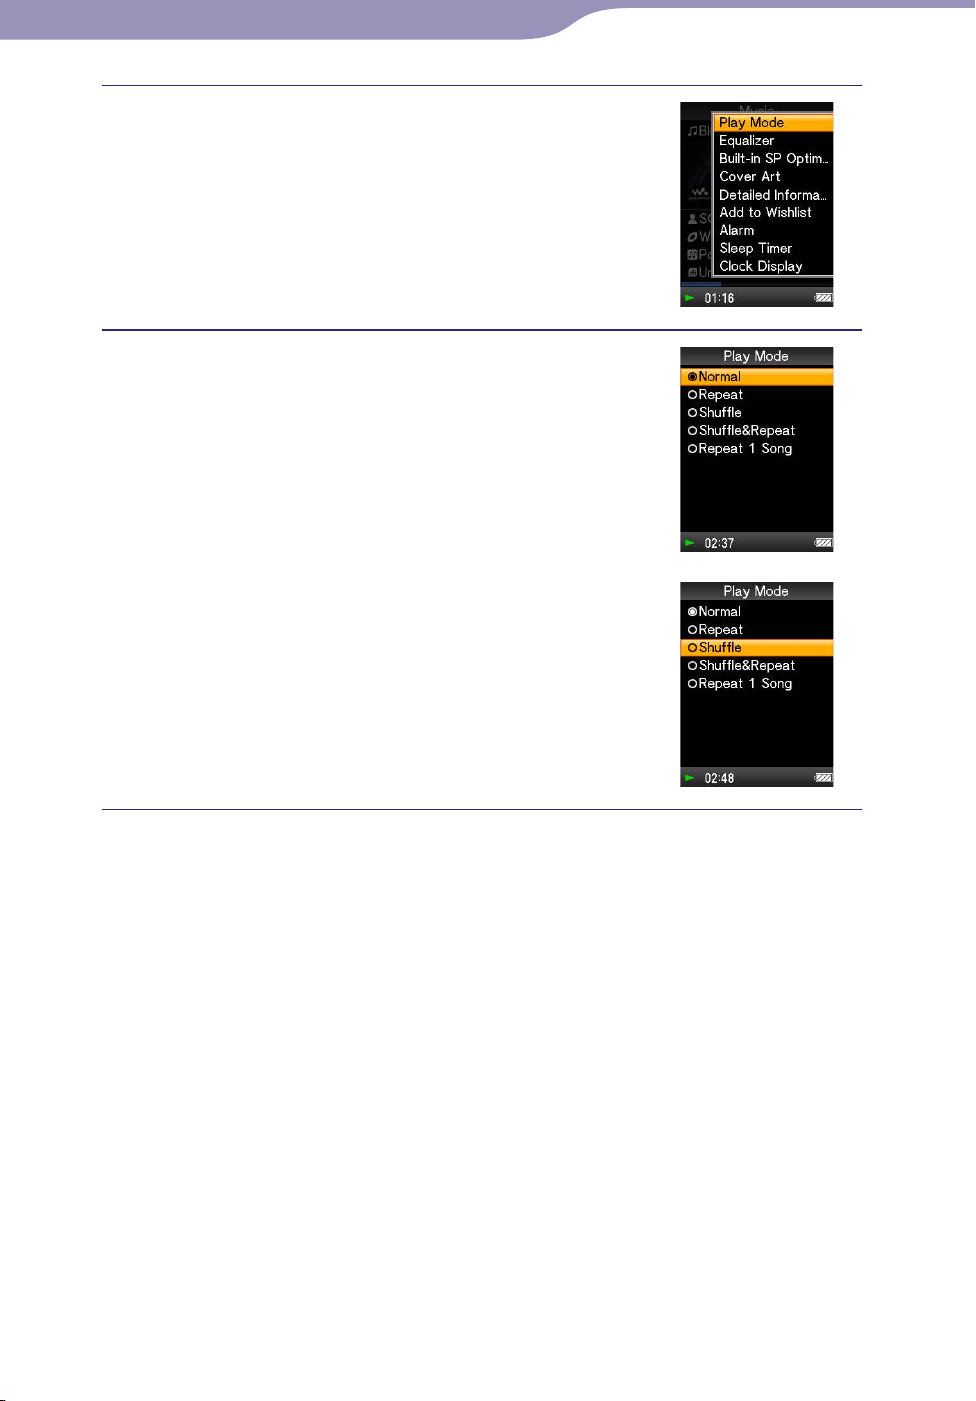
Press the /// button to select
[Play Mode], and then press the
button to confirm.
Press the /// button to select
[Shuffle], and then press the button
to confirm.
The play mode changes to [Shuffle].
The items of the option menu differ, depending on the screen on which you
press the OPTION/PWR OFF button.
For details, see the following pages.
“Using the Music Option Menu” ( p
“Using the Video Option Menu” ( p
“Using the Photo Option Menu” ( p
“Using the FM Radio Option Menu” ( p
“Using the Voice Recording Option Menu” ( p
. 43)
. 53)
. 62)
. 74)
. 81)
Page 17

17
Table of
Contents
Home
Menu
Index
17
Basic Operations and Screens
About the Software
Bundled Software
Content Transfer
Content Transfer can transfer music, videos or photos from a computer to the
player by a simple drag-and-drop operation. You can use Windows Explorer or
iTunes, etc., to drag-and-drop data to Content Transfer. Content Transfer can
also convert a video file of a format not supported by the player into a playable
format. For details on operation, refer to the Help of the software.
Transferable files: Music (MP3, WMA, AAC, WAV), Photo (JPEG), Video
(MPEG-4 Simple Profile, AVC (H.264/AVC) Baseline Profile, WMV*
*1 Some WMV files cannot be played back after being transferred by Content Transfer. If you
retransfer them using Windows Media Player 11, they may become playable.
Hint
ATRAC files managed by SonicStage can be transferred to the player after conversion to
MP3 file format. To convert files, download the MP3 Conversion Tool from the
customer support Web site ( p
. 121).
1
)
Compatible Software
Windows Media Player 11
Windows Media Player can import audio data from CDs and transfer data to
the player.
Transferable files: Music (MP3, WMA), Video (WMV), Photo (JPEG)
For details on operation, refer to the Help of the software or visit the following
website.
http://www.support.microsoft.com/
Hint
Some computers that already have Windows Media Player 10 installed may encounter
file limitations (AAC, video files, etc.) when transferring by drag-and-drop. If you install
Windows Media Player 11 from the Windows Media Player download site, you can solve
this problem, allowing you to transfer by drag-and-drop again. Before installing
Windows Media Player 11 on your computer, make sure to check whether your software
or service corresponds to Windows Media Player 11.
Page 18
18
Table of
Contents
Home
Menu
Index
18
Preparing the Player
Preparing the Player
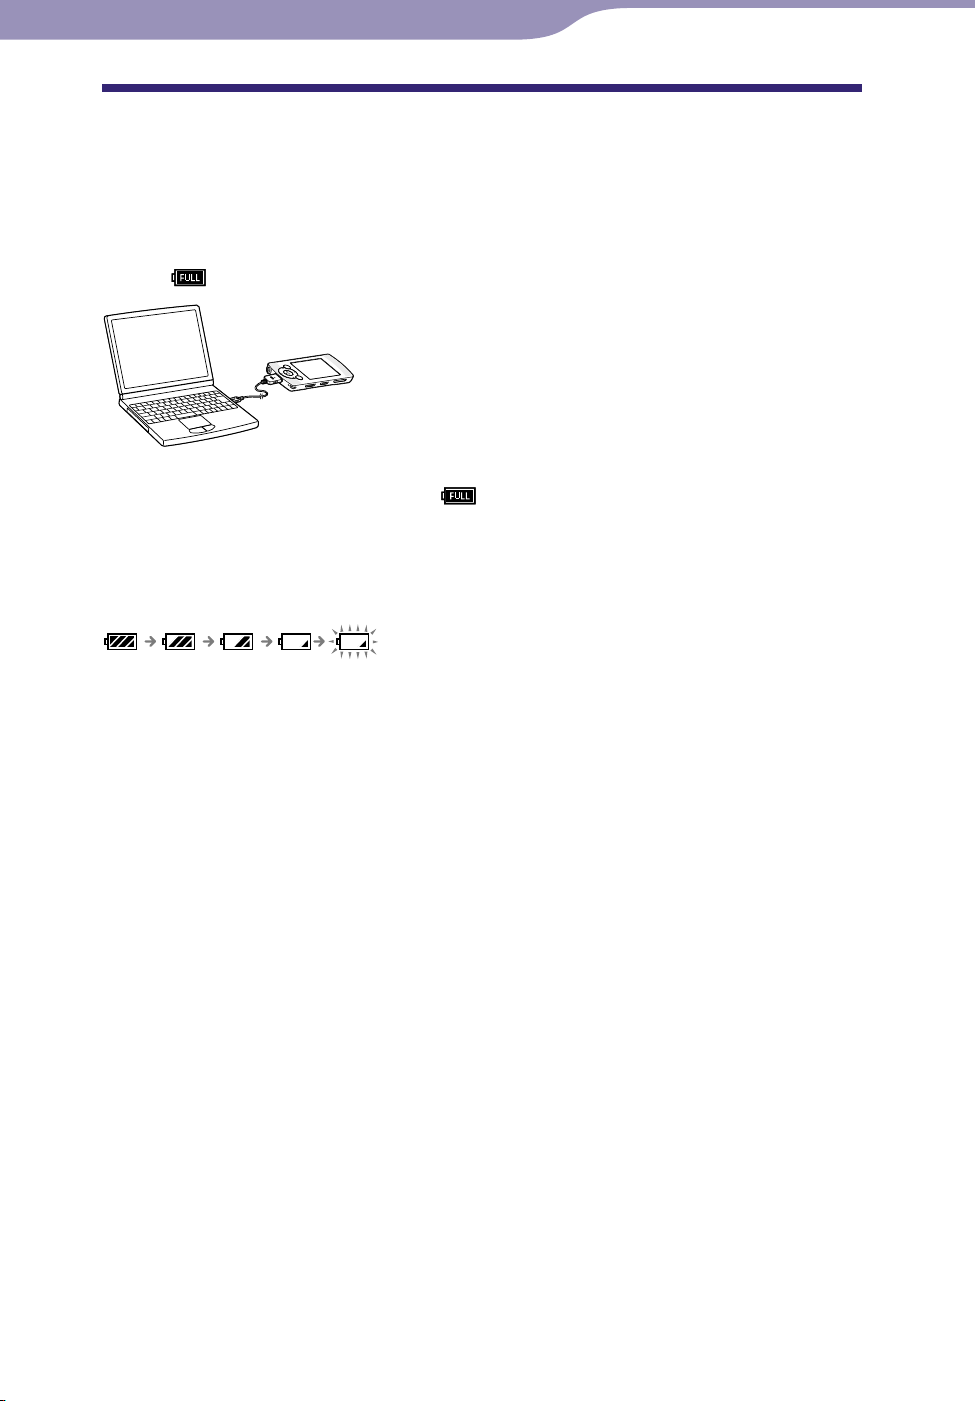
Charging the Battery
The player’s battery is recharged while the player is connected to a running
computer.
When you connect the player to your computer, use the supplied USB cable.
When the remaining battery indication in the lower right corner of the display
shows:
When you use the player for the first time, or if you have not used the player
for a long time, recharge it fully (to
the display).
About the battery indicator
The battery indicator in the information area shows remaining battery charge.
, charging is completed (charging time is approx. 2.5 hours).
in the remaining battery indication of
As the battery power gets lower, the bars of the icon disappear. If [LOW
BATTERY. Please Charge.] appears, you cannot use the player. In this case,
charge the battery by connecting to your computer. See p
duration.
. 129 on battery
Continued
Page 19

19
Table of
Contents
Home
Menu
Index
19
Preparing the Player
Note
If you charge the player when it has not been used for a long period, your computer may
not recognize the player or nothing may appear on the display. Charge the player for
about 5 minutes, and it starts operating properly.
harge the battery in an ambient temperature of between 5 ºC to 35 ºC (41 ºF to 95 ºF).
C
If you try to charge the battery in an ambient temperature outside this range, the battery
indicator may blink, and charging cannot be performed.
e number of times the battery can be recharged before it is used up is approximately
Th
500 times. This number may vary, depending on the conditions under which you use the
player.
e battery indicator on the display is only an estimate. For example, one section of
Th
black in the indicator will not always indicate exactly one-fourth of the battery’s charge.
o not disconnect.] appears in the display while the computer accesses the player. Do
[D
not disconnect the supplied USB cable while [Do not disconnect.] appears or data being
transferred may be damaged.
e control buttons on the player become inoperative while it is connected to a
Th
computer.
f you do not intend to use the player for over half a year, charge the battery at least once
I
during this time to maintain battery performance.
ome USB devices connected to the computer may interfere with proper operation of
S
the player.
e do not guarantee battery recharging using a personally assembled/modified
W
computer.
f the computer enters a power saving mode, such as the Sleep or Hibernation mode,
I
while the player is connected via the USB cable, the player’s battery will not be charged.
Instead, the player continues to draw power from the battery, discharging it.
o not leave the player connected for extended periods to a laptop computer that is not
D
connected to AC power, since the player may discharge the computer’s battery.
hile the player is connected to a computer, do not turn on, restart, wake up from sleep
W
mode, or shut down the computer. These operations may cause the player to
malfunction. Disconnect the player from the computer before performing these
operations.
eat may build up in the player while charging. This is not malfunction.
H
Page 20
20
Table of
Contents
Home
Menu
Index
20
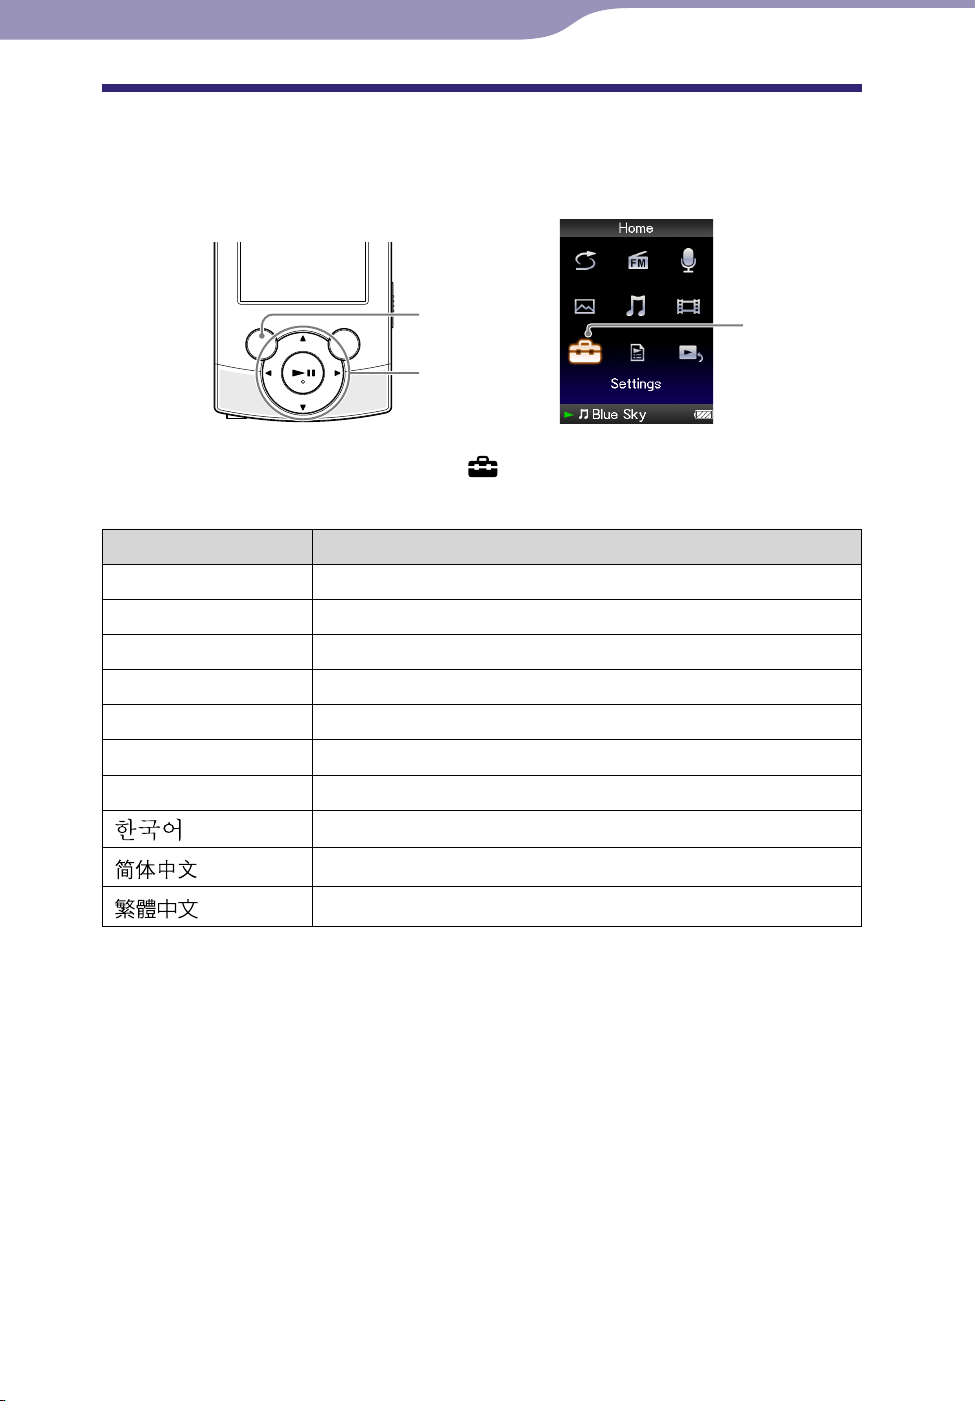
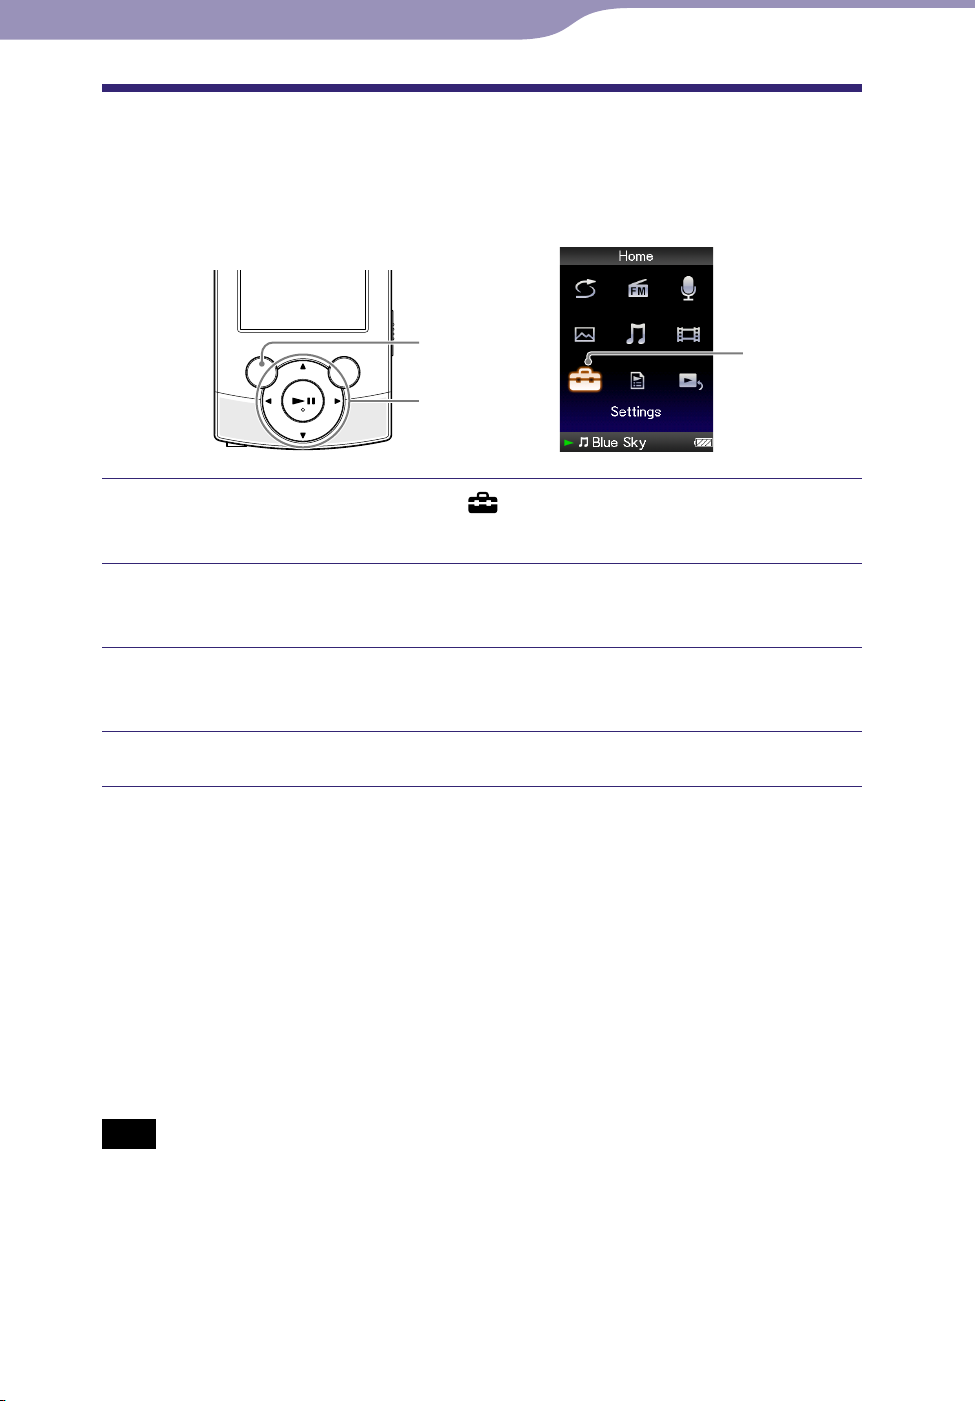
Preparing the Player
Selecting the Display Language
You can select from a variety of languages for menus and messages.
BACK/HOME
button
5-way button
From the [Home] menu, select [Settings]
desired language setting.
Language Messages and menus are displayed in
[Deutsch] German
[English] English
[Español] Spanish
[Français] French
[Italiano] Italian
[Português] Portuguese
[Русский] Russian
[
[
]
]
Korean
Simplified Chinese
[Settings]
[Language Settings]
[
]
Traditional Chinese
Page 21
21
Table of
Contents
Home
Menu
Index
21
Preparing the Player
Setting the Date and Time
Some applications of the player do not work correctly until the date and time
are set. Set the current date and time before using the player.
BACK/HOME
button
5-way button
From the [Home] menu, select [Settings]
[Set Date-Time].
[Common Settings]
[Settings]
Press the / button to select a year, and then press the /
button to change the value.
As in step , adjust the settings for month, date, hour, and
minute.
Press the button to confirm.
To display the current time
To display the current time, press the OPTION/PWR OFF button on the
[Home] menu or the playback screen, and select [Clock Display] from the
option menu.
Hint
You can select the date format from among [YYYY/MM/DD], [MM/DD/YYYY], and
[DD/MM/YYYY]. Furthermore, you can select the time format from either [12-hour] or
[24-hour ]. For details, see “Setting the date format [Date Display Format]” ( p
“Setting the time format [Time Display Format]” ( p
Note
If the battery power is used up because, for example, the player has not been used for a
long time, your settings for date and time may be lost and “-” will be displayed instead of
the current date and time.
e clock may gain or lose up to 60 seconds per month. In this case, set the clock again.
Th
. 91).
. 91), or
Page 22
22
Table of
Contents
Home
Menu
Index
22
Transferring Music
Transferring Music
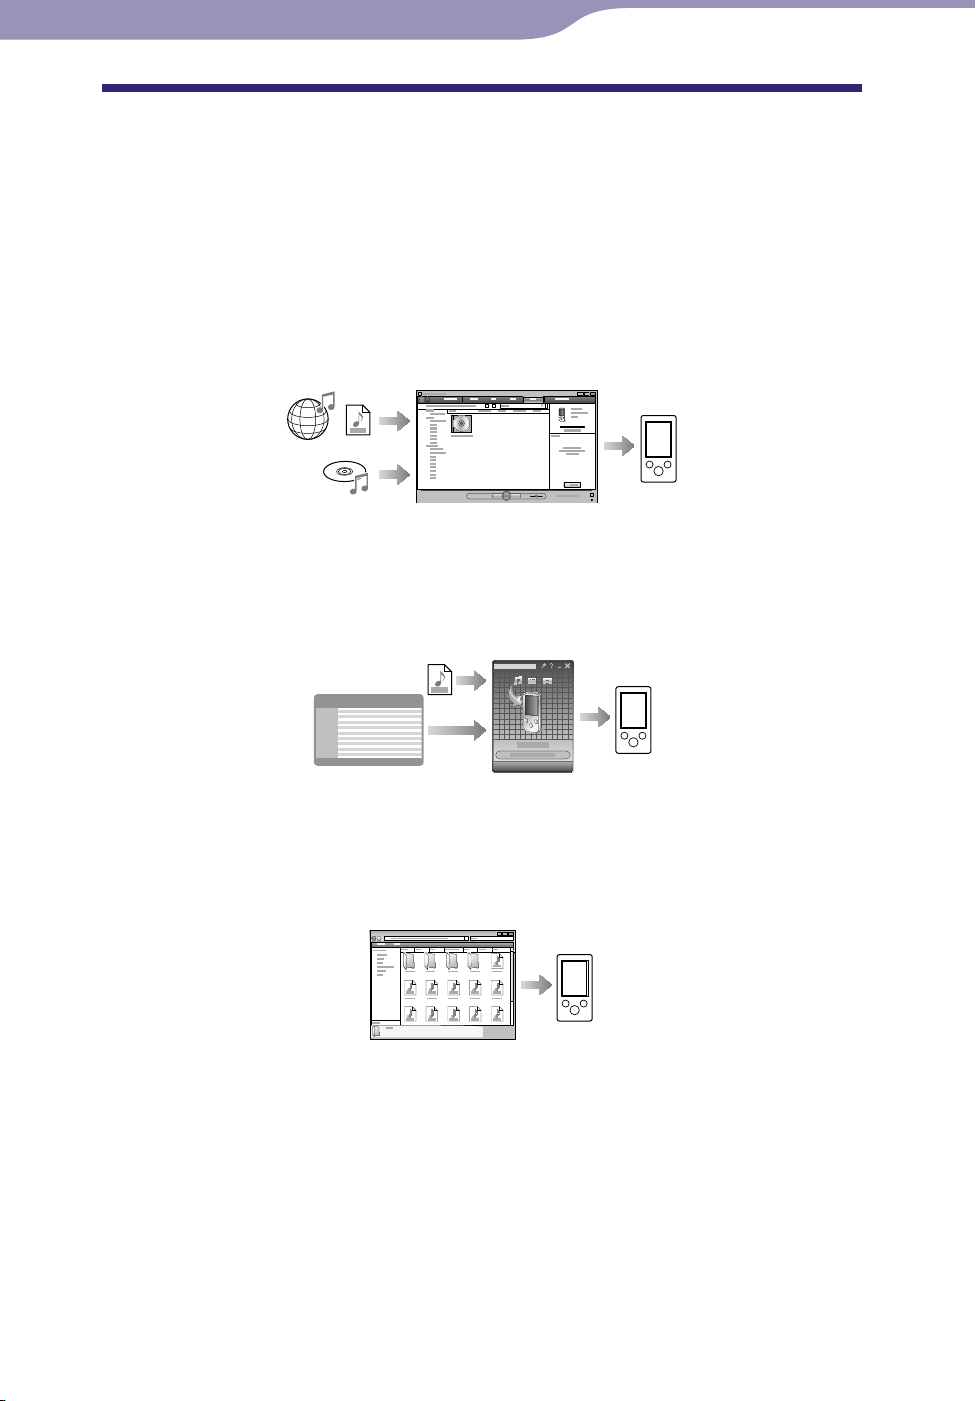
Selecting the Way to Transfer Music
You can import music from audio CDs or from the Internet, etc. To import
music into your computer, use appropriate software.
You can transfer music to the player in the following three ways.
Transferring music from CDs using Windows Media Player 11 (
p. 23)
You can import music from your CDs, etc., to your computer, and transfer
them to the player using Windows Media Player 11.
Transferring music from iTunes, etc., using Content Transfer (
p. 27)
If you have already managed music with iTunes, etc., you can transfer
them to the player using Content Transfer.
Transferring music by drag-and-drop using Windows Explorer (
p. 29)
You can directly transfer music stored on your computer by drag-and-drop
using Windows Explorer.
Hint
For detailed information on how to import music, refer to the Help of each software.
or details about supported file formats, see “Supported file format” ( p
F
Th
e player does not use SonicStage software (SonicStage software, developed by Sony,
manages music on a computer or transfers music to other types of players). For this
player, you can transfer music in the above three ways, not using SonicStage.
ATRAC files managed by SonicStage can be transferred to the player after conversion to
MP3 file format. To convert files, download the MP3 Conversion Tool from the
customer support Web site ( p
Th
e maximum number of files per folder in the [MUSIC] folder is 4,000.
. 121).
. 125).
Page 23
23
Table of
Contents
Home
Menu
Index
23
Transferring Music
Transferring Music Using Windows Media Player 11
You can import songs from your CDs, etc., to your computer, and transfer
them to the player using Windows Media Player 11.
Hint
For details about usage, or support on Windows Media Player, refer to the Windows
Media Player information from the following web site:
http://support.microsoft.com/
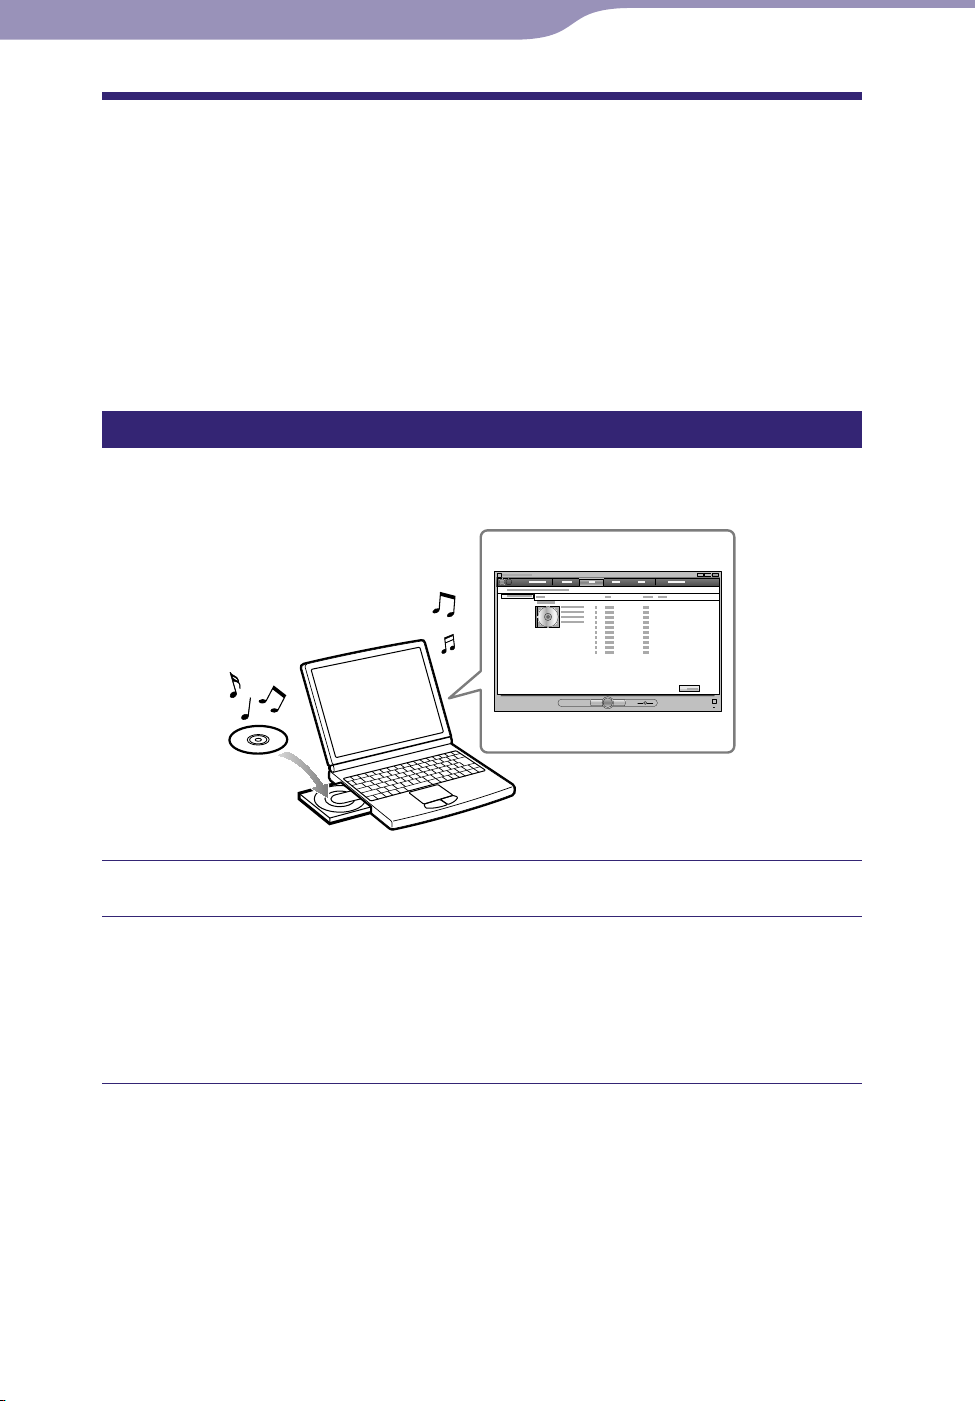
Importing music from CDs
You can use Windows Media Player 11 to copy (rip) music from your CDs.
Follow these instructions to rip songs from a CD to your computer.
Insert an audio CD.
Start up Windows Media Player 11, and then click the [Rip] tab at
the top of the window.
When connected to the Internet, Windows Media Player 11 obtains CD
information (CD title, song name or artist name, etc.) and displays it in the
window.
Continued
Page 24

24
Table of
Contents
Home
Menu
Index
24
Transferring Music
Click [Start Rip].
Windows Media Player 11 begins to import the CD.
The imported songs are indicated as [Ripped to library]. Wait until all
songs have been imported.
Hint
Imported songs are stored in the [My Music] folder (Windows XP) or [Music] folder
(Windows Vista) of the computer. Click the [Library] tab of the Windows Media Player
11 window to find them.
indows Media Player 11 obtains the CD information from a database on the Internet.
W
However, some CDs’ information may not be available in the database. If your CDs’
information is missing, you can add it after importing. For information about adding
and editing CD information, refer to the Help of Windows Media Player 11.
If you want a song not to be imported, uncheck the checkbox to the left of the song title.
Note
Imported songs are limited to private use only. Use of a song beyond this limitation
requires permission of the copyright holders.
Page 25
25
Table of
Contents
Home
Menu
Index
25
Transferring Music
Transferring Music
You can use Windows Media Player 11 to transfer music from your computer
to the player.
Note
Do not disconnect the USB cable while [Do not disconnect.] appears on the player, as
the data being transferred may be damaged.
f Content Transfer starts automatically after connecting the player to your computer
I
using the supplied USB cable, close or ignore Content Transfer as Content Transfer need
not be used. For details on setting automatic start of Content Transfer, refer to the Help
of Content Transfer.
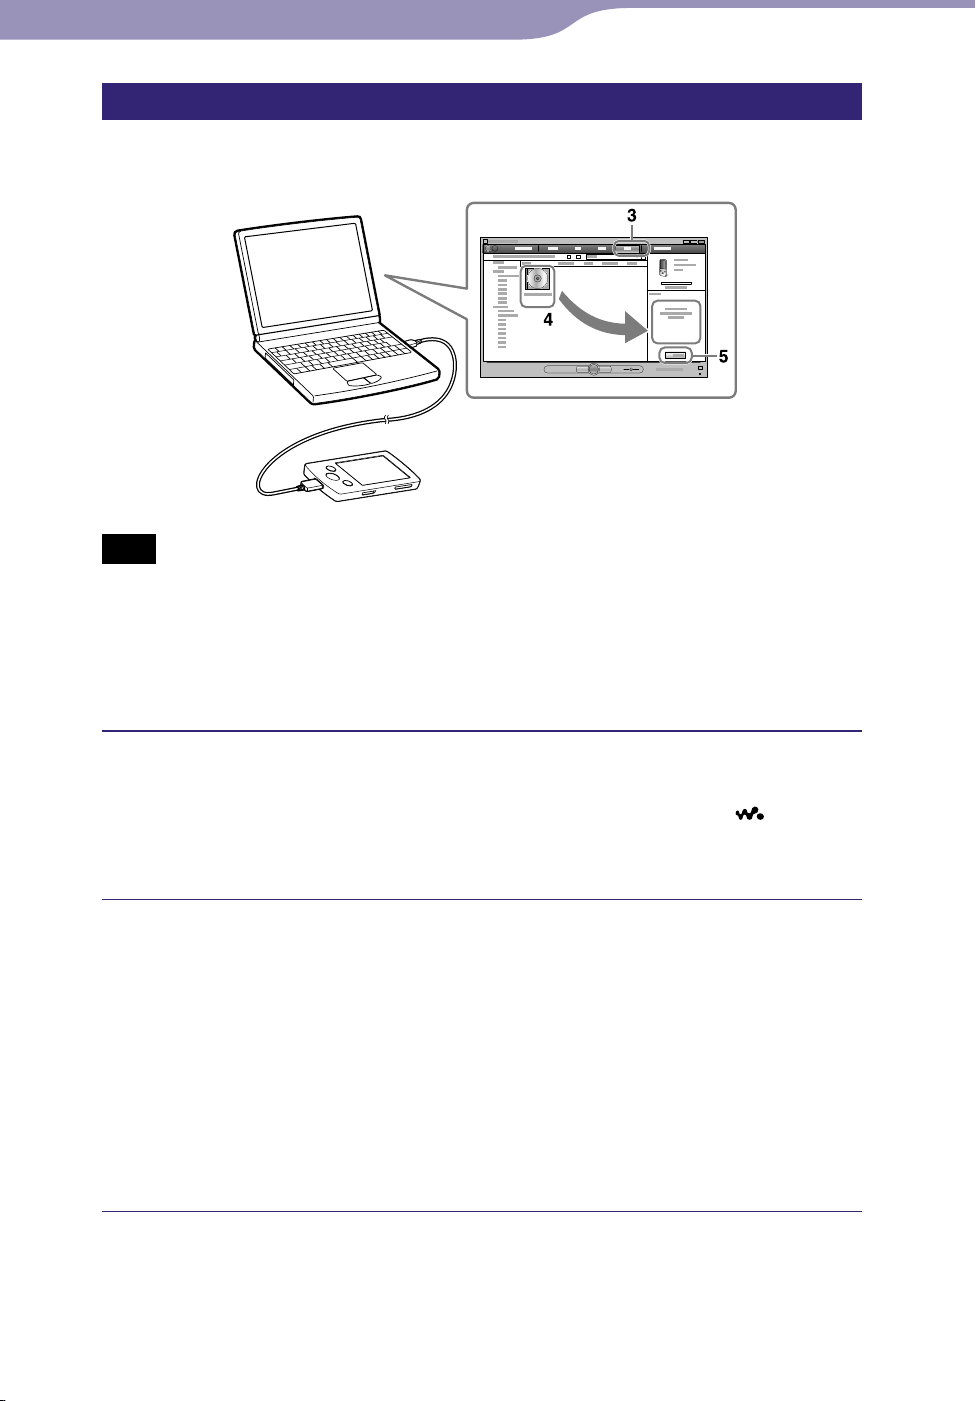
Start up Windows Media Player 11, and then connect the player to
your computer using the supplied USB cable.
Insert the connector of the USB cable into the player with the mark
facing up.
The [Device Setup] window appears.
Click [Cancel].
Close the auto play window, if it appears, by clicking [Cancel] or the Close
icon.
f you click [Finish] instead of [Cancel], the entire library data of
I
Windows Media Player is automatically copied to the player. If the
library data size is larger than the available storage space on the player,
the copy process will not start.
ou can open the [Device Setup] window at any time. To open it, right-
Y
click [WALKMAN] on the left side of the Windows Media Player
window, and then click [Set Up Sync].
Continued
Page 26

26
Table of
Contents
Home
Menu
Index
26
Transferring Music
Click the [Sync] tab on the Windows Media Player 11 window.
Drag-and-drop the desired songs to the Sync List on the right side
of the window.
The songs are added to the Sync List.
Click [Start Sync] to start synchronization.
When synchronization is complete, a message confirming you can
disconnect the player appears on the Sync List. After completion, close
Windows Media Player 11, and disconnect the player from the computer.
Page 27
27
Table of
Contents
Home
Menu
Index
27
Transferring Music
Transferring Music Using Content Transfer
If you have already managed music with iTunes, etc., you can transfer them to
the player using Content Transfer. You can use iTunes, etc., to drag-and-drop
music to Content Transfer.
Note
Do not disconnect the USB cable while [Do not disconnect.] appears on the player, or
the data being transferred may be damaged.
ontent Transfer cannot be used for Windows Media Player contents.
C
ontents with copyright protection cannot be transferred.
C
ontent Transfer supports data transfer from iTunes 8.1 to the player. For details on
C
restrictions on transferring songs from iTunes, visit the customer support Web sites (
p. 121).
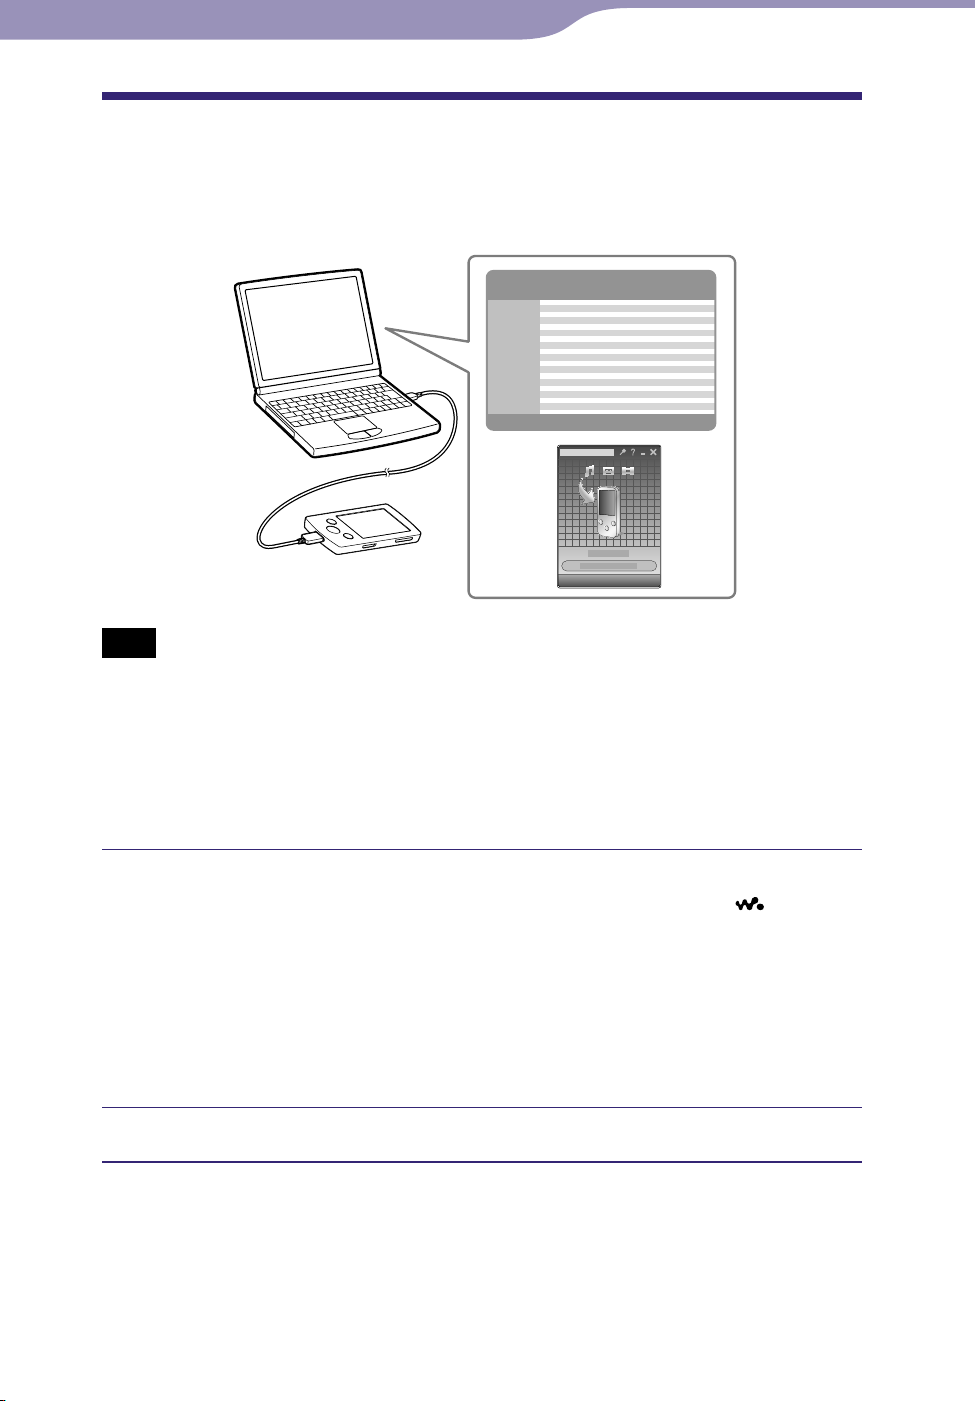
Connect the player to your computer using the supplied USB cable.
Insert the connector of the USB cable into the player with the
facing up.
Content Transfer starts automatically.
or details on setting automatic start and general operation of Content
F
Transfer, refer to the Help of Content Transfer.
ou can also click [All programs] in the [start] menu, and then [Content
Y
Transfer] - [Content Transfer] to start the software.
mark
Start up iTunes, etc.
Continued
Page 28

28
Table of
Contents
Home
Menu
Index
28
Transferring Music
Select the desired songs from iTunes, etc., and drag-and-drop them
to Content Transfer.
Content Transfer recognizes the type of data by filename extension, and
sends it to the appropriate folder of the player.
iTunes, etc.
Content Transfer
Page 29
29
Table of
Contents
Home
Menu
Index
29
Transferring Music
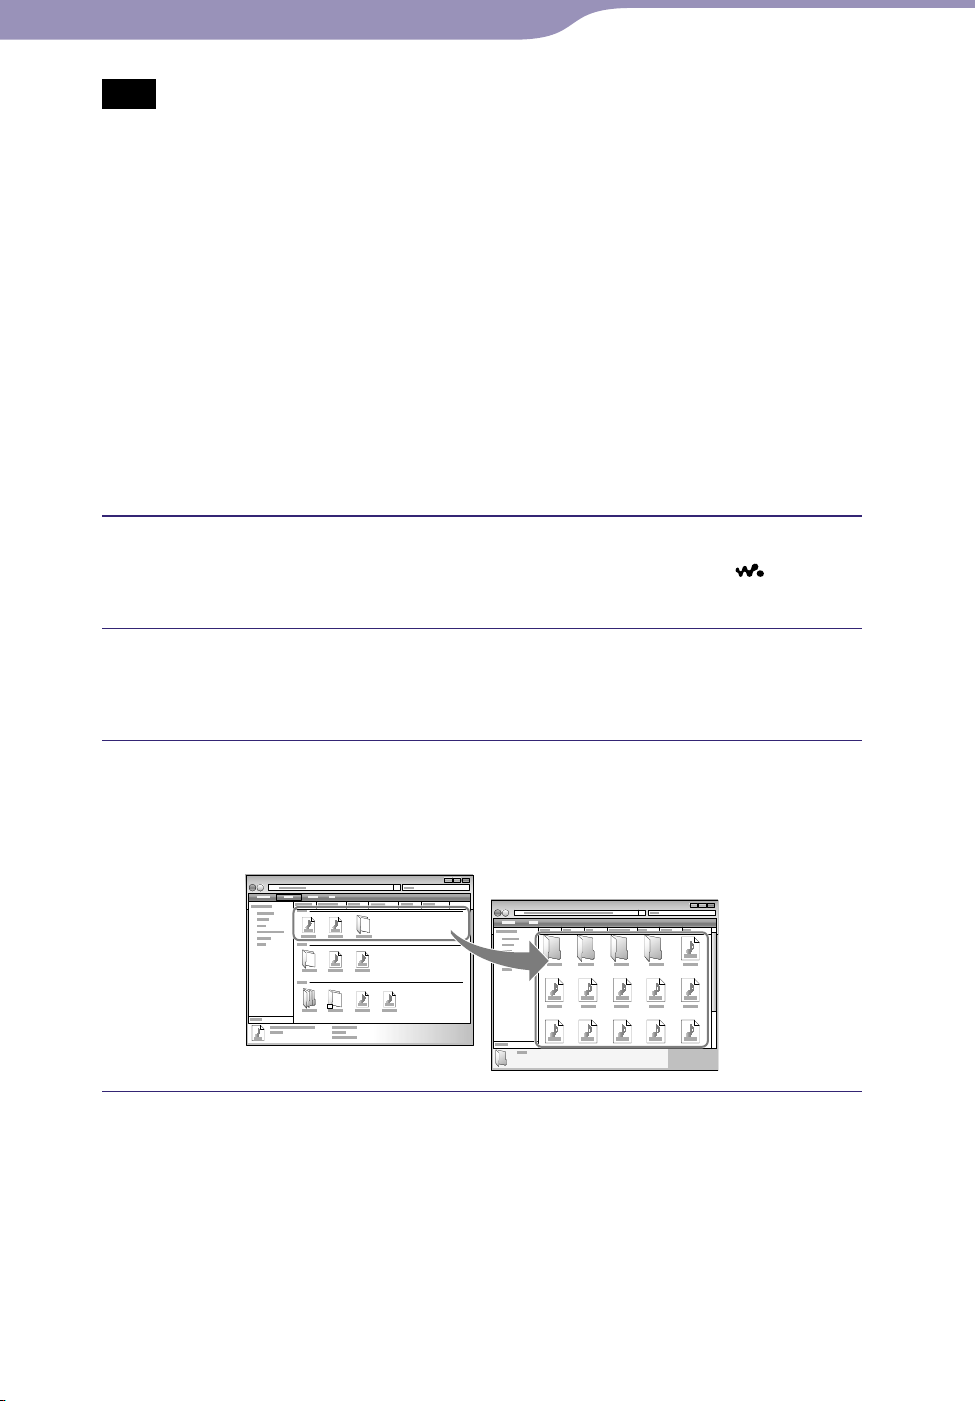
Transferring Music Using Windows Explorer
You can directly transfer data by drag-and-drop using Windows Explorer on
your computer.
Playable data hierarchy has rules. To transfer data properly, see the following
instructions.
Hint
Some computers that already have Windows Media Player 10 installed may encounter a
limitation on the number of files (AAC, video files, etc.) that can be transferred by dragand-drop. If you install Windows Media Player 11 from the Windows Media Player
download site, you can solve this problem, allowing you to transfer by drag-and-drop
again. Before installing Windows Media Player 11 on your computer, make sure to check
whether your software or service corresponds to Windows Media Player 11.
Continued
Page 30
30
Table of
Contents
Home
Menu
Index
30
Transferring Music
Note
Data hierarchy may differ, depending on your computer environment.
o not disconnect the USB cable while [Do not disconnect.] appears on the player, as
D
the data being transferred may be damaged. If the player is disconnected while files are
being transferred, unnecessary files may be left in the player. In this case, transfer usable
files back to the computer and format the player ( p
D
o not change folder names or delete the [MUSIC], [MP_ROOT], [MPE_ROOT],
[VIDEO], [PICTURE], [PICTURES], [Record], [Voice] and [FM] folders.
o not change folder or file names directly under the [MP_ROOT] ,[MPE_ROOT] and
D
[Record] folders. Otherwise, they will not be displayed on the player.
ome files may not be played back on the player due to copyright protection. Although
S
you can transfer more files or folders to the player, the player cannot display or play any
files, folders, or levels that exceed this limit.
f Content Transfer starts automatically after connecting the player to your computer
I
using the supplied USB cable, close or ignore Content Transfer as Content Transfer need
not be used. For details on setting automatic start of Content Transfer, refer to the Help
of Content Transfer.
. 92).
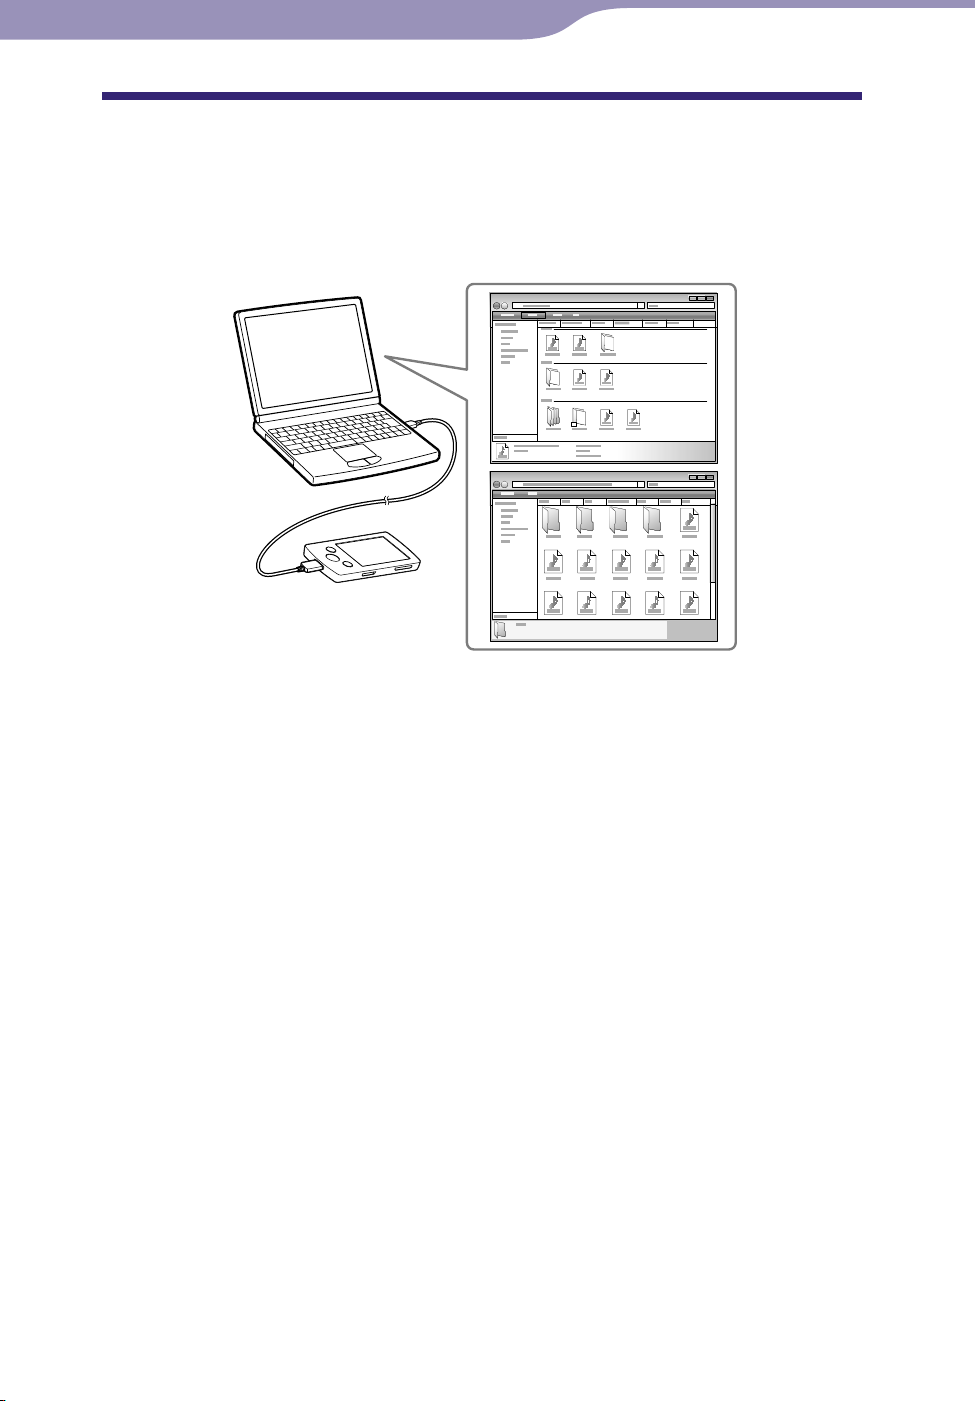
Connect the player to your computer using the supplied USB cable.
Insert the connector of the USB cable into the player with the
facing up.
mark
Click [start] – [My Computer] or [Computer] – [WALKMAN] –
[Storage Media], and then select the [MUSIC] folder.
Data hierarchy may differ, depending on your computer environment.
Drag-and-drop files or folders into the [MUSIC] folder, or one of its
subfolders.
Accessibility to files and folders beyond the 8th level is not guaranteed.
Music files or folders in your computer
[MUSIC] folder in your player
Page 31

31
Table of
Contents
Home
Menu
Index
31
Transferring Videos/Photos
Transferring Videos/Photos
Selecting the Way to Transfer Videos/Photos
You can import videos from recorded videos or from the Internet, etc.
You can import photos from a digital camera, etc.
To import videos/photos into your computer, use appropriate software.
You can transfer videos/photos to the player in the following three ways.
Transferring videos/photos using Content Transfer (
You can transfer videos/photos stored on your computer to the player
using Content Transfer.
p
. 32)
Transferring videos/photos by drag-and-drop using Windows
p
Explorer (
You can directly transfer videos/photos stored on your computer by dragand-drop using Windows Explorer.
. 34)
Transferring videos/photos using Windows Media Player 11
You can transfer videos/photos managed with Windows Media Player 11
to the player using Windows Media Player 11.
For details about usage, or support on Windows Media Player, refer to the
Windows Media Player information from the following web site:
http://support.microsoft.com/
Hint
For detailed information on how to import videos/photos, refer to the Help of each
software.
or details about supported file formats, see “Supported file format” ( p
F
Th
e maximum number of files per folder in the [PICTURE], [PICTURES] or [DCIM]
folder is 4,000.
. 125).
Page 32

32
Table of
Contents
Home
Menu
Index
32
Transferring Videos/Photos
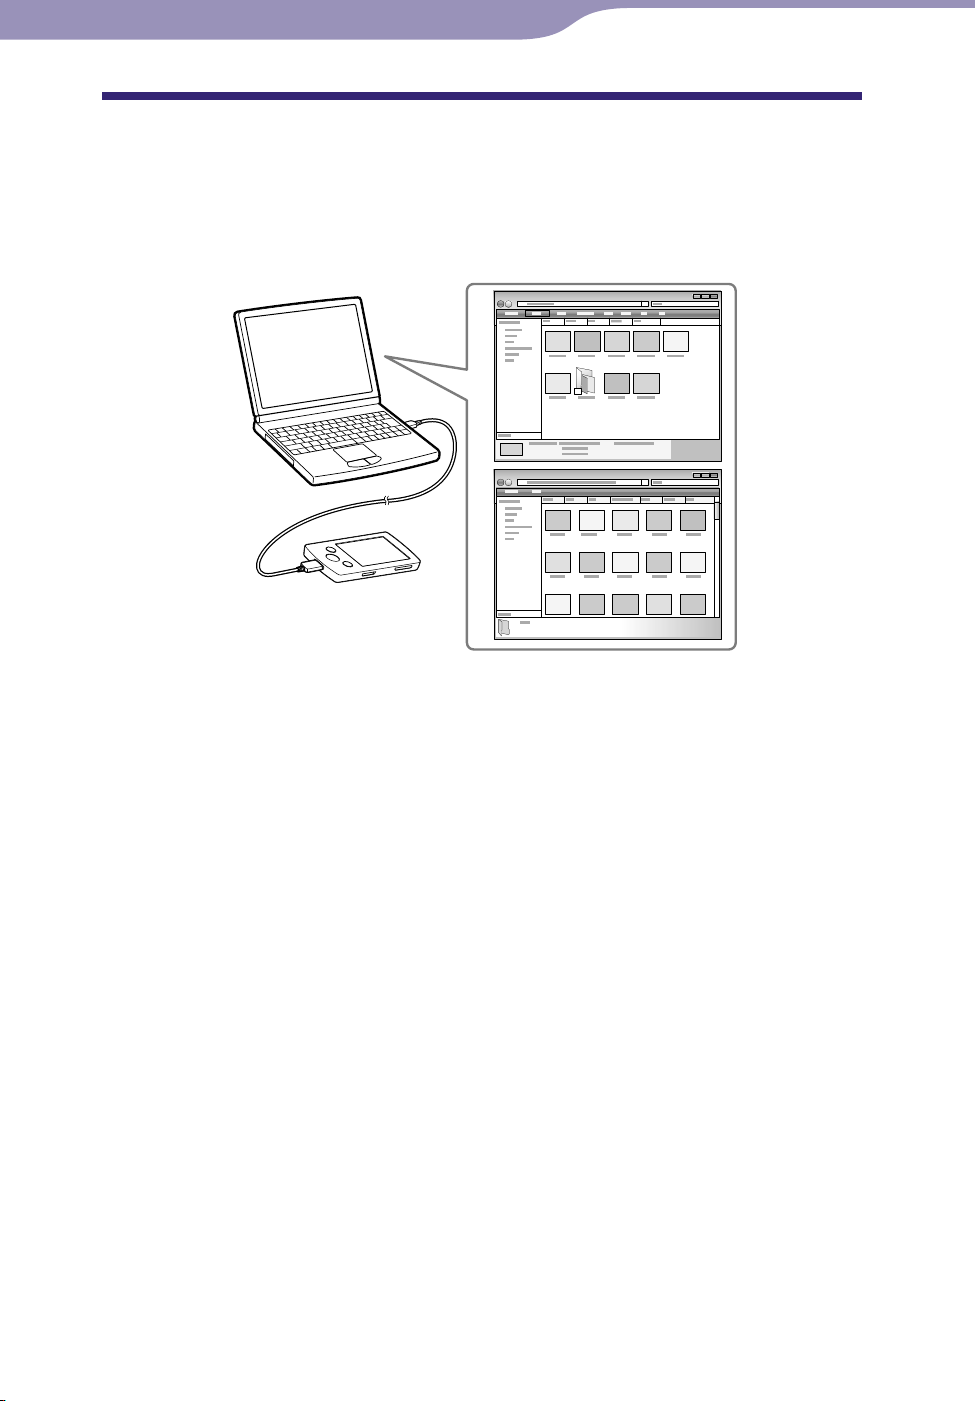
Transferring Videos/Photos Using Content Transfer
You can transfer videos/photos stored on your computer to the player using
Content Transfer. You can transfer videos/photos by drag-and-drop of the
desired videos/photos from Windows Explorer to Content Transfer.
Note
Do not disconnect the USB cable while [Do not disconnect.] appears on the player, as
the data being transferred may be damaged.
ontents with the copyright protection cannot be transferred.
C
Connect the player to your computer using the supplied USB cable.
Insert the connector of the USB cable into the player with the
facing up.
Content Transfer starts automatically.
or details on setting automatic start and general operation of Content
F
Transfer, refer to the Help of Content Transfer.
ou can also click [All programs] in the [start] menu, and then [Content
Y
Transfer] - [Content Transfer] to start the software.
mark
Continued
Page 33

33
Table of
Contents
Home
Menu
Index
33
Transferring Videos/Photos
Select the desired videos/photos from Windows Explorer, and drag-
and-drop them to Content Transfer.
Content Transfer recognizes the type of data by filename extension, and
sends it to the appropriate folder of the player.
Video/photo files or folders
in your computer
Content Transfer
Page 34
34
Table of
Contents
Home
Menu
Index
34
Transferring Videos/Photos
Transferring Videos/Photos Using Windows Explorer
You can directly transfer data by drag-and-drop using Windows Explorer on
your computer.
Playable data hierarchy has rules. To transfer data properly, see the following
instructions.
Hint
Some WMV files can be played back only by transferring using Windows Media Player
11.
ome computers that already have Windows Media Player 10 installed may encounter a
S
limitation on the number of files (AAC, video files, etc.) that can be transferred by dragand-drop. If you install Windows Media Player 11 from the Windows Media Player
download site, you can solve this problem, allowing you to transfer by drag-and-drop
again. Before installing Windows Media Player 11 on your computer, make sure to check
whether your software or service corresponds to Windows Media Player 11.
Continued
Page 35

35
Table of
Contents
Home
Menu
Index
35
Transferring Videos/Photos
Note
Data hierarchy may differ, depending on your computer environment.
o not disconnect the USB cable while [Do not disconnect.] appears on the player, as
D
the data being transferred may be damaged. If the player is disconnected while files are
being transferred, unnecessary files may be left in the player. In this case, transfer usable
files back to the computer and format the player ( p
D
o not change folder names or delete the [MUSIC], [MP_ROOT], [MPE_ROOT],
[VIDEO], [PICTURE], [PICTURES], [Record], [Voice] and [FM] folders.
o not change folder or file names directly under the [MP_ROOT], [MPE_ROOT] and
D
[Record] folders. Otherwise, they will not be displayed on the player.
ome files may not be played back on the player due to copyright protection. Although
S
you can transfer more files or folders to the player, the player cannot display or play any
files, folders, or levels that exceed this limit.
f Content Transfer starts automatically after connecting the player to your computer
I
using the supplied USB cable, close or ignore Content Transfer as Content Transfer need
not be used. For details on setting automatic start of Content Transfer, refer to the Help
of Content Transfer.
. 92).
Connect the player to your computer using the supplied USB cable.
Insert the connector of the USB cable into the player with the
facing up.
mark
Click [start] – [My Computer] or [Computer] – [WALKMAN] –
[Storage Media], and then select the [VIDEO] or [PICTURE] folder.
Data hierarchy may differ, depending on your computer environment.
Drag-and-drop files or folders into the [VIDEO] or [PICTURE] folder
or one of its subfolders.
V
ideo files or folders: drag-and-drop into the [VIDEO] folder, or one of
its subfolders.
hoto files or folders: drag-and-drop into the [PICTURE] folder, or one
P
of its subfolders.
Accessibility to files and folders beyond the 8th level is not guaranteed.
Video or photo files or folders
in your computer
Video: [VIDEO] folder in your player
Photo: [PICTURE] folder in your player
Page 36

36
Table of
Contents
Home
Menu
Index
36
Playing Music
Playing Music
Playing Music
To play music, select [Music] to display the [Music] screen.
You can play back recorded FM radio programs and recorded voice files from
[Music]. For details, see “Searching for Songs” ( p
[Music]
. 39).
[Music]
BACK/HOME
button
5-way button
From the [Home] menu, select [Music].
The search menu appears.
Y
ou can select the desired search method to display the music list screen
and search for songs. For details, see “Searching for Songs” ( p
Select desired search method
song.
The music playback screen appears and
playback of the songs begins.
elect items until a song list appears.
S
or details on how to operate the music
F
playback screen, see “Music playback
screen” ( p
. 37).
desired
. 39).
Note
It may take time to start up the player or display the file/folder list when many files or
folders are stored on the player.
Page 37

37
Table of
Contents
Home
Menu
Index
37
Playing Music
Music playback screen
Operations on the music playback screen
To (screen indication) Do this
Play ()/pause ()
*1
Press the button.
Song name
Artist name
Album title
Genre
Release year
Playing status
Fast forward ()/
fast rewind ()
Find the beginning of the previous
(or current) song ()/
find the beginning of the next
song ()
Display the cursor and scroll all
through the displayed items
*1 During pause, if there is no operation for more than 3 minutes, the player automatically enters
standby mode.
Press and hold the / button.
Press the / button.
Press the / button.
Page 38

38
Table of
Contents
Home
Menu
Index
38
Playing Music
Music list screen
The following are examples of music list screens.
Index
The initials of song and album,
etc., names in the list section
appear.
Song list screen Album list screen
Operations on the music list screen
To Do this
Confirm an item in the
list
Press the button.
Move the cursor up or
down
Move the cursor left/
right when an index is
displayed
Display the previous/
next screen of the list
when an index is not
displayed
Press the / button.
ress and hold the / button to scroll up or down faster.
P
Press the / button.
Press the / button.
Page 39

39
Table of
Contents
Home
Menu
Index
39
Playing Music
Searching for Songs
When you select [Music] on the [Home] menu, the search menu appears.
You can select the desired search method on the search menu to search the
music list for desired song.
Also, you can search the music list for a desired song by selecting
on the [Home] menu.
[Playlists]
[Music]
BACK/HOME
button
5-way button
Hint
[All Songs], [Album] and [Artist] lists are arranged in alphanumeric order.
From the [Home] menu, select [Music]
desired song.
S
elect items as follows until a song list appears.
desired search method
[Playlists]
Continued
Page 40

40
Table of
Contents
Home
Menu
Index
40
Playing Music
Search method
Method Description
[All Songs]*
[Album]*
[Artist]*
[Genre]*
[Release Year]*
[Folder]*
[Voice Recording]*
[FM Recording]*
*1
Recorded voice files and FM radio programs are not displayed in the list.
*2
“The” at the beginning of the artist name is omitted when arranging the list.
*3
You can see all the songs of the selected artist, genre or release year. On the [Artist], [Genre] or
[Release Year] list screen, select [All [XXX]].
*4
Folders containing recorded voice files and FM radio programs are not displayed in the [Folder]
list.
*5
Folders are displayed in name order first, then files are displayed in name order. In this case,
upper or lower case letters are not distinguished.
6
You can record voice using the player’s built-in microphone ( p
*
player. For details on how to play back recorded voice files, see “Playing Back Recorded Voice
Files” ( p
7
You can record FM radio programs on the player ( p
*
For details on how to play back recorded FM radio programs, see “Playing Back Recorded FM
Radio Programs” ( p
1
1
1, *2, *3
1, *3
4, *5
. 79).
1, *3
Select a song from the song list.
Select an album song.
Select an artist an album song.
Select a genre an artist an album song.
Select a release year an artist song.
Select a folder song.
6
Select a folder recorded date recorded voice file.
7
Select a folder recorded date recorded FM radio program.
. 77), and play them back on the
. 70), and play them back on the player.
. 72).
Playing a playlist
You can play lists of songs (playlists).
Playlists are created using Windows Media Player 11. For information on how
to create a playlist, refer to the Help of Windows Media Player 11. Cover art
images registered to a playlist are not displayed on the player.
From the [Home] menu, select [Playlists]
desired song.
desired playlist
Page 41

41
Table of
Contents
Home
Menu
Index
41
Playing Music
Playing All Songs in Random Order
All the songs stored on the player are played in random order.
BACK/HOME
button
5-way button
From the [Home] menu, select [Shuffle All].
All songs are shuffled. Then the music playback screen appears and
playback of the songs begins.
Hint
When you start [Shuffle All] play, the play mode changes to [Shuffle] or
[Shuffle&Repeat]( p
[Shuffle&Repeat] setting for the play mode is retained.
huffle All] play is automatically cancelled by any of the following operations:
[S
Starting playback of a song by selecting it from the [Music], etc.
Changing the play mode.
. 46). Even if you cancel [Shuffle All], the [Shuffle] or
[Shuffle All]
Note
The play mode differs between songs and recorded voice files. Recorded voice files and
recorded FM radio programs are not shuffled even if [Shuffle All] is selected.
Page 42

42
Table of
Contents
Home
Menu
Index
42
Playing Music
Deleting Songs
When you delete songs from the player, use the software you used to transfer
the songs, or Windows Explorer.
For details about using the software, see the Help of the software.
Hint
You can delete recorded voice files and recorded FM radio programs on the player. For
details, see “Deleting Recorded Voice Files” ( p
Radio Programs” ( p
Note
The player itself cannot delete songs without connecting to a computer.
. 73).
. 80) and “Deleting Recorded FM
Page 43

43
Table of
Contents
Home
Menu
Index
43
Playing Music
Using the Music Option Menu
You can bring up the music option menu by pressing the OPTION/PWR OFF
button on the music list or on the music playback screen. For details on how to
use the option menu, see p
The option items shown on the option menu vary depending on the screen
from which you bring it up. See the reference page for settings and usage.
Option items appearing on the music list screen
Option items Description/reference page
[Now Playing] Displays the playback or display screen of the currently
. 15.
playing content.
[Go to Recording Screen]
[Go to FM Radio screen] The FM Radio screen of the last received broadcast
[Detailed Information] Displays detailed information of a song, such as playing
[Go to the song playback
screen]
[Delete This Song]*
*1 This option appears only when the list of recorded voice files or recorded FM radio programs is
displayed.
1
Displays the Voice Recording screen ( p
FM Recording screen ( p
station appears ( p
time, audio format, bit rate, and file name ( p
Displays the music playback screen of the song last
played.
Deletes a recorded voice file or a recorded FM radio
program ( p
. 73, 80).
. 70).
. 66).
. 77) or the
. 45).
Continued
Page 44

44
Table of
Contents
Home
Menu
Index
44
Playing Music
Option items appearing on the music playback screen
Option items Description/reference page
[Play Mode]
Sets the play mode ( p
. 46).
[Equalizer]
[Built-in SP Optimizer] Optimizes the quality of the sound output from the
[Cover Art]
[Detailed Information] Displays detailed information of a song, such as playing
[Add to Wishlist/Remove from
Wishlist]
[Alarm]
[Sleep Timer]
[Clock Display]
Customizes the sound quality ( p
built-in speakers ( p
Displays cover art ( p
time, audio format, bit rate, and file name ( p
Adds the song to the wish list to purchase it on the
service corresponded software./ Removes the song from
the wish list.
Sets the alarm ( p
Sets the sleep timer ( p
Displays the current time ( p
. 49).
. 45).
. 85).
. 86).
. 47).
. 45).
. 21, 90).
Page 45

45
Table of
Contents
Home
Menu
Index
45
Playing Music
Displaying the detailed information screen [Detailed Information]
From the music list or music playback screen, press the OPTION/
PWR OFF button.
Select [Detailed Information].
Detailed information screen
When you display this screen from the music playback screen, you can move to the previous or next song by
pressing the / button.
Playback time
File format
Bit rate
Copyrighted files
While playing back a variable bit rate song, “VBR” is shown.
File name
Displaying the cover art screen [Cover Art]
From the music playback screen, press the OPTION/PWR OFF
button.
Select [Cover Art].
Cover art screen
While the cover art screen is displayed, you can move songs to the previous or the next one by pressing the
/ button.
Hint
If the songs do not have cover art information, the default picture of the player will be
displayed.
over art only appears if cover art information is available. You can set cover art using
C
Windows Media Player 11, or another transfer capable software for setting cover art. For
details on operation, refer to the Help or maker of the software. Cover art may not be
displayed, depending on the cover art file format.
Page 46

46
Table of
Contents
Home
Menu
Index
46
Playing Music
Changing the Music Settings
To change the music settings, select [Settings] from the [Home] menu, then
select [Music Settings].
BACK/HOME
button
5-way button
[Settings]
Setting the play mode [Play Mode]
The player offers a variety of play modes, including random play and selected
repeat play.
From the [Home] menu, select [Settings]
[Play Mode]
Type/icon Description
[Normal]/ No icon The songs within the playback range are played back in the song
[Repeat]/
[Shuffle]/
desired play mode type.
list order. (Default setting)
The songs within the playback range are played back in the song
list order and then repeated.
The songs within the playback range are played back in random
order.
[Music Settings]
[Shuffle&Repeat]/
[Repeat 1 Song]/
Note
The player plays back songs only in the lists from which the playback starts (album list,
artist list, etc.).
hen you start [Shuffle All] play, the play mode changes to [Shuffle] or
W
[Shuffle&Repeat].
ecorded voice files and recorded FM radio programs are not included in the play
R
mode, and they are not shuffled or repeated.
The songs within the playback range are played back in random
order and then repeated.
The current song or the song selected from a song list is played
back repeatedly.
Page 47

47
Table of
Contents
Home
Menu
Index
47
Playing Music
Setting the sound quality [Equalizer]
You can set the sound quality according to the music genre, etc.
From the [Home] menu, select [Settings]
[Equalizer]
Type (icon) Description
[None] Sound quality setting is not activated. (Default setting)
[Heavy] (
[Pop] (
[Jazz] (
[Unique] (
[Custom 1] (
[Custom 2] (
Note
If your personal settings saved as [Custom 1] and [Custom 2] seem to produce a
different volume level than the other settings, you may have to adjust the volume
manually to compensate.
e [Equalizer] setting is not applied while playing a video or FM radio.
Th
e [Equalizer] setting is not applied to the sound output from the built-in speakers
Th
when [Built-in SP Optimizer] is set to [On] ( p
(speaker) and [Built-in SP Optimizer] is set to [On], [Equalizer] cannot be selected.
)
)
desired equalizer type.
)
)
)
)
Emphasizes high and low ranges for a powerful sound.
Stresses the middle range audio, ideal for vocals.
Emphasizes high and low ranges for a lively sound.
Emphasizes high and low ranges, so that even soft sounds can
be heard easily.
User-customizable sound settings for which you can adjust each
frequency range individually. See p
. 49). When the output switch is set to
[Music Settings]
. 48 for details.
Continued
Page 48

48
Table of
Contents
Home
Menu
Index
48
Playing Music
Customizing sound quality
You can preset the value of CLEAR BASS (bass) and 5 band Equalizer as
[Custom 1] or [Custom 2].
From the [Home] menu, select [Settings]
[Equalizer]
[Edit] displayed under [Custom 1] or [Custom 2].
[Music Settings]
Press the / button to select a cursor for the CLEAR BASS or the
frequency range setting, and press the / button to adjust the
setting level, and then press the button to confirm.
The [Equalizer] screen reappears.
CLEAR B
ranges can be set to any of 7 sound levels.
fter you have adjusted the setting level, be sure to press the button
A
to confirm. If you press the BACK/HOME button before you confirm,
the setting will be cancelled.
ASS can be set to any of 4 sound levels, and the 5 frequency
Listening with Clear Stereo [Clear Stereo]
[Clear Stereo] enables individual left and right digital processing of the sound.
From the [Home] menu, select [Settings]
[Clear Stereo]
desired Clear Stereo type.
[Music Settings]
Type Description
[On] Activates the [Clear Stereo] function when you use the supplied
headphones.
[Off] Disables the [Clear Stereo] function and plays back normal
sound. (Default setting)
Note
The [Clear Stereo] setting is not applied while playing a video or FM radio.
e [Clear Stereo] setting is not applied to the sound output from the built-in speakers
Th
when [Built-in SP Optimizer] is set to [On] ( p
(speaker) and [Built-in SP Optimizer] is set to [On], [Clear Stereo] cannot be selected.
e [Clear Stereo] function is designed to obtain maximum effect with the supplied
Th
headphones. The [Clear Stereo] effect may not be obtained with other headphones.
When using other headphones, set [Clear Stereo] to [Off].
. 49). When the output switch is set to
Page 49

49
Table of
Contents
Home
Menu
Index
49
Playing Music
Adjusting the volume level [Dynamic Normalizer]
You can reduce the volume level between songs. With this setting, when
listening to album songs in the shuffle play mode, the volume level between
songs is moderated to minimize the difference in their recording levels.
From the [Home] menu, select [Settings]
[Dynamic Normalizer]
Type Description
[On] Minimizes the difference in volume level between songs.
[Off] Plays back songs at their original transferred volume level.
(Default setting)
Note
The [Dynamic Normalizer] setting is not applied while playing a video or FM radio.
e [Dynamic Normalizer] setting is not applied to the sound output from the built-in
Th
speakers when [Built-in SP Optimizer] is set to [On] ( p
is set to (speaker) and [Built-in SP Optimizer] is set to [On], [Dynamic Normalizer]
cannot be selected.
desired Dynamic Normalizer type.
[Music Settings]
. 49). When the output switch
Optimizing the quality of the sound output from the built-in speakers
[Built-in SP Optimizer]
The player is equipped with the Digital Linear Phase Speaker feature to
optimize the quality of sound from the built-in speakers.
The Digital Linear Phase Speaker feature achieves a precise localization of
sounds by improving the frequency-amplitude and phase characteristics.
The default setting of [Built-in SP Optimizer] is [On].
From the [Home] menu, select [Settings]
[Built-in SP Optimizer]
Type Description
[On] Activates the [Built-in SP Optimizer] function when sounds
output from the built-in speakers.
[Off] Disables the [Built-in SP Optimizer] function and outputs
normal sound from the built-in speakers. (Default setting)
Note
[Built-in SP Optimizer] is not applied to the sound output from the headphones.
hen the output switch is set to (speaker) and [Built-in SP Optimizer] is set to [On]
W
. 49), [Equalizer], [Clear Stereo] and [Dynamic Normalizer] cannot be selected.
( p
desired setting type.
[Music Settings]
Page 50

50
Table of
Contents
Home
Menu
Index
50
Watching Videos
Watching Videos
Playing a Video
[Videos]
To play a video, select [Videos] to display the [Videos] screen.
BACK/HOME
button
5-way button
From the [Home] menu, select [Videos]
desired video.
The video playback screen appears and playback of
the video begins.
or details on how to operate the video playback
F
screen, see “Video playback screen” ( p
. 51).
[Videos]
Hint
When [Display] is set to [On] ( p
playback icon, elapsed playing time, etc., appears while the video is playing. The
information disappears if this setting is [Off].
ou can play back the most recently played video. Press the OPTION/PWR OFF button
Y
on the video list, and then select [Most Recent Video] from the option menu.
ideo files are displayed in the order they are transferred. (The latest data appears at the
V
top.)
ou can set JPEG files as a thumbnails of video files by placing JPEG files in the
Y
corresponding video folders. When you display the video list, you can see the
thumbnails (small pictures to display on the menu) for the video files on the player.
To display a thumbnail for a video file, create a JPEG file (horizontal 160 × vertical 120
dots, extension: .jpg) and name it the same as the desired video file, then store it in the
video file folder.
The maximum video size playable on the player is 240 × 320. For detailed specifications,
see “Specifications” ( p
Note
Up to 1,000 video files can be displayed in the video lists.
. 125).
. 56), detailed information, such as the video title, its
Page 51

51
Table of
Contents
Home
Menu
Index
51
Watching Videos
Video playback screen
Operations on the video playback screen
To (Screen indication) Do this
Play ()/pause ()*
1
Press the button.
Video title
Elapsed time/total time
Information area
Fast forward ()/fast rewind
Press and hold the / button.
()
Fast forward ()/fast rewind
() during pause*
Forward slightly (
slightly (
)*
2
)/rewind
3
Find the beginning of the current
Press and hold the / button during pause.
Press the / button during pause.
Press the button.
video
*1 During pause, if there is no operation for more than 3 minutes, the player automatically enters
standby mode.
2
The speed of fast forward/fast rewind during pause varies depending on the length of the video.
*
3
The interval of forward/rewind during pause varies depending on the video.
*
Page 52

52
Table of
Contents
Home
Menu
Index
52
Watching Videos
Deleting Videos
When you delete videos from the player, use the software you used to transfer
the videos, or Windows Explorer.
For details about using the software, see the Help of the software.
Note
The player itself cannot delete videos without connecting to a computer.
Page 53

53
Table of
Contents
Home
Menu
Index
53
Watching Videos
Using the Video Option Menu
You can bring up the video option menu by pressing the OPTION/PWR OFF
button on the video list or on the video playback screen. For details on how to
use the option menu, see p
The option items shown on the option menu vary depending on the screen
from which you bring it up. See the reference page for settings and usage.
Option items appearing on the video list screen
Option items Description/reference page
[Now Playing] Displays the playback or display screen of the currently
. 15.
playing content.
[Go to Recording Screen]
[Go to FM Radio screen] The FM Radio screen of the last received broadcast
[Play from beginning]
[Detailed Information] Displays file information, such as file size, resolution,
[Most Recent Video] Starts playback of the most recently played video.
[Go to the song playback
screen]
Displays the Voice Recording screen ( p
FM Recording screen ( p
station appears ( p
Finds the beginning of a video ( p
video/audio compression format, and file name, etc.
Displays the music playback screen of the song last
played.
. 70).
. 66).
. 77) or the
. 51).
Option items appearing on the video playback screen
Option items Description/reference page
[Play from beginning]
[Zoom Settings]
[Video Orientation]
[Display]
[Detailed Information] Displays file information, such as file size, resolution,
Finds the beginning of a video ( p
Sets the zoom function ( p
Sets the video orientation ( p
Sets to display/not display video information ( p
video/audio compression format, and file name, etc.
. 51).
. 54).
. 57).
. 56).
[Brightness]
[Clock Display]
[Go to the song playback
screen]
Adjusts the brightness of the screen ( p
Displays the current time ( p
Displays the music playback screen of the song last
played.
. 21, 90).
. 89).
Page 54

54
Table of
Contents
Home
Menu
Index
54
Watching Videos
Changing the Video Settings
To change the video settings, select [Settings] from the [Home] menu, then
select [Video Settings].
BACK/HOME
button
5-way button
[Settings]
Setting the zoom function [Zoom Settings]
You can zoom in the currently playing video.
From the [Home] menu, select [Settings]
[Zoom Settings]
Type Description
[Auto] The video image is resized to fit the display area, maintaining the
desired zoom setting type.
original aspect ratio (Default setting).
A 16:9 video image is displayed full-width, with black bands at the
top and bottom of the screen (Letterbox).
[Video Settings]
4:3 source 16:9 source
Continued
Page 55

55
Table of
Contents
Home
Menu
Index
55
Watching Videos
Type Description
[Full] The video image is resized to fit the available display area,
maintaining the aspect ratio. The video image is displayed fullheight, with the right/left sides of the image trimmed to fit.
4:3 source 16:9 source
The dotted line frame represents the original video image size.
[Off] The video image is not resized, and appears in the original
resolution. If video resolution is too large, the left, right, top and
bottom of the screen will be cut.
4:3 source 16:9 source
The dotted line frame represents the original video image size.
Page 56

56
Table of
Contents
Home
Menu
Index
56
Watching Videos
Setting the display of the video screen [Display]
You can display or hide detailed information of a video, such as its title,
playback icon, and elapsed playing time, etc., during playback.
From the [Home] menu, select [Settings]
[Display]
Type Description
[On] Displays the video title, playback status, or the elapsed
[Off] Hides detailed information of the currently playing
Note
If [Video Orientation] is set to [Horizontal (right)], the title of the video is not displayed.
desired display type.
time, etc.
video and displays it only when you operate the player.
(Default setting)
[Video Settings]
Page 57

57
Table of
Contents
Home
Menu
Index
57
Watching Videos
Setting the video orientation [Video Orientation]
You can set the video orientation to [Vertical] or [Horizontal (right)].
The operation of the 5-way button is switched according to the setting of
[Video Orientation].
From the [Home] menu, select [Settings]
[Video Orientation]
Type Description
[Vertical] Displays at 240 × 180 pixels. (Default setting)
[Horizontal (right)] Displays at 320 × 240 pixels.
desired video orientation type.
4:3 source 16:9 source
[Video Settings]
4:3 source 16:9 source
Hint
When [Display] is set to [On] ( p
playback icon, and elapsed playing time, etc., appears. The information disappears if this
setting is set to [Off].
Note
If [Video Orientation] is set to [Horizontal (right)], the video title is not displayed.
. 56), detailed information, such as the video title, its
Page 58

58
Table of
Contents
Home
Menu
Index
58
Viewing Photos
Viewing Photos
Viewing Photos
To view photos, select [Photos] to display the [Photos] screen.
From the [Home] menu, select [Photos]
desired folder
The photo display screen appears.
ress the / button to display the previous or
P
next photo.
or details on how to operate the photo display
F
screen, see “Photo display screen” ( p
[Photos]
desired photo.
BACK/HOME
button
5-way button
. 59).
[Photos]
Continued
Page 59

59
Table of
Contents
Home
Menu
Index
59
Viewing Photos
Hint
In the photo folder list, only folders containing photos are displayed in alphabetical
order.
layback of songs or FM reception continues even while you are searching for photos in
P
the photo folder lists or photo lists, or when the photo display screen is displayed.
ou can display the photos in a selected folder continuously (slide show play) ( p
Y
Y
ou can arrange photos transferred to the player by folder. Select the player (as
[WALKMAN]) using Windows Explorer, and drag-and-drop a new folder just under the
[PICTURE] or [PICTURES] folder. For details on data hierarchy, see p
Note
All files with the extension .jpg, including thumbnail files of videos, are recognized as
photos. All folders containing .jpg files are displayed in the photo folder list.
p to 8,000 photo folders can be displayed in the photo folder list. And, up to 8,000
U
photos can be displayed in the photo lists, regardless of the number of folders in which
they are contained.
f the size of a photo is too large, or the photo file is damaged,
I
photo cannot be displayed.
f photos are not compliant with DCF 2.0 (or folder/file name is long., etc.), operation
I
time (to display photos or slideshow) may take more time.
appears, and the
. 34.
. 60).
Photo display screen
Information area
Operations on the photo display screen
When you change the display orientation to horizontal, the /// button
orientation and functions also change.
To (Screen indication) Do this
Play ()/pause () *1 a slide show Press the button.
Display the next/previous photo
*1 When playing songs while a slide show is paused, the screen goes dark if there is no operation for
more than 30 seconds. When the song playback and a slide show accompanying it are paused, and
there is no operation for more than 3 minutes, the screen turns off and the player enters standby
mode.
Press the / button.
Page 60

60
Table of
Contents
Home
Menu
Index
60
Viewing Photos
Playing a Slide Show
You can display photos in a selected folder in slide show form.
[Photos]
BACK/HOME
button
5-way button
From the [Home] menu, select [Photos].
The photo folder list appears.
Press the /// button to select a photo folder, and then press
and hold the button.
A slide show of the photos in the selected folder starts.
Hint
You can start playback of a slide show by any of the following operations:
Press and hold the button in the photo list.
ress the button on the photo display screen.
P
ress the OPTION/PWR OFF button on the photo folder list, or a photo list, and then
P
select [Begin slide show] from the option menu.
Note
The screen does not turn off automatically or change to a screensaver ( p
slide show is playing.
. 89) while a
Page 61

61
Table of
Contents
Home
Menu
Index
61
Viewing Photos
Deleting Photos
When you delete photos from the player, use the software you used to transfer
the photos, or Windows Explorer.
For details about using the software, see the Help of the software.
Note
The player itself cannot delete photos without connecting to a computer.
Page 62

62
Table of
Contents
Home
Menu
Index
62
Viewing Photos
Using the Photo Option Menu
You can bring up the photo option menu by pressing the OPTION/PWR OFF
button on the photo folder list or photo list, or on the photo display screen. For
details on how to use the option menu, see p
The option items shown on the option menu vary depending on the screen
from which you bring it up. See the reference page for settings and usage.
Option items appearing on the photo folder/photo list screen
Option items Description/reference page
[Now Playing] Displays the playback or display screen of the currently
playing content.
. 15.
[Go to Recording Screen]
[Go to FM Radio screen] The FM Radio screen of the last received broadcast station
[Begin slide show]
[Detailed Information] Displays file information, such as file size, resolution, and
[Most Recent Photo] Starts playback of the most recently played photo.
[Go to the song playback
screen]
Displays the Voice Recording screen ( p
Recording screen ( p
appears ( p
Starts a slide show ( p
file name, etc.
Displays the music playback screen of the last song played.
. 66).
. 70).
. 60).
. 77) or the FM
Option items appearing on the photo display screen
Option items Description/reference page
[Photo Orientation]
[Display]
[Detailed Information] Displays file information, such as file size, resolution, and
[Slide Show Repeat]
Sets the photo orientation ( p
Sets to display/not display photo information ( p
file name, etc.
Selects the slide show play mode ( p
. 63).
. 64).
. 64).
[Slide Show Interval]
[Brightness]
[Clock Display]
[Go to the song playback
screen]
Selects the slide show interval ( p
Adjusts the brightness of the screen ( p
Displays the current time ( p
Displays the music playback screen of the last song played.
. 65).
. 89).
. 21, 90).
Page 63

63
Table of
Contents
Home
Menu
Index
63
Viewing Photos
Changing the Photo Settings
To change the photo settings, select [Settings] from the [Home] menu, then
select [Photo Settings].
BACK/HOME
button
5-way button
[Settings]
Photo orientation [Photo Orientation]
You can set the photo orientation to [Vertical], [Horizontal (right)], or
[Horizontal (left)].
The operation of the 5-way button is switched according to the setting of
[Photo Orientation].
From the [Home] menu, select [Settings]
[Photo Orientation]
Type Description
[Vertical] Displays at 240 × 180 pixels. (Default setting)
desired photo orientation type.
[Photo Settings]
[Horizontal (right)]
[Horizontal (left)]
Displays at 320 × 240 pixels.
Page 64

64
Table of
Contents
Home
Menu
Index
64
Viewing Photos
Setting the display of the photo screen [Display]
You can display or hide detailed information of a photo, such as an icon that
shows playback status, etc., while displaying a photo.
From the [Home] menu, select [Settings]
[Display]
Type Description
[On] Displays the photo title, the shooting date, playback
[Off] Hides the information of the current photo. (Default
Note
If [Photo Orientation] is set to [Horizontal (right)], or [Horizontal (left)] ( p
photo title is not displayed, even if [Display] is set to [On].
desired display type.
status, photo number, etc.
setting)
[Photo Settings]
. 63), the
Setting the slide show play mode [Slide Show Repeat]
You can display photos as a slide show repeatedly.
From the [Home] menu, select [Settings]
[Slide Show Repeat]
Type Description
desired setting type.
[Photo Settings]
[On] Displays photos in a photo folder continuously and
repeatedly.
[Off ] Displays photos in a photo folder continuously, to the
last photo, then returns to the first photo, and playback
pauses. (Default setting)
Note
The screen does not turn off automatically or change to a screensaver ( p
slide show is playing.
. 89) while a
Page 65

65
Table of
Contents
Home
Menu
Index
65
Viewing Photos
Setting the interval of a slide show [Slide Show Interval]
You can set the time each photo is displayed.
From the [Home] menu, select [Settings]
[Slide Show Interval]
Type Description
[Short] Photos switch to the next photos at a short interval.
[Normal] Photos switch to the next photos at the standard interval.
[Long] Photos switch to the next photos at a long interval.
Note
It may take time to display a large-size photo.
desired interval type.
(Default setting)
[Photo Settings]
Page 66

66
Table of
Contents
Home
Menu
Index
66
Listening and Recording FM Radio
Listening and Recording FM Radio
Listening to FM Radio
To Listen to FM Radio, select [FM Radio] from the [Home] menu to display
the [FM Radio] screen.
BACK/HOME
button
OPTION/PWR OFF
button
5-way button
Note
The headphone cord serves as an antenna, so extend it as far as possible.
From the [Home] menu, select [FM Radio].
The FM Radio screen appears.
Press the / button to select the desired
frequency, or press the / button to select the
desired preset number.
or details on how to operate the FM Radio screen,
F
see “FM Radio screen” ( p
. 67).
[FM Radio]
Frequency
Preset number
Note
You cannot select a preset number if no preset station is stored. Preset receivable station
using [Auto Preset] ( p
. 68), or preset the receivable stations manually ( p. 69).
Page 67
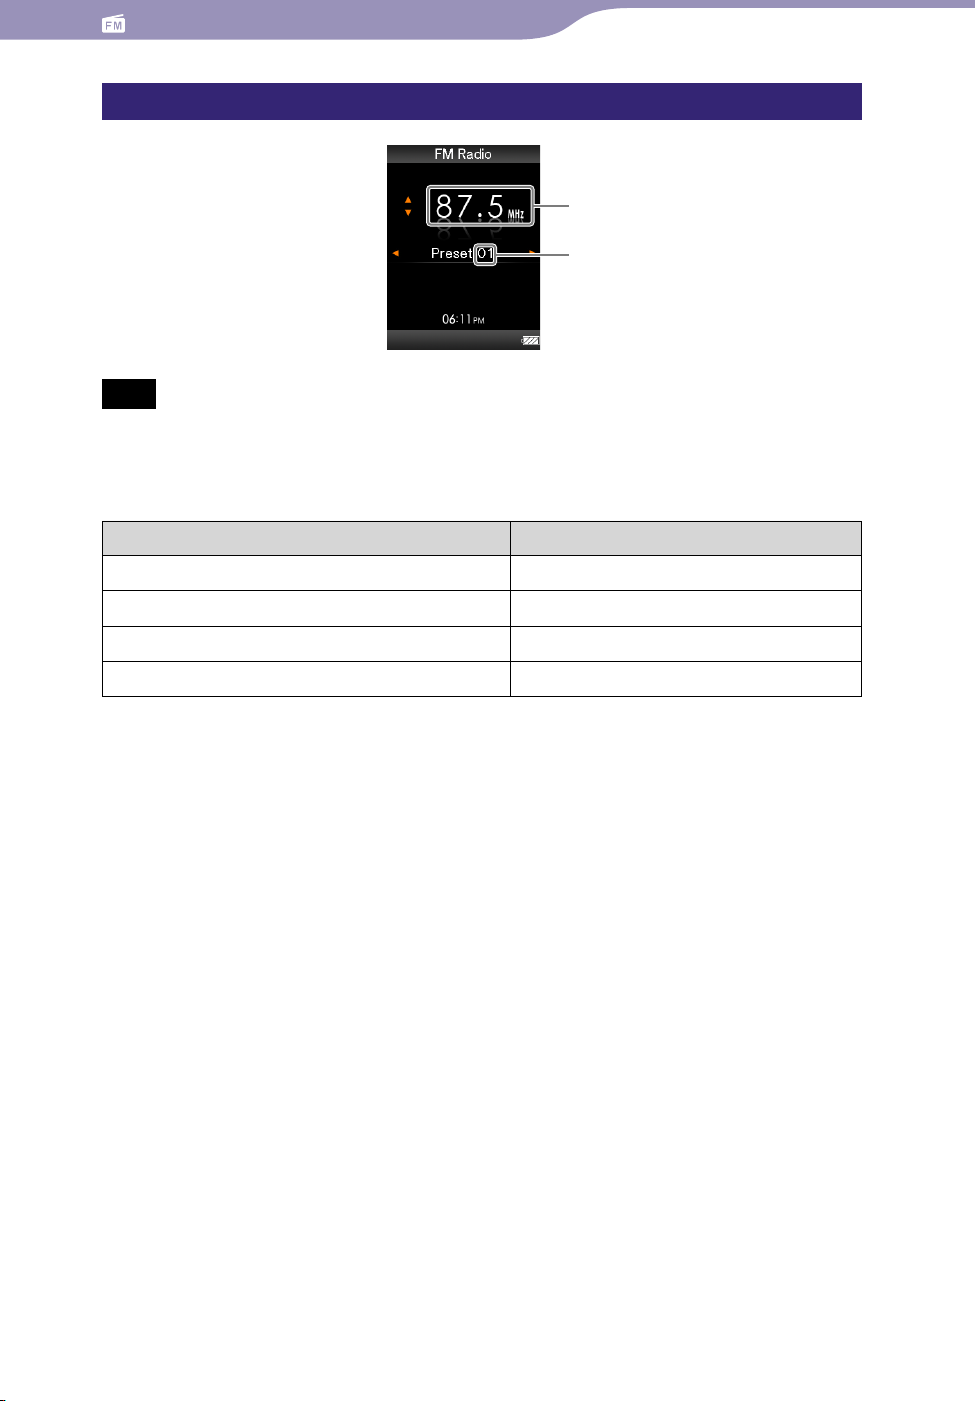
67
Table of
Contents
Home
Menu
Index
67
Listening and Recording FM Radio
FM Radio screen
Frequency
Preset number
Note
Depending on the country/region in which you have purchased the player, the screen
appearance may differ.
Operations on the FM Radio screen
To Do this
Select the previous/next frequency
Select the previous/next receivable station*
Select the previous/next preset number*
2
Press the / button.
1
Press and hold the / button.
Press the / button.
Pause/resume the FM reception
*1 If sensitivity is too high, change the [Scan Sensitivity] setting ( p
2
You cannot select a preset number if no preset station is stored. Preset receivable stations using
*
[Auto Preset] ( p
. 68).
Press the button.
. 76) to [Low].
Page 68

68
Table of
Contents
Home
Menu
Index
68
Listening and Recording FM Radio
Presetting broadcast stations automatically [Auto Preset]
You can preset (up to 30) receivable broadcast stations in your area
automatically by selecting [Auto Preset]. When you use the FM radio for the
first time, or when you move to a new area, we recommend you preset
receivable broadcast stations by selecting [Auto Preset].
On the FM Radio screen, press the OPTION/PWR OFF button.
The option menu appears.
Select [Auto Preset]
Receivable broadcast stations will be preset in order of frequency (low to
high).
[Auto Preset completed.] appears when presetting is completed, and the
first preset station is ready to be received.
elect [No] to cancel automatic presetting.
S
[Yes].
Hint
If high sensitivity causes the player to receive many unwanted broadcast stations, change
the [Scan Sensitivity] setting ( p
Note
The [Auto Preset] operation will delete already preset broadcast stations.
. 76) to [Low].
Page 69

69
Table of
Contents
Home
Menu
Index
69
Listening and Recording FM Radio
Presetting broadcast stations manually
You can manually preset broadcast stations that [Auto Preset] cannot detect
. 68).
( p
On the FM Radio screen, select the desired frequency.
Press and hold the button.
The frequency you select in step
number appears below the frequency.
Hint
You can preset up to 30 stations.
Note
The preset numbers are stored in order, from low to high frequency.
is preset and the assigned preset
Deleting preset broadcast stations
On the FM Radio screen, select the preset number you intend to
delete.
Press the OPTION/PWR OFF button.
The option menu appears.
Select [Delete from Preset].
The preset broadcast station is deleted, and a message appears.
Page 70

70
Table of
Contents
Home
Menu
Index
70
Listening and Recording FM Radio
Recording FM Radio
You can record FM radio programs on the player. FM radio program is
recorded in MP3 format.
Before recording, connect the headphones, and confirm that FM broadcasts
can be heard and reception is good.
BACK/HOME
button
OPTION/PWR OFF
button
5-way button
Note
If the [Set Date-Time] setting is not accurate, the date folder may not be named
correctly. Set the current date and time before recording FM radio programs ( p
90).
[FM Radio]
On the FM Radio screen, press the OPTION/PWR OFF button.
The option menu appears.
I
f you press the OPTION/PWR OFF button on the FM Radio screen
during pause, [Record] cannot be selected.
Select [Record].
The FM Recording screen appears and the player goes into record standby.
Press the button.
Recording starts. During recording, you can listen to the currently
recording FM radio program from the headphones or the built-in
speakers.
o pause recording, press the button. Press it again to resume
T
recording.
. 21,
Continued
Page 71

71
Table of
Contents
Home
Menu
Index
71
Listening and Recording FM Radio
Press the BACK/HOME button to stop recording.
Th
e recording is saved as a file “FM-xxxx-nnn-hhmm*1” in the [Record]
– [FM] – [yyyy-mm-dd*
*1
File names are automatically assigned to “FM-xxxx-nnn-hhmm” (FM – frequency – serial
number – hour and minutes).
*2
Folder names are automatically assigned to “yyyy-mm-dd” (year – month – day). In the
case of subsequent folders created on the same day, an attached folder number (2 to 999)
is added after “dd” of the folder name.
FM Recording screen
(during recording),
(during record pause)
2
] folder.
Folder name
File name
Available remained time
The available remind time does not change if the remind
time is more than 99 hours.
Elapsed time
Codec/bit rate
Hint
Recording in poor reception areas may result in noise. Record in a stronger reception
area.
ou can select the recording quality (bit rate) ( p
Y
T
o record to a new folder, press the OPTION/PWR OFF button on the FM Recording
screen while recording is stopped, and then select [Create New Folder] from the option
menu. The next FM radio program to be recorded is stored in the new folder. If the
folder number after “dd” reaches 999, no more folders can be created.
Note
If you rename files of the [Record] and [FM] folders on your computer, or put files
which have been imported to your computer back into the [Record] and [FM] folders,
you may not be able to play them on the player.
p to 4,000 files of FM radio programs can be recorded.
U
e maximum number for “nnn” (serial number of the file name) is 999. If the number
Th
exceeds 999, you need to create a new folder.
. 83).
Page 72

72
Table of
Contents
Home
Menu
Index
72
Listening and Recording FM Radio
Playing Back Recorded FM Radio Programs
To play back recorded FM radio programs, select [Music] to display the
[Music] screen. You can display the folder list in the [FM] folder.
[Music]
BACK/HOME
button
5-way button
From the [Home] menu, select [Music]
desired folder
desired recorded FM radio program.
[FM Recording]
The music playback screen appears and playback of the recorded FM radio
program begins.
or details on how to operate the music playback screen, see “Music
F
playback screen” ( p
. 37).
Hint
You can also play back recorded FM radio programs from the option menu appearing on
the FM Radio or FM Recording screen. On the FM Radio or FM Recording screen, press
the OPTION/PWR OFF button, then select [Play Recorded Data] desired folder
desired recorded FM radio program.
Music playback screen of recorded FM programs
File name
Folder name
Codec
Bit rate
Page 73

73
Table of
Contents
Home
Menu
Index
73
Listening and Recording FM Radio
Deleting Recorded FM Radio Programs
You can delete the recorded FM radio programs on the player.
BACK/HOME
button
OPTION/PWR OFF
button
5-way button
From the [Home] menu, select [Music]
desired folder.
The list of files stored in the [FM] folder appears.
[FM Recording]
[Music]
Press the /// button to select the recorded FM radio program
you intend to delete, and then press the OPTION/PWR OFF button.
The option menu appears.
Select [Delete This Song]
The selected FM radio program is deleted.
S
elect [No] to cancel deletion.
[Yes].
Note
You cannot delete recorded FM radio programs during playback of the songs.
hen the song has been played back before deleting the recorded FM radio programs,
W
the resume information of the last played song is cleared at the same time as deleting the
recorded FM radio programs.
Page 74

74
Table of
Contents
Home
Menu
Index
74
Listening and Recording FM Radio
Using the FM Radio Option Menu
You can bring up the FM radio option menu by pressing the OPTION/PWR
OFF button on the FM Radio screen or on the FM Recording screen. You can
also bring up the FM radio option menu from the folder/file list of recorded
FM radio programs or the music playback screen of recorded FM radio
programs. For details on how to use the option menu, see p
The option items shown on the option menu vary, depending on the screen
from which you bring it up. See the reference page for settings and usage.
Option items appearing on the FM Radio screen
Option items Description/reference page
[Record]
[Play Recorded Data] Displays the folder list screen of the [FM] folder of the
Displays the FM Recording screen ( p
[Record] folder ( p
. 72).
. 15.
. 70).
[Save to Preset ]
[Delete from Preset]
[Auto Preset]
[Scan Sensitivity]
[Mono/Auto]
[Clock Display]
[Go to the song playback
screen]
Presets the currently tuned-in broadcast station (
p
. 69).
Deletes a broadcast station from a preset station (
. 69).
p
Presets a broadcast stations automatically ( p
Adjusts the sensitivity of radio reception ( p
Changes to either monaural or stereo ( p
Displays the current time ( p
Displays the music playback screen of the song last
played.
. 21, 90).
. 68).
. 76).
. 76).
Option items appearing on the FM Recording screen
Option items Description/reference page
[Create New Folder] Adds a new folder to the [FM] folder of the [Record]
folder.
[Play Recorded Data] Displays the folder list screen of the [FM] folder of the
. 72).
. 83).
[Bit Rate Settings]
[Record] folder ( p
Sets the recording quality ( p
[Go to the song playback
screen]
Displays the music playback screen of the song last
played.
Continued
Page 75

75
Table of
Contents
Home
Menu
Index
75
Listening and Recording FM Radio
Option items appearing on the folder/file list screen of recorded FM radio programs
Option items Description/reference page
[Now Playing] Displays the playback or displays screen of the
currently playing content.
[Go to Recording Screen]
[Go to FM Radio screen] The FM Radio screen of the last received broadcast
[Detailed Information]*
[Delete This Song]*
[Go to the song playback
screen]
*1 This option appears only when the file list screen is displayed.
1
1
Displays the Voice Recording screen ( p
FM Recording screen ( p
station appears ( p
Displays detailed information of a recorded FM radio
program, such as playing time, audio format, bit rate,
and file name ( p
Deletes a recorded voice file or a recorded FM radio
program ( p
The music playback screen of the last played song
appears.
. 45).
. 73, 80).
. 70).
. 66).
. 77) or the
Option items appearing on the music playback screen of recorded FM radio
programs
Option items Description/reference page
[Play Mode]
[Equalizer]
[Built-in SP Optimizer] Optimizes the quality of the sound output from the
Sets the play mode ( p
Customizes the sound quality ( p
built-in speakers ( p
. 46).
. 47).
. 49).
[Cover Art]
[Detailed Information] Displays detailed information of a recorded FM radio
[Add to Wishlist/Remove from
Wishlist]
[Alarm]
[Sleep Timer]
[Clock Display]
Displays a cover art ( p
program, such as playing time, audio format, bit rate,
and file name ( p
Adds the song to the wish list to purchase it on the
service corresponded software./ Removes the song
from the wish list.
Sets the alarm ( p
Sets the sleep timer ( p
Displays the current time ( p
. 45).
. 45).
. 85).
. 86).
. 21, 90).
Page 76

76
Table of
Contents
Home
Menu
Index
76
Listening and Recording FM Radio
Changing the FM Radio Settings
To change the FM radio settings, select [Settings] from the [Home] menu,
then select [FM Radio Settings].
BACK/HOME
button
5-way button
[Settings]
Setting the reception [Scan Sensitivity]
When you select stations using the [Auto Preset] function ( p
/ button, the FM receiver may receive unwanted broadcast stations as a
result of sensitivity being too high. In this case, set the reception to [Low].
[High] is set by default.
From the [Home] menu, select [Settings]
[Scan Sensitivity] [Low].
T
o set the reception sensitivity back to the default, select [High].
[FM Radio Settings]
. 68) or the
Setting monaural/stereo [Mono/Auto]
If noise occurs during FM reception, set the receiver to [Mono] for monaural.
If you set it to [Auto], monaural/stereo reception is selected automatically,
depending on reception conditions. [Auto] is set by default.
From the [Home] menu, select [Settings]
[Mono/Auto] [Mono].
T
o return to the automatic setting, select [Auto].
[FM Radio Settings]
Page 77

77
Table of
Contents
Home
Menu
Index
77
Recording/Listening Voice
Recording/Listening Voice
Recording Voice
You can record voice using the player’s built-in microphone and play back the
recorded voice files. Files are recorded in MP3 format.
[Voice Recording]
BACK/HOME
button
5-way button
Microphone
Note
If the [Set Date-Time] setting is not accurate, the date folder may not be named
correctly. Set the current date and time before recording ( p
D
uring recording, you cannot listen to sound from the headphones or the built-in
speakers.
. 21, 90).
From the [Home] menu, select [Voice Recording].
The Voice Recording screen appears and the player goes into record
standby.
Press the button.
Recording starts.
T
o pause recording, press the button. Press it again to resume
recording.
Continued
Page 78

78
Table of
Contents
Home
Menu
Index
78
Recording/Listening Voice
Press the BACK/HOME button to stop recording.
Th
e recording is saved as a file “VR-nnn-hhmm*1” in the [Record] –
[Voice] – [yyyy-mm-dd*
*1
File names are automatically assigned to “VR-nnn-hhmm” (VR – serial number – hour
and minutes).
*2
Folder names are automatically assigned to “yyyy-mm-dd” (year – month – day). In the
case of subsequent folders created on the same day, an attached folder number (2 to 999) is
added after “dd” of the folder name.
Voice Recording screen
(during recording),
(during record pause)
2
] folder.
Folder name
File name
Available remained time
The available remind time does not change if the remind
time is more than 99 hours.
Elapsed time
Codec/bit rate
Hint
You can select the recording quality (bit rate) ( p
T
o record to a new folder, press the OPTION/PWR OFF button on the Voice Recording
screen while recording is stopped, and then select [Create New Folder] from the option
menu. The next recording is sent the new folder. If the folder number after “dd” reaches
999, no more folders can be created.
Note
If you rename files of the [Record] and [Voice] folders on your computer, or put files
which have been imported to your computer back into the [Record] and [Voice] folders,
you may not be able to play them on the player.
p to 4,000 files of recorded voice can be recorded.
U
e maximum number for “nnn” (serial number of the file name) is 999. If the number
Th
exceeds 999, you need to create a new folder.
. 83).
Page 79

79
Table of
Contents
Home
Menu
Index
79
Recording/Listening Voice
Playing Back Recorded Voice Files
To play back recorded voice files, select [Music] to display the [Music]
screen. You can display the folder list in the [Voice] folder.
[Music]
BACK/HOME
button
5-way button
From the [Home] menu, select [Music]
desired folder
desired recorded voice file.
[Voice Recording]
The music playback screen appears and playback of the recorded voice file
begins.
or details on how to operate the music playback screen, see “Music
F
playback screen” ( p
. 37).
Hint
You can also play back recorded voice files from the option menu appearing on the Voice
Recording screen. On the Voice Recording screen, press the OPTION/PWR OFF button,
then select [Play Recorded Data] desired folder desired recorded voice file.
Music playback screen of recorded voice files
File name
Folder name
Codec
Bit rate
Page 80

80
Table of
Contents
Home
Menu
Index
80
Recording/Listening Voice
Deleting Recorded Voice Files
You can delete recorded voice files on the player.
BACK/HOME
button
OPTION/PWR OFF
button
5-way button
From the [Home] menu, select [Music]
desired folder.
The list of files stored in the [Voice] folder appears.
[Voice Recording]
[Music]
Press the /// button to select the recorded voice you intend
to delete, and then press the OPTION/PWR OFF button.
The option menu appears.
Select [Delete This Song]
The selected voice file is deleted.
S
elect [No] to cancel deletion.
[Yes].
Note
You cannot delete recorded voice file during playback of a song.
e resume information of the last played song is cleared when recorded voice file is
Th
deleted.
Page 81

81
Table of
Contents
Home
Menu
Index
81
Recording/Listening Voice
Using the Voice Recording Option Menu
You can bring up the voice recording option menu by pressing the OPTION/
PWR OFF button on the Voice Recording screen. You can also bring up the
voice recording option menu from the folder/file list of recorded voices or the
music playback screen of recorded voices. For how to use the option menu, see
. 15.
p
The option items shown on the option menu vary depending on the screen
from which you bring it up. See the reference page for settings and usage.
Option items appearing on the Voice Recording screen
Option items Description/reference page
[Create New Folder] Adds a new folder to the [Voice] folder of the [Record]
folder.
[Play Recorded Data] Displays the folder list screen of the [Voice] folder of the
[Record] folder ( p
. 79).
[Bit Rate Settings]
[Go to the song playback
screen]
Sets recording quality ( p
Displays the music playback screen of the song last
played.
. 83).
Option items appearing on the folder/file list screen of recorded voice files
Option items Description/reference page
[Now Playing] Displays the playback or displays screen of the currently
playing content.
[Go to Recording Screen]
[Go to FM Radio screen] The FM Radio screen of the last received broadcast
[Detailed Information]*
[Delete This Song]*
[Go to the song playback
screen]
1
1
Displays the Voice Recording screen ( p
FM Recording screen ( p
station appears ( p
Displays detailed information of a recorded voice file,
such as playing time, audio format, bit rate, and file
name ( p
Deletes a recorded voice file or a recorded FM radio
program ( p
The music playback screen of the last played song
appears.
. 45).
. 73, 80).
. 70).
. 66).
. 77) or the
*1 This option appears only when the file list screen is displayed.
Continued
Page 82

82
Table of
Contents
Home
Menu
Index
82
Recording/Listening Voice
Option items appearing on the music playback screen of recorded voice files
Option items Description/reference page
[Play Mode]
Sets the play mode ( p
. 46).
[Equalizer]
[Built-in SP Optimizer] Optimizes the quality of the sound output from the
[Cover Art]
[Detailed Information] Displays detailed information of a recorded voice file,
[Add to Wishlist/Remove from
Wishlist]
[Alarm]
[Sleep Timer]
[Clock Display]
Customizes the sound quality ( p
built-in speakers ( p
Displays a cover art ( p
such as playing time, audio format, bit rate, and file
name ( p
Adds the song to the wish list to purchase it on the
service corresponded software./ Removes the song from
the wish list.
Sets the alarm ( p
Sets the sleep timer ( p
Displays the current time ( p
. 45).
. 49).
. 45).
. 85).
. 86).
. 47).
. 21, 90).
Page 83
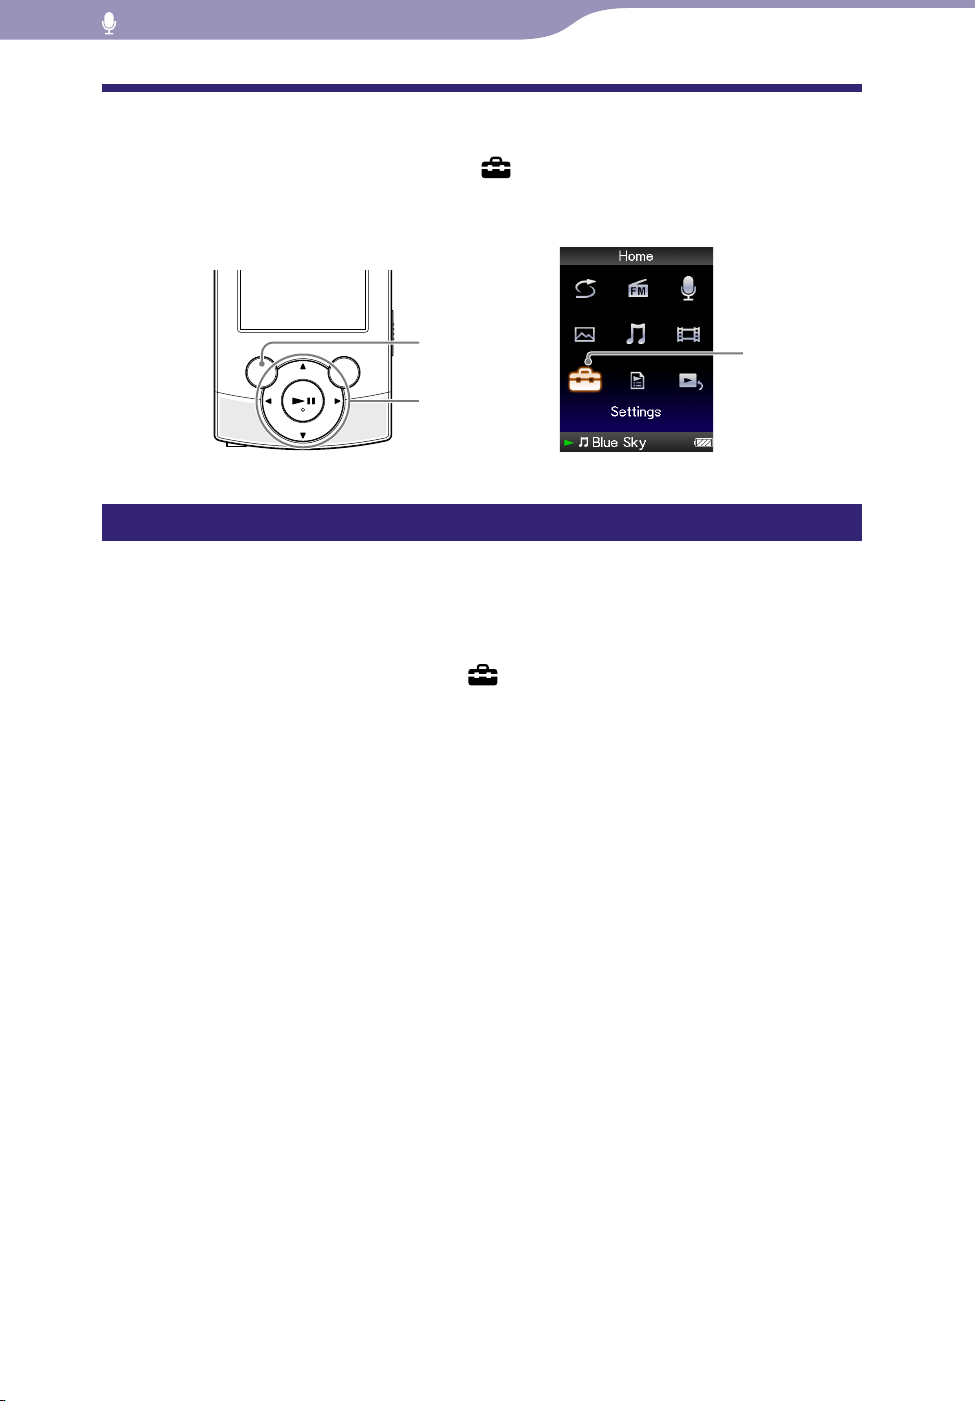
83
Table of
Contents
Home
Menu
Index
83
Recording/Listening Voice
Changing the Recording Settings
To change the recording settings, select [Settings] from the [Home] menu,
then select [Recording Settings].
BACK/HOME
button
5-way button
[Settings ]
Selecting a level of recording quality [Bit Rate Settings]
You can select a level of recording quality from [MP3 160kbps], [MP3 128kbps]
or [MP3 96kbps]. The higher the level is, the more memory the player uses for
recording sound. [MP3 128kbps] is set by default.
From the [Home] menu, select [Settings]
[Bit Rate Settings] [MP3 160kbps], [MP3 128kbps] (default
setting) or [MP3 96kbps].
[Recording Settings]
Page 84

84
Table of
Contents
Home
Menu
Index
84
Using the Timer
Using the Timer
Setting the Timer
You can set the timer to play back songs at a specified time (Alarm). You can
also set the period of time after which the player automatically puts off itself
into standby mode (Sleep Timer).
The alarm and sleep timer cannot be set at the same time.
The timer can be set in the music playback screen.
BACK/HOME
button
OPTION/PWR OFF
button
5-way button
Note
If the [Set Date-Time] setting is not accurate, timer settings cannot be set correctly. Set
the current date and time before setting the timer ( p
. 21, 90).
[Music ]
Page 85

85
Table of
Contents
Home
Menu
Index
85
Using the Timer
Setting the alarm [Alarm]
You can set the timer to play back songs at a specified time as an alarm.
From the [Home] menu, select [Music]
desired song.
desired search method
Press the OPTION/PWR OFF button.
The option menu appears.
Select [Alarm].
Press the / button to select the hour, and then press the /
button to change the value.
As in step , adjust the minute setting.
Press the button to confirm.
The player automatically stops playback of the songs, and the player is
automatically turned off.
At the set time, the player automatically plays back the song last played.
To cancel the alarm
After setting the alarm, press any button to turn on the player.
When [Alarm is now set. Cancel?] appears, select [Yes].
If you select [No], the alarm is not cancelled, and the player turns off
automatically.
Note
The alarm will not activate if the player is connected to a computer. Disconnect the USB
cable before the set time.
f there is no resume information for the song last played, or if the song file last played is
I
deleted, the alarm sounds automatically at the set time.
Page 86

86
Table of
Contents
Home
Menu
Index
86
Using the Timer
Setting the sleep timer [Sleep Timer]
You can set the period of time after which the player automatically puts itself
into standby mode (Sleep Timer).
On the music playback screen, press the OPTION/PWR OFF button.
The option menu appears.
Select [Sleep Timer]
Duration Description
[30 Min] Turns off the player after 30 minutes.
[60 Min] Turns off the player after 60 minutes.
[90 Min] Turns off the player after 90 minutes.
[120 Min] Turns off the player after 120 minutes.
desired sleep timer duration.
Hint
After setting the sleep timer,
screen.
appears in the information area of the music playback
To cancel the sleep timer
After setting the sleep timer, press the BACK/HOME button, press and hold
the BACK/HOME button or press the OPTION/PWR OFF button on the
music playback screen.
When [Sleep timer is now set. Cancel?] appears, select [Yes].
If you select [No], the sleep timer is not cancelled, and the music playback
screen reappears.
Note
The sleep timer will not activate if the player is connected to a computer.
fter setting the sleep timer, if you turn the player off by pressing and holding the
A
OPTION/PWR OFF button and then turn the player on again, the sleep timer is
cancelled.
Page 87

87
Table of
Contents
Home
Menu
Index
87
Common Settings
Common Settings
Changing the Common Settings
To change the common settings of the player, select [Settings] from the
[Home] menu, then select [Common Settings].
BACK/HOME
button
5-way button
[Settings]
Displaying the player information [Unit Information]
Information such as model name, firmware version, etc., is displayed.
From the [Home] menu, select [Settings]
[Unit Information].
Item Description
[Model:] Displays the model name of the player.
[Firmware:] Displays version information for the player’s firmware.
[Total songs:] Displays the total number of songs stored on the player.
[Total videos:] Displays the total number of videos stored on the player.
[Total photos:] Displays the total number of photos stored on the player.
[WM-PORT:] Displays the version information for WM-PORT.
[Common Settings]
Page 88

88
Table of
Contents
Home
Menu
Index
88
Common Settings
Limiting the volume [AVLS (Volume Limit)]
You can set [AVLS (Volume Limit)] (Automatic Volume Limiter System) to
limit the maximum volume to prevent auditory issues or distraction. With
[AVLS (Volume Limit)], you can listen to music at a comfortable volume level.
From the [Home] menu, select [Settings]
[AVLS (Volume Limit)] desired setting type.
Type Description
[On] Maintains a moderate volume level.
[Off] Plays back audio at the original volume. (Default setting)
Note
The [AVLS (Volume Limit)] setting is not applied to the sound output from the built-in
speakers.
[Common Settings]
Turning off the beep sound [Beep Settings]
You can turn on or off the operation sounds of the player.
From the [Home] menu, select [Settings]
[Beep Settings] desired setting type.
Type Description
[On] Produces beep sounds. (Default setting)
[Common Settings]
[Off] Does not produce beep sounds.
Page 89

89
Table of
Contents
Home
Menu
Index
89
Common Settings
Setting a screensaver type [Screensaver]
You can set the screen saver to either [Clock] or [Blank] for when there is no
operation for more than 30 seconds during song playback or FM reception.
From the [Home] menu, select [Settings]
[Screensaver] [Type] desired setting type.
Type Description
[Clock] When there is no operation for more than 30 seconds, a
clock appears as a screen saver.
[Blank] When there is no operation for more than 30 seconds,
the screen goes off. (Default setting)
[Common Settings]
Adjusting the brightness of the screen [Brightness]
You can set the display brightness to one of 5 levels.
From the [Home] menu, select [Settings]
[Brightness] desired setting type.
Type Description
[1] – [5] The larger the number, the brighter the screen. [3] is set
by default.
[Common Settings]
Hint
If you adjust the brightness of the screen to a lower level, the battery will last longer.
Note
While the player is connected via the USB cable, the brightness of the screen may be
adjusted to a lower level regardless of the setting.
Page 90

90
Table of
Contents
Home
Menu
Index
90
Common Settings
Setting the current time [Set Date-Time]
You can set the date and time.
From the [Home] menu, select [Settings]
[Set Date-Time].
[Common Settings]
Press the / button to select a year, and then press the /
button to change the value.
As in step , adjust the settings for month, date, hour, and
minute.
Press the button to confirm.
Hint
To display the current time, press the OPTION/PWR OFF button on the music playback
screen and select [Clock Display] from the option menu.
ou can select the date format from among [YYYY/MM/DD], [MM/DD/YYYY], and
Y
[DD/MM/YYYY]. Furthermore, you can select the time format from either [12-hour] or
[24-hour]. For details, see “Setting the date format [Date Display Format]” ( p
“Setting the time format [Time Display Format]” ( p
Note
If battery power is used up because, for example, the player has not been used for a long
time, your settings for date and time may be lost and “-” will be displayed instead of the
current date and time.
e clock may gain or lose up to 60 seconds per month. In this case, set the clock again.
Th
. 91).
. 91), or
Page 91

91
Table of
Contents
Home
Menu
Index
91
Common Settings
Setting the date format [Date Display Format]
You can set the date format displayed for the current date ( p
MM/DD], [MM/DD/YYYY], or [DD/MM/YYYY].
From the [Home] menu, select [Settings]
[Date Display Format] desired format type.
Type Description
[YYYY/MM/DD] Displays the date as year/month/day.
[MM/DD/YYYY] Displays the date as month/day/year.
[DD/MM/YYYY] Displays the date as day/month/year.
[Common Settings]
Setting the time format [Time Display Format]
You can select the format to display the current time ( p
[12-hour] or [24-hour] display.
From the [Home] menu, select [Settings]
[Time Display Format] desired format type.
Type Description
. 90) from either a
[Common Settings]
. 90) as [YYYY/
[12-hour] Displays the current time in the 12-hour format.
[24-hour] Displays the current time in the 24-hour format.
Page 92

92
Table of
Contents
Home
Menu
Index
92
Common Settings
Returning to the factory settings [Reset all Settings]
You can reset the player to the default settings. Resetting the player will not
delete data such as music, video, and photo data.
Note
This function is only available in the pause mode.
From the [Home] menu, select [Settings]
[Reset all Settings] [Yes].
[Restored factory settings.] appears.
o cancel the operation, select [No] on the confirmation screen.
T
[Common Settings]
Formatting memory [Format]
You can format the built-in flash memory of the player.
Note
If the memory is formatted, all data (songs, videos, photos, etc., including sample data
installed at the factory) will be erased. Be sure to verify the data stored in memory prior
to formatting, and export any important data to the hard disk of your computer.
e sure not to initialize (format) the built-in flash memory of the player using Windows
B
Explorer. If you have formatted with Windows Explorer, format again using the player.
s function is only available in the pause mode.
Thi
From the [Home] menu, select [Settings]
[Format].
[All data including songs will be deleted. Proceed?] appears.
[Common Settings]
Select [Yes].
[All data will be deleted. Proceed?] appears.
T
o cancel the operation, select [No].
Select [Yes].
When initialization finishes, [Memory formatted.] appears.
T
o cancel the operation, select [No].
Page 93

93
Table of
Contents
Home
Menu
Index
93
Common Settings
Selecting the Display Language
[Language Settings]
You can select from a variety of languages for menus and messages.
BACK/HOME
button
5-way button
From the [Home] menu, select [Settings]
desired language setting.
Language Messages and menus are displayed in
[Deutsch] German
[English] English
[Español] Spanish
[Français] French
[Language Settings]
[Settings]
[Italiano] Italian
[Português] Portuguese
[Русский] Russian
[
[
[
]
] Simplified Chinese
] Traditional Chinese
Korean
Page 94

94
Table of
Contents
Home
Menu
Index
94
Useful Facts
Useful Facts
About Battery Life
By adjusting the settings or managing the power supply properly, it is possible
to save battery power for longer usage time between charges.
The following hints will yield a longer battery life.
Turn off the player manually
If you press and hold the OPTION/PWR OFF button, the player enters standby
mode and the screen turns off to save battery power. Furthermore, if standby
mode continues for more than about 4 hours, the player turns completely off
automatically.
Adjust data format and bit rate
Playing time will vary, as battery charge can be affected by the format and bit
rate of songs, videos or photos that are played.
For details on charging time and usage time, see p
. 128, 129.
Page 95

95
Table of
Contents
Home
Menu
Index
95
Useful Facts
What are Format and Bit Rate?
What is audio format?
Audio format refers to the method used to import audio data from the Internet
or audio CDs to a computer, and then save it as an audio file.
Common formats include MP3 and WMA, etc.
MP3: MP3 (MPEG-1 Audio Layer3) is a common audio compression
technology developed by the MPEG working group of the ISO (International
Organization for Standardization).
MP3 can compress audio files to about 1/10 the size of standard CD audio files.
WMA: WMA (Windows Media Audio) is a common audio compression
technology developed by Microsoft Corporation. The WMA format produces
the same sound quality as that of the MP3 format with a smaller file size.
AAC: AAC (Advanced Audio Coding) is a common audio compression
technology developed by the MPEG working group of the ISO (International
Organization for Standardization). The AAC format produces the same sound
quality as that of the MP3 format, with a smaller file size.
Linear PCM: Linear PCM is an audio recording format without digital
compression. You can achieve the same quality as CD music by recording with
this format.
What is copyright protection?
Certain music files or video files, etc., that you purchase from a music
download service site, etc., may apply access control technologies, such as
encryption, to limit usage and duplication of material, in accordance with
copyright laws.
What is bit rate?
Bit rate refers to the amount of data used to store each second of audio,
expressed in kbps (kilo bits per second), such as 64 kbps. Generally, higher bit
rates provide better sound quality, but require more storage space for the same
length of audio.
Continued
Page 96

96
Table of
Contents
Home
Menu
Index
96
Useful Facts
What is the relationship between bit rate, sound quality, and storage size?
Generally, higher bit rates provide better sound quality, but require more
storage space for the same length of audio, so you can store fewer songs on the
player.
Lower bit rates enable you to store more songs, but at a lower sound quality.
Note
If you import a song from a CD to your computer at a low bit rate, you cannot improve
the song’s sound quality by selecting a high bit rate when further transferring the song
from the computer to the player.
What is video format?
Video format refers to the method used when importing video and audio data
to a computer and saving it as a video file.
Common formats include MPEG-4 and AVC, etc.
MPEG-4: MPEG-4 refers to Moving Picture Experts Group phase 4, developed
by the MPEG working group of the ISO (International Organization for
Standardization). The compression format is for video and audio data.
AVC: AVC refers to Advanced Video Coding, developed by the MPEG working
group of the ISO (International Organization for Standardization). It enables
reproduction of more vivid images at a lower bit rate. AVC files include four
profiles, and “AVC Baseline Profile” is one of them. AVC format is based on the
MPEG-4 AVC standard of the ISO (International Organization for
Standardization), and since AVC is standardized as the MPEG-4 Part 10
Advanced Video Coding, it is commonly referred to as MPEG-4 AVC/H.264 or
H.264/AVC.
WMV: WMV (Windows Media Video) is a video compression format
developed by Microsoft Corporation. It was built upon MPEG-4, achieves a
high compression rate, and supports copy control by DRM.
What is photo format?
Photo format refers to the method used when importing images to a computer
and saving them as image files. JPEG is one example of a commonly used
format.
JPEG: JPEG (Joint Photographic Experts Group) is a common image
compression format developed by the JPEG. JPEG can compress an image file
to between 1/10 and 1/100 the size of original image files.
Hint
For details on supported file formats and bit rates, see p
. 125.
Page 97

97
Table of
Contents
Home
Menu
Index
97
Useful Facts
Storing Data
You can store computer data into the built-in flash memory of the player by
transferring the data from your computer using Windows Explorer, or another
transfer capable software. If the player is connected to the computer, the builtin flash memory appears in Windows Explorer as [WALKMAN].
Note
Do not use the bundled software while using Windows Explorer to interact with the
built-in flash memory of the player.
o not disconnect the supplied USB cable while [Do not disconnect.] appears during
D
data transfer. The data could be damaged.
o not format the built-in flash memory using Windows Explorer. If you want to format
D
the built-in flash memory, format it on the player ( p
Y
ou cannot change the following folder names or delete them: [MUSIC], [MP_ROOT],
[MPE_ROOT], [VIDEO], [PICTURE], [PICTURES], [Record], [Voice] and [FM]
folders.
o not change folder or file names directly under the [MP_ROOT], [MPE_ROOT] or
D
[Record] folder. Otherwise, they will not be displayed on the player.
. 92).
Page 98

98
Table of
Contents
Home
Menu
Index
98
Useful Facts
Upgrading the Player’s Firmware
You can update the player’s firmware. Installing the latest player’s firmware
allows you to add new features to the player. For details on the latest firmware
information and how to install it, visit the customer support Web sites (
. 121).
p
Download the update program to your computer from the Web site.
Connect the player to your computer, and then start the update
program.
Follow the on-screen instructions to update the player’s firmware.
Firmware update is complete.
Hint
Version information for the player’s firmware can be displayed by selecting
[Common Settings] [Unit Information] from the [Home] menu ( p
[Settings]
. 87).
Page 99

99
Table of
Contents
Home
Menu
Index
99
Troubleshooting
Troubleshooting
Troubleshooting
If the player does not function as expected, try the following steps to resolve
the issue.
1 Find the symptoms of the issue in the following troubleshooting tables,
and try any corrective actions listed.
2 Connect the player to your computer to charge the battery.
You may be able to resolve some issues by charging the battery.
3 Press the RESET button with a small pin, etc.
If you press the RESET button while operating the player, stored data and
player settings may be lost.
RESET button
4 Check information on the issue in the Help of each software.
5 Look up information on the issue on one of the customer support Web
sites ( p
. 121).
6 If the approaches listed above fail to resolve the issue, consult your
nearest Sony dealer.
Page 100

100
Table of
Contents
Home
Menu
Index
100
Troubleshooting
Operation
There is no sound.
e volume level is set to zero.
Th
urn the volume up ( p. 5).
T
Th
e headphone plug is not connected properly.
onnect the headphone plug properly ( p. 6).
C
Th
e headphone plug is dirty.
lean the headphone plug with a soft dry cloth.
C
N
o songs or videos are stored on the player.
ollow the instructions in the displayed message, and transfer songs or videos
F
from the computer.
There is no sound from the built-in speakers.
e output switch is set to the (headphones) position.
Th
et the output switch to the (speaker) position ( p. 7).
S
Th
e remaining battery power is low or insufficient.
f the remaining battery power is low or insufficient, sound from the built-in
I
speakers may not be output though sound from the headphones may be output.
In this case, charge the battery by connecting the player to a running computer
. 18).
( p
Th
e volume level is set to low.
ound from the built-in speakers may be hard to listen to due to surrounding
S
noise. In this case, turn the volume up ( p
. 5).
Data cannot be played.
e battery is consumed.
Th
harge the battery fully ( p. 18).
C
f the player does not react, even after charging the battery, press the RESET
I
button to reset the player ( p
N
o data is stored on the player.
ollow the instructions in the message, and transfer data from the computer.
F
T
ransferred files are not in a playable format. For details, see “Supported file
format” of “Specifications” ( p
ongs or videos may not be playable, depending on the file format ( p. 125).
S
hotos may not be displayable, depending on their file size or file format (
P
p
. 125).
e playback limitation period of the song has expired due to subscription
Th
conditions, etc.
ongs with an expired playback limitation period cannot be played back. Update
S
them using the software used for transferring.
fter transferring by drag-and-drop in Windows Explorer, data hierarchy levels do
A
not correspond to the player ( p
. 99).
. 125).
. 29, 34).
Continued
 Loading...