

Page 1
NV-U81T/U81 2-695-873-12 (1)
2-695-873-12(1)
©2007 Sony Corporation
How to use this manual
When reading this manual, keep the control
layout illustration (on the rear of this page)
open for quick reference from any page.
Utilisation de ce mode
d’emploi
Lorsque vous consultez ce mode d’emploi,
gardez près de vous les illustrations (situées
au verso) que vous pouvez consulter à partir
de n’importe quelle page.
Utilización de este manual
Cuando lea este manual, mantenga abierta la
ilustración de la distribución de los controles
(en el reverso de esta página) para poder
consultarla rápidamente desde cualquier
página.
Sony Corporation Printed in Thailand
If you have any questions/problems: / En cas de questions/problèmes:
1 Read “Troubleshooting” in this
“Quick Start Guide.”
For BLUETOOTH models, see also
“Troubleshooting” in the supplied
“BLUETOOTH Hands-free Manual.”
2 Reset the unit.
Note: Stored data may be erased.
3 Please contact:
U.S.A.
Call 1-800-222-7669
URL http://www.sony.com/nav-u/support
Canada
Call 1-877-899-7669
URL http://www.sony.ca/nav-u
1
Lisez la section « Dépannage » du
« Guide de démarrage rapide ».
Pour les modèles BLUETOOTH, repor tez-vous
également à la section « Dépannage » du
« Manuel de la fonction BLUETOOTH mains
libres » fourni.
2 Réinitialisez l’appareil.
Remarque : Les données enregistrées peuvent
être effacées.
3 Merci de contacter:
États-Unis
Téléphone : 1-800-222-7669
URL : http://www.sony.com/nav-u/support
Canada
Téléphone: 1-877-899-7669
URL: http://www.fr.sony.ca/nav-u
Following registration enables Sony to send
you periodic mailings about software,
fi rmware updates and other important
product information.
To register your product, please visit our
website at:
U.S.A.
http://productregistration.sony.com
Canada
http://www.sonystyle.ca/registration
Thank you.
L’enregistrement suivant permet à Sony
d’envoyer des courriers périodiques sur les
mises à jour logicielles et micrologicielles,
ainsi que d’autres informations importantes.
Pour enregistrer votre produit, visitez notre
site Web
États-Unis
http://productregistration.sony.com
Canada
http://www.fr.sonystyle.ca/enregistrement
Merci.
PRODUCT REGISTRATION / ENREGISTREMENT DU PRODUIT
US
Quick Start Guide
FR
Guide de démarrage
rapide
ES
Guía de inicio rápido
Personal Navigation System
Quick Start Guide
NV-U81T
NV-U81
Page 2
NV-U81T/U81 2-695-873-12 (1)
Warning
This equipment has been tested and found to
comply with the limits for a Class B digital
device, pursuant to Part 15 of the FCC Rules
and RSS-Gen of IC Rules. These limits are
designed to provide reasonable protection
against harmful interference in a residential
installation. This equipment generates, uses,
and can radiate radio frequency energy and,
if not installed and used in accordance with
the instructions, may cause harmful
interference to radio communications.
However, there is no guarantee that
interference will not occur in a particular
installation. If this equipment does cause
harmful interference to radio or television
reception, which can be determined by
turning the equipment off and on, the user is
encouraged to try to correct the interference
by one or more of the following measures:
– Reorient or relocate the receiving antenna.
– Increase the separation between the
equipment and receiver.
– Connect the equipment into an outlet on a
circuit different from that to which the
receiver is connected.
– Consult the dealer or an experienced
radio/TV technician for help.
This transmitter must not be co-located or
operated in conjunction with any other
antenna or transmitter.
This equipment complies with FCC and IC
radiation exposure limits set forth for
uncontrolled equipment and meets the FCC
radio frequency (RF) Exposure Guidelines in
Supplement C to OET65 and RSS-102 of the
2
IC radio frequency (RF) Exposure rules.
This equipment has very low levels of RF
energy that it deemed to comply without
maximum permissive exposure evaluation
(MPE). But it is desirable that it should be
installed and operated with at least 20 cm
and more between the radiator and person’s
body (excluding extremities: hands, wrists,
feet and legs).
You are cautioned that any changes or
modifi cations not expressly approved in this
manual could void your authority to operate
this equipment.
If you have any questions about this product,
you may contact:
Sony Customer Information Services Center
Call: 1-(800)-222-7669
Address: 12451 Gateway Blvd., Fort
Myers, FL 33913
URL: www.sony.com/nav-u/support
Operation is subject to the following two
conditions;
– this device may not cause interference.
– this device must accept any interference,
including interference that may cause
undesired operation of the device.
Owner’s Record
The model and serial numbers are located on
the bottom of the main unit. Record the
serial number in the space provided below.
Refer to these numbers whenever you call
upon your Sony dealer regarding this
product.
Model No. NV-U81T/U81
Serial No.
On copyrights
The map and POI data may contain
copyrighted material. Copyrighted data on
a “Memory Stick Duo” should be used
within the limits of the copyright law. Do
not violate the previsions of the copyright
law.
On trademarks
• Microsoft and Windows are registered
trademarks of Microsoft Corporation.
•
“Memory Stick,” “ ,” “Memory Stick
Duo,” “ ,” “Memory Stick
PRO Duo,” “ ,”
“MagicGate” and “ ” are
trademarks of Sony Corporation.
• The BLUETOOTH word mark and
logos are owned by the BLUETOOTH
SIG, Inc. and any use of such marks by
Sony Corporation is under license.
Other trademarks and trade names are
those of their respective owners.
• All other trademarks are trademarks of
their respective owners.
© 2005 NAVTEQ. All Rights Reserved.
The data for areas of Canada includes
information taken with permission from
Canadian authorities, including: © Her
Majesty the Queen in Right of Canada, ©
Queen’s Printer for Ontario, © Canada
Post Corporation, GeoBase®.
V
DC IN 5
Page 3
C:\WINNT\Profiles\Administrator\Desktop\NAVU\2695873121NVU81U\01US01INT-U.fm
00US+00COV-U.book Page 3 Friday, November 10, 2006 6:24 PM
masterpage:Right
Disposal of Old Electrical &
Electronic Equipment (Applicable in
the European Union and other
European countries with separate
collection systems)
This symbol on the product or on its
packaging indicates that this product shall not be treated
as household waste. Instead it shall be handed over to the
applicable collection point for the recycling of electrical
and electronic equipment. By ensuring this product is
disposed of correctly, you will help prevent potential
negative consequences for the environment and human
health, which could otherwise be caused by inappropriate
waste handling of this product. The recycling of materials
will help to conserve natural resources. For more detailed
information about recycling of this product, please contact
your local Civic Office, your household waste disposal
service or the shop where you purchased the product.
Applicable accessories: Car battery adapter/AC power
adapter
Caution
IN NO EVENT SHALL SONY BE LIABLE
FOR ANY INCIDENTAL, INDIRECT OR
CONSEQUENTIAL DAMAGES OR
OTHER DAMAGES INCLUDING
WITHOUT LIMITATION LOSS OF
PROFITS, LOSS OF REVENUE, LOSS OF
DATA, LOSS OF USE OF THE PRODUCT
OR ANY ASSOCIATED EQUIPMENT,
DOWNTIME, AND PURCHASER’S TIME
RELATED TO OR ARISING OUT OF THE
USE OF THIS PRODUCT, ITS
HARDWARE AND/OR ITS SOFTWARE.
Declaration of Conformity
Trade Name: Sony
Model No.: NV-U81T/U81
Responsible Party: Sony Electronics Inc.
Address: 16530 Via Esprillo,
Telephone number: 858-942-2230
This device complies with Part 15 of the
FCC Rules. Operation is subject to the
following two conditions: (1) This device
may not cause harmful interference, and
(2) this device must accept any
interference received, including
interference that may cause undesired
operation.
San Diego, CA
92127 U.S.A.
3
NV-U81T/U81
2-695-873-11 (1)
Page 4
C:\WINNT\Profiles\Administrator\Desktop\NAVU\2695873121NVU81U\00US+00COV-UTOC.fm
00US+00COV-U.book Page 4 Friday, November 10, 2006 6:24 PM
Table of Contents
masterpage:Right
Warning . . . . . . . . . . . . . . . . . . . . . . . .6
Location of controls. . . . . . . . . . . . . . .9
Turning the unit on . . . . . . . . . . . . . . 10
Performing initial setup. . . . . . . . . . . 10
Receiving GPS signals . . . . . . . . . . .11
Basic Operations 11
Menu operations . . . . . . . . . . . . . . . . 11
Gesture Command operation. . . . . . .12
Keyboard operations . . . . . . . . . . . . . 13
Route Searching 14
Setting the destination and starting
guidance . . . . . . . . . . . . . . . . . . . .14
Setting the destination
in other ways. . . . . . . . . . . . . . . . .16
Guidance displays . . . . . . . . . . . . . . .17
System Settings 20
4
Using the Supplied
Software 21
Contents. . . . . . . . . . . . . . . . . . . . 21
Connecting to your computer . . . 21
Additional Information 22
Precautions . . . . . . . . . . . . . . . . . . . . 22
About the “Memory Stick” . . . . . . . 22
What is “Memory Stick”? . . . . . . 22
Types of “Memory Stick Duo” that
the system can use. . . . . . . . . . . . 23
Note on LCD panel . . . . . . . . . . . . . 24
Maintenance. . . . . . . . . . . . . . . . . . . 24
Cleaning the suction cup . . . . . . . 24
Fuse replacement. . . . . . . . . . . . . 25
Notes on unit disposal . . . . . . . . . . . 26
Specifications. . . . . . . . . . . . . . . . . . 27
Troubleshooting . . . . . . . . . . . . . . . . 29
Resetting the unit. . . . . . . . . . . . . 30
NV-U81T/U81
2-695-873-12 (1)
Page 5
C:\WINNT\Profiles\Administrator\Desktop\NAVU\2695873121NVU81U\01US02NAV-U.fm
00US+00COV-U.book Page 5 Friday, November 10, 2006 6:24 PM
About this manual
• This Quick Start Guide contains
instructions for basic operations.
For more information, see the PDF
manual on the supplied Application
Disc. For details on installation and
connections, see the supplied
“Read This First” (installation
manual).
• Contents of this manual are written
for users with knowledge of using
the Microsoft® Windows®
operating system. For details about
computer operation, see the manual
for your computer.
• Illustrations in this manual may
differ from the actual device.
• Before operating this system, read
this manual and “Read This First”
thoroughly.
• Retain this manual and the supplied
“Read This First” in a place where
you can refer to at any future time.
masterpage:Right
NV-U81T/U81
2-695-873-12 (1)
5
Page 6
C:\WINNT\Profiles\Administrator\Desktop\NAVU\2695873121NVU81U\01US02NAV-U.fm
00US+00COV-U.book Page 6 Friday, November 10, 2006 6:24 PM
masterpage:Right
Warning
PLEASE READ THIS MANUAL AND
THE SUPPLIED “READ THIS FIRST”
(INSTALLATION MANUAL)
COMPLETELY BEFORE INSTALLING
OR OPERATING YOUR PERSONAL
NAVIGATION SYSTEM. IMPROPER
INSTALLATION OF THIS DEVICE
MAY CAUSE ACCIDENT, INJURY OR
DEATH.
On safety
•Be sure to:
– install the navigation system in a safe
place where it does not obstruct the
driver’s view.
– not install the unit above an airbag.
– place the cables and cradle where they
do not obstruct driving.
– attach the unit to the cradle properly,
otherwise the unit may fall.
– clean the surface of the suction cup
and attachment surface before
attaching. Also, confirm that the
suction cup is securely attached after
installation. Otherwise, the unit or
cradle may fall.
– clean the surface on the dashboard
before using the supplied sheet.
Failure to do so may result in unsafe
driving conditions.
• Do not apply excessive force to the unit
or cradle as it may fall.
6
• Comply with local traffic rules, laws and
regulations.
• Do not continuously watch the unit
while driving. It is dangerous and may
cause a traffic accident.
• If you need to operate the navigation
system while driving, be sure to stop the
car in a safe place before operating.
• Do not modify the unit.
• Do not disassemble the unit except when
disposing of it.
• Do not use the navigation system with
the system covered or blocked.
When using the unit indoors
Use this product near a wall outlet. This is to
ensure that the power plug can be
immediately unplugged from the wall outlet
to power off if some abnormality occurs
during use. Do not use the AC Adaptor
placed in a narrow space, such as between
a wall and furniture.
On handling
• Do not let foreign objects get inside the
cradle connector (8) of the unit, as it
may cause a malfunction.
NV-U81T/U81
2-695-873-12 (1)
Page 7
C:\WINNT\Profiles\Administrator\Desktop\NAVU\2695873121NVU81U\01US02NAV-U.fm
00US+00COV-U.book Page 7 Friday, November 10, 2006 6:24 PM
masterpage:Right
• Turn the unit off by pressing ?/1 (4),
take it out of the cradle, then disconnect
the car battery adapter, otherwise it may
drain the car battery.
Note the following.
If your car’s cigarette lighter socket is
not connected to the ACC on your
ignition switch, power will continue to
be supplied to the unit's built-in power
supply even when the ignition is off or
the unit is not in use.
• Do not connect any accessory (car
battery adapter, AC power adapter, etc.)
other than those supplied or optional.
• Do not expose the unit to fire or water, as
it may cause a malfunction.
• Be sure to remove the unit out of the car
when leaving your car to prevent theft or
high temperature damage inside the car.
• Note that the built-in battery cannot be
charged outside the temperature range 5
– 45 ºC (41 – 113 ºF).
• Do not leave the unit in high ambient
temperature as the built-in battery
capacity will deteriorate, or it will
become unchargeable.
On GPS
GPS (Global Positioning System)
satellites continuously emit signals for
positioning anywhere on the earth. As a
GPS antenna receives these signals, users
can be informed of their location (latitude,
longitude and altitude). Information must
be received from 3 satellites in order to
obtain two-dimensional fixes (latitude and
longitude), and 4 satellites are required for
three-dimensional positioning (latitude,
longitude and altitude). As GPS satellites
are controlled by the U.S. Department of
Defense, a deliberate margin of error
between a few meters (a few feet) and 10
meters (32.8 feet) exists. As a result, the
GPS navigation system may include an
error of between 10 meters (32.8 feet) and
about 200 meters (656.2 feet), depending
on the circumstances.
As GPS information is obtained using
signal from satellites, it may be impossible
or difficult to obtain the information in the
following locations:
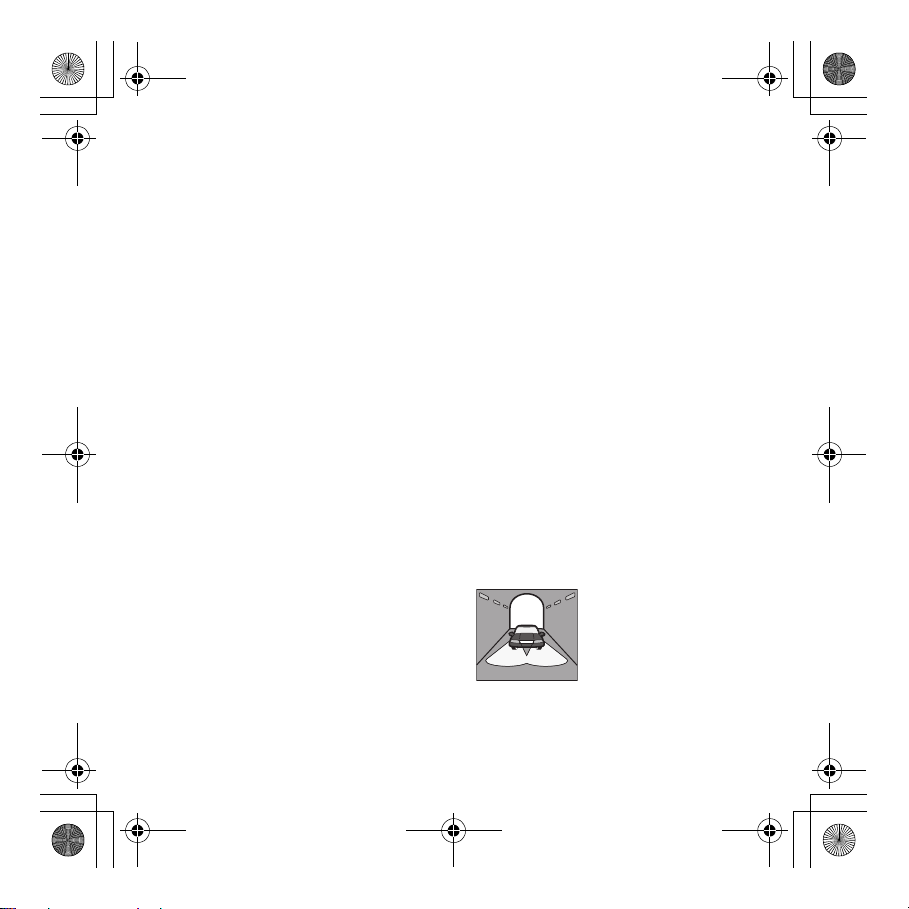
• Tunnel or underground
continue to next page t
7
NV-U81T/U81
2-695-873-12 (1)
Page 8
C:\WINNT\Profiles\Administrator\Desktop\NAVU\2695873121NVU81U\01US02NAV-U.fm
00US+00COV-U.book Page 8 Friday, November 10, 2006 6:24 PM
masterpage:Right
• Under a highway
• Between high buildings
• Between tall trees with dense foliage
After the initial installation, park your car
in a safe, open place (no high buildings,
etc.) for up to 20 minutes to allow for GPS
signals to be received before using the
navigation system.
Note
It takes time to receive a GPS signal after
the built-in battery is fully discharged or after
resetting the unit.
On this positioning system
The system has a function that allows the
car’s current position to be correctly
displayed even at locations where the GPS
signal is temporarily interrupted or poorly
received, as when going under an
overpass. To activate this function, do the
following.
– Attach the unit to the cradle.
– Drive for a while in an area where the
GPS signal is clearly received.
The positioning system will become ready
for operation after you have driven a little
with the unit on.
Notes
• The accuracy of this function may
deteriorate if the unit is installed near a
heated or heat-reflecting windshield.
• Depending on the conditions, the car’s
current position or the movement may not
be accurately displayed. This, however,
will be corrected as soon as the GPS
signal reception resumes.
• This function is available only during route
guidance.
On the software
Read the “END-USER LICENSE
AGREEMENT” carefully before use.
8
NV-U81T/U81
2-695-873-12 (1)
Page 9

C:\WINNT\Profiles\Administrator\Desktop\NAVU\2695873121NVU81U\01US02NAV-U.fm
00US+00COV-U.book Page 9 Friday, November 10, 2006 6:24 PM
masterpage:Right
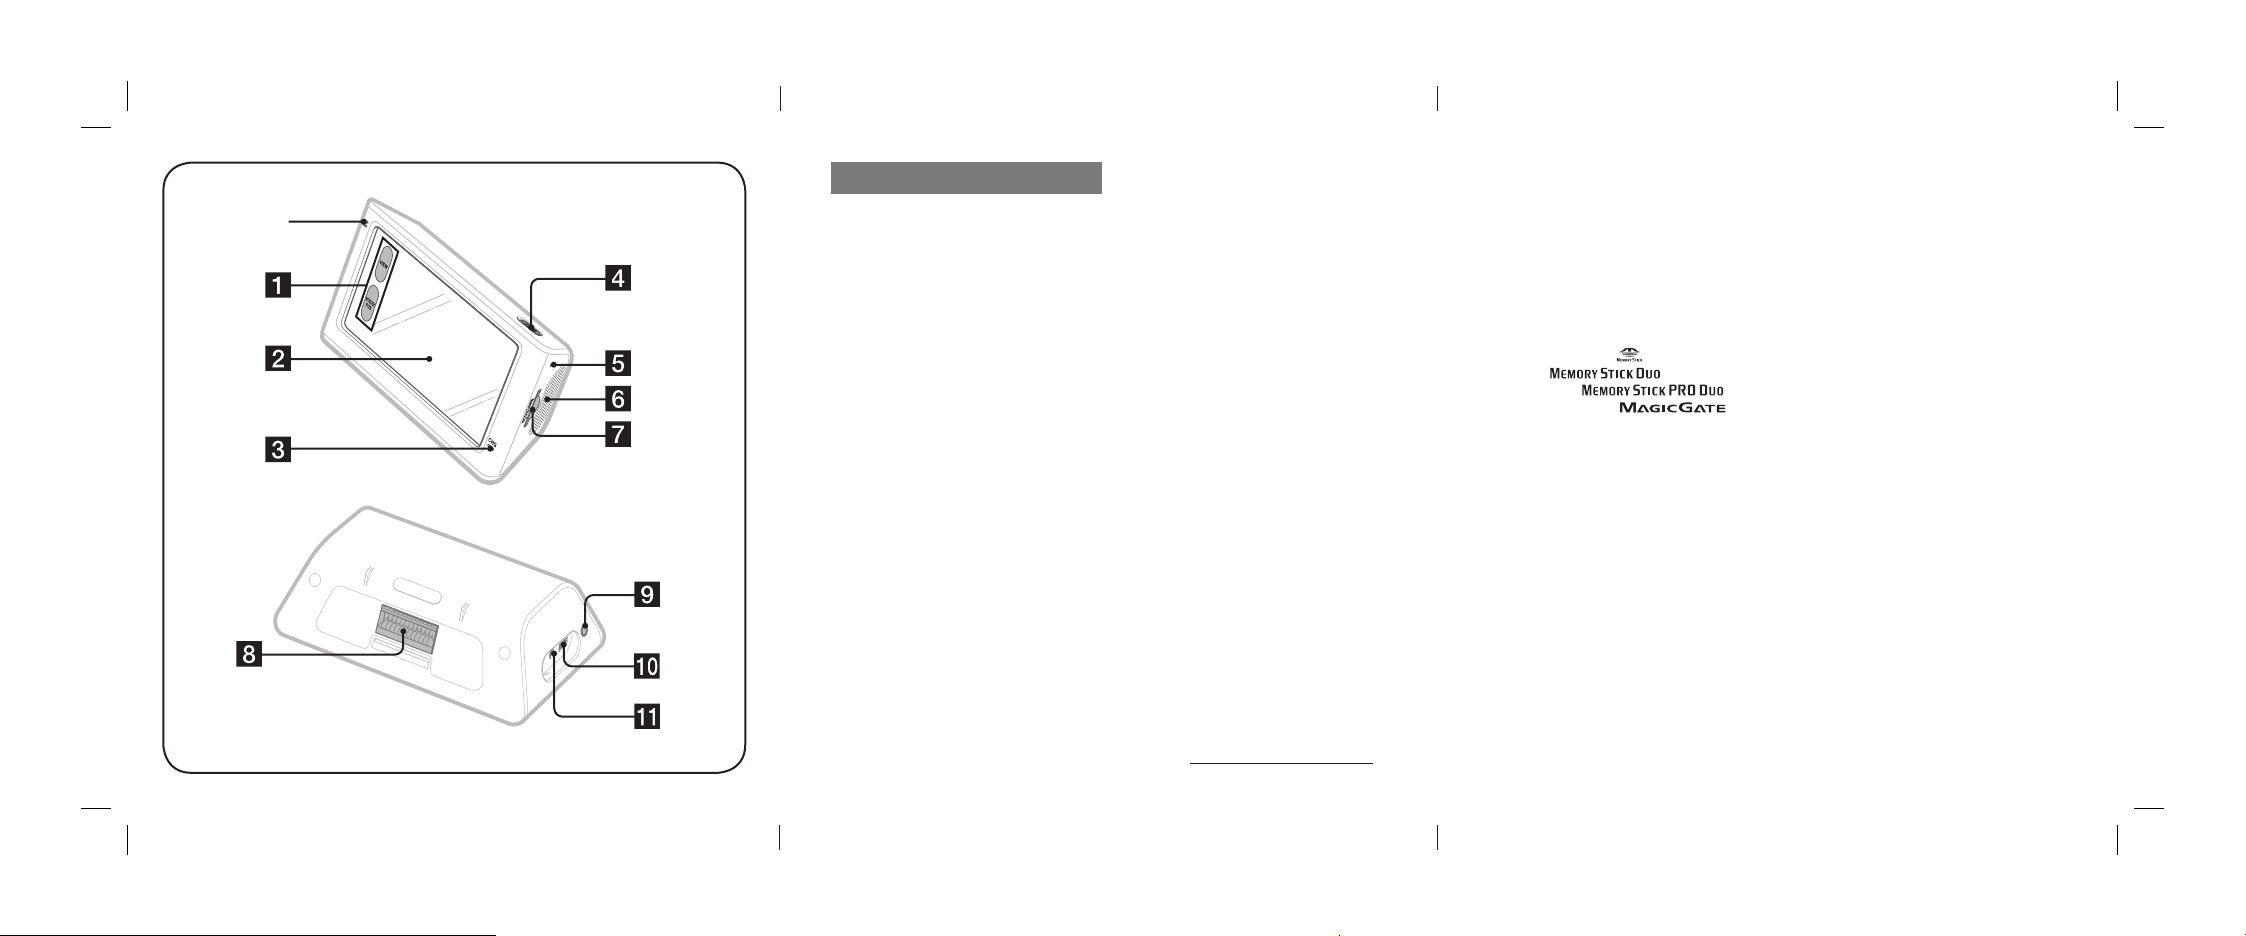
Location of controls
Read the explanations below while
referring to the illustrations on the flap.
Refer to the pages listed for details.
a Screen buttons 17
b Display window/touch screen
c CHG (battery charge)
indicator
Lights up in red while charging.
d ?/1 (on/standby) button 10
To turn the unit on/off.
e RESET button 30
f Speaker
Outputs guidance and warnings.
g Memory Stick Duo slot
For “Memory Stick Duo” insertion
for functional expansion.
h Cradle connector
i Auto dimmer sensor
This sensor automatically adjusts
the brightness of the display in
response to the brightness of the
surroundings.
j USB jack 22
To connect to a computer with the
USB cable.
k DC IN 5 - 5.2V jack
To connect to the AC power adapter
or the car battery adapter.
A Microphone (only for models with built-in
BLUETOOTH wireless technology)
To talk on the telephone using the
BLUETOOTH function. For details, see
the supplied “BLUETOOTH Hands-free
Manual.”
NV-U81T/U81
2-695-873-12 (1)
9
Page 10
C:\WINNT\Profiles\Administrator\Desktop\NAVU\2695873121NVU81U\01US02NAV-U.fm
00US+00COV-U.book Page 10 Friday, November 10, 2006 6:24 PM
masterpage:Right
Turning the unit on
The unit’s built-in battery is not
charged at the time of purchase.
When there is no battery power,
connect the AC power adapter or the
car battery adapter to charge the
battery or to operate the navigation
system (the system can be operated
while the battery is being charged).
Press ?/1 (4).
The display appears as follows.
During route guidance, the map display
appears.
In other cases, the top menu appears.
To turn the unit off
Press ?/1 (4).
The unit enters standby mode for
minimum power consumption.
Note
Be sure to take the unit out of the cradle and
disconnect the car battery adapter when the
unit is not in use to prevent car battery drain.
10
Performing initial setup
The following contents can be set up by
the Startup Configuration Wizard.
– Language
– Distance format
–Brightness
– Time format
– Address input method
– Home address
– Home phone number (BLUETOOTH
models only, such as the NV-U81)
Follow the on-screen instructions to
perform the setup.
These settings can then be further
configured in the setting menu at any
time (page 20).
Note
The current time setting (including time
zone of current region and daylight saving
time/standard time) is automatically set after
GPS signals are received correctly.
NV-U81T/U81
2-695-873-12 (1)
Page 11
C:\WINNT\Profiles\Administrator\Desktop\NAVU\2695873121NVU81U\01US02NAV-U.fm
00US+00COV-U.book Page 11 Friday, November 10, 2006 6:24 PM
masterpage:Right
Receiving GPS signals
After the initial installation, park your
car in a safe, open place (no high
buildings, etc.) for up to 20 minutes to
allow for GPS signals to be received
before using the navigation system. The
system requires signals from a
minimum of 3 GPS satellites to
calculate the current car position
properly.
GPS status indicator*
* The icon shows the GPS signal reception
condition. The indicator lights up in
red when the signal cannot be received.
Basic Operations
Common procedures to operate the
system are explained.
General operations can be performed on
the touch screen. Touch the displayed
icons with your finger gently.
Note
Do not press the display with excessive
force, or use any sharp article, such as a
pen, etc., to tap on the display.
Menu operations
The top menu appears when turning on
the unit by pressing ?/1 (except during
route guidance, in which case the map
appears).
To show the top menu from the map
display, touch the map.
continue to next page t
11
NV-U81T/U81
2-695-873-12 (1)
Page 12
C:\WINNT\Profiles\Administrator\Desktop\NAVU\2695873121NVU81U\01US02NAV-U.fm
00US+00COV-U.book Page 12 Friday, November 10, 2006 6:24 PM
masterpage:Right
To return to the top menu from any
menu display, touch “VOICE/POS,”
then touch the map.
You can set items in the menu by the
following procedures.
1 Show the top menu.
2 Touch “More....”
3 Touch “Settings.”
The list of setting categories
appears.
4 Touch a desired setting
category.
The list of setting items in the
selected category appears.
E.g.: when selecting the default map
view
Touch “General Settings” c
“Navigation View” c “2D” or “3D.”
During menu operation:
To return to the previous display, touch
or .
To cancel the menu selection, touch
“VOICE/POS” (the current car position
display appears).
Note
The items on the menu and setting
operations differ depending on the selected
menu item.
Gesture Command
operation
In map displays (except in map
scrolling mode), by assigning a screen
finger stroke such as line, etc.,
frequently-used operations can be
performed easily. This is called Gesture
Command operation.
12
NV-U81T/U81
2-695-873-12 (1)
Page 13
C:\WINNT\Profiles\Administrator\Desktop\NAVU\2695873121NVU81U\01US02NAV-U.fm
00US+00COV-U.book Page 13 Friday, November 10, 2006 6:24 PM
masterpage:Right
To D raw
start navigation to
your home
start navigation to
the nearest POI
stored on Quick
Links*
Make a call to
your home
(BLUETOOTH
models only, such
as the NV-U81)
* For details on Quick Links, see pages 16
and 20.
a circumflex.
Quick Link 1
horizontal line
(left to right).
Quick Link 2
vertical line
(downward).
Quick Link 3
horizontal line
(right to left).
draw a “V.”
Keyboard operations
The keyboard display appears when you
need to enter text.
You need only enter characters in upper
case, as the system automatically
converts them to appropriate characters.
You can enter special characters when
necessary.
Keyboard display
Candidates/entry field
continue to next page t
13
NV-U81T/U81
2-695-873-12 (1)
Page 14
C:\WINNT\Profiles\Administrator\Desktop\NAVU\2695873121NVU81U\01US02NAV-U.fm
00US+00COV-U.book Page 14 Friday, November 10, 2006 6:24 PM
masterpage:Right
To To uch
enter an
alphabetical
character
enter a special
character
enter a number “123” to switch to
enter a space “Spc”/“Space”
delete a character “Backspace”
show the
candidate list*
* The candidate list automatically appears
when candidates are narrowed down as
you continue inputting characters.
the desired
character key.
“ÂÄÁ” to switch to
the special char acter
keyboard, then the
desired character;
and “ABC” to
switch back.
the numeric
keyboard, then the
desired number key;
and “ABC” to
switch back.
“List”
14
Route Searching
The system searches for routes
automatically after setting the
destination.
Before starting, check that GPS signals
are sufficient for navigation (page 11).
Setting the destination
and starting guidance
The procedure for searching for the
route and starting route guidance is
explained.
The following is an example of how to
set the destination by its address in the
given conditions below (configured at
the Startup Configuration Wizard or in
the setting menu).
– Selected address input method:
“Step-by-Step Input”
For details on setting the destination in
other ways, see “Setting the destination
in other ways” on page 16.
For your safety, park your car in a safe
place, then enter the destination
information before starting a journey.
NV-U81T/U81
2-695-873-12 (1)
Page 15

C:\WINNT\Profiles\Administrator\Desktop\NAVU\2695873121NVU81U\01US02NAV-U.fm
00US+00COV-U.book Page 15 Friday, November 10, 2006 6:24 PM
masterpage:Right
1 Show the top menu.
In the map display, touch the map.
In the menu display, touch “VOICE/
POS,” then touch the map.
2 Select “Navigate.”
3 Select “Enter Address,” then
input the address details.
Input the items in the order below,
and touch “OK” or the candidate in
the list to proceed.
For details on how to input
characters, see “Keyboard
operations” on page 13.
1 “Country / State”
2 “City / Zip / Postal Code”
3 “Street / Destination”
4“No.” or “Cross Street”*
The address confirmation display
appears.
* Selectable only if existent in the
selected street.
4 Select “Calculate Route.”
The map display appears, the route
is calculated, and route guidance
starts.
To fine adjust the destination
point
You can jump from the address
confirmation display to the map
scrolling mode, and fine adjust the
destination point.
1 Touch to switch to the map
scrolling mode.
2 Drag the screen to adjust the
destination point.
3 Touch to display the map
scrolling mode menu.
4 Select “Navigate to Here” to start the
route guidance.
For details on operations in the map
scrolling mode, see “Map scrolling
mode” on page 19.
15
NV-U81T/U81
2-695-873-12 (1)
Page 16
C:\WINNT\Profiles\Administrator\Desktop\NAVU\2695873121NVU81U\01US02NAV-U.fm
00US+00COV-U.book Page 16 Friday, November 10, 2006 6:24 PM
masterpage:Right
Setting the destination in
other ways
You can also set the destination and
search for routes by the following
methods.
From the top menu, select the items in
the following order, then “Calculate
Route” (if necessary).
For details, see the supplied PDF
manual.
Points of Interest
Searches for routes to a POI, such as
restaurant, hotel, etc., near the current
car position.
Select “Points of Interest,” then any of
the following options.
“Quick Link 1 - 3”
Searches for routes to the nearest POI
of the category stored on Quick Links.
Categories on Quick Links can be
customized in the setting menu
(page 20).
“Enter Name”
Enter the name of the POI directly.
“Pick Category”
Select the desired POI category from
the list.
16
Tak e Me Hom e
Searches for routes to your home when
it is registered.
Navigate
The destination can be set by the
following methods.
“Address Book”
Searches for routes to a saved
destination point.
“Navigate” c “Address Book”
“Recent Destinations”
Searches for routes to recently
searched destinations.
“Navigate” c “Recent Destinations”
“POI Search Nationwide”
Searches for routes to a POI, such as
airport, etc., within the specified
country.
“Navigate” c “POI Search
Nationwide”
“POI Search City”
Searches for routes to POI, such as
restaurant, hotel, etc., within the
specified city.
“Navigate” c “POI Search City”
NV-U81T/U81
2-695-873-12 (1)
Page 17
C:\WINNT\Profiles\Administrator\Desktop\NAVU\2695873121NVU81U\01US02NAV-U.fm
00US+00COV-U.book Page 17 Friday, November 10, 2006 6:24 PM
masterpage:Right
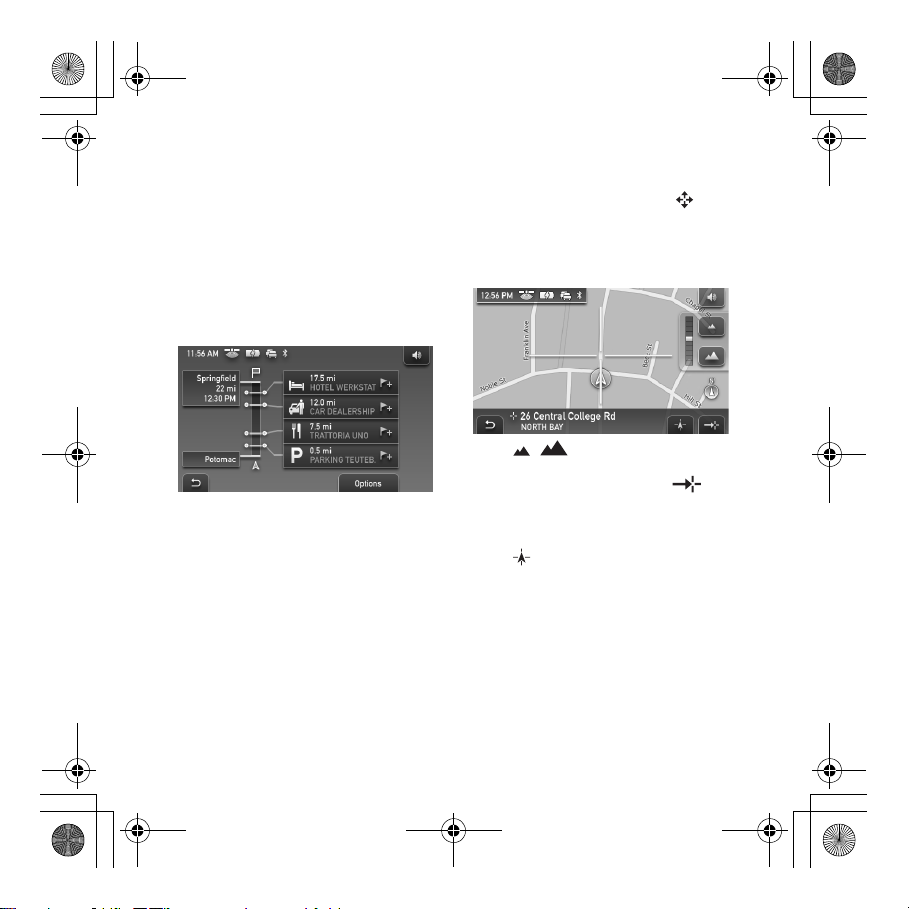
Guidance displays
Once a route has been calculated, visual
guidance navigates you to the
destination along with audio guidance.
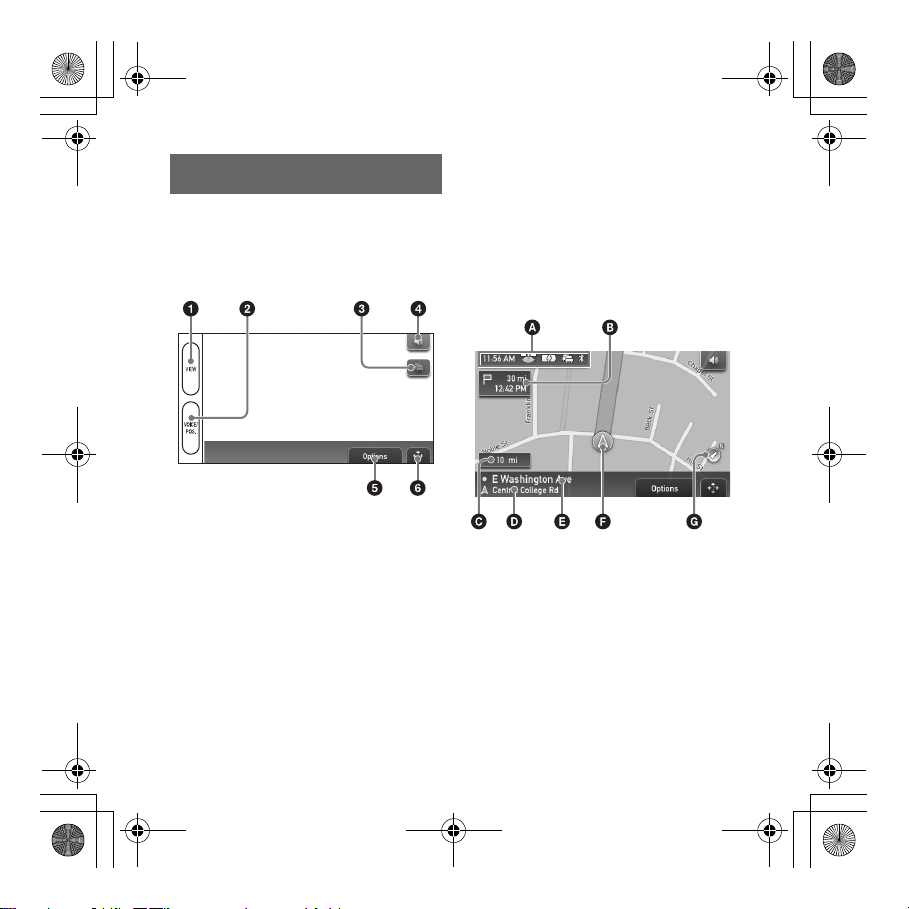
Information on map tool menu
1 To select a map display (Map, DR,
or Map+DR).
For details on DR, see “Dynamic
Route Information display (DR)” on
page 19.
2 During route guidance:
To hear the next voice guidance.
In map scrolling mode:
To switch to the current car position
display.
3 To view detailed TMC information.*
4 To adjust the voice guidance
volume.
5 To show option menu.
6 To switch to map scrolling mode.
* When the supplied (or optional) TMC
cradle is used, this appears only when the
route that has been found is congested.
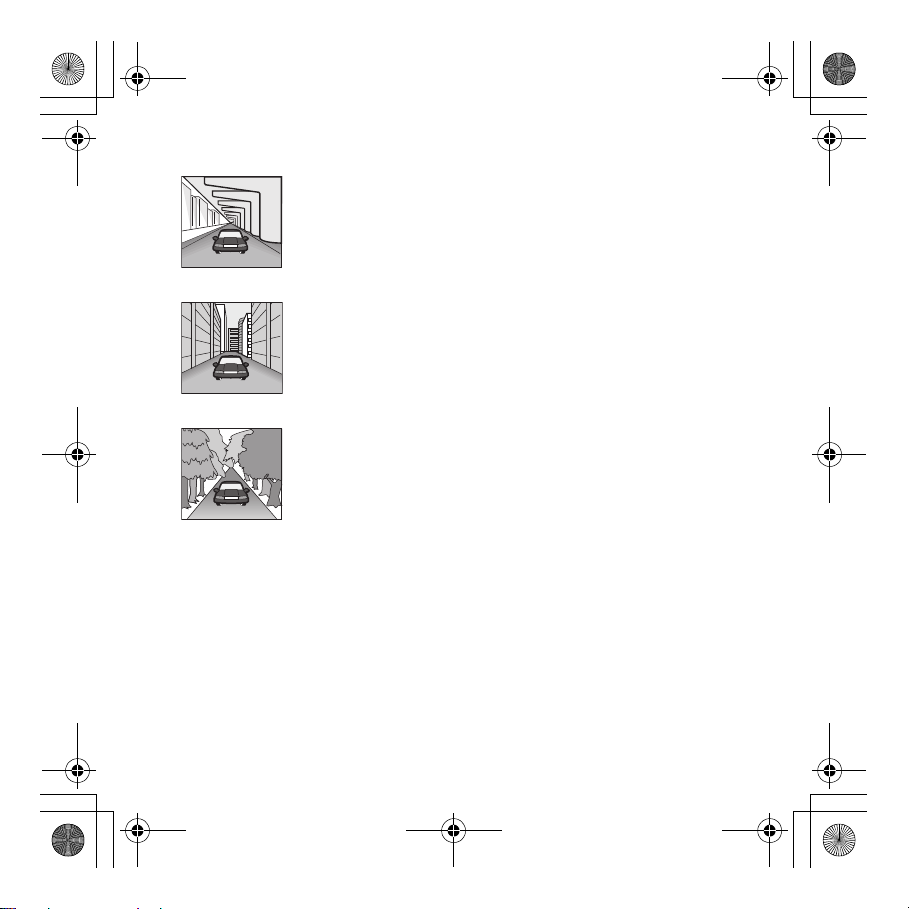
2D Map display
Straight-ahead driving (during route
guidance)
continue to next page t
17
NV-U81T/U81
2-695-873-12 (1)
Page 18
C:\WINNT\Profiles\Administrator\Desktop\NAVU\2695873121NVU81U\01US02NAV-U.fm
00US+00COV-U.book Page 18 Friday, November 10, 2006 6:24 PM
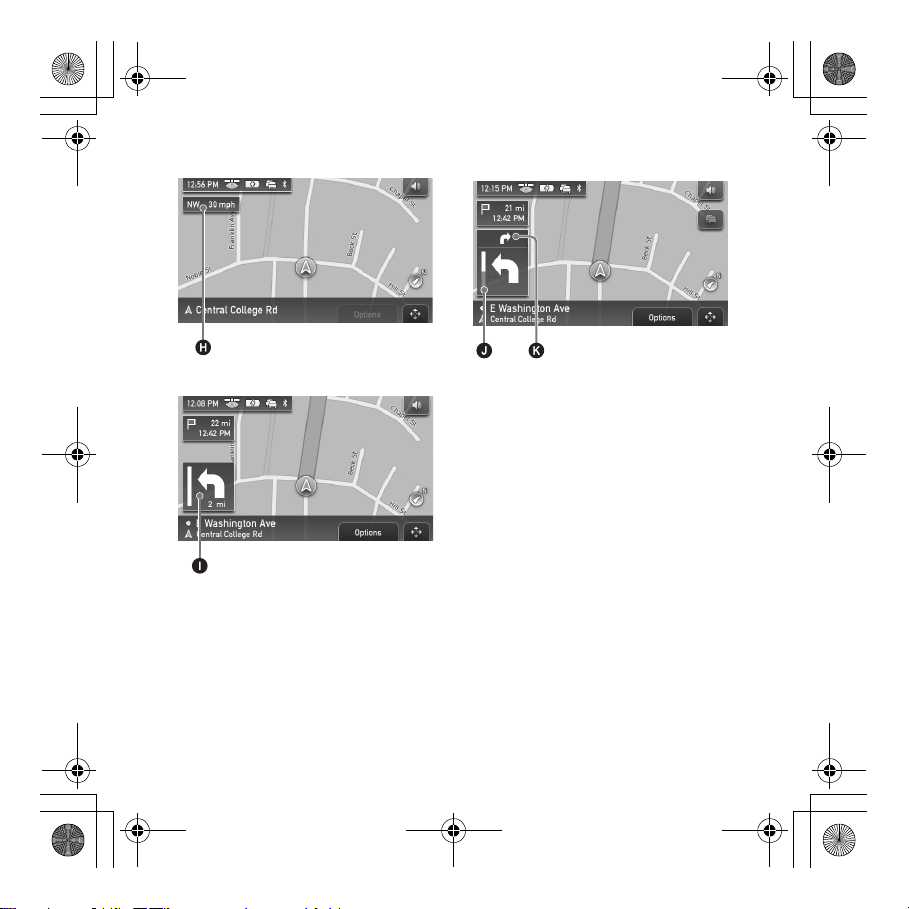
masterpage:Right
Straight-ahead driving (in other cases)
Approaching an intersection
18
Approaching an intersection (closer)
A Indicators
Current time/GPS status/Battery
condition/TMC status*/
BLUETOOTH status
For details, see the supplied PDF
manual.
B Distance to/ETA (Estimated Time of
Arrival) at destination
C Distance to next turn
D Current street name
E Next street name
F Current position
G To indicate where north is.
H Current direction/current speed
I Next turn instruction
J Bar indication of distance to next
turn
K Instruction after next
* This indicator appears when the supplied
(or optional) TMC cradle is used.
NV-U81T/U81
2-695-873-12 (1)
Page 19
C:\WINNT\Profiles\Administrator\Desktop\NAVU\2695873121NVU81U\01US02NAV-U.fm
00US+00COV-U.book Page 19 Friday, November 10, 2006 6:24 PM
masterpage:Right
3D Map display
You can set the 3D map display in the
setting menu (page 20).
Dynamic Route Information
display (DR)
This display shows the distance to the
destination, POI information, etc.
For details, see the supplied PDF
manual.
Route display
You can view the entire route to the
destination.
To display, select “Options” c “Show
Route.”
Map scrolling mode
You can switch to map scrolling mode
from map display by touching ,
whether during route guidance or not.
In map scrolling mode, the cross-hair is
displayed on the map, and you can drag
the screen to scroll the map.
Touch / to adjust map scale.
Place the intersection of the cross-hair
on a desired point, then touch to
show the map scrolling mode menu,
where you can set the point as a
destination, etc.
Touch to switch from map scrolling
mode to the current car position display.
19
NV-U81T/U81
2-695-873-12 (1)
Page 20
C:\WINNT\Profiles\Administrator\Desktop\NAVU\2695873121NVU81U\01US02NAV-U.fm
00US+00COV-U.book Page 20 Friday, November 10, 2006 6:24 PM
masterpage:Right
System Settings
Various settings related to the system
and memory are configurable.
From the top menu, select “More...” c
“Settings” c the desired category c the
desired item below to make each
setting.
Several representative setting items in
each category are introduced here as
examples.
For details, see the supplied PDF
manual.
General Settings
Navigation View (to select the default
map view (2D or 3D)), Show Distance/
ETA to Destination (to show/do not
show the distance to and ETA
(Estimated Time of Arrival) at the
destination), etc.
Map Settings
Current Map (to select a map stored in
the unit).
POI Settings
Show POIs (to show/do not show each
POI), Quick Link 1 - 3 (to store 3
frequently-used POI categories, which
can be used as shortcuts when setting
the destination).
20
Route Profile
Type of Route (to select the route search
preference), Freeways (to allow/avoid/
forbid freeways/highways), etc.
Note
Warnings given according to map
information may not always be correct due
to road works, etc. Traffic situations and
road regulations take absolute precedence
over information given by the navigation
system.
NV-U81T/U81
2-695-873-12 (1)
Page 21

C:\WINNT\Profiles\Administrator\Desktop\NAVU\2695873121NVU81U\01US02NAV-U.fm
00US+00COV-U.book Page 21 Friday, November 10, 2006 6:24 PM
masterpage:Right
Using the Supplied
Software
The major functions of the software on
the supplied CD-ROM are introduced
below.
If you insert the CD-ROM into your
computer, the screen appears
automatically. Follow the on screen
instructions.
System requirements
• OS: Windows 2000/XP
• CD-ROM/DVD-ROM drive
•USB port
• 150 MHz CPU speed minimum
Contents
Install PC Connection Software
PC connection software (ActiveSync)
can be installed.
Language Manager
Language data for on-screen display
and voice guidance can be added to the
unit, and unnecessary language data can
be deleted from the unit.
Read the Manual
You can read the PDF manual which
contains further information on
operations available.
Support Link
Easy access to the Sony navigation
support site is available.
Visit this site for technical support, such
as software updates, FAQs, etc.
Connecting to your
computer
Before connecting to your computer,
install the PC connection software
(ActiveSync) to your computer.
1 Connect the unit to an outlet
using the AC power adapter
and the AC power cable.
continue to next page t
21
NV-U81T/U81
2-695-873-12 (1)
Page 22
C:\WINNT\Profiles\Administrator\Desktop\NAVU\2695873121NVU81U\01US02NAV-U.fm
00US+00COV-U.book Page 22 Friday, November 10, 2006 6:24 PM
masterpage:Right
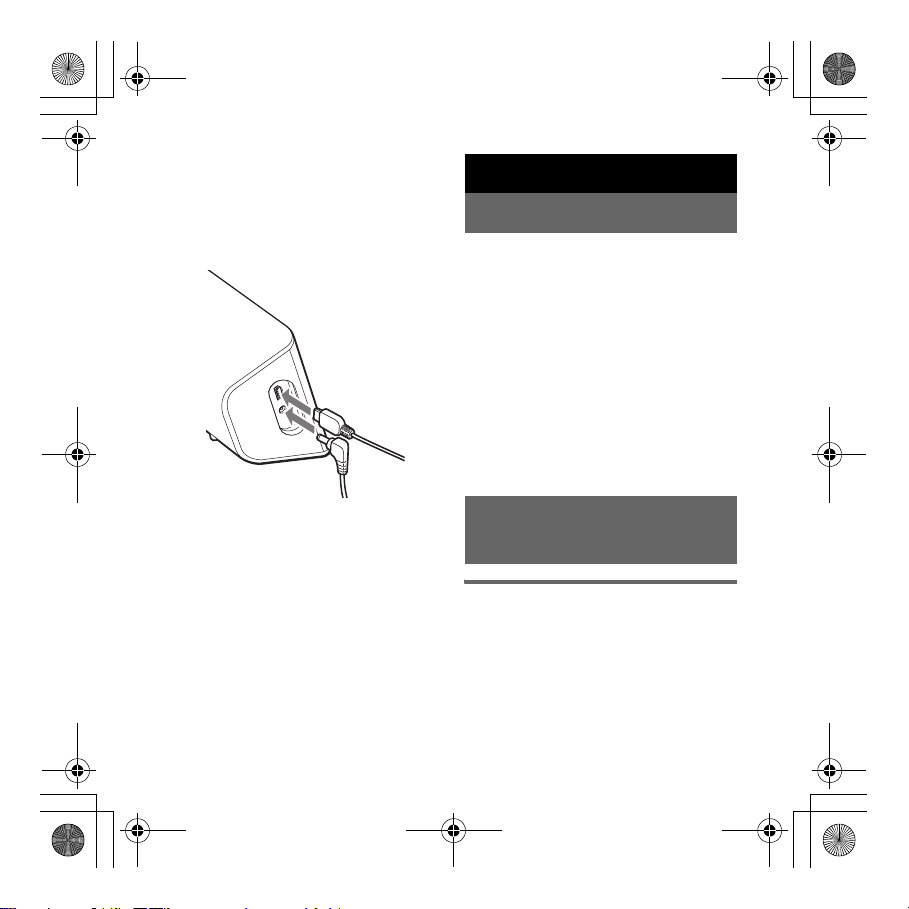
2 Connect the unit to your
computer with the USB cable.
Connect the small connector of the
USB cable to the USB jack on the
unit, then the large connector to a
USB port on your computer.
Notes when transferring data
• When connecting the unit to your
computer, connect it directly to the
computer. The unit may not work properly
if it is connected through a USB hub.
• During transfer, do not
– disconnect the USB cable or the AC
power adapter.
– enter unit standby mode or reset the
unit.
– shut down the computer, enter computer
standby mode, or restart the computer.
If you want to cancel transferring mid-way,
click the cancel button on the computer
screen.
22
Additional Information
Precautions
If your car has been parked in direct
sunlight, allow the unit to cool off before
operating it.
Moisture condensation
On a rainy day or in a very damp area,
moisture condensation may occur inside
the display of the unit. Should this occur,
the unit will not operate properly. In such
a case, slide the POWER switch on the
bottom left of the unit to OFF position,
then wait for about an hour until the
moisture has evaporated.
About the “Memory
Stick”
What is “Memory Stick”?
“Memory Stick” is a compact-size IC
recording medium with a large capacity. It
has been designed not only for
exchanging/sharing digital data among
“Memory Stick” compatible products, but
also for serving as an insertable/removable
external storage medium that can save
data.
NV-U81T/U81
2-695-873-12 (1)
Page 23
C:\WINNT\Profiles\Administrator\Desktop\NAVU\2695873121NVU81U\01US02NAV-U.fm
00US+00COV-U.book Page 23 Friday, November 10, 2006 6:24 PM
masterpage:Right
Types of “Memory Stick
Duo” that the system can
use
With the system, you can use the
following types of “Memory Stick Duo.”*
• Memory Stick Duo (Not compatible
with MagicGate)
• MagicGate Memory Stick Duo
• Memory Stick PRO Duo
* The system has been demonstrated as
operable with a “Memor y Stick Duo” with a
capacity of 4 GB or smaller. However, we
do not guarantee the operations of all the
“Memory Stick Duo” media.
Notes
• This system supports only the reading of
data on a “Memory Stick Duo.” “Memory
Stick Duo” formatting and writing cannot
be performed.
• This system does not support parallel
high-speed data transfer.
• When you format a “Memory Stick Duo,”
all the data will be erased. To avoid
erasing important data by accident, make
sure to check the content before
formatting.
• To format a “Memory Stick Duo,” use a
formatting application that is compatible
with the “Memory Stick Duo.” When
formatting the “Memory Stick Duo,” do not
use the format function on the Windows
Explorer.
• Standard-size “Memory Stick” cannot be
used in this system.
• When using a “Memory Stick Duo,” make
sure to check correct insertion direction.
Wrong usage may cause trouble with the
system.
• Do not place the “Memory Stick Duo”
within the reach of a small child to prevent
him from swallowing it by accident.
• Avoid removing the “Memory Stick Duo”
from the system while the system is
reading data.
• Data may be damaged in such occasions:
– “Memory Stick Duo” is removed or the
system is turned off during a read
operation.
– “Memory Stick Duo” is used in a location
subject to static electricity or electrical
noises.
• We recommend that you save backup of
the important data.
• Do not bend, drop or apply strong shock to
the “Memory Stick Duo.”
• Do not disassemble or modify the
“Memory Stick Duo.”
• Do not allow the “Memory Stick Duo” to
get wet.
• Do not use or store the “Memory Stick
Duo” in a location that is subject to:
– Extremely high temperature, such as in
a car parked in the sun
– Direct sunlight
– High humidity or places with corrosive
substances
continue to next page t
23
NV-U81T/U81
2-695-873-12 (1)
Page 24
C:\WINNT\Profiles\Administrator\Desktop\NAVU\2695873121NVU81U\01US02NAV-U.fm
00US+00COV-U.book Page 24 Friday, November 10, 2006 6:24 PM
masterpage:Right
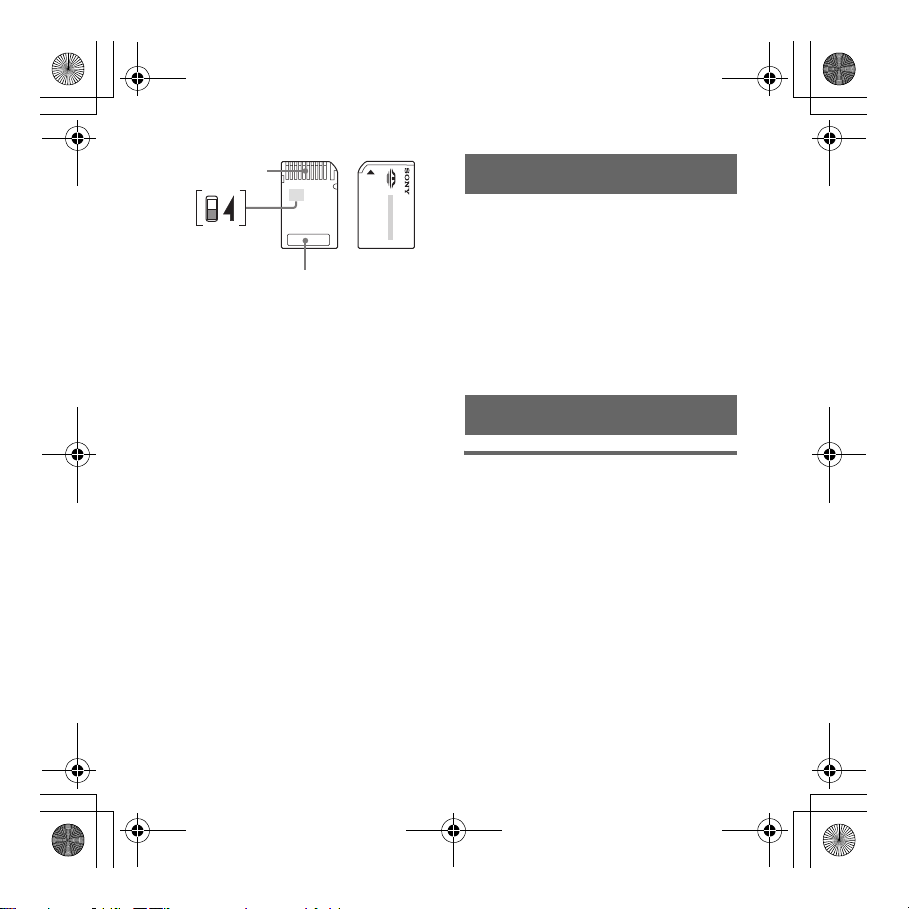
Connector
Write-protect
switch
Memo area
• Do not touch the “Memory Stick Duo”
connector with your finger or metallic
objects.
• You cannot record, edit or delete data if
you slide the write-protect switch to LOCK.
• When you slide the write-protect switch of
the “Memory Stick Duo,” use a thinpointed device.
• When you use a “Memory Stick Duo”
without the write-protect switch, be careful
not to edit or delete the data by accident.
• When you write on the memo area of the
attached label, do not write forcefully.
• When you carry or store the “Memory
Stick Duo,” put it in the case supplied with
it.
24
Note on LCD panel
Some stationary blue, red or green dots
may appear on the monitor. These are
called “bright spots,” and can happen with
any LCD. The LCD panel is precisionmanufactured with more than 99.99 % of
its segments functional. However, it is
possible that a small percentage (typically
0.01 %) of the segments may not light up
properly. This will not, however, interfere
with your viewing.
Maintenance
Cleaning the suction cup
If the surface of the suction cup gets dirty
and the attachment strength weakens,
wash and clean the surface of the suction
cup.
Before washing, be sure to detach the
suction cup part from the cradle following
the steps below.
NV-U81T/U81
2-695-873-12 (1)
Page 25

C:\WINNT\Profiles\Administrator\Desktop\NAVU\2695873121NVU81U\01US02NAV-U.fm
00US+00COV-U.book Page 25 Friday, November 10, 2006 6:24 PM
masterpage:Right
1 Detach the suction cup from the
cradle.
2 Wash the surface of the suction cup
with water.
3 Allow the suction cup to air dry
completely.
Warning
• Never wash the suction cup without
detaching it from the cradle. Otherwise,
it may damage the cradle.
• Do not use cleanser. Wash only with
water.
• Be sure to dry the suction cup section
before reattaching.
Notes
• If the suction cup leaves a trace on the
windshield, wipe with water.
• The dashboard may leave an impression
on the surface of the suction cup,
however, it does not affect the attachment
strength.
Tip
Retain the removed protection sheet and
attach it to the suction cup when you detach
the cradle from the dashboard to keep the
suction cup clean.
Fuse replacement
When replacing the fuse in the car battery
adapter, be sure to use one matching the
amperage rating stated on the original
fuse. If the fuse blows, check the power
connection and replace the fuse. If the fuse
blows again after replacement, there may
be an internal malfunction. In such a case,
consult your nearest Sony dealer.
Fuse (2.5A)
Warning
Never use a fuse with an amperage rating
exceeding the one supplied with the unit
as this could damage the unit.
To tigh ten
To remo ve
25
NV-U81T/U81
2-695-873-12 (1)
Page 26
C:\WINNT\Profiles\Administrator\Desktop\NAVU\2695873121NVU81U\01US02NAV-U.fm
00US+00COV-U.book Page 26 Friday, November 10, 2006 6:24 PM
masterpage:Right
Notes on unit disposal
Remove the built-in lithium-ion battery
when disposing of the unit, and return the
battery to a recycling location.
The procedure for removing the battery is
explained below.
Note
Never disassemble the unit except when
disposing of it.
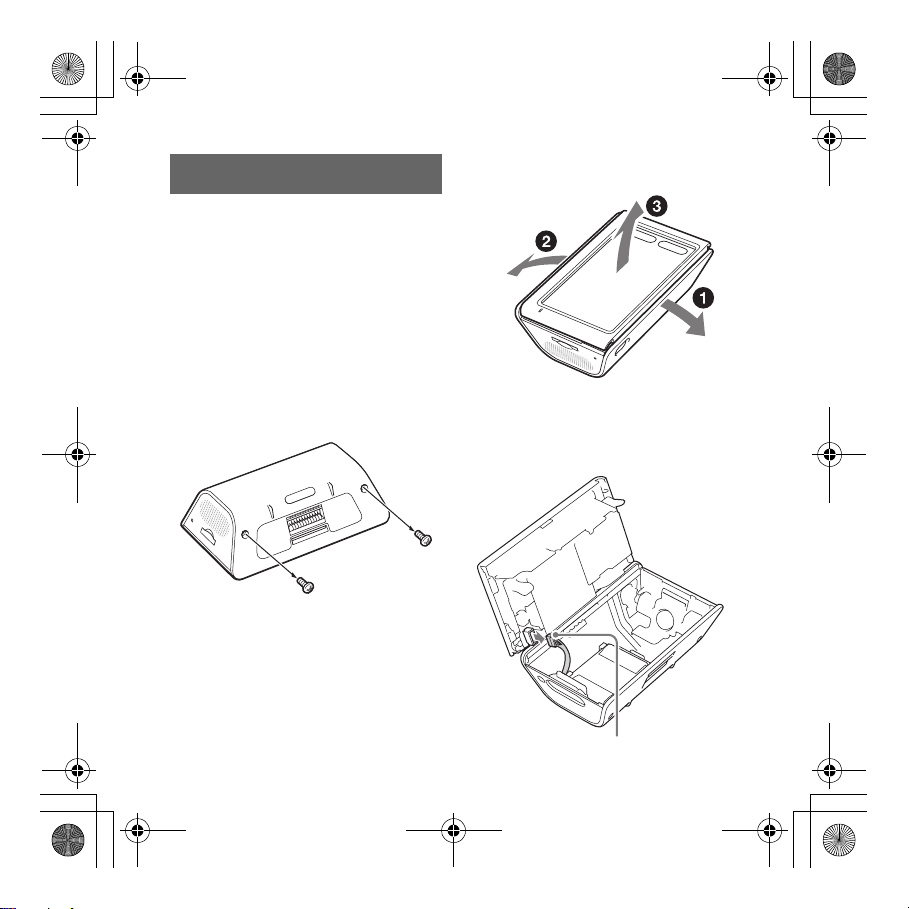
1 Press ?/1 to turn the unit off.
2 Remove the 2 screws on the
underside of the unit using a
screwdriver.
3 Remove the rear cover.
1Remove the top of the unit as
shown below.
2Remove the bottom of the unit in
the same way.
4 Disconnect the battery
connector.
26
Battery connector
NV-U81T/U81
2-695-873-12 (1)
Page 27
C:\WINNT\Profiles\Administrator\Desktop\NAVU\2695873121NVU81U\01US02NAV-U.fm
00US+00COV-U.book Page 27 Friday, November 10, 2006 6:24 PM
masterpage:Right
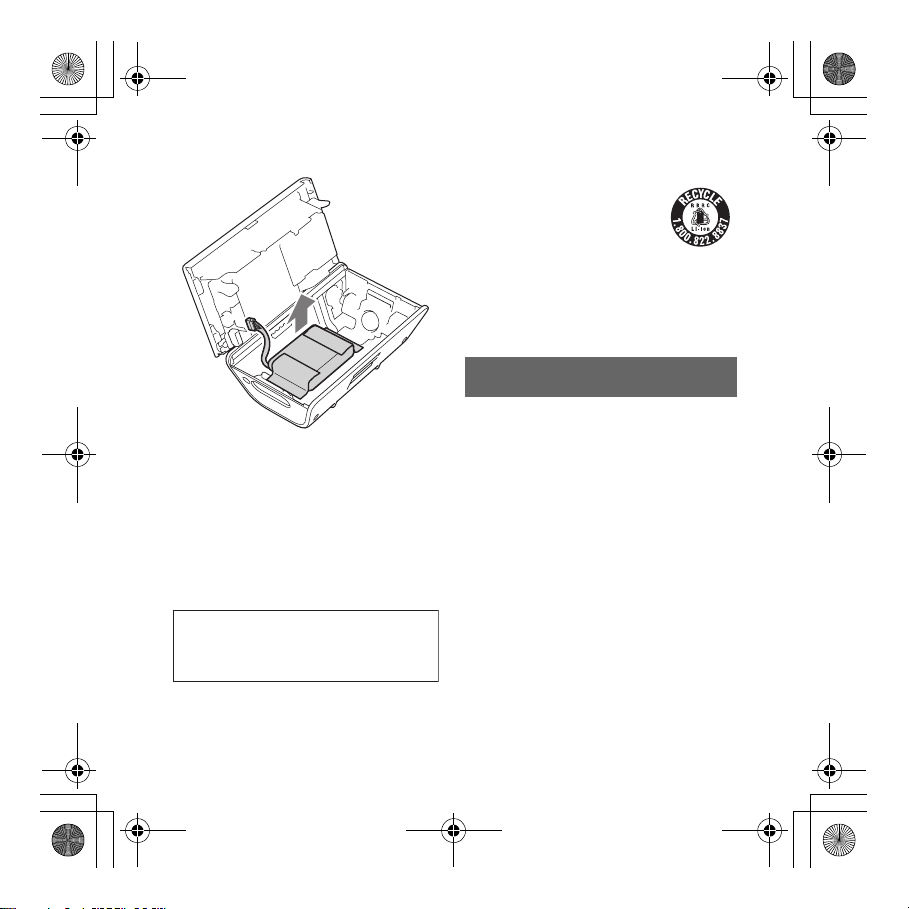
5 Remove the battery.
6 Insulate the connector
terminal by wrapping with a
tape.
Notes on the lithium-ion battery
• Keep the battery out of the reach of
children.
• Do not hold the battery with metallic
tweezers, otherwise a short-circuit may
occur.
WARNING
Battery may explode if mistreated.
Do not recharge, disassemble, or dispose of
in fire.
RECYCLING LITHIUM-ION BATTERIES
Lithium-ion batteries are recyclable.
You can help preserve our
environment by returning your used
rechargeable batteries to the collection
and recycling location nearest you.
For more information regarding recycling of
rechargeable batteries, call toll free 1-800-8228837, or visit http://www.rbrc.org/.
Caution: Do not handle damaged or leaking
Lithium-ion batteries.
Specifications
Main unit
Operating temperature: 5 – 45 ºC
(41 – 113 ºF)
Power requirements: DC 5 - 5.2 V
(from supplied AC power adapter or car
battery adapter)
Connection terminals:
Cradle connector
DC IN 5 - 5.2V jack
USB jack
Memory card slot:
Memory Stick Duo slot
Speaker:
20
× 40 mm (0.8 × 1.6 in) oval speaker
Consumption current: Max. 1.5 A
continue to next page t
27
NV-U81T/U81
2-695-873-12 (1)
Page 28

C:\WINNT\Profiles\Administrator\Desktop\NAVU\2695873121NVU81U\01US02NAV-U.fm
00US+00COV-U.book Page 28 Friday, November 10, 2006 6:24 PM
masterpage:Right
Dimensions:
Approx. 134.4
(5.3
× 3.1 × 1.8 in) (w × h × d,
protruding parts excluded)
Mass: Approx. 380 g (13.4 oz)
× 79.1 × 44.0 mm
Monitor
System: Transmissive liquid crystal display
Drive system: a-Si TFT active matrix system
Dimensions: 4.3 in (16:9)
95.0
× 53.9, 109.2 mm (3.8 × 2.1, 4.4 in)
(h
× v, d)
Segment: 391,680 dots (480
× 272 pixel)
Cradle
Operating temperature: 5 – 45 ºC
(41 – 113 ºF)
Connection terminals:
Unit connector
TMC antenna jack (TMC models only,
such as the NV-U81T)
Reception frequency: 87.5 – 108.0 MHz
(TMC models only, such as the NVU81T)
Built-in battery charging time/
usage time
Charging time
With the supplied car battery adapter/AC
power adapter: Approx. 4.5 hours
(with unit turned on), or 2.5 hours (in
standby mode)
Usage time
Up to 3.5 hours (depending on usage)
Optional accessories
TMC Car Cradle Kit: NVA-CP3T
Car Install Kit: XA-49FM
Design and specifications are subject to
change without notice.
28
NV-U81T/U81
2-695-873-12 (1)
Page 29
C:\WINNT\Profiles\Administrator\Desktop\NAVU\2695873121NVU81U\01US02NAV-U.fm
00US+00COV-U.book Page 29 Friday, November 10, 2006 6:24 PM
masterpage:Right
Troubleshooting
The following checklist will help you
remedy problems you may encounter with
your unit.
Before going through the checklist below,
check the connection and operating
procedures.
The operation icons on the display do
not function.
An operation may take time while a map is
displayed.
The unit does not turn on.
t Charge the built-in battery.
– Install the unit properly according to
the supplied installation manual.
– Connect the unit to an outlet using the
AC power adapter and the AC power
cable.
– Connect the unit to the cigarette
lighter socket using the car battery
adapter.
The built-in battery cannot be
charged.
t If the AC power adapter is being used,
disconnect it from the outlet, then
reconnect.
t Reconnect the car battery adapter to the
cigarette lighter socket.
t The built-in lithium-ion battery can be
charged at temperatures between 5 – 45
ºC (41 – 113 ºF). The battery may not be
charged if the temperature inside the unit
increases because of direct sunlight
exposure, etc. This is not a malfunction.
GPS signal cannot be received.
• Read the GPS overview (page 7).
• The system cannot receive GPS signals
due to an obstruction.
t Move your car to a place where signals
can be received clearly.
• GPS signal reception is low.
t Check the GPS status by selecting
“More...” in the top menu c “GPS
Status.”
• There is an obstacle in front of the GPS
antenna.
t Install the unit where the signal is not
interrupted by the body of the car, etc.
• GPS signal reception may be prevented by
a heated or heat reflective windshield.
t Depending on the windshield type,
GPS signal reception may not be
possible.
29
NV-U81T/U81
2-695-873-12 (1)
Page 30
C:\WINNT\Profiles\Administrator\Desktop\NAVU\2695873121NVU81U\01US02NAV-U.fm
00US+00COV-U.book Page 30 Friday, November 10, 2006 6:24 PM
masterpage:Right
The car position on the map does not
match the current road.
The error margin of the signal from the GPS
satellites is too large. A maximum error
margin of a few hundred meters can exist.
Voice guidance cannot be heard.
The volume is set too low.
t Raise the volume by touching in the
top menu or the map display.
When the unit is powered by the built-in
battery, volume may slightly decrease.
The LCD is not displayed normally.
• In high temperatures, the LCD may darken
and not display clearly. In low
temperatures, afterimage may occur on the
LCD. These are not malfunctions, and the
LCD will return to normal when the
temperature returns to within the specified
operating range.
• The LCD is dark.
t The auto dimmer function may be
activated because its sensor (page 9) is
covered by a hand, etc.
The cradle comes off from the
attachment surface.
Attachment strength weakens if the surface
of the suction cup or attachment surface
become dirty.
t Wash and clean the suction cup and the
attachment surface (page 24).
The demonstration mode starts
automatically even if no operation is
performed.
t Turn off the auto demonstration mode by
selecting “More...” in the top menu c
“Settings” c “General Settings” c
“Demo Mode.” Then, confirm that
“Demo Mode” is set to off.
Resetting the unit
If the navigation software freezes, try
resetting the unit.
Press the RESET button with a pointed
object, such as a ballpoint pens
(page 9).
Note
After you reset the unit, it may take time to
receive GPS signals.
30
NV-U81T/U81
2-695-873-12 (1)
Page 31

C:\WINNT\Profiles\Administrator\Desktop\NAVU\2695873121NVU81U\01US02NAV-U.fm
00US+00COV-U.book Page 31 Friday, November 10, 2006 6:24 PM
masterpage:Right
NV-U81T/U81
2-695-873-12 (1)
Page 32

G:\##sagyou\11
r
p
p
No\1109\2695873121\2695873121NVU81U\02FR01INT-U.fm
02FR+00COV-U.book Page 2 Thursday, November 9, 2006 3:11 PM
masterpage:Right
Traitement des appareils électriques
et électroniques en fin de vie
(Applicable dans les pays de l’Union
Européenne et aux autres pays
européens disposant de systèmes
de collecte sélective)
Ce symbole, apposé sur le produit ou sur son emballage,
indique que ce produit ne doit pas être traité avec les
déchets ménagers. Il doit être remis à un point de collecte
approprié pour le recyclage des équipements électriques et
électroniques. En s’assurant que ce produit est bien mis au
ebut de manière appropriée, vous aiderez à prévenir les
conséquences négatives potentielles pour l’environnement
et la santé humaine. Le recyclage des matériaux aidera à
réserver les ressources naturelles. Pour toute information
supplémentaire au sujet du recyclage de ce produit, vous
ouvez contacter votre municipalité, votre déchetterie ou
le magasin où vous avez acheté le produit.
Accessoires compatibles : Adaptateur pour batterie de
voiture/Adaptateur secteur
Attention
EN AUCUN CAS SONY NE POURRA
ÊTRE TENUE RESPONSABLE DE TOUT
DOMMAGE, DIRECT, OU INDIRECT DE
QUELQUE NATURE QUE CE SOIT, OU
DE TOUT PRÉJUDICE (SANS QUE LA
LISTE CI-APRÈS PUISSE ÊTRE
CONSIDÉRÉE COMME LIMITATIVE),
TEL QUE PERTE DE BÉNÉFICE, PERTE
DE REVENUS, PERTE DE DONNÉES,
PERTE D’USAGE DE L’ÉQUIPEMENT
OU DE N’IMPORTE QUEL ÉQUIPEMENT
ASSOCIÉ, INDISPONIBILITÉ, PERTE DE
TEMPS PAR L’ACHETEUR IMPUTABLE
À L’UTILISATION OU PROVENANT DE
L’UTILISATION DE CE PRODUIT, DE
SON MATÉRIEL ET/OU DE SON
LOGICIEL.
2
Son fonctionnement est soumis aux deux
conditions suivantes :
– cet appareil ne doit être la cause d’aucune
interférence ;
– cet appareil doit accepter les interférences,
y compris celles susceptibles d’en perturber
le fonctionnement.
NV-U81T/U81
2-695-873-12 (1)
Page 33

G:\##sagyou\11
No\1109\2695873121\2695873121NVU81U\02FR+00COV-
02FR+00COV-U.book Page 3 Thursday, November 9, 2006 3:11 PM
UTOC.fm
Table des matières
masterpage:Right
Avertissement . . . . . . . . . . . . . . . . . . .5
Emplacement des commandes. . . . . . .8
Mise sous tension de l’appareil . . . . . .9
Réglage initial . . . . . . . . . . . . . . . . . .10
Réception des signaux GPS. . . . . . . .10
Opérations de base 11
Opérations de menu. . . . . . . . . . . . . .11
Opération Gesture Command
(manuelle) . . . . . . . . . . . . . . . . . . . 12
Opérations du clavier. . . . . . . . . . . . . 13
Recherche d’un
itinéraire 14
Définition de la destination et
démarrage du radioguidage. . . . . .14
Définition de la destination par
d’autres moyens . . . . . . . . . . . . . .15
Écrans de radioguidage . . . . . . . . . . . 17
Réglages du système 20
Utilisation du logiciel
fourni 21
Table des matières. . . . . . . . . . . . 21
Raccordement à votre
ordinateur. . . . . . . . . . . . . . . . . . . 22
Informations
complémentaires 23
Précautions . . . . . . . . . . . . . . . . . . . . 23
À propos du « Memory Stick » . . . . 23
Qu’est-ce qu’un
« Memory Stick » ? . . . . . . . . . . . 23
Types de « Memory Stick Duo »
pouvant être utilisés par le
système . . . . . . . . . . . . . . . . . . . . 23
Remarque sur le panneau ACL . . . . 25
Entretien . . . . . . . . . . . . . . . . . . . . . . 25
Nettoyage de la ventouse. . . . . . . 25
Remplacement du fusible . . . . . . 26
Remarques sur la mise au rebut de
l’appareil . . . . . . . . . . . . . . . . . . . 27
Caractéristiques techniques . . . . . . . 29
Dépannage . . . . . . . . . . . . . . . . . . . . 31
Réinitialisation de l’appareil . . . . 33
3
NV-U81T/U81
2-695-873-12 (1)
Page 34

G:\##sagyou\11
No\1109\2695873121\2695873121NVU81U\02FR02NAV-U.fm
02FR+00COV-U.book Page 4 Thursday, November 9, 2006 3:11 PM
À propos de ce mode d’emploi
• Ce Guide de démarrage rapide
contient des instructions relatives
aux opérations de base de ce
produit. Pour plus de détails,
reportez-vous au mode d’emploi au
format PDF disponible sur le
disque de l’application fourni. Pour
les détails concernant l’installation
et les raccordements, reportez-vous
au document « Read This First »
fourni (guide d’installation).
• Le contenu de ce manuel est rédigé
pour des utilisateurs déjà habitués à
utiliser le système d’exploitation
Microsoft® Windows®. Pour
obtenir des informations
concernant le fonctionnement de
l’ordinateur, reportez-vous au
mode d’emploi de l’ordinateur.
• Les illustrations de ce mode
d’emploi peuvent être différentes
de celles de votre appareil.
• Avant d’utiliser le système, lisez
attentivement ce mode d’emploi et
le document « Read This First ».
• Conservez précieusement ce mode
d’emploi et le document « Read
This First » fourni pour toute
référence ultérieure.
masterpage:Right
4
NV-U81T/U81
2-695-873-12 (1)
Page 35

G:\##sagyou\11
No\1109\2695873121\2695873121NVU81U\02FR02NAV-U.fm
02FR+00COV-U.book Page 5 Thursday, November 9, 2006 3:11 PM
masterpage:Right
Avertissement
LISEZ CE MODE D’EMPLOI ET LE
DOCUMENT « READ THIS FIRST »
FOURNI (GUIDE D’INSTALLATION)
COMPLÈTEMENT AVANT
D’INSTALLER OU D’UTILISER
VOTRE SYSTÈME DE NAVIGATION
PERSONNEL. UNE INSTALLATION
INCORRECTE DE CET APPAREIL
PEUT ENTRAÎNER UN ACCIDENT,
UNE BLESSURE OU LA MORT.
À propos de la sécurité
• Veillez à :
– installer le système de navigation dans
un endroit sûr où il ne gêne pas la
vision du conducteur ;
– ne pas installer l’appareil au-dessus
d’un coussin de sécurité gonflable ;
– placer les câbles et la station d’accueil
à un endroit où ils ne gênent pas la
conduite ;
– fixer l’appareil correctement sur la
station d’accueil afin qu’il ne tombe
pas ;
– nettoyer la surface de la ventouse et du
pare-brise avant de l’installer. Vérifiez
également que la ventouse est bien
fixée après l’installation. Sinon
l’appareil ou la station d’accueil risque
de tomber ;
– nettoyer la surface du tableau de bord
avant d’utiliser la feuille fournie.
Si vous n’observez pas ces précautions,
la conduite risque d’être dangereuse.
• N’appliquez pas de force excessive sur
l’appareil ou la station d’accueil car ceci
peut les faire tomber.
• Respectez les réglementations sur le
trafic routier en vigueur dans votre pays.
• Ne regardez pas le moniteur en
permanence lorsque vous conduisez.
Cela est dangereux et peut entraîner un
accident.
• Si vous devez utiliser le système de
navigation en conduisant, arrêtez la
voiture dans un endroit sûr avant de
l’utiliser.
• Ne modifiez pas l’appareil.
• Ne démontez pas l’appareil sauf pour le
mettre au rebut.
• N’utilisez pas le système de navigation
si le système est couvert ou bloqué.
Lorsque vous utilisez l’appareil à
l’intérieur
Utilisez cet appareil à proximité d’une prise
murale. Vous pourrez ainsi immédiatement
débrancher la prise de courant de la prise
murale pour mettre l’appareil hors tension
en cas de fonctionnement anormal lors de
son utilisation. N’utilisez pas l’adaptateur
CA dans un espace confiné, entre un mur et
des meubles par exemple.
Suite à la page suivante t
5
NV-U81T/U81
2-695-873-12 (1)
Page 36

G:\##sagyou\11
No\1109\2695873121\2695873121NVU81U\02FR02NAV-U.fm
02FR+00COV-U.book Page 6 Thursday, November 9, 2006 3:11 PM
masterpage:Right
À propos de la manipulation
• Ne laissez pas des corps étrangers
pénétrer dans le connecteur de la station
d’accueil (8) de l’appareil car cela
risquerait de provoquer des problèmes
de fonctionnement.
• Mettez l’appareil hors tension en
appuyant sur ?/1 (4), retirez-le de la
station d’accueil, puis déconnectez
l’adaptateur pour batterie de voiture,
sans quoi celle-ci risque de se décharger.
Notez les éléments suivants.
Si la prise de l’allume-cigare de votre
voiture n’est pas raccordée à la position
ACC du contact, la batterie intégrée
continue à être alimentée, même si vous
avez coupé le contact.
• Ne raccordez aucun accessoire
(adaptateur pour batterie de voiture,
adaptateur CA, etc.) autres que ceux
fournis ou en option.
• N’exposez pas l’appareil au feu ni à
l’eau car ceci risquerait de provoquer un
problème de fonctionnement.
• Veillez à retirer l’appareil de la voiture
lorsque vous quittez celle-ci, pour éviter
les risques de vol ou de détérioration
causée par une température élevée à
l’intérieur de la voiture.
• Notez que la batterie intégrée ne peut
pas être chargée à des températures en
dehors d’une plage comprise entre 5 et
45 ºC (41 et 113 ºF).
• Ne laissez pas l’appareil exposé à des
températures ambiantes élevées car la
capacité de la batterie intégrée risque de
se détériorer ou vous risquez de ne plus
pouvoir la recharger.
À propos du GPS
Les satellites GPS (Global Positioning
System) émettent continuellement des
signaux de localisation en tout point de la
terre. Grâce à une antenne GPS qui reçoit
ces signaux, les utilisateurs peuvent être
informés de leur position (latitude,
longitude et altitude). Pour générer une
position en deux dimensions (latitude et
longitude), les informations doivent
provenir de 3 satellites et pour le
positionnement sur trois dimensions
(latitude, longitude et altitude), 4 satellites
sont nécessaires. Étant donné que les
satellites GPS sont contrôlés par le
Ministère de la Défense des États-Unis, il
existe une marge d’erreur délibérée de
l’ordre de quelques mètres (quelques
pieds) à 10 mètres (32,8 pieds). Par
conséquent, le système de navigation GPS
peut contenir une erreur comprise entre
10 mètres (32,8 pieds) et 200 mètres
(656,2 pieds) environ, selon les
circonstances.
6
NV-U81T/U81
2-695-873-12 (1)
Page 37

G:\##sagyou\11
No\1109\2695873121\2695873121NVU81U\02FR02NAV-U.fm
02FR+00COV-U.book Page 7 Thursday, November 9, 2006 3:11 PM
masterpage:Right
Les informations GPS étant obtenues à
l’aide des signaux émis par des satellites,
il peut être difficile, voire impossible
d’obtenir des informations dans les
endroits suivants :
• Tunnel ou souterrain
• Étage inférieur d’une autoroute à deux
voies superposées
• Entre des bâtiments très élevés
• Entre des grands arbres au feuillage dense
Avant d’utiliser le système de navigation
pour la première fois après l’avoir installé,
garez votre voiture dans un endroit dégagé
et sûr (sans bâtiments élevés, etc.) pendant
environ 20 minutes pour que les signaux
GPS soient captés.
Remarque
La réception d’un signal GPS demande
quelques instants après avoir déchargé
complètement la batterie intégrée ou après
avoir réinitialisé l’appareil.
À propos de ce GPS
Le système est doté d’une fonction qui
permet d’afficher la position courante de
la voiture même dans des endroits où le
signal GPS est momentanément
interrompu ou reçu de manière
insatisfaisante comme sous un viaduc.
Pour activer cette fonction, procédez
comme suit.
– Fixez l’appareil à la station d’accueil.
– Conduisez pendant un moment dans
une zone où la réception du signal GPS
est bonne.
Le GPS est prêt à fonctionner après avoir
conduit un moment en faisant fonctionner
l’appareil.
Suite à la page suivante t
NV-U81T/U81
2-695-873-12 (1)
7
Page 38

G:\##sagyou\11
No\1109\2695873121\2695873121NVU81U\02FR02NAV-U.fm
02FR+00COV-U.book Page 8 Thursday, November 9, 2006 3:11 PM
masterpage:Right
Remarques
• La précision de cette fonction peut se
détériorer si l’appareil est installé à
proximité d’un pare-brise chauffant ou
thermoréfléchissant.
• Selon les conditions, le mouvement ou la
position courante de la voiture peut ne pas
s’afficher précisément. Cependant, ce
défaut sera corrigé lorsque le signal GPS
sera reçu à nouveau.
• Cette fonction est disponible uniquement
lors du radioguidage.
À propos du logiciel
Lisez attentivement l’« ACCORD DE
LICENCE UTILISATEUR FINAL »
avant utilisation.
Emplacement des
commandes
Lisez les explications ci-dessous
lorsque vous vous référez aux
illustrations sur le rabat.
Reportez-vous aux pages indiquées
pour obtenir plus d’informations.
a Touches de l’écran 17
b Fenêtre d’affichage/écran
tactile
c Témoin CHG (charge de la
batterie)
S’allume en rouge en cours de
charge.
d Touche ?/1 (sous tension/
veille) 9
Permet de mettre l’appareil sous/
hors tension.
e Touche RESET 33
f Haut-parleur
Émet le radioguidage et les
avertissements.
g Fente pour Memory Stick Duo
Permet d’introduire le « Memory
Stick Duo » pour une extension de
fonctionnement.
h Connecteur de la station
d’accueil
i Capteur du régulateur
automatique de luminosité
Ce capteur règle automatiquement
la luminosité de l’affichage selon la
luminosité environnante.
8
NV-U81T/U81
2-695-873-12 (1)
Page 39

G:\##sagyou\11
No\1109\2695873121\2695873121NVU81U\02FR02NAV-U.fm
02FR+00COV-U.book Page 9 Thursday, November 9, 2006 3:11 PM
masterpage:Right
j Prise USB 22
Permet de raccorder un ordinateur
par l’entremise d’un câble USB.
k Prise DC IN 5 – 5,2V
Permet le raccordement à
l’adaptateur CA ou à l’adaptateur
pour batterie de voiture.
A Microphone (uniquement pour les
modèles dotés de la technologie sans fil
BLUETOOTH)
Permet de téléphoner à l’aide de la
fonction BLUETOOTH. Pour plus de
détails, consultez le manuel
« Manuel de la fonction BLUETOOTH
mains libres ».
Mise sous tension de
l’appareil
La batterie interne de l’appareil n’est
pas chargée au moment de l’achat.
Si la batterie n’est pas chargée,
raccordez l’adaptateur CA ou
l’adaptateur pour batterie de voiture
pour recharger la batterie ou pour
utiliser le système de navigation (le
système peut être utilisé alors que la
batterie est en cours de charge).
Appuyez sur ?/1 (4).
L’écran s’affiche comme suit.
Lors du radioguidage, la carte apparaît.
Dans les autres cas, le menu principal
apparaît.
Pour mettre l’appareil hors
tension
Appuyez sur ?/1 (4).
L’appareil passe en mode de veille
permettant ainsi une consommation
d’énergie minimale.
Remarque
Veillez à retirer l’appareil de la station
d’accueil et à débrancher l’adaptateur pour
batterie de voiture lorsque l’appareil n’est
pas utilisé afin d’éviter que la batterie ne se
décharge.
9
NV-U81T/U81
2-695-873-12 (1)
Page 40

G:\##sagyou\11
No\1109\2695873121\2695873121NVU81U\02FR02NAV-U.fm
02FR+00COV-U.book Page 10 Thursday, November 9, 2006 3:11 PM
masterpage:Right
Réglage initial
Vous pouvez régler les éléments
suivants au moyen de l’assistant de
configuration de démarrage.
–Langue
– Unités de distance
– Luminosité
– Format horaire
– Méthode de saisie d’une adresse
– Adresse du domicile
– Numéro de téléphone du domicile
(modèles BLUETOOTH uniquement
comme le NV-U81)
Pour effectuer le réglage, suivez les
instructions qui s’affichent à l’écran.
Vous pouvez ensuite reconfigurer ces
réglages à tout moment dans le menu de
réglage (page 20).
Remarque
Le réglage de l’heure actuelle (y compris le
fuseau horaire de la région actuelle, l’heure
d’été et l’heure d’hiver) s’effectue
automatiquement une fois les signaux GPS
correctement reçus.
10
Réception des signaux
GPS
Avant d’utiliser le système de
navigation pour la première fois après
l’avoir installé, garez votre voiture dans
un endroit dégagé et sûr (sans bâtiments
élevés, etc.) pendant environ 20 minutes
pour que les signaux GPS soient captés.
Ce système doit recevoir des signaux de
3 satellites GPS au minimum pour
calculer correctement la position du
véhicule.
Témoin d’état du GPS*
* L’icône affiche l’état de réception du signal
GPS. Le témoin s’allume en rouge
lorsque le signal n’est pas reçu.
NV-U81T/U81
2-695-873-12 (1)
Page 41

G:\##sagyou\11
No\1109\2695873121\2695873121NVU81U\02FR02NAV-U.fm
02FR+00COV-U.book Page 11 Thursday, November 9, 2006 3:11 PM
masterpage:Right
Opérations de base
Les procédures de base permettant
d’utiliser le système sont expliquées
dans cette section.
Les opérations générales peuvent être
effectuées sur l’écran tactile. Touchez
doucement les icônes affichées avec le
doigt.
Remarque
N’exercez pas de pression excessive sur
l’écran et n’utilisez pas d’objet pointu,
comme un stylo, etc. pour tapoter l’écran.
Opérations de menu
Le menu principal s’affiche lorsque
vous mettez l’appareil sous tension en
appuyant sur
radioguidage, auquel cas la carte
s’affiche).
Pour afficher le menu principal à partir
de l’écran de la carte, touchez-la.
(sauf lors du
?/1
Pour revenir au menu principal à partir
de n’importe quel menu, touchez
« VOICE/POS », puis touchez la carte.
Vous pouvez régler les options du menu
en suivant les procédures ci-dessous.
1 Affichez le menu principal.
2 Touchez « Plus... ».
3 Touchez « Configurations ».
La liste des catégories de réglage
apparaît.
4 Touchez la catégorie de
réglage souhaitée.
La liste des éléments de réglage
dans la catégorie sélectionnée
apparaît.
Par exemple, lorsque vous touchez
l’affichage de la carte par défaut.
Touchez « Réglages de base » c
« Affichage de la navigation » c
« 2D » ou « 3D ».
Suite à la page suivante t
11
NV-U81T/U81
2-695-873-12 (1)
Page 42

G:\##sagyou\11
No\1109\2695873121\2695873121NVU81U\02FR02NAV-U.fm
02FR+00COV-U.book Page 12 Thursday, November 9, 2006 3:11 PM
masterpage:Right
En cours d’utilisation du menu :
Pour revenir à l’écran précédent,
touchez ou .
Pour annuler la sélection du menu,
touchez « VOICE/POS » (l’affichage de
la position actuelle du véhicule
apparaît).
Remarque
Les paramètres du menu et les opérations
de réglage varient selon le menu
sélectionné.
Opération Gesture
Command (manuelle)
Sur les écrans de carte (sauf en mode de
défilement de la carte), en exécutant une
commande à l’aide du doigt, comme
une ligne, etc., vous pouvez exécuter
facilement les opérations les plus
fréquentes. C’est ce qu’on appelle une
opération Gesture Command
(manuelle).
12
Pour Dessinez
lancer la
navigation vers
votre domicile un accent
démarrer la
navigation vers la
destination
spéciale la plus
proche enregistrée
dans Quick
Links*
Passer un appel
téléphonique à
votre domicile
(modèles
BLUETOOTH
uniquement
comme le
NV-U81)
* Pour plus de détails sur Quick Links,
reportez-vous aux pages 15 et 20.
circonflexe.
Raccourci 1
Horizontalement (de
gauche à droite).
Raccourci 2
Verticalement (vers
le bas).
Raccourci 3
Horizontalement (de
droite à gauche).
un « V ».
NV-U81T/U81
2-695-873-12 (1)
Page 43

G:\##sagyou\11
No\1109\2695873121\2695873121NVU81U\02FR02NAV-U.fm
02FR+00COV-U.book Page 13 Thursday, November 9, 2006 3:11 PM
masterpage:Right
Opérations du clavier
Le clavier s’affiche lorsque vous devez
saisir du texte.
Il vous suffit de saisir des caractères en
majuscules car le système les convertit
automatiquement en caractères
appropriés. Vous pouvez saisir des
caractères spéciaux en cas de besoin.
Affichage du clavier
Zone de saisie/candidats
Pour Touchez
saisir un
caractère
alphabétique
saisir un
caractère spécial
saisir un numéro « 123 » pour basculer
saisir un espace
supprimer un
caractère
afficher la liste
des candidats*
* La liste des candidats s’affiche
automatiquement lorsque les candidats
sont restreints au fur et à mesure que
vous saisissez des caractères.
la touche de caractère
de votre choix.
« ÂÄÁ » pour
basculer vers le
clavier des caractères
spéciaux, puis
touchez le caractère
de votre choix et
« ABC » pour revenir
au clavier
alphabétique.
vers le clavier
numérique, puis
touchez la touche
numérique de votre
choix et « ABC »
pour revenir au
clavier alphabétique.
« List »
13
NV-U81T/U81
2-695-873-12 (1)
Page 44

G:\##sagyou\11
No\1109\2695873121\2695873121NVU81U\02FR02NAV-U.fm
02FR+00COV-U.book Page 14 Thursday, November 9, 2006 3:11 PM
Pour plus d’informations sur le réglage
Recherche d’un
itinéraire
Dès que la destination est définie, le
système recherche automatiquement
des itinéraires.
Avant de commencer, vérifiez que les
signaux GPS sont suffisants pour
permettre la navigation (page 10).
Définition de la
destination et démarrage
de la destination par d’autres moyens,
reportez-vous à la section « Définition
de la destination par d’autres moyens »
à la page 15.
Pour votre sécurité, garez votre véhicule
dans un endroit sûr, puis saisissez la
destination avant le départ.
1 Affichez le menu principal.
Touchez la carte lorsque celle-ci
s’affiche.
Dans l’écran de menu, touchez
« VOICE/POS », puis touchez la
carte.
2 Sélectionnez « Navigation ».
du radioguidage
La procédure à suivre pour rechercher
l’itinéraire et démarrer le radioguidage
est décrite ci-dessous.
Dans l’exemple ci-dessous, la
destination est définie par l’adresse
(configuration dans l’assistant de
configuration de démarrage ou dans le
menu de réglage).
– Méthode de saisie de l’adresse
sélectionnée : « Saisie pas à pas »
3 Sélectionnez « Saisir
adresse », puis saisissez les
détails de l’adresse.
Saisissez les éléments dans l’ordre
défini ci-dessous, puis touchez
ou le candidat dans la liste à
exécuter.
masterpage:Right
14
NV-U81T/U81
2-695-873-12 (1)
Page 45

G:\##sagyou\11
No\1109\2695873121\2695873121NVU81U\02FR02NAV-U.fm
02FR+00COV-U.book Page 15 Thursday, November 9, 2006 3:11 PM
masterpage:Right
Pour obtenir plus de détails sur la
manière de saisir les caractères,
reportez-vous à la section
« Opérations du clavier » à la
page 13.
1 « Pays »
2 « Localité/Code postal »
3 « Route/Destination »
4 « N° de rue » ou « Intersection »*
L’écran de confirmation de
l’adresse apparaît.
* Ne peut être sélectionnée que si
elle existe dans la rue
sélectionnée.
4 Sélectionnez « Calculer
l’itinéraire ».
La carte s’affiche, l’itinéraire est
calculé et le radioguidage
commence.
Pour régler avec précision le
point de destination
Vous pouvez passer de l’affichage de
confirmation de l’adresse au mode de
défilement de la carte et régler avec
précision le point de destination.
1 Touchez pour basculer en mode
de défilement de la carte.
2 Faites glisser l’écran pour régler le
point de destination.
3 Touchez pour afficher le menu
du mode de défilement de la carte.
4 Sélectionnez « Naviguer vers ce
point » pour démarrer le
radioguidage.
Pour plus de détails sur les opérations
en mode de défilement de la carte,
reportez-vous à la section « Mode de
défilement de la carte » à la page 19.
Définition de la
destination par d’autres
moyens
Vous pouvez également définir la
destination et rechercher des itinéraires
en utilisant les méthodes suivantes.
Dans le menu principal, sélectionnez les
options dans l’ordre suivant, puis
sélectionnez « Calculer l’itinéraire » (si
nécessaire).
Pour plus de détails, consultez le
manuel au format PDF fourni.
Suite à la page suivante t
15
NV-U81T/U81
2-695-873-12 (1)
Page 46

G:\##sagyou\11
No\1109\2695873121\2695873121NVU81U\02FR02NAV-U.fm
02FR+00COV-U.book Page 16 Thursday, November 9, 2006 3:11 PM
masterpage:Right
A proximité
Permet de rechercher des itinéraires
vers une destination spéciale
(restaurant, hôtel, etc.) à proximité de
la position courante du véhicule.
Sélectionnez « A proximité », puis
l’une des options suivantes.
« Raccourci 1 - 3 »
Permet de rechercher des itinéraires
vers une destination spéciale de la
catégorie enregistrée dans Quick
Links. Vous pouvez personnaliser les
catégories de Quick Links dans le
menu de réglage (page 20).
« Recherche par nom »
Saisissez directement le nom de
l’itinéraire de la destination spéciale.
« Recherche par catégorie »
Sélectionnez la catégorie d’itinéraire
de la destination spéciale dans la liste.
Vers mon domicile
Permet de rechercher des itinéraires
vers votre domicile, quand ils sont
enregistrés.
16
Navigation
La destination peut être définie à l’aide
des méthodes suivantes.
« Carnet d’adresses »
Permet de rechercher les itinéraires
vers un point de destination enregistré.
« Navigation » c «Carnet
d’adresses »
« Destinations récentes »
Permet de rechercher des itinéraires
vers les destinations récentes
recherchées.
« Navigation » c « Destinations
récentes »
« Au niveau national »
Permet de rechercher des itinéraires
vers une destination spéciale, comme
un aéroport, etc., dans le pays spécifié.
« Navigation » c « Au niveau
national »
« Dans une ville »
Permet de rechercher des itinéraires
vers une destination spéciale
(restaurant, hôtel, etc.) dans la ville
spécifiée.
« Navigation » c « Dans une ville »
NV-U81T/U81
2-695-873-12 (1)
Page 47

G:\##sagyou\11
No\1109\2695873121\2695873121NVU81U\02FR02NAV-U.fm
02FR+00COV-U.book Page 17 Thursday, November 9, 2006 3:11 PM
masterpage:Right
Écrans de radioguidage
Lorsqu’un itinéraire a été calculé, le
guidage visuel vous permet de naviguer
vers la destination, avec le
radioguidage.
Informations sur le menu
outils de la carte
1 Pour sélectionner une carte (Map,
DR ou Map+DR).
Pour plus de détails sur DR,
reportez-vous à la section
« Affichage des informations sur
l’itinéraire dynamique (DR) » à la
page 19.
2 En cours de radioguidage :
Pour écouter le radioguidage
suivant.
En mode de défilement de la carte :
Pour revenir à l’affichage de la
position actuelle du véhicule.
3 Pour visualiser des informations
TMC détaillées.*
4 Pour régler le niveau du volume du
radioguidage.
5 Pour afficher le menu Options.
6 Pour basculer en mode de
défilement de la carte.
* Lorsque la station d’accueil TMC fournie
(ou en option) est utilisée, ces
informations apparaissent uniquement
lorsque l’itinéraire trouvé est encombré.
Affichage de carte 2D
Tout droit (en cours de radioguidage)
Suite à la page suivante t
17
NV-U81T/U81
2-695-873-12 (1)
Page 48

G:\##sagyou\11
No\1109\2695873121\2695873121NVU81U\02FR02NAV-U.fm
02FR+00COV-U.book Page 18 Thursday, November 9, 2006 3:11 PM
masterpage:Right
Tout droit (dans les autres cas)
À l’approche d’une intersection
18
À l’approche d’une intersection (plus
près)
A Indicateurs
Heure actuelle/État du GPS/État de
la batterie/État TMC*/État
BLUETOOTH
Pour plus de détails, consultez le
manuel au format PDF fourni.
B Heure d’arrivée estimée/distance
jusqu’à la destination
C Distance jusqu’à la prochaine
bifurcation
D Nom de la rue courante
E Nom de la rue suivante
F Position actuelle
G Permet d’indiquer le nord.
H Direction actuelle/vitesse actuelle
I Instructions jusqu’à la prochaine
bifurcation
J Indication sous forme de barres de la
distance jusqu’à la prochaine
bifurcation
NV-U81T/U81
2-695-873-12 (1)
Page 49

G:\##sagyou\11
No\1109\2695873121\2695873121NVU81U\02FR02NAV-U.fm
02FR+00COV-U.book Page 19 Thursday, November 9, 2006 3:11 PM
masterpage:Right
K Instructions après la prochaine
bifurcation
* Cet indicateur s’affiche lorsque la station
d’accueil TMC fournie (ou en option) est
utilisée.
Affichage de carte 3D
Vous pouvez régler l’écran de la carte
3D dans le menu de réglage (page 20).
Affichage des informations
sur l’itinéraire dynamique
(DR)
Cet écran affiche la distance jusqu’à la
destination, les informations sur
l’itinéraire vers une destination
spéciale, etc.
Pour plus de détails, consultez le
manuel au format PDF fourni.
Écran de l’itinéraire
Vous pouvez visualiser tout l’itinéraire
jusqu’à la destination.
Pour afficher l’itinéraire, sélectionnez
« Options » c « Afficher l’itinéraire ».
Mode de défilement de la carte
Vous pouvez passer en mode de
défilement de la carte à partir de l’écran
de la carte en touchant , pendant le
radioguidage ou non.
En mode de défilement de la carte, le
quadrillage est affiché sur la carte et
vous pouvez faire glisser l’écran pour
faire défiler la carte.
Touchez / pour régler l’échelle
de la carte.
Placez l’intersection du quadrillage sur
un point de votre choix, puis touchez
pour afficher le menu du mode de
défilement de la carte afin de définir le
point comme destination, etc.
Touchez pour passer du mode de
défilement de la carte à l’écran de la
position actuelle du véhicule.
19
NV-U81T/U81
2-695-873-12 (1)
Page 50

G:\##sagyou\11
No\1109\2695873121\2695873121NVU81U\02FR02NAV-U.fm
02FR+00COV-U.book Page 20 Thursday, November 9, 2006 3:11 PM
masterpage:Right
Réglages du système
Vous pouvez configurer divers
paramètres du système et de la
mémoire.
Dans le menu principal, sélectionnez
« Plus... » c « Configurations » c la
catégorie souhaitée c puis l’option
souhaitée ci-dessous pour procéder à
chaque réglage.
Plusieurs options de réglage
représentatives dans chaque catégorie
sont fournies ici à titre d’exemple.
Pour plus de détails, consultez le
manuel au format PDF fourni.
Réglages de base
Affichage de la navigation (pour
sélectionner l’affichage de la carte par
défaut (2D ou 3D)), Afficher l’heure
d’arrivée estimée/la distance jusqu’à la
destination (pour afficher/masquer la
distance jusqu’à la destination et
l’heure d’arrivée estimée)
Carte actuelle
Carte actuelle (pour sélectionner une
carte enregistrée dans l’appareil).
Adresses utiles
Afficher les CI (pour afficher/masquer
chaque itinéraire vers une destination
spéciale), Raccourci 1 - 3 (pour
enregistrer 3 catégories d’itinéraires
vers une destination spéciale les plus
fréquemment empruntés, pouvant être
utilisés comme raccourcis lors du
réglage de la destination).
Profil d’itinéraire
Type d’itinéraire (pour sélectionner la
préférence de recherche d’itinéraire),
Autoroute (pour permettre/éviter/
interdire les autoroutes), etc.
Remarque
Les avertissements donnés sur la base des
informations concernant la carte risquent de
ne pas toujours être corrects en raison des
travaux de voirie, etc. Les informations
concernant l’état de la circulation et la
sécurité des routes sont prioritaires sur
toutes les informations provenant du
système de navigation.
20
NV-U81T/U81
2-695-873-12 (1)
Page 51

G:\##sagyou\11
No\1109\2695873121\2695873121NVU81U\02FR02NAV-U.fm
02FR+00COV-U.book Page 21 Thursday, November 9, 2006 3:11 PM
masterpage:Right
Utilisation du logiciel
fourni
Les fonctions principales du logiciel sur
le CD-ROM fourni sont présentées cidessous.
Si vous insérez le CD-ROM dans votre
ordinateur, l’écran s’affiche
automatiquement. Suivez les
instructions qui s’affichent à l’écran.
Caractéristiques du logiciel
• Systèmes d’exploitation : Windows
2000/XP
• Lecteur de CD-ROM/DVD-ROM
• Port USB
• Vitesse du processeur de 150 MHz
minimum
Table des matières
Installation du logiciel de
connexion pour PC
Un logiciel de raccordement à
l’ordinateur (ActiveSync) peut être
installé.
Assistant langues
Des données concernant la langue
d’affichage à l’écran et du radioguidage
peuvent être ajoutées à l’appareil et les
données inutiles peuvent être
supprimées.
Lire le manuel
Vous pouvez lire le mode d’emploi au
format PDF, qui contient des
informations supplémentaires sur les
opérations disponibles.
Support
Il est possible d’accéder facilement au
site du support Sony consacré aux
systèmes de navigation.
Consultez ce site pour obtenir un
support technique comme des mises à
jour logicielles et consulter les FAQ,
etc.
Suite à la page suivante t
21
NV-U81T/U81
2-695-873-12 (1)
Page 52

G:\##sagyou\11
No\1109\2695873121\2695873121NVU81U\02FR02NAV-U.fm
02FR+00COV-U.book Page 22 Thursday, November 9, 2006 3:11 PM
Raccordement à votre
ordinateur
Avant d’effectuer le raccordement à votre
ordinateur, installez le logiciel de
connexion pour PC (ActiveSync) sur votre
ordinateur.
1 Raccordez l’appareil à une
prise à l’aide de l’adaptateur
CA et du câble d’alimentation
CA.
2 Raccordez l’appareil à votre
ordinateur à l’aide du câble
USB.
Branchez le petit connecteur du
câble USB dans la prise USB de
l’appareil, puis le connecteur large
dans un port USB de votre
ordinateur.
Remarques lors du transfert des
données
• Lorsque vous raccordez l’appareil à
l’ordinateur, raccordez-le directement.
L’appareil ne fonctionne pas correctement
s’il est raccordé au moyen d’un
concentrateur USB.
• Pendant le transfert :
– ne débranchez pas le câble USB ni
l’adaptateur CA ;
– ne faites pas passer l’appareil en mode
de veille et ne le réinitialisez pas.
– n’arrêtez pas l’ordinateur, ne le mettez
pas en mode de veille ou ne le
redémarrez pas.
Si vous souhaitez interrompre le transfert,
cliquez sur le bouton Annuler sur l’écran
de l’ordinateur.
masterpage:Right
22
NV-U81T/U81
2-695-873-12 (1)
Page 53

G:\##sagyou\11
No\1109\2695873121\2695873121NVU81U\02FR02NAV-U.fm
02FR+00COV-U.book Page 23 Thursday, November 9, 2006 3:11 PM
masterpage:Right
Informations
complémentaires
Précautions
Si votre véhicule est resté stationné en
plein soleil, laissez refroidir l’appareil
avant de l’utiliser.
Condensation
Par temps de pluie ou dans des régions très
humides, de la condensation peut se
former dans l’écran de l’appareil. Si cela
se produit, l’appareil ne fonctionne pas
correctement. Dans ce cas faites coulisser
l’interrupteur POWER situé en bas à
gauche de l’appareil à la position OFF,
puis attendez environ une heure pour que
l’humidité s’évapore.
À propos du « Memory
Stick »
Qu’est-ce qu’un « Memory
Stick » ?
Un « Memory Stick » est un support
d’enregistrement à circuit intégré compact
doté d’une mémoire de grande capacité. Il
a été conçu non seulement pour échanger/
partager des données numériques entre les
produits compatibles « Memory Stick »,
mais également pour servir de support de
stockage externe (amovible) pouvant
sauvegarder des données.
Types de « Memory Stick
Duo » pouvant être utilisés
par le système
Avec ce système, vous pouvez utiliser les
types de « Memory Stick Duo »* suivants.
• Memory Stick Duo (incompatible avec
MagicGate)
• MagicGate Memory Stick Duo
• Memory Stick PRO Duo
Suite à la page suivante t
23
NV-U81T/U81
2-695-873-12 (1)
Page 54

G:\##sagyou\11
No\1109\2695873121\2695873121NVU81U\02FR02NAV-U.fm
02FR+00COV-U.book Page 24 Thursday, November 9, 2006 3:11 PM
masterpage:Right
* Le système s’est montré opérationnel
avec un « Memory Stick Duo » de 4 Go
maximum. Cependant, nous ne
garantissons pas le fonctionnement de
tous les supports « Memory Stick Duo ».
Remarques
• Ce système prend en charge uniquement
la lecture de données sur le « Memory
Stick Duo ». Le formatage du « Memory
Stick Duo » et l’écriture de données ne
peuvent pas être effectués.
• Ce système ne prend pas en charge le
transfert de données haute vitesse.
• Lorsque vous formatez un « Memory Stick
Duo », toutes les données sont effacées.
Pour éviter l’effacement accidentel de
données importantes, assurez-vous de
vérifier le contenu avant le formatage.
• Pour formater un « Memory Stick Duo »,
utilisez une application de formatage
compatible avec le « Memory Stick Duo ».
N’utilisez pas la fonction de formatage de
Windows Explorer pour formater le
« Memory Stick Duo ».
• Un « Memory Stick » standard ne peut
pas être utilisé dans ce système.
• Lors de l’utilisation d’un « Memory Stick
Duo », assurez-vous de son sens
d’insertion. Une utilisation incorrecte peut
endommager le système.
• Tenez le « Memory Stick Duo » éloigné
des enfants en bas âge pour éviter qu’ils
ne l’avalent accidentellement.
• Évitez de retirer le « Memory Stick Duo »
du système lorsque celui-ci lit des
données.
24
• Les données risquent d’être
endommagées dans les cas suivants :
– Le « Memory Stick Duo » est retiré ou le
système est mis hors tension lors d’une
opération de lecture.
– Le « Memory Stick Duo » est utilisé
dans un lieu soumis à de l’électricité
statique ou des bruits électriques.
• Il est recommandé de sauvegarder les
données importantes.
• Ne pliez pas, n’échappez pas le
« Memory Stick Duo » et ne le soumettez
pas à des chocs violents.
• Ne désassemblez pas et ne modifiez pas
le « Memory Stick Duo ».
• Ne mouillez pas le « Memory Stick Duo ».
• N’utilisez pas et ne rangez pas le
« Memory Stick Duo » dans un endroit
soumis :
– À des températures très élevées, par
exemple dans une voiture stationnée en
plein soleil ;
– Au rayonnement direct du soleil ;
– À un taux d’humidité élevé ou dans un
environnement favorisant la corrosion.
Connecteur
Commutateur
de protection
en écriture
• Ne touchez jamais le connecteur du
« Memory Stick Duo » avec les doigts ou
avec un objet métallique.
Zone mémo
NV-U81T/U81
2-695-873-12 (1)
Page 55

G:\##sagyou\11
No\1109\2695873121\2695873121NVU81U\02FR02NAV-U.fm
02FR+00COV-U.book Page 25 Thursday, November 9, 2006 3:11 PM
• Vous ne pouvez pas enregistrer, modifier
ni supprimer de données si vous réglez le
commutateur de protection en écriture à
LOCK.
• Pour régler le commutateur de protection
en écriture du « Memory Stick Duo »,
utilisez un objet pointu.
• Lorsque vous utilisez un « Memory Stick
Duo » sans commutateur de protection en
écriture, assurez-vous de ne pas modifier
ou supprimer accidentellement les
données.
• Lorsque vous écrivez dans la zone mémo
de l’étiquette fixée, n’appuyez pas trop.
• Pour transporter ou ranger le « Memory
Stick Duo », mettez-le dans son étui.
Remarque sur le
panneau ACL
Des points immobiles bleus, rouges ou
verts peuvent apparaître sur le moniteur. Il
s’agit de « points lumineux » et ils
peuvent apparaître sur n’importe quel
écran ACL. Le panneau ACL est le fruit
d’une technologie de pointe et plus de
99,99 % de ses segments sont
fonctionnels. Toutefois, un petit
pourcentage d’entre eux (généralement
0,01 %) peut ne pas s’allumer
correctement. Ceci n’occasionnera
toutefois aucune gêne lors du visionnage.
Entretien
Nettoyage de la ventouse
Si la surface de la ventouse est sale et que
la fixation est moins solide, nettoyez la
surface de la ventouse.
Avant le nettoyage, veillez à détacher la
ventouse de la station d’accueil en suivant
les étapes décrites ci-dessous.
Suite à la page suivante t
masterpage:Right
25
NV-U81T/U81
2-695-873-12 (1)
Page 56

G:\##sagyou\11
No\1109\2695873121\2695873121NVU81U\02FR02NAV-U.fm
02FR+00COV-U.book Page 26 Thursday, November 9, 2006 3:11 PM
masterpage:Right
1 Détachez la ventouse de la station
d’accueil.
2 Nettoyez la surface de la ventouse à
l’eau.
3 Faites sécher complètement la
ventouse à l’air libre.
Avertissement
• Ne lavez jamais la ventouse sans la
détacher de la station d’accueil. Ceci
risquerait d’endommager la station
d’accueil.
• N’utilisez pas de nettoyant. Effectuez un
nettoyage à l’eau uniquement.
• Veillez à sécher la ventouse avant de la
refixer.
Remarques
• Si la ventouse laisse des traces sur le
pare-brise, nettoyez-le avec de l’eau.
• Le tableau de bord peut laisser des traces
à la surface de la ventouse. Toutefois, cela
n’affecte en rien la fixation.
Conseil
Conservez la feuille de protection que vous
avez enlevée et fixez-la à la ventouse
lorsque vous détachez le support du parebrise, afin de garder la ventouse propre.
Remplacement du fusible
Lorsque vous remplacez le fusible de
l’adaptateur pour batterie de voiture,
veillez à utiliser un fusible dont la
capacité, en ampères, correspond à la
valeur indiquée sur l’ancien fusible. Si le
fusible fond, vérifiez le branchement de
l’alimentation et remplacez le fusible. Si
le nouveau fusible fond également, il est
possible que l’appareil soit défectueux.
Dans ce cas, communiquez avec votre
détaillant Sony le plus proche.
Fusible (2,5 A)
Avertissement
Ne jamais utiliser de fusible dont la
capacité en ampères dépasse celle du
fusible fourni avec l’appareil, car cela
pourrait endommager l’appareil.
Pour serrer
Pour le retirer
26
NV-U81T/U81
2-695-873-12 (1)
Page 57

G:\##sagyou\11
No\1109\2695873121\2695873121NVU81U\02FR02NAV-U.fm
02FR+00COV-U.book Page 27 Thursday, November 9, 2006 3:11 PM
masterpage:Right
Remarques sur la mise
au rebut de l’appareil
Retirez la batterie au lithium-ion lorsque
vous mettez l’appareil au rebut et portez la
batterie dans un lieu de collecte et de
recyclage.
La procédure permettant de retirer la
batterie est décrite ci-dessous.
Remarque
Ne démontez jamais l’appareil sauf pour le
mettre au rebut.
1 Maintenez la touche ?/1
enfoncée pour mettre
l’appareil hors tension.
2 Retirez les 2 vis situées sous
l’appareil à l’aide d’un
tournevis.
3 Retirez le capot arrière.
1Retirez la partie supérieure de
l’appareil comme décrit cidessous.
2Retirez le bas de l’appareil de la
même manière.
Suite à la page suivante t
27
NV-U81T/U81
2-695-873-12 (1)
Page 58

G:\##sagyou\11
No\1109\2695873121\2695873121NVU81U\02FR02NAV-U.fm
02FR+00COV-U.book Page 28 Thursday, November 9, 2006 3:11 PM
masterpage:Right
4 Débranchez le connecteur de
la batterie.
Connecteur de la batterie
5 Retirez la batterie.
6 Isolez la borne du connecteur
en l’enroulant dans un ruban
adhésif.
Remarques sur la batterie au lithium-ion
• Maintenez la batterie hors de portée des
enfants.
• Ne tenez pas la batterie avec des pinces
métalliques, car cela peut entraîner un
court-circuit.
ATTENTION
Utilisée de façon incorrecte, la pile peut
exploser. Ne pas la recharger, la démonter ni
la jeter au feu.
28
NV-U81T/U81
2-695-873-12 (1)
Page 59

G:\##sagyou\11
No\1109\2695873121\2695873121NVU81U\02FR02NAV-U.fm
02FR+00COV-U.book Page 29 Thursday, November 9, 2006 3:11 PM
masterpage:Right
RECYCLAGE DES BATTERIES ION-LITHIUM
Les batteries ion-lithium sont
recyclables.
Vous pouvez contribuer à la protection
de l’environnement en rapportant les
batteries rechargeables usagées à votre
point de collecte et de recyclage le
plus proche.
Pour plus d’informations sur le recyclage des
batteries rechargeables, applez gratuitement le
1-800-822-8837 ou visitez le site Web
http://www.rbrc.org/.
Attention : Ne manipulez pas de batteries ion-
lithium endommagées ou présentant
des traces de fuite.
Caractéristiques
techniques
Appareil principal
Température de fonctionnement :
5 ºC à 45 ºC (41 ºF à 113 ºF)
Alimentation requise : 5 – 5,2 V CC
(à partir de l’adaptateur CA fourni ou de
l’adaptateur pour batterie de voiture)
Bornes de connexion :
Connecteur de la station d’accueil
Prise DC IN 5 – 5,2V
Prise USB
Fente pour carte mémoire :
Fente pour Memory Stick Duo
Haut-parleur :
Haut parleur ovale 20 × 40 mm
(0,8 × 1,6 po)
Puissance consommée : 1,5 A maximum
Dimensions :
Environ. 134,4 × 79,1 × 44,0 mm
(5,3 × 3,1 × 1,8 po) (l × h × p, hors
parties saillantes)
Poids : Environ 380 g (13,4 oz)
Moniteur
Système : écran à cristaux liquides
transmissif
Système de lecteur : système à matrice
active TFT a-Si
Dimensions : 4,3 po (16:9)
95,0 × 53,9, 109,2 mm (3,8 × 2,1,
4,4 po) (h × v, d)
Segmentation : 391 680 points (480 × 272
pixels)
Station d’accueil
Température de fonctionnement :
5 ºC à 45 ºC (41 ºF à 113 ºF)
Bornes de connexion :
Connecteur de l’appareil
Prise d’antenne TMC (modèles TMC
uniquement comme le NV-U81T)
Fréquence de réception : 87,5 à 108,0 MHz
(modèles TMC uniquement comme le
NV-U81T)
Suite à la page suivante t
29
NV-U81T/U81
2-695-873-12 (1)
Page 60

G:\##sagyou\11
No\1109\2695873121\2695873121NVU81U\02FR02NAV-U.fm
02FR+00COV-U.book Page 30 Thursday, November 9, 2006 3:11 PM
Temps d’utilisation/Temps de
charge de la batterie intégrée
Temps de charge
Avec l’adaptateur pour batterie de
voiture/l’adaptateur CA fourni :
Environ 4 heures et demie (avec
l’appareil allumé) ou 2 heures et demie
(en mode de veille)
Temps d’utilisation :
Jusqu’à 3 heures et demie (selon l’utilisation)
Accessoires en option
Kit pour station d’accueil de voiture TMC :
NVA-CP3T
Kit d’installation voiture : XA-49FM
La conception et les caractéristiques
techniques sont sujettes à modifications
sans préavis.
• Aucun retardateur de flamme halogéné
n’est utilisé dans certaines cartes à
circuits imprimés.
• Utilisation des batteries au lithium-ion
rechargeables.
• La prévention contre les chocs est
assurée par une protection en carton
ondulé.
• Imprimée avec de l’encre à base d’huile
végétale sans COV (composés
organiques volatils).
masterpage:Right
30
NV-U81T/U81
2-695-873-12 (1)
Page 61

G:\##sagyou\11
No\1109\2695873121\2695873121NVU81U\02FR02NAV-U.fm
02FR+00COV-U.book Page 31 Thursday, November 9, 2006 3:11 PM
masterpage:Right
Dépannage
La liste de contrôle suivante vous aidera à
remédier aux problèmes que vous pourriez
rencontrer avec cet appareil.
Avant de passer en revue la liste de
contrôle ci-dessous, vérifiez les
procédures de raccordement et
d’utilisation.
Les icônes de fonctionnement de
l’écran sont inopérantes.
Une opération peut prendre un certain temps
lorsqu’une carte routière est affichée.
L’appareil ne démarre pas.
t Rechargez la batterie intégrée.
– Installez l’appareil correctement,
conformément aux indications
fournies.
– Raccordez l’appareil à une prise à
l’aide de l’adaptateur CA et du câble
d’alimentation CA.
– Raccordez l’appareil à la prise de
l’allume-cigare à l’aide de
l’adaptateur pour batterie de voiture.
La batterie intégrée ne peut pas être
rechargée.
t Si l’adaptateur CA est utilisé,
débranchez-le de la prise de courant,
puis rebranchez-le.
t Raccordez à nouveau l’adaptateur pour
batterie de voiture à la prise de l’allumecigare.
t La batterie au lithium-ion intégrée peut
être chargée à des températures
comprises entre 5 et 45 ºC (41 et 113 ºF).
La batterie ne peut pas être chargée si la
température à l’intérieur de l’appareil
augmente en raison d’une exposition
directe au soleil, etc. Il ne s’agit pas d’un
problème de fonctionnement.
Suite à la page suivante t
31
NV-U81T/U81
2-695-873-12 (1)
Page 62

G:\##sagyou\11
No\1109\2695873121\2695873121NVU81U\02FR02NAV-U.fm
02FR+00COV-U.book Page 32 Thursday, November 9, 2006 3:11 PM
masterpage:Right
Impossible de recevoir un signal GPS.
• Lisez la présentation du GPS (page 6).
• Le système ne peut recevoir de signaux
GPS à cause d’un obstacle.
t Déplacez votre véhicule vers un
endroit où les signaux peuvent être
reçus plus clairement.
• La réception du signal GPS est faible.
t Vérifiez le statut GPS en sélectionnant
« Plus... » dans le menu principal c
« État GPS ».
• Il y a un obstacle devant l’antenne GPS.
t Installez l’appareil à un endroit où le
signal n’est pas interrompu par le
véhicule, etc.
• La réception du signal GPS peut être
entravée par un pare-brise chauffant ou
thermoréfléchissant.
t Selon le type de pare-brise, la
réception du signal GPS peut être
impossible.
La position du véhicule sur la carte ne
correspond pas à la route sur laquelle
se trouve actuellement le véhicule.
La marge d’erreur du signal émis par les
satellites GPS est trop grande. Une marge
d’erreur de quelques centaines de mètres
maximum peut se produire.
Le radioguidage est inaudible.
Le réglage du volume est trop faible.
t Augmentez le volume en touchant
dans le menu principal ou de l’écran de
la carte.
Lorsque l’appareil est alimenté par la
batterie intégrée, le volume peut
baisser légèrement.
L’affichage sur l’écran ACL est
anormal.
• Avec des températures élevées, l’écran
ACL risque de s’assombrir et les images
risquent de ne pas être nettes. Avec des
températures basses, une image rémanente
peut apparaître sur l’écran ACL. Il ne
s’agit pas de problèmes de fonctionnement
et l’écran ACL ne reviendra à son état
normal que lorsque la température sera
revenue dans les limites de la plage de
fonctionnement spécifiée.
• L’écran ACL est sombre.
t La fonction de régulation automatique
de luminosité est peut-être activée car
son capteur (page 8) est couvert par
une main, etc.
La station d’accueil se détache de la
surface de fixation.
La fixation est moins solide si la surface de
la ventouse ou la surface de fixation est sale.
t Nettoyez la ventouse et la surface de
fixation (page 25).
32
NV-U81T/U81
2-695-873-12 (1)
Page 63

G:\##sagyou\11
No\1109\2695873121\2695873121NVU81U\02FR02NAV-U.fm
02FR+00COV-U.book Page 33 Thursday, November 9, 2006 3:11 PM
Le mode de démonstration démarre
automatiquement même si aucune
opération n’est effectuée.
t Éteignez le mode de démonstration
automatique en sélectionnant « Plus... »
c « Configurations » c « Réglages de
base » c « Mode de démonstration »
dans le menu principal. Vérifiez ensuite
que le « Mode de démonstration » est
réglé à désactivé.
Réinitialisation de l’appareil
Si le logiciel de navigation est bloqué,
essayez de réinitialiser l’appareil.
Appuyez sur RESET avec un objet
pointu, comme un stylo à bille (page 8).
Remarque
Après avoir réinitialisé l’appareil, la
réception des signaux GPS peut prendre
quelques instants.
masterpage:Right
33
NV-U81T/U81
2-695-873-12 (1)
Page 64

G:\##sagyou\11
No\1109\2695873121\2695873121NVU81U\03ES01INT-U.fm
02FR+00COV-U.book Page 2 Thursday, November 9, 2006 3:11 PM
Tratamiento de los equipos
eléctricos y electrónicos al final de
su vida útil (aplicable en la Unión
Europea y en países europeos con
sistemas de recogida selectiva de
residuos)
Este símbolo en el equipo o el embalaje indica que el
presente producto no puede ser tratado como residuos
domésticos normales, sino que debe entregarse en el
correspondiente punto de recogida de equipos eléctricos y
electrónicos. Al asegurarse de que este producto se
desecha correctamente, Ud. ayuda a prevenir las
consecuencias negativas para el medio ambiente y la salud
humana que podrían derivarse de la incorrecta
manipulación en el momento de deshacerse de este
producto. El reciclaje de materials ayuda a conservar los
recursos naturales. Para recibir información detallada
sobre el reciclaje de este producto, póngase en contacto
con el ayuntamiento, el punto de recogida más cercano o
el establecimiento donde ha adquirido el producto.
Accesorios aplicables: Adaptador para batería de
automóvil/Adaptador de alimentación de ca
Atención
EN NINGÚN CASO SONY SERÁ
RESPONSABLE DE LOS DAÑOS
INDIRECTOS, IMPREVISTOS,
DERIVADOS NI DE NINGÚN OTRO
TIPO, INCLUIDOS, SIN LIMITARSE A
LOS MISMOS, LOS DAÑOS POR
PÉRDIDA DE BENEFICIOS O
INGRESOS, LA PÉRDIDA DE DATOS, LA
PÉRDIDA DE USO DEL PRODUCTO O
DE EQUIPAMIENTO ASOCIADO,
TIEMPO DE INACTIVIDAD Y PÉRDIDA
DE TIEMPO DEL COMPRADOR
RELACIONADOS O DERIVADOS DEL
USO DE ESTE PRODUCTO O DEL
HARDWARE Y SOFTWARE DEL MISMO.
2
masterpage:Right
NV-U81T/U81
2-695-873-12 (1)
Page 65

G:\##sagyou\11
No\1109\2695873121\2695873121NVU81U\03ES+00COV-
02FR+00COV-U.book Page 3 Thursday, November 9, 2006 3:11 PM
UTOC.fm
Tabla de contenido
masterpage:Right
Advertencia . . . . . . . . . . . . . . . . . . . . .5
Ubicación de los controles. . . . . . . . . .8
Encendido de la unidad . . . . . . . . . . . .9
Realización del ajuste inicial. . . . . . .10
Recepción de señales GPS. . . . . . . . . 10
Operaciones básicas 11
Funcionamiento del menú . . . . . . . . .11
Modo de funcionamiento Gesture
Command
(Operaciones gestuales) . . . . . . . .12
Operaciones con el teclado . . . . . . . . 13
Búsqueda de rutas 14
Indicación del destino e inicio de las
instrucciones . . . . . . . . . . . . . . . . . . .14
Indicación del destino en otras
formas . . . . . . . . . . . . . . . . . . . . . .15
Pantallas de instrucciones . . . . . . . . .17
Configuración del
sistema 20
Utilización del software
suministrado 21
Contenido . . . . . . . . . . . . . . . . . . 21
Conexión a la computadora . . . . . 22
Información
complementaria 23
Precauciones. . . . . . . . . . . . . . . . . . . 23
Acerca de “Memory Stick” . . . . . . . 24
¿Qué es “Memory Stick”?. . . . . . 24
Tipos de “Memory Stick Duo” que
puede usar el sistema. . . . . . . . . . 24
Nota sobre el panel LCD . . . . . . . . . 26
Mantenimiento . . . . . . . . . . . . . . . . . 26
Limpieza de la ventosa . . . . . . . . 26
Sustitución del fusible . . . . . . . . . 27
Notas sobre cómo deshacerse de la
unidad . . . . . . . . . . . . . . . . . . . . . 27
Especificaciones. . . . . . . . . . . . . . . . 29
Solución de problemas. . . . . . . . . . . 31
Restauración de la unidad . . . . . . 33
3
NV-U81T/U81
2-695-873-12 (1)
Page 66

G:\##sagyou\11
No\1109\2695873121\2695873121NVU81U\03ES02NAV-U.fm
02FR+00COV-U.book Page 4 Thursday, November 9, 2006 3:11 PM
Acerca de este manual
• Esta Guía de inicio rápido contiene
instrucciones sobre las operaciones
básicas. Si desea obtener más
información, consulte el manual
PDF en el disco de aplicación
suministrado. Para tener más
detalles acerca de la instalación y
de las conexiones, consulte la guía
“Read This First” (manual de
instalación) suministrada.
• El contenido de este manual está
destinado a usuarios con
conocimientos del sistema
operativo Microsoft® Windows®.
Para obtener más información
sobre el funcionamiento del
equipo, consulte el manual que se
suministra con éste.
• Las ilustraciones de este manual
pueden no coincidir con el
dispositivo en sí.
• Antes de utilizar este sistema, lea
detenidamente este manual y el
documento “Read This First”.
• Conserve este manual y el
documento “Read This First”
suministrado en un lugar donde
pueda consultarlo en el futuro.
masterpage:Right
4
NV-U81T/U81
2-695-873-12 (1)
Page 67

G:\##sagyou\11
No\1109\2695873121\2695873121NVU81U\03ES02NAV-U.fm
02FR+00COV-U.book Page 5 Thursday, November 9, 2006 3:11 PM
masterpage:Right
Advertencia
LEA DETENIDAMENTE ESTE
MANUAL Y EL DOCUMENTO “READ
THIS FIRST” (MANUAL DE
INSTALACIÓN) SUMINISTRADO
ANTES DE INSTALAR O UTILIZAR
EL SISTEMA DE NAVEGACIÓN
PERSONAL. LA INSTALACIÓN O
UTILIZACIÓN INCORRECTA DE
ESTE DISPOSITIVO PUEDE
PROVOCAR ACCIDENTES, LESIONES
O LA MUERTE.
Seguridad
• Asegúrese de:
– instalar el sistema de navegación en un
lugar seguro en el que no se
obstaculice la visión del conductor.
– no instalar la unidad sobre un airbag.
– colocar los cables y la base en donde
no obstaculicen el manejo del
automóvil.
– colocar la unidad en la base
correctamente ya que, de lo contrario,
es posible que se caiga.
– limpiar la superficie de la ventosa y del
accesorio antes de colocarlos.
Asimismo, compruebe que la ventosa
está firmemente colocada después de
la instalación. De lo contrario, es
posible que la unidad o la base se
caigan.
– limpiar la superficie del tablero antes
de utilizar la lámina suministrada.
En caso de no seguir estas
recomendaciones, las condiciones de
seguridad del manejo del automóvil se
verán reducidas.
• No ejerza excesiva fuerza sobre la
unidad ni la base, ya que podrían caerse.
• Respete la normativa y la legislación de
tráfico local.
• No observe la unidad continuamente
mientras maneja. Es peligroso y podría
provocar un accidente.
• Si necesita manipular el sistema de
navegación durante el manejo, asegúrese
de parar el automóvil en un lugar seguro
previamente.
• No modifique la unidad.
• No desmonte la unidad excepto en el
momento de desecharla.
• No utilice el sistema de navegación con
el sistema cubierto o bloqueado.
Utilización de la unidad en interiores
Utilice la unidad cerca de un tomacorriente
de pared. Así se asegura que puede
desconectar el enchufe del tomacorriente
de pared si se produce alguna anomalía
durante su utilización. No utilice el
adaptador de ca en espacios estrechos
como el que puede haber entre la pared y
los muebles.
continúa en la página siguiente
t
5
NV-U81T/U81
2-695-873-12 (1)
Page 68

G:\##sagyou\11
No\1109\2695873121\2695873121NVU81U\03ES02NAV-U.fm
02FR+00COV-U.book Page 6 Thursday, November 9, 2006 3:11 PM
masterpage:Right
Manipulación
• No permita que ningún objeto extraño se
introduzca en el conector de la base de la
unidad (8), ya que podría producir una
falla de funcionamiento.
•Presione ?/1 ( 4) para apagar la unidad,
retírela de la base y desconecte el
adaptador para batería de automóvil ya
que, de lo contrario, es posible que ésta
se agote.
Tenga en cuenta lo siguiente.
Si la toma del encendedor de su
automóvil no está conectada a la
posición ACC del interruptor de
encendido, se continúa suministrando
energía a la fuente de alimentación
incorporada aunque la llave de
encendido esté en la posición de
apagado o la unidad no esté en uso.
• No conecte ningún accesorio (adaptador
para batería de automóvil, adaptador de
alimentación de ca, etc.) distinto de los
suministrados u opcionales.
• No exponga la unidad al fuego ni al
agua, ya que es posible que se produzca
una falla de funcionamiento.
• Asegúrese de extraer la unidad del
automóvil al abandonarlo para evitar
robos, así como daños producidos por
las altas temperaturas del interior del
mismo.
• Tenga en cuenta que la batería
incorporada no puede cargarse con
temperaturas situadas fuera del rango de
5 – 45 ºC.
• No deje la unidad en lugares con
temperatura ambiente elevada, ya que la
capacidad de la batería incorporada se
deteriorará o ésta no podrá cargarse.
GPS
Los satélites GPS (Global Positioning
System, Sistema de posicionamiento
global) emiten señales constantemente
para determinar una ubicación
determinada en la tierra. Cuando una
antena GPS recibe estas señales, los
usuarios reciben información acerca de su
ubicación (latitud, longitud y altitud). La
información debe llegar de 3 satélites para
obtener una posición bidimensional
(latitud y longitud) y de 4 satélites para
obtener una posición tridimensional
(latitud, longitud y altitud). Puesto que los
satélites GPS están controlados por el
Departamento de Defensa de los EE. UU.,
existe un margen de error expreso
comprendido entre unos pocos metros y
10 metros. Como resultado, el sistema de
navegación GPS puede presentar un error
comprendido entre los 10 metros y
aproximadamente 200 metros, en función
de las circunstancias.
6
NV-U81T/U81
2-695-873-12 (1)
Page 69

G:\##sagyou\11
No\1109\2695873121\2695873121NVU81U\03ES02NAV-U.fm
02FR+00COV-U.book Page 7 Thursday, November 9, 2006 3:11 PM
masterpage:Right
Puesto que la información del GPS se
recibe de las señales de los satélites,
podría resultar imposible o difícil obtener
la información en los lugares siguientes:
• Túneles o pasos subterráneos
• Bajo autopistas
• Entre edificios altos
• Entre árboles altos con follaje denso
Antes de utilizar el sistema de navegación
por primera vez después de la instalación,
estacione el automóvil en un lugar seguro
y abierto (sin edificios altos, etc.) hasta
aproximadamente 20 minutos para que se
puedan recibir las señales GPS.
Nota
La unidad tarda un tiempo en recibir
señales GPS cuando la batería incorporada
se ha descargado por completo o tras
reiniciar la unidad.
Acerca de este sistema de
posicionamiento
El sistema tiene una función que permite
mostrar correctamente la posición actual
del automóvil incluso en lugares donde la
señal GPS se interrumpe temporalmente o
su recepción es deficiente, como cuando
se transita por un paso elevado. Para
activar esta función, haga lo siguiente.
– Fije la unidad a la base.
– Estacione el automóvil por un
momento en un lugar donde la señal
del GPS se reciba con claridad.
El sistema de posicionamiento quedará
listo para funcionar después de que haya
manejado durante unos minutos con la
unidad encendida.
continúa en la página siguiente
t
NV-U81T/U81
2-695-873-12 (1)
7
Page 70

G:\##sagyou\11
No\1109\2695873121\2695873121NVU81U\03ES02NAV-U.fm
02FR+00COV-U.book Page 8 Thursday, November 9, 2006 3:11 PM
Notas
• La exactitud de esta función se puede
deteriorar si la unidad se instala cerca de
un parabrisas con calefacción
incorporada o de reflexión del calor.
• Es posible que el sistema no muestre la
posición actual con exactitud en función
de las circunstancias o de la posición
actual o el movimiento del automóvil.
Esto, sin embargo, se corregirá en cuanto
se reanude la señal de recepción del
GPS.
• Esta función está disponible sólo durante
las instrucciones de ruta.
Software
Lea detenidamente el “CONTRATO DE
LICENCIA DEL USUARIO FINAL”
antes de utilizar el software.
Ubicación de los
controles
Lea las explicaciones que se indican a
continuación mientras consulta las
ilustraciones de la solapa.
Consulte las páginas indicadas para
obtener información detallada.
a Botones de la pantalla 17
b Ventana de visualización/
pantalla táctil
c Indicador CHG (carga de la
batería)
Se ilumina en rojo durante la carga.
d Botón ?/1 (encendido/espera)
9
Permite encender/apagar la unidad.
e Botón RESET 33
f Altavoz
Emite instrucciones y avisos.
g Ranura del Memory Stick Duo
Permite insertar un “Memory Stick
Duo” para la expansión funcional.
h Conector de la base
masterpage:Right
8
NV-U81T/U81
2-695-873-12 (1)
Page 71

G:\##sagyou\11
No\1109\2695873121\2695873121NVU81U\03ES02NAV-U.fm
02FR+00COV-U.book Page 9 Thursday, November 9, 2006 3:11 PM
masterpage:Right
i Sensor del atenuador
automático
Este sensor ajusta el brillo de la
pantalla automáticamente según el
brillo del entorno.
j Tom a USB 22
Permite conectar la unidad a una
computadora mediante el cable
USB.
k Toma DC IN 5 – 5,2V
Permite conectar la unidad el
adaptador de alimentación de ca o
el adaptador para batería de
automóvil.
A Micrófono (sólo para modelos con
tecnología inalámbrica BLUETOOTH
incorporada) Permite hablar por teléfono
mediante la función BLUETOOTH. Para
obtener más información, consulte el
“Manual de manos libres BLUETOOTH”
suministrado.
Encendido de la unidad
La batería incorporada de la unidad
no está cargada en el momento de la
compra.
Cuando la batería está vacía, conecte
el adaptador de alimentación de ca o
el adaptador para batería de
automóvil para cargar la batería o
manipular el sistema de navegación
(el sistema puede utilizarse mientras
se carga la batería).
Presione ?/1 (4).
La pantalla se muestra como se indica a
continuación.
El mapa aparece durante las
instrucciones de ruta.
En otros casos, aparece el menú
principal.
Para apagar la unidad
Presione
La unidad entra en el modo de espera
para reducir el consumo de energía.
Nota
Asegúrese de extraer la unidad de la base y
desconectar el adaptador para batería de
automóvil cuando la unidad no esté en uso
para evitar que se agote la batería del
automóvil.
?/1
(4).
NV-U81T/U81
2-695-873-12 (1)
9
Page 72

G:\##sagyou\11
No\1109\2695873121\2695873121NVU81U\03ES02NAV-U.fm
02FR+00COV-U.book Page 10 Thursday, November 9, 2006 3:11 PM
masterpage:Right
Realización del ajuste
inicial
Los siguientes contenidos pueden
ajustarse mediante el asistente de
configuración inicial.
– Idiomas
– Formato de distancia
– Zona horaria
–Brillo
– Método de entrada de direcciones
– Domicilio
– Número de teléfono de domicilio
(únicamente para los modelos
BLUETOOTH como el NV-U81)
Siga las instrucciones que aparecen en
la pantalla para realizar la
configuración.
Estos ajustes puede configurarse
posteriormente en el menú de ajuste en
cualquier momento (página 20).
Nota
El ajuste de la hora actual (incluidos los
ajustes de la zona horaria de la región
actual y del horario de verano/horario
estándar) se ajusta automáticamente
después que las señales de GPS se
reciban correctamente.
10
Recepción de señales
GPS
Antes de utilizar el sistema de
navegación por primera vez después de
la instalación, estacione el automóvil en
un lugar seguro y abierto (sin edificios
altos, etc.) hasta aproximadamente 20
minutos para que se puedan recibir las
señales GPS. El sistema necesita
señales de al menos 3 satélites GPS
para calcular la posición actual del
automóvil correctamente.
Indicador del estado del GPS*
* El ícono muestra el estado de recepción
de la señal GPS. El indicador se
ilumina en rojo cuando no es posible
recibir la señal.
NV-U81T/U81
2-695-873-12 (1)
Page 73

G:\##sagyou\11
No\1109\2695873121\2695873121NVU81U\03ES02NAV-U.fm
02FR+00COV-U.book Page 11 Thursday, November 9, 2006 3:11 PM
masterpage:Right
Operaciones básicas
En este apartado se explican los
procedimientos habituales de
funcionamiento del sistema.
Las operaciones generales pueden
efectuarse en la pantalla táctil. Toque
los íconos que aparecen suavemente
con el dedo.
Nota
No presione la pantalla con demasiada
fuerza ni utilice ningún objeto puntiagudo
como un bolígrafo, etc., para tocar la
pantalla.
Funcionamiento del menú
El menú principal aparece cuando se
enciende la unidad al presionar ?/1
(excepto durante las instrucciones de
ruta, en cuyo caso aparece el mapa).
Para mostrar el menú principal desde la
pantalla del mapa, toque el mapa.
Para regresar al menú principal desde
cualquier punto de la pantalla del menú,
toque “VOICE/POS” y, a continuación,
toque el mapa.
El procedimiento siguiente permite
definir elementos en el menú.
1 Vaya al menú principal.
2 Toque “Más...”.
3 Toque “Configuración”.
Aparece la lista de categorías de
ajustes.
4 Toque la categoría de ajustes
que desee.
Aparece la lista de elementos de
ajustes en la categoría seleccionada.
Ej.: cuando seleccione la vista
predeterminada del mapa.
Toque “Configuración básica” c
“Vista de navegación” c “2D” o
“3D”.
continúa en la página siguiente
t
11
NV-U81T/U81
2-695-873-12 (1)
Page 74

G:\##sagyou\11
No\1109\2695873121\2695873121NVU81U\03ES02NAV-U.fm
02FR+00COV-U.book Page 12 Thursday, November 9, 2006 3:11 PM
masterpage:Right
Desde dentro del menú:
Para volver a la pantalla anterior, toque
o .
Para cancelar la selección de menú,
toque “VOICE/POS” (aparecerá la
pantalla de posición actual del
automóvil).
Nota
Los elementos del menú y las operaciones
de ajuste varían en función del elemento de
menú seleccionado.
Modo de funcionamiento
Gesture Command
(Operaciones gestuales)
En las pantallas de mapa (excepto en el
modo de desplazamiento de mapa), las
operaciones que se realizan con más
frecuencia pueden ejecutarse fácilmente
mediante la asignación de un trazo con
el dedo en la pantalla como, por
ejemplo, una línea, etc. Este modo de
funcionamiento se denomina Gesture
Command (Operaciones gestuales).
Operación Dibuje
Inicio de la
navegación a su
domicilio
iniciar la
navegación al PDI
más cercano
almacenado en
Enlaces rápidos*
Realización de
una llamada
telefónica al
domicilio
(únicamente
modelos
BLUETOOTH,
como el NV-U81)
un acento
circunflejo.
Enlace rápido 1
Línea horizontal (de
izquierda a derecha).
Enlace rápido 2
Línea vertical
(hacia abajo).
Enlace rápido 3
Línea horizontal (de
derecha a izquierda).
dibujo de una “V”.
12
NV-U81T/U81
2-695-873-12 (1)
Page 75

G:\##sagyou\11
No\1109\2695873121\2695873121NVU81U\03ES02NAV-U.fm
02FR+00COV-U.book Page 13 Thursday, November 9, 2006 3:11 PM
masterpage:Right
* Para obtener más detalles sobre los
enlaces rápidos, consulte las páginas 15 y
21.
Operaciones con el
teclado
La pantalla de teclado aparece cuando
hay que introducir texto.
Sólo debe introducir los caracteres en
mayúsculas, ya que el sistema los
convierte automáticamente en los
caracteres adecuados. Puede introducir
caracteres especiales si es necesario.
Pantalla del teclado
Campo de entrada/candidatos
Para Toque
introducir un
carácter alfabético
introducir un
carácter especial
introducir un
número
introducir un
espacio
borrar un carácter
muestra la lista de
candidatos*
* La lista de candidatos aparece
automáticamente cuando limita la
búsqueda a medida que va introduciendo
caracteres.
la tecla de carácter
que desee.
“ÂÄÁ” para
cambiar al teclado
de caracteres
especiales, a
continuación, la
tecla del carácter
deseado y “ABC”
para volver al
teclado alfabético.
“123” para cambiar
al teclado numérico
y, a continuación, la
tecla numérica
deseada y “ABC”
para retroceder.
“List”
13
NV-U81T/U81
2-695-873-12 (1)
Page 76

G:\##sagyou\11
No\1109\2695873121\2695873121NVU81U\03ES02NAV-U.fm
02FR+00COV-U.book Page 14 Thursday, November 9, 2006 3:11 PM
masterpage:Right
Búsqueda de rutas
El sistema busca las rutas
automáticamente después de indicar el
destino.
Antes de empezar, compruebe que hay
suficientes señales GPS para la
navegación (página 10).
Indicación del destino e
inicio de las
instrucciones
A continuación, se explica el
procedimiento de búsqueda de la ruta e
inicio de las instrucciones de ruta.
El siguiente es un ejemplo de cómo
ajustar el destino por su dirección en las
condiciones que se mencionan a
continuación (configurado en el
asistente de configuración inicial o en el
menú de ajuste).
– Método de entrada de direcciones
seleccionado: “Introducción paso a
paso”
14
Para obtener información sobre cómo
indicar el destino en otras formas,
consulte “Indicación del destino en
otras formas” en la página 15.
Para su seguridad, estacione el
automóvil en un lugar seguro e
introduzca la información de destino
antes de iniciar un viaje.
1 Vaya al menú principal.
Toque el mapa en la pantalla de
mapa.
En la pantalla de menú, toque
“VOICE/POS” y, a continuación,
seleccione el mapa.
2 Seleccione “Navegar”.
3 Seleccione “Introducir
dirección” y, a continuación,
ingrese la información de la
dirección.
Introduzca los elementos en el orden
que se indica a continuación, y
seleccione o el candidato en la
lista para continuar.
NV-U81T/U81
2-695-873-12 (1)
Page 77

G:\##sagyou\11
No\1109\2695873121\2695873121NVU81U\03ES02NAV-U.fm
02FR+00COV-U.book Page 15 Thursday, November 9, 2006 3:11 PM
masterpage:Right
Para obtener información sobre
cómo introducir caracteres, consulte
“Operaciones con el teclado” en la
página 13.
1 “País”
2 “Población/CP”
3 “Calle/destino”
4 “Número de la calle” o “Calle
transversal”*
Aparece la pantalla de
confirmación de la dirección.
* Es posible seleccionarlo
únicamente si existe la calle
seleccionada.
4 Seleccione “Calcular ruta”.
Aparece el mapa, se calcula la ruta y
empiezan a darse las instrucciones.
Para ajustar al máximo el
punto de destino
Puede saltar de la pantalla de
confirmación de la dirección al modo de
desplazamiento de mapa y ajustar con
precisión el punto de destino.
1 Toque para pasar al modo de
desplazamiento de mapa.
2 Es posible arrastrar la pantalla para
ajustar el punto de destino.
3 Toque para mostrar el menú de
modo de desplazamiento de mapa.
4 Seleccione “Navegar hacia allí” para
empezar las instrucciones de ruta.
Para obtener más información sobre el
modo de desplazamiento de mapa,
consulte “Modo de desplazamiento de
mapa” en la página 19.
Indicación del destino en
otras formas
Los métodos siguientes también
permiten indicar el destino y buscar
rutas.
Seleccione los elementos en el siguiente
orden desde el menú principal y, a
continuación, seleccione “Calcular
ruta” (si es necesario).
continúa en la página siguiente
t
15
NV-U81T/U81
2-695-873-12 (1)
Page 78

G:\##sagyou\11
No\1109\2695873121\2695873121NVU81U\03ES02NAV-U.fm
02FR+00COV-U.book Page 16 Thursday, November 9, 2006 3:11 PM
masterpage:Right
Para obtener más información, consulte
el manual PDF suministrado.
Puntos de interés
Busca las rutas a un PDI, como un
restaurante, hotel, etc., cercanas a la
posición actual del automóvil.
Seleccione “Puntos de interés”, y, a
continuación, cualquiera de las
siguientes opciones.
“Enlace rápido 1 - 3”
Busca rutas al PDI más cercano de la
categoría almacenada en Enlaces
rápidos. Las categorías de los Enlaces
rápidos pueden personalizarse en el
menú de configuración (página 21).
“Buscar por nombre”
Ingrese el nombre del PDI
directamente.
“Buscar por categoría”
Seleccione la categoría de PDI
deseada de la lista.
A casa
Busca rutas a su casa, si está registrada.
Navegar
El destino se puede ajustar mediante
los siguientes métodos.
“Libreta de direcciones”
Busca rutas a un punto de destino
grabado.
“Navegar” c “Libreta de direcciones”
“Últimos destinos”
Busca rutas a destinos buscados
recientemente.
“Navegar” c “Últimos destinos”
“en todo el país”
Busca rutas a un PDI, como un
aeropuerto, etc., dentro del país
especificado.
“Navegar” c “en todo el país”
“en una población”
Busca las rutas a un PDI, como un
restaurante, hotel, etc., dentro de la
ciudad especificada.
“Navegar” c “en una población”
16
NV-U81T/U81
2-695-873-12 (1)
Page 79

G:\##sagyou\11
No\1109\2695873121\2695873121NVU81U\03ES02NAV-U.fm
02FR+00COV-U.book Page 17 Thursday, November 9, 2006 3:11 PM
Para volver a la pantalla de la
Pantallas de
instrucciones
Una vez calculada la ruta, las
instrucciones visuales y de audio le
guían al destino.
Información del menú de
herramientas del mapa
posición actual del automóvil.
3 Para visualizar información
detallada del TMC.*
4 Para ajustar el volumen de las
instrucciones orales.
5 Para mostrar el menú de opciones.
6 Para cambiar al modo de
desplazamiento de mapa.
* Cuando se utiliza la base TMC
suministrada (u opcional), ésta aparece
únicamente cuando la ruta que se ha
encontrado está congestionada.
Mapa bidimensional
Conducción recta (durante las
instrucciones de ruta)
1 Para seleccionar un indicador del
mapa (Map, DR o Map+DR).
Para obtener más información sobre
la DR, consulte “Indicador de
información de ruta dinámica (DR)”
en la página 19.
2 Durante las instrucciones de ruta:
para escuchar la siguiente
instrucción oral.
En el modo de desplazamiento de
mapa:
continúa en la página siguiente
masterpage:Right
t
17
NV-U81T/U81
2-695-873-12 (1)
Page 80

G:\##sagyou\11
No\1109\2695873121\2695873121NVU81U\03ES02NAV-U.fm
02FR+00COV-U.book Page 18 Thursday, November 9, 2006 3:11 PM
masterpage:Right
Conducción recta (en otros casos)
Proximidad de una intersección
18
Proximidad de una intersección (más
cerca)
A Indicadores
Hora actual/Estado del GPS/
Condición de batería/Estado de
TMC*/Estado del BLUETOOTH
Para obtener más información,
consulte el manual PDF
suministrado.
B Distancia hasta el destino/ETA (hora
estimada de llegada)
C Distancia hasta el siguiente giro
D Nombre de la calle actual
E Nombre de la siguiente calle
F Posición actual
G Para indicar la localización del
punto norte.
H Dirección actual/velocidad actual
I Instrucción del siguiente giro
J Indicación de barra de distancia
hasta el siguiente giro
K Instrucción posterior a la siguiente
NV-U81T/U81
2-695-873-12 (1)
Page 81

G:\##sagyou\11
No\1109\2695873121\2695873121NVU81U\03ES02NAV-U.fm
02FR+00COV-U.book Page 19 Thursday, November 9, 2006 3:11 PM
masterpage:Right
* Este indicador aparece cuando se utiliza
el soporte TMC suministrado (u opcional).
Mapa tridimensional
Es posible seleccionar el mapa
tridimensional en el menú de ajuste
(página 20).
Indicador de información de
ruta dinámica (DR)
Esta pantalla muestra la distancia hasta
el destino, la información del PDI, etc.
Para obtener más información, consulte
el manual PDF suministrado.
Indicador de ruta
Es posible visualizar la ruta completa
hasta el destino.
Para visualizar, seleccione “Opciones”
c “Mostrar ruta”.
Modo de desplazamiento de
mapa
Para cambiar al modo de
desplazamiento de mapa desde la
pantalla de mapa, toque tanto si se
están recibiendo instrucciones de la ruta
como si no.
En el modo de desplazamiento de mapa,
se muestra el retículo en el mapa y es
posible arrastrar la pantalla para
desplazarse por el mapa.
Toque / para ajustar la escala
del mapa.
continúa en la página siguiente
t
19
NV-U81T/U81
2-695-873-12 (1)
Page 82

G:\##sagyou\11
No\1109\2695873121\2695873121NVU81U\03ES02NAV-U.fm
02FR+00COV-U.book Page 20 Thursday, November 9, 2006 3:11 PM
Coloque la intersección del retículo en
el punto que desee y toque para
que se muestre el menú del modo de
desplazamiento de mapa, en el que
podrá establecer un punto como
destino, etc.
Toque para cambiar del modo de
desplazamiento de mapa a la pantalla de
la posición actual del automóvil.
Configuración del
sistema
Pueden configurarse varios ajustes
relacionados con el sistema y la
memoria.
Desde el menú principal, seleccione
“Más...” c “Configuración” c la
categoría deseada c y, a continuación,
el elemento deseado para realizar cada
ajuste.
A modo de ejemplo, se introducen
varios elementos de ajuste
representativos en cada categoría.
Para obtener más información, consulte
el manual PDF suministrado.
Configuración básica
Vista de navegación (para seleccionar la
vista predeterminada del mapa
(bidimensional o tridimensional)),
Mostrar distancia hasta el destino/hora
estimada de llegada (ETA) (para
mostrar/ocultar la distancia hasta el
destino y la hora estimada de llegada
(ETA)), etc.
masterpage:Right
20
Mapa actual
Mapa actual (para seleccionar un mapa
almacenado en la unidad).
NV-U81T/U81
2-695-873-12 (1)
Page 83

G:\##sagyou\11
No\1109\2695873121\2695873121NVU81U\03ES02NAV-U.fm
02FR+00COV-U.book Page 21 Thursday, November 9, 2006 3:11 PM
masterpage:Right
Destinos especiales
Mostrar PDI (para mostrar/no mostrar
cada PDI), Enlace rápido 1 - 3 (para
almacenar tres categorías de PDI de uso
frecuente, que pueden usarse como
accesos directos cuando se indique el
destino).
Perfil de ruta
Tipo de ruta (para seleccionar la
búsqueda de ruta de preferencia),
Autopistas (para permitir/evitar/
prohibir autopistas/carreteras), etc.
Nota
Es posible que las advertencias facilitadas
de acuerdo con la información del mapa no
sean siempre correctas debido a obras en
la calzada, etc. La situación y la normativa
del tráfico tienen absoluta prioridad sobre la
información facilitada por el sistema de
navegación.
Utilización del software
suministrado
Las funciones principales del software
del CD-ROM suministrado se describen
a continuación.
Cuando inserta el CD-ROM en la
computadora, la pantalla aparece
automáticamente. Siga las instrucciones
en pantalla.
Requisitos del sistema
• Sistema operativo: Windows 2000/XP
• Unidad de CD-ROM/DVD-ROM
• Puerto USB
• Velocidad mínima de la CPU de
150 MHz
Contenido
Instalar software de conexión
para PC
Es posible instalar el software de
conexión a la computadora
(ActiveSync).
continúa en la página siguiente
t
21
NV-U81T/U81
2-695-873-12 (1)
Page 84

G:\##sagyou\11
No\1109\2695873121\2695873121NVU81U\03ES02NAV-U.fm
02FR+00COV-U.book Page 22 Thursday, November 9, 2006 3:11 PM
masterpage:Right
Asistente de idiomas
Es posible añadir a la unidad la
información del idioma para las
indicaciones en pantalla y las
instrucciones orales, y eliminar los
datos innecesarios del mismo.
Leer el manual
Puede leer el manual en formato PDF
en el que se incluyen más detalles sobre
las operaciones disponibles.
Servicio de atención
Puede acceder fácilmente al sitio Web
de soporte técnico de Sony.
Visite este sitio Web para obtener
asistencia técnica como, por ejemplo,
actualizaciones del software, respuestas
a las preguntas más frecuentes, etc.
Conexión a la computadora
Antes de utilizar la computadora, instale el
software de conexión a la misma
(ActiveSync).
1 Conecte la unidad a un
tomacorriente mediante el
adaptador de alimentación de
ca y el cable de alimentación
de ca.
2 Conecte la unidad a la
computadora mediante el
cable USB.
Introduzca el conector pequeño del
cable USB a la toma USB de la
unidad y el conector grande a un
puerto USB de la computadora.
22
NV-U81T/U81
2-695-873-12 (1)
Page 85

G:\##sagyou\11
No\1109\2695873121\2695873121NVU81U\03ES02NAV-U.fm
02FR+00COV-U.book Page 23 Thursday, November 9, 2006 3:11 PM
Notas sobre la transferencia de datos
• Si conecta la unidad al ordenador, hágalo
directamente. Es posible que la unidad no
funcione adecuadamente si se conecta a
través de un concentrador USB.
• Durante la transferencia, no
– desconecte el cable USB ni el
adaptador de alimentación de ca.
– ponga la unidad en modo de espera ni
la reinicie.
– apague la computadora, ponga la
computadora en modo de espera ni la
reinicie.
Si desea cancelar la transferencia cuando
se encuentre a la mitad, haga clic en el
botón de cancelación que se encuentra en
la pantalla de la computadora.
Información
complementaria
Precauciones
Si estaciona el automóvil bajo la luz
directa del sol, deje que la unidad se enfríe
antes de usarla.
Condensación de humedad
En días lluviosos o en zonas muy
húmedas, es posible que se condense
humedad en el interior de la pantalla de la
unidad. Si esto ocurre, la unidad no
funcionará en forma correcta. En tal caso,
deslice el interruptor POWER situado en
la parte inferior izquierda de la unidad
hacia la posición OFF y espere
aproximadamente una hora hasta que la
humedad se evapore.
masterpage:Right
23
NV-U81T/U81
2-695-873-12 (1)
Page 86

G:\##sagyou\11
No\1109\2695873121\2695873121NVU81U\03ES02NAV-U.fm
02FR+00COV-U.book Page 24 Thursday, November 9, 2006 3:11 PM
Notas
Acerca de “Memory
Stick”
¿Qué es “Memory Stick”?
“Memory Stick” es un medio de grabación
IC de tamaño compacto con una gran
capacidad. Ha sido diseñado no sólo para
intercambiar o compartir información
digital entre productos compatibles con
“Memory Stick”, sino además para servir
como medio de almacenamiento externo
que se puede retirar o insertar para guardar
información.
Tipos de “Memory Stick
Duo” que puede usar el
sistema
Con el sistema, es posible utilizar los
siguientes tipos de “Memory Stick Duo”.*
• Memory Stick Duo (No compatible con
MagicGate)
• MagicGate Memory Stick Duo
• Memory Stick PRO Duo
* Se ha demostrado que el sistema
funciona con un “Memory Stick Duo” con
una capacidad de 4 GB o inferior. Sin
embargo, no se garantizan todas las
operaciones de todos los soportes
“Memory Stick Duo”.
• Este sistema sólo admite la lectura de
datos contenidos en un “Memory Stick
Duo”. No es posible efectuar las acciones
de formateo y escritura del “Memory Stick
Duo”.
• El sistema no es compatible con la
transferencia de información de alta
velocidad paralela.
• Cuando formatee un “Memory Stick Duo”,
se borrará toda la información. Para evitar
que se borre de manera accidental
información importante, asegúrese de
comprobar el contenido antes de
formatear.
• Para formatear un “Memory Stick Duo”,
utilice una aplicación de formateo
compatible con “Memory Stick Duo”.
Cuando formatee el “Memory Stick Duo”,
no utilice la función de formatear del
Explorador de Windows.
• No es posible usar el tamaño estándar de
“Memory Stick” en este sistema.
• Cuando utilice un “Memory Stick Duo”,
asegúrese de comprobar que lo ha
introducido en la dirección correcta. La
mala utilización puede ocasionar
problemas con el sistema.
• No deje el “Memory Stick Duo” al alcance
de un niño, para evitar que lo ingiera de
manera accidental.
• No retire el “Memory Stick Duo” del
sistema mientras esté leyendo datos.
• La información se puede dañar en los
siguientes casos:
24
masterpage:Right
NV-U81T/U81
2-695-873-12 (1)
Page 87

G:\##sagyou\11
No\1109\2695873121\2695873121NVU81U\03ES02NAV-U.fm
02FR+00COV-U.book Page 25 Thursday, November 9, 2006 3:11 PM
masterpage:Right
– Si se retira el “Memory Stick Duo” o se
apaga el sistema durante una operación
de lectura.
– El “Memory Stick Duo” se utiliza en un
lugar que está sometido a electricidad
estática o ruidos eléctricos.
• Se recomienda guardar una copia de
seguridad de la información importante.
• No doble, deje caer o ejerza presión
fuerte al “Memory Stick Duo”.
• No desmonte o modifique el “Memory
Stick Duo”.
• No permita que el “Memory Stick Duo” se
moje.
• No utilice o guarde el “Memory Stick Duo”
en un lugar que esté sometido a:
– Temperaturas extremadamente altas,
como en un automóvil parqueado en un
lugar soleado
– Luz solar directa
– Humedad alta o lugares con sustancias
corrosivas
Conector
Conmutador de
protección
contra escritura
• No toque el conector del “Memory Stick
Duo” con el dedo o con objetos metálicos.
• No es posible grabar, editar o borrar
información si desliza el conmutador de
protección contra escritura hacia la
posición LOCK.
Área de anotaciones
• Cuando deslice el conmutador de
protección contra escritura del “Memory
Stick Duo”, utilice un dispositivo
puntiagudo.
• Cuando use un “Memory Stick Duo” sin el
conmutador de protección contra
escritura, tenga cuidado de no editar o
borrar la información de manera
accidental.
• Cuando escriba en el área de anotaciones
de la etiqueta adjunta, no lo haga con
fuerza.
• Cuando lleve consigo o guarde el
“Memory Stick Duo”, colóquelo en el
estuche suministrado.
25
NV-U81T/U81
2-695-873-12 (1)
Page 88

G:\##sagyou\11
No\1109\2695873121\2695873121NVU81U\03ES02NAV-U.fm
02FR+00COV-U.book Page 26 Thursday, November 9, 2006 3:11 PM
masterpage:Right
Nota sobre el panel LCD
Es posible que aparezcan algunos puntos
fijos azules, rojos o verdes en el monitor.
Se conocen como “puntos brillantes” y
pueden darse en cualquier pantalla LCD.
Los paneles LCD se fabrican con
tecnología de precisión y más de un
99,99% de sus segmentos son funcionales.
No obstante, es posible que un pequeño
porcentaje (normalmente el 0,01%) de los
segmentos no se encienda correctamente.
Sin embargo, esto no interferirá en la
visualización.
Mantenimiento
Limpieza de la ventosa
Si la superficie de la ventosa se ensucia y
la resistencia del accesorio se debilita, lave
y limpie la superficie de la ventosa.
Antes de lavarla, asegúrese de separar la
ventosa de la base mediante los siguientes
pasos.
1 Separe la ventosa de la base.
2 Lave la superficie de la ventosa con
agua.
3 Deje que la ventosa se seque al aire
libre en su totalidad.
Advertencia
• Nunca lave la ventosa sin separarla de la
base. De lo contrario, se puede dañar la
base.
• No use productos de limpieza. Lave
únicamente con agua.
• Asegúrese de que la ventosa está seca
antes de volver a colocarla.
Notas
• Si la ventosa deja marca en el parabrisas,
límpielo con agua.
• Es posible que el tablero deje una marca
en la superficie de la ventosa, pero esto
no afecta a la fuerza de adherencia.
26
NV-U81T/U81
2-695-873-12 (1)
Page 89

G:\##sagyou\11
No\1109\2695873121\2695873121NVU81U\03ES02NAV-U.fm
02FR+00COV-U.book Page 27 Thursday, November 9, 2006 3:11 PM
Sugerencia
Conserve la lámina de protección que ha
retirado y adhiérala a la ventosa cuando
retire la base del parabrisas para mantener
limpia la ventosa.
Sustitución del fusible
Al sustituir el fusible del adaptador para
batería de automóvil, asegúrese de utilizar
uno con el mismo amperaje que el
indicado en el fusible original. Si el
fusible se funde, verifique la conexión de
alimentación y sustitúyalo. Si el fusible
vuelve a fundirse después de sustituirlo, es
posible que exista alguna falla de
funcionamiento interno. En tal caso,
consulte al distribuidor Sony más cercano.
Fusible (2,5 A)
Para apretar
Notas sobre cómo
deshacerse de la unidad
Extraiga la batería de iones de litio
incorporada cuando vaya a deshacerse de
la unidad y entréguela en un punto de
reciclaje.
A continuación se explica el
procedimiento de extracción de la batería.
Nota
No desmonte la unidad excepto en el
momento de desecharla.
1 Presione ?/1 para apagar la
unidad.
2 Extraiga los 2 tornillos
situados en la parte inferior de
la unidad mediante un
destornillador.
Para retirar
Advertencia
Nunca use un fusible cuyo amperaje
supere el del suministrado con la unidad,
ya que ésta podría dañarse.
masterpage:Right
continúa en la página siguiente
NV-U81T/U81
2-695-873-12 (1)
t
27
Page 90

G:\##sagyou\11
No\1109\2695873121\2695873121NVU81U\03ES02NAV-U.fm
02FR+00COV-U.book Page 28 Thursday, November 9, 2006 3:11 PM
masterpage:Right
3 Extraiga la cubierta posterior.
1 Retire la parte superior de la
unidad como se indica a
continuación.
2 Retire la parte inferior de la
unidad de la misma manera.
4 Desconecte el conector de la
batería.
Conector de la batería
28
NV-U81T/U81
2-695-873-12 (1)
Page 91

G:\##sagyou\11
No\1109\2695873121\2695873121NVU81U\03ES02NAV-U.fm
02FR+00COV-U.book Page 29 Thursday, November 9, 2006 3:11 PM
masterpage:Right
5 Extraiga la batería.
6 Envuelva con cinta el terminal
del conector para aislarlo.
Notas sobre la batería de iones de litio
• Mantenga la batería fuera del alcance de
los niños.
• No agarre la batería con pinzas metálicas,
ya que puede producirse un cortocircuito.
PRECAUCIÓN
La pila puede explotar si la trata mal.
No la recargue, desarme, ni la tire al fuego.
Especificaciones
Unidad principal
Temperatura de funcionamiento: 5 – 45 ºC
Requisitos de alimentación: cc de 5 – 5,2 V
(desde el adaptador de alimentación de
ca suministrado o el adaptador para
batería de automóvil)
Terminales de conexión:
Conector de la base
Toma DC IN 5 – 5,2V
Toma USB
Ranura para la tarjeta de memoria:
Ranura del Memory Stick Duo
Altavoz:
altavoz ovalado 20 × 40 mm
Corriente de consumo: Máx. 1,5 A
Dimensiones:
aprox. 134,4 × 79,1 × 44,0 mm
(an × al × prf, se excluyen las partes
salientes)
Peso: aprox. 380 g
Monitor
Sistema: pantalla LCD transmisiva
Sistema de la unidad: sistema de matriz
activa TFT a-Si
Dimensiones: 4,3 pulgadas (16:9)
95,0 × 53,9, 109,2 mm (al × an × prf)
Segmento: 391.680 (480 × RGB × 272)
puntos
continúa en la página siguiente
t
29
NV-U81T/U81
2-695-873-12 (1)
Page 92

G:\##sagyou\11
No\1109\2695873121\2695873121NVU81U\03ES02NAV-U.fm
02FR+00COV-U.book Page 30 Thursday, November 9, 2006 3:11 PM
Base
Temperatura de funcionamiento: 5 – 45 ºC
Terminales de conexión:
Conector de la unidad
Toma de la antena TMC (modelos TMC
únicamente, como el NV-U81T)
Frecuencia de recepción: 87,5 – 108,0 MHz
(modelos TMC únicamente, como el
NV-U81T)
Tiempo de carga/tiempo de uso
de la batería incorporada
Tiempo de carga
Con el adaptador para batería de
automóvil y el adaptador de
alimentación de ca suministrados:
aproximadamente 4,5 horas (con la
unidad encendida) o 2,5 horas (en modo
de espera)
• Ciertas placas del circuito impreso no
contienen retardantes de llama
halogenados.
• Se utilizan pilas de ion de litio
recargables.
• Se ha utilizado cartón ondulado como
material de relleno y de protección para
este producto.
• Impreso con tinta de aceites vegetales,
libre de COV (Compuestos Orgánicos
Volátiles).
Tiempo de uso
hasta 3,5 horas (en función del uso)
Accesorios opcionales
Kit de base TMC para automóvil:
NVA-CP3T
Kit de instalación para el automóvil:
XA-49FM
El diseño y las especificaciones están
sujetos a cambios sin previo aviso.
masterpage:Right
30
NV-U81T/U81
2-695-873-12 (1)
Page 93

G:\##sagyou\11
No\1109\2695873121\2695873121NVU81U\03ES02NAV-U.fm
02FR+00COV-U.book Page 31 Thursday, November 9, 2006 3:11 PM
masterpage:Right
Solución de problemas
La siguiente lista de comprobación le
ayudará a solucionar los problemas que
puedan producirse con la unidad.
Antes de consultarla, revise los
procedimientos de conexión y de
funcionamiento.
Los íconos de operación de la
pantalla no funcionan.
Las operaciones pueden demorarse un poco
cuando se visualizan mapas.
La unidad no se enciende.
t Cargue la batería incorporada.
– Instale la unidad apropiadamente de
acuerdo con el manual de instalación
suministrado.
– Conecte la unidad a un tomacorriente
mediante el adaptador de
alimentación de ca y el cable de
alimentación de ca.
– Conecte la unidad a la toma del
encendedor mediante el adaptador
para batería de automóvil.
No se puede cargar la batería
incorporada.
t Si se está utilizando el adaptador de
alimentación de ca, desconéctelo del
tomacorriente y, a continuación, vuelva a
conectarlo.
t Vuelva a conectar el adaptador para
batería de automóvil a la toma del
encendedor.
t La batería de iones de litio incorporada
puede cargarse a una temperatura de
entre 5 – 45 ºC. Es posible que la batería
no se cargue si la temperatura en el
interior de la unidad aumenta debido a la
exposición a la luz solar directa, etc. No
se trata de una falla de funcionamiento.
continúa en la página siguiente
t
31
NV-U81T/U81
2-695-873-12 (1)
Page 94

G:\##sagyou\11
No\1109\2695873121\2695873121NVU81U\03ES02NAV-U.fm
02FR+00COV-U.book Page 32 Thursday, November 9, 2006 3:11 PM
masterpage:Right
No se recibe ninguna señal de GPS.
• Lea la descripción general del GPS
(página 6).
• El sistema no puede recibir señales de GPS
debido a una obstrucción.
t Desplace el automóvil hasta una
ubicación en la que puedan recibirse
las señales con claridad.
• La recepción de la señal GPS es débil.
t Compruebe el estado del GPS
mediante la selección de “Más...” en el
menú principal c “Estado GPS”.
• Hay un obstáculo frente a la antena GPS.
t Instale la unidad en un sitio donde la
señal no se interrumpa por el cuerpo
del automóvil, etc.
• La recepción de señal del GPS puede verse
interrumpida por un parabrisas con
calefacción incorporada o de reflexión de
calor.
t La recepción de la señal del GPS
puede verse interrumpida, en función
del tipo de parabrisas.
La posición del vehículo en el mapa
no coincide con la carretera por la
que se circula.
El margen de error de la señal procedente de
los satélites GPS es demasiado grande.
Puede haber un margen de error máximo de
unos pocos cientos de metros.
32
No se escuchan las instrucciones
orales.
El volumen está demasiado bajo.
t Puede elevar el volumen si toca en
el menú principal o en la pantalla del
menú.
Cuando la unidad se alimenta de la
batería incorporada, es posible que el
volumen descienda ligeramente.
La pantalla LCD no se visualiza con
normalidad.
• A altas temperaturas, es posible que la
pantalla LCD se oscurezca y no se
visualice correctamente. A bajas
temperaturas, es posible que se produzca
una imagen residual en dicha pantalla. No
se trata de fallas de funcionamiento, por lo
que la pantalla LCD volverá a funcionar
con normalidad cuando la temperatura
vuelva a situarse dentro del rango de
funcionamiento especificado.
• La pantalla LCD está oscura.
t Es posible que la función del atenuador
automático esté activada debido a que
el sensor (página 9) está cubierto por
una mano, etc.
La base se desprende de la superficie
del accesorio.
La resistencia del accesorio se debilita si la
superficie de la ventosa o del accesorio se
ensucia.
t Limpie la ventosa y la superficie de
adhesión (página 26).
NV-U81T/U81
2-695-873-12 (1)
Page 95

G:\##sagyou\11
No\1109\2695873121\2695873121NVU81U\03ES02NAV-U.fm
02FR+00COV-U.book Page 33 Thursday, November 9, 2006 3:11 PM
El modo de demostración se inicia
automáticamente aunque no se
realice ninguna operación.
t Desactive el modo de demostración
automática mediante la opción “Más...”
del menú principal c “Configuración” c
“Configuración básica” c “Modo
demo”. A continuación, compruebe que
“Modo demo” se ha desactivado.
Restauración de la unidad
Si el software de navegación se
bloquea, pruebe a reiniciar la unidad.
Presione el botón RESET con un objeto
puntiagudo, como un bolígrafo
(página 8).
Nota
Después de reiniciar la unidad, es posible
que tarde un tiempo en recibir señales GPS.
masterpage:Right
33
NV-U81T/U81
2-695-873-12 (1)
Page 96

02FR+00COV-U.book Page 34 Thursday, November 9, 2006 3:11 PM
Page 97

02FR+00COV-U.book Page 35 Thursday, November 9, 2006 3:11 PM
Page 98

02FR+00COV-U.book Page 36 Thursday, November 9, 2006 3:11 PM
 Loading...