

Sony NAV-U NV-U81T,NAV-U NV-U80 Quick Start Manual
Personal Navigation System
Personal Navigation System
Quick Start Guide
2-695-873-21(1)
Quick Start Guide
Anleitung zur schnellen
Inbetriebnahme
Guide de démarrage
rapide
Beknopte handleiding
Guida rapida all’uso
Guía de inicio rápido
GB
DE
FR
NL
IT
ES
How to use this manual
When reading this manual, keep the control
layout illustration (on the rear of this page)
open for quick reference from any page.
Hinweis zu dieser
Bedienungsanleitung
Wenn Sie diese Bedienungsanleitung lesen,
klappen Sie die Abbildung mit den
Bedienelementen (auf der Rückseite dieser
Seite) auf. So haben Sie sie beim Lesen
immer im Blick.
Comment utiliser ce manuel
Lorsque vous lisez ce manuel, laissez ouverte
l’illustration de représentation des
commandes (au verso de cette page) pour
pouvoir vous y reporter rapidement à partir
de n’importe quelle page.
Hoe moet u deze handleiding
gebruiken
Wanneer u deze handleiding leest, moet u de
illustratie met het overzicht van de
bedieningselementen (op de achterkant van
deze pagina) bij de hand houden.
Uso del presente manuale
Durante la lettura del manuale, utilizzare le
illustrazioni sul retro di questa pagina come
riferimento rapido.
Utilización de este manual
Cuando lea este manual, mantenga abierta la
ilustración de la distribución de los controles
(en el reverso de esta página) para poder
consultarla rápidamente desde cualquier
página.
Hur du använder denna
manual
När du läser den här manualen är det enklast
att ha bilden av kontrollayouten (på baksidan
av denna sida) framme så att du enkelt kan
följa referenserna i instruktionerna.
Como utilizar este manual
Quando estiver a ler este manual, mantenha
aberta a ilustração do desenho de controlo
(no verso desta página), para consulta rápida
a partir de qualquer página.
NV-U81T
NV-U80
©2006 Sony Corporation
Snabbstartguide
Guia de iniciação rápida
SE
PT
Disposal of Old Electrical &
Electronic Equipment (Applicable in
the European Union and other
European countries with separate
collection systems)
This symbol on the product or on its
packaging indicates that this product shall not be treated
as household waste. Instead it shall be handed over to the
applicable collection point for the recycling of electrical
and electronic equipment. By ensuring this product is
disposed of correctly, you will help prevent potential
negative consequences for the environment and human
health, which could otherwise be caused by inappropriate
waste handling of this product. The recycling of materials
will help to conserve natural resources. For more detailed
information about recycling of this product, please contact
your local Civic Office, your household waste disposal
service or the shop where you purchased the product.
Applicable accessories: Car battery adapter/AC power
adapter
POWER
OFF
ON
DC IN 5V
Hereby, Sony Corp., declares that these
NV-U81T/U80 are in compliance with the
essential requirements and other relevant
provisions of Directive 1999/5/EC.
For details, please access the following URL:
http://www.compliance.sony.de/
Caution
IN NO EVENT SHALL SONY BE LIABLE
FOR ANY INCIDENTAL, INDIRECT OR
CONSEQUENTIAL DAMAGES OR
OTHER DAMAGES INCLUDING
WITHOUT LIMITATION LOSS OF
PROFITS, LOSS OF REVENUE, LOSS OF
DATA, LOSS OF USE OF THE PRODUCT
OR ANY ASSOCIATED EQUIPMENT,
DOWNTIME, AND PURCHASER’S TIME
RELATED TO OR ARISING OUT OF THE
USE OF THIS PRODUCT, ITS
HARDWARE AND/OR ITS SOFTWARE.
2

Table of Contents
Warning . . . . . . . . . . . . . . . . . . . . . . . .5
Location of controls. . . . . . . . . . . . . . .8
Turning the unit on . . . . . . . . . . . . . . .9
Performing initial setup. . . . . . . . . . . .9
Receiving GPS signals . . . . . . . . . . .10
Basic Operations 10
Menu operations . . . . . . . . . . . . . . . .10
Gesture Command operation. . . . . . .11
Keyboard operations . . . . . . . . . . . . .12
Route Searching 13
Setting the destination and starting
guidance . . . . . . . . . . . . . . . . . . . .13
Setting the destination
in other ways. . . . . . . . . . . . . . . . .15
Guidance displays . . . . . . . . . . . . . . .16
System Settings 18
Using the Supplied
Software 19
Contents. . . . . . . . . . . . . . . . . . . . 19
Connecting to your computer . . . 20
Additional Information 21
Precautions. . . . . . . . . . . . . . . . . . . . 21
About the “Memory Stick” . . . . . . . 21
What is “Memory Stick”? . . . . . . 21
Types of “Memory Stick Duo” that
the system can use . . . . . . . . . . . . 21
Note on LCD panel . . . . . . . . . . . . . 23
Maintenance. . . . . . . . . . . . . . . . . . . 23
Cleaning the suction cup . . . . . . . 23
Fuse replacement. . . . . . . . . . . . . 24
Notes on unit disposal . . . . . . . . . . . 24
Specifications. . . . . . . . . . . . . . . . . . 26
Troubleshooting . . . . . . . . . . . . . . . . 27
Resetting the unit. . . . . . . . . . . . . 29
3

About this manual
• This Quick Start Guide contains
instructions for basic operations.
For more information, see the PDF
manual on the supplied Application
Disc. For details on installation and
connections, see the supplied
“Read This First” (installation
manual).
• Contents of this manual are written
for users with knowledge of using
the Microsoft® Windows®
operating system. For details about
computer operation, see the manual
for your computer.
• Illustrations in this manual may
differ from the actual device.
• Before operating this system, read
this manual and “Read This First”
thoroughly.
• Retain this manual and the supplied
“Read This First” in a place where
you can refer to at any future time.
4

Warning
PLEASE READ THIS MANUAL AND
THE SUPPLIED “READ THIS FIRST”
(INSTALLATION MANUAL)
COMPLETELY BEFORE INSTALLING
OR OPERATING YOUR PERSONAL
NAVIGATION SYSTEM. IMPROPER
INSTALLATION OF THIS DEVICE
MAY CAUSE ACCIDENT, INJURY OR
DEATH.
On safety
•Be sure to:
– install the navigation system in a safe
place where it does not obstruct the
driver’s view.
– not install the unit above an airbag.
– place the cables and cradle where they
do not obstruct driving.
– attach the unit to the cradle properly,
otherwise the unit may fall.
– clean the surface of the suction cup
and attachment surface before
attaching. Also, confirm that the
suction cup is securely attached after
installation. Otherwise, the unit or
cradle may fall.
– clean the surface on the dashboard
before using the supplied sheet.
Failure to do so may result in unsafe
driving conditions.
• Do not apply excessive force to the unit
or cradle as it may fall.
• Comply with local traffic rules, laws and
regulations.
• Do not continuously watch the unit
while driving. It is dangerous and may
cause a traffic accident.
• If you need to operate the navigation
system while driving, be sure to stop the
car in a safe place before operating.
• Do not modify the unit.
• Do not disassemble the unit except when
disposing of it.
• Do not use the navigation system with
the system covered or blocked.
When using the unit indoors
Use this product near a wall outlet. This is to
ensure that the power plug can be
immediately unplugged from the wall outlet
to power off if some abnormality occurs
during use. Do not use the AC Adaptor
placed in a narrow space, such as between
a wall and furniture.
On handling
• Do not let foreign objects get inside the
cradle connector (9) of the unit, as it
may cause a malfunction.
continue to next page t
5

• Turn the unit off by pressing ?/1 (4),
take it out of the cradle, then disconnect
the car battery adapter, otherwise it may
drain the car battery.
Note the following.
If your car’s cigarette lighter socket is
not connected to the ACC on your
ignition switch, power will continue to
be supplied to the unit's built-in power
supply even when the ignition is off or
the unit is not in use.
• Do not connect any accessory (car
battery adapter, AC power adapter, etc.)
other than those supplied or optional.
• Do not expose the unit to fire or water, as
it may cause a malfunction.
• Be sure to remove the unit out of the car
when leaving your car to prevent theft or
high temperature damage inside the car.
• Note that the built-in battery cannot be
charged outside the temperature range 5
– 45 ºC (41 – 113 ºF).
• Do not leave the unit in high ambient
temperature as the built-in battery
capacity will deteriorate, or it will
become unchargeable.
On GPS
GPS (Global Positioning System)
satellites continuously emit signals for
positioning anywhere on the earth. As a
GPS aerial receives these signals, users
can be informed of their location (latitude,
longitude and altitude). Information must
be received from 3 satellites in order to
obtain two-dimensional fixes (latitude and
longitude), and 4 satellites are required for
three-dimensional positioning (latitude,
longitude and altitude). As GPS satellites
are controlled by the U.S. Department of
Defense, a deliberate margin of error
between a few meters (a few feet) and 10
meters (32.8 feet) exists. As a result, the
GPS navigation system may include an
error of between 10 meters (32.8 feet) and
about 200 meters (656.2 feet), depending
on the circumstances.
As GPS information is obtained using
signal from satellites, it may be impossible
or difficult to obtain the information in the
following locations:
• Tunnel or underground
6
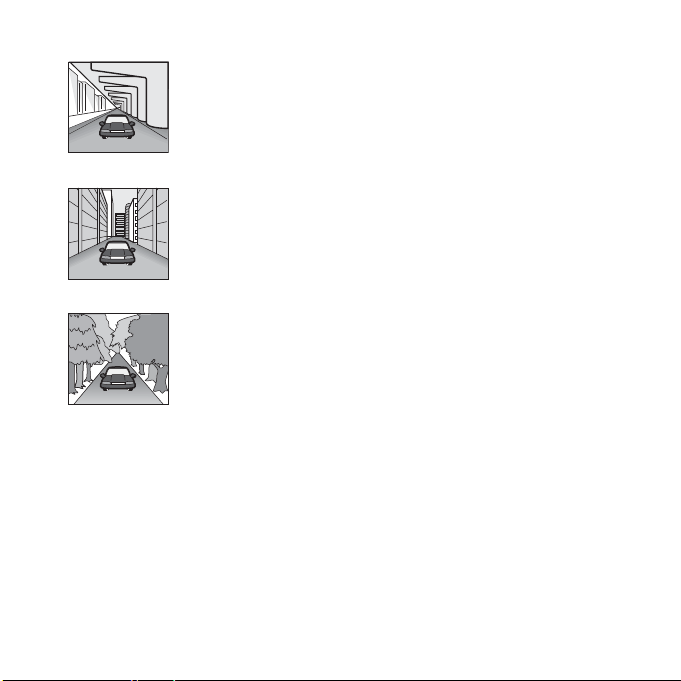
• Under a highway
• Between high buildings
• Between tall trees with dense foliage
After the initial installation, park your car
in a safe, open place (no high buildings,
etc.) for up to 20 minutes to allow for GPS
signals to be received before using the
navigation system.
Note
It takes time to receive a GPS signal when
switching the unit ON after switching OFF
the main power, after the built-in battery is
fully discharged, or after resetting the unit.
On this positioning system
The system has a function that allows the
car’s current position to be correctly
displayed even at locations where the GPS
signal is temporarily interrupted or poorly
received, as when going under an
overpass. To activate this function, do the
following.
– Attach the unit to the cradle.
– Drive for a while in an area where the
GPS signal is clearly received.
The positioning system will become ready
for operation after you have driven a little
with the unit on.
Notes
• The accuracy of this function may
deteriorate if the unit is installed near a
heated or heat-reflecting windscreen. In
this case, use the optional External GPS
Antenna.
• Depending on the conditions, the car’s
current position or the movement may not
be accurately displayed. This, however,
will be corrected as soon as the GPS
signal reception resumes.
• This function is available only during route
guidance.
On the software
Read the “END-USER LICENSE
AGREEMENT” carefully before use.
7

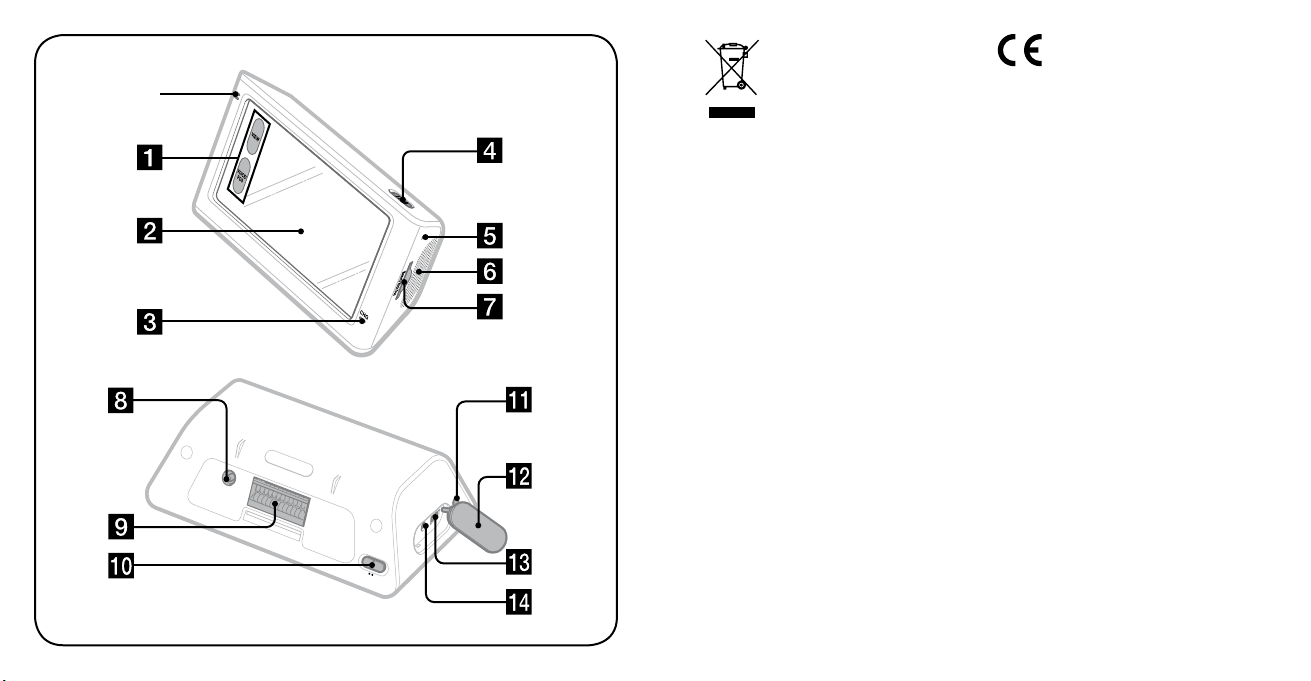
Location of controls
Read the explanations below while
referring to the illustrations on the flap.
Refer to the pages listed for details.
a Screen buttons 16
b Display window/touch screen
c CHG (battery charge)
indicator
Lights up in red while charging.
d ?/1 (on/standby) button 9
To turn the unit on/off.
e RESET button 29
f Speaker
Outputs guidance and warnings.
g Memory Stick Duo slot
For “Memory Stick Duo” insertion
for functional expansion.
h External GPS antenna (aerial)
jack
To connect the optional External
GPS Antenna VCA-41 to the
cradle.
i Cradle connector
j POWER switch 9, 29
To turn the main power on/off.
k Auto dimmer sensor
This sensor automatically adjusts
the brightness of the display in
response to the brightness of the
surroundings.
l Jack cover
Note
If you pull off the jack cover by accident,
use a pointed object to push it back in.
m USB jack 20
To connect to a computer with the
USB cable.
n DC IN 5V jack
To connect to the AC power
adapter.
A Microphone (only for models with built-in
BLUETOOTH wireless technology)
To talk on the telephone using the
BLUETOOTH function. For details, see
the supplied “BLUETOOTH Hands-free
Manual.”
8

Turning the unit on
Performing initial setup
Check that the POWER switch on the
bottom left of the unit is in the ON
position beforehand (page 8).
Press ?/1 (4).
The display appears as follows.
During route guidance, the map display
appears.
In other cases, the top menu appears.
To turn the unit off
Press ?/1 (4).
The unit enters standby mode for
minimum power consumption.
Notes
• Do not turn the main power off except
when the unit will not be used for more
than 3 months.
• If you switch off the main power, it may
take time to receive GPS signals when
switching on again.
• Be sure to take the unit out of the cradle
and disconnect the car battery adapter
when the unit is not in use to prevent car
battery drain.
The following contents can be set up by
the Startup Configuration Wizard.
– Language
– Distance format
–Brightness
– Time format
– Address input method
– Home address
– Home phone number (BLUETOOTH
models only, such as the NV-U80)
Follow the on-screen instructions to
perform the setup.
These settings can then be further
configured in the setting menu at any
time (page 18).
Note
The current time setting (including time
zone of current region and daylight saving
time/standard time) is automatically set after
GPS signals are received correctly.
9

Receiving GPS signals
After the initial installation, park your
car in a safe, open place (no high
buildings, etc.) for up to 20 minutes to
allow for GPS signals to be received
before using the navigation system. The
system requires signals from a
minimum of 3 GPS satellites to
calculate the current car position
properly.
GPS status indicator*
* The icon shows the GPS signal reception
condition. The indicator lights up in
red when the signal cannot be received.
10
Basic Operations
Common procedures to operate the
system are explained.
General operations can be performed on
the touch screen. Touch the displayed
icons with your finger gently.
Note
Do not press the display with excessive
force, or use any sharp article, such as a
pen, etc., to tap on the display.
Menu operations
The top menu appears when turning on
the unit by pressing ?/1 (except during
route guidance, in which case the map
appears).
To show the top menu from the map
display, touch the map.
To return to the top menu from any
menu display, touch “VOICE/POS,”
then touch the map.
You can set items in the menu by the
following procedures.
1 Show the top menu.
2 Touch “More....”
3 Touch “Settings.”
The list of setting categories
appears.
During menu operation:
To return to the previous display, touch
or .
To cancel the menu selection, touch
“VOICE/POS” (the current car position
display appears).
Note
The items on the menu and setting
operations differ depending on the selected
menu item.
Gesture Command
operation
4 Touch a desired setting
category.
The list of setting items in the
selected category appears.
E.g.: when selecting the default map
view
Touch “General Settings” c
“Navigation View” c “2D” or “3D.”
In map displays (except in map
scrolling mode), by assigning a screen
finger stroke such as line, etc.,
frequently-used operations can be
performed easily. This is called Gesture
Command operation.
continue to next page t
11
To Draw
start navigation to
your home
a circumflex.
start navigation to
the nearest POI
stored on Quick
Links*
Make a call to
your home
(BLUETOOTH
models only, such
as the NV-U80)
* For details on Quick Links, see pages 15
and 18.
Quick Link 1
horizontal line
(left to right).
Quick Link 2
vertical line
(downwards).
Quick Link 3
horizontal line
(right to left).
draw a “V.”
12
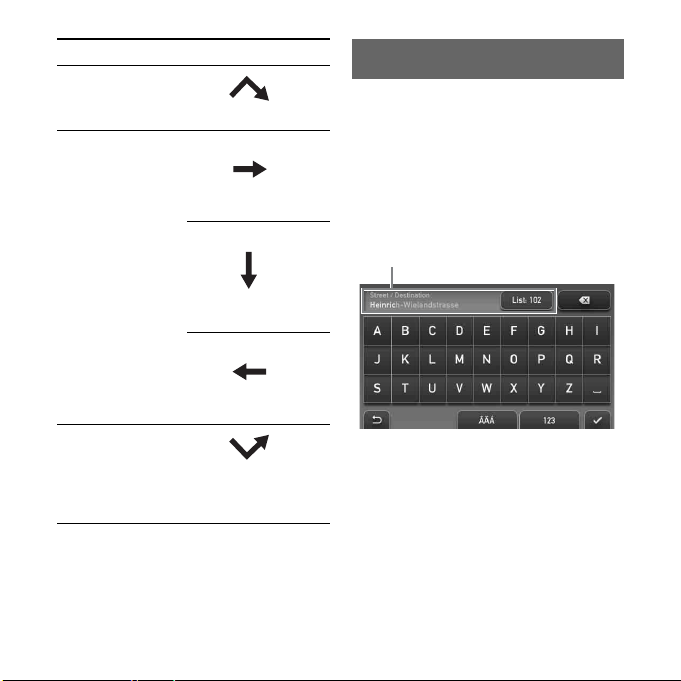
Keyboard operations
The keyboard display appears when you
need to enter text.
You need only enter characters in upper
case, as the system automatically
converts them to appropriate characters.
You can enter special characters when
necessary.
Keyboard display
Candidates/entry field
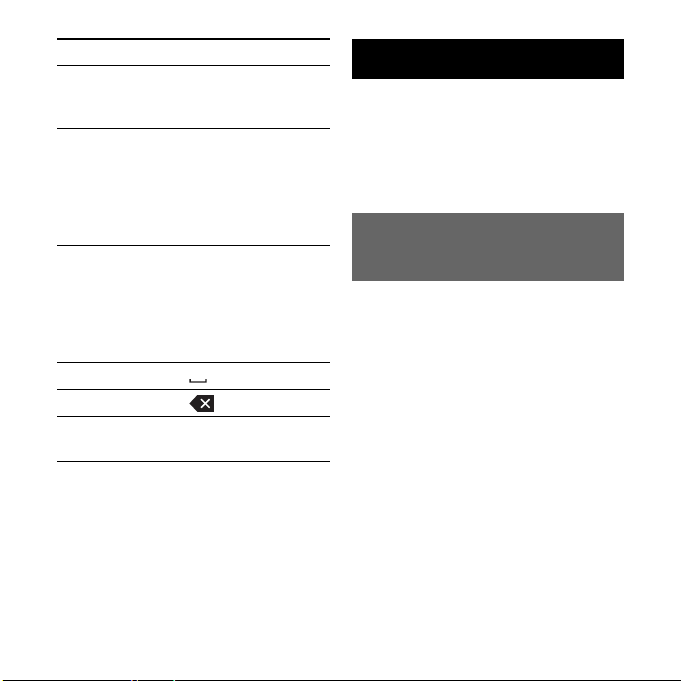
To Touc h
enter an
alphabetical
character
enter a special
character
enter a number “123” to switch to
enter a space
delete a character
show the
candidate list*
* The candidate list automatically appears
when candidates are narrowed down as
you continue inputting characters.
the desired
character key.
“ÂÄÁ” to switch to
the special char acter
keyboard, then the
desired character;
and “ABC” to
switch back.
the numeric
keyboard, then the
desired number key;
and “ABC” to
switch back.
“List”
Route Searching
The system searches for routes
automatically after setting the
destination.
Before starting, check that GPS signals
are sufficient for navigation (page 10).
Setting the destination
and starting guidance
The procedure for searching for the
route and starting route guidance is
explained.
The following is an example of how to
set the destination by its address in the
given conditions below (configured at
the Startup Configuration Wizard or in
the setting menu).
– Selected address input method:
“Step-by-Step Input”
For details on setting the destination in
other ways, see “Setting the destination
in other ways” on page 15.
continue to next page t
13
For your safety, park your car in a safe
place, then enter the destination
information before starting a journey.
1 Show the top menu.
In the map display, touch the map.
In the menu display, touch “VOICE/
POS,” then touch the map.
2 Select “Navigate.”
3 Select “Address Input,” then
input the address details.
Input the items in the order below,
and touch or the candidate in the
list to proceed.
For details on how to input
characters, see “Keyboard
operations” on page 12.
1 “Country”
2 “Town / Postal Code”
If it is possible to pinpoint the
destination by the selected postal
1
code*
, the address confirmation
display appears. Select
14
“Calculate Route.”
3 “Street / Destination”
4 “No.” or “Intersection”*
The address confirmation display
appears.
*1 Available only in the UK and
Netherlands.
*2 Selectable only if existent in the
selected street.
2
4 Select “Calculate Route.”
The map display appears, the route
is calculated, and route guidance
starts.
To fine adjust the destination
point
You can jump from the address
confirmation display to the map
scrolling mode, and fine adjust the
destination point.
1 Touch to switch to the map
scrolling mode.
2 Drag the screen to adjust the
destination point.
3 Touch to display the map
scrolling mode menu.
4 Select “Navigate to Here” to start the
route guidance.
For details on operations in the map
scrolling mode, see “Map scrolling
mode” on page 18.

Setting the destination in
other ways
You can also set the destination and
search for routes by the following
methods.
From the top menu, select the items in
the following order, then “Calculate
Route” (if necessary).
For details, see the supplied PDF
manual.
Search Nearby
Searches for routes to a POI, such as
restaurant, hotel, etc., near the current
car position.
Select “Search Nearby,” then any of the
following options.
“Quick Link 1 - 3”
Searches for routes to the nearest POI
of the category stored on Quick Links.
Categories on Quick Links can be
customized in the setting menu
(page 18).
“Search by Name”
Enter the name of the POI directly.
“Search by Category”
Select the desired POI category from
the list.
Go Home
Searches for routes to your home when
it is registered.
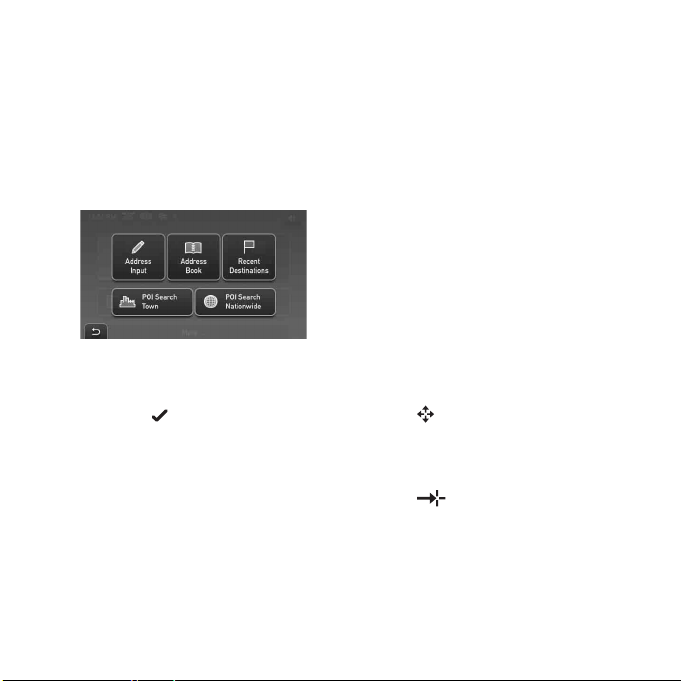
Navigate
The destination can be set by the
following methods.
“Address Book”
Searches for routes to a saved
destination point.
“Navigate” c “Address Book”
“Recent Destinations”
Searches for routes to recently
searched destinations.
“Navigate” c “Recent Destinations”
“POI Search Nationwide”
Searches for routes to a POI, such as
airport, etc., within the specified
country.
“Navigate” c “POI Search
Nationwide”
“POI Search Town”
Searches for routes to POI, such as
restaurant, hotel, etc., within the
specified town.
“Navigate” c “POI Search Town”
15
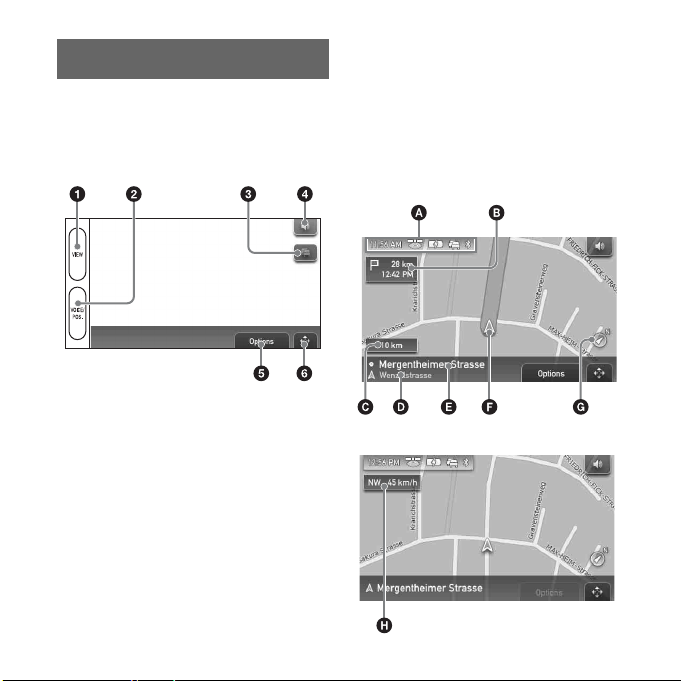
Guidance displays
Once a route has been calculated, visual
guidance navigates you to the
destination along with audio guidance.
Information on map tool menu
1 To select a map display (Map, DR,
or Map+DR).
For details on DR, see “Dynamic
Route Information display (DR)” on
page 17.
2 During route guidance:
To hear the next voice guidance.
In map scrolling mode:
To switch to the current car position
display.
3 To view detailed TMC information.*
4 To adjust the voice guidance
volume.
5 To show option menu.
16
6 To switch to map scrolling mode.
* When the supplied (or optional) TMC
cradle is used, this appears only when the
route that has been found is congested.
2D Map display
Straight-ahead driving (during route
guidance)
Straight-ahead driving (in other cases)
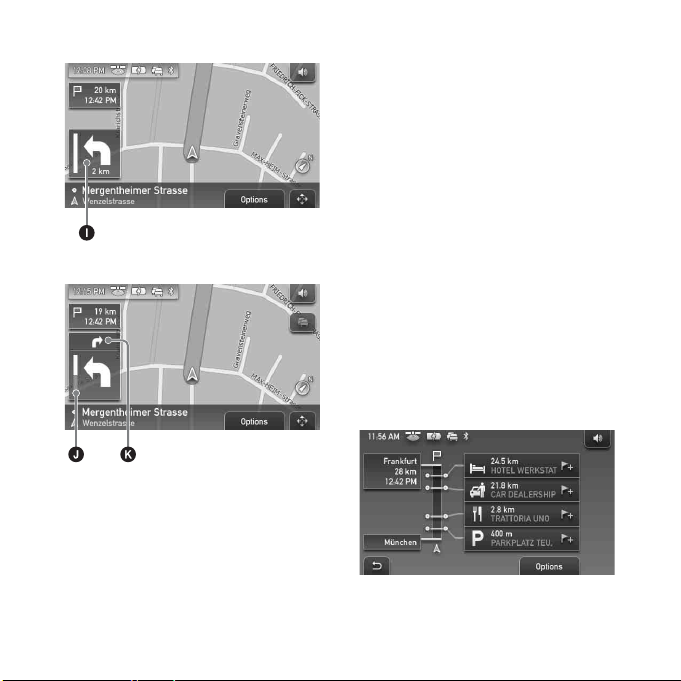
Approaching an intersection
Approaching an intersection (closer)
A Indicators
Current time/GPS status/Battery
condition/TMC status/
BLUETOOTH status
For details, see the supplied PDF
manual.
B Distance to/ETA (Estimated Time of
Arrival) at destination
C Distance to next turn
D Current street name
E Next street name
F Current position
G To indicate where north is.
H Current direction/current speed
I Next turn instruction
J Bar indication of distance to next
turn
K Instruction after next
3D Map display
You can set the 3D map display in the
setting menu (page 18).
Dynamic Route Information
display (DR)
This display shows the distance to the
destination, POI information, etc.
For details, see the supplied PDF
manual.
continue to next page t
17
Route display
You can view the entire route to the
destination.
To display, select “Options” c “Show
Route.”
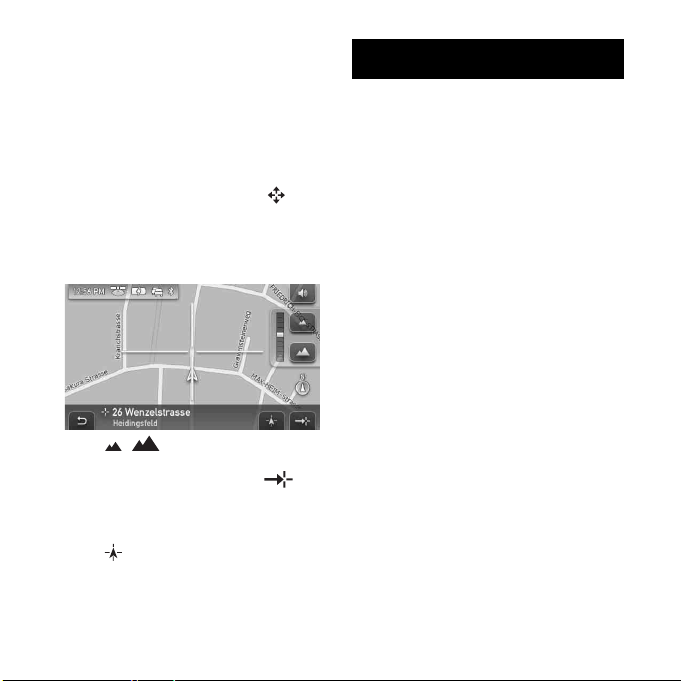
Map scrolling mode
You can switch to map scrolling mode
from map display by touching ,
whether during route guidance or not.
In map scrolling mode, the cross-hair is
displayed on the map, and you can drag
the screen to scroll the map.
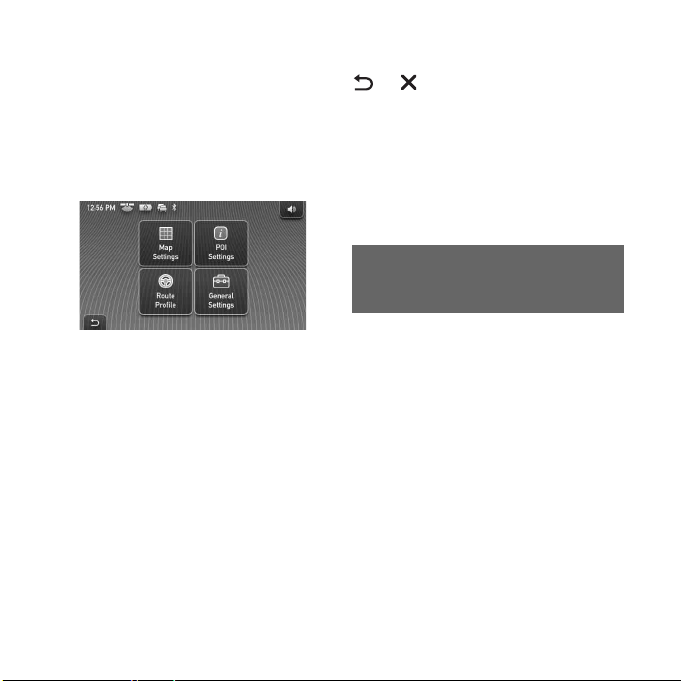
System Settings
Various settings related to the system
and memory are configurable.
From the top menu, select “More...” c
“Settings” c the desired category c the
desired item below to make each
setting.
Several representative setting items in
each category are introduced here as
examples.
For details, see the supplied PDF
manual.
General Settings
Navigation View (to select the default
map view (2D or 3D)), Show Distance/
ETA to Destination (to show/hide the
distance to and ETA (Estimated Time of
Arrival) at the destination), etc.
Touch / to adjust map scale.
Place the intersection of the cross-hair
on a desired point, then touch to
show the map scrolling mode menu,
where you can set the point as a
destination, etc.
Touch to switch from map scrolling
mode to the current car position display.
18
Map Settings
Current Map (to select a map stored in
the unit).
POI Settings
Show POIs (to show/hide each POI),
Quick Link 1 - 3 (to store 3 frequentlyused POI categories, which can be used
as shortcuts when setting the
destination).

Route Profile
Type of Route (to select the route search
preference), Motorways (to allow/
avoid/forbid motorways/highways), etc.
Note
Warnings given according to map
information may not always be correct due
to road works, etc. Traffic situations and
road regulations take absolute precedence
over information given by the navigation
system.
Using the Supplied
Software
The major functions of the software on
the supplied CD-ROM are introduced
below.
If you insert the CD-ROM into your
computer, the screen appears
automatically. Follow the on screen
instructions.
System requirements
• OS: Windows 2000/XP
• CD-ROM/DVD-ROM drive
•USB port
• 150 MHz CPU speed minimum
Contents
Install PC Connection Software
PC connection software (ActiveSync)
can be installed.
Language Manager
Language data for on-screen display
and voice guidance can be added to the
unit, and unnecessary language data can
be deleted from the unit.
19
Read the Manual
You can read the PDF manual which
contains further information on
operations available.
Support Link
Easy access to the Sony navigation
support site is available.
Visit this site for technical support, such
as software updates, FAQs, etc.
Connecting to your
computer
Before connecting to your computer,
install the PC connection software
(ActiveSync) to your computer.
1 Connect the unit to an outlet
using the AC power adapter
and the AC power cable.
20
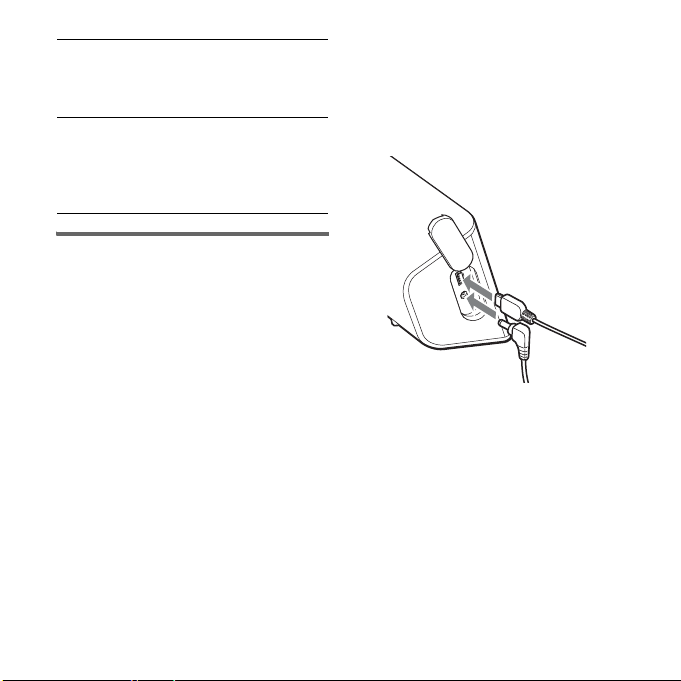
2 Connect the unit to your
computer with the USB cable.
Connect the small connector of the
USB cable to the USB jack on the
unit, then the large connector to a
USB port on your computer.
Notes when transferring data
• When connecting the unit to your
computer, connect it directly to the
computer. The unit may not work properly
if it is connected through a USB hub.
• During transfer, do not
– disconnect the USB cable or the AC
power adapter.
– turn off the main power of the unit, enter
unit standby mode, or reset the unit.
– shut down the computer, enter computer
standby mode, or restart the computer.
If you want to cancel transferring mid-way,
click the cancel button on the computer
screen.

Additional Information
Precautions
About the “Memory
Stick”
If your car has been parked in direct
sunlight, allow the unit to cool off before
operating it.
Moisture condensation
On a rainy day or in a very damp area,
moisture condensation may occur inside
the display of the unit. Should this occur,
the unit will not operate properly. In such
a case, slide the POWER switch on the
bottom left of the unit to OFF position,
then wait for about an hour until the
moisture has evaporated.
What is “Memory Stick”?
“Memory Stick” is a compact-size IC
recording medium with a large capacity. It
has been designed not only for
exchanging/sharing digital data among
“Memory Stick” compatible products, but
also for serving as an insertable/removable
external storage medium that can save
data.
Types of “Memory Stick
Duo” that the system can
use
With the system, you can use the
following types of “Memory Stick Duo.”*
• Memory Stick Duo (Not compatible
with MagicGate)
• MagicGate Memory Stick Duo
• Memory Stick PRO Duo
* The system has been demonstrated as
operable with a “Memory Stick Duo” with a
capacity of 4 GB or smaller. However, we
do not guarantee the operations of all the
“Memory Stick Duo” media.
continue to next page t
21
Notes
• This system supports only the reading of
data on a “Memory Stick Duo.” “Memory
Stick Duo” formatting and writing cannot
be performed.
• This system does not support parallel
high-speed data transfer.
• When you format a “Memory Stick Duo,”
all the data will be erased. To avoid
erasing important data by accident, make
sure to check the content before
formatting.
• To format a “Memory Stick Duo,” use a
formatting application that is compatible
with the “Memory Stick Duo.” When
formatting the “Memory Stick Duo,” do not
use the format function on the Windows
Explorer.
• Standard-size “Memory Stick” cannot be
used in this system.
• When using a “Memory Stick Duo,” make
sure to check correct insertion direction.
Wrong usage may cause trouble with the
system.
• Do not place the “Memory Stick Duo”
within the reach of a small child to prevent
him from swallowing it by accident.
• Avoid removing the “Memory Stick Duo”
from the system while the system is
reading data.
• Data may be damaged in such occasions:
– “Memory Stick Duo” is removed or the
system is turned off during a read
operation.
– “Memory Stick Duo” is used in a location
subject to static electricity or electrical
noises.
22
• We recommend that you save backup of
the important data.
• Do not bend, drop or apply strong shock to
the “Memory Stick Duo.”
• Do not disassemble or modify the
“Memory Stick Duo.”
• Do not allow the “Memory Stick Duo” to
get wet.
• Do not use or store the “Memory Stick
Duo” in a location that is subject to:
– Extremely high temperature, such as in
a car parked in the sun
– Direct sunlight
– High humidity or places with corrosive
substances
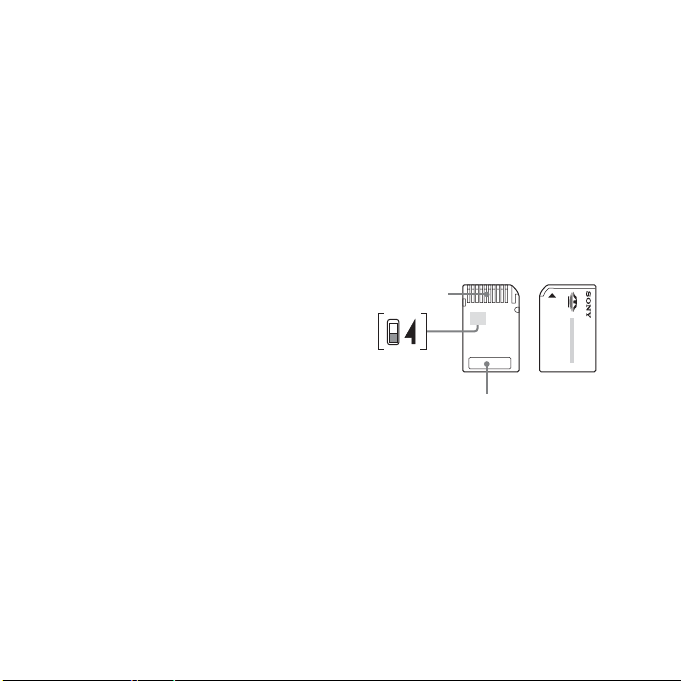
Connector
Write-protect
switch
Memo area
• Do not touch the “Memory Stick Duo”
connector with your finger or metallic
objects.
• You cannot record, edit or delete data if
you slide the write-protect switch to LOCK.
• When you slide the write-protect switch of
the “Memory Stick Duo,” use a thinpointed device.
• When you use a “Memory Stick Duo”
without the write-protect switch, be careful
not to edit or delete the data by accident.
• When you write on the memo area of the
attached label, do not write forcefully.
• When you carry or store the “Memory
Stick Duo,” put it in the case supplied with
it.
Note on LCD panel
Some stationary blue, red or green dots
may appear on the monitor. These are
called “bright spots,” and can happen with
any LCD. The LCD panel is precisionmanufactured with more than 99.99 % of
its segments functional. However, it is
possible that a small percentage (typically
0.01 %) of the segments may not light up
properly. This will not, however, interfere
with your viewing.
Maintenance
Cleaning the suction cup
If the surface of the suction cup gets dirty
and the attachment strength weakens,
wash and clean the surface of the suction
cup.
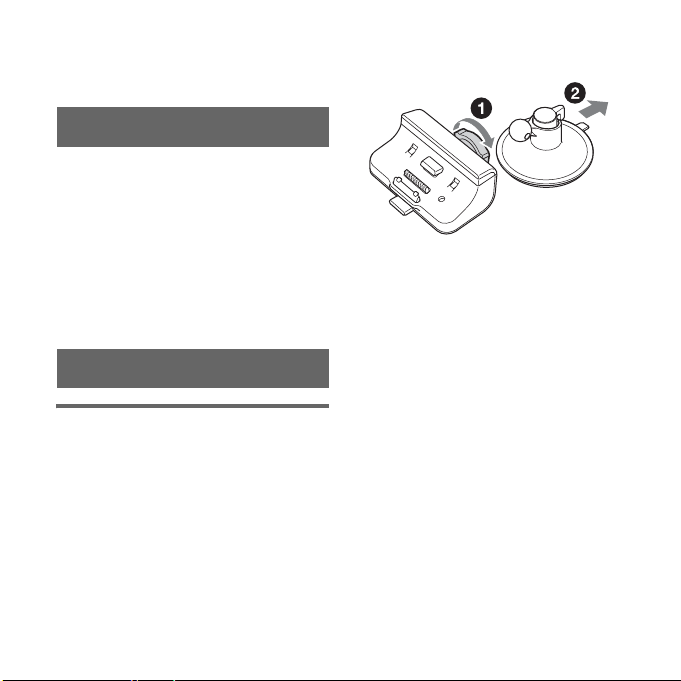
Before washing, be sure to detach the
suction cup part from the cradle following
the steps below.
1 Detach the suction cup from the
cradle.
2 Wash the surface of the suction cup
with water.
3 Allow the suction cup to air dry
completely.
Warning
• Never wash the suction cup without
detaching it from the cradle. Otherwise,
it may damage the cradle.
• Do not use cleanser. Wash only with
water.
• Be sure to dry the suction cup before
reattaching.
Notes
• If the suction cup leaves a trace on the
windscreen, wipe with water.
• The dashboard may leave an impression
on the surface of the suction cup,
however, it does not affect the attachment
strength.
continue to next page t
23
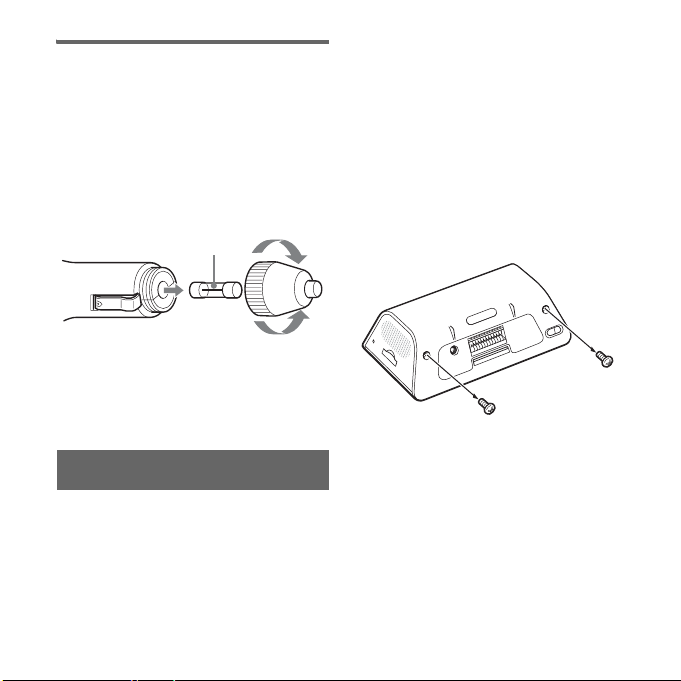
Fuse replacement
When replacing the fuse in the car battery
adapter, be sure to use one matching the
amperage rating stated on the original
fuse. If the fuse blows, check the power
connection and replace the fuse. If the fuse
blows again after replacement, there may
be an internal malfunction. In such a case,
consult your nearest Sony dealer.
Fuse (2.5A)
Warning
Never use a fuse with an amperage rating
exceeding the one supplied with the unit
as this could damage the unit.
To tight en
To remove
Notes on unit disposal
Remove the built-in lithium-ion battery
when disposing of the unit, and return the
battery to a recycling location.
The procedure for removing the battery is
explained below.
Note
Never disassemble the unit except when
disposing of it.
1 Switch off the main power by
sliding the POWER switch to
the OFF position.
2 Remove the jack cover
(page 8).
3 Remove the 2 screws on the
underside of the unit using a
screwdriver.
4 Remove the rear cover.
24
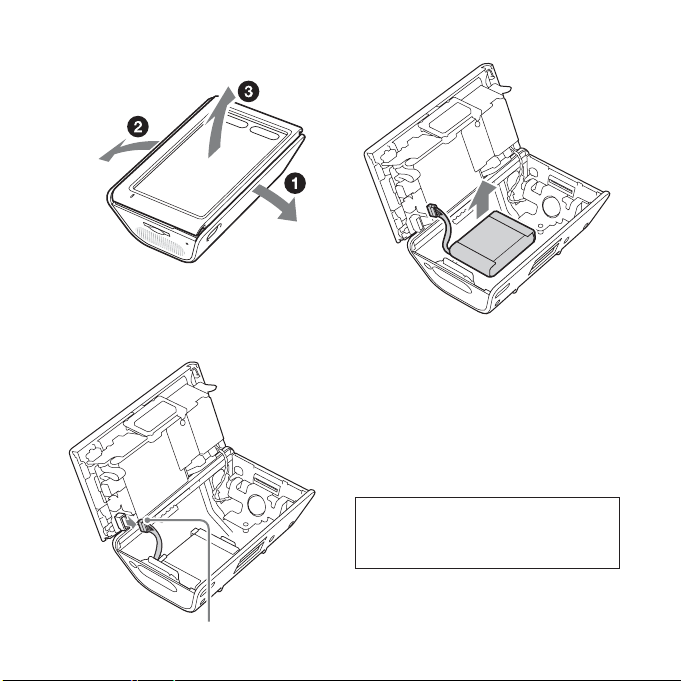
1 Remove the top of the unit as
shown below.
2 Remove the bottom of the unit in
the same way.
5 Disconnect the battery
connector.
6 Remove the battery.
7 Insulate the connector
terminal by wrapping with a
tape.
Notes on the lithium-ion battery
• Keep the battery out of the reach of
children.
• Do not hold the battery with metallic
tweezers, otherwise a short-circuit may
occur.
WARNING
Battery may explode if mistreated.
Do not recharge, disassemble, or dispose of
in fire.
Battery connector
25

Specifications
Main unit
Operating temperature: 5 – 45 ºC
(41 – 113 ºF)
Power requirements: DC 5 V
(from supplied AC power adapter)
Connection terminals:
Cradle connector
DC IN 5V jack
USB jack
External GPS antenna (aerial) jack
Memory card slot:
Memory Stick Duo slot
Speaker:
20 × 40 mm (0.8 × 1.6 in) oval speaker
Consumption current: Max. 1.5 A
Dimensions:
Approx. 134.4 × 79.1 × 44.0 mm
(5.3 × 3.1 × 1.8 in) (w × h × d,
protruding parts excluded)
Mass: Approx. 380 g (13.4 oz)
Monitor
System: Transmissive liquid crystal display
Drive system: a-Si TFT active matrix system
Dimensions: 4.3 in (16:9)
95.0 × 53.9, 109.2 mm (3.8 × 2.1, 4.4
in) (h × v, d)
Segment: 391,680 dots (480 × 272 pixel)
Cradle
Operating temperature: 5 – 45 ºC
(41 – 113 ºF)
Power requirements: DC 5.2 V
(from supplied 12 V car battery adapter
(negative earth))
Connection terminals:
Unit connector
DC IN 5.2V jack
TMC aerial jack (TMC models only,
such as the NV-U81T)
Reception frequency: 87.5 – 108.0 MHz
(TMC models only, such as the NVU81T)
Built-in battery charging time/
usage time
Charging time
With the supplied car battery adapter/AC
power adapter: Approx. 4.5 hours
(with unit turned on), or 2.5 hours (in
standby mode)
Usage time
Up to 3.5 hours (depending on usage)
Optional accessories
External GPS Antenna: VCA-41
TMC Car Cradle Kit: NVA-CP3T
Car Install Kit: XA-49FM
Design and specifications are subject to
change without notice.
26
Troubleshooting
The following checklist will help you
remedy problems you may encounter with
your unit.
Before going through the checklist below,
check the connection and operating
procedures.
The operation icons on the display do
not function.
An operation may take time while a map is
displayed.
The unit does not turn on.
t Check that the POWER switch on the
bottom left of the unit is in the ON
position.
t Charge the built-in battery.
– Install the unit properly according to
the supplied installation manual.
– Connect the unit to an outlet using the
AC power adapter and the AC power
cable.
27

The built-in battery cannot be
charged.
t Check that the POWER switch on the
bottom left of the unit is in the ON
position.
t If the AC power adapter is being used,
disconnect it from the outlet, then
reconnect.
t The built-in lithium-ion battery can be
charged at temperatures between 5 – 45
ºC (41 – 113 ºF). The battery may not be
charged if the temperature inside the unit
increases because of direct sunlight
exposure, etc. This is not a malfunction.
GPS signal cannot be received.
• Read the GPS overview (page 6).
• The system cannot receive GPS signals
due to an obstruction.
t Move your car to a place where signals
can be received clearly.
• GPS signal reception is low.
t Check the GPS status by selecting
“More...” in the top menu c “GPS
Status.”
• There is an obstacle in front of the GPS
aerial.
t Install the unit where the signal is not
interrupted by the body of the car, etc.
• GPS signal reception may be prevented by
a heated or heat reflective windscreen.
t Use the optional External GPS
Antenna VCA-41.
The car position on the map does not
match the current road.
The error margin of the signal from the GPS
satellites is too large. A maximum error
margin of a few hundred metres can exist.
Voice guidance cannot be heard.
The volume is set too low.
t Raise the volume by touching in the
top menu or the map display.
When the unit is powered by the built-in
battery, volume may slightly decrease.
The LCD is not displayed normally.
• In high temperatures, the LCD may darken
and not display clearly. In low
temperatures, afterimage may occur on the
LCD. These are not malfunctions, and the
LCD will return to normal when the
temperature returns to within the specified
operating range.
• The LCD is dark.
t The auto dimmer function may be
activated because its sensor (page 8) is
covered by a hand, etc.
The cradle comes off from the
attachment surface.
Attachment strength weakens if the surface
of the suction cup or attachment surface
become dirty.
t Wash and clean the suction cup and the
attachment surface (page 23).
28

The demonstration mode starts
automatically even if no operation is
performed.
t Turn off the auto demonstration mode by
selecting “More...” in the top menu c
“Settings” c “General Settings” c
“Demo Mode.” Then, confirm that
“Demo Mode” is set to off.
Resetting the unit
If the navigation software freezes, try
resetting the unit.
Press the RESET button with a pointed
object, such as a ballpoint pens
(page 8).
If the problem persists, switch off the
main power by sliding the POWER
switch to the OFF position, then switch
on again after approximately 10
seconds (page 8).
Note
After you switch off the main power, it may
take time to receive GPS signals when
switching on again.
29

Entsorgung von gebrauchten
elektrischen und elektronischen
Geräten (anzuwenden in den
Ländern der Europäischen Union
und anderen europäischen Ländern
mit einem separaten Sammelsystem
für diese Geräte)
Das Symbol auf dem Produkt oder seiner Verpackung
weist darauf hin, dass dieses Produkt nicht als normaler
Haushaltsabfall zu behandeln ist, sondern an einer
Annahmestelle für das Recycling von elektrischen und
elektronischen Geräten abgegeben werden muss. Durch
Ihren Beitrag zum korrekten Entsorgen dieses Produkts
schützen Sie die Umwelt und die Gesundheit Ihrer
Mitmenschen. Umwelt und Gesundheit werden durch
falsches Entsorgen gefährdet. Materialrecycling hilft, den
Verbrauch von Rohstoffen zu verringern. Weitere
Informationen über das Recycling dieses Produkts
erhalten Sie von Ihrer Gemeinde, den kommunalen
Entsorgungsbetrieben oder dem Geschäft, in dem Sie das
Produkt gekauft haben.
Geeignetes Zubehör: Autobatterieadapter/Netzteil
Achtung
UNTER KEINEN UMSTÄNDEN
ÜBERNIMMT SONY DIE HAFTUNG FÜR
NEBEN-, INDIREKTE ODER
FOLGESCHÄDEN ODER FÜR
IRGENDWELCHE ANDEREN SCHÄDEN,
EINSCHLIESSLICH UND OHNE JEDE
EINSCHRÄNKUNG JEGLICHER
HAFTUNG FÜR ENTGANGENEN
GEWINN, ENTGANGENES
EINKOMMEN, DATENVERLUST,
NUTZUNGSAUSFALL DES PRODUKTS
ODER ZUGEHÖRIGER GERÄTE,
AUSFALLZEITEN ODER ZEITAUFWAND
DES BENUTZERS, DIE AUF DIE
VERWENDUNG DIESES PRODUKTS,
DER ZUGEHÖRIGEN HARDWARE UND/
ODER SOFTWARE ZURÜCKGEHEN
ODER IN VERBINDUNG DAMIT
AUFTRETEN.
Hiermit erklärt Sony Corp., dass sich dieser
NV-U81T/U80 in Übereinstimmung mit den
grundlegenden Anforderungen und den
anderen relevanten Vorschriften der
Richtlinie 1999/5/EG befindet.
Weitere Informationen erhältlich unter:
http://www.compliance.sony.de/
2
 Loading...