

Sony MHC-GTR8,MHC-GTR7,MHC-GTR6,MHC-GTR6H Operating Instructions Manual

Mini HI-FI
Component
System
4-132-090-12(1)
Operating Instructions
MHC-GTR8
MHC-GTR7
MHC-GTR6
MHC-GTR6H
©2009 Sony Corporation
WARNING
To reduce the risk of f ire or electric shock, do
not expose this apparatus to rain or moisture.
To reduce the risk of fire, do not cover the
ventilation opening of the apparatus with
newspapers, tablecloths, curtains, etc.
Do not place the naked flame sources such as
lighted candles on the apparatus.
To reduce the risk of f ire or electric shock, do
not expose this apparatus to dripping or
splashing, and do not place objects filled
with liquids, such as vases, on the apparatus.
Do not expose batteries or apparatus with
battery-installed to excessive heat such as
sunshine, fire or the like.
Do not install the appliance in a confined
space, such as a bookcase or built-in cabinet.
As the main plug is used to disconnect the
unit from the mains, connect the unit to an
easily accessible AC outlet. Should you
notice an abnormality in the unit, disconnect
the main plug from the AC outlet
immediately.
The unit is not disconnected from the mains
as long as it is connected to the AC outlet,
even if the unit itself has been turned off.
Excessive sound pressure from earphones
and headphones can cause hearing loss.
CAUTION
The use of optical instruments with this
product will increase eye hazard.
For customers in Australia
Disposal of Old
Electrical &
Electronic
Equipment
(Applicable in the
European Union
and other European
countries with
separate collection
systems)
Note on DualDiscs
A DualDisc is a two sided disc product
which mates DVD recorded material on one
side with digital audio material on the other
side. However, since the audio material side
does not conform to the Compact Disc (CD)
standard, playback on this product is not
guaranteed.
Music discs encoded with
copyright protection
technologies
This product is designed to play back discs
that conform to the Compact Disc (CD)
standard. Recently, various music discs
encoded with copyright protection
technologies are marketed by some record
companies. Please be aware that among
those discs, there are some that do not
conform to the CD standard and may not be
playable by this product.
This appliance is classified as a CLASS 1
LASER product. This marking is located on
the rear exterior.
GB
2
The recorded music is limited to private
use only. Use of the music beyond this
limit requires permission of the copyright
holders.

“WALKMAN” and “WALKMAN” logo are
registered trademarks of Sony Corporation.
MICROVAULT is a trademark of Sony
Corporation.
MPEG Layer-3 audio coding technology and
patents licensed from Fraunhofer IIS and
Thomson.
Windows Media is a registered trademark of
Microsoft Corporation in the United States
and/or other countries.
“Memory Stick” is a trademark of Sony
Corporation.
About this manual
The instructions in this manual are for
models MHC-GTR8, MHC-GTR7,
MHC-GTR6 and MHC-GTR6H. In this
manual, the MHC-GTR8 is used for
illustration purposes unless stated
otherwise.
The MHC-GTR8 consists of:
–Unit
Latin American and Mexican models
only HCD-GTR8
Other models HCD-GTR8B
– Speaker System
Latin American and Mexican models
only
• Front speakers SS-GTR8
• Surround speakers SS-RSR8
• Subwoofers SS-WGR8
Other models
• Front speakers SS-GTR8B
• Surround speakers SS-RSR8B
• Subwoofers SS-WGR8B
The MHC-GTR7 consists of:
–Unit
Latin American and Mexican models
only HCD-GTR7
Other models HCD-GTR7B
– Speaker System
Latin American and Mexican models
only
• Front speakers SS-GTR7
• Surround speakers SS-RSR7
• Subwoofer SS-WGR7
Other models
• Front speakers SS-GTR7B
• Surround speakers SS-RSR7B
• Subwoofer SS-WGR7B
Continued
l
GB
3

The MHC-GTR6 consists of:
–Unit
Latin American and Mexican models
only HCD-GTR6
Other models HCD-GTR6B
– Speaker System
Latin American and Mexican models
only
• Front speakers SS-GTR6
• Surround speakers SS-RSR6
Other models
• Front speakers SS-GTR6B
• Surround speakers SS-RSR6B
The MHC-GTR6H consists of:
–Unit HCD-GTR6H
– Speaker System
• Front speakers SS-GTR6H
GB
4

Table of Contents
About this manual ........................3
Guide to parts and controls ..........6
Getting Started
Hooking up the system...............12
Positioning the speakers.............15
Setting the clock.........................18
Basic Operations
Other Operations
Creating your own program ...... 36
— Program Play
Presetting radio stations ............ 38
Recording onto a tape ............... 39
(Except for Latin American
and Mexican models)
Creating your own sound
effect..................................... 40
Singing along ............................ 41
Using the timer.......................... 42
Playing a CD/MP3 disc..............19
Listening to the radio .................21
Transferring onto an USB
device ....................................22
Listening to music of an USB
device ....................................27
Playing a tape .............................30
(Except for Latin American
and Mexican models)
Using optional components........31
Adjusting the sound ...................31
Changing the display..................33
Viewing information in the
display ...................................34
Additional Information
Troubleshooting ........................ 44
Messages ................................... 51
Precautions ................................ 52
Specifications ............................ 54
Compatible USB devices with
this system............................ 58
Index............................ Back cover
GB
5
Guide to parts and controls
This manual mainly explains operations using the buttons on the unit, but the same
operations can also be performed using the buttons on the remote having the same or
similar names.
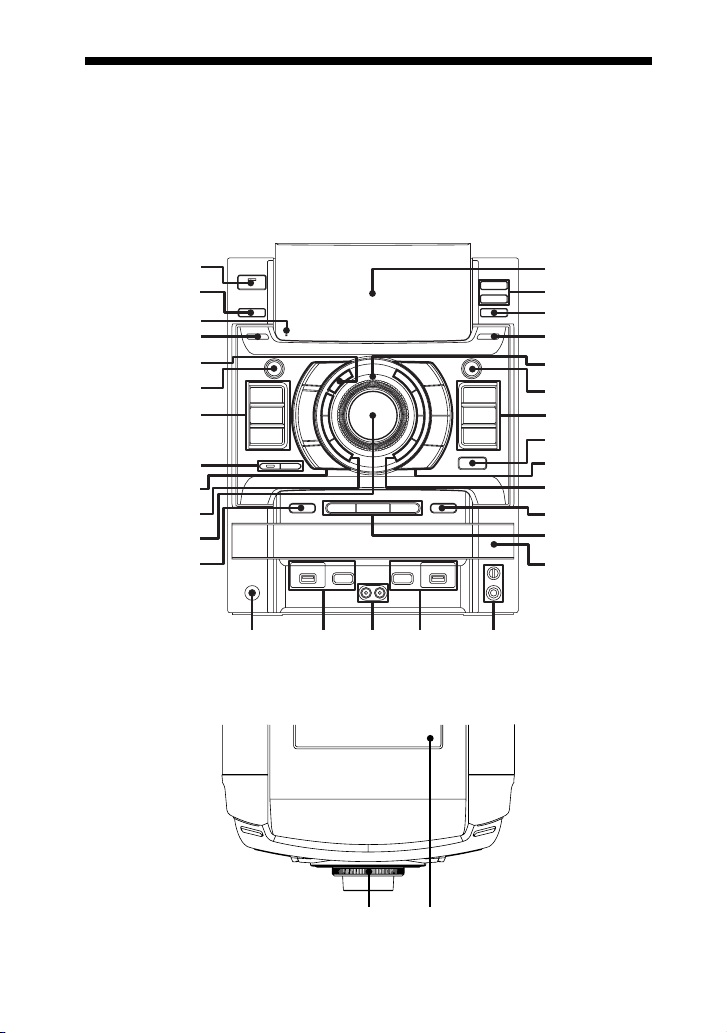
Unit
– Front view
1
2
3
4
5
6
7
*
8
9
q;
qa
qs
qd qf qg qh qj
* MHC-GTR8/MHC-GTR7 only
– Top view
wh
wg
wf
wd
ws
wa
7
qh
9
q;
w;
ql
qk
wj wk
GB
6

A "/1 (on/standby) (pages 13, 43,
44, 50)
Press to turn the system on or off.
The indicator lights up in green when
the system is turned on.
The indicator lights up in red when
the system is turned off.
B OPTIONS (pages 25, 33)
Press to select the display pattern and
USB MEMORY SELECT.
C IR Receptor (page 45)
D DISPLAY (pages 18, 33, 34, 44)
Press to change the information on
the display.
E EQ BAND/MEMORY (page 40)
Press to select a frequency band.
F RETURN (pages 19, 28, 33)
Press to return to the parent folder.
Press to exit search mode.
Press to return to the previous
display in OPTIONS menu.
G Function buttons:
CD (pages 14, 19, 23, 36, 39)
Press to select the CD function.
USB
(pages 24, 28, 36)
Press to select the USB function.
PC (pages 24, 31)
Press to select the PC function.
TUNER/BAND (Except for Latin
American and Mexican models)
(page 21)
Press to select the TUNER function.
Press to select the FM or AM band.
TUNER FM (For Latin American
and Mexican models only)
(page 21)
Press to select FM band.
TUNER AM (For Latin American
and Mexican models only)
(page 21)
Press to select AM band.
TAPE (Except for Latin American
and Mexican models) (page 30)
Press to select the TAPE function.
VIDEO (page 31)
Press to select the VIDEO function.
H (MHC-GTR8/MHC-GTR7 only)
SUBWOOFER ON/OFF
(page 13)
Press to turn the subwoofer on or off.
The SUBWOOFER ON/OFF
indicator lights up when the
subwoofer is turned on.
SUBWOOFER LEVEL (page 13)
Press to enter or exit the subwoofer
level setting.
I +/– (pages 19, 28, 36, 39)
Press to select a folder.
N (play) (pages 19, 27, 30, 37,
46, 49)
Press to start playback.
.m/M> (rewind/fast
forward) (pages 18, 19, 28, 30,
36, 42)
Press to select a track or file.
Hold down to find a point in a track
or file.
TUNING +/– (pages 21, 22)
Press to tune in a radio station.
X (pause) (pages 19, 28, 30)
Press to pause playback.
Guide to parts and controls
Continued
l
GB
7

x (stop) (pages 19, 21, 24, 28,
30, 40, 46)
Press to stop playback, recording or
transferring.
J SURR SP MODE
(MHC-GTR8/MHC-GTR7 only)
(page 31)
Press to select the sound system.
SURROUND
(MHC-GTR6/MHC-GTR6H only)
(page 31)
Press to select the surround effect.
NIGHT MODE (page 32)
Press to select the NIGHT MODE
function.
SOUND FLASH (page 33)
Hold down to create a sound flash
effect.
M PHONES (jack) (pages 45, 55)
Connect the headphones.
N USB A (pages 27, 28, 36)
Press to select the USB device
connected to the A port.
A indicator (page 11)
A port (pages 24, 28, 36, 37,
48)
Connect an optional USB device.
O PC IN L/R (jacks) (page 31)
Connect the audio output of the
computer to these jacks using an
audio cord (not supplied). You can
then output audio through this
system.
P USB B (pages 27, 28, 36)
Press to select the USB device
connected to the B port.
PRESET EQ (pages 31, 41)
Press to select a preset sound effect.
GROOVE (page 31)
Press to reinforce the bass.
MP3 BOOSTER+ (page 32)
Press to select the MP3 BOOSTER+
function.
BREAK (page 32)
Press to select the BREAK function.
K MASTER VOLUME (pages 19,
27, 31, 33, 45)
Turn to adjust the volume.
L DISC SKIP/EX-CHANGE
(pages 19, 20, 36)
Press to select a disc during CD tray
open.
Press to exchange other discs during
playback.
GB
8
B indicator (page 11)
Lights up in red when transferring to
the connected optional USB device.
B port (pages 22, 23, 28, 36,
37, 48)
Connect and transfer to an optional
USB device.
REC TO (pages 23, 24, 25)
USB
Press to transfer onto the connected
optional USB device which is
connected to the B port.
Q MIC (jack) (pages 41, 45, 55)
Connect an optional microphone.
MIC LEVEL (pages 40, 41, 45)
Turn to adjust the microphone
volume.
R Disc tray (pages 14, 19, 23, 39,
46, 51)

S DISC 1 ~ 3 (pages 20, 36)
Press to select a disc.
Press to switch to the CD function
from other function.
T OPEN/CLOSE Z (pages 14, 19,
46)
Press to load or eject a disc.
U ENTER (pages 13, 18, 19, 23,
24, 28, 33, 36, 37, 38, 39, 40)
Press to enter the selection.
V Power illuminator (page 33)
W METER MODE (pages 34, 45)
Press to select a preset display
pattern.
X ERASE (page 28)
Press to erase audio files or folders
on the connected optional USB
device.
Y REC TO TAPE (Except for Latin
American and Mexican models)
(page 39)
Press to record onto a tape.
REC TIMER (page 43)
Press to set the Recording Timer.
Z Display (pages 11, 33, 34, 51)
Meter display (page 34)
wj OPERATION DIAL (pages 13,
19, 25, 28, 33, 37, 40)
Turn to select a track, file or folder.
Turn to select a setting.
wk (Except for Latin American and
Mexican models)
PUSH Z OPEN/CLOSE
(page 30)
Press to insert or eject a tape.
Remote
qg
qf
qd
qs
qa
q;
8
1 "/1 (on/standby) (pages 13, 43,
44, 50)
Press to turn the system on or off.
B CLOCK/TIMER SELECT
(pages 43, 51)
CLOCK/TIMER SET (pages 18,
42)
Press to set the clock and the timers.
C REPEAT (pages 19, 28)
Press to change the Repeat Play
setting of USB and CD function.
FM MODE (pages 22, 50)
Press to select the FM monaural or
stereo reception.
1
2
3
4
5
6
7
8
9
Guide to parts and controls
Tape deck (pages 30, 39, 43, 50)
Continued
l
GB
9

D USB (pages 27, 36)
Press to select the USB function.
CD (pages 19, 23, 36, 39)
Press to select the CD function.
TUNER/BAND (page 21)
Press to select the TUNER function.
Press to select the FM or AM band.
FUNCTION (pages 24, 30)
Press to select a function.
E ./> (go back/go forward)
(pages 19, 28, 36, 43)
Press to select a track or file.
m/M (rewind/fast forward)
(pages 19, 28, 30)
Hold down to find a point in a track
or file.
+/– (tuning) (pages 22, 38)
Press to tune in a radio station.
N (play) (pages 19, 27, 30, 37,
46, 49)
Press to start playback.
X (pause) (pages 19, 28, 30)
Press to pause playback.
x (stop) (pages 19, 21, 24, 28,
30, 40, 46)
Press to stop playback, recording or
transferring.
F ENTER (pages 13, 18, 19, 23,
24, 28, 33, 36, 37, 38, 39, 40)
Press to enter the selection.
G DISC SKIP (pages 20, 36)
Press to select a disc.
USB SELECT (pages 28, 36)
Press to select the USB device
connected to the A port or
B port.
H +/– (select folder) (pages 19,
28, 36, 39)
Press to select a folder.
I VOLUME +/–* (pages 19, 21, 27,
31, 42, 45)
Press to adjust the volume.
* The VOLUME + button has a tactile dot.
Use the tactile dot as a reference when
operating the system.
J EQ (pages 31, 41)
Press to select a preset sound effect.
K CLEAR (page 37)
Press to delete a pre-programmed
step.
L TUNER MEMORY (page 38)
Press to preset the radio station.
M PLAY MODE
(pages 20, 23, 29, 36, 39, 46)
Press to select the play mode of CD
or USB function.
TUNING MODE (pages 21, 38)
Press to select the tuning mode.
N DISPLAY (pages 34, 44)
Press to change the information on
the display.
O SLEEP (page 42)
Press to activate the Sleep Timer.
10
GB
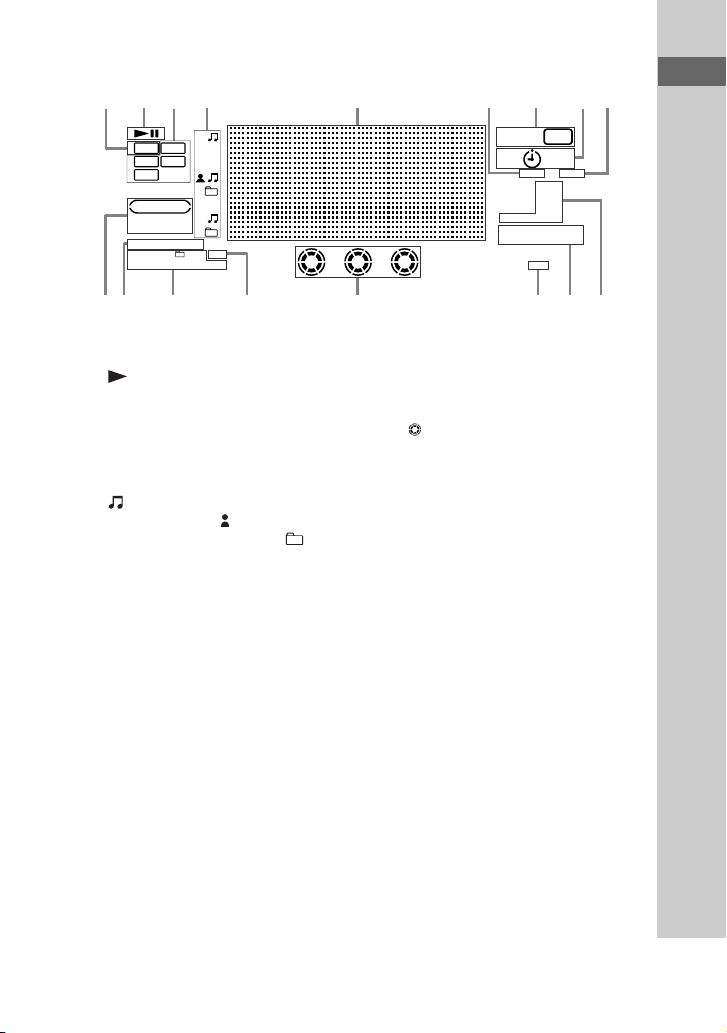
– Display
q
q
qsqaq
q
q
q
23 7 895
1
[ USB A ]
ALL1
USB SHUF PGM REP 1
4 6
USB
CD
MP3 WMA
AAC
BOOSTER
Z-GROOVE
[ USB B ]
DISC TAG
1 2 3
USB SYNC
TAPE
USB REC
TAPE
SLEEP NIGHT
MATRIX
MONO
ST TUNED
TAPE
SUR
LINK
SUR 12
PLAY
REC
PRESET
Guide to parts and controls
AUTO
;
g
h
f
A Lights up when the USB function is
selected (page 28).
B “ ” lights up during playback.
“NX” lights up when playback is
paused.
C Indicates the type of disc or file that
the system recognized.
D Indicates the type of audio file
information that displayed (page 34).
“ ” lights up when a file name/track
title is displayed. “ ” lights up when
an artist name is displayed. “ ”
lights up when a folder name/album
title is displayed.
E Displays the current status and
information (page 34).
F Lights up when the Sleep Timer is
activated (page 42).
G Lights up during transferring onto an
USB device or recording onto a tape
(pages 22, 39).
H Lights up when the timer is set
(page 42).
I Lights up when NIGHT MODE is
turned on (page 32).
J Indicates the activated sound effect
(pages 31, 40).
Note
“LINK”, “MATRIX SUR 1” and
“MATRIX SUR 2” light up for
MHC-GTR8 and MHC-GTR7 only.
d
K Indicators for the TUNER function
(pages 21, 38).
L Lights up when there is a tape in the
tape deck.
M Indicators for the disc tray (page 19).
“ ” lights up when a disc is selected.
“1”, “2” and “3” light up when there
is(are) disc(s) on the disc tray.
N Lights up when an audio file contains
tag information.
O Indicates the selected play mode
(pages 20, 29).
P [USB A] or [USB B] lights up to
indicate the selected USB device.
Note
“TAPE” does not lights up for Latin American
and Mexican models.
;
GB
11

Getting Started
Hooking up the system
1
2
A
B
C
*
6
*
345
***
8
*
*
7
C
E
D
1 To FM lead antenna
2 To AM loop antenna
3 To front speaker (right)
4 To front speaker (left)
5 To surround speaker (right)
6 To surround speaker (left)
7 To subwoofer
8 To subwoofer
* MHC-GTR8/MHC-GTR7/
MHC-GTR6 only.
** MHC-GTR8/MHC-GTR7
only.
*** MHC-GTR8 only.
A Antennas
Find a location and an orientation that
provide good reception, and then set up
the antennas.
Extend the FM lead
antenna horizontally
GB
12
AM loop
antenna
Notes
• The FM 75 Ω COAXIAL jack varies
according to models.
• Keep the antennas away from the speaker
cords, the power cord and the USB cable to
avoid picking up noise.
B VIDEO (AUDIO IN) L/R jacks
Use an audio cord (not supplied) to
connect to the audio output jacks of an
optional component (such as a TV or
VCR).
C Speakers
The speaker connectors are color-coded
with their respective speaker terminals on
the unit.
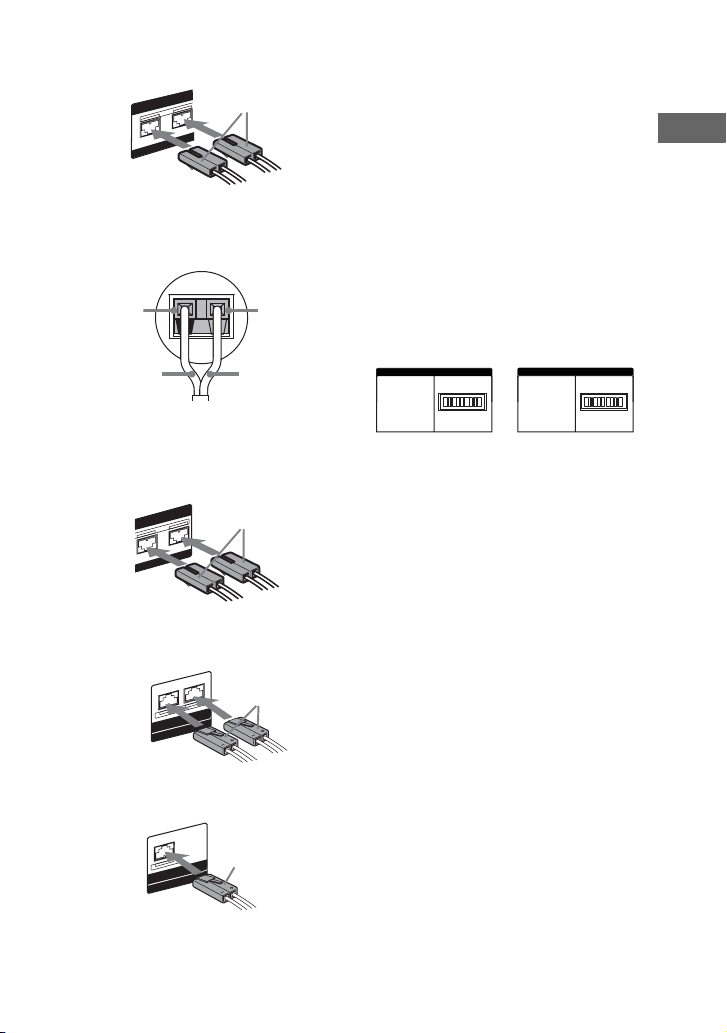
Front speakers
FRONT SPEAKER
R
ONLY FOR SS-GTR8B
Notes
• Be sure to use only the supplied speakers.
White
L
• Be sure to connect the speakers securely and
correctly. When connecting speaker cords,
insert the connector straight into the
terminals.
• Be sure to connect the subwoofer(s) to the unit
(MHC-GTR8/MHC-GTR7 only).
Getting Started
(MHC-GTR6H only)
Connect the speaker cords to the terminals on
the front speakers.
Black (#)
Black (#)
Red (3)
Red (3)
Surround speakers
(MHC-GTR8/MHC-GTR7/MHC-GTR6
only)
SURROUND SPEAKER
R
-RSR8B
ONLY FOR SS
Grey
L
Subwoofers
(MHC-GTR8 only)
Purple
SUBWOOFER
Y FOR SS-WGR8B
L
ON
Subwoofer
(MHC-GTR7 only)
Purple
Y FOR SS-WGR7B
L
ON
SUBWOOFER
D VOLTAGE SELECTOR
For models equipped with a voltage
selector, set VOLTAGE SELECTOR to
the position of your local power line
voltage.
Depending on the model, the VOLTAGE
SELECTOR may differ.
Brazil model only Other models
VOLTAGE SELECTOR
127V 220V 220V
VOLTAGE SELECTOR
120V 220V 230-240V
E Power
Connect the power cord to a wall outlet.
The demonstration appears in the display.
When you press "/1, the system turns on
and the demonstration automatically
ends.
If the supplied adaptor on the plug does
not fit your wall outlet, detach it from the
plug (only for models equipped with an
adaptor).
Using the subwoofer(s)
(MHC-GTR8/MHC-GTR7 only)
You can use the subwoofer(s) to enhance
the bass.
1 Press SUBWOOFER ON/OFF on
the unit to light up the indicator.
The subwoofer(s) is(are) turned on.
2 Press SUBWOOFER LEVEL on the
unit to enter the subwoofer level
setting.
3 Turn OPERATION DIAL to select
the subwoofer level you want, then
press ENTER.
13
GB
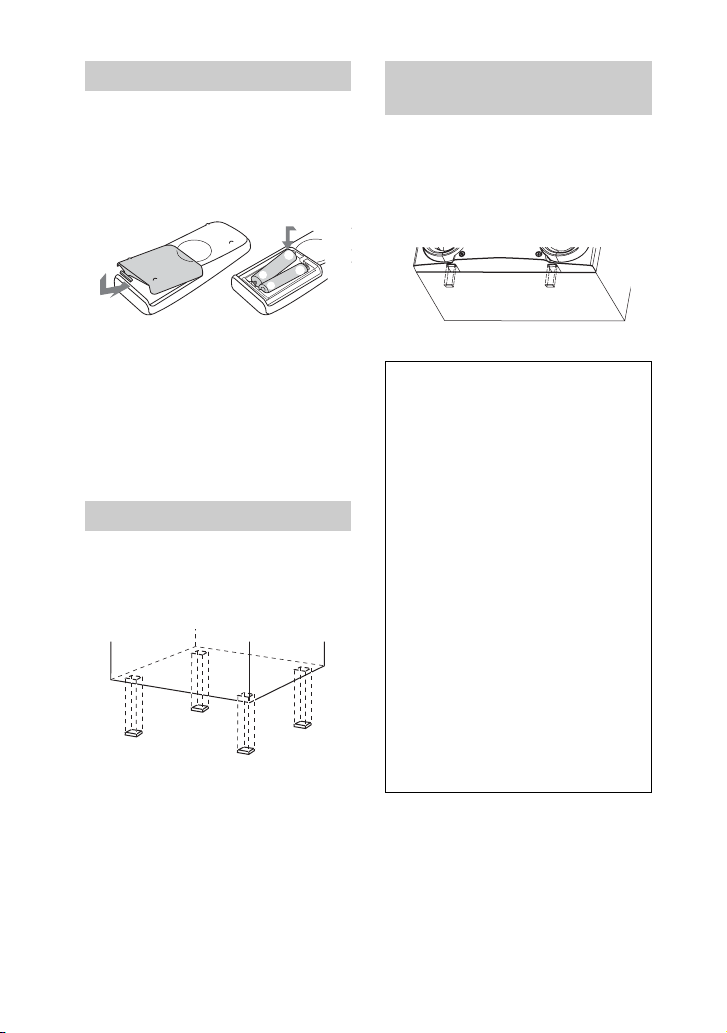
Using the remote
Slide and remove the battery
compartment lid, and insert the two
supplied R6 (size AA) batteries, E side
first, matching the polarities shown
below.
e
E
E
e
Notes
• If you do not use the remote for a long period
of time, remove the batteries to avoid p ossible
damage from battery leakage and corrosion.
• When the remote no longer operates the
system, replace both batteries with new ones.
• Batteries installed devices shall not be
exposed to excessive heat such as sunshine,
fire or the like.
Attaching the speaker pads
Attach the supplied speaker pads at each
corner on the bottom of the speakers to
stabilize the speakers and to prevent them
from slipping.
Attaching the subwoofer front
panel pads
(For MHC-GTR8 only)
Attach the supplied subwoofer front panel
pads on the bottom of the subwoofers to
stabilize the subwoofers and to prevent
them from slipping.
When carrying the unit
Do the following procedure to protect
the disc mechanism.
Use the buttons on the unit for the
operation.
1 Press "/1 to turn on the system.
2 Press CD.
3 Press OPEN/CLOSE Z to open
the disc tray and remove the
disc.
4 Press OPEN/CLOSE Z again to
close the disc tray. Wait until
“CD No Disc” appears in the
display.
5 Hold down CD and then press
"/1 until “STANDBY” appears
in the display. Then, “MECHA
LOCK” appears in the display.
6 Unplug the AC power cord.
14
GB

Positioning the speakers
You can place your speakers as shown
below or by using Line Array Speaker
System (page 16).
A Front speaker (left)
B Front speaker (right)
C Surround speaker (left)
D Surround speaker (right)
E Subwoofer
F Unit
Place the front speakers at an angle of
45 degrees from your listening position.
MHC-GTR8 only
CEFEDBA
0.3 m 0.3 m
MHC-GTR6 only
FB
AC
0.3 m 0.3 m
45
D
MHC-GTR6H only
There are 2 ways to place the front
speakers.
Example 1:
AFB
0.3 m 0.3 m
45
Getting Started
MHC-GTR7 only
CFE DBA
0.3 m
45
0.3 m
45
Example 2:
F
A
B
0.3 m0.3 m
45
Note
Place the speakers at least 0.3 meter away from
the unit.
15
GB
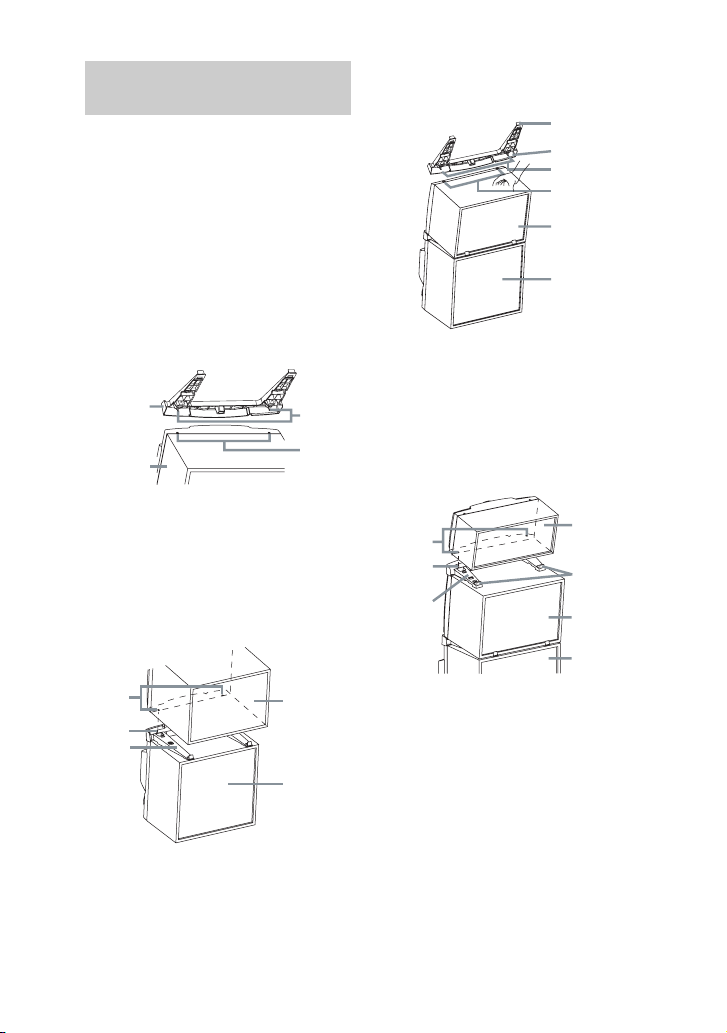
Installing the Line Array
Speaker System
(MHC-GTR8/MHC-GTR6 only)
To create a party environment, we
recommend that you install your speakers
using Line Array Speaker System. Line
Array Speaker System provides a wide
sound space that suitable for large room
like a hall.
MHC-GTR8 only
1 Insert the pins of the Spacer A
(supplied) to the catcher holes on
top of the subwoofer.
Spacer A
Subwoofer
Pin
Catcher
hole
3 Insert the pins of the Spacer B
(supplied) to the catcher holes on
the front right speaker.
Stopper
Spacer B
Pin
Catcher hole
Front right
speaker
Subwoofer
4 Stack the surround right speaker
horizontally on the front right
speaker. Make sure the catcher
holes of the surround right speaker
is inserted to the pins of the Spacer
B and the surround right speaker is
within the stopper of the Spacer B.
2 Stack the front right speaker
horizontally on top of the
subwoofer. Make sure the catcher
holes of the front right speaker is
inserted to the pins of the Spacer A
and the front right speaker is within
the stopper of the Spacer A.
Catcher
hole
Pin
Spacer
A
GB
16
Front right
speaker
Subwoofer
Catcher
hole
Pin
Spacer
B
Surround
right speaker
Stopper
Front right
speaker
Subwoofer
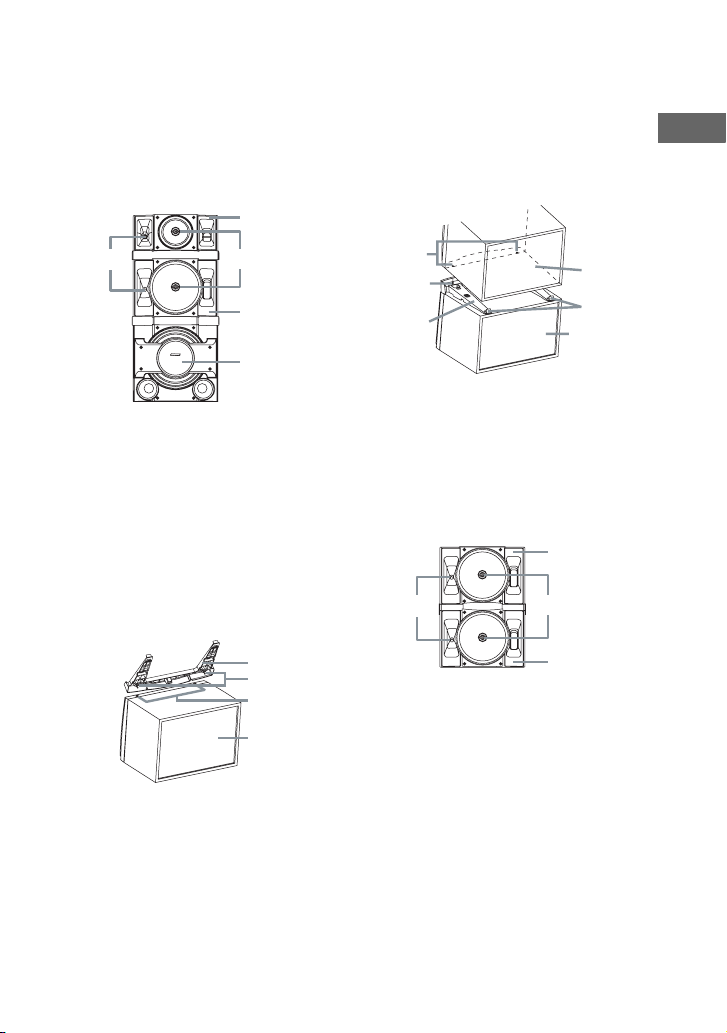
5 Check that both the front right and
surround right speaker horn are at
the same side. Make sure the horns
are near to the unit.
Turn the SONY emblem on the front
right and surround right speaker to
horizontal position.
Surround
right speaker
SONY emblemHorn
Front right
speaker
Subwoofer
6 Repeat steps 1 to 5 to install
another subwoofer, front left
speaker and surround left speaker.
MHC-GTR6 only
1 Place the front right speaker
horizontally.
2 Insert the pins of the Spacer A
(supplied) to the catcher holes on
the front right speaker.
3 Stack the surround right speaker
horizontally on top of the front right
speaker. Make sure the catcher
holes of the surround right speaker
is inserted to the pins of the Spacer
A and the surround right speaker is
within the stopper of the Spacer A.
Catcher
hole
Pin
Spacer A
Surround
right
speaker
Stopper
Front right
speaker
4 Check that both the front right and
surround right speaker horn are at
the same side. Make sure the horns
are near to the unit.
Turn the SONY emblem on the front
right and surround right speaker to
horizontal position.
Surround
right speaker
Horn
SONY emblem
Getting Started
Spacer A
Pin
Catcher hole
Front right
speaker
Front right
speaker
5 Repeat steps 1 to 4 to install the
front left speaker and surround left
speaker.
Continued
l
17
GB
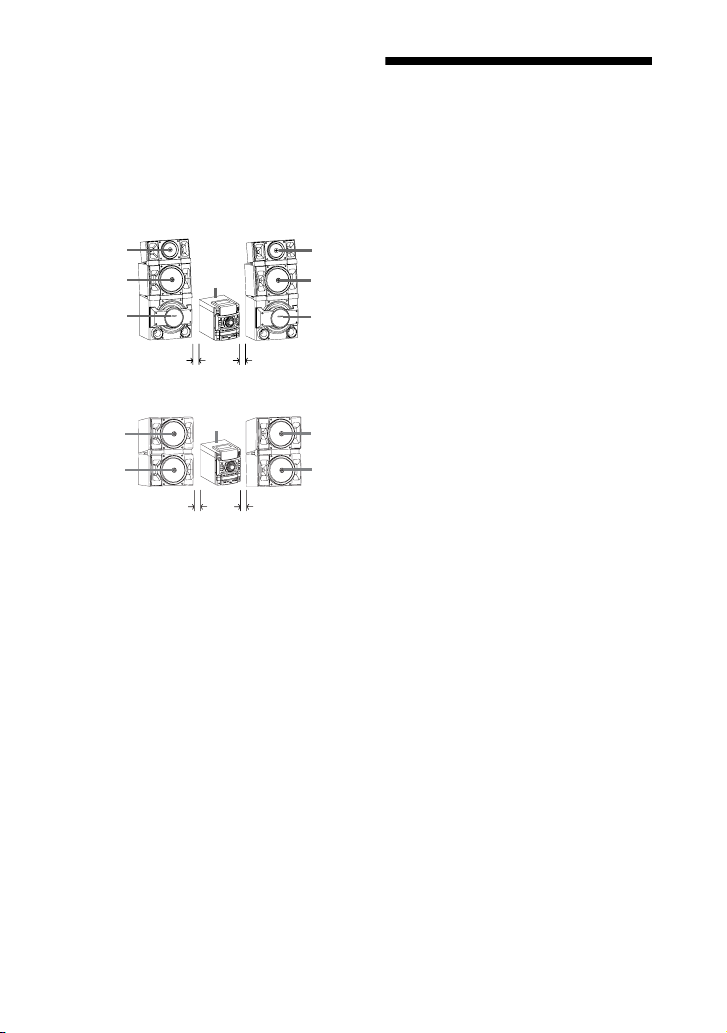
Positioning the Line Array Speaker
System
A Front speaker (left)
B Front speaker (right)
C Surround speaker (left)
D Surround speaker (right)
E Subwoofer
F Unit
MHC-GTR8 only
C
A
E
MHC-GTR6 only
C
A
Notes
• For maximum listening effect, we recommend
you to place the speakers with the horn near to
the unit.
• Place the speakers at least 0.3 meter away
from the unit.
F
F
D
B
E
0.3 m0.3 m
D
B
0.3 m0.3 m
Setting the clock
Use buttons on the remote for the
operation.
1 Press "/1 to turn on the system.
2 Press CLOCK/TIMER SET.
The hour indication flashes in the
display.
If “PLAY SET?” flashes in the
display, press . or > repeatedly
to select “CLOCK SET?”, then press
ENTER.
3 Press . or > repeatedly to
set the hour.
4 Press ENTER.
The minute indication flashes in the
display.
5 Press . or > repeatedly to
set the minute.
6 Press ENTER.
The clock starts functioning.
Note
The clock settings are cancelled when you
disconnect the power cord or if a power failure
occurs.
18
To display the clock when the
system is off
Press DISPLAY on the unit repeatedly
until the clock is displayed. The clock is
displayed for a few seconds.
GB
 Loading...