

Page 1
Multi Disc Player
2-581-681-24 (1)
Multi Disc Player
Operating Instructions
Manual de instrucciones
For installation and connections, see the supplied installation/connections manual.
Para obtener información sobre la instalación y las conexiones, consulte el manual
de instalación/conexiones suministrado.
MEX-R1
GB
ES
CT
MEX-R5
© 2005 Sony Corporation
Page 2
Warning
To prevent fire or shock hazard, do not
expose the unit to rain or moisture.
T o avoid electrical shock, do not open the
cabinet. Refer servicin g to qualified
personnel only.
CAUTION
The use of optical instruments with this product
will increase eye hazard. As the laser beam used
in this CD/DVD player is harmful to eyes, do not
attempt to disass em ble the cabinet.
Refer servicing to qualified personnel only.
This label is located on the bottom of the
chassis.
CAUTION
RADIATION WHEN OPEN AND INTERLOCKS DEFEATED.
DO NOT VIEW DIRECTLY WITH OPTICAL INSTRUMENTS.
This label is located on the drive unit’s internal
chassis.
Warning if your car’s ignition has no
ACC position
After turning the ignition off, be sure to press
and hold (OFF) on the unit until the display
disappears.
Otherwise, the display does not turn off and
this causes battery drain.
:
CLASS 1M VISIBLE/INVISIBLE LASER
2
Page 3

Table of Contents
Welcome! . . . . . . . . . . . . . . . . . . . . . . . . . . . 4
Precautions . . . . . . . . . . . . . . . . . . . . . . . . . . 5
Playable discs . . . . . . . . . . . . . . . . . . . . . . . . 5
Getting Started
Resetting the unit. . . . . . . . . . . . . . . . . . . . . . 8
Setting the clock . . . . . . . . . . . . . . . . . . . . . . 8
DEMO mode . . . . . . . . . . . . . . . . . . . . . . . . . 8
Detaching the front panel . . . . . . . . . . . . . . . 8
Inserting the disc in the unit . . . . . . . . . . . . . 9
Location of contro l s and basic
operations . . . . . . . . . . . . . . . . . . . . . . . . 10
Menu displays . . . . . . . . . . . . . . . . . . . . . . . 13
Player
Playing discs . . . . . . . . . . . . . . . . . . . . . . . . 15
Resuming playback
— Resume play. . . . . . . . . . . . . . . . . . . . 17
Viewing the disc information
— Time/text information . . . . . . . . . . . . 17
Searching a specif i c point on a disc
— Scan . . . . . . . . . . . . . . . . . . . . . . . . . . 18
Using the menus on DVDs . . . . . . . . . . . . . 19
Using PBC functions
— PBC (Playback control). . . . . . . . . . . 19
Playing in variou s m odes
— Repeat play/Shuffle play/
Search play . . . . . . . . . . . . . . . . . . . . . . . 20
Various DVD operations
Changing the audio channels. . . . . . . . . . . . 22
Changing the angles . . . . . . . . . . . . . . . . . . 23
Displaying the subtitles. . . . . . . . . . . . . . . . 24
Magnifying pictures. . . . . . . . . . . . . . . . . . . 24
Changing the picture quality
— Picture EQ . . . . . . . . . . . . . . . . . . . . . 25
Locking dis cs
— Parental control . . . . . . . . . . . . . . . . . 26
Settings and Adjustments
Using the Setup menu . . . . . . . . . . . . . . . . . 28
Setting the display la nguage or sound track
— Language setup . . . . . . . . . . . . . . . . . 29
Setting the screen
— Screen setup. . . . . . . . . . . . . . . . . . . . 30
Custom settings
— Custom setup . . . . . . . . . . . . . . . . . . . 31
Audio settin gs
— Audio setup . . . . . . . . . . . . . . . . . . . . 32
Radio
Storing automatically
— BTM . . . . . . . . . . . . . . . . . . . . . . . . . 33
Storing manually. . . . . . . . . . . . . . . . . . . . . 33
Receiving the stored stations . . . . . . . . . . . 33
Tuning automatically . . . . . . . . . . . . . . . . . 3 3
Receiving a station t hr ough a list
— list-up. . . . . . . . . . . . . . . . . . . . . . . . . 33
Other functions
Adjusting the sound characteristics . . . . . . 34
Adjusting the equalizer curve
— EQ7 Tune . . . . . . . . . . . . . . . . . . . . . 34
Labelling a station/disc. . . . . . . . . . . . . . . . 35
Adjusting unit menu items
— SYSTEM MENU . . . . . . . . . . . . . . . 35
Using optional equipment. . . . . . . . . . . . . . 37
Switching the front/ rear output
— Zone × Zone . . . . . . . . . . . . . . . . . . . 39
Additional Information
Maintenance . . . . . . . . . . . . . . . . . . . . . . . . 39
Removing the unit. . . . . . . . . . . . . . . . . . . . 40
Notes on discs. . . . . . . . . . . . . . . . . . . . . . . 41
About MP3 files . . . . . . . . . . . . . . . . . . . . . 41
Note on wireless transmission
(MEX-R5 only) . . . . . . . . . . . . . . . . . . . 4 1
Specifications . . . . . . . . . . . . . . . . . . . . . . . 42
Troubleshooting . . . . . . . . . . . . . . . . . . . . . 43
Error displays/Messages. . . . . . . . . . . . . . . 46
Glossary . . . . . . . . . . . . . . . . . . . . . . . . . . . 47
Language code list . . . . . . . . . . . . . . . . . . . 49
Index . . . . . . . . . . . . . . . . . . . . . . . . . . . . . . 5 0
3
Page 4
Welcome!
Thank you for purchasing this Sony Multi Disc
Player. Before operating this unit, read this
manual thoroughly and retain it for future
reference.
FEATURING:
• DVD, CD, VCD playback compatibility
–Compatible with vari ous disc fo rmats, su ch as
DVD-R/-RW, DVD+R/DVD+RW, etc.
DVD-RW: compatible with Video mode and
VR mode (various editing available)
DVD+RW: compatible with +VR mode
(various editing available)
–Plays back up to 1,000 tracks*
DVD-R/-RW, DVD+R/+RW or CD-R/-RW in
MP3 file format
• 2 video outputs (front and rear)*
Zone × Zone audio output*
digital output provided
• Wireless transmission*
complicated connections, audio/vi deo signals
can be transmitted to the optional monitor
XVM-F65WL.
• Zone × Zone: You can lis te n to the radio, or
music from a CD/MD changer (if connected) in
the front, and simulta neously output DVD to
the rear.
• Picture EQ: You can select de sired picture
tone from preset settings accord in g t o th e car
interior/ambient light.
• DVD level adjustment: balances the output
level differences between PCM, Dolby Digital
and DTS, and the volume level differences
between disc and source.
• EQ7: You can select an equ al izer curve for 7
music types.
• DSO (Dynamic Soundstage Organizer):
creates a more ambient sound field, using
virtual speaker sy nt hesis, to enhance th e sound
of speakers, ev en if the y ar e insta lled lo w in the
door.
• Optional CD/MD units (both changers a nd
players)*
*1 Depends on track length
*2 1 front video output for MEX-R5
*3 MEX-R1 only
*4 MEX-R5 only
*5 This unit works with Sony products only.
5
.
1
recorded on
3
, and 1
4
: without
2
, 1
About this manual
• Instructions in this manual describe the
controls on the card remote commander. You
can also use the controls on the unit if they have
the same or similar names to those on the card
remote commander.
• I n this manual, “DVD” is used as the general
term for DVD-R/-RW and DVD+R/+RW.
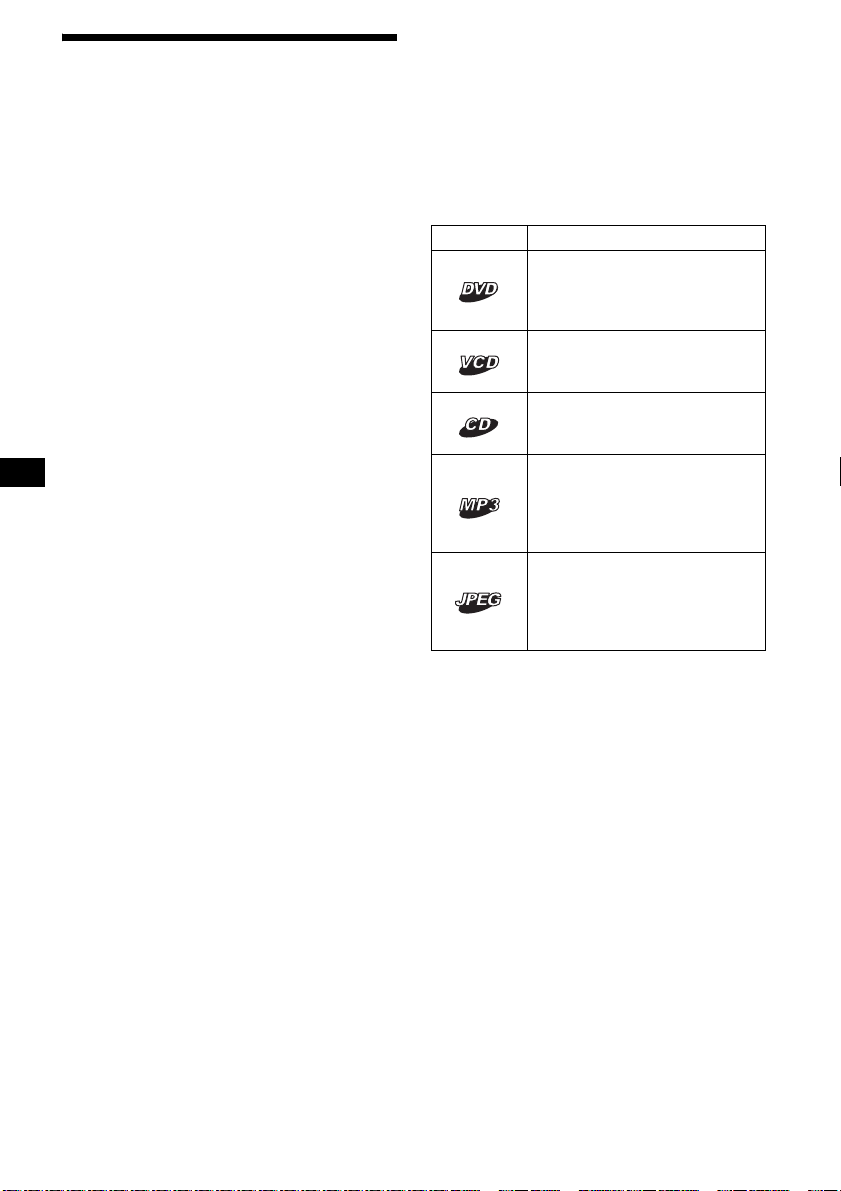
• The meaning of the ico ns used in this manual is
described bel ow:
Icon Meaning
Functions available for DVD
VIDEOs, DVD-Rs/DVD-RWs,
or DVD+Rs/D VD+RWs in
Vi deo mode
Functions available for Video
CDs or CD-Rs/CD-RWs in video
CD format
Functions available for music
CDs or CD-Rs/CD-RWs in
music CD fo rmat
Functions available for files in
MP3 format stored on CD ROMs/CD-Rs/CD-RWs/DVDRs/DVD-RWs/DVD+Rs/
DVD+RWs
Functions available for files in
JPEG format stored on CDROMs/CD-Rs/CD-RWs/DVDRs/DVD-RWs/DVD+Rs/
DVD+RWs
4
Page 5
Precautions
Playable discs
• Do not use the custom functions while driving,
or perform any othe r function which could
divert your attention from the road.
• If your car has been parked in direct su nl i ght ,
allow the unit to cool off before operating it.
• Power aerial will extend automatically while
the unit is operating.
On safety
• Comply with the Traffic Laws in your countr y.
• For your safety, the monitor co nnected to the
FRONT VIDEO OUT turns off automatically
when the parking brake is not applied.
Preventing an accident
The pictures appea r only after you park the car
and set the parking brake.
When the car starts moving, the pictures
coming from the FRONT VIDEO OUT
automatically disappear after displaying the
following caution.
The monitor connect ed to the REAR VIDEO
OUT is available while the car is in motion.
The pictures on the screen are turned off, but
CD/MP3 sound can be heard.
For your safety,
the video is blocked.
Do not operate the unit or watch the monitor
while driving.
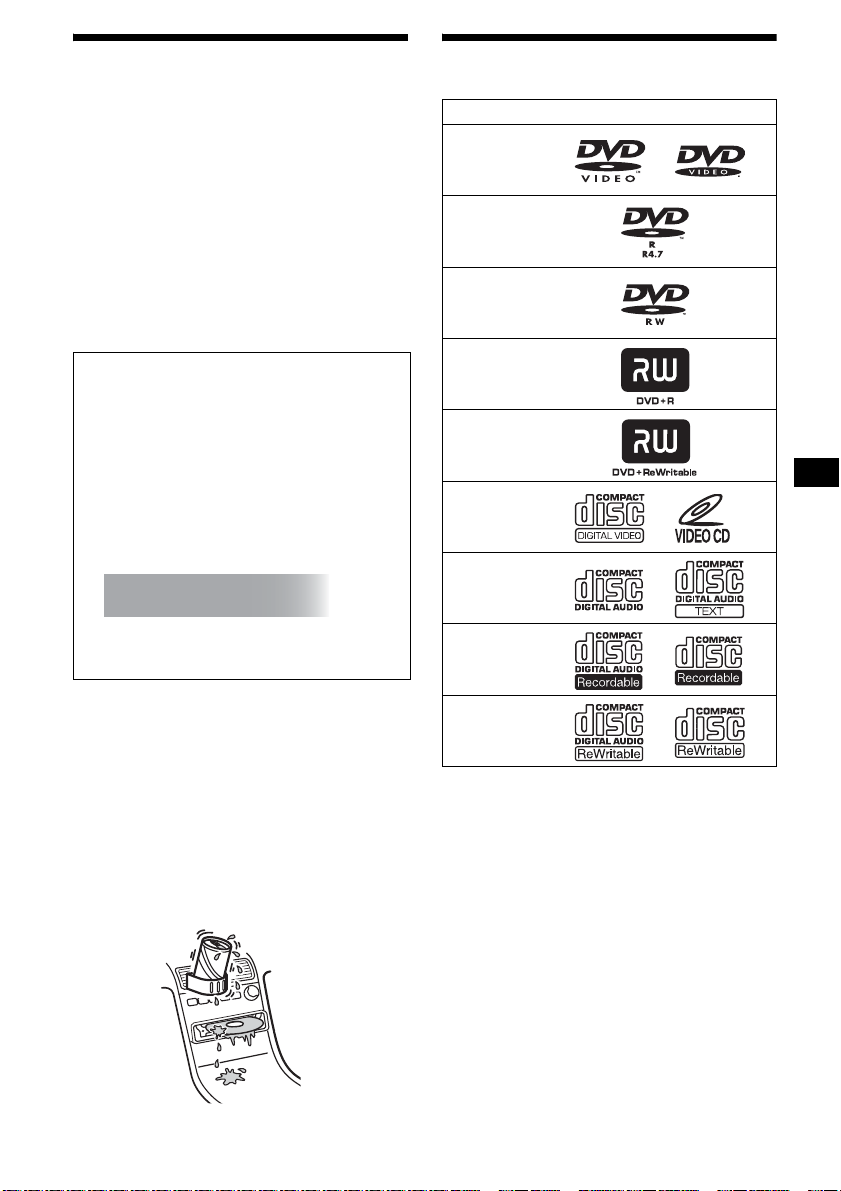
Format of discs
DVD VIDEO
DVD-R*
(MP3/JPEG)
DVD-RW*
Video mode/VR mode
(MP3/JPEG)
DVD+R*
(MP3/JPEG)
DVD+RW*
(MP3/JPEG)
Video CD
Audio CD
CD-R*
(MP3/JPEG)
Moisture condensation
On a rainy day or in a very damp area, moisture
condensation may occur inside the lenses and
display of the unit. Should this occur, the unit
will not operate p roperly. In such a case, remove
the disc and wait for about an hour until th e
moisture has evaporated.
To maintain high sound quality
Be careful not to splash juice or other soft drinks
onto the unit or discs.
CD-RW*
(MP3/JPEG)
* Discs that are not finalized cannot be played.
“DVD VIDEO,” “DVD-R,” “DVD-RW,”
“DVD+R,” an d “DVD+RW” are trad emarks.
DVD
A DVD contains both audio and visual data. A 12
cm disc can hold 7 times the amount of data
contained in a CD-ROM, which equals to 4
consecutive hours of pl ayi ng time (8 hours for
double-sided dis cs ). DVDs are divided int o 4
types: single sided single layer , sin gle sided
double layer, double side d si ngle layer, and
double sided double layer.
continue to next page t
5
Page 6

Video CD (VCD)
A Video CD can contain both audio and visual
data on a disc the same si ze as a regular Audio
CD. The playing time is 74 minutes for a
standard 12 cm CD .
Audio CD
An Audio CD cont ainin g audio da ta. Th e playin g
time is 74 minutes for a standard 12 cm CD.
CD-Recordable (CD-R)
With a CD-R, you can edit audi o data. You can
write information on a CD - R onl y once.
CD-Rewritable (CD-RW)
With a CD-RW, you c an edi t au dio d ata . You can
write information on a CD-RW again and again.
CD-Extra
A CD-Extra has two sections (sessions) for audio
and data respectively. You can only play the
section of audio on this unit.
Notes
• For customers in the region code 3 areas
This unit conforms to the PAL colour system. A disc
recorded in a colour system other than P AL, such as
NTSC or SECAM, cannot be played.
• For customers in the region code 4 areas
This unit conforms to the NTSC colour system. A
disc recorded in a colour system other than NTSC,
such as PAL or SECAM, cannot be played.
• You can play DVD-Rs/DVD-RWs, DVD+Rs/
DVD+RWs and CD-Rs/CD-RWs designed for audio
with this unit. However, depending on the recorded
conditions, you cannot play some discs.
• You cannot play CD-Rs/CD-RWs, DVD-Rs/DVDRWs or DVD+Rs/DVD+RWs that are not finalized.
• Discs created in Packet Write format cannot be
played.
• Recordable discs may not play back correctly if the
ambient temperature is high.
• The discs listed below cannot be played on this unit:
– 8 cm discs
– CD-ROM (the data other than the MP3 or JPEG
files)
– CD-G
–Photo-CD
– VSD (Video single disc)
– DVD-ROM (the data other than the MP3 or JPEG
files)
– DVD-RAM
–DVD-Audio
– DVD+R DL (Dual Layer)
– Active-Audio (Data)
– CD-Extra (Data)
– Mixed CD
– SVCD (Super Video CD)
–CDV
– SACD (Super Audio CD)
Note on transparent discs
12 cm discs containing of only an inner 8 cm
data portion (the rest is transparent) cannot be
played on this unit.
Music discs encoded with
copyright protection
This unit is designed t o pl ay back discs that
conform to the Compact Disc (CD) standard.
Recently, various music discs encoded with
copyright protection are marketed by some
record companies. Please be aware that among
those discs, there are some that do not conform to
the CD standard and m ay not be playable and
recordable by this product.
6
Page 7
Region code
This system is used to protect software
copyrights.
The region code is locate d on the bottom of the
unit, and only DVDs labelled with an identical
region code can be played on this unit.
Region code
Copyrights
This product inc orporates copyright pro tection
technology that is pro te ct ed by U.S. patents and
other intellectual property rights. Use of this
copyright protection technology must be
authorized by Macrovision, and is intended for
home and other limited vie wing u se s o nly u nless
otherwise authorized by Macrovision. Reverse
engineering or disassembly is prohibited.
Manufactured und er li cense from Dolby
Laboratories.
“Dolby” and the doub l e-D symbol are
trademarks of D ol by Laboratories.
DVDs labelled can be also played on this
unit.
If you try to play any other DVD, the message
“Cannot play this disc.” will appear on the
monitor screen. Depending on the DVD, no
region code may be labelled even though playing
the DVD is prohibited by area restrictions.
ALL
Note on playback operations of
DVDs and VCDs
Some playback operations of DVDs and VCDs
may be intentionally set by software producers.
Since this unit plays DVDs and VCDs according
to the disc conten ts the software producers
designed, some playback features may not be
available. Also, refer to the instructions supplied
with the DVDs or VCDs.
“DTS” and “DTS 2. 0 + D ig i ta l Out” are
trademarks of D igital Theater Systems, Inc.
7
Page 8
Getting Started
Resetting the unit
Before operating the unit for the first time, or
after replacing the car battery or changing the
connections, you must reset the unit.
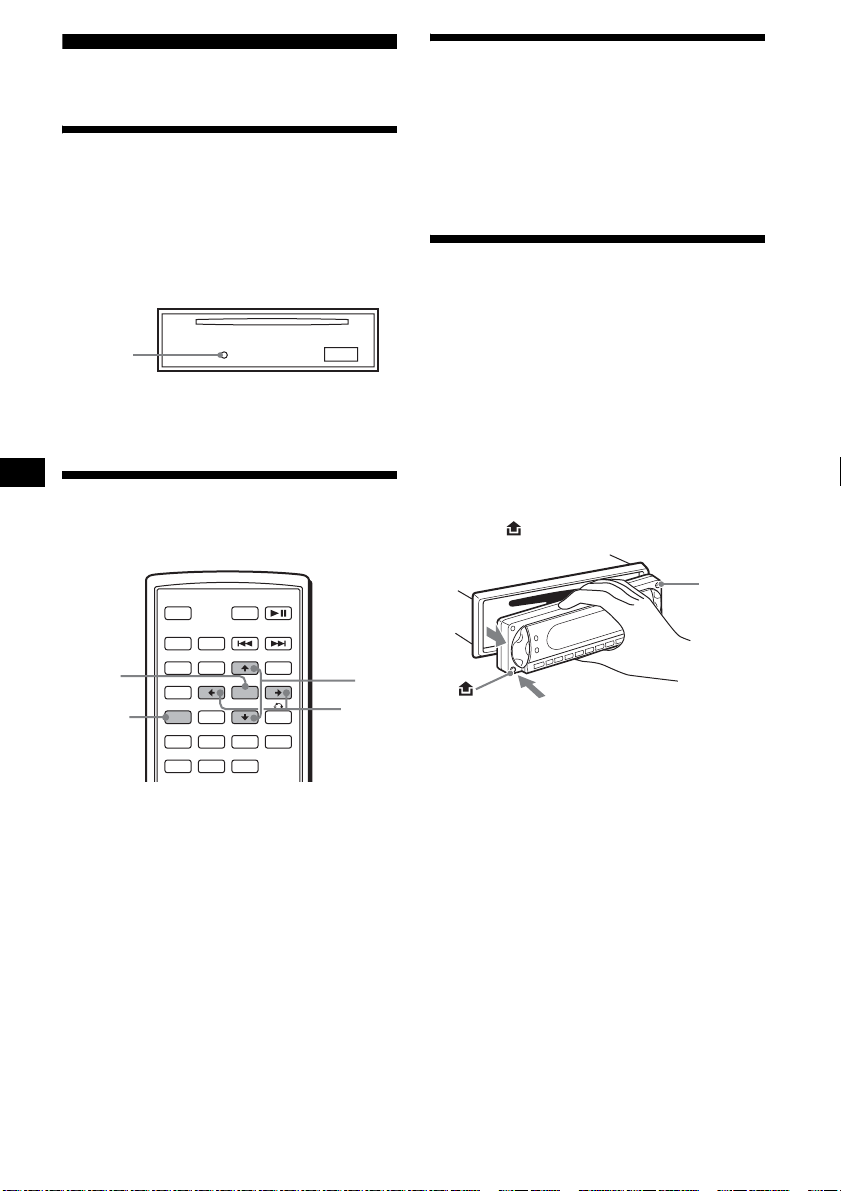
Detach the front panel and press the RESET
button with a pointed object, such as a ballpoint
pen.
RESET
button
Note
Pressing the RESET button will erase the clock setting
and some stored contents.
Setting the clock
The clock uses a 12-hour digital indication.
DEMO mode
When the unit is turned off, the clock is
displayed first, then demonstration (DEMO)
mode starts the demonstration display.
To cancel the DEMO mode, set “DEMO-OFF”
in setup (page 36) while the unit is turned off.
Detaching the front panel
You can detach the front panel of this unit to
prevent theft.
Caution alarm
If you turn the ignition switch to the OFF
position without detaching the front panel, the
caution alarm will sound for a few seconds.
The alarm will only sound if the built-in
amplifier is used.
1 Press (OFF).
The unit is turned off.
2 Press , then pull it off towards you.
ATT DVD
MODE
TOP MENU
LIST
PICTURE
EQZ
Z DSO EQ7
SUBTITLE
+
ENTER
–
ANGLE
MENU
ENTER
SYSTEM
MENU
OFF
SRC
SOUND
SETUP
SYSTEM
MENU
×
AUDIO
1 Press (SYSTEM MENU).
The setup display appears.
2 Press M/m repeatedly until “CLOCK-
ADJ” appears.
3 Press (ENTER).
The hour indication flashes.
4 Press M/m to set the hour and minute.
To move the digital indication, press </,.
5 Press (ENTER).
The clock starts.
To display the clock during playback/reception,
set “CLOCK-ON” (page 36).
8
M/m
</,
(OFF)
Notes
• Do not drop or put excessive pressure on the front
panel and display window.
• Do not subject the front panel to heat/high
temperature or moisture. Avoid leaving it in a parked
car or on a dashboard/rear tray.
Tip
When carrying the front panel, use the supplied front
panel case.
Page 9
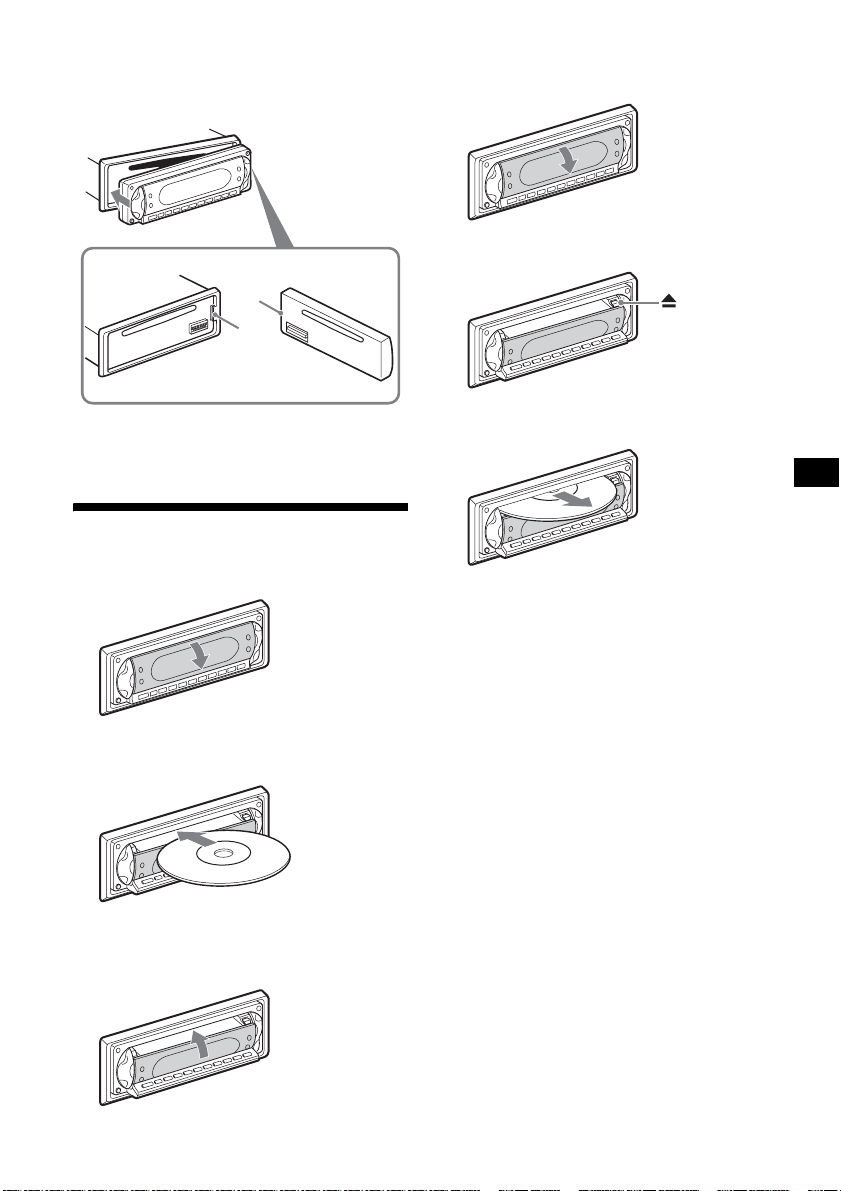
Attaching the front panel
Engage part A of the front panel with part B of
the unit, as illustrated, and push the left side into
position until it clicks.
A
B
Ejecting the disc
1 Open the shutter.
2 Press Z.
Note
Do not put anything on the inner surface of the front
panel.
Inserting the disc in the unit
1 Open the shutter.
2 Insert the disc with the playback side
down.
Playback st arts . (D ependi ng o n the dis c, pr ess
DVD u to start playback.)
3 Close the shutter.
x
The disc is ejected.
Note
While inserting or ejecting the disc, do not close the
shutter. The disc may be caught and damaged.
Tip
The disc can be played with the shutter open or
closed.
9
Page 10
Location of controls and basic operations
q
q
q
q
q
q
q
0
q
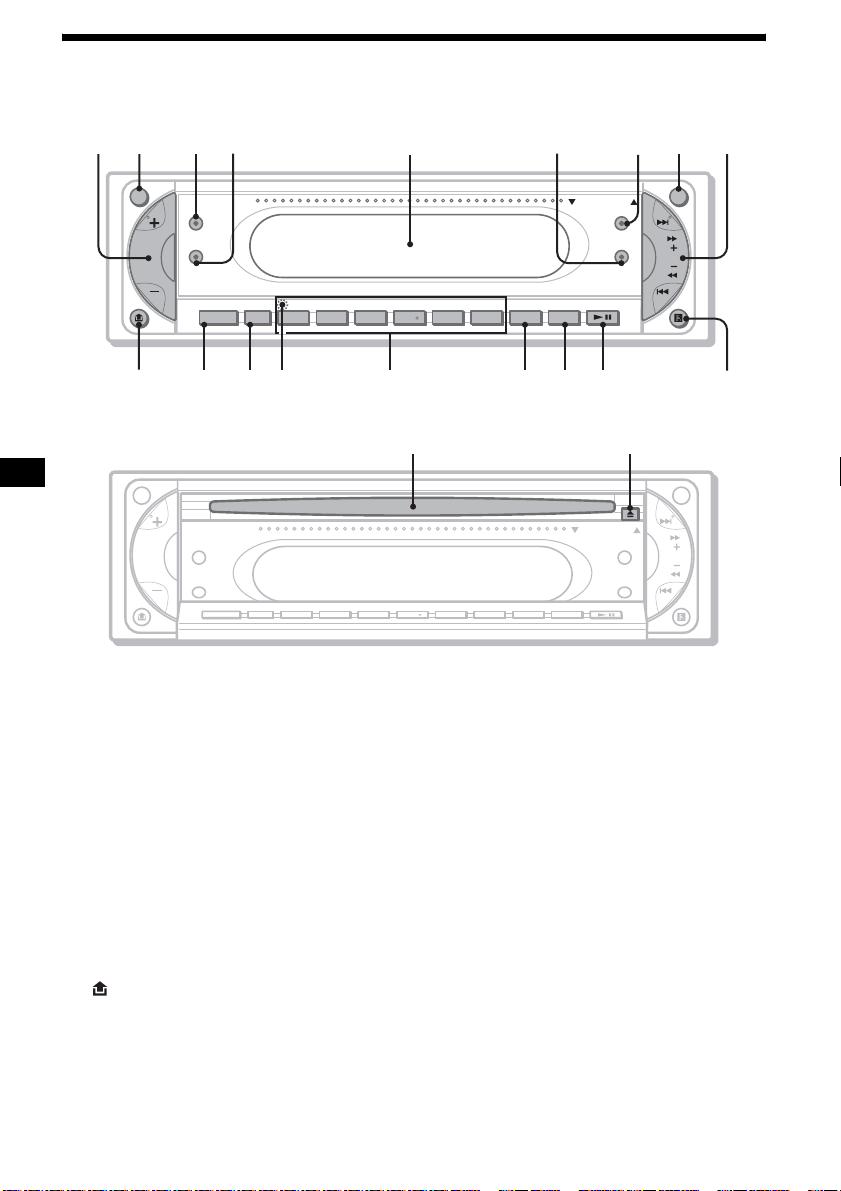
Main unit
12 34 6 78 9
ATT OFF
Z
×
Z
SOUND
SOURCE MODE
s
a
SHUFREP ALBM +
d
5
OPEN/CLOSE
DSO
EQ7
-
f
DSPL
654321
g
SCRL
DVD
h
SEEK
MEX-R1
MEX-R5
j
OPEN/CLOSE shutter opened
ql w;
ATT OFF
OPEN/CLOSE
Z
×
Z
SOUND
SOURCE MODE
Refer to the pages listed for details.
a Volume +/– button 34
b ATT (attenuate) button
c Z×Z (Zone × Zone) button
d SOUND button
e Display window
f EQ7 (equalizer) button
g DSO button
h OFF button 8
i SEEK +/– button
Radio:
T o tune in stat ions automatica lly (press); f ind
a station manual l y (press and hold).
DVD/CD:
To skip chapters/tracks (press); fast-forward/
reverse a chapter/tr ack (press and hol d ) .
j (front panel release) button 8
k SOURCE button 39
l MODE button
m RESET button (located behind the front
panel) 8
DSO
EQ7
DSPL
654321
DVDSHUFREP ALBM +
SCRL
n Number buttons
Radio:
To receive stored stations (press); sto r e
stations (press and hold ).
CD/MD*
1
:
(1): REP 20, 37
(2): SHUF 20, 37
(3)/(4): ALBM –/+*
To skip albums (press); skip albums
continuousl y (press and hold).
o DSPL button
p SCRL button
To scroll the display items.
q DVD u (play/pause) button
r Receptor for the card remote
commander
s Disc slot 9
t Z (eject) button 9
*1 When an MD changer is connected.
*2 When an MP3/JPEG is played and a changer is not
connected. If the changer is connected, the
operation is different, see page 37.
SEEK
2
k
10
Page 11
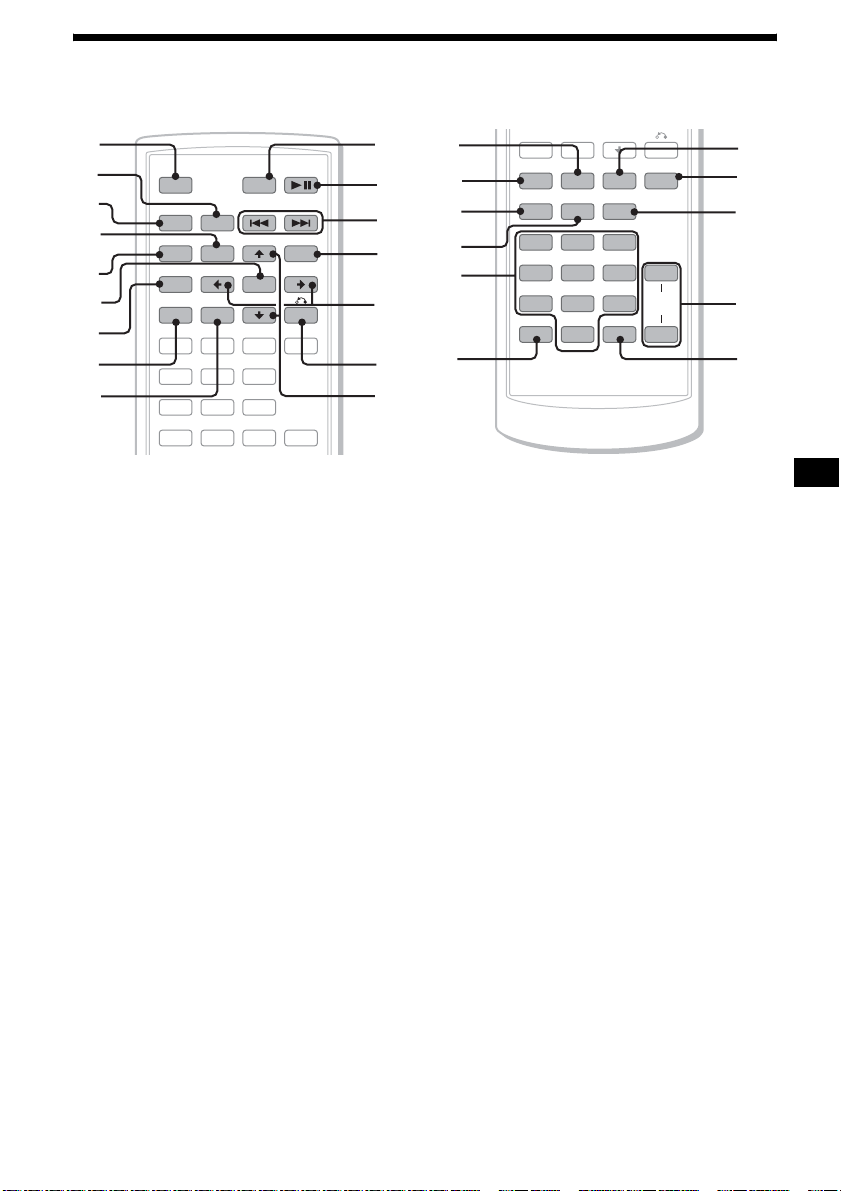
Card remote commander RM-X702
1
2
3
4
5
6
7
8
9
MODE
TOP MENU
LIST
PICTURE
EQZ
SUBTITLE
ATT DVD
+
ENTER
–
ANGLE
OFF
SRC
SOUND
SETUP
SYSTEM
MENU
×
Z DSO EQ7
AUDIO
123
456
MENU
+
0
qa
qs
qd
qf
qg
qh
qj
qk
ql
w;
wa
ws
LIST
PICTURE
EQZ
SUBTITLE
0
–
ANGLE
DSPL
SYSTEM
MENU
×
Z DSO EQ7
AUDIO
123
456
789
CLEAR
VOL
wd
wf
wg
+
wh
–
wj
a OFF button 15, 17, 19
To power off/stop the source.
b MODE button 33, 37
To select the radio ba nd (FM/AM)/select the
1
unit*
.
c SRC (SOURCE) button
To po wer on/change the source (Radio/DVD/
CD/MD*
2
/AUX*3).
d TOP MENU button 19
To display the top menu on a DVD.
e SOUND button 34
To select sound items.
f ENTER button
To complete a setting.
g SETUP button
To display the Setup menu and Play mode
menu.
h SYSTEM MENU button
To enter the unit menu.
i LIST button 33, 37
To list up.
j ATT (attenuate) button
To attenuate the sound. To cancel, press
again.
k DVD u (play/pause) button 9, 15, 16 ,
17
To start/pause playback.
l ./> (previous/next; revers e/fast-
forward; station tuning) buttons
m MENU button 19
To display the menu on a disc.
n </, (cursor) buttons
To move the cursor, or turn the pages.
o O (RETUR N) button 19, 28, 29
To return to the previous display, or previous
operation.
p M/m (cursor) buttons
To move the cursor.
q PICTURE EQ button 25
To select the picture quality.
r Z×Z (Zone × Zone) button 39
To switch the front/rear output.
s AUDIO button 22
To change the audio output.
t SUBTITLE button 24
To change the subtitle language.
u Number buttons
continue to next page t
11
Page 12

v CLEAR button 21
To cancel entered numbers.
w DSO button 4
To select the DSO mode (1, 2, 3 or OFF).
The larger the number, the more enhanced
the effect.
x EQ7 (equalizer) button
T o select an equalizer type (XPLOD,
VOCAL, CLUB, JAZZ, NEW A GE, R OCK,
CUSTOM or OFF).
y ANGLE button 23
To change the viewing angl e.
z VOL (volume) +/– button
To adjust the volume.
wj DSPL button 15, 17, 18, 35
To change display items.
*1 When a CD/MD changer is connected.
*2 When an MD changer is connected.
*3 When an optional Sony por ta ble device is
connected.
Note
If the unit is turned off and the display disappears, it
cannot be operated with the card remote commander
unless (SOURCE) on the main unit is pressed, or a
disc is inserted to activate the unit first.
Tip
For details on how to replace the battery, see
“Replacing the lithium battery of the card remote
commander” on page 39.
12
Page 13
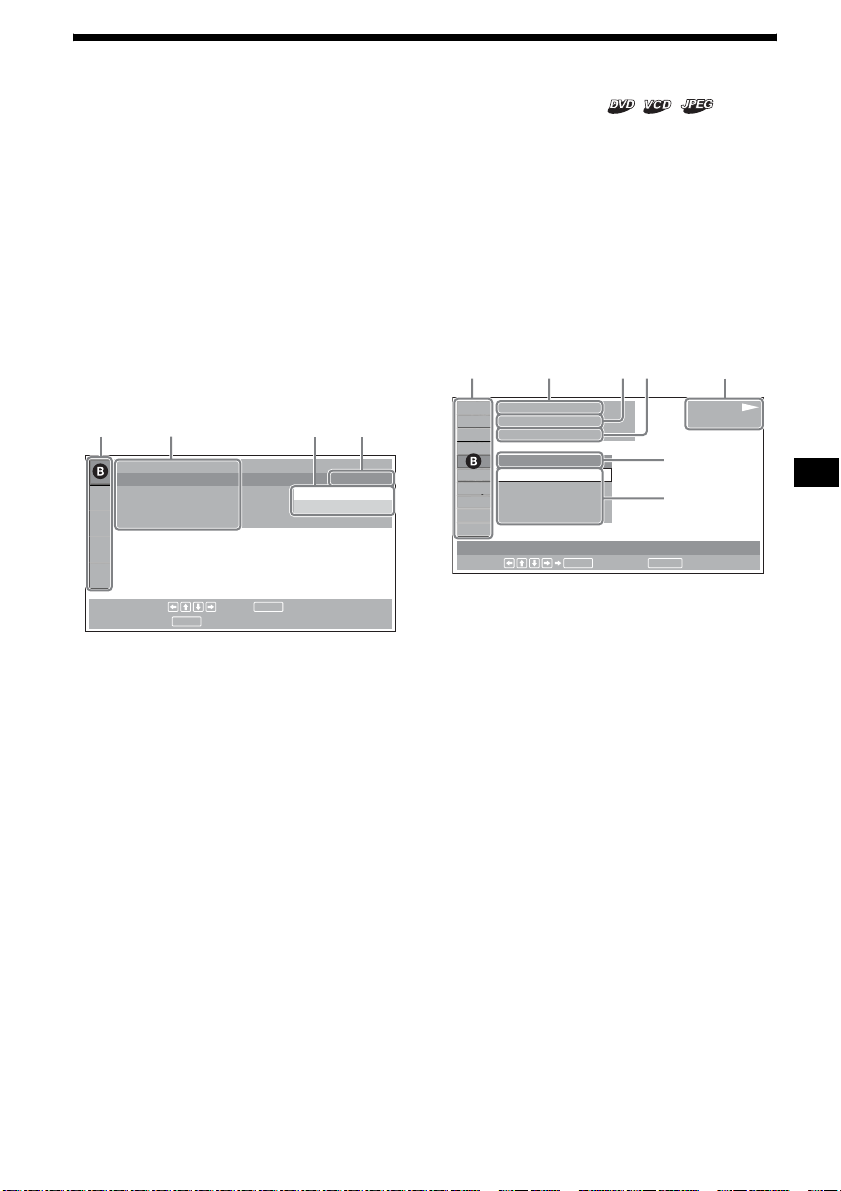
Menu displays
AC DE
ACDEF
Use the menus of this unit to adjust the various
functions and set tings for playback.
The displaying menu differs depending on the
status of the unit.
Setup menu
Appears when pr essing (SETUP) while
playback is st opped.
To select the item
Press </M/m/,, then press (ENTER).
To turn off the Setup menu
Press (SETUP).
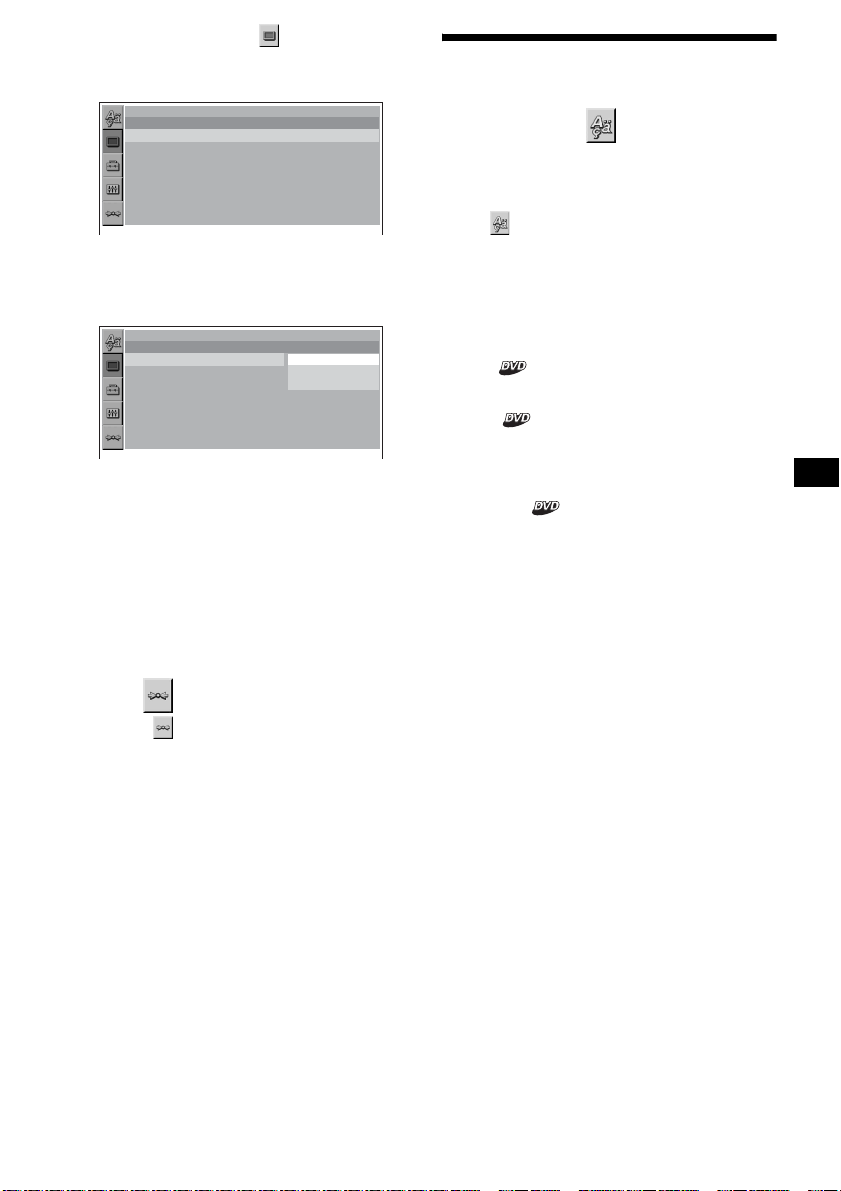
Example: When “LANGUAGE SETUP” is
selected.
LANGUAGE SETUP
OSD :
MENU :
AUDIO :
SUBTITLE :
To set, press , then .
To quit, press .
SETUP
A Setup item s
B Selected item
C Setting items
D Options
E Current setting
ENTER
ENGLISH
JAPANESE
ENGLISH
ENGLISH
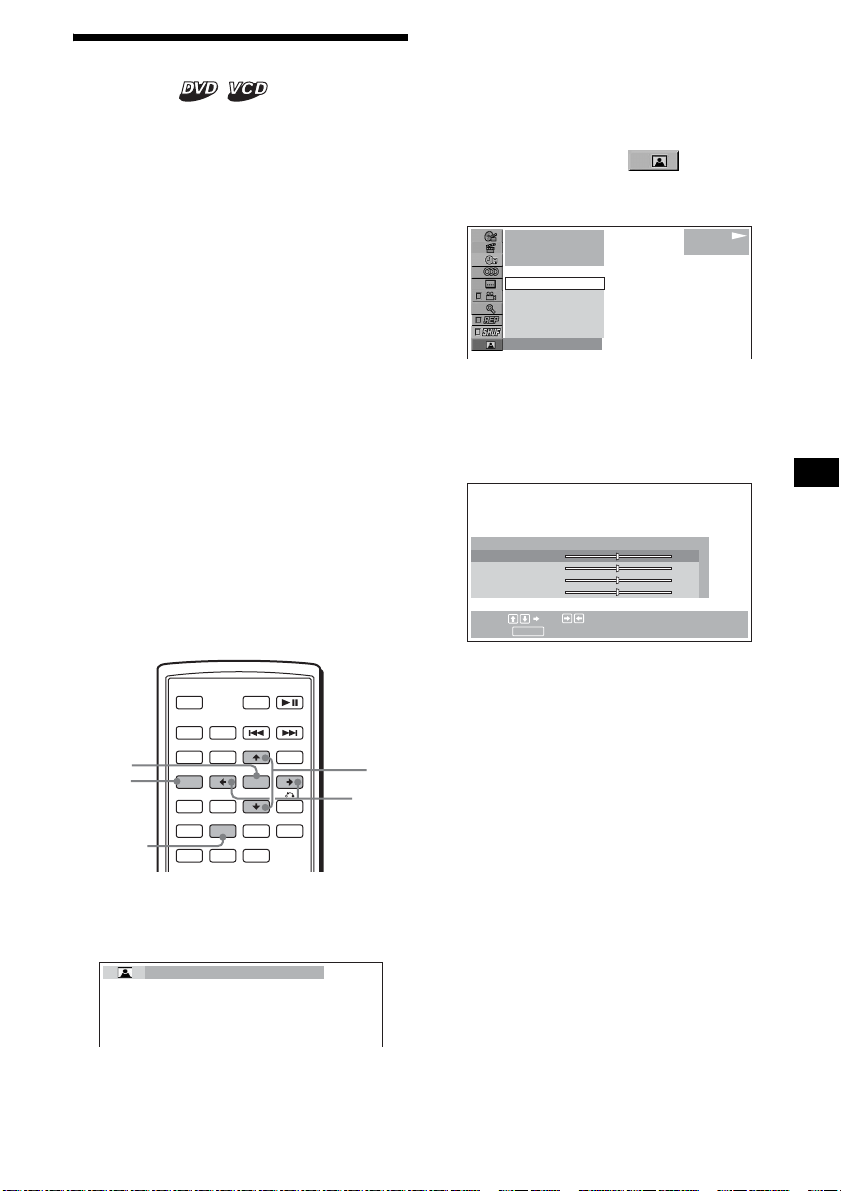
Play mode menu
Appears when pressing (SETUP) during
playback.
To select the item
Press </M/m/,, then press (ENTER).
To tur n off th e Play mode menu
Press (SETUP).
Note
The items on the menu, and the operation procedures
differ depending on the disc.
Example: When playing a DVD
)
12(67
)
018(034
T 1:35:55
1;ENGLISH
OFF
1:ENGLISH
2:FRENCH
3:SPANISH
SUBTITLE
Select :
ENTER RETURN
Cancel
A Play mode items
B Selected item
C Title number*
1
/Total title number*
D Chapter number*2/Total chapte r number*
E Elapsed playback time
F Playback status (NPLAY, XPAUSE, etc.)/
Disc format
G Current setting
H Options
*1 Displays the track number for VCDs, album number
for JPEG files. When playing VCD with the PBC
function on, no indication is displayed.
*2 Displays the image number for JPEG files.
Notes
• While playing back CD/MP3, the Play mode menu
cannot be displayed.
• While playing back JPEG files, (SETUP) is active
only when the image is fully displayed.
G
H
PLAY
DVDVIDEO
1
2
continue to next page t
13
Page 14
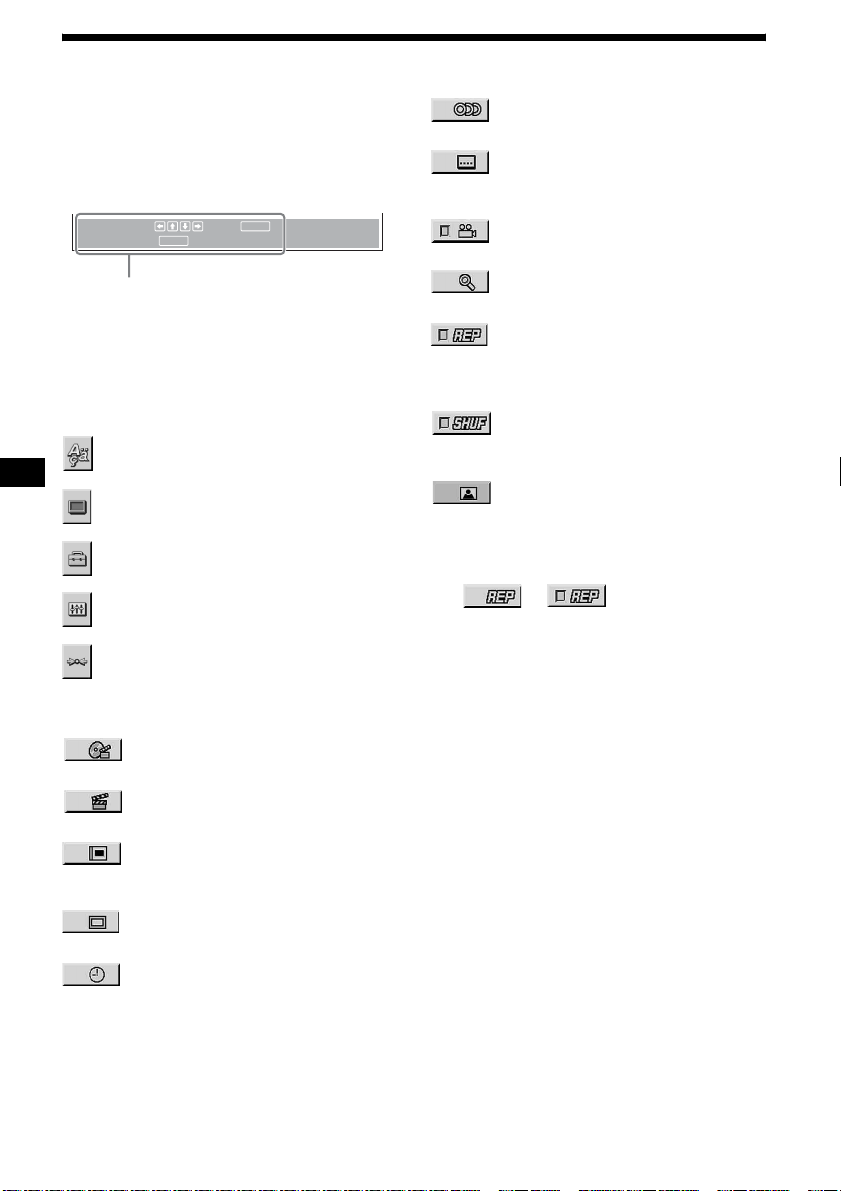
Operation message
Menu operations differ depending on the item
selected, and the buttons to be used appear on the
bottom of the menu display to assist your
operations.
ENTER
To set, press , then .
To quit, press .
Selected item name and/or
operation massages appear.
Tip
“Operation not possible” appears when the function is
not available.
SETUP
SETUP
ENTER
Setup items
LANGUAGE SETUP (page 29)
Switches the languages.
SCREEN SETUP (page 30)
Selects the screen modes.
CUSTOM SETUP (page 31)
Sets the playback operations.
AUDIO SETUP (page 32)
Adjusts the output sound.
RESET (page 29)
Resets all setup items.
AUDIO (page 22)
Changes the audi o setting.
SUBTITLE (page 24)
Displays the subtitles.
Changes the subtitle language.
ANGLE (page 23)
Changes the angl e.
CENTER ZOOM (page 24)
Magnifies the picture .
REPEAT (page 20)
Plays the entire disc (all titles/all trac ks /
all albums) repeatedly, or one chapter/
track/album repeatedly.
SHUFFLE (page 20)
Plays titles/chapters/tracks in random
order.
PICTURE EQ (page 25)
Selects the picture quality.
Tip
When “REPEAT” or “SHUFFLE” is activated, or
“ANGLE” is available, its check-box lights up in green
(e.g. ). However, you may not
be able to change the angle depending on the scene,
even if the check-box is lit in green.
t
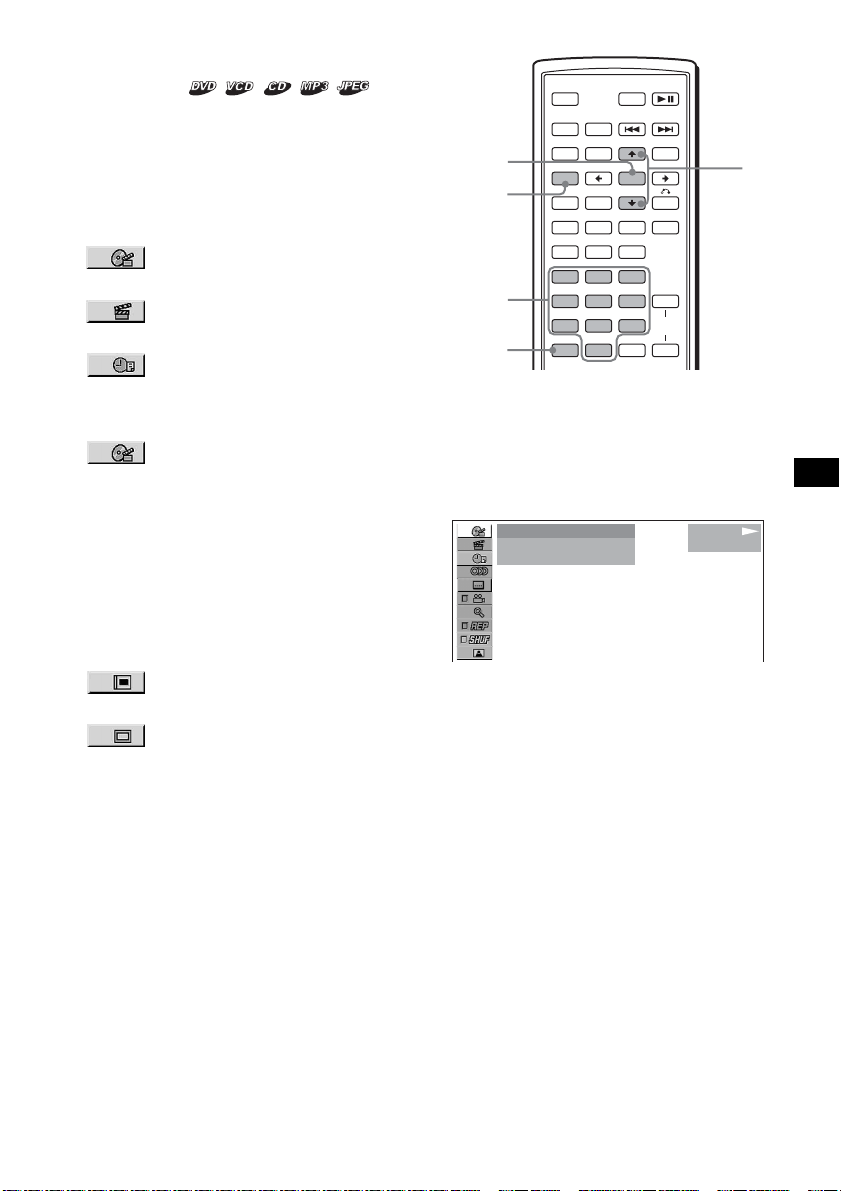
Play mode items
TITLE, TRACK (page 21)
Selects the title, or track to be played.
CHAPTER (page 21)
Selects the chapter to be played.
ALBUM (JPEG) (page 21)
Selects the image album to be
displayed.
IMAGE (page 21)
Selects the image to be displayed.
TIME/TEXT (page 17, 21)
Checks the elap sed time and the
remaining playback time.
Inputs the time code for picture
searching.
Displays DVD text.
14
Page 15
Player
A
C
B
D
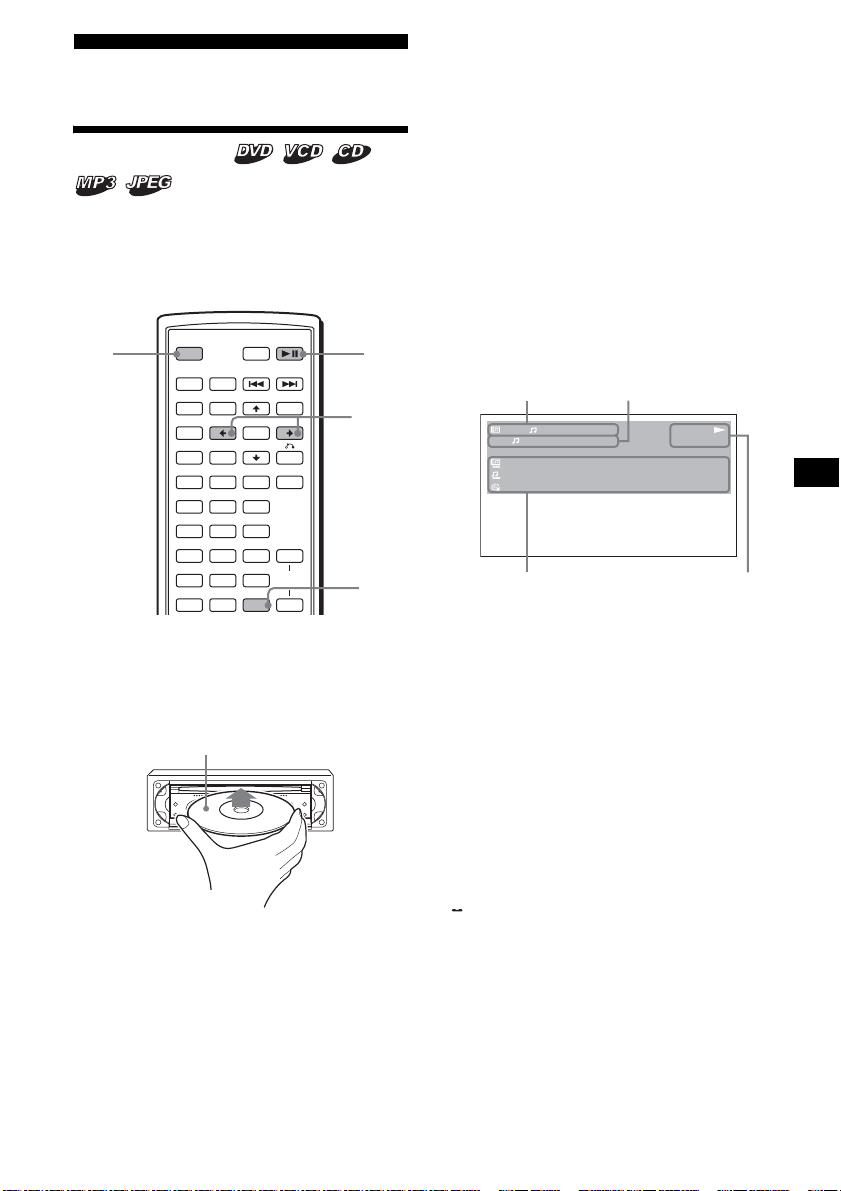
Playing discs
Depending on the disc, some operations may be
different or restricted.
Refer to the operating instructions supplied with
your disc.
Notes
• If a large-size image is rotated, it may take longer to
display.
• A JPEG file is designed to be optimally displayed at
640 x 480 pixels. A file in another size may not be
displayed correctly , or picture shift (to the left or
right) may occur.
• Progressive JPEG files cannot be displayed.
When the disc is inserted
Press DVD u to start playback.
To stop playback/to turn off the unit
Press (OFF).
Tip
You cannot insert a disc while the unit is turned off.
OFF DVD
OFF
SRC
SOUND
SETUP
SYSTEM
MENU
×
AUDIO
123
456
789
CLEAR
ATT DVD
MODE
TOP MENU
LIST
PICTURE
EQZ
Z DSO EQ7
SUBTITLE
0
+
ENTER
–
ANGLE
DSPL
MENU
VOL
+
–
1 Turn on your monitor, then select the
input source on your monitor
corresponding to this unit.
2 Insert a disc.
Playback sid e d o wn
Playback starts automatically. (Depending on
the disc, press DVD u to start playback.)
A menu may appe ar on t h e screen when a
DVD or VCD is inserted.
When “MP3/JPEG” o n “CUSTOM SETUP” is
set to “JPEG, ” a slide show start s automatically if
JPEG files are on the disc (page31).
Each time you press </,, the image rotates
every 90º.
For details on these menus, see page19 for
DVDs, and page 19 for VCDs.
u
</,
DSPL
Display items on the CD/MP3
playback
1
1
0:42
REP
:
ALBUM NAME 001
:
TRACK NAME 001
:
ID3 INFORMATION
160k
A Album number*1/Track number/
Elapsed playback time
B Playback mode/Bit rate*
C Disc name*3/Album na m e *1/Track name/
ID3 tag information*
1
D Playback status (NPLAY, XPAUSE, etc.)/
Disc format
*1 Appears only when MP3 files are played.
*2 No indication when VBR (Variable bit rate) is
applied.
*3 “NO DISC NAME” or “NO TRACK NAME” appears
when the disc or track has no name.
To scroll the text information
Press (DSPL).
Note
“ ” appears in place of the letters other than the
alphabet and numbers.
Notes on DVDs with a DTS sound track
DTS audio signal is output at all times; a loud noise
may come out from the speakers if you connect the
unit to the audio equipment without a DTS decoder.
This may cause damage to the speakers, or affect
your hearing.
continue to next page t
1*2
PLAY
MP3
15
Page 16
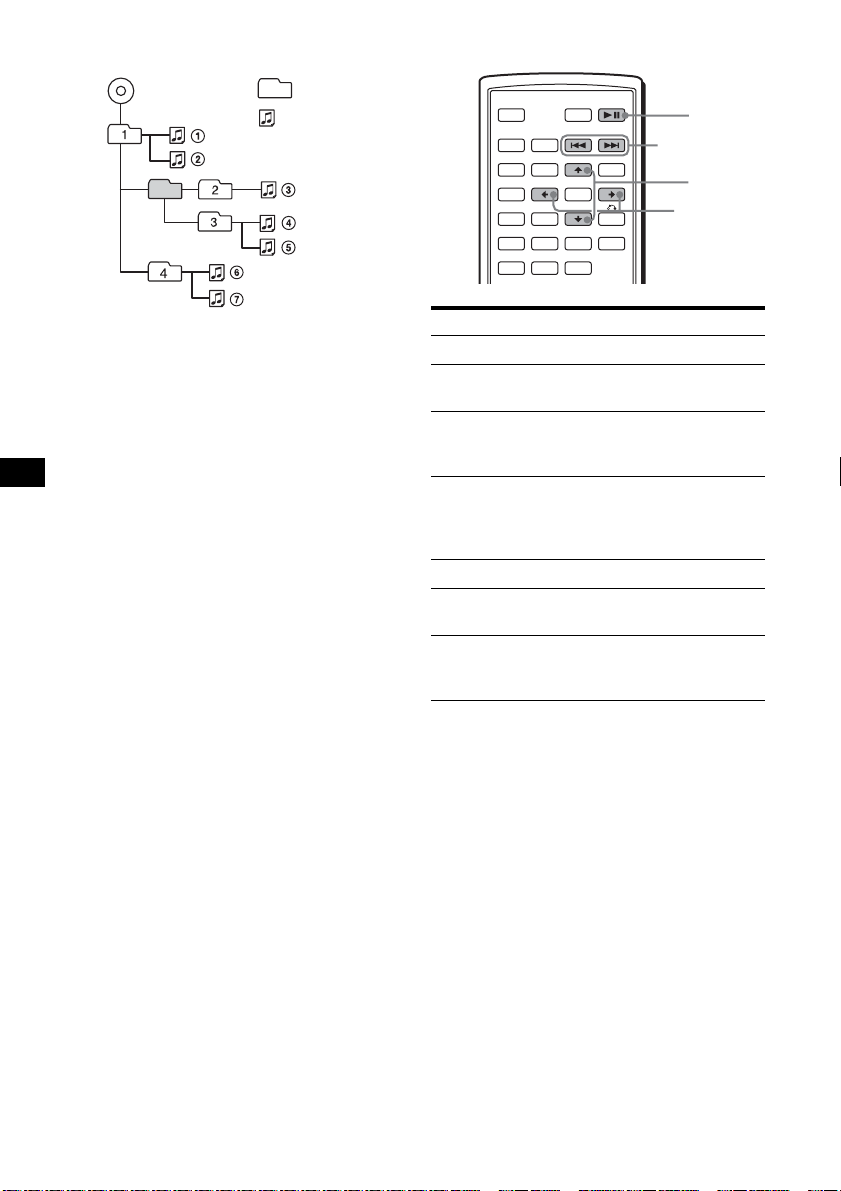
Playback order of MP3 files
MP3
Folder
(album)
MP3 file
(track)
Additional operations
OFF
SRC
SOUND
SETUP
SYSTEM
MENU
×
AUDIO
ATT DVD
MODE
TOP MENU
LIST
PICTURE
EQZ
Z DSO EQ7
SUBTITLE
+
ENTER
–
ANGLE
MENU
DVD
u
./>
M/m
</,
Notes
• The playback order may differ depending on the
writing software.
• The unit can play up to 1,000 tracks and 256
albums. Tracks beyond the first 1,000 and albums
beyond the first 256 cannot be recognized.
Tips
• If you add numbers (01, 02, 03, etc.) to the front of
the track names, the tracks in each folder will be
played in numerical order.
• Since a disc with many trees takes longer to start
playback, it is recommended that you create albums
of no more than two tree levels.
• For details on MP3 files, see “About MP 3 files” on
page 41.
To Operation
Pause Press DVD u
Resume play after
Press DVD u
pause
Go to the next chapter,
Press > (,)
track, or scene in
continuous play mo de
Go back to the
Press . (<)
previous chapter,
track, or scene in
continuous play mo de
Go to the next album Press M*
Go to the previous
Press m*
album
Stop play and remove
the disc
Press Z after opening
the shutter of the unit
(page 9)
* Available only when MP3 or JPEG files are played.
16
Page 17
Resuming playback
— Resume play
The unit stores the po int where you stopped
playback for up to 20 discs, and starts resuming
playback even after the unit is tur ned off, or the
disc being played is eje ct ed.
OFF
OFF
SRC
SOUND
SETUP
SYSTEM
MENU
×
AUDIO
ATT DVD
MODE
TOP MENU
LIST
PICTURE
EQZ
Z DSO EQ7
SUBTITLE
+
ENTER
–
ANGLE
MENU
DVD
u
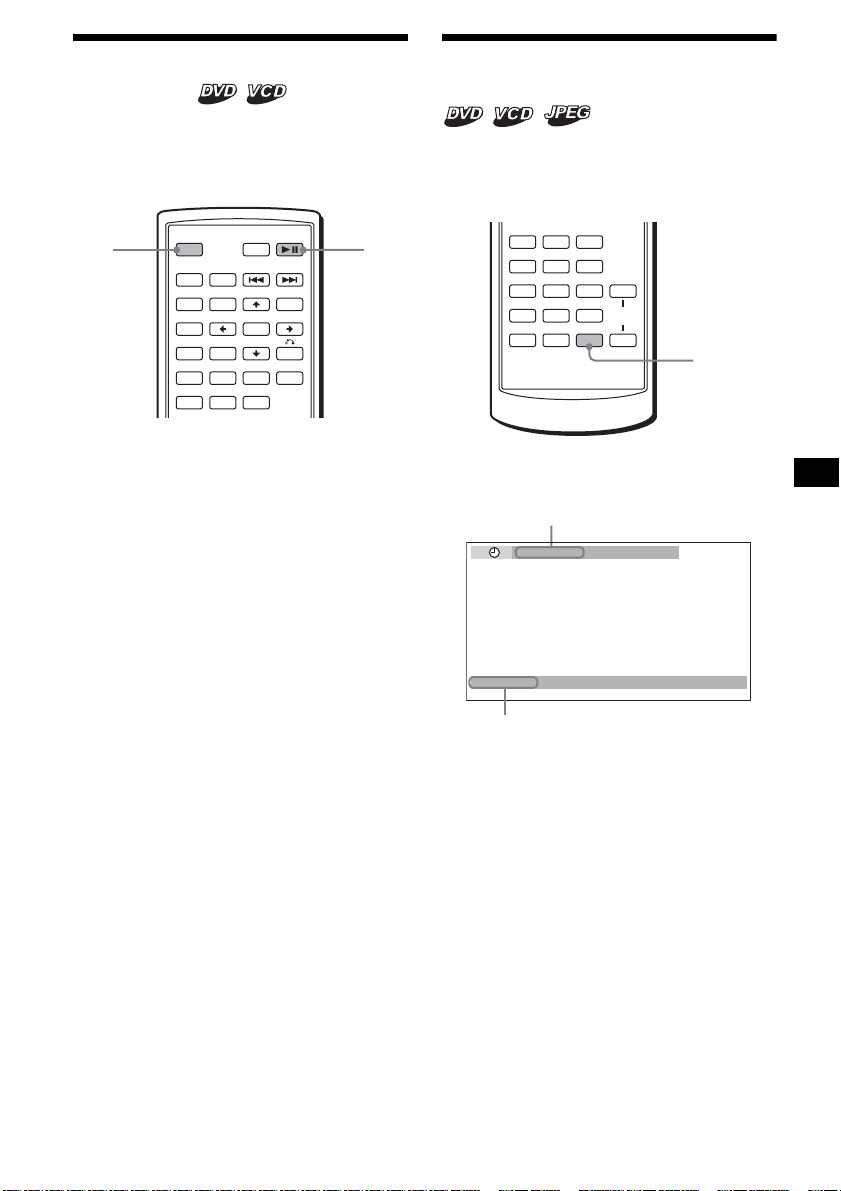
Viewing the disc information
— Time/text information
You can check the playing time and remaining
time of the current title, chapter, or track. You
can also check text information, such as name of
title, chapter, file, etc.
AUDIO
SUBTITLE
ANGLE
123
DSPL
+
VOL
–
DSPL
456
789
CLEAR
0
1 During playback, press (OFF) to stop.
2 Press DVD u to r esume playback.
Playback start s from the point stopped in
step 1.
To play from the beginning
After settin g “MULTI-DISC RESUME” in
“CUSTOM SETUP” to “O FF” (page 31), pr ess
Z to eject the disc, then insert the disc again.
Select the desired c hapter on the DVD menu or
the Top menu depending on the disc.
Notes
• MP3 playback will start from the beginning of the last
track that was played.
• To use resume playback, make sure that “MULTIDISC RESUME” in “CUSTOM SETUP” is set to
“ON” (page 31).
• When storing a resume point for the 21st di sc, the
stored resume point for the 1st disc is cleared
automatically.
• Resume playback is cancelled when the setting for
the parental controls is changed.
• Depending on the disc or scene, you cannot use the
resume playback.
• If parental contro l is applied, the resume playback
will not work. In this case, playback starts from the
beginning of the disc when it is inserted.
Tip
When CD, MP3 files, or JPEG files are played, the unit
temporarily stores the resume point for the disc being
played. Once the unit is turned off or the disc is
ejected, the stored resume point for the disc is
cleared.
1 During playback, press (DSPL).
The current playba ck information appears.
Time information
T 1:01:57
NO TEXT
Text information*
* “NO TEXT” appears when there is no text
information.
continue to next page t
17
Page 18
2 Press (DSPL) repeatedly to switch the
time information.
Time information differs depe ndi ng on the
disc as follows:
DVD:
“T
**:**:**
the current title
“T-
**:**:**
current title
“C
**:**:**
the current chap t er
“C-
**:**:**
current chapter
VCD (wit hout PBC functions) :
“T
**:**
current track
“T-
**:**
track
“D
**:**
current disc
“D-
**:**
disc
JPEG:
Album number
Image number
” - Elapsed playin g t ime of
” - Remaining time of the
” - Elapsed playin g t im e of
” - Remaining time of the
” - Elapsed playing time of the
” - Remaining time of the current
” - Elapsed play i ng time of the
” - Remaining time of the current
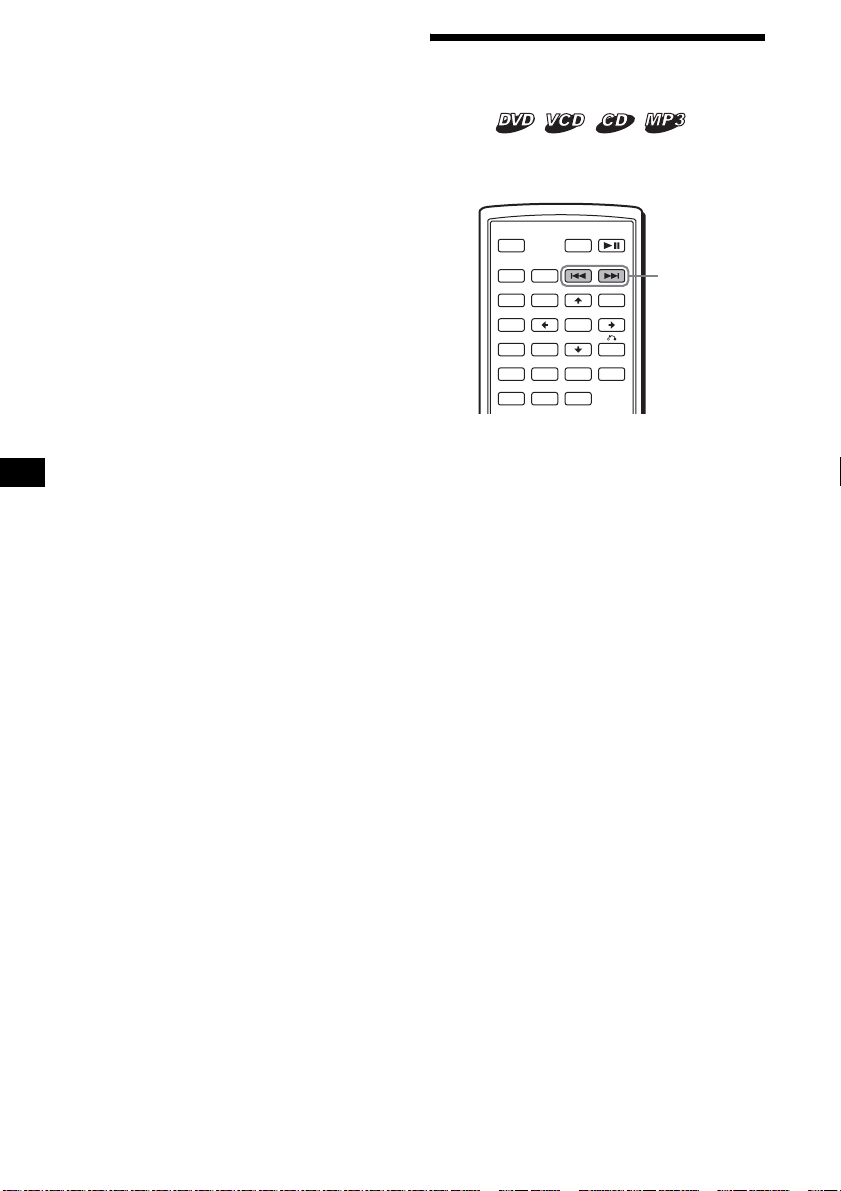
Searching a specific point on
a disc
— Scan
You can quickly locate a s pecific point on a disc
by monitoring the picture.
OFF
SRC
SOUND
SETUP
SYSTEM
MENU
×
AUDIO
During playback, press and hold ./
>, and release at the desir ed point.
If you press and hold the button, searching speed
increases.
Note
While searching, audio is not output, and subtitles are
not displayed.
ATT DVD
MODE
TOP MENU
LIST
PICTURE
EQZ
Z DSO EQ7
SUBTITLE
+
ENTER
–
ANGLE
MENU
./>
18
Page 19
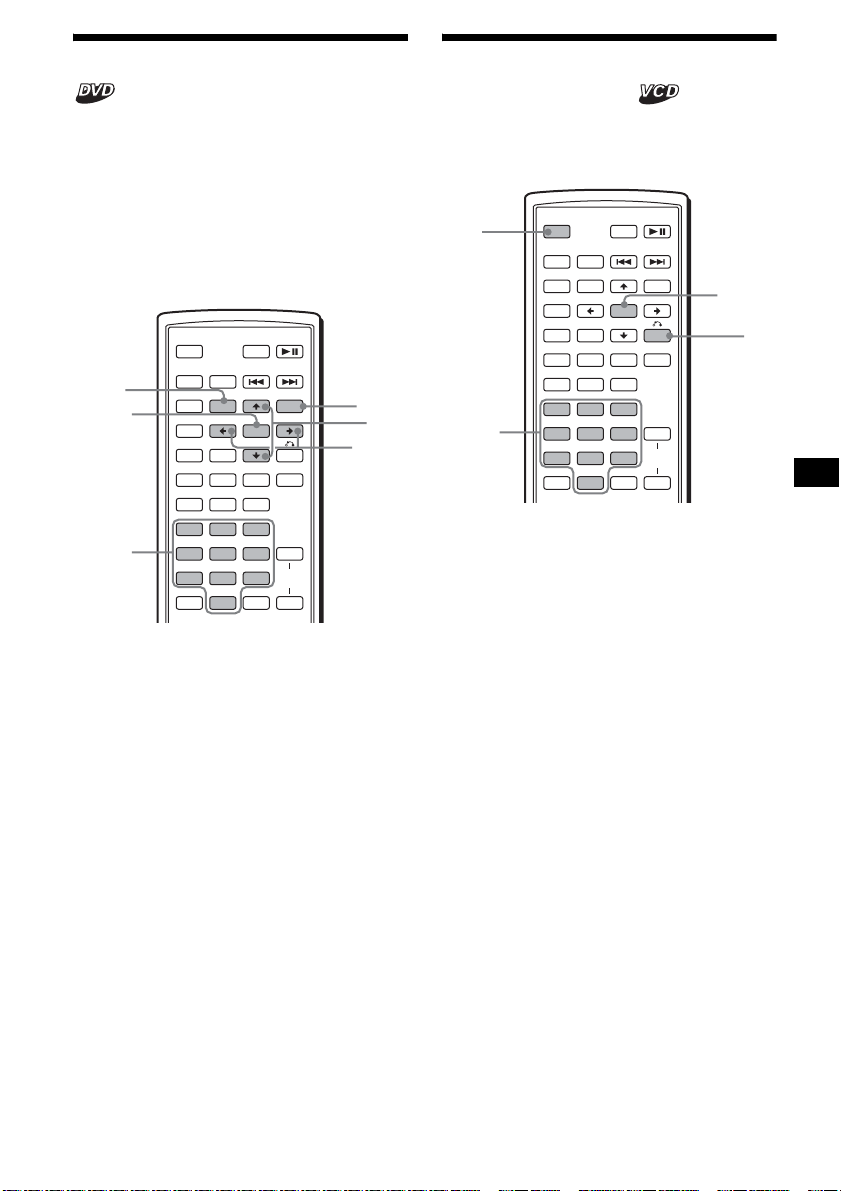
Using the menus on DVDs
With some DVDs, you can use their original
menu(s), such as the Top menu or DVD menu.
If the DVD contains several titles of tracks and
scenes, you can u se the Top menu to select the
desired title, and start playing.
If the DVD contains mo re comprehensive menu
items, such as th e audio and subtitle languages,
titles, chapters, etc., you can use the DVD menu
to select the desired item, and start playing.
ATT DVD
MODE
TOP MENU
LIST
PICTURE
EQZ
Z DSO EQ7
SUBTITLE
+
ENTER
–
ANGLE
MENU
MENU
M/m
</,
TOP
MENU
ENTER
OFF
SRC
SOUND
SETUP
SYSTEM
MENU
×
AUDIO
Using PBC functions
— PBC (Playback control)
The PBC menu assists your operation
interactively while a PBC compatible VCD is
played.
OFF
Number
buttons
OFF
SRC
SOUND
SETUP
SYSTEM
MENU
×
AUDIO
123
456
789
CLEAR
ATT DVD
MODE
TOP MENU
LIST
PICTURE
EQZ
Z DSO EQ7
SUBTITLE
MENU
+
ENTER
–
ANGLE
VOL
DSPL
0
ENTER
+
–
O
Number
buttons
123
456
789
CLEAR
DSPL
0
+
VOL
–
1 During DVD playback, press
(TOP MENU) or (MENU).
The DVD menu or Top menu appears.
The contents of the menu differ depending on
the disc.
2 Press </M/m/,, or the number
buttons to select the desired item,
then press (ENTER).
Note
The items on the menu, and the operation procedures
differ depending on the disc.
1 Start playing a PBC compat ible VCD.
The PBC menu appear s.
2 Press the number buttons to select the
desired item, then press (ENTER).
3 Follow the instructions in the menu for
interactive opera tions.
To return to the previous display
Press O.
Playing without the PBC function
1 During playback, press (OFF).
2 Press the number buttons to select the
desired item, then press (ENTER).
“Play without PBC” appears and playback
starts.
The PBC menu does not a ppe ar during
playback.
Notes
• The items on the menu, and the operation
procedures differ depending on the disc.
• During PBC playback, the track number, playback
time, etc., are not displayed in the Play mode menu.
Tip
To resume PBC playback, stop playback by pressing
(OFF), then press DVD u. PBC playback starts.
19
Page 20
Playing in various modes
— Repeat play/Shuffle play/Search play
You can set the following play modes:
• Repeat play (page 20)
• Shuffle play (page 20)
• Search play (page 21)
Notes
• The selected play mode is cancelled when the disc
being played is ejected or the unit is turned off.
• When playing a VCD with the PBC function on,
Repeat play or Shuffle play is not available.
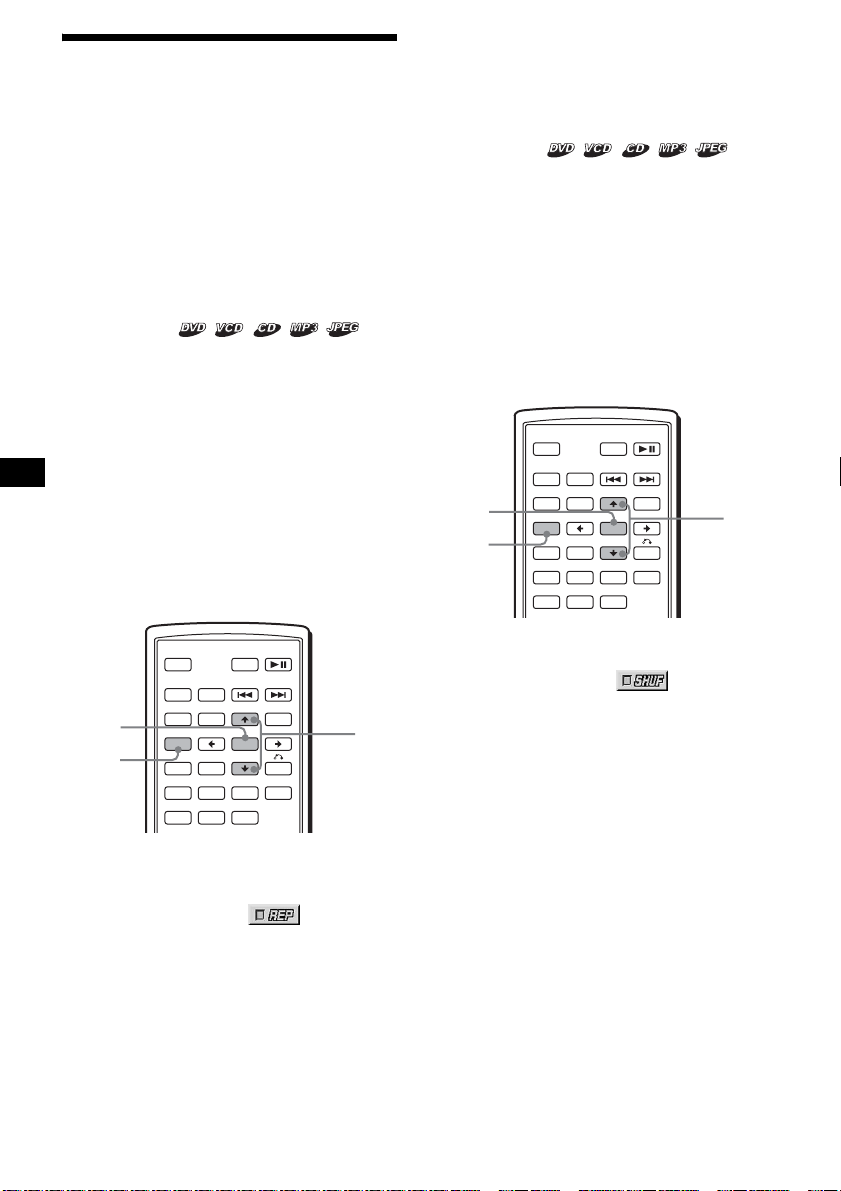
Playing repeatedly
— Repeat play
The unit can repeat a title, chapter, or track when
the item being played reaches the end.
The following repeat options are available:
• TITLE (Title Repeat) - to repeat the current
title.
• CHAPTER (Chapter Repeat) - to repeat th e
current chapt er.
• TRACK (Track Repeat) - to repeat the cu rrent
track/image.
• ALBUM (Album Repeat) - to repeat the tracks/
images in the current album.
Note
When setting Repeat play for CD/MP3, operate with
the main unit by pressing (1) (REP) repeatedly.
Tips
• The repeat options differ depending on the disc.
• You can also set Repeat play by pressing (1) (REP)
on the main unit repeatedly.
Playing in random order
— Shuffle play
The unit can play tit le s, chapters or tracks in
random order.
The followi ng shuffle options are available:
• TITLE (Title Shuffle) - to pl ay chapters in the
current title in random order.
• DISC (Disc Shuffle) - to play tracks/images in
the current disc in random order.
• ALBUM (Album Shuffle) - to play tracks/
images in the current album in random order.
Note
When setting Shuffle play for CD/MP3, operate with
the main unit by pressing (2) (SHUF) repeatedly.
ATT DVD
MODE
TOP MENU
LIST
PICTURE
EQZ
Z DSO EQ7
SUBTITLE
+
ENTER
–
ANGLE
MENU
M/m
ENTER
SETUP
OFF
SRC
SOUND
SETUP
SYSTEM
MENU
×
AUDIO
ATT DVD
MODE
TOP MENU
LIST
PICTURE
EQZ
Z DSO EQ7
SUBTITLE
+
ENTER
–
ANGLE
MENU
ENTER
SETUP
OFF
SRC
SOUND
SETUP
SYSTEM
MENU
×
AUDIO
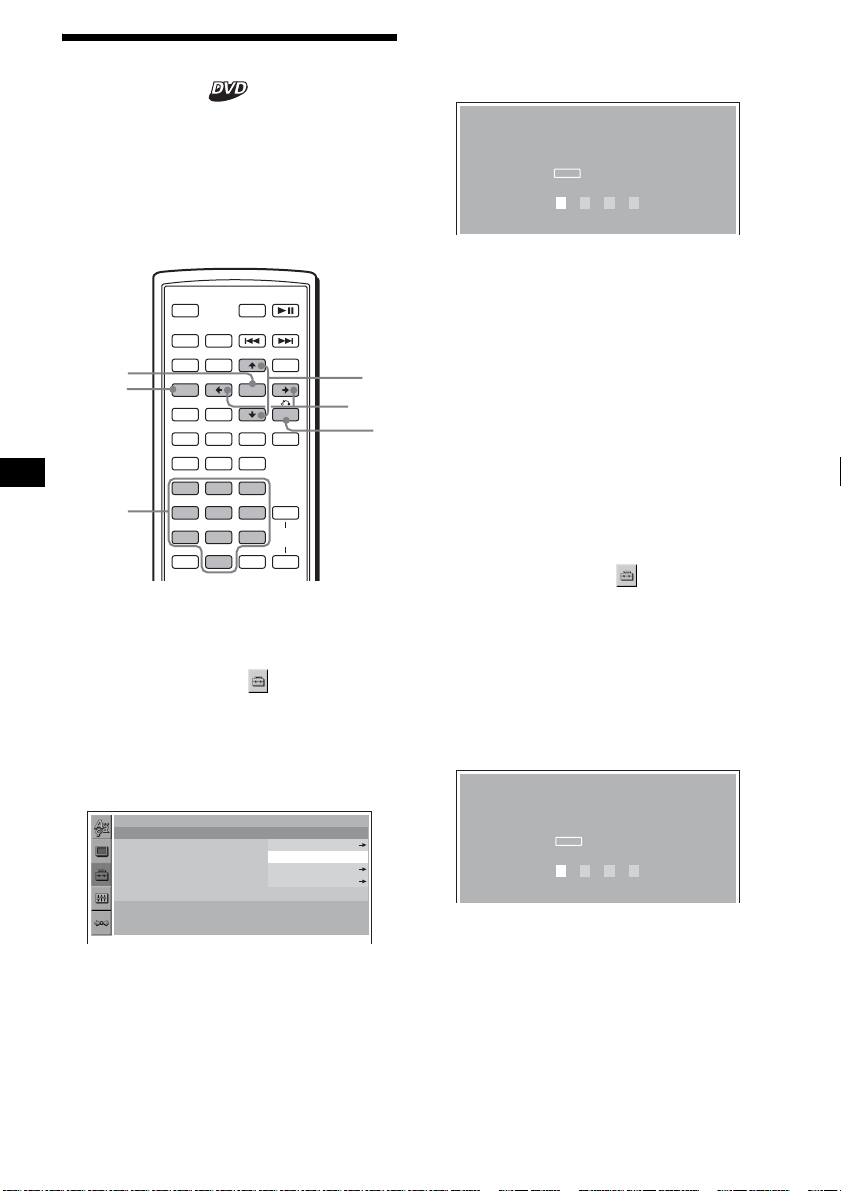
1 During playback, press (SETUP).
The Play mode men u appears.
2 Press M/m to select (REPEAT),
then press (ENTER).
The Play mode options appear.
3 Press M/m to select the desired option,
then press (ENTER).
Repeat play starts.
To return to normal play
Select “OFF” in step 3.
To turn off the Play mode menu
Press (SETUP).
20
M/m
1 During pl aybac k, press (SETUP).
2 Press M/m to select
(SHUFFLE), then press (ENTER).
The Play mode options appear.
3 Press M/m to select the desired option,
then press (ENTER).
Shuffle play starts.
To return to normal play
Select “OFF” in step 3.
To turn off the Play mode menu
Press (SETUP).
Notes
• Title shuffle play for DVD will be cancelled after it is
played once.
• Title shuffle play for DVD will be cancelled if . or
> is pressed during playback.
Tips
• The shuffle opt i ons differ depend i ng on the disc.
• You can also set Shuffle play by pressing (2)
(SHUF) on the main unit repeatedly.
Page 21
Starting playback from a selecte d
point
— Search play
You can quickly locate a de si red point by
specifying the title, chapter, elapsed time of the
title (using the time code), or track.
The following search options are available
depending on the di sc:
DVD:
• TITLE starts playing from the
selected title.
• CHAPTER starts playing from the
selected chapter.
• TIME/TEXT starts playing from the
point according to the input time code.
VCD:
• TRACK starts playing from the
selected track.
CD:
• TR ACK starts playing from the selected track.
MP3:
• TR ACK starts playing from the selected track.
ATT DVD
MODE
TOP MENU
LIST
PICTURE
EQZ
Z DSO EQ7
SUBTITLE
MENU
+
ENTER
–
ANGLE
DSPL
0
M/m
+
VOL
–
ENTER
SETUP
Number
buttons
CLEAR
OFF
SRC
SOUND
SETUP
SYSTEM
MENU
×
AUDIO
123
456
789
CLEAR
1 During playback, press (SETUP).
The Play mode menu appears.
2 Press M/m to select the desired search
item, then press (ENTER).
The search item s dif f er depe nd in g on th e di sc .
)
12(67
018(034
T 1:35:55
1
)
PLAY
DVDVIDEO
JPEG:
• ALBUM starts playing fro m the
selected album.
• IMAGE starts playing from the
selected image.
Note
When locating a track for CD/MP3, press the number
buttons to enter track number, then press (ENTER).
The number in parentheses indicates the tot al
number of items selected.
3 Press the number bu ttons to e nter title
number, chapter number, track
number, or the elapsed time of the
title.
For example, to find a desired point at 2
hours, 10 minutes, and 20 seconds after t h e
beginning, just ente r “2:10:20.”
To clear the numbers already input , pr ess
(CLEAR).
4 Press (ENTER).
Playback starts from the selected point.
To tur n off th e Play mode menu
Press (SETUP).
21
Page 22
Various DVD operations
Changing the audio channels
When playing a DVD recorded in multiple audio
formats (PCM, Do l by Di gi t al , or DTS), you can
change the audio format. If the DVD is record ed
with multilingual tracks, you can als o change t he
language.
With VCDs, you can select the sound from the
right or left channel and listen to the sound of the
selected channel through both the right and left
speakers. For example, w hen playing a disc
containing a song with the vocals on the right
channel and the inst ruments on the lef t ch annel,
you can hear the instruments from both speakers
by selecting the left channel.
OFF
SRC
ENTER
SETUP
SYSTEM
MENU
AUDIO
SOUND
SETUP
SYSTEM
MENU
×
AUDIO
During playback, press (AUDIO)
repeatedly to select the desired audio
channels.
1:ENGLISH DolbyD
Audio sound setti ngs differ depending on the
disc as follows:
ATT DVD
MODE
TOP MENU
LIST
PICTURE
EQZ
Z DSO EQ7
SUBTITLE
+
ENTER
–
ANGLE
MENU
M/m
</,
VCD:
STEREO*: Standard stereo sound
1/L: Left channel sound (monaural)
2/R: Right channel sound (mon aural)
* The default setting
Note
You may not be able to change the audio channels
depending on disc.
Tip
You can also change the settings by selecting
“AUDIO” in the Play mode menu (page 13).
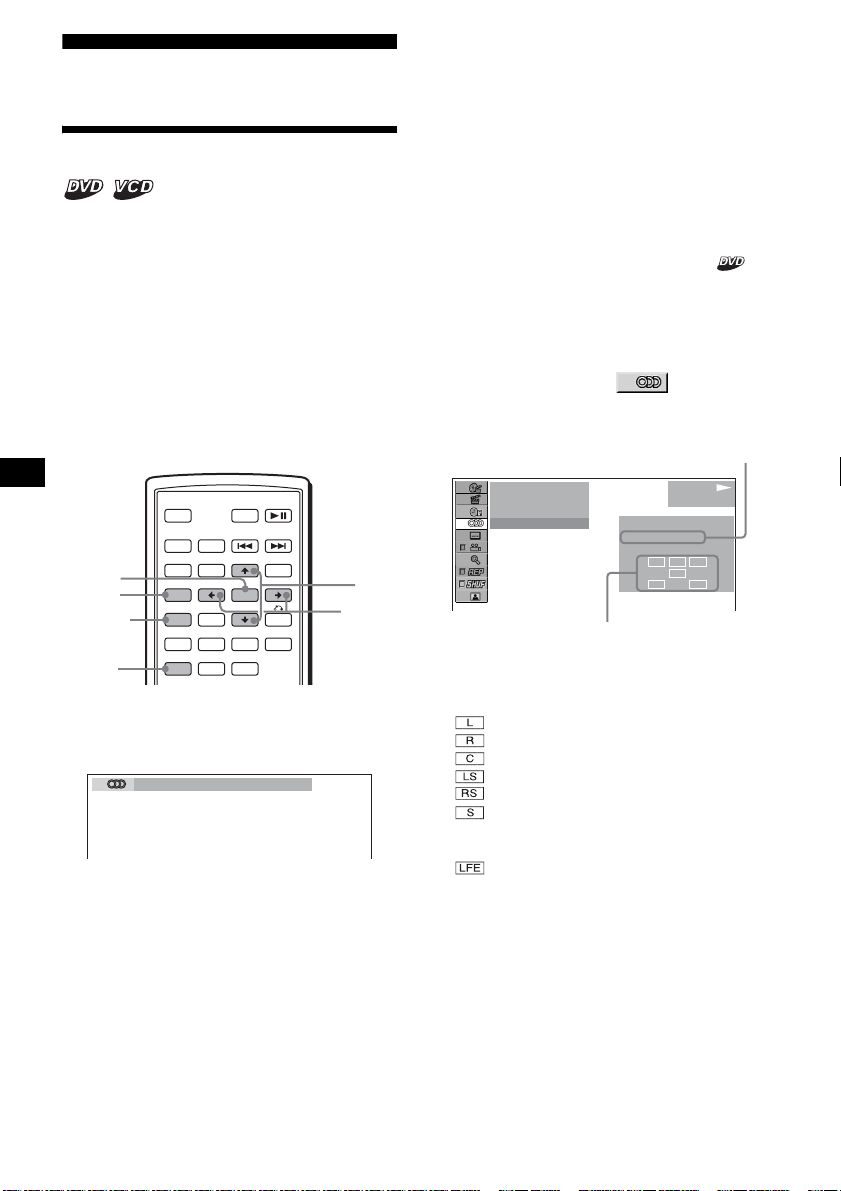
Checking the program format
You can check the numbe r of channels and
component positi on on the DVD being played.
1 During pl aybac k, press (SETUP).
The Play mode menu appears.
2 Press
then press (ENTER).
The program format appears.
The letters in the program format display
represent the foll owing sound components
and its positions:
to select (AUDIO) ,
M/m
Current audio format*
)
12(67
)
018(034
T 01:35:55
1: ENGLISH
Current program format*
PLAY
DVDVIDEO
PROGRAMFORMAT
DOLBY DIGITAL
3 / 2. 1
L C
LFE
LSRRS
2
: Front (left)
: Front (right)
: Centre
: Rear (left)
: Rear (right)
: Rear (monaural): The rear component
of the Dolby Surround processed signal
and the Dolby Digital sig nal
: Low Frequency Effect signal
1
DVD:
The audio language sw i t ches among the
avail able language s.
When 4 digits appear, input the language code
corresponding to the desired language
(page 49).
When the same language is displayed two or
more times, the DVD is recorded in multiple
audio formats.
22
Page 23
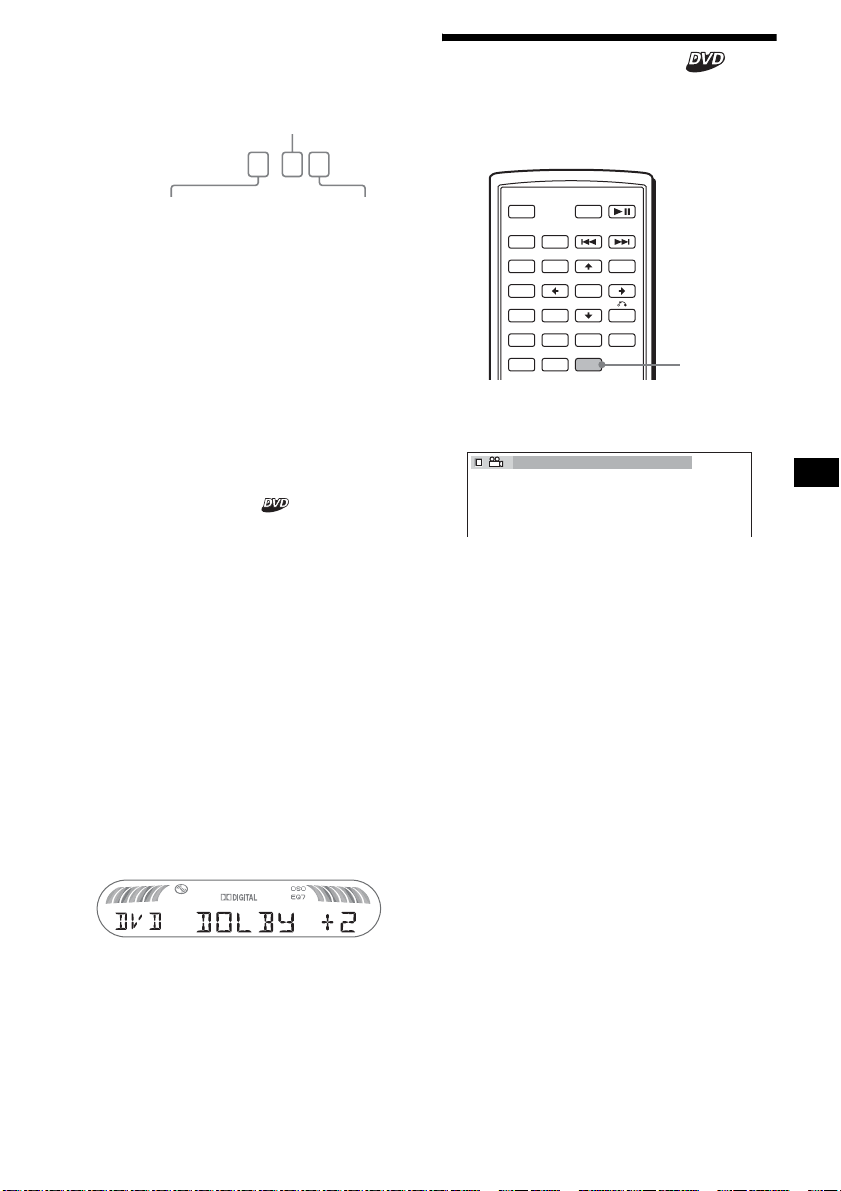
When “DOLBY DIGITAL” is applied, the
program format name and channel num bers
appear as follows:
Example: Dolby Digital 5.1 ch
Rear component × 2
DOLBY DIGITAL
Front component × 2 +
Center component × 1
*1 “PCM,” “DTS,” or “DOLBY DIGITAL” appears
depending on the disc.
*2 Appears only when the “DOLBY DIGITAL” format is
applied.
3 / 2 . 1
LFE component × 1
To turn off the Play mode menu
Press (SETUP).
Tip
For Dolby Digital and DTS, “LFE” is always enclosed
in a solid line regardless of the LFE signal component
being output.
Adjusting the audio output level
— DVD level adjustment
Changing the angles
You can change the viewing an gl e i f various
angles (multi-angles) for a scene are recorded on
a DVD.
OFF
SRC
SOUND
SETUP
SYSTEM
MENU
×
AUDIO
Press (ANGLE) repeatedly to select the
desired angle number.
2(2
ATT DVD
MODE
TOP MENU
LIST
PICTURE
EQZ
Z DSO EQ7
SUBTITLE
)
+
ENTER
–
ANGLE
MENU
ANGLE
The audio output level for DVD video differs
depending on the rec or ded audio format (PC M,
Dolby Digital, or DTS). You can adjust the
output level of PCM, Dolby Digita l o r DTS
separately to reduce th e volume lev el d ifferences
between disc and source.
1 Press (SYSTEM MENU).
2 Press M/m repeatedly to select “DVD
LVL,” then press (ENTER).
3 Press , to set to “ADJ-ON,” then
press (ENTER).
4 Press </, to select “DOLBY ,” “DTS”
or “PCM.”
5 Press M/m to adjust the output level,
then press (ENTER).
Note
You can adjust the output level only when a disc is
inserted in the unit.
Tip
The output level is adjustable from –6 dB to +6 dB.
The angle changes.
Note
Depending on the DVD, you may not be able to
change the angles, even if multi-angles are recorded.
Tip
You can also change the viewing angle by selecting
“ANGLE” in the Play mode menu (page 13).
23
Page 24

Displaying the subtitles
Y ou can turn the subtitles on or off, or change the
subtitle langua ge if more are recorded on the
DVD.
Magnifying pictures
You can magnify pictures .
OFF
SRC
SOUND
SETUP
SYSTEM
MENU
×
AUDIO
ATT DVD
MODE
TOP MENU
LIST
PICTURE
EQZ
Z DSO EQ7
SUBTITLE
+
ENTER
–
ANGLE
MENU
SUBTITLE
1 During playback, press (SUBTITLE).
The subtitle language appears.
2 Press (SUBTITLE) repeatedly to select
the desired language.
1:ENGLISH
Available languages will vary, depending on
the disc.
When 4 digits appear, input the language code
corresponding to the desired language
(page 49).
To turn off the subtitles
Press (SUBTITLE) repeatedly to select “OFF.”
Note
Depending on the DVD, you may not be able to
change (or turn off) the subtitles, even if multilingual
subtitles are recorded.
Tip
You can also change the subtitle language by
selecting “SUBTITLE” on the Play mode menu
(page 13), or the DVD menu (page 19).
ATT DVD
MODE
TOP MENU
LIST
PICTURE
EQZ
Z DSO EQ7
SUBTITLE
+
ENTER
–
ANGLE
MENU
M/m
</,
ENTER
SETUP
OFF
SRC
SOUND
SETUP
SYSTEM
MENU
×
AUDIO
1 During pl aybac k, press (SETUP).
The Play mode menu appears.
2 Press M/m to select (CENTER
ZOOM), then press (ENTER).
The current opt i on appears.
3 Press M/m to select the desired option
(ZOOM×1, ×2*, ×4*), then press
(ENTER).
The picture is magnified.
* The picture becomes grainy.
To shift the frame position
After magnifying the picture, press </M/m/,.
T o restore th e original scale
Select “ZOOM×1” i n step 3.
To turn off the Play mode menu
Press (SETUP).
Notes
• Depending on the DVD, you may not be able to
change the magnification .
• If you resume playback, the picture returns to its
original scale.
24
Page 25
Changing the picture quality
— Picture EQ
You can select picture quality suitable for the
interior brightness of the car.
You can set “PICTURE E Q ” t o “LIGHT OFF,”
“LIGHT ON,” or “AUTO” in “CUSTOM
SETUP” (page 31). The o pt ions (be lo w ) fo r ea ch
setting differ. If you set “PICTURE EQ” to
“AUTO,” the available options switch
automatically depending on whether the light is
on or off.
The following setting options are available.
• NORMAL - normal picture quality.
•Daytime*
•Sunset*
• Shine*
when sunlight r eflects on the monitor).
•Night*
your driving at night.
• Midnight*
“Night” setting.
• Theater*
when you want to enjoy a bright monitor at
night.
• CUSTOM - user-adjustable settings.
*1 Available when “PICTURE EQ” in “CUSTOM
*2 Available when “PICTURE EQ” in “CUSTOM
1
- suitable in a bright place.
1
- suitable w h en it gets li ttle dark.
1
- suitable in a very bright place (e.g.
2
- darkens the monitor to not distract
2
- darkens the moni tor more t han the
2
- brightens the monitor; suitable
SETUP” is set to “LIGHT OFF,” or “AUTO” and the
light is of f.
SETUP” is set to “LIGHT ON,” or “AUTO” and the
light is on .
Adjusting the custom settings
You can store your own use r-adj ustable settings
for different picture t ones.
1 During playback, press (SETUP).
The Play mode menu appears.
2 Press M/m to select (PICTURE
EQ), then press (ENTER).
The setting items appear.
1
001
002:35
Daytime
Sunset
Shine
CUSTOM
NORMAL
NORMAL
PLAY
DVDVIDEO
3 Press M/m to select “CUSTOM,” then
press (ENTER).
4 Press M/m to select the setting item,
then press </, to adjust the level.
USER CUSTOM SETUP
Color
Bright
Contrast
Tint
Select: Set:
RETURN
Cancel:
0
0
0
0
ATT DVD
MODE
TOP MENU
LIST
PICTURE
EQZ
Z DSO EQ7
SUBTITLE
+
ENTER
–
ANGLE
MENU
M/m
</,
ENTER
SETUP
PICTURE
EQ
OFF
SRC
SOUND
SETUP
SYSTEM
MENU
×
AUDIO
During playback, press (PICTURE EQ)
repeatedly to select the desired
setting.
Daytime
Tip
You can also change the picture quality by selecting
“PICTURE EQ” in Play mode menu (page 13).
5 Press (ENTER).
Tip
Adjustments for “LIGHT OFF” and “LIGHT ON” can be
stored separately.
25
Page 26
Locking discs
— Parental control
You can lock a disc, or set playback restrictions
according to a prede t ermined level such as
viewer age. Restricted playback scenes are
blocked or replaced with different scenes when a
parental control compatible DVD is played.
Setting the parental control on
OFF
SRC
ENTER
SETUP
Number
buttons
SOUND
SETUP
SYSTEM
MENU
×
AUDIO
123
456
789
CLEAR
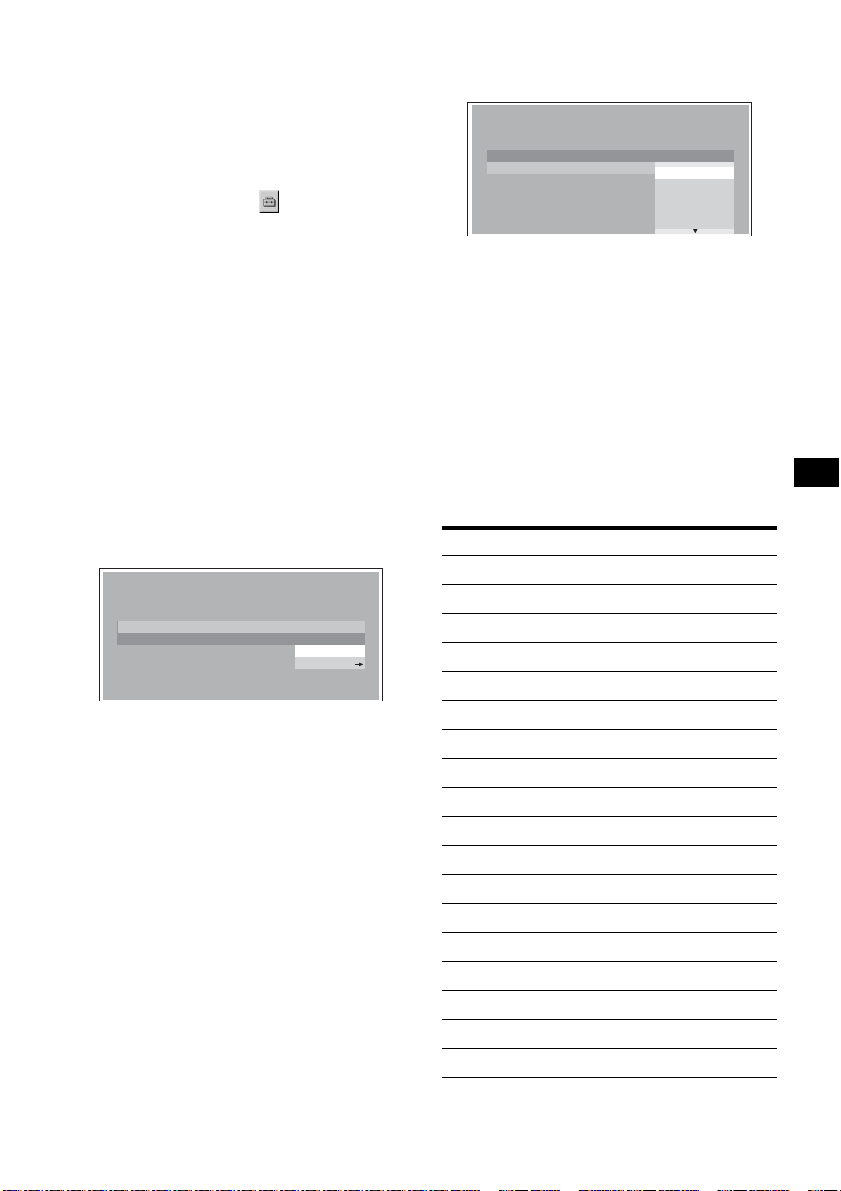
1 Press (SETUP) while playback is
stopped.
The set up menu ap pe ars.
2 Press M/m to select (CUSTOM
SETUP), then press (ENTER).
The setting items appear.
3 Press M/m to select “PARENTAL
CONTROL,” then press (ENTER).
The parental cont rol options appear.
CUSTOM SETUP
PARENTAL CONTROL :
MUTI–DISC RESUME :
MP3/JPEG :
SLIDE SHOW TIME :
PLAY LIST PLAY :
PICTURE EQ :
ATT DVD
MODE
TOP MENU
LIST
PICTURE
EQZ
Z DSO EQ7
SUBTITLE
MENU
+
ENTER
–
ANGLE
VOL
DSPL
0
+
–
PLAYER
PASSWORD
OFF
ON
OFF
AUTO
M/m
</,
O
4 Press M/m to select “ON t,” the n
press (ENTER).
The password setting di splay appears.
PARENTAL CONTROL
Enter a new 4–digit password,
ENTER
then press .
PASSWORD
5 Press the number buttons to enter
your password, then press (ENTER).
The conformation display appears.
6 To confirm, press the number buttons
to enter your password again, then
press (ENTER).
Parental control is set.
To turn off the Setup menu
Press (SETUP).
Setting the parental control off
1 Press (SETUP) while playback is
stopped.
The set up menu appears.
2 Press M/m to select (CUSTOM
SETUP), then press (ENTER).
The setting it em s ap pear .
3 Press M/m to select “PARENTAL
CONTROL,” then press (ENTER).
The parental control options appear.
4 Press M/m to select “OFF t,” then
press (ENTER).
The display to ente r your password appear s.
PARENTAL CONTROL
Enter password,
ENTER
then press .
PASSWORD
26
5 Press the number buttons to enter
your password, then press (ENTER).
“Parental control is canceled” appear s.
If a wrong number i s en t ered, press < to
move the cursor and ente r the number again.
Page 27
Changing the area and its movie
rating level
You can set the restriction levels depending on
the area and its movie rat i ngs .
7 Press M/m to select “LEVEL,” then
press (ENTER).
The rating options appear.
1 Press (SETUP) while playback is
stopped.
The set up menu appe ars.
2 Press M/m to select (CUSTOM
SETUP), th en press (ENTER).
The setting ite m s appear.
3 Press M/m to select “PARENTAL
CONTROL,” then press (ENTER).
The parental cont r ol o pt i ons appear.
4 Press M/m to select “PLAYER t,” the n
press (ENTER).
When the parental control is already set to on,
the display to en te r your password appear s.
To change the settings, enter your password
number, then press (ENTER).
If a wrong number is e nt ered, press < to
move the cursor and enter the number again.
5 Press M/m to select “STANDARD,”
then press (ENTER).
The standard op tions appear.
CUSTOM SETUP
LEVEL :
STANDARD :
8:
USA
USA
OTHER
6 Press M/m to select th e desi red area to
apply its movie ratings, then press
(ENTER).
The area is selected.
When you want to select the standard on the
“Area code list” (page 27), select “OTHERS
t,” then enter its code number using the
number buttons.
CUSTOM SETUP
LEVEL :
STANDARD :
8:
8:
7:
NC17
6:
R
5:
4:
PG13
The lower the number, the strict er the
restriction level.
8 Press M/m to select the desired rating,
then press (ENTER).
Parental control setting is complete.
To tur n off th e Setup menu
Press (SETUP).
Note
When you play discs which do not have the parental
control, playback cannot be restricted on this unit.
Area code list
Standard Code numbe r
Argentina 2044
Australia 2047
Austria 2046
Belgium 2057
Brazil 2070
Canada 2079
Chile 2090
China 2092
Denmark 2115
Finland 2165
France 2174
Germany 2109
India 2248
Indonesia 2238
Italy 2254
Japan 2276
Korea 2304
Malaysia 2363
continue to next page t
27
Page 28
Standard Code number
Mexico 2362
Netherlands 2376
New Zealand 2390
Norway 2379
Pakistan 2427
Philippines 2424
Portugal 2436
Russia 2489
Singapore 2501
Spain 2149
Sweden 2499
Switzerland 2086
Thailand 2528
United Kingdom 2184
Changing the password
1 Press (SETUP) while playback is
stopped.
The Setup menu appe ar s.
2 Press M/m to select (CUSTOM
SETUP), then press (ENTER).
The setting items appear.
3 Press M/m to select “PARENTAL
CONTROL,” then press (ENTER).
The parental cont rol options appear.
4 Press M/m to select “PASSWORD t,”
then press (ENTER).
The display to enter your password appears.
5 Press the number buttons to en ter
your 4-digit password, then press
(ENTER).
When a wrong num ber i s ent ered, p ress < to
move the cursor and enter the number again.
6 Press the number buttons to en ter a
new 4-digit password, then press
(ENTER).
7 To confirm, press the number button
to enter your new 4-digit password
again, then press (ENTER).
Settings and Adjustments
Using the Setup menu
By using the Setup me nu, you can make various
adjustments to items, such as picture and sound.
You can also set a langu age for the subtitle and
the on-scree n display, among othe r t hings. For
details on each setup items , see pages from 29 to
32.
Note
Playback settings stored in the disc take priority over
the Setup menu settings, and not all the functions
described may work.
OFF
SRC
ENTER
SETUP
SOUND
SETUP
SYSTEM
MENU
×
AUDIO
Basic operation
Example: When y ou w ant to change the aspect
ratio (“MONITOR TYPE”) to “4:3 PAN SCAN.”
1 Press (SETUP) while playback is
stopped.
The Setup menu appears.
LANGUAGE SETUP
OSD :
MENU :
AUDIO :
SUBTITLE
ATT DVD
MODE
TOP MENU
LIST
PICTURE
EQZ
Z DSO EQ7
SUBTITLE
:
+
ENTER
–
ANGLE
MENU
ENGLISH
ENGLISH
ORIGINAL
AUDIO FOLLOW
M/m
O
To return to the previous display
Press O.
To turn off the Setup menu
Press (SETUP).
28
Page 29
2 Press M/m to s e lect (SCREEN
SETUP), th en press (ENTER).
The setup display appears.
SCPEEN SETUP
MONITOR TYPE :
SCREEN SAVER :
16:9
ON
3 Press M/m to select “MONITOR TYPE,”
then press (ENTER).
The monitor type options appear.
SCPEEN SETUP
MONITOR TYPE :
SCREEN SAVER :
4:3 LETTER BOX
16:9
16:9
4:3 PAN SCAN
4 Press M/m to select “4:3 PAN SCAN,”
then press (ENTER).
The setting is appl ie d and setup is complete.
To return to the previous display
Press O.
To turn off the Setup menu
Press (SETUP).
To reset all the setting items
— Reset
1 Select (RESET) in step 2, then
press (ENTER).
2 Press M to select “YES ,” then press
(ENTER).
All the settings* on the Setup menu return to
the default settings.
* Excluding parental control settings.
Setting the display language
or sound track
— Language set up
“LANGUAGE SETUP” allows you to set the
desired languag e f or the on-screen display or
sound track accordingly.
Select (LANGUAGE SETUP) in the Setup
menu, then select the desired setting item.
For details on the set up pr ocedures, see “Using
the Setup menu” o n pa ge 28.
OSD (On-Screen Display)
Switches the display language on the screen.
MENU
Switches the lan gua ge for the menu on the dis c.
AUDIO
Switches the language of the sound track.
When you select “ORIGINAL,” the language
given priority in the disc is selecte d.
SUBTITLE
Switches the language of the subtitle recorded on
the disc.
When you select “AUDIO FOLLOW,” the
language for the subtitles changes according to
the language yo u selected for the sound track.
Note
When you select a language in “MENU,” “SUBTITLE,”
or “AUDIO” that is not recorded on the disc, one of the
recorded languages will be automatically selected.
Tip
If you select “OTHERS t” in “MENU,” “SUBTITLE,” or
“AUDIO,” select and enter a language code from
“Language code list” (page 49) using the number
buttons.
T o cancel resetting
Select “NO” in step 2 .
Note
Do not turn off the unit while resetting the Setup menu
item as it takes a few seconds to complete.
29
Page 30
Setting the screen
— Screen setup
“SCREEN SETUP” allows you to adjust the
setting for the connected monitor.
Select (SCREEN SETUP) in the Setup
menu, then select the desired setting item.
For details on the setup procedures, see “Using
the Setup menu” on page 28.
Setting items with “*” i n the tables below a re the
default settings.
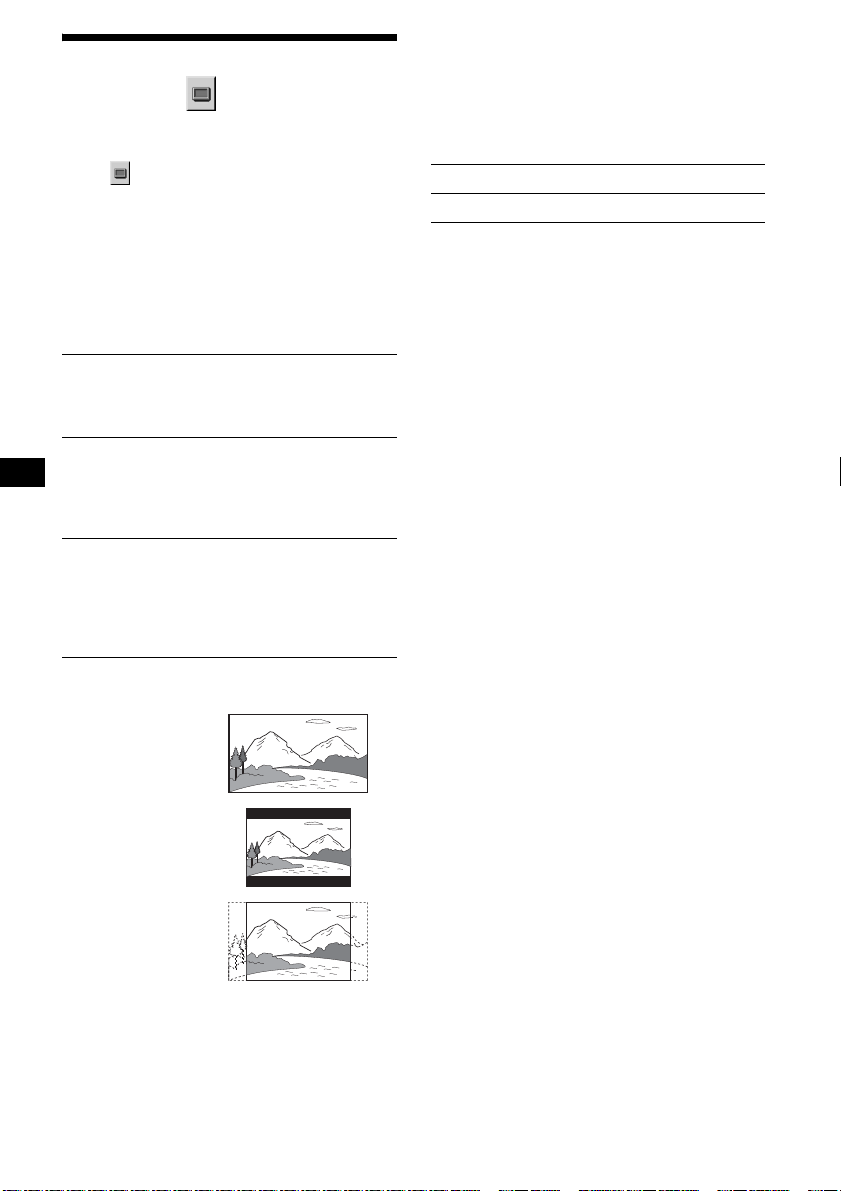
MONITOR TYPE
Selects the aspect ratio of the connected monitor
(4:3 standard o r wide).
16:9* Displays the wide picture.
4:3
LETTER
BOX
4:3
PAN SCAN
Select this when you connect a
wide-screen monitor or a monitor
with a wide mode function.
Displays a wide picture with
bands on the upper and lower
portions of the screen.
Select this when you connect a
4:3 screen monit or.
Displays a wide picture on the
entire scree n and automatica lly
cuts off the portions that do not
fit.
Select this when you connect a
4:3 screen monit or.
SCREEN SAVER
Turns the screen saver on and off. The scr een
saver image appears when you leave the system
in stop mode for 5 minutes. The screen save r will
help prevent your display devic e fr om becoming
damaged (afterimage). Press DVD u to turn
off the screen saver.
ON Turns on the screen saver.
OFF* Turns off the screen saver.
16:9
4:3 LETTER BOX
4:3 PAN SCAN
Note
Depending on the DVD, “4:3 LETTER BOX” may be
selected automatically instead of “4:3 PAN SCAN, ”
and vice versa.
30
Page 31

Custom settings
— Custom setup
“CUSTOM SETUP” allows you to set the
playback conditions of this unit.
Select (CUSTOM SETUP) in the Setup
menu, then select the desired setting item.
For details on the setup procedures, see “Using
the Setup menu” on page 28.
Setting items with “*” in the tables below are the
default settings.
PARENTAL CONTROL
Sets the playback restri ctio ns so th at the u nit wi ll
not play inappropriate discs or scenes (page 26).
ON t Sets the parental control on.
OFF t* Sets the parental control off.
PLAYER t Sets the restriction standard
PASSWORD t Sets a new 4-digit password.
MULTI-DISC RESUME
Stores resume playback points for up t o 20
different discs.
ON* Stores the resume settings in
OFF Cancels storing the resume
Note
If parental control is applied, the resume playback will
not work. In this case, playback starts from the
beginning of the disc when it is inserted.
MP3/JPEG
Sets the priority when MP3 files and JPEG files
are on the same dis c.
MP3* Takes priority over JPEG files when
JPEG Takes priority over MP3 files when
and its level.
memory for up to 2 0 di scs. (The
settings remain in memory even
if you select “OFF.”)
settings in memory. Playback
restarts at the resume poi nt only
for the current disc in the unit.
playing.
playing.
SLIDE SHOW TIME
Sets the time for displaying images on the disc.
5sec Switches the images every 5
seconds.
10sec* Switches the images every 10
seconds.
20sec Swi tc hes the images every 20
seconds.
40sec Swi tc hes the images every 40
seconds.
60sec Swi tc hes the images every 60
seconds.
FIXED Cancels switching images.
PLAY LIST PLAY
Sets priority between the originally recorded
titles or the edited play list on a DVD-RW in VR
mode.
ORIGINAL* Takes priority over play list
edited from the originally
recorded titles.
PLA Y LIST T akes priori ty over ori ginally
recorded titles.
Notes
• Play list playback is available only for a D VD- RW in
VR mode.
• When there is no play list created on a disc, the
originally recorded titles are played.
PICTURE EQ
Selects to displa y t he picture quality opt io ns.
AUTO* Switches the options
depending on whether the
light is on or off. (Available
only when the illumination
control lead is con nected.)
LIGHT OFF Displays the options for
daytime use.
LIGHT ON Displays the options for
nighttime use.
31
Page 32

Audio settings
— Audio setup
“ AUDIO SETUP” allows y ou to a djust th e soun d
according to playback conditions and co nnected
equipment.
Select (AUDIO SETUP) in the Setup menu,
then select the desired setting item.
For details on the setup procedures, see “Using
the Setup menu” on page 28.
The setting items with “*” in the tables below are
the default settings .
AUDIO DRC (Dynamic Range Control)
Makes the sound clear when the volume is turned
down when playing a DVD that conforms to
“AUDIO DRC.”
This setting affect s the outputs of FR ONT/REAR
AUDIO OUT.
STANDARD* Normally select this position.
WIDE
RANGE
DOWNMIX
Switches the method for mixing down to 2
channels when you play a DVD which has rear
sound elements ( channels) or is recorded in
Dolby Digital format. For details on the rear
signal components, see “Checking the program
format” on page 22. This setting affec ts th e
output of FRONT/REAR AUDIO OUT.
SURROUND Select this when the unit is
NORMAL* Select this when the unit is
Gives yo u the feel ing of bein g at
a live pe rformance.
connected to an audio
component that conforms to
Dolby Surround (Pro Logic).
connected to an audio
component that does not
conform to Dolby Surround
(Pro Logic).
DOLBY DIGITAL
Selects the type of Do lby Di gi ta l si gnal.
DOLBY
DIGITAL*
DOWNMIX
PCM
DTS
Selects whether or not to output DTS signals.
ON* Sele c t this when the unit is
OFF Select this when the unit is
Select this when th e u nit is
connected t o an audio
component with a built-i n
Dolby Digital decoder.
Select this when th e u nit is
connected t o an audio
component lacking a built-in
Dolby Digital decoder. You can
select whether the signals
conform to Dolby Surr ound
(Pro Logic) or not by making
adjustments to the
“DOWNMIX” item in “AUDIO
SETUP” (page 32).
connected to an audi o
component with a built-in DTS
decoder.
connected to an audi o
component lacking a built-in
DTS decoder.
32
Page 33

Radio
Caution
When tuning in statio ns w hile driving, use Best
Tuning Memory (BTM) to prevent an accident.
MODE
SRC
ENTER
LIST
SYSTEM
MENU
Number
buttons
OFF
SRC
SOUND
SETUP
SYSTEM
MENU
×
AUDIO
123
456
789
CLEAR
Storing automatically
— BTM
1 Press (SRC) (SOURCE) repeat edly
until “TUNER” appears.
To change the band, press (MODE)
repeatedly. You can select from FM1, FM2,
FM3, AM1 or AM2.
2 Press (SYSTEM MENU), then press M/m
repeatedly until “BTM” appears.
3 Press (ENTER).
The unit stores s ta ti ons in order of freque ncy
on the number buttons ((1) to (6)).
A beep sounds w hen a setting is stored.
ATT DVD
MODE
TOP MENU
LI ST
PICTURE
EQZ
Z DSO EQ7
SUBTITLE
0
+
ENTER
–
ANGLE
DSPL
MENU
VOL
./>
M/m
+
–
Storing manually
While receiving the station th at you
want to store, press and hold a
number button ((1) to (6)) until
“MEM” appears.
The number button indication appears in the
display.
Note
If you try to store another station on the same number
button, the previous stored station will be replaced.
Receiving the stored stations
Select the band, then press a nu mber
button ((1) to (6)) or M/m.
Tuning automatically
Select the band, then press ./>
to search for the station.
Scanning stops wh e n th e unit receives a
station. Repeat this procedure until the
desired station is received.
Tip
If you know the frequency of the station you want to
listen to, press and hold ./> to locate the
approximate frequency, then press ./>
repeatedly to fine adjust to the desired frequency
(manual tuning).
With the main unit
To search for the station, press (SEEK) +/–.
Receiving a station through a
list
— list-up
You can list up the frequency.
1 Select the band, then pres s (LIST).
The frequency appea rs .
2 Press M/m repeatedly until the desired
station appears.
3 Press (ENTER) to receive the station.
33
Page 34

Other functions
Adjusting the sound
characteristics
You can adjust the bass, treble, balance, fader
and subwoofer volume.
OFF
SOUND
SRC
SOUND
SETUP
SYSTEM
MENU
×
AUDIO
1 Select a source, then press (SOUND)
repeatedly to select the desired item.
The item changes as follows:
BAS (bass) t TRE (treble) t
BAL (left-right) t FAD (front-rear) t
SUB (subwoofer volume)*
* “ ∞” is displayed at the lowest setting, and can be
adjusted up to 20 steps.
2 Press </, repeatedly to adj ust the
selected item.
After 3 seconds, the setting is complete and
the display returns to normal play/reception
mode.
Note
Adjust within 3 seconds of selecting the item.
With the main unit
In step 2, to adjust the selected item, press the volume
+/– button.
ATT DVD
MODE
TOP MENU
LIST
PICTURE
EQZ
Z DSO EQ7
SUBTITLE
+
ENTER
–
ANGLE
MENU
</,
Adjusting the equalizer curve
— EQ7 Tune
You can adjust and store the equalizer settings
for different tone ranges.
OFF
SRC
ENTER
SYSTEM
MENU
SOUND
SETUP
SYSTEM
MENU
×
AUDIO
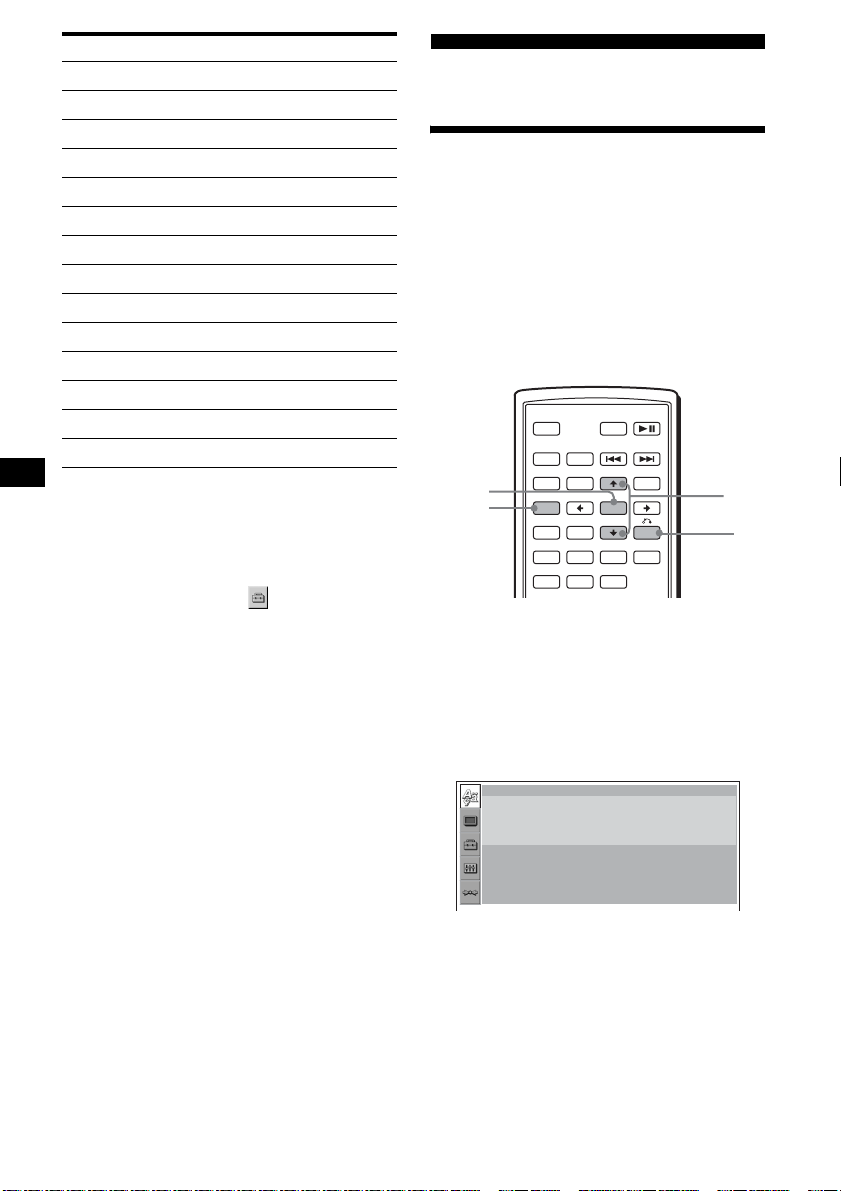
1 Select a source, then press
(SYSTEM MENU).
2 Press M/m repeatedly until “EQ7
TUNE” appears, then press (ENTER).
3 Press </, repeatedly to select the
desired equalizer type, then press
(ENTER).
4 Press </, repeatedly to select the
desired frequency.
The frequenc y ch anges as follo ws:
62Hz y 157Hz y 396Hz y 1kHz y
2.5kHz y 6.3kHz y 16kHz
5 Press M/m repeatedly to adjust the
desired volume level.
The volume level is adjustable in 1 dB steps,
from –10 dB to +10 dB.
Repeat steps 4 and 5 to adjust the equalizer
curve.
To restore the facto ry-set equalizer c urve,
press and hold (ENTER).
6 Press (ENTER).
The setting is complete and the display
returns to normal play/reception mode.
ATT DVD
MODE
TOP MENU
LIST
PICTURE
EQZ
Z DSO EQ7
SUBTITLE
+
ENTER
–
ANGLE
MENU
M/m
</,
34
Page 35

Labelling a station/disc
When you receive a statio n, or play a disc in a
CD changer with the CUSTOM FILE function,
you can label each st at ion/disc with a cust om
name up to 8 characters (Station Memo/Disc
Memo).
If you label a statio n/ di sc, the name appears on
the list (page 3 3 or 37).
1 While receiving a station or playing a
disc that you want to label, press
(SYSTEM MENU).
2 Press M/m repeatedly until
“NAMEEDIT” appears, then press
(ENTER).
3 Press M/m repeatedly until the desired
character ap pears.
The character changes as follows:
A y B y C ... y 0 y 1 y 2 ... y +
y – y ... y (blank space) y A
To move the digital indication, press the </
,.
Repeat this oper at io n until the entire name i s
entered.
4 Press (ENTER).
The labelling is complete and the display
returns to normal reception/play mode.
To display the nam e, press (DSPL) during
reception/playback.
Tips
• To correct or erase a character, overwrite or enter
“.”
• The Disc Memo always takes priority over any
prerecorded title.
• You can label a disc on the unit if a changer with the
CUSTOM FILE function is connected.
• “REP-TRACK” and all shuffle play are suspended
until the labelling is complete.
4 Press and hold (ENTER).
The name is deleted. Rep ea t s te p 3 a nd 4 i f
you want to delete other names .
5 Press (SYSTEM MENU) twice.
The unit retu rns to normal reception/play
mode.
Adjusting unit menu items
— SYSTEM MENU
OFF
SRC
ENTER
SYSTEM
MENU
SOUND
SETUP
SYSTEM
MENU
×
AUDIO
1 Press (SYSTEM MENU).
2 Press M/m repeatedly until the desired
item appears.
3 Press </, to sel ec t t he desired
setting (example: “ON” or “OFF” ).
4 Press (ENTER).
The setting is complete and the display
returns to normal play/reception mode.
Note
Displayed items will differ, depending on the source
and setting.
Tip
You can easily switch among categories by pressing
and holding M/m.
ATT DVD
MODE
TOP MENU
LIST
PICTURE
EQZ
Z DSO EQ7
SUBTITLE
+
ENTER
–
ANGLE
MENU
</,
continue to next page t
M/m
Deleting the custom name
1 Select the unit that has stored the
custom name you want to delete, then
press (SYSTEM MENU).
2 Press M/m repeatedly until “NAME
DEL” appears, then press (ENTER).
The stored name w i l l ap pear.
3 Press M/m repeatedly to select the
name you want to delete.
35
Page 36

The following items can be set (follow the page
reference fo r details):
“
z” indicates the default settings.
SET (Setup)
CLOCK-ADJ (Clock Adjust) (page 8)
BEEP
To set “ON” (z) or “OFF.”
RM (Rotary Commande r )
To change the operative direction of the rotary
commander controls.
–“NORM” (
the factory-set position.
– “REV”: when you mount the rotary
commander on t he right side of the steering
column.
AUX-A*
To turn the AUX source disp l ay “ON” (
“OFF” (page 38).
PAL/NTSC*1*
To change the TV colour system to PAL or
NTSC.
WL*1*3 (Wireless)
–“CH1” (
interference with the wireless transmission.
–“OFF”: to turn off the wireless transmission.
DSPL (Display)
CLOCK (Clock In formation)
To d isplay the clock and the display items at the
same time.
–“ON”: to display at the same time.
–“OFF” (
DIM (Dimmer)
To change the brightness of the display.
–“AT” (
when you turn the lights on.*
–“ON”: to dim the display.
–“OFF”: to deactivate the dimmer.
CONTRAST
To adjust the contrast of the main unit display.
The contrast level is adjustable in 7 steps.
M.DSPL*
To select the Motion Display mode.
–“SA” (
spectrum analyzer.
–“ON”: to show moving patterns.
–“OFF”: to deactivate the Motion Display.
DEMO*
To set “ON” (
A.SCRL (Auto Scroll)
To scroll long displayed items automatically
when the disc/album is changed.
–“ON”: to scroll.
–“OFF” (
z): to use the rotary commander in
1
(AUX Audio)
2
z), “CH2,” “CH3,” “CH4”: to avoid
z): to not display at the same time.
z): to dim the display automatically
5
(Motion Display)
z): to show moving patterns and
1
(Demonstration)
z) or “OFF” (pa ge 8).
z): to not scroll.
z) or
4
P/M (Play Mode)
LOCAL (Local seek mode)
–“ON”: to only tune into stat ions with stronger
signals.
–“OFF” (
z): to tune normal rec eption.
MONO (Monaural mode)
T o improve poor FM reception, select monaural
reception mode.
–“ON”: to hear stereo broadcasts in mo naural.
–“OFF” (
z): to hear stereo broadcast in stereo.
SND (Sound)
EQ7 TUNE (page 34)
HPF (High Pass Filter)
To select the fr ont/rear speaker cut-off
frequency: “OFF” (
z), “78HZ” or “125H Z.”
LPF (Low Pass Filter)
T o select the subwoofer cut-off frequency:
“OFF” (
z), “125HZ” or “78 H Z.”
LOUD (Loudness)
To enhance bas s and treble at lower volume.
–“ON”: to reinforce bass and treble.
–“OFF” (
DVD LVL*
z): to not reinforce bass and treble.
6
(DVD level) (page 23)
To set the audio output level according to the
recorded DVD audio format.
AUX LVL*
7
(Auxiliary level)
To adjust the volume lev el for each conn ected
auxiliary equipment. This setting negates the
need to adjust the volume le v el betwee n sources.
EDIT
NAMEEDIT (page 35 )
NAME DEL (page 3 5)
BTM (page 33)
*1 When the unit is turned off.
*2 The default setting differs, depending on the
model:
PAL: Asian model
NTSC: Latin American model
*3 MEX-R5 only.
*4 When the illumination control lead is connected.
*5 When the unit is turned on.
*6 When a disc is played back.
*7 When auxiliary equipment is connected and
played.
36
Page 37

Using optional equipment
MODE
SRC
ENTER
SYSTEM
MENU
OFF
SRC
SOUND
SETUP
SYSTEM
MENU
×
AUDIO
123
456
789
CLEAR
CD/MD changer
Selecting the changer
1 Press (SRC) (SOURCE) repeat edly
until “CDC1” or “MDC1” appears.
2 Press (MODE) repeatedly until the
desired changer appears.
Unit number of CD/MD changer
ATT DVD
MODE
TOP MENU
LIST
PICTURE
EQZ
Z DSO EQ7
SUBTITLE
0
+
ENTER
–
ANGLE
DSPL
MENU
VOL
</,
+
–
DSPL
M/m
LIST
Repeat and shuffle play
(With the main unit)
During playback, press (1) (REP) or
(2) (SHUF) repeatedly until the
desired setting appears.
Select To play
REP-DISC* disc repeatedly.
SHUF-
CHGR*
* When one or more CD/MD changers are connected.
tracks in the changer in random
order.
To return to normal play mode, select “REPOFF” or “SHUF-OFF.”
Locating a disc by name — list-up
You can sele ct a disc from the list when
connecting a CD changer with the CUSTOM
FILE function or an MD changer.
If you assign a nam e to a disc, the name appe ars
on the list.
1 During playback, press (LIST).
The disc number and disc name will appear.
2 Press M/m repeatedly until the desired
disc appears.
3 Press (ENTER) to play the disc.
continue to next page t
Playback starts.
Skipping albums and discs
During playback, press M/m.
To skip Press M/m
album and release (hold fo r a
moment).
album
continuously
within 2 seconds of first
releasing.
discs repeatedly.
discs
continuously
With the main unit
To skip discs, press (3) (ALBM –) or (4) (ALBM +).
To skip albums, press and hold (3) (ALBM –) or (4)
(ALBM +).
then, press again w ithin 2
seconds and hold .
37
Page 38

Rotary commander RM-X4S
Attaching the label
Attach the indication label depending on how
you mount the rota ry commander.
D
S
M
O
D
E
S
O
U
ATT
DSPL
P
L
N
D
MODE
OFF
OFF
D
N
U
SO
E
D
O
M
PL
S
D
Location of controls
The correspo nd i ng buttons on t he rotary
commander cont rol the same functi ons as those
on the main unit or the card remote commander.
SOUND
PRESET/
DISC
SOURCE
VOL
SEEK/AMS
The following controls on the ro ta ry commander
require a different operation from the main unit
or the card remote commander.
• PRESET/DISC control
To select preset st ations; control CD, the same
as (3)/(4) (ALBM –/+) on the main unit or M/
m on the card remote commander (push in and
rotate).
• VOL (volume) control
The same as the volume +/– buttons (rotate).
• SEEK/AMS control
The same as (SEEK) +/– on the main unit or
./> on the car d r em ote commander
(rotate, or rot at e and hold).
Changing the operative direction
The operative direction of the controls is factory set as shown below.
To increase
To decrease
If you need to moun t t he r otary commander o n
the right hand side of th e steering column, you
can reverse the operative direction.
While pushing the VOL control, press
and hold (SOUND).
Tip
You can also change the operative direction of these
controls in the menu (page 36).
Auxiliary audio equipment
You can connect optional Sony portable devices
to the BUS AUDIO IN/AUX IN terminal on the
unit. If the changer or other device is not
connected to the ter m inal, the unit allows you to
listen to the portable device on your car speakers.
Note
When connecting a portable device, be sure BUS
CONTROL IN is not connected. If a device is
connected to BUS CONTROL IN, “AUX” cannot be
selected with (SRC) (SOURCE).
Tip
When connecting both a portable device and a
changer, use the optional AUX-IN selector.
Selecting auxiliary equipment
Press (SRC) (SOURCE) repeatedly
until “AUX” appears.
Operate by the portable device itself.
38
To adjust the volume level of auxiliary
equipment, see “AUX LVL” on page 36.
Page 39

Switching the front/re ar
1
output
— Zone × Zone
You can set to have DVD audio/video output to
the rear moni tor, and output another sou rce t o the
front.
This function is convenient when you want to
enjoy radio, music playback, etc, in the front, and
DVD playback in the re ar.
OFF
SRC
SOUND
SETUP
SYSTEM
MENU
Z
×
Z
AUDIO
×
ATT DVD
MODE
TOP MENU
LIST
PICTURE
EQZ
Z DSO EQ7
SUBTITLE
+
ENTER
–
ANGLE
MENU
Additional Information
Maintenance
Replacing t he lithium bat tery of the card
remote commander
Under normal conditions, the battery will last
approximately 1 year . (The serv ic e lif e may be
shorter, depending on the conditions of use.)
When the battery becomes weak, the range of the
card remote commander becomes shorter.
Replace the battery with a new CR2025 lithium
battery. Use of any other battery may present a
risk of fire or explosion.
+ side up
2
c
1 Press (ZxZ).
2 Press (SOURCE) on the main unit to
switch the source of the front.
Operate the front with the main unit, an d th e
rear (DVD) with the card remote commander.
To return to normal statu s
Press (ZxZ).
Notes
• While Zone × Zone is activated, the following buttons
on the card remote commander become inactive:
(ATT), (SRC) (SOURCE), (MODE), (VOL) +/–,
(SYSTEM MENU), (LIST), (SOUND), (DSO), (EQ7).
• Zone × Zone is not cancelled even if the disc is
ejected, and it will be activated when a disc is
inserted again.
Notes on the lithium battery
• Keep the lithium battery out of the reach of children.
Should the battery be swallowed, immediately
consult a doctor.
• Wipe the battery with a dry cloth to assure a good
contact.
• Be sure to observe the correct polarity when
install ing the battery.
• Do not hold the battery with metallic tweezers,
otherwise a short-circuit may occur.
WARNING
Battery may explode if mistreated.
Do not recharge, disassemble, or dispose of
in fire.
Fuse replacement
When replacing the fuse, be
sure to use one matc hi ng the
amperage rating stated on the
original fuse. If the fuse
blows, check the power
connection an d replace the
fuse. If the fuse blows again
after replacement, there may
be an internal malfunction. In
such a case, con sult your
Fuse (10A)
nearest Sony dealer.
continue to next page t
39
Page 40

Cleaning the connectors
The unit may not functi on pr operly if the
connectors between the unit and the front panel
are not clean. In order to prevent this, detach the
front panel (page 8) and clean the connectors
with a cotton swab dipped in alcohol. Do not
apply too much fo rce. Otherwise, the connectors
may be damaged.
Removing the unit
1 Remove the protection collar.
1Detach the front panel (page 8).
2Engage the re le ase keys together
with the protection collar.
Main unit Back of the front panel
Notes
• For safety, turn off the ignition before cleaning the
connectors, and remove the key from the ignition
switch.
• Never touch the connectors directly with your fingers
or with any metal device.
Orient the re lease
keys as shown.
3Pull out the rele ase keys to remove
the protection collar.
2 Remove the unit.
1Insert both releas e keys
simultaneously until they click.
Hook facing
inwards.
2Pull the release keys to unseat the
unit.
40
3Slide the unit out of the mounting.
Page 41

Notes on discs
About MP3 files
• To keep a disc clean, do not touch its su rface.
Handle the disc by its edge.
• Keep your discs in the ir cases or disc
magazines when not in use.
• Do not subject discs to heat/high temperature.
Avoid leaving them in a parked car or on a
dashboard/rear tray.
• Do not attach labels, or use discs with sticky
ink/residue. Such discs may stop spi nning
when used, causing a malfunction, or may ruin
the disc.
• Do not use any discs w i t h labels or stickers
attached.
The following malfunctions may result from
using such dis cs:
–Inability to eject a disc (due to a label or
sticker peeling off and jamming the eject
mechanism).
–Inability to read audio data correctly (e.g.,
playback skipping, or no playback) due to
heat shrinking of a sticker or label causing a
disc to warp.
• Discs with non-standard shapes (e.g., heart,
square, star) cannot be played on this un i t.
Attempting to do so may damage the unit. Do
not use such discs.
• You cannot play 8 cm discs.
• Before playing, cl ean the
discs with a commercially
available cleaning cloth. Wipe
each disc from the centre out.
Do not use solvents such as
benzine, thinner,
commercially availa bl e
cleaners, or antistatic spray
intended for analogue discs.
Note on DualDiscs
A DualDisc is a two sided disc product which
mates DVD recorded material on one side with
digital audio material on the other side. However,
since the audio material side does not conform to
the Compact Disc ( C D ) st andard, playback on
this product is not guaranteed.
MP3, which stands for MPEG-1 Audio Layer-3,
is a music file compression format standard. It
compresses a udio CD d ata t o ap prox imatel y 1/ 10
of its original size.
• The unit is compatible with the following
standards.
For CD
–ISO 9660 level 1/level 2 format , Joliet/Romeo
in the expansion format
–Multi Session
For DVD
–UDF Bridge format (combined UDF and ISO
9660)
For CD/DVD
–ID3 tag version 1.0, 1.1, 2.2, 2.3 and 2.4
• The maximum number of:
–folders (albums): 256 (including ro ot and
empty folders).
–MP3 files (tracks) and folders contained in a
disc: 1,000 (if a folder/file names contain
many characters, this number may become
less than 1,000).
–displayable characters for a folder/file name
is 128; ID3 tag is 12 6 characters.
Notes
• Be sure to finalize the disc before using on the unit.
• When naming an MP3 file, be sure to add the file
expansion “.mp3” to the file name.
• If you play a high-bit-rate MP3, such as 320 kbps,
sound may be intermittent.
• During playback of a VBR (variable bit rate) MP3 file
or fast-forward/reverse, elapsed playing time may
not display accurately.
• When the disc is recorded in Multi Session, only the
first track of the first session format is recognized
and played (any other format is skipped). The
priority of the format is CD-DA and MP3.
– When the first track is a CD-DA, only CD-DA of the
first session is played.
– When the first track is not a CD-DA or MP3
session i s played. If the disc has no data in any of
these formats, “NO MUSIC” is displayed.
• The unit cannot play back Multi Border recorded
MP3.
• MP3 files not recorded at 44.1 kHz or 48 kHz
sampling rate and 64 to 320 kbps bit rate cannot be
played.
Note on wireless
transmission (MEX-R5 only)
The unit transmits audio/video at FM 2.4 GHz.
Simultaneous use with other 2.4 GHz equipment
may cause image interference or audio noise.
This is not a malfunction, but a result of
equipment sharing the same operating frequency.
41
Page 42

Specifications
System
Laser Semiconductor laser
Signal format system PAL/NTSC switchable
DVD/CD Player section*
Signal-to-noise ratio 120 dB
Frequency response 10 – 20,000 Hz
Wow and flutter Below measurable limit
Harmonic distortion (DVD)
Wow and flutter Less than detected value
* Measured from the AUDIO OUT jacks.
When you play PCM sound tracks with a 96 kHz
sampling frequency, the output signals from the
DIGITAL OUT jack are converted to 96 kHz
sampling frequency.
0.01%
(±0.001 % W PEAK)
Tuner section
FM
Tuning range Asian model:
Aerial terminal External aerial connector
Intermediate frequency 10.7 MHz/450 kHz
Usable sensitivity 9 dBf
Selectivity 75 dB at 400 kHz
Signal-to-noise ratio 67 dB (stereo), 69 dB
Harmonic distortion at 1 kHz
Separation 35 dB at 1 kHz
Frequency response 30 – 15,000 Hz
87.5 – 108.0 MHz (at 50
kHz step)
Latin American mo de l:
87.5 – 107.9 MHz (at 200
kHz step)
(mono)
0.5 % (stereo),
0.3 % (mono)
AM
Tuning range Asian model:
Aerial terminal External aerial connector
Intermediate frequency 10.7 MHz/450 kHz
Sensitivity 30 µV
531 – 1,602 kHz (at 9kHz
step)
Latin American mo de l:
530 – 1,710 kHz (at 10kHz
step)
Power amplifier section
Outputs Speaker outputs (sure seal
Speaker impedance 4 – 8 ohms
Maximum power outp ut 52 W × 4 (at 4 ohms)
connectors)
Wireless AV section (MEX-R5 only)
Transmission frequencies 2,414, 2,432, 2,450,
Modulation method FM modulation
RF output power –1.2 dBm
2,468 MHz
General
Outputs Front audio/video output
Inputs Telephone ATT cont ro l
Tone controls B a ss: ±8 dB at 100 Hz
Loudness +8 dB at 100 Hz
Power requirements 12 V DC car battery
Dimensions Approx. 178 × 50 × 182 mm
Mounting dimensions Approx. 182 × 53 × 161 mm
Mass Approx. 1.3 kg
Supplied accessories Card remote commander
terminals
Rear audio (Z×Z)/video
output terminals (MEX-R1
only)
Rear audio output terminal
Subwoofer output terminal
(mono)
Optical digital output
terminal
Power aerial relay control
terminal
Power amplifier control
terminal
terminal
Illumination contr o l
terminal
BUS control input ter minal
BUS audio input/AUX IN
terminal
Parking break control
terminal
Remote controller input
terminal
Aerial input termi nal
Treble: ±8 dB at 10 kHz
+2 dB at 10 kHz
(negativ e eart h )
(w/h/d)
(w/h/d)
RM-X702
Parts for installation and
connections (1 set)
Front panel case (1)
42
Page 43

Optional accessories Overhead Monitor
XVM-R70
Headrest Monitor
XVM-H65
Mobile Monitor
XVM-F65 (for MEX-R1)
Mobile Monitor
XVM-F65WL
(for MEX-R5)
CD changer (10 discs)
CDX-757MX, CDX-656X
MD changer (6 discs)
MDX-66XLP
Source selector
XA-C30
AUX-IN selector
XA-300
Optical audio cable
RC-104
US and foreign patents licensed from Dolby
Laboratories.
MPEG Layer-3 audio coding technology and
patents licensed f rom Fraunhofer IIS and
Thomson.
Note
This unit cannot be connected to a digital preamplifier
or an equalizer which is Sony BUS system compatible.
Design and specifications are subject to change
without notice.
• Lead-free solder is used for soldering certain
parts. (more than 80 %)
• Halogenated flame retardants are not used in the
certain printed wiring boards.
• Halogenated flame retardants are not used in
cabinets.
• VOC (Volatile Organic Compound)-free vegetable
oil based ink is used for printing the carton.
• Packaging cushions do not use polystyrene foam.
Troubleshooting
The following checklist will help you remedy
problems you may encounter with your unit.
Before going thr ough the checklist below, check
the connection and operating procedures.
General
No power is bei ng supplied to t h e unit.
• The power connec t ion has not been made
correctly.
t Check the connection. I f everythin g is in
order, check the fuse.
• The car does not have an A C C position.
t Insert a disc to turn on the unit.
• If the unit is turned off and the display
disappears, i t ca nnot be operated with the
remote commander.
t Turn on the unit.
The power aerial does not extend.
The power aerial does not have a rel ay box.
Stored stations and correct time are erased.
The fuse has blown.
Makes noise when the position of the
ignition key is switched.
The leads are not matched correctly with the
car’s accessory power connector.
The display disappears from/does not
appear in the display window.
• The dimmer is set to “DIM-ON” (page 36).
• The display disappears if you press and hold
(OFF).
t Pres s and hold (OFF) again until the
display appears.
• The connectors are dirty (page 40).
DSO does not function.
Depending on the ty pe of car interior or typ e
of music, DSO may not have a desirable
effect.
Depending on the connected monitor, the unit
may take a few seconds to turn of f after
turning the ignition switch to the OFF
position. This is not a malfunction.
continue to next page t
43
Page 44

Image interference or audio noise occurs
during wireless transmission. (MEX-R5
only)
• The unit transmits audio/video at FM 2.4
GHz. Simulta neous use with othe r 2.4 GHz
equipment may caus e i m age interference or
audio noise.
t Change the channel (page 36). If th ere is
no improvement, stop using the other
equipment. Wireless transmission of the
unit can also be turned off if necessary
(page 36).
• The transmitter is not positioned correctly.
t Position the optional monitor XVM-
F65WL closer to the unit.
t Position the transmitter higher than the
unit to prevent obstruction by the seat or
passenger.
t Place the transmitter in a stable place,
otherwise its position and angle may
change.
• Installing the rear monitor in front of the
second row is recomme nded.
• Cancel the Zone × Zone function and use the
car speakers if audi o noise is strong.
• Interference or audio noise may temporari ly
occur during driving as a result of obstacles
outside t h e car.
Picture
There is no picture/picture noise appears.
• A connection has not been made correctly.
• Check the connection to the connected
equipment, and set the input selector of the
equipment to the source correspondin g t o
this unit .
• The disc is dirty, flawed, or deteriorated.
• The unit is installed at an angle of more than
45°.
• The unit is not installed in a sturdy part of
the car.
• The monitor is connected to the FRONT
AUDIO/VIDEO OUT, and the parking cord
(Light green) is not connected to the parking
brake switch cord, or the parking brake is not
applied.
• The colour system setting is incorr ec t.
t Set th e colour system to “PAL” or
“NTSC” accord ing to the connected
monitor.
Picture does not fit in the screen.
The aspect ratio is fixed on the DVD.
Sound
There is no sound/sound skip s /s ound
cracks.
• A connection has not been made correctl y.
• Check the connection to the connected
equipment, an d set the input selector of the
equipment to the s our ce corresponding to
this unit.
• The disc is dirty, flawed, or deteriorated.
• The unit is installed at an angle of more than
45°.
• The unit is not ins t al le d in a sturdy part of
the car.
• The MP3 file sampling rate is not 44.1 kHz
or 48 kHz.
• The MP3 file bit rate is not 64 to 320 kbps.
• The unit is in pause pl ayback mode, or
scanning.
• Th e unit is in fast-forward mode, or in fastreverse mode.
• The settings for th e outputs are not made
correctly.
• Adjust DVD output level (page 23) .
• Th e volume is too low.
• The AT T function is activated, or the
Tele pho ne ATT function (when the interface
cable of a car telephone is connect ed to the
ATT lead) is activated.
• The position of the fader control (FAD) is
not set for a 2-speaker system.
• The CD changer is incompatible with the
disc format (MP3).
t Pl ay back with a Sony MP3 compatible
CD changer, or this unit.
Sound is noisy.
Keep cords and cables away from each other.
44
Page 45

Operation
The remote does not function.
• There are obstacles between the remote and
the unit, or the remote receptor.
• The distance betw een the card remote
commander and the unit is too far.
• Th e card remote commander is not pointed
at the remote senso r, or the rece pt or on the
unit properly.
• The batteries in the card remote commander
are weak.
The operation buttons do not function.
The disc will not eject.
Press the RESET butto n (page 8).
No beep sound.
The beep sound is canc el le d (page 36).
The contents of the memory have been
erased.
• The RESET button has been pressed.
t Store again into the memory.
• The power connecting lea d or battery has
been disconnected.
• The power connecting lea d is not connected
properly.
The display items do not scroll.
• For discs with very many characters, those
may not scroll.
• “A.SCRL” is set to off.
t S et “A.SCRL-ON” (page 36) or pre ss
(SCRL) on the main unit.
“MS” or “MD” does not appear on the
source display when both the optional MGSX1 and MD changer are connected.
This unit recognizes MGS-X1 as an MD unit.
t Press (SRC) (SOURCE) until “MS” or
“MD” appears, then press (MODE)
repeatedly.
The disc cannot be loaded.
• Another disc is al ready loaded.
• The ignition key switch of the car is set to the
OFF position.
The unit does not start playing.
• The disc is inse rt ed upside down.
t Insert the disc with the playback surface
down.
• The disc inserted is n o t a pplicable .
• Th e DVD inserted is not applicable due to
the region code.
• Moisture has condensed insid e the unit.
• The DVD-R, DVD-RW, DVD+R,
DVD+RW, CD-R, or CD-RW inserted is not
finalized.
You cannot select a source.
Zone × Zone is activated.
t Press (ZxZ) to deactivate Zone × Zone.
MP3 files cannot be played.
• Recording was not performed according to
the ISO 9660 level 1 or lev e l 2 format, or the
Joliet or Romeo in the expansion format.
• The MP3 file does not have the extension
“.mp3.”
• Files are not stored in MP3 format.
• The unit cannot play files stored in MP3PRO
format.
• The unit cannot play files stored in a format
other than the MPEG1 Audio Layer 3.
• Both MP3 and JPEG files are stored on the
disc.
t Set “MP3/JPEG” in “CUSTOM SETUP”
to “MP3” (page 31).
MP3 files take longer to play back than
others.
The following discs take a longer time to start
playback.
–a disc recorded with a complicated tree
structure.
–a disc recorded in Multi Session.
– a disc to which data can be added.
The JPEG files cannot be pla yed.
• JPEG files do not have the extension “.jpg.”
• Files are not stored in JPEG format.
• Both MP3 and JPEG files are stored on the
disc.
t Set “MP3/JPEG” in “CUSTOM SETUP”
to “JPEG” (page 31).
The title of the MP3 audio album or track is
not correctly disp layed.
The player can only di splay numbers and
alphabet. Other characters are displayed as
“.”
The disc does not start playi ng from the
beginning.
Resume play has t aken effect (page 17).
Playback stops automatically.
While playing discs with an auto pause signal,
the unit stops playback at the auto pause
signal.
You cannot perform certain functions.
Depending on the disc, you may not be able to
perform operations such as Stop, Search,
Repeat play, or Shuffle play. For details, see
the operating manual supplied with the disc.
The language for the sound track cannot be
changed.
• Use the DVD menu instead of the direct
selection button on the card remote
commander (page 19).
• Multilingual tracks are not recorded on t he
DVD being played.
• The DVD prohibits the changing of the
language for the sound track.
continue to next page t
45
Page 46

The subtitle langua ge cannot be changed or
turned off.
• Use the DVD menu instead of the direct
selection button on the card remote
commander (p age 19).
• Multilingual subtitles are not recorded on the
DVD being played.
• The DVD prohibits the chang i ng of th e
subtitles.
The angles cannot be changed.
• Use the DVD menu instead of the direct
selection button on the card remote
commander (p age 19).
• Multi-angles are not recorded on the DVD
being played.
• The DVD prohibits changing of th e angles.
Radio reception
The stations cannot be received.
The sound is hampered by noises.
• Connect a power aerial control lead (blue) or
accessory power suppl y lead (red) to the
power supply lead of a ca r’s aerial booster
(only when your car has built-in FM/AM
aerial in the rear/side glass).
• Check the connection of the car aerial.
• The auto aerial will not go up.
t Chec k the connection of the power aer i al
control lead.
• Check the frequency.
• When the DSO mo de is on, the sound is
sometimes hampered by noises.
t Set the DSO mode to “OFF” (page 12).
Preset tuning is not possible.
• Store the correct frequency in the memory.
• The broadcast signal is too weak.
Automatic tuning is not possible.
• The loca l seek mode is set to “ON .”
t Set “LOCAL” to “OFF” (page 36).
• The broadcast signal is too weak.
t Perform manual tuning.
During FM reception, the “ST” indication
flashes.
• Tune in the frequency accurate ly.
• The broadcast signal is too weak.
t Set “MONO” to “ON” (page 36).
An FM programme broadcast in stereo is
heard in monaural.
The unit is in monaural reception mode.
t Set “MONO” to “OFF” (page 36).
Error displays/Messages
The following indications appear when a
malfunc tion occurs in the unit.
On the main unit
BLANK*
ERROR*
FAILURE
LOAD
L.SEEK +/–
NO DATA
NO DISC
NO ID3
NO MAG
NO MUSIC
NO NAME
NOT READ
1
Tracks have not been recorded on th e MD.*
t Play an MD with recorded tracks.
1
• The disc is dirty or inserted upside down.*
t Cl ean or insert the disc cor rectly.
• The disc cannot pl ay because of some
problem.
t Insert another disc.
• Th e disc is not compatible with this unit.
t Insert a compatible disc.
The speake r/amplifier connection is incorr e ct.
t See the supplied installation/connect io ns
manual to check the connection.
The changer is load in g t he disc.
t Wait until loading is complete.
The local seek mode is on during automatic
tuning.
All custom names have been deleted, or none
are stored.
The disc is n o t inserted in the CD/M D
changer.
t I nsert discs in the changer.
ID3 tag information is not written in the MP3
file.
The disc magazine is not inserted in the CD
changer.
t Insert the magazine in the changer.
The disc is not a music file.
t Insert a music CD in this unit or MP3
playable changer.
A track/album/disc name is not written in the
track.
The disc information has not been read by the
unit.
t L oad the disc, then select it on the list.
2
2
46
Page 47

NOTREADY
The lid of the MD changer is open or the MDs
are not inserted properly.
t Close the lid or insert the MDs properly.
OFFSET
There may be an internal malfunction.
t Check the connection. If the error
indication remains on in the display,
consult your near es t Sony dealer.
READ
The unit is reading all track and album
information on the disc.
t Wait until reading is complete and
playback starts automatically. Depending
on the disc structure, i t may tak e more than
a minute.
RESET
The unit and CD/MD changer cannot be
operated because of some problem.
t Press the RESET button (page 8).
“” or “”
During fast-forwa rd or reverse, you have
reached the beginnin g or the end of the disc
and you cannot go any fu rther.
“”
The character cannot be displayed with the
unit.
*1 If an error occurs during playback of a CD or MD,
the disc number of the CD or MD does not appear
in the display.
*2 The disc number of the disc causing the error
appears in the display.
On the monitor
Cannot play this disc.
• Th e disc is not compatible with this unit.
• The DVD is prohibited for playb ack due to
the different region code.
No MP3 or JPEG file
The disc contains no MP3/JPEG file.
Read error
• Th e unit cannot read the data due to some
problem.
• The data is damaged or corrupted.
Please Press RESET.
The unit cannot operate due to some problem.
t Press the RESET button.
Glossary
Chapter
Sections of a picture or a music feature that are
smaller than titles. A title is compo se d of several
chapters. Depending on the disc, no chapters
may be recorded .
Dolby Digital
Digital audio compression technology developed
by Dolby Laboratories. This te chnology
conforms to 5.1-channel surround sound. The
rear channel is stereo and there is a discrete
subwoofer channel in this format. Dolby Digita l
provides the same 5. 1 di screte channels of hi gh
quality digital audio found in Dolby Digital
cinema audio systems. Good channel separation
is realized because all of the channel data are
recorded discretely and little deterioration is
realized because all channel data processing is
digital.
DTS
Digital audio com pression technology th at
Digital Theater Systems, Inc. developed. This
technology conforms to 5.1-channel surround
sound. The rear channel is stereo and there is a
discrete subwoofer channel in this format. DTS
provides the same 5. 1 di screte channels of hi gh
quality digital audio.
Good channel separation is realized because all
of the channel data is recorded discretely and
little deterioration is realized becaus e all channel
data processin g is di gi tal.
continue to next page t
If these solutions do not help improve the
situation, consult your nearest Sony de al er.
If you take the unit to be repaired because of disc
playback trouble, bring the disc tha t was used at the
time the problem began .
47
Page 48

DVD VIDEO
A disc that contains up to 8 hours of moving
pictures even though its diameter is the same as a
CD.
The data capacity of a si ngle-layer and sing l esided DVD is 4.7 GB (Giga Byte), w hi ch is 7
times that of a CD. The data capacity of a
double-layer and si ngl e-sided DVD is 8.5 GB, a
single-layer an d double-sided DVD is 9.4 GB,
and double-layer and double-sided DVD is
17 GB.
The picture data uses the MPEG 2 format, one of
the worldwide standards of digital compression
technology. The picture data is compressed to
about 1/40 (average) of its ori gi nal size. The
DVD also uses a variable rate coding technology
that changes the data to be allo cated accordin g to
the status of the pict ure. Audio information is
recorded in a multi-channel format, such as
Dolby Digital, allo win g you to enjoy a more real
audio presence.
Furthermor e, various ad v a nced func tio n s such as
the multi-angle, multilingual, and Parental
Control functions are provided with the DVD.
DVD-RW
A DVD-RW is a recordabl e an d rewritable di sc
with the same size as the DVD VIDEO. The
DVD-RW can be recorded in two different
modes: VR mode a nd Video mode. V R (Video
Recording) mode e nables various programmin g
and editing functions, some of which are limited
in the case of Video mode. V id eo m ode co mpli es
with DVD VIDEO format and can be played on
other DV D players whi le a DV D-R W record ed in
VR mode can only be played on DVD-RW
compliant players. The “DVD-RW” appearing in
this manual, and th e on-screen displays refer to
DVD-RWs in VR mode.
DVD+RW
A DVD+RW is a recordable and rewritable disc.
DVD+RWs use a recording format th at is
comparable to the DVD VID E O f o r m at.
Film based software, Video based
software
DVDs can be classified as Film based or Video
based software. Film based DVDs contain th e
same images (24 frames per second) that are
shown at movie theaters. Vi deo based DVDs,
such as television dram as or sit-coms, displa ys
images at 30 fram es (or 60 fields) per second.
JPEG (Joint Photographic Expert Group)
Under the ausp ices of the Intern at i o nal
Organization for Standardizatio n (ISO), JPEG is
defined as a universal standar d format for digital
compression and decompression of still images
for use in computer related systems. Usu ally, the
compression rate is variabl e before visible
degradation occurs. Still images are compressed
about 1/10 to 1/100 original size.
Title
The longest sectio n of a picture or music feat ure
on a DVD, movie, etc., in video software, or the
entire album in audio softwa re.
Track
Sections of a pictur e or a music feature on a C D
or VIDEO CD (the length of a song).
48
Page 49

Language code list
The language spelli ngs conform to the ISO 639: 1988 (E/F) standard.
Code Language Code Language Code Language Code Language
1027 Afar
1028 Abkhazian
1032 Afrikaans
1039 Amharic
1044 Arabic
1045 Assamese
1051 Aymara
1052 Azerbaijani
1053 Bashkir
1057 Byelorussian
1059 Bulgarian
1060 Bihari
1061 Bislama
1066 Bengali;
Bangla
1067 Tibetan
1070 Breton
1079 Catalan
1093 Corsican
1097 Czech
1103 Welsh
1105 Danish
1109 German
1130 Bhutani
1142 Greek
1144 English
1145 Esperanto
1149 Spanish
1150 Estonian
1151 Basque
1157 Persian
1165 Finnish
1166 Fiji
1171 Faroese
1174 French
1181 Frisian
1183 Irish
1186 Scots Gaelic
1194 Galician
1196 Guarani
1203 Gujarati
1209 Hausa
1217 Hindi
1226 Croatian
1229 Hungarian
1233 Armenian
1235 Interlingua
1239 Interlingue
1245 Inupiak
1248 Indonesian
1253 Icelandic
1254 Italian
1257 Hebrew
1261 Japanese
1269 Yiddish
1283 Javanese
1287 Georgian
1297 Kazakh
1298 Greenlandic
1299 Cambodian
1300 Kannada
1301 Korean
1305 Kashmiri
1307 Kurdish
1311 Kirghiz
1313 Latin
1326 Lingala
1327 Laothian
1332 Lithuanian
1334 Latvian;
Lettish
1345 Malagasy
1347 Maori
1349 Macedonian
1350 Malayalam
1352 Mongolian
1353 Moldavian
1356 Marathi
1357 Malay
1358 Maltese
1363 Burmese
1365 Nauru
1369 Nepali
1376 Dutch
1379 Norwegian
1393 Occitan
1403 (Afan)Oromo
1408 Oriya
1417 Punjabi
1428 Polish
1435 Pashto; Pushto
1436 Portuguese
1463 Quechua
1481 Rhaeto-
Romance
1482 Kirundi
1483 Romanian
1489 Russian
1491 Kinyarwanda
1495 Sanskrit
1498 Sindhi
1501 Sangho
1502 Serbo-
Croatian
1503 Singhalese
1505 Slovak
1506 Slovenian
1507 Samoan
1508 Shona
1509 Somali
1511 Albanian
1512 Serbian
1513 Siswati
1514 Sesotho
1515 Sundanese
1516 Swedish
1517 Swahili
1521 Tamil
1525 Telugu
1527 Tajik
1528 Thai
1529 Tigrinya
1531 Turkmen
1532 Tagalog
1534 Setswana
1535 Tonga
1538 Turkish
1539 Tsonga
1540 Tatar
1543 Twi
1557 Ukrainian
1564 Urdu
1572 Uzbek
1581 Vietnamese
1587 Volapük
1613 Wolof
1632 Xhosa
1665 Yoruba
1684 Chinese
1697 Zulu
1703 Not specified
49
Page 50

Index
Numeric
16:9 30
4:3 LETTER BOX 30
4:3 PAN SCAN 30
A
Album (ALBUM) 21
Angle (ANGLE) 23
Area code list 27
Audio (AUDIO) 22, 29
Audio setup (AUDIO SETUP)
32
Auto Scro ll (A.SCRL) 3 6
Auxiliary audio (AUX-A) 36, 38
Auxiliary level (AUX LVL) 36
B
Balance (BAL) 34
Bass (BAS) 34
Beep (BEEP) 36
Best Tuning Memory (BTM) 33
C
Card remote commander 11
CD/MD changer 37
Chapter (CHAPTER) 21
Clock Adjust (CLOCK-ADJ) 8
Clock Information (CL O CK) 36
Contrast (CONTRAST) 36
Custom setup (CUSTOM
SETUP) 31
D
Demonstration (DEMO) 8, 36
Dimmer (DIM) 36
Disc name
Delete (NAME DEL) 35
Edit (NAMEEDIT) 35
Display item
CD/MP3 playback 15
Play mode menu 13
Setup menu 13, 28
Dolby Digital (DOLBY
DIGITAL) 32
Downmix (DOWNMIX) 32
DRC (Dynamic Range Control)
(AUDIO DRC) 32
DTS 32
DVD level (DVD LVL) 23, 36
DVD menu 19, 29
Dynamic Soundstage Organize r
(DSO) 4, 12
E
Equalizer ( EQ 7) 12, 34
F
Fader (FAD) 34
Fuse 39
H
High Pass Filter (HPF) 36
I
Image (IMAGE) 21
J
JPEG (MP3/JPEG) 31
L
Language code list 49
Language setup (LANGUAGE
SETUP) 29
List-up 33, 37
Lithium battery 39
Local seek mode (LOCAL ) 36
Locating
Fast forward 16
Fast reverse 16
Scan 18
Loudness (LOUD) 36
Low Pass Filter (LPF) 36
M
Monaural mode (MONO) 36
Monitor type (MONITOR
TYPE) 30
Motion Display (M.DSPL) 36
MP3 (MP3/JPEG) 31
O
OSD 29
P
Parental control (PARENTAL
CONTROL) 26, 31
PBC (Playback control) 19
Picture EQ (PI C TURE EQ) 25,
31
Play list play (PLAY LIST
PLAY) 31
Play mode menu 13
Playable discs 5
Program format 22
R
Radio 33
Region code 7
Repeat play (REPEAT )
Album 20
Chapter 20
Disc 37
Title 20
Track 20
Reset (RESET) 29
RESET button 8
Resume play (MULTI-DISC
RESUME) 17, 31
Rotary commander (RM) 36, 38
S
Screen saver (SCREEN SAVER)
30
Screen setup (SCREEN SETUP)
30
Search play 21
Setup menu 13, 28
Shuffle play (SHUFFLE)
Album 20
Changer 37
Disc 20
Title 20
Slide show time ( SLIDE SHOW
TIME) 31
Station name
Delete (NAME DEL) 35
Edit (NAMEEDIT) 35
Subtitle (SUBTITLE) 24, 29
Subwoofer (SUB) 34
T
Time/text information (T IME /
TEXT) 17
Title (TITLE) 21
Top menu 19
Track (TRACK) 21
Treble (TRE) 34
W
Wireless (WL) 36
Z
Zone × Zone (Z×Z) 39
Zoom (CENTER ZOOM) 24
50
Page 51

Page 52

Advertencia
Para evitar el riesgo de incendio o
electrocución, no exponga la unidad a la
lluvia ni a la humed a d.
Para evitar recibir descargas eléctricas,
no abra el aparato. Solicit e asi stencia
técnica únicamente a personal
especializado.
PRECAUCIÓN
El uso de instrumentos ópticos con este producto
aumenta el riesgo de sufrir daños oculares. No
intente desmonta r l a carcasa, puesto que el haz
láser utilizado en este reproductor de CD/DVD
es perjudicial pa ra los ojos.
Solicite asistencia téc nica úni cam ente a personal
especializado.
Esta etiqueta está situada en la parte inferior del
chasis.
CAUTION
RADIATION WHEN OPEN AND INTERLOCKS DEFEATED.
DO NOT VIEW DIRECTLY WITH OPTICAL INSTRUMENTS.
Esta etiqueta está situada en el chasis interno de
la unidad de activación.
Advertencia: si el encendido del
automóvil no dispone de una posición
ACC
Tras apagar el motor, mantenga presionado
(OFF) en la unidad hasta que se apague la
pantalla.
Si no lo hace, la pantalla no se desactiva y se
desgasta la batería.
COFETEL
Este equipo opera a titulo secundario,
consecuentemente, debe aceptar interferencias
perjudiciales incluyendo equipos de la misma
clase y puede no causar interferencias a sistemas
operando a titulo pri mario.
:
CLASS 1M VISIBLE/INVISIBLE LASER
2
Page 53

Tabla de contenido
Bienvenido. . . . . . . . . . . . . . . . . . . . . . . . . . . 4
Precauciones . . . . . . . . . . . . . . . . . . . . . . . . . 5
Discos que se pueden reproducir. . . . . . . . . . 6
Procedimientos iniciales
Restauración de la unidad . . . . . . . . . . . . . . . 8
Ajuste del reloj . . . . . . . . . . . . . . . . . . . . . . . 8
Modo DEMO. . . . . . . . . . . . . . . . . . . . . . . . . 8
Extracción del panel frontal. . . . . . . . . . . . . . 8
Inserción del disco en la unidad . . . . . . . . . . 9
Ubicación de los controles y operaciones
básicas . . . . . . . . . . . . . . . . . . . . . . . . . . . 10
Pantallas de menú . . . . . . . . . . . . . . . . . . . . 13
Reproductor
Reproducción de discos. . . . . . . . . . . . . . . . 15
Reanudación de la reproducción
— Reanudación de l a reproducción . . . . 17
Visualización de la información del disco
— Información de tiempo/texto . . . . . . . 18
Búsqueda de un punto determinado de un disco
— Exploración . . . . . . . . . . . . . . . . . . . . 19
Uso de los menús del DVD. . . . . . . . . . . . . 19
Uso de las funciones PBC
— PBC (control de r epr oducción) . . . . . 20
Reproducción en diversos modos
— Reproducción repetida/
reproducción aleatoria/
reproducción con búsqueda . . . . . . . . . . 21
Diversas operaciones con DVD
Cambio de los canales de audio. . . . . . . . . . 23
Cambio de los ángulos. . . . . . . . . . . . . . . . . 25
Visualización de los subtítulos . . . . . . . . . . 25
Ampliación de imágenes . . . . . . . . . . . . . . . 26
Cambio de la calidad de imagen
— Ecualizador de imagen. . . . . . . . . . . . 26
Bloqueo de discos
— Control de bloqueo. . . . . . . . . . . . . . . 27
Ajustes
Uso del menú Configuración. . . . . . . . . . . . 30
Ajuste de l idioma d e la pantalla o pista de
sonido
— Configuración de idioma . . . . . . . . . . 31
Ajuste de la pantalla
— Configuración de pantalla . . . . . . . . . 32
Ajustes person al i zados
— Configuració n pe rsonalizada . . . . . . . 33
Ajustes de audio
— Configuración de audio . . . . . . . . . . . 34
Radio
Almacenamiento automático
— BTM . . . . . . . . . . . . . . . . . . . . . . . . . 35
Almacenamiento manual . . . . . . . . . . . . . . 36
Recepción de las emi soras almacenadas. . . 36
Sintonización automática . . . . . . . . . . . . . . 36
Recepción de emisoras mediante una lista
— Listado. . . . . . . . . . . . . . . . . . . . . . . . 36
Otras funciones
Ajuste de las características de sonido . . . . 3 7
Ajuste de la curva del ecualizador
— EQ7 Tune . . . . . . . . . . . . . . . . . . . . . 37
Etiquetado de una emisora o un disco . . . . 38
Ajuste de elementos de menú individuales
— SYSTEM MENU . . . . . . . . . . . . . . . 38
Uso del equipo opcional . . . . . . . . . . . . . . . 40
Cambio entre las salidas frontal y posterior
— Zone × Zone . . . . . . . . . . . . . . . . . . . 42
Información complementaria
Mantenimiento . . . . . . . . . . . . . . . . . . . . . . 42
Extracción de la unidad. . . . . . . . . . . . . . . . 43
Notas sobre los discos. . . . . . . . . . . . . . . . . 43
Acerca de los archivos MP3. . . . . . . . . . . . 44
Nota sobre la transm isión inal ámbrica
(MEX-R5 solamente). . . . . . . . . . . . . . . 4 4
Especificaciones . . . . . . . . . . . . . . . . . . . . . 45
Solución de problemas . . . . . . . . . . . . . . . . 4 6
Mensajes/indicaciones de error. . . . . . . . . . 50
Glosario. . . . . . . . . . . . . . . . . . . . . . . . . . . . 51
Lista de códigos de idiomas . . . . . . . . . . . . 53
Índice . . . . . . . . . . . . . . . . . . . . . . . . . . . . . 54
3
Page 54

Bienvenido
Gracias por adquirir este reproducto r múltip le de
discos Sony. Antes de poner en funcionamiento
esta unidad, lea este manual detenidamente y
guárdelo para co nsultarlo en el futuro.
CARACTERÍSTICAS:
• Compatibilidad para reproducir discos
DVD, CD y VCD
–Compatibilidad con diversos formatos de
discos, como DVD-R/-RW, DVD+R/
DVD+RW, etc.
DVD-R W : compatible con los modos Video y
VR (posibilidad de diversas opciones de
edición)
DVD+RW: compatible con el modo +VR
(posibilidad de diversas opciones de edición)
–Capacidad de reproducción de hasta 1 000
1
pistas*
grabadas en discos DVD-R/-RW,
DVD+R/+RW o CD-R/-RW en formato de
archivo MP3
• Incluye 2 salidas de video (frontal y
posterior)*
Zone*
• T ransmisión inalámbrica*
complejas, las señales de audio o video se
pueden transmitir al monitor opcional
XVM-F65WL.
• Zone × Zone: permite escuchar la radio o
música de un cambia dor de CD/MD (en caso
de que esté conectado) en la parte fro ntal y
emitir un DVD en la post erior a l mismo ti empo.
• Ecualizador de imagen: permite
seleccionar el tono de imagen deseado de los
ajustes predeterm i nados en función de la
iluminación del interior del vehículo o de la
iluminación am bi ent e.
• Ajuste del nivel de DVD: permite equilibrar
las diferencias de nivel de salida de PCM,
Dolby Digital y DTS, así como las diferencias
de volumen entre el disco y la fuente.
• EQ7: permite seleccionar una curva del
ecualizador para 7 tipos de música.
• DSO (Organizador de sonido de baja
frecuencia dinámico): permite crear un campo
de sonido más ambiental, utilizando una
síntesis de altavoces virtuales para mejorar el
sonido de los altavoces, in cluso si éstos están
instalados en una posición baj a en la puerta.
• Unidades opcionales de CD/MD
(cambiadores y reproductores)*
*1 En función de la duración de las pistas
*2 1 salida de video frontal 1 para MEX-R5
*3 MEX-R1 solamente
*4 MEX-R5 solamente
*5 Esta unidad funciona solamente con productos
Sony.
2
, 1 salida de audio Zone ×
3
y 1 salida digi t al
4
: sin conexiones
5
.
Acerca de este manual
• Las instrucc io nes que se incluyen e n este
manual describen los controles del control
remoto de tarjeta. También puede utilizar los
controles de la unidad si poseen los mismos
nombres o nombres similares a los del control
remoto de tarjeta.
• En este manual, “DVD” se u t iliza como
término general para DVD-R/-RW y DVD+R/
+RW.
• El significado de los íconos utilizados en este
manual se describe a continuación:
Ícono Significado
Funciones d isponi bles para DVD
VIDEO, DVD-R/DVD-RW o
DVD+R/DVD+RW en modo
Video
Funciones disponi bles para
Video CD o CD-R/CD-RW en
formato de CD de video
Funciones disponibles para CD
de música o CD-R/CD - RW en
formato de CD de música
Funciones disponi bles para
archivos en formato MP3
almacenados en CD-ROM/CDR/CD-RW/DVD-R/DVD-RW/
DVD+R/DVD+RW
Funciones disponi bles para
archivos en formato JPEG
almacenados en CD-ROM/CDR/CD-RW/DVD-R/DVD-RW/
DVD+R/DVD+RW
4
Page 55

Precauciones
• No utilice las fu nci ones personalizad as
mientras manej a, ni realice ninguna otra
función que pudiese distraer su atención de la
carretera.
• Si estaciona el automóvil bajo la luz directa del
sol, deje que la unidad se enfríe antes de usarla.
• La antena aérea m otorizada se extender á
automáticamente mientras la unidad se
encuentre en fu ncionamiento.
Seguridad
• Respete las leyes de tránsito de su país.
• Por razones de segur id ad, e l m oni to r c one cta do
a FRONT VIDEO OUT se apaga
automáticamente cuando no se uti l iza el freno
de mano.
Prevención de accidentes
Las imágenes apar ecen sólo después d e
estacionar el auto y utilizar el freno de mano.
Cuando el auto comienza a moverse, las
imágenes provenientes de FRONT VIDEO
OUT desaparecen automáticamente después de
mostrar la siguiente advertencia.
El monitor conectado a la toma REAR VIDEO
OUT podrá utilizarse mientras el auto se
encuentre en movimiento.
Las imágenes de la pantalla se apagarán,
aunque podrá escu char el sonido de CD/M P3.
Condensación de humedad
En días lluviosos o en zonas muy húmedas, es
posible que se c ondense humedad en el interior
de las lentes y la pantalla de la unidad. Si esto
ocurre, la unidad no funcionará corre ct am ente.
En tal caso, extraiga el di sco y espere una hora
aproximadame nte h asta que s e ha ya e v apor ado la
humedad.
Para mantener una alta calidad de
sonido
Asegúrese de no derramar jugos ni refresco s
sobre la unidad o lo s discos.
For your safety,
the video is blocked.
No opere la unidad ni mire el monitor mientras
maneje.
5
Page 56

Discos que se pueden
reproducir
Formato de d is c o s
DVD VIDEO
DVD
Los discos DVD contienen tanto datos de audio
como visuales. Un disco de 12 cm puede
contener hasta 7 veces la cantidad de datos de un
CD-ROM, lo que representa 4 horas consecutivas
de tiempo de reproducción (8 horas en el caso de
discos de doble cara). Los DVD se divi den en 4
tipos: una cara de una capa, una cara de doble
capa, dos caras de una capa y dos caras de doble
capa.
DVD-R*
(MP3/JPEG)
DVD-RW*
modo Video/modo VR
(MP3/JPEG)
DVD+R*
(MP3/JPEG)
DVD+RW*
(MP3/JPEG)
Video CD
CD de audio
CD-R*
(MP3/JPEG)
CD-RW*
(MP3/JPEG)
* No es posible reproducir discos que no estén
finalizados.
“DVD VIDEO”, “DVD-R”, “DVD-RW”,
“DVD+R” y “DVD+RW” son marcas
comerciales.
6
Video CD (VCD)
Un Video CD puede contener datos ta nt o de
audio como visuale s e n un disco del mismo
tamaño que un Audio CD común. El tiempo de
reproducción es de 74 minutos para un CD
estándar de 12 cm.
CD de audio
Un CD de audio cont i ene datos de audio. El
tiempo de reproducción es de 74 minutos para un
CD estándar de 12 cm.
CD-Grabable (CD-R)
Con un CD-R se pueden editar datos de audio. Se
puede escribir información en un CD-R sólo una
vez.
CD-Reescribible (CD-RW)
Con un CD-RW se pueden editar datos de audio
y se puede escribir información en el CD-RW
una y otra vez.
CD-Extra
Un CD-Extra posee dos secciones (sesiones)
para audio y datos r espectivamente. En esta
unidad sólo se puede reproducir la sec ci ón de
audio.
Notas
• Para los clientes de las áreas correspondientes al
código de región 3
Esta unidad está adaptada para el sistema de color
PAL. No puede reproducir un disco grabado en un
sistema de color que no sea PAL, como NTSC o
SECAM.
• Para los clientes de las áreas correspondientes al
código de región 4
Esta unidad está adapt ada al sistema de color
NTSC. No puede reproducir un disco grabado en un
sistema de color que no sea NTSC, como PAL o
SECAM.
• Esta unidad permite reproducir discos DVD-R/DVDRW, DVD+R/DVD+RW y CD-R/CD-RW diseñados
para audio. Sin embargo, es posible que no pueda
reproducir algunos discos debido a las condiciones
de grabación.
• No es posible reproducir discos CD-R/CD-RW, DV DR/DVD-RW o DVD+R/D VD+RW que no estén
finalizados.
• No es posible reproducir discos creados en formato
Packet Write.
• Es posible que los discos grabados no se
reproduzcan correctamente con una temperatura
ambiente muy alta.
Page 57

• No es posible reproducir en es ta unidad l os
siguientes discos:
– Discos de 8 cm
– CD-ROM (datos que no sean los de archivos MP3
o JPEG)
– CD-G
–Photo-CD
– VSD (disco simple de video)
– DVD-ROM (datos que no sean los de archivos
MP3 o JPEG)
–DVD-RAM
– DVD-Audio
– DVD+R DL (Doble capa)
– Active-Audio (Datos)
– CD-Extra (Datos)
– Mixed CD
– SVCD (Super video CD)
–CDV
– SACD (Super Audio CD)
Nota sobre discos transparentes
No es posible reproducir en esta unidad discos de
12 cm que contengan sólo una porción interior de
8 cm con datos (el res t o es transparente ).
Discos de música codificados con
protección de los derechos de
autor
La unidad se diseñó para reproducir discos que
cumplen con el es t ándar Compact Disc (CD).
Desde hace poco tiem po, algunas compa ñías
discográficas com ercializan discos de m úsica
codificados con prot ección de derec hos de autor.
T enga en cuenta que, entre estos dis cos, algunos
no cumplen con el estándar CD, por lo que no
podrán reproducirse ni grabarse con este
producto.
Código de región
Este sistema se utiliza para proteger los derechos
de autor del softw are.
El código de región se en cuentra en la parte
inferior de la unidad y ésta sólo reproducirá los
DVD etiquetados con códigos de región
idénticos.
Si intenta repr oducir cualquier ot ro DVD,
aparecerá en la pa ntal la el mens aje: “Cann ot pl ay
this disc.” (No se puede reproducir este disc o). Es
posible que algu nos DVD no pr es ent en la
etiqueta de indic aci ón del código de región,
aunque su repro ducción esté prohibida por
límites de zona.
Nota sobre operaciones de
reproducción de discos DVD y VCD
Es posible que ciertas operaciones de
reproducción de discos DVD y VCD estén
expresamente determinadas por los fabricantes
de software. Puesto que esta unidad reproduce
discos DVD y VCD en función del contenido
diseñado por los fabricantes de software, ciertas
funciones de reproducción pueden no est ar
disponibles. Consulte también las instrucciones
suministradas con los discos DVD o VCD.
Derechos de autor
Este producto incorpora tecnología de protección
de derechos de autor (copyright) amparada por
patentes de EE.UU. y ot ros derechos de
propiedad intelectua l . E l uso de dicha te cnología
debe contar con la autorización de Macrovision y
es únicamente par a uso doméstico y otros usos
de visualización limitados, a menos que
Macrovision autorice lo contrario. Está prohibida
la ingeniería inversa o el desmontaje de la
unidad.
Fabricado bajo licencia de Dolby Laboratories.
“Dolby” y el símbolo de la doble D son marcas
comerciales de Dolby Laboratories.
“DTS” y “DTS 2.0 + D i gi ta l Out” son marcas
comerciales de Digital Theater Systems, Inc .
Código de
región
Los DVD con la etiqueta también pueden
ALL
reproducirse en esta unidad.
7
Page 58

Procedimientos iniciales
Restauración de la unidad
Modo DEMO
Cuando la unidad está apagada, primero se
muestra el reloj y, a continuación, el modo de
demostración (DEMO) inicia la pantalla
respectiva.
Antes de utilizar la unidad por primera vez, o
después de reemplazar la batería del automóvil o
de cambiar las conexiones, debe restaurarla.
Extraiga el panel frontal y presione el botón
RESET con un objeto puntiagudo, como un
bolígrafo.
Botón
RESET
Nota
Al presionar el botón RESET, se borra el ajuste del
reloj y algunos contenidos almacenados.
Ajuste del reloj
El reloj emplea una indicación digital de 12
horas.
OFF
SRC
ENTER
SYSTEM
MENU
SOUND
SETUP
SYSTEM
MENU
×
AUDIO
1 Presione (SYSTEM MENU).
Aparece la pantalla de ajustes.
2 Presione M/m varias veces hasta que
aparezca “CLOCK-ADJ”.
3 Presione (ENTER).
La indicación de la hora parpadea.
4 Presione M/m para ajustar la hora y los
minutos.
Para desplazar la indicación digital, presione
</,.
5 Presione (ENTER).
El reloj se pone en funcionamiento.
ATT DVD
MODE
TOP MENU
LIST
PICTURE
EQZ
Z DSO EQ7
SUBTITLE
+
ENTER
–
ANGLE
MENU
M/m
</,
Para cancelar el modo DEMO, ajuste “DEMOOFF” en la configuración (página 39) mientras la
unidad está apagada.
Extracción del panel frontal
Puede extraer el panel frontal de la unidad para
evitar que la roben.
Alarma de precaución
Si gira el interruptor de encendido hasta la
posición OFF sin haber extraído el panel frontal,
la alarma de precaución sonará durante unos
segundos.
La alarma sonará únicamente si se utiliza el
amplificador integrado.
1 Presione (OFF).
La unidad se apaga.
2 Presione , luego extráigalo tirando
hacia usted.
(OFF)
Notas
• No deje caer ni ejerza excesiva presión sobre el
panel frontal y la pantalla.
• No someta el panel frontal al calor ni a temperaturas
altas o excesiva humedad. Evite dejarlo en un
automóvil estacionado o sobre el tablero o la
bandeja trasera.
Sugerencia
Al transportar el panel frontal, utilice el estuche
suministrado.
Para visualizar el reloj durante la reproducción o
recepción, ajuste “CLOCK-ON” (página 39).
8
Page 59

Colocación del panel frontal
Fije la parte A del panel frontal con la parte B
de la unidad, como se muestra en la ilustració n y
presione el lado izq ui erdo en su posición has ta
escuchar un clic.
A
B
3 Cierre la bandeja.
Expulsión del disco
1 Abra la bandeja.
Nota
No coloque nada sobre la superficie interior del panel
frontal.
Inserción del disco en la
unidad
1 Abra la bandeja.
2 Inserte el disco con la cara de
reproducción hacia abajo.
Se inicia la reproducción. (En función del
disco, presi one DVD u para iniciar la
reproducción.)
2 Presione Z.
x
El disco se expulsa.
Nota
No cierre la bandeja mientras inserta o expulsa el
disco. El disco puede atorarse y dañarse.
Sugerencia
Se puede reproducir el disco con la bandeja cerrada o
abierta.
9
Page 60

Ubicación de los controles y operaciones básicas
q
q
q
q
q
q
q
0
q
Unidad principal
12 34 6 78 9
ATT OFF
Z
×
Z
SOUND
SOURCE MODE
s
a
SHUFREP ALBM +
d
5
OPEN/CLOSE
DSO
EQ7
-
f
DSPL
654321
g
SCRL
DVD
j
h
Bandeja OPEN/CLOSE abier ta
ql w;
ATT OFF
OPEN/CLOSE
Z
×
Z
SOUND
SOURCE MODE
Consulte las páginas indicadas para obt ener
informació n detallada.
a Botón de volumen +/– 37
b Botón ATT (atenuación)
c Botón Z×Z (Zone × Zone)
d Botón SOUND
e Pantalla
f Botón EQ7 (ecualizador)
g Botón DSO
h Botón OFF 8
i Botón SEEK +/–
Radio:
Para sintonizar emisoras aut omá tic ame nt e
(presionar); para localizar un a emisora
manualmente (mantener presiona do).
DVD/CD:
Para saltar capítulos o pistas (presionar);
para avanzar rápidament e o rebobinar un
capítulo o pista (m antener presionado).
j Botón (liberación del panel frontal)
8
k Botón SOURCE 42
l Botón MODE
10
DSPL
654321
m Botón RESET (ubicado detrás del panel
frontal) 8
n Botones numéricos
Radio:
Para recibir las emisoras almacenadas
(presionar); para almacenar emisoras
(mantener presionado).
CD/MD*
1
:
(1): REP 21, 40
(2): SHUF 21, 40
(3)/(4): ALBM –/+*
Para omitir álbumes (presionar); para omitir
álbumes continuamente (mantener
presionado).
o Botón DSPL
p Botón SCRL
Para desplazar los ele mentos de la p a ntalla.
q Botón DVD u (reproducir/pausa)
r Receptor del control remoto de tarjeta
s Ranura del disco 9
t Botón Z (expulsar) 9
*1 Si se conecta un cambiad or de MD.
*2 Cuando se reproduce un archivo MP3/JPEG y no
se conecta un cambiador. Si se conecta el
cambiador, la operación es diferente. Consulte la
página 40.
DSO
EQ7
DVDSHUFREP ALBM +
SCRL
2
SEEK
MEX-R1
MEX-R5
SEEK
k
Page 61

Control remoto de tarje ta RM-X702
1
2
3
4
5
6
7
8
9
MODE
TOP MENU
LIST
PICTURE
EQZ
SUBTITLE
ATT DVD
+
ENTER
–
ANGLE
OFF
SRC
SOUND
SETUP
SYSTEM
MENU
×
Z DSO EQ7
AUDIO
123
456
MENU
+
0
qa
qs
qd
qf
qg
qh
qj
qk
ql
w;
wa
ws
LIST
PICTURE
EQZ
SUBTITLE
0
–
ANGLE
DSPL
SYSTEM
MENU
×
Z DSO EQ7
AUDIO
123
456
789
CLEAR
VOL
wd
wf
wg
+
wh
–
wj
a Botón OFF 15, 17, 20
Para apagar o detener la fuente.
b Botón MODE 35, 40
Para seleccionar la banda de radio (FM/AM)
o seleccionar la unidad*
1
.
c Botón SRC (SOURCE)
Para encender o cambiar la fuente (Radio/
DVD/CD/MD*
2
/AUX*3).
d Botón TOP MENU 19
Para mostrar el menú superior de un DVD.
e Botón SOUND 37
Para seleccionar el ementos de sonido.
f Botón ENTER
Para realizar un aju st e.
g Botón SETUP
Para visualizar el menú Configuración y el
menú Modo de reproducción.
h Botón SYSTEM MENU
Para accede r al m enú de la unidad.
i Botón LIST 36, 40
Para mostrar una lista.
j Botón ATT (atenuación)
Para atenuar el sonido. Para cancelar esta
función, vuelva a presio narlo.
k Botón DVD u (reproducir/pausa) 9,
15, 16, 17
Para iniciar o insert ar una pausa en la
reproducción.
l Botones ./> (anterior/siguiente;
rebobinado/avance rápido;
sintonización de emisoras)
m Botón MENU 19
Para visualizar el men ú de un disco.
n Botones </, (cursor)
Para mover el cursor o camb ia r de página.
o Botón O (RETURN) 20, 30, 31
Para volver a la pantalla o a la operación
anterior.
p Botones M/m (cursor)
Para mover el cursor.
q Botón PICTURE EQ 27
Para seleccionar la calidad de imagen.
r Botón Z×Z (Zone × Zon e) 42
Para cambiar entre la salida frontal y la
posterior.
s Botón AUDIO 23
Para cambiar la sa lida de audio.
t Botón SUBTITLE 25
Para cambiar el idioma de los subtítulos.
u Botones numéricos
continúa en la página siguiente t
11
Page 62

v Botón CLEAR 23
Para cancelar los números ingresados.
w Botón DSO 4
Para seleccionar el modo DSO (1, 2, 3 u
OFF). Cuanto mayor sea el número, mejor
será el efecto.
x Botón EQ7 (ecualizador)
Para seleccionar un tipo de ecualizador
(XPLOD, VOCAL, CLUB, JAZZ, NEW
AGE, ROCK, CUSTOM u OFF).
y Botón ANGLE 25
Para cambiar el ángulo de visualización.
z Botón VOL (volumen) +/–
Para ajustar el volumen.
wj Botón DSPL 16, 18, 38
Para cambiar los elementos en panta lla .
*1 Si se conecta un cambiador de CD/MD.
*2 Si se conecta un cambiador de MD.
*3 Si se conecta un dispositivo portátil de Sony
opcional.
Nota
Si la unidad está apagada y desaparece la pantalla,
no se podrá operar con el control remoto de tarjeta
salvo que se presione (SOURCE) en la unidad
principal o primero se inserte un disco para activar la
unidad.
Sugerencia
Si desea obtener información adicional sobre cómo
sustituir la pila, consulte “Sustitución de la pila de litio
del control remoto de tarjeta” en la página 42.
12
Page 63

Pantallas de menú
AC DE
ACDEF
Utilice los menús de esta unidad para ajustar las
diversas funciones y ajust es de reproducción.
El menú que se muestra difier e según el estado
de la unidad.
Menú Configuración
Aparecerá cuando presione (SETUP) mientras
se detiene la repr oducción.
Para seleccionar un elemento
Presione </M/m/, y luego presione
(ENTER).
Para cerrar el menú Configuración
Presione (SETUP).
Ejemplo: Cuando selecciona “LANGUA GE
SETUP”.
LANGUAGE SETUP
OSD :
MENU :
AUDIO :
SUBTITLE :
To set, press , then .
To quit, press .
SETUP
ENTER
A Elementos de ajuste
B Elemento selecc i onado
C Elementos de ajuste
D Opciones
E Configuración actual
JAPANESE
ENGLISH
ENGLISH
ENGLISH
Menú Modo de reproducción
Aparecerá cuando presione (SETUP) duran t e la
reproducción.
Para seleccionar un elemento
Presione </M/m/, y luego presione
(ENTER).
Para cerrar el menú Modo de
reproducción
Presione (SETUP).
Nota
Los elementos del menú y los procedimientos de
operación varían según el disco.
Ejemplo: Al repro ducir un DVD
)
12(67
)
018(034
T 1:35:55
1;ENGLISH
OFF
1:ENGLISH
2:FRENCH
3:SPANISH
SUBTITLE
Select :
ENTER RETURN
Cancel
A Elemento s de l M odo de reproducció n
B Elemento seleccionado
C Número de título*
D Número de capítulo*2/Número total de
capítulos*
1
/Número total de títulos*
2
E Tiempo de reproducción transcurrido
F Estado de reproducción (NPLAY, XPAUSE,
etc.)/Forma to del disco
G Configuración actual
H Opciones
*1 Muestra el número de pista en el caso de discos
VCD y el número de álbum en el caso de archivos
JPEG. Cuando reproduzca un VCD con la función
PBC activada, no aparecerá ninguna indicación.
*2 Muestra el número de imagen en el caso de
archivos JPEG.
Notas
• Cuando reproduzca CD/MP3, no se podrá visualizar
el menú Modo de reproducción.
• Cuando reproduzca archivos JPEG, (SETUP) estará
activo sólo cuando la imagen se muestre
completamente.
G
H
PLAY
DVDVIDEO
1
continúa en la página siguiente t
13
Page 64

Mensaje de operación
Las operaciones del m enú varían según el
elemento selecci onado y los botones qu e se
utilizarán aparec en en la parte inferior de la
pantalla de menú para asistirlo con las
operaciones.
ENTER
To set, press , then .
To quit, press .
Aparecerá el nombre del elemento
seleccionado y/o los mensajes de operación.
Sugerencia
Aparecerá el mensaje “Operation not possible”
(Operación imposible) si la función no está disponible.
SETUP
SETUP
ENTER
Elementos de ajuste
LANGUAGE SETUP (ajuste de
idioma) (página 31)
Cambia el idioma.
SCREEN SETUP (ajuste pantalla)
(página 32)
Selecciona los modos de pantalla.
CUSTOM SETUP (ajuste
personalizado) (página 33)
Ajusta las operaciones de reproducción.
AUDIO SETUP (ajuste audio)
(página 34)
Ajusta el sonido de salida.
RESET (página 31)
Restaura todos los elementos de ajuste.
Elementos del Modo de
reproducción
TITLE, TRACK (título, pista)
(página 22)
Selecciona el título o l a pista que se v a a
reproducir.
CHAPTER (capítulo) (página 22)
Selecciona el capítulo que se va a
reproducir.
IMAGE (imagen) (página 22)
Selecciona la imagen que se va a
mostrar.
TIME/TEXT (tiempo/texto)
(página 18, 22)
Comprueba el tiem po transcurrido y el
restante de reproducción.
Ingresa el código de t ie m po para la
búsqueda de imágenes.
Muestra el texto del DVD.
AUDIO (página 23)
Cambia el valor de audio.
SUBTITLE (subtítulos)
(página 25)
Muestra los subtítulos.
Cambia el idioma de los subtítulos.
ANGLE (ángulo) (página 25)
Cambia el ángulo.
CENTER ZOOM (ampliar)
(página 26)
Amplía la imagen.
REPEAT (repetición) (página 21)
Reproduce el disco completo (todos los
títulos/pistas/álbumes) en forma
repetida o un capítulo/pista/álbum en
forma repetida .
SHUFFLE (aleatoria) (página 21)
Reproduce los títulos, capítulo s o pi stas
en orden aleatori o.
PICTURE EQ (ecualizador de
imagen) (página 26)
Selecciona la calidad de imagen.
Sugerencia
Cuando esté activado “REPEAT” o “SHUFFLE”, o si
está disponible “ANGLE”, la casilla de verificación
correspondiente se iluminará en verde
(p. ej. ). Sin embargo, es
posible que no pueda cambiar el ángulo en algunas
escenas aunque la casilla de verificación esté
iluminada en verde.
t
14
ALBUM (ál bum) (JPEG)
(página 22)
Selecciona el ál bum de i mágenes que se
va a mostrar.
Page 65

Reproductor
A
C
B
D
Reproducción de discos
Dependiend o del disco, es posible que algunas
operaciones se an diferentes o esté n prohibidas.
Consulte las instrucciones de uso suministradas
con el disco.
OFF DVD
OFF
SRC
SOUND
SETUP
SYSTEM
MENU
×
AUDIO
ATT DVD
MODE
TOP MENU
LIST
PICTURE
EQZ
Z DSO EQ7
SUBTITLE
+
ENTER
–
ANGLE
MENU
u
</,
Si la opción “MP3/JPEG” de “CUSTOM
SETUP” está ajustada en “JPEG”, la
presentación de diapositivas se iniciará
automáticame nt e cuando el disco contenga
archivos JPEG (página 33).
Cada vez que presione </,, la imagen gira
cada 90º.
Notas
• Si se gira una imagen de gran tamaño, es posible
que ésta demore más tiempo en visualizarse.
• Los archivos JPEG están diseñados para una
visualización óptima con una resolución de 640 x
480 píxeles. Es posible que los archivos de tamaño
distinto no se visualicen correctamente o que las
imágenes aparezcan desplazadas (hacia la
izquierda o la derecha).
• No es posible visualizar archivos JPEG progresivos.
Una vez insert ado el disco
Presione DVD u para iniciar la repro ducción.
Para detener la reproducción o apagar la
unidad
Presione (OFF).
Sugerencia
No se puede insertar un disco si la unidad está
apagada.
123
DSPL
+
VOL
–
456
789
CLEAR
0
1 Encienda el monitor y seleccione la
fuente de entrada del monitor que
corresponda a esta unidad.
2 Introduzca un disco.
La cara de reproducción hacia abajo
La reproducción se iniciará automáticamente.
(En función del disco, presione DVD u
para iniciar la repr oducción.)
Es posible que aparezca un menú en la
pantalla cuando se inserta un DVD o un VCD.
Si desea obtener más información sobre estos
menús, consulte la página 19 para DVD y la
página 20 para VCD.
DSPL
Elementos de la pantalla durante la
reproducción de CD/MP3
1
1
0:42
REP
:
ALBUM NAME 001
:
TRACK NAME 001
:
ID3 INFORMATION
160k
A Número de álbum*1/Número de pista /
Tiempo de reproducción tr anscurrido
B Modo de reproducción/Velocidad de bits*
C Nombre del disco*3/Nombre del álbum*1/
Nombre de la pista/Información del indicador
1
ID3*
D Estado de reproducción (NPLAY, XPAUSE,
etc.)/Forma to del disco
*1 Aparece solamente cuando s e reproducen
archivos MP3.
*2 Si se aplica VBR (velocidad de bits variable), no
aparecerá ninguna indicación.
*3 Si el disco o la pista no tienen nombre, aparecerá
“NO DISC NAME” o “NO TRACK NAME”.
continúa en la página siguiente t
PLAY
MP3
1*2
15
Page 66

Para desplazarse por la información del
texto
Presione (DSPL).
Nota
“ ” aparece en lugar de los caracteres que no
pertenezcan al alfabeto ni sean números.
Notas sobre discos DVD con pista de sonido DTS
La señal de audio DTS se emite en todo momento, y
es posible que se emita un ruido fuerte desde los
altavoces si conecta la unidad al equipo de audio sin
un decodificador DTS. Esto podría dañar los altavoces
o sus oídos.
Orden de reproducción de los
archivos MP3
MP3
Notas
• El orden de reproducción puede variar según el
software de escritura.
• La unidad puede reproducir hasta 1 000 pistas y
256 álbumes. Las pistas que superen las 1 000
primeras o los álbumes que superen los 256
primeros no se reconocerán.
Sugerencias
• Si añade números (01, 02, 03, etc.) delante de los
nombres de las pistas, las pistas de cada carpeta se
reproducirán por orden numérico.
• Dado que la reproducción de un disco con muchos
árboles demora más para iniciarse, se recomienda
no crear álbumes que contengan más de dos
niveles de árboles.
• Para obtener más información acerca de los
archivos MP3, consulte “Acerca de los archivos
MP3” en la página 44.
Carpeta
(álbum)
Archivo MP3
(pista)
Operaciones adicionales
OFF
SRC
SOUND
SETUP
SYSTEM
MENU
×
AUDIO
ATT DVD
MODE
TOP MENU
LIST
PICTURE
EQZ
Z DSO EQ7
SUBTITLE
+
ENTER
–
ANGLE
MENU
Para Operación
Insertar una pausa Presione DVD u
Reanudar la
Presione DVD u
reproducción después
de la pausa
Pasar al capí tul o, pi sta
Presione > (,)
o escena siguiente en
el modo de
reproducción continua
Retroceder al capítulo,
Presione . (<)
pista o escena anterior
en el modo de
reproducción continua
Ir al siguiente álbum Presi one M*
Ir al álbum anterior Presione m*
Detener la
reproducción y extraer
el disco
* Sólo disponible cuando se reproducen archivos
MP3 o JPEG.
Presione Z tras abrir
la bandeja de la unidad
(página 9)
DVD
u
./>
M/m
</,
16
Page 67

Reanudación de la
reproducción
— Reanudación de la reproducción
La unidad memoriza el punto en el que se detuvo
la reproducción h asta un máximo de 20 dis cos y
reanuda la reproducción aún después de apagar la
unidad o de expulsar el di sco que se está
reproduciendo.
OFF
OFF
SRC
SOUND
SETUP
SYSTEM
MENU
×
AUDIO
1 Durante la reproducción, presione
(OFF) para detenerla.
2 Presione DVD u para reanudar la
reproducción.
La reproducción se inicia desde el punto en el
que se detuvo en el paso 1.
ATT DVD
MODE
TOP MENU
LIST
PICTURE
EQZ
Z DSO EQ7
SUBTITLE
+
ENTER
–
ANGLE
MENU
DVD
u
Notas
• La reproducción de archivos MP3 se iniciará desde
el principio de la última pista reproducida.
• Para utilizar la función de reanudación de
reproducción, asegúrese de que la opció n “MULTIDISC RESUME” de “CUSTOM SETUP” esté
ajustada en “ON” (página 33).
• Al almacenar el punto de reanudación de
reproducción del disco número 21, se borra
automáticamente el punto de reanudación
correspondiente al primer disco.
• La reanudación de reproducción se cancela cuando
se cambia el ajuste del control de bloqueo.
• Dependiendo del disco o la escena, no podrá utilizar
la función de reanudación de reproducción.
• Si se aplica el control de bloqueo, la reanudación de
la reproducción no funcionará. En tal caso, la
reproducción se iniciará desde el principio del disco
cuando se inserte.
Sugerencia
Cuando se reproducen CD, archivos MP3 o archivos
JPEG, la unidad memoriza temporalmente el punto de
reanudación del disco que se está reproduciendo.
Cuando se apaga la unidad o se expulsa el disco, el
punto de reanudación memorizado del disco se borra.
Para reproducir un disco desde el
principio
Después de ajustar la opción “MULTI-DISC
RESUME” de “CUSTOM SETU P” en “OFF”
(página 33 ), presione Z para expulsar el disco y
luego vuelva a insertarl o.
En función del disco, seleccione el capítulo que
desee en el menú del DVD o el menú superior.
17
Page 68

Visualización de la
información del disco
— Información de tiempo/texto
Puede comprobar el tiempo de reproducción y el
tiempo restante del título, capítu lo o pista
actuales. Asimism o, puede comprobar la
información de texto, como el nombre del título,
capítulo, archivo, etc.
AUDIO
SUBTITLE
ANGLE
123
DSPL
+
VOL
–
DSPL
456
789
CLEAR
0
1 Durante la reproducción, presione
(DSPL).
Aparecerá la in formación de reproducción
actual.
Información de tiempo
2 Presione (DSPL) varias veces para
cambiar la información de tiempo.
La información de tiempo varía según el
disco de la siguiente manera:
DVD:
“T
**:**:**
transcurrido del título actual
“T-
**:**:**
actual
“C
**:**:**
transcurrido del capítulo actual
“C-
**:**:**
capítulo actual
VCD (sin funciones PBC):
“T
**:**
transcurrido de l a pi sta actual
“T-
**:**
actual
“D
**:**
transcurrido del di sco actual
“D-
**:**
actual
JPEG:
Número de álbum
Número de imagen
” - Tiempo de reproducción
” - Tiempo re stante d el título
” - Tiempo de reproducción
” - Tiempo restante del
” - Tiempo de reproducción
” - Tiempo restante de la pista
” - Tiempo de reproducci ón
” - Tiempo restante del di sco
T 1:01:57
NO TEXT
Información de texto*
* Cuando no exista ninguna información de
texto, aparecerá “NO TEX T ”.
18
Page 69

Búsqueda de un punto
determinado de un disco
— Exploración
Puede localizar con rapidez un punto
determinado de un disco mediante la supervisión
de las imágenes.
OFF
SRC
SOUND
SETUP
SYSTEM
MENU
×
AUDIO
Durante la reproducción, mantenga
presionado ./> y suéltelo en el
punto deseado.
Si mantiene presion ado el botón, la velocidad de
búsqueda aumen t ará.
Nota
Durante la búsqueda, no se emitirá ningún sonido ni
se visualizarán los subtítulos.
ATT DVD
MODE
TOP MENU
LIST
PICTURE
EQZ
Z DSO EQ7
SUBTITLE
+
ENTER
–
ANGLE
MENU
./>
Uso de los menús del DVD
Con algunos DVD se pueden utilizar los menús
originales, como el menú superior o el menú del
DVD.
Si el DVD contiene varios títulos de pistas y
escenas, puede ut ilizar el menú super ior para
seleccionar el título que desea y comenzar la
reproducción.
Si el DVD incluye un menú más completo con
elementos como los idiomas del audio y de los
subtítulos, títulos, capítulos, etc., puede utilizar
el menú del DVD para seleccionar el elemento
que desea y comenzar la reproducción.
ATT DVD
MODE
TOP MENU
LIST
PICTURE
EQZ
Z DSO EQ7
SUBTITLE
MENU
+
ENTER
–
ANGLE
VOL
DSPL
0
MENU
M/m
</,
+
–
TOP
MENU
ENTER
Botones
numéricos
OFF
SRC
SOUND
SETUP
SYSTEM
MENU
×
AUDIO
123
456
789
CLEAR
1 Durante la reproducción de un DVD,
presione (TOP MENU) o (MENU).
Aparecerá el menú DVD o el menú superior.
El contenido del menú varía según el disco.
2 Presione </M/m/, o los botones
numéricos para seleccionar el
elemento que desea y lu ego presione
(ENTER).
Nota
Los elementos del menú y los procedimientos de
operación varían según el disco.
19
Page 70

Uso de las funciones PBC
— PBC (control de reproducción)
El menú PBC lo asiste con las operaciones en
forma interactiva cuando se reprodu ce un VCD
con funciones PBC .
OFF
OFF
SRC
SOUND
SETUP
SYSTEM
MENU
×
AUDIO
ATT DVD
MODE
TOP MENU
LIST
PICTURE
EQZ
Z DSO EQ7
SUBTITLE
+
ENTER
–
ANGLE
MENU
ENTER
O
Notas
• Los elementos del menú y los procedimientos de
operación varían según el disco.
• Durante la reproducción PBC, el número de pista, el
tiempo de reproducción y otros elementos no
aparecerán en el menú Modo de reproducción.
Sugerencia
Para reanudar la reproducción PBC, presione (OFF)
para detener la reproducción y, a continuación,
presione DVD u. Se iniciará la reproducción PBC.
Botones
numéricos
123
456
789
CLEAR
DSPL
0
+
VOL
–
1 Inicie la reproducción de un VCD
compatible con las funciones PBC.
Aparecerá el menú PBC.
2 Presione los botones numéri cos p ar a
seleccionar el elemento deseado y, a
continuación, presione (ENTER).
3 Siga las instrucciones del menú para
llevar a cabo las operaciones
interactivas.
Para volver a la pantalla anterior
Presione O.
Reproducción sin la función PBC
1 Durante la reproducción, presione
(OFF).
2 Presione los botones numéri cos p ar a
seleccionar el elemento deseado y, a
continuación, presione (ENTER).
Aparecerá “Pla y w i th out PBC”
(Reproducción sin PBC) y se iniciará la
reproducción.
El menú PBC no apar ece durante la
reproducción.
20
Page 71

Reproducción en diversos
modos
— Reproducción repetida/reproducción
aleatoria/reproducción con búsqueda
Puede establecer los siguientes mod os de
reproducción:
• Reproducción repetida (página 21)
• Reproducción aleatoria (página 21)
• Reproducción con búsqueda (página 22)
Notas
• El modo de reproducción seleccionado se cancela si
se expulsa el disco que se está reproduciendo o si
se apaga la unidad.
• Cuando se reproduzca un VCD con la función PBC
activada, la reproducción repetida y la aleatoria no
estarán disponibles.
Reproducción repetida
— Reproducción repetida
La unidad puede repetir un título, capítulo o pista
cuando el elemen to que se está reproduc ie ndo
llega al final.
Están disponibles las si guientes funciones de
repetición:
• TITL E (Repetición de títulos) - para repetir el
título actual.
• CHAPTER (Repetición de capítulos) - para
repetir el capítulo actual.
• TR ACK (Repetición de pistas) - para repetir la
pista o imagen act ual .
• ALBUM (Repetición de álb umes) - para r epetir
las pistas o imágenes del álbum actual.
Nota
Cuando ajuste la reproducción repetida para CD/MP3,
utilice la unidad principal; para ello, presione (1)
(RE P) va rias vec es.
ATT DVD
MODE
TOP MENU
LIST
PICTURE
EQZ
Z DSO EQ7
SUBTITLE
+
ENTER
–
ANGLE
MENU
M/m
ENTER
SETUP
OFF
SRC
SOUND
SETUP
SYSTEM
MENU
×
AUDIO
2 Presione M/m para seleccionar
(REPEAT) y, a continuación, presione
(ENTER).
Aparecerán las opciones del Modo de
reproducción.
3 Presione M/m par a sel eccionar la
opción que desea y, a continuación,
presione (ENTER).
Se inicia la reproducción repetida.
Para volver a la reproducción normal
Seleccione “OFF” en el paso 3.
Para cerrar el menú Modo de
reproducción
Presione (SETUP).
Sugerencias
• Las opciones de repetición varían según el disco.
• Si lo desea, para ajustar la reproducción repetida,
también puede presionar (1) (REP) varias veces en
la unidad principal.
Reproducción en orden aleatorio
— Reproducción aleatoria
La unidad puede reproducir títulos, capítulos o
pistas en orden ale at orio.
Están disponibles las sigu i entes opciones de
reproducción aleatoria:
• TITLE (Reproducción aleatori a de títulos) para reproducir los c apítulos del título actual en
orden aleatorio.
• DISC (Reproducción aleatoria de discos) - para
reproducir las pistas o imágenes del dis co
actual en orden aleat orio.
• ALBUM (Reproducción aleatoria de álbumes)
- para reproducir l as pistas o imágene s del
álbum actual en orden ale at orio.
Nota
Cuando ajuste la reproducción aleatoria para CD/
MP3, utilice la unidad principal; para ello, presione
(2) (SHUF) varias veces.
ATT DVD
MODE
TOP MENU
LIST
PICTURE
EQZ
Z DSO EQ7
SUBTITLE
+
ENTER
–
ANGLE
MENU
M/m
ENTER
SETUP
OFF
SRC
SOUND
SETUP
SYSTEM
MENU
×
AUDIO
1 Durante la reproducción, presione
(SETUP).
Aparecerá el menú Modo de reproducción.
continúa en la página siguiente t
21
Page 72

1 Durante la reproducción, presione
(SETUP).
2 Presione M/m para sele ccionar
(SHUFFLE) y, a continuación, presione
(ENTER).
Aparecerán las opciones del Modo de
reproducción.
3 Presione M/m para sele ccionar la
opción que desea y, a continuación,
presione (ENTER).
Se inici a la reprodu c ción aleatoria.
Para volver a la reproducción normal
Seleccione “OFF” en el paso 3.
Para cerrar el menú Modo de
reproducción
Presione (SETUP).
Notas
• La reproducción aleatoria de títulos para DVD se
cancelará después de reproducirse una vez.
• La reproducción aleatoria de títulos para DVD se
cancelará si se presiona . o > durante la
reproducción.
Sugerencias
• Las opciones de reproducción aleatoria varían
según el disco.
• Si lo desea, para ajustar la reproducción aleatoria,
también puede presionar (2) (SHUF) varias veces
en la unidad principal.
Inicio de la reproducción desde un
punto seleccionado
— Reproducción con búsqueda
Puede localizar con rapidez un punto deseado al
especificar el títu lo, capítulo, ti empo transcurri do
del título (mediante el código de tiempo) o la
pista.
En función d el disco, dis pondrá de las si guientes
opciones de búsqu eda:
DVD:
• TITLE inicia la reproducción a partir
del título seleccionado.
• CHAPTER inic ia la reproducción a
partir del capítulo seleccionado.
• TIME/TEXT inicia la reproducción a
partir del pu nto correspond i ente al código de
tiempo ingr esado.
CD:
• TRACK inicia la reproducción a partir de la
pista seleccionada.
MP3:
• TRACK inicia la reproducción a partir de la
pista seleccionada.
JPEG:
• ALBUM inicia la reproducción a
partir del álbum seleccionado.
• IMAGE inicia la reproduc ción a
partir de la imagen seleccionada.
Nota
Para localizar una pista de CD/MP3, presione los
botones numéricos para ingresar el número de pista y,
a continuación, presione (ENTER).
ATT DVD
MODE
TOP MENU
LIST
PICTURE
EQZ
Z DSO EQ7
SUBTITLE
0
+
ENTER
–
ANGLE
DSPL
MENU
VOL
M/m
+
–
ENTER
SETUP
Botones
numéricos
CLEAR
OFF
SRC
SOUND
SETUP
SYSTEM
MENU
×
AUDIO
123
456
789
CLEAR
1 Durante la reproducción, presione
(SETUP).
Aparecerá el menú M odo de reproducción.
2 Presione M/m para seleccionar el
elemento de búsqueda que desea y, a
continuación, presione (ENTER).
Los elementos de búsqueda varían según el
disco.
)
12(67
018(034
T 1:35:55
1
)
PLAY
DVDVIDEO
VCD:
• TRACK inicia la reproducción a
partir de la pista se l eccionada.
22
El número entre paréntesis indica el total de
elementos seleccionados.
Page 73

3 Presione los botones numéricos para
introducir el número del título, número
del capítu lo, núme r o de pis ta o t iem po
transcurrido del título.
Por ejemplo, para buscar el punto deseado a
las 2 horas, 10 min utos y 20 segundos des de
el principio, basta con ingresar “2:10:20”.
Para borrar los núm eros ya introducido s,
presione (CLEAR).
4 Presione (ENTER).
Comenzará la rep roducción desde el punto
seleccionado.
Para cerrar el menú Modo de
reproducción
Presione (SETUP).
Diversas operaciones
con DVD
Cambio de los canales de
audio
Al reproducir un DVD grab ado en múltiples
formatos de audio (PCM, Dolby Digital o DTS),
podrá cambiar el formato de audio. Si el DVD
está grabado con pi stas en varios idiomas,
también podrá cambiar el idioma.
Con los VCD, puede se l eccionar el soni do del
canal derecho o izquierdo y escuchar el sonido
del canal seleccionado a través de los altavoces
derecho e izquierdo. Por ejemplo, al reproducir
un disco que conten g a una ca nc ió n con el sonid o
vocal en el canal derecho y el instrumen tal en el
izquierdo, es posible seleccionar el ca nal
izquierdo y escuchar el instrumental por ambos
altavoces.
ATT DVD
MODE
TOP MENU
LIST
PICTURE
EQZ
Z DSO EQ7
SUBTITLE
+
ENTER
–
ANGLE
MENU
</,
ENTER
SETUP
SYSTEM
MENU
AUDIO
OFF
SRC
SOUND
SETUP
SYSTEM
MENU
×
AUDIO
Durante la reproducción, presione
(AUDIO) varias veces para seleccionar
los canales de audio que de sea.
1:ENGLISH DolbyD
Los ajustes del so ni do de audio varían según
el disco de la siguie nt e m anera:
DVD:
El idioma del audio cambia entre los idiomas
disponibles.
Si aparecen 4 dígitos, introduz ca el código de
idioma correspondiente al idioma que desea
(página 53).
continúa en la página siguiente t
M/m
23
Page 74

Si el mismo idioma aparece dos o más veces,
significa que el DVD está grabado en varios
formatos de audio .
VCD:
STEREO*: sonido estéreo estándar
1/L: sonido del canal izquierdo (monoaur al)
2/R: sonido del ca nal derecho (monoau ral)
* El ajuste predeterminado
Nota
Es posible que no pueda cambiar los canales de
audio con algunos discos.
Sugerencia
También puede cambiar los ajustes seleccionando
“AUDIO” en el menú Modo de reproducción
(página13).
Si se aplica “DOLBY DIGITAL”, el nombre
del formato de programa y los números de
canal aparecen como se indica a continuación:
Ejemplo: Dolby Digital (5. 1 canales)
Componente posterior × 2
DOLBY DIGITAL
Componente frontal × 2 +
Componente central × 1
*1 “PCM”, “DTS” o “DOLBY DIGITAL” aparece según
el disco.
*2 Aparece solamente cuando se aplica el formato
“DOLBY DIGITAL”.
3 / 2 . 1
Componente LFE
(efecto de baja
frecuencia) × 1
Comprobación del formato de
programa
Puede comproba r el número de canales y la
posición de los componentes del DVD que se
está reprod uciendo.
1 Durante la reproducción, presione
(SETUP).
Aparecerá el menú Modo de reproducci ón.
2 Presione
m para seleccionar
M/
(AUDIO) y, a continuación, presione
(ENTER).
Aparecerá el formato de progr am a.
Formato de audio actual*
)
12(67
)
018(034
T 01:35:55
1: ENGLISH
Formato de programa actual*
PROGRAMFORMAT
DOLBY DIGITAL
L C
LSRRS
Las letras de la pant al la de f ormato de
programa representan los sigui entes
componentes de sonido y sus posiciones:
: Frontal (izquierdo)
: Frontal (derecho)
: Central
: Posterior (izqui erdo)
: Posterior (der echo)
: Posterior (monoaural): componente
posterior de la señal estéreo procesada
con Dolby Surround y de la señal
Dolby Digital
: Señal de efecto de b aj a frecuencia
24
PLAY
DVDVIDEO
3 / 2. 1
LFE
2
Para cerrar el menú Modo de
reproducción
Presione (SETUP).
Sugerencia
En Dolby Digital y DTS, la indicación “LFE” siempre
aparece dentro de una línea continua
independientemente del componente de señal LFE
emitida.
Ajuste del nivel de salida de audio
— Ajuste del nivel de DVD
El nivel de salida de audio de discos DVD
VIDEO difiere en función del formato de au dio
empleado pa ra l a grab ació n (P CM, Do lb y Di gital
1
o DTS). Es posible ajustar el nivel de salida de
PCM, Dolby Digital o DT S en forma
independiente para reducir las diferencias de
nivel de volumen entre el disc o y l a fuente.
1 Presione (SYSTEM MENU).
2 Presione M/m varias veces para
seleccionar “DVD LVL” y, a
continuación, presione (ENTER).
3 Presione , para ajustarl o en “ADJ-
ON” y, a continuación, presione
(ENTER).
4 Presione </, para selecciona r
“DOLBY”, “DTS” o “PCM”.
5 Presione M/m para ajustar el nivel de
salida y, a continuación, presione
(ENTER).
Nota
Sólo podrá ajustar el nivel de salida si insertó un disco
en la unidad.
Sugerencia
El nivel de salida puede ajustarse de –6 dB a +6 dB.
Page 75

Cambio de los ángulos
Si el DVD contiene distintos ángulos
(multiángulos) para una escena, podrá cambiar el
ángulo de visualización.
OFF
SRC
SOUND
SETUP
SYSTEM
MENU
×
AUDIO
Presione (ANGLE) varias veces para
seleccionar el número de ángulo que
desea.
2(2
El ángulo cambi a.
Nota
En función del DVD, es posible que no pueda cambiar
los ángulos aunque haya varios ángulos grabados.
Sugerencia
También puede cambiar el ángulo de visualización
seleccionando “ANGLE” en el menú Modo de
reproducción (página 13).
ATT DVD
MODE
TOP MENU
LIST
PICTURE
EQZ
Z DSO EQ7
SUBTITLE
)
+
ENTER
–
ANGLE
MENU
ANGLE
Visualización de los
subtítulos
Puede activar o desactivar los subt í tulos o
cambiar el idioma de los subtítulos si el DVD
tiene grabados los subtítulos en varios idiomas.
OFF
SRC
SOUND
SETUP
SYSTEM
MENU
×
AUDIO
SUBTITLE
1 Durante la reproducción, presione
(SUBTITLE).
Aparecerá el idioma de los subtítulos.
2 Presione (SUBTITLE) varias veces para
seleccionar el idioma qu e desea.
1:ENGLISH
Los idiomas disp onibles varían según el
disco.
Si aparecen 4 dígitos, introduz ca el código de
idioma correspondiente al idioma que desea
(página 53).
Para desactivar los subtítulos
Presione (SUBTITLE) varias veces para
seleccionar “OFF”.
Nota
En función del DVD, es posible que no pueda cambiar
(o desactivar) los subtítulos aunque los tenga
grabados en varios idiomas.
Sugerencia
También puede cambiar el idioma de los subtítulos
seleccionando “SUBTITLE” en el menú Modo de
reproducción (página 13) o en el menú del DVD
(página 19).
ATT DVD
MODE
TOP MENU
LIST
PICTURE
EQZ
Z DSO EQ7
SUBTITLE
+
ENTER
–
ANGLE
MENU
25
Page 76

Ampliación de imágen es
Puede aumentar el tamaño de las imágenes.
OFF
SRC
ENTER
SETUP
SOUND
SETUP
SYSTEM
MENU
×
AUDIO
1 Durante la reproducción, presione
(SETUP).
Aparecerá el menú Modo de reproducci ón.
2 Presione M/m para sele ccionar
(CENTER ZOOM) y, a continuación,
presione (ENTER).
Aparecerá la opción actual.
3 Presione M/m para sele ccionar la
opción que desea (ZOOM×1, × 2*, ×4*)
y, a continuación, presione (ENTER).
La imagen se amplía.
* La imagen aparece granulada.
Para desplazar la posición del marco
Tras ampliar la imagen, presione </M/m/,.
Para restaurar la escala original
Seleccione “ZOO M ×1” en el paso 3.
Para cerrar el menú Modo de
reproducción
Presione (SETUP).
Notas
• En algunos DVD, es posible que no pueda cambiar
el tamaño.
• Si reanuda la reproducción, la imagen regresará a
su escala original.
ATT DVD
MODE
TOP MENU
LIST
PICTURE
EQZ
Z DSO EQ7
SUBTITLE
+
ENTER
–
ANGLE
MENU
M/m
</,
Cambio de la calidad de
imagen
— Ecualizador de imagen
Puede seleccionar la calidad de imagen adecuada
al brillo del interior del vehículo.
Puede ajustar “PICTURE EQ” de “CUSTOM
SETUP” en “LIGHT OFF”, “LIGHT ON” o
“AUTO” (página 34). Las opciones (a
continuación) varían en función del ajuste. Si
ajusta “PICT URE EQ ” en “AUTO”, l as o pci one s
disponibles cambiarán en forma automática en
función de si la luz está encendida o apagada.
Están disponibles la s s ig uientes opciones de
ajuste:
• NORMAL - calidad de imagen normal.
• Da ytime*
•Sunset*
oscurecer.
• Shine*
(por ejemplo, cuando la luz del sol se refleja en
el monitor).
• Night*
distraiga al manejar de noche.
• Midnight*
opción “Night”.
• Theater*
adecuada si desea que el monitor tenga mucho
brillo de noche.
• CUSTOM - ajustes configurables por parte del
usuario.
*1 Disponible cuando “PICTURE EQ” de “CUSTOM
*2 Disponible cuando “PICTURE EQ” de “CUSTOM
ENTER
SETUP
PICTURE
EQ
1
- adecuada para lu gar es brillantes.
1
- adecuada para cu ando empieza a
1
- adecuada para lugares muy brillante s
2
- oscurece el monitor para que no le
2
- oscurece el moni to r más que la
2
- aumenta el brillo del monitor;
SETUP” está ajustado en “LIGHT OFF” o “AUTO” y
la luz está apagada.
SETUP” está ajustado en “LIGHT ON” o “AUTO” y
la luz está encendida.
OFF
SRC
SOUND
SETUP
SYSTEM
MENU
×
AUDIO
ATT DVD
MODE
TOP MENU
LIST
PICTURE
EQZ
Z DSO EQ7
SUBTITLE
+
ENTER
–
ANGLE
MENU
M/m
</,
26
Page 77

Durante la reproducción, presione
(PICTURE EQ) varias veces para
seleccionar el ajuste que desea.
Daytime
Sugerencia
También puede cambiar la calidad de imagen
seleccionando “PICTURE EQ” en el menú Modo de
reproducción (página 13).
Configuración de los ajustes
personalizados
Puede almacenar sus pr opios ajustes
personalizados para distintos tonos de imagen.
1 Durante la reproducción, presione
(SETUP).
Aparecerá el menú Modo de reproducción.
2 Presione M/m para seleccionar
(PICTURE EQ) y, a continuación,
presione (ENTER).
Aparecen los elementos de ajuste.
1
001
002:35
Daytime
Sunset
Shine
CUSTOM
NORMAL
NORMAL
PLAY
DVDVIDEO
3 Presione M/m para seleccionar
“CUSTOM” y , a continuación, presione
(ENTER).
4 Presione M/m para seleccionar el
elemento de ajuste y, a continuación,
presione </, para ajus ta r el ni vel.
USER CUSTOM SETUP
Color
Bright
Contrast
Tint
Select: Set:
RETURN
Cancel:
0
0
0
0
Bloqueo de discos
— Control de bloqueo
Puede bloquear un disco o establecer
restricciones de reproducción s egún niveles
predeterminados como, por ejemplo, la edad de
los usuarios. Las escenas de reprod ucción
prohibida se bloquean o reempla zan con escenas
diferentes cuando se reproduce un DVD con
control de bloqueo.
Activación del control de bloqueo
OFF
SRC
ENTER
SETUP
Botones
numéricos
SOUND
SETUP
SYSTEM
MENU
×
AUDIO
123
456
789
CLEAR
1 Presione (SETUP) con la reproducción
detenida.
Aparecerá el m enú de ajuste.
2 Presione M/m para seleccionar
(CUSTOM SETUP) y, a continuación,
presione (ENTER).
Aparecen los elementos de ajuste.
3 Presione M/m para seleccionar
“PARENTAL CONTROL” y, a
continuación, pr esione (ENTER).
Aparecerán las opciones de control de
bloqueo.
CUSTOM SETUP
PARENTAL CONTROL :
MUTI–DISC RESUME :
MP3/JPEG :
SLIDE SHOW TIME :
PLAY LIST PLAY :
PICTURE EQ :
ATT DVD
MODE
TOP MENU
LIST
PICTURE
EQZ
Z DSO EQ7
SUBTITLE
MENU
+
ENTER
–
ANGLE
VOL
DSPL
0
+
–
PLAYER
PASSWORD
OFF
ON
OFF
AUTO
M/m
</,
O
5 Presione (ENTER).
Sugerencia
Los ajustes correspondientes a “LIGHT OFF” y
“LIGHT ON” pueden almacenarse por separado.
continúa en la página siguiente t
27
Page 78

4 Presione M/m para sele ccionar
“ON t” y , a continuación, presione
(ENTER).
Aparecerá la pan talla de ajuste de co nt raseña.
5 Presione los botones numéricos para
ingresar la contraseña y, a
continuación, presione (ENTER).
Aparecerá el mensaje “Parental control is
canceled” (El cont rol de bloqueo se can celó).
PARENTAL CONTROL
Enter a new 4–digit password,
ENTER
then press .
PASSWORD
5 Presione los botones numéri cos p ar a
introducir la contraseña y presione
(ENTER).
Aparecerá la pan t al la de confirmación.
6 Para confirmar, presione los botones
numéricos para volver a ingresar la
contraseña y luego pre si one (ENTER).
El control de bloqueo está establecido.
Para cerrar el menú Configuración
Presione (SETUP).
Desactivación del control de
bloqueo
1 Presione (SETUP) con la reproducción
detenida.
Aparecerá el menú de ajuste.
2 Presione M/m para sele ccionar
(CUSTOM SETUP) y, a continuación,
presione (ENTER).
Aparecen los elementos de ajuste.
3 Presione M/m para sele ccionar
“PARENTAL CONTROL” y, a
continuación, presione (ENTER).
Aparecerán las opc iones de control de
bloqueo.
4 Presione M/m para seleccionar “OFF
t” y, a continuación, presione
(ENTER).
Aparecerá la pan t al la para que introduzca l a
contraseña.
PARENTAL CONTROL
Enter password,
ENTER
then press .
PASSWORD
Si introduce un número incorrecto, pres io ne
< para mover el cursor y vuelva a introducir
el número.
Cambio de área y del nivel de
clasificación de películas
Puede establecer niveles de restricción según el
área y las clasificaciones de las películas.
1 Presione (SETUP) con la reproducción
detenida.
Aparecerá el menú de ajuste.
2 Presione M/m para seleccionar
(CUSTOM SETUP) y, a continuación,
presione (ENTER).
Aparecen los elementos de ajuste.
3 Presione M/m para seleccionar
“PARENTAL CONTROL” y, a
continuación, presione (ENTER).
Aparecerán las op ci ones de control de
bloqueo.
4 Presione M/m para seleccionar
“PLAYER t” y, a continuación,
presione (ENTER).
Cuando el control de bloqueo ya e st é
activado, aparecerá la pantalla para introducir
la contraseña.
Para cambiar los ajustes, introduzca el
número de la contras eña y presione
(ENTER).
Si introduce un número incorrecto, pres io ne
< para mover el cursor y vuelva a introducir
el número.
5 Presione M/m para seleccionar
“STANDARD” y presione (ENTER).
Aparecerán las opciones estándar.
CUSTOM SETUP
LEVEL :
STANDARD :
8:
USA
USA
OTHER
28
Page 79

6 Presione M/m para seleccionar el área
que desea a fin de aplicar su
clasificación de película y, a
continuación, presione (ENTER).
El área queda sele ccionada.
Si desea seleccionar la opción estándar en la
“Lista de código de área” (página 29),
seleccione “OTHERS t” y luego introduzca
el número de có di go mediante los bot ones
numéricos.
7 Presione M/m para seleccionar
“LEVEL” y luego presione (ENTER).
Aparecerán las opciones de clasificación.
CUSTOM SETUP
LEVEL :
STANDARD :
8:
8:
7:
NC17
6:
R
5:
4:
PG13
Mientras menor sea el número, más estricto
será el nivel de restricción.
8 Presione M/m para seleccio n a r la
clasificación que desea y pres io ne
(ENTER).
El ajuste de cont rol de bloqueo se compl etó.
Para cerrar el menú Configuración
Presione (SETUP).
Nota
Si reproduce discos que no poseen la opción de
control de bloqueo, no podrá limitar la reproducción en
esta unidad.
Lista de códigos de área
Estándar Núm e ro de c ódigo
Alemania 2109
Argentina 2044
Australia 2047
Austria 2046
Bélgica 2057
Brasil 2070
Canadá 2079
Chile 2090
China 2092
Corea 2304
Dinamarca 2115
España 2149
Filipinas 2424
Finlandia 2165
Francia 2174
India 2248
Indonesia 2238
Italia 2254
Japón 2276
Malasia 2363
México 2362
Noruega 2379
Nuev a Zelanda 2390
Países Bajos 2376
Pakistán 2427
Portugal 2436
Reino Unido 2184
Rusia 2489
Singapur 2501
Suecia 2499
Suiza 2086
Tailandia 2528
continúa en la página siguiente t
29
Page 80

Cambio de la contraseña
1 Presione (SETUP) con la reproducción
detenida.
Aparecerá el menú Configuración.
2 Presione M/m para sele ccionar
(CUSTOM SETUP) y, a continuación,
presione (ENTER).
Aparecen los elementos de ajuste.
3 Presione M/m para sele ccionar
“PARENTAL CONTROL” y, a
continuación, presione (ENTER).
Aparecerán las opc iones de control de
bloqueo.
4 Presione M/m para sele ccionar
“PASSWORD t” y, a continuación,
presione (ENTER).
Aparecerá la pan t al la para que introduzca l a
contraseña.
5 Presione los botones numéri cos p ar a
introducir la contraseña de 4 dígitos y,
a continuación, presione (ENTER).
Si introduce un número incorrecto, p re si one
< para mover el cu rso r y vu e lv a a in tr oduc ir
el número.
6 Presione los botones numéri cos p ar a
introducir una nueva contraseña de 4
dígitos y, a continuación, presione
(ENTER).
7 Para confirmar, presione los botones
numéricos para volver a introducir la
nueva contraseña de 4 dígitos y luego
presione (ENTER).
Para volver a la pantalla anterior
Presione O.
Para cerrar el menú Configuración
Presione (SETUP).
Ajustes
Uso del menú Configuración
Al utilizar el menú Configuració n, puede realizar
diversos ajustes en los elementos, como las
imágenes y el sonido. También puede establecer
el idioma de los subtítulos y la visualización en
pantalla, entre ot r as cosas. Si desea obtener más
información acerca de cada elemento de ajuste,
consulte las páginas de la 31 a la 34.
Nota
Los ajustes d e rep r od uc c ió n alma c e na do s en el d is co
tienen prioridad sobre los ajustes del menú
Configuración y es posible que no todas las funciones
descritas funcionen.
OFF
SRC
ENTER
SETUP
SOUND
SETUP
SYSTEM
MENU
×
AUDIO
Operaciones básicas
Ejemplo: Si desea cambiar el formato
(“MONITOR TYPE”) a “4:3 PAN SCAN”.
1 Presione (SETUP) con la reproducción
detenida.
Aparecerá el menú Configuración.
ATT DVD
MODE
TOP MENU
LIST
PICTURE
EQZ
Z DSO EQ7
SUBTITLE
+
ENTER
–
ANGLE
MENU
M/m
O
30
LANGUAGE SETUP
OSD :
MENU :
AUDIO :
SUBTITLE
:
ENGLISH
ENGLISH
ORIGINAL
AUDIO FOLLOW
Page 81

2 Presione M/m para seleccionar
(SCREEN SETUP) y, a continuación,
presione (ENTER).
Aparecerá la pa nt al l a de ajustes.
SCPEEN SETUP
MONITOR TYPE :
SCREEN SAVER :
16:9
ON
3 Presione M/m para seleccionar
“MONITOR TYPE” y, a continuación,
presione (ENTER).
Aparecerán la s opciones del tipo de monitor.
SCPEEN SETUP
MONITOR TYPE :
SCREEN SAVER :
4:3 LETTER BOX
16:9
16:9
4:3 PAN SCAN
4 Presione M/m para seleccionar “4:3
PAN SCAN” y, a continuación,
presione (ENTER).
El ajuste se aplica y finali za la configuración.
Para volver a la pantalla anterior
Presione O.
Para cerrar el menú Configuración
Presione (SETUP).
Para restaurar todos los elementos
de ajuste
— Restaurar
1 Seleccione (RESET) en el paso 2 y,
a continuación, presione (ENTER).
2 Presione M para seleccionar “YES” y,
a continuación, presione (ENTER).
Todos los ajustes* del menú Configuración
regresan a los valores pr edeterminados.
* Sin contar los ajustes de control de bloqueo.
Ajuste del idioma de la
pantalla o pista de sonido
— Configuración de idioma
“LANGUAGE SETUP” (ajuste de idioma)
permite ajustar el idioma que desea para las
indicaciones e n pantalla o la pista de so nido.
Seleccione (LANGU AGE SETUP) del menú
Configuración y, a continuación, seleccione el
elemento de ajuste que desea.
Si desea obten er má s información acer ca de los
procedimientos de ajuste, consulte “Uso del
menú Configuración” en la página 30.
OSD (Indicación en pantalla)
Cambia el idioma de las i ndicaciones en pantalla.
MENU
Cambia el idioma del menú del disco.
AUDIO
Cambia el idioma de la pista de sonido.
Si elige “ORIGINAL”, se seleccionará el idioma
que tenga prioridad en el disco.
SUBTITLE
Cambia el idioma de los subtítulos grabados en
el disco.
Si selecciona “AUDIO FOLLOW” (seguir el
audio), el idiom a de los subtítulos cam biará de
acuerdo con el idi oma seleccionado para la pista
de sonido.
Nota
Cuando en “MENU”, “SUBTITLE” o “AUDIO”
seleccione un idioma que no está grabado en el disco,
se seleccionará automáticamente uno de los idiomas
grabados.
Sugerencia
Si selecciona “OTHERS t” en “MENU”, “SUBTITLE”
o “AUDIO”, seleccione e ingrese el código de idioma
de “Lista de códigos de idiomas” (página 53) con los
botones numéricos.
Para cancelar la restauració n
Seleccione “NO” en el paso 2.
Nota
No apague la unidad mientras restaura el elemento
del menú Configuración ya que esta acción demora
unos segundos para completarse.
31
Page 82

Ajuste de la pantalla
— Configuración de pan talla
“SCREEN SETUP” (ajuste pantalla) permite
ajustar los valores del monitor conectado.
Seleccione (SCREEN SETUP) del men ú
Configuración y, a continuación, seleccione el
elemento de ajuste que desea.
Si desea obtener más información ac erca de los
procedimientos de ajuste, consulte “Uso del
menú Configuración” en l a pá gina 30.
Los elementos de ajuste marcados con “*” de las
tablas siguientes constituyen los ajustes
predeterminados.
MONITOR TYPE (tipo monitor)
Selecciona la relación de aspecto del monitor
conectado (4:3 estándar o panorámico).
16:9* Muestra la imagen panorámica.
4:3
LETTER
BOX (tipo
buzón)
4:3
PAN SCAN
(exploración
PAN)
Seleccione este elemento cuando
conecte un monitor de pantalla
panorámica o uno co n una
función de modo panorámico.
Muestra una imagen panorámica
con bandas en la par t e superior e
inferior de la pantalla.
Seleccione este elemento cuando
conecte un monitor con pantalla
4:3.
Muestra una imagen panorámica
en toda la pantalla y corta
automáticament e las partes que
no se adapten a ésta.
Seleccione este elemento cuando
conecte un monitor con pantalla
4:3.
16:9
4:3 LETTER BOX
(tipo buzón)
4:3 PAN SCAN
(exploración PAN)
Nota
Con algunos discos DVD, es posible que “4:3 LETTER
BOX” se seleccione automáticamente en lugar de “4:3
PAN SCAN” o viceversa.
SCREEN SAVER (protector de pantalla)
Activa o desactiva el protector de pantal la. La
imagen del protector de pantalla apa re cerá
cuando deje el sistema en modo de parada
durante 5 minutos. Éste evita que su dispositivo
de visualización se dañe (imagen secundaria).
Presione DVD u para desactivar el protector
de pantalla.
ON Activa el protector de pantalla.
OFF* Desactiva el protector de
pantalla.
32
Page 83

Ajustes personalizados
— Configuración personalizada
“CUSTOM SETUP” permite ajustar las
condiciones de reproducción de esta unidad.
Seleccione (CUSTOM SETUP) en el menú
Configuración y, a continuación, seleccione el
elemento que desee ajustar.
Si desea obtener m ás información acerca de los
procedimientos de aj uste, consulte “Uso del
menú Configuración” en la página 30.
Los elementos de ajuste marcados con “*” de las
tablas siguiente s constituyen los ajus te s
predeterminados.
PARENTAL CONTROL (control de
bloqueo)
Ajusta las restr ic ciones de reproduc ci ón de
manera que la unid ad no reproduzca discos o
escenas no apropiadas (página 27).
ON t Activa el control de bloqueo.
OFF t* Desactiva el co ntrol de
PLAYER t
(Reproductor)
PASSWORD t
(Contraseña)
MULTI-DISC RESUME
Almacena los punt os de reanudación de
reproducción para un máximo de 20 discos
diferentes.
ON* Almacena en la memoria los
OFF Cancela el almacenamiento en la
Nota
Si se aplica el control de bloqueo, la reanudación de la
reproducción no funcionará. En tal caso, la
reproducción se iniciará desde el principio del disco
cuando se inserte.
bloqueo.
Ajusta la norma de
restricción y el nivel
correspondiente.
Define un a nueva c ontr as eñ a
de 4 dígitos.
ajustes de restauración para un
máximo de 20 discos. (Los
ajustes permanecen en la
memoria aún si selecciona
“OFF”.)
memoria de los ajustes de
reanudación. La reproducción se
reinicia en el punto de
reanudación só lo par a el disco
que se encuentra actualmente en
la unidad.
MP3/JPEG
Ajusta la prioridad cuando el mismo disco
incluye archivos MP3 y JPEG .
MP3* Prevalece sobr e l o s archivos JPEG
durante la repr oducción.
JPEG Prevalece sobre l os archivos MP3
durante la repr oducción.
SLIDE SHOW TIME (Tiempo de
presentación de diapositivas)
Establece el horario para emitir las imágenes del
disco.
5sec Camb ia la s i mágenes cada 5
segundos.
10sec* Cambia las imágene s cada 10
segundos.
20sec Cambia las imágenes c ada 20
segundos.
40sec Cambia las imágenes c ada 40
segundos.
60sec Cambia las imágenes c ada 60
segundos.
FIXED
Cancela el cambio de imágenes.
(Fija)
PLAY LIST PLAY
Ajusta la prioridad entre los títulos grabados
originalmente o la lista de reproducción editada
en un DVD-RW en modo VR.
ORIGINAL* Tiene prioridad sobre la list a
de reproducción edi t ada a
partir de los títulos grabados
originalmente.
PLAY LIST Tiene prioridad sobre los
títulos grabados
originalmente.
Notas
• La reproducción de listas de reproducción sólo está
disponible para discos DVD-RW en modo VR.
• Si un disco no ti ene ningun a list a de repr odu cción
creada, se reproducirán los títulos grabados
originalmente.
continúa en la página siguiente t
33
Page 84

PICTURE EQ
Selecciona la visualización de las opciones de
calidad de imagen.
AUTO* Cambia las opc io nes en
función de si la luz está
encendida o apagad a.
(Disponible sól o si está
conectado el cable de control
de la iluminación.)
LIGHT OFF Muestra la s opciones que se
pueden utilizar con la luz del
día.
LIGHT ON Mue st ra la s opciones que se
pueden utilizar de noche.
Ajustes de audio
— Configuración de audio
“AU D I O SETUP” permite ajus ta r el sonido
según las condiciones de reproducción y el
equipo conectado .
Seleccione (AUDIO SETUP) en el menú
Configuración y, a continuación, elija el
elemento que de see ajustar.
Si desea obtener m ás información ac erca de los
procedimientos de ajuste, consulte “Uso del
menú Configuración” e n la página 30.
Los elementos de ajuste marcados con “*” de las
tablas siguientes constituyen los ajustes
predeterminados.
AUDIO DRC (Control de gama dinámica)
Produce un sonido ní t i do cuando se baja el
volumen al reproduc i r un DVD que se ajuste a
“AUDIO DRC”.
Este ajuste afecta las salidas de FRONT/REAR
AUDIO OUT (Salida de audio frontal y
posterior).
STANDARD*
(Estándar)
WIDE
RANGE
(gama amplia)
Normalmente, seleccione esta
posición.
Produce la sensación de asistir a
una actuación en dir ecto.
34
DOWNMIX (mezcla)
Cambia el método de mezcla de 2 canales
cuando reproduce un DVD con elementos de
sonido posterio r es (canales) o cuando es t á
grabado en formato Dolby Digital. Si desea
obtener más inf or mación acerca de los
componentes de señales posteriores, consulte
“Comprobación del formato de programa” en la
página 24. Este ajuste afecta a la salida de
FRONT/REAR AUDIO OUT.
SURROUND Seleccione esta opción cuando
la unidad esté cone ct ada a un
componente de audi o
compatible con Dolby Surround
(Pro Logic).
NORMAL* Seleccio ne esta opción cuando
la unidad esté cone ct ada a un
componente de audi o que no
sea compatible con Dolby
Surround (Pro Logic ).
Page 85

DOLBY DIGITAL
Selecciona el tipo d e se ñal Dolby Digital.
DOLBY
DIGITAL*
Seleccione esta opción cuando
la unidad esté conectada a un
componente de audio con
decodificador Dolby D i gi ta l
integrado.
DOWNMIX
PCM
Seleccione esta opción cuando
la unidad esté conectada a un
componente de audio sin
decodificador Dolby D i gi ta l
integrado. Puede selecciona r si
las señales con compatibles co n
Dolby Surround (Pro Logic) o
no; para ello, ajuste el elemento
“DOWNMIX” de “AUDIO
SETUP” (página 34).
DTS
Selecciona si se emitirán o no señales DTS.
ON* Seleccione est a opción cuando
la unidad esté conec t ada a un
componente de audi o con
decodificador DTS integrado.
OFF Seleccione esta opción cuando
la unidad esté conec t ada a un
componente de audi o s in
decodificador DTS integrado.
Radio
Precaución
Para sintonizar emisora s mientr as manej a, ut ilice
la función Memoria de la mejor sintonía (BTM)
para evitar accidentes.
MODE
SRC
ENTER
LIST
SYSTEM
MENU
Botones
numéricos
OFF
SRC
SOUND
SETUP
SYSTEM
MENU
×
AUDIO
123
456
789
CLEAR
Almacenamiento automático
— BTM
ATT DVD
MODE
TOP MENU
LI ST
PICTURE
EQZ
Z DSO EQ7
SUBTITLE
MENU
+
ENTER
–
ANGLE
VOL
DSPL
0
./>
M/m
+
–
1 Presione (SRC) (SOURCE) varias
veces hasta que aparezca “TUNER”.
Para cambiar de banda, presione (MODE)
varias veces. Puede selecci onar entre FM1,
FM2, FM3, AM1 o AM2.
2 Presione (SYSTEM MENU) y, a
continuación,
que aparezca “BTM”.
varias veces hasta
M/m
3 Presione (ENTER).
La unidad almacena las emisoras por orden
de frecuencia en los botones numéri cos
(del (1) al (6)).
La unidad emite un pitido al almacenar un
ajuste.
35
Page 86

Almacenamiento manual
Mientras recibe la emis ora que desea
almacenar, mantenga presionado un
botón numérico (del (1) al (6)) hasta
que aparezca “MEM”.
La indicación de botón numérico aparece en
pantalla.
Nota
Si intenta almacenar otra emisora en el mismo botón
numérico, se reemplazará la que estaba almacenada
previamente.
Recepción de las emisoras
almacenadas
Seleccione la banda y, a continuación,
presione un botón numérico (del (1)
al (6)) o M/m.
Sintonización automática
Seleccione la banda y, a continuación,
presione ./> para buscar la
emisora.
La búsqueda se deti ene cuando la unidad
recibe una emisora. Repita este
procedimiento hasta recibir la emisora
deseada.
Sugerencia
Si conoce la frecuencia de la emisora que desea
escuchar, mantenga presionado ./> para
localizar la frecuencia aproximada y, a continuación,
presione ./> varias veces para ajustar la
frecuencia deseada con mayor precisión
(sintonización manual).
Con la unidad principal
Para buscar la emisora, presione (SEEK) +/–.
Recepción de emisoras
mediante una lista
— Listado
Puede visualiza r un li st ado de las frecuenci as.
1 Seleccione la banda y, a continuación,
presione (LIST).
Aparecerán las frecuencias.
2 Presione M/m varias veces hasta que
aparezca la emisora desea da.
3 Presione (ENTER) para sintonizar la
emisora.
36
Page 87

Otras funciones
Ajuste de las características
de sonido
Ajuste de la curva del
ecualizador
— EQ7 Tune
Puede definir y alm acenar los ajustes del
ecualizador para distintos rangos de tono.
Puede ajustar los gr aves, agu dos, el balance, el
equilibrio y el volumen del altavoz potenciador
de graves.
ATT DVD
MODE
TOP MENU
LIST
PICTURE
EQZ
Z DSO EQ7
SUBTITLE
+
ENTER
–
ANGLE
MENU
</,
SOUND
OFF
SRC
SOUND
SETUP
SYSTEM
MENU
×
AUDIO
1 Seleccione una fuente y, a
continuación, presione (SOUND)
varias veces para seleccionar el
elemento que desee.
El elemento cambia de la manera siguiente:
BAS (graves) t TRE (agudos) t
BAL (izquierdo-derecho) t
FAD (frontal-posterior) t
SUB (volumen del altavoz potenciador de
graves)*
* “ ∞” aparecerá con el valor más bajo. Este
elemento puede ajustarse en un máximo de 20
pasos.
2 Presione </, varias veces para
ajustar el elemento seleccionado.
Después de 3 segun dos, se completa el ajuste
y la pantalla vu elve al modo de recepción/
reproducción normal.
Nota
Realice el ajuste a los 3 segundos de seleccionar el
elemento.
Con la unidad principal
En el paso 2, para ajustar el elemento seleccionado,
presione el botón de volumen +/–.
ATT DVD
MODE
TOP MENU
LIST
PICTURE
EQZ
Z DSO EQ7
SUBTITLE
+
ENTER
–
ANGLE
MENU
M/m
</,
ENTER
SYSTEM
MENU
OFF
SRC
SOUND
SETUP
SYSTEM
MENU
×
AUDIO
1 Seleccione una fuente y, a
continuación, pr esione
(SYSTEM MENU).
2 Presione M/m varias veces hasta que
aparezca “EQ7 TUNE” y, a
continuación, pr esione (ENTER).
3 Presione </, varias veces para
seleccionar el tipo de ecuali za dor q ue
desee y, a continuación, presione
(ENTER).
4 Presione </, varias veces para
seleccionar la frecuencia que desee.
La frecuencia cambia de la manera siguiente:
62Hz y 157Hz y 396Hz y 1kHz y
2.5kHz y 6.3kHz y 16kHz
5 Presione M/m varias veces para
ajustar el nivel de volumen que desee.
El nivel de volumen puede ajustarse en
intervalos de 1 dB, entre –10 dB y +10 dB.
Repita los pasos 4 y 5 para ajustar la curva del
ecualizador.
Para restaurar l a curva de ecualizador
ajustada en fábrica, mantenga presionado
(ENTER).
6 Presione (ENTER).
El ajuste finaliza y la pantalla regresa al modo
de reproducción/recepción normal.
37
Page 88

Etiquetado de una emisora o
un disco
Cuando sintoniza u na emisora o reproduce un
disco en un cambiador de CD con la función
CUSTOM FILE, puede etiquetar cada emisor a/
disco con un nombre personalizado de hasta 8
caracteres (Memorando de emisoras/Memorando
del disco).
Si etiqueta una emisora o un disco, el nombre
aparece en la lista (página 36 o 40).
1 Mientras escucha una emi s ora o
reproduce un disco que desea
etiquetar, presione (SYSTEM MENU).
2 Presione M/m varias veces hast a que
aparezca “NAMEEDIT” y, a
continuación, presione (ENTER).
2 Presione M/m varias veces hasta que
aparezca “NAME DEL” y, a
continuación, presione (ENTER).
Aparecerá el nombre almacenado.
3 Presione M/m varias veces para
seleccionar el nombre que desea
eliminar.
4 Mantenga presionado (ENTER).
Se elimina el nombre. Si de se a e limin ar otros
nombres, repita los pas os 3 y 4.
5 Presione (SYSTEM MENU) dos veces.
La unidad vuelve al modo de recepción/
reproducción no rmal.
Ajuste de elementos de
menú individuales
— SYSTEM MENU
3 Presione M/m varias veces hast a que
aparezca el carácte r de seado.
El carácter cambia de la manera siguiente:
A y B y C ... y 0 y 1 y 2 ... y +
y – y ... y (espacio en blanco)
y A
Para desplazar la in di cación digital, presi one
</,.
Repita esta operación hasta que se in gr ese el
nombre completo.
4 Presione (ENTER).
Finaliza el etiqu et ado y la pantalla regresa al
modo de recepc ió n/ reproducción nor m al .
Para mostrar el nombre, presione (DSPL)
durante la recepci ón o reproducción.
Sugerencias
• Para corregir o borrar un carácter, sobrescriba o
ingrese “ ”.
• El Memorando del disco siempre prevalece sobre
cualquier título pregrabado.
• Puede etiquetar un disco en la unidad si se conectó
un cambiador con la función CUSTOM FILE.
• Se suspende “REP-TRACK” y toda reproducción
aleatoria hasta que finalice el etiquetado.
Eliminación del nombre personalizado
1 Seleccione la unidad donde se guardó
el nombre personalizado que desea
eliminar y, a continuación, presione
(SYSTEM MENU).
ATT DVD
MODE
TOP MENU
LIST
PICTURE
EQZ
Z DSO EQ7
SUBTITLE
+
ENTER
–
ANGLE
MENU
M/m
</,
ENTER
SYSTEM
MENU
OFF
SRC
SOUND
SETUP
SYSTEM
MENU
×
AUDIO
1 Presione (SYSTEM MENU).
2 Presione M/m varias veces hasta que
aparezca el elemento deseado.
3 Presione </, para selecciona r el
ajuste que desee (ejemplo: “O N ” u
“OFF”).
4 Presione (ENTER).
El ajuste fi naliz a y la pantal la re gresa al modo
de reproducción/ re cepción normal.
Nota
Los elementos que se muestran en pantalla variarán
en función de la fuente y del ajuste.
Sugerencia
Puede cambiar fácilmente las categorías; para ello,
mantenga presionado M/m.
38
Page 89

Se pueden ajustar l os elementos siguie nt es
(consulte la ref erencia de página para obtener
más inform ación):
“
z” indica el ajuste predeterminado.
SET (Configuración)
CLOCK-ADJ (Ajuste del reloj) (página 8)
BEEP
Para ajustar “ON” (
RM (Mando rotatorio)
Para cambiar la dirección de funcion am i ento de
los controles del mando rotatorio.
–“NORM” (
la posición ajusta da en fábrica.
–“REV”: cuando monte el mando rotatorio del
lado derecho de la columna de dirección.
AUX-A*
1
(Audio auxiliar)
Para ajus tar la visualizació n d e la fuent e AUX
en “ON” (
z) u “OFF” (página 41).
PAL/NTSC*
Para cambiar el sistema de televisión en co l or a
PAL o NTSC.
WL*1*3 (Inalámbrico)
–“CH1” (
z), “CH2”, “CH3”, “CH4”: para evitar
interferencias con la transmisión inalámbrica.
–“OFF”: para desa ctivar la transmi sión
inalámbrica.
DSPL (Pan talla)
CLOCK (Información del reloj)
Para mostrar el reloj y los elementos de
visualización al mismo tiempo.
–“ON”: para que se muestren al mismo tiempo.
–“OFF” (
z): para que no se muestren al mismo
tiempo.
DIM (Atenuador)
Para cambiar el brillo de la pantalla.
–“AT” (
z): para que la pant al l a se atenúe
automáticamente al encender la luz.*
–“ON”: para atenuar la pantalla.
–“OFF”: para desactivar el atenuador.
CONTRAST
Para ajustar el contraste de la pantalla de la
unidad principal.
El nivel de contraste puede ajustarse en 7 pasos.
M.DSPL*
5
(Desplazamiento de indicaciones)
Para seleccionar el modo de indicador de
movimiento.
–“SA” (
z): para mostra r patrones en
movimiento y el analiz ador de espectro.
–“ON”: para mostrar patrones en movimiento.
–“OFF”: para desactivar el indicador de
movimiento.
1
DEMO*
(Demostración)
Para ajustar “ON” (
z) u “OFF”.
z): para usar el mand o rotatorio en
1*2
4
z) u “OFF” (página 8).
A.SCRL (Desplazamiento automático)
Para desplazar automática men te lo s elem entos
de la pantalla cuando se cambia de disco o
álbum.
–“ON”: para que se desplacen.
–“OFF” (
z): para que no se de splacen.
P/M (Modo de reproducción)
LOCAL (Modo de búsqueda local)
–“ON”: para que se sintonicen solamente las
emisoras de señal más intensa.
–“OFF” (
z): para ajustar la recepción normal.
MONO (Modo monoaural)
Para mejorar una recepción de FM defectuosa,
seleccione el modo de r ecepción monoaural.
–“ON”: para escuchar las emisio nes estéreo en
monoaural.
–“OFF” (
z): para escuchar las emisiones
estéreo en estéreo.
SND (Sonido)
EQ7 TUNE (página 37)
HPF (Filtro de paso alto)
Para seleccionar la frecuencia de cort e de los
altavoces frontales y posteriores: “OFF” (
z),
“78HZ” o “125HZ ”.
LPF (Filtro de paso bajo)
Para seleccionar la frecuencia de cort e del
altavoz potencia dor de graves: “OFF” (
z),
“125HZ” o “78HZ”.
LOUD (Sonoridad)
Para potenciar los graves y agudos con un
volumen bajo.
–“ON”: para reforzar los graves y agudo s.
–“OFF” (
z): para no reforzar los graves y
agudos.
DVD LVL*6 (Nivel de DVD) (página 24)
Para ajustar el nivel de salid a de audio en
función del formato de audio grabado en el
DVD.
AUX LVL*
7
(Nivel auxiliar)
Para ajustar el nivel de volumen d e cada equipo
auxiliar conectado. Este ajuste elimina la
necesidad de ajus ta r el nivel de volumen entre
fuentes.
continúa en la página siguiente t
39
Page 90

EDIT
NAMEEDIT (página 38)
NAME DEL (página 38)
BTM (página 35)
*1 Cuando la unidad está apagada.
*2 El ajuste predeterminado variará en función del
modelo:
PAL: modelo asiático
NTSC: modelo latinoamericano
*3 MEX-R5 solamente
*4 Cuando está conectado el cable de control de la
iluminación.
*5 Cuando la unidad está encendida.
*6 Cuando se reproduce un disco.
*7 Cuando se conecta y ejecuta un equipo auxiliar.
Uso del equipo opcional
MODE
SRC
ENTER
SYSTEM
MENU
OFF
SRC
SOUND
SETUP
SYSTEM
MENU
×
AUDIO
123
456
789
CLEAR
Cambiador de CD/MD
Selección del cambiador
1 Presione (SRC) (SOURCE) varias
veces hasta que apar ezca “CDC1” o
“MDC1”.
2 Presione (MODE) varias veces hasta
que aparezca el cambiad or deseado.
Número de unidad del cambiador de CD/MD
Se inici a la reprodu c ción.
ATT DVD
MODE
TOP MENU
LIST
PICTURE
EQZ
Z DSO EQ7
SUBTITLE
MENU
+
ENTER
–
ANGLE
VOL
DSPL
0
M/m
</,
LIST
+
–
DSPL
Omisión de álbumes y discos
Durante la reproducción, presione
M/m.
Para omitir Presione M/m
un álbum y suéltelo (ma n t éngalo
presionado durant e un
momento).
un álbum
continuamente
a los 2 segundos de haberlo
soltado por prim er a ve z.
discos varias veces.
discos
continuamente
a continuación, vuel va a
presionarlo a los 2 segundos y
manténgalo presionado.
Con la unidad principal
Para omitir discos, presione (3) (ALBM –) o (4)
(ALBM +).
Para omitir álbumes, mantenga presionado (3)
(ALBM –) o (4) (ALBM +).
Reproducción repetida y aleatoria
(Con la unidad principal)
Durante la reproducción, presione (1)
(REP) o (2) (SHUF) varias veces hasta
que aparezca el ajuste dese ado.
Seleccione Para reproducir
REP-DISC* un disco varias veces.
SHUF-
CHGR*
* Si se conectó uno o más cambiadores de CD/MD.
las pistas del cambiador en
orden aleatorio.
Para regresar al modo d e reproducción norm al,
seleccione “REP - O FF” o “SHUF-OFF”.
Ubicación de discos por nombre
— Listado
Puede seleccionar un disco de la lista al conectar
un cambiador de CD co n l a función CUSTOM
FILE o un cambiador de MD.
Si asigna un nombre al disco, el nombre aparece
en la lista.
1 Durante la reproducción, presione
(LIST).
Aparece el número y el nombre del dis co .
2 Presione M/m varias veces hasta que
aparezca el disco deseado.
3 Presione (ENTER) para reproducir el
disco.
40
Page 91

Mando rotatorio RM-X4S
Colocación de la etiqueta
Coloque la etiqueta de indicación según el modo
en que instale el mando rotatorio.
D
S
P
ND
U
SO
E
D
O
M
PL
S
D
Ubicación de los controles
Los botones corr es pondientes en el man do
rotatorio controlan las mismas fu nciones que los
de la unidad principal o el control remoto de
tarjeta.
SOUND
PRESET/
DISC
SOURCE
VOL
SEEK/AMS
Sin embargo, los contr ol es siguientes presen tan
unas funciones diferentes a l as de la unidad
principal o el control remoto de tarjeta.
• Control PRESET/DISC
Para seleccionar emisoras predefinidas;
controlar CD, de igual manera que con (3)/
(4) (ALBM –/+) de l a unidad prin cipal o M/m
del control remoto de tarjeta (presionar y girar).
• Control VOL (volumen)
Funciona de igual manera que los boto nes de
volumen +/– (girar).
• Control SEEK/AMS
Funciona de igual manera que (SEEK) +/– de
la unidad principa l o ./> del control
remoto de tarjeta (girar o girar y mantener en
esa posición ).
M
O
D
S
O
ATT
DSPL
L
E
U
N
D
MODE
OFF
OFF
Cambio del sentido de funcionamiento
El sentido de funcionamiento de los cont r oles
está ajustado de fábrica como se muestra a
continuación.
Para aumentar
Para disminuir
Si necesita instalar el mando rotatorio en el lado
derecho de la co lu m na de la dirección, pue de
invertir el sentido de funcion am i ento.
Mientras presione el control VOL,
mantenga presionado (SOUND).
Sugerencia
También puede cambiar el sentido de funcionamiento
de estos controles en el menú (página 39).
Equipo de audio auxiliar
Puede conectar di spositivos portátiles de Sony
opcionales al terminal BUS AUDIO IN/AUX IN
de la unidad. Si el cambiador u otro dispositivo
no está conectado al termin al, la unidad permiti rá
escuchar el dispositivo portátil a través de los
altavoces del vehículo.
Nota
Cuando conecte un dispositi vo portátil, asegúrese de
que BUS CONTROL IN no esté conectado. Si se
conecta un dispositivo a BUS CONTROL IN, “AUX” no
se podrá seleccionar con (SRC) (SOURCE).
Sugerencia
Cuando conecte un dispositivo portátil y un
cambiador, utilice el selector opcional AUX-IN.
Selección del equipo aux iliar
Presione (SRC) (SOURCE ) varias
veces hasta que apare zc a “AUX”.
Realice las op eraciones corr espondientes
desde el dispositivo portá til .
Para ajustar el nivel de volumen del equipo
auxiliar, consulte “AUX LVL” en la página 39.
41
Page 92

Cambio entre las sa li das
1
frontal y posterior
— Zone × Zone
Puede ajustar que se emita audio/video de un
DVD en el monitor posterior y otra fuente
distinta en la parte frontal.
Esta función res ul ta d e ut ili da d si dese a es cuch a r
la radio, reproducir música, etc. en la parte
frontal y reproducir un DVD en la posterior.
OFF
SRC
SOUND
SETUP
SYSTEM
MENU
Z
×
Z
AUDIO
×
1 Presione (ZxZ).
2 Presione (SOURCE) en la unidad
principal para cambiar la fuente de la
parte frontal.
Controle la parte frontal con la unidad
principal y la posterior (DVD) con el control
remoto de tarjeta.
Para volver al estado normal
Presione (ZxZ).
Notas
• Cuando Zone × Zone esté activado, los siguientes
botones del control remoto de tarjeta no podrán
utilizarse: (ATT), (SRC) (SOURCE), (MODE),
(VOL) +/–, (SYSTEM MENU), (LIST), (SOUND),
(DSO) y (EQ7).
• Zone × Zone no se cancelará aunque se expulse el
disco, y se activará cuando vuelva a insertar uno.
ATT DVD
MODE
TOP MENU
LIST
PICTURE
EQZ
Z DSO EQ7
SUBTITLE
+
ENTER
–
ANGLE
MENU
Información
complementaria
Mantenimiento
Sustitución de la pila de litio del control
remoto de tarjeta
En condicione s normales, la pil a dura
aproximadam ent e 1 año. (La duració n puede ser
menor en funció n de las condicione s de uso.)
El alcance del contr ol remoto de tarjeta
disminuye a medi da que se agota la pila.
Sustitúyala por un a pi l a de litio CR2025 nueva.
El uso de cualquier otra pila podría provocar un
incendio o una explosió n.
Lado + hacia arriba
2
c
Notas sobre la pila de litio
• Mantenga la pila de litio fuera del alcance de los
niños. Si se ingiriese, póngase en contacto
inmediatamente con un médico.
• Limpie la pila con un paño seco para garantizar un
contacto óptimo.
• Asegúrese de observar la polaridad correcta al
instalarla.
• No agarre la pila con pinzas metálicas, ya que
puede producirse un cortocircuito.
ADVERTENCIA
La pila puede explotar si no se emplea
adecuadamente.
No recargue la pila; tampoco la desmonte ni
la arroje al fuego.
42
Sustitución del fusible
Al sustituir el fusible,
asegúrese de utilizar uno cuyo
amperaje coincida con el
especificado en el original. Si
el fusible se funde, verifique
la conexión de alimentación y
sustitúyalo. Si el fusible
vuelve a fundirse después de
sustituirlo, es posible que
exista alguna falla de
Fusible (10 A)
funcionamiento interno. En
tal caso, consult e con el distribuidor Sony más
cercano.
Page 93

Limpieza de los conectores
Es posible que la unida d no funcione
correctament e si los conectores entr e ésta y el
panel frontal está n sucios. Para prevenir esta
situación, extraiga el panel frontal (página 8) y
limpie los conectores con un hisopo de alg odón
humedecido en alcohol. No aplique demasiada
fuerza, ya que po dr ía d añar los conectores .
2 Extraiga la unidad.
1 Inserte l as dos llaves de liberación
simultáneamente hasta escuchar un
clic.
El gancho
debe mirar
hacia adentro.
Unidad principal Parte posterior del
Notas
• Por razones de seguridad, apague el motor antes de
limpiar los conectores y extraiga la llave del
interruptor de encendido.
• No toque nunca los conectores directamente con los
dedos ni con ningún dispositivo metálico.
panel frontal
Extracción de la unidad
1 Extraiga el marco de protección.
1 Extraiga el panel frontal (página 8).
2 Fije las llaves de liberación al marco
de protección.
Oriente las llaves de liberación
como se indica en la ilustración.
3 Tire de las llaves de lib eración para
extraer el marco de protección.
2 Tire de las llaves de liberación para
extraer la unidad.
3 Deslice la unidad para extraerla del
marco.
Notas sobre los discos
• Para mantener los discos limpios, no toque su
superficie. Tómelos por los bordes.
• Guarde los discos en sus cajas o en los
cargadores de discos cuando no los use.
• No someta los discos al calor ni a altas
temperaturas. Evite dejarlos en un automóvil
estacionado o sobr e el tablero o la bandeja
trasera.
• No adhiera etiquetas ni utilice disco s con
residuos de pegament o o t i n t a. Tales discos
pueden dejar de girar durante el uso, l o que
provocaría una falla de funci onamiento o
podría dañarlo.
continúa en la página siguiente t
43
Page 94

• No use discos con etiquetas o autoadhesivos.
Su uso puede prod ucir las siguien t es fallas de
funcionamiento:
–Imposibilidad de expulsar el disco (dado que
se despegó la et iqueta o el autoadhesivo y se
obstruye el mecanismo de expulsión).
–Imposibilidad de leer los datos de audio
correctamente (por ejemplo, se interrumpe la
reproducción o si m pl emente no la hay)
debido a que el calor contrae el autoad hesivo
o la etiqueta y hace que el disco se deforme.
• No se pueden repro ducir en esta unidad discos
con formas no es ta ndarizadas (por eje mplo,
formas de corazón, cuadrado o estrella). Si lo
intenta, puede dañar la unidad. No use este tipo
de discos.
• No se pueden repro ducir discos de 8 cm.
• Antes de reproducir los
discos, límpielos con un paño
de limpieza disponible en el
mercado. Hágalo desde el
centro hacia los bordes. No
utilice disolventes como
bencina, diluyent es ,
productos de limpieza
comerciales ni aerosoles
antiestáticos para discos analógicos.
Nota sobre discos DualDisc
Un DualDisc es un disco de dos caras que
combina material grabado en DVD en una cara
con material de audio digital en la otra cara. Sin
embargo, como le lado del m at erial de audio no
cumple con la norma Compact Disc (CD ) , n o es
seguro que la reproducción pueda hacerse en este
producto.
• Cantidad máxima de:
– carpetas (álbumes): 256 (inclu idas la carpeta
raíz y las carpet as vacías).
– archivos MP3 (pistas) y carpetas contenidas
en un disco: 1 000 (si un nombre de archivo o
carpeta contiene m u chos caracteres, este
número puede ser i n f erior a 1 000).
– caracteres que se pueden visualizar de un
nombre de carpeta o ar chivo: 128; para el
indicador ID3 : 126 caracteres.
Notas
• Asegúrese de finalizar el disco antes de utilizarlo en
la unidad.
• Al asignar un nombre a un archivo MP3, asegúrese
de añadir la extensión “.mp3” al nombre de archivo.
• Si reproduce un archivo MP3 de alta tasa de bits,
como 320 kbps, el sonido puede ser discontinuo.
• Durante la reproducción de un archivo MP3 de VBR
(tasa de bits variable) o al avanzar o retroceder
rápidamente, es posible que el tiempo de
reproducción transcurrido no se muestre con
precisión.
• Si el disco se grabó en Multi Session, sólo se
reconoce y reproduce la primera pista del formato
de la primera sesión (cualquier otro formato se
omite). La prioridad del formato es CD-DA y MP3.
– Cuando la primera pista es un CD-DA, sólo se
reproduce el CD-DA de la primera sesión.
– Cuando la primera pista no es un CD-DA, se
reproduce una sesión de MP3. Si el disco no
contiene datos en ninguno de estos formatos,
aparece “NO MUSIC”.
• La unidad no puede reproducir archivos MP3
grabados con Multi Border.
• Los archivos MP3 que no se grabaron con una
frecuencia de m ue s t re o d e 4 4, 1 kH z o 48 kH z y una
velocidad de bits de 64 a 320 kbps no se podrán
reproducir.
Acerca de los archivos MP3
MP3, que significa MPEG-1 Audio Layer-3, es
un formato estandarizado que permit e comprimir
archivos de música. Comprime los datos de CD
de audio a aproximadamente 1/10 de su ta m año
original.
• La unidad es compatible con los siguientes
estándares:
Para CD
–ISO 9660 de formato de nivel 1/nivel 2,
Joliet/Romeo en cuanto al forma to de
expansión
–Multi Session
Para DVD
–Formato UDF Bridge (combina UDF e ISO
9660)
Para CD/DVD
–Versión del indicador ID3 1.0, 1.1, 2.2, 2.3 y
2.4
44
Nota sobre la transmisión
inalámbrica (MEX-R5
solamente)
La unidad transmite aud io o video con una
frecuencia FM de 2,4 GHz. La utilización
simultánea con ot ro equipo de 2,4 GHz p uede
causar interferencias en la imagen o ruidos en el
sonido. No se trat a de un fallo de
funcionamien to , s i no que se debe a que el
equipo comparte la misma frecuencia operativa.
Page 95

Especificaciones
Sistema
Láser Láser semiconductor
Sistema de formato de señal
Intercambiable entre PAL y
NTSC
Sección del reproductor de DVD/CD*
Relación señal-ruido 120 dB
Respuesta de frecuencia de 10 a 20 000 Hz
Fluctuación y trémolo Inferior al límite medible
Distorsión armónica (DVD)
Fluctuación y trémolo Inferior al valor detectado
* Medido desde las tomas AUDIO OUT.
Cuando reproduce pistas con sonido PCM con una
frecuenc ia de muestreo de 96 kHz, las señales de
salida de la toma DIGITAL OUT (salida digital) se
convierten a una frecuencia de muestreo de 96 kHz.
0,01 %
(±0,001 % W PEAK)
Sección del sintonizador
FM
Rango de sintonización Modelo asiático:
Terminal de la antena aérea
Frecuencia intermedia 10,7 MHz/450 kHz
Sensibilidad útil 9 dBf
Selectividad 75 dB a 400 kHz
Relación señal-ruido 67 dB (estéreo) , 69 dB
Distorsión armónica a 1 kHz
Separación 35 dB a 1 kHz
Respuesta de frecuencia de 30 a 15 000 Hz
de 87,5 a 108,0 MHz (a
intervalos de 50 kHz)
Modelo latinoamerica no:
de 87,5 a 107,9 MHz (a
intervalos de 200 kHz)
Conector de antena aérea
(mono)
0,5 % (estéreo),
0,3 % (mono)
AM
Rango de sintonización Modelo asiático:
Terminal de la antena aérea
Frecuencia intermedia 10,7 MHz/450 kHz
Sensibilidad 30 µV
de 531 a 1 602 kHz (a
intervalos de 9 kHz)
Modelo latinoamerica no:
de 530 a 1 710 kHz (a
intervalos de 10 kHz)
Conector de antena aérea
Sección del amplificador de potencia
Salidas Salidas de altavoz
Impedancia de altavoz de 4 a 8 Ω
Salida máxima de potencia
(conectores de sellado
seguro)
52 W × 4 (a 4 Ω)
Sección AV inalámbrica (MEX-R5
solamente)
Frecuencias de transmisión
Método de modulación Modulaci ón FM
Potencia de salida de RF –1,2 dBm
2 414, 2 432, 2 450,
2 468 MHz
Generales
Salidas Terminales de salida de
Entradas Terminal de control ATT
Controles de tono Graves: ±8 dB a 100 Hz
Sonoridad +8 dB a 100 Hz
Requisitos de alimentación
Dimensiones Aprox. 178 × 50 × 182 mm
Dimensiones de montaje Aprox. 182 × 53 × 161 mm
Peso Aprox. 1,3 kg
Accesorios suministrados Control remoto de tarjeta
audio/video frontales
Terminales de salida de
audio (Z×Z)/video
posteriores (MEX-R1
solamente)
Terminal de salida de audio
posterior
Terminal de salida de
altavoz potenciador de
graves (mono)
Terminal de salida digital
óptica
Terminal de control del relé
de la antena moto rizada
Terminal de control del
amplificador de potencia
para teléf ono
Terminal de control de
iluminación
Terminal de entrada de
control BUS
Terminal de entrada de
audio BUS/AUX IN
Terminal de control del
freno de mano
Terminal de entrada del
control remoto
Terminal de entrada de
antena
Agudos: ±8 dB a 10 kHz
+2 dB a 10 kHz
Batería de automóvil de cc
de 12 V (tierra negativa)
(an/al/prf)
(an/al/prf)
RM-X702
Componentes de instalación
y conexiones (1 juego)
Estuche para el panel frontal
(1)
continúa en la página siguiente t
45
Page 96

Accesorios opcionales Monitor suspendido
y
XVM-R70
Monitor para reposacabezas
XVM-H65
Monitor móvil
XVM-F65 (para MEX-R1)
Monitor móvil
XVM-F65WL
(para MEX - R5)
Cambiador de CD
(10 discos)
CDX-757MX, CDX-656X
Cambiador de MD
(6 discos)
MDX-66XLP
Selector de fuente
XA-C30
Selector AUX-IN
XA-300
Cable de audio óptico
RC-104
Patentes de los EE.UU. y otros países usados con
licencia de Dolb
Laboratories.
Tecnología de codificación de audio MPEG
Layer-3 y patentes bajo licencia de Fraunhofer
IIS y Thomson.
Nota
Esta unidad no puede conectarse a un
preamplificador digital ni a un ecualizador que sea
compatible con el sistema BUS de Sony.
El diseño y las especificaciones están sujetos a
cambios sin previo aviso.
• Se ha utilizado soldadura sin plomo para soldar
ciertos componentes. (más del 80 %)
• Ciertas placas del circuito impreso no contienen
retardantes de llama halogenados.
• Las carcasas no contienen retardantes de llama
halogenados.
• Impreso con tinta de aceites vegetales, libre de
COV (Compuestos Orgánicos Volátiles).
• No se ha utilizado goma esponjosa de poliestireno
para el material de relleno y protección.
Solución de problemas
La siguiente lista de comprobación le a yudará a
solucionar los problemas que puedan producirse
con la unidad.
Antes de consultarla, revise los procedimientos
de conexión y de funcionamiento.
Generales
La unidad no recibe alimentación.
• No se realizó correctamente la co nexión
eléctrica.
t Revise la conexión. Si todo está en orden,
compruebe el fusible.
• El auto no tiene una posición ACC.
t Inserte un disco pa ra encender la unid ad.
• Si la unidad está apagada y la pantalla
desaparece, no se puede operar con el control
remoto.
t Enc i enda la unidad.
La antena motorizada no se extiende.
La antena motorizada no tiene una caja de relé.
Las emisoras almacenadas y la hora
correcta se borraron.
El fusible se fundió.
Se escucha ruido cuando se cambia la
posición de la llave de encendido.
Los cables no coinciden correctamente con el
conector de alimen tación auxiliar del
automóvil.
Las indicaciones desaparecen de la
pantalla o no aparecen en ella.
• El atenuador es t á aj ustado en “DIM-O N ”
(página 39).
• La pantalla se apaga si mantiene presionado
(OFF).
t Mantenga presionado (OFF)
nuevamente hasta que se ilumine la
pantalla.
• Los conectores están sucios (págin a 43).
La función DSO no está disponib le.
Según el tipo de interior del automóvil o el
tipo de música, DSO puede no producir el
efecto deseado .
46
Según el monitor co nectado, la unidad
puede tardar unos segundos en
desconectars e después de girar el
interruptor de encendido hasta la posición
OFF. No se trata de una falla de
funcionamiento.
Page 97

Se producen interferencias en la imagen o
ruido en el sonido durante la transmisión
inalámbrica (MEX-R5 solamente).
• La unidad transmite audio o video con una
frecuencia FM de 2,4 GHz. La utilización
simultánea con otro equipo de 2,4 GHz
puede causar interferencias en la im agen o
ruidos en el sonido.
t Cambie de canal (pá gi na 39). Si no se
experimenta mejoría, deje de utilizar el
otro equipo. Asimismo, es posible
desactivar la transmisión inalám b rica de
la unidad si fu era necesario (pá gina 39).
• El transmisor no está colocado
correctamente.
t Coloque el monito r opcional
XVM-F65WL má s cerca de la unidad.
t Coloque el transmisor a mayor altu ra que
la unidad para evitar que el asiento o el
pasajero obstruyan la transmisión.
t C oloque el transmisor en un lugar
estable, ya que de lo contrario la posición
y ángulo del mismo pueden variar.
• Es recomendable instalar el monitor
posterior delante de la segunda fila.
• Si el ruido del sonido es fuerte, cancele l a
función Zone × Zone y utilice los altavoces
del automóvil.
• Es posible que se pr oduzcan temporalmente
interferen cias o ruido en el sonido durante la
conducción como consecuencia de
obstáculos en el exterior del automóvil.
Imagen
No hay imagen o se produce un ruido en la
imagen.
• No se realizó correctamente la conexión.
• Verifique la conexión al equipo enchufado y
ajuste el selector de entrada del equipo en la
fuente correspondiente a esta unidad.
• El disco está sucio, defectuoso o dete ri orado.
• La unidad está instalada en un ángulo
superior a 45º.
• La unidad no está instalada en una parte
firme del auto.
• El monitor está conectado a FRONT
AUDIO/VIDEO OUT, y el cable del freno
(color verde claro) no está conectado al cable
de conmutación d el fr eno de mano o no se
aplicó el freno de ma no.
• El ajuste del siste m a de color no es corre ct o.
t Ajuste el sistem a de color en “PAL” o
“NTSC” en función del monitor
conectado.
La imagen no se ajusta a la pantalla.
El formato en el DVD es fijo.
Sonido
No hay sonido, se producen saltos en el
sonido o el sonido se distorsiona.
• No se realiz ó correctamente la conexión.
• Verifi que la conexión al equipo enchufado y
ajuste el sele ct o r de entrada del equipo en la
fuente correspondiente a esta un i dad.
• El disco está sucio, defectuoso o deteriorado.
• La unidad está instalada en un ángulo
superior a 45º.
• La unidad no está instalada en una parte
firme del auto.
• La frecuencia de muestreo del ar chivo MP3
no es de 44,1 kHz ni 48 kHz.
• La velocidad de bi ts del archivo MP3 file no
se encuentra dent r o del rango de 64 a 320
kbps.
• La unidad se encuentra en modo de pausa de
reproducción o exploración.
• La unidad est á en modo de avance rápido o
en modo de retroc eso rápido.
• Los ajuste s de las salidas no se realizaron
correctamente.
• Ajuste el nivel de salid a del DVD
(página 24).
• El volumen es demas i ado bajo.
• La función ATT está activada o la función
ATT de teléfono (cuando se conecta el cable
de interfaz de un teléfono para auto al cable
ATT) está activada.
• La posició n del control de equilibrio (FAD)
no está ajustad a para un sistema de 2
altavoces.
• El cambiador de CD no es compatible con el
formato del disco (MP3).
t Repr oduzca con un cambiado r de CD de
Sony compatible con MP3 o con esta
unidad.
El sonido se escucha con ruido.
Mantenga los cabl es alejados entre sí.
continúa en la página siguiente t
47
Page 98

Funcionamiento
El control remot o no funciona.
• Hay obstáculos entre el control remoto y la
unidad o el receptor remoto.
• El control remoto de tarjeta y la unidad están
demasiado separados.
• No se orienta corre ct amente el control
remoto de tarjeta hacia el sensor remoto o
hacia el receptor d e l a unidad.
• Las pilas del control remoto de tarjeta
disponen de poca e nergía.
Los botones de operación no funcionan.
El disco no se expulsa.
Presione el botón RE SET ( página 8).
No se escuchan pitidos.
El sonido de los pitidos está cancelado
(página 39).
El contenido de la memoria se borró.
• Presionó el botón RESET.
t Vuelva a almacenar los datos en la
memoria.
• Se desconectó el cable de conexión de
alimentación o la pila.
• El cable de conexión de la alimentación no
está conectado correctamente.
Los elementos de la pantalla no se
desplazan.
• En el caso de disco s con muchos caract er es,
es posible que éstos no se desplacen.
• “A.SCRL” está desactivado.
t Ajuste “A.SCRL-ON” (página 39) o
presione (SCRL) en la unidad principal.
“MS” o “MD” no aparecen en la pantalla de
origen cuando se conectan el MGS-X1 y el
cambiador MD opcional e s .
Esta unidad reconoce MGS-X1 como una
unidad de MD.
t Presione (SRC) (S OURCE) hasta que
aparezca “MS” o “MD” y, a continuación,
presione (MODE) varias veces.
No es posible insertar el disco.
• Ya hay un disco insert ado.
• El interruptor de la llave de encendido del
automóvil se ajustó en la posición OFF.
La unidad no inicia la reproducción.
• El disco se insertó al revés.
t Ins erte el disco con la su per fici e de
reproducción hacia abajo.
• El disco que se insertó no es compatible.
• El DVD que se insertó no es com patible
debido al código de regió n.
• Se condensó humedad dentro de la unidad.
• El DVD-R, DVD- RW, DVD+R, DVD+RW,
CD-R o CD-RW insertado no está finalizado.
No se puede seleccionar una fuente.
Zone × Zone está activado.
t Presione (ZxZ) para desactivar Zone ×
Zone.
48
No es posible reproduc ir archivos MP3.
• La grabación no se realizó conforme al
formato Nivel 1 o Nivel 2 de ISO 9660, o las
normas Joliet o Romeo en cuanto al form at o
de expansión.
• El archivo MP3 no tiene la extensión
“.mp3”.
• Los archivos no se almacenar on en formato
MP3.
• La unidad no puede reproducir archivos
almacenados en formato MP3PRO.
• La unidad no puede reproducir archivos
almacenados en un formato que no sea
MPEG1 Audio Layer 3.
• El disco contiene ar chivos MP3 y JPEG.
t Ajuste “MP3/JPEG” de “CUSTOM
SETUP” (ajuste personalizado) en la
posición “MP3” (página 33).
Los archivos MP3 demoran más tiempo en
reproducirse que los demás.
El inicio de la reproduc ci ón de los siguientes
discos demora algo m ás d e t iempo.
–disco grabado con una estru ctura de árbol
complicada.
–disco grabado en Multi Session.
–disco al que es posible añadir dat os.
No es posible reproduc ir archivos JPEG.
• Los archivos JPEG no tienen la extens i ón
“.jpg”.
• Los archivos no se almacenar on en formato
JPEG.
• El disco contiene ar chivos MP3 y JPEG.
t Ajuste “MP3/JPEG” de “CUSTOM
SETUP” (ajuste personalizado) en la
posición “JPEG” (página 33).
El título del álbum MP3 audio o la pista no
se muestra correctamente.
El reproductor sólo puede mostrar números y
caracteres alfabéticos. Los demás caracteres se
muestran como “ ”.
El disco no comienza a reproducirse desde
el principio.
Se activó la reanudación de reproducción
(página 17).
La reproducción s e detiene
automáticamente.
Si se reproducen discos con una señal de pausa
automática, la unidad detiene la reproducción
en el punto de la señal de pausa automática.
No es posible realizar ciertas funciones.
Según el disco, es posib le que no pueda
realizar las siguientes operac io ne s: Detener,
Buscar, Reproducción repetida o
Reproducción ale at or ia . Para ob te ner más
información, consulte el manual de
operaciones qu e se entrega con el disco.
Page 99

No es posible cambiar el idioma de la pista
de sonido.
• Utilice el menú DVD en lugar del botón de
selección directa del control remoto de
tarjeta (página 19).
• El DVD en reproducción no d i spone de
pistas grabadas en vario s i di omas.
• El DVD prohibe el cambio del idioma par a la
pista de sonido.
El idioma de subtítulos no se puede
cambiar ni desactivar.
• Utilice el menú DVD en lugar del botón de
selección directa del control remoto de
tarjeta (página 19).
• El DVD en reproducción no d i spone de
subtítulos graba dos en varios idiomas.
• El DVD no permite el cambio de los
subtítulos.
No es posible cambiar los ángulos.
• Utilice el menú DVD en lugar del botón de
selección directa del control remoto de
tarjeta (página 19).
• En el DVD que se está reproduciendo no hay
diversos ángulos grabad os .
• El DVD prohibe el cambio de los ángulos.
Recepción de radio
No es posible recibir las emisoras.
Hay ruidos que obstaculizan el sonido.
• Conecte un cable de control de antena
motorizada (a zul) o un cable de fuent e de
alimentación auxiliar (rojo) al cable de
suministro de alimentación del amplif ic ad or
de antena del automóvil (sólo si el automóvil
dispone de una a nt ena FM/AM incorpora da
en el cristal posterior o lateral).
• Revise la conexión de l a antena del
automóvil.
• La antena aut omática no se extiende.
t Revise la conexión del cable de control
de la antena motorizada.
• Revise la frecuencia.
• Cuando el mo do DSO está activado, el
sonido se escucha ocasionalmente con ruido.
t Ajuste el modo DSO en “OFF”
(página 12).
No es posible utilizar la sintonización
programada.
• Almacene la frecuencia correcta en la
memoria.
• La señal de em i sión es demasiado d ébi l.
No es posible utilizar la sintonización
automática.
• El modo de búsqueda local está ajustado en
“ON”.
t Ajuste “LOCAL” en “OFF” (página 39).
• La señal de em i sión es demasiado d ébi l.
t Use la sintonización manual.
Durante la recepción de FM, la indicación
“ST” parpadea.
• Sintonice la frecuencia con precisión.
• La señal de em i sión es demasiado d ébi l.
t Ajuste “MONO” en “ON” (página 39).
Un programa de FM emitido en estéreo se
escucha en monoaural.
La unidad se encuent r a en el modo de
recepción monoaural.
t Ajuste “MONO” en “OFF” (página 39).
49
Page 100

Mensajes/indicaciones de
error
Las siguientes indi caciones aparecen cuando se
produce una falla en la unidad.
En la unidad principal
BLANK*
ERROR*
FAILURE
LOAD
L.SEEK +/–
NO DATA
NO DISC
NO ID3
NO MAG
NO MUSIC
NO NAME
1
No hay pistas grabadas en el MD.*
2
t Reproduzca un MD que tenga pistas
grabadas.
1
• El disco está suc io o se insertó al revés.*
2
t Límpielo o insértelo correctamente.
• El disco no se reprod uce debido a algún
problema.
t Inserte otro disco.
• El disco no es compatible con esta unidad.
t Inserte un disco compatible.
La conexión del altavoz/amp lificador no es
correcta.
t Cons ul te el ma nual de instalación/
conexiones suministrado para comprobar la
conexión.
El cambiador está cargando el disco.
t Espe re hasta que finalice.
El modo de búsqueda local está activado
durante la sintonización automáti c a.
Se eliminaron todos los nombres
personalizados o no se guardó ninguno.
El disco no está insertado en el cam bi ador de
CD/MD.
t Ins er te los discos en el cambi ador.
No se grabó la información del indicador ID3
en el archivo MP3.
El cargador de disc os no es tá insertado en el
cambiador de CD.
t Inserte el cargador en el cambiador.
El disco no es un archivo de música.
t Inserte un CD de música en esta unidad o
en un cambiador co n capacidad para
reproducir MP3.
No se grabó un nombre de pista/álbum/disco
en la pista.
NOT READ
La unidad no puede leer la información del
disco.
t Cargue el disco y, a continuación,
selecciónelo en la lista.
NOTREADY
La tapa del cambiador de MD está abierta o
los MD no están in s ertados correctamente.
t C ierre la tapa o inserte los MD
correctamente.
OFFSET
Es posible que se hay a pr oducido una falla
interna.
t Revise la conexi ón . Si el ind ica d or de er ro r
permanece en pantalla, póngase en
contacto con el distribuidor Sony más
cercano.
READ
La unidad está leyendo toda la información de
pistas y de álbumes del dis co.
t Espere hasta que finalice la lectura y se
inicie la reproducción automáticamente. Es
posible que demore más de un minuto en
función de la estructura del disco.
RESET
La unidad y el cambiador de CD/MD no
pueden utilizarse debido a al gún problema.
t Presione el botón RESET (pá gi na 8).
“” o “”
Durante la operación de avance o retroceso
rápido, llegó al principi o o al final del disco,
por lo que no es pos ib le continuar.
“”
No se puede mos t rar el carácter con la un i dad.
*1 Si se produce un error durante la reproducción de
un CD o MD, el número de disco del CD o MD no
aparece en pantalla.
*2 La pantalla muestra el número del disco que causa
el error.
50
 Loading...