

Sony MEX-IHD Operating Instructions Manual
SONY0
Audio Library
System
3-242-073-11 (1)
Operating instructions !
Mode d’emploi
Owner’s Record
The model and \eriai numbers are located on the bottom of the unit.
Record thew numbers in the quce provided below.
Kefer to thew numbers whenever you call upon your Sony dealer resayding this product.
Model No, MEX- I HD Serial No.
DIGITAL AUDIO
1-1
MEX-IHD
0 2002 Sony Corporation

Warning Welcome !
This equipment has been tested and found to
comply with the limits for a Class B digital
device, pursuant to Part I5 of the FCC Rules.
These limits are designed to provide reasonable
protection against harmful interference in a
residential installation. This equipment
generates, uses, and can radiate radio frequency
energy and, if not installed and used in
accordance with the instructions, may cause
harmful interference to radio communications.
However, there is no guarantee that interference
will not occur in a particular installation. If this
equipment does cause harmful interference to
radio or television reception, which can be
determined by turning the equipment off and on,
the user is encouraged to try to correct the
interference by one or more of the following
measures:
-Reorient or relocate the receiving antemu.
-Increase the separation between the equipment
and receiver.
-Connect the equipment into an outlet
on a
circuit different from that to which the receive1
is connected.
-Consult the dealer or an experienced radio/TV
technician for help.
You are cautioned that any changes
OI
modifications not expressly approved in this
manual could void your authority to operate this
equipment.
CAUTION
The use of optical instruments with this product
will increase eye hazard.
Thank you for purchasing thi\ Sony Audio
Library System.
l
Storage of aboul ~000 tracks (When you \clecl
a recording bit ram ‘.I OSk.“) on the internal
HDD using the latest compression technique
(ATRAC3)
l
High-speed irecording at a maximum speed
8 times< ’ faster than the normal speed
l
Quick tmck search from the track list
rearranged by the number of times played bath
or in alphabetical ordet
l
Sorting out recorded tracks into albums
and
folders
l
Creating a Play Li\t folders for collecting
~OLII
favorite tracks
l
Data transfer to an “MC Memory Stick” or a
Network Walkman
l
Playback of MP3 file,:” stored on a CD-R/RW
or “Memory Stick”
l
Car G-PROTECTION
l
ID3 tagy2 version I, version 2 (text only)
information (displayed when
an
MP3 file is
played)
l
CD TEXT information (displayed when
:I
CD
TEXT discif is played)
l
Optional controller accessory
Wireless rotary commander RM-XoS
Notes
l
The recorded music IS limited to private use only
Use of the rnusfc beyond this /jmif requires
permiwon of the copyught holders.
l
Sony is not respons/ble for music fi/es that are not
saved on this unit due to unsuccessful recording
from CD or mwc down/oading.
l
Sony ,s not responsible for any fi/es that are
damaged or erased from the hard disc.
“’ I Avai/ab/e on/y for MP3 fi/es using MEG 1 Audio
Layer3 with a samp/ing frequency of 44.lkHz.
: 2 D3 tag is an MP3 fi/e that contams information
about album name, artist name, track name, etc.
3 A CD TEXT disc 1s an audio CD that includes
informat;on such as the disc name, arfist name,
and track names. This information is recorded on
the dfsc.
2
Car G-PROTECTION
G7PROTECT10N is originally developed for
Walkman and performs suprcme skip-free
against shock. Car G-PROTECTION is designed
and tuned for car audio based on the technology
of original G-PROTECTION. Car GPROTECTION creates comfortable audio
reproduction with supreme skip-free and the
\ame time, it extends the concept and the value of
G-PROTECTION from Walkman to car audio.
Specification of Car G-PROTECTION
Car G-PROTECTION has following
specification.
(a) Re-focus within 03 sec.. if there is a missed
data.
(b) Read data with double speed or more.
Limitation of Car G-PROTECTION
Car G-PROTECTION performs supreme skip-
fi-ee but it doesn’t mean that it can guarantee the
perfect skip-free, Some skips may occur by
continuous vibration and/or the installation
condition of the master- unit.
l
OpenMG and its logo are trademarks of Sony
Corporation.
l
“MagicGate Memory Stick,” g, “Memory
Stick,” *, are trademarks of Sony
Corporation.
l
“MagicGate” and
MAGICGATE
are
trademarks of Sony Corporation.
l
This product includes fonts owned by ELISA
Font Project under license.
l
J. Portions of this product are protected under
copyright law and provided under license by
Aris/SoIanal4c.
l
.‘POBox” and mex are trademark of Sony
Corporation.
l
Car G-PROTECTION and !%%!?! are
trademarks of Sony corporation.
l
US and foreign patents licensed from Dolby
Laboratories.
l
“WALKMAN’. is trademark of Sony
Corporation.
All other trademarks and registered trademarks
are trademarks or registered trademarks of their
respective holders.
3
Table of Contents
Location of controls. .6
Recording and Editing HDD
Getting Started
Resetting the unit
.8
Detaching the front panel.
.8
Initial settings.
.9
Basic operations
Listening to a track on a CD . . . . . . . 10
Listening to the radio. . . . . . . . . . . . . 11
Recording audio CDs onto the HDD .12
Listening to tracks on the HDD. . . . . 13
Listening to audio files. . . . . . . . . . . . 14
Menu display I5
List display. I6
Function menu I7
Checking the information on the contents
Recording an albumArack onto the HDD
-Track recording 1X
Labeling a foi~ier~~ll~~i~ii/tr~~ck
- Name In 29
Creating 2, folder/album, 3 I
Moving recorded ~~)l~ler/~~lbtllhttps://manualmachine.com/tr~~ck
- Move t’unctjon 31
Erasing a folder/~llbtli~i/tr~~ck
-
Erase function 33
Using “MG Memory Stick”
selected I8
CD/HDD/“MG Memory Stick”
Transt’erring a track to an ‘.MCi Memory Stick”
- Chech-Out 34
Returning a trach to the HDD from an
.‘MG Memory Stick”
~ Check-In. 35
Moving a track to :III ‘.MG Memory Stick”
- Move-Out. 35
Returning audio t’ileh to the HDD
- Move-In. 36
Importing audio file\ into the HDD
~ In1port. 36
Storing dam onto the HDD
- Bachup.. 37
Restoring data into a “Mcmor) Stick”
~ Re\torc 37
Labeling XI album 3X
Changing the OI-&x of audio files in an
+MG Memoq Stick”
~ Move function 39
Erasing audio t’ilc\ ~II JII “MG Memory Stick.’
- Erase funcnon
40
Formatting an ..MG Mcmoty Stich” 40
Playing a track
Display items
Playing the tracks on CD automatically.
Playing tracks repeatedly
- Repeat Play.
Playing tracks in mndom order
- Shuffle Play
Locating a folder~~lbtm~/track by name
-List-up.
Searching a track you want to listen to
Collecting favorite tracks
- Play List
Radio
Storing stations automatically
-Best Tuning Memory (BTM)
Receiving the stored stations
Storing only desired stations
- Manual Preset Memory
Labeling a radio station
-Station Memo.
Locating a station by name
- List-up.
.?I
.23
,?-I
.x
.I6
.27
Using Network Walkman
Connecting a Netwot-IL Walkman 41
Tranhferring a tl-ack to a Network Walkman
- Check-Out .41
Returning a trach to the HDD from a Network
Walkman
-Check-In. 43
Changing order 01. audio file\ in a Network
Walkman
- Move l’unction 43
EK~SIII~ audio t’ilc\ in Nctworh Walkn~an
- Erase function 44
Formatting a Net\vork Walhman. 44
4
Sound effect
~ EQl ,46
Adjusting the IX\\ ancl tt-cble
- BASITRE.. ,47
Adiusting the balance
-BAL.......,.,......,,.,...,,,4J
Adjudmg the facle~
-FAD.......,......,,,.,...,,,,48
Acljusting the subwoot’er ~~olmne
-SUB.,......,,......,,,,,...,,49
~Setting the louclnes5
- LOUD SO
Other Function
Quickly attenuating the sound SO
Changins the sound and cli~play hettings
-Menu Sl
Selecting the spectrum awiy7er S3
Connecting auxiliary auclio cquipmcnt S3
Using the rotary u~ninimider S4
Additional Information
Maintcnancc
Removing the unit
Precautions
Notes on cli\cs
Notes on MP3 t’ile\
Notes on “Memory Stick
Troubleshooting.
Erl-or ~i~s~~l~~ys/Me~s~~~~s
Specifications
Glossary
Index
ss
.5J
.57
S8
.59
.60
.6l
63
66
.67
69
5
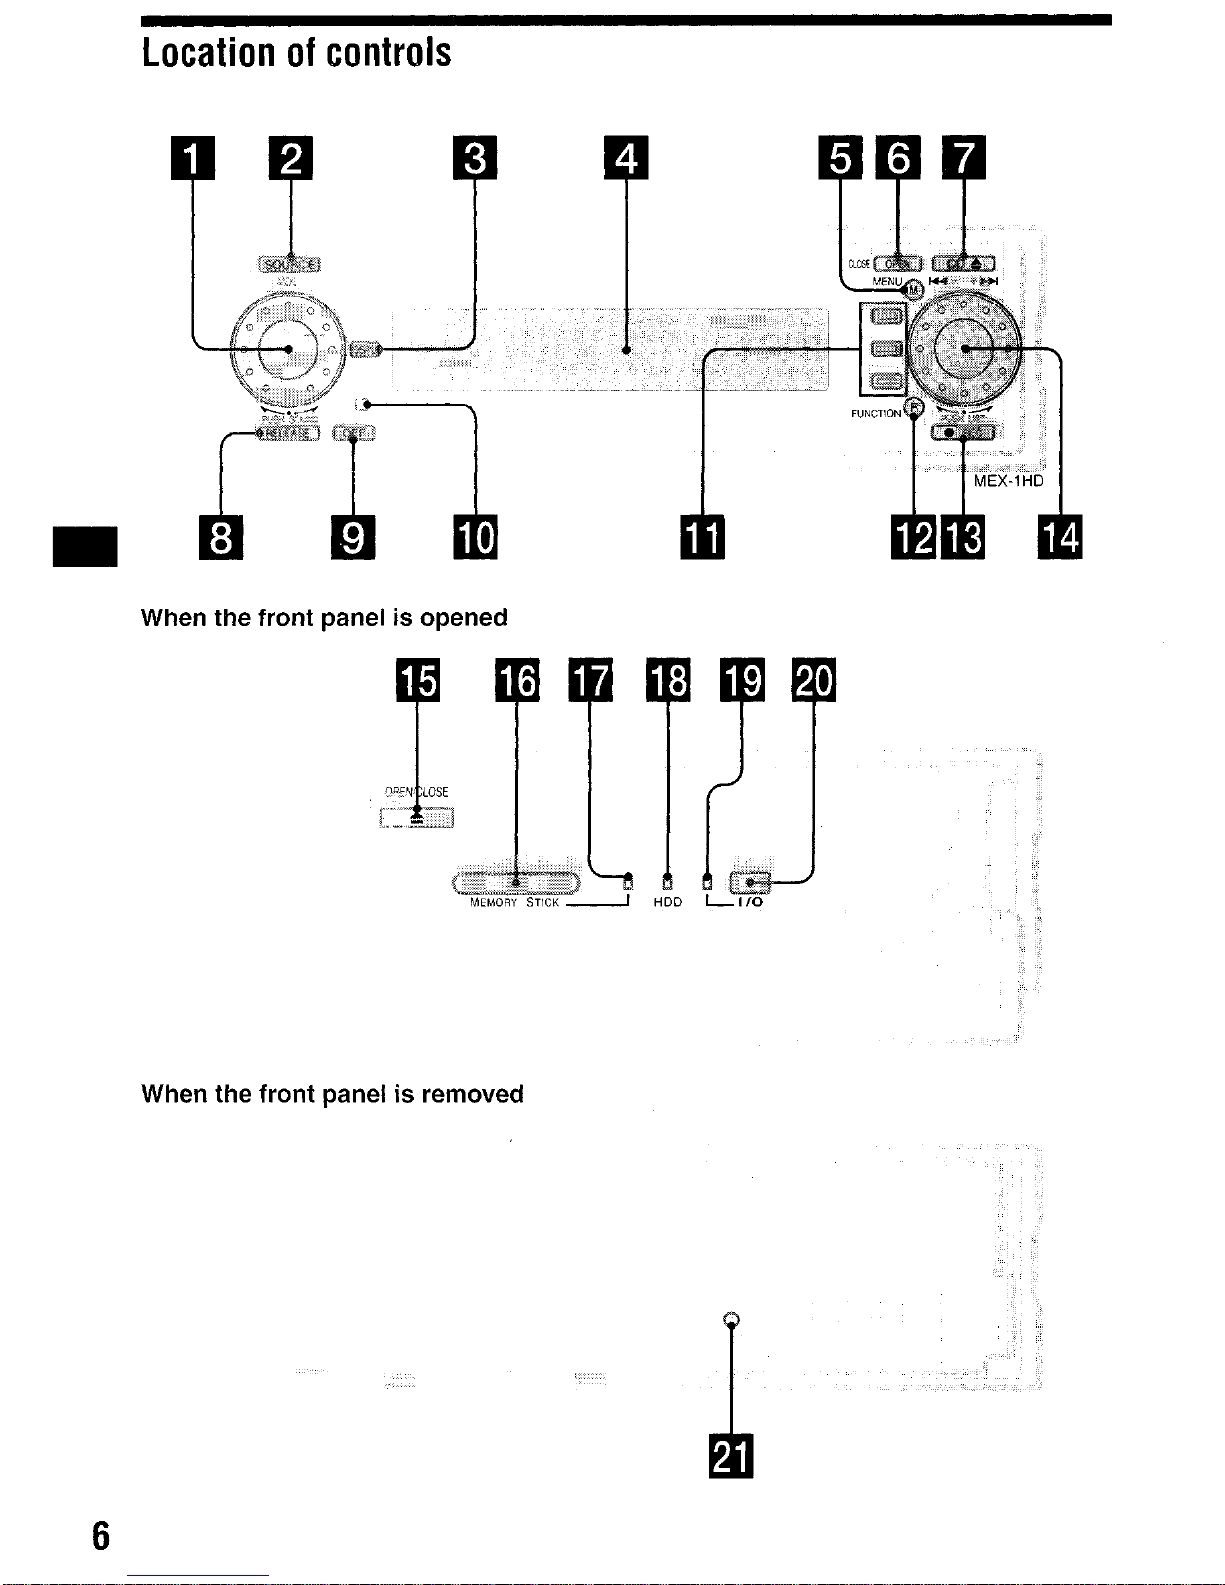
Location of controls
When the front panel is opened
When the front panel is removed
Q L (left) dial
Rotate to:
-
Adjust the volume
-
Select a sound item
PI-es\ 1co:
Display the \ound menu
- Enter a setting
q
SOURCE button
To select the source.
q
DSPL button IO, 13, 14,20, 27,30,
31,
39
q
Display window
H MENU button
To display the menus.
fl OPEN (CLOSE) button
14, 18,41
H CD = (eject) button 10,
18
q
RELEASE button 8
q
OFF (Stop/Power off) buttorV’ 8, 10,
14,18
q
Receptor for remote commander
q
FllF2lF3 buttons
These buttons have different functions
depending on the situation.
q
FUNCTION button
To change the function menu.
q
0 REC button
For record \e~~ings/to htal-t recording.
q
R (right) dial
Rotate to:
- Receive preset station\
- Skip tracks
Select a menu ilem
Press to:
-
Display the list
- Entct- a settin!!
L
k (OPEN/CLOSE) 9,
19,41
“MG Memory Stick” Slot
LED (“MG Memory Stick”)
Lights up while the unit is accessing the
“MG Memory SticK’.
LED (HDD)
Lights up while the
unit
is accessing the
HDD.
LED (l/O)
Lights up while the unit is accessing the
Digital I/O.
Digital l/O terminal (4 pins)
To connect to the Network Walkman, etc.
RESET button 8
Warning when installing in a car without
an ACC (accessory) position on the
ignition switch
After turning off the ignition, be sure to press
cm on the unit for 2 seconds to turn off the
clock display.
Otherwise, the clock display does not turn off
and causes battery drain.
7
Getting Started
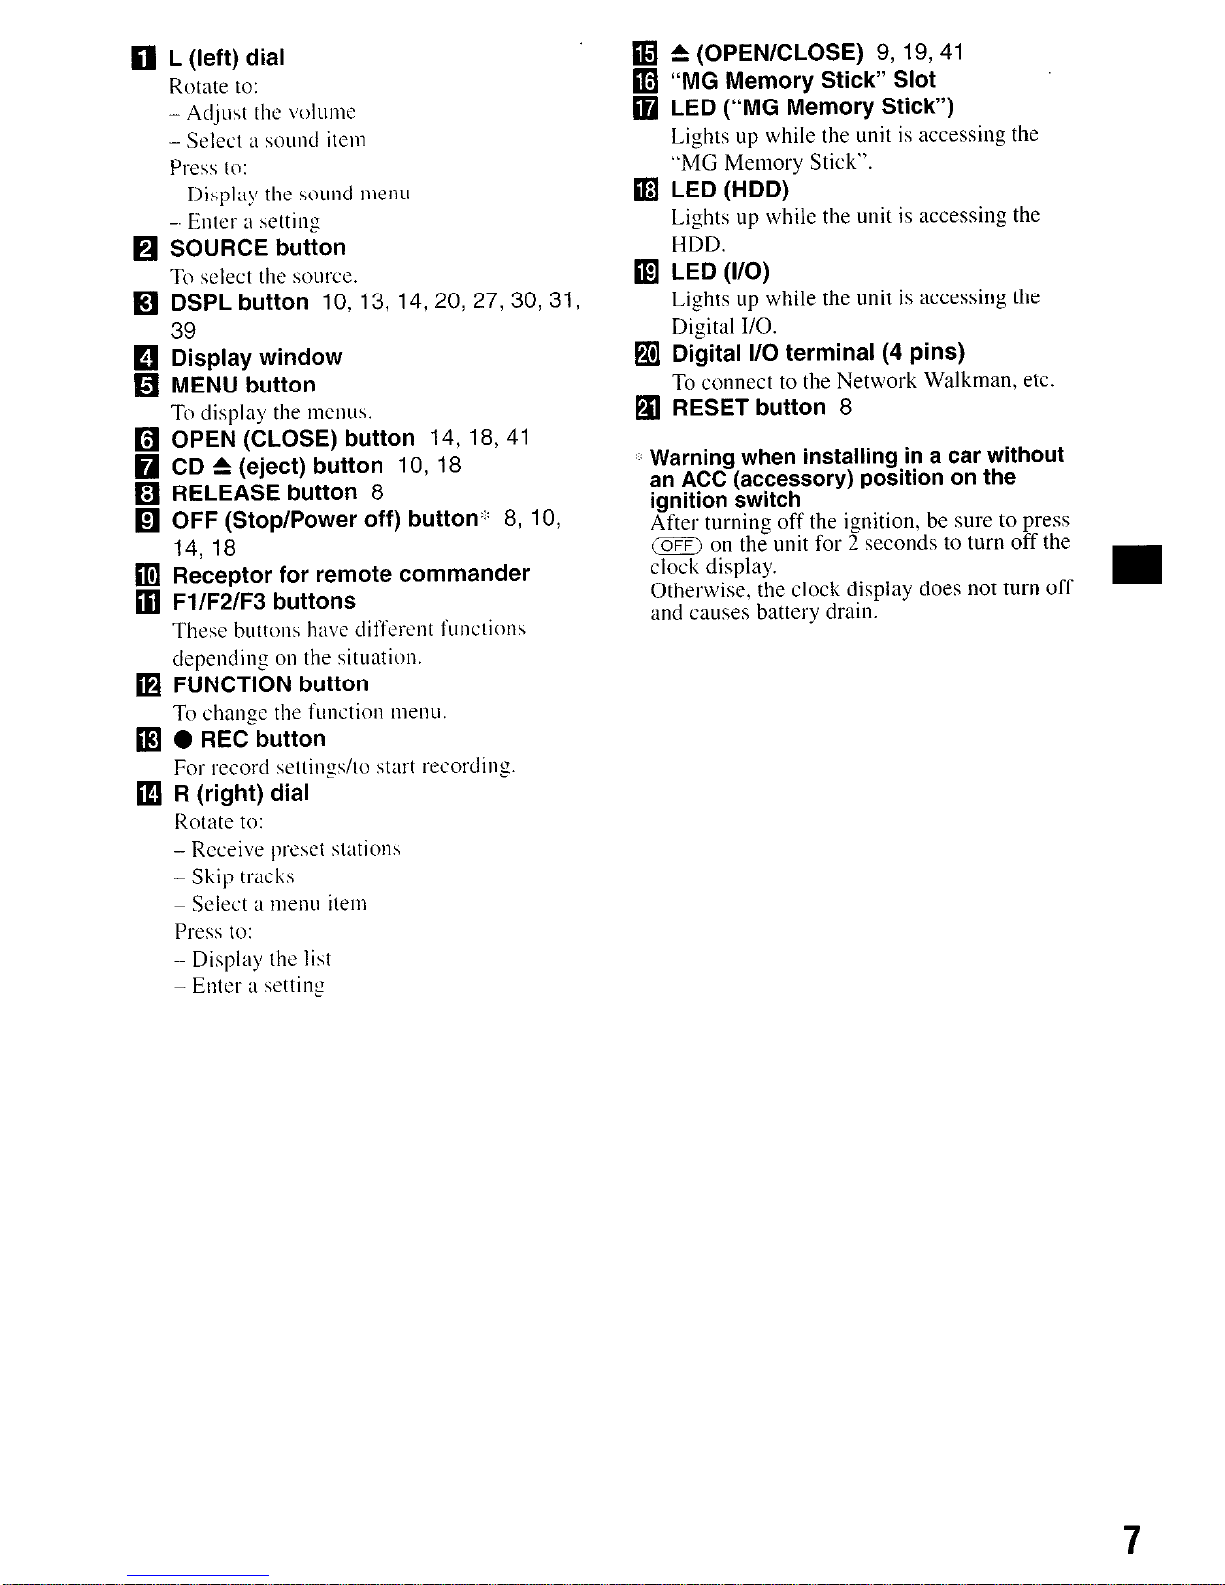
Resetting the unit
Before operating the unit for the first time. or
after replacing the car battery or changing the
connections,
you must
reset the unit.
Remove the front panel and press the RESET
button with a pointed object, $uch as a ball-point
pen.
RE<ET button
Note
Pressing the RESET button wi// erase the c/o& settmg
and some stored information.
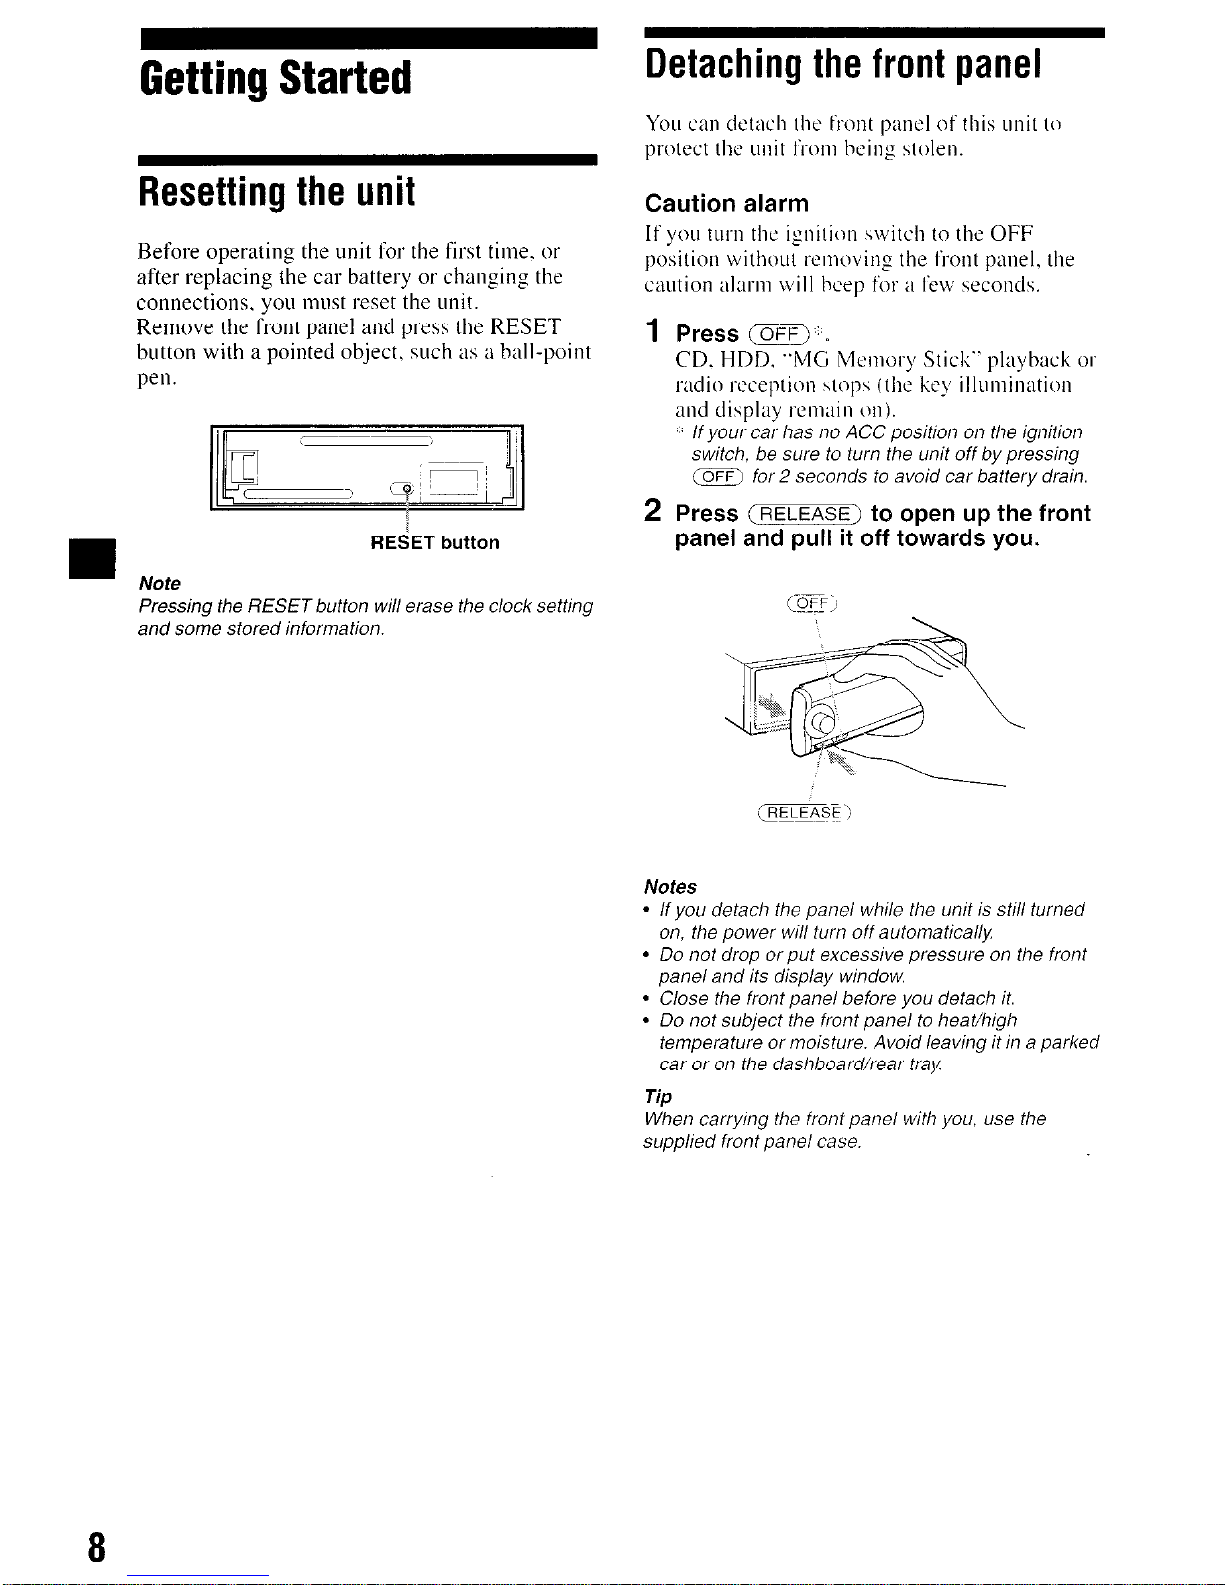
Detaching the front panel
You
cm
detach the front panel of this unit to
protect the unit
fi-otii
being stolen.
Caution alarm
If you tnl-n the ignition \witch to the OFF
position without removing the front panel, the
caution alarm will hcep for a few seconds,
Press m .
CD. HDD. “MCi Memory Stick” playback ol
radio reception \top\ (the key illumination
and display rcma~n on).
/f your car has no ACC posit/on on the ignition
switch, be sure to turn the unit off by pressing
m for 2 seconds to avoid car battery drain.
Press
(RELEASE)
to open up the front
panel and pull it off towards you.
Notes
l
/f you detach the pane/ whi/e the unit is sti// turned
on, the power wi// turn off aufonJatica//y
l
Do not drop or put excessive pressure on the front
pane/ and its disp/ay window
l
C/ose the front pane/ before you detach it.
l
Do not subject the front panel to heat/h/gh
temperature or moisture. Avoid /caving it in a parked
car or on the dashboard/rear traJx
Tip
When carrying the front panel with you, usa the
supp/ied front pane/ case.
Notes
* Do not put anything on the inner surface of the front
panel.
l
Do not detach fhe front pane/ during the eject
operat!on. If the front pane/ is detached
during
eject,
opera tfon wit/ stop.
To rcmovc the disc with the front panel detached:
0irough hole @. press ti (OPEN/CLOSE) inside
the unit with a pointed object, such as a ball-
poill~ pm.
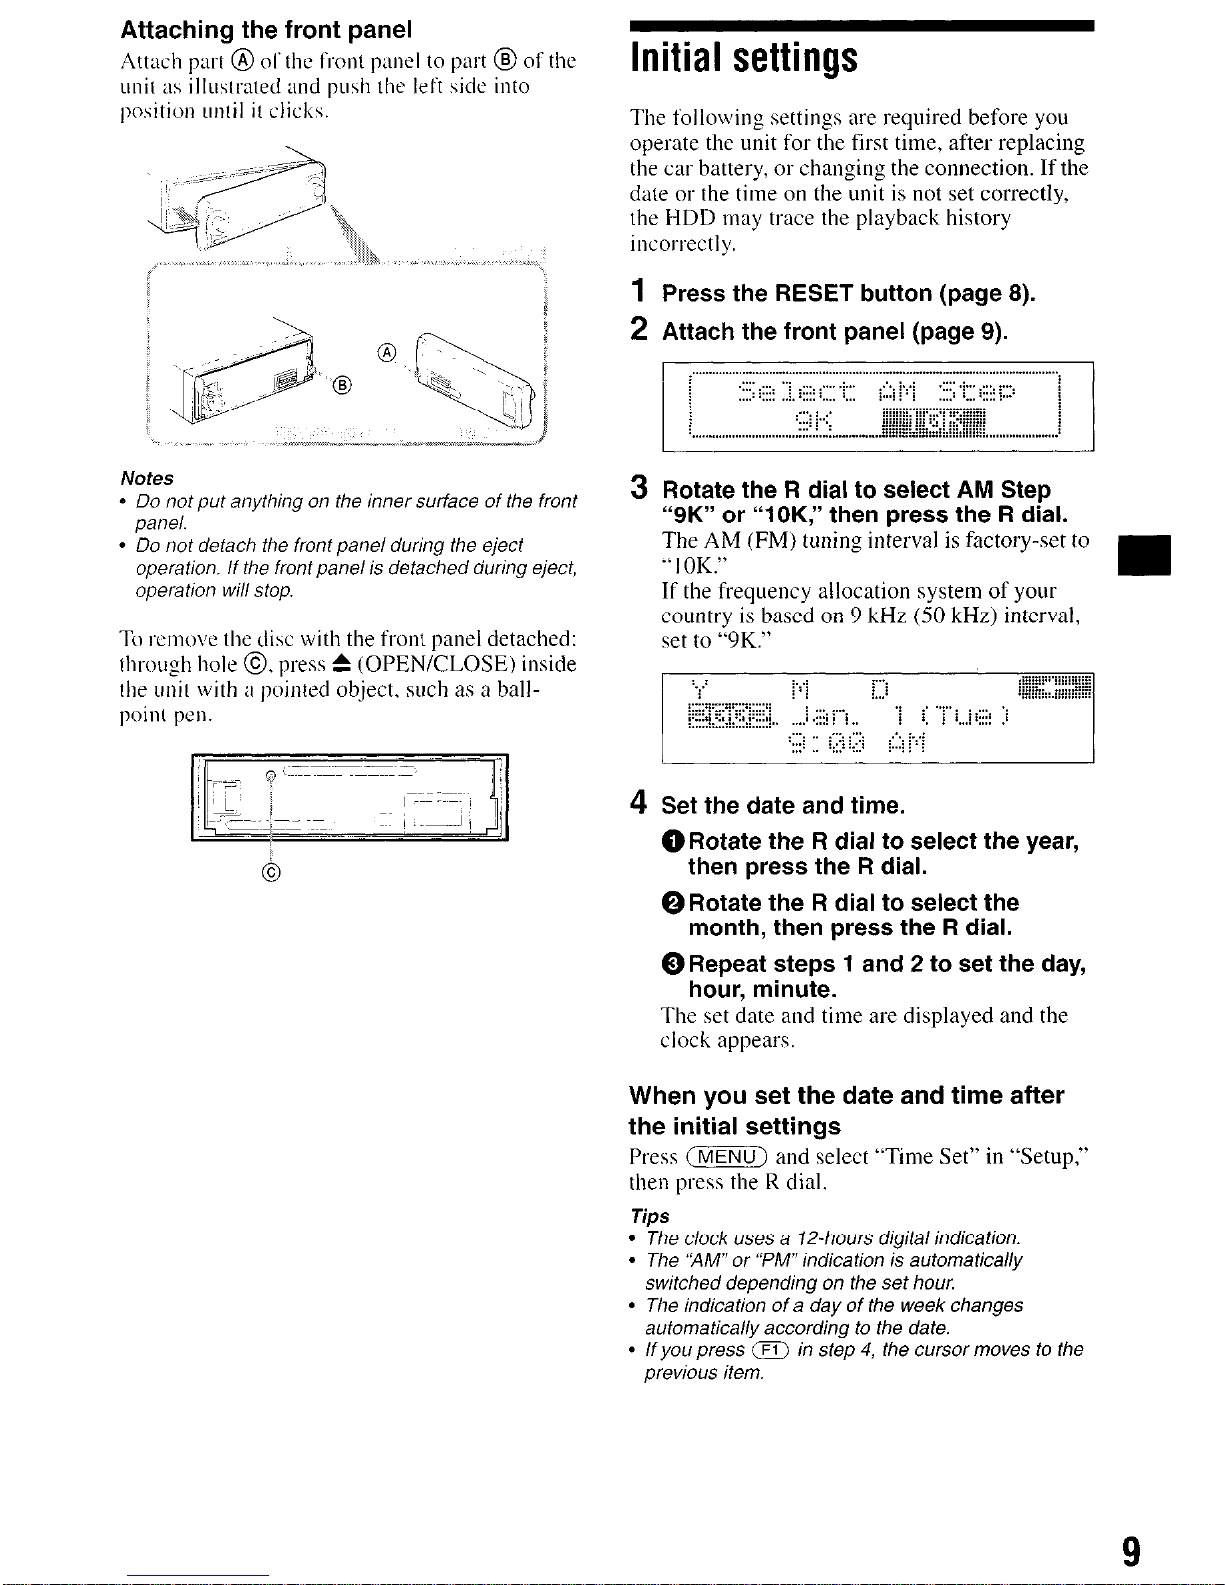
Initial settings
The following settings are required before you
operate the unit for the first time, after replacing
the car battery, or changing the connecGon. If the
date or the time on the unit is not set correctly,
the HDD may trace the playback history
incorrectly.
Press the RESET button (page 8).
Attach the front panel (page 9).
Rotate the R dial to select AM Step
“9K” or “lOK,” then press the R dial.
The AM (FM) tuning interval is factory-set to
.’ I OK.”
If the frequency ailocaGon system of your
country is based on 9 kHz (50 kHz) interval,
set to “9K.”
Set the date and time.
@Rotate the R dial to select the year,
then press the R dial.
@Rotate the R dial to select the
month, then press the R dial.
0 Repeat steps 1 and 2 to set the day,
hour, minute.
The set date and time are displayed and the
clock appears.
When you set the date and time after
the initial settings
Press m and select “Time Set” in “Setup,”
then press the R dial.
T@s
l
The dock uses a 12~hours digital MicaHon.
l
The “AM” or “PM” mdication is automaticatty
switched depending on the set hour.
l
The indication of a day of the week changes
automafica//y according to the date.
l
If you press a in step 4, the cursor moves to the
previous item.
9
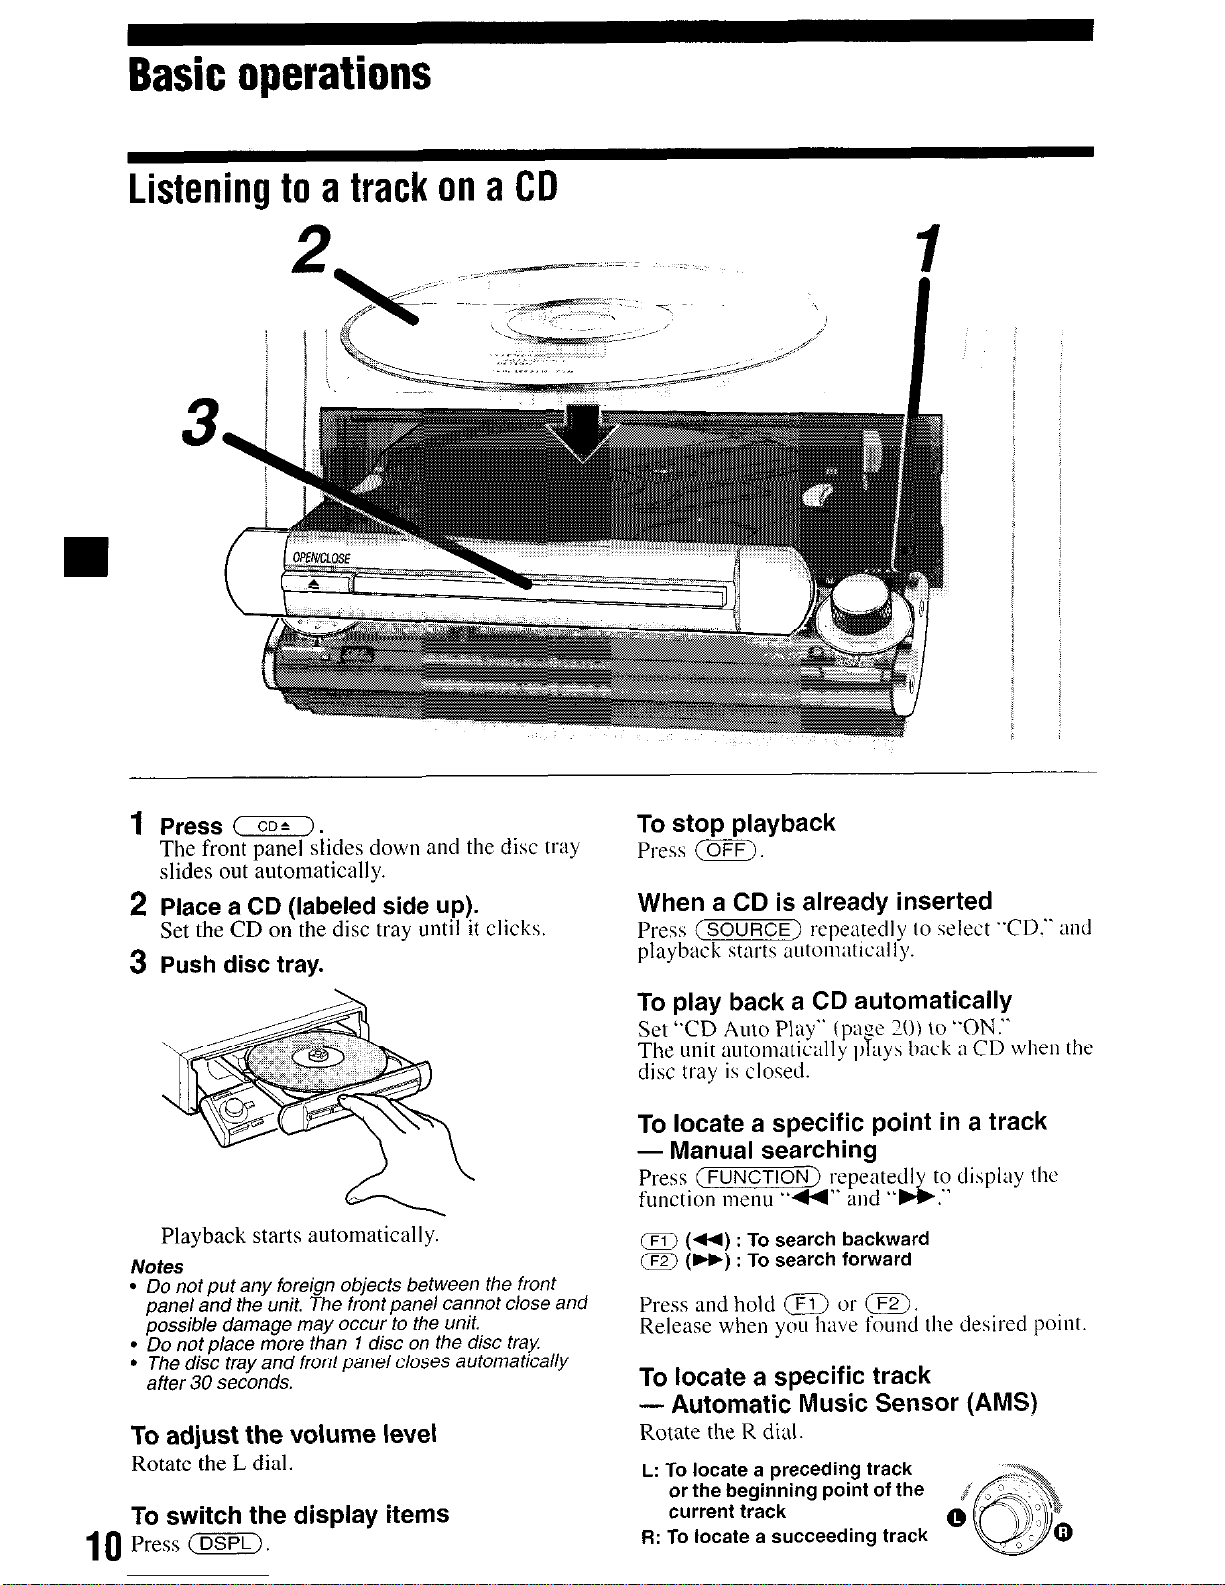
Basic operations
Listening to a track on a CD
1
Press m.
The front panel slides down and the disc tray
slides out tiutomatically.
2
Place a CD (labeled side up).
Set the CD on the disc tray until it clicks.
3 Push disc tray.
Playback starts automatically.
Notes
l
Do not put any foreign objects between the front
pane/ and the unit, The front panel cannot cJose
and
possib/e damage may occur to the unit.
l
Do not place more fhan 1 disc on the disc tray
l
The disc tray and front pane/ c/oses automatics//y
after 30 seconds.
To adjust the volume level
Rotate the L dial.
To switch the displav items
To stop playback
Press m.
When a CD is already inserted
Press m repeatedly to select “CD.” and
playback starts automatically.
To play back a CD automatically
Set ‘CD Auto Play” (pa!x 20) to YIN.”
The unit
automatically $ays
back a CD when the
disc tray is closed.
To locate a specific point in a track
- Manual searching
Press (FUNCTION] rcpeatedl to dihptay the
function menu “44” and
,.&-
@iJ (44) : To search backward
m (W) : To search forward
Press and hold m or a.
Release when you have found the desired point.
To locate a specific track
- Automatic Music Sensor (AMS)
Rotate the R dial.
L: To locate a preceding track
or the beginning point of the
J
current track
0
R: To locate a succeeding track
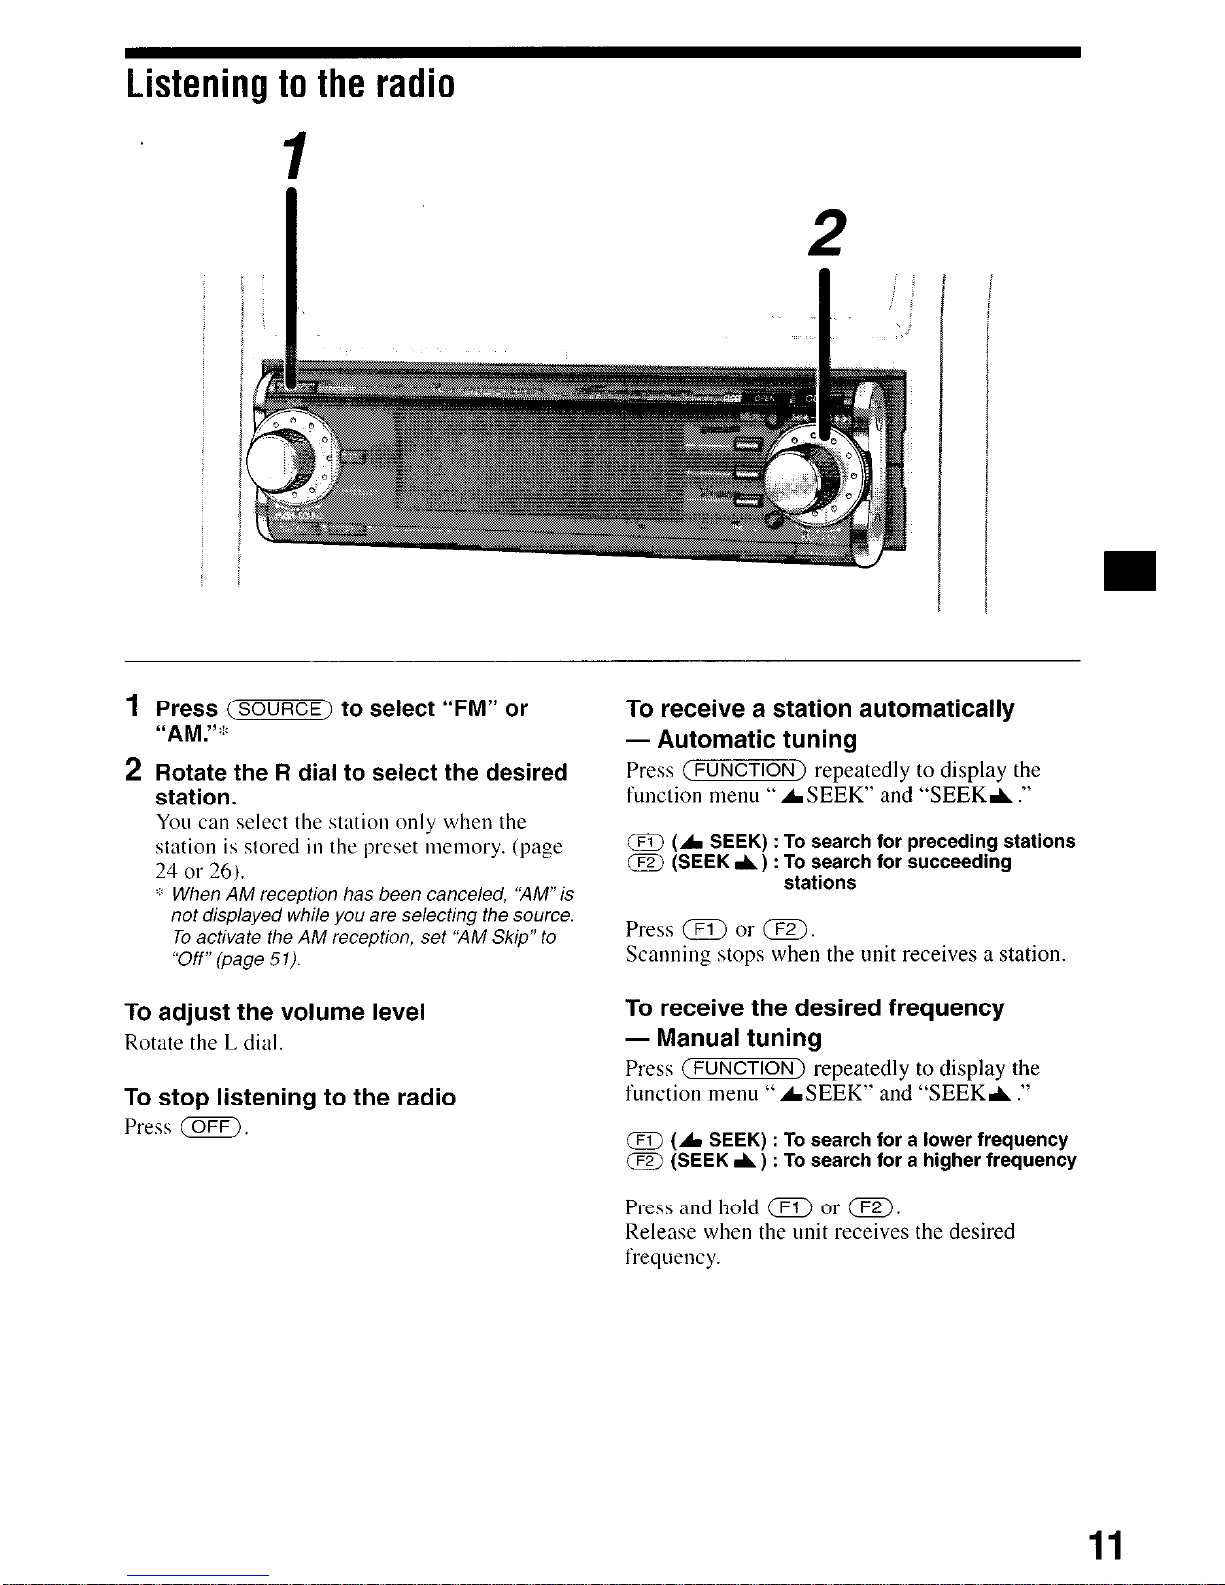
Listening to the radio
1 Press (ZZjURCC)
to select “FM” or
-AM.%::
2 Rotate the R dial to select the desired
station.
You can select the station only when the
station is stored in the preset memory. (page
24
or 26).
When AM recepiion has been canceled, ‘XIV” is
not disp/ayed whi/e you are se/ecfmg the source.
To activate the AM reception, set ‘NM Skip”
to
“OfY (page 51).
To adjust the volume level
Rotate the L dial.
To stop listening to the radio
Press m,
To receive a station automatically
- Automatic tuning
Press (FUNCTION) repeatedly to display the
t’unction menu “ ASEEK” and “SEEKA .”
m (A SEEK) : To search for preceding stations
a (SEEK A) : To search for succeeding
stations
Press m or m.
Scanning stops when the unit receives a station.
To receive the desired frequency
- Manual tuning
Press (FUNCTION) repeatedly to display the
function tnenu “ASEEK” and “SEEKA .”
m (A SEEK) : To search for a lower frequency
a (SEEK A) : To search for a higher frequency
Press and hold m or m.
Release when the unit receives the desired
frequency.
11
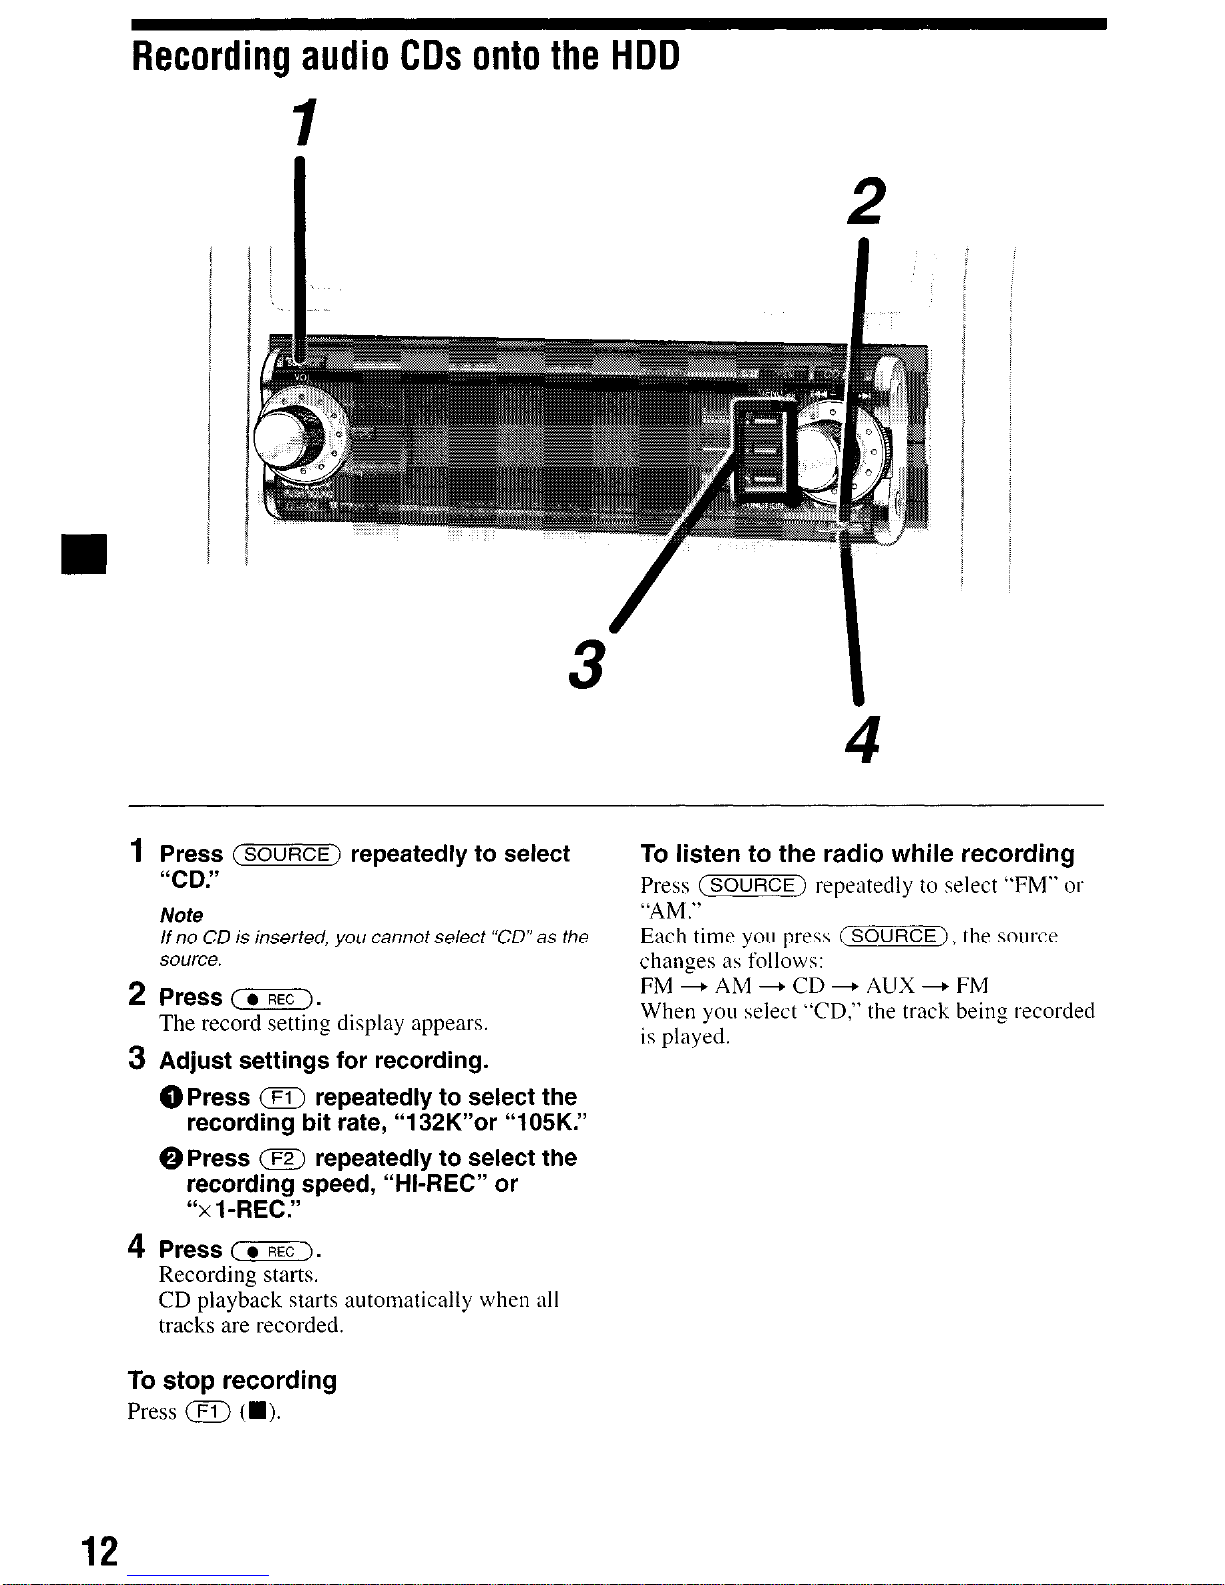
Recording audio CDs onto the HDD
1
Press ~~~ repeatedly to select
“CD!’
Note
/f no CD is hserfed, you camof se/e& “CD” as the
scwrce.
2
Press m.
The record setting display appears
3 Adjust settings for recording.
@Press m repeatedly to select the
recording bit rate, “132K”or “105K.”
@Press a repeatedly to select the
recording speed, “HI-REC” or
“x l-REC.”
4P
ress (-GZI.
Recording starts.
CD playback starts automatically when all
tracks are recorded.
To listen to the radio while recording
Press (m) repeatedly to select “FM” OI
“AM,”
Each time you press (s), the source
changes as f’ollows:
FM+AM+CD+AUX+FM
When you select ‘.CD,” the track being recorded
is played.
To stop recording
Press m (m).
12

Listening to tracks on the HDD
1
Press (-3 repeatedly to select
“HDD.”
Playback start\ automatically from the first
track in the last alhtmi recorded on the HDD.
Note
When you use the HDD for the firsf time, or when
there is nothing recorded on the HDD, you cannot
se/e& “HDD” as the source. /n this case, record a
CD or create a fo/der ore the HDD.
2 Press the R dial to display the list.
Each time you press the R dial, the list display
changes as follows:
Album name list + Track
name
list --+
normal playback display
3 Rotate the R dial to select the desired
track, then press the R dial.
Playback starts.
To adjust the volume level
Rotate the L dial.
To switch the display items
Press m.
To locate a specific point in a track
- Manual searching
Press (FUNCTION) repeatedly to display the
function menu “44” and “bb.”
(FJl (44) : To search backward
m (W) : To search forward
Press and hold m or m.
Release when you have found the desired point.
To locate a specific track
- Automatic Music Sensor (AMS)
Rotate the R dial.
L: To locate a preceding track
or the beginning point of the
current track
R: To locate a succeeding track
To stop playback
Press m.
13
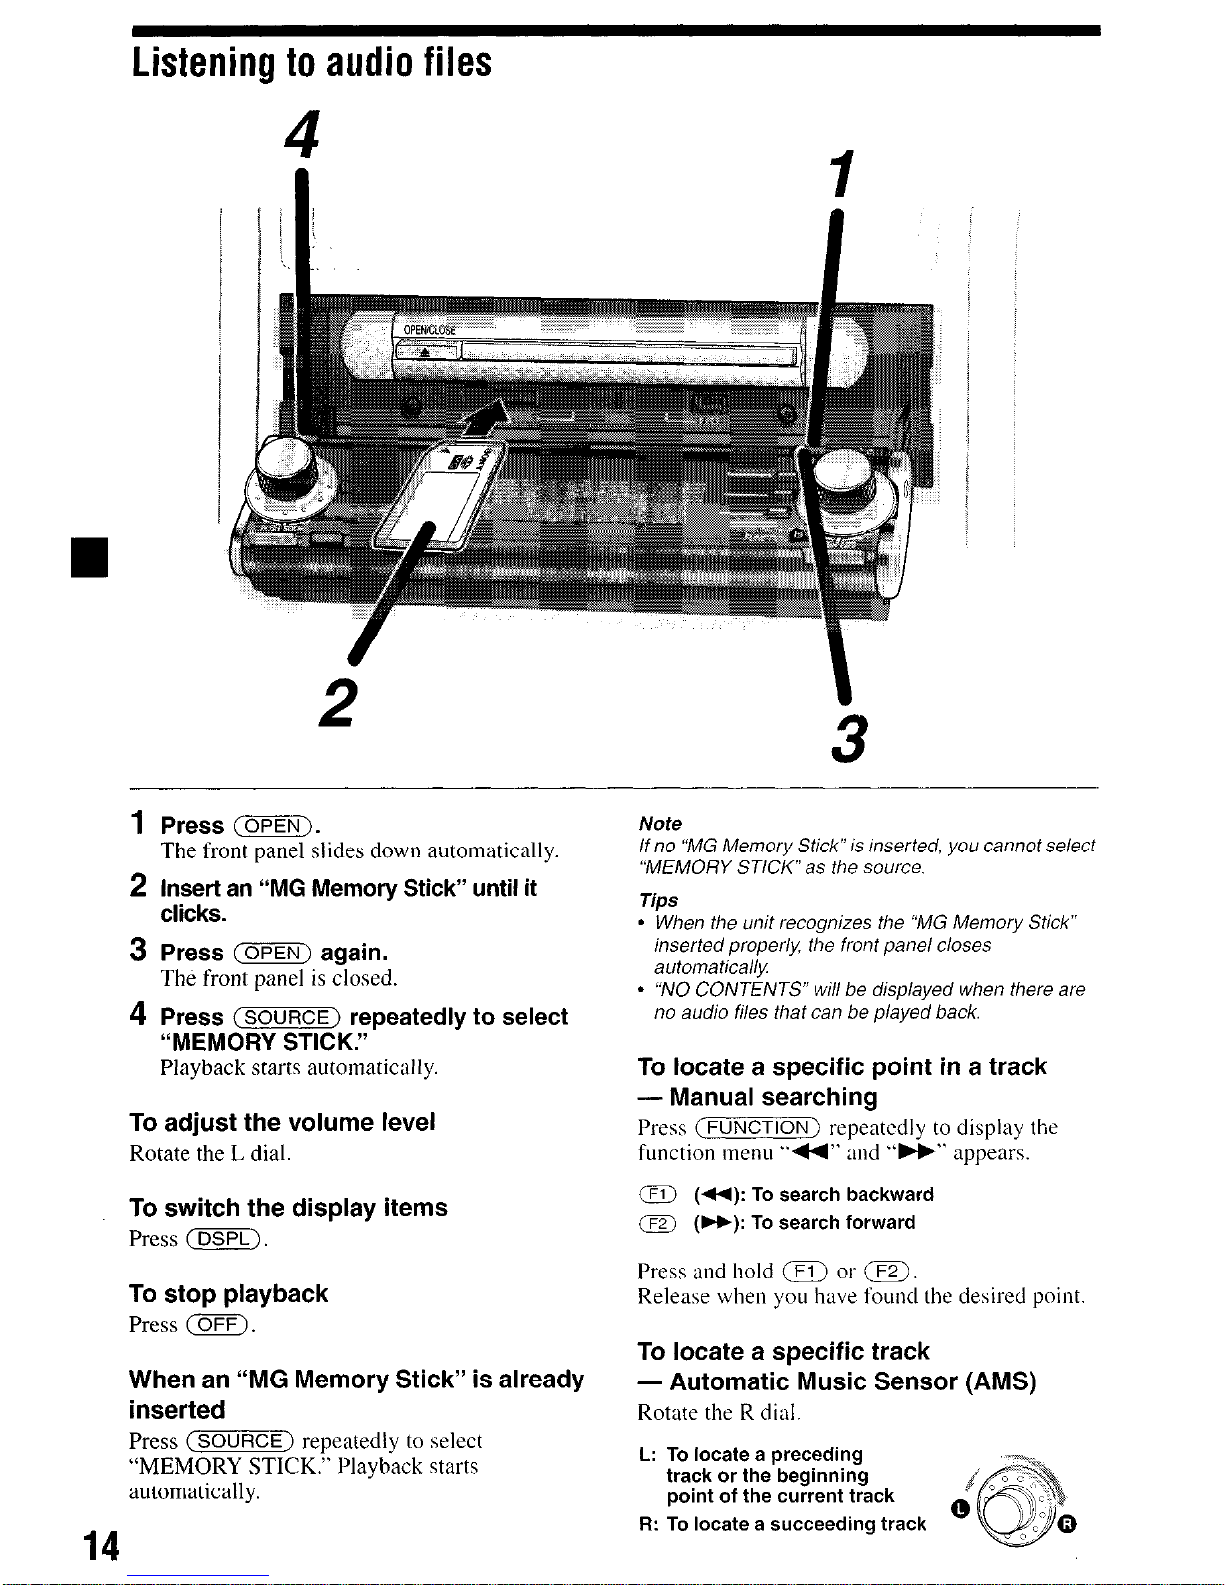
Listening to audio files
1
Press m.
The front panel slides down automatically.
2 lnnk; an “MG Memory Stick” until it
3
Press m again.
The front panel is closed.
4
Press (-1 repeatedly to select
“MEMORY STICK.”
Playback starts automatically.
To adjust the volume level
Rotate the L dial.
To switch the display items
Press m.
To stop playback
Press m.
When an “MG Memory Stick” is already
inserted
Press (%DFGZF) repeatedly to select
“MEMORY STICK.” Playback starts
automatically.
Note
/f no “MG Memory Stick” LS lnserfed, you cannot .se/ect
“MEMORY STICK as the source.
l
When the unit recognizes the “MG Memory Stick”
inserted proper/x fhe fronf pane/ closes
automatica/@
l
“NO CONTENTS” wi// be disp/ayed when there are
no audio fi/es thaf can be played back.
To locate a specific point in a track
- Manual searching
Press
(FUNCTION)
repeatedly to display the
function
menu
..44” and “W” appears.
m (44): To search backward
a (W): To search forward
Press
and hold m or a.
Release when you have found the desired point.
To locate a specific track
- Automatic Music Sensor (AMS)
Rotate the R dial.
L: To locate a preceding
track or the beginning
point of the current track
Ft: To locate a succeeding track
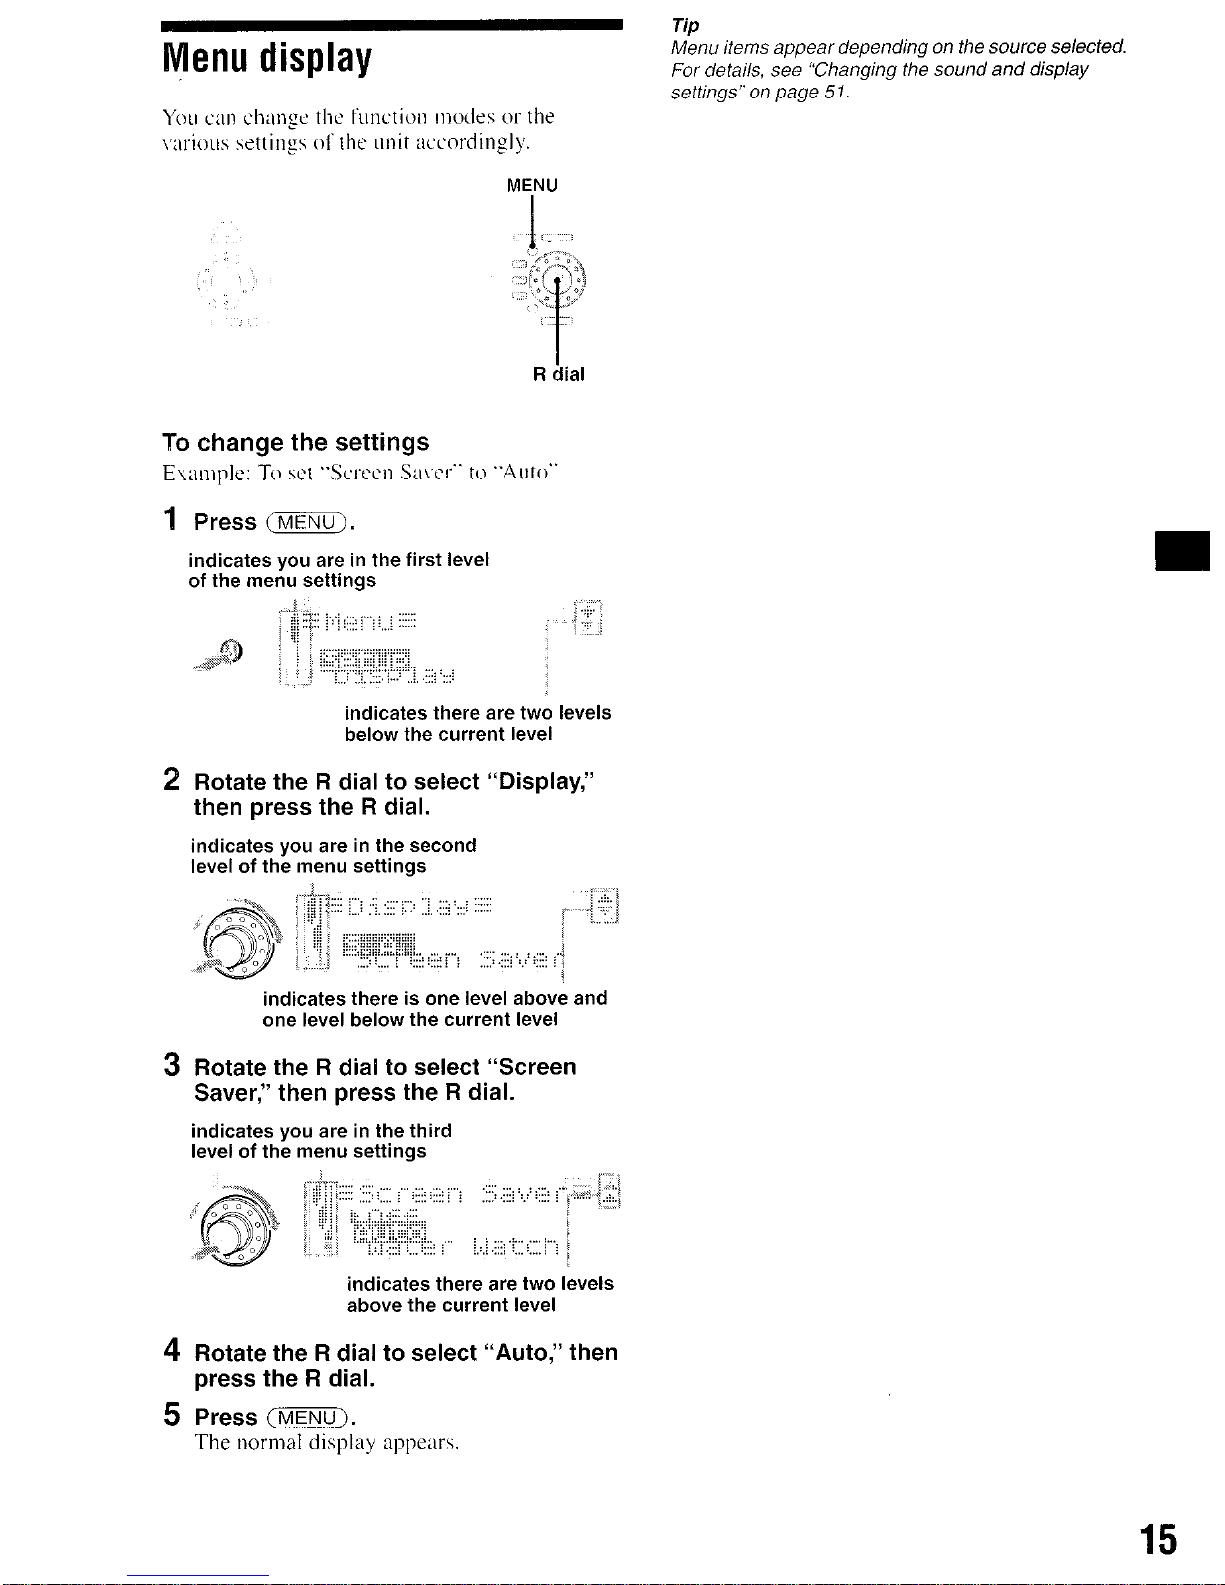
yenu display
M&u
items appear depending on the source selected
For detaik, see “Changing the sound and display
settings” on page 51.
indicates you are in the first level
of the menu settings
indicates there are two levels
below the current level
Rotate the R dial to select “Display,”
then press the R dial.
indicates you are in the second
level of the menu settings
indicates there is one level above and
one level below the current level
Rotate the R dial to select “Screen
Saver,” then press the R dial.
indicates you are in the third
level of the menu settings
indicates there are two levels
above the current level
Rotate the R dial to select “Auto,” then
press the R dial.
15
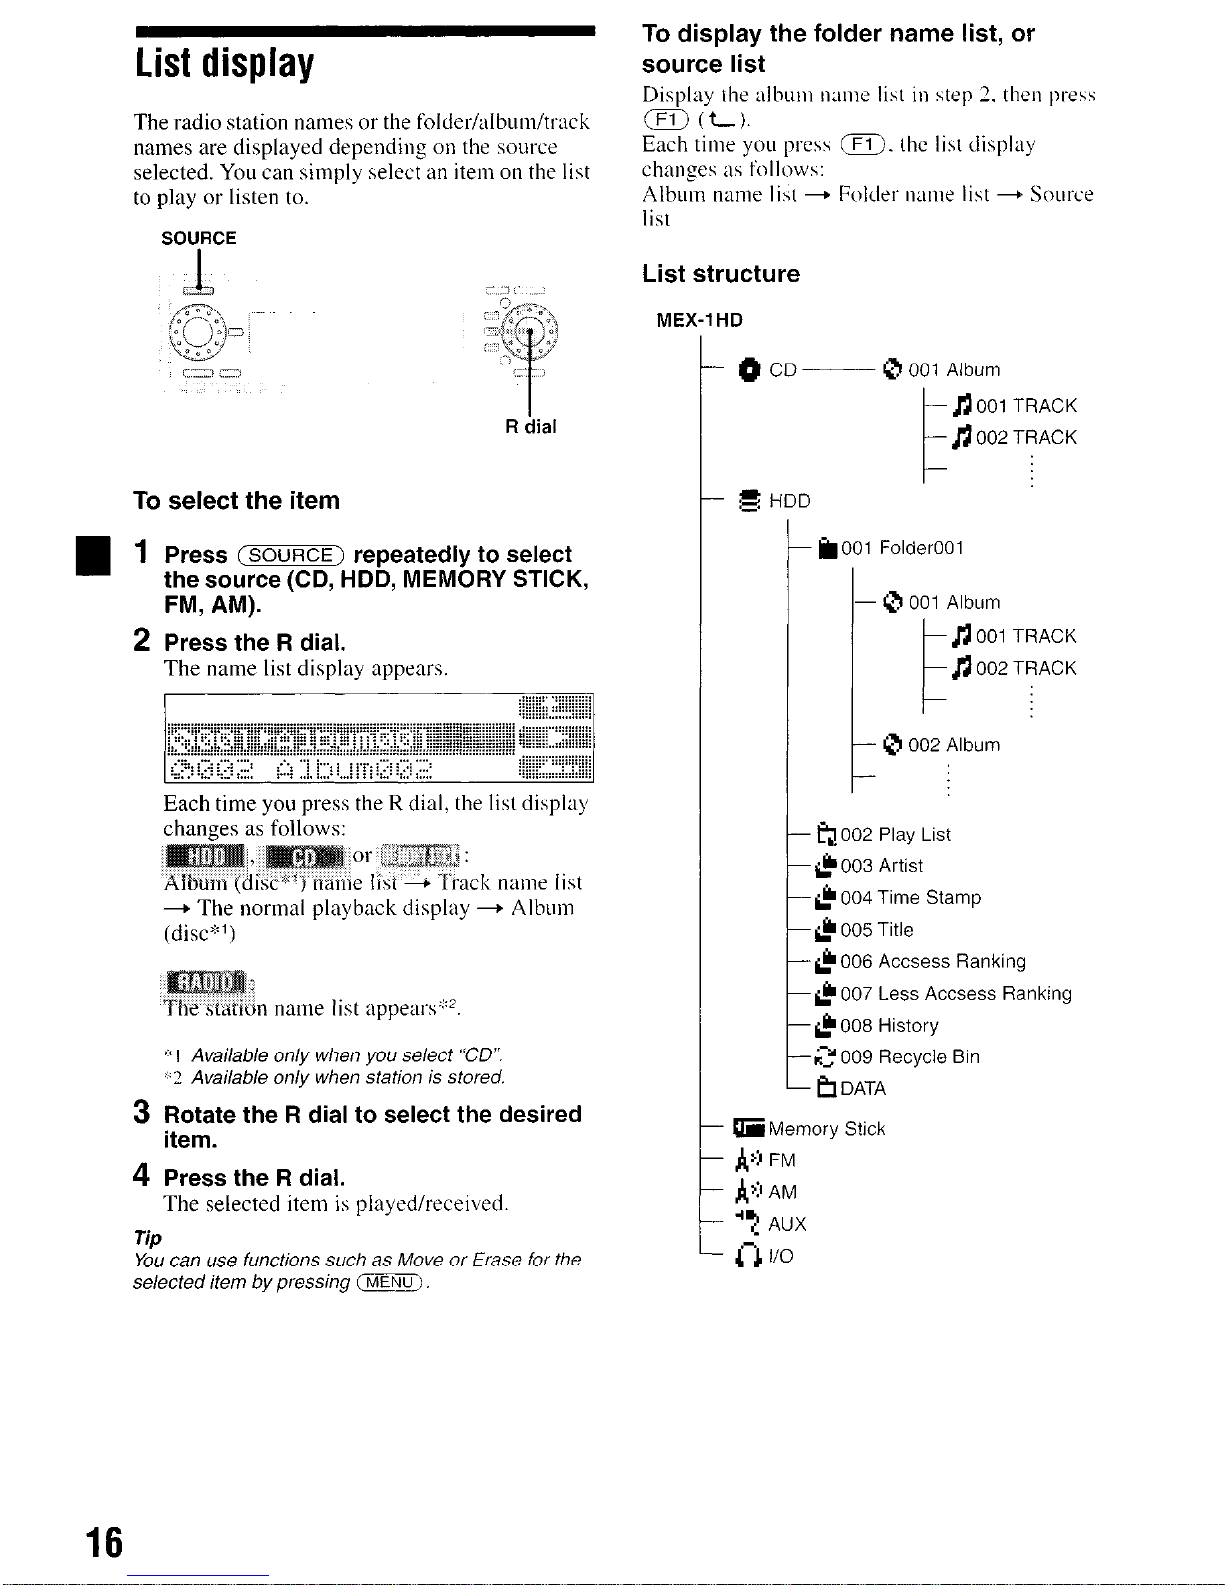
List display
The
radio station names or the ~oid~r/~~ib~~~ii/tr~~ck
names are displayed depending on the source
selected.
You
can simply select an item on the list
to play or listen to.
To select the item
1 Press (3337Z) repeatedly to select
the source (CD, HDD, MEMORY STICK,
FM, AM).
2
Press the R dial.
The
name list display appears.
Each time you press the R dial, the list dispia)
changes as follows:
.Nbmn (disc*x) name list - Yrack name list
- The normal playback display - Album
(disc*‘)
I Avai/ab/e on/y when you se/ect “CD”.
2 Avai/ab/e only when station is stored.
3 ;zF the R dial to select the desired
4 Press the R dial.
The selected item is played/received
Tip
You can use iunctions such as Move or Erase for the
selected item by pressing m.
To display the folder name list, or
source list
Display the ailxm~ ~name libt in \tep 2. then pi-ev
m CL).
Each time WILI arcs\ D. the list display
changes as’t’ollow~
Album name li\t list
Folder Iname list + Source
List structure
MEX-1 HD
- #CD-
- .z HDD
- ho01 Folder001
-
- 0 001 Album
- 0 002 Album
- b.002 Play List
- & 003 Artist
-& 004 Time Stamp
-& 005 Title
- & 006 Accsess Ranking
-& 007 Less Accsess Ranking
- & 008 History
-k:OO9 Recycle Bin
- b DATA
- E Memory Stick
- A>> FM
- AclAM
- ‘T AUX
- 4-J 110
16
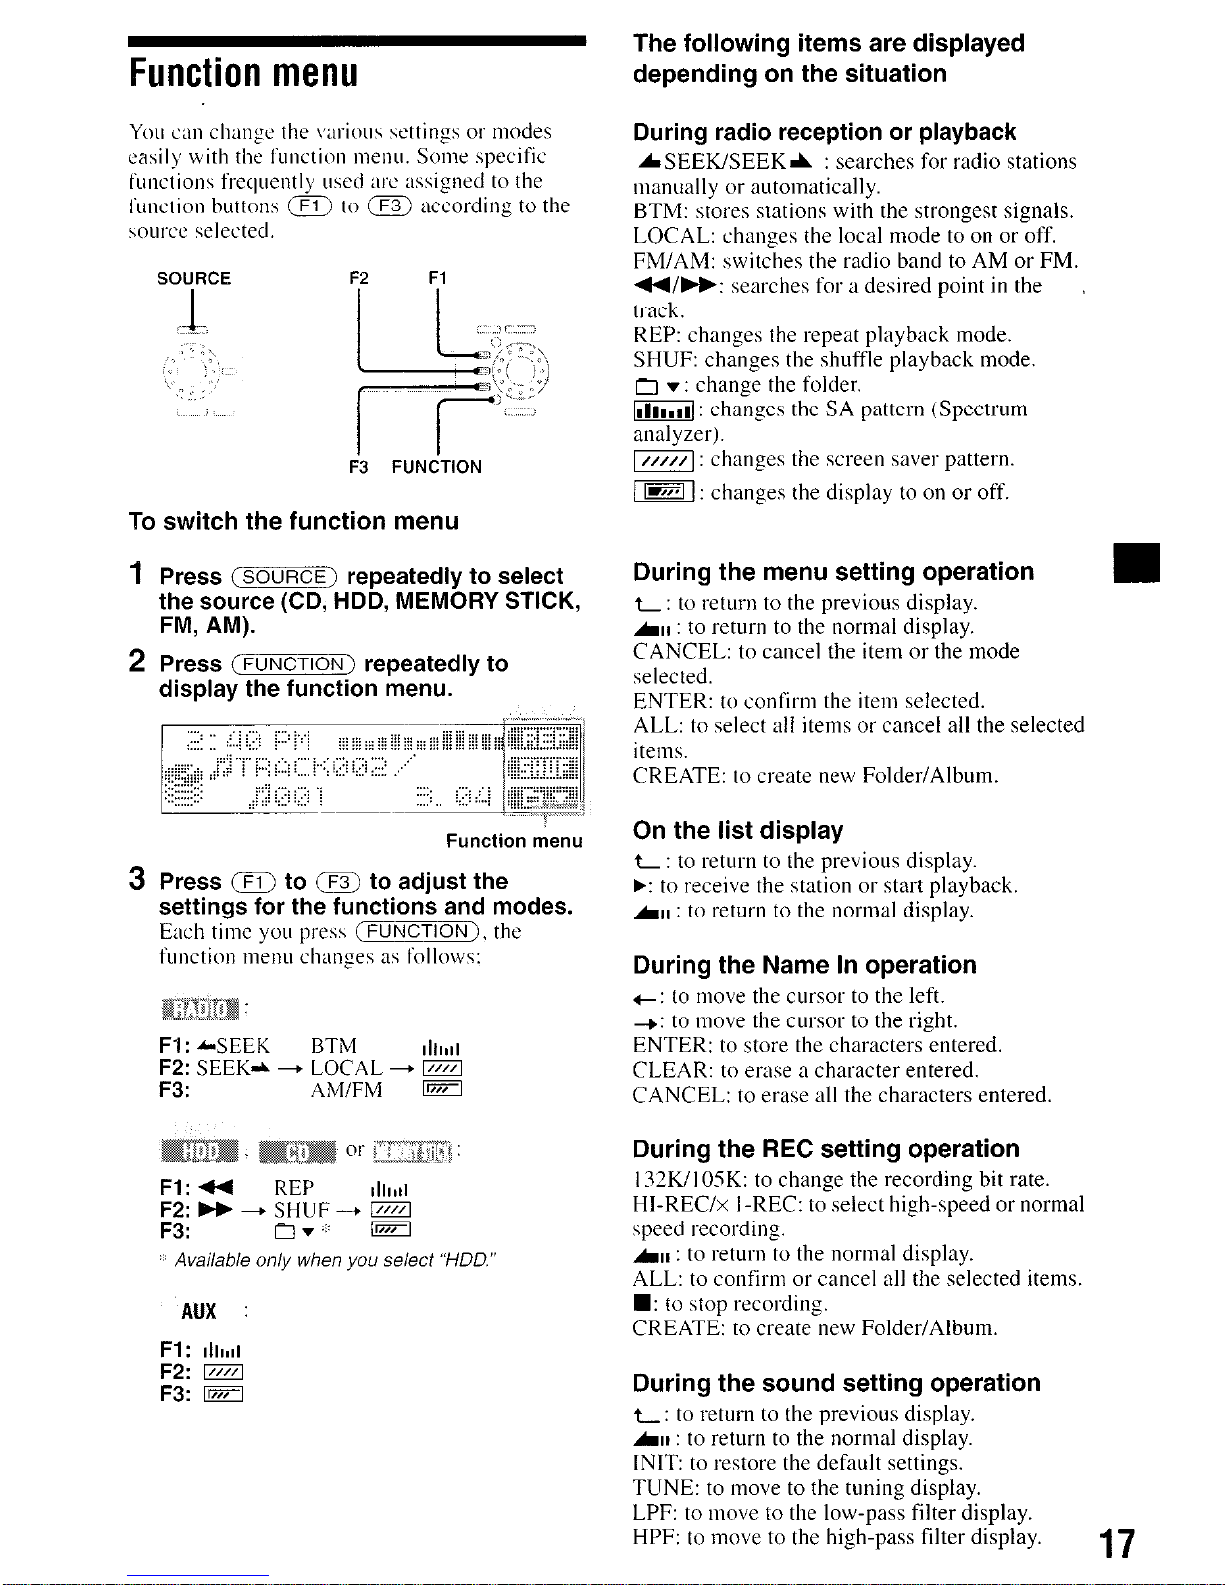
Function menu
The following items are displayed
depending on the situation
You can change! the variott\ wttings or modes
easily with the function menu. Some specific
function\ frequently used arc assigned to the
l’unctton buttons a to m according to the
w~~rcc
selected.
SOURCE
F2 Fi
k3 FUNtTiON
To switch the function menu
Press (m] repeatedly to select
the source (CD, HDD, MEMORY STICK,
FM, AM).
Press
(FUNCTION)
repeatedly to
display the function menu.
Press @II to m to adjust the
settings for the functions and modes.
Each time you pres\ (FUNCTIONJ. the
function menu changes as follow\:
F1 : ASEEK
BTM
lill,ll
F2: SEEKA - LOCAL - m
F3:
AM/FM
m
AUX :
Fl
: IIIMI
F2: m
F3: m
During radio reception or playback
bSEEK/SEEKA : searches for radio stations
manually or automatically.
BTM: stores stations with the strongest signals.
LOCAL: changes the local mode to on or off.
FM/AM: switches the radio band to AM or FM.
44/W: searches for a desired point in the
,
track.
REP: changes the repeat playback mode.
SHUF: changes the shuffle playback tnode.
m v : change the folder.
m : changes the SA pattern (Spectrum
analyzer).
m : changes the screen saver pattern.
m : changes the display to on or off.
During the menu setting operation
t- : to return to the previous display.
~II : to return to the normal display.
CANCEL: to cancel the item or the mode
selected.
ENTER: to confirm the item selected.
ALL: to select all items or cancel all the selected
items.
CREATE: to create new Folder/Album.
On the list display
L : to return to the previous display.
b: to receive the station or start playback.
~II : to return to the normal display.
During the Name In operation
+: to mo\ie the cursor to the left.
+: to move the cursor to the right.
ENTER: to store the characters entered.
CLEAR: to erase a character entered.
CANCEL: to erase all the characters entered,
During the FlEC setting operation
I XK/lO5K: to change the recording bit rate.
HI-REC/x I -REC: to select high-speed or normal
speed t-ecording.
~1, : to return to the normal display.
ALL: to confirm or cancel all the selected items.
n
: to stop recording.
CREATE: to create new Folder/Album.
During the sound setting operation
t-: to return to the previous display.
~II : to return to the normal display.
INIT to restore the default settings.
TUNE: to move to the tuning display.
LPF: to move to the low-pass filter display.
HPF: to move to the high-pass filter display.
17

Checking the information on
the contents selected
You can confirm the available HDD free space,
or the restrictions to Check-In/Out, etc.
1
Press the R dial to display the desired
item list you want to check.
2 Rotate the R dial to select the item,
then press m.
3 Rotate the R dial to select
“Information,” then press the R dial.
The information display appears.
The items listed below are displayed
according to the source selected:
- Remaining HDD free space
-The number of folders, albums and track>
-Check-In/Out is available/not available
- Move-In/Out is available/not available
- Import is available/not available
-Playback time
- Recording bit rate (- - - kbps/Variable bit
rate)
-The date and time that the item has been
created
- The restriction for playback count
-The restriction for playback valid period
Notes
l
The playing time of a track which has not been
p/ayed back may be displayed as “--h--m--s.”
l
There may be a discrepancy between the playing
time disp/ayed and the actua/ p/aying fime.
CD/HDD/“MG Memory
Stick”
Playing a track
When playing a music CD. a track recorded on
the HDD or “MCi Memory Stich.” text
information (folder name. album name, track
name, artist name etc.) i\ displayed.
Press c-1 repeatedly to select
“CD,” “HDD” or “MEMORY STICK.”
Playback starts automatically.
Note
When no media such as a CD or an “MG Memory
Sfick” is inserted, or no fo/der AS ore the HDD,
corresponding source ind/cations such as “CD.” “HDD,”
or “MEMORY ST/CK do not appear ,n the d/sp/ay
whi/e se/ecfing
SOURCE
F2 FUNCTION
R dial
To
Do this
Stop playback
Eject the disc
Skip tracks
-Automatic
Mtlhic Scnsot
Rotatc the R dial
Fast-forward/
Preu
(FUNCTION) t0
reverse
display the function menu,
- Manual Search
when press and hold m ok
m and release at the
desired point.
Open the front
vane1
Prcu m.
18
To remove the disc, press down the center
spindle. and lift up the edge of the disc from the
relief in the disc tray.
Notes
l
Do not touch the /ens in the disc tray
l
Do nof use a commerciaky avai/ab/e /ens c/caner.
l
Depending on the recording mefhod used on the
disc, if may
take
a minute or more before playing the
first track.
l
Depending on the condition of the disc, it may not
play back (page 58, 59).
l
CD-R or CD-RW discs should be finalized.
l
When the R dia/ is rotated whke the first (or /ast)
track on the drsc is being played, playback skips to
the /ast (or first) track on the CD.
l
/f the /asf track on the disc is over, p/ayback restarts
from the first track of the disc.
To eject the “MC Memory Stick,” push in the
..MG Memory Stick.’ lightly. then pull out.
Notes
l
There is a de/ay of a few seconds affer you press 5
(OPEN/CLOSE) before the disc tray is ejected.
l
Insert the “MG Memory Sfick” in the correct
d/reckon.
l
Do not forcefuky remove the “MG Memory Stick.”
l
The fokowing tracks cannot be Checked-Out..
-A track whose a//owab/e number of Check-Out
count is 0 (zero)
-A track whose playback period has expired
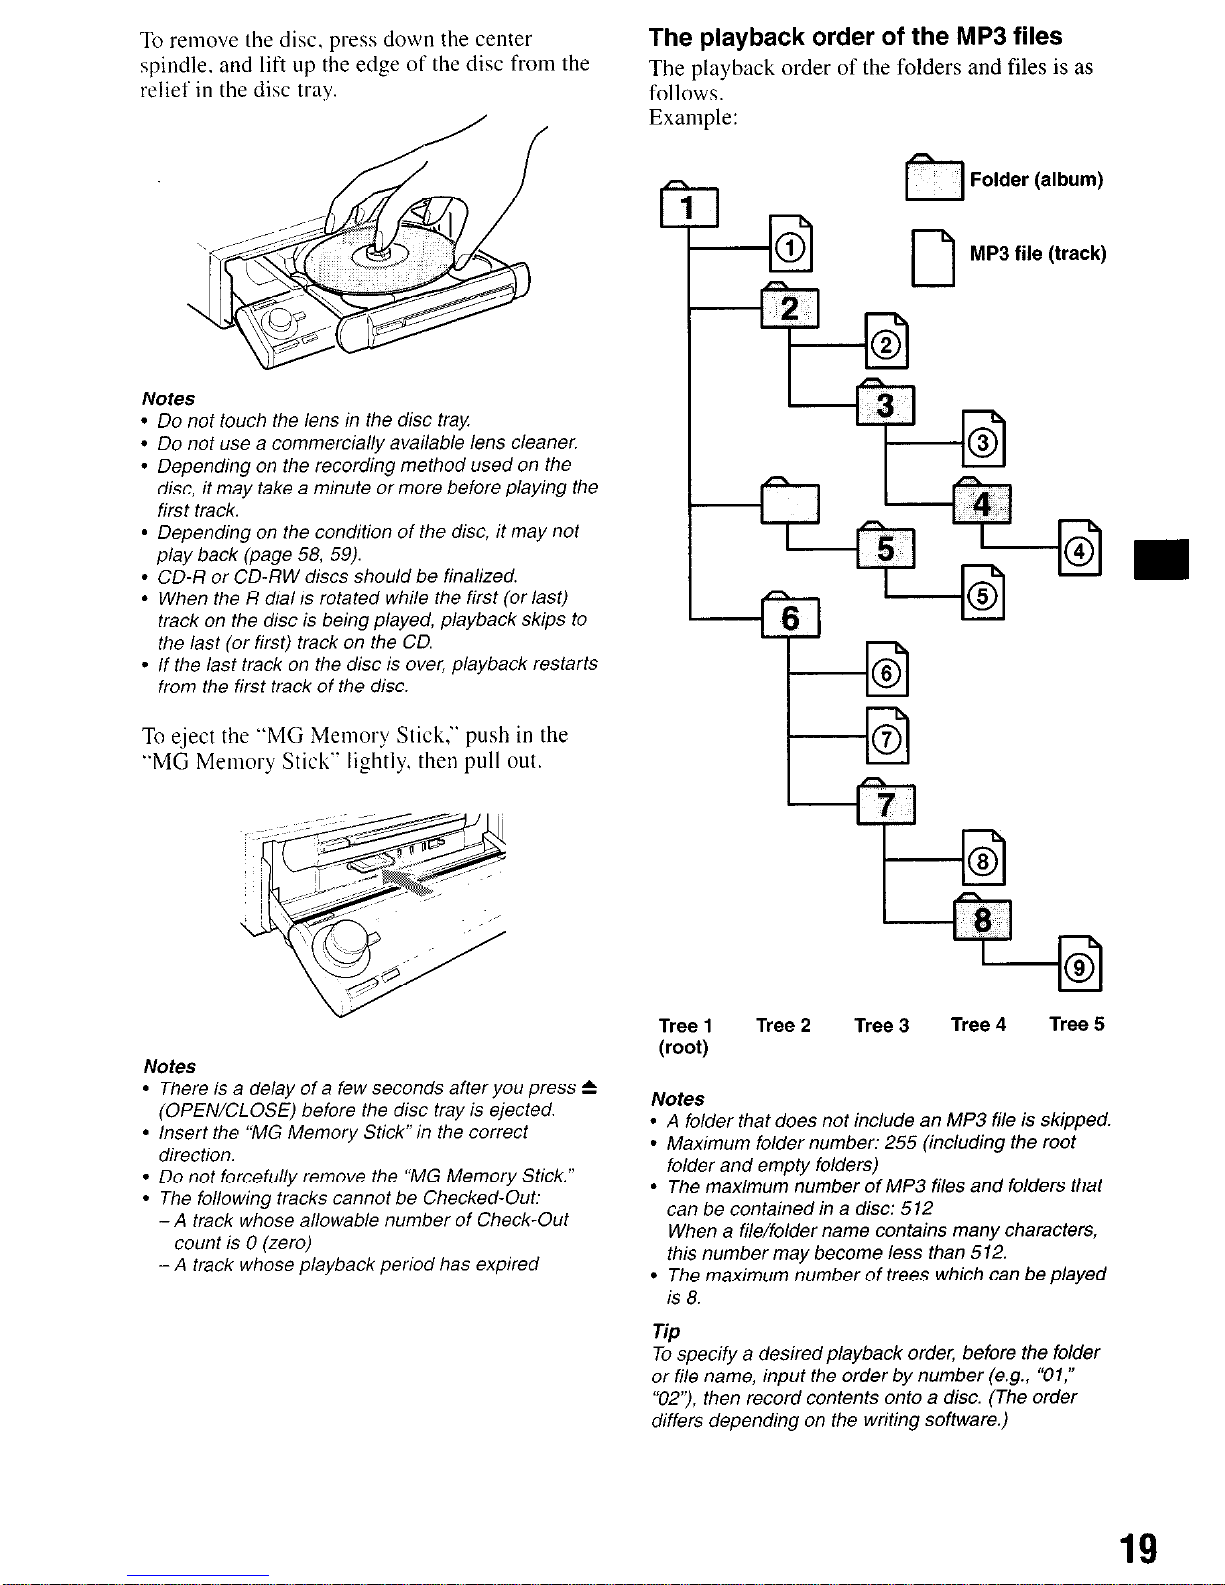
The playback order of the MP3 files
The playback order of the folders and files is as
follows.
Example:
rl
Folder (album)
l-7
MP3 file (track)
I
-
Tree 1
(root)
Tree 2
Tree 3
Tree 4 Tree 5
Notes
l
A fo/der that does nof in&de an MP3 fke is skipped.
l
Maximum folder number: 255 (inckrding fhe root
fo/der and empfy folders)
l
The maximum number of MP3 fi/es and folders fhat
can be contained in a disc: 512
When a fi/e/fo/der name contains many characters,
this number may become /ess than 512.
l
The maximum number of trees which can be p/ayed
is 8.
To specify a desired p/ayback order, before the folder
or fi/e name, input the order by number (e.g., #Oi,”
“OF), then record contents omo a disc. (The order
differs depending on fhe writing software.)
19
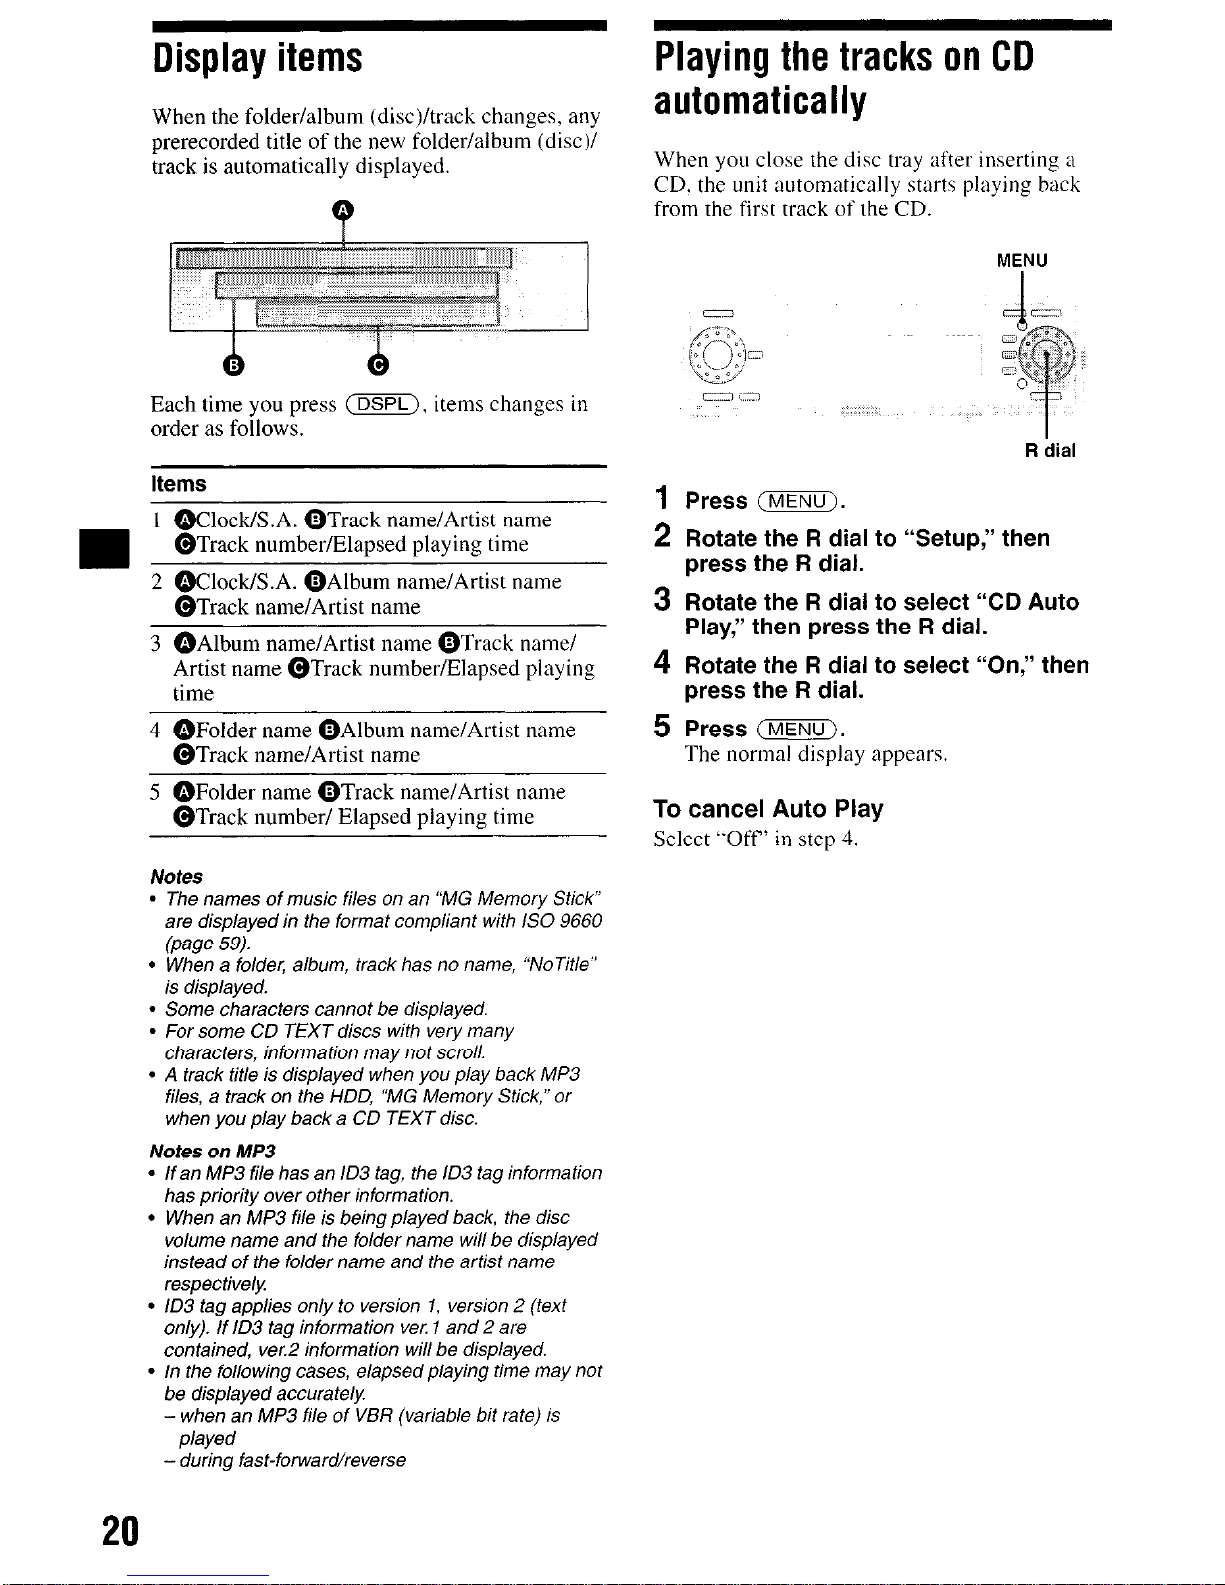
Display items
When the folder/album (disc)/track changes, any
prerecorded title of the new folder/album (disc)/
track is automatically displayed.
Each time you press m, items changes in
order as follows.
Items
1 @Clock/S.A. OTrack name/Artist name
@Track number/Elapsed playing time
2 ~Cloclc6.A. OAlbum name/Artist name
@Track name/Artist name
3 @Album name/Artist name OTrack name/
Artist name @Track number/Elapsed playing
time
4 @Folder name @Album name/Artist name
@Track name/Artist name
5 @Folder name OTrack name/Artist name
@Track number/ Elapsed playing time
Notes
l
The names of music fi/es on an “MG Memory Stick
sre disphyed in the formaf compliant wifh /SO 9660
@we 59.
l
When a fo/cfe< a/bum, frack has no name, “NoTit/e”
is displayed.
l
Some characters cannot be displayed.
l
For some CD TEXT discs with very many
characters, informafion may not scro//.
l
A track tit/e is di.sp/ayed when you p/ay back MP3
fi/es, a track on the HDD, “MG Memory Stick,” or
when you play back a CD TEXT disc.
Notes on MP3
l
/fan MP3 fi/e has an \D3 tag, the /D3 tag information
has priority over other informafion.
l
When an MP3 fife is being played back, the disc
vo/ume name and fhe fo/der name wi// be displayed
instead of the fo/der name and the arfisf name
respective/y
l
/D3 tag app/ies on/y to version I, version 2 (fext
only). if ID3 tag information vet I and 2 are
contained, ver.2 information wi// be displayed.
l
/n fhe folowing cases, e/apsedp/aying time may not
be disp/ayed accurately
- when an MP3 fi/e of VBR (variable bit rate) is
p/ayed
-during fast-forward/reverse
Playing the tracks on CD
automatically
When you close the disc tray after inserting a
CD. the unit automatically starts playing back
from the first track of the CD.
MENU
Press m.
Rotate the R dial to “Setup,” then
press the R dial.
Rotate the R dial to select “CD Auto
Play,” then press the R dial.
Rotate the R dial to select “On,” then
press the R dial.
Press m.
The normal display appears.
To cancel Auto Play
Select ‘.Off’ in step 4.
20
Playing tracks repeatedly
i Repeat
Play
The unit can repeat a track. an album, or a folder
when the item being played reaches the end. The
following repeat options are available:
l
Track Repeat-to repeat a track.
l
Album Repeat ~ to repeat an album.
l
Folder Repeat - to repeat a folder.
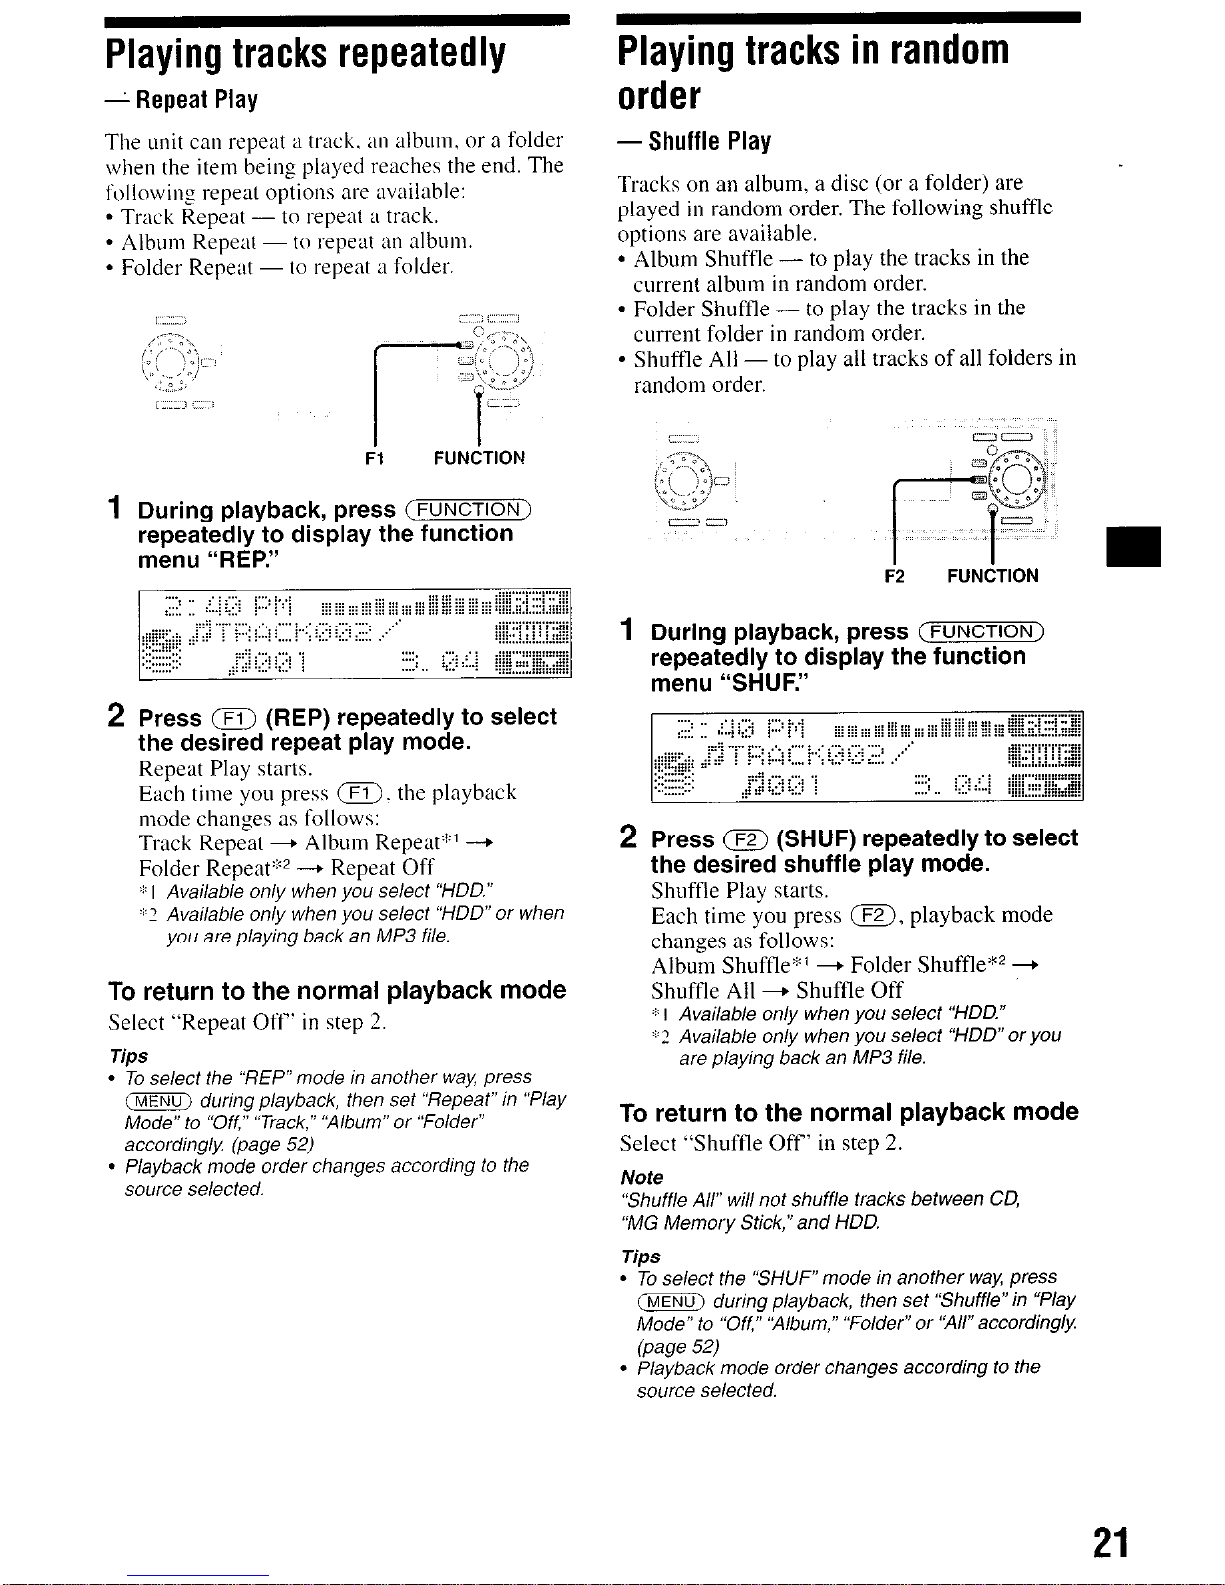
During playback, press
(FUNCTION)
repeatedly to display the function
menu “REP.”
Press m (REP) repeatedly to select
the desired repeat play mode.
Repeat Play starts.
Each time you press m. the playback
mode changes as follows:
Track Repeat - Album Repeat::’ -+
Folder Repeat’%* --+ Repeat Off
: I Avai/ab/e on/y when you select “HDD.”
2 Avai/ab/e on/y when you select “HDD” or when
you are p/aying back an MP3 fife.
To return to the normal playback mode
Select “Repeat OfY in step 2.
l
To se/eci the “REP”mode m another waK press
Tips
m during playback, then set “Repeat” in “P/ay
Mode” to “Off,” “Track,” “Album” or “Folder”
accordingly (page 5.2)
l
P/ayback mode order changes according 10 the
source se/ected.
Playing tracks in random
order
- Shuffle Play
Trxks on an album, a disc (or a folder) are
played in random order, The following shuffle
options are available.
l
Album Shuffle - to play the tracks in the
current album in random order.
l
Folder Shuffle - to play the tracks in the
current folder in random order.
l
Shuffle All - to play all tracks of all folders in
random order.
i2 FUNiTlON
During playback, press
(FUNCTION)
repeatedly to display the function
menu “SHUF.”
Press m (SHUF) repeatedly to select
the desired shuffle play mode.
are p/aying back an MP3 file.
Shuffle Play starts.
Each time you press m, playback mode
changes as follows:
Album Shuffle*’ + Folder Shuffle** +
Shuffle All + Shuffle Off
4 I Avai/ab/e on/y when you se/e& WDD.”
2 Avai/ab/e on/y when you se/e& “HDD” or you
To return to the normal playback mode
Select “Shuffle Off’ in step 2.
Note
“Shuff/e A/Y wi// not shuff/e tracks between CD,
“MG Memory Stick,” and HDD.
Tips
l
To
select
the ‘SHUF” mode in another wax press
m during playback, then set “.Shuff/e” in “Play
Mode” to “Off” “A/bum,” “Fo/der” or “A//” according/v
l
Playback mode order changes according to the
source se/ected.
21
Locating a folder/album/track
by name
- list-up
You can select and play back the desired music
file from the folder/album/track name list.
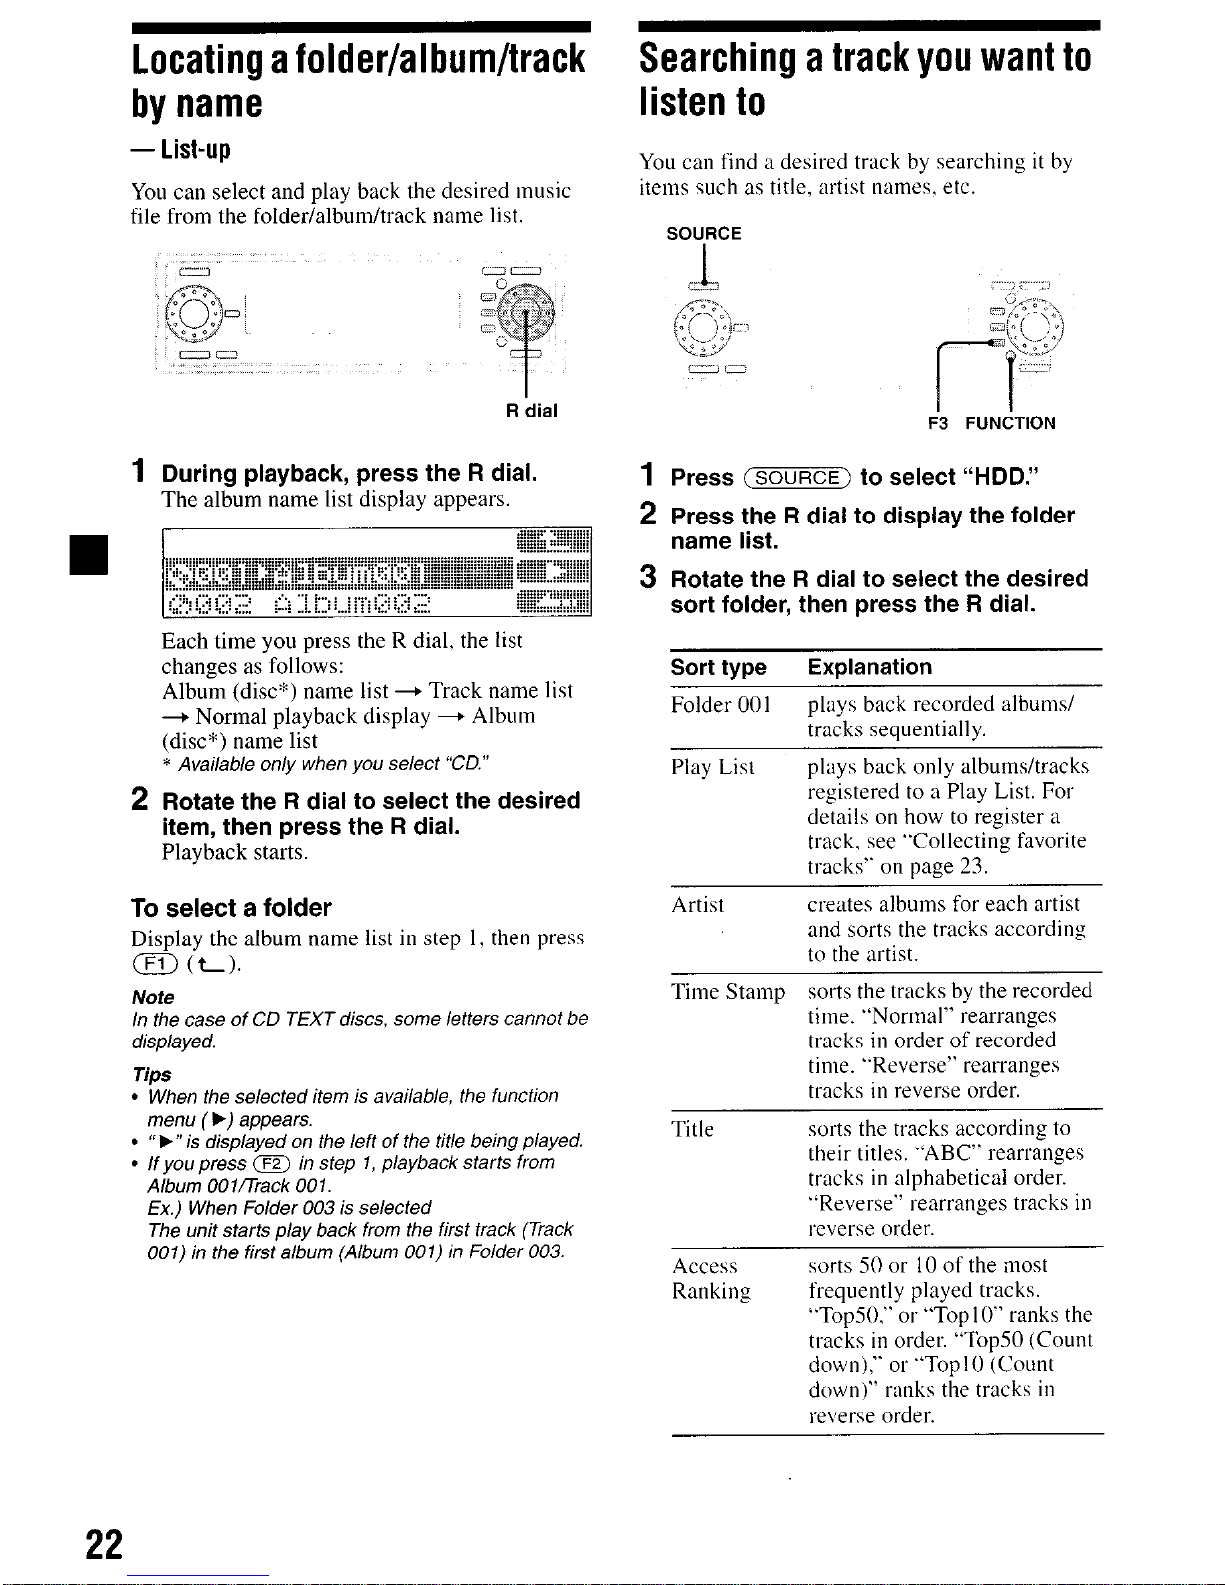
During playback, press the Fi dial.
The album name list display appears.
Each time you press the R dial, the list
changes as follows:
Album (disc*) name list + Track name list
+ Normal playback display + Album
(disc*) name list
* Avai/aHe on/y &en you se/e& “CD.”
Rotate the R dial to select the desired
item, then press the R dial.
Playback starts.
To select a folder
Display the album name list in step I, then press
m (t-1.
Note
/n fhe case of CD TE%T discs, some /etters cannof be
displayed.
Tips
l
When the se/ected item is avai/ab/e, the function
menu (b) appears.
l
” w” is disp/ayed on the /eff of fhe tit/e being played.
l
/f you press m in step 7, p/ayback starts from
A/bum OOl/liack 00 I.
Ex,) When Fo/der 003 is se/ecfed
The unit starts p/ay back from the first frack (7?ack
001) in the first a/bum (Album 001) in Fo/der 003.
Searching a track you want to
listen to
You can find a desired trxk by searching it by
items quch as title, artist names. etc.
SOURCE
1
2
3
Press
(SOURCE)
to select “HDD.”
Press the R dial to display the folder
name list.
Rotate the R dial to select the desired
sort folder, then press the R dial.
Sort type
Explanation
Folder 00 I
plays back recorded albums/
tracks sequentially.
Play List
plays back only albums/tracks
registered to a Play List. FOI
details on how to register a
track, see ‘Collecting favorite
tracks’. on page 23.
Artist
creates albums for each artist
and sorts the tracks according
to the artist.
Time Stamp sorts the tracks by the recorded
time. “Normal” rearranges
tracks in order of recorded
time. ‘.Reverse” rearranges
tracks in reverse order.
Title
sorts the tracks according to
their titles, .‘ABC” rearranges
tracks in alphabetical order.
“Reverse” rearranges tracks iu
reverse order.
Access
Ranking
sorts 50 or IO of the most
frequently played tracks.
“Top50,” or “Top IV’ ranks the
tracks in order. “Top50 (Count
dnwn),” or .‘ToplO (Count
down)” ranks the tracks in
reverse nrder.
22

4
5
Sort type
Explanation
Less Access sorts SO or IO of the least
Ranking
frequently played tracks.
“Bottom50,‘. or “Bottom IO”
ranks the tracks in order.
‘.Bottom50 (Count Down),” or
.‘Bottom IO (Count Down)”
ranks the tracks in reverse
order.
History
.*Normal” rearranges tracks in
order of most recently played
tracks. “Reverse” rearranges
tracks in reverse order of most
recently played tracks.
Rotate the R dial to select the desired
search item, then press the R dial.
Rotate the R dial to select the desired
track, then press the R dial.
The normal display appears.
Tip
The unit sequentMy plays back tracks in the album in
which the se/ected track ,s included.
Collecting favorite tracks
- Play List
Collecting your favorite tracks in the Play List
folder enables you to play them back just by
selecting the Play List.
SOURCE
Fi MENU
Registering a track in the Play List
Press (FZKKF) to select “HDD.”
Press 0.
Rotate the R dial to select “Play List,‘.’
then press the R dial.
Rotate the R dial to select “Entry,” then
press the R dial.
The track name list appears.
Rotate the R dial to select the track
you want to register, then press the R
dial.
The selected track is marked with “J .”
To cancel the item being selected, press the R
dial again.
Repeat step 5 until you finish selecting
all the tracks you want to register.
Press m (ENTER).
Select a Play List folder/album on which you
want to register your favorite track.
Rotate the R dial to select the desired
Play List folder, then press the R dial.
Rotate the R dial to select the desired
Play List album, then press the R dial.
The normal display appears.
Tips
l
/n the defau/f setting, a// tracks are se/ected in the
track name /ist, To se/ect specific tracks, press a
(ALL) to cance/ the selection first.
l
You can register up to 400 tracks in an album (Play List).
l
To create a new P/ay Lisf foldec press a (CREATE)
then assign a name in step 8.
23
Erasing the stored station
ODuring radio reception, press the Fl
dial.
The preset
station mm
list appears.
@Rotate the R dial to select the
station you want to erase, then
press m.
@Rotate the R dial to select “Erase,”
then press the R dial.
0 Rotate the R dial to select “OK,”
then press the R dial.
The selected station is erased.
t3 Press m (b,).
The normal reception display) appears.
Radio
The unit can store up to 20 FM stations and IO
AM stations.
Caution
When tuning in stations while driving, use the
Best Tuning Memory to prevent accidents.
Storing stations
automatically
- Best Tuning Memory (BTM)
The unit selects the stations with the strongest
signals within the selected band, and stores them
in order of frequency.
SOURCE Fl
FUNiTlON
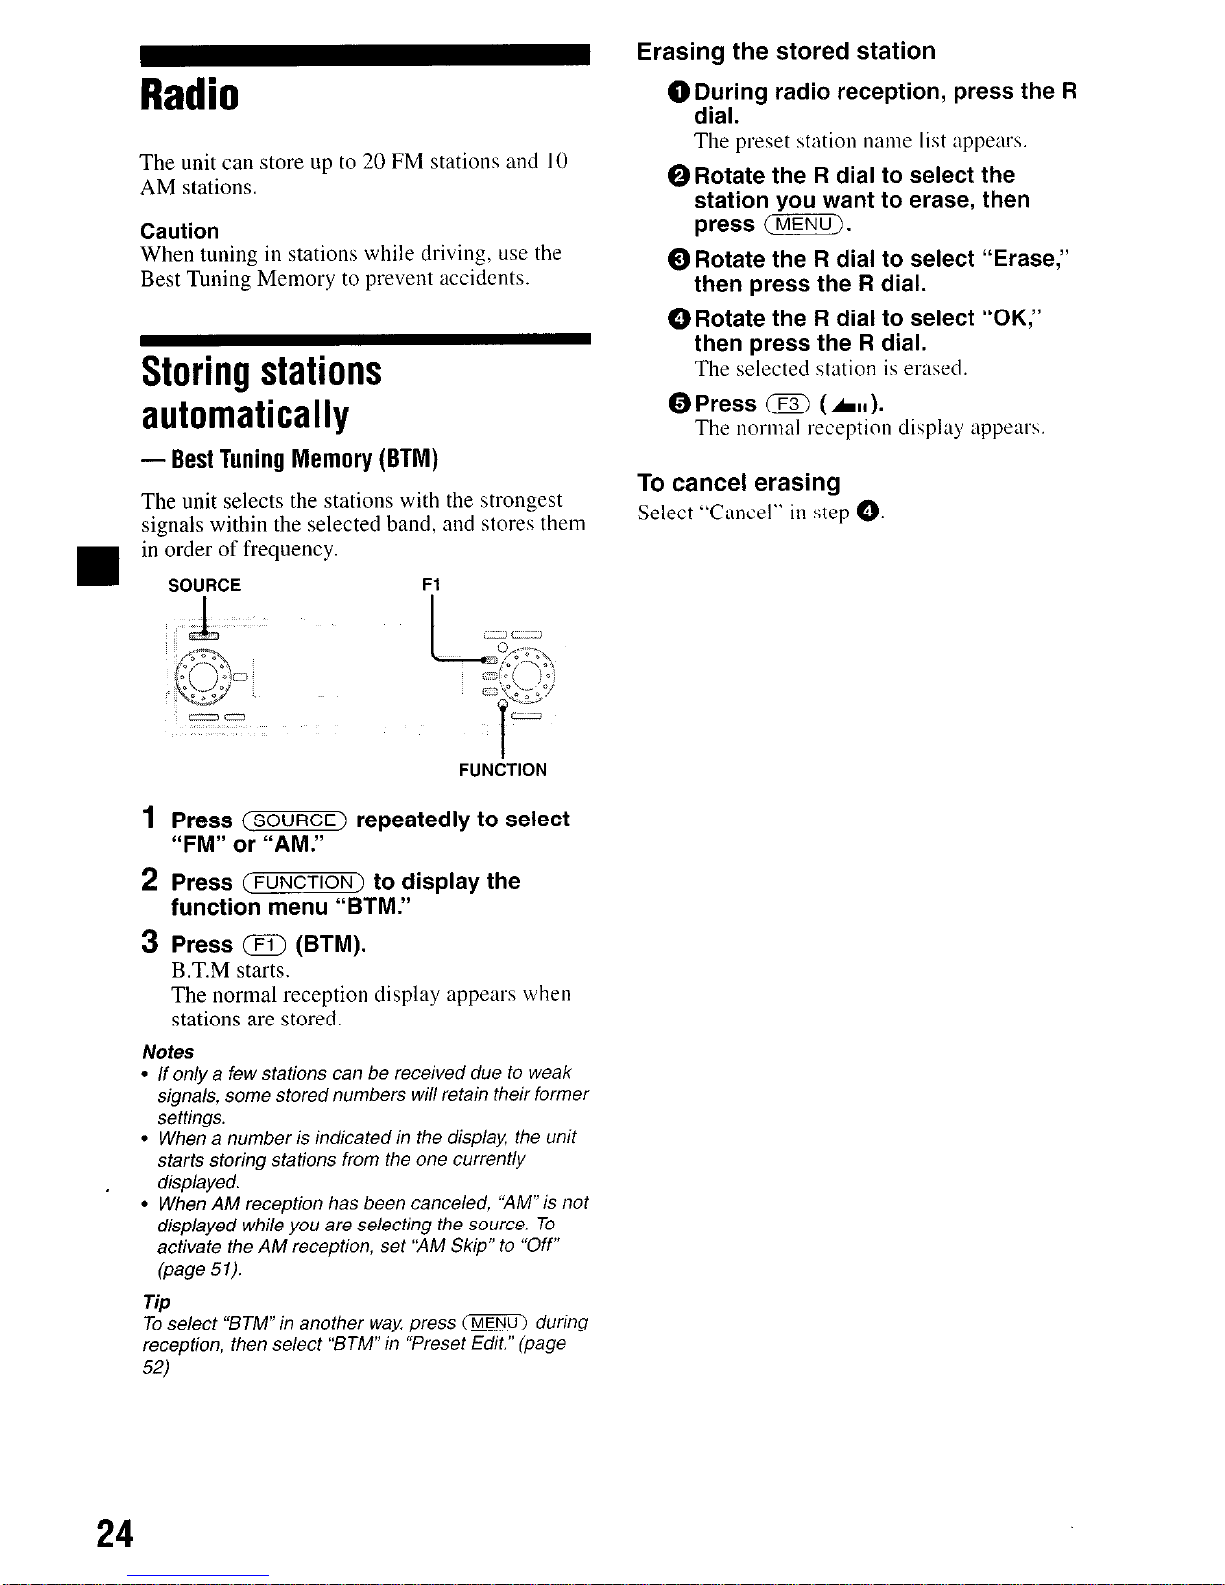
1
Press (ZSURZ) repeatedly to select
“FM” or “AM.”
2 Press (FUNCTION) to display the
function menu “BTM.”
3 Press m (BTM).
B,T.M starts.
The normal reception display appears when
stations are stored.
Notes
l
/f on/y a few sfafions can be received due fo weak
signs/s, some sfored numbers wi// refain fheir former
seffings.
l
When a number is indicafed in fhe disp/ax fhe unif
sfarfs sforing sfafions from fhe one currenfly
displayed.
l
When AM recepfion has been canceled, “AM”is nof
disp/ayed whi/e you are se/ecfing fhe source. To
acfivafe fhe AM recepfion, sef “AM Skip” fo “Off”
kwe 571.
Tip
To se/ecf Y3TM” in anofher way, press m during
recepfion, fhen se/ecf “6TfvV in “Presef fdif.” (page
52)
To
cancel erasing
Select “Cancel” in step 0
24
 Loading...