

Page 1
2-693-038-12 (1)
Bluetooth Audio System
Bluetooth™
Audio System
Operating Instructions
Bedienungsanleitung
Mode d’emploi
Istruzioni per l’uso
Gebruiksaanwijzing
Инструкция по эксплуатации
To cancel the demonstration (Demo) display, see page 20.
Zum Deaktivieren der Demo-Anzeige (Demo) schlagen Sie bitte auf Seite 22 nach.
Pour annuler la démonstration (Demo), reportez-vous à la page 22.
Per annullare la dimostrazione (Demo), vedere pagina 22.
Om de demonstratie (Demo) te annuleren, zie pagina 22.
Для отмены демонстрации на дисплее (режим Demo) см. стр. 23.
GB
DE
FR
IT
NL
RU
MEX-BT5000
© 2006 Sony Corporation
Page 2
Be sure to install this unit in the dashboard of
the car for safety. For installation and
connections, see the supplied installation/
connections manual.
Warning if your car’s ignition has no
ACC position
After turning the ignition off, be sure to press
and hold (OFF) on the unit until the display
disappears.
Otherwise, the display does not turn off and
this causes battery drain.
This label is located on the bottom of the
chassis.
The nameplate indicating operating voltage, etc.,
is located on the bottom of the chassis.
Hereby, Sony Corp., declares that this MEXBT5000 is in compliance with the essential
requirements and other relevant provisions of
Directive 1999/5/EC.
For details, please access the following URL:
http://www.compliance.sony.de/
Manufactured under license
R
from BBE Sound, Inc.
The BBE MP process
improves digitally compressed sound, such as
MP3, by restoring and enhancing the higher
harmonics lost through compression. BBE MP
works by generating even-order harmonics from
the source material, effectively recovering
warmth, detail and nuance.
The Bluetooth word mark and logos are owned
by the Bluetooth SIG, Inc. and any use of such
marks by Sony Corporation is under license.
Other trademarks and trade names are those of
their respective owners.
SonicStage and its logo are trademarks of Sony
Corporation.
“ATRAC” and are trademarks of
Sony Corporation.
Microsoft, Windows Media,
and the Windows logo are
trademarks or registered
trademarks of Microsoft
Corporation in the United States and/or other
countries.
Disposal of Old Electrical &
Electronic Equipment (Applicable in
the European Union and other
European countries with separate
collection systems)
packaging indicates that this product shall not be treated
as household waste. Instead it shall be handed over to the
applicable collection point for the recycling of electrical
and electronic equipment. By ensuring this product is
disposed of correctly, you will help prevent potential
negative consequences for the environment and human
health, which could otherwise be caused by inappropriate
waste handling of this product. The recycling of materials
will help to conserve natural resources. For more detailed
information about recycling of this product, please contact
your local Civic Office, your household waste disposal
service or the shop where you purchased the product.
Applicable accessory: Remote commander
This symbol on the product or on its
2
Page 3

Table of Contents
Welcome ! . . . . . . . . . . . . . . . . . . . . . . . . . . . . . 4
Getting Started
Resetting the unit. . . . . . . . . . . . . . . . . . . . . . . . 6
Setting the clock . . . . . . . . . . . . . . . . . . . . . . . . 6
Detaching the front panel . . . . . . . . . . . . . . . . . 6
Attaching the front panel . . . . . . . . . . . . . . . 7
Inserting the disc in the unit . . . . . . . . . . . . . . . 7
Ejecting the disc . . . . . . . . . . . . . . . . . . . . . . 7
Location of controls and basic
operations
Audio function . . . . . . . . . . . . . . . . . . . . . . . 8
Bluetooth function . . . . . . . . . . . . . . . . . . . 10
CD
Display items . . . . . . . . . . . . . . . . . . . . . . . 12
Repeat and shuffle play. . . . . . . . . . . . . . . . 12
Radio
Storing and receiving stations . . . . . . . . . . . . . 12
Storing automatically — BTM . . . . . . . . . . 12
Storing manually. . . . . . . . . . . . . . . . . . . . . 12
Receiving the stored stations . . . . . . . . . . . 12
Tuning automatically . . . . . . . . . . . . . . . . . 12
Receiving a station through a list
— LIST. . . . . . . . . . . . . . . . . . . . . . . . . . . . 13
RDS . . . . . . . . . . . . . . . . . . . . . . . . . . . . . . . . . 13
Overview. . . . . . . . . . . . . . . . . . . . . . . . . . . 13
Setting AF and TA . . . . . . . . . . . . . . . . . . . 13
Selecting PTY. . . . . . . . . . . . . . . . . . . . . . . 14
Setting CT. . . . . . . . . . . . . . . . . . . . . . . . . . 14
Bluetooth function
Before using the Bluetooth function. . . . . . . . 15
Menu operations of the Bluetooth
function . . . . . . . . . . . . . . . . . . . . . . . . . . . 15
Configuring Bluetooth Settings . . . . . . . . . 15
Pairing and connecting this unit with a
Bluetooth device. . . . . . . . . . . . . . . . . . . . . 15
Connecting to registered devices . . . . . . . . 16
Handsfree talking . . . . . . . . . . . . . . . . . . . . . . 16
Making calls. . . . . . . . . . . . . . . . . . . . . . . . 17
Receiving calls . . . . . . . . . . . . . . . . . . . . . . 17
Ending calls . . . . . . . . . . . . . . . . . . . . . . . . 17
Using the Phonebook . . . . . . . . . . . . . . . . . 18
Using the Preset Dial . . . . . . . . . . . . . . . . . 18
Music streaming . . . . . . . . . . . . . . . . . . . . . . . 18
Listening to music from an audio
device . . . . . . . . . . . . . . . . . . . . . . . . . . . . . 18
Operating an audio device with this
unit . . . . . . . . . . . . . . . . . . . . . . . . . . . . . . . 18
Other settings . . . . . . . . . . . . . . . . . . . . . . . . . 19
Setting a handsfree device . . . . . . . . . . . . . 19
Deleting the registration of a connected
device . . . . . . . . . . . . . . . . . . . . . . . . . . . . . 19
Auto connection function. . . . . . . . . . . . . . 19
Other functions
Adjusting menu items — MENU . . . . . . . . . . 20
Customizing the equalizer curve
— EQ3 Tune . . . . . . . . . . . . . . . . . . . . . . . 21
Using optional equipment. . . . . . . . . . . . . . . . 21
CD/MD changer. . . . . . . . . . . . . . . . . . . . . 21
Auxiliary audio equipment. . . . . . . . . . . . . 22
Rotary commander RM-X4S . . . . . . . . . . . 22
Additional Information
Precautions . . . . . . . . . . . . . . . . . . . . . . . . . . . 23
Notes on discs . . . . . . . . . . . . . . . . . . . . . . 23
About MP3/WMA files . . . . . . . . . . . . . . . 24
About ATRAC CD. . . . . . . . . . . . . . . . . . . 24
About Bluetooth function. . . . . . . . . . . . . . 25
Maintenance . . . . . . . . . . . . . . . . . . . . . . . . . . 25
Removing the unit. . . . . . . . . . . . . . . . . . . . . . 26
Specifications . . . . . . . . . . . . . . . . . . . . . . . . . 26
Troubleshooting . . . . . . . . . . . . . . . . . . . . . . . 27
Error displays/Messages. . . . . . . . . . . . . . . 29
3
Page 4
Welcome !
Thank you for purchasing this Sony Bluetooth™
Audio System. You can enjoy your drive with the
following functions.
• CD playback
You can play CD-DA (also containing CD
TEXT*), CD-R/CD-RW (MP3/WMA files also
containing Multi Session (page 24)) and
ATRAC CD (ATRAC3 and ATRAC3plus
format (page 24)).
Type of discs Label on the disc
CD-DA
MP3
WMA
ATRAC CD
• Radio reception
– You can store up to 6 stations per band (FM1,
FM2, FM3, MW and LW).
– BTM (Best Tuning Memory): the unit selects
strong signal stations and stores them.
• RDS services
You can use FM station with Radio Data
System (RDS).
• Bluetooth function
– Handsfree talking with your cellular phone in
the car.
– Phonebook transfer from your cellular phone.
– Music streaming from your cellular phone or
portable audio device.
– HFP 1.0, A2DP, OPP and AVRCP profiles
supported.
• Sound adjustment
– EQ3 parametric: You can choose any one
of 7 preset equalizer curves, and adjust as
desired.
– DSO (Dynamic Soundstage Organizer):
creates a more ambient sound field, using
virtual speaker synthesis, to enhance the
sound of speakers, even if they are installed
low in the door.
– BBE MP: improves digitally compressed
sound such as MP3.
* A CD TEXT disc is a CD-DA that includes
information such as disc, artist and track name.
4
Page 5

Caution
IN NO EVENT SHALL SONY BE LIABLE FOR
ANY INCIDENTAL, INDIRECT OR
CONSEQUENTIAL DAMAGES OR OTHER
DAMAGES INCLUDING, WITHOUT
LIMITATION, LOSS OF PROFITS, LOSS OF
REVENUE, LOSS OF DATA, LOSS OF USE OF
THE PRODUCT OR ANY ASSOCIATED
EQUIPMENT, DOWNTIME, AND
PURCHASER’S TIME RELATED TO OR
ARISING OUT OF THE USE OF THIS
PRODUCT, ITS HARDWARE AND/OR ITS
SOFTWARE.
IMPORTANT NOTICE!
Safe and efficient use
Changes or modifications to this unit not expressly
approved by Sony may void the user’s authority to
operate the equipment.
Please check for exceptions, due to national
requirement or limitations, in usage of Bluetooth
equipment before using this product.
Driving
Check the laws and regulations on the use of cellular
phones and handsfree equipment in the areas where
you drive.
Always give full attention to driving and pull off the
road and park before making or answering a call if
driving conditions so require.
Connecting to other devices
When connecting to any other device, please read its
user guide for detailed safety instructions.
Emergency calls
This Bluetooth car handsfree and the electronic
device connected to the handsfree operate using
radio signals, cellular, and landline networks as well
as user-programmed function, which cannot
guarantee connection under all conditions.
Therefore do not rely solely upon any electronic
device for essential communications (such as
medical emergencies).
Remember, in order to make or receive calls, the
handsfree and the electronic device connected to the
handsfree must be switched on in a service area with
adequate cellular signal strength.
Emergency calls may not be possible on all cellular
phone networks or when certain network services
and/or phone features are in use.
Check with your local service provider.
Radio frequency exposure
RF signals may affect improperly installed or
inadequately shielded electronic systems in cars,
such as electronic fuel injection systems, electronic
antiskid (antilock) braking systems, electronic speed
control systems or air bag systems. For installation
or service of this device, please consult with the
manufacturer or its representative of your car. Faulty
installation or service may be dangerous and may
invalidate any warranty that may apply to this
device.
Consult with the manufacturer of your car to ensure
that the use of your cellular phone in the car will not
affect its electronic system.
Check regularly that all wireless device equipment
in your car is mounted and operating properly.
5
Page 6

Getting Started
Detaching the front panel
Resetting the unit
Before operating the unit for the first time, or
after replacing the car battery or changing the
connections, you must reset the unit.
Detach the front panel and press the RESET
button with a pointed object, such as a ballpoint
pen.
RESET
button
Note
Pressing the RESET button will erase the clock setting
and some stored contents.
Setting the clock
The clock uses a 24-hour digital indication.
1 Press (MENU).
2 Push the joystick up/down until
“Setup” appears, then push it right.
3 Push the joystick up/down until “Clock
Adjust” appears, then push it right.
4 Push the joystick up/down to set the
hour and minutes.
To move the digital indication, push the
joystick left/right.
5 After setting the clock, press the
joystick.
The clock starts.
Tip
You can set the clock automatically with the RDS
feature (page 14).
You can detach the front panel of this unit to
prevent theft.
Caution alarm
If you turn the ignition switch to the OFF
position without detaching the front panel, the
caution alarm will sound for a few seconds.
The alarm will only sound if the built-in
amplifier is used.
1 Press (OFF).
The unit is turned off.
2 Press (OPEN).
The front panel is flipped down.
3 Slide the front panel to the right, then
gently pull out the left end of the front
panel.
1
2
Notes
• Do not drop or put excessive pressure on the front
panel and display window.
• Do not subject the front panel to heat/high
temperature or moisture. Avoid leaving it in a parked
car or on a dashboard/rear tray.
6
Page 7
Attaching the front panel
Place the hole A of the front panel onto the
spindle B on the unit, then lightly push the left
side in.
Press (SOURCE) on the unit (or insert a disc) to
operate the unit.
A
B
c
Note
Do not put anything on the inner surface of the front
panel.
Inserting the disc in the unit
1 Press (OPEN).
2 Insert the disc (label side up).
3 Close the front panel.
Playback starts automatically.
Ejecting the disc
1 Press (OPEN).
2 Press Z.
The disc is ejected.
3 Close the front panel.
7
Page 8
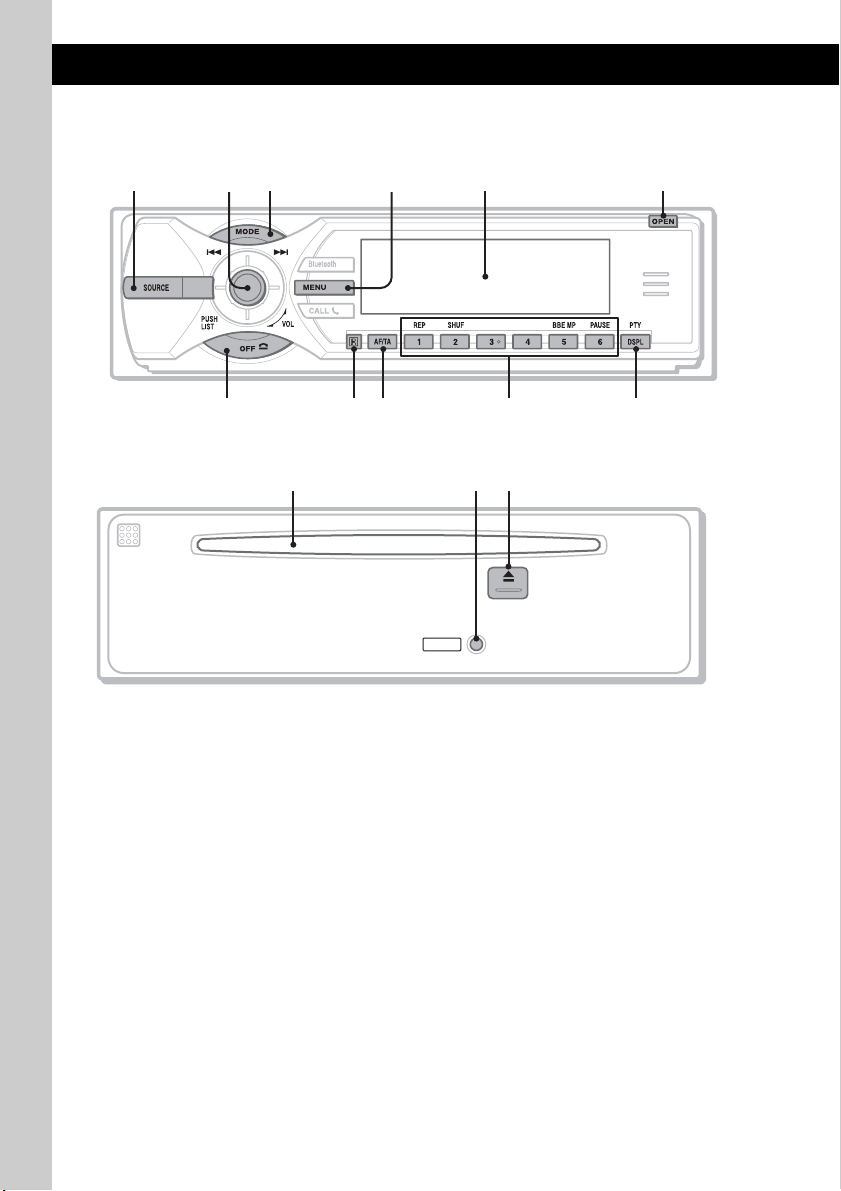
Location of controls and basic operations
Audio function
Main unit
1
35624
79 qa0
Front panel removed
Refer to the pages listed for details. The
corresponding buttons on the card remote
commander control the same functions as those
on the unit.
A SOURCE button
To power on; change the source (Radio/CD/
1
MD*
/Bluetooth AUDIO/AUX).
B Joystick/LIST button 13, 22
Rotate to: Adjust the volume.
Push up/down/left/right to: Select a menu
item.
Press to: Apply a setting.
CD/MD*
Push up/down to*
– Skip groups*
– Skip groups*
Push left/right to:
– Skip tracks (push).
– Skip tracks continuously (push, then push
– Reverse/fast-forward a track (push and
1
:
2
:
3
/albums*4 (push).
3
(push and hold).
again within about 2 seconds and hold).
hold).
/albums*4 continuously
8
8
MEX-BT5000
qfqdqs
RESET
Radio:
Push up/down to:
– Receive stored station.
Push left/right to:
– Tune in stations automatically (push).
– Find a station manually (push and hold).
Press to:
– Display the list.
C MODE button 12, 21
To select the radio band (FM/MW/LW)/
select the unit*
D MENU button
To enter menu.
E Display window
F OPEN button 7
G OFF button
To power off; stop the source.
H Receptor for the card remote
commander
5
.
Page 9
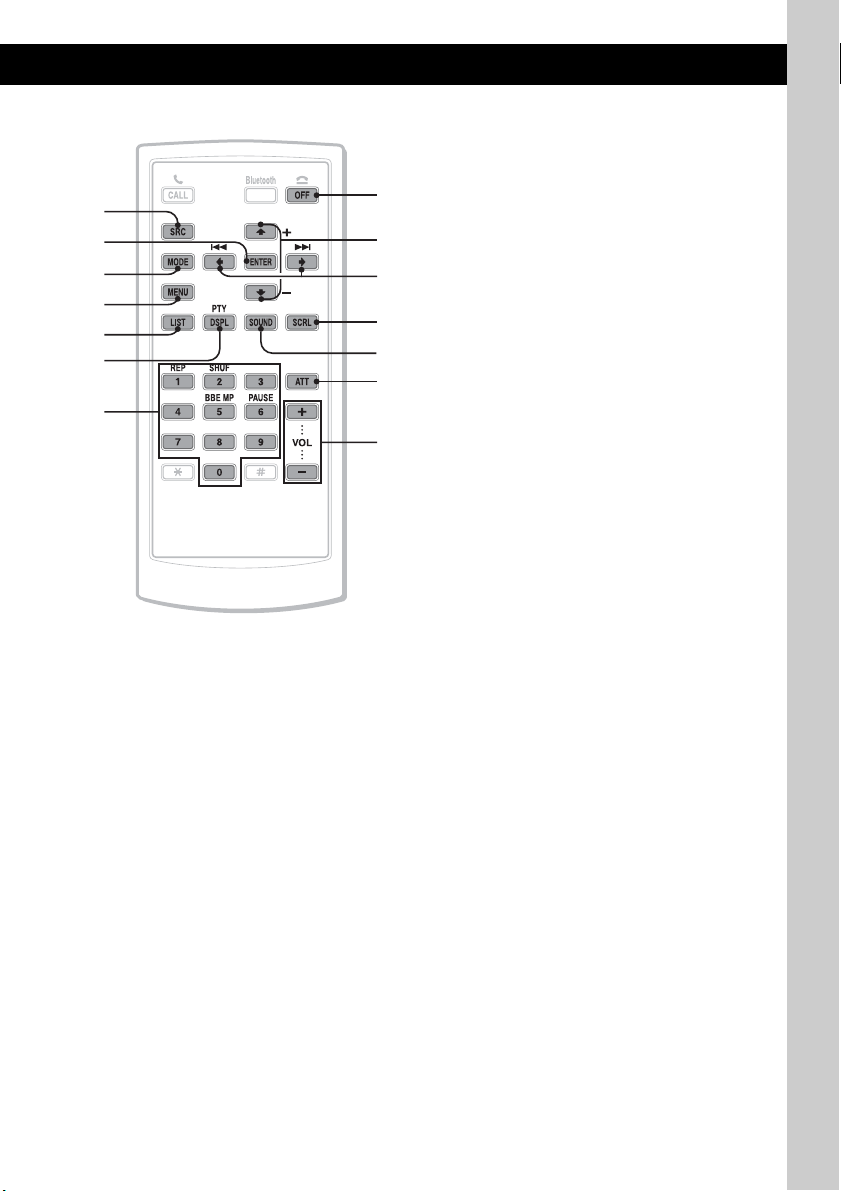
Card remote commander RM-X302
1
qg
3
4
qh
qa
qj
I AF (Alternative Frequencies)/TA
(Traffic Announcement) button 13
To set AF and TA in RDS.
J Number buttons
CD/MD*
(1): REP 12, 22
(2): SHUF 12, 22
(5): BBE MP*
(6): PAUS E*
Radio:
To receive stored stations (press); store
stations (press and hold).
K DSPL (display)/PTY (Programme
Type) button 12, 14
To change display items; select PTY in RDS.
L Disc slot 7
To insert the disc.
M RESET button 6
N Z (eject) button 7
To eject the disc.
1
:
6
To activate the BBE MP function, set
“BBE MP on.” To cancel, set “BBE MP
off.”
To pause playback. To cancel, press
again.
2
6
7
qk
ql
w;
wa
ws
wd
The following buttons on the card remote
commander have also different buttons/functions
from the unit.
qg ENTER button
To apply a setting.
qh LIST button
To list up.
qj Number buttons
Buttons 1 to 6 share the same functions as
the number buttons on the unit.
qk M (+)/m (–) buttons
The same as pushing the joystick up/down.
ql < (.)/, (>) buttons
The same as pushing the joystick left/right.
w; SCRL (scroll) button
To scroll display item.
wa SOUND button
To select sound items.
ws ATT (attenuate) button
To attenuate the sound. To cancel, press
again.
wd VOL (volume) +/– buttons
To adjust volume.
*1 When an MD changer is connected.
*2 If the changer is connected, the operation is
different, see page 21.
*3 When an ATRAC CD is played.
*4 When an MP3/WMA is played.
*5 When a CD/MD changer is connected.
*6 When playing back on this unit.
Note
If the unit is turned off and the display disappears, it
cannot be operated with the card remote commander
unless (SOURCE) on the unit is pressed, or a disc is
inserted to activate the unit first.
Tip
For details on how to replace the battery, see
“Replacing the lithium battery of the card remote
commander” on page 25.
9
Page 10
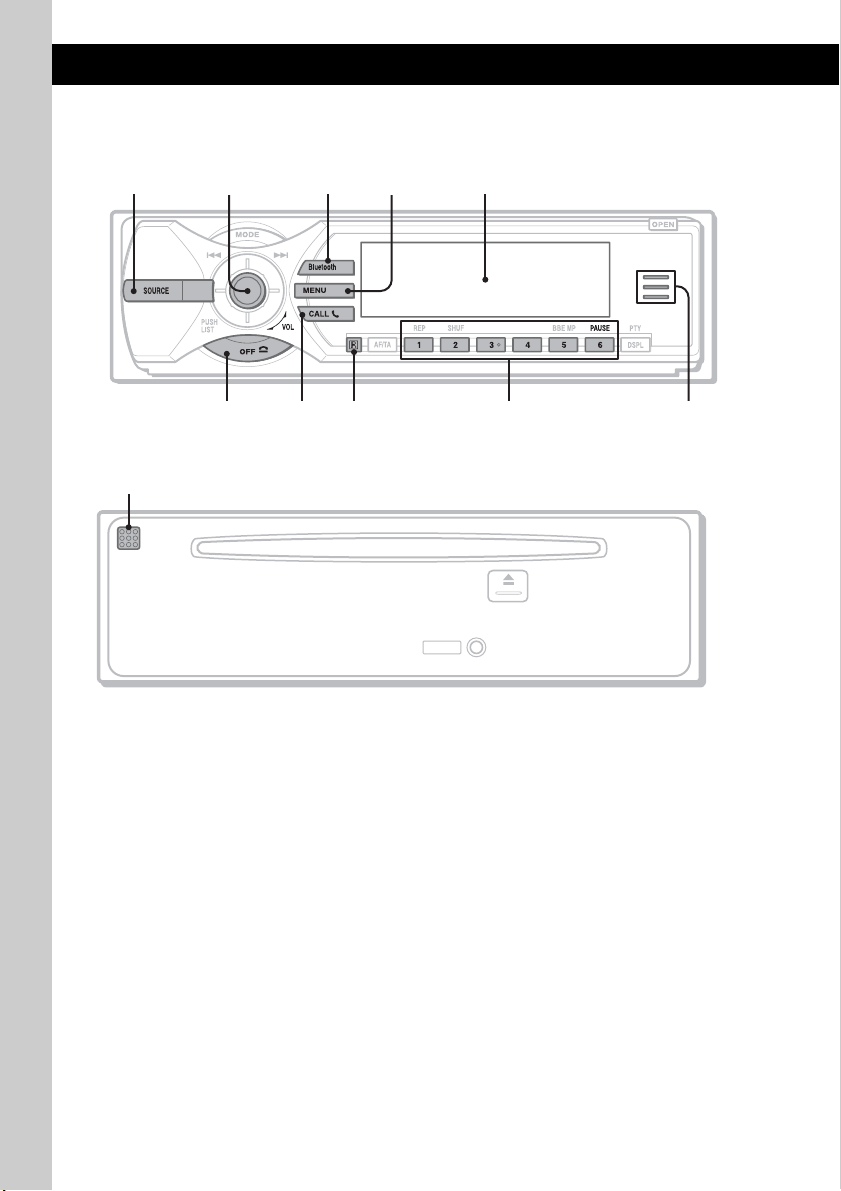
Bluetooth function
6097
8
Main unit
1
Front panel removed
qa
Refer to the pages listed for details. The
corresponding buttons on the card remote
commander control the same functions as those
on the unit.
A SOURCE button
To power on; change the source (Radio/CD/
1
MD*
/Bluetooth AUDIO/AUX).
B Joystick
Rotate to: Adjust the volume.
Push up/down/left/right to: Select a menu
item.
Press to: Apply a setting.
Bluetooth audio device*
Push left/right to:
– Skip tracks (push).
– Reverse/fast-forward a track (push and
hold).
C Bluetooth button 15, 16, 17, 19
To access the Bluetooth functions; receive a
call.
2
:
10
3524
RESET
D MENU button 17
To enter menu; receive a call.
E Display window
F OFF button 17
To power off; stop the source; end or reject a
call.
G CALL button 17
To access the telephone functions; receive a
call.
H Receptor for the card remote
commander
I Number buttons
To call stored dials.
Bluetooth audio device*
(6): PAU SE
To pause playback.
J Bluetooth indicator
Lights up when the Bluetooth signal is input/
output. Goes off when the Bluetooth signal is
off.
K Microphone 16
MEX-BT5000
2
:
Page 11
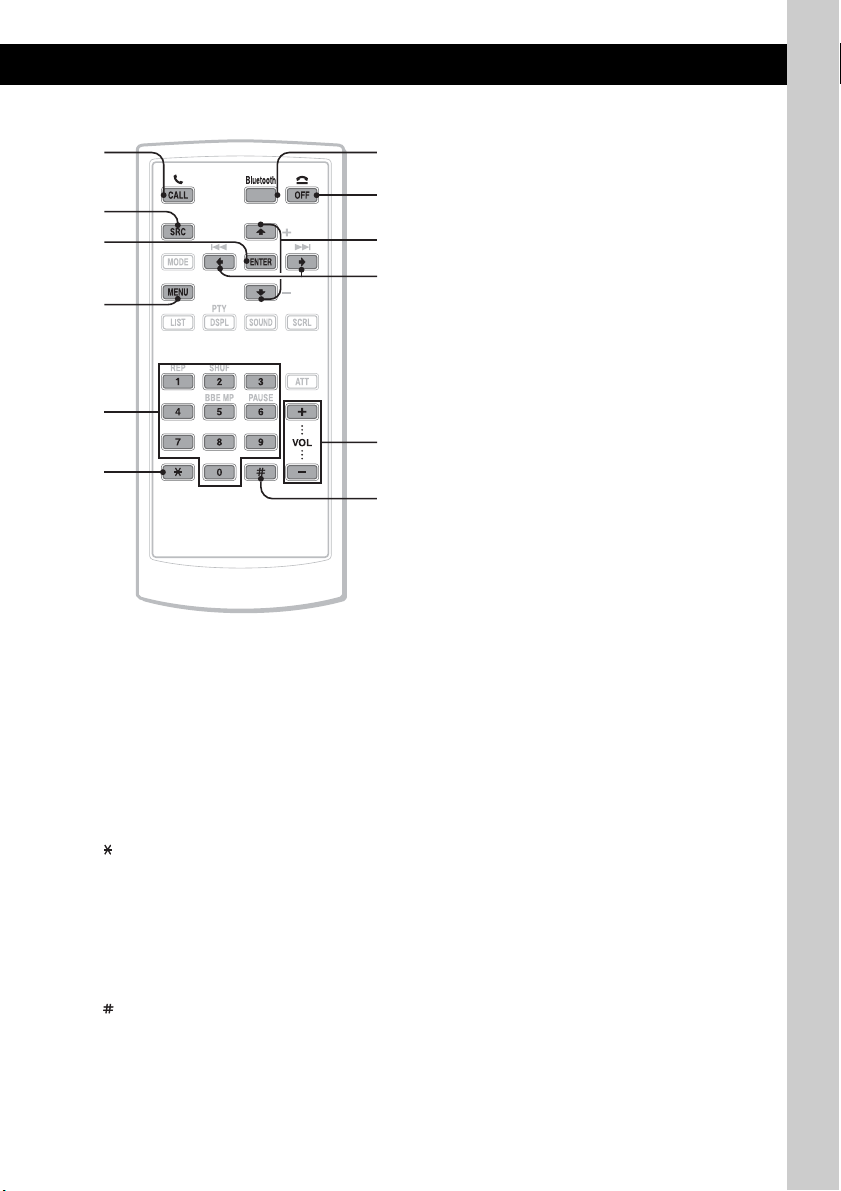
Card remote commander RM-X302
73
1
qs
6
qg
Note
If the unit is turned off and the display disappears, it
cannot be operated with the card remote commander
unless (SOURCE) on the unit is pressed, or a disc is
inserted to activate the unit first.
Tip
For details on how to replace the battery, see
“Replacing the lithium battery of the card remote
commander” on page 25.
qh
4
qd
qj
qf
qk
The following buttons on the card remote
commander have also different buttons/functions
from the unit.
qs ENTER button
To apply a setting.
qd Number buttons 15, 16, 17
To input numbers (phone number, passcode,
etc.).
Buttons 1 to 6 share the same functions as
the number buttons on the unit.
qf
button 17
qg M (+)/m (–) buttons
The same as pushing the joystick up/down.
qh < (.)/, (>) buttons
The same as pushing the joystick left/right.
qj VOL (volume) +/– buttons
To adjust volume.
button 17
qk
*1 When an MD changer is connected.
*2 When a Bluetooth audio device (supports AVRCP
of Bluetooth technology) is connected. Depending
on the device, certain operations may not be
available.
11
Page 12

CD
For details on selecting a CD/MD changer, see
page 21.
Display items
Example: when you set Info (informatio n) mode
to “All” (pag e 20).
A B
C
A Source/MP3/ATRAC/WMA indication
B Clock
C Track number/Elapsed playing time, Disc/
artist name, Album/group number, Album/
group name, Track name, Text information*
* When playing an MP3, ID3 tag is displayed, when
playing ATRAC CD, text information written by
SonicStage, etc., is displayed, and when playing
WMA, WMA tag is displayed.
To change display items C, press (DSPL);
scroll display items C, press (SCRL) on the
card remote commander or set “Auto Scroll on”
(page 20).
Tip
Displayed items will differ, depending on the disc type,
recorded format and settings. For details on MP3/
WMA, see page 24; ATRAC CD, see page 24.
Repeat and shuffle play
1 During playback, press (1) (REP) or
(2) (SHUF) repeatedly until the
desired setting appears.
Select To play
Repeat Track track repeatedly.
Repeat Album*1album repeatedly.
2
Repeat Group*
Shuffle Album*1album in random order.
Shuffle Group*
Shuffle Disc disc in random order.
*1 When an MP3/WMA is played.
*2 When an ATRAC CD is played.
To return to normal play mode, select “Repeat
off” or “Shuffle off.”
group repeatedly.
2
group in random order.
Radio
Storing and receiving stations
Caution
When tuning in stations while driving, use Best
Tuning Memory (BTM) to prevent an accident.
Storing automatically — BTM
1 Press (SOURCE) repeatedly until
“TUNER” appears.
To change the band, press (MODE)
repeatedly. You can select from FM1, FM2,
FM3, MW or LW.
2 Press (MENU).
3 Push the joystick up/down until
“Receive Mode” appears, then push it
right.
4 Push the joystick up/down until “BTM”
appears.
5 Press the joystick.
The unit stores stations in order of frequency
on the number buttons.
A beep sounds when the setting is stored.
Storing manually
1 While receiving the station that you
want to store, press and hold a
number button ((1) to (6)) until
“MEM” appears.
The number button indication appears in the
display.
Note
If you try to store another station on the same number
button, the previously stored station will be replaced.
Tip
When a RDS station is stored, the AF/TA setting is
also stored (page 13).
Receiving the stored stations
1 Select the band, then press a number
button ((1) to (6)).
Tuning automatically
1 Select the band, then push the joystick
left/right to search for the station.
Scanning stops when the unit receives a
station. Repeat this procedure until the
desired station is received.
12
Page 13
Tip
If you know the frequency of the station you want to
listen to, push and hold the joystick left/right to locate
the approximate frequency, then push the joystick left/
right to fine adjust to the desired frequency (manual
tuning).
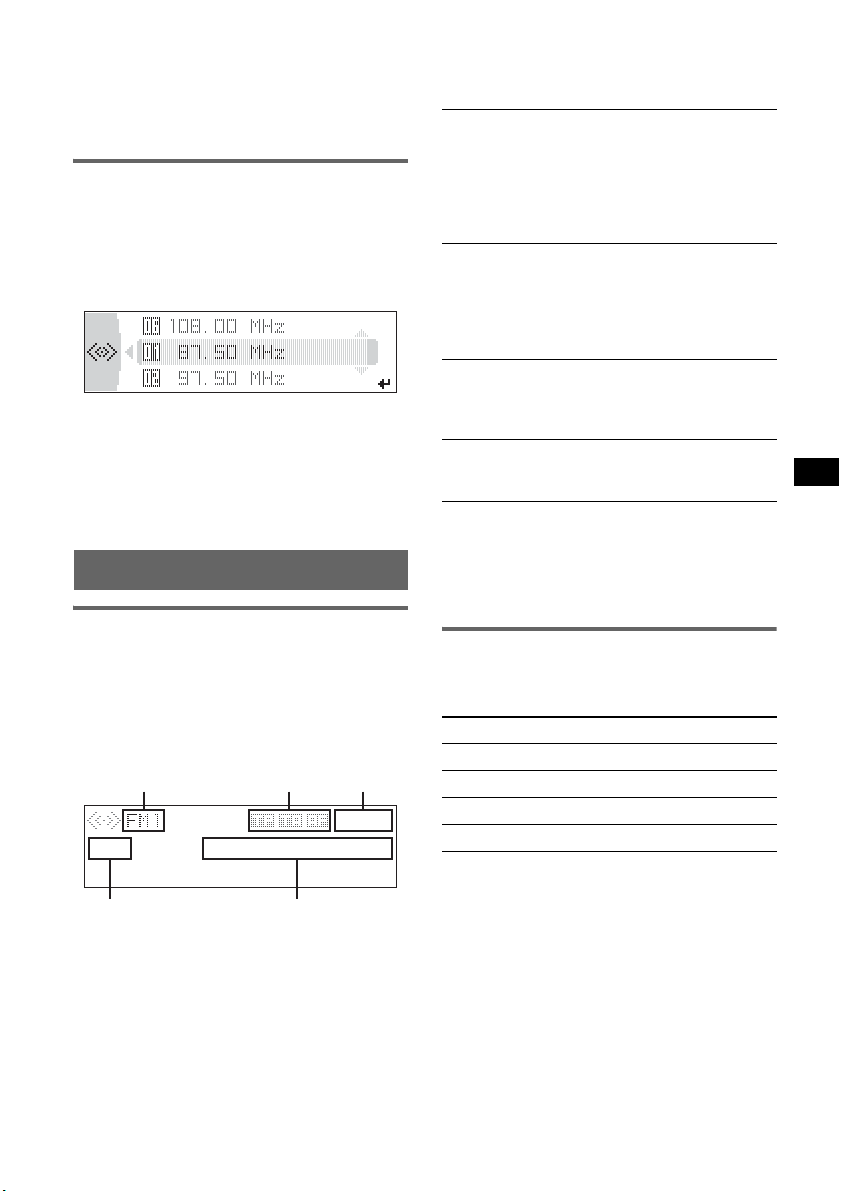
Receiving a station through a list
— LIST
You can list up the frequency.
1 Select the band, then press the
joystick.
The frequency appears.
2 Push the joystick up/down until the
desired station appears.
3 Press the joystick to receive the
station.
The display returns to normal reception
mode.
RDS
Overview
FM stations with Radio Data System (RDS)
service send inaudible digital information along
with the regular radio programme signal.
Display items
Example: when you set Info (information) mode
to “All” (page 20).
ABC
RDS services
This unit automatically provides RDS services as
follows:
AF (Alternative Frequencies)
Selects and retunes the station with the
strongest signal in a network. By using this
function, you can continuously listen to the
same programme during a long-distance drive
without having to retune the same station
manually.
TA (Traffic Announcement)/TP (Traffic
Programme)
Provides current traffic information/
programmes. Any information/programme
received, will interrupt the currently selected
source.
PTY (Programme Types)
Displays the currently received programme
type. Also searches your selected programme
type.
CT (Clock Time)
The CT data from the RDS transmission sets
the clock.
Notes
• Depending on the country/region, not all RDS
functions may be available.
• RDS will not work if the signal strength is too weak,
or if the station you are tuned to is not transmitting
RDS data.
Setting AF and TA
1 Press (AF/TA) repeatedly until the
desired setting appears.
Select To
AF on activate AF and deactivate TA.
TA on activate TA and deactivate AF.
AF/TA on activate both AF and TA.
AF/TA off deactivate both AF and TA.
ED
A Radio band
B TA /T P/ AF *
1
C Clock
D Preset number
E Frequency*
2
(Programme service name),
RDS data
*1 When Info (Information) “All” is set:
– “TP” lights up while “TP” is received.
– “TA”/“AF” lights up while “TA/AF” is on.
*2 While receiving the RDS station, “ RDS” is
displayed on the left of the frequency indication.
Storing RDS stations with the AF and
TA setting
You can preset RDS stations along with the AF/
TA setting. If you use the BTM function, only
RDS stations are stored with the same AF/TA
setting.
If you preset manually, you can preset both RDS
and non-RDS stations with the AF/TA setting for
each.
1 Set AF/TA, then store the station with BTM or
manually.
continue to next page t
13
Page 14

Presetting the volume of traffic
announcements
You can preset the volume level of the traffic
announcements so as to not miss hearing them.
1 Rotate the joystick to adjust the volume level.
2 Press and hold (AF/TA) until “TA Vol”
appears.
Receiving emergency
announcements
With AF or TA on, the emergency
announcements will automatically interrupt the
currently selected source.
Staying with one regional
programme — REG
When the AF function is on: this unit’s factory
setting restricts reception to a specific region, so
you will not be switched to another regional
station with a stronger frequency.
If you leave this regional programme’s reception
area, set “Regional off” in setup during FM
reception (page 20).
Note
This function does not work in the UK and in some
other areas.
Local Link function (UK only)
This function enables you to select other local
stations in the area, even if they are not stored on
your number buttons.
1 During FM reception, press a number button
((1) to (6)) on which a local station is stored.
2 Within 5 seconds, press again a number button
of the local station.
Repeat this procedure until the local station is
received.
Type of programmes
News (News), Current Affairs (Current
Affairs), Information (Information), Sport
(Sports), Education (Education), Drama
(Drama), Cultures (Culture), Science
(Science), Varied Speech (Varied),
Pop Music (Popular Music), Rock Music
(Rock Music), Easy Listening (Easy
Listening), Light Classics M (Light
Classical), Serious Classics (Classical),
Other Music (Other Music Type), Weather &
Metr (Weather), Finance (Finance),
Children’s Progs (Children’s Programmes),
Social Affairs (Social Affairs), Religion
(Religion), Phone In (Phone In), Tr av el &
Touring (Travel), Leisure & Hobby
(Leisure), Jazz Music (Jazz Music),
Country Music (Country Music),
National Music (National Music),
Oldies Music (Oldies Music), Folk Music
(Folk Music), Documentary (Documentary)
Note
You cannot use this function in countries/regions
where no PTY data is available.
Setting CT
1 Set “CT on” in setup (page 20).
Notes
• The CT function may not work even though an RDS
station is being received.
• There might be a difference between the time set by
the CT function and the actual time.
Selecting PTY
1 Press (PTY) during FM reception.
The current programme type name appears if
the station is transmitting PTY data.
2 Push the joystick up/down until the
desired programme type appears.
3 Press the joystick.
The unit starts to search for a station
broadcasting the selected programme type.
14
Page 15
Bluetooth function
Before using the Bluetooth
function
Menu operations of the Bluetooth
function
The Bluetooth settings can be configured from
the Bluetooth function menu or CALL menu.
Menu operations can generally be performed
using the joystick.
1 Press (Bluetooth) or (CALL).
The Bluetooth function menu or CALL menu
appears.
2 Push the joystick up/down until the
desired setting item appears, then
push it right.
The digital indication moves to the right
(setting selection) side.
3 Push the joystick up/down to select
the setting, then press it.
The setting is complete.
4 Press (Bluetooth) or (CALL).
The normal display appears.
To input a character
Push the joystick up/down to select a character,
and push left/right to move the cursor.
The characters that can be input are A – Z, a – z,
0 – 9 and a blank space.
Configuring Bluetooth Settings
Before connecting to a Bluetooth device,
configure the Bluetooth Settings on this unit.
1 Press (Bluetooth).
The Bluetooth function menu appears.
2 Select “Bluetooth Settings.”
3 Select the desired menu.
4 Select the setting.
5 Press (Bluetooth).
Bluetooth Settings menu
“z” indicates the default settings.
Signal
To switch the Bluetooth signal output of this
unit to “ON” or “OFF.”
– “ON”: to output the Bluetooth signal (RF 2.4
GHz).
–“OFF” (
Be sure to set to “ON” when you connect to the
Bluetooth device.
Visibility
To allow other Bluetooth devices to search for
this unit.
– “Show”: to allow the other device to search.
–“Hide” (
Be sure to set to “Show” when you search for
this unit from a Bluetooth device.
Device Name
To change the name of this unit displayed on
connected device. (Default setting: “Xplod”)
Select “Rename” and input characters. Up to 12
characters can be input.
To restore “Xplod,” select “Default” c “yes.”
Note
For details on the settings of other Bluetooth devices,
see their respective manuals.
z): to not output the Bluetooth signal
(RF 2.4 GHz).
z): to not allow the other device to
search.
Pairing and connecting this unit
with a Bluetooth device
When connecting Bluetooth devices for the first
time, mutual registration is required. This is
called “pairing.” This registration (pairing) is
required only for the first time, as this unit and
the other devices will recognize each other
automatically from the next time. (Depending on
the device, you may need to input a passcode for
each connection.)
Searching for a Bluetooth device
from this unit
Check that the other Bluetooth device is set to
allow for searching (discoverable) beforehand.
1 Press (Bluetooth).
The Bluetooth function menu appears.
2 Select “Connectivity” c “Search.”
continue to next page t
15
Page 16
The process of searching for a connectable
device begins, then the detected device
name(s) appear in a list. If a device name
cannot be received, “Unknown” will be
displayed.
Search time varies depending on the number
of Bluetooth devices.
3 Select the device to connect.
Pairing starts.
4 Input a passcode*.
Input the same passcode for this unit and the
connecting device using the joystick or card
remote commander. The passcode can be
either your own selected number or the
number determined by the connecting device.
For details, see the manual of the connecting
device.
5 Press the joystick to confirm.
“Connected” appears and connection is
complete.
“ ” or “ ” appears during connection.
* Passcode may be called “passkey,” “PIN code,” “PIN
number” or “Password,” etc., depending on the
device.
Searching for this unit from a
Bluetooth device
Check that “Visibility” in the Bluetooth Settings
menu is set to “Show” (page 15).
1 Set the connecting device to search.
2 When “Allow Connection?” appears
on this unit, select “yes.”
Connection starts.
Depending on the device, the passcode input
display appears.
3 Input the passcode of the connecting
device.
4 Press the joystick to confirm.
“Connected” appears and connection is
complete.
“ ” or “ ” appears during connection.
Tip
The passcode can also be input with the number
buttons of the card remote commander.
16
Notes
• While connecting to a Bluetooth device, this unit
cannot be detected from another device. To be
detected, disconnect the current connection and
search for this unit from another device.
• Depending on the device, searching from this unit
may not be possible. In this case, search for this unit
from the connecting device.
• If you search for this unit and the connecting device
mutually at the same time, this unit will not recognize
the connecting device.
• It may take time to search or connect.
• Depending on the device, the confirmation display of
the connection appears before inputting the
passcode.
• The time limit for inputting the passcode differs
depending on the device.
• This unit can register up to 6 devices each for
handsfree and audio devices.
• This unit cannot be connected to a device that
supports only HSP (Head Set Profile).
Connecting to registered devices
Devices are registered once paired and connected
with this unit. You can select the registered
device and connect it.
1 Press (Bluetooth).
The Bluetooth function menu appears.
2 Select “Connectivity” c “Handsfree
Devices” or “Audio Devices.”
The list of registered devices appears.
3 Select the device to connect.
4 Select “Connect.”
“Connected” appears and connection is
complete.
“ ” or “ ” appears during connection.
To stop the connection
Select “Disconnect” c “yes” in step 4.
Tip
Depending on the device, it may be possible to select
this unit from the device, and then connect.
Handsfree talking
Check that this unit and the cellular phone are
connected beforehand (page 15, 16).
Notes
• For details on operation when a cellular phone with
Bluetooth audio streaming function is connected as
an audio device, see “Listening to music from an
audio device” on page 18.
• The microphone of this unit is located on the rear of
the front panel (page 10). Do not mask the
microphone with tape, etc.
• Even if you activate the ATT function during a call,
the outgoing sound will not be attenuated.
Page 17
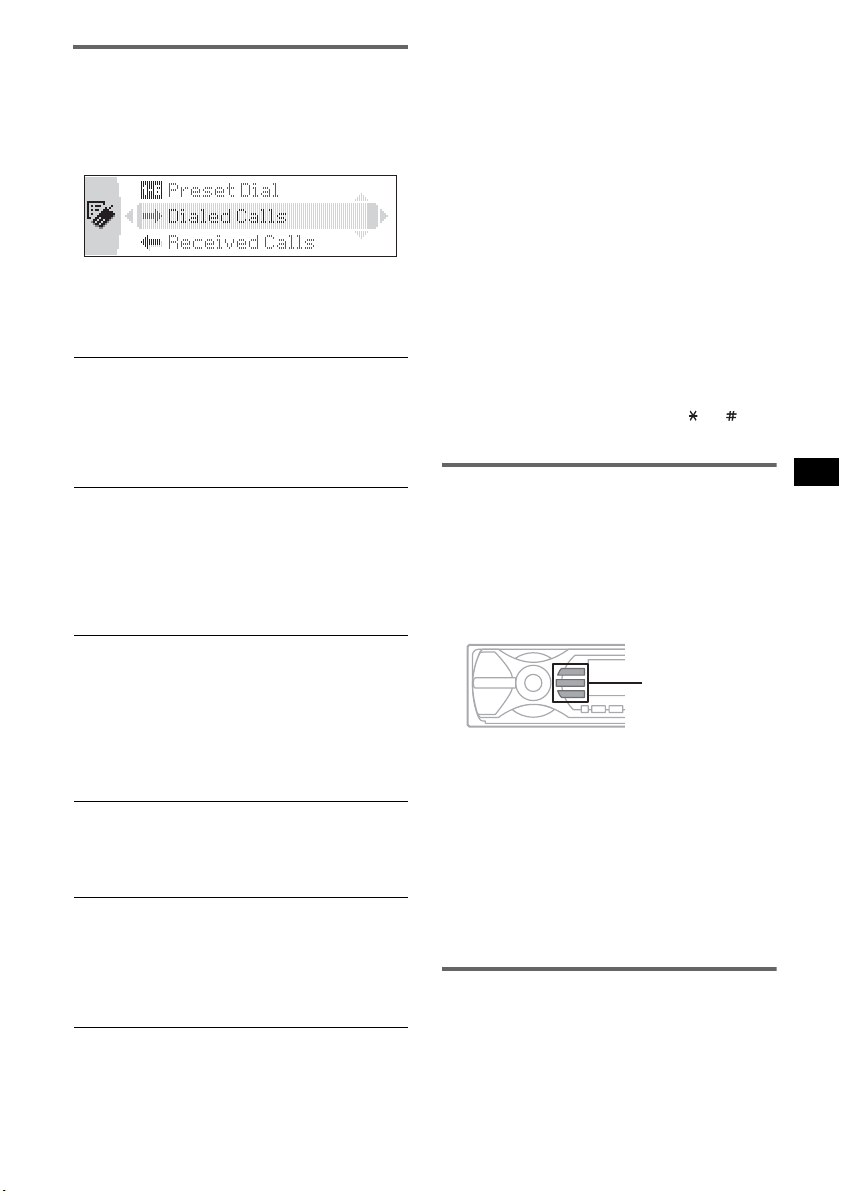
Making calls
You can make a call from the connected cellular
phone by operating this unit.
1 Press (CALL).
The CALL menu appears.
2 Select the items in the following order,
then press the joystick to start calling.
• On the “Dialed Calls,” “Received Calls” and “Preset
Dial” menus, you can make a call by pressing
(CALL) while the phone number is displayed.
Presetting the volume of ring tone
and talker’s voice
You can preset the volume level of the ring tone
and talker’s voice.
To adjust the ring tone:
Rotate the joystick while the phone is ringing.
“Ring Vol” appears and ring tone volume is set.
To adjust the talker’s voice:
Rotate the joystick during a call. “Talk Vol”
appears and the talker’s voice volume is set.
CALL menu
Dialed Calls*
Selects from the dialed call history. (Maximum
storable name and phone numbers: 10)
Name and phone number to call c “Call”
Select “Delete” to delete the name and phone
number, “Delete All” to clear the history.
Received Calls*
Selects from the received call history.
(Maximum storable name and phone
numbers:10)
Name and phone number to call c “Call”
Select “Delete” to delete the name and phone
number, “Delete All” to clear the history.
Phonebook*
Selects from the phonebook list. (Maximum
storable name and phone numbers: 50)
“Contact List” c Name to call c the name and
phone number
For details on how to store in the phonebook,
see “Using the Phonebook” on page 18 and
“Setting a handsfree device” on page 19.
Dial
Inputs the phone number using the joystick or
card remote commander.
To input “+,” press and hold the 0 button on the
card remote commander.
Preset Dial*
Selects the phone number stored in a number
button.
Preset number (P1 – P6) c “Call”
For details on how to store in the number
buttons, see “Using the Preset Dial” on page 18.
* If you set “Security” (page 19), “Security Locked”
appears and operation is not possible.
Tips
• Preset Dial also allows you to make a call by
pressing a number button twice after pressing
(CALL).
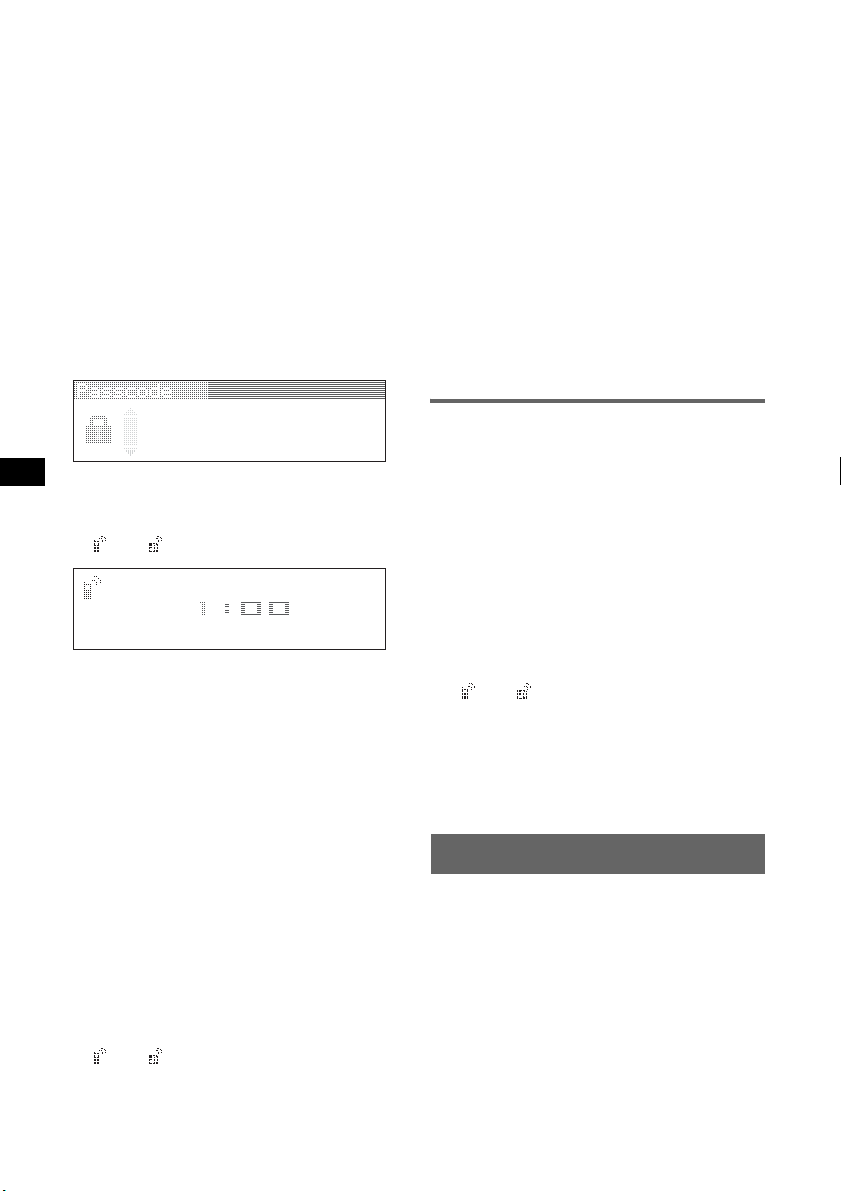
Sending DTMF (Dual Tone Multiple
Frequency) tones
You can send DTMF tones.
To send DTMF tones, use the joystick or press
the required number buttons (0 – 9, or ) on
the card remote commander during a call.
Receiving calls
When receiving a call, ring tone is output from
your car speakers.
For details on the settings for receiving a call and
during a call, see “Setting a handsfree device” on
page 19.
1 When receiving a call, press (CALL),
(MENU) or (Bluetooth).
(Bluetooth)
(MENU)
(CALL)
The phone call starts.
To reject a call
Press (OFF).
Tips
• If you set “Auto Answer” to on, the phone call is
automatically started in the set time (page 19).
• If (CALL) is pressed during a call, the handsfree
function is deactivated, and the microphone and
speaker of the cellular phone are activated. In this
case, the Bluetooth connection may become
disconnected depending on the cellular phone.
Ending calls
1 Press (OFF).
When the call ends, talk time appears for a
few seconds.
continue to next page t
17
Page 18

Note
Even if the call is ended, the Bluetooth connection is
not cancelled.
Using the Phonebook
Receiving phonebook data from a
cellular phone
1 Select “Phone Settings” from the Bluetooth
function menu.
2 Select “Receive PB.”
“Waiting…” appears.
3 Send the phonebook data by operating the
cellular phone.
“Data Receiving…” appears while receiving
the phonebook data.
“Complete” appears when receiving is
complete.
Note
To cancel the transfer of phonebook data, operate the
cellular phone. Transfer cannot be cancelled from this
unit.
Using the Preset Dial
Storing the Preset Dial
You can store a phone number in the phonebook
to the Preset Dial.
1 Select “Preset Dial” from the CALL menu.
2 Select the preset number (P1 – P6) to store,
then select “Preset Memory.”
3 Select the name to store.
4 Select a phone number of the selected name.
5 Select “yes” when “Save?” appears.
Note
To replace a registered preset number, delete the
existing registration first, then store the new phone
number.
Deleting the Preset Dial
1 Select “Preset Dial” from the CALL menu.
2 Select the preset number to delete.
3 Select “Delete” c “yes.”
Storing the numbers from “Dialed
Calls” or “Received Calls”
1 Select “Dialed Calls” or “Received Calls”
from the CALL menu.
2 Select the phone number to store, then select
“Save.”
The “Contact Name” display appears.
3 Input a name.
Up to 20 characters can be input.
4 Select “Save?” c “yes.”
Note
Up to 50 phone numbers can be stored in the
Phonebook. If you try to register more than 50
numbers, “Memory Full” appears.
Deleting from the phonebook
1 Select “Phonebook” c “Contact List” from the
CALL menu.
2 Select the name to delete.
3 Select “Delete” c “yes.”
To clear all phonebook data, select “Delete All”
in step 1. After clearing, confirm that all
phonebook data has been cleared properly.
Changing a name in the phonebook
1 Select “Phonebook” c “Contact List” from the
CALL menu.
2 Select the name to change.
3 Select “Edit Name,” then input a new name.
Music streaming
Listening to music from an audio
device
You can listen to music of an audio device on this
unit if the audio device supports A2DP
(Advanced Audio Distribution Profile) of
Bluetooth technology.
1 Connect this unit and the Bluetooth
audio device (page 16).
“ ” appears during connection.
2 Turn down the volume on this unit.
3 Press (SOURCE) repeatedly until
“Bluetooth AUDIO” appears.
4 Operate the audio device to start
playback.
5 Adjust the volume on this unit.
Operating an audio device with this
unit
You can perform the following operations on this
unit if the audio device supports AVRCP (Audio
Video Remote Control Profile) of Bluetooth
technology. (The operation differs depending on
the audio device.)
18
Page 19

To Do this
Skip tracks Push the joystick left/right.
Reverse/fast-
forward a track
Push and hold the joystick left/
right.
Pause Press (6) (PAUSE)*.
* Depending on the device, it may be necessary to
press twice.
Operations other than the above should be
performed on the audio device.
Note
Even if the source is changed on this unit, playback of
the audio device does not stop.
Tip
You can connect a cellular phone that supports A2DP
(Advanced Audio Distribution Profile) as an audio
device and listen to music.
Other settings
Setting a handsfree device
You can set various functions when a cellular
phone compatible with the Bluetooth function is
connected as a handsfree device.
1 Press (Bluetooth).
The Bluetooth function menu appears.
2 Select “Phone Settings.”
3 Select the desired menu.
4 Select the setting.
5 Press (Bluetooth).
Phone Settings menu
“z” indicates the default settings.
Receive PB*
To receive and store the phonebook data from a
cellular phone (page 18).
Auto Answer
– “on”: to start a call automatically when
received. Set the time to start a call: “1 sec” –
“60 sec”
– “off” (
(MENU) or (Bluetooth) is pressed.
Ringtone
To switch the ring tone.
–“Cellular*
with the cellular phone.
– “Default”: to output this unit’s ring tone.
1*2
(Receive Phonebook)
z): to not start a call until (CALL),
3
” (z): to output the ring tone set
EC/NC Mode*4 (Echo Canceller/Noise
Canceller Mode)
To reduce echo and noise in phone call
conversations.
Set to “Mode 1” (
z) normally. If the quality of
the outgoing sound is unsatisfactory, set to
“Mode 2” or “off.”
Speaker Sel*
4
(Speaker Select)
To set the front speaker to output the ring tone,
dial-tone and other party’s voice.
–“FR-L” (
z): to output from the left channel of
front speakers.
– “FR-R”: to output from the right channel of
front speakers.
– “Front”: to output from both front speakers.
Security
To lock the personal information in the
following menus by setting a 4-digit password
(page 17).
“Dialed Calls,” “Received Calls,” “Phonebook,”
“Preset Dial,” “Receive PB”
If you set the security, “Security Locked”
appears when the above menus are operated.
To unlock the security, select “Unlock” and
input the password number.
*1 If “Security” is set, “Security Locked” appears and
operation is not possible.
*2 If a character that cannot be displayed on this unit
is used, it is not displayed correctly.
*3 Depending on the cellular phone, this unit’s ring
tone may be output even if set to “Cellular.”
*4 Configurable during a call.
Note
If you select “Initialize” in the Security setting, all
stored data is deleted (“Dialed Calls,” “Received Calls,”
“Phonebook” and “Preset Dial”).
Deleting the registration of a
connected device
1 Press (Bluetooth).
The Bluetooth function menu appears.
2 Select “Connectivity” c “Handsfree
Devices” or “Audio Devices.”
The list of registered devices appears.
3 Select the device to delete.
4 Select “Delete” c “yes.”
To clear all devices in the selection list, select
“Delete All” in step 4.
Auto connection function
If your car’s ignition switch is set to the ACC
position, this unit reconnects automatically to the
last connected Bluetooth device.
19
Page 20

Other functions
Adjusting menu items — MENU
1 Press (MENU).
2 Push the joystick up/down until the
desired menu item appears, then push
it right.
The items changes as follows:
Setup y Display y Receive Mode
y Sound
3 Push the joystick up/down until the
desired setting item appears, then
push it right.
The digital indication moves to the right
(setting selection) side.
4 Push the joystick up/down to select
the setting, then press it.
The setting is complete.
5 Press (MENU).
The display returns to normal play/reception
mode.
Note
Displayed items will differ, depending on the source
and setting.
Tips
• You can go to the next menu level by pressing the
joystick.
• In step 5, push the joystick left until “EXIT” appears,
then press the joystick, instead of pressing (MENU).
• You can enter the Sound setting menu directly by
pressing (SOUND) on the card remote commander.
The following items can be set (follow the page
reference for details):
“
z” indicates the default settings.
Setup
Clock Adjust (page 6)
CT (Clock Time)
To set “on” or “off” (z) (page 13, 14).
Beep
To s et “on” ( z) or “off.”
RM (Rotary Commander)
To change the operative direction of the rotary
commander controls.
– “NORM” (
the factory-set position.
– “REV”: when you mount the rotary
commander on the right side of the steering
column.
AUX Audio*
To turn the AUX source display “on” (
“off” (page 22).
z): to use the rotary commander in
20
z) or
Version*
To display the unit’s firmware version.
Display
Image
To set various display images.
– “SpaceProducer” (
z): to create animated on-
screen patterns in time with the music.
– “All”: to step repeatedly through the display
images in all display modes.
– “off”: to not display any image.
– “SA 1 – 5”: to display the Spectrum Analyzer.
– “Movie 1 – 3”: to display a movie.
– “Wallpaper 1 – 3”: to display a wallpaper.
– “SA All”/“Movie All”/“Wallpaper All”: to
step repeatedly through the display images of
each mode.
Info (Information)
To display the items (depending on the source,
etc.).
– “All”: to display all items.
–“Simple” (
z): to not display any items.
– “Clear”: to have items automatically
disappear.
Demo*
(Demonstration)
To set “on” (z) or “off.”
Dimmer
To change the brightness of the display.
–“Auto” (
z): to dim the display automatically
when you turn lights on.
– “on”: to dim the display.
– “off”: to deactivate the dimmer.
Auto Scroll
To scroll long displayed item automatically
when the disc/album/group/track is changed.
– “on”: to scroll.
–“off” (
z): to not scroll.
ID3 Tag
To switch the priority of the displayed ID3 tag
character (when CD is selected as the source).
–“EUR” (
z): Western Europe display character
priority.
– “RUS”: Cyrillic display character priority.
Receive Mode
Local (Local seek mode)
–“off” (
z): to tune normal reception.
– “on”: to only tune into stations with stronger
signals.
Mono (Monaural mode)
To improve poor FM reception, select monaural
reception mode.
–“off” (
z): to hear stereo broadcast in stereo.
– “on”: to hear stereo broadcasts in monaural.
Regional
To set “on” (
z)” or “off” (page 14).
Page 21
BTM (page 12)
Sound
EQ3 Preset
To select an equalizer type: “Xplod,” “Vocal,”
“Edge,” “Cruise,” “Space,” “Gravity,” “Custom”
or “Off” (
z).
EQ3 Tune
See “Customizing the equalizer curve” on
page 21.
DSO
To select the DSO mode: “1,” “2,” “3” or “off”
(
z). The larger the number, the more enhanced
the effect.
Balance
To adjust the balance between the right and left
speakers: “R10” – “±0” (
z) – “L10”
Fader
To adjust the balance between the front and rear
speakers: “F10” – “±0” (
z) – “R10”
Subwoofer
To adjust the subwoofer volume: “+10” – “±0”
(
z) – “–10”
(“– ∞” is displayed at the lowest setting.)
LPF (Low Pass Filter)
To select the subwoofer cut-off frequency: “off”
(
z), “125Hz” or “78Hz.”
AUX Level
To adjust the volume level for each connected
auxiliary equipment. This setting negates the
need to adjust the volume level between sources
(page 22).
Adjustable level: “+6 dB” – “±0 dB” (
z) –
“–6 dB”
* When the unit is turned off.
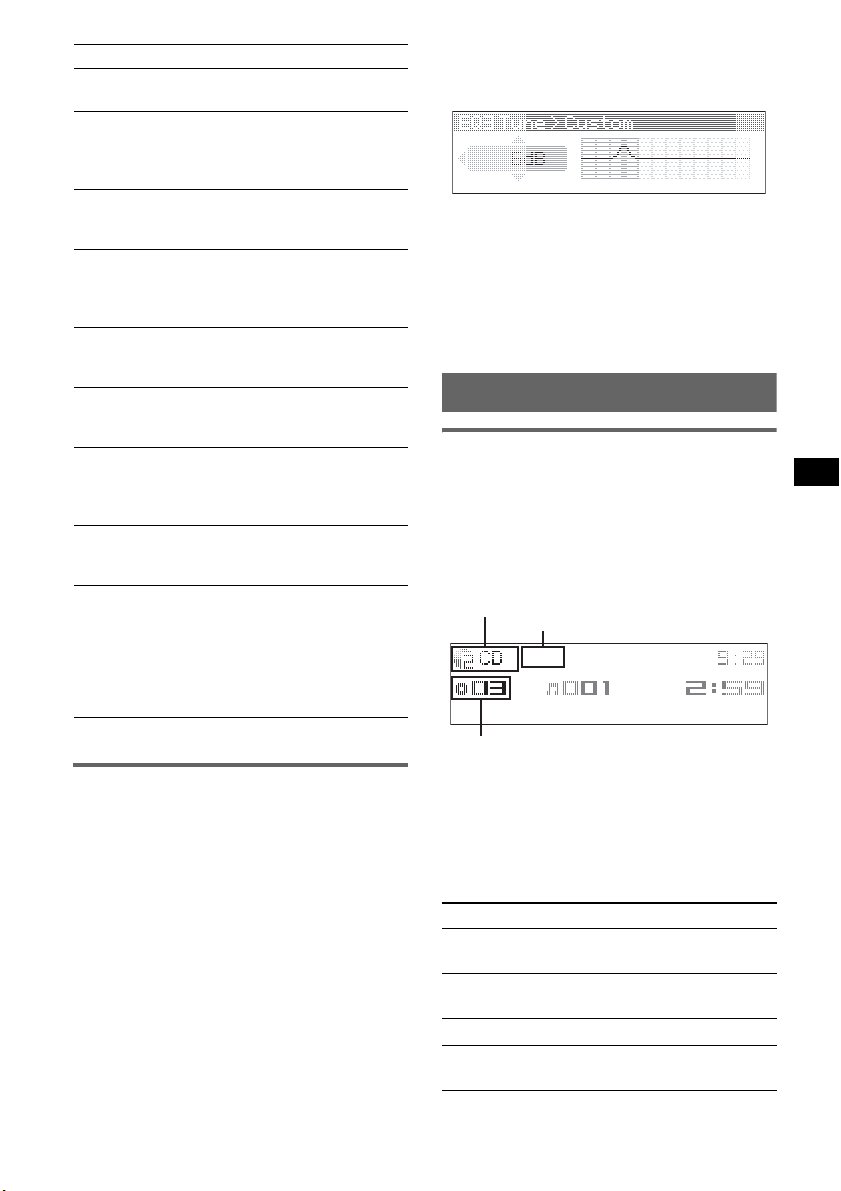
Customizing the equalizer curve
— EQ3 Tune
“Custom” of EQ3 allows you to make your own
equalizer settings.
1 Select a source, then press (MENU).
2 Select “Sound” c “EQ3 Preset” c
“Custom,” using the joystick.
3 Select “EQ3 Tune” using the joystick.
4 Select the desired frequency range
from “LOW,” “MID” and “HI.”
5 Select the frequency you wish to
adjust.
Adjustable frequency in each range:
LOW: 60 Hz or 100 Hz
MID: 500 Hz or 1.0 kHz
HI: 10.0 kHz or 12.5 kHz
6 Adjust the equalizer curve.
The volume level is adjustable in 1 dB steps,
from –10 dB to +10 dB.
7 Press the joystick.
Repeat steps 4 to 7 to adjust other
frequencies.
To restore the factory-set equalizer curve,
select “Initialize” c “Yes” in step 4.
Tip
Other equalizer types are also adjustable.
Using optional equipment
CD/MD changer
Selecting the changer
1 Press (SOURCE) repeatedly until “CD” or
“MD” appears.
2 Press (MODE) repeatedly until the desired
changer appears.
Unit number, MP3 indication*
Disc/Album number
LP2/LP4 indication*
Playback starts.
*1 When an MP3 is played.
*2 When MDLP disc is played.
Skipping albums and discs
1 During playback, push the joystick up/down.
To skip Push up/down
album and hold for a moment, then
album
continuously
discs repeatedly.
discs
continuously
release.
and hold within 2 seconds of
first releasing.
then push again within 2
seconds and hold.
continue to next page t
1
2
21
Page 22

Repeat and shuffle play
1 During playback, press (1) (REP) or (2)
(SHUF) repeatedly until the desired setting
appears.
Select To play
Repeat Disc*1disc repeatedly.
Shuffle
Changer*
Shuffle All*
tracks in the changer in random
1
order.
2
tracks in all units in random
order.
*1 When one or more CD/MD changers are
connected.
*2 When one or more CD changers, or two or more
MD changers are connected.
To return to normal play mode, select “Repeat
off” or “Shuffle off.”
Tip
“Shuffle All” will not shuffle tracks between CD units
and MD changers.
Locating a disc by name — LIST
You can select a disc from the list when a CD
changer with CD TEXT capability, or MD
changer is connected.
If you assign a name to a disc, the name appears
on the list.
1 During playback, press the joystick.
The disc number or disc name appears.
2 Push the joystick up/down until the desired
disc appears.
3 Press the joystick to play the disc.
The display returns to normal play mode.
Auxiliary audio equipment
You can connect optional Sony portable devices
to the BUS AUDIO IN/AUX IN terminal on the
unit. If the changer or other device is not
connected to the terminal, the unit allows you to
listen to the portable device on your car speakers.
Note
When connecting a portable device, be sure BUS
CONTROL IN is not connected. If a device is
connected to BUS CONTROL IN, “AUX” cannot be
selected by (SOURCE).
Tip
When connecting both a portable device and a
changer, use the optional AUX-IN selector.
Selecting auxiliary equipment
1 Press (SOURCE) repeatedly until “AUX”
appears.
Operate by the portable device itself.
Adjusting the volume level
Be sure to adjust the volume for each connected
audio device before playback.
1 Turn down the volume on the unit.
2 Press (SOURCE) repeatedly until “AUX”
appears.
3 Start playback of the portable audio device at a
moderate volume.
4 Set your usual listening volume on the unit.
5 Adjust the volume level, following “Adjusting
menu items — MENU” on page 20. The input
level is adjustable from –6 dB to +6 dB.
Rotary commander RM-X4S
Attaching the label
Attach the indication label depending on how
you mount the rotary commander.
D
S
D
UN
SO
E
D
O
M
L
SP
D
P
L
M
O
D
E
S
O
U
N
D
Location of controls
The corresponding buttons on the rotary
commander control the same functions as those
on this unit.
SOUND*
PRESET/
DISC
SOURCE
VOL
The following controls on the rotary commander
require a different operation from the unit.
• PRESET/DISC control
The same as pushing the joystick up/down on
the unit (push in and rotate).
• VOL (volume) control
The same as rotating the joystick on the unit
(rotate).
• SEEK/AMS control
The same as pushing the joystick left/right on
the unit (rotate, or rotate and hold).
* Not available for this unit.
ATT
DSPL
SEEK/AMS
MODE
OFF
OFF
22
Page 23

Changing the operative direction
The operative direction of the controls is factoryset as shown below.
To increase
To decrease
If you need to mount the rotary commander on
the right hand side of the steering column, you
can reverse the operative direction.
1 While pushing the VOL control, press and
hold (SOUND).
Additional Information
Precautions
• If your car has been parked in direct sunlight,
allow the unit to cool off before operating it.
• Power aerial will extend automatically while the
unit is operating.
Moisture condensation
On a rainy day or in a very damp area, moisture
condensation may occur inside the lenses and
display of the unit. Should this occur, the unit will
not operate properly. In such a case, remove the disc
and wait for about an hour until the moisture has
evaporated.
To maintain high sound quality
Be careful not to splash juice or other soft drinks
onto the unit or discs.
Notes on discs
• To keep a disc clean, do not touch its surface.
Handle the disc by its edge.
• Keep your discs in their cases or disc magazines
when not in use.
• Do not subject discs to heat/high temperature.
Avoid leaving them in a parked car or on a
dashboard/rear tray.
• Do not attach labels, or use discs with sticky ink/
residue. Such discs may stop spinning when used,
causing a malfunction, or may ruin the disc.
• Do not use any discs with labels or stickers
attached.
The following malfunctions may result from using
such discs:
– Inability to eject a disc (due to a label or sticker
peeling off and jamming the eject mechanism).
– Inability to read audio data correctly (e.g.,
playback skipping, or no playback) due to heat
shrinking of a sticker or label causing a disc to
warp.
• Discs with non-standard shapes (e.g., heart,
square, star) cannot be played on this unit.
Attempting to do so may damage the unit. Do not
use such discs.
• You cannot play 8 cm CDs.
continue to next page t
23
Page 24
• Before playing, clean the discs
with a commercially available
cleaning cloth. Wipe each disc
from the centre out. Do not use
solvents such as benzine,
thinner, commercially available
cleaners, or antistatic spray
intended for analogue discs.
Notes on CD-R/CD-RW discs
• Some CD-Rs/CD-RWs (depending on the
equipment used for its recording or the condition
of the disc) may not play on this unit.
• You cannot play a CD-R/a CD-RW that is not
finalized.
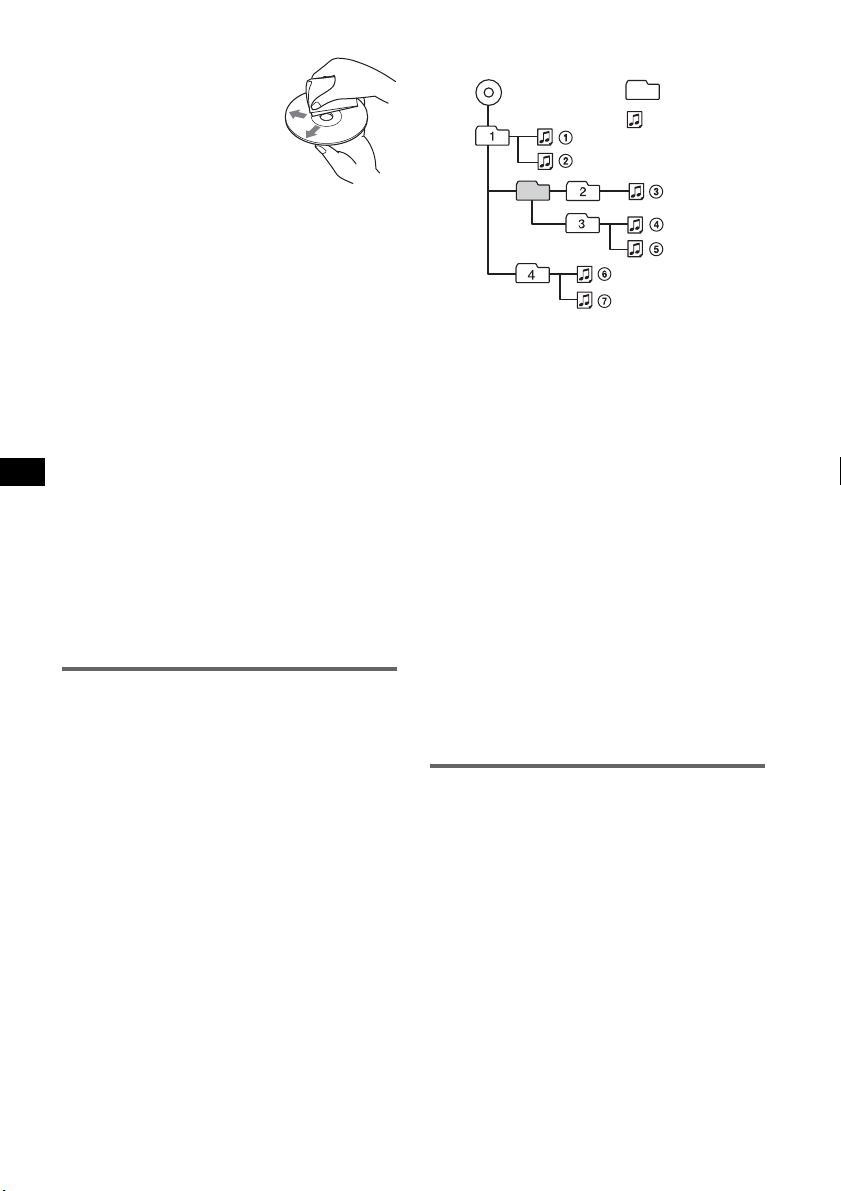
Playback order of MP3/WMA files
MP3/WMA
Folder
(album)
MP3/WMA file
(track)
Music discs encoded with copyright
protection technologies
This product is designed to play back discs that
conform to the Compact Disc (CD) standard.
Recently, various music discs encoded with
copyright protection technologies are marketed by
some record companies. Please be aware that among
those discs, there are some that do not conform to
the CD standard and may not be playable by this
product.
Note on DualDiscs
A DualDisc is a two sided disc product which
mates DVD recorded material on one side with
digital audio material on the other side. However,
since the audio material side does not conform to
the Compact Disc (CD) standard, playback on this
product is not guaranteed.
About MP3/WMA files
MP3, which stands for MPEG-1 Audio Layer-3, is a
music file compression format standard. It
compresses audio CD data to approximately 1/10 of
its original size.
WMA, which stands for Windows Media Audio, is
another music file compression format standard. It
compresses audio CD data to approximately 1/22*
of its original size.
* only for 64 kbps
• The unit is compatible with the ISO 9660 level 1/
level 2 format, Joliet/Romeo in the expansion
format, and Multi Session.
• The maximum number of:
– folders (albums): 150 (including root and empty
folders).
– MP3/WMA files (tracks) and folders contained
in a disc: 300 (if a folder/file names contain
many characters, this number may become less
than 300).
– displayable characters for a folder/file name is
25 (Joliet), or 50 (Romeo).
• ID3 tag versions 1.0, 1.1, 2.2, 2.3 and 2.4 apply to
MP3 only. Displayable ID3 tag is 30 characters
(1.0 and 1.1), or 50 characters (2.2, 2.3 and 2.4).
Displayable WMA tag is 25 characters.
24
Notes
• When naming an MP3 file/WMA file, be sure to add
the file extension “.mp3”/“.wma” to the file name.
• During playback of a VBR (variable bit rate) MP3/
WMA file or fast-forward/reverse, elapsed playing
time may not display accurately.
• When the disc is recorded in Multi Session, only the
first track of the first session format is recognized
and played (any other format is skipped). The
priority of the format is CD-DA, ATRAC CD and
MP3/WMA.
– When the first track is a CD-DA, only CD-DA of the
first session is played.
– When the first track is not a CD-DA, an ATRAC CD
or MP3/WMA session is played. If the disc has no
data in any of these formats, “NO Music” is
displayed.
Notes on MP3
• Be sure to finalize the disc before using on the unit.
• If you play a high-bit-rate MP3, such as 320 kbps,
sound may be intermittent.
Notes on WMA
• Files made with lossless compression are not
playable.
• Files protected by copyright are not playable.
About ATRAC CD
ATRAC3plus format
ATRAC3, which stands for Adaptive Transform
Acoustic Coding3, is audio compression
technology. It compresses audio CD data to
approximately 1/10 of its original size.
ATRAC3plus, which is an extended format of
ATRAC3, compresses the audio CD data to
approximately 1/20 of its original size. The unit
accepts both ATRAC3 and ATRAC3plus format.
ATRAC CD
ATRAC CD is recorded audio CD data which is
compressed to ATRAC3 or ATRAC3plus format
using authorized software, such as SonicStage 2.0 or
later, or SonicStage Simple Burner.
• The maximum number of:
– folders (groups): 255
– files (tracks): 999
• The characters for a folder/file name and text
information written by SonicStage are displayed.
Page 25
For details on ATRAC CD, see the SonicStage or
SonicStage Simple Burner manual.
Note
Be sure to create the ATRAC CD using authorized
software, such as SonicStage 2.0 or later, or
SonicStage Simple Burner 1.0 or 1.1.
If you have any questions or problems concerning
your unit that are not covered in this manual, consult
your nearest Sony dealer.
About Bluetooth function
On Bluetooth communication
• Bluetooth wireless technology operates within a
range of about 10 m.
Maximum communication range may vary
depending on obstacles (person, metal, wall, etc.)
or electromagnetic environment.
• The following conditions may affect the
sensitivity of Bluetooth communication.
– There is an obstacle such as a person, metal, or
wall between this unit and Bluetooth device.
– A device using 2.4 GHz frequency, such as a
wireless LAN device, cordless telephone, or
microwave oven, is in use near this unit.
• Because Bluetooth devices and wireless LAN
(IEEE802.11b/g) use the same frequency,
microwave interference may occur and resulting in
communication speed deterioration, noise, or
invalid connection if this unit is used near a
wireless LAN device. In such as case, perform the
following.
– Use this unit at least 10 m away from the
wireless LAN device.
– If this unit is used within 10 m of a wireless
LAN device, turn off the wireless LAN device.
– Install this unit and Bluetooth device as near to
each other as possible.
• Microwaves emitting from a Bluetooth device may
affect the operation of electronic medical devices.
Turn off this unit and other Bluetooth devices in
the following locations, as it may cause an
accident.
– where inflammable gas is present, in a hospital,
train, airplane, or a petrol station
– near automatic doors or a fire alarm
• This unit supports security capabilities that
comply with the Bluetooth standard to provide a
secure connection when the Bluetooth wireless
technology is used, but security may not be
enough depending on the setting. Be careful when
communicating using Bluetooth wireless
technology.
• We do not take any responsibility for the leakage
of information during Bluetooth communication.
• Connection with all Bluetooth devices cannot be
guaranteed.
– A device featuring Bluetooth function is
required to conform to the Bluetooth standard
specified by Bluetooth SIG, and be
authenticated.
– Even if the connected device conforms to the
above mentioned Bluetooth standard, some
devices may not be connected or work correctly,
depending on the features or specifications of the
device.
– While talking on the phone hands free, noise
may occur, depending on the device or
communication environment.
• Depending on the device to be connected, it may
require some time to start communication.
Others
• Using the Bluetooth device may not function on
cellular phones, depending on radio wave
conditions and location where the equipment is
being used.
• If you experience discomfort after using the
Bluetooth device, stop using the Bluetooth device
immediately. Should any problem persist, consult
your nearest Sony dealer.
Maintenance
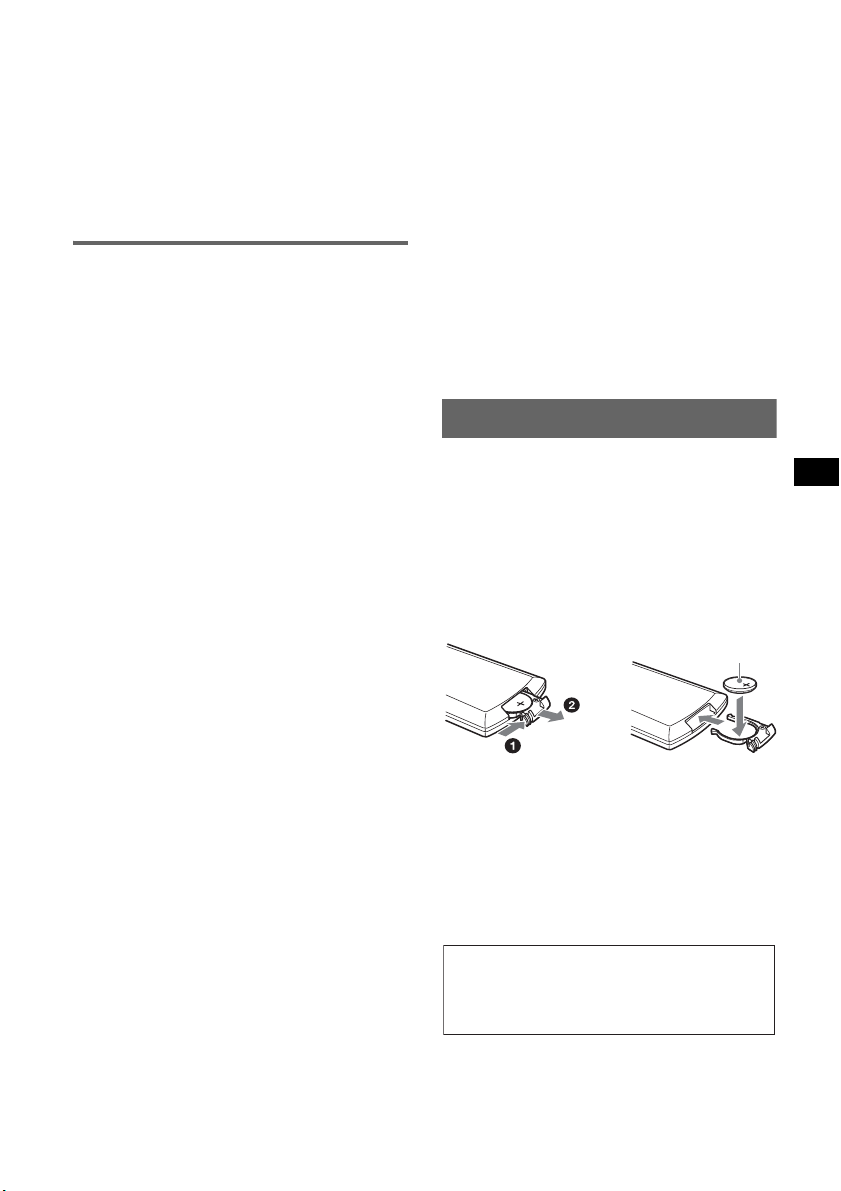
Replacing the lithium battery of the
card remote commander
Under normal conditions, the battery will last
approximately 1 year. (The service life may be
shorter, depending on the conditions of use.)
When the battery becomes weak, the range of the
card remote commander becomes shorter. Replace
the battery with a new CR2025 lithium battery. Use
of any other battery may present a risk of fire or
explosion.
+ side up
c
Notes on the lithium battery
• Keep the lithium battery out of the reach of children.
Should the battery be swallowed, immediately
consult a doctor.
• Wipe the battery with a dry cloth to assure a good
contact.
• Be sure to observe the correct polarity when
installing the battery.
• Do not hold the battery with metallic tweezers,
otherwise a short-circuit may occur.
WARNING
Battery may explode if mistreated.
Do not recharge, disassemble, or dispose of
in fire.
continue to next page t
25
Page 26
Fuse replacement
When replacing the fuse, be
sure to use one matching the
amperage rating stated on the
original fuse. If the fuse blows,
check the power connection and
replace the fuse. If the fuse
blows again after replacement,
there may be an internal
malfunction. In such a case,
consult your nearest Sony
dealer.
Fuse (10A)
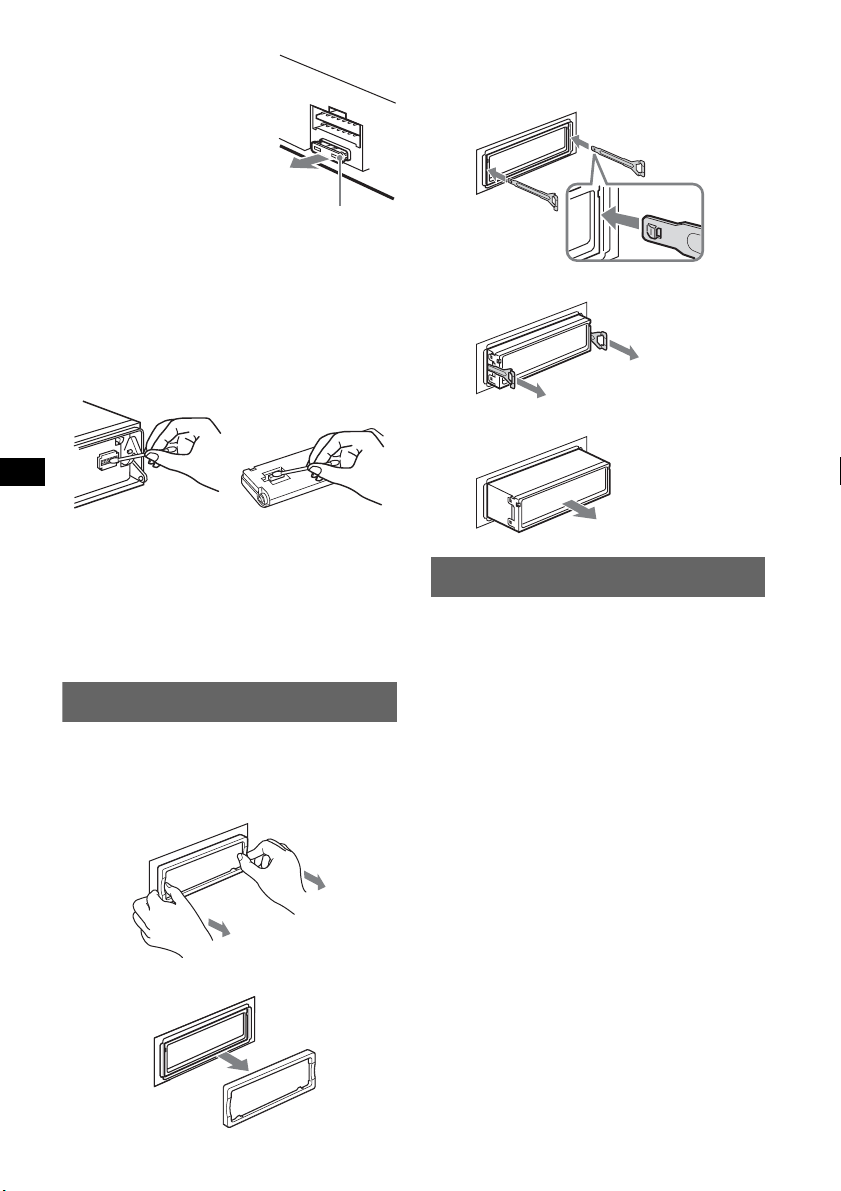
2 Remove the unit.
1Insert both release keys simultaneously
until they click.
Hook facing
inwards.
Cleaning the connectors
The unit may not function properly if the connectors
between the unit and the front panel are not clean. In
order to prevent this, detach the front panel
(page 15) and clean the connectors with a cotton
swab dipped in alcohol. Do not apply too much
force. Otherwise, the connectors may be damaged.
Main unit Back of the front
Notes
• For safety, turn off the ignition before cleaning the
connectors, and remove the key from the ignition
switch.
• Never touch the connectors directly with your fingers
or with any metal device.
panel
Removing the unit
1 Remove the protection collar.
1 Detach the front panel (page 15).
2 Pinch both edges of the protection collar,
then pull it out.
x
2Pull the release keys to unseat the unit.
3Slide the unit out of the mounting.
Specifications
CD Player section
Signal-to-noise ratio: 120 dB
Frequency response: 10 – 20,000 Hz
Wow and flutter: Below measurable limit
Tuner section
FM
Tuning range: 87.5 – 108 MHz
Aerial terminal: External aerial connector
Intermediate frequency: 10.7 MHz/450 kHz
Usable sensitivity: 9 dBf
Selectivity: 75 dB at 400 kHz
Signal-to-noise ratio: 67 dB (stereo), 69 dB (mono)
Harmonic distortion at 1 kHz: 0.5 % (stereo),
0.3 % (mono)
Separation: 35 dB at 1 kHz
Frequency response: 30 – 15,000 Hz
MW/LW
Tuning range:
MW: 531 – 1,602 kHz
LW: 153 – 279 kHz
Aerial terminal: External aerial connector
Intermediate frequency: 10.7 MHz/450 kHz
Sensitivity: MW: 30 µV, LW: 40 µV
26
Page 27

Wireless Communication
Communication System:
Bluetooth Standard version 2.0
Output:
Bluetooth Standard Power Class 2 (Max. +4 dBm)
Maximum communication range:
Line of sight approx. 10 m*
Frequency band:
2.4 GHz band (2.4000 – 2.4835 GHz)
Modulation method: FHSS
Compatible Bluetooth Profiles*
A2DP (Advanced Audio Distribution Profile)
AVRCP (Audio Video Remote Control Profile)
HFP (Handsfree Profile)
OPP (Object Push Profile)
*1 The actual range will vary depending on factors
such as obstacles between devices, magnetic
fields around a microwave oven, static electricity,
reception sensitivity, antenna's perfomance,
operating system, software application, etc.
*2 Bluetooth standard profiles indicate the purpose of
Bluetooth communication between devices.
1
2
:
Power amplifier section
Outputs: Speaker outputs (sure seal connectors)
Speaker impedance: 4 – 8 ohms
Maximum power output: 52 W × 4 (at 4 ohms)
General
Outputs:
Audio outputs terminal (front/rear)
Subwoofer output terminal (mono)
Power aerial relay control terminal
Power amplifier control terminal
Inputs:
Telephone ATT control terminal
Illumination control terminal
BUS control input terminal
BUS audio input/AUX IN terminal
Remote controller input terminal
Aerial input terminal
Tone controls:
Low: ±10 dB at 60 Hz or 100 Hz (XPLOD)
Mid: ±10 dB at 500 Hz or 1 kHz (XPLOD)
High: ±10 dB at 10 kHz or 12.5 kHz (XPLOD)
Power requirements: 12 V DC car battery
(negative earth)
Dimensions: Approx. 178 × 50 × 183 mm (w/h/d)
Mounting dimensions: Approx. 182 × 53 × 162 mm
(w/h/d)
Mass: Approx. 1.2 kg
Supplied accessories:
Card remote commander: RM-X302
Parts for installation and connections (1 set)
Optional accessories/equipment:
Rotary commander: RM-X4S
BUS cable (supplied with an RCA pin cord):
RC-61 (1 m), RC-62 (2 m)
CD changer (10 discs): CDX-757MX
CD changer (6 discs): CDX-T70MX, CDX-T69
Source selector: XA-C30, XA-C40
AUX-IN selector: XA-300
Your dealer may not handle some of the above listed
accessories. Please ask the dealer for detailed
information.
US and foreign patents licensed from Dolby
Laboratories.
MPEG Layer-3 audio coding technology and
patents licensed from Fraunhofer IIS and Thomson.
Note
This unit cannot be connected to a digital preamplifier
or an equalizer which is Sony BUS system compatible.
Design and specifications are subject to change
without notice.
• Lead-free solder is used for soldering.
• Halogenated flame retardants are not used in the
certain printed wiring boards.
• Halogenated flame retardants are not used in
cabinets.
• Paper is used for the packaging cushions.
Troubleshooting
The following checklist will help you remedy
problems you may encounter with your unit.
Before going through the checklist below, check the
connection and operating procedures.
General
No power is being supplied to the unit.
• Check the connection. If everything is in order, check
the fuse.
• If the unit is turned off and the display disappears, it
cannot be operated with the remote commander.
t Turn on the unit.
The power aerial does not extend.
The power aerial does not have a relay box.
No sound.
• The volume is too low.
• The ATT function is activated, or the Telephone ATT
function (when the interface cable of a car telephone
is connected to the ATT lead) is activated.
• The position of the fader control is not set for a 2speaker system.
• The CD changer is incompatible with the disc format
(MP3/WMA/ATRAC CD).
t Play back with a Sony MP3 compatible CD
changer, or this unit.
No beep sound.
• The beep sound is cancelled (page 20).
• An optional power amplifier is connected and you are
not using the built-in amplifier.
continue to next page t
27
Page 28
The contents of the memory have been erased.
• The RESET button has been pressed.
tStore again into the memory.
• The power connecting lead or battery has been
disconnected.
• The power connecting lead is not connected properly.
Stored stations and correct time are erased.
The fuse has blown.
Makes noise when the position of the ignition
key is switched.
The leads are not matched correctly with the car’s
accessory power connector.
The display disappears from/does not appear
in the display window.
• The dimmer is set “Dimmer on” (page 20).
• The display disappears if you press and hold (OFF).
tPress and hold (OFF) on the unit until the
display appears.
• The connectors are dirty (page 26).
DSO does not function.
Depending on the type of car interior or type of music,
DSO may not have a desirable effect.
Any display items do not display.
t Set to “Info All” (page 20).
CD/MD playback
The disc cannot be loaded.
• Another disc is already loaded.
• The disc has been forcibly inserted upside down or in
the wrong way.
The disc does not playback.
• Defective or dirty disc.
• The CD-Rs/CD-RWs are not for audio use (page 24).
MP3/WMA files cannot be played back.
The disc is incompatible with the MP3/WMA format
and version (page 24).
MP3/WMA files take longer to play back than
others.
The following discs take a longer time to start
playback.
– a disc recorded with a complicated tree structure.
– a disc recorded in Multi Session.
– a disc to which data can be added.
The ATRAC CD cannot play.
• The disc is not created by authorized software, such
as SonicStage or SonicStage Simple Burner.
• Tracks that are not included in the group cannot be
played.
ID3 tag of the MP3 file is not displayed
correctly.
• Check the “ID3 Tag” setting (page 20).
• Customers in Russia, set to “RUS”; other customers,
set to “EUR.” Note that even if you set to “RUS,” ID3
tag may not be displayed correctly.
The display items do not scroll.
• For discs with very many characters, those may not
scroll.
• “Auto Scroll” is set to “off.”
tSet “Auto Scroll on” (page 20) or press (SCRL)
28
on the card remote commander.
The sound skips.
• Installation is not correct.
t Install the unit at an angle of less than 45° in a
sturdy part of the car.
• Defective or dirty disc.
The operation buttons do not function.
The disc will not eject.
Press the RESET button (page 6).
Radio reception
The stations cannot be received.
The sound is hampered by noises.
• Connect a power aerial control lead (blue) or
accessory power supply lead (red) to the power
supply lead of a car’s aerial booster (only when your
car has built-in FM/MW/LW aerial in the rear/side
glass).
• Check the connection of the car aerial.
• The auto aerial will not go up.
t Check the connection of the power aerial control
lead.
• Check the frequency.
• When the DSO mode is on, the sound is sometimes
hampered by noises.
t Set the DSO mode to “off” (page 21).
Preset tuning is not possible.
• Store the correct frequency in the memory.
• The broadcast signal is too weak.
Automatic tuning is not possible.
• The local seek mode is set to “on.”
t Set to “Local off” (page 20).
• The broadcast signal is too weak.
t Perform manual tuning.
During FM reception, the “ST” indication
flashes.
• Tune in the frequency accurately.
• The broadcast signal is too weak.
t Set to “Mono on” (page 20).
An FM programme broadcast in stereo is heard
in monaural.
The unit is in monaural reception mode.
t Set to “Mono off” (page 20).
RDS
The SEEK starts after a few seconds of
listening.
The station is non-TP or has weak signal.
t Deactivate TA (page 13).
No traffic announcements.
• Activate TA (page 13).
• The station does not broadcast any traffic
announcements despite being TP.
t Tune in another station.
PTY displays “None.”
• The current station is not an RDS station.
• RDS data has not been received.
• The station does not specify the programme type.
Page 29

Bluetooth function
The connecting device cannot detect this unit.
• Set “Signal” to “ON” (page 15).
• Set “Visibility” to “Show” (page 15).
• While connecting to the other Bluetooth device, this
unit cannot be detected from another device.
Disconnect the current connection and search for this
unit from another device. The disconnected device
can be reconnected by selecting from the list of
registered devices.
This unit cannot detect the connecting device.
Check the Bluetooth setting of the connecting device.
Connection is not possible.
• Depending on the other device, searching from this
unit may not be possible.
t Search for this unit from the other device.
• Depending on the status of the other device,
searching from this unit may not be possible.
t Search for this unit from the other device.
• Check the pairing and connection procedures in the
manual of the other device, etc., and perform the
operation again.
The name of the detected device does not
appear.
Depending on the status of the other device, it may not
be possible to obtain the name.
No ring tone.
• Adjust the volume in “Ring Vol” (page 17).
• Depending on the connecting device, the ring tone
may not be sent properly.
t Set “Ringtone” to “Default” (page 19).
The talker’s voice volume is low.
Adjust the volume in “Talk Vol” (page 17).
Echo or noise occurs in phone call
conversations.
• Lower the volume.
• “EC/NC Mode” is set to “off.”
t Set “EC/NC Mode” to “Mode 1” or “Mode 2”
(page 19).
• If the ambient noise other than the phone call sound
is loud, try reducing this noise.
E.g.: If a window is open and road noise, etc., is loud,
shut the window. If the air conditioner is loud, lower
the air conditioner.
The phone sound quality is poor.
Phone sound quality depends on reception conditions
of cellular phone.
tMove your car to a place where you can enhance
the cellular phone's signal if the reception is poor.
The volume of the connected audio device is
low (high).
Volume level will differ depending on the audio
device.
tAdjust the volume of the connected audio device or
this unit.
The sound skips during playback of a
Bluetooth audio device.
• Reduce the distance between the unit and the
Bluetooth audio device.
• If the Bluetooth audio device is stored in a case
which interrupts the signal, remove the audio device
from the case while using.
• Several Bluetooth devices or other devices which
emit radio waves are used nearby.
t Turn off the other devices.
t Reduce the distance from the other devices.
The connected Bluetooth audio device cannot
be controlled.
Check that the connected Bluetooth audio device
supports AVRCP.
Some functions do not work.
Check that the connecting device supports the
functions in question.
The name of the other party does not appear
when a call is received.
• The other party is not stored in the phonebook.
t Store in the phonebook (page 18).
• The calling phone is not set to send the phone
number.
A call starts unintentionally.
• The connecting phone is set to start a call
automatically.
• “Auto Answer” of this unit is set to “on” (page 19).
Pairing failed in Time Over.
Depending on the connecting device, the time limit for
pairing may be short. Try completing the pairing
within the time by setting a single digit passcode.
The ring tone or other party’s voice is output
only from one speaker.
“Speaker Sel” is set to “FR-L” or “FR-R.”
t Set “Speaker Sel” to “Front” (page 19).
No sound is output from the car speakers
during handsfree call.
If the sound is output from the cellular phone, set the
cellular phone to output the sound from the car
speakers.
Error displays/Messages
Audio function
Blank Disc
Tracks have not been recorded on the MD.
t Play an MD with recorded tracks.
Error
• The disc is dirty or inserted upside down.
t Clean or insert the disc correctly.
• The disc cannot play due to a problem.
t Insert another disc.
Failure (Illuminates until any button is pressed.)
The connection of speakers/amplifiers is incorrect.
t See the installation guide manual of this model to
check the connection.
continue to next page t
29
Page 30
Load
The changer is loading the disc.
t Wait until loading is complete.
Local Seek +/–
The local seek mode is on during automatic tuning.
NO AF
There is no alternative frequency for the current
station.
t Push the joystick left/right while the programme
service name is flashing. The unit starts searching
for another frequency with the same PI
(Programme Identification) data (“PI Seek”
appears).
NO Disc
The disc is not inserted in the CD/MD changer.
t Insert discs in the changer.
NO Disc Name
A disc name is not written in the track.
NO Group Name
A group name is not written in the track on the ATRAC
CD.
NO ID3 Tag
ID3 tag information is not written in the MP3 file.
NO Information
Text information is not written in the ATRAC3/
ATRAC3plus or WMA file.
NO Magazine
The disc magazine is not inserted in the CD changer.
t Insert the magazine in the changer.
NO Music
The disc is not a music file.
t Insert a music CD in this unit or MP3 playable
changer.
NO TP
The unit will continue searching for available TP
stations.
NO Track Name
A track name is not written in the track.
Offset
There may be an internal malfunction.
t Check the connection. If the error indication
remains on in the display, consult your nearest
Sony dealer.
Push Reset
The CD unit and CD/MD changer cannot be operated
due to a problem.
t Press the RESET button (page 6).
Read
The unit is reading all track and group information on
the disc.
t Wait until reading is complete and playback starts
automatically. Depending on the disc structure, it
may take more than a minute.
“” or “”
During reverse or fast-forward, you have reached the
beginning or the end of the disc and you cannot go any
further.
“”
The character cannot be displayed with the unit.
30
Bluetooth function
Busy
The Bluetooth process is not complete.
t Discontinue receiving the phonebook data.
t Stop the current operation and wait for a while.
Connection Complete
The Bluetooth connection is complete.
Connection Failed
• Cannot be connected to the device due to problem.
• Cannot be connected to the device because the input
passcode is incorrect.
• The time limit for connection has been exceeded.
Disconnected
The Bluetooth signal is disconnected.
Empty
• There is no data in “Dialed Calls,” “Received Calls”
or “Phonebook” in the CALL menu.
• There is no data in the phonebook when storing to the
Preset Dial.
Error
The phonebook data cannot be received due to a
problem.
HF Device is not available
Handsfree device is not connected.
Invalid Code
The input security code is incorrect.
Memory Full
• The phonebook memory of this unit became full
while the phonebook data is received.
• The phonebook memory of this unit is full.
Not Available
Bluetooth AUDIO is selected as the source, but no
Bluetooth audio device is connected.
No Devices Found
• No connectable device is found after searching.
• The device is not registered in “Handsfree Devices”
or “Audio Devices.”
t Register the device in “Handsfree Devices” or
“Audio Devices.”
Security Locked
Security is set.
Turn ON Bluetooth
The Bluetooth setting is off.
t Set the Bluetooth setting to on.
If these solutions do not help improve the situation,
consult your nearest Sony dealer.
If you take the unit to be repaired because of CD
playback trouble, bring the disc that was used at the
time the problem began.
Support site
If you have any questions or for the latest
support information on this product, visit the
web site below:
http://support.sony-europe.com
Page 31

Page 32

Wichtig!
Bitte nehmen Sie sich etwas Zeit, um
den Geräte-Pass vollständig
auszufüllen. Dieser befindet sich auf
der hinteren Umschlagseite dieser
Bedienungsanleitung.
Montieren Sie dieses Gerät aus
Sicherheitsgründen im Armaturenbrett des
Fahrzeugs. Zur Installation und zum
Anschluss siehe die mitgelieferte
Installations-/Anschlussanleitung.
Warnhinweis, wenn die Zündung Ihres
Fahrzeugs nicht über eine
Zubehörposition (ACC oder I) verfügt
Nachdem Sie die Zündung ausgeschaltet
haben, halten Sie am Gerät unbedingt (OFF)
gedrückt, bis die Anzeige ausgeblendet wird.
Andernfalls wird die Anzeige nicht
ausgeschaltet und der Autobatterie wird
Strom entzogen.
Dieses Etikett befindet sich an der Unterseite
des Gehäuses.
Das Typenschild mit Betriebsspannung usw.
befindet sich an der Geräteunterseite.
Hiermit erklärt Sony Corp., dass sich dieser
MEX-BT5000 in Übereinstimmung mit den
grundlegenden Anforderungen und den anderen
relevanten Vorschriften der Richtlinie 1999/5/EG
befindet.
Weitere Informationen erhältlich unter:
http://www.compliance.sony.de/
Entsorgung von gebrauchten
elektrischen und elektronischen
Geräten (anzuwenden in den
Ländern der Europäischen Union
und anderen europäischen Ländern
mit einem separaten Sammelsystem
für diese Geräte)
Das Symbol auf dem Produkt oder seiner Verpackung
weist darauf hin, dass dieses Produkt nicht als normaler
Haushaltsabfall zu behandeln ist, sondern an einer
Annahmestelle für das Recycling von elektrischen und
elektronischen Geräten abgegeben werden muss. Durch
Ihren Beitrag zum korrekten Entsorgen dieses Produkts
schützen Sie die Umwelt und die Gesundheit Ihrer
Mitmenschen. Umwelt und Gesundheit werden durch
falsches Entsorgen gefährdet. Materialrecycling hilft, den
Verbrauch von Rohstoffen zu verringern. Weitere
Informationen über das Recycling dieses Produkts
erhalten Sie von Ihrer Gemeinde, den kommunalen
Entsorgungsbetrieben oder dem Geschäft, in dem Sie das
Produkt gekauft haben.
Geeignetes Zubehör: Fernbedienung
Hergestellt unter der Lizenz
R
von BBE Sound, Inc.
Mithilfe von BBE MP lässt
sich die Klangqualität bei digital komprimiertem
Ton wie z. B. MP3 verbessern, indem die bei der
Komprimierung verloren gegangenen
harmonischen Obertöne wiederhergestellt und
verstärkt werden. Mit BBE MP werden aus dem
vorhandenen Tonmaterial geradzahlige Obertöne
erzeugt, so dass der Klang wärmer, detailgetreuer
und nuancierter wiedergegeben wird.
Der Bluetooth-Schriftzug und die BluetoothLogos sind Eigentum von Bluetooth SIG, Inc.,
und ihre Verwendung durch die Sony
Corporation erfolgt in Lizenz. Andere
Markenzeichen und Produktnamen sind
Eigentum der jeweiligen Rechteinhaber.
SonicStage und das entsprechende Logo sind
Markenzeichen der Sony Corporation.
„ATRAC“ und sind eingetragene
Markenzeichen der Sony Corporation.
Microsoft, Windows Media
und das Windows-Logo sind
Markenzeichen oder
eingetragene Markenzeichen
der Microsoft Corporation in den USA und/oder
anderen Ländern.
2
Page 33

Inhalt
Willkommen!. . . . . . . . . . . . . . . . . . . . . . . . . . . 4
Vorbereitungen
Zurücksetzen des Geräts . . . . . . . . . . . . . . . . . . 6
Einstellen der Uhr . . . . . . . . . . . . . . . . . . . . . . . 6
Abnehmen der Frontplatte. . . . . . . . . . . . . . . . . 6
Anbringen der Frontplatte. . . . . . . . . . . . . . . 7
Einlegen einer CD in das Gerät. . . . . . . . . . . . . 7
Auswerfen der CD . . . . . . . . . . . . . . . . . . . . 7
Lage und Grundfunktionen der
Teile und Bedienelemente
Audiofunktion. . . . . . . . . . . . . . . . . . . . . . . . 8
Bluetooth-Funktion. . . . . . . . . . . . . . . . . . . 10
CD
Informationen im Display. . . . . . . . . . . . . . 12
Repeat und Shuffle Play . . . . . . . . . . . . . . . 12
Radio
Speichern und Empfangen von Sendern . . . . . 13
Automatisches Speichern von
Sendern — BTM. . . . . . . . . . . . . . . . . . . . . 13
Manuelles Speichern von Sendern . . . . . . . 13
Einstellen gespeicherter Sender . . . . . . . . . 13
Automatisches Einstellen von Sendern. . . . 13
Einstellen eines Senders anhand einer
Liste — LIST . . . . . . . . . . . . . . . . . . . . . . . 13
RDS . . . . . . . . . . . . . . . . . . . . . . . . . . . . . . . . . 13
Übersicht. . . . . . . . . . . . . . . . . . . . . . . . . . . 13
Einstellen von AF und TA . . . . . . . . . . . . . 14
Auswählen des Programmtyps (PTY) . . . . 15
Einstellen der Uhrzeit (CT). . . . . . . . . . . . . 15
Bluetooth-Funktion
Vorbereitungen für die
Bluetooth-Funktion . . . . . . . . . . . . . . . . . . . . . 16
Menüfunktionen bei der
Bluetooth-Funktion. . . . . . . . . . . . . . . . . . . 16
Konfigurieren von
Bluetooth-Einstellungen . . . . . . . . . . . . . . . 16
Pairing und Herstellen einer Verbindung mit
einem Bluetooth-Gerät . . . . . . . . . . . . . . . . 16
Herstellen einer Verbindung mit den
registrierten Geräten . . . . . . . . . . . . . . . . . . 18
Freisprecheinrichtung . . . . . . . . . . . . . . . . . . . 18
Tätigen von Anrufen . . . . . . . . . . . . . . . . . 18
Entgegennehmen von Anrufen. . . . . . . . . . 19
Beenden eines Anrufs . . . . . . . . . . . . . . . . 19
Verwenden des Telefonbuchs . . . . . . . . . . 19
Verwenden der Kurzwahl . . . . . . . . . . . . . 20
Musik-Streaming . . . . . . . . . . . . . . . . . . . . . . 20
Wiedergeben von Musik von einem
Audiogerät . . . . . . . . . . . . . . . . . . . . . . . . . 20
Steuern eines Audiogeräts mit diesem
Gerät. . . . . . . . . . . . . . . . . . . . . . . . . . . . . . 20
Weitere Einstellungen. . . . . . . . . . . . . . . . . . . 20
Konfigurieren der
Freisprecheinrichtung. . . . . . . . . . . . . . . . . 20
Löschen der Registrierung eines verbundenen
Geräts . . . . . . . . . . . . . . . . . . . . . . . . . . . . . 21
Funktion zum automatischen Herstellen einer
Verbindung. . . . . . . . . . . . . . . . . . . . . . . . . 21
Weitere Funktionen
Einstellen von Menüoptionen — MENU . . . . 22
Individuelles Einstellen der Equalizer-Kurve
— EQ3 Tune . . . . . . . . . . . . . . . . . . . . . . . 23
Verwenden gesondert erhältlicher Geräte. . . . 24
CD/MD-Wechsler . . . . . . . . . . . . . . . . . . . 24
Zusätzliche Audiogeräte. . . . . . . . . . . . . . . 24
Joystick RM-X4S. . . . . . . . . . . . . . . . . . . . 25
Weitere Informationen
Sicherheitsmaßnahmen. . . . . . . . . . . . . . . . . . 26
Hinweise zu CDs . . . . . . . . . . . . . . . . . . . . 26
MP3-/WMA-Dateien . . . . . . . . . . . . . . . . . 26
ATRAC-CDs . . . . . . . . . . . . . . . . . . . . . . . 27
Informationen zur
Bluetooth-Kommunikation . . . . . . . . . . . . 27
Wartung . . . . . . . . . . . . . . . . . . . . . . . . . . . . . 28
Ausbauen des Geräts. . . . . . . . . . . . . . . . . . . . 29
Technische Daten . . . . . . . . . . . . . . . . . . . . . . 30
Störungsbehebung. . . . . . . . . . . . . . . . . . . . . . 31
Fehleranzeigen/Meldungen . . . . . . . . . . . . 33
3
Page 34

Willkommen!
Danke, dass Sie sich für diese Bluetooth™Audioanlage von Sony entschieden haben. Mit
diesem Gerät stehen Ihnen im Auto die
folgenden Funktionen zur Verfügung.
• CD-Wiedergabe
Wiedergabe von CD-DAs (auch solche mit CD
TEXT*), CD-Rs/CD-RWs (MP3-/WMADateien, auch auf Multisession-CDs (Seite 26))
sowie ATRAC-CDs (ATRAC3- und
ATRAC3plus-Format (Seite 27)).
CD-Typ Beschriftung auf der CD
CD-DA
MP3
WMA
ATRAC-CD
• Radioempfang
– Für jeden Frequenzbereich (FM1 (UKW1),
FM2 (UKW2), FM3 (UKW3), MW und LW)
können Sie bis zu 6 Sender speichern.
– BTM (Best Tuning Memory -
Speicherbelegungsautomatik): Das Gerät
wählt die Sender mit den stärksten Signalen
aus und speichert diese.
• RDS-Funktionen
Sie können die RDS-Dienste von UKWSendern nutzen, die RDS-Signale (Radio Data
System) ausstrahlen.
• Bluetooth-Funktion
– Freisprecheinrichtung für Ihr Mobiltelefon im
Auto.
– Telefonbuchübertragung vom Mobiltelefon.
– Musik-Streaming von einem Mobiltelefon
oder einem tragbaren Audiogerät.
– Unterstützung der Profile HFP 1.0, A2DP,
OPP und AVRCP.
• Klangeinstellungen
– EQ3 parametric: Sie können eine der 7
voreingestellten Equalizer-Kurven auswählen
und wie gewünscht einstellen.
– DSO (Dynamic Soundstage Organizer):
Mithilfe virtueller Lautsprecher wird auch bei
niedrig in der Tür montierten Lautsprechern
eine bessere Raumklangwirkung erzeugt.
– BBE MP: Dient zum Verbessern digital
komprimierten Klangs, wie z. B. bei MP3Dateien.
* Eine CD mit CD TEXT ist eine CD-DA, die
Informationen wie den Namen der CD, den Namen
des Interpreten und die Namen der Titel enthält.
4
Page 35

Achtung
UNTER KEINEN UMSTÄNDEN ÜBERNIMMT
SONY DIE HAFTUNG FÜR INDIREKTE,
NEBEN- ODER FOLGESCHÄDEN ODER FÜR
IRGENDWELCHE SCHÄDEN. DIESER
HAFTUNGSAUSSCHLUSS GILT OHNE JEDE
EINSCHRÄNKUNG FÜR ENTGANGENEN
GEWINN, ENTGANGENES EINKOMMEN,
DATENVERLUST, NUTZUNGSAUSFALL DES
PRODUKTS ODER ZUGEHÖRIGER GERÄTE,
AUSFALLZEITEN UND ZEITAUFWAND DES
KÄUFERS, DIE AUF DIE VERWENDUNG
DIESES PRODUKTS, DER HARDWARE UND/
ODER SEINER SOFTWARE ZURÜCKGEHEN
ODER IN VERBINDUNG DAMIT AUFTRETEN.
WICHTIGER HINWEIS!
Sicherer und effizienter Gebrauch
Jegliche Änderungen am Gerät, die ohne die
ausdrückliche Genehmigung von Sony durchgeführt
werden, können die Befugnis des Betreibers zur
Verwendung des Geräts aufheben.
Bitte überprüfen Sie vor dem Gebrauch dieses
Produkts, ob es auf nationaler Ebene Vorschriften
oder Bestimmungen gibt, die die Verwendung von
Bluetooth-Geräten einschränken.
Führen von Fahrzeugen
Erkundigen Sie sich in den Gebieten, in denen Sie
unterwegs sind, nach Gesetzen und Vorschriften
zum Gebrauch von Mobiltelefonen und
Freisprecheinrichtungen.
Richten Sie Ihre Aufmerksamkeit beim Fahren
immer uneingeschränkt auf das Verkehrsgeschehen.
Wenn die Verkehrssituation es erfordert, fahren Sie
an den Straßenrand und halten Sie, bevor Sie einen
Anruf tätigen oder entgegennehmen.
Herstellen einer Verbindung zu
anderen Geräten
Wenn Sie eine Verbindung zu einem anderen Gerät
herstellen, lesen Sie in der dazugehörigen
Bedienungsanleitung bitte die ausführlichen
Sicherheitshinweise.
Hochfrequenzstrahlung
HF-Signale beeinträchtigen möglicherweise nicht
ordnungsgemäß installierte oder unzureichend
abgeschirmte elektronische Systeme in
Kraftfahrzeugen, wie z. B. elektronische
Kraftstoffeinspritzsysteme, elektronische
Antiblockiersysteme, elektronische
Geschwindigkeitsregelsysteme oder AirbagSysteme. Zur Installation oder Wartung dieses
Geräts wenden Sie sich bitte an den
Fahrzeughersteller oder einen Vertreter des
Herstellers. Eine fehlerhafte Installation oder
Wartung kann gefährlich sein und zum Erlöschen
der für dieses Gerät gültigen Gewährleistung führen.
Wenden Sie sich bitte an den Fahrzeughersteller und
klären Sie ab, ob der Gebrauch von Mobiltelefonen
im Fahrzeug die Fahrzeugelektronik in ihrer
Funktionsfähigkeit beeinträchtigen könnte.
Überprüfen Sie regelmäßig, ob alle drahtlosen
Geräte in Ihrem Fahrzeug richtig montiert sind und
ordnungsgemäß funktionieren.
Notrufe
Diese Bluetooth-Freisprecheinrichtung für das Auto
und das elektronische Gerät, das mit der
Freisprecheinrichtung verbunden ist, arbeiten mit
Radiosignalen, Mobilfunk- und Festnetzen sowie
benutzerprogrammierten Funktionen, bei denen
nicht unter allen Umständen eine Verbindung
garantiert werden kann.
Verlassen Sie sich daher bei wichtigen Mitteilungen
(wie z. B. medizinischen Notfällen) nicht
ausschließlich auf elektronische Geräte.
Wenn Sie Anrufe tätigen oder empfangen wollen,
denken Sie daran, dass die Freisprecheinrichtung
und das elektronische Gerät, das mit der
Freisprecheinrichtung verbunden ist, eingeschaltet
sein müssen und nur in Gebieten mit ausreichender
Mobilfunksignalstärke verwendet werden können.
Notrufe sind unter Umständen nicht bei allen
Mobilfunknetzen möglich oder stehen bei
Verwendung bestimmter Netzwerkdienste und/oder
Telefonfunktionen nicht zur Verfügung.
Weitere Informationen erhalten Sie bei ihrem
lokalen Mobilfunkanbieter.
5
Page 36

Vorbereitungen
Abnehmen der Frontplatte
Zurücksetzen des Geräts
Bevor Sie das Gerät zum ersten Mal benutzen
oder wenn Sie die Autobatterie ausgetauscht
oder die Verbindungen gewechselt haben,
müssen Sie das Gerät zurücksetzen.
Nehmen Sie die Frontplatte ab und drücken Sie
die Taste RESET mit einem spitzen Gegenstand,
wie z. B. einem Kugelschreiber.
Tas te
RESET
Hinweis
Wenn Sie die Taste RESET drücken, werden die
eingestellte Uhrzeit und einige weitere gespeicherte
Einstellungen gelöscht.
Einstellen der Uhr
Die Uhr zeigt die Uhrzeit im 24-Stunden-Format
digital an.
1 Drücken Sie (MENU).
2 Drücken Sie den Joystick nach oben
bzw. unten, bis „Setup“ erscheint, und
drücken Sie ihn dann nach rechts.
3 Drücken Sie den Joystick nach oben
bzw. unten, bis „Clock Adjust“
erscheint, und drücken Sie ihn dann
nach rechts.
4 Drücken Sie zum Einstellen von
Stunde und Minuten den Joystick
nach oben bzw. unten.
Drücken Sie den Joystick nach links bzw.
rechts, um zur jeweils nächsten Ziffer der
Digitalanzeige zu wechseln.
5 Drücken Sie nach dem Einstellen der
Uhr den Joystick.
Die Uhr beginnt zu laufen.
Tipp
Mithilfe der RDS-Funktion können Sie die Uhr auch
automatisch einstellen lassen (Seite 15).
Um zu verhindern, dass das Gerät gestohlen
wird, können Sie die Frontplatte abnehmen.
Warnton
Wenn Sie den Zündschlüssel in die Position OFF
stellen, ohne die Frontplatte abzunehmen, ertönt
einige Sekunden lang ein Warnton.
Der Warnton wird nur ausgegeben, wenn der
integrierte Verstärker verwendet wird.
1 Drücken Sie (OFF).
Das Gerät schaltet sich aus.
2 Drücken Sie (OPEN).
Die Frontplatte klappt nach unten auf.
3 Schieben Sie die Frontplatte nach
rechts und ziehen Sie sie an der linken
Seite vorsichtig heraus.
1
2
Hinweise
• Lassen Sie die Frontplatte nicht fallen und drücken
Sie nicht zu stark auf die Frontplatte und das
Display.
• Schützen Sie die Frontplatte vor Hitze bzw. hohen
Temperaturen und vor Feuchtigkeit. Lassen Sie sie
nicht in geparkten Autos, auf dem Armaturenbrett
oder auf der Hutablage liegen.
6
Page 37

Anbringen der Frontplatte
Setzen Sie die Aussparung A an der Frontplatte
am Stift B am Gerät an und drücken Sie dann
die linke Seite behutsam hinein.
Drücken Sie (SOURCE) am Gerät bzw. legen
Sie eine CD ein, um das Gerät einzuschalten.
A
B
c
Hinweis
Legen Sie auf der Innenseite der Frontplatte nichts ab.
Einlegen einer CD in das Gerät
1 Drücken Sie (OPEN).
2 Legen Sie eine CD mit der
beschrifteten Seite nach oben ein.
3 Schließen Sie die Frontplatte.
Die Wiedergabe beginnt automatisch.
Auswerfen der CD
1 Drücken Sie (OPEN).
2 Drücken Sie Z.
Die CD wird ausgeworfen.
3 Schließen Sie die Frontplatte.
7
Page 38

Lage und Grundfunktionen der Teile und Bedienelemente
Audiofunktion
Hauptgerät
1
35624
79 qa0
Mit abgenommener Frontplatte
Näheres finden Sie auf den angegebenen Seiten.
Die entsprechenden Tasten auf der
Kartenfernbedienung haben dieselbe Funktion
wie die Tasten am Gerät.
A Taste SOURCE
Einschalten bzw. Wechseln der Tonquelle
(Radio/CD/MD*
B Joystick/Taste LIST 13, 24
Drehen: Einstellen der Lautstärke.
Nach oben/unten/links/rechts drücken:
Auswählen einer Menüoption.
Drücken: Bestätigen einer Einstellung.
CD/MD*
Nach oben/unten drücken*
– Überspringen von Gruppen*
(drücken).
– Überspringen mehrerer Gruppen*
Alben*
Nach links/rechts drücken:
– Überspringen von Titeln (drücken).
– Überspringen mehrerer Titel (drücken,
innerhalb von etwa 2 Sekunden erneut
drücken und gedrückt halten).
– Rückwärts-/Vorwärtssuchen in einem Titel
8
(gedrückt halten).
1
/Bluetooth AUDIO/AUX).
1
:
4
(gedrückt halten).
2
:
3
/Alben*4
3
/
8
MEX-BT5000
qfqdqs
RESET
Radio:
Nach oben/unten drücken:
– Empfangen gespeicherter Sender.
Nach links/rechts drücken:
– Automatisches Einstellen von Sendern
(drücken).
– Manuelles Suchen eines Senders (gedrückt
halten).
Drücken:
– Anzeigen der Liste.
C Taste MODE 13, 24
Auswählen des Radiofrequenzbereichs (FM
(UKW)/MW/LW)/Auswählen des Geräts*
D Taste MENU
Aufrufen des Menüs.
E Display
F Taste OPEN 7
G Taste OFF
Ausschalten bzw. Stoppen der Tonquelle.
H Empfänger für die
Kartenfernbedienung
5
.
Page 39

Kartenfernbedienung RM-X302
1
qg
3
4
qh
qa
qj
I Taste AF (Alternativfrequenzen)/TA
(Verkehrsdurchsagen) 14
Einstellen von AF und TA bei einem RDSSender.
J Zahlentasten (Stationstasten)
CD/MD*
(1): REP 12, 24
(2): SHUF 12, 24
(5): BBE MP*
(6): PAUS E*
Radio:
Einstellen gespeicherter Sender (drücken)
bzw. Speichern von Sendern (gedrückt
halten).
K Taste DSPL (Anzeige)/PTY
(Programmtypauswahl) 12, 15
Wechseln der Informationen im Display bzw.
Auswählen des Programmtyps (PTY) bei
einem RDS-Sender.
L CD-Einschub 7
Einlegen der CD.
1
:
6
Zum Aktivieren der BBE MP-Funktion
wählen Sie „BBE MP on“. Zum
Deaktivieren der Funktion stellen Sie
„BBE MP off“ ein.
Anhalten der Wiedergabe. Zum
Beenden der Funktion drücken Sie die
Taste erneut.
2
6
7
qk
ql
w;
wa
ws
wd
M Taste RESET 6
N Taste Z (Auswerfen) 7
Auswerfen der CD.
Die folgenden Tasten auf der
Kartenfernbedienung unterscheiden sich
außerdem hinsichtlich ihres Namens bzw. ihrer
Funktion von denen am Gerät.
qg Taste ENTER
Bestätigen einer Einstellung.
qh Taste LIST
Anzeigen der Liste.
qj Zahlentasten (Stationstasten)
Die Tasten 1 bis 6 haben dieselben
Funktionen wie die Zahlentasten am Gerät.
qk Tasten M (+)/m (–)
Das Drücken dieser Tasten entspricht dem
Drücken des Joysticks nach oben bzw. unten.
ql Tasten < (.)/, (>)
Das Drücken dieser Tasten entspricht dem
Drücken des Joysticks nach links bzw.
rechts.
w; Taste SCRL (Bildlauf)
Hiermit lassen Sie die Informationen im
Display durchlaufen.
wa Taste SOUND
Auswählen von Klangoptionen.
ws Taste ATT (Dämpfen des Tons)
Dämpfen des Tons. Zum Beenden der
Funktion drücken Sie die Taste erneut.
wd Tasten VOL (Lautstärke) +/–
Einstellen der Lautstärke.
*1 Wenn ein MD-Wechsler angeschlossen ist.
*2 Wenn ein Wechsler angeschlossen ist, sind andere
Schritte auszuführen (siehe Seite 24).
*3 Bei Wiedergabe einer ATRAC-CD.
*4 Bei Wiedergabe einer MP3-/WMA-Datei.
*5 Wenn ein CD/MD-Wechsler angeschlossen ist.
*6 Bei der Wiedergabe mit diesem Gerät.
Hinweis
Wenn Sie das Gerät ausschalten und die Anzeige
ausgeblendet ist, können Sie es nicht mit der
Kartenfernbedienung bedienen. Drücken Sie zunächst
(SOURCE) am Gerät oder legen Sie eine CD ein, um
das Gerät zu aktivieren.
Tipp
Einzelheiten zum Austauschen der Batterie finden Sie
unter „Austauschen der Lithiumbatterie der
Kartenfernbedienung“ auf Seite 28.
9
Page 40

Bluetooth-Funktion
6097
8
Bluetooth-Funktion
Hauptgerät
1
Mit abgenommener Frontplatte
qa
Näheres finden Sie auf den angegebenen Seiten.
Die entsprechenden Tasten auf der
Kartenfernbedienung haben dieselbe Funktion
wie die Tasten am Gerät.
A Taste SOURCE
Einschalten bzw. Wechseln der Tonquelle
(Radio/CD/MD*
B Joystick
Drehen: Einstellen der Lautstärke.
Nach oben/unten/links/rechts drücken:
Auswählen einer Menüoption.
Drücken: Bestätigen einer Einstellung.
Bluetooth-Audiogerät*
Nach links/rechts drücken:
– Überspringen von Titeln (drücken).
– Rückwärts-/Vorwärtssuchen in einem Titel
(gedrückt halten).
C Taste Bluetooth 16, 17, 18, 19, 21, 21
Zugreifen auf die Bluetooth-Funktionen
bzw. Entgegennehmen eines Anrufs.
1
/Bluetooth AUDIO/AUX).
2
:
10
3524
RESET
D Taste MENU 19
Aufrufen des Menüs bzw. Entgegennehmen
eines Anrufs.
E Display
F Taste OFF 19
Ausschalten des Geräts, Stoppen der
Tonquelle bzw. Beenden oder Zurückweisen
eines Anrufs.
G Taste CALL 19
Zugreifen auf die Telefonfunktionen bzw.
Entgegennehmen eines Anrufs.
H Empfänger für die
Kartenfernbedienung
I Zahlentasten (Stationstasten)
Abrufen gespeicherter Telefonnummern.
Bluetooth-Audiogerät*
(6): PAU SE
Anhalten der Wiedergabe.
J Bluetooth-Anzeige
Leuchtet beim Einspeisen/Ausgeben von
Bluetooth-Signalen. Erlischt, wenn keine
Bluetooth-Signale mehr vorhanden sind.
K Mikrofon 18
MEX-BT5000
2
:
Page 41

Kartenfernbedienung RM-X302
73
1
qs
6
qg
qh
4
*1 Wenn ein MD-Wechsler angeschlossen ist.
*2 Wenn ein Bluetooth-Audiogerät, das das
Bluetooth-Profil AVRCP unterstützt,
angeschlossen ist. Je nach Gerät stehen
möglicherweise nicht alle Funktionen zur
Verfügung.
Hinweis
Wenn Sie das Gerät ausschalten und die Anzeige
ausgeblendet ist, können Sie es nicht mit der
Kartenfernbedienung bedienen. Drücken Sie zunächst
(SOURCE) am Gerät oder legen Sie eine CD ein, um
das Gerät zu aktivieren.
Tipp
Einzelheiten zum Austauschen der Batterie finden Sie
unter „Austauschen der Lithiumbatterie der
Kartenfernbedienung“ auf Seite 28.
qd
qj
qf
qk
Die folgenden Tasten auf der
Kartenfernbedienung unterscheiden sich
außerdem hinsichtlich ihres Namens bzw. ihrer
Funktion von denen am Gerät.
qs Taste ENTER
Bestätigen einer Einstellung.
qd Zahlentasten (Stationstasten) 17, 18,
19
Eingeben von Zahlen (Telefonnummer,
Passwort usw.).
Die Tasten 1 bis 6 haben dieselben
Funktionen wie die Zahlentasten am Gerät.
qf Taste
qg Tasten M (+)/m (–)
qh Tasten < (.)/, (>)
qj Tasten VOL (Lautstärke) +/–
qk Taste
19
Das Drücken dieser Tasten entspricht dem
Drücken des Joysticks nach oben bzw. unten.
Das Drücken dieser Tasten entspricht dem
Drücken des Joysticks nach links bzw.
rechts.
Einstellen der Lautstärke.
19
11
Page 42

CD
Einzelheiten zum Auswählen eines CD/MDWechslers finden Sie auf Seite 24.
Informationen im Display
Beispiel: Wenn der Modus „Info“
(Informationen) auf „All“ gesetzt ist (Seite 22).
A B
C
A Tonquelle/MP3-/ATRAC-/WMA-Anzeige
B Uhrzeit
C Titelnummer/Verstrichene Spieldauer, CD-/
Interpretenname, Album-/Gruppennummer,
Album-/Gruppenname, Titelname,
Textinformationen*
* Bei der Wiedergabe einer MP3-Datei wird das ID3-
Tag angezeigt, bei der Wiedergabe einer ATRAC-CD
werden mit SonicStage usw. eingegebene
Textinformationen angezeigt und bei der
Wiedergabe einer WMA-Datei wird das WMA-Tag
angezeigt.
Zum Wechseln der Informationen im Display C
drücken Sie (DSPL). Damit die Informationen
im Display C durchlaufen, drücken Sie (SCRL)
auf der Kartenfernbedienung oder stellen „Auto
Scroll on“ ein (Seite 22).
Tipp
Je nach CD-Typ, Aufnahmeformat und Einstellungen
werden unterschiedliche Informationen angezeigt.
Erläuterungen zu MP3/WMA finden Sie auf Seite 26,
Erläuterungen zu ATRAC-CDs auf Seite 27.
Repeat und Shuffle Play
1 Drücken Sie während der Wiedergabe
(1) (REP) oder (2) (SHUF) so oft, bis
die gewünschte Einstellung im Display
erscheint.
Einstellung Funktion
Repeat Track Wiederholtes
Repeat Album*
Repeat Group*
Shuffle Album*
Shuffle Group*
Shuffle Disc Wiedergeben einer CD
*1 Bei Wiedergabe einer MP3-/WMA-Datei.
*2 Bei Wiedergabe einer ATRAC-CD.
Wenn Sie wieder in den normalen
Wiedergabemodus schalten möchten, wählen Sie
„Repeat off“ oder „Shuffle off“.
Wiedergeben eines
Titels.
1
Wiederholtes
Wiedergeben eines
Albums.
2
Wiederholtes
Wiedergeben einer
Gruppe.
1
Wiedergeben eines
Albums in willkürlicher
Reihenfolge.
2
Wiedergeben einer
Gruppe in willkürlicher
Reihenfolge.
in willkürlicher
Reihenfolge.
12
Page 43

Radio
Speichern und Empfangen von
Sendern
Achtung
Wenn Sie während der Fahrt Sender einstellen,
sollten Sie die BTM-Funktion (Best Tuning
Memory - Speicherbelegungsautomatik)
verwenden. Andernfalls besteht Unfallgefahr.
Automatisches Speichern von
Sendern — BTM
1 Drücken Sie (SOURCE) so oft, bis
„TUNER“ erscheint.
Zum Wechseln des Frequenzbereichs drücken
Sie mehrmals (MODE). Sie können zwischen
FM1 (UKW1), FM2 (UKW2), FM3
(UKW3), MW und LW wählen.
2 Drücken Sie (MENU).
3 Drücken Sie den Joystick nach oben
bzw. unten, bis „Receive Mode“
erscheint, und drücken Sie ihn dann
nach rechts.
4 Drücken Sie den Joystick nach oben
bzw. unten, bis „BTM“ erscheint.
5 Drücken Sie den Joystick.
Das Gerät speichert die Sender in der
Reihenfolge der Frequenzen auf den
Zahlentasten (Stationstasten).
Ein Signalton ist zu hören und die Einstellung
wird gespeichert.
Manuelles Speichern von Sendern
1 Während der zu speichernde Sender
empfangen wird, halten Sie eine
Stationstaste ((1) bis (6)) gedrückt,
bis „MEM“ erscheint.
Die Stationstastenanzeige erscheint im
Display.
Hinweis
Wenn Sie auf der gleichen Stationstaste einen
anderen Sender speichern, wird der zuvor
gespeicherte Sender ersetzt.
Tipp
Wenn ein RDS-Sender gespeichert wird, wird auch
die AF/TA-Einstellung gespeichert (Seite 14).
Automatisches Einstellen von
Sendern
1 Wählen Sie den Frequenzbereich aus
und drücken Sie den Joystick nach
links bzw. rechts, um einen Sender zu
suchen.
Der Suchlauf stoppt, wenn ein Sender
empfangen wird. Wiederholen Sie diesen
Vorgang, bis das Gerät den gewünschten
Sender empfängt.
Tipp
Wenn Sie die Frequenz des gewünschten Senders
kennen, halten Sie den Joystick nach links bzw. rechts
gedrückt, bis die Frequenz in etwa erreicht ist, und
drücken Sie den Joystick dann nach links bzw. rechts,
bis die gewünschte Frequenz genau eingestellt ist
(manuelle Sendersuche).
Einstellen eines Senders anhand
einer Liste — LIST
Sie können die Frequenzen auflisten lassen.
1 Wählen Sie den Frequenzbereich aus
und drücken Sie den Joystick.
Die Frequenz erscheint.
2 Drücken Sie den Joystick nach oben
bzw. unten, bis der gewünschte
Sender erscheint.
3 Drücken Sie den Joystick, um den
Sender einzustellen.
Im Display erscheint wieder die Anzeige für
den normalen Empfangsmodus.
RDS
Übersicht
UKW-Sender, die RDS (Radio Data System)
unterstützen, strahlen zusammen mit den
normalen Radioprogrammsignalen nicht hörbare,
digitale Informationen aus.
Fortsetzung auf der nächsten Seite
t
Einstellen gespeicherter Sender
1 Wählen Sie den Frequenzbereich aus
und drücken Sie eine Stationstaste
((1) bis (6)).
13
Page 44

Informationen im Display
Beispiel: Wenn der Modus „Info“
(Informationen) auf „All“ gesetzt ist (Seite 22).
ABC
ED
A Radiofrequenzbereich
B TA /T P/ AF *
1
C Uhrzeit
D Speichernummer
E Frequenz*
2
(Programmdienstname), RDS-
Daten
*1 Wenn „Info“ (Informationen) auf „All“ gesetzt ist:
– „TP“ leuchtet, wenn ein Verkehrsfunksender
(„TP“) empfangen wird.
– „TA“/„AF“ leuchtet, wenn „TA/AF“ aktiviert ist.
*2 Beim Empfang eines RDS-Senders wird „RDS“
links neben der Frequenz angezeigt.
RDS-Funktionen
Mit diesem Gerät stehen folgende RDSFunktionen automatisch zur Verfügung:
AF (Alternativfrequenzen)
In einem Netzwerk wird der Sender mit den
stärksten Signalen ausgewählt und neu
eingestellt. So können Sie auch bei einer langen
Fahrt über eine große Entfernung hinweg
ununterbrochen denselben Sender empfangen,
ohne ihn manuell neu einstellen zu müssen.
TA (Verkehrsdurchsagen)/
TP (Verkehrsfunksender)
Aktuelle Verkehrsinformationen bzw.
Verkehrsfunksender werden empfangen. Wenn
solche Informationen bzw. Sendungen
empfangen werden, wird die gerade
ausgewählte Tonquelle unterbrochen.
PTY (Programmtypen)
Der gerade empfangene Programmtyp wird
angezeigt. Außerdem kann nach dem
ausgewählten Programmtyp gesucht werden.
CT (Uhrzeit)
Mit den CT-Daten (Uhrzeitdaten), die von
RDS-Sendern ausgestrahlt werden, lässt sich
die Uhr einstellen.
Hinweise
• Je nach Land bzw. Region stehen möglicherweise
nicht alle RDS-Funktionen zur Verfügung.
• Die RDS-Funktion arbeitet möglicherweise nicht,
wenn die Sendesignale zu schwach sind oder wenn
der eingestellte Sender keine RDS-Daten ausstrahlt.
Einstellen von AF und TA
1 Drücken Sie (AF/TA) so oft, bis die
gewünschte Einstellung angezeigt
wird.
Einstellung Funktion
AF on AF wird aktiviert und TA wird
deaktiviert.
TA on TA wird aktiviert und AF wird
deaktiviert.
AF/TA on AF und TA werden aktiviert.
AF/TA off AF und TA werden deaktiviert.
Speichern von RDS-Sendern
zusammen mit der AF- und TAEinstellung
Sie können zusammen mit den RDS-Sendern die
AF/TA-Einstellung speichern. Mit der BTMFunktion werden nur RDS-Sender mit derselben
AF/TA-Einstellung gespeichert.
Beim manuellen Speichern von Sendern können
Sie RDS- und Nicht-RDS-Sender mit
unterschiedlicher AF/TA-Einstellung speichern.
1 Stellen Sie AF/TA ein und speichern Sie die
Sender dann mit BTM oder manuell ab.
Speichern der Lautstärke von
Verkehrsdurchsagen
Sie können die Lautstärke für die
Verkehrsdurchsagen voreinstellen, so dass Sie sie
nicht überhören.
1 Drehen Sie den Joystick, um den
Lautstärkepegel einzustellen.
2 Halten Sie (AF/TA) gedrückt, bis „TA Vol“
erscheint.
Empfangen von
Katastrophenwarnungen
Wenn AF oder TA aktiviert ist, unterbrechen
Katastrophenwarnungen automatisch die
ausgewählte Tonquelle.
Unveränderter Empfang eines
Regionalsenders — REG
Wenn die AF-Funktion aktiviert ist, wird der
Empfang dieses Geräts werkseitig auf eine
bestimmte Region beschränkt, so dass nicht zu
einem anderen Regionalsender mit einer
stärkeren Frequenz gewechselt wird.
Wenn Sie den Empfangsbereich des betreffenden
Regionalsenders verlassen, stellen Sie während
des Empfangs eines UKW-Senders bei der
Konfiguration „Regional off“ ein (Seite 23).
14
Page 45

Hinweis
Diese Funktion steht in Großbritannien und in einigen
anderen Regionen nicht zur Verfügung.
Lokalsenderfunktion (nur
Großbritannien)
Mithilfe dieser Funktion können Sie andere
Lokalsender auswählen, auch wenn diese zuvor
nicht unter einer Stationstaste gespeichert
wurden.
1 Drücken Sie während des UKW-Empfangs
eine Stationstaste ((1) bis (6)), unter der ein
Lokalsender gespeichert ist.
2 Drücken Sie innerhalb von 5 Sekunden erneut
die Stationstaste des Lokalsenders.
Wiederholen Sie diesen Vorgang, bis das Gerät
den Lokalsender empfängt.
Auswählen des Programmtyps
(PTY)
1 Drücken Sie während des UKW-
Empfangs (PTY).
Der Name des aktuellen Programmtyps
erscheint, wenn der Sender PTY-Daten
ausstrahlt.
2 Drücken Sie den Joystick nach oben
bzw. unten, bis der gewünschte
Programmtyp erscheint.
3 Drücken Sie den Joystick.
Das Gerät beginnt, nach einem Sender zu
suchen, der den ausgewählten Programmtyp
ausstrahlt.
Programmtypen
News (Nachrichten), Current Affairs
(Aktuelles Zeitgeschehen), Information
(Informationen), Sport (Sport), Education
(Erziehung und Bildung), Drama (Hörspiele),
Cultures (Kultur), Science (Wissenschaft),
Varied Speech (Verschiedenes), Pop Music
(Pop-Musik), Rock Music (Rock-Musik),
Easy Listening (Unterhaltungsmusik),
Light Classics M (Leichte Klassik), Serious
Classics (Klassik), Other Music (Sonstige
Musik), Weather & Metr (Wetter), Finance
(Finanzberichte), Children’s Progs
(Kinderprogramme), Social Affairs
(Magazinsendungen), Religion (Religion),
Phone In (Hörertelefon), Travel & Touring
(Reiseinformationen), Leisure & Hobby
(Freizeitprogramm), Jazz Music (Jazz),
Country Music (Country-Musik),
National Music (Volksmusik), Oldies Music
(Oldies), Folk Music (Folk-Musik),
Documentary (Dokumentarbeiträge)
Hinweis
Sie können diese Funktion in Ländern/Regionen, in
denen keine PTY-Daten zur Verfügung stehen, nicht
verwenden.
Einstellen der Uhrzeit (CT)
1 Stellen Sie bei der Konfiguration „CT
on“ ein (Seite 22).
Hinweise
• Die CT-Funktion steht möglicherweise nicht zur
Verfügung, auch wenn ein RDS-Sender empfangen
wird.
• Die mit der CT-Funktion eingestellte Uhrzeit ist nicht
immer korrekt.
15
Page 46

Bluetooth-Funktion
Vorbereitungen für die
Bluetooth-Funktion
Menüfunktionen bei der BluetoothFunktion
Die Bluetooth-Einstellungen können über das
Bluetooth-Funktionsmenü oder das Menü CALL
konfiguriert werden. Die Schritte im Menü
können generell mit dem Joystick ausgeführt
werden.
1 Drücken Sie (Bluetooth) oder (CALL).
Das Bluetooth-Funktionsmenü oder das
Menü CALL erscheint.
2 Drücken Sie den Joystick nach oben
bzw. unten, bis die gewünschte
Menüoption erscheint, und drücken
Sie den Joystick dann nach rechts.
Die Markierung in der Digitalanzeige
wechselt auf die rechte Seite (Auswahl der
Einstellung).
3 Drücken Sie den Joystick nach oben
bzw. unten, um die Einstellung
auszuwählen, und drücken Sie dann
den Joystick.
Die Einstellung ist damit abgeschlossen.
4 Drücken Sie (Bluetooth) oder (CALL).
Die normale Anzeige erscheint.
So geben Sie ein Zeichen ein
Drücken Sie den Joystick nach oben bzw. unten,
um ein Zeichen auszuwählen, und drücken Sie
ihn nach links bzw. rechts, um den Cursor zu
bewegen.
Die Zeichen A – Z, a – z, 0 – 9 und das
Leerzeichen können eingegeben werden.
3 Wählen Sie das gewünschte Menü
aus.
4 Nehmen Sie die Einstellung vor.
5 Drücken Sie (Bluetooth).
Menü „Bluetooth Settings“
„z“ gibt die Standardeinstellung an.
Signal
Zum Umschalten der Bluetooth-Signalausgabe
dieses Geräts auf „ON“ oder „OFF“.
– „ON“: Bluetooth-Signale werden ausgegeben
(RF 2,4 GHz).
– „OFF“ (
Stellen Sie sicher, dass „ON“ eingestellt ist,
wenn Sie eine Verbindung zu einem BluetoothGerät herstellen wollen.
Visibility
Damit ermöglichen Sie es anderen BluetoothGeräten, dieses Gerät zu suchen.
– „Show“: Andere Geräte können dieses Gerät
–„Hide“ (
Stellen Sie sicher, dass „Show“ eingestellt ist,
wenn Sie dieses Gerät von einem anderen
Bluetooth-Gerät aus suchen.
Device Name
Zum Ändern des Namens dieses Geräts, der am
verbundenen Gerät angezeigt wird
(Standardeinstellung: „Xplod“).
Wählen Sie „Rename“ aus und geben Sie
Zeichen ein. Bis zu 12 Zeichen können für
diesen Namen eingegeben werden.
Wenn Sie „Xplod“ wiederherstellen wollen,
wählen Sie „Default“ c „yes“.
Hinweis
Einzelheiten zu den Einstellungen an anderen
Bluetooth-Geräten finden Sie in den jeweiligen
Anleitungen.
z): Es werden keine Bluetooth-
Signale ausgegeben (HF 2,4 GHz).
suchen.
z): Andere Gerät können dieses Gerät
nicht suchen.
Konfigurieren von BluetoothEinstellungen
Bevor Sie eine Verbindung zu einem BluetoothGerät herstellen können, müssen Sie die
Bluetooth-Einstellungen an diesem Gerät
konfigurieren.
1 Drücken Sie (Bluetooth).
Das Bluetooth-Funktionsmenü erscheint.
2 Wählen Sie „Bluetooth Settings“.
16
Pairing und Herstellen einer
Verbindung mit einem BluetoothGerät
Wenn Sie zum ersten Mal eine Verbindung
zwischen Bluetooth-Geräten herstellen wollen,
ist eine gegenseitige Registrierung erforderlich.
Dies wird als „Pairing“ bezeichnet. Diese
Registrierung (Pairing) ist nur beim ersten Mal
erforderlich, da dieses Gerät und die anderen
Geräte sich ab dem nächsten Mal automatisch
erkennen. Je nach Gerät muss beim Herstellen
einer Verbindung möglicherweise jedes Mal ein
Passwort eingegeben werden.
Page 47

Suchen nach einem Bluetooth-Gerät
von diesem Gerät aus
Überprüfen Sie zunächst, ob das andere
Bluetooth-Gerät so eingestellt ist, dass es gesucht
bzw. erkannt werden kann.
1 Drücken Sie (Bluetooth).
Das Bluetooth-Funktionsmenü erscheint.
2 Wählen Sie „Connectivity“ c „Search“.
Das Suchen nach einem Gerät, zu dem eine
Verbindung hergestellt werden kann, beginnt
und der Name des bzw. der gefundenen
Geräte erscheint in einer Liste. Wenn kein
Gerätename empfangen wird, wird
„Unknown“ angezeigt.
Die Suchdauer hängt von der Anzahl der
Bluetooth-Geräte ab.
3 Wählen Sie das Gerät aus, zu dem eine
Verbindung hergestellt werden soll.
Das Pairing beginnt.
4 Geben Sie ein Passwort ein.*
Geben Sie für dieses und das andere Gerät, zu
dem eine Verbindung hergestellt werden soll,
mit dem Joystick oder der
Kartenfernbedienung dasselbe Passwort ein.
Das Passwort kann eine von Ihnen
ausgewählte oder vom zu verbindenden Gerät
festgelegte Nummer sein.
Einzelheiten dazu finden Sie in der Anleitung
zu dem zu verbindenden Gerät.
5 Drücken Sie zum Bestätigen den
Joystick.
„Connected“ erscheint und die Verbindung ist
damit hergestellt.
„ “ oder „ “ wird während der Verbindung
angezeigt.
Suchen nach diesem Gerät von
einem Bluetooth-Gerät aus
Überprüfen Sie, ob „Visibility“ im Menü
„Bluetooth Settings“ auf „Show“ gesetzt ist
(Seite 16).
1 Starten Sie am zu verbindenden Gerät
die Suche.
2 Wenn bei diesem Gerät „Allow
Connection?“ angezeigt wird, wählen
Sie „yes“.
Die Verbindung wird hergestellt.
Je nach Gerät erscheint die Anzeige zum
Eingeben des Passworts.
3 Geben Sie das Passwort für das zu
verbindende Gerät ein.
4 Drücken Sie zum Bestätigen den
Joystick.
„Connected“ erscheint und die Verbindung ist
damit hergestellt.
„ “ oder „ “ wird während der Verbindung
angezeigt.
Tipp
Das Passwort können Sie auch mit den Zahlentasten
auf der Kartenfernbedienung eingeben.
Hinweise
• Während eine Verbindung zu einem Bluetooth-Gerät
besteht, kann dieses Gerät von einem anderen
Gerät nicht erkannt werden. Damit dieses Gerät
erkannt werden kann, trennen Sie die aktuelle
Verbindung und lassen Sie dann vom anderen Gerät
aus nach diesem Gerät suchen.
• Je nach Gerät ist die Suche von diesem Gerät aus
unter Umständen nicht möglich. Suchen Sie in
diesem Fall vom zu verbindenden Gerät aus nach
diesem Gerät.
• Wenn Sie dieses Gerät und das zu verbindende
Gerät sich gleichzeitig gegenseitig suchen lassen,
erkennt dieses Gerät das zu verbindende Gerät
nicht.
• Die Suche bzw. das Herstellen der Verbindung kann
etwas dauern.
• Bei einigen Gerät erscheint die Bestätigungsanzeige
für die Verbindung vor dem Eingeben des
Passworts.
• Das Zeitlimit zum Eingeben des Passworts variiert je
nach Gerät.
• Bei diesem Gerät können je bis zu 6 Geräte für das
Freisprechen und für die Audiowiedergabe registriert
werden.
• Von diesem Gerät kann keine Verbindung zu einem
Gerät hergestellt werden, das ausschließlich HSP
(Head Set Profile) unterstützt.
* Das Passwort wird bei einigen Geräten auch
„Kennwort“, „PIN-Code“, „PIN-Nummer“ oder
„Passcode“ genannt.
Fortsetzung auf der nächsten Seite t
17
Page 48

Herstellen einer Verbindung mit
den registrierten Geräten
Geräte sind registriert, sobald einmal ein Pairing
und eine Verbindung mit diesem Gerät
stattgefunden hat. Sie können ein registriertes
Gerät auswählen und eine Verbindung herstellen.
1 Drücken Sie (Bluetooth).
Das Bluetooth-Funktionsmenü erscheint.
2 Wählen Sie „Connectivity“ c
„Handsfree Devices“ oder „Audio
Devices“.
Eine Liste der registrierten Geräte erscheint.
3 Wählen Sie das Gerät aus, zu dem eine
Verbindung hergestellt werden soll.
4 Wählen Sie „Connect“.
„Connected“ erscheint und die Verbindung ist
damit hergestellt.
„ “ oder „ “ wird während der Verbindung
angezeigt.
So beenden Sie die Verbindung
Wählen Sie in Schritt 4 „Disconnect“ c „yes“.
Tipp
Je nach Gerät können Sie dieses Gerät am anderen
Gerät auswählen und eine Verbindung herstellen.
Freisprecheinrichtung
Überprüfen Sie zunächst, ob eine Verbindung
zwischen diesem Gerät und dem Mobiltelefon
besteht (Seite 16, 18).
Hinweise
• Einzelheiten zum Vorgehen, wenn mit einem
Mobiltelefon mit Bluetooth-Audio-StreamingFunktion eine Verbindung als Audiogerät besteht,
finden Sie unter „Wiedergeben von Musik von einem
Audiogerät“ auf Seite 20.
• Das Mikrofon dieses Geräts befindet sich an der
Rückseite der Frontplatte (Seite 10). Decken Sie das
Mikrofon nicht durch Klebeband o. Ä. ab.
• Selbst wenn Sie während eines Telefongesprächs
die ATT-Funktion einschalten, wird der Ton des
abgehenden Gesprächs nicht gedämpft.
Tätigen von Anrufen
Sie können von diesem Gerät aus einen Anruf
über das Mobiltelefon tätigen, zu dem eine
Verbindung besteht.
1 Drücken Sie (CALL).
Das Menü CALL erscheint.
18
2 Wählen Sie die Optionen in der
folgenden Reihenfolge aus und
drücken Sie dann zum Tätigen des
Anrufs den Joystick.
Menü CALL
Dialed Calls*
Zum Auswählen aus der Rufliste der gewählten
Nummern (maximale Anzahl speicherbarer
Namen und Telefonnummern: 10).
Name und Telefonnummer des Anzurufenden c
„Call“
Wählen Sie „Delete“, wenn Sie Name und
Telefonnummer löschen wollen, bzw. „Delete
All“, wenn die Rufliste gelöscht werden soll.
Received Calls*
Zum Auswählen aus der Rufliste der
angenommenen Anrufe (maximale Anzahl
speicherbarer Namen und Telefonnummern:
10).
Name und Telefonnummer des Anzurufenden c
„Call“
Wählen Sie „Delete“, wenn Sie Name und
Telefonnummer löschen wollen, bzw. „Delete
All“, wenn die Rufliste gelöscht werden soll.
Phonebook*
Zum Auswählen aus der Telefonbuchliste
(maximale Anzahl speicherbarer Namen und
Telefonnummern: 50).
„Contact List“ c Name des Anzurufenden c
Name und Telefonnummer
Einzelheiten zum Speichern von Daten im
Telefonbuch finden Sie unter „Verwenden des
Telefonbuchs“ auf Seite 19 und „Konfigurieren
der Freisprecheinrichtung“ auf Seite 20.
Dial
Zum Eingeben der Telefonnummer mit Joystick
oder Kartenfernbedienung.
Zum Eingeben von „+“ halten Sie die Taste 0
auf der Kartenfernbedienung gedrückt.
Preset Dial*
Zum Auswählen der Telefonnummer, die unter
einer Zahlentaste gespeichert ist.
Speichernummer (P1 – P6) c „Call“
Einzelheiten zum Belegen der Zahlentasten
finden Sie unter „Verwenden der Kurzwahl“ auf
Seite 20.
* Wenn Sie „Security“ einstellen (Seite 21), erscheint
„Security Locked“ und die Funktion steht nicht zur
Verfügung.
Tipps
• Mit „Preset Dial“ können Sie einen Anruf auch
tätigen, indem Sie (CALL) drücken und eine
Zahlentaste zweimal drücken.
Page 49

• In den Menüs „Dialed Calls“, „Received Calls“ und
„Preset Dial“ können Sie einen Anruf tätigen, indem
Sie (CALL) drücken, solange die Telefonnummer
angezeigt wird.
Voreinstellen der Lautstärke des
Rufzeichens und der Stimme des
Gesprächsteilnehmers
Sie können den Lautstärkepegel des Rufzeichens
und der Stimme des Gesprächsteilnehmers
voreinstellen.
So stellen Sie das Rufzeichen ein:
Drehen Sie den Joystick, während das
Rufzeichen ertönt. „Ring Vol“ erscheint und die
Lautstärke des Rufzeichens ist eingestellt.
So stellen Sie die Stimme des
Gesprächsteilnehmers ein:
Drehen Sie während eines Anrufs den Joystick.
„Talk Vol“ erscheint und die Lautstärke für die
Stimme des Gesprächsteilnehmers ist eingestellt.
Senden von DTMF-Signalen
(Doppeltonmehrfrequenz)
Sie können DTMF-Signale senden.
Zum Senden von DTMF-Signalen verwenden
Sie während eines Anrufs den Joystick oder
drücken die erforderlichen Zahlentasten (0 – 9,
oder ) auf der Kartenfernbedienung.
Beenden eines Anrufs
1 Drücken Sie (OFF).
Am Ende des Anrufs wird ein paar Sekunden
lang die Gesprächsdauer angezeigt.
Hinweis
Auch wenn der Anruf beendet wird, bleibt die
Bluetooth-Verbindung bestehen.
Verwenden des Telefonbuchs
Empfangen von Telefonbuchdaten
von einem Mobiltelefon
1 Wählen Sie „Phone Settings“ aus dem
Bluetooth-Funktionsmenü.
2 Wählen Sie „Receive PB“.
„Waiting…“ erscheint.
3 Senden Sie vom Mobiltelefon aus die
Telefonbuchdaten.
„Data Receiving…“ erscheint, während die
Telefonbuchdaten empfangen werden.
„Complete“ erscheint, wenn das Empfangen
der Daten abgeschlossen ist.
Hinweis
Abbrechen können Sie die Telefonbuchübertragung
ausschließlich über das Mobiltelefon. Von diesem
Gerät aus lässt sich die Übertragung nicht abbrechen.
Entgegennehmen von Anrufen
Wenn ein Anruf eingeht, wird über die
Autolautsprecher ein Rufzeichen ausgegeben.
Informationen zu den Einstellungen zum
Entgegennehmen eines Anrufs und während
eines Gesprächs finden Sie unter „Konfigurieren
der Freisprecheinrichtung“ auf Seite 20.
1 Zum Entgegennehmen eines Anrufs
drücken Sie (CALL), (MENU) oder
(Bluetooth).
(Bluetooth)
(MENU)
(CALL)
Das Telefongespräch beginnt.
So weisen Sie einen Anruf zurück
Drücken Sie (OFF).
Tipps
• Wenn Sie „Auto Answer“ aktivieren, beginnt das
Telefongespräch automatisch nach der eingestellten
Zeit (Seite 21).
• Wenn Sie während eines Anrufs (CALL) drücken,
wird die Freisprechfunktion deaktiviert und Mikrofon
und Lautsprecher des Mobiltelefons werden
aktiviert. In diesem Fall wird je nach Mobiltelefon
möglicherweise die Bluetooth-Verbindung getrennt.
Speichern der Nummern von „Dialed
Calls“ oder „Received Calls“
1 Wählen Sie „Dialed Calls“ oder „Received
Calls“ aus dem Menü CALL.
2 Wählen Sie die zu speichernde
Telefonnummer aus und wählen Sie dann
„Save“.
Die Anzeige „Contact Name“ erscheint.
3 Geben Sie einen Namen ein.
Bis zu 20 Zeichen können für diesen Namen
eingegeben werden.
4 Wählen Sie „Save?“ c „yes“.
Hinweis
Im Telefonbuch können bis zu 50 Telefonnummern
gespeichert werden. Wenn Sie versuchen, mehr als
50 Nummern zu speichern, erscheint „Memory Full“.
Löschen von Daten aus dem
Telefonbuch
1 Wählen Sie im Menü CALL die Option
„Phonebook“ c „Contact List“.
2 Wählen Sie den zu löschenden Namen.
3 Wählen Sie „Delete“ c „yes“.
Fortsetzung auf der nächsten Seite t
19
Page 50

Wenn Sie alle Telefonbuchdaten löschen wollen,
wählen Sie in Schritt 1 die Option „Delete All“.
Vergewissern Sie sich nach dem Löschen, dass
alle Telefonbuchdaten ordnungsgemäß gelöscht
wurden.
Ändern eines Namens im
Telefonbuch
1 Wählen Sie im Menü CALL die Option
„Phonebook“ c „Contact List“.
2 Wählen Sie den zu ändernden Namen aus.
3 Wählen Sie „Edit Name“ und geben Sie einen
neuen Namen ein.
1 Stellen Sie eine Verbindung zwischen
diesem Gerät und dem BluetoothAudiogerät her (Seite 18).
„ “ wird während der Verbindung angezeigt.
2 Drehen Sie die Lautstärke an diesem
Gerät herunter.
3 Drücken Sie (SOURCE) so oft, bis
„Bluetooth AUDIO“ erscheint.
4 Starten Sie am Audiogerät die
Wiedergabe.
5 Stellen Sie die Lautstärke an diesem
Gerät ein.
Verwenden der Kurzwahl
Speichern von Nummern für die
Kurzwahl
Sie können eine Telefonnummer im Telefonbuch
für die Kurzwahl speichern.
1 Wählen Sie „Preset Dial“ im Menü CALL.
2 Wählen Sie die Speichernummer (P1 – P6) für
die Kurzwahl aus und wählen Sie „Preset
Memory“.
3 Wählen Sie den zu speichernden Namen aus.
4 Wählen Sie eine Telefonnummer für den
ausgewählten Namen aus.
5 Wählen Sie „yes“, wenn „Save?“ erscheint.
Hinweis
Wenn Sie eine registrierte Speichernummer ersetzen
wollen, löschen Sie zuerst die vorhandene
Registrierung und speichern Sie dann die neue
Telefonnummer.
Löschen der Kurzwahl
1 Wählen Sie „Preset Dial“ im Menü CALL.
2 Wählen Sie die zu löschende Speichernummer
aus.
3 Wählen Sie „Delete“ c „yes“.
Musik-Streaming
Steuern eines Audiogeräts mit
diesem Gerät
Sie können die folgenden Funktionen an diesem
Gerät ausführen, wenn das Audiogerät das
Bluetooth-Profil AVRCP (Audio Video Remote
Control Profile) unterstützt. Das Vorgehen hängt
vom Audiogerät ab.
Funktion Vorgehen
Überspringen
von Titeln
Vorwärts- bzw.
Rückwärtssuchen in
einem Titel
Unterbrechen
der Wiedergabe
(Pause)
* Bei manchen Geräten muss die Taste zweimal
gedrückt werden.
Andere als die oben genannten Funktionen
müssen am Audiogerät ausgeführt werden.
Hinweis
Auch wenn die Tonquelle an diesem Gerät gewechselt
wird, stoppt die Wiedergabe am Audiogerät nicht.
Tipp
Sie können ein Mobiltelefon, das A2DP (Advanced
Audio Distribution Profile) unterstützt, als Audiogerät
anschließen und auf diese Weise Musik hören.
Drücken Sie den Joystick nach
links bzw. rechts.
Halten Sie den Joystick nach
links bzw. rechts gedrückt.
Drücken Sie (6) (PAUSE)*.
Wiedergeben von Musik von einem
Audiogerät
Sie können mit diesem Gerät Musik von einem
Audiogerät wiedergeben lassen, wenn das
Audiogerät das Bluetooth-Profil A2DP
(Advanced Audio Distribution Profile)
unterstützt.
20
Weitere Einstellungen
Konfigurieren der
Freisprecheinrichtung
Sie können verschiedene Funktionen
konfigurieren, wenn eine Verbindung mit einem
Bluetooth-kompatiblen Mobiltelefon hergestellt
wurde und dieses Gerät als Freisprecheinrichtung
verwendet wird.
Page 51

1 Drücken Sie (Bluetooth).
Das Bluetooth-Funktionsmenü erscheint.
2 Wählen Sie „Phone Settings“.
3 Wählen Sie das gewünschte Menü
aus.
4 Nehmen Sie die Einstellung vor.
5 Drücken Sie (Bluetooth).
Menü „Phone Settings“
„z“ gibt die Standardeinstellung an.
Receive PB*
Zum Empfangen und Speichern der
Telefonbuchdaten von einem Mobiltelefon
(Seite 19).
Auto Answer (automatische
Anrufentgegennahme)
– „on“: Der Anruf wird bei Eingang automatisch
entgegengenommen. Stellen Sie die Dauer bis
zum Beginn des Gesprächs ein: „1 sec“ – „60
sec“
– „off“ (
von (CALL), (MENU) oder (Bluetooth)
entgegengenommen.
Ringtone (Rufzeichen)
Zum Wechseln des Rufzeichens:
–„Cellular*
eingestellte Rufzeichen wird ausgegeben.
– „Default“: Das Rufzeichen dieses Geräts wird
ausgegeben.
EC/NC Mode*
Rauschunterdrückungsmodus)
Zum Verringern von Echo bzw. Rauschen bei
Telefongesprächen.
Normalerweise sollte hier „Mode 1“ (
eingestellt sein. Ist die Tonqualität abgehender
Telefongespräche unzureichend, stellen Sie
„Mode 2“ oder „off“ ein.
Speaker Sel*
Zum Einstellen der Frontlautsprecher für die
Ausgabe von Rufzeichen, Wählzeichen und der
Stimme des Gesprächsteilnehmers.
–„FR-L“ (
linken Kanal der Frontlautsprecher.
– „FR-R“: Die Ausgabe erfolgt über den rechten
Kanal der Frontlautsprecher.
– „Front“: Die Ausgabe erfolgt über beide
Frontlautsprecher.
1*2
(Telefonbuch empfangen)
z): Der Anruf wird erst durch Drücken
3
“ (z): Das am Mobiltelefon
4
(Echo-/
z)
4
(Lautsprecher auswählen)
z): Die Ausgabe erfolgt über den
Security (Sicherheit)
Zum Sperren persönlicher Daten in den
folgenden Menüs mithilfe eines 4-stelligen
Passworts (Seite 18).
„Dialed Calls“, „Received Calls“, „Phonebook“,
„Preset Dial“, „Receive PB“
Wenn Sie die Sicherheitsfunktion aktivieren und
auf die Menüs oben zugreifen, wird „Security
Locked“ angezeigt.
Wenn Sie die Sicherheitsfunktion deaktivieren
wollen, wählen Sie „Unlock“ und geben die
Nummer für das Passwort ein.
*1 Wenn „Security“ eingestellt ist, erscheint „Security
Locked“ und die Funktion steht nicht zur
Verfügung.
*2 Ein Zeichen, das mit diesem Gerät nicht angezeigt
werden kann, wird nicht richtig angezeigt.
*3 Bei manchen Mobiltelefonen wird das Rufzeichen
dieses Geräts ausgegeben, obwohl „Cellular“
eingestellt ist.
*4 Während eines Anrufs konfigurierbar.
Hinweis
Wenn Sie bei der Sicherheitsfunktion die Option
„Initialize“ wählen, werden alle gespeicherten Daten
gelöscht („Dialed Calls“, „Received Calls“,
„Phonebook“ und „Preset Dial“).
Löschen der Registrierung eines
verbundenen Geräts
1 Drücken Sie (Bluetooth).
Das Bluetooth-Funktionsmenü erscheint.
2 Wählen Sie „Connectivity“ c
„Handsfree Devices“ oder „Audio
Devices“.
Eine Liste der registrierten Geräte erscheint.
3 Wählen Sie das zu löschende Gerät
aus.
4 Wählen Sie „Delete“ c „yes“.
Wenn Sie alle Geräte in der Auswahlliste löschen
wollen, wählen Sie in Schritt 4 die Option
„Delete All“.
Funktion zum automatischen
Herstellen einer Verbindung
Wenn der Zündschlüssel im Auto an der
Zubehörposition steht, stellt dieses Gerät
automatisch erneut eine Verbindung zum zuletzt
angeschlossenen Bluetooth-Gerät her.
21
Page 52

Weitere Funktionen
Einstellen von Menüoptionen
— MENU
1 Drücken Sie (MENU).
2 Drücken Sie den Joystick nach oben
bzw. unten, bis das gewünschte Menü
erscheint, und drücken Sie den
Joystick dann nach rechts.
Die Menüs wechseln folgendermaßen:
Setup y Display y Receive Mode
y Sound
3 Drücken Sie den Joystick nach oben
bzw. unten, bis die gewünschte
Menüoption erscheint, und drücken
Sie den Joystick dann nach rechts.
Die Markierung in der Digitalanzeige
wechselt auf die rechte Seite (Auswahl der
Einstellung).
4 Drücken Sie den Joystick nach oben
bzw. unten, um die Einstellung
auszuwählen, und drücken Sie dann
den Joystick.
Die Einstellung ist damit abgeschlossen.
5 Drücken Sie (MENU).
Im Display erscheint wieder die Anzeige für
den normalen Wiedergabe-/Empfangsmodus.
Hinweis
Die angezeigten Optionen unterscheiden sich je nach
Tonquelle und Einstellung.
Tipps
• Sie können durch Drücken des Joysticks in die
nächste Menüebene gelangen.
• Drücken Sie in Schritt 5 den Joystick nach links, bis
„EXIT“ erscheint, und drücken Sie dann nicht
(MENU), sondern den Joystick.
• Sie können das Einstellmenü „Sound“ direkt
aufrufen, indem Sie (SOUND) auf der
Kartenfernbedienung drücken.
Folgende Optionen können eingestellt werden
(Einzelheiten finden Sie jeweils auf den
angegebenen Seiten):
„
z“ gibt die Standardeinstellung an.
Konfiguration
Clock Adjust (Uhr einstellen) (Seite 6)
CT (Uhrzeit)
Zum Einstellen von „on“ oder „off“ (z)
(Seite 14, 15).
Beep (Signalton)
Zum Einstellen von „on“ (
z) oder „off“.
RM (Fernbedienung)
Zum Wechseln der Drehrichtung der Regler am
Joystick.
–„NORM“ (
z): Die werkseitig voreingestellte
Drehrichtung der Regler wird beibehalten.
– „REV“: Wählen Sie diese Option, wenn Sie
den Joystick auf der rechten Seite der
Lenksäule anbringen.
AUX Audio*
Zum Einstellen der AUX-Tonquellenanzeige auf
„on“ (
z) oder „off“ (Seite 24).
Version*
Zum Anzeigen der Firmware-Version des
Geräts.
Anzeige
Image (Bild)
Zum Einstellen verschiedener Anzeigebilder.
– „SpaceProducer“ (
animierte Muster werden angezeigt.
– „All“: Die Anzeigebilder für alle Anzeigemodi
werden wiederholt nacheinander angezeigt.
– „off“: Es wird kein Bild angezeigt.
– „SA 1 – 5“: Der Spektrumanalysator wird
angezeigt.
– „Movie 1 – 3“: Ein Film wird angezeigt.
– „Wallpaper 1 – 3“: Ein Hintergrundbild wird
angezeigt.
– „SA All“/„Movie All“/„Wallpaper All“: Die
Anzeigebilder in allen Modi werden
wiederholt nacheinander angezeigt.
Info (Informationen)
Im Display werden Informationen angezeigt (je
nach Tonquelle usw.).
– „All“: Alle Informationen werden angezeigt.
–„Simple“ (
angezeigt.
– „Clear“: Die Informationen werden
automatisch ausgeblendet.
Demo*
(Demo-Modus)
Zum Einstellen von „on“ (z) oder „off“.
Dimmer
Zum Wechseln der Helligkeit im Display.
–„Auto“ (
z): Das Display wird dunkler, wenn
Sie die Beleuchtung einschalten.
– „on“: Das Display wird dunkler.
– „off“: Der Dimmer wird deaktiviert.
Auto Scroll (automatischer Bildlauf)
Zum Einstellen des automatischen Bildlaufs für
Informationen mit vielen Zeichen beim
Wechseln der CD, des Albums, der Gruppe bzw.
des Titels.
– „on“: Die Informationen laufen im Display
durch.
–„off“ (
z): Die Informationen laufen im Display
nicht durch.
z): Im Rhythmus der Musik
z): Es werden keine Informationen
22
Page 53

ID3 Tag
Zum Wechseln der Priorität bei den angezeigten
ID3-Tag-Zeichen (wenn CD als Tonquelle
ausgewählt ist).
–„EUR“ (
z): Westeuropäische Zeichen werden
vorrangig angezeigt.
– „RUS“: Kyrillische Zeichen werden vorrangig
angezeigt.
Empfangsmodus
Local (lokaler Suchmodus)
–„off“ (
z): Normaler Empfang beim Einstellen
von Sendern.
– „on“: Nur Sender mit starken Signalen werden
eingestellt.
Mono (monauraler Modus)
Zum Verbessern des UKW-Empfangs wählen
Sie den monauralen Empfangsmodus.
–„off“ (
z): Stereosendungen werden stereo
ausgegeben.
– „on“: Stereosendungen werden monaural
ausgegeben.
Regional
Zum Einstellen von „on“ (
z) oder „off“
(Seite 14).
BTM (Best Tuning Memory) (Seite 13)
Klang
EQ3 Preset (EQ3-Voreinstellung)
Zum Auswählen eines Equalizer-Typs: „Xplod“,
„Vocal“, „Edge“, „Cruise“, „Space“, „Gravity“,
„Custom“ oder „Off“ (
EQ3 Tune (EQ3-Einstellung)
Informationen dazu finden Sie unter
„Individuelles Einstellen der Equalizer-Kurve“
auf Seite 23.
DSO (Dynamic Soundstage Organizer)
Zum Auswählen des DSO-Modus: „1“, „2“, „3“
oder „off“ (
z). Je höher die Zahl, desto stärker
ist die Wirkung.
Balance
Zum Einstellen der Balance zwischen den
rechten und den linken Lautsprechern: „R10“ –
„±0“ (
z) – „L10“
Fader
Zum Einstellen der Balance zwischen den
Front- und Hecklautsprechern: „F10“ – „±0“ (
– „R10“
Subwoofer (Tiefsttonlautsprecher)
Zum Einstellen der Lautstärke des
Tiefsttonlautsprechers: „+10“ – „±0“ (
„–10“ („– ∞“ wird bei der leisesten Einstellung
angezeigt.)
z).
z) –
LPF (Niedrigpassfilter)
Zum Auswählen der Grenzfrequenz des
Tiefsttonlautsprechers: „off“ (
z), „125Hz“ oder
„78Hz“.
AUX Level (AUX-Pegel)
Zum Einstellen des Lautstärkepegels der
einzelnen zusätzlich angeschlossenen Geräte.
Damit brauchen Sie den Lautstärkepegel nicht
mehr zwischen den Tonquellen anzupassen
(Seite 25).
Einstellbarer Pegel: „+6 dB“ – „±0 dB“ (
„–6 dB“
* Bei ausgeschaltetem Gerät.
Individuelles Einstellen der
Equalizer-Kurve — EQ3 Tune
Mit „Custom“ unter EQ3 können Sie Ihre
individuellen Equalizer-Einstellungen
vornehmen.
1 Wählen Sie eine Tonquelle aus und
drücken Sie (MENU).
2 Wählen Sie mit dem Joystick „Sound“
c „EQ3 Preset“ c „Custom“ aus.
3 Wählen Sie mit dem Joystick „EQ3
Tune“ aus.
4 Wählen Sie den Frequenzbereich
„LOW“, „MID“ oder „HI“ aus.
5 Wählen Sie die einzustellende
Frequenz aus.
Einstellbare Frequenz in den einzelnen
Bereichen:
LOW: 60 Hz oder 100 Hz
MID: 500 Hz oder 1,0 kHz
HI: 10,0 kHz oder 12,5 kHz
6 Stellen Sie die Equalizer-Kurve ein.
Die Lautstärke lässt sich in Schritten von
1 dB auf einen Wert zwischen –10 dB und
+10 dB einstellen.
7 Drücken Sie den Joystick.
z)
Stellen Sie wie in Schritt 4 bis 7 erläutert die
anderen Frequenzen ein.
Wenn Sie die werkseitig eingestellte
Equalizer-Kurve wiederherstellen wollen,
wählen Sie in Schritt 4 die Option „Initialize“
c „Yes“.
Tipp
Andere Equalizer-Typen lassen sich ebenfalls
einstellen.
z) –
23
Page 54

Verwenden gesondert
erhältlicher Geräte
CD/MD-Wechsler
Auswählen des Wechslers
1 Drücken Sie (SOURCE) so oft, bis „CD“ oder
„MD“ erscheint.
2 Drücken Sie (MODE) so oft, bis der
gewünschte Wechsler angezeigt wird.
Gerätenummer, MP3-Anzeige*
Anzeige LP2/LP4*
CD/MD-/Albumnummer
1
2
Die Wiedergabe beginnt.
*1 Bei Wiedergabe einer MP3-Datei.
*2 Bei Wiedergabe einer MDLP.
Überspringen von Alben und CDs/
MDs
1 Drücken Sie während der Wiedergabe den
Joystick nach oben bzw. unten.
Zum
Überspringen
Drücken Sie den Joystick
nach oben/unten
eines Albums und halten Sie ihn vor dem
Loslassen einem Moment
gedrückt.
mehrerer Alben
hintereinander
und halten Sie ihn innerhalb
von 2 Sekunden nach dem
Loslassen erneut gedrückt.
von CDs/MDs und wiederholen Sie dies
mehrmals.
mehrerer CDs/
MDs
hintereinander
und drücken Sie ihn innerhalb
von 2 Sekunden erneut und
halten Sie ihn dann gedrückt.
Repeat und Shuffle Play
1 Drücken Sie während der Wiedergabe
(1) (REP) oder (2) (SHUF) so oft, bis die
gewünschte Einstellung im Display erscheint.
24
Einstellung Funktion
Repeat Disc*1Wiederholte Wiedergabe einer
CD/MD.
Shuffle
Changer*
Wiedergabe der Titel im
1
Wechsler in willkürlicher
Reihenfolge.
Shuffle All*
2
Wiedergabe der Titel in allen
Geräten in willkürlicher
Reihenfolge.
*1 Wenn mindestens ein CD/MD-Wechsler
angeschlossen ist.
*2 Wenn mindestens ein CD-Wechsler bzw.
mindestens zwei MD-Wechsler angeschlossen
sind.
Wenn Sie wieder in den normalen
Wiedergabemodus schalten möchten, wählen Sie
„Repeat off“ oder „Shuffle off“.
Tipp
Mit „Shuffle All“ werden nicht Titel von CD-Geräten
und MD-Wechslern gemischt wiedergegeben.
Ansteuern einer CD/MD anhand des
Namens — LIST
Sie können eine CD/MD aus der Liste wählen,
wenn ein CD-Wechsler mit CD TEXT-Funktion
bzw. ein MD-Wechsler angeschlossen ist.
Wenn Sie einer CD/MD einen Namen zuweisen
erscheint der Name auf der Liste.
1 Drücken Sie während der Wiedergabe den
Joystick.
Die Nummer oder der Name der CD/MD
erscheint.
2 Drücken Sie den Joystick nach oben bzw.
unten, bis die gewünschte CD/MD erscheint.
3 Drücken Sie den Joystick, um die Wiedergabe
der CD/MD zu starten.
Im Display erscheint wieder die Anzeige für
den normalen Wiedergabemodus.
Zusätzliche Audiogeräte
An den Anschluss BUS AUDIO IN/AUX IN des
Geräts können Sie gesondert erhältliche tragbare
Geräte von Sony anschließen. Wenn an den
Anschluss kein Wechsler oder sonstiges Gerät
angeschlossen ist, können Sie den Ton des
tragbaren Geräts über die Lautsprecher des
Fahrzeugs wiedergeben lassen.
Hinweis
Wenn Sie ein tragbares Gerät anschließen, darf kein
Gerät an BUS CONTROL IN angeschlossen sein.
Wenn an BUS CONTROL IN ein Gerät angeschlossen
ist, können Sie „AUX“ mit (SOURCE) nicht auswählen.
Tipp
Wenn Sie ein tragbares Gerät und einen Wechsler
anschließen wollen, verwenden Sie den gesondert
erhältlichen AUX-IN-Signalquellenwähler.
Page 55

Auswählen eines zusätzlichen
Geräts
1 Drücken Sie (SOURCE) so oft, bis „AUX“
erscheint.
Bedienen Sie das tragbare Gerät.
Einstellen des Lautstärkepegels
Stellen Sie unbedingt vor der Wiedergabe die
Lautstärke der einzelnen angeschlossenen
Audiogeräte ein.
1 Drehen Sie die Lautstärke an diesem Gerät
herunter.
2 Drücken Sie (SOURCE) so oft, bis „AUX“
erscheint.
3 Starten Sie die Wiedergabe am tragbaren
Audiogerät mit gemäßigter Lautstärke.
4 Stellen Sie die gewohnte Hörlautstärke an
diesem Gerät ein.
5 Stellen Sie den Lautstärkepegel wie unter
„Einstellen von Menüoptionen — MENU“ auf
Seite 22 erläutert ein. Der Eingangspegel lässt
sich zwischen –6 dB und +6 dB einstellen.
Joystick RM-X4S
Anbringen des Aufklebers
Bringen Sie den Aufkleber je nach Montage des
Joysticks an.
• Regler PRESET/DISC
Entspricht dem Drücken des Joysticks am
Gerät nach oben bzw. unten (drücken und
drehen).
• Lautstärkeregler VOL
Entspricht dem Drehen des Joysticks am Gerät
(drehen).
• Regler SEEK/AMS
Entspricht dem Drücken des Joysticks am
Gerät nach links bzw. rechts (drehen oder
drehen und gedreht halten).
* Funktion steht bei diesem Gerät nicht zur
Verfügung.
Wechseln der Drehrichtung
Die Drehrichtung der Regler ist werkseitig wie in
der folgenden Abbildung zu sehen eingestellt.
Erhöhen
Verringern
Wenn Sie den Joystick rechts von der Lenksäule
anbringen, können Sie die Drehrichtung der
Regler ändern.
1 Drücken Sie den Regler VOL nach innen und
halten Sie (SOUND) gedrückt.
D
S
D
N
U
O
S
E
D
O
M
L
SP
D
P
L
M
O
D
E
S
O
U
N
D
Lage und Funktion der
Bedienelemente
Die entsprechenden Tasten auf dem Joystick
haben dieselbe Funktion wie die Tasten an
diesem Gerät.
SOUND*
PRESET/
DISC
SOURCE
VOL
Bei folgenden Reglern auf dem Joystick müssen
Sie anders als mit dem Gerät vorgehen.
ATT
DSPL
SEEK/AMS
MODE
OFF
OFF
25
Page 56

Weitere Informationen
Sicherheitsmaßnahmen
• Wenn das Fahrzeug längere Zeit in direktem
Sonnenlicht geparkt war, lassen Sie das Gerät
etwas abkühlen, bevor Sie es einschalten.
• Motorantennen werden automatisch ausgefahren,
wenn das Gerät eingeschaltet wird.
Feuchtigkeitskondensation
Bei Regen oder bei sehr hoher Luftfeuchtigkeit kann
sich auf den Linsen im Inneren des Geräts und im
Display Feuchtigkeit niederschlagen. In diesem Fall
funktioniert das Gerät nicht mehr richtig. Nehmen
Sie die CD heraus und warten Sie etwa eine Stunde,
bis die Feuchtigkeit verdunstet ist.
So bewahren Sie die hohe
Tonqualität
Achten Sie darauf, keine Säfte oder andere
zuckerhaltige Getränke auf das Gerät oder die CDs
zu verschütten.
Hinweise zu CDs
• Berühren Sie nicht die Oberfläche von CDs, damit
diese nicht verschmutzt werden. Fassen Sie CDs
nur am Rand an.
• Bewahren Sie CDs in ihrer Hülle oder in den CDMagazinen auf, wenn sie nicht abgespielt werden.
• Schützen Sie CDs vor Hitze bzw. hohen
Temperaturen. Lassen Sie sie nicht in geparkten
Autos, auf dem Armaturenbrett oder auf der
Hutablage liegen.
• Bringen Sie keine Aufkleber auf CDs an und
verwenden Sie keine CDs mit Rückständen von
Tinte oder Klebstoffen. Solche CDs drehen sich
beim Betrieb möglicherweise nicht mehr und
führen zu einer Fehlfunktion oder können
beschädigt werden.
• Verwenden Sie keine CDs, an denen Etiketten
oder Aufkleber angebracht sind.
Bei Verwendung solcher CDs kann es zu
folgenden Fehlfunktionen kommen:
– Die CD lässt sich nicht auswerfen, weil sich ein
Etikett oder Aufkleber gelöst hat und den
Auswurfmechanismus blockiert.
– Die Audiodaten werden nicht korrekt gelesen
(z. B. Tonsprünge bei der Wiedergabe, keine
Wiedergabe), weil ein Etikett oder Aufkleber
durch Wärmeeinwirkung geschrumpft ist und
die CD sich verzogen hat.
26
• CDs mit außergewöhnlichen Formen (z. B.
herzförmige, quadratische oder sternförmige CDs)
können mit diesem Gerät nicht wiedergegeben
werden. Falls Sie es doch versuchen, kann das
Gerät beschädigt werden. Verwenden Sie solche
CDs nicht.
• Single-CDs (8-cm-CDs) können ebenfalls nicht
verwendet werden.
• Reinigen Sie CDs vor dem
Abspielen mit einem
handelsüblichen
Reinigungstuch. Wischen Sie
dabei von der Mitte nach außen.
Verwenden Sie keine
Lösungsmittel wie Benzin oder
Verdünner und keine
handelsüblichen
Reinigungsmittel oder Antistatik-Sprays für
Schallplatten.
Hinweise zu CD-Rs/CD-RWs
• Je nach dem Gerät, mit dem die CD-R/CD-RW
bespielt wurde, oder dem Zustand der CD-R/CDRW selbst ist eine Wiedergabe mit diesem Gerät
nicht in jedem Fall möglich.
• Eine noch nicht abgeschlossene CD-R/CD-RW
kann nicht wiedergegeben werden.
Musik-CDs mit
Urheberrechtsschutzcodierung
Dieses Gerät ist auf die Wiedergabe von CDs
ausgelegt, die dem Compact Disc-Standard (CD)
entsprechen.
Seit neuestem bringen einige Anbieter Musik-CDs
mit Urheberrechtsschutzcodierung auf den Markt.
Beachten Sie bitte, dass einige dieser CDs nicht dem
CD-Standard entsprechen und mit diesem Produkt
möglicherweise nicht wiedergegeben werden
können.
Hinweis zu DualDiscs
Eine DualDisc ist eine zweiseitig bespielte Disc,
auf der DVD-Aufnahmen auf der einen und
digitale Audiodaten auf der anderen Seite
aufgezeichnet sind. Da jedoch die
Audiomaterialseite nicht dem Compact Disc (CD)Standard entspricht, kann einwandfreie
Wiedergabe auf diesem Produkt nicht garantiert
werden.
MP3-/WMA-Dateien
MP3 steht für MPEG-1 Audio Layer-3. Dabei
handelt es sich um einen Formatstandard zum
Komprimieren von Musikdateien. Hierbei werden
Audio-CD-Daten auf etwa 1/10 ihrer ursprünglichen
Größe komprimiert.
WMA steht für Windows Media Audio. Dabei
handelt es sich um einen weiteren Formatstandard
zum Komprimieren von Musikdateien. Hierbei
werden Audio-CD-Daten auf etwa 1/22* ihrer
ursprünglichen Größe komprimiert.
* nur bei 64 Kbps
Page 57

• Das Gerät ist mit dem Format ISO 9660, Stufe 1/
Stufe 2, dem erweiterten Joliet- bzw. RomeoFormat sowie dem Multisession-Format
kompatibel.
• Höchstzahl an:
– Ordnern (Alben): 150 (einschließlich
Stammordner und leerer Ordner).
– MP3-/WMA-Dateien (Titeln) und Ordnern auf
einer CD: 300. Wenn ein Ordner- bzw. die
Dateinamen viele Zeichen enthalten, ist die
maximale Anzahl möglicherweise geringer als
300.
– anzeigbaren Zeichen für einen Ordner-/
Dateinamen: 25 (Joliet) bzw. 50 (Romeo).
• ID3-Tags der Versionen 1.0, 1.1, 2.2, 2.3 und 2.4
stehen nur bei MP3 zur Verfügung. Bei ID3-Tags
können 30 Zeichen (1.0 und 1.1) bzw. 50 Zeichen
(2.2, 2.3 und 2.4) angezeigt werden. Bei WMATags können 25 Zeichen angezeigt werden.
Wiedergabereihenfolge von MP3-/
WMA-Dateien
MP3/WMA
Hinweise
• Fügen Sie beim Benennen einer MP3-/WMA-Datei
unbedingt die Dateierweiterung „.mp3“ bzw. „.wma“
zum Dateinamen hinzu.
• Bei der Wiedergabe einer VBR-MP3-/-WMA-Datei
(VBR = Variable Bit Rate) bzw. beim Vorwärts-/
Rückwärtssuchen wird die verstrichene Spieldauer
möglicherweise nicht richtig angezeigt.
• Bei einer Multisession-CD wird nur das Format des
ersten Titels der ersten Session erkannt und
wiedergegeben (alle anderen Formate werden
übersprungen). Das CD-DA-Format hat Vorrang vor
dem ATRAC-CD-Format und dieses hat Vorrang vor
dem MP3-/WMA-Format.
– Wenn der erste Titel das CD-DA-Format aufweist,
werden nur die CD-DA-Titel der ersten Session
wiedergegeben.
– Wenn der erste Titel nicht das CD-DA-Format
aufweist, wird eine ATRAC-CD- oder MP3-/WMASession wiedergegeben. Wenn auf der CD keine
Daten in einem dieser Formate enthalten sind,
wird „NO Music“ angezeigt.
Hinweise zu MP3
• Schließen Sie die CD unbedingt ab, bevor Sie sie
mit diesem Gerät verwenden.
• Wenn Sie eine MP3-Datei mit einer hohen Bitrate,
wie z. B. 320 Kbps, wiedergeben, kommt es
möglicherweise zu Tonaussetzern.
Ordner
(Album)
MP3-/WMADatei (Titel)
Hinweise zu WMA
• Mit verlustfreier Komprimierung erstellte Dateien
können nicht wiedergegeben werden.
• Urheberrechtlich geschützte Dateien können nicht
wiedergegeben werden.
ATRAC-CDs
ATRAC3plus-Format
ATRAC3 steht für „Adaptive Transform Acoustic
Coding3“ und ist eine Komprimierungstechnologie
für Tonsignale. Hierbei werden Audio-CD-Daten
auf etwa 1/10 ihrer ursprünglichen Größe
komprimiert. Bei ATRAC3plus, einem erweiterten
ATRAC3-Format, werden Audio-CD-Daten auf
etwa 1/20 ihrer ursprünglichen Größe komprimiert.
Dieses Gerät unterstützt das ATRAC3- und das
ATRAC3plus-Format.
ATRAC-CD
Eine ATRAC-CD ist eine mit Audio-CD-Daten
bespielte CD, bei der die Daten mithilfe autorisierter
Software, wie z. B. SonicStage 2.0 oder höher bzw.
SonicStage Simple Burner, im ATRAC3- oder
ATRAC3plus-Format komprimiert wurden.
• Höchstzahl an:
– Ordnern (Gruppen): 255
– Dateien (Titeln): 999
• Die mit SonicStage eingegebenen Ordner- bzw.
Dateinamen und Textinformationen werden
angezeigt.
Weitere Informationen zu ATRAC-CDs finden Sie
im Handbuch zu SonicStage bzw. SonicStage
Simple Burner.
Hinweis
Verwenden Sie zum Erstellen einer ATRAC-CD
unbedingt ein autorisiertes Softwareprodukt wie
SonicStage 2.0 oder höher bzw. SonicStage Simple
Burner 1.0 oder 1.1.
Sollten an Ihrem Gerät Probleme auftreten oder
sollten Sie Fragen haben, auf die in dieser Anleitung
nicht eingegangen wird, wenden Sie sich bitte an
Ihren Sony-Händler.
Informationen zur BluetoothKommunikation
Bluetooth-Kommunikation
• Die Reichweite der Bluetooth-Funktechnologie
beträgt ca. 10 m.
Die maximale Kommunikationsreichweite kann je
nach Hindernissen (Personen, Metall, Wände
usw.) oder elektromagnetischer Umgebung
variieren.
• Die folgenden Bedingungen können die
Empfindlichkeit der Bluetooth-Kommunikation
beeinträchtigen.
Fortsetzung auf der nächsten Seite t
27
Page 58

– Zwischen diesem Gerät und dem Bluetooth-
Gerät befindet sich ein Hindernis, wie z. B.
Personen, Metall oder eine Wand.
– Ein Gerät mit 2,4-GHz-Frequenz, wie z. B. ein
WLAN-Gerät, ein schnurloses Telefon oder ein
Mikrowellenherd, wird in der Nähe dieses
Geräts verwendet.
• Da Bluetooth-Geräte und WLANs
(IEEE802.11b/g) mit derselben Frequenz arbeiten,
kann es zu Interferenzen im Mikrowellenbereich
kommen. Daher kann sich die
Kommunikationsgeschwindigkeit verringern oder
Rauschen und Störungen usw. können auftreten,
wenn dieses Gerät in der Nähe eines WLANGeräts verwendet wird. Gehen Sie in einem
solchen Fall folgendermaßen vor:
– Verwenden Sie dieses Gerät in einem Abstand
von mindestens 10 m vom WLAN-Gerät.
– Wenn dieses Gerät innerhalb von 10 m
Entfernung von einem WLAN-Gerät verwendet
wird, schalten Sie das WLAN-Gerät aus.
– Stellen Sie dieses Gerät und das Bluetooth-Gerät
möglichst nahe beieinander auf.
• Von einem Bluetooth-Gerät ausgehende
Mikrowellen können den Betrieb von
medizinischen Geräten beeinflussen. Schalten Sie
dieses Gerät und andere Bluetooth-Geräte an
folgenden Orten aus. Andernfalls besteht
Unfallgefahr.
– An Orten mit entzündlichen Gasen, in einem
Krankenhaus, Zug, Flugzeug oder an einer
Tankstelle,
– In der Nähe von automatischen Türen oder
Feuermeldern.
• Dieses Gerät unterstützt dem Bluetooth-Standard
entsprechende Sicherheitsfunktionen, um die
Verbindungssicherheit bei BluetoothFunkverbindungen zu gewährleisten. Je nach
Einstellung bieten diese jedoch möglicherweise
keinen ausreichenden Schutz. Seien Sie bei der
Kommunikation mit Bluetooth-Funktechnologie
also vorsichtig.
• Für Sicherheitslücken bei der Übertragung von
Informationen während der BluetoothKommunikation kann keine Haftung übernommen
werden.
• Eine Verbindung mit allen Bluetooth-Geräten
kann nicht garantiert werden.
– Für die Authentifizierung benötigen Sie ein
Gerät mit Bluetooth-Funktion, das dem von
Bluetooth SIG spezifizierten Bluetooth-Standard
entspricht.
– Auch bei Geräten, die dem oben erwähnten
Bluetooth-Standard entsprechen, kann es
vorkommen, dass je nach Funktionen oder
Spezifikationen der Geräte keine Verbindung
hergestellt werden kann oder sie nicht
einwandfrei funktionieren.
– Wenn Sie freihändig telefonieren, kann je nach
Gerät oder Kommunikationsumgebung
Störrauschen zu hören sein.
• Je nach dem Gerät, zu dem eine Verbindung
hergestellt werden soll, kann es eine Weile dauern,
bis die Kommunikation startet.
28
Sonstiges
• Je nach dem Zustand der Radiowellen und dem
Ort, an dem die Geräte verwendet werden,
funktioniert das Bluetooth-Gerät u. U. nicht mit
Mobiltelefonen.
• Wenn Sie sich nach dem Verwenden des
Bluetooth-Geräts nicht wohl fühlen, verwenden
Sie das Bluetooth-Gerät auf keinen Fall weiter.
Sollte die Störung bestehen bleiben, wenden Sie
sich an Ihren Sony-Händler.
Wartung
Austauschen der Lithiumbatterie der
Kartenfernbedienung
Unter normalen Bedingungen hält die Batterie etwa
1 Jahr. Die Lebensdauer der Batterie kann je nach
Gebrauch des Geräts jedoch auch kürzer sein.
Wenn die Batterie schwächer wird, verkürzt sich die
Reichweite der Kartenfernbedienung. Tauschen Sie
die Batterie gegen eine neue CR2025Lithiumbatterie aus. Bei Verwendung einer anderen
Batterie besteht Feuer- oder Explosionsgefahr.
Mit der Seite + nach oben
c
Hinweise zur Lithiumbatterie
• Bewahren Sie die Lithiumbatterie außerhalb der
Reichweite von Kindern auf. Sollte eine
Lithiumbatterie verschluckt werden, ist umgehend
ein Arzt aufzusuchen.
• Wischen Sie die Batterie mit einem trockenen Tuch
ab, um einen guten Kontakt zwischen den
Batteriepolen und -anschlüssen sicherzustellen.
• Achten Sie beim Einlegen der Batterie auf die
richtige Polarität.
• Halten Sie die Batterie nicht mit einer Metallpinzette.
Dies könnte zu einem Kurzschluss führen.
VORSICHT
Die Batterie kann bei falscher Handhabung
explodieren!
Auf keinen Fall darf sie aufgeladen,
auseinandergenommen oder ins Feuer
geworfen werden.
Entsorgungshinweis: Bitte werfen Sie nur
entladene Batterien in die Sammelboxen beim
Handel oder den Kommunen. Entladen sind
Batterien in der Regel dann, wenn das Gerät
abschaltet und „Batterie leer“ signalisiert oder
nach längerer Gebrauchsdauer der Batterien
nicht mehr einwandfrei funktioniert.
Um sicherzugehen, kleben Sie die Batteriepole
z. B. mit einem Klebestreifen ab oder geben Sie
die Batterien einzeln in einen Plastikbeutel.
Page 59

Austauschen der
Sicherung
Wenn Sie eine Sicherung
austauschen, achten Sie darauf,
eine Ersatzsicherung mit dem
gleichen Ampere-Wert wie die
Originalsicherung zu
verwenden. Dieser ist auf der
Originalsicherung angegeben.
Wenn die Sicherung
durchbrennt, überprüfen Sie
den Stromanschluss und
tauschen die Sicherung aus. Brennt die neue
Sicherung ebenfalls durch, kann eine interne
Fehlfunktion vorliegen. Wenden Sie sich in einem
solchen Fall an Ihren Sony-Händler.
Sicherung (10 A)
Ausbauen des Geräts
1 Entfernen Sie die Schutzumrandung.
1 Nehmen Sie die Frontplatte ab (Seite 6).
2 Fassen Sie die Schutzumrandung mit den
Fingern an den Seitenkanten und ziehen
Sie sie heraus.
Reinigen der Anschlüsse
Das Gerät funktioniert möglicherweise nicht
ordnungsgemäß, wenn die Anschlüsse zwischen
dem Gerät und der Frontplatte verschmutzt sind.
Um dies zu vermeiden, nehmen Sie die Frontplatte
ab (Seite 6) und reinigen Sie die Anschlüsse mit
einem mit Alkohol angefeuchteten Wattestäbchen.
Drücken Sie dabei nicht zu fest auf die Anschlüsse.
Andernfalls können sie beschädigt werden.
Hauptgerät
Hinweise
• Schalten Sie aus Sicherheitsgründen vor dem
Reinigen der Anschlüsse die Zündung aus und
ziehen Sie den Schlüssel aus dem Zündschloss.
• Berühren Sie die Anschlüsse unter keinen
Umständen direkt mit den Händen oder einem
Metallgegenstand.
Rückseite der
Frontplatte
x
2 Nehmen Sie das Gerät heraus.
1 Setzen Sie beide Löseschlüssel
gleichzeitig so ein, dass sie mit einem
Klicken einrasten.
Der Haken
muss nach
innen weisen.
2 Ziehen Sie an den Löseschlüsseln, um das
Gerät zu lösen.
3 Ziehen Sie das Gerät aus der Halterung.
29
Page 60

Technische Daten
CD-Player
Signal-Rauschabstand: 120 dB
Frequenzgang: 10 – 20.000 Hz
Gleichlaufschwankungen: Unterhalb der Messgrenze
Tune r
UKW
Empfangsbereich: 87,5 – 108 MHz
Antennenanschluss: Anschluss für Außenantenne
Zwischenfrequenz: 10,7 MHz/450 kHz
Nutzbare Empfindlichkeit: 9 dBf
Trennschärfe: 75 dB bei 400 kHz
Signal-Rauschabstand: 67 dB (stereo), 69 dB (mono)
Harmonische Verzerrung bei 1 kHz: 0,5 % (stereo),
0,3 % (mono)
Kanaltrennung: 35 dB bei 1 kHz
Frequenzgang: 30 – 15.000 Hz
MW/LW
Empfangsbereich:
MW: 531 – 1.602 kHz
LW: 153 – 279 kHz
Antennenanschluss: Anschluss für Außenantenne
Zwischenfrequenz: 10,7 MHz/450 kHz
Empfindlichkeit: MW: 30 µV, LW: 40 µV
Drahtlose Kommunikation
Kommunikationssystem:
Bluetooth-Standard Version 2.0
Sendeleistung:
Bluetooth-Standard Leistungsklasse 2 (max.
+4 dBm)
Maximale Kommunikationsreichweite:
Sichtlinie ca. 10 m*
Frequenzbereich:
2,4 GHz Frequenzbereich (2,4000 – 2,4835 GHz)
Modulationsverfahren: FHSS
Kompatible Bluetooth-Profile*
A2DP (Advanced Audio Distribution Profile)
AVRCP (Audio Video Remote Control Profile)
HFP (Handsfree Profile)
OPP (Object Push Profile)
*1 Die tatsächliche Reichweite hängt von
verschiedenen Faktoren ab, wie z. B. Hindernissen
zwischen Geräten, Magnetfeldern um einen
Mikrowellenherd, statischer Elektrizität,
Empfangsempfindlichkeit, Leistung der Antenne,
Betriebssystem, Softwareanwendung usw.
*2 Bluetooth-Standardprofile geben den Zweck der
Bluetooth-Kommunikation zwischen den Geräten
an.
1
2
:
Allgemeines
Ausgänge:
Audioausgänge (vorne/hinten)
Ausgang für Tiefsttonlautsprecher (mono)
Motorantennen-Steueranschluss
Steueranschluss für Endverstärker
Eingänge:
Steueranschluss für Stummschaltung beim
Telefonieren
Steueranschluss für Beleuchtung
BUS-Steuereingang
BUS-Audioeingang/Anschluss AUX IN
Fernbedienungseingang
Antenneneingang
Klangregler:
Bässe: ±10 dB bei 60 Hz oder 100 Hz (XPLOD)
Mitten: ±10 dB bei 500 Hz oder 1 kHz (XPLOD)
Höhen: ±10 dB bei 10 kHz oder 12,5 kHz
(XPLOD)
Betriebsspannung: 12 V Gleichstrom, Autobatterie
(negative Erdung)
Abmessungen: ca. 178 × 50 × 183 mm (B/H/T)
Einbaumaße: ca. 182 × 53 × 162 mm (B/H/T)
Gewicht: ca. 1,2 kg
Mitgeliefertes Zubehör:
Kartenfernbedienung: RM-X302
Montageteile und Anschlusszubehör (1 Satz)
Sonderzubehör/gesondert erhältliche Geräte:
Joystick: RM-X4S
BUS-Kabel (mit einem Cinchkabel geliefert):
RC-61 (1 m), RC-62 (2 m)
CD-Wechsler (10 CDs): CDX-757MX
CD-Wechsler (6 CDs): CDX-T70MX, CDX-T69
Signalquellenwähler: XA-C30, XA-C40
AUX IN-Signalquellenwähler: XA-300
Ihr Händler führt unter Umständen nicht alle der
oben genannten Zubehörteile. Fragen Sie Ihren
Händler nach ausführlichen Informationen.
US-amerikanische Patente und Patente anderer
Länder lizenziert von Dolby Laboratories.
MPEG Layer-3 Audiocodiertechnologie und
Patente lizenziert von Fraunhofer IIS und Thomson.
Hinweis
Dieses Gerät kann nicht an einen digitalen
Vorverstärker oder an einen Equalizer, der mit dem
Sony-BUS-System kompatibel ist, angeschlossen
werden.
Änderungen, die dem technischen Fortschritt dienen,
bleiben vorbehalten.
Endverstärker
Ausgänge: Lautsprecherausgänge (versiegelte
Anschlüsse)
Lautsprecherimpedanz: 4 – 8 Ohm
Maximale Ausgangsleistung: 52 W × 4 (an 4 Ohm)
30
• Für den Lötprozeß wird bleifreies Lot verwendet.
• In bestimmten Leiterplatten werden keine
halogenierten Flammschutzmittel verwendet.
• Im Gehäuse werden keine halogenierten
Flammschutzmittel verwendet.
• Papier wird als Verpackungsfüllmaterial verwendet.
Page 61

Störungsbehebung
Anhand der folgenden Checkliste können Sie die
meisten Probleme, die möglicherweise an Ihrem
Gerät auftreten, selbst beheben.
Bevor Sie die folgende Checkliste durchgehen,
überprüfen Sie bitte zunächst, ob Sie das Gerät
richtig angeschlossen und bedient haben.
Allgemeines
Das Gerät wird nicht mit Strom versorgt.
• Überprüfen Sie die Kabelverbindungen. Wenn die
Anschlüsse in Ordnung sind, überprüfen Sie die
Sicherung.
• Wenn Sie das Gerät ausschalten und die Anzeige
ausgeblendet ist, können Sie es nicht mit der
Kartenfernbedienung bedienen.
t Schalten Sie das Gerät ein.
Die Motorantenne wird nicht ausgefahren.
Die Motorantenne hat kein Relaiskästchen.
Es ist kein Ton zu hören.
• Die Lautstärke ist zu niedrig.
• Die Funktion zum Dämpfen des Tons oder die
Stummschaltfunktion zum Telefonieren (wenn das
Schnittstellenkabel eines Autotelefons mit der ATTLeitung verbunden ist) ist aktiviert.
• Der Fader-Regler ist nicht für ein 2-LautsprecherSystem eingestellt.
• Der CD-Wechsler unterstützt das CD-Format (MP3-/
WMA-/ATRAC-CD) nicht.
t Lassen Sie die CD mit einem MP3-kompatiblen
CD-Wechsler von Sony oder mit diesem Gerät
wiedergeben.
Kein Signalton ertönt.
• Der Signalton ist deaktiviert (Seite 22).
• Ein gesondert erhältlicher Endverstärker ist
angeschlossen und Sie verwenden nicht den
integrierten Verstärker.
Der Speicherinhalt wurde gelöscht.
• Die Taste RESET wurde gedrückt.
t Speichern Sie die Einstellungen erneut.
• Das Stromversorgungskabel wurde gelöst oder die
Verbindung zur Batterie besteht nicht mehr.
• Das Stromversorgungskabel ist nicht richtig
angeschlossen.
Gespeicherte Sender und die korrekte Uhrzeit
werden gelöscht.
Die Sicherung ist durchgebrannt.
Störgeräusche sind zu hören, wenn der
Zündschlüssel gedreht wird.
Die Leitungen sind nicht korrekt an den
Stromanschluss für Zubehörgeräte angeschlossen.
Die Anzeige wird ausgeblendet bzw. erscheint
nicht im Display.
• Der Dimmer ist auf „Dimmer on“ eingestellt
(Seite 22).
• Die Anzeige wird ausgeblendet, wenn Sie (OFF)
gedrückt halten.
t Halten Sie (OFF) am Gerät erneut gedrückt, bis
die Anzeige eingeblendet wird.
• Die Anschlüsse sind verschmutzt (Seite 29).
Die DSO-Funktion hat keine Wirkung.
Je nach dem Innenraum des jeweiligen Fahrzeugs bzw.
dem Musiktyp hat die DSO-Funktion möglicherweise
nicht die gewünschte Wirkung.
Im Display werden keine Informationen
angezeigt.
t Setzen Sie „Info“ auf „All“ (Seite 22).
CD/MD-Wiedergabe
Es lässt sich keine CD/MD einlegen.
• Es ist bereits eine andere CD/MD eingelegt.
• Die CD/MD wurde mit Gewalt falsch herum oder
falsch eingelegt.
Die CD/MD lässt sich nicht abspielen.
• Die CD/MD ist beschädigt oder verschmutzt.
• Die CD-R/CD-RW ist nicht als Audio-CD konzipiert
(Seite 26).
MP3-/WMA-Dateien können nicht
wiedergegeben werden.
Die CD ist nicht mit dem MP3-/WMA-Format bzw.
der Version kompatibel (Seite 26).
Es dauert länger, bis die Wiedergabe von MP3-/
WMA-Dateien beginnt.
Bei folgenden CDs dauert es länger, bis die
Wiedergabe beginnt:
– CDs mit einer komplizierten Datei-/Ordnerstruktur.
– Multisession-CDs.
– CDs, zu denen noch Daten hinzugefügt werden
können.
Eine ATRAC-CD kann nicht abgespielt werden.
• Die CD wurde nicht mit autorisierter Software wie
SonicStage oder SonicStage Simple Burner erstellt.
• Titel, die nicht in einer Gruppe enthalten sind,
können nicht abgespielt werden.
Das ID3-Tag einer MP3-Datei wird nicht richtig
angezeigt.
• Überprüfen Sie die Einstellung der Option „ID3 Tag“
(Seite 23).
• Kunden in Russland müssen die Option auf „RUS“,
Kunden in anderen Ländern auf „EUR“ setzen.
Beachten Sie, dass das ID3-Tag möglicherweise nicht
richtig angezeigt wird, auch wenn die Option auf
„RUS“ gesetzt ist.
Im Display angezeigte Informationen laufen
nicht automatisch durch.
• Bei CDs/MDs mit sehr viel Textinformationen laufen
diese im Display möglicherweise nicht durch.
• „Auto Scroll“ ist auf „off“ gesetzt.
t Stellen Sie „Auto Scroll on“ ein (Seite 22) oder
drücken Sie (SCRL) auf der
Kartenfernbedienung.
Tonsprünge treten auf.
• Das Gerät ist nicht richtig installiert.
t Installieren Sie das Gerät in einem Winkel von
unter 45° an einem stabilen Teil des Fahrzeugs.
• Die CD/MD ist beschädigt oder verschmutzt.
Die Funktionstasten funktionieren nicht.
Die CD/MD lässt sich nicht auswerfen.
Drücken Sie die Taste RESET (Seite 6).
Fortsetzung auf der nächsten Seite t
31
Page 62

Radioempfang
Sender lassen sich nicht empfangen.
Der Ton ist stark gestört.
• Schließen Sie eine Motorantennen-Steuerleitung
(blau) oder eine Stromversorgungsleitung für
Zubehörgeräte (rot) an die Stromversorgungsleitung
für den Antennenverstärker des Fahrzeugs an (nur,
wenn das Fahrzeug mit einer in der Heck-/
Seitenfensterscheibe integrierten FM (UKW)/MW/
LW-Antenne ausgestattet ist).
• Prüfen Sie die Verbindung der Autoantenne.
• Die Autoantenne wird nicht ausgefahren.
tPrüfen Sie die Verbindung der Motorantennen-
Steuerleitung.
• Überprüfen Sie die Frequenz.
• Wenn der DSO-Modus aktiviert ist, ist der Ton
manchmal gestört.
tSetzen Sie DSO auf „off“ (Seite 23).
Gespeicherte Sender lassen sich nicht
einstellen.
• Speichern Sie den/die Sender unter der korrekten
Frequenz ab.
• Das Sendesignal ist zu schwach.
Der automatische Sendersuchlauf funktioniert
nicht.
• Der lokale Sendersuchmodus ist auf „on“ eingestellt.
tSetzen Sie „Local“ auf „off“ (Seite 23).
• Das Sendesignal ist zu schwach.
tStellen Sie die Sender manuell ein.
Während des UKW-Empfangs blinkt die
Anzeige „ST“.
• Stellen Sie die Frequenz genau ein.
• Das Sendesignal ist zu schwach.
tSetzen Sie „Mono“ auf „on“ (Seite 23).
Eine UKW-Stereosendung ist nur monaural zu
hören.
Das Gerät ist in den monauralen Empfangsmodus
geschaltet.
t Setzen Sie „Mono“ auf „off“ (Seite 23).
RDS
Der Sendersuchlauf (SEEK) startet nach ein
paar Sekunden Radioempfang.
Der Sender ist kein Verkehrsfunksender (TP) oder die
Sendesignale sind zu schwach.
t Deaktivieren Sie TA (Seite 14).
Es sind keine Verkehrsdurchsagen zu hören.
• Aktivieren Sie TA (Seite 14).
• Der Sender sendet keine Verkehrsdurchsagen,
obwohl es sich um einen Verkehrsfunksender (TP)
handelt.
tStellen Sie einen anderen Sender ein.
Bei der PTY-Funktion wird „None“ angezeigt.
• Der aktuelle Sender ist kein RDS-Sender.
• Es wurden keine RDS-Daten empfangen.
• Der Sender gibt den Programmtyp nicht an.
Bluetooth-Funktion
Das zu verbindende Gerät kann dieses Gerät
nicht erkennen.
• Setzen Sie „Signal“ auf „ON“ (Seite 16).
• Setzen Sie „Visibility“ auf „Show“ (Seite 16).
• Während eine Verbindung zu einem Bluetooth-Gerät
besteht, kann dieses Gerät von einem anderen Gerät
nicht erkannt werden. Trennen Sie die aktuelle
Verbindung und lassen Sie dann vom anderen Gerät
aus nach diesem Gerät suchen. Die
Geräteverbindung, die getrennt wurde, lässt sich
wieder herstellen, indem Sie das Gerät aus der Liste
der registrierten Geräte auswählen.
Dieses Gerät kann das zu verbindende Gerät
nicht erkennen.
Überprüfen Sie die Bluetooth-Einstellung am zu
verbindenden Gerät.
Es kann keine Verbindung hergestellt werden.
• Je nach dem anderen Gerät ist die Suche von diesem
Gerät aus unter Umständen nicht möglich.
t Suchen Sie vom anderen Gerät aus nach diesem
Gerät.
• Je nach dem Status des anderen Geräts ist die Suche
von diesem Gerät aus unter Umständen nicht
möglich.
t Suchen Sie vom anderen Gerät aus nach diesem
Gerät.
• Schlagen Sie die Erläuterungen zum Pairing und zum
Herstellen einer Verbindung im Handbuch zu dem
anderen Gerät usw. nach und führen Sie den Vorgang
erneut aus.
Der Name des erkannten Geräts wird nicht
angezeigt.
Je nach dem Status des anderen Geräts wird der Name
möglicherweise nicht angezeigt.
Es ist kein Rufzeichen zu hören.
• Stellen Sie die Lautstärke über „Ring Vol“ ein
(Seite 19).
• Je nach dem verbundenen Gerät wird das Rufzeichen
möglicherweise nicht richtig übertragen.
t Setzen Sie „Ringtone“ auf „Default“ (Seite 21).
Die Stimme des Gesprächsteilnehmers ist sehr
leise.
Stellen Sie die Lautstärke über „Talk Vol“ ein
(Seite 19).
Bei Telefongesprächen ist ein Echo oder
Rauschen zu hören.
• Verringern Sie die Lautstärke.
• „EC/NC Mode“ ist auf „off“ gesetzt.
t Setzen Sie „EC/NC Mode“ auf „Mode 1“ oder
„Mode 2“ (Seite 21).
• Wenn Umgebungsgeräusche das Telefongespräch
überlagern, versuchen Sie, diese Geräusche zu
reduzieren.
Beispiel: Wenn das Fenster geöffnet ist und
Straßenlärm usw. hereindringt, schließen Sie das
Fenster. Wenn die Klimaanlage laut ist, drehen Sie
diese herunter.
32
Page 63

Die Tonqualität beim Telefonieren ist nicht gut.
Die Tonqualität beim Telefonieren hängt von den
Empfangsbedingungen des Mobiltelefons ab.
tFahren Sie bei schlechtem Empfang mit dem Auto
an eine Stelle, an der der Empfang für das
Mobiltelefon besser ist.
Die Lautstärke des angeschlossenen
Audiogeräts ist zu niedrig (hoch).
Der Lautstärkepegel variiert je nach Audiogerät.
tStellen Sie am angeschlossenen Audiogerät oder an
diesem Gerät die Lautstärke ein.
Der Ton setzt während der Wiedergabe mit
einem Bluetooth-Audiogerät aus.
• Verringern Sie den Abstand zwischen diesem Gerät
und dem Bluetooth-Audiogerät.
• Wenn sich das Bluetooth-Audiogerät in einem
Behälter befindet, der die Signalübertragung stört,
nehmen Sie das Audiogerät während des Betriebs aus
dem Behälter.
• In der Nähe werden einige Bluetooth- oder andere
Geräte verwendet, die Radiowellen ausstrahlen.
t Schalten Sie die anderen Geräte aus.
t Verringern Sie den Abstand zu den anderen
Geräten.
Das verbundene Bluetooth-Audiogerät lässt
sich nicht steuern.
Überprüfen Sie, ob das verbundene BluetoothAudiogerät das Profil AVRCP unterstützt.
Einige Funktionen stehen nicht zur Verfügung.
Vergewissern Sie sich, dass das verbundene Gerät die
betreffenden Funktionen unterstützt.
Der Name des Gesprächsteilnehmers wird
nicht angezeigt, wenn ein Anruf eingeht.
• Der Gesprächsteilnehmer ist nicht im Telefonbuch
gespeichert.
t Speichern Sie ihn im Telefonbuch (Seite 19).
• Das anrufende Telefon ist so eingestellt, dass keine
Telefonnummer übermittelt wird.
Ein Anruf wird unbeabsichtigt gestartet.
• Das verbundene Telefon ist so eingestellt, dass
automatisch ein Anruf gestartet wird.
• „Auto Answer“ an diesem Gerät ist auf „on“ gesetzt
(Seite 21).
Das Pairing ist wegen einer
Zeitlimitüberschreitung fehlgeschlagen.
Je nach dem verbundenen Gerät ist das Zeitlimit für
das Pairing sehr kurz. Versuchen Sie, das Pairing in der
vorgegebenen Zeit abzuschließen, indem Sie ein
einstelliges Passwort definieren.
Das Rufzeichen oder die Stimme des
Gesprächsteilnehmers wird nur über einen
Lautsprecher ausgegeben.
„Speaker Sel“ ist auf „FR-L“ oder „FR-R“ gesetzt.
tSetzen Sie „Speaker Sel“ auf „Front“ (Seite 21).
Bei einem Anruf über die
Freisprecheinrichtung wird über die
Lautsprecher des Fahrzeugs kein Ton
ausgegeben.
Wenn der Ton über das Mobiltelefon ausgegeben wird,
stellen Sie dieses so ein, dass der Ton über die
Lautsprecher des Fahrzeugs ausgegeben wird.
Fehleranzeigen/Meldungen
Audiofunktion
Blank Disc
Die MD enthält keine Titel.
t Legen Sie eine MD ein, auf der Titel aufgezeichnet
sind.
Error
• Die CD/MD ist verschmutzt oder falsch herum
eingelegt.
t Reinigen Sie die CD/MD bzw. legen Sie sie
korrekt ein.
• Die CD/MD kann aufgrund eines Problems nicht
wiedergegeben werden.
t Legen Sie eine andere CD/MD ein.
Failure (Leuchtet, bis eine Taste gedrückt wird.)
Die Lautsprecher-/Verstärkeranschlüsse sind nicht
korrekt.
t Schlagen Sie in der Installationsanleitung nach, wie
die Anschlüsse korrekt vorgenommen werden
müssen.
Load
Der Wechsler lädt die CD/MD.
t Warten Sie, bis der Ladevorgang abgeschlossen ist.
Local Seek +/–
Beim automatischen Sendersuchlauf ist der lokale
Suchmodus aktiviert.
NO AF
Für den aktuellen Sender gibt es keine
Alternativfrequenz.
t Drücken Sie den Joystick nach links bzw. rechts,
solange der Programmdienstname blinkt. Das Gerät
beginnt dann mit der Suche nach einer Frequenz
mit denselben PI-Daten (Programme Identification
- Programmkennung). „PI Seek“ wird angezeigt.
NO Disc
Im CD/MD-Wechsler befindet sich keine CD/MD.
t Legen Sie CDs/MDs in den Wechsler ein.
NO Disc Name
Der Titel enthält keinen CD/MD-Namen.
NO Group Name
Der Titel auf der ATRAC-CD enthält keinen
Gruppennamen.
NO ID3 Tag
Die MP3-Datei enthält keine ID3-Tag-Informationen.
NO Information
Die ATRAC3-/ATRAC3plus- oder WMA-Datei
enthält keine Textinformationen.
NO Magazine
Das CD-Magazin ist nicht in den CD-Wechsler
eingesetzt.
t Setzen Sie das Magazin in den Wechsler ein.
NO Music
Die CD enthält keine Musikdateien.
t Legen Sie eine Musik-CD in dieses Gerät oder
einen MP3-kompatiblen Wechsler ein.
Fortsetzung auf der nächsten Seite t
33
Page 64

NO TP
Das Gerät sucht weiter nach verfügbaren
Verkehrsfunksendern.
NO Track Name
Der Titel enthält keinen Titelnamen.
Offset
Es liegt möglicherweise eine interne Fehlfunktion vor.
t Überprüfen Sie die Verbindungen. Wenn die
Fehleranzeige weiterhin im Display angezeigt wird,
wenden Sie sich an einen Sony-Händler.
Push Reset
Das CD-Gerät bzw. der CD/MD-Wechsler kann wegen
einer Störung nicht bedient werden.
t Drücken Sie die Taste RESET (Seite 6).
Read
Das Gerät liest gerade alle Titel- und
Gruppeninformationen von der CD/MD ein.
t Bitte warten Sie, bis das Einlesen abgeschlossen ist.
Die Wiedergabe beginnt danach automatisch. Je
nach CD/MD-Struktur kann das Einlesen länger als
eine Minute dauern.
„ “ oder „ “
Sie sind beim Rückwärts- oder Vorwärtssuchen am
Anfang bzw. Ende der CD/MD angelangt und können
nicht weitersuchen.
„“
Das Zeichen kann mit diesem Gerät nicht angezeigt
werden.
Bluetooth-Funktion
Busy
Der Bluetooth-Vorgang ist nicht abgeschlossen.
t Unterbrechen Sie den Empfang von
Telefonbuchdaten.
t Beenden Sie die aktuelle Funktion und warten Sie
eine Weile.
Connection Complete
Die Bluetooth-Verbindung wurde hergestellt.
Connection Failed
• Eine Verbindung zum anderen Gerät ist aufgrund
eines Problems nicht möglich.
• Eine Verbindung zum anderen Gerät ist nicht
möglich, da ein falsches Passwort eingegeben wurde.
• Das Zeitlimit für die Verbindung wurde
überschritten.
Disconnected
Die Bluetooth-Verbindung wurde getrennt.
Empty
• Unter „Dialed Calls“, „Received Calls“ oder
„Phonebook“ im Menü CALL sind keine Daten
vorhanden.
• Beim Speichern der Kurzwahl befinden sich keine
Daten im Telefonbuch.
Error
Die Telefonbuchdaten können aufgrund eines
Problems nicht empfangen werden.
HF Device is not available
Es besteht keine Verbindung zum Gerät für das
Freisprechen.
34
Invalid Code
Der eingegebene Sicherheitscode ist nicht richtig.
Memory Full
• Der Telefonbuchspeicher dieses Geräts wurde beim
Empfangen von Telefonbuchdaten voll.
• Der Telefonbuchspeicher dieses Geräts ist voll.
Not Available
Bluetooth AUDIO ist als Quelle ausgewählt, aber es ist
kein Bluetooth-Audiogerät angeschlossen.
No Devices Found
• Beim Suchen wurden keine Geräte gefunden, zu
denen eine Verbindung hergestellt werden kann.
• Das Gerät ist nicht unter „Handsfree Devices“ oder
„Audio Devices“ registriert.
t Registrieren Sie das Gerät unter „Handsfree
Devices“ oder „Audio Devices“.
Security Locked
Die Sicherheitsfunktion ist aktiviert.
Turn ON Bluetooth
Die Bluetooth-Funktion ist deaktiviert.
t Aktivieren Sie die Bluetooth-Einstellung.
Wenn sich das Problem mit diesen
Abhilfemaßnahmen nicht beheben lässt, wenden Sie
sich an einen Sony-Händler.
Wenn Sie das Gerät aufgrund einer Störung bei der
CD-Wiedergabe zur Reparatur bringen, bringen Sie
bitte auch die CD mit, die eingelegt war, als das
Problem zum ersten Mal auftrat.
Support-Website
Wenn Sie Fragen haben oder die neuesten
Support-Informationen zu diesem Produkt
abrufen möchten, rufen Sie folgende Website
auf:
http://support.sony-europe.com
Page 65

35
Page 66

Pour plus de sécurité, installez cet appareil
dans le tableau de bord de votre véhicule. Pour
de plus amples informations sur l’installation
et les raccordements, reportez-vous au manuel
d’installation et de raccordement fourni.
Avertissement au cas où le contact de
votre voiture ne dispose pas d’une
position ACC
Après avoir coupé le moteur, n’oubliez pas de
maintenir la touche (OFF) de l’appareil
enfoncée jusqu’à ce que l’affichage
disparaisse.
Sinon, l’affichage n’est pas désactivé et la
batterie se décharge.
Cette étiquette est située sur la partie inférieure
du châssis.
La plaque signalétique indiquant la tension de
fonctionnement, etc. se trouve sous le boîtier de
l’appareil.
Par la présente, Sony Corp. déclare que l'appareil
MEX-BT5000 est conforme aux exigences
essentielles et aux autres dispositions pertinentes
de la directive 1999/5/CE.
Pour toute information complémentaire, veuillez
consultez l'URL suivante :
http://www.compliance.sony.de/
Fabriqué sous licence de
R
BBE Sound, Inc.
Le procédé BBE MP
améliore le son compressé numériquement,
comme le MP3, en restaurant et en optimisant
les harmoniques les plus élevées perdues au
cours de la compression. Le processus BBE MP
est fondé sur la génération d’harmoniques
d’ordre paire à partir du matériel source en leur
restituant leur richesse, leurs détails et leurs
nuances.
La marque Bluetooth et les logos appartiennent à
Bluetooth SIG, Inc. et sont utilisés sous licence
uniquement par Sony Corporation. Les autres
marques commerciales et noms commerciaux
appartiennent à leurs propriétaires respectifs.
SonicStage et son logo sont des marques
commerciales de Sony Corporation.
« ATRAC » et sont des marques
commerciales de Sony Corporation.
Microsoft, Windows Media et
le logo Windows sont des
marques de commerce ou des
marques déposées de
Microsoft Corporation aux Etats-Unis et/ou
dans d’autres pays.
Traitement des appareils électriques
et électroniques en fin de vie
(Applicable dans les pays de l’Union
Européenne et aux autres pays
européens disposant de systèmes
de collecte sélective)
Ce symbole, apposé sur le produit ou sur son emballage,
indique que ce produit ne doit pas être traité avec les
déchets ménagers. Il doit être remis à un point de collecte
approprié pour le recyclage des équipements électriques et
électroniques. En s’assurant que ce produit est bien mis au
rebut de manière appropriée, vous aiderez à prévenir les
conséquences négatives potentielles pour l’environnement
et la santé humaine. Le recyclage des matériaux aidera à
préserver les ressources naturelles. Pour toute information
supplémentaire au sujet du recyclage de ce produit, vous
pouvez contacter votre municipalité, votre déchetterie ou
le magasin où vous avez acheté le produit.
Accessoire compatible : Télécommande
2
Page 67

Table des matières
Félicitations !. . . . . . . . . . . . . . . . . . . . . . . . . . . 4
Préparation
Réinitialisation de l’appareil . . . . . . . . . . . . . . . 6
Réglage de l’horloge . . . . . . . . . . . . . . . . . . . . . 6
Retrait de la façade . . . . . . . . . . . . . . . . . . . . . . 6
Installation de la façade . . . . . . . . . . . . . . . . 7
Insertion du disque dans l’appareil . . . . . . . . . . 7
Ejection du disque. . . . . . . . . . . . . . . . . . . . . 7
Emplacement des commandes et
opérations de base
Fonction audio . . . . . . . . . . . . . . . . . . . . . . . 8
Fonction Bluetooth . . . . . . . . . . . . . . . . . . . 10
CD
Rubriques d’affichage. . . . . . . . . . . . . . . . . 12
Lecture répétée et aléatoire. . . . . . . . . . . . . 12
Radio
Mémorisation et réception des stations . . . . . . 13
Mémorisation automatique — BTM. . . . . . 13
Mémorisation manuelle . . . . . . . . . . . . . . . 13
Réception des stations mémorisées. . . . . . . 13
Recherche automatique des fréquences . . . 13
Réception des stations par l’intermédiaire
d’une liste — LIST . . . . . . . . . . . . . . . . . . . 13
Fonction RDS . . . . . . . . . . . . . . . . . . . . . . . . . 13
Aperçu. . . . . . . . . . . . . . . . . . . . . . . . . . . . . 13
Réglages AF et TA . . . . . . . . . . . . . . . . . . . 14
Sélection de PTY . . . . . . . . . . . . . . . . . . . . 15
Réglage de CT . . . . . . . . . . . . . . . . . . . . . . 15
Fonction Bluetooth
Avant d’utiliser la fonction Bluetooth . . . . . . 16
Opérations du menu de la fonction
Bluetooth . . . . . . . . . . . . . . . . . . . . . . . . . . 16
Configuration des paramètres
Bluetooth . . . . . . . . . . . . . . . . . . . . . . . . . . 16
Pairage et connexion de cet appareil avec un
périphérique Bluetooth. . . . . . . . . . . . . . . . 16
Connexion à des périphériques
enregistrés . . . . . . . . . . . . . . . . . . . . . . . . . 17
Discussion en mains libres . . . . . . . . . . . . . . . 18
Appels . . . . . . . . . . . . . . . . . . . . . . . . . . . . 18
Réception d’appels. . . . . . . . . . . . . . . . . . . 19
Terminaison d’appels. . . . . . . . . . . . . . . . . 19
Utilisation du répertoire . . . . . . . . . . . . . . . 19
Utilisation de la fonction Preset Dial . . . . . 20
Transmission en continu de musique . . . . . . . 20
Ecoute de musique à partir d’un périphérique
audio. . . . . . . . . . . . . . . . . . . . . . . . . . . . . . 20
Fonctionnement d’un périphérique audio avec
cet appareil . . . . . . . . . . . . . . . . . . . . . . . . . 20
Autres paramètres . . . . . . . . . . . . . . . . . . . . . . 20
Paramétrage d’un périphérique mains
libres. . . . . . . . . . . . . . . . . . . . . . . . . . . . . . 20
Suppression de l’enregistrement d’un
périphérique connecté . . . . . . . . . . . . . . . . 21
Fonction de connexion automatique . . . . . 21
Autres fonctions
Réglage des rubriques de menu
— MENU . . . . . . . . . . . . . . . . . . . . . . . . . . . . 22
Personnalisation de la courbe de l’égaliseur
— EQ3 Tune . . . . . . . . . . . . . . . . . . . . . . . 23
Utilisation d’un appareil en option . . . . . . . . . 24
Changeur CD/MD . . . . . . . . . . . . . . . . . . . 24
Appareil audio auxiliaire . . . . . . . . . . . . . . 24
Satellite de commande RM-X4S . . . . . . . . 25
Informations complémentaires
Précautions . . . . . . . . . . . . . . . . . . . . . . . . . . . 26
Remarques sur les disques . . . . . . . . . . . . . 26
A propos des fichiers MP3/WMA . . . . . . . 26
A propos de CD ATRAC . . . . . . . . . . . . . . 27
A propos de la fonction Bluetooth. . . . . . . 27
Entretien . . . . . . . . . . . . . . . . . . . . . . . . . . . . . 28
Retrait de l’appareil . . . . . . . . . . . . . . . . . . . . 29
Spécifications . . . . . . . . . . . . . . . . . . . . . . . . . 30
Dépannage . . . . . . . . . . . . . . . . . . . . . . . . . . . 31
Affichage des erreurs et messages . . . . . . . 33
3
Page 68

Félicitations !
Nous vous remercions d’avoir fait l’acquisition
de ce système audio Bluetooth™ Sony. Vous
pouvez profiter de cet appareil grâce aux
fonctions ci-dessous.
• Lecture de CD
Vous pouvez lire des CD-DA (contenant
également des informations CD TEXT*), des
CD-R/CD-RW (fichiers MP3/WMA contenant
également des multisessions (page 26)) et des
CD ATRAC (formats ATRAC3 et ATRAC3plus
(page 27)).
Type de disque
CD-DA
MP3
WMA
CD ATRAC
• Réception radio
– Vous pouvez mémoriser jusqu’à 6 stations
pour chaque bande de fréquences (FM1,
FM2, FM3, MW (PO) et LW (GO)).
– BTM (Mémorisation des meilleurs accords) :
l’appareil sélectionne les stations pour
lesquelles les signaux reçus sont clairs et les
mémorise.
• Services RDS
Vous pouvez utiliser une station FM disposant
du système RDS (Radio Data System).
• Fonction Bluetooth
– Discussion en mains libres avec votre
téléphone mobile pendant la conduite.
– Transfert du répertoire à partir de votre
téléphone mobile.
– Transmission en continu de musique à partir
de votre téléphone mobile ou d’un autre
appareil audio portatif.
– Prise en charge des profils HFP 1.0, A2DP,
OPP et AVRCP.
• Réglage du son
– EQ3 paramétrique : vous pouvez choisir
une des 7 courbes d’égaliseur prédéfinies et
effectuer le réglage souhaité.
– DSO (Répartiteur dynamique du son) : crée
un champ sonore mieux réparti grâce à une
synthèse de haut-parleurs virtuels, afin
d’améliorer le son des haut-parleurs même si
ceux-ci sont installés dans la partie inférieure
des portières.
Symbole indiqué sur le
disque
4
– BBE MP : améliore le son compressé
numériquement, notamment celui des fichiers
MP3.
* Un disque CD TEXT est un CD-DA contenant des
informations, telles que le nom du disque, le nom de
l’artiste et le nom de la plage.
Page 69

Attention
SONY NE PEUT EN AUCUN CAS ETRE TENU
RESPONSABLE DE TOUT DOMMAGE DIRECT
OU INDIRECT OU DE TOUT AUTRE
DOMMAGE, Y COMPRIS, SANS LIMITATION,
TOUTE PERTE DE REVENU, DE DONNEES,
D’UTILISATION DU PRODUIT OU DE TOUT
EQUIPEMENT ASSOCIE, DU TEMPS D’ARRET
LIE A OU DECOULANT DE L’UTILISATION DE
CE PRODUIT, MATERIEL ET/OU LOGICIEL.
NOTIFICATION IMPORTANTE !
Utilisation efficace et en sécurité
Les modifications ou changements apportés
appareil, qui ne sont pas approuvés expressément
par Sony, peuvent annuler le droit d'utilisation de
l’appareil.
Veuillez vérifier les exceptions, dues à des
exigences ou limitations nationales, relatives aux
équipements Bluetooth avant d’utiliser ce produit.
à cet
Conduite
Vérifiez la législation et la réglementation en
vigueur concernant l’utilisation des téléphones
mobiles et des équipements mains libres dans les
endroits o
Soyez toujours très attentif au volant et garez-vous
avant d’effectuer ou de répondre
conditions de circulation l’exigent.
ù vous circulez.
à un appel si les
Connexion à d’autres périphériques
Avant de connecter un autre périphérique, lisez
attentivement son mode d’emploi pour plus de
détails concernant les instructions de sécurité.
Appels d’urgence
Cet appareil mains libres Bluetooth et l’appareil
électronique connecté au système mains libres
fonctionnent grâce à des signaux radio, des réseaux
mobiles et terrestres, ainsi que grâce à des fonctions
programmées par l’utilisateur, qui ne peuvent
garantir la connexion dans toutes les conditions.
Par conséquent, ne vous reposez pas uniquement sur
les périphériques électroniques pour vos
communications importantes (telles que les
urgences médicales).
Rappelez-vous que pour passer ou recevoir des
appels, le périphérique mains libres et le
périphérique électronique connecté
être activés dans une zone de service dans
doivent
laquelle la puissance des signaux cellulaires est
adaptée.
Les appels d’urgence peuvent ne pas être possibles
sur tous les téléphones mobiles ou lorsque certains
services de réseau ou certaines fonctions du
téléphone sont utilisés.
Consultez votre fournisseur de service local pour
plus de renseignements.
à celui-ci
Exposition aux fréquences radio
Les signaux RF peuvent perturber des systèmes
électroniques automobiles mal installés ou
insuffisamment protégés, tels que les systèmes
d’injection électronique, les dispositifs
d’antiblocage de frein électronique (ABS), les
systèmes de contrôle de vitesse électroniques ou les
systèmes airbag. Veuillez confier l’installation ou
l’entretien de cet appareil au constructeur ou au
concessionnaire de votre véhicule. Une installation
défectueuse ou un entretien mal fait peut être
dangereux et annuler toute garantie concernant cet
appareil.
Vérifiez auprès du constructeur de votre véhicule
que l’utilisation de votre téléphone mobile ne risque
pas d’affecter les systémes électroniques
embarqués.
Vérifiez réguliérement que tous les équipements
périphériques sans fil installés dans votre véhicule
sont bien montés et fonctionnent correctement.
5
Page 70

Préparation
Retrait de la façade
Réinitialisation de l’appareil
Avant la première mise en service de l’appareil
ou après avoir remplacé la batterie du véhicule
ou modifié les raccordements, vous devez
réinitialiser l’appareil.
Retirez la façade et appuyez sur la touche
RESET avec un objet pointu, comme un stylo à
bille.
Tou che
RESET
Remarque
Une pression sur la touche RESET remet l’heure à
zéro et efface certaines informations mémorisées.
Réglage de l’horloge
L’horloge numérique fonctionne suivant un cycle
de 24 heures.
1 Appuyez sur (MENU).
2 Poussez le bouton de commande vers
le haut ou le bas jusqu’à ce que
« Setup » s’affiche, puis poussez-le
vers la droite.
3 Poussez le bouton de commande vers
le haut ou le bas jusqu’à ce que
« Clock Adjust » s’affiche, puis
poussez-le vers la droite.
4 Poussez le bouton de commande vers
le haut ou le bas pour régler l’heure et
les minutes.
Poussez le bouton de commande vers la
gauche ou la droite pour déplacer l’indication
numérique.
5 Une fois l’horloge réglée, appuyez sur
le bouton de commande.
L’horloge démarre.
Conseil
Vous pouvez régler l’horloge automatiquement au
moyen de la fonction RDS (page 15).
Vous pouvez retirer la façade de cet appareil pour
le protéger du vol.
Alarme d’avertissement
Si vous mettez la clé de contact en position OFF
sans ôter la façade, l’alarme d’avertissement
retentit pendant quelques secondes.
L’alarme est émise uniquement lorsque
l’amplificateur intégré est utilisé.
1 Appuyez sur (OFF).
L’appareil est mis hors tension.
2 Appuyez sur (OPEN).
La façade bascule vers le bas.
3 Faites glisser la façade vers la droite,
puis tirez doucement son extrémité
gauche vers l’extérieur.
1
2
Remarques
• N’exercez pas de pression excessive sur la façade
ni sur la fenêtre d’affichage et ne la laissez pas
tomber.
• N’exposez pas la façade à des températures
élevées ou à l’humidité. Evitez de la laisser dans un
véhicule en stationnement, sur le tableau de bord ou
la plage arrière.
6
Page 71

Installation de la façade
Placez l’orifice A de la façade sur la tige B de
l’appareil, puis poussez légèrement sur le côté
gauche pour l’enclencher.
Appuyez sur la touche (SOURCE) de l’appareil
(ou insérez un disque) pour le faire fonctionner.
A
B
Insertion du disque dans
l’appareil
1 Appuyez sur (OPEN).
2 Insérez le disque (côté imprimé vers le
haut).
c
Remarque
Ne posez rien sur la face interne de la façade.
3 Fermez la façade.
La lecture commence automatiquement.
Ejection du disque
1 Appuyez sur (OPEN).
2 Appuyez sur Z.
Le disque est éjecté.
3 Fermez la façade.
7
Page 72

Emplacement des commandes et opérations de base
Fonction audio
Appareil principal
1
35624
79 qa0
Sans la façade
Pour plus de détails, reportez-vous aux numéros
de pages indiqués. Les touches correspondantes
de la mini-télécommande commandent les
mêmes fonctions que celles de l’appareil.
A Touche SOURCE
Permet de mettre l’appareil sous tension/de
changer de source (Radio/CD/MD*
Bluetooth AUDIO/AUX).
B Bouton de commande/Touche LIST
13, 24
Tournez pour régler le volume.
Poussez vers le haut, le bas, la gauche ou la
droite pour sélectionner une rubrique de menu.
Appuyez pour appliquer un réglage.
CD/MD*
Poussez vers le haut/le bas pour *
– ignorer des groupes*
– ignorer des groupes*
Poussez vers la gauche/la droite pour :
– ignorer des plages (appuyez sur la touche).
– ignorer des plages successives (appuyez
8
1
:
3
(appuyez sur la touche).
successifs (appuyez sur la touche et
maintenez-la enfoncée).
une première fois, puis une seconde fois
dans un délai d’environ 2 secondes en
maintenant la touche enfoncée).
/des albums*4
3
/des albums*4
MEX-BT5000
8
qfqdqs
RESET
– Avancer/reculer rapidement dans une plage
(appuyez sur la touche et maintenez-la
enfoncée).
Radio :
Poussez vers le haut/le bas pour :
1
/
2
:
– capter une station enregistrée.
Poussez vers la gauche/la droite pour :
– régler des stations automatiquement
(appuyez).
– rechercher une station manuellement
(appuyez sur la touche et maintenez-la
enfoncée).
Appuyez pour :
– afficher la liste.
C Touche MODE 13, 24
Permet de sélectionner la bande radio (FM/
MW/LW)/ou l’appareil*
D Touche MENU
Permet d’accéder au menu.
E Fenêtre d’affichage
F Touche OPEN 7
G Touche OFF
Permet de mettre l’appareil hors tension/
d’arrêter la source.
H Récepteur de la mini-télécommande
5
.
Page 73

Mini-télécommande RM-X302
1
qg
3
7
qk
ql
4
qh
qa
w;
wa
ws
qj
wd
I Touche AF (fréquences alternatives)/
TA (messages de radioguidage) 14
Permet de régler AF et TA en RDS.
J Touches numériques
CD/MD*
(1): REP 12, 24
(2): SHUF 12, 24
(5): BBE MP*
(6): PAUS E*
Radio :
Permettent de capter les stations enregistrées
(appuyez) ; de mémoriser des stations
(appuyez sur la touche et maintenez-la
enfoncée).
K DSPL (affichage)/Touche PTY (Type
d’émission) 12, 15
Pour modifier les paramètres d’affichage,
sélectionnez PTY en RDS.
L Fente d’insertion des disques 7
Permet d’insérer le disque.
M Touche RESET 6
1
:
6
Pour activer la fonction BBE MP,
réglez « BBE MP on ». Pour désactiver
cette fonction, réglez « BBE MP off ».
Pour interrompre la lecture. Appuyez
de nouveau sur cette touche pour
annuler.
2
6
N Touche Z (éjection) 7
Permet d’éjecter le disque.
Les touches suivantes de la mini-télécommande
ont également des touches ou des fonctions
différentes de celles de l’appareil.
qg Touche ENTER
Permet d’appliquer un réglage.
qh Touche LIST
Permet d’afficher une liste.
qj Touches numériques
Les fonctions des touches 1 à 6 sont les
mêmes que celles des touches numériques de
l’appareil.
qk Touches M (+)/m (–)
Equivalent à pousser le bouton de commande
vers le haut ou le bas.
ql Touches < (.)/, (>)
Equivalent à pousser le bouton de commande
vers la gauche ou la droite.
w; Touche SCRL (défilement)
Permet de faire défiler le paramètre
d’affichage.
wa Touche SOUND
Permet de sélectionner les paramètres du
son.
ws Touche ATT (atténuation du son)
Permet d’atténuer le son. Appuyez de
nouveau sur cette touche pour annuler.
wd Touches VOL (volume) +/–
Permet de régler le niveau du volume.
*1 Lorsqu’un changeur MD est raccordé.
*2 Si un changeur est raccordé, le fonctionnement est
différent. Reportez-vous à la page 24.
*3 Lors de la lecture d’un CD ATRAC.
*4 Lors de la lecture d’un fichier MP3/WMA.
*5 Lorsqu’un changeur CD/MD est raccordé.
*6 Lors de la lecture sur cet appareil.
Remarque
Si vous mettez l’appareil hors tension et que
l’affichage est désactivé, il ne peut plus être utilisé
avec la mini-télécommande sauf si la touche
(SOURCE) de l’appareil est enfoncée ou si un disque
est inséré dans le lecteur pour l’activer.
Conseil
Pour obtenir des informations détaillées sur la façon
de remplacer la pile, reportez-vous à la section
« Remplacement de la pile au lithium de la minitélécommande » page 28.
9
Page 74

Fonction Bluetooth
6097
8
Appareil principal
1
Sans la façade
qa
Pour plus de détails, reportez-vous aux numéros
de pages indiqués. Les touches correspondantes
de la mini-télécommande commandent les
mêmes fonctions que celles de l’appareil.
A Touche SOURCE
Permet de mettre l’appareil sous tension/de
changer de source (Radio/CD/MD*
Bluetooth AUDIO/AUX).
B Bouton de commande
Tournez pour régler le volume.
Poussez vers le haut, le bas, la gauche ou la
droite pour sélectionner une rubrique de
menu.
Appuyez pour appliquer un réglage.
Appareil audio Bluetooth*
Poussez vers la gauche/la droite pour :
– sauter des plages (appuyez).
– Avancer/reculer rapidement dans une plage
(appuyez sur la touche et maintenez-la
enfoncée).
C Touche Bluetooth 16, 17, 19, 20, 21
Permet d’accéder aux fonctions Bluetooth/de
recevoir un appel.
2
:
10
3524
RESET
D Touche MENU 19
Permet d’accéder à un menu/de recevoir un
appel.
E Fenêtre d’affichage
F Touche OFF 19
1
/
Permet de mettre l’appareil hors tension/
d’arrêter la source ; de terminer ou de rejeter
un appel.
G Touche CALL 19
Permet d’accéder aux fonctions du téléphone
de recevoir un appel.
H Récepteur de la mini-télécommande
I Touches numériques
Permettent de rappeler des numéros
enregistrés.
Appareil audio Bluetooth*
(6): PAU SE
Permet d’interrompre la lecture.
J Témoin Bluetooth
S’allume lorsqu’un signal Bluetooth est
reçu/émis. S’éteint lorsque le signal
Bluetooth est désactivé.
K Microphone 18
MEX-BT5000
/
2
:
Page 75

Mini-télécommande RM-X302
73
1
qs
6
qg
qh
4
*2 Lorsqu’un appareil audio Bluetooth (prenant en
charge le profil AVRCP de la technologie
Bluetooth) est connecté. Selon l’appareil, il est
possible que certaines opérations ne soient pas
disponibles.
Remarque
Si vous mettez l’appareil hors tension et que
l’affichage est désactivé, il ne peut plus être utilisé
avec la mini-télécommande sauf si la touche
(SOURCE) de l’appareil est enfoncée ou si un disque
est inséré dans le lecteur pour l’activer.
Conseil
Pour obtenir des informations détaillées sur la façon
de remplacer la pile, reportez-vous à la section
« Remplacement de la pile au lithium de la minitélécommande » page 28.
qd
qj
qf
qk
Les touches suivantes de la mini-télécommande
ont également des touches ou des fonctions
différentes de celles de l’appareil.
qs Touche ENTER
Permet d’appliquer un réglage.
qd Touches numériques 17, 18, 19
Permettent d’entrer des numéros (numéro de
téléphone, code d’authentification, etc.).
Les fonctions des touches 1 à 6 sont les
mêmes que celles des touches numériques de
l’appareil.
qf Touche
qg Touches M (+)/m (–)
Equivalent à pousser le bouton de commande
vers le haut ou le bas.
qh Touches < (.)/, (>)
Equivalent à pousser le bouton de commande
vers la gauche ou la droite.
qj Touches VOL (volume) +/–
Permet de régler le niveau du volume.
qk Touche
*1 Lorsqu’un changeur MD est raccordé.
19
19
11
Page 76

CD
Pour obtenir des informations détaillées sur le
raccordement à un changeur CD/MD, reportezvous à la page 24.
Rubriques d’affichage
Exemple : lorsque vous réglez le mode Info
(informations) sur « A ll » (page 22).
A B
C
A Indication Source/MP3/ATRAC/WMA
B Horloge
C Numéro de plage/temps de lecture écoulée,
nom du disque/de l’artiste, numéro de
l’album/du groupe, nom de l’album/du
groupe, nom de la plage, informations
textuelles*
* Lorsque vous lisez un fichier MP3, l’étiquette ID3
s’affiche. S’il s’agit d’un CD ATRAC, ce sont des
informations textuelles rédigées par SonicStage,
etc. qui s’affichent, tandis que la lecture d’un fichier
WMA s’accompagne de l’affichage de l’étiquette
WMA.
Pour modifier les paramètres d’affichage C,
appuyez sur
paramètres
télécommande ou sélectionnez « Auto Scroll on »
(page 22).
Conseil
Les paramètres affichés diffèrent selon le type de
disque, le format d’enregistrement et les réglages.
Pour plus de détails sur le format MP3/WMA,
reportez-vous à la page 26 ; pour les CD ATRAC,
reportez-vous à la page 27.
(DSPL)
C
, appuyez sur
; pour faire défiler les
(SCRL)
sur la mini-
Lecture répétée et aléatoire
1 En cours de lecture, appuyez
plusieurs fois sur (1) (REP) ou sur (2)
(SHUF) jusqu’à ce que le réglage
souhaité apparaisse.
Sélectionnez Pour lire
Repeat Track une plage en boucle.
1
Repeat Album*
Repeat Group*
Shuffle Album*
Shuffle Group*
Shuffle Disc un disque dans un ordre
*1 Lors de la lecture d’un fichier MP3/WMA.
*2 Lors de la lecture d’un CD ATRAC.
Pour rétablir le mode de lecture normale,
sélectionnez « Repeat off » ou « Shuffle off ».
un album en boucle.
2
un groupe en boucle.
1
un album dans un ordre
aléatoire.
2
un groupe dans un ordre
aléatoire.
aléatoire.
12
Page 77

Radio
Mémorisation et réception des
stations
Réception des stations
mémorisées
1 Sélectionnez la bande, puis appuyez
sur une touche numérique ((1) à (6)).
Attention
Pour syntoniser des stations pendant que vous
conduisez, utilisez la fonction de mémorisation
des meilleurs accords (BTM) afin d’éviter les
accidents.
Mémorisation automatique — BTM
1 Appuyez plusieurs fois sur (SOURCE)
jusqu’à ce que l’indication « TUNER »
apparaisse.
Pour changer de bande, appuyez plusieurs
fois sur (MODE). Vous pouvez sélectionner
FM1, FM2, FM3, MW (PO) ou LW (GO).
2 Appuyez sur (MENU).
3 Poussez le bouton de commande vers
le haut ou le bas jusqu’à ce que
l’indication « Receive Mode »
s’affiche, puis poussez-le vers la
droite.
4
Poussez le bouton de commande vers
le haut ou le bas jusqu’à ce que « BTM »
s’affiche.
5 Appuyez sur le bouton de commande.
L’appareil enregistre les stations sur les
touches numériques dans l’ordre des
fréquences.
Un bip retentit lorsque le réglage est
mémorisé.
Recherche automatique des
fréquences
1 Sélectionnez la bande, puis poussez le
bouton de commande vers la gauche
ou la droite pour rechercher la station.
Le balayage s’interrompt lorsque l’appareil
capte une station. Répétez cette procédure
jusqu’à ce que vous captiez la station
souhaitée.
Conseil
Si vous connaissez la fréquence de la station que
vous souhaitez écouter, poussez le bouton de
commande vers la gauche ou vers la droite et
maintenez-le enfoncé pour localiser la fréquence
approximativement, puis poussez-le vers la droite ou
la gauche pour régler la fréquence souhaitée avec
précision (syntonisation manuelle).
Réception des stations par
l’intermédiaire d’une liste — LIST
Vous pouvez lister la fréquence.
1 Sélectionnez la bande, puis appuyez
sur le bouton de commande.
La fréquence s’affiche.
Mémorisation manuelle
1 Lorsque vous recevez la station que
vous souhaitez mémoriser, appuyez
sur une touche numérique ((1) à (6))
et maintenez-la enfoncée jusqu’à ce
que l’indication « MEM » apparaisse.
Le numéro de la touche apparaît dans la
fenêtre d’affichage.
Remarque
Si vous mémorisez une autre station sur la même
touche numérique, la station mémorisée
précédemment est effacée.
Conseil
Lorsqu’une station RDS est mémorisée, le réglage
AF/TA est également mémorisé (page 14).
2 Poussez le bouton de commande vers
le haut ou le bas jusqu’à ce que la
station souhaitée s’affiche.
3 Appuyez sur le bouton de commande
pour recevoir la station.
L’affichage revient en mode de réception
normale.
Fonction RDS
Aperçu
Les stations FM disposant du système RDS
(Radio Data System) transmettent des
informations numériques inaudibles en même
temps que le signal normal de leurs émissions
radio.
Suite à la page suivante
t
13
Page 78

Rubriques d’affichage
Exemple : lorsque vous réglez le mode Info
(informations) sur « All » (page 22).
ABC
ED
A Bande radio
B TA /T P/ AF *
1
C Horloge
D Numéro de préréglage
E Fréquence*
2
(nom du service de programme),
données RDS
*1 Lorsque l’info (Informations) « All » est réglée :
– L’indication « TP » s’allume lorsqu’une station
« TP » est captée.
– L’indication « TA »/« AF » s’allume lorsqu’une
station « TA/AF » est captée.
*2 Lorsque vous captez la station RDS, « RDS » est
affiché à gauche de l’indication de la fréquence.
Services RDS
Cet appareil propose automatiquement les
services RDS, comme suit :
AF (Fréquences alternatives)
Permet de sélectionner et de régler de nouveau
la station ayant le signal le plus fort sur un
réseau. Cette fonction vous permet d’écouter la
même émission en continu pendant un voyage
de longue distance sans avoir à régler de
nouveau cette station manuellement.
TA (Messages de radioguidage)/
TP (Programmes de radioguidage)
Propose les messages et les programmes de
radioguidage disponibles à cet instant. Tout
message/programme reçu interrompt la source
sélectionnée en cours de diffusion.
PTY (Types d’émission)
Permet d’afficher le type d’émission en cours
de réception et de rechercher votre type
d’émission sélectionné.
CT (Heure)
Les données CT (heure) accompagnant la
transmission RDS assurent un réglage de
l’horloge.
Remarques
• Selon le pays ou la région où vous vous trouvez, il
est possible que les services RDS ne soient pas
tous disponibles.
• La fonction RDS ne fonctionne pas correctement si
le signal de retransmission est faible ou si la station
syntonisée ne transmet pas de données RDS.
Réglages AF et TA
1 Appuyez plusieurs fois sur (AF/TA)
jusqu’à ce que le réglage souhaité
apparaisse.
Sélectionnez Pour
AF on activer AF et désactiver TA.
TA on activer TA et désactiver AF.
AF/TA on activer AF et TA.
AF/TA off désactiver AF et TA.
Mémorisation des stations RDS avec
les réglages AF et TA
Vous pouvez prérégler les stations RDS avec les
réglages AF/TA. Si vous utilisez la fonction
BTM, seules les stations RDS sont mémorisées
avec les mêmes réglages AF/TA.
Si vous effectuez un préréglage manuel, vous
pouvez prérégler à la fois des stations RDS et
non-RDS, avec leurs réglages AF/TA respectifs.
1 Réglez AF/TA, puis mémorisez la station à
l’aide de la fonction BTM ou manuellement.
Préréglage du volume sonore des
messages de radioguidage
Vous pouvez prérégler le niveau de volume des
messages de radioguidage de façon à ne manquer
aucune information.
1 Tournez le bouton de commande pour régler le
niveau du volume.
2 Appuyez sur la touche (AF/TA) et maintenez-
la enfoncée jusqu’à ce que l’indication « TA
Vol » apparaisse.
Réception de messages d’urgence
Lorsque la fonction AF ou TA est activée, les
messages d’urgence interrompent
automatiquement la source sélectionnée en cours
de diffusion.
Ecoute continue d’une émission
régionale — REG
Lorsque la fonction AF est activée : ce réglage
par défaut restreint la réception à une région
spécifique, afin qu’une station régionale ayant
une fréquence plus puissante ne soit pas captée.
Si vous quittez la zone de réception de cette
émission régionale, choisissez « Regional off »
en réception FM (page 23).
Remarque
Cette fonction est inopérante au Royaume-Uni et dans
certaines autres régions.
14
Page 79

Fonction de liaison locale (RoyaumeUni uniquement)
Cette fonction vous permet de sélectionner
d’autres stations locales de la région, même si
elles ne sont pas associées à vos touches
numériques.
1 En réception FM, appuyez sur une touche
numérique ((1) à (6)) sur laquelle une
station locale est mémorisée.
2 Dans les 5 secondes qui suivent, appuyez de
nouveau sur la touche numérique de la station
locale.
Répétez cette procédure jusqu’à ce que vous
captiez la station locale souhaitée.
Sélection de PTY
1 Appuyez sur (PTY) en cours de
réception FM.
Le nom du type d’émission diffusé apparaît si
la station transmet des données PTY.
2 Poussez le bouton de commande vers
le haut ou le bas jusqu’à ce que le type
d’émission souhaitée s’affiche.
3 Appuyez sur le bouton de commande.
L’appareil commence à rechercher une station
diffusant le type d’émission sélectionné.
Types d’émissions
News (Nouvelles), Current Affairs (Dossiers
d’actualité), Information (Informations),
Sport (Sport), Education (Programmes
éducatifs), Drama (Théâtre), Cultures
(Culture), Science (Science), Varied Speech
(Divers), Pop Music (Musique pop),
Rock Music (Rock), Easy Listening
(Musique légère), Light Classics M (Musique
classique légère), Serious Classics (Musique
classique), Other Music (Autres styles de
musique), Weather & Metr (Météo), Finance
(Finance), Children’s Progs (Emissions pour
les enfants), Social Affairs (Affaires sociales),
Religion (Religion), Phone In (Emissions
ligne ouverte), Travel & Touring (Voyage),
Leisure & Hobby (Loisirs), Jazz Music
(Jazz), Country Music (Musique country),
National Music (Musique nationale),
Oldies Music (Musique d’autrefois),
Folk Music (Musique folk), Documentary
(Documentaires)
Remarque
Cette fonction est inopérante dans certains pays ou
régions où les données PTY ne sont pas disponibles.
Réglage de CT
1 Réglez « CT on » lors de la
configuration (page 22).
Remarques
• Il est possible que la fonction CT ne fonctionne pas,
même si une station RDS est captée.
• Il peut y avoir une différence entre l’heure réglée par
la fonction CT et l’heure réelle.
15
Page 80

Fonction Bluetooth
Avant d’utiliser la fonction
Bluetooth
Opérations du menu de la fonction
Bluetooth
Les paramètres Bluetooth peuvent être
configurés à partir du menu de la fonction
Bluetooth ou du menu CALL. En général, les
opérations du menu peuvent s’effectuer à partir
du bouton de commande.
1 Appuyez sur (Bluetooth) ou (CALL).
Le menu de la fonction Bluetooth ou le menu
CALL s’affiche.
2 Poussez le bouton de commande vers
le haut ou le bas jusqu’à ce que le
paramètre souhaité apparaisse, puis
poussez-le vers la droite.
L’indication numérique se déplace vers le
côté droit (sélection de paramètre).
3 Poussez le bouton de commande vers
le haut ou le bas pour sélectionner le
paramètre, puis appuyez dessus.
Le réglage est terminé.
4 Appuyez sur (Bluetooth) ou (CALL).
L’affichage normal apparaît.
Pour saisir un caractère
Poussez le bouton de commande vers le haut ou
le bas pour sélectionner un caractère, puis vers la
gauche ou la droite pour déplacer le curseur.
Il est possible de saisir les caractères A à Z, a à z,
0 à 9 et les espaces.
Configuration des paramètres
Bluetooth
Avant de connecter un périphérique Bluetooth,
configurez les paramètres Bluetooth de cet
appareil.
1 Appuyez sur (Bluetooth).
Le menu de la fonction Bluetooth apparaît.
Menu de réglages Bluetooth
« z » indique les réglages par défaut.
Signal
Permet de régler le signal Bluetooth émis par cet
appareil sur « ON » ou « OFF ».
– « ON » : pour émettre le signal Bluetooth (RF
2,4 GHz).
– « OFF » (
Bluetooth (RF 2,4 GHz).
Veillez à régler sur « ON » lorsque vous
établissez la connexion au périphérique
Bluetooth.
Visibility
Permet d’autoriser d’autres périphériques
Bluetooth à rechercher cet appareil.
– « Show » : pour autoriser l’autre périphérique
à rechercher.
– « Hide » (
périphérique à rechercher.
Veillez à sélectionner « Show » lorsque vous
recherchez cet appareil à partir d’un
périphérique Bluetooth.
Device Name
Permet de modifier le nom de cet appareil
affiché sur les périphériques connectés.
(Réglage par défaut : « Xplod »)
Sélectionnez « Rename » et saisissez des
caractères. Vous pouvez saisir jusqu’à 12
caractères.
Pour restaurer le nom « Xplod », sélectionnez
« Default » c « yes ».
Remarque
Pour plus de détails sur le réglage des autres
périphériques Bluetooth, reportez-vous à leurs
manuels respectifs.
z) : pour ne pas émettre de signal
z) : pour ne pas autoriser l’autre
Pairage et connexion de cet
appareil avec un périphérique
Bluetooth
Lorsque vous connectez des périphériques
Bluetooth pour la première fois, il est nécessaire
que les périphériques se reconnaissent
mutuellement. Il s’agit du « pairage ». Cette
reconnaissance (pairage) est nécessaire la
première fois uniquement ; à partir de la seconde
connexion, cet appareil et le périphérique se
reconnaissent automatiquement. (Selon le
périphérique, il peut être nécessaire de saisir un
code d’authentification à chaque connexion.)
2 Sélectionnez « Bluetooth Settings ».
3 Sélectionnez le menu souhaité.
4 Sélectionnez le réglage.
5 Appuyez sur (Bluetooth).
16
Recherche d’un périphérique
Bluetooth à partir de cet appareil
Vérifiez au préalable que l’autre périphérique
Bluetooth est réglé pour autoriser la rechercher
(découvrable).
1 Appuyez sur (Bluetooth).
Le menu de la fonction Bluetooth apparaît.
Page 81

2 Sélectionnez « Connectivity » c
« Search ».
La recherche d’un périphérique à connecter
démarre, puis le nom du périphérique détecté
apparaît dans une liste. « Unknown »
s’affiche lorsque le nom du périphérique ne
peut pas être reçu.
Le temps de recherche varie en fonction du
nombre de périphériques Bluetooth.
3 Sélectionnez le périphérique à
connecter.
Le pairage démarre.
4 Saisissez un code d’authentification*.
Saisissez le même code d’authentification
pour cet appareil et pour le périphérique à
connecter à l’aide du bouton de commande ou
de la mini-télécommande. Le code
d’authentification peut être un nombre que
vous avez choisi ou un nombre déterminé par
le périphérique à connecter.
Pour plus de détails, reportez-vous au manuel
du périphérique à connecter.
5 Appuyez sur le bouton de commande
pour confirmer.
L’indication « Connected » apparaît et la
connexion est terminée.
L’indication « » ou « » s’affiche en
cours de connexion.
2 Lorsque l’indication « Allow
Connection? » s’affiche sur cet
appareil, sélectionnez « yes ».
La connexion commence.
Selon le périphérique, l’écran de saisie du
code d’authentification apparaît.
3 Saisissez le code d’authentification du
périphérique à connecter.
4 Appuyez sur le bouton de commande
pour confirmer.
L’indication « Connected » apparaît et la
connexion est terminée.
L’indication « » ou « » s’affiche en
cours de connexion.
Conseil
Vous pouvez également saisir le code
d’authentification à l’aide des touches numériques de
la mini-télécommande.
Remarques
• En cours de connexion avec un périphérique
Bluetooth, cet appareil ne peut pas être détecté par
un autre périphérique. Pour qu’il soit détecté,
désactivez la connexion en cours et recherchez
l’appareil à partir de l’autre périphérique.
• Selon le périphérique, il peut être impossible de
rechercher un périphérique à partir de cet appareil.
Dans ce cas, recherchez cet appareil à partir du
périphérique à connecter.
• Si vous recherchez cet appareil et le périphérique à
connecter en même temps, cet appareil ne
reconnaitra pas le périphérique à connecter.
• La recherche ou la connexion peut prendre
quelques instants.
• Selon le périphérique, l’écran de confirmation de la
connexion s’affiche avant de saisir le code
d’authentification.
• Le délai de saisie du code d’authentification varie en
fonction du périphérique.
• Cet appareil peut enregistrer 6 périphériques au
maximum pour les périphériques mains libres et 6
pour les périphériques audio.
• Cet appareil ne peut pas être connecté à un
périphérique prenant uniquement en charge le profil
HSP (Head Set Profile).
* Le code d’authentification peut également être
nommé « clé d’authentification », « code PIN »,
« nombre PIN » ou « mot de passe », en fonction du
périphérique.
Recherche de cet appareil à partir
d’un périphérique Bluetooth
Vérifiez que « Visibility » est réglé sur « Show »
dans le menu des paramètres Bluetooth
(page 16).
1 Réglez le périphérique à connecter
pour qu’il commence à rechercher.
Connexion à des périphériques
enregistrés
Une fois appariés et connectés à cet appareil, les
périphériques sont enregistrés. Vous pouvez
sélectionner un périphérique enregistré et le
connecter.
1 Appuyez sur (Bluetooth).
Le menu de la fonction Bluetooth apparaît.
2 Sélectionnez « Connectivity » c
« Handsfree Devices » ou « Audio
Devices ».
La liste des périphériques enregistrés
s’affiche.
Suite à la page suivante t
17
Page 82

3 Sélectionnez le périphérique à
connecter.
4 Sélectionnez « Connect ».
L’indication « Connected » apparaît et la
connexion est terminée.
L’indication « » ou « » s’affiche en
cours de connexion.
Arrêt de la connexion
Sélectionnez « Disconnect » c « yes » à l’étape 4.
Conseil
Selon le périphérique, il peut être possible de
sélectionnez cet appareil à partir du périphérique, puis
de le connecter.
Discussion en mains libres
Vérifiez au préalable que cet appareil et le
téléphone mobile sont connectés (page 16, 17).
Remarques
• Pour plus de détails sur le fonctionnement lorsqu’un
téléphone mobile avec une fonction de transmission
audio en continu Bluetooth est connecté en tant que
périphérique audio, reportez-vous à la section
« Ecoute de musique à partir d’un périphérique
audio » page 20.
• Le micro de cet appareil est situé à l’arrière de la
façade (page 10). Ne cachez pas le micro avec du
ruban adhésif, etc.
• Le son émis ne sera pas atténué, même si vous
activez la fonction ATT pendant un appel.
Appels
Vous pouvez passer des appels à partir du
téléphone mobile connecté à l’aide de cet
appareil.
1 Appuyez sur (CALL).
Le menu CALL apparaît.
2 Sélectionnez les éléments dans l’ordre
suivant, puis appuyez sur le bouton de
commande pour commencer l’appel.
Menu CALL
Dialed Calls*
Sélectionne un numéro dans l’historique des appels
effectués. (nombre maximal de noms et numéros de
téléphone pouvant être enregistrés : 10)
Nom et numéro de téléphone à appeler c
« Call »
Sélectionnez « Delete » pour supprimer un nom
et un numéro de téléphone, « Delete All » pour
vider l’historique.
18
Received Calls*
Sélectionne un numéro dans l’historique des
appels reçus. (nombre maximal de noms et
numéros de téléphone pouvant être enregistrés :
10)
Nom et numéro de téléphone à appeler c
« Call »
Sélectionnez « Delete » pour supprimer un nom
et un numéro de téléphone, « Delete All » pour
vider l’historique.
Phonebook*
Sélectionne un numéro dans le répertoire.
(nombre maximal de noms et numéros de
téléphone pouvant être enregistrés : 50)
« Contact List » c Nom à appeler c nom et
numéro de téléphone
Pour plus de détails sur la façon d’enregistrer
dans le répertoire, reportez-vous à la section
« Utilisation du répertoire » page 19 et
« Paramétrage d’un périphérique mains libres »
à la page 20.
Dial
Permet de saisir le numéro de téléphone à l’aide
du bouton de commande ou de la minitélécommande.
Pour saisir « + », appuyez sur la touche 0 de la
mini-télécommande et maintenez-la enfoncée.
Preset Dial*
Permet de sélectionner un numéro de téléphone
enregistré sur une touche numérique.
Numéro présélectionné (P1 – P6) c « Call »
Pour plus de détails sur la façon d’enregistrer
sur les touches numériques, reportez-vous à la
section « Utilisation de la fonction Preset Dial »
page 20.
* Si vous sélectionnez « Security » (page 21),
l’indication « Security Locked » apparaît et cette
opération est impossible.
Conseils
• La fonction Preset Dial vous permet également de
passer un appel en appuyant deux fois sur une
touche numérique après avoir appuyé sur (CALL).
• Dans les menus « Dialed Calls », « Received Calls »
et « Preset Dial », vous pouvez passer un appel en
appuyant sur (CALL) lorsque le numéro de
téléphone est affiché.
Préréglage du volume de la sonnerie
et de la voix du correspondant
Vous pouvez prérégler le volume de la sonnerie
et de la voix de votre correspondant.
Réglage de la sonnerie :
Tournez le bouton de commande lorsque le
téléphone sonne. L’indication « Ring Vol »
apparaît et le volume de la sonnerie est réglé.
Page 83

Réglage de la voix du correspondant :
Tournez le bouton de commande en cours
d’appel. L’indication « Talk Vol » apparaît et le
volume de la voix du correspondant est réglé.
Envoi de tonalités DTMF (Dual Tone
Multiple Frequency)
Vous pouvez envoyer des tonalités DTMF.
Pour envoyer des tonalités DTMF, utilisez le
bouton de commande ou appuyez sur les touches
numériques requises (0 à 9, ou ) de la minitélécommande en cours d’appel.
Réception d’appels
Lorsque vous recevez un appel, les haut-parleurs
de votre véhicule émettent une sonnerie.
Pour plus de détails sur les réglages de réception
d’un appel et en cours d’appel, reportez-vous à la
section « Paramétrage d’un périphérique mains
libres » page 20.
1 Lorsque vous recevez un appel,
appuyez sur (CALL), (MENU) ou
(Bluetooth).
(Bluetooth)
(MENU)
(CALL)
L’appel commence.
Rejet d’appel
Appuyez sur (OFF).
Conseils
• Si vous activez « Auto Answer », l’appel commence
automatiquement dans le délai défini (page 21).
• Si vous appuyez sur (CALL) en cours d’appel, la
fonction mains libres est désactivée et le micro et le
haut-parleur du téléphone mobile sont activés. Dans
ce cas, en fonction du téléphone mobile, la
connexion Bluetooth peut être interrompue.
Terminaison d’appels
1 Appuyez sur (OFF).
A la fin de l’appel, le temps de discussion
s’affiche pendant quelques secondes.
Remarque
Même si l’appel est terminé, la connexion Bluetooth
n’est pas annulée.
Utilisation du répertoire
Réception des données de répertoire
à partir d’un téléphone mobile
1 Sélectionnez « Phone Settings » dans le menu
de la fonction Bluetooth.
2 Sélectionnez « Receive PB ».
L’indication « Waiting… » apparaît.
3 Envoyez les données du répertoire à l’aide du
téléphone mobile.
L’indication « Data Receiving… » apparaît
pendant la réception des données du
répertoire.
L’indication « Complete » apparaît lorsque la
réception est terminée.
Remarque
Pour annuler le transfert des données du répertoire,
activez le téléphone mobile. Le transfert ne peut pas
être annulé à partir de cet appareil.
Enregistrement des numéros à partir
des options « Dialed Calls » ou
« Received Calls »
1 Sélectionnez « Dialed Calls » ou « Received
Calls » dans le menu CALL.
2 Sélectionnez le numéro de téléphone à
enregistrer, puis « Save ».
L’écran « Contact Name » apparaît.
3 Saisissez un nom.
Vous pouvez saisir jusqu’à 12 caractères.
4 Sélectionnez « Save? » c « yes ».
Remarque
Vous pouvez enregistrer 50 numéros de téléphone au
maximum dans le répertoire. Si vous essayez
d’enregistrer plus de 50 numéros, l’indication
« Memory Full » apparaît.
Suppression de numéros du
répertoire
1 Sélectionnez « Phonebook » c
« Contact List » dans le menu CALL.
2 Sélectionnez le nom à supprimer.
3 Sélectionnez « Delete » c « yes ».
Pour supprimer toutes les données du répertoire,
sélectionnez « Delete All » à l’étape 1.
Après la suppression, vérifiez que toutes les
données de répertoire ont bien été supprimées
correctement.
Modification d’un nom dans le
répertoire
1 Sélectionnez « Phonebook » c
« Contact List » dans le menu CALL.
2 Sélectionnez le nom à modifier.
3 Sélectionnez « Edit Name », puis saisissez un
nouveau nom.
Suite à la page suivante t
19
Page 84

Utilisation de la fonction Preset
Dial
Enregistrement des numéros
présélectionnés
Vous pouvez enregistrer un numéro de téléphone
dans le répertoire dans la fonction Preset Dial.
1 Sélectionnez « Preset Dial » dans le menu
CALL.
2 Sélectionnez le numéro présélectionné (P1 à
P6) à enregistrer, puis sélectionnez « Preset
Memory ».
3 Sélectionnez le nom à enregistrer.
4 Sélectionnez un numéro de téléphone pour le
nom sélectionné.
5 Sélectionnez « yes » lorsque « Save? »
s’affiche.
Remarque
Pour remplacer un numéro présélectionné enregistré,
supprimez tout d’abord l’enregistrement existant, puis
enregistrez le nouveau numéro de téléphone.
Suppression des numéros
présélectionnés
1 Sélectionnez « Preset Dial » dans le menu
CALL.
2 Sélectionnez le numéro de téléphone à
supprimer.
3 Sélectionnez « Delete » c « yes ».
Transmission en continu de
musique
Fonctionnement d’un périphérique
audio avec cet appareil
Vous pouvez effectuer les opérations suivantes
sur cet appareil si le périphérique audio prend en
charge le profil AVRCP (Audio Video Remote
Control Profile) de la technologie Bluetooth. (Le
fonctionnement diffère selon le périphérique
audio.)
Pour Effectuez cette opération
ignorer des
plages
avancer/reculer
rapidement
interrompre la
lecture
* En fonction du périphérique, il peut être nécessaire
d’appuyer deux fois sur la touche.
Les opérations autres que celles citées ci-dessus
doivent être effectuées à partir du périphérique
audio.
Remarque
Même si la source change sur cet appareil, la lecture
ne s’interrompt pas sur le périphérique audio.
Conseil
Vous pouvez connecter un téléphone mobile
compatible avec le profil A2DP (Advanced Audio
Distribution Profile) comme périphérique audio et
écouter de la musique.
poussez le bouton de
commande vers la gauche ou la
droite.
poussez le bouton de
commande vers la gauche ou la
droite, et maintenez-le enfoncé.
appuyez sur (6) (PAUSE)*.
Autres paramètres
Ecoute de musique à partir d’un
périphérique audio
Vous pouvez écoutez de la musique lue sur un
périphérique audio sur cet appareil si le
périphérique audio prend en charge le profil
A2DP (Advanced Audio Distribution Profile) de
la technologie Bluetooth.
1 Connectez cet appareil et le
périphérique audio Bluetooth
(page 17).
L’indication « » s’affiche en cours de
connexion.
2 Diminuez le volume de l’appareil.
3 Appuyez plusieurs fois sur (SOURCE)
jusqu’à ce que l’indication « Bluetooth
AUDIO » apparaisse.
4 Faites fonctionnez le périphérique
audio pour commencer la lecture.
5 Réglez le volume sur cet appareil.
20
Paramétrage d’un périphérique
mains libres
Vous pouvez régler différentes fonctions
lorsqu’un téléphone mobile compatible
Bluetooth est raccordé comme périphérique
mains libres.
1 Appuyez sur (Bluetooth).
Le menu de la fonction Bluetooth apparaît.
2 Sélectionnez « Phone Settings ».
3 Sélectionnez le menu souhaité.
4 Sélectionnez le réglage.
5 Appuyez sur (Bluetooth).
Page 85

Menu des paramètres du téléphone
« z » indique les réglages par défaut.
Receive PB*
Permet de recevoir et d’enregistrer les données
du répertoire à partir d’un téléphone mobile
(page 19).
Auto Answer
– « on » : pour commencer un appel
automatiquement à la réception. Réglez le
délai de démarrage d’un appel : « 1 sec » à
« 60 sec »
– « off » (
jusqu’à ce que vous appuyiez sur (CALL),
(MENU) ou (Bluetooth).
Ringtone
Permet de commuter la sonnerie :
– « Cellular*
réglée depuis le téléphone mobile.
– « Default » : pour émettre la sonnerie depuis
cet appareil.
EC/NC Mode*
Correcteur de bruits)
Permet de réduire l’écho et les parasites dans les
conversations téléphoniques.
Normalement réglé a « Mode 1 » (
qualité du son émis n’est pas satisfaisante,
réglez sur « Mode 2 » ou « off ».
Speaker Sel*
Permet de régler le haut-parleur afin qu’il
émette la sonnerie, la tonalité et la voix du
correspondant.
– « FR-L » (
gauche des haut-parleurs avant.
– « FR-R » : pour émettre à partir du canal droit
des haut-parleurs avant.
– « Front » : pour émettre à partir des deux haut-
parleurs avant.
Security
Permet de verrouiller les informations
personnelles dans les menus suivants grâce à un
mot de passe à 4 chiffres (page 18).
« Dialed Calls », « Received Calls »,
« Phonebook », « Preset Dial », « Receive PB »
Si vous réglez la sécurité, l’indication « Security
Locked » apparaît lorsque les menus suivants
sont activés.
Pour déverrouiller la sécurité, sélectionnez
« Unlock » et saisissez le numéro de votre mot
de passe.
*1 Si vous réglez l’option « Security », l’indication
« Security Locked » apparaît et cette opération est
impossible.
*2 Si un caractère qui ne peut pas s’afficher sur cet
appareil est utilisé, il ne sera pas affiché
correctement.
*3 En fonction du téléphone mobile, la sonnerie du
téléphone peut être émise sur cet appareil même si
elle est réglée sur « Cellular ».
*4 Configurable en cours d’appel.
1*2
(Réception du répertoire)
z) : pour ne pas commencer d’appel
3
» (z) : pour émettre la sonnerie
4
(Mode Correcteur d’écho/
z). Si la
4
(Sélection des haut-parleurs)
z) : pour émettre à partir du canal
Remarque
Si vous sélectionnez « Initialize » dans le paramètre
Security, toutes les données enregistrées sont
supprimées (« Dialed Calls », « Received Calls »,
« Phonebook » et « Preset Dial »).
Suppression de l’enregistrement
d’un périphérique connecté
1 Appuyez sur (Bluetooth).
Le menu de la fonction Bluetooth apparaît.
2 Sélectionnez « Connectivity » c
« Handsfree Devices » ou « Audio
Devices ».
La liste des périphériques enregistrés
s’affiche.
3 Sélectionnez le périphérique à
supprimer.
4 Sélectionnez « Delete » c « yes ».
Pour supprimer tous les périphériques de la liste
de sélection, sélectionnez « Delete All » à l’étape
4.
Fonction de connexion
automatique
Si le contact de votre véhicule est réglé en
position ACC, cet appareil se reconnecte
automatiquement au dernier périphérique
Bluetooth connecté.
21
Page 86

Autres fonctions
Réglage des rubriques de menu
— MENU
1 Appuyez sur (MENU).
2 Poussez le bouton de commande vers
le haut ou le bas jusqu’à ce que
l’élément de menu souhaité
apparaisse, puis poussez-le vers la
droite.
Les rubriques changent comme suit :
Réglage y Affichage y Mode de
réception y Son
3 Poussez le bouton de commande vers
le haut ou le bas jusqu’à ce que le
réglage souhaité apparaisse, puis
poussez-le vers la droite.
L’indication numérique se déplace vers le
côté droit (sélection de paramètre).
4 Poussez le bouton de commande vers
le haut ou le bas pour sélectionner le
réglage, puis appuyez dessus.
Le réglage est terminé.
5 Appuyez sur (MENU).
L’affichage revient en mode de lecture/
réception normale.
Remarque
Les rubriques affichées diffèrent selon la source et le
réglage.
Conseils
• Vous pouvez accéder au niveau de menu suivant en
appuyant sur le bouton de commande.
• A l’étape 5, poussez le bouton de commande vers la
gauche jusqu’à ce que l’indication « EXIT »
apparaisse, puis appuyez sur le bouton de
commande au lieu d’appuyer sur (MENU).
• Vous pouvez accéder directement au menu de
réglage du son en appuyant sur la touche (SOUND)
de la mini-télécommande.
Les paramètres suivants peuvent être réglés
(reportez-vous à la page indiquée pour plus de
détails) :
«
z » indique les réglages par défaut.
Configuration
Clock Adjust (page 6)
CT (Heure)
Pour régler sur « on » ou sur « off » (
(page 14, 15).
Beep
Pour régler sur « on » (
z) ou sur « off ».
z)
RM (Satellite de commande)
Pour changer le sens de fonctionnement des
commandes du satellite de commandes.
– « NORM » (
z) : pour utiliser le satellite de
commande avec les réglages par défaut.
– « REV » : lorsque vous montez le satellite de
commande du côté droit de la colonne de
direction.
AUX Audio*
Pour régler l’affichage de la source AUX sur
« on » (
z) ou « off » (page 24).
Version*
Pour afficher la version du micrologiciel de
l’appareil.
Affichage
Image
Pour régler différentes images affichées.
– « SpaceProducer » (
animés à l’écran en harmonie avec la musique.
– « All » : pour passer de façon répétée d’une
image de tous les modes d’affichage à l’autre.
– « off » : pour qu’aucune image ne s’affiche.
– « SA 1 – 5 » : pour afficher l’analyseur de
spectre.
– « Movie 1 – 3 » : pour afficher un film.
– « Wallpaper 1 – 3 » : pour afficher un papier
peint.
– « SA All »/« Movie All »/« Wallpaper All » :
pour passer de façon répétée d’une image de
tous les modes à l’autre.
Info (Informations)
Pour afficher les rubriques (selon la source,
etc.).
– « All » : pour afficher toutes les rubriques.
– « Simple » (
s’affiche.
– « Clear » : pour faire disparaître
automatiquement les rubriques.
Demo*
(Demonstration)
Pour régler sur « on » (z) ou sur « off ».
Dimmer
Pour modifier la luminosité de l’affichage.
– « Auto » (
z) : pour réduire automatiquement la
luminosité de l’affichage lorsque vous allumez
les phares.
– « on » : pour réduire la luminosité de
l’affichage.
– « off » : pour désactiver le gradateur.
Auto Scroll
Pour faire défiler automatiquement les longs
paramètres d’affichage lorsque le disque/
l’album/le groupe/la plage est modifié.
– « on » : pour faire défiler.
– « off » (
z) : pour ne pas faire défiler.
z) : pour créer des motifs
z) : pour qu’aucune rubrique ne
22
Page 87

ID3 Tag
Pour changer la priorité des caractères de
l’étiquette ID3 affichée (lorsque CD est
sélectionné comme source).
–« EUR » (
z) : pour afficher les caractères
d’Europe occidentale en priorité.
– « RUS » : pour afficher les caractères
cyrilliques en priorité.
Mode de réception
Local (mode de recherche locale)
– « off » (
z) : pour régler la réception normale.
– « on » : pour régler uniquement les stations
émettant des signaux forts.
Mono (mode monaural)
Pour améliorer la réception FM faible,
sélectionnez le mode de réception monaurale.
– « off » (
z) : pour entendre les émissions stéréo
en stéréo.
– « on » : pour entendre les émissions stéréo en
mono.
Regional
Pour régler sur « on » (
z) ou sur « off »
(page 14).
BTM (page 13)
Son
EQ3 Preset
Pour sélectionner un type d’égaliseur :
« Xplod », « Vocal », « Edge », « Cruise »,
« Space », « Gravity », « Custom » ou « Off »
(
z).
EQ3 Tune
Reportez-vous à la rubrique « Personnalisation
de la courbe de l’égaliseur » à la page 23.
DSO
Pour sélectionner le mode DSO : « 1 », « 2 »,
« 3 » ou « off » (
plus l’effet est prononcé.
Balance
Pour régler la balance entre les haut-parleurs
droit et gauche : « R10 » – « ±0 » (
Fader
Pour régler la balance entre les haut-parleurs
avant et arrière : « F10 » – « ±0 » (
Subwoofer
Pour régler le volume du caisson de graves :
« +10 » – « ±0 » (
(« – ∞ » s’affiche sur le réglage inférieur.)
LPF (Filtre passe-bas)
Pour sélectionner la fréquence de coupure du
caisson de graves : « off » (
« 78Hz ».
z). Plus la valeur est élevée,
z) – « L10 »
z) – « R10 »
z) – « –10 »
z), « 125Hz » ou
AUX Level
Pour régler le niveau du volume pour chaque
appareil auxiliaire connecté. Ce réglage annule
le besoin de régler le niveau du volume entre les
sources (page 25).
Niveau réglable : « +6 dB » à « ±0 dB » (
z) –
« –6 dB »
* Lorsque l’appareil est hors tension.
Personnalisation de la courbe de
l’égaliseur — EQ3 Tune
L’option « Custom » de EQ3 vous permet de
définir vos propres réglages d’égalisation.
1 Sélectionnez une source, puis
appuyez sur (MENU).
2 Sélectionnez « Sound » c « EQ3
Preset » c « Custom » à l’aide du
bouton de commande.
3 Sélectionnez « EQ3 Tune » à l’aide du
bouton de commande.
4 Sélectionnez la bande de fréquences
souhaitée entre « LOW », « MID » et
« HI ».
5 Sélectionnez la fréquence que vous
souhaitez régler.
Fréquence réglable pour chaque bande :
LOW : 60 Hz ou 100 Hz
MID : 500 Hz ou 1,0 kHz
HI : 10,0 Hz ou 12,5 kHz
6 Réglez la courbe de l’égaliseur.
Le niveau de volume peut être réglé par
incréments de 1 dB, de – 10 dB à + 10 dB.
7 Appuyez sur le bouton de commande.
Répétez les étapes 4 à 7 pour régler les autres
fréquences.
Pour restaurer la courbe par défaut de
l’égaliseur, sélectionnez « Initialize » c
« Yes » à l’étape 4.
Conseil
D’autres types d’égaliseur peuvent aussi être réglés.
23
Page 88

Utilisation d’un appareil en
option
Changeur CD/MD
Sélection du changeur
1 Appuyez plusieurs fois sur (SOURCE)
jusqu’à ce l’indication « CD » ou « MD »
apparaisse.
2 Appuyez plusieurs fois sur (MODE) jusqu’à
ce que le changeur souhaité s’affiche.
Numéro de l’appareil, indication MP3*
Indication LP2/LP4*
Numéro du disque/de l’album
2
La lecture commence.
*1 Lors de la lecture d’un fichier MP3.
*2 Lors de la lecture d’un disque MDLP.
Saut d’albums et de disques
1 En cours de lecture, poussez le bouton de
commande vers le haut ou vers le bas.
Pour ignorer Poussez vers le haut/le bas
l’album puis relâchez (maintenez le
bouton de commande enfoncé
brièvement).
l’album en
continu
puis maintenez le bouton de
commande dans les 2 secondes
après l’avoir relâché pour la
première fois.
des disques de façon répétée.
des disques en
continu
puis appuyez de nouveau sur le
bouton de commande dans les 2
secondes, et maintenez-le
enfoncé.
Lecture répétée et aléatoire
1 En cours de lecture, appuyez plusieurs fois sur
(1) (REP) ou sur (2) (SHUF) jusqu’à ce que
le réglage souhaité apparaisse.
Sélectionnez Pour lire
Repeat Disc*1un disque en boucle.
Shuffle
Changer*
des plages du changeur dans un
1
ordre aléatoire.
24
Shuffle All*2des plages de tous les
périphériques dans un ordre
aléatoire.
*1 Lorsqu’un ou plusieurs changeurs CD/MD sont
raccordés.
*2 Lorsqu’un ou plusieurs changeurs CD ou au moins
deux changeurs MD sont raccordés.
Pour rétablir le mode de lecture normale,
sélectionnez « Repeat off » ou « Shuffle off ».
Conseil
La fonction « Shuffle All » ne passe pas de façon
aléatoire de la lecture de plages de lecteurs de CD à
la lecture de plages de lecteurs de MD.
1
Localisation d’un disque par nom —
LIST
Vous pouvez sélectionner un disque dans la liste
lorsqu’un changeur CD doté de la fonction CD
TEXT ou un changeur MD est connecté.
Si vous attribuez un nom à un disque, ce nom
apparaît dans la liste.
1 En cours de lecture, appuyez sur le bouton de
commande.
Le numéro ou le nom du disque s’affiche.
2 Poussez le bouton de commande vers le haut
ou le bas jusqu’à ce que le disque souhaité
s’affiche.
3 Appuyez sur le bouton de commande pour lire
le disque.
L’affichage revient en mode de lecture
normale.
Appareil audio auxiliaire
Vous pouvez raccorder des périphériques
portatifs Sony en option à la borne BUS AUDIO
IN/AUX IN de l’appareil. Si le changeur ou
l’autre périphérique n’est pas raccordé à la borne,
l’appareil vous permet d’écouter le périphérique
portatif par l’intermédiaire des haut-parleurs du
véhicule.
Remarque
Lorsque vous raccordez un périphérique portatif,
assurez-vous que BUS CONTROL IN n’est pas
raccordé. Si un périphérique est raccordé à la prise
BUS CONTROL IN, « AUX » ne peut pas être
sélectionné par (SOURCE).
Conseil
Lorsque vous raccordez un périphérique portatif et un
changeur, utilisez le sélecteur AUX-IN en option.
Sélection d’un appareil auxiliaire
1 Appuyez plusieurs fois sur (SOURCE)
jusqu’à ce que l’indication « AUX »
apparaisse.
Utilisez les commandes du périphérique
portatif lui-même.
Page 89

Réglage du niveau de volume
Avant de commencer la lecture, n’oubliez pas de
régler le volume de chaque périphérique audio
raccordé.
1 Diminuez le volume de l’appareil.
2 Appuyez plusieurs fois sur (SOURCE)
jusqu’à ce que l’indication « AUX »
apparaisse.
3 Démarrez la lecture sur le périphérique audio
portatif, à un niveau de volume moyen.
4 Réglez votre appareil sur le volume d’écoute
habituel.
5 Réglez le volume en vous reportant à la
rubrique « Réglage des rubriques de menu —
MENU » à la page 22. Le niveau d’entrée peut
être réglé entre –6 dB et +6 dB.
Satellite de commande RM-X4S
Fixation de l’étiquette
Fixez l’étiquette comportant les indications en
fonction de la position de montage du satellite de
commande.
D
S
D
N
U
O
S
E
D
O
M
PL
DS
P
L
M
O
D
E
S
O
U
N
D
• Commande SEEK/AMS
Revient à pousser le bouton de commande de
l’appareil vers la gauche ou la droite (tournez,
ou tournez et maintenez enfoncée).
* Indisponible sur cet appareil.
Modification du sens de
fonctionnement
Le sens de fonctionnement des commandes est
réglé par défaut comme indiqué sur l’illustration
ci-dessous.
Pour augmenter
Pour diminuer
Si vous devez monter le satellite de commande
du côté droit de la colonne de direction, vous
pouvez inverser le sens de fonctionnement.
1 Appuyez sur la touche (SOUND) et
maintenez-la enfoncée tout en appuyant sur la
commande VOL.
Emplacement des commandes
Les touches du satellite de commande
commandent les mêmes fonctions que les
touches correspondantes de l’appareil.
SOUND*
PRESET/
DISC
SOURCE
VOL
Les commandes suivantes du satellite de
commande ne s’utilisent pas de la même manière
que celles de l’appareil.
• Commande PRESET/DISC
Revient à pousser le bouton de commande de
l’appareil vers le haut ou le bas (enfoncez et
tournez).
• Commande VOL (volume)
Revient à tournez le bouton de commande de
l’appareil (tournez).
ATT
DSPL
SEEK/AMS
MODE
OFF
OFF
25
Page 90

Informations complémentaires
Précautions
• Si votre véhicule est resté garé en plein soleil,
laissez l’appareil refroidir avant de l’utiliser.
• L’antenne électrique se déploie automatiquement
lorsque l’appareil est en fonctionnement.
Condensation
Par temps de pluie ou dans des régions très humides,
de l’humidité peut se condenser à l’intérieur des
lentilles et dans la fenêtre d’affichage de l’appareil.
Si cela se produit, l’appareil ne fonctionne pas
correctement. Dans ce cas, retirez le disque et
attendez environ une heure que l’humidité se soit
évaporée.
Pour conserver un son de haute
qualité
Veillez à ne pas renverser de jus de fruit ou d’autres
boissons sucrées sur l’appareil ou sur les disques.
Remarques sur les disques
• Pour que le disque reste propre, ne touchez pas sa
surface. Manipulez le disque en le tenant par les
bords.
• Rangez vos disques dans leurs boîtiers ou dans des
chargeurs lorsque vous ne vous en servez pas.
• Ne soumettez pas les disques à des températures
élevées. Evitez de les laisser dans un véhicule en
stationnement, sur le tableau de bord ou la plage
arrière.
• Ne collez pas d’étiquettes sur les disques et
n’utilisez pas de disques rendus collants par de
l’encre ou des résidus. De tels disques peuvent
s’arrêter de tourner en cours de lecture et
provoquer des problèmes de fonctionnement ou
être endommagés.
• N’utilisez pas de disques sur lesquels sont collés
des étiquettes ou des autocollants.
L’utilisation de tels disques peut entraîner les
problèmes de fonctionnement suivants :
– impossibilité d’éjecter un disque parce que
l’étiquette ou l’autocollant s’est décollé et
bloque le mécanisme d’éjection ;
– erreurs de lecture des données audio (notamment
sauts de lecture ou absence de lecture)
provoquées par une déformation du disque suite
au rétrécissement de l’étiquette ou de
l’autocollant sous l’effet de la chaleur.
• Les disques de forme non standard (notamment en
forme de cœur, de carré ou d’étoile) ne peuvent
pas être lus avec cet appareil. Vous risquez
d’endommager votre appareil si vous essayez de le
faire. N’utilisez pas de tels disques.
• Cet appareil ne permet pas la lecture des CD de
8 cm.
• Avant la lecture, nettoyez les
disques avec un chiffon de
nettoyage disponible dans le
commerce. Essuyez chaque
disque en partant du centre vers
l’extérieur. N’utilisez pas de
solvants tels que de l’essence,
du diluant, des nettoyants
disponibles dans le commerce
ou des vaporisateurs antistatiques destinés aux
disques vinyle.
Remarques sur les disques CD-R et
CD-RW
• Il est possible que cet appareil ne puisse pas lire
certains CD-R ou CD-RW (en fonction de
l’appareil utilisé pour l’enregistrement ou de l’état
du disque).
• Cet appareil ne permet pas la lecture des CD-R ou
CD-RW non finalisés.
Disques de musique encodés à l’aide
d’une technologie de protection des
droits d’auteur
Cet appareil est conçu pour la lecture des disques
conformes à la norme Compact Disc (CD).
Dernièrement, certaines maisons de disques ont
lancé sur le marché divers types de disques de
musique encodés selon des technologies de
protection des droits d’auteur. Notez que, parmi ces
types de disques, certains ne sont pas conformes à la
norme CD. La lecture de ces disques avec cet
appareil peut être impossible.
Remarque sur les DualDiscs
Un DualDisc est un disque double face qui
comporte les données d’un DVD sur une face et
des données audio numériques sur l’autre face.
La face du contenu audio des DualDiscs n’étant
pas conforme à la norme Compact Disc (CD), la
lecture de ces disques sur cet appareil n’est pas
garantie.
A propos des fichiers MP3/WMA
MP3, qui est l’abréviation de MPEG-1 Audio
Layer-3, est un format standard de compression de
fichiers musicaux. Elle comprime les données de
CD audio à environ 1/10 de leur taille initiale.
WMA, qui est l’abréviation de Windows Media
Audio, est un autre format standard de compression
des fichiers musicaux. Il comprime les données de
CD audio à environ un 1/22* de leur taille initiale.
* uniquement pour 64 Kbits/s
26
Page 91

• L’appareil est compatible avec le format ISO 9660
niveau 1/niveau 2, avec les extensions Joliet/
Romeo et les multisessions.
• Nombre maximal de :
– dossiers (albums) : 150 (y compris le répertoire
racine et les dossiers vides).
– fichiers (plages) MP3/WMA et de dossiers
contenus sur un disque : 300 (voire moins si des
noms de fichier/de dossier contiennent de
nombreux caractères).
– caractères affichables pour un nom de dossier/de
fichier : 25 (Joliet) ou 50 (Romeo).
• Versions 1.0, 1.1, 2.2, 2.3 et 2.4 des étiquettes ID3
applicables aux fichiers MP3 uniquement.
L’étiquette ID3 compte 30 caractères (1.0 et 1.1)
ou 50 caractères (2.2, 2.3 et 2.4). L’étiquette
WMA affichable compte 25 caractères.
Ordre de lecture des fichiers MP3/
WMA
MP3/WMA
Remarques
• Lors de l’identification d’un fichier MP3/WMA, veillez
à ajouter l’extension « .mp3 »/« .wma » au nom de
fichier.
• Lors de la lecture d’un fichier MP3/WMA VBR (à
débit variable) ou pendant l’avance/retour rapide, le
temps de lecture écoulé qui s’affiche peut être
inexact.
• Lors de l’enregistrement d’un disque en
multisession, seule la première plage du premier
format de session est reconnue et lue (tout autre
format est ignoré). La priorité du format est CD-DA,
CD ATRAC et MP3/WMA.
– Lorsque la première plage est un CD-DA, seul le
CD-DA de la première session est lu.
– Lorsque la première plage n’est pas un CD-DA,
seul un CD ATRAC ou une session MP3/WMA est
lu. Si le disque ne contient aucune information
dans ces formats, l’indication « NO MUSIC »
apparaît.
Remarques sur les fichiers MP3
• Assurez-vous de finaliser le disque avant de l’utiliser
sur l’appareil.
• Il est possible que le son soit intermittent lors de la
lecture d’un fichier MP3 à haut débit binaire (par
exemple 320 Kbit/s).
Dossier
(album)
Fichier MP3/
WMA (plage)
Remarques sur les fichiers WMA
• Il n’est pas possible de lire des fichiers compressés
sans perte.
• Il n’est pas possible de lire des fichiers protégés par
copyright.
A propos de CD ATRAC
Format ATRAC3plus
La norme ATRAC3 (Adaptive Transform Acoustic
Coding3) est une technologie de compression des
données audio. Elle comprime les données de CD
audio à environ 1/10 de leur taille initiale.
ATRAC3plus, qui est un format étendu de ATRAC3,
comprime les données de CD audio à environ 1/20
de leur taille initiale. L’appareil accepte le format
ATRAC3 et ATRAC3plus.
CD ATRAC
Le CD ATRAC est constitué de données CD audio
comprimées au format ATRAC3 ou ATRAC3plus
en utilisant un logiciel autorisé, tel que SonicStage
2.0 ou ultérieur, ou encore SonicStage Simple
Burner.
• Nombre maximal de :
– dossiers (groupes) : 255
– fichiers (plages) : 999
• Les caractères d’un nom de dossier ou de fichier et
les informations textuelles écrites par SonicStage
sont affichés.
Pour plus de détails sur le format CD ATRAC,
reportez-vous au manuel SonicStage ou SonicStage
Simple Burner.
Remarque
Assurez-vous de créer le CD ATRAC à l’aide d’un
logiciel autorisé, tel que SonicStage 2.0 ou ultérieur,
ou encore SonicStage Simple Burner 1.0 ou 1.1.
Si vous avez des questions ou des problèmes
concernant cet appareil qui ne sont pas abordés dans
ce mode d’emploi, contactez votre revendeur Sony.
A propos de la fonction Bluetooth
Communication Bluetooth
• La technologie sans fil Bluetooth fonctionne dans
un rayon d’environ 10 mètres.
La portée de communication maximum peut varier
selon les obstacles (personne, métal, mur, etc.) ou
l’environnement électromagnétique.
• Les conditions suivantes peuvent affecter la
sensibilité de la communication Bluetooth :
– un obstacle, par exemple une personne, un objet
métallique ou un mur se trouve entre cet appareil
et le périphérique Bluetooth ;
– un appareil utilisant une fréquence de 2,4 GHz,
par exemple un périphérique LAN sans fil, un
téléphone sans fil ou un four à micro-ondes est
utilisé à proximité de cet appareil.
Suite à la page suivante t
27
Page 92

• Etant donné que les périphériques Bluetooth et les
périphériques LAN sans fil (IEEE802.11b/g)
utilisent la même fréquence, des interférences en
hyperfréquences peuvent survenir et entraîner une
dégradation de la vitesse de communication, des
parasites ou une connexion non valide si cet
appareil est utilisé à proximité d’un périphérique
LAN sans fil. En pareil cas, prenez les mesures
suivantes :
– utilisez cet appareil à au moins 10 m du
périphérique LAN sans fil ;
– si cet appareil est utilisé dans un rayon de 10 m
par rapport au périphérique LAN sans fil, mettez
ce dernier hors tension ;
– installez cet appareil et le périphérique
Bluetooth aussi près que possible l’un de l’autre.
• Les émissions d’hyperfréquences d’un
périphérique Bluetooth peuvent perturber le
fonctionnement des appareils médicaux
électroniques. Mettez cet appareil ainsi que les
autres périphériques Bluetooth situés dans les
endroits suivants hors tension afin d’éviter tout
accident :
– endroits où du gaz inflammable est présent, dans
un hôpital, un train, un avion ou une station
service ;
– à proximité de portes automatiques ou
d’alarmes incendie.
• Cet appareil prend en charge les capacités de
sécurité conformes à la norme Bluetooth pour
offrir une connexion sécurisée lors de l’utilisation
de la technologie sans fil. Cependant, la sécurité
peut être insuffisante selon le réglage. Soyez
prudent lorsque vous communiquez au moyen de
la technologie sans fil Bluetooth.
• Nous ne pouvons être tenus responsables de la
fuite d’informations lors d’une communication
Bluetooth.
• La connexion ne peut pas être garantie avec tous
les périphériques Bluetooth.
– Un périphérique doté de la fonction Bluetooth
doit être conforme à la norme Bluetooth
spécifiée par Bluetooth SIG et être authentifié.
– Même si le périphérique raccordé est conforme à
la norme Bluetooth précédemment mentionnée,
certains périphériques risquent de ne pas se
connecter ou de ne pas fonctionner
correctement, selon leurs caractéristiques ou
spécifications.
– Lors de communications téléphoniques en mains
libres, des parasites peuvent se produire, en
fonction du périphérique ou de l’environnement
de communication.
• Selon le périphérique à connecter, le délai avant le
début de la communication peut être plus ou
moins long.
Autres
• L’appareil Bluetooth peut ne pas fonctionner avec
les téléphones mobiles, en fonction des conditions
des ondes radio et de l’endroit où l’appareil est
utilisé.
• Si vous éprouvez une gêne après avoir utilisé
l’appareil Bluetooth, cessez de l’utiliser
immédiatement. Si le problème persiste, consultez
votre revendeur Sony le plus proche.
Entretien
Remplacement de la pile au lithium
de la mini-télécommande
Dans des conditions d’utilisation normales, la pile
dure environ 1 an. (En fonction des conditions
d’utilisation, sa durée de vie peut être plus courte.)
Lorsque la pile est faible, la portée de la minitélécommande diminue. Remplacez la pile par une
pile au lithium CR2025 neuve. L’utilisation de tout
autre type de pile présente un risque d’incendie ou
d’explosion.
Pôle + vers le haut
c
Remarques sur la pile au lithium
• Tenez la pile au lithium hors de la portée des
enfants. En cas d’ingestion de la pile, consultez
immédiatement un médecin.
• Essuyez la pile avec un chiffon sec pour assurer un
bon contact.
• Veillez à respecter la polarité lors de l’installation de
la pile.
• Ne tenez pas la pile avec des pinces métalliques,
car cela pourrait entraîner un court-circuit.
ATTENTION
Utilisée de façon incorrecte, la pile peut
exploser. Ne pas la recharger, la démonter ni
la jeter au feu.
Remplacement du
fusible
Lorsque vous remplacez le
fusible, veillez à utiliser un
fusible dont l’intensité, en
ampères, correspond à la valeur
indiquée sur le fusible usagé. Si
le fusible saute, vérifiez le
branchement de l’alimentation
et remplacez-le. Si le nouveau
fusible saute également, il est
possible que l’appareil soit
défectueux. Dans ce cas, consultez votre revendeur
Sony le plus proche.
Fusible (10 A)
28
Page 93

Nettoyage des connecteurs
L’appareil risque de ne pas fonctionner
correctement si les connecteurs entre l’appareil et la
façade sont souillés. Pour éviter cette situation,
enlevez la façade (page 6) et nettoyez les
connecteurs à l’aide d’un coton-tige imbibé
d’alcool. N’exercez pas une pression excessive,
sinon les connecteurs risquent d’être endommagés.
Retrait de l’appareil
1 Retirez le tour de protection.
1 Retirez la façade (page 6).
2 Pincez les deux côtés du tour de
protection, puis tirez-le.
Appareil principal
Remarques
• Pour plus de sécurité, coupez le moteur avant de
nettoyer les connecteurs et retirez la clé du contact.
• Ne touchez jamais les connecteurs directement
avec les doigts ou avec un objet métallique.
Arrière de la façade
x
2 Retirez l’appareil.
1 Insérez simultanément deux clés de
déblocage jusqu’à ce qu’elles émettent un
déclic.
2 Tirez sur les clés de déblocage pour
extraire l’appareil.
Tournez le
crochet vers
l’intérieur.
3 Faites glisser l’appareil en dehors de son
support.
29
Page 94

Spécifications
Lecteur CD
Rapport signal/bruit : 120 dB
Réponse en fréquence : 10 à 20 000 Hz
Pleurage et scintillement : en dessous du seuil
mesurable
Radio
FM
Plage de syntonisation : 87,5 à 108,0 MHz
Borne d’antenne : connecteur d’antenne externe
Moyenne fréquence : 10,7 MHz/450 kHz
Sensibilité utile : 9 dBf
Sélectivité : 75 dB à 400 kHz
Rapport signal/bruit : 67 dB (stéréo), 69 dB (mono)
Distorsion harmonique à 1 kHz : 0,5 % (stéréo),
0,3 % (mono)
Séparation : 35 dB à 1 kHz
Réponse en fréquence : 30 à 15 000 Hz
MW (PO)/LW (GO)
Plage de syntonisation :
MW (PO) : 531 à 1 602 kHz
LW (GO) : 153 à 279 kHz
Borne d’antenne : connecteur d’antenne externe
Moyenne fréquence : 10,7 MHz/450 kHz
Sensibilité : MW : 30 µV, LW : 40 µV
Communication sans fil
Système de communication :
Norme Bluetooth version 2.0
Sortie :
Norme Bluetooth Power Class 2 (Max. + 4 dBm)
Portée de communication maximale :
En ligne directe : environ 10 m*
Bande de fréquences :
bande de 2,4 GHz (2,4000 – 2,4835 GHz)
Méthode de modulation : FHSS
Profils Bluetooth compatibles*
A2DP (Advanced Audio Distribution Profile)
AVRCP (Audio Video Remote Control Profile)
HFP (Handsfree Profile)
OPP (Object Push Profile)
*1 La portée réelle varie en fonction de nombreux
facteurs tels que la présence d’obstacles entre les
périphériques, les champs magnétiques autour
des fours à micro-ondes, l’électricité statique, la
sensibilité de la réception, les performances de
l’antenne, le système d’exploitation, les
applications logicielles, etc.
*2 Les profils standard Bluetooth sont destinés à la
communication Bluetooth entre les périphériques.
1
2
:
Généralités
Sorties :
Borne de sorties audio (avant/arrière)
Borne de sortie du caisson de graves (mono)
Borne de commande de relais d’antenne électrique
Borne de commande d’amplificateur de puissance
Entrées :
Borne de commande ATT téléphone
Borne de commande de l’éclairage
Borne d’entrée de commande BUS
Borne d’entrée audio BUS/AUX IN
Borne d’entrée de commande à distance
Borne d’entrée de l’antenne
Commandes de tonalité :
Graves : ±10 dB à 60 Hz ou 100 Hz (XPLOD)
Médiums : ±10 dB à 500 Hz ou 1 kHz (XPLOD)
Aiguës : ±10 dB à 10 kHz ou 12,5 kHz (XPLOD)
Alimentation : batterie de véhicule 12 V CC
(masse négative)
Dimensions : environ 178 × 50 × 183 mm (l/h/p)
Dimensions du support : environ 182 × 53 × 162 mm
(l/h/p)
Poids : environ 1,2 kg
Accessoires fournis :
Mini-télécommande : RM-X302
Composants destinés à l’installation et au
raccordement (1 jeu)
Appareils/accessoires en option :
Satellite de commande : RM-X4S
Câble BUS (fourni avec un cordon à broches
cinch) :
RC-61 (1 m), RC-62 (2 m)
Changeur CD (10 disques) : CDX-757MX
Changeur CD (6 disques) : CDX-T70MX,
CDX-T69
Sélecteur de source : XA-C30, XA-C40
Sélecteur AUX-IN : XA-300
Il est possible que votre revendeur ne propose pas
certains des accessoires repris ci-dessus. Demandezlui des informations détaillées.
Brevets américains et internationaux sous licence
de Dolby Laboratories.
Licence de la technologie de codage audio MPEG
Layer-3 et des brevets obtenue de Fraunhofer IIS et
Thomson.
Remarque
Cet appareil ne peut pas être raccordé à un
préamplificateur numérique ou à un égaliseur
compatible avec le système BUS de Sony.
La conception et les spécifications sont sujettes à
modification sans préavis.
Amplificateur de puissance
Sorties : sorties haut-parleurs (connecteurs de sécurité)
Impédance des haut-parleurs : 4 à 8 ohms
Puissance de sortie maximale : 52 W × 4 (à 4 ohms)
30
• Les soudures sont effectuées sans plomb.
• Aucun retardateur de flamme halogéné n’est utilisé
dans certaines cartes à circuits imprimés.
• Aucun retardateur de flamme halogéné n’est utilisé
dans la composition des coques.
• Du papier est utilisé pour les cales d’emballage.
Page 95

Dépannage
La liste de contrôles suivante vous aidera à remédier
aux problèmes que vous pourriez rencontrer avec cet
appareil.
Avant de passer en revue la liste de contrôles cidessous, vérifiez les procédures de raccordement et
d’utilisation.
Généralités
L’appareil n’est pas alimenté.
• Vérifiez le raccordement. Si tout est en ordre, vérifiez
le fusible.
• Si vous mettez l’appareil hors tension et que
l’affichage disparaît, vous ne pouvez pas le
commander avec la mini-télécommande.
t Mettez l’appareil sous tension.
L’antenne électrique ne se déploie pas.
L’antenne électrique ne dispose pas d’un boîtier de
relais.
Aucun son.
• Le volume est trop faible.
• La fonction ATT est activée ou la fonction ATT
téléphone (lorsque le câble d’interface d’un
téléphone embarqué est raccordé au fil ATT) est
activée.
• La position de la commande d’équilibre avant-arrière
n’est pas réglée pour un système à 2 haut-parleurs.
• Le changeur CD est incompatible avec le format du
disque (MP3/WMA/CD ATRAC).
t Lecture avec un changeur CD compatible MP3 de
Sony, ou cet appareil.
Aucun bip n’est émis.
• Le bip est désactivé (page 22).
• Un amplificateur de puissance en option est raccordé
et vous n’utilisez pas l’amplificateur intégré.
Le contenu de la mémoire a été effacé.
• La touche RESET a été enfoncée.
t Recommencez la procédure d’enregistrement
dans la mémoire.
• Le cordon d’alimentation ou la batterie a été
déconnecté.
• Le cordon d’alimentation n’est pas raccordé
correctement.
Les stations mémorisées et l’heure sont
effacées.
Le fusible a sauté.
Emission de bruit lorsque la position de la clé
de contact est modifiée.
Les fils ne sont pas raccordés correctement au
connecteur d’alimentation du véhicule destiné aux
accessoires.
L’affichage disparaît de la fenêtre d’affichage
ou il ne s’affiche pas.
• Le gradateur est réglé sur « Dimmer on » (page 22).
• L’affichage est désactivé si vous maintenez la touche
(OFF) enfoncée.
t Maintenez de nouveau la touche (OFF) de
l’appareil enfoncée jusqu’à ce que l’affichage
apparaisse.
• Les connecteurs sont sales (page 29).
Le mode DSO ne fonctionne pas.
Selon l’intérieur de la voiture ou le type de musique, le
mode DSO peut avoir un effet indésirable.
Les rubriques d’affichage ne s’affichent pas.
t Réglez l’option sur « Info All » (page 22).
Lecture de CD ou de MD
Impossible d’introduire le disque.
• Un autre disque est déjà en place.
• Le disque a été introduit de force à l’envers ou dans le
mauvais sens.
La lecture du disque ne commence pas.
• Le disque est défectueux ou sale.
• Les CD-R/CD-RW ne sont pas destinés à un usage
audio (page 26).
Impossible de lire des fichiers MP3/WMA.
Le disque n’est compatible ni avec le format MP3/
WMA, ni avec la version (page 26).
Certains fichiers MP3/WMA exigent un délai
plus long que d’autres avant le début de la
lecture.
La lecture des types de disques suivants exige un délai
de démarrage plus long :
– disques comportant une hiérarchie de dossiers
complexe ;
– disques enregistrés en multisession ;
– disques auxquels il est possible d’ajouter des
données.
La lecture du CD ATRAC ne commence pas.
• Le disque n’a pas été créé par un logiciel autorisé, tel
que le logiciel SonicStage ou SonicStage Simple
Burner.
• Les plages qui ne sont pas incluses dans le groupe ne
peuvent pas être lues.
L’étiquette ID3 du fichier MP3 ne s’affiche pas
correctement.
• Vérifiez le paramètre « ID3 Tag » (page 23).
• Pour les utilisateurs en Russie, réglez l’option sur
« RUS » ; pour les autres, réglez-la sur « EUR ».
Veuillez noter que même si vous réglez l’option sur
« RUS », il est possible que l’étiquette ID3 ne
s’affiche pas correctement.
Les rubriques d’affichage ne défilent pas.
• Pour les disques contenant un grand nombre de
caractères, le défilement peut être inopérant.
• « Auto Scroll » est réglé sur « off ».
t Réglez « Auto Scroll on » (page 22) ou appuyez
sur (SCRL) de la mini-télécommande.
Le son saute.
• L’installation est incorrecte.
t Installez l’appareil suivant un angle de moins de
45° dans un endroit stable de la voiture.
• Le disque est défectueux ou sale.
Les touches de commande sont inopérantes.
Le disque ne s’éjecte pas.
Appuyez sur la touche RESET (page 6).
Suite à la page suivante t
31
Page 96

Réception radio
Impossible de capter des stations.
Le son comporte des parasites.
• Raccordez un câble de commande d’antenne
électrique (bleu) ou un câble d’alimentation
d’accessoire (rouge) au câble d’alimentation de
l’amplificateur d’antenne de la voiture (uniquement
si votre voiture est équipée d’une antenne FM/MW
(PO)/LW (GO) intégrée dans la vitre arrière/latérale).
• Vérifiez le raccordement de l’antenne du véhicule.
• L’antenne automatique ne se déploie pas.
tVérifiez le raccordement du câble de commande
de l’antenne électrique.
• Vérifiez la fréquence.
• Lorsque le mode DSO est activé, le son peut parfois
comporter des parasites.
tRéglez le mode DSO sur « off » (page 23).
Impossible de capter une présélection.
• Enregistrez la fréquence correcte dans la mémoire.
• Le signal capté est trop faible.
Le réglage automatique des stations est
impossible.
• Le mode de recherche locale est réglé sur « on ».
tRéglez-le sur « Local off » (page 23).
• Le signal capté est trop faible.
tRéglez manuellement la fréquence.
En cours de réception FM, l’indication « ST »
clignote.
• Réglez la fréquence correctement.
• Le signal capté est trop faible.
tRéglez-le sur « Mono on » (page 23).
Un programme FM émis en stéréo est entendu
en mono.
L’appareil est en mode de réception mono.
t Réglez-le sur « Mono on » (page 23).
Fonction RDS
Une recherche (SEEK) commence après
quelques secondes d’écoute.
La station ne diffuse pas de programmes de
radioguidage (fonction TP désactivée) ou le signal
capté est faible.
t Désactivez TA (page 14).
Aucun message de radioguidage.
• Activez TA (page 14).
• La station n’émet pas de messages de radioguidage,
malgré l’indication TP.
tRéglez la fréquence pour capter une autre station.
PTY affiche « None ».
• La station actuellement captée n’est pas une station
RDS.
• Les données RDS n’ont pas été reçues.
• La station ne spécifie pas le type d’émission.
Fonction Bluetooth
Le périphérique à connecter ne détecte pas cet
appareil.
• Réglez « Signal » sur « ON » (page 16).
• Réglez « Visibility » sur « Show » (page 16).
• En cours de connexion avec l’autre périphérique
Bluetooth, cet appareil ne peut pas être détecté par un
autre périphérique. Désactivez la connexion en cours
et recherchez l’appareil à partir de l’autre
périphérique. Le périphérique déconnecté peut être
reconnecté en le sélectionnant dans la liste des
périphériques enregistrés.
Cet appareil ne peut pas détecter le
périphérique à connecter.
Vérifiez les paramètres Bluetooth du périphérique à
connecter.
Impossible d’établir la connexion.
• En fonction de l’autre périphérique, il peut être
impossible d’effectuer une recherche à partir de cet
appareil.
t Recherche de cet appareil à partir de l’autre
périphérique Bluetooth.
• En fonction de l’état de l’autre périphérique, il peut
être impossible d’effectuer une recherche à partir de
cet appareil.
t Recherche de cet appareil à partir de l’autre
périphérique Bluetooth.
• Vérifiez les procédures de pairage et de connexion en
vous reportant au manuel de l’autre périphérique,
etc., puis effectuez à nouveau cette opération.
Le nom du périphérique détecté ne s’affiche
pas.
Selon l’état de l’autre périphérique, il peut être
impossible d’obtenir un nom.
Pas de sonnerie.
• Réglez le volume dans l’option « Ring Vol »
(page 18).
• En fonction du périphérique à connecter, la sonnerie
peut ne pas être émise correctement.
t Réglez « Ringtone » sur « Default » (page 21).
Le volume de la voix du correspondant est
faible.
Réglez le volume dans l’option « Talk Vol » (page 19).
Il y a de l’écho ou des parasites pendant les
conversations téléphoniques.
• Baissez le volume.
• L’option « EC/NC Mode » est réglée sur « off ».
t Réglez « EC/NC Mode » sur « Mode 1 » ou
« Mode 2 » (page 21).
• Si les bruits ambiants autres que ceux de la
conversation téléphonique sont forts, essayez de les
réduire.
Par exemple : si une fenêtre est ouverte et que le bruit
du trafic, par exemple, est fort, fermez la fenêtre. Si la
climatisation fait beaucoup de bruit, baissez-la.
La qualité sonore du téléphone est mauvaise.
La qualité sonore du téléphone dépend des conditions
de réception du téléphone mobile.
t Déplacez votre véhicule dans un endroit où la
réception est meilleure si elle était mauvaise.
32
Page 97

Le volume du périphérique audio raccordé est
faible (élevé).
Le niveau de volume varie d’un périphérique audio à
l’autre.
tRéglez le volume du périphérique audio connecté
ou de cet appareil.
Le son saute en cours de lecture d’un
périphérique audio Bluetooth.
• Réduisez la distance entre l’appareil et le
périphérique audio Bluetooth.
• Si le périphérique audio Bluetooth est rangé dans un
étui qui interrompt le signal, sortez-le de cet étui pour
l’utiliser.
• Plusieurs périphériques Bluetooth ou autres
périphériques qui émettent des ondes radio sont
utilisés à proximité.
t Mettez les autres périphériques hors tension.
t Réduisez la distance à partir des autres
périphériques.
Impossible de commander le périphérique
audio Bluetooth connecté.
Vérifiez que le périphérique audio Bluetooth connecté
prend en charge le profil AVRCP.
Certaines fonctions ne sont pas activées.
Vérifiez que le périphérique à connecter prend en
charge les fonctions en question.
Le nom du correspondant ne s’affiche pas lors
de la réception d’un appel.
• Ce correspondant n’est pas enregistré dans le
répertoire.
t Enregistrez-le dans le répertoire (page 19).
• Le téléphone appelant n’est pas réglé pour envoyer le
numéro de téléphone.
Un appel commence involontairement.
• Le téléphone à connecter est réglé pour commencer
un appel automatiquement.
• L’option « Auto Answer » de cet appareil est réglée
sur « on » (page 21).
Echec du pairage dans le délai imparti.
Selon le périphérique à connecter, le délai de pairage
peut être court. Essayez de terminer le pairage dans le
délai en définissant un code d’authentification à un
seul chiffre.
La sonnerie ou la voix du correspondant est
émise par un haut-parleur uniquement.
L’option « Speaker Sel » est réglée sur « FR-L » ou
« FR-R ».
tRéglez « Speaker Sel » sur « Front » (page 21).
Aucun son n’est émis par les haut-parleurs du
véhicule lors d’un appel en mains libres.
Si le son est émis par le téléphone mobile, réglez ce
dernier de sorte qu’il émette le son via les hautparleurs du véhicule.
Affichage des erreurs et messages
Fonction audio
Blank Disc
Le MD ne contient aucune plage enregistrée.
tInsérez un MD contenant des plages enregistrées.
Error
• Le disque est sale ou inséré à l’envers.
t Nettoyez le disque ou insérez-le correctement.
• Le disque ne peut pas être lu en raison d’un
problème.
t Insérez-en un autre.
Failure (Est allumé tant qu’aucune touche n’est
activée.)
Les haut-parleurs ou les amplificateurs ne sont pas
raccordés correctement.
t Reportez-vous au manuel d’installation de ce
modèle pour vérifier les raccordements.
Load
Le changeur est en train de charger le disque.
t Attendez que cette opération soit terminée.
Local Seek +/–
Le mode de recherche locale est activé en cours de
recherche automatique des fréquences.
NO AF
Il n’existe aucune fréquence alternative pour la station
actuelle.
t Poussez le bouton de commande vers la gauche ou
la droite lorsque le nom du service de programme
clignote. L’appareil commence à rechercher une
autre fréquence avec les mêmes données
d’identification de programme (PI) (l’indication
« PI Seek » apparaît).
NO Disc
Le disque n’est pas inséré dans le changeur CD ou
MD.
t Insérez un disque dans le changeur.
NO Disc Name
Aucun nom de disque n’est écrit dans la plage.
NO Group Name
Aucun nom de groupe n’est écrit dans le CD ATRAC.
NO ID3 Tag
Les informations de l’étiquette ID3 ne sont pas écrites
dans le fichier MP3.
NO Information
Les informations textuelles ne sont pas écrites dans le
fichier ATRAC3/ATRAC3plus ou WMA.
NO Magazine
Le chargeur n’a pas été inséré dans le changeur CD.
t Insérez le chargeur dans le changeur.
NO Music
Le disque n’est pas un fichier audio.
t Insérez un CD audio dans cet appareil ou un
changeur compatible MP3.
NO TP
L’appareil continue à rechercher les stations diffusant
des messages de radioguidage.
NO Track Name
Aucun nom de plage n’est écrit dans la plage.
Suite à la page suivante t
33
Page 98

Offset
Il est possible qu’il y ait un problème de
fonctionnement.
t Vérifiez le raccordement. Si le message d’erreur
reste affiché, contactez votre revendeur Sony le
plus proche.
Push Reset
Le lecteur CD et le changeur CD/MD ne peuvent pas
être utilisés en raison d’un problème.
t Appuyez sur la touche RESET (page 6).
Read
L’appareil lit toutes les informations de plage et de
groupe sur le disque.
t Attendez que la lecture soit terminée et la lecture
commence automatiquement. Selon la structure du
disque, cette opération peut prendre plus d’une
minute.
« » ou « »
Pendant le retour ou l’avance rapide, vous avez atteint
le début ou la fin du disque et vous ne pouvez pas aller
plus loin.
« »
Le caractère ne peut pas être affiché.
Fonction Bluetooth
Busy
La connexion Bluetooth n’est pas terminée.
t Interrompez la réception des données du répertoire.
t Arrêtez l’opération en cours et attendez un instant.
Connection Complete
La connexion Bluetooth est terminée.
Connection Failed
• Impossible d’établir la connexion au périphérique
suite à un problème.
• Impossible d’établir la connexion au périphérique car
le code d’authentification saisi est incorrect.
• Le délai autorisé pour la connexion a été dépassé.
Disconnected
Le signal Bluetooth est déconnecté.
Empty
• Aucune donnée n’est stockée dans « Dialed Calls »,
« Received Calls » ou « Phonebook » du menu
CALL.
• Il n’y a aucune donnée dans le répertoire lors de
l’enregistrement dans les numéros présélectionnés.
Error
Les données du répertoire ne peuvent pas être reçues
en raison d’un problème.
HF Device is not available
Aucun périphérique mains libres n’est connecté.
Invalid Code
Le code de sécurité saisi est incorrect.
Memory Full
• La mémoire du répertoire de cet appareil devient
pleine lors de la réception des données du répertoire.
• La mémoire du répertoire de cet appareil est pleine.
Not Available
La source est définie sur Bluetooth AUDIO, mais
aucun périphérique audio Bluetooth n’est connecté.
34
No Devices Found
• Aucun périphérique à connecter n’a été trouvé après
la recherche.
• Le périphérique n’est pas enregistré dans « Handsfree
Devices » ou « Audio Devices ».
t Enregistrez le périphérique dans « Handsfree
Devices » ou « Audio Devices ».
Security Locked
La sécurité est activée.
Turn ON Bluetooth
Le paramètre Bluetooth est désactivé.
t Activez le paramètre Bluetooth.
Si ces solutions ne permettent pas d’améliorer la
situation, contactez votre revendeur Sony le plus
proche.
Si vous portez l’appareil à réparer en raison d’un
problème de lecture de CD, apportez le disque
utilisé au moment où le problème s’est produit.
Site d’assistance
Si vous avez des questions ou si vous
souhaitez consulter les toutes dernières
informations techniques sur ce produit,
rendez-vous sur le site Web suivant :
http://support.sony-europe.com
Page 99

Page 100

Si dichiara che l’apparecchio è stato fabbricato in
conformità all’art.2, Comma l del D.M.28.08.1995
n.548.
Per motivi di sicurezza, assicurarsi di
installare il presente apparecchio nel cruscotto
dell’auto. Per l’installazione e i collegamenti,
consultare il manuale di istruzioni per
l’installazione e i collegamenti in dotazione.
Avvertenza relativa all’installazione su
un’auto sprovvista della posizione
ACC (accessoria) sul blocchetto di
accensione
Dopo avere spento il motore, assicurarsi di
tenere premuto (OFF) sull’apparecchio
finché il display non scompare.
Diversamente, il display non viene disattivato
causando lo scaricamento della batteria.
Questa etichetta è posta nella parte inferiore
esterna.
La targhetta indicante la tensione operativa e
informazioni simili è situata nella parte inferiore
del rivestimento.
Con la presente Sony Corp. dichiara che questo
MEX-BT5000 è conforme ai requisiti essenziali
ed alle altre disposizioni pertinenti stabilite dalla
direttiva 1999/5/CE.
Per ulteriori dettagli, si prega di consultare il
seguente URL:
http://www.compliance.sony.de/
Trattamento del dispositivo elettrico
od elettronico a fine vita
(applicabile in tutti i paesi
dell’Unione Europea e in altri paesi
europei con sistema di raccolta
differenziata)
Questo simbolo sul prodotto o sulla confezione indica che
il prodotto non deve essere considerato come un normale
rifiuto domestico, ma deve invece essere consegnato ad un
punto di raccolta appropriato per il riciclo di apparecchi
elettrici ed elettronici. Assicurandovi che questo prodotto
sia smaltito correttamente, voi contribuirete a prevenire
potenziali conseguenze negative per l’ambiente e per la
salute che potrebbero altrimenti essere causate dal suo
smaltimento inadeguato. Il riciclaggio dei materiali aiuta a
conservare le risorse naturali. Per informazioni più
dettagliate circa il riciclaggio di questo prodotto, potete
contattare l’ufficio comunale, il servizio locale di
smaltimento rifiuti oppure il negozio dove l’avete
acquistato.
Accessorio utilizzabile: Telecomando
Prodotto con Licenza della
R
BBE Sound, Inc.
Il processo BBE MP
consente di migliorare la qualità dell
’
audio
compresso digitalmente, ad esempio in formato
MP3, ripristinando e potenziando i suoni più
acuti persi a seguito della compressione. Grazie
al processo BBE MP, vengono generati suoni di
pari altezza a partire dal materiale sorgente,
recuperando in mode efficace una qualità più
naturale, realistica e sfumata.
Bluetooth e i relativi loghi sono di proprietà di
Bluetooth SIG, Inc. L’uso di tali marchi è
concesso in licenza a Sony Corporation. Tutti gli
altri marchi di fabbrica o marchi di fabbrica
registrati sono di proprietà delle rispettive
aziende.
SonicStage e il relativo logo sono marchi di
fabbrica di Sony Corporation.
“ATRAC” e sono marchi di
fabbrica di Sony Corporation.
Microsoft, Windows Media e
il loro Windows sono marchi
di fabbrica o marchi registrati
di Microsoft Corporation
negli Stati Uniti e/o in altri paesi.
2
 Loading...