

Sony MEX-BT2800 User Manual 2
4-157-841-11(1)
Bluetooth
®
Audio System
Operating Instructions
Mode d’emploi
Owner’s Record
The model and serial numbers are located on the bottom of the unit.
Record the serial number in the space provided below.
Refer to these numbers whenever you call upon your Sony dealer regarding this product.
Model No. MEX-BT2800 Serial No.
To cancel the demonstration (DEMO) display, see page 7.
Pour annuler l’affichage de démonstration (DEMO), reportez-vous à la page 7.
US
FR
MEX-BT2800
©2009 Sony Corporation
Be sure to install this unit in the dashboard of
–
–
–
–
the car for safety. For installation and
connections, see the supplied installation/
connections manual.
Warning
FOR UNITED STATES CUSTOMERS. NOT
APPLICABLE IN CANADA, INCLUDING
IN THE PROVINCE OF QUEBEC.
POUR LES CONSOMMATEURS AUX
ÉTATS-UNIS. NON APPLICABLE AU
CANADA, Y COMPRIS LA PROVINCE DE
QUÉBEC.
This equipment has been tested and found to
comply with the limits for a Class B digital
device, pursuant to Part 15 of the FCC Rules.
These limits are designed to provide reasonable
protection against harmful interference in a
residential installation. This equipment
generates, uses, and can radiate radio frequency
energy and, if not installed and used in
accordance with the instructions, may cause
harmful interference to radio communications.
However, there is no guarantee that interference
will not occur in a particular installation. If this
equipment does cause harmful interference to
radio or television reception, which can be
determined by turning the equipment off and on,
the user is encouraged to try to correct the
interference by one or more of the following
measures:
Reorient or relocate the receiving antenna.
Increase the separation between the equipment
and receiver.
Connect the equipment into an outlet on a
circuit different from that to which the receiver
is connected.
Consult the dealer or an experienced radio/TV
technician for help.
You are cautioned that any changes or
modifications not expressly approved in this
manual could void your authority to operate this
equipment.
This device complies with Part 15 of the FCC
Rules and RSS-Gen of IC Rules. Operation is
subject to the following two conditions: (1) this
device may not cause harmful interference, and
(2) this device must accept any interference
received, including interference that may cause
undesired operation of the device.
This transmitter must not be co-located or
operated in conjunction with any other antenna
or transmitter.
This equipment complies with FCC and IC
radiation exposure limits set forth for
uncontrolled equipment and meets the FCC
radio frequency (RF) Exposure Guidelines in
Supplement C to OET65 and RSS-102 of the
IC radio frequency (RF) Exposure rules. This
equipment has very low levels of RF energy
that it deemed to comply without maximum
permissive exposure evaluation (MPE). But it
is desirable that it should be installed and
operated with at least 20 cm and more between
the radiator and person’s body (excluding
extremities: hands, wrists, feet and ankles).
CAUTION
The use of optical instruments with this product
will increase eye hazard.
For the State of California, USA only
Perchlorate Material – special handling may apply,
See www.dtsc.ca.gov/hazardouswaste/perchlorate
Perchlorate Material: Lithium battery contains
perchlorate
The “HD Radio Ready” logo indicates that this
product will control a Sony HD Radio
(sold separately).
For HD Radio
the HD Radio
HD Radio
TM
tuner operation, please refer to
TM
tuner Operating Instructions.
TM
and the HD Radio Ready logo are
TM
tuner
proprietary trademarks of iBiquity Digital Corp.
2
The “SAT Radio Ready”
logo indicates that this
product will control a satellite
radio tuner module (sold
separately). Please see your nearest authorized
Sony dealer for details on the satellite radio
tuner module.
“SAT Radio,” “SAT Radio Ready,” the SAT
Radio and SAT Radio Ready logos and all
related marks are trademarks of Sirius XM
Radio Inc. and XM Satellite Radio Inc.
The Bluetooth word mark and logos are owned
by the Bluetooth SIG, Inc. and any use of such
marks by Sony Corporation is under license.
Other trademarks and trade names are those of
their respective owners.
Windows Media and the
Windows logo are trademarks
or registered trademarks of
Microsoft Corporation in the
United States and/or other countries.
MPEG Layer-3 audio coding technology and
patents licensed from Fraunhofer IIS and Thomson.
This product is protected by certain intellectual
property rights of Microsoft Corporation. Use or
distribution of such technology outside of this
product is prohibited without a license from
Microsoft or an authorized Microsoft subsidiary.
Note on the lithium battery
Do not expose the battery to excessive heat such as
direct sunlight, fire or the like.
Warning if your car’s ignition has no
ACC position
Be sure to set the Auto Off function (page 22).
The unit will shut off completely and
automatically in the set time after the unit is
turned off, which prevents battery drain.
If you do not set the Auto Off function, press
and hold (SOURCE/OFF) until the display
disappears each time you turn the ignition off.
3

Table of Contents
Getting Started
Playable discs on this unit . . . . . . . . . . . . . . . . . 6
Notes on Bluetooth . . . . . . . . . . . . . . . . . . . . . . 6
Resetting the unit. . . . . . . . . . . . . . . . . . . . . . . . 6
Canceling the DEMO mode . . . . . . . . . . . . . . . 7
Preparing the card remote commander . . . . . . . 7
Setting the clock . . . . . . . . . . . . . . . . . . . . . . . . 7
Detaching the front panel . . . . . . . . . . . . . . . . . 7
Attaching the front panel . . . . . . . . . . . . . . . 7
Quick Guide for Bluetooth function
3 steps to Bluetooth function. . . . . . . . . . . . . . . 8
Buttons and icons . . . . . . . . . . . . . . . . . . . . . . . 9
1 Pairing . . . . . . . . . . . . . . . . . . . . . . . . . . . . 10
2 Connection . . . . . . . . . . . . . . . . . . . . . . . . . 10
3 Handsfree calling and Music streaming. . . 11
Location of controls and basic
operations
Main unit. . . . . . . . . . . . . . . . . . . . . . . . . . . 12
Card remote commander RM-X304. . . . . . 14
Radio
Storing and receiving stations . . . . . . . . . . . . . 15
Storing automatically — BTM . . . . . . . . . . 15
Storing manually. . . . . . . . . . . . . . . . . . . . . 15
Receiving the stored stations . . . . . . . . . . . 15
Tuning automatically . . . . . . . . . . . . . . . . . 15
RDS . . . . . . . . . . . . . . . . . . . . . . . . . . . . . . . . . 15
Overview. . . . . . . . . . . . . . . . . . . . . . . . . . . 15
Selecting PTY. . . . . . . . . . . . . . . . . . . . . . . 16
Setting CT. . . . . . . . . . . . . . . . . . . . . . . . . . 16
CD
Display items . . . . . . . . . . . . . . . . . . . . . . . 17
Repeat and shuffle play. . . . . . . . . . . . . . . . 17
Bluetooth (Handsfree calling and
Music streaming)
Bluetooth operations. . . . . . . . . . . . . . . . . . . . 18
Pairing. . . . . . . . . . . . . . . . . . . . . . . . . . . . . . . 18
About Bluetooth icons . . . . . . . . . . . . . . . . 18
Connection . . . . . . . . . . . . . . . . . . . . . . . . . . . 19
To switch the Bluetooth signal output of this
unit to on . . . . . . . . . . . . . . . . . . . . . . . . . . 19
Connecting a cellular phone. . . . . . . . . . . . 19
Connecting an audio device . . . . . . . . . . . . 19
Handsfree calling . . . . . . . . . . . . . . . . . . . . . . 19
Receiving calls . . . . . . . . . . . . . . . . . . . . . . 19
Making calls. . . . . . . . . . . . . . . . . . . . . . . . 20
Call transfer . . . . . . . . . . . . . . . . . . . . . . . . 20
Voice Dial Activation . . . . . . . . . . . . . . . . 20
Music streaming . . . . . . . . . . . . . . . . . . . . . . . 20
Listening to music from an audio
device . . . . . . . . . . . . . . . . . . . . . . . . . . . . . 20
Operating an audio device with this
unit . . . . . . . . . . . . . . . . . . . . . . . . . . . . . . . 21
Deleting registration of all paired devices . . . 21
Other functions
Changing the sound settings. . . . . . . . . . . . . . 21
Adjusting the sound characteristics . . . . . . 21
Customizing the equalizer curve
— EQ3 . . . . . . . . . . . . . . . . . . . . . . . . . . . . 22
Adjusting setup items — SET . . . . . . . . . . . . 22
Using optional equipment. . . . . . . . . . . . . . . . 23
Auxiliary audio equipment. . . . . . . . . . . . . 23
Additional Information
Precautions . . . . . . . . . . . . . . . . . . . . . . . . . . . 23
Notes on discs . . . . . . . . . . . . . . . . . . . . . . 23
Playback order of MP3/WMA files . . . . . . 24
About MP3 files. . . . . . . . . . . . . . . . . . . . . 24
About WMA files. . . . . . . . . . . . . . . . . . . . 24
About Bluetooth function. . . . . . . . . . . . . . 24
Maintenance . . . . . . . . . . . . . . . . . . . . . . . . . . 25
Removing the unit. . . . . . . . . . . . . . . . . . . . . . 26
Specifications . . . . . . . . . . . . . . . . . . . . . . . . . 26
Troubleshooting . . . . . . . . . . . . . . . . . . . . . . . 27
Error displays/Messages. . . . . . . . . . . . . . . 29
4
Support site
If you have any questions or for the latest support information on this
product, please visit the web site below:
http://esupport.sony.com
http://www.xplodsony.com/
Provides information on:
• Models and manufacturers of compatible cellular phones and the FAQ
about Bluetooth function
5
Getting Started
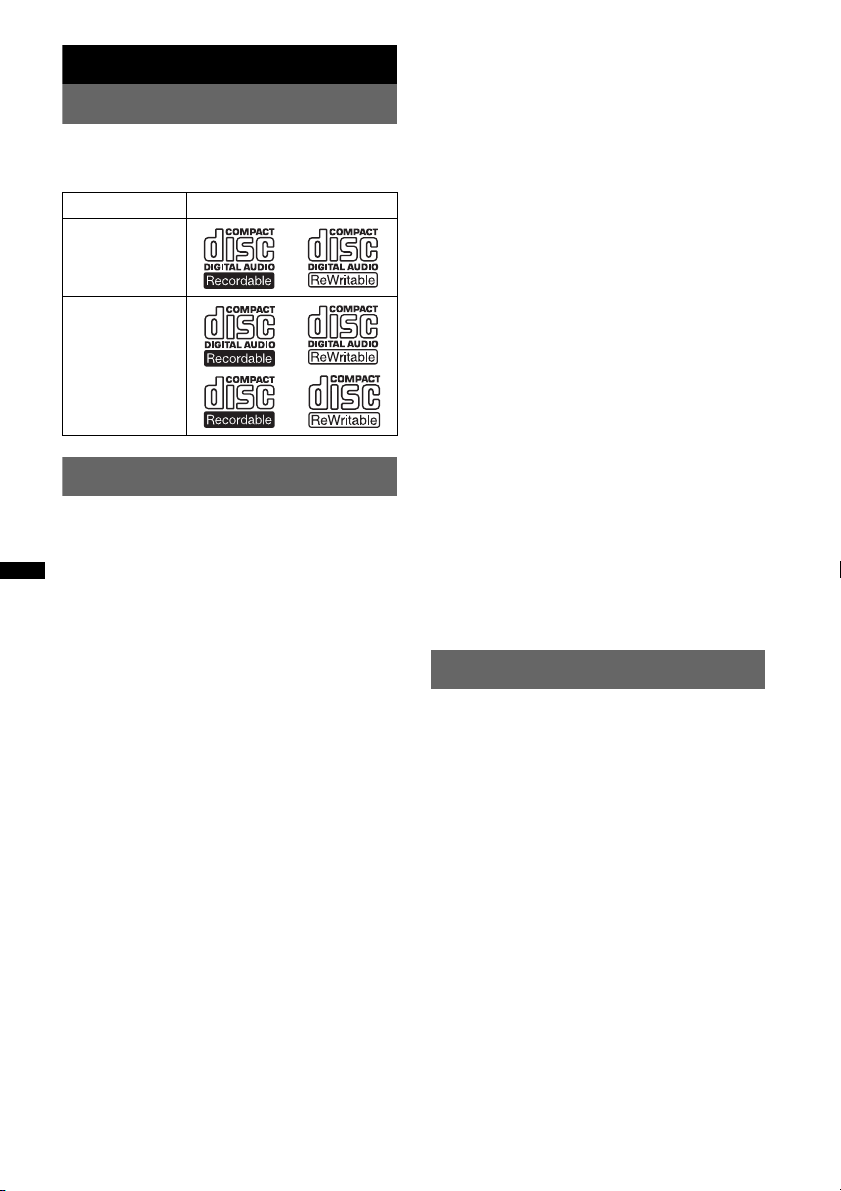
Playable discs on this unit
This unit can play CD-DA (also containing CD
TEXT) and CD-R/CD-RW (MP3/WMA files
(page 24)).
Type of discs Label on the disc
CD-DA
Radio frequency exposure
RF signals may affect improperly installed or
inadequately shielded electronic systems in cars,
such as electronic fuel injection systems, electronic
antiskid (antilock) braking systems, electronic speed
control systems or air bag systems. For installation
or service of this device, please consult with the
manufacturer or its representative of your car. Faulty
installation or service may be dangerous and may
invalidate any warranty that may apply to this
device.
Consult with the manufacturer of your car to ensure
that the use of your cellular phone in the car will not
affect its electronic system.
Check regularly that all wireless device equipment
in your car is mounted and operating properly.
MP3
WMA
Notes on Bluetooth
Caution
IN NO EVENT SHALL SONY BE LIABLE FOR
ANY INCIDENTAL, INDIRECT OR
CONSEQUENTIAL DAMAGES OR OTHER
DAMAGES INCLUDING, WITHOUT
LIMITATION, LOSS OF PROFITS, LOSS OF
REVENUE, LOSS OF DATA, LOSS OF USE OF
THE PRODUCT OR ANY ASSOCIATED
EQUIPMENT, DOWNTIME, AND
PURCHASER’S TIME RELATED TO OR
ARISING OUT OF THE USE OF THIS
PRODUCT, ITS HARDWARE AND/OR ITS
SOFTWARE.
IMPORTANT NOTICE!
Safe and efficient use
Changes or modifications to this unit not expressly
approved by Sony may void the user’s authority to
operate the equipment.
Please check for exceptions, due to national
requirement or limitations, in usage of Bluetooth
equipment before using this product.
Driving
Check the laws and regulations on the use of cellular
phones and handsfree equipment in the areas where
you drive.
Always give full attention to driving and pull off the
road and park before making or answering a call if
driving conditions so require.
Emergency calls
This Bluetooth car handsfree and the electronic
device connected to the handsfree operate using
radio signals, cellular, and landline networks as well
as user-programmed function, which cannot
guarantee connection under all conditions.
Therefore do not rely solely upon any electronic
device for essential communications (such as
medical emergencies).
Remember, in order to make or receive calls, the
handsfree and the electronic device connected to the
handsfree must be switched on in a service area with
adequate cellular signal strength.
Emergency calls may not be possible on all cellular
phone networks or when certain network services
and/or phone features are in use.
Check with your local service provider.
Resetting the unit
Before operating the unit for the first time, or
after replacing the car battery or changing the
connections, you must reset the unit.
Detach the front panel (page 7) and press the
RESET button (page 12) with a pointed object,
such as a ball-point pen.
Note
Pressing the RESET button will erase the clock setting
and some stored contents.
Connecting to other devices
When connecting to any other device, please read its
user guide for detailed safety instructions.
6
Canceling the DEMO mode
Detaching the front panel
You can cancel the demonstration display which
appears during turning off.
1 Press and hold the select button.
The setup display appears.
2 Press the select button repeatedly
until “DEMO” appears.
3 Rotate the control dial to select
“DEMO-OFF.”
4 Press and hold the select button.
The setup is complete and the display returns
to normal reception/play mode.
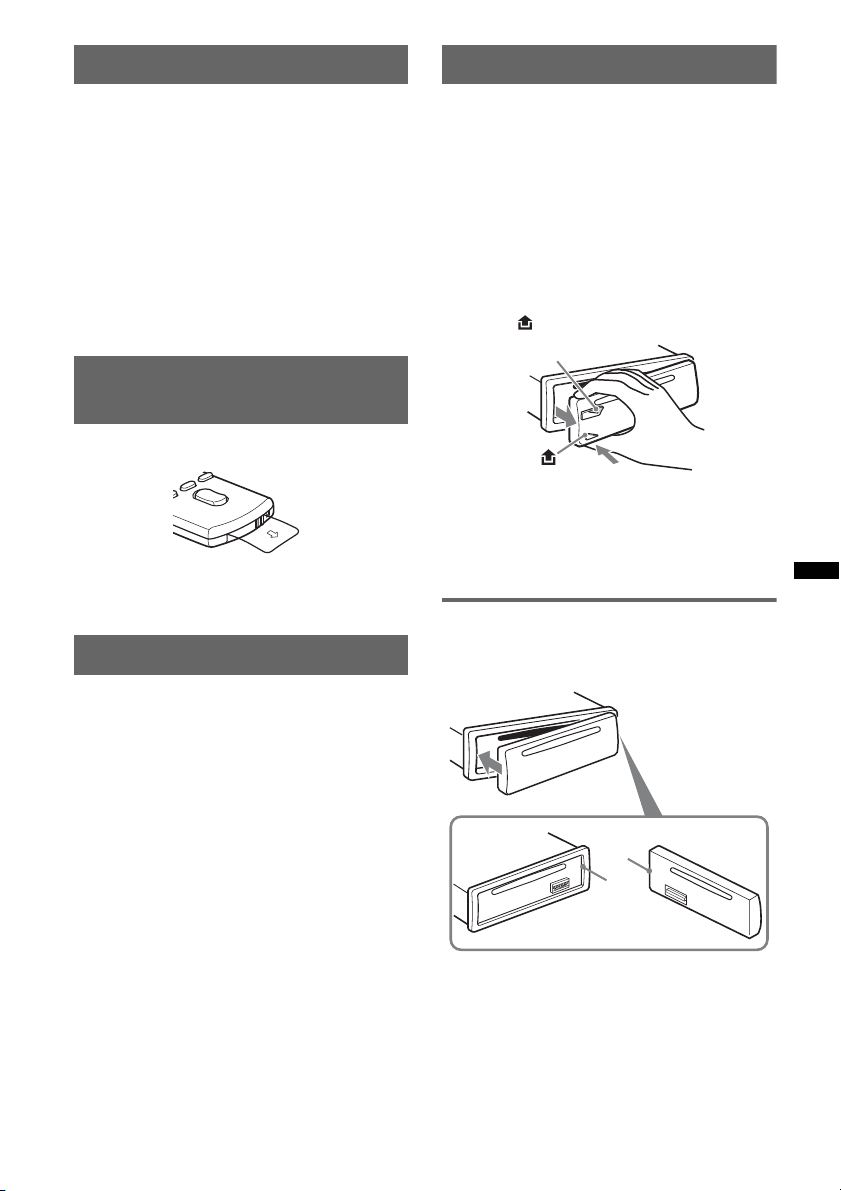
Preparing the card remote
commander
Remove the insulation film.
Tip
For how to replace the battery, see page 25.
Setting the clock
The clock uses a 12-hour digital indication.
1 Press and hold the select button.
The setup display appears.
2 Press the select button repeatedly
until “CLOCK-ADJ” appears.
3 Press (SEEK) +.
The hour indication flashes.
4 Rotate the control dial to set the hour
and minute.
To move the digital indication, press (SEEK)
–/+.
5 After setting the minute, press the
select button.
The setup is complete and the clock starts.
To display the clock, press (DSPL/SCRL). Press
(DSPL/SCRL) again to return to the previous
display.
Tip
You can set the clock automatically with the RDS
feature (page 16).
You can detach the front panel of this unit to
prevent theft.
Caution alarm
If you turn the ignition switch to the OFF
position without detaching the front panel, the
caution alarm will sound for a few seconds.
The alarm will only sound if the built-in
amplifier is used.
1 Press and hold (SOURCE/OFF).
The unit is turned off.
2 Press , then pull it off towards you.
(SOURCE/OFF)
Notes
• Do not drop or put excessive pressure on the front
panel and display window.
• Do not subject the front panel to heat/high
temperature or moisture. Avoid leaving it in a parked
car or on a dashboard/rear tray.
Attaching the front panel
Engage part A of the front panel with part B of
the unit, as illustrated, and push the left side into
position until it clicks.
A
B
Note
Do not put anything on the inner surface of the front
panel.
7
Quick Guide for Bluetooth function
For full details on operation, see “Bluetooth (Handsfree calling and Music streaming)” (page 18) and
the Bluetooth device operating instructions.
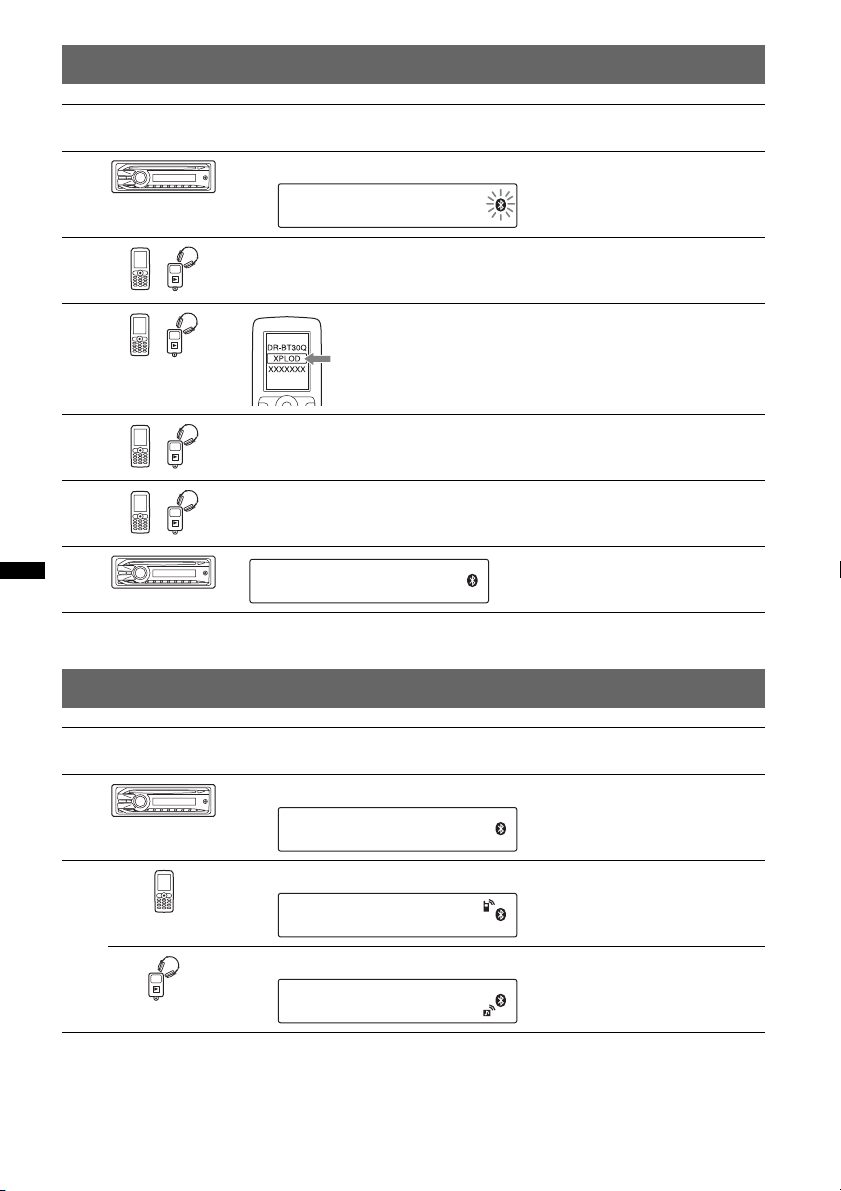
3 steps to Bluetooth function
Pairing
1
First, register (“pair”) Bluetooth device (cellular phone, etc.) with this unit. Pairing is no longer
required after the first time.
Connection
2
Sometimes pairing allows to connect automatically. To use the device after pairing is made, start
the connection.
Handsfree calling/Music streaming
3
You can talk handsfree and listen to music when the connection is made.
Support site
http://esupport.sony.com
http://www.xplodsony.com/
8
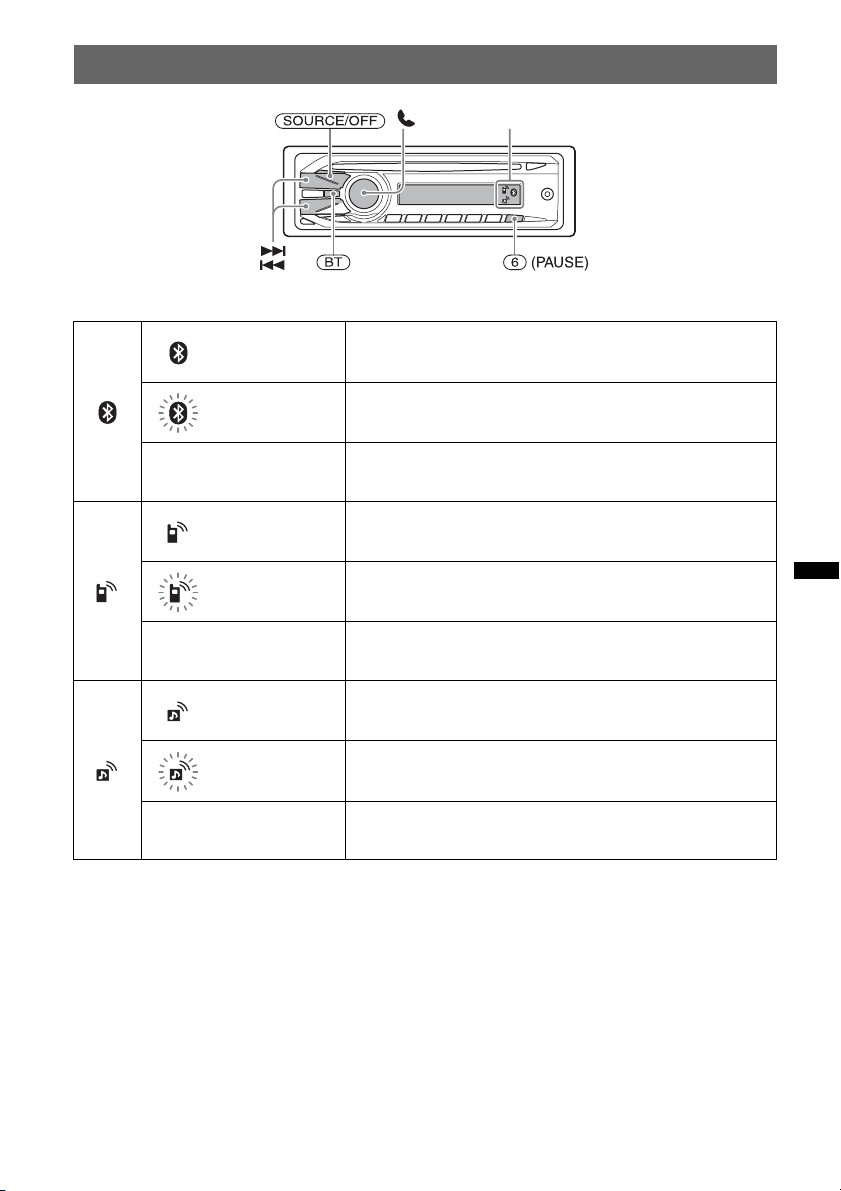
Buttons and icons
Icon status descriptions
Lit Bluetooth signal on
Flashing Pairing standby mode
None Bluetooth signal off
Lit Cellular phone connection successful
Flashing Unit connecting to cellular phone
Icons
None No connection
Lit Audio device connection successful
Flashing Unit connecting to audio device
None No connection
9
1 Pairing
Operated
equipment
1
2
3
4
5
6
2 Connection
Operation
Press and hold (BT) for about 5 seconds.
t
Search for this unit.
Select “XPLOD”.
Input passkey “0000”.
Follow display directions.
(Pairing successful)
Operated
equipment
1
2
Note
You can connect from this unit to a Bluetooth device (page 19).
If you cannot connect from this unit to the Bluetooth device, start pairing again.
Operation
Press and hold (BT) for about 3 seconds.
t
Connect to this unit using a cellular phone.
t
Connect to this unit using an audio device.
t
10
3 Handsfree calling and Music streaming
Handsfree calling
To do Operation
Receive a call/end a call Press .
Reject a call Press and hold for 2 seconds.
Redial 1 Press (SOURCE/OFF).
t
2 Press and hold for 3 seconds.
To transfer a call Press and hold for 2 seconds.
Music streaming
To do Operation
Listen 1 Press (SOURCE/OFF).
t
2 Press Start playback on the audio device.
Play back/pause (AVRCP)* Press (6) (PAUSE).
Skip tracks (AVRCP)* Press ./>.
* The operation may differ depending on the audio device.
11
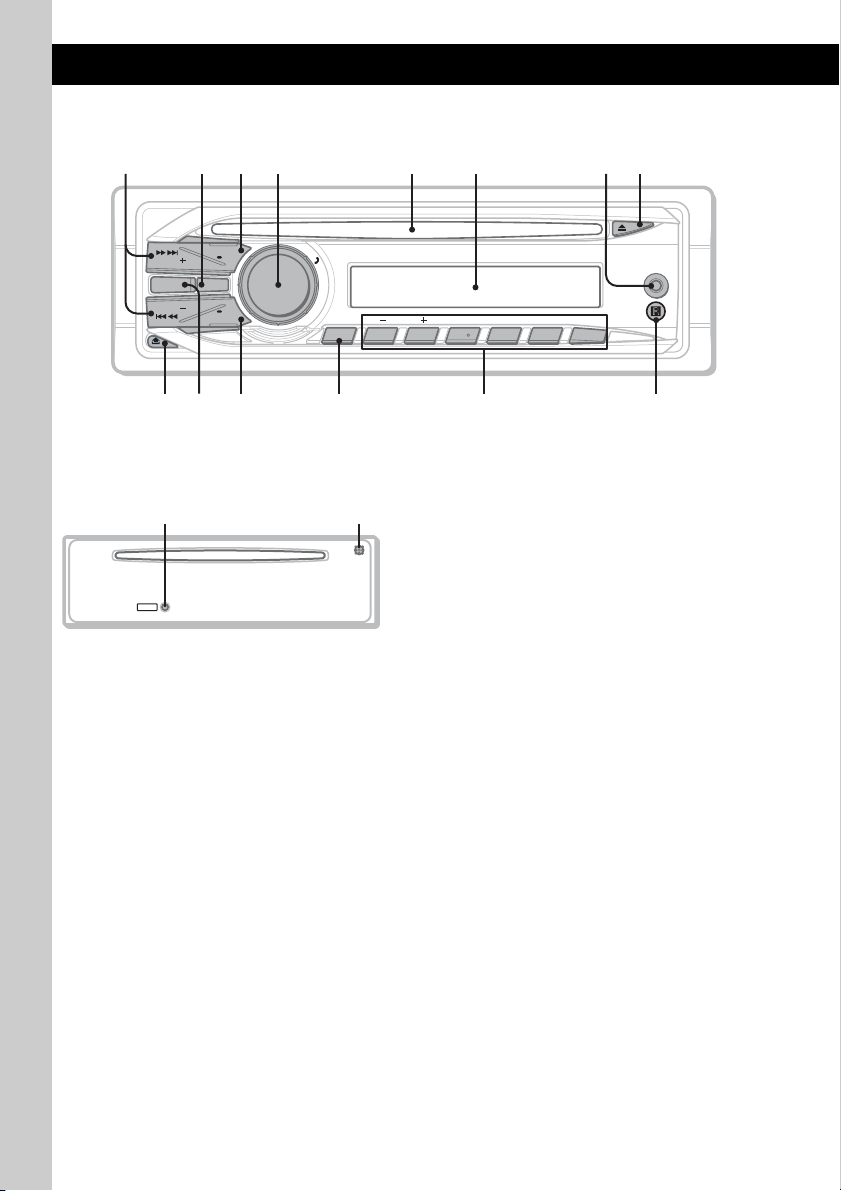
Location of controls and basic operations
9 q
q
q
q
q
Main unit
1 73 4 5 6 8
2
SEEK
MODE BT
SEEK
;
SOURCE
OFF
SCRL
DSPL
/
T
C
E
L
E
S
H
S
U
P
PTY
a
ALBUM REPCAT MICSHUF PAUSE
123456
s
d
AUX
f
Front panel removed This section contains instructions on the location
qhqg
of controls and basic operations.
For details, see the respective pages.
A SEEK +/– buttons
CD:
To skip tracks (press); skip tracks
RESET
continuously (press, then press again within
about 1 second and hold); reverse/fastforward a track (press and hold).
Radio:
To tune in stations automatically (press); find
a station manually (press and hold).
Bluetooth audio device*
1
:
To skip tracks (press).
B BT (BLUETOOTH) button page 18
For Bluetooth signal on/off, pairing.
C SOURCE/OFF button*
2
Press to turn on the power/change the source
(Radio/CD/AUX/Bluetooth audio/Bluetooth
phone).
Press for 1 second to turn off the power.
Press for 2 seconds or more to turn off the
power and the display disappears.
12

D Control dial/select / (handsfree)
button
To adjust volume (rotate); select setup items
(press and rotate); receive/end a call (press).
E Disc slot
Insert the disc (label side up), playback
starts.
F Display window
G AUX input jack page 23
To connect a portable audio device.
H Z (eject) button
To eject the disc.
I (front panel release) button page 7
J MODE button*
2
page 15
To select the radio band (FM/AM).
K DSPL (display)/SCRL (scroll) button
page 15, 17
To change display items (press); scroll the
display item (press and hold).
L PTY/CAT*
3
button page 16
To select PTY in RDS.
M Number buttons
CD:
(1)/(2): ALBUM –/+ (during MP3/WMA
playback)
To skip albums (press); skip albums
continuously (press and hold).
(3): REP*
4
page 17
(4): SHUF page 17
(6): PAU SE
To pause playback. To cancel, press
again.
Radio:
To receive stored stations (press); store
stations (press and hold).
Bluetooth audio device*
1
:
(6): PAU SE
To pause playback. To cancel, press
again.
Bluetooth phone:
(5): MIC page 19
N Receptor for the card remote
commander
O RESET button (located behind the front
panel) page 6
P Microphone page 19
Note
Do not cover the microphone, the handsfree
function may not work properly.
*1 When a Bluetooth audio device (supports AVRCP
of Bluetooth technology) is connected. Depending
on the device, certain operations may not be
available.
*2 If an HD Radio tuner or SAT tuner is connected:
when (SOURCE/OFF) is pressed, the connected
device (“HD,” “XM” or “SR”) will appear in the
display. Furthermore, if (MODE) is pressed, you
can switch the HD Radio tuner band or SAT tuner
band.
*3 When the SAT tuner is connected.
*4 This button has a tactile dot.
13
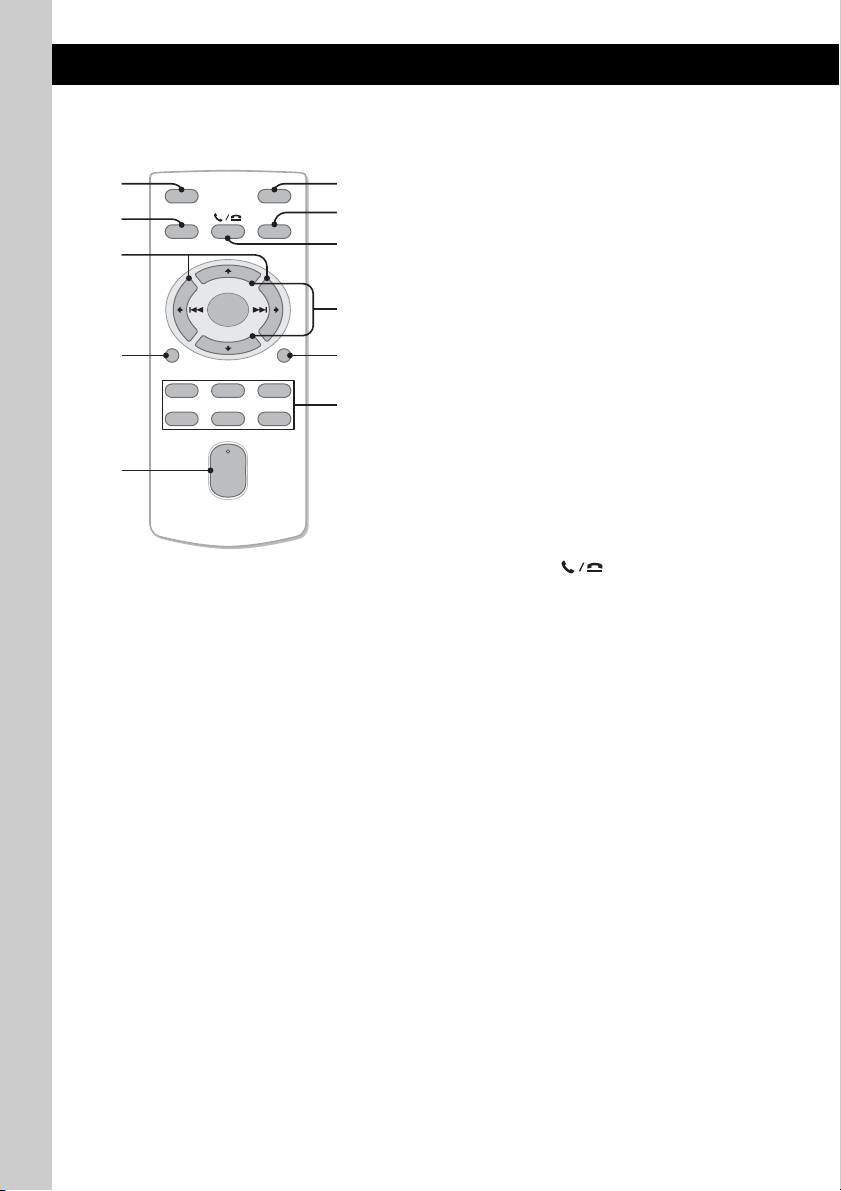
Card remote commander
RM-X304
1
2
OFF
SOURCE
SEL
ATT
MODE
3
+
–
VOL
SCRL
+
–
4
5
DSPL
132
465
6
7
8
9
0
qa
Remove the insulation film before use (page 7).
A OFF button
To turn off; stop the source.
B SOURCE button*
1
To turn on; change the source (Radio/CD/
AUX/Bluetooth audio/Bluetooth phone).
C < (.)/, (>) buttons
To control Radio/CD/Bluetooth audio, the
same as (SEEK) –/+ on the unit.
Setup, sound setting, etc., can be operated by
< ,.
D DSPL (display) button
To change display items.
E VOL (volume) +*
2
/– button
To adjust volume.
F ATT (attenuate) button
To attenuate the sound. To cancel, press
again.
G MODE button*
1
To select the radio band (FM/AM).
H SEL (select)/ (handsfree) button
The same as the select button on the unit.
I M (+)/m (–) buttons
To control CD, the same as (1)/(2)
(ALBUM –/+) on the unit.
Setup, sound setting, etc., can be operated by
M m.
J SCRL (scroll) button
To scroll the display item.
K Number buttons
To receive stored stations (press); store
stations (press and hold).
*1 If an HD Radio tuner or SAT tuner is connected:
when (SOURCE) is pressed, the connected device
(“HD,” “XM” or “SR”) will appear in the display.
Furthermore, if (MODE) is pressed, you can switch
the HD Radio tuner band or SAT tuner band.
*2 This button has a tactile dot.
Note
If the unit is turned off and the display disappears, it
cannot be operated with the card remote commander
unless (SOURCE/OFF) on the unit is pressed, or a disc
is inserted to activate the unit first.
14
Radio
Storing and receiving stations
Caution
When tuning in stations while driving, use Best
Tuning Memory (BTM) to prevent an accident.
Storing automatically — BTM
1 Press (SOURCE/OFF) repeatedly until
“TUNER” appears.
To change the band, press (MODE)
repeatedly. You can select from FM1, FM2,
FM3, AM1 or AM2.
2 Press and hold the select button.
The setup display appears.
3 Press the select button repeatedly
until “BTM” appears.
4 Press (SEEK) +.
The unit stores stations in order of frequency
on the number buttons.
A beep sounds when the setting is stored.
Storing manually
1 While receiving the station that you
want to store, press and hold a
number button ((1) to (6)) until
“MEM” appears.
Note
If you try to store another station on the same number
button, the previously stored station will be replaced.
Receiving the stored stations
1 Select the band, then press a number
button ((1) to (6)).
Tuning automatically
1 Select the band, then press (SEEK) +/–
to search for the station.
Scanning stops when the unit receives a
station. Repeat this procedure until the
desired station is received.
Tip
If you know the frequency of the station you want to
listen to, press and hold (SEEK) +/– to locate the
approximate frequency, then press (SEEK) +/–
repeatedly to fine adjust to the desired frequency
(manual tuning).
RDS
Overview
FM stations with Radio Data System (RDS)
service send inaudible digital information along
with the regular radio program signal.
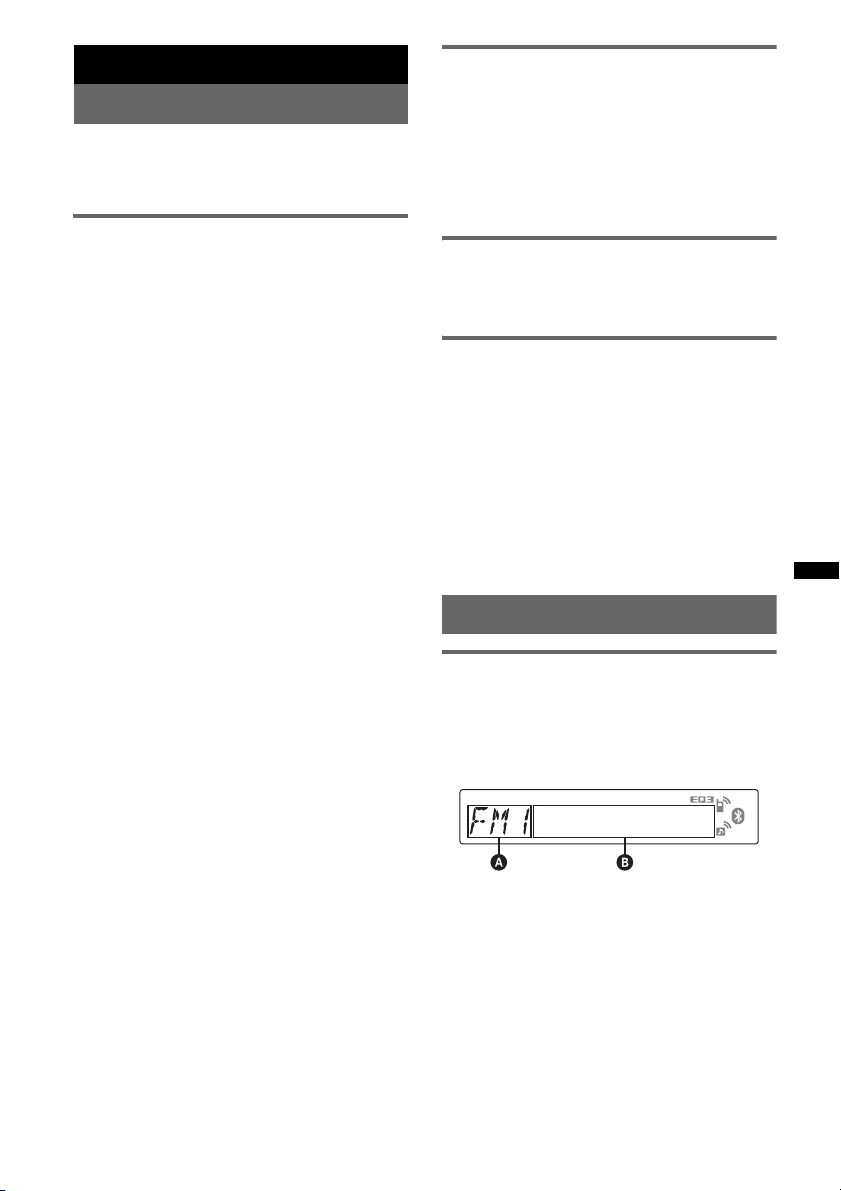
Display items
A Radio band, Function
B Program service name, Clock, Frequency*,
Preset number
* While receiving the RDS station, “ *” is displayed on
the left of the frequency indication.
To change display items B, press
continue to next page t
(DSPL/SCRL)
.
15
RDS services
This unit automatically provides RDS services as
follows:
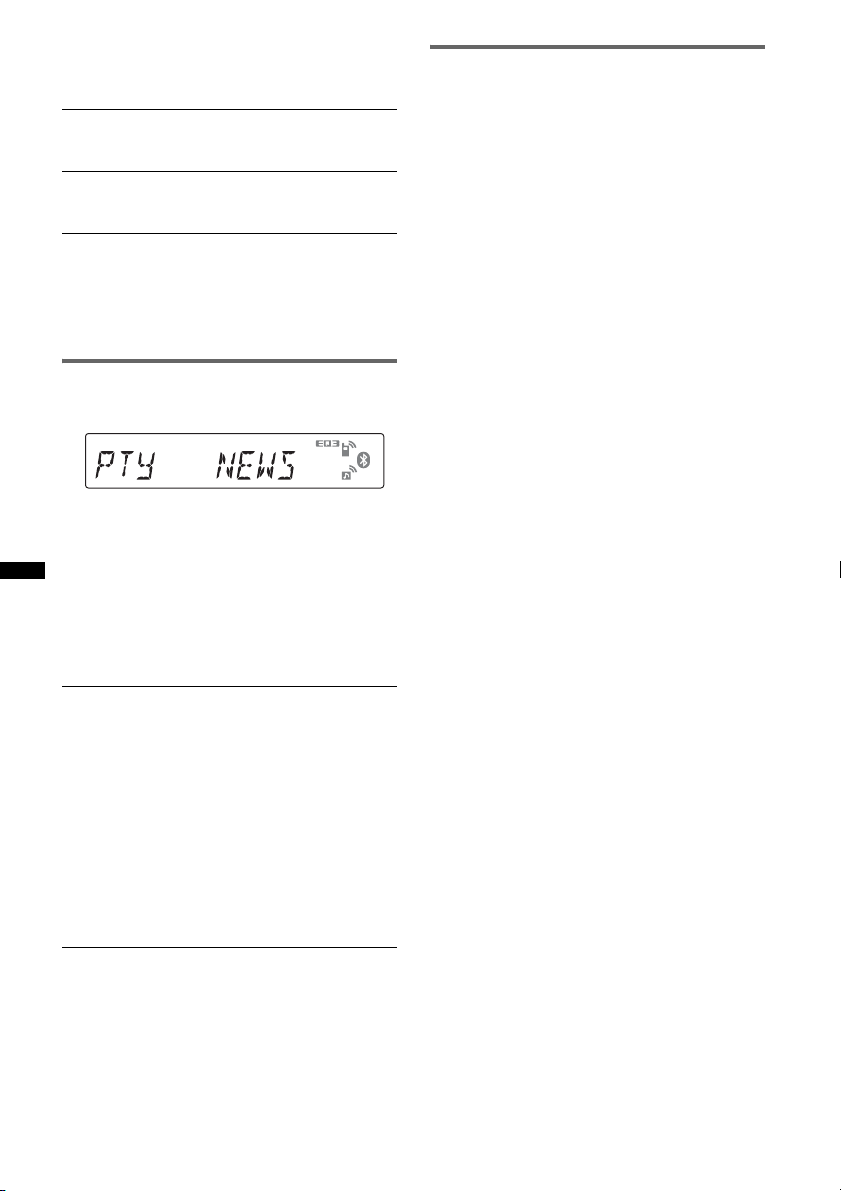
PTY (Program Types)
Displays the currently received program type.
Also searches your selected program type.
CT (Clock Time)
The CT data from the RDS transmission sets
the clock.
Notes
• Depending on the country/region, not all RDS
functions may be available.
• RDS will not work if the signal strength is too weak,
or if the station you are tuned to is not transmitting
RDS data.
Selecting PTY
1 Press (PTY) during FM reception.
The current program type name appears if the
station is transmitting PTY data.
2 Press (PTY) repeatedly until the
desired program type appears.
3 Press (SEEK) +/–.
The unit starts to search for a station
broadcasting the selected program type.
Setting CT
1 Set “CT-ON” in setup (page 22).
Notes
• The CT function may not work even though an RDS
station is being received.
• There might be a difference between the time set by
the CT function and the actual time.
Type of programs
NEWS (News), INFORM (Information),
SPORTS (Sports), TALK (Talk), ROCK
(Rock), CLS ROCK (Classic Rock), ADLT
HIT (Adult Hits), SOFT RCK (Soft Rock),
TOP 40 (Top 40), COUNTRY (Country),
OLDIES (Oldies), SOFT (Soft), NOSTALGA
(Nostalgia), JAZZ (Jazz), CLASSICL
(Classical), R AND B (Rhythm and Blues),
SOFT R B (Soft Rhythm and Blues),
LANGUAGE (Foreign Language), REL
MUSC (Religious Music), REL TALK
(Religious Talk), PERSNLTY (Personality),
PUBLIC (Public), COLLEGE (College),
WEATHER (Weather)
Notes
• You cannot use this function in countries/regions
where no PTY data is available.
• You may receive a different radio program from the
one you select.
16
CD
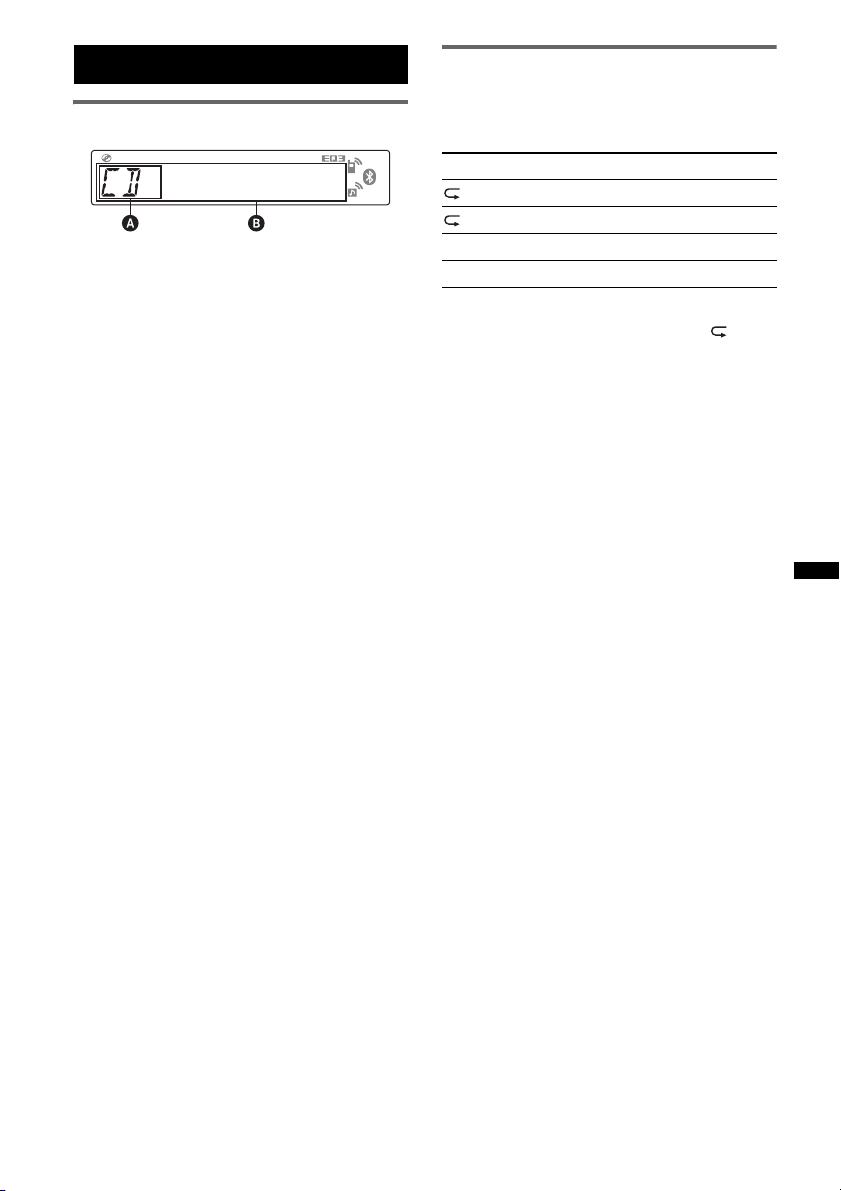
Display items
A Source
B Track name*
name*
Track number/Elapsed playing time, Clock
*1 The information of a CD TEXT, MP3/WMA is
displayed.
*2 Album number is displayed only when the album is
changed.
To change display items B, press
Tip
Displayed items may differ depending on model, disc
type, recording format and settings. For details on
MP3/WMA, see page 24.
1
, Disc/artist name*1, Artist
1
, Album number*2, Album name*1,
(DSPL/SCRL)
Repeat and shuffle play
1 During playback, press (3) (REP) or
(4) (SHUF) repeatedly until the
desired setting appears.
Select To play
TRACK track repeatedly.
ALBUM* album repeatedly.
SHUF ALBUM* album in random order.
SHUF DISC disc in random order.
* When an MP3/WMA is played.
To return to normal play mode, select “ OFF”
or “SHUF OFF.”
.
17

Bluetooth (Handsfree calling
and Music streaming)
Bluetooth operations
A list of detected devices appears in the
display of the device to be connected. This
unit is displayed as “XPLOD” on the device
to be connected.
To use the Bluetooth function, the following
procedure is necessary.
1 Pairing
When connecting Bluetooth devices for the
first time, mutual registration is required. This
is called “pairing.” This registration (pairing)
is required only for the first time, as this unit
and the other devices will recognize each
other automatically from the next time. You
can pair up to 8 devices. (Depending on the
device, you may need to input a passkey for
each connection.)
2 Connection
To use the device after pairing is made, start
the connection. Sometimes pairing allows to
connect automatically.
3 Handsfree calling/Music streaming
You can talk handsfree and listen to music
when the connection is made.
Support site
http://esupport.sony.com
http://www.xplodsony.com/
Pairing
First, register (“pair”) a Bluetooth device
(cellular phone, etc.) and this unit with each
other. You can pair up to 8 devices. Once pairing
is established, there is no need for pairing again.
1 Place the Bluetooth device within 1 m
(3 ft) of this unit.
2 Press and hold (BT) until “ ” flashes
(about 5 seconds).
The unit enters pairing standby mode.
flashing
3 Set the Bluetooth device to search for
this unit.
DR-BT30Q
XPLOD
XXXXXXX
4 If Passkey* input is required on the
display of the device to be connected,
input “0000.”
Input passkey.
XXXX
This unit and the Bluetooth device memorize
each other’s information, and when pairing is
made, the unit is ready for connection to the
device.
“ ” flashes and then stays lit after pairing is
complete.
“0000”
5 Set the Bluetooth device to connect to
this unit.
“ ” or “ ” appears when the connection is
made.
* Passkey may be called “passcode,” “PIN code,” “PIN
number” or “Password,” etc., depending on the
device.
Note
Pairing standby mode is not released until the
connection is made.
About Bluetooth icons
The following icons are used by this unit.
lit:
flashing:
off:
lit:
flashing:
off:
lit:
flashing:
off:
Bluetooth signal on
Pairing standby mode
Bluetooth signal off
Connection successful
Connecting
No connection
Connection successful
Connecting
No connection
18
 Loading...