

Page 1

3-043-280-15(1)
Portable
Memory Stick Player
Operating Instructions
NW-MS7
© 2000 Sony Corporation
Page 2

For the customers in the
United States
Owner’s Record
The model and serial numbers are located at the
bottom of the player. Record the serial number in
the space provided below. Refer to them whenever
you call your Sony dealer regarding this product.
Model No. NW-MS7
Serial No.
INFORMATION:
This equipment has been tested and found to
comply with the limits for a Class B digital device,
pursuant to Part 15 of the FCC Rules. These limits
are designed to provide reasonable protection
against harmful interference in a residential
installation. This equipment generates, uses, and can
radiate radio frequency energy and, if not installed
and used in accordance with the instructions, may
cause harmful interference to radio
communications.
However, there is no guarantee that interference
will not occur in a particular installation. If this
equipment does cause harmful interference to radio
or television reception, which can be determined by
turning the equipment off and on, the user is
encouraged to try to correct the interference using
one or more of the following measures:
– Reorient or relocate the receiving antenna.
– Increase the separation between the equipment
and receiver.
– Connect the equipment into an outlet on a circuit
different from that to which the receiver is
connected.
– Consult the dealer or an experienced radio/TV
technician for help.
You are cautioned that any changes or modifications
not expressly approved in this manual could void
your authority to operate this equipment.
If you have any questions about this product, you
may call:
Sony Direct Response Center 1-(800)-222-7669
or write to:
Sony Direct Response Center 12451 Gateway
Blvd.Fort Myers, FL 33913
Declaration of Conformity
Trade Name: SONY
Model No.: NW-MS7
Responsible Party: Sony Electronics Inc.
Address: 1 Sony Drive,
Telephone No.: 201-930-6972
This device complies with Part 15 of the FCC
Rules. Operation is subject to the following two
conditions: (1) This device may not cause harmful
interference, and (2) this device must accept any
interference received, including interference that
may cause undesired operation.
Park Ridge, NJ.07656 USA
Notice for users
On the supplied software
• Copyright laws prohibit reproducing the software
or the manual accompanying it in whole or in
part, or renting the software without the
permission of the copyright holder.
• In no event will SONY be liable for any financial
damage, or loss of profits, including claims made
by third parties, arising out of the use of the
software supplied with this player.
• In the event a problem occurs with this software
as a result of defective manufacturing, SONY will
replace it.
However, SONY bears no other responsibility.
• The software provided with this player cannot be
used with equipment other than that which is so
designated.
• Please note that, due to continued efforts to
improve quality, the software specifications may
be changed without notice.
• Operation of this player with software other than
that provided is not covered by the warranty.
Program©1999 Sony Corporation
Documentation©2000 Sony Corporation
NOTES:
• The recorded music is limited to private use
only. Use of the music beyond this limit
requires permission of the copyright holders.
• Sony is not responsible for music files that are
not saved on your computer due to
unsuccessful recording from CD or music
downloading.
• A Backup/ Restore function requires the use of
the Backup/ Restore service which Sony is
currently developing. For authentication, this
service requires the Internet. Details on the
Backup/ Restore service will be available on
the OpenMG Web site
(http://www.openmg.com/).
• If your PC has optical output, the music played
back on OpenMG Jukebox will not send digital
data through that optical output.
2
Page 3

Table of Contents
Overview .......................................... 4
What you can do with
“Memory Stick Walkman” ... 4
On copyright protection.............. 5
On “MagicGate Memory Stick” ...
Other features ............................... 7
System requirements ................... 7
About this manual ........................... 8
To use the Help files .................... 8
Getting Started
Step 1: Unpacking ........................... 9
Step 2: Charging the battery........ 10
Step 3: Installing the OpenMG
Jukebox software ......................11
Basic Operations
Transferring music data from the
computer to Memory Stick
Walkman ................................... 13
Listening to music with Memory
Stick Walkman ......................... 16
On other operations ................... 17
On the display ............................ 17
Advanced Operations
(Memory Stick Walkman)
Playing in various modes ............. 18
Emphasizing the bass sound (BASS) ..
Playing tracks repeatedly
(REPEAT) .............................. 19
Protecting your hearing (AVLS) ..
Changing the display mode ......... 20
Locking the controls (Hold) ......... 21
Changing the settings of
Memory Stick Walkman ......... 21
To turn off the beep sound (BEEP) ... 21
To change the display backlight
setting (LIGHT) .................... 22
To adjust the LCD contrast
(CONTRAST) ....................... 22
To format the “Memory Stick”
(FORMAT) ............................ 23
To set the date and time
(DATE & TIME) ................... 24
Menu................................................ 25
18
20
Advanced Operations
(OpenMG Jukebox)
Names and functions of the
OpenMG Jukebox window .... 26
Menu Reference ............................. 28
6
OpenMG Jukebox ...................... 28
OpenMG CD Recorder.............. 30
Transferring data from the
“Memory Stick” to the computer
(Check-In) ................................. 31
On the Windows Explorer............ 31
Uninstalling the OpenMG Jukebox
.................................................... 32
Other Information
Precautions ..................................... 33
Notes on the rechargeable battery
...................................................... 34
Troubleshooting ............................. 35
To reset the player ...................... 35
What happened ? ....................... 35
Error messages ........................... 38
Specifications .................................. 40
Note on the supplied
“Magic Gate Memory Stick”...
Glossary .......................................... 41
Restrictions on copyright protection
by OpenMG.............................. 43
Looking at the controls ................. 44
Index ................................................ 46
Notes
• The illustrations in this manual may differ
from the actual software.
• Explanations in this manual assume that you
are familiar with basic operations of Windows
98. For how to use your computer and
operating system, please refer to the
respective manuals.
40
3
Page 4
Overview
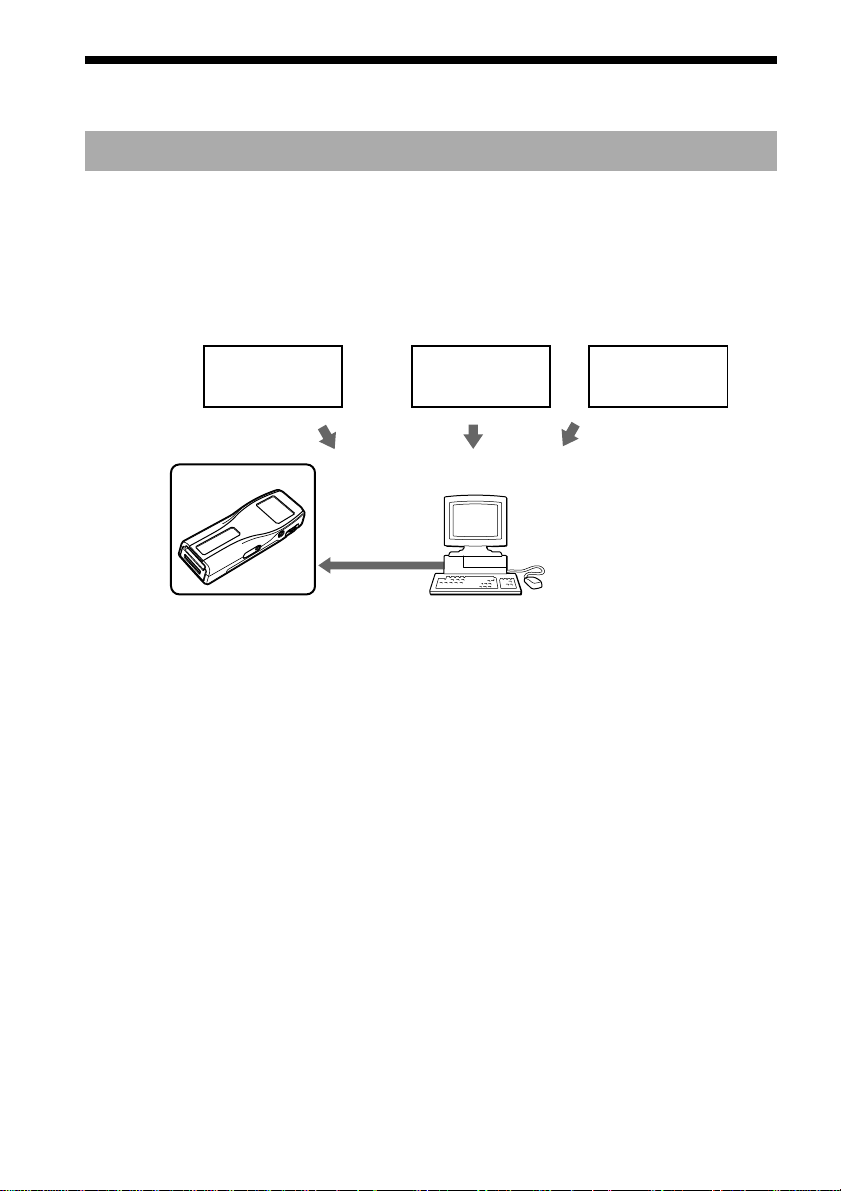
What you can do with “Memory Stick Walkman”
Memory Stick Walkman is a portable “Memory Stick” player. You can easily transfer digital
sound data from your computer to Memory Stick Walkman.
Two copyright protection technologies* “OpenMG” and “MagicGate” allow you to enjoy digital
music, while maintaining the copyrights of its holders.
The OpenMG compliant software “OpenMG Jukebox,” which is supplied with your Memory
Stick Walkman enables you to store digital music data on your computer’s hard drive, transfer it
to the Memory Stick Walkman and record it on “MagicGate Memory Stick.”
EMD Services
Memory Stick
Walkman
USB connection Hard drive of
The supplied OpenMG Jukebox software allows you to import digital sound data to the hard
drive of your computer as follows:
– downloads sound data provided by Electronic Music Distribution (EMD) services over digital
networks such as the Internet
– records audio CDs onto the hard drive of your computer (the imported tracks are compressed
and encoded in ATRAC3 format)
– encodes the existing MP3 and WAV format audio files to ATRAC3 and encrypts them in
OpenMG format.
The OpenMG Jukebox encrypts sound data in OpenMG format and stores it on the hard drive of
your computer to prevent unauthorized distribution.
* The copyright protection technology of Memory Stick Walkman conforms to the SDMI (Secure Digital Music
Initiative) specifications.
Audio CDs
WAV,
MP3 files
your computer
(OpenMG Jukebox)
4
Page 5
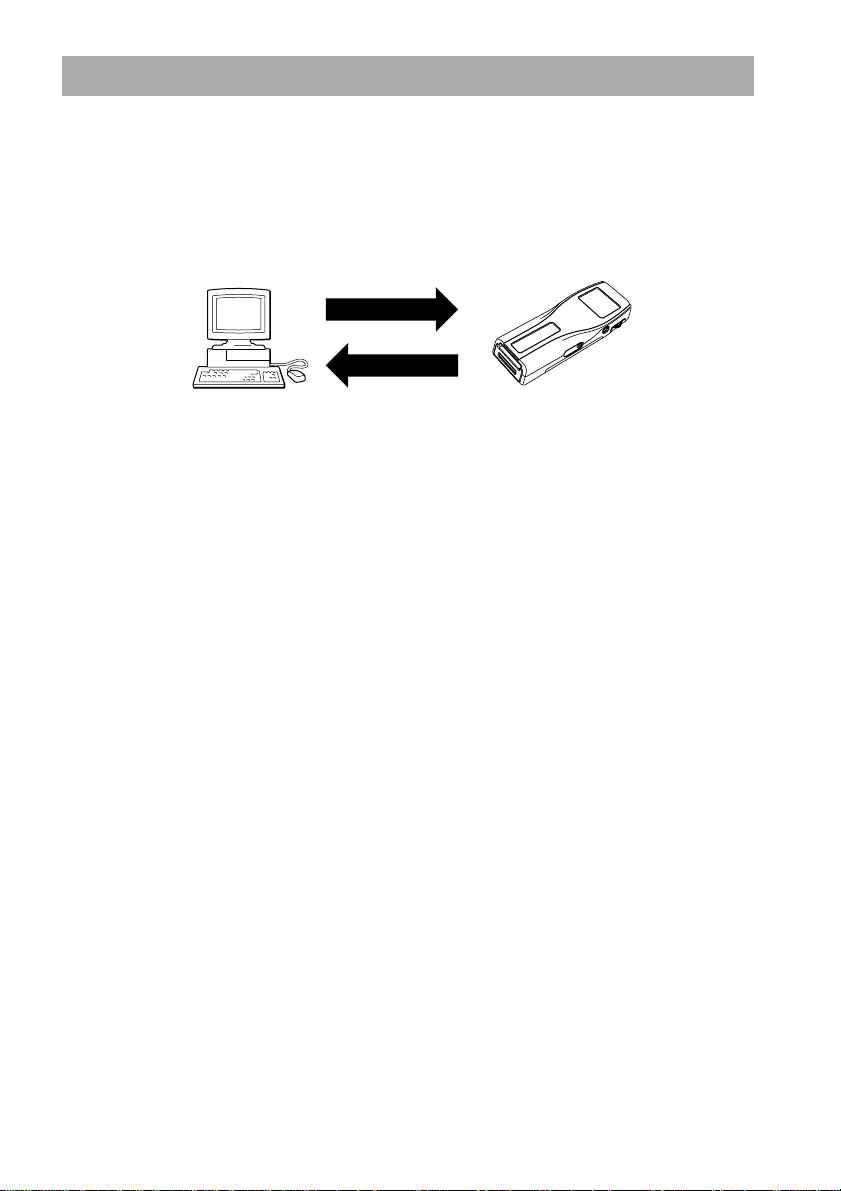
On copyright protection
Memory Stick Walkman has some restrictions on recording and playback to protect copyrights.
For details, see “Restrictions on the copyright protection by OpenMG” on page 43.
Transfer of sound data from your computer to Memory Stick Walkman –
“Check-In/Out”
The supplied application software (OpenMG Jukebox) enables you to transfer the sound data
stored on your computer’s hard drive to Memory Stick Walkman (Check-Out) and transfer it
from Memory Stick Walkman to your computer (Check-In).
Check Out
Check In
Check-In/Out has restrictions as follows:
– You cannot Check-Out the same song more than three times (excluding certain audio
contents). However, if you transfer a Checked-Out song back to your computer (Check-In),
you can then Check-Out the track again.
– You cannot Check-In songs Checked-Out to Memory Stick Walkman to any computer
other than the computer used for the Check-Out.
For details, see “Glossary” on page 42.
Restrictions on sound data
Some sound data is distributed with restrictions on recording or playback of the data to maintain
the copyrights of its holders.
Memory Stick Walkman employs copyright protection technology that enables you to record or
play music within the limits determined by the copyright holders. For example, songs which
have playback period restrictions can be played back only within the given period of time.
5
Page 6
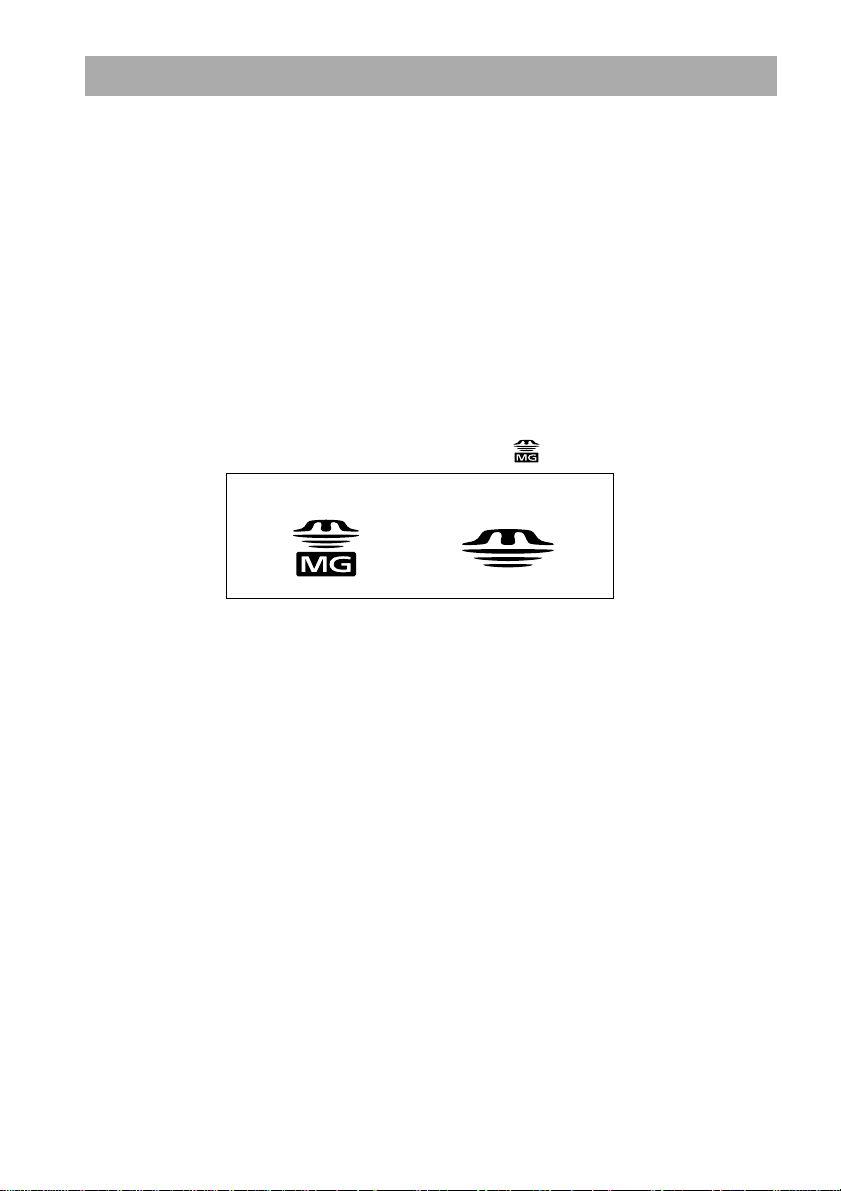
On “MagicGate Memory Stick”
What is a “Memory Stick”?
“Memory Stick” is a new compact, portable and versatile Integrated Circuit recording medium
with a data capacity that exceeds a floppy disk. “Memory Stick” is specially designed for
exchanging and sharing digital data among “Memory Stick” compatible products. Because it is
removable, the “Memory Stick” can also be used for external data storage.
Types of “Memory Stick”
There are two types of “Memory Stick”:
- “MagicGate Memory Stick” that is equipped with “MagicGate” copyright protection
technology.
- “Memory Stick” that is not equipped with “MagicGate” copyright protection technology.
(See “Glossary” on page 41 for details.)
Use a “MagicGate Memory Stick” with this player.
A 64-MB “MagicGate Memory Stick” is supplied with this product.
When you purchase a spare “Memory Stick” for your Memory Stick Walkman, be sure to ask for
a “MagicGate Memory Stick,” which is distinguished by the logo.
Cannot be usedCan be used
What is “MagicGate”?
“MagicGate” is a copyright protection technology for “MagicGate Memory Stick” and compliant
products, such as Memory Stick Walkman. Authentication ensures that protected content is
transferred only between compliant devices and “MagicGate Memory Stick,” and that protected
content is recorded and transferred in an encrypted format to prevent unauthorized copying or
playback.
Notes on use
To avoid damaging data, do not
– release the “Memory Stick” or unplug the AC power adaptor during reading or writing of data.
– use the “Memory Stick” in a location subject to static electricity or electric noise.
On formatting the “Memory Stick”
The “Memory Stick” is shipped with a FAT format as the standard format.
To format the “Memory Stick,” please use devices conformable with the “Memory Stick.” When
using Memory Stick Walkman, please follow the instructions in “To format the Memory Stick” on
page 23 to format the “Memory Stick.”
Note
If you format the “Memory Stick” using the computer, further operation with this player is not guaranteed.
6
Page 7

Other features
• Compact size, light weight
• Anti-skip function: you can enjoy uninterrupted enjoyment of music during physical activities
such as jogging or commuting.
• Recordable time: up to 60 min., 80 min., 120 min.*, on the supplied 64MB “MagicGate Memory
Stick.”
• Full-dot LCD screen: album titles and track names can be displayed for up to three lines.
• Jog lever: easy to operate, with a simple ejection mechanism for “MagicGate Memory Stick.”
• High speed data transfer using the supplied USB cable.
• OpenMG Jukebox software enables you to record compact discs using the ATRAC3 format
(high sound quality, high compression) to the hard drive.
* Differs according to the bit rate when recording. In this case, the figures for the recordable time are when
recording on a 64MB “MagicGate Memory Stick” at 132kbps, 105kbps, and 66kbps.
System requirements
• IBM PC/AT or Compatible
CPU: MMX™ Pentium® 233MHz or higher
Hard disk drive space: 50MB or more
RAM: 64MB or higher
CD-ROM drive
Sound Board
USB port
• Operating System: Windows® 98/ Windows® 98 Second Edition (manufacturer installed)
The following environments are not supported.
– Windows 95, Windows NT and Windows 2000
– Upgraded from Windows 3.1/95 to Windows 98 (or Windows 98 Second Edition)
– Dual boot with Windows 2000 and Windows 98 (or Windows 98 Second Edition)
• Display: High (16bit) Color or more (800 × 480 dot or more)
• Internet access: for Web registration and EMD services
“MagicGate Memory Stick,” , “Memory Stick,” , Memory Stick Walkman, and are
trademarks of Sony Corporation.
OpenMG and its logo are trademarks of Sony Corporation.
“MagicGate” and
WALKMAN is a registered trademark of Sony Corporation.
IBM and PC/AT are registered trademarks of International Business Machines Corporation.
Microsoft and Windows are trademarks of Microsoft Corporation, registered in the U.S.A. and other countries.
Copyright ©1995 Microsoft Corporation. All Rights Reserved.
Portion Copyright ©1995 Microsoft Corporation
MMX and Pentium are registered trademarks of Intel Corporation.
All other trademarks and registered trademarks are trademarks or registered trademarks of their respective
holders.
are trademarks of Sony Corporation.
7
Page 8
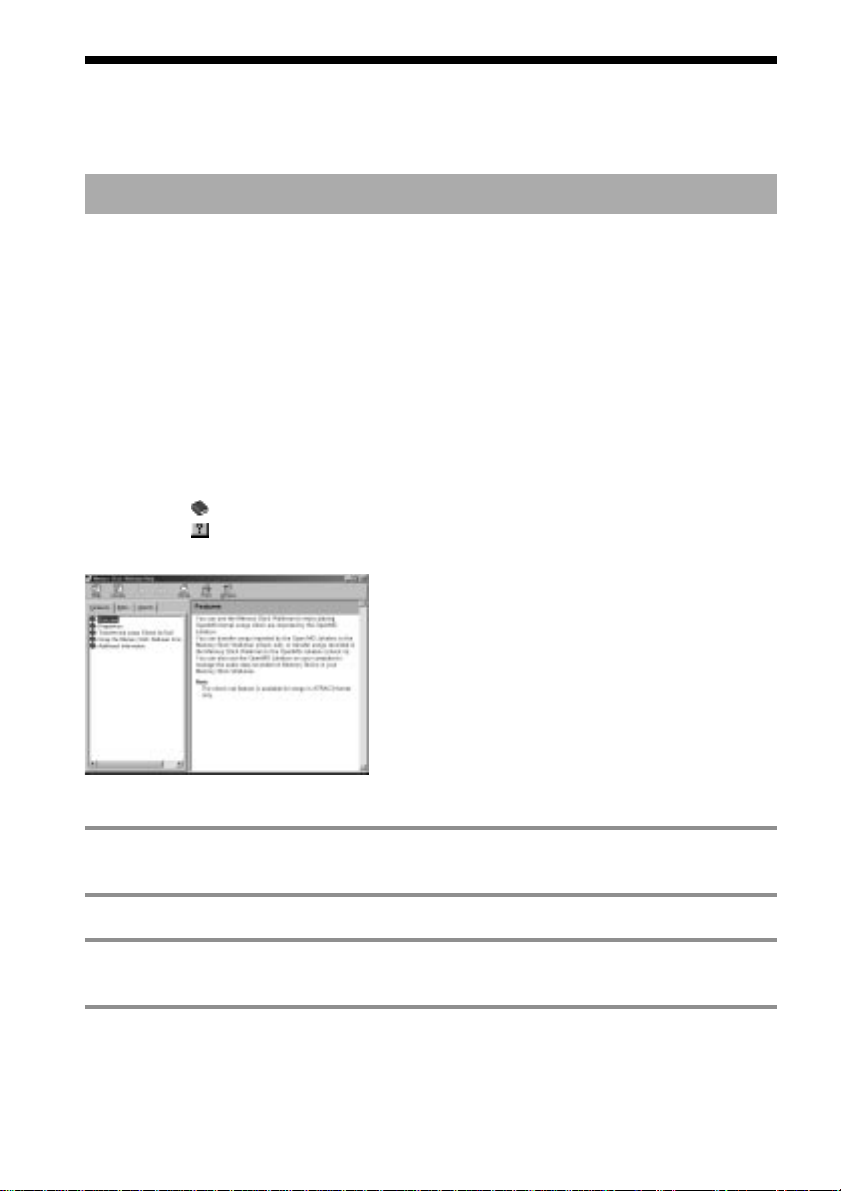
About this manual
This manual explains how to operate Memory Stick Walkman. For details on how to use the
supplied software (OpenMG Jukebox), refer to the OpenMG Jukebox Help files.
To use the Help files
Displaying the Help files
The supplied software includes two types of Help files:
– OpenMG Jukebox Help: Help files on how to use the OpenMG Jukebox software.
– Memory Stick Walkman Help: Help files on how to use Memory Stick Walkman when
connected to a computer.
You can display the Help files by either of the following ways:
– Click [Start]-[Programs]-[OpenMG Jukebox]-[OpenMG Jukebox Help] or [Memory Stick
Walkman Help].
– Start the OpenMG Jukebox software, then click [Help]-[OpenMG Jukebox Help] or [Memory
Stick Walkman Help].
Selecting a topic from the contents
• Double click to display the items included in the title.
• Double click to display the contents of the item.
• Click the underlined item to display reference page on the item.
Searching using a keyword
1 Select the [Index] tab from the Help dialog box.
The Keyword list appears.
2 Enter the keyword you want to apply, or scroll through the keyword list.
3 Select a topic, then click [Display].
Topics related to the keyword appear.
8
Page 9
Getting Started
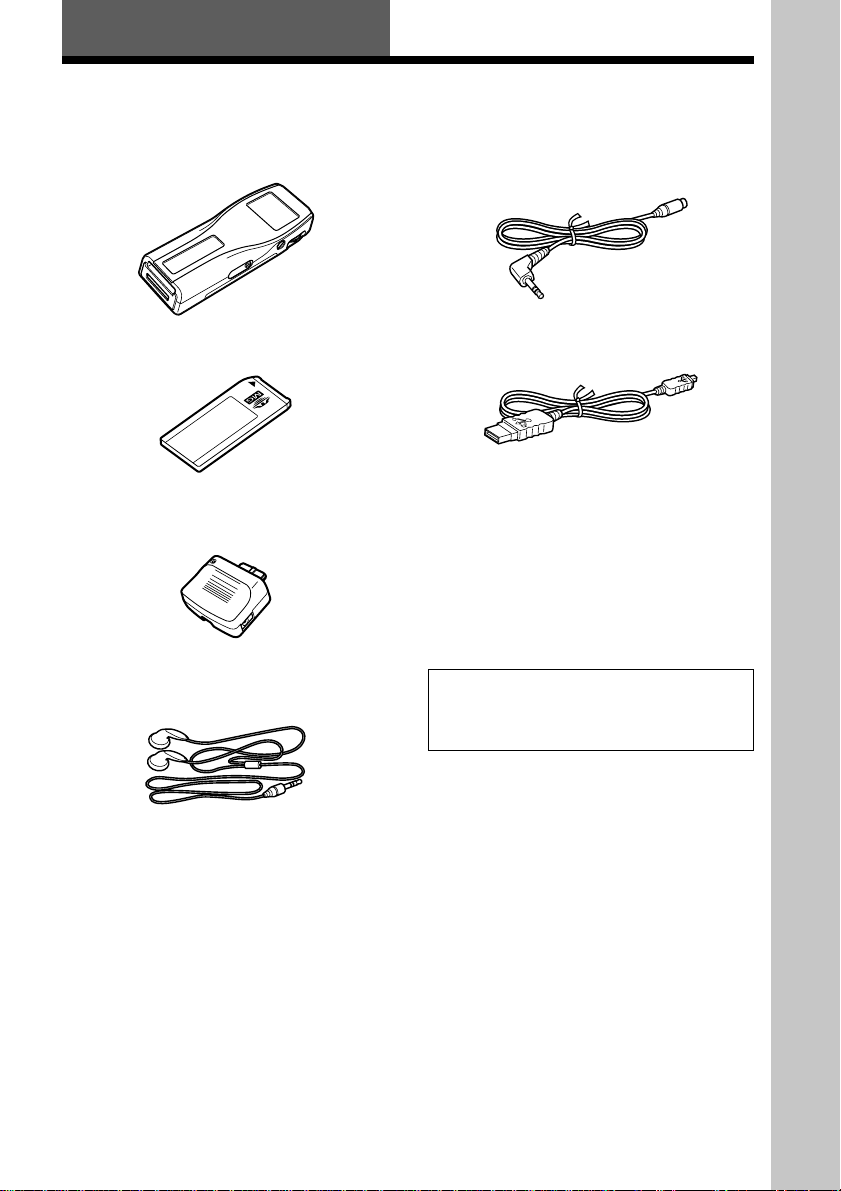
Step 1: Unpacking
Your Memory Stick Player comes with the following items.
• Memory Stick Player (1)
•“MagicGate Memory Stick” (1)
• DC/USB adaptor (1)
• Headphones (1)
• Headphones extension cord (1)
• USB cable (1)
• AC power adaptor (1)
• Strap (for U.S.A. and Canadian model
only) (1)
• Carrying pouch (except for U.S.A. and
Canadian model) (1)
• CD-ROM
(OpenMG Jukebox installation disc) (1)
• Operating Instructions (1)
Note
Be sure to keep the CD-ROM and CD key in a
secure place.
Getting Started
9
Page 10
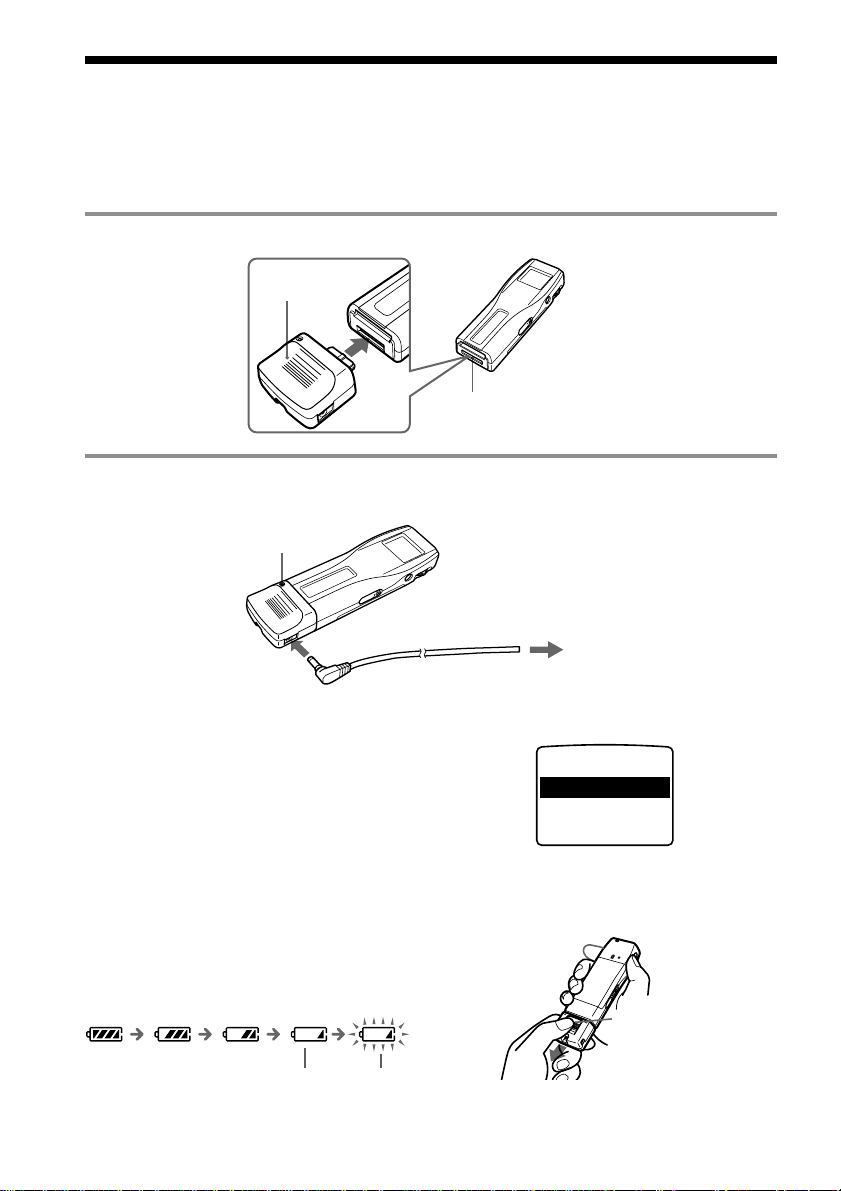
Step 2: Charging the battery
Please charge the battery before using the player.
To use power from an AC wall outlet, connect the AC power adaptor to Memory Stick Walkman
as shown below.
You can use the player while charging the battery also.
1 Connect the DC/USB adaptor to Memory Stick Walkman.
DC/USB
adaptor
DC/USB adaptor plug
2 Connect the AC power adaptor to the DC IN 5.5V jack of the DC/USB adaptor
and to the wall outlet.
BATTERY CHARGE
lamp
10
to DC IN 5.5V
Charging begins and the BATTERY
CHARGE lamp lights up.
The BATTERY CHARGE lamp goes off
when charging is complete. This takes
about 3 hours maximum.
Note
Please charge the battery where temperature is
0˚C to 35˚C.
Battery duration
About 4 hours.
On the remaining battery
indication
The battery icon in the display changes as
shown below.
low battery please charge
the battery
to wall outlet
If “LOW BATT” is displayed in the display,
you need to recharge the battery.
LOW BATT
To release the DC/USB adaptor
Push the Release button gently to pull the DC/
USB adaptor as shown below.
Release button
Do not pull the DC/USB
adaptor forcefully.
Page 11
Step 3: Installing the OpenMG Jukebox software
This section describes how to install the OpenMG Jukebox software to your computer. Before
installation, turn on your computer, and start Windows 98.
Note
Be sure to install the software before connecting with the supplied USB cable. Do not install the software while
connecting the USB cable. Connect the USB cable only after you have restarted the computer after installation.
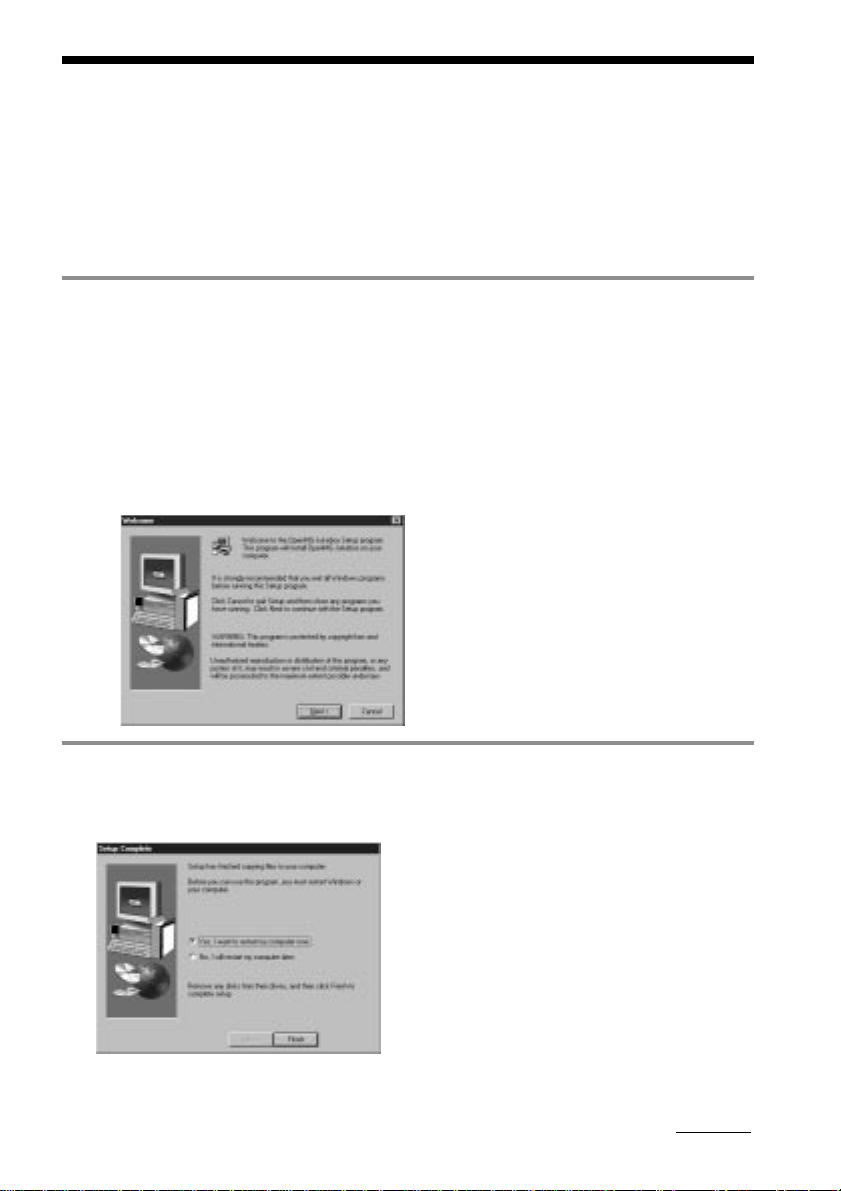
1 Insert the supplied CD-ROM into the CD-ROM drive of your computer.
For the customers in U.S.A. and Canada
The Setup program automatically starts and the following window appears. If the program
does not start, double-click [Setup.exe].
For customers in other countries
1 Find the folder labeled with the language you want to select in the CD-ROM.
For example, if you want to install the OpenMG Jukebox with help files in English, select
the [English] folder.
2 Open the desired folder, and double-click [Setup.exe] inside the folder.
The Setup program starts up and the following window appears.
2 Follow the instructions in the Installer window to complete the installation.
When the Input window for the CD key appears, input the CD key written on the CD-ROM
case label .
When the installation is finished, the following dialog box appears in the display.
Click [Finish] to restart the computer.
Note
Do not delete, move or modify the installed folder.
continued
11
Page 12

Step 3: Installing the OpenMG Jukebox software (continued)
About the “OpenMG Registration” icon on the desktop
When you restart the computer after installing the software, the “OpenMG(NW-MS7)
Registration” icon will appear on the desktop. Make sure that you can connect to Internet, then
double-click this icon to start customer registration for this product (Memory Stick Walkman)
and for the EMD services.
For details on registration, refer to the supplied leaflet.
Notes on EMD (Electronic Music Distribution) services
To use OpenMG-enabled EMD services on the Internet, the following conditions are required.
• You need Internet access from your computer. (Sign up an Internet service provider.)
• You need to download several programs (e.g., EMD key installer).
To download these programs, double-click the “OpenMG Registration” icon, then follow the
displayed instructions.
• You need to register yourself with the EMD service provider you are going to use. Consult the
provider for details.
For current OpenMG Jukebox users
1 In order to update your OpenMG Jukebox software, your current software must be registered.
If your software is not registered, please register your current software now. If you are a
registered user, proceed to step 2.
2 Insert the CD-ROM supplied with your new product. This will automatically run. If the
program does not start, double-click [Setup.exe].
Please follow the on-screen instructions to retain all existing music files and update your
software.
3 After your update is completed, restart the computer.
Then double-click the “OpenMG(NW-MS7) Registration” icon on your desktop and follow the
instructions to register.
Notes
• If the OpenMG Jukebox icon is displayed on the task tray, right-click the icon to choose [Remove from the
task tray], then proceed with the installation.
• Be sure to input the CD keys of the CD-ROM you are going to install. If an error message appears in the
display, check if the CD keys are of the correct CD-ROM case label.
12
Page 13
Basic Operations
Transferring music data from the computer to Memory Stick Walkman
This section describes how to record the contents of a compact disc onto the hard drive of your
computer, and then how to transfer it to Memory Stick Walkman (Check-Out).
You can also download by using EMD Services, or convert MP3 files and WAV format audio
files. Please refer to the online help for more information.
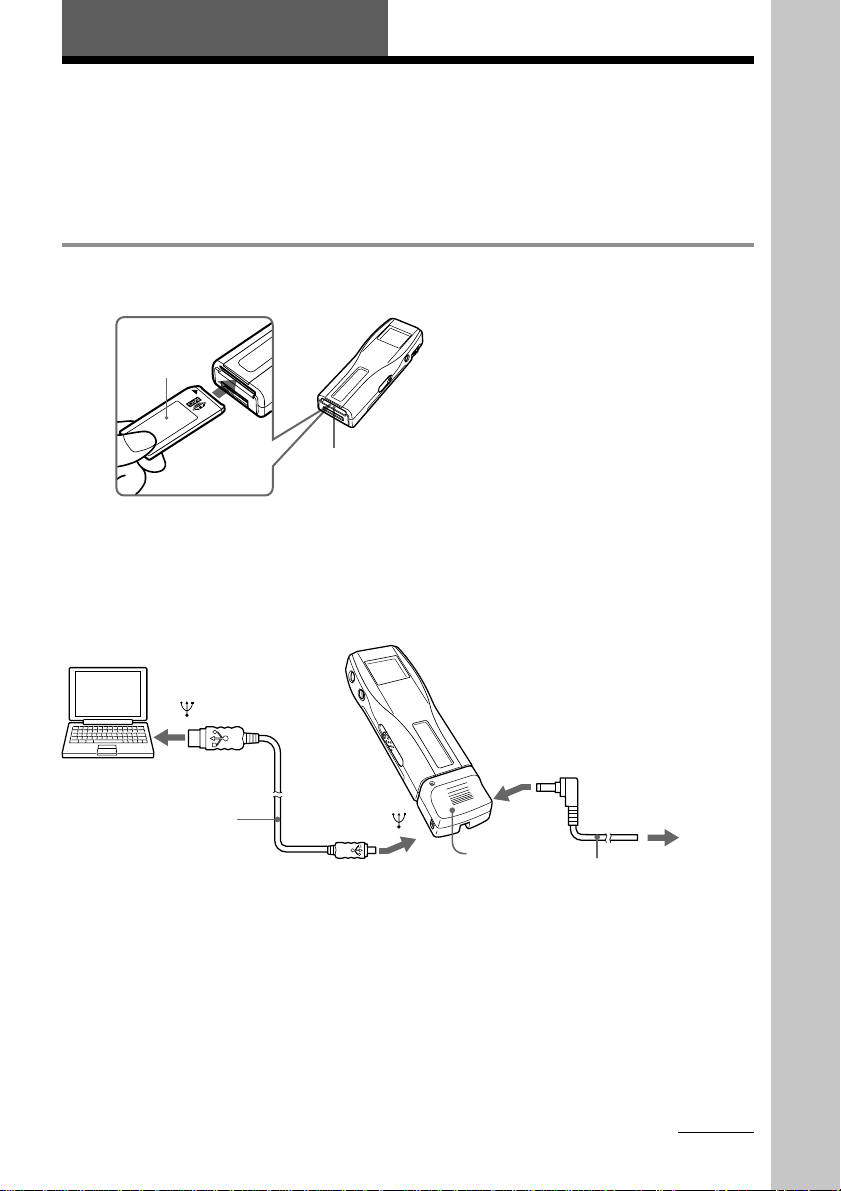
1 Connect Memory Stick Walkman to your computer.
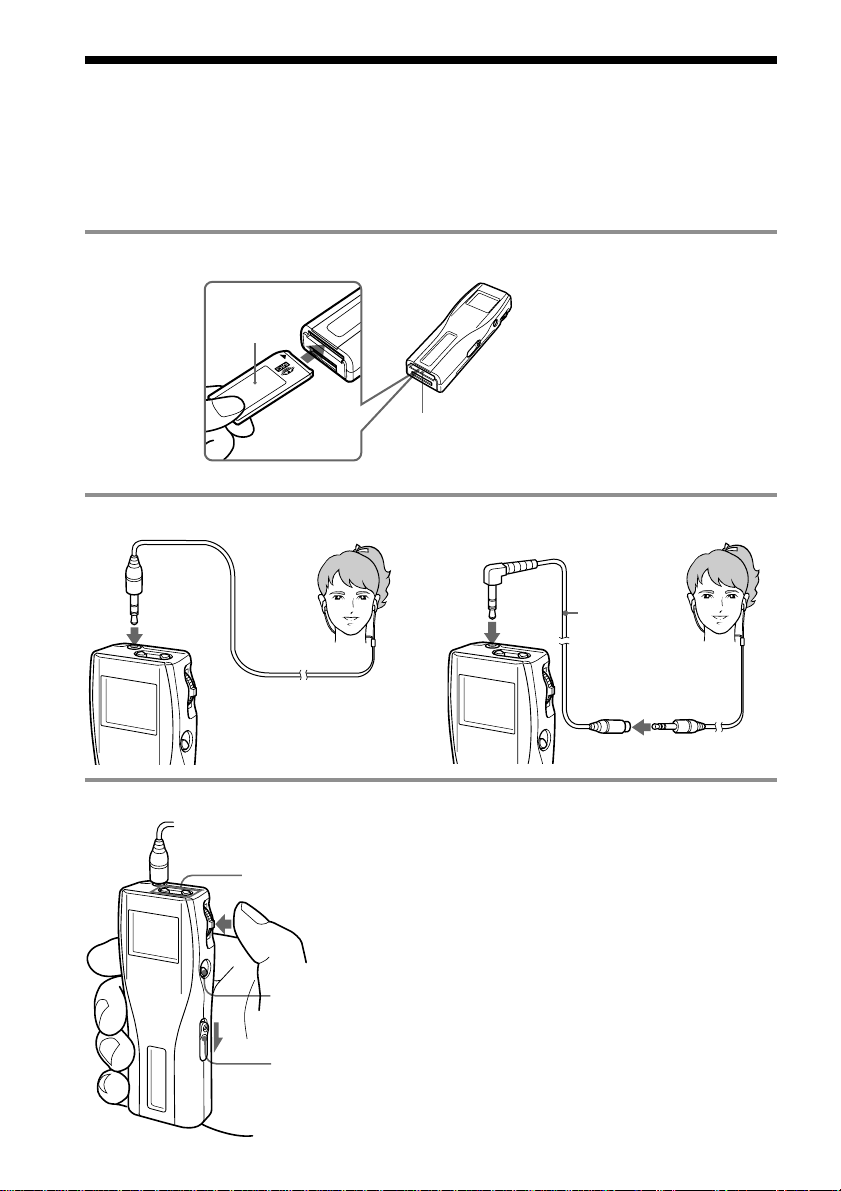
1 Insert “MagicGate Memory Stick.”
“MagicGate
Memory
Stick“
Memory Stick slot
2 Connect the AC power adaptor.
Connect the supplied AC power adaptor to
an AC wall outlet, then into the DC IN 5.5V
jack on the right side of the DC/USB
adaptor.
to
USB cable
(supplied)
to
Notes
• Do not connect more than two USB devices to your computer. Normal operation will not be guaranteed.
• Use of this player with a USB hub or a USB extension cable is not guaranteed.
• A malfunction may occur depending on the USB devices connected at any one time.
• Be sure to connect the player to an AC wall outlet when connecting it to your computer.
• When connecting Memory Stick Walkman to your computer for the first time, the USB driver Installer
window appears. Please follow the instructions in the Installer window.
Notes
• When connecting Memory Stick Walkman
to your computer, make sure the erasure
prevention switch of the “Memory Stick”
(page 33) is OFF .
• Do not start your computer while Memory
Stick Walkman is connected.
3 Connect Memory Stick Walkman to your
computer.
Connect the small connector of the supplied
USB cable into the USB jack on the left side
of the DC/USB adaptor, then the large
connector to the USB jack of your computer.
“PC CONNECT” appears in the display.
to DC IN 5.5V
to AC
wall outlet
DC/USB
adaptor
AC power adaptor
(supplied)
Basic Operations
continued
13
Page 14
Transferring music data from the computer to
Memory Stick Walkman (continued)
2 Start the OpenMG Jukebox software.
Double click the OpenMG Jukebox icon on the desktop or click [Start]–[Programs]–
[OpenMG Jukebox]–[OpenMG Jukebox]
The OpenMG Jukebox window appears.
Portable Player window
(the music files inside the
“Memory Stick” appear)
zIf the Start-Up function is ON
The OpenMG Jukebox software automatically starts when Memory Stick Walkman is connected to your
computer. (Please refer to the online help for more information.)
3 Start recording.
You can record music from a compact disc onto the hard drive of your computer, using the
OpenMG CD Recorder software.
1 Insert the compact disc you want to record into the CD-ROM drive of your computer. If
the OpenMG CD Recorder automatically starts, go to 3.
2 Click the [Recorder] button in the OpenMG Jukebox window.
The OpenMG CD Recorder window appears showing the contents of the compact disc.
If the message “Do you want to check your CD Drive to optimize for
recording ?” appears in the display
This message appears when you use the OpenMG CD Recorder for the first time. We recommend you
to choose [Yes]. You can optimize the CD drive later, too. Please refer to the online help for more
information. (It may take maximum 20 minutes to optimize the CD drive.)
3 Click z.
14
bit rate
z button
The recording begins. When recording is finished, the recorded music will appear in the
OpenMG Jukebox window as a new album.
Page 15
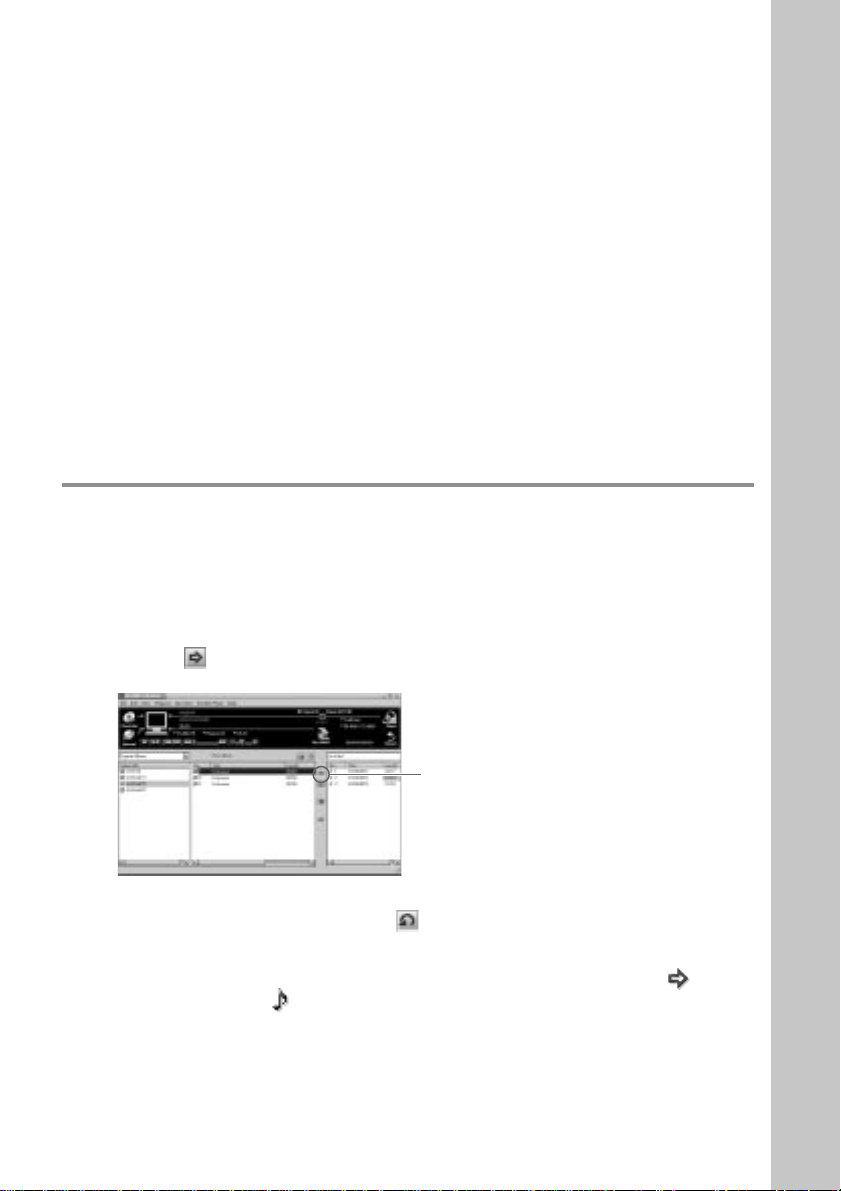
To stop the recording
Click x. The recording will be interrupted.
Click z again to continue the recording.
zTo select only certain items
Click the check box of the contents you do not want to record to remove the check, then click z.
zOn the bit rate
You can choose the bit rate among 132kbps, 105kbps, 66kbps. If you choose a higher bit rate, recording
will have better sound quality, however the recordable time will be shorter. If you choose a lower bit
rate, you can record longer, however the sound will not be as good. See below for the recording time
according to the bit rate when using the supplied 64MB “Memory Stick.”
• 132kbps: maximum 60 min.
• 105kbps: maximum 80 min.
• 66kbps: maximum 120 min.
(The recording time differs according to the number of songs you are recording.)
To choose the bit rate, click [Control]-[Settings]. The Settings window appears. Click the Recording
Setup tab and choose from the ATARC3 Bit rate list. Please refer to the online help for more
information.
zTo name a new album or song
You can enter the name using the keyboard or bring the name from the Internet database.
Please refer to the online help for more information.
4 Transfer the music file to the “Memory Stick” (Check-Out).
1 Check that the Portable Player window (page 14) is displayed on the right side of the
OpenMG Jukebox window.
2 Click the album which contains the songs you want to Check-Out.
The contents of the album appear.
3 Click the music item you want to Check-Out.
Click the music item while pressing the Ctrl key to choose more than one music item.
4 Click the button.
The desired music item appears in the Portable Player window as Check-Out candidate.
Click here
To cancel the song added as Check-Out candidate, click the respective song in the
Portable Player window, then click the button.
5 Click the START button.
The desired music item is Checked-Out to Memory Stick Walkman.
During Check-Out the STOP button flashes. When Check-Out is finished, the
indication changes to .
To quit Check-Out
Click the STOP button.
To Check-In
See page 31.
Basic Operations
15
Page 16
Listening to music with Memory Stick Walkman
Please charge the battery before use (see page 10).
Note
When using Memory Stick Walkman, be sure to disonnect it from the computer.
1 Insert a recorded “MagicGate Memory Stick” into Memory Stick Walkman.
“MagicGate
Memory
Stick“
Memory Stick
slot
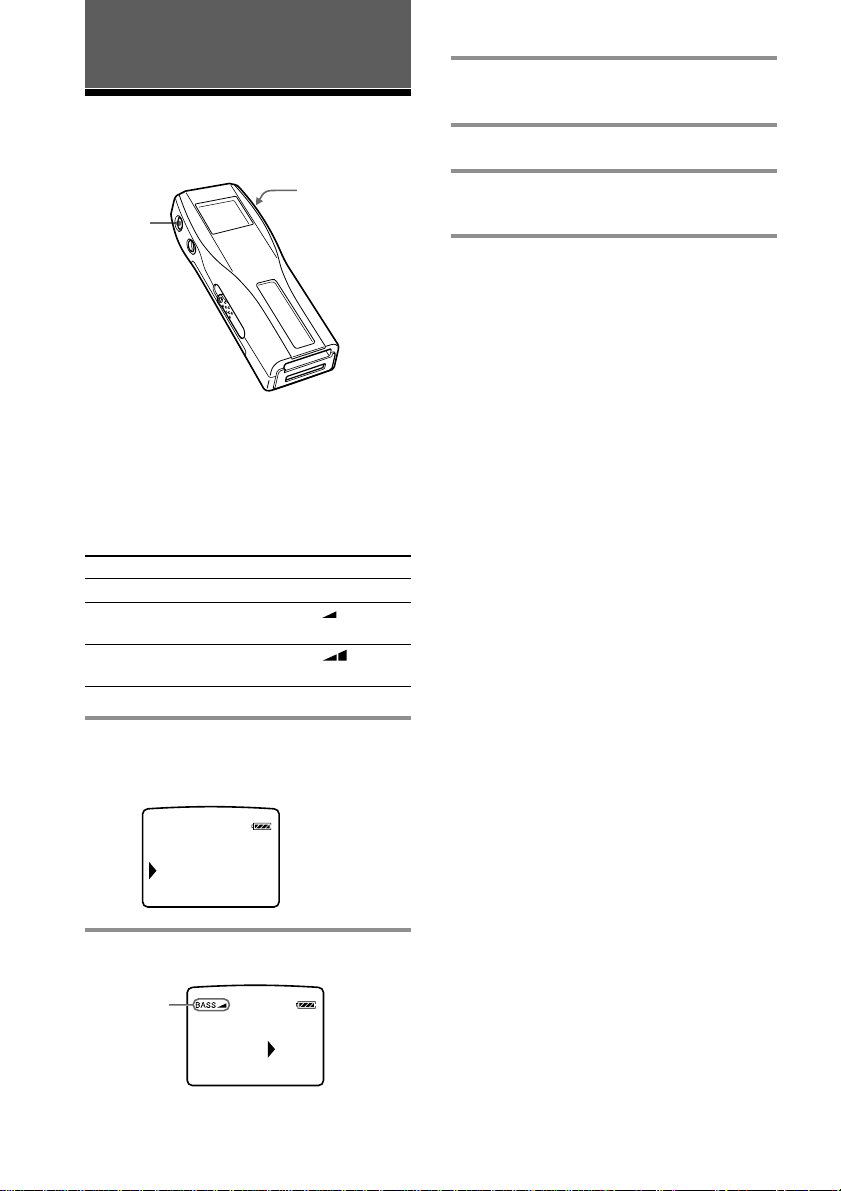
2 Connect the headphones.
to i jack
3 Start playback.
2 Press the VOLUME
+/- button up or
down to adjust the
volume.
1 Press the Jog lever.
x button
HOLD switch
To use the headphones extension cord
to i jack
Headphones
extension
cord
Playback stops automatically when the music
reaches the end (only when REPEAT OFF is
selected).
If playback does not start
The HOLD switch may be switched down. Please
release it up (page 21).
To stop playback
Press the x button.
Tip
If you do not operate the player for 10 seconds while
in stop mode, the display automatically turns off.
16
Page 17
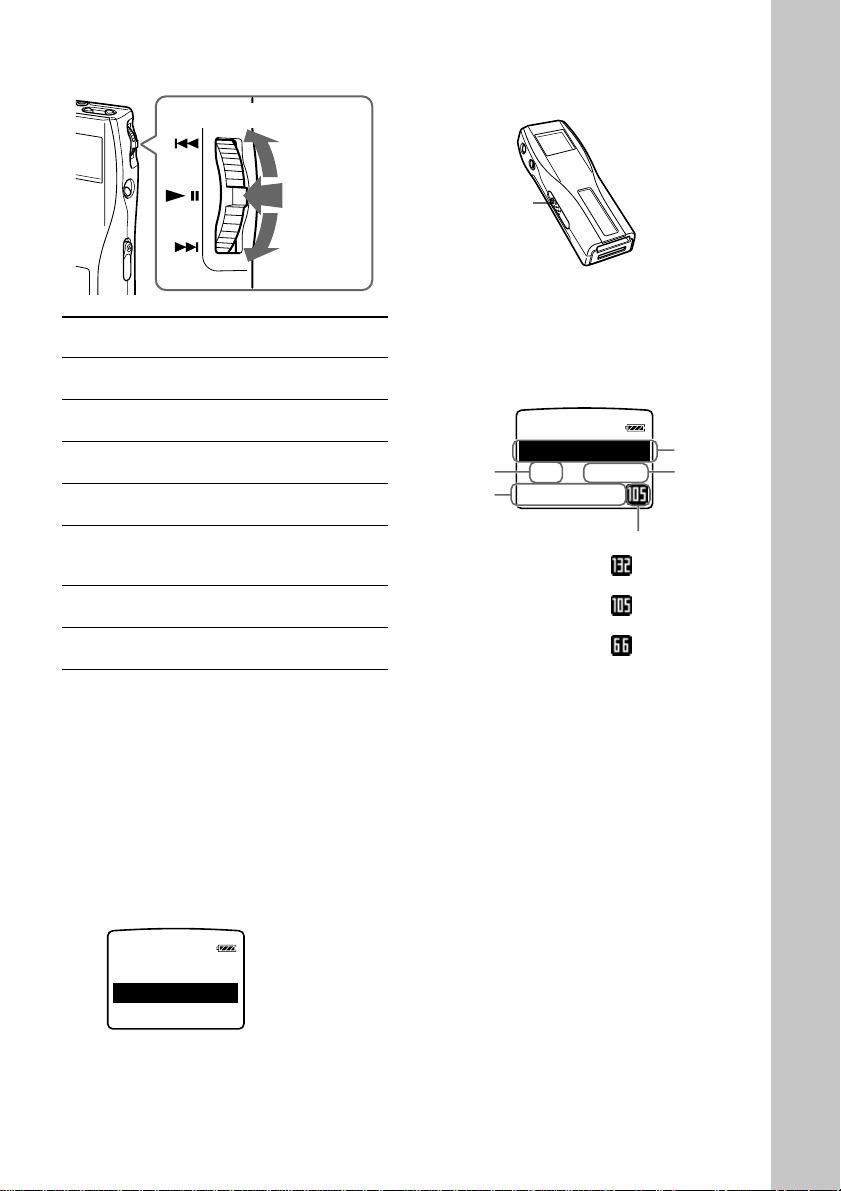
On other operations
l
ERITMY FAVOU
HAP Y B RT
001 02:01
PI
0
Jog lever
Press
upwards
To take out the “Memory Stick”
Slide the EJECT lever in the direction of the arrow as
shown below.
Press
Press
downwards
To
1)
Pause
Go to the beginning
of the actual track
Go to previous
tracks
Go to the beginning
of the next track
Go to the beginning
of the succeding
tracks
Go backward
Go forward
1)
If you do not operate the player for 10 seconds
while in pause mode, the player automatically
switches to stop mode.
2)
To go backward or forward without listening to
the sound, press upwards or downwards and hold
while in pause mode.
2)
Operation of
the Jog lever
Press while in playback
mode.
Press upwards once.
Press upwards
continuously.
Press downwards once.
Press downwards
continuously.
2)
While playback, press up
and hold still.
While playback, press
down and hold still.
EJECT lever
On the display
Press the DISPLAY button to change the
display mode. See “Changing the display
mode” (page 20) for more information.
Album
Track
number
Song
title*
Bit rate
* Song title and album title are displayed when
information is recorded on the “Memory Stick.”
title*
Elapsed
time
: songs recorded
at 132kbps
: songs recorded
at 105kbps
: songs recorded
at 66kbps
Basic Operations
To select by track name
While in stop mode, press the Jog lever up or down
and hold it still. Three track names are displayed.
Press the Jog lever upwards or downwards to select
the track, then press the Jog lever to playback.
HAPPY
1
BI
2HELLOMY
3
MERRY
CH
17
Page 18
Advanced Operations (Memory Stick Walkman)
Playing in various modes
Jog lever
MENU
button
Emphasizing the bass sound (BASS)
Mega Bass function intensifies low frequency
sound for richer quality audio reproduction.
Menu
OFF
ON-1
ON-2
Sound quality
normal play
Mega Bass
(moderate effect)
Mega Bass
(strong effect)
Display indication
none
BASS
BASS
3 Select ON-1 or ON-2 using the Jog
lever.
4 Press the Jog lever.
5 Press the MENU button.
The display returns to normal.
Note
If the sound becomes distorted when emphasizing
the bass, turn down the volume.
To exit from the Menu mode
Select [RETURN] in the menu or press the MENU
button.
To cancel the MEGA BASS effect
Select OFF in step 3.
1 Press the MENU button.
The menu is displayed.
Check that “BASS” is selected.
[RETURN]
BASS OFF
REPEAT OFF
2 Press the Jog lever.
Display
indication
18
BASS
OFF
-
O
N
-
O
N
1
2
Page 19
Playing tracks repeatedly (REPEAT)
You can play tracks repeatedly in three waysall repeat, single repeat and shuffle repeat.
Menu
OFF
ALL
1
SHUF
* The display indication appears after step 5.
Playback mode
normal
all tracks
repeatedly
current track
repeatedly
all tracks
repeatedly in
random order
Display indication*
none
F
F 1
F SHUF
1 Press the MENU button.
The menu is displayed.
2 Select “REPEAT” using the Jog
lever.
BASS OFF
REPEAT OFF
AVLS NORM
6 Press the MENU button.
The display returns to normal.
To exit from the Menu mode
Select [RETURN] in the menu or press the MENU
button.
To cancel the REPEAT mode
Select OFF in step 4.
Note
If there is no “Memory Stick” inserted, “REPEAT
----” appears in the display, and repeat mode cannot
be selected.
Advanced Operations (Memory Stick Walkman)
3 Press the Jog lever.
4 Select “ALL,” “1” or “SHUF” using
the Jog lever.
OFF
REPEAT
A1LL
5 Press the Jog lever.
The selected playback mode is
displayed.
Display indication
BASS OFF
L
L
REPEAT
ALS NRMV
A
O
continued
19
Page 20
Playing in various modes
(continued)
Protecting your hearing (AVLS)
The AVLS (Automatic Volume Limiter
System) function keeps down the maximum
volume to protect your ears.
1 Press the MENU button.
The menu is displayed.
2 Select “AVLS” using the Jog lever.
REPEAT OFF
AVLS NORM
BEEP OFF
Changing the display mode
You can change the display mode and display
the track number, the remaining time, etc.
while in playback or stop mode.
DISPLAY
button
3 Press the Jog lever.
4 Select “LIMIT” using the Jog lever.
NORM
AVLS
LIMIT
5 Press the Jog lever.
The AVLS indication is displayed.
AVLS indication
REPEAT OFF
AVLS
LIMIT
BEEP OFF
The volume is kept to a moderate level.
6 Press the MENU button.
The display returns to normal.
To exit from the Menu mode
Select [RETURN] in the menu or press the MENU
button.
To cancel AVLS
Select NORM in step 4.
Press the DISPLAY button.
Each time you press the DISPLAY button, the
display changes as shown below.
Album
Track
number
Song
title
HAP Y B RT
0
001 02:01
PI
RITMY FAVOU
-
001 04:18
0
REMEIN
A
Number
of
remaining
tracks*
When playing in repeat mode, “-----” appears
instead of the number of remaining tracks and the
total time remaining.
-
0-
008 54:11
REM IN
ALL
HAP
A
YBRT
PI
ERITMY FAVOU
ERITMY FAVOU
HD
title
Elapsed
time
Bit rate
Remaining
time of the
current
track
Total time
remaining *
Song title*
(only while
in play /
pause mode)
20
Page 21
Locking the
Changing the settings
controls (Hold)
To prevent the controls from being
accidentally operated when you carry the
player, use this function.
HOLD switch
L
Slide the HOLD switch in the direction
of the arrow.
No controls will be able to operate. (except
the EJECT lever)
If you press buttons other than the Jog lever
or the EJECT lever while the HOLD switch is
ON, HOLD appears in the display.
The current time appears in the display when
you press the Jog lever while the HOLD
switch is ON. (See page 24)
To release the Hold function
Slide the HOLD switch in the opposite direction of
the arrow.
of Memory Stick
Walkman
Jog lever
MENU
button
To turn off the beep sound (BEEP)
BEEP ON: a beep will sound to indicate that
BEEP OFF: no beep sound will be heard.
1 Press the MENU button.
2 Select “BEEP” using the Jog lever.
3 Press the Jog lever.
operation has been accepted.
The menu is displayed.
AVLS NORM
BEEP ON
LIGHT OFF
4 Select “OFF” using the Jog lever.
BEEP
OFF
ON
5 Press the Jog lever.
6 Press the MENU button.
The display returns to normal.
To exit from the Menu mode
Select [RETURN] in the menu or press the MENU
button.
To cancel the Beep function
Select ON in step 4.
continued
21
Page 22
Changing the settings of Memory Stick
Walkman
(continued)
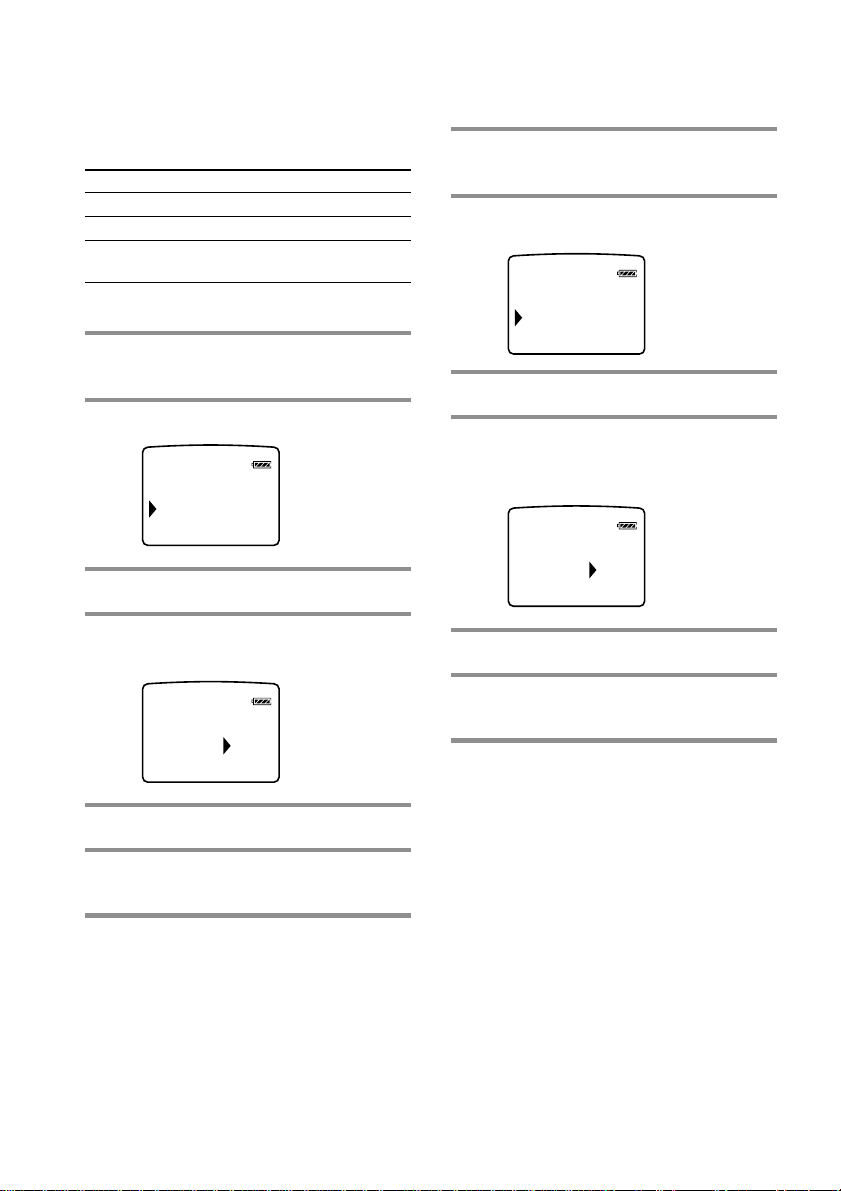
To change the display backlight setting (LIGHT)
You can select from the following 3 settings.
Menu
OFF
ON
OPR
* The battery life is shorter if ON is selected.
Backlight mode
always off
turns on during operation*
turns on for three seconds after each
operation
1 Press the MENU button.
The menu is displayed.
2 Select “LIGHT” using the Jog lever.
BEEP OFF
LIGHT OFF
CONTRAST
3 Press the Jog lever.
To adjust the LCD contrast (CONTRAST)
1 Press the MENU button.
The menu is displayed.
2 Select “CONTRAST” using the Jog
lever.
LIGHT OFF
CONTRAST
TITLE JPN
3 Press the Jog lever.
4 Select the contrast using the Jog
lever.
You can adjust between -5 and +5
CONTRAST
+1
4 Select a backlight mode using the
Jog lever.
OFF
LIGHT ON
OPR
5 Press the Jog lever.
6 Press the MENU button.
The display returns to normal.
To exit from the Menu mode
Select [RETURN] in the menu or press the MENU
button.
22
5 Press the Jog lever.
6 Press the MENU button.
The display returns to normal.
To exit from the Menu mode
Select [RETURN] in the menu or press the MENU
button.
Page 23
To format the “Memory Stick” (FORMAT)
If you need to format the “Memory Stick,”
use this player.
If formatted, all data previously recorded on
the “Memory Stick” will be erased. Be sure to
check the data of the “Memory Stick” before
formatting (data recorded using other devices
will also be erased).
A commercially available “Memory Stick” is
already formatted at the factory.
The supplied “Memory Stick” is also
formatted.
Notes
• Be sure to connect the player to a power source
with the AC power adaptor.
• You cannot use a “Memory Stick” that has been
formatted using the computer.
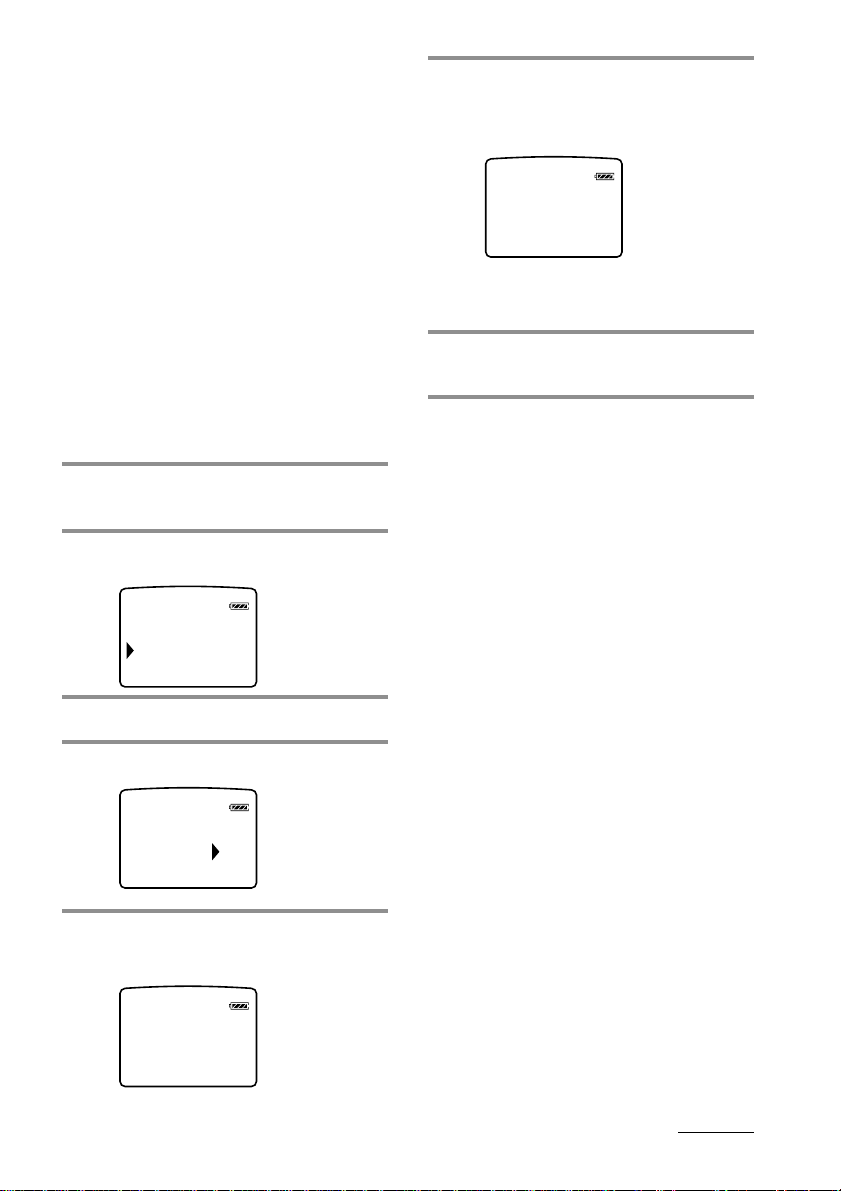
1 Press the MENU button.
The menu is displayed.
2 Select “FORMAT” using the Jog
lever.
TITLE JPN
FORMAT
DATE&TIME
3 Press the Jog lever.
6 Press the Jog lever.
“FORMATTING” appears in the display,
and the formatting of the “Memory
Stick” begins.
TIFORMAT NG
When formatting is finished,
“COMPLETE” appears in the display,
and returns to the menu in step 2.
7 Press the MENU button.
The display returns to normal.
To exit from the Menu mode
Select [RETURN] in the menu or press the MENU
button.
To cancel the formatting
Select “NO” in step 4 or press any button other than
the Jog lever in step 5.
Notes
• You cannot format while playback or in pause
(“FORMAT” will not be displayed).
• If the erasure prevention switch of the “Memory
Stick” is ON, “LOCKED” appears in the display,
and you cannot format the “Memory Stick.”
• Do not take out the “Memory Stick” or unplug the
AC power adaptor when “FORMATTING” is
displayed.
4 Select “YES” using the Jog lever.
YEFORMATONS
5 Press the Jog lever.
“FORMAT OK?” appears in the display.
OKFORMAT ?
continued
23
Page 24
Changing the settings of Memory Stick
Walkman
(continued)
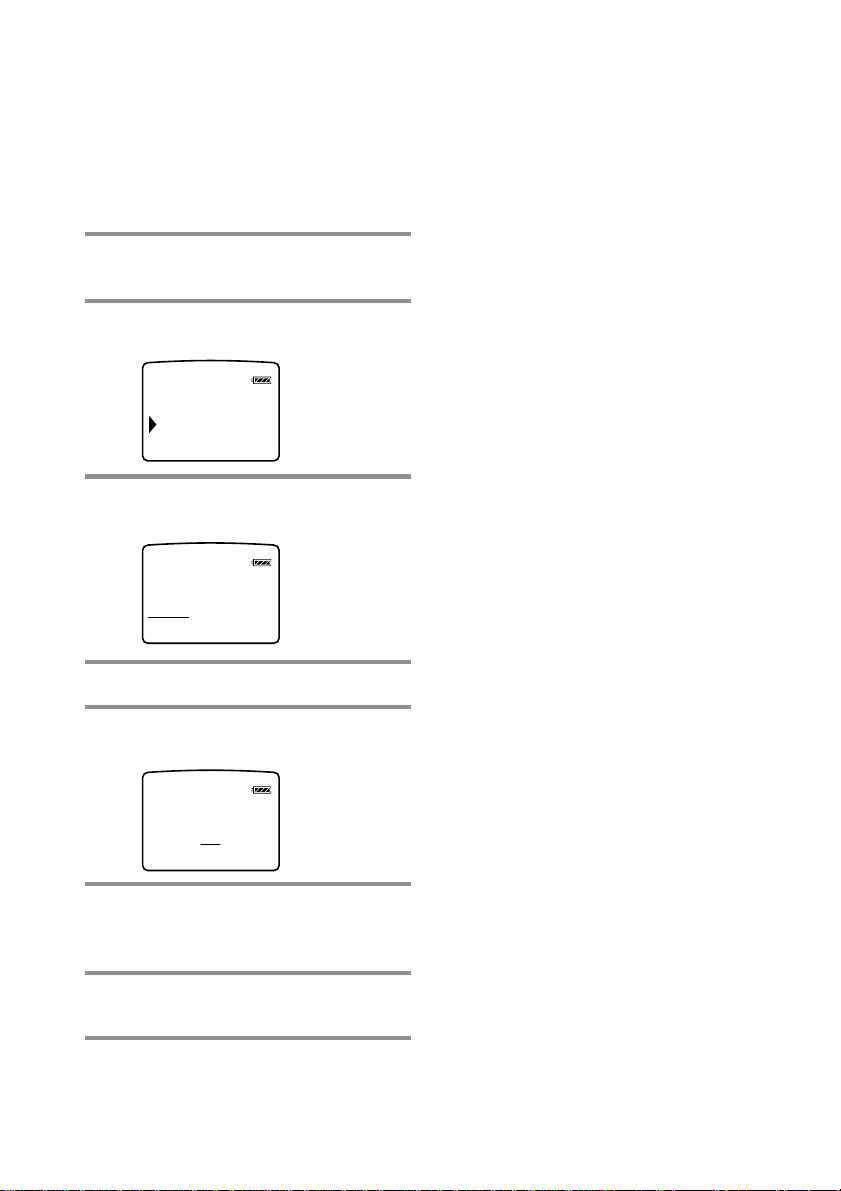
To set the date and time (DATE & TIME)
You can set the current date and time and
display it. To play a music item with a
playback period restriction (page 5), you need
to set the date and time.
1 Press the MENU button.
The menu is displayed.
2 Select “DATE&TIME” using the Jog
lever.
FORMAT
DATE&TIME
3 Press the Jog lever.
A cursor appears under the year.
DATE&TIME
00
Y 1 M 1 D
20
0:00
To switch between 24 hour display and
12 hour display
Press the DISPLAY button during the setting.
To exit from the Menu mode
Select [RETURN] in the menu or press the MENU
button.
To display the current time
You can display the current time by any of the
following ways.
• Press the Jog lever while the display is OFF and
the HOLD switch is ON.
t The current time is displayed for 3 seconds
while the Jog lever is being pressed.
• Press the Jog lever while the display is ON and the
HOLD switch is ON.
t The current time is displayed while the Jog
lever is being pressed.
• Press the DISPLAY button for a while when the
HOLD switch is OFF.
t The current time is displayed while the
DISPLAY button is being pressed.
4 Set the year using the Jog lever.
5 Press the Jog lever.
The cursor moves to the month.
DATE&TIME
00
Y 1 M 1 D
20
0:00
6 Do the same to set the month, day,
hour and minutes, and then press
the Jog lever.
7 Press the MENU button.
The display returns to normal.
24
Page 25
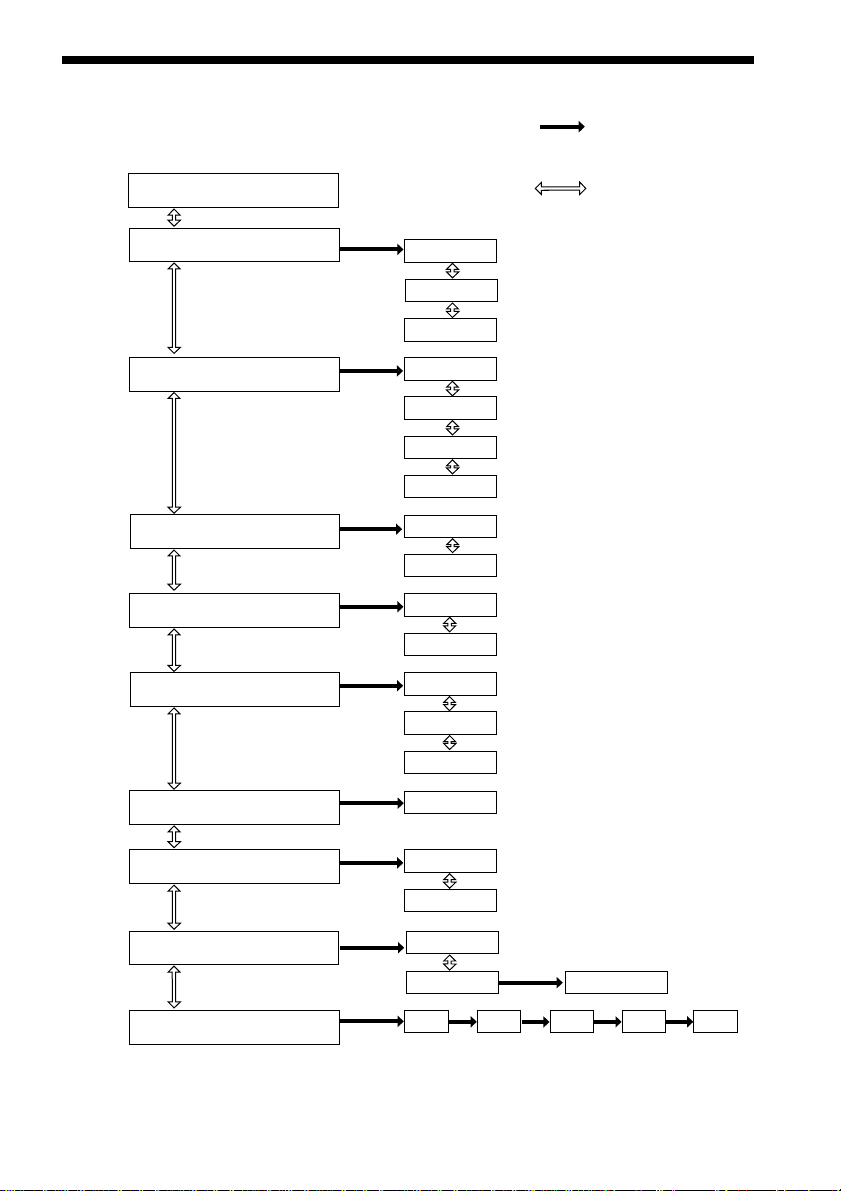
Menu
Press the MENU button to display the menu.
v
[RETURN]*
Press the Jog lever
to go to the next step.
Press the Jog lever
upwards or downwards
to select an item.
BASS
REPEAT
AVLS
BEEP
LIGHT
CONTRAST
(page 18)
(page 19)
(page 20)
(page 21)
(page 22)
(page 22)
OFF
ON-1
ON-2
OFF
ALL
1
SHUF
NORM
LIMIT
OFF
ON
OFF
ON
OPR
-5 to +5
* Select [RETURN], then press the
Jog lever to exit from the menu.
TITLE
FORMAT**
DATE&TIME
(see below)
(page 23)
(page 24)
ENG
JPN
NO
YES
Y
** If you cannot format (while in
play/pause mode, or there is no
“Memory Stick” inserted),
“FORMAT” does not appear in
the display.
FORMAT OK?
M
D
H M
On the TITLE menu
You can choose between “ENG” (English) and“JPN” (Japanese). This function will be available in
the future when the OpenMG Jukebox software is upgraded and you can use both English and
Japanese for album and song titles.
25
Page 26

Advanced Operations (OpenMG Jukebox)
Names and functions of the OpenMG Jukebox window
1
qa
0
9
8
7
1 Menu bar: for details on each menu items,
see page 28.
2 Operation buttons: you can play or adjust
the volume, etc.
3 Close button: quits the OpenMG Jukebox
software. (You can also quit by clicking
[File]–[Quit])
4 Portable Player: opens the Portable Player
window (page 27)
5 Edit My Select: opens the My Select
window.
6 Song title list: displays the song titles
listed in the selected album/Filter
7 Album title list: displays the album/Filter
titles in the OpenMG Jukebox
2
3
4
5
6
8 Album view select box: You can select
albums and songs that you want to view.
Original Albums= Displays an original
album and the songs included in that
album.
My Selections= Displays a My Select
album and the songs included in that
album.
Original & My Selections= Displays both
albums and the songs included in those
albums.
Various Search= Displays only the albums
and songs which match a certain
condition.
9 Internet: for using EMD services
0 Recorder: opens the OpenMG CD
Recorder window
qa Playback mode buttons: you can set the
shuffle mode, repeat mode, etc.
26
Page 27

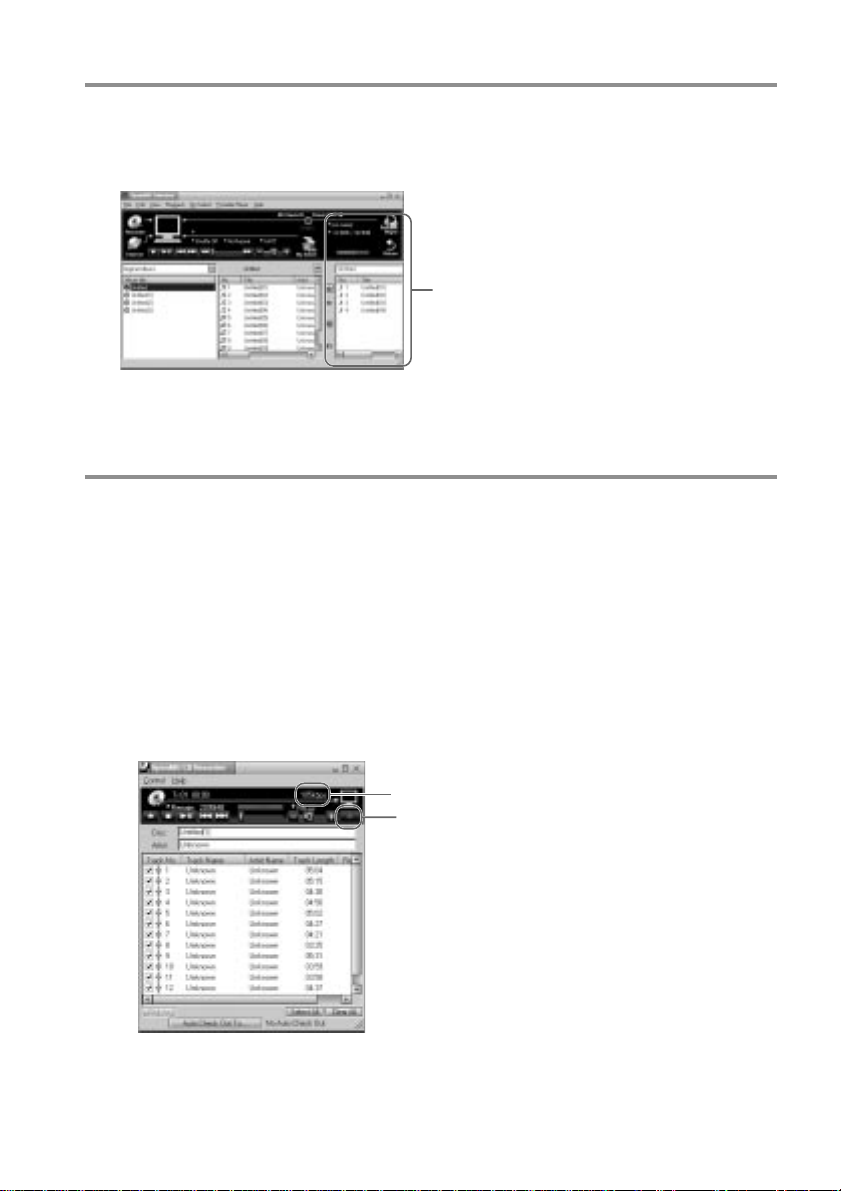
Portable Player window
When you connect Memory Stick Walkman to the computer, the Portable Player window appears
in the display on the right side of the OpenMG Jukebox.
qs
qs You can use these buttons to operate the
OpenMG Jukebox software (see page 26
for more information).
qd CHECK IN/OUT START (STOP) button:
starts or stops the Check-In/Out
qf Name of the connected portable player
(such as Memory Stick Walkman)
qg Memory space on the “Memory Stick” or
memory used for audio files, and total
memory capacity*
qd
qf
qg
qh
qj
qk
ql
qh RETURN button: closes the Portable
Player window
qj Album title of the “Memory Stick”
qk Displays the song titles recorded on the
“Memory Stick”
ql Check-In/Out buttons (to start Check-In/
Out, click the START button next)
* When using a 64MB “Memory Stick,” “61.8MB”
appears in the display as the total memory
capacity. This number is a result of subtracting
memory for the system operation of Memory Stick
Walkman.
Advanced Operations (OpenMG Jukebox)
27
Page 28

Menu Reference
Properties
Shows information on the currently selected
album/song.
OpenMG Jukebox
[File] menu
CD Recorder
Opens the OpenMG CD Recorder window.
Internet
Accesses the Web site for the EMD service
supporting OpenMG or CD database.
File Import
MP3/ WAV: Starts up OpenMG File Importer.
Windows Media: Starts up OpenMG Internet
File Importer (if available).
Settings
Displays the “Settings” window of the OpenMG
Jukebox.
Exit
Exits the OpenMG Jukebox.
[Edit] menu
Delete
Deletes the currently selected album/song.
Divide
Divides the currently played song.
Combine
Combines the selected two songs.
Get CD Info
Automatically registers audio CD information
such as the titles of an album or a song by
accessing a CD database.
URL
Displays the web pages related to an album,
registered in advance.
Rename
Changes the name of the currently selected
album/song.
Enter Search Keyword
Displays the dialog box for entering search
keywords for [Find by Artist], [Find by Song] or
[Find by Genre] of the “Various Search”
window.
Note
You cannot select this command when “Original
Album” list, “My Select Album” list or search
methods other than [Find by Artist], [Find by Song]
or [Find by Genre] are displayed.
[View] menu
Simple Mode
Switches the OpenMG Jukebox to “Simple
Mode” window.
Cover Art
Displays images registered in the album as jacket
illustrations.
Music Visualizer
Starts up Music Visualizer.
Shown only with Sony VAIO series computers in
which Media Bar 3.0 or later is installed.
Operation Panel
Shows/hides the button/control information of
the OpenMG Jukebox.
Status Bar
Shows/hides the Status Bar of the OpenMG
Jukebox.
Original Album
Displays the “Original Album” list.
My Selection
Displays the “My Select Album” list.
Various Search
Displays the album list which matches a certain
condition.
Refresh
Updates the various information shown on the
OpenMG Jukebox to the latest da ta.
[Playback] menu
Play
Plays the currently selected album/song.
Pause
Pauses playback.
Stop
Stops playback.
Next
Locates the beginning of the next song in the
currently played album.
Previous
Locates the beginning of the currently played
song.
Repeat All
Repeats all songs in the currently played album.
28
Page 29

Single Repeat
Repeats the currently played song.
No Repeat
Cancels repeat play and returns to normal
playback.
Shuffle
Turns on and off the shuffle playback which
plays the songs in an album in random order.
[My Select] menu
New
The “Edit My Select” window opens to create a
new “My Select Album”.
Rename Album
Changes the name of a “My Select Album.”
Add Songs
Adds the currently selected song to the currently
created “My Select” album.
Remove songs
Deletes the currently selected song from the
“My Select Album” shown in the “Edit My
Select” window.
Close
Closes the “Edit My Select” window.
[Portable Player] menu
Open
Opens the “Portable Player” window.
Execute
Checks in/out the “Check In/Check Out”
candidates.
Stop
Stops “Check In/Check Out” before it is
completed.
Undo
Cancels all the registration of the “Check In/
Check Out” candidates.
Check Out
Registers the currently selected album/song as a
“Check Out” candidate.
Check In
Registers the currently selected album/song as a
“Check In” candidate.
Check In All
Registers all the songs in the portable player as
“Check In” candidates.
Delete
Deletes the currently selected song from the
portable player.
Rename
Changes the name of the currently connected
portable player.
Select
When two or more portable players are
connected to the computer, switches the player
operated on the “Portable Player” window.
Initialize...
Initializes the memory of the connected portable
player.
Note
Depending on the type of the portable player to
connect to your computer, this function may not be
utilized.
You cannot use this function with Memory Stick
Walkman.
Close
Closes the “Portable Player” window.
[Help] menu
OpenMG Jukebox Help
Shows the help file for OpenMG Jukebox.
Memory Stick Walkman Help
Shows the help file for Memory Stick Walkman.
About OpenMG Jukebox
Shows the version, the CD key information, etc.
of the OpenMG Jukebox.
If you have installed the OpenMG Jukebox with
two or more CD-ROMs, the CD key of the CD
you used first is displayed here.
continued
29
Page 30

Menu Reference (continued)
Menu items for the “Simple
Mode”
Play
Plays the currently selected album/song.
Pause
Pauses playback.
Stop
Stops playback.
Next
Locates the beginning of the next song in the
currently played album.
Previous
Locates the beginning of the currently played
song.
Repeat All
Repeats all songs in the currently played album.
Single Repeat
Repeats the currently played song.
No Repeat
Cancels repeat play and returns to normal
playback.
Shuffle
Turns on/off the shuffle play with which the
songs in an album are played back in random
order.
Select Album
Selects the album for playback. The [Select
Album] dialog box appears. Choose the desired
album and click [OK].
Always On Top
Shows the “Simple Mode” window always on
top of other software.
Full Mode
Returns to the “Full Mode” window of the
OpenMG Jukebox.
Skin
To select a Skin to use in the “Simple Mode.”
The [Select Skin] dialog box appears. If more
than one Skins are registered, choose the one
you like and click [OK].
Exit
Exits the OpenMG Jukebox.
OpenMG CD Recorder
[Control] menu
Rec
Starts recording of an audio CD.
Stop
Stops recording of an audio CD.
Play
Plays an audio CD. You cannot play an audio
CD while recording is performed.
Pause
Pauses playback of an audio CD.
Eject
Ejects an audio CD.
CD Info.
Automatically registers audio CD information
such as the titles of an album or a song by
accessing a CD database.
Internet
Accesses the Web site for the EMD service
supporting OpenMG or CD database.
Select All Tracks
Selects all tracks in an audio CD for recording.
Clear All Tracks
Removes all the check marks for recording.
Settings
Displays the “Settings” window.
Launch OpenMG Jukebox
Starts up the OpenMG Jukebox.
Exit
Exits the OpenMG CD Recorder.
[Help] menu
Contents
Shows the help file for OpenMG Jukebox..
About OpenMG CD Recorder
Shows the version information of the OpenMG
CD Recorder.
30
Page 31

Transferring data
On the Windows
from the “Memory
Stick” to the
computer (Check-In)
You can return the tracks recorded on a
“Memory Stick” back to the hard drive of
your computer (Check-In). You can return
them only to the same computer from which
the tracks have been Checked-Out.
1 Connect Memory Stick Walkman to
your computer and start the
OpenMG Jukebox software.
The Portable Player window appears.
See pages 13 and 14 for details.
2 Click the track you want to Check-
In in the Portable Player window,
then click the
Click the track while pressing the Ctrl
key to choose more than one track.
To Check-In all the tracks, click the
button.
3 Click the START button.
The desired tracks are Checked-In.
During Check-In, the STOP button
flashes. When Check-In is finished, the
song titles disappear from the Portable
Player window.
To cancel Check-In
Click the STOP button.
button.
Explorer
When you connect Memory Stick Walkman to
your computer with the supplied USB cable,
you can display the data recorded on a
“Memory Stick” as an external drive (for
example, as the D drive) using the Windows
Explorer.
Data is stored in a folder called Hifi Folder.
Do not edit data that is stored in the Hifi
Folder. You cannot playback data that has
been copied or edited using the Windows
Explorer.
On data that is not stored in the
Hifi Folder
You can display data that has been recorded
on other “Memory Stick” compatible devices
(JPEG data, MPEG data, etc.). However, if
you transfer or copy data that has been
displayed on the Windows Explorer, further
normal operation will not be guaranteed. To
edit data on your computer, do not use
Memory Stick Walkman. Please use the
Memory Stick slot or a Memory Stick
adaptor.
For information on how to handle data that is
not stored in the Hifi Folder, please refer to
the instruction manual that comes with the
equipment with which the recording has been
done.
Note
Even if you display data on the Windows Explorer
without using the OpenMG Jukebox, the use of the
AC power adaptor is recommended. (If you use
only the battery, data may be broken when the
battery is exhausted)
Note on formatting
When formatting the “Memory Stick,” do not
use the format function on the Windows
Explorer. “FORMAT ERROR” (page 38) is
displayed and you cannot playback using
Memory Stick Walkman. Please follow the
instructions on how to format a “Memory
Stick” on page 23.
31
Page 32

Uninstalling the OpenMG Jukebox
Follow the instructions below on how to
uninstall the OpenMG Jukebox.
1 Click [Start]–[Settings]–[Control
Panel] to display the Control Panel.
2 Double-click [Add/Remove
programs].
The Add/Remove programs Property
window appears.
3 Click “OpenMG Jukebox” from the
list.
4 Click Add/Remove.
The OpenMG Jukebox software is
uninstalled.
Note
After installation, the compact disc may not start
playing automatically when inserted into the CDROM drive. In this case, refer to the instruction
manual or online help of the player software you are
using to set to start automatically.
32
Page 33
Other Information
LOCK
Precautions
On safety
Do not put any foreign objects in the DC IN
5.5V jack.
On power sources
• Use the AC power adaptor supplied with
this player. Do not use any other AC power
adaptor since this may cause the player to
malfunction.
On handling the “Memory Stick”
AB
• The player is not disconnected from the AC
power source (mains) as long as it is
connected to the wall outlet, even if the
player itself has been turned off.
• If you are not going to use this player for a
long time, be sure to disconnect the power
supply. To remove the AC power adaptor
from the wall outlet, grasp the adaptor plug
itself; never pull the cord.
On installation
• Never use the player where it will be
subjected to extremes of light, temperature,
moisture or vibration.
• Never wrap the player in anything when it
is being used with the AC power adaptor.
Heat build-up in the player may cause
malfunction or damage.
On heat build-up
Heat may build up in the player while
charging if it is used for an extended period
of time.
C
• When the “Memory Stick” erasure
prevention switch is set to “LOCK,” data
cannot be recorded, erased or edited.(B)
• The tactile protrusion on the rear surface of
“MagicGate Memory Stick” distinguishes it
from a general “Memory Stick.”(C)
• Do not attach any other material than the
supplied label on the label space.(D)
• Attach the label so that it does not stick out
from the proper attachment location.
• Do not touch the “Memory Stick” connector
with your finger or metallic objects.(A)
• Do not bend, drop or apply strong shock to
the “Memory Stick.”
• Do not disassemble or modify the “Memory
Stick.”
• Do not allow the “Memory Stick” to get
wet.
• Do not use or store the “Memory Stick” in a
location that is subject to:
- Extremely high temperature, such as in a
car parked in the sun
- Direct sunlight
- High humidity or places with corrosive
substances
• To prolong the life of the “Memory Stick,”
use the supplied storage case.
D
Other Information
continued
33
Page 34

Precautions (continued)
On the headphones
Road Safety
Do not use headphones while driving,
cycling, or operating any motorized vehicle.
It may create a traffic hazard and is illegal in
many areas. It can also be potentially
dangerous to play your player at high
volume while walking, especially at
pedestrian crossings. You should exercise
extreme caution or discontinue use in
potentially hazardous situations.
Preventing hearing damage
Avoid using headphones at high volume.
Hearing experts advise against continuous,
loud and extended play. If you experience a
ringing in your ears, reduce the volume or
discontinue use.
Caring for others
Keep the volume at a moderate level. This
will allow you to hear outside sounds and to
be considerate of the people around you.
On cleaning
• Clean the player casing with a soft cloth
slightly moistened with water or a mild
detergent solution. Do not use any type of
abrasive pad, scouring powder or solvent
such as alcohol or benzene as it may mar the
finish of the casing.
• Clean the headphones plug and extension
cord plug periodically.
If you have any questions or problems
concerning your Memory Stick Walkman,
please consult your nearest Sony dealer. (If
trouble occurred when the “Memory Stick”
was in the player, we recommend that the
“Memory Stick” be left in the player when
you consult your Sony dealer so that the
cause of trouble may be better understood.)
34
Notes on the rechargeable battery
• Be sure to use the supplied AC power
adaptor for charging.
• The charging time may vary depending on
the battery condition.
• When a rechargeable battery is charged for
the first time or charged after a long period
of disuse, battery life may be shorter than
usual. Repeat discharging and recharging a
few times. The battery life should return to
normal.
• When the battery life of a fully charged
rechargeable battery becomes about half the
normal life, you may need to replace the
battery. Please contact your nearest Sony
dealer.
• This player has a built-in lithium ion
battery. When you dispose of the player, be
sure to dispose of it properly.
For the customers in the U.S.A.
and Canada
DISPOSAL OF LITHIUM ION
BATTERY.
LITHIUM ION BATTERY.
DISPOSE OF PROPERLY.
This unit has a built-in lithium ion battery.
Do not attempt to remove the battery from
the unit.
Please consult your nearest Sony Service
Center or Factory Service Center to have the
battery removed from the unit and disposed
of properly.
Note: In some areas the disposal of lithium
ion batteries in household or business trash
may be prohibited.
For the Sony Service Center nearest you call:
1-800-222-SONY (United States only)
For the Sony Factory Service Center nearest
you call:
416-499-SONY (Canada only)
Caution: Do not handle damaged or leaking
lithium ion batteries.
Voor de Klanten in Nederland
Bij dit product zijn batterijen
geleverd. Wanneer deze leeg zijn,
moet u ze niet weggooien maar
inleveren als KCA.
Page 35
Troubleshooting
If you experience any of the following difficulties while using Memory Stick Walkman, use this
troubleshooting guide to help you remedy the problem. Should any problem persist, consult your
nearest Sony dealer. For trouble concerning operations while connecting with your computer,
please refer to the supplied software‘s online help “Troubleshooting” contents, too.
To reset the player
If Memory Stick Walkman does not operate
normally even after checking the troubleshooting
guide below, press the RESET button on the rear of
Memory Stick Walkman with a thin object and
hold it there for more than one second.
What happened ?
On playback
Symptom
There is no sound.
The volume does not increase.
Sound is distorted.
There is no sound from the right
channel of the headphones.
The same track is repeated while in
Shuffle mode.
Playback has stopped suddenly.
Cannot playback audio data with
date limits.
The sound is not normal after I
reset the player.
Cause/Remedy
c Adjust the volume. (page 16)
c Set the AVLS function to “NORM.” (page 20)
c Record with a higher bps value. (page 15)
c Make sure that the headphones plug is connected securely.
c If you stop playback, the player reshuffles the tracks and the
track played before stopping may play again as the first
selected track.
c The battery is exhausted. You need to charge it. (page 10)
c Release and reinsert the “Memory Stick” a few times to clean
the terminals.
c You must set the date in the menu. (page 24)
c The date has expired.
c The erasure prevention switch is on LOCK.
c You must press the RESET button longer. Press the RESET
button with a thin object for more than one second. (page 35)
RESET button
On the display window
Symptom
The backlight is off.
The LCD is light/dark.
“s” appears instead of the album
title.
Cause/Remedy
c Set the LIGHT setting to OPR (three seconds after each
operation) or ON (during operation) in the menu. (page 22)
c Set the CONTRAST setting in the menu. (page 22)
c Use the OpenMG Jukebox to rename the title with characters
which can be displayed on the player.
continued
35
Page 36

Troubleshooting (continued)
On charging
Symptom
The battery does not last even
when recharged.
The battery is quickly exhausted.
Charging stops just after
connecting the supplied AC power
adaptor.
Cause/Remedy
c If you use the player where the temperature is below 0°C
(32°F), the battery does not function.
c You need to replace the battery. Please contact your nearest
Sony dealer.
c When you connect the player to your computer, use the
supplied AC power adaptor, otherwise the battery is quickly
exhausted. (page 13)
c The battery is full. (If the charging stops even when the battery
is low, this may be due to a problem with the battery life. Please
contact your nearest Sony dealer.)
On the connection with the computer
Symptom
“PC CONNECT” does not appear
in the display window when
connecting to the computer with
the supplied USB cable.
The player is suddenly
disconnected and “PC CONNECT”
disappears from the LCD.
The computer does not identify the
player when it is connected to the
computer.
There are only a few songs I can
Check-Out. (The recordable time is
short.)
After connecting to the computer,
the drive appears but there is
nothing inside.
The computer/player do not
operate normally when connected.
“Failed to authenticate the portable
player” appears on the display
when the player is connected to the
computer.
Cause/Remedy
c Please wait for the authentication of the OpenMG Jukebox
(page 41) to be finished.
c If another software is active on your computer, wait for a
while, then reconnect the USB cable. If the problem persists,
disconnect the USB cable, restart your computer, then connect
the USB cable to your computer again.
c Make sure the USB cable is correctly connected.
c The supplied AC power adaptor was not connected and the
battery is exhausted. You need to connect the supplied AC
power adaptor to the player.
c Make sure the USB cable is correctly connected. (page 13)
c If there is data other than audio files in the “Memory Stick,”
copy them to your computer to free memory on the “Memory
Stick.”
c Make sure the “Memory Stick” is inserted and reconnect the
player to your computer.
c If you are connecting both devices with a USB hub or a USB
extension cable, normal operation is not guaranteed. Please use
only the supplied USB cable.
c You cannot use this player anymore. Please contact your
nearest Sony dealer.
36
Page 37

Other
Symptom
The buttons do not operate.
There is no beep sound to indicate
that operation has been accepted.
The EJECT lever does not work.
Cannot connect the DC/USB
adaptor.
Cannot release the DC/USB adaptor.
Cannot insert the “Memory Stick.”
The current time is reset.
The player gets warm.
Cannot use a “Memory Stick” used
on other devices.
Cause/Remedy
c Make sure the HOLD switch is OFF. (page 21)
c You must recharge the battery. (page 10)
c Set the BEEP setting to ON in the menu. (page 21)
c You must release the DC/USB adaptor. (page 10)
c Make sure the DC/USB adaptor is correctly connected with the
SONY logo on the upper side. (page 10)
c Remove and reinsert the “Memory Stick.”
c Press the Release button gently and then pull the DC/USB
adaptor. (page 10)
c Make sure the “Memory Stick” is correctly inserted as shown
on Memory Stick Walkman. (page 13)
c If you have reset the player by pressing the RESET button, the
current time is reset. (page 35)
c The battery is low and needs to be charged.
c The player gets warm during charging and playback.
c Only “MagicGate Memory Stick” can be used with this player.
c If the “Memory Stick” has been formatted using a computer,
backup the files of the“Memory Stick” on your computer if
necessary, and reformat the “Memory Stick” using this player.
(page 23)
continued
37
Page 38

Troubleshooting (continued)
Error messages
Follow the instructions below if an error message appears in the display.
Message
ACCESS
CANNOT PLAY
FILE ERROR
FORMAT ERROR
HI DC IN
HOLD
LEGAL LOCK
LOCKED
LOW BATT
LOW DC IN
NO AUDIO
Meaning
Accessing the “Memory Stick.”
• The player cannot playback certain
contents of this “Memory Stick” due
to a difference in format.
•
The data‘s playback date has expired.
• The current date has not been set to
playback data with date limits.
• Check-Out has been interrupted
forcefully.
• Cannot read the data.
• The data is not normal.
The inserted “Memory Stick” contains
a data format which is not supported
by Memory Stick Walkman. (For
example, if you format the “Memory
Stick” using the computer.)
The DC IN voltage is too high. (You
are not using the supplied AC power
adaptor.)
The HOLD switch is ON, and no
operating buttons are available (except
the EJECT lever).
The erasure prevention switch on the
“Memory Stick” is on LOCK while
trying to playback data with date
limits.
The erasure prevention switch of the
“Memory Stick” is on LOCK.
The battery is low, and needs to be
charged.
The DC IN voltage is too low. (You
are not using the supplied AC power
adaptor. The AC power adaptor or
DC/USB adaptor are not connected
correctly.)
•There is no music data in
“MagicGate Memory Stick.”
•The “Memory Stick” is not
“MagicGate Memory Stick.”
Remedy
This is not an error. Please wait for
access to be finished. Do not take out the
“Memory Stick” or unplug the AC
power adaptor.
• You need to set the current date to
playback data with date limits.
• If there is data in a different format,
you must delete that data from the
“Memory Stick.” See “To delete
abnormal data from the Memory
Stick,” on page 39.
You need to Check-In data you are able
to Check-In into your computer, then
format the “Memory Stick” using this
player. (See “To delete abnormal data
from the Memory Stick” on page 39.)
You must format the “Memory Stick”
following the instructions on page 23.
(You must format the “Memory Stick”
using this player. If you format the
“Memory Stick” using the computer,
you may Check-In/Out, but you cannot
playback using this player.)
You must use the supplied AC power
adaptor.
This is not an error. Switch the HOLD
switch to OFF before operating the
buttons.
Slide the erasure prevention switch on
the “Memory Stick” to OFF.
Switch the erasure prevention switch to
OFF when connecting to your computer
or formatting a “Memory Stick.”
You must charge the battery.
You must use the supplied AC power
adaptor. Make sure it is correctly
connected.
Check that “MagicGate Memory Stick”
is inserted. If there is no music data in
“MagicGate Memory Stick,” use the
OpenMG Jukebox to Check-Out music
items.
38
Page 39

Message
NO DATA
NO STICK
PC CONNECT
STICK ERROR
Meaning
There are no tracks inside
“MagicGate Memory Stick.”
There is no “Memory Stick” inserted.
The player is connected to the
computer.
You cannot access the “Memory
Stick,” or the data inside the
“Memory Stick” or the player itself
is not normal.
Remedy
Use the OpenMG Jukebox to Check-Out
music items.
Insert a “Memory Stick.”
This is not an error. You can operate
using the OpenMG Jukebox software, but
you cannot operate the controls on the
player.
Eject and reinsert the “Memory Stick” a
few times. If this does not solve the
problem, Check-In data items into the
computer, and then format the “Memory
Stick” using this player. (See below “To
delete abnormal data from the Memory
Stick.”)
If the problem persists, bring both the
player and the “Memory Stick” to your
nearest Sony dealer.
To delete abnormal data from the “Memory Stick”
If “CANNOT PLAY,” “FILE ERROR,” “STICK ERROR” appears in the display window, there is
abnormal data in the “Memory Stick.”
Please follow the instructions below to delete abnormal data (data you cannot playback).
1 Connect Memory Stick Walkman to your computer and open the Portable Player window.
(page 13)
2 If the cause of the abnormal data is clear (data of which the playback date limits have expired,
etc.), delete the data from the Portable Player window.
3 If the problem persists, click the button on the OpenMG Jukebox to Check-In all data you
are able to Check-In.
4 Disconnect the player from the computer and then format the “Memory Stick” using the menu.
(page 23)
Note
If you format the “Memory Stick,” data that has been recorded using other devices will be deleted, too. If there
are other data in the “Memory Stick,” check the data contents using a compatible equipment before formatting
the “Memory Stick.”
39
Page 40

Specifications
Recording time (when using the
supplied 64MB “MagicGate Memory
Stick”
Approx. 60 min. (132kbps)
Approx. 80 min. (105kbps)
Approx. 120 min. (66kbps)
Sampling frequency response
44.1kHz
Recording format
ATRAC3
Frequency response
20 to 20 000 Hz (single signal measurement)
Output
Headphone: stereo mini-jack
Signal-to-noise ratio (S/N)
More than 80dB (excluding 66 kbps)
Model for France only: more than 78dB
Dynamic range
More than 85dB (excluding 66 kbps)
Operating temperature
5˚C to 35˚C (-41˚F to 95˚F)
Power source
• DC IN 3.7V (internal Lithium-ion battery)
• DC IN 5.5V (supplied AC power adaptor)
Supplied accessories
64MB “MagicGate Memory Stick”
AC power adaptor
DC/USB adaptor
Headphones
Headphones extension cord
USB cable
CD-ROM
Strap (For U.S.A. and Canadian model only)
Carrying pouch (except for U.S.A. and Canadian
model)
Operating Instructions
Optional accessories
“MagicGate Memory Stick” MSG-32A (32MB)
Design and specifications are subject to change
without notice.
MSG-64A (64MB)
Note on the supplied “Magic Gate Memory Stick”
For the customers in the United
States
This device complies with Part 15 of the FCC Rules.
Operation is subject to the following two conditions:
(1) This device may not cause harmful interference,
and (2) this device must accept any interference
received, including interference that may cause
undesired operation.
For the customers in Canada
This class B digital apparatus complies with
Canadian ICES-003.
Battery life
Approx. 4 hours
Dimensions (approx.)
37 × 96.3 × 19.2 mm (1 1/2 × 3 7/8 × 25/32 inches)
(w/h/d, projecting parts not included)
Mass (approx.)
70g (2.5 oz) (internal battery and a “Memory Stick”
included)
40
Page 41

Glossary
MagicGate
Copyright protection technology that consists of authentication and encryption technology.
Authentication ensures that protected content is transferred only between compliant devices and
media, and that protected content is recorded and transferred in an encrypted format to prevent
unauthorized copying or playback.
Note
guarantee conversion among other media.
“MagicGate Memory Stick”
A compact Integrated Circuit recording medium “Memory Stick” equipped with “MagicGate”
copyright protection technology.
“Memory Stick”
“Memory Stick” is a portable and compact Integrated Circuit recording medium. There are two
types of “Memory Stick”: “MagicGate Memory Stick” equipped with “MagicGate” copyright
protection technology and a normal “Memory Stick” not equipped with the copyright protection
technology. You can record image files, audio files, and sound files using “Memory Stick”
compatible audio visual devices, or record data from the computer. Data with different formats
can be stored in the same “Memory Stick.” (Please refer to the instruction manuals that come with
the devices to check which format the equipment is able to read.)
For example, you can store image files in the space available on “MagicGate Memory Stick” using
the respective equipment even if there are already audio files in “MagicGate Memory Stick.”
OpenMG
Copyright protection technology that securely manages music content from the EMD/Audio CD
on a personal computer. Application software that is installed on the computer encrypts the
digital music content when recording on the hard drive. This allows you to enjoy music content
on the computer, but prevents unauthorized transmission of this content across a network (or
elsewhere). This PC copyright protection complies with “MagicGate,” and allows you to transfer
digital music content from a PC’s hard drive to a compliant device.
is terminology denoting the copyright protection system developed by Sony. It does not
ATRAC3
ATRAC3, which stands for Adaptive Transform Acoustic Coding3, is audio compression
technology that satisfies the demand for high sound quality and high compression rates.
The ATRAC3 compression rate is double that of the Mini Disc, resulting in increased data
capacity for the media.
SDMI
SDMI which stands for Secure Digital Music Initiative, is a forum that consists of over 130
companies in the fields of recorded audio content, computers, and consumer electronics,
dedicated to developing an integrated method of copyright protection technology that can be
used worldwide.
SDMI is working to create a framework for preventing improper usage of audio files and to
promote legal music distribution services. The copyright protection technologies “OpenMG” and
“MagicGate” are based upon the SDMI standard.
continued
41
Page 42

Glossary (continued)
“Check-In /Check-Out”
Check-Out is to transfer music files managed on a personal computer by an OpenMG-compliant
software to a portable player (such as Memory Stick Walkman). Returning the Checked-Out
music files back to that computer is to Check-In. (You cannot move a Checked-Out audio data to
another computer.)
You can also Check-Out a music file, Check it back In, and then Check it Out again.
The SDMI rules provide that up to four copies of a music file can be created unless a special
condition for usage is set. Thus, unless a special restriction exists while one copy is saved in the
computer, the other three can be Checked-Out to the Portable Players.
MP3
Abbreviation for MPEG-1 Audio Layer3. A standard for audio data compression determined by
the Motion Picture Experts Group, which is an ISO (International Organization for
Standardization) working group.
It enables compression of audio data to about 1/10 of the data size of a standard compact disc.
Since the MP3 encoding algorithm is disclosed, there are various encoders/decoders compliant
with this standard, including freeware that is available for no charge. Thus, the MP3 standard is
widely used in the computer field.
Bit rate
Quantity, per second, of information. The unit is bps (bit per second). You can choose from
132kbps/105kbps/66kbps when recording a compact disc or converting an MP3/WAV file to an
ATRAC3 file. For example, 105kbps means there are 105000 bits of information per second being
transferred. Bigger the number, larger is the information. When comparing audio files of the
same format, you can enjoy a better sound quality when recorded at 132kbps than at 105kbps,
also better at 103kbps than at 66kbps. (Audio files cannot be compared if of different format)
42
Page 43

Restrictions on copyright protection by OpenMG
This product (NW-MS7) features OpenMG, a copyright protection technology developed by Sony
to protect music copyrights.
OpenMG uses a high-level cryptographic technology to protect music contents with computers.
Users should be notified of the restrictions mentioned below.
1. This product can only be used with a computer on which the supplied OpenMG Jukebox software has been
installed.
2. Music recorded on the hard disk using the OpenMG Jukebox software cannot be played if copied onto other
computers.
3. Music contents Checked-Out from a computer cannot be played if copied onto other computers.
4. Music contents Checked-Out from a computer must be Checked-In to the same computer. You cannot CheckIn to other computers.
5. Installation of the same OpenMG Jukebox software onto other computers is not permitted.
6. Usage Rules for using music
If a Usage Rule is included in the music by way of the copyright holder or the distributor, operation will be
restricted to use permitted by the Usage Rule. For music, such as compact discs, that does not contain a Usage
Rule, the Default Usage Rule of SDMI will be followed. This Default Usage Rule states that one file can be
Checked-Out up to three times only.
7. On music contents that are not compatible with the OpenMG Jukebox software
Under the supervision of SDMI, this software prohibits recording of music with a copy prohibition signal.
8. Upgrading the supplied OpenMG Jukebox
This software was developed in accordance with the current arrangement between Sony and SDMI. If this
arrangement is modified in the future, some of the software functions may become unavailable. Sony may
offer an upgrade kit in this case at additional user expense.
43
Page 44

Looking at the controls
Memory Stick Walkman
(front)
1 i (Headphones) jack (page 16)
2 Display (page 17, 20)
3 VOLUME +/- button (page 16)
4 Jog lever (page 16 - 25)
5 x (stop) button (page 16)
6 HOLD switch (page 21)
(rear)
7
7 Strap hole for attaching the strap
(supplied with U.S.A. model only)
8 RESET button (page 35)
9 MENU button (page 18 - 25)
0 DISPLAY button (page 20)
qa EJECT lever (page 17)
qs DC/USB adaptor plug (page 10)
qd Memory Stick slot (page 13, 16)
Display
44
1 Mega-bass (page 18)
2 AVLS (page 20)
3 Playback mode (page 19)
4 Battery remain indication (page 10)
5 Information
Track name, track number, counter, menu
items, error messages, etc., are displayed.
(page 17, 20)
Page 45

DC/USB adaptor
(front)
1 BATTERY CHARGE lamp (page 10)
2 Connector (page 10)
3 DC IN 5.5 V jack (page 10, 13)
(rear)
4 Release button (page 10)
5 USB jack (for the supplied USB cable)
(page 13)
45
Page 46

Index
A
AC power adaptor 9, 10, 13, 31, 33, 36
album title 15, 17, 20, 26, 27
ATRAC3 41
AVLS 20
B
Backlight 22, 35
BASS 18
Battery 10, 34, 37
BATTERY CHARGE lamp
10, 45
BEEP 21
beginning of the track 17
Bit rate 15, 42
C
CD (compact disc) 14
CD drive 14
CD Recorder 14, 30
CD-ROM 11
charging 10, 34, 37
Check-In 5, 31, 42
Check-Out 5, 15, 39, 42
computer 4, 11, 13, 31, 36
CONTRAST 22
copyright protection technology
5, 41
D
DATE&TIME 24
DC/USB adaptor 9, 10, 13, 36, 45
display 17, 20
DISPLAY button 20
display mode 20
download 4, 12
driver (USB) 13
E
EMD services 12
erasure prevention switch
13, 23, 33, 35
Explorer 31
F
FORMAT 23, 31
formatting 23, 31, 38
G
go backward 17
go forward 17
H
hard drive 4, 13, 31
headphones 9, 16, 34
extension cord 9, 16
help file 8, 29, 30
HOLD 16, 21
Hold switch 16, 21
I
install 11
Internet (EMD services)12
J
Jog lever 16, 18, 21, 25
L
LCD 22
backlight 22
contrast 22
LIGHT 22
listen to music 16
46
Page 47

M
MagicGate 4, 6, 41
“MagicGate Memory Stick”
4, 9, 13, 16, 41
“Memory Stick” 6, 13, 16, 41
insert 13, 16
Menu 25, 28
MP3 42
O
online help 8
OpenMG 4, 41
OpenMG Jukebox software
4, 11, 14, 26, 28
OpenMG CD Recorder 14, 30
optimizing the CD drive
14
T
TITLE 25
transferring 13, 31
to your computer 31
to the “Memory Stick” 13
troubleshooting 35
U
upgrading 43
uninstalling 32
Usage Rule 43
USB cable 9, 13, 36, 45
USB driver 13
V
volume 16
P
pause 17
playback 16
Portable Player window
14, 27
previous tracks 17
Q
quit (software) 26
R
record 14
REPEAT 19
RESET button 35, 44
restrictions 43
RETURN 25
S
SDMI 4, 41
set the current time 24
song title 17, 20, 25, 26
start (software) 14
succeding tracks 17
supplied accessories 9
W
WAV format 4
window 26
Windows Explorer 31
47
Page 48

EN
Sony Corporation
48
Printed in Japan
 Loading...