

Page 1

VIDEO CD/CD/LD Player
VIDEO CD/CD/LD Player
MDP-V9K
3-856-640-13(1)
Operating Instructions
®œ•Œª°©˙Æ—
®œ•Œª°©˙Æ—
EN
C¡c
C¬
Sony Corporation
MDP-V9K
1996 by Sony Corporation
Page 2
WARNING
To prevent fire or shock hazard, do not expose the unit
to rain or moisture.
To avoid electrical shock, do not open the cabinet. Refer
servicing to qualified personnel only.
This VIDEO CD/CD/LD Player is classified as a
CLASS 1 LASER product.
• If the unit is brought directly from a cold to a warm
location, moisture may condense inside the unit. If
this happens, playback may not start. When you first
install the unit, or when you move it from a cold to a
warm location, wait for about one hour before
operating the unit.
Operating voltage and AC plug
This unit does not have a voltage selector. You can
operate the unit between 110 and 240 V AC, 50/60Hz.
CAUTION
The use of optical instruments with this product
will increase eye hazard.
As the laser beam used in this player is harmful to
the eyes, do not attempt to disassemble the cabinet.
Refer servicing to qualified personnel only.
Precautions
Safety
• If any liquid or solid object falls into the cabinet,
unplug the unit and have it checked by qualified
personnel before operating it any further.
• The unit is not disconnected from the house current
as long as it is connected to the AC outlet, even if the
unit itself has been turned off.
• Unplug the unit from the wall outlet if you do not
intend to use it for an extended period of time. To
disconnect the cord, pull it out by the plug, never by
the cord itself.
• Take care that your fingers or other objects do not
get pinched by the front cover of the unit when you
place a disc on the disc tray. The front cover
automatically slides up and down when the disc tray
opens and closes.
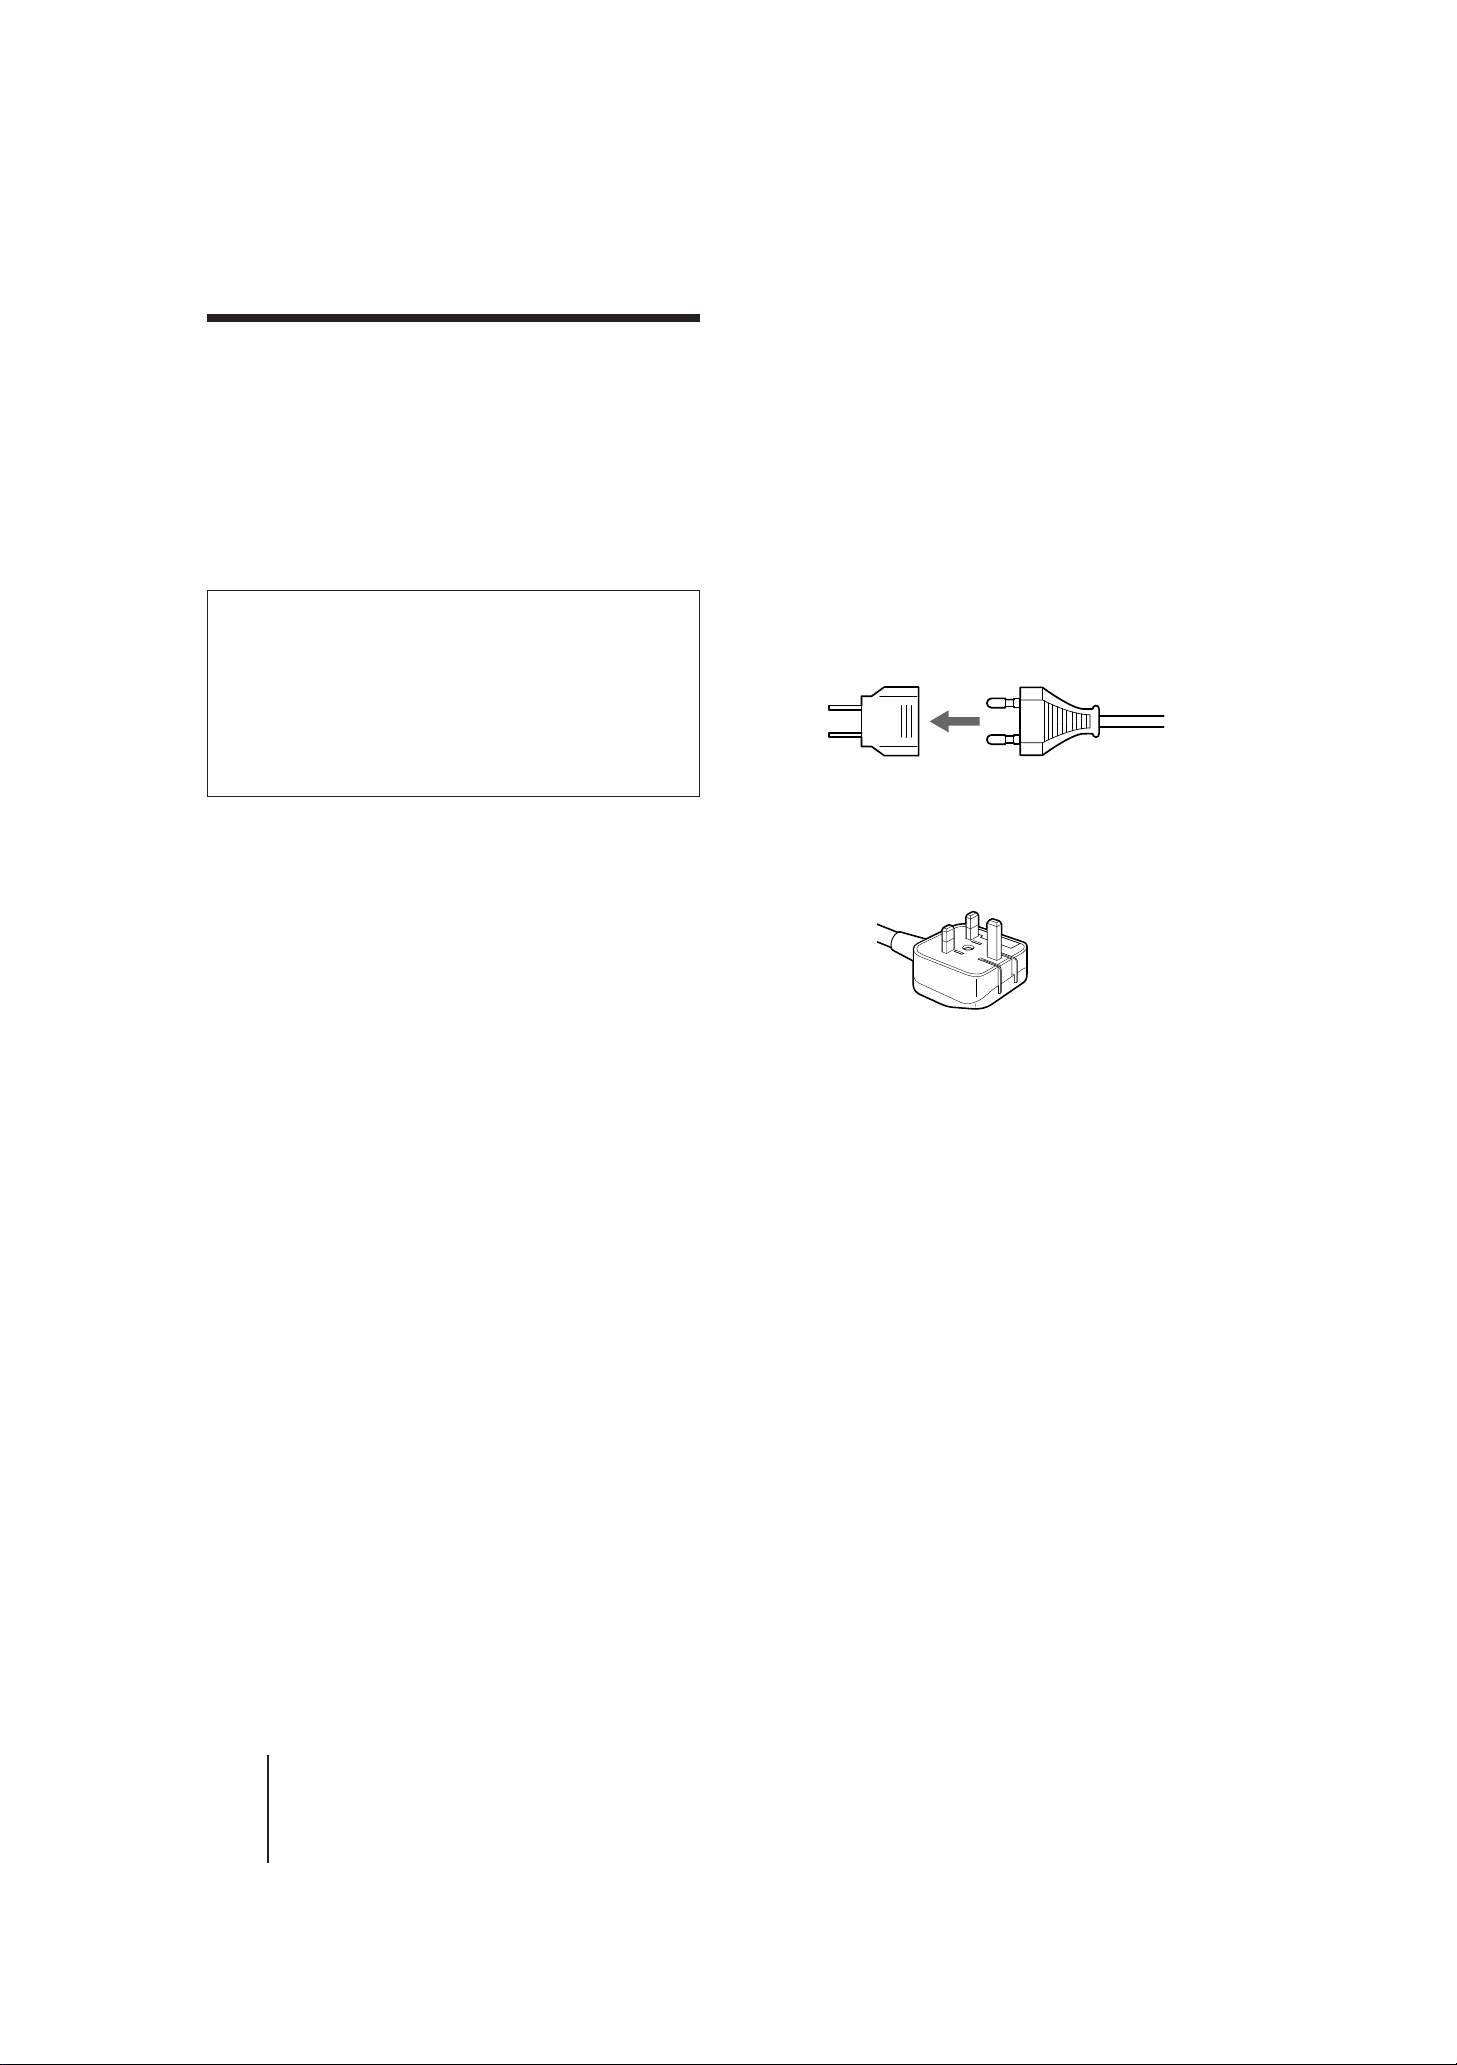
If the AC plug of your unit does not fit into the wall
outlet, attach the AC plug adaptor (supplied with
models other than Hong Kong model).
Model for Hong Kong
The model for Hong Kong has an AC plug as shown
below. The AC plug adaptor is not supplied with these
units.
If you have any questions or problems concerning your
unit, please contact your nearest Sony dealer.
Installing
• Allow adequate air circulation to prevent internal
heat buildup.
• Do not place the unit on surfaces (rugs, blankets,
etc.) or near materials (curtains, draperies) that may
block the space under the unit.
• Do not install the unit near heat sources such as
radiators or air ducts, or in a place subject to direct
sunlight, excessive dust, mechanical vibration or
shock.
• Do not install the unit in an inclined position. It is
designed to be operated in a horizontal position
only.
• Do not place heavy objects on the unit.
• Do not place the unit on soft surfaces (such as rugs,
blankets, or matresses) or any projections that may
block the movement of the front cover.
-EN
2
Introduction
MDP-V9K.3-856-640-13 (En, C1, C2)
Page 3

Table of contents
4 Welcome!
4 About this manual
Getting Started
5 Step 1: Unpacking
5 Step 2: Inserting batteries into the remote commander
6 Step 3: Connecting the player
Basic Operations
10 Playing a disc
13 Playing karaoke
15 Playing a VIDEO CD using PBC functions (PBC Playback)
Additional Operations
16 Understanding on-screen indications
18 Selecting a chapter or track directly (Chapter/Track Search)
19 Searching by frame, time, or scene number
(Frame/Time/Scene Search)
20 Searching for a particular point on a disc
22 Viewing frame-by-frame action
23 Resuming LD/VIDEO CD playback (Auto Resume)
24 Resuming VIDEO CD Playback from a point you like
(Book Mark)
25 Playing a section repeatedly (Repeat Play)
27 Playing songs in random order (Shuffle Play)
29 Playing songs in any order you like (Program Play)
30 Playing a disc within a specified period of time (Auto Program
Play)
32 Using the sound control functions
33 Selecting karaoke song order (Reserve)
36 Using karaoke functions
EN
Additional Information
42 Troubleshooting
43 Specifications
44 Optical discs
46 Index to parts and controls
48 Glossary
48 Index
Introduction
-EN
3
MDP-V9K.3-856-640-13 (En, C1, C2)
Page 4

Welcome!
Thank you for purchasing the Sony Laser Disc Player.
Before operating the unit, please read this manual thoroughly and
retain it for future reference.
The MDP-V9K, an easy-to-operate laser disc player, allows you to:
• Play many types of optical discs, LDs, CDs and VIDEO CDs
• Play a double sided LD without turning it over
• Play VIDEO CDs which conform to Ver. 2.0 of VIDEO CD standards,
using its Play Back Control (PBC) functions which allow you to:
– Perform interactive playback using menu screens
– View high-resolution still pictures
• Mark a point on a VIDEO CD where you want to resume playback
—Book Mark
• The COLOR SYSTEM selector allows you to play PAL VIDEO CDs
regardless of the TV system (PAL, NTSC or Multi Monitor system)
• Continue an LD/VIDEO CD from the exact point at which you
stopped— Auto Resume
• Use enjoyable functions such as Program, Shuffle, Auto Program or
Repeat play
• Play karaoke (sing along with a disc)
The player enters karaoke mode when a microphone is connected.
Features include:
– 9 song reservation from two discs for non-stop karaoke
entertainment—Reserve
– Digital key controller to adjust backup key to your voice*
– Up to four microphones can be used by connecting to two
microphone jacks on each front and rear panel
– Digital echo to create the ideal mood
– Singing along with the original vocals—Vocal Select*
– Automatic applause—Auto Effect*
– Getting help when you forget words or melody—Vocal Support
– Adding richness to your voice—Karaoke Star
– Playing karaoke with non-karaoke discs—Karaoke Pon*
– Playing karaoke with video tapes—LINE IN input *
– Pausing after a song is played—Auto Pause *
* These functions are also available in non-karaoke mode.
About this manual
-EN
4
Introduction
Conforming to Ver. 2.0 of VIDEO CD standards
This player conforms to Ver. 1.0, Ver. 1.1, and Ver. 2.0 of the VIDEO CD
standards. If you use a Ver. 2.0 VIDEO CD, Play Back Control (PBC)
functions (the new part of Ver. 2.0 of the VIDEO CD standards) enable
you to play the disc interactively following menus on the screen. You
can also enjoy high-resolution still pictures, as well as normal playback
of moving pictures and sound.
Compatible color systems
This player plays LDs recorded in the NTSC color system,
and VIDEO CDs in both the NTSC and PAL color systems.
Conventions
• Instructions in this manual describe the controls on the remote.
You can also use the controls on the player if they have the same or
similar names as those on the remote.
• The following icon is used in this manual:
z Indicates hints and tips for making the task easier.
MDP-V9K.3-856-640-13 (En, C1, C2)
Page 5
Step 1
Unpacking
Step 2
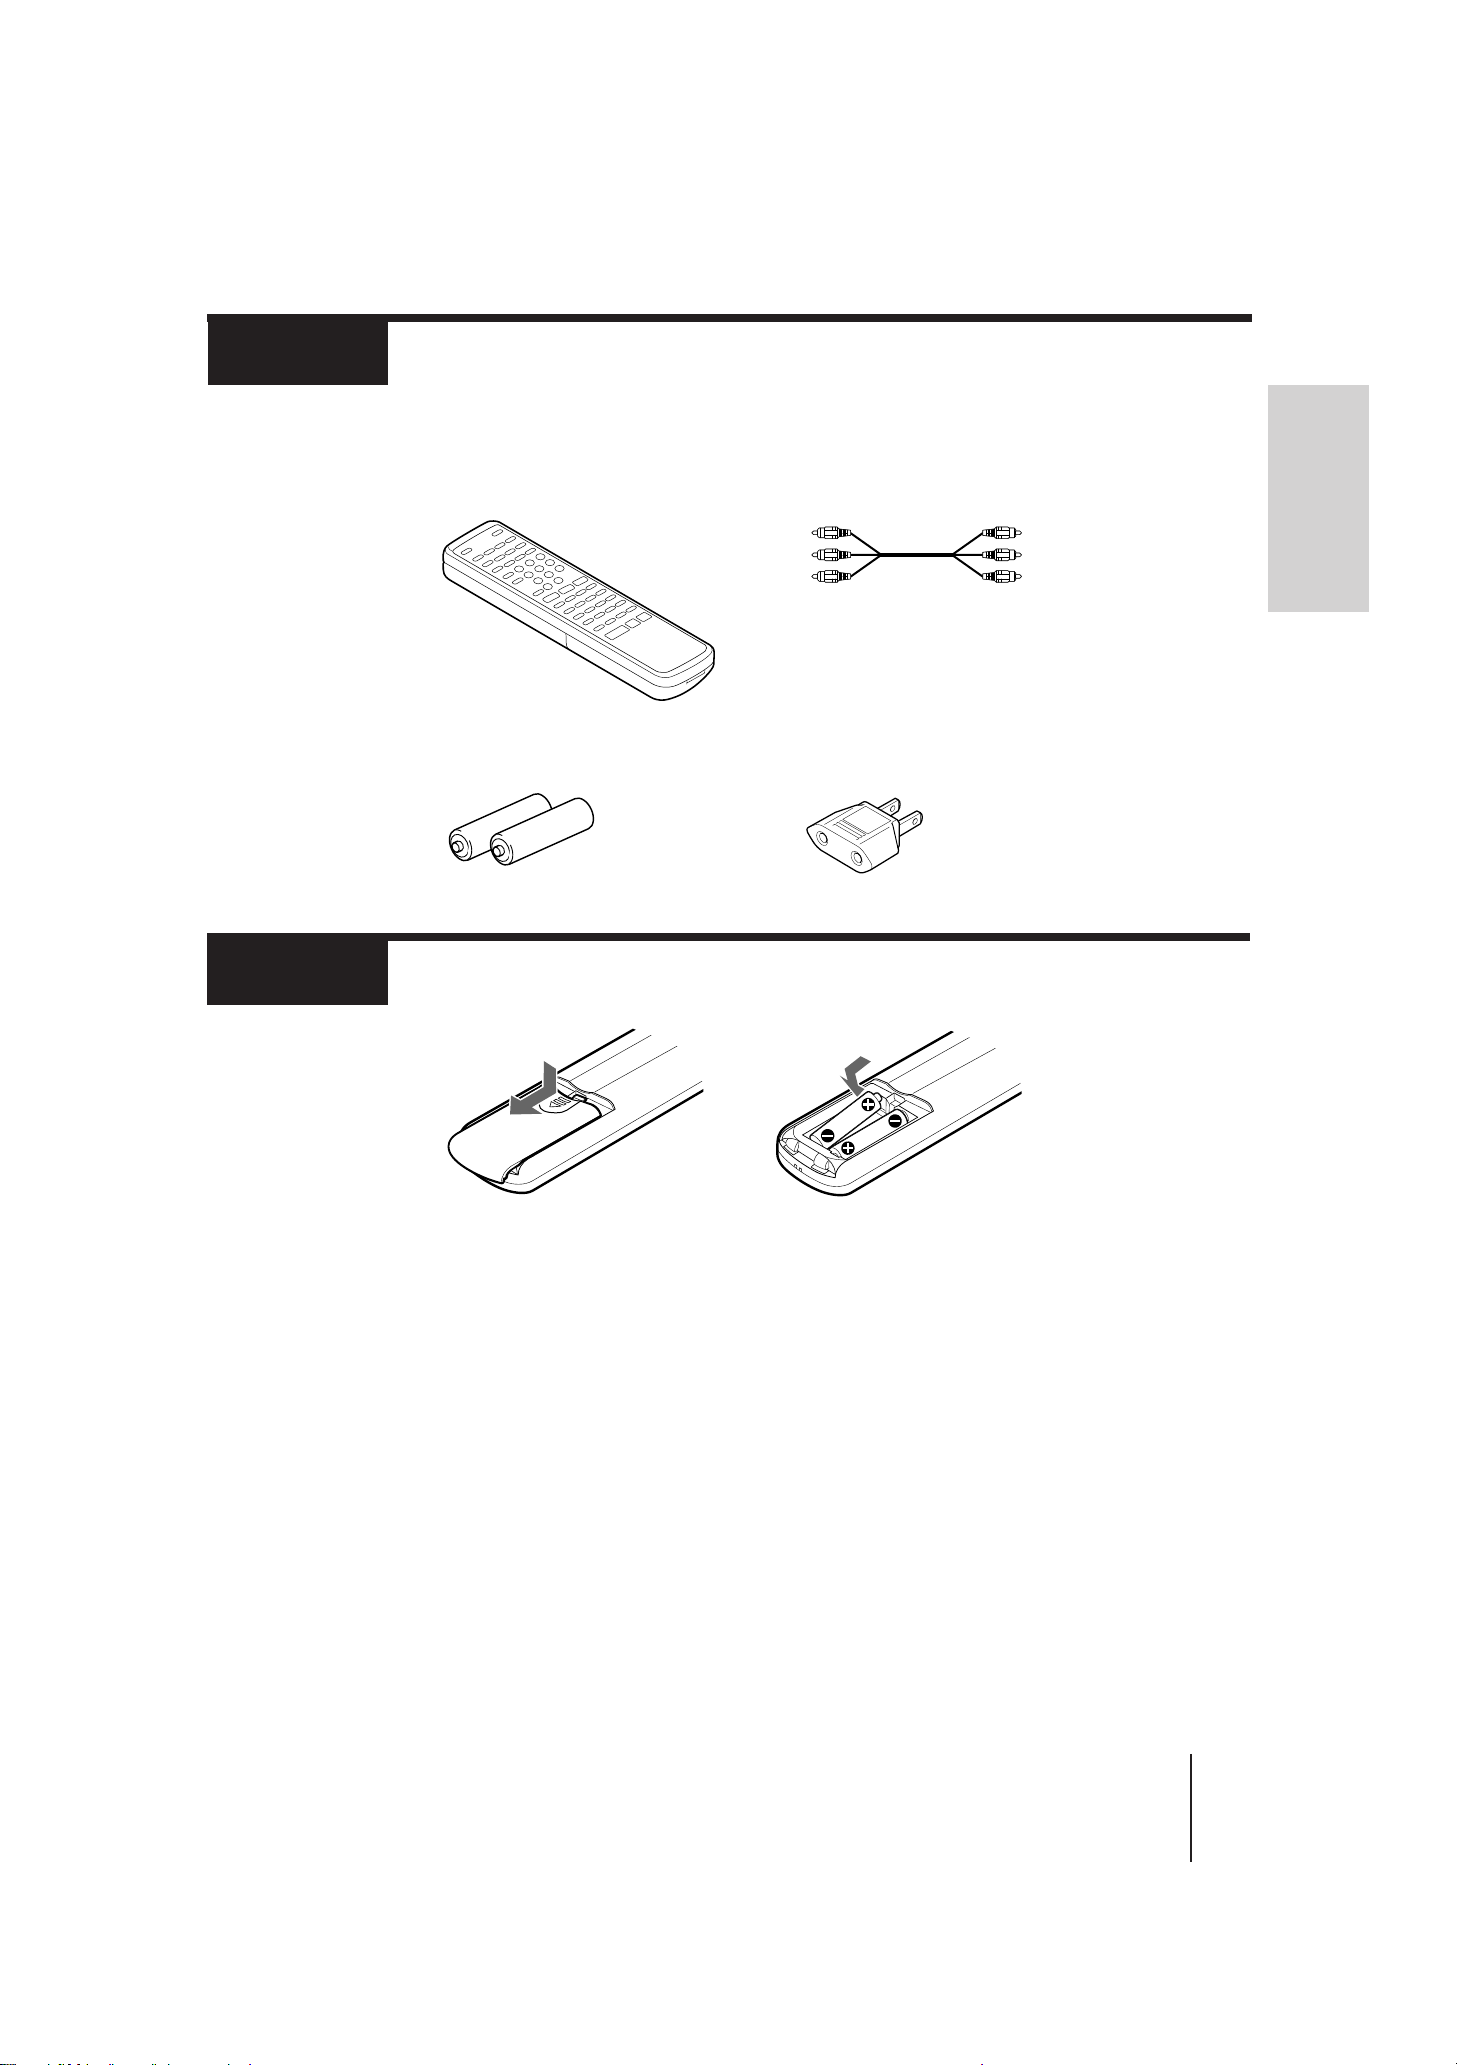
Check that you have the following items:
• Remote commander
RMT-M45A
• Two R6 (size AA) batteries
• Audio/Video cable
• AC plug adaptor (supplied with models other
than Hong Kong model)
Inserting batteries into the remote commander
Getting Started
1 Turn the commander
over, and remove the
cover.
Notes
• With normal use, the batteries should last for approximately six months.
• Use two R6 (size AA) batteries.
• If you use the batteries incorrectly, they may leak or explode. See notes
below for correct usage.
–Insert the batteries with correct polarity as shown above.
–Do not use a new battery together with an old one.
–Do not use different types of batteries together.
–Do not recharge the batteries.
–If you are not going to use the remote commander for an extended period
of time, remove the batteries to avoid possible damage from battery
leakage.
–If battery leakage should occur, wipe off the leakage from the battery
compartment, then insert new batteries.
• Do not let direct sunlight or powerful artificial light fall directly on the
remote sensor on the front panel of the player. Such light interferes with
the signals from the remote commander, causing the remote commander to
fail to operate correctly.
2 Check the polarities and
position two R6 (size
AA) batteries correctly.
3 Close the cover.
Getting Started
MDP-V9K.3-856-640-13 ( En, C1, C2)
-EN
5
Page 6
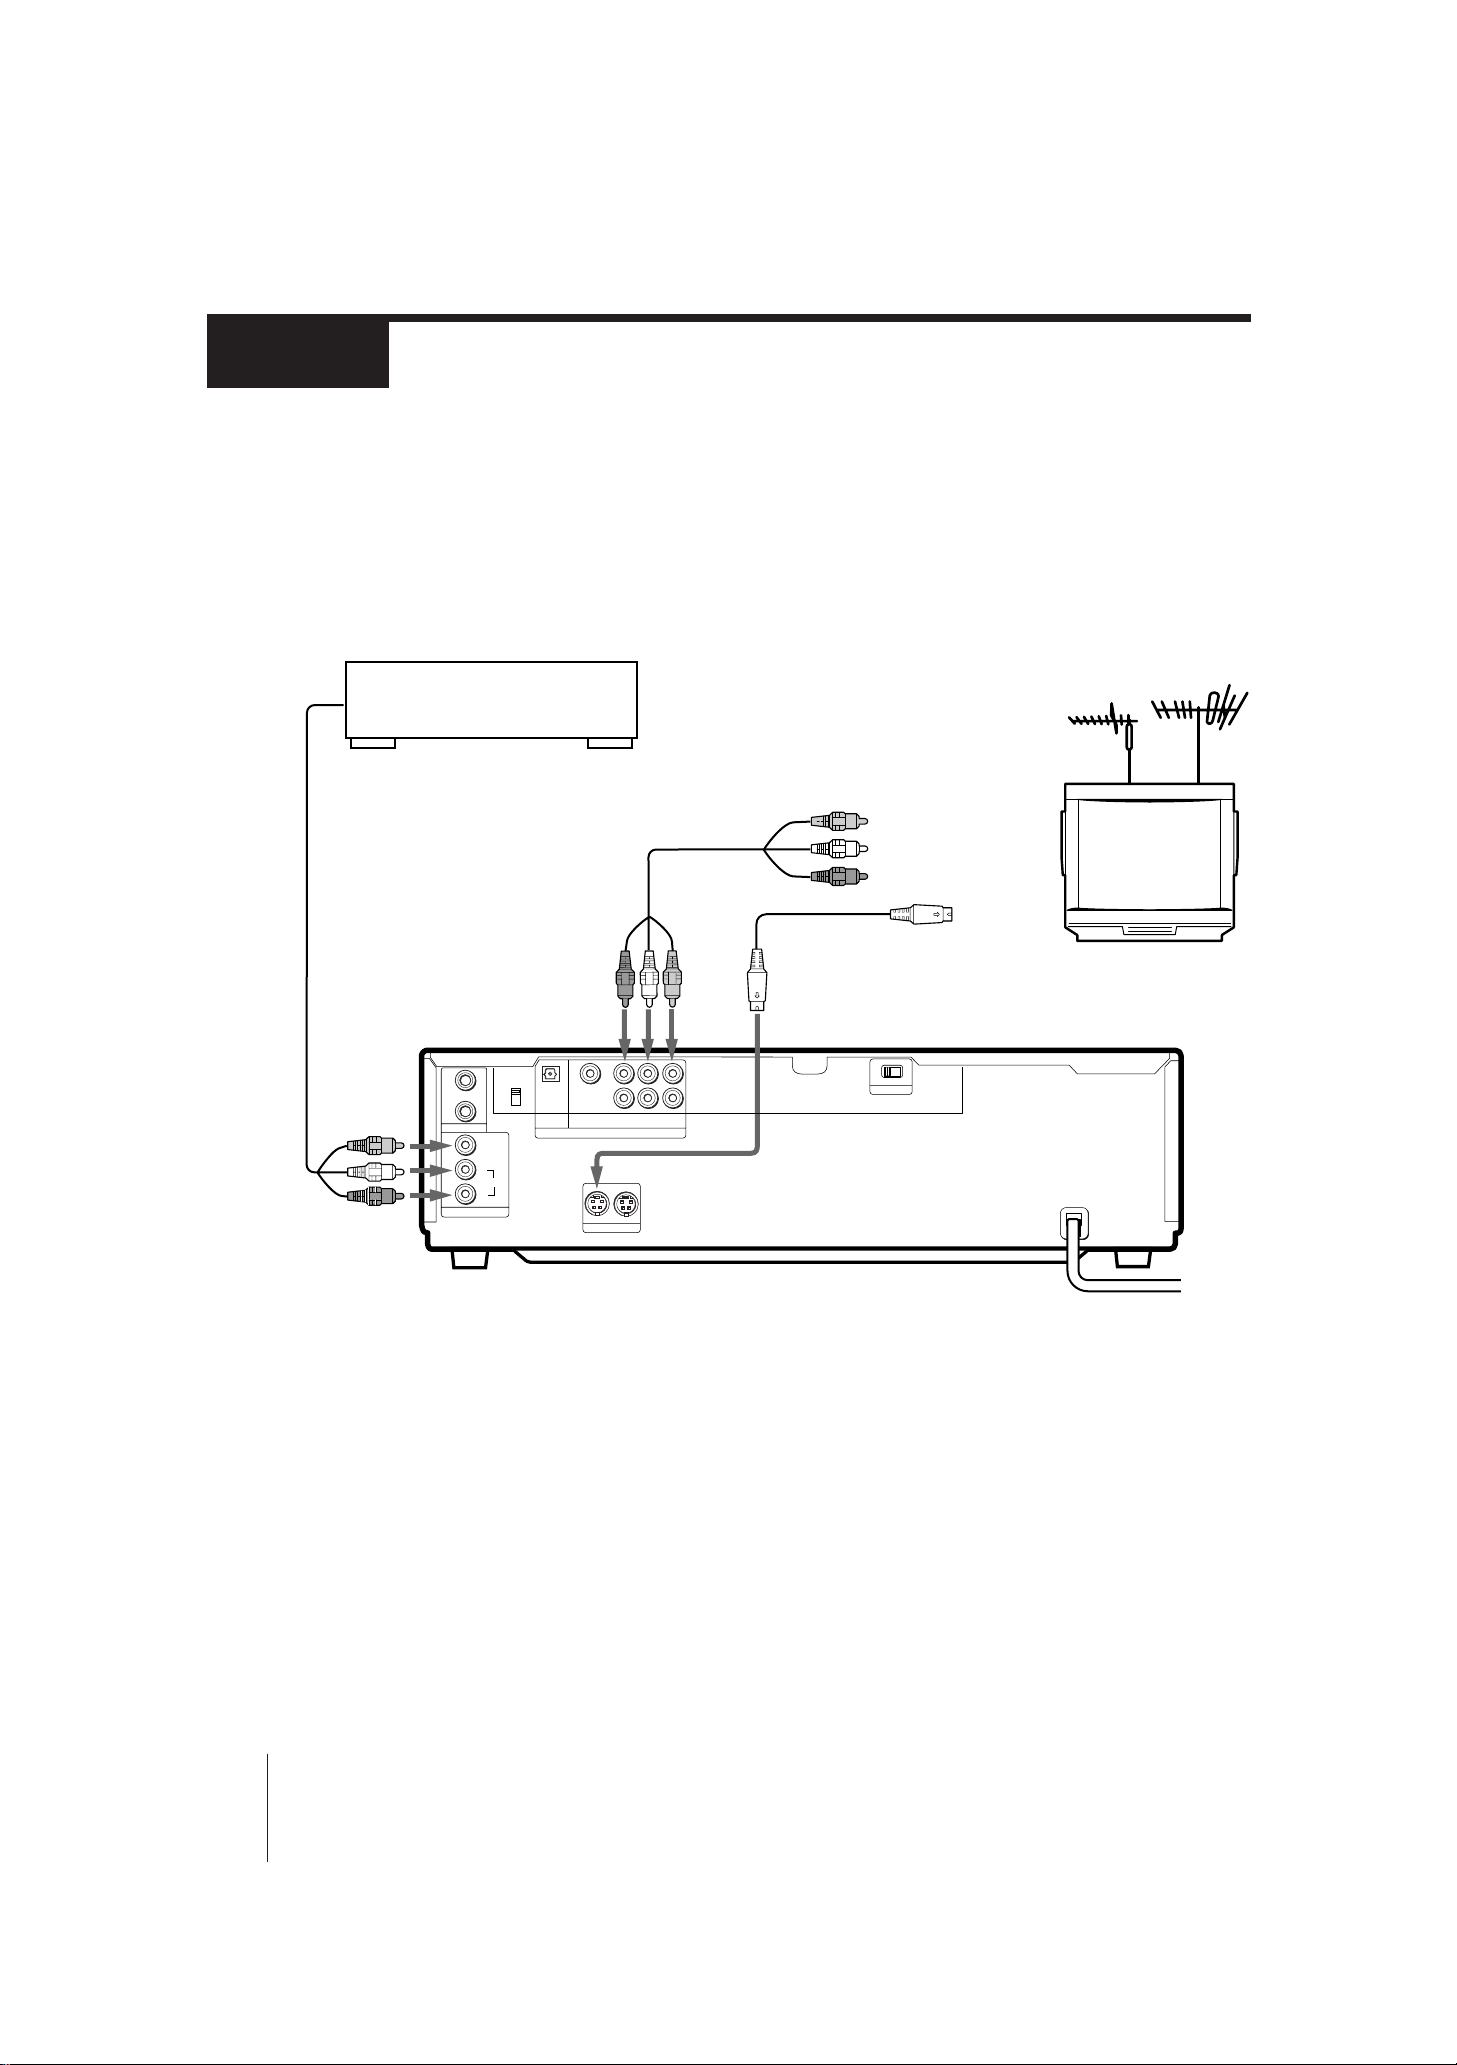
Step 3
Connecting the player
Television hook-up
To play LDs or VIDEO CDs, hook up a television to the player. Take out the supplied
audio/video connecting cable (yellow, red, and white plugs). Use this to connect the player
to the television. Once you have hooked up the television, set the input selector on the TV to
“Video.” Before connecting or disconnecting any cables, turn off all equipment.
If your TV has an S video input jack, use a YC-15V S Video Connecting Cable instead of the
supplied video cable to connect the player to get a better picture.
VCR
Audio/Video
Cable (not supplied)
1
2
Note
To view a PAL VIDEO CD, the COLOR SYSTEM selector on the rear of the player should be set to the
appropriate position, according to your TV system. See “COLOR SYSTEM selector setting ” on page 7.
MIC
LINE IN
COLOR SYSTEM
VIDEO
L
AUDIO
(VIDEO CD)
AUTO
PAL
NTSC
DIGITAL OUT
OPTICAL
DIGITAL
RF OUT
(AC-3)
S VIDEO OUT
Audio/Video
Cable (supplied)
1
2
LRR
AUDIO
VIDEO
LINE OUT
21
Yellow plug / Video In
Red & White
plugs
YC-15V S Video Cable
(not supplied)
OFF ON
ATT
/
Audio In
/ S Video In
Television
to AC outlet
-EN
6
Getting Started
MDP-V9K.3-856-640-13 ( En, C1, C2)
Page 7

Television/VCR hook-up
Connect the player to the VCR’s inputs when:
–the video inputs of the TV are already used for the VCR or a similar machine.
–the TV has only an antenna input.
When you connect this player using the VCR’s inputs, do not use the LINE IN jacks of the player to
connect the VCR because doing so will cause interference with the sound or picture.
OPTICAL
COLOR SYSTEM
1
(VIDEO CD)
1
AUTO
DIGITAL
PAL
RF OUT
2
(AC-3)
NTSC
2
MIC
VIDEO
L
AUDIO
LINE IN
DIGITAL OUT
S VIDEO OUT
LRR
VIDEO
AUDIO
LINE OUT
21
Video Out jack
Audio Out jacks
VCR
Input jacks
Antenna
(Video/Audio)
Input
Connect to the external video/audio inputs of a VCR.
Notes
• Make sure all equipment is turned off before connecting or disconnecting any cables.
• Connection methods may differ; when in doubt about a connection, consult the TV or VCR
manufacturer’s manual.
• If the sound or picture is disturbed by noise, try moving the equipment farther apart.
• Firmly insert plugs into the jacks. A loose connection may cause noise.
• To prevent interference with TV broadcast reception, turn off all equipment connected but not currently
in use.
• If the TV only has a monaural phono jack for audio input, use a VMC-910/915 Connecting Cable (not
supplied).
OFF ON
ATT
Television
VHF Out
terminals or
Video/Audio
Out jacks
Getting Started
COLOR SYSTEM selector setting (only for VIDEO CDs)
This player conforms to the NTSC and PAL color systems. Set the COLOR SYSTEM selector
on the rear of the player to the appropriate position, according to your TV.
1 Turn off the power of the player.
2 Set the COLOR SYSTEM selector to AUTO, PAL or NTSC, according to the TV system.
TV system Set to
Multi monitor system AUTO
PAL system PAL
NTSC system NTSC
COLOR SYSTEM
(VIDEO CD)
AUTO
PAL
,
NTSC
Getting Started
-EN
7
MDP-V9K.3-856-640-13 ( En, C1, C2)
Page 8
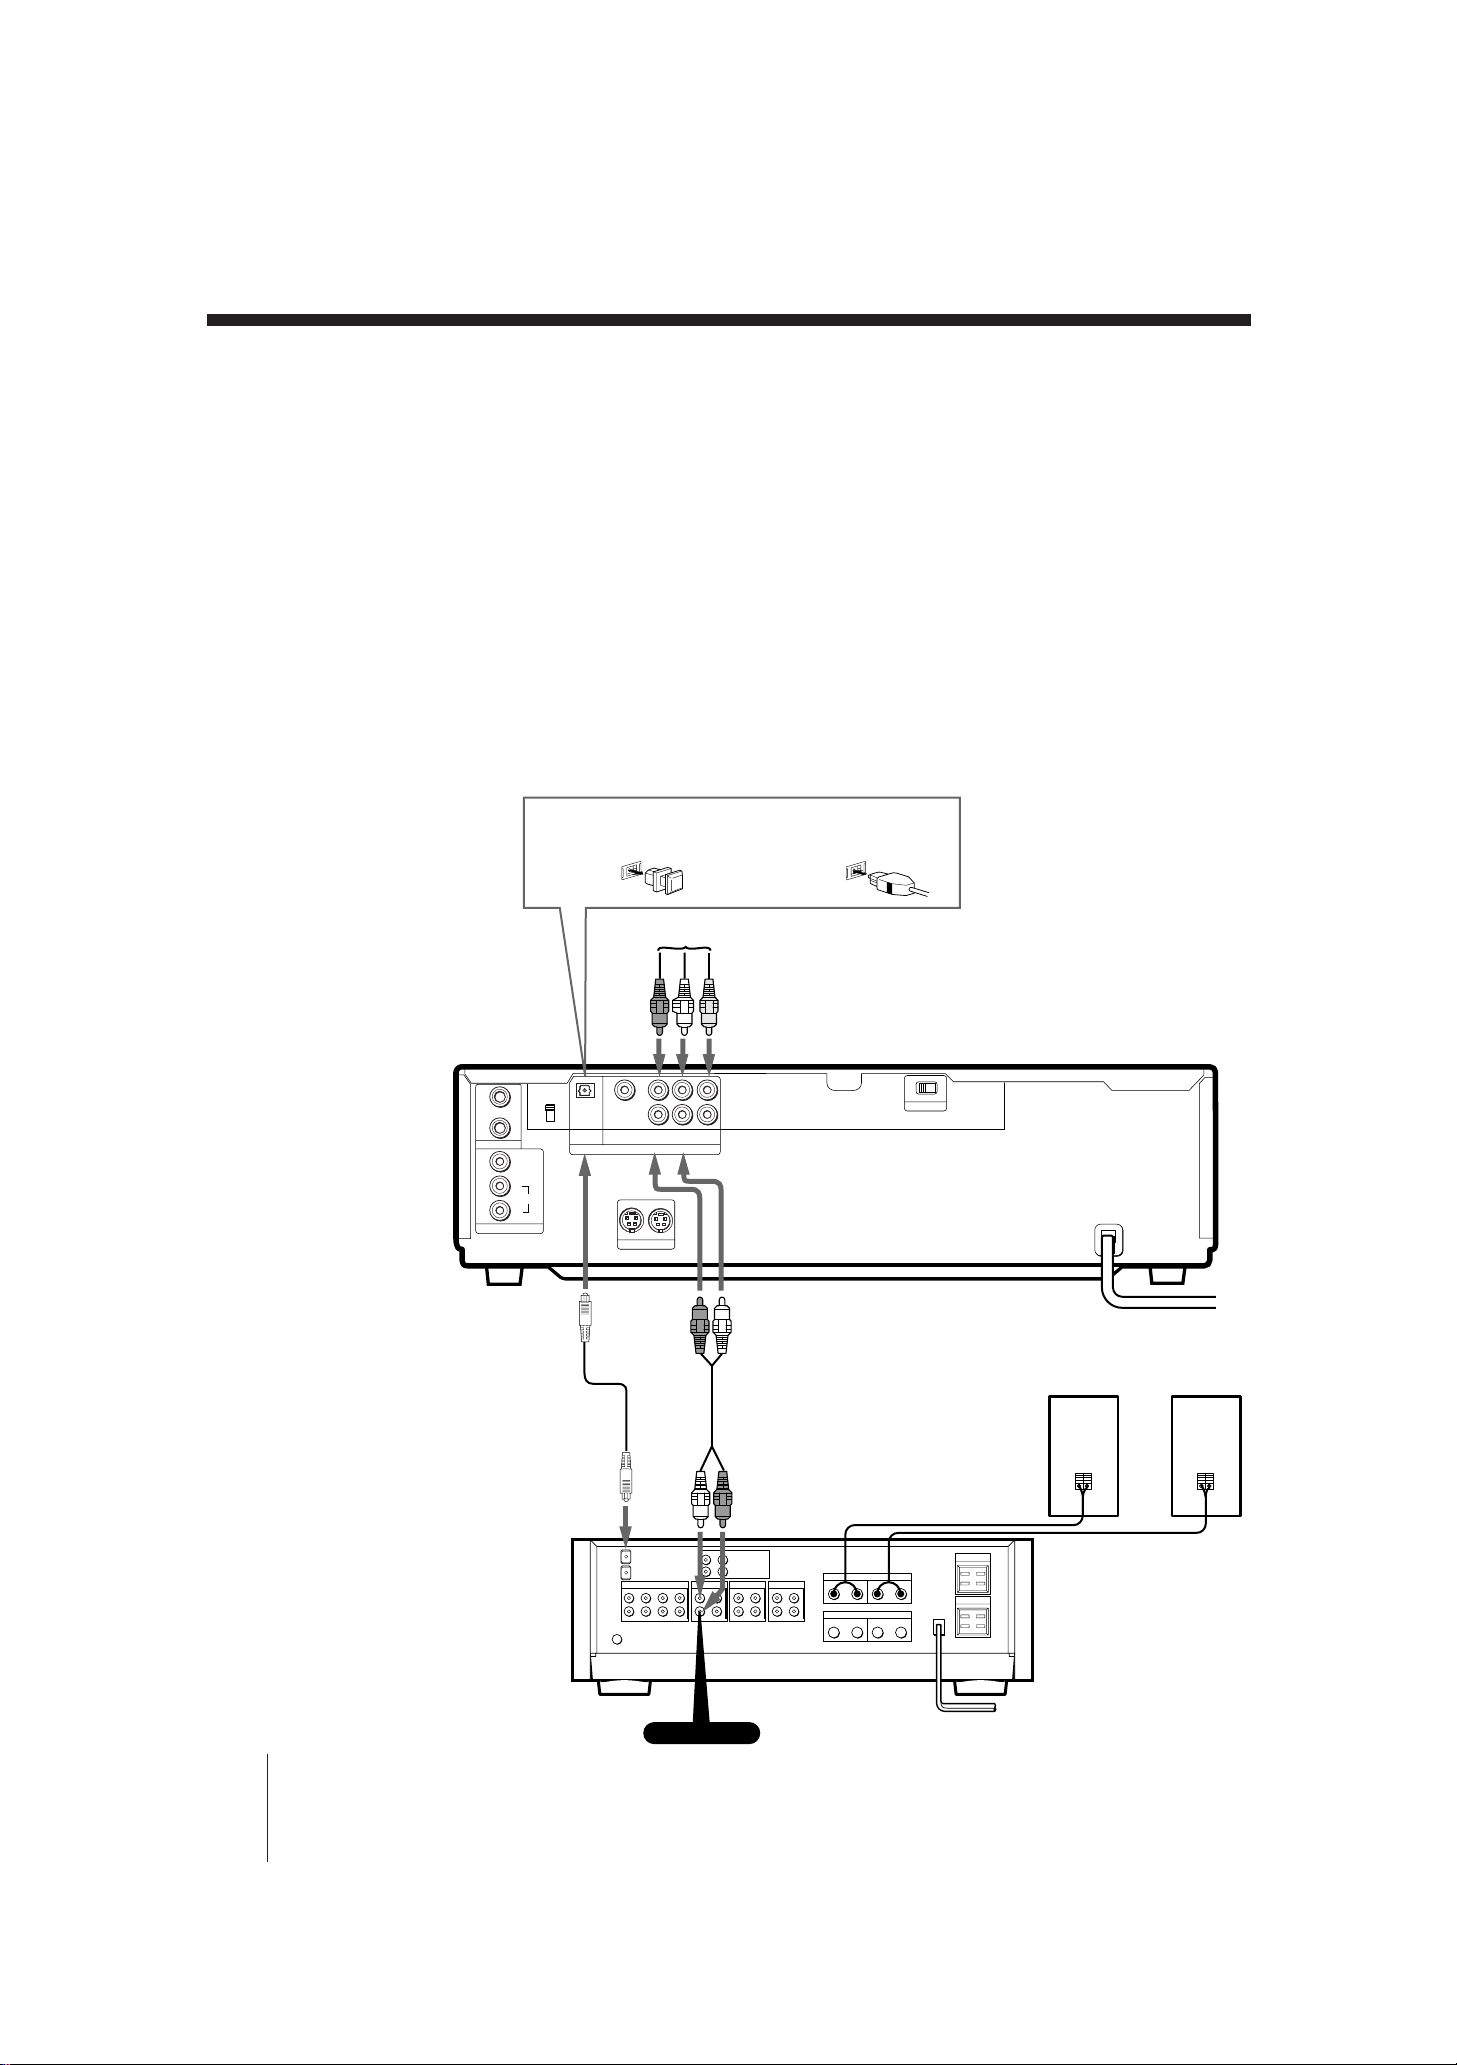
Step 3 Connecting the player (continued)
Audio equipment hook-up
To achieve full stereo sound from the player, hook up a stereo system following the diagram
below. Use an RK-C310 (or RK-C315) Audio Connecting Cable (not supplied) to connect the
player to your amplifier or receiver. Before connecting or disconnecting any cables, turn off
all equipment.
To achieve digital sound
Optical fiber digital audio output enables high quality sound reproduction. If your amplifier
has an optical input connector, or if you have a D/A converter unit with optical input,
connect the player to the amplifier or D/A converter using an Optical Fiber Audio cable
POC-15 (not supplied).
• You can get digital audio output from CDs and most LDs. When you play an LD which
does not have digital sound tracks, you cannot get any sound from the DIGITAL OUT
(OPTICAL) connector.
• Sound from a microphone is not output from the DIGITAL OUT (OPTICAL) connector.
When you play karaoke with a microphone, connect the player using an Audio Cable (red
& white plugs).
When connecting the optical fiber cable
Plug in firmly.Remove the protective cover.
1
2
MIC
LINE IN
VIDEO
L
AUDIO
AUTO
PAL
NTSC
DIGITAL OUT
OPTICAL
COLOR SYSTEM
(VIDEO CD)
POC-15 Optical Fiber Cable
(not supplied)
To TV or VCR
1
DIGITAL
RF OUT
2
(AC 3)
AUDIO
LINE OUT
21
S VIDEO OUT
Red
plug
LRR
VIDEO
White
plug
RK-C310/C315
Audio Cable (not supplied)
OFF ON
ATT
to AC outlet
Speakers
Optical In
Amplifier
CD or AUX
-EN
8
Getting Started
Audio In
to AC outlet
MDP-V9K.3-856-640-13 ( En, C1, C2)
Page 9

Notes
• You cannot make digital recordings of VIDEO CDs, since this player does not output signals through the
DIGITAL OUT (OPTICAL) connector while playing a VIDEO CD.
• Make sure all equipment is turned off before making any connections.
• Firmly insert plugs into the jacks. A loose connection may cause noise.
• When listening to a radio broadcast, turn off the player to get better reception.
If you have a processor or amplifier that conforms to the Dolby
Surround AC-3 system*
To enjoy discs that conform to the Dolby Surround AC-3 system (discs with the
logo), connect the DIGITAL RF OUT to the processor or amplifier's digital RF input. You
can obtain a theater-like atmosphere more effectively than with Dolby Pro Logic Surround.
For details, refer to the instructions supplied with the processor or decoder amplifier.
DIGITAL
RF OUT
OPTICAL
COLOR SYSTEM
1
(VIDEO CD)
1
AUTO
DIGITAL
PAL
2
RF OUT
(AC 3)
NTSC
2
MIC
VIDEO
L
AUDIO
LINE IN
DIGITAL OUT
S VIDEO OUT
LRR
VIDEO
AUDIO
LINE OUT
21
OFF ON
ATT
Digital RF input
processor or amplifier
Getting Started
This laser disc player provides an AC-3 RF Output for laser discs recorded with Dolby AC-3
digital audio soundtracks. Dolby Surround AC-3 decoders with an AC-3 RF Input can
accept this signal directly. Dolby Surround AC-3 decoders with an AC-3 Digital Input
require a separate AC-3 RF demodulator.
* “DOLBY”, “AC-3”, and the double-D a symbol are trademarks of Dolby Laboratories
Licensing Corporation.
Using Cushions
We recommend that you put a cushion under each
foot of the laser disc player to reduce vibration
caused by loud sound. This will create a more pure
and stable bass sound. The four cushions are
supplied in this plastic bag.
Cushions
Getting Started
-EN
9
MDP-V9K.3-856-640-13 ( En, C1, C2)
Page 10

Basic Operations
Playing a disc
6
OPEN/CLOSE
POWER
This section shows you how to play an LD, CD or VIDEO CD.
Before you start...
Connect the player to your TV and set the input selector on the TV to
“Video” (see “Connecting the player” on page 6 ).
Loading and playing a disc
1 Press POWER to turn on the player.
You can also directly turn on the player by
pressing · SELECT/PLAY on the remote
commander or player.
2 Press 6 OPEN/CLOSE to open the disc tray.
The front cover of the player automatically slides
down and the disc tray comes out.
3 Place a disc on the disc tray.
·
SELECT/PLAY
z
• You can also turn on the
player by pressing
§ OPEN/CLOSE on the
player.
Notes
• If you place more than one
disc on the tray, or if the
disc is not seated properly,
the disc may not start
playing, and may cause
damage the disc or player.
• Do not transport the player
while playing a disc as
doing so may damage your
disc or player.
• Do not use a CD stabilizer
when playing a CD or
VIDEO CD as doing so may
damage your disc or player.
LD (Side A)
Place only one disc on the tray,
carefully fitting it in the circle on the
tray.
CD, VIDEO CD, or LD
Single
(Label faces up)
4 Press · SELECT/PLAY.
The disc tray closes and the disc starts
playing. You can also start playing by
pressing the disc tray to close it.
When you play a double-sided LD
The upper side of the LD (side A) starts playing. When the upper side
ends, the other side (side B) starts playing automatically.
To play a VIDEO CD with Play Back Control (PBC) functions
(Ver. 2.0 VIDEO CD)
Ver. 2.0 VIDEO CDs have Play Back Control (PBC) functions, which
allow you to play them interactively. When press · SELECT/PLAY or
push in the disc tray in step 4, a menu appears on the screen and the
player waits for you to play the disc using the PBC functions. To play a
VIDEO CD using PBC functions, see “Playing a VIDEO CD using PBC
functions” on page 15 for details.
10
-EN
Basic Operations
MDP-V9K.3-856-640-13 ( En , C1, C2)
Page 11

z
• When playing a doublesided LD, the player
determines that the upper
side of the disc is side “A”
and the other side is “B,”
regardless of the label “A”
or “B” printed on the disc.
• When playing side A of an
LD, “SIDE A” appears on
the front panel display.
When playing side B of an
LD, “SIDE B” appears on
the front panel display.
• When playback of LD side
B ends, the player stops.
• When playing a CD or
VIDEO CD, the DISC SIDE
B button does not function.
Note
• When you press P PAUSE,
the picture goes blank
when playing a CLV LD,
and the picture freezes
when playing a CAV LD or
VIDEO CD (see “Viewing
frame-by-frame action” on
page 22).
To view a PAL VIDEO CD
Set the COLOR SYSTEM selector on the rear panel to the appropriate
position, according to your TV. See “COLOR SYSTEM selector setting
(only for VIDEO CDs)” on page 7 for details.
AUTO setting; when a PAL VIDEO CD is played, the VIDEO CD PAL
OUT indicator on the player lights up.
PAL setting; when a VIDEO CD is played, the VIDEO CD PAL OUT
indicator on the player lights up.
The indicator also lights up even when an NTSC disc is played.
However, the picture is not played properly.
To Press
Stop play p STOP
Pause play P PAUSE
Resume play after pause P PAUSE or · SELECT/PLAY
Scan forward or backward 0/) SCAN
Skip chapters or tracks =/+ PREV/NEXT (ACS/AMS)
Play step by step /7 STILL/STEP (CAV LDs only)
Go to a chapter/track Number button
7
During PBC VIDEO CD playback, press
number buttons to select items in the onscreen menu (see page 15 for details).
Remove the disc 6 OPEN/CLOSE
To start playing from the beginning of either LD side
Press DISC SIDE A to play the upper side of the LD from the beginning.
Press DISC SIDE B to play the other side of the LD from the beginning.
To pause playing just before starting
Press P PAUSE instead of pressing · SELECT/PLAY after you place
the disc on the tray.
The disc tray closes and the player waits at the start of the disc until you
press · SELECT/PLAY or P PAUSE. If you want to start from side B
of an LD, press P PAUSE, then DISC SIDE B.
To stop playing and turn off the player
Press POWER.
You can resume playback of an LD from the point you stopped at by
simply pressing · SELECT/PLAY (see “Resuming LD/VIDEO CD
playback” on page 23 ).
To stop playing and remove the disc
Press 6 OPEN/CLOSE.
Remove the disc and press 6 OPEN/CLOSE again to close the empty
tray.
To listen with headphones
Plug headphones into the PHONES jack on the front panel and adjust
the volume with the level control beside the jack.
Basic Operations
11
MDP-V9K.3-856-640-13 ( En , C1, C2)
-EN
Page 12

Playing a disc (continued)
12345678 9
10
11
12 13 14 20
15
16 17 18 19
VIDEO
CD
1/L2/R
REPEAT
AV calendar (“>” indicates that the disc
contains more than 20 tracks)
Track number Index number (CD) or
Video index number (VIDEO CD)
Selected function
Time (hr/min/sec)
Output sound
MS
Playing disc type
Reading the front panel display
The illustration below is an example of what is displayed on the front
panel of the player.
DISPLAY
p
STOP
When playing an LD
Playing disc type
Playing disc side
12345678 9
SIDE ALD
Chapter number
AV calendar on side A
(“>” indicates that the disc contains
more than 20 chapters)
15
12 13 14 20
11
10
16 17 18 19
1/L2/R
REPEAT
MS
When playing a VIDEO CD or CD
Viewing the on-screen display
Output sound
Selected function
Time (hr/min/sec) or
frame numberAV calendar on side B
z
• The AV calendar shows the
chapters/tracks remaining
on the disc. As chapters/
tracks are played, the
corresponding numbers on
the calendar disappear.
• While playing a Ver. 2.0
VIDEO CD using PBC
functions, the AV calendar
shows the numbers you can
use to select items from the
menu.
• When there is no disc in the
player, “NO dISC” appears
on the front panel display.
Notes
• The AV calendar is
available for LDs
containing TOC (Table of
Contents) data, CDs, or
VIDEO CDs.
• When you play a VCR or a
similar equipment using
LINE IN, the current key
level always appears on the
front panel instead of a
chapter/track number (see
“Playing karaoke using
auxiliary equipment” on
page 41).
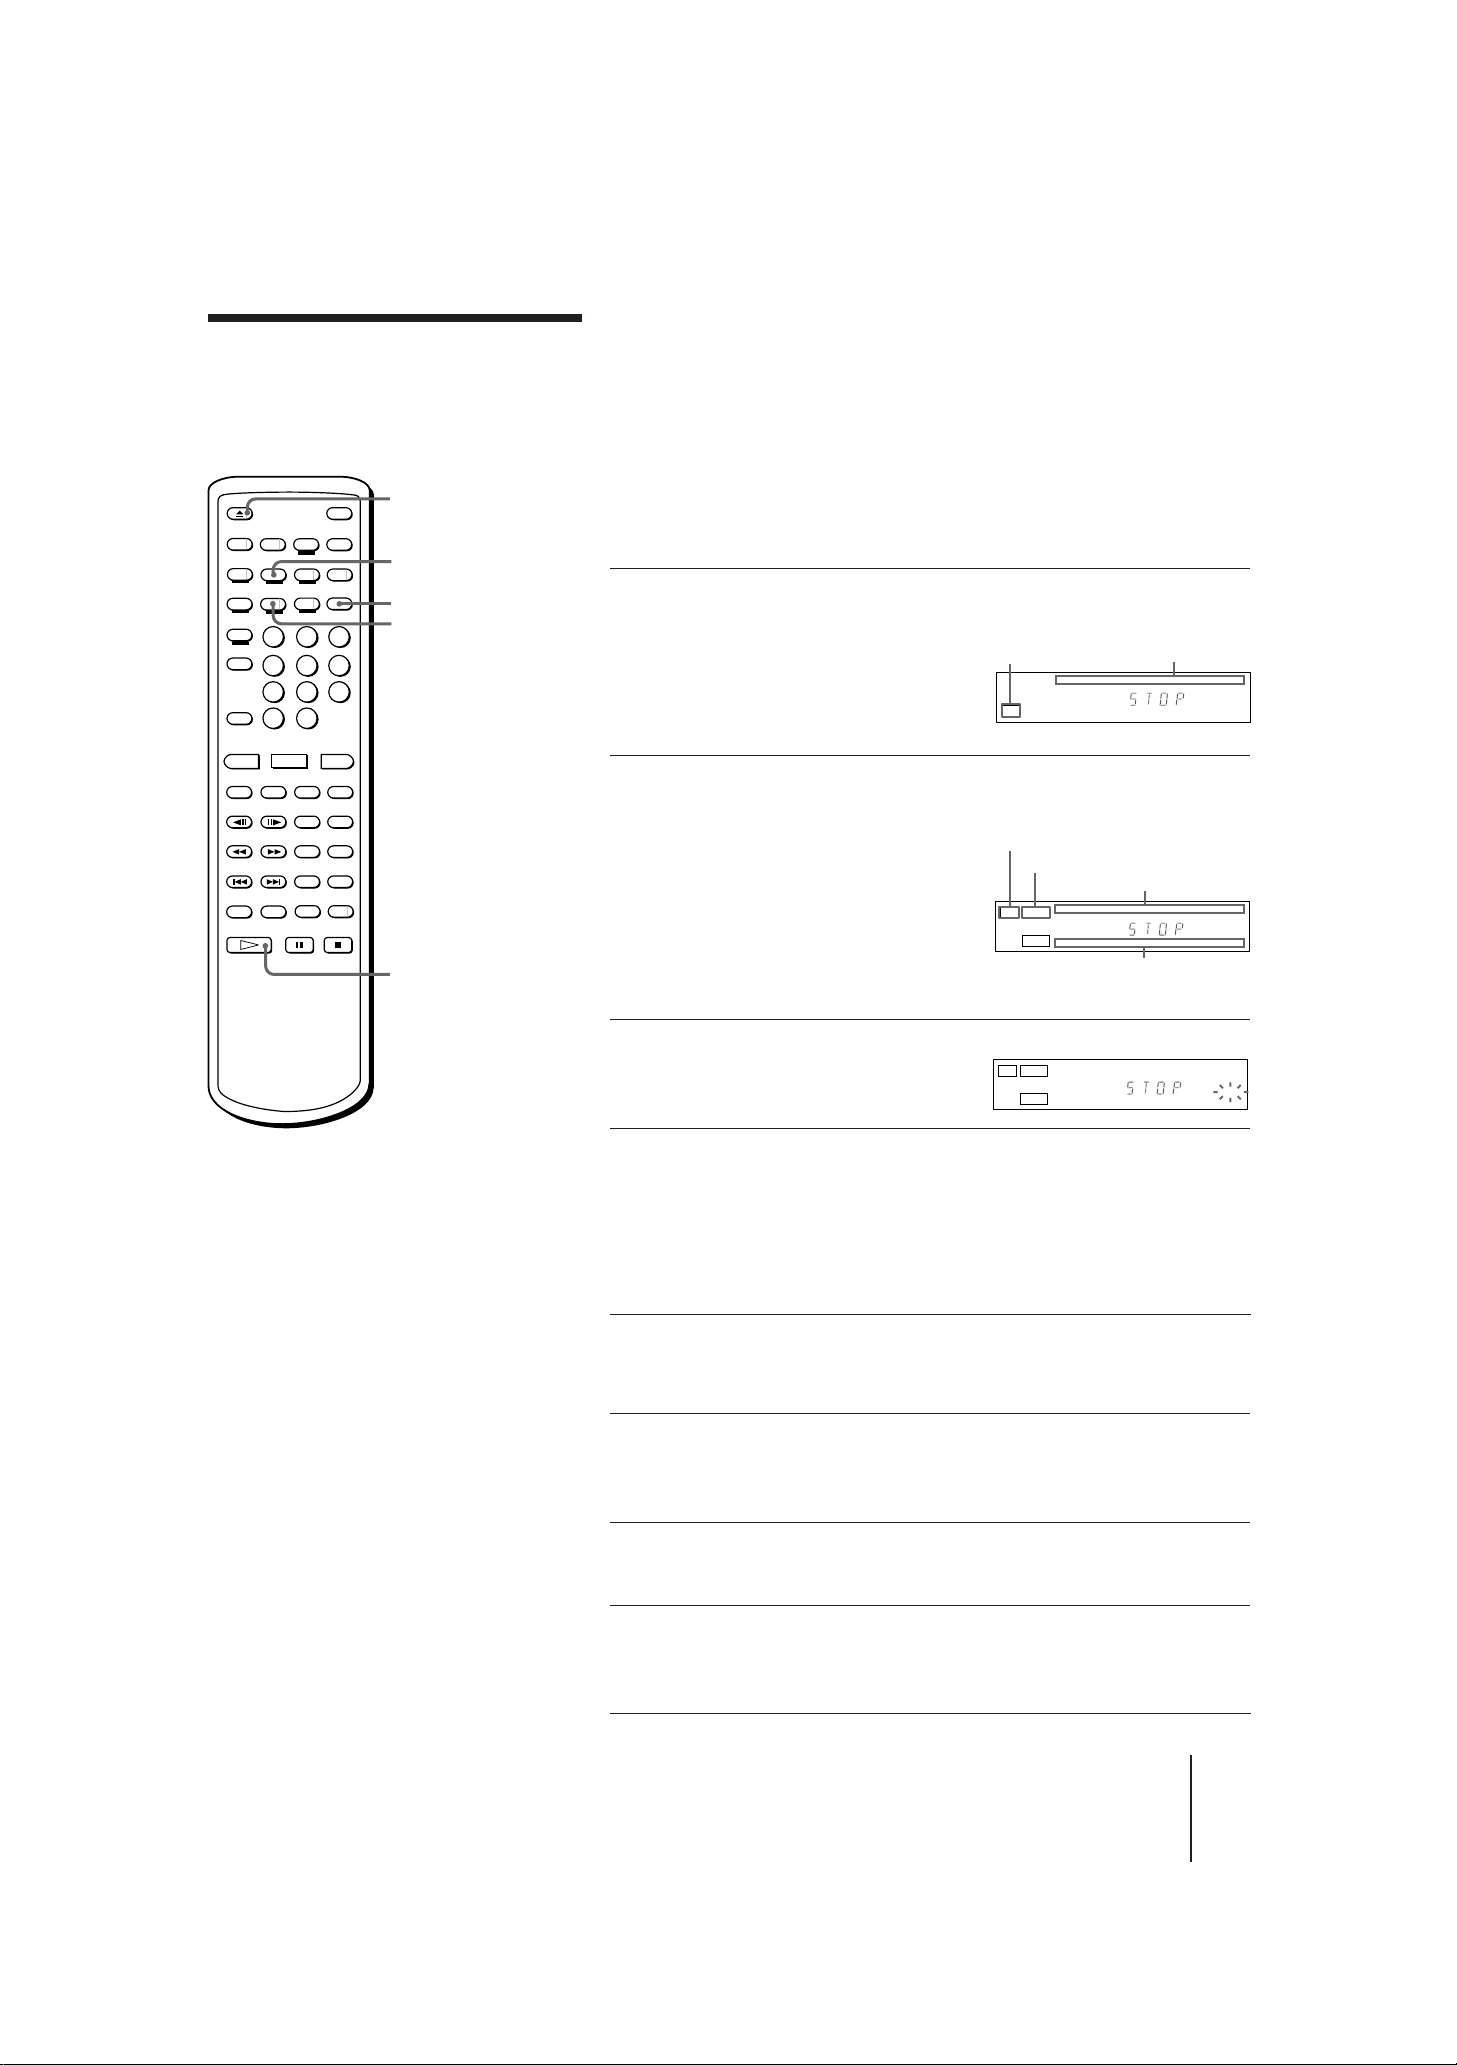
Press DISPLAY. The on-screen display appears (see “Understanding onscreen indications” on page 16). You can select the language of the onscreen display, English or Chinese, by pressing the p STOP button on
the player less than 10 seconds after you turn on the player. To return to
the original display, press the p STOP button again less than 10 seconds
after you first pressed it. Each time you press the p STOP button
(within 10 seconds) the displays alternate.
STOP
A. RESUME
,
-EN
Basic Operations
12
MDP-V9K.3-856-640-13 ( En , C1, C2)
Page 13

Playing Karaoke
This section gives you short instructions for playing “karaoke” (singing
along with a disc).
POWER
MIC 1/
2
MIC LEVEL 1/
2
z
• The player has two MIC
jacks on each front and rear
panel. In addition, you can
use infrared cordless
microphones by connecting
the infrared receiver to the
MIC jacks (see “Using the
infrared cordless
microphone system (not
supplied)” on page 40).
• To control the player from
the karaoke microphone,
plug the control plug into
the CONTROL jack (see
“Using the optional
karaoke microphone” on
page 40).
• You can enjoy karaoke
using auxiliary equipment
such as a VCR (see “Playing
karaoke using auxiliary
equipment” on page 41).
Notes
• If you insert more than one
disc, or if the disc is not
seated properly, the disc
may not start playing, and
may damage the disc or
player.
• When playing a doublesided LD, the player
determines that the upper
side of the disc is side “A”
and the other side is “B,”
regardless of the label “A”
or “B” printed on the disc.
§ OPEN/CLOSE
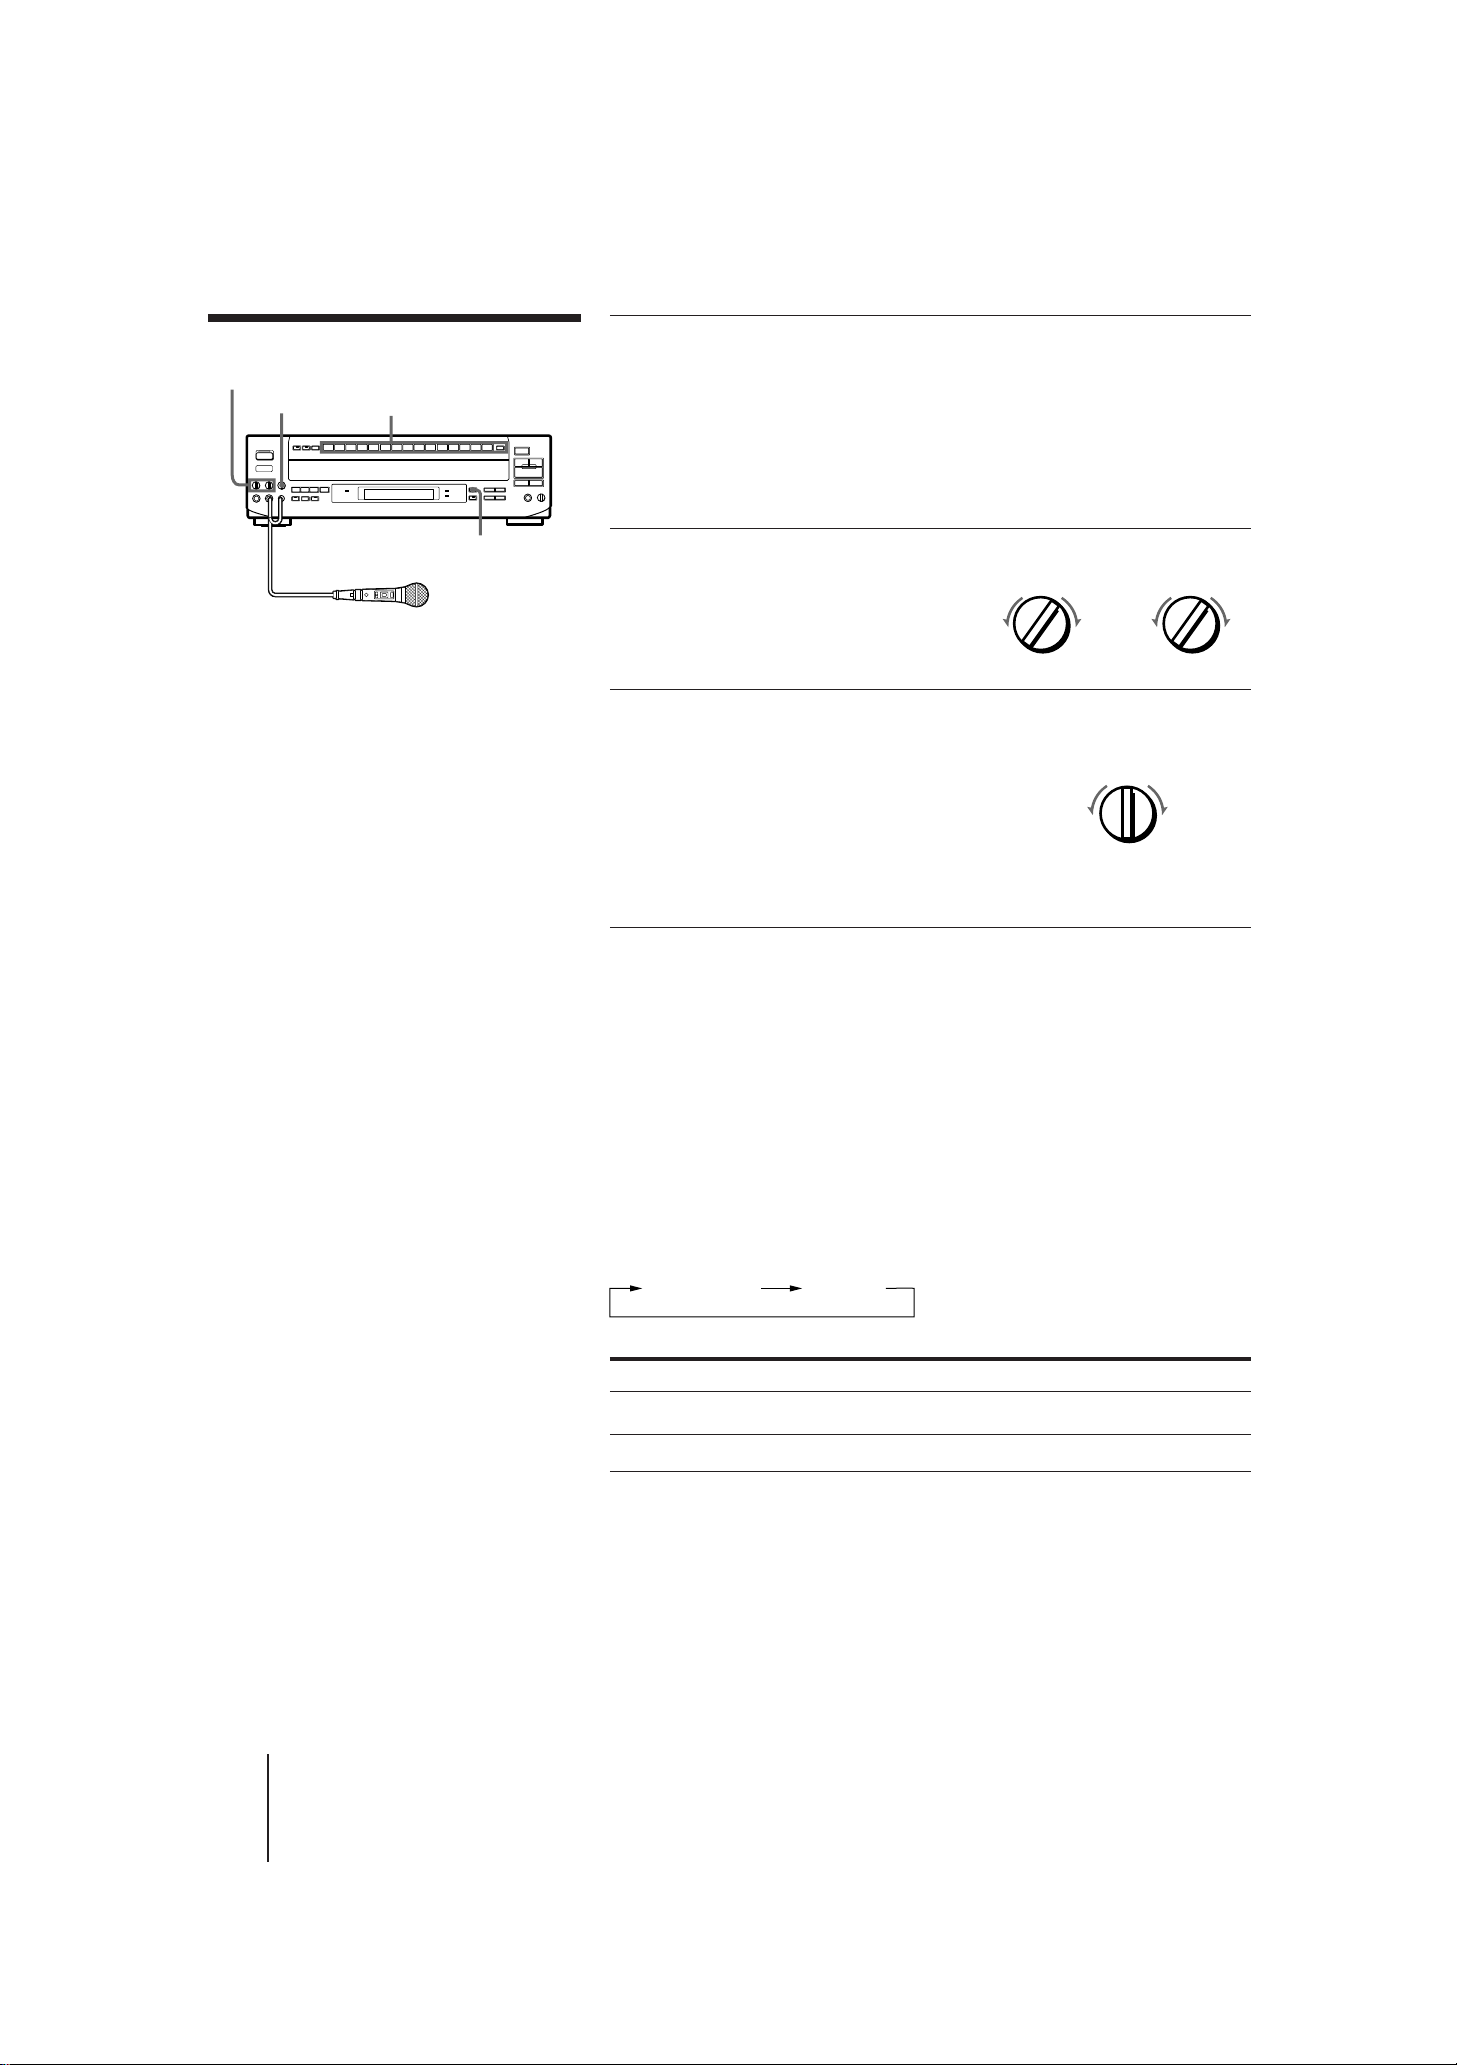
1 Set the MIC LEVEL 1 and 2 controls
on the player to MIN.
MIC 1
LEVEL
MIN MAX
2 Plug a microphone into the MIC 1
or 2 jack on the player.
When using the karaoke microphone FKM1 (not supplied), plug the
CONTROL plug into the CONTROL
(MIC 1/2) jack.
Karaoke microphone
F-KM1
(not supplied)
MIC plug
3 Press POWER to turn on the
player.
4 Turn on the TV and stereo system.
TV:
Set to “Video.”
Stereo system:
Turn on the amplifier or receiver and
select CD or AUX (the jacks to which
you connected the player) for audio
output.
5 Press § OPEN/CLOSE.
The disc tray comes out.
6 Place a disc on the disc tray.
MIN MAX
MIC 2
MIC 1
MIC 2
LEVEL
CONTROL
(MIC 1/2)
Control plug
Place only one disc on the tray, carefully
fitting it in the circle on the tray.
MDP-V9K.3-856-640-13 ( En , C1, C2)
LD (Side A)
CD, VIDEO CD, or LD
Single
(Label faces up)
Basic Operations
13
-EN
Page 14
Playing Karaoke (continued)
MIC LEVEL 1/
2
ECHO LEVEL
Number buttons
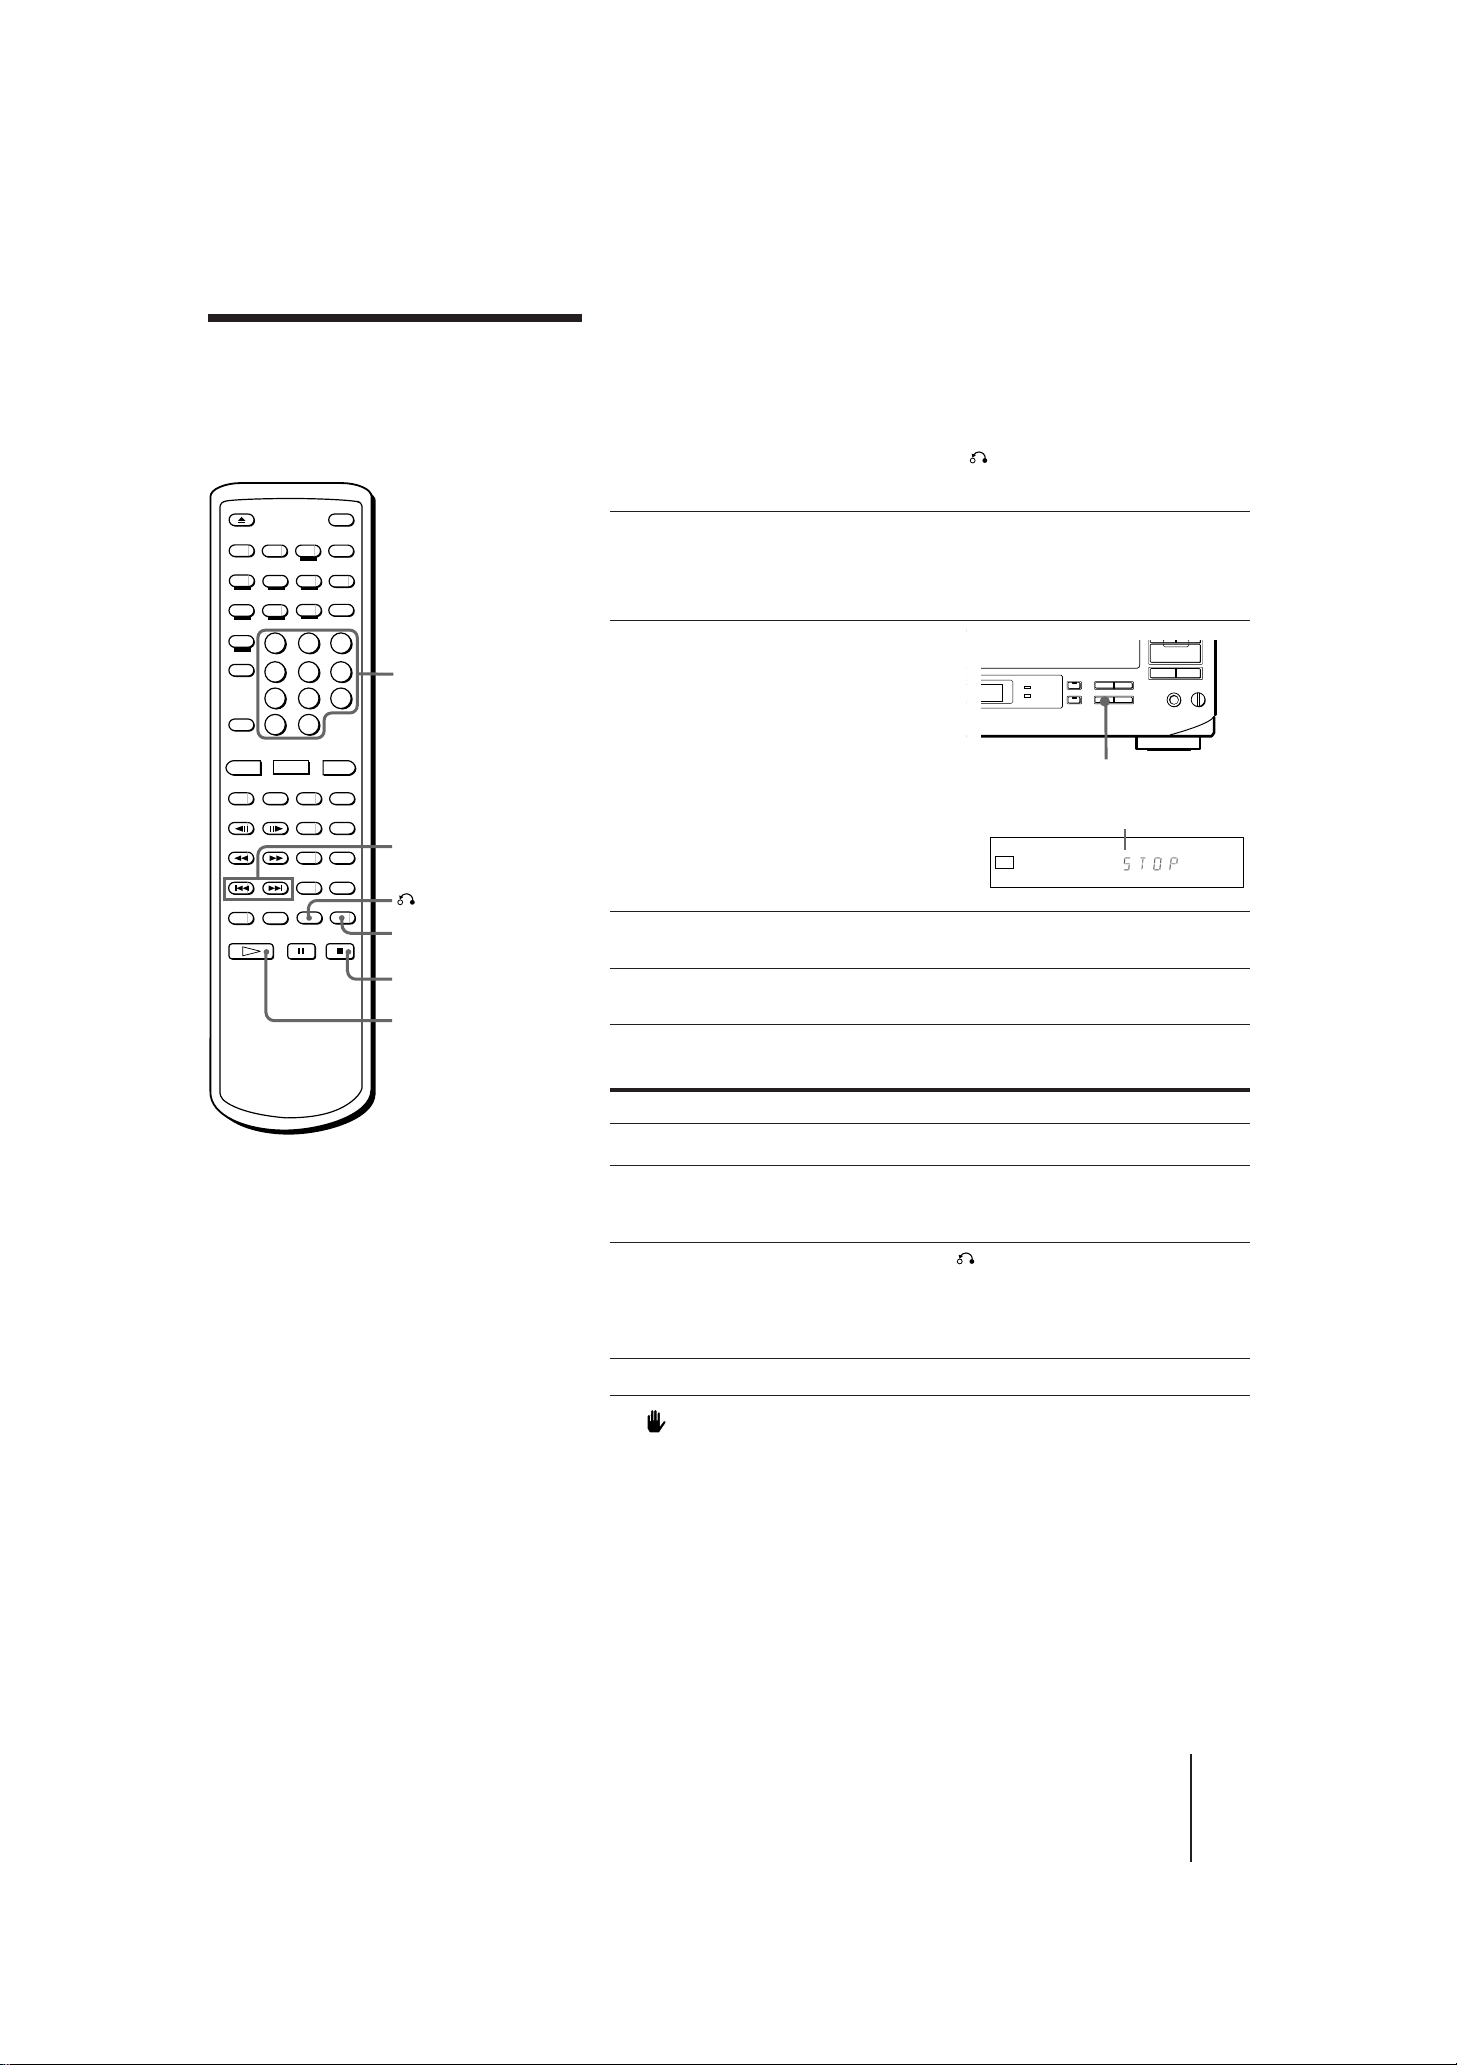
7 Press one of the number buttons
to enter the song number.
The song starts playing. To select a song
on side B of an LD, press DISC SIDE B,
then press the number button. To enter
a song number greater than 15, see page
18.
AUTO PAUSE
z
• If you press p STOP, § OPEN/
CLOSE or POWER while playing a
song in karaoke mode (with
microphones connected), the sound
automatically fades out before
playback stops (Auto Fade Out).
• If howling occurs
– Move the microphone
away from the speakers.
– Lower the microphone
volume or echo level.
– Lower the overall volume.
• If the sound is distorted or the picture
flickers when listening through your
TV speakers, set the ATT switch at the
rear of the player to ON to lower the
output level.
Notes
• If you want to use the menu of a Ver.
2.0 karaoke VIDEO CD, make sure that
the PBC ON/OFF button indicator on
the player is lit and press · SELECT/
PLAY to display the menu before
entering the song number. If the PBC
ON/OFF button indicator is not lit,
press p STOP to stop playing the disc,
then press the PBC (ON/OFF) button
to turn it on (see “Playing a VIDEO CD
using PBC functions” on page 15 for
details).
• To stop playing a song on a Ver. 2.0
karaoke VIDEO CD and return to the
menu, press the RETURN button
instead of p STOP.
• If you reserve several songs (see
”Selecting karaoke song order” on
page 33), the player plays them
continuously, then pauses.
• You can also use the Auto Pause
function in non-karaoke mode
(without microphones connected).
Each time you press the AUTO PAUSE
button, the Auto Pause function is
turned on/off.
• Auto Pause does not function during
PBC playback on a Ver. 2.0 VIDEO CD
(if the PBC ON/OFF button indicator
on the player is lit). However, if the
disc is a karaoke VIDEO CD with a
menu for song selection, playback
automatically pauses and returns to
the menu each time a song is played.
8 Set the ON/OFF switch on the
microphone to ON and turn
the MIC LEVEL 1 or 2 control
to adjust microphone
volume.
MIC 1
LEVEL
MIN MAX
MIC 2
LEVEL
MIN MAX
9 Turn the ECHO LEVEL control to
adjust the echo strength.
The same echo level is applied to both
MIC 1 and MIC 2.
Now you can enjoy playing karaoke.
When the song finishes, the player
pauses until you enter the next song
number.
Pausing automatically in karaoke mode
When you connect a microphone, the player automatically switches to
karaoke mode. In karaoke mode, the player pauses every time a song is
played (Auto Pause).
To play songs on the disc continuously in karaoke mode
Press AUTO PAUSE.
“A. PAUSE OFF” appears on the screen briefly and the AUTO PAUSE
button indicator on the player goes off.
Each time you press AUTO PAUSE, the on-screen indication changes as
follows and the AUTO PAUSE button indicator on the player turns off
or on.
A. PAUSEA. PAUSE OFF
AUTO PAUSE button indicator Songs are played
On Pausing at end of each song
Off Continuously
ECHO
LEVEL
MIN MAX
14
-EN
Basic Operations
MDP-V9K.3-856-640-13 ( En , C1, C2)
Page 15
PBC ON/OFF button and indicator
Playing a VIDEO CD using PBC functions (PBC Playback)
Number
buttons
=/+ PREV/NEXT
(ACS/AMS)
RETURN
PBC
VIDEO CDs conforming to Ver. 2.0 of the VIDEO CD standards have
Play Back Control (PBC) functions, which enable you to play the VIDEO
CD interactively, following menus on the screen. Operation methods
may differ depending on the disc. For details, refer to the instructions
supplied with the disc. Use the number buttons, · SELECT/PLAY,
=/+ PREV/NEXT (ACS/AMS), and RETURN during PBC
playback.
1 Place a Ver. 2.0 VIDEO CD (with PBC functions) on the
disc tray, then press · SELECT/PLAY to close the disc
tray.
2 Check to see that the PBC
ON/OFF button indicator on
the player lights up.
A menu appears on the screen
and the player waits for you to
select a number on the menu. On
some discs, moving pictures may
play for a while before the menu
appears.
Lights up when a Ver. 2.0
VIDEO CD is in the player.
VIDEO
CD
12345678 9
10
PBC
1/L2/R
3 Enter a number to select the item in the menu.
p
STOP
·
SELECT/PLAY
z
• To select a song over 10,
Press >10, then press two
number buttons, first the
tens digit, then the ones
digit (see page 18). To use
the number buttons on the
player, see page 18.
• You can view highresolution still pictures on
some Ver. 2.0 VIDEO CDs.
Note
• If no menus appear on the
screen:
– check that the disc is a
Ver. 2.0 VIDEO CD
(“PBC” is lit on the front
panel display when a
Ver. 2.0 VIDEO CD is in
the player.)
– turn on the PBC ON/OFF
button indicator
– press · SELECT/PLAY
to display a menu
4 Play the VIDEO CD interactively, following the menus.
Playing a Ver. 2.0 VIDEO CD interactively
To Press
Select an item in the menu Number button
Jump to another scene · SELECT/PLAY or a number
Go back to the menu
Scroll the menu =/+ PREV/NEXT (ACS/AMS)
If “ NOT VALID NOW” appears on the screen
You have pressed an unoperable button. Use the operable buttons,
following the menu.
Canceling PBC playback
Press p STOP to stop playing the VIDEO CD, then press PBC on the
remote commander, or PBC ON/OFF on the player to turn off the PBC
ON/OFF button indicator. Now you can play the VIDEO CD
continuously but menus for interactive playback are not displayed.
To turn on PBC playback again
The PBC ON/OFF button indicator must be lit to use PBC functions. If
it is not lit, press p STOP to stop playing the disc, then press the PBC
(ON/OFF) button to turn it on. Press · SELECT/PLAY to display a
menu.
button when “SELECT” flashes on a
moving picture
RETURN
Operation methods may differ
depending on the disc. For details,
refer to the instructions supplied
with the disc.
Basic Operations
15
-EN
MDP-V9K.3-856-640-13 ( En , C1, C2)
Page 16

Additional Operations
Understanding on-
You can view the operating status of the player or disc information on
the TV screen.
screen indications
DISPLAY
Displaying on-screen indications
Press DISPLAY.
The operating status of the player is displayed on the screen.
C–3 5484 PLAY
Press DISPLAY again.
Operating status and disc information are displayed on the screen.
C–3 5484 PLAY
LD SIDE A
VIDEO 1- 6 24:31
ONE SIDE
REPEAT
Press DISPLAY once again to turn off the indications.
Message 1
Display Current status of the player
Message 1 (see table below)
Current frame number or
elapsed time
Index number
Current chapter, track, or scene number
Message 2 (see table below)
Number of chapters/tracks and total playing time
(only for LDs with TOC, CDs, and VIDEO CDs)
AV calendar (chapters/tracks remaining to be played)
(only for LDs with TOC, CDs, and VIDEO CDs)
Selected functions
Notes
• The AV calendar for LDs
(display of remaining
chapter numbers) is only
available for LDs with TOC
data.
• When playing an LD
without TOC data, total
playing time of the disc
does not appear.
• When playing an LD
without chapters, the
chapter number does not
appear.
• When playing a CLV LD
without time data to the
second, a two-digit number
such as “22:”, meaning 22
minutes, appears.
• Messages concerning sound
control functions such as
“1/L, 2/R” or “≥ DIGITAL,
≥ ANALOG” appear only
briefly when you press the
AUDIO MONITOR or
ANALOG/´ button.
OPEN Disc tray open
CLOSE Disc tray closed
PLAY Playing a disc
STOP Operation stopped
PAUSE Operation momentarily stopped
0)
/
Speed scanning
SEARCH Searching
Message 2
Display Currently playing
LD SIDE A Side A of LD
LD SIDE B Side B of LD
CD CD
VIDEO CD VIDEO CD
1/L First soundtrack/left channel
2/R Second soundtrack/right channel
≥ DIGITAL Digital sound
≥ ANALOG Analog sound
16
-EN
Additional Operations
MDP-V9K.3-856-640-13 ( En, C1, C2)
Page 17

DISPLAY
AV TIME
Checking the elapsed or remaining time of the disc
You can check the elapsed or remaining time on the TV screen.
Press DISPLAY, then press AV TIME repeatedly.
Each time you press AV TIME, the on-screen display changes as
follows:
Notes
• When playing an LD
without TOC data, you can
only view the total elapsed
time (for a CLV disc) or
current frame number (for a
CAV disc).
• When playing a Ver. 2.0
VIDEO CD using PBC
functions:
– the scene number (such
as “S-5”) is displayed
instead of the track
number
– you can only view the
elapsed time for the
current scene
• The display does not show
remaining time for chapters
or tracks that are 51 or
more chapters or tracks
away from the beginning of
the disc.
LDs with TOC
This display is
skipped when
playing a CLV disc.
Chapter number
C–6 24:22 PLAY
Total elapsed time
for a CLV disc
(or frame number
for a CAV disc)
C–6 I–1 1:28 PLAY
Elapsed time
for chapter
Index number
C–6 25:30 PLAY
Total elapsed time
for a CAV disc
C–6 –3:40 PLAY
Remaining time
for chapter
–5 –22:24 PLAY
Total remaining
play time
Remaining chapters
on the disc
CDs/VIDEO CDs
Track number or
scene number
Index number (for indexed
VIDEO CDs, “V” appears
instead of “I”)
T–5 I–1 1:11 PLAY
Elapsed time for
track
T–5 11:19 PLAY
Total elapsed time
for the disc
T–5 –1:05 PLAY
Remaining time
for track
–14 –38:52 PLAY
Total remaining
play time
Remaining tracks
on the disc
Additional Operations
17
MDP-V9K.3-856-640-13 ( En, C1, C2)
-EN
Page 18
Selecting a chapter or track directly (Chapter/Track Search)
DISPLAY
Number
buttons
LDs are divided into sections called “chapters.” CDs and VIDEO CDs
are divided into sections called “tracks.” Simply enter the desired
chapter/track number to start playing it immediately.
Locating a particular chapter/track
Press one of the number buttons to enter the chapter/track number.
SEARCH
CHAPTER 8 LD
To play a chapter on the opposite side of the LD, press DISC SIDE B (or
A), then enter the chapter number.
To enter a number greater than 10
>
Press
10
first the tens digit, then the ones digit. If you press
>
again, then enter the correct one digit number.
10
To Press
SIDE A
on the remote, then press two number buttons in sequence,
>
by mistake, press
10
z
• In addition to normal play mode,
you can do Chapter/Track Search
while in Freeze Frame (CAV LDs
or VIDEO CDs), Repeat, or Pause
mode. When the selected chapter
or track is located after the search,
playback continues in the same
mode.
• When you do Chapter/Track
search while a song is
automatically paused in karaoke
mode, the selected chapter or track
starts playing immediately,
without entering pause mode.
• You can enter 0 to select chapter 0
on LDs.
To enter 0, press >10 (or >15 on the
player), then press 10/0 (or 10 on
the player).
Notes
• Chapter Search does not function
properly if the LD does not contain
chapter numbers, or if the chapter
number entered does not exist.
• You cannot use Track Search when
you play a Ver. 2.0 VIDEO CD
using PBC functions. Entering a
number selects an item in the
menu.
• If you do Track Search on a Ver. 2.0
VIDEO CD using the PBC
functions before the AV calendar
appears on the front panel display,
the PBC function is turned off.
Enter 10
Enter 14
Enter 20
Enter 25
10
/0
>
, then 1, then
10
>
, then 2, then
10
>
, then 2, then
10
4
10
/0
5
To enter a number greater than 15 using the number buttons
on the player
Press >15 first, then the corresponding number buttons. To enter “0”,
use 10.
Example: To enter 30
Press >15 first, then 3 and 10.
To check the current chapter/track number on the screen
Press DISPLAY to display the chapter/track number.
The number appears in the upper left-hand corner of the screen. If the
LD does not contain chapter numbers, no number is displayed.
C-5 24:22 PLAY
18
-EN
Additional Operations
MDP-V9K.3-856-640-13 ( En, C1, C2)
Page 19

Searching by frame, time, or scene number (Frame/Time/ Scene Search)
FRAME/TIME/
SCENE
DISPLAY
Number
buttons
Video scenes are counted as a series of still pictures or “frames.” When
playing a CAV (standard-play) LD, the player keeps track of the
number of frames, allowing you to locate a scene on the CAV disc by
specifying the frame number.
When playing a CLV (extended-play) LD, the player keeps track of the
elapsed playing time, allowing you to locate a particular point on the
CLV LD by specifying the total elapsed time.
On Ver. 2.0 VIDEO CDs (with PBC functions), “scene numbers” are
assigned to some points on moving pictures and to each still picture,
allowing you to locate a scene you want to view on the VIDEO CD by
specifying the scene number. This is only available during PBC
playback (when the PBC ON/OFF button indicator on the player is lit).
You can check the scene number by pressing the DISPLAY button
during PBC playback (see “Checking the elapsed or remaining time of
the disc” on page 17).
Entering the frame number, elapsed time, or scene
number
1 Press FRAME/TIME/SCENE while playing the disc.
When playing Indication
·
SELECT/PLAY
z
• In addition to normal play
mode, you can do Frame/
Time/Scene Search while in
Freeze Frame, Repeat, or
Pause mode. When the
specified frame, time, or
scene is located after the
search, playback continues
in the same mode.
CAV LD FRAME 00000
CLV LD TIME 0:00:00
Ver. 2.0 VIDEO CD SCENE 00000
(with PBC functions)
FRAME 00000
LD SIDE A
TIME 0:00:00
LD SIDE A
SCENE 00000
VIDEO CD
2 Enter the multi-digit number corresponding to the
frame, time or scene you want to locate.
To locate frame number 12340 on the CAV LD, press 1,2,
,4and0.
3
To locate the 12 minutes, 5 second point on the CLV LD,
press1,2,0and 5.
To locate scene 123 on the VIDEO CD, press1,2and3.
If you enter the wrong number, press FRAME/TIME/SCENE to
clear the number, then enter the correct number.
3 Press · SELECT/PLAY.
Playback starts from the frame, time, or scene you entered.
To check the frame number or time
Press DISPLAY.
The current frame number, time, or scene number is displayed.
To cancel Frame/Time Search
Press CLEAR before pressing · SELECT/PLAY.
Additional Operations
MDP-V9K.3-856-640-13 ( En, C1, C2)
19
-EN
Page 20
Searching for a
particular point on a
You can locate a particular point on a disc by scanning scenes or
skipping chapters/tracks.
disc
0/)
SCAN
=/+ ACS/AMS
(PREV/NEXT)
z
• ACS/AMS is the abbreviation for
Automatic Chapter Sensor/
Automatic Music Sensor.
• In addition to normal play mode,
you can also do Speed Scan and
Skip Search while in Freeze Frame
(CAV LDs or VIDEO CDs), Repeat,
or Pause mode. After the scan or
search, playback continues in the
same mode.
• If you hold down 0/) SCAN
after pressing P PAUSE while
playing a VIDEO CD, the scanning
speed increases. (When playing a
Ver. 2.0 VIDEO CD using PBC
functions, you can do this
operation only while the picture is
moving and the playing time is
displayed.) The picture where you
pressed P PAUSE freezes and
remains on the screen. Navigate by
using the time display. Release
0/) SCAN to display the
picture at the indicated time. The
new picture freezes. Press ·
SELECT/PLAY to resume
playback.
Scanning a disc quickly (Speed Scan)
Hold down 0/) SCAN while playing the disc.
To Hold down
Scan forward ) SCAN
Scan backward 0 SCAN
To resume normal playback, release 0/) SCAN.
Skipping chapters or tracks (Skip Search)
Press or hold down =/+ ACS/AMS (PREV/NEXT).
To go to the beginning of Press
Next chapter/track + ACS/AMS (NEXT) once
Current chapter/track = ACS/AMS (PREV) once
Previous chapter/track = ACS/AMS (PREV) twice before the
picture or sound resumes
Hold down + or = to skip chapters/tracks continuously.
Skip Search on Ver.2.0 VIDEO CDs
If the PBC function is turned on, Skip Search may not be operated
properly on some VIDEO CDs. The PBC function should be set to off
(the PBC ON/OFF button indicator on the player is turned off) when
operating Skip Search.
Notes
• When scanning a CLV LD or
VIDEO CD, frames are skipped.
• A certain amount of visual noise
and instability is inevitable when
scanning an LD.
-EN
20
Additional Operations
MDP-V9K.3-856-640-13 ( En, C1, C2)
Page 21

C/c
V. INDEX
Locating a point using the index (Index Search)
There are two kinds of indexes: one is for audio CDs and the other is for
VIDEO CDs. You can locate any point on the disc using the index.
Note that this function is available only for indexed discs.
While playing a track, press C V.INDEX or c V.INDEX repeatedly.
• To locate the current or preceding index numbers, press
C V.INDEX.
• To locate the next or subsequent index numbers, press c V.INDEX.
Front panel display
15
12 13 14 20
M S
16 17 18 19
/L2/
R
1
REPEAT
11
VIDEO
CD
12345678 9
10
Video index number
TV screen (while playing a VIDEO CD)
T–5 V–5 1:11 PLAY
Video index number
What is an index?
It is the division of a track or
disc into numbered sections.
It allows you to easily locate a
desired point on the disc. To
determine whether or not a
disc has an index, look at the
disc's packaging.
TV screen (while playing an audio CD)
T–5 I–1 1:11 PLAY
Index number
Index Search on Ver. 2.0 VIDEO CDs
To operate Index Search on a VIDEO CD, the PBC ON/OFF button
indicator on the player should not be lit. Press p STOP to stop
playback, then press PBC on the remote, or PBC ON/OFF on the player
to turn off the PBC ON/OFF button indicator.
Additional Operations
21
MDP-V9K.3-856-640-13 ( En, C1, C2)
-EN
Page 22

Viewing frame-byframe action
/7
7
STILL/STEP
·
SELECT/PLAY
P
PAUSE
During any scene, you can freeze play into a still picture, and then
advance or reverse the action frame-by-frame.
Freezing the action (Freeze Frame)
You can use this function for CAV LDs and VIDEO CDs.
Press P PAUSE while playing a CAV LD or VIDEO CD.
The sound mutes and the picture freezes.
To resume normal playback
Press · SELECT/PLAY.
Playing frame-by-frame (Step Play)
You can use this function only for CAV LDs.
1 Press /7 STILL/STEP while
playing a CAV LD.
The sound mutes and the picture
freezes.
2 Press /7 repeatedly to
advance or reverse the action
frame-by-frame.
Hold down /7 to view continuous
frame-by-frame action.
z
• When you play a CLV LD,
Freeze Frame and Step Play
are not available. When you
press P PAUSE, the screen
goes blank. If you press
/7 STILL/STEP,
“CLV SIDE A” or “CLV
SIDE B” appears briefly.
To resume normal playback
Press · SELECT/PLAY.
22
-EN
Additional Operations
MDP-V9K.3-856-640-13 ( En, C1, C2)
Page 23

Resuming LD/VIDEO CD playback (Auto Resume)
POWER
DISC SIDE
A/B
p
STOP
P
PAUSE
·
SELECT/PLAY
z
• Each time you stop playing, the point at
which you stopped last is memorized.
• The point at which you stopped playing is
cleared when:
– you press 6 OPEN/CLOSE, DISC SIDE
A/B or =/+ PREV/NEXT (ACS/
AMS)
– you do a Chapter Search
– you do a Frame/Time Search
– you unplug the AC power cord of the
player
If an LD is in the player and you press 6
OPEN/CLOSE to close the disc tray while
it is opening, the point at which you
stopped is retained.
This function operates automatically only for LDs or VIDEO CDs in
non-karaoke mode (without microphones connected). Once you press p
STOP or POWER to stop playing an LD or VIDEO CD, the player
memorizes the point you stopped at so that you can continue viewing
from the same point.
1 Press p STOP (or POWER) to stop
playing an LD or VIDEO CD.
The AUTO RESUME indicator on the
player lights up and the point you
stopped at is stored (if you press
POWER, the indicator lights up briefly,
then goes off with the power).
2 Press · SELECT/PLAY.
The player searches for the scene at
which you stopped playing, then
playback starts.
To pause playing just before starting
If the player is turned on, press P PAUSE instead of · SELECT/
PLAY.
If the player is turned off, press POWER or · SELECT/PLAY to turn
on the player, then press P PAUSE.
To view from the beginning of the disc
For LDs, press DISC SIDE A to start playing from the beginning of side
A. Press DISC SIDE B to start playing from the beginning of side B.
For VIDEO CDs, press DISC SIDE A to start playing from the beginning
of the disc.
The point at which you stopped is cleared.
Notes
• The point at which you stopped is not
memorized if you stop playback during a
Chapter Search or Frame/Time Search.
• If you press · SELECT/PLAY when the
power is off, the player turns on
automatically. If a disc is loaded, playback
resumes where you last stopped.
• For VIDEO CDs, the player memorizes the
point at which you stopped regardless of
the PBC ON/OFF setting.
• If you connect a microphone (switching
the player to karaoke mode), Auto
Resume is canceled. Although Auto
Resume is not canceled if you switch the
player’s input mode to LINE IN, it is
canceled if you connect a microphone.
Additional Operations
23
MDP-V9K.3-856-640-13 ( En, C1, C2)
-EN
Page 24

Resuming VIDEO CD playback from a point you like (Book Mark)
This is available for VIDEO CDs. You can mark any point you like on
the disc with a “Book Mark” so that you can resume playback from that
point. The player memorizes the point even after you remove the disc or
turn off the player. You can make one Book Mark. Each time you make
a new Book Mark, the old Book Mark is erased.
Making a Book Mark
Play the VIDEO CD on which you want to
make a Book Mark, then press VIDEO CD
MARK on the remote commander at a point
MARK SET
you like.
Resuming playback using the Book Mark
VIDEO CD MARK
VIDEO CD M. PLAY
z
• Each time you press the
VIDEO CD MARK button
while playing a disc, the
Book Mark moves (the old
Book Mark is erased and a
new Book Mark is made).
• You can use Book Marks on
Ver. 1.0, Ver. 1.1, and Ver.
2.0 VIDEO CDs.
• The Book Mark remains
even after you unplug the
AC power cord of the
player.
Press VIDEO CD M.PLAY.
The player searches for the point you marked,
then starts playing.
SEARCH
VIDEO CD
Note
• The PBC ON/OFF button
indicator must be lit to use
a Book Mark on a Ver. 2.0
VIDEO CD. If it is not lit,
press p STOP to stop
playing the disc, then press
the PBC (ON/OFF) button
to turn it on.
-EN
24
Additional Operations
MDP-V9K.3-856-640-13 ( En, C1, C2)
Page 25
Playing a section repeatedly (Repeat Play)
REPEAT
1/SIDE/ALL
CLEAR
Repeat play allows you to play the disc over and over. You can replay
both sides, a single side, or one chapter of an LD; a whole disc or a
single track on a CD or VIDEO CD; or a selected portion of the disc.
Repeating the whole disc (All Disc Repeat)
Press REPEAT.
“REPEAT” appears on the screen briefly. “REPEAT” lights up on the
front panel display. When playing an LD, the player plays through both
sides of the LD repeatedly. When playing a CD or VIDEO CD, the
player plays all the tracks on the disc repeatedly.
REPEAT
Repeating the selected chapter/track (Single
Repeat)
Press 1/SIDE/ALL once, then press REPEAT.
“SINGLE” and “REPEAT” appear on the screen briefly. “REPEAT 1”
lights up on the front panel display. The player plays the selected
chapter/track repeatedly.
Notes
• You cannot use Repeat and
Reserve at the same time.
• You cannot use Repeat
while using PBC functions
on a Ver. 2.0 VIDEO CD. To
use Repeat on a Ver. 2.0
VIDEO CD, press p STOP
to stop playing, then press
the PBC (ON/OFF) button
to turn off the PBC ON/
OFF button indicator on the
player.
SINGLE
REPEAT
Repeating the current side of the LD (One Side
Repeat)
Press 1/SIDE/ALL twice, then press REPEAT.
“ONE SIDE” and “REPEAT” appear on the screen briefly. “REPEAT 1
SIDE” lights up on the front panel display. The player plays the selected
disc side repeatedly.
ONE SIDE
REPEAT
To check the repeat status
Press DISPLAY twice.
Canceling Repeat Play
Press CLEAR.
Additional Operations
25
MDP-V9K.3-856-640-13 ( En, C1, C2)
-EN
Page 26

Playing a section repeatedly
(continued)
REPEAT A ˜ B
CLEAR
Replaying a selected portion on the disc
(Repeat A˜B)
1 Press REPEAT A˜B at the
beginning of the scene or phrase
you want to repeat.
This tells the player where to start.
“REPEAT” and “A-” appear, and “B”
flashes on the front panel display.
2 Let the player run to the end of
the scene or phrase.
3 Press REPEAT A˜B again.
This tells the player where to end.
“REPEAT” and “A-B” appear on the
front panel display. The player
repeatedly plays the scenes or phrases
between the two points you specified
To repeat a different portion
Repeat steps 1 to 3 to reenter new start and end points.
z
• You can scan the disc
between points A and B by
holding down 0/)
SCAN.
Note
• You can do Repeat A˜B
only on the current side of
an LD. You cannot do it on
both sides of the LD.
• You cannot do Repeat
A˜B while using PBC
functions on a Ver. 2.0
VIDEO CD.
To cancel Repeat A ˜ B
Press CLEAR.
26
-EN
Additional Operations
MDP-V9K.3-856-640-13 ( En, C1, C2)
Page 27
12345678 9
10
12345678 9
10
11
12
SIDE ALD
1/L2/R
AV calendar on side A
Playing disc side
AV calendar on side B
Playing disc type
SIDE B
Playing songs in random order (Shuffle Play)
You can play the songs on a disc in random order, each song once
(Shuffle Play). If you select the songs you want to play in advance, the
player plays only selected songs in random order (Delete Shuffle). The
player needs the TOC data of the disc to do Shuffle Play and Delete
Shuffle Play, so these functions are available only on LDs containing
TOC data, CDs, and VIDEO CDs.
6
OPEN/CLOSE
1/SIDE/ALL
CLEAR
SHUFFLE
·
SELECT/PLAY
Shuffle playing on one side of a disc
(One Side Shuffle)
1 Place a disc on the disc tray, then press 6 OPEN/CLOSE
to close the tray.
When you use a CD or VIDEO
CD, the AV calandar appears on
the front panel display, showing
Playing disc type
12345678 9
CD
AV calendar
10 11 12
1
/L2/
R
that TOC data was read.
2 (This step is for an LD. Skip this step when playing a CD
or VIDEO CD.)
Press · SELECT/PLAY and
wait for the AV calendar to
appear on the front panel
display, then press p STOP
to stop playing.
The player reads the TOC data of
the LD.
3 Press SHUFFLE.
“SHUFFLE” flashes on the front
panel display.
SIDE ALD
SIDE B
12345678 9
12345678 9
10
10
1/L2/R
12
11
SHUFFLE
z
• You can skip the current song to
the next song which will be
randomly selected by pressing the
+ NEXT (ACS/AMS) button.
The = PREV (ACS/AMS) button
does not function during Shuffle or
Delete Shuffle Play.
Notes
• If the LD does not contain TOC
data, or if the player has not read
the TOC data of the LD, “NO
TOC” appears on the screen when
you press SHUFFLE, and you
cannot do Shuffle or Delete Shuffle
Play.
• You cannot do Shuffle or Delete
Shuffle Play while using PBC
functions on a Ver. 2.0 VIDEO CD.
To do Shuffle or Delete Shuffle,
play on a Ver. 2.0 VIDEO CD, press
p STOP to stop playing, then press
the PBC (ON/OFF) button to turn
off the PBC ON/OFF button
indicator on the player.
4 Press · SELECT/PLAY.
Songs start playing. All songs on the disc are played once in
random order. To play side A of a double-sided LD, press DISC
SIDE A, then press · SELECT/PLAY. To do Shuffle Play on side
B, perform steps 3 and 4 in playback mode or pause mode while
on side B.
Shuffle playing on both sides of a double-sided LD
(Both Sides Shuffle)
1 Follow steps 1 to 3 above to enter SHUFFLE mode.
Make sure that both AV calendars for side A and side B appear,
and “SHUFFLE” flashes on the front panel display.
2 Press CLEAR to turn off “SIDE” on the front panel
display.
3 Press · SELECT/PLAY.
The songs on side A are played in random order, then the songs
on side B are played in random order.
Additional Operations
27
-EN
MDP-V9K.3-856-640-13 ( En, C1, C2)
Page 28

Playing songs in random
order (continued)
DISPLAY
1/SIDE/ALL
SHUFFLE
CLEAR
Playing only your favorite songs in random order
(One Side Delete Shuffle)
To select your favorite songs in random order, delete the songs you do
not want to play from the disc. If you use an LD, make sure the AV
calendars appear on the front panel display.
1 Press SHUFFLE to enter SHUFFLE
mode.
“SHUFFLE” flashes on the front panel display.
Number
buttons
·
SELECT/PLAY
z
• You can delete songs
numbered up to 99. To
delete a song over 10, press
>10, then press two number
buttons in sequence, first
tens digit, then the ones
digit (see page 18). To use
the number buttons on the
player, see page 18.
• You can repeat Shuffle and
Delete Shuffle Play. Press
REPEAT on the remote
commander. Each time
repeat finishes, the order of
the songs is reshuffled.
2 Press DISPLAY twice to use the on-screen display.
3 Press the number buttons to
delete songs you do not want to
play.
The deleted song numbers are
displayed on the screen.
If you enter a wrong number, press CLEAR. With each press, the
last song you entered is restored (the number on the screen
disappears).
VIDEO 1-12 52:07 SIDE A
DELETE 2 7
SHUFFLE - - - -
- - - - - - - - - -
- - - - - - - - - -
- - - - - - - - - -
- - - - - -
- - - - - -
4 Press · SELECT/PLAY.
The remaining songs on the disc are played once in random order.
To play the remaining songs on side A of a double-sided LD,
press DISC SIDE A, then press · SELECT/PLAY. To play with
the Delete Shuffle function on side B, perform steps from 1 to 4 in
playback mode or pause mode while on side B.
Delete shuffle playing on both sides of an LD (Both
Sides Delete Shuffle)
Play side B and wait for the AV calendar to appear on the front panel
display, then perform the following steps.
1 Follow steps 1 to 3 above to delete songs.
To delete songs on side B of a double-sided LD, press DISC SIDE
B, then press the number buttons. The songs deleted from side B
appear in squares.
2 Press CLEAR on the remote commander to turn off
“SIDE” on the front panel display.
28
-EN
Additional Operations
3 Press · SELECT/PLAY.
The remaining songs on side A are played in random order, then
the remaining songs on side B are played in random order.
Canceling Shuffle Play or Delete Shuffle Play
Press CLEAR.
“SHUFFLE” on the front panel goes off. The player exits Shuffle mode.
All the deleted songs are restored.
MDP-V9K.3-856-640-13 ( En, C1, C2)
Page 29

Playing songs in any order you like (Program Play)
You can select up to 25 songs to be played in any order you like,
regardless of disc side, even while a song is being played. The songs are
played continuously in the order you specify. This is available in nonkaraoke mode (without microphones connected). In karaoke mode, use
Reserve instead of this function (see “Selecting karaoke song order” on
page 33).
Selecting songs to make a program
PROGRAM
/RESERVE
CLEAR
Number
buttons
DISC SIDE
A/B
·
SELECT/PLAY
z
• You can select songs numbered up to 99. To
select a song over 10, Press >10, then press
two number buttons, first the tens digit, then
the ones digit (see page 18). To use the
number buttons on the player, see page 18.
• You can skip to the previous or next song in
the program by pressing the =/+
PREV/NEXT (ACS/AMS) button.
• Even when the playback of the whole
program is complete, the program is not
cleared. The program is cleared when:
– you press CLEAR (except while “PGM” on
the front panel display is flashing) to exit
Program mode.
– you open the disc tray or turn off the player
• To repeat playing the program automatically,
press REPEAT on the remote commander.
Notes
• You cannot use Program while using PBC
functions on a Ver. 2.0 VIDEO CD. To use
Program on a Ver. 2.0 VIDEO CD, press p
STOP playing, then press the PBC (ON/OFF)
button to turn off the PBC ON/OFF button
indicator on the player.
• To check the total playing time of the program
on an LD:
– Use an LD with TOC data
– Press · SELECT/PLAY (and press SIDE
B) make the player read the LD’s TOC data,
before you press PROGRAM/RESERVE.
• If you select songs numbered over 50, or if the
total playing time exceeds 100 minutes, the
time display changes to “--:--.”
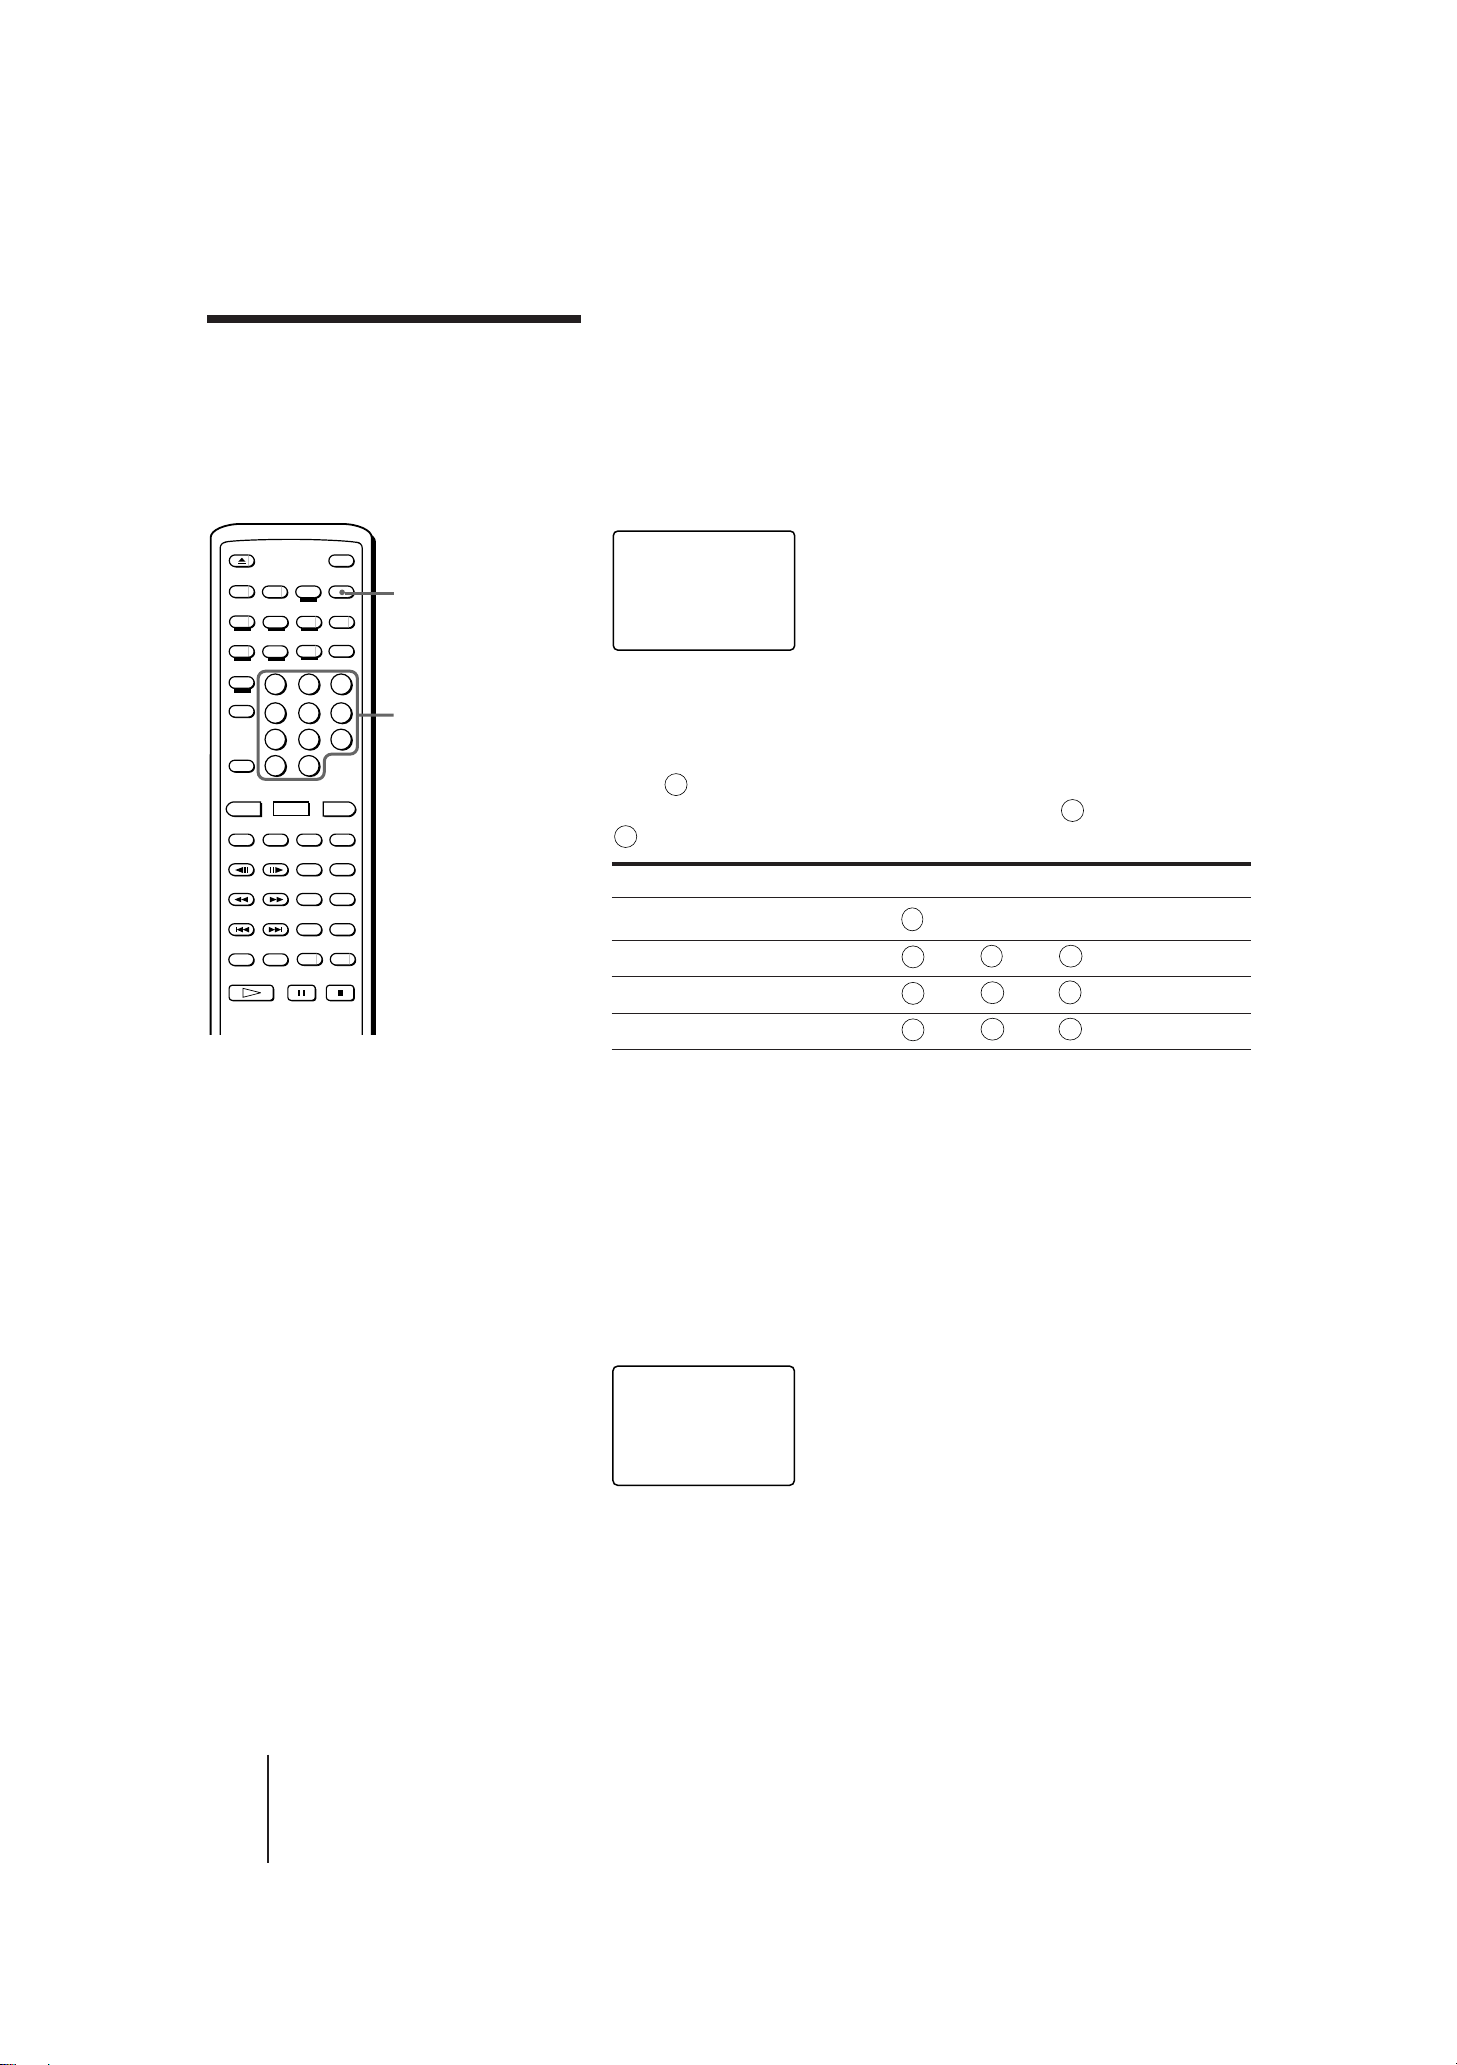
1 Press PROGRAM/RESERVE.
“PROGRAM” appears. “PGM” flashes
on the front panel display.
VIDEO 1-10 48:31 SIDE A
PROGRAM - - - - - - - - - – – : – – - - - - - - - - - -
- - - - - - - - - -
- - - - - - - - - -
- - - - - - - - - -
2 Press the number buttons to select songs in the order
you want them to play.
When you play a double-sided LD,
select the disc side by pressing DISC
SIDE A (or B), then press the number
buttons to select songs in the order you
VIDEO 1-12 52:07 SIDE B
PROGRAM 4 2 10 5 1
36 : 41 3 - - - - - - - -
- - - - - - - - - -
- - - - - - - - - -
- - - - - - - - - -
want them to play. The songs selected
from side B appear in squares.
If you enter a wrong number, press CLEAR. With each press, the
last song you entered is deleted.
3 Repeat step 2 until you finish selecting songs.
4 Press · SELECT/PLAY.
The selected songs are programmed and the on-screen display
disappears. “PGM” lights up on the front panel display. The
selected songs are played in order you selected them.
To make a program while checking the
total playing time
You can check the total playing time of the
program while selecting songs. The time is
displayed both on the screen and front panel
displays. Each time you select a song, its
playing time is added.
If you enter P PAUSE in the program
You can enter P PAUSEs among songs you select, to make the player
automatically pause during the program. If you enter a P PAUSE, the
total playing time is re-counted from --:-- (zero).
To check the contents of the program
Press DISPLAY twice.
The numbers of the selected songs appear. If playing a song, its number
flashes.
Canceling Program Play
Press CLEAR.
“CLEAR” appears briefly and “PGM” on the front panel display goes
off. The player exits Program mode and all the programmed songs are
cleared.
VIDEO 1-10 48:31 SIDE A
PROGRAM 4 2 10 5 1
52: 18 3 7 6 - - - -
- - - - - - - - - -
- - - - - - - - - -
- - - - - - - - - -
Total playing time of the
program
Additional Operations
29
MDP-V9K.3-856-640-13 ( En, C1, C2)
-EN
Page 30

Playing a disc within a specified period of time (Auto Program Play)
AUTO PGM
With Auto Program Play, the player divides the tracks on the disc into
what it calls “Program A” and “Program B”, playing both A and B for
the amount of time entered. Since the player pauses between the two
programs, this feature is useful for making tapes.
Decide how long you want the disc to play and then enter half that
amount of time.
This function is available only on CDs, VIDEO CDs and LDs with TOC.
To ensure correct operation for LDs
When you play an LD with TOC, press P PAUSE, and then press DISC
SIDE A or DISC SIDE B to display the AV calendar before you press
AUTO PGM. Make sure that you cannot make programs consisting of
chapters from both sides of LD using Auto Program.
Number
buttons
DISC SIDE
A/B
P
PAUSE
·
SELECT/PLAY
z
• To use the number buttons
on the player, see page 18.
• You can skip to the
previous or next song in the
program by pressing the
=/+ PREV/NEXT
(ACS/AMS) button.
• If an LD contains 51 or
more chapters on the
playing side, Auto Program
may not operate correctly.
Note
• You cannot use Program
while using PBC functions
on a Ver. 2.0 VIDEO CD. To
use Program on a Ver. 2.0
VIDEO CD, press p STOP
to stop playing and then
press the PBC (ON/OFF)
button to turn off the PBC
ON/OFF button indicator
on the player.
Programming the songs automatically
1 Press AUTO PGM.
“AUTO PGM” appears. “AUTO PGM”
flashes on the front panel display.
AUDIO 1-10 48:31
AUTO PGM - - - - - - - - - -
- - MIN
A - -:- -
- - - - - - - - - -
- - - - - - - - - -
- - - - - - - - - -
- - - - - - - - - -
2 Enter the desired playing time
with the number buttons.
To enter 11 minutes or more
Press
and then press two number buttons in sequence, first
>
10
the tens digit, then the ones digit.
For example, to enter 30 minutes, press
, 3 and then
>
10
Even if you enter the wrong time, you can enter the correct time
by pressing the number buttons.
The player selects the songs for both Program A and B, and the
total playing time of two programs appear alternately.
AUDIO 1-10 48:31
AUTO PGM 1 2 3 4 5
30 MIN
6 P 7 8 9
A 26:13
10
Pause
Program A
Total playing time of Program A
AUDIO 1-10 48:31
AUTO PGM 1 2 3 4 5
30 MIN
B 22:18
6 P 7 8 9
10
Program B
,
Total playing time of Program B
3 Press · SELECT/PLAY.
The contents of Program A start playing and the player pauses at
the end of Program A. To play Program B, press · SELECT/
PLAY again.
To check the contents of the program
Press DISPLAY twice.
The selected song numbers in program A and program B appear.
10
.
/0
30
-EN
Additional Operations
MDP-V9K.3-856-640-13 ( En, C1, C2)
Page 31

CLEAR
Assignment of the time to Program A and B
If you enter a playing time shorter than half the disc playing time, some
songs on the disc may not fit into the specified time and may not be
programmed. On the other hand, if you enter a playing time longer
than the disc playing time, all songs will be stored only in Program A.
This is because Program A always has priority over B.
The table below shows how the player assigns the time in such cases.
Example for a 40-minute disc:
z
• Even when the playback of
the whole program is
completed, the program is
not cleared. The program is
cleared when:
– you press CLEAR (except
while “AUTO PGM” on
the front panel display is
flashing) to exit Program
mode.
– you open the disc tray or
turn off the player.
You enter
15 min
30 min
45 min
Program A plays
15 min (or less)
30 min (or less)
40 min (all songs)
Program B plays
15 min (or less)
10 min (about)
0 min
Total playing time
30 min (or less)
40 min
40 min
Canceling Auto Program Play
Press CLEAR.
“CLEAR” appears briefly and “AUTO PGM” on the front panel display
goes off. The player exits Program mode and the program contents are
cleared.
Additional Operations
31
MDP-V9K.3-856-640-13 ( En, C1, C2)
-EN
Page 32

Using the sound
Playing a stereo disc or Second Audio Program
(SAP) disc
control functions
AUDIO MONITOR
ANALOG/´
When playing SAP discs such as bilingual discs, you can alternate the
sound output using AUDIO MONITOR.
To alternate the sound output
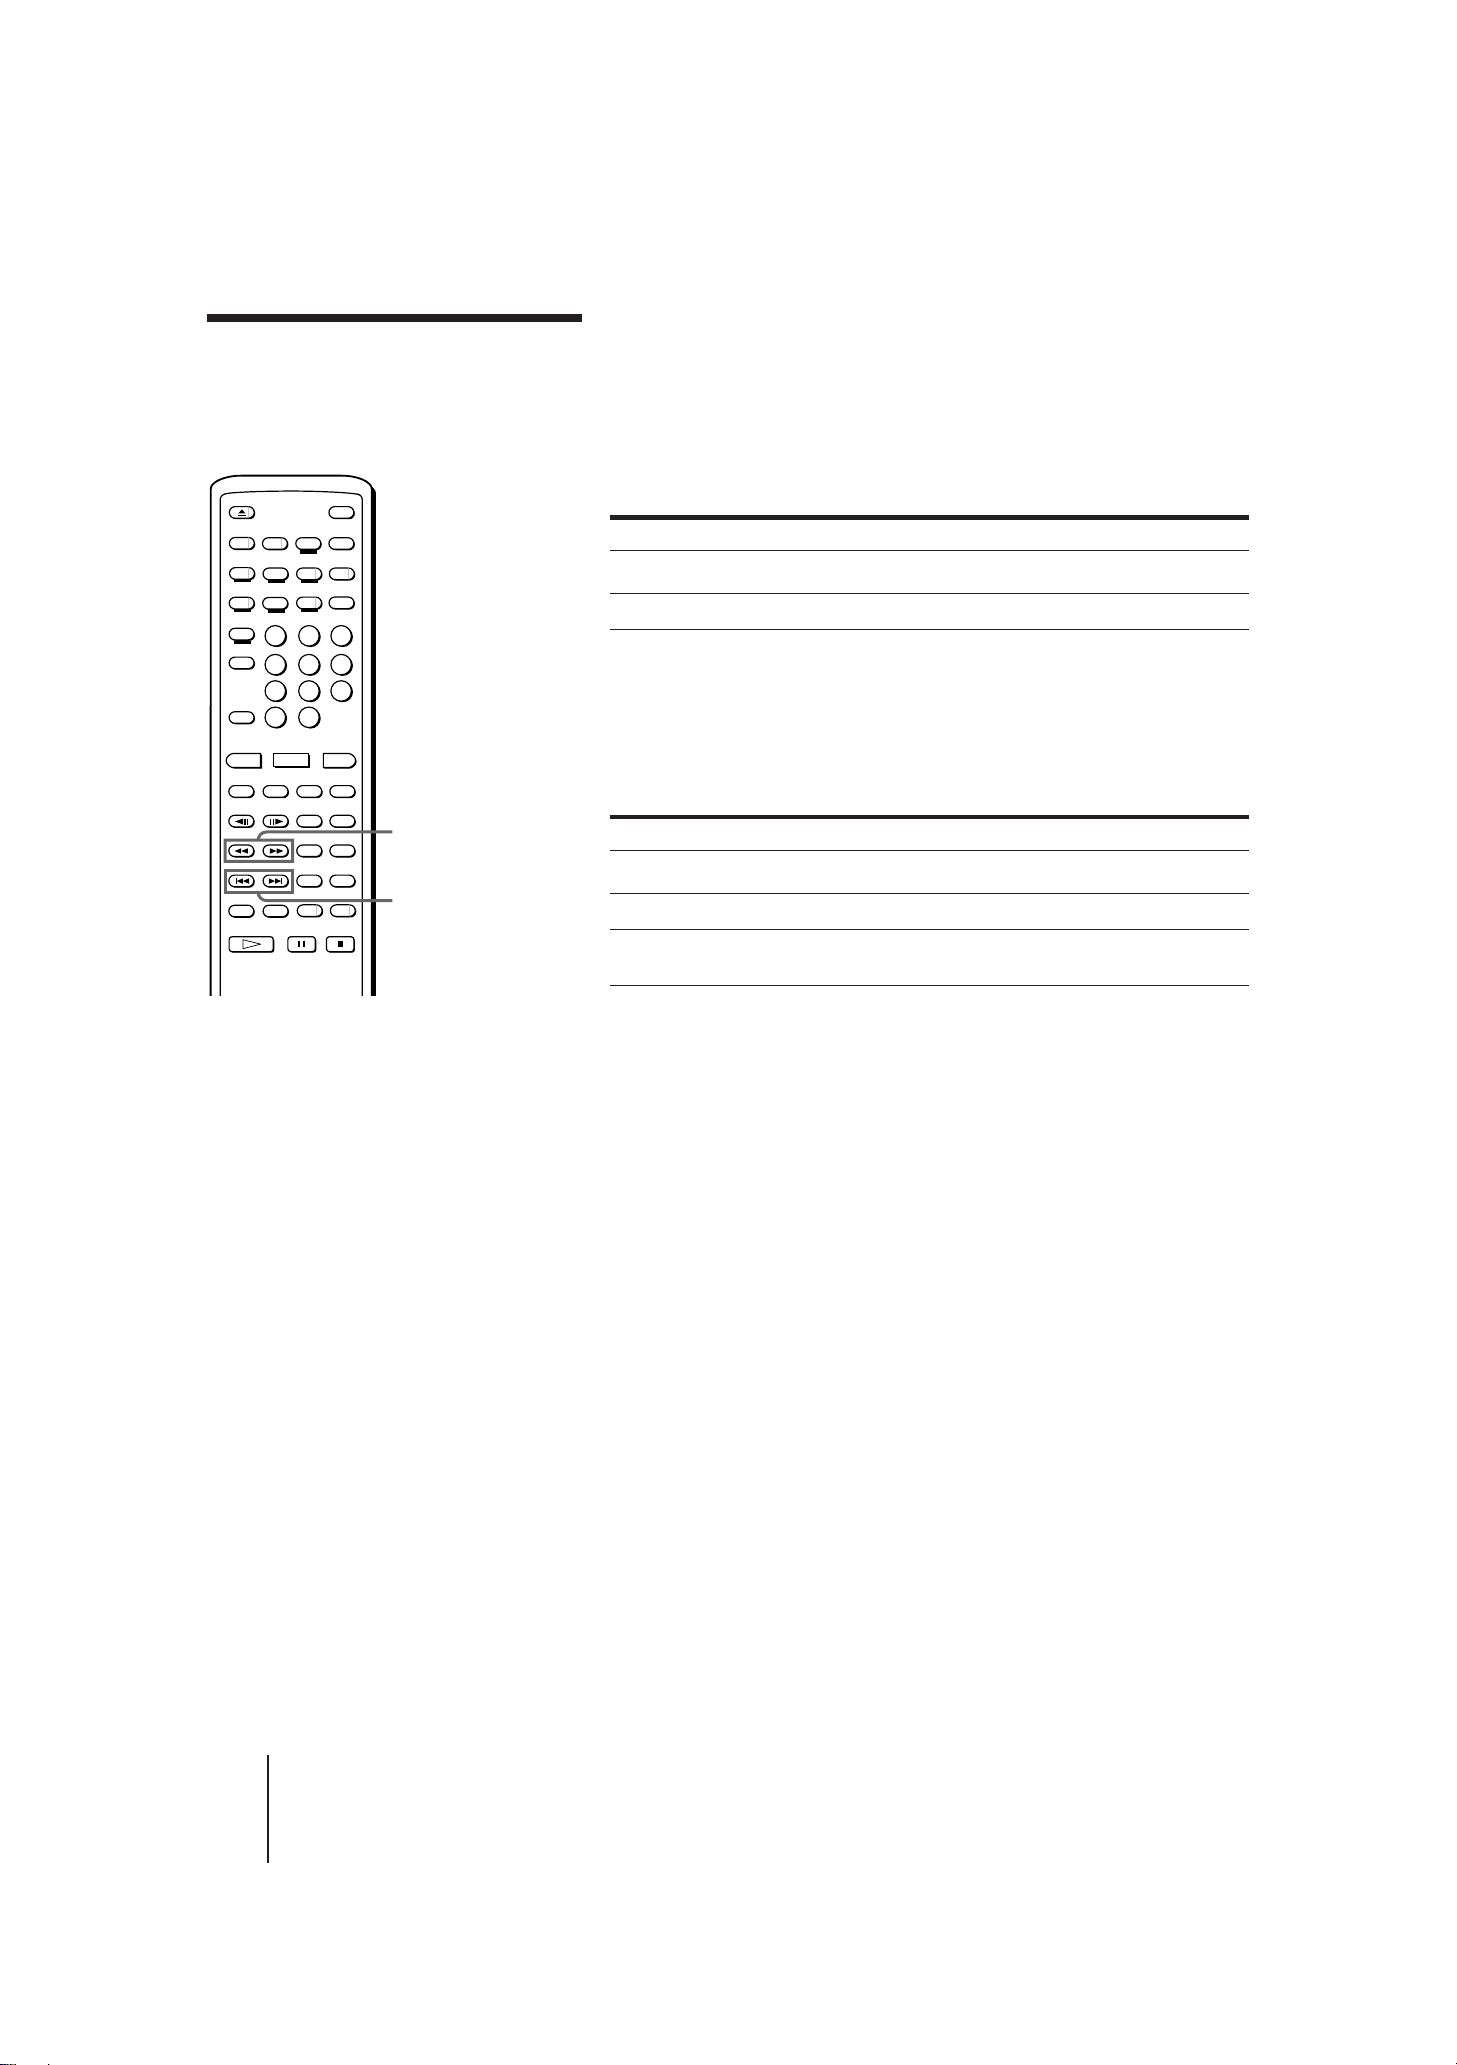
Press AUDIO MONITOR while playing the disc.
Each time you press AUDIO MONITOR, the on-screen indication
changes as follows:
1/L 2/R 1/L 2/R
Indication From stereo disc From SAP disc
1/L Left channel Sound track 1 (Left channel)
2/R Right channel Sound track 2 (Right channel)
1/L 2/R Stereo Sound track 1 (Left channel)
(Both channels) Sound track 2 (Right channel)
When you select 1/L (or 2/R), the sound of the left (or right) channel is
output from both speakers.
Listening to analog sound on an LD
Notes
• If you select the analog
sound during playback of
the disc which conforms to
the Dolby Surround AC-3
system, only the sound of
the left channel is output
from both speakers. With
this type of disc, you cannot
use AUDIO MONITOR to
alternate the left and right
channels of analog sound.
• The output level may differ
between digital and analog
sound.
If your LD contains digital soundtracks, the player automatically
outputs digital sound. To listen to sound recorded on analog
soundtracks, use ANALOG/´.
Press ANALOG/´ while playing the disc.
“≥ ANALOG” appears briefly on the screen and the analog sound is
output.
To return to digital sound
Press ANALOG/´ repeatedly until “ ≥ DIGITAL” appears on the
screen.
Playing discs with the ´ (CX) logo
LDs bearing the ´ logo are recorded with the CX noise reduction
system, which gives lower noise level and higher dynamic range on
analog sound. The player detects most ´ discs and activates the CX
noise reduction system automatically when outputting analog sound. If
your ´ LD does not contain a code to activate the CX noise reduction
system, you can activate the CX noise reduction system manually while
playing only analog sound.
32
-EN
Additional Operations
To activate the CX noise reduction system manually
Press ANALOG/´ repeatedly until “CX ON” appears. The CX noise
reduction system is activated.
MDP-V9K.3-856-640-13 ( En, C1, C2)
Page 33

Selecting karaoke song order (Reserve)
PROGRAM
/RESERVE
CLEAR
Number
buttons
This is available in karaoke mode. You can select up to 9 songs to be
played in any order you like, regardless of disc side, even while a song
is being played. The songs are played continuously in the order you
selected so that you can enjoy non-stop karaoke playing. You can also
select songs on another disc (Next Disc Reserve).
Selecting songs on the current disc
1 Press PROGRAM/RESERVE.
“RESERVE” appears. The RESERVE
button indicator on the player flashes.
VIDEO 1-10 48:31 SIDE A
RESERVE - - - - - - - - - -
- - - - - - - -
Note
• You cannot use Reserve
while using PBC functions
on a Ver. 2.0 VIDEO CD. To
use Reserve on a Ver. 2.0
VIDEO CD, press p STOP
playing, then press the PBC
(ON/OFF) button to turn
off the PBC ON/OFF
button indicator on the
player.
DISC SIDE
A/B
·
SELECT/PLAY
2 Press the number buttons to
select songs in the order you
want them to play.
When you play a double-sided LD,
select the disc side by pressing DISC
SIDE A (or B), then press the number
Selected disc side
VIDEO 1-10 48:31 SIDE A
RESERVE 4 2 10 - - - -
- - - - - - - -
buttons to select songs.
If you enter a wrong number, press CLEAR. With each press, the
last song you entered is deleted.
3 To enter songs from the other
side of the double-sided LD, press
DISC SIDE B (or A), then press the
number buttons to select the
songs in the order you want them
Alternate disc side
VIDEO 1-12 52:07 SIDE B
RESERVE 4 2 10 5 1
3 - - - - - -
to play.
4 Repeat steps 2 and 3 until you finish selecting songs.
5 Press PROGRAM/RESERVE.
On-screen indications disappear. The RESERVE button indicator
on the player lights up.
If you reserve songs while playing a song, the reserved songs
start playing, without pausing, after the current song.
If you reserve songs while the player is stopped, press ·
SELECT/PLAY. The reserved songs start playing.
Additional Operations
MDP-V9K.3-856-640-13 ( En, C1, C2)
33
-EN
Page 34

Selecting karaoke song order
(continued)
Selecting songs on another disc
(Next Disc Reserve)
6 OPEN/CLOSE
PROGRAM
/RESERVE
CLEAR
Number
buttons
NEXT DISC
RESERVE
·
SELECT/PLAY
1 Press NEXT DISC RESERVE after steps 1 to 4 on the
previous page.
“ ” appears on the screen, rotating. Now you can select songs
on another disc. Follow steps 2 (and 3) on the previous page to
select the songs.
NEXT DISC SIDE A
RESERVE 4 2 10 5 1
3 - - - - - -
NEXT DISC SIDE A
RESERVE 4 2 10 5 1
3 1 3 2
Songs on
another disc
2 Press PROGRAM/RESERVE (then
press · SELECT/PLAY).
The songs on the current disc are
played, then the player stops
automatically and prompts you to
change the disc.
STOP
PLEASE CHANGE THE DISC
RESERVE 1 3 2
3 Press 6 OPEN/CLOSE to open the
disc tray, then change the disc.
z
• You cannot use Next Disc
Reserve in non-karaoke
mode (without
microphones connected).
Instead, you can select up
to 25 songs in non-karaoke
mode (see “Playing songs
in any order you like” on
page 29).
Notes
• When you play songs using
Reserve (and Next Disc
Reserve), the songs are
played continuously, and
you cannot use Auto Pause.
The player enters pause
mode after playing all the
reserved songs.
• You cannot use Reserve
and Repeat at the same
time.
• You cannot select tracks
over 80 on a CD or VIDEO
CD using Next Disc
Reserve.
4 Press · SELECT/PLAY or push in
the disc tray.
The selected songs on the new disc start
playing automatically.
Canceling Reserve and Next Disc Reserve
Press CLEAR.
“CLEAR” appears briefly and the player exits Reserve mode. The
RESERVE button indicator on the player goes off. All the reserved songs
are cleared.
34
-EN
Additional Operations
MDP-V9K.3-856-640-13 ( En, C1, C2)
Page 35

z
• You can enter 0 to select
chapter 0 on LDs.
To enter 0, press >10 (or
>15 on the player), then
press 10/0 (or 10 on the
player).
To enter a number greater than 10
Press
on the remote, then press two number buttons in sequence,
>
10
first the tens digit, then the ones digit.
If you press
by mistake, press
>
10
again to flash “– –” on the screen,
>
10
then enter the correct one digit number.
To Press
Enter 10
Enter 14
Enter 20
Enter 25
10
/0
>
, then 1, then
10
>
, then 2, then
10
>
, then 2, then
10
4
10
/0
5
To enter a number greater than 15 using the number buttons
on the player
Press >15 first, then the corresponding number buttons. To enter “0”,
use 10.
Example: To enter 30
Press >15 first, then 3 and 10.
To check the songs to be played
Press DISPLAY twice.
The numbers of the reserved songs appear. When a song has been
played, its number disappears.
C–5 22:58 PLAY
LD SIDE A
VIDEO 1-10 48:31
RESERVE 4 2 6
Reserved songs
To skip the current song
Press +.
The next reserved song starts playing.
Additional Operations
35
MDP-V9K.3-856-640-13 ( En, C1, C2)
-EN
Page 36

Using karaoke
You can enjoy karaoke using various functions.
functions
VOCAL
SELECT
Singing along with the original vocals
(Vocal Select)
You can listen to words or melody you forget by listening to the original
vocals. This is available in karaoke mode for karaoke discs or tapes.
To listen to the original vocals on MULTI AUDIO LDs
On MULTI AUDIO karaoke LDs, vocals are recorded on an analog
track. When playing MULTI AUDIO karaoke LDs, the player
automatically outputs the backup sound recorded on digital tracks in
stereo. To listen to the vocals, use Vocal Select. You can easily select the
analog track on which the vocals are recorded.
1 Press VOCAL to turn on the SELECT button indicator.
2 Press SELECT repeatedly until the vocals are heard.
With each press, the on-screen indication changes as follows:
VOCAL 2VOCAL 1 VOCAL 3
Indication Output sound recorded on
VOCAL 1 Right analog track
VOCAL 2 Left analog track
z
• When you connect your
VCR to the LINE IN input
on the player and set the
player to line in mode (see
“Playing karaoke using
auxiliary equipment” on
page 41), you can also use
Vocal Select for karaoke
video tapes.
Note
• On some VIDEO CDs,
original vocals are recorded
on the left channel. If you
play such a disc, the player
outputs the vocals and
backup sound. To listen to
backup sound only, use the
AUDIO MONITOR button
to select “2/R” (see “Using
the sound control
functions” on page 32).
VOCAL 3 Right analog track
(with stereo sound on digital tracks)
To listen to the original vocals on karaoke CDs, VIDEO CDs, or
tapes
When playing karaoke CDs, VIDEO CDs in karaoke mode (with
microphones connected), or when playing karaoke tapes using LINE IN,
the player automatically outputs backup sound recorded on the left
channel. To listen to the vocals, use Vocal Select to also output the
original vocals recorded on another track.
1 Press VOCAL to turn on the SELECT button indicator.
2 Press SELECT repeatedly to select the sound.
With each press, the on-screen indication changes as follows:
VOCAL 2VOCAL 1
Indication Output
VOCAL 1 Vocals with backup sound from both
speakers
VOCAL 2 Stereo
(Backup sound from left speaker and vocals
from right speaker)
36
-EN
Additional Operations
To cancel Vocal Select
Press VOCAL to turn off the SELECT button indicator.
“VOCALSEL OFF” appears on the screen briefly.
MDP-V9K.3-856-640-13 ( En, C1, C2)
Page 37

KARAOKE STAR
KEY CONTROL
Changing the backup key (Key Control)
You can adjust the backup key to your voice.
Press n UP or ˜ DOWN repeatedly to find the backup key that suits
your voice.
To Press
Raise the key n UP
Lower the key ˜ DOWN
Return to the original key N NATURAL
The key is adjustable to one of 17 steps (8 steps higher, 8 steps lower
than the original key, and the original key). Your setting appears on the
screen briefly. In karaoke mode (with microphones connected), or when
you use LINE IN, the key change (in steps) is always displayed on the
front panel display.
KEY +3
˜ n
SIDE ALD
Key change (in steps)
12345678 9
12345678 9
10
12
11
10
1/L2/R
z
• In karaoke mode, the key
returns to the original key
when playback pauses
automatically at the end of
a song. If Auto Pause is
canceled, the key does not
change at the end of a song.
• You can also adjust the key
from the karaoke
microphone (see “Using the
optional karaoke
microphone” on page 40).
• You can also use Key
Control in non-karaoke
mode (without
microphones connected).
Note
• When you use KARAOKE
STAR, the ECHO LEVEL
control should be set to the
appropriate level. If the
control is set to MIN, the
karaoke star function has
no effect.
Adding richness to your voice (Karaoke Star)
If you feel that your voice lacks depth, use the karaoke star function.
Press KARAOKE STAR. The KARAOKE STAR indicator-button on the
player lights green and “K. STAR 1” appears on the screen. Initially, the
effect level is low.
K. STAR 1
To increase the effect level, press KARAOKE STAR again. The
KARAOKE STAR indicator-button on the player lights orange and “K.
STAR 2” appears on the screen, and the effect level becomes high.
With each press, the on-screen indication changes as follows:
K. STAR 2K. STAR 1 K. STAR OFF
To cancel Karaoke Star
Press KARAOKE STAR so that the KARAOKE STAR indicator-button
goes off.
Additional Operations
37
MDP-V9K.3-856-640-13 ( En, C1, C2)
-EN
Page 38

Using karaoke functions
(continued)
Applauding the singer
The player can liven up karaoke entertainment by applauding the
singer.
To select automatic applause
The player applauds at the beginning and end of each song
automatically (except during PBC playback on a Ver. 2.0 VIDEO CD).
You can select two types of applause.
Press EFFECT MODE on the remote commander or AUTO EFFECT on
the player to turn on the AUTO EFFECT button indicator. With each
press, the on-screen indication changes as follows:
EFFECT 2EFFECT 1 EFFECT OFF
Indication Select
EFFECT MODE
EFFECT EXECUTE
z
• Even in non-karaoke mode,
you can use the applause
function.
Note
• The EFFECT EXECUTE
button does not function
during applause. To use the
EFFECT EXECUTE button,
press it after applause
finishes.
• When playing karaoke
using LINE IN, you can
only use the applause
function manually.
• You cannot use Applause
while using PBC functions
on a Ver. 2.0 VIDEO CD.
To use the applause
function, press p STOP to
stop playback, then press
the PBC (ON/OFF) button
to turn off the PBC ON/
OFF button indicator on the
player.
EFFECT 1 Applause only
EFFECT 2 Applause and cheers
EFFECT OFF Cancel (the indicator turns off)
To applaud manually
You can applaud the singer any time you like.
Press EFFECT EXECUTE on the remote commander.
Each time you press EFFECT EXECUTE, the player applauds.
When you applaud manually, the player applauds according to the
Auto Effect Applause setting. When the Auto Effect Applause is set to
EFFECT 1, the player does "Applause" only. When the Auto Effect
Applause is set to EFFECT 2 or EFFECT OFF, the player does "Applause
and cheers".
38
-EN
Additional Operations
MDP-V9K.3-856-640-13 ( En, C1, C2)
Page 39

KARAOKE PON
Letting the vocals help you (Vocal Support)
You can let the original vocals come in when you forget the words or
melody. This is available for MULTI AUDIO discs, or multiplex discs or
tapes.
Press VOCAL SUPPORT to turn on the VOCAL SUPPORT indicator on
the player.
“SUPPORT” appears on the screen briefly.
While you are singing into the microphone, the player outputs the
backup sound, but when you are not, it also outputs the singer’s voice
to help you.
VOCAL SUPPORT
z
• Using the Vocal Support
function, you can sing a duet
by yourself. You can sing the
male part (or female part) and
the other part comes in when
you stop singing.
• You can also use Karaoke Pon
in non-karaoke mode (without
microphones connected).
To turn off Vocal Support
Press VOCAL SUPPORT again to turn off the VOCAL SUPPORT
indicator on the player.
“SUPPORT OFF” appears on the screen briefly.
Enjoying karaoke with non-karaoke discs (Karaoke
Pon)
With a disc recorded in stereo, you can enjoy karaoke even if it is a nonkaraoke disc.
Press KARAOKE PON to turn on the KARAOKE PON function.
“KARAOKE PON” appears on the screen.
The volume of the singer’s voice is lowered.
To turn off Karaoke Pon
Press KARAOKE PON again to turn off the KARAOKE PON function.
“K. PON OFF” appears on the screen briefly.
Notes
• You cannot use Vocal Support
in non-karaoke mode (without
microphones connected).
• Karaoke Pon is only available
for discs recorded in stereo.
With monaural discs, the
backup level is also lowered.
• You cannot completely shut off
the vocals by using Karaoke
Pon. Even with stereo discs, if
the voice deviates from the
center, its level may not be
lowered well.
• When using Karaoke Pon,
stereo effect is reduced.
Additional Operations
39
-EN
MDP-V9K.3-856-640-13 ( En, C1, C2)
Page 40

Using karaoke functions
(continued)
Using the optional karaoke microphone
You can control the player from the karaoke microphone (F-KM1, not
supplied) by connecting the control plug to the CONTROL jack on the
player.
To sing repeatedly
You can go back to any point of a song using the REPEAT button on the
microphone. Hold down REPEAT and release it at the desired point.
Playback continues again from the point at which the button is released.
z
• When using two
microphones, Repeat
Singing and Key Control
are only operable on the
microphone connected to
the CONTROL (MIC 1/2)
jack.
Note
• The MIC 1 LEVEL (or MIC
2 LEVEL) control adjusts
the volume level of the MIC
1 (or MIC 2) jack on the
front panel and that on the
rear panel simultaneously.
To use Key Control
You can change the backup key by pressing KEY CONTROL n/˜
on the microphone. This is the same operation as KEY CONTROL on
the player or remote commander (see “Changing the backup key” on
page 37).
REPEAT
ON/OFF
KEY CONTROL n/˜
Control plug
To CONTROL (MIC 1/2) jack
To MIC 1 or MIC 2 jack
MIC plug
Using the infrared cordless microphone system
(not supplied)
You can use infrared cordless microphones by connecting the infrared
receiver to the MIC jacks on the player.
IFM-V55K/V50K
1 Connect the infrared receiver to the MIC 1/2 jacks.
Plug adaptor
(supplied with IFM-V55K/V50K)
to MIC jack
40
-EN
Additional Operations
to MIC jack
Infrared receiver
TO AN-IFS
Infrared sensors
Cordless microphone
OUTPUT LEVEL OUTPUT DC IN 9V
1234
MIC
LINE
Infrared cordless
microphone system
(IFM-V55K/V50K)
2 Set the OUTPUT LEVEL selector on the infrared receiver to MIC.
OUTPUT LEVEL
LINE MIC
MDP-V9K.3-856-640-13 ( En, C1, C2)
Page 41

z
• When you use LINE IN, the
left channel is output
automatically, even if
microphones are not
connected. To listen to the
right channel, or to listen to
both channels in stereo, use
Vocal Select. Vocal Select
operates as it would do for
CDs (VOCAL 1 and
VOCAL 2). See “Singing
along with the original
vocals” on page 36 for
details.
• When you use LINE IN,
you can only use the
applause function
manually.
Note
• When you play karaoke
using auxiliary equipment
such as a VCR using LINE
IN:
– Always turn on the LD
player.
– Stop playing the disc by
pressing p STOP. When
playing a disc, you
cannot use LINE IN.
IFM-V1K
Connect the infrared receiver to the MIC 1/2 jacks.
to MIC jack
Plug adaptor
Cordless
microphone
(supplied with IFM-V1K)
Infrared receiver
Infrared cordless
microphone system
(IFM-V1K)
Playing karaoke using auxiliary equipment
You can also enjoy karaoke by connecting auxiliary equipment such as a
VCR to the LINE IN AUDIO/VIDEO inputs on the player. The karaoke
functions such as Vocal Select, Key Control, Applause, Karaoke Star,
Vocal Support, and Karaoke Pon are available as they would be for
discs.
1 Connect the VCR to the LINE IN AUDIO/VIDEO inputs on the
rear.
2 Press LINE IN on the player.
The LINE IN button indicator on the player lights up.
If a disc is being played, press p STOP to stop playing it.
Now you can enjoy playing karaoke with your video tape.
To return to playing a disc, press · SELECT/PLAY.
VIDEO
L
AUDIO
R
LINE IN
VMC-810 Audio/Video Cable (not supplied)
VCR
Additional Operations
41
MDP-V9K.3-856-640-13 ( En, C1, C2)
-EN
Page 42

Additional Information
Troubleshooting
Power
Karaoke
Playback
Symptom
No power
No sound from microphone
Distorted sound
Howling occurs
KARAOKE STAR does not
operate
Playback does not start
Playback stops every time a
chapter/track ends
Menu does not appear on a
VIDEO CD
Remedy
• Connect the AC power cord securely.
• Switch the microphone on.
• Turn up the MIC LEVEL 1 or 2 control on the player.
• Set the ATT switch at the rear of the player to ON.
• Move the microphone away from the speakers.
• Lower the volume.
• Lower the microphone volume or echo level.
• Set ECHO LEVEL to the appropriate position. KARAOKE STAR
does not operate if ECHO LEVEL is set to MIN.
• Insert the disc correctly. When playing a CD, VIDEO CD or LD
Single, place it with the label facing up.
• Select the disc side on which signals are recorded.
• If there may be moisture condensation within the player, wait for
about one hour before operating the player.
• Clean the disc.
• Press AUTO PAUSE to turn off the AUTO PAUSE button indicator
on the player.
• Use a VIDEO CD which has PBC functions (Ver. 2.0 VIDEO CD).
• Press p STOP to stop playing the disc, then press the PBC (ON/OFF)
button to turn on the PBC ON/OFF button indicator on the player.
Press · SELECT/PLAY to display the menu.
Picture
Sound
Others
No picture, but “(” lights up
on the front panel display
Poor picture
Visual noise while scanning a
disc
Freeze Frame does not operate
No sound
Remote Commander does not
operate
• Connect the TV correctly.
• Turn on the TV and set the input selector on the TV to “Video.”
• Connect the TV correctly.
• Clean the disc.
• A certain amount of visual noise and instability is inevitable while
scanning a disc.
• Use a CAV LD or VIDEO CD. Freeze Frame does not operate on CLV
LDs.
• Connect the TV or amplifier correctly.
• Turn up the volume on the TV or amplifier.
• Switch on the amplifier and set the input selector to “CD” or “AUX.”
• Press · SELECT/PLAY. No sound is output while in pause mode.
• Turn on the player.
• Point the remote commander at the remote sensor on the player.
• Remove any obstacles between the remote commander and the
sensor.
• Insert the batteries correctly.
• Replace both the batteries with new ones if they are weak.
42
-EN
Additional Information
MDP-V9K.3-856-640-13 (En, C1, C2)
Page 43

Specifications
System
Type
VIDEO CD/CD/LD player
Signal readout
Optical (Laser beam reflection)
Signal format system
EIA standard, NTSC color
system
CCIR standard, PAL color
system (for VIDEO CDs only)
Playing time
See “Optical discs” on page 44.
Digital audio specifications
Signal-to-noise ratio
More than 115 dB (EIAJ)*
Dynamic range
More than 99 dB (EIAJ)
Wow and flutter
Below measurement limit
(± 0.001 % W.PEAK) (EIAJ)
HeadPHONES output
12 mW (8 ohms)
LINE IN
VIDEO input, Phono jack (1)
Input signal: 1 Vp-p, 75 ohms,
unbalanced, sync negative
AUDIO input, Phono jacks (2)
Stereo L, R
Max. input level: 200 mVrms
(–20 dB)
Input impedance:
more than 47 kilohoms
MIC 1/2 jacks
Standard jacks
1 mV
(Impedance below 1 kilohm)
General
Power requirements
110–240 V AC, 50/60 Hz
Power consumption
45 W
Operating temperature
5°C to 35°C
Video specification
Horizontal video resolution
425 lines (LD)
Signal-to-noise ratio
More than 50 dB
* Measured according to EIAJ (Electric
Industries Association of Japan)
standards.
Input and Output
LINE OUT 1, 2
VIDEO output, Phono jack (1)
Output signal: 1 Vp-p, 75 ohms,
unbalanced
AUDIO output, Phono jacks (2)
Stereo L, R
Analog: 200 mVrms
(1 kHz, 40 % modulation)
Digital: 200 mVrms
(1 kHz, –20 dB)
S VIDEO OUT 1, 2
Luminance: 1 Vp-p, 75 ohms,
unbalanced, sync negative
Chrominance: 0.286 Vp-p, 75
ohms, unbalanced
Ambient humidity
5% to 90 %
Dimensions
Approx. 430 × 127.5 × 413.5 mm
(w/h/d)
including projecting parts and
controls
Mass
Approx. 6.8 kg
Supplied accessories
Remote Commander RMT-M45A (1)
R6 (size AA) batteries (2)
Audio/Video Cable
(phono plug 3 ˜ phono plug 3) (1)
AC plug adaptor (supplied with
models other than Hong Kong model)
(1)
Cushions (4)
Design and specifications are subject to
change without notice.
OPTICAL DIGITAL OUT
–18 dBm, wavelength 660 nm
Dolby AC-3 RF OUT
Phono jack (1)
Output level: 400 m Vp-p
Output impedance: 75 ohms
Additional Information
43
MDP-V9K.3-856-640-13 (En, C1, C2)
-EN
Page 44

Optical discs
The MDP-V9K can play optical discs currently available for home
entertainment, laser discs (LD) and compact discs (CD and VIDEO CD).
The table below shows the discs available for this player.*
Disc class
Laser Discs
For movies,
animation,
operas, concerts,
and karaoke
Compact Discs
For music,
movies,
animation,
karaoke, and
photographs
Disc logo
E
Disc type
LD Single
(NTSC)
8-inch LD
(NTSC)
12-inch LD
(NTSC)
CD Single
CD
VIDEO CD
(NTSC
and PAL)
Multi audio discs
Size
8 in. (20 cm)
8 in. (20 cm)
12 in. (30 cm)
3 in. (8 cm)
5 in. (12 cm)
3 in. (8 cm)
5 in. (12 cm)
* The MDP-V9K cannot play discs other than those shown above.
Sides
Single
Double
Double
Single
Single
Single
Single
Play time
CAV
CLV
CAV
CLV
CAV
CLV
20 min (audio only)
74 min (audio only)
14 min
20 min
28 min
40 min
1 hr
2 hr
20 min
74 min
F
‰
Discs with these logos contain separate analog and digital tracks which
may differ in content.
VIDEO CD standards to which the player conforms
This player conforms to Ver. 1.0, Ver. 1.1, and Ver. 2.0 of the VIDEO CD
specifications. If you use a Ver. 2.0 CD, Play Back Control (PBC)
functions and high-resolution still pictures (the new part of Ver. 2.0 of
the VIDEO CD specifications) are available as well as normal playback
of moving pictures and sound.
Discs conforming to the Dolby Surround AC-3 system
With this type of disc, the player outputs only the left channel signals as
monaural sound, muting the sound of the right channel when analog
audio is selected. Thus, you cannot alternate the right and left channels
of analog audio with the Audio Monitor function.
44
-EN
Additional Information
MDP-V9K.3-856-640-13 (En, C1, C2)
Page 45

Optical disc maintenance
Holding CDs
Hold CDs (including VIDEO CDs) by putting
your index finger through the center hole and
grasping the edge of the disc with the thumb
and other fingers as pictured in the
illustration.
Holding LDs
Hold LDs by grasping the outside edge with
both hands as illustrated.
Light exposure
Do not expose the disc to direct sunlight or
heat sources such as hot air ducts, or leave the
disc in a car parked in direct sunlight where
there can be a considerable rise in
temperature.
Cracked or damaged discs
Do not play cracked or damaged discs, or try
to play discs that have been repaired with
adhesive glues.
Keeping the disc surface clean
Clean the surface of the disc before playing,
using a soft, dry, cleaning cloth. Wipe the disc
from the center out. Do not use solvents such
as benzine, paint thinner, commercially
available cleaners, or anti-static spray
intended for LP record discs.
To prevent marring, after playing, remove the
disc and put it back into its jacket.
Putting your fingers on, or adhering anything
to the surface of the disc such as sticky note
pad paper or adhesive tape, will deteriorate
the quality of the playing surface, and thus the
output quality.
If there is glue (or a similar substance) on the
disc, remove the glue completely before using
the disc.
Additional Information
MDP-V9K.3-856-640-13 (En, C1, C2)
45
-EN
Page 46

Index to parts and controls
Front
See the pages indicated in ( ) for details.
1
2
3
4
5
6
7
8
9
!º
!¡
!™
!£
!¢
!∞
!§
!¶
!•
!ª
@º
@¡
@™
@£
@¢
@∞
@§
@¶
@•
1 Number buttons (15) (18) (35)
2 CLEAR button (19) (26) (28) (29) (34) (36)
3 NEXT DISC RESERVE button and indicator (34)
4 RESERVE button and indicator (33) (35)
5 POWER switch and indicator (10) (13)
During STANDBY : Lights up red
While ON : Goes off
6 Remote sensor (42)
7 ECHO LEVEL control (14)
8 MIC LEVEL 1 and 2 controls (13) (14)
9 MIC 1, 2 and CONTROL (MIC 1/2) jacks (13)
0 KEY CONTROL ˜ DOWN/NATURAL/n UP
indicator-buttons (37)
!¡ AUTO EFFECT button and indicator (38)
!™ VOCAL/SELECT buttons and indicator (36)
!£ KARAOKE STAR indicator-button (37)
!¢ VOCAL SUPPORT indicator (39)
!∞ Display (12)
!§ § OPEN/CLOSE button (10) (11) (13)
!¶ SIDE A/B buttons (11) (29) (33)
!• · SELECT (Play) button (10) (11)
!ª p (Stop) button (11) (12)
@º PHONES jack and control (11)
@¡ P (Pause) button (11)
@™ =/+ PREV/NEXT (ACS/AMS) buttons
(11) (15) (20)
@£ RETURN button (15) (24)
@¢ PBC ON/OFF button and indicator (15) (24)
@∞ AUTO PAUSE button and indicator (14)
@§ LINE IN button and indicator (41)
@¶ VIDEO CD PAL OUT indicator (11)
@• AUTO RESUME indicator (23)
46
-EN
Additional Information
MDP-V9K.3-856-640-13 (En, C1, C2)
Page 47

Remote commander
1
2
3
4
5
6
7
8
9
!º
!¡
!™
!£
!¢
!∞
!§
!¶
!•
!ª
@º
@¡
@™
@£
@¢
@∞
@§
@¶
@•
@ª
#º
#¡
#™
1 6 OPEN/CLOSE button (10) (11) (13)
2 ANALOG/´ button (32)
3 1/SIDE/ALL button (25) (27) (28)
4 REPEAT button (25)
5 SHUFFLE button (27) (28)
6 PROGRAM/RESERVE button (29) (33) (34)
7 NEXT DISC RESERVE button (34)
8 AUTO PAUSE button (14)
9 KARAOKE STAR button (37)
0 VOCAL SUPPORT button (39)
!¡ KARAOKE PON button (39)
!™ /7 STILL/STEP buttons (11) (22)
!£ 0/) SCAN buttons (11) (20)
!¢ =/+ PREV/NEXT (ACS/AMS) buttons
(11) (15) (20)
!∞ DISC SIDE A/B buttons (11) (29) (33)
!§ · SELECT/PLAY button (10) (11)
!¶ AUDIO MONITOR button (32)
!• FRAME/TIME/SCENE button (19)
!ª POWER switch (10) (13)
@º DISPLAY button (16) (17) (28)
@¡ REPEAT A˜B button (26)
@™ AV TIME button (17)
@£ AUTO PGM button (30)
@¢ CLEAR button (19) (26) (28) (29) (34) (36)
@∞ Number buttons (15) (18) (35)
@§ KEY CONTROL buttons (37)
˜ DOWN button
N NATURAL button
n UP button
@¶ VOCAL/SELECT buttons (36)
@• EFFECT MODE/EXECUTE buttons (38)
@ª C/c V. INDEX buttons (21)
#º VIDEO CD buttons (15) (24)
MARK button
M.PLAY button
RETURN button
PBC button
#¡ p STOP button (11) (12)
#™ P PAUSE button (11)
A function activated by pressing a button with an orange
mark can be canceled by pressing the CLEAR button.
Additional Information
MDP-V9K.3-856-640-13 (En, C1, C2)
47
-EN
Page 48

Glossary
VIDEO CD
A compact disc which contains
moving pictures. VIDEO CDs
contain picture information using
the MPEG 1 format, one of the
world wide standards of digital
compression technology. Picture
information is compressed about
120 times. Consequently, a 12 cm
VIDEO CD can contain up to 74
minutes of moving pictures.
VIDEO CDs also contain
compressed audio information.
Sounds outside the range of human
hearing are compressed while the
sounds we can hear are not
compressed. VIDEO CDs can hold 6
times amount of the audio
information of conventional audio
CDs. There are two versions of the
standards for VIDEO CDs.
Version 1.0 and 1.1: Only play
moving pictures and
sound.
Version 2.0: Adds interactive
playback using PBC
functions and high-
resolution still pictures.
This player conforms to both
versions.
PBC (Play Back Control)
functions
Available on Version 2.0 VIDEO
CDs, which enable you to play the
disc interactively. When PBC
functions are turned on, the PBC
ON/OFF button indicator lights up.
KARAOKE STAR function
This function allows you to obtain
depth of your voice adding a lower
frequency sound to your voice.
Index
A, B
Accesories, supplied 5
ACS/AMS 20
Adjusting
backup key 37
echo 14
microphone volume 14
ATT switch 14
Auto pause 14
Auto program 30
Book mark 24
C
CAV disc 11, 19, 22
CD disc 18, 36, 44
CLV disc 11, 19
Chapter search 18
Color system selector 7
Connecting
amplifier 8
headphones 11
infrared cordless
microphones 40
microphones 13
processor or amplifier
conforming to Dolby Surround
AC-3 system 9
TV or VCR 6
VCR to LINE IN jacks 41
D, E
Delete shuffle 28
Disc
classification 44
maintenance 45
Display
front panel 12
on-screen 16
time 17
F, G, H, I, J
Frame/time/scene search 19
Freeze frame 22
K
Karaoke, playing 13
changing the backup key 37
letting the original vocals help
you 39
listening to the original
vocals 36
pausing automatically 14
selecting the next songs 33
using auxiliary equipment 41
using the karaoke
microphone 40
with non-karaoke discs 39
Karaoke star 37
Karaoke pon 39
Key control 37
L
Line in 41
Loading a disc 10
M, N
MULTI AUDIO disc 36, 39, 44
Next disc reserve 32
O
One side repeat 25
Opening the disc tray 10
Optical disc types 44
P, Q
PAL VIDEO CD 11
PBC (Play Back Control) 10, 15
Picture
flickering 14
Playback 10
frame-by-frame 28
interactive 15
random 27
resume 23
Power
AC plug adaptor 2
turning on/off 10
PREV/NEXT 15, 20
Program play 29
R
Repeat A˜B26
Repeat play 25
current chapter/track 25
one side of an LD 25
particular portion 26
whole disc 25
Remote commander 5, 42
inserting batteries 5
Reserve 33
S
Searching
by chapter/track number 18
by frame/time/scene
number 19
by index number 21
skipping chapters/tracks 20
speed scanning 20
Single repeat 25
Skip search 20
Sound
analog 32
digital 32
distorted 14
on SAP discs 32
with CX noise reduction
system 32
Step play 22
T, U
Track search 18
Trouble shooting 42
V, W, X, Y, Z
VIDEO CD disc 10, 15, 44
Vocal select 36
Vocal support 39
48
-EN
Additional Information
MDP-V9K.3-856-640-13 (En, C1, C2)
Page 49

™` N°I°I
æfiß@ q¿£§Œ•Ê¨y q¥°¿Y
•ªæ˜µL q¿£øÔæ‹æ -•ªæ˜™ æfiß@ q¿£¨ 110~240 V
AC°M50/60 Hz-
¨ ®æ§Ó§fiµo§ı®a©Œ q¿ª°M§£•iß‚•ªæ˜©Ò¶b´B¬I©“§Œ©Œ
™ÃºÈ¿„™ ¶a§Ë-
昧 À¶ ¶M¿I™ ™ q¿£°M¨G –§ æ’¶¤•¥ }æ˜ È•~¥fl-
§ °™ ¿À¬I•u؇©e¶´±M ~§H ˚ i¶Ê-
•ª VIDEO CD/CD/LD ºv –昃›©Û CLASS I LASER
°] ƒ I ˛ pÆgªs´~°^-
™` N
•ªæ˜©“•Œ™ •˙æ« ] °M |ºW•[Ô¥˙™ ÀÆ`-
•ªºv –昧 ©“•Œ™ pÆg•˙ßÙÔ¥˙¶Æ`°M¶]¶ §£
•i©Ó®¯æ˜ È•~¥fl-§ ° ˚ –©e§ß±M ~§H ˚ i¶Ê-
®œ•Œ´e ™æ® µ
¶w•˛
• Y¶ •Ù¶Û G È©Œ©T ȱº ®æ˜§ °M –•flßY©fi§U q u°M® g
±MÆa¿À¨d•H´·°M§~•i¶A¶Ê®œ•Œ-
• Ì q u¥°¶b q ¥°ÆyÆ…°M´hßY®œ ˆ±º q } ˆ°M§¥ |¶
§÷ q q¨yøÈ© •ªæ˜-
• Y™¯¥¡§£®œ•Œ•ªæ˜°M –•—¿ æ¿¥°Æy©fi§U q u - n©fi®˙
q uÆ…°M Æ ¶Ì¥°¿Y©fi•X°M§¡§ ©‚©‘qu°§¿-
• À©Òºv –Æ…°M –§p§fl§‚´¸©Œ®‰•L™´ È°M§£ n ˝•ªæ˜™ ´e
ª\ß®®Ï-´eª\¶bºv –¶´ L } ˆÆ…¶¤ §W§U -
Y•ªæ˜™ q u¥°¿Y§£æA¶X Q¶a¿ §W¥°Æyߌ™¨°M –®œ•Œ
•Ê¨y¥°¿Y¬‡±µæ °] £ ª¥‰æ˜´¨•H•~™ ®‰•L昴¨ß°¿H昙˛
±a°^-
ª¥‰•Œæ˜´¨
ª¥‰æ˜´¨™˛¶ §@¶p§U œ©“•‹™ •Ê¨y q¥°¿Y-¶˝®S™˛•Ê
¨y q¥°¿Y•Œ™ ¬‡±µæ -
¶p Ô•ªæ˜µo•Õ•Ù¶Û ›°M –ªP¬˜ Q¶a Ùҙ Sony g
æP©± ” q-
¶w À
• –¶b•ªæ˜•|©P´OØdæA Ì™ °°M•HßK昧 ºˆ qønªW°MµL B
µo¥ -
• §£ nß‚•ªæ˜©Ò¶b¨X n™Ì ±°]¶p¶a¥‡°N§Ú¿÷°^°M©Œæa™Ò¶p
µ° Æ°N±c ˜µ•™´™˛™Ò°M•HßK昩 °§¿®¸™˝ Î-
• §£•iß‚•ªæ˜©Ò¶b¶p q xƒl©Œ xÆ fiµ•ºˆ §ß B°M©Œ©Ò¶b
®¸ ß•˙™ ±µ ”Æg°N¶« – •¶h°N©ˆ®¸æ˜±Òæ_ ©Œ®¸ q¿ªµ•
B-
• §£•iß‚•ªæ˜ À¶b …± ™ ¶a§Ë-•ªæ˜•u؇©Ò¶b§Ù• ±§W®œ
•Œ-
• §£•i¶b•ªæ˜æ˜ ª©Òm¬´™´È-
• §£ nß‚•ªæ˜©Ò¶b¨X n™Ì ±°]¶p¶a¥‡°N§Ú¿÷©Œ© ‘°^©Œ•Ù
¶Û |™˝ ™´eª\ } ˆ™ ™´ È-
• ±q¥HßN¶a§Ë™ ±µß‚•ªæ˜Æ ®Ï x©– °Æ…°M昧 §Œºv – |
æƵ §Ù w°M´hºv –昧£Ø‡º ©Ò-¶]¶ ƒ§@¶ ¶w À•ªæ˜
Æ…°M©Œ±q¥HßN¶a§Ë æ®Ï x©– °Æ…°M –µ• 1 §pÆ…•H´·§~
}©læfiß@-
-C¡c
2
¬Ê§–
MDP-V9K.3-856-640-13 (E, C1, C2)
Page 50

•ÿø˝
4 ªÔ¡¬¥f U°I
4 ˆ©Û•ª®œ•Œª°©˙Æ—
}©læfiß@•H´e
5 ®B J 1 °G•¥}Àc
5 ®B J 2 °G¶bªª±±æ à À§J q¶¿
6 ®B J 3°G s±µºv –æ˜
Ú•ªæfiß@™k
10 º ©Òºv –
13 º ©Ò•d©‘ OK
15 •Œ PBC •\؇º ©Ò VIDEO CD°] PBC º ©Ò•\؇°^
®‰•Læfiß@™k
16 qµ¯ø ı§W™ ¶U ÿ „•‹® µ
18 ™ ±µøÔ拨Y§@ `©Œ y Ò°] `°˛ y Ò¥M߉•\؇°^
19 ´ˆ¥V°NÆ… °©Œ ı¥ X¥M߉°]¥V°˛Æ… °°˛ ı¥ ¥M߉•\؇°^
20 ¥M߉ºv –§W™ ¨Y§@ØS©w¶Ï m
22 [¨› v¥V©Ò¨M ß@
23 ´Ï¥_ LD/VIDEO CD º ©Ò°]¶¤ ´Ï¥_•\؇°^
24 ±q©“ n¶Ï m´Ï¥_ VIDEO CD º ©Ò°]Æ— ±•\؇°^
25 §œ¥_º ©Ò¨Y§@¨q ®°]§œ¥_º ©Ò•\؇°^
27 •H•Ù N ß«º ©Ò q¶±°]•ÙøÔº ©Ò•\؇°^
29 •H©“ n ß«º ©Ò q¶±°] sß«º ©Ò•\؇°^
30 ¶b´¸©w™ §@¨qÆ… ° ú ©Òºv –°]¶¤ `•ÿº ©Ò°^
32 ®œ•Œ¡n µ±±®Ó•\؇
33 øÔæ‹•d©‘ OK q¶±™ ß«°] w©w•\؇°^
36 ®œ•Œ•d©‘ OK •\؇
C¡c
®‰•L Í T
42 ¨GªŸ± £
43 WÆÊ
44 •˙´H œ –
46 ¶U °•Û§Œ±±®Óæ §@ƒ˝
48 Nªy
48 Ø¡§fi
¬Ê§–
-C¡c
3
MDP-V9K.3-856-640-13 (E, C1, C2)
Page 51

ªÔ¡¬¥f U°I
¡¬¡¬±z¡ R o¨[ Sony µPºv –æ˜-
¶b®œ•Œ•ª À m§ß´e°M –•J ”æ\ ™•ª®œ•Œª°©˙Æ—°M® –ߥµ ´O¶s•H ±N
®”¨dæ\-
o¨[ MDP-V9K æfiß@¬ Ê°M؇•Œ©Û°G
• º ©Ò¶h ÿ ˛´¨™ •˙ –°GLD ºv –°NCD ¤ –§Œ VIDEO CD ºv –
• º ©Ò¬˘ ± LD°]§£• ¬ ±°^
• º©Ò ¶X 2.0 ™© VIDEO CD º– «™ VIDEO CD ºv –°MßQ•Œ•¶™ º ©Ò±±
®Ó°] PBC°^•\؇؇ ˜°G
– ®œ•ŒøÔ Êø ı i¶ÊøÔ拺 ©Ò
– [¨› ™¬A©˙´ ¿R§Ó œ
• ¶b VIDEO CD §W™ n´Ï¥_º ©Ò™ ¶Ï m µº– O—–Æ— ±•\؇
• COLOR SYSTEM øÔæ‹æ ®œ±z؇º ©Ò PAL VIDEO CD ºv –°M¶”§£ fi®‰
qµ¯®Ó¶°¶p¶Û°]PAL°N NTSC ©Œ¶h®Ó¶° µ¯æ ®t Œ°^
• ±q ±§U¶Ï m « TƒÚ©Ò LD/VIDEO CD —–¶¤ ´Ï¥_•\؇
• sß«°N•ÙøÔ°N¶¤ sß«©Œ§œ¥_º ©Òµ•§Ë´K•\؇
• º ©Ò•d©‘ OK°]¿Hµ¤ºv – q¶±°^
̱µ§W ¡ßJ Æ…°M•ªæ˜´h i§J•d©‘ OK §Ë¶°-
¶U ÿ•\؇•]¨A°G
– w©w®‚ Lºv –§W™ 9 §‰ q¶±•Œ©Û•d©‘ OK s¤—– w©w•\؇
– ß‚ßU¤µ’’¶‹±z™ q Ô™ µ •—–º X¶° µ ’±±®Óæ *
– q L s±µ´e´·™O¶U®‚ ” ¡ßJ ¥°§’°M•i®œ•Œ™ ¡ßJ ¶h F•| ”
– –•X z Q±° “™ º X¶°¶^¡nƃ™G
– ªP Ï q¡n§@_q¤—– q¡nøÔæ‹•\؇*
– ¶¤ ‹™ˆ—–¶¤ ƃ™G•\؇*
– ¶b±zß— O qµ¸©Œ¶± ’Æ…ßU ¤—–ßU ¤•\؇
– ®œ±z™ q¡nßÛ•[¬ ¥I¶h±m—–•d©‘ OK q¨P•\؇
– •Œ´D•d©‘ OK ºv –º ©Ò•d©‘ OK—– Ï ¤¡n q ’±±•\؇*
– •Œø˝ºv±aº ©Ò•d©‘ OK—–LINE IN øȧJ•\؇*
– º e q¶±´·º» ±—–¶¤ º» ±•\؇*
* o®«•\؇¶b´D•d©‘ OK §Ë¶°§U§]¶ ƃ -
ˆ©Û•ª®œ•Œª°©˙Æ—
-C¡c
4
¬Ê§–
¶X 2.0 ™© VIDEO CD º– «
•ªæ˜ ¶X 1.0 ™©°N1.1 ™©©M 2.0 ™© VIDEO CD º– «-¶p™G®œ•Œ 2.0 ™©
VIDEO CD ºv –°Mº ©Ò±±®Ó°]PBC°^•\؇°]2.0 ™© VIDEO CD º– «™ sºW
°§¿°^®œ±z؇´ˆø ı§W™ øÔ ÊøÔ拺 ©Òºv –-±z¡ŸØ‡™Y ‡ ™¬A©˙´ ¿R§Ó œ
§Œ ©M µ T™ •ø±`º ©Ò-
•i ›Æe™ ±m¶‚®t Œ
•ªæ˜º ©Ò•— NTSC qµ¯®Ó¶°ø˝ªs™ LD ºv –©M•— NTSC §Œ PAL qµ¯
®Ó¶°ø˝ªs™ VIDEO CD ºv –-
ª°©˙® µ
• •ª®œ•Œª°©˙Æ—§ –§Fªª±±æ §W¶U¡‰ s™ ®œ•Œ§Ë™k°M¶p™G¶b•ªæ˜§W¶ ªPªª
±±æ §W¨¤¶P©Œ¨¤¶¸¶W Ÿ™ ¡‰ s°M±z§]•i•H´ˆ¶PºÀ§Ë™k®œ•Œ-
• •ª®œ•Œª°©˙Æ—§§®œ•Œ§U ± °G
z ™Ì•‹¥£•‹©M¬¨™˘-•¶•i®œæfiß@ßÛ¨ ¬ ´K-
MDP-V9K.3-856-640-13 (E, C1, C2)
Page 52

®B J 1
•¥}Àc
¨d¨› c èOß_ À¶ §U¶C™˛•Û°G
•ªª±±æ
RMT-M45A
}©læfiß@•H´e
• µ°˛µ¯¿Wqlu
®B J 2
•2 ” R6 (AA) ´¨ q¶¿
¶bªª±±æ à À§J q¶¿
1 ¬ ¬‡ªª±±æ ¶‹ I ±°M®˙§Uª\
§l-
••Ê¨y q¥°¿Y¬‡±µæ
°]™˛ƒ›©Û ª¥‰æ˜´¨•H•~™ 昴¨°^
3 ª\§Wª\§l-
2 ¨d¨› q¶¿ •© §Ë¶V°M•ø T©Ò
§J 2 ” R6 (AA) ´¨ q¶¿-
µ˘
• •ø±`®œ•ŒÆ…°M q¶¿•i´˘ƒÚ®œ•Œ 6 ”§Î•™•k-
• –®œ•Œ®‚ ” R6°] AA°^´¨ q¶¿ -
• Y q¶¿®œ•Œ§£ Ì°M•¶Ã||G©Œº…µı- – —®£§U¶C•ø T®œ•Œ™k -
–´ˆ§W œ©“•‹•ø T •© À§J q¶¿ -
–§£ n V•Œ s¬¬ q¶¿-
–§£ n V•Œ§£¶P´¨ ™ q¶¿-
–§£ n Ô q¶¿ i¶Ê•R q-
– Y™¯¥¡§£ « ®œ•Œªª±±æ °M –®˙•X q¶¿•HßK q¶¿|Gy¶®la-
– U§@ q¶¿µo•Õ | G°M¿ø b q¶¿øµ§ ™ | G´·°M¶A À§J s q¶¿-
• §£ n ˝™ Æg ß•˙©Œ±jØP™ §H y•˙™ ±µ ”¶b•ªæ˜´e ±™O§W™ ªª±± P¿ æ §W- o ÿ•˙
u |§z¬Zªª±±æ ®”™ ´H ¶” y¶®ªª±±æ §£Ø‡•ø T i¶Êæfiß@-
MDP-V9K.3-856-640-13 (E, C1, C2)
}©læfiß@•H´e
-C¡c
5
Page 53

®B J 3
µ°˛µ¯¿Wqlu
Audio/Video
°]´D™˛ƒ›°^
Cable (not supplied)
s±µºv –æ˜
•ªæ˜©M qµ¯æ˜™ u Ù§ß s±µ
nº ©Ò LD ©Œ VIDEO CD ºv –Æ…°M ß‚•ªæ˜©M qµ¯æ˜¨¤ s±µ- –•H™˛ƒ›™ µ°˛µ¯¿W s±µ q
l u°] ¿¶‚°N¨ı¶‚•H§Œ•’¶‚¥°¿Y°^ s±µ•ªæ˜©M qµ¯æ˜- s±µß ¶•H´·°Mß‚ qµ¯æ˜™ øȧJøÔæ‹æ ]
©w¶b°ßµ¯¿W°®§ß B- n s±µ©Œ©fi®˙ q l uÆ…°M§@©w n•˝§¡¬_©“¶ ¨¤ s±µæ˜•Û™ q §~¶Ê-
ø˝ºvæ˜
VCR
µ°˛µ¯¿Wqlu
Audio/Video
Cable (supplied)
°]™˛ƒ›°^
YC-15V S Video Cable
YC-15V S µ¯¿Wqlu
(not supplied)
°]´D™˛ƒ›°^
Yellow plug / Video In
¿¶‚¥°¿Y/ µ¯¿WøȧJ
¨ı¶‚§Œ
Red & White
plugs
•’¶‚¥°¿Y
/ µ¿WøȧJ
/
Audio In
/ S Video In
S µ¯¿WøȧJ
Television
qµ¯æ˜
1
2
MIC
LINE IN
COLOR SYSTEM
VIDEO
L
AUDIO
(VIDEO CD)
AUTO
PAL
NTSC
DIGITAL OUT
DIGITAL
RF OUT
(AC-3)
S VIDEO OUT
1
2
AUDIO
LINE OUT
21
OFF ON
ATT
LRR
VIDEO
to AC outlet
¶‹•Ê¨y q q ¥°Æy
OPTICAL
µ˘
n [¨› PAL VIDEO CD ºv –Æ…°Mª›Æ⁄æ⁄±z™ qµ¯æ˜®Ó¶°±N¶Ï©Û•ªæ˜ I ±™ COLOR SYSTEM°] qµ¯®Ó¶°°^
øÔæ‹æ ]©Û¨¤¿ ¶Ï m- – —æ\ ƒ 7 §W™ °ßCOLOR SYSTEM°] qµ¯®Ó¶°°^øÔæ‹æ §ß ]©w°®§@ `-
-C¡c
6
}©læfiß@•H´e
MDP-V9K.3-856-640-13 (E, C1, C2)
Page 54

qµ¯æ˜°˛ø˝ºvæ˜ u Ù s±µ™k
¶b§U¶C±°ßŒÆ…°M –ß‚•ªæ˜ s±µ®Ïø˝ºv昙 øȧJ¥°§f°G
– qµ¯æ˜™ µ¯¿WøȧJ¥°§f§w g s±µµ¤ø˝ºv昩Œ ˛¶¸æ˜•Û-
– qµ¯æ˜•u¶ §@ ”§— uøȧJ§f-
̱zß‚•ªºv –昩Mø˝ºv昙 øȧJ§f¨¤ s±µÆ…°M§£•i®œ•Œºv –昙 LINE IN ¥°§’®” s±µ°Mß_´h | y¶®¡n µ©Œ
œº“k-
OPTICAL
COLOR SYSTEM
1
(VIDEO CD)
1
AUTO
DIGITAL
PAL
RF OUT
2
(AC-3)
NTSC
2
MIC
VIDEO
L
AUDIO
LINE IN
ø˝ºvæ˜
VCR
Antenna
§— uøȧJ
Input
¥°§f
Connect to the external video/audio inputs of a VCR.
s±µ¶‹ø˝ºv昙 •~ ° µ°˛µ¯¿WøȧJ¥°§f
LRR
VIDEO
AUDIO
DIGITAL OUT
LINE OUT
21
S VIDEO OUT
µ¯¿WøÈ•X¥°§’
Video Out jack
Audio Out jacks
µ¿WøÈ•X¥°§’
Input jacks
øȧJ¥°§’
(Video/Audio)
°] µ°˛µ¯¿W°^
µ˘
• n s±µ©Œ©fi®˙ q l u•H´e°M§@©w n•˝§¡¬_ q -
• ¶ B©“ª°©˙™ ±µ u§Ë™k°M§] \©M±z™ ±µ u™k§£¶P- Ô±µ u§Ë™kµo•Õ ›Æ…°M –¨d¨› qµ¯æ˜©Mø˝ºv昙 ®œ•Œª°©˙
Æ—-
• Yºv ©Œ¡n µ´H ¶ ¬¯™i°M –ß‚”ÀmÆ }§@¬I -
• ¥°¿Y n®c©T¥°§J¥°§’-¥°±µ P¶¢°M |§fi _æ µ©Œ œ º“ k-
• ¨ ¡ ßK•H´· n¶¨¨› qµ¯æ˜ `•ÿÆ…°M®¸¬¯™iºv T°M £§F {¶b®œ•Œ§§™ À m•H•~°Mß‚®‰•L¨¤ s±µµ¤™ À m q §¡
¬_-
• Y±z™ qµ¯æ˜•u¶ §@ ” µ¿WøȧJ•Œ™ Ê¡n D µ¿W´¨¥°§’°M –®œ•Œ VMC-910/915 s±µ•Œ q l u°]´D™˛ƒ›°^-
OFF ON
ATT
qµ¯æ˜
Television
VHF Out
VHF øÈ•X ›§l
terminals or
©Œ µ°˛µ¯¿W
Video/Audio
øÈ•X¥°§’
Out jacks
}©læfiß@•H´e
COLOR SYSTEM°] qµ¯®Ó¶°°^øÔæ‹æ §ß ]©w°] » ©Û VIDEO CD°^
•ªæ˜•i®œ•Œ NTSC ©M PAL qµ¯®Ó¶°- –Æ⁄æ⁄ qµ¯æ˜™ ®Ó¶°±N•ªºv –昴· I§W™ COLOR
SYSTEM øÔæ‹æ ]©w©ÛæA Ì™ ¶Ï m-
1 ˆ ¨ºv –昙 q -
2 Æ⁄æ⁄ qµ¯æ˜™ ®Ó¶°°M±N COLOR SYSTEM°] qµ¯®Ó¶°°^øÔæ‹æ ]¨ AUTO°NPAL ©Œ
NTSC-
qµ¯®Ó¶° ]©w¨
¶h®Ó¶° µ¯æ ®t Œ AUTO
PAL ®Ó¶° PAL
NTSC ®Ó¶° NTSC
COLOR SYSTEM
(VIDEO CD)
AUTO
PAL
,
NTSC
}©læfiß@•H´e
MDP-V9K.3-856-640-13 (E, C1, C2)
-C¡c
7
Page 55

®B J 3 s±µºv –昰]±µ§W °^
©MµTÀm§ßs±µ
Y n®œ•ªºv –昿ڱo•fl È¡n µ T°M –´ˆ ”§U¶C±µ u œ s±µ•fl È¡nµTÀm- –•H RK-C310
°]©Œ RK-C315°^ µ¿W s±µ q l u°]´D™˛ƒ›°^ß‚•ªæ˜©M©Ò§jæ ©Œ¶¨ µæ˜¨¤ s±µ- s±µ©Œ©fi®˙§U¶C
À m™ q uÆ…°M –•˝§¡¬_©“¶ À m™ q -
nÍ{º XµT
•˙æ« ÷ ˚º X µ¿WøÈ•X•i £•X™Ëq™ µT- Y±z™ ©Ò§jæ ¶ •˙æ«øȧJ ›§l°M©Œ±z¶ §@•x±a
•˙æ«øȧJ™ D/A ‹¥´ À m -´h –•Œ§@±¯•˙æ«÷˚µ¿Wqlu POC-15°]´D™˛ƒ›°^±Nºv –昪P ”
©Ò§jæ ©Œ D/A ‹¥´æ ¨¤ s±µ -
• ±z•i±q CD ¤ –©M§j °§¿ LD ºv –® à ¨±oº X µ¿WøÈ•X´H - ̺ e§@±iµLº X µ Tº÷¶±
™ LD ºv –Æ…°M±zµL™k±q DIGITAL OUT (OPTICAL) ›§l¿Ú±o•Ù¶Û µ T-
• ®”¶¤ ¡ßJ ™ µ TµL™k±q DIGITAL OUT (OPTICAL) ›§løÈ•X- ̱z•Œ ¡ßJ t ¤•d©‘ OK
Æ…°M –•Œ µ¿W q l u°]¨ı¶‚©M•’¶‚¥°¿Y°^ s±µºv –æ˜-
When connecting the optical fiber cable
s±µ•˙æ«÷˚qluÆ…°M
–®˙§U´O @ª\- ®c©T¥°§J-
¶‹ qµ¯æ˜©Œø˝ºvæ˜
To TV or VCR
Plug in firmly.Remove the protective cover.
1
2
MIC
POC-15 •˙æ«÷˚qlu
POC-15 Optical Fiber Cable
(not supplied)
°]´D™˛ƒ›°^
LINE IN
VIDEO
L
AUDIO
•˙æ«øȧJ
Optical In
AUTO
PAL
NTSC
DIGITAL OUT
OPTICAL
COLOR SYSTEM
(VIDEO CD)
DIGITAL
RF OUT
(AC 3)
S VIDEO OUT
1
2
LINE OUT
Red
¨ı¶‚
plug
¥°¿Y
AUDIO
21
LRR
VIDEO
•’¶‚
White
plug
¥°¿Y
RK-C310/C315
RK-C310/C315
Audio Cable (not supplied)
µ¿W q l u°]´D™˛ƒ›°^
µ¿WøȧJ
Audio In
OFF ON
ATT
to AC outlet
¶‹•Ê¨y q q ¥°Æy
¥ ¡næ
Speakers
Amplifier
¥ ¡næ
CD or AUX
CD ©Œ AUX
-C¡c
8
}©læfiß@•H´e
to AC outlet
¶‹•Ê¨y q q ¥°Æy
MDP-V9K.3-856-640-13 (E, C1, C2)
Page 56

µ˘
processor or amplifier
Digital RF input
OFF ON
ATT
MIC
1
2
1
2
21
VIDEO
VIDEO
LINE IN
DIGITAL OUT
DIGITAL
RF OUT
(AC 3)
LINE OUT
S VIDEO OUT
COLOR SYSTEM
(VIDEO CD)
AUTO
PAL
NTSC
OPTICAL
AUDIO
AUDIO
L
LRR
DIGITAL
RF OUT
• ±zµL™k Ô VIDEO CD i¶Êº ¶r¶°ø˝ µ°M¶]¨ ¶bº ©Ò VIDEO CD Æ…°M•ªæ˜§£Ø‡ q L DIGITAL OUT
°]OPTICAL°^ s±µæ øÈ•X´H -
• i¶Ê§W z•Ù¶Û s±µ•H´e°M• •˝§¡¬_©“¶ 昕ۙ q -
• ¥°¿Y n®c©T¥°§J¥°§f-¥°±µ§£ Ú©T™ ‹°M |§fi _æ µ-
• ¶¨ •ºsº `•ÿÆ…°M ˆ±ººv –æ˜Ø‡¿Ú±o˚M°™¡nµ-
¶p™G±z¶ §@•xæA©y©Ûߢ§Ò¿Ù¬ ¡n AC-3 ®t Œ™ B zæ ©Œ©Ò§jæ*
¶p™G n™Y ‡æA©y©Ûߢ§Ò¿Ù¬ ¡n AC-3 ®t Œº ©Ò™ ºv –°]±a º– O™ ºv –°^°M´h –
±Nº ¶ÏÆg¿WøÈ•X s±µ¶‹ B zæ ©Œ©Ò§jæ ™ º ¶ÏÆg¿WøȧJ¥°§’-•—¶ ±z•i¿Ú±o§@ ” ˛¶¸ qºv |™ Æ
™^°M§Ò§@ØÎߢ§Ò¿Ù¬ ¡nƃ™GßÛ®Œ-
ˆ©Û ‘±°°M–—”Bzæ©Œ—X©Ò§jæ ™˛±a™ ª°©˙-
º ¶ÏÆg¿WøÈ•X
º ¶ÏÆg¿WøȧJ
B zæ ©Œ©Ò§jæ
¶ øE•˙µ¯ L昨 §wø˝¶ ߢ§Ò AC-3 º Xø˝ µ§ßøE•˙ ¤ –¥£®—§F AC-3 Æg¿WøÈ•X-®œ•Œ®„¶
AC-3 Æg¿WøȧJ§ßߢ§Ò¿Ù¬ AC-3 — Xæ •i™ ±µ±µ¶¨¶ Æg¿WøÈ•X T -¶” Ô©Û•u®„¶ AC-3 ºX
øȧJ™ ߢ§Ò¿Ù¬ AC-3 — Xæ ´hª›•~ m AC-3 Æg¿W — ’æ §~•i±µ¶¨¶ Æg¿WøÈ•X T -
}©læfiß@•H´e
* ߢ§Ò°MDOLBY°M AC-3 §Œ¬˘ D º– a ß°¨ ߢ§Ò Í Á “©˙§ •q§ß ”º–-
®œ•Œ ‘§l
ß⁄ ôÿƒ ±z¶bøE•˙ ¤æ˜™ ®C ” }§U©Ò§@ Ù ‘§l°M•H
¥Ó§÷¶] ™ µ q¶” y¶®™ Æ - oºÀ؇ £•ÕßÛج©MßÛ ©w
™ßCµ-¶b•ª ÏÆ U§ ™˛±a•| ” ‘§l-
Cushions
Ԥl
}©læfiß@•H´e
-C¡c
9
MDP-V9K.3-856-640-13 (E, C1, C2)
Page 57

®‰•Læfiß@™k
qµ¯ø ı§W™ ¶U ÿ „•‹®
µ
±z•i•H¶b qµ¯ø ı§W [¨›®Ïºv –昙 æfiß@™¨ A©Œºv –™ Í T-
„•‹•Xø ı „•‹§ Æe
´ˆ¿£ DISPLAY ¡‰´hºv –昙 æfiß@™¨™p´K |•X {©Ûø ı§W-
DISPLAY
C–3 5484 PLAY
„•‹® µ 1°] —¨›§U™Ì°^
{¶bº ©Ò§§™ µe ±¥V ©Œ g LÆ… °
Ø¡§fi X
{¶bº ©Ò§§™ `°N y Ò©Œ ı¥ ™ X
¶A´ˆ§@¶ DISPLAY ¡‰æfiß@™¨™p§Œ –§˘º æ⁄ £ | „•‹•X¶‹ qµ¯´Ã ı-
C–3 5484 PLAY
LD SIDE A
VIDEO 1- 6 24:31
ONE SIDE
REPEAT
„•‹® µ 2°] —¨›§U™Ì°^
`°˛ y Ò™ X§Œ¡`º ©ÒÆ… °
°] » ©Û±a TOC ™ LD°NCD §Œ VIDEO CD°^
µµ¯¿W§@ƒ˝™Ì°]•ºº ©Ò™ —æl `°˛ y Ò°^
°] » ©Û±a TOC ™ LD°NCD §Œ VIDEO CD°^
©“øÔæ‹™ æfiß@•\؇
¶A´ˆ§@¶ DISPLAY ¡‰´h؇®œø ı™ „•‹® µÆ¯•¢-
„•‹® µ 1
ø ı§W™ ^§Â ºv –æ˜ {¶b™ æfiß@™¨ A
OPEN ¶´ L¶˘•X昕~
CLOSE ¶´ L¡Y¶^昧
µ˘
•LD •Œ µµ¯¿W§@ƒ˝™Ì°] „•‹ —
æl™ ` X°^ »æA•Œ©Û±a
TOC º æ⁄™ LD-
• º ©Ò§£±a TOC º æ⁄™ LD
Æ…°Mºv –™ ¡`º ©ÒÆ… °§£ |
•X {-
• º ©Ò®S¶ `™ LD Æ…°M
` X§£ |•X { -
• Yº ©Ò§@±i®S Oø˝¨Ì ʶÏÆ… °
º æ⁄™ CLV LD ºv –°MÆ… °
´¸•‹ B´K•u•X { 2 ¶Ïº™º
¶r°M¶p°ß22:°®°MßY™Ì•‹ 22 §¿
ƒ¡§ß N-
• ̱z´ˆ¿£ AUDIO MONITOR
¡‰©Œ ANALOG/´ ¡‰Æ…°M
ˆ©Û µ¡n•\؇±±®Ó•\؇™ ´¸
•‹¶r °M¶p°ß1/L, 2/R°®
©Œ°ß≥ DIGITAL°M≥
ANALOG°®°Mµ• £•u |•X {
µuº»Æ… °-
PLAY ºv –º ©Ò§ß§§
STOP ß@ ±§Ó
PAUSE ß@º» ±§Ó
0)
/
ß÷ t± ¥y§§
SEARCH ¥M߉
„•‹® µ 2
ø ı§W™ ^§Â ºv –™ º ©Ò™¨ A
LD SIDE A LD ºv – A ±
LD SIDE B LD ºv – B ±
CD CD JÆg ¤§˘
VIDEO CD VIDEO CD
1/L ƒ 1 ¡n y°˛•™´H D
2/R ƒ 2 ¡n y°˛•k´H D
16
-C¡c
®‰•Læfiß@™k
≥ DIGITAL º X¶° µ¡n´H
≥ ANALOG º“¿¿¶° µ¡n´H
MDP-V9K.3-856-640-13 (E, C1, C2)
Page 58

¨d¨›ºv –™ º ©Ò g LÆ… °©Œ —ælÆ… °
DISPLAY
AV TIME
±z•i•H¶b qµ¯ø ı§W¨d¨›º ©Ò g LÆ… °©Œ —ælÆ… °-
•˝´ˆ¿£ DISPLAY ¡‰°MµM´·´ˆ AV TIME ¡‰-
®C´ˆ§@¶ AV TIME ¡‰°Mø ı „•‹¶p§U œ©“•‹ßÔ ‹°G
±a TOC ™ LD
º ©Ò CLV ºv –Æ…°M
¶ „•‹® µ § L-
`X
C–6 24:22 PLAY
CLV ºv –™ ¡`º ©Ò
g LÆ… °°]©Œ CAV
ºv –™ ¥V °^
C–6 I–1 1:28 PLAY
`™º©Òg
LÆ… °
Ø¡§fi X
C–6 25:30 PLAY
CAV ºv –™ ¡`º ©Ò
g LÆ… °
CD/VIDEO CD
y Ò X©Œ ı¥ X
Ø¡§fi X°] Ô©Û§wØ¡§fi™
VIDEO CD°M•N¥¿°ß I °®¶”
•X {°ßV°®°^
T–5 I–1 1:11 PLAY
yÒ™º©Ò
g LÆ… °
T–5 11:19 PLAY
ºv –™ ¡`º ©Ò
g LÆ… °
T–5 –1:05 PLAY
µ˘
• º ©Ò§£±a TOC º æ⁄™ LD
Æ…°M±z »Ø‡¨›®Ï¡`º ©Ò g L
Æ… °°] Ô©Û CLV ºv –°^©Œ {
¶bº ©Ò™ ¥V °] Ô©Û CAV ºv
–°^-
• •Œ PBC º©Ò 2.0 ™© VIDEO
CD Æ…°R
– „•‹ ı¥ X°]¶p°ßS-5°®°^
¶”§£¨O y Ò X -
– »Ø‡¨›®Ï {º ©Ò ı¥ ™ g
LÆ… °-
• „•‹® µ§£ „•‹±qºv – }¿Y
º _WL 51 ™ `©ŒyÒ™
º ©Ò —©ÛÆ… ° -
C–6 –3:40 PLAY
`™º©Ò
—ælÆ… °
–5 –22:24 PLAY
¡`º ©Ò —ælÆ… °
ºv –§W™ —æl `
yÒ™º©Ò
—ælÆ… °
–14 –38:52 PLAY
¡`º ©Ò —ælÆ… °
ºv –§W™ —æl y Ò
®‰•Læfiß@™k
17
MDP-V9K.3-856-640-13 (E, C1, C2)
-C¡c
Page 59

™ ±µøÔ拨Y§@ `§Œ©Œ y
Ò°] `°˛ y Ò¥M߉•\؇°^
DISPLAY
Number
X¡‰
buttons
LD •— Ÿß@°ß `°®™ °§¿ c¶®-CD ©Œ VIDEO CD •— Ÿß@°ß y Ò°®
™ °§¿ c¶®-•u nøȧJ©“ª›™ `°˛ y Ò XßY•i•flßY }©lº ©Ò -
¥M߉ØS©w™ `°˛ y Ò
´ˆ¿£ X¡‰øȧJ `°˛ y Ò™ X -
SEARCH
CHAPTER 8 LD
nº ©Ò LD •t§@ ±§W™ §@ ” `Æ…°M´ˆ¿£ DISC SIDE B°]©Œ A°^¡‰´·°M
¶AøȧJ ` X -
nøȧJ§j©Û 10 ™ XÆ…
•˝´ˆ¿£ªª±±æ §W™
¶A´ˆ¿£ ”¶Ïº - Yø˘´ˆ
X-
n... ´ˆ¿£
SIDE A
>
10
¡‰°M¶A®Ã¶ ´ˆ¿£®‚ ” X¡‰°G•˝´ˆ¿£§Q¶Ïº °M
>
10
¡‰°M¶A´ˆ¿£
>
10
¡‰´·°MøȧJ•ø T™ ”¶Ïº
z
• £§F¥ qº ©Ò§Ë¶°•H•~°M¶b¿R§Ó¥V
°]CAV LD ©Œ VIDEO CD°^°N§œ¥_©Œ
º» ±º ©Ò§Ë¶°§U§]؇ i¶Ê¥V°˛Æ… °°˛
ı¥ ¥M߉-߉®Ï´¸©w™ ¥V°NÆ… °©Œ ı
¥ Æ…°Mº ©Ò•H¨¤¶P§Ë¶°ƒ~ƒÚ i¶Ê-
• º÷¶±¶b•d©‘ OK §Ë¶°§U¶¤ º» ±¥¡
°°M±z n i¶Ê `°˛ y Ò¥M߉ƅ°M©“
øÔæ‹™ `©Œ y ÒßY®Ë }©lº ©Ò¶”§£
| i§Jº» ±™¨ A -
• øȧJ 0 ؇øÔæ‹ LD §W™ ƒ 0 `- n
øȧJ 0 Æ…°M´ˆ¿£ >10 ¡‰°]©Œ•ªæ˜§W™
>15 ¡‰°^´·°M¶A´ˆ¿£ 10/0 ¡‰°]©Œ•ª
昧W™ 10 ¡‰°^-
µ˘
• Y LD §£±a ` X©ŒøȧJ™ `
X§£¶s¶b°M´h `¥M߉§£Ø‡•ø±` i
¶Ê-
• •Œ PBC •\؇º ©Ò 2.0 ™© VIDEO CD
Æ…°M§£Ø‡®œ•Œ y Ò¥M߉•\؇-øȧJ
XøÔæ‹øÔ Ê§W™ µ•ÿ-
• ¶p™G¶b µµ¯¿W§@ƒ˝™Ì•X {¶b´e ±™O
ı§W§ß´e®œ•Œ PBC •\؇¶b 2.0 ™©
VIDEO CD §W¥M߉ y Ò°MPBC •\؇±N
Q®˙Ư-
øȧJ 10
øȧJ 14
øȧJ 20
øȧJ 25
10
/0
>
10
¡‰°N1¡‰°N4¡‰
>
10
¡‰°N2¡‰°N
>
10
¡‰°N2¡‰°N5¡‰
10
¡‰
/0
®œ•Œ•ªæ˜§W™ XøȧJ§@ ”§j©Û 15 ™X
•˝´ˆ¿£ >15 ¡‰°M¶A´ˆ¿£¨¤¿ ™ X¡‰- nøȧJ°ß 0°®°M –®œ•Œ 10 ¡‰-
®“¶p°G nøȧJ°ß30°®
•˝´ˆ¿£ >15 ¡‰°M¶A´ˆ¿£ 3 ©M 10 ¡‰-
n¶bø ı§W¨d¨› {¶bº ©Òµ¤™ `°˛ y Ò XÆ…
´ˆ¿£ DISPLAY ¡‰ „•‹•X `°˛ y Ò™ X-
X•X {¶bø ı™ •™§W§Ë - Y LD §£ßt ` X°M´h®S¶ X „•‹•X
®”-
C-5 24:22 PLAY
18
-C¡c
®‰•Læfiß@™k
MDP-V9K.3-856-640-13 (E, C1, C2)
Page 60

´ˆ¥V°NÆ… °©Œ ı¥ X¥M
߉°]¥V°˛Æ… °°˛ ı¥ ¥M߉
•\؇°^
FRAME/TIME/
SCENE
DISPLAY
X¡‰
Number
buttons
ºvµ¯ ı¥ §¿ß@§@®t¶C¿R§Ó œ ©Œ Ÿ¨ °ß¥V°®-º©Ò CAV°]º– «º ©Ò°^
LD Æ…°Mºv –æ˜ O¶Ì¶U ”¥V °M®œ±z؇ q L´¸©w¥V ߉®Ï CAV ºv –§W™ §@
”ı¥-
º©Ò CLV°]™¯Æ…º ©Ò°^ LD Æ…°Mºv –æ˜ O¶Ìº ©Ò g LÆ… °°M®œ±z؇ q
L´¸©w¡`º ©Ò g LÆ… °ß‰®Ï CLV LD §W™ ØS©w¶Ï m-
¶b 2.0 ™© VIDEO CD°]±a PBC •\؇°^§W°M¶ °ß ı¥ X°®º–•‹ µe™
¨Y®« °¶Ï§Œ©“¶ ¿R§Ó œ °M®œ±z؇ q L´¸©w ı¥ X߉®Ï VIDEO CD §W n
Q [¨›™ ı¥- o »æA•Œ©Û PBC º ©Ò§§°]ºv –昧W™ PBC ON/OFF ¡‰´¸
•‹øOµo´GÆ…°^-¶b PBC º ©Ò§§•i•H´ˆ DISPLAY ¡‰¨d¨› ı¥ X-°] —æ\
ƒ 17 ™ °ß¨d¨›ºv –º ©Ò g LÆ… °©Œ —ælÆ… °°®°^-
øȧJ¥V °Nº ©Ò g LÆ… °©Œ ı¥ X
1 ¶bºv –º ©Ò§§´ˆ¿£ FRAME/TIME/SCENE ¡‰ -
¶bº ©Ò „•‹¶r
CAV LD Æ… FRAME 00000
CLV LD Æ… TIME 0:00:00
2.0 ™© VIDEO CD SCENE 00000
°]±a PBC •\؇°^Æ…
·
SELECT/PLAY
z
• £§F¥ qº ©Ò§Ë¶°•H•~°M¶b
¿R§Ó¥V°N§œ¥_©Œº» ±º ©Ò§Ë
¶°§U§]؇ i¶Ê¥V°˛Æ… °°˛ ı
¥ ¥M߉-߉®Ï´¸©w™ ¥V°NÆ…
°©Œ ı¥ Æ…°Mº ©Ò•H¨¤¶P§Ë
¶°ƒ~ƒÚ i¶Ê-
FRAME 00000
LD SIDE A
TIME 0:00:00
LD SIDE A
SCENE 00000
2 ¨¤¿ ©Û n߉™ ¥V°NÆ… °©Œ ı¥ øȧJ¶h¶Ïº X-
n¶b CAV LD §W߉¥V 12340 Æ…°M´ˆ¿£1¡‰°N2¡‰°N3¡‰°N
¡‰§Œ0¡‰-
4
n¶b CLV LD §W߉ 12 §¿ 5 ¨Ì´·™ ¶Ï mÆ…°M´ˆ¿£1¡‰°N2¡‰°N
¡‰§Œ5¡‰-
0
n¶b VIDEO CD §W߉ ı¥ 123°M´ˆ¿£1¡‰°N2¡‰§Œ3¡‰Y±zøÈø˘ X°M´h´ˆ¿£ FRAME/TIME/SCENE ¡‰ M £ X´·°M
¶AøȧJ•ø T™ X -
3 ´ˆ¿£ · SELECT/PLAY ¡‰-
º ©Ò±q±zøȧJ´¸©w™ ¥V°NÆ… °©Œ ı¥ }©l i¶Ê-
n¨d¨›¥V ©ŒÆ… °Æ…
´ˆ¿£ DISPLAY ¡‰-
{¶bº ©Ò™ ¥V °NÆ… °©Œ ı¥ X | „•‹•X®”-
n®˙Ư¥V°˛Æ… °™ ¥M߉ƅ
¶b´ˆ¿£ · SELECT/PLAY ¡‰§ß´e´ˆ¿£ CLEAR ¡‰-
VIDEO CD
®‰•Læfiß@™k
19
MDP-V9K.3-856-640-13 (E, C1, C2)
-C¡c
Page 61

¥M߉ºv –§W™ ¨Y§@ØS©w¶Ï
±z•i•H q L± ¥y ı¥ ©Œ § L `°˛ y Ò߉®Ïºv –§W™ ¨Y§@ØS©w¶Ï m-
m
0/)
SCAN
=/+ ACS/AMS
(PREV/NEXT)
nß÷ t± ¥yºv –Æ…°]ß÷ t± ¥y°^
¶bº ©Òºv –Æ…°M´ˆ¶Ì 0/) SCAN ¡‰-
n... ´ˆ¶Ì
¶V´e± ¥y ) SCAN ¡‰
¶V´·± ¥y 0 SCAN ¡‰
n´Ï¥_• ±`™ º ©ÒÆ…°M©Ò } 0/) SCAN ¡‰-
§ L¨Y `©Œ¨Y y Ò°] § £¥M߉•\؇°^
´ˆ¿£©Œ´ˆ¶Ì =/+ ACS/AMS°]PREV/NEXT°^¡‰-
n...´ˆ
¥M߉§U§@ `°˛ y Ò§ß _¬I 1 ¶ + ACS/AMS°]NEXT°^¡‰
¥M߉ {¶b™ `°˛ y Ò§ß _¬I 1 ¶ = ACS/AMS °]PREV°^¡‰
¥M߉´e ±™ `°˛ y Ò§ß _¬I 2 ¶ = ACS/AMS°]PREV°^¡‰
¶b®S´Ï¥_ Ï®”™ œ §Œ¡n µ•H´e
z
• ACS/AMS ¨O Automatic Chapter
Sensor°]¶¤ `P¿æ °^°˛Automatic
Music Sensor°]¶¤ µº÷ P¿ æ °^™
¡Yºg-
• £§F¥ qº ©Ò§Ë¶°•H•~°M¶b¿R§Ó¥V
°]CAV LD ©Œ VIDEO CD°^°N§œ¥_©Œ
º» ±º ©Ò§Ë¶°§U§]؇ i¶Êß÷ t± ¥y§Œ
§ L¥M߉ -± ¥y©Œ¥Mß‰ß ¶§ß´·°Mº
©Ò•H¨¤¶P§Ë¶°ƒ~ƒÚ i¶Ê-
• Y¶b VIDEO CD º ©Ò§§•˝´ˆ¿£ P
PAUSE ¡‰°M¶A´ˆ¶Ì 0/) SCAN
¡‰°M± ¥y t´ ºWß÷-°] Ì•Œ PBC •\؇
º©Ò 2.0 ™© VIDEO CD Æ…°M »¶b œ
æ Æ…©M „•‹•Xº ©ÒÆ… °Æ… •i i
¶Ê¶ æfiß@°^-´ˆ¿£ P PAUSE ¶Ï m™
œ H©w¶Ì® Ød¶bø ı§W-ßQ•ŒÆ… ° „
•‹ ¨›°M¶b´¸©w™ Æ… °©Ò } 0/)
SCAN ¡‰•H „•‹ œ - s™ œ ©w
¶Ì-´ˆ¿£ · SELECT/PLAY ¡‰´Ï¥_
º©Ò-
µ˘
• ±¥y CLV LD ©Œ VIDEO CD Æ…°M¥V
Q§L-
• ±¥y LD Æ… |•X {§@©w™ µe ±º“ k§Œ
œ ß›ÆÙ { H-
n sƒÚ § L `°˛ y ÒÆ…°M´ˆ¶Ì + ©Œ = ¡‰-
¶b 2.0 ™© VIDEO CD §W®œ•Œ § £¥M߉•\؇
Y•¥ }§F PBC •\؇°M¶b¨Y®« VIDEO CD §W § £¥M߉•\؇•i؇§£Ø‡•ø
±`µo¥ßß@•Œ- ¶]¶ ¶b®œ•Œ § £¥M߉•\؇ƅ¿ ˆ ¨ PBC •\؇°]•ªæ˜§W™ PBC
ON/OFF ¡‰´¸•‹øO ¿°^-
20
-C¡c
®‰•Læfiß@™k
MDP-V9K.3-856-640-13 (E, C1, C2)
Page 62

C/c
V. INDEX
q LØ¡§fi¥M߉°]Ø¡§fi jØ¡°^
Ø¡§fi¶ §U z®‚ ÿ°G§@ ÿ•Œ©Û µ¿W CD°M•t§@ ÿ•Œ©Û VIDEO CD-±z•i
•ŒØ¡§fi¥M߉ºv –§W™ •Ù¶Û¶Ï m™` N°M¶ •\؇ » Ô§w s§JØ¡§fi™ ºv –¶ ƃ-
º ©Ò¶±•ÿÆ…°M§œ¥_´ˆ C V.INDEX ©Œ c V.INDEX ¡‰-
• n¥M߉ {¶b™ ©Œ§W§@ ”Ø¡§fi X°M –´ˆ C V.INDEX ¡‰-
• n¥M߉§U§@ ”©Œ®‰´·™ Ø¡§fi X°M –´ˆ c V.INDEX ¡‰-
´e ±™O „•‹´Ã
15
12 13 14 20
M S
16 17 18 19
/L2/
R
1
REPEAT
11
VIDEO
CD
12345678 9
Video index number
µ¯¿WØ¡§fi X
10
qµ¯æ˜ø ı°]¶bº ©Ò VIDEO CD Æ…°^
T–5 V–5 1:11 PLAY
Video index number
µ¯¿WØ¡§fi X
¶Ûø °ßØ¡§fi°®°H
°ßØ¡§fi°®¨O´¸§w s °§¿
™ `°N y Ò©Œºv –™ ¶E§¿-
•¶•i¿ ßU±z§Ë´K¶a¥M߉ºv –§W
©“ª›™ ¶Ï m- n Tª{ºv –¶ µL
Ø¡§fi°M –¨›ºv –™ •] À-
qµ¯æ˜ø ı°]¶bº ©Ò µ¿W CD Æ…°^
T–5 I–1 1:11 PLAY
Index number
Ø¡§fi X
¶b 2.0 ™© VIDEO CD §W i¶ÊØ¡§fi jØ¡
n¶b VIDEO CD §W i¶Ê jØ¡°M•ªæ˜§W™ PBC ON/OFF ¡‰´¸•‹øO§£¿
µo´G-•˝´ˆ¿£ p STOP ¡‰ ±§Óº ©Ò°MµM´·¶A´ˆªª±±æ §W™ PBC ¡‰©Œ•ªæ˜
§W™ PBC ON/OFF ¡‰°M•H ˆ±º PBC ON/OFF ¡‰´¸•‹øO-
®‰•Læfiß@™k
21
MDP-V9K.3-856-640-13 (E, C1, C2)
-C¡c
Page 63

[¨› v¥V©Ò¨M ß@
/7
7
STILL/STEP
¶b•Ù§@ ı¥ §§°M±z £•i•H±Nº ©Ò ‹¶®¿R§Ó œ °MµM´· v¥V¶V´e©Œ¶V´·
©Ò¨M ß@-
n®œ¨Y ” ß@¿R§Ó§U®”Æ…°]¿R§Ó¥V•\؇°^
•i Ô CAV LD ©M VIDEO CD ºv –®œ•Œ•ª•\؇¶bº ©Ò CAV LD ©Œ VIDEO CD ºv –§ß§§°M´ˆ¿£ P PAUSE ¡‰¡n µ±NƯ•¢¶” œ ´h¿R§Ó§U®”-
n´Ï¥_• ±`™ º ©Ò™¨ AÆ…
´ˆ¿£ · SELECT/PLAY ¡‰-
v¥Vº ©Ò°]®B iº ©Ò•\؇°^
»•i Ô CAV LD ºv –®œ•Œ•ª•\؇-
1 ¶b CAV LD º ©Ò§§´ˆ¿£ '/7 STILL/
STEP ¡‰-
¡n µÆ¯•¢°M œ ©w¶Ì-
·
SELECT/PLAY
P
PAUSE
z
• º©Ò CLV LD Æ…°M§£Ø‡®œ•Œ
¿R§Ó¥V•\؇©M v®Bº ©Ò•\
؇- Ì´ˆ¿£ P PAUSE ¡‰Æ…°M
ø ı ‹¨ ™ •’- Y´ˆ¿£ '/
7 STILL/STEP ¡‰°M°ßCLV
SIDE A°®©Œ°ßCLV SIDE B°®
µuº»•X {-
2 §œ¥_´ˆ¿£ '/7 ¡‰®œ ß@ v¥V¶V´e©Œ¶V
´·©Ò¨M-
´ˆ¶Ì '/7 ¡‰•i [¨› sƒÚ™ v¥V©Ò
¨M ß@-
n´Ï¥_¥ qº ©Ò§Ë¶°Æ…
´ˆ¿£ · SELECT/PLAY ¡‰-
22
-C¡c
®‰•Læfiß@™k
MDP-V9K.3-856-640-13 (E, C1, C2)
Page 64

´Ï¥_ LD/VIDEO CD º©Ò
°]¶¤ ´Ï¥_•\؇°^
POWER
DISC SIDE
A/B
p
STOP
P
PAUSE
·
SELECT/PLAY
¶ •\؇ »¶¤ §uß@©Û´D•d©‘ OK §Ë¶°§U™ LD ©Œ VIDEO CD º ©Ò§§
°]•º s±µ ¡ßJ °^-§@• ´ˆ¿£ p STOP ¡‰©Œ POWER ¡‰ ±§Óº ©Ò LD ©Œ
VIDEO CD°Mºv –æ˜ Oæ–¶Ì ±§Ó¶Ï m°M®œ±z؇±q ”¶Ï m }©lƒ~ƒÚ [¨›-
1 ´ˆ¿£ p STOP ¡‰°]©Œ POWER ¡‰°^•H ±
§Ó LD ©Œ VIDEO CD ºv –§ßº ©Ò -
´hºv –昙 AUTO RESUME ´¸•‹øO
µo´G°M™Ì•‹ ±§Ó§ß B§w Q O¶Ì§F -°]¶ Æ…
Y´ˆ¿£ POWER ¡‰°M´¸•‹øO±Nµuº»µo´G°M
®§W§S ¿°M q •Á Q§¡¬_ -°^
2 ´ˆ¿£ · SELECT/PLAY ¡‰-
ºv –昱N¥M߉ ˧~ ±§Ó™ ¶a§Ë°MµM´·
±q® Ã }©lº ©Ò -
Y n¶b }©lº ©Ò•H´e•Oºv –昺» ±§U®”
Y¶ Æ…ºv –æ˜ q ±µ qµ¤°M –´ˆ¿£ P PAUSE ¡‰¶”§£ n´ˆ¿£ ·
SELECT/PLAY ¡‰-
Y¶ Æ…ºv –æ˜ q Q ˆ±º°M•˝´ˆ¿£ POWER ¡‰©Œ · SELECT/PLAY
¡‰±µ qºv –æ˜ q °MµM´·§~´ˆ¿£ P PAUSE ¡‰-
n±qºv –™ }¿Yº ©Ò _Æ…
®œ•Œ LD Æ…°M Y n±q A ±™ _¬I }©l©Òºv°M´ˆ¿£ DISC SIDE A ¡‰-
Y n±q B ±™ _¬I }©l©Òºv°M´ˆ¿£ DISC SIDE B ¡‰-
®œ•Œ VIDEO CD Æ…°M Y n±qºv –™ _¬I }©l©Òºv°M´ˆ¿£ DISC SIDE
A ¡‰-
±§Ó§ß B™ Oæ–® | QƯ £-
z
• ®C´ˆ ±§Óº ©ÒÆ…°M•ªæ˜ £ Oæ–¶Ì Ã´·§@¶ ±
§Ó™ ¶Ï m-
• ¶b§U¶C±°™p§U°Mº ©Ò ±§Ó¶Ï m Oæ–|QM
£°G
– ´ˆ¿£ 6 OPEN/CLOSE°MDISC SIDE A/B
¡‰©Œ =/+ PREV/NEXT°]ACS/
AMS°^¡‰Æ…
– i¶Ê `¥M߉ƅ
– i¶Ê¥V°˛Æ… °¥M߉ƅ
– ©fi§Uºv –昙 q uÆ…
Y昧 §w¶ §@™T LD ºv –•B¶bºv –¶´ L•¥
} Lµ{§§´ˆ¿£ 6 OPEN/CLOSE ¡‰ ˆ ¨¶´ L°M
´hº ©Ò ±§Ó¶Ï m Oæ–´O´˘ -
µ˘
• Y¶b `¥M߉©Œ¥V°˛Æ… °¥M߉§§ ±§Óº ©Ò°M
” ±§Ó¶Ï m§£ |±o®Ï Oæ– -
• Y¶b q ¬_ }Æ…´ˆ¿£ · SELECT/PLAY
¡‰°Mºv –æ˜ |¶¤ ±µ q q - Y¶ ƅ昧 À
¶ ºv –°M´hº ©Ò±q§W¶ ±§Ó§ß B }©l i¶Ê-
• Ô©Û VIDEO CD °M§£ fi PBC ON/OFF ]©w
¶p¶Û°M•ªæ˜ß° | Oæ–®‰º ©Ò ±§Ó¶Ï m -
• Y s±µ¶ ¡ßJ °]ºv –æ˜ßY¬‡¨ •d©‘ OK §Ë
¶°°^°M¶¤ ´Ï¥_•\؇ßY Q®˙Ư-¡ˆµM¶b±Nºv
–昙 øȧJ§Ë¶°¬‡¥´¨ LINE IN §Ë¶°Æ…§£ |
®˙Ư¶¤ ´Ï¥_•\؇°M¶˝ Y s±µ§W ¡ßJ °M¶
•\؇ßY Q®˙Ư-
®‰•Læfiß@™k
23
MDP-V9K.3-856-640-13 (E, C1, C2)
-C¡c
Page 65

±q©“ n¶Ï m´Ï¥_ VIDEO
CD º ©Ò°]Æ— ±•\؇°^
¶ •\؇æA•Œ©Û VIDEO CD-±z•i•H¶bºv –§W•Œ°ßÆ— ±°®º–•‹•Ù§@ Q n
º– O™ ¶Ï m°M oºÀ¥N؇±q® ”¶Ï m´Ï¥_º ©Ò-ºv –昶bºv –®˙®´©Œ q ˆ ¨
´·§¥µM Oæ–µ¤ ”¶Ï m -±z•i•[§W§@ ”Æ— ±-®C¶ •[§W s™ Æ— ±Æ…°M¬¬™ Æ—
±ßY Q©ŸÆ¯-
•[Æ— ±
º ©Ò n•[Æ— ±™ VIDEO CD°MµM´·¶b©“ n¶Ï
m´ˆ¿£ªª±±æ §W™ VIDEO CD MARK ¡‰-
MARK SET
•ŒÆ— ±´Ï¥_º ©Ò
VIDEO CD MARK
VIDEO CD M. PLAY
z
• ®C¶ ¶bºv –º ©Ò§§´ˆ¿£
VIDEO CD MARK ¡‰Æ…°MÆ—
± æ °]¬¬Æ— ±©ŸÆ¯°M sÆ—
±•[§W°^-
• 1.0 ™©°M1.1 ™©©M 2.0 ™©
VIDEO CD §W £•i•H®œ•ŒÆ—
±•\؇ -
• ßY®œ¶b©fi§Uºv –昙 •Ê¨y q
u´·Æ— ±§¥´O´˘ -
´ˆ¿£ VIDEO CD M. PLAY ¡‰-
ºv –春M߉º– O™ ¶Ï m°M߉®Ï´·ßY }©lº
©Ò-
SEARCH
VIDEO CD
µ˘
• n®œ•Œ 2.0 ™© VIDEO CD §W
™Æ—±°MPBC ON/OFF ¡‰´¸
•‹øO• µo´G- Y•ºµo´G°M
´h•˝´ˆ¿£ p STOP ¡‰ ±§Óº
©Òºv –°M¶A´ˆ¿£ PBC°]ON/
OFF°^¡‰®œ•¶µo´G-
-C¡c
24
®‰•Læfiß@™k
MDP-V9K.3-856-640-13 (E, C1, C2)
Page 66

§œ¥_º ©Ò¨Y§@¨q ®°]§œ¥_
º ©Ò•\؇°^
REPEAT
1/SIDE/ALL
CLEAR
§œ¥_º ©Ò•\؇®œ±z؇§œ¥_ ´º ºv – -±z•i•H ´º LD ™ •ø§œ ±°N Ê ±
©Œ¨Y§@ `°QCD ©Œ VIDEO CD ™ æ„ L§ Æe©Œ¨Y§@ y Ò°Q©Œºv –™ ¨Y§@øÔ
æ‹ °§¿-
§œ¥_º ©Òæ„ Lºv –°]•˛ –§œ¥_•\؇°^
´ˆ¿£ REPEAT ¡‰°ßREPEAT°®µuº»•X {¶bø ı§W-°ßREPEAT°®¬I´G¶b´e ±™O „•‹´Ã
§W-º©Ò LD Æ…°Mºv –昧œ¥_º ©Ò LD ™ •ø§œ®‚ ±-º©Ò CD ©Œ VIDEO
CD Æ…°Mºv –昧œ¥_º ©Ò –§˘™ •˛°yÒ-
REPEAT
§œ¥_º ©Ò©“øÔ™ `°˛ y Ò°] ʧ@§œ¥_•\؇°^
´ˆ¿£ 1 ¶ 1/SIDE/ALL ¡‰´·°M´ˆ¿£ REPEAT ¡‰-
°ßSINGLE°®©M°ßREPEAT°®µuº»•X {¶bø ı§W-°ßREPEAT 1°®¬I´G
¶b´e ±™O „•‹´Ã§W -ºv –昧œ¥_º ©Ò©“øÔ™ `°˛ y Ò-
µ˘
• §£Ø‡¶PÆ…®œ•Œ§œ¥_•\؇©M w
©w•\؇-
• §£Ø‡¶b®œ•Œ 2.0 ™© VIDEO CD
™ PBC •\؇ƅ®œ•Œ§œ¥_•\
؇-nÔ 2.0 ™© VIDEO CD
®œ•Œ§œ¥_•\؇ƅ°M•˝´ˆ¿£
p STOP ¡‰ ±§Óº ©Ò°M¶A´ˆ¿£
PBC°] ON/OFF°^¡‰ ¿ºv
–昧W™ PBC ON/OFF ¡‰´¸
•‹øO-
SINGLE
REPEAT
§œ¥_º ©Ò LD ™ {¶bº ©Ò ±°] Ê ±§œ¥_•\؇°^
´ˆ¿£ 2 ¶ 1/SIDE/ALL ¡‰´·°M´ˆ¿£ REPEAT ¡‰-
°ßONE SIDE°®©M°ßREPEAT°®µuº»•X {¶bø ı§W-°ßREPEAT 1 SIDE°®
¬I´G¶b´e ±™O „•‹´Ã§W -ºv –昧œ¥_º ©Ò©“øÔ™ ºv – ±-
ONE SIDE
REPEAT
n¨d¨›§œ¥_º ©Ò™ ™¨ A
´ˆ¿£ 2 ¶ DISPLAY ¡‰-
n®˙Ư§œ¥_º ©Ò•\؇
´ˆ¿£ CLEAR ¡‰-
®‰•Læfiß@™k
25
MDP-V9K.3-856-640-13 (E, C1, C2)
-C¡c
Page 67

§œ¥_º ©Ò¨Y§@¨q ® °]±µ§W °^
REPEAT A ˜ B
§œ¥_º ©Òºv –§W™ §@¨qøÔæ‹ °§¿°]A˜B §œ¥_•\؇°^
1 ¶b n }©l§œ¥_º ©Ò™ ı¥ ©Œ Ô ‹ B´ˆ¿£
REPEAT A˜B ¡‰-
oßYßi Dºv –æ˜ }©lº ©Ò¶Ï m-
°ßREPEAT°®©M°ßA-°®•X {°M°ßB°®
{ {µ¤¶b´e ±™O „•‹´Ã§W -
CLEAR
z
• ´ˆ¶Ì 0/) ¡‰Ø‡¶b A ¬I©M
B ¬I§ß °± ¥yºv –-
2 ˝ºv –昺 ©Ò¶‹ ı¥ ©Œ Ô ‹™ µ ß¿-
3 ¶A¶ ´ˆ¿£ REPEAT A ˜B ¡‰-
oßYßi Dºv –昵 ßÙº ©Ò¶Ï m -
°ßREPEAT°®©M°ßA-B°®•X {¶b´e ±
™O „•‹´Ã§W-ºv –昧œ¥_º ©Ò©“´¸©w™ ®‚
”¶Ïm°™ ı¥©ŒÔ‹-
n§œ¥_º ©Ò§£¶P °§¿Æ…
´®BJ 1 ¶‹ 3 ´ søȧJ s™ ©l¬I©M ¬I-
n®˙Ư A ˜B §œ¥_•\؇ƅ
´ˆ¿£ CLEAR ¡‰-
µ˘
• A˜B §œ¥_•\؇ »§uß@©Û
LD ™ {¶bº ©Ò ±°M§£§uß@©Û
LD ™®‚±-
• ̶b 2.0 ™© VIDEO CD §W®œ
•Œ PBC •\؇ƅ°MA ˜B §œ¥_
•\؇§£ _ß@•Œ-
-C¡c
26
®‰•Læfiß@™k
MDP-V9K.3-856-640-13 (E, C1, C2)
Page 68

•H•Ù N ß«º ©Ò q¶±°]•Ù
12345678 9
10
12345678 9
10
11
12
SIDE ALD
1/L2/R
AV calendar on side A
Playing disc side
AV calendar on side B
Playing disc type
SIDE B
øÔº ©Ò•\؇°^
±z•i•H•H•Ù N ß«º ©Ò§@ Mºv –§§™ q¶±°]•ÙøÔº ©Ò•\؇°^- Y w•˝
øÔ拧F Q nº ©Ò™ q¶±°Mºv –昴h•H•Ù N ß« »º ©Ò©“øÔ™ q¶±°]Ư¶±•ÙøÔ
•\؇°^-¶]¨ ºv –昪› nºv –™ TOC º æ⁄ i¶Ê•ÙøÔº ©Ò§ŒÆ¯¶±•ÙøÔº ©Ò°M
¶]¶ °M o®«•\؇ »æA•Œ©Û CD°NVIDEO CD §Œ±a TOC º æ⁄™ LD-
•ÙøÔº ©Òºv –™ §@ ±°] Ê ±•ÙøÔ•\؇°^
6
OPEN/CLOSE
1/SIDE/ALL
CLEAR
SHUFFLE
·
SELECT/PLAY
1 ¶bºv –¶´ L§W©Ò§@ Lºv –°MµM´·´ˆ¿£ 6 OPEN/CLOSE ¡‰ ˆ§W¶´ L-
®œ•Œ CD ©Œ VIDEO CD Æ…°M µ
µ¯¿W§@ƒ˝™Ì•X {¶b´e ±™O „•‹´Ã
§W°M™Ì•‹ TOC º æ⁄§w Q ™§J -
º ©Ò§§™ ºv – ˛´¨
12345678 9
CD
µµ¯¿W§@ƒ˝™Ì
10 11 12
/L2/
R
1
2 °]¶ ®B J¨ LD •Œ®B J- º ©Ò CD ©Œ VIDEO CD Æ…´h § L¶ ®B J-°^
´ˆ¿£ · SELECT/PLAY ¡‰® µ•´›
µµ¯¿W§@ƒ˝™Ì•X {©Û´e ±™O „•‹´Ã
§W´·°M´ˆ¿£ p STOP ¡‰ ±§Óº ©Ò -
ºv –æ˜ ™®˙ LD ™ TOC ºæ⁄-
3 ´ˆ¿£ SHUFFLE ¡‰-
°ßSHUFFLE°® { {¶b´e ±™O „
•‹´Ã§W-
º ©Ò§§™ ºv – ˛´¨
º ©Ò§§™ ºv – ±
A ±™ µµ¯¿W§@ƒ˝™Ì
B ±™ µµ¯¿W§@ƒ˝™Ì
12345678 9
SIDE ALD
SIDE B
12345678 9
10
10
1/L2/R
12
11
SHUFFLE
4 ´ˆ¿£ · SELECT/PLAY ¡‰-
q¶± }©lº ©Ò-ºv –§§™ ©“¶ q¶±•H•Ù N ß«º ©Ò§@ M- nº ©Ò
¬˘ ± LD ™ A ±Æ…°M´ˆ¿£ DISC SIDE A ¡‰´·°M´ˆ¿£ · SELECT/
PLAY ¡‰- n•ÙøÔº ©Ò B ±°M –¶b B©Û B ±Æ…§Œ¶bº ©Ò§Ë¶°©Œº» ±
§Ë¶°§U ı¶Ê§W z ƒ 3 ©M ƒ 4 ®B J-
z
• ´ˆ¿£ + NEXT°]ACS/AMS°^¡‰Ø‡
§ L {¶bº ©Ò™ q¶±°M i¶‹±N Q•ÙøÔ
™ §U§@§‰ q¶±-= PREV°]ACS/
AMS°^¡‰§£§uß@©Û•ÙøÔº ©Ò©ŒÆ¯¶±•Ù
øÔº ©Ò§§-
µ˘
• Y LD §£±a TOC º æ⁄©Œºv –昕º ™
®˙ LD ™ TOC º æ⁄°M´ˆ¿£ SHUFFLE
¡‰Æ…ø ı§W |•X {°ßNO TOC°®°M o
Æ…´h§£Ø‡ i¶Ê•ÙøÔº ©Ò©ŒÆ¯¶±•ÙøÔº
©Ò-
• ®œ•Œ 2.0 ™© VIDEO CD ™ PBC •\؇
Æ…§£Ø‡ i¶Ê•ÙøÔº ©Ò©ŒÆ¯¶±•ÙøÔº
©Ò- n Ô 2.0 ™© VIDEO CD i¶Ê•Ù
øÔº ©Ò©ŒÆ¯¶±•ÙøÔº ©Ò°M´ˆ¿£
p STOP ¡‰ ±§Óº ©Ò´·°M´ˆ¿£ PBC
°]ON/OFF°^¡‰ ¿ºv –昧W™
PBC ON/OFF ¡‰´¸•‹øO-
•ÙøÔº ©Ò¬˘ ± LD ™ •ø§œ®‚ ±°]¬˘ ±•ÙøÔ•\؇°^
1 i¶Ê§W z®B J 1 ¶‹ 3 •H i§J SHUFFLE §Ë¶°-
Tª{ A ±©M B ±™ µµ¯¿W§@ƒ˝™Ì £•X {-¶”•B°ß SHUFFLE°®
{ {¶b´e ±™O „•‹´Ã§W-
2 ´ˆ¿£ CLEAR ¡‰ ¿´e ±™O „•‹´Ã§W™ °ßSIDE°® „•‹-
3 ´ˆ¿£ · SELECT/PLAY ¡‰-
A ±§W™ q¶±•H•Ù N ß«º ©Ò´·°MB ±§W™ q¶±•H•Ù N ß«º
©Ò-
®‰•Læfiß@™k
27
-C¡c
MDP-V9K.3-856-640-13 (E, C1, C2)
Page 69

•H•Ù N ß«º ©Ò q¶±°]±µ§W °^
DISPLAY
1/SIDE/ALL
SHUFFLE
CLEAR
X¡‰
Number
buttons
•H•Ù N ß«º ©Ò±z fl w™ q¶±°] Ê ±Æ¯¶±•ÙøÔ•\؇°^
n•H•Ù N ß«øÔ拱z fl w™ q¶±°M –±N§£ Qº ©Ò™ ºv –§W™ q¶±Æ¯
•h- Y®œ•Œ™ ¨O LD°M – Tª{ µµ¯¿W§@ƒ˝™Ì•X {¶b´e ±™O „•‹´Ã§W -
1 ´ˆ¿£ SHUFFLE ¡‰ O§J SHUFFLE §Ë¶°-
°ß SHUFFLE°® { {¶b´e ±™O „•‹´Ã§W-
2 ´ˆ¿£ 2 ¶ DISPLAY ¡‰•H®œ•Œø ı „•‹-
3 ´ˆ¿£ X¡‰Æ¯ £§£ Qº ©Ò™ q¶±-
©“Ư £™ q¶± X „•‹¶bø ı§W-
YøÈø˘ X°M´ˆ¿£ CLEAR ¡‰-®C´ˆ
¿£§@¶ ¶ ¡‰°M±zøȧJ™ ô·§@§‰
q¶±ßY±o•H´Ï¥_°]ø ı§W™ XƯ•¢°^-
VIDEO 1-12 52:07 SIDE A
DELETE 2 7
SHUFFLE - - - -
- - - - - - - - - -
- - - - - - - - - -
- - - - - - - - - -
- - - - - -
- - - - - -
4 ´ˆ¿£ · SELECT/PLAY ¡‰-
ºv –§W —æl™ q¶±•H•Ù N ß«º ©Ò§@ M- nº ©Ò¬˘ ± LD ™ A ±
§W™ —æl q¶±°M•˝´ˆ¿£ DISC SIDE A ¡‰°M¶A´ˆ¿£ · SELECT/PLAY
¡‰- n•ŒÆ¯¶±•ÙøÔ•\؇º ©Ò B ±°M –¶b B©Û B ±Æ…¶}¶bº ©Ò©Œº» ±
§Ë¶°§U ı¶Ê ƒ 1°„4 ®B J-
·
SELECT/PLAY
z
• ±z öh•iøÔæ‹ 99 §‰ q¶±-n
øÔæ‹ X§j©Û 10 ™ q¶±°M´ˆ
¿£ >10 ¡‰´·°M®Ã¶ ´ˆ¿£®‚ ”
X¡‰°G•˝´ˆ¿£§Q¶Ïº ¶r°M
¶A´ˆ¿£ ”¶Ïº ¶r°] —¨› ƒ 18
°^- n®œ•Œ´e ±™O§W™ X
¡‰°M – —¨› ƒ 18 -
• •ÙøÔº ©Ò©MƯ¶±•ÙøÔº ©Ò•i
•H§œ¥_ i¶Ê -´ˆ¿£ªª±±æ §W
™ REPEAT ¡‰-®C¶ §œ¥_µ
ßÙ´·°M q¶±™ ß« ´ s•Ù
øÔ-
LD •ø§œ®‚ ±Æ¯¶±•ÙøÔº ©Ò°]¬˘ ±Æ¯¶±•ÙøÔ•\؇°^
º©Ò B ±® µ• µµ¯¿W§@ƒ˝™Ì•X {¶b´e ±™O „•‹´Ã§W§ß´·°M ı¶Ê§U z®B
J-
1 i¶Ê§W z®B J 1 ¶‹ 3 •HƯ £ LD •ø§œ®‚ ±§W™ §£ n q¶±-
nƯ £¬˘ ± LD ™ B ±§W™ q¶±°M•˝´ˆ¿£ DISC SIDE B ¡‰°M¶A
´ˆ¿£ X¡‰ -B ±§W QƯ £™ q¶±•H§ËÆÿ•X {-
2 ´ˆ¿£ªª±±æ §W™ CLEAR ¡‰ ¿´e ±™O „•‹´Ã§W™ °ßSIDE°® „•‹-
3 ´ˆ¿£ · SELECT/PLAY ¡‰-
A ±§W™ —æl q¶±•H•Ù N ß«º ©Ò´·°MB ±§W™ —æl q¶±•H•Ù N
ß«º ©Ò-
n®˙Ư•ÙøÔº ©Ò©ŒÆ¯¶±•ÙøÔº ©ÒÆ…
´ˆ¿£ CLEAR ¡‰´e ±™O „•‹´Ã§W™ °ßSHUFFLE°®Æ¯•¢-ºv –æ˜ h•X•Ùøԧ˶°-©“¶ Q
Ư £™ q¶±ßY±o•H´Ï¥_-
28
-C¡c
®‰•Læfiß@™k
MDP-V9K.3-856-640-13 (E, C1, C2)
Page 70

•H©“ n ß«º ©Ò q¶±°] s
ß«º ©Ò•\؇°^
±z öh•iøÔæ‹ 25 §‰ q¶±•H±z Q n™ •Ù¶Û ß« i¶Êº ©Ò°]§£ – ±¨ ¶Û
§Œ q¶±¨Oß_¶bº ©Ò§§°^- q¶±´ˆ±z´¸©w™ ß« sƒÚº ©Ò-¶ •\؇æA•Œ©Û´D
•d©‘ OK ™¨ A°]•º s±µ ¡ßJ Æ…°^-¶˝¶b•d©‘ OK ™¨ AÆ… –ßÔ•Œ w©w•\؇
°] —¨› ƒ 33 ™ øÔæ‹•d©‘ OK q¶±™ ß«°^-
øÔæ‹ sß«•Œ q¶±
PROGRAM
/RESERVE
CLEAR
Number
X¡‰
buttons
DISC SIDE
A/B
·
SELECT/PLAY
z
• ±z öh•iøÔæ‹ 99 §‰ q¶±- nøÔæ‹ X§j©Û
10 ™ q¶±°M´ˆ¿£ >10 ¡‰´·°M®Ã¶ ´ˆ¿£®‚ ”
X¡‰°G•˝´ˆ¿£§Q¶Ïº ¶r°M¶A´ˆ¿£ ”¶Ïº
¶r°] —¨› ƒ 18 °^- n®œ•Œºv –昧W™
X¡‰°M – —¨› ƒ 18 -
• ´ˆ¿£ = /+ PREV/NEXT°]ACS/
AMS°^¡‰Ø‡ ı¶‹µ{ß«§§™ §W§@§‰©Œ§U§@§‰
q¶±-
• æ„ ”µ{ß«º ©Òß ¶´·§]§£|QM£-¶˝¶b
§U¶C±°™p§Uµ{ß«|QM£°G
– ´ˆ¿£ CLEAR ¡‰°]´e ±™O „•‹´Ã§W™
°ßPGM°® { {µ¤™ ±°™p £•~°^ h•X sß«
§Ë¶°Æ…-
– •¥ }ºv –¶´ L©Œ ˆ ¨ºv –æ˜ q Æ…-
• n¶¤ §œ¥_º ©Òµ{ß«Æ…°M´ˆ¿£ªª±±æ §W™
REPEAT ¡‰-
µ˘
• ®œ•Œ 2.0 ™© VIDEO CD ™ PBC •\؇ƅ§£
؇®œ•Œ sß«•\؇ - n Ô 2.0 ™© VIDEO CD
®œ•Œ sß«•\؇°M´ˆ¿£ p STOP ¡‰ ±§Óº ©Ò
´·°M´ˆ¿£ PBC°] ON/OFF°^¡‰ ¿ºv –æ˜
§W™ PBC ON/OFF ¡‰´¸•‹øO-
• n¨d¨› LD §W™ µ{ß«™ ¡`º ©ÒÆ… °°G
– ®œ•Œ±a TOC º æ⁄™ LD-
– ¶b´ˆ¿£ PROGRAM/RESERVE ¡‰§ß
´e°M´ˆ¿£ · SELECT/PLAY ¡‰°]® ´ˆ
¿£ SIDE B ¡‰°^®œºv –æ˜ ™®˙ LD ™ TOC
ºæ⁄-
• YøÔæ‹ X§j©Û 50 ™ q¶±©Œ¡`º ©ÒÆ… ° W
L 100 §¿ƒ¡°MÆ… ° „•‹´h ‹¨ °ß--:--°® -
1 ´ˆ¿£ PROGRAM/RESERVE ¡‰-
°ßPROGRAM°®•X {°M°ßPGM°® {
{¶b´e ±™O „•‹´Ã§W-
VIDEO 1-10 48:31 SIDE A
PROGRAM - - - - - - - - - – – : – – - - - - - - - - - -
- - - - - - - - - -
- - - - - - - - - -
- - - - - - - - - -
2 ´ˆ±z nº ©Ò™ ß«´ˆ¿£ X¡‰øÔæ‹ q¶±-
Yº ©Ò¬˘ ± LD°M´h•˝´ˆ¿£ DISC
SIDE A °]©Œ B °^¡‰øÔæ‹ – ±°M¶A´ˆ¿£ X
¡‰´ˆ±z nº ©Ò™ ß«øÔæ‹ q¶±-±q B ±øÔ
®”™ q¶±•H§ËÆÿ•X {-
YøÈø˘ X°M´ˆ¿£ CLEAR ¡‰-®C´ˆ¿£§@¶ ¶ ¡‰°M±zøȧJ™ ô·
§@§‰ q¶±ßY Q®˙Ư-
VIDEO 1-12 52:07 SIDE B
PROGRAM 4 2 10 5 1
36 : 41 3 - - - - - - - -
- - - - - - - - - -
- - - - - - - - - -
- - - - - - - - - -
3 §œ¥_ i¶Ê®B J 2°M™ ®Ïµ ßÙ q¶±øÔæ‹-
4 ´ˆ¿£ · SELECT/PLAY ¡‰-
©“øÔæ‹™ q¶±ßY Q sß«°Mø ı „•‹•ÁƯ•¢-°ßPGM°®¬I´G¶b´e
±™O „•‹´Ã§W-©“øÔæ‹™ q¶±´ˆøÔæ‹™ ß« i¶Êº ©Ò-
n¶b sß«§§¨d¨›¡`º ©ÒÆ… °
øÔæ‹ q¶±Æ…؇¨d¨›µ{ß«™ ¡`º ©ÒÆ… °-®‰Æ…
°¶PÆ… „•‹¶bø ı©M´e ±™O „•‹´Ã§W-®CøÔ拧@
§‰ q¶±°M®‰º ©ÒÆ… °ßY Q•[ ‚-
Y¶bµ{ß«§§øȧJ P PAUSE
±z•i•H¶b q¶±§ß °øȧJ P PAUSE ®œºv –昶bµ{ß«º ©Ò§§¶¤ º» ±-
YøȧJ P PAUSE°M¡`º ©ÒÆ… °´h±q --:--°] s°^ }©l ´ s pÆ…-
n¨d¨›µ{ß«™ § ÆeÆ…
´ˆ¿£ 2 ¶ DISPLAY ¡‰-
©“øÔæ‹™ q¶± X•X {- Y q¶± B©Ûº ©Ò§§°M®‰ X´h|{{-
n®˙Ư sß«º ©Ò•\؇ƅ
´ˆ¿£ CLEAR ¡‰°ßCLEAR°®µuº»•X {°M´e ±™O „•‹´Ã§W™ °ßPGM°®´¸•‹øO ¿-ºv –
æ˜ h•X sß«§Ë¶°°M©“¶ sß« q¶±ßY Q®˙Ư-
VIDEO 1-10 48:31 SIDE A
PROGRAM 4 2 10 5 1
52: 18 3 7 6 - - - -
- - - - - - - - - -
- - - - - - - - - -
- - - - - - - - - -
Total playing time of the
µ{ß«™ ¡`º ©ÒÆ… °
program
®‰•Læfiß@™k
29
MDP-V9K.3-856-640-13 (E, C1, C2)
-C¡c
Page 71

¶b´¸©w™ §@¨qÆ… ° ú ©Ò
ºv –°]¶¤ `•ÿº ©Ò°^
AUTO PGM
Number
X¡‰
buttons
®œ•Œ¶¤ sß«º ©Ò•\؇°Mºv –昱Nºv –§W™ y Ò°˛ `§¿¨ °ß sß«
A°®©M°ß sß« B°®°M¶b´¸©w™ §@¨qÆ… ° ú ©Ò A ©M B-ºv –æ˜ |¶b®‚ ” s
ß«§ß °º» ±°M¨Gø˝®Ó œ±aÆ…°M ”•\؇´D±`¶ ƃ-
¶ •\؇ »¶bº ©Ò CD°MVIDEO CD ©M±a TOC ™ LD ºv –Æ…¶ ƃ-
n•ø T®œ•Œ LD
¶bº ©Ò±a TOC ™ LD ºv –Æ…°M¶b´ˆ¿£ AUTO PGM ¡‰§ß´e°M•˝´ˆ¿£
P PAUSE ¡‰°M¶A´ˆ DISC SIDE A ©Œ DISC SIDE B ¡‰•H „•‹•X µµ¯¿W§@ƒ˝
™Ì-™` N°M®œ•Œ¶¤ sß«º ©Ò•\؇°MµL™k Ô Û LD ºv –®‚ ±§W™ ` i¶Ê
sß«-
¶¤ sß« q¶±
1 ´ˆ AUTO PGM ¡‰-
°ßAUTO PGM°®•X {-°ßAUTO
PGM°®¶b´e ±™O „•‹´Ã§W { {-
AUDIO 1-10 48:31
AUTO PGM - - - - - - - - - -
- - MIN
A - -:- -
- - - - - - - - - -
- - - - - - - - - -
- - - - - - - - - -
- - - - - - - - - -
2 •Œº X¡‰øȧJ Q nº ©Ò™ Æ… °-
DISC SIDE
A/B
P
PAUSE
·
SELECT/PLAY
z
• n®œ•Œºv –昧W™ X¡‰°M
– —¨› ƒ 18 -
• ´ˆ =/+ PREV/NEXT
°]ACS/AMS°^¡‰•i ı¶‹´e§@
©Œ§U§@ º÷¶±-
• Y¶b LD ™ º ©Ò ±§Wßt¶ 51
”•H§W™ `°M¶¤ sß«º
©Ò•\؇•i؇§£Ø‡•ø±`§uß@-
µ˘
• ®œ•Œ 2.0 ™© VIDEO CD ™
PBC •\؇ƅ§£Ø‡®œ•Œ sß«•\
؇-nÔ 2.0 ™© VIDEO CD
®œ•Œ sß«•\؇°M´ˆ¿£ p STOP
¡‰ ±§Óº ©Ò´·°M´ˆ¿£ PBC
°]ON/OFF°^¡‰ ¿•ªæ˜§W
™ PBC ON/OFF ¡‰´¸•‹øO-
nøȧJ 11 §¿•H§W™ º ¶r°G
>
•˝´ˆ
®“°G nøȧJ 30 §¿°M´h´ˆ
¡‰°M¶A®Ã¶ ´ˆ®‚ ”º X°M•˝¨ §Q¶Ïº °M´·¨ ”¶Ïº -
10
>
10
¶pøȧJ™ Æ… °¶ ø˘°M´h•i´ˆº X¡‰øȧJ•ø T™ Æ… °-
ºv –æ˜øÔæ‹ n¶s§J sß« A ©M sß« B ™ º÷¶±°M®‚ ” sß«™ ¡`º ©Ò
Æ… °•Ê¥¿•X {-
AUDIO 1-10 48:31
AUTO PGM 1 2 3 4 5
30 MIN
6 P 7 8 9
A 26:13
10
Program A
sß« A
sß« A ™ ¡`º ©ÒÆ… °
Total playing time of Program A
Pause
º» ±
,
3 ´ˆ¿£ · SELECT/PLAY ¡‰-
sß« A ™ § Æe }©lº ©Ò°Mºv –昺» ±©Û sß« A ™µß¿B-nº
©Ò sß« B°M –¶A´ˆ · SELECT/PLAY ¡‰-
n¨d¨› sß«§ Æe
´ˆ DISPLAY ¡‰®‚¶ ©“øÔæ‹™ sß« A ©M sß« B ™ º÷¶± X•X { -
sß« B
10
¡‰-
/0
¡‰°M3¡‰°M¶A´ˆ
AUDIO 1-10 48:31
AUTO PGM 1 2 3 4 5
30 MIN
6 P 7 8 9
B 22:18
10
Program B
sß« B ™ ¡`º ©ÒÆ… °
Total playing time of Program B
30
-C¡c
®‰•Læfiß@™k
MDP-V9K.3-856-640-13 (E, C1, C2)
Page 72

CLEAR
sß« A ©M sß« B §ßÆ… °§¿ t
¶p™GøȧJ™ º ©ÒÆ… °µu©Ûºv –º ©ÒÆ… °™ §@•b°Mºv –§W™ ¨Y®«º÷¶±•i
؇§£æA©y©Û©“´¸©w™ Æ… °°M¶”•B•i؇§£Ø‡ Ô¶ i¶Ê sß«-•t§@§Ë ±°M¶p™GøÈ
§J™ º ©ÒÆ… °™¯©Ûºv –™ º ©ÒÆ… °°M©“¶ º÷¶± » Q¶s¿x©Û sß« A §§- o¨O
¶]¨ ˚§ß sß« B sß« A ¡`¨O®„¶ ¿u•˝ v-
§U™Ì™Ì•‹¶b o ÿ±°™p§Uºv –昨O¶p¶Û§¿ tÆ… °™-
•H§@±i 40 §¿ƒ¡™ ºv –¨ ®“°G
z
• ßY®œ©“¶ ™ sß« £§wº ©Òß
¶°M sß«§]§£ | QßR £-¶˝
¶b§U z±°™p§U°M sß« | QßR
£°G
– ´ˆ CLEAR°]´e ±™O „•‹§W
™°ßAUTO PGM°®´¸•‹øO
¶b { {Æ… £•~°^¡‰ h•X sß«
§Ë¶°Æ…°F
– •¥ }ºv –¶´ L©Œ ˆ ¨ºv –æ˜
qÆ…-
øȧJ
15 §¿
30 §¿
45 §¿
sß« A º©Ò
15 §¿°]©Œ§÷©Û 15 §¿°^
30 §¿°]©Œ§÷©Û 30 §¿°^
40 §¿°]©“¶ º÷¶±°^
sß« B º©Ò
15 §¿°]©Œ§÷©Û 15 §¿°^
¨˘ 15 §¿
0 §¿
¡`º ©ÒÆ… °
30 §¿°]©Œ§÷©Û 30 §¿°^
40 §¿
40 §¿
ßR £¶¤ sß«º ©Ò
´ˆ CLEAR ¡‰-
°ßCLEAR°®µuº»•X {°M¶”´e ±™O „•‹´Ã§W™ °ßAUTO PGM°®´¸•‹øOƯ
•¢- ºv –æ˜ h•X sß«§Ë¶°°M sß«§ Æe QßR £-
–
®‰•Læfiß@™k
31
MDP-V9K.3-856-640-13 (E, C1, C2)
-C¡c
Page 73

®œ•Œ¡n µ±±®Ó•\؇
AUDIO MONITOR
ANALOG/´
nº ©Ò•fl È¡n©Œ¬˘ ´ µ¡n°]SAP°^ºv –Æ…
º ©Ò¶p®‚ ͪy®•µ•™ ¬˘ ´ µ¡n°]SAP°^ºv –Æ…°M±z•i®œ•Œ AUDIO
MONITOR ¡‰¡n µº •X-
¶p¶Û ‹¥´¡n µ™ º •X
¶bºv –º ©Ò§§´ˆ¿£ AUDIO MONITOR ¡‰®C´ˆ§@¶ AUDIO MONITOR ¡‰°Mø ı „•‹´KßÔ ‹§@¶ °R
1/L 2/R 1/L 2/R
ø ı „•‹ ®œ•Œ•fl È¡nºv – ®œ•Œ SAP ºv –
1/L •™´H D ¡n y 1°]•™´H D°^
2/R •k´H D ¡n y 2°]•k´H D°^
1/L 2/R •fl È¡n ¡n y 1°]•™´H D°^
°]•™•k´H D°^ ¡n y 2°]•k´H D°^
YøÔ拧F 1/L°]©Œ 2/R°^°M•™°]©Œ•k°^¿W D™ ¡n µ´K±q¬˘§Ë™ ¥ ¡næ
à «•X -
µ˘
• ¶bº ©ÒæA•Œ©Ûߢ§Ò¿Ù¬ ¡n
AC-3 ®t Œ™ ºv –Æ…°M¶pøÔæ‹
º“¿¿¡n µ°M´h±q®‚ º¥ ¡næ
¨È؇øÈ•X•™ º¡n D™ ¡n µ-
•Œ o ÿºv –°M±z§£Ø‡®œ•Œ
AUDIO MONITOR ®”ßÛ¥´
º“¿¿¡n µ™ •™•k¡n D-
• º X¡n µ©Mº“¿¿¡n µ °™ øÈ
•X q• •i؇¶ ©“§£¶P-
n¶¨ • LD ºv –™ º“¿¿ µ¡nÆ…
Y±z™ LD ºv –•]¨Aº X¡n°M•ªæ˜´K؇¶¤ øÈ•Xº X µ¡n- n¶¨ • Ù
¶bº“¿¿¡n y Ù ¡n µÆ…°M –®œ•Œ ANALOG/´ ¡‰-
¶bºv –º ©Ò§§´ˆ¿£ ANALOG/´ ¡‰-
ø ıµuº»•X {°ß≥ ANALOG°®°MµM´·º“¿¿ µ¡n´K Qº •X-
n¶^®Ïº X µ¡nÆ…
§œ¥_´ˆ¿£ ANALOG/´ ¡‰™ ®Ï°ß≥ DIGITAL °®•X {¨ §Ó -
º ©Ò±a ´°]CX°^º–ªx™ ºv –
±a¶ ´ º–ªx™ LD ¨ •— CX ¥Óæ ®t Œø˝ µ™ °M•¶Ø‡®œº“¿¿¡n µ™
æ µ ßC°M A d Ú¥£ ™-•ªæ˜Ø‡¿À¥˙§j °§¿±a ´ º–ªx™ ºv –® ¶bøÈ
•Xº“¿¿¡n µÆ…¶¤ ±“ CX ¥Óæ ®t Œ - Y ´ LD §£±a±“ CX ¥Óæ ®t
Œ™ s X°M±z•i•H¶b »º ©Òº“¿¿¡n µÆ…§‚ ±“ CX ¥Óæ ®t Œ -
n§‚ ±“ CX ¥Óæ ®t ŒÆ…
§œ¥_´ˆ¿£ ANALOG/´ ¡‰°M™ ®Ï°ß CX ON°®•X {-CX ¥Óæ ®t Œ
ßY Q±“ -
32
-C¡c
®‰•Læfiß@™k
MDP-V9K.3-856-640-13 (E, C1, C2)
Page 74

øÔæ‹•d©‘ OK q¶±™
ß«°] w©w•\؇°^
¶ •\؇æA•Œ©Û•d©‘ OK §Ë¶°-±z öh•iøÔæ‹ 9 §‰ q¶±•H±z Q n™ •Ù¶Û
ß« i¶Êº ©Ò°]§£ – ±¨ ¶Û§Œ q¶±¨Oß_¶bº ©Ò§§°^- q¶±´ˆ±z´¸©w™ ß«
sƒÚº ©Ò°M®œ±z؇®…®¸µL °¬_•d©‘ OK º©Ò-±z¡Ÿ•i•HøÔæ‹•t§@ Lºv –§W
™ q¶±°]§U Lºv – w©w•\؇°^-
øÔ拺 ©Ò§§™ ºv –§W™ q¶±
PROGRAM
/RESERVE
CLEAR
Number
X¡‰
buttons
DISC SIDE
A/B
·
SELECT/PLAY
1 ´ˆ¿£ PROGRAM/RESERVE ¡‰-
°ßRESERVE°®•X {-ºv –昧W™
RESERVE ¡‰´¸•‹øO { {-
2 ´ˆ±z nº ©Ò™ ß«´ˆ¿£ X¡‰øÔæ‹ q¶±-
º ©Ò¬˘ ± LD Æ…°M•˝´ˆ¿£ DISC SIDE
A°]©Œ B°^¡‰øÔæ‹ – ±°M¶A´ˆ¿£ X¡‰øÔ
æ‹ q¶±-
YøÈø˘ X°M´ˆ¿£ CLEAR ¡‰-®C´ˆ¿£§@¶ ¶ ¡‰°M±zøȧJ™ ô·
§@§‰ q¶±ßY Q®˙Ư-
3 nøȧJ¬˘ ± LD ™ •t§@ ±§W™ q¶±Æ…°M•˝
´ˆ¿£ DISC SIDE B°]©Œ A°^¡‰°M¶A´ˆ±z n
º ©Ò™ ß«´ˆ¿£ X¡‰øÔæ‹ q¶±-
VIDEO 1-10 48:31 SIDE A
RESERVE - - - - - - - - - -
- - - - - - - -
©“øÔæ‹™ – ±
Selected disc side
VIDEO 1-10 48:31 SIDE A
RESERVE 4 2 10 - - - -
- - - - - - - -
ºv –™ •t§@ ±
Alternate disc side
VIDEO 1-12 52:07 SIDE B
RESERVE 4 2 10 5 1
3 - - - - - -
Note
• ®œ•Œ 2.0 ™© VIDEO CD ™
PBC •\؇ƅ§£Ø‡®œ•Œ w©w•\
؇- n Ô 2.0 ™© VIDEO CD
®œ•Œ w©w•\؇°M´ˆ¿£ p STOP
¡‰ ±§Óº ©Ò´·°M´ˆ¿£ PBC
°]ON/OFF°^¡‰ ¿ºv –æ˜
§W™ PBC ON/OFF ¡‰´¸•‹
øO-
4 §œ¥_ i¶Ê®B J 2 ©M 3°M™ ®Ïµ ßÙ q¶±øÔæ‹-
5 ´ˆ¿£ PROGRAM/RESERVE ¡‰-
ø ı „•‹Æ¯•¢-ºv –昧W™ RESERVE ¡‰´¸•‹øOµo´G -
Y¶b q¶±º ©Ò§§ w©w q¶±°M w©w™ q¶±¶b {¶bº ©Ò™ q¶±µ ßÙ´·
§£±aº» ±¶” }©lº ©Ò-
Y¶bºv –æ˜ ±§ÓÆ… w©w q¶±°M´ˆ¿£ · SELECT/PLAY ¡‰ßY }
©lº ©Ò w©w™ q¶±-
®‰•Læfiß@™k
33
MDP-V9K.3-856-640-13 (E, C1, C2)
-C¡c
Page 75

øÔæ‹•d©‘ OK q¶±™ ß«°]±µ§W
°^
6 OPEN/CLOSE
PROGRAM
/RESERVE
CLEAR
Number
X¡‰
buttons
NEXT DISC
RESERVE
øÔæ‹•t§@ Lºv –§W™ q¶±°]§U Lºv – w©w•\؇°^
1 ¶b i¶Êß ´e 1 ®Ï 4 ®B J§ßæfiß@•H´·°M´ˆ¿£ NEXT DISC RESERVE
¡‰-
qµ¯æ˜ø ı•X {±¤¬‡µ¤™ °ß °®º– O-´h±z´K•i•H }©l´¸©w§U
±iºv – nº ©Ò™ q¶±- n´¸©w q¶±Æ…°M –´ˆ ”´e 2°]§Œ 3°^®B J§ß
æfiß@ i¶Ê -
NEXT DISC SIDE A
RESERVE 4 2 10 5 1
3 - - - - - -
NEXT DISC SIDE A
RESERVE 4 2 10 5 1
3 1 3 2
Songs on
•t§@ Lºv –§ß q¶±
another disc
2 ´ˆ¿£ PROGRAM/RESERVE ¡‰°]µM´·´ˆ
¿£ · SELECT/PLAY ¡‰°^-
ºv –昱N }©lº ©Ò {¶bº ©Ò§§™ ºv –
§ß´¸©w q¶±°Mº ß ´K¶¤ ±§Ó°M¶n ˝±z•Ê
¥´§U§@±iºv –-
STOP
PLEASE CHANGE THE DISC
RESERVE 1 3 2
·
SELECT/PLAY
z
• ¶b´D•d©‘ OK §Ë¶°§U°]•º s±µ
¡ßJ Æ…°^§£Ø‡®œ•Œ§U Lºv
– w©w•\؇-ß@¨ •N¥¿°M¶b
´D•d©‘ OK §Ë¶°§U•i•H öhøÔ
º 25 §‰ q¶±°] —¨› ƒ 29
™ •H©“ n ß«º ©Ò q¶±°^-
µ˘
• ®œ•Œ w©w•\؇°]§Œ§U Lºv –
w©w•\؇°^º ©Ò q¶±Æ…°M q
¶± sƒÚº ©Ò°M±z§£Ø‡®œ•Œ¶¤
º» ±•\؇ -ºv –昶bº ©Ò
ß ©“¶ w©w q¶±´·¶¤ i§J
º» ±™¨ A-
• §£Ø‡¶PÆ…®œ•Œ w©w•\؇©M§œ
¥_•\؇-
• ±z§£Ø‡•Œ§U Lºv – w©w•\؇
¶b CD ©Œ VIDEO CD §WøÔæ‹
X§j©Û 80 ™yÒ-
3 ´ˆ¿£ 6 OPEN/CLOSE ¡‰•H•¥ }ºv –¶´
L°MµM´·•Ê¥´ºv –-
4 ´ˆ¿£ · SELECT/PLAY ¡‰©Œß‚¶´ L±¿§J
昧 -
s À i•h™ ºv –™ ´¸©w q¶±±N Q¶¤
º©Ò-
n®˙Ư w©w•\؇§Œ§U Lºv – w©w•\؇
´ˆ¿£ CLEAR ¡‰°ßCLEAR°®µuº»•X {°Mºv –æ˜ h•X w©w§Ë¶°-ºv –昧W™ RESERVE
¡‰´¸•‹øO ¿-©“¶ w©w™ q¶±ßY Q®˙Ư-
34
-C¡c
®‰•Læfiß@™k
MDP-V9K.3-856-640-13 (E, C1, C2)
Page 76

z
• øȧJ 0 •iøÔæ‹ LD §W™ ƒ 0
`-
nøȧJ 0 Æ…°M•˝´ˆ¿£ >10 ¡‰
°]©Œºv –昧W™ >15 ¡‰°^°M
¶A´ˆ¿£ 10/0 ¡‰°]©Œºv –昧W
™ 10 ¡‰°^-
nøȧJ§j©Û 10 ™X
´ˆ¿£ªª±±æ §W™
>
¡‰´·°M®Ã¶ ´ˆ¿£®‚ ” X¡‰°G•˝´ˆ¿£§Q¶Ïº ¶r°M¶A
10
´ˆ¿£ ”¶Ïº ¶r-
Yø˘´ˆ§F
>
¡‰°M¶A´ˆ¿£
10
>
¡‰®œ°ß--°® { {¶bø ı§W°MµM´·øȧJ•ø T
10
™ ”¶Ïº ¶r X-
n... ´ˆ¿£
øȧJ 10
øȧJ 14
øȧJ 20
øȧJ 25
10
¡‰
/0
>
¡‰°N1¡‰°N4¡‰
10
>
¡‰°N2¡‰°N
10
>
¡‰°N2¡‰°N5¡‰
10
10
¡‰
/0
n•Œºv –昧W™ X¡‰øȧJ§j©Û 15 ™X
´ˆ¿£ >15 ¡‰•H´·°M¶A´ˆ¿£¨¤¿ ™ X¡‰- nøȧJ°ß0°®°M –´ˆ¿£ 10
¡‰-
®“¶p°G nøȧJ 30
•˝´ˆ¿£ >15 ¡‰°M¶A´ˆ¿£ 3 ¡‰©M 10 ¡‰-
n¨d¨›©“ nº ©Ò™ q¶±Æ…
´ˆ¿£ 2 ¶ DISPLAY ¡‰-
w©w™ q¶±§ß X•X {-§@§‰ q¶±º ß Æ…°M®‰ XßYƯ•¢ -
C–5 22:58 PLAY
LD SIDE A
VIDEO 1-10 48:31
RESERVE 4 2 6
Reserved songs
©“ w©w™ q¶±
n § L {¶bº ©Ò™ q¶±
´ˆ¿£ + ¡‰-
§U§@§‰ w©w q¶±´K }©lº ©Ò-
®‰•Læfiß@™k
35
MDP-V9K.3-856-640-13 (E, C1, C2)
-C¡c
Page 77

®œ•Œ•d©‘ OK •\؇
VOCAL
SELECT
±z•i•H®œ•Œ¶U ÿ•\؇®”®…®¸•d©‘ OK-
©M Ï q¡n§@ _ q ¤°] q¡nøÔæ‹•\؇°^
±z•i•H q L¶¨ • Ï q¡n®”ºÙ±x±zß— O§F™ qµ¸©Œ¶± ’-¶ •\؇æA•Œ©Û
¶b•d©‘ OK §Ë¶°§U®œ•Œ•d©‘ OK ºv –©Œø˝ºv±a-
n¶¨ • MULTI AUDIO LD°]¶h µ¡nºv –°^§W™ Ï q¡nÆ…
MULTI AUDIO •d©‘ OK •Œ LD ™ q¡nø˝©Ûº“¿¿¡n D§W-º©Ò MULTI
AUDIO •d©‘ OK •Œ LD Æ…°Mºv –昶¤ øÈ•X•H•fl È¡nø˝ªs©Ûº X¡n D§W
™ ¶Ò´µ¡n µ- n¶¨ • q¡n°M –®œ•Œ q¡nøÔæ‹•\؇-±z•i•H¬ ʶaøÔæ‹ø˝¶
q¡n™ º“¿¿¡n D-
1 ´ˆ¿£ VOCAL ¡‰•H®œ SELECT ¡‰´¸•‹øOµo´G-
2 §œ¥_´ˆ¿£ªª±±æ ™ SELECT ¡‰™ ®Ï •®Ï q¡n¨ §Ó-
®C´ˆ§@¶ °Mø ı§W™ „•‹¶r ´K´ˆ ”§U¶C ß«ßÔ ‹°G
VOCAL 2VOCAL 1 VOCAL 3
„•‹¶r øÈ•X¡n µ Oø˝©Û
VOCAL 1 •kº“¿¿¡n D
VOCAL 2 •™º“¿¿¡n D
z
• ̱z±Nø˝ºvæ˜ s±µ®Ïºv –æ˜
§W™ LINE IN øȧJ¥°§’® ±N
ºv –æ˜ ]©w©Û u ÙøȧJ§Ë¶°
°] —¨› ƒ 41 ™ °ß®œ•Œª ßU
À mº ©Ò•d©‘ OK°®°^Æ…°M±z
¡ŸØ‡®œ•Œ q¡nøÔæ‹•\؇º ©Ò
•d©‘ OK ø˝ºv±a-
µ˘
• ¨Y®« VIDEO CD §W™ Ï q¡n
ø˝©Û•™¡n D§W- Yº ©Ò o ÿ
ºv –°Mºv –昶PÆ…øÈ•X q¡n
©M¶Ò´µ¡n µ- n »¶¨ •¶Ò´µ
¡n µÆ…°M –®œ•Œ AUDIO
MONITOR ¡‰®”øÔæ‹
°ß2/R°®°] —æ\ ƒ 32 ™
°ß®œ•Œ¡n µ±±®Ó•\؇°®°^-
VOCAL 3 •kº“¿¿¡n D°]º X¡n D´h Oø˝•fl È¡n¡n µ°^
̶¨ ••d©‘ OK •Œ CD°NVIDEO CD ©Œø˝ºv±a§W™ Ï q¡nÆ…
¶b•d©‘ OK §Ë¶°°] s±µµ¤ ¡ßJ Æ…°^º ©Ò•d©‘ OK •Œ CD°N VIDEO CD
©Œ®œ•Œ LINE IN ¥°§’º ©Ò•d©‘ OK •Œø˝ºv±aÆ…°Mºv –昶¤ øÈ•Xø˝©Û•™¡n
D§W™ ¶Ò´µ¡n µ- n¶¨ • q¡nÆ…°M –®œ•Œ q¡nøÔæ‹•\؇¶PÆ…øÈ•Xø˝©Û•t§@ ”
¡n D§W™ Ï q¡n-
1 ´ˆ¿£ VOCAL ¡‰•H®œ SELECT ¡‰´¸•‹øOµo´G-
2 §œ¥_´ˆ¿£ SELECT ¡‰•HøÔæ‹ n®œ•Œ™ ¡n µ-
®C´ˆ§@¶ °Mø ı§W™ „•‹¶r ´K´ˆ ”§U¶C ß«ßÔ ‹°G
VOCAL 2VOCAL 1
„•‹¶r øÈ•X
VOCAL 1 q¡nßY¶Ò´µ µº÷
VOCAL 2 •fl È¡n
°]•™¥ ¡næ º ©Ò•X¶Ò´µ¡n µ°M•k¥ ¡næ º ©Ò
•X Ï q¡n°^
36
-C¡c
n®˙ƯßU ¤øÔæ‹•\؇ƅ
´ˆ¿£ VOCAL ¡‰•H®œ SELECT ¡‰™ ´¸•‹øO•˙ ¿-¶ Æ…ø ı§W±N•X
{°ßVOCALSEL OFF°®-
®‰•Læfiß@™k
MDP-V9K.3-856-640-13 (E, C1, C2)
Page 78

ßÔ ‹¶Ò´µ µ ’°] µ ’±±®Ó•\؇°^
±z•i•Hß‚¶Ò´µ µ ’ ’æ„®ÏæA¶X±z™ ¡n µ™ µ •-
§œ¥_´ˆ¿£ n UP ©Œ ˜ DOWN ¡‰°M•H߉•XæA¶X±z™ ¡n µ™ µ •-
n.. ´ˆ¿£
¥£™µ’ n UP ¡‰
KARAOKE STAR
KEY CONTROL
z
• ¶b•d©‘ OK §Ë¶°§U°M ̺ ©Ò¶b
q¶±µ ßÙ¶¤ º» ±Æ…°Mµ’|
¶¤ ™¶^ϵ’-Y¶¤ º»±
•\؇ Q®˙Ư°M µ ’¶b q¶±µ ßÙ
Æ…§£ |ßÔ ‹-¶˝¶b ʶ±§œ¥_§Ë
¶°§U i¶Êº ©ÒÆ…°MßY®œ®˙Ư§F
¶¤ º» ±•\؇°M¶b q¶±µ ßÙÆ…
µ’§]|™¶^ϵ’-
• ±z¡ŸØ‡ q L•d©‘ OK ¡ßJ ’
æ„ µ ’°] —¨› ƒ 40 ™ ®œ•Œ
•t ‚™ •d©‘ OK •Œ ¡ßJ °^ -
• ±z¡ŸØ‡¶b´D•d©‘ OK §Ë¶°°]•º
s±µ ¡ßJ Æ…°^§U®œ•Œ µ ’±±
®Ó•\؇-
µ˘
• ̱z®œ•Œ KARAOKE STAR
Æ…°MECHO LEVEL ±±®Óæ ¿
]¨ æA©y™ q• -¶p ”±±®Óæ
]¨ MIN°M´h•d©‘ OK q¨P
•\؇§£ _ß@•Œ-
ßCµ’ ˜ DOWN ¡‰
´Ï¥_ Ï®”™ µ ’ N NATURAL ¡‰
µ ’•i ’愶‹ 17 ” µ •°]§Òϵ’™™ 8 ” µ •°M§Ò Ï µ ’ßC™ 8 ”
µ •§Œ Ï µ ’°^§§™ §@”µ•§W-±z™ ]©wµuº»•X {¶bø ı§W-¶b•d©‘ OK
§Ë¶°°] s±µµ¤ ¡ßJ Æ…°^©Œ®œ•Œ LINE IN ¥°§’Æ…°Mµ’‹§°]µ•°^|„
•‹¶b´e ±™O „•‹´Ã§W -
KEY +3
˜ n
SIDE ALD
Key change (in steps)
µ ’ ‹§ °] µø”°^
12345678 9
12345678 9
10
12
11
10
1/L2/R
®œ±z™ q¡nßÛ•[¬ ¥I¶h±m°]•d©‘ OK q¨P•\؇°^
¶p™G±zƒ±±o±z™ q¡nØ •F `´ °M´h –®œ•Œ•d©‘ OK q¨P•\؇-
´ˆ¿£ KARAOKE STAR ¡‰°Mºv –昧W™ KARAOKE STAR ¡‰µo´G°] Ò
¶‚°^°M°ßK. STAR 1°®•X {¶bø ´Ã ı§W- µ Tƃ™G q• ™ ™Ï©l » ˚ßC-
K. STAR 1
¶p nºW§j µ Tƃ™G q• °M –¶A´ˆ KARAOKE STAR ¡‰-ºv –昧W™
KARAOKE STAR ´¸•‹øO¡‰µo´G°]æ̶‚°^°M® •B°ßK. STAR 2°®•X {¶bø
ı§W°M µ Tƃ™G q• ‹ ™-
®C´ˆ¿£ ”¡‰§@¶ °Mø ı´¸•‹ßÔ ‹¶p§U°G
K. STAR 2K. STAR 1 K. STAR OFF
n®˙Ư•d©‘ OK q¨P•\؇
´ˆ¿£ KARAOKE STAR ¡‰°MKARAOKE STAR ´¸•‹øO¡‰ßY ¿-
®‰•Læfiß@™k
MDP-V9K.3-856-640-13 (E, C1, C2)
37
-C¡c
Page 79

®œ•Œ•d©‘ OK •\؇°]±µ§W °^
EFFECT MODE
EFFECT EXECUTE
¨ q ¤™Ã ™¥x
•ªºv –æ˜Ø‡¨ q¶±™Ã ™¥x®œ•d©‘ OK ÆTº÷¨°º‚ _®”- ¶ •\؇ »æA•Œ©Û
•d©‘ OK §Ë¶°-
øÔ拶¤ ™¥x•\؇
ºv –昶b¶U¶±™ }©l©Mµ ßÙÆ…¶¤ ™¥x°]®œ•Œ 2.0 ™© VIDEO CD i¶Ê
PBC º ©ÒÆ… £•~°^-±z؇øÔæ‹®‚ ÿ ™¥x§Ë¶°§ß§@-
´ˆ¿£ªª±±æ §W™ EFFECT MODE ¡‰©Œºv –昧W™ AUTO EFFECT ¡‰
®œ AUTO EFFECT ¡‰´¸•‹øOµo´G- ®C´ˆ¿£§@¶ ¶ ¡‰°Mø ı „•‹§ ÆeßÔ ‹¶p
§U°G
EFFECT 2EFFECT 1 EFFECT OFF
„•‹¶r øÔæ‹
EFFECT 1 » ™¥x
EFFECT 2 ™¥x¶X w©I
EFFECT OFF ®˙Ư ™¥x°]´¸•‹øO ¿°^
§‚ ™¥x
±z•i•H¶b Q¨ q ¤™Ã ™¥xÆ… ™¥x ´ˆ¿£ªª±±æ §W™ EFFECT EXECUTE ¡‰-
®C´ˆ¿£§@¶ EFFECT EXECUTE ¡‰°M§£ fi¨Oß_øÔ拶¤ ™¥xƃ™G°Mºv
–昺 •X¥x¡n©M w©I¡n -§‚ ™¥xÆ…°Mºv –昴ˆ ”¶¤ µ Tƃ™G ™¥x ]©w
º •X¥x¡n - ̶¤ µ Tƃ™G ™¥x ]©w©Û EFFECT 1 Æ…°M•ªæ˜ »º •X°ß¥x
¡n°®°F ̶¤ µ Tƃ™G ™¥x ]©w©Û EFFECT 2 ©Œ EFFECT OFF Æ…°M•ªæ˜
º •X°ß¥x¡n©M w©I¡n°®-
z
• ßY®œ¶b´D•d©‘ OK §Ë¶°§U°M±z
§]•i®œ•Œ ™¥x•\؇-
µ˘
• ¶bº ©Ò¥x¡nÆ…°MEFFECT
EXECUTE ¡‰§£ _ß@•Œ-¶p n
®œ•Œ¶ ¡‰°M –¶b ™¥xµ ßÙ§ß
´·´ˆ¿£§ß-
• ¶b®œ•Œ LINE IN º ©Ò•d©‘
OK Æ…°M »•i®œ•Œ§‚ ™¥x•\
؇-
• ¶b 2.0 ™© VIDEO CD §W®œ•Œ
PBC •\؇ƅ°M±zµL™k®œ•Œ ™
¥x•\؇-¶p™G n®œ•Œ ™¥x•\
؇°M –•˝´ˆ-p STOP ¡‰ ±§Ó
º ©Ò°MµM´·¶A´ˆ PBC°] ON/
OFF°^¡‰®œ•ªæ˜§W™ PBC
ON/OFF ¡‰´¸•‹øO ¿-
38
-C¡c
®‰•Læfiß@™k
MDP-V9K.3-856-640-13 (E, C1, C2)
Page 80

n•H Ï q¡nª ßU±z™ q ¤Æ…°]ßU ¤•\؇°^
¶b q ¤Æ… Yß— O qµ¸©Œ¶± ’°M•i ˝ Ï q¡n±µ ¤§U•h-º©Ò MULTI
AUDIO ºv –©Œ µ¡n¶h Ù «øȺv –©Œø˝ºv±aÆ…°M؇®œ•Œ¶ •\؇-
´ˆ¿£ VOCAL SUPPORT ¡‰•H®œºv –昙 VOCAL SUPPORT ¡‰´¸•‹
øO•˙´G _-
ø ı§Wµuº»•X {°ßSUPPORT°®-
´h ̱z Ôµ¤ ¡ßJ q ¤Æ…°M ¤æ˜ |º •X¶Ò´µ¡n µ°M¶” ̱z ±§Ó q ¤
Æ…°M ¤æ˜´hº •X q§‚™ Ï q¡n-
KARAOKE PON
VOCAL SUPPORT
z
• •HßU ¤•\؇°M´h±z؇©M¶¤§v i¶Ê
®‚§H Ô ¤-•ÁßY±z ¤®k¡n°]©Œ§k
¡n °§¿°^°M¶” ̱z ¤ß Æ…°M Ô§Ë
´K±µ§U•h ¤-
• ßY®œ¶b´D•d©‘ OK t ¤°]§£ s±µ
¡ßJ °^Æ…§]؇®œ•Œ•d©‘ OK
PON°] Ï ¤¡n q ’±±°^•\؇-
n — £ßU ¤•\؇ƅ
¶A´ˆ§@¶ VOCAL SUPPORT ¡‰•H®œºv –昙 VOCAL SUPPORT ¡‰
§ß´¸•‹øO•˙ ¿-
¶ Æ…ø ı•X {µuº»™ °ßSUPPORT OFF°®-
n•H´D•d©‘ OK •Œ –§˘ i¶Ê•d©‘ OK §ß t ¤Æ…°] Ï ¤¡n q ’
±±•\؇°^
•u n¨O•H•fl È¡nø˝ µ™ ºv –°M´hßY®œ ”ºv –´D¨ •d©‘ OK t ¤•Œ™ ºv
–°M§]؇ i¶Ê•d©‘ OK §ßt¤-
´ˆ¿£ KARAOKE PON ¡‰•H•¥ } KARAOKE PON •\؇ø ı§W±N•X {°ßKARAOKE PON°®-
¶ Æ… q§‚™ q¡n | Q ßC§U®”-
n—£Ï¤¡nq’±±•\؇ƅ
¶A´ˆ§@¶ KARAOKE PON ¡‰•H ˆ ¨ KARAOKE PON •\؇-
¶ Æ…ø ı•X {µuº»™ °ßK. PON OFF°®-
µ˘
• ¶b´D•d©‘ OK t ¤°]§£ s±µ ¡ßJ
°^Æ…°M§£Ø‡®œ•ŒßU ¤•\؇ -
• •u ̺ ©Ò•H•fl È¡nƒÈ µ™ ºv –Æ…
§~؇®œ•Œ Ï ¤¡n q ’±±•\؇-®œ
•Œ Ê¡n Dºv –Æ…°M¶Ò´µ¡n µ§] |
¶PÆ… Q ßC µ q-
• •H Ï ¤¡n q ’±±•\؇§£Ø‡ß •˛Æ¯
£ q¡n °§¿™ ¡n µ-ßY®œº ©Ò•fl
È¡n™ ºv –°M Y¡n µ±q§§§fl æÆt
•X®”°M ”¡n µ§ß q• §£Ø‡ Qß •˛
ßC§U®”-
• ®œ•Œ Ï ¤¡n q ’±±•\؇ƅ°M•fl È
¡nƃ™G | ßC -
®‰•Læfiß@™k
39
-C¡c
MDP-V9K.3-856-640-13 (E, C1, C2)
Page 81

®œ•Œ•d©‘ OK •\؇°]±µ§W °^
®œ•Œ•t ‚™ •d©‘ OK •Œ ¡ßJ
ß‚•d©‘ OK •Œ ¡ßJ °] F-KM1°M´D™˛ƒ›°^™ ±±®Ó¥°¿Y¥°±µ¶‹ºv –昙
CONTROL ¥°§’§W°M´K؇ q L ¡ßJ ±±®Óø˝ºvæ˜-
n§œ¥_ q ¤Æ…
±z•i•H®œ•Œ ¡ßJ §W™ REPEAT ¡‰™ ¶^®Ï§@§‰ q¶±™ •Ù§@¶Ï m-´ˆ¶Ì
REPEAT ¡‰® ¶b©“ª›¶Ï m±N®‰©Ò }-º ©ÒßY±q´ˆ¡‰©Ò }™ ¶Ï mƒ~ƒÚ¶A¶ i
¶Ê-
z
• ®œ•Œ®‚¬˘ ¡ßJ Æ…°M§œ¥_ q
¤©M µ ’±±®Óæfiß@ »Ø‡•— s
±µ©Û CONTROL°]MIC 1/
2°^¥°§’§W™ ¡ßJ i¶Ê-
µ˘
• MIC 1 LEVEL ©Œ°]MIC 2
LEVEL°^±±®Óæ ¶PÆ… ’ `´e
±™O©M´· ±™O MIC 1°]©Œ
MIC 2°^¥°§’™ µ q q•-
n®œ•Œ µ ’±±®Ó
´ˆ¿£ ¡ßJ §W™ KEY CONTROL n/˜ ¡‰Ø‡ßÔ ‹¶Ò´µ µ ’-¶ ¡‰ªPºv
–昩Œªª±±æ §W™ KEY CONTROL ¡‰™ •\؇¨¤¶P°] —¨› ƒ 37 ™ßÔ‹
¶Ò´µ µ ’°^ -
REPEAT
ON/OFF
KEY CONTROL n/˜
Control plug
±±®Ó•Œ¥°¿Y
¶‹ CONTROL (MIC 1/2) ¥°§’
¶‹ MIC 1 ©Œ MIC 2 ¥°§’
¡ßJ ¥°¿Y
MIC plug
®œ•Œ¨ı•~ u ¡ßJ ®t Œ°]´D™˛ƒ›°^
q L±N¨ı•~ u±µ¶¨æ˜±µ¶‹•ªæ˜§W™ MIC ¥°§’°M±z•i®œ•Œ¨ı•~ u ¡ßJ
-
IFM-V55K/V50K
1 ±N¨ı•~ u±µ¶¨æ˜ s±µ®Ï MIC 1/2 ¥°§’-
¥°¿Y¬‡±µæ
Plug adaptor
(supplied with IFM-V55/V50K)
°]IFM-V55K/V50K ´¨™˛ƒ›°^
¶‹ MIC ¥°§’
to MIC jack
¶‹ MIC ¥°§’
to MIC jack
40
-C¡c
®‰•Læfiß@™k
Infrared receiver
¨ı•~ u±µ¶¨æ˜
Infrared sensors
¨ı•~u«Pæ
Cordless microphone
µL u ¡ßJ
TO AN-IFS
OUTPUT LEVEL OUTPUT DC IN 9V
1234
MIC
LINE
Infrared cordless
¨ı•~µL u ¡ßJ ®t Œ
microphone system
°]IFM-V55K/V50K°^
(IFM-V55/V50K)
2 ±N¨ı•~ u±µ¶¨æ˜™ OUTPUT LEVEL øÔæ‹æ ]©Û MIC-
OUTPUT LEVEL
LINE MIC
MDP-V9K.3-856-640-13 (E, C1, C2)
Page 82

z
• ®œ•Œ LINE IN ¥°§’Æ…°MßY®œ
•º s±µ ¡ßJ -ºv –昧] |
¶¤ øÈ•X•™¡n D™ ¡n µ-
n¶¨ ••k¡n D™ ¡n µ©Œ•H•fl
È¡n¶¨ •®‚ ”¡n D™ ¡n µ
Æ…°M –®œ•Œ q¡nøÔæ‹•\؇-q
¡nøÔæ‹æfiß@ªP CD ™ ¨¤¶P
°]VOCAL 1 §Œ VOCAL
2°^- ‘®£ ƒ 36 ™©MÏq
¡n§@_q¤-
• ®œ•Œ LINE IN Æ…°M »Ø‡®œ•Œ
§‚ ™¥x•\؇-
IFM-V1K
±N¨ı•~ u±µ¶¨æ˜ s±µ¶‹ MIC 1/2 ¥°§’-
Plug adaptor
¥°¿Y¬‡±µæ
(supplied with IFM-V1K)
Cordless
microphone
µL uªª±±æ
°]IFM-V1K ´¨™˛ƒ›°^
to MIC jack
¶‹ MIC ¥°§’
Note
• ®œ•Œ q L LINE IN ¥°§’ s±µ
™ ø˝ºv昵•ª ßU À mº ©Ò•d
©‘ OK Æ…°G
– ©l ´O´˘ºv –æ˜ q ©Û±µ
q™¨ A-
– ´ˆ¿£ p STOP ¡‰ ±§Óº ©Ò
ºv –-º ©Òºv –Æ…°MLINE
IN ¡‰§£Ø‡®œ•Œ-
Infrared receiver
¨ı•~ u±µ¶¨æ˜
Infrared cordless
¨ı•~ uµL u ¡ßJ ®t Œ
microphone system
°]IFM-V1K°^
(IFM-V1K)
®œ•Œª ßU À mº ©Ò•d©‘ OK
±z§]•i•Hß‚ø˝ºv昵•ª ßU À m s±µ®Ïºv –昧W™ LINE IN AUDIO/
VIDEO øȧJ¥°§’®”®…®¸•d©‘ OK- oÆ…¶PºÀ•i•H æfiß@ºv –§@Øήœ•Œ q¡n
øÔæ‹°N µ ’±±®Ó°N ™¥x°N•d©‘ OK q¨P°NßU ¤§Œ Ï ¤¡n q ’±±µ••d©‘ OK
•Œ•\؇-
1 ß‚ø˝ºvæ˜ s±µ®Ï´· ±™O™ LINE IN AUDIO/VIDEO øȧJ¥°§’-
2 ´ˆ¿£ºv –昧W™ LINE IN ¡‰-
ºv –昧W™ LINE IN ¡‰´¸•‹øOµo´G-
Yºv –•ø¶bº ©Ò§§°M´ˆ¿£ p STOP ¡‰ ±§Óº ©Ò -
oÆ…ßY•i•Œø˝ºv±a®…®¸•d©‘ OK º©Ò-
n¶^®Ïºv –º ©ÒÆ…°M´ˆ¿£ · SELECT/PLAY ¡‰-
VIDEO
L
AUDIO
R
LINE IN
ø˝ºvæ˜
VCR
VMC-810 Audio/Video Cable (not supplied)
VMC-810 µ°˛µ¯¿W q l u°]´D™˛ƒ›°^
®‰•Læfiß@™k
41
-C¡c
MDP-V9K.3-856-640-13 (E, C1, C2)
Page 83

®‰•L Í T
¨GªŸ± £
q
•d©‘ OK
º©Ò
ºx™¨
®S¶ ®— q
¡ßJ ®S¶ ¡n µ «•X
¡n µ•¢Øu
µo•ÕºS•s
KARAOKE STAR •\؇§£§uß@
º ©Ò§£ }©l i¶Ê
º ©Ò¶b®C ” `°˛ yµ ßÙÆ… ±§Ó
®œ•Œ VIDEO CD Æ… µ•ÿ™Ì§£•X {
—®M§Ë™k
• ®cæa s±µ•Ê¨y q u -
• ±µ q ¡ßJ q -
• ’§jºv –昧W™ MIC LEVEL 1 ©Œ 2 ±±®Ó±¤Ø -
• ß‚ºv –æ˜ I ±™ ATT } ˆ ]©w©Û ON-
• ª ¬˜¥ ¡næ ®œ•Œ ¡ßJ -
• ßCµq-
• ßC ¡ßJ µ q©Œ¶^¡n q• -
• ±N ECHO LEVEL ]©ÛæA Ì¶Ï m - Y ECHO LEVEL Q ]©Û MIN°M
KARAOKE STAR •\؇´h§£§uß@-
• •ø T À§Jºv –-º ©Ò CD°N VIDEO CD ©ŒÊ± LD Æ…°Mº– ± ±¿ ¥¬§W©Ò
m-
• øÔæ‹ø˝¶ ´H ™ – ±-
• Y昧 µo•Õ¿„Æ æƵ °M –µ•§W§@ ”§pÆ…•™•k¶A®œ•Œºv –æ˜-
• Mº‰ºv –-
• ´ˆ¿£ AUTO PAUSE ¡‰ ¿ºv –昧W™ AUTO PAUSE ¡‰´¸•‹øO-
• –®œ•Œ±a PBC •\؇™ VIDEO CD°]2.0 ™© VIDEO CD°^-
• ´ˆ¿£ p STOP ¡‰ ±§Óº ©Òºv –´·°M´ˆ¿£ PBC°]ON/OFF°^¡‰®œºv –æ˜
§W™ PBC ON/OFF ¡‰´¸•‹øOµo´G´ˆ¿£ · SELECT/PLAY ¡‰ „•‹•X µ•ÿ™Ì -
œ
¡n µ
®‰•L
®S¶ œ °M¶˝°ß(°®¬I´G¶b´e ±
™O „•‹´Ã§W
œ Ë qÆt
± ¥yºv –Æ…¶ •i®£æ µ
¿R§Ó¥V•\؇§£§uß@
®S¶ ¡n µ
ªª±±æ §£§uß@
• •ø T s±µ qµ¯æ˜-
• ±µ q qµ¯æ˜ q ® ±N qµ¯æ˜§W™ øȧJøÔæ‹æ ]©w©Û°ßµ¯¿W°®-
• •ø T s±µ qµ¯æ˜-
• Mº‰ºv –-
• ± ¥yºv –Æ…¡ ßK§£§F¨Y ÿµ{´ ™ •i®£æ µ©Mß›ÆÃ-
• –®œ•Œ CAV LD ©Œ VIDEO CD¿R§Ó¥V§£§uß@©Û CLV LD-
• •ø T s±µ qµ¯æ˜©Œ©Ò§jæ -
• ’§j qµ¯æ˜©Œ©Ò§jæ §W™ µ q-
• ±µ q©Ò§jæ q ® ±NøȧJøÔæ‹æ ]©w©Û°ßCD°®©Œ°ßAUX°®-
• ´ˆ¿£ · SELECT/PLAY ¡‰-º» ±™¨ A§U®S¶ ¡n µøÈ•X-
• ±µ qºv –æ˜ q -
• ß‚ªª±±æ Ô¶Vºv –昧W™ ªª±± P¿ æ-
• æ }ªª±±æ §Œ®‰ P¿ æ §ß °™ ªŸ ™™´-
• •ø T À§J q¶¿ -
• Y q¶¿Æz§F°M –•Œ s q¶¿ßÛ¥´®‚ ` q¶¿-
42
-C¡c
®‰•L Í T
MDP-V9K.3-856-640-13 (E, C1, C2)
Page 84

WÆÊ
®t Œ
´¨¶°
VIDEO CD/CD/LD ºv –æ˜
´H ™®˙
•˙´H °] pÆg•˙ u§œÆg°^
´H ®Ó¶°®t Œ
EIA º– «°M NTSC ±m¶‚®t Œ
CCIR º– «°MPAL ±m¶‚®t Œ°] »
©Û VIDEO CD°^
º ©ÒÆ… °
—¨› ƒ 44 ™ •˙´H ºv –
¡ßJ øÈ•X
12 mW°]8£[°^
LINE IN
VIDEO øȧJ°M µ¿W´¨¥°§’°]1°^
øȧJ´H °G1Vp-p°M75£[°M´D•
ø °M t¶P®B
AUDIO øȧJ°M µ¿W´¨¥°§’°]2°^
•fl È¡n L, R
çjøȧJ q• °G200 mVrms
°]–20 dB°^
øȧJ™˝ß‹°G§j©Û 47 k£[
MIC 1/2 ¥°§’
º– «¥°§’
1 mV°]™˝ß‹ßC©Û 1 k£[°^
º X µ¿W WÆÊ
´Hæ §Ò
§j©Û 115 dB°]EIAJ°^*
AdÚ
§j©Û 99 dB°]EIAJ°^
ß›Æà v
ßC©Û•i¥˙¨… »°]±0.001% Æp
»°^°]EIAJ°^
µ¯¿W WÆÊ
§Ù• µ¯¿W M¥ ´
425 ¶Ê°]LD°^
´Hæ §Ò
§j©Û 50 dB
* Æ⁄æ⁄ EIAJ°]§È•ª qÆ §u ~®Û |°^º– «¥˙ q
™-
øȧJ§ŒøÈ•X
LINE OUT 1, 2
VIDEO øÈ•X°M µ¿W´¨¥°§’°]1°^
øÈ•X´H °G1 Vp-p°M 75£[°M´D•
ø
AUDIO øÈ•X°M µ¿W´¨¥°§’°]2°^
•fl È¡n L°MR
º“¿¿°G200 mVrms
°]1kHz°M 40% ’®Ó°^
º X°G200 mVrms
°]1kHz°M –20dB°^
æ„ È
q
110–240 V AC, 50/60 Hz
ؔqq
45 W
§uß@ ´
5°C–35°C
¿Ù “¿„´
5%–90 %
§ÿ§o
¨˘ 430°—127.5°—413.5 mm
°]ºe°— ™°—™¯°^
•]¨A¨ •X °§¿©M±±®Óæ
´q
¨˘ 6.8 kg
™˛ƒ›´~
ªª±±æ RMT-M45A°]1°^
R6°]AA ´¨°^ q¶¿°]2°^
µ°˛µ¯¿Wqlu
°] µ¿W´¨¥°¿Y 3 ˜ µ¿W´¨¥°¿Y 3°^
°]1°^
•Ê¨y¥°¿Y¬‡±µæ °]™˛ƒ›©Û ª¥‰æ˜´¨•H•~
™ 昴¨°^°]1°^
‘§l°]4°^
] p§Œ WÆʶp¶ ‹ßÛ°MƧ§£•t¶Ê q
™æ-
S VIDEO OUT 1, 2
´G´ °G1 Vp-p°M75 £[
´D• ø °M t¶P®B
¶‚´ °G 0.286 Vp-p°M75 £[
´D• ø
OPTICAL DIGITAL OUT
–18dBm°M™i™¯ 660nm
Dolby AC-3 RF OUT
µ¿W´¨¥°§’°]1°^
øÈ•X q• °G400 mVp-p
øÈ•X™˝ß‹°G 75£[
®‰•L Í T
43
MDP-V9K.3-856-640-13 (E, C1, C2)
-C¡c
Page 85

•˙´H œ –
MDP-V9K ؇º ©Ò {¶b•´ ‚™ •˙´H ºv –®—ÆaÆxÆTº÷§ß•Œ°G pÆgºv –
°] LD°^§Œ S¨ ´¨ºv µ –°]CD §Œ VIDEO CD°^-§U™Ì¶C•X•ªæ˜•Œ™ •˙ – ˛
´¨*-
•˙–ÿ˛
pÆgºv –
•Œ©Û qºv µe
§˘°N qº@°N µº÷
|§Œ•d©‘ OK
S¨ ´¨ºv µ –
•Œ©Û µº÷°N q
ºv°N µe§˘°N•d
©‘ OK §Œ ”§˘
•˙ –º–ªx
E
•˙ –´¨¶°
LD (NTSC)
8-inch LD
(NTSC)
12-inch LD
(NTSC)
榱 CD
CD
VIDEO CD
(NTSC
§Œ PAL)
µ¡n¶h Ù «øȺv –
§ÿ§o
8 in. (20 cm)
8 in. (20 cm)
12 in. (30 cm)
3 in. (8 cm)
5 in. (12 cm)
3 in. (8 cm)
5 in. (12 cm)
* MDP-V9K §£Ø‡º ©Ò§W™Ì©“•‹•˙ –•H•~™ •˙ –-
º©Ò±
ʱ
¬˘ ±
¬˘ ±
ʱ
ʱ
ʱ
ʱ
º ©ÒÆ… °
CAV
CLV
CAV
CLV
CAV
CLV
20 §¿ƒ¡°] »±a µ¿W´H °^
74 §¿ƒ¡°] »±a µ¿W´H °^
14 §¿ƒ¡
20 §¿ƒ¡
28 §¿ƒ¡
40 §¿ƒ¡
1 §pÆ…
2 §pÆ…
20 §¿ƒ¡
74 §¿ƒ¡
F
‰
±a o®«º–ªx™ ºv –§ßº“¿¿ y Ò©Mº X y Ò§¿¬˜°M¶”•B |¶]§ Æe§£¶P¶”
ß-
•ªºv –æ˜æA¶X™ VIDEO CD º– «
•ªºv –æ˜æA¿ VIDEO CD ™ 1.0°N1.1 ™©©M 2.0 ™©™ WÆÊ- Y®œ•Œ 2.0
™© VIDEO CD°M £ µe§Œ¡n µ™ •ø±`º ©Ò•~°M¡Ÿ•i®œ•Œº ©Ò±±®Ó°]PBC°^
•\؇§Œ ™¬A©˙´ ¿R •\؇°]2.0 ™© VIDEO CD WÆÊ™ s•[ °§¿°^-
æA•Œ©Ûߢ§Ò¿Ù¬ ¡n AC-3 ®t Œ™ ºv –
øÔ拺“¿¿ µ¿WÆ…°M®œ•Œ o ÿºv –°Mºv –æ˜ »øÈ•X•™ º¡n D™ ´H °] Ê
¡n D°^°M¶”•k º¡n DµL¡n µøÈ•X-¶]¶ °M±z§£Ø‡•Œ µ¿W ±±•\؇ßÛ¥´º“¿¿ µ
¿W™ •™ º©M•k º¡n D -
44
-C¡c
®‰•L Í T
MDP-V9K.3-856-640-13 (E, C1, C2)
Page 86

•˙ –™ ´Oæi
CD •˙ –™ Æ ™k
–¶p¥° œ©“•‹°Mß‚ ´¸¨Ô L CD°]•]¨A
VIDEO CD°^§§•°™ §p§’°M•H©Ê´¸©M®‰•L§‚´¸Æ
µ¤ ¤ –µ•™ ‰ t-
LD ºv –™ Æ ™k
Æ LD ºv –Æ…°M –´ˆ ”¥° œ©“•‹°M•Œ®‚§‚Æ
¶Ìºv–‰t-
–™` N±jØP•˙ u
§£•iß‚•˙ –µ•©Ò¶b®¸ ß•˙™ ±µ ”Æg§ß B°M©Œ
¶p xÆ fiµ•ºˆ ™˛™Ò°M§]§£•iß‚•˙ –©Ò¶b ß•˙©
§U™ ®T®Æ ðM¶]¨ ®Æ§ ´ •i؇ •´ §… ™-
Ø l©Œ ‹ßŒ•˙ –
§£Ø‡º ©Ò¶ Ø l©Œ ‹ßŒ™ •˙ –°M§]§£•iº ©Ò
•Œ U؇ ¶µ• …™ •˙ –-
¶p¶Û´O´˘ºv –µ•™Ì ±™ Mº‰
®œ•Œ§ß´e°M –•H§@ Æ•¨¿ø´¯•˙ –™ ™Ì ±-¿ø
Æ…°M –±q§ ¶V•~¿ø•h-§£•i®œ•Œ¶p¥ßµo© ™oØ °N
™o £•Œµ}ƒ¿ G°N§@ØΕ´±cÊ™ Mº‰æØ°M©Œ LP
´¨¥ qØd¡næ˜ ¤§˘•Œ™ ß‹¿R qºQ ˙æص•¿ø´¯-
¨ ®æ§Ó™g§W¶ º°Mº ©Òß ¶•H´·°M•—ºv –æ˜
î˙•X•˙ –°M©Ò¶^Ø» U ôO fi-
˝§‚´¸¶b•˙ –µ•™Ì ±Ød§U´¸Ø槂´Ø°M©Œ¶b•˙
–µ•™Ì ± KØ»±i°N ¶Ø»µ•™ ‹°M | l À•˙ –µ•™
™Ì ±°M® ßCøÈ•X Ë q-
¶p™G•˙ –§W™˛¶ ¶•ƒ°]©Œ ˛¶¸™´ Ë°^°M –¶b
®œ•Œ•˙ –´e±N®‰M£Æb-
®‰•L Í T
MDP-V9K.3-856-640-13 (E, C1, C2)
45
-C¡c
Page 87

¶U °•Û§Œ±±®Óæ §@ƒ˝
´e ±™O
‘ ”ª°©˙ – —¨›°]°^§ ©“º–•‹§ß -
1
2
3
4
5
6
7
8
9
!º
!¡
!™
!£
!¢
!∞
!§
!¶
!•
!ª
@º
@¡
@™
@£
@¢
@∞
@§
@¶
@•
1 X¡‰ (15) (18) (35)
2 CLEAR°]Ư £°^¡‰ (19) (26) (28) (29) (34) (36)
3 NEXT DISC RESERVE°]§U Lºv – w©w°^¡‰§Œ´¸•‹øO
(34)
4 RESERVE°] sß«°˛ w©w°^¡‰§Œ´¸•‹øO (33) (35)
5 POWER°] q °^ } ˆ§Œ´¸•‹øO (10) (13)
STANDBY°]´›æ˜°^°G¨ı¶‚
ON°] }°^°G ¿
6 n±± P¿ æ (42)
7 ECHO LEVEL°]¶^¡n q• °^±±®Ó±¤Ø (14)
8 MIC LEVEL°] ¡ßJ q• °^1 ©M 2 ±±®Ó±¤Ø (13) (14)
9 MIC°] ¡ßJ °^1, 2 §Œ CONTROL°]±±®Ó°^ (MIC 1/2)
¥°§’ (13)
0 KEY CONTROL ˜ DOWN/NATURAL/n UP°]µ’
±±®Ó ˜°˛•ª¶Ï µ°˛§… n°^´¸•‹øO¡‰ (37)
!¡ AUTO EFFECT°]¶¤ ƃ™G µ°^¡‰§Œ´¸•‹øO (38)
!™ VOCAL/SELECT°] q¡nøÔæ‹°^¡‰§Œ´¸•‹øO (36)
!£ KARAOKE STAR ´¸•‹øO§Œ¡‰ (37)
!¢ VOCAL SUPPORT°]ßU ¤°^´¸•‹øO (39)
!∞ „•‹´Ã (12)
!§ § OPEN/CLOSE°] }¶´ L°˛ ˆ¶´ L°^¡‰ (10) (11) (13)
!¶ SIDE A/B°]A/B ±°^¡‰ (11) (29) (33)
!• · SELECT°]øÔæ‹°˛º ©Ò°^¡‰ (10) (11)
!ª p°] ±§Ó°^¡‰ (11) (12)
@º PHONES°]¶’昰^¥°§’§Œ±±®Ó±¤Ø (11)
@¡ P°]º» ±°^¡‰ (11)
@™ =/+ PREV/NEXT(ACS/AMS)°e´· h°˛´e i°]¶¤
` P¿ °˛¶¤ µº÷ P¿ °^°f¡‰ (11) (15) (20)
@£ RETURN°]™ ¶^°^¡‰ (15) (24)
@¢ PBC ON/OFF°]º ©Ò±±®Ó }°˛ ˆ°^¡‰§Œ´¸•‹øO (15)
(24)
@∞ AUTO PAUSE°]¶¤ º» ±°^¡‰§Œ´¸•‹øO (14)
@§ LINE IN°] u ÙøȧJ°^¡‰§Œ´¸•‹øO (41)
@¶ VIDEO CD PAL OUT°]CD ºv – PAL ´H øÈ•X°^´¸
•‹øO (11)
@• AUTO RESUME°]¶¤ ´Ï¥_°^´¸•‹øO (23)
46
-C¡c
®‰•L Í T
MDP-V9K.3-856-640-13 (E, C1, C2)
Page 88

ªª±±æ
1
2
3
4
5
6
7
8
9
!º
!¡
!™
!£
!¢
!∞
!§
!¶
!•
!ª
@º
@¡
@™
@£
@¢
@∞
@§
@¶
@•
@ª
#º
#¡
#™
1 6 OPEN/CLOSE°] }¶´ L°˛ ˆ¶´ L°^¡‰ (10) (11) (13)
2 ANALOG°]º“¿¿°^°˛´ ¡‰ (32)
3 1/SIDE/ALL°] ʧ@°˛ Ê ±°˛•˛ °°^¡‰ (25) (27) (28)
4 REPEAT°]§œ¥_°^¡‰ (25)
5 SHUFFLE°]•ÙøÔ°^¡‰ (27) (28)
6 PROGRAM/RESERVE°] sß«°˛ w©w°^¡‰ (29)(33)(34)
7 NEXT DISC RESERVE°]§UL¤–w©w°^¡‰ (34)
8 AUTO PAUSE°]¶¤ º» ±°^¡‰ (14)
9 KARAOKE STAR°]•d©‘ OK q¨P°^¡‰ (37)
0 VOCAL SUPPORT°]ßU ¤°^¡‰ (39)
!¡ KARAOKE PON°] Ï ¤¡n q ’±±°^¡‰ (39)
!™ '/7 STILL/STEP°]¿R§Ó°˛ v¥V°^¡‰ (11) (22)
!£ 0/) SCAN °]± ¥y°^¡‰ (11) (20)
!¢ =/+ PREV/NEXT (ACS/AMS)°e´· h°˛´e i°]¶¤
` P¿ °˛¶¤ µº÷ P¿ °^°f¡‰ (11) (15) (20)
!∞ DISC SIDE A/B°]–± A/B°^¡‰ (11) (29) (33)
!§ · SELECT/PLAY°]øÔæ‹°˛º ©Ò°^¡‰ (10) (11)
!¶ AUDIO MONITOR°] µ¿W ±±°^¡‰ (32)
!• FRAME/TIME/SCENE°]¥V°˛Æ… °°˛ ı¥ °^¡‰ (19)
!ª POWER°]q °^}ˆ (10) (13)
@º DISPLAY°] „•‹°^¡‰ (16) (17) (28)
@¡ REPEAT A˜B°]A˜B §œ¥_°^¡‰ (26)
@™ AV TIME°] µµ¯¿WÆ… °°^¡‰ (17)
@£ AUTO PGM°]¶¤ sß«°^¡‰ (30)
@¢ CLEAR°]Ư £°^¡‰ (19) (26) (28) (29) (34) (36)
@∞ X¡‰ (15)(18)(35)
@§ KEY CONTROL°] µ ’±±®Ó°^¡‰ (37)
˜ DOWN°] °^¡‰
N NATURAL°]•ª¶Ï µ°^¡‰
n UP °]§…°^¡‰
@¶ VOCAL/SELECT°] q¡nøÔæ‹°^¡‰ (36)
@• EFFECT MODE/EXECUTE°]ƃ™G µ§Ë¶°°˛º •X°^¡‰ (38)
@ª C/c V. INDEX°]µ¯¿WØ¡§fi°^¡‰ (21)
#º VIDEO CD°]CD ºv –°^¡‰ (15) (24)
MARK°]Æ— ±°^¡‰
M.PLAY°]Æ— ±º ©Ò°^¡‰
RETURN°]™ ¶^°^¡‰
PBC°]º ©Ò±±®Ó°^¡‰
#¡ p STOP°] ±§Ó°^¡‰ (11) (12)
#™ P PAUSE°]º» ±°^¡‰ (11)
•—´ˆ¿£±aæÔ ¿¶‚º– O™ ¡‰±“ ™ •\؇•i•H•—´ˆ¿£¡‰®”®˙Ư-
®‰•L Í T
MDP-V9K.3-856-640-13 (E, C1, C2)
47
-C¡c
Page 89

Nªy
Ø¡§fi
M, N, O
MULTI AUDIO – 36, 39, 44
VIDEO CD
VIDEO CD ¨±aµe´H™S¨
´¨ºv –°M§ ßt•—•@¨… q•Œ™ º X¿£¡Y
ßfi Nº– «—– MPEG 1 ߌ¶°¿£¡Y 120 ø
™ œ Í T -¶]¶ °M§@ L VIDEO CD
؇¿x¶s 74 §¿ƒ¡™¯™ µe -VIDEO CD
§ ¡Ÿ•]ßt¿£¡Y§F™ µ¡n Í T- W•X§H
™ •ƒ± d Ú™ ¡n µ Q¿£¡Y-¶”§H •±o
®Ï™ ¡n µ´h§£ Q¿£¡Y-VIDEO CD ؇
´O¶ ¥ q CD ¤– 6 ø§ß µ¡n Í T -
VIDEO CD •Œº– «¶ ®‚ ÿ™©•ª-
1.0 ™©©M 1.1 ™©°G »º ©Ò µe§Œ¡n µ -
2.0 ™©°GºW•[§F•Œ PBC •\؇ i¶ÊøÔæ‹
º ©Ò§Œ ™¬A©˙´ ¿R ™ •\
؇-
•ªºv –æ˜æA•Œ©Û o®‚ ÿ™©•ª W
ÆÊ-
PBC°]º ©Ò±±®Ó°^•\؇
2.0 ™© VIDEO CD ¥£®—™ o§@•\
؇®œ±z؇øÔ拺 ©Òºv –-PBC •\؇±“
Æ…°M PBC ON/OFF ¡‰´¸•‹øO |µo
´G-
•d©‘ OK q¨P•\؇
•ª•\؇ q Lµ ±z™ q¡n K•[§@ ”
ßC¿W¡n•HºW±j±z™ q¡n™ `´-
A
A˜B §œ¥_ 26
ACS/AMS 20
ATT }ˆ 14
B
sß«º ©Ò 29
º©Ò 10
øÔæ‹ 15
´Ï¥_ 23
•ÙøÔ 27
v¥V 28
C
CAV – 11, 19, 22
CD – 18, 36, 44
CLV – 11, 19
D, E
•¥ }ºv –¶´ L 10
Ê ±§œ¥_ 25
ʧ@§œ¥_ 25
qµ¯®Ó¶°øÔæ‹æ 7
q
•Ê¨y¥°¿Y¬‡±µæ 2
±µ q°˛§¡¬_ 10
F
§œ¥_º ©Ò 25
LD ™§@±25
ØS©w °§¿ 26
{¶bº ©Ò™ `°˛ y Ò 25
æ„ Lºv – 25
™˛ƒ›´~°M¿H昮—¿ 5
G, H, I
q¡nøÔæ‹ 36
•˙ –
§¿ ˛ 44
˚@45
•˙ – ˛´¨ 44
y ҥM߉ 18
¨GªŸ± £ 42
J
¿R§Ó¥V 22
P, Q, R
PAL VIDEO CD 11
PBC°]º ©Ò±±®Ó°^ 10, 15
PREV/NEXT 15, 20
S
¡n µ
±a CX ¥Óæ ®t Œ™ 32
º“¿¿ 32
SAP –™ 32
•¢Øu 14
ºX 32
Æ— ± 24
T, U
ı V¥M߉ 20
’æ„
¶Ò´µ µ ’ 37
¶^¡n 14
¡ßJ µ q 14
œ
ß›Æà 14
V, W
VIDEO CD – 10, 15, 44
X
u ÙøȧJ 41
„•‹
´e ±™O 12
Æ… ° 17
qµ¯ø ı§W 16
§U Lºv – w©w 34
Ư¶±•ÙøÔ 28
¥M߉
ß÷ t± ¥y 20
§L `°˛yÒ 20
qL `°˛yÒ X 18
q L¥V°˛Æ… °°˛ ı¥ X 19
q LØ¡§fi X 21
Y
ªª±±æ 5, 42
À§J q¶¿ 5
µ ’±±®Ó 37
Ï ¤¡n q ’±± 39
w©w 23
48
-C¡c
®‰•L Í T
K
•d©‘ OK°Mº ©Ò 13
ßÔ ‹¶Ò´µ µ ’ 37
˝ Ï q¡nßU±z q ¤ 39
®œ•Œª ßU À m 41
®œ•Œ•d©‘ OK •Œ ¡ßJ 40
¶¨ • Ï q¡n 36
øÔ拧U§@§‰ q¶± 32
•Œ´D•d©‘ OK ºv – 39
¶¤ º» ± 14
•d©‘ OK q¨P 37
L
s±µ
¶’æ˜ 11
qµ¯æ˜©Œø˝ºvæ˜ 6
©Ò§jæ 8
¨ı•~µL u ¡ßJ 40
ø˝ºv昶‹ LINE IN ¥°§’ 41
¡ßJ 13
æA•Œ©Ûߢ§Ò¿Ù¬ ¡n®t Œ™ B zæ ©Œ
©Ò§jæ 9
Z
`¥M߉ 18
¥V°˛Æ… °°˛ ı¥ ¥M߉19
¶¤ sß« 30
¶¤ º» ± 14
À– 10
®B iº ©Ò 22
ßU ¤ 39
MDP-V9K.3-856-640-13 (E, C1, C2)
 Loading...