

Page 1

CD CDV LD Player
3-767-581-21(1)
Operating Instructions
MDP-500IA500
01993 by Sony Corporation
Page 2
Owner' Record
For Customers in the USA
The model number is located on the rear panel. The
serial number is located on the top of the front panel.
Record the model number and the serial number in the
space provided below. Refer to them whenever you call
upon your Sony dealer regarding this product.
Model No..
Serial No.
WARNING
To prevent fire or shock hazard, do not expose the unit to rain or moisture.
CAUTION
RISK OF ELECTRIC SHOCK
OO NOT OPEN
CAUTION: TO REDUCE THE RISK OF ELECTRIC SHOCK.
OO NOT REMOVE COVER (OR BACK).
NO USER-SERVICEABLE PARTS INSIDE.
REFER SERVICING TO OUALIFIEO SERVICE PERSONNEL
INFORMATION
You are cautioned that any changes or modifications not
expressly approved in this manual could void your
authority to operate this equipment.
NOTE: This equipment has been tested and found to
comply with the limits for a Class B digital device,
pursuant to Part 15 of the FCC Rules. These limits are
designed to provide reasonable protection against
harmful interference in a residential installation. This
equipment generates, uses, and can radiate radio
frequency energy and, if not installed and used in
accordance with the instructions, may cause harmful
interference to radio communications. However, there is
no guarantee that interference will not occur in a
particular installation. If this equipment does cause
harmful interference to radio or television reception,
which can be determined by turning the equipment off
and on, the user is encouraged to try to correct the
interference by one or more of the following measures:
- Reorient or relocate the receiving antenna.
- Increase the separation between the equipment and
receiver.
- Connect the equipment into an outlet on a circuit
different from that to which the receiver is connected.
- Consult the dealer or an experienced radio/TV
technician for help.
This symbol is intended to alert the user
to the presence of uninsulated
"dangerous voltage" within the product's
enclosure that may be of sufficient
magnitude to constitute a risk of electric
shock to persons.
”rhis symbol is intended to alert the user
to the presence of important operating
and maintenance (servicing) instructions
in the literature accompanying the
appliance.
For detailed safety precautions, see the leaflet
"IMPORTANT SAFEGUARDS".
This CD CDV LD player is classified as a CLASS 1
LASER product.
CAUTION
The use of optical instruments with the product will
increase eye hazard.
As the laser beam used in this videodisc player is
harmful to the eyes, do not attempt to disassemble the
cabinet. Refer servicing to qualified personnel only.
For Customers in CANADA
This apparatus complies with the Class B limits for radio
noise emissions set out in Radio Interference Regulations
I-CAUTION--------------------------------------------
TO PREVENT ELECTRIC SHOCK, DO NOT USE
THIS POLARIZED AC PLUG WITH AN
EXTENSION CORD, RECEPTACLE OR OTHER
OUTLET UNLESS THE BLADES CAN BE FULLY
INSERTED TO PREVENT BLADE EXPOSURE.
Page 3

Table of Contents
About Operating Voltage..................................................................................... 4
Introduction Introduction to Your Player................................................................................. 5
What to Do First................................................................................................... 5
The Principles of Operation................................................................................ 6
Playing Disc T3^es............................................................................................. 7
Installation and Front and Rear Panel Controls and Supplied Accessories................................... 8
Connection Controls on the Remote Commander
How to Cormect the Television..........................................................................11
How to Connect Audio Equipment.....................................................................12
.................................................................
10
To Play a Disc How to Load and Play a Disc
How to Resume Playback—^Auto Resume (only for LDs)...............................16
How to Search for a Particular Point on a Disc
Understanding Displays and Messages When Playing Discs
How to Search by (Zhapter/Track Numbers......................................................18
How to Search by Frame Number or Time—^Frame/Time Search
(only for LDs)....................................................................................................19
How to Play Frame-by-Frame (only for CAV LDs)..........................................20
How to Replay the Same Selections..................................................................21
.............................................................................
..................................................
............................
13
16
17
Additional Information Troubleshooting.........................................................................................................22
Optical Disc Maintenance..................................................................................23
Player Maintenance and Safety..........................................................................23
Glossary.............................................................................................................24
Specifications.....................................................................................................25
Index 26
Page 4

About Operating Voltage-
Before operating the Multi Disc Player, make sure that the operating voltage of your unit is identical with that of your
local power supply.
How to Determine the Correct Operating Voltage
• The MDP-500 operates at 120 V AC 60 Hz only and does not have a voltage selector.
• The MDP-A500 has a voltage selector.
Before operating the unit, find out the local voltage, and if necessary reset the selector at the rear of the Multi Disc
Player to the voltage corresponding to your local power supply (120,220 or 240 volts AC). The voltage selector of this
unit is set to 220 V AC originally. When using in Malaysia, reset the selector to 240 V AC.
To reset the voltage selector, disconnect the power cord and turn the selector with a blade screwdriver so that the
arrow on the rear panel points to the appropriate voltage.
How to Use the AC Plug Adaptor (supplied with the MDP-A500)
• If the AC plug on your MDP-A500 does not fit into the wall outlet, attach the supplied AC plug adaptor.
If you have any questions or problems concerning your unit, please contact your nearest Sony dealer.
Page 5

Introduction
This introduction explains the features and principles of operation of the Multi Disc Player (MDP).
Before operating the unit, please read this manual thoroughly and retain it for future
reference.
Introduction to Your Player-
The Multi Disc Player is capable of playing laser discs (LDs), compact discs (CDs), and
compact disc videos (CDVs). As operating procedures are the same or similar for all
discs, each procedure applies to all disc types.
Differences between models
This manual covers the MDP-5(K) and MDP-A500. Their differences are as follows:
MDP-500
Rear Panel
• S VIDEO OUT output equipped not equipped
• CONTROL S IN input
• Voltage selector not equipped equipped
• AC power cable detachable
Supplied accessories
• AC plug adaptor
The illustrations in this manual are of the MDP-500.
equipped not equipped
not supplied supplied
MDP-A500
not detachable
To Play a Laser Disc (LD), Compact Disc (CD) or Compact
Disc Video (CDV)
With the MDP-500/A500, you can playback both sides of an LD without replacing it and
resume playback from any point on an LD by simply pressing the PLAY (►) button
—^Auto Resume. Also unique to LD play are STILL/STEP for CAV LDs (see page 24) and
FRAME/TIME search.
Most operations for CDs are comparable to those of LDs. The procedures for CLV LDs
and CDs are also for the CDV's video and audio sections respectively. VSDs are CDVs
that have no audio section.
What to Do First-
Once you have read through this page, read "The Principles of Operation" (page 6), then
go ahead and connect up the Multi Disc Player to your television and/or stereo system
using the connection diagrams on pages 11 and 12. You will then be ready to play a disc.
Introduction
Page 6

The Principles of Operation*
The MDP-500/A500 allows you to play discs by simple operation. Although some
hmctions of the player vary depending on what type of (laser disc, compact disc or
compact disc video) you are playing, keep in mind that the majority of the buttons on
the player and Remote Commander have been designed to aclüeve a comparable effect
for each type of disc. The following paragraphs briefly summarize what the basic Multi
Disc Player functions allow you to do.
Primary Functions
include the traditional functions of disc players.
Variabla Spaed Functions let you vary play speed so that you can easily locate ("search") scenes or tracks
as you watch or listen.
Repeatabie Functions
Auxiiiary Functions
Primary
Functions
Variabie
Speed
memory functions that let you repeat playback. Because the player locates a
point on the disc and starts playing according to your request, some repeatable
functions also serve as "search" functions.
additional functions that simply add to what you can do with the Multi Disc
Player.
Repeatabie
Functions
Auxiliary
Functions
Functions
Power
Open/Qose
Play
Pause
Stop
SideA/B
Speed Scan
(SCAN)
Still/Step Scan
(STILL/STEP)
Auto Resume Playback
Chapter/Track Search
(ACS/AMS)
Frame/Time Search
(FRAME/TIME)
Repeat Play
(1/SIDE/ALL,
REPEAT)
Sound Quality Functions;
(AUDIO MONITOR,
ANALOG/CX)
On-Screen Display
(DISPLAY)
Page 7
Playing Disc lypes-----------------------------------------------------------------
The MDP-500/A500 Multi Disc Player integrates the functions of three machines into one: laser disc, compact disc, and
compact disc video player. Below follows an explanation of the kinds of discs the Multi Disc Player can play.
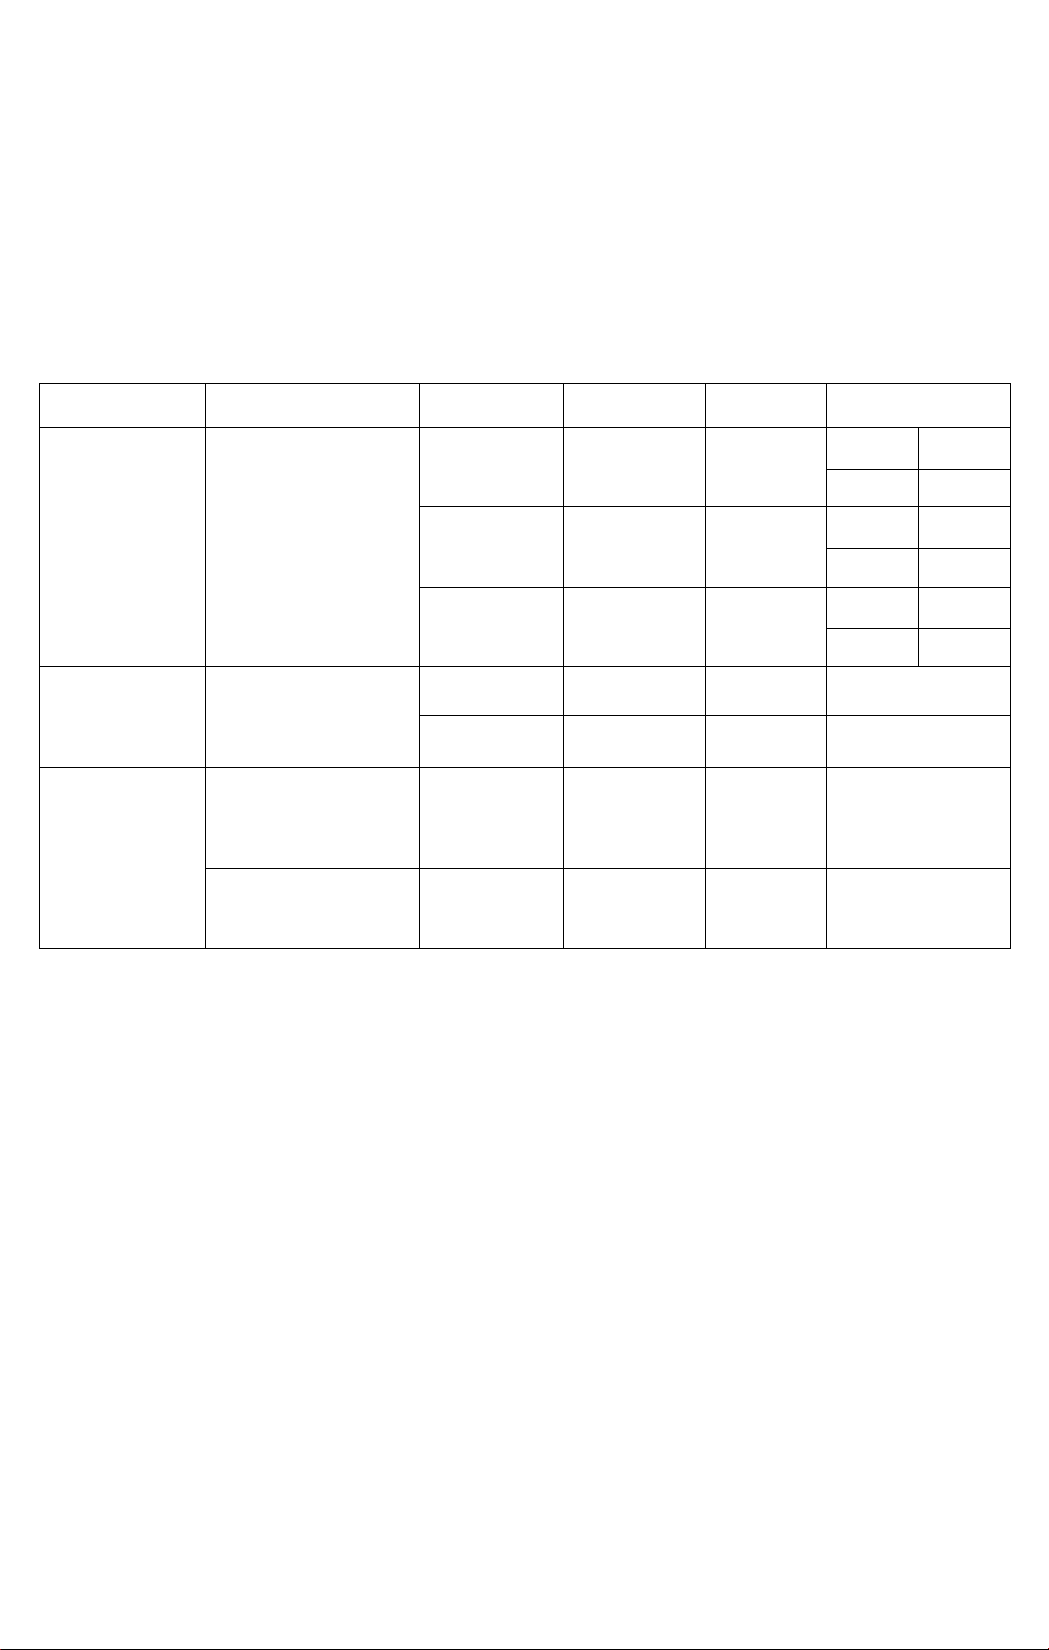
The MDP-500/A500 Plays Three Classes of Optical/Digital Discs*
The MDP-500/A500 Multi Disc Player can play all three types of optical discs currently available for home
entertainment. The following table illustrates ¿heir types and features.
Disc Class
Laser Discs
For movies,
operas, and
concerts
Compact Discs
For music
Compact Disc
Videos
For music videos
and educational
material
(Digital Audio)
Multi Audio Discs
Disc Logo
Zf
LASERDISC
if
L**S*ViSKf>
<aoe>
CD VIDEO
VIDEO A/
SINGLE^y
DISC V
Disc Type
LD Single 8 in. (20 cm)
8-inch LD
12-inch LD
CD Single
CX>
CDV
VSD
Size
8 in. (20 cm)
12 in. (30 cm)
3 in. (8 cm)
5 in. (12 cm)
5 in. (12 cm)
5 in. (12 cm)
Piay Side
Single Side
Double Side
Double Side
Single Side
Single Side
Single Side
Single Side
Piay Time
CAV
CLV
CAV
CLV
CAV
CLV
20 min
74 min
Video+Audio 5 min
Audio 20 min
Video+Audio 5 min
14 min
20 min
28 min
40 min
Ihr
2hr
fi®!» /xtUIJI AUDIO
On laser discs bearing this logo, the analog tracks are recorded in multiplex, and the digital tracks are recorded in stereo.
♦ These apply only to those discs recorded in the NTSC standard. The MDP-500IA500 cannot play CED, VHD discs or PAL video
discs, CD-ROM, CD-GRAPHICS,
CD-I discs, aluminum-lined discs or MD (MiniDisc) discs.
Introduction
Page 8

Installation and Connection
Front and Rear Panel Controls and Supplied Accessories
Front Panel
± OPEN/CLOSE button-,
POWER button— and indicator
ON: Green
OFF:Off(MDP-500)
STANDBY: Red
(MDP-A500)
DiSPLAY button-
Press the button to display
messages on the TV screen.
AUTO RESUiME indicator
Lights up when you can
resume pla>’ing an LD
(see page 16)
r II PAUSE button
■ STOP
button
► PLAY
button
SIDE A/SIDE B buttons
Press to start playing
from the beginning of
side A or B of an LD.
Remote Commander—
sensor
Point the Remote Commander
here to control the player.
Front Cover
Automatically slides down when you press the
OPEN/CLOSE (A) button, and the disc tray
comes out.
SIDE A/SiDE B indicator-
Lights up to indicate the current disc side
• SIDE "A" lights up
- While a disc is loaded and the player stops
- While side A of an LD is played or searched
for
- While a CD or CDV is played
• SIDE "B" lights up while side B of an LD is
played or search^ for
• Both the indicators go off when no disc is
loaded.
-----------------------
Installation and Connection
Chapter/Track number display
Lights up to indicate the current chapter/
track number
Examples:
- " td "appearswhilechapter/track 12
is played.
- " - - " flashes while the player searches
for the beginning of the disc side.
- " 00 " appears white chapter "0"of an
LD is played.
- While the player is stopped, "0"
appears.
- (joes off when no disc is loaded
What is this indication?
fp -) This indication appears while
Jj the LD playing side is changing.
The segments turn clockwise if changing
from side A to B, counterclockwise if
changing from side B to A.
Page 9

Understanding Displays and Messages When Playing Discs-
You can check the player operating status or disc information on the TV screen. Locate
the DISPLAY button on the Remote Commander or the front panel of the player.
To View On-Screen
Information.............
Display for LD
Message 1 (Examples for LD)
Screen Display Current Status of the Player
OPEN Disc tray open
CLOSE Disc tray closed
PLAY PlayinKLD
STOP Operation stopped
PAUSE Operation momentarily stopped
s/e
SEARCH
.
Speed scanning
Searching
DISPLAY
e
(Player) (Remote) messages that appear on the right of the screen.
Press DISPLAY twice.
When pressing DISPLAY once, only the first
line appears. The tables below are keys to the
Display for CD or CDV
Message 1 ■
Elapsed time of current track
Index number
Track number
Playing disc type
Number of tracks and
total playing time**
Selected function
rjl {audio 1 -16 S2:5S I
flEPEAT
Message 1 (Examples for CD or CDV)
Screen Display
OPEN
CLOSE Disc tray closed
PLAY
STOP
PAUSE
@/e
SEARCH
Current Status of the Player
Disc tray open
Playing CD or CDV
Operation stopped
Operation momentarily stopped
Speed scanning
Setnching
Message 2 (Examples for LD)
Screen Display Currently Playing
LDSIDEA
LDSIDEB
1/L
2/R
J> DIGITAL Digital sound
J> ANALOG Analog sound
To Turn Off the Display
Side A of LD
SideBofLD
first soundtrack/left channel
Second soundtrack/right channel
DISPLAY Press DISPLAY again.
P^=i
(Player) (Remote)
• When playing a CAV LD, the current frame number appears. When playing aCLV LD, the total elapsed time appears. CLV LDs
not indicating time data to the second, indicate two-digit numbers such as "22:".
** When playing a CDV,
the number of the track and total playing time of the video section also appair.
To Piava Disc
17
Page 10
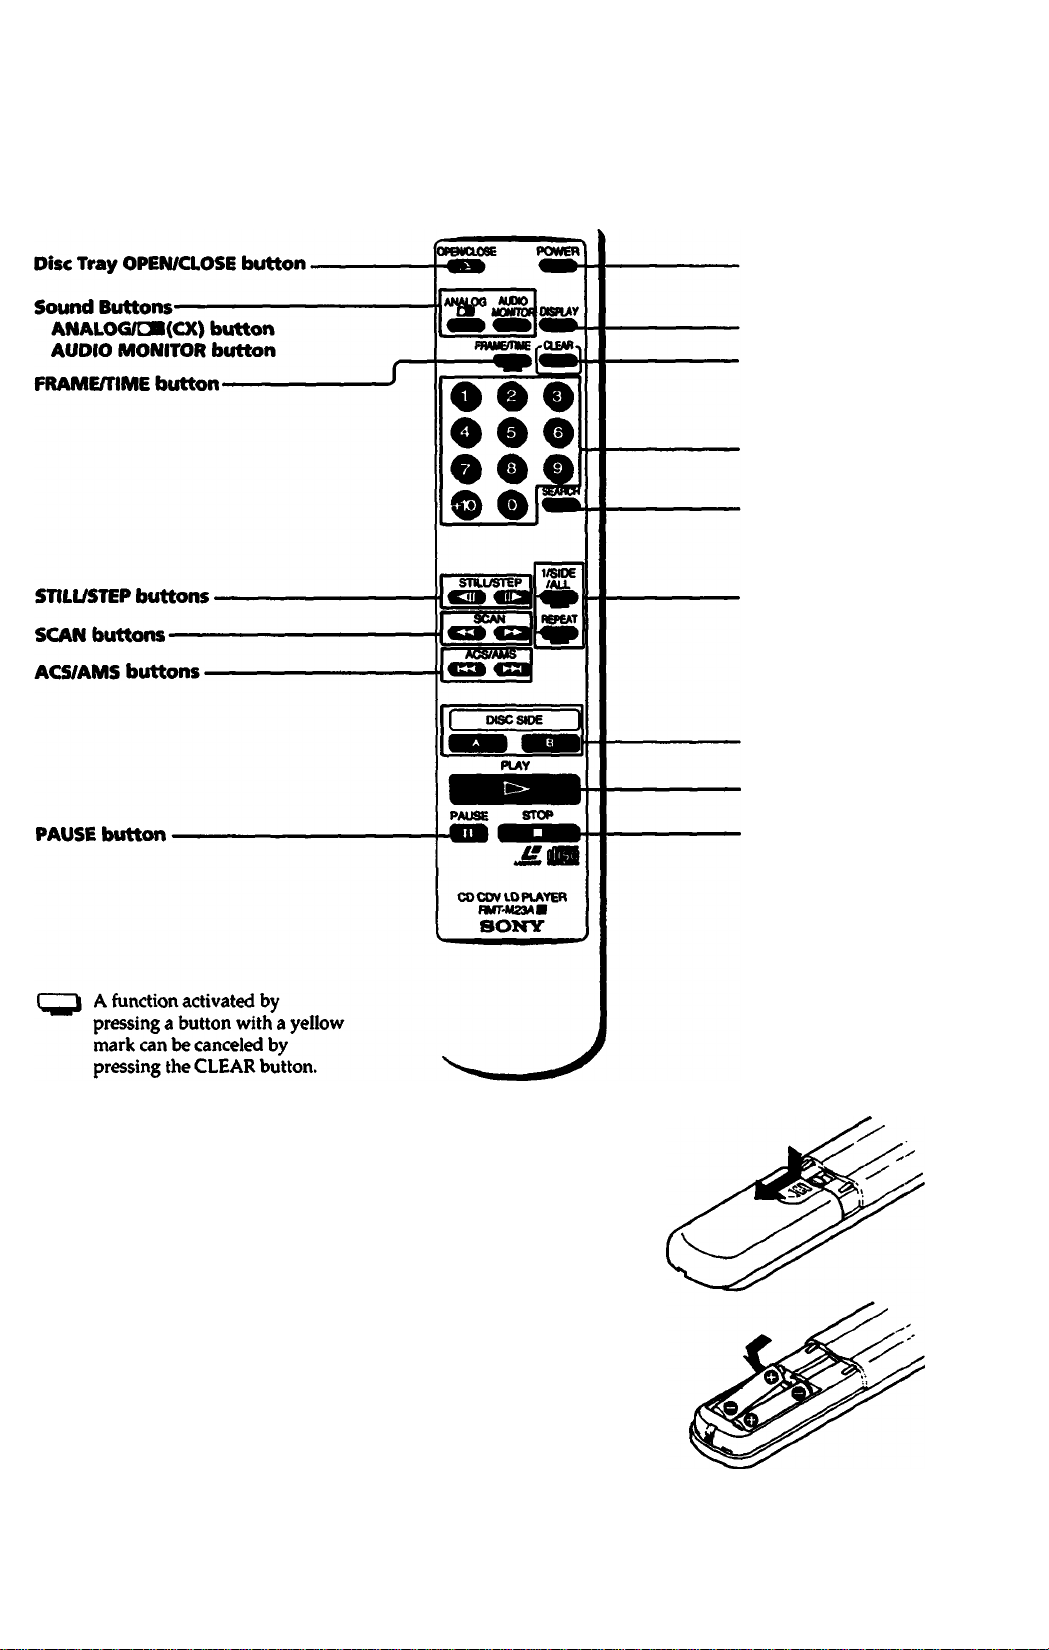
Controls on the Remote Commander-
You can use the Remote Commander to control the player or the identical buttons on the player itself.
POWER button
DISPLAY button
CLEAR button
Number keys
SEARCH button
Replay/Repeat Buttons
l/SloeALL button
REPEAT button
To Activate the Remote Commander
Open the back cover, and insert two size AA (R6) batteries
according to the polarity indicated in the illustration. The
batteries will last for about 6 months. If the range of the
Remote Commander becomes noticeably short, replace all
the batteries with new ones. If the Remote Commander is
not to be used for a long time, remove the batteries to avoid
damage from possible battery leakage.
DISC SIDE A/B buttons
PLAY button
STOP button
Remote Commander Precautions
• Do not let sunlight or powerful artificial light fall directly
on the Remote Commander sensor on the front panel (of
the player) as it may interfere with Remote Commander
operation.
• Use size AA (R6) batteries only.
Insert two size AA (R6) batteries.
Page 11

How to Connect the Television'
To play LDs or CDVs, hook up a television to the Multi Disc Player. Take out the supplied audio/video connecting
cable (yellow, red and white plugs). Use this to connect the player to the television.» Once you have hooked-up the
television, set the input selector on the TV to "Video". Before connecting or disconnecting any of the cables, turn off all
equipment.
Television Hook-Up
MDP-500
Television
Antenna
Input
VCR 'O"
Input Jacks
(Video/Audio)
Connect to the external video/audio inputs o
VHF Out terminals or
VIdeo/AudIo Out Jacks "
fa VCR.
-----^^---------
J
Connecting Precautions
• Make sure all equipment is turned off before connecting or disconnecting any cables.
• Connection methods may differ; when in doubt about a connection consult the TV or VCR manufacturer's manual.
• If the sound or picture is disturbed by noise, try moving the equipment farther apart.
• Firmly insert plugs into the jacks. A loose connection may cause noise.
• To prevent later interference with TV broadcast reception, turn off all equipment connected but not currently in use.
• If the TV only has a monaural phono jack for audio input, use a VMC-910MSI915MS Connecting Cable (not supplied).
** With theMDP-5(X), you can use S Video connection. If your TV has an S Video Input jack, obtain a YC-15V S Video Connecting
Cable and use it to connect the TV to your MDP-500
so that you can get a
better image.
Installation and Connection
11
Page 12

How to Connect Audio Equipment-
To achieve full stereo sound from your Multi Disc Player, hook up a stereo system following the diagram below. Use an
RK-C310 (or RK-C315) audio connecting cable (not supplied) to connect the Multi Disc Player to your amplifier or
receiver. Before connecting or disconnecting any of the below cables, turn off all equipment.
Audio Epuipment Hook-Up
MDP-500
fiZ
®©®i
"LJ"
\
7
q=5)
to AC outlet
To TV or VCR
Audio In
I© ® ^
I® ® ® ®y® ®||® ®|
CoDfiGct/OfT Pi^couUoos
RK-C310/315
Audio Cable (not supplied)
Amplifier ^
Speakers
I
to AC outlet
• Make sure all equipment is turned off before making any of the above coimections.
• Firmly insert plugs into the jacks. A loose connection may cause noise.
• When listening to a radio broadcast, switch off the Multi Disc Player to get better reception.
12
Irtstallation and Connection
r-“ ri - ; t- ':.ri
... i
-. ■!-
i
T—t-
i- ■ a., i
'f ’:7,ri ■ ; V- ';.-F
--
-rr-n .'.4
Page 13

To Play a Disc
This section shows you how to conduct 2dl the procedures associated with pla)dng both LDs and CDs (CDVs).
How to Load and Play a Disc-
After you have connected the Multi Disc Player to the TV and/or stereo system, you can
begin playing a disc. Locate the POWER, OPEN/CLOSE, and PLAY buttons on the
Remote Commander or the front panel of the player.
1 Turn on the multi disc
player.
Turn on the TV and stereo system.
3 Open the disc tray.
4 Place a disc on the tray
POWER
(Player) (Remote) OPEN/CLOSE (±) or PLAY (►) on the player.
9
(Player) (Remote)
POWER Press POWER on the player or Remote
( ^ Commander.
You can also turn on the player by pressing
When using the Remote Commander, press
POWER.
TV: Set the input selector on the TV to
"Video".
Stereo System: Turn on the amplifier or
receiver and select CD or AUX for audio
output.
OPEN/CLOSE ****** OPEN/CLOSE (e).
X———V The front cover of the player slides down and
'—' the disc tray comes out.
Carefully center a single disc on the tray.
If you insert more than one disc, or if the disc is
not seated properly, it may not play or it may
damage the player.
LD (Side A*) When playing a CD, do not use a CD
stabilizer as it may cause damage to
your disc or player.
CD.CDV or LD Single
(Label faces up)
5 Start playback.
* When playing an LD, the player determines that the upper side of the LD is side “A," and the other side is “B,” regardless of the
label "A" or "B" printed on the disc.
**
When playback of the upper side of an LD (side A) ends, the other side (side B) starts playing automatiailly.
PLAY
(Player or Remote)
Press PLAY (►).
The disc tray closes and the disc starts
playing.**
You can also start playing by pressing the disc
tray to close it.
Do not transport the player while
playing a disc as it may cause damage to
the disc
To Plav a Disc 13
Page 14

To Advance or Reverse.
SCAN Hold down SCAN or on the
(3Ï) ŒE) Remote Commander
(Remote)
To Advance or Go Back a
Chapter or Track at a Time....
To Start From the Beginning
of Each LD Side
..........................
To Interrupt Piayback.
To Stop Piayback
ACS/AMS Press ACS/AMS (Hd or >W) on the
( C Remote Commander.
(Remote)
Press (DISC) SIDE A to play the upper side of
>
TBT
(Player) (Remote)
PAUSE
GD
(Player or Remote)
STOP
c
(Player or Remote)
o>scs«e
the LD from the beginning.
Cj
Press (DISC) SIDE B to play the other side of
the LD from the beginning.*
Press PAUSE (II).
The sound mutes, and "PAUSE" appears on the
TV screen. When playing a CAV disc, the
picture freezes.** To resume playback, press
PAUSE (II) or PLAY (►).
Press STOP (■).
To resume playback of an LD from the point
J
you stopped at, press PLAY (►) (see page lb).
If you want to pause playing at the point before
starting, press PAUSE (II) instead of PLAY
(^). To play again from the beginning of disc
side A (or B), press (DISC) SIDE A (or B).
To Stop Piayback and Turn
the Power Off
.........................
POWER
(Player) (Remote) you stopped at, press PLAY(^) (see page lb).
To Stop Piay and Remove
the Disc.................................
g
(Player) (Remote)
* Vihen playback of LD side B ends, the player stops playing. When playing a CD, playback stops if you press (DISC) SIDE B.
** When playing a CLV LD or the video section ofCDV, the TV screen goes blank.
POWER Press POWER on the player or Remote
Commander.
To resume playback of an LD from the pt>int
OPENCLOSE Press OPEN/CLOSE (a).
( ) Remove the disc and press a again to close the
empty tray.
14
To Plav a Disc
Page 15

To Pause the Player Just
Before Starting
...................
PAUSE
□D
(Player or Remote)
Press PAUSE (II) after doing step 4 on page 13.
The tray closes, "PAUSE" appears on the TV
screen, and the player waits at the start of the
disc until you press PLAY (►) or PAUSE (II).
If you want to play side B of an LD, press
PAUSE (II), then (DISC) SIDE B.
To Play a Stereo Disc or
a Second Audio Program
(SAP) Disc
............................
The procedure below indicates how the output and the display changes with each press.
The active track appears for three seconds on the TV screen. When you select 1 /L (or 2/R), the sound of the left
(or right) channel is output from both speakers.
Procedure
1 Press PLAY (►).
2 Press AUDIO MONITOR.
3 Press AUDIO MONITOR again.
4 Press AUDIO MONITOR again
to return to stereo status.
PUV
(Player or Remote) (Remote) tracks, such as bilingual discs.
Screen
message
No message
1/L 2/R
To Switch from Digital to
Analog Sound
(for LDs only*)
......................
(Remote)
AUDIO Press PLAY (^), then press AUDIO
MONITOR MONITOR on the Remote Commander.
3 This function alternates the sound output on a
disc that has been recorded with two sound
Output Sound
Stereo Disc
1/L
2/R
ANALCX3
Stereo
(Both channels)
Left channel Soundtrack 1 (left channel)
Right channel Soundtrack 2 (right channel)
Stereo
(Both channels)
Press ANALOG/GB on the Remote
Commander to switch the player to analog or
digital sound. Digital affords a better quality
sound reproduction. If the LD contains a digital
sound signal, the player automatically sends
that output to the amplifier or receiver. To
switch to analog sound, press ANALOG/CB
on the Remote Commander. "J> ANALOG "
appears on screen for three seconds. To return
to digital sound, press ANALOG/GB until "J>
DIGITAL" appears on screen. With certain discs
there may be a difference in volume.
Soundtrack 1 (left channel)
Soundtrack 2 (right channel)
Soundtrack 1 (left channel)
Soundtrack 2 (right channel)
SAP Disc
LDs with a □■(CX) Label
All CDs and CDVs output digital, not analog sound.
ANALOG
CZD
(Remote)
Discs bearing the GB label are recorded with
the CX noise reduction system, which gives
lower noise levels and higher dynamic range on
analog sound. The player detects most GB discs
and activates the CX noise reduction system
automatically. When playing a GB disc which
does not contain a code to activate the CX noise
reduction system, press ANALOG/GB on the
Remote Commander until "CX ON" appears on
screen. The CX noise reduction system will be
activated.
Page 16

How to Resume Playback—^Auto Resume (only for LDs)-
This function can only be used for LDs. Even if you press STOP (■) or POWER to stop
playback, you can still continue viewing horn the scene you stopped at.
To View From the Scene You Stopped at
1 Press STOP (■) or POWER to stop
playback.
2 Press PLAY (►).*
* The point where you stopped playing is cleared when:
-you press OPENICLOSE (±), (DISC)SIDE A/B or ACSIAMS
-you carry out Chapter Search or Frame/Time Search.
** When the power is off, press PLAY(^) on the Front Panel. The player turns on automatically and resumes playback. When you
use the Remote Commander, press POWER, then PLAY (■►).
STOP
__________
rpiauor or Romof > just before starting, press
(Player or Remote) PLAY(^).
POWER The AUTO RESUME indicator on the front
D or
( ^ panel lights up and the point you stopped at is
ayeror emo ) Ughts up briefly, then goes off with the power.
PLAY The AUTO RESUME indicator lights up as the
stored.* When you press POWER, the indicator
player searches for the scene where you
stopped playing, then playback starts. If you
How to Search for a Particular Point on a Disc-
To find a particular point, play the disc in reverse or forward at high speed.* The sound
is automatically muted while scanning an LD.** You can monitor sound while scanning
a CD. Locate the SCAN buttons on the Remote Commander.
To Scan in Forward or
Reverse...........................
SCAN
CSD ŒE)
To Resume Normai Playback
* A certain amount of visual noise and instability is inevitable while scanning an LD or the video section of a CDV.
•* When scanning aCLVLD or the video section of a CDV, frames are skipped.
...................
Hold down SCAN (►►) on the Remote
Conunander to forward scan.
Hold down SCAN (<d) to scan a disc in
reverse.
Release SCAN or bP’).
Page 17

Understanding Displays and Messages When Playing Discs-
You can check the player operating status or disc information on the TV screen. Locate
the DISPLAY button on the Remote Commander or the front panel of the player.
To View On-Screen
Information.............
Display for LD
Message 1 (Examples for LD)
Screen Display Current Status of the Player
OPEN Disc tray open
CLOSE Disc tray closed
PLAY PlayinKLD
STOP Operation stopped
PAUSE Operation momentarily stopped
s/e
SEARCH
.
Speed scanning
Searching
DISPLAY
e
(Player) (Remote) messages that appear on the right of the screen.
Press DISPLAY twice.
When pressing DISPLAY once, only the first
line appears. The tables below are keys to the
Display for CD or CDV
Message 1 ■
Elapsed time of current track
Index number
Track number
Playing disc type
Number of tracks and
total playing time**
Selected function
Message 1 (Examples for CD or CDV)
Screen Display
OPEN
CLOSE Disc tray closed
PLAY
STOP
PAUSE
@/e
SEARCH
rjl {audio 1 -16 S2:5S I
flEPEAT
Current Status of the Player
Disc tray open
Playing CD or CDV
Operation stopped
Operation momentarily stopped
Speed scanning
Setnching
Message 2 (Examples for LD)
Screen Display Currently Playing
LDSIDEA
LDSIDEB
1/L
2/R
J> DIGITAL Digital sound
J> ANALOG Analog sound
To Turn Off the Display
Side A of LD
SideBofLD
first soundtrack/left channel
Second soundtrack/right channel
DISPLAY Press DISPLAY again.
P^=i
(Player) (Remote)
• When playing a CAV LD, the current frame number appears. When playing aCLV LD, the total elapsed time appears. CLV LDs
not indicating time data to the second, indicate two-digit numbers such as "22:".
** When playing a CDV,
the number of the track and total playing time of the video section also appair.
To Piava Disc
17
Page 18

How to Search by Chapter/Track Numbers*
LDs are divided into sections called "chapters". CDs are divided into sections called
"tracks". Chapters or tracks are usually listed on the jacket or label of the disc. By
entering the desired chapter/track number, you can have the player find the chapter/
track and play it. Use ACS/AMS (M^ /MH) —Automatic Chapter Sensing/Automatic
Music Sensing—to advance or reverse a chapter at a time.* Locate the number keys and
the ACS/AMS (M^ /►►!) buttons on the Remote Commander.
To Locate a Particular Chapter
or Track (Chapter/Track Search)
For example, to locate chapter 8, press
"8" on the Remote Commander.**
To Enter a Number Greater
Than 10....................................
Do this to make a numerical sum. For
example, to enter 14, press +10 and 4;
to enter 30, press +10, +10, +10 and 0.
S
@ -*®
§
Press one of the number keys on the
Remote Commander corresponding to the
chapter/track you want to play.
The player starts searching for Chapter 8.
SEARCH
CHAPTERS
The player finds Chapter 8 and starts playing
from the beginning of Chapter 8.
Press +10 and one of the number keys.
.0
“14"
0-»0 -30-
If you make a mistake while entering numbers,
press CLEAR on the Remote Commander, then
enter the correct numbers.
to SIDE A
To Check the Current Chapter/ p
Track Number
............................
^
(Player) (Remote) comer of the screen. If the LD does not contain
To Advance or Go Back a
Chapter/Track at a Time
(Skip Search)
.......................
To Resume Normal
Playback
* ¡n addition to normal play mode, you can conduct Chapter/Track Search and Skip Search while in Freeze-Frame. Repeat or Pause
mode. When the specified chapter or track is located after the search, playback continues in the same mode.
** Chapter Search does not function properly if the LD does not contain chapter numbers, or the chapter number entered does not
exist.
...................
DISPLAY The current chapter/track number lights up on
(
.....
^ the front panel. Pross DISPLAY to display the
chapter/track number in the upper left-hand
chapter numbers, the number is not displayed.
ACS/AMS
Press ACS/AMS (Md) on the Remote
Commander once to return to the beginning
of the current chapter/track.
Press ACS/AMS (>M) to advance to the
beginning of the next chapter/track.
Press ACS//LMS (Md) twice before the
picture reappears to return to the beginning of
the pre\*ious chapter/track.
Hold down ACS/AMS or PM) (or
continuous skip search.
The player automatically resumes playback
from the beginning of the selected chapter/
track.
18 To Plav a Disc
Page 19

How to Search by Frame Number or Time —Frame/Time Search (only for LDs)
This function can only be used for LE)s. Video scenes are counted as a series of still
pictures or "frames". The player keeps track of the number of frames that have been
played from the beginning of the disc to the current position. Similarly, the player also
keeps track of the elapsed playing time from the beginning of the disc. To play from a
particular frame or time, use the Frame/Time Search function. Locate the FRAME/
TIME, SEARCH buttons, and number keys on the Remote Commander.
On CAV (standard-play) discs, enter a frame number.
On CLV (extended-play) discs, enter the time.*
To Enter the Elapsed Frame or Time
--------------
1 Press FRAME/TIME on the Remote FRAMEmME
Commander.
2 Enter the desired multi-digit
number corresponding to the frame or
time you want to find.
Sample Entry for CAV Discs
To locate frame number 12340, press the
number keys in the order on the right:
Sample Entry for CLV Discs
0_»0_0_0_»0
To locate the 12-minute, 5-second point,
press the number keys on the Remote
0_»0_0_»0
Commander in the order on the right:
The screen displays "00000" (for CAVs) or
"0:00:00" (forCLVs).
CAV CLV
(standard-play) disc (extended-play) disc
FRAME 00000 LD SIDE A
fiV
-------------
TIME 0:00:00 LD8I0EA
^
--------------
Enter five digits for CAVs.
Enter four digits for CLVs displaying the time
to the second.
Enter two digits for CLVs displaying the time to
the minute.
If you pressed the wrong key, press FRAME/
TIME to clear the number, then enter the correct
number.
3 Press SEARCH on the Remote
Commander.
To Check the Frame/Time
Numbers..............................
To Cancel Frame/Time Search
............................
SEARCH i^lay starts from the time or frame specified in
( \ step 2.**
DISPLAY Press DISPLAY.
( ^ The current frame or current time number
(Player) (Remote)
■CLEAR
appears.
Press CLEAR on the Remote Commander
before pressing the SEARCH button.
* In addition to normal play mode, you can conduct Frame/Time Sairch while in Freeze-Frame, Repeat or Pause mode. When the
specified frame or time is located after the search, play continues in the same mode.
**
“CAV” or "CLV"
should be noted somewhere on the disc jacket.
To Ptav a Disc
19
Page 20

How to Play Frame-by-Frame (only for CAV LDs)-
Once you have found a particular scene on a CAV LD, you can examine the
progression of that scene by advancing or reversing the action one frame at a time (Step
Play),* or freezing the action into a still picture (Freeze Frame).*
Locate the STILL/STEP^II/II^ buttons on the Remote Commander.
To Play One Frame at a Time
(Step Play)
1 PressSTILL/STEPHlIorllHonthe
Remote Commander once.
2 Press STILUSTEP Hll or !!►)
repeatedly.
To reverse -^11
To advance !!►
To Freeze the Action
(Freeze Frame).......................
To Resume Normal Play ....
Extended-Play (CLV) Discs.
STILUSTEP
îD CŒ)
STILL/STEP Each press shifts the image one h’ame backward
( -^11 ^ ( !!► ^ or forward.
PAUSE
II
(Player or Remote)
PLAY
(Player or Remote)
The frame freezes.
Hold down the button for continuous frame-byframe action.
Press PAUSE (II ) once.
Press PLAY (►).
Freeze Frame and Step Play are not possible
with CLV discs. When STILL/STEP is pressed,
the screen goes blank and the message "CLV
SIDE A (or B)" appears. When PAUSE (II) is
pressed, the screen goes blank and the message
"PAUSE" appears.
* This function can only be performed on CAV LDs,
20 ToPlavaDisc
Page 21

How to Replay the Same Selections
These instructions show you how to set the player to play the same scenes or selections
over and over until you signal the repetition to stop. You can replay both sides, a single
side or one chapter of an LD, and a whole disc or a single track on a CD. Locate the
REPEAT and 1/SIDE/ALL on the Remote Commander.
To Repeat the Whole Disc
(Whole Disc Repeat)
.............
To Repeat the Current Side
of the LD (One Side i/siPE/Aa i/side/all
Repeat)..........................*4
To Repeat the Current Chapter i/side/au
or Track (Single Repeat).............
REPEAT
C-2 S1000 PLAY
LO 8I0EB
1^”
REPEAT
At the end of the disc
repeat
C*2 S1000 PLAY
LD8I0EA
0NE810E ^*-3^
REPEAT
At the end of one
side of the disc
repeat
Press REPEAT on the Remote Commander.
“REPEAT" appears on screen for three seconds.
When playing an LD, the player repeats playing
both disc sides, side A to B. V^en playing a CD
or CDV, the player repeats playing ail the tracks
on the disc.
PLAY
VIDEO 0- 5
LDA4-B
Returns to the
* beginning of
REPEAT
the disc
Press 1/SIDE/ALL twice, then REPEAT on the
Remote Commander.
"REPEAT" and "ONE SIDE" appear on the
screen for three seconds.* The player repeats
playing the current disc side.
SEARCH
CHAPTER —
VIDEO 0" 5
ONE 8IDE
REPEAT
LDSIDEA
Returns to the
beginning of
the side
Press 1/SIDE/ALL once, then REPEAT.
"REPEAT" and "SINGLE" appear on the screen
for three seconds. The current chapter repeats
continuously. If you press 1 /SIDE/ALL once
and do not press REPEAT, the player plays the
current chapter/track once, then stops.
To Check the Replaying
Status................................
To Cancel Whole Repeat
............
.
e
(Player) (Remote)
DISPLAY Press DISPLAY twice.
^ Playing status information appears on the TV
screen as shown above.
REPEAT Press REPEAT.**
To Cancel One Side
Repeat................................................................................ i/side/aix^ repeat Press I/SIDBALL once, then repeat.’
To Cancel
Single Repeat
* "ONE SIDE" appears only when playing an LD.
** You can also cancel Whole Disc Repeat, One Side Repeat and Single Repeat by pressing CLEAR. "CLEAR" appears on the TV
................
i/siPE^a 1/SIPE/Aa repeat press i/SIDE/ALL twice, then repeat.**
screen for three seconds.
To Piava Disc
21
Page 22

Additional Information
This section contains information that will help you if you have problems with your player. It also contains
maintenance information and glossary.
Troubleshooting
Check the following before requesting service.
Symptom Point to check
No power
PLAY (^) button or Number
keys do not produce
playback.
No picture or sound
Poor picture or sound quality
No sound
Remote Commander does not
operate.
Picture distorted during scan.
• AC Power cable properly connected?
• Discmserted?
• Disc properly seated?
• Label side of the CD facing upward?
• TV or monitor switched on?
• TV properly connected to player?
• The input selector on TV set to "Video"?
• TV properly connected?
• Any source of noise nearby?
• Disc dirty or scratched?
• Any condensation on player objective lens?
• TV properly connected to player?
• Volume control on TV, monitor, or ampliher high enough?
• Playback at normal speed? (The player produces sound only during normal
speed playback.)
• Batteries correctly inserted?
• Batteries weak?
• Any obstacles between the Remote Commander and the Sensor on the player?
• The Remote Commander is pointed at the sensor on the player?
• Some distortion in the lower part of the picture is normal - even for CAV
discs.
22
Additional Information
Page 23

Optical Disc Maintenance-
Holding CDs or CDVs
Hold CDs and CDVs by putting your index finger through the center hole and grasping
the edges of the disc with the thumb and other Angers as pictured in the illustration.
Holding LDs
Hold LDs by grasping the outside edge in both hands as illustrated.
Light Exposure
Do not expose the disc to direct sunlight or heat sources such as hot air ducts, or leave
the disc in a car parked in direct sunlight where there can be a considerable rise in
temperature.
Cracked or Damaged Discs
Do not play cracked or damaged discs, or try to play discs that have been repaired with
adhesive glues.
Keeping the Disc Surface Ciean
Qean the surface of the disc before playing, using a soft, dry cleaning cloth. Wipe the
disc from the center out. Do not use solvents such as benzine, paint thinner,
commercially available cleaners, or anti-static spray intended for LP record discs.
To prevent marring, after playing, remove the disc and put it back into its jacket.
Putting your fingers on, or adhering anything to the surface of the disc su(± as sticky
note pad paper or adhesive tape wm deteriorate the quality of the pla)dng surface, and
thus the output quality.
Player Maintenance and Safety
---------------------------------------------------
On Electrical Safety
• Should any foreign object or liquid fall into the cabinet of the player, unplug the player and have it checked by
qualified personnel before operating it any further.
• Unplug the player from the wall outlet if you are not going to use it for an extended period of time. To disconnect the
cord, pull it out by the plug. Never pull the cord itself.
On Player Location
• Avoid placing the player where there is:
— high humidity — mechamcal vibration
— high temperature — direct sunlight
— excessive dust
• Allow adequate air circulation to prevent internal heat build-up. Do not place the player on surfaces such as shag pile
rugs, blankets or near materials such as curtains, drapes that may block the ventilation holes.
On Moisture Condensation
• Do not operate the player where the temperature has risen suddenly or in a location where the temperature is radically
different from the previous location because moisture may condense in the operating section of the player. Wait about
an hour before turning the power on in a different location or keep the rise in the room temperature gradual.
• If you operate the player with moisture condensation, the player and the disc may be damaged. Therefore, remove the
disc immediately when there is a possibility of moisture condensation.
• To evaporate moisture rapidly, leave the player turned on without a disc inside.
On Operation
• Remove the disc from the tray after playing it if you are not going to use the player for any length of time. E>o not
transport the player with a disc in place.
• When the disc tray is in the open position, do not press down on it forcefully, or place heavy objects on it.
On Cleaning
Qean the cabinet, panel, and controls with a soft dry cloth or a soft cloth lightly moistened with a mild detergent
solution. Do not use any t3rpe of solvent, such as alcohol or benzine, which may damage the finish.
On Repacking
Do not throw away the carton and the packing materials. The carton makes an ideal container to transport the player in.
Additional Information
23
Page 24

Glossary-
ACS/AMS Automatic Chapter Sensor/ Automatic Music Sensor is a function in the player that allows the laser beam
to sense the beginning of chapters or tracks on a disc.
CAV Discs Constant Angular Velocity (CAV) or standard-play discs rotate at a constant 1800 r/min. Each track
traced by the laser for a single rotation of the disc produces a single frame. Up to 54,000 frames make up each side of the
disc, for up to 30 minutes of play. Each frame has a number that is stored with other data on the disc. When searching
for a particular location on CAV discs, you must enter that "frame number".
Chapters Some laser discs are divided into sections, called chapters. These are analogous to tracks on CDs. Such
discs usually have a numbered list of chapters on the jacket or label. Each chapter has been numbered fur easy location
when you use Chapter Search or Repeat functions.
CLV Discs Constant Linear Velocity (CLV) or extended-play discs double maximum playing time to 60 minutes by
varying the rotational speed from a maximum of 1800 r/min to a minimum of 600 r/min as the laser beam moves away
from the center of the disc. The disc surface therefore moves past the laser head at a constant rate, and each track is
longer than its predecessor. For this reason. Variable Speed Play, Freeze Frame, and Step Play arc not possible with CLV
discs, so when searching for a scene on CLV discs you must enter the time instead of the frame number.
Digital Sound Recordings Sound translated into digital signals has a better signal-to-noise ratio. Therefore, digital
sound recordings offer a higher quality reproduction than the alternative, analog recordings (found on LPs and older
audio cassette tapes). However, some laser discs have been recorded in the higher-quality digital audio signal as well as
the conventional analog type signal. This player reproduces both signals with priority given to the digital signal when it
is encountered.
Indexes Signs marked in a track so that you can hnd a particular point on the disc easily.
MULTI AUDIO Disc Different sounds are recorded on analog and digital tracks. You can select either sound by
switching one to the other.
SAP Second Audio Programs are double soundtrack recordings found on bilingual and karaoke (sing-along)
recordings. Two completely different sound programs have been recorded on the disc. By pressing the AUDIO
MONITOR button, you can switch from one sound track to the other.
Tracks CDs and CDVs are divided into sections, called tracks. Each track has been numbered for easy location when
you use Track Search or Repeat functions. The tracks usually correspond to the selections on the disc.
?4 Additional Information
Page 25

Specifications-
Type
Signal readout
Signal format system
Playing time
CD/CDV/LD Player
Optical (Laser beam reflection)
ElA standard, NTSC color system
(minutes)
30 cm (12 in)
double-sided
20 cm (8 in)
CAV
double-sided
20 cm (8 in)
LD
CX>
CDV
VSD
single-sided
30 cm (12 in)
double-sided
20 cm (8 in)
CLV
double-sided
20 cm (8 in)
single-sided
12 cm (5 in)
single-sided
8 cm (3 in)
single-sided
Audio portion 20
Video portion
Video portion
120
60
28
14
40
20
74
20
Power requirements
Power requirements
120VAC60HZ
(MDP-500)
120/220/240 VAC
adjustable, 50/60 Hz
(MDP-A500)
Power consumption
Mass
Dimensions
40W
10 kg (22 lb)
Approx. 430 X117 X 429
mm (w/h/d)
(17x45/8x17 in)
Operating temperature
Ambient humidity
Remote Commander RMT-M23A
Principle of operation
Power requirements
+5 «C to +35 °C
5% to 90%
Inhered pulse
3VDC(2sizeAA
batteries)
Dimensions
Approx. 44 X 23.5 x 214.5
mm (w/h/d)
(13/4X15/16X8 1/2 in)
Mass
Approx. 100 g (3.5 oz)
(including batteries)
5
5
Supplied accessories
Digital audio specifications
Frequency response 4 Hz to 20kHz (±0.5 dB)
Signal-to-noise ratio
Dynamic range
Wow and flutter
More than 115 dB (EIAJ)*
More than 99 dB (EIAJ)
Below measurement limit
(±0.001% W.PEAK) (EIAJ)
Video specifications
Horizontal video
425 lines
resolution
Signal-to-noise ratio
Input/output specifications
Video output 1
Video output 2
More than 49 dB
1.0 Vp-p, 75 ohms, unbalanced
1.0 Vpp, 75 ohms, unbalanced
(MDP-A500only)
Audio output 1,2
Stereo L, R
Analog: 200 mVrms
(1 kHz, 40% modulation)
Digital: 200 mVrms
(1 kHz,-20dB)
5 Video output
(MDP-500 only)
Luminance: 1 Vp-p, 75 ohms,
unbalanced, sync negative
Chrominance: 0.286 Vp-p, 75 ohms,
unbalanced
CONTROL SIN jack
Mini jack
(MDP-500 only)
Remote Commander RMT-M23A (1)
Size AA (R6) batteries (2)
Audio/Video cable
(phono plug 3++phono plug 3) (1)
AC power cable (1) (MDP-500 only)
AC plug adaptor (1) (MDP-A500 only)
Elesign and specifications are subject to change
without notice.
Measured according to EIAJ (Electronic Industries Association
of Japan) standards.
Additional Information
25
Page 26

Index
1/SIDE/ALL,10,21
Accessories, 9
ACS/AMS,10,14,18,24
ANALOGOi CX, 10,15
AUDIO MONITOR, 10,15
Audio connection, 12
Auxiliary functions, 6
Battery, 10,22
CAVdbcs,7,17,19,20,24
CD, 7
CDV,7
Chapter search, 18
Chapters, 18,24
CLEAR, 10,19,21
CLV discs, 7,17,19,20,24
Compact disc, 7
CX noise reduction system, 15
Disc classification, 7
(DISC) SIDE Am, 8,10,14
Disc tray, 8,13
DISPLAY, 10,17,18,19,21
FRAME/riME, 10,19
Frame/time search, 19
Freeze frame, 20
Front panel, 8
controls, 8
Glossary, 24
Index, 17,24
Laser disc, 7
LD,7
Maintenance, 23
MULTI AUDIO disc, 7,24
Number keys, 10,18,19
On-screen messages, 17
OPEN/CLOSE,8,10,13
Optical/digital discs, 7
PAUSE, 8,10,14,15,20
PLAY, 8,10,13,16,20
POWER, 8,10,13,16
Primary functions, 6
Problems, 22
Rear panel, 9
Remote Commander, 10
sensor, 8,22
REPEAT, 10,21
Repeatable functions, 6
Replaying, 21
SAP (Second Audio Program), 15,24
SCAN, 10,14,16
SEARCH, 10,19
Skip search, 18
Speaker connection, 12
Speed Scan, 16
Step play, 20
Stereo discs, 15
STlLLfSTEP, 10,20
STOP, 8,10,14,16
Television connection, 11
Tracks, 18,24
Troubleshooting, 22
VCR connection, 11
Video connectors, 9
Video single disc, 7
Voltage selector, 4,9
VSD,7
26
Index
Page 27

 Loading...