

Page 1
LCD Monitor
4-095-793-05 (1)
取扱説明書 _____________________________________________
Operating Instructions ____________________________________
Mode d’emploi __________________________________________
Bedienungsanleitung _____________________________________
Manual de instrucciones ___________________________________
Istruzioni per l’uso ________________________________________
_____________________________________________
____________________________________________
____________________________________________
お買い上げいただきありがとうございます。
電気製品は安全のための注意事項を守らないと、
火災や人身事故になることがあります。
この取扱説明書には、事故を防ぐための重要な注意事項と製品の取り扱いかたを示してあり
ます。この取扱説明書をよくお読みのうえ、製品を安全にお使いください。お読みになった
あとは、いつでも見られるところに必ず保管してください。
JP
GB
FR
DE
ES
IT
CS
CT
KR
LMD-4420
LMD-5320
LMD-7220W
© 2003 Sony Corporation
Page 2
安全のために
ソニーのモニターは正しく使用すれば事故が起きないよ
うに、安全には十分配慮して設計されています。しかし、
内部に非常に高い電圧を使用しているので、まちがった
使いかたをすると、火災や感電などにより死亡や大けが
など人身事故につながることがあり、危険です。
事故を防ぐために次のことを必ずお守りください。
安全のための注意事項を守る
4 ~ 5 ページの注意事項をよくお読みください。製品全
般の安全上の注意事項が記されています。
6 ページの「使用上のご注意」も併せてお読みください。
警告表示の意味
この取扱説明書および製品では、次のような表示
をしています。表示の内容をよく理解してから本
文をお読みください。
この表示の注意事項を守らないと、火災や感電な
どにより死亡や大けがなど人身事故につながるこ
とがあります。
定期点検をする
5 年に 1 度は、内部の点検を、お買い上げ店またはソ
ニーのご相談窓口にご依頼ください(有料)。
故障したら使わない
すぐに、お買い上げ店またはソニーのご相談窓口にご連
絡ください。
万一、異常が起きたら
・ 煙が出たら
・ 異常な音、においがしたら
・ 内部に水、異物が入ったら
・ 製品を落としたり、キャビネットを破損したと
きは
a 電源を切ります。
b 電源コードや接続ケーブルを抜きます。
c お買い上げ店またはソニーのご相談窓口までご相談く
ださい。
この表示の注意事項を守らないと、感電やその他
の事故によりけがをしたり周辺の物品に損害を与
えたりすることがあります。
注意を促す記号
行為を禁止する記号
行為を指示する記号
JP
2
Page 3
目次
警告 .........................................................................................4
注意 .........................................................................................5
設置 ................................................................................................6
使用・設置場所について ....................................... 6
設置に関する注意とお願い ................................... 6
ラックに取り付けるには ....................................... 6
使用上のご注意 ...........................................................................6
液晶画面について .................................................. 6
輝点・滅点について ..............................................6
お手入れのしかた .................................................. 6
電源接続について .................................................. 7
廃棄するときは ..................................................... 7
主な特長 ........................................................................................7
各部の名称と働き ....................................................................... 8
前面 .......................................................................8
裏面 .................................................................... 10
電源について ............................................................................ 11
保証書とアフターサービス ...................................................12
保証書 ................................................................ 12
アフターサービス ............................................... 12
主な仕様 .....................................................................................12
JP
この取扱説明書について
本書では以下の機種について説明しています。
・LMD-4420(4 型 )
・LMD-5320(5.6 型 )
・LMD-7220W(7 型 )
細かい違いについては本文中の説明をご覧ください。
JP
3
Page 4
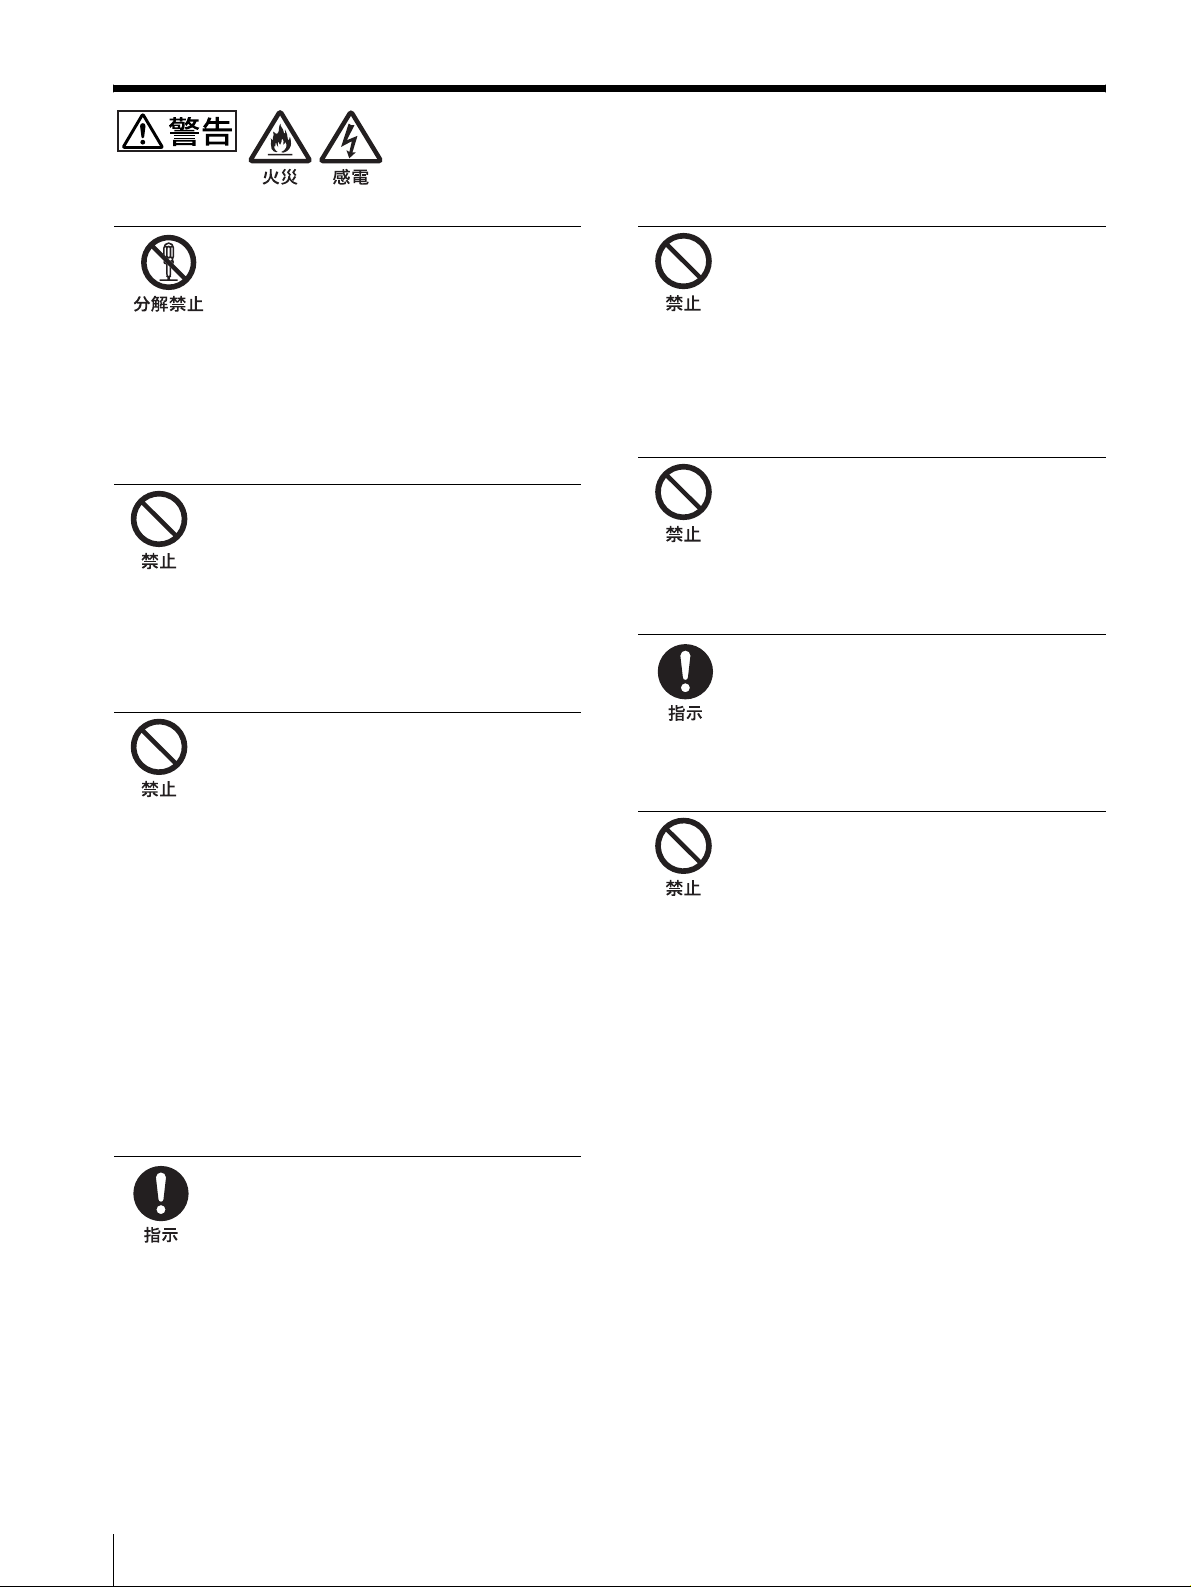
下記の注意を守らないと、 火災や感電により死亡や大けがにつながること
があります。
キャビネットをはずさない、改造し
ない
内部には電圧の高い部分があり、キャビ
ネットや裏ぶたなどをはずしたり、改造し
たりすると、火災や感電の原因となります。
内部の調整や設定、点検、修理は、お買い
上げ店またはソニーのご相談窓口にご依頼
ください。
内部に水や異物を入れない
水や異物が入ると火災や感電の原因となり
ます。
万一、水や異物が入ったときは、すぐに電
源を切り、電源コードや接続ケーブルを抜
いて、お買い上げ店またはソニーのご相談
窓口にご相談ください。
電源コードを傷つけない
電源コードを傷つけると、火災や感電の原
因となります。
・ 設置時に、製品と壁やラック、棚などの
間に、はさみ込まない。
・ 電源コードを加工したり、傷つけたりし
ない。
・ 重いものをのせたり、引っ張ったりしな
い。
・ 熱器具に近づけたり、加熱したりしない。
・ 電源コードを抜くときは、必ずプラグを
持って抜く。
万一、電源コードが傷んだら、お買い上げ
店またはソニーのご相談窓口に交換をご依
頼ください。
油煙、湯気、湿気、ほこりの多い場所
では設置•使用しない
上記のような場所に設置すると、火災や感
電の原因となります。
この取扱説明書に記されている仕様条件以
外の環境での使用は、火災や感電の原因と
なることがあります。
3P-2P 変換アダプターを使用しな
い
3P の電源プラグを 2P に変換するアダプ
ターは確実な設置・接続ができないため、
感電の原因となることがあります。
指定された方法でラックマウントす
る
ラックの取扱説明書に記載された方法以外
で本機をラックに取り付けると、落下して
故障やけがの原因となることがあります。
高温下では使用しない
高温の場所で本機を使用すると、発火、発
煙の原因となることがあります。
周囲温度が 35 ℃を超える場所や、直射日
光のあたる場所では使用しないでください。
6 ページの設置に関する注意とお願いの項
を合わせてお読みください。
JP
規定の電源電圧で使う
この取扱説明書に記されている電源電圧で
お使いください(交流 100V)。
規定外の電源電圧での使用は、火災や感電
の原因となります。
4
Page 5
下記の注意を守らないと、 けがをしたり周辺の物品に損害を与えることがあります。
接続の際は電源を切る
電源コードや接続ケーブルを接続するとき
は、電源を切ってください。感電や故障の
原因となることがあります。
指定された電源コード、接続ケーブ
ルを使う
付属の、あるいは取扱説明書に記されてい
る電源コード、接続ケーブルを使わないと、
感電や故障の原因となることがあります。
他の電源コードや接続ケーブルを使用する
場合は、お買い上げ店またはソニーのご相
談窓口にご相談ください。
水のある場所に設置しない
水が入ったり、ぬれたりすると、火災や感
電の原因となることがあります。雨天や降
雪中、海岸や水辺での使用は特にご注意く
ださい。
不安定な場所に設置しない
ぐらついた台の上や傾いたところなどに設
置すると、モニターが落ちたり、倒れたり
して、けがの原因となることがあります。
また、設置・取り付け場所の強度を充分に
お確かめください。
転倒、移動防止の処置をする
モニターをラックに取り付け・取りはずし
をするときは、転倒・移動防止の処置をし
ないと、倒れたり、動いたりして、けがの
原因となることがあります。安定した姿勢
で注意深く作業してください。
また、ラックの設置状況、強度を充分にお
確かめください。
ぬれた手で電源プラグに触らない
ぬれた手で電源プラグの抜き差しをすると、
感電の原因となることがあります。
移動させるときは電源コード、接続
ケーブルを抜く
接続したまま移動させると、電源コードや
接続ケーブルが傷つき、火災や感電の原因
となることがあります。
定期的に内部の掃除を依頼する
長い間掃除をしないと内部にホコリがたま
り、火災や感電の原因となることがありま
す。1 年に 1 度は、内部の掃除をお買い上
げ店またはソニーのご相談窓口にご依頼く
ださい(有料)。
特に、湿気の多くなる梅雨の前に掃除をす
ると、より効果的です。
直射日光の当たる場所や熱器具の近
くに設置・保管しない
内部の温度が上がり、火災や故障の原因と
なることがあります。
真夏の、窓を閉め切った自動車内では 50
℃を越えることがありますので、ご注意く
ださい。
お手入れの際は、電源を切って電源
プラグを抜く
電源を接続したままお手入れをすると、感
電の原因となることがあります。
入力アダプターを取り付ける際には
電源を切って電源プラグを抜く
入力アダプターを取り付ける際はモニター
の電源を切り、電源プラグを抜いてくださ
い。モニターに電源を接続したまま各種入
力アダプターを取り付けると感電の原因と
なることがあります。
電源プラグは突きあたるまで差し込
む
まっすぐに突きあたるまで差し込まないと、
火災や感電の原因となります。
DC IN 端子に規格以外の入力電圧
をかけない
DC IN 端子に規格以外の入力電圧をかける
と火災や感電の原因となることがあります。
JP
5
Page 6
設置
使用・設置場所について
次のような場所での使用・設置はお避けください。
・ 異常に高温になる場所
炎天下や夏場の窓を閉め切った自動車内はとくに高温に
なり、放置すると変形したり、故障したりすることがあ
ります。
・ 直射日光の当たる場所、熱器具の近く
変形したり、故障したりすることがあります。
・ 激しい振動のある場所
・ 強力な磁気のある場所
・ 砂地、砂浜などの砂ぼこりの多い場所
海辺や砂地、あるいは砂ぼこりが起こる場所などでは、
砂がかからないようにしてください。故障の原因になる
ばかりか、修理できなくなることがあります。
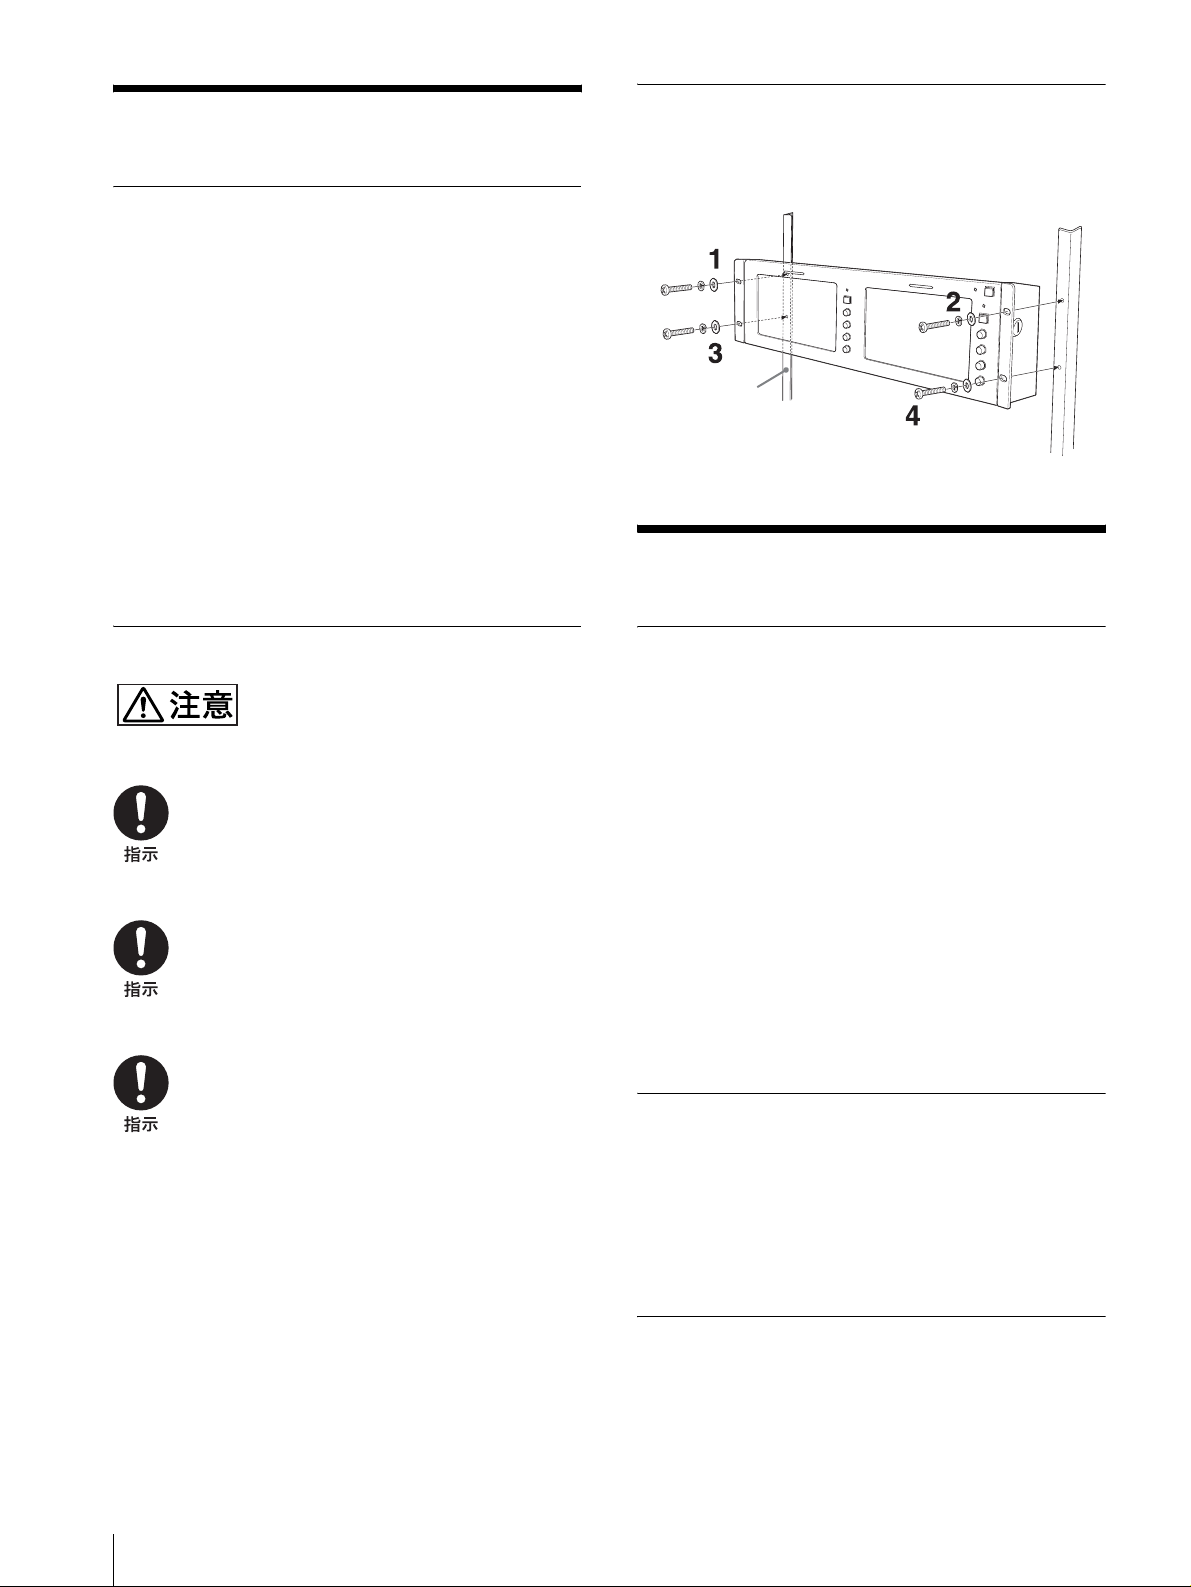
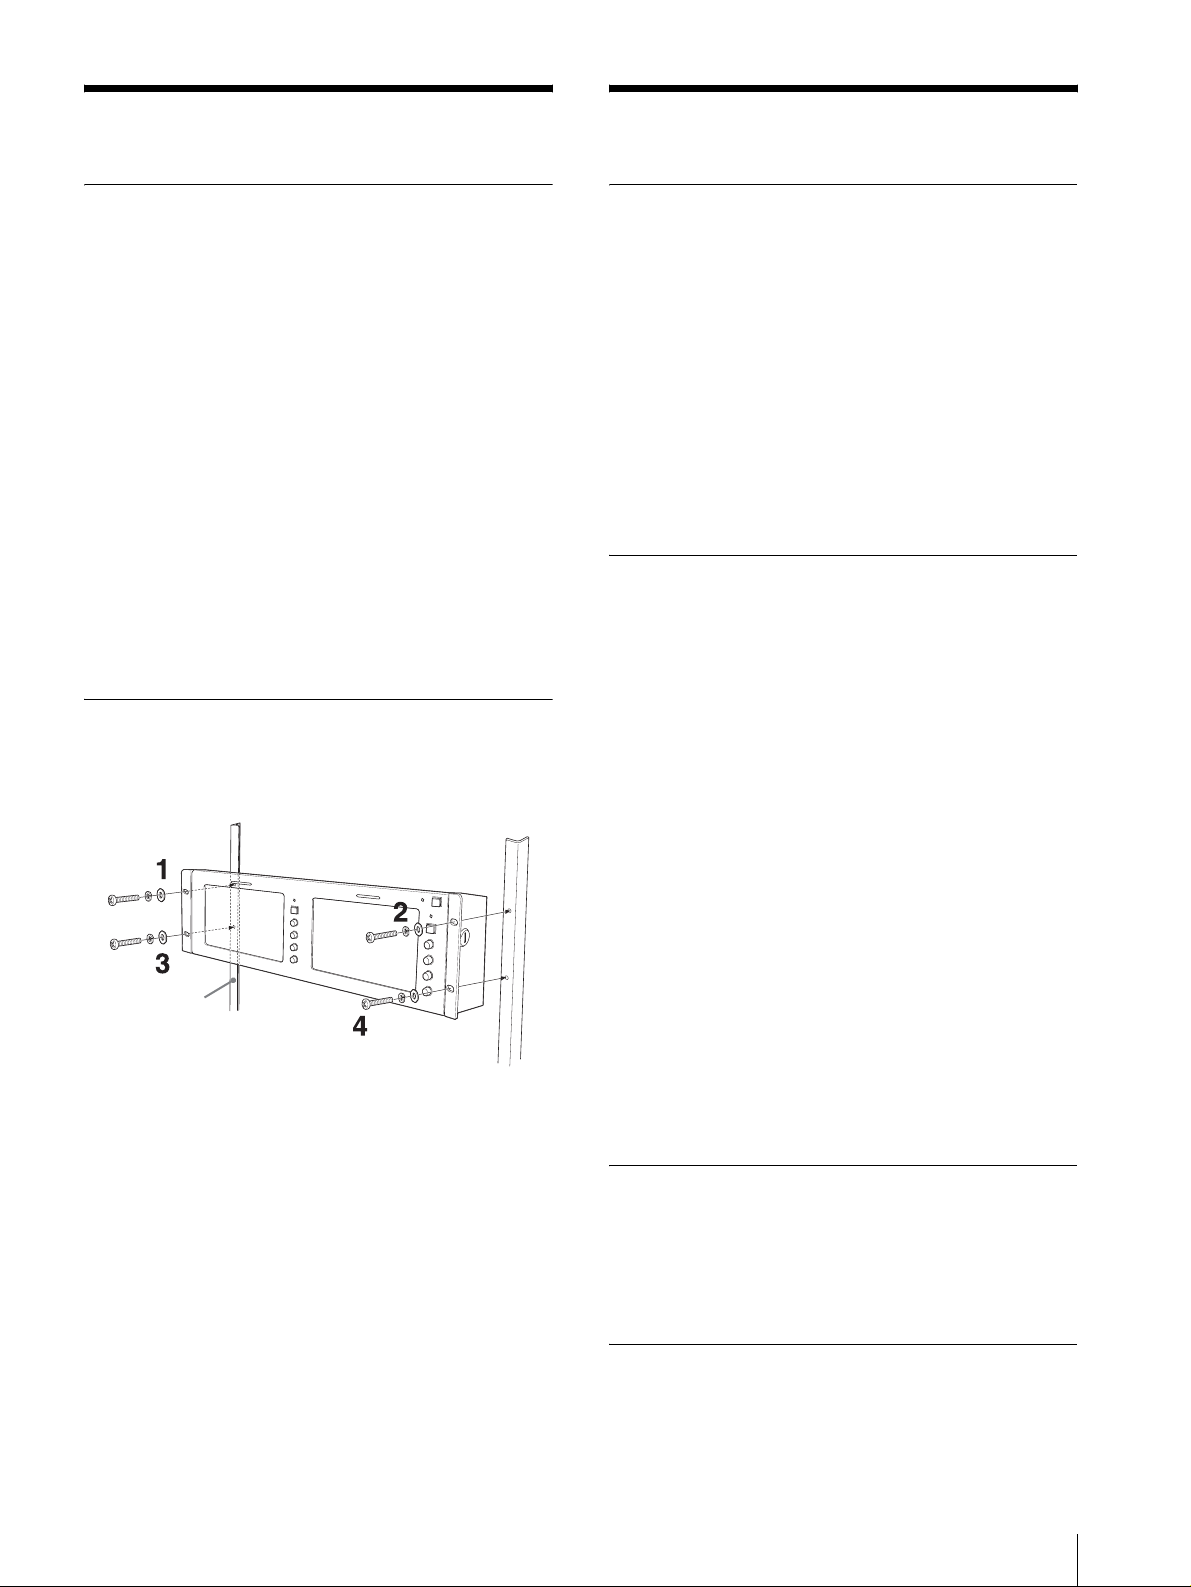
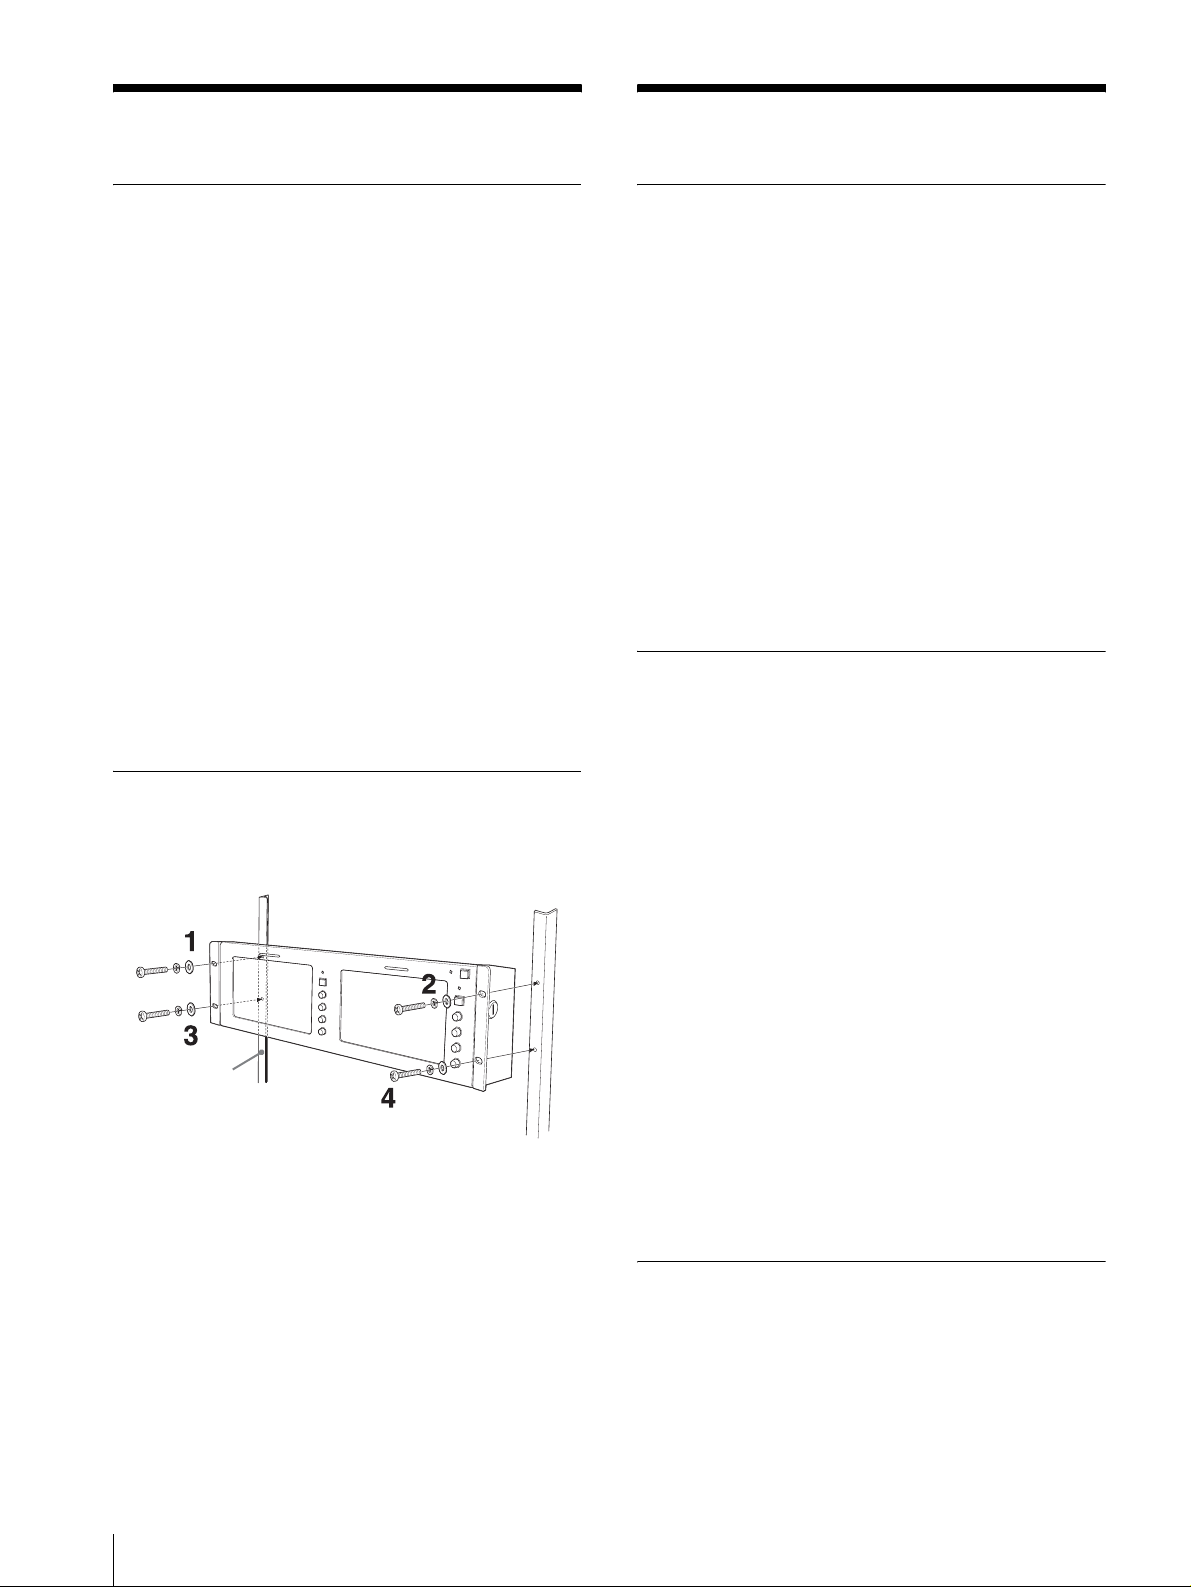
ラックに取り付けるには
ブラケット固定用のネジは図のように、先に上側のネジ
を取り付けてから下側のネジを取り付けてください。
ラック
使用上のご注意
設置に関する注意とお願い
下記の注意事項を守らないと発火、発
煙の原因となるほか、製品寿命を低下
させる原因ともなります。
本機は動作温度条件 0 ℃~ 35 ℃を想定して設
計されています。
設置にあたってはこの温度を超えないことをお
確かめください。
本機をラックやモニター棚に収納した際に、動
作温度条件を超える場合は、セットの上、下お
よび周辺機器との隙間を充分にあけ、条件内に
おさまるように配慮してください。
密封されるようなラックまたはコンソールにマ
ウントする場合は、ファンによる強制冷却が必
要になる場合があります。
液晶画面について
・ 液晶画面を太陽にむけたままにすると、液晶画面を痛め
てしまいます。窓際や室外に置くときなどはご注意くだ
さい。
・ 液晶画面を強く押したり、ひっかいたり、上にものを置
いたりしないでください。画面にムラが出たり、液晶パ
ネルの故障の原因になります。
・ 寒い所でご使用になると、横縞が見えたり、画像が尾を
引いて見えたり、画面が暗く見えたりすることがありま
すが、故障ではありません。温度が上がると元に戻りま
す。
・ 静止画を継続的に表示した場合、残像を生じることがあ
りますが、時間の経過とともに元に戻ります。
・ 使用中に画面やキャビネットがあたたかくなることがあ
りますが、故障ではありません。
輝点・滅点について
画面上に常時点灯している輝点(赤、青、緑など)や滅
点がある場合があります。
液晶パネルは非常に精密な技術で作られており、99.99
%以上の有効画素がありますが、ごくわずかの画素欠け
や常時点灯する画素があります。
JP
設置 / 使用上のご注意
6
お手入れのしかた
・ お手入れをする前に、必ず電源プラグをコンセントから
抜いてください。
・ モニターの画面は特殊加工がされていますので、なるべ
く画面にふれないようにしてください。また画面の汚れ
Page 7

を拭きとるときは、乾いた柔らかい布で拭き取ってくだ
さい。
・ シンナー、ベンジンなどは使わないでください。変質す
ることがあります。
・ 化学ぞうきんをご使用の際は、その注意書きに従ってく
ださい。
・ 殺虫剤のような揮発性のものをかけたり、ゴムやビニー
ル製品に長時間接触させると、変質することがありま
す。
軽量薄型と AC パワーアダプター搭載機能
軽量薄型設計のため放送中継車への重量負荷が軽減され、
より広い作業空間が得られます。また、AC パワーアダプ
ターをモニター背面に搭載できるなど、実際のシステム
運用に細かく配慮した設計を施しています。
2 カラー方式に対応
NTSC、PAL の 2 カラー方式に対応しており、切り換え
は自動です。
電源接続について
付属の AC アダプターをお使いください。
アース接続は必ず電源プラグを電源につなぐ前に行って
ください。また、アース接続をはずす場合は、必ず電源
プラグを切り離してから行ってください。
廃棄するときは
・ 一般の廃棄物と一緒にしないでください。
ごみ廃棄場で処分されるごみの中にモニターを捨てない
でください。
・ 本機の蛍光管の中には水銀が含まれています。破棄の際
は、地方自治体の条例または規則に従ってください。
主な特長
LCD モニター LMD-7220W は EIA19 インチラックに
搭載できる 7 型ワイド 2 連モニター、LMD-5320 は 5.6
型 3 連モニター、LMD-4420 は 4 型 4 連モニターです。
SDI オプション入力機能
別売りのインプットアダプター (BKM-320D) を取り付け
ると SDI 信号も入力することができます。アダプターは
各画面ごとに接続できます。
省電力設計
LMD-7220W は約 23W、LMD-5320 は約 22W、
LMD-4420 は約 18W と消費電力が少なく、車載などの
際も発電容量を抑えることができます。
外部リモート機能
オプション入力(BKM-320D 取り付け時)とビデオ入力
の切り換え、タリーランプ、アスペクト(LMD-7220W
のみ)を外部機器を使って操作できます。
3 色タリーランプ
赤、緑、アンバーと 3 色表示できるタリーランプを搭載。
放送中かどうかなど各入力画像のモニタリング状態を瞬
時に把握できます。
アスペクト切り換え機能(LMD-7220W
高輝度 LCD パネル
高輝度、高コントラストな LCD パネルの採用により、
様々な照明環境で鮮明に映像を再現できます。
チルト機構付ラックマウント機能
LMD-7220W、LMD-5320 は 3U サイズ、LMD-4420
は 2U サイズと EIA19 インチラックマウントに標準で搭
載でき、チルト機構が付いています。放送中継車など限
られた設置環境に、より多くの機器を搭載可能にした省
スペース設計です。
操作性、デザイン性を重視した操作部縦型
配列
操作部を縦型に配列し、下方向にチルトしたときの操作
性が損なわれません。
のみ)
ビデオ信号入力時に応じて 16:9 と 4:3 の画角を切り
換えることが可能です。
主な特長
JP
7
Page 8

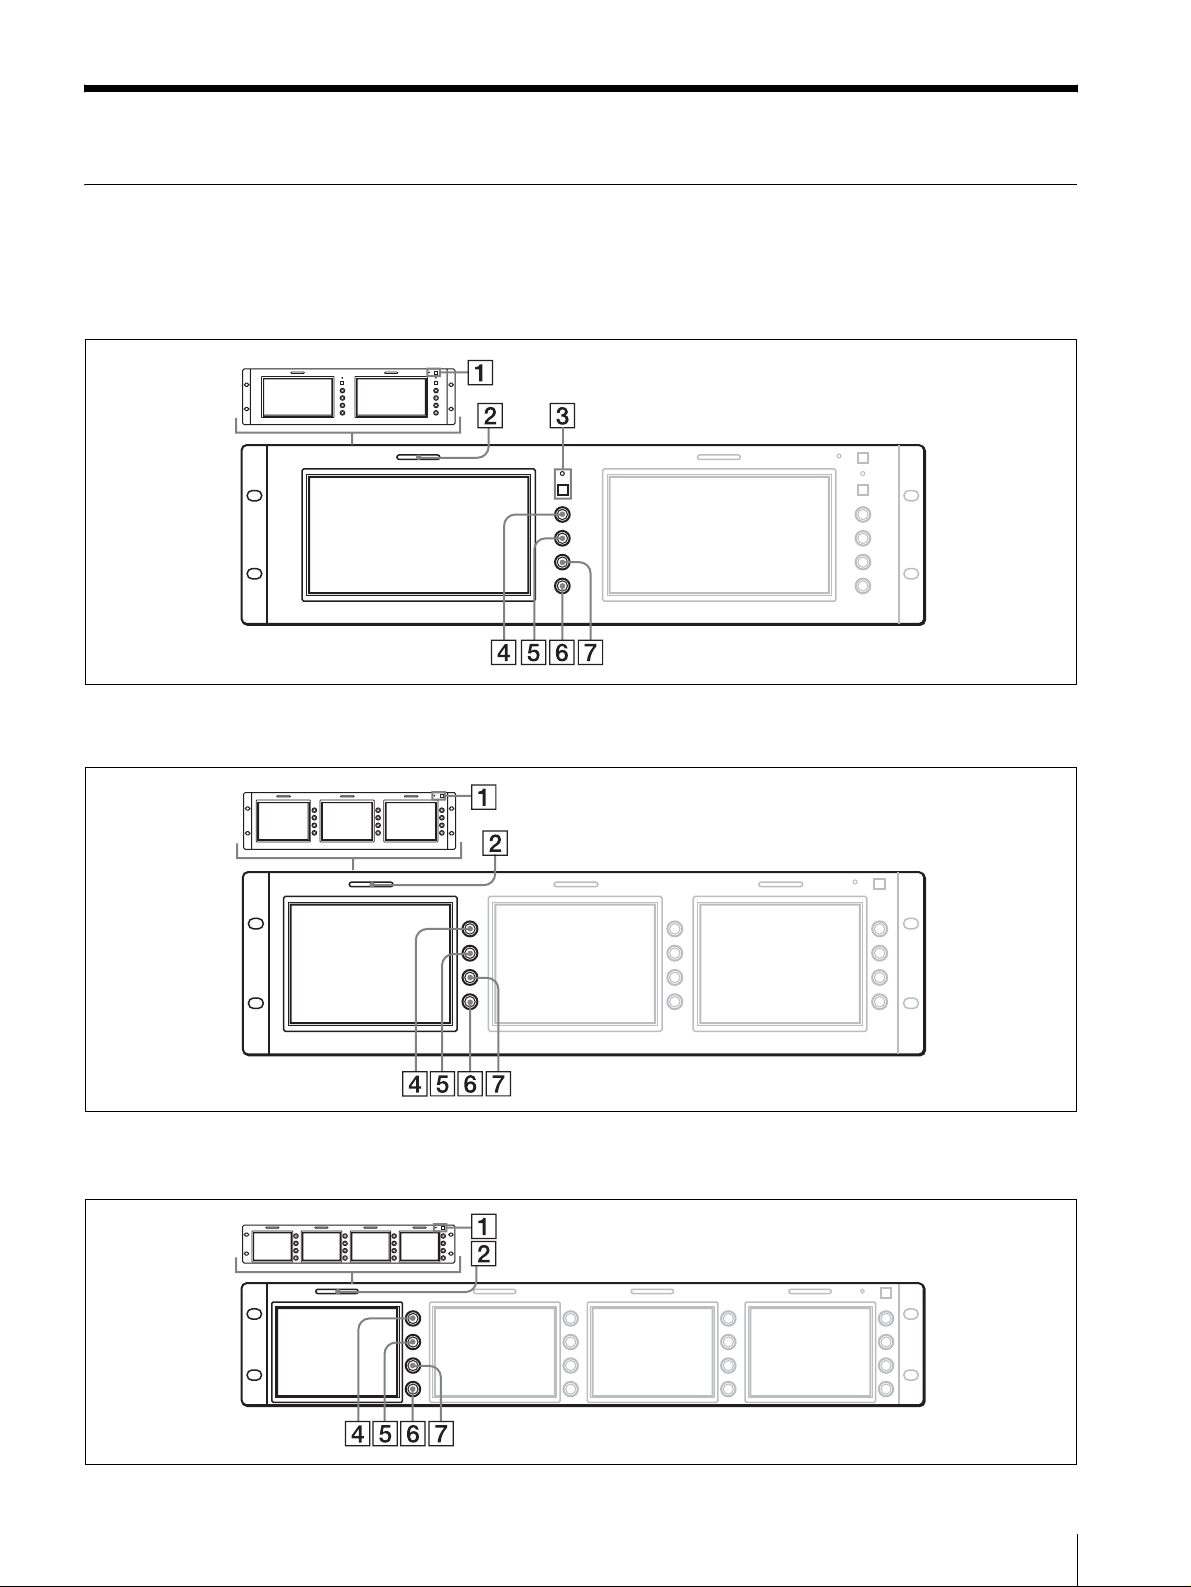
各部の名称と働き
前面
POWER スイッチとインジケーター以外は各画面ごとに付いています。
LMD-7220W
LMD-5320
LMD-4420
JP
各部の名称と働き
8
Page 9
A POWER(電源)スイッチとインジケーター
押すたびにモニターの電源を入/切します。電源が入る
とインジケーターが緑色に点灯します。
B タリーランプ
入力画面のモニター状態を色によって管理することがで
きます。
本機の REMOTE 端子に接続されている機器から赤 , 緑
のランプを点灯させることができ、赤と緑を同時に点灯
するとアンバーになります。
タリーランプを点灯させるには、タリー制御の配線が必
要です。
詳しくは 10 ページをご覧ください。
C アスペクトボタンとインジケーター(LMD-7220W
のみ)
画面のアスペクト(縦横比)を選びます。
このボタンを押すと画面のアスペクトが 4:3 に切り換
わり、インジケーターが点灯します。
D CONTRAST(コントラスト)調整つまみ
右に回すとコントラストが強くなり、左に回すと弱くな
ります。
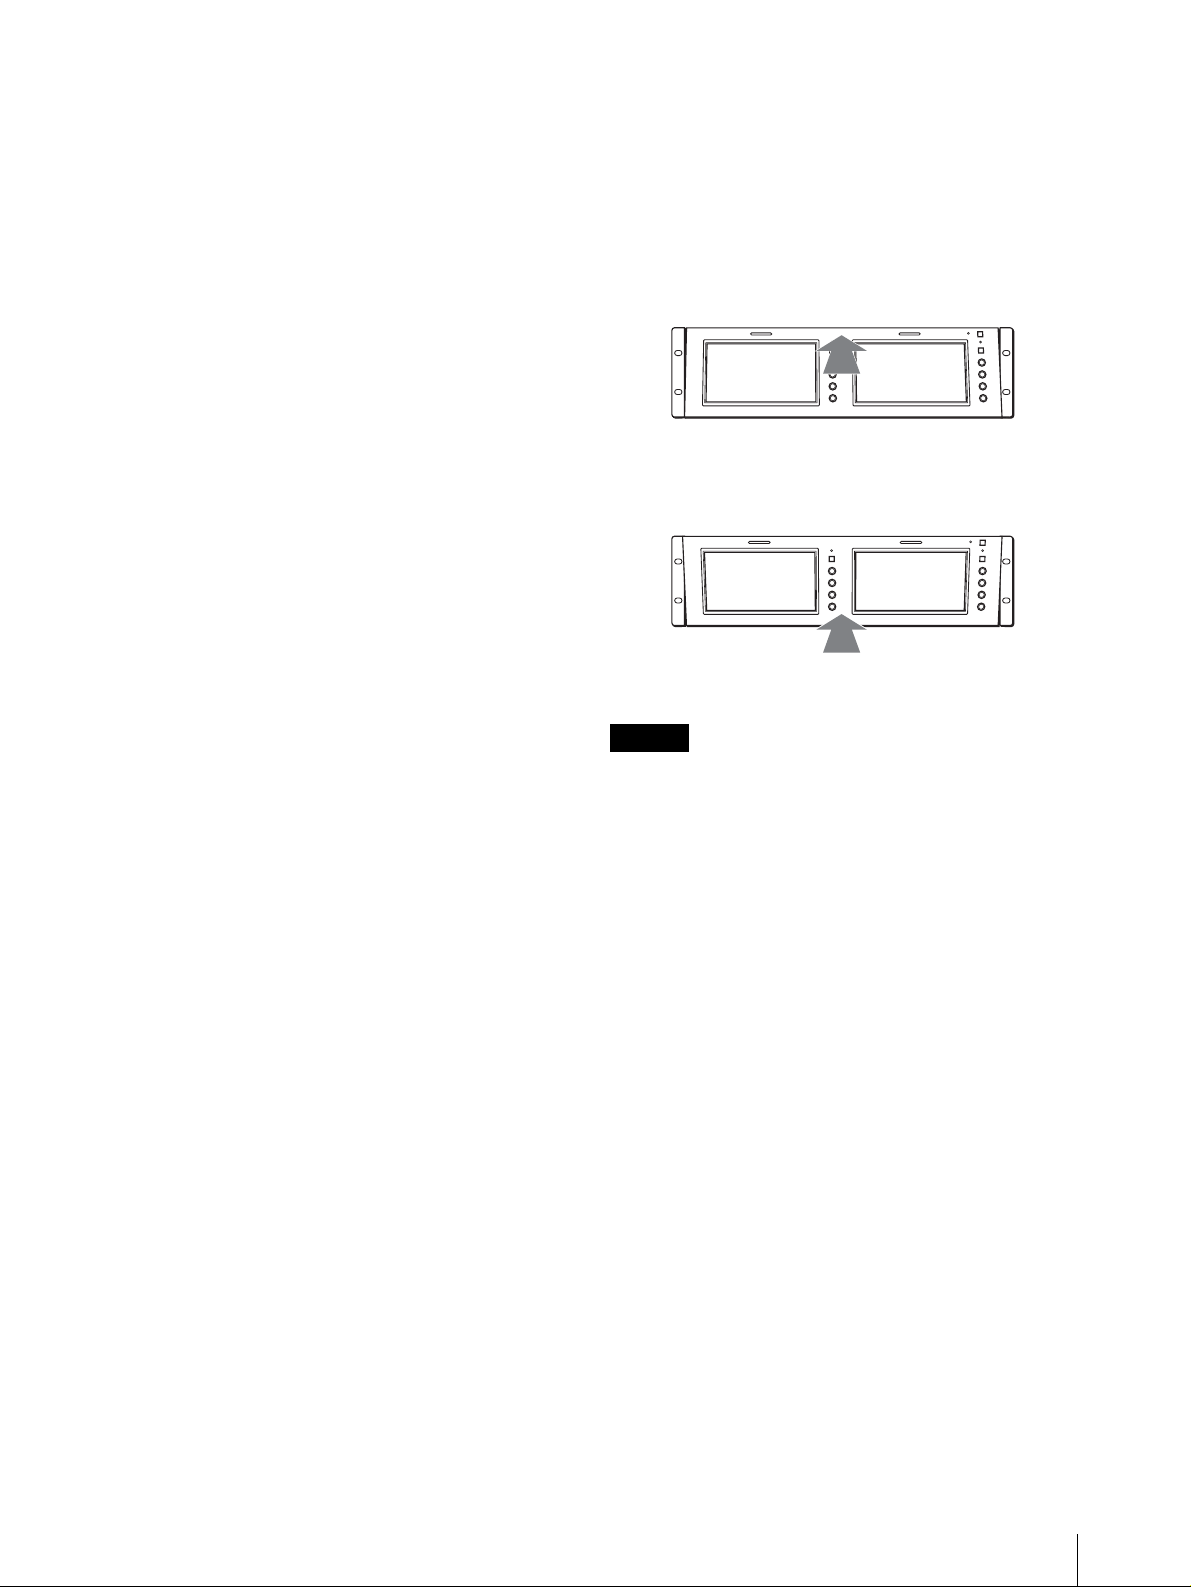
モニターの角度を調整するには
LMD-5320/7220W は上または下に 10 度まで、LMD4420 は上に 8 度、下に 10 度まで傾けてお使いいただ
けます。
上に向けたいとき
上部のまん中を押す。
下に向けたいとき
下部のまん中を押す。
E PHASE (色相)調整つまみ
この調整つまみは、NTSC カラ-方式の信号にだけ働
きます。
右へ回すと、肌色が緑がかります。
左へ回すと、肌色が紫がかります。
F BRIGHT(明るさ)調整つまみ
右へ回すと、画面が明るくなります。
左へ回すと、画面が暗くなります。
モニターの視野角を決めて画像が見にくい場合、明るさ
を調節すると画像が補正されて見やすくなる場合があり
ます。
G CHROMA(色の濃さ)調整つまみ
右へ回すと、色が濃くなります。
左へ回すと、色が薄くなります。
ご注意
アダプターを取り付けた状態でモニターを傾け、上下に
設置した機器とぶつかる場合は、AC アダプターホルダー
を取りはずしてください。
各部の名称と働き
JP
9
Page 10

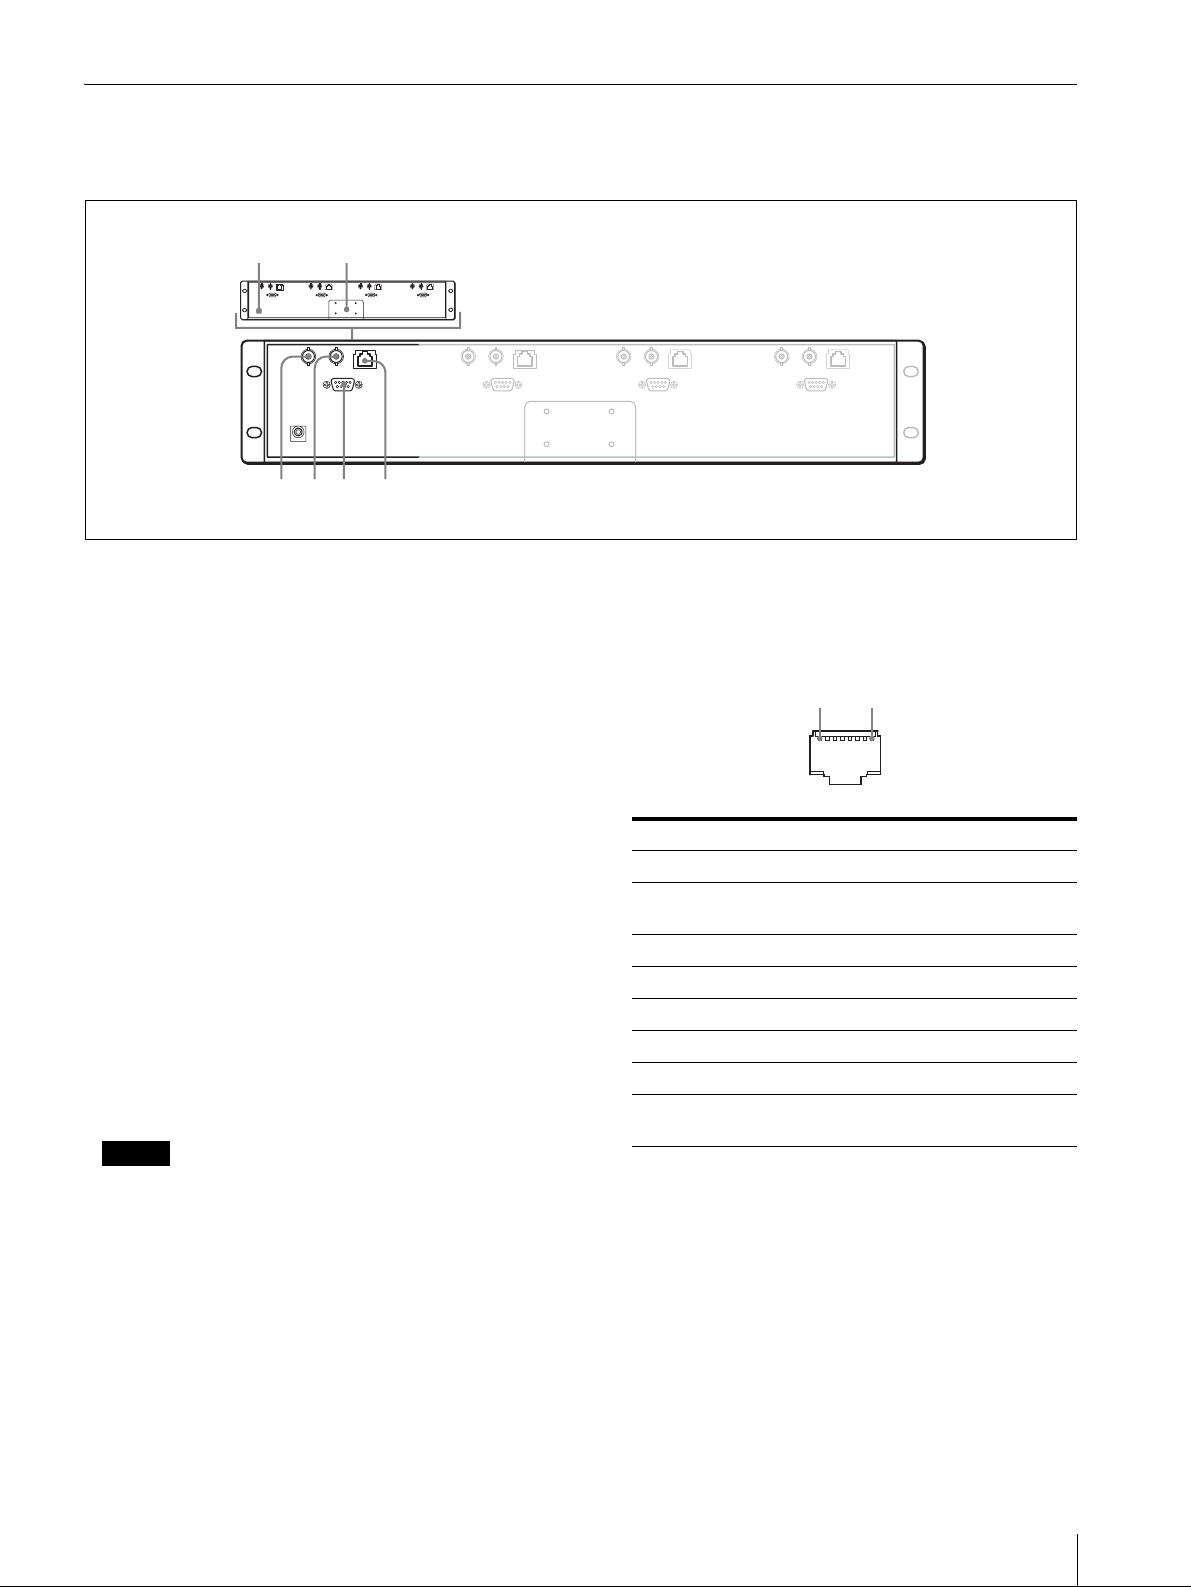
裏面
345 6
図は LMD-4420 です。
DC IN ジャックと AC アダプター取り付け部以外は各画面ごとに端子が付いています。
12
A DC IN ジャック
付属の AC アダプターを接続します。
B AC アダプタ-取り付け部
付属の AC アダプターを取り付けます。
C VIDEO IN(映像入力)端子(BNC 型)
ビデオデッキなどの映像出力端子と接続します。
OPTION IN 端子にインプットアダプター BKM-320D
を取り付けると、この端子は働かなくなります。
REMOTE 端子を使うとオプション入力(OPTION)
とビデオ入力(VIDEO)を切り換えることができます。
D VIDEO OUT(映像出力)端子(BNC 型)
VIDEO IN 端子に入力されている映像をル-プスル-
出力します。
75Ω に自動的に終端されます。
E OPTION IN(インプットアダプタ-入力)端子(D-
sub 9 ピン、メス)
別売りのソニーインプットアダプター BKM-320D を
取り付けると SDI 信号を入力できます。
ご注意
BKM-320D 以外の機器を取り付けないでください。取
り付けると故障の原因になります。
F REMOTE(リモート)端子(モジュラーコネク
ター)
パラレルコントロールスイッチを構成してモニターを外
部操作します。
ピン配列と機能の割り付けは以下のとおりです。
1 8
ピン番号 機能 (High y Low)
1 VIDEO IN (OFF y ON)*
2 OPTION IN (OFF y ON)*
3タリー赤(OFF y ON)
4タリー緑(OFF y ON)
5接地
6未接続
7未接続
8 16:9/4:3 切換 (16:9 y 4:3)**
* BKM-320D 装着時に機能する。両方のピンをショート
させているときは OPTION IN (SDI) が VIDEO IN に優
先します。
**LMD-7220W のみ
LMD-5320/4420: 未接続
JP
10
各部の名称と働き
以下のようにピンの設定を変えて、各機能を切り換えま
す。
High : 各ピンをオープンにする。
Low : 各ピンと 5 ピンをショートさせる。
Page 11
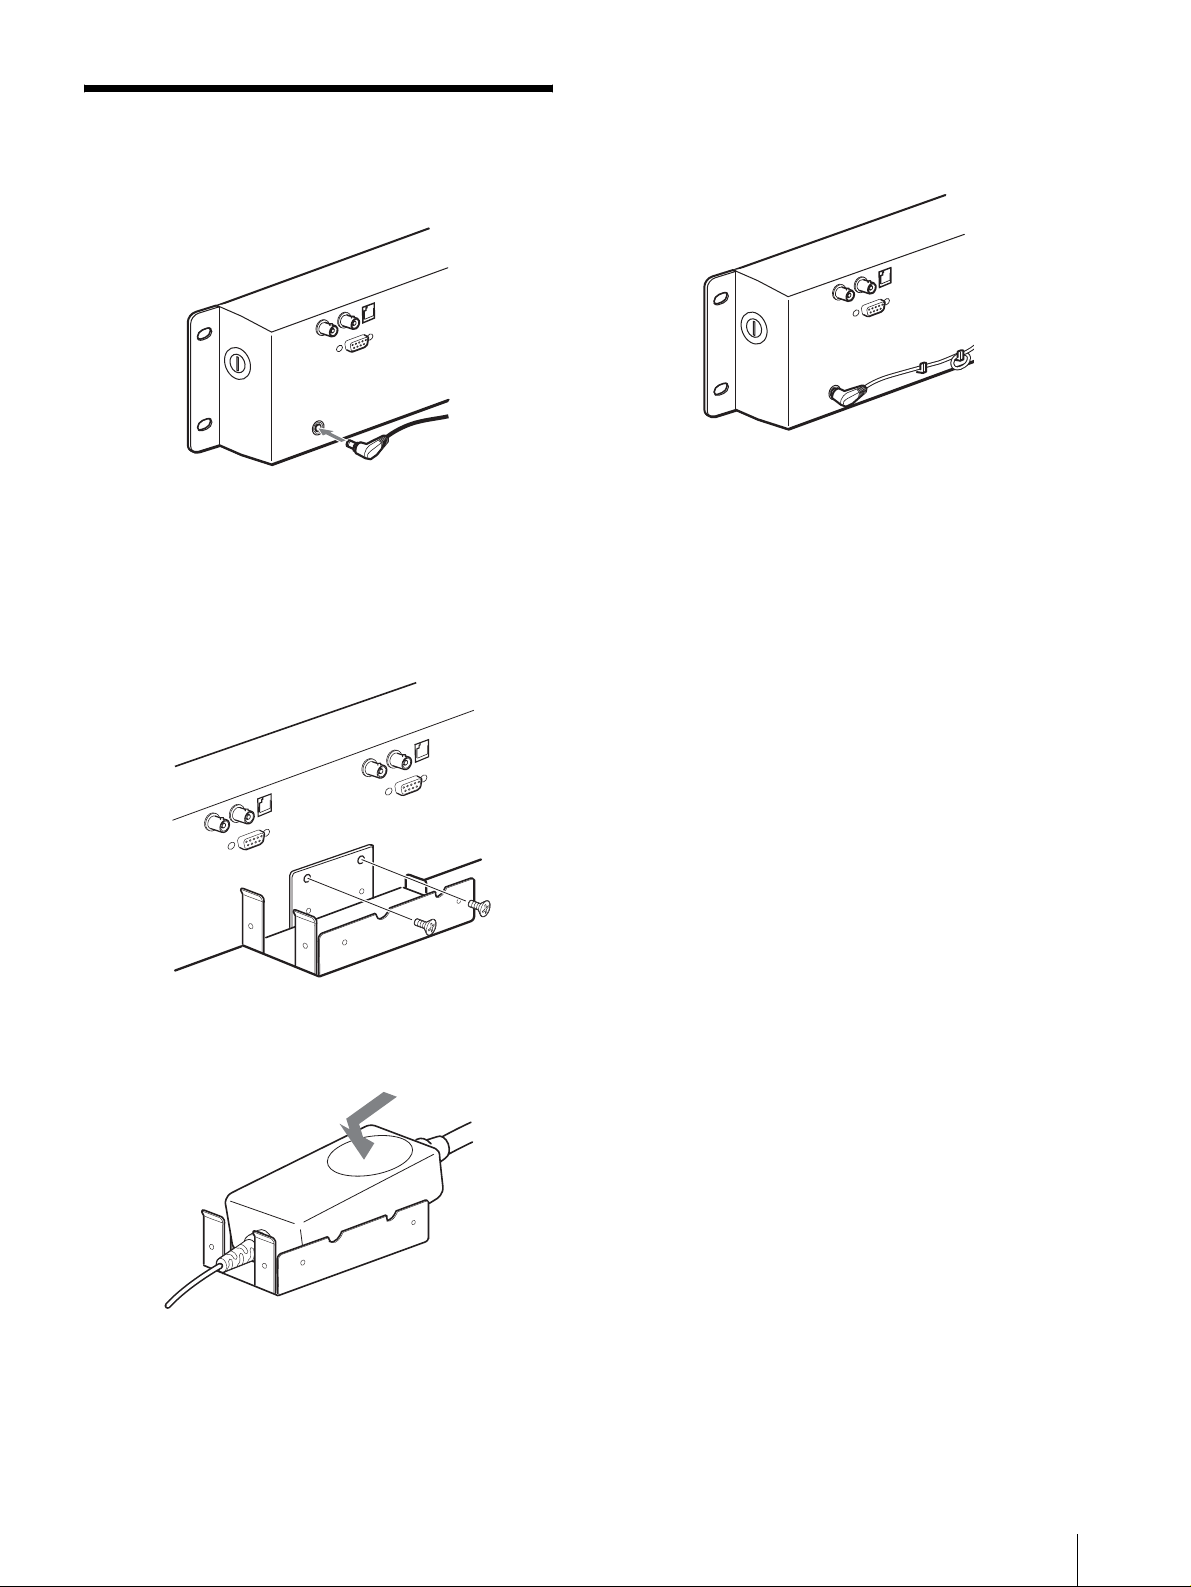
電源について
AC アダプターを接続します。
AC アダプターをモニターに取り付けると
き
1
付属の取り付け金具をモニター裏面に取り付ける。
AC アダプターのコードについて
次のようにまとめてください。
2
AC アダプターを取り付ける。
電源について
11
JP
Page 12

保証書とアフターサービ
主な仕様
ス
保証書
・ この製品には保証書が添付されていますので、お買い上
げの際お受け取りください。
・ 所定事項の記載内容をお確かめのうえ、大切に保存して
ください。
アフターサービス
調子が悪いときはまずチェックを
この説明書をもう一度ご覧になってお調べください。
それでも具合の悪いときはサービスへ
お買い上げ店、または添付の「ソニー業務用製品ご相談
窓口のご案内」にあるソニーサービス窓口にご相談くだ
さい。
保証期間中の修理は
保証書の記載内容に基づいて修理させていただきます。
詳しくは保証書をご覧ください。
保証期間経過後の修理は
修理によって機能が維持できる場合は、ご要望により有
料修理をさせていただきます。
画像系
LMD-7220W
LCD パネル a-Si TFT アクティブマトリックス
画面サイズ 7 型
154.1 × 86.6 × 176.7mm
(幅×高さ×対角)
解像度 480 × 234 ドット
有効画素率 99.99%
視野角 40° /65° /65° /65° (typical)
(上 / 下 / 左 / 右コントラスト 10:1)
アスペクト 16:9
表示色 フルカラー
LMD-5320
LCD パネル a-Si TFT アクティブマトリックス
画面サイズ 5.6 型
113.3 × 84.7 × 141.5mm
(幅×高さ×対角)
解像度 320 × 234 ドット
有効画素率 99.99%
視野角 50° /30° /50° /50° (typical)
(上 / 下 / 左 / 右コントラスト 10:1)
アスペクト 4:3
表示色 フルカラー
LMD-4420
LCD パネル a-Si TFT アクティブマトリックス
画面サイズ 4 型
82.1 × 61.8 × 102.8mm
(幅×高さ×対角)
解像度 480 × 234 ドット
有効画素率 99.99%
視野角 50° /30° /50° /50° (typical)
(上 / 下 / 左 / 右コントラスト 10:1)
アスペクト 4:3
表示色 フルカラー
JP
保証書とアフターサービス / 主な仕様
12
入/出力
LMD-7220W
VIDEO IN: BNC 型× 2、コンポジット 1 V
± 2 dB、同期負(75Ω 終端)
OUT: ループスルー BNC 型× 2、
VIDEO IN 端子のル-プスル-出力
(75Ω 自動終端)
P-P
Page 13

OPTION IN 端子
D-sub 9 ピン× 2
REMOTE 端子 モジュラーコネクター 8 ピン× 2(ピン
配列については 10 ページ参照)
LMD-5320
VIDEO IN: BNC 型× 3、コンポジット 1 V
P-P
± 2 dB、同期負(75Ω 終端)
OUT: ループスルー BNC 型× 3、
VIDEO IN 端子のル-プスル-出力
(75Ω 自動終端)
OPTION IN 端子
D-sub 9 ピン× 3
REMOTE 端子 モジュラーコネクター 8 ピン× 3(ピン
配列については 10 ページ参照)
LMD-4420
VIDEO IN: BNC 型× 4、コンポジット 1 V
P-P
± 2 dB、同期負(75Ω 終端)
OUT: ループスルー BNC 型× 4、
VIDEO IN 端子のル-プスル-出力
(75Ω 自動終端)
OPTION IN 端子
D-sub 9 ピン× 4
REMOTE 端子 モジュラーコネクター 8 ピン× 4(ピン
配列については 10 ページ参照)
一般
消費電力 LMD-7220W
最大:約 26 W(BKM-320D を 2 個取
り付け)
標準:約 23 W(入力アダプター取り付
け無し)
LMD-5320
最大:約 28 W(BKM-320D を 3 個取
り付け)
標準:約 22 W(入力アダプター取り付
け無し)
LMD-4420
最大:約 26 W(BKM-320D を 4 個取
り付け)
標準:約 18 W(入力アダプター取り付
け無し)
電源 DC 12V(付属の AC アダプター使用)
動作条件 温度 0
~+35℃
湿度 30 ~ 85%(結露のないこと)
気圧 700
保存/輸送条件 温度
~ 1,060hPa
− 10 ~+40℃
湿度 0 ~ 90%
気圧 700
~ 1,060hPa
最大外形寸法 LMD-7220W:約 482 × 133 × 47
mm(幅×高さ×奥行き)
LMD-5320:約 482 × 133 × 47
mm(幅×高さ×奥行き)
LMD-4420:約 482 × 88.1 × 47
mm(幅×高さ×奥行き)
質量 LMD-7220W:約 2.3 kg
LMD-5320:約 2.3 kg
LMD-4420:約 1.9 kg
付属品 AC アダプター (1)
AC アダプターホルダー (1)
アダプター取り付けねじ (2)
AC コード
保証書 (1)
取扱説明書 (1)
ソニー業務用製品ご相談窓口のご案内
(1)
別売りアクセサリー
インプットアダプター BKM-320D
本機の仕様および外観は、改良のため予告なく変更する
ことがありますが、ご了承ください。
この装置は、情報処理装置等電波障害自主規制協議会
(VCCI) の基準に基づくクラス A 情報技術装置です。
この装置を家庭環境で使用すると電波障害を引き起こ
すことがあります。この場合には使用者が適切な対策
を講ずるよう要求されることがあります。
電源接続時のご注意
それぞれの地域に合った電源コードをお使いください。
アメリカ合衆国、カナダ ヨーロッパ諸国 イギリス、アイルランド、
プラグ型名 VM0233 COX-07/636
コネクタ型名 VM0089 COX-02/VM0310B VM0303B YC-13
コード型名 SVT H05VV-F CEE (13) 53rd (O.C) VCTF
定格電圧・電流 10A/125V 10A/250V 10A/250V 7A/125V
安全規格 UL/CSA VDE VDE 電安
1)プラグに関しては各国規制に適合し、使用に適した定格のものを使用してください。
オーストラリア、ニュージーランド
1)
⎯
日本
YP332
主な仕様
13
JP
Page 14
WARNING
Owner's Record
The model and serial numbers are located at the rear.
Record these number in the space provided below.
Refer to these numbers whenever you call upon your
Sony dealer regarding this product.
Model No. ____________________
Serial No. ____________________
To prevent fire or shock hazard, do not expose the unit to
rain or moisture.
Dangerously high voltages are present inside the unit.
Do not open the cabinet. Refer servicing to qualified
personnel only.
In the event of a malfunction or when maintenance is
necessary, consult an authorized Sony dealer.
This unit contains substances which can pollute the
environment if disposed carelessly. Please contact our
nearest representative office or your local environmental
office in case of disposal of this unit.
Power Switch
The power switch is a functional switch only.
To isolate the set from the mains supply remove the
mains plug from the wall socket.
CAUTION
Danger of explosion if battery is incorrectly replaced.
Replace only with the same or equivalent type
recommended by the manufacturer.
Dispose of used batteries according to the
manufacturer’s instructions.
For customers in Canada
This Class A digital apparatus complies with Canadian
ICES-003.
For the customers in Europe
This product with the CE marking complies with the
EMC Directive (89/336/EEC) issued by the
Commission of the European Community.
Compliance with this directive implies conformity to the
following European standards:
• EN55103-1: Electromagnetic Interference (Emission)
• EN55103-2: Electromagnetic Susceptibility
(Immunity)
This product is intended for use in the following
Electromagnetic Environment(s):
E1 (residential), E2 (commercial and light industrial),
E3 (urban outdoors) and E4 (controlled EMC
environment, ex. TV studio).
For the Customers in the USA
This equipment has been tested and found to comply
with the limits for a Class A digital device, pursuant to
Part 15 of the FCC Rules. These limits are designed to
provide reasonable protection against harmful
interference when the equipment is operated in a
commercial environment. This equipment generates,
uses, and can radiate radio frequency energy and, if not
installed and used in accordance with the instruction
manual, may cause harmful interference to radio
communications. Operation of this equipment in a
residential area is likely to cause harmful interference in
which case the user will be required to correct the
interference at his own expense.
You are cautioned that any changes or modifications not
expressly approved in this manual could void your
authority to operate this equipment.
This device complies with Part 15 of the FCC Rules.
Operation is subject to the following two conditions: (1)
This device may not cause harmful interference, and (2)
this device must accept any interference received,
including interference that may cause undesired
operation.
This product contains mercury. Disposal of this product
may be regulated if sold in the United States. For
disposal or recycling information, please contact your
local authorities or the Electronics Industries Alliance
(www.eiae.org http://www.eiae.org).
Be sure to connect the AC power cord to a grounded
outlet.
Warning on power connection
Use a proper power cord for your local power supply
The United States,
Canada
Plug type VM0233 COX-07/636
Female end VM0089 COX-02/VM0310B VM0303B
Cord type SVT H05VV-F CEE(13)53rd (O, C)
Rated Voltage &
Current
Safety approval UL/CSA VDE VDE
10A/125V 10A/250V 10A/250V
Continental Europe UK, Ireland, Australia,
1) Use an appropriate rating plug which is applied to local regulations.
GB
2
New Zealand
_ 1)
Page 15

Attention-when the product is installed in Rack:
1.Prevention against overloading of branch
circuit:
When this product is installed in a rack and is supplied
power from an outlet on the rack, please make sure that
the rack does not overload the supply circuit.
2.Providing protective earth:
When this product is installed in a rack and is supplied
power from an outlet on the rack, please confirm that the
outlet is provided with a suitable protective earth
connection.
3.Internal air ambient temperature of the rack:
When this product is installed in a rack, please make
sure that the internal air ambient temperature of the rack
is within the specified limit of this product.
4.Prevention against achieving hazardous
condition due to uneven mechanical loading:
When this product is installed in a rack, please make
sure that the rack does not achieve hazardous condition
due to uneven mechanical loading.
5.Install the equipment while taking the
operating temperature of the equipment into
consideration:
Please ensure the amount of air flow required for safe
operation of this product. For the operating temperature
of the equipment, refer to the specifications of the
Operation Manual.
GB
3
Page 16

Table of Contents
Installation ..............................................................5
Cautions ..............................................................5
Installing to the rack ...........................................5
Precautions .............................................................5
On safety .............................................................5
Handling the LCD screen ...................................5
About the fluorescent tube ..................................5
Maintenance ........................................................5
Disposal of the unit .............................................6
Features ...................................................................6
Location and Function of Parts and Controls .....7
Front Panel ..........................................................7
Rear .....................................................................9
Power Sources ......................................................10
Specifications ........................................................11
About this manual
The instructions in this manual are for the following
three models:
• LMD-4420 (4 type)
• LMD-5320 (5.6 type)
• LMD-7220W (7 type)
Any differences in operation are clearly indicated in
the text.
4
Page 17
Installation
Precautions
Cautions
• Prevent internal heat build-up allowing adequate air
circulation.
Do not place the unit on surfaces (rugs, blankets, etc.)
or near materials (curtains, draperies) that may block
the ventilation holes.
• Do not install the unit near heat sources such as
radiators or air ducts, or in a place subject to direct
sunlight, excessive dust, mechanical vibration or
shock.
• Do not place the monitor near equipment which
generates magnetism, such as a transformer or high
voltage power lines.
• Use the unit under an operating temperature of 0°C to
35°C (32°F to 95°F).
• When the unit is installed on the rack or on a shelf,
leave the space above and beneath the unit and
between the unit and other equipment.
• Use a fan to cool the unit if the spaces are small.
Installing to the rack
First secure the upper screws and then the lower ones, as
illustrated below.
Rack
On safety
• Operate the unit on 100 - 240 V AC only.
• The nameplate indicating operating voltage, power
consumption, etc. is located on the rear.
• Should any solid object or liquid fall into the cabinet,
unplug the unit and have it checked by qualified
personnel before operating it any further.
• Unplug the unit from the wall outlet if it is not to be
used for several days or more.
• To disconnect the AC power cord, pull it out by
grasping the plug. Never pull the cord itself.
• The socket-outlet shall be installed near the equipment
and shall be easily accessible.
Handling the LCD screen
• Bright or dark points of lights (red, blue or green) may
appear on the LCD screen. This is not a malfunction.
The LCD screen is made with high-precision
technology and more than 99.99 % of the picture
element is intact. However, some of the picture
element may not appear or some of the picture element
may appear constantly.
• Do not leave the LCD screen facing the sun as it can
damage the LCD screen. Take care when you place
the unit by a window.
• Do not push or scratch the LCD monitor’s screen. Do
not place a heavy object on the LCD monitor’s screen.
This may cause the screen to lose uniformity.
• If the unit is used in a cold place, the horizontal lines
or a residual image may appear on the screen. This is
not a malfunction. When the monitor becomes warm,
the screen returns to normal.
• If a still picture is displayed for a long time, a residual
image may appear. The residual image will eventually
disappear.
• The screen and the cabinet become warm during
operation. This is not a malfunction.
About the fluorescent tube
A specially designed fluorescent tube is installed as the
lighting apparatus for this unit. If the LCD screen
becomes dark, unstable or does not turn on, consult your
Sony dealer.
Maintenance
• Clean the cabinet, panel and controls with a soft cloth
lightly moistened with a mild detergent solution. Do
Installation / Precautions
GB
5
Page 18

not use any type of abrasive pad, scouring powder or
solvent, such as benzine.
• Do not rub, touch, or tap the surface of the screen with
sharp or abrasive items such as a ball-point pen or
screwdriver. This type of contact may result in a
scratched picture panel.
• Clean the screen with a soft cloth. If you use a glass
cleaning liquid, do not use any type of cleaner
containing an antistatic solution or similar additive as
this may scratch the screen’s coating.
Disposal of the unit
• Do not dispose of the unit with general waste. Do not
include the monitor with household waste.
• The fluorescent tube includes mercury. Dispose of the
monitor in accordance with the regulations of your
local sanitation authority.
If you have any questions about this unit, contact your
authorized Sony dealer.
an AC power adaptor can be installed to the rear of the
monitor for easy use.
Two color system available
The monitor can display NTSC and PAL signals. The
appropriate color system is selected automatically.
SDI optional input function
SDI signals can be available when input adaptor BKM320D (optional) is attached. The adaptor can be
attached to each monitor.
Energy-saving design
Because of the low power consumption LMD-7220W
23W, LMD-5320 22W and LMD-4420 18W electric
power, the generation in an OB vehicle is reduced.
Remote function
The switching of an optional input (when BKM-320D is
connected) and video input, tally lamp and aspect ratio
(LMD-7220W only) can be controlled by an external
equipment.
Features
Two 7-type wide LCD panels are mounted for LMD7220W, three 5.6-type LCD panels are mounted for
LMD-5320 and four 4-type LCD panels are mounted for
LMD-4420.
High brightness LCD panel
Because the monitor uses high brightness and high
contrast technology, it can be used under various
lighting conditions.
Rack mount monitors with tilt function
LMD-7220W and LMD-5320 are mounted to a 3U size
rack and LMD-4420 is mounted to a 2U size rack. All
the monitors are equipped with tilt function. They can
be installed to a 19-inch standard rack. They are
essential when space is at a premium in crowded OB
vehicles.
Vertical arrangement of controls for easy
operation and unitary layout
The controls of three models are laid out vertically and
have a unitary design. When the monitor is tilted
downward, it is easy to operate.
3-color tally lamp
The tally lamp lights in red, green or amber to monitor
each input picture and check the on-air mode. The tally
function can be operated with the remote function.
Aspect setting (LMD-7220W only)
You can set the monitor to 16:9 or 4:3 when a video
signal is input.
Lightweight, thin design/AC power
adaptor mount function
The lightweight, thin design reduces the load for an OB
vehicle and the space needed for the equipment. Also,
GB
6
Features
Page 19
Location and Function of Parts and Controls
Front Panel
Each panel is equipped with buttons and controls other than the POWER switch and indicator.
LMD-7220W
LMD-5320
LMD-4420
Location and Function of Parts and Controls
GB
7
Page 20
A POWER switch and indicator
Each time you press the switch, the power is turned on
or off. When the power is turned on, the indicator
lights in green.
Adjusting the viewing angle
You can adjust the viewing angle of LMD-5320/7220W
up to 10 degrees upward or downward and LMD-4420
up to 8 degrees upward or 10 degrees downward.
B Tally lamp
You can check the status of the monitor that the signal
is input by the color.
The lamp lights in red or green by signals from the
equipment connected to the REMOTE connector.
When red and green signals are input, the lamp lights
in amber.
The pins on the REMOTE connector are used to
control the tally lamp.
For details, see page 9.
C Aspect select button and indicator (LMD-
7220W only)
Sets the aspect ratio of the picture. When the button is
pressed, the aspect ratio of the picture is set to 4
:3 and
the indicator lights.
D CONTRAST control
Turn this control clockwise to make the contrast
higher or counterclockwise to make it lower.
E PHASE control
This control is effective only for the NTSC color
system.
Turn it clockwise to make the skin tones greenish or
counterclockwise to make them purplish.
F BRIGHT (brightness) control
Turn this control clockwise to increase the brightness
or counterclockwise to decrease it.
Indistinctness of the picture when the viewing angle of
the monitor is adjusted may be compensated by
adjusting the brightness.
Adjusting upward
Press the center top.
Adjusting downward
Press the center bottom.
NOTE
When the AC adaptor is attached to the monitor and the
angle is adjusted, the AC adaptor may be touched to the
equipment set to upper or lower. Remove the AC
adaptor holder from the monitor.
G CHROMA control
Turn this control clockwise to increase the color
intensity or counterclockwise to decrease it.
GB
8
Location and Function of Parts and Controls
Page 21
Rear
345 6
The illustration refers to LMD-4420.
Each panel is equipped with connectors other than the DC IN jack and AC adaptor attachment.
12
A DC IN jack
Connect the supplied AC adaptor.
B AC adaptor attachment
Attach the supplied AC adaptor.
C VIDEO IN connector (BNC)
Connect to the video output connector of the VCR,
etc.
When input adaptor BKM-320D is connected to the
OPTION IN connector, this connector does not
function.
An optional input (OPTION) and video input
(VIDEO) can be switched by using the REMOTE
connector.
D VIDEO OUT connector (BNC)
Loop-through output of the VIDEO IN connector.
The connector is automatically terminated at 75 ohms.
E OPTION IN connector (D-sub 9 pin, female)
When optional Sony input adaptor BKM-320D is
connected, SDI signals are input.
NOTE
Do not install the other equipment than BKM-320D.
It causes to damage the unit or the equipment.
F REMOTE connector (modular)
Forms a parallel switch and controls the monitor
externally. The pin assignment and factory setting
function assigned to each pin are given below.
1 8
Pin number Function (High y Low)
1 VIDEO IN (OFF y ON)*
2 OPTION IN
(SDI)
3Tally Red(OFF y ON)
4 Tally Green (OFF y ON)
5 Ground
6N.C
7N.C
8 16:9/4:3
Selectable
(OFF y ON)*
(16:9 y 4:3)**
*Functions when BKM-320D is connected. When
both pins are shorted, OPTION IN (SDI) is prior to
VIDEO IN.
**LMD-7220W only
LMD-5320/4420: N.C
To switch each function between high and low, change
pin connections in the following way.
High: Leave each pin open.
Low: Short each pin and 5-pin at the same time.
Location and Function of Parts and Controls
GB
9
Page 22

Power Sources
Connect the AC adaptor.
When attaching the AC adaptor to the
monitor
1
Install the supplied bracket to the rear of the
monitor.
About the AC adaptor cord
Clamp the cord as illustrated.
GB
10
2
Attach the AC adaptor.
Power Sources
Page 23

Specifications
Picture performance
LMD-7220W
LCD Panel a-Si TFT Active Matrix
Picture size 7 type
154.1
× 86.6 × 176.7 mm (W/H/
Diagonal)
1
(6
/8 × 31/2 × 7 inches)
Resolution 480
Pixel efficiency 99.99 %
Viewing angle 40°/65°/65°/65° (typical)
Aspect ratio 16:9
Colors Full color
LMD-5320
LCD Panel a-Si TFT Active Matrix
Picture size 5.6 type
Resolution 320
Pixel efficiency 99.99 %
Viewing angle 50°/30°/50°/50° (typical)
Aspect ratio 4:3
Colors Full color
LMD-4420
LCD Panel a-Si TFT Active Matrix
Picture size 4 type
Resolution 480
Pixel efficiency 99.99 %
Viewing angle 50°/30°/50°/50° (typical)
Aspect ratio 4:3
Colors Full color
Input/output
× 234 dots
(up/down/left/right contrast 10:1)
113.3
× 84.7 × 141.5 mm (W/H/
Diagonal)
1
(4
/2 × 33/8 × 55/8 inches)
× 234 dots
(up/down/left/right contrast 10:1)
82.1
× 61.8 × 102.8 mm (W/H/
Diagonal)
1
(3
/4 × 21/2 × 41/8 inches)
× 234 dots
(up/down/left/right contrast 10:1)
LMD-5320
VIDEO IN: BNC connectors (3), composite 1
Vp-p
± 2 dB, sync negative (75
ohms terminated)
OUT: BNC connectors (3), loop-
through (75 ohms terminated
automatically)
OPTION IN
D-sub 9-pin connectors (3)
REMOTE Modular connectors 8-pin (3) (See the
See the pin assignment on page 9
LMD-4420
VIDEO IN: BNC connectors (4), composite 1
Vp-p
± 2 dB, sync negative (75
ohms terminated)
OUT: BNC connectors (4), loop-
through (75 ohms terminated
automatically)
OPTION IN
D-sub 9-pin connectors (4)
REMOTE Modular connectors 8-pin (4) (See the
pin assignment on page 9.)
General
Power consumption
LMD-7220W
Maximum: Approx. 26W (with
2
×BKM-320D)
Standard: Approx. 23W (without
optional input adaptor)
LMD-5320
Maximum: Approx. 28W (with
3
×BKM-320D)
Standard: Approx. 22W (without
optional input adaptor)
LMD-4420
Maximum: Approx. 26W (with
4
×BKM-320D)
Standard: Approx. 18W (without
optional input adaptor)
Power requirement
12 V DC (with the supplied AC
adaptor)
When this product is operated by AC adaptor:
LMD-7220W
VIDEO IN: BNC connectors (2), composite 1
Vp-p
± 2 dB, sync negative (75
ohms terminated)
OUT: BNC connectors (2), loop-
through (75 ohms terminated
automatically)
OPTION IN
D-sub 9-pin connectors (2)
REMOTE Modular connectors 8-pin (2) (See the
pin assignment on page 9.)
Specifications
11
GB
Page 24

Peak inrush current
LMD-7220W
(1) Power ON, current probe method: 57 A (230V)
(2) Hot switching inrush current, measured in
accordance with European standard EN55103-1:
8 A (230 V)
LMD-5320
(1) Power ON, current probe method: 55 A (230V)
(2) Hot switching inrush current, measured in
accordance with European standard EN55103-1:
8 A (230 V)
LMD-4420
(1) Power ON, current probe method: 53 A (230V)
(2) Hot switching inrush current, measured in
accordance with European standard EN55103-1:
8 A (230 V)
Operating conditions
Temperature: 0 to 35
Humidity: 30 to 85 % (No
condensation)
Pressure: 700 to 1,060 hPa
Transport and storage conditions
Temperature: –10 to 40
104
°F)
Humidity: 0 to 90 %
Pressure: 700 to 1,060 hPa
Dimensions (w/h/d)
LMD-7220W: Approx. 482
mm (19
LMD-5320: Approx. 482
mm (19
LMD-4420: Approx. 482
mm (19
Mass LMD-7220W: Approx. 2.3 kg (5 lb 1
oz)
LMD-5320: Approx. 2.3 kg (5 lb 1 oz)
LMD-4420: Approx. 1.9 kg (4 lb 3 oz)
Accessories supplied
AC adaptor (1)
AC adaptor holder (1)
Screws for AC adaptor holder (2)
AC cord (1)
Warranty Card (1)
Operating Instructions (1)
Optional accessory
Input adaptor BKM-320D
× 5
× 5
× 3
°C (32 to 95°F)
°C (14 to
1
/4 × 17/8 inches)
1
/4 × 17/8 inches)
1
/2 × 17/8 inches)
× 133 × 47
× 133 ×47
× 88.1 ×47
GB
Design and specifications are subject to change without
notice
12
Specifications
Page 25

Specifications
13
GB
Page 26
AVERTISSEMENT
Afin d’éviter tout risque d’incendie ou d’électrocution,
ne pas exposer cet appareil à la pluie ou à l’humidité.
Des courants de hautes tensions dangereuses sont
présents à l’intérieur de cet appareil. Ne pas ouvrir le
coffret. Se reporter à un personal qualifié uniquement.
Dans le cas d’une défaillance ou de si un entretien est
nécessaire, consulter un revendeur Sony autorisé.
Cet appareil contient des substances susceptibles de
polluer l’environnement si elles ne sont pas éliminées de
façon conforme. Consultez votre bureau local de
préservation de l’environnement pour savoir comment
vous débarrasser de cet appareil.
Interrupteur général
L’interrupteur général est un interrupteur de
fonctionnement uniquement.
Pour isoler le système de l’alimentation secteur, retirez
la fiche d’alimentation de la pri se murale.
ATTENTION
Il y a un risque d’explosion en cas de remplacement
incorrent de la batterie.
Remplacer uniquement par une batterie de même type
ou de type équivalent recommandée par le constructeur.
Mettre les batteries usagées au rebu t conformément aux
instructions du fabricant.
Pour les utilisateurs du Canada
Cet appareil numérique de la classe A est conforme à la
norme NMB-003 du Canada.
Pour les clients européens
Ce produit portant la marque CE est conforme à la
Directive sur la compatabilit é électromagnétique (EMC)
(89/336/CEE) émise par la Commission de la
Communauté européene.
La conformité à cette directiv e impl iq ue la con f ormit é
aux normes européenes suivantes :
• EN55103-1 : Interférences électromagnétiques
(émission)
• EN55103-2 : Sensibilité électromagnétique
(immunité)
Ce produit est prévu pour être utilisé dans les
environnements électromagnétiques suivants:
E1 (résidentiel), E2, (commercial et industrie légère),
E3 (urbain extérieur) et E4 (environnement EMC
contrôlé ex. studio de télévision).
Raccordez le cordon d’alimentation à une prise murale
mise à la terre.
Avertissement sur le raccordement de l’alimentation
Utilisez un cordon d’alimentation approprié à la tension secteur locale
États-Unis, Canada Europa
continentale
Type de fiche VM0233 COX-07/636
Extrémité femelle VM0089 COX-02/VM0310B VM0303B
Type de cordon SVT H05VV-F CEE(13)53rd (O, C)
Te nsion et courant
nominaux
Agréation de
sécurité
10A/125V 10A/250V 10A/250V
UL/CSA VDE VDE
Royaume-Uni,
Irlande, Australie,
Nouvelle-Zélande
_ 1)
1) Utilisez une prise correspondant à la réglementation en vigueur dans votre région.
FR
2
Page 27
Table de matières
Installation ..............................................................4
Précautions ..........................................................4
Installation sur le rack .........................................4
Précautions .............................................................4
Sécurité ...............................................................4
Manipulation de l’écran LCD .............................4
Tube fluorescent ..................................................4
Entretien ..............................................................5
Mise au rebut du moniteur ..................................5
Caractéristiques .....................................................5
Emplacement et fonction des composants et
commandes .............................................................7
Panneau av ant .....................................................7
Arrière .................................................................9
Sources d’alimentation ........................................10
Spécifications ........................................................11
A propos de ce manuel
Les instructions contenues dans ce manuel concernent
les 3 modèles suivants :
• LMD-4420 (Type 4)
• LMD-5320 (Type 5,6)
• LMD-7220W (Type 7)
Toutes les différences de fonctionnement sont
indiquées clairement dans le texte.
FR
FR
3
Page 28
Installation
Précautions
Précautions
• Afin d’éviter toute surchauffe interne, assurez une
circulation d’air adéquate.
Ne placez pas l’appareil sur des surfaces textiles
(tapis, couvertures, etc.) ni à proximité de rideaux ou
de draperies susceptibles d’obstruer les orifices de
ventilation.
• N’installez pas l’appareil près d’une source de
chaleur, comme un radiateur ou une bouche d’air
chaud, ou dans un endroit exposé directement au
soleil, à de la poussière excessive, des vibrations ou
des chocs mécaniques.
• Ne placez pas le moniteur près d’un équipement
source de magnétisme tel qu’un transformateur ou des
lignes haute tension.
• Utilisez l’appareil à une température de
fonctionnement de 0 à 35°C (32 à 95°F).
• Lorsque l’appareil est monté sur le rack ou une
étagère, laissez un espace au-dessus et au-dessous de
l’appareil et entre l’appareil et un autre équipement.
• Utilisez un ventilateur pour refroidir l’appareil si les
dégagements sont réduits.
Installation sur le rack
Fixez d’abord les vis supérieures, puis les vis inférieures
comme illustré ci-dessous.
Rack
Sécurité
• Raccorder l’appareil à une prise secteur 100-240 V
uniquement.
• La plaquette signalétique indiquant la tension de
fonctionnement, la puissance consommée, etc., est
située à l’arrière de l’appareil.
• Si du liquide ou un objet quelconque ve nait à pénétrer
dans le châssis, débranchez l’appareil et faites-le
vérifier par un technicien qualifié a v ant de le remet tre
en service.
• Débranchez l’appareil de la prise murale si vous
n’avez pas l’intention de l’utiliser pendant plusieurs
jours.
• Pour débrancher le cordon, saisissez-le par la fiche.
Ne jamais tirer sur le câble proprement dit.
• La prise secteur doit se trouver à proximité de
l’appareil et être facile d’accès.
Manipulation de l’écran LCD
• Des points lumineux ou sombres (rouges, bleus ou
verts) peuvent apparaît re sur l’écran LCD. Il n e s’a git
pas d’une anomalie. L ’écran LCD est conçu selon une
technologie de fabrication de haute précision et plus
de 99,99% des pixels sont intacts. Cependant, une
partie des pixels peut ne pas s’afficher ou s’afficher
constamment.
• Ne laissez pas l’écran LCD exposé au soleil. Faites
attention si vous le placez près d’une fenêtre.
• Ne poussez ou ne rayez pas l’écran LCD du moniteur.
Ne posez pas d’objets lourds sur l’écran. Il risquerait
de ne plus être uniforme.
• Si le moniteur est utilisé dans un endroit frais, les
lignes horizontales ou une image résiduelle peuvent
apparaître sur l’écran. Il ne s’agit pas d’une anomalie.
Lorsque le moniteur chauffe, l’écran redevient
normal.
• Si une image fixe est affichée pendant un certain
temps, une image résiduelle peut apparaître. Cette
image résiduelle disparaît par la suite.
• L’écran et le châssis chauffent pendant l’utilisation du
moniteur. Il ne s’agit pas d’une anomalie.
FR
4
Installation / Précautions
Tube fluorescent
Un tube fluorescent conçu spécialement est installé
comme dispositif lumineux du moniteur . Si l’écran LCD
s’assombrit, devient instable ou ne s’allume pas,
consultez votre revendeur Sony.
Page 29

Entretien
• Nettoyez le châssis, le panneau et les commandes à
l’aide d’un chiffon doux légèrement imbibé d’une
solution détergente non agressive. N’utilisez pas de
tampon abrasif, poudre à récurer ou solvant tel que du
benzène.
• Ne frottez pas, ne touchez pas ou ne tapotez pas
l’écran avec des éléments pointus ou abrasifs tels
qu’un stylo à bille ou un tournevis. Ce type de contact
risquerait de rayer le panneau d’affichage.
• Nettoyez l’écran à l’aide d’un chiffon doux. Si vous
utilisez un liquide nettoyant à vitre, n’utilisez aucun
produit contenant une solution antistatique ou un
additif similaire qui risquerait de rayer le revêtement
de l’écran.
Mise au rebut du moniteur
• Ne mettez pas l’écran au rebut n’importe où. Ne le
mettez pas avec les ordures ménagères.
• Le tube fluorescent contient du mercure. Mettez le
moniteur au rebut en respectant la réglementati on des
autorités sanitaires locales.
Caractéristiques
Deux tablettes à cristaux liquides de type 7 sont
montées pour le moniteur LMD-7220W , trois tablettes
à cristaux liquides de type 5,6 pour le LMD-5320 et
quatre tablettes à cristaux liquides de type 4 pour le
LMD-4420.
Panneau LCD à luminosité élevée
Le moniteur utilisant une technologie de luminosité et
de contraste élevés, il peut être utilisé dans des
conditions de luminosité variées.
Moniteurs montés en rack avec fonction
d’inclinaison
Les moniteurs LMD-7220W et LMD-5320 sont montés
dans un rack de dimension 3U, le moniteur LMD-4420
dans un rack de dimension 2U. Tous les mo niteu rs sont
équipés de la fonction d’inclinaison. Ils peuvent être
installés dans un rack standard de 19 pouc es (48 cm), ce
qui peut être essentiel lorsque l’espace est précieux dans
des véhicules de transport encombrés.
Si vous avez des questions concernant ce moniteur,
contactez votre revendeur Sony agréé.
Disposition verticale des commandes
pour une utilisation aisée et une
présentation unitaire
Les commandes des trois modèles sont disposées
verticalement et sont conçues de manière unitaire.
Lorsque le moniteur est incliné vers le bas, il est facile à
utiliser.
Moniteur léger et mince/fonction de
montage d’adaptateur secteur
La conception du moniteur réduit son poids et la place
qu’il nécessite dans un véhicule de transport. Un
adaptateur secteur peut également être installé à l’arrière
de l’appareil afin de faciliter son utilisation.
Deux systèmes de couleur disponibles
Le moniteur peut aff icher des signaux NTSC et PAL. Le
système de couleur approprié est sélectionné
automatiquement.
Fonction d’entrée SDI en option
Des signaux SDI peuvent être disponibles si l’adaptateur
d’entrée BKM-320D en option est installé. Cet
adaptateur peut être rattaché à chaque moniteur .
Caractéristiques
FR
5
Page 30

Économie d’énergie
Grâce à la faible consommation électrique des
moniteurs LMD-7220W 23W, LMD-5320 22W et
LMD-4420 18W, le besoin de génération dans un
véhicule de transport est réduit.
Fonction distante
La commutation d’une entrée en option (si BKM-320D
est branché) et d’une entrée vidéo, le v oyant de pointage
et le rapport largeur/hauteur (LMD-7220W seulement)
peuvent être commandés par un appareil externe.
Voyant de pointage tricolore
Le voyant de pointage s’a llume en rouge, ve rt ou ambre
afin de contrôler chaque image d’entrée et de vérifier le
mode de passage à l’antenne. La fonction de pointage
peut être utilisée avec la fonction distante.
Réglage de la hauteur/largeur
(LMD-7220W uniquement)
Vous pouvez régler le moniteur sur le format 16:9 ou
4:3 lorsqu’un signal vidéo est entré.
FR
6
Caractéristiques
Page 31

Emplacement et fonction des composants et
commandes
Panneau avant
Chaque panneau est équipé de touches et de comman des en plus du commutateu r et du témoin d’aliment ation PO WER.
LMD-7220W
LMD-5320
LMD-4420
Emplacement et fonction des composants et commandes
FR
7
Page 32

A Commutateur et témoin d’alimentation
POWER
Appuyez sur le commutateur pour mettre le moni teur
sous ou hors tension. Lorsque le moniteur est sous
tension, le témoin est allumé en vert.
Réglage de l’angle de vision
Vous pouvez régler l’angle de vision du LMD-5300/
7220W jusqu’à 10 degrés vers le haut ou vers le bas et le
LMD-4420 jusqu’à 8 degrés vers le haut ou 10 degrés
vers le bas.
B Voyant de pointage
Vous pouvez déterminer par la couleur l’état du
moniteur où le signal est envoyé.
Le voyant s’allume en rouge ou en vert lorsque
l’appareil est raccordé au connecteur REMOTE.
Lorsque les signaux rouge et vert sont entrés, le voyant
s’allume en couleur ambre.
Les broches situées sur le connecteur REMOTE
permettent de contrôler le voyant de pointage.
Pour tout détail, voir page 9.
C Touche et témoin de sélection de la hauteur/
largeur (LMD-7220W uniquement)
Définit le format de l’image. Lorsque vous appuyez
sur cette touche, le format de l’image est réglé sur
et le témoin s’allume.
4:3
D Commande CONTRAST
Tournez cette commande dans le sens des aiguilles
d’une montre pour augmenter le contraste ou dans le
sens inverse pour le diminu er.
E Commande PHASE
Cette commande n’est prise en compte que pour le
système de couleur NTSC.
Tournez-la dans le sens des aiguilles d’une montre
pour rendre les tons de couleur chair verdâtre s ou dans
le sens inverse des aiguilles d’une montre pour les
rendre violâtres.
F Commande BRIGHT (luminosité)
Tournez cette commande dans le sens des aiguilles
d’une montre pour augmenter la luminosité ou da ns le
sens inverse pour la diminu er.
Il est possible de compenser une image floue lorsque
l’angle de vue du moniteur est réglé en ajustant la
luminosité.
Réglage vers le haut
Appuyez au centre en haut du moniteur.
Réglage vers le bas
Appuyez au centre en bas du moniteur.
REMARQUE
Lorsque l’adaptateur secteur est raccordé au moniteur et
lors du réglage de l’angle de vue, le moniteur peut
toucher l’adaptateur secteur. Retirez le support
d’adaptateur secteur du moniteur.
G Commande CHROMA
Tournez cette commande dans le sens des aiguilles
d’une montre pour augmenter l’intensité d e la couleur
ou dans le sens inverse pour la diminuer.
FR
8
Emplacement et fonction des composants et commandes
Page 33

Arrière
345 6
L’illustration présente le moniteur LMD-4420.
Chaque panneau est équipé de connecteurs en plus de la prise DC IN et de l’accessoire d’adaptateur secteur.
12
A Prise DC IN
Pour brancher l’adaptateur secteur fourni.
B Accessoire d’adaptateur secteur
Pour raccorder l’adaptateur secteur fourni.
C Connecteur VIDEO IN (BNC)
Pour brancher le connecteur de sortie vidéo du
magnétoscope, etc.
Si l’adaptateur d’entrée BKM-320D est raccordé au
connecteur OPTION IN en option, celui-ci ne
fonctionne pas.
Une entrée en option (OPTION) et une entrée vidéo
(VIDEO) peuvent être commutées en utilisant le
connecteur REMOTE.
D Connecteur VIDEO OUT (BNC)
Sortie en boucle du connecteur VIDEO IN.
La terminaison de ce connecteur est automatiquement
de 75 ohms.
E Connecteur OPTION IN (D-sub à 9 broches,
femelle)
Si l’adaptateur d’entrée en option Sony BKM-320D
est connecté, des signaux SDI sont entrés.
F Connecteur REMOTE (modulaire)
Forme un commutateur parallèle et commande le
moniteur en externe. L’affectation des broches et la
fonction de réglage d’usine af fectées à chaq ue broche
sont décrites ci-dessous.
1 8
Numéro de
broche
1 VIDEO IN (OFF y ON)*
2 OPTION IN
3 Pointage rouge (OFF y ON)
4 Pointage vert (OFF y ON)
5 Masse
6N.C
7N.C
8 16:9/4:3
Fonction (Mini y Maxi)
(OFF y ON)*
(SDI)
(16:9 y 4:3)**
sélectionnable
REMARQUE
Ne pas installer un appareil autre que BKM-320D
faute de quoi le système risque d’être endommagé.
*Fonctions lorsque BKM-320D est branché.
Lorsque les deux broches sont court-circuitées,
OPTION IN (SDI) vient avant VIDEO IN.
**LMD-7220W seulement
LMD-5320/4420 : N.C
Pour faire basculer chaque fonction entre mini et
maxi, modifier les connexions des broches de la
manière suivante.
Mini : Laisser chacune des broches ouvertes.
Maxi : Court-circuiter chaque broche et la broche 5 en
même temps.
Emplacement et fonction des composants et commandes
FR
9
Page 34

Sources d’alimentation
Brancher l’adaptateur secteur.
Branchement de l’adaptateur secteur au
moniteur
1
Installez le support fourni à l’arrière du moniteur.
A propos du cordon adaptateur secteur
Fixez le cordon comme illustré.
2
Raccordez l’adaptateur secteur.
FR
10
Sources d’alimentation
Page 35

Spécifications
Performances de l’image
LMD-7220W
Tablette LCD Matrice active TFT a-Si
Format d’image
Type 7
× 86,6 × 176,7 mm (L/H/
154,1
Diagonal)
1
/8 × 31/2 × 7 pouces)
(6
Résolution 480
Rendement des pixels
Angle de vue 40°/65°/65°/65° (type)
Rapport largeur/hauteur
Couleurs Toutes couleurs
LMD-5320
Tablette LCD Matrice active TFT a-Si
Format d’image
Résolution 320
Rendement des pixels
Angle de vue 50°/30°/50°/50° (type)
Rapport largeur/hauteur
Couleurs Toutes couleurs
× 234 points
99,99%
(contraste haut/bas/gauche/droit
10:1)
16:9
Type 5,6
× 84,7 × 141,5 mm (L/H/
113,3
Diagonal)
1
/2 × 33/8 × 5
(4
5
/8 pouces)
× 234 points
99,99%
(contraste haut/bas/gauche/droit
10:1)
4:3
Entrée/sortie
LMD-7220W
VIDEO IN : Connecteurs BNC (2), composite
1 Vp-p
(terminaison 75 ohms)
OUT : Connecteurs BNC (2), en
boucle (terminaison 75 ohms
automatique)
OPTION IN
Connecteurs à 9 broches D-sub (2)
REMOTE Connecteurs modulaires à 8 broches
(2) (Voir l’affectation des broches à
la page 9.)
LMD-5320
VIDEO IN : Connecteurs BNC (3), composite
1 Vp-p
(terminaison 75 ohms)
OUT : Connecteurs BNC (3), en
boucle (terminaison 75 ohms
automatique)
OPTION IN
Connecteurs à 9 broches D-sub (3)
REMOTE Connecteurs modulaires à 8 broches
(3) (Voir l’affectation des broches à
la page 9.)
LMD-4420
VIDEO IN : Connecteurs BNC (4), composite
1 Vp-p
(terminaison 75 ohms)
OUT : Connecteurs BNC (4), en
boucle (terminaison 75 ohms
automatique)
OPTION IN
Connecteurs à 9 broches D-sub (4)
REMOTE Connecteurs modulaires à 8 broches
(4) (Voir l’affectation des broches à
la page 9.)
± 2 dB, synchro négative
± 2 dB, synchro négative
± 2 dB, synchro négative
LMD-4420
Tablette LCD Matrice active TFT a-Si
Format d’image
Type 4
× 61,8 × 102,8 mm (L/H/
82,1
Diagonal)
1
/4 × 21/2 × 4
(3
Résolution 480
Rendement des pixels
Angle de vue 50°/30°/50°/50° (type)
Rapport largeur/hauteur
Couleurs Toutes couleurs
× 234 points
99,99%
(contraste haut/bas/gauche/droit
10:1)
4:3
1
/8 pouces)
Caractéristiques générales
Consommation électrique
LMD-7220W
Maximum : Environ 26 W (avec
×BKM-320D)
2
Standard : Environ 23 W (sans
adaptateur d’entrée en option)
LMD-5320
Maximum : Environ 28 W (avec
×BKM-320D)
3
Standard : Environ 22 W (sans
adaptateur d’entrée en option)
LMD-4420
Maximum : Environ 26 W (avec
×BKM-320D)
4
Standard : Environ 18 W (sans
adaptateur d’entrée en option)
Spécifications
11
FR
Page 36

Alimentation 12 V cc (avec l’adaptateur secteur
fourni)
Lorsque l’appareil est alimenté par l’adaptateur secteur :
Appel de courant de crête
LMD-7220W
(1) Mise sous tension (ON), méthode de sondage du
courant : 57 A (230 V)
(2) Appel de courant de commutation à chaud,
mesuré conformément à la norme européenne
EN55103-1 : 8 A (230 V)
LMD-5320
(1) Mise sous tension (ON), méthode de sondage du
courant : 55 A (230 V)
(2) Appel de courant de commutation à chaud,
mesuré conformément à la norme européenne
EN55103-1 : 8 A (230 V)
LMD-4420
(1) Mise sous tension (ON), méthode de sondage du
courant : 53 A (230 V)
(2) Appel de courant de commutation à chaud,
mesuré conformément à la norme européenne
EN55103-1 : 8 A (230 V)
Conditions d’utilisation
Température : 0 à 35
°C (32 à 95°F)
Humidité : 30 à 85% (Pas de
condensation)
Pression : 700 à 1 060 hPa
Conditions de transport et de stockage
T empérature : –10 à 40
°C (14 à 104°F)
Humidité : 0 à 90 %
Pression : 700 à 1 060 hPa
Dimensions (l/h/p)
LMD-7220W :
Environ 482
× 5
(19
× 133 × 47 mm
1
7
/4 × 1
/8 pouces)
LMD-5320 :
Environ 482
× 5
(19
× 133 × 47 mm
1
7
/4 × 1
/8 pouces)
LMD-4420 :
Environ 482
× 3
(19
× 88,1 × 47 mm
1
7
/2 × 1
/8 pouces)
Poids LMD-7220W :
Environ 2,3 kg (5 lb 1 oz)
LMD-5320 :
Environ 2,3 kg (5 lb 1 oz)
LMD-4420 :
Environ 1,9 kg (4 lb 3 oz)
Accessoires fournis
Adaptateur secteur (1)
Support d’adaptateur secteur(1)
Vis (2)
Cordon d’alimentation secteur (1)
Carte de garantie (1)
Mode d’emploi (1)
Accessoire en option
Adaptateur d’entrée BKM-320D
La conception et les spécifications sont sujettes à
modifications sans préavis.
FR
12
Spécifications
Page 37

Page 38

VORSICHT
Um Feuergefahr und die Gefahr eines elektrischen
Schlages zu vermeiden, darf das Gerät weder Regen
noch Feuchtigkeit ausgesetzt werden.
Im Inneren des Geräts liegt gefährliche Hochspannung
an. Öffnen Sie niemals das Gehäuse, und überlassen Sie
Wartungsarbeiten stets nur einem Fachmann.
Sollten am Gerät Probleme auftreten oder eine W artung
erforderlich werden, wend en Sie sich an einen
autorisierten Sony-Händler.
Dieses Gerät enthält Substanzen, die bei unsachgemäßer
Entsorgung die Umwelt belasten. Bitte wenden Sie sich
an unsere nächste Niederlassung oder an Ihr
Unweltschutzamt, wenn Sie das Gerät entsorgen
möchten.
Netzschalter
Der Netzschalter dient nur zum Ausschalten der
Betriebsfunktionen des Geräts.
Um das Gerät vollständig vom Stromnetz zu trennen,
muss der Stecker aus der Steckdose gezogen werden.
VORSICHT
Bei einem falschen oder falsch eingele gten Akku besteht
Explosionsgefahr.
Tauschen Sie den Akku nur gegen einen Akku des
gleichen oder eines vergleichbaren Typs aus, der vom
Hersteller empfohlen wird.
Entsorgen Sie gebrauchte Akkus nach den Angaben des
Herstellers.
Für Kunden in Europa
Dieses Produkt besitzt die CE-Kennzeichnung und
erfüllt die EMV-Richtlinie (89/336/EWG) der
EU-Kommission.
Die Erfüllung dieser Richtlinie bedeutet Konformität für
die folgenden europäischen Normen:
• EN55103-1: Elektromagnetische Interferenz
(Emission)
• EN55103-2: Elektromagnetische Empfindlichkeit
(Immunität)
Dieses Produkt ist für den Einsatz unter folgenden
elektromagnetischen Bedingungen ausgelegt:
E1 (Wohnbereich), E2 (kommerzieller und in
beschränktem Maße industrieller Bereich),
E3 (Stadtbereich im Freien) und E4 (kontrollierter
EMV-Bereich, z. B. Fernsehstudio).
Schließen Sie das Netzkabel unbedingt an eine
geerdete Netzsteckdose an.
Warnhinweis zum Netzanschluss
Verwenden Sie das für die Stromversorgung in Ihrem Land geeignete Netzkabel
USA, Kanada Kontinental-
europa
Steckertyp VM0233 COX-07/636
Buchsen-Ende VM0089 COX-02/VM0310B VM0303B
Kabeltyp SVT H05VV-F CEE(13)53rd (O, C)
Netzspannung &
Stromstärke
Sicherheitszertifizierung UL/CSA VDE VDE
10A/125V 10A/250V 10A/250V
Großbritannien, Irland,
Australien, Neuseeland
_ 1)
1) Verwenden Sie einen geeigneten Netzstecker, der die örtlichen Bestimmungen erfüllt.
DE
2
Page 39

Inhalt
Installation ..............................................................4
Vorsichtsmaßnahmen ..........................................4
An Gestell anbauen .............................................4
Sicherheitsmaßnamen ............................................4
Sicherheit ............................................................4
Hinweise zum LCD-Bildschirm .........................4
Hinweise zur Leuchtstoffröhre ...........................5
Wartung ...............................................................5
Entsorgung des Geräts ........................................5
Funktionen ..............................................................5
Positionen und Funktionen der Teile und
Bedienelemente .......................................................7
Vorderseite ..........................................................7
Rückseite .............................................................9
Spannungsquellen ................................................10
Spezifikationen .....................................................11
Hinweis für die Bedienungsanleitung
Die Angaben in dieser Bedienungsanleitung beziehen
sich auf die drei folgenden Modelle:
• LMD-4420 (4 Zoll)
• LMD-5320 (5,6 Zoll)
• LMD-7220W (7 Zoll)
Alle Funktionsunterschiede sind im Text klar
gekennzeichnet.
DE
DE
3
Page 40

Installation
Sicherheitsmaßnamen
Vorsichtsmaßnahmen
• Belüften Sie das Gerät ausreichend, damit es nicht
überhitzen kann.
Stellen Sie das Gerät nicht auf Oberflächen (Decken,
Teppiche, etc.) oder in der Nähe von Stoffen
(Vorhänge, Behänge) auf, von denen die
Lüftungsöffnungen verdeckt werden können.
• Stellen Sie das Gerät nicht in der Nähe von
Wärmequellen wie Heizungen oder
Belüftungsaustritten auf. Vermeiden Sie Standorte,
die direktem Sonnenlicht, Verschmutzung oder
Erschütterungen ausgesetzt sind.
• Stellen Sie den Monitor nicht in die Nähe anderer
Geräte auf, die ein Magnetfeld generieren, wie zum
Beispiel Transformatoren oder
Hochspannungsleitungen.
• Gerät bei einer Betriebstemperatur von 0 °C bis 35 °C
(32 °F bis 95 °F) verwenden.
• Wurde das Gerät an ein Gestell oder ein Regal
angebaut, über und unter dem Gerät sowie zwischen
Gerät und weiterer Ausrüstung Platz lassen.
• Bei zu geringem Abstand Gerät mit einem Ventilator
abkühlen.
An Gestell anbauen
Befestigen Sie zunächst die oberen Schrauben und
anschließend die unteren (siehe unten).
Gestell
Sicherheit
• Betreiben Sie das Gerät nur mit 100 - 240 V
Wechselspannung.
• Das Typenschild mit Angaben wie Betriebsspannung
und Stromverbrauch befindet sich auf der
Geräterückseite.
• Ziehen Sie den Netzstecker aus der Steckdose, wenn
Gegenstände oder Flüssigkeit in das Gerät gelangen.
Lassen Sie das Gerät von qualifiziertem Personal
überprüfen, bevor Sie es wieder benutzen.
• Ziehen Sie den Netzstecker aus der Steckdose, wenn
das Gerät längere Zeit nicht benutzt wird.
• Zum Lösen des Netzkabels ziehen Sie am Netzstecker .
Nie am Kabel selbst ziehen.
• Die Netzsteckdose sollte in der Nähe des Gerä tes
angebracht und leicht zugänglich sein.
Hinweise zum LCD-Bildschirm
• Auf dem LCD-Bildschirm können helle oder dunkle
Lichtpunkte (rot, blau oder grün) zu sehen sein. Dies
ist keine Fehlfunktion. Der LCD-Bildsc hirm wird mit
Hochpräzisionstechnologie herg estellt, und der Anteil
der effektiven Bildpunkte lie gt bei über 99,99 %. Es ist
jedoch möglich, dass einige Bildelemente gar nicht
oder andere Bildelemente ständig angezeigt werden.
• Stellen Sie den LCD-Bildschirm nicht so auf, dass er
genau auf die Sonne gerichtet ist, da dies zu
Beschädigungen des LCD-Bildschirms führen kann.
Achten Sie darauf, wenn Sie das Gerät in der Nähe
eines Fensters aufstellen.
• Vermeiden Sie Berührungen und Zerkratzen des LCDBildschirms. Stellen Sie keine schweren Gegenstände
auf dem LCD-Bildschirm ab. Dies könnte die
Gleichförmigkeit des Bildes stören.
• Wenn Sie das Gerät in kalter Umgebung benutzen,
können die horizontalen Linien oder ein Nachbild auf
dem Bildschirm zu sehen sein. Dies ist keine
Fehlfunktion. Sobald sich der Monitor erwärmt, wird
das Bild wieder normal.
• Wenn über längere Zeit ein Standbild angezeigt wird,
kann ein Nachbild sichtbar sein. Dieses Nachbild ist
nach einer Weile nicht mehr sichtbar.
• Bildschirm und Gehäuse erwärmen sich bei Betrieb.
Dies ist keine Fehlfunktion.
DE
4
Installation / Sicherheitsmaßnamen
Page 41

Hinweise zur Leuchtstoffröhre
Diesem Bildschirm dient eine spezielle
Leuchtstoffröhre als Lichtquelle. Wenden Sie sich an
Ihren Sony-Händler, wenn das Bild des LCDBildschirms dunkel oder instabil wird oder gar nicht
mehr vorhanden ist.
Funktionen
Der LMD-7220W enthält zwei 7 Zoll-LC DAnzeigefelder, der LMD-5320 drei 5,6 Zoll-LCDAnzeigefelder und der LMD-4420 vier 4 Zoll-LCDAnzeigefelder.
Wartung
• Reinigen Sie Gehäuse, Anzeigefeld und
Bedienelemente mit einem weichen Tuch, das leicht
mit einem milden Reinigungsmittel angefeuchtet ist.
Verwenden Sie keinen Scheuerschwamm, keine
Scheuermittel oder Lösungsmittel wie Benzin.
• Berühren Sie die Bildschirmoberfläche nicht mit
scharfen oder spitzen Gegenständen wie
Kugelschreiber oder Schraubendreher. Andernfalls
kann die Bildschirmoberfläche zerkratzt werden.
• Reinigen Sie den Bildschi rm mit einem weichen Tu ch.
W enn Sie ein Glasreinigungsmittel v erwenden, sollten
Sie darauf achten, dass es keine Antistatik-Lösung
oder ähnliche Zusätze enthält, da andernfalls die
Beschichtung des Bildschirms zerkratzt werden kann.
Entsorgung des Geräts
• Entsorgen Sie d as Gerät un d den Bildsc hirm nicht i m
normalen Restmüll.
• Die Leuchtstoffröhre enthält Quecksilber. Entsorgen
Sie den Monitor gemäß den lokalen Müllentsorgungsund Umweltvorschriften.
LCD-Anzeigefeld für hohe Helligkeit
Der Monitor ist wegen der verwendeten speziellen
Helligkeits- und Kontrasttechnologie für
unterschiedliche Lichtverhältnisse geeignet.
Gestelleinschubmonitore mit
Neigungsfunktion
Der LMD-7220W und der LMD-5320 sind in einen
3U-Gestelleinschub, der LMD-4420 in einen
2U-Gestelleinschub montiert. Alle Monitore sind mit
Neigungsfunktion ausgestattet. Sie können an ein
19 Zoll-Standardgestell angebaut werden. Sie sind
besonders geeignet für Orte, an denen der Platz knapp
ist, wie zum Beispiel in Ü-Wagen.
Leichte Handhabung und einheitliches
Design durch vertikale Anordnung der
Regler
Die Regler der drei Modelle sind vertikal angeordnet
und haben ein einheitliches Design. Eine einfache
Handhabung wird durch das Abwärtsneigen des
Monitors ermöglicht.
Wenden Sie sich bei Fragen zu diesem Gerät an Ihren
Sony-Händler.
Geringes Gewicht, flaches Design/
Einbaumöglichkeit für Wechselstromadapter
Das geringe Gewicht verringert das Ladegewicht des
Ü-W age ns, und da s flache Design ist sehr plat zsparend.
Außerdem kann ein Wechselstromadapter ganz einfach
an der Monitorrückseite angebracht werden.
Wahl zwischen zwei Farbsystemen
Der Monitor kann sowohl NTSC- a ls auch PAL-Signale
anzeigen. Das jeweils benötigte Farbsystem wird
automatisch gewählt.
Optionale SDI-Eingangsfunktion
SDI-Signale können empfangen werden, wenn der
Eingangsadapter BKM-320D (optional) angeschlossen
ist. Der Adapter kann an jeden Monitor angebracht
werden.
Funktionen
DE
5
Page 42

Energiesparende Technik
Durch den geringen Stromverbrauch bei LMD-7220W
23W, LMD-5320 22W und LMD-4420 18W wird der
Energieverbrauch eines Ü-Wagens reduziert.
Fernsteuerungsfunktion
Das Zuschalten von optionalen Eingängen (wenn
BKM-320D angeschlossen ist) sowie Videoeingang,
Kontroll-LED und Bildfo rmat (nur LMD-7220W) kann
über eine Fernbedienung gesteuert werden.
Kontroll-LED mit drei Farben
Zur Überwachung der Eingangsbilder und des
Übertragungsmodus leuchtet die Kontroll-LED rot, grün
oder gelb. Die Kontrollfunktion kann mit der
Fernbedienungsfunktion gesteuert werden.
Bildformateinstellung (nur LMD-7220W)
Bei Empfang eines Videosignals können Sie das
Bildformat 16:9 oder 4:3 einstellen.
DE
6
Funktionen
Page 43

Positionen und Funktionen der Teile und
Bedienelemente
Vorderseite
Jedes Anzeigefeld verfügt neben der Taste und Anzeige POWER über Tasten und Regler.
LMD-7220W
LMD-5320
LMD-4420
Positionen und Funktionen der Teile und Bedienelemente
DE
7
Page 44

A Taste und Anzeige POWER
Bei jedem Drücken der Taste wird das Gerät entweder
ein- oder ausgeschaltet. Die Anzeige leuchtet grün,
wenn das Gerät eingeschaltet ist.
B Kontroll-LED
Sie können den Status des Monitors je nach
empfangenem Signal an der Farbe erkennen.
Die LED leuchtet rot oder grün, wenn Signale von
Geräten empfangen werden, die an den Ansc hluss
REMOTE angeschlossen sind . Die LED leuchtet gelb,
wenn rote und grüne Signale empfangen werden.
Die Kontroll-LED wird durch die Pins des
Anschlusses REMOTE gesteuert.
Für Einzelheiten siehe Seite 9.
C Bildformattaste und -anzeige
(nur LMD-7220W)
Hiermit stellen Sie das Bildformat ein. Bei gedrückter
Taste ist das Bildformat 4
:3 eingestellt, und die
Anzeige leuchtet.
D Regler CONTRAST
Durch Drehen dieses Reglers im Uhrzeigersinn
erhöhen Sie den Kontrast, durch Drehen entgegen dem
Uhrzeigersinn verringern Sie ihn.
Einstellen des Betrachtungswinkels
Sie können den Betrachtungswinkel des LMD-5300/
7220W bis zu 10 Grad nach oben oder unten und den
Betrachtungswinkel des LMD-4420 bis zu 8 Grad nach
oben oder 10 Grad nach unten einstellen.
Erhöhung
Drücken Sie oben auf die Mitte des Gerätes.
Verringerung
E Regler PHASE
Dieser Regler kann nur für das Farbsystem NTSC
verwendet werden.
Durch Drehen des Reglers im Uhrzei ge rsi nn erhö hen
Sie den Grünanteil, durch Drehen entgegen dem
Uhrzeigersinn erhöhen Sie den Pinkanteil der
Hautfarbtöne.
F Regler BRIGHT (Helligkeit)
Durch Drehen des Reglers im Uhrzei ge rsi nn erhö hen
Sie die Helligkeit, durch Drehen entgegen dem
Uhrzeigersinn verringern Sie sie.
Das Bild auf dem Monitor kann undeutlich werden,
wenn der Neigungswinkel des Monitors verändert
wird. Dieses Problem kann durch Anpassen der
Helligkeit behoben werden.
G Regler CHROMA
Durch Drehen des Reglers im Uhrzei ge rsi nn erhö hen
Sie die Farbintensität, durch Drehen entgegen dem
Uhrzeigersinn verringern Sie sie.
Drücken Sie unten auf die Mitte des Geräts
HINWEIS
Wenn der Wechselstromadapter angebracht und der
Neigungswinkel eingestellt ist, kann es vorkommen,
dass der Adapter Geräte berührt. Bauen Sie den Halter
des Wechselstromadapters vom Monitor ab.
DE
8
Positionen und Funktionen der Teile und Bedienelemente
Page 45

Rückseite
345 6
Die Abbildung zeigt das Gerät LMD-4420.
Jedes Anzeigefeld verfügt neben der Buchse DC IN und der Halterung für den Wechselstromadapter über andere
Anschlüsse.
12
A Buchse DC IN
Schließen Sie hier den mitgelieferten
Wechselstromadapter an.
B Halterung für den Wechselstromadapter
Befestigen Sie hier den mitgelieferten
Wechselstromadapter.
C Anschluss VIDEO IN (BNC)
Schließen Sie hier den Video-Ausgang des
Videorecorders oder anderer Geräte an.
Dieser Anschluss ist nicht funktionsfähig, wenn der
Adapter BKM-320D mit dem Anschluss OPTION IN
verbunden ist.
Ein optionaler Eingang (OPTION) und Videoeingang
(VIDEO) kann mit der Buchse REMOTE zugeschaltet
werden.
D Anschluss VIDEO OUT (BNC)
Durchschleif-Ausgang des Anschlusses VIDEO IN.
Der Anschluss verfügt über einen automatischen
75 Ω-Abschlusswiderstand.
E Anschluss OPTION IN (D-sub 9 Pin-Buchse)
SDI-Signale werden empfangen, wenn der optional
erhältliche Sony-Eingangsadapter BKM-320D
angeschlossen ist.
HINWEIS
Installieren Sie keine andere Ausrüstung als
BKM-320D.
Dies kann zur Beschädigung des Geräts führen.
F Anschluss REMOTE (modular)
Er fungiert als paralleler Schalter und ermöglicht
externe Steuerung des Monitors. Die Pinb elegung und
werkseitig festgelegten Funktionen der einzelnen Pins
können Sie der folgenden Tabelle entnehmen.
1 8
Pinnummer Funktion (Hoch y Niedrig)
1 VIDEO IN (OFF y ON)*
2 OPTION IN
(SDI)
3 Kontroll-LED
Rot
4 Kontroll-LED
Grün
5 Erdung
6 nicht belegt
7 nicht belegt
8 16:9/4:3
auswählbar
(OFF y ON)*
(OFF y ON)
(OFF y ON)
(16:9 y 4:3)**
*Funktioniert, wenn BKM-320D angeschlossen ist.
Wenn beide Pins kurzgeschlossen werden, ist
OPTION IN (SDI) vor VIDEO IN.
**Nur LMD-7220W
LMD-5320/4420: nicht belegt.
Ändern Sie die Pinanschlüsse wie folgt, wenn Sie bei
den einzelnen Funktionen zwischen Hoch und Niedrig
wechseln möchten.
Hoch: Lassen Sie jeden Pin offen.
Niedrig: Verbinden Sie jeden Pin mit Pin 5.
Positionen und Funktionen der Teile und Bedienelemente
DE
9
Page 46

Spannungsquellen
Schließen Sie den Wechselstromadapter an.
Montage des Wechselstromadapters am
Monitor
1
Schrauben Sie die mitgelieferte Halterung an die
Monitorrückseite an.
Hinweis zum WechselstromadapterKabel
Kabel wie gezeigt sichern.
2
Befestigen Sie den Wechselstromadapter.
DE
10
Spannungsquellen
Page 47

Spezifikationen
Bildqualität
LMD-7220W
LCD-Anzeigefeld
a-Si TFT Aktivmatrix
Bildgröße 7 Zoll
× 86,6 × 176,7 mm (B/H/
154,1
Diagonale)
1
/8 × 31/2 × 7 Zoll)
(6
Auflösung 480
Effektive Bildpunkte
Neigungswinkel
Bildformat 16:9
Farben Alle Farben
LMD-5320
LCD-Anzeigefeld
Bildgröße 5,6 Zoll
Auflösung 320
Effektive Bildpunkte
Neigungswinkel
Bildformat 4:3
Farben Alle Farben
× 234 Punkte
99,99 %
40°/65°/65°/65° (typisch)
(Kontrast auf/ab/links/rechts 10:1)
a-Si TFT Aktivmatrix
× 84,7 × 141,5 mm (B/H/
113,3
Diagonale)
1
/2 × 33/8 × 5
(4
× 234 Punkte
99,99 %
50°/30°/50°/50° (typisch)
(Kontrast auf/ab/links/rechts 10:1)
5
/8 Zoll)
Ein-/Ausgang
LMD-7220W
VIDEO IN: BNC-Anschlüsse (2), FBAS
1 Vp-p
Synchronisation (75 Ω-
Abschlusswiderstand)
OUT: BNC-Anschlüsse (2),
durchgeschleift (75 Ω-
Abschlusswiderstand, automatisch)
OPTION IN D-Sub 9 Pin-Anschlüsse (2)
REMOTE Modulare 8 Pin-Anschlüsse (2) (Siehe
Pinbelegung auf Seite 9.)
LMD-5320
VIDEO IN: BNC-Anschlüsse (3), FBAS
1 Vp-p
Synchronisation (75 Ω-
Abschlusswiderstand)
OUT: BNC-Anschlüsse (3),
durchgeschleift (75 Ω-
Abschlusswiderstand, automatisch)
OPTION IN D-Sub 9 Pin-Anschlüsse (3)
REMOTE Modulare 8 Pin-Anschlüsse (3) (Siehe
Pinbelegung auf Seite 9.)
LMD-4420
VIDEO IN: BNC-Anschlüsse (4), FBAS
1 Vp-p
Synchronisation (75 Ω-
Abschlusswiderstand)
OUT: BNC-Anschlüsse (4),
durchgeschleift (75 Ω-
Abschlusswiderstand, automatisch)
OPTION IN D-Sub 9 Pin-Anschlüsse (4)
REMOTE Modulare 8 Pin-Anschlüsse (4) (Siehe
Pinbelegung auf Seite 9.)
± 2 dB, negative
± 2 dB, negative
± 2 dB, negative
LMD-4420
LCD-Anzeigefeld
a-Si TFT Aktivmatrix
Bildgröße 4 Zoll
× 61,8 × 102,8 mm (B/H/
82,1
Diagonale)
1
/4 × 21/2 × 4
3
Auflösung 480
Effektive Bildpunkte
Neigungswinkel
Bildformat 4:3
Farben Alle Farben
× 234 Punkte
99,99 %
50°/30°/50°/50° (typisch)
(Kontrast auf/ab/links/rechts 10:1)
1
/8 Zoll)
Allgemein
Leistungsaufnahme
LMD-7220W
Maximal: ca. 26 W (mit
Standard: ca. 23 W (ohne Adapter für
LMD-5320
Maximal: ca. 28 W (mit
Standard: ca. 22 W (ohne Adapter für
LMD-4420
Maximal: ca. 26 W (mit
Standard: ca. 18 W (ohne Adapter für
×BKM
2
optionalen Eingang)
×BKM
3
optionalen Eingang)
×BKM
4
optionalen Eingang)
320D)
-
320D)
-
320D)
-
Spezifikationen
11
DE
Page 48

Betriebsspannung
12 V Gleichstrom (mit mitgeliefertem
Wechselstromadapter)
Hinweis für den Betrieb mit dem W ec hselstromadapter:
Spitzeneingangsstrom
LMD-7220W
(1) Power ON, Stromprüfmethode: 57 A (230V)
(2) Eingangsstrom bei laufendem Betrieb, ermittelt
gemäß dem europäischen Standard EN55103-1:
8 A (230 V)
LMD-5320
(1) Power ON, Stromprüfmethode: 55 A (230V)
(2) Eingangsstrom bei laufendem Betrieb, ermittelt
gemäß dem europäischen Standard EN55103-1:
8 A (230 V)
LMD-4420
(1) Power ON, Stromprüfmethode: 53 A (230V)
(2) Eingangsstrom bei laufendem Betrieb, ermittelt
gemäß dem europäischen Standard EN55103-1:
8 A (230 V)
Betriebsbedingungen
Temperatur: 0 bis 35
°C (32 bis 95 °F)
Feuchtigkeit: 30 bis 85 % (Keine
Kondensation)
Druck: 700 bis 1060 hPa
Transport- und Lagerbedingungen
Temperatur: –10 bis 40
°C
Feuchtigkeit: 0 bis 90 %
Druck: 700 bis 1060 hPa
Abmessungen (B/H/T)
LMD-7220W: ca. 482
(19
LMD-5320: ca. 482
(19
LMD-4420: ca. 482
(19
× 5
× 5
× 3
1
/4 × 1
1
/4 × 1
1
/2 × 1
× 133 × 47 mm
7
/8 Zoll)
× 133 × 47 mm
7
/8 Zoll)
× 88,1 × 47 mm
7
/8 Zoll)
Gewicht LMD-7220W: ca. 2,3 kg (5 lb 1 oz)
LMD-5320: ca. 2,3 kg (5 lb 1 oz)
LMD-4420: ca. 1,9 kg (4 lb 3 oz)
Mitgeliefertes Zubehör
Wechselstromadapter (1)
Halter des Wechselstromadapters (1)
Schrauben (2)
Netzkabel (1)
Garantiekarte (1)
Bedienungsanleitung (1)
Zubehör
Eingangsadapter BKM-320D
Design und Spezifikationen können ohne
Vorankündigung geändert werden.
DE
12
Spezifikationen
Page 49

Page 50

ADVERTENCIA
Para evitar incendios o el riesgo de electrocución, no
exponga la unidad a la lluvia ni a la humedad.
Dentro de la unidad existen altas tensiones peligrosas.
No la abra. En caso de averia, solicite los servicios de
personal cualificado.
En caso de mal funcionamiento o cuando sea necesario
el servicio de mantenimiento, consulte a su proveedor
Sony.
Esta unidad contiene sustancias que pueden contaminar
el medio ambiente si no se desechan adecuadamente.
Póngase en contacto con nuestro departamento de
representación más próximo o con el departamento local
de medio ambiente cuando vaya a desechar esta unida d.
Interruptor de alimentación
El interruptor de alimentación sólo es de tipo funcional.
Para aislar la unidad del suministro de alimentación,
retire el enchufe de alimentación de la toma mural.
ATENCIÓN
Si la batería se sustituye incorrectamente existe peligro
de explosión.
Sustitúyala únicamente por otra del mismo tipo o
equivalente recomendada por el fabricante.
Deseche la batería usada siguiendo las instrucciones del
fabricante.
Para los clientes en Europa
Este producto con marca CE cumple con la Directiva
EMC (89/336/EEC) emitida por la Comisión de la
Comunidad Europea.
El cumplimiento de la misma implica su conformidad
con las siguientes normas europeas:
• EN55103-1: Interferencias electromagnéticas
(emisión)
• EN55103-2: Susceptibilid a d ele ctro ma gn éti ca
(inmunidad)
Este producto está diseñado para utilizarse en los
siguientes entornos electromagnéticos:
E1 (residencial), E2 (comercial e industria ligera),
E3 (exteriores urbanos) y E4 (entorno de EMC
controlada, ej. estudio de TV).
Asegúrese de conectar el cable de alimentación de CA
a una toma de tierra.
Aviso sobre la conexión de alimentación
Emplee un cable de alimentación adecuado al suministro local de aliment aci ón
Estados Unidos,
Canadá
Tipo de enchufe VM0233 COX-07/636
Extremo hembra VM0089 COX-02/VM0310B VM0303B
Tipo de cable SVT H05VV-F CEE(13)53rd (O, C)
Corriente y tensión
nominal
Aprobación de
seguridad
10A/125V 10A/250V 10A/250V
UL/CSA VDE VDE
Europa continental Reino Unido, Irlanda,
Australia, Nueva Zelanda
_ 1)
1) Utilice un enchufe de valor nominal adecuado que cumpla con las regulaciones locales.
ES
2
Page 51

Contenido
Instalación ...............................................................4
Advertencias .......................................................4
Montaje en el rack ...............................................4
Precauciones ...........................................................4
Seguridad ............................................................4
Manipulación de la pantalla LCD .......................4
Acerca del tubo fluorescente ...............................4
Mantenimiento ....................................................5
Desechado de la unidad ......................................5
Características ........................................................5
Ubicación y funciones de componentes y
controles ..................................................................7
Panel frontal ........................................................7
Parte trasera .........................................................9
Fuentes de alimentación ......................................10
Especificaciones ....................................................11
Acerca de este manual
Las instrucciones de este manual son para los tres
modelos siguientes:
• LMD-4420 (Tipo 4)
• LMD-5320 (Tipo 5,6)
• LMD-7220W (Tipo 7)
Las diferencias en cuanto a su funcionamiento se
indican claramente en el texto.
ES
ES
3
Page 52

Instalación
Precauciones
Advertencias
• Impida la acumulación de calor en su interior
facilitando una circulación de aire adecuada.
No coloque la unidad sobre superficies (cojines,
sábanas, etc.) o cerca de materiales (cortinas, tapices)
que puedan obstruir los orificios de ventilación.
• No instale la unidad cerca de fuentes de calor como
radiadores o conductos de aire ni la coloque donde
pueda verse sometida a la acción de luz solar directa,
polvo excesivo, vibraciones mecánicas o golpes.
• No coloque el monitor cerca de equipos que generen
magnetismo, como un transformador o líneas de alta
tensión.
• La unidad se debe utilizar a una temperatura de entre
0°C y 35°C (32°F a 95°F).
• Si se va a montar la unidad en el rack o en un soporte,
deje un espacio encima y debajo de la unidad, y entre
la unidad y otros equipos.
• Utilice un vent ilador para enfriar la unidad en el caso
de que no haya suficiente espacio alrededor de ella.
Montaje en el rack
Fije en primer lugar los tornillos superiores y, a
continuación, los inferiores, como se muestra en la
ilustración.
Rack
Seguridad
• Utilice la unidad a 100 - 240 V CA solamente.
• La placa que indica la tensión de funcionamiento, el
consumo de corriente, etc., se encuentra en la parte
posterior.
• Si se introduce algún objeto sólido o líquido en la
unidad, desenchúfela y hágala revisar por personal
especializado antes de volver a utilizarla.
• Desenchufe la unidad de la toma de pared si no se v a
a utilizar durante varios días o durante mucho tiempo.
• Para desenchufar el cabl e de alimentación de CA, tire
de él cogiéndolo por el enchufe, nunca tire del propio
cable.
• La toma de la pared debe estar situada ju nto al equipo
y ser fácilmente accesible.
Manipulación de la pantalla LCD
• En la pantalla LCD pueden aparecer puntos de luz
brillantes u oscuros (rojo, azul o verde). Esto no e s un
fallo de funcionamiento. La pantalla LCD está
fabricada mediante tecnología de alta precisión y más
del 99,99% de los elementos de imagen permanecen
intactos. No obstante, es posible que algún elemento
de imagen no aparezca o bien que aparezca
continuamente.
• No deje la pantalla LCD de cara al sol puesto que
puede resultar dañada. Tenga cuidado al colocar la
unidad cerca de una ventana.
• No empuje ni raye la pantalla del monitor LCD. No
coloque objetos pesados sobre la pantalla del monitor
LCD. La pantalla puede perder uniformidad.
• Si se utiliza la unidad en un lugar frío, pueden aparecer
líneas horizontales o imágenes residuales en la
pantalla. Esto no es un fallo de funcionamiento.
Cuando se caliente el monitor, l a pant all a se verá con
normalidad.
• Si se visualiza una imagen f ija durante mucho tiempo,
es posible que aparezca una imagen residual. Esta
imagen residual acabará desapareciendo.
• La pantalla y la carcasa se calientan durante el
funcionamiento. Esto no es un fallo de
funcionamiento.
ES
4
Instalación / Precauciones
Acerca del tubo fluorescente
Se monta un tubo fluorescente especialmente diseñado
para iluminar esta unidad. Si la pantalla LCD se
oscurece, se muestra inestable o no se enciende, consulte
a un distribuidor Sony.
Page 53

Mantenimiento
• Limpie la carcasa, el panel y los mandos un paño
suave ligeramente humedecido en una solución
jabonosa poco concentrada. No utilice ningún tipo de
material abrasivo, polvos limpiadores ni disolventes
como la bencina.
• No frote, toque ni golpee ligeramente la superficie de
la pantalla con elementos puntiagudos o abrasivos,
como un bolígrafo o un destornillador. Puede llegar a
rayarse el panel de imagen.
• Limpie la pantalla con un paño suave. Si utiliza un
líquido limpiador , n o utilic e ningún tipo d e limpiado r
que contenga algún líquido antiest ático o algún aditivo
similar, puesto que puede rayarse la pantalla.
Desechado de la unidad
• No deseche la unidad con la basura conv enci onal. No
incluya el monitor en la basura doméstica.
• El tubo fluorescente contiene mercurio. Deseche el
monitor con arreglo a las normas de las autoridades
sanitarias de su país.
Si tiene alguna duda acerca de esta unidad, póngase en
contacto con un distribuidor autorizado Sony.
Características
La unidad LMD-7220W lleva dos paneles LCD de tipo
7, la unidad LMD-5320 lleva tres paneles LCD de tipo
5,6 y la unidad LMD-4420 lleva cuatro paneles LCD de
tipo 4.
Panel LCD de brillo elevado
Puesto que el monitor utiliza una tecnología de brillo y
contaste elevados, se puede utilizar en distintas
condiciones de iluminación.
Monitores inclinables para montaje en
rack
Los monitores LMD-7220W y LMD-5320 van
montados en un rack 3U y el monitor LMD-4420 se
monta en un rack 2U. Todos los monitores son
inclinables. Se pueden montar en un rack estándar de 19
pulgadas. Son de gran utilidad cuando se necesita
espacio en vehículos-emisora muy equ ipados.
Disposición vertical de los mandos para
facilitar su manejo y disposición única
Los mandos de los tres modelos van dispuestos
verticalmente y tienen un único diseño. Cuando se
inclina hacia abajo el monitor, su mane jo es más fácil.
Adaptador de alimentación de CA de
diseño ligero y delgado
Su diseño ligero y delgado reduce la carga en el
vehículo-emisora, así como el espacio necesario para los
equipos. También se puede montar un adaptador de
alimentación de CA en la parte trasera del monitor , para
facilitar su uso.
Dispone de dos sistemas de color
El monitor puede mostrar señales en sistema NTSC y
PAL. El sistema de color correspondiente se selecciona
automáticamente.
Entrada opcional SDI
Se puede disponer de señales SDI si se conecta un
adaptador de entrada BKM-320D (opcional). El
adaptador se puede conectar a cada monitor.
Diseñado para ahorrar energía
Gracias al bajo consumo de corriente eléctrica de las
unidades LMD-7220W 23W, LMD-5320 22W y
LMD-4420 18W, se reduce la necesidad de generación
de corriente en vehículos-emisora.
Características
ES
5
Page 54

Función a distancia
La activación de una entrada opcional (BKM-320D
conectado) o de una entrada de vídeo, el testigo de
selección y la relación de aspecto (LMD-7220W
solamente) se pueden controlar desde un eq uipo externo.
Testigo de selección en 3 colores
El testigo de selección se ilumina en rojo, verde o ámbar
para controlar la entrada de cada imagen y comprobar el
modo de emisión. La función de selección se puede
llevar a cabo a distancia.
Relación de aspecto (LMD-7220W
solamente)
Se puede ajustar el monitor a 16:9 ó 4:3 al entrar una
señal de vídeo.
ES
6
Características
Page 55

Ubicación y funciones de componentes y controles
Panel fr ontal
Cada panel va equipado con botones y mandos, aparte del interruptor e indicador POWER.
LMD-7220W
LMD-5320
LMD-4420
Ubicación y funciones de componentes y controles
ES
7
Page 56

A Interruptor e indicador POWER
Cada vez que se pulsa el interruptor, se conecta o
desconecta la alimentación. Cuando se conecta la
alimentación, el indicador se ilumina en verde.
B Testigo de selección
Por el color se puede comprobar el estado del monitor
en el que entra la señal.
El testigo se ilumina en rojo o en verde mediante las
señales recibidas de los equipos enchufados al
conector REMOTE. C uando se reciben señales rojas y
verdes, el testigo se ilumina en ámbar.
Los terminales del conector REMOTE se ut ilizan para
controlar el testigo de selección.
Para más información, remítase a la página 9.
C Botón e indicador de relación de aspecto
(LMD-7220W solamente)
Ajusta la relación de aspecto de la imagen. Al pulsar
el botón, la relación de aspecto de la imagen se ajusta
:3 y se ilumina el testigo.
a 4
D Mando CONTRAST
Gire este mando a derechas para aume ntar el contraste
o a izquierdas para reducirlo.
Ajuste del ángulo de visualización
Se puede ajustar el ángulo de visualización del LMD5300/7220W hasta 10 grados hacia arriba o hacia abajo
y el del LMD-4420 hasta 8 grados hacia arriba o
10 grados hacia abajo.
Ajuste hacia arriba
Presione la parte superior central.
Ajuste hacia abajo
E Mando PHASE
Este control sólo resulta efectiv o en el sistema de color
NTSC.
Gírelo a derechas para que los tonos de la piel sean
más verdosos o a izquierdas para que sean más
púrpura.
F Mando BRIGHT (brillo)
Gire este mando a derechas para aumentar el bril lo o a
izquierdas para reducirlo.
Si la imagen aparece borrosa cuando se ajusta el
ángulo de visualización del monitor, es posible
compensarla ajustando el brillo.
G Mando CHROMA
Gire este mando a derechas para aumentar la
intensidad de color o a izquierdas para reducirla.
Presione la parte inferior central.
NOTA
Cuando se conecta un adaptador de CA al monitor y se
ajusta el ángulo, el adaptador de CA puede entrar en
contacto con el equipo al mover hacia arriba o hacia
abajo el monitor. Desmonte el soporte del adaptador de
CA del monitor.
ES
8
Ubicación y funciones de compone ntes y controles
Page 57

Parte trasera
345 6
La ilustración se refiere a la unidad LMD-4420.
Cada panel va equipado con otros conectores, aparte de la toma DC IN y el conector del adaptador de CA.
12
A Toma DC IN
Conecte el adaptador de CA suministrado.
B Conexión para adaptador de CA
Conecte el adaptador de CA suministrado.
C Conector VIDEO IN (BNC)
Conéctelo a la salida de vídeo de la videograbadora,
etc.
Cuando se conecta el adaptador de entrada
BKM-320D se enchufa al conector OPTION IN, este
conector no funciona.
Se puede activar una entrada opcional (OPTION) o
una entrada de vídeo (VIDEO) mediante el conector
REMOTE.
D Conector VIDEO OUT (BNC)
Salida en cadena del conector VIDEO IN.
El conector se termina automáticamente a 75 ohmios.
E Conector OPTION IN (D-sub de 9 terminales,
hembra)
Cuando se conecta el adaptador de entrada opcional de
Sony BKM-320D, se reciben señales SDI.
NOTA
No instale ningún otro equipo excepto BKM-320D.
De lo contrario la unidad resultará dañada.
F Conector REMOTE (modular)
Forma un interruptor paralelo y controla externament e
el monitor. A continuación se indica la asignación de
terminales y los ajustes de origen para cada terminal.
1 8
Número de
terminal
1 VIDEO IN (OFF y ON)*
2 OPTION IN
3 Rojo - Selección (OFF y ON)
4 Verde - Selección (OFF y ON)
5Masa
6 No conectado
7 No conectado
8 16:9/4:3
Función (Alto y Bajo)
(OFF y ON)*
(SDI)
(16:9 y 4:3)**
Seleccionable
*Funciones cuando BKM-320D está conectado.
Cuando se conectan juntos los dos terminales, la señal
de OPTION IN (SDI) tiene prioridad sobre la de señal
de VIDEO IN.
**LMD-7220W solamente
LMD-5320/4420: No conectado
Para conmutar cada función entre alto y bajo, cambie
las conexiones de los terminales del siguiente modo.
Alto: Deje cada terminal abierto.
Bajo: Cortocircuite cada terminal y el terminal 5 al
mismo tiempo.
Ubicación y funciones de componentes y controles
ES
9
Page 58

Fuentes de alimentación
Conecte el adaptador de CA.
Conexión del adaptador de CA al monitor
1
Monte el soporte suministrado en la parte posterior
del monitor.
Acerca del cable del adaptador de CA
Fije el cable como se muestra en la ilustración.
2
Conecte el adaptador de CA.
ES
10
Fuentes de alimentación
Page 59

Especificaciones
Rendimiento de la imagen
LMD-7220W
Panel LCD a-Si TFT de matriz activa
Tamaño de imagen
Tipo 7
× 86,6 × 176,7 mm (an/al/prf)
154,1
1
/8 × 31/2 × 7 pulgadas)
(6
Resolución 480
Eficiencia de pixeles
Ángulo de visualización
Relación de aspecto
Colores Todo color
LMD-5320
Panel LCD a-Si TFT de matriz activa
Tamaño de imagen
Resolución 320
Eficiencia de pixeles
Ángulo de visualización
Relación de aspecto
Colores Todo color
LMD-4420
Panel LCD a-Si TFT de matriz activa
Tamaño de imagen
Resolución 480
Eficiencia de pixeles
Ángulo de visualización
Relación de aspecto
Colores Todo color
× 234 puntos
99,99%
40°/65°/65°/65° (típico)
(hacia arriba/abajo/izquierda/
derecha contraste 10:1)
16:9
Tipo 5,6
× 84,7 × 141,5 mm (an/al/prf)
113,3
1
/2 × 33/8 × 5
(4
5
/8 pulgadas)
× 234 puntos
99,99%
50°/30°/50°/50° (típico)
(hacia arriba/abajo/izquierda/
derecha contraste 10:1)
4:3
Tipo 4
× 61,8 × 102,8 mm (an/al/prf)
82,1
1
/4 × 21/2 × 4
(3
1
/8 pulgadas)
× 234 puntos
99,99%
50°/30°/50°/50° (típico)
(hacia arriba/abajo/izquierda/
derecha contraste 10:1)
4:3
Entrada/salida
LMD-7220W
VIDEO IN: Conectores BNC (2), compuesto
1 Vp-p
(terminado con 75 ohmios)
OUT: Conectores BNC (2),
encadenados (terminados
automáticamente con 75 ohmios)
OPTION IN Conectores D-sub de 9 terminales (2)
REMOTE Conectores modulares de 8 terminales
(2) (Remítase a la asignación de
terminales en la página 9.)
LMD-5320
VIDEO IN: Conectores BNC (3), compuesto
1 Vp-p
(terminado con 75 ohmios)
OUT: Conectores BNC (3),
encadenados (terminados
automáticamente con 75 ohmios)
OPTION IN Conectores D-sub de 9 terminales (3)
REMOTE Conectores modulares de 8 terminales
(3) (Remítase a la asignación de
terminales en la página 9.)
LMD-4420
VIDEO IN: Conectores BNC (4), compuesto
1 Vp-p
(terminado con 75 ohmios)
OUT: Conectores BNC (4),
encadenados (terminados
automáticamente con 75 ohmios)
OPTION IN Conectores D-sub de 9 terminales (4)
REMOTE Conectores modulares de 8 terminales
(4) (Remítase a la asignación de
terminales en la página 9.)
± 2 dB, sinc. negativa
± 2 dB, sinc. negativa
± 2 dB, sinc. negativa
Generales
Consumo de energía
LMD-7220W
Máximo: Aprox. 26 W (con
×BKM-320D)
2
Estándar: Aprox. 23 W (sin adaptador
de entrada opcional)
LMD-5320
Máximo: Aprox. 28 W (con
×BKM-320D)
3
Estándar: Aprox. 22 W (sin adaptador
de entrada opcional)
LMD-4420
Máximo: Aprox. 26 W (con
×BKM-320D)
4
Estándar: Aprox. 18 W (sin adaptador
de entrada opcional)
Requisitos de alimentación
12 V CC (con adaptador de CA)
Cuando este producto funciona con adap ta do r de CA:
Especificaciones
11
ES
Page 60

Pico de corriente de entrada
LMD-7220W
(1) En ON, método detector de corriente: 57 A
(230V)
(2) Corriente de entrada para conmutación en
marcha, medida de acuerdo con la norma europ ea
EN55103-1: 8 A (230 V)
LMD-5320
(1) En ON, método detector de corriente: 55 A
(230V)
(2) Corriente de entrada para conmutación en
marcha, medida de acuerdo con la norma europ ea
EN55103-1: 8 A (230 V)
LMD-4420
(1) En ON, método detector de corriente: 53 A
(230V)
(2) Corriente de entrada para conmutación en
marcha, medida de acuerdo con la norma europ ea
EN55103-1: 8 A (230 V)
Condiciones de funcionamien to
Temperatura: 0 a 35
°C (32 a 95°F)
Humedad: 30 a 85% (Sin
condensación)
Presión: 700 a 1.060 hPa
Condiciones de transporte y almacenamiento
Temperatura: –10 a 40
°C (14 a 104°F)
Humedad: 0 a 90%
Presión: 700 a 1.060 hPa
Dimensiones (anchura/altura/profundidad)
LMD-7220W: Aprox.
× 133 × 47 mm
482
(19
× 5
1
/4 × 1
7
/8 pulgadas)
LMD-5320: Aprox.
× 133 × 47 mm
482
(19
× 5
1
/4 × 1
7
/8 pulgadas)
LMD-4420: Aprox.
× 88,1 × 47 mm
482
(19
× 3
1
/2 × 1
7
/8 pulgadas)
Peso LMD-7220W: Aprox.
2,3 kg (5 libras 1 onzas)
LMD-5320: Aprox.
2,3 kg (5 libras 1 onzas)
LMD-4420: Aprox.
1,9 kg (4 libras 3 onzas)
Accesorios suministrados
Adaptador de CA (1)
Soporte del adaptador de CA (1)
Tornillos (2)
Cable de alimentación de CA (1)
Tarjeta de garantía (1)
Manual de instrucciones (1)
Accesorio opcional
Adaptador de entrada BKM-320D
ES
El diseño y las especificaciones están sujetos a cambios
sin previo aviso.
12
Especificaciones
Page 61

Page 62

ATTENZIONE
Per evitare incendi o cortocircuiti, l’apparecchio non
deve essere esposto alla pioggia o all’umidità.
All’interno dell’apparecchio sono presenti tensioni
pericolosamente alte. Non aprire l’apparecchio. Per le
riparazioni, rivolgersi esclusivamente a personale
specializzato.
In caso di problemi di funzionamento o di necessarie
riparazioni dell’apparecchio, consultare un rivenditore
autorizzato Sony.
Questo apparecchio contiene sostanze che possono
inquinare l’ambiente se non vengono smaltite con le
dovute cautele. Per informazioni sulle normati ve in caso
di smaltimento di questo apparecchio, si prega di
contattare il nostro rappresentante locale o il centro di
informazioni ambientali di zona.
Interruttore principale
L’interruttore principale ha solo la funzione di attivare
l’apparecchio.
Per isolare l’apparecchio dall’alimentazione di rete,
staccare la spina dalla presa a muro.
ATTENZIONE
Pericolo di esplosione in caso di sostituzione non
corretta della batteria.
Sostituire unicamente con lo stesso modello o con un
modello simile consigliato dal produttore.
Smaltire le batterie utilizzate in base alle indicazioni
fornite dal produttore.
Per i clienti in Europa
Questo apparecchio contrassegnato dal marchio CE è
conforme alla direttiva EMC (89/336/EEC) emessa
dalla commissione dalla Comunità europea.
Tale direttiva implica la conformità agli standard
europei elencati di seguito:
• EN55103-1: interferenza elettromagne tic a
(emissione)
• EN55103-2: suscettibil it à elettromagnetica
(immunità)
Il presente prodotto è stato progettato per l’impiego in
uno o più dei seguenti ambienti elettromagnetici:
E1 (residenziale), E2 (commerciale e di industria
leggera), E3 (esterni urbani) e E4 (ambiente controllato
EMC, ad esempio uno studio televisivo).
Assicurarsi di collegare il cavo di alimentazione CA
ad una presa con messa a terra.
Avvertenza sui collega m ent i
Utilizzare un cavo di alimentazione adeguato all’alimentazione del paese in cui ci si trova.
Stati Uniti, Canada Europa
Tipo di spina VM0233 COX-07/636
Terminale
femmina
Type de cordon SVT H05VV-F CEE(13)53rd (O, C)
Te nsion & courant
nominaux
Agréation de
sécurité
VM0089 COX-02/VM0310B VM0303B
10A/125V 10A/250V 10A/250V
UL/CSA VDE VDE
continentale
Regno Unito, Irlanda,
Australia, Nuova Zelanda
_ 1)
1) Utilizzare una presa con voltaggio adeguato conforme alle normative locali.
IT
2
Page 63

Sommario
Installazione ............................................................4
Precauzioni ..........................................................4
Montaggio sul Rack ............................................4
Precauzioni .............................................................4
Sicurezza .............................................................4
Gestione dello schermo LCD ..............................4
Il tubo fluorescente .............................................5
Manutenzione ......................................................5
Smaltimento dell’apparecchio ............................5
Funzioni ..................................................................5
Posizione e funzione dei componenti e dei
comandi ...................................................................7
Pannello anteriore ...............................................7
Lato posteriore ....................................................9
Fonti di alimentazione .........................................10
Caratteristiche tecniche .......................................11
Descrizione del manuale
Le istruzioni di questo manuale si riferiscono ai tre
seguenti modelli:
• LMD-4420 (4 pollici)
• LMD-5320 (5,6 pollici)
• LMD-7220W (7 pollici)
Qualsiasi differenza nel funzionamento è chiaramente
indicata nel testo.
IT
IT
3
Page 64

Installazione
Precauzioni
Precauzioni
• Per evitare il surriscaldamento all’interno
dell’apparecchio, accertarsi che vi sia una buona
circolazione dell’aria.
Non appoggiare l’apparecchio su tappeti, coperte o
vicino a superficie simili o nelle vicinanze di tessuti
come tende che potrebbero bloccare le prese di
ventilazione.
• Non installare l’apparecchio vicino a fonti di calore
come radiatori o condotti d’aria calda, né in luoghi
esposti alla luce solare diretta, a polvere eccessiva,
vibrazioni o scosse di natura meccanica.
• Non collocare il monitor vicino ad apparecchi che
generano magnetismo, come trasformatori o linee di
corrente ad alta tensione.
• Utilizzare l’apparecchio ad una temperatura di
esercizio compresa tra 0°C e 35°C (32°F e 95°F).
• Quando l’apparecchio viene montato su rack o su un
ripiano, lasciare dello spazio al di sopra e al di sotto
dell’apparecchio e tra l’apparecchio e le altre
attrezzature.
• Utilizzare una ventola per raf freddare l’apparecchio se
gli spazi sono ridotti.
Montaggio sul Rack
In primo luogo fissare le viti superiori e quindi quelle
inferiori, come illustrato di seguito.
Rack
Sicurezza
• Alimentare l’unità esclusi vamente con una corrente da
100 - 240 V CA.
• La targhetta di identificazione indicante tensione
operativa, consumo di c orrente, ecc. è situata sul retro
dell’apparecchio.
• Se un liquido o un oggetto solido dovessero cadere
all’interno dell’apparecchio, scolle garlo dalla presa di
corrente e farlo controllare da personale qualificato
prima di farlo funzionare nuovamente.
• Se non si intende utilizzare l’apparecchio per diversi
giorni, scollegarlo dalla presa di corrente.
• Per scollegare il cavo di alimentazione della corrente
alternata, tirarlo per la spina. Non tirare mai il cavo
stesso.
• La presa deve trovarsi nei pressi dell’apparecchio in
modo da essere facilmente accessibile.
Gestione dello schermo LCD
• Sullo schermo LCD potrebbero apparire punti di luce
scuri o luminosi (rosso, blu o verde). Non si tratta di
un malfunzionamento. Lo schermo LCD è stato
fabbricato impiegan do tecnolog ie ad alta precisione e
oltre il 99,99% dell’elemento dell’immagine è intatto.
Tuttavia, una parte dell’elemento dell’immagine
potrebbe non apparire oppure potrebbe apparire
costantemente.
• Non lasciare lo schermo LCD esposto al sole in quanto
ciò potrebbe danneggiarlo. Fare attenzione quando si
colloca l’apparecchio nei pressi di una finestra.
• Non spingere o graffiare lo schermo del monitor LCD.
Non poggiare oggetti pesanti sullo schermo del
monitor LCD, in quanto lo schermo potrebbe perdere
uniformità.
• Se l’apparecchio viene utilizzato in un ambiente
freddo, sullo schermo potrebbero apparire delle linee
orizzontali o un’immagine residua. Non si tratta di un
malfunzionamento. Man mano che il monitor si
riscalda, lo schermo torna ad essere normale.
• Se viene visualizzata un’immagine ferma per un lungo
periodo di tempo, potrebbe apparire un’immagine
residua. L’immagine residua finirà per scomparire.
• Lo schermo e l’apparecchio si riscaldano durante il
funzionamento. Non si tratta di un malfunzionamento.
IT
4
Installazione / Precauzioni
Page 65

Il tubo fluorescente
L’apparato di illuminazione di questo apparecchio
consiste in un tubo fluorescente appositamente
progettato. Se lo schermo LCD diventa scuro, instabile
o non si accende, rivolgersi al proprio rivenditore Sony.
Funzioni
L’apparecchio LMD-7220W è dotato di due pannelli
LCD da 7 pollici, l’apparecchio LMD-5320 è dotato di
tre pannelli LCD da 5,6 pollici, mentre l’apparecchio
LMD-4420 è dotato di 4 pannelli LCD da 4 pollici.
Manutenzione
• Pulire l’apparecchio, il pannello e i comandi con un
panno morbido leggermente inumidito con una
soluzione detergente delicata. Non utilizzare alcun
tipo di tampone abrasivo, polvere per sgrassaggio o
solvente, come benzina.
• Non sfregare, toccare o colpire la superficie dello
schermo con oggetti aguzzi o abrasivi come un a penna
a sfera o un cacciavite. Questo tipo di contatto
potrebbe produrre graffi sul pannello.
• Pulire lo schermo con un panno morbido. Qualora si
utilizzi un liquido per la pulizia dei vetri, non
utilizzare alcun tipo di detergente contenente una
soluzione antielettrostatica o un additi vo simile poiché
potrebbe graffiare il rivestimento dello schermo.
Smaltimento dell’apparecchio
• Non smaltire l’apparecchio con i normali rifiuti. Non
gettare il monitor tra i rifiuti domestici.
• Il tubo fluorescente contiene mercurio. Smaltire il
monitor conformemente alle norme sanitarie locali.
Per ulteriori informazioni su questo apparecchio,
contattare il rivenditore Sony di zona autorizzato.
Pannello LCD ad alta luminosità
Il monitor è stato costruito sulla base di tecnologie di
alta luminosità ed elev ato contrasto, pertanto può essere
utilizzato con una vasta gamma di condizioni di
illuminazione.
Monitor montati su rack con funzione di
inclinazione
Gli apparecchi LMD-7220W e LMD-5320 sono montati
su un rack 3U mentre l’apparecchio LMD-4420 è
montato su un rack 2U. T utti i monitor so no dotati della
funzione di inclinazione. Essi possono essere montati su
un rack standard da 19 pollici. Sono essenziali quando lo
spazio è limitato in veicoli OB particolarmente stipati.
Disposizione verticale dei comandi per
un funzionamento agevole ed una
configurazione unitaria
I comandi dei tre modelli sono disposti in modo
verticale e presentano un design unitario. Quando il
monitor viene inclinato verso il basso, risulta più facile
da gestire.
Design leggero e sottile/funzione di
montaggio adattatore di alimentazione
CA
Il design leggero e sottile riduce il carico per un veicolo
OB e lo spazio necessario per l’apparecchiatura. Inoltre,
è possibile installare un adattatore di alimentazione CA
sul retro del monitor per un uso più agevole.
Due sistemi a colori disponibili
Il monitor può visualizzare segnali NTSC e PAL. Il
sistema a colori appropriato viene selezionato
automaticamente.
Funzione ingresso opzionale SDI
I segnali SDI sono disponibili quando viene fissato
l’adattatore di ingresso BKM-320D (opzionale).
L’adattatore può essere fissato a ciascun monitor.
Funzioni
IT
5
Page 66

Risparmio energetico
Poiché gli apparecchi LMD-7220W 23W, LMD-5320
22W e LMD-4420 18W richiedono una quantità ridotta
di energia elettrica, la quantità di energia che i veicoli
per trasmissioni esterne (OB) devono generare risulta
ridotta.
Funzione telecomando
L’attivazione di un ingresso opzionale (quando è
collegato BKM-320D) e dell’ingresso video, della spia
di controllo e del rapporto di formato (solo LMD7220W) può essere controllata da un’attrezzatura
esterna.
Spia di controllo a 3 colori
La spia di controllo si illumina in rosso, verde o ambra
per vedere ogni immagine di ingresso e controllare la
modalità di funzionamento. La funzione di controllo
può essere gestita tramite la funzione di telecomando.
Impostazione formato
(solo LMD-7220W)
Quando viene ricevuto un segnale video, è possibile
impostare il monitor su un rapporto pari a 16:9 o 4:3.
IT
6
Funzioni
Page 67

Posizione e funzione dei componenti e dei comandi
Pannello anteriore
Ciascun pannello è equipaggiato con diversi tasti e comandi oltre alla spia e all’interruttore POWER.
LMD-7220W
LMD-5320
LMD-4420
Posizione e funzione dei componenti e dei comandi
IT
7
Page 68

A Spia e indicatore POWER
Ogni volta che si preme l’interruttore, l’alimentazione
viene attivata o disattivata. Quando viene attivata la
corrente, la spia si illumina in verde.
B Spia di controllo
Il colore della spia consente di controllare lo stato del
monitor al quale viene inviato il segnale.
La spia si illumina in rosso o verde in risposta a
segnali provenienti dall’apparecchiatura collegata al
connettore REMOTE. Quando i segnali in ingresso
sono rossi o verdi, la spia si illumina in ambra.
I pin sul connettore REMOTE vengono utilizzati per
controllare la spia di controllo.
Per i dettagli, vedere pagina 9.
C Spia e tasto di selezione formato
(solo LMD-7220W)
Imposta il rapporto di formato dell’immagine.
Quando viene premuto il tasto, il rapporto di fo rmato
dell’immagine viene impostato su 4
:3 e la spia si
accende.
D Comando CONTRAST
Ruotare questo comando in senso orario per
aumentare il contrasto oppure in senso antiorario per
diminuirlo.
E Comando PHASE
Questo comando è operativo solo per il sistema a
colori NTSC.
Ruotarlo in senso orario per rendere i toni della pelle
verdastri o in senso antiorario per renderli violastri.
F Comando BRIGHT (luminosità)
Ruotare questo comando in senso orario per
aumentare la luminosità o in senso antiorario per
diminuirla.
In fase di regolazione dell’angolo di visione del
monitor si ottengono generalmente delle immagini
indistinte. La regolazione della luminosità consente
spesso di ovviare a tale inconveniente.
Regolazione dell’angolo di visione
È possibile regolare l’angolo di visione dell’apparecchio
LMD-5300/722W fino a 10 gra di verso l’alto o verso il
basso e l’apparecchio LMD-4420 fino a 8 gradi verso
l’alto o 10 gradi verso il basso.
Regolazione in aumento
Premere la parte centrale superiore.
Regolazione in diminuzione
Premere la parte centrale inferiore.
NOTA
Quando l’adattatore CA è fissato al monitor ed è stato
regolato l’angolo, l’adattatore CA potrebbe entrare in
contatto con l’apparecchio in fase di abbassamento o
innalzamento dello stesso. Smontare il supporto
dell’adattatore CA dal monitor.
G Comando CHR OMA
Ruotare il comando in senso or ario per aumentare
l’intensità del colore o in senso antiorario per
diminuirla.
IT
8
Posizione e funzione dei componenti e dei comandi
Page 69

Lato posteriore
345 6
La figura mostra l’apparecchio LMD-4420.
Ogni pannello è equipaggiato con diversi connettori oltre alla presa DC IN e all’attacco dell’adattatore CA.
12
A Presa DC IN
Collegare l’adattatore CA in dotazione.
B Attacco adattatore CA
Collegare l’adattatore CA in dotazione.
C Connettore VIDEO IN (BNC)
Collegare il connettore di uscita video del
videoregistratore, ecc.
Quando l’adattatore di ingresso BKM-320D è
collegato al connettore OPTION IN, questo
connettore non funziona.
L’ingresso opzionale (OPTION) e l’ingresso video
(VIDEO) possono essere attivati utilizzando il
connettore REMOTE.
D Connettore VIDEO OUT (BNC)
Uscita loop-through del connettore VIDEO IN.
Il connettore viene terminato automaticamente a
75 ohm.
E Connettore OPTION IN (D-sub a 9 pin,
femmina)
Quando viene collegato l’adattatore di ingresso
BKM-320D Sony opzionale, si ricevono segnali SDI.
NOTA
Non installare un adattatore diverso da BKM-320D.
Causa danni all’unità sull’apparecchio.
F Connettore REMOTE (modulare)
Forma un interruttore parallelo e controlla il monitor
esternamente. Qui di seguito vengono riportate
l’assegnazione dei pin e la funzione assegnata in
fabbrica ad ogni pin.
1 8
Numero pin Funzione (Alto y Basso)
1 VIDEO IN (OFF y ON)*
2 OPTION IN
(SDI)
3 Spia di controllo
rosso
4 Spia di controllo
verde
5 Massa
6N.C
7N.C
8 16:9/4:3
selezionabile
(OFF y ON)*
(OFF y ON)
(OFF y ON)
(16:9 y 4:3)**
*Funzioni quando è collegato BKM-320D.
Quando entrambi i pin sono in cortocircuito,
OPTION IN (SDI) precede VIDEO IN.
**Solo LMD-7220W
LMD-5320/4420: N.C
Per cambiare ogni funzione da alto a basso, ca mb iare
i collegamenti pin nel modo seguente.
Alto: Lasciare ogni pin aperto.
Basso: Cortocircuitare ogni pin e 5 pin allo stesso
tempo.
Posizione e funzione dei componenti e dei comandi
IT
9
Page 70

Fonti di alimentazione
Collegare l’adattatore CA.
Attacco dell’adattatore CA al monitor
1
Montare la staffa fornita sul lato posteriore del
monitor.
Su cavo adattatore CA
Fissare il cavo come illustrato.
2
Attaccare l’adattatore CA.
IT
10
Fonti di alimentazione
Page 71

Caratteristiche tecniche
Caratteristiche immagine
LMD-7220W
Pannello LCD a-Si TFT Active Matrix
Dimensioni immagine
7 pollici
× 86,6 × 176,7 mm (W/H/D)
154,1
1
/8 × 31/2 × 7 pollici)
(6
Risoluzione 480
Efficienza pi xel 99,99%
Angolo di visione
Rapporto di formato
Colori Colore pieno
LMD-5320
Pannello LCD a-Si TFT Active Matrix
Dimensioni immagine
Risoluzione 320
Efficienza pi xel 99,99%
Angolo di visione
Rapporto di formato
Colori Colore pieno
LMD-4420
Pannello LCD a-Si TFT Active Matrix
Dimensioni immagine
Risoluzione 480
Efficienza pi xel 99,99%
Angolo di visione
Rapporto di formato
Colori Colore pieno
× 234 punti
40°/65°/65°/65° (tipico)
(alto/basso/sinistra/destra contrasto
10:1)
16:9
5,6 pollici
× 84,7 × 141,5 mm (W/H/D)
113,3
1
/2 × 33/8 × 5
(4
5
/8 pollici)
× 234 punti
50°/30°/50°/50° (tipico)
(alto/basso/sinistra/destra contrasto
10:1)
4:3
4 pollici
× 61,8 × 102,8 mm (W/H/D)
82,1
1
/4 × 21/2 × 4
(3
1
/8 pollici)
× 234 punti
50°/30°/50°/50° (tipico)
(alto/basso/sinistra/destra contrasto
10:1)
4:3
Ingresso/uscita
LMD-7220W
VIDEO IN: connettori BNC (2), 1 Vp-p
composito, sincronizzazione
negativa (terminazione a 75 ohm)
OUT: connettori BNC (2), loop-
through (terminazione a 75 ohm
automatica)
OPTION IN Connettori D-sub a 9 pin (2)
REMOTE Connettori modulari a 8 pin (2) (v edere
l’assegnazione dei pin a pagina 9)
LMD-5320
VIDEO IN: connettori BNC (3), composito
1 Vp-p
negativa (terminazione a 75 ohm)
OUT: connettori BNC (3), loop-
through (terminazione a 75 ohm
automatica)
OPTION IN Connettori D-sub a 9 pin (3)
REMOTE Connettori modulari a 8 pin (3) (v edere
l’assegnazione dei pin a pagina 9)
LMD-4420
VIDEO IN: connettori BNC (4), 1 Vp-p
composito, sincronizzazione
negativa (terminazione a 75 ohm)
OUT: connettori BNC (4), loop-
through (terminazione a 75 ohm
automatica)
OPTION IN Connettori D-sub a 9 pin (4)
REMOTE Connettori modulari a 8 pin (4) (v edere
l’assegnazione di pin a pagina 9)
± 2 dB, sincronizzazione
± 2dB
± 2dB
Dati generali
Consumo corrente
LMD-7220W
Massimo: circa 26W (con
×BKM-320D)
2
Standard: circa 23W (senza adattatore
di ingresso opzionale)
LMD-5320
Massimo: circa 28W (con
×BKM-320D)
2
Standard: circa 22W (senza adattatore
di ingresso opzionale)
LMD-4420
Massimo: circa 26W (con
×BKM-320D)
4
Standard: circa 18W (senza adattatore
di ingresso opzionale)
Alimentazione
12 V c.c. (con adattatore CA in
dotazione)
Quando questo prodotto è operato da adattatore CA:
Caratteristiche tecniche
11
IT
Page 72

Corrente di punta di entrata
LMD-7220W
(1) Stato di accensione ON, metodo di sondaggio di
corrente: 57 A (230V)
(2) Corrente di entrata a commutazione a caldo,
misurata secondo la normativa europea
EN55103-1: 8 A (230 V)
LMD-5320
(1) Stato di accensione ON, metodo di sondaggio di
corrente: 55 A (230V)
(2) Corrente di entrata a commutazione a caldo,
misurata secondo la normativa europea
EN55103-1: 8 A (230 V)
LMD-4420
(1) Stato di accensione ON, metodo di sondaggio di
corrente: 53 A (230V)
(2) Corrente di entrata a commutazione a caldo,
misurata secondo la normativa europea
EN55103-1: 8 A (230 V)
Condizioni di funzionamento
Temperatura: da 0 a 35
°F)
95
°C (da 32 a
Umidità: da 30 a 85% (Nessuna
condensazione)
Pressione: da 700 a 1.060 hPa
Condizioni di trasporto e deposito
Temperatura: da –10 a 40
°F)
104
°C (da 14 a
Umidità: da 0 a 90%
Pressione: da 700 a 1.060 hPa
Dimensioni (w/h/d)
LMD-7220W:
Circa 482
(19
× 133 × 47 mm
1
× 5
/4 × 1
7
/8 pollici)
LMD-5320:
Circa 482
(19
× 133 × 47 mm
1
× 5
/4 × 1
7
/8 pollici)
LMD-4420:
Circa 482
(19
× 88,1 × 47 mm
1
× 3
/2 × 1
7
/8 pollici)
Massa LMD-7220W: Circa 2,3 kg (5 lb 1 oz)
LMD-5320: Circa 2,3 kg (5 lb 1 oz)
LMD-4420: Circa 1,9 kg (4 lb 3 oz)
Accessori in dotazione
Adattatore CA (1)
Supporto adattatore CA (1)
Vi ti (2)
Cavo CA (1)
Scheda di garanzia (1)
Istruzioni per l’uso (1)
Accessori opzionali
Adattatore di ingresso BKM-320D
Design e caratteristiche tecniche soggetti a modifiche
senza preavviso.
IT
12
Caratteristiche tecniche
Page 73

Page 74

电源开关
警告
为了防止火灾和受电击的危险 千万不要将本
机淋雨或放在潮湿的地方
机内有危险的高压电 请勿打开外壳 请委托
专业人员进行维修
在发生故障或需要维修时 请与经授权的
Sony 经销商联络
关于电源连接的警告
请使用符合贵地电源的电源线
此为 A 级产品
干扰采取切实可行的措施
在生活环境中 该产品可能会造成无线电干扰 在这种情况下 可能需要用户对其
声 明
电源开关只是一个功能开关
若要将机器与主电源断开 需把电源插头从墙
上插座中拔下
请小心
若未正确地更换电池
险
更换电池时请使用厂家推荐的相同或同等型号
的电池
请按照厂家的有关说明处理用过的电池
务必将交流电源线连接至接地插座
则可能发生爆炸的危
CS
2
Page 75

目录
安装 ..........................................................................4
注意事项 ............................................................4
机架安装 ............................................................4
使用前须知 ..............................................................4
安全方面 ............................................................4
使用 LCD 屏幕 ..................................................4
关于荧光管 ........................................................4
日常维护 ............................................................5
设备的处理 ........................................................5
特点 ..........................................................................5
各部件及控制按钮的位置和功能 .........................6
前面板 ................................................................6
背面 ....................................................................8
电源 ..........................................................................9
规格说明 ................................................................10
关于本手册
本手册中的使用说明是针对以下 3 种机型
• LMD-4420 (4 型 )
• LMD-5320 (5.6 型 )
• LMD-7220W (7 型 )
任何使用上的不同之处都会在内文中详细说明
CS
CS
3
Page 76

安装
使用前须知
注意事项
• 请保证适当的空气流通 以防止内部过热
请不要将设备放置在某些物品的表面
地毯等 或放置在某些物品的附近 如窗帘 织
物等
• 请不要将设备安装在热源 如散热器或风道 附
近
在机械振动或冲击的环境中
• 请不要将显示器放置在靠近产生电磁辐射的场
所
• 在 0°C 到 35°C 32°F 到 95°F 的环境下使用此
设备
• 在将此设备安装到机架或支架上时 在此设备的
上方和下方以及它与其它设备之间应留有足够的
空间
• 如果空间狭小 请使用风扇进行冷却
这些物品可能会阻塞通风孔
也不要将其安装在阳光直射 尘土飞扬 存
如存在变压器或高压线的环境中
如毛毯
机架安装
照下图所示 先拧紧上面的螺丝 然后拧紧下面的
螺丝
机架
安全方面
• 只能在 100 - 240 V 的交流电压下操作此设备
• 背面铭牌上标有工作电压 耗电量等信息
• 如果有任何物品或液体落入机壳中 请拔下设备
插头
检查
• 如果该设备多日或长期不用 请从墙上插座拔下
插头
• 要拔下交流电源线 应该抓紧插头将其拔出 不
要直接拔电源线
• 插座板应该安装在设备附近 并能方便地使用
使用
•LCD 屏幕上可能会出现光线的亮点或暗点 红
色
LCD 屏幕是采用高精密技术制造的 它能够保留
超过 99.99 % 的像素
在屏幕上显示
幕上
• 请不要将 LCD 屏幕直接面对阳光 这样可能会损
伤 LCD 屏幕
非常小心
• 请不要推拉 LCD 显示器屏幕或将屏幕擦伤 请不
要在 LCD 显示器屏幕上放置任何重物
会导致屏幕失去均匀
• 如果在寒冷的地方使用该设备
现水平线或残留图像
障
• 如果静止图像显示的时间过长
像的情况
• 屏幕和机壳在操作过程中会逐渐变暖 这并不是
设备出现了故障
在操作该设备之前务必将其送交专业人员
LCD
蓝色或绿色 这并不是设备出现了故障
当显示器变暖后
屏幕
但是 有些像素可能不会
而有些像素可能会一直显示在屏
在窗口附近放置该设备时一定要
这样可能
屏幕上可能会出
这并不是设备出现了故
屏幕会恢复到正常状况
则会出现残留图
残留图像最终会自动消失
CS
4
安装 / 使用前须知
关于荧光管
该设备安装了一个专门设计的荧光管 将其用做照
明设备
咨询 SONY 经销商
如果 LCD 屏幕变暗 不稳定或不亮 请
Page 77

日常维护
• 使用少量中性清洁剂将柔软的织物浸湿 然后使
用该织物来清洁机壳
使用任何磨砂垫
设备
• 请不要使用锋利的 带擦伤性的物品如圆珠笔或
螺丝刀敲打
导致图像面板被擦伤
• 使用柔软的织物清洁屏幕 如果您要使用玻璃清
洁液来清洁屏幕
能或类似添加剂的清洁剂
表面的涂层
触摸或刮擦屏幕 这类接触可能会
面板和控制按钮 请不要
洗涤粉或溶剂如汽油来清洁该
请不要使用任何含有抗静电功
否则可能会擦伤屏幕
设备的处理
• 请不要将该设备与一般的废品一起处理
将显示器与生活垃圾一起处理
• 荧光管中含有水银
规定来处理显示器
如果您对该设备有任何疑问 请联系授权的 Sony
经销商
请按照当地卫生部门的有关
请不要
特点
LMD-7220W 安装了两个 7 型宽的 LCD 屏幕
LMD-5320 安装了三个 5.6 型的 LCD 屏幕
LMD-4420 安装了四个 4 型的 LCD 屏幕
高亮度
由于显示器采用了高亮度和高对比度技术 因此该
设备可以在任何光照条件下使用
LCD
屏幕
带倾斜功能的机架安装显示器
LMD-7220W 和 LMD-5320 可安装在 3U 尺寸的机架上
LMD-4420 可安装在 2U 尺寸的机架上 所有显示器都
带有倾斜功能
间有限的 OB 车辆中就显得尤为重要
可以安装到 19 寸的标准机架中 在空
控制按钮采用整体布局 垂直排列 操作简便
3 个模块的控制按钮采用整体设计 全部垂直排
列
当显示器向下倾斜时就能够方便地进行操作
轻便的轻薄设计/交流电源转接器安装功能
轻便的轻薄设计减少了 OB 车辆的承载 节省了设
备空间
后面安装交流电源转接器
此外 为了使用方便 还可以在显示器的
两种彩色制式
显示器能够显示 NTSC 和 PAL 信号 它能自动选择
相应的彩色制式
可选的
当安装了转换器 BKM-320D 可选 时 可以使用
SDI 信号
输入功能
SDI
每台显示器上都可以安装转换器
节能设计
由于具有很低的能耗 LMD-7220W 23W LMD-
5320 22W
辆上的发电量
LMD-4420 18W 因此可以降低 OB 车
遥控功能
切换可选输入 连接 BKM-320D 时 和视频输入
讯号灯和宽高比例 仅 LMD-7220W 可以通过外
部设备来控制
色讯号灯
3
讯号灯显示为红色 绿色或黄色 用于监视每个输
入图像并检查播发模式
功能进行操作
讯号功能可以通过遥控器
纵横比设定 仅
您可以在输入视频信号时将显示器纵横比设定为
16:9 或 4:3
LMD-7220W
特点
CS
5
Page 78

各部件及控制按钮的位置和功能
前面板
每个面板除了带有 POWER 开关和指示灯之外 还带有各种键和控制按钮
LMD-7220W
LMD-5320
LMD-4420
CS
6
各部件及控制按钮的位置和功能
Page 79

POWER 开关和指示灯
A
当您每按一下此开关时
源打开时
B
讯号灯
指示灯显示为绿色
电源打开或关闭 当电
您可以通过灯的颜色来检查输入信号的显示器状
态
根据来自接到 REMOTE 接口的设备的信号 灯
的颜色显示为红色或绿色
色信号时
灯显示为黄色
当输入红色信号或绿
REMOTE 接口上的管脚用来控制讯号灯
有关详情 请参见第 8 页
C
纵横比键和指示灯 仅 LMD-7220W
用于设定画面的宽高比例 当您按一下此键时
画面的宽高比例被设为 4:3
CONTRAST 控制按钮
D
顺时针转动该控制按钮时调高对比度
同时
指示灯变亮
逆时针转
动时调低对比度
PHASE 控制按钮
E
该控制按钮只在 NTSC 彩色制式下有效
顺时针转动该按钮时显示肤色偏绿
逆时针转动
时肤色偏紫
调节视角
您可以将 LMD-5300/7220W 的视角向上或向下调
节 10 度和 LMD-4420 的视角向上调节 8 度或向下
10 度
向上调节
按显示器的中上部
向下调节
BRIGHT
F
顺时针转动该按钮时亮度增加
亮度 控制按钮
逆时针转动时亮
度减小
当您调节显示器视角时 显示画面可能会变得不
清晰
G
顺时针转动该按钮时色度增加
您可以通过调节亮度对其进行补偿
CHROMA 控制按钮
逆时针转动时色
度减小
按显示器的中下部
备注
当显示器上安装了交流转接器并调节显示器的视角
时
交流转接器可能会碰到其它设备
从显示器上
卸下交流转接器托架
各部件及控制按钮的位置和功能
CS
7
Page 80

背面
345 6
下图为 LMD-4420 的背面视图
面板上除了带有 DC IN 插孔和交流转接器接口之外 还带有其它各种接口
12
DC IN 插孔
A
连接附带的交流转接器
B
交流转接器接口
连接附带的交流转接器
VIDEO IN 接口 (BNC)
C
连接到 VCR 等的视频输出接口
当输入转接器 BKM-320D 连接到 OPTION IN 接口
时
此接口功能将无法使用
可选输入 (OPTION) 和视频输入 (VIDEO) 可以通
过 REMOTE 接口来切换
VIDEO OUT 接口 (BNC)
D
VIDEO IN 接口的环形转接输出
该接口自动端接为 75 欧姆
OPTION IN 接口
E
D 型 9 针雌头
当连接可选的 Sony 输入转接器 BKM-320D 时
SDI 信号为输入
注意
请不要安装 BKM-320D 之外的其它设备 否则会
损坏设备的部件
REMOTE 接口
F
模块化组件
形成一个并行开关 从外部对显示器进行控制
管脚配置和每个管脚的工厂预设值如下所示
1 8
Pin 号码 功能
1 VIDEO IN (OFF y ON) *
2 OPTION IN
3
4
5
6N.C
7N.C
8
(SDI)
发出红色讯号
发出绿色讯号
接地
16:9/4:3 可选
* 连接 BKM-320D 时具有的功能
时
OPTION IN (SDI) 会优先于 VIDEO IN
高位 y 低位
(OFF y ON) *
(OFF y ON)
(OFF y ON)
(16:9 y 4:3)**
当管脚短接
** 仅对于 LMD-7220W
LMD-5320/4420
N.C
CS
8
各部件及控制按钮的位置和功能
在高位和低位之间切换每项功能
按照以下方法
更改管脚连线
高位 打开每个管脚
低位 同时将每个管脚与管脚 5 短接
Page 81

电源
连接交流转接器
安装交流转接器到显示器
1
将附带的托架安装在显示器的背面
关于交流转接器电缆
按图所示夹紧电缆
2
安装交流转接器
电源
CS
9
Page 82

输入/输出
规格说明
图像质量
LMD-7220W
LCD 屏幕 a-Si TFT 有源阵列
图像尺寸 7 型
154.1
×
86.6 ×176.7 毫米
(W/H/ 对角 )
1
(6
/8 × 31/2 × 7 英寸 )
分辨率 480
像素效率 99.99 %
视角 40°/65°/65°/65° ( 典型 )
宽高比例 16:9
颜色 全彩色
LMD-5320
LCD 屏幕 a-Si TFT 有源阵列
图像尺寸 5.6 型
分辨率 320
像素效率 99.99 %
视角 50°/30°/50°/50° ( 典型 )
宽高比例 4:3
颜色 全彩色
LMD-4420
LCD 屏幕 a-Si TFT 有源阵列
图像尺寸 4 型
分辨率 480
像素效率 99.99 %
视角 50°/30°/50°/50° ( 典型 )
宽高比例 4:3
颜色 全彩色
×
234 点
( 上 / 下 / 左 / 右对比度 10:1)
113.3
×
84.7 × 141.5 毫米
(W/H/ 对角 )
1
(4
/2 × 33/8 × 55/8 英寸 )
×
234 点
( 上 / 下 / 左 / 右对比度 10:1)
82.1
×
61.8 × 102.8 毫米 (W/H/ 对角 )
1
(3
/4 × 21/2 × 41/8 英寸 )
×
234 点
( 上 / 下 / 左 / 右对比度 10:1)
LMD-7220W
VIDEO IN: BNC 接口 (2) 复合 1
±
Vp-p
(75 欧姆端接 )
OUT: BNC 接口 (2)
( 自动 75 欧姆端接 )
OPTION IN
D 型 9 针接口 (2)
REMOTE 模块化接口 8 针 (2)
( 参见第 8 页中的管脚配置
2 dB 负同步
环形转接
LMD-5320
VIDEO IN: BNC 接口 (3) 复合 1
±
Vp-p
(75 欧姆端接 )
OUT: BNC 接口 (3)
( 自动 75 欧姆端接 )
OPTION IN
D 型 9 针接口 (3)
REMOTE 模块化接口 8 针 (3)
( 参见第 8 页中的管脚配置
2 dB 负同步
环形转接
LMD-4420
VIDEO IN: BNC 接口 (4) 复合 1
±
Vp-p
(75 欧姆端接 )
OUT: BNC 接口 (4)
( 自动 75 欧姆端接 )
OPTION IN
D 型 9 针接口 (4)
REMOTE 模块化接口 8 针 (4)
( 参见第 8 页中的管脚配置
2 dB 负同步
环形转接
一般规格
能耗
LMD-7220W
最大 约
标准 约
LMD-5320
最大 约
标准 约
LMD-4420
最大 约
标准 约
电源要求 12 V DC
当该产品由交流转接器供电时
26W (含 2 个BKM-320D)
23W (
28W (含 3 个BKM-320D)
22W (
26W (含 4 个BKM-320D)
18W (
( 由附带的交流转接器供电 )
无可选输入转接器
无可选输入转接器
无可选输入转接器
)
)
)
)
)
)
CS
10
规格说明
Page 83

峰值起动电流
LMD-7220W
(1) 电源 ON
(230V)
(2) 热开关起动电流
测试
LMD-5320
(1) 电源 ON
(230V)
(2) 热开关起动电流
测试
LMD-4420
(1) 电源 ON
(230V)
(2) 热开关起动电流
测试
工作条件
运输和存储条件
尺寸 ( 宽 / 高 / 厚 )
重量 LMD-7220W
附属配件
可选附件
使用电流探针方法测试 57A
按照欧洲标准 EN55103-1
8 A (230 V)
使用电流探针方法测试 55 A
按照欧洲标准 EN55103-1
8 A (230 V)
使用电流探针方法测试 53 A
按照欧洲标准 EN55103-1
8 A (230 V)
温度
湿度
压力
温度
湿度
压力
LMD-7220W: 大约 482
LMD-5320: 大约 482
LMD-4420: 大约 482
LMD-5320
LMD-4420
交流转接器 (1)
交流转接器托架 (1)
螺丝 (2)
交流电源线 (1)
保修卡 (1)
操作指南 (1)
输入转接器 BKM-320D
0 到 35°C (32 到 95°F)
30 到 85 % ( 无凝结 )
700 到 1,060 hPa
10 到 40°C (14 到 104°F)
–
0 到 90 %
700 到 1,060 hPa
米 (19
(19
(19
(5 磅 1 盎司 )
(5 磅 1 盎司 )
(4 磅 3 盎司 )
×
×
51/4 × 17/8 英寸 )
×
31/2 × 17/8 英寸 )
×
133 × 47 毫
51/4 × 17/8 英寸 )
×
133 × 47 毫米
×
88.1 × 47 毫米
大约 2.3 千克
大约 2.3 千克
大约 1.9 千克
设计和规格如有更改
恕不另行通知
规格说明
11
CS
Page 84

警告
若要避免起火或電擊危險,請勿將本機器曝露在雨
中或潮濕環境中。
機器內部有危險高電壓。請勿開啟機殼。請僅由合
格的維修人員進行維修。
若發生故障或需要維修時,請洽授權的 Sony 經銷商。
電源開關
電源開關僅為功能性開關。
若要將它與主要電源隔離,請將主要電源插頭從牆
上插座拔下。
電源連接警告
使用符合當地電源的電源線
注意事項
如果更換的電池不正確,會有爆炸的危險。
僅使用製造商建議的同一種或相當類型的電池進行
更換。
請依製造商的指示來處置用過的電池。
請確定 AC 電源線連接至有接地的電源插座。
警告使用者:
這是甲類的資訊產品,在居住的環境中使用時,
可能會造成射頻干擾,在這種情況下,使用者會
被要求採取某些適當的對策。
CT
2
Page 85

目錄
安裝 ..........................................................................4
注意事項 ............................................................4
安裝至機架 ........................................................4
使用前需知 ..............................................................4
安全注意事項 ....................................................4
LCD 螢幕的處理方式 .......................................4
關於螢光燈 ........................................................4
維護 ....................................................................4
本裝置的處置方式 ............................................5
功能 ..........................................................................5
零件和控制器的位置和功能 .................................6
正面面板 ............................................................6
背面 ....................................................................8
電源 ..........................................................................9
規格 ........................................................................10
關於本說明書
本說明書是針對以下 4 種機型﹕
• LMD-4420 (4 類型 )
• LMD-5320 (5.6 類型 )
• LMD-7220W (7 類型 )
任何使用上的不同之處皆于內文中詳細說明。
CT
CT
3
Page 86

安裝
使用前需知
注意事項
• 請維持空氣流通,以避免內部過熱。
請勿在裝置上方放置可能會堵住通風口的材質,
例如地毯、毛毯或相近材質 (例如窗簾布料)。
• 請勿將此裝置安裝在靠近熱源的地方,例如散熱
器或空氣導管,或置於直接日射、灰麈多、或
震動或撞擊的地方。
• 不可將本產品放置在會產生磁力的設備附近,
例如,變壓器或高壓輸電線。
• 在 0°C 到 35°C (32°F 到 95°F)操作溫度下使用
此裝置。
• 當此裝置安裝在機架上時,請讓機架周圍與附近
裝置和其他設備間保持距離。
• 如果相隔距離太窄,請使用風扇來冷卻裝置。
安裝至機架
首先先固定上層螺絲,再固定下層螺絲,如下圖所
示。
機架
安全注意事項
• 本產品限用 100 - 240 V AC 電源。
• 在裝置背面有標示牌,註明操作電壓、消耗功率
等資訊。
• 若有任何物體或液體掉入或潑撒滲入機殼中,請
拔下機器拔頭,並請合格維修人員檢查,然後才
繼續使用。
• 如果有幾天或更長時間不使用機器,請將機器的
插頭從牆上插座拔下。
• 請抓住插頭部位再拔下 AC 電源線,請勿拉扯電
源線本身。
• 電源插座應位於靠近設備且易於取得的位置。
LCD 螢幕的處理方式
• LCD 螢幕可能會出現亮點或暗點 (紅、藍或
橙色)。這並非故障。 LCD 螢幕採用高精度技術
製作,有 99.99 % 的畫面元素是正常的。但是,
有些畫面元素可能暫時無法顯示,或有些畫面元
素可能會經常出現。
• 請勿讓 LCD 螢幕面朝陽光,因為這會使 LCD
螢幕受損。當您將本裝置置於窗戶旁時,請格外
小心。
• 請勿重壓或刮傷 LCD 顯示器的螢幕。請勿將重物
置於 LCD 顯示器的螢幕上。這會使螢幕喪失一致
性。
• 如果在寒冷的環境使用本裝置,螢幕上可能會出
現水平線或殘像。這並非故障。當顯示器變暖
時,螢幕就會恢復正常。
• 如果長時間顯示靜態影像,可能會出現殘像。
此殘像最後就會消失。
• 在運作期間,螢幕和機殼會變熱。這並非故障。
CT
4
安裝 / 使用前需知
關於螢光燈
本裝置安裝有特殊設計的螢光燈,可做為本裝置的
照明設備。如果 LCD 螢幕變暗、不穩定或尚未啟
動,請洽詢您的 Sony 經銷商。
維護
• 使用軟布沾上微量的中性清潔液,然後清潔機
殼、面板和控制鍵。請不要使用有磨損力擦墊、
清潔粉或溶劑,例如汽油。
• 請不要使用尖銳或表面粗糙的東西 (例如原子筆
或螺絲起子)來磨擦、接觸或輕敲螢幕表面。這
會刮傷螢幕面板。
• 請使用軟布清潔螢幕。如果您要使用玻璃清潔
液,請勿使用含抗靜電溶劑或類似添加劑的清潔
液,因為這會刮傷螢幕表面。
Page 87

本裝置的處置方式
• 請勿將本裝置當成一般垃圾裝置。請勿將顯示器
與家庭垃圾一起裝置。
• 因為螢光燈管中含有水銀。請依當地衛生機關的
規定處置顯示器。
如果您對本裝置有任何疑問,請聯絡 Sony 經銷商。
功能
LMD-7220W 中安裝了 2 個 7 類型寬的 LCD 面板;
LMD-5320 安裝了 3 個 5.6 類型 LCD 面板;
LMD-4420 安裝了 4 個 4 類型 LCD 面板。
高亮度 LCD 面板
由於顯示器使用高亮度和高對比技術,所以可在多
種光線環境下使用。
安裝在機架上的顯示器具備傾斜功能
LMD-7220W 和 LMD-5320 安裝於 3U 尺寸機架和
LMD-4420 安裝於 2U 尺寸機架。所有顯示器都具
備傾斜功能。它們可安裝於 19 吋機架中。當安裝
位置主要位於人潮擁擠的 OB 車輛上時,它們就十
分重要。
遙控功能
可透過外接設備控制切換選用輸入 (當連接
BKM-320D 時)和視訊輸入、指示燈和寬高比
(限 LMD-7220W)。
3 色指示燈
紅色、綠色或琥珀色指示燈可監視各輸入影像並檢
查實況轉播模式。指示燈功能可與遙控功能搭配使
用。
寬高比設定 (限 LMD-7220W)
當視訊訊號輸入時,您可將顯示器設為 16:9 或
4:3。
垂直排列的控制器可方便操作和整體規劃
此 3 個機型的控制器以垂直方向配置,並有整體設
定。當顯示器向下傾時,可易於操作。
輕薄設計 /AC 電源轉接器安裝功能
本裝置的輕薄設計可減輕 OB 車輛的負擔和安裝空
間的需求。此外, AC 電源轉接器可安裝於顯示器
背面,以方便使用。
可顯示兩種色彩系統
顯示器可顯示 NTSC 和 PAL 訊號。它可自動選取適
當的色彩系統。
SDI 選用輸入功能
當安裝輸入介面卡 BKM-320D (選購)時,可使用
SDI 訊號。此介面卡可附接至每部顯示器上。
省電設計
由於 LMD-7220W 23W、 LMD-5320 22W 和
LMD-4420 18W 的耗電率低,所以可降低 OB 車輛
產生的電力。
功能
CT
5
Page 88

零件和控制器的位置和功能
正面面板
每個面板上除了 POWER 開關和指示燈外,還有其他按鈕和控制器。
LMD-7220W
LMD-5320
LMD-4420
CT
6
零件和控制器的位置和功能
Page 89

A POWER 開關和指示燈
每次按下此開關時,就可開啟或關閉電源。當電
源啟動時,指示燈呈綠色。
B 指示燈
您可從指示燈色彩來檢查訊號輸入的顯示器狀態。
依連接至 REMOTE 接頭的設備所輸入的訊號,
指示燈會呈紅色或綠色。當輸入紅色和綠色訊號
時,指示燈會呈琥珀色。
REMOTE 連接器上的針腳可用來控制指示燈。
如需詳細資訊,請參閱第 8 頁。
C 寬高比選擇按鈕和指示燈 (限 LMD-7220W)
設定圖像的寬高比。當按下此按鈕時,圖像的寬
高比會設為 4
:3 且指示燈會亮起。
D CONTRAST 控制器
以順時針方向轉動此控制器可提高對比度,以逆
時針方向轉動此控制器可降低對比度。
E PHASE 控制器
此控制器僅適用於 NTSC 色彩系統。
以順時針方向轉動它可使膚色變綠,以逆時針方
向轉動它可使膚色變紫。
調整檢視角度
您可將 LMD-5300/7220W 的檢視角度上下調整最多
10 度, LMD-4420 的檢視角度向上調整最多 8 度或
向下調整最多 10 度。
向上調整
按中上方。
向下調整
F BRIGHT (亮度)控制器
以順時針方向轉動它可提高亮度,以逆時針方向
轉動它可降低亮度。
在調整顯示器的檢視角度後,可調整亮度來改善
圖像的清晰度。
G CHROMA 控制器
以順時針方向轉動它可提高彩度,以逆時針方向
轉動它可降低彩度。
按中下方。
注意
當連接 AC 轉接器至顯示器並調整角度後, AC 轉
接器可能會碰到上方或下方設備。請將 AC 轉接器
固定器從顯示器拔下。
零件和控制器的位置和功能
CT
7
Page 90

背面
345 6
此為 LMD-4420 的範例圖。
每個面板上除了有 DC IN 插座與 AC 轉接器外,還附接了其他接頭。
12
A DC IN 插座
連接隨附的 AC 轉接器。
B AC 轉接器接頭
附接隨附的 AC 轉接器。
C VIDEO IN 接頭 (BNC)
連接 VCR 等設備的視訊輸出接頭。
當輸入介面卡 BKM-320D 連接至 OPTION IN 接頭
時,此接頭無作用。
可使用 REMOTE 接頭切換選用輸入 (OPTION) 和
視訊輸入 (VIDEO)。
D VIDEO OUT 接頭 (BNC)
VIDEO IN 接頭的循環迴路輸出。
此接頭會自動以 75 歐姆做為終端電阻。
E OPTION IN 接頭 (D-sub 9 接針母座接頭)
當連接選購 Sony 輸入介面卡 BKM-320D 後,會
輸入 SDI 訊號。
注意
請勿安裝 BKM-320D 以外的設備。這可能會損壞
裝置或設備。
F REMOTE 接頭 (模組)
建立一個平行開關,並從外部控制顯示器。針腳
指定與每針腳的出廠設定功能如下。
1 8
針腳號碼 功能 (高 y 低)
1 VIDEO IN (OFF y ON)*
2 OPTION IN
3
4
5
6
7
8
(SDI)
紅色指示燈
綠色指示燈
接地
無
無
可選擇 16:9/4:3
(OFF y ON)*
(OFF y ON)
(OFF y ON)
(16:9 y 4:3)**
* 當連接 BKM-320D 後才有作用。當此兩針腳短
路時, OPTION IN (SDI) 優先於 VIDEO IN。
** 限 LMD-7220W
LMD-5320/4420:無
CT
8
零件和控制器的位置和功能
若要切換每項功能之高和低值,請依下列步驟變
更針腳連接。
高:讓每個針腳保持開路。
低:讓每個針腳和針腳 5 同時短路。
Page 91

電源
連接 AC 轉接器。
當附接 AC 轉接器至顯示器時
1
安裝隨附的托架至顯示器背面。
關於 AC 轉接器電源線
固定電源線,如圖所示。
2
附接 AC 轉接器。
電源
CT
9
Page 92

規格
畫面效能
LMD-7220W
LCD 面板 Si TFT 主動矩陣
畫面大小 7 類型
154.1
× 86.6 × 176.7 公釐
(W/H/ 對角線)
1
(6
/8 × 31/2 × 7 吋)
解析度 480
像素效能 99.99 %
檢視角度 40°/65°/65°/65° (典型)
寬高比 16:9
色彩 全彩
LMD-5320
LCD 面板 Si TFT 主動矩陣
畫面大小 5.6 類型
解析度 320
像素效能 99.99 %
檢視角度 50°/30°/50°/50° (典型)
寬高比 4:3
色彩 全彩
LMD-4420
LCD 面板 Si TFT 主動矩陣
畫面大小 4 類型
解析度 480
像素效能 99.99 %
檢視角度 50°/30°/50°/50° (典型)
寬高比 4:3
色彩 全彩
× 234 點
(上 / 下 / 左 / 右對比 10:1)
113.3
× 84.7 × 141.5 公釐
(W/H/ 對角線)
1
(4
/2 × 33/8 × 55/8 吋)
× 234 點
(上 / 下 / 左 / 右對比 10:1)
82.1
× 61.8 × 102.8 公釐
(W/H/ 對角線)
1
(3
/4 × 21/2 × 41/8 吋)
× 234 點
(上 / 下 / 左 / 右對比 10:1)
LMD-5320
VIDEO IN:BNC 接頭 (3),複合 1 Vp-p ±
2 dB,同步負極 (75 歐姆終端)
OUT:BNC 接頭 (3),循環迴路
(75 歐姆自動終端)
OPTION IN D-sub 9 針腳接頭 (3)
REMOTE Modular 接頭 8 針腳 (3) (請參閱
第 8 頁上的針腳指定。)
LMD-4420
VIDEO IN:BNC 接頭 (4),複合 1 Vp-p ±
2 dB,同步負極 (75 歐姆終端)
OUT:BNC 接頭 (4),循環迴路
(75 歐姆自動終端)
OPTION IN D-sub 9 針腳接頭 (4)
REMOTE Modular 接頭 8 針腳 (4) (請參閱
第 8 頁上的針腳指定。)
一般
耗電率 LMD-7220W
最大值:約 26W
(使用 2
標準:約 23W (不使用選購輸入
介面卡)
LMD-5320
最大值:約 28W
(使用 3
標準:約 22W (不使用選購輸入
介面卡)
LMD-4420
最大值:約 26W
(使用 4
標準:約 18W (不使用選購輸入
介面卡)
電源需求 12 V DC (使用隨附的 AC 轉接器)
當本產品使用 AC 轉接器運作時:
×BKM-320D)
×BKM-320D)
×BKM-320D)
CT
輸入 / 輸出
LMD-7220W
VIDEO IN:BNC 接頭 (2),複合 1 Vp-p ±
2 dB,同步負極 (75 歐姆終端)
OUT:BNC 接頭 (2),循環迴路
(75 歐姆自動終端)
OPTION IN D-sub 9 針腳接頭 (2)
REMOTE Modular 接頭 8 針腳 (2) (請參閱
第 8 頁上的針腳指定。)
10
規格
Page 93

峰值電流
LMD-7220W
(1) 啟動電源,電流測試方式:57 A (230V)
(2) 熱交換峰值電流,依歐洲標準 EN55103-1
測量:8 A (230 V)
LMD-5320
(1) 啟動電源,電流測試方式:55 A (230V)
(2) 熱交換峰值電流,依歐洲標準 EN55103-1
測量:8 A (230 V)
LMD-4420
(1) 啟動電源,電流測試方式:53 A (230V)
(2) 熱交換峰值電流,依歐洲標準 EN55103-1
測量:8 A (230 V)
運作條件 溫度:0 到 35
濕度:30 到 85 % (非冷凝)
氣壓:700 到 1,060 hPa
溫度和存放條件
溫度:–10 到 40
濕度:0 到 90 %
氣壓:700 到 1,060 hPa
尺寸 (w/h/d) LMD-7220W:約 482
(19
× 5
LMD-5320:約 482
(19
× 5
LMD-4420:約 482
(19
× 3
總重 LMD-7220W:約 2.3 公斤
(5 磅 1 盎斯)
LMD-5320:約 2.3 公斤
(5 磅 1 盎斯)
LMD-4420:約 1.9 公斤
(4 磅 3 盎斯)
隨附配件 AC 轉接器 (1)
AC 轉接器固定器 (1)
AC 轉接器固定器螺絲 (2)
AC 電源線 (1)
保固卡 (1)
操作說明 (1)
選購配件 輸入介面卡 BKM-320D
°C (32 到 95°F)
°C (14 到 104°F)
1
/4 × 17/8 吋)
1
/4 × 17/8 吋)
1
/2 × 17/8 吋)
× 133 × 47 公釐
× 133 × 47 公釐
× 88.1 × 47 公釐
設計及規格如有變動,恕不另行通知
規格
11
CT
Page 94

주의
경고
화재나 감전 위험을 방지하려면 장치가 물기나 습기
에 노출되지 않도록 하십시오.
장치 내부에는 고압이 사용되므로 위험합니다. 절대
본체를 열지 마십시오. 자격 있는 전문 정비 요원만
서비스를 실시해야 합니다.
오동작이 발생하거나 유지 보수가 필요하면 Sony 공
인 대리점에 문의하십시오.
POWER 스위치
전원 스위치는 단순히 기능적인 스위치일 뿐입니다.
기기 세트를 주 전원으로부터 격리하려면 주 플러그
를 벽 콘센트에서 분리하십시오.
전원 연결에 대한 경고
현지 공급 전원에 맞는 규격 전원 코드를 사용하십시오.
배터리를 올바로 장착하지 않으면 폭발 위험이 있습
니다.
제조업체에서 권장하는 규격과 동일하거나 상응하
는 제품만 사용하십시오.
쓰고난 배터리는 제조업체의 지침에 따라 폐기하십
시오.
AC 전원 코드는 접지 콘센트에 확실히 연결되어
있어야 합니다.
KR
2
Page 95

목차
설치 ..........................................................................4
주의 ....................................................................4
랙에 설치 ...........................................................4
주의 사항 .................................................................4
안전 ....................................................................4
LCD 화면 취급 방법 .........................................4
형광 튜브 ...........................................................4
유지 보수 ...........................................................4
장치의 폐기 .......................................................5
특징 ..........................................................................5
부품 및 제어부 위치 및 기능 ................................6
전면 패널 ...........................................................6
뒷면 ....................................................................8
전원 ..........................................................................9
사양 ........................................................................10
이 설명서의 적용 모델
이 설명서의 지침은 다음 세 모델에 적용됩니다.
• LMD-4420(4 유형)
• LMD-5320(5.6 유형)
• LMD-7220W(7 유형)
취급상의 차이는 본문에 명시되어 있습니다.
KR
KR
3
Page 96

설치
주의 사항
주의
• 내부에 열이 쌓이는 것을 방지하려면 통풍이 잘 되
도록 하십시오.
기기를 양탄자나 담요 등이 있는 바닥에 놓거나 통
풍구를 막을 수 있는 물건(커튼, 휘장) 가까이에 두
지 마십시오.
• 기기를 라디에이터 또는 환기구와 같은 열원 가까
이에 설치하거나 직사광선, 과도한 먼지, 물리적인
진동 또는 충격 등에 노출되기 쉬운 장소에 설치하
지 마십시오.
• 변압기나 고전압 전력선과 같이 자력이 발생하는
기기를 모니터 가까이에 놓아 두지 마십시오.
• 기기의 취급 온도는 0°C - 35°C (32°F - 95°F)사이입
니다.
• 기기를 랙이나 선반에 설치할 경우 기기 위/아래와
이 기기와 다른 장치 사이에 공간을 두십시오.
• 공간이 협소할 경우에는 팬을 사용하여 냉각하십
시오.
랙에 설치
아래 그림에 표시된 것처럼 먼저 위쪽 스크류를 고
정한 다음 아래쪽 스크류를 고정합니다.
랙
안전
• 기기는 100 - 240 V AC에서만 작동합니다.
• 작동 전압, 소비 전력 등이 표시된 명판은 뒷면에
부착되어 있습니다.
• 단단한 물체나 액체가 본체에 떨어진 경우 기기에
서 전원을 분리하고 자격이 있는 기술자에게 점검
을 받은 후에 사용하십시오.
• 며칠 이상 사용하지 않는 경우 기기의 전원 케이블
을 콘센트에서 분리하십시오.
• 전원을 분리하려면 AC 전원 코드의 플러그를 잡
고 빼내십시오. 코드를 잡고 당기지 마십시오.
• 전원 콘센트는 기기에 가까운 곳에 있고 쉽게 접근
할 수 있어야 합니다.
LCD 화면 취급 방법
•LCD 화면에 밝거나 어두운 점(빨강, 파랑 또는 녹
색)이 나타날 수 있습니다. 이것은 고장이 아닙니
다. LCD 화면은 고도의 정밀 기술을 사용하여 제
조되며 이미지 요소를 99.99 % 이상 재현합니다.
하지만, 일부 화상 요소가 나타나지 않거나 계속
나타날 수도 있습니다.
•LCD 화면을 직사광선에 오랫동안 노출시킬 경우
손상될 수 있습니다. 기기를 창문 근처에 둘 경우
주의하시기 바랍니다.
•LCD 모니터의 화면을 누르거나 긁지 마십시오.
LCD 모니터 화면 위에 무거운 물건을 놓지 마십시
오. 화면의 균일성이 손상될 수 있습니다.
• 추운 곳에서 기기를 사용하는 경우 화면에 수평선
또는 잔상이 나타날 수 있습니다. 이것은 고장이
아닙니다. 모니터의 온도가 올라가면 정상으로 돌
아옵니다.
• 오랫동안 같은 정지 이미지를 표시할 경우 잔상이
나타날 수 있습니다. 잔상은 시간이 지나면 사라
집니다.
• 작동 시 화면과 본체의 온도가 높아집니다. 이것
은 고장이 아닙니다.
KR
4
설치 / 주의 사항
형광 튜브
이 기기에는 특수하게 설계된 형광 튜브가 조명용으
로 내장되어 있습니다. LCD 화면이 어두워지거나
불안정하거나 켜지지 않는 경우 Sony 대리점에 문의
하십시오.
유지 보수
• 부드러운 천에 순한 세제를 조금 묻혀 본체, 패널
및 제어부를 닦으십시오. 연마용 패드, 연마 파우
더 또는 벤진과 같은 용제를 사용하지 마십시오.
Page 97

• 날카롭거나 연마 성분이 있는 소제로 화면 표면을
문지르거나 건드리거나 두드리지 마십시오. 화면
이 긁힐 수 있습니다.
• 부드러운 천으로 화면을 닦으십시오. 유리 닦는
액체를 사용하는 경우 정전기 방지제나 그와 유사
한 첨가물이 포함된 클리너를 사용하지 마십시오.
화면 코팅이 긁힐 수 있습니다.
장치의 폐기
두 가지 컬러 시스템 사용 가능
모니터로 NTSC와 PAL 신호를 모두 디스플레이할
수 있습니다. 적합한 컬러 시스템이 자동으로 선택
됩니다.
SDI 입력 기능(선택 사양)
입력 어댑터 BKM-320D(선택 사양)를 연결하면 SDI
신호를 사용할 수 있습니다. 이 어댑터는 각 모니터
에 연결할 수 있습니다.
• 장치를 일반 쓰레기와 함께 버리지 마십시오.
모니터를 생활 쓰레기와 함께 버리지 마십시오.
• 형광 튜브에는 수은이 포함되어 있습니다. 폐기물
처리 규정에 따라 모니터를 폐기하십시오.
이 기기에 대해 문의 사항이 있는 경우 Sony 공인 대
리점에 문의하십시오.
특징
LMD-7220W에는 두 개의 7 타입 와이드 LCD 패널
이, LMD-5320에는 세 개의 5.6 타입 LCD 패널이,
LMD-4420에는 네 개의 4 타입 LCD 패널이 장착됩
니다.
고휘도 LCD 패널
이 모니터는 고휘도 및 고대비 기술을 사용하므로
다양한 조명 조건하에서 사용할 수 있습니다.
경사도 조절 기능이 있는 랙 설치 모니터
LMD-7220W와 LMD-5320은 3U 크기 랙에 설치되고
LMD-4420은 2U 크기 랙에 설치됩니다. 모든 모니
터에는 경사도 조절 기능이 있으며 표준 19인치 랙
에 설치할 수 있습니다. 따라서 복잡한 OB(외부 방
송 제작) 차량 등 공간 활용이 중요한 곳에서는 매우
요긴합니다.
절전형 디자인
LMD-7220W 23W, LMD-5320 22W 및 LMD-4420은
18W의 저전력을 소모하므로 OB 차량의 전기 소모
를 줄여줍니다.
원격 기능
선택적인 입력(BKM-320D가 연결된 경우)과 비디오
입력 사이의 전환, 탈리 램프 및 화면 비율(LMD7220W만 해당)을 외부 장치로 제어할 수 있습니다.
3색 탈리 램프
3색(빨강, 녹색, 노랑)의 탈리 램프를 통해 각 입력 화
상을 모니터링하여 방송 모드를 확인할 수 있습니다.
탈리 기능은 원격으로 조작할 수 있습니다.
화면 비율(LMD-7220W만 해당)
비디오 신호가 입력될 때 모니터를 16:9 또는 4:3으
로 설정할 수 있습니다.
편리한 조작할 수 있도록 컨트롤을 수직으로
정렬한 단일 레이아웃
세 모델의 컨트롤은 수직으로 정렬되어 있으며 단일
디자인입니다. 모니터를 아래로 기울이더라도 조작
이 편리합니다.
경량의 슬림형 디자인/AC 전원 어댑터 장착
기능
경량의 슬림형 디자인은 OB 차량의 하중과 설치 공
간을 줄여 줍니다. 또한 AC 전원 어댑터를 모니터
뒷면에 설치할 수 있어 사용이 편리합니다.
특징
KR
5
Page 98

부품 및 제어부 위치 및 기능
전면 패널
각 패널에는 POWER 스위치와 표시등 외의 버튼과 컨트롤이 있습니다.
LMD-7220W
LMD-5320
LMD-4420
KR
6
부품 및 제어부 위치 및 기능
Page 99

A POWER 스위치 및 표시등
스위치를 누르면 전원이 꺼지거나 켜집니다. 전원
이 켜져 있으면 표시등이 녹색으로 켜집니다.
B 탈리 램프
모니터의 상태(신호가 컬러별로 입력되는지 여부)
를 확인할 수 있습니다.
REMOTE 커넥터에 연결된 기기로부터 받은 신호
에 따라 램프가 빨간색 또는 초록색으로 표시됩니
다. 빨간색 또는 초록색 신호가 입력되면 램프는
호박색으로 표시됩니다.
REMOTE 커넥터의 핀은 탈리 램프를 제어하는 데
사용됩니다.
자세한 내용은 8 페이지를 참조하십시오.
C 화면 비율 버튼 및 표시등(LMD-7220W만 해당)
화상의 화면 비율을 설정합니다. 버튼을 누르면
화상의 화면 비율이 4
:3으로 설정되고 표시등이
켜집니다.
D CONTRAST 컨트롤
컨트라스트를 높이려면 이 컨트롤을 시계 방향으
로 돌리고 낮추려면 반시계 방향으로 돌립니다.
가시각 조절
LMD-5300/7220W의 가시각은 위 또는 아래로 최대 10
도까지, 그리고 LMD-4420의 가시각은 위로는 최대 8
도까지 아래로는 최대 10도까지 조절할 수 있습니다.
위로
조절
중심 위쪽을 누름
아래로
조절
E PHASE 컨트롤
이 컨트롤은 NTSC 컬러 시스템에서만 효과가 있
습니다.
피부 톤에 녹색조를 높이려면 이 컨트롤을 시계 방
향으로 돌리고 자주색조를 높이려면 반시계 방향
으로 돌립니다.
F BRIGHT(밝기) 컨트롤
밝기를 높이려면 이 컨트롤을 시계 방향으로 돌리
고 낮추려면 반시계 방향으로 돌립니다.
모니터 가시각을 조절했을 때 발생하는 화상의 불
명료성을 밝기 조절을 통해 보상할 수 있습니다.
G CHROMA 컨트롤
농도를 높이려면 이 컨트롤을 시계 방향으로 돌리
고 낮추려면 반시계 방향으로 돌립니다.
중심 아래쪽을 누름
참고
AC 어댑터를 모니터에 연결한 후 각도를 조절하면
AC 어댑터가 위 또는 아래쪽의 기기 세트를 건들 수
있습니다. 따라서 먼저 모니터에서 AC 어댑터 홀더
를 분리하십시오.
부품 및 제어부 위치 및 기능
KR
7
Page 100

뒷면
345 6
LMD-4420 모델을 기준으로 설명합니다.
각 패널에는 DC IN 잭과 AC 어댑터 부착물 외의 커넥터가 있습니다.
12
A DC IN 잭
제공된 AC 어댑터를 연결합니다.
B AC 어댑터 부착물
제공된 AC 어댑터를 부착합니다.
C VIDEO IN 커넥터(BNC)
VCR 등의 비디오 출력 커넥터에 연결합니다.
입력 어댑터 BKM-320D가 OPTION IN 커넥터에
연결되면 이 커넥터가 작동하지 않습니다.
REMOTE 커넥터를 사용하여 선택적인 입력
(OPTION)과 비디오 입력(VIDEO) 사이를 전환할
수 있습니다.
D VIDEO OUT 커넥터(BNC)
VIDEO IN 커넥터의 출력을 루프 쓰루합니다.
이 커넥터는 75 ohm에서 자동으로 터미네이션됩
니다.
E OPTION IN 커넥터(D-서브 9핀, 암커넥터)
선택 사양인 Sony 입력 어댑터 BKM-320D가 연결
되면 SDI 신호가 입력됩니다.
참고
BKM-320D 이외의 다른 장비를 설치하지 마십시
오. 이 기기나 다른 장비가 손상될 수 있습니다.
F REMOTE 커넥터(모듈식)
병렬 스위치를 구성하고 모니터를 외부적으로 제
어합니다. 핀 할당과 각 핀에 할당된 공장 출하시
의 설정에 대한 자세한 내용은 아래를 참조하십시
오.
1 8
핀 번호 기능 (높음 y 낮음)
1 VIDEO IN (OFF y ON)*
2 OPTION IN(SDI) (OFF y ON)*
3
4
5
6N.C
7N.C
8
탈리 빨간색
탈리 녹색
접지
16:9/4:3 선택 가능
(OFF y ON)
(OFF y ON)
(16:9 y 4:3)**
*BKM-320D가 연결되어야 작동합니다. 두 핀 모
두 단락되면 OPTION IN(SDI)이 VIDEO IN에 우선
합니다.
**LMD-7220W만 해당
LMD-5320/4420: N.C
KR
8
부품 및 제어부 위치 및 기능
높음에서 낮음으로 또는 그 반대로 기능을 전환하
려면 다음과 같이 핀 연결을 변경하십시오.
높음: 각 핀을 개방 상태로 둡니다.
낮음: 각 핀과 5 핀을 동시에 단락시킵니다.
 Loading...