

Page 1
4-273-674-81(1)
Mini HI-FI
Component System
Operating Instructions
Manual de instruccionesUSES
LBT-SH2000
Page 2
WARNING
To reduce the risk of f ire or electric shock, do
not expose this apparatus to rain or moisture.
To reduce the risk of fire, do not cover the
ventilation opening of the apparatus with
newspapers, tablecloths, curtains, etc.
Do not place the naked flame sources such as
lighted candles on the apparatus.
To reduce the risk of f ire or electric shock, do
not expose this apparatus to dripping or
splashing, and do not place objects filled
with liquids, such as vases, on the apparatus.
As the main plug is used to disconnect the
unit from the mains, connect the unit to an
easily accessible AC outlet. Should you
notice an abnormality in the unit, disconnect
the main plug from the AC outlet
immediately.
Do not install the appliance in a confined
space, such as a bookcase or built-in cabinet.
Do not expose batteries or apparatus with
battery-installed to excessive heat such as
sunshine, fire or the like.
The unit is not disconnected from the mains
as long as it is connected to the AC outlet,
even if the unit itself has been turned off.
CAUTION
The use of optical instruments with this
product will increase eye hazard.
This appliance is classified as a CLASS 1
LASER product. This marking is located on
the rear exterior.
When unpacking or handling a big and/or
heavy speaker, be sure to handle the unit
with two or more persons. Dropping the unit
may cause personal injury and/or property
damage.
Owner’s Record
The model and serial numbers are located on
the rear of the unit. Record these numbers in
the space provided below. Refer to them
whenever you call upon your Sony dealer
regarding this product.
Model No. __________________________
Serial No. __________________________
This symbol is intended to
alert the user to the
presence of uninsulated
“dangerous voltage” within
the product’s enclosure that
may be of sufficient
magnitude to constitute a
risk of electric shock to
persons.
This symbol is intended to
alert the user to the
presence of important
operating and maintenance
(servicing) instructions in
the literature
accompanying the
appliance.
Important Safety
Instructions
1) Read these instructions.
2) Keep these instructions.
3) Heed all warnings.
4) Follow all instructions.
5) Do not use this apparatus near water.
6) Clean only with dry cloth.
7) Do not block any ventilation openings.
Install in accordance with the
manufacturer’s instructions.
8) Do not install near any heat sources such
as radiators, heat registers, stoves, or
other apparatus (including amplifiers)
that produce heat.
US
2
Page 3
9) Do not defeat the safety purpose of the
polarized or grounding-type plug. A
polarized plug has two blades with one
wider than the other. A grounding type
plug has two blades and a third
grounding prong. The wide blade or the
third prong are provided for your safety.
If the provided plug does not fit into your
outlet, consult an electrician for
replacement of the obsolete outlet.
10) Protect the power cord from being
walked on or pinched particularly at
plugs, convenience receptacles, and the
point where they exit from the apparatus.
11) Only use attachments/accessories
specified by the manufacturer.
12) Use only with the cart, stand, tripod,
bracket, or table specified by the
manufacturer, or sold with the apparatus.
When a cart is used, use caution when
moving the cart/apparatus combination
to avoid injury from tip-over.
13) Unplug this apparatus during lightning
storms or when unused for long periods
of time.
14) Refer all servicing to qualified service
personnel. Servicing is required when
the apparatus has been damaged in any
way, such as power-supply cord or plug
is damaged, liquid has been spilled or
objects have fallen into the apparatus, t he
apparatus has been exposed to rain or
moisture, does not operate normally, or
has been dropped.
The following FCC
statement applies only to
the version of this model
manufactured for sale in
the U.S.A. Other versions
may not comply with FCC
technical regulations.
NOTE:
This equipment has been tested and found to
comply with the limits for a Class B digital
device, pursuant to Part 15 of the FCC Rules.
These limits are designed to provide
reasonable protection against harmful
interference in a residential installation. This
equipment generates, uses and can radiate
radio frequency energy and, if not installed
and used in accordance with the instructions,
may cause harmful interference to radio
communications. However, there is no
guarantee that interference will not occur in
a particular installation. If this equipment
does cause harmful interference to radio or
television reception, which can be
determined by turning the equipment off and
on, the user is encouraged to try to correct the
interference by one or more of the following
measures:
– Reorient or relocate the receiving
antenna.
– Increase the separation between the
equipment and receiver.
– Connect the equipment into an outlet on a
circuit different from that to which the
receiver is connected.
– Consult the dealer or an experienced
radio/TV technician for help.
CAUTION
You are cautioned that any changes or
modifications not expressly approved in this
manual could void your authority to operate
this equipment.
US
Continued
l
US
3
Page 4

License and Trademark Notice
• “WALKMAN” and “WALKMAN” logo
are registered trademarks of Sony
Corporation.
• MPEG Layer-3 audio coding technology
and patents licensed from Fraunhofer IIS
and Thomson.
• Windows Media is either a registered
trademark or trademark of Microsoft
Corporation in the United States and/or
other countries.
• This product contains technology subject
to certain intellectual property rights of
Microsoft.
Use or distribution of this technology
outside of this product is prohibited
without the appropriate license(s) from
Microsoft.
• “PlayStation” is a registered trademark of
Sony Computer Entertainment Inc.
US
4
Page 5

Table of Contents
Guide to parts and controls ..........6
Getting Started
Hooking up the system
securely ......................................10
Positioning the speakers.............12
Setting the clock.........................12
Disc
Playing an AUDIO CD/MP3
disc .............................................12
Using play mode ........................13
Tuner
Listening to the radio .................14
Receiving RDS broadcasts.........15
USB Device
Before using the USB device
with this system..........................16
Transferring music .....................16
Playing a file ..............................19
Sound Adjustment
Adjusting the sound ...................21
Creating your own sound
effect ..........................................21
Creating a party atmosphere
(DJ EFFECT) .............................22
Other Operations
Singing along ............................ 22
Changing the lighting pattern
on the speakers .......................... 22
Using the timers ........................ 23
Changing the display................. 24
Using optional equipment ......... 25
Deactivating the buttons on the
unit (Child Lock)....................... 25
Additional Information
Playable discs ............................ 25
Troubleshooting ........................ 26
Messages ................................... 30
Precautions ................................ 31
Specifications ............................ 32
US
5
Page 6
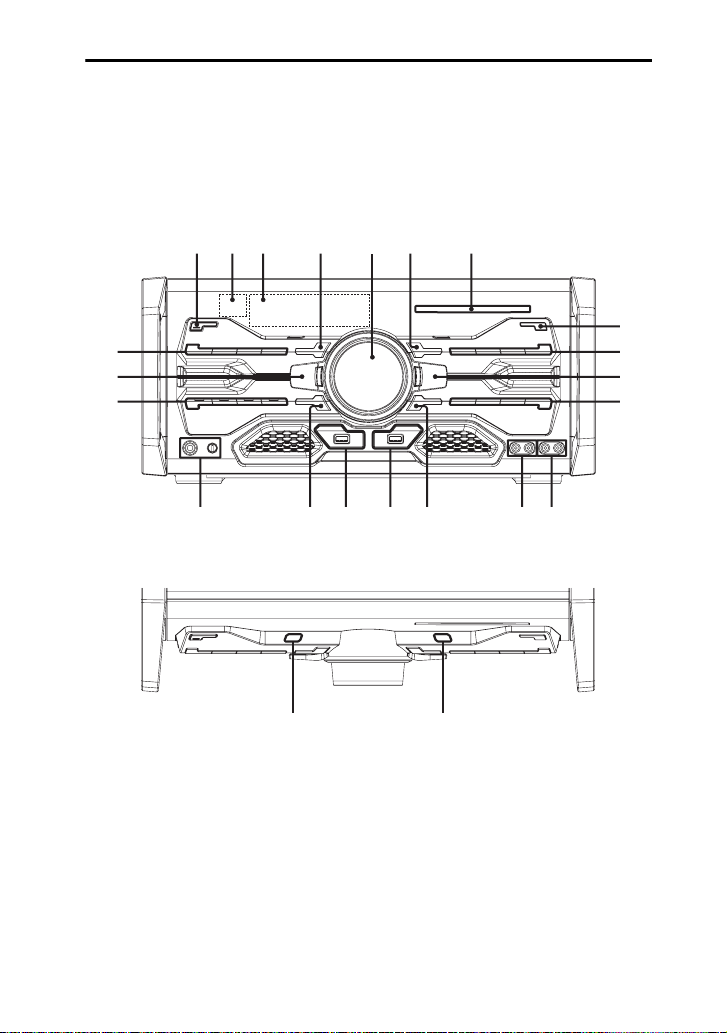
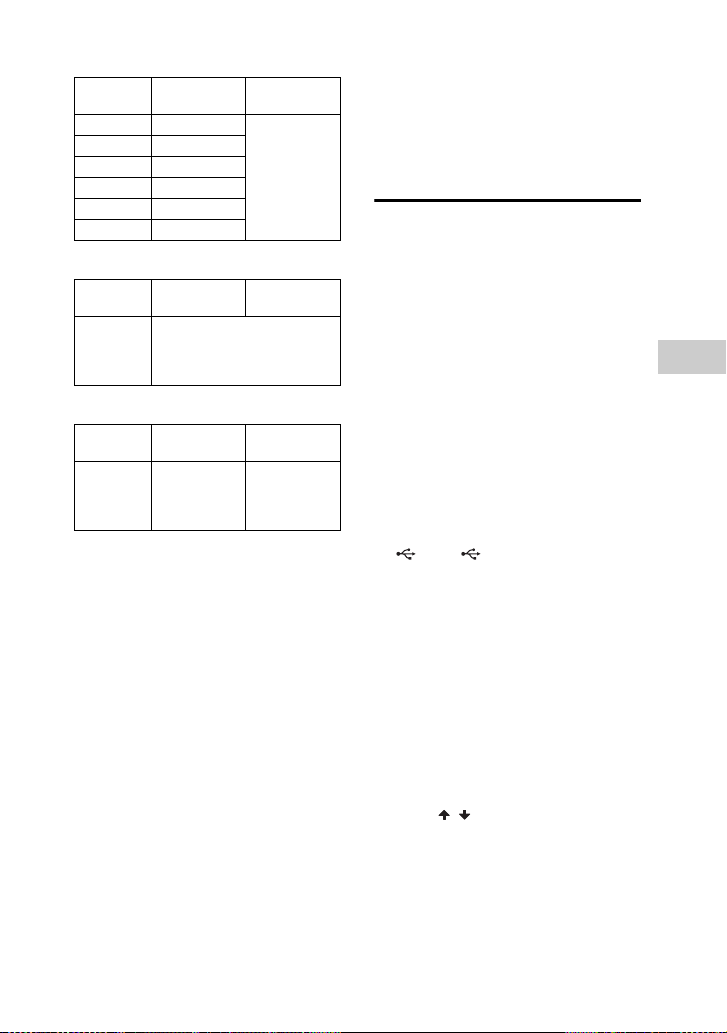
Guide to parts and controls
This manual mainly explains operations using the unit, but the same operations can also
be performed using the buttons on the remote control having the same or similar names.
Unit
– Front view
1454623
7
qj
9
qh
qg qf qd qs qa44
– Top view
8
9
q;
qk ql
US
6
Page 7

Remote control RM-SCU37B
wh
wg
wf
wd
8
ws
qj
4
BAND
1
"/1 (on/standby)
Turn on the system, or set it to standby
mode. The STANDBY indicator lights up
in red when the system is turned off.
B
Remote control sensor
C
Display panel
D
Unit: / / /
Select the menu items.
+/– (select folder)
Select a folder on an MP3 disc or a USB
device.
m/M (rewind/fast forward)
Hold down to find a point in a track or file
during playback.
Unit: l/L (go back/go
forward)
Select a track or file.
Remote control: ./>
(go back/go forward)
Select a track or file.
Unit: TUNING +/–
Remote control: +/– (tuning)
Tune to the station you want.
1
w;
wa
q;
4
9
ql
4
5
E
Unit: VOLUME/DJ CONTROL
Adjust the volume.
Adjust the DJ EFFECT level (page 22).
You cannot use this knob to adjust the
volume when the DJ EFFECT is
activated.
Remote control: VOLUME +/–*
Adjust the volume.
* The VOLUME + button has a tactile dot. Use
the tactile dot as a reference when operating
the system.
F
Disc slot
G
Z EJECT
Eject a disc.
H
OPTIONS
Enter the option menus.
TUNER/BAND
Select the TUNER function.
Select the FM or AM band during
TUNER function.
CD
Select the CD function.
Unit: USB/USB SELECT
Remote control: USB
Select the USB function.
Select the USB device connected to the
A or B port during USB function.
Continued
l
US
7
Page 8

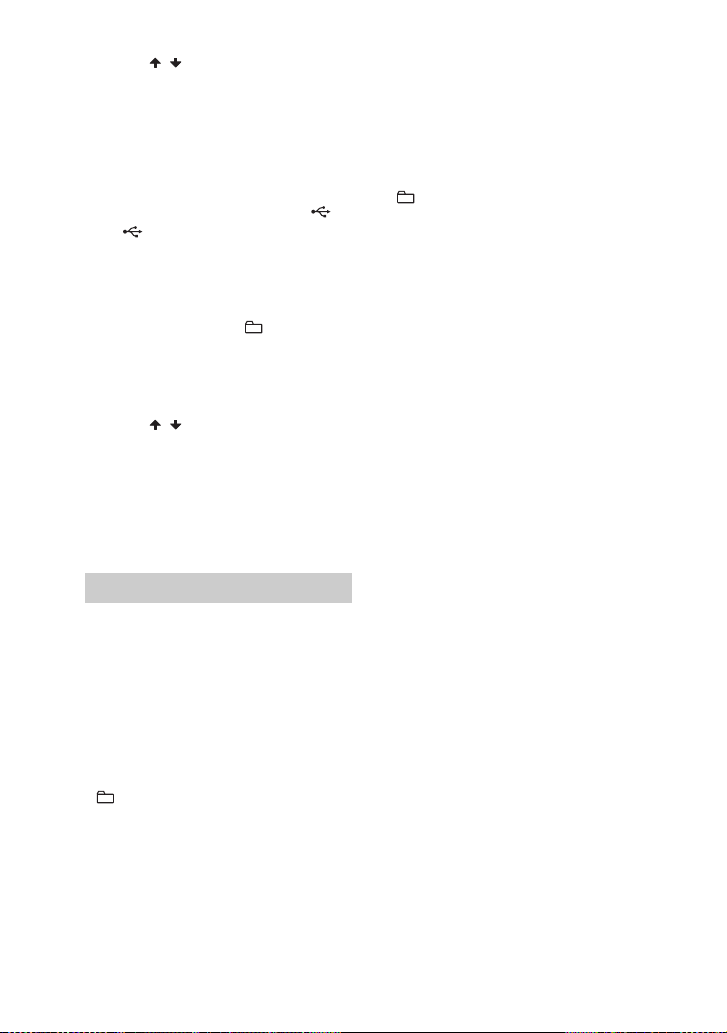
I
Unit: NX (play/pause)
Remote control: N (play),
X (pause)
Start or pause playback.
To resume playback of the USB device,
press NX or N.
x (stop)
Stop playback.
Press x twice to cancel resume play of the
USB device.
J
Unit: PC
Select the PC function.
Unit: TV
Select the TV function.
Unit: DVD/SAT
Select the DVD/SAT function.
Unit: GAME
Select the GAME function.
Remote control: FUNCTION
Select a function.
K
TV L/R jacks
Use an audio cord (not supplied) to
connect to the audio output jacks of a TV.
The TV sound is output through this
system.
L
PC L/R jacks
Use an audio cord (not supplied) to
connect to the audio output jacks of an
audio equipment. The audio is output
through this system.
M
B (PLAY/REC) port
Connect and transfer to an optional USB
device.
B indicator
Lights up in red when transferring to the
connected optional USB device.
US
8
N
A (PLAY) port
Connect an optional USB device.
A indicator
O
MIC IN jack
Connect a microphone.
MIC LEVEL
Adjust the microphone volume.
P
Unit: FLANGER, ISOLATOR,
SOUND FLASH, PHASER
Activate or select the DJ EFFECT type.
Q
Unit: SEARCH
Enter or exit search mode.
Unit: GROOVE
Reinforce the bass.
Unit: PRESET EQ
Remote control: EQ
Select the sound effect (page 21).
REC TO USB B
Transfer onto the optional USB device
which is connected to the B port.
R
RETURN
Return to previous selection.
S
ENTER
Enter the settings.
T
CLOCK/TIMER SELECT (page 23)
CLOCK/TIMER SET (page 12, 23)
Set the clock and the timers.
Page 9

U
REPEAT/FM MODE
Listen to a disc, a USB device, a single
track or file repeatedly (page 14, 20).
Select the FM reception mode (monaural
or stereo) (page 14).
V
CLEAR
Delete the last step from the program list.
W
TUNER MEMORY (page 15)
Preset the radio station.
X
PLAY MODE/TUNING MODE
Select the play mode of an AUDIO CD,
MP3 disc or a USB device (page 13, 20).
Select the tuning mode (page 14).
Y
DISPLAY
Change the information on the display
panel.
Z
SLEEP (page 23)
Set the Sleep Timer.
US
9
Page 10
Getting Started
Hooking up the system securely
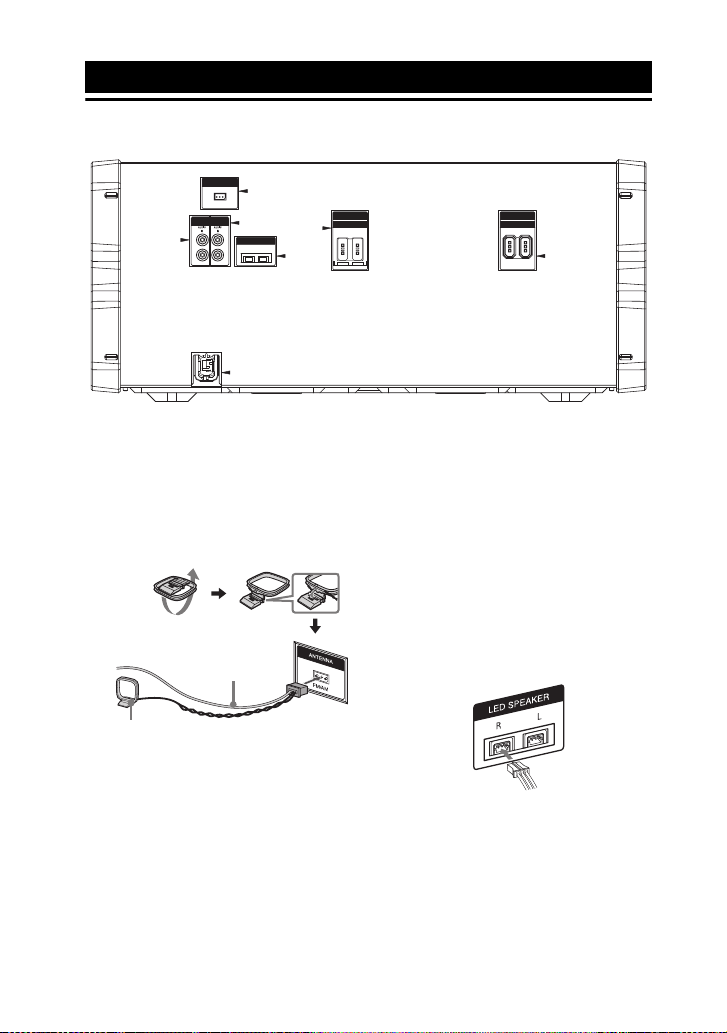
ANTENNA
A
B
FM/AM
GAME
DVD/SAT
C
L
L
LED SPEAKER
RL
R
R
F
SPEAKERS
HIGH CHANNEL
E
RL
DE
IMPEDANCE USE 4
Ω
SPEAKERS
LOW CHANNEL
IMPEDANCE USE 4
LR
Ω
A Antennas
Find a location and an orientation that
provide good reception, and then set up
the antennas.
Keep the antennas away from the speaker
cords, the power cord and the USB cable
to avoid picking up noise.
Extend the FM lead
antenna horizontally
AM loop antenna
B GAME L/R jacks
Use an audio cord (not supplied) to
connect to the audio output jacks of a
gaming device (such as PlayStation 3).
The audio is output through this system.
US
10
C DVD/SAT L/R jacks
Use an audio cord (not supplied) to
connect to the audio output jacks of an
audio/video equipment. The audio is
output through this system.
D LED SPEAKER terminals
Connect the LED SPEAKER connector of
the speaker to this terminal.
The lighting on the speakers will react
according to the music source. You can
select the lighting pattern according to
your preference (page 22).
Page 11
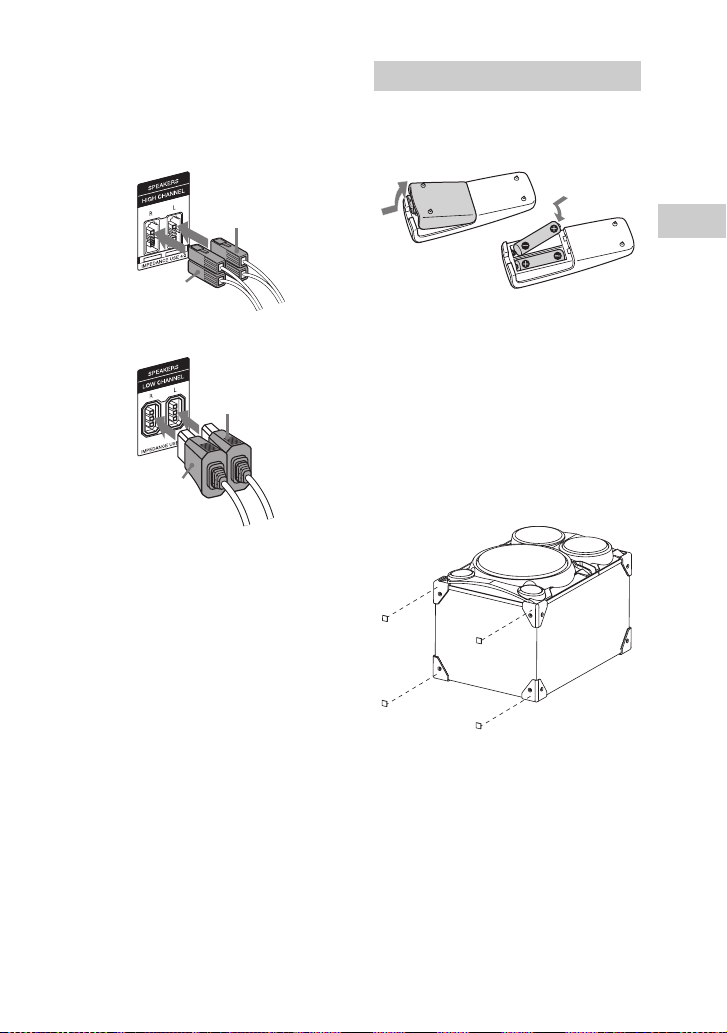
E Speakers
The speaker connectors are color-coded
with their respective speaker terminals on
the unit.
HIGH CHANNEL
White
Red
LOW CHANNEL
Blue
Grey
Notes
• Be sure to use only the supplied speakers.
• When connecting speaker cords, insert the
connector straight into the terminals.
F Power
Plug the power cord into a wall socket.
The demonstration appears in the display
panel. Press "/1 to turn on the system and
the demonstration automatically ends.
If the supplied adaptor on the plug does
not fit your wall outlet, detach it from the
plug (only for models equipped with an
adaptor).
Inserting batteries
Insert the two supplied R6 (size AA)
batteries, matching the polarities shown
below.
Notes
• Do not mix an old battery with a new one or
mix different types of batteries.
• If you do not use the remote for a long period
of time, remove the batteries to avoid damage
from battery leakage and corrosion.
Attaching the speaker foot
Attach the supplied speaker foot at each
corner on the bottom of the speakers to
stabilize the speakers and to prevent them
from slipping.
Getting Started
11
US
Page 12
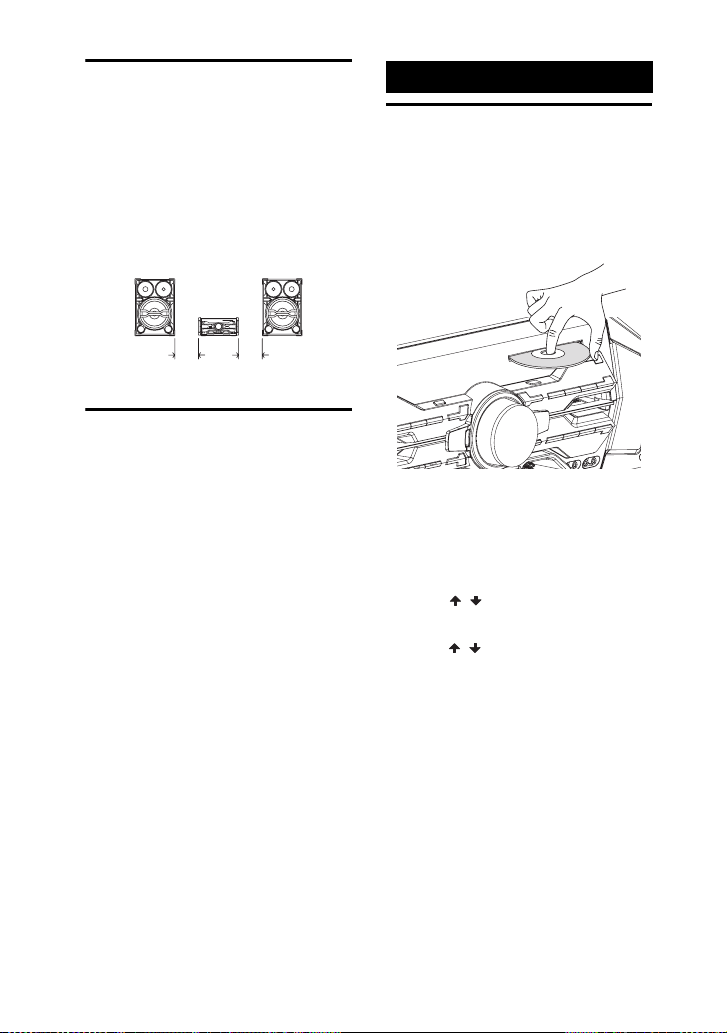
Positioning the
speakers
To obtain optimum performance from the
system, we recommend you to place the
speakers as shown below.
A Unit
B Speaker (left)
C Speaker (right)
BC
A
Disc
Playing an AUDIO CD/
MP3 disc
1
Press CD.
2 Insert a disc with the label side
facing up.
0.3 m
(1 foot)
0.3 m
(1 foot)
Setting the clock
You cannot set the clock in Power Saving
Mode.
Use the buttons on the remote control to
perform this operation.
1 Press "/1 to turn on the system.
2 Press CLOCK/TIMER SET.
If “PLAY SET” appears in the display
panel, press ./> repeatedly to
select “CLOCK SET”, then press
ENTER.
3 Press ./> repeatedly to set
the hour, then press ENTER.
4 Press ./> repeatedly to set
the minutes, then press ENTER.
To search a track or MP3 file
(TRACK SEARCH)
1 Press SEARCH.
2 (MP3 files only)
Press / to select the folder you
want, then press ENTER or NX.
3 Press / to select the track or file
you want, then press ENTER or
NX.
The selected track or file starts
playback.
Notes on playing discs
• The system can recognize up to
– 999 folders (including root folder).
– 999 MP3 files.
– 250 MP3 files on a single folder.
– 8 folder levels (tree structure of files).
• CD-TEXT information is not supported.
12
US
Page 13
Using play mode
Playing in original order
(Normal Play)
Press PLAY MODE on the remote control
repeatedly when playback is stopped.
• (blank): a disc
• *: all MP3 files in the folder on the
disc
* When playing an AUDIO CD, “ ”
performs the same operation as normal play
mode.
Playing in random order
(Shuffle Play)
Press PLAY MODE on the remote control
repeatedly when playback is stopped.
• SHUF: shuffle a disc.
• SHUF*: shuffle all MP3 files in the
folder on the disc
* When playing an AUDIO CD, “ SHUF”
performs the same operation as “SHUF” play
mode.
Note
When you turn off the system, the selected
Shuffle Play is cleared and the play mode
returns to Normal Play.
Creating your own program
(Program Play)
You can make a program of up to 25 steps
in the order you want them to be played
back.
Use the buttons on the remote control to
perform this operation.
2 When playback is stopped,
press PLAY MODE repeatedly
until “PGM” lights up in the
display panel.
3 For USB function:
Press USB repeatedly to select the
USB you want.
4 (Audio files only)
+/– repeatedly to select a
Press
folder.
If you want to program all files in the
folder, press ENTER.
5 Press ./> repeatedly to
select the track or file you want,
then press ENTER.
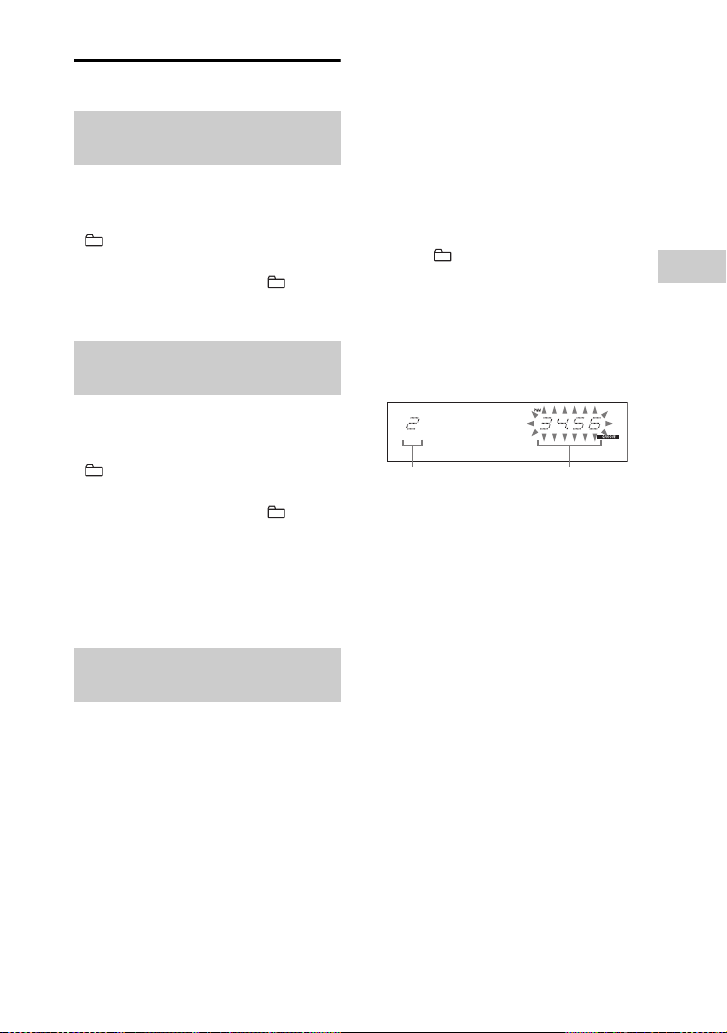
Selected track
or file number
“--.--” appears when the total playing
time exceeds 100 minutes for an
AUDIO CD or when you program an
audio file.
Total playing time of
program (including
selected track)
6 Repeat steps 3 to 5 to program
additional tracks or files.
7 Press N to start Program Play.
To cancel Program Play
When playback is stopped, press PLAY
MODE on the remote control repeatedly
until “PGM” disappear from the display
panel.
Disc
1 For CD function:
Press CD.
For USB function:
Press USB.
Continued
l
13
US
Page 14
To delete the last step from the
program list
Press CLEAR on the remote control when
playback is stopped.
Notes
• (CD function only) The program list remains
available until you eject the disc.
• (USB function only) The program list is
cleared when you:
– remove the USB device.
– switch the USB memory select.
Playing repeatedly (Repeat
Play)
Press REPEAT on the remote control
repeatedly.
• REP: repeat all tracks or files
• REP 1: repeat a track or file
Tuner
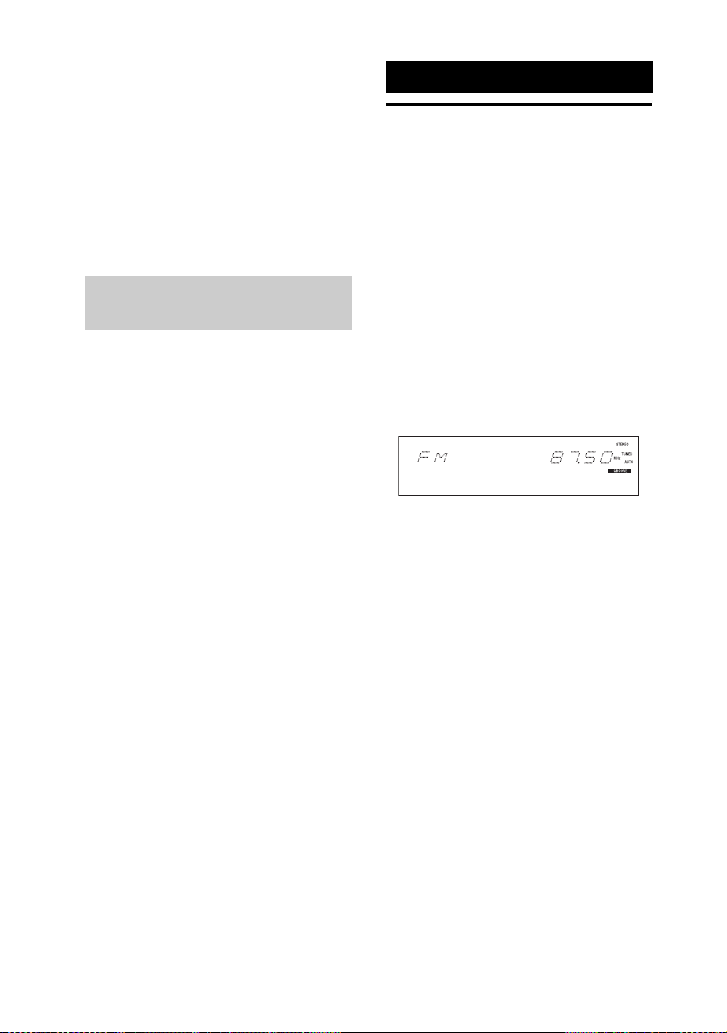
Listening to the radio
Use the buttons on the remote control to
perform this operation.
1 Press TUNER/BAND repeatedly
to select FM or AM band.
2 For automatic scanning:
Press TUNING MODE repeatedly
until “AUTO” lights up in the display
panel. Then, press +/–.
Scanning stops automatically when a
station is tuned in, and then “TUNED”
and “STEREO” (for FM stereo
programs only) light up in the display
panel.
If “TUNED” does not light up and
scanning does not stop, press x to stop
scanning. Then, perform manual
tuning (below).
For manual tuning:
Press TUNING MODE repeatedly
until “AUTO” and “PRESET”
disappear from the display panel.
Then, press +/– repeatedly to tune to
the station you want.
Tip
To reduce static noise on a weak FM stereo
station, press FM MODE repeatedly until
“MONO” lights up in the display panel.
14
To change the AM tuning interval
The default setting for AM tuning interval
is 9 kHz (or 10 kHz for some areas). You
cannot change the AM tuning interval in
Power Saving Mode.
Use the buttons on the unit to perform this
operation.
US
Page 15
1 Press TUNER/BAND repeatedly to
select AM band.
2 Press "/1 to turn off the system.
3 While holding down ENTER, press
"/1.
“AM 9K STEP” or “AM 10K STEP”
appears in the display panel.
When you change the interval, all the
AM preset stations are erased.
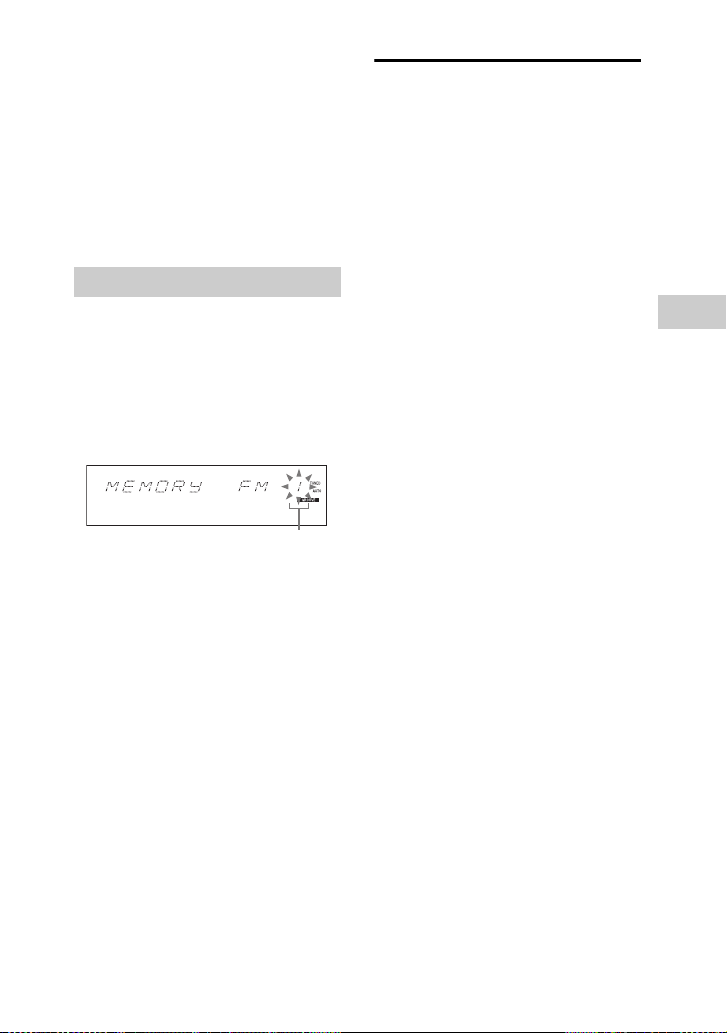
Presetting radio stations
You can store up to 20 FM and 10 AM
stations as your favorite stations.
Use the buttons on the remote control to
perform this operation.
1 Tune to the station you want.
2 Press TUNER MEMORY.
Preset number
3 Press +/– repeatedly to select
the preset number you want,
then press ENTER.
“COMPLETE” appears in the display
panel. The station is stored.
Receiving RDS
broadcasts
This system allows you to use Radio Data
System (RDS), which enables radio
stations to send additional information
along with the regular programming
signal. This system offers convenient
RDS features, such as Program Service
name display. RDS is available only for
FM stations.*
* Not all FM stations provide RDS service, nor
do they provide the same type of services. If
you are not familiar with the RDS services in
your area, check with your local radio stations
for details.
Simply select a station on the FM
band.
When you tune to a station that provides
RDS services, the Program Service name
appears in the display panel.
You can check the RDS information by
pressing DISPLAY on the remote control
repeatedly.
Note
RDS may not work properly if the station you
tuned to is not transmitting the RDS signal or if
the signal strength is weak.
Tuner
To tune to a preset station
Press TUNING MODE repeatedly until
“PRESET” lights up in the display panel.
Then, press +/– repeatedly to select the
preset number you want.
15
US
Page 16

USB Device
Before using the USB
device with this system
Check the websites below for the
information about compatible USB
devices.
<http://www.sony.com/shelfsupport>
Note on the maximum number of
audio files and folders on a USB
device
This system cannot transfer or playback audio
files and folders of the USB device in the
following cases.
– When the number of audio files in a folder
exceeds 250.
– When the number of audio files in a USB
device exceeds 3000.
– When the number of folders in a USB device
exceeds 1000.
Note
Do not remove the USB device during
transferring or erase operations. Doing so may
corrupt the data on the USB device or damage
the USB device itself.
To select the playback source or
transferring destination
If the USB device has more than one
memory (for example, internal memory
and a memory card), you can select which
memory to use as a playback source or
transferring destination.
Note
You cannot select a memory during playback or
transferring. Make sure to select a memory
before starting playback or transferring.
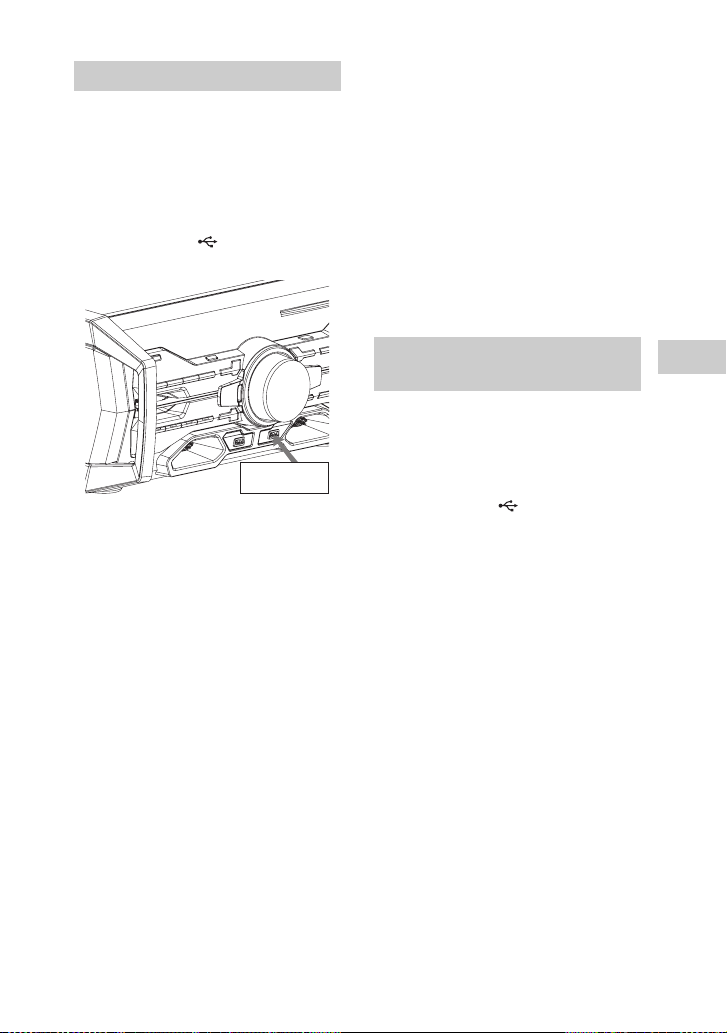
1 Connect the USB device to the
A or B port on the unit.
2 Press USB/USB SELECT
repeatedly to select “USB A” or
“USB B”.
3 Press OPTIONS when playback is
stopped.
4 Press / to select “USB MEM
SEL”, then press ENTER.
5 Press / to select the memory
you want, then press ENTER.
6 Start playback the audio files of the
selected memory or start
transferring.
Transferring music
You can transfer music from a sound
source to a USB device.
The audio format of files transferred by
this system is MP3. However, you can
also transfer WMA and AAC files from
USB A to USB B.
Notes
• When transferring from an AUDIO CD, the
tracks are transferred as 128 kbps MP3 files.
When transferring from an MP3 disc, MP3
files are transferred with the same bit rate as
the original MP3 files.
When transferring from a USB device, the
audio files are transferred with the same bit
rate as the original audio files.
• When transferring from TUNER, PC, TV,
DVD/SAT, GAME function, the music are
transferred as 128 kbps MP3 files.
Note on copyright-protected
content
The transferred music is limited to private
use only. Use of the music beyond this
limit requires permission of the copyright
holders.
16
US
Page 17
Transferring music from a disc
You can easily transfer all the music on a
disc to a USB device (CD-USB
Synchronized Transfer). You can also
transfer a single track or MP3 file during
playback (REC1 Transferring).
1 Connect a transferable USB
device to the B port as
shown below.
USB device
2 Press CD.
3 Insert the disc you want to
transfer.
4 For CD-USB Synchronized
Transfer:
When playback is stopped, press
PLAY MODE on the remote control
repeatedly to select the play mode you
want.
Note
If you start transferring in Shuffle Play or
Repeat Play, the selected play mode is
automatically changes to Normal Play.
For REC1 Transferring:
Select the track or MP3 file you want
to transfer, then start playback.
5 Press REC TO USB B.
“PUSH ENTER” appears in the
display panel.
6 Press ENTER.
Transferring starts when “DON’T
REMOVE” appears in the display
panel.
For CD-USB Synchronized
Transfer:
When the transferring is completed,
the disc and the USB device stop
automatically.
For REC1 Transferring:
When the transferring is completed,
the disc continues to play.
Transferring analog audio
(Analog Transferring)
You can transfer the sound from analog
audio sources (other than CD and USB
function) to a USB device.
1 Connect a transferable USB
device to the B port on the
unit (page 17).
2 Press FUNCTION repeatedly to
select the source you want to
transfer.
3 Press REC TO USB B.
“PUSH ENTER” appears in the
display panel.
4 Press ENTER.
Transferring starts when “DON’T
REMOVE” appears in the display
panel.
5 Start playback the source.
To stop transferring
Press x.
Continued
l
17
USB Device
US
Page 18
To create a new MP3 file
Press REC TO USB B.
“NEW TRACK” appears in the display
panel.
If you press REC TO USB B again after a
few seconds, a new MP3 file cannot be
created.
Note
When a new MP3 file is created, transferring is
disabled for the time being.
Tip
A new MP3 file is created automatically after
approximately 1 hour of transferring.
Transferring music from USB
device
You can easily transfer the audio files
from a USB device to another USB device
(USB A-USB B Synchronized Transfer).
You can also transfer a single audio file
during playback (USB A-USB B REC1
Transferring).
1 Connect a transferable USB
device to the B port, then
connect the USB device you
want to transfer to A port.
2 Press USB/USB SELECT
repeatedly to select “USB A”.
3 For USB A-USB B Synchronized
Transfer:
When playback is stopped, press
PLAY MODE on the remote control
repeatedly to select the play mode you
want.
Note
If you start transferring in “ALL USB”,
“ALL USB SHUF”, “1 USB SHUF” and
Repeat Play, the play mode automatically
changes to “1 USB”.
If you start transferring in “ SHUF”, the
play mode automatically changes to “ ”.
For USB A-USB B REC1
Transferring:
Select the audio file you want to
transfer, then start playback.
4 Press REC TO USB B.
“PUSH ENTER” appears in the
display panel.
5 Press ENTER.
Transferring starts when “DON’T
REMOVE” appears in the display
panel.
For USB A-USB B Synchronized
Transfer:
When the transferring is completed,
both USB devices stop automatically.
For USB A-USB B REC1
Transferring:
When the transferring is completed,
the audio file continues to play.
Folder and file generation
rules
When transferring to a USB device, a
“MUSIC” folder is created directly below
the “ROOT”. Folders and files are
generated within this “MUSIC” folder as
follows.
CD-USB Synchronized Transfer
Transferring
source
MP3 Same as the transferring source
AUDIO CD “CDDA0001”* “TRACK001”*
CD-USB REC1 Transferring
Transferring
source
MP3
AUDIO CD “REC1-CD” “TRACK001”*
Folder name File name
Folder name File name
“REC1-MP3”
Same as the
transferring
source
18
US
Page 19
Analog Transferring
Transferring
source
FM “TUFM0001”* “TRACK001”*
AM “TUAM0001”*
PC “EXPC0001”*
TV “EXTV0001”*
DVD/SAT “EXDS0001”*
GAME “EXGA0001”*
USB A-USB B Synchronized Transfer
Transferring
source
Audio files
(MP3,
WMA,
AAC)
USB A-USB B REC1 Transferring
Transferring
source
Audio files
(MP3,
WMA,
AAC)
* Folder and file numbers are assigned serially
thereafter.
Notes on transferring
• While transferring from an MP3 disc, AUDIO
CD or USB device, no sound is output.
• CD-TEXT information is not transferred in
the created MP3 files.
• Transferring stops automatically if:
– the USB device runs out of space during
– the number of audio files and folders on the
– the function or tuner band is changed.
• If a folder or file that you are trying to transfer
already exists on the USB device with the
same name, a sequential number is added after
the name without overwriting the original
folder or file.
• You cannot eject the disc, select another track
or file, pause playback or find a point in the
track or file during CD-USB Synchronized
Transfer or REC1 Transferring.
Folder name File name
Folder name File name
Same as the transferring source
Folder name File name
Same as the
“REC1-MP3”
transferring.
USB device reaches the limit for the number
that the system can recognize.
transferring
source
®
• When transferring music to a Walkman
using “Media Manager for WALKMAN”, be
sure to transfer in MP3 format.
• When connecting a Walkman
be sure to connect after the display “Creating
Library” or “Creating Database” on the
®
Walkman
has disappeared.
®
to the system,
Playing a file
The audio formats that can be played back
by this system are as follows:
– MP3: file extension “.mp3”
– WMA: file extension “.wma”
– AAC: file extension “.m4a”, “.mp4” or
“.3gp”
If the audio files have the above file
extension but are not the respective
formats, the system may produce noise or
may malfunction.
1 Press USB/USB SELECT
repeatedly to select “USB A” or
“USB B”.
2 Connect a USB device to the
A or B port on the unit.
The display changes as follows:
READING
* “xxxx” represent number of folders.
t xxxx FOLDER*
3 Press NX.
The audio files are played back in
alphabetical order.
To search an audio file
(TRACK SEARCH)
1 Press SEARCH.
2 Press / to select the folder you
want, then press ENTER or NX.
Continued
l
19
USB Device
US
Page 20
3 Press / to select the audio file
you want, then press ENTER or
NX.
The selected file starts playback.
To erase audio files or folders from
the USB device
1 Connect a USB device to the A
or B port on the unit.
2 Press USB/USB SELECT
repeatedly to select “USB A” or
“USB B” when playback is stopped.
3 Press l/L or +/–
repeatedly to select the audio file or
folder.
4 Press OPTIONS.
5 Press / to select “USB
ERASE”, then press ENTER.
“FOLDER ERASE” or “TRACK
ERASE” appears in the display panel.
6 Press ENTER.
“COMPLETE” appears in the display
panel.
Using play mode
Use the buttons on the remote control to
perform this operation.
Playing in original order (Normal
Play)
Press PLAY MODE repeatedly when
playback is stopped.
• ALL USB: all USB devices
• 1 USB: a USB device
• : all audio files in the folder on the
USB device
Playing in random order (Shuffle
Play)
Press PLAY MODE repeatedly when
playback is stopped.
• ALL USB SHUF: shuffle all USB
devices
• 1 USB SHUF: shuffle a USB device
• SHUF: shuffle all audio files in the
folder on the USB device
Note
When you turn off the system, the selected
Shuffle Play is cleared and the play mode
returns to Normal Play.
Creating your own program (Program
Play)
See page 13.
Playing repeatedly (Repeat Play)
Press REPEAT repeatedly.
• REP: repeat all audio files on a USB
device
• REP 1: repeat an audio file
Notes on the USB device
• The playback order for the system may differ
from the playback order of the connected
digital music player.
• Be sure to turn off the system before removing
the USB device. Removing the USB device
while the system is turned on may corrupt the
data on the USB device.
• You cannot erase audio files and folders in
Shuffle Play or Program Play.
20
US
Page 21
Sound Adjustment
Adjusting the sound
To Do this
Reinforce the
bass and create
a more powerful
sound
(CD and USB
function only)
Enhance the
sound quality of
the audio file
To select a preset sound effect
Press PRESET EQ (or EQ on the remote
control) repeatedly.
The type of sound effects varies
depending on the selected function as
below:
• TV function: SPORTS, DRAMA/
NEWS, MOVIE, REGGAETON,
FLAT, USER EQ
• DVD/SAT function: MOVIE, Music
EQ*, FLAT, USER EQ
• Other functions: Music EQ*, FLAT,
USER EQ
* REGGAETON, ROCK, POP, JAZZ,
DANCE, TECHNO, SALSA, SAMBA
To cancel preset sound effect, select
“FLAT”.
Press GROOVE
repeatedly.
1 Press OPTIONS.
2 Press / repeatedly
to select “MP3
BOOSTER+”, then
press ENTER.
3 Press / to select
“AUTO”, then press
ENTER.
To exit the OPTIONS
menu, press OPTIONS.
Creating your own
sound effect
You can raise or lower the levels of
specific frequency ranges and then store
the setting in the memory as “USER EQ”.
1 Press OPTIONS.
2 Press / repeatedly to select
“EQ EDIT”, then press ENTER.
3 Press / repeatedly to adjust
the equalizer level, then press
ENTER.
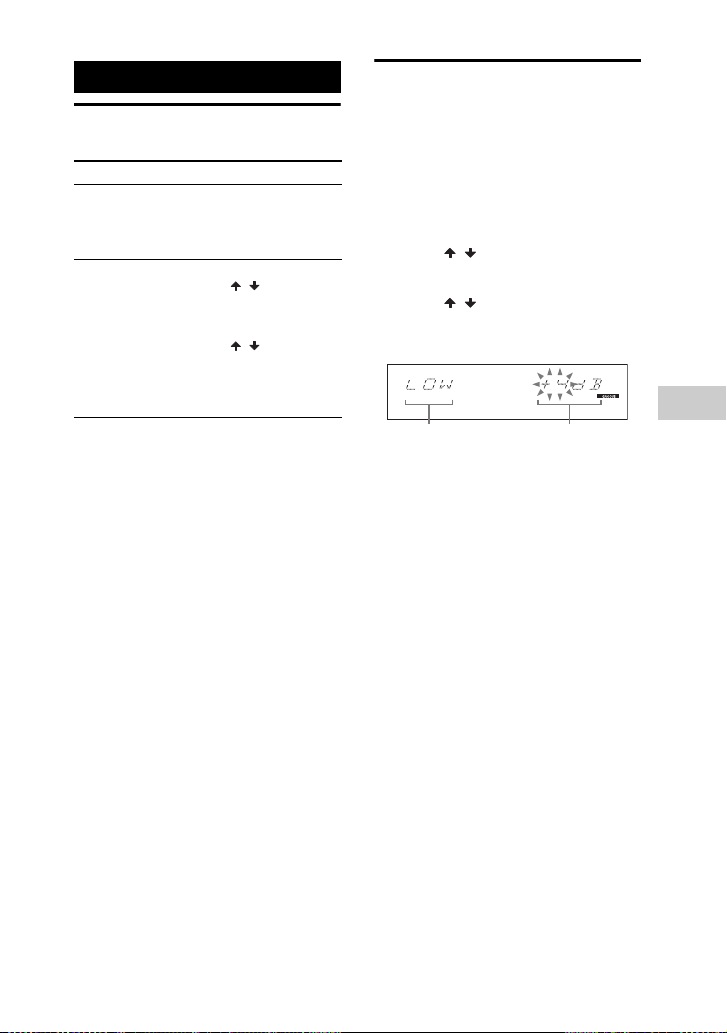
Equalizer levelFrequency band
4 Repeat step 3 to adjust the level
of other frequency bands and
surround effect.
The user equalizer setting is stored
when “USER EQ” appears in the
display panel.
To call up the user equalizer setting
Press PRESET EQ (or EQ on the remote
control) repeatedly to select “USER EQ”.
Sound Adjustment
21
US
Page 22

Creating a party
atmosphere
(DJ EFFECT)
1 Press the following button to
select the effect type.
• FLANGER: Create a deep flanging
effect that is similar to the roar of a
jet plane.
• ISOLATOR: Isolate a specific
frequency band by adjusting the
other frequency bands. For example,
when you want to focus on only
vocal, etc.
• SOUND FLASH: Flash the sound
output. The sound cuts off
periodically.
• PHASER: Create a series of peaks
and troughs in the frequency
spectrum, like a sweeping effect.
2 Turn DJ CONTROL to adjust the
effect level.
To turn off the effect
Press the selected effect button again.
Notes
• The DJ EFFECT is automatically turned off
when you turn off the system, change the
function or change the tuner band.
• If you activate the DJ EFFECT during
transferring, the sound effect will not be
transferred onto the USB device.
• You cannot use VOLUME/DJ CONTROL to
adjust the volume when the DJ EFFECT is
activated. Press VOLUME +/– on the remote
control to adjust the volume.
US
22
Other Operations
Singing along
You can sing along with any audio source
that played back on this system.
1 Turn MIC LEVEL to MIN to
reduce the microphone volume
level.
2 Connect a microphone to the
MIC jack on the unit.
3 Start playing the music and
adjust the volume.
4 Turn MIC LEVEL to adjust the
microphone volume.
If acoustic feedback (howling) occurs,
reduce the volume, move the
microphone away from the speakers,
or change the direction of the
microphone.
After you have finished, disconnect the
microphone.
Note
During transferring, the sound from microphone
will not be transferred onto the USB device.
Changing the lighting
pattern on the
speakers
1
Press OPTIONS.
2 Press / repeatedly to select
“LED SPEAKER”, then press
ENTER.
3 Press / repeatedly to select
the speaker lighting pattern you
want, then press ENTER.
To turn off the lighting, select
“PATTERN OFF”.
Page 23

Using the timers
The system offers three timer functions.
You cannot activate both the Play Timer
and the Recording Timer at the same time.
If you use either with the Sleep Timer, the
Sleep Timer has priority.
Sleep Timer
You can fall asleep to music. The system
turns off after the preset time.
Press SLEEP on the remote control
repeatedly.
Tip
To check the remaining time before the system
turns off, press SLEEP on the remote control.
To cancel Sleep Timer
Press SLEEP on the remote control
repeatedly to select “SLEEP OFF”.
Play Timer/Recording Timer
Make sure you have set the clock.
Use the button on the remote control to
perform this operation.
Play Timer:
You can wake up to disc, tuner or USB
device at a preset time.
Recording Timer:
You can transfer music from a preset radio
station into a USB device at a specified
time.
1 For Play Timer:
Prepare the sound source, and then
press VOLUME +/– to adjust the
volume.
To start from a specific track or file,
create your own program (page 13).
For Recording Timer:
Tune to the preset radio station
(page 15).
2 Press CLOCK/TIMER SET.
3 Press ./> repeatedly to
select “PLAY SET” or “REC
SET”, then press ENTER.
4 Set the time to start playing or
transferring.
Press ./> repeatedly to set the
hour/minute, then press ENTER.
5 Use the same procedure as in
step 4 to set the time to stop
playing or transferring.
6 Press ./> repeatedly to
select the sound source you
want, then press ENTER.
For Recording Timer:
Connect a transferable USB device to
the B port on the unit.
7 Press "/1 to turn off the system.
To check the timer setting or
activate the timer again
Press CLOCK/TIMER SELECT, press
./> repeatedly to select “PLAY
SELECT” or “REC SELECT”, then press
ENTER.
To cancel the timer
Press CLOCK/TIMER SELECT, press
./> repeatedly to select “TIMER
OFF”, then press ENTER.
Notes
• The system turns on before the preset time. If
the system is turned on at the preset time or if
“STANDBY” flashes in the display panel, the
Play Timer and the Recording Timer will not
play or transfer.
• Do not operate the system from the time the
system turns on until the playback or
transferring starts.
Other Operations
23
US
Page 24

Changing the display
Changing the display mode
Changing the illumination
pattern around VOLUME/
DJ CONTROL knob
Press DISPLAY on the remote
control repeatedly while the
system is turned off.
Demonstration
The display changes and the indicator
flashes even when the system is turned
off.
No display (Power Saving Mode)
The display is turned off to conserve
power. The timer and clock continue to
operate. You cannot turn on the system by
pressing the function buttons.
Clock
The clock display automatically turns to
Power Saving Mode after a few seconds.
Changing the spectrum
pattern of the display panel
1 Press OPTIONS.
2 Press / repeatedly to select
“SPECTRUM”, then press
ENTER.
3 Press / repeatedly to select
the spectrum pattern you want,
then press ENTER.
To exit the OPTIONS menu, press
OPTIONS.
US
24
1 Press OPTIONS.
2 Press / repeatedly to select
“ILLUM”, then press ENTER.
3 Press / repeatedly to select
the illumination pattern you
want, then press ENTER.
To exit the OPTIONS menu, press
OPTIONS.
Changing the brightness of the
display panel
1 Press OPTIONS.
2 Press / repeatedly to select
“DIMMER”, then press ENTER.
3 Press / repeatedly to select
the brightness setting you want,
then press ENTER.
To exit the OPTIONS menu, press
OPTIONS.
Viewing information in the
display panel
Press DISPLAY on the remote
control repeatedly when the
system is turned on.
You can view the information as follows:
• For AUDIO CD:
– The elapsed playing time, remaining
playing time and total remaining
playing time during playback.
– The total playing time when playback
is stopped.
• For audio files:
– The elapsed playing time, file name
and folder name.
– The title, artist and album information.
Page 25

Note
The elapsed playing time of an audio file
encoded using a VBR (variable bit rate) is not
displayed correctly.
Using optional
equipment
1
Connect an optional equipment
(page 10).
2 Turn VOLUME counterclockwise
to reduce the volume.
3 Press FUNCTION repeatedly to
select the function which
corresponds to the connected
equipment.
4 Start playing the connected
equipment.
Deactivating the
buttons on the unit
(Child Lock)
You can deactivate the buttons on the unit
(except "/1) for preventing
misoperation, such as child mischief.
Hold down x for more than 5
seconds.
“CHILD LOCK” and “ON” appear in the
display panel.
You can only operate the system using the
buttons on the remote control.
To cancel, hold down x for more than 5
seconds until “CHILD LOCK” and
“OFF” appear in the display panel.
Additional Information
Playable discs
• AUDIO CD
• CD-R/CD-RW
– audio data
– MP3 files that conforms to ISO9660
Level 1/Level 2, or Joliet (expansion
format).
Notes
• MP3 (MPEG 1 Audio Layer 3) is a standard
format defined by ISO (International
Organization for Standardization) which
compresses audio data. MP3 files must be in
MPEG 1 Audio Layer 3 format.
• The system can only play back MP3 files that
have a file extension of “.mp3”.
Discs that cannot be played back
•CD-ROM
• CD-R/CD-RW which has the following
conditions:
– Recorded in MP3 PRO format.
– Recorded in multisession that have not
ended by “closing the session”
– Recorded with an incompatible
recording device
– Poor recording quality
– Scratches or dirty
– Finalized incorrectly
• Discs of non-standard shape (for
example, heart, square, star)
• Discs that have adhesive tape, paper, or
sticker attached to them
• Rental or used discs with attached seals
where the glue extends beyond the seal
• Discs that have labels printed using ink
that feels tacky when touched
Additional Information
Continued
l
25
US
Page 26

Note on DualDiscs
A DualDisc is a two sided disc product
which mates DVD recorded material on
one side with digital audio material on the
other side. However, since the audio
material side does not conform to the
Compact Disc (CD) standard, playback
on this product is not guaranteed.
Music discs encoded with copyright
protection technologies
This product is designed to play back
discs that conform to the Compact Disc
(CD) standard. Recently, various music
discs encoded with copyright protection
technologies are marketed by some record
companies. Please be aware that among
those discs, there are some that do not
conform to the CD standard and may not
be playable by this product.
Notes on playing multisession discs
• This system can play back multisession
discs when an MP3 file is contained in
the first session. Any subsequent MP3
files recorded in later sessions can also
be played back.
• If the first session is recorded in AUDIO
CD format, only the first session will be
played back.
US
26
Troubleshooting
Should you encounter a problem with
your system, find your problem in the
troubleshooting checklist below and take
the corrective action.
If the problem persist, consult your
nearest Sony dealer.
Note that if service personnel changes
some parts during repair, these parts may
be retained.
If “PROTECT” appears in the
display panel
Immediately unplug the power cord,
and check the following items.
• Are you using only the supplied
speakers?
• Is anything blocking the ventilation
holes of the unit?
After checking the above items and
fixing any problems, plug in the power
cord again and turn on the system. If
the issue persists, consult your nearest
Sony dealer.
General
The clock or timer setting is canceled.
• The power cord is disconnected or a
power failure occurred. Set the clock
(page 12) and timer (page 23) again.
There is no sound.
• Adjust the volume.
• Check the speaker connections
(page 10).
• Check the connection of the optional
equipment, if any (page 10).
• Turn on the connected equipment.
• There is no audio output during
Recording Timer.
There is no microphone sound.
• Adjust the microphone volume.
• Make sure the microphone is connected
to the MIC jack correctly.
Page 27

• Make sure the microphone is turned on.
There is severe hum or noise.
• A TV or VCR is placed too close to the
unit. Move the unit away from the
source of noise.
• Connect the unit to a different wall
outlet.
• Install a noise filter (commercially
available) to the power cord.
• Turn off surrounding electrical
equipment.
The timer does not function.
• Check the timer setting and set the
correct time (page 23).
• Cancel the Sleep Timer function
(page 23).
The remote control does not function.
• Remove the obstacles between the
remote control and the unit.
• Move the remote control closer to the
unit.
• Point the remote control at the unit’s
sensor.
• Replace the batteries (R6/size AA).
• Move the unit away from the
fluorescent light.
There is acoustic feedback.
• Reduce the volume.
• Move the microphone away from the
speakers or change the direction of the
microphone.
“CHILD LOCK” appears when you
press any button on the unit.
• Set the Child Lock function to off
(page 25).
“CONNECT ALL SPEAKERS AND
CHANGE VOL” appears.
• Connect all speakers and adjust the
volume to the level that you want.
Speakers
Sound comes from one channel or
unbalanced left and right volume.
• Place the speakers as symmetrically as
possible.
• Check that the speakers are connected
securely and correctly.
• The source being played back is
monaural.
There is no sound from a specific
speaker.
• Check that the speaker is connected
securely and correctly.
Disc player
The system does not eject the disc
and “LOCKED” appears.
• Consult your nearest Sony dealer or
local authorized Sony service facility.
The disc cannot be inserted.
• Check that the system is turned on.
• You cannot insert the disc immediately
after turning on the system.
The disc does not eject.
• You cannot eject the disc during
CD-USB Synchronized Transfer or
REC1 Transferring. Press x to cancel
the transferring, then press Z EJECT to
eject the disc.
• Consult your nearest Sony dealer.
Playback does not start.
• Wipe the disc clean (page 31).
• Reload the disc.
• Load the disc that this system can play
back (page 25).
• Remove the disc and wipe away the
moisture on the disc, then leave the
system turned on for a few hours until
the moisture evaporates.
Additional Information
Continued
l
27
US
Page 28

The sound skips.
• Wipe the disc clean (page 31).
• Reload the disc.
• Move the unit to place without vibration
(e.g., on top of a stable stand).
• Move the speakers away from the unit,
or place them on separate stands. When
you listen to a track with bass sounds at
high volume, the speaker vibration may
cause the sound to skip.
Playback does not start from the first
track.
• Set the play mode to Normal Play
(page 13).
The folder name, track name, file
name and ID3 tag characters do not
appear properly.
• Use a disc that conforms to ISO9660
Level 1/Level 2, or Joliet (expansion
format).
• The ID3 tag is not Version 1(1.0/1.1)
and Version 2(2.2/2.3).
• The character code that can be displayed
by this system are as follows:
– Upper cases (A to Z)
– Numbers (0 to 9)
– Symbols (< > * +, [ ] \ _)
Other characters appear as “_”.
USB device
Transferring results in an error.
• You are using an unsupported USB
device. Check the information on the
websites about compatible USB devices
(page 16).
• The USB device is not formatted
correctly. Refer to the operating
instructions supplied with the USB
device on how to format.
• Turn off the system and remove the
USB device. If the USB device has a
power switch, turn the USB device off
and then on again after removing it from
the system. Then perform transferring
again.
US
28
• If the transferring and erase operations
are repeated multiple times, the file
structure within the USB device
becomes fragmented. Refer to the
operating instructions supplied with the
USB device on how to deal with this
problem.
• The USB device was disconnected or
the power was turned off during
transferring. Delete the partiallytransferred file, and perform
transferring again. If this does not fix the
problem, the USB device may be
broken. Refer to the operating
instructions supplied with the USB
device on how to deal with this problem.
Audio files or folders on the USB
device cannot be erased.
• Check if the USB device is writeprotected.
• The USB device was disconnected or
the power was turned off during the
erase operation. Delete the partiallyerased file. If this does not fix the
problem, the USB device may be
broken. Refer to operating instructions
supplied with the USB device on how to
deal with this problem.
There is no sound.
• The USB device is not connected
correctly. Turn off the system and
reconnect the USB device, then turn on
the system and check if “USB A” or
“USB B” lights up in the display panel.
There is noise, skipping, or distorted
sound.
• You are using an unsupported USB
device. Check the information on the
websites about compatible USB devices
(page 16).
• Turn off the system and reconnect the
USB device, then turn on the system.
• The music data itself contains noise, or
the sound is distorted. Noise may have
entered during the transferring process.
Delete the file, and try transferring
again.
Page 29

• The bit rate used when encoding audio
files was low. Send audio files with
higher bit rate to the USB device.
“READING” is displayed for an
extended time, or it takes a long time
before playback starts.
• The reading process can take a long time
in the following cases.
– There are many folders or files on the
USB device (page 16).
– The file structure is extremely
complex.
– The memory capacity is excessive.
– The internal memory is fragmented.
“OVER CURRENT” appears.
• A problem has been detected with the
level of electrical current from the
A or B port. Turn off the
system and remove the USB device
from the port. Make sure there is no
problem with the USB device. If this
display pattern persists, contact your
nearest Sony dealer.
Erroneous display.
• The data stored in the USB device may
have been corrupted, perform the
transferring again.
• The character code that can be displayed
by this system are as follows:
– Upper cases (A to Z)
– Numbers (0 to 9)
– Symbols (< > * +, [ ] \ _)
Other characters appear as “_”.
The USB device is not recognized.
• Turn off the system and reconnect the
USB device, then turn on the system.
• Check the information on the websites
about compatible USB devices
(page 16).
• The USB device does not work
properly. Refer to the operating
instructions supplied with the USB
device on how to deal with this problem.
Playback does not start.
• Turn off the system and reconnect the
USB device, then turn on the system.
• Check the information on the websites
about compatible USB devices
(page 16).
Playback does not start from the first
file.
• Set the play mode to Normal Play
(page 20).
Audio file cannot be played back.
• MP3 files in MP3 PRO format cannot be
played back.
• Some AAC files may not be played bac k
correctly.
• An AAC file which has video stream
cannot be played back.
• WMA files in Windows Media Audio
Lossless and Professional format cannot
be played back.
• USB device formatted with file systems
other than FAT16 or FAT32 are
unsupported.*
• In case multiple partitions exist in USB
device that is being used, files may not
be played back.
• The system can play back to a depth of
8 folders only.
• Files that are encrypted or protected by
passwords, etc. cannot be played back.
• Files with copyright protection (Digital
Rights Management) cannot be played
back by this system.
* This system supports FAT16 and FAT32, but
some USB device may not support all of these
FAT. For details, refer to the operating
instructions of each USB device or contact the
manufacturer.
Additional Information
29
US
Page 30

Tuner
Severe hum or noise, or stations
cannot be received. (“TUNED” or
“STEREO” flashes in the display
panel.)
• Connect the antenna properly.
• Find a location and an orientation that
provide good reception, and then set up
the antenna again.
• Connect a commercially available
external antenna.
• Consult your nearest Sony dealer if the
supplied AM antenna has come off the
plastic stand.
• Turn off surrounding electrical
equipment.
To reset the system
If the system still does not operate
properly after performing the above
measures or other troubles not described
above occur, reset the system to factory
settings.
Use the buttons on the unit to perform this
operation.
1 Unplug and plug the power cord
back in.
2 Press "/1 to turn on the system.
3 Hold down x and follow by "/1 for
about 3 seconds.
“COLD RESET” appears in the display
panel.
All user-configured settings, such as
preset radio stations, timer, and the
clock are reset to factory setting.
Messages
Disc/Timer
CANNOT PLAY
You have inserted a disc that cannot be
played back on this system.
NO DISC
There is no disc in the disc slot.
NO STEP
All of the programmed steps have been
erased.
NOT IN USE
You have pressed a button that the
operation is not allowed or invalid at this
time.
OFF TIME NG
The Play Timer or Recording Timer start
time and stop time is the same.
PUSH SELECT
You tried to set the clock or timer during
timer operation.
PUSH STOP
You tried to perform an operation that can
be performed only when the playback is
stopped.
READING
The system is reading information of the
disc. Some buttons are not available.
SET CLOCK
You pressed CLOCK/TIMER SELECT
before the clock is set.
SET TIMER
You pressed CLOCK/TIMER SELECT
before the Play Timer or Recording Timer
is set.
STEP FULL
You tried to program more than 25 steps.
UNLOCK
The disc theft-preventive function is
released.
30
US
Page 31

USB device
DATA ERROR
You tried to play back a file that is not
playable.
DEVICE ERROR
The USB device could not be recognized
or an unknown device is connected.
DEVICE FULL
The memory of the USB device is full.
FATAL ERROR
The USB device was removed during
transferring or erase operation, and may
have been damaged.
FOLDER FULL
The number of folders has reached the
maximum.
NO DEVICE
No USB device is connected.
NO MEMORY
The memory selected for playback or
transfer has no memory media inserted in
the USB device.
NO STEP
All of the programmed steps have been
erased.
NO TRACK
No playable file is inserted in the system.
NOT IN USE
You tried to perform a specific operation
under conditions where that operation is
prohibited.
NOT SUPPORTED
An unsupported USB device is connected,
or the USB device is connected through
an USB hub.
PROTECTED
The USB device is write-protected.
PUSH STOP
You tried to perform an operation that can
be performed only when the playback is
stopped.
READING
The system is reading information of the
USB device. Some buttons are not
available.
REC ERROR
Transferring did not start, stopped
partway, or otherwise could not be
performed.
STEP FULL
You tried to program more than 25 steps.
TRACK FULL
The number of files has reached the
maximum.
Precautions
When carrying the unit
Perform the following procedure to
protect the disc mechanism.
Use the buttons on the unit to perform this
operation.
1 Press "/1 to turn on the system.
2 Press CD.
3 Remove the disc.
Press Z EJECT to remove the disc.
Wait until “CD NO DISC” appears in
the display panel.
4 Hold down CD and follow by "/1 for
about 3 seconds. Then, “MECHA
LOCK” appears in the display
panel.
5 Unplug the power cord.
Notes on discs
• Before playing, wipe the disc with a cleaning
cloth from the center out to the edge.
• Do not clean discs with solvents, such as
benzine thinner, or commercially available
cleaners or anti-static spray intended for vinyl
LPs.
• Do not expose discs to direct sunlight or heat
sources such as hot air ducts, nor leave it in a
car parked in direct sunlight.
Additional Information
Continued
l
31
US
Page 32

On safety
• Completely disconnect the power cord (mains
lead) from the wall outlet (mains) if it is not
going to be used for an extended period of
time. When unplugging the unit, always grip
the plug. Never pull the cord itself.
• Should any solid object or liquid get into the
system, unplug the system, and have it
checked by qualified personnel before
operating it again.
• AC power cord must be changed only at the
qualified service shop.
• Avoid looking directly at the lighting on the
LED speakers for too long. Doing so may be
harmful to your health.
On placement
• Do not place the system in an inclined
position or in locations that are extremely hot,
cold, dusty, dirty, or humid or lacking
adequate ventilation, or subject to vibration,
direct sunlight or a bright light.
• Be careful when placing the unit or speakers
on surfaces that have been specially treated
(for example, with wax, oil, polish) as staining
or discoloration of the surface may result.
• If the system is brought directly from a cold to
a warm location or is placed in a very damp
room, moisture may condense on the lens
inside the unit, and cause the system to
malfunction. In this situation, remove the
disc, and leave the system turned on for about
an hour until the moisture evaporates.
On heat buildup
• Heat buildup on the unit during operation is
normal and is not a cause for alarm.
• Do not touch the cabinet if it has been used
continuously at a high volume because the
cabinet may have become hot.
• Do not obstruct the ventilation holes.
On the speaker system
This speaker system is not magnetically
shielded, and the picture on nearby TV sets may
become magnetically distorted. In this situation,
turn off the TV, wait 15 to 30 minutes, and turn
it back on. If there is no improvement, move the
speakers far away from the TV.
Cleaning the cabinet
Clean this system with a soft cloth slightly
moistened with a mild detergent solution.
Do not use any type of abrasive pad, scouring
powder, or solvent, such as thinner, benzine,
or alcohol.
US
32
Specifications
AUDIO POWER SPECIFICATIONS
POWER OUTPUT AND TOTAL
HARMONIC DISTORTION:
With 4 ohm loads, both channels driven,
from 120 – 10,000 Hz; rated 240 watts per
channel minimum RMS power, with no
more than 0.7% total harmonic distortion
from 250 milliwatts to rated output.
Amplifier section
The following are measured at AC 120 V,
60 Hz
Power output (rated):
High channel
300 W + 300 W (at 4 :, 1 kHz,
1% THD)
Low channel
300 W + 300 W (at 4 :, 100 Hz,
1% THD)
RMS output power (reference):
High channel
500 W + 500 W (per channel at 4 :,
1kHz)
Low channel
500 W + 500 W (per channel at 4 :,
100 Hz)
Inputs
PC (AUDIO IN) L/R, TV (AUDIO IN) L/R,
DVD/SAT (AUDIO IN) L/R, GAME
(AUDIO IN) L/R
Voltage 2 V, impedance 47 k:
MIC
Sensitivity 1 mV, impedance 10 k:
A, B port: Type A
USB section
Supported bit rate
MP3 (MPEG 1 Audio Layer-3):
32 kbps – 320 kbps, VBR
WMA: 48 kbps – 192 kbps
AAC: 48 kbps – 320 kbps
Page 33

Sampling frequencies
MP3 (MPEG 1 Audio Layer-3):
32 kHz/44.1 kHz/48 kHz
WMA: 44.1 kHz
AAC: 44.1 kHz
Transfer speed
Full-Speed
Supported USB device
Mass Storage Class
Maximum current
500 mA
Disc player section
System
Compact disc and digital audio system
Laser Diode Properties
Emission Duration: Continuous
Laser Output*: Less than 44.6 PW
* This output is the value measurement
at a distance of 200 mm from the
objective lens surface on the Optical
Pick-up Block with 7 mm aperture.
Frequency response
20 Hz – 20 kHz
Signal-to-noise ratio
More than 90 dB
Dynamic range
More than 88 dB
Tuner section
FM stereo, FM/AM superheterodyne tuner
Antenna:
FM lead antenna
AM loop antenna
FM tuner section
Tuning range
87.5 MHz – 108.0 MHz (100 kHz step)
AM tuner section
Tuning range
530 kHz – 1,710 kHz (10 kHz step)
531 kHz – 1,710 kHz (9 kHz step)
Speaker
Speaker system
3-way, Bass reflex
Speaker unit
Subwoofer: 380 mm (15 in), cone type
Woofer: 200 mm (8 in), cone type
Tweeter: 25 mm (1 in), horn type
Rated impedance
High channel: 4 ohms
Low channel: 4 ohms
Dimensions (w/h/d) (Approx.)
510 mm × 720 mm × 500 mm
(20 1/8 in × 28 3/8 in × 19 3/4 in)
Mass (Approx.)
28.0 kg (61 lb 12 oz)
General
Power requirements
AC 120 V, 60 Hz
Power consumption
320 W
Dimensions (w/h/d) (excl. speakers)
(Approx.)
510 mm × 235 mm × 420 mm
(20 1/8 in × 9 3/8 in × 16 5/8 in)
Mass (excl. speakers) (Approx.)
10.0 kg (22 lb 1 oz)
Supplied accessories
Remote control (1)
R6 (Size AA) batteries (2)
FM lead/AM loop antenna (1)
Speaker foot (8)
Design and specifications are subject to
change without notice.
Additional Information
33
US
Page 34

ADVERTENCIA
Para reducir el riesgo de incendios o
descargas eléctricas, no exponga el aparato a
la lluvia ni a la humedad.
Para reducir el riesgo de incendios, no cubra
las aberturas de ventilación del aparato con
periódicos, manteles, cortinas, etc.
No coloque ninguna fuente de llamas al
descubierto, como velas ence ndidas, sobre el
aparato.
Para reducir el riesgo de incendios o
descargas eléctricas, no exponga el aparato a
goteos o salpicaduras, ni coloque recipientes
con líquidos, como jarrones, encima de éste.
Puesto que el enchufe principal se utiliza
para desconectar la unidad de la corriente,
conecte la unidad a una toma de corriente de
ca de fácil acceso. En caso observar un
funcionamiento anómalo de la unidad,
desconecte inmediatamente el enchufe
principal de la toma de corriente de ca.
No instale el aparato en un espacio cerrado,
como una estantería para libros o un armario
empotrado.
No exponga pilas o aparatos con pilas
instaladas a fuentes de calor excesivo, como
la luz solar directa, el fuego o similares.
Aunque se haya apagado la unidad, esta
continuará recibiendo suministro eléctrico
mientras esté conectada a la toma de
corriente de ca.
PRECAUCIÓN
El uso de instrumentos ópticos con este
producto aumentará el riesgo de lesiones
oculares.
Este aparato está clasificado como producto
CLASS 1 LASER. Esta marca está ubicada
en la parte exterior posterior.
ES
2
A la hora de desempaquetar o manipular un
altavoz grande y/o pesado, asegúrese de
hacerlo entre dos o más personas. Si la
unidad se cae, podría provocar lesiones
personales y/o daños a la propiedad.
Registro del propietario
El número de modelo y el número de serie
están ubicados en la parte posterior de la
unidad. Registre esos números en el espacio
suministrado a continuación. Menciónelos
siempre que llame al distribuidor Sony
respecto a este producto.
Núm. modelo ________________________
Núm. serie __________________________
Este símbolo pretende
alertar al usuario sobre la
presencia de un “voltaje
peligroso” no aislado en el
interior del producto que
puede ser de suficiente
magnitud como para
constituir un riesgo de
descarga eléctrica para las
personas.
Este símbolo pretende
alertar al usuario sobre la
presencia de instrucciones
de funcionamiento y
mantenimiento
(reparación) importantes en
la documentación que
acompaña al aparato.
Instrucciones de seguridad
importantes
1) Lea estas instrucciones.
2) Conserve estas instrucciones.
3) Tenga presentes todas las advertencias.
4) Siga todas las instrucciones.
5) No utilice este aparato cerca del agua.
6) Límpielo solamente con un paño seco.
7) No bloquee las aberturas de ventilación.
Instale el aparato según las instrucciones
del fabricante.
Page 35

8) No lo instale junto a ninguna fuente de
calor como radiadores, salidas de aire
caliente, estufas ni ningún otro aparato
que produzca calor (incluídos
amplificadores).
9) No desactive las funciones de seguridad
del enchufe polarizado o de toma de
tierra. Un enchufe polarizado tiene dos
patillas, una más ancha que la otra. Un
enchufe de toma de tierra tiene dos
patillas y una tercera clavija a tierra. La
patilla ancha o la tercera clavija se
suministran por su seguridad. Si el
enchufe suministrado no encaja en su
toma de corriente, pida a un electricista
que sustituya la toma de corriente
obsoleta.
10) Proteja el cable de alimentación para que
no se pise ni se pince, especialmente en
los enchufes, las tomas de corriente y el
punto en el que sale del aparato.
11) Utilice solamente complementos/
accesorios especificados por el
fabricante.
12) Utilícelo solamente con el carro, el
soporte, el trípode, la abrazadera o la
mesa que especifica el fabricante o que
se vende con el aparato. Cuando utilice
un carro, tenga precaución al mover el
carro junto al aparato para evitar que
pueda sufrir lesiones si vuelca.
14) Solicite todas las repa raciones a personal
de servicio cualificado. Las reparaciones
son necesarias cuando el aparato ha
sufrido cualquier tipo de daños, como
por ejemplo, cuando se daña el cable de
alimentación o el enchufe, cuando se
derrama líquido o caen objetos en el
interior del aparato, cuando el aparato se
ha expuesto a la lluvia o a la humedad,
cuando no funciona normalmente o se ha
caído.
La siguiente declaración
FCC es aplicable
solamente a la versión de
este modelo fabricada para
su venta en Estados
Unidos. Es posible que
otras versiones no
cumplan con las
regulaciones técnicas de
la FCC.
ES
13) Desenchufe este aparato durante las
tormentas o cuando no lo utilice durante
largos periodos de tiempo.
Continúa
l
ES
3
Page 36

NOTA:
Este equipo se ha probado y ha demostrado
cumplir con los límites de un dispositivo
digital de Clase B, según lo que indica la
Sección 15 de las disposiciones de la FCC.
Esos límites están diseñados para
proporcionar una protección razonable
contra las interferencias perjudiciales en una
instalación residencial. Este equipo genera,
utiliza y puede radiar energía de radio
frecuencia, y, si no se instala y se utiliza de
acuerdo con sus instrucciones, puede
provocar interferencias perjudiciales en las
comunicaciones de radio. No obstante, no
hay ninguna garantía de que en una
instalación concreta no puedan aparecer
interferencias. Si este equipo causa
efectivamente interferencias perjudiciales en
la recepción de radio o televisión, lo que
puede determinarse apagand o y encendiendo
el equipo, se recomienda al usuario que
intente corregir la interferencia tomando una
o más de las siguientes medidas:
– Reoriente o recoloque la antena receptora.
– Aumente la separació n entre el equipo y el
receptor.
– Conecte el equipo a una toma de corriente
de un circuito diferente al que está
conectado el receptor.
– Pida ayuda a su distribuidor o a un técnico
experto en radio y televisión.
Aviso sobre la licencia y marcas
comerciales
• “WALKMAN” y el logotipo de
“WALKMAN” son marcas comerciales
registradas de Sony Corporation.
• Tecnología de codificación de audio
MPEG Layer-3 y patentes, bajo licencia de
Fraunhofer IIS y Thomson.
• Windows Media es una marca comercial
registrada o una marca comercial de
Microsoft Corporation en los Estados
Unidos y/o en otros países.
• Este producto incorpora tecnología que
está sujeta a determinados derechos de
propiedad intelectual de Microsoft.
Está prohibido el uso o la distribución de
dicha tecnología con otros productos
distintos a este sin la licencia apropiada de
Microsoft.
• “PlayStation” es una marca comercial
registrada de Sony Computer
Entertainment Inc.
PRECAUCIÓN
Se advierte que cualquier cambio o
modificación que no esté expresamente
aprobado en este manual podría inhabilitar
su autoridad para utilizar este equipo.
ES
4
Page 37

Índice
Guía de piezas y controles ...........6
Procedimientos
iniciales
Conexión del sistema de forma
segura .........................................10
Posición de los altavoces ...........12
Ajuste del reloj ...........................12
Disco
Reproducción de un disco
AUDIO CD/MP3 .......................12
Uso del modo de
reproducción ..............................13
Sintonizador
Para escuchar la radio ................14
Recepción de emisiones RDS ....15
Dispositivo USB
Antes de utilizar el dispositivo
USB con este sistema.................16
Transferencia de música ...........16
Reproducción de un archivo ......20
Otras operaciones
Cantando sobre el audio............ 23
Cambio del patrón de iluminación
en los altavoces ......................... 23
Uso de los temporizadores ........ 24
Cambio de la pantalla................ 25
Uso de equipos opcionales........ 27
Desactivación de los botones de
la unidad (Child Lock) .............. 27
Información adicional
Discos reproducibles ................. 27
Solución de problemas .............. 28
Mensajes.................................... 33
Precauciones.............................. 34
Especificaciones ........................ 35
Ajuste del sonido
Ajuste del sonido........................22
Creación de su propio efecto de
sonido.........................................22
Creación de un ambiente de fiesta
(DJ EFFECT) .............................23
ES
5
Page 38

Guía de piezas y controles
Este manual explica principalmente las operaciones disponibles desde la unidad, pero las
mismas operaciones se pueden realizar utilizando los botones del mando a distancia que
tienen los mismos nombres o similares.
Unidad
– Vista frontal
1454623
7
qj
9
qh
qg qf qd qs qa44
– Vista superior
8
9
q;
qk ql
ES
6
Page 39

Mando a distancia RM-SCU37B
wh
wg
wf
wd
8
ws
qj
4
BAND
1
"/1 (encendido/en espera)
Encienda el sistema o ajústelo al modo en
espera. El indicador STANDBY se
ilumina en rojo cuando se apaga el
sistema.
B
Sensor de mando a distancia
C
Visor
D
Unidad: / / /
Seleccione los elementos del menú.
+/– (seleccionar carpeta)
Seleccione una carpeta de un disco MP3 o
un dispositivo USB.
m/M (rebobinar/avanzar
rápido)
Manténgalo pulsado para buscar un punto
en una pista o en un archivo durante la
reproducción.
Unidad: l/L (ir hacia atrás/
ir hacia delante)
Seleccionar una pista o archivo.
Mando a distancia: ./>
(ir hacia atrás/ir hacia delante)
Seleccionar una pista o archivo.
1
w;
wa
q;
4
9
ql
4
5
Unidad: TUNING +/–
Mando a distancia: +/–
(sintonización)
Sintonice la emisora que desee.
E
Unidad: VOLUME/DJ CONTROL
Ajuste el volumen.
Ajuste el nivel de DJ EFFECT
(página 23).
No es posible usar esta rueda para ajustar
el volumen cuando DJ EFFECT está
activado.
Mando a distancia: VOLUME +/–*
Ajuste el volumen.
* El botón VOLUME + tiene un punto táctil.
Utilice el punto táctil como referencia cuando
use el sistema.
F
Ranura para discos
G
Z EJECT
Expulse un disco.
H
OPTIONS
Acceda a los menús de opciones.
TUNER/BAND
Seleccione la función TUNER.
Seleccione la banda FM o AM mientras la
función TUNER está activada.
CD
Seleccione la función CD.
Unidad: USB/USB SELECT
Mando a distancia: USB
Seleccione la función USB.
Seleccione el dispositivo USB conectado
al puerto A o B mientras la
función USB está activada.
Continúa
l
ES
7
Page 40

I
Unidad: NX (reproducir/pausa)
Mando a distancia: N (reproducir),
X (pausa)
Iniciar o introducir una pausa en la
reproducción.
Para reanudar la reproducción del
dispositivo USB, pulse NX o N.
x (parar)
Detener la reproducción.
Pulse x dos veces para cancelar la
reanudación de la reproducción del
dispositivo USB.
J
Unidad: PC
Seleccione la función PC.
Unidad: TV
Seleccione la función TV.
Unidad: DVD/SAT
Seleccione la función DVD/SAT.
Unidad: GAME
Seleccione la función GAME.
Mando a distancia: FUNCTION
Seleccione una función.
K
Tomas TV L/R
Utilice un cable de audio (no
suministrado) para realizar la conexión a
las tomas de salida de audio de un
televisor. El sonido del televisor se emite
a través de este sistema.
L
Tomas PC L/R
Utilice un cable de audio (no
suministrado) para realizar la conexión a
las tomas de salida de audio de un equipo
de audio. El sonido se emite a través de
este sistema.
M
Puerto B (PLAY/REC)
Conecta y transfiere a un dispositivo USB
opcional.
Indicador B
Se ilumina en rojo cuando se transfiere al
dispositivo USB opcional conectado.
N
Puerto A (PLAY)
Conecte un dispositivo USB opcional.
Indicador A
O
Toma MIC IN
Conecte un micrófono.
MIC LEVEL
Ajuste el volumen del micrófono.
P
Unidad: FLANGER, ISOLATOR,
SOUND FLASH, PHASER
Active o seleccione el tipo de DJ
EFFECT.
Q
Unidad: SEARCH
Acceda o salga del modo de búsqueda.
Unidad: GROOVE
Refuerce el nivel de graves.
Unidad: PRESET EQ
Mando a distancia: EQ
Seleccione el efecto de sonido
(página 22).
REC TO USB B
Haga una transferencia al dispositivo
USB opcional que está conectado al
puerto B.
R
RETURN
Vuelva a la selección anterior.
ES
8
Page 41

S
ENTER
Introduzca los ajustes.
T
CLOCK/TIMER SELECT (página 25)
CLOCK/TIMER SET (página 12, 24)
Ajuste el reloj y los temporizadores.
U
REPEAT/FM MODE
Escuche un disco, un dispositivo USB, un
archivo o una pista individual varias veces
(página 14, 21).
Seleccione el modo de recepción FM
(monoaural o estéreo) (página 14).
V
CLEAR
Elimine el último paso de la lista de
programas.
W
TUNER MEMORY (página 15)
Presintonice la emisora de radio.
X
PLAY MODE/TUNING MODE
Seleccione el modo de reproducción de un
AUDIO CD, un disco MP3 o un
dispositivo USB (página 13, 21).
Seleccione el modo de sintonización
(página 14).
Y
DISPLAY
Cambie la información del visor.
Z
SLEEP (página 24)
Ajuste el temporizador para desconexión.
ES
9
Page 42

Procedimientos iniciales
Conexión del sistema de forma segura
ANTENNA
A
B
FM/AM
GAME
DVD/SAT
C
L
L
LED SPEAKER
RL
R
R
F
SPEAKERS
HIGH CHANNEL
E
RL
DE
IMPEDANCE USE 4
Ω
SPEAKERS
LOW CHANNEL
IMPEDANCE USE 4
LR
Ω
A Antenas
Busque una ubicación y una orientación
que ofrezcan una buena recepción y, a
continuación, instale las antenas.
Mantenga las antenas alejadas de los
cables de altavoz, el cable de alimentación
y el cable USB para evitar captar ruido.
Extienda la antena
del cable de FM
horizontalmente
Antena cerrada de AM
B Tomas GAME L/R
Utilice un cable de audio (no
suministrado) para realizar la conexión a
las tomas de salida de audio de un
dispositivo de juego (por ejemplo, una
PlayStation 3). El sonido se emite a través
de este sistema.
ES
10
C Tomas DVD/SAT L/R
Utilice un cable de audio (no
suministrado) para realizar la conexión a
las tomas de salida de audio de un equipo
de audio/vídeo. El sonido se emite a
través de este sistema.
D Terminales LED SPEAKER
Conecte el conector LED SPEAKER del
altavoz a este terminal.
La iluminación de los altavoces cambiará
de acuerdo con la fuente musical. Puede
seleccionar el patrón de iluminación
según sus preferencias (página 23).
Page 43

E Altavoz
Los conectores del altavoz están
codificados con un color con los
terminales del altavoz respectivos en la
unidad.
HIGH CHANNEL
Inserción de las pilas
Inserte las dos pilas R6 (tamaño AA)
suministradas de acuerdo con la polaridad
que se muestra en la ilustración.
Blanco
Rojo
LOW CHANNEL
Azul
Gris
Notas
• Asegúrese de utilizar solamente los altavoces
suministrados.
• Cuando conecte los cables de altavoz, inserte
el conector recto en los terminales.
F Alimentación
Enchufe el cable de alimentación a una
toma de corriente de la pared. La
demostración aparece en el visor. Pulse
"/1 para encender el sistema. La
demostración finalizará automáticamente.
Si el adaptador suministrado en el enchufe
no encaja en ta toma de corriente de la
pared, sepárelo del enchufe (solamente
para modelos equipados con un
adaptador).
Notas
• No mezcle pilas antiguas y nuevas ni pilas de
distinto tipo.
• Si no va a utilizar el mando a distanci a durante
mucho tiempo, extraiga las pilas para evitar
daños por fugas y corrosión de las mismas.
Instalación de los pies de altavoz
Instale los pies del altavoz suministrados
en cada una de las esquinas de la parte
inferior de los altavoces para
estabilizarlos y evitar que se deslicen.
Procedimientos iniciales
11
ES
Page 44

Posición de los
altavoces
Para que el rendimiento del sistema se
óptimo, recomendamos que coloque los
altavoces tal y como se muestra más
abajo.
A Unidad
B Altavoz (izquierdo)
C Altavoz (derecho)
BC
A
Disco
Reproducción de un
disco AUDIO CD/MP3
1
Pulse CD.
2 Inserte un disco con la etiqueta
hacia arriba.
0,3 m
(1 pie)
0,3 m
(1 pie)
Ajuste del reloj
No puede ajustar el reloj en el modo de
ahorro de energía.
Utilice los botones del mando a distancia
para realizar esta operación.
1 Pulse "/1 para encender el
sistema.
2 Pulse CLOCK/TIMER SET.
Si aparece “PLAY SET” en el visor,
pulse ./> varias veces para
seleccionar “CLOCK SET” y, a
continuación, pulse ENTER.
3 Pulse ./> varias veces
para ajustar la hora y, a
continuación, pulse ENTER.
4 Pulse ./> varias veces
para ajustar los minutos y, a
continuación, pulse ENTER.
Para buscar una pista o un archivo
MP3 (TRACK SEARCH)
1 Pulse SEARCH.
2 (Archivos MP3 solamente)
Pulse / para seleccionar la
carpeta que desee y, a
continuación, pulse ENTER o
NX.
3 Pulse / para seleccionar la
pista o el archivo que desea y, a
continuación, pulse ENTER o
NX.
La pista o el archivo seleccionado
empezará a reproducirse.
Notas sobre reproducción de discos
• El sistema puede reconocer hasta
– 999 carpetas (incluida la carpeta raíz).
– 999 archivos MP3.
– 250 archivos MP3 de una sola carpeta.
– 8 niveles de carpeta (árbol de directorios de
archivos).
• La información CD-TEXT no es compatible.
12
ES
Page 45

Uso del modo de
reproducción
Creación de su propio
programa (Reproducción
programada)
Reproducción en el orden
original (Reproducción
normal)
Pulse PLAY MODE en el mando a
distancia varias veces cuando la
reproducción se haya detenido.
• (en blanco): un disco
• *: todos los archivos MP3
almacenados en la carpeta del disco
* Cuando se reproduce un AUDIO CD, “ ”
funciona igual que el modo de reproducción
normal.
Reproducción en orden
aleatorio (Reproducción
aleatoria)
Pulse PLAY MODE en el mando a
distancia varias veces cuando la
reproducción se haya detenido.
• SHUF: reproduce un disco en orden
aleatorio.
• SHUF*: reproduce en orden
aleatorio todos los archivos MP3
almacenados en la carpeta del disco
* Cuando se reproduce un AUDIO CD,
“ SHUF” funciona igual que el modo de
reproducción “SHUF”.
Nota
Cuando apague el sistema, se cancelará la
reproducción aleatoria seleccionada y el modo
de reproducción volverá a la reproducción
normal.
Puede crear un programa de hasta 25
pasos en el orden que desee que se
reproduzcan.
Utilice los botones del mando a distancia
para realizar esta operación.
1 Para la función CD:
Pulse CD.
Para la función USB:
Pulse USB.
2 Cuando la reproducción se
detenga, pulse PLAY MODE
varias veces hasta que “PGM”
se ilumine en el visor.
3 Para la función USB:
Pulse USB varias veces para
seleccionar la opción USB que desee.
4 (Solo archivos de audio)
+/– varias veces para
Pulse
seleccionar una carpeta.
Si desea programar todos los archivos
de la carpeta, pulse ENTER.
5 Pulse ./> varias veces
para seleccionar la pista o el
archivo que desea y, a
continuación, pulse ENTER.
Número de
pista o archivo
seleccionado
La indicación “--.--” aparece cuando el
tiempo de reproducción total es
superior a 100 minutos para un
AUDIO CD o cuando se programa un
archivo de audio.
Tiempo de reproducción
total del programa
(incluida pista
seleccionada)
Continúa
l
13
Disco
ES
Page 46

6 Repita los pasos 3 a 5 para
programar más pistas o
archivos.
7 Pulse N para comenzar la
reproducción programada.
Para cancelar la reproducción
programada
Cuando la reproducción se detenga, pulse
PLAY MODE varias veces en el mando a
distancia hasta que “PGM” desaparezca
del visor.
Para eliminar el último paso de la
lista de programas
Pulse CLEAR en el mando a distancia
cuando la reproducción se haya detenido.
Notas
• (Función CD solamente) La lista de
programas permanecerá disponible hasta que
expulse el disco.
• (Función USB solamente) La lista de
programas se borra cuando:
– quita el dispositivo USB;
– cambie la memoria USB seleccionada.
Reproducción varias veces
(Reproducción repetida)
Pulse REPEAT en el mando a distancia
varias veces.
• REP: repite todas las pistas o archivos
• REP 1: repite una pista o archivo
Sintonizador
Para escuchar la radio
Utilice los botones del mando a distancia
para realizar esta operación.
1 Pulse TUNER/BAND varias
veces para seleccionar la banda
FM o AM.
2 Para la exploración automática:
Pulse TUNING MODE varias veces
hasta que la indicación “AUTO” se
ilumine en el visor. A continuación,
pulse +/–.
La exploración se detiene
automáticamente cuando se sintoniza
una emisora y, a continuación,
“TUNED” y “STEREO” (solo para
programas de FM estéreo) se iluminan
en el visor.
Si “TUNED” no se ilumina y la
exploración no se detiene, pulse x
para interrumpir la exploración. A
continuación, realice la sintonización
manualmente.
Para la sintonización manual:
Pulse TUNING MODE varias veces
hasta que las indicaciones “AUTO” y
“PRESET” desaparezcan del visor.
A continuación, pulse +/– varias veces
para sintonizar la emisora que desee.
Observación
Para reducir el ruido estático en una emisora de
FM estéreo débil, pulse FM MODE varias veces
hasta que la indicación “MONO” se ilumine en
el visor.
14
ES
Page 47

Para cambiar el intervalo de
sintonización de AM
El ajuste predeterminado para el intervalo
de sintonización de AM es 9 kHz (o
10 kHz en algunas zonas). No puede
cambiar el intervalo de sintonización de
AM en el modo de ahorro de energía.
Utilice los botones de la unidad para
realizar esta operación.
1 Pulse TUNER/BAND varias veces
para seleccionar la banda AM.
2 Pulse "/1 para apagar el sistema.
3 Mientras mantiene pulsado
ENTER, pulse "/1.
El visor mostrará “AM 9K STEP” o
“AM 10K STEP”.
Cuando se cambia el intervalo, se
borran todas las emisoras
presintonizadas de AM.
Presintonización de emisoras
de radio
Puede almacenar hasta 20 emisoras de
FM y 10 de AM como sus emisoras
favoritas.
Utilice los botones del mando a distancia
para realizar esta operación.
1 Sintonice la emisora que desee.
2 Pulse TUNER MEMORY.
Número de presintonía
3 Pulse +/– varias veces para
seleccionar el número de
presintonía que desee y, a
continuación, pulse ENTER.
El visor mostrará “COMPLETE”. Se
almacena la emisora.
Para sintonizar una emisora
presintonizada
Pulse TUNING MODE varias veces hasta
que la indicación “PRESET” se ilumine
en el visor. A continuación, pulse +/–
varias veces para seleccionar el número
de presintonía que desee.
Recepción de
emisiones RDS
Este sistema permite utilizar el Sistema de
datos por radio (RDS), mediante el cual
las emisoras de radio pueden enviar
información adicional junto con la señal
normal de programación. El sistema
incorpora funciones útiles de RDS, como
la visualización del nombre del servicio
del programa. RDS solo se puede utilizar
con emisoras de FM.*
* No todas las emisoras de FM proporcionan el
servicio RDS, ni tampoco todas proporcionan
el mismo tipo de servicios. Si no está
familiarizado con el servicio RDS de su área,
solicite información a sus emisoras de radio
locales.
Simplemente seleccione una
emisora en la banda de FM.
Cuando sintonice una emisora que ofrezca
servicios RDS, el nombre del servicio del
programa aparecerá en el visor.
Para consultar la información de RDS,
pulse DISPLAY varias veces en el mando
a distancia.
Nota
Es posible que los servicios RDS no funcionen
correctamente si la emisora que ha sintonizado
no transmite la señal RDS o si la intensidad de
la señal es débil.
Sintonizador
15
ES
Page 48

Dispositivo USB
Antes de utilizar el
dispositivo USB con
este sistema
Consulte los sitios web que se facilitan a
continuación para obtener información
sobre los dispositivos USB compatibles.
<http://www.sony.com/shelfsupport>
Nota sobre el número máximo de
carpetas y archivos de audio
almacenados en un dispositivo USB
El sistema no puede transferir ni reproducir
carpetas o archivos de audio almacenados en un
dispositivo USB en los casos siguientes:
– Cuando el número de archivos de audio
almacenados en una carpeta sea superior a
250.
– Cuando el número de archivos de audio
almacenados en un dispositivo USB sea
superior a 3 000.
– Cuando el número de carpetas almacenadas
en un dispositivo USB sea superior a 1 000.
Nota
No extraiga el dispositivo USB durante la
transferencia ni borre operaciones. Si lo hace,
podría dañar los datos del dispositivo USB o
dañar el mismo dispositivo USB.
Nota
La memoria no se puede seleccionar mientras la
reproducción o la transferencia están en curso.
Asegúrese de seleccionar la memoria antes de
iniciar la reproducción o la transferencia.
1 Conecte el dispositivo USB al
puerto A o B de la unidad.
2 Pulse USB/USB SELECT varias
veces para seleccionar “USB A” o
“USB B”.
3 Pulse OPTIONS cuando la
reproducción se detenga.
4 Pulse / para seleccionar “USB
MEM SEL” y, a continuación, pulse
ENTER.
5 Pulse / para seleccionar la
memoria que desee y, a
continuación, pulse ENTER.
6 Inicie la reproducción de los
archivos de audio de la memoria
seleccionada o inicie la
transferencia.
Transferencia de
música
Para seleccionar la fuente de
reproducción o el destino de
transferencia
Si el dispositivo USB tiene más de una
opción de memoria (por ejemplo, la
memoria interna y una tarjeta de
memoria), puede seleccionar la opción
que desee usar como fuente de
reproducción o destino de transferencia.
ES
16
Puede transferir música de una fuente de
sonido a un dispositivo USB.
El formato de audio de los archivos
transferidos por este sistema es MP3. Sin
embargo, también puede transferir
archivos WMA y AAC de USB A a
USB B.
Page 49

Notas
• Cuando transfiera a partir de un AUDIO CD,
las pistas se transferirán como archivos MP3
de 128 kbps. Cuando transfiera a partir de un
disco MP3, los archivos MP3 se transferirán
con la misma velocidad de transferencia que
los archivos MP3 originales.
Cuando transfiera a partir de un dispositivo
USB, los archivos de audio se transferirán con
la misma velocidad de transferencia que los
archivos de audio originales.
• Cuando transfiera a partir de la función
TUNER, PC, TV, DVD/SAT, GAME la
música se transferirá como archivos MP3 de
128 kbps.
Nota sobre el contenido protegido
por derechos de autor
La música que se transfiere está limitada
al uso privado. Para usar la música fuera
de este límite, se requiere el permiso de
los titulares de los derechos de autor.
Transferencia de música de un
disco
Puede transferir fácilmente toda la música
de un disco a un dispositivo USB
(transferencia sincronizada a alta
velocidad de CD a USB). Asimismo,
puede transferir una sola pista o archivo
MP3 durante la reproducción
(transferencia REC1).
1 Conecte un dispositivo USB
transferible al puerto B,
como se indica a continuación.
2 Pulse CD.
3 Inserte el disco que desea
transferir.
4 Para la transferencia
sincronizada a alta velocidad de
CD a USB:
Cuando la reproducción se detenga,
pulse PLAY MODE varias veces en el
mando a distancia para seleccionar el
modo de reproducción que desee.
Nota
Si inicia la transferencia durante la
reproducción aleatoria o la reproducción
repetida, el modo de reproducción
seleccionado cambiará automáticamente a la
reproducción normal.
Para la transferencia REC1:
Seleccione la pista o el archivo MP3
que desee transferir y, a continuación,
inicie la reproducción.
5 Pulse REC TO USB B.
El visor mostrará “PUSH ENTER”.
6 Pulse ENTER.
La transferencia se inicia cuando
“DON’T REMOVE” aparece en el
visor.
Para la transferencia
sincronizada a alta velocidad de
CD a USB:
Cuando se haya completado la
transferencia, el disco y el dispositivo
USB se detendrán automáticamente.
Para la transferencia REC1:
Cuando se haya completado la
transferencia, el disco continuará
reproduciéndose.
Dispositivo USB
Dispositivo
USB
17
ES
Page 50

Transferencia de audio
analógico (Transferencia
analógica)
Puede transferir sonido de fuentes
analógicas (al margen de las funciones
CD y USB) a un dispositivo USB.
1 Conecte un dispositivo USB
transferible al puerto B de la
unidad (página 17).
2 Pulse FUNCTION varias veces
para seleccionar la fuente que
desea transferir.
3 Pulse REC TO USB B.
El visor mostrará “PUSH ENTER”.
4 Pulse ENTER.
La transferencia se inicia cuando
“DON’T REMOVE” aparece en el
visor.
5 Inicie la reproducción de la
fuente.
Para detener la transferencia
Pulse x.
Para crear un archivo MP3 nuevo
Pulse REC TO USB B.
El visor mostrará “NEW TRACK”.
Si pulsa REC TO USB B de nuevo al cabo
de unos segundos, no se podrá crear un
archivo MP3 nuevo.
Nota
Cuando se crea un archivo MP3 nuevo, la
transferencia se inhabilita por el momento.
Observación
Se crea automáticamente un archivo MP3 nuevo
al cabo de aproximadamente 1 hora de
transferencia.
Transferencia de música de un
dispositivo USB
Puede transferir fácilmente archivos de
audio desde un dispositivo USB a otro
dispositivo USB (transferencia
sincronizada a alta velocidad de USB A a
USB B). También puede transferir un solo
archivo de audio durante la reproducción
(transferencia REC1 de USB A a USB B).
1 Conecte un dispositivo USB
transferible al puerto B y, a
continuación, conecte el
dispositivo USB que desea
transferir al puerto A.
2 Pulse USB/USB SELECT varias
veces para seleccionar “USB A”.
3 Para la transferencia
sincronizada a alta velocidad de
USB A a USB B:
Cuando la reproducción se detenga,
pulse PLAY MODE varias veces en el
mando a distancia para seleccionar el
modo de reproducción que desee.
Nota
Si comienza la transferencia en “ALL
USB”, “ALL USB SHUF”, “1 USB SHUF”
y reproducción repetida, el modo de
reproducción cambiará automáticamente a
“1 USB”.
Si inicia la transferencia en “ SHUF”, el
modo de reproducción cambiará
automáticamente a “ ”.
Para la transferencia REC1 de
USB A a USB B:
Seleccione el archivo de audio que
desee transferir y, a continuación,
inicie la reproducción.
4 Pulse REC TO USB B.
El visor mostrará “PUSH ENTER”.
18
ES
Page 51

5 Pulse ENTER.
La transferencia se inicia cuando
“DON’T REMOVE” aparece en el
visor.
Para la transferencia
sincronizada a alta velocidad de
USB A a USB B:
Cuando se haya completado la
transferencia, los dos dispositivos
USB se detendrán automáticamente.
Para la transferencia REC1 de
USB A a USB B:
Cuando se haya completado la
transferencia, el archivo de audio
continuará reproduciéndose.
Reglas de generación de
carpetas y archivos
Cuando haga una transferencia a un
dispositivo USB, se crea una carpeta
“MUSIC” directamente bajo la carpeta
“ROOT”. Las carpetas y archivos se
generarán en la carpeta “MUSIC” tal y
como se indica a continua.
Transferencia sincronizada a alta
velocidad de CD a USB
Fuente de
transferencia
MP3 El mismo que el de la fuente de
AUDIO CD “CDDA0001”* “TRACK001”*
Transferencia REC1 de CD a USB
Fuente de
transferencia
MP3
AUDIO CD “REC1-CD” “TRACK001”*
Nombre de
carpeta
transferencia
Nombre de
carpeta
“REC1-MP3”
Nombre de
archivo
Nombre de
archivo
El mismo que el
de la fuente de
transferencia
Transferencia analógica
Fuente de
transferencia
FM “TUFM0001”* “TRACK001”*
AM “TUAM0001”*
PC “EXPC0001”*
Televisor “EXTV0001”*
DVD/SAT “EXDS0001”*
GAME “EXGA0001”*
Nombre de
carpeta
Nombre de
archivo
Transferencia sincronizada a alta
velocidad de USB A a USB B
Fuente de
transferencia
Archivos de
audio (MP3,
WMA,
AAC)
Nombre de
carpeta
El mismo que el de la fuente de
transferencia
Nombre de
archivo
Transferencia REC1 de USB A a USB B
Fuente de
transferencia
Archivos de
audio (MP3,
WMA,
AAC)
* Los números de carpeta y de archivo se
asignan en serie a partir de ahí.
Nombre de
carpeta
“REC1-MP3”
Nombre de
archivo
El mismo que el
de la fuente de
transferencia
Notas sobre la transferencia
• Mientras se transfiere a partir de un disco
MP3, AUDIO CD o dispositivo USB, no se
emitirá sonido.
• La información CD-TEXT no se transfiere a
los archivos MP3 creados.
• La transferencia se detiene automáticamente
si:
– el dispositivo USB se queda sin espacio
durante la transferencia.
– el número de archivos de audio y de
carpetas del dispositivo USB alcanza el
límite numérico que el sistema puede
reconocer.
– la función o la banda de sintonización se ha
cambiado.
Dispositivo USB
Continúa
l
19
ES
Page 52

• Si una carpeta o archivo que está intentando
transferir ya existe en el dispositivo USB con
el mismo nombre, se añade un número
secuencial después del nombre sin
sobrescribir la carpeta o el archivo original.
• No puede expulsar el disco, seleccionar otro
pista o archivo, pausar la reproducción o
buscar un punto en la pista o el archivo
durante la transferencia sincronizada a alta
velocidad de CD a USB o la transferencia
REC1.
• Cuando transfiera música a un Walkman
mediante “Media Manager for WALKMAN”,
asegúrese de que los archivos tengan el en
formato MP3.
• Cuando conecte un Walkman
asegúrese de hacerlo cuando los mensajes
“Creating Library” o “Creating Database”
desaparezcan del Walkman
®
®
.
al sistema,
®
Reproducción de un
archivo
Este sistema puede reproducir los
siguientes formatos de audio:
– MP3: extensión de archivo “.mp3”
– WMA: extensión de archivo “.wma”
– AAC: extensión de archivo “.m4a”,
“.mp4” o “.3gp”
Si los archivos de audio tienen la
extensión de archivo anterior pero no son
los formatos respectivos, el sistema
podría producir ruido o fallos en el
funcionamiento.
1 Pulse USB/USB SELECT varias
veces para seleccionar “USB A”
o “USB B”.
2 Conecte un dispositivo USB al
puerto A o B de la
unidad.
La pantalla cambiará de la forma
siguiente:
READING
* “xxxx” indica el número de carpetas.
t xxxx FOLDER*
3 Pulse NX.
Los archivos de audio se reproducen
por orden alfabético.
Para buscar un archivo de audio
(TRACK SEARCH)
1 Pulse SEARCH.
2 Pulse / para seleccionar la
carpeta que desee y, a
continuación, pulse ENTER o
NX.
3 Pulse / para seleccionar el
archivo de audio que desee y, a
continuación, pulse ENTER o
NX.
El archivo seleccionado comienza a
reproducirse.
Para borrar archivos de audio o
carpetas del dispositivo USB
1 Conecte un dispositivo USB al
puerto A o B de la unidad.
2 Pulse USB/USB SELECT varias
veces para seleccionar “USB A” o
“USB B” cuando se detenga la
reproducción.
3 Pulse l/L o +/– varias
veces para seleccionar el archivo
de audio o la carpeta.
4 Pulse OPTIONS.
5 Pulse / para seleccionar “USB
ERASE” y, a continuación, pulse
ENTER.
El visor muestra “FOLDER ERASE” o
“TRACK ERASE”.
6 Pulse ENTER.
El visor mostrará “COMPLETE”.
20
ES
Page 53

Uso del modo de reproducción
Utilice los botones del mando a distancia
para realizar esta operación.
Reproducción en el orden original
(Reproducción normal)
Pulse PLAY MODE varias veces cuando
se detenga la reproducción.
• ALL USB: todos los dispositivos USB
• 1 USB: un dispositivo USB
• : todos los archivos de audio
almacenados en la carpeta del
dispositivo USB
Notas sobre el dispositivo USB
• El orden de reproducción para el sistema
puede ser distinto del orden de reproducción
del reproductor de música digital conectado.
• Asegúrese de apagar el sistema antes de
extraer el dispositivo USB. Si se extrae el
dispositivo USB mientras el sistema está
encendido, podrían dañarse los datos del
dispositivo USB.
• No es posible borrar archivos de audio ni
carpetas en el modo de reproducción aleatoria
o el modo de reproducción programada.
Reproducción en orden aleatorio
(Reproducción aleatoria)
Pulse PLAY MODE varias veces cuando
se detenga la reproducción.
• ALL USB SHUF: reproduce el
contenido de todos los dispositivos USB
en orden aleatorio
• 1 USB SHUF: reproduce el contenido
de un dispositivo USB en orden
aleatorio
• SHUF: reproduce en orden aleatorio
todos los archivos de audio
almacenados en la carpeta del
dispositivo USB
Nota
Cuando apague el sistema, se cancelará la
reproducción aleatoria seleccionada y el modo
de reproducción volverá a la reproducción
normal.
Creación de su propio programa
(Reproducción programada)
Consulte página 13.
Reproducción varias veces
(Reproducción repetida)
Pulse REPEAT varias veces.
• REP: repite todos los archivos de audio
almacenados en un dispositivo USB
• REP 1: repite un archivo de audio
Dispositivo USB
21
ES
Page 54

Ajuste del sonido
Ajuste del sonido
Para Haga esto
Reforzar el nivel
de graves y crear
un sonido más
potente
(Función CD y
USB solamente)
Mejorar la
calidad del
sonido del
archivo de audio
Para seleccionar un efecto de
sonido predeterminado
Pulse PRESET EQ (o EQ en el mando a
distancia) varias veces.
El tipo de efecto de sonido varía de
acuerdo con la función seleccionada del
modo siguiente:
• Función TV: SPORTS, DRAMA/
NEWS, MOVIE, REGGAETON,
FLAT, USER EQ
• Función DVD/SAT: MOVIE, Music
EQ*, FLAT, USER EQ
• Otras funciones: Music EQ*, FLAT,
USER EQ
* REGGAETON, ROCK, POP, JAZZ,
DANCE, TECHNO, SALSA, SAMBA
Para cancelar un efecto de sonido
predefinido, seleccione “FLAT”.
Pulse GROOVE varias
veces.
1 Pulse OPTIONS.
2 Pulse / varias veces
para seleccionar “MP3
BOOSTER+” y, a
continuación, pulse
ENTER.
3 Pulse / para
seleccionar “AUTO” y,
a continuación, pulse
ENTER.
Para salir del menú
OPTIONS, pulse
OPTIONS.
Creación de su propio
efecto de sonido
Puede aumentar o reducir los niveles para
intervalos de frecuencias específicos y, a
continuación, almacenar el ajuste en la
memoria como “USER EQ”.
1 Pulse OPTIONS.
2 Pulse / varias veces para
seleccionar “EQ EDIT” y, a
continuación, pulse ENTER.
3 Pulse / varias veces para
ajustar el nivel de ecualizador y,
a continuación, pulse ENTER.
Nivel de ecualizadorBanda de frecuencia
4 Repita los paso 3 para ajustar el
nivel de otras bandas de
frecuencia y el efecto de sonido
envolvente.
El ajuste de ecualizador de usuario se
almacena cuando la indicación “USER
EQ” aparece en el visor.
Para recuperar el ajuste del
ecualizador de usuario
Pulse PRESET EQ (o EQ en el mando a
distancia) varias veces para seleccionar
“USER EQ”.
22
ES
Page 55

Creación de un
ambiente de fiesta
(DJ EFFECT)
1 Pulse el botón que se indica a
continuación para seleccionar el
tipo de efecto.
• FLANGER: Crear un sonido muy
metalizado similar al estruendo de un
avión a reacción.
• ISOLATOR: Aislar una banda de
frecuencia específica ajustando las
demás bandas de frecuencia. Por
ejemplo, si solo desea centrarse en
música vocal, etc.
• SOUND FLASH: Transmitir el
sonido intermitentemente. El sonido
se interrumpe regularmente.
• PHASER: Crear picos y valles en el
espectro de frecuencia, como un
efecto de barrido.
2 Gire la rueda DJ CONTROL para
ajustar el nivel de efecto.
Para desactivar el efecto
Pulse nuevamente el botón de efecto
seleccionado.
Notas
• DJ EFFECT se desactivará automáticamente
cuando apague el sistema, cambie de función
o cambie de banda de sintonización.
• Si activa el botón DJ EFFECT durante una
transferencia, el efecto de sonido no se
transferirá al dispositivo USB.
• No es posible usar VOLUME/DJ CONTROL
para ajustar el volumen cuando DJ EFFECT
está activado. Pulse VOLUME +/– en el
mando a distancia para ajustar el volumen.
Otras operaciones
Cantando sobre el
audio
Puede cantar con cualquier fuente de
audio que haya reproducido música en el
sistema.
1 Gire MIC LEVEL a la posición
MIN para reducir el nivel de
volumen del micrófono.
2 Conecte un micrófono a la toma
MIC de la unidad.
3 Comience la reproducción de
música y ajuste el volumen.
4 Gírelo MIC LEVEL para ajustar el
volumen del micrófono.
Si se produce retroalimentación
acústica (acople), reduzca el volumen,
separe el micrófono de los altavoces o
cambie la dirección del micrófono.
Cuando termine, desconecte el
micrófono.
Nota
Durante la transferencia, el sonido del
micrófono no se transferirá al dispositivo USB.
Cambio del patrón de
iluminación en los
altavoces
1
Pulse OPTIONS.
2 Pulse / varias veces para
seleccionar “LED SPEAKER” y,
a continuación, pulse ENTER.
Ajuste del sonido/Otras operaciones
Continúa
l
23
ES
Page 56

3 Pulse / varias veces para
seleccionar el patrón de
iluminación de los altavoces que
desea y, a continuación, pulse
ENTER.
Para apagar la iluminación, seleccione
“PATTERN OFF”.
Uso de los
temporizadores
El sistema ofrece tres funciones de
temporización. No es posible activar el
temporizador de reproducción y el
temporizador de grabación a la vez. Si los
utiliza en combinación con el
temporizador para desconexión, este tiene
prioridad.
Temporizador para
desconexión
Usted puede quedarse dormido
escuchando música. El sistema se apaga
después de la hora preajustada.
Pulse SLEEP en el mando a
distancia varias veces.
Observación
Si desea comprobar el tiempo que falta para que
el sistema se apague, pulse SLEEP en el mando
a distancia.
Si desea cancelar el temporizador
para desconexión
Pulse SLEEP en el mando a distancia
varias veces para seleccionar “SLEEP
OFF”.
ES
24
Temporizador de
reproducción/Temporizador de
grabación
Asegúrese de que ha ajustado el reloj.
Utilice el botón del mando a distancia
para realizar esta operación.
Temporizador de reproducción:
También puede despertarse con un disco,
emisora de radio o dispositivo USB a una
hora preajustada.
Temporizador de grabación:
También puede transferir música desde
una emisora de radio predeterminada a un
dispositivo USB a una hora preajustada.
1 Para el temporizador de
reproducción:
Prepare la fuente de sonido y, a
continuación, pulse VOLUME +/–
para ajustar el volumen.
Para empezar desde una pista o archivo
específico, cree su propio programa
(página 13).
Para el temporizador de
grabación:
Sintonice la emisora de radio
presintonizada (página 15).
2 Pulse CLOCK/TIMER SET.
3 Pulse ./> varias veces
para seleccionar “PLAY SET” o
“REC SET” y, a continuación,
pulse ENTER.
4 Ajuste la hora para empezar la
reproducción o la transferencia.
Pulse ./> varias veces para
ajustar la hora/minuto y, a
continuación, pulse ENTER.
5 Utilice el mismo procedimiento
que en el paso 4 para ajustar la
hora para detener la
reproducción o la transferencia.
Page 57

6 Pulse ./> varias veces
para seleccionar la fuente de
sonido que desea y, a
continuación, pulse ENTER.
Para el temporizador de
grabación:
Conecte un dispositivo USB
transferible al puerto B de la
unidad.
7 Pulse "/1 para apagar el
sistema.
Para comprobar el ajuste del
temporizador o activar el
temporizador de nuevo
Pulse CLOCK/TIMER SELECT, pulse
./> varias veces para seleccionar
“PLAY SELECT” o “REC SELECT” y, a
continuación, pulse ENTER.
Para cancelar el temporizador
Pulse CLOCK/TIMER SELECT, pulse
./> varias veces para seleccionar
“TIMER OFF” y, a continuación, pulse
ENTER.
Notas
• El sistema se enciende antes de la hora
preajustada. Si el sistema se enciende a la hora
preajustada o si “STANDBY” parpadea en el
visor, el temporizador de reproducción y el
temporizador de grabación no iniciarán la
reproducción o la transferencia.
• No utilice el sistema desde que se enciende
hasta que se inicia la reproducción o la
transferencia.
Cambio de la pantalla
Cambio del modo de pantalla
Pulse DISPLAY en el mando a
distancia varias veces mientras el
sistema está apagado.
Demostración
La pantalla cambia y el indicador
parpadea aun con el sistema apagado.
Pantalla apagada (Modo de ahorro de
energía)
La pantalla se apaga para conservar la
energía. El temporizador y el reloj siguen
funcionando. No puede encender el
sistema pulsando los botones de función.
Reloj
La pantalla del reloj pasa
automáticamente al modo de ahorro de
energía al cabo de unos segundos.
Cambio del patrón de espectro
del visor
1 Pulse OPTIONS.
2 Pulse / varias veces para
seleccionar “SPECTRUM” y, a
continuación, pulse ENTER.
3 Pulse / varias veces para
seleccionar el patrón de
espectro que desea y, a
continuación, pulse ENTER.
Para salir del menú OPTIONS, pulse
OPTIONS.
Otras operaciones
25
ES
Page 58

Cambio del patrón de
iluminación alrededor de la
rueda VOLUME/DJ CONTROL
1 Pulse OPTIONS.
2 Pulse / varias veces para
seleccionar “ILLUM” y, a
continuación, pulse ENTER.
3 Pulse / varias veces para
seleccionar el patrón de
iluminación que desea y, a
continuación, pulse ENTER.
Para salir del menú OPTIONS, pulse
OPTIONS.
Cambio del brillo del visor
1 Pulse OPTIONS.
2 Pulse / varias veces para
seleccionar “DIMMER” y, a
continuación, pulse ENTER.
3 Pulse / varias veces para
seleccionar el ajuste de brillo
que desea y, a continuación,
pulse ENTER.
Para salir del menú OPTIONS, pulse
OPTIONS.
Visualización de información
en el visor
Pulse DISPLAY en el mando a
distancia varias veces mientras el
sistema está encendido.
Puede ver la información que se indica a
continuación:
• Para AUDIO CD:
– El tiempo de reproducción
transcurrido, el tiempo de
reproducción restante y el tiempo total
de reproducción restante durante la
reproducción.
– El tiempo de reproducción total
cuando la reproducción se ha
detenido.
• Para archivos de audio:
– El tiempo de reproducción
transcurrido, el nombre del archivo y
el nombre de la carpeta.
– La información del título, el artista y el
álbum.
Nota
El tiempo de reproducción transcurrido para un
archivo de audio codificado con VBR
(velocidad de bits variable) no se muestra
correctamente.
26
ES
Page 59

Uso de equipos
opcionales
1
Conecte un equipo opcional
(página 10).
2 Gire la rueda VOLUME en el
sentido contrario al de las
agujas del reloj para reducir el
nivel de volumen.
3 Pulse FUNCTION varias veces
para seleccionar la función que
corresponde al equipo
conectado.
4 Inicie la reproducción para el
equipo conectado.
Desactivación de los
botones de la unidad
(Child Lock)
Puede desactivar los botones de la unidad
(excepto "/1) para evitar que se haga un
uso incorrecto (por ejemplo, las
travesuras de los niños).
Mantenga pulsado x durante más
de 5 segundos.
Las indicaciones “CHILD LOCK” y
“ON” aparecen en el visor.
El sistema solo se puede controlar con los
botones del mando a distancia.
Para cancelar la selección, mantenga
pulsado x durante más de 5 segundos
hasta que “CHILD LOCK” y “OFF”
aparezcan en el visor.
Información adicional
Discos reproducibles
• AUDIO CD
• CD-R/CD-RW
– datos de audio
– Archivos MP3 que cumplen con el
estándar ISO9660 nivel 1/nivel 2 o
Joliet (formato ampliado).
Notas
• MP3 (MPEG 1 Audio Layer 3) es un formato
estándar definido por ISO (Organización
Internacional para la Estandarización) que se
utiliza para comprimir datos de audio. Los
archivos MP3 deben tener formato MPEG 1
Audio Layer 3.
• El sistema solo puede reproducir archivos
MP3 que tengan la extensión “.mp3”.
Discos que no se pueden reproducir
•CD-ROM
• Discos CD-R/CD-RW que tengan las
siguientes características:
– Han sido grabados en formato MP3
PRO
– Grabados en multisesiones que no se
hayan finalizado “cerrando la sesión”
– Han sido grabados con un dispositivo
de grabación incompatible
– Tienen una calidad de grabación
deficiente
– Tienen arañazos o están sucios
– Se han finalizado incorrectamente
• Discos de forma no estándar (por
ejemplo, corazón, cuadrado, estrella)
• Discos que tengan cinta adhesiva, papel
o pegatinas adheridas
• Discos de alquiler o usados con sellos
pegados en los que la cola sobresale del
sello
• Discos que tienen etiquetas impresas
con tinta pegajosa al tacto
Información adicional
Continúa
l
27
ES
Page 60

Nota sobre DualDiscs (Discos a dos
caras)
Un DualDisc es un disco a doble cara que
comparte material DVD grabado en una
cara, con grabación de audio digital en la
otra cara. No obstante, debido a que el
material de audio no cumple con el
estándar de Compact Disc (CD), no es
seguro que se pueda reproducir en este
producto.
Discos de música codificados con
tecnologías de protección de los
derechos de autor
Este producto está diseñado para
reproducir discos que cumplen con el
estándar de Compact Disc (CD).
Recientemente algunas compañías
discográficas comercializan varios discos
de música codificados con tecnologías de
protección de los derechos de autor.
Tenga en cuenta que entre esos discos,
hay algunos que no cumplen con el
estándar de CD y es posible que no se
puedan reproducir mediante este
producto.
Notas sobre reproducción de discos
multisesión
• Este sistema puede reproducir discos
multisesión si la primera sesión contiene
un archivo MP3. Cualquier archivo
MP3 siguiente grabado en las sesiones
posteriores también se podrá reproducir.
• Si la primera sesión se graba en formato
AUDIO CD, solamente se reproducirá
la primera sesión.
Solución de problemas
Si tiene algún problema con el sistema,
localice el problema en la lista de solución
de problemas que se incluye más abajo y
tome las medidas correctivas que se
indican.
Si el problema continúa, póngase en
contacto con el distribuidor de Sony más
cercano.
Tenga en cuenta que si el personal del
servicio técnico cambia algunas piezas
durante la reparación, es posible que
dichas piezas no le sean devueltas.
Si la indicación “PROTECT”
aparece en el visor
Desconecte inmediatamente el cable
de alimentación y compruebe los
elementos siguientes.
• ¿Está utilizando solamente los
altavoces suministrados?
• ¿Hay algún obstáculo que bloquee la
ventilación de la unidad?
Después de comprobar los elementos
anteriores y arreglar los problemas,
conecte de nuevo el cable de
alimentación y encienda el sistema. Si
el problema continúa, póngase en
contacto con el distribuidor de Sony
más cercano.
General
El ajuste del reloj o del temporizador
se ha cancelado.
• El cable de alimentación está
desconectado o se ha producido un fallo
en la alimentación. Ajuste el reloj
(página 12) y el temporizador
(página 24) de nuevo.
28
ES
Page 61

No hay sonido.
• Ajuste el volumen.
• Compruebe las conexiones de los
altavoces (página 10).
• Compruebe la conexión del equipo
opcional si lo hubiera (página 10).
• Encienda el equipo conectado.
• No hay emisión de audio cuando el
temporizador de grabación está en
funcionamiento.
No hay sonido del micrófono.
• Ajuste el volumen del micrófono.
• Asegúrese de que el micrófono está
conectado correctamente a la toma
MIC.
• Asegúrese de que el micrófono está
encendido.
Hay un zumbido o un ruido
considerable.
• Un televisor o una VCR se han colocado
demasiado cerca de la unidad. Aleje la
unidad de la fuente de ruido.
• Conecte la unidad a otra toma de
corriente de la pared.
• Instale un filtro de ruido (disponible en
el mercado) al cable de alimentación.
• Apague el equipo eléctrico del entorno.
El temporizador no funciona.
• Compruebe el ajuste del temporizador y
ajuste la hora correcta (página 24).
• Cancele la función del temporizador
para desconexión (página 24).
El mando a distancia no funciona.
• Quite los obstáculos que haya entre el
mando a distancia y la unidad.
• Acerque el mando a distancia a la
unidad.
• Apunte el mando a distancia al sensor de
la unidad.
• Sustituya las pilas (R6/tamaño AA).
• Aleje la unidad de luces fluorescentes.
Se produce retroalimentación
acústica.
• Reduzca el volumen.
• Separe el micrófono de los altavoces o
cambie la dirección del micrófono.
La indicación “CHILD LOCK” aparece
al pulsar cualquier botón de la
unidad.
• Apague la función de bloqueo infantil
(página 27).
Aparece la indicación “CONNECT
ALL SPEAKERS AND CHANGE VOL”.
• Conecte todos los altavoces y ajuste el
nivel de volumen deseado.
Altavoces
El sonido procede de un canal o del
volumen izquierdo y derecho
desequilibrado.
• Coloque los altavoces lo más
simétricamente posible.
• Compruebe que los altavoces estén
conectados correcta y firmemente.
• La fuente que se reproduce es
monoaural.
No se emite sonido desde un altavoz
específico.
• Compruebe que el altavoz está
conectado de manera firme y correcta.
Reproductor de discos
El sistema no expulsa el disco y
aparece la indicación “LOCKED”.
• Consulte con el distribuidor Sony o el
servicio técnico autorizado Sony más
cercano.
El disco no se puede insertar.
• Compruebe que el sistema está
encendido.
• El disco no se puede insertar
inmediatamente después de encender el
sistema.
Continúa
l
29
Información adicional
ES
Page 62

El disco no se expulsa.
• No puede expulsar el disco durante una
transferencia sincronizada a alta
velocidad de CD-USB o una
transferencia REC1. Pulse x para
cancelar la transferencia y, a
continuación, pulse Z EJECT para
expulsar el disco.
• Consulte con el distribuidor Sony más
cercano.
La reproducción no se inicia.
• Limpie el disco (página 34).
• Vuelva a cargar el disco.
• Cargue un disco que se pueda
reproducir en este sistema (página 27).
• Extraiga el disco y limpie la humedad; a
continuación deje el sistema encendido
varias horas hasta que la humedad se
evapore.
El sonido salta.
• Limpie el disco (página 34).
• Vuelva a cargar el disco.
• Mueva la unidad a un lugar sin
vibración (p. ej., encima de un soporte
estable).
• Aleje los altavoces de la unidad o
colóquelos en soportes distintos.
Cuando escuche una pista con sonidos
graves a un volumen elevado, la
vibración del altavoz puede hacer que el
sonido salte.
La reproducción no se inicia desde la
primera pista.
• Ajuste el modo de reproducción al
modo de reproducción normal
(página 13).
Los caracteres del nombre de la
carpeta, el nombre de la pista, el
nombre del archivo y la etiqueta ID3
no aparecen correctamente.
• Utilice un disco que se ajuste al nivel 1/
nivel 2 o Joliet de ISO9660 (formato
ampliado).
• La etiqueta ID3 no es versión 1(1.0/1.1)
ni versión 2(2.2/2.3).
• El código de caracteres que se puede
mostrar en este sistema es el siguiente:
– Mayúsculas (A - Z)
– Números (0 - 9)
– Símbolos (< > * +, [ ] \ _)
Aparecen otros caracteres como “_”.
Dispositivo USB
La transferencia da error.
• Está utilizando un dispositivo USB no
compatible. Consulte la información de
los sitios web acerca de los dispositivos
USB compatibles (página 16).
• El dispositivo USB no está formateado
correctamente. Consulte el manual de
instrucciones suministrado con el
dispositivo USB para saber cómo
formatearlo.
• Apague el sistema y extraiga el
dispositivo USB. Si el dispositivo USB
tiene un interruptor de alimentación,
apague el dispositivo USB y enciéndalo
de nuevo después de extraerlo del
sistema. A continuación, vuelva a
realizar la transferencia.
• Si las operaciones de transferencia y
borrado se repiten muchas veces, la
estructura de archivos del dispositivo
USB se fragmenta. Consulte el manual
de instrucciones suministrado con el
dispositivo USB para saber cómo
abordar este problema.
• El dispositivo USB se ha desconectado
o la alimentación se ha interrumpido
durante la transferencia. Elimine el
archivo parcialmente transferido y
realice la transferencia de nuevo. Si no
se arregla el problema de esta forma, es
posible que el dispositivo USB esté roto.
Consulte el manual de instrucciones
suministrado con el dispositivo USB
para saber cómo abordar este problema.
30
ES
Page 63

Los archivos de audio o carpetas del
dispositivo USB no se pueden borrar.
• Compruebe si el dispositivo USB está
protegido contra escritura.
• El dispositivo USB se ha desconectado
o la alimentación se ha interrumpido
durante la operación de borrado.
Elimine el archivo parcialmente
transferido. Si no se arregla el problema
de esta forma, es posible que el
dispositivo USB esté roto. Consulte el
manual de instrucciones suministrado
con el dispositivo USB para saber cómo
abordar este problema.
No hay sonido.
• El dispositivo USB no está conectado
correctamente. Apague el sistema y
vuelva a conectar el dispositivo USB. A
continuación, encienda el sistema y
compruebe si “USB A” o “USB B” se
iluminan en el visor.
Hay ruido, saltos o sonido
distorsionado.
• Está utilizando un dispositivo USB no
compatible. Consulte la información de
los sitios web acerca de los dispositivos
USB compatibles (página 16).
• Apague el sistema y vuelva a conectar el
dispositivo USB. A continuación,
encienda el sistema.
• Los datos de música contienen ruido o el
sonido está distorsionado. Es posible
que haya entrado ruido durante el
proceso de transferencia. Elimine el
archivo e intente transferirlo de nuevo.
• La velocidad de bits utilizada al
codificar los archivos de audio era baja.
Envíe archivos de audio al dispositivo
USB con una velocidad de bits más alta.
“READING” se muestra durante
bastante tiempo o tarda mucho en
iniciar la reproducción.
• El proceso de lectura puede tardar
mucho tiempo en los casos siguientes:
– El dispositivo USB contiene muchas
carpetas o archivos (página 16).
– La estructura de archivos es
extremadamente compleja.
– La capacidad de la memoria es
excesiva.
– La memoria interna está fragmentada.
“OVER CURRENT” aparece.
• Se ha detectado un problema con el
nivel de corriente eléctrica del puerto
A o B. Apague el sistema y
extraiga el dispositivo USB del puerto.
Asegúrese de que no hay ningún
problema con el dispositivo USB. Si
este patrón de pantalla persiste, póngase
en contacto con el distribuidor Sony
más cercano.
Pantalla con mensaje erróneo.
• Es posible que los datos almacenados en
el dispositivo USB se hayan dañado.
Realice la transferencia de nuevo.
• El código de caracteres que se puede
mostrar en este sistema es el siguiente:
– Mayúsculas (A - Z)
– Números (0 - 9)
– Símbolos (< > * +, [ ] \ _)
Aparecen otros caracteres como “_”.
No se reconoce el dispositivo USB.
• Apague el sistema y vuelva a conectar el
dispositivo USB. A continuación,
encienda el sistema.
• Consulte la información de los sitios
web acerca de los dispositivos USB
compatibles (página 16).
• El dispositivo USB no funciona
correctamente. Consulte el manual de
instrucciones suministrado con el
dispositivo USB para saber cómo
abordar este problema.
Información adicional
Continúa
l
31
ES
Page 64

La reproducción no se inicia.
• Apague el sistema y vuelva a conectar el
dispositivo USB. A continuación,
encienda el sistema.
• Consulte la información de los sitios
web acerca de los dispositivos USB
compatibles (página 16).
La reproducción no se inicia desde el
primer archivo.
• Ajuste el modo de reproducción al
modo de reproducción normal
(página 21).
El archivo de audio no se puede
reproducir.
• Los archivos MP3 en formato MP3
PRO no se pueden reproducir.
• Es posible que algunos archivos AAC
no se puedan reproducir correctamente.
• Un archivo AAC con transmisión de
vídeo no se puede reproducir.
• Los archivos WMA de formato
Windows Media Audio Lossless y
Professional no se pueden reproducir.
• Los dispositivos USB formateados con
sistemas de archivos distintos de FAT16
o FAT32 no son compatibles.*
• En el caso de que existan varias
particiones en el dispositivo USB que se
está utilizando, es posible que los
archivos no se reproduzcan.
• El sistema solamente puede reproducir
hasta una profundidad de 8 carpetas.
• Los archivos cifrados o protegidos por
contraseña, etc., no se pueden
reproducir.
• Los archivos con protección de
derechos de autor (Gestión de derechos
digitales) no se pueden reproducir en
este sistema.
* Esta sistema es compatible con FAT16 y
FAT32, pero es posible que algunos
dispositivos USB no sean compatibles con
todos los sistemas FAT. Para obtener más
información, consulte el manual de
instrucciones de cada dispositivo USB o
póngase en contacto con el fabricante.
Sintonizador
Se produce un zumbido o ruido
considerable o no se pueden recibir
emisoras. (Las indicaciones
“TUNED” o “STEREO” parpadean en
el visor.)
• Conecte la antena correctamente.
• Busque una ubicación y una orientación
que ofrezca una buena recepción y, a
continuación, instale la antena de nuevo.
• Conecte una antena externa disponible
en el mercado.
• Consulte con el distribuidor Sony más
cercano si la antena de AM se ha salido
del soporte de plástico.
• Apague el equipo eléctrico del entorno.
Para restablecer el sistema
Si el sistema sigue sin funcionar
correctamente después de tomar las
medidas anteriores o se producen otros
problemas descritos anteriormente,
restablezca el sistema a los ajustes de
fábrica.
Utilice los botones de la unidad para
realizar esta operación.
1 Desenchufe y vuelva a enchufar el
cable de alimentación.
2 Pulse "/1 para encender el
sistema.
3 Mantenga pulsado x, seguido de
"/1, durante aproximadamente 3
segundos.
El visor mostrará “COLD RESET”.
Todos los ajustes configurados por el
usuario, como las emisoras de radio
presintonizadas, el temporizador y el
reloj, se restablecen a los ajustes de
fábrica.
32
ES
Page 65

Mensajes
Disco/Temporizador
CANNOT PLAY
Ha insertado un disco que no se puede
reproducir en el sistema.
NO DISC
No hay ningún disco en la ranura para
discos.
NO STEP
Todos los pasos programados se han
borrado.
NOT IN USE
Ha pulsado un botón cuya operación no
está permitida o no es válida en este
momento.
OFF TIME NG
La hora de inicio y la hora de finalización
del temporizador de reproducción y el
temporizador de grabación coinciden.
PUSH SELECT
Ha intentado ajustar el reloj o el
temporizador mientras funciona el
temporizador.
PUSH STOP
Ha intentado realizar una operación que
solo se puede realizar cuando la
reproducción no está en curso.
READING
El sistema está leyendo información del
disco. Algunos botones no están
disponibles.
SET CLOCK
Ha pulsado CLOCK/TIMER SELECT
antes de que se ajuste el reloj.
SET TIMER
Ha pulsado CLOCK/TIMER SELECT
antes de que se ajuste el temporizador de
reproducción o el temporizador de
grabación.
STEP FULL
Ha intentado programar más de 25 pasos.
UNLOCK
La función de prevención de robo del
disco está desactivada.
Dispositivo USB
DATA ERROR
Ha intentado reproducir un archivo que no
se puede reproducir.
DEVICE ERROR
El dispositivo USB no se ha podido
reconocer o se ha desconectado un
dispositivo desconocido.
DEVICE FULL
La memoria del dispositivo USB está
llena.
FATAL ERROR
El dispositivo USB se ha extraído durante
la operación de transferencia o borrado y
puede haberse dañado.
FOLDER FULL
El número de carpetas ha alcanzado el
límite máximo.
NO DEVICE
No hay ningún dispositivo USB
conectado.
NO MEMORY
No se ha insertado ningún medio de
memoria en el dispositivo USB para
realizar la reproducción o la transferencia
con la memoria seleccionada.
NO STEP
Todos los pasos programados se han
borrado.
NO TRACK
No se ha insertado ningún archivo
reproducible en el sistema.
NOT IN USE
Ha intentado realizar una operación
específica en unas condiciones en las que
dicha operación está prohibida.
NOT SUPPORTED
Se ha conectado un dispositivo USB no
compatible o el dispositivo USB está
conectado a través de un concentrador
USB.
Continúa
l
33
Información adicional
ES
Page 66

PROTECTED
El dispositivo USB está protegido contra
escritura.
PUSH STOP
Ha intentado realizar una operación que
solo se puede realizar cuando la
reproducción no está en curso.
READING
El sistema está leyendo información del
dispositivo USB. Algunos botones no
están disponibles.
REC ERROR
La transferencia no ha empezado, se ha
detenido en mitad del proceso o no se ha
realizado.
STEP FULL
Ha intentado programar más de 25 pasos.
TRACK FULL
El número de archivos ha alcanzado el
límite máximo.
Precauciones
Cuando transporte la unidad
Realice el procedimiento que se indica a
continuación para proteger el mecanismo
del disco.
Utilice los botones de la unidad para
realizar esta operación.
1 Pulse "/1 para encender el
sistema.
2 Pulse CD.
3 Extraiga el disco.
Pulse Z EJECT para extraer el disco.
Espere hasta que la indicación “CD NO
DISC” aparezca en el visor.
4 Mantenga pulsado CD, seguido de
"/1, durante unos 3 segundos. El
visor mostrará “MECHA LOCK”.
5 Desconecte el cable de
alimentación.
Notas sobre discos
• Antes de reproducirlos, limpie el d isco con un
trapo desde el centro hacia el borde.
• No limpie discos con disolventes, como
diluyente o limpiadores disponibles en el
mercado o spray antiestático para LP de
vinilo.
• No exponga los discos a la luz directa del sol
o fuentes de calor como conductos de aire
caliente, ni los deje en un coche en un
aparcamiento a la luz directa del sol.
Seguridad
• Desconecte el cable de alimentación de la
toma de corriente de la pared si no va a utilizar
el sistema durante un periodo largo de tiempo.
Cuando desconecte la unidad hágalo siempre
agarrando el enchufe. Nunca tire del cable.
• Si cae dentro del sistema algún objeto sólido o
líquido, desenchúfelo y deje que personal
cualificado lo compruebe antes de utilizarlo
de nuevo.
• El cable de alimentación de ca deberá ser
cambiado solamente en un taller de servicio
cualificado.
• Evite mirar directamente a la luz de los
altavoces LED durante un tiempo prolongado.
Si lo hace, puede ser perjudicial para su salud.
Colocación
• No coloque el sistema en una posición
inclinada o en ubicaciones extremadamente
calientes, frías, polvorientas, sucias, húmedas
o sin ventilación adecuada, o sujetas a
vibración, luz directa del sol o luz intensa.
• Tenga cuidado si coloca la unidad o los
altavoces sobre superficies que tengan un
tratamiento especial (por ejemplo, con ceras,
aceites, pulidor), pues pueden aparecer
manchas o decoloración en la superficie.
• Si el sistema se traslada directamente desde
una ubicación fría a una caliente o si se coloca
en una habitación muy húmeda, la humedad
se puede condensar en la lente del interior de
la unidad y producir fallos de funcionamiento.
En esta situación extraiga el disco y deje el
sistema encendido cerca de una hora hasta que
la humedad de evapore.
34
ES
Page 67

Acumulación de calor
• La acumulación de calor en la unidad durante
su funcionamiento es normal y no debe ser
causa de alarma.
• No toque la caja si se ha usado de manera
continuada a un volumen alto, ya que la caja
puede haberse calentado mucho.
• No obstruya los orificios de ventilación.
El sistema de altavoces
Este sistema de altavoces no está
magnéticamente apantallado y la imagen de los
televisores del entorno pueden distorsionarse
magnéticamente. En esta situación, apague el
televisor, espere entre 15 y 30 minutos y
enciéndalo de nuevo. Si no hay mejoría, aleje
los altavoces del televisor.
Limpieza de la caja
Limpie el sistema con un paño suave
humedecido ligeramente con una solución de
detergente suave.
No utilice ningún tipo de estropajos abrasivos,
polvo desengrasante ni disolventes, como
diluyente, alcohol o bencina.
Especificaciones
ESPECIFICACIONES DE POTENCIA DE
AUDIO
SALIDA DE POTENCIA Y
DISTORSIÓN ARMÓNICA TOTAL:
Con cargas de 4 ohm, ambos canales
accionados, de 120 a 10 000 Hz; potencia
RMS mínima de 240 W de potencia nominal
por canal, con no más de 0,7% de distorsión
armónica total, de 250 mW a la salida
nominal.
Sección del amplificador
Los siguientes elementos se han medido con
una ca de 120 V, 60 Hz
Salida de potencia (nominal):
Canal alto
300 W + 300 W (a 4 :, 1 kHz,
1% THD)
Canal bajo
300 W + 300 W (a 4 :, 100 Hz,
1% THD)
Potencia de salida RMS (referencia):
Canal alto
500 W + 500 W (por canal a 4 :,
1kHz)
Canal bajo
500 W + 500 W (por canal a 4 :,
100 Hz)
Entradas
PC (AUDIO IN) L/R, TV (AUDIO IN) L/R,
DVD/SAT (AUDIO IN) L/R, GAME
(AUDIO IN) L/R
Voltaje 2 V, impedancia 47 k:
MIC
Sensibilidad 1 mV, impedancia 10 k:
Puerto A, B: Tipo A
Sección de USB
Velocidad de bits compatible
MP3 (MPEG 1 Audio Layer-3):
32 kbps – 320 kbps, VBR
WMA: 48 kbps – 192 kbps
AAC: 48 kbps – 320 kbps
Frecuencias de muestreo
MP3 (MPEG 1 Audio Layer-3):
32 kHz/44,1 kHz/48 kHz
WMA: 44,1 kHz
AAC: 44,1 kHz
Velocidad de transferencia
A toda velocidad
Dispositivo USB compatible
Clase de almacenamiento masivo
Corriente máxima
500 mA
Información adicional
Continúa
l
35
ES
Page 68

Sección de reproductor de discos
Sistema
Disco compacto y sistema de audio
digital
Propiedades de diodo láser
Duración de la emisión: Continua
Salida de láser*: Menos de 44,6 PW
* Esta salida es la medida del valor en
una distancia de 200 mm desde la
superficie de la lente del objetivo en
el cabezal óptico con 7 mm de
apertura.
Respuesta de frecuencias
20 Hz – 20 kHz
Ratio señal a ruido
Más de 90 dB
Rango dinámico
Más de 88 dB
Sección del sintonizador
FM estéreo, sintonizador superheterodino
FM/AM
Antena:
Antena de cable de FM
Antena cerrada de AM
Sección del sintonizador de FM
Gama de sintonización
87,5 MHz – 108,0 MHz (Intervalo en
100 kHz)
Sección del sintonizador de AM
Gama de sintonización
530 kHz – 1 710 kHz (Intervalo en
10 kHz)
531 kHz – 1 710 kHz (Intervalo en
9kHz)
Altavoz
Sistema de altavoces
3 vías, reflector de graves
Altavoz
Altavoz de graves: 380 mm
(15 pulgadas), tipo cónico
Altavoz de graves: 200 mm
(8 pulgadas), tipo cónico
Altavoz de agudos: 25 mm (1 pulgada),
tipo corneta
Impedancia nominal
Canal alto: 4 ohm
Canal bajo: 4 ohm
Dimensiones (an/al/prf) (aprox.)
510 mm × 720 mm × 500 mm
(20 1/8 pulgadas × 28 3/8 pulgadas ×
19 3/4 pulgadas)
Peso (aprox.)
28,0 kg (61 libras y 12 onzas)
General
Requisitos de alimentación
ca de 120 V, 60 Hz
Consumo de potencia
320 W
Dimensiones (an/al/prf) (excl. altavoces)
(aprox.)
510 mm × 235 mm × 420 mm
(20 1/8 pulgadas × 9 3/8 pulgadas ×
16 5/8 pulgadas)
Peso (excl. altavoces) (aprox.)
10,0 kg (22 libras y 1 onza)
Accesorios suministrados
Mando a distancia (1)
R6 (Tamaño AA) pilas (2)
Antena de cable de FM/cerrada de AM
(1)
Pie de altavoz (8)
36
El diseño y las especifica ciones están sujetos
a cambios sin previo aviso.
ES
Page 69

Page 70

Page 71

Page 72

©2012 Sony Corporation Printed in Malaysia
 Loading...