

Page 1

4-094-069-11 (1)
LCD Colour TV
KLV-30MR1
2003 Sony Corporation
Operating Instructions
Bedienungsanleitung
Manual de instrucciones
Mode d’emploi
GB
DE
FR
NL
Page 2
NOTICE FOR CUSTOMERS IN THE UNITED KINGDOM
A moulded plug complying with BS1363 is fitted to this equipment for your safety and convenience.
Should the fuse in the plug supplied need to be replaced, a 5 AMP fuse approved by ASTA or BSI to BS
1362 (i.e. marked with or ) must be used.
When an alternative type of plug is used it should be fitted with a 5 AMP FUSE, otherwise the circuit
should be protected by a 5 AMP FUSE at the distribution board.
If the plug supplied with this equipment has a detachable fuse cover, be sure to attach the fuse cover after
you change the fuse. Never use the plug without the fuse cover. If you should lose the fuse cover, please
contact your nearest Sony service station.
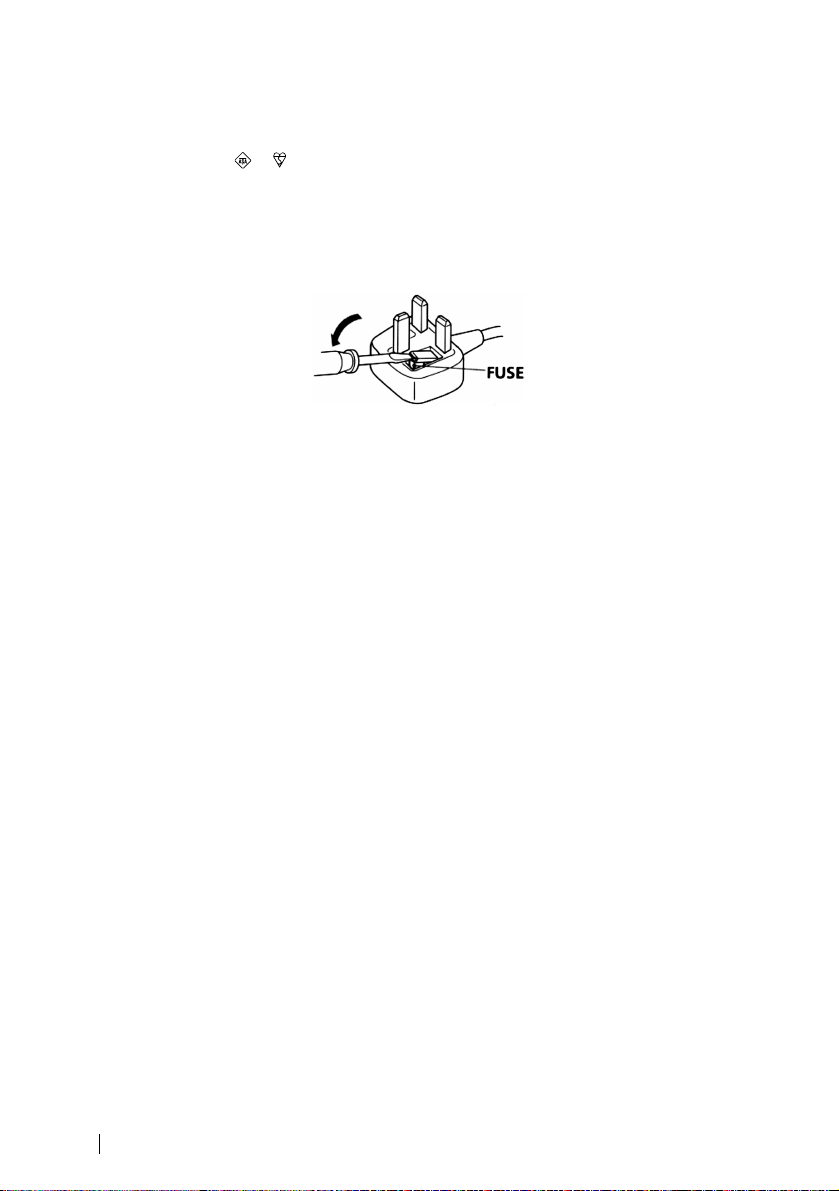
How to replace the fuse
Open the fuse compartment with a blade screwdriver, and replace the fuse.
IMPORTANT
If the plug supplied is not suitable for the socket outlets in your home, it should be cut off and an
appropriate plug fitted in accordance with the following instructions:
The wires in this mains lead are coloured in accordance with the following code:
Blue Neutral
Brown Live
As the colours of the wires in the mains lead of this apparatus may not correspond with the coloured
markings identifying the terminals in your plug, proceed as follows:
The wire which is coloured blue must be connected to the terminal which is marked with the letter N or
coloured black. The wire which is coloured brown must be connected to the terminal which is marked with
the letter L or coloured red. Do not connect either wire to the earth terminal in the plug which is marked
by the letter E or by the safety earth symbol I or coloured green or green and yellow.
WARNING
• To prevent the risk of electric shock, do not insert the plug cut off from the mains lead into a socket
outlet. This plug cannot be used and should be destroyed.
• To prevent the risk of fire or electric shock, do not expose the unit to rain or moisture.
• Dangerously high voltages are present inside the set. Do not open the cabinet. Refer servicing to
qualified personnel only.
2
Page 3

Introduction
Thank you for choosing this Sony LCD Colour Television.
Before operating the TV, please r ea d this manual thoroughly and retain it for future reference.
Symbols used in the manual
.........Important information.
.........Information on a feature.
1,2 ...........Sequence of instructions.
....Shaded buttons on the remote control
OK
show you the buttons you have to press
to follow the sequence of instructions.
..........Informs you of the result of instructions
followed.
Table of Contents
Safety Information
Safety Information .....................................................................................................................................5
Precautions ...............................................................................................................................................11
Overview
Checking the Accessories Supplied .........................................................................................................13
Overview of the Display Unit ..................................................................................................................14
Overview of the Media Receiver Unit Buttons and Indicators ...............................................................15
Overview of the Remote Control Buttons ...............................................................................................16
Installation
Inserting Batteries into the Remote Control ............................................................................................18
Connecting the Display Unit to the Media Receiver Unit .......................................................................19
Storing the cables in the display stand .....................................................................................................21
Connecting the Aerial and VCR ..............................................................................................................22
First Time Operation
Switching On the TV and Tuning the TV Automatically ....................................................................... 23
Menu System
Introducing and Using the Menu System ................................................................................................26
Picture Adjustment ..................................................................................................................................26
Sound Adjustment ...................................................................................................................................28
Screen Control ......................................................................................................................................... 30
Features ....................................................................................................................................................33
Set Up ......................................................................................................................................................36
Timer .......................................................................................................................................................40
Unit Status ............................................................................................................................................... 42
“Memory Stick”
About “Memory Stick” ............................................................................................................................43
Inserting and Removing a “Memory Stick” ............................................................................................46
Using the “Memory Stick” (Memory Stick Home) ................................................................................. 47
GB
(continued)
Table of Contents
3
Page 4

Teletext
Teletext ....................................................................................................................................................55
NexTView
NexTView* .............................................................................................................................................56
Additional Information
Connecting Optional Equipment ............................................................................................................. 59
Using Optional Equipment ......................................................................................................................63
Remote Control Configuration for VCR/DVD .......................................................................................64
Specifications ........................................................................................................................................... 66
Troubleshooting .......................................................................................................................................69
Television Channel Number Guide for United Kingdom .................................................................74
4
Table of Contents
Page 5
Safety Information
For Safety
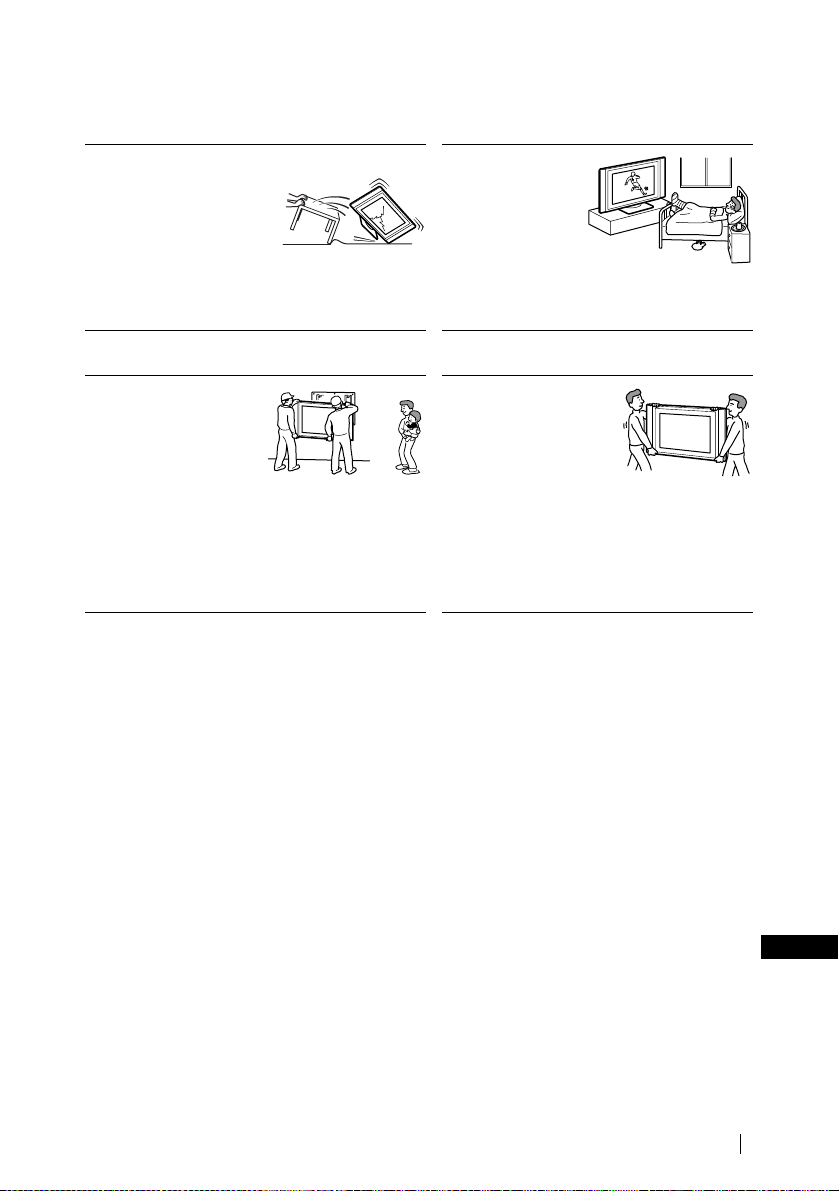
Mains lead and display cable
Unplug the mains lead and the
display cable when moving
the set. Do not move the set
with the mains lead and the
display cable plugged in. It
may damage the mains lead
and the display cable and result in fire or electric shock.
If the set has been dropped or damaged, have it checked
immediately by qualified service personal.
For the display unit
Installation
Installation of the display
unit on the wall should be
carried out by qualified
servicemen. Improper
installation may render the
unit unsafe in the event of an
earthquake, etc.
Medical institution
Do not place this unit
in a place where
medical equipment is
in use. It may cause
malfunction of
medical instruments.
Carrying
Carrying the display unit
requires two or more people.
If you carry the display unit
in a manner other than that
specified, it may drop and a
serious injury may be caused. Be sure two or more
people carry the display unit. When transporting, do
not subject the display unit to shocks or excessive
vibration. The display unit may fall and be damaged
or cause serious injury. When you carry the display
unit for repair or when you move it, pack it using the
original carton and packing material.
(continued)
Safety Information
GB
5
Page 6
Installation and moving
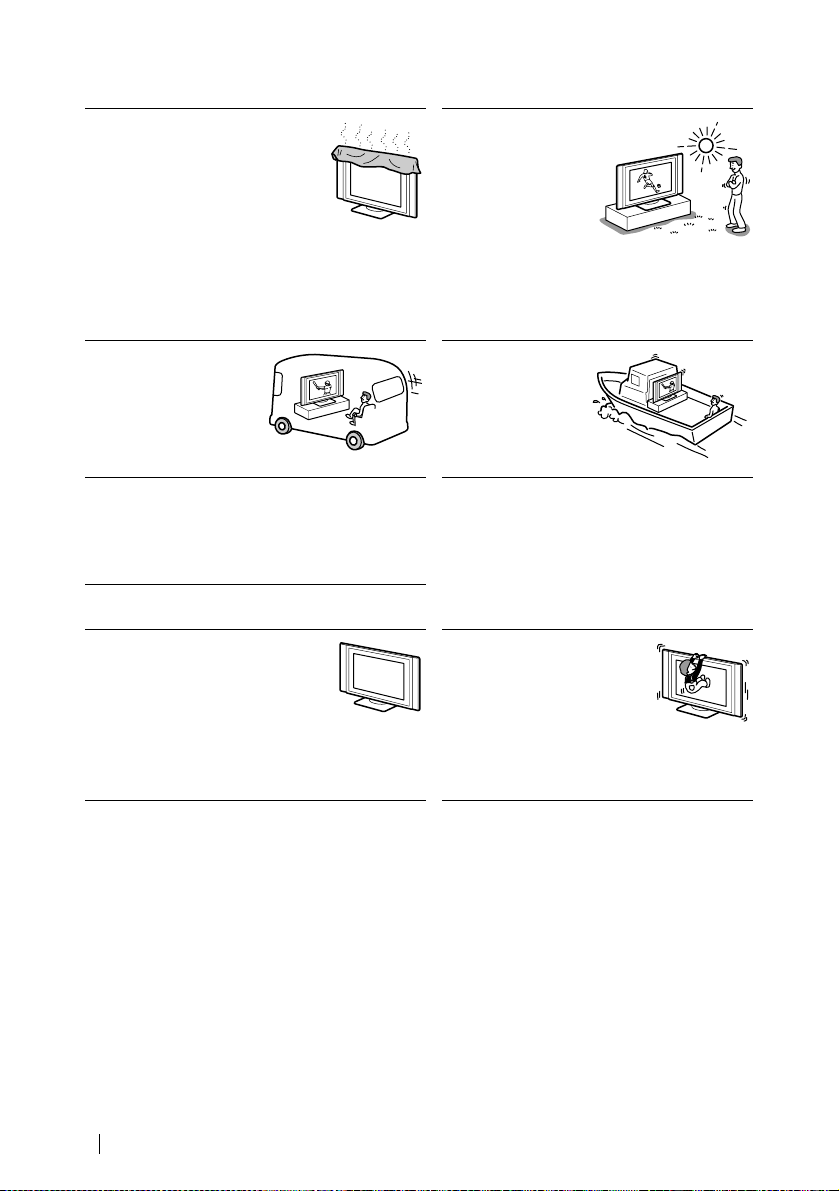
Ventilation
Never cover the ventilation holes in the
cabinet. It may cause overheating and
result in fire. Unless proper ventilation
is provided, the unit may gather dust
and get dirty. For proper ventilation,
observe the following:
• Do not install the unit turned backwards or sideways.
• Do not install the unit turned over or upside down.
• Do not install the unit on a shelf or in a closet.
• Do not place the unit on a rug or bed.
• Do not cover the unit with cloth, such as curtains, or
items such as news papers, etc.
Vehicle or ceiling
Do not install this unit in a
vehicle. Bumping of the
vehicle may cause the set to
fall down and cause injury.
Do not hang this unit from
the ceiling.
Water and moisture
Do not use this unit near water - for example, near a
bathtub or shower room. Also do not expose to rain,
moisture or smoke. It may result in fire or electric shock.
Do not use this unit where insects may enter.
For the display unit
Optional accessories
Observe the following when installing
the display unit using a stand or wallmount bracket. If not, the unit may fall
and cause serious injury.
• Be sure to follow the operating instructions supplied
with your stand when installing the unit.
• Be sure to attach the brackets supplied with your
stand.
Outdoor use
Do not install this unit
outdoors. If the unit is
exposed to rain, it may
result in fire or electric
shock. If the unit is
exposed to direct
sunlight, the unit may
heat up and it may damage the unit.
Ships and other
vessels
Do not install this unit
in a ship or vessel. If
the unit is exposed to
seawater, it may cause
fire or damage the unit.
To prevent the un it from
falling
Place the display unit on a secure,
stable stand. Do not hang anyt hing
on the display unit. The unit may
fall from the stand or wallhanging rack unit, causing damage or serious injury.
Do not allow children to climb on to the display unit.
6
Safety Information
Page 7

Power Sources
Overloading
This set is designed to
operate on a 220-240V AC
supply only. Take care not to
connect too many applianc es
to the same mains socket as
this could result in fire or
electric shock.
Mains
Do not use a poor fitting mains socket.
Insert the plug fully into the mains. If it is
loose, it may cause arcing and result in
fire. Contact your electrician to have the
mains socket changed.
Moisture
Do not touch the mains lead with a wet
hand. If you plug/unplug the mains lead
with a wet hand, it may cause electric
shock.
Lightnin g s torms
For your own safety, do not
touch any part of the set, mains
lead or aerial lead during
lightning storms.
Mains lead
protection
Pull out the mains lead
by the plug. Do not
pull on the mains lead
itself.
Wiring
Unplug the mains lead when wiring cables. Be sure
to unplug the mains lead for your safety, when
hooking up.
Cleaning
Clean the mains plug regularly. If
the plug is covered with dust and
it picks up moisture, its insulation
may deteriorate and result in fire.
Unplug the mains plug and clean
it regularly.
(continued)
Safety Information
GB
7
Page 8
Use
Damage requiring service
If the surface of the display unit cracks, do not touch it
until you have unplugged the mains lead. Otherwise
electric shock may result.
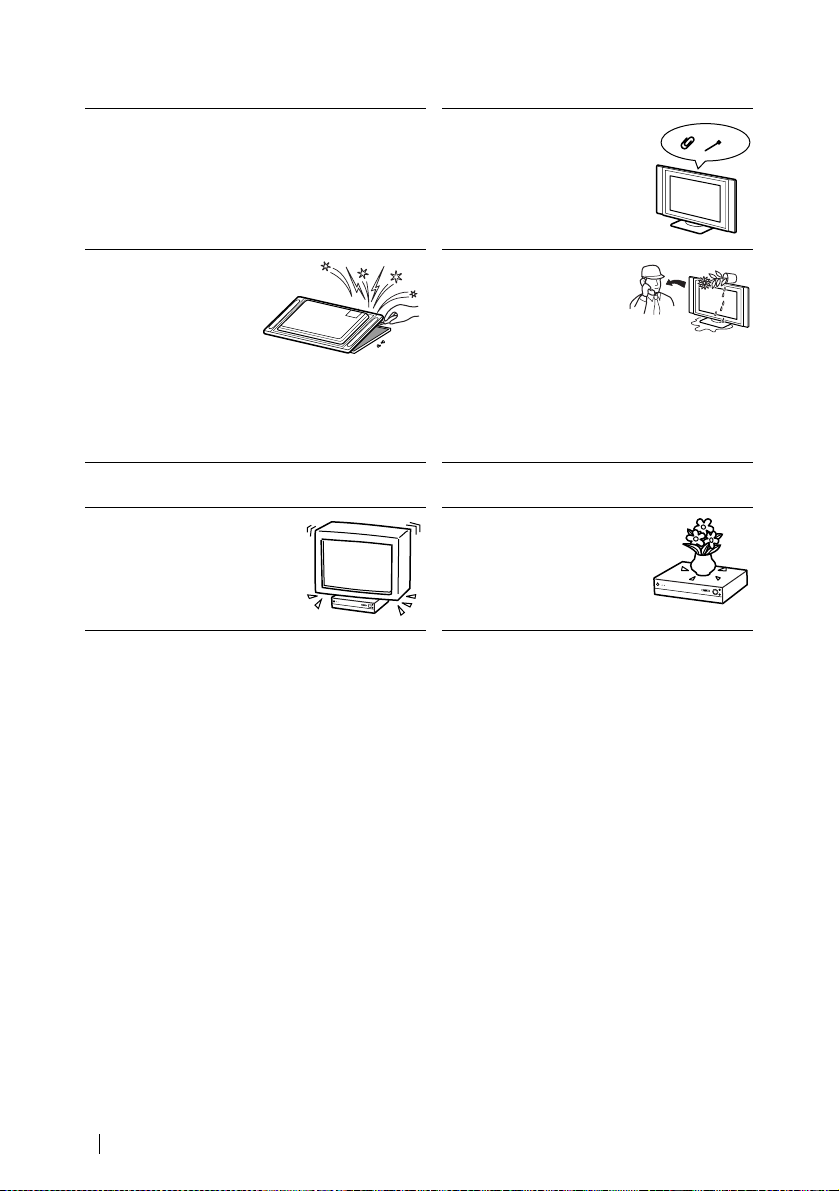
Ventilation holes
Do not insert anything in the
ventilation holes. If metal or
something flammable enters, it
may result in fire or electric
shock.
Servicing
Do not open the cabinet or
remove the rear cover of the
set. Refer to qualified
service personnel only.
For the media receiver unit
Object placement
Do not place anything heavy on
the media receiver unit. It may
damage the unit.
Moisture and flammable
objects
• Do not let this unit get
wet. Never spill liquid of
any kind on the unit. If
any liquid or solid object
does fall through, do not operate the unit. It may
result in electric shock or damage to the unit.
Have it checked immediately by qualified
personnel.
• To prevent fire, keep inflammable objects or
naked lights (e.g. candles) away from the set.
Liquid
Do not place objects containing
liquid on the media receiver
unit. It may result in electric
shock or damage the unit.
8
Safety Information
Page 9
Additional Safety Information
Electric shock
Do not touch the unit with wet hands. Doing so may c ause
electric shock or damage the unit.
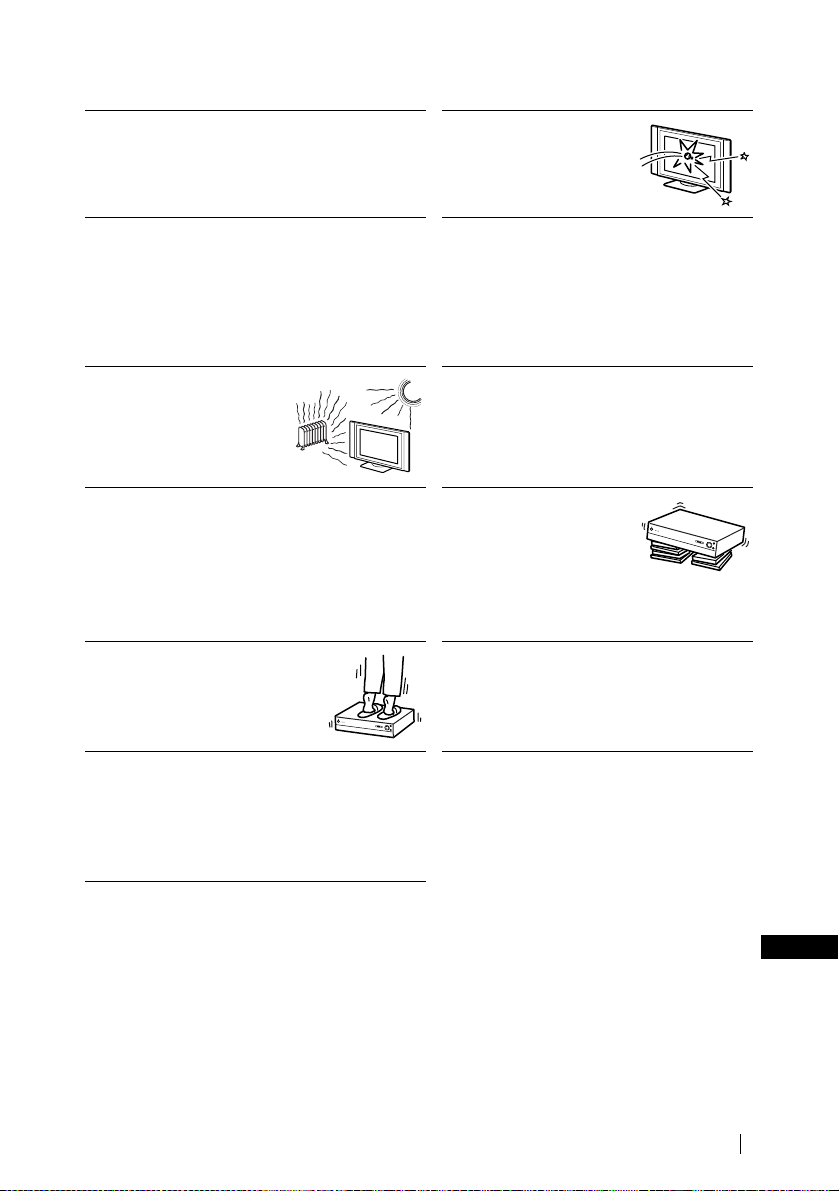
Broken glass
Do not throw anything at the
unit. The screen glass may
explode by the impact and
cause serious injury.
Protruding location
Do not install the display unit in protruding locations. If
you install the unit in the following locations, it may
result in injury.
• Do not install the unit in a location where the unit
protrudes, such as on or behind pillar.
• Do not install the unit in a location where you might
bump your head on it.
Placement
Never place the set in hot, humid
or excessively dusty places. Do
not install the unit where it may
be exposed to mechanical
vibration.
Accessories
Secure the display unit properly.
If the display unit is not secured properly, it may fall and
cause injury. Take measures to prevent this by using a
stand or other apparatus on the floor or wall in the
specified manner, referring to the operating instructions
supplied with your stand.
Weight
Do not stand on the media receiver unit.
The unit may fall or be broken, causing
injury. Pay special attention when little
children are likely to come near the set.
Disposal of the display unit
• Do not dispose of display units with general
household waste.
• The LCD contains a small amount of liquid crystal
and mercury. The fluorescent tube used in this display
also contains mercury. Follow your local ordinances
and regulations for disposal.
Oils
Do not install this unit in restaurants that use oil.
Dust absorbing oil may enter into the unit and
damage the unit.
Corrosion
If you use this set near the se ashore, salt may corrode
metal parts of the unit and cause internal damage or
fire. It may also shorten the life of the unit. Steps
should be taken to reduce the humidity and
temperature of the area where the set is located.
Recommended place for
the media receiver u n it
Place the media receiver unit
on a stable, level surface.
Otherwise, the media receiver
unit may fall and cause injury.
Use an optional Sony stand, which has adequate
strength.
Cleaning
Unplug the mains lead when cleaning this unit. If
not, it may result in electric shock.
(continued)
Safety Information
GB
9
Page 10
LCD Screen
• Although the LCD screen is made with hig h-precision
technology and has effective pixels of 99.99% or
more, black dots may appear or bright points of light
(red, blue, or green) may appear constantly on the
LCD screen. This is a structural property of the LCD
panel and is not a malfunction.
• Do not expose the LCD screen surface to the sun.
Doing so may damage the screen surface.
• Do not push or scratch the front filter, or place objects
on top of this unit. The image may be uneven or the
LCD panel may be damaged.
• If this unit is used in a cold place, a smear may occur
in the picture or the picture may become dark.
This does not indicate a failure. These phenomena
improve as the temperature rises.
• Ghosting may occur when still pictures are displayed
continuously. It may disappear after a few moments.
• The screen and cabinet get warm when this unit is in
use. This is not a malfunction.
Fluorescent lamp
This unit uses a special fluorescent lamp as its light
source. If the screen image becomes dark, flickers, or
does not appear, the fluorescent lamp has run down and
should be replaced. For replacement, consult qualified
service personnel.
Cleaning the screen surface
The screen surface is finished with a special coating to
prevent strong light reflections. Be sure to observe the
following precautions to avoid damaging the finish.
• To remove dust from the screen surface, wipe gently
with a soft cloth. If dust is persistent, wipe with a soft
cloth slightly moistened with a diluted mild detergent
solution. You can wash and repeatedly use the soft
cloth.
• Never use any type of abrasive pad, alkaline/acid
cleaner, scouring powder or strong solvent such as
alcohol, benzene or thinner.
Cooling fan
This display unit uses a cooling fan to avoid overheating.
Note that the noise of the cooling fan may be heard from
the display unit, depending on where the display unit is
installed.
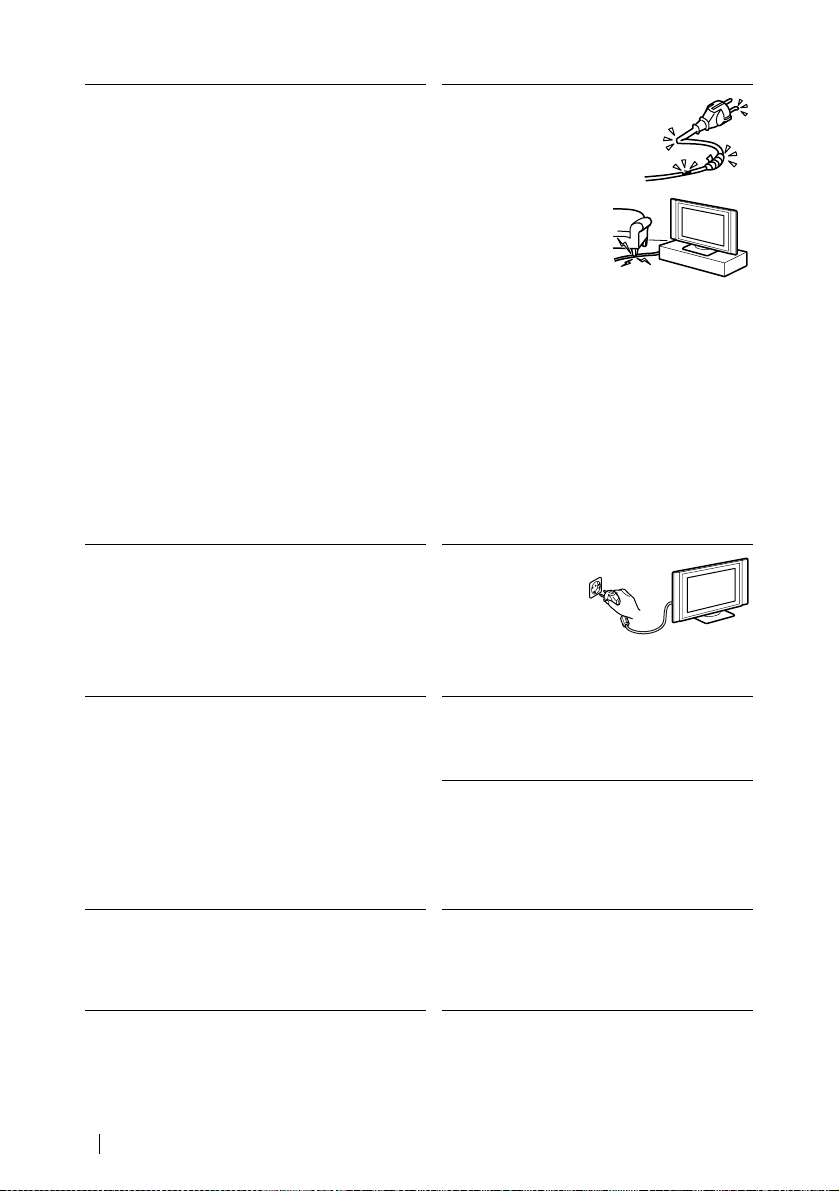
Mains lead and
display cable
If you damage the mains
lead or display cable, it
may result in fire or
electric shock.
• Do not pinch, bend, or
twist the cable
excessively. The core
lines may be bared or
cut, causing a short circuit which may in
fire or electric shock.
• Do not convert or damage the mains lead or
display cable.
• Do not put anything heavy on the mains lead or
display cable. Do not pull the mains lead or
display cable.
• Keep the mains lead or display cable away from
heat sources.
• Be sure to grasp the plug when disconnecting the
mains lead.
Refer to the operating instructions when
disconnecting the display cable. If the mains lead or
display cable is damaged, stop using it and ask your
dealer or Sony service centre to exchange it.
When not in use
For environmental
and safety reasons, it
is recommended that
the set is switched off
when not in use - not
left in standby mode.
Disconnect from the mains.
Cable wiring
Take care not to catch your feet on the cables. It may
damage the unit.
Installation
Do not install optional components too close to the
display unit. Keep optional components at least 30
cm away from the display unit. If a VCR is installed
in front or at the right side of the display unit, the
picture may distort.
Heat
Do not touch the surface of the display unit. It
remains hot, even after the display unit has been
turned off for some time.
10
Safety Information
Page 11

Precautions
On viewing the TV comfortably
• To view the TV comfortably, the recommended viewing position is from four to seven times of the
screen’s vertical length away from the TV set.
• View the TV in a moderate light room, as viewing the TV in poor light taxes your eyes. Watching the
screen continuously for long periods of time can also tax your eyes.
On installing the TV set
Installing the display unit
Use the specified wall-mount bracket or stands.
Installing the media receiver unit
Leave enough space for ventilation between the exhaust fan in the rear of unit and the wall.
• Do not install the display unit in places subject to extreme temperature, for example in direct sunlight,
or near a radiator, or heating vent. If the unit is exposed to extreme temperature, the unit may heat up
and it may cause deformations of the casing or cause the unit to malfunction.
• After transporting the display unit directly from a cold to a warm location, or if the room temperature
has changed suddenly, pictures may be blurred or show poor colour over portions of the picture. This
is because moisture has condensed on the mirrors or lenses inside the unit. In this case let the moisture
evaporate before using the unit.
• To obtain a clear picture, do not expose the screen to direct illumination or direct sunlight. If possible,
use spot lighting directed down from the ceiling.
• The TV set is not disconnected from the mains when the switch is in Off position. To disconnect the
set completely, pull the plug from the mains.
On volume adjustment
• Adjust the volume so as not to trouble neighbours. Sound carries very easily at night time. Therefore,
closing the windows or using headphones is suggested.
• When using headphones, adjust the volume so as to avoid excessive levels, as hearing damage may
result.
On image
With extensive use of this TV set in 4:3 mode, the 4:3 screen area might become darker within a 16:9
panel. To avoid this problem, the “Smart” picture mode should be used.
On handling the remote control
• Handle the remote control with care. Do not drop or step on it, or spill liquid of any kind onto it.
• Do not place the remote control in a location near a heat source, or in a place subject to direct sunlight,
or in a damp room.
On handling and cleaning the screen surface of the display unit
To avoid screen degradation, follow the points mentioned below. Do not push on or scratch with hard
objects, or throw anything at the screen. The screen may be damaged.
• Be sure to unplug the mains lead connected to the media receiver unit from the mains before cleaning.
• Do not touch the display panel after operating continuously for a long period as the display panel
becomes hot.
• We recommend that the screen surface is touched as little as possible.
• Clean the screen with a soft cloth.
• Never use any type of abrasive pad, scouring powder, or solvent, such as alcohol or benzine. This type
of contact may result in damage to the screen surface.
GB
(continued)
Safety Information
11
Page 12

On cleaning the cabinet
• Be sure to unplug the mains lead connected to the media receiver unit from the mains before cleaning.
• Clean the cabinet with a soft cloth.
• Note that material deterioration or screen coating degradation may occur if the display unit is exposed
to a volatile solvent, such as alcohol, thinner, benzine or insecticide, or if prolonged contact is
maintained with rubber or vinyl materials.
• The ventilation holes can accumulate dust over a period of time and the accumulated dust may make
the cooling function of the built-in fan less effective. To prevent this, we recommend removing the dust
periodically (once a month) using a vacuum cleaner.
12
Safety Information
Page 13
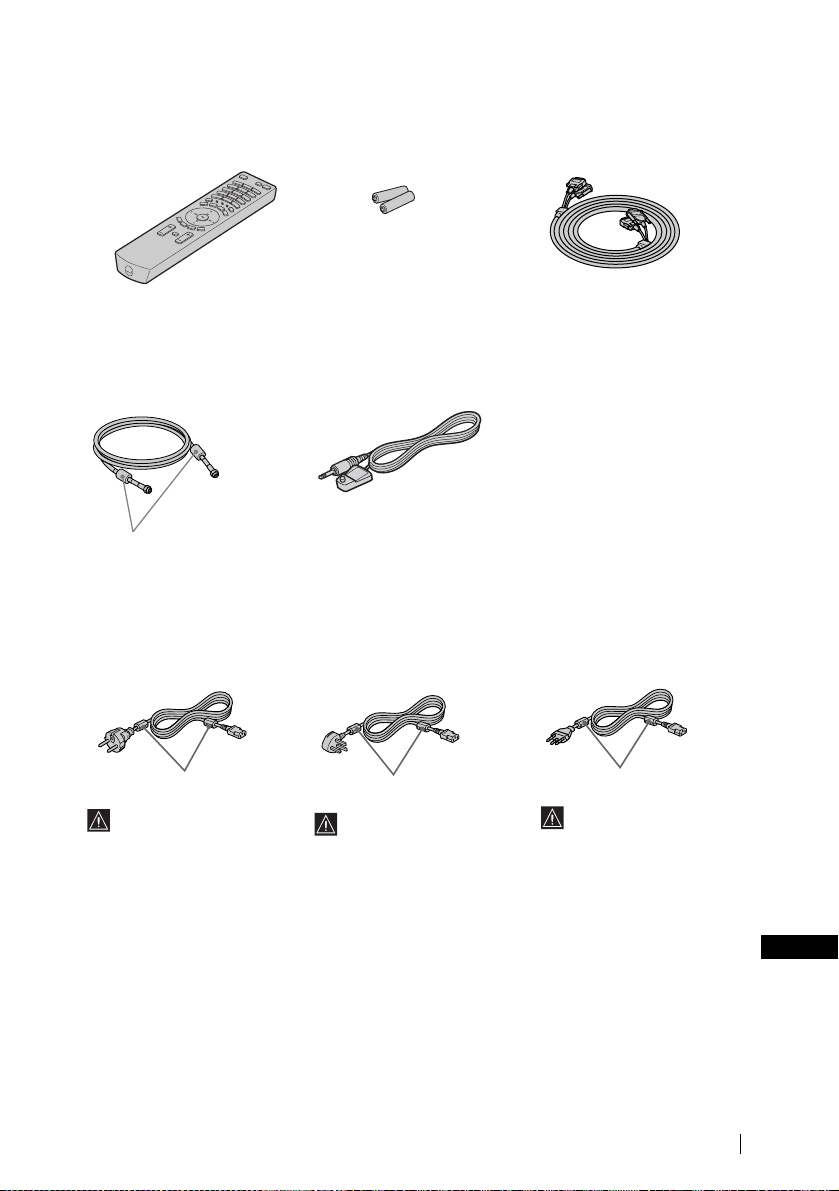
Checking the Accessories Supplied
One Remote Control
(RM-972):
Two size AAA batteries
(R03 Type):
One Coaxial Cable: One AV Mouse:
Do not remove ferrite cores.
Two Mains Leads
(Type C-4):
Two Mains Leads
(Type BF):
One Display Interface
Cable:
Two Mains Leads
(Type C-5):
Do not remove ferrite cores.
Use these mains leads
(with safety earth) if you
use the set outside the
United Kingdom.
Do not remove ferrite cores.
• Use these mains leads
(with safety earth) if you
use the set in the United
Kingdom.
• See “NOTICE FOR
CUSTOMERS IN THE
UNITED KINGDOM” on
page 2 when using the
mains leads.
• These mains leads may not
be supplied depending on
the country.
Do not remove ferrite cores.
• Use these mains leads
(with safety earth) if you
use the set in the Swiss
Confederation.
• These mains leads may
not be supplied depending
on the country.
Safety Information
GB
13
Page 14
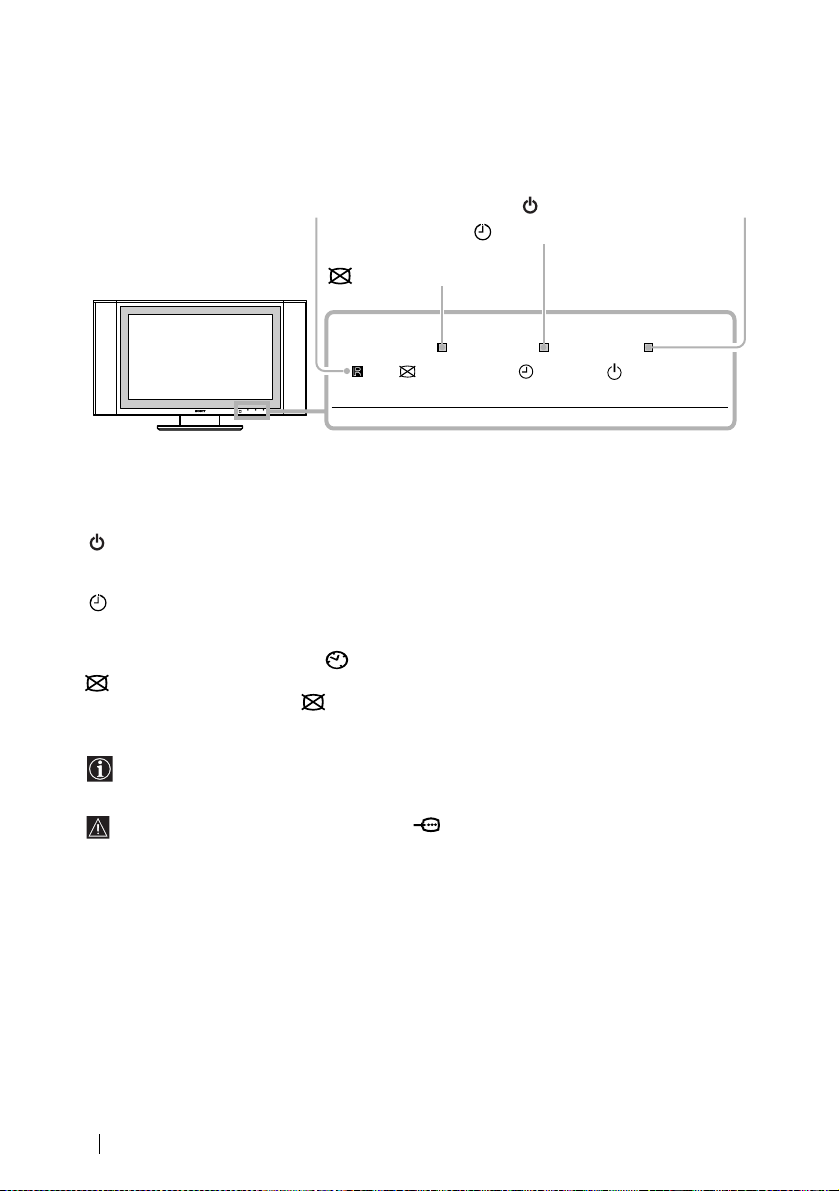
Overview of the Display Unit
Remote contro l s en s or
PICTURE OFF indicator
POWER/STANDBY indicator
TIMER indicator
POWER/STANDBYTIMERPICTURE OFF
About the indicators
The following indicators are on the display unit and the media receiver unit.
POWER/STANDBY indicator
Lights up in green when the TV is switched on. When in standby mode, the indicator lights up in red.
When in PC power saving* mode, the indicator lights up in yellow.
TIMER indicator
When lit, indicates that one of the timers is set. When the on timer is set and the TV is in standby mode,
this indicator lights up in yellow. When one of the off timers is set, this indicator lights up in red. For more
details regarding the timers, refer to “ Timer” on page 40.
PICTURE OFF indicator
Lights up in blue when you press (picture off) on the remote control to switch off the picture. Only
the picture is switched off (the sound remains unchanged).
* If the TV is connected to a personal computer or video graphic board that is DPMS (Display Power
Management System) compliant, the TV will automatically reduce power consumption (PC power
saving mode).
If you connect a personal computer to the PC connector, the “Auto Shutoff ” function cannot
work. After a certain period without a signal from a personal computer, the TV switches into PC
power saving mode, not standby mode.
14
Overview
Page 15
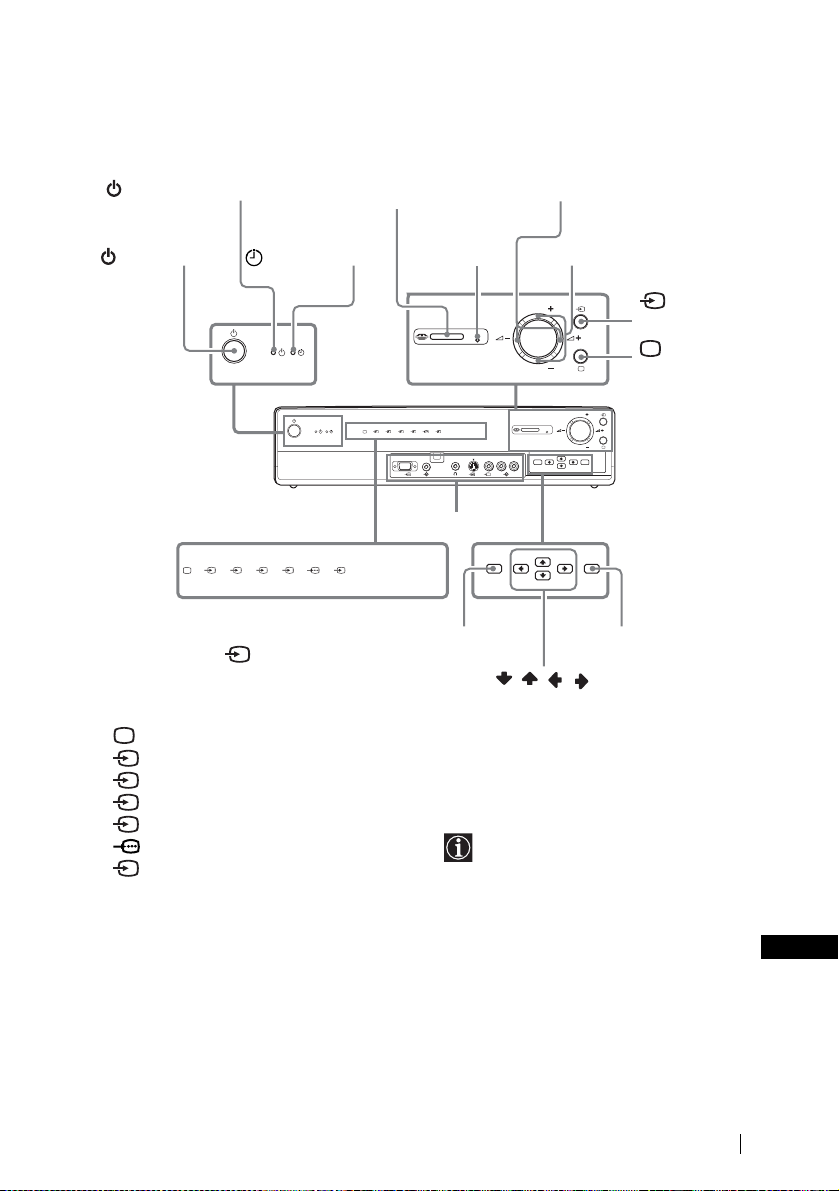
Overview of the Media Receiver Unit Buttons and
Indicators
PROG (channel)
(Power on/standby) indicator
“Memory Stick” slot
+/– buttons
(Power) switch
(Timer) indica tor
PC
64321
5
Input select indicators
To watch the picture of connected
equipment, press repeatedly until the
correct input indicator lights up. For more
details, refer to “Using Optional
Equipment” on page 63.
TV indicator
1 Input 1 indicator
2 Input 2 indicator
3 Input 3 indicator
4 Input 4 indicator
5 Input 5 indicator
6 Input 6 indicator
PC PC indicator
MEMORY
STICK
Memory Stick indicator
“Memory Stic k ”
access lamp
PC
MEMORY STICK
654321
66
Front connectors*
MEMORY STICK
MENU OK
Menu button
* For more details of the front
2(Volume) +/–
buttons
PROG
(Input
select) button
(TV mode)
L/G/S/I R/D/D/D
PROG
6
PROG
PROG
MENUPCOK
button
OK button
///
buttons
connectors, refer to “Connecting
Optional Equipment” on page 59.
GB
Overview
15
Page 16
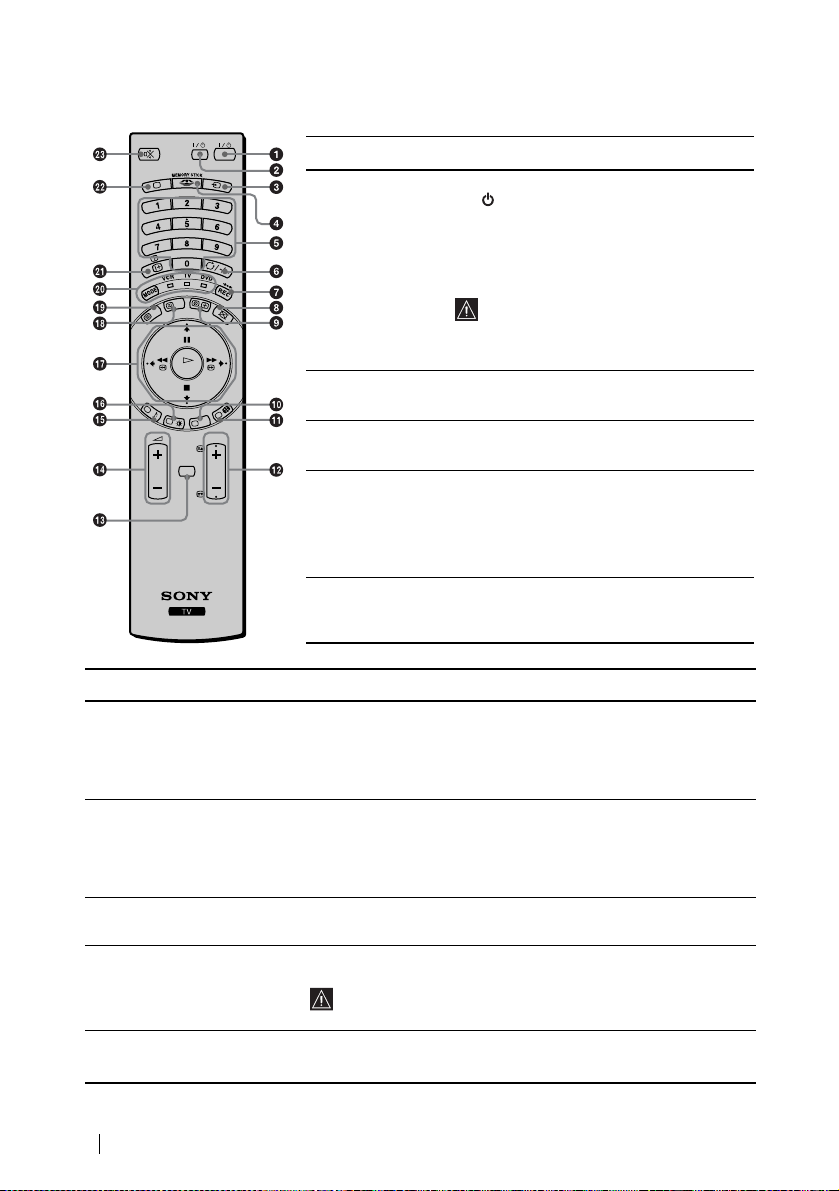
Overview of the Remote Control Buttons
TV
OK
MENU
VIDEO
PROG
Buttons
a To Temporarily
Switch Off TV:
b VCR or DVD on/
off:
c Selecting input
source:
d Displaying the
Memory Stick
Home (“Memory
Stick” picture
viewer):
e Selecting
channels:
Description
Press this button to temporarily switch off the TV
(the (power on/standby) indicators on the
display unit and the media receiver unit light up in
red). Press again to switch on the TV from standby
mode.
To save energy we recommend switching the TV
off completely when the TV is not in use.
After a certain period without a signal and
without any button being pressed, the TV
automatically switches into standby mode
(Auto Shutoff, page 41).
Press this button to switch your VCR or DVD on
or off.
Press this button repeatedly until the desired input
symbol of the source appears on the TV screen.
Press this button to display the Memory Stick
Home (“Memory Stick” picture viewer). For more
details, refer to “Using the Memory Stick Home”
on page 50.
Press this button to select channels.
For double-digit programme numbers, enter the
second digit within 2.5 seconds.
Buttons
f a) If the Media Selector is
switched to TV:
b) If the Media Selector is
switched to VCR:
g a) If the Media Selector is
Description
Press this button to watch the last channel selected (the last channel
watched for at least 5 seconds).
For Sony’s VCR double-digit programme numbers, e.g. 23, press
-/- - first and then the buttons 2 and 3.
Press this button to record programmes.
switched to VCR or DVD:
b) If the Media Selector is
switched to TV:
Press this button to return the picture and sound to the factory preset levels.
This will also return the set to the install condition.
h Switching off the picture: Press this button to switch off the picture. Only the picture is switched off;
the sound remains on. Press again to cancel.
i Displaying the clock: Press this button to display the clock on the TV screen. Press again to turns
the clock display off.
The clock display turns off automatically 5 minutes after it is
turned on.
j This button works in Teletext mode and is also u s ed for program m ing the remote control to operate
the VCR and DVD .
16
Overview
Page 17
Buttons
k Selecting screen format: Press this button repeatedly to change the format of the screen. For more
l Selecting channels: Press these buttons to select the next or previous channel.
m Displaying the menu
system:
n Adjusting the TV volume: Press these buttons to adjust the volume of the TV.
o Selecting Sound effect: Press this button repeatedly to change the sound effect.
p Selecting Picture mode: Press this button repeatedly to change the picture mode.
q Joystick
a) If the Media Selector is
set to TV:
b) If the Media Selector is
set to VCR or DVD:
r NexTView: For more details, refer to “NexTView*” on page 56.
s Selecting Teletext: Press this button to switch on Teletext.
t Media Selector: With this remote control you can operate not only this TV but also the main
Description
details, refer to “Screen Control” on page 30.
Press this button to display the menu on the TV screen. Press again to
remove the menu display from the TV screen.
• When MENU is selected, use these buttons to operate the menu system.
For more details, refer to “Introducing and Using the Menu System” on
page 26.
• When MENU is switched off, press OK to show an overview of all TV
channels. Then press
to watch the selected channel.
Using these buttons, you can control the main functions of your VCR or
DVD.
functions of your VCR or DVD.
Switch on the equipment you want to operate and then press this button
repeatedly to select VCR, TV or DVD. A green light will light up
momentarily.
or to select the channel and then press
An initial set up is required to synchronise this remote control to
your VCR or DVD. This setup depends on the manufacturer. For
more details, refer to “Remote Control Configuration for VCR/
DVD” on page 64.
u Displaying On Screen
information:
v Selecting TV mode: Press this button to switch off teletext or video input.
w Muting the Sound: Press this button to mute the TV sound. Press again to restore the sound.
Press this button to display all on-screen indications. Press again to cancel.
In addition to the TV functions, all coloured buttons as well as green symbols are also used for
Teletext operations. For more details, refer to “Teletext” on page 55.
Overview
GB
17
Page 18
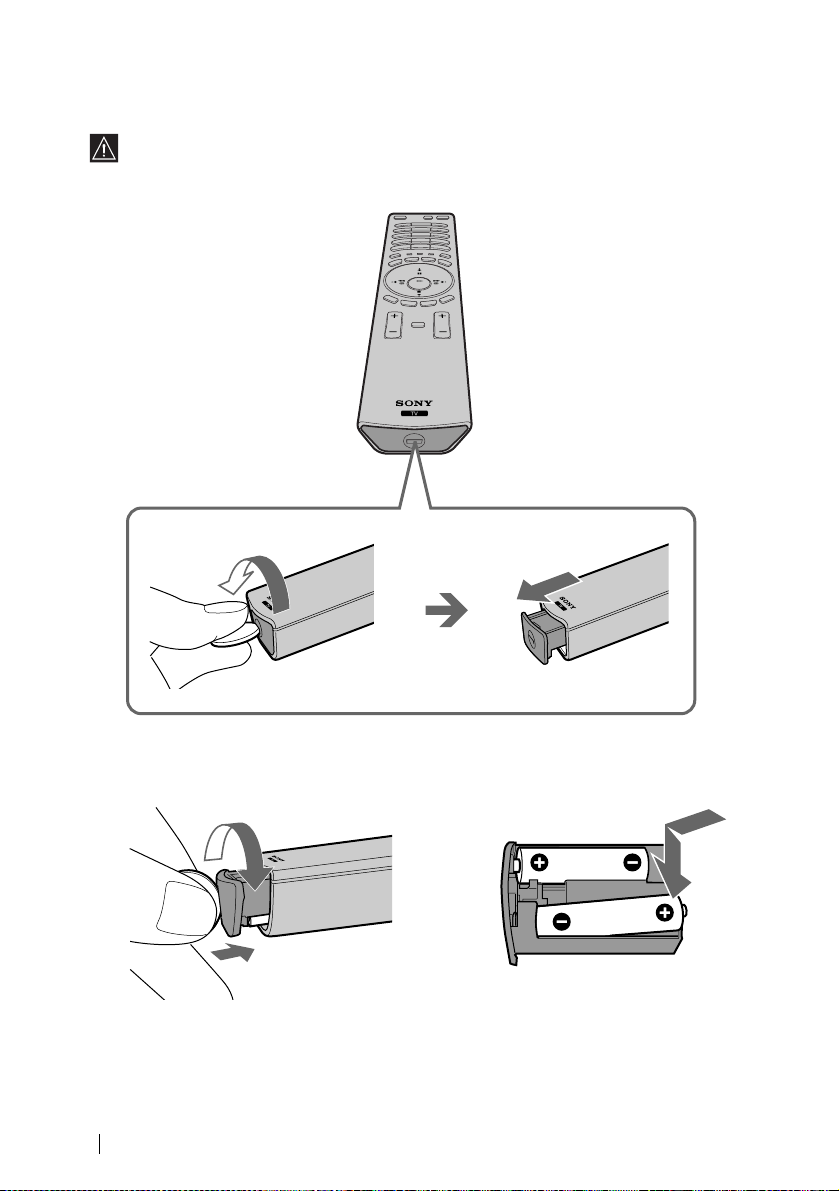
Inserting Batteries into the Remote Control
Make sure you insert the supplied batteries observing the correct polarity.
Always remember to dispose of used batteries in an environmentally friendly way.
18
m
<
Installation
Page 19
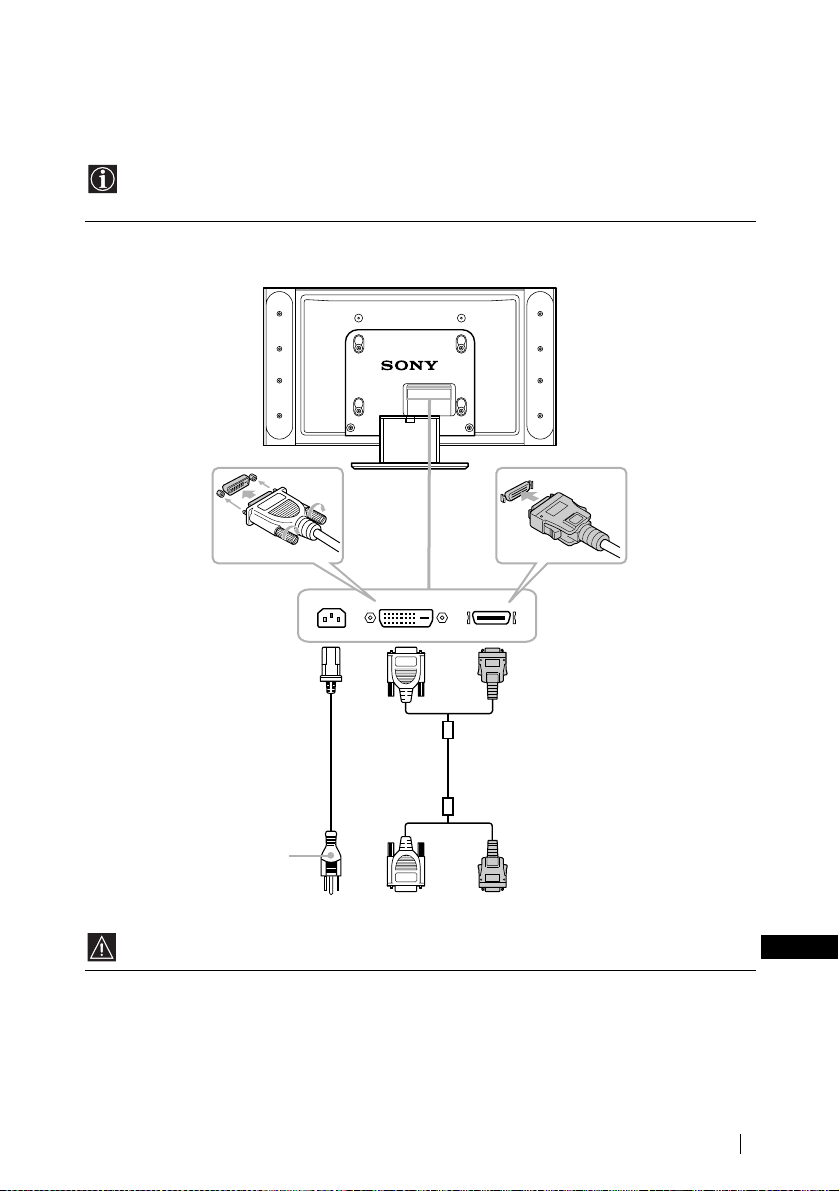
Connecting the Display Unit to the Media Receiver
Unit
• Use the supplied display interface cable.
• Use the supplied mains lead for the display unit (Type C-4, Type BF or Type C-5, see page 13).
1 Connect the supplied display interface cable and the supplied mains lead for the display unit to the
display unit.
Tighten the
screw slowly
until the scre w
is stabilized.
WHITEAC IN
DISPLAY SIGNAL IN
Mains leads
(supplied)
After making all
connections,
connect to a wall
outlet.
Do not connect to the mains before all connections are completed.
To Media receiver unit.
BLACK
Display interface
cable (supplied)
(continued)
Installation
GB
19
Page 20
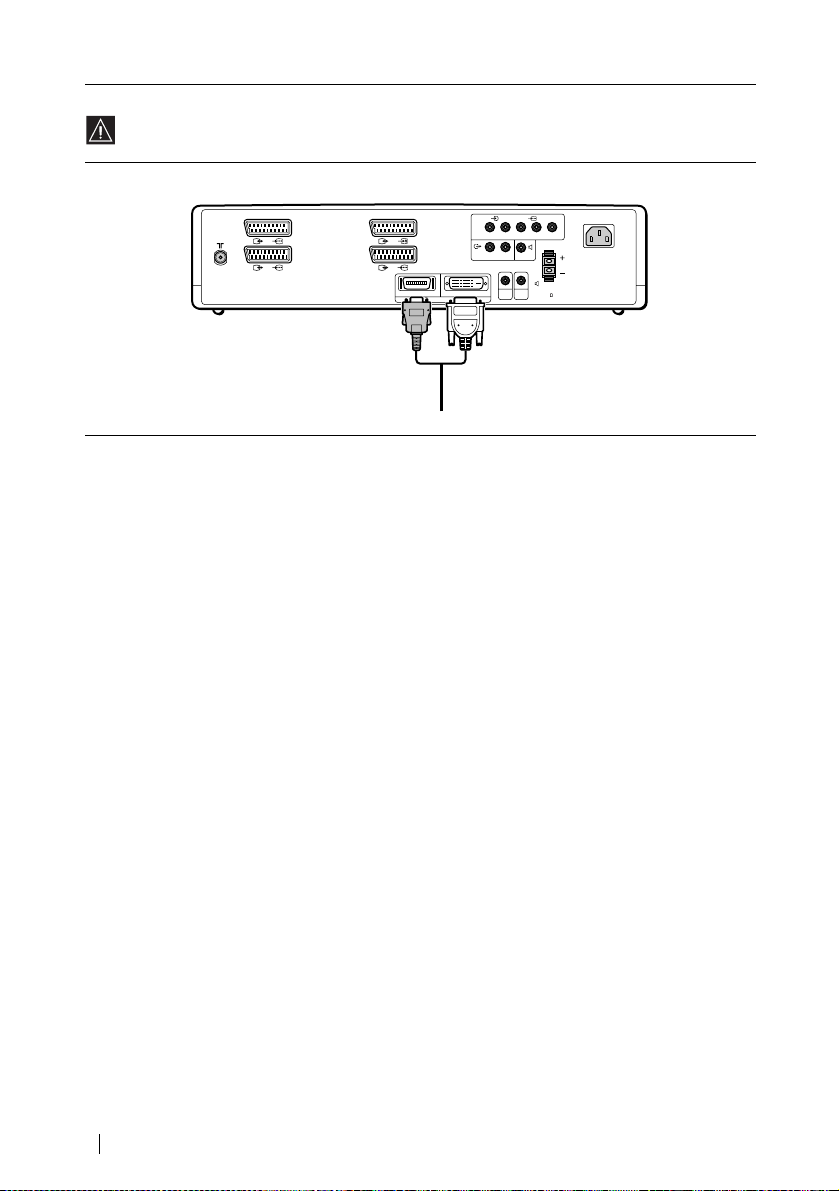
2 Install the display unit using the specified wall-mount bracket or stand.
Before installing the display unit, check the installation instructions of your wall-mount bracket or
stand.
3 Connect the supplied display interface cable to the media receiver unit.
55
R/D/D/D
L/G/S/I
Y
B/CBPR/CR
1/
2/
(SMARTLINK)
3/
(SMARTLINK)
4/
BLACK WHITE
DISPLAY SIGNAL OUT
P
CENTRE
SPEAKER IN
180W (6 ) MAX
AC IN
W/G/W/GL/G/S/IR/D/D/D
CTRL
AV
S
MOUSE
20
Installation
Page 21
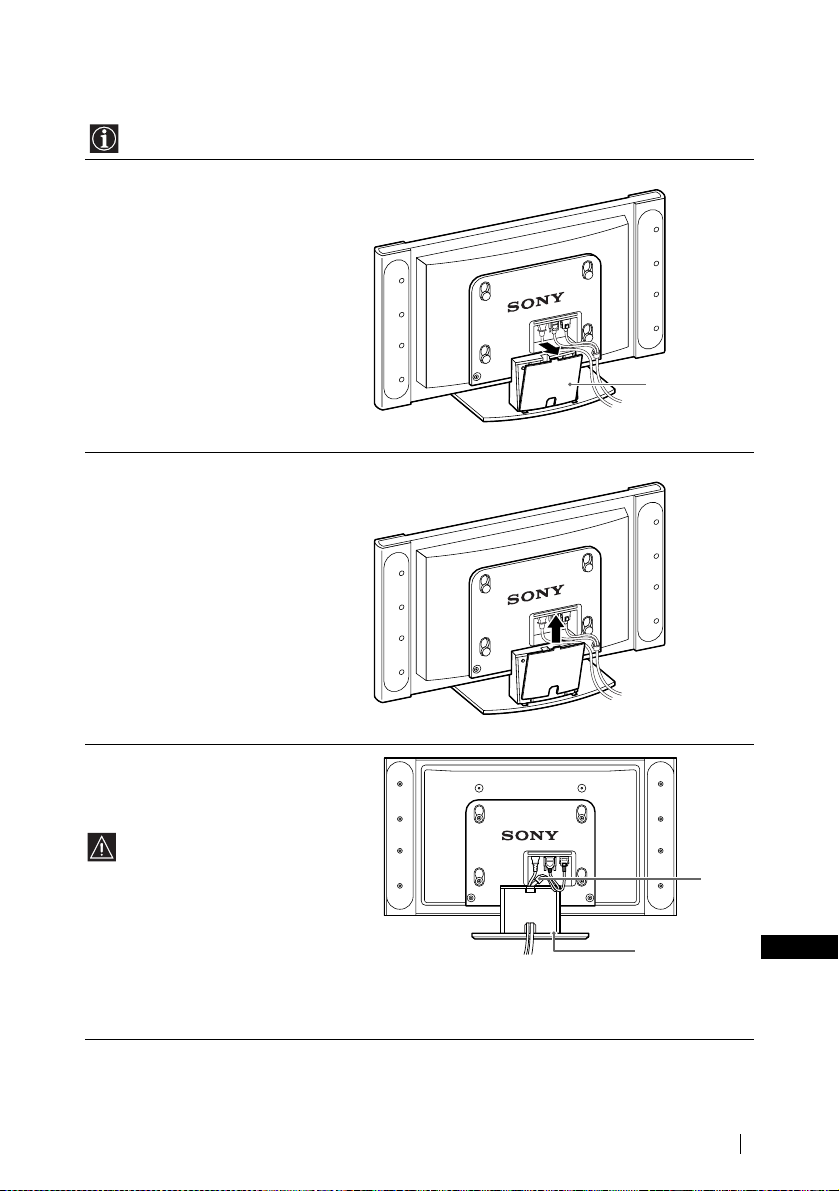
Storing the cables in the display stand
Remove the cable cover on the display stand to store the mains lead and display interface cable.
1 Pull the top of the cable cover of the
display stand towards you to unlock it.
2 Detach the cable cover and remove.
Rear of display
Cable cover
3 Store the cables in the display stand.
Pass the cable through the centre hole. Set
the cable cover in the groove at the bottom
of the stand, and then push it shut.
The branch point of the display cable's
black and white connectors is thick,
and will not fit under the cable cover.
Arrange the branch point so that it is
outside and above the cable cover.
Branch
point
Groove at the
bottom of the
stand
Installation
GB
21
Page 22

Connecting the Aerial and VCR
• Use the supplied mains lead for the media receiver unit (Type C-4, Type BF or Type C-5, see
page 13).
• Use the supplied coaxial cable for aerial connection.
Connecting an aerial
55
R/D/D/D
L/G/S/I
Y
B/CBPR/CR
1/
2/
Connect the supplied
coaxial cable.
Connecting a VCR with an aerial
1/
VCR
OUT IN
2/
(SMARTLINK)
3/
(SMARTLINK)
4/
BLACK WHITE
(SMARTLINK)
3/
(SMARTLINK)
4/
BLACK WHITE
DISPLAY SIGNAL OUT
DISPLAY SIGNAL OUT
W/G/W/GL/G/S/IR/D/D/D
CTRL
AV
S
MOUSE
55
R/D/D/D
L/G/S/I
Y
W/G/W/GL/G/S/IR/D/D/D
CTRL
AV
S
MOUSE
P
AC IN
CENTRE
SPEAKER IN
180W (6 ) MAX
Connect the supplied mains
lead (Type C-4, Type BF or
Type C-5, with safety earth).
P
B/CBPR/CR
AC IN
CENTRE
SPEAKER IN
180W (6 ) MAX
Connect the supplied mains
lead (Type C-4, Type BF or
Type C-5, with safety earth).
22
Scart lead is optional.
For more details regarding VCR connection, refer to
“Connecting Optional Equipment” on page 59.
Do not connect to the mains before all connections are
complete.
Installation
Page 23
Switching On the TV and Tuning the TV
Automatically
The first time you switch on your TV, a sequence of menu screens appear on the TV enabling you
to: 1) choose the language of the menu screen, 2) choose the country in which you wish to operate
the TV, 3) set the clock, 4) search and store all available channels (TV Broadcast) and 5) change the
order in which the channels (TV Broadcast) appear on the screen.
However, if you need to change any of these settings at a later date, you can do so by selecting the
appropriate option in the (Set Up) menu.
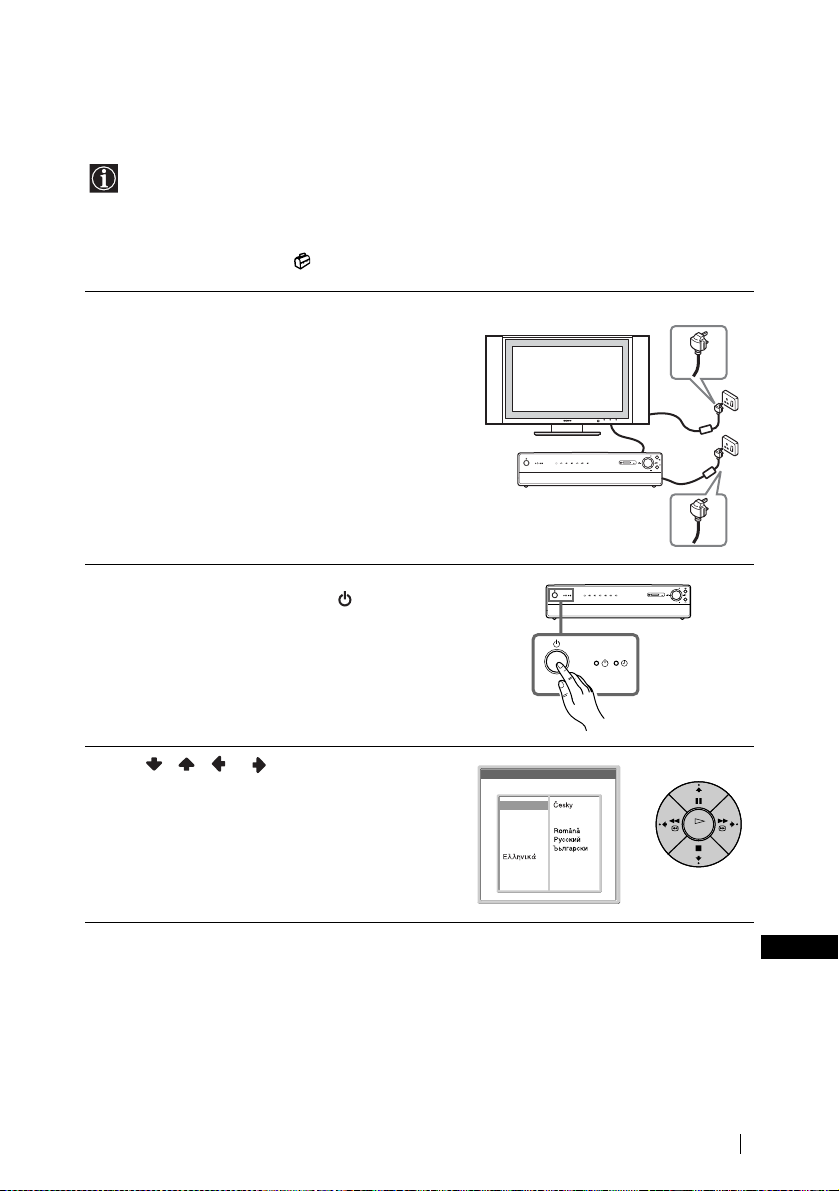
1 Connect the display unit and media receiver unit to the
mains (100 - 240V AC; 50/60Hz for the display unit, 220
- 240V AC; 50/60Hz for the media receiver unit).
PROG
PC
MEMORY STICK
654321
PROG
2 The first time that the TV set is connected, it is usually
turned on. If the TV is off, press the Power switch on
the media receiver unit to turn on the TV.
The first time you switch on the TV, a Language menu
appears automatically on the TV screen.
3 Press / / or on the remote control to select
the language, then press OK to confirm your selection.
From now on, all menus will appear in the selected
language.
Language
Select language
English
Nederlands
Français
Italiano
Deutsch
Türkçe
Español
Português
Polski
PC
MEMORY STICK
654321
Slovensy
Magyar
Suomi
Dansk
Svenska
Norsk
First TIme Operation
PROG
PROG
OK
(continued)
GB
23
Page 24
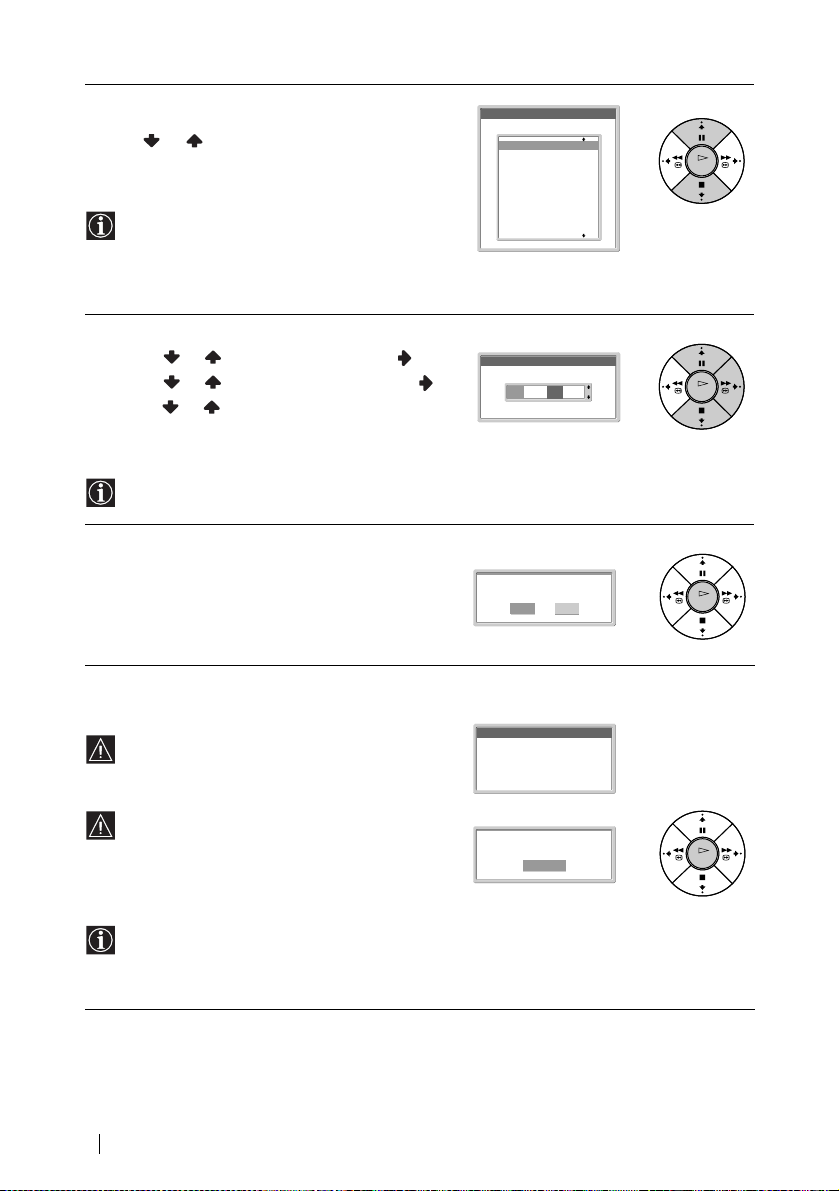
4 The Country menu appears automatically on the TV
screen.
Press or to select the country in which you will
operate the TV set, then press OK to confirm your
selection.
• If the country in which you want to use the TVset
does not appear in the list, select “Off ” instead of a
country.
• If you change the country selection, Clock Set
should always be performed next.
5 The Clock Set menu appears on the TV screen.
a) Press or to set the hour, then press .
b)Press or to set the minutes, then press .
c) Press or to set the day of a week, t hen press OK
at the time signal.
The clock starts.
If you adjust the clock, Auto Tuning should always be
performed next.
6 The Auto Tuning menu appears on the screen.
Press OK to select Yes.
Country
Select country
Off
United Kingdom
Ireland
Nederland
België/Belgique
Luxembourg
France
Italia
Schweiz/Suisse/Svizzera
Deutschland
Österreich
Clock Set
0 0 : 0 0 : 0 0 Mon
Do you want to start
automatic tuning ?
Yes No
OK
OK
OK
7 The TV automatically starts searching and storing all
available broadcast channels for you.
This procedure could take some minutes. Please be
patient and do not press any buttons, otherwise
automatic tuning will not be completed.
If no channels are found during the auto tuning
process, a new menu appears automatically on the
screen asking you to connect the aerial. Please connect
the aerial (see page 22) and press OK. The auto tuning
process will start again.
After all available channels are captured and stored,
the Programme Sorting menu appears automatically
on the screen enabling you to change the order in
which the channels appear on the screen.
24
First TIme Operation
Auto Tuning
Programme :
System :
Channel :
Please connect aerial
Searching...
No channel found.
Confirm
01
I
C23
OK
Page 25
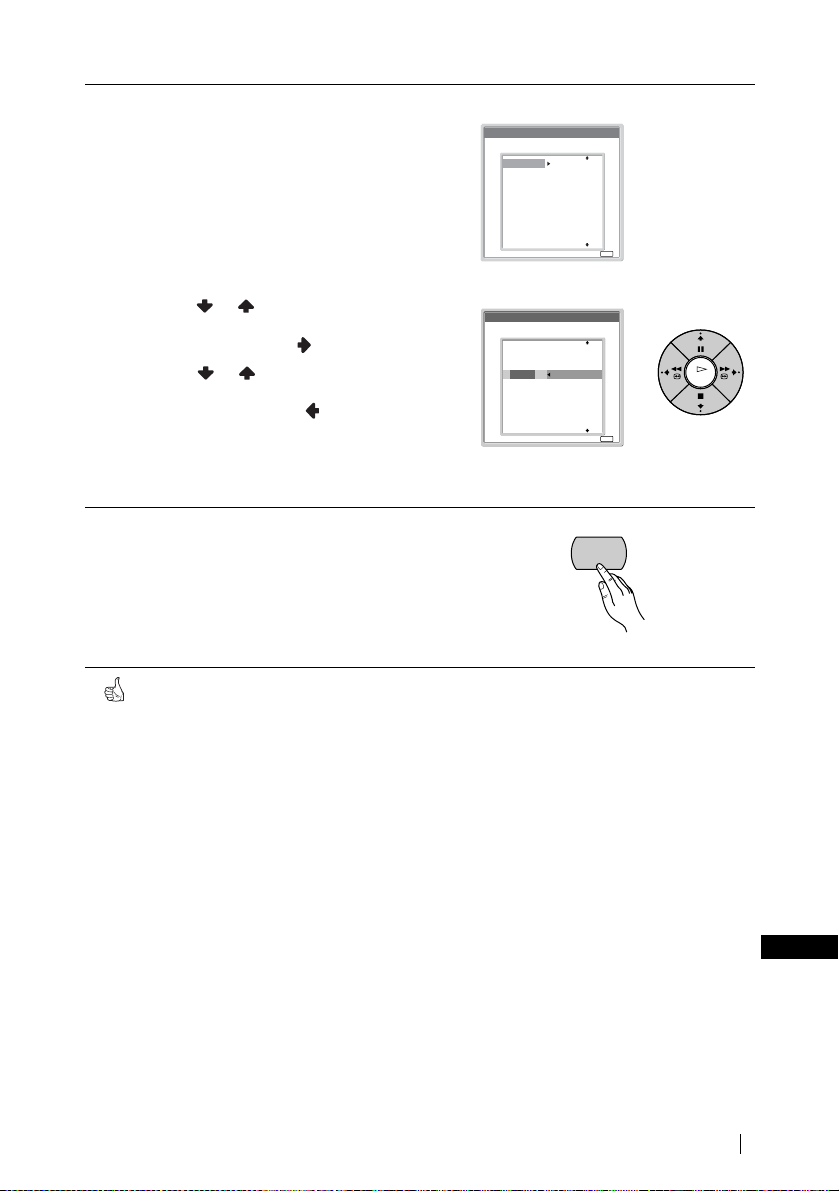
8 The Programme sorting menu appears automatically on
the TV screen.
A) If you wish to keep the broadcast channels in the
tuned order, go to step 9.
B) If you wish to store the channels in a different order:
a) Press or to select the programme number
with the channel (TV Broadcast) you wish to
rearrange, then press .
b) Press or to select the new programme
number position for your selected channel (TV
Broadcast), then press .
c) Repeat steps B) a and B) b if you wish to change
the order of the other channels.
9 Press MENU to turn off the menu.
Programme Sorting
Select channel
01
TVE
02
TVE2
03
TV3
04
C33
05
C27
06
C58
07
S02
08
S06
09
S08
10
S12
Programme Sorting
Select channel
TVE
01
TVE2
02
TV3
03
C33
04
C27
05
C58
06
S02
07
S06
08
S08
09
S12
10
01 TVE
MENU
MENU
Exit:
OK
MENU
Exit:
Your TV is now ready for use.
First TIme Operation
GB
25
Page 26
Introducing and Using the Menu System
Your TV uses an on-screen menu system to guide you through the operations. Use the following
buttons on the Remote Control to operate the menu system:
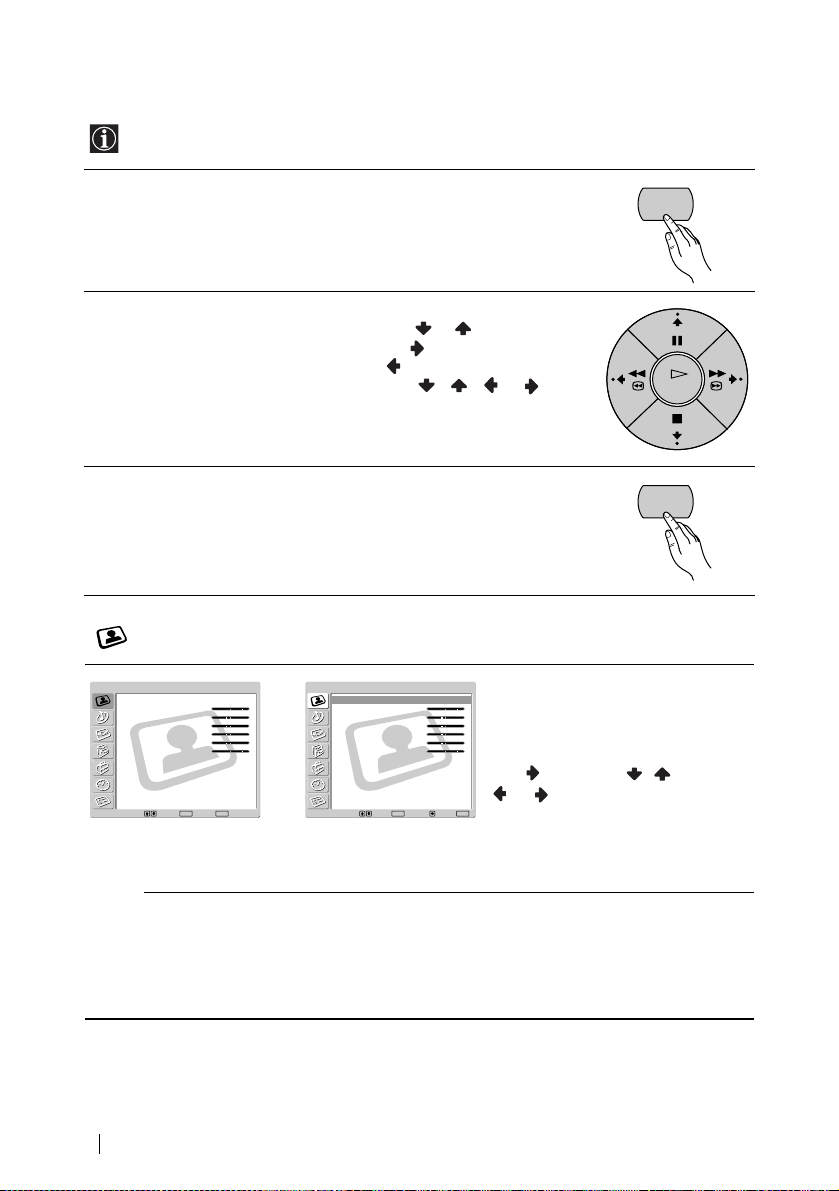
1Press MENU to switch the first level menu on.
MENU
2Do the following to operate the menu.
• To highlight the desired menu or option, press or .
• To enter to the selected menu or option, press .
• To return to the last menu or option, press .
• To alter settings of your selected option, press / / or .
• To confirm your selection, press OK.
3Press MENU to turn off the menu.
MENU
Picture Adjustment
OK
Picture Adjustment
26
Menu System
Mode :
Contrast :
Brightness :
Colour :
Hue :
Sharpness :
Backlight :
NR :
Dynamic Picture :
Colour Tone :
Colour Correction :
Gamma Correction :
Reset
Select: Set: End:
Live
80
0
0
0
0
8
Auto
On
Cool
On
High
OK
Picture Adjustment
Mode :
Contrast :
Brightness :
Colour :
,
MENU
Hue :
Sharpness :
Backlight
NR :
Dynamic Picture :
Colour Tone :
Colour Correction :
Gamma Correction :
Reset
Select: Set: Back:OKEnd:
Live
80
0
0
0
0
8
Auto
On
Cool
On
High
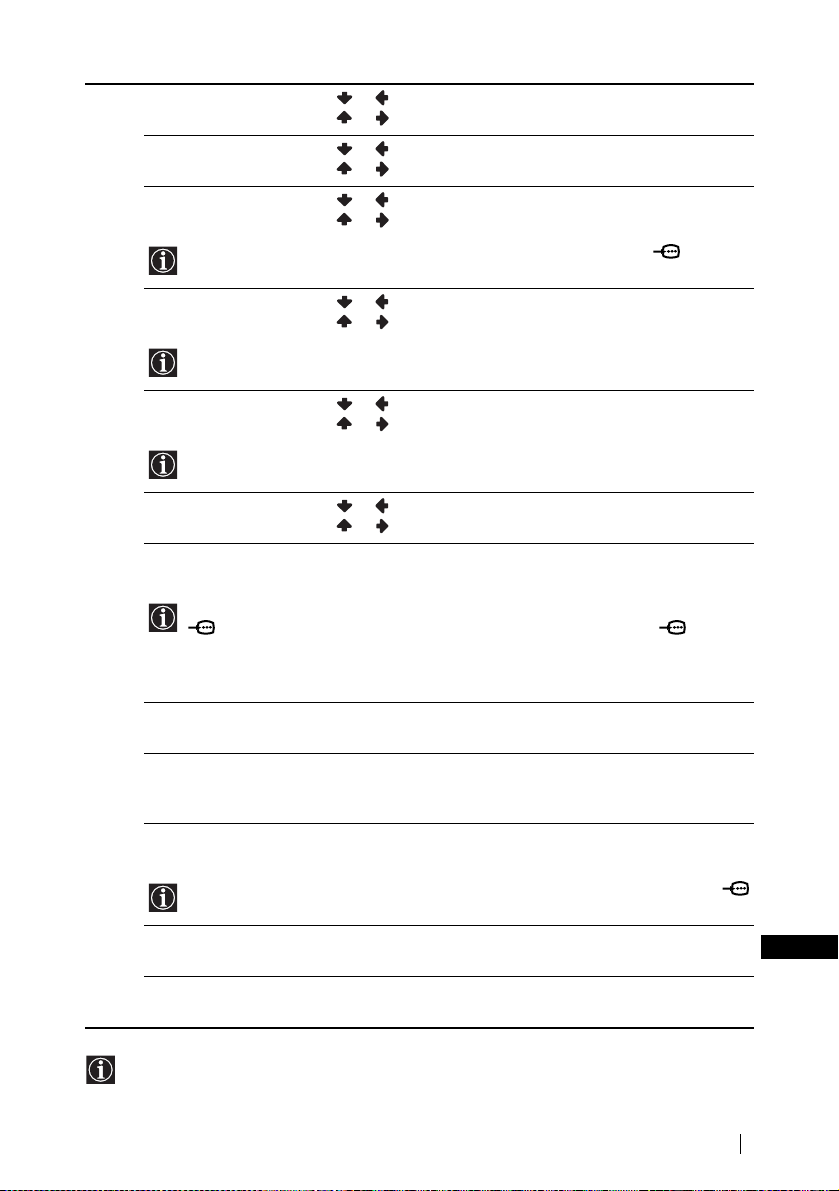
The “Picture Adjustment” menu allows
you to alter the picture adjustments.
To do this:
After selecting the item you want to alter,
press , then press / /
or repeatedly to adjust it.
MENU
This menu also allows you to customise
the picture quality for the “PC/GAME”
and “Personal” modes based on the
programme you are watching.
Mode Live (for enhanced picture contrast and sharpness).
Standard (for a picture with contrast to suit your room’s lighting
conditions).
Movie (for a finely detailed picture).
PC/GAME (for a picture from a personal computer or game).
Personal (for your own custom settings).
Page 27
Contrast Press or to reduce picture contrast.
Press or to enhance picture contrast.
Brightness Press or to darken the picture.
Press or to brighten the picture.
Colour Press or to decrease colour intensity.
Press or to increase colour intensity.
Colour cannot be adjusted for an RGB input signal connected to the PC connector.
Hue Press or to decrease the green tones.
Press or to increase the green tones.
Hue can only be adjusted for NTSC colour signal (e.g. USA video tapes).
Sharpness Press or to soften the picture.
Press or to sharpen the picture.
This function does not operate in PC mode and in Memory Stick.
Back Light Press or to darken the Back Light.
Press or to brighten the Back Light.
NR (Noise Reduction) Auto/Off/ Low/Middle/High
Select to reduce the noise level.
NR (Noise Reduction) cannot be adjusted for an RGB input signal connected to the PC
connector, a DTV* signal connected to the Y, P
B/CB, PR/CR jacks of 5, and the
“Memory Stick” input.
* DTV is the digital broadcast format in the United States (e.g. digital tuner with RGB
signal).
Dynamic Picture On/Off
Select to enhance the picture contrast.
Colour Tone Cool/Normal/Warm
Select to give bright colours a red tint (Setting is variable from Cool to
Warm).
Colour Correction On/Off
Select to emphasise reds and blues.
Colour Correction cannot be adjusted for an RGB input signal connected to the PC
connector.
Gamma Correction High/Middl e/Low
Select to adjust the balance between bright and dark areas of the picture.
Reset Cancel/OK
Select OK to reset the picture to the factory preset levels.
GB
• No option can be adjusted when Mode is set to Live.
• Only Contrast can be adjusted when Mode is set to Standard or Movie.
Menu System
27
Page 28

Sound Adjustment
Picture Adjustment
Mode :
Contrast :
Brightness :
Colour :
Hue :
Sharpness :
Backlight :
NR :
Dynamic Picture :
Colour Tone :
Colour Correction :
Gamma Correction :
Reset
Select: Set: End:
Live
80
0
0
0
0
8
Auto
On
Cool
On
High
OK
MENU
The “Sound Adjustment” menu allows
you to alter the sound adjustments.
To do this:
After selecting the item you want to alter,
press , then press / / or
repeatedly to adjust it.
m
Sound Adjustment
Effect :
Treble :
Bass :
Balance :
Auto Volume :
Dual Sound :
Speaker Link :
Volume :
Dual Sound :
Reset
Select: Set: End:
Natural
0
0
0
On
Stereo
On
30
Stereo
OK
MENU
Effect Off (no effect).
If you set “Auto Volume” to “On,” the “Natural” effect is selected automatically.
* The “BBE High Definition Sound system” is manufactured by Sony Corporation
under licence from BBE Sound, Inc. It is covered by U.S. Patent No. 4,638,258 and
No. 4,482,866. The word “BBE” and BBE Symbol are trademarks of BBE sound.
** Manufactured under licence from Dolby Laboratories. “Dolby,” “Pro Logic” and the
double-D symbol are trademarks of Dolby Laboratories. Confidential unpublished
works. © 1992-1997 Dolby Laboratories. All rights reserved.
Treble Press or to decrease higher-frequency sounds.
Bass Press or to decrease lower-frequency sounds.
Balance Press or to emphasise the left speaker.
Auto Volume On/Off
If you set “Effect” to “Virtual Dolby,” Off is selected automatically
Sound Adjustment
,
Effect :
Treble :
Bass :
Balance :
Auto Volume :
Dual Sound :
Speaker Link :
Volume :
Dual Sound :
Reset
Select: Set: Back:OKEnd:
Natural
0
0
0
On
Stereo
On
30
Stereo
MENU
Natural (enhances clarity, detail and presence of sound by using “BBE
High Definition Sound system”
*).
Dynamic (“BBE High Definition Sound system”
presence of sound for better intelligibility and musical realism).
Dolby Virtual
** (uses the TV speakers to simulate the surround effect
produced by a multi channel system). This is a simulation of “Dolby
Surround Pro Logic.”
Press or to increase higher-frequency sounds.
Press or to increase lower-frequency sounds.
Press or to emphasise the right speaker.
Volume level of the channels will stay the same, independent of the
broadcast signal (e.g. in the case of advertisements).
* intensifies clarity and
28
Menu System
Page 29
Dual Sound Mono/Stereo
i Speaker Link On/Off
i Volume Press or to turn the volume of headphones down.
If you set “i Speaker Link” to “On,” i Volume cannot be adjusted.
For a stereo broadcast, select Stereo or Mono.
Mono/A/B
For a bilingual broadcast, select A for sound channel 1, B for sound
channel 2 or Mono for a mono channel if available.
Select to control the sound output of the TV’s speakers when headphones
are connected. If you want both the sound of the headphones and the TV’s
speakers, select Off.
Press or to turn the volume from headphones up.
i Dual Sound Select Dual Sound option of the headphones.
Mono/Stereo
For a stereo broadcast, select Stereo or Mono.
Mono/A/B
For a bilingual broadcast, select A for sound channel 1, B for sound
channel 2 or Mono for mono channel if available.
If you set “i Speaker Link” to “On,” i Dual Sound cannot be adjusted.
Reset Cancel/OK
Select OK to reset the sound to the factory preset.
GB
Menu System
29
Page 30
Screen Contro
l
Picture Adjustment
Mode :
Contrast :
Brightness :
Colour :
Hue :
Sharpness :
Backlight :
NR :
Dynamic Picture :
Colour Tone :
Colour Correction :
Gamma Correction :
Reset
Select: Set: End:
Live
80
0
0
0
0
8
Auto
On
Cool
On
High
OK
MENU
The “Screen Co ntrol” menu allows you to
alter the screen adjustments.
m
Screen Control
Auto Format :
Screen Format :
Screen Size/Shift
Adjust Pixel
Select: Set: End:
On
Smart
OK
MENU
Auto Format The “Auto Format” option allows you to automatically change the aspect
Even if you have selected On or Off in the “Auto Format” option, you can always modify
the format of the screen by pressing repeatedly on the remote control.
Screen Control
,
Auto Format :
Screen Format :
Screen Size/Shift
Adjust Pixel
Select: Set: Back:OKEnd:
On
Smart
MENU
ratio of the screen.
To do this:
1 After selecting the option, press .
2 Press or to select On (if you wish the TV set to automatically
switch the screen format according to the broadcast signal) or Off (if
you wish to keep your preference).
30
Menu System
Page 31

Screen Format The “Screen Format” option allows you to modify the format of the
screen.
To do this:
1 After selecting the option, press .
2 Press or to select the desired screen format.
Smart: Imitation of wide screen effect
for 4:3 broadcast.
4:3: Conventional 4:3 picture size,
Smart
full picture information.
14:9: Compromise between 4:3 and
4:3
16:9 picture size.
14:9
Zoom: Wid e screen format for letterbox
movies.
Zoom
Wide: For 16:9 broadcast.
Wide
• If parts of the top and bottom of the screen are cut off, press
or to adjust the
position of the image on the screen (e.g. to read subtitles).
• Screen Format cannot be adjusted for a HD signal connected to the Y, P
B/CB, PR/CR
jacks of 5 and the “Memory Stick” input.
• Only 4:3 or Wide can be selected for an RGB signal connected to the PC
connector.
(continued)
Menu System
GB
31
Page 32

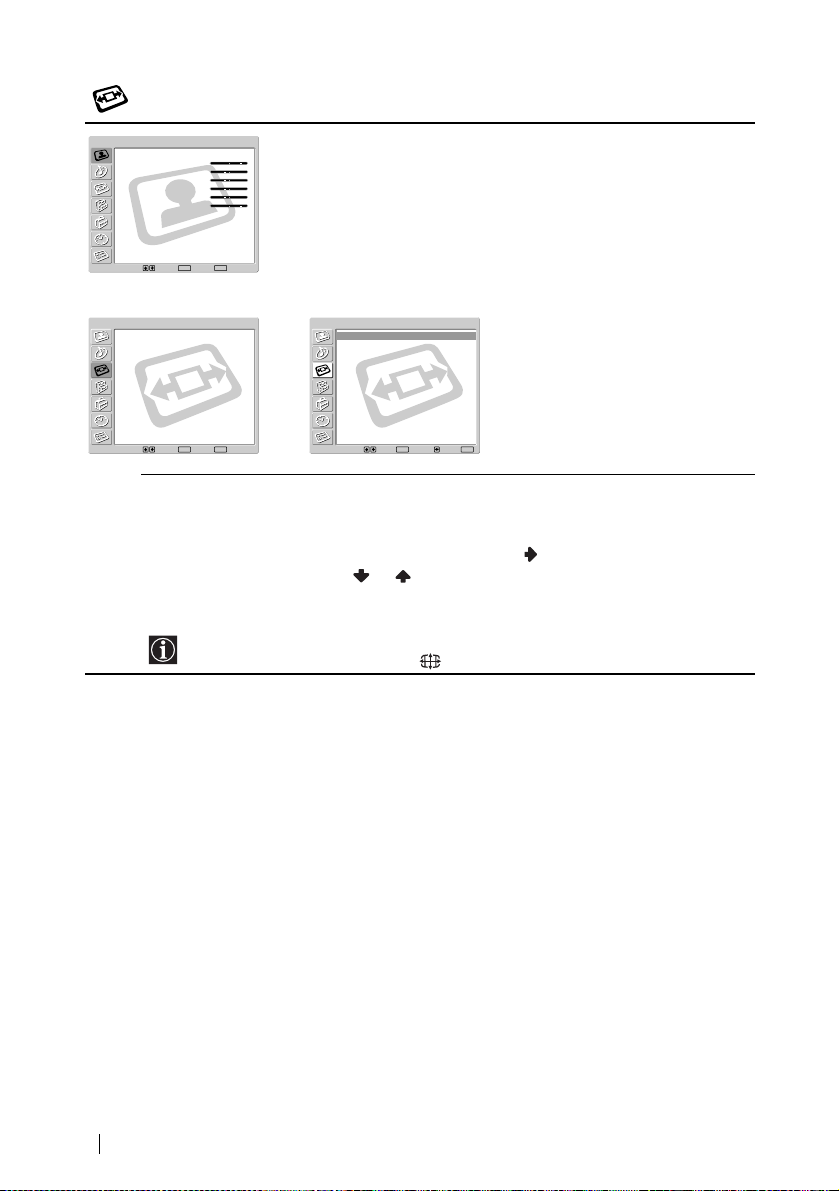
Screen Size/Shift The “Screen Size/Shift” option allows you to adjust the size and position
• Screen Size/Shift cannot be adjusted for a HD signal connected to the Y, P
jacks of 5 and the “Memory Stick” input.
• H Shift (Horizontal Shift) can only be adjusted for an RGB input signal connected to
the Scart Connector 1/ , 2/ or 4/ .
• When “Screen Format” is set to “4:3” or “Wide,” V Size (Vertical Size) and V Shift
(Vertical Shift) ca nnot be adjusted for the video input signal from connected eq uipment.
Adjust Pixel The “Adjust Pixel” option allows you to adjust the picture from RGB
Adjust Pixel is only available for an RGB input signal connected to the PC
connector.
of the picture for each screen format.
To do this:
1 After selecting the option, press .
2 Press or to select the option and press . Then Press / /
V Size (Vertical Size):
Screen Shift
Reset:
equipment.
To do this:
1 After selecting the option, press
2 Press
Auto Adjust:
Dot phase:
Total H Pixel (Total Horizontal Pixel):
Reset:
to adjust the size and position of the picture.
or
Press to enlarge the Screen Size vertically.
Press to shrink the Screen Size vertically.
H Shift (Horizontal Shift):
Press to move the screen to the left.
Press to move the screen to the right.
V Shift (Vertical Shift):
Press to move the screen up.
Press to move the screen down.
Select OK to reset to the factory settings.
B/CB, PR/CR
.
or to select the following option.
Select OK to automatically make the best picture for the input
signal. Note that it may not be adjusted perfectly depending on the
input signal condition or picture pattern. In this case, perform Auto
Adjust again or adjust manually as below.
Adjust between 00-100 when part of a displayed text or image is not
clear.
Adjust when the general picture is not completely clear.
Reset to the factory settings.
32
Menu System
Page 33

Features
Picture Adjustment
Mode :
Contrast :
Brightness :
Colour :
Hue :
Sharpness :
Backlight :
NR :
Dynamic Picture :
Colour Tone :
Colour Correction :
Gamma Correction :
Reset
Select: Set: End:
m
Live
80
0
0
0
0
8
Auto
On
Cool
On
High
OK
MENU
The “Features” menu allows you to alter
various adjustments of the TV.
Features
Power Saving :
Speaker :
Phase :
Audio Output :
AV3 Output :
AV4 Output :
SmartLink :
AV4 Input Select :
Menu Colour :
Logo Illumination :
Select: Set: End:
OK
Standard
Main
Reverse
Variable
Auto
Auto
AV3
Auto
White
Yes
MENU
,
Features
Power Saving :
Speaker :
Phase :
Audio Output :
AV3 Output :
AV4 Output :
SmartLink :
AV4 Input Select :
Menu Colour :
Logo Illumination :
Select: Set: Back:OKEnd:
Standard
Main
Reverse
Variable
Auto
Auto
AV3
Auto
White
Yes
MENU
Power Saving The “Power Saving” option allows you to reduce the power consumption
of this TV.
To do this:
1 After selecting the option, press
.
2 Press or to select Reduce.
• If you turn off the TV whilst the Power Saving mode is on, the mode stays on next time
you turn on the TV.
• If you select the “PC/GAME” or “Personal” mode on the “Picture Adjustment” menu
(page 26), you can adjust the picture option even if the Power Saving mode is set to
On. Note that power consumption will increase if you increase Contrast or
Brightness.
Speaker The “Speaker” option allows you to control the sound of the TV’s
speakers when external audio equipment is connected.
To do this:
1 After selecting the option, press
.
2 Press or to select the desired output.
Main:
Sound of the TV is output through the TV’s speakers.
Centre in:
When an external amplifier is connected to the TV’s CENTRE
SPEAKER IN terminals, the centre spe aker sound from t he external
amplifier is output through the TV’s speakers.
Off:
Sound of the TV is not output through the TV’s speakers.
GB
(continued)
Menu System
33
Page 34

Phase The “Phase” option adjusts the phase of sound when using the TV’s
speakers as the centre speaker. If sound from the TV’s speaker (as centre
speaker) sound unnatural, adjust the “Phase” option.
To do this:
1 After selecting the option, press
.
2 Press or to select Reverse. Sound from the TV’s speakers is
phase-reversed.
Phase can be adjusted only when the “Speaker” option, “Centre in”, is selected.
vb
Audio Output The “Audio Output” option allows you to select either the TV’s remote
control or the external amplifiers remote control to control the volume of
the TV’s speakers when an external amplifier is connected to the TV’s
audio output sockets.
To do this:
1 After selecting the option, press
.
2 Press or to select Variable (if you wish to use the TV’s remote
control) or Fix (if you wish to use the external amplifier’s remote
control).
• When you connect the AV mouse and install it on the external amplifier, you can use
the external amplifier’s remote control, pointed toward the TV, for controlling the
external amplifier’s volume level. For more details on AV mouse installation, refer to
“Connecting Optional Equipment” on page 59.
• Audio Output cannot be adjusted when “Centre in” is selected in the “Speaker” option.
AV3 Output/
AV4 Output
The “AV3 Output” and “AV4 Output” options allow you to select the
source to be output from the Scart connectors 3/ and 4/ .
S
You can record from these Scarts any signal coming from the TV or from
external equipment connected to the other Scart connectors.
If your VCR supports SmartLink, this procedure is not necessary.
34
Menu System
To do this:
1 After selecting the option, press .
2 Press or to select the desired output signal: Auto, TV, AV1,
AV2, AV3 (only for AV4 Output), AV4 (only for AV3 Output) or
AV6.
• If you select Auto, the output signal will always be the same
one that is displayed on the screen.
• If you have connected a decoder to the Scart connectors 3/
S
or 4/ , or to a VCR connected to this Scart, please
remember to change back to AV3 Output or AV4 Output to
Auto for correct unscrambling.
•When AV3 Output or AV4 Output is set to Auto, the signals
input through the AV5 input, PC input and “Memory
Stick” input are not output from Scart connectors 3/
or 4/ .
S
Page 35

SmartLink The “SmartLink” option allows you to select a Scart connector that
supports SmartLink. Both Scart connectors 3/ and 4/
S
cannot support SmartLink at the same time.
To do this:
1 After selecting the option, press .
2 Press or to select AV3 or AV4.
AV4 Input Select Select the “AV4 Input Select” option if a DVD recorder is connected to
both the Scart connector 4/ and Y, P
B/CB, PR/CR jacks of 5.
Some DVD recorders may have 576p signal format. The Scart
connector does not accept 576p signal format on its own. If you
wish to input the signal just as it is, connect the DVD recorder to
both the Scart connector 4/ and Y, P
B/CB, PR/CR jacks of
5.
To do this:
1 After selecting the option, press .
2 Press or to select Auto or Manual.
Auto: The signal from the DVD recorder is input via the Scart 4/
.
Manual: The signal from the DVD recorder is input via the Y, P
R/CR jacks of 5. If the input signal from the DVD recorder is
P
B/CB,
576p signal format, select this.
Menu Colour The “Menu Colour” option allows you to alter the background colour of
the menus.
To do this:
1 After selecting the option, press .
2 Press or to select White or Black.
Logo
Illumination
The “Logo Illumination” option allows you to illuminate the SONY logo
on the front panel of display unit in blue.
To do this:
1 After selecting the option, press .
2 Press or to select Yes.
Menu System
GB
35
Page 36

Set Up
Picture Adjustment
Mode :
Contrast :
Brightness :
Colour :
Hue :
Sharpness :
Backlight :
NR :
Dynamic Picture :
Colour Tone :
Colour Correction :
Gamma Correction :
Reset
Select: Set: End:
Set Up
Language :
Country :
Auto Tuning
Programme Sorting
Programme Labels
AV Preset
Manual Programme Preset
m
Live
80
0
0
0
0
8
Auto
On
Cool
On
High
OK
MENU
Set Up
English
UK
,
Language :
Country :
Auto Tuning
Programme Sorting
Programme Labels
AV Preset
Manual Programme Preset
English
UK
various options on this TV.
The “Set Up” menu allows you to alter
Select: Set: End:
OK
Language/
Country
MENU
Select: Set: Back:OKEnd:
The “Language/Country” option allows you to select the language that the
menus are displayed in. It also allows you to select the country in which
MENU
you wish to operate the TV set.
To do this:
1 After selecting the option, press
.
2 Follow steps 3 and 4 of the section “Switching On the TV and Tuning
the TV Automatically” on page 23.
Auto Tuning The “Auto Tuning” option allows you to automatically search and store
all available TV channels.
To do this:
1 After selecting the option, press .
2 Follow steps 6 and 7 of the section “Switching On the TV and Tuning
the TV Automatically” on page 23.
Programme
Sorting
The “Programme Sorting” option allows you to change the order in which
the channels (TV Broadcast) appear on the screen.
To do this:
1 After selecting the option, press .
2 Follow step 8 B) of the section “Switching On the TV and Tuning the
TV Automatically” on page 23.
36
Menu System
Page 37

Programme
Labels
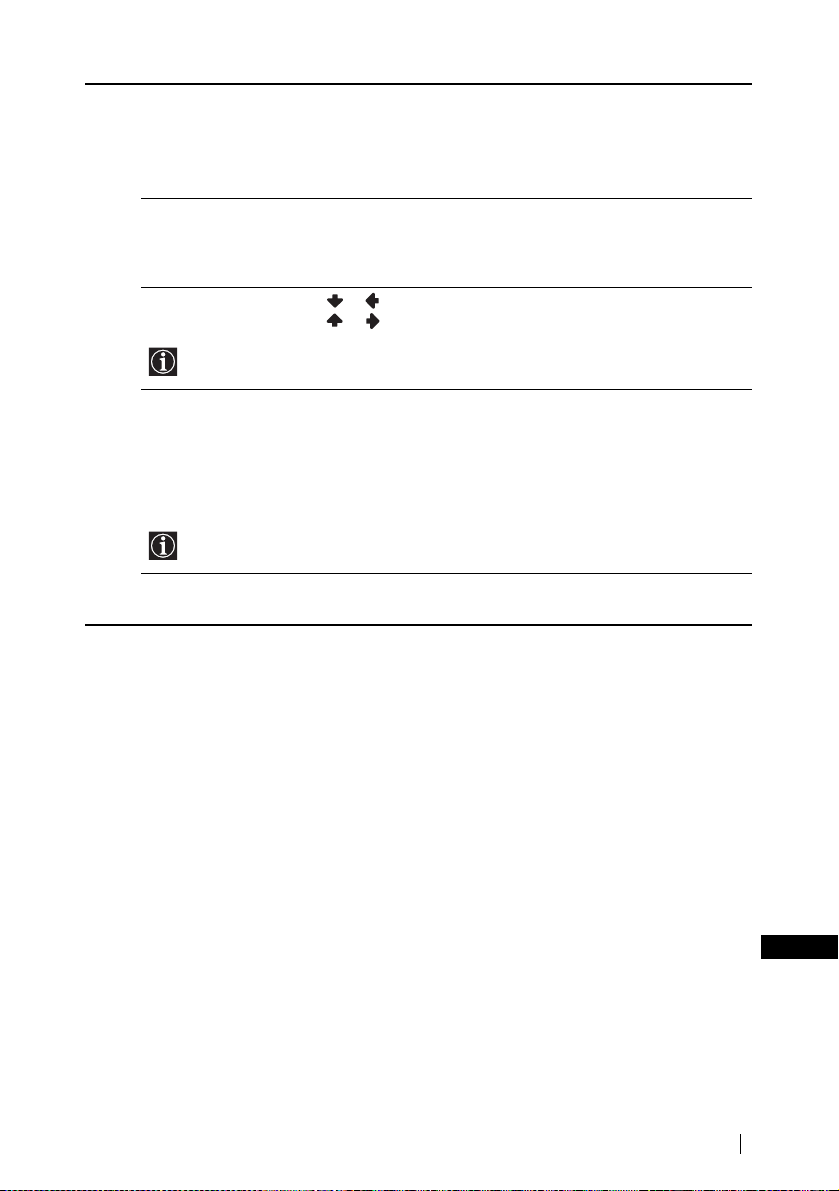
AV Preset The “AV Preset” option allows you to designate a name to the external
The “Programme Labels” option allows you to name a channel using up
to five characters (letter or numbers).
To do this:
1 After selecting the option, press
2 Press
3 Press / / / to select the letter, then press OK.
4 When you have finished, press / / or to select the word
• To correct th e letter, select o n th e screen to go back and pres s OK.
• For a blank, select on the screen and press OK.
equipment you have connected to this TV.
To do this:
1 After selecting the option, press .
2 Press or to select the input source you wish to name. Then
3 A label automatically appears in the label column:
a) If you want to use one of the predefined labels (CABLE, GAME,
b) If you want to set a different label, select Edit and
or to select the programme number with the channel you
wish to name, then press OK.
“End” on the screen and press OK to turn off the menu from the
screen.
press .
CAM, DVD, VIDEO, or SAT), press or
desired label.
press . Then with the first element highlighted, press / /
/ to select the letter, then press OK.
When you have finished, press / / or to select the
word “End” on the screen and press OK to turn off the menu from
the screen.
• To correct the letter, select on the screen to go back and press
OK.
• For a blank, select on the screen and press OK.
.
to select the
(continued)
Menu System
GB
37
Page 38

Manual
Programme Preset
The “Manual Programme Preset” option (A-E) allows you to:
A) Preset Channels, one by one, in the programme order of your choice.
To do this:
1 After selecting the “Manual Programme Preset” option, press .
2 Highlight the Programme option and press .
3 Press or to select a programme number on which you want to
preset the channel. Then press OK.
4 After selecting the System option, press .
The availability of this option depends on the country you have
selected in the “Language/Country” menu.
5 Press or to select the TV Broadcast system (B/G for western
European countries, D/K for eastern European countries, I for United
Kingdom or L for France), then press OK.
6 After selecting the Channel option, press .
7 Press or to select the type of channel to be tuned (S for cable
channels or C for terrestrial channels), then press .
After that, press the number buttons to directly enter the channel
number of the TV Broadcast. If you do not know the channel number,
press or to search for it.
When you tune the desired channel, press OK.
8 Highlight the Confirm option and press OK. Then press to select
OK and finally press OK to store.
Repeat all the above steps to tune and store oth er channels.
B) Label a channel using up to five characters.
To do this:
1 Highlighting the Programme option, press PROG +/– to select the
programme number with the channel you wish to name.
2 When the programme you want to name appears on the screen, select
the Label option and press .
3 Press / / or to select the letter, then press OK.
4 When you have finished, press / / or to select the word
“End” on the screen and press OK to turn off the menu from the
screen.
• To correct th e letter, select o n th e screen to go back and pres s OK.
• For a blank, select on the screen and press OK.
38
Menu System
Page 39

Normally the automatic fine tuning (AFT) will give the best possible
C)
picture, however you can manually fine tune the TV to obtain a better
picture if the picture is distorted.
To do this:
1 Whilst watching the channel (TV Broadcast) you wish to fine-tune,
select the AFT option and press .
2 Press or to adjust the fine tuning between -15 and +15 and
press OK.
3 Highlight the Confirm option and press OK. Then press to select
OK and finally press OK to store.
D) Skip any unwanted programme numbers when they are selected with
the PROG +/–.
To do this:
1 Highlight the Programme option, press PROG +/– to select the
programme number you want to skip.
2 When the programme you want to skip appears on the screen, select
the Skip option and press .
3 Press or to select Yes and press OK.
4 Highlight the Confirm option and press OK. Then press to select
OK and finally press OK to store.
To cancel this function afterwards, select No instead of Yes in the step
above.
E) View and record scrambled channels when using a decoder connected
to the Scart connectors 3/ or 4/ either directly or
via a VCR.
This option is only available depending on the country you have
selected in the “Language/Country” menu.
S
To do this:
1 After selecting the Decoder option, press .
2 Press or to select On and press OK.
3 Highlight the Confirm option and press OK. Then press to select
OK and finally press OK to store.
To cancel this function afterwards, select Off instead of On in above.
Menu System
GB
39
Page 40

Timer
Picture Adjustment
Mode :
Contrast :
Brightness :
Colour :
Hue :
Sharpness :
Backlight :
NR :
Dynamic Picture :
Colour Tone :
Colour Correction :
Gamma Correction :
Reset
Select: Set: End:
Timer
Sleep Timer :
Clock Set :
Clock Display :
On/Off Timer
Auto Shutoff :
Select: Set: End:
m
Live
80
0
0
0
0
8
Auto
On
Cool
On
High
OK
Off
00:00:00 (Mon
Off
On
OK
The “Timer” menu allows you to alter the
timer adjustments.
MENU
Timer
)
,
MENU
Sleep Timer :
Clock Set :
Clock Display :
On/Off Timer
Auto Shutoff :
Select: Set: Back:OKEnd:
Off
00:00:00 (Mon
Off
On
)
MENU
Sleep Timer The “Sleep Timer” option allows you to select a time period for the TV to
switch itself automatically into the standby mode.
To do this:
1 After selecting the option, press .
2 Press or to set the time period delay (max. of 2 hours).
Whilst watching the TV, you can press the button on the remote control to display the
time remaining.
Clock Set The “Clock Set” option allows you to set the current time. The error range
of the built-in clock is ± 30 seconds a month.
To do this:
1 After selecting the option, press .
2 Press or to set the hour, then press .
3 Press or to set the minute, then press .
4 Press or to set the day of a week.
5 Press OK at the time signal. The clock starts.
Clock Display The “Clock Display” option allows you to display the clock on the screen.
To do this:
1 After selecting the option, press .
2 Press or to select On, then press OK.
• The clock display turns off automatically 5 minutes after it is turned on.
• The clock display also turns on or off by pressing on the remote.
40
Menu System
Page 41

On/Off Timer The “On/Off Timer” option allows you to turn the TV on and off
Auto Shutoff The “Auto Shutoff” option allows you to set the TV to change to the
Auto Shutoff cannot be set when the TV receives the TV Broadcast signal.
automatically at a specified time automatically. To use this function, set
the clock in advance (page 40).
• If you chan ge the following settings, Off is selected automatically
in the Timer option. In this case, select On in the Timer option.
– Unplugging the mains lead of the media receiver unit
– On Time, Holding Time, Wee kly Setting, Re peat, Programme
option settings
To do this:
1 After selecting the option, press
2 Highlight Timer and press
3 Press or
4 Set the time for the TV to turn on itself automatically. Press or
to set the hour, then press . Next press or
then press .
5 Press or
6 Press or
time (max. of 5 hours) for the TV to switch itself automatically into the
standby mode.
7 Press or
8 Press or
Off Timer, then press
9 Press or
10 Repeat steps 8 and 9 to set any other days of a week.
11 Press or
12 Press or
to watch at the time of turning on the TV, then press .
To turn the TV on and off at a specified time everyday, set Re peat
to On after step 2, then go to step 3.
To cancel this function afterwards , selec t Off instead of On in step 2
above.
standby mode automatically if there is no input signal through the
connected equipment.
To do this:
1 After selecting the option, press .
2 Press or to select On.
to select On Time, then press .
to select Holding Time, then press .
to selec t the desired Holding Time. Select the holding
to select Weekly Setting, then press .
to select the day of the week you wish to set for On/
.
to select On, then press .
to select Programme, then press .
to select the channels (TV Broadcast) that you want
.
or to select On, then press .
to set the minutes,
Menu System
GB
41
Page 42

Unit Status
Picture Adjustment
Mode :
Contrast :
Brightness :
Colour :
Hue :
Sharpness :
Backlight :
NR :
Dynamic Picture :
Colour Tone :
Colour Correction :
Gamma Correction :
Reset
Select: Set: End:
Unit Status
Model Name :
Display Serial No. :
Box Serial No. :
m
Live
80
0
0
0
0
8
Auto
On
Cool
On
High
OK
MENU
KEñ50MR1
20000001
40000001
The “Unit Status” menu allows you to
check the Model Name and Serial
Number of this TV.
Select: End:
MENU
Model Name Model name of this TV.
Display Serial No.: Serial number allocated for each display unit.
Box Serial No.: Serial number allocated for each media receiver unit.
42
Menu System
Page 43

About “Memory Stick”
The “Memory Stick” feature allows you to view digital images that are stored on “Memory Stick”
media on your TV screen.
Picture viewer
This TV’s “Memory Stick” picture viewer can display still image data (JPEG) and moving image data
(MPEG1) stored in the “Memory Stick.” You can also run a slideshow of those images, and customise the
features of the slideshow by selecting automatic or manual slide show.
Digital Camera Mode
This TV’s Digital Camera Mode can display only images using JPEG or MPEG1 format, and recorded on
a DCF compliant digital camera.
Supported image types
Recorded images must meet the following specifications:
• Still images: JPEG* compression format and DCF** compliant folder and file names.
• Moving images must be recorded on a Sony digital camera and use one of the following MPEG1***
compression formats:
MPEG MOVIE, MPEG MOVIE AD, MPEG MOVIE EX, MPEG MOVIE HQ, MPEG MOVIE CV,
MPEG MOVIE HQX, MPEG1 (corresponding to VIDEO CD) of VAIO Giga pocket
* JPEG is a standard technology format for compressing a still image (extension. jpg). JPEG stands for
“Joint Photographic Experts Group,” which is the organization that implemented this format.
** DCF stands for “Design Rules for Camera file Systems,” which has specifications established by the
Japan Electronic Industry Development Association (JEIDA).
***MPEG is one of the technology formats for compressing a moving image (extension. mpg).
Unsupported image types
• Still images stored in TIFF or any other non-JPEG compression format
• Still images recorded using products that are not DCF compliant, including the following Sony
products.
– Digital still cameras DSC-D700, DSC-D770
– Digital video cameras DCR-TRV900/DSR-PD100A
• The following still images stored in JPEG compression format
– Images that were processed on a computer
– Images in folders that were modified or renamed on a computer
– Images stored in a “Memory Stick” that were formatted on a computer
Notes on use
• We recommend that you backup important data on the hard disk of your computer. Sony cannot be
responsible for any lost or damaged data.
• Use of some pre-recorded image data except for personal use may be an infringement of copyright.
• The “Memory Stick” application software may be modified or changed by Sony without prior notice.
(continued)
“Memory Stick”
GB
43
Page 44

What is a “Memory Stick”?
“Memory Stick” is a compact, portable and versatile Integrated Circuit recording medium with a data
capacity that exceeds a floppy disk. “Memory Stick” is specially designed for exchanging and sharing
digital data among “Memory Stick” compatible products. Because it is removable, the “Memory Stick”
can also be used for external data storage.
“Memory Stick” is available in two sizes: standard size and compact “Memory Stick Duo” size. Once
attached to a Memory Stick Duo adapter, “Memory Stick Duo” is physically the same size as standard
“Memory Stick” and thus can be used with products compliant with standard “Memory Stick.”
Types of “Memory Stick”
“Memory Stick” is available in the following three types to meet various requirements in functions.
• “Memory Stick”
Stores any type of data except copyright-protected data that requires the MagicGate copyright
protection technology.
• “MagicGate Memory Stick”
Equipped with the MagicGate copyright protection technology.
• “Memory Stick-ROM”
Stores pre-recorded, read-only data. You cannot record on “Memory Stick-ROM” or erase the prerecorded data.
Types of “Memory Stick” compatible with the device
You can use three types of “Memory Stick”: general “Memory Stick,” “MagicGate Memory Stick” and
“Memory Stick-ROM” with your TV. However, because your TV does not support the MagicGate
standards, data displayed with your TV is not subjected to MagicGate copy protection.
Notes on Memory Stick Duo
To use “Memory Stick Duo” with this unit, attach it to the Memory Stick Duo adapter before inserting it
into the unit.
Make sure that you attach “Memory Stick Duo” to the adapter correctly.
Make sure that you insert the Memory Stick Duo adapter correctly, otherwise the unit may be damaged.
Do not insert the Memory Stick Duo adapter without “Memory Stick Duo” attached. Doing so may result
in malfunction of the unit.
44
“Memory Stick”
Page 45

On handling the “Memory Stick”
Terminal
Write-protect
switch
Labelling
position
• You cannot record or erase images when the write-protect switch on the “Memory Stick” is set to
LOCK.
• Use a sharp object, such as a ballpoint pen, to move the “Memory Stick Duo” erasure prevention switch.
• We recommend that you backup important data on the hard disk of your computer.
• Image data may be damaged in the following cases:
– If you remove the “Memory Stick,” or turn the power off whilst the access lamp is lit or flashing.
– If you use “Memory Stick” near magnets or magnetic fields, such as speakers.
– If you unplug the mains lead whilst the access lamp is lit or flashing.
• Prevent metallic objects or your finger from coming into contact with the metal parts of the connecting
section.
• Do not attach any material other than the supplied label on the labelling position.
• Do not attach the label so that it sticks out from the proper labelling position.
• Do not write forcefully on the “Memory Stick Duo” memo area.
• Do not bend, drop or apply strong shock to “Memory Stick.”
• Do not disassemble or modify “Memory Stick.”
• Do not allow the “Memory Stick” get wet.
• Do not use or keep the “Memory Stick” in a location that is subject to
– extremely high temperature, such as in a car parked in the sun or on a radiator
– under direct sunlight
– high humidity or places with corrosive substance present
• When you carry or store a “Memory Stick,” put it in its supplied case.
On formatting the “Memory Stick”
The “Memory Stick” is shipped with an exclusive standard format.
N.B.
A “Memory Stick” formatted by computer does not have a guaranteed compatibility with this TV.
When the access lamp is lit or flashing
When the access lamp is lit or flashing, the “Memory Stick” is reading or writing data. In this do not shake
or strike the TV, turn the power off or eject the “Memory Stick”, otherwise image data breakdown may
occur.
• ”MagicGate Memory Stick,” “Memory Stick” and are trademarks of Sony Corporation.
• “MagicGate” and are trademarks of Sony Corporation.
• “Memory Stick-ROM” and are trademarks of Sony Corporation.
• “Memory Stick Duo” and are trademarks of Sony Corporation.
“Memory Stick”
GB
45
Page 46

Inserting and Removing a “Memory Stick”
Inserting a “Memory Stick”
Insert a “Memory Stick” in the “Memory Stick” slot as far as it can go with the b mark facing up as
illustrated. The “Memory Stick” access lamp flashes.
“Memory Stick”
b mark
• Be sure to insert the “Memory Stick” correctly. If the “Memory Stick” is forced in the wrong way,
the “Memory Stick” or the slot may become damaged.
• Insert only “Memory Stick” into the “Memory Stick” slot. Attempting to insert other objects into
the slot may damage the TV.
“Memory Stick” access lamp
PROG
PROG
Removing a “Memory Stick”
1 Check that the “Memory Stick” access lamp is off, then push the “Memory Stick” gently into the
“Memory Stick” slot.
The “Memory Stick” is ejected.
PROG
PROG
2 Pull the “Memory Stick” completely out of the “Memory Stick” slot.
• Do not turn the power off whilst the “Memory Stick” access lamp is flashing in red.
If you do so, the “Memory Stick” may become damaged.
• When removing the “Memory Stick,” do not attempt to just pull it from the “Memory Stick” slot.
If you do so, the “Memory Stick” or the slot may become damaged.
• If, when removing the “Memory Stick”, you release it immediately after pushing it into the
“Memory Stick” slot, the “Memory Stick” may jump out.
46
“Memory Stick”
Page 47

Using the “Memory Stick” (Memory Stick Home)
The “Memory Stick” feature allows you to display an index of thumbnail images that are on the “Memory
Stick.” You can select an image from those to display on the full screen, playback a moving image or run
a slideshow of those images.
Displaying the Memory Stick Home
The default setting for “Digi. Camera Mode” is “On”.
1 Insert a “Memory Stick” that contains the images you want to
view.
TVVIDEO
2 Press “Memory Stick.”.
The Memory Stick Home appears on the screen.
Index of thumbnail images contained
in the select ed f older
Press / / or button to select
Memory Stick
Home mark
Memory Stick Home
Slide Show…
Option…
Select Folder
100MSDCF
Sel: Back: Set: Enter
Folder name for the
selected folder
an image. The selected image is
highlighted in yellow.
No.: 1/1234
Size: 1024x768
File: SPJP0001.JPG
Date: 7/15/2002 12:34
Information about the
selected image file
Mark indicated in the lower part of image
: Protected image icon
: Moving image icon
: Related file icon (displayed only when
“Digi. Camera Mode” is set to “On”).
“Memory
Stick”
OK
PROG
MENU
• To close the Memory Stick Home, press “Memory Stick”
again.
• To switch the “Memory Stick” input, you also press
repeatedly until Memory Stick indicator on the media
receiver unit lights up (see page 15).
(continued)
“Memory Stick”
GB
47
Page 48

Selecting the index menu of the Memory Stick Home
Press or to highlight the menu item, and then press OK. The selected option is highlighted in
yellow.
Option
Slide Show Displays a slideshow of images that are on the “Memory Stick.” For more
Option Displays the Option menu. You can select any of the following options.
Select Folder Allows you to select a specific folder on the “Memory Stick.” For more details,
Description
details, refer to “Using the “Memory Stick” Slide Show” on page 53.
File: displays the following options:
Sort: Sorts the image file according to the file name or the renewal date
in the ascending/descending order.
Filter: Filters only the still images (Still) or the moving images (Movie)
out from the content.
The Sort/Filter functions can be activated only when Digital
Camera Mode is set to Off. Filter setting information is displayed in
Memory Stick Home.
Memory Stick: Displays the type, the used capacity and the capacity of the
“Memory Stick” in use.
refer to “Selecting a folder that you want to view on the “Memory Stick”” on
page 49.
48
“Memory Stick”
Page 49

Selecting a folder that you want to view on the “Memory Stick”
1 Insert a “Memory Stick” that contains the images you want to view.
2 Press “Memory Stick.”.
The Memory Stick Home appears on the screen.
3 Press or to highlight Select Folder, then press OK.
The Select Folder menu appears.
Current Selected folder
Memory Stick Home
Slide Show…
Option…
Filter: Still
Select Folder
100MSDCF
List of folders included in the
Close
currently selected folder
Sel: Back: Set: Enter
To upper stage
No.: 1/1234
Size: 1024x768
File: SPJP0001.JPG
Date: 7/15/2002 12:34
First image file contained in the
currently selected folder
4 Press to select the list of folders, and press or to select one that you want to view. Then
press OK.
An index of thumbnail images of selected folder appears.
To select the folders which are not displayed
Press to select the slider and press or . The next or previous 10 folders appear.
Sorting out image files (Digital Camera Mode)
“Digi. Camera Mode” allows you to sort out image files that are JPEG and MPEG compression format
recorded on digital still cameras and digital video cameras which are DCF compliant.
In step 4 above, select Digi. Camera Mode. Then press or to select On, and press OK.
• You cannot select Digi. Camera Mode if the image files recorded on the “Memory Stick” using
a digital still camera or digital video camera are more than 2000 files.
• For an image file recorded with the Voice Memo function of a Sony digital camera, the still
image file is displayed.
GB
(continued)
“Memory Stick”
49
Page 50

Using the Memory Stick Home
Memory Stick Home allows you to display selected images on the full screen and playback a moving
image using the index screen. You can also protect, rotate and delete the images using the index menu.
1 Insert a “Memory Stick” that contains the images you want to view.
2 Press “Memory Stick.”
The Memory Stick Home appears on the screen.
3 Press or to highlight Select Folder, then press OK.
The Select Folder menu appears.
4 Press to select the list of contents, and press or to select a folder that you want to view.
Then press OK.
An index of thumbnail images of the selected folder appears.
5 Press , then press / / or to select an image that you want to display on the full screen
or playback a moving image. Then press OK.
To display other image files when mo re th an im age files ar e c ontained in the current
selected folder
Press until the next images display, or press to select the slider and press . An index
of thumbnail images appears for every page.
The index menu of a thumbnail appears. You can select any of the following options. Press or
to select the options, and press OK.
Index menu of a thumbnail
Option
Full Screen
(for a still image only)
Movie player
(for a moving image only)
Slide Show
Protect
Rotate
(for a still image only)
Delete
Close
Description
Displays the still image on the full screen. For more details, refer to
“Displaying a still image on the full screen” on page 51.
Displays “Movie Player.” For more details, refer to “Playing back the moving
image (Movie Player)” on page 52.
Displays a slideshow of images that are on the “Memory Stick.” For more
details, refer to “Using the “Memory Stick” Slide Show” on page 53.
Protects the image file against being erased. All On or All Off for all files in
the folder contained the selected image file, On or Off for the selected image
file only. is marked on the protected image.
Rotates only a still image 90 degrees clockwise or anticlockwise. Whenever
you press OK, the image rotates 90 degrees.
Deletes the image file. Select All. Img. for all files in the folder containing the
selected image file, select Sel. Img. for the selected image file only.
Closes the index menu.
• You cannot rotate or delete a protected image ( ).
• You cannot rotate or delete the images on the “Memory Stick” if the write -protect is set to
LOCK.
• If an image has been rotated, it remains on the “Memory Stick,” and is displayed this way again
the next time.
50
“Memory Stick”
Page 51

Displaying a still image on the full screen
Select Full Screen in the index menu of thumbnail images.
• The time that the still image is displayed on the full screen varies according to the image size.
• The TV automatically displays the appropriate image size for each image on the full screen.
No.: 1/1234
Size: 1024x768
File: SPJP0001.JPG
Date: 7/15/2002 12:34
To display the next image
Press .
To display the previous image
Press .
Full screen index menu image
Press OK, whilst the image is displayed on the full screen.
The full screen index menu image appears. You can select any of the following options. Press or
to select the options, and press OK.
Option
Return
Information
Protect
Rotate (for a still image
only)
Delete
Close
Description
Returns to Memory Stick Home
Displays the information of the selected image file.
Protects the selected image file against being erased. is marked on the protected
image.
Rotates only a still image 90 degrees clockwise or anticlockwise. Whenever you
press OK, the image rotates 90 degrees.
Deletes the selected image file.
Closes the index screen.
• You cannot rotate or delete the protected image ( ).
• You cannot rotate or delete the images on the “Memory Stick” if the write -protect is set to
LOCK.
• If an image has been rotated, it remains on the “Memory Stick,” and is displayed this way again
the next time.
GB
(continued)
“Memory Stick”
51
Page 52

Playing back the moving image (Movie Player)
Select Movie Player in the index menu of thumbnail images, the “Movie Player” appears on the screen.
You can operate the “Movie Player” as follows. Press or to select the button or the option, and
press OK.
Prev.
Next
Full Screen
Menu
Return
File: BASEBALL.MPG
Date: 7/15/2002 12:34
Button/Option
N (Play/pause)
No.: 1/1234
Size: 320x240
Description
Plays back a moving image. During playback, the button display is changed to the
X (pause) button. When the playback is finished, playback stops with the first image
of the moving image displayed.
x (Stop)
Full Screen
Stops playback.
Displays a moving image on the full screen and starts playback automatically. To
return to the “Movie Player,” press
/// or OK.
The TV automatically displays the appropriate image size for each
moving image on the full screen.
Menu
Displays the Menu. You can select any of the following options.
Information: Displays the information of the selected image.
Protect: Protects the selected image file against be erased.
Delete: Deletes the selected image file.
Close: Closes the Menu.
You cannot delete a protected image ( ).
Return
Returns to Memory Stick Home
Guide Display
The guide display guides the function of and on the remote control when the “Movie Player” is
displayed.
Rew: Rewinds the moving image.
FF: Fast forwards the moving image.
If you are starting the slideshow and stop or pause the moving image, the guide display is changed to
Prev and Next. For more details of the slideshow, refer to “Using the “Memory Stick” Slide Show”
on page 53.
Prev: Displays the previous image.
Next: Displays the next image.
52
“Memory Stick”
Page 53

Using the “Memory Stick” Slide Show
“Slide Show” allows you to watch a slideshow of the images on the “Memory Stick.”
1 Insert a “Memory Stick” that contains the images you want to view.
2 Press “Memory Stick.”
The Memory Stick Home appears on the screen.
3 Press or to highlight Select Folder, then press OK.
The Select Folder menu appears.
4 Press to select the list of contents, and press or to select a folder that you want to view.
Then press OK.
An index of thumbnail images of selected folder appears.
5 Press or to highlight Slide Show, then press OK.
The index menu of Slide Show appears. You can select any of the following options. Press or
to select the options, and press OK.
Advan. Slds.
Interval: Selects the period for which one image is displayed from 5sec, 10sec, 30sec, 1min,
: Sets the slide show to automatic or manual advance.
5min, or 10min. The time is about right. When Advan. Slds. is set to Manual, the
interval option is not variable.
6 Press or to select Start, and press OK.
To Start the Slide Show
When you set “Advan. Slds.” to “Auto”
The images change automatically. When a moving image file is selected, it plays back automatically, and
after playback the next image is displayed automatically.
“Movie Player” is not displayed when you set Advan. Slds. to Auto.
When you set “Advan. Slds.” to “Manual”
Press or to slide the images.
: Displays the next image.
: Displays the previous image.
When you display a still image on the full screen, you can slide the images in the same way as described
above.
When a moving image file is sele cted
The moving image does not playback and “Movie Player” is displayed. For more details about using
“Movie Player,” refer to “Playing back the moving image (Movie Player)” on page 52.
Press to display the next image.
To stop the Slide Show
If you want to the stop Slide Show, do the following to return to Memory Stick Home.
When you set “Advan. Slds.” to “Auto”
Press OK.
When you set “Advan. Slds.” to “Manual”
Press OK to display the index menu, then press or to select Return.
(continued)
“Memory Stick”
GB
53
Page 54

Caution displays while you are using the “Memory Stick”
If an image file has a problem, the following indicators may appear on the screen. Use the list below to
check the meaning of the caution display.
The picture file is in the JPEG or MPEG1 format and is not-compatible.
There is a thumbnail but it is not DCF-compatible.
There is no selected picture file.
There is a picture file but the thumbnail is broken.
The picture file is broken.
Caution messages while using the “Memory Stick”
Use the list below to check the meaning of the messages.
No Memory Stick Insert the “Memory Stick” into the “Memory Stick” slot correctly.
No file No picture files are contained in the currently selected folder.
No movie file No movie picture files are contained in the currently selected folder
No still file No still picture files are contained in the currently selected folder
Cannot play Image data of a movie picture file is broken.
Memory Stick locked The erasure prevention switch on a “Memory Stick” is set to “LOCK.”
Memory Stick error • The “Memory Stick” is broken.
Memory Stick type error A “Memory Stick” that is not compatible or cannot be used with the TV
Format error The “Memory Stick” has not been formatted correctly.
File error The selected folder has not been named correctly. Re-enter the name
Read Only Memory • A read-only “Memory Stick” in which picture files are recorded has
54
“Memory Stick”
although “Filter” is set to “Movie” in the “Option” menu.
although “Filter” is set to “Still” in the “Option” menu.
Release the lock.
• Clean the terminal on the “Memory Stick.”
has been inserted.
with less than 66 characters including “/” by displaying the “Select
Folder” menu.
been inserted. You cannot record or delete the data with a read-only
“Memory Stick.”
Page 55

Teletext
Teletext is an information service transmitted by most TV stations. The index page of the teletext
service (usually page 100) gives you information on how to use the service. To operate teletext, use
the remote control buttons as indicated below.
Make sure you use a channel (TV Broadcast) with a strong signal, otherwise teletext errors may
occur.
To Switch On Teletext:
After selecting the TV channel which carries the teletext service you wish to
view, press .
To Select a Teletext page:
Input 3 digits for the page number, using the numbered buttons.
• If you have made a mistake, ret ype th e correct page number.
• If the counter on the screen continues searchi ng, it is because this page is not availab le. In thi s case ,
input another page number.
To access the next or preceding page:
Press PROG + () or PROG - ().
To superimpose teletext on to the TV:
Whilst you are viewing teletext, press . Press it again to cancel teletext mode.
To freeze a teletext page:
Some teletext pages have sub-pages which follow on automatically. To stop them, press
/ . Press it again to cancel the freeze.
TELETEXT
TELETEXT
TELETEXT
TELETEXT
TELETEXT
TELETEXT
TELETEXT
TELETEXT
Index
Index
Index
Index
Index
Index
Index
Index
Programme
Programme
Programme
Programme
Programme
Programme
Programme
Programme
News
News
News
News
News
News
News
News
Sport
Sport
Sport
Sport
Sport
Sport
Sport
Sport
Weather
Weather
Weather
Weather
Weather
Weather
Weather
Weather
25
25
25
25
25
25
25
25
153
153
153
153
153
153
153
153
101
101
101
101
101
101
101
101
98
98
98
98
98
98
98
98
To reveal concealed information (e.g., answers to a quiz)
Press / . Press it again to conceal the information.
To Switch Off Teletext:
Press .
Fastext
Fastext service lets you access pages with one push of a button.
Whilst you are in Teletext mode and Fastext is broadcast, a colour coded menu appears at the bottom
of the teletext page. Press the colour button (red, green, yellow or blue) to access the corresponding
page.
Teletext
GB
55
Page 56

NexTView*
* (depending on availability of service).
NexTView is an on-screen electronic programme guide, providing you with programme
information for different broadcasters.
When looking for information you can search by theme (sports, art, etc.) or date.
If wrong characters appear when viewing NexTView, using the menu system enter the “Language/
Country” menu (see page 36) and select the same language as the NexTView is broadcast.
Displaying NexTView
1 Select a broadcast channel providing a NexTView service. In this case the indication “NexTView” is
displayed as soon as data is available.
2 To see NexTView service, you have two different NexTView interface types, depending on the % of
available data:
a) “Programme List” interface:
Whilst you are watching TV, and after the indication “NexTView” in white is displayed on the
screen, press on the remote control to see the “Programme List” interface (see fig. 1 on next
page).
b)“Overview” i n terface:
Whilst you are watching TV, and after more than 50% of NexTView data is available (100% data
may not be available depending on your area) the indication “NexTView” in black is displayed on
the screen. Then press the on the remote control to watch the “Overview” interface (see fig. 2
on next page).
As soon as you enter the NexTView service, the lower left corner of the screen will show the %
of NexTView data available. Once you have entered this service, the % of data will not increase.
3 To navigate through NexTView:
• Moving right or left, press of .
• Moving up or down, press or .
• Confirming a selection, press OK.
4 To switch the NexTView off, press on the remote control.
56
NexTView
Page 57

“Programme List” interface (fig. 1):
1
01
02
Mon
Tue03Wed04Thu05Fri06Sat07Sun 7 : 07 : 01
TV1
2
3
00 : 30
TV2
01 : 30
TV3
05 : 30
TV4
06 : 30
TV5
07 : 30
TV6
08 : 30
TV7
09 : 30
TV8
10 : 30
Songs from the shows
TV1 00:30 - 01:30 Thursday 04
Programme descriptio n
Record Remind
Songs from the shows
Weather forecast informati
A1 news magazine
Arts show
Oclock news
Weather forecast informati
A1 news magazine
Arts show
“Overview” interface (fig. 2):
1
01
Mon
2
3
TV1
TV2
TV3
TV4
TV5
TV6
TV7
TV8
Songs from the shows
TV1 00:30 - 01:30 Thursday 04
Programme descriptio n
A Icons for different themes
(see the “Icons’ key” on next
page)
B Date
C Programme list
4
02
Tue03Wed04Thu05Fri06Sat07Sun 9 : 15 : 03
9 : 00 9 : 30 10 : 00
Magazine
Weather Forecast | Mike's show
Euronews
Home Shopping Europe |Euro Sports
News | Arts show
Larry King's live | Euro Sports
Euro magazine | Euro Sports
Home Shopping Europe | Euronews
Record Remind
4
5
|
Songs from the shows
|
Fantasy film
|
Magazine
5
|
Star Wars
D Record
This function only works if you have connected a
VCR which supports SmartLink and Timer
Programming feature.
If you wish to record the selected programme, press the red
button on the remote control.
E Remind
If you wish to be reminded when the selected programme is
broadcast, press the green button on the remote control. At
the time that programme should be broadcast a reminder
message is displayed on the TV.
• “Record” and “Remind” options will be shown on the screen as soon as a programme have been
selected, but they will not be shown if you are watching the NexTView service on a TV channel
which is not a NexTView provider.
• “Record” and “Remind” will not be available if the programme that you have selected has already
started.
(continued)
NexTView
GB
57
Page 58

Icons’ key:
full selection list:
All the programme information is listed
by time and broadcast channels order.
entertainment
children
arts
sports
news
movies
music
channel selection:
If the NexTView provider sends
information of more than 8 broadcast
channels, you can select 8 of them to
create a personal list.
After you have created your personal list,
the default list can be restored. To restore
it, select “Auto B” by pressing
button on the remote control.
remind list:
Shows you the list with all the
programmes (maximum 5 programmes)
that you have selected to be reminded
about.
58
NexTView
Page 59

Connecting Optional Equipment
Using the following instructions, you can connect a wide range of optional equipment to your TV
set. (Connecting cables are not supplied.)
Connecting to the front of the Media Receiver Unit
PROG
PC
MEMORY STICK
654321
L/G/S/I R/D/D/D
MENU
PC
6
66
PROG
OK
Personal computer
PC
i Headphones
PC
654321
MEMORY STICK
L/G/S/I R/D/D/D
66
S VHS/Hi8/DVC
camcorder
PROG
To avoid a
noisy picture,
do not connect
PROG
MENU
6
OK
external
equipment to
connectors E
and F at the
same time.
GB
(continued)
Additional Information
59
Page 60

Connecting to the Rear of Media Receiver Unit
Decoder
Decoder
VCR
55
R/D/D/D
WHITE
L/G/S/I
CTRL
S
1/
2/
3/
4/
(SMARTLINK)
(SMARTLINK)
BLACK
DISPLAY SIGNAL OUT
Y
W/G/W/GL/G/S/IR/D/D/D
AV
MOUSE
B/CBPR/CR
P
CENTRE
SPEAKER IN
180W (6 ) MAX
DVD
Sub woofer
(SA-WD100)
AC IN
DVD Recorder
**
Hi-Fi
“PlayStation”*
2
1
Compact
AV System/
Amplifier
* “PlayStation” is a product of Sony Computer Entertainment, Inc.
* “PlayStation” is a trademark of Sony Computer Entertainment, Inc.
** To control other Sony equipment with the TV’s remote control, connect the CONTROL S IN jack of
the equipment to the CONTROL S OUT jack of the TV with the CONTROL S cable.
60
Additional Information
Page 61

55
R/D/D/D
L/G/S/I
Y
B/CBPR/CR
CTRL
P
W/G/W/GL/G/S/IR/D/D/D
SPEAKER IN
AV
180W (6 ) MAX
S
MOUSE
AC IN
CENTRE
1/
2/
(SMARTLINK)
3/
(SMARTLINK)
4/
BLACK WHITE
DISPLAY SIGNAL OUT
Connecting a VCR:
To connect a VCR, refer to “Connecting the Aerial and VCR” on page 22. We recommend you connect
your VCR using a Scart lead. If you do not have a Scart lead, tune in the VCR test signal to the TV
programme number “0” by using the “Manual Programme Preset” option. (For details on how to manually
programme these presets, see page 38, step A.)
Refer to your VCR instruction manual to find out how to find the output channel of your VCR.
Connecting a VCR or a DVD recorder that supports SmartLink:
SmartLink is a direct link between the TV set and a VCR or a DVD recorder. For more information
on SmartLink, refer to the instruction manual of your VCR or DVD recorder.
If you use a VCR or a DVD recorder that supports SmartLink, please connect the VCR or the DVD
recorder by using a Scart lead to the Scart connectors 3/ or 4/ .
Both Scart connectors 3/ and 4/ cannot support SmartLink at the same time. If
S
you connect a VCR or a DVD recorder to both Scart connectors 3/ and 4/ , select
which Scart supports SmartLink by using “Smart Link” option in the “Features” menu (page 35).
S
S
If you have connected a decoder to the Scart connector 3/ , or
S
through a VCR connected to this Scart:
Select the “Manual Programme Preset” option in the “Set Up” menu and after entering in the “Decoder*”
option, select “On” (by using or ). Repeat this option for each scrambled signal.
* This option is only available depending on the country you have selected in the “Language/Country”
menu.
If you connect a DVD recorder to the Scart connector 4/
Some DVD recorders may have 576p signal format. If you wish to input the 576p signal connect the DVD
recorder to both the Scart connector 4/ and Y, P
B/CB, PR/CR jacks of 5. Select the “Features”
menu and set “AV4 Input Select” to “Manual” (page 35).
Connecting to external Audio Equipment:
To listen to the sound from TV on Hi-Fi equipment:
Connect your Hi-Fi equipment to the audio output sockets J if you wish to amplify the audio output from
TV. Next, using the menu system, select the “Features” menu and set “TV Speakers” to “Off.”
For a sub woofer
Connect your sub woofer to the 5 W/G/W/G output jack M using a monaural audio cable.
(continued)
Additional Information
GB
61
Page 62

To listen to Dolby Prologic system sound on the TV speakers:
Connect your Dolby Prologic system decorder amplifier to the CENTRE SPEAKER IN terminals P if
you wish to listen to the audio output from your equipment on the TV speakers. If you have a Dolby
amplifier, connect the centre output from your amplifier to the CENTRE SPEAKER IN terminals P to
use the TV speakers as a centre speaker. Next, using the menu system, select the “Features” menu and set
“TV Speakers” to “Centre in.”
You can select either the TV’s remote control or the external amplifier’s remote control for
controlling the volume output from TV’s speakers. Select the remote control by using “Audio
Output” option in the “Feature” menu (page 34).
When connecting the AV mouse
When you connect the AV mouse and install it in an external amplifier, you can use the external
amplifier’s remote control toward the TV for controlling the volume level of the external amplifier.
Connect the AV mouse to the AV MOUSE IN jack O, and install it right above the external amplifier’s
remote control sensor.
AV mouse
Amplifier
Remote control sensor
62
Additional Information
Page 63

Using Optional Equipment
1 Connect your equipment to the designated TV socket, as indicated on pages 61, 62 and 63.
2 Switch on the connected equipment.
3 To watch the picture of the connected equipment, press repeatedly until the correct input symbol
appears on the screen. Also as you press repeatedly, the corresponding input select indicator on the
media receiver unit lights up.
.
Symbol Input select
1 or 2 1 or 2 • Audio / video input signal through the Scart connector H.
1 or 2 1 or 2 • RGB input signal through the Scart connector H. This
3 or 4 3 or 4 • Audio / video input signal through the Scart connector I or
S
33• S Video input signal through the Scart connector I.
44• RGB input signal through the Scart connector N. This
55• Component input signal through the Y, P
66• Video input signal through the phono socket F and Audio
S S
66• S Video input signal through the S Video input jack E and
PC PC • RGB input signal through the 15-DSub connector B and
MEMORY
STICK
indicator
MEMORY
STICK
Input Signals
symbol appears only if an RGB source has been connected.
N.
symbol appears only if an RGB source has been connected.
B/CB, PR/CR jacks
L and Audio input signal through K.
input signal through G.
Audio signal through G.
audio input signal through C.
• Data input from a “Memory Stick” inserted in “Memory
Stick” slot A.
If your DVD recorder is connected to both the Scart connector 4/ and the Y, P
C
R jacks of 5, select the input connector by using “AV4 Input Select” option in the “Feature”
menu (page 35).
B/CB, PR/
4 Press the button on the remote control to return to the normal TV picture.
The indicator on the media receiver unit lights up.
For Mono Equipment
Connect the phono plug to the L/G/S/I socket and select 5 input signal using the instructions above.
Refer to “Sound Adjustment” and select “Dual Sound” “A” on the sound menu screen (page 29).
Additional Information
GB
63
Page 64

Remote Control Configuration for VCR/DVD
This remote control is set by default to operate the basic functions of this Sony TV, Sony DVD and most
Sony VCRs when batteries are initially installed. To control VCRs and DVDs of other major brands and
certain Sony VCR models, please complete the following steps:
• Before you start, look up the 3 digit code for your brand of DVD or VCR from the list on next
page. On those brands that have more than one code, enter the first code number.
• Sony will endeavour to update the software according to market changes. Therefore, please refer
to the code table included with the remote control for the latest code set.
1 Press the Media Selector button on the remote control repeatedly until the
required VCR or DVD green light lights up.
If Media Selector is in the TV position, code numbers will not be
stored.
2 Before the green light goes out, press and hold the yellow button for
approximately 6 seconds until the green light starts flashing.
3 Whilst the green light is flashing, enter all three digits of the code for your
brand (see next page) using the number buttons on the remote control.
If your selected code is entered correctly, all three green lights
will be lit momentarily.
4 Turn on your VCR or DVD and check that the main functions work.
• If your equipment is not working or some of the functions do
not work, please check you entered the correct code set or try
the next code listed against the brand (see next page).
• Your brand codes may be lost if weak batteries are not replaced
within a few minutes. To reset your DVD or VCR code number
please repeat the above steps. A small label is attached inside
the battery door to allow you to record your brand codes.
• Not all brands are covered and not all models of every brand
may be covered.
TVVIDEO
3
1
OK
2
PROG
MENU
64
Additional Information
Page 65

VCR Brand List DVD Brand List
Brand Code Brand Code
SONY (VHS) 301, 302, 303, 308, 309 SONY 001
SONY (BETA) 303, 307, 310 AIWA 021
SONY (DV) 304, 305, 306 DENON 018, 027, 020, 002
AIWA 325, 331, 351 GRUNDIG 009, 028, 023, 024, 016, 003
AKAI 326, 329, 330 HITACHI 025, 026, 015, 004
DAEWOO 342, 343 JVC 006, 017
GRUNDIG 358, 355, 360, 361, 320, 351 KENWOOD 008
HITACHI 327, 333, 334 LG 015, 014
JVC
LG 332, 338 ONKYO 022
LOEWE 358, 355, 360, 361, 320, 351 PANASONIC 018, 027, 020, 002
MATSUI 356, 357 PHILIPS 009, 028, 023, 024, 016, 003
ORION 328 PIONEER 004
PANASONIC 321, 323 SAMSUNG 011, 014
PHILIPS
SAMSUNG 339, 340, 341, 345 THOMSON 012
SANYO 335, 336 TOSHIBA 003
SHARP 324 TOSHIBA 337
THOMSON 319, 350 YAMAHA 018, 027, 020, 002
314, 315, 322, 344, 352, 353,
354, 348, 349
311, 312, 313, 316, 317, 318,
358, 359
LOEWE 009, 028, 023, 024, 016, 003
MATSUI 013, 016
SANYO 007
SHARP 019, 027
Additional Information
GB
65
Page 66

Specifications
KLV-30MR1
Media Receiver Unit (MBT-MRL1)
Power Requirement: 220-240V AC; 50/60 Hz
Power Consumption: 30 W
Standby Power Consumption: 0.6 W
Dimensions (w x h x d):
Approx. 430 x 105 x 348 mm
Weight: Approx. 6 kg
Display Unit (LDM-3000)
Power Requirement: 220-240V AC; 50/60 Hz
Screen Size: 30inches
Approx. 76 cm measured diagonally
Display Resolution:
1280 dots (horizontal) x 768 lines
(vertical)
Power Consumption: 150W
Standby Power Consumption: 0.1W
Dimensions (w x h x d):
Approx. 971.2 x 594.4 x 229 mm
with stand
Approx. 971.2 x 524.3 x 93.4 mm
without stand
Weight: Approx. 20 kg
Approx. 27 kg (including stand)
Panel System:
LCD Display Panel
TV system:
Depending on your country selection:
B/G/H, D/K, L, I
Colour system:
PAL, SECAM
NTSC 3.58, 4.43 (only Video In)
Aerial:
75 ohm external terminal for VHF/UHF
Channel Coverage:
VHF: E2-E12
UHF: E21-E69
CATV: S1-S20
HYPER: S21-S41
D/K: R1-R12, R21-R69
L: F2-F10, B-Q, F21-F69
I: UHF B21-B69
Rear Terminals:
1/
21-pin Scart connector (CENELEC standard)
including audio/video input, RGB input, TV
audio/video output.
2/
21-pin Scart connector (CENELEC standard)
including audio/video input, RGB input, TV
audio/video output.
S
3/ (SMARTLINK; selectable)
21-pin Scart connector (CENELEC standard)
including audio/video input, S video input,
selectable audio/video output and Smartlink
interface.
4/ (SMARTLINK; selectable)
21-pin Scart connector (CENELEC
standard) including audi o/video input, RGB
input, selectable audio/video output, and
Smartlink interface.
5
Y: 1 Vp-p, 75 ohms, 0.3V negative sync
B: 0.7 Vp-p, 75 ohms
P
R: 0.7 Vp-p, 75 ohms
P
5
audio input (phono jacks)
500 m Vrms (100% modulation),
Impedance: 47 kilo ohms
5 SUB WOOFER: phono jack
: audio outputs (Left/Right) - phono jacks
5 CENTRE SPEAKER IN:
15W x 2 (4-ohms)
CTRL S: minijack
AV MOUSE: minijack
66
Additional Information
Page 67

Front Terminals:
S
6
S video input (4-pin mini DIN):
Y: 1 Vp-p, 75-ohms unbalanced, sync negative
C: 0.286 Vp-p (Burst signal), 75 ohms
6
video input (phono jack):
1 Vp-p, 75-ohms unbalanced, sync negative
6
audio input (phono jacks):
500 m Vrms (100% modulation),
Impedance: 47 kilo ohms
i headphones jack
PC
PC Input (15-Dsub)
G: 0.7 Vp-p, 75 ohms, non Sync on Green
B: 0.7 Vp-p, 75 ohms, non Sync on Green
R: 0.7 Vp-p, 75 ohms, non Sync on Green
HD:1-5 Vp-p
VD: 1-5 Vp-p
PC
PC audio input: minijack
Memory Stick Slot
Sound Output:
10W x 2
Accessories supplied:
• One Remote Control (RM-972)
• Two size AAA batteries (R03 type)
• One Display Interface Cable
• One Coaxial Cable
• One AV Mouse
• Two Mains Leads (Type C-4)
• Two Mains Leads (Type BF)
• Two Mains Leads (Type C-5)
Main leads Type BF and Type C-5 may
not be supplied depending on the
country.
Other features:
• Teletext, Fastext, TOPtext
• Sleep Timer
• Smartlink (direct link between your TV set and a
compatible VCR. For more information on
Smartlink, please refer to the Instruction Manual
of your VCR).
It’s available either 3 or 4. (Selectable)
• TV system Autodetection
•Auto Format
PC Input Timing:
Input signal frequency
Horizontal: 15.6 - 90 kHz
Vertical: 48 - 85 Hz
Maximum Resolution: 1600 dots x 1200 lines
Additional Information
GB
67
Page 68

Preset mode timing table for PC
No. Resolution
(dots x lines)
1 640x480 VESA 31.469 59.940
2 720x400 VGA TEXT 31.469 70.086
3 800x600 VESA 37.879 60.317
4 1024x768 VESA 48.363 60.004
5 1280x768(*) VESA 47.776 59.870
(*) If your graphic board or personal computer is compatible, you can select this mode.
Graphic mode Horizontal
frequency
(kHz)
Vertical
frequency
(Hz)
68
Additional Information
Page 69

Troubleshooting
Here are some simple solutions to problems which may affect the picture and sound.
Problem Possible remedies
No picture
No picture (screen is dark) and no sound. • Check the aerial connection.
The TV turns off automatically. (The TV
enters the standby mode.)
No picture or no menu information from
equipment connected to the Scart
connector.
Poor picture/Unstable picture.
Double images or ghosting. • Check aerial/cable connections.
Only snow and noise appears on the
screen.
Dotted lines or stripes. • Keep the TV away from electrical noise sources such as cars,
No colour on colour programmes. • Using the menu system, select the “Picture Adjustment”
Some tiny black points and/or bright
points on the screen.
The picture is too bright. • Using the menu system, select the “Picture Adjustment”
Picture (stripe) noise. • Make sure that the aerial is connected using the supplied
Poor picture (white saturation) when
viewing a signal from Scart connector
S
3/ .
• Connect the display unit and media receiver unit to the mains,
and press the power switch on the front of media receiver
unit.
• Connect the display unit to the media receiver unit using the
supplied display interface cable.
• If the (power on/standby) indicator is on, press TV
on the remote control.
• Check if the Sleep Timer is activated (page 40).
• Check if the On/Off Timer is activated (page 42).
• Check if Auto Shutoff is activated (page 41).
• Check that the optional equipment is on and press the
button repeatedly on the rem ote control until the correct input
symbol is displayed on the screen.
• Check the connection between the optional equipment and
the TV.
• Check the aerial location and direction.
• Check if the aerial is broken or bent.
• Check if the aerial has reached the end of its serviceable life.
(3-5 years in normal use, 1-2 years at the seaside)
motorcycles, or hair-dryers.
menu and select “Reset” to return to the factory settings
(page 27).
• If you set the Power Saving function to “Reduce,” picture
colours may become dimmer (page 33).
• The picture of a display unit is composed of pixels. Tiny
black points and/or bright points (pixels) on the screen, do
not indicate a malfunction.
menu and select “mode.” Then select the desired picture
mode (page 26).
coaxial cable.
• Keep the aerial cable away from other connecting cords.
• Do not use 300-ohm twin lead cables as interference may
occur.
• Make sure that the output signal of the equipment connected
to the Scart connector 3/ is not an RGB signal. If it
is an RGB signal, please connect the equipment to Scart
1/ ,
2/ or 4/ .
S
GB
(continued)
Additional Information
69
Page 70

Problem Possible remedies
Distorted picture and noisy sound. • Check if any connected optional equipment is installed in
Stripe noise during playback/recording of
a VCR.
Poor or no picture (screen is dark), but
good sound.
Noisy picture when viewing a TV
channel.
Distorted picture when changing
programmes or selecting teletext.
Wrong characters appear w hen vi ewing
teletext.
Wrong characters appear w hen vi ewing
NexTView.
front of the TV or at the side of the TV. When installing
optional equipment, leave some space between the optional
equipment and TV.
• Video head interference. Keep your VCR away from the TV.
• Leave a space of 30 cm between your VCR and the display
unit to avoid noise.
• Avoid installing your VCR in front of the display unit or at
the side of the display unit.
• Using the menu system, select the “Picture Adjustment”
menu and select “Reset” to return to the factory settings
(page 27).
• If the PICTURE OFF indicator lights up in blue, press
(picture off) on the remote control.
• Using the menu system, select the “Manual Programme
Preset” option in the “Set Up” menu and adjust Fine Tuning
(AFT) to obtain better picture reception (page 39).
• Using the menu system, set the “NR” (Noise Reduction)
option in the “Picture Adjustment” menu to reduce the noise
in the picture (page 27).
• Turn off any equipment connected to the Scart connector on
the rear of the media receiver unit.
• Using the menu system, enter the “Language/Country”
option in the “Set Up” menu and select the country in which
you operate the TV set (page 36). For Cyrillic languages, we
recommend that you select Russia in case your own country
does not appear in the list.
• Using the menu system, enter the “Language/Country”
option in the “Setup” menu and select the country as the
NexTView is broadcasted (page 36).
No sound/Noisy sound.
Good picture, no sound. • Press the 2 +/– or % (mute) on the remote control.
Audio noise. • Make sure that the aerial is connected using the supplied
The TV fan noise becomes bigger. • The ventilation holes can accumulate dust over a period of
Cannot operate the menu.
• Check that “Speaker” option is set to “Main” in the
“Features” menu (page 33).
• If headphones are connected, select the “
option in the “Sound adjustment” menu to “Off,” or
disconnect the headphones.
coaxial cable.
• Keep the aerial cable away from other connecting cords.
• Do not use 300-ohm twin lead cables as interference may
occur.
time. the accumulated d ust may make the cooling function of
the built-in fan less effective. To prevent this, we recommend
removing the dust periodically (once a month) using a
vacuum cleaner.
• If the item you want to select appears in a pale colour, you
cannot select it.
i Speaker Link”
70
Additional Information
Page 71

Problem Possible remedies
Strange sound.
The TV cabinet creaks. • Changes in room temperature sometimes causes the TV
The TV whirs. • The TV’s fan setting is working. This does not indicate a
The TV ticks. • An electrical circuit inside the TV is activated when the TV
The TV buzzes. • There might be a surge sound when turning on the TV. This
Remote control does not function. • Check that the Media Selector on the remote control is set
The (power on/standb y) indi cator on
cabinet to expand or contract, which can make slight noises.
This does not indicate a malfunction.
malfunction.
is turned on. This does not indicate a malfunction.
does not indicate a malfunction.
correctly for the device you are using (VCR, TV or DVD).
• If the remote control does not operate the VCR or DVD even
when the Media Selector has been set correctly, enter the
necessary code set as explained in “Remote Control
Configuration for VCR/DVD” on page 64.
• Replace the batteries.
• Contact your nearest Sony service centre.
the TV flashes.
Personal Computer
Problem Possible remedies
No picture
If the NO INPUT SIGNAL message
appears on the screen or if the (power
on/standby) indicator lights up in yellow
If the OUT OF SCAN RANGE message
appears on the screen
®
If using Windows
If using a Macintosh** system • When connecting a Macintosh computer, use an adapter (not
* • If you replaced an old monitor with this TV, reconnect the
• Check that the video signal cable is properly connected and
all plugs are firmly seated in their sockets.
• Check that the 15-Dsub video input connector’s pins are not
bent or pushed in.
Problems caused by the connected computer
• The computer is in power saving mode. Try pressing any key
on the computer keyboard.
• Check that the computer’s power is “on.”
• Check that the graphic board is completely seated in the
proper bus slot.
Problems caused by the connected computer
• Check that the video frequency range is within that specified
for the monitor. If you replaced an old monitor with this TV,
reconnect the old monitor and adjust the frequency range to
the following:
Horizontal: 15.6 – 90 kHz
Vertical: 48 – 85 Hz
old monitor and do th e following. Select 640 x 480 resolu tion
at 60Hz for Windows using the Windows device selection
screen.
supplied) if necessary. Connect the adapter to the computer
before connecting the video signal cable.
GB
(continued)
Additional Information
71
Page 72

Problem Possible remedies
Picture flickers , b oun c es , o s cillates, or is
scrambled.
• Using the menu system, select “Adjust Pixel” option in the
“Screen Control” menu and adjust “Dot phase” or “Total H
Pixel” (page 32).
• Try connecting the TV to a different mains socket, preferably
on a different circuit.
Problems caused by the connected computer
• Check your graphic board manual for the proper TV setting.
• Confirm that the graphic mode and the frequency of the input
signal are supported by this TV (page 68). Even if the
frequency is within the proper range, some graphics boards
may have a sync pulse that is too narrow for the TV to sync
correctly.
• Adjust the computer’s refresh rate (vertical frequency) to
obtain the best possible picture.
Picture is fuzzy.
• Using the menu system, adjust “Brightness” and “Contrast”
in the “Picture adjustment” menu (page 27).
• Using the menu system, select “Adjust Pixel” option in the
“Screen Control” menu and adjust “Dot phase” or “Total H
Pixel”(page 32).
Problems caused by the connected computer
• If the resolution is more than the numerical value specified
in “Specifications” on page 66, the picture is reduced in size
and the picture quality may be less than the original. This is
not a malfunction.
Picture is ghosting.
Picture is not centred or sized properly.
• Eliminate the use of video cable extensions and /or video
switch boxes.
• Check that all plugs are firmly seated in their sockets.
• Using the menu system, select the “Screen Size/Shift” option
in the “Screen Control” menu and adjust “V Size” (page 32).
• Using the menu system, select the “Screen Size/Shift” option
in the “Screen Control” menu, and adjust “H Shift” or “V
Shift” (page 32). Note that s ome graphic modes do not fill the
screen to the edges.
Picture is too small. Problems caused by the connected computer
• Set the resolution of the connected computer to the same as
the TV.
Wavy or elliptical pattern (moire) is
visible.
Colour is not uniform.
• Using the menu system, select the “Adjust Pixel” option in
the “Screen Control” menu and adjust “Dot phase” or “Total
H Pixel”(page 32).
• Using the menu system, select the “Adjust Pixel” option in
the “Screen Control” menu and adjust “Dot phase” or “Total
H Pixel”(page 32).
The TV turns off after a while. Problems caused by the connected computer
• Set the computer’s power saving setting to off.
* Windows® is a registered trademark of Microsoft corporation in the United States and other
countries.
**Macintosh is a trademark licensed to Apple Computer, Inc., registered in the U.S.A. and other
countries.
72
Additional Information
Page 73

“Memory Stick”
Problem Possible remedies
Cannot insert the “Memory Stick” into
the “Memory Stick” slot.
Cannot save a file.
Cannot delete a file or all materials.
The still image files in the JPEG format
stored in a “Memory Stick” cannot be
displayed.
The moving image files in the MPEG1
format stored in a “Memory Stick”
cannot be displayed.
The image is not displayed and the
or appears.
If you continue to experience problems, have your TV serviced by qualified personnel.
Never open the casing yourself.
• The “Memory Stick” is not facing in the correct direction.
Insert the “Memory Stick” with the
“Memory Stick” slot (page 46).
• The “Memory Stick” is full. Delete unwanted image files in
the “Memory Stick.”
• The write-protect switch on the “Memory Stick” is set to
LOCK. Release the lock.
• The write-protect switch on the “Memory Stick” is set to
LOCK. Release the lock.
• The image file is protected. Release the protection in the
index Screen.
• Select “Optio n” in the Memory Stick Hom e and select “File.”
Then set “Filter” to “Still” or “Off” (page 48).
• Select “Optio n” in the Memory Stick Hom e and select “File.”
Then set “Filter” to “Movie” or “Off” (page 48).
• The image file is not DCF-compatible.
b mark facing up into the
Additional Information
GB
73
Page 74

Television Channel Number Guide for United
Kingdom
Only the main transmitters are listed. Information regarding the regional sub-relay channel numbers can
be obtained by contacting The BBC Engineering Information Dept., Telephone Number 020 7852 5040.
74
Additional Information
Page 75

Page 76

Page 77

Bedienungsanleitung
DE
1
Page 78

2
Page 79

Einführung
Vielen Dank, dass Sie sich für diesen Sony-Farbfernseher mit LCD-Bildschirm entschieden
haben.
Vor dem Gebrauch dieses Fernsehers lesen Sie seine Bedienungsanleitung bitte sorgfältig
durch und bewahren Sie diese für die weitere Anwendung für später auf.
In dieser Bedienungsanleitung verwendete Symbole:
.........Wichtige Information.
.........Information über die Funktionen.
1,2 ...........Reihenfolge der zu befolgenden
Anleitungen.
....Die dunkel getönten Tasten der
OK
Fernbedienung entsprechen den
Tasten, die betätigt werden müssen,
um die verschiedenen Anleitungen
auszuführen.
..........Information über das Resultat der
befolgten Anleitungen.
Inhaltsverzeichnis
Sicherheitsmaßnahmen
Sicherheitsmaßnahmen ..........................................................................................................................5
Zusätzliche Sicherheitsmaßnahmen ..................................................................................................11
Allgemeine Beschreibung
Kontrolle der mitgelieferten Zubehörteile ........................................................................................ 13
Allgemeine Beschreibung des Fernsehers mit Bildschirm .............................................................14
Allgemeine Beschreibung der Tasten und Anzeigen der Empfangseinheit ................................ 15
Allgemeine Beschreibung der Tasten auf der Fernbedienung ......................................................16
Installation
Einlegen der Batterien in die Fernbedienung ...................................................................................18
Anschluss des Fernsehers mit Bildschirm an die Empfangseinheit ..............................................19
Verstauen der Kabel im Ständer des Fernsehers .............................................................................21
Anschluss der Antenne und des Videorecorders ............................................................................22
Erstmalige Inbetriebnahme
Einschalten und automatische Feinabstimmung des Fernsehers .................................................. 23
Das Menü- System auf dem Bildschirm
Einführung in das Menü- System auf dem Bildschirm und seine Anwendung ......................... 26
Bild- Einstellungen ...............................................................................................................................26
Ton- Einstellungen ................................................................................................................................28
Bildschirm Einstellen ............................................................................................................................30
Funktionen .............................................................................................................................................33
Grundeinstellungen ..............................................................................................................................36
Timer .......................................................................................................................................................40
Gerätestatus ...........................................................................................................................................43
DE
(wird fortgesetzt)
Inhaltsverzeichnis
3
Page 80

„Memory Stick“
Information über das „Memory Stick“ ..............................................................................................44
Anwendung des „Memory Stick“ „MS Home“ ............................................................................... 47
Anwendung des „Memory Stick“ (MS Home) ................................................................................48
Videotext
Videotext ................................................................................................................................................56
NexTView
NexTView* .............................................................................................................................................57
Zusätzliche Information
Anschluss von frei wählbaren Zusatzgeräten .................................................................................. 60
Anwendung der frei wählbaren Zusatzgeräte ................................................................................. 64
Grundeinstellung der Fernbedienung für einen Videorecorder oder ein DVD .......................... 65
Technische Daten ..................................................................................................................................67
Störungsbehebung ................................................................................................................................70
4
Inhaltsverzeichnis
Page 81

Sicherheitsmaßnahmen
Zur Schadensverhütung
Netzkabel und Antennenkabel
Ziehen Sie den Netzstecker
und das Antennenkabel,
wenn das Gerät an einem
anderen Platz aufgestellt
werden soll.
Transportieren Sie den
Fernseher nicht, wenn der Netzstecker und das
Antennenkabel angeschlossen sind; hierdurch
könnten die Kabel beschädigt werden und einen
Brand oder einen elektrischen Schlag verursachen.
Wenn das Gerät herunterfällt und aus einem
sonstigen Grund beschädigt wird, lassen Sie es
sofort durch qualifiziertes Fachpersonal einer
technischen Kundendienststelle überprüfen.
Für den Fernseher mit bildschirm
Installation
Die Installation des
Bildschirms an der Wand
muss durch einen
qualifizierten Fachmann
vorgenommen werden.
Eine falsche Installation
kann für das Gerät im Fall eines Erdbebens, usw.
eine Gefahr darstellen.
Ärztliche
Institutionen
Dieses Gerät darf an
Orten, an dem
ärztliche
Einrichtungen in
Betrieb sind, nicht
installiert werden. Es kann ein fehlerhaftes
Funktionieren der ärztlichen Instrumente
verursachen.
Transport
Die Beförderung dieses
Fernsehers mit
Bildschirm benötigt zwei
oder mehr Personen.
Wenn Sie dieses Gerät
anders transportieren, als angegeben, kann es
herunterfallen und ernsthafte Schäden
verursachen. Sicher stellen, dass es von zwei
oder mehr Personen transportiert wird. Bei der
Beförderung müssen Schläge oder übermäßige
Vibrationen vermieden werden; es kann
herunterfallen und dadurch stark beschädigt
werden oder bedeutende Verletzungen
auslösen. Wenn Sie diesen Fernseher wegen
einer Reparatur oder bei einem Umzug
transportieren müssen, verpacken Sie ihn
mithilfe der Originalverpackungsmaterialien
im Originalkarton.
(wird fortgesetzt)
Sicherheitsmaßnahmen
DE
5
Page 82

Installation und Beförderung
Belüftung
Bedecken Sie nicht die
Lüftungsöffnungen des
Fernsehgeräts. Es könnte eine
Überhitzung und Feuerbildung
verursacht werden. Wenn das
Gerät nicht gut belüftet wird, kann
es Staub und Schmutz aufspeichern. Befolgen Sie
zu einer guten Belüftung die folgenden Ratschläge:
• Installieren Sie das Gerät nicht nach hinten oder
seitwärts geneigt.
• Installieren Sie den Fernseher nicht auf dem
Kopf stehend oder verkehrt.
• Stellen Sie den Fernseher nicht auf einen Teppich
oder auf das Bett.
• Bedecken Sie den Fernseher nicht mit Stoff, wie
z.B. mit Vorhängen, oder durch Zeitungen, usw.
Fahrzeuge und Dächer
Installieren Sie den
Fernseher nicht in einem
Fahrzeug und hängen Sie
ihn nicht an das Dach. Das
Schütteln des Fahrzeugs
kann dazu führen, dass er
herabfällt und Verletzungen hervorruft.
Wasser und Feuchtigkeit
Verwenden Sie dieses Fernsehgerät nicht in der
Nähe von Wasser – z.B. in der Nähe einer
Badewanne oder einer Dusche. Schützen Sie das
Gerät außerdem vor Regen, Feuchtigkeit und
Rauch. Es kann Feuer oder ein elektrischer Schlag
hervorgerufen werden.
Verwenden Sie das Gerät nicht an Orten, an denen
die Gefahr besteht, dass Insekten in das Gerät
eindringen.
Gebrauch im Freien
Installieren Sie den
Fernseher nicht im
Freien. Wenn er dem
Regen ausgesetzt
wird, kann Feuer
oder ein elektrischer
Schlag verursacht
werden. Bei direkter Einwirkung der
Sonnenstrahlen kann der Fernseher sich
übermäßig erhitzen und Schaden nehmen.
Schiff oder
Segelboot
Installieren Sie
dieses Fernsehgerät
nicht in einem Schiff
oder einem
Segelboot. Wenn es
dem Meerwasser ausgesetzt wird, kann dies
einen Brand oder Schäden des Fernsehgeräts
hervorrufen.
Für den Fernseher mit Bildschirm
Frei wählbare Zubehörteile
Bei der Installation des Bildschirms,
sei es auf einem Gestell oder an einer
Halterung zum Aufhängen an der
Wand, beachten Sie bitte die
folgenden Hinweise. Bei Nichtbeachtung könnte
der Fernseher herunterfallen und ernsthafte
Verletzungen verursachen.
• Vergewissern Sie sich bei der Installation, die
Montageanleitungen zu befolgen, die mit dem
Gestell mitgeliefert werden.
• Stellen sie sicher, dass die Stützen des Gestells
richtig befestigt werden.
6
Sicherheitsmaßnahmen
Fall
Stellen Sie den Fernseher mit
Bildschirm auf ein sicheres
und stabiles Untergestell.
Hängen Sie nichts am
Bildschirm auf. Der Fernseher
kann vom Untergestell oder aus der
Wandhalterung fallen und dann
Beschädigungen oder ernsthafte Verletzungen
hervorrufen.
Sorgen Sie dafür, dass keine Kinder auf den
Fernseher klettern.
Page 83

Stromspeisung
Überlastung
Dieses Gerät wurde
entworfen für eine
Stromzufuhr von 220 –
240 V Wechselstrom.
Achten Sie darauf, nicht
zu viele Geräte am
gleichen Netzhauptschalter anzuschließen, da
hierdurch ein Brand oder ein elektrischer Schlag
verursacht werden könnte.
Stromzufuhr
Verwenden Sie keine einfache
Steckdose minderer Qualität für die
Stromzufuhr. Stecken Sie den Stecker
bis zum Anschlag in die Steckdose.
Wenn er lose sitzt, können Funken
erzeugt werden, die einen Brand
verursachen könnten. Lassen Sie durch Ihren
Elektriker die Steckdose durch eine andere, besserer
Qualität ersetzen.
Feuchtigkeit
Berühren Sie das elektrische Kabel
nicht mit feuchten Händen. Wenn
Sie den Stecker mit feuchten
Händen in die Steckdose stecken
oder herausziehen, können Sie einen
elektrischen Schlag erhalten.
Gewitter
Berühren Sie während
Gewittern zu Ihrer eigenen
Sicherheit weder die Teile
des Fernsehgeräts, noch das
Netzkabel oder das
Antennenkabel.
Schutz des
elektrischen
Kabels
Ziehen Sie das
Netzkabel direkt am
Stecker heraus.
Ziehen Sie nie am Kabel selbst.
Verkabelung
Ziehen Sie das Hauptkabel aus der Steckdose,
wenn Sie Kabel installieren. Überprüfen Sie zu
Ihrer eigenen Sicherheit, dass das Hauptkabel
aus der Steckdose gezogen ist, wenn Sie
Anschlüsse vornehmen.
Reinigung
Reinigen Sie den Hauptstecker
regelmäßig. Wenn sich Staub
ansammelt und dieser feucht
wird, kann die Isolierung
Schaden nehmen und ein
Brand hervorgerufen werden. Ziehen Sie den
Hauptstecker und reinigen Sie ihn regelmäßig.
(wird fortgesetzt)
Sicherheitsmaßnahmen
DE
7
Page 84

Anwendung
Ein Defekt, der den technischen Kundendienst
benötigt
Wenn die Oberfläche des Bildschirms rissig wird
oder bricht, berühren Sie den Fernseher nicht, bis
das Netzkabel aus der Steckdose gezogen ist. In
gegenteiligem Fall können Sie einen elektrischen
Schlag erhalten.
Instandhaltung
Öffnen Sie weder das
Gehäuse, noch die
hintere Abdeckung.
Wenden Sie sich
ausschließlich an
qualifiziertes
Kundendienstpersonal.
Hinsichtlich der Empfangseinheit
Aufstellen von
Gegenständen
Stellen Sie keine schweren
Gegenstände auf die
Empfangseinheit. Dies kann
das Gerät beschädigen.
Lüftungsöffnungen
Stecken Sie nichts in die
Lüftungsöffnungen. Wenn Sie
metallische Gegenstände oder
irgendein entflammbares
Produkt in die Öffnungen
einführen, kann ein Brand
entstehen oder ein elektrischer
Schlag erfolgen.
Feuchtigkeit und
Verbrennung
• Schützen Sie das
Fernsehgerät vor
Feuchtigkeit. Achten
Sie darauf, dass
keinerlei Flüssigkeit in das Fernsehgerät
gelangt. Wenn Flüssigkeiten oder
Fremdkörper in das Gerät gelangt sind,
dürfen Sie es nicht mehr benutzen.
Andernfalls kann es zu einem elektrischen
Schlag kommen und das Gerät kann
beschädigt werden. Lassen Sie das
Fernsehgerät umgehend von qualifiziertem
Fachpersonal überprüfen.
• Halten Sie zur Vermeidung eines Brandes
alle entflammbaren Produkte oder solche
mit offener Flamme (z.B. Kerzen) entfernt.
Behälter mit Flüssigkeit
Stellen Sie auf die
Empfangseinheit keine
Gegenstände, die Flüssigkeit
enthalten. Hierdurch kann
ein elektrischer Schlag oder
eine Beschädigung der
Einheit verursacht werden.
8
Sicherheitsmaßnahmen
Page 85

Zusätzliche Sicherheitsinformation
Elektrischer Schlag
Berühren Sie den Fernseher nicht mit nasser Hand.
Hierdurch können Sie einen elektrischen Schlag
empfangen oder das Gerät beschädigen.
Anbringung an vorstehenden Stellen
Installieren Sie den Bildschirm nicht an Stellen, die
vorstehen. Bei der Installation an den nachfolgend
beschriebenen Stellen können Verletzungen
verursacht werden:
• Installieren Sie das Gerät nicht an Stellen, wo es
vorsteht, wie z. B. an Säulen.
• Bringen Sie das Gerät nicht so an, dass man mit
dem Kopf daran stoßen könnte.
Aufstellung
Stellen Sie das Fernsehgerät
nicht in heißer, feuchter oder
übermäßig staubiger
Umgebung auf. Stellen Sie
das Fernsehgerät nicht an
Orten auf, an denen es
mechanischen Vibrationen ausgesetzt ist.
Zubehörteile
Schützen Sie den Bildschirm vor einem möglichen
Fall. Wenn er nicht in angemessener Weise
angebracht ist, kann er herunterfallen und
Verletzungen verursachen. Verhüten Sie diese
Eventualität und stellen Sie das Gerät auf einen
sicheren Ständer oder sonstige Untergestelle auf
den Boden oder bringen Sie es in der angegebenen
Art und Weise an der Wand an wie es in den
beigefügten Anleitungen beschrieben ist.
Gewicht
Stellen Sie sich nicht auf die
Empfangseinheit. Sie kann
zusammenbrechen oder zerbrechen
und Verletzungen verursachen.
Tragen Sie speziell mit kleinen
Kindern dafür Sorge.
Entsorgen des Fernsehgeräts
• Entsorgen Sie das Fernsehgerät nicht im
normalen Hausmüll.
• Der LCD-Bildschirm enthält kleine Mengen an
Flüssigkristall und Quecksilber. Die
Leuchtstoffröhre in diesem Fernsehgerät enthält
ebenfalls Quecksilber. Entsorgen Sie das Gerät
gemäß den örtlichen Vorschriften.
Zerbrochene Teile
Werfen Sie keine
Gegenstände gegen den
Fernseher. Der Bildschirm
aus Glas kann explodieren
und schwere
Verletzungen verursachen.
Öl
Installieren Sie den Fernseher nicht in
Restaurants, die Öl verwenden. Der mit Öl
getränkte Staub kann in das Gerät eindringen
und es beschädigen.
Korrosion
Wenn Sie den Fernseher in der Nähe des
Meeresufers benutzen, kann der Salzgehalt die
Metallteile korrodieren und interne Schäden
oder einen Brand verursachen. Hierdurch kann
auch die Gebrauchsdauer des Geräts verkürzt
werden. Wenn das Gerät solchen Bedingungen
ausgesetzt ist, müssen Sie entsprechende
Maßnahmen treffen, um die Feuchtigkeit und
die Temperatur des Bereichs, in dem es
aufgestellt ist, herabzusetzen.
Empfohlene Aufstellung
für die Empfangseinheit
Stellen Sie die
Empfangseinheit auf eine
stabile und ebene
Unterlage. In gegenteiligem
Falle kann sie herunterfallen und Verletzungen
hervorrufen. Verwenden Sie einen frei
wählbaren Sony- Ständer, der die gebotene
Festigkeit vorweist.
Reinigung
Ziehen Sie das Netzkabel aus der Steckdose,
bevor Sie den Fernseher reinigen. Wenn er bei
der Reinigung angeschlossen ist, können Sie
einen elektrischen Schlag empfangen.
DE
(wird fortgesetzt)
Sicherheitsmaßnahmen
9
Page 86

LCD-Bildschirm
• Der LCD-Bildschirm wird in einer
Hochpräzisionstechnologie hergestellt und der Anteil
der effektiven Pixel beträgt mindestens 99,99 %.
Trotzdem sind möglicherweise schwarze Punkte
oder helle Lichtpunkte (rot, blau oder grün)
permanent auf dem LCD-Bildschirm zu sehen.
Dies ist auf die spezifischen Eigenschaften des LCDBildschirms zurückzuführen und keine Fehlfunktion.
• Schützen Sie den LCD-Bildschirm vor direktem
Sonnenlicht. Andernfalls kann die
Bildschirmoberfläche beschädigt werden.
• Stoßen Sie nicht gegen den vorderen Filter,
zerkratzen Sie ihn nicht und stellen Sie nichts auf
dieses Gerät. Das Bild kann ungleichmäßig werden
und der LCD-Bildschirm kann beschädigt werden.
• Wenn dieses Gerät an einem kalten Ort verwendet
wird, kommt es möglicherweise zu Schmierstreifen
im Bild oder das Bild wird dunkel.
Dabei handelt es sich nicht um eine Fehlfunktion.
Diese Effekte verschwinden, wenn die Temperatur
steigt.
• Wenn Standbilder längere Zeit angezeigt werden,
kann es zu Doppelbildern kommen. Dieser Effekt
verschwindet möglicherweise nach einigen
Augenblicken.
• Bei Betrieb werden Bildschirm und Gehäuse warm.
Dies ist keine Fehlfunktion.
Leuchtstoffröhre
Bei diesem Gerät wird als Lichtquelle eine spezielle
Leuchtstoffröhre eingesetzt. Wenn das Bild auf dem
Bildschirm dunkel wird, flimmert oder gar nicht mehr
erscheint, ist die Leuchtstoffröhre defekt und muss
ausgetauscht werden. Wenden Sie sich bitte an
qualifiziertes Kundendienstpersonal, um die
Leuchtstoffröhre austauschen zu lassen.
Reinigen der Bildschirmoberfläche
Die Bildschirmoberfläche ist mit einer
Spezialbeschichtung versehen, die starke
Lichtreflexionen verhindert.
Beachten Sie unbedingt folgende
Sicherheitsmaßnahmen, um eine Beschädigung der
Beschichtung zu vermeiden.
• Entfernen Sie Staub von der Bildschirmoberfläche
vorsichtig mit einem weichen Tuch. Bei stärkerer
Verschmutzung feuchten Sie ein weiches Tuch leicht
mit einer milden Reinigungslösung an und wischen
dann über den Bildschirm. Das Tuch kann gewaschen
und mehrmals verwendet werden.
• Verwenden Sie keine Scheuerschwämme, keine
alkalischen/säurehaltigen Reinigungsmittel, kein
Scheuerpulver und keine starken Lösungsmittel wie
Alkohol, Benzin oder Verdünnung.
Ventilator
Dieser Fernseher ist zum Schutz vor Überhitzung mit
einem Ventilator ausgestattet.
Beachten Sie, dass das Geräusch des Ventilators unter
Umständen zu hören ist, und zwar je nachdem, wo der
Fernseher installiert ist.
Netz- und
Antennenkabel
Wenn Sie am Netz- oder
am Antennenkabel
Beschädigungen
verursachen, kann ein
Brand oder ein
elektrischer Schlag
verursacht werden.
• Drücken Sie das Kabel
nicht übermäßig
zusammen und
biegen oder verdrehen
Sie es nicht zu sehr. Die inneren Filamente
können dadurch frei gesetzt werden und
brechen, was einen Kurzschluss verursachen
würde und das Ergebnis kann ein Brand oder ein
elektrischer Schlag sein.
• Nehmen Sie keine Änderungen vor, beschädigen
Sie das Netz- oder Antennenkabel nicht.
• Achten Sie darauf, dass keine schweren
Gegenstände auf dem Netz- oder Antennenkabel
liegen.
• Halten Sie das Netz- oder Antennenkabel
entfernt von Wärmequellen.
• Achten Sie darauf das Netzkabel immer aus der
Steckdose zu ziehen, indem Sie am Stecker
ziehen.
Halten Sie sich an die Anleitungsanweisungen,
wenn Sie das Antennenkabel unterbrechen. Wenn
das Netz- oder Antennenkabel beschädigt ist,
benutzen Sie es nicht und bitten Sie Ihren Händler
oder den technischen Kundendienst von Sony um
Austausch.
Nichtgebrauch
Aus Umwelt- und
Sicherheitsgründen
wird empfohlen den
Fernseher nicht in der
„Standby“- Position
zu belassen, wenn er
nicht benutzt werden soll. Ziehen Sie das Netzkabel
aus der Steckdose.
Kabel
Legen Sie die Kabel so, dass Sie sich mit den Füßen
nicht darin verfangen können. Sie könnten
hierdurch den Fernseher beschädigen.
Installation
Installieren Sie frei wählbare Komponenten nicht zu
nahe am Bildschirm. Lassen Sie mindestens einen
Abstand von 30 cm zum Bildschirm. Wenn Sie vor
oder neben dem Bildschirm einen Videorecorder
installieren, kann dadurch das Bild verzerrt
werden.
Warme Oberfläche
Berühren Sie die Bildschirmoberfläche nicht. Sie
bleibt sogar einige Zeit nach dem Ausschalten des
Fernsehgeräts warm.
10
Sicherheitsmaßnahmen
Page 87

Zusätzliche Sicherheitsmaßnahmen
Zum bequemen Betrachten des Fernsehens
• Zum Betrachten des Fernsehens in bequemer Weise wird ein Abstand vom Fernsehgerät
empfohlen, der vier bis sieben Mal der Bildschirmhöhe entspricht.
• Wenn Sie das Fernsehen in einem Raum mit mäßiger Beleuchtung oder wenig Licht betrachten,
setzen Sie Ihre Augen einer besonderen Anstrengung aus. Das andauernde Ansehen des
Bildschirms während langer Zeiträume verursacht ebenfalls Ermüdungserscheinungen für das
Sehvermögens.
Zum Installieren des Fernsehgeräts
Installieren des Bildschirms
Verwenden Sie die Wandhalterung oder die angegebenen Ständer.
Installation der Empfangseinheit
Lassen Sie genügend Abstand zwischen dem Entlüftungsventilator, der hinter der Einheit und der
Wand angebracht ist.
• Bringen Sie den Bildschirm nicht an Stellen an, die extremen Temperaturen ausgesetzt sind, z.B.
unter direkter Sonnenbestrahlung oder in der Nähe eines Heizkörpers oder einer Austrittsöffnung
heißer Luft. Wenn der Fernseher hohen Temperaturen ausgesetzt ist, kann er übermäßig erwärmt
werden und das kann Verformungen der Formteile oder Funktionsstörungen hervorrufen.
• Wenn der Bildschirm direkt von einem kalten Bereich in einen warmen gebracht wird, oder wenn
die Raumtemperatur sich plötzlich ändert, können die Bilder an einigen Stellen verschwommen
oder ausgebleicht erscheinen. Das ist darauf zurückzuführen, dass sich die Feuchtigkeit auf den im
Innern des Fernsehgeräts existierenden Spiegel und Linsen kondensiert hat.
• Beleuchten Sie den Bildschirm nicht direkt oder durch Sonnenlicht, um ein klares Bild zu erhalten.
Verwenden Sie nach Möglichkeit senkrechtes Licht von der Decke aus.
• Wenn der Schalter auf Aus steht, ist der Fernseher nicht ausgeschaltet. Ziehen Sie zum kompletten
Ausschalten den Netzstecker aus der Steckdose.
Zum Einstellen der Lautstärke
• Stellen Sie die Lautstärke so ein, dass die Nachbarn nicht gestört werden. Der Ton wird in der Nacht
mit größerer Leichtigkeit übertragen. Wir schlagen deshalb vor, dass Sie die Fenster schließen oder
Kopfhörer verwenden.
• Bei der Verwendung von Kopfhörern stellen Sie die Lautstärke so ein, dass eine übermäßige
Lautstärke vermieden wird, da diese das Trommelfell schädigen kann.
Für das Bild
Bei einem fortgesetzten Gebrauch dieses Fernsehgeräts in Format 4:3 kann die Bildschirmoberfläche
4:3 im Bildschirmformat 16:9 dunkler werden. Um dieses Problem zu vermeiden, muss der Bildmodus
„Smart“ angewendet werden.
Zur Handhabung der Fernbedienung
• Benutzen Sie die Fernbedienung mit Vorsicht. Lassen Sie sie nicht fallen und treten Sie nicht darauf
oder schütten Sie keine Flüssigkeit darüber.
• Legen Sie die Fernbedienung nicht in die Nähe einer Wärmequelle oder an eine Stelle mit direkter
Sonnenbestrahlung und ebenso wenig in einen feuchten Raum.
(wird fortgesetzt)
Sicherheitsmaßnahmen
DE
11
Page 88

Zur Instandhaltung und Reinigung der Bildschirmoberfläche des Fernsehgeräts
Zur Verhütung der Abnutzung des Bildschirms beachten Sie bitte die unten aufgeführten Punkte.
Drücken oder zerkratzen Sie den Bildschirm nicht mit harten Gegenständen und werfen Sie nichts
dagegen. Hierdurch kann der Bildschirm beschädigt werden.
• Versichern Sie sich, dass der Netzstecker der Empfangseinheit herausgezogen ist, bevor Sie die
Reinigung vornehmen.
• Berühren Sie die Bildschirmoberfläche nicht nachdem sie während eines längeren Zeitraums
ununterbrochen in Betrieb war, da der Bildschirm heiß wird.
• Wir empfehlen die Bildschirmoberfläche nicht oft zu berühren..
• Reinigen Sie den Bildschirm mit einem weichen Tuch.
• Verwenden Sie in keinem Fall einen Topfreiniger zum Scheuern, Entfettungspulver oder Lösemittel
wie Alkohol oder Benzin. Bei Kontakt mit diesen Mitteln kann die Bildschirmoberfläche beschädigt
werden.
Zur Reinigung des Gehäuses
• Versichern Sie sich, dass der Netzstecker der Empfangseinheit herausgezogen ist, bevor Sie die
Reinigung vornehmen.
• Reinigen Sie das Gehäuse mit einem weichen Tuch.
• Beachten Sie, dass einige Gerätekomponenten des Fernsehgeräts oder die Antireflexbeschichtung
des Bildschirms beschädigt werden können, wenn der Fernseher flüchtigen Lösemitteln wie
Alkohol, Verdünnungsmittel, Benzin oder Insektenbekämpfungsmitteln oder auch, wenn die
Komponenten einem permanenten Kontakt mit Gummi- oder Vinylartikeln ausgesetzt sind.
• Im Lauf der Zeit können die Entlüftungsöffnungen Staub ansammeln. Dieser Staub kann die
Kühlfunktion des im Gerät eingebauten Ventilators verringern. Um dies zu vermeiden, empfehlen
wir Ihnen mit Hilfe eines Staubsaugers den Staub regelmäßig zu entfernen (einmal monatlich).
12
Sicherheitsmaßnahmen
Page 89

Kontrolle der mitgelieferten Zubehörteile
Die Ferritkerne nicht
entfernen.
Eine Fernbedienung
(RM-972):
Zwei Batterien der Größe
AAA (Referenz R03):
Ein Koaxial- Kabel: Eine AV- Maus (Verteiler des
Infrarotsignals der
Fernbedienung):
Die Ferritkerne nicht
entfernen.
Zwei Stromzuführungskabel
(Typ C-4):
Zwei Stromzuführungskabel
(Typ BF):
Ein Antennenkabel:
Zwei Stromzuführungskabel
(Typ C-5):
Die Ferritkerne nicht
entfernen.
Verwenden Sie diese
Stromzuführungskabel
(mit Erdbuchse) für den
Betrieb des Geräts,
ausgenommen im
Vereinigten Königreich
und in der Schweiz.
Die Ferritkerne nicht
entfernen.
• Verwenden Sie diese
Stromzuführungskabel
(mit Erdbuchse) bei
Betrieb des Geräts im
Vereinigten Königreich.
• Siehe „NOTICE FOR
CUSTOMERS IN THE
UNITED KINGDOM“
auf Seite 2 GB , wenn
Sie diese
Stromzuführungskabel
benutzen.
• Je nach Land werden
diese Kabel nicht immer
mitgeliefert.
• Verwenden Sie diese
Strozuführungskabel
(mit Erdbuchse) bei
Betrieb des Geräts in
der Schweiz.
• Je nach Land werden
diese Kabel nicht
immer mitgeliefert.
Allgemeine Beschreibung
DE
13
Page 90

Allgemeine Beschreibung des Fernsehers mit
Bildschirm
Anzeige STROMZUFUHR/
Sensor für die Fernbedienung
Anzeige des TIMER (Zeitschalter)
Anzeige BILD-WEGFALL
Angaben zu den Anzeigen
Die Anzeigen, die im Anschluss aufgeführt werden, befinden sich auf dem Paneel des
Bildschirms und in der Empfangseinheit.
Anzeige STROMZUFUHR/BEREITSCHAFTSMODUS
Diese leuchtet Grün auf, wenn der Fernseher eingeschaltet ist. Im Bereitschaftsmodus leuchtet
sie in Rot. Im Modus PC-Energie- Sparen* leuchtet sie Gelb.
Anzeige des TIMER
Wenn diese aufleuchtet, wird damit angezeigt, dass einer der Timer aktiviert ist. Bei Einstellung
des Timers auf Ein und des Fernsehgeräts im Standby- Modus leuchtet diese Anzeige in Gelb.
Bei Einstellung eines der Timer auf Aus leuchtet die Anzeige in Rot. Konsultieren Sie für weitere
Daten hinsichtlich der Timer das Kapitel „ Timer“ auf der Seite 40.
Anzeige BILD- WEGFALL
Diese leuchtet auf, wenn auf der Fernbedienung gedrückt wird, um das Bild zu löschen. Es
wird nur das Bild gelöscht, der Ton bleibt weiterhin aktiviert.
BEREITSCHAFTSMODUS
POWER/STANDBYTIMERPICTURE OFF
* Wenn der Fernseher mit einem Personalcomputer verbunden ist oder an eine graphische
Videoanlage mit dem System DPMS (Display Power Management System – System der
Energiebewirtschaftung des Bildschirms) angeschlossen ist, reduziert das Gerät
automatisch den Stromverbrauch (Energiesparmodus des Personalcomputers).
Wenn Sie einen Personalcomputer an den PC- Eingang
Funktion „Auto.Ausschalt“ nicht operieren. Nach einer gewissen Zeit ohne
Signalempfang durch einen Computer stellt der Fernseher auf den Modus des
Personalcomputers mit Energiesparen um, nicht auf die Stellung Standby.
14
Allgemeine Beschreibung
PC
anschließen, kann die
Page 91

Allgemeine Beschreibung der Tasten und
Anzeigen der Empfangseinheit
Anzeige Einschaltung /
Bereitschaftsmodus (Standby)
Schalter Ein /
Aus
Zeitschalter-
Anzeige (Timer)
Slot für das „Memory
Stick“
Lampe bei Zugriff
auf „Memory Stick“
PROG Kanal- Wähltaste
(Fernsehsender) des folgenden
oder vorausgegangenen Kanals +/-
2 Kontrolltaste der
Lautstärke +/-
64321
5
Eingangsanzeigen der
Geräteauswahl
Zum Betrachten des angeschlossenen
Geräts drücken Sie wiederholt die
Taste , bis die entsprechende
Eingangsanzeige aufleuchtet. Wenn
Sie weitere Information benötigen,
konsultieren Sie das Kapitel über
„Anwendung der frei wählbaren
Zusatzgeräte“ auf der Seite 64.
Anzeige Fernsehmodus
1 Anzeige 1 (Eingang 1)
2 Anzeige 2 (Eingang 2)
3 Anzeige 3 (Eingang 3)
4 Anzeige 4 (Eingang 4)
5 Anzeige 5 (Eingang 5)
6 Anzeige 6 (Eingang 6)
PC Anzeige des
Personalcomputers
MEMORY
STICK
Anzeige des Memory Stick
PC
MEMORY STICK
654321
Vordere Anschlüsse*
PC
MEMORY STICK
MENU OK
Menü- Taste
* Für weitere Einzelheiten
Eingangs-
Auswahltaste
Taste
Fernsehmodus
L/G/S/I R/D/D/D
66
PROG
PROG
6
PROG
PROG
MENUPCOK
Taste OK
Tasten
///
hinsichtlich der vorderen
Anschlüsse konsultieren Sie das
Kapitel „Anschluss von frei
wählbaren Zusatzgeräten“ auf der
Seite 60.
DE
Allgemeine Beschreibung
15
Page 92

Allgemeine Beschreibung der Tasten auf der Fernbedienung
TVVIDEO
OK
PROG
MENU
Tasten
6 a) Wenn sich der Wähler des
Geräts in der Position TV
befindet.:
b) Wenn sich der Wähler des
Geräts in der Position VCR
(fur Videorecorder)
befindet.:
7 a) Wenn der Wähler der
Anlage auf der Position VCR
(fur Videorecorder) oder
DVD steht:
b) Wenn der Wähler der
Anlage auf der Position TV
steht:
8 Löschen des Bildes:
9 Bildschirmanzeige der Uhr:
Tasten
1
Vorübergehendes
Ausschalten des
Fernsehgerätes:
Beschreibung
Drücken Sie diese Taste, um den Fernseher
vorübergehend auszuschalten (die Anzeigen
der Einschaltung / Bereitschaftsmodus
(Standby) im Bildschirmelement und in der
Empfangseinheit leuchten in Rot). Drücken
Sie die Taste nochmals, um den Fernseher
ausgehend vom Bereitschaftsmodus
(Standby) wieder einzuschalten.
Um Energie zu sparen, wird empfohlen den
Fernseher komplett auszuschalten, wenn er
nicht gebraucht wird.
Wenn nach einer gewissen Zeit weder
ein Fernsehsignal vorliegt, noch eine
Taste betätigt wird, schaltet der
Fernseher automatisch in den
Bereitschaftsmodus (Standby). (Auto
Ausschalt, Seite 42).
2 Videorecorder
oder DVD Ein- /
Ausschalten:
3 Auswahl der
Eingangsquelle:
4 Zum Zeigen der
MS Home
(Bildanzeige des
„Memory
Stick“):
5 Auswählen der
Kanäle:
Drücken Sie diese Taste, um Ihren
Videorecorder oder Ihr DVD ein- oder
auszuschalten.
Drücken Sie diese Taste wiederholt, bis das
gewünschte Symbol der Eingangsquelle auf
dem Bildschirm erscheint.
Drücken Sie diese Taste, um die MS Home
(Bildanzeige des „Memory Stick“) zu sehen.
Für weitere Einzelheiten lesen Sie das Kapitel
„ Verwendung der Bildanzeige des „MS
Home““ auf der Seite 51.
Drücken Sie diese Taste, um Kanäle
auszuwählen.
Für Kanäle mit zweistelliger ProgrammNummer drücken Sie die zweite Zahl
innerhalb von 2,5 Sekunden.
Beschreibung
Drücken Sie diese Taste, um zum zuletzt ausgewählten Kanal
zurückzukehren (der mindestens 5 Sekunden lang aktiviert
gewesen sein muss).
Wenn Sie einen Sony- Videorecorder benützen mit zweistelligen
Programm- Nummern, z.B. 23, drücken Sie zuerst -/- - und
anschließend die Nummern 2 und 3.
Betätigen Sie diese Taste, um Programme aufzunehmen.
Betätigen Sie diese Taste, um die werkseitigen Bild- und TonEinstellungen wieder herzustellen. Hierdurch wird das Gerät auch
neu initialisiert wie bei der ersten Inbetriebnahme desselben.
Drücken Sie diese Taste, um das Bild zu löschen. Es wird nur das
Bild gelöscht; der Ton bleibt aktiviert. Drücken Sie die Taste
nochmals, um es wieder zurückzugewinnen.
Drücken Sie diese Taste, um die Uhr auf dem Bildschirm des
Fernsehgerätes anzuzeigen. Drücken Sie nochmals, um den Befehl
zu löschen.
Die Bildschirmanzeige der Uhr verschwindet automatisch 5
Minuten nach dem Einschalten.
16
Allgemeine Beschreibung
Page 93

Tasten
0 Diese Taste operiert in der Position Videotext und wird auch gebraucht, um die Fernbedienung für den
Betrieb des Videorecorders und des DVD zu programmieren.
qa Auswahl des
Bildschirmformats:
qs Auswählen der Kanäle: Drücken Sie diese Taste, um den folgenden oder vorausgegangenen
qd Bildschirmanzeige des
Menü- Systems:
qf Lautstärke- Regelung: Drücken Sie diese Tasten, um die Lautstärke des Fernsehgeräts
qg Auswählen von
Toneffekten:
qh Auswählen des Bild- Modus: Drücken Sie diese Taste wiederholt, um den Bild- Modus zu ändern.
qj Joystick
a) Wenn sich der Wähler der
Anlage in der Position TV
befindet:
b) Wenn sich der Wähler
der Anlage in der Position
VCR (fur Videorecorder
oder DVD befindet:
qk NexTView: Im Kapitel „NexTView“ auf der Seite 57 finden Sie weitere
ql Auswählen des Videotextes: Drücken Sie diese Taste, um auf Videotext umzustellen.
w; Wähler der Anlage: Mit dieser Fernbedienung können Sie nicht nur den Fernseher,
wa Informationsanzeige auf
dem Bildschirm:
ws Auswählen des Fernseh-
Modus:
wd Ausschalten des Tons: Drücken Sie diese Taste, um den Ton des Fernsehgerätes
Beschreibung
Drücken Sie diese Taste wiederholt, um das Bildschirmformat zu
ändern. Für weitere Einzelheiten lesen Sie das Kapitel „Bildschirm
Einstellen“ auf der Seite 30.
Kanal zu wählen.
Drücken Sie diese Taste, um die Anzeige des Menüs auf dem
Bildschirm des Fernsehgerätes zu sehen. Drücken sie nochmals, um
sie zu löschen.
einzustellen.
Drücken Sie diese Taste wiederholt, um den Toneffekt zu ändern.
• Wenn MENÜ eingeblendet ist, betätigen Sie diese Tasten, um sich
im Menü- System fortzubewegen. Für weitere Einzelheiten lesen
Sie das Kapitel „ Einführung in das Menü- System auf dem
Bildschirm und seine Anwendung“ auf der Seite 26.
• Wenn MENÜ nicht eingeblendet ist, drücken Sie OK , um die
allgemeine Liste sämtlicher abgestimmter Kanäle anzuzeigen.
Anschließend drücken Sie
gewünschten Kanal auszuwählen und hiernach drücken Sie ,
um den ausgewählten Kanal zu sehen.
Bei Benützen dieser Tasten können Sie die hauptsächlichen
Funktionen Ihres Videorecorders oder DVD aufrufen.
oder , um den
Informationen.
sondern auch die hauptsächlichen Funktionen Ihres Videorecorders
oder DVD bedienen.
Schalten Sie die gewünschte Anlage ein und drücken Sie
anschließend wiederholt diese Taste, um VCR (für den
Videorecorder), TV oder DVD auszuwählen. Auf der
ausgewählten Position leuchtet einige Augenblicke lang ein grünes
Licht auf.
Zur Synchronisierung dieser Fernbedienung mit Ihrem
Videorecorder oder DVD ist zuvor eine Konfigurierung
erforderlich. „ Für weitere Einzelheiten konsultieren Sie das
Kapitel „ Grundeinstellung der Fernbedienung für einen
Videorecorder oder ein DVD“ auf der Seite 65.
Betätigen Sie diese Taste, um alle Anzeigen auf dem Bildschirm des
Fernsehgerätes einzublenden. Drücken Sie die Taste nochmals, um
den Befehl zu löschen.
Drücken Sie diese Taste, um den Videotext zu löschen oder den
Eingang des Videorecorders.
auszuschalten. Drücken Sie die Taste nochmals, um ihn wieder
einzuschalten.
Abgesehen von der Bedienung der Eigenfunktionen des Fernsehgerätes, dienen alle
farbigen Tasten wie auch die Symbole in Grün für die Videotext- Funktionen. Lesen Sie für
weitere Einzelheiten das Kapitel „Videotext“ auf der Seite 56.
Allgemeine Beschreibung
DE
17
Page 94

Einlegen der Batterien in die Fernbedienung
Versichern Sie sich, dass die mitgelieferten Batterien polaritätsrichtig eingelegt werden.
Respektieren Sie die Umwelt und werfen Sie die gebrauchten Batterien in die speziell
dafür vorgesehenen Behälter.
18
Installation
m
<
Page 95

Anschluss des Fernsehers mit Bildschirm an
die Empfangseinheit
• Benützen Sie das mitgelieferte Antennen- Anschlusskabel.
• Benützen Sie das mitgelieferte Stromzuführungskabel für den Fernseher (Typ C-4, Typ
BF oder Typ C-5). Lesen Sie weitere Einzelheiten auf der Seite 13.
1 Schließen Sie das mitgelieferte Antennen- Anschlusskabel und das mitgelieferte
Stromzuführungskabel an den Fernseher an.
Ziehen Sie die
Schraube
vorsichtig an,
um den
Stecker sicher
zu befestigen.
WHITEAC IN
DISPLAY SIGNAL IN
BLACK
Netzkabel
(mitgeliefert)
Nachdem Sie alle Anschlüsse
vorgenommen haben, schließen
Sie das Netzkabel an eine
Netzsteckdose an.
An Empfangseinheit.
Stecken Sie den Netzstecker erst dann in die Steckdose, wenn alle Verbindungen
hergestellt sind.
Antennenkabel
(mitgeliefert)
(wird fortgesetzt)
Installation
DE
19
Page 96

2 Installieren Sie den Bildschirm mit Hilfe der angegebenen Wandhalterung oder des Ständers.
Lesen Sie vor dem Installieren des Bildschirms die entsprechenden Anleitungen, die
dem Wandhalter oder dem Ständer mitgegeben sind.
3 Schließen Sie das mitgelieferte Antennenkabel an die Empfangseinheit an.
55
P
R/D/D/D
L/G/S/I
Y
1/
2/
(SMARTLINK)
3/
(SMARTLINK)
4/
BLACK WHITE
DISPLAY SIGNAL OUT
B/CBPR/CR
CENTRE
SPEAKER IN
180W (6 ) MAX
AC IN
W/G/W/GL/G/S/IR/D/D/D
CTRL
AV
S
MOUSE
20
Installation
Page 97

Verstauen der Kabel im Ständer des Fernsehers
Nehmen Sie die Kabelabdeckung vom Ständer ab, wenn Sie das Netzkabel und das
Antennenkabel darin verstauen mächten.
1 Ziehen Sie die Oberkante der
Kabelabdeckung am Ständer auf sich
zu, um sie zu entriegeln.
2 Lösen Sie die Kabelabdeckung und
nehmen Sie sie ab.
3 Verstauen Sie die Kabel im Ständer.
Führen Sie die Kabel durch die Bohrung
in der Mitte. Setzen Sie die
Kabelabdeckung in die Kerbe in der
Bodenplatte des Ständers und drücken
Sie sie zu.
Der Verzweigungspunkt der
schwarzen und weißen Anschlüsse
des Kabels ist dick und passt nicht
unter die Kabelabdeckung. Führen
Sie das Kabel so, dass der
Verzweigungspunkt außen über
der Kabelabdeckung zu liegen
kommt.
Rückseite des Fernsehers
Kabelabdeckung
Verzweigungspunkt
Kerbe in der
Bodenplatte
des Ständers
DE
Installation
21
Page 98

Anschluss der Antenne und des Videorecorders
• Benützen Sie das mitgelieferte Stromkabel für den Fernseher Typ C-4, Typ BF oder Typ
C-5). Konsultieren Sie die Seit 13.
• Benützen Sie das mitgelieferte Koaxial- Kabel.
Anschließen einer Antenne
55
P
R/D/D/D
L/G/S/I
Y
1/
2/
(SMARTLINK)
3/
(SMARTLINK)
4/
BLACK WHITE
Schließen Sie das mitgelieferte
Koaxial- Kabel an.
Anschließen eines Videorecorders an eine Antenne
(SMARTLINK)
3/
(SMARTLINK)
4/
BLACK WHITE
Videorecorder
OUT IN
1/
2/
DISPLAY SIGNAL OUT
DISPLAY SIGNAL OUT
B/CBPR/CR
CENTRE
SPEAKER IN
180W (6 ) MAX
AC IN
W/G/W/GL/G/S/IR/D/D/D
CTRL
AV
S
MOUSE
Schließen Sie das mitgelieferte
Stromkabel an (Typ C-4, Typ BF
oder Typ C-5, mit Erdung zur
Sicherheit).
55
P
R/D/D/D
L/G/S/I
Y
B/CBPR/CR
CENTRE
SPEAKER IN
180W (6 ) MAX
AC IN
W/G/W/GL/G/S/IR/D/D/D
CTRL
AV
S
MOUSE
Schließen Sie das mitgelieferte
Stromkabel an (Typ C-4, Typ
BF oder Typ C-5 mit Erdung
zur Sicherheit).
22
Installation
Das Kabel der Eurobuchse ist frei wählbar.
Lesen Sie für weitere Information hinsichtlich des
Anschlusses eines Videorecorders das Kapitel „Anschluss
von frei wählbaren Zusatzgeräten“ auf der Seite 60.
Stecken Sie den Netzstecker des Stromkabels erst dann in
die Steckdose, wenn alle Anschlüsse vorgenommen sind.
Page 99

Einschalten und automatische
Feinabstimmung des Fernsehers
Beim erstmaligen Einschalten des Fernsehers erscheinen einige Menü- Reihenfolgen auf
dem Bildschirm, mit denen Sie folgende Einstellungen vornehmen können:
1) die Menüsprache auswählen, 2) das Land auswählen, in dem Sie das Gerät einsetzen,
3) Einstellen der Uhr, 4) Suchen und Speichern aller verfügbaren Kanäle (Fernsehsender)
und 5) die Reihenfolge ändern, mit der die verschiedenen Kanäle (Fernsehsender) auf
dem Bildschirm erscheinen.
Wenn Sie jedoch zu einem späteren Zeitpunkt irgendeine dieser Einstellungen ändern
wollen, können Sie dies tun, indem Sie im Menü (Grundeinstellungen) die
entsprechende Option auswählen.
1 Stecken Sie die Stecker des Bildschirms und der
Empfangseinheit in die Steckdose (100 – 240 V
Wechselstrom; 50/60 Hz für den Bildschirm und
220 – 240 V Wechselstrom; 50/60 Hz für die
Empfangseinheit).
PROG
PC
MEMORY STICK
654321
PROG
2 Beim erstmaligen Anschluss des Fernsehgerätes
schaltet sich dieses automatisch ein. Falls dies nicht
der Fall ist, drücken Sie die Einschalt- /
Ausschalttaste an der Vorderseite Ihres
Fernsehgerätes, um es einzuschalten.
Beim ersten Mal, wenn Sie den Fernseher
einschalten, erscheint auf dem Bildschirm
automatisch das Menü Language (Sprache).
3 Drücken Sie / / oder auf der
Fernbedienung, um die Sprache zu wählen und
anschließend drücken Sie OK , um Ihre Auswahl zu
bestätigen.
Ab diesem Moment an erscheinen alle Menüs in der
gewählten Sprache.
Language
Select language
English
Nederlands
Français
Italiano
Deutsch
Türkçe
Español
Português
Polski
PROG
PC
MEMORY STICK
654321
PROG
Slovensy
Magyar
Suomi
Dansk
Svenska
Norsk
OK
(wird fortgesetzt)
Erstmalige Inbetriebnahme
DE
23
Page 100

4 Das Menü Land erscheint automatisch auf dem
Fernsehbildschirm.
Drücken Sie oder , um das Land auszuwählen
in dem Sie den Fernseher in Betrieb nehmen wollen
und drücken Sie anschließend OK , um Ihre Wahl zu
bestätigen.
• Wenn das Land in dem Sie den Fernseher
benützen wollen nicht in der Liste enthalten
ist, wählen Sie „Aus“ anstatt eines Landes.
• Wenn Sie die Landeswahl ändern, müssen Sie
danach immer Uhr einstellen (Einstellung
der Uhr) ausführen.
5 Das Menü Uhr einstellen erscheint auf dem
Bildschirm des Fernsehgerätes.
a) Drücken Sie oder , um die Stunde
einzustellen und drücken Sie danach .
b) Drücken Sie oder , um die Minuten
einzustellen und drücken Sie danach .
c) Drücken Sie oder , um die Sekunden
einzustellen und drücken Sie OK auf dem
Zeichen der Uhr.
Die Uhr setzt sich in Betrieb.
Wenn Sie die Uhr einstellen, müssen Sie
anschließend immer das Autom. Progr.
(automatische Abstimmung) vornehmen.
6 Das Menü Autom. Progr. erscheint auf dem
Bildschirm des Fernsehgerätes. Drücken Sie OK, um
Ja auszuwählen.
Land:
Land wählen
Aus
United Kingdom
Ireland
Nederland
België/Belgique
Luxembourg
France
Italia
Schweiz/Suisse/Svizzera
Deutschland
Österreich
Uhr einstellen
0 0 : 0 0 : 0 0 Mo
Automatisches Abspeichern
jetzt starten?
Ja Nein
OK
OK
OK
7
Der Fernseher beginnt automatisch die Suche und das
Speichern aller verfügbaren Kanäle (Fernsehsender).
Dieser Prozess kann einige Minuten
beanspruchen. Haben Sie bitte Geduld und
drücken Sie keine Taste während dieser
Operation; in gegenteiligem Falle würde das
automatische Abspeichern nicht zu Ende geführt.
Wenn während des automatischen
Abspeicherns kein Kanal gefunden wird,
erscheint ein neues Menü auf dem Bildschirm,
das Sie auffordert, die Antenne anzuschließen.
Schließen Sie die Antenne an (siehe Seite 22) und
drücken Sie OK. Der Prozess der automatischen
Abspeicherung beginnt von Neuem.
Nachdem alle verfügbaren Kanäle aufgespürt
und gespeichert wurden erscheint auf dem
Bildschirm automatisch das Menü Programme
ordnen, das Ihnen erlaubt die Reihenfolge zu
ändern, mit der die Kanäle auf dem Bildschirm
gezeigt werden.
24
Erstmalige Inbetriebnahme
Autom. Progr.
Programm :
TV-System :
Kanal :
Kein Sender gefunden Bitte
Antenne anschliessen
Bestätigen
Suche...
01
I
C23
OK
 Loading...