

Sony KL-37W1U, KL-50W1U User Manual

R
3-858-007-31 (1)
KL-37W1U
KL-50W1U
Getting Started
Operating Instructions
Procedimientos
iniciales
Instrucciones de
funcionamiento
Como começar
Instruções de
funcionamento
Komma igång S
Basfunktioner
Przed uéciem po raz
pierwszy
GB
GB
E
E
P
P
S
PL
LCD Projection TV
Instrukcja Obsàugi
A kíszÖlík
Özembehelyezíse
Hasznèlati Øtmutatô
àÌcÚpyÍáËÓ Ôo
íÍcÔÎyaÚaáËË
èoÀÖoÚoÇÍa Í
íÍcÔÎyaÚaáËË
PL
H
H
RF
RF
© 1996 by Sony Corporation Printed in Spain
WARNING
To prevent fire or shock hazard, do not expose the unit to
rain or moisture.
Dangerously high voltages are present inside the set. Do
not open the cabinet. Refer servicing to qualified
personnel only.
Safety Information
All TVs operate on extremely high voltages. To prevent
fire or electric shock, please follow the safety procedures
below. For your protection, refer all servicing to qualified
personnel only.
For general safety:
• Do not expose the TV to rain or moisture.
• Do not open the rear cover.
For safe operations:
• Do not operate the TV on any other voltages, but 220–
240 V AC.
• Do not operate the TV if any liquid or solid object falls in it
- have it checked immediately.
• Do not keep the set plugged in if you are not going to use
it for several days.
• Do not pull on the power cord to disconnect the TV. Pull it
out by the plug.
• Do not place anything on the surface of the front panel
cover when you open it.
• To remove dust from the front of the screen, unplug the
TV and wipe gently with a soft cloth lightly dampened with
water or a mild detergent solution, using vertical strokes
only. Then wipe it with a dry, soft cloth. Never use
solvents or thinners for cleaning purposes.
• If the picture turns dark after the TV has been in use for a
long period of time, it may be necessary to clean the
inside of the TV. Consult qualified service personnel for
this.
NOTICE FOR CUSTOMERS IN THE UNITED
KINGDAM
A moulded plug complying with BS1363 is fitted to this
equipment for your safety and convenience.
Should the fuse in the plug supplied need to be replaced,
a 5 AMP fuse approved by ASTA or BSI to BS 1362 (i.e.
marked with
When an alternative type of plug is used it should be fitted
with a 5 AMP FUSE, otherwise the circuit should be
protected by a 5 AMP FUSE at the distribution board.
If the plug supplied with this equipment has a detachable
fuse cover, be sure to attach the fuse cover after you
change the fuse. Never use the plug without the fuse
cover. If you should lose the fuse cover, please contact
your nearest Sony service sation.
or must be used.
GB
GB
Important Information
Please read the following information on using and
maintaining the TV, for optimum viewing quality.
Picture Quality
• Avoid touching the screen, and take care not to scratch
the surface with hard objects.
Illumination
To obtain a clear picture, do not expose the screen to
direct illumination or direct sunlight. If possible, use spot
lighting directed down from the ceiling.
Installation
• To prevent over heating of the set, do not block the
ventilation openings.
• Do not install the TV in a hot or humid place, or in a place
subject to direct sunlight, excessive dust or mechanical
vibration.
• After transporting the TV directly from a cold to a warm
location, or if the room temperature has changed
suddenly, pictures may be blurred or show poor colour
over portions of the picture. This is because moisture has
condensed on the mirrors or lenses inside the TV. Let the
moisture evaporate before using the TV.
Maintenance
• Save the original shipping carton and packing material to
use if you ever have to ship your TV. For maximum
protection, repack your TV as it was originally packed at
the factory.
• To keep the cabinet looking brand-new, periodically clean
it with a soft cloth. Stubborn stains may be removed with a
cloth slightly dampened with a mild detergent solution.
Never use strong solvents such as thinner or benzene, or
abrasive cleaners since these will damage the cabinet. As
a safety precaution, unplug the TV before cleaning it.
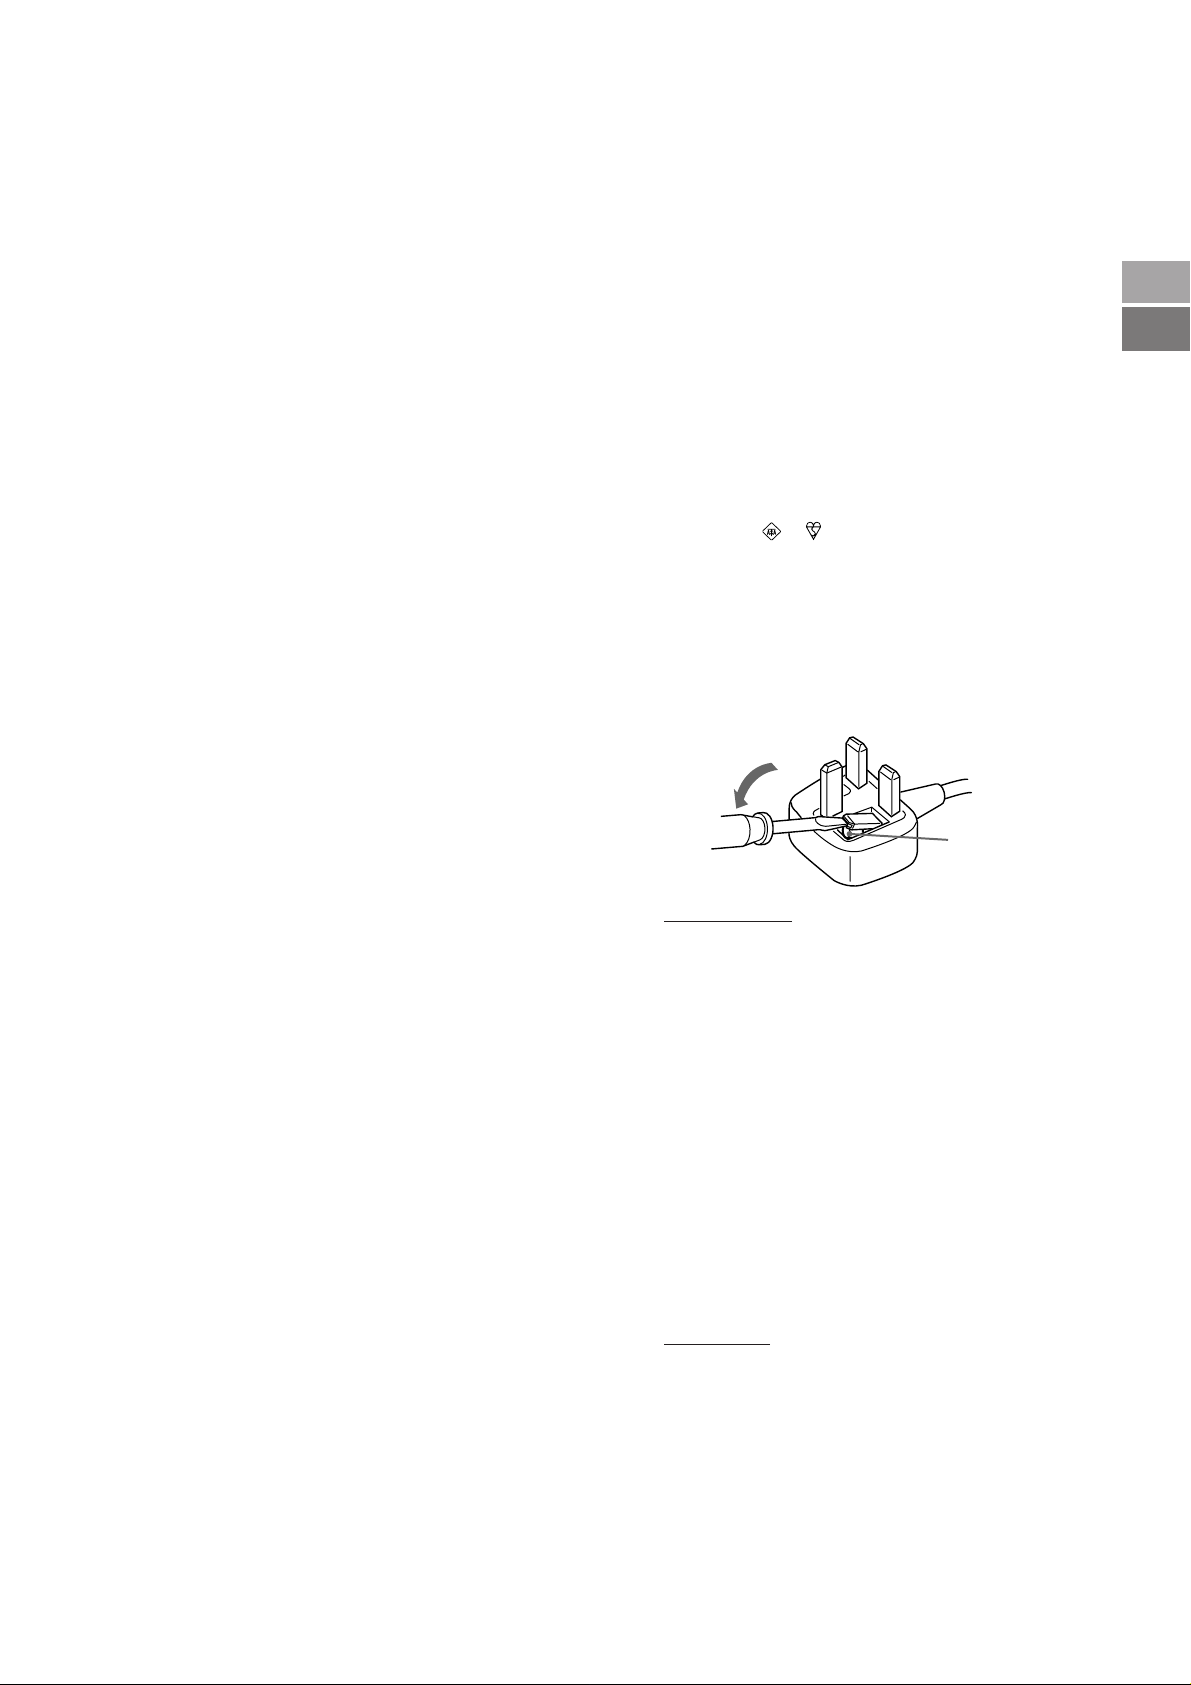
FUSE
• IMPORTANT
If the plug supplied is not suitable for the socket outlets in
your home, it should be cut off and an appropriate plug
fitted in accordance with the following instructions:
The wires in this mains lead are coloured in accordance
with the following code:
Blue Neutral
Brown Live
As the colours of the wires in the mains lead of this
apparatus may not correspond with the coloured
identifying the terminals in your plug, proceed as follows:
The wire which is coloured blue must be connected to the
terminal which is marked with the letter N or coloured
black. The wire which is coloured brown must be
connected to the terminal which is marked with the letter L
or coloured red. Do not connect either wire to the earth
terminal in the plug which is marked by the letter E or by
safety earth symbol Y or coloured green or green and yellow.
markings
• WARNING
To prevent shock hazard, do not insert the plug cut off
from the mains lead into a socket outlet. This plug cannot
be used and should be destroyed.
• To prevent fire or shock hazard, do not expose the unit to
rain or mositure.
• Dangerously high voltages are present inside the set. Do
not open the cabinet. Refer servicing to qualified personnel only.
How to replace the fuse Open the fuse compartment
with a blade screwdriver, and replace the fuse.
the
2

Contents
Overview ................................................................................... 4
Getting Started...............................................................
Step 1 Preparation..................................................................... 6
Check the supplied accessories ...................................... 6
Insert the battery into the Remote Commander................ 6
Connect the aerial ........................................................... 6
Step 2 Tuning in to TV Stations .................................................. 7
Choose a language......................................................... 7
Display the menu ............................................................ 7
Preset Channels automatically ........................................ 8
Preset Channels manually .............................................. 9
Additional Presetting Functions ................................................ 10
Sorting Programme Positions........................................ 10
Using “Further Programme Preset” ............................... 11
Skipping Programme Positions ..................................... 12
Captioning a Station Name ........................................... 12
Parental Lock................................................................ 13
Tuning in a Channel Temporarily................................... 13
Operating Instructions .................................................
Watching the TV....................................................................... 14
Switching the TV on and off ........................................... 14
Selecting TV Programmes ............................................ 14
Adjusting the Volume .................................................... 14
Operating the TV Using the Buttons on the TV ............... 14
Watching Teletext or Video Input ................................... 15
More Convenient Functions .......................................... 15
14
6
Getting Started
Operating Instructions
GB
GB
Adjusting and Setting the TV Using the Menu ........................... 16
Adjusting the Picture and Sound ................................... 16
Graphic Equalizer ......................................................... 17
Using the Sleep Timer................................................... 17
PAP (Picture and Picture)......................................................... 18
Operating Screen Mode/PAP Using the Menu ............... 19
Auto Format.................................................................. 19
Teletext.................................................................................... 20
Direct Access Functions................................................ 20
Using the Teletext Menu ............................................... 21
User Page Bank System ............................................... 22
Connecting and Operating Optional Equipment ........................ 23
Connecting Optional Equipment.................................... 23
Selecting lnput and Output ............................................ 24
Using AV Preset ........................................................... 25
Remote Control of Other Sony Equipment ..................... 26
For Your Information ................................................................ 27
Optimum Viewing Area ................................................. 27
Cleaning of the Air Filter ................................................ 28
Replacing the Lamp ...................................................... 29
Troubleshooting............................................................ 30
Specifications ............................................................... 30
Warning Indicators ........................................................ 31
Stabilizing the Projection TV.......................................... 31
Television Channel Number Guide ................... back cover
3
Overview
This section briefly describes the buttons and controls on the TV
set and on the Remote Commander. For more information, refer to
the pages given next to each description.
TV set-front
AB
PROGR
GB
Symbol
φ
φ
A-µ-B
PROGR+/–
+/–
λ
S
3, 3, 3
Name
Main power switch
Standby indicator
Stereo A/B indicators
Programme
Volume buttons
Input select buttons
Headphones jack
Input jacks (S video/video/audio)
Refer to page
14
14
16
14
14
15
23
24
4
Note
The SAT button does not
operate with this TV.
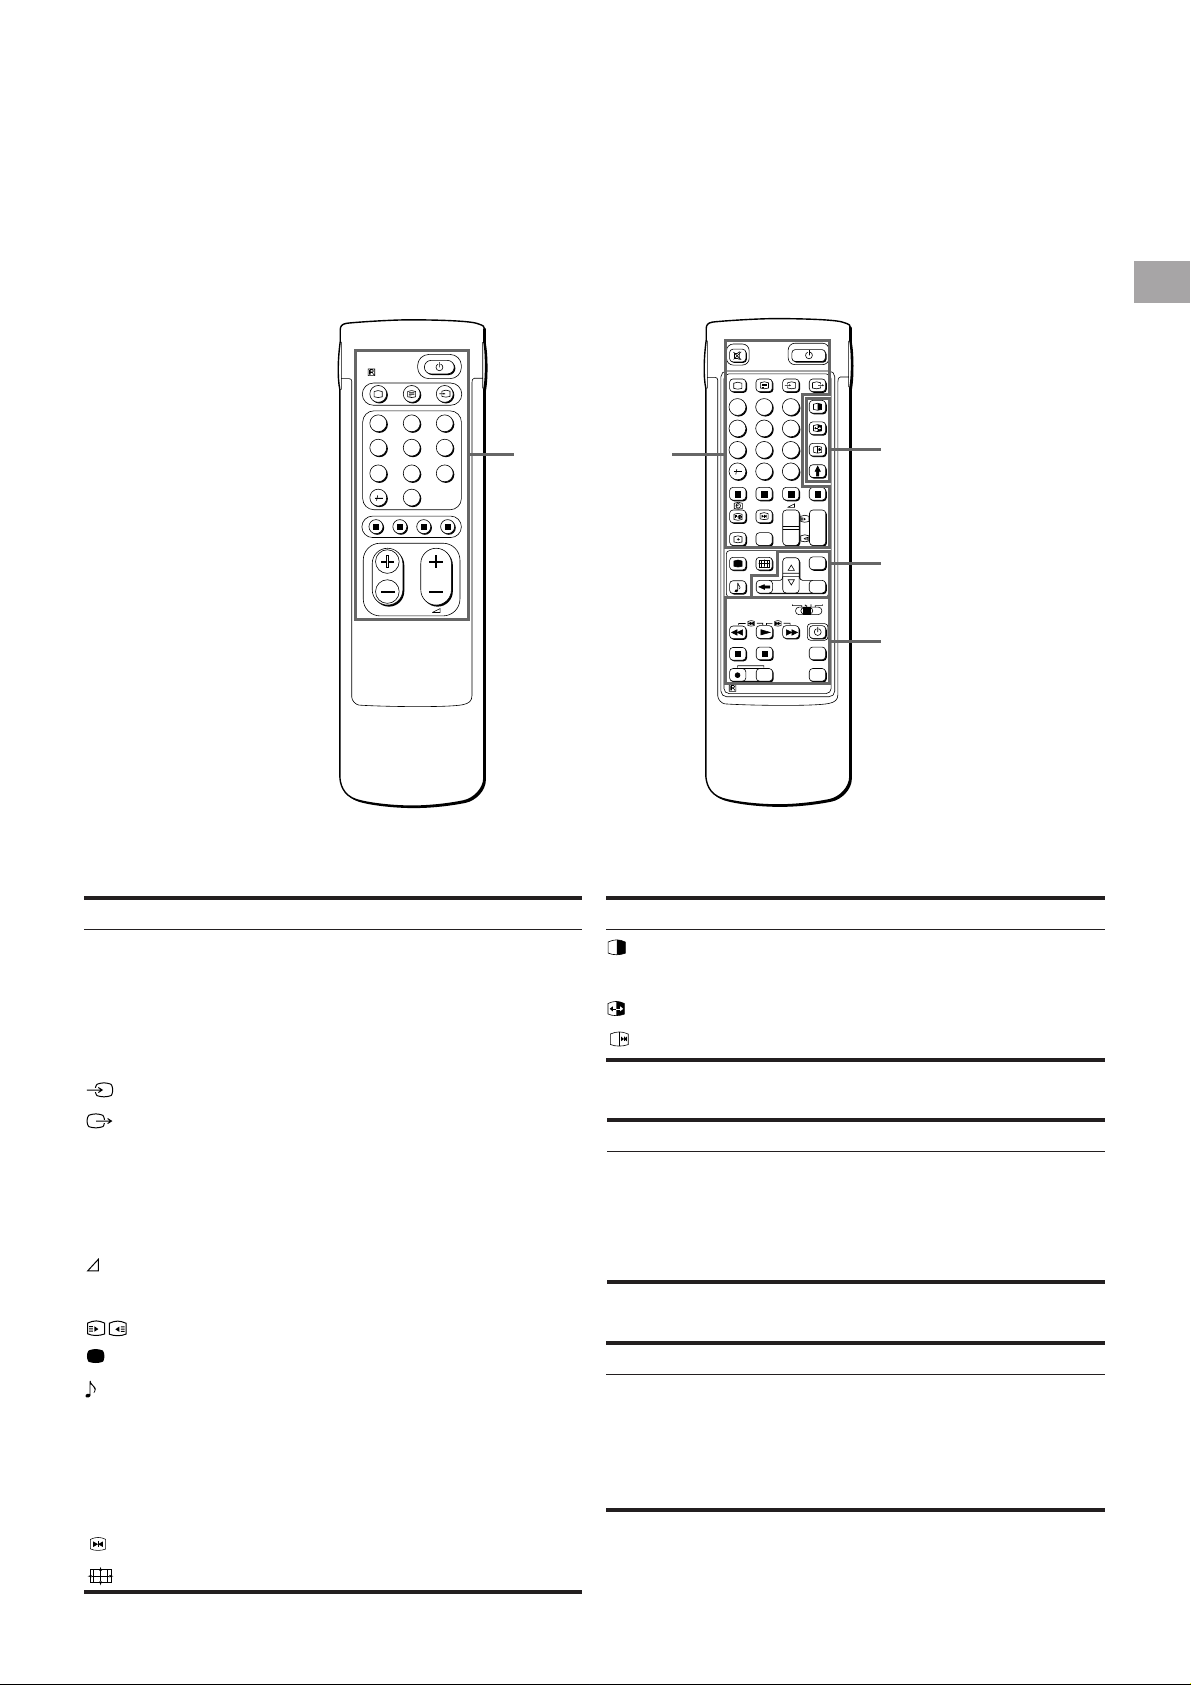
Remote commander
RM-838
2
1
45
7
PROGR
3
6
9
8
0
TV/Teletext
operation
Full-Function sideSimple side
2
1
45
8
7
0
SAT
MEM
USE
RM-838
C
+
_
+
_
VTR 1-2-3
RESET
GB
3
6
9
PROGR
+
1
_
1
MENU
OK
MDP
+
PROGR
_
PAP operation
Menu operation
Video operation
TV/Teletext operation
Symbol
ο
φ
Ο
_
1,2,3,4,5,6,
7,8,9 and 0
–/-C
+/–
PROGR +/–
1
1
∃
[
#
ΛΛΛΛ
Name
Mute on/off button
Standby button
TV power on/TV mode selector
button
Teletext button
Input mode selector
Output mode selector
Number buttons
Double-digit entering button
Direct channel entering button
Volume control button
Programme selectors
Teletext page access buttons
Picture adjustment button
Sound adjustment button
On-screen display button
Teletext hold button
Time display button
Fastext buttons
“Freeze” button
Button to change Screen Format
Refer to page
15
14
14
15
15
24
14
14
10
14
14
20
16
16
15
20
15
20
15
15
PAP (Picture-and-picture) operation
Symbol
Χ
Name
PAP on/off button
PAP source selector
Swap button
PAP freeze button
Menu operation
Symbol
MENU
>+/ ?–
OK
≅
Name
Menu on/off button
Select buttons
OK(confirming)button
Back button
Video operation
Symbol
VTR1/2/3,
MDP
;; − :: Λ
ϑ α φ
PROGR +/–
Name
Video equipment selector
Video equipment operation
buttons
Refer to page
18
18
18
18
Refer to page
7
7
7
7
Refer to page
26
26
5
Getting Started
RM-838
PROGR
VTR 1-2-3
MDP
1
2
4
5
3
6
9
8
7
0
C
SAT
MENU
+
_
OK
+
4
PROGR
1
1
+
_
+
_
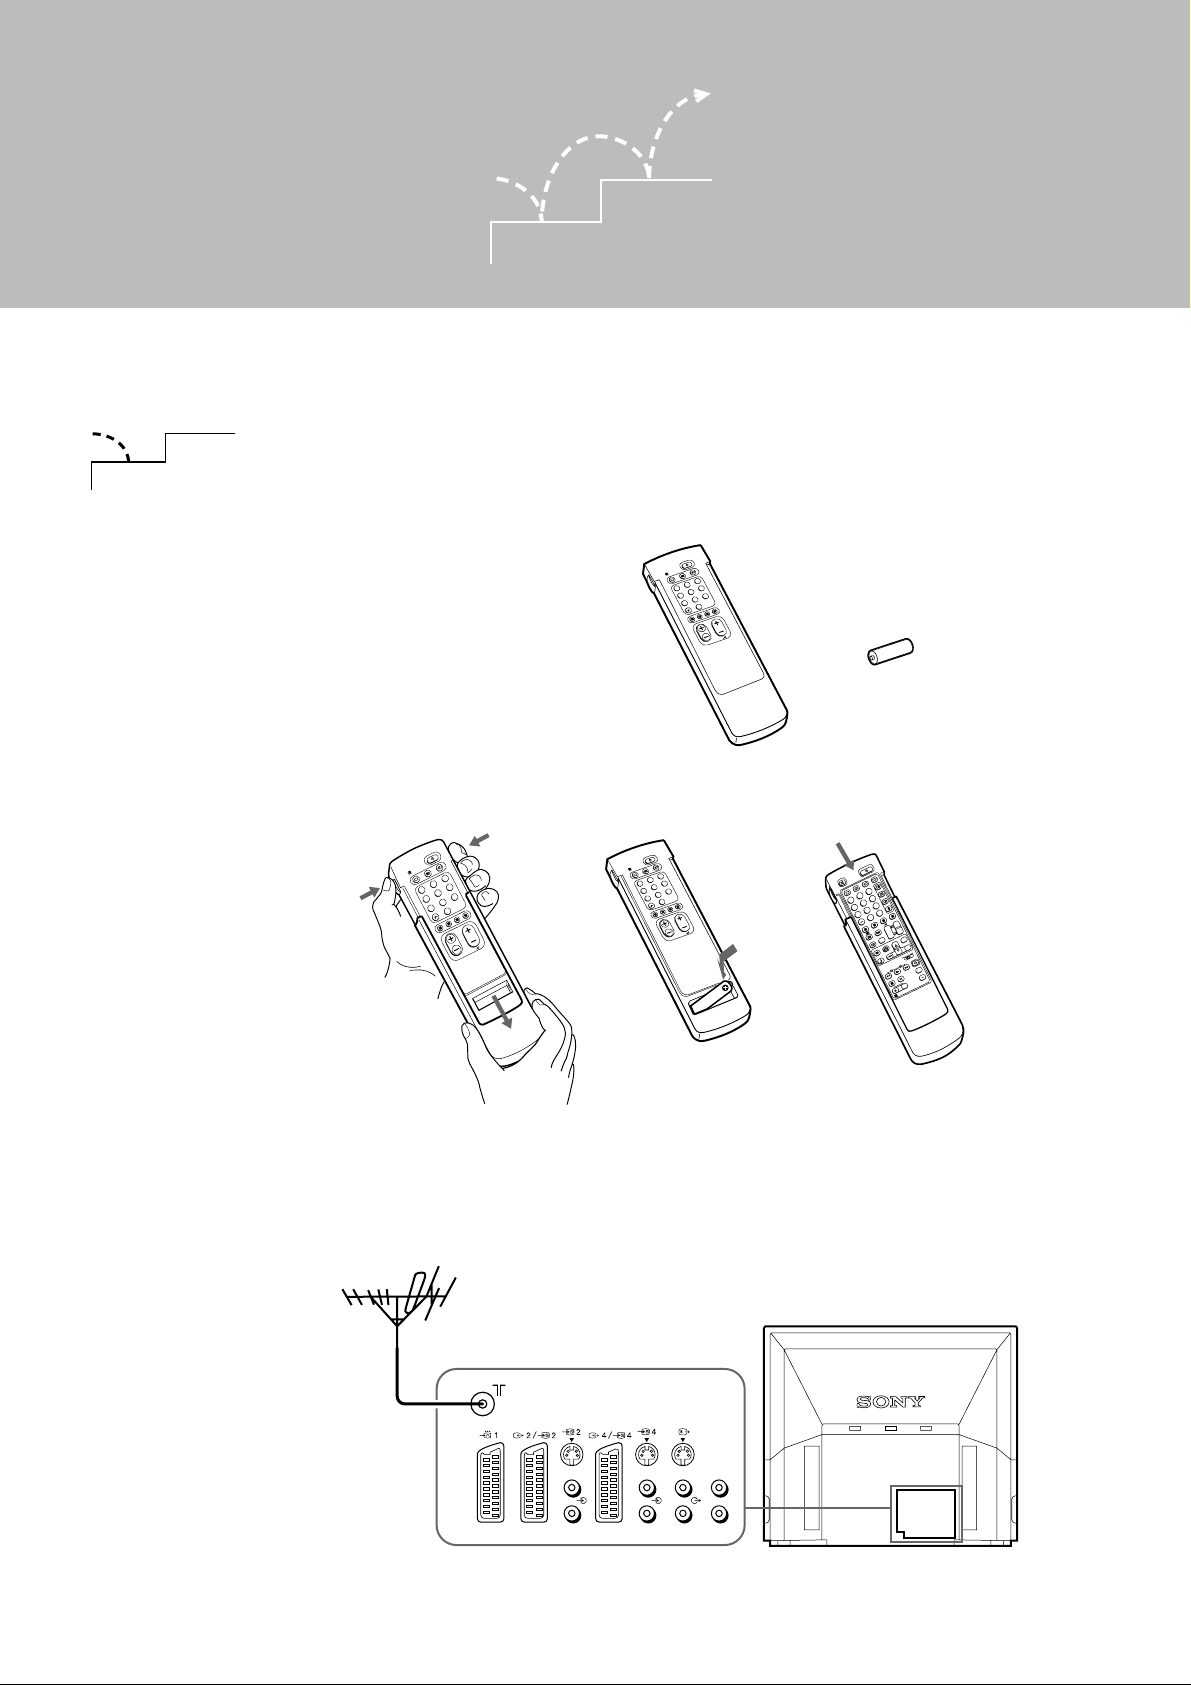
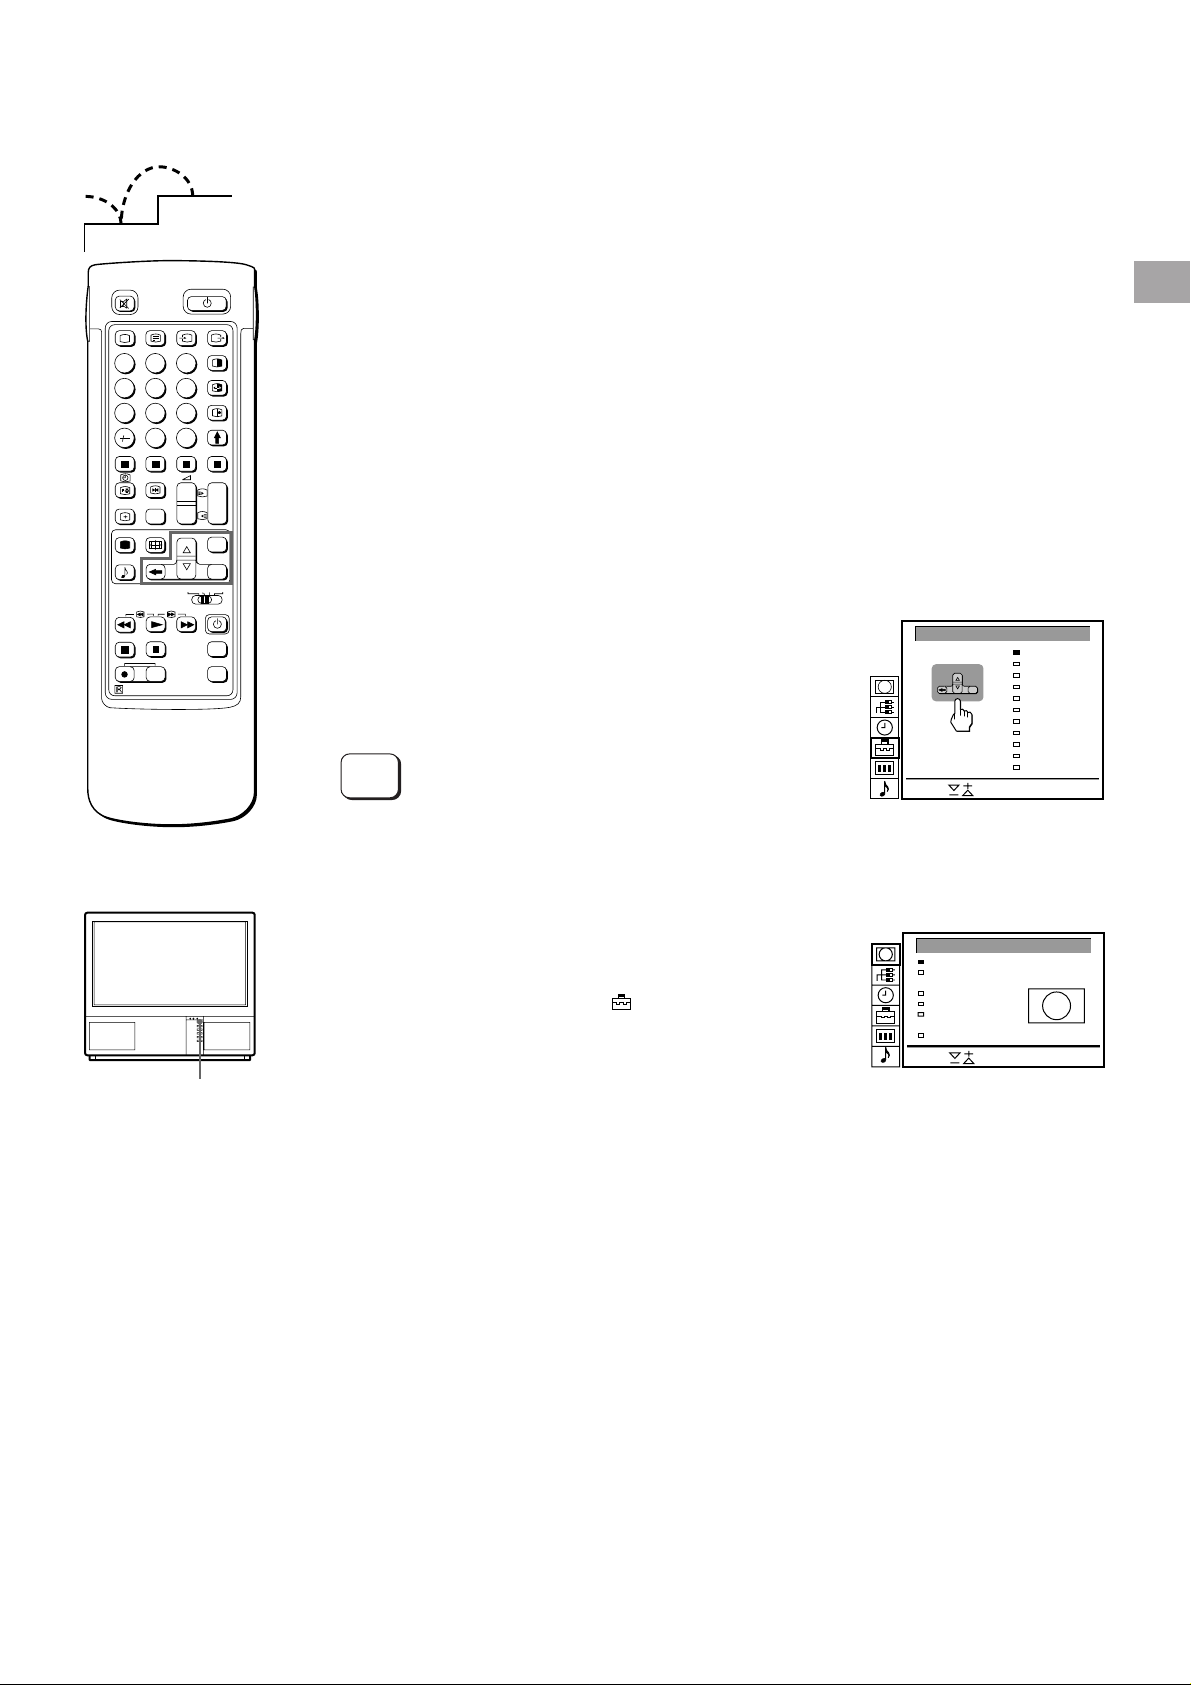
Step 1 Preparation
2
1
1
Check the supplied accessories
2
1
GB
Note: Always remember
to dispose of used
batteries in an
enviromental friendly
way.
When you’ve taken everything
out of the carton, check that you
have these items:
• RM-838 Remote Commander
• One IEC designation R6 battery
RM-838
3
2
1
6
5
4
9
8
7
0
PROGR
• Lamp (1)
• Wrench (1)
• Bracket (2)
2
Insert the battery into the Remote Commander
RM-838
2
1
1
4
7
Remove the cover. Check the correct
1
RM-838
3
6
5
9
8
0
PROGR
3
2
1
6
5
4
9
8
7
0
PROGR
3
3
2
Refit the outside cover
polarities.
making sure that the FullFunction side is visible to use
the menu in step 2.
Connect the aerial
3
L/G/S/I
Fit an IEC aerial connector attached to 75-ohm coaxial cable (not
supplied) to the ) socket at the rear of the TV.
R/D/D/D
L/G/S/I
R/D/D/D
L/G/S/I
R/D/D/D
L/G/S/I
R/D/D/D
6
Step 2 Tuning in to TV Stations
LANGUAGE
English
Deutsch
Français
Italiano
Español
Nederlands
Português
Suomi
Svenska
#######
Türkçe
Select and press OK
Select
+
_
OK
2
1
Once you have set up the TV, you can choose the language of the
menu. Then, you should preset the channels (up to 100 channels)
by choosing either the automatic or manual method. The
automatic method is easier if you want to preset all receivable
2
1
45
8
7
0
SAT
MEM
USE
RM-838
C
+
VTR 1-2-3
RESET
3
6
9
PROGR
+
1
_
_
1
+
MENU
_
OK
MDP
+
PROGR
_
channels at once. Use the manual method if you only have a few
channels and want to preset channels one by one.
Before you begin
• Check that the Full-Function side of the Remote Commander is
visible.
• Locate Menu operation buttons on the Remote Commander.
They are shaded in the illustration at the left.
Choose a language
1
1 Press φ on the TV.
The TV will switch on. If the standby indicator on the TV is lit, press
Ο or a number button on the Remote Commander.
2 Press the MENU button.
The LANGUAGE menu appears. (See Fig. 1.)
GB
φ Fig. 2
To go back to main
menu
Keep pressing ≅.
To go back to the
normal TV picture
Press MENU. Normal
TV picture will be
restored after one
minute if menu functions
are not selected.
MENU
3 Select the language you want with > + or ? – and press OK.
Display the menu
2
Press MENU.
The main menu appears. (See Fig. 2.)
Using > + or ? – select the symbol
and press OK.
Now, choose one of the methods described overleaf:
“Preset Channels Automatically”
or
“Preset Channels Manually”
Fig. 1
SCREEN MODE
Screen Mode
Screen Position
Strobe
PAP
Clip Board
Auto Format
Select and press OK
[on]
[off]
[off]
[ ]zoom
[ ]
0
Note on the Demo
function
If you choose Demo in
the Installation menu,
you can see a sequential
demonstration of the
menu functions.
Press MENU to stop the
function.
7
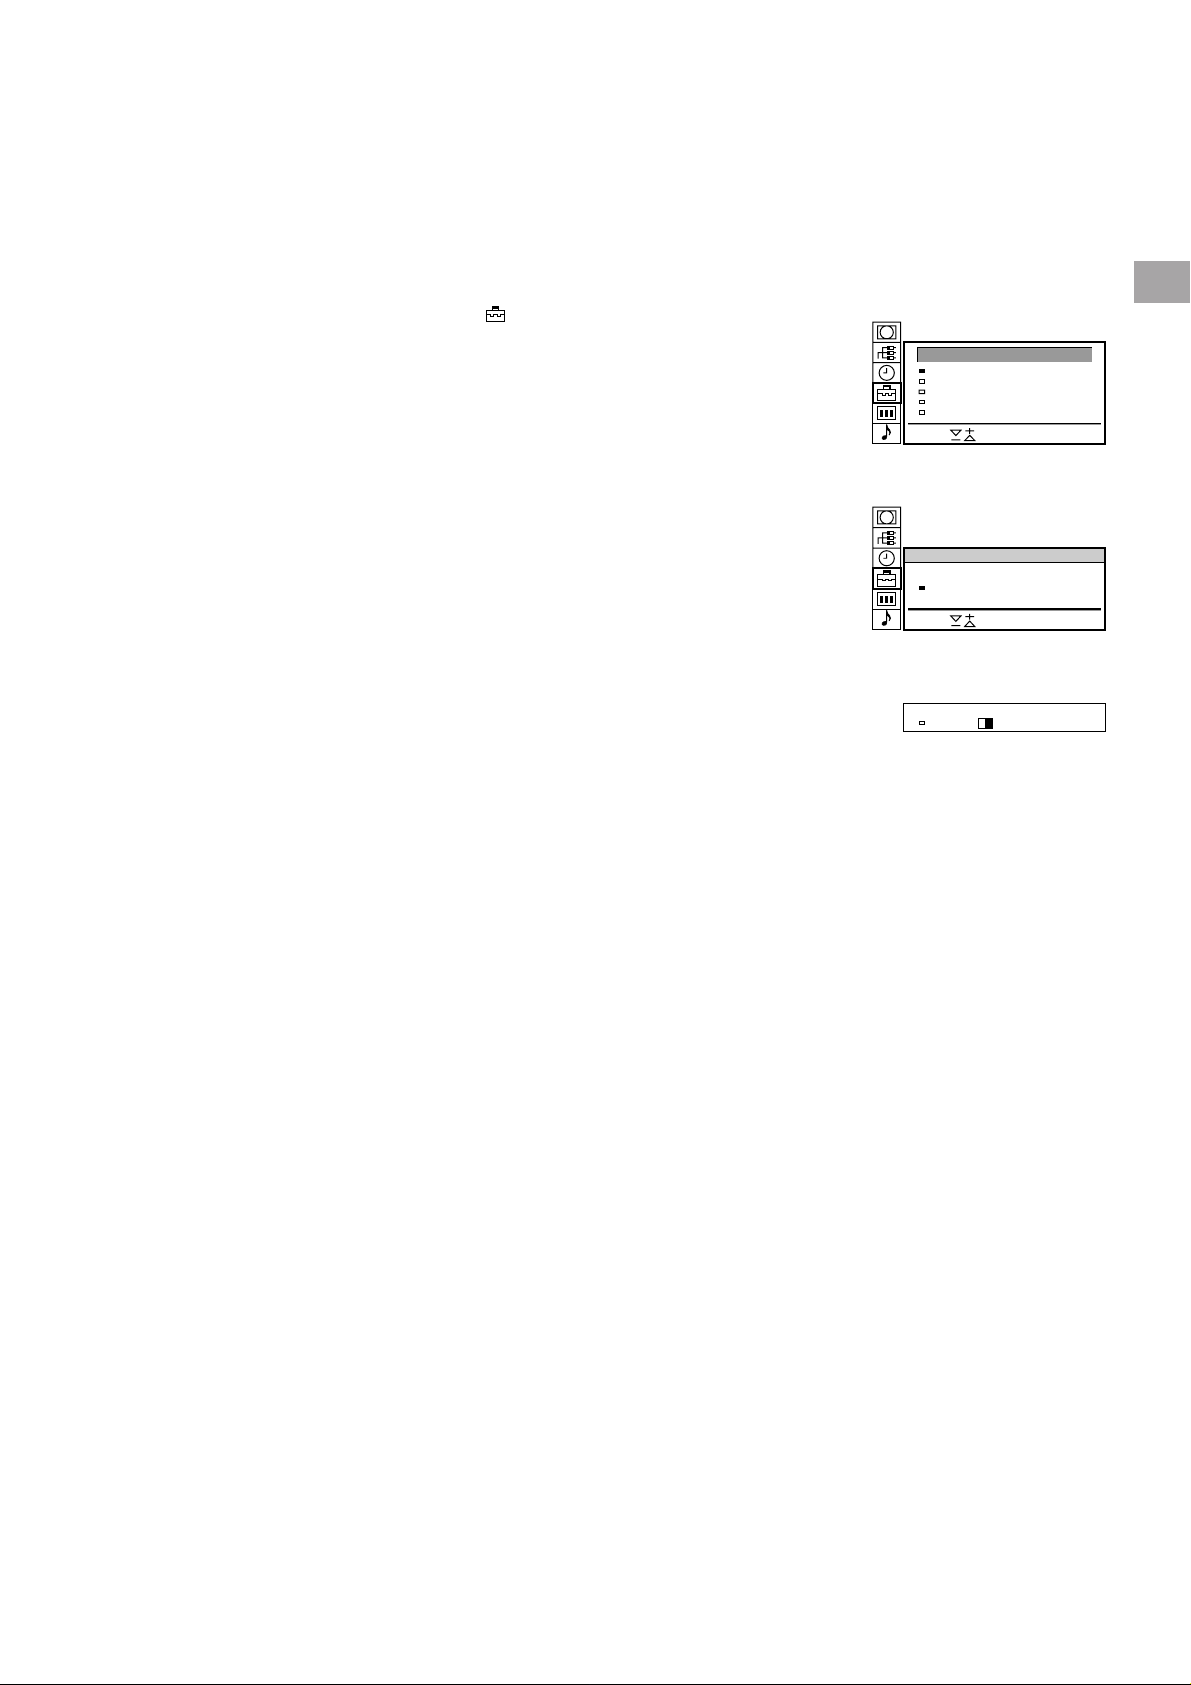
Preset channels automatically
B/G
SYS PROG
C25CH–
LABEL
––––04
3
1 Select the symbol for “Preset” with >+ or ?– and press OK.
The PRESET menu appears. (See Fig. 3.)
2 Select “Auto Programme” with >+ or ?– and press OK.
The AUTO PROGRAMME menu appears. (See Fig. 4.)
3 Press OK.
Select if necessary the TV broadcast system (B/G for Western
European or D/K for Eastern European countries) with >+ or ?–
and press OK. The first element of the “PROG” number will be
highlighted.
4 Select the programme (number button) from which you want to
start presetting. Select the first element of the double-digit number
with >+ or ?– or the number buttons (e.g., For “04,” select “0”
here) and press OK.
The second element of “PROG” will be highlighted.
5 Select the second element of the double-digit number with >+ or
?– or the number buttons (e.g., For “04,” select “4” here) (See Fig.
5) and press OK.
6 Select “C” or “S” with >+ or ?– and press OK.
The automatic channel presetting starts.
When presetting is finished, the preset menu reappears. All
available channels are now stored on successive number buttons.
Press menu to restore normal TV picture.
PRESET
Auto Programme
Manual Programme Preset
Programme Sorting
Parental Lock
Installation
Select and press OK
Fig. 3
AUTO PROGRAMME
SYS PROG
B/G
Select and press OK
Fig. 4
Fig. 5
C25CH–
LABEL
––––01
GB
To go back to the main
menu
Keep pressing ≅.
To stop automatic
channel presetting
Press ≅ on the Remote
Commander.
Notes
• After presetting the
channels automatically,
you can check which
channels are stored on
which programme
positions.
For details, see
“Displaying the
Programme Table” on
page 15.
• You can sort the
programme positions to
have them appear on
screen in the order you
like. For details, see
“Sorting Programme
Positions” on page 10.
8
Use this method if there
2 C –––––21B/G off
are only a few channels
in your area to preset or if
you want to preset
channels one by one.
You may also allocate
programme numbers to
various video input
sources.
If you have made a
mistake
Press ≅ to go back to
the previous position.
To return to the main
menu
Keep pressing ≅.
To go back to the
normal TV picture
Press MENU.
To tune in a channel by
frequency
After selecting F in step 6,
enter three digits using
the number buttons.
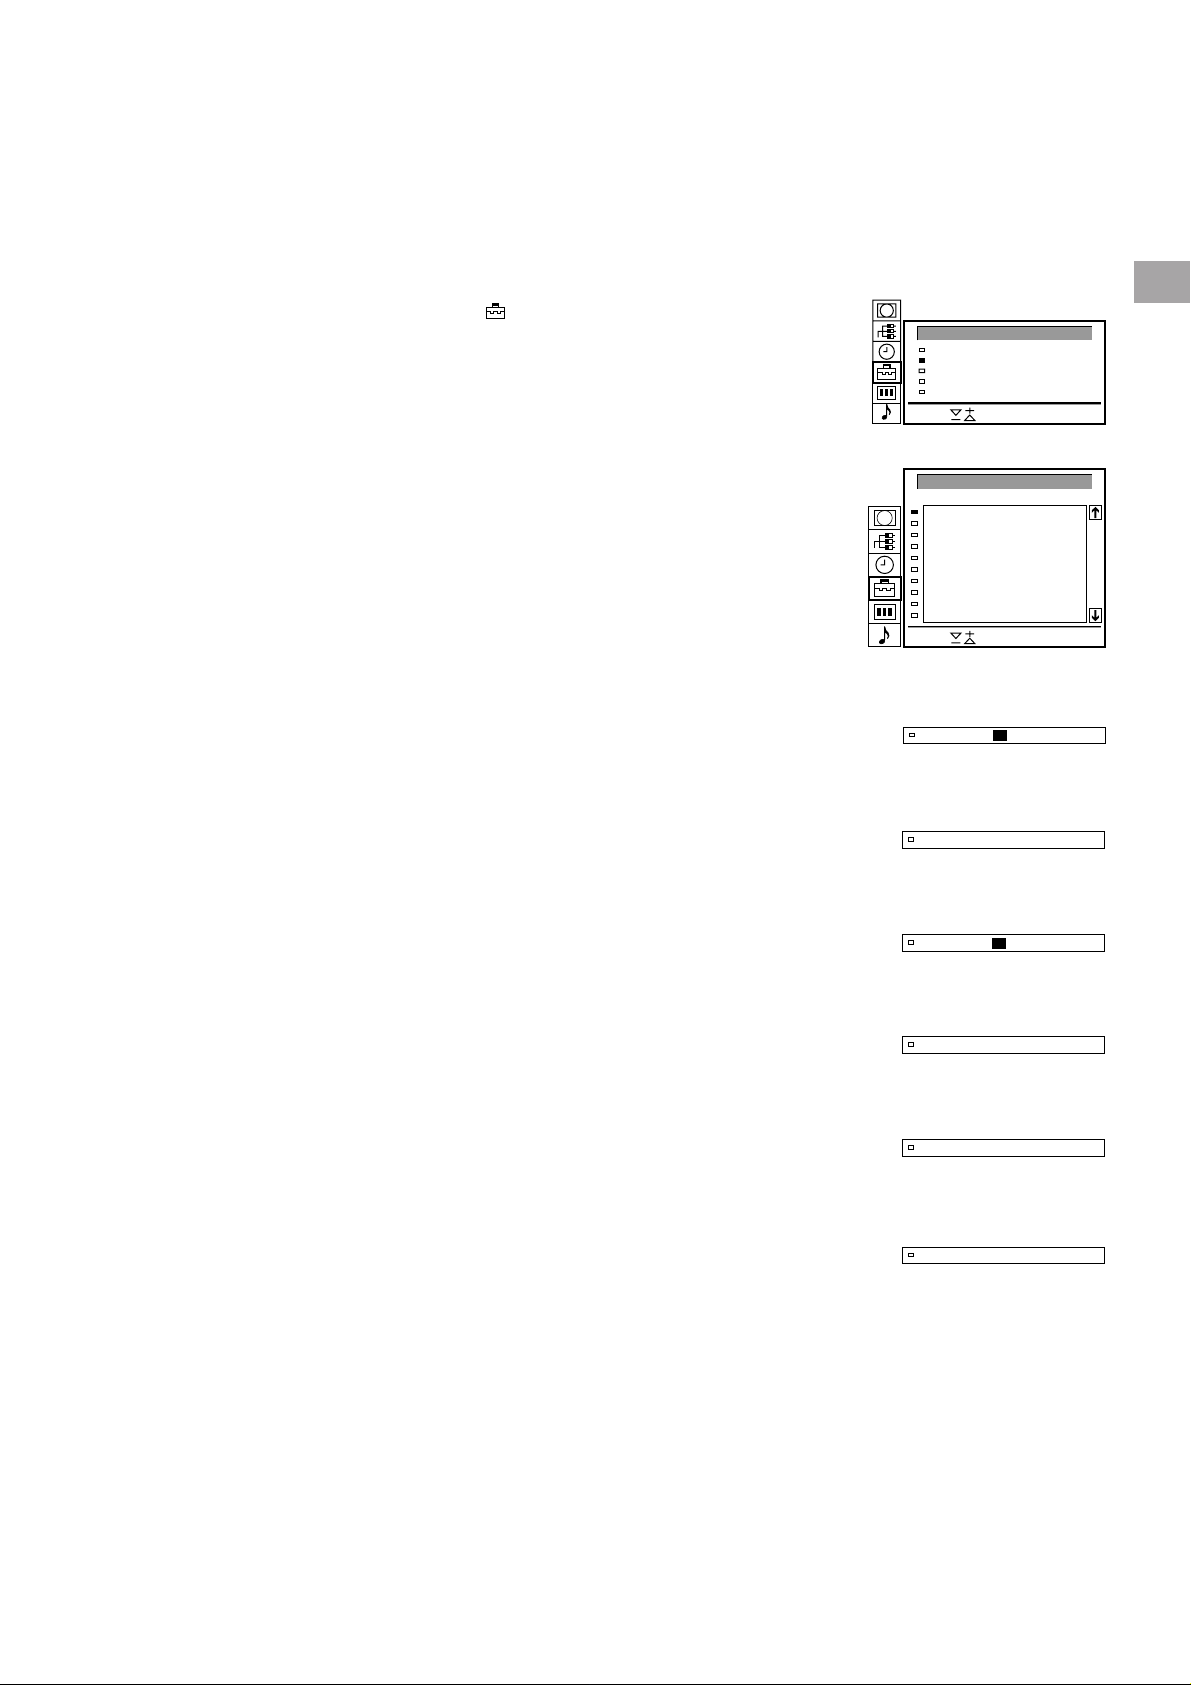
Preset channels manually
3
1 Select the symbol for “Preset” with >+ or ?– and press OK.
The PRESET menu appears. (See Fig. 6.)
2 Select “Manual Programme Preset” with >+ or ?– and press OK.
The MANUAL PROGRAMME PRESET menu appears. (See Fig.
7.)
3 Using >+ or ?–, select the programme position (number button) to
which you want to preset a channel, and press OK.
4 Select, if necessary the TV broadcast system or a video input
source (EXT)) with >+ or ?–.
5 Then press OK. The CH position will be highlighted. (See Fig. 8.)
6 Using >+ or ?–, select C (to preset a regular channel), S (cable
channel) or F (to tune in by frequency) and press OK.
The first element of the “CH” number will be highlighted.
If you have selected EXT in step 5, select the video input source
with >+ or ?–. (See Fig. 9.)
There are two ways to preset channels, If you know the channel
number, go to step “7-Manual,”
or
If you don’t know the channel number, go to step “7-Search.”
7 Manual
-a Select the first element of the “CH” number with >+ or ?– or the
number buttons and press OK.
The second element of the “CH” number will be highlighted.
-b Select the second element of the number with >+ or ?– or the
number buttons.
The selected number appears. (See Fig. 10.)
-c Press OK
The “SEARCH” position is highlighted and the selected channel is
now stored. (See Fig. 11.)
-d Press OK until the cursor appears by the next programme position.
-e Repeat steps 3 to 7 to preset other channels.
PRESET
Auto Programme
Manual Programme Preset
Programme Sorting
Parental Lock
Installation
Select and press OK
Fig. 6
MANUAL PROGRAMME PRESET
PROG
SYS
CH
B/G
B/G
B/G
B/G
B/G
B/G
B/G
B/G
B/G
B/G
SEARCH LABEL
C21
off
C34
off
C33
off
C45
off
C02
off
C08
off
C10
off
C12
off
C20
off
C59
off
1
2
3
4
5
6
7
8
9
10
Select and press OK
Fig. 7
Fig. 8
3 AV1 –––––EXT
Fig. 9
2 C –––––21B/G off
Fig. 10
2 C –––––35B/G off
Fig. 11
-----
-----
-----
-----
-----
-----
-----
-----
-----
-----
GB
7 Search
-a Press OK repeatedly until the colour of the SEARCH position
changes.
-b Start searching for the channel with >+ (up) or ?– (down).
The CH position changes colour. (See Fig. 12.)
The CH number starts counting up or downwards. When a
channel is found, it stops. (See Fig. 13.)
-c Press OK if you want to store this channel. If not, press >+ or ?–
to continue channel searching.
-d Press OK until the cursor appears by the next programme position.
-e Repeat steps 3 to 7 to preset other channels.
2 C –––––35B/G off
Fig. 12
2 C –––––50B/G
Fig. 13
4$
9
PROGRAMME SORTING
PROG
1
2
3
4
5
6
7
8
Select and press OK
C15
C03
C04
C07
C09
C12
C13
C14
CH LABEL
BBC 1
BBC 2
ITV
MBC
-----
-----
-----
-----
Move PR 1 to PR - -
Additional Presetting Functions
8 BBC1C15
2
1
This section shows you additional presetting functions such as
sorting or skipping programme positions, captioning a station
name, manual fine-tuning, and using the parental lock.
Before you begin
• Check that the Full Function side of the Remote
Commander is visible.
• Locate the Menu operation buttons.
Sorting Programme Positions
PROGRAMME
SORTING
2
1
45
7
3
6
9
8
0
C
PROGR
+
1
_
1
SAT
+
_
VTR 1-2-3
MEM
USE
+
_
MENU
OK
MDP
With this function, you can sort the programme positions to a
preferable order.
1 Press MENU to display the main menu.
2 Select the symbol
for “Preset” with >+ or ?– and press OK.
The PRESET menu appears.
3 Select “Programme Sorting” with >+ or ?– and press OK.
The PROGRAMME SORTING menu appears. (See Fig. 14.)
4 Using >+ or ?–, select the programme position you want to move
to another and press OK.
The colour of the selected position changes. (See Fig. 15.)
5 Using >+ or ?–, select the programme position to which you want
to move the channel of the programme position selected in step 4
and press OK. Now the programme positions have been sorted.
(See Fig. 16.)
6 Repeat steps 4 and 5 to sort other programme positions.
PROGRAMME SORTING
PROG
1
2
3
4
5
6
7
8
Move PR 8 to PR - -
Select and press OK
Fig. 14
Fig. 15
CH LABEL
C03
BBC 2
C04
C07
C09
C12
C13
C14
C15
ITV
MBC
-----
-----
-----
-----
BBC 1
GB
For higher programme
positions
The display scrolls
automatically.
If you have made a
mistake
Press ≅ to go back to
the previous position
To go back to main
menu
Keep pressing ≅.
To go back to the
normal TV picture
Press MENU.
RM-838
RESET
PROGR
+
_
Fig. 16
10
 Loading...