

Page 1
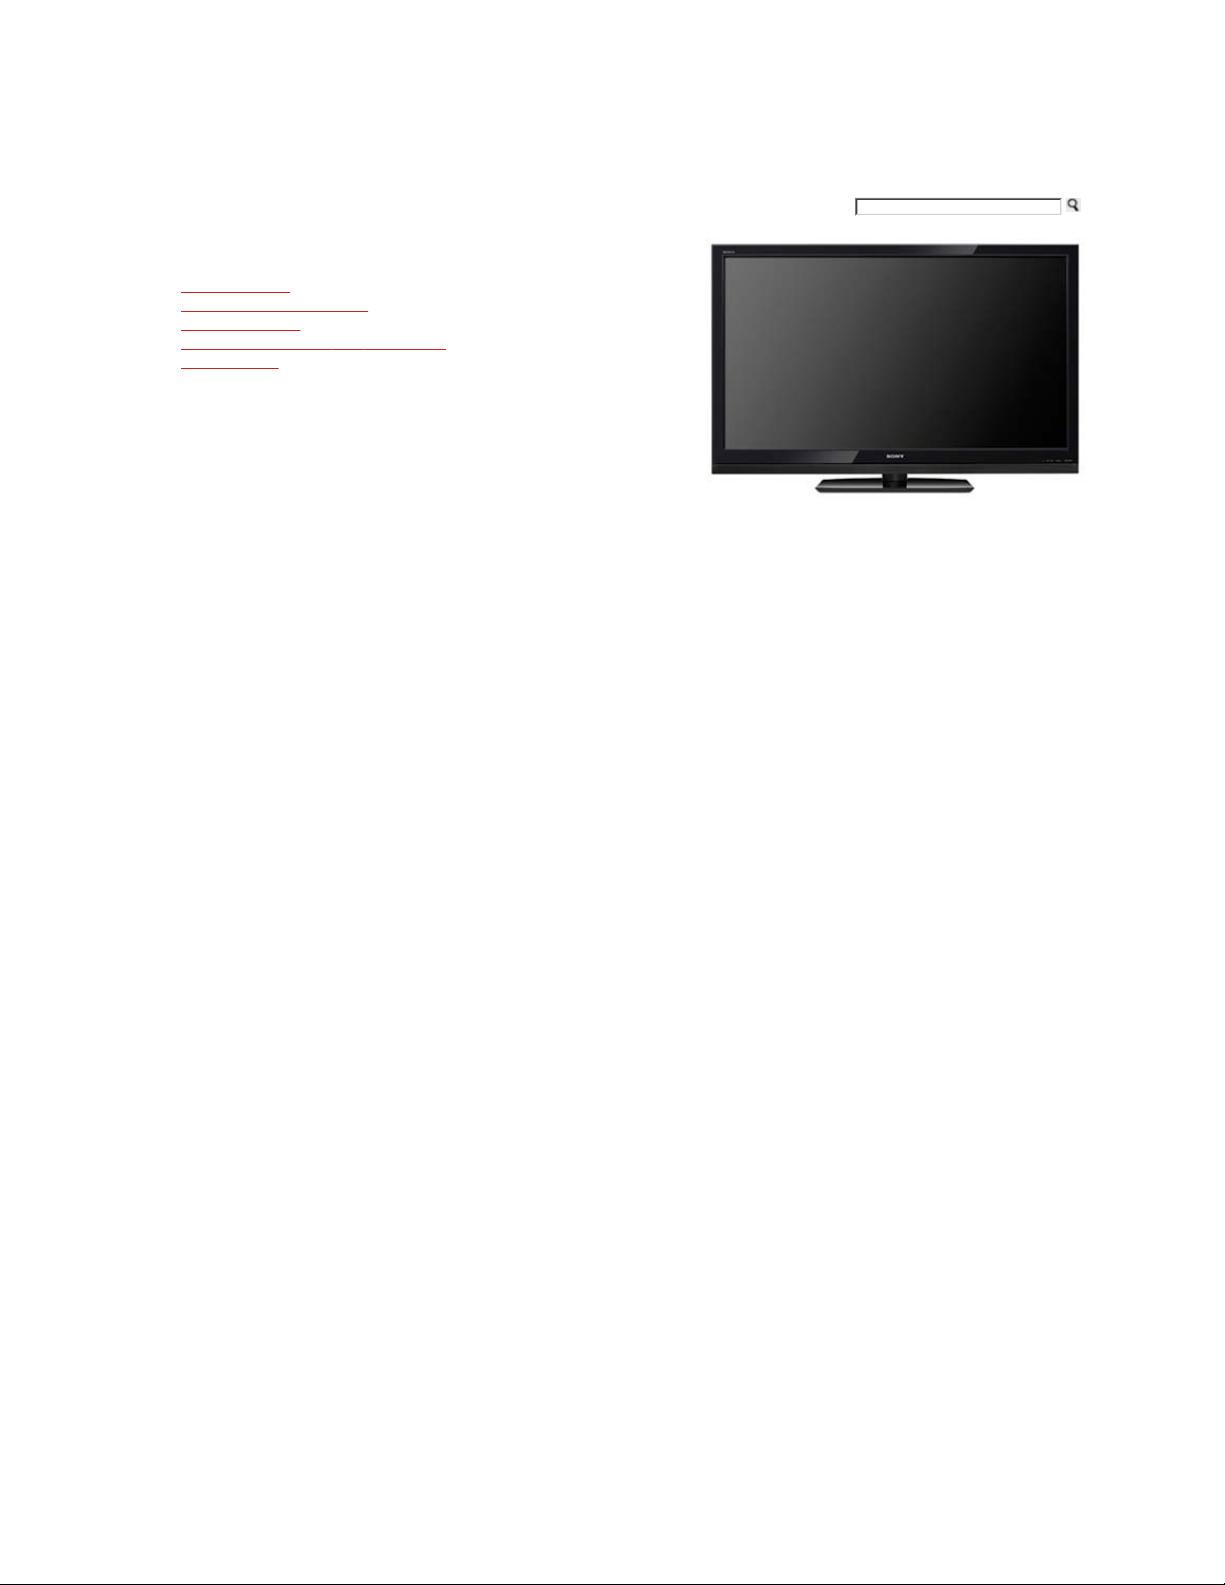
KDL-52Z5100
KDL-46Z5100
KDL-40Z5100
Copyright © 2009 Sony Electronics Inc. All rights reserved.
Page 2
Welcome to the Sony Online Reference Book
This manual is a part of Sony’s eco-friendly initiatives to help reduce the consumption of natural resources. Use the printed Operating Instructions, the Quick Setup
Guide, and this online Reference Book to fully enjoy your TV.
For the best online experie n ce, use the latest version of
Firefox or Internet Explorer.
This Online Reference Book will be updated periodically.
Copyright © 2009 Sony Electronics Inc. All rights reserved.
Page 3
Getting Started Operating the TV Exploring Fun Features TV Home Menu Other Information Specifications
Getting Started
Installing the TV
Locating Inputs and Outputs
Connecting the TV
Setting Up the Channel List-Initial Setup
Network Setup
Home | Getting Started | Operating the TV | Exploring Fun Features | TV Home Menu | Other Information | Specifications
Tell us your opinion about this online reference book.
Copyright © 2009 Sony Electronics Inc. All rights reserved.
Page 4
Getting Started Operating the TV Exploring Fun Features TV Home Menu Other Information Specifications
Getting Started > Installing the TV
Installing the TV
This TV can be mounted on a wall using a Wall-Mount Bra cket or placed on a TV stand (each sold separately). This section explains:
How to carry the TV
Preparation for a Table-Top stand
Using a Wall-Mount Bracket
Installing the Wall-Mount Bracket
Installation against a wall or enclosed area
Bundling the connecting cables
Securing the TV
Back to Getting Started Next to How to carry the TV
Home | Getting Started | Operating the TV | Exploring Fun Features | TV Home Menu | Other Information | Specifications
Tell us your opinion about this online reference book.
Copyright © 2009 Sony Electronics Inc. All rights reserved.
Page 5

Getting Started Operating the TV Exploring Fun Features TV Home Menu Other Information Specifications
Getting Started > Installing the TV > How to Carry the TV
How to Carry the TV
Some TV models are packaged with a detached Table-Top Stand so you can mount your TV to a wall right
away. If you are not mounting the TV to a wall, you will need to attach the Table-To p Stand. You will need
a Phillips screwdriver and the supplied screws to complete the task. Look for the attachment instructions
provided with the TV.
Be sure to consider the following while setting up your TV:
Disconnect all cables when carrying the TV .
Carry the TV with the adequate number of people; larger size TVs require two or more people.
Correct hand placement while carrying the TV is very important for safety and to avoid damage.
Ensure your TV has adequate ventilation.
For best picture quality, do not expose the screen to direct illumination or sunlight.
Avoid installing the TV in a room with reflective wall and floor materials.
Avoid moving the TV from a cold area to a warm area. Sudden room temperatu re changes may
cause moisture condensation. This may cause the TV to show poor picture and/or poor color.
Should this occur, allow moisture to evaporate completely before powering the TV on.
Be sure to hold the bottom of the panel, and not the transparent part, speaker, or speaker grill
area. Do not compress the panel's spea ker grill area.
Do not lift the TV from the bottom center.
Back to Installing the TV Next to Preparation for Table-Top Stand
Home | Getting Started | Operating the TV | Exploring Fun Features | TV Home Menu | Other Information | Specifications
Tell us your opinion about this online reference book.
Copyright © 2009 Sony Electronics Inc. All rights reserved.
Page 6
Getting Started Operating the TV Exploring Fun Features TV Home Menu Other Information Specifications
Getting Started > Installing the TV > Preparation for a Table-Top Stand
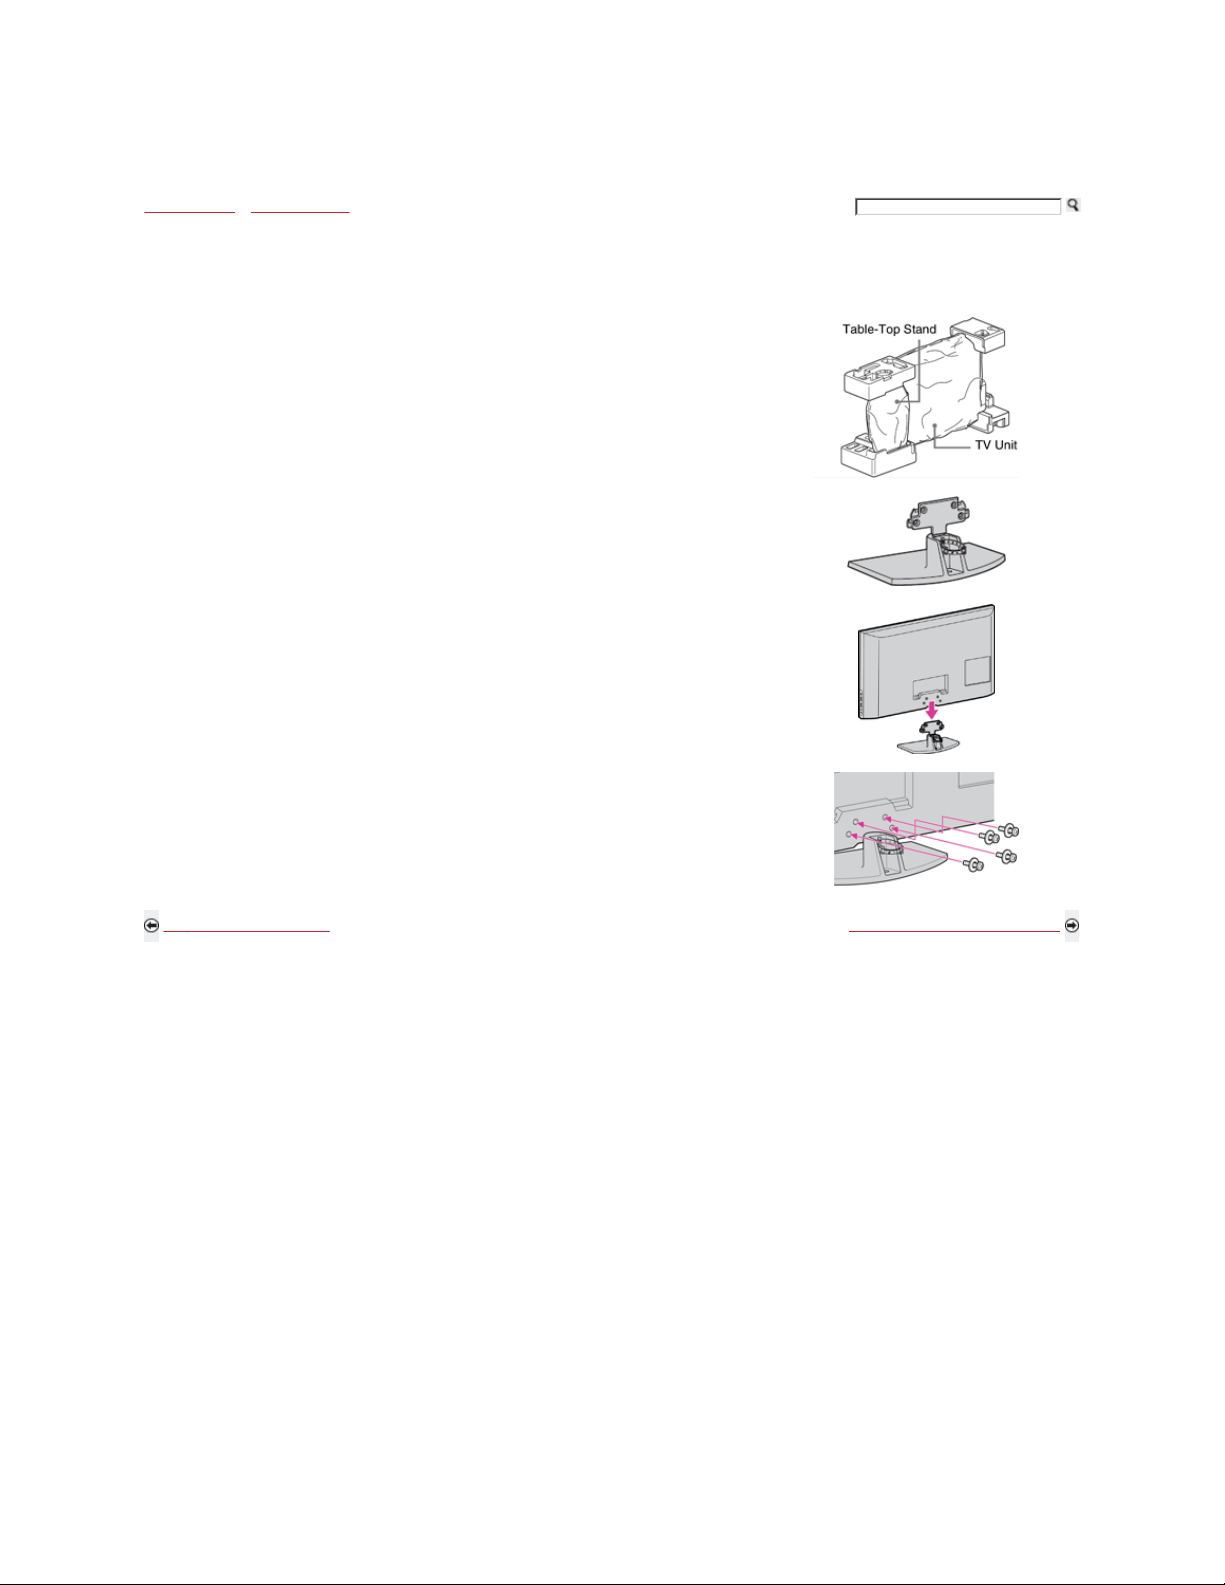
Preparation for a Table-Top Stand
Follow the assembling steps required to place on a TV stand.
1) Remove the Table-Top Stand. For product pro tection and safety reasons, Sony strongly recommends
that you use the screws provided with the TV.
2) Place the Table-Top Stand on a level and stable surface.
The screws are attached to the Table-Top Stand.
3) Gently slide the TV unit onto the neck of the Table-Top Stand and align the screw hole s.
Do not put stress on the LCD panel or the frame around the screen.
Be careful to not pinch your hands or the AC power cord when you install the TV unit to the TableTop Stand.
4) Use the supplied screws to attach the TV unit to the Table-Top Stand (refer to the “Attaching th e TableTop Stand” flyer found inside the carton). If an electric screwdriver is used, set the torque to tighten at
approximately 1.5 N·m, 15 Kgf·cm.
Back to How to Carry the TV Next to Using a Wall-Mount Bracket
Home | Getting Started | Operating the TV | Exploring Fun Features | TV Home Menu | Other Information | Specifications
Tell us your opinion about this online reference book.
Copyright © 2009 Sony Electronics Inc. All rights reserved.
Page 7
Getting Started Operating the TV Exploring Fun Features TV Home Menu Other Information Specifications
Getting Started > Installing the TV > Using a Wall-Mount Bracket
Using a Wall-Mount Bracket
Your TV can be mounted to a wall using the Wall-Mount Bracket (not supplied) out of the box as packaged.
Prepare the TV for the Wall-Mount Bracket be fore making cable connections.
Sony strongly recommends that you use the Wall-Mount Bracket model designed for your TV and that wall-mounting of your TV should be
performed by a Sony dealer or licensed contractor.
Follow the instruction guide provided with the Wall-Mount Bracket for your model. Sufficient
expertise is required in installing this TV, especially to determine the strength of the wall for
withstanding the TV’s weight.
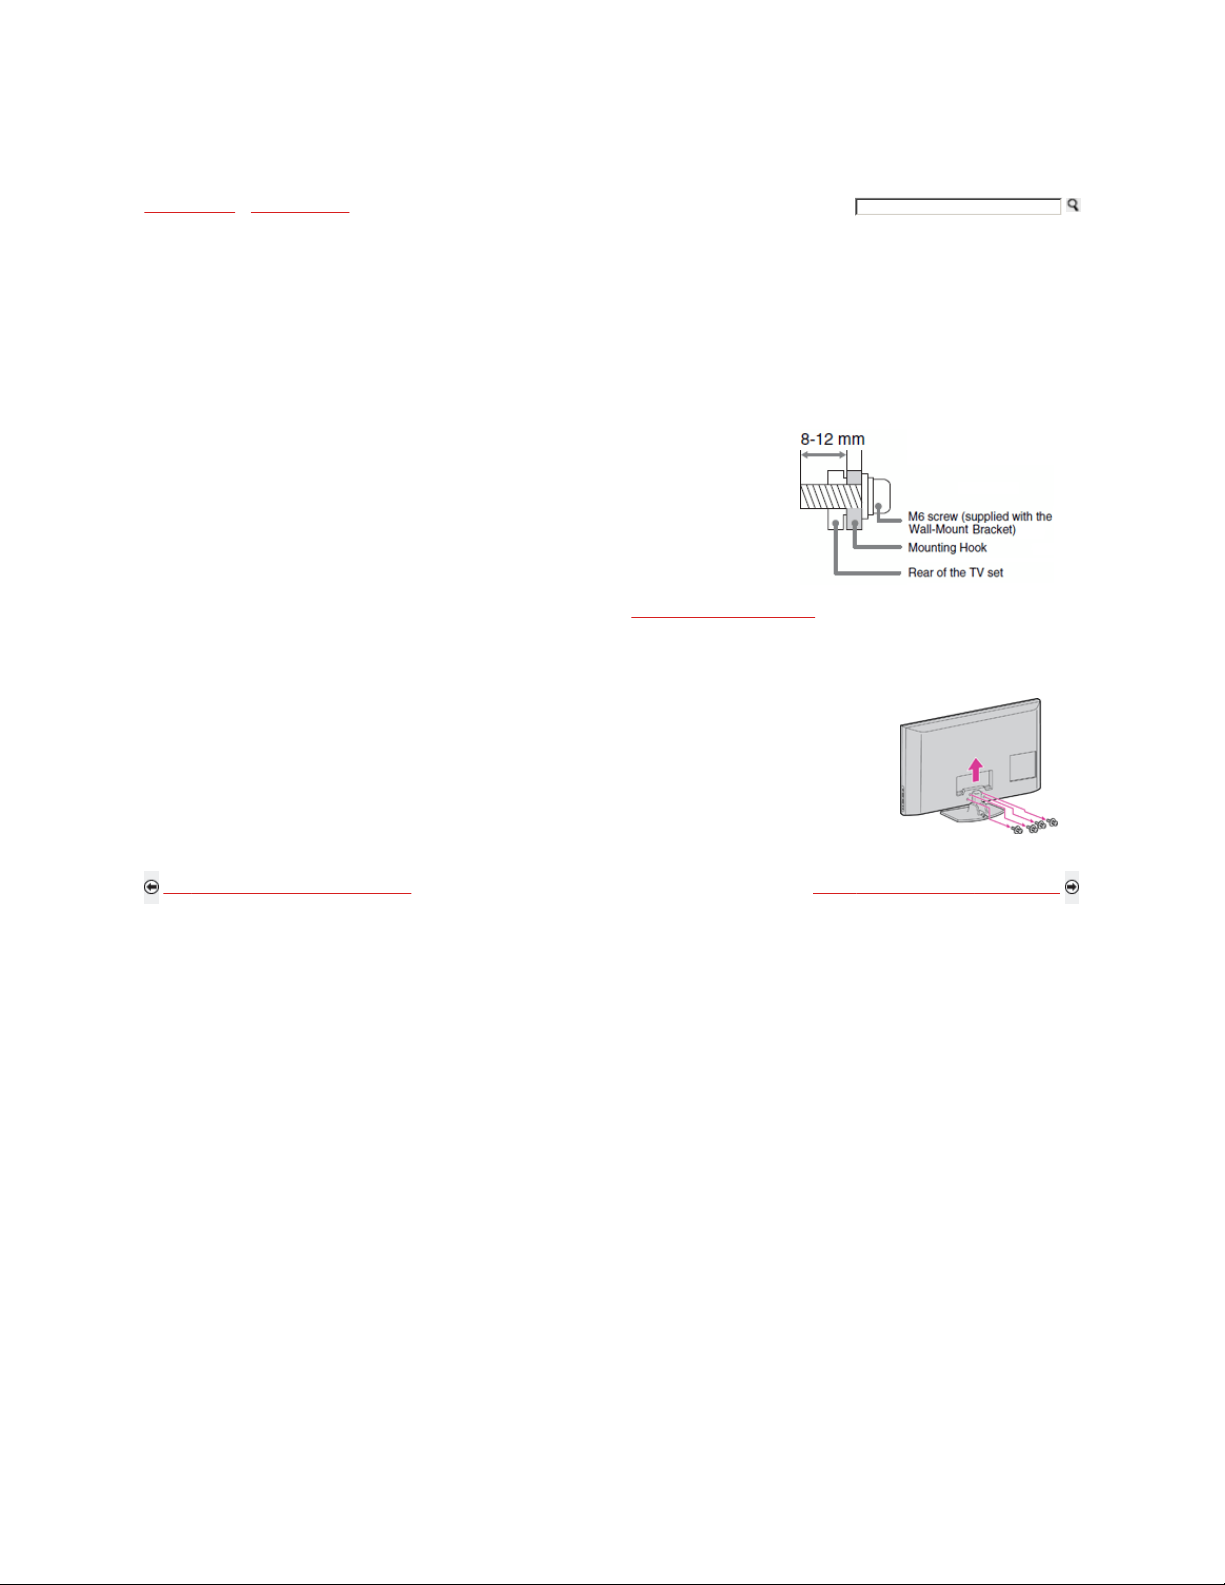
Be sure to use the screws supplied with the Wall-Mount Bracket when attaching the mounting
hooks to the TV set. (Do not use the screws that are intended for the Table-Top Stand
The supplied M6 screws are designed so that the y are 8 mm to 12 mm in length when measured
from the attaching surface of the mounting hook. Use of screws other than t ho se supplied with the
bracket may result in internal damage to the TV set or cause it to fall, etc.
Be sure to store the unused screws and Table-Top S tand in a safe place until you are ready to
attach the Table-Top Stand. Keep the screws away from small children.
For details on how to use the Wall-Mount Bracket compatible with your model, visit www.sony.com/accessories
call 1-800-488-7669 (United States) 1 - 877-899-7669 (Canada)
Follow the simple steps below to remove the Table-Top Stand:
1) Unplug the AC power cord and disconnect all the cables fr om the TV.
2) Secure the Mounting Hook to the rear of the TV.
3) Adjust the angle of the Mounting Hook.
4) Remove the screws on the rear of the TV (see illustration in the next column). Do not remove any other screws from the
TV.
5) When screws are removed, lift the TV off the stand. Make sure that you carry out this task with at least two or three
people. Do not attempt to lift the TV by yourself.
Back to Preparation for a Table-Top Stand Next to Installing the Wall-Mount Bracket
Home | Getting Started | Operating the TV | Exploring Fun Features | TV Home Menu | Other Information | Specifications
attachment.)
or
Tell us your opinion about this online reference book.
Copyright © 2009 Sony Electronics Inc. All rights reserved.
Page 8
Getting Started Operating the TV Exploring Fun Features TV Home Menu Other Information Specifications
Getting Started > Installing the TV >Installing the Wall-Mount Bracket
Installing the Wall-Mount Bracket (Page 1 of 3)
To Customers
Your TV can be wall-mounted using a Wall-Mount Bracket (sold separately).
Use your TV with the Sony Wall-Mount Bracket Model number: SU-WL500
For product protection and safety, Sony strongly recommends that you use the Wall-Mount Bracket designed for your TV (SU-WL500) and wall-mounting is
performed by a Sony dealer or a licensed contractor. Do not a ttempt to install it yourself. Sony is not liable for any damage or injury caused by mishandling or
improper installation.
Please provide your licensed contractor with this installation information section as w ell as instructions supplied with the Wall-Mount Bracket.
To Sony Dealers and Licensed Contractors
To avoid injury and property damage, read these instructions carefully. Periodic inspection and maintenance is highly recommended to ensure that the TV is
securely mounted.
Back to Using a Wall-Mount Bracket Next to Installing the Wall-Mount Bracket (Page 2 fo 3)
Home | Getting Started | Operating the TV | Exploring Fun Features | TV Home Menu | Other Information | Specifications
Tell us your opinion about this online reference book.
Copyright © 2009 Sony Electronics Inc. All rights reserved.
Page 9
Getting Started Operating the TV Exploring Fun Features TV Home Menu Other Information Specifications
Getting Started > Installing the TV > Installing the Wall-Mount Bracket
Installing the Wall-Mount Bracket (Page 2 of 3)
Installing the Wall-Mount Bracket and Mounting Hooks
1) Open the Wall-Mount Bracket package and check for all the required parts along with the Instructions.
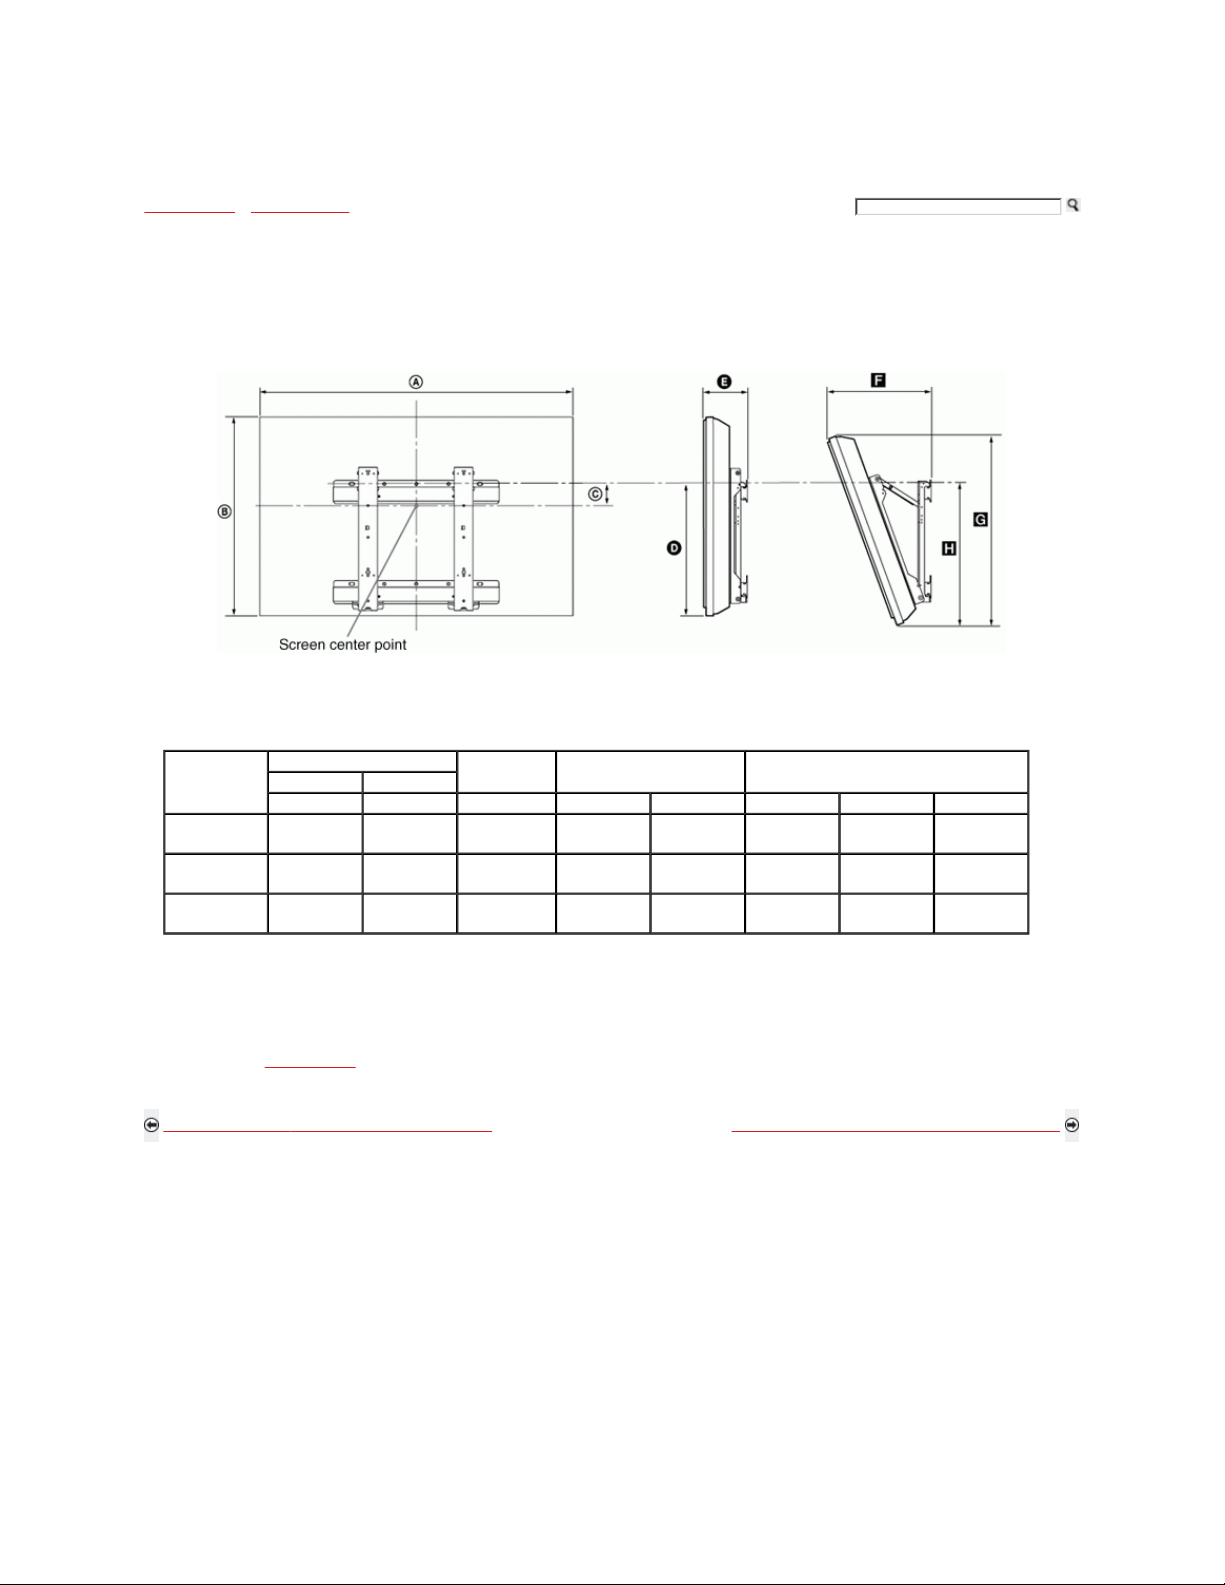
2) Decide where you want to install your TV. Refer to the TV installation dimensions table.
Dimensions Table
Unit: inches (mm)
Model Name
KDL-40Z5100
KDL-46Z5100
KDL-52Z5100
Display Dimension
width height
A B C D E F G H
37 3/8
(961)
43 1/8
(1,094)
49
(1,243)
24 1/4
(614)
27 3/8
(695)
30 7/8
(783)
Screen
center
1 13/16
(126)
3 1/2
(87)
(46)
Length of Mounting
5
at 0 degree
17 7/8
(454)
18 1/8
(459)
18 1/8
(459)
5 3/8
(134)
5 3/8
(134)
5 3/8
(134)
Length of Mounting
at 20 degree angle
12 3/8
(313)
13 3/8
(339)
14 5/8
(369)
22 3/4
(577)
25 3/4
(653)
29 1/8
(739)
19
(480)
19 1/8
(484)
19 1/8
(484)
Figures in the above table may differ slightly depending on the installation.
The wall that the TV will be installed on should be capable of supporting a weight of at least four times that of the TV. Refer to your TV’s operating
instructions or the Specificatio ns
Back to Installing the Wall-Mount Bracket (Page 1 of 3) Next to Installing the Wall-Mount Bracket (Page 3 of 3)
Home | Getting Started | Operating the TV | Exploring Fun Features | TV Home Menu | Other Information | Specifications
section of this online Reference Book for its weight.
Tell us your opinion about this online reference book.
Copyright © 2009 Sony Electronics Inc. All rights reserved.
Page 10
Getting Started Operating the TV Exploring Fun Features TV Home Menu Other Information Specifications
Getting Started > Installing the TV > Installing the Wall-Mount Bracket
Installing the Wall-Mount Bracket (Page 3 of 3)
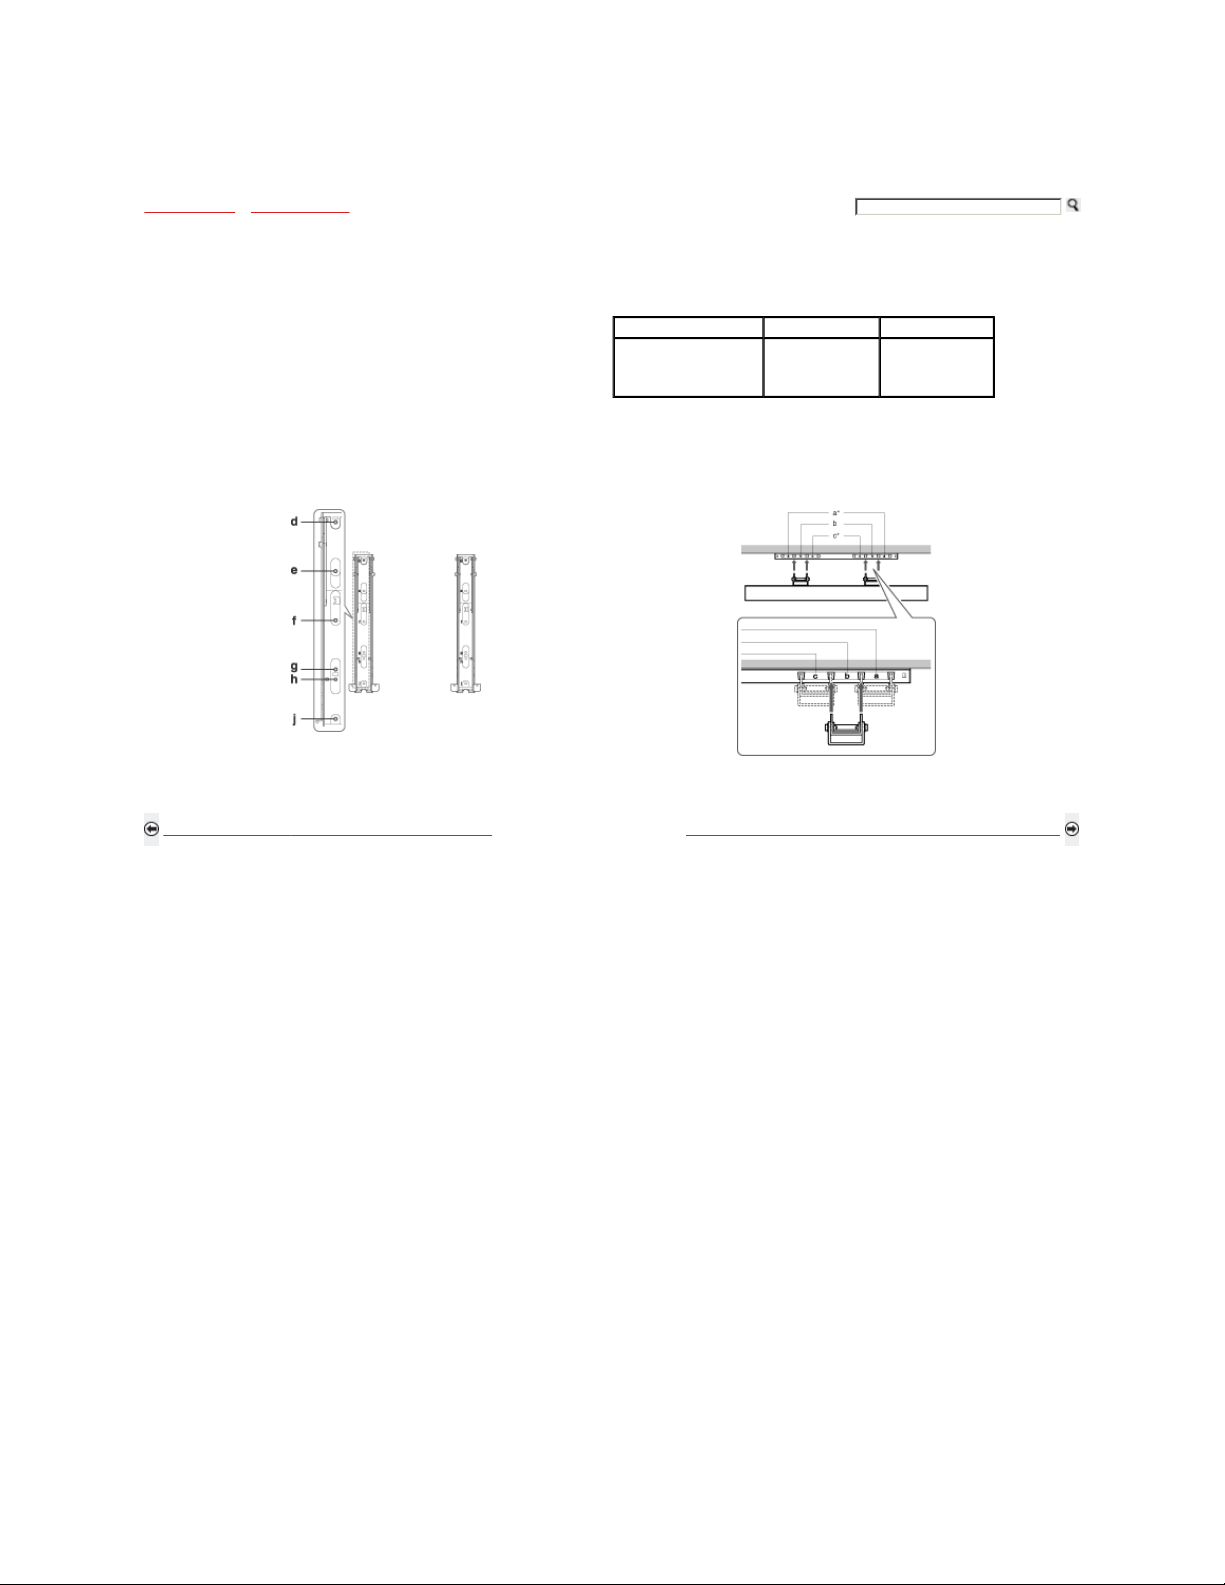
Installing the Wall-Mount Bracket and Mounting Hooks (continued)
4) Disconnect all cables and remove the Table-Top Stand.
5) Secure the Mounting Hook to the rear of the TV.
Determine the screw locations and secure the Mounting Hooks to the rear of
the TV. Refer to the “Screw and Hook Locations Di agram/Table” shown here.
Screw Location
When installing the Mounting Hooks on the TV
Back to Installing the Wall-Mount Bracket (Page 2 of 3) Next to When Installing the TV Against a Wall or Enclosed Area
Model Name Screw Locations Hook Location
KDL-40Z5100
KDL-46Z5100
KDL-52Z5100
d, g b
Hook Location
When installing the TV onto Base Bracket.
* Hook position “a” and “c” cannot be used for the models for Z5100 series.
Home | Getting Started | Operating the TV | Exploring Fun Features | TV Home Menu | Other Information | Specifications
Tell us your opinion about this online reference book.
Copyright © 2009 Sony Electronics Inc. All rights reserved.
Page 11
Getting Started Operating the TV Exploring Fun Features TV Home Menu Other Information Specifications
Getting Started > Installing the TV > When Installing the TV Against a Wall or Enclosed Area
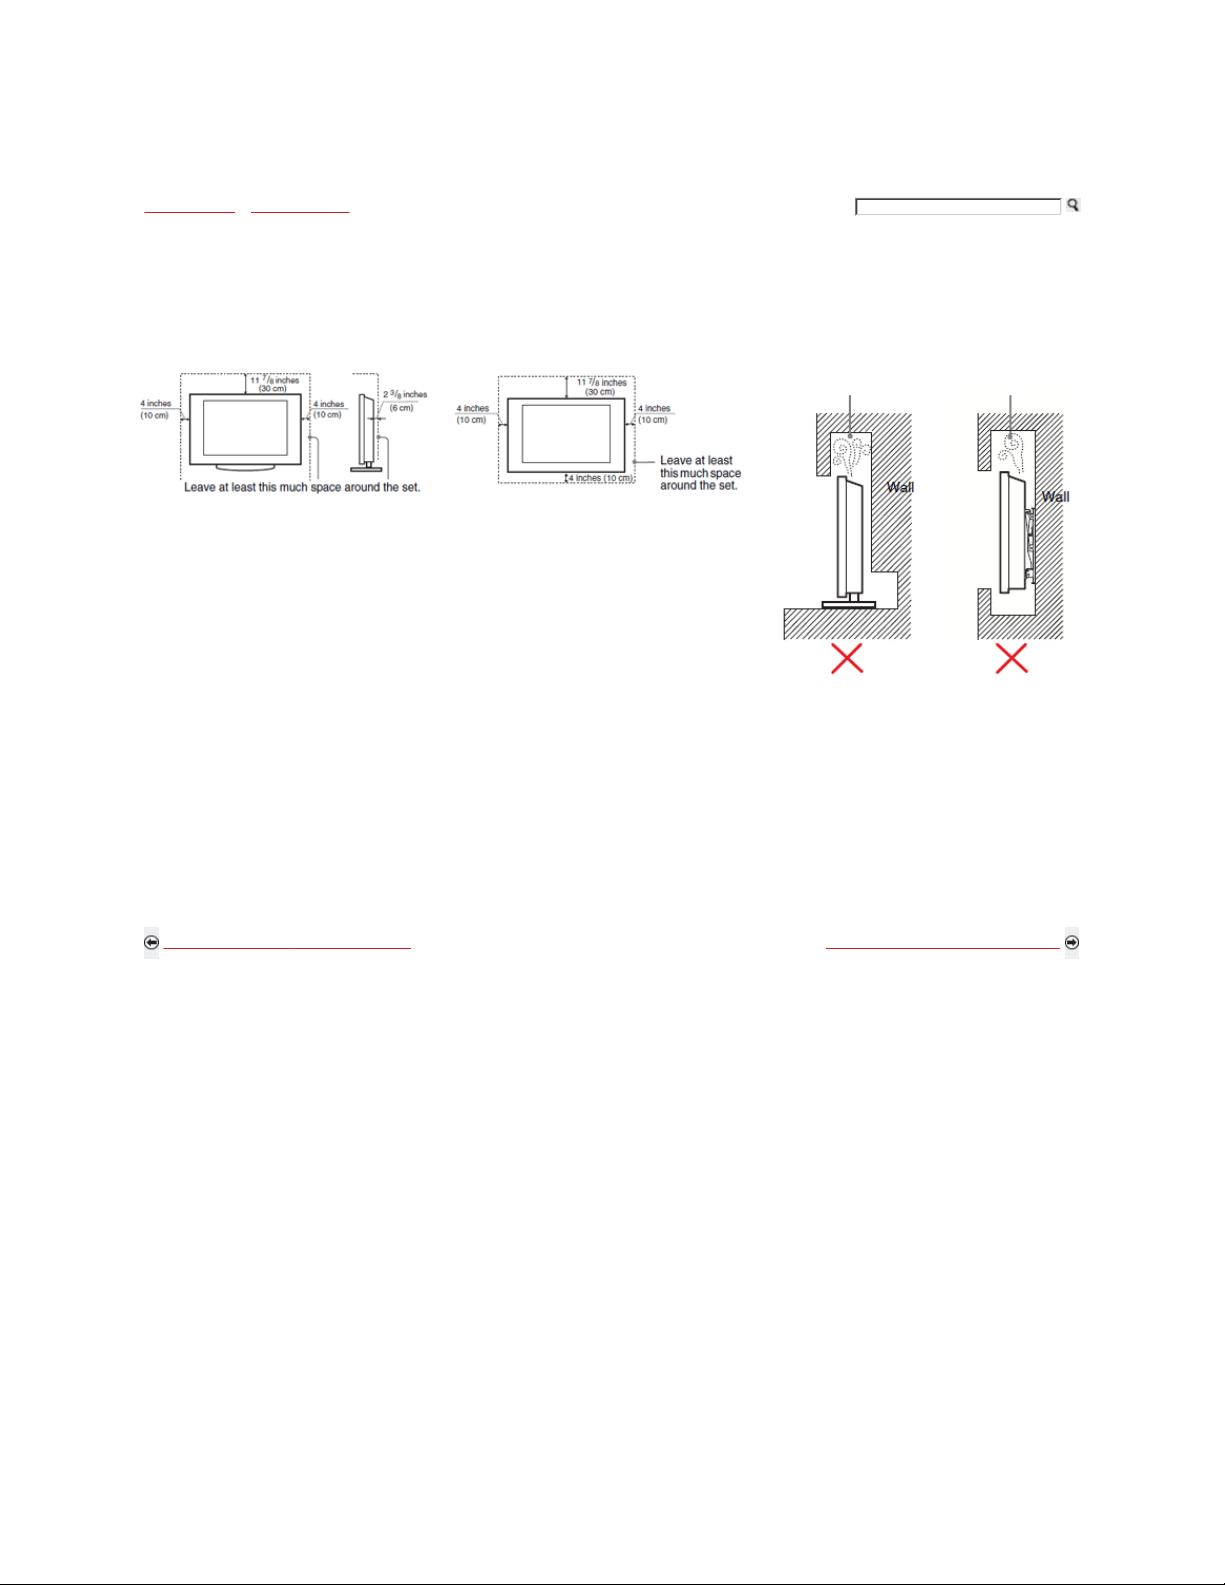
When Installing the TV Against a Wall or Enclosed Area
Make sure that your TV has adequate air circulation. Allow enough space around the TV as shown below.
Avoid operating the TV at temperatures below 41 °F (5 °C).
Installed with stand
Inadequate air circulation can lead to overheating of the TV and may cause damage to your TV or cause a fire.
Consider the following for best picture quality
Installed on the wall
Never install the TV set as follows:
Circulation is blocked. Circulation is blocked.
Do not expose the screen to direct illumination or sunlight.
Use spot lighting directed down from the ceiling or cover the windows that face the screen with opaque drapery.
Install the TV in a room where the floor and walls are not of a reflective material.
When moving the TV from a cold area to a warm area, sudden change in room temperature may cause the TV’s picture to blur or show
poor color due to moisture condensation. Should this occur, please wait a few hours to a llow the mo is ture to evaporate before
powering on the TV.
Back to Installing the Wall-Mount Bracket Next to Bundling the Connection Cables
Home | Getting Started | Operating the TV | Exploring Fun Features | TV Home Menu | Other Information | Specifications
Tell us your opinion about this online reference book.
Copyright © 2009 Sony Electronics Inc. All rights reserved.
Page 12
Getting Started Operating the TV Exploring Fun Features TV Home Menu Other Information Specifications
Getting Started > Installing the TV > Bundling the Connecting Cables
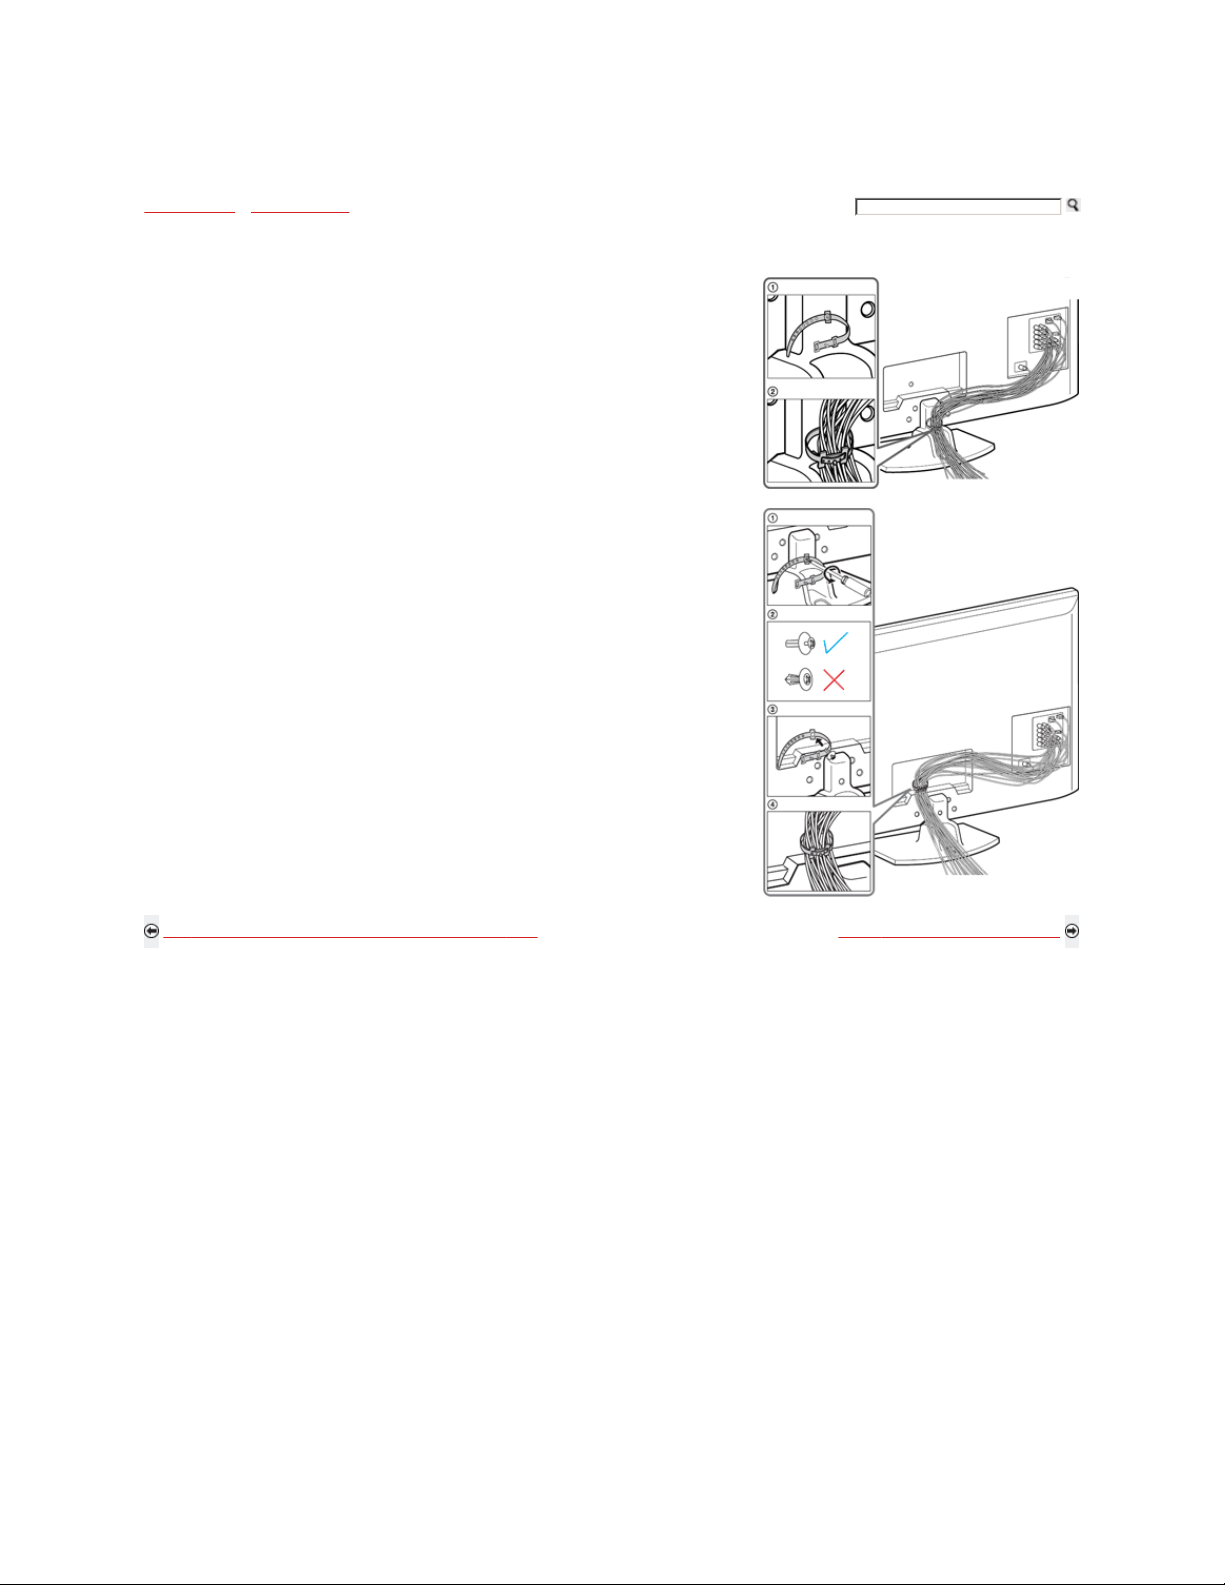
Bundling the Connecting Cables
Use the attached cable clamper to bundle the connecting cables. The cable clamper is located on the
Table-Top Stand as illustrated.
Do not bundle the AC power cord with other connecting cables. This can affect the picture quality.
When using a Wall-Mount Bracket, your c onnected cables can be clamped to an alternate location. Follow
the steps below.
1) Remove the cable clamper from the Table-Top Stand using a Phillips screwdriver (not supplied).
2) Make sure that the tip of the plastic fastener you removed is closed as shown in (2).
3) Locate the alternate hole to attach the cable clamper on the TV rear cover as shown in (3). Push the
fastener into the hole.
4) Bundle the cables and close the clamper.
Back to When Installing the TV Against a Wall or Enclosed Area Next to Securing the TV (Page 1 of 3)
Home | Getting Started | Operating the TV | Exploring Fun Features | TV Home Menu | Other Information | Specifications
Tell us your opinion about this online reference book.
Copyright © 2009 Sony Electronics Inc. All rights reserved.
Page 13
Getting Started Operating the TV Exploring Fun Features TV Home Menu Other Information Specifications
Getting Started > Installing the TV > Securing the TV
Securing the TV (Page 1 of 3)
Sony strongly recommends taking measures to prevent the T V from toppling over. Unsecured TVs may topple and result in property damage, serious
bodily injury or even death.
Prevent the TV from Toppling Over
Secure the TV to a wall and/or stand.
Do not allow children to play or climb on furniture and TV sets.
Avoid placing or hanging items on the TV.
Never install the TV on:
slippery, unstable and/or uneven surfaces.
furniture that can easily be used as steps, such as a che st of drawers.
Install the TV where it cannot be pulled, pushed, or knocked over.
Route all AC power cords and connecting cables so that they ar e no t accessible to curious children.
Back to Bundling the Connecting Cables Next to Securing the TV (Page 2 of 3)
Home | Getting Started | Operating the TV | Exploring Fun Features | TV Home Menu | Other Information | Specifications
Tell us your opinion about this online reference book.
Copyright © 2009 Sony Electronics Inc. All rights reserved.
Page 14
Getting Started Operating the TV Exploring Fun Features TV Home Menu Other Information Specifications
Getting Started > Installing the TV > Securing the TV
Securing the TV (Page 2 of 3)
Use a Sony TV Stand
Use a Sony specified TV stand and follow the instruction manual provided with the Sony TV stand.
If a Sony specified TV stand is not used, consider the following recommended measures.
Recommended Measures to Secure the TV
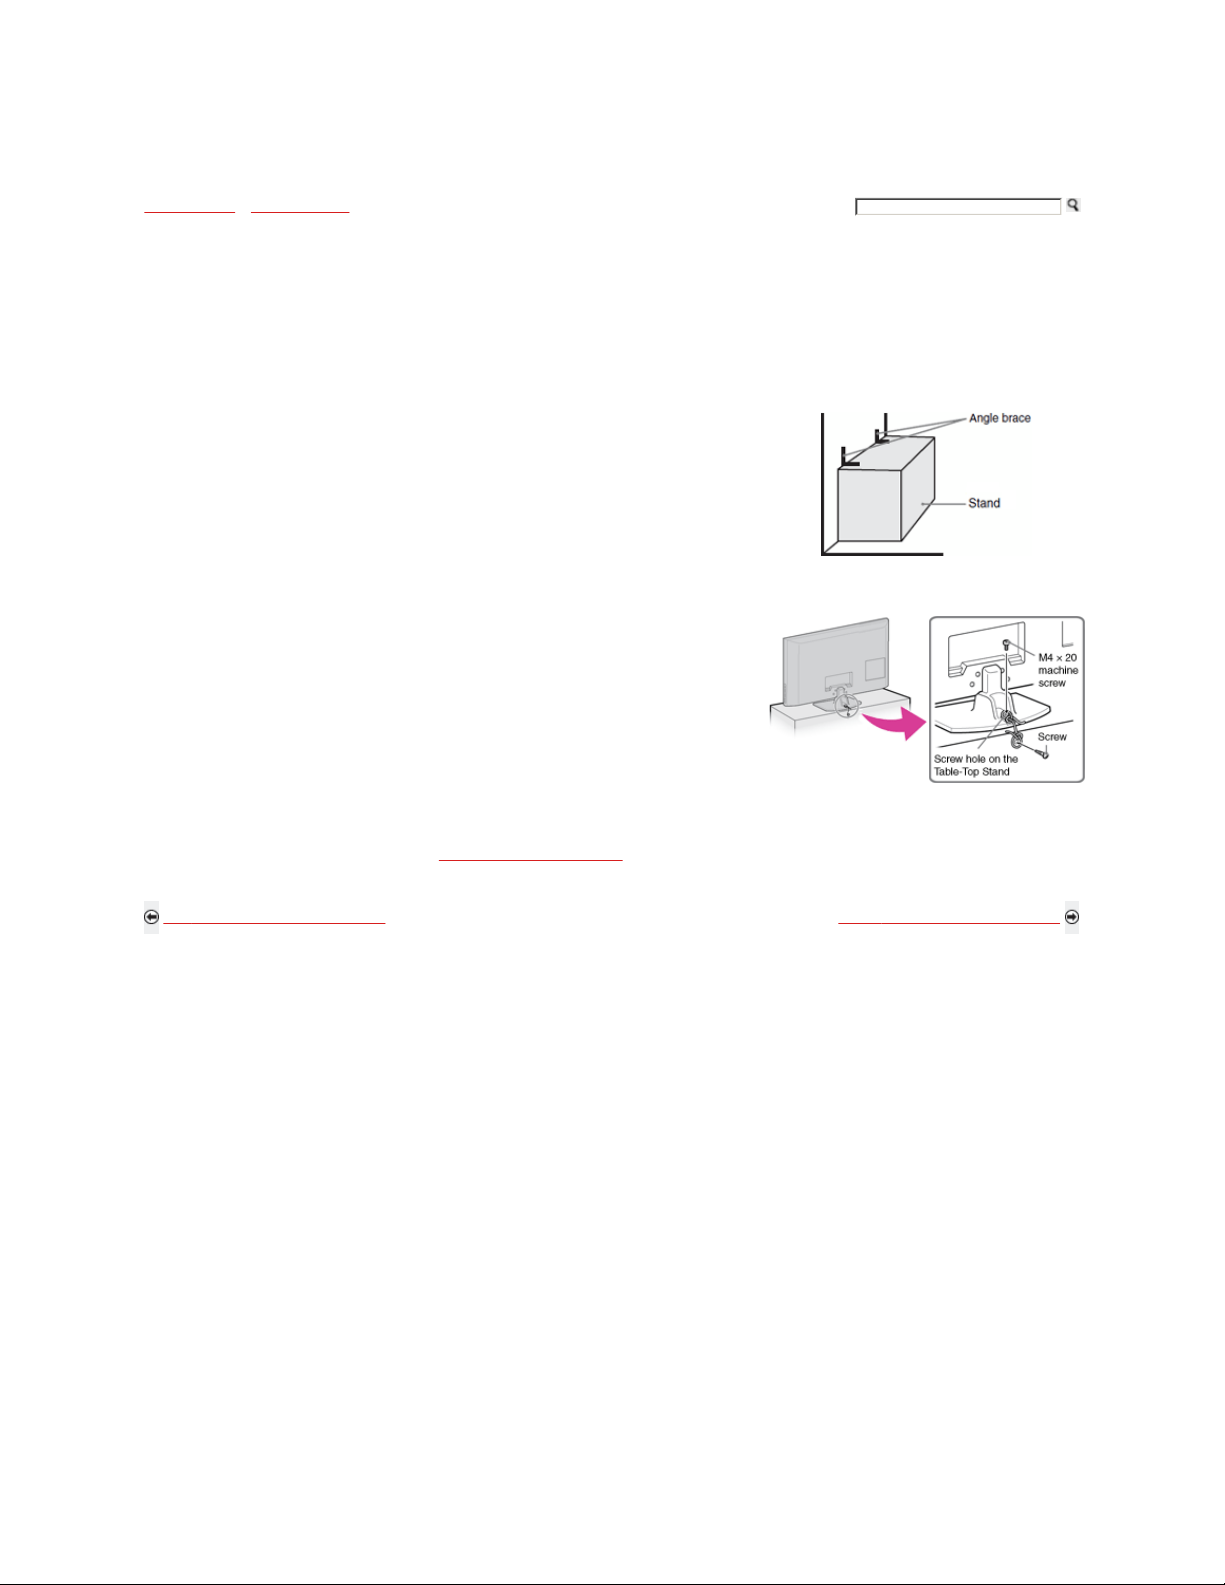
Secure the Stand for the TV
Make sure the TV stand can adequately support the weight of the TV. Use two angle braces (not supplied)
to secure the stand. For each angle brace use the appropriate hardware to:
Attach one side of the angle brace to the wall stud.
Attach the other side to the TV stand.
Secure the TV to the Stand
Use the optional hardware listed below (not supplied):
M4 × 20 machine screw (screwed into the TV’s Table-Top Stand)
A screw or similar (attach it to the TV stand)
Rope or chain (strong enough to support the weight of the TV). Make sure that
there is no excess slack in the rope or chain.
An alternative way to secure the TV is with an optional Son y Support Belt Kit.
Contact Sony Customer Support to purchase the optional Suppo rt Belt Kit by providing your TV model name.
For United States call: 1-800-488-7669 or visit: www.sony.com/accessories
For Canada call: 1-877-899-7669
Back to Securing the TV (Page 1 of 3) Next to Securing the TV (Page 3 of 3)
Home | Getting Started | Operating the TV | Exploring Fun Features | TV Home Menu | Other Information | Specifications
Tell us your opinion about this online reference book.
Copyright © 2009 Sony Electronics Inc. All rights reserved.
Page 15
Getting Started Operating the TV Exploring Fun Features TV Home Menu Other Information Specifications
Getting Started > Installing the TV > Securing the TV
Securing the TV (Page 3 of 3)
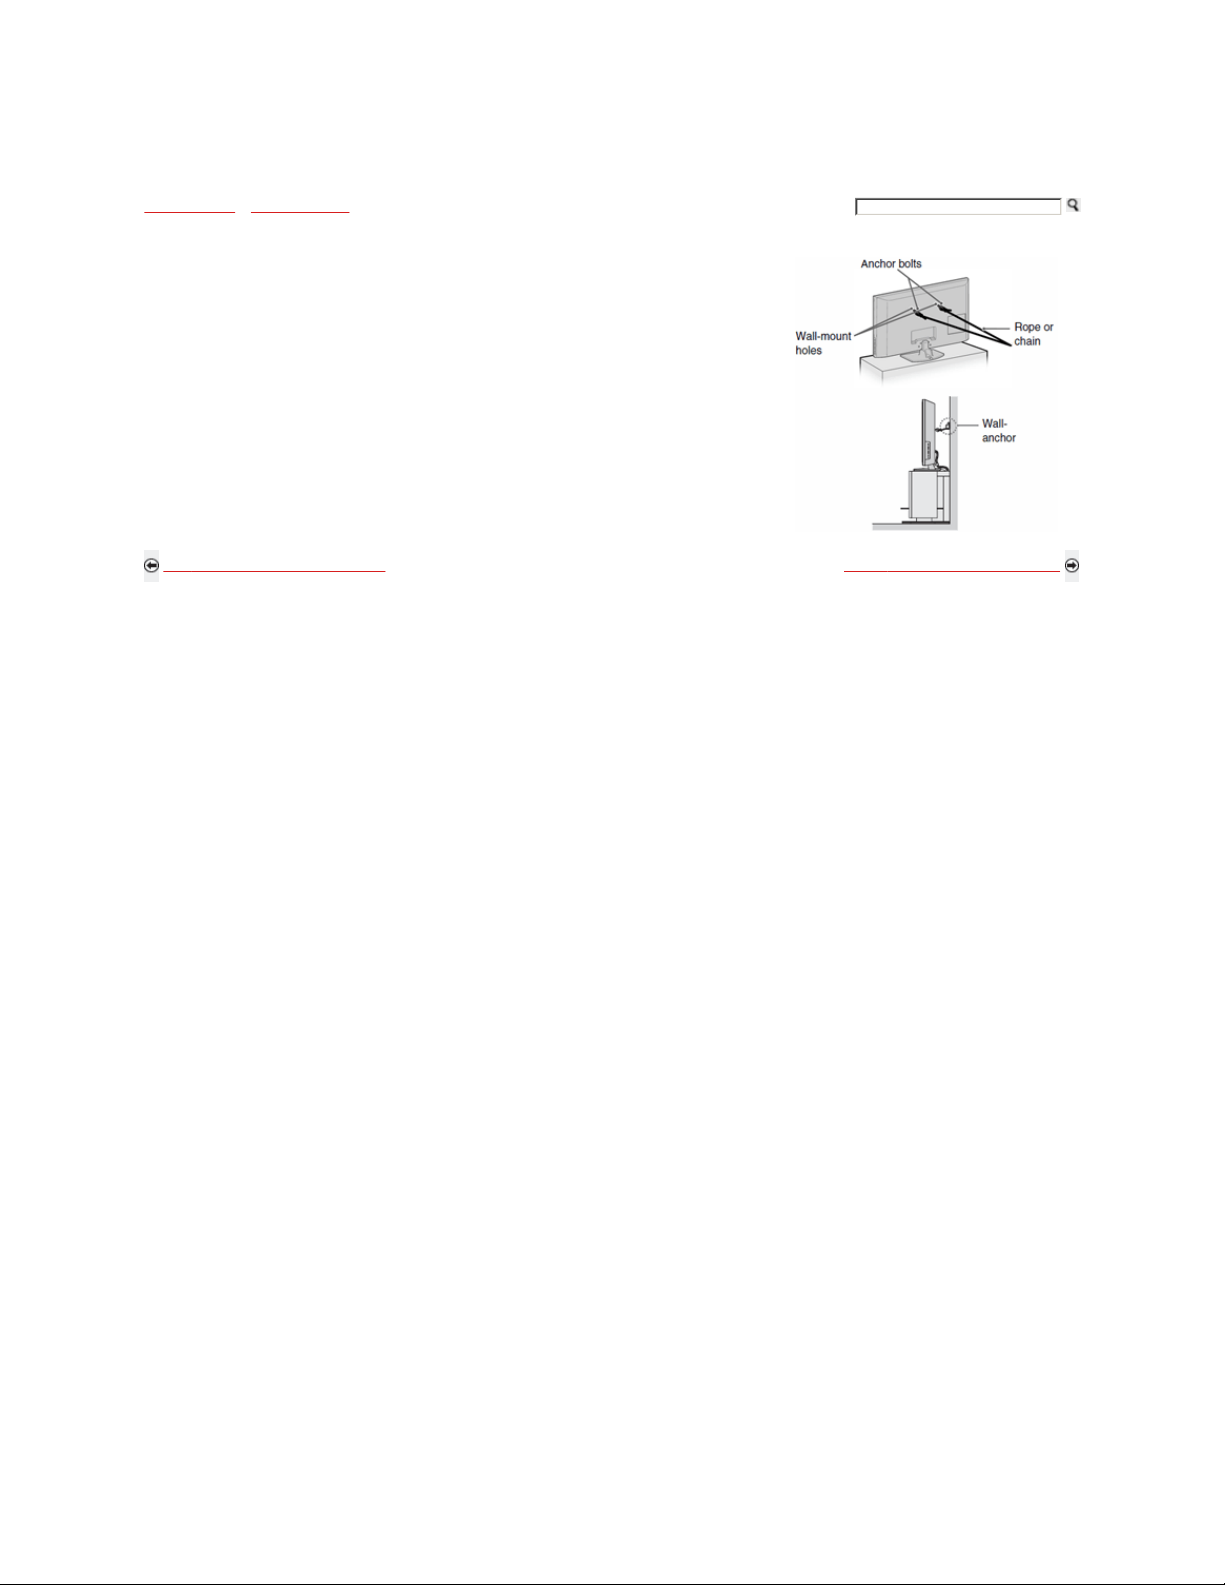
Anchor the TV to the Wall
Use the hardware listed below (not supplied):
Two M6 ×14 mm anchor bolts (screw into the top-most wall-mount holes located on the rear of the
TV)
Rope or chain (attach to one M6 anchor bolt)
Wall-anchor (attach to the wall stud) strong enough to support the weight of the TV (pass the rope
through the wall-anchor, then attach to the other M6 anchor bolt)
Securing the TV to the stand without securing the TV and the stand to the wall provides minimum
protection against the TV toppling over. For further protection, be sure to follow the three measures
recommended.
Back to Securing the TV (Page 2 of 3) Next to Locating Inputs and Outputs
Home | Getting Started | Operating the TV | Exploring Fun Features | TV Home Menu | Other Information | Specifications
Tell us your opinion about this online reference book.
Copyright © 2009 Sony Electronics Inc. All rights reserved.
Page 16
Getting Started Operating the TV Exploring Fun Features TV Home Menu Other Information Specifications
Getting Started > Locating Inputs and Outputs
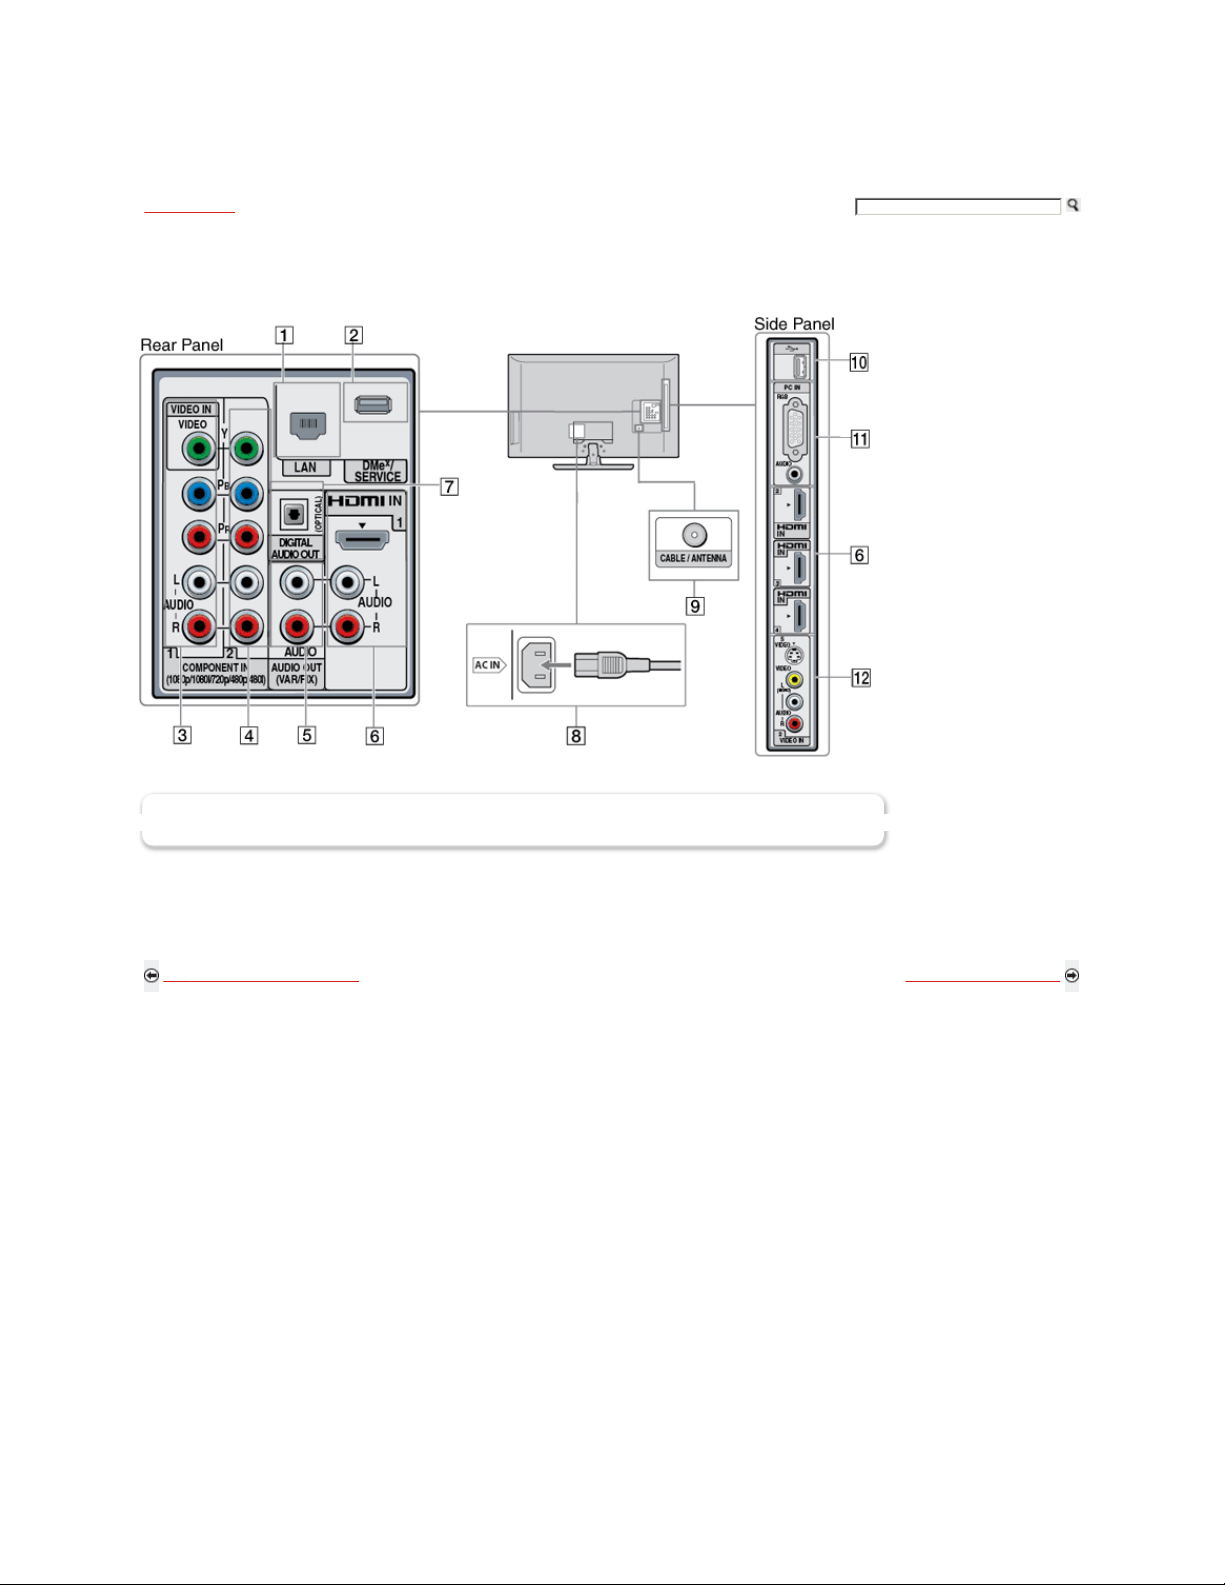
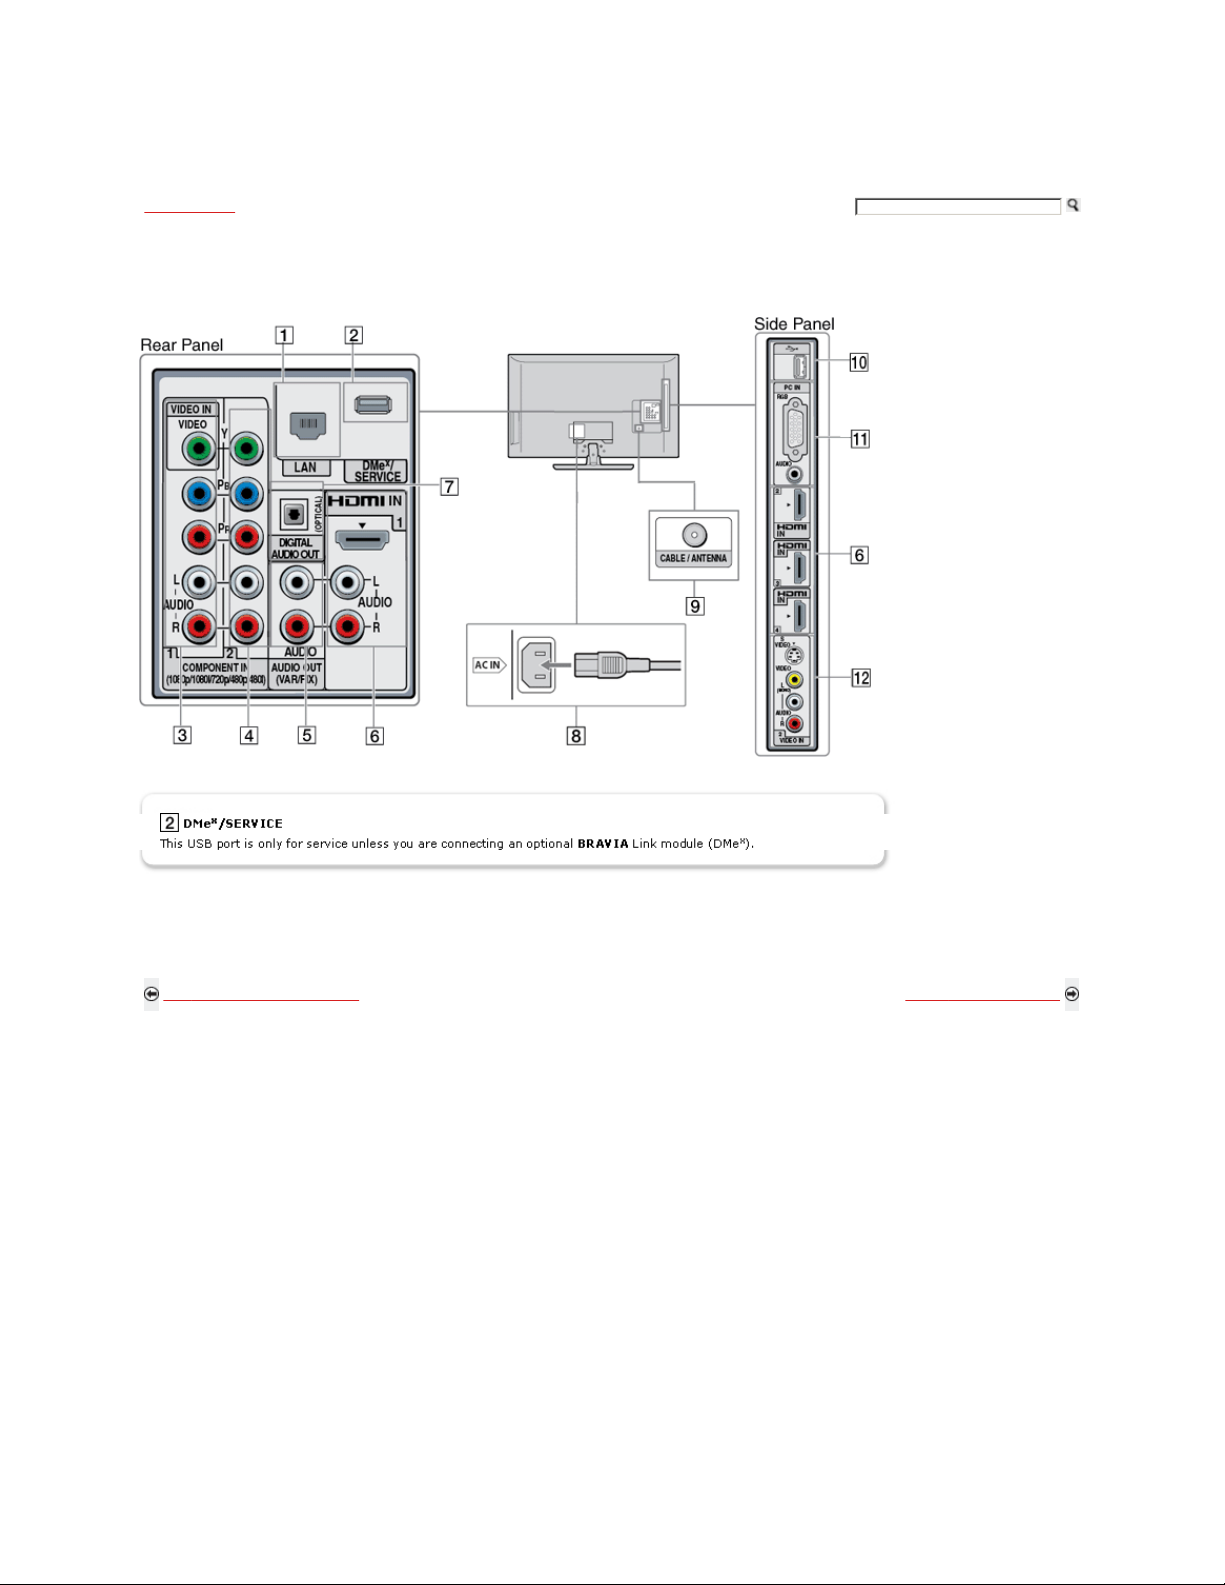
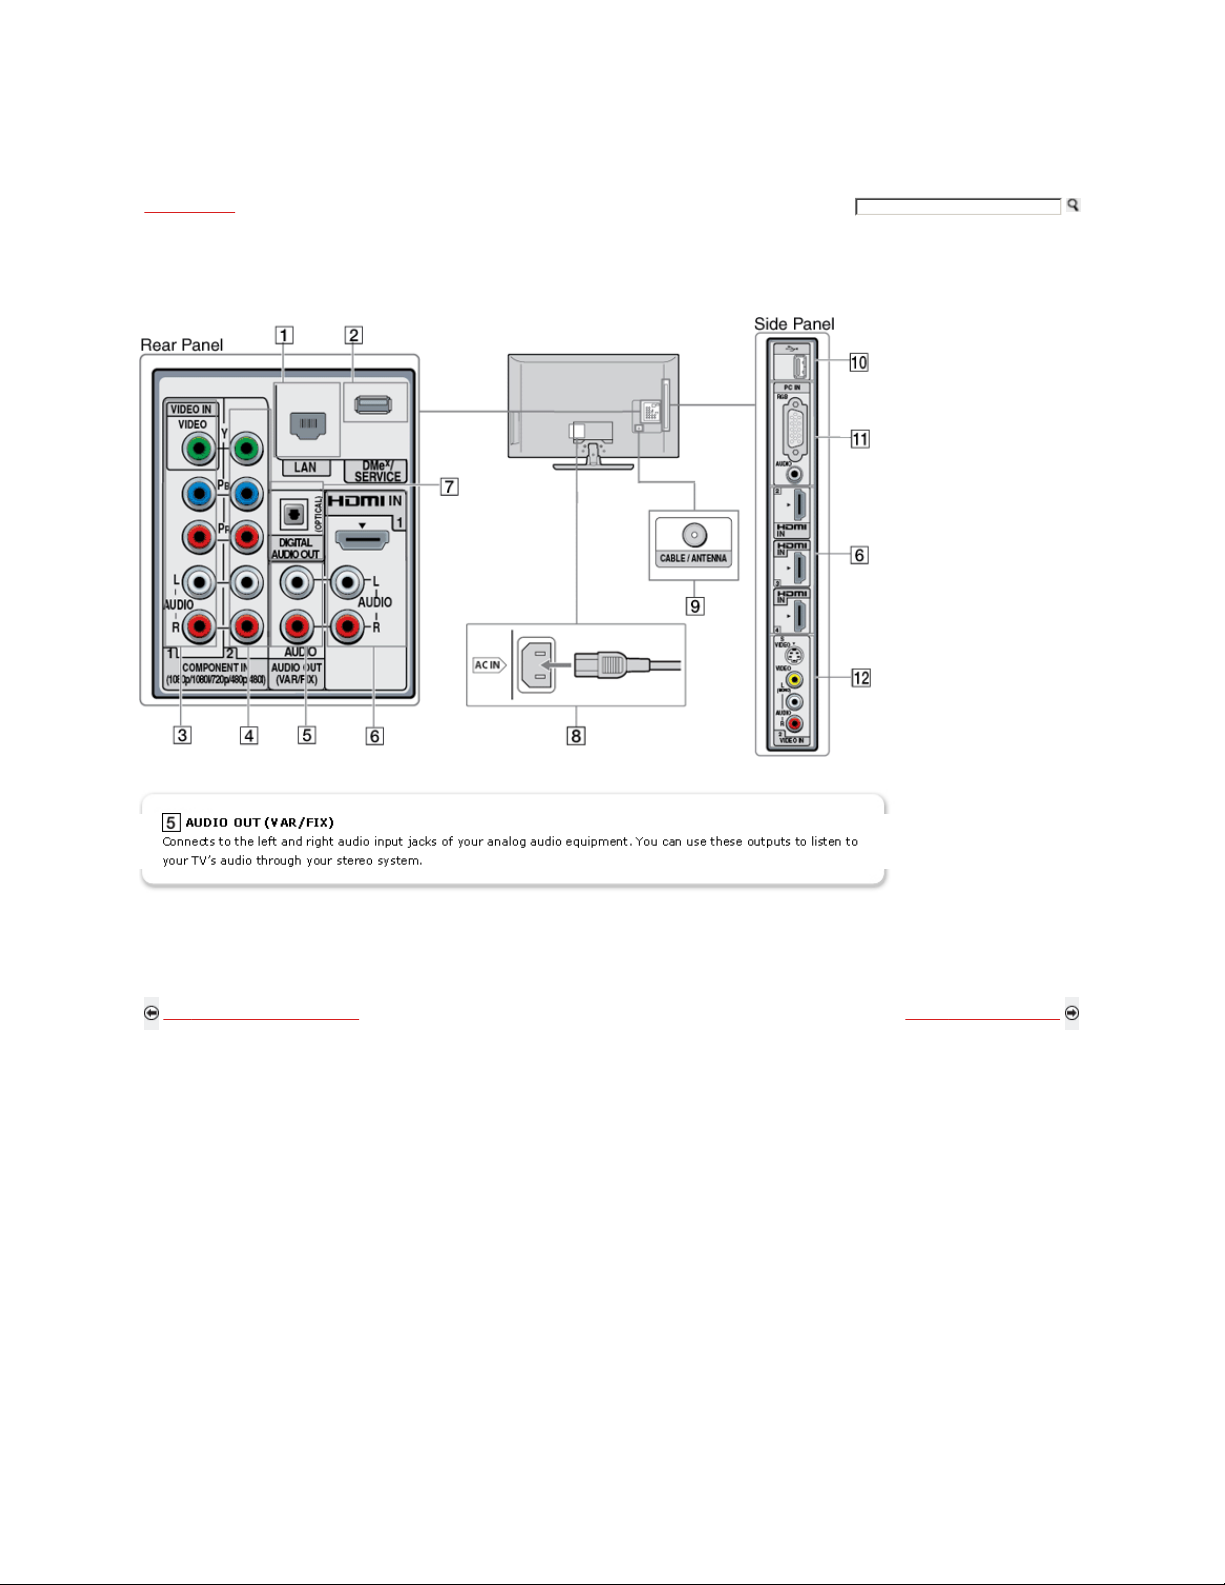
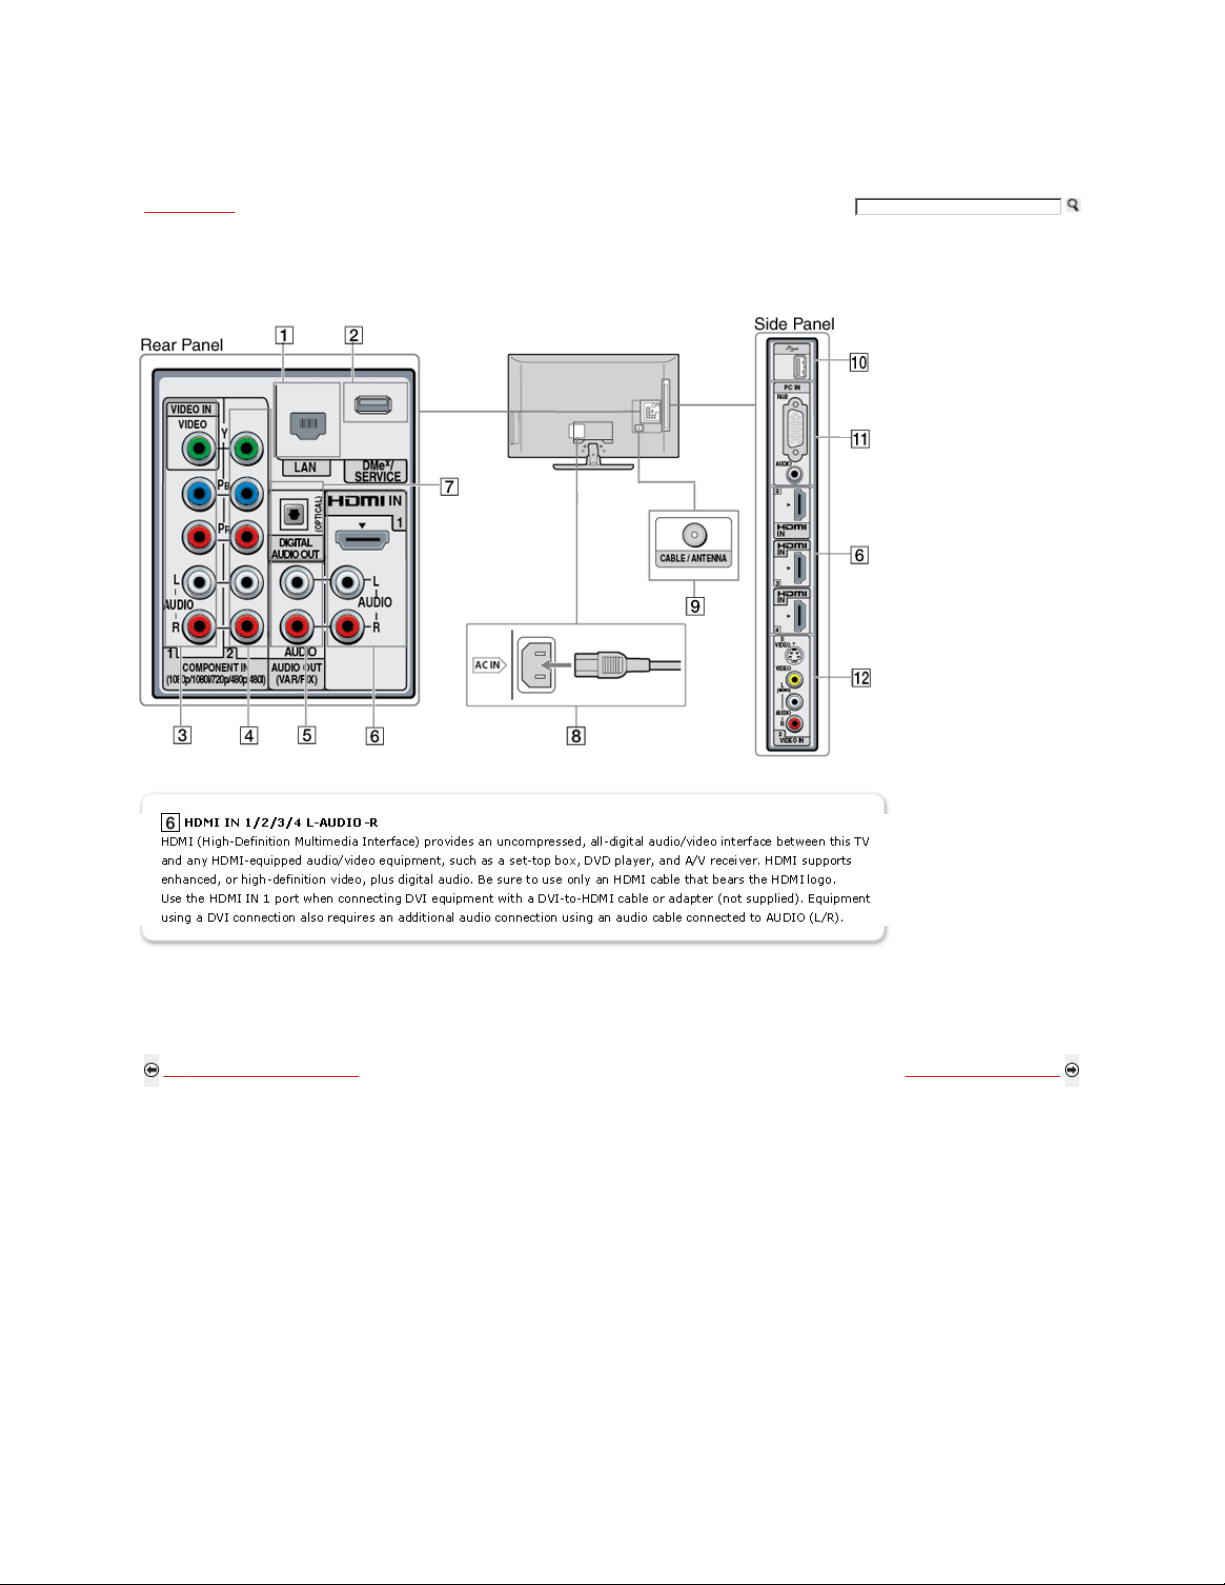
Locating Inputs and Outputs
Click on a number to view that feature's description.
Click a number on the diagram for more information.
An HDMI or Component video (YPBPR) connection is required to view 480i, 480p, 720p, 1080i and 1080p video formats. The 1080/24p video format is
available only with HDMI connection. This TV displays all video input signals in a resolution of 1,920 dots × 1,080 lines.
Back to Securing the TV (Page 3) Next to Connecting the TV
Home | Getting Started | Operating the TV | Exploring Fun Features | TV Home Menu | Other Information | Specifications
Tell us your opinion about this online reference book.
Copyright © 2009 Sony Electronics Inc. All rights reserved.
Page 17

Getting Started Operating the TV Exploring Fun Features TV Home Menu Other Information Specifications
Getting Started > Locating Inputs and Outputs
Locating Inputs and Outputs
Click on a number to view that feature's description.
An HDMI or Component video (YPBPR) connection is required to view 480i, 480p, 720p, 1080i and 1080p video formats. The 1080/24p video format is
available only with HDMI connection. This TV displays all video input signals in a resolution of 1,920 dots × 1,080 lines.
Back to Securing the TV (Page 3) Next to Connecting the TV
Home | Getting Started | Operating the TV | Exploring Fun Features | TV Home Menu | Other Information | Specifications
Tell us your opinion about this online reference book.
Copyright © 2009 Sony Electronics Inc. All rights reserved.
Page 18
Getting Started Operating the TV Exploring Fun Features TV Home Menu Other Information Specifications
Getting Started > Locating Inputs and Outputs
Locating Inputs and Outputs
Click on a number to view that feature's description.
An HDMI or Component video (YPBPR) connection is required to view 480i, 480p, 720p, 1080i and 1080p video formats. The 1080/24p video format is
available only with HDMI connection. This TV displays all video input signals in a resolution of 1,920 dots × 1,080 lines.
Back to Securing the TV (Page 3) Next to Connecting the TV
Home | Getting Started | Operating the TV | Exploring Fun Features | TV Home Menu | Other Information | Specifications
Tell us your opinion about this online reference book.
Copyright © 2009 Sony Electronics Inc. All rights reserved.
Page 19

Getting Started Operating the TV Exploring Fun Features TV Home Menu Other Information Specifications
Getting Started > Locating Inputs and Outputs
Locating Inputs and Outputs
Click on a number to view that feature's description.
An HDMI or Component video (YPBPR) connection is required to view 480i, 480p, 720p, 1080i and 1080p video formats. The 1080/24p video format is
available only with HDMI connection. This TV displays all video input signals in a resolution of 1,920 dots × 1,080 lines.
Back to Securing the TV (Page 3) Next to Connecting the TV
Home | Getting Started | Operating the TV | Exploring Fun Features | TV Home Menu | Other Information | Specifications
Tell us your opinion about this online reference book.
Copyright © 2009 Sony Electronics Inc. All rights reserved.
Page 20

Getting Started Operating the TV Exploring Fun Features TV Home Menu Other Information Specifications
Getting Started > Locating Inputs and Outputs
Locating Inputs and Outputs
Click on a number to view that feature's description.
An HDMI or Component video (YPBPR) connection is required to view 480i, 480p, 720p, 1080i and 1080p video formats. The 1080/24p video format is
available only with HDMI connection. This TV displays all video input signals in a resolution of 1,920 dots × 1,080 lines.
Back to Securing the TV (Page 3) Next to Connecting the TV
Home | Getting Started | Operating the TV | Exploring Fun Features | TV Home Menu | Other Information | Specifications
Tell us your opinion about this online reference book.
Copyright © 2009 Sony Electronics Inc. All rights reserved.
Page 21
Getting Started Operating the TV Exploring Fun Features TV Home Menu Other Information Specifications
Getting Started > Locating Inputs and Outputs
Locating Inputs and Outputs
Click on a number to view that feature's description.
An HDMI or Component video (YPBPR) connection is required to view 480i, 480p, 720p, 1080i and 1080p video formats. The 1080/24p video format is
available only with HDMI connection. This TV displays all video input signals in a resolution of 1,920 dots × 1,080 lines.
Back to Securing the TV (Page 3) Next to Connecting the TV
Home | Getting Started | Operating the TV | Exploring Fun Features | TV Home Menu | Other Information | Specifications
Tell us your opinion about this online reference book.
Copyright © 2009 Sony Electronics Inc. All rights reserved.
Page 22
Getting Started Operating the TV Exploring Fun Features TV Home Menu Other Information Specifications
Getting Started > Locating Inputs and Outputs
Locating Inputs and Outputs
Click on a number to view that feature's description.
An HDMI or Component video (YPBPR) connection is required to view 480i, 480p, 720p, 1080i and 1080p video formats. The 1080/24p video format is
available only with HDMI connection. This TV displays all video input signals in a resolution of 1,920 dots × 1,080 lines.
Back to Securing the TV (Page 3) Next to Connecting the TV
Home | Getting Started | Operating the TV | Exploring Fun Features | TV Home Menu | Other Information | Specifications
Tell us your opinion about this online reference book.
Copyright © 2009 Sony Electronics Inc. All rights reserved.
Page 23

Getting Started Operating the TV Exploring Fun Features TV Home Menu Other Information Specifications
Getting Started > Locating Inputs and Outputs
Locating Inputs and Outputs
Click on a number to view that feature's description.
An HDMI or Component video (YPBPR) connection is required to view 480i, 480p, 720p, 1080i and 1080p video formats. The 1080/24p video format is
available only with HDMI connection. This TV displays all video input signals in a resolution of 1,920 dots × 1,080 lines.
Back to Securing the TV (Page 3) Next to Connecting the TV
Home | Getting Started | Operating the TV | Exploring Fun Features | TV Home Menu | Other Information | Specifications
Tell us your opinion about this online reference book.
Copyright © 2009 Sony Electronics Inc. All rights reserved.
Page 24

Getting Started Operating the TV Exploring Fun Features TV Home Menu Other Information Specifications
Getting Started > Locating Inputs and Outputs
Locating Inputs and Outputs
Click on a number to view that feature's description.
An HDMI or Component video (YPBPR) connection is required to view 480i, 480p, 720p, 1080i and 1080p video formats. The 1080/24p video format is
available only with HDMI connection. This TV displays all video input signals in a resolution of 1,920 dots × 1,080 lines.
Back to Securing the TV (Page 3) Next to Connecting the TV
Home | Getting Started | Operating the TV | Exploring Fun Features | TV Home Menu | Other Information | Specifications
Tell us your opinion about this online reference book.
Copyright © 2009 Sony Electronics Inc. All rights reserved.
Page 25

Getting Started Operating the TV Exploring Fun Features TV Home Menu Other Information Specifications
Getting Started > Locating Inputs and Outputs
Locating Inputs and Outputs
Click on a number to view that feature's description.
An HDMI or Component video (YPBPR) connection is required to view 480i, 480p, 720p, 1080i and 1080p video formats. The 1080/24p video format is
available only with HDMI connection. This TV displays all video input signals in a resolution of 1,920 dots × 1,080 lines.
Back to Securing the TV (Page 3) Next to Connecting the TV
Home | Getting Started | Operating the TV | Exploring Fun Features | TV Home Menu | Other Information | Specifications
Tell us your opinion about this online reference book.
Copyright © 2009 Sony Electronics Inc. All rights reserved.
Page 26

Getting Started Operating the TV Exploring Fun Features TV Home Menu Other Information Specifications
Getting Started > Locating Inputs and Outputs
Locating Inputs and Outputs
Click on a number to view that feature's description.
An HDMI or Component video (YPBPR) connection is required to view 480i, 480p, 720p, 1080i and 1080p video formats. The 1080/24p video format is
available only with HDMI connection. This TV displays all video input signals in a resolution of 1,920 dots × 1,080 lines.
Back to Securing the TV (Page 3) Next to Connecting the TV
Home | Getting Started | Operating the TV | Exploring Fun Features | TV Home Menu | Other Information | Specifications
Tell us your opinion about this online reference book.
Copyright © 2009 Sony Electronics Inc. All rights reserved.
Page 27

Getting Started Operating the TV Exploring Fun Features TV Home Menu Other Information Specifications
Getting Started > Locating Inputs and Outputs
Locating Inputs and Outputs
Click on a number to view that feature's description.
An HDMI or Component video (YPBPR) connection is required to view 480i, 480p, 720p, 1080i and 1080p video formats. The 1080/24p video format is
available only with HDMI connection. This TV displays all video input signals in a resolution of 1,920 dots × 1,080 lines.
Back to Securing the TV (Page 3) Next to Connecting the TV
Home | Getting Started | Operating the TV | Exploring Fun Features | TV Home Menu | Other Information | Specifications
Tell us your opinion about this online reference book.
Copyright © 2009 Sony Electronics Inc. All rights reserved.
Page 28

Getting Started Operating the TV Exploring Fun Features TV Home Menu Other Information Specifications
Getting Started > Locating Inputs and Outputs
Locating Inputs and Outputs
Click on a number to view that feature's description.
An HDMI or Component video (YPBPR) connection is required to view 480i, 480p, 720p, 1080i and 1080p video formats. The 1080/24p video format is
available only with HDMI connection. This TV displays all video input signals in a resolution of 1,920 dots × 1,080 lines.
Back to Securing the TV (Page 3) Next to Connecting the TV
Home | Getting Started | Operating the TV | Exploring Fun Features | TV Home Menu | Other Information | Specifications
Tell us your opinion about this online reference book.
Copyright © 2009 Sony Electronics Inc. All rights reserved.
Page 29

Getting Started Operating the TV Exploring Fun Features TV Home Menu Other Information Specifications
Getting Started > Connecting the TV
Connecting the TV
Input Signal Reference Chart
Cable System or/and VHF/UHF Antenna System
HD Cable Box/HD Satellite Box
PC
Connecting Internet & DLNA Certified™ Networks
Other Equipment
Home | Getting Started | Operating the TV | Exploring Fun Features | TV Home Menu | Other Information | Specifications
Copyright © 2009 Sony Electronics Inc. All rights reserved.
Tell us your opinion about this online reference book.
Page 30
Getting Started Operating the TV Exploring Fun Features TV Home Menu Other Information Specifications
Getting Started > Connecting the TV > Input Signal Reference Chart
Input Signal Reference Chart
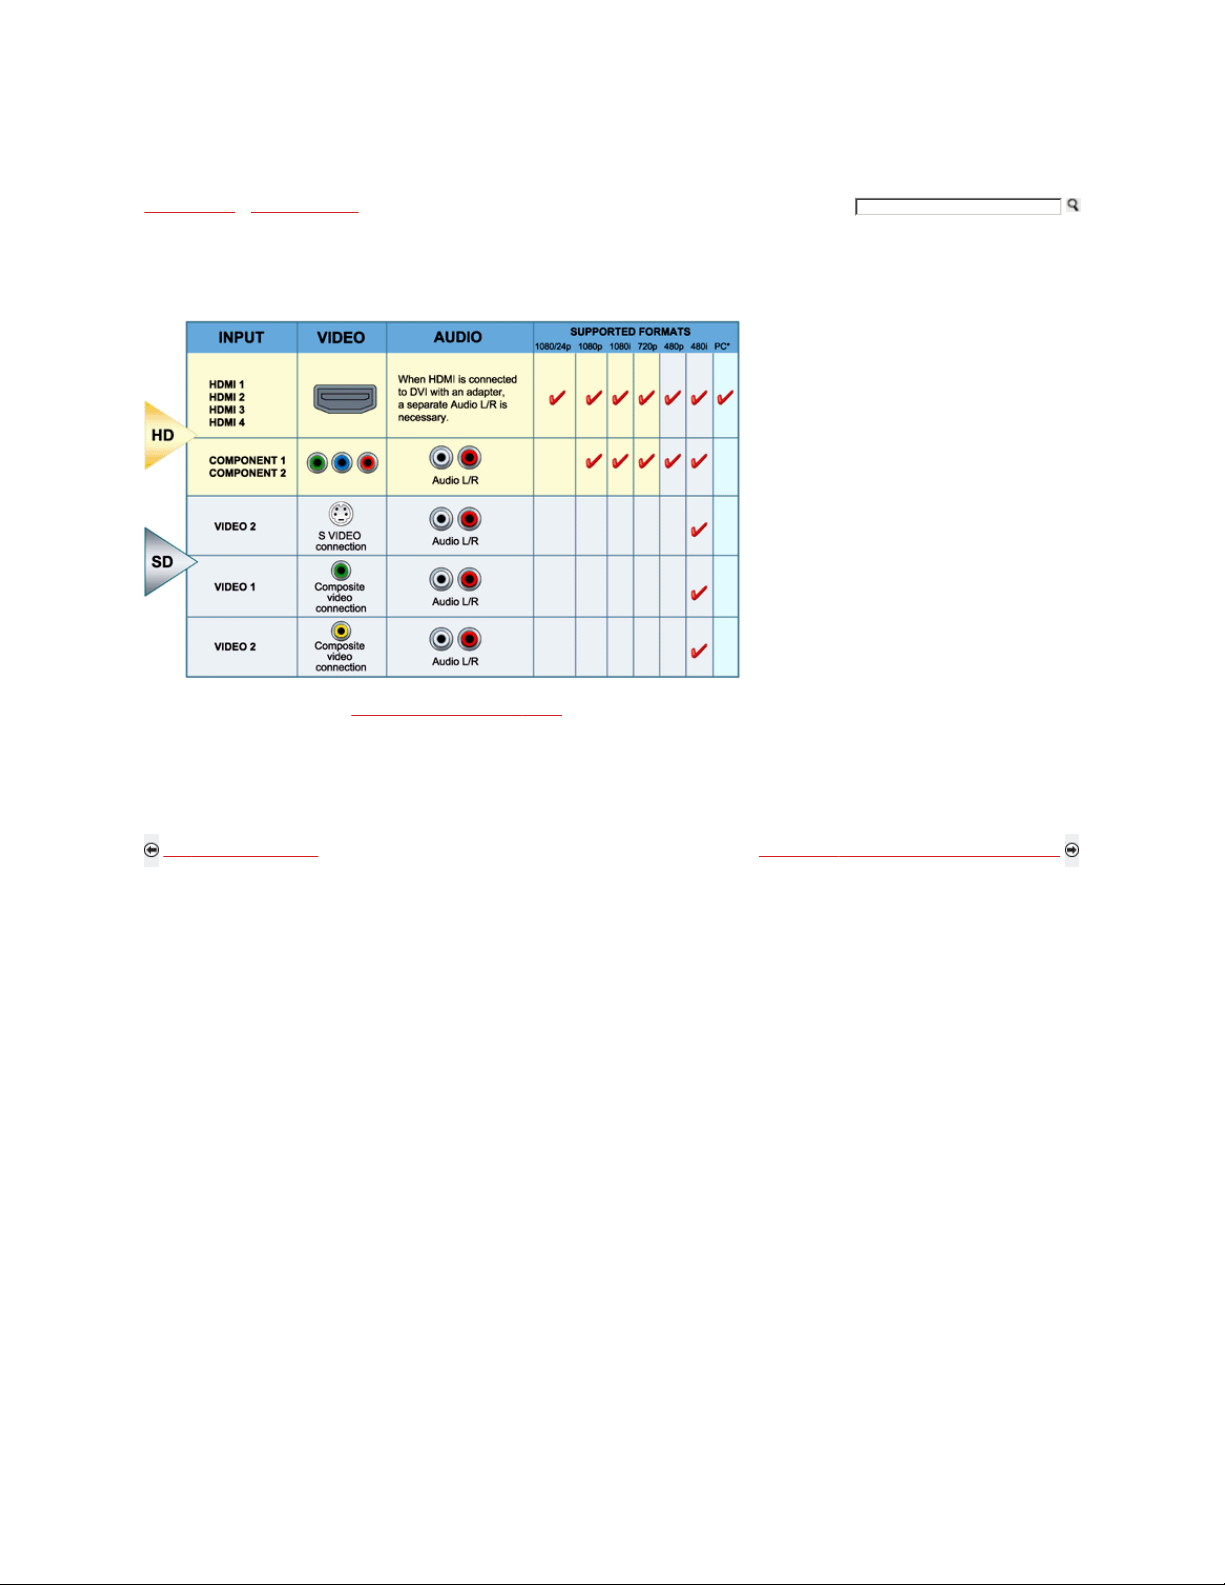
The following chart shows the high-definition (HD) and standard-definition (SD) video formats supported by your BRAVIA TV inputs.
* For supported PC formats see the PC Input Signal Reference
Chart.
Back to Connecting the TV Next to Cable System or VHF/UHF Antenna System
Home | Getting Started | Operating the TV | Exploring Fun Features | TV Home Menu | Other Information | Specifications
Tell us your opinion about this online reference book.
Copyright © 2009 Sony Electronics Inc. All rights reserved.
Page 31

Getting Started Operating the TV Exploring Fun Features TV Home Menu Other Information Specifications
Getting Started > Connecting the TV > Cable System or/and VHF/UHF Antenna System
Cable System or VHF/UHF Antenna System
You can enjoy high-definition and standard-definition digital programming (if available in your area) along
with standard-definition analog programming. This TV is capable of receiving unscrambled digital
programming for both cable (QAM and 8VSB) and external VHF/UHF antenna (ATSC).
It is strongly recommended that you connect the CABLE/ANTENNA input using a 75-ohm coaxial cable
to receive optimum picture quality. A 300-ohm twin lead cable can easily be affected by radio
frequency interference, resulting in signal degradation.
Cable or VHF/UHF (or VHF only)
Cable System and VHF/UHF Antenna System
Use an optional A-B RF switch (not supplied) to switch between the cable and over-the-air
antenna programming, as shown here. Set the Cable/Antenna se ttin g found under the Settings
on the XMB™ to Cable or Antenna for the type of input signal you choose.
Back to Input Signal Reference Chart Next to HD Cable Box/HD Satellite Box
Home | Getting Started | Operating the TV | Exploring Fun Features | TV Home Menu | Other Information | Specifications
Tell us your opinion about this online reference book.
Copyright © 2009 Sony Electronics Inc. All rights reserved.
Page 32

Getting Started Operating the TV Exploring Fun Features TV Home Menu Other Information Specifications
Getting Started > Connecting the TV > HD Cable Box/HD Satellite Box
HD Cable Box/HD Satellite Box
You can enjoy high-definition programming by subscribing to a high-definition service or a high-definition satellite service. For the best possible picture, make
sure you connect this equipment to your TV via the HDMI or component video (with au dio) input located on the back of your TV.
Shown with HDMI Connection
Shown with DVI Connection
If your equipment has a DVI output and not an HDMI output, connect the DVI output to the HDMI IN 1 (with DVI-to-HDMI cable or adapter) and connect
the audio output to the AUDIO IN (L/R) of HDMI IN 1.
Shown with Component Connection
Back to Cable System or/and VHF/UHF Antenna System Next to PC
Page 33

Getting Started Operating the TV Exploring Fun Features TV Home Menu Other Information Specifications
Getting Started > Connecting the TV > PC
PC
Use the TV as a monitor for your PC by connecting an HD15-HD15 cable connection as shown below. This TV can also be connected t o a PC with a DVI or HDMI
output. (Refer to the Quick Setup Guide supplied with the TV.)
Connect the PC IN jack to the PC using an HD15- HD15 cable with ferrite core (analog RGB) and audio cable.
The TV enters the standby mode automatically when the PC is connected to the TV and no signal has been output from the PC for more than 30 seconds.
PC Input Signal Reference Chart
After connecting the PC to the TV, set the output signal from your PC according to the supported resolutions and timings indicated below.
Supported Resolutions Horizontal
Signal Horizontal (Pixel) x Vertical (Line)
VGA 640 x 480 31.5 60 VGA
SVGA 800 x 600 37.9 60 VESA Guidelines
XGA 1,024 x 768 48.4 60 VESA Guidelines
WXGA 1,280 x 768 47.4 60 VESA
SXGA 1,280 x 1,024 64.0 60 VESA
HDTV* 1,920 x 1,080 67.5 60 CEA-861*
This TV’s PC input does not support Sync on Green or Composite Sync.
This TV’s PC VGA input does not support interlaced signals.
For the best picture quality, it is recommended to use the signals in th e above chart. In plug and play, signals with a 60 Hz vertical frequency will be
detected automatically. (PC reboot may be necessary.)
Phase and Pitch options are not available with PC signal connected to HDMI input.
*The 1080p timing when applied to the HDMI input will be treated as a video timing and not PC timing. This affects Picture
settings, and Wide Mode
Back to HD Cable Box/HD Satellite Box Next to Connecting Internet & DLNA Certified™ Networks
1,280 x 768 47.8 60 VESA
1,360 x 768 47.7 60 VESA
settings. To view PC content set Scene Select to Graphics, Wide Mode to Full, and Display Area to Full Pixel.
Home | Getting Started | Operating the TV | Exploring Fun Features | TV Home Menu | Other Information | Specifications
Tell us your opinion about this online reference book.
frequency (kHz)
Vertical
frequency (Hz)
Standard
Copyright © 2009 Sony Electronics Inc. All rights reserved.
Page 34

Getting Started Operating the TV Exploring Fun Features TV Home Menu Other Information Specifications
Getting Started > Connecting the TV > Connecting Internet & DLNA Certified™ Networks
Connecting Internet & DLNA Certified™ Networks
Connect an Ethernet cable from your home network to the LAN input of your TV to enjoy BRAVIA Internet features and/or connect to DLNA Certified™ media
servers.
Sample Network Connection Diagram
For more information about compatible wireless bridges, visit https://internet.sony.tv
Refer to your DLNA Certified equipment’s operating instruction s fo r setup and connection information.
Back to PC Next to Other Equipment
Home | Getting Started | Operating the TV | Exploring Fun Features | TV Home Menu | Other Information | Specifications
Tell us your opinion about this online reference book.
Copyright © 2009 Sony Electronics Inc. All rights reserved.
Page 35

Getting Started Operating the TV Exploring Fun Features TV Home Menu Other Information Specifications
Getting Started > Connecting the TV > Other Equipment
Other Equipment
Refer to the Quick Setup Guide (supplied with the TV) when connecting other equipment to your TV.
Back to Connecting Internet & DLNA Certified™ Networks Next to Setting Up the Channel List-Initial Setup (Page 1)
Home | Getting Started | Operating the TV | Exploring Fun Features | TV Home Menu | Other Information | Specifications
Tell us your opinion about this online reference book.
Copyright © 2009 Sony Electronics Inc. All rights reserved.
Page 36

Getting Started Operating the TV Exploring Fun Features TV Home Menu Other Information Specifications
Getting Started > Setting Up the Channel List-Initial Setup
Setting Up the Channel List-Initial Setup (Page 1 of 2)
The Initial Setup screen appears when you turn on the TV for the first time.
1) Complete your cable connections before proceeding with the Initial Setup (refer to the Quick Setup
Guide for additional information).
2) Use the following remote control buttons to navigate through the Initial Setup:
/ button:
Allows you to highlight options where applicable.
button:
Allows you to select the highlighted option.
button:
Allows you to move back to the previous screen, where applicable.
button:
Allows you to move to the next screen, where applicable.
3) Select the language for the on-screen display (OSD) text.
4) Select your viewing environment. Home mode sets the TV dis play to settings optimized for home viewing (this setting is ENERGY STAR compliant). Retail
mode changes the display settings to a default more ap propriate for a store environment.
Back to Other Equipment Next to Setting Up the Channel List-Initial Setup (Page 2 of 2)
Home | Getting Started | Operating the TV | Exploring Fun Features | TV Home Menu | Other Information | Specifications
Tell us your opinion about this online reference book.
Copyright © 2009 Sony Electronics Inc. All rights reserved.
Page 37

Getting Started Operating the TV Exploring Fun Features TV Home Menu Other Information Specifications
Getting Started > Setting Up the Channel List-Initial Setup
Setting Up the Channel List-Initial Setup (Page 2 of 2)
5)
Select your country and enter your ZIP or Postal code.
6)
Set the clock to the current date and time.
7)
Select Continue to scan for available channels and enable the TV Guide On Screen® feature. If you rec eive channels from a cable
box or satellite receiver and do not wish to use the TV’s built-in tuner, select Skip. Selecting Skip will disable the TV Guide On
Screen feature, which is only available when the TV’s tuner is used.
8)
To benefit from the network features included on this TV, connect to your existing home network. Follow the instructions on the
screen to complete Network Setup, or select Skip to complete it at a later time (optional).
Initial Setup is complete. You can now begin watching y our new TV.
Enabling the TV Guide On Screen feature will increase the amount of time the TV is in Download Acquisition Mode (DAM).
For more information on TV Guide On Screen, see TV Guide On Screen section.
If the language that you selected in the Language setting is available from the broadcaster as an Alternate Audio language, your TV will automatically
switch to the matching language with the Alternate Audio feature. To cha nge the audio settings, access the Alternate Audio menu by pressing OPTIONS
on the remote control when an alternate audio stream is available from the broadcaster. Alternate Audio is only availa b le for digital programs.
To complete Network Setup at a later time, access the XMB™ and select the Network icon on the Setting s menu. Then select Network Setup.
Back to Setting Up the Channel List-Initial Setup (Page 1 of 2) Next to Network Setup
Home | Getting Started | Operating the TV | Exploring Fun Features | TV Home Menu | Other Information | Specifications
Tell us your opinion about this online reference book.
Copyright © 2009 Sony Electronics Inc. All rights reserved.
Page 38

Getting Started Operating the TV Exploring Fun Features TV Home Menu Other Information Specifications
Getting Started > Network Setup
Network Setup (Page 1 of 5)
To fully benefit from the features included on this TV, connect your TV to your existing home network.
You will need an Ethernet cable (not supplied) to connect the TV to your home network.
There are several connection options available, each of which require configuration with the TV:
Direct connection to router
Wireless Bridge
Powerline Adapter
Other Gaming Adapters as Wireless Bridge
To connect to your home network, complete Network Setup as the last step of Initial Setup. If you wish to com plete the Network Setup at a later time,
access the Network Setup menu. On the XMB™, highlight the Settings menu and select Network. Then, select Network Setup.
Network Setup Menu
View Network Statu s Select to view information about your network and connection.
Wired Setup Select to configure the TV’s accessibilit y to your home networ k when connecting your TV directly to the
Wireless Bridge Setup Select to configur e the TV’s accessibility to your home network wh en connecting your TV to the
router using an Ethernet cable.
network using a compatible Wireless Bridge (for compatibility, see Wireless Bridge
).
Recommended connection speed: Standard Definition video - 2.5 Mbps, High Definition video - 10 Mbps.
Back to Setting Up the Channel List-Initial Setup (Page 2 of 2) Next to Network Setup (Page 2 of 5)
Home | Getting Started | Operating the TV | Exploring Fun Features | TV Home Menu | Other Information | Specifications
Tell us your opinion about this online reference book.
Copyright © 2009 Sony Electronics Inc. All rights reserved.
Page 39

Getting Started Operating the TV Exploring Fun Features TV Home Menu Other Information Specifications
Getting Started > Network Setup
Network Setup (Page 2 of 5)
Direct connection to router
Requirements: Ethernet LAN cable, Router, Modem
1) Connect an Ethernet LAN cable between the LAN port on the
TV and the router.
2) On the Network Setup menu, select Wired Setup.
3) Select Auto to complete the setup. The TV will automatically
configure the connection.
Custom setup allows you to enter your own IP address by selecting Manual and enter your proxy server settings by s ele cting Yes. This setup is
recommended for advanced users only.
Back to Network Setup (Page 1 of 5) Next to Network Setup (Page 3 of 5)
Home | Getting Started | Operating the TV | Exploring Fun Features | TV Home Menu | Other Information | Specifications
Tell us your opinion about this online reference book.
Copyright © 2009 Sony Electronics Inc. All rights reserved.
Page 40

Getting Started Operating the TV Exploring Fun Features TV Home Menu Other Information Specifications
Getting Started > Network Setup
Network Setup (Page 3 of 5)
Wireless Bridge
This TV includes an automatic setup for the following model of CISCO Wireless Bridge: WET610N.
Requirements: Ethernet LAN cable, Wireless Router, CISCO Wireless Bridge model WET610N.
There are two types of setup for the Wireless Bridge.
Click on the link below corresponding to your scenario.
Scenario 1: Wi-Fi Protected Setup
(WPS)
Scenario 2: Scan for SSID
For more details on manual setup instructions and advance d setup configurations, refer to the instruction manual of the CISCO Wireless Bridge.
We recommend using a Wireless Router and Wireless Bridge with support of Wireless N for streaming video support.
It is normal for the TV to take up to several minutes to re cognize the Wireless Bridge device when it is first plugged in.
Back to Network Setup (Page 2 of 5) Next to Network Setup (Page 4 of 5)
Home | Getting Started | Operating the TV | Exploring Fun Features | TV Home Menu | Other Information | Specifications
Click a link to the left for more information.
Tell us your opinion about this online reference book.
Copyright © 2009 Sony Electronics Inc. All rights reserved.
Page 41

Getting Started Operating the TV Exploring Fun Features TV Home Menu Other Information Specifications
Getting Started > Network Setup
Network Setup (Page 3 of 5)
Wireless Bridge
This TV includes an automatic setup for the following model of CISCO Wireless Bridge: WET610N.
Requirements: Ethernet LAN cable, Wireless Router, CISCO Wireless Bridge model WET610N.
There are two types of setup for the Wireless Bridge.
Click on the link below corresponding to your scenario.
Scenario 1: Wi-Fi Protected Setup
(WPS)
Scenario 2: Scan for SSID
For more details on manual setup instructions and advance d setup configurations, refer to the instruction manual of the CISCO Wireless Bridge.
We recommend using a Wireless Router and Wireless Bridge with support of Wireless N for streaming video support.
It is normal for the TV to take up to several minutes to re cognize the Wireless Bridge device when it is first plugged in.
Back to Network Setup (Page 2 of 5) Next to Network Setup (Page 4 of 5)
Home | Getting Started | Operating the TV | Exploring Fun Features | TV Home Menu | Other Information | Specifications
Tell us your opinion about this online reference book.
Copyright © 2009 Sony Electronics Inc. All rights reserved.
Page 42

Getting Started Operating the TV Exploring Fun Features TV Home Menu Other Information Specifications
Getting Started > Network Setup
Network Setup (Page 3 of 5)
Wireless Bridge
This TV includes an automatic setup for the following model of CISCO Wireless Bridge: WET610N.
Requirements: Ethernet LAN cable, Wireless Router, CISCO Wireless Bridge model WET610N.
There are two types of setup for the Wireless Bridge.
Click on the link below corresponding to your scenario.
Scenario 1: Wi-Fi Protected Setup
(WPS)
Scenario 2: Scan for SSID
For more details on manual setup instructions and advance d setup configurations, refer to the instruction manual of the CISCO Wireless Bridge.
We recommend using a Wireless Router and Wireless Bridge with support of Wireless N for streaming video support.
It is normal for the TV to take up to several minutes to re cognize the Wireless Bridge device when it is first plugged in.
Back to Network Setup (Page 2 of 5) Next to Network Setup (Page 4 of 5)
Home | Getting Started | Operating the TV | Exploring Fun Features | TV Home Menu | Other Information | Specifications
Tell us your opinion about this online reference book.
Copyright © 2009 Sony Electronics Inc. All rights reserved.
Page 43

Getting Started Operating the TV Exploring Fun Features TV Home Menu Other Information Specifications
Getting Started > Network Setup
Network Setup (Page 4 of 5)
Powerline Adapter
Requirements: Ethernet LAN cable, Powerline Ethernet Adapter, Router
1) Connect an Ethernet LAN cable between the LAN port
on the TV and one Powerline Ethernet Adapter.
2) Plug the Powerline Ethernet Adapter into a power
outlet.
3) Connect another Powerline Ethernet Adapter between
the router and another power outlet.
4)
On the Network Setup menu, select Wired Setup.
5) Select Auto to complete the setup. The TV will
automatically configure the connection.
Back to Network Setup (Page 3 of 5) Next to Network Setup (Page 5 of 5)
Home | Getting Started | Operating the TV | Exploring Fun Features | TV Home Menu | Other Information | Specifications
Tell us your opinion about this online reference book.
Copyright © 2009 Sony Electronics Inc. All rights reserved.
Page 44

Getting Started Operating the TV Exploring Fun Features TV Home Menu Other Information Specifications
Getting Started > Network Setup
Network Setup (Page 5 of 5)
Other Gaming Adapter as Wireless Bridge
Use this setup when using a Gaming Adapter as a Wireless Brid ge other than that listed on the Wireless Birdge page.
Requirements: Ethernet LAN cable, Gaming Adapter as W ireless Bridge, Wireless Router
1) Configure your gaming adapter as wireless bridge using your PC. Refer
to the instructions of the gaming adapter.
2) Once the gaming adapter is configured, connect an Ethernet LAN cable
between the LAN port on the TV and the gaming adapter.
3) On the Network Setup menu of the TV, select Wired Setup.
4) Follow the instructions on the screen to complete the setup. The TV will
automatically configure the connect ion.
We recommend using a Wireless Router and Wireless Bridge with support of Wireless N for streaming video support.
Back to Network Setup (Page 4 of 5) Next to Operating the TV
Home | Getting Started | Operating the TV | Exploring Fun Features | TV Home Menu | Other Information | Specifications
Tell us your opinion about this online reference book.
Copyright © 2009 Sony Electronics Inc. All rights reserved.
Page 45

Getting Started Operating the TV Exploring Fun Features TV Home Menu Other Information Specifications
Operating the TV
TV Controls & Indicators
The Remote Control
Remote Control Button Description
Programming the Remote Control
Manufacturer's Code List
Using Other Equipment with Your Remote Control
Home | Getting Started | Operating the TV | Exploring Fun Features | TV Home Menu | Other Information | Specifications
Tell us your opinion about this online reference book.
Copyright © 2009 Sony Electronics Inc. All rights reserved.
Page 46

Getting Started Operating the TV Exploring Fun Features TV Home Menu Other Information Specifications
Operating the TV > TV Controls
TV Controls
The buttons located on the side of the TV operate in the same manner as the
corresponding buttons on the remote control.
Click a number for more information.
Back to Operating the TV Next to The Remote Control
Home | Getting Started | Operating the TV | Exploring Fun Features | TV Home Menu | Other Information | Specifications
Tell us your opinion about this online reference book.
Copyright © 2009 Sony Electronics Inc. All rights reserved.
Page 47

Getting Started Operating the TV Exploring Fun Features TV Home Menu Other Information Specifications
Operating the TV > TV Controls
TV Controls
The buttons located on the side of the TV operate in the same manner as the
corresponding buttons on the remote control.
Back to Operating the TV Next to The Remote Control
Home | Getting Started | Operating the TV | Exploring Fun Features | TV Home Menu | Other Information | Specifications
Tell us your opinion about this online reference book.
Copyright © 2009 Sony Electronics Inc. All rights reserved.
Page 48

Getting Started Operating the TV Exploring Fun Features TV Home Menu Other Information Specifications
Operating the TV > TV Controls
TV Controls
The buttons located on the side of the TV operate in the same manner as the
corresponding buttons on the remote control.
Back to Operating the TV Next to The Remote Control
Home | Getting Started | Operating the TV | Exploring Fun Features | TV Home Menu | Other Information | Specifications
Tell us your opinion about this online reference book.
Copyright © 2009 Sony Electronics Inc. All rights reserved.
Page 49

Getting Started Operating the TV Exploring Fun Features TV Home Menu Other Information Specifications
Operating the TV > TV Controls
TV Controls
The buttons located on the side of the TV operate in the same manner as the
corresponding buttons on the remote control.
Back to Operating the TV Next to The Remote Control
Home | Getting Started | Operating the TV | Exploring Fun Features | TV Home Menu | Other Information | Specifications
Tell us your opinion about this online reference book.
Copyright © 2009 Sony Electronics Inc. All rights reserved.
Page 50

Getting Started Operating the TV Exploring Fun Features TV Home Menu Other Information Specifications
Operating the TV > TV Controls
TV Controls
The buttons located on the side of the TV operate in the same manner as the
corresponding buttons on the remote control.
Back to Operating the TV Next to The Remote Control
Home | Getting Started | Operating the TV | Exploring Fun Features | TV Home Menu | Other Information | Specifications
Tell us your opinion about this online reference book.
Copyright © 2009 Sony Electronics Inc. All rights reserved.
Page 51

Getting Started Operating the TV Exploring Fun Features TV Home Menu Other Information Specifications
Operating the TV > TV Controls
TV Controls
The buttons located on the side of the TV operate in the same manner as the
corresponding buttons on the remote control.
Back to Operating the TV Next to The Remote Control
Home | Getting Started | Operating the TV | Exploring Fun Features | TV Home Menu | Other Information | Specifications
Tell us your opinion about this online reference book.
Copyright © 2009 Sony Electronics Inc. All rights reserved.
Page 52

Getting Started Operating the TV Exploring Fun Features TV Home Menu Other Information Specifications
Operating the TV > TV Controls
TV Controls
The buttons located on the side of the TV operate in the same manner as the
corresponding buttons on the remote control.
Back to Operating the TV Next to The Remote Control
Home | Getting Started | Operating the TV | Exploring Fun Features | TV Home Menu | Other Information | Specifications
Tell us your opinion about this online reference book.
Copyright © 2009 Sony Electronics Inc. All rights reserved.
Page 53

Getting Started Operating the TV Exploring Fun Features TV Home Menu Other Information Specifications
Operating the TV > TV Controls
TV Controls
The buttons located on the side of the TV operate in the same manner as the
corresponding buttons on the remote control.
Back to Operating the TV Next to The Remote Control
Home | Getting Started | Operating the TV | Exploring Fun Features | TV Home Menu | Other Information | Specifications
Tell us your opinion about this online reference book.
Copyright © 2009 Sony Electronics Inc. All rights reserved.
Page 54

Getting Started Operating the TV Exploring Fun Features TV Home Menu Other Information Specifications
Operating the TV > TV Controls
TV Controls
The buttons located on the side of the TV operate in the same manner as the
corresponding buttons on the remote control.
Back to Operating the TV Next to The Remote Control
Home | Getting Started | Operating the TV | Exploring Fun Features | TV Home Menu | Other Information | Specifications
Tell us your opinion about this online reference book.
Copyright © 2009 Sony Electronics Inc. All rights reserved.
Page 55

Getting Started Operating the TV Exploring Fun Features TV Home Menu Other Information Specifications
Operating the TV > TV Controls
TV Controls
The buttons located on the side of the TV operate in the same manner as the
corresponding buttons on the remote control.
Back to Operating the TV Next to The Remote Control
Home | Getting Started | Operating the TV | Exploring Fun Features | TV Home Menu | Other Information | Specifications
Tell us your opinion about this online reference book.
Copyright © 2009 Sony Electronics Inc. All rights reserved.
Page 56

Getting Started Operating the TV Exploring Fun Features TV Home Menu Other Information Specifications
Operating the TV > TV Controls
TV Controls
The buttons located on the side of the TV operate in the same manner as the
corresponding buttons on the remote control.
Back to Operating the TV Next to The Remote Control
Home | Getting Started | Operating the TV | Exploring Fun Features | TV Home Menu | Other Information | Specifications
Tell us your opinion about this online reference book.
Copyright © 2009 Sony Electronics Inc. All rights reserved.
Page 57

Getting Started Operating the TV Exploring Fun Features TV Home Menu Other Information Specifications
Operating the TV > The Remote Control
The Remote Control
Inserting Batteries into the Remote Control
Insert two size AA batteries (supplied) by matching and on the batteries to the diagram inside the
battery compartment of the remote control.
When Using the Remote Control
Follow the guidelines below
Point your remote control directly at the IR sensor located on your TV.
Make sure that no objects are blocking the path between the remote control and the IR sensor on
your TV.
Fluorescent lamps can interfere with your remote control; try turning off the fluorescent lamps.
If you are having problems with the remote control, reinsert or replace you r batteries and make
sure that they are correctly inserted.
Back to TV Controls & Indicators Next to Remote Control Button Description
Home | Getting Started | Operating the TV | Exploring Fun Features | TV Home Menu | Other Information | Specifications
Tell us your opinion about this online reference book.
Copyright © 2009 Sony Electronics Inc. All rights reserved.
Page 58

Getting Started Operating the TV Exploring Fun Features TV Home Menu Other Information Specifications
Operating the TV > Remote Control Button Description
Remote Control Button Description
Click a button on the remote control for more information.
Back to The Remote Control Next to Programming the Remote Control
Home | Getting Started | Operating the TV | Exploring Fun Features | TV Home Menu | Other Information | Specifications
Tell us your opinion about this online reference book.
Copyright © 2009 Sony Electronics Inc. All rights reserved.
Page 59

Getting Started Operating the TV Exploring Fun Features TV Home Menu Other Information Specifications
Operating the TV > Remote Control Button Description
Remote Control Button Description
Back to The Remote Control Next to Programming the Remote Control
Home | Getting Started | Operating the TV | Exploring Fun Features | TV Home Menu | Other Information | Specifications
Tell us your opinion about this online reference book.
Copyright © 2009 Sony Electronics Inc. All rights reserved.
Page 60

Getting Started Operating the TV Exploring Fun Features TV Home Menu Other Information Specifications
Operating the TV > Remote Control Button Description
Remote Control Button Description
Back to The Remote Control Next to Programming the Remote Control
Home | Getting Started | Operating the TV | Exploring Fun Features | TV Home Menu | Other Information | Specifications
Tell us your opinion about this online reference book.
Copyright © 2009 Sony Electronics Inc. All rights reserved.
Page 61

Getting Started Operating the TV Exploring Fun Features TV Home Menu Other Information Specifications
Operating the TV > Remote Control Button Description
Remote Control Button Description
Back to The Remote Control Next to Programming the Remote Control
Home | Getting Started | Operating the TV | Exploring Fun Features | TV Home Menu | Other Information | Specifications
Tell us your opinion about this online reference book.
Copyright © 2009 Sony Electronics Inc. All rights reserved.
Page 62

Getting Started Operating the TV Exploring Fun Features TV Home Menu Other Information Specifications
Operating the TV > Remote Control Button Description
Remote Control Button Description
Back to The Remote Control Next to Programming the Remote Control
Home | Getting Started | Operating the TV | Exploring Fun Features | TV Home Menu | Other Information | Specifications
Tell us your opinion about this online reference book.
Copyright © 2009 Sony Electronics Inc. All rights reserved.
Page 63

Getting Started Operating the TV Exploring Fun Features TV Home Menu Other Information Specifications
Operating the TV > Remote Control Button Description
Remote Control Button Description
Back to The Remote Control Next to Programming the Remote Control
Home | Getting Started | Operating the TV | Exploring Fun Features | TV Home Menu | Other Information | Specifications
Tell us your opinion about this online reference book.
Copyright © 2009 Sony Electronics Inc. All rights reserved.
Page 64

Getting Started Operating the TV Exploring Fun Features TV Home Menu Other Information Specifications
Operating the TV > Remote Control Button Description
Remote Control Button Description
Back to The Remote Control Next to Programming the Remote Control
Home | Getting Started | Operating the TV | Exploring Fun Features | TV Home Menu | Other Information | Specifications
Tell us your opinion about this online reference book.
Copyright © 2009 Sony Electronics Inc. All rights reserved.
Page 65

Getting Started Operating the TV Exploring Fun Features TV Home Menu Other Information Specifications
Operating the TV > Remote Control Button Description
Remote Control Button Description
Back to The Remote Control Next to Programming the Remote Control
Home | Getting Started | Operating the TV | Exploring Fun Features | TV Home Menu | Other Information | Specifications
Tell us your opinion about this online reference book.
Copyright © 2009 Sony Electronics Inc. All rights reserved.
Page 66

Getting Started Operating the TV Exploring Fun Features TV Home Menu Other Information Specifications
Operating the TV > Remote Control Button Description
Remote Control Button Description
Back to The Remote Control Next to Programming the Remote Control
Home | Getting Started | Operating the TV | Exploring Fun Features | TV Home Menu | Other Information | Specifications
Tell us your opinion about this online reference book.
Copyright © 2009 Sony Electronics Inc. All rights reserved.
Page 67

Getting Started Operating the TV Exploring Fun Features TV Home Menu Other Information Specifications
Operating the TV > Remote Control Button Description
Remote Control Button Description
Back to The Remote Control Next to Programming the Remote Control
Home | Getting Started | Operating the TV | Exploring Fun Features | TV Home Menu | Other Information | Specifications
Tell us your opinion about this online reference book.
Copyright © 2009 Sony Electronics Inc. All rights reserved.
Page 68

Getting Started Operating the TV Exploring Fun Features TV Home Menu Other Information Specifications
Operating the TV > Remote Control Button Description
Remote Control Button Description
Back to The Remote Control Next to Programming the Remote Control
Home | Getting Started | Operating the TV | Exploring Fun Features | TV Home Menu | Other Information | Specifications
Tell us your opinion about this online reference book.
Copyright © 2009 Sony Electronics Inc. All rights reserved.
Page 69

Getting Started Operating the TV Exploring Fun Features TV Home Menu Other Information Specifications
Operating the TV > Remote Control Button Description
Remote Control Button Description
Back to The Remote Control Next to Programming the Remote Control
Home | Getting Started | Operating the TV | Exploring Fun Features | TV Home Menu | Other Information | Specifications
Tell us your opinion about this online reference book.
Copyright © 2009 Sony Electronics Inc. All rights reserved.
Page 70

Getting Started Operating the TV Exploring Fun Features TV Home Menu Other Information Specifications
Operating the TV > Remote Control Button Description
Remote Control Button Description
Back to The Remote Control Next to Programming the Remote Control
Home | Getting Started | Operating the TV | Exploring Fun Features | TV Home Menu | Other Information | Specifications
Tell us your opinion about this online reference book.
Copyright © 2009 Sony Electronics Inc. All rights reserved.
Page 71

Getting Started Operating the TV Exploring Fun Features TV Home Menu Other Information Specifications
Operating the TV > Remote Control Button Description
Remote Control Button Description
Back to The Remote Control Next to Programming the Remote Control
Home | Getting Started | Operating the TV | Exploring Fun Features | TV Home Menu | Other Information | Specifications
Tell us your opinion about this online reference book.
Copyright © 2009 Sony Electronics Inc. All rights reserved.
Page 72

Getting Started Operating the TV Exploring Fun Features TV Home Menu Other Information Specifications
Operating the TV > Remote Control Button Description
Remote Control Button Description
Back to The Remote Control Next to Programming the Remote Control
Home | Getting Started | Operating the TV | Exploring Fun Features | TV Home Menu | Other Information | Specifications
Tell us your opinion about this online reference book.
Copyright © 2009 Sony Electronics Inc. All rights reserved.
Page 73

Getting Started Operating the TV Exploring Fun Features TV Home Menu Other Information Specifications
Operating the TV > Remote Control Button Description
Remote Control Button Description
Back to The Remote Control Next to Programming the Remote Control
Home | Getting Started | Operating the TV | Exploring Fun Features | TV Home Menu | Other Information | Specifications
Tell us your opinion about this online reference book.
Copyright © 2009 Sony Electronics Inc. All rights reserved.
Page 74

Getting Started Operating the TV Exploring Fun Features TV Home Menu Other Information Specifications
Operating the TV > Remote Control Button Description
Remote Control Button Description
Back to The Remote Control Next to Programming the Remote Control
Home | Getting Started | Operating the TV | Exploring Fun Features | TV Home Menu | Other Information | Specifications
Tell us your opinion about this online reference book.
Copyright © 2009 Sony Electronics Inc. All rights reserved.
Page 75

Getting Started Operating the TV Exploring Fun Features TV Home Menu Other Information Specifications
Operating the TV > Remote Control Button Description
Remote Control Button Description
Back to The Remote Control Next to Programming the Remote Control
Home | Getting Started | Operating the TV | Exploring Fun Features | TV Home Menu | Other Information | Specifications
Tell us your opinion about this online reference book.
Copyright © 2009 Sony Electronics Inc. All rights reserved.
Page 76

Getting Started Operating the TV Exploring Fun Features TV Home Menu Other Information Specifications
Operating the TV > Remote Control Button Description
Remote Control Button Description
Back to The Remote Control Next to Programming the Remote Control
Home | Getting Started | Operating the TV | Exploring Fun Features | TV Home Menu | Other Information | Specifications
Tell us your opinion about this online reference book.
Copyright © 2009 Sony Electronics Inc. All rights reserved.
Page 77

Getting Started Operating the TV Exploring Fun Features TV Home Menu Other Information Specifications
Operating the TV > Remote Control Button Description
Remote Control Button Description
Back to The Remote Control Next to Programming the Remote Control
Home | Getting Started | Operating the TV | Exploring Fun Features | TV Home Menu | Other Information | Specifications
Tell us your opinion about this online reference book.
Copyright © 2009 Sony Electronics Inc. All rights reserved.
Page 78

Getting Started Operating the TV Exploring Fun Features TV Home Menu Other Information Specifications
Operating the TV > Remote Control Button Description
Remote Control Button Description
Back to The Remote Control Next to Programming the Remote Control
Home | Getting Started | Operating the TV | Exploring Fun Features | TV Home Menu | Other Information | Specifications
Tell us your opinion about this online reference book.
Copyright © 2009 Sony Electronics Inc. All rights reserved.
Page 79

Getting Started Operating the TV Exploring Fun Features TV Home Menu Other Information Specifications
Operating the TV > Remote Control Button Description
Remote Control Button Description
Back to The Remote Control Next to Programming the Remote Control
Home | Getting Started | Operating the TV | Exploring Fun Features | TV Home Menu | Other Information | Specifications
Tell us your opinion about this online reference book.
Copyright © 2009 Sony Electronics Inc. All rights reserved.
Page 80

Getting Started Operating the TV Exploring Fun Features TV Home Menu Other Information Specifications
Operating the TV > Remote Control Button Description
Remote Control Button Description
Back to The Remote Control Next to Programming the Remote Control
Home | Getting Started | Operating the TV | Exploring Fun Features | TV Home Menu | Other Information | Specifications
Tell us your opinion about this online reference book.
Copyright © 2009 Sony Electronics Inc. All rights reserved.
Page 81

Getting Started Operating the TV Exploring Fun Features TV Home Menu Other Information Specifications
Operating the TV > Remote Control Button Description
Remote Control Button Description
Back to The Remote Control Next to Programming the Remote Control
Home | Getting Started | Operating the TV | Exploring Fun Features | TV Home Menu | Other Information | Specifications
Tell us your opinion about this online reference book.
Copyright © 2009 Sony Electronics Inc. All rights reserved.
Page 82

Getting Started Operating the TV Exploring Fun Features TV Home Menu Other Information Specifications
Operating the TV > Programming the Remote Control
Programming the Remote Control
The remote control can be programmed to operate other equipment and is pre-programmed to operate the following Sony equipment.
Function Button Sony Equipment Code Number
DVD DVD Player 31033
AMP Receiver 52172
STB Digital Satellite 01639
Back to Remote Control Button Description Next to Programming Other Equipment
Home | Getting Started | Operating the TV | Exploring Fun Features | TV Home Menu | Other Information | Specifications
Tell us your opinion about this online reference book.
Copyright © 2009 Sony Electronics Inc. All rights reserved.
Programming Other Equipment
Remote Control Backlight
Page 83

Getting Started Operating the TV Exploring Fun Features TV Home Menu Other Information Specifications
Operating the TV > Programming the Remote Control > Programming Other Equipment
Programming Other Equipment
Follow the steps below to program your TV remote control.
1) Find the code that corresponds to your equipment here
programming the first code listed.
2) Press and hold DVD, AMP or STB simultaneously with the INPUT button and release. When in the
programming mode, the FUNCTION button blinks for approximately 30 seconds until a code is
entered.
3) Enter the five digit code using 0-9 while the FUNCTION button is lit. If the code is not entered within
30 seconds, you must repeat step 2.
4)
Press or ENT to confirm the code. If successfully programmed, the FUNCTION button blinks
twice; if not, it blinks five times.
Any of the FUNCTION buttons can be programmed to operate other equip ment regardless of the
labeling. For example, DVD can be programmed to operate a Blu-ray Disc player.
Confirm the Programming
If you can turn your equipment on and off using the green POWER button, the programming is
complete. If not, try the next code listed.
In some cases, you may not be able to program your remote co ntrol. If this is the case, use your
equipment’s own remote control.
. If more than one code is provided, try
Back to Programming the Remote Control Next to Remote Control Backlight
Home | Getting Started | Operating the TV | Exploring Fun Features | TV Home Menu | Other Information | Specifications
Tell us your opinion about this online reference book.
Copyright © 2009 Sony Electronics Inc. All rights reserved.
Page 84

Getting Started Operating the TV Exploring Fun Features TV Home Menu Other Information Specifications
Operating the TV > Programming the Remote Control > Remote Control Backlight
Remote Control Backlight
The remote control backlight can be set to automatically light up when a button is pressed.
To set auto backlight:
Press LIGHT and MUTING simultaneously until the four FUNCTION buttons blink.
To turn off auto backlight:
Press LIGHT and MUTING simultaneously until the four TV FUNCTION button blink.
To change the backlight timeout:
1) Press LIGHT, VOL+, and then CH+ simultaneously until one of the FUNCTION buttons blinks.
2)
Select the FUNCTION button that corresponds to your preferred time out setting and press .
Time Out Settings
5 seconds (default), press DVD button
10 seconds, press AMP button
15 seconds, press STB button
20 seconds, press TV button
To reset the remote control to the factory default:
Press SCENE, TV POWER, and simultaneously. The four FUNCTION buttons blink when successfully reset.
Back to Programming Other Equipment Next to Manufacturer's Code List
Home | Getting Started | Operating the TV | Exploring Fun Features | TV Home Menu | Other Information | Specifications
Tell us your opinion about this online reference book.
Copyright © 2009 Sony Electronics Inc. All rights reserved.
Page 85

Getting Started Operating the TV Exploring Fun Features TV Home Menu Other Information Specifications
Operating the TV > Manufacturer's Code List
Manufacturer's Code List
If your equipment’s code is not listed, visit http://esupport.sony.com/remotecodes for a more comprehensive list.
Sony Equipment Codes
Other Manufacturer Equipment Codes
Home | Getting Started | Operating the TV | Exploring Fun Features | TV Home Menu | Other Information | Specifications
Tell us your opinion about this online reference book.
Copyright © 2009 Sony Electronics Inc. All rights reserved.
Page 86

Getting Started Operating the TV Exploring Fun Features TV Home Menu Other Information Specifications
Operating the TV > Manufacture r's Code List > Sony Equipment Codes
Sony Equipment Codes
Sony Equipment Programmable Code Number
AV Receiver 52172
Blu-ray Disc Player 41516, 42178, 42180
Cable–Digital 02177
DVD AV System 51622, 51558, 51658, 51858
DVD Changers 31633
DVD Player 31033, 31069, 31070
DVD/HDD Combo Player 31033, 31 069, 31070
DVD/VCR Combo Player 30864
DVR /HDD Player 22181, 22182, 22183
Satellite 01639
VCR 21232, 21546, 22184
Back to Manufacturer's Code List Next to Other Manufacturer Equipment Codes
Home | Getting Started | Operating the TV | Exploring Fun Features | TV Home Menu | Other Information | Specifications
Tell us your opinion about this online reference book.
Copyright © 2009 Sony Electronics Inc. All rights reserved.
Page 87

Getting Started Operating the TV Exploring Fun Features TV Home Menu Other Information Specifications
Operating the TV > Manufacture r's Code List > Other Manufacturer Equipment Codes
Other Manufacturer Equipment Codes
A/V Receiver/Home Theater Systems
Cable Box
Digital Video Recorders
DVD Changers
DVD Player
DVD Recorder
DVD/VCR Combo Units
HD Blu-ray Players
Satellite
VCR's
Back to Sony Equipment Codes Next to Using Other Equipment with your Remote Control
Home | Getting Started | Operating the TV | Exploring Fun Features | TV Home Menu | Other Information | Specifications
Click an equipmen t type for codes.
Tell us your opinion about this online reference book.
Copyright © 2009 Sony Electronics Inc. All rights reserved.
Page 88

Getting Started Operating the TV Exploring Fun Features TV Home Menu Other Information Specifications
Operating the TV > Manufacture r's Code List > Other Manufacturer Equipment Codes
Other Manufacturer Equipment Codes
A/V Receiver/Home Theater Systems
Cable Box
Digital Video Recorders
DVD Changers
DVD Player
DVD Recorder
DVD/VCR Combo Units
HD Blu-ray Players
Satellite
VCR's
Back to Sony Equipment Codes Next to Using Other Equipment with your Remote Control
Home | Getting Started | Operating the TV | Exploring Fun Features | TV Home Menu | Other Information | Specifications
Tell us your opinion about this online reference book.
Copyright © 2009 Sony Electronics Inc. All rights reserved.
Page 89

Getting Started Operating the TV Exploring Fun Features TV Home Menu Other Information Specifications
Operating the TV > Manufacture r's Code List > Other Manufacturer Equipment Codes
Other Manufacturer Equipment Codes
A/V Receiver/Home Theater Systems
Cable Box
Digital Video Recorders
DVD Changers
DVD Player
DVD Recorder
DVD/VCR Combo Units
HD Blu-ray Players
Satellite
VCR's
Back to Sony Equipment Codes Next to Using Other Equipment with your Remote Control
Home | Getting Started | Operating the TV | Exploring Fun Features | TV Home Menu | Other Information | Specifications
Tell us your opinion about this online reference book.
Copyright © 2009 Sony Electronics Inc. All rights reserved.
Page 90

Getting Started Operating the TV Exploring Fun Features TV Home Menu Other Information Specifications
Operating the TV > Manufacture r's Code List > Other Manufacturer Equipment Codes
Other Manufacturer Equipment Codes
A/V Receiver/Home Theater Systems
Cable Box
Digital Video Recorders
DVD Changers
DVD Player
DVD Recorder
DVD/VCR Combo Units
HD Blu-ray Players
Satellite
VCR's
Back to Sony Equipment Codes Next to Using Other Equipment with your Remote Control
Home | Getting Started | Operating the TV | Exploring Fun Features | TV Home Menu | Other Information | Specifications
Tell us your opinion about this online reference book.
Copyright © 2009 Sony Electronics Inc. All rights reserved.
Page 91

Getting Started Operating the TV Exploring Fun Features TV Home Menu Other Information Specifications
Operating the TV > Manufacture r's Code List > Other Manufacturer Equipment Codes
Other Manufacturer Equipment Codes
A/V Receiver/Home Theater Systems
Cable Box
Digital Video Recorders
DVD Changers
DVD Player
DVD Recorder
DVD/VCR Combo Units
HD Blu-ray Players
Satellite
VCR's
Back to Sony Equipment Codes Next to Using Other Equipment with your Remote Control
Home | Getting Started | Operating the TV | Exploring Fun Features | TV Home Menu | Other Information | Specifications
Tell us your opinion about this online reference book.
Copyright © 2009 Sony Electronics Inc. All rights reserved.
Page 92

Getting Started Operating the TV Exploring Fun Features TV Home Menu Other Information Specifications
Operating the TV > Manufacture r's Code List > Other Manufacturer Equipment Codes
Other Manufacturer Equipment Codes
A/V Receiver/Home Theater Systems
Cable Box
Digital Video Recorders
DVD Changers
DVD Player
DVD Recorder
DVD/VCR Combo Units
HD Blu-ray Players
Satellite
VCR's
Back to Sony Equipment Codes Next to Using Other Equipment with your Remote Control
Home | Getting Started | Operating the TV | Exploring Fun Features | TV Home Menu | Other Information | Specifications
Tell us your opinion about this online reference book.
Copyright © 2009 Sony Electronics Inc. All rights reserved.
Page 93

Getting Started Operating the TV Exploring Fun Features TV Home Menu Other Information Specifications
Operating the TV > Manufacture r's Code List > Other Manufacturer Equipment Codes
Other Manufacturer Equipment Codes
A/V Receiver/Home Theater Systems
Cable Box
Digital Video Recorders
DVD Changers
DVD Player
DVD Recorder
DVD/VCR Combo Units
HD Blu-ray Players
Satellite
VCR's
Back to Sony Equipment Codes Next to Using Other Equipment with your Remote Control
Home | Getting Started | Operating the TV | Exploring Fun Features | TV Home Menu | Other Information | Specifications
Tell us your opinion about this online reference book.
Copyright © 2009 Sony Electronics Inc. All rights reserved.
Page 94

Getting Started Operating the TV Exploring Fun Features TV Home Menu Other Information Specifications
Operating the TV > Manufacture r's Code List > Other Manufacturer Equipment Codes
Other Manufacturer Equipment Codes
A/V Receiver/Home Theater Systems
Cable Box
Digital Video Recorders
DVD Changers
DVD Player
DVD Recorder
DVD/VCR Combo Units
HD Blu-ray Players
Satellite
VCR's
Back to Sony Equipment Codes Next to Using Other Equipment with your Remote Control
Home | Getting Started | Operating the TV | Exploring Fun Features | TV Home Menu | Other Information | Specifications
Tell us your opinion about this online reference book.
Copyright © 2009 Sony Electronics Inc. All rights reserved.
Page 95

Getting Started Operating the TV Exploring Fun Features TV Home Menu Other Information Specifications
Operating the TV > Manufacture r's Code List > Other Manufacturer Equipment Codes
Other Manufacturer Equipment Codes
A/V Receiver/Home Theater Systems
Cable Box
Digital Video Recorders
DVD Changers
DVD Player
DVD Recorder
DVD/VCR Combo Units
HD Blu-ray Players
Satellite
VCR's
Back to Sony Equipment Codes Next to Using Other Equipment with your Remote Control
Home | Getting Started | Operating the TV | Exploring Fun Features | TV Home Menu | Other Information | Specifications
Tell us your opinion about this online reference book.
Copyright © 2009 Sony Electronics Inc. All rights reserved.
Page 96

Getting Started Operating the TV Exploring Fun Features TV Home Menu Other Information Specifications
Operating the TV > Manufacture r's Code List > Other Manufacturer Equipment Codes
Other Manufacturer Equipment Codes
A/V Receiver/Home Theater Systems
Cable Box
Digital Video Recorders
DVD Changers
DVD Player
DVD Recorder
DVD/VCR Combo Units
HD Blu-ray Players
Satellite
VCR's
Back to Sony Equipment Codes Next to Using Other Equipment with your Remote Control
Home | Getting Started | Operating the TV | Exploring Fun Features | TV Home Menu | Other Information | Specifications
Tell us your opinion about this online reference book.
Copyright © 2009 Sony Electronics Inc. All rights reserved.
Page 97

Getting Started Operating the TV Exploring Fun Features TV Home Menu Other Information Specifications
Operating the TV > Manufacture r's Code List > Other Manufacturer Equipment Codes
Other Manufacturer Equipment Codes
A/V Receiver/Home Theater Systems
Cable Box
Digital Video Recorders
DVD Changers
DVD Player
DVD Recorder
DVD/VCR Combo Units
HD Blu-ray Players
Satellite
VCR's
Back to Sony Equipment Codes Next to Using Other Equipment with your Remote Control
Home | Getting Started | Operating the TV | Exploring Fun Features | TV Home Menu | Other Information | Specifications
Tell us your opinion about this online reference book.
Copyright © 2009 Sony Electronics Inc. All rights reserved.
Page 98

Getting Started Operating the TV Exploring Fun Features TV Home Menu Other Information Specifications
Operating the TV > Using Other Equipment with Your Remote Control
Using Other Equipment with Your Remote Control (Page 1 of 3)
Remote control tips are provided below for the equipment you have programmed on the DVD, AMP, STB buttons of the remote control. Press INPUT to see
your connected equipment in the External Inputs (Manage Inputs) menu. Button functionality may differ depending on your equipment.
Button Action
Access Control
DISPLAY Display Information
Select
Clear, (cancel) N/A
ENT Enter
Shortcuts Control
GUIDE Guide
FAVORITES Favorites N/A N/A N/A
INPUT In put Select
RETURN Exit
HOME Setup Menu
OPTIONS Options N/A List List List
TOP MENU Top Menu/List Top Menu List List Top Menu
MENU Menu Menu Menu Menu Menu
F1
F2 DVD DVD N/A N/A
Back to Other Manufacturer Equipment Codes Next to Using Other Equipment with Your Remote Control (Page 2 of 3)
For selecting
between
DVD/VCR in
combo units
Home | Getting Started | Operating the TV | Exploring Fun Features | TV Home Menu | Other Information | Specifications
Universal Blu-ray,
HD-DVD, DVD, DVD-R,
DVD/HDD, DVD/VCR
HDD, DVD/HDD, DVD/VCR VCR, VCR/DVD N/A N/A
Universal VCR, DVR Universal SAT/CBL
Universal AMP/
Receiver
Tell us your opinion about this online reference book.
Copyright © 2009 Sony Electronics Inc. All rights reserved.
Page 99

Getting Started Operating the TV Exploring Fun Features TV Home Menu Other Information Specifications
Operating the TV > Using Other Equipment with Your Remote Control (Page 2)
Using Other Equipment with Your Remote Control (Page 2 of 3)
Remote control tips are provided below for the equipment you have programmed on the DVD, AMP, STB buttons of the remote control. Press INPUT to see
your connected equipment in the External Inputs menu. Button functionality may differ depending on your equipment.
Button Action
Equipment Control
POWER Turn on/off
Previous, Skip
backward
Replay Band
Advance, Skip Surround
Next, Skip
forward
Rewind
Play
Fast forward
Pause
Stop
Recording Control
Record
Record Pause
Stop
Back to Using Other Equipment with Your Remote Control (Page 1 of 2) Next to Using Other Equipment with Your Remote Control (Page 3 of 3)
Home | Getting Started | Operating the TV | Exploring Fun Features | TV Home Menu | Other Information | Specifications
Universal Blu-ray,
HD-DVD, DVD, DVD-R,
DVD/HDD, DVD/VCR
Universal VCR, DVR Universal SAT/CBL
Universal AMP/
Receiver
Tell us your opinion about this online reference book.
Copyright © 2009 Sony Electronics Inc. All rights reserved.
Page 100

Getting Started Operating the TV Exploring Fun Features TV Home Menu Other Information Specifications
Operating the TV > Using Other Equipment with Your Remote Control (Page 3)
Using Other Equipment with Your Remote Control (Page 3 of 3)
Remote control tips are provided below for the equipment you have programmed on the DVD, AMP, STB buttons of the remote control. Press INPUT to see
your connected equipment in the External Inputs menu. Button functionality may differ depending on your equipment.
Button Action
Navigation Control
/
/
Tuning Control
0 - 9 Digital input
CH +/- Channel up/down
JUMP Last channel N/A N/A N/A
Volume Control
VOL +/- TV volume +/- N/A AMP/RECEIVER Vol.
MUTING Muting N/A N/A N/A
R/G/B/Y Control
Red Red N/A DVD or BD Input
Green Green N/A VIDEO 1 or A/V Input
Blue Blue N/A SAT or Cable Input
Yellow Yellow N/A TV or Tuner Input
Back to Using Other Equipment with Your Remote Control (Page 2 of 3) Next to Exploring Fun Features
Cursor up/down
Cursor left/right
Home | Getting Started | Operating the TV | Exploring Fun Features | TV Home Menu | Other Information | Specifications
Universal Blu-ray,
HD-DVD, DVD, DVD-R,
DVD/HDD, DVD/VCR
Universal VCR, DVR Universal SAT/CBL
Universal AMP/
Receiver
Tell us your opinion about this online reference book.
Copyright © 2009 Sony Electronics Inc. All rights reserved.
 Loading...