

Sony KDL-40BX420, KDL-32BX320, KDL-26BX320, KDL-22BX320 User Manual [sr]
4-270-479-12(1)
Digitalni LCD
TV prijemnik
Uputstvo za upotrebu
Uputstvo za brzi početak
Upotreba TV-a
Upotreba dodatne opreme
Upotreba Meni funkci� a
Dodatne informacije
j
KDL-40BX420 / 32BX320 / 26BX320 / 22BX320

Zahvaljujmo se na odabiru Sony proizvoda.
Pre upotrebe TV-a, molimo vas da pa ljivo pro itate
ovo uputstvo i sa uvate ga za kasniju upotrebu.
The illustrations used in this manual are of the
KDL-32BX320 unless otherwise stated.
• is a registered trademark of the DVB Project.
• HDMI, the HDMI Logo, and High-Definition
Multimedia Interface are trademarks or registered
trademarks of HDMI Licensing LLC in the United
States and other countries.
• Manufactured under license from Dolby
Laboratories. Dolby and the double-D symbol are
trademarks of Dolby Laboratories.
• DivX
®
, DivX Certified® and associated logos are
trademarks of DivX, Inc. and are used under
license.
ABOUT DIVX VIDEO: DivX
®
is a digital video
format created by DivX, Inc. This is an official
DivX Certified
®
device that plays DivX video.
Visit divx.com for more information and software
tools to convert your files into DivX video.
ABOUT DIVX VIDEO-ON-DEMAND: This
DivX Certified
®
device must be registered in order
to play purchased DivX Video-on-Demand (VOD)
movies. To obtain your registration code, locate the
DivX VOD section in your device setup menu. Go
to vod.divx.com for more information on how to
complete your registration.
• “BRAVIA” and are trademarks of Sony
Corporation.
Labels for Model No. and Power Supply rating (in
accordance with applicable safety regulation) are
located on the rear of the TV.
IMPORTANT INFORMATION
If a television is not positioned in a sufficiently stable
location, it can be potentially hazardous due to falling.
Many injuries, particularly to children, can be avoided
by taking simple precautions such as:
• Using cabinets or stands recommended by the
manufacturer of the television.
• Only using furniture that can safely support the
television.
• Ensuring the television is not overhanging the edge
of the supporting furniture.
• Not placing the television on tall furniture (for
example, cupboards or bookcases) without
anchoring both the furniture and the television to a
suitable support.
• Not standing the televisions on cloth or other
materials placed between the television and
supporting furniture.
• Educating children about the dangers of climbing
on furniture to reach the television or its controls.
Trademark information
Location of the identification label
Uvod
Uvod
Položaj identikacione nalepnice
Zahvaljujemo se na odabiru Sony proizvoda.
Pre upotrebe TV-a, molimo vas da pažljivo pročitate
ovo uputstvo i sačuvate ga za kasniju upotrebu.
Ilustracije korišćene u ovom priručniku su za model
KDL-32BX320 sem ako drugačije nije navedeno.
Informacije o zaštitnom znaku
• je registrovani zaštitni znak DVB Project.
• HDMI, logotip HDMI i High-Denition Multimedia Interface su zaštitni znakovi ili registrovani
zaštitni znakovi HDMI Licensing LLC u Sjedinjenim
Američkim Državama i drugim zemljama.
• Proizvedeno po licenci kompanije Dolby Laboratories. Dolby i simbol duplo D su zaštitni znaci
kompanije Dolby Laboratories.
• DivX®, DivX Certied® i povezani logotipi su
zaštitni znaci kompanije DivX, Inc. i koriste se sa
licencom.
O DIVX VIDEO: DivX® je digitalni video format
koji je osmislila kompanija DivX, Inc. Ovaj uređaj
ima službeni DivX sertikat i reprodukuje DivX
video zapise. Više informacija i softverske alate za
konvertovanje datoteka u DivX video potražite na
www.divx.com.
O DIVX VIDEO-NA-ZAHTEV (VOD) : Uređaj sa
oznakom DivX Certied® potrebno je registrovati
kako bi mogao da reprodukuje sadržaje DivX Videona-zahtev (VOD). Da biste dobili registracioni kod,
pronađite odeljak DivX VOD u meniju za postavljanje uređaja. Kod unesite na vod.divx.com da biste
završili postupak registracije i saznali više o DivX
VOD.
• “BRAVIA” i su zaštitni znaci Sony korporacije.
Nalepnice sa brojem modela i specikacijom napajanja (u skladu sa primenjivim sigurnosnim propisima) nalaze se na zadnjoj strani TV-a.
VAŽNE INFORMACIJE
Ako televizor nije postavljen na dovoljno stabilnom
mestu, može biti potencijalno opasan zbog mogućeg
pada. Mnoge povrede, posebno dece, mogu se izbeći
jednostavnim merama predostrožnosti kao što su:
• Upotreba ormarića ili stalaka koje je preporučio
proizvođač televizora.
• Upotreba samo onog nameštaja koji sigurno
podržava televizor.
• Osiguravanje da televizor ne viri preko ivice
nameštaja na kojem stoji.
• Ne postavljanje televizora na visok nameštaj
(na primer, na ormariće ili police za knjige) bez
pričvršćivanja i nameštaja i televizora za stabilnu
podlogu.
• Ne postavljanje televizora na stolnjake ili druge
materijale postavljene između televizora i nameštaja
na kojem stoji.
• Učenje dece o opasnostima penjanja na nameštaj
kako bi dohvatila televizor ili njegove kontrole.
SRP
2

Sadržaj
Uputstvo za brzi početak
Provera pribora ........................................................ 4
1: Pričvrščćivanje postolja ................................. ...... 4
2: Priključivanje antene/kabla/videa ................ ........ 5
3: Sprečavanje prevrtanja televizora ........................ 5
4: Inicijalno postavljanje........................................... 6
Gledanje TV-a .......................................................... 6
Odvajanje postolja od TV-a ..................................... 6
Sigurnosne informacije ............................................ 7
Mere opreza ............................................................. 8
Upotreba TV-a
Pregled daljinskog upravljača .................................. 9
Pregled tipki TV-a i indikatora................................ 11
Upotreba dodatne opreme
Spajanje dodatne opreme ....................................... 12
Gledanje slika sa spojene opreme .......................... 13
Gledanje PIP (slika u slici)...................................... 14
Upotreba funkcija menija
Prolaz kroz menije ................................................. 15
Upotreba Digital Favourite liste .................. 15
Upotreba digitalnog elektronskog programskog
vodiča (EPG) ................................................. 16
Reprodukcija slika/muzike/video snimaka
putem USB-a ......................................................... 17
Upotreba BRAVIA Sync sa Control for HDMI ..... 20
Podešavanje postavki ............................................. 21
Slika ....................................................................... 21
Zvuk ....................................................................... 22
Ekran ...................................................................... 24
Podešavanje kanala ................................................ 26
Parental Lock ......................................................... 28
Podešavanje ........................................................... 29
Eko ......................................................................... 30
Dodatne informacije
Instaliranje pribora
(zidni nosač) .......................................................... 31
Tabela dimenzija za postavljanje TV-a .................. 32
Dijagram/tabela položaja vijaka i kuke ................. 33
Rešavanje problema ............................................... 34
Tehnički podaci ...................................................... 36
: samo za digitalne kanale
Pre upotrebe TV-a, molimo pročitajte “Sigurnosne informacije” (str. 7). Sačuvajte ovaj priručnik za buduću upotrebu.
3
SRP
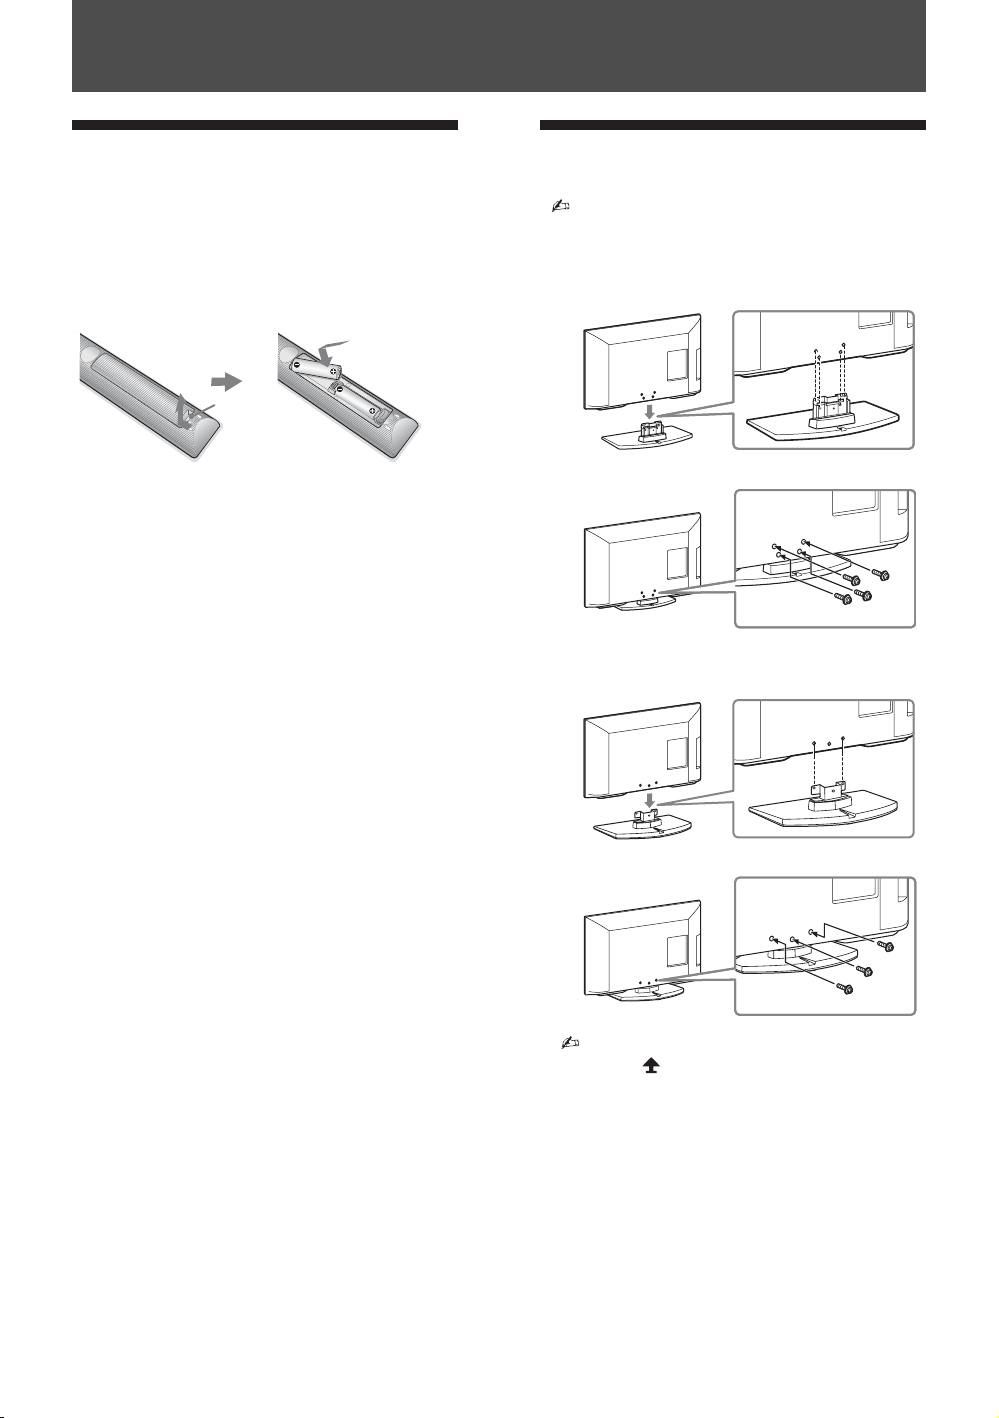
1: Attaching the stand
Refer to the supplied stand leaflet for proper
attachment for some TV models
B KDL-40BX420/KDL-32/26BX320
B KDL-22BX320
Start-up Guide
1: Attaching the stand
Refer to the supplied stand leaflet for proper
attachment for some TV models
B KDL-40BX420/KDL-32/26BX320
Push to
open
attachment for some TV models
1: Attaching the stand
Refer to the supplied stand leaflet for proper
attachment for some TV models
B KDL-40BX420/KDL-32/26BX320
B KDL-22BX320
1: Attaching the stand
Refer to the supplied stand leaflet for proper
attachment for some TV models
B KDL-40BX420/KDL-32/26BX320
B KDL-22BX320
Uputstvo za brzi početak
Provera pribora
Postolje (1) i vijci (7)
Daljinski upravljač RM-ED046 (1)
Veličina AA baterija (tip R6) (2)
Za umetanje baterija u daljinski upravljač
Pritisnite
da otvorite
1: Pričvršćivanje postolja
• Pogledajte isporučeni prospekt postolja za
ispravno pričvršćivanje nekih TV modela.
SRP
4
• Pričvrstite TV za postolje prema oznakama
strelica koje navode otvore za vijke pomoću
isporučenih vijaka.
• Ovaj TV je veoma težak, pa je potrebno
dvoje ili više ljudi da bi se TV postavio na
postolje.
• Ako koristite električni odvijač, podesite moment zatezanja na oko 1.5 N•m (15 kgf•cm).
• Proverite da li je kabl napajanja udaljen od
otvora za vijke tokom instaliranja postolja
kako se kabl ne bi oštetio.

1: Attaching the stand
Refer to the supplied stand leaflet for proper
attachment for some TV models
B KDL-40BX420/KDL-32/26BX320
B KDL-22BX320
5
GB
Start-up Guide
2: Connecting an antenna/
cable/VCR
• Connecting cables are not supplied.
Connecting an antenna/cable
3: Preventing the TV from
toppling over
1
Install a wood screw (4 mm in diameter, not
supplied) in the TV stand.
2
Install a machine screw (M4 × 16, not
supplied) into the screw hole of the TV.
3
Tie the wood screw and the machine screw
with a strong cord (not supplied).
z
2: Priključivanje antene/
kabla/ videa
• Spojni kablovi nisu isporučeni.
Priključivanje antene/kabla
Antenna cable
Kabl anatene
3: Sprečavanje prevrtanja
televizora
Start-up Guide
Priključivanje antene/kabla i videa
Connecting an antenna/cable and VCR
AV cable
AV Kabl
Antenna cable
Kabl anatene
Kabl anatene
Antenna cable
1 Postavite drveni vijak (4 mm u promeru, nije
isporučen) na postolje za televizor.
2 Ugradite mašinski vijak (M4 × 16, nije isporučen)
u otvor vijka na televizoru.
3 Zavežite drveni i mašinski vijak jakim užetom
(nije isporučen).
z • Možete koristiti i Sony pojas za učvršćivanje
TV-a. Kontaktirajte najbliži Sony servisni centar
kako biste kupili ovu opremu. Imajte spremno ime
modela vašeg TV-a.
VCR
SRP
5

Watching TV
1
Press 1 on the TV to turn on the TV.
2
Press DIGITAL/ANALOG to switch
between digital and analogue modes.
3
Press the number buttons or PROG +/– to
select a TV channel.
4
Press 2 +/– to adjust the volume.
Detaching the stand from the
TV
• Do not remove the stand for any reason other than to
wall-mount the TV.
4: Performing the initial
set-up
Watching TV
1
Press 1 on the TV to turn on the TV.
2
Press DIGITAL/ANALOG to switch
between digital and analogue modes.
3
Press the number buttons or PROG +/– to
select a TV channel.
4
Press 2 +/– to adjust the volume.
Detaching the stand from the
TV
• Do not remove the stand for any reason other than to
wall-mount the TV.
B KDL-40BX420/KDL-32/26BX320
* The shapes of AC power plug and AC power outlet
differ depending on the region.
**When the TV is in standby mode (the 1 (standby)
indicator on the TV front panel is red), press "/1 on
the remote to turn on the TV.
4: Performing the initial
set-up
Watching TV
1
Press 1 on the TV to turn on the TV.
2
Press DIGITAL/ANALOG to switch
between digital and analogue modes.
3
Press the number buttons or PROG +/– to
select a TV channel.
4
Press 2 +/– to adjust the volume.
Detaching the stand from the
4: Inicijalno postavljanje
1: Attaching the stand
Refer to the supplied stand leaflet for proper
attachment for some TV models
B KDL-40BX420/KDL-32/26BX320
B KDL-22BX320
* Oblici utikača naizmenične struje i utičnice se
razlikuju u zavisnosti od regiona.
**Kada je TV u pripravnom stanju (indikator 1
(standby) na prednjoj strani TV-a svetli crveno),
pritisnite “/1 na daljinskom upravljaču da uključite
TV.
3
Gledanje TV-a
1 Pritisnite 1 na TV-u da uključite TV.
2 Pritisnite DIGITAL/ANALOG za promenu
između digitalnih i analognih modova.
3 Pritisnite brojčane tipke ili PROG +/– za odabir
TV kanala.
4 Pritisnite 2 +/– da podesite glasnoću.
Odvajanje postolja od TV-a
• Ne skidajte postolje ni iz kog razloga osim ako
ćete postavljati TV na zid.
B KDL-40BX420/KDL-32/26BX320
Sledite uputstvo na ekranu.
“Redosled programa”: Ako želite da promenite
redosled analognih kanala, sledite korake u “Redosled programa”
Pritisnite HOME za izlaz.
• Takođe možete podešavati kanale ručno
(str. 26).
(str. 26).
SRP
6
B KDL-22BX320

• When lifting or moving the TV set, hold it
firmly from the bottom.
• When transporting the TV set, do not
subject it to jolts or excessive vibration.
• When transporting the TV set for repairs
or when moving, pack it using the original
carton and packing material.
Ventilation
• Never cover the ventilation holes or insert
anything in the cabinet.
• Leave space around the TV set as shown
below.
• It is strongly recommended that you use a
Sony wall-mount bracket in order to
provide adequate air-circulation.
Installed on the wall
AC power cord
Handle the AC power cord and outlet as
follows in order to avoid any risk of fire,
electrical shock or damage and/or injuries:
– The shape of AC power plug, which is
supplied with the TV set, varies
depending on the regions. Be sure to
connect the appropriate supplied AC
power cord with the plug that fits into the
AC power outlet.
– Use only Sony supplied AC power cords,
not those of other brands.
– Insert the plug fully into the AC power outlet.
– Operate the TV set on a 110-240 V AC
supply only.
– When wiring cables, be sure to unplug the
AC power cord for your safety and take
care not to catch your feet on the cables.
– Disconnect the AC power cord from the
AC power outlet before working on or
moving the TV set.
– Keep the AC power cord away from heat
sources.
– Unplug the AC power plug and clean it
regularly. If the plug is covered with dust
and it picks up moisture, its insulation may
30 cm
10 cm 10 cm
10 cm
• When lifting or moving the TV set, hold it
firmly from the bottom.
• When transporting the TV set, do not
subject it to jolts or excessive vibration.
• When transporting the TV set for repairs
or when moving, pack it using the original
carton and packing material.
Ventilation
• Never cover the ventilation holes or insert
anything in the cabinet.
• Leave space around the TV set as shown
below.
• It is strongly recommended that you use a
Sony wall-mount bracket in order to
provide adequate air-circulation.
Installed on the wall
Installed with stand
AC power cord
Handle the AC power cord and outlet as
follows in order to avoid any risk of fire,
electrical shock or damage and/or injuries:
– The shape of AC power plug, which is
supplied with the TV set, varies
depending on the regions. Be sure to
connect the appropriate supplied AC
power cord with the plug that fits into the
AC power outlet.
– Use only Sony supplied AC power cords,
not those of other brands.
– Insert the plug fully into the AC power outlet.
– Operate the TV set on a 110-240 V AC
supply only.
– When wiring cables, be sure to unplug the
AC power cord for your safety and take
care not to catch your feet on the cables.
– Disconnect the AC power cord from the
AC power outlet before working on or
moving the TV set.
– Keep the AC power cord away from heat
sources.
– Unplug the AC power plug and clean it
regularly. If the plug is covered with dust
and it picks up moisture, its insulation may
deteriorate, which could result in a fire.
Notes
• Do not use the supplied AC power cord on
any other equipment.
• Do not pinch, bend, or twist the AC power
cord excessively. The core conductors
may be exposed or broken.
• Do not modify the AC power cord.
• Do not put anything heavy on the AC
power cord.
• Do not pull on the AC power cord itself
30 cm
10 cm 10 cm
10 cm
Leave at least this space around
the set.
30 cm
10 cm
10 cm
6 cm
• When lifting or moving the TV set, hold it
firmly from the bottom.
• When transporting the TV set, do not
subject it to jolts or excessive vibration.
• When transporting the TV set for repairs
or when moving, pack it using the original
carton and packing material.
Ventilation
• Never cover the ventilation holes or insert
anything in the cabinet.
• Leave space around the TV set as shown
below.
• It is strongly recommended that you use a
Sony wall-mount bracket in order to
provide adequate air-circulation.
Installed on the wall
Installed with stand
• To ensure proper ventilation and prevent
the collection of dirt or dust:
– Do not lay the TV set flat, install
upside down, backwards, or sideways.
– Do not place the TV set on a shelf, rug,
bed or in a closet.
– Do not cover the TV set with a cloth,
such as curtains, or items such as
newspapers, etc.
– Do not install the TV set as shown
below.
AC power cord
Handle the AC power cord and outlet as
follows in order to avoid any risk of fire,
electrical shock or damage and/or injuries:
– The shape of AC power plug, which is
supplied with the TV set, varies
depending on the regions. Be sure to
connect the appropriate supplied AC
power cord with the plug that fits into the
AC power outlet.
– Use only Sony supplied AC power cords,
not those of other brands.
– Insert the plug fully into the AC power outlet.
– Operate the TV set on a 110-240 V AC
supply only.
– When wiring cables, be sure to unplug the
AC power cord for your safety and take
care not to catch your feet on the cables.
– Disconnect the AC power cord from the
AC power outlet before working on or
moving the TV set.
– Keep the AC power cord away from heat
sources.
– Unplug the AC power plug and clean it
regularly. If the plug is covered with dust
and it picks up moisture, its insulation may
deteriorate, which could result in a fire.
Notes
• Do not use the supplied AC power cord on
any other equipment.
• Do not pinch, bend, or twist the AC power
cord excessively. The core conductors
may be exposed or broken.
• Do not modify the AC power cord.
• Do not put anything heavy on the AC
power cord.
• Do not pull on the AC power cord itself
when disconnecting the AC power cord.
• Do not connect too many appliances to
the same AC power outlet.
• Do not use a poor fitting AC power outlet.
Prohibited Usage
Do not install/use the TV set in locations,
environments or situations such as those
listed below, or the TV set may malfunction
and cause a fire, electrical shock, damage
and/or injuries.
Location:
• Outdoors (in direct sunlight), at the
seashore, on a ship or other vessel, inside
a vehicle, in medical institutions, unstable
locations, near water, rain, moisture or
smoke.
• If the TV is placed in the changing room
of a public bath or hot spring, the TV may
be damaged by airborne sulfur, etc.
Environment:
• Places that are hot, humid, or excessively
dusty; where insects may enter; where it
might be exposed to mechanical
30 cm
10 cm 10 cm
10 cm
Leave at least this space around
the set.
30 cm
10 cm
10 cm
6 cm
Leave at least this space around the
set.
Air circulation is blocked.
Wall
Wall
Safety information
Installation/Set-up
Install and use the TV set in accordance with
the instructions below in order to avoid any
risk of fire, electrical shock or damage and/or
injuries.
Installation
• The TV set should be installed near an
easily accessible AC power outlet.
• Place the TV set on a stable, level surface
to avoid it from falling down and cause
personal injury or damage to the TV.
• Only qualified service personnel should
carry out wall installations.
• For safety reasons, it is strongly
recommended that you use Sony
accessories, including:
– KDL-40BX420/32BX320:
Wall-mount bracket SU-WL50B
– KDL-26BX320/22BX320:
Wall-mount bracket SU-WL100
• Be sure to use the screws supplied with
the Wall-mount bracket when attaching
the mounting hooks to the TV set. The
supplied screws are designed as indicated
by illustration when measured from the
attaching surface of the mounting hook.
The diameter and length of the screws
differ depending on the Wall-mount
bracket model.
Use of screws other than those supplied
may result in internal damage to the TV
set or cause it to fall, etc.
Transporting
• Before transporting the TV set,
disconnect all cables.
• Two or more people are needed to
transport a large TV set.
• When transporting the TV set by hand,
hold it as shown below. Do not put stress
on the LCD panel.
• When lifting or moving the TV set, hold it
firmly from the bottom.
• When transporting the TV set, do not
subject it to jolts or excessive vibration.
• When transporting the TV set for repairs
or when moving, pack it using the original
carton and packing material.
Ventilation
• Never cover the ventilation holes or insert
anything in the cabinet.
• Leave space around the TV set as shown
below.
• It is strongly recommended that you use a
Sony wall-mount bracket in order to
provide adequate air-circulation.
Installed on the wall
Installed with stand
• To ensure proper ventilation and prevent
the collection of dirt or dust:
– Do not lay the TV set flat, install
upside down, backwards, or sideways.
– Do not place the TV set on a shelf, rug,
bed or in a closet.
– Do not cover the TV set with a cloth,
such as curtains, or items such as
newspapers, etc.
– Do not install the TV set as shown
below.
AC power cord
Handle the AC power cord and outlet as
follows in order to avoid any risk of fire,
electrical shock or damage and/or injuries:
– The shape of AC power plug, which is
supplied with the TV set, varies
depending on the regions. Be sure to
connect the appropriate supplied AC
power cord with the plug that fits into the
AC power outlet.
– Use only Sony supplied AC power cords,
not those of other brands.
– Insert the plug fully into the AC power outlet.
– Operate the TV set on a 110-240 V AC
supply only.
– When wiring cables, be sure to unplug the
AC power cord for your safety and take
care not to catch your feet on the cables.
– Disconnect the AC power cord from the
AC power outlet before working on or
moving the TV set.
– Keep the AC power cord away from heat
sources.
– Unplug the AC power plug and clean it
regularly. If the plug is covered with dust
and it picks up moisture, its insulation may
deteriorate, which could result in a fire.
Notes
• Do not use the supplied AC power cord on
any other equipment.
• Do not pinch, bend, or twist the AC power
cord excessively. The core conductors
may be exposed or broken.
• Do not modify the AC power cord.
• Do not put anything heavy on the AC
power cord.
• Do not pull on the AC power cord itself
when disconnecting the AC power cord.
• Do not connect too many appliances to
the same AC power outlet.
• Do not use a poor fitting AC power outlet.
Prohibited Usage
Do not install/use the TV set in locations,
environments or situations such as those
listed below, or the TV set may malfunction
and cause a fire, electrical shock, damage
and/or injuries.
Location:
• Outdoors (in direct sunlight), at the
seashore, on a ship or other vessel, inside
a vehicle, in medical institutions, unstable
locations, near water, rain, moisture or
smoke.
• If the TV is placed in the changing room
of a public bath or hot spring, the TV may
be damaged by airborne sulfur, etc.
Environment:
• Places that are hot, humid, or excessively
dusty; where insects may enter; where it
might be exposed to mechanical
vibration, near flammable objects
(candles, etc). The TV set shall not be
exposed to dripping or splashing and no
objects filled with liquids, such as vases,
shall be placed on the TV.
• Do not place the TV in a humid or dusty
space, or in a room with oily smoke or
steam (near cooking tables or
humidifiers). Fire, electric shock, or
warping may result.
Screw (supplied with the
Wall-mount bracket)
Mounting Hook
Hook attachment on rear of
TV set
Min. ~ 26 TV: 6.5 ~ 10mm
32 TV ~ Max.: 8 ~ 12mm
KDL-26BX320/
KDL-22BX320
KDL-40BX420/
KDL-32BX320
30 cm
10 cm 10 cm
10 cm
Leave at least this space around
the set.
30 cm
10 cm
10 cm
6 cm
Leave at least this space around the
set.
Air circulation is blocked.
Wall
Wall
Safety information
Installation/Set-up
Install and use the TV set in accordance with
the instructions below in order to avoid any
risk of fire, electrical shock or damage and/or
injuries.
Installation
• The TV set should be installed near an
easily accessible AC power outlet.
• Place the TV set on a stable, level surface
to avoid it from falling down and cause
personal injury or damage to the TV.
• Only qualified service personnel should
carry out wall installations.
• For safety reasons, it is strongly
recommended that you use Sony
accessories, including:
– KDL-40BX420/32BX320:
Wall-mount bracket SU-WL50B
– KDL-26BX320/22BX320:
Wall-mount bracket SU-WL100
• Be sure to use the screws supplied with
the Wall-mount bracket when attaching
the mounting hooks to the TV set. The
supplied screws are designed as indicated
by illustration when measured from the
attaching surface of the mounting hook.
The diameter and length of the screws
differ depending on the Wall-mount
bracket model.
Use of screws other than those supplied
may result in internal damage to the TV
set or cause it to fall, etc.
• When lifting or moving the TV set, hold it
firmly from the bottom.
• When transporting the TV set, do not
subject it to jolts or excessive vibration.
• When transporting the TV set for repairs
or when moving, pack it using the original
carton and packing material.
Ventilation
• Never cover the ventilation holes or insert
anything in the cabinet.
• Leave space around the TV set as shown
below.
• It is strongly recommended that you use a
Sony wall-mount bracket in order to
provide adequate air-circulation.
Installed on the wall
Installed with stand
• To ensure proper ventilation and prevent
the collection of dirt or dust:
– Do not lay the TV set flat, install
upside down, backwards, or sideways.
– Do not place the TV set on a shelf, rug,
bed or in a closet.
– Do not cover the TV set with a cloth,
such as curtains, or items such as
AC power cord
Handle the AC power cord and outlet as
follows in order to avoid any risk of fire,
electrical shock or damage and/or injuries:
– The shape of AC power plug, which is
supplied with the TV set, varies
depending on the regions. Be sure to
connect the appropriate supplied AC
power cord with the plug that fits into the
AC power outlet.
– Use only Sony supplied AC power cords,
not those of other brands.
– Insert the plug fully into the AC power outlet.
– Operate the TV set on a 110-240 V AC
supply only.
– When wiring cables, be sure to unplug the
AC power cord for your safety and take
care not to catch your feet on the cables.
– Disconnect the AC power cord from the
AC power outlet before working on or
moving the TV set.
– Keep the AC power cord away from heat
sources.
– Unplug the AC power plug and clean it
regularly. If the plug is covered with dust
and it picks up moisture, its insulation may
deteriorate, which could result in a fire.
Notes
• Do not use the supplied AC power cord on
any other equipment.
• Do not pinch, bend, or twist the AC power
cord excessively. The core conductors
may be exposed or broken.
• Do not modify the AC power cord.
• Do not put anything heavy on the AC
power cord.
• Do not pull on the AC power cord itself
when disconnecting the AC power cord.
• Do not connect too many appliances to
the same AC power outlet.
• Do not use a poor fitting AC power outlet.
Prohibited Usage
Do not install/use the TV set in locations,
environments or situations such as those
listed below, or the TV set may malfunction
Screw (supplied with the
Wall-mount bracket)
Mounting Hook
Hook attachment on rear of
TV set
Min. ~ 26 TV: 6.5 ~ 10mm
32 TV ~ Max.: 8 ~ 12mm
30 cm
10 cm 10 cm
10 cm
Leave at least this space around
the set.
30 cm
10 cm
10 cm
6 cm
Leave at least this space around the
set.
Sigurnosne
informacije
Instalacija/postavljanje
Postavite i koristite TV prijemnik u
skladu sa instrukcijama datim ispod kako
biste izbegli rizik od požara, električnog
udara ili štete i/ili povreda.
Instalacija
• TV prijemnik treba postaviti blizu lako
dostupne utičnice.
• Postavite TV prijemnik na stabilnu,
ravnu površinu kako ne bi pao i izazvao
ličnu povredu ili se oštetio.
• Samo kvalikovano servisno osoblje
treba da izvodi postavljanje na zid.
• Zbog sigurnosnih razloga, preporučuje
se da koristite Sony pribor, uključujući:
– KDL-40BX420/32BX320:
Zidni nosač SU-WL50B
– KDL-26BX320/22BX320:
Zidni nosač SU-WL100
• Obavezno koristite vijke isporučene
sa zidnim nosačem kada postavljate
montažne kuke na TV prijemnik.
Isporučeni vijci su napravljeni kako je
prikazano ilustracijom kada se meri od
spojne površine montažne kuke. Prečnik
i dužina vijaka razlikuju se u zavisnosti
od modela zidnog nosača.
Upotreba vijaka koji nisu isporučeni
može rezultirati unutrašnjim oštećenjem
TV prijemnika ili izazvati njegov pad,
i sl.
Min. ~ 26 TV: 6.5 ~ 10mm
32 TV ~ Max.: 8 ~ 12mm
Prenošenje
• Pre prenošenja TV prijemnika,
odspojite sve kablove.
• Potrebno je dve ili više osoba za
prenošenje velikog TV prijemnika.
• Kod nošenja držite TV prijemnik kao
što je prikazano ispod. Zaštitite LCD
ekran od udaraca.
Vijak (isporučen sa
nosačem za zid)
Montažna kuka
Učvršćenje kuke na zadnjoj strani TV prijemnika
• Prilikom podizanja ili pomeranja TV
prijemnika, držite ga čvrsto sa donje
strane.
• Prilikom prenošenja TV prijemnika,
zaštitite ga od udaraca i vibracija.
• Prilikom prenošenja TV prijemnika na
popravak ili kod preseljenja, zapakujte
ga u originalnu ambalažu.
Ventilacija
• Nikada nemojte prekrivati ventilacione
otvore i ne stavljajte nikakve predmete
unutra.
• Ostavite slobodan prostor oko TV
prijemnika kao što je prikazano ispod.
• Preporučuje se da koristite Sony zidni
nosač kako bi se obezbedila adekvatna
cirkulacija vazduha.
Postavljanje na zid
Ostavite bar ovoliko prostora oko prijemnika.
Instalacija sa postoljem
Ostavite bar ovoliko prostora oko prijemnika.
• Za ispravnu ventilaciju i sprečavanje
nakupljanja prašine i prljavštine:
– Ne postavljajte uređaj površinom
ekrana okrenut prema podlozi, ne instalirajte ga naopako, na zadnju stranu ili
bočnu stranu.
– Ne stavljajte uređaj na policu, tepih,
krevet ili u vitrinu.
– Ne prekrivajte TV pokrivačima poput
zavesa ili novina i sl.
– Ne postavljajte TV prijemnik kao što je
prikazano ispod.
Protok vazduha je blokiran.
Kabl napajanja
S kablom i strujnom utičnicom postupajte
kao što je opisano, kako biste sprečili
opasnost od požara, električnog udara ili
štete i/ili povreda:
– Oblik strujne utičnice, koja je isporučena sa TV prijemnikom, razlikuje se
u zavisnosti od regije. Obavezno spojite
odgovarajući isporučeni mrežni kabl sa
utikačem koji odgovara struj-noj utičnici.
– Koristite isključivo isporučene Sony
kablove napajanja, ne kablove drugih
proizvođača.
– Umetnite utikač do kraja u utičnicu.
– TV koristite isključivo na napajanju
110-240 V.
– Prilikom povezivanja kablova, obavezno odspojite kabl napajanja i pazite da
nogom ne zapnete i povučete kabl.
– Odspojite kabl napajanja pre premeštanja ili rada na TV-u.
– Držite kabl napajanja dalje od izvo-ra
toplote.
– Redovno odspojite i očistite utikač
napajanja. Utikač pokriven prašinom može
nakupiti vlagu zbog čega može doći do
oštećenja izolacije, a time i do opasnosti
od požara.
Napomene
• Ne koristite isporučeni kabl napaja-nja
na drugoj opremi.
• Nemojte prelamati, savijati ili uvrtati
kabl. Može doći do oštećenja izolacije oko
provodnika ili prekida provodnika.
• Nemojte praviti prepravke na kablu
napajanja.
• Nemojte stavljati teške predmete na kabl
napajanja.
• Ne vucite kabl, već uhvatite utikač
prilikom odspajanja iz utičnice.
• Ne spajajte previše uređaja na istu
utičnicu.
• Ne koristite labave strujne utičnice.
Zabranjena upotreba
Ne instalirajte/ne koristite TV prijem-nik
na mestima, u okruženjima ili okolnostima
poput dole opisanih, kako biste sprečili
nepravilnosti u radu TV prijemnika, požar,
električni udar, štetu i/ili povrede.
Mesta:
• Na otvorenim mestima (na direktnom
uticaju sunca), na obali, na brodu i ostalim
plovilima, u vozilima, u me-dicinskim
ustanovama, na mestima izloženim
mehaničkim vibracijama, blizu vode, kiše,
vlage ili dima.
• Ako je TV smešten u svlačionicu javnog
kupatila ili vrućeg izvora, TV može biti
oštećen sumporom iz vazduha, itd.
Okruženje:
• Mesta koja su vrela, vlažna ili veoma
prljava; gde mogu ući insekti; gde može
biti izložen mehaničkim vibracijama,
blizu zapaljivih predmeta (sveća, itd). TV
prijemnik se ne sme izlagati kapanju ili
prskanju. Ne stavljajte posude napunjene
vodom (npr. vaze) na TV prijemnik.
• Ne postavljajte TV u vlažan ili praš-njav
prostor, ili u prostoriju sa uljanim dimom
ili parom (blizu radnih stolova u kuhinji
ili osveživača prostorija). Može doći do
požara, električnog udara ili uvijanja.
Nastavlja se
SRP
7

Okolnosti:
• Ne rukujte uređajem mokrim rukama, kad je otvoreno kućište uređaja
ili sa priključcima koje nije preporučio
proizvođač. Odspojite TV prijemnik
iz strujne utičnice i antene tokom
olujnog nevremena.
• Ne postavljajte televizor tako da viri
u otvorenom prostoru. Može doći do
povrede lica ili štete objekta koji se
sudare sa televizorom.
Slomljeni delovi:
• Ne bacajte stvari na TV prijemnik.
Staklo ekrana bi se moglo razbiti i
uzrokovati ozbiljne povrede.
• Ukoliko površina TV ekrana pukne,
ne dodirujte je dok ne odspojite kabl
napajanja. U suprotnom bi moglo doći
do električnog udara.
Kad se ne koristi
• Ukoliko ne planirate da koristite TV
prijemnik nekoliko dana, odspojite ga
iz napajanja radi očuvanja okoline i iz
sigurnosnih razloga.
• TV prijemnik je odspojen iz
napajanja tek nakon odspajanja kabla
napajanja.
• Međutim, neki TV prijemnici su
možda opremljeni funkcijom koja
zahteva da budu u pripravnom stanju
kako bi pravilno funkcionisali.
Za decu
• Ne dozvolite deci da se penju na TV
prijemnik.
• Sitne delove čuvajte van domašaja
dece, kako ih ne bi slučajno progutala.
U slučaju problema...
Isključite TV prijemnik i odmah ga
odspojite iz napajanja u slučajevima
opisanim u nastavku.
Obratite se Sony ovlašćenom servisu
kako bi uređaj proverio kvalikovani
tehničar.
Kad:
– je oštećen kabl napajanja.
– je loš kontakt sa strujnom
utičnicom.
– je TV prijemnik oštećen, budući
da je pao, udaren ili je nešto bačeno
na njega.
– tečnost ili neki predmet dospe u
otvore uređaja.
O temperaturi LCD monitora
Kad se LCD monitor koristi duže
vreme, prostor oko ekrana postaje
topao. Možda ćete osetiti vruće kad
pipnete rukom.
SRP
8
Mere opreza
Praćenje TV prijema
• Pratite program na TV-u pri umerenom svetlu, jer gledanje duže vreme pri
slaboj rasveti opterećuje oči.
• Kod korišćenja slušalica, podesite
glasnoću kako biste sprečili preterane
promene u glasnoći i tako sprečili
oštećenje sluha.
LCD ekran
• Iako je LCD ekran izrađen uz upotrebu visokoprecizne tehnologije i ima
99.99% ili više aktivnih piksela, može
doći do trajne pojave crnih ili tačkica u
boji (crvenih, plavih ili zelenih). To je
karakteristika LCD ekrana i ne predstavlja kvar.
• Nemojte pritiskati ili ogrepsti prednji
lter i ne stavljajte nikakve predmete na
TV prijemnik. Slika u tom slučaju može
biti neujednačena ili se LCD ekran može
oštetiti.
• Ako koristite TV prijemnik na hladnom mestu, slika može biti razmazana
ili previše tamna, no to ne predstavlja
kvar. Ovaj fenomen nestaje zajedno sa
porastom temperature.
• Ako na ekranu duže vreme stoje mirne
slike, može doći do pojave dvostrukih
slika. To može nestati nakon nekoliko
trenutaka.
• Ekran i kućište TV prijemnika se
zagrevaju tokom upotrebe. Ovo ne predstavlja kvar.
• LCD ekran sadrži malu količinu tečnog
kristala. Neke uorescentne sijalice
ugrađene u ovaj TV prijemnik takođe
sadrže živu. Poštujte lokalne propise o
odlaganju otpada.
Rukovanje i čišćenje površine
ekrana/kućišta TV-a
Pre čišćenja, odspojite TV prijemnik iz
napajanja.
Kako biste sprečili propadanje materijala
ili premaza ekrana, uzmite u obzir
sledeće.
• Prašinu sa površine ekrana/ kućišta
obrišite mekom tkaninom. Tvrdokornu
nečistoću uklonite mekom krpom
umočenom u rastvor blagog deterdženta.
• Ne prskajte TV direktno vodom ili
deterdžentom. Mogli bi da iscure u donji
deo ekrana ili spoljne delove i uzrokuju
kvar.
• Nikada nemojte upotrebljavati abrazivne sunđere, kisela ili alkalna sredstva za
čišćenje, erozivni prašak ili zapaljiv rastvor poput alkohola, benzina, razređivača
ili insekticida. Upotreba takvih sredstava
ili duži kontakt sa gumom ili vinilom
može oštetiti površinu ekrana i kućište.
• Kako bi se osigurala pravilna ventilacija, preporučujemo da usisivačem povremeno očistite ventilacione otvore.
• Ukoliko je moguće podesiti nagib TV
prijemnika, budite pažljivi kako se ne bi
prevrnuo sa postolja.
Dodatna oprema
Držite dodatne komponente i svu
opremu koja emituje elektromagnetno
zračenje dalje od TV prijemnika. U
suprotnom može doći do deformacije
slike ili zvuka.
(Upozorenje o rukovanju daljinskim
upravljačem)
Napomene
• Prilikom umetanja baterija obratite
pažnju na ispravan polaritet.
• Ne koristite različite vrste baterija
istovremeno i ne mešajte stare i nove
baterije.
• Iskorišćene baterije odložite na
ekološki prihvatljiv način. Neke regije
imaju zakonski uređeno odlaganje
baterija. Upoznajte se sa lokalnim
propisima.
• Pažljivo rukujte daljinskim
upravljačem. Ne ispuštajte i ne gazite
po njemu i ne prolivajte nikakvu
tečnost po njemu.
• Ne ostavljajte daljinski upravljač
na mesta blizu izvora toplote, na
direktnu sunčevu svetlost ili u vlažnoj
prostoriji.

Operating the TV
• Displays the connected equipment list and selects the input source (page 13).
• In Text mode: Holds the current page.
Press to display the BRAVIA Sync Menu and then select connected HDMI
equipment from “HDMI Device Selection”.
The following options can be selected from BRAVIA Sync Menu:
“Device Control”: Use the “Device Control” menu to operate equipment that is
compatible with Control for HDMI. Select options from “Home (Menu)”,
“Options” and “Content List” to operate the equipment.
“Speakers”: Selects “TV Speakers” or “Audio System” to output the TV’s sound
from the TV speakers or connected audio equipment.
“TV Control”: Use the “TV Control” menu to operate the TV from the “HOME
(Menu)” or “Options” menu.
“Return to TV”: Selects this option to return to TV programme.
You can operate the BRAVIA Sync-compatible equipment that is connected to t he
TV. Some other buttons on the remote control may also operate BRAVIA Sync
equipment.
Press to switch between digital and analogue mode.
Changes the picture size. Press repeatedly to select the desired wide mode
(page 10).
Press to display the “Scene Select” menu. When you select the desired scene
option, the optimum sound and picture quality for selected scene are automatically
set. The options you can select may vary. Unavailable options are greyed out.
“Auto”: Delivers optimum picture and sound quality which is automatically set
according to input source. There may not be any effect depending on the connected
equipments.
“General”: Current user settings.
“Photo”: Delivers picture that reproduces the texture and colour of a printed
photo.
“Music”: Delivers dynamic and clear sound effects like at a concert.
“Cinema”: Delivers theatre-like picture and dynamic sound.
“Game”: Delivers the best picture and sound quality for fullest game playing
enjoyment.
“Graphics”: Delivers clearer detailed pictures to reduce fatigue for prolonged
viewing.
“Sports”: Delivers realistic picture with surround sound like in a stadium.
Press to display the Digital Electronic Programme Guide (EPG) (page 16).
• Returns to the previous screen of any displayed menu.
• When playing a photo/music/video file: Press to stop the playback (the display
returns to the file or thumbnail view).
Displays or cancels the menu.
• Selects channels. For channel numbers 10 and above, enter the next digit
quickly.
• In Text mode: Enters the three digit page number to select the page.
In Text mode: Displays Text broadcast.
Each time you press /, the display changes cyclically as follows:
Text t Text over the TV picture (mix mode) t No Text (exit the Text service)
Adjusts volume.
Press to mute the sound. Press again to restore the sound.
– TV standby
Operating the TV
• Displays the connected equipment list and selects the input source (page 13).
• In Text mode: Holds the current page.
Press to display the BRAVIA Sync Menu and then select connected HDMI
equipment from “HDMI Device Selection”.
The following options can be selected from BRAVIA Sync Menu:
“Device Control”: Use the “Device Control” menu to operate equipment that is
compatible with Control for HDMI. Select options from “Home (Menu)”,
“Options” and “Content List” to operate the equipment.
“Speakers”: Selects “TV Speakers” or “Audio System” to output the TV’s sound
from the TV speakers or connected audio equipment.
“TV Control”: Use the “TV Control” menu to operate the TV from the “HOME
(Menu)” or “Options” menu.
“Return to TV”: Selects this option to return to TV programme.
You can operate the BRAVIA Sync-compatible equipment that is connected to t he
TV. Some other buttons on the remote control may also operate BRAVIA Sync
equipment.
Press to switch between digital and analogue mode.
Changes the picture size. Press repeatedly to select the desired wide mode
(page 10).
Press to display the “Scene Select” menu. When you select the desired scene
option, the optimum sound and picture quality for selected scene are automatically
set. The options you can select may vary. Unavailable options are greyed out.
“Auto”: Delivers optimum picture and sound quality which is automatically set
according to input source. There may not be any effect depending on the connected
equipments.
“General”: Current user settings.
“Photo”: Delivers picture that reproduces the texture and colour of a printed
photo.
“Music”: Delivers dynamic and clear sound effects like at a concert.
“Cinema”: Delivers theatre-like picture and dynamic sound.
“Game”: Delivers the best picture and sound quality for fullest game playing
enjoyment.
“Graphics”: Delivers clearer detailed pictures to reduce fatigue for prolonged
viewing.
“Sports”: Delivers realistic picture with surround sound like in a stadium.
Press to display the Digital Electronic Programme Guide (EPG) (page 16).
• Returns to the previous screen of any displayed menu.
• When playing a photo/music/video file: Press to stop the playback (the display
returns to the file or thumbnail view).
Displays or cancels the menu.
• Selects channels. For channel numbers 10 and above, enter the next digit
quickly.
• In Text mode: Enters the three digit page number to select the page.
In Text mode: Displays Text broadcast.
Each time you press /, the display changes cyclically as follows:
Text t Text over the TV picture (mix mode) t No Text (exit the Text service)
Adjusts volume.
– Mute
Operating the TV
• Displays the connected equipment list and selects the input source (page 13).
• In Text mode: Holds the current page.
Press to display the BRAVIA Sync Menu and then select connected HDMI
equipment from “HDMI Device Selection”.
The following options can be selected from BRAVIA Sync Menu:
“Device Control”: Use the “Device Control” menu to operate equipment that is
compatible with Control for HDMI. Select options from “Home (Menu)”,
“Options” and “Content List” to operate the equipment.
“Speakers”: Selects “TV Speakers” or “Audio System” to output the TV’s sound
from the TV speakers or connected audio equipment.
“TV Control”: Use the “TV Control” menu to operate the TV from the “HOME
(Menu)” or “Options” menu.
“Return to TV”: Selects this option to return to TV programme.
You can operate the BRAVIA Sync-compatible equipment that is connected to t he
TV. Some other buttons on the remote control may also operate BRAVIA Sync
equipment.
Press to switch between digital and analogue mode.
Changes the picture size. Press repeatedly to select the desired wide mode
(page 10).
Press to display the “Scene Select” menu. When you select the desired scene
option, the optimum sound and picture quality for selected scene are automatically
set. The options you can select may vary. Unavailable options are greyed out.
“Auto”: Delivers optimum picture and sound quality which is automatically set
according to input source. There may not be any effect depending on the connected
equipments.
“General”: Current user settings.
“Photo”: Delivers picture that reproduces the texture and colour of a printed
photo.
“Music”: Delivers dynamic and clear sound effects like at a concert.
“Cinema”: Delivers theatre-like picture and dynamic sound.
“Game”: Delivers the best picture and sound quality for fullest game playing
enjoyment.
“Graphics”: Delivers clearer detailed pictures to reduce fatigue for prolonged
viewing.
“Sports”: Delivers realistic picture with surround sound like in a stadium.
Press to display the Digital Electronic Programme Guide (EPG) (page 16).
• Returns to the previous screen of any displayed menu.
• When playing a photo/music/video file: Press to stop the playback (the display
returns to the file or thumbnail view).
Displays or cancels the menu.
• Selects channels. For channel numbers 10 and above, enter the next digit
quickly.
• In Text mode: Enters the three digit page number to select the page.
In Text mode: Displays Text broadcast.
Each time you press /, the display changes cyclically as follows:
Text t Text over the TV picture (mix mode) t No Text (exit the Text service)
+/– – Volume
Operating the TV
Text over the TV picture (mix mode) t No Text (exit the Text service)
Operating the TV
Text over the TV picture (mix mode) t No Text (exit the Text service)
Operating the TV
• Displays the connected equipment list and selects the input source (page 13).
• In Text mode: Holds the current page.
Press to display the BRAVIA Sync Menu and then select connected HDMI
equipment from “HDMI Device Selection”.
The following options can be selected from BRAVIA Sync Menu:
“Device Control”: Use the “Device Control” menu to operate equipment that is
compatible with Control for HDMI. Select options from “Home (Menu)”,
“Options” and “Content List” to operate the equipment.
“Speakers”: Selects “TV Speakers” or “Audio System” to output the TV’s sound
from the TV speakers or connected audio equipment.
“TV Control”: Use the “TV Control” menu to operate the TV from the “HOME
(Menu)” or “Options” menu.
“Return to TV”: Selects this option to return to TV programme.
You can operate the BRAVIA Sync-compatible equipment that is connected to t he
TV. Some other buttons on the remote control may also operate BRAVIA Sync
equipment.
Press to switch between digital and analogue mode.
Changes the picture size. Press repeatedly to select the desired wide mode
(page 10).
Press to display the “Scene Select” menu. When you select the desired scene
option, the optimum sound and picture quality for selected scene are automatically
set. The options you can select may vary. Unavailable options are greyed out.
“Auto”: Delivers optimum picture and sound quality which is automatically set
according to input source. There may not be any effect depending on the connected
equipments.
“General”: Current user settings.
“Photo”: Delivers picture that reproduces the texture and colour of a printed
photo.
“Music”: Delivers dynamic and clear sound effects like at a concert.
“Cinema”: Delivers theatre-like picture and dynamic sound.
“Game”: Delivers the best picture and sound quality for fullest game playing
enjoyment.
“Graphics”: Delivers clearer detailed pictures to reduce fatigue for prolonged
viewing.
“Sports”: Delivers realistic picture with surround sound like in a stadium.
Press to display the Digital Electronic Programme Guide (EPG) (page 16).
• Returns to the previous screen of any displayed menu.
• When playing a photo/music/video file: Press to stop the playback (the display
returns to the file or thumbnail view).
Displays or cancels the menu.
• Selects channels. For channel numbers 10 and above, enter the next digit
quickly.
• In Text mode: Enters the three digit page number to select the page.
– Text
Operating the TV
• Displays the connected equipment list and selects the input source (page 13).
• In Text mode: Holds the current page.
Press to display the BRAVIA Sync Menu and then select connected HDMI
equipment from “HDMI Device Selection”.
The following options can be selected from BRAVIA Sync Menu:
“Device Control”: Use the “Device Control” menu to operate equipment that is
compatible with Control for HDMI. Select options from “Home (Menu)”,
“Options” and “Content List” to operate the equipment.
“Speakers”: Selects “TV Speakers” or “Audio System” to output the TV’s sound
from the TV speakers or connected audio equipment.
“TV Control”: Use the “TV Control” menu to operate the TV from the “HOME
(Menu)” or “Options” menu.
“Return to TV”: Selects this option to return to TV programme.
You can operate the BRAVIA Sync-compatible equipment that is connected to t he
TV. Some other buttons on the remote control may also operate BRAVIA Sync
equipment.
Press to switch between digital and analogue mode.
Changes the picture size. Press repeatedly to select the desired wide mode
(page 10).
Press to display the “Scene Select” menu. When you select the desired scene
option, the optimum sound and picture quality for selected scene are automatically
set. The options you can select may vary. Unavailable options are greyed out.
“Auto”: Delivers optimum picture and sound quality which is automatically set
according to input source. There may not be any effect depending on the connected
equipments.
“General”: Current user settings.
“Photo”: Delivers picture that reproduces the texture and colour of a printed
photo.
“Music”: Delivers dynamic and clear sound effects like at a concert.
“Cinema”: Delivers theatre-like picture and dynamic sound.
“Game”: Delivers the best picture and sound quality for fullest game playing
enjoyment.
“Graphics”: Delivers clearer detailed pictures to reduce fatigue for prolonged
viewing.
“Sports”: Delivers realistic picture with surround sound like in a stadium.
Operating the TV
• Displays the connected equipment list and selects the input source (page 13).
• In Text mode: Holds the current page.
Press to display the BRAVIA Sync Menu and then select connected HDMI
equipment from “HDMI Device Selection”.
The following options can be selected from BRAVIA Sync Menu:
“Device Control”: Use the “Device Control” menu to operate equipment that is
compatible with Control for HDMI. Select options from “Home (Menu)”,
“Options” and “Content List” to operate the equipment.
“Speakers”: Selects “TV Speakers” or “Audio System” to output the TV’s sound
from the TV speakers or connected audio equipment.
“TV Control”: Use the “TV Control” menu to operate the TV from the “HOME
(Menu)” or “Options” menu.
“Return to TV”: Selects this option to return to TV programme.
You can operate the BRAVIA Sync-compatible equipment that is connected to t he
TV. Some other buttons on the remote control may also operate BRAVIA Sync
equipment.
Press to switch between digital and analogue mode.
Operating the TV
• Displays the connected equipment list and selects the input source (page 13).
• In Text mode: Holds the current page.
Press to display the BRAVIA Sync Menu and then select connected HDMI
equipment from “HDMI Device Selection”.
The following options can be selected from BRAVIA Sync Menu:
“Device Control”: Use the “Device Control” menu to operate equipment that is
compatible with Control for HDMI. Select options from “Home (Menu)”,
“Options” and “Content List” to operate the equipment.
“Speakers”: Selects “TV Speakers” or “Audio System” to output the TV’s sound
from the TV speakers or connected audio equipment.
“TV Control”: Use the “TV Control” menu to operate the TV from the “HOME
(Menu)” or “Options” menu.
“Return to TV”: Selects this option to return to TV programme.
Upotreba TV-a
Operating the TV
Operating the TV
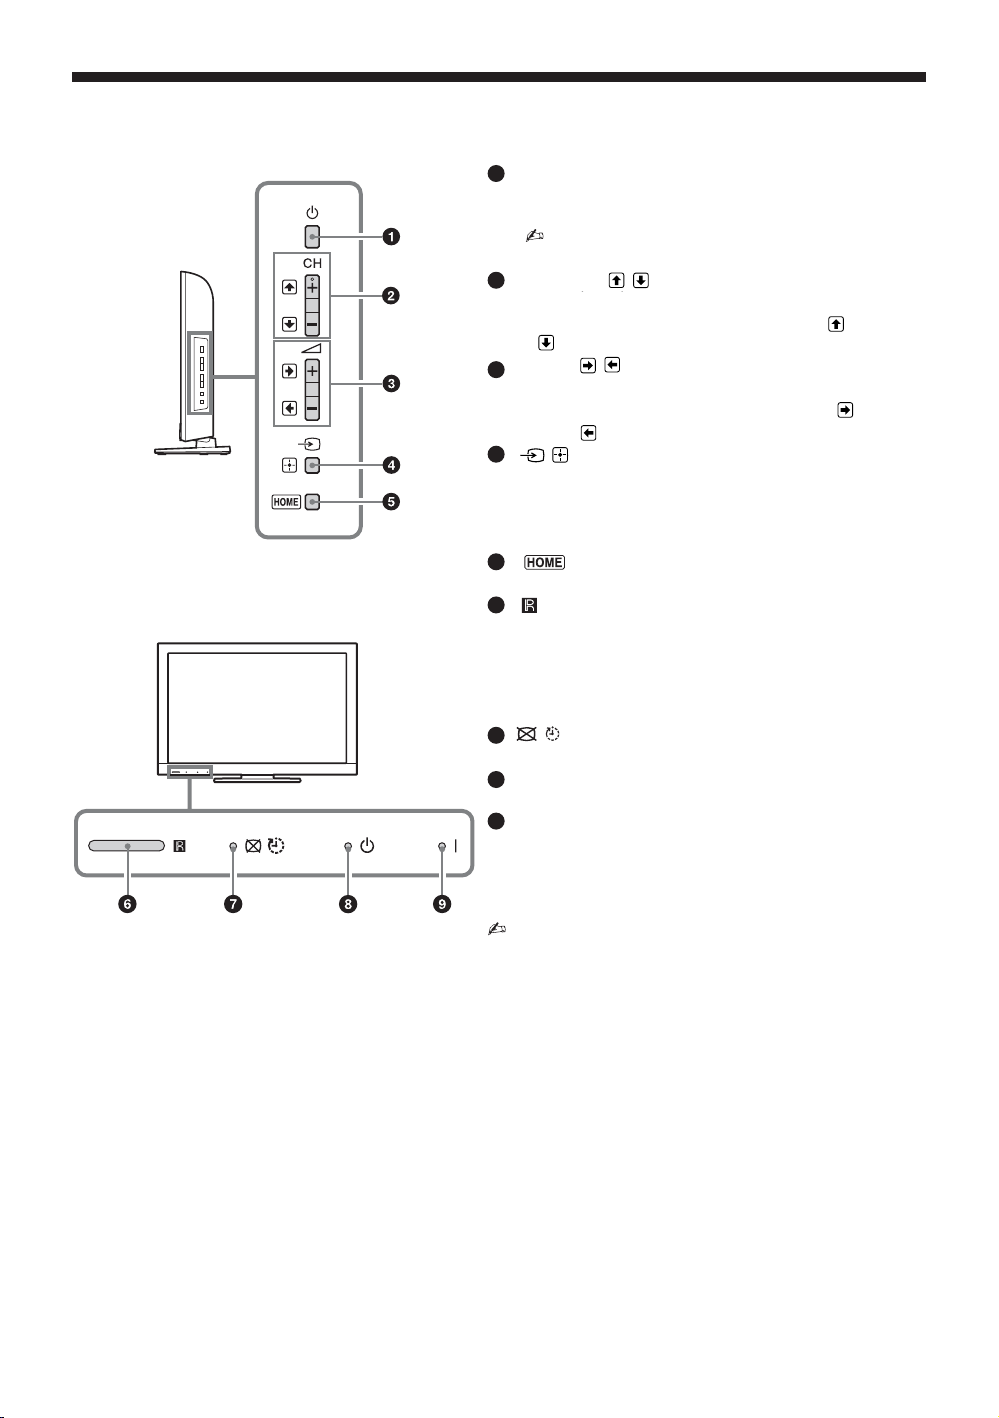
Overview of the remote
1 / – Input select / Text hold
• Displays the connected equipment list and selects the input source (page 13).
• In Text mode: Holds the current page.
2 SYNC MENU
Press to display the BRAVIA Sync Menu and then select connected HDMI
equipment from “HDMI Device Selection”.
The following options can be selected from BRAVIA Sync Menu:
“Device Control”: Use the “Device Control” menu to operate equipment that is
compatible with Control for HDMI. Select options from “Home (Menu)”,
“Options” and “Content List” to operate the equipment.
“Speakers”: Selects “TV Speakers” or “Audio System” to output the TV’s sound
from the TV speakers or connected audio equipment.
“TV Control”: Use the “TV Control” menu to operate the TV from the “HOME
(Menu)” or “Options” menu.
“Return to TV”: Selects this option to return to TV programme.
3 N/X/x/m/M/./>
You can operate the BRAVIA Sync-compatible equipment that is connected to t he
TV. Some other buttons on the remote control may also operate BRAVIA Sync
equipment.
4 DIGITAL/ANALOG
Press to switch between digital and analogue mode.
5 – Wide Mode
Changes the picture size. Press repeatedly to select the desired wide mode
(page 10).
6 SCENE – Scene Select mode
Press to display the “Scene Select” menu. When you select the desired scene
option, the optimum sound and picture quality for selected scene are automatically
set. The options you can select may vary. Unavailable options are greyed out.
“Auto”: Delivers optimum picture and sound quality which is automatically set
according to input source. There may not be any effect depending on the connected
equipments.
“General”: Current user settings.
“Photo”: Delivers picture that reproduces the texture and colour of a printed
photo.
“Music”: Delivers dynamic and clear sound effects like at a concert.
“Cinema”: Delivers theatre-like picture and dynamic sound.
“Game”: Delivers the best picture and sound quality for fullest game playing
enjoyment.
buttons have tactile dots. Use
the tactile dots as references
Operating the TV
1 / – Input select / Text hold
• Displays the connected equipment list and selects the input source (page 13).
• In Text mode: Holds the current page.
2 SYNC MENU
Press to display the BRAVIA Sync Menu and then select connected HDMI
equipment from “HDMI Device Selection”.
The following options can be selected from BRAVIA Sync Menu:
“Device Control”: Use the “Device Control” menu to operate equipment that is
compatible with Control for HDMI. Select options from “Home (Menu)”,
“Options” and “Content List” to operate the equipment.
“Speakers”: Selects “TV Speakers” or “Audio System” to output the TV’s sound
from the TV speakers or connected audio equipment.
“TV Control”: Use the “TV Control” menu to operate the TV from the “HOME
(Menu)” or “Options” menu.
“Return to TV”: Selects this option to return to TV programme.
3 N/X/x/m/M/./>
You can operate the BRAVIA Sync-compatible equipment that is connected to t he
TV. Some other buttons on the remote control may also operate BRAVIA Sync
equipment.
4 DIGITAL/ANALOG
Press to switch between digital and analogue mode.
5 – Wide Mode
Changes the picture size. Press repeatedly to select the desired wide mode
(page 10).
6 SCENE – Scene Select mode
Press to display the “Scene Select” menu. When you select the desired scene
option, the optimum sound and picture quality for selected scene are automatically
set. The options you can select may vary. Unavailable options are greyed out.
“Auto”: Delivers optimum picture and sound quality which is automatically set
according to input source. There may not be any effect depending on the connected
equipments.
“General”: Current user settings.
“Photo”: Delivers picture that reproduces the texture and colour of a printed
photo.
,
Pregled daljinskog upravljača
– Odabir ulaza / Zadržavanje teksta
1
• Prikazuje listu spojene opreme i bira izvor ulaza (str. 13).
• U teletekst modu: Zaustavljanje odabrane stranice teleteksta.
2
SYNC MENU
Pritisnite za prikaz menija BRAVIA Sync, a onda izaberite spojenu HDMI opremu iz
“HDMI Device Selection”.
Sledeće opcije mogu biti izabrane iz menija BRAVIA Sync:
• Brojčana tipka 5, tipke,
z • The number 5, N,
PROG + and AUDIO
PROG + i AUDIO
imaju ispupčenja. Ova
ispupčenja služe kao refer-
when operating the TV.
entne tačke tokom upotrebe
TV-a.
N
“Device Control”: Koristite “Device Control” meni da upravljate opremom koja je kompatibilna sa Control for HDMI. Izaberite opcije iz “Home (Menu)”,
“Options” i “Content List” za upravljanje opremom.
“Speakers”: Bira “TV Speakers” ili “Audio System” za izlaz zvuka TV-a iz zvučnika TV-a
ili spojene audio opreme.
“TV Control”: Koristite meni “TV Control” za upravljanje TV-om sa “HOME
(Menijem)” ili “Options” menijem.
“Return to TV”: Bira ovu opciju za povratak na TV program.
3
N/X/x/m/M/./>
Možete upravljati BRAVIA Sync kompatibilnom opremom koja je spojena na TV. Neke
druge tipke na daljinskom upravljaču mogu takođe upravljati BRAVIA Sync opremom.
4
DIGITAL/ANALOG
Pritisnite za promenu između digitalnog i analognog moda.
– Wide Mode
5
Menja veličinu slike. Pritisnite više puta za odabir željenog moda širokog prikaza (str. 10).
6
SCENE – Mod odabira scene
Pritisnite za prikaz menija “Scene Select”. Kad izaberete željenu opciju scene, optimalni
zvuk i kvalitet slike za odabranu scenu su automatski podešeni. Opcije koje možete
izabrati mogu se razlikovati. Nedostupne opcije su u sivoj boji.
“Auto”: Pruža optimalan kvalitet slike i zvuka koji se automatski podešava prema izvoru
signala. Možda neće biti nikakvih efekata u zavisnosti od povezane opreme.
“General”: Podešenja trenutnog korisnika.
“Photo”: Pruža sliku koja reprodukuje teksturu i boju štampane fotograje.
“Music”: Pruža dinamičan i jasan zvuk efekata kao na koncertu.
“Cinema”: Pruža sliku i dinamičan zvuk nalik pozorišnom.
“Game”: Pruža najbolji kvalitet slike i zvuka za uživanje u igranju igrica.
“Graphics”: Pruža jasnije detaljne slike da smanji zamor od dužeg gledanja.
“Sports”: Pruža realnu sliku sa surround zvukom kao na stadionu.
GUIDE (EPG)
7
Pritisnite za prikaz digitalnog elektronskog programskog vodiča (EPG) (str. 16).
8
RETURN
• Vraća na prethodnu stranicu prikazanog menija.
• Kod reprodukcije fotograje/muzike/video snimka: Pritisnite za zaustavljanje reprodukcije (prikaz se vraća na datoteke ili prikaz u sličicama).
9
HOME
Prikazuje ili otkazuje meni.
10
Brojčane tipke
• Odabir kanala. Za kanale preko 10, unesite drugu i treću cifru vrlo brzo.
• U teletekst modu: Unos trocifrenog broja stranice za odabir stranice.
11
– Teletekst
/
U teletekst modu: Prikaz emitovanja teleteksta.
Svaki put kad pritisnete prikaz se menja na sledeći način:
Teletekst Teletekst preko slike na TV-u (mix mode) Bez teleteksta (izlaz iz teletekst
usluge)
2
12
Glasnoća
Podešavanje glasnoće.
– Isključenje zvuka
13
Pritisnite za isključenje zvuka. Pritisnite opet za uključenje zvuka.
14
– Pripravno stanje TV-a
"/1
Pritisnite za uključenje TV-a i isključenje u pripravno stanje.
15
AUDIO – Dual Sound (str. 23)
t
%
/
Operating the TV
t
Nastavlja se
SRP
9

To change the Wide Mode
For TV, Video, Component or HDMI (except
PC input)
PC or HDMI PC Input (PC timing)
qh / – Info / Text reveal
• Displays information. Press once to display information about the programme/
input you are viewing. Press again to remove the display from the screen.
• In Text mode: Reveals hidden information (e.g. answers to a quiz).
qjF/f/G/g/ – Item select / Enter
• Selects or adjusts items.
• Confirms selected items.
• When playing a photo file: Press G to select the previous file. Press g to select
the next file.
When playing a music/video file: Press to pause/start the playback. Press and
hold G/g to fast forward/fast reverse, then release the button at the point where
you want to resume playback.
qk OPTIONS
Press to display a list that contains shortcuts to some setting menus.
The listed options vary depending on the current input and content.
ql Coloured buttons
When the coloured buttons are available, an operation guide appears on the screen.
w; – Subtitle setting
Press to change the subtitle language (page 27) (in digital mode only).
wa PROG/CH +/–/ /
• Selects the next (+) or previous (–) channel.
• In Text mode: Selects the next ( ) or previous ( ) page.
ws – Previous channel
Returns to the previous channel or input watched (for more than 15 seconds).
– Info / Otkrivanje teksta
• Displays information. Press once to display information about the programme/
input you are viewing. Press again to remove the display from the screen.
• In Text mode: Reveals hidden information (e.g. answers to a quiz).
F/f/G/g
/ – Item select / Enter
• Selects or adjusts items.
• Confirms selected items.
• When playing a photo file: Press G to select the previous file. Press g to select
the next file.
When playing a music/video file: Press to pause/start the playback. Press and
hold G/g to fast forward/fast reverse, then release the button at the point where
you want to resume playback.
Press to display a list that contains shortcuts to some setting menus.
The listed options vary depending on the current input and content.
When the coloured buttons are available, an operation guide appears on the screen.
Press to change the subtitle language (page 27) (in digital mode only).
• Selects the next (+) or previous (–) channel.
• In Text mode: Selects the next ( ) or previous ( ) page.
• Displays information. Press once to display information about the programme/
input you are viewing. Press again to remove the display from the screen.
• In Text mode: Reveals hidden information (e.g. answers to a quiz).
/ – Item select / Enter
• Displays information. Press once to display information about the programme/
input you are viewing. Press again to remove the display from the screen.
• In Text mode: Reveals hidden information (e.g. answers to a quiz).
F/f/G/g
/ – Item select / Enter
• Selects or adjusts items.
• Confirms selected items.
• When playing a photo file: Press G to select the previous file. Press g to select
the next file.
When playing a music/video file: Press to pause/start the playback. Press and
hold G/g to fast forward/fast reverse, then release the button at the point where
you want to resume playback.
Press to display a list that contains shortcuts to some setting menus.
The listed options vary depending on the current input and content.
When the coloured buttons are available, an operation guide appears on the screen.
16
• Prikaz informacija. Pritisnite jednom za prikaz informacija o programu/
ulazu koji gledate. Pritisnite opet za skidanje prikaza sa ekrana.
• U teletekst modu: Otkrivanje skrivenih informacija (npr. odgovori u kvizu).
– Odabir stavke / Enter
17
F/f/G/g
• Bira ili podešava stavke.
• Potvrđuje odabranu stavku.
• Pri reprodukciji datoteke sa fotograjama: Pritisnite G za odabir prethodne datoteke.
Pritisnite g za odabir naredne datoteke.
Pri reprodukciji muzičke/video datoteke: Pritisnite za pauzu/pokretanje reprodukcije.
Pritisnite i zadržite G/g za brzo premotavanje unapred/unazad, zatim otpustite dugme na
mestu odakle želite da nastavite reprodukciju.
18
OPTIONS
Pritisnite za prikaz liste koja sadrži prečice do nekih menija podešenja.
Navedene opcije se razlikuju u zavisnosti od trenutnog ulaza i sadržaja.
19
Brojčane tipke
Kad su brojčane tipke dostupne, na ekranu se pojavljuje vodič za upotrebu.
– Podešenje prevoda
20
Pritisnite za promenu jezika prevoda (str. 27) (samo u digitalnom modu).
21
PROG/CH
• Odabir sledećeg (+) ili prethodnog (–) kanala.
• U teletekst modu: Odabir sledeće ili prethodne stranice.
– Prethodni kanal
22
Povratak na prethodni gledani kanal ili ulaz (na više od 15 sekundi).
Za promenu moda širokog prikaza slike
Za TV, Video, Component ili HDMI (sem za PC
ulaz)
Wide Zoom* Enlarges the centre portion of the
Uvećava centralni deo slike. Ivice sa leve i
desne strane slike su razvučene da popune
picture. The left and right edges of
ekran
16:9 formata.
the picture are stretched to fill the
16:9 screen.
Normal Displays the 4:3 picture in its original
Prikazuje slike formata 4:3 u svojoj originalnoj veličini. Linije sa strane su prikazane da
size. Side bars are shown to fill the
popune16:9 ekran.
16:9 screen.
Full Stretches the 4:3 picture horizontally
Razvlači sliku 4:3 formata horizontalno kako
to fill the 16:9 screen.
bi popunio 16:9 ekran.
PC ili HDMI PC ulaz (PC timing)
Normal Displays the picture in its original
Prikaz slike u svojoj originalnoj veličini
piksela. Linije su prikazane na vrhu, dnu i
pixel size. Bars are shown at the top,
obe strane male slike.
bottom, and both sides for small
picture.
Full 1 Stretches the original picture to fill
Razvlači originalnu sliku da popuni ekran
vertikalno, zadržavajući njen originalni
the screen vertically, keeping its
razmer horizontalno-do-vertikalnog.
original horizontal-to-vertical aspect
ratio.
Full 2 Stretches the Full 1 picture
Razvlači Full 1 sliku horizontalno da popuni
horizontally to fill the 16:9 screen.
16:9 ekran.
Zoom* Displays cinemascopic (letter box
Prikaz cinemascopic (letter box format) slike
format) broadcasts in the correct
u ispravnim proporcijama.
proportions.
14:9* Displays 14:9 broadcasts in the
Prikaz slike formata 14:9 u ispravnim
proporcijama. Na ekranu se vide i crne
correct proportions. As a result, black
pruge.
border areas are visible on the screen.
* Gornji i donji delovi slike mogu da budu isečeni.
* Parts of the top and bottom of the picture may be cut
off.
• You cannot select “Normal” or “14:9” for HD signal
Ne možete izabrati “Normal” ili “14:9” za
source pictures.
HD signal izvornih slika.
10
SRP
Neke opcije možda neće biti dostupne
• Some options may not be available depending on the
PC input signal.
u zavisnosti od PC ulaznog signala.
Operating the TV
Press to turn the TV on or to switch to standby mode.
• To disconnect the TV from the AC power
completely, pull the plug from the AC power
outlet.
• Selects the next (+) or previous (–) channel.
• In TV menu: Moves through the options up ( ) or
down ( ).
• Increases (+) or decreases (–) the volume.
• In TV menu: Moves through the options right ( )
or left ( ).
• Displays the connected equipment list and selects
the input source (page 13).
• In TV menu: Selects the menu or option, and
confirms the setting.
Displays or cancels the menu.
Receives IR signals from the remote.
Senses room light level and adjusts the screen
brightness accordingly. Do not put anything over the
sensor, doing so may affect its function.
Operating the TV
Press to turn the TV on or to switch to standby mode.
• To disconnect the TV from the AC power
completely, pull the plug from the AC power
outlet.
• Selects the next (+) or previous (–) channel.
• In TV menu: Moves through the options up ( ) or
down ( ).
Press to turn the TV on or to switch to standby mode.
• To disconnect the TV from the AC power
completely, pull the plug from the AC power
outlet.
– Power
11
GB
Operating the TV
Overview of the TV buttons and indicators
1 1 – Power
Press to turn the TV on or to switch to standby mode.
• To disconnect the TV from the AC power
completely, pull the plug from the AC power
outlet.
2 CH +/–/ /
• Selects the next (+) or previous (–) channel.
• In TV menu: Moves through the options up ( ) or
down ( ).
3 2 +/–/ /
• Increases (+) or decreases (–) the volume.
• In TV menu: Moves through the options right ( )
or left ( ).
4 / – Input select / Enter
• Displays the connected equipment list and selects
the input source (page 13).
• In TV menu: Selects the menu or option, and
confirms the setting.
5
Displays or cancels the menu.
6 – Remote sensor / Light sensor
Receives IR signals from the remote.
Senses room light level and adjusts the screen
brightness accordingly. Do not put anything over the
sensor, doing so may affect its function.
7 / – Picture Off / Timer indicator
Lights up in green when you select “Picture Off”
(page 30).
8 1 – Standby indicator
Lights up in red when the TV is in standby mode.
9 " – Power indicator
• Lights up in green when the TV is turned on.
• Flashes while the remote is being operated.
• Make sure that the TV is completely turned off before
unplugging the AC power cord. Unplugging the AC
power cord while the TV is turned on may cause the
indicator to remain lit or may cause the TV to
malfunction.
z • The CH + button has a tactile dot. Use it as a
reference when operating the TV.
Operating the TV
• To disconnect the TV from the AC power
completely, pull the plug from the AC power
outlet.
down ( ).
or left ( ).
Operating the TV
Press to turn the TV on or to switch to standby mode.
• To disconnect the TV from the AC power
completely, pull the plug from the AC power
outlet.
• Selects the next (+) or previous (–) channel.
• In TV menu: Moves through the options up ( ) or
down ( ).
• Increases (+) or decreases (–) the volume.
• In TV menu: Moves through the options right ( )
or left ( ).
• Displays the connected equipment list and selects
the input source (page 13).
• In TV menu: Selects the menu or option, and
confirms the setting.
Displays or cancels the menu.
– Power
Operating the TV
1 1 – Power
Press to turn the TV on or to switch to standby mode.
• To disconnect the TV from the AC power
completely, pull the plug from the AC power
outlet.
2 CH +/–/ /
• Selects the next (+) or previous (–) channel.
• In TV menu: Moves through the options up ( ) or
down ( ).
3 2 +/–/ /
• Increases (+) or decreases (–) the volume.
• In TV menu: Moves through the options right ( )
or left ( ).
4 / – Input select / Enter
• Displays the connected equipment list and selects
the input source (page 13).
• In TV menu: Selects the menu or option, and
confirms the setting.
5
Displays or cancels the menu.
6 – Remote sensor / Light sensor
Receives IR signals from the remote.
Senses room light level and adjusts the screen
brightness accordingly. Do not put anything over the
sensor, doing so may affect its function.
7 / – Picture Off / Timer indicator
Lights up in green when you select “Picture Off”
(page 30).
8 1 – Standby indicator
Lights up in red when the TV is in standby mode.
9 " – Power indicator
• Lights up in green when the TV is turned on.
• Flashes while the remote is being operated.
• Make sure that the TV is completely turned off before
unplugging the AC power cord. Unplugging the AC
power cord while the TV is turned on may cause the
indicator to remain lit or may cause the TV to
malfunction.
• The CH + button has a tactile dot. Use it as a
Press to turn the TV on or to switch to standby mode.
• To disconnect the TV from the AC power
Pregled tipki TV-a i indikatora
1
– Napajanje
1
Pritisnite da uključite TV ili da prebacite na pripravno
stanje.
• Kako biste u potpunosti isključili TV prijem nik, odspojite utikač iz utičnice.
2
PROG
• Bira sledeći (+) ili prethodni (–) kanal.
• U TV meniju: Kreće se kroz opcije gore ili dole
2 +/–/ /
3
• Povećava (+) ili smanjuje (–) glasnoću.
• U TV meniju: Kreće se kroz opcije desno
ili levo
4
– Odabir ulaza / Enter
• Prikazuje listu spojene opreme i bira izvor ulaza (str.
13).
• U TV meniju: Bira meni ili opciju i potvrđuje
podešenje.
5
Prikazuje ili otkazuje prikaz menija.
6
– Senzor daljinskog upravljača / Senzor
svetla
Prima infracrveni signal sa daljinskog upravljača.
Opaža nivo osvetljenosti prostorije i u skladu sa tim
prilagođava svetlinu ekrana. Ne pokrivajte senzor jer
mu time možete poremetiti funkciju.
7
– Isključenje slike / Indikator tajmera
Zasvetli zeleno kada izaberete “Picture Off” (str. 30).
– Indikator pripravnog stanja
8
1
Svetli crveno kad je TV prijemnik u pripravnom stanju.
9
I – Indikator napajanja
• Svetli zeleno dok je TV prijemnik uključen.
• Treperi dok se koristi daljinski upravljač.
• Proverite da li je TV prijemnik potpuno isključen pre
odspajanja kabla napajanja. Odspajanje kabla napajanja
dok je TV uključen može dovesti do toga da indikator
ostane uključen ili do kvara TV-a.
z
• Tipka CH + ima ispupčenje. Koristite je kao referentnu
tačku dok upravljate TV prijemnikom.
11
Operating the TV
SRP

Using Optional Equipment
Connecting optional equipment
You can connect a wide range of optional equipment to your TV.
Digital still
camera
PC
(HDMI-
output)
Home
theatre
system
Blu-ray
Disc
player
Video game
equipment
DVD player
with
component
output
Camcorder
PC
DVD
player
VCR
S VHS/
Hi8/DVC
camcorder
Audio
system
DVD
player
with
HDMI
output
Camcorder
USB storage
media
Hi-Fi audio
equipment
Headphones
Upotreba dodatne opreme
Spajanje dodatne opreme
Možete spojiti širok spektar dodatne opreme na vaš TV prijemnik.
DVD
Kućni
bioskop
Audio
sistem
Kamkorder
uređaj sa
HDMI
izlazom
PC
(HDMIizlaz)
Blu-ray
Disk
plejer
Hi-Fi audio oprema sa
optičkim audio ulazom
PC
Hi-Fi audio
oprema
DVD uređaj
sa komponentnim
izlazom
Digitalna video
kamera
Kamkorder
USB uređaj
S VHS/ Hi8/DVC
kamkorder
Oprema za video
igrice
DVD
plejer
Video rekorder
Slušalice
12
SRP
 Loading...