Sony JIG-ST9_NT3, JIG-XT3, JIG-CT780, JIG-CT380 Operating Instruction

Page 1

SONY

Home Theatre System

Operating Instructions GB
Mode d'emploi FR

  • -
  • -
  • -

JIG-ST9 NT3/JIG-XT3/JIG-CT780/JIG-CT380

Page 2

WARNING

Do not install the appliance in a

confined space, such as a bookcase or built-in cabinet.

To reduce the risk of fire, do not cover the ventilation opening of the appliance with newspapers, tablecloths, curtains, etc.

Do not expose the appliance to naked flame sources (for example, lighted candles).

To reduce the risk of fire or electric shock, do not expose this appliance to dripping or splashing, and do not place objects filled with liquids, such as vases, on the appliance.

To prevent injury, this apparatus must be securely placed on the cabinet in accordance with the installation instructions.

When unpacking or handling the system, be sure to handle the system with two or more persons. Dropping the system may cause personal injury and/or property damage. Indoor use only.

On power sources

  • The unit is not disconnected from the mains as long as it is connected to the AC outlet, even if the unit itself has been turned off.
  • As the main plug is used to disconnect the unit from the mains, connect the unit to an easily accessible AC outlet. Should you notice an abnormality in the unit, disconnect the main plug from the AC outlet immediately.
Recommended cables

Properly shielded and grounded cables and connectors must be used for connection to host computers and/or peripherals.

CAUTION

The use of optical instruments with this product will increase eye hazard. As the laser beam used in this Home Theatre System is harmful to eyes, do not attempt to disassemble the cabinet. Refer servicing to qualified personnel only.

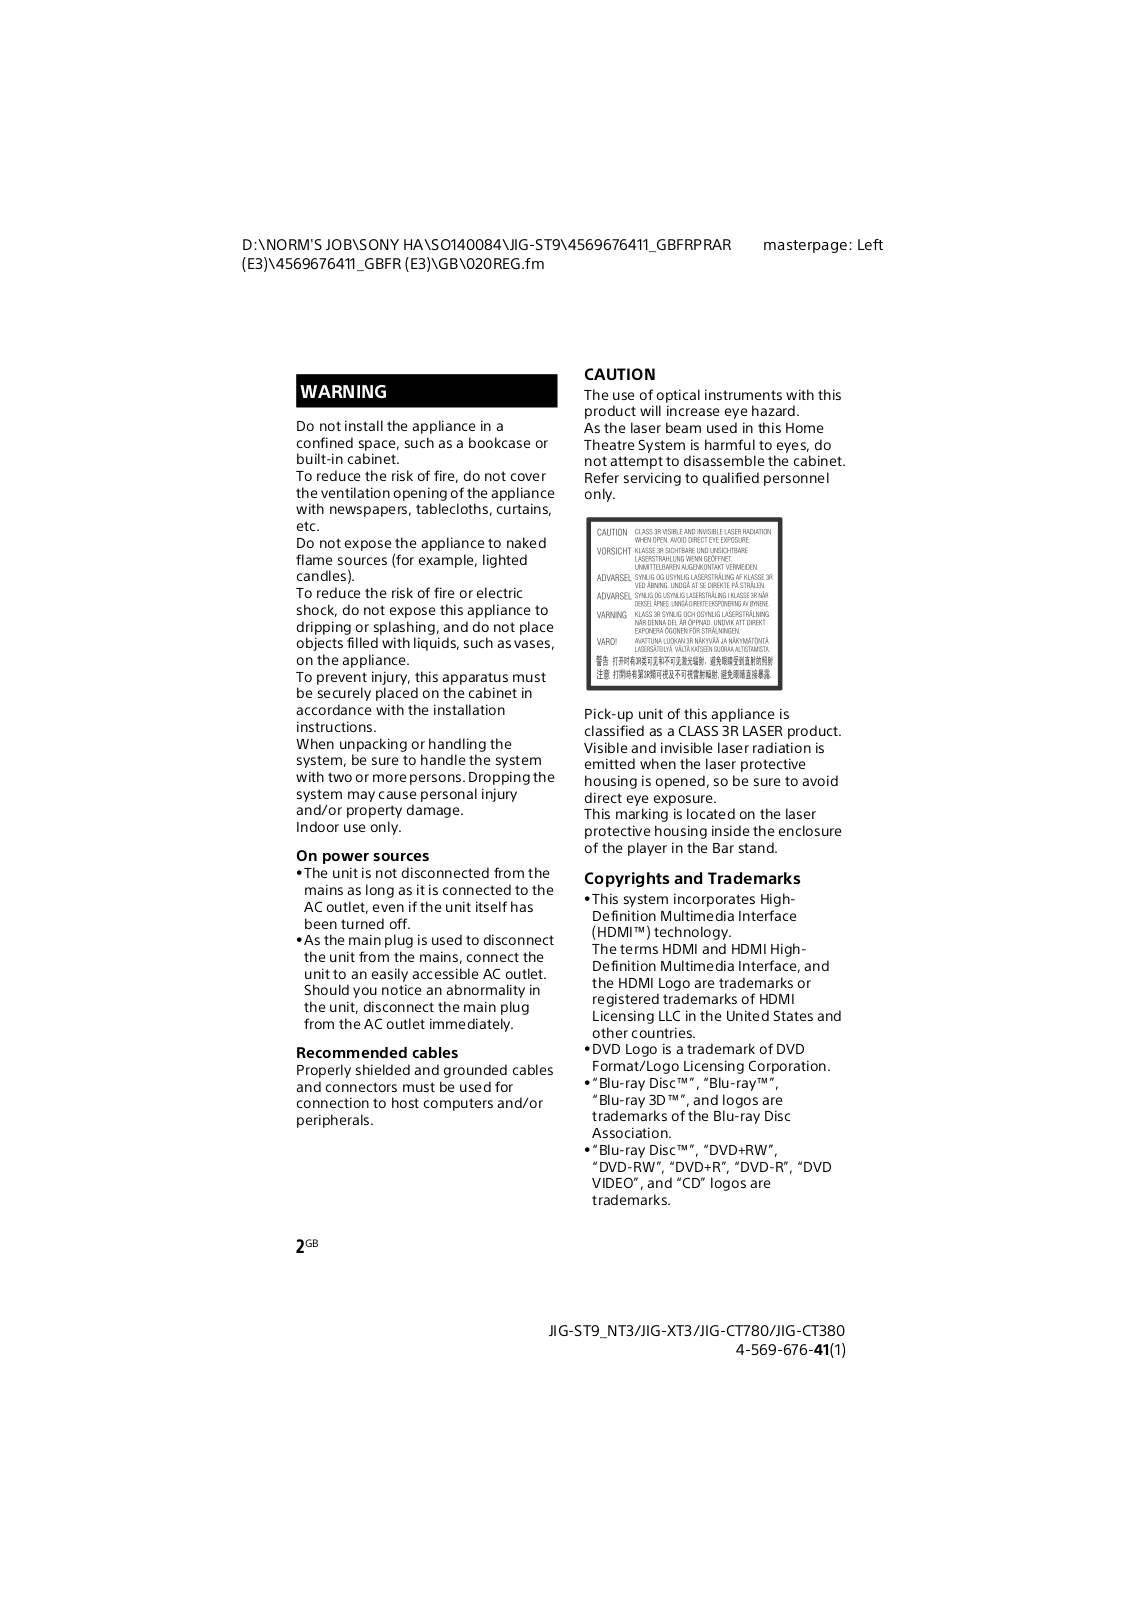
Pick-up unit of this appliance is classified as a CLASS 3R LASER product. Visible and invisible laser radiation is emitted when the laser protective housing is opened, so be sure to avoid direct eye exposure.

This marking is located on the laser protective housing inside the enclosure of the player in the Bar stand.

Copyrights and Trademarks

This system incorporates High-Definition Multimedia Interface (HDMI) technology. The terms HDMI and HDMI High-Definition Multimedia Interface, and the HDMI Logo are trademarks or registered trademarks of HDMI Licensing LLC in the United States and other countries.

  • DVD Logo is a trademark of DVD Format/Logo Licensing Corporation. • "Blu-ray Disc™" "Blu-ray™"
  • "Blu-ray Disc™", "Blu-ray™", "Blu-ray 3D™", and logos are trademarks of the Blu-ray Disc Association.

"Blu-ray Disc™", "DVD+RW", "DVD-RW", "DVD+R", "DVD-R", "DVD VIDEO", and "CD" logos are trademarks.

Page 3

  • •The BLUETOOTH® word mark and logos are registered trademarks owned by Bluetooth SIG, Inc. and any use of such marks by Sony Corporation is under license. Other trademarks and trade names are those of their respective owners.
  • All other trademarks are trademarks of their respective owners.
  • Other system and product names are generally trademarks or registered trademarks of the manufacturers. ™ and ® marks are not indicated in this document.

Region code (BD-ROM/DVD VIDEO only)

Your system has a region code printed on the rear exterior of the Bar stand and will only play a BD-ROM/DVD VIDEO (playback only) labeled with identical region codes or .

Page 4

Table of Contents

Unpacking 5
Setting up
Step 1: Positioning the
System 7
Step 2: Inserting the POP
Label 8
Step 3: Installing the TV stand
(JIG-ST9_NT3 only) 9
Step 4: Connecting the Bar
stand . 10
Step 5: Inserting the Demo
Disc . 13

How to Use

Button/Knob Specification? 14
Changing the POP Label 15

Additional Information

Precautions16 6
Notes about Discs1 7
Troubleshooting1 7
Specifications18 8
Page 5

Unpacking

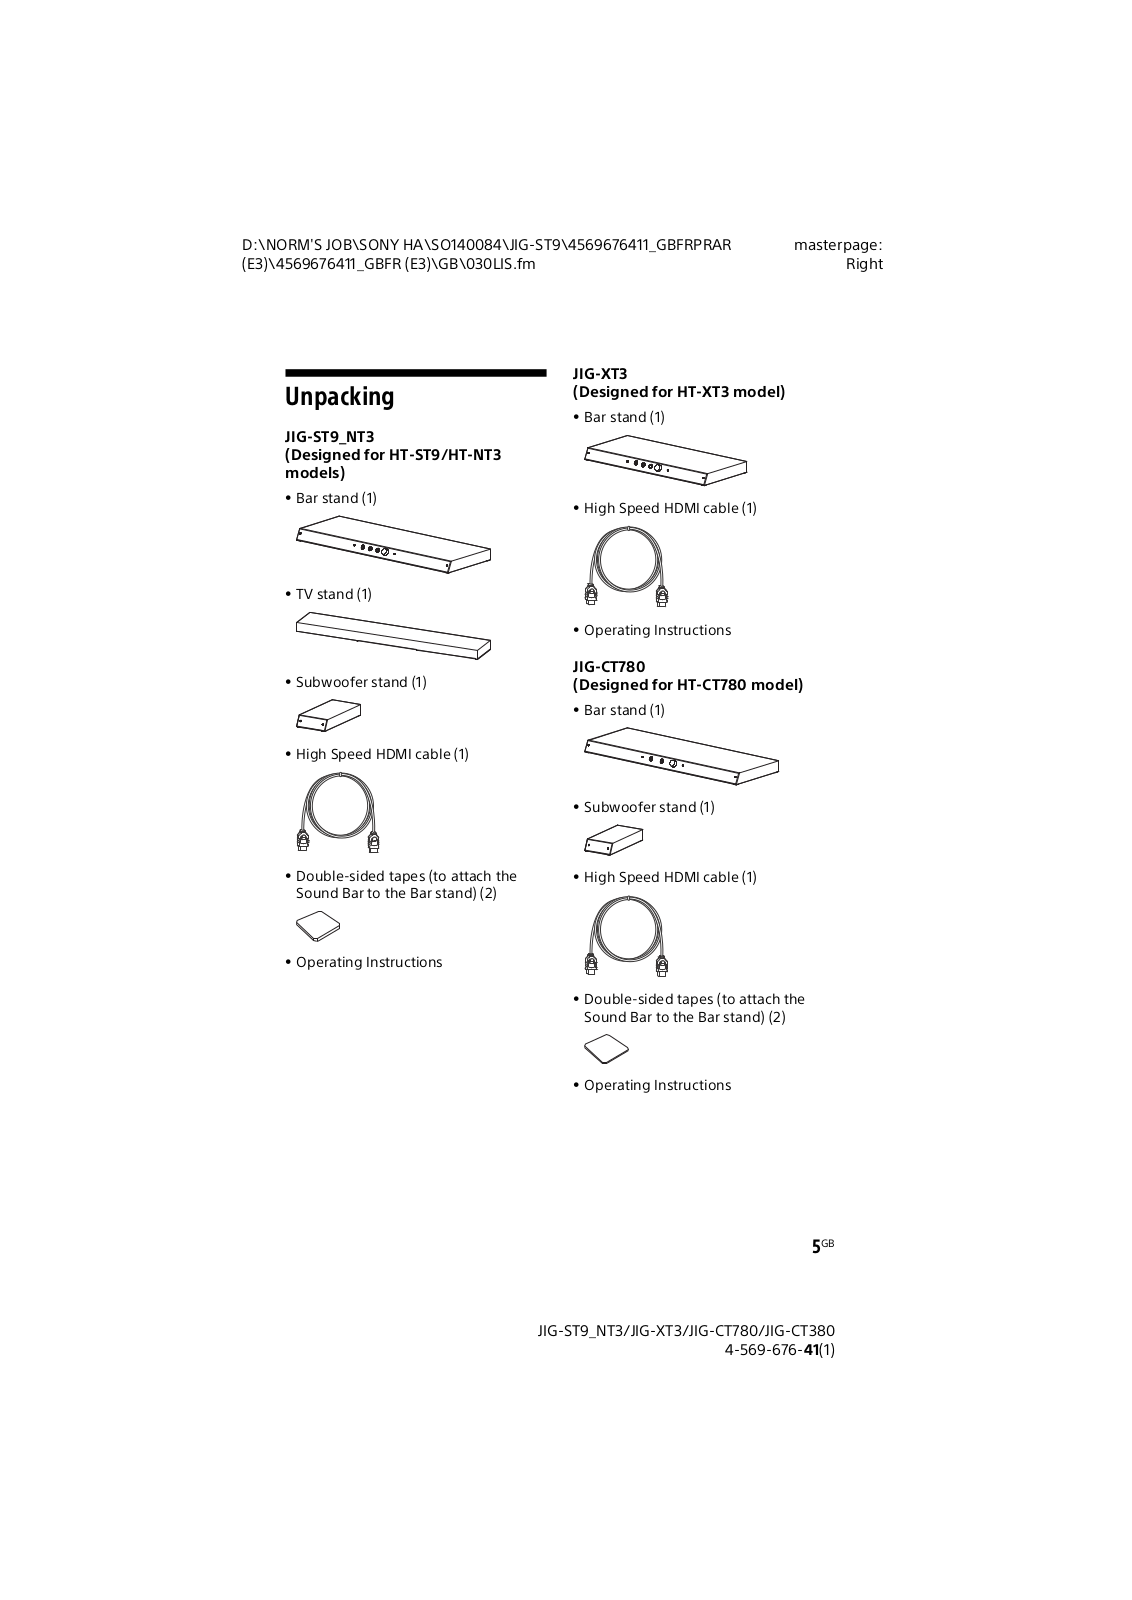
JIG-ST9_NT3 (Designed for HT-ST9/HT-NT3 models)

• Bar stand (1)

• TV stand (1)

• Subwoofer stand (1)

• High Speed HDMI cable (1)

• Double-sided tapes (to attach the Sound Bar to the Bar stand) (2)

Operating Instructions

JIG-XT3

(Designed for HT-XT3 model)

• Bar stand (1)

• High Speed HDMI cable (1)

Operating Instructions

JIG-CT780

(Designed for HT-CT780 model)

• Bar stand (1)

• Subwoofer stand (1)

• High Speed HDMI cable (1)

• Double-sided tapes (to attach the Sound Bar to the Bar stand) (2)

Operating Instructions

Page 6

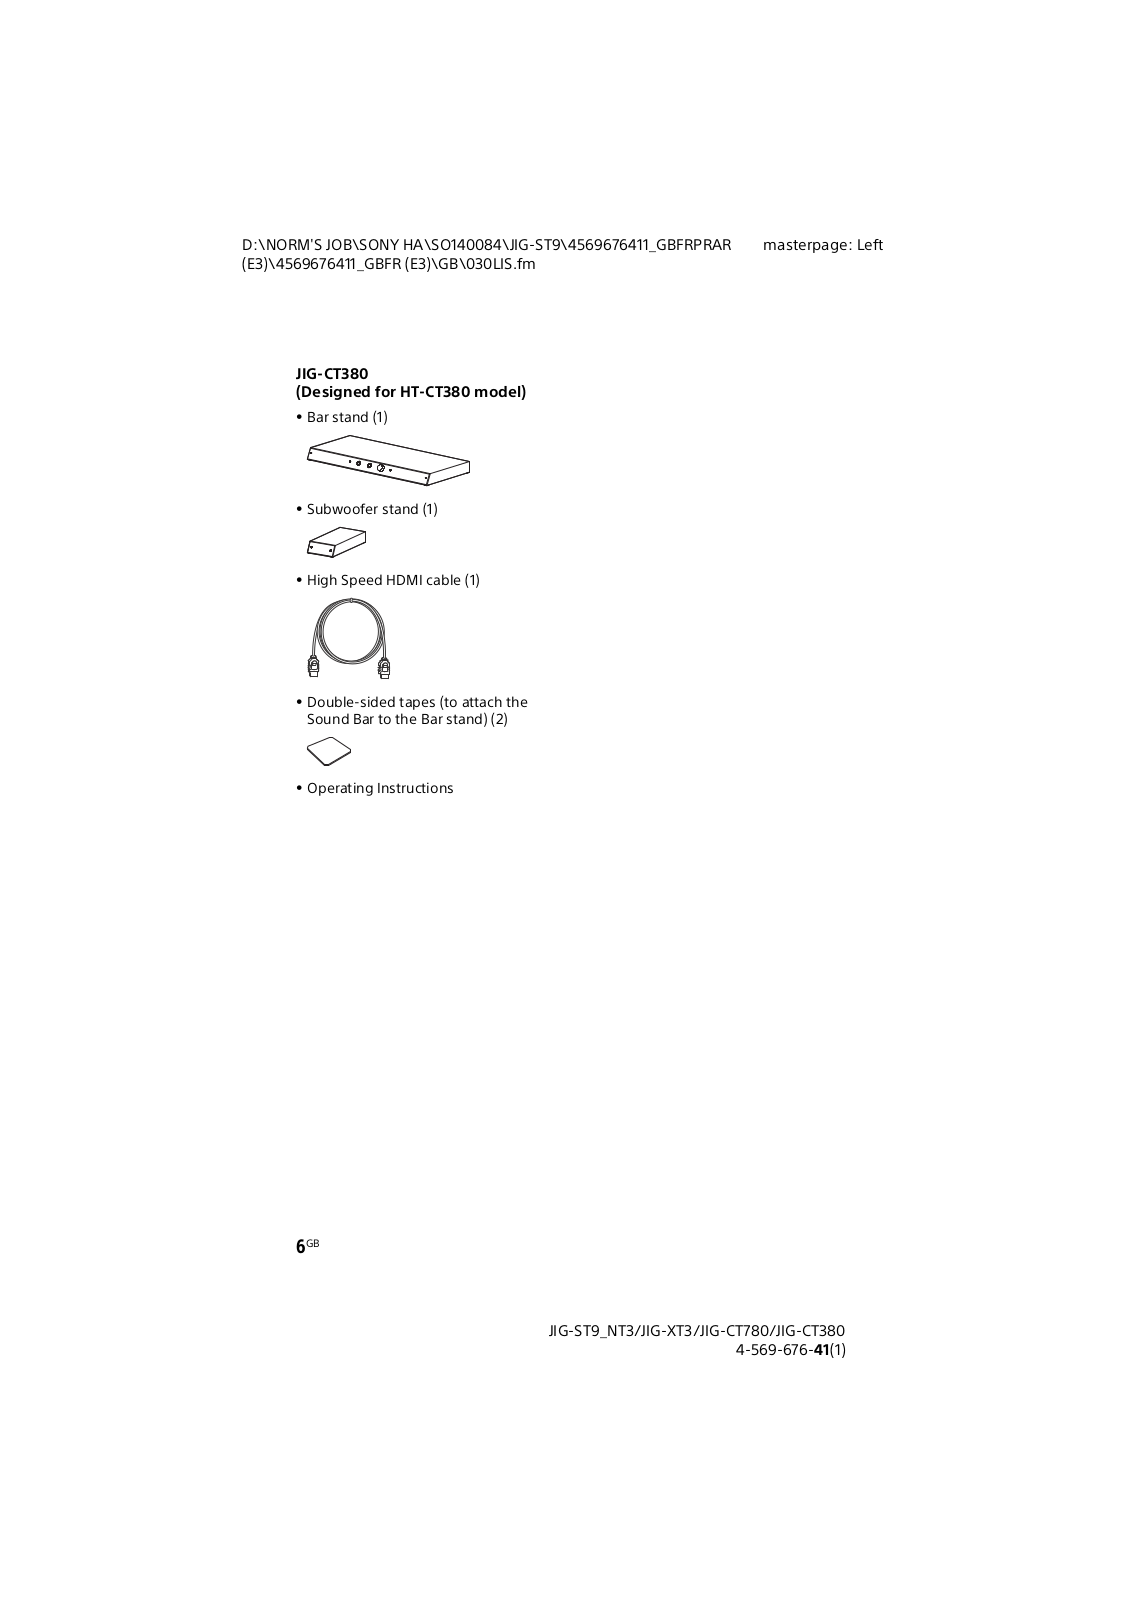
JIG-CT380

(Designed for HT-CT380 model)

• Bar stand (1)

• Subwoofer stand (1)

• High Speed HDMI cable (1)

• Double-sided tapes (to attach the Sound Bar to the Bar stand) (2)

Operating Instructions

Page 7

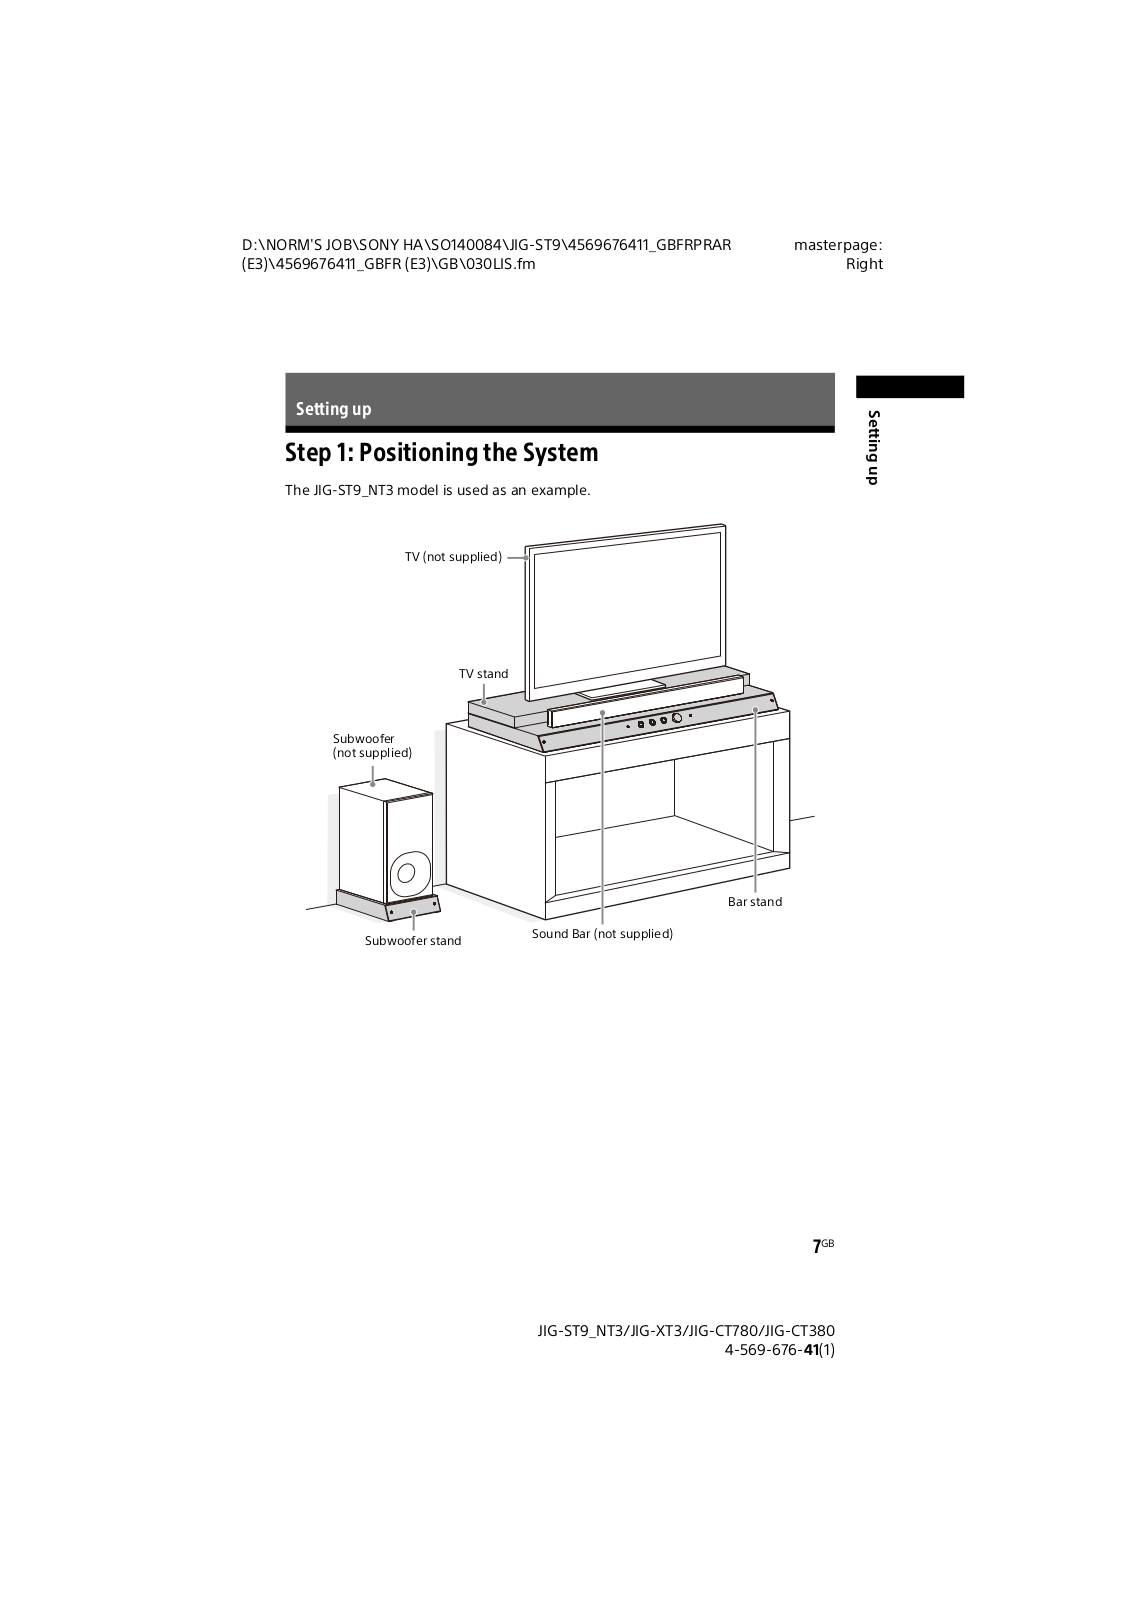
Step 1: Positioning the System

The JIG-ST9_NT3 model is used as an example.

Page 8

Step 2: Inserting the POP Label

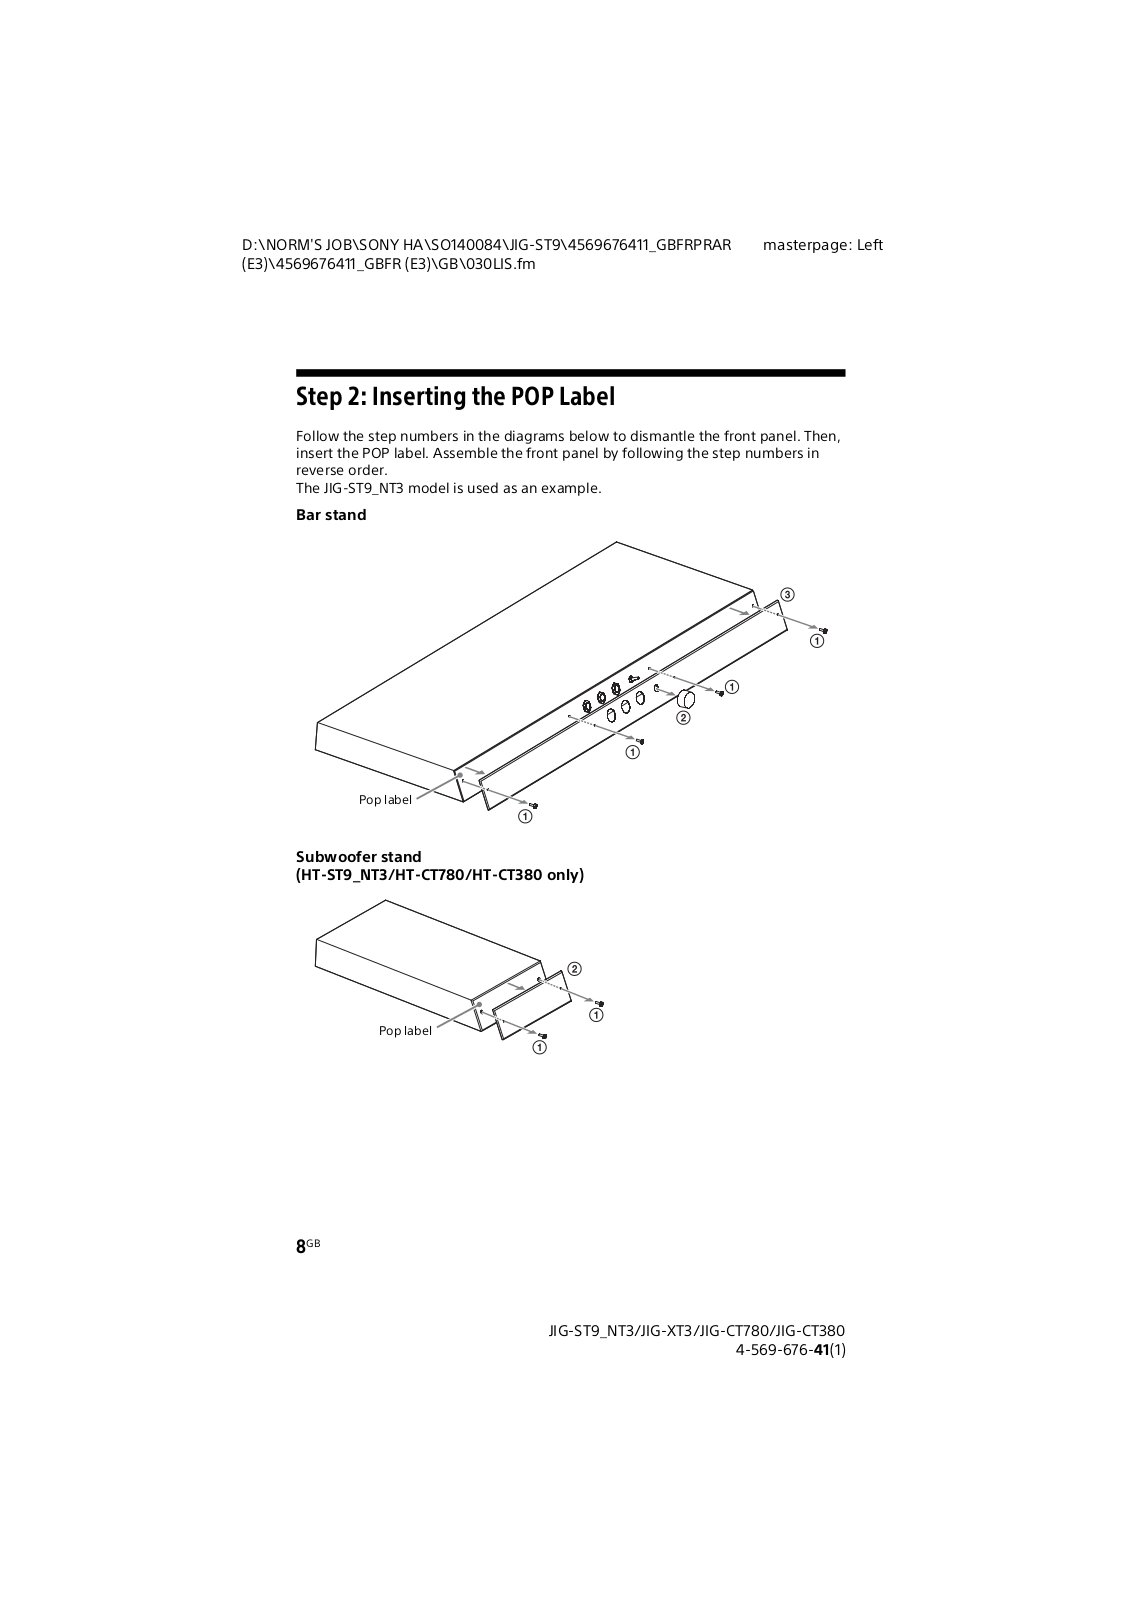
Follow the step numbers in the diagrams below to dismantle the front panel. Then, insert the POP label. Assemble the front panel by following the step numbers in reverse order.

The JIG-ST9 NT3 model is used as an example.

Bar stand

Subwoofer stand

(HT-ST9_NT3/HT-CT780/HT-CT380 only)

Page 9

Step 3: Installing the TV stand (JIG-ST9_NT3 only)

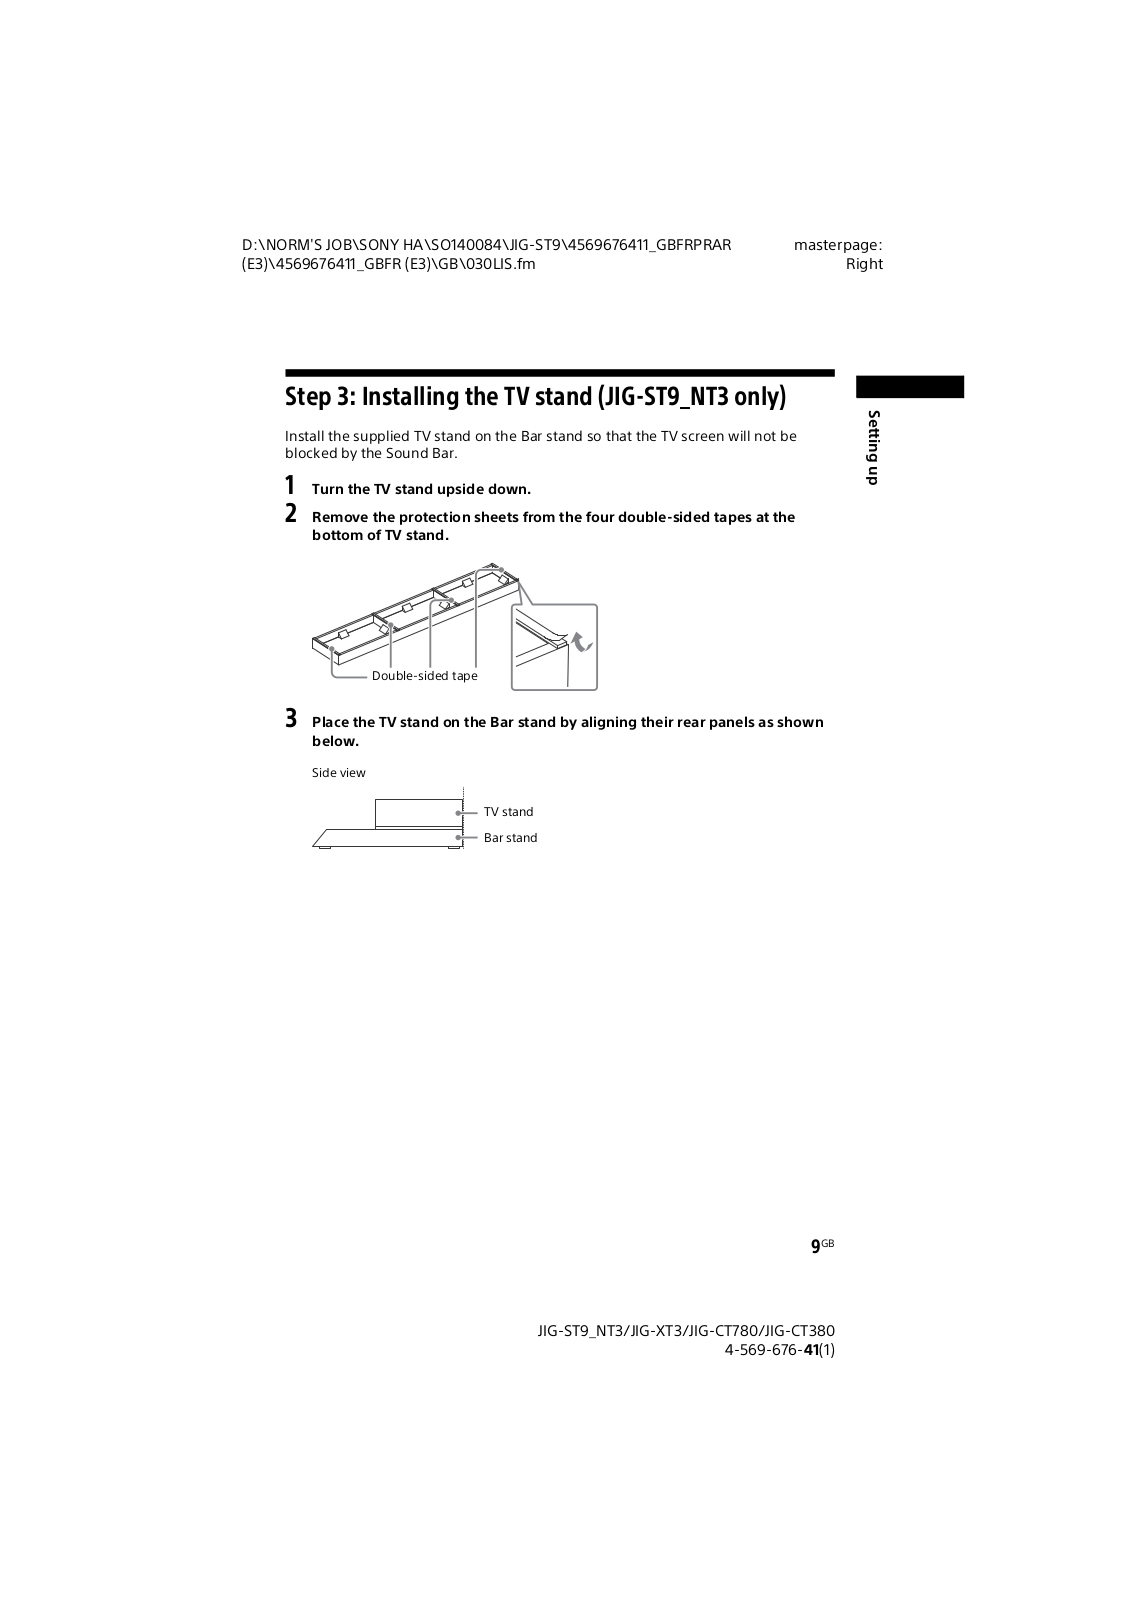
Install the supplied TV stand on the Bar stand so that the TV screen will not be blocked by the Sound Bar.

  • 1 Turn the TV stand upside down.
  • 2 Remove the protection sheets from the four double-sided tapes at the bottom of TV stand.

3 Place the TV stand on the Bar stand by aligning their rear panels as shown below.

Side view

Page 10

Step 4: Connecting the Bar stand

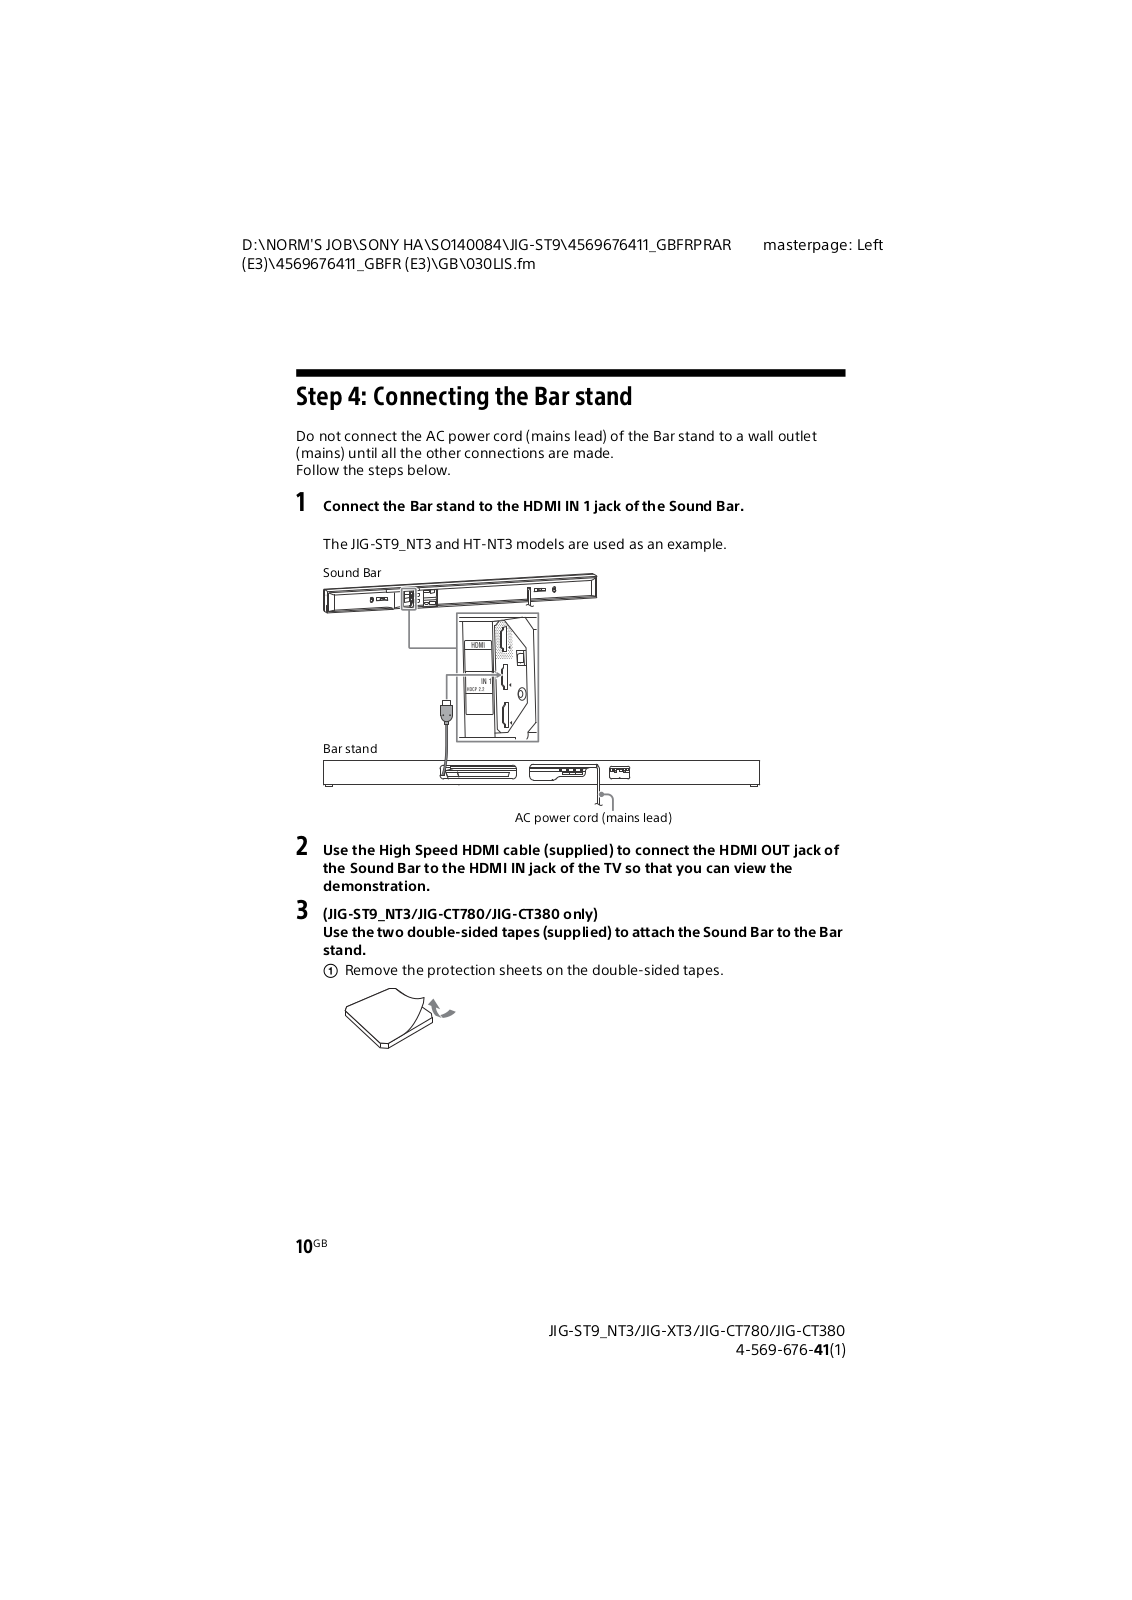
Do not connect the AC power cord (mains lead) of the Bar stand to a wall outlet (mains) until all the other connections are made. Follow the steps below.

1 Connect the Bar stand to the HDMI IN 1 jack of the Sound Bar.

The JIG-ST9 NT3 and HT-NT3 models are used as an example.

  • 2 Use the High Speed HDMI cable (supplied) to connect the HDMI OUT jack of the Sound Bar to the HDMI IN jack of the TV so that you can view the demonstration.
  • 3 (JIG-ST9_NT3/JIG-CT780/JIG-CT380 only)

Use the two double-sided tapes (supplied) to attach the Sound Bar to the Bar stand.

(1) Remove the protection sheets on the double-sided tapes.

Page 11
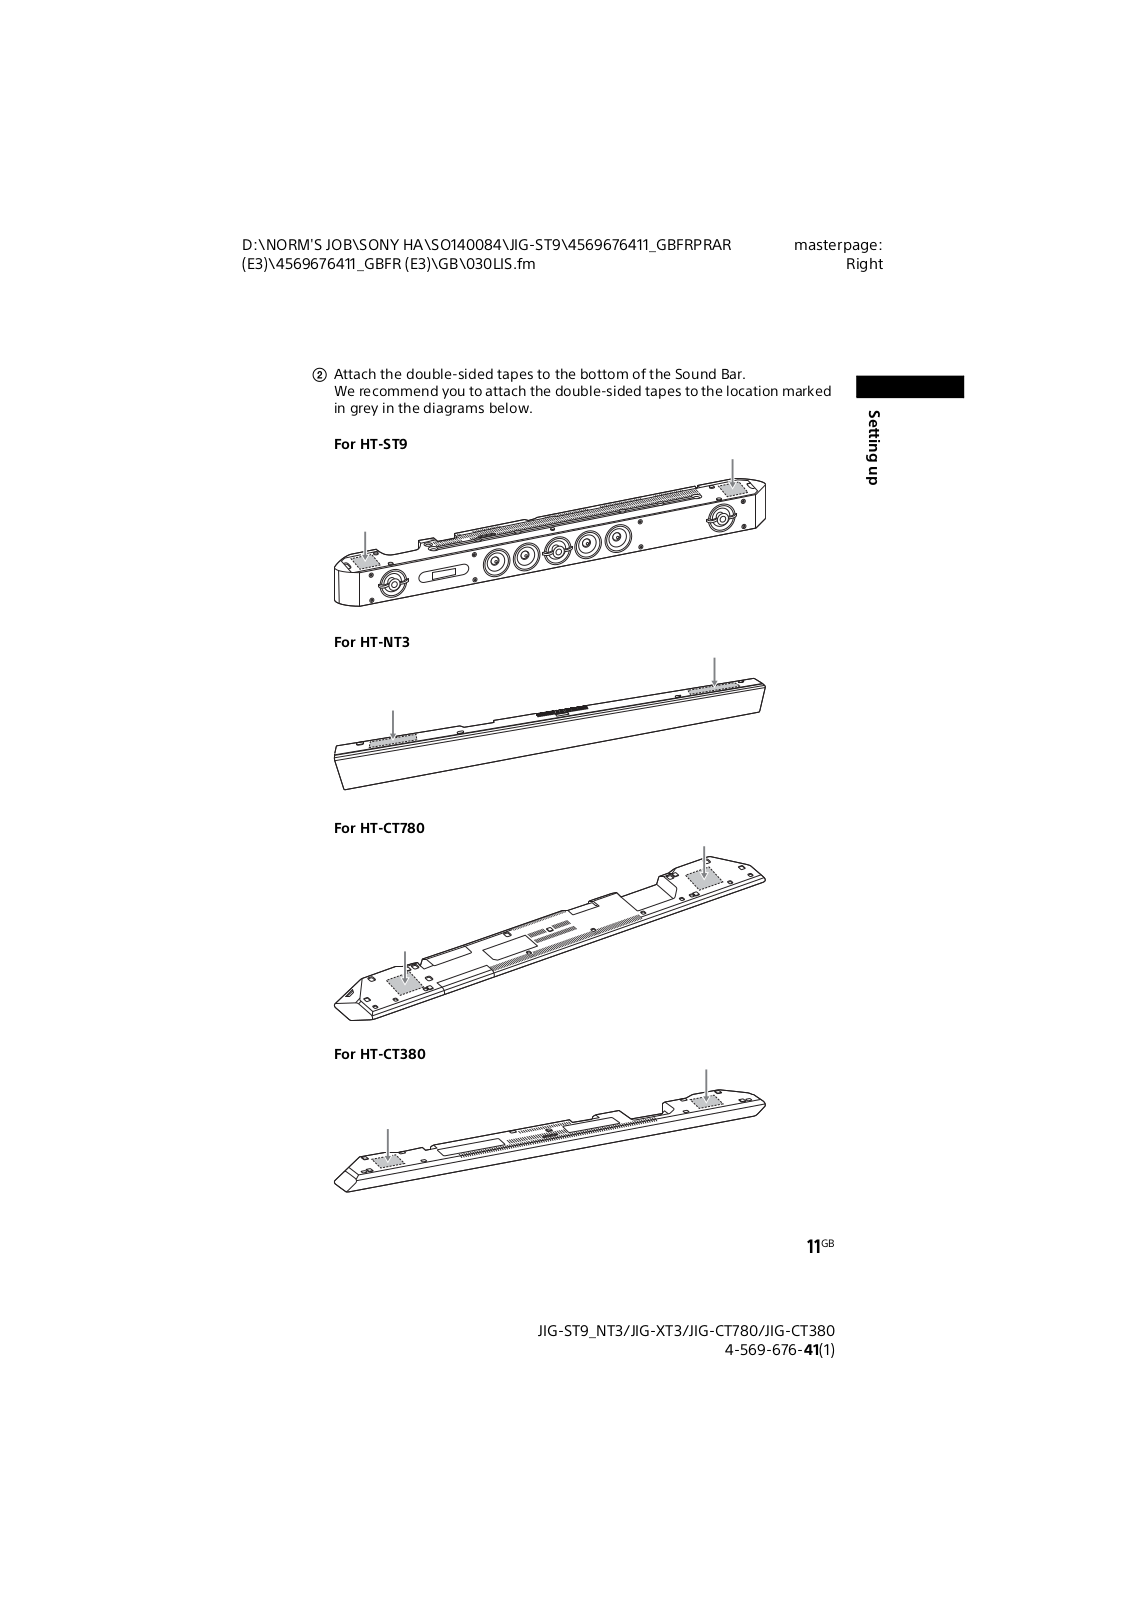
(2) Attach the double-sided tapes to the bottom of the Sound Bar. We recommend you to attach the double-sided tapes to the location marked

We recommend you to attach the double-sided tapes to the location marke in grey in the diagrams below.

For HT-ST9

For HT-NT3

For HT-CT780

For HT-CT380

Page 12

  • ③ Remove the protection sheet on the two double-sided tapes that you have attached in step ②.
  • 4 Place the Sound Bar on the Bar stand.
  • 5 Connect the AC power cord (mains lead) of the Sound Bar and TV.
  • 6 Connect the AC power cord (mains lead) of the Bar stand.
  • Note

(JIG-ST9_NT3/JIG-CT780/JIG-CT380 only)

Be sure to specify the wireless connection to link the Sound Bar to the subwoofer (Secure Link or LINK function) before you insert the Demo Disc. For details on Secure Link or LINK function, refer to the operating instructions supplied with the Sound Bar.

Page 13

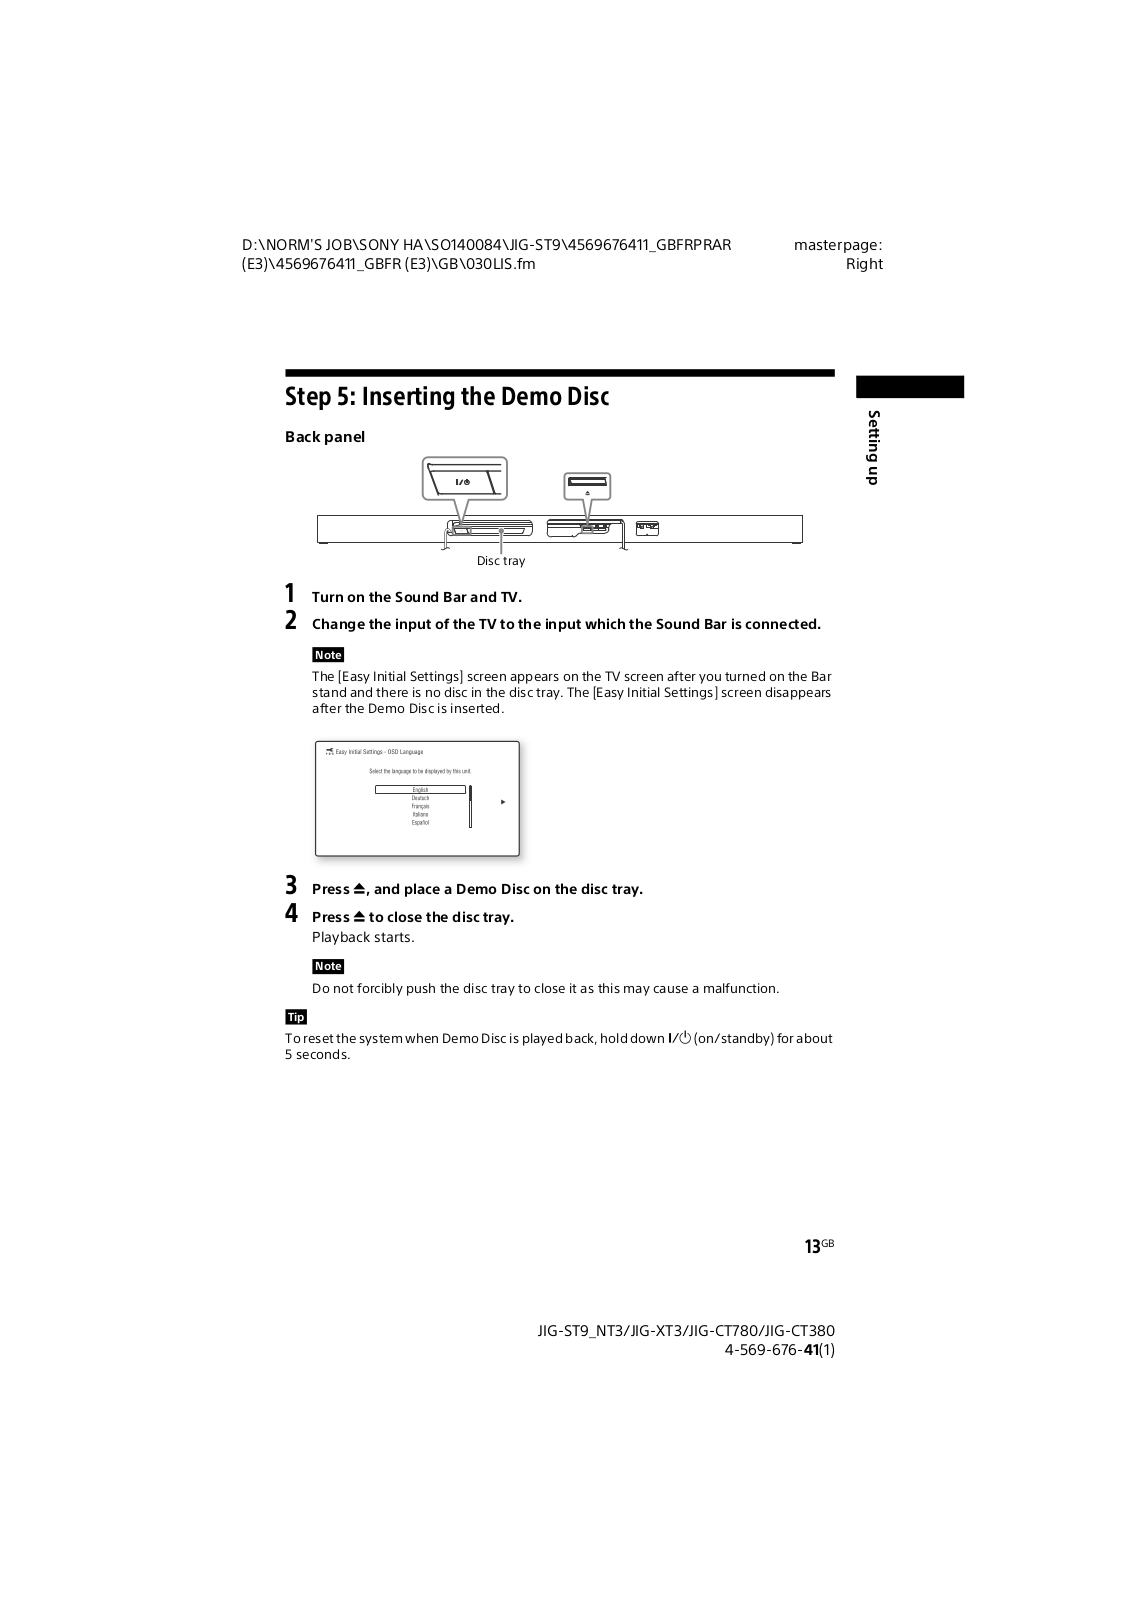
Step 5: Inserting the Demo Disc

Back panel

  • 1 Turn on the Sound Bar and TV.
  • 2 Change the input of the TV to the input which the Sound Bar is connected.
Note

The [Easy Initial Settings] screen appears on the TV screen after you turned on the Bar stand and there is no disc in the disc tray. The [Easy Initial Settings] screen disappears after the Demo Disc is inserted.

  • 3 Press , and place a Demo Disc on the disc tray.
    • Press 📤 to close the disc tray.

Plavback starts.

Do not forcibly push the disc tray to close it as this may cause a malfunction.

Tip

To reset the system when Demo Disc is played back, hold down I/() (on/standby) for about 5 seconds.

Page 14

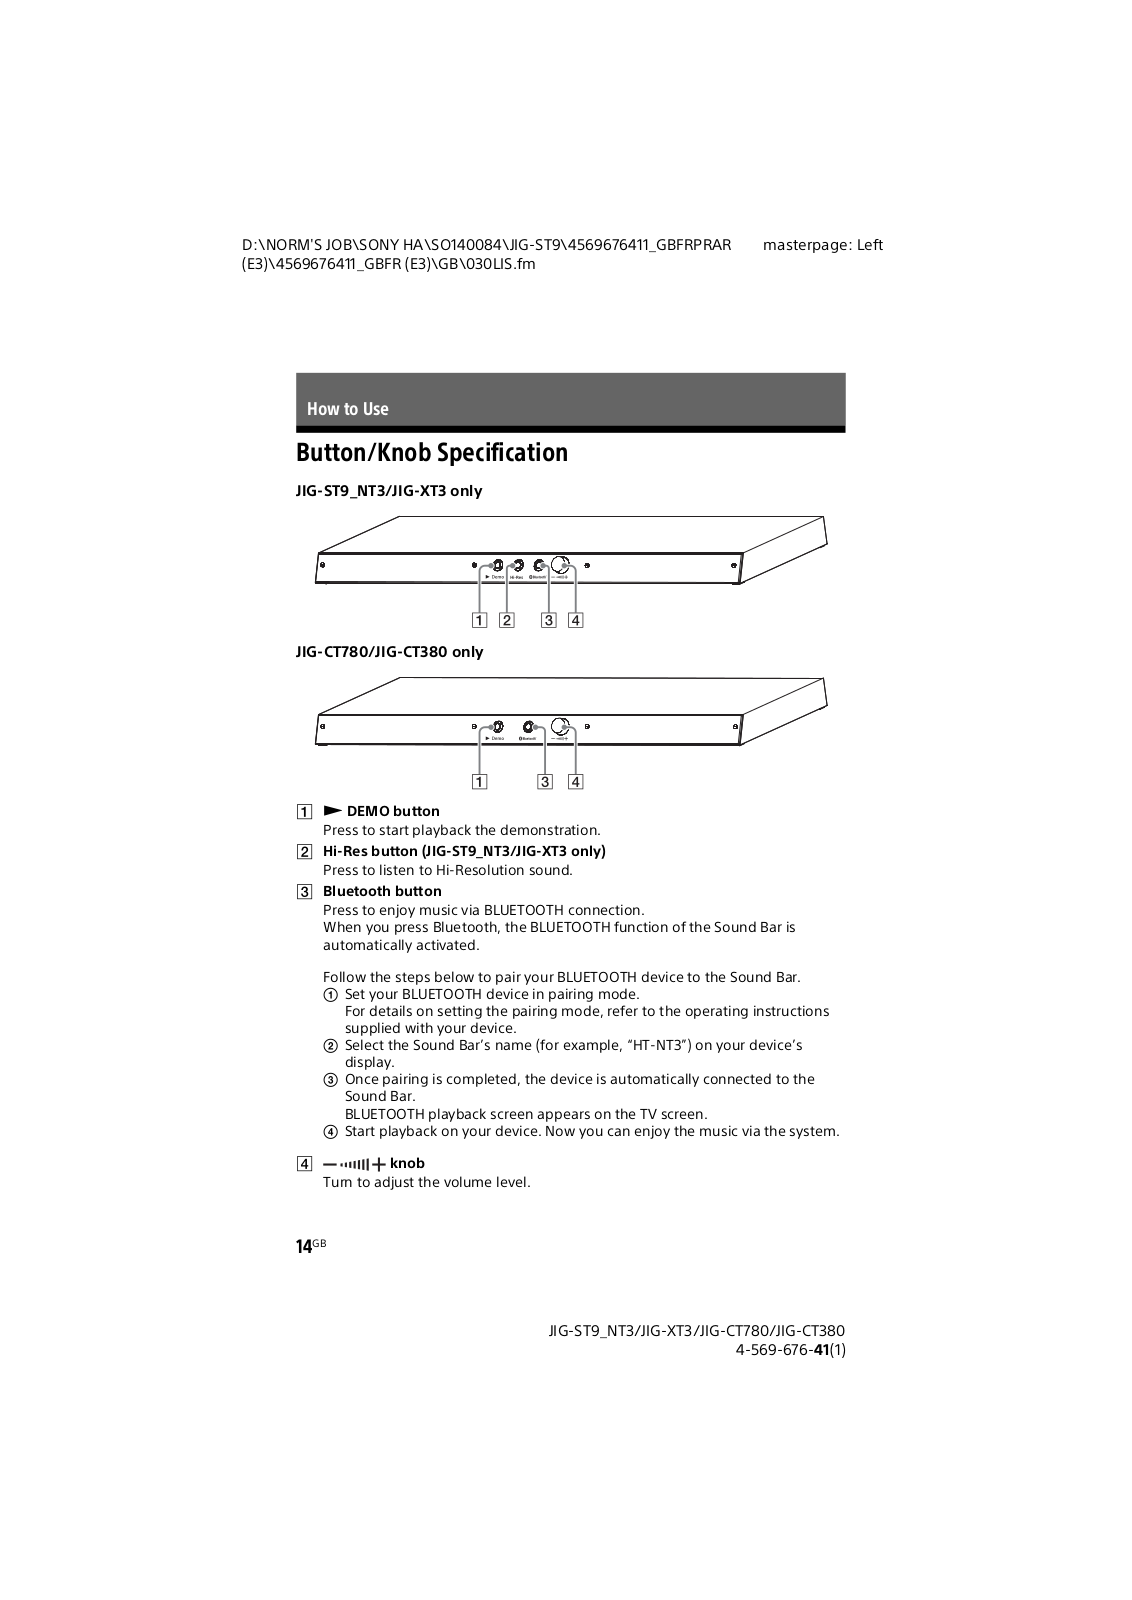
Button/Knob Specification

JIG-ST9_NT3/JIG-XT3 only

JIG-CT780/JIG-CT380 only

1 DEMO button

Press to start playback the demonstration.

2 Hi-Res button (JIG-ST9_NT3/JIG-XT3 only)

Press to listen to Hi-Resolution sound.

3 Bluetooth button

Press to enjoy music via BLUETOOTH connection. When you press Bluetooth, the BLUETOOTH function of the Sound Bar is automatically activated.

Follow the steps below to pair your BLUETOOTH device to the Sound Bar

  • ① Set your BLUETOOTH device in pairing mode.
    • For details on setting the pairing mode, refer to the operating instructions supplied with your device.
  • Select the Sound Bar's name (for example, "HT-NT3") on your device's display
  • Once pairing is completed, the device is automatically connected to the Sound Bar.
    • BLUETOOTH playback screen appears on the TV screen.
  • (1) Start playback on your device. Now you can enjoy the music via the system.

4 — ...................................

Turn to adjust the volume level.

Page 15
About the LED indicators

  • White (on top and bottom of the front panel)
  • Blue (on the buttons)

When you insert the Demo Disc and demonstration starts, the white LED indicator lights up and blue LED indicator flashes. If you press the button, the blue LED indicator of the button lights up for about 5 minutes. Then the indicator continues flashing.

All the LED indicators lights off when the disc trav is opened or no disc is inserted.

Changing the POP Label

You can change the POP label in the front panel of the Bar stand and subwoofer stand.

See "Step 2: Inserting the POP Label" (page 8) to dismantle and assemble the front panel.

Page 16

Additional Information

Precautions

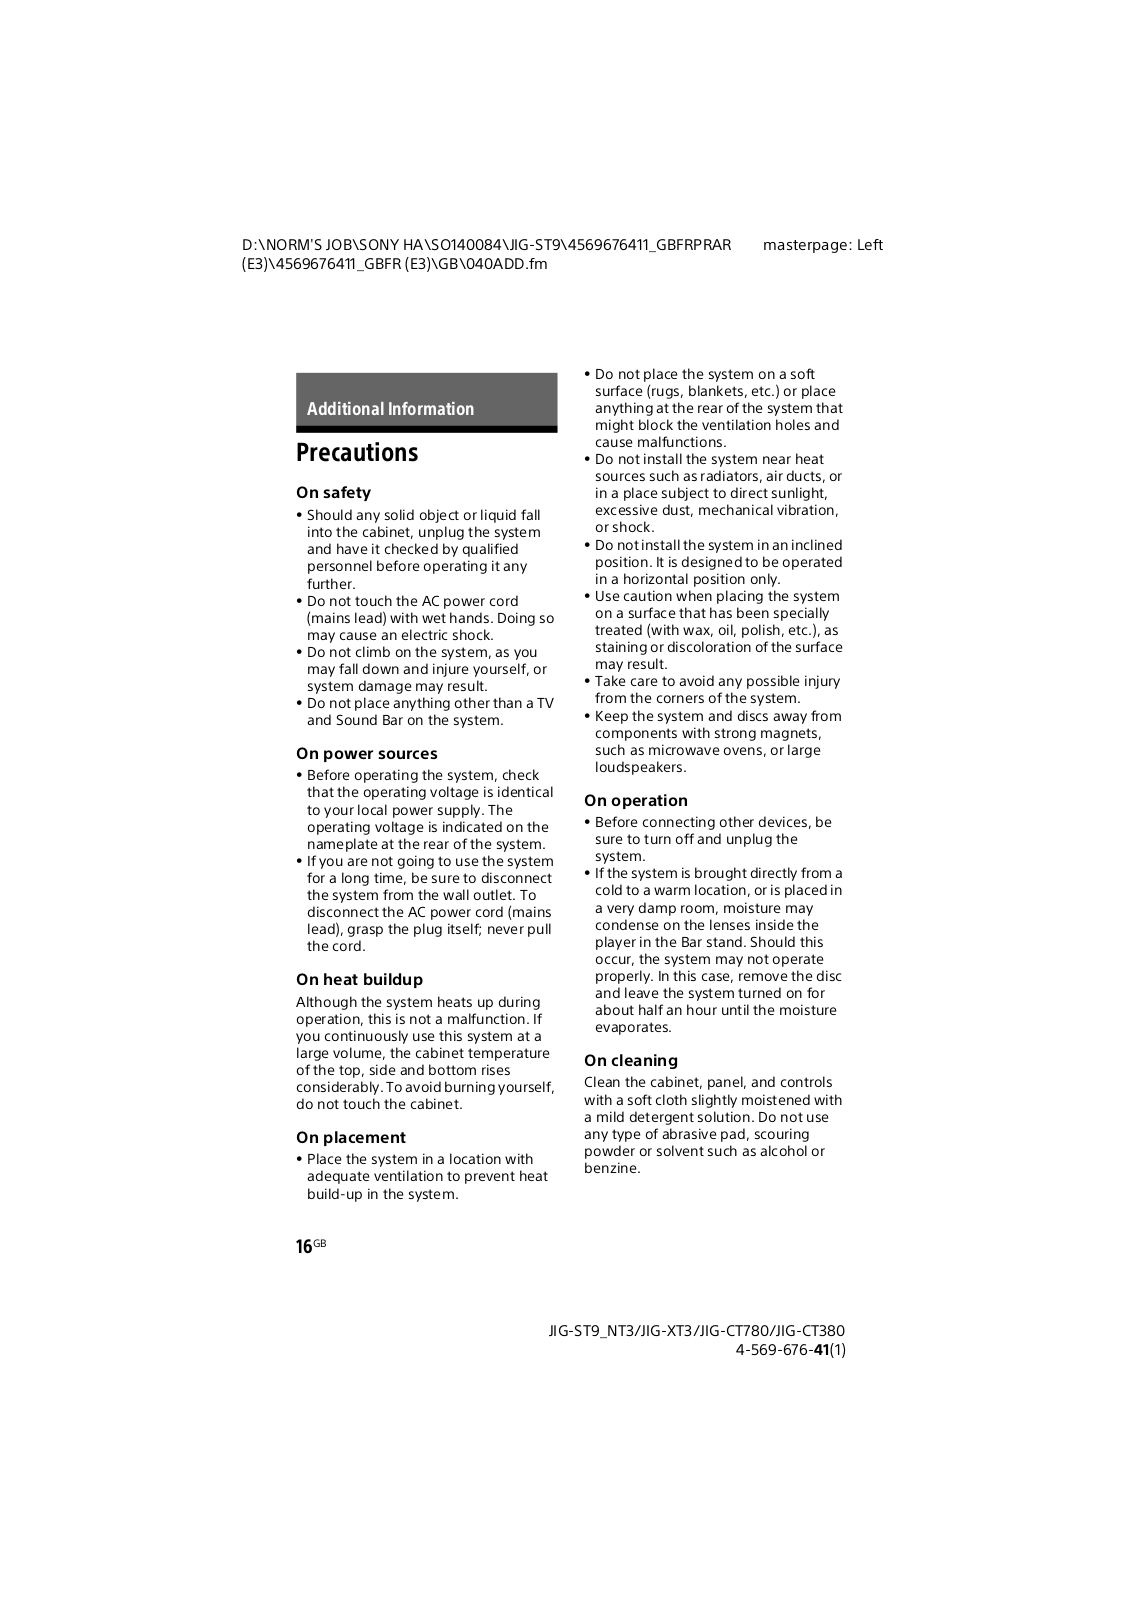
On safety

  • Should any solid object or liquid fall into the cabinet, unplug the system and have it checked by qualified personnel before operating it any further.
  • Do not touch the AC power cord (mains lead) with wet hands. Doing so may cause an electric shock.
  • Do not climb on the system, as you may fall down and injure yourself, or system damage may result.
  • Do not place anything other than a TV and Sound Bar on the system.

On power sources

  • Before operating the system, check that the operating voltage is identical to your local power supply. The operating voltage is indicated on the nameplate at the rear of the system
  • If you are not going to use the system for a long time, be sure to disconnect the system from the wall outlet. To disconnect the AC power cord (mains lead), grasp the plug itself; never pull the cord.

On heat buildup

Although the system heats up during operation, this is not a malfunction. If you continuously use this system at a large volume, the cabinet temperature of the top, side and bottom rises considerably. To avoid burning yourself, do not touch the cabinet.

On placement

Place the system in a location with adequate ventilation to prevent heat build-up in the system.

  • Do not place the system on a soft surface (rugs, blankets, etc.) or place anything at the rear of the system that might block the ventilation holes and cause malfunctions
  • Do not install the system near heat sources such as radiators, air ducts, or in a place subject to direct sunlight, excessive dust, mechanical vibration, or shock
  • Do not install the system in an inclined position. It is designed to be operated in a horizontal position only
  • Use caution when placing the system on a surface that has been specially treated (with wax, oil, polish, etc.), as staining or discoloration of the surface may result.
  • Take care to avoid any possible injury from the corners of the system.
  • Keep the system and discs away from components with strong magnets, such as microwave ovens, or large loudspeakers.

On operation

  • Before connecting other devices, be sure to turn off and unplug the system
  • If the system is brought directly from a cold to a warm location, or is placed in a very damp room, moisture may condense on the lenses inside the player in the Bar stand. Should this occur, the system may not operate properly. In this case, remove the disc and leave the system turned on for about half an hour until the moisture evaporates.

On cleaning

Clean the cabinet, panel, and controls with a soft cloth slightly moistened with a mild detergent solution. Do not use any type of abrasive pad, scouring powder or solvent such as alcohol or benzine.

Page 17

Notes about Discs

Use only the Demo Disc supplied separately.

On handling discs

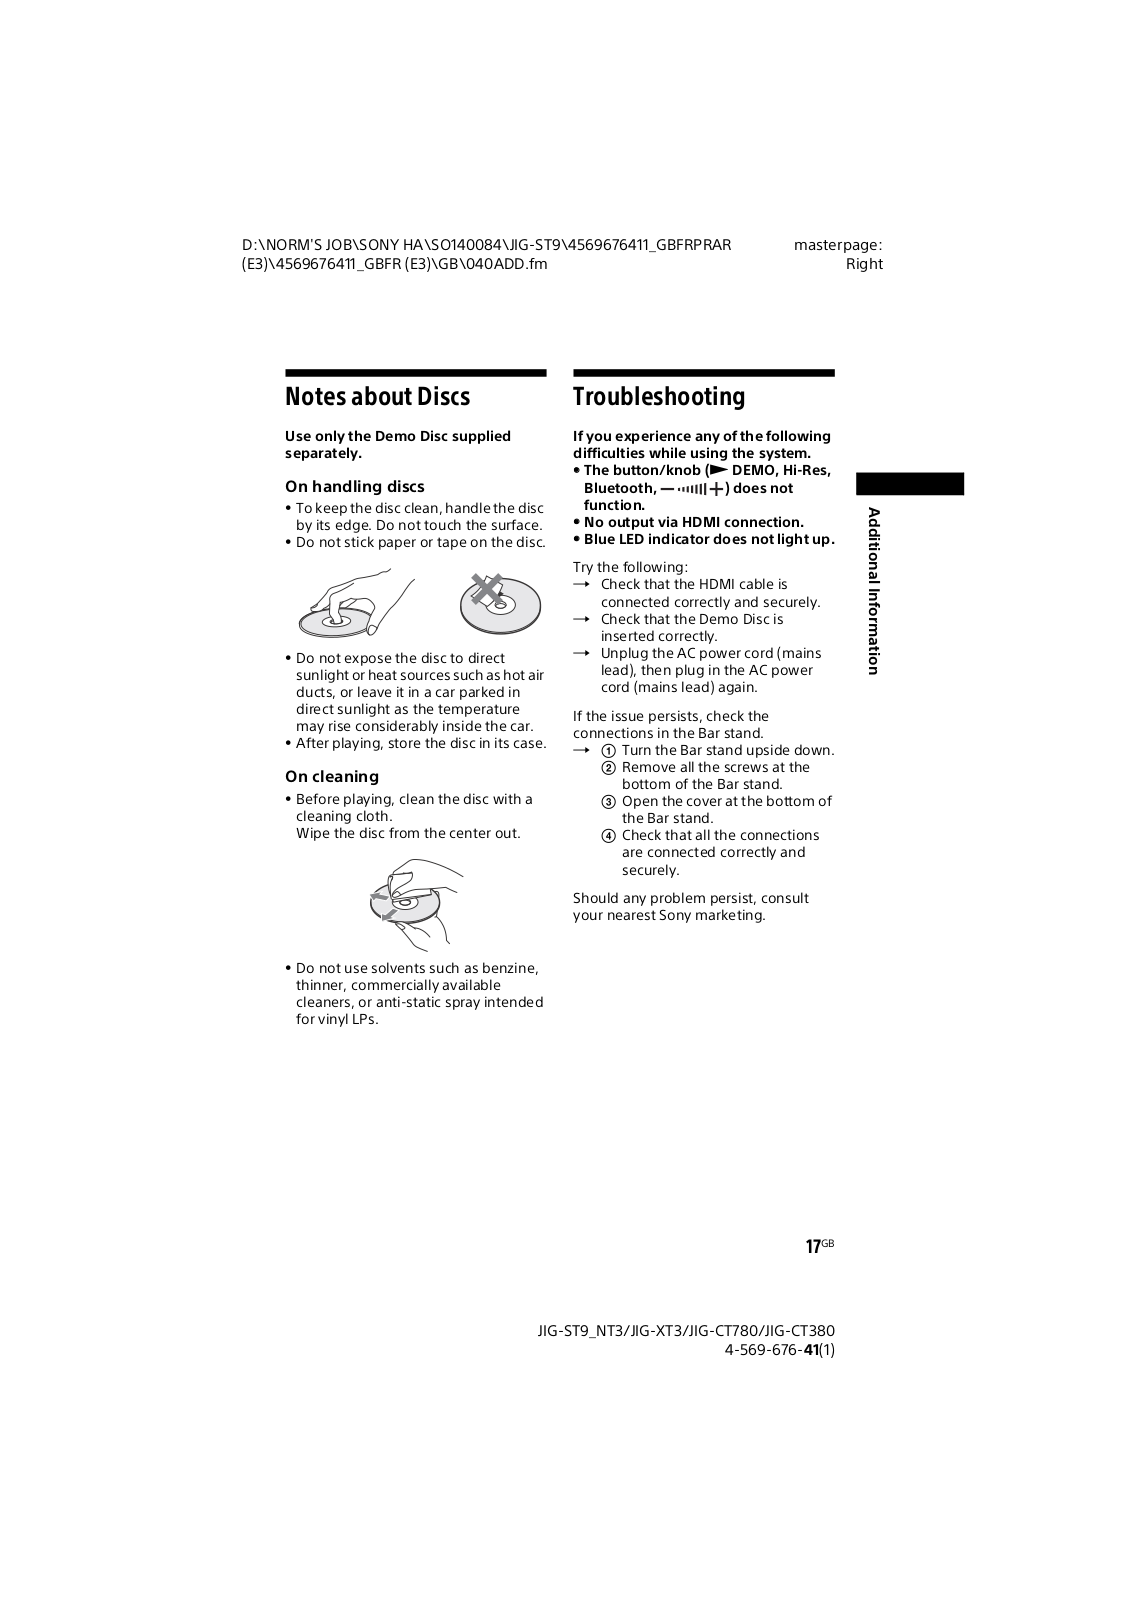
  • To keep the disc clean, handle the disc by its edge. Do not touch the surface.
  • Do not stick paper or tape on the disc.

  • Do not expose the disc to direct sunlight or heat sources such as hot air ducts, or leave it in a car parked in direct sunlight as the temperature may rise considerably inside the car.
  • After playing, store the disc in its case.

On cleaning

• Before playing, clean the disc with a cleaning cloth. Wipe the disc from the center out.

Do not use solvents such as benzine, thinner, commercially available cleaners, or anti-static spray intended for vinyl LPs.

Troubleshooting

If you experience any of the following difficulties while using the system.

  • The button/knob (► DEMO, Hi-Res, Bluetooth, — ···································
  • No output via HDMI connection.
  • Blue LED indicator does not light up.

Try the following:

  • → Check that the HDMI cable is connected correctly and securely.
  • → Check that the Demo Disc is inserted correctly.
  • → Unplug the AC power cord (mains lead), then plug in the AC power cord (mains lead) again.

If the issue persists, check the connections in the Bar stand

  • → ① Turn the Bar stand upside down
    • Remove all the screws at the bottom of the Bar stand.
    • Open the cover at the bottom of the Bar stand.
    • Get that all the connections are connected correctly and securely.

Should any problem persist, consult your nearest Sony marketing.

Page 18

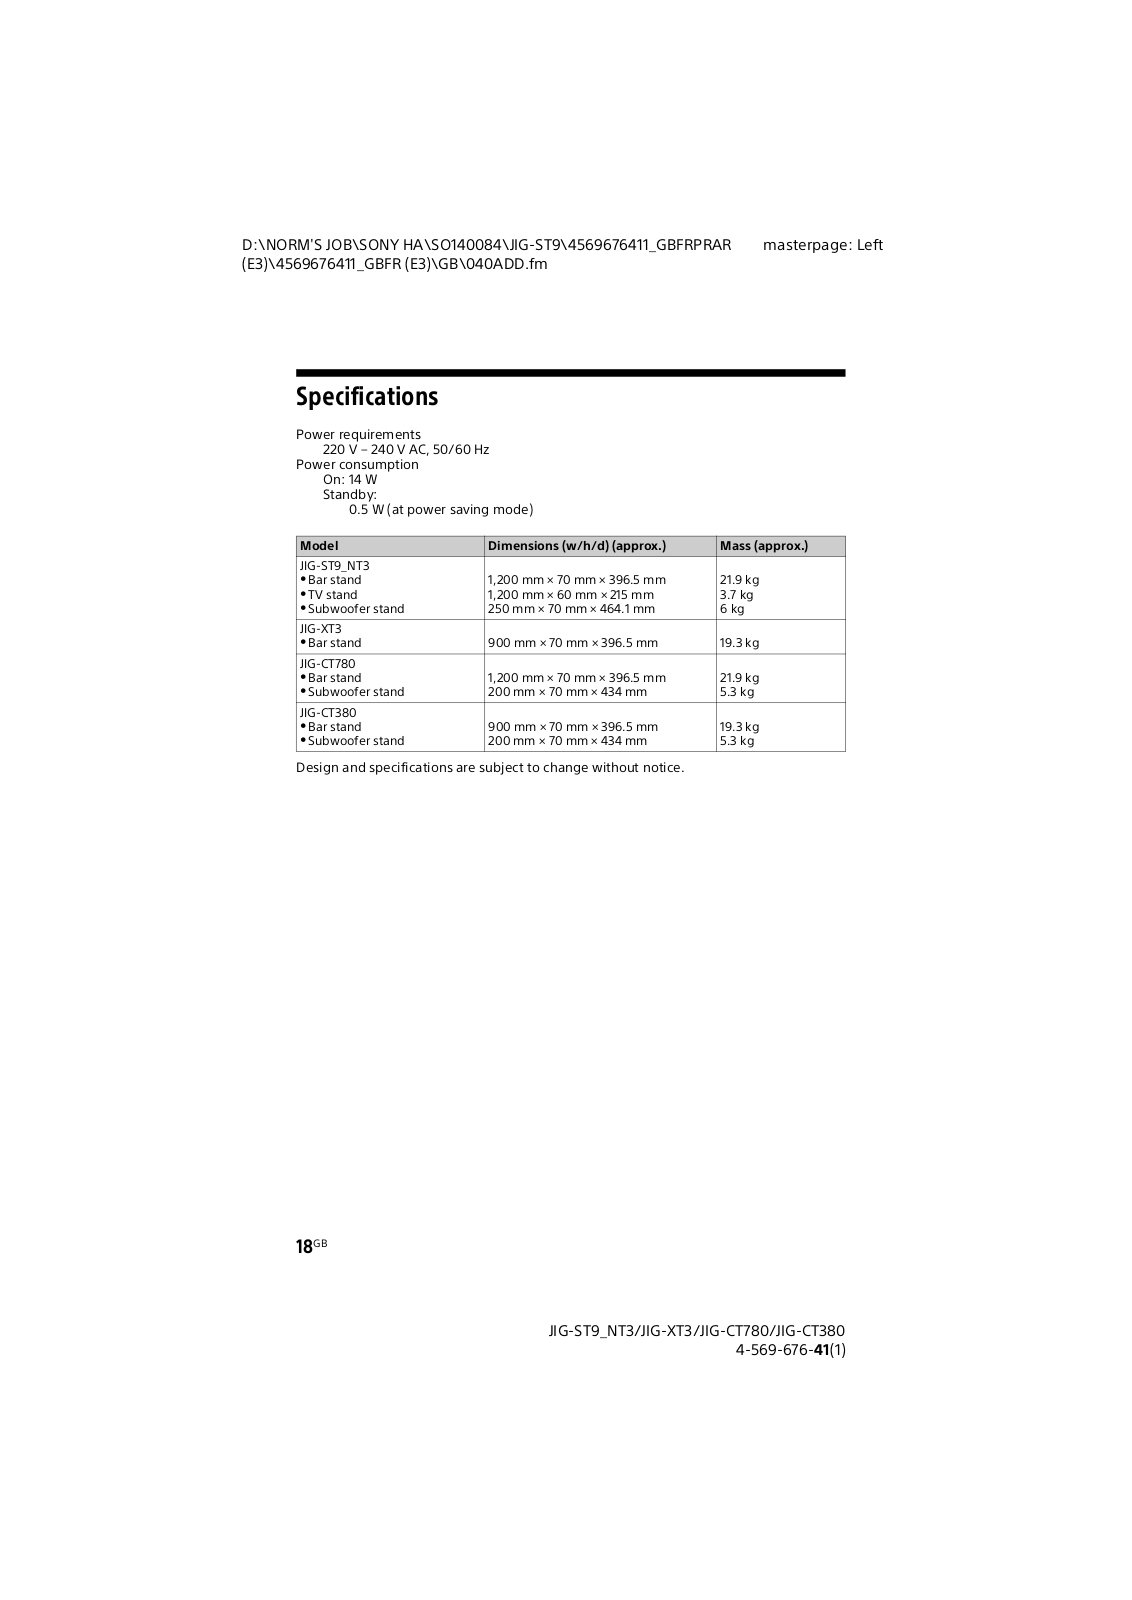
Specifications

Power requirements 220 V – 240 V AC. 50/60 Hz

Power consumption On: 14 W

Standby:

0.5 W (at power saving mode)

Model Dimensions (w/h/d) (approx.) Mass (approx.)
JIG-ST9_NT3
• Bar stand
• TV stand
• Subwoofer stand
1,200 mm × 70 mm × 396.5 mm
1,200 mm × 60 mm × 215 mm
250 mm × 70 mm × 464.1 mm
21.9 kg
3.7 kg
6 kg
JIG-XT3
• Bar stand
900 mm × 70 mm × 396.5 mm 19.3 kg
JIG-CT780
• Bar stand
• Subwoofer stand
1,200 mm × 70 mm × 396.5 mm
200 mm × 70 mm × 434 mm
21.9 kg
5.3 kg
JIG-CT380
• Bar stand
• Subwoofer stand
900 mm × 70 mm × 396.5 mm
200 mm × 70 mm × 434 mm
19.3 kg
5.3 kg

Design and specifications are subject to change without notice

Page 19

Page 20

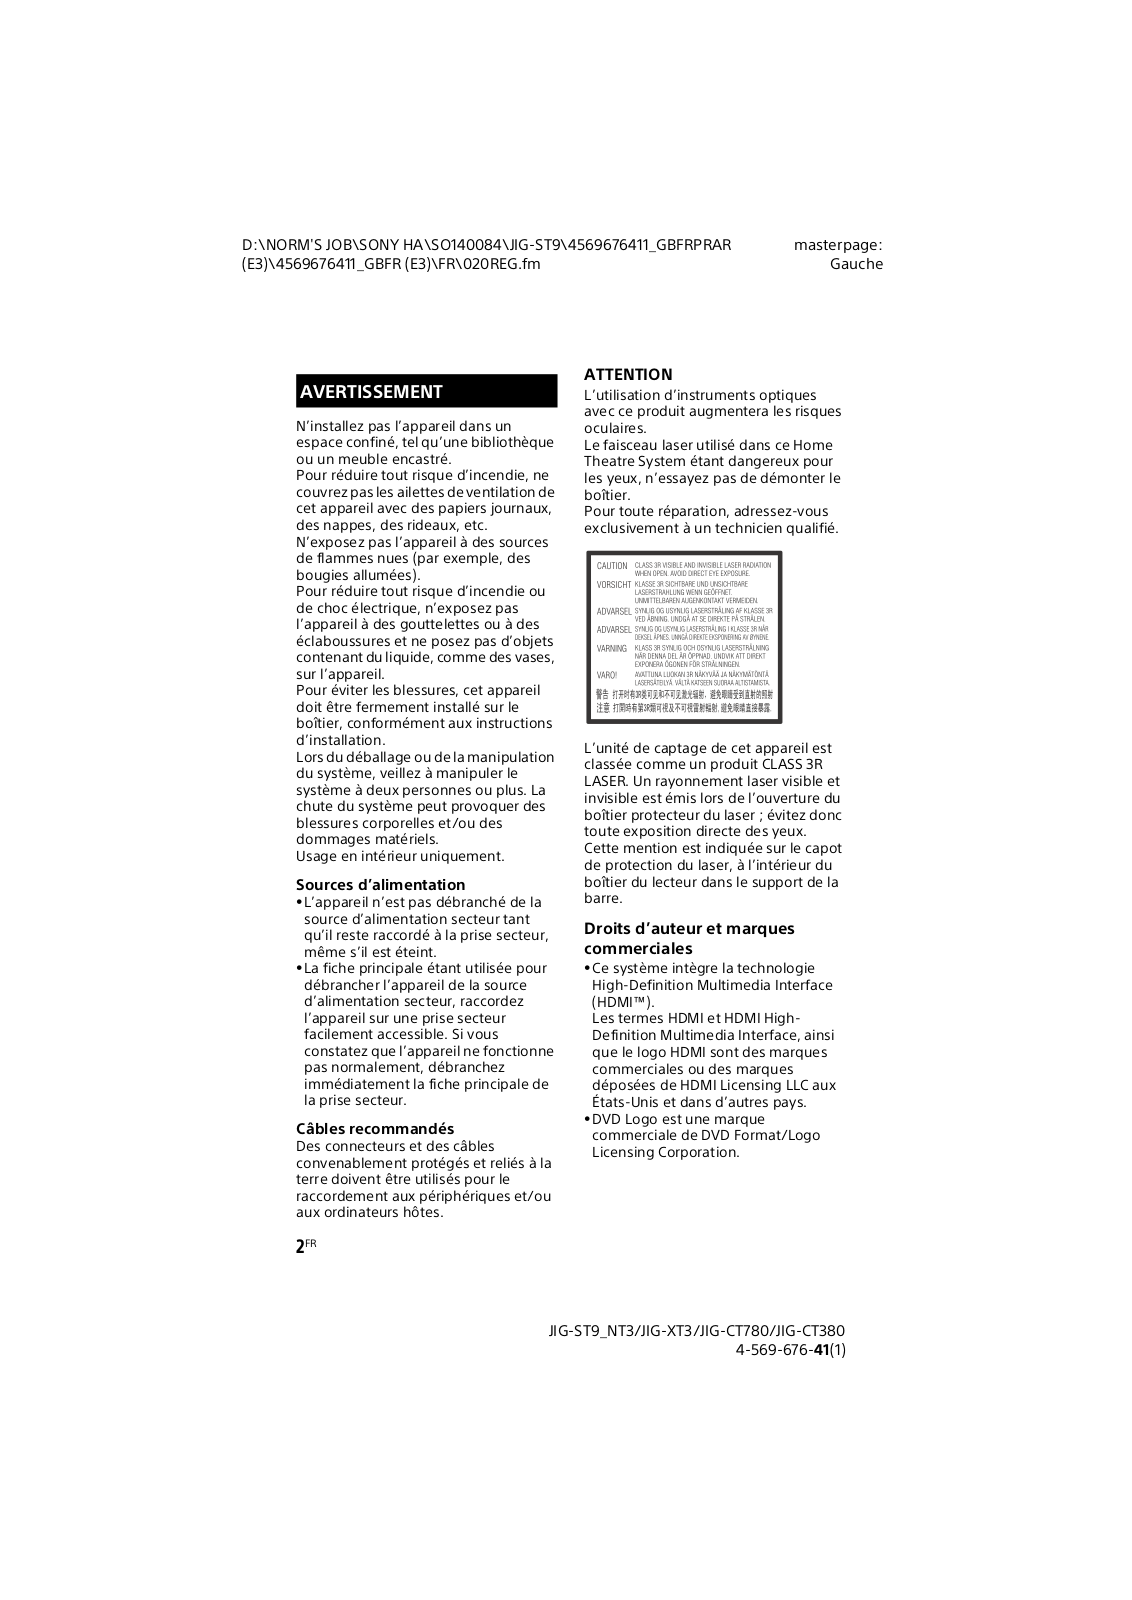
AVERTISSEMENT

N'installez pas l'appareil dans un

espace confiné, tel qu'une bibliothèque

Pour réduire tout risque d'incendie ne couvrez pas les ailettes de ventilation de

cet appareil avec des papiers journaux. des nappes, des rideaux, etc.

N'exposez pas l'appareil à des sources de flammes nues (par exemple, des bougies allumées)

Pour réduire tout risque d'incendie ou de choc électrique, n'exposez pas l'appareil à des gouttelettes ou à des éclaboussures et ne posez pas d'objets contenant du liquide, comme des vases, sur l'appareil

Pour éviter les blessures, cet appareil doit être fermement installé sur le boîtier conformément aux instructions

Lors du déballage ou de la manipulation du système, veillez à manipuler le système à deux personnes ou plus. La chute du système peut provoquer des blessures corporelles et/ou des dommages matériels

Usage en intérieur uniquement.

Sources d'alimentation

  • •L'appareil n'est pas débranché de la source d'alimentation secteur tant qu'il reste raccordé à la prise secteur,
  • La fiche principale étant utilisée pour débrancher l'appareil de la source d'alimentation secteur, raccordez l'appareil sur une prise secteur facilement accessible. Si vous constatez que l'appareil ne fonctionne pas normalement, débranchez immédiatement la fiche principale de
Câbles recommandés

Des connecteurs et des câbles convenablement protégés et reliés à la terre doivent être utilisés pour le raccordement aux périphériques et/ou

ATTENTION

L'utilisation d'instruments optiques avec ce produit augmentera les risques

Le faisceau laser utilisé dans ce Home Theatre System étant dangereux pour les yeux, n'essayez pas de démonter le

Pour toute réparation, adressez-vous exclusivement à un technicien qualifié

L'unité de captage de cet appareil est classée comme un produit CLASS 3R LASER. Un rayonnement laser visible et invisible est émis lors de l'ouverture du boîtier protecteur du laser ; évitez donc toute exposition directe des yeux Cette mention est indiquée sur le capot de protection du laser à l'intérieur du boîtier du lecteur dans le support de la

Droits d'auteur et marques commerciales

•Ce système intègre la technologie High-Definition Multimedia Interface

Les termes HDMI et HDMI High-Definition Multimedia Interface, ainsi que le logo HDMI sont des margues commerciales ou des marques déposées de HDMI Licensing LLC aux États-Unis et dans d'autres pays. • DVD Logo est une marque

commerciale de DVD Format/Logo Licensing Corporation

Page 21

  • « Blu-ray Disc », « Blu-ray », « Blu-ray 3D » et les logos sont des marques commerciales de Blu-ray Disc Association.
  • Les logos « Blu-ray Disc™ », « DVD+RW », « DVD-RW », « DVD+R », « DVD-R », « DVD VIDEO » et « CD » sont des marques commerciales.
  • Le nom de marque et les logos BLUETOOTH® sont des marques déposées appartenant à Bluetooth SIG, Inc. et tout usage de ces marques par Sony Corporation s'inscrit dans le cadre d'une licence. Les autres marques commerciales et noms commerciaux appartiennent à leurs propriétaires respectifs.
  • Toutes les autres marques commerciales appartiennent à leurs propriétaires respectifs.
  • Les autres noms de systèmes et de produits sont généralement des marques commerciales ou des marques déposées des fabricants. Les marques ™ et ® ne sont pas indiquées dans ce document.
Code de région (BD-ROM/DVD VIDEO uniquement)

Un code de région est imprimé au dos à l'extérieur du support de la barre de votre système et ce dernier ne lira que les BD-ROM/DVD VIDEO (lecture uniquement) portant ces codes de région ou .

Page 22

Table des matières

Déballage5
Installation
Étape 1 : Positionnement du
système7
Étape 2 : Insertion de
l'étiquette POP8
Étape 3 : Installation du support
du téléviseur (JIG-ST9 NT3
uniquement)
Étape 4 : Raccordement du
support de la barre
Étape 5 : Insertion du disque
de démonstration13
Mode d'utilisation
Spécification des touches/
boutons14
Changement de l'étiquette
POP 15
Informations

complémentaires

Précautions16
Remarques sur les disques17
Dépannage 18
Spécifications 19
Page 23

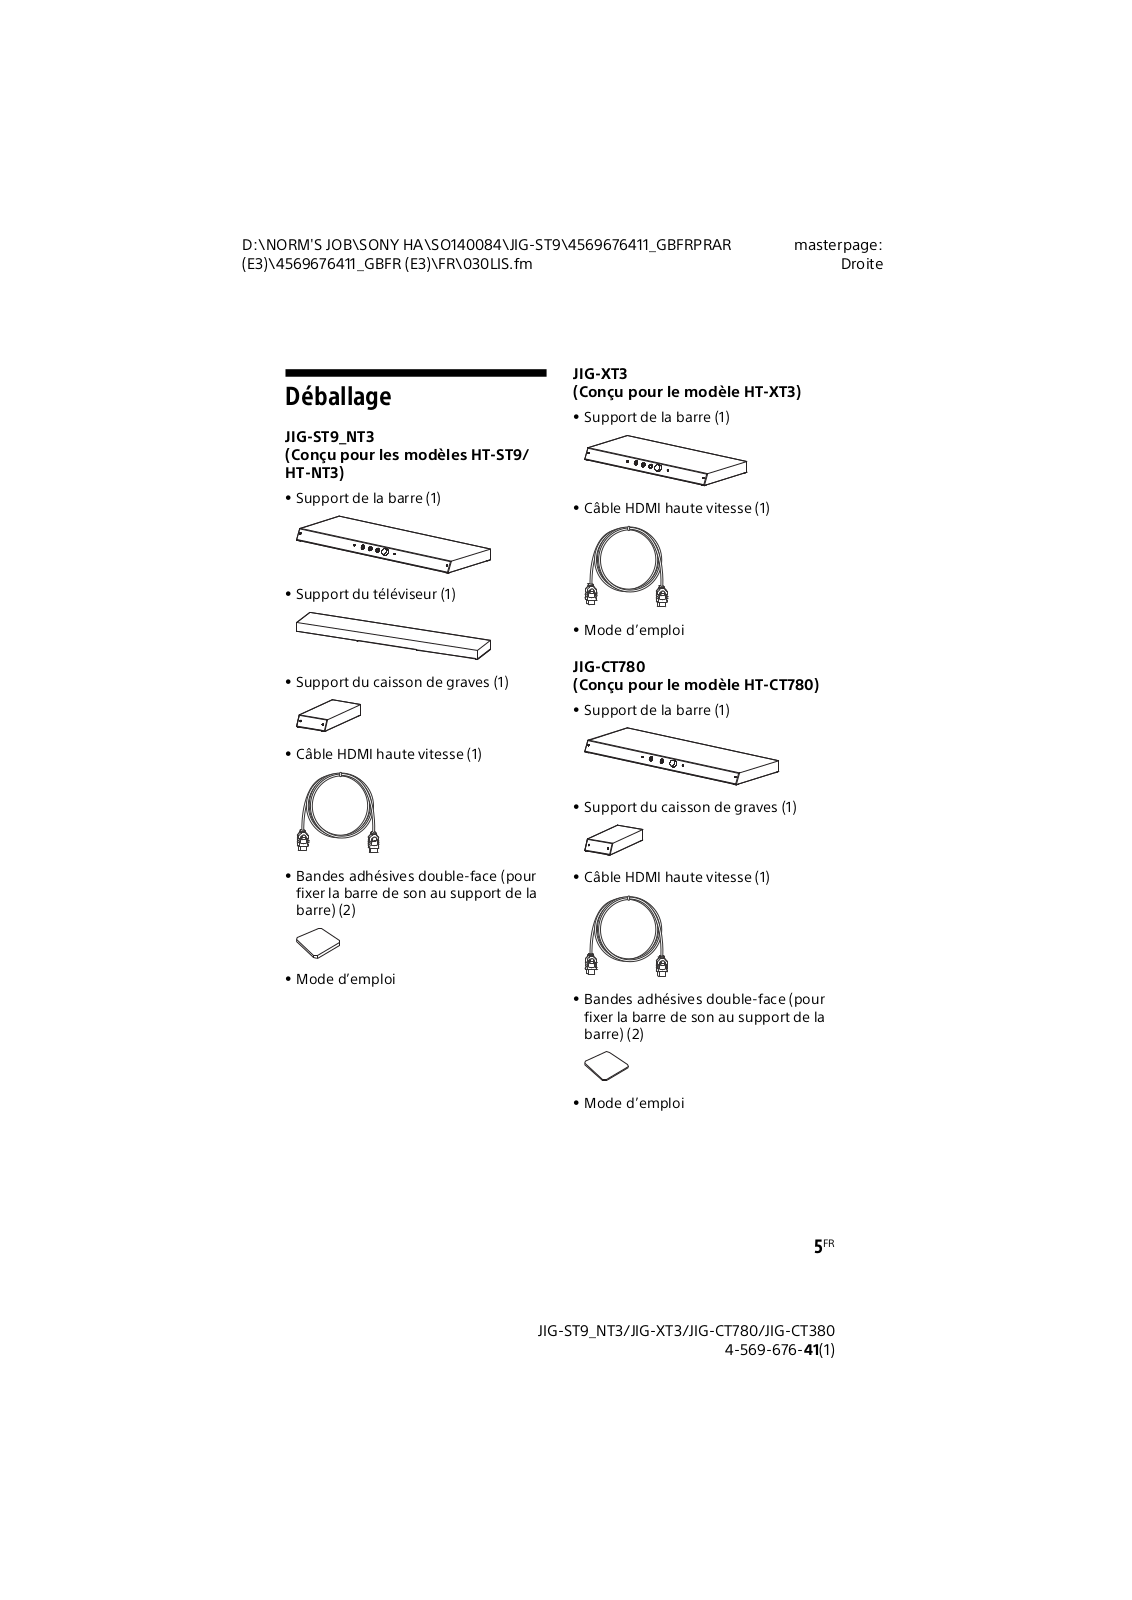
Déballage

JIG-ST9_NT3 (Conçu pour les modèles HT-ST9/ HT-NT3)

• Support de la barre (1)

• Support du téléviseur (1)

• Support du caisson de graves (1)

• Câble HDMI haute vitesse (1)

Bandes adhésives double-face (pour fixer la barre de son au support de la barre) (2)

• Mode d'emploi

JIG-XT3

  • (Conçu pour le modèle HT-XT3)
  • Support de la barre (1)

• Câble HDMI haute vitesse (1)

• Mode d'emploi

JIG-CT780

(Conçu pour le modèle HT-CT780)

• Support de la barre (1)

• Support du caisson de graves (1)

• Câble HDMI haute vitesse (1)

Bandes adhésives double-face (pour fixer la barre de son au support de la barre) (2)

Mode d'emploi

Page 24

JIG-CT380

(Conçu pour le modèle HT-CT380)

• Support de la barre (1)

• Support du caisson de graves (1)

• Câble HDMI haute vitesse (1)

• Bandes adhésives double-face (pour fixer la barre de son au support de la barre) (2)

• Mode d'emploi

Page 25

Étape 1 : Positionnement du système

Le modèle JIG-ST9_NT3 est utilisé à titre d'exemple.

Page 26

Étape 2 : Insertion de l'étiquette POP

Suivez les étapes numérotées dans les diagrammes ci-dessous pour démonter le panneau avant. Insérez ensuite l'étiquette POP. Assemblez le panneau avant en suivant les étapes numérotées dans l'ordre inverse. Le modèle JIG-ST9 NT3 est utilisé à titre d'exemple.

Support de la barre

Support du caisson de graves (HT-ST9_NT3/HT-CT780/HT-CT380 uniquement)

Page 27

Étape 3 : Installation du support du téléviseur (JIG-ST9_NT3 uniquement)

Installez le support du téléviseur fourni sur le support de la barre de sorte que l'écran du téléviseur ne soit pas bloqué par la barre de son.

  • 1 Renversez le support du téléviseur.
  • 2 Retirez les feuilles de protection des quatre bandes adhésives double-face au bas du support du téléviseur.

3 Placez le support du téléviseur sur le support de la barre en alignant leurs panneaux arrière comme illustré ci-dessous.

Vue latérale

Page 28

Étape 4 : Raccordement du support de la barre

Ne branchez pas le cordon d'alimentation secteur du support de la barre à une prise murale tant que tous les autres raccordements n'ont pas été effectués. Suivez les étapes décrites ci-dessous.

Raccordez le support de la barre à la prise HDMI IN 1 de la barre de son.

Les modèles JIG-ST9 NT3 et HT-NT3 sont utilisés à titre d'exemple.

Cordon d'alimentation secteur

2 Utilisez le câble HDMI haute vitesse (fourni) pour raccorder la prise HDMI OUT de la barre de son à la prise HDMI IN du téléviseur de manière à pouvoir regarder la démonstration.

? (IIG-ST9 NT3/IIG-CT780/IIG-CT380 uniquement)

Utilisez les deux bandes adhésives double-face (fournies) pour fixer la barre

de son au support de la barre.

Retirez les feuilles de protection sur les bandes adhésives double-face.

Page 29

② Fixez les bandes adhésives double-face au bas de la barre de son. Nous vous recommandons de fixer les bandes adhésives double-face à l'emplacement signalé en gris dans les diagrammes ci-dessous.

Pour HT-ST9

Pour HT-NT3

Pour HT-CT780

Pour HT-CT380

Page 30

  • ③ Retirez la feuille de protection sur les deux bandes adhésives double-face que yous avez fixées à l'étape ②.
  • 4 Placez la barre de son sur le support de la barre.
  • 5 Raccordez le cordon d'alimentation secteur de la barre de son et du téléviseur.
  • 6 Raccordez le cordon d'alimentation secteur du support de la barre.
Remarque

(JIG-ST9_NT3/JIG-CT780/JIG-CT380 uniquement)

Veillez à spécifier la connexion sans fil pour connecter la barre de son au caisson de graves (fonction Secure Link ou LINK) avant d'insérer le disque de démonstration. Pour obtenir plus de détails sur la fonction Secure Link ou LINK, reportez-vous au mode d'emploi fourni avec la barre de son.

Page 31

Étape 5 : Insertion du disque de démonstration

Panneau arrière

  • Allumez la barre de son et le téléviseur.
  • 2 Changez l'entrée du téléviseur à celle à laquelle est raccordée la barre de son.
Remarque

L'écran [Easy Initial Settings] apparaît sur l'écran du téléviseur après la mise sous tension du support de la barre et il n'y a pas de disque dans le plateau de disque. L'écran [Easy Initial Settings] disparaît après l'insertion du disque de démonstration.

  • 3 Appuyez sur ≜ et placez un disque de démonstration sur le plateau de disque.
  • 4 Appuyez sur ≜ pour fermer le plateau de disque.

La lecture commence.

Remarque

Ne forcez pas le plateau de disque pour le fermer, car vous risqueriez d'entraîner un dysfonctionnement de l'appareil.

Conseil

Pour réinitialiser le système quand le disque de démonstration est lu, maintenez I/(1) (marche/veille) enfoncé pendant 5 secondes environ.

Page 32

Spécification des touches/boutons

JIG-ST9_NT3/JIG-XT3 uniquement

JIG-CT780/JIG-CT380 uniquement

1 Touche ► DEMO

Appuyez pour démarrer la lecture de la démonstration.

2 Touche Hi-Res (JIG-ST9_NT3/JIG-XT3 uniquement)

Appuyez pour écouter le son haute résolution.

3 Touche Bluetooth

Appuyez pour écouter la musique via une connexion BLUETOOTH. Quand vous appuyez sur Bluetooth, la fonction BLUETOOTH de la barre de son est activée automatiquement.

Suivez les étapes ci-dessous pour appairer votre périphérique BLUETOOTH à la barre de son.

  • Réglez votre périphérique BLUETOOTH en mode d'appairage. Pour plus d'informations sur le réglage en mode d'appairage, reportez-vous au mode d'emploi fourni avec votre périphérique.
  • ② Sélectionnez le nom de la barre de son (par exemple, « HT-NT3 ») sur l'affichage du périphérique.
  • ③ Une fois l'appairage terminé, le périphérique est raccordé automatiquement à la barre de son.

L'écran de lecture BLUETOOTH apparaît sur l'écran du téléviseur.

④ Démarrez la lecture sur votre périphérique. Vous pouvez à présent écouter la musique via le système.

4 ------------------------------------

Tournez pour régler le niveau du volume.

Page 33

À propos des indicateurs LED

  • Blanc (en haut et au bas du panneau avant)
  • Bleu (sur les touches)

Lorsque vous insérez le disque de démonstration et la démonstration commence, l'indicateur LED blanc s'allume et l'indicateur LED bleu clignote. Si vous appuyez sur la touche, l'indicateur LED bleu de la touche s'allume pendant 5 minutes environ. L'indicateur continue de clignoter.

Tous les indicateurs LED s'éteignent quand le plateau de disque est ouvert ou si aucun disque n'est inséré.

Changement de l'étiquette POP

Vous pouvez changer l'étiquette POP dans le panneau avant du support de la barre et du support du caisson de graves.

Reportez-vous à « Étape 2 : Insertion de l'étiquette POP » (page 8) pour démonter et assembler le panneau avant.

Page 34

Informations complémentaires

Précautions

Sécurité

  • Si un objet ou un liquide pénètre dans le boîtier du système, débranchez le système et faites-le vérifier par un technicien qualifié avant de le réutiliser.
  • Ne touchez pas le cordon d'alimentation secteur avec les mains mouillées. Ceci pourrait provoquer un choc électrique.
  • Ne grimpez pas sur le système, car vous risqueriez de tomber et de vous blesser, ou encore d'endommager le système.
  • Ne posez aucun objet autre qu'un téléviseur et une barre de son sur le système.
Sources d'alimentation

  • Avant d'utiliser le système, assurezvous que sa tension de fonctionnement correspond à celle de votre alimentation secteur. La tension de fonctionnement est indiquée sur la plaque signalétique au dos du système.
  • Débranchez le système de la prise murale si vous ne comptez pas l'utiliser pendant longtemps. Pour débrancher le cordon d'alimentation secteur, tenez-le par la fiche ; ne tirez jamais directement sur le cordon luimême.

Accumulation de chaleur

Bien que le système chauffe pendant le fonctionnement, ceci n'est pas une anomalie. Si vous utilisez constamment ce système à un volume élevé, la température sur le sommet, les côtés et le fond du boîtier augmente considérablement. Pour ne pas risquer de vous brûler, ne touchez pas le boîtier.

Lieu d'installation

  • Placez le système dans un endroit bien aéré pour éviter toute accumulation de chaleur à l'intérieur.
  • Ne placez pas le système sur une surface molle (tapis, couvertures, etc.) ou ne placez rien à l'arrière du système qui puisse obstruer les orifices d'aération et provoquer des anomalies.
  • Ne placez pas le système près de sources de chaleur, telles que des radiateurs ou des conduites d'air, ou dans un endroit exposé aux rayons du soleil, à de la poussière excessive, à des vibrations mécaniques ou à des chocs.
  • N'installez pas le système en position inclinée. Il est conçu pour fonctionner en position horizontale uniquement.
  • Prenez garde lorsque vous placez le système sur des surfaces ayant subi un traitement spécial (cire, huile, polish, etc.), car sa surface risque de se tâcher ou de se décolorer.
  • Veillez à éviter tout risque de blessures aux angles du système.
  • Maintenez le système et les disques éloignés des composants dotés d'aimants puissants, tels que les fours micro-ondes ou les enceintes volumineuses.

16FR

Page 35
Utilisation

  • Avant de raccorder d'autres périphériques, veillez à éteindre et débrancher le système.
  • Si le système est directement déplacé d'un environnement froid à un environnement chaud, ou s'il est placé dans une salle très humide, l'humidité peut se condenser sur les lentilles qui se trouvent à l'intérieur du lecteur dans le support de la barre. Dans ce cas, il est possible que le système ne fonctionne pas correctement. Retirez alors le disque et laissez le système allumé pendant une demi-heure environ jusqu'à ce que s'évapore l'humidité.

Nettoyage

Nettoyez le boîtier, le panneau et les commandes avec un chiffon doux légèrement imbibé d'une solution détergente douce. N'utilisez aucun type de tampon abrasif, de poudre à récurer ou de solvant, tel que de l'alcool ou de l'essence.

Remarques sur les disques

N'utilisez que le disque de démonstration fourni séparément.
Manipulation des disques

  • Pour garder le disque propre, manipulez-le en le tenant par le bord. Ne touchez pas la surface.
  • Ne collez pas de papier ou de scotch sur le disque.

  • N'exposez pas le disque aux rayons du soleil ou à des sources de chaleur tels que des conduites de chauffage et ne les laissez pas dans une voiture directement garée au soleil car la température peut augmenter considérablement à l'intérieur du véhicule.
  • Après la lecture du disque, rangez ce dernier dans son boîtier.

Nettoyage

Après la lecture du disque, nettoyez ce dernier avec un chiffon. Nettoyez le disque en allant du centre

vers la périphérie.

N'utilisez pas de solvants tels que de l'essence, des diluants, des produits de nettoyage disponibles dans le commerce ou des vaporisateurs antistatigues destinés aux disgues vinyle.

Page 36

Dépannage

Si vous rencontrez l'une des difficultés suivantes pendant l'utilisation du système.

  • La touche/le bouton (► DEMO, Hi-Res, Bluetooth, — uniii)+) est inopérant.
  • Aucune sortie via le raccordement HDMI.
  • L'indicateur LED bleu ne s'allume pas.

Essayez les solutions suivantes :

  • Assurez-vous que le câble HDMI est correctement et fermement raccordé.
  • → Vérifiez que le disque de démonstration est correctement inséré.
  • → Débranchez le cordon d'alimentation secteur, puis rebranchez-le.

Si le problème persiste, vérifiez les raccordements dans le support de la barre.

  • → ① Renversez le support de la barre.
    • (2) Retirez toutes les vis au bas du support de la barre.
    • Ouvrez le couvercle au bas du support de la barre.
    • Assurez-vous que tous les raccordements sont correctement et fermement effectués.

Si le moindre problème persiste, consultez votre revendeur Sony le plus proche.

Page 37

Spécifications

Alimentation

220 V à 240 V CA, 50/60 Hz

Consommation

Marche :

14 W

Veille :

0,5 W (en mode d'économie d'énergie)

Modèle Dimensions (l/h/p) (environ) Poids (environ)
JIG-ST9_NT3
• Support de la barre
• Support du téléviseur
• Support du caisson de graves
1 200 mm × 70 mm × 396,5 mm
1 200 mm × 60 mm × 215 mm
250 mm × 70 mm × 464,1 mm
21,9 kg
3,7 kg
6 kg
JIG-XT3
• Support de la barre
900 mm × 70 mm × 396,5 mm 19,3 kg
JIG-CT780
• Support de la barre
• Support du caisson de graves
1 200 mm × 70 mm × 396,5 mm
200 mm × 70 mm × 434 mm
21,9 kg
5,3 kg
JIG-CT380
• Support de la barre
• Support du caisson de graves
900 mm × 70 mm × 396,5 mm
200 mm × 70 mm × 434 mm
19,3 kg
5,3 kg

La conception et les spécifications sont sujettes à modifications sans préavis.

Page 38

Page 39

Page 40

Page 41

مشخصات

نیازمندی های برق 220 – 240 ولت برق متناوب، 50/60 هرتز مصرف برق 14 وات آماده به کار: 0.5 وات (در حالت ذخیره نیرو)

مدل ابعاد (عرض/ارتفاع/عمق) (تقريباً) جرم (تقريباً)
JIG-ST9_NT3
• پایه اصلی 1,200 میلی متر × 70 میلی متر × 396.5 میلی متر 21.9 کیلوگرم
• پايه تلويزيون 1,200 میلی متر × 60 میلی متر × 215 میلی متر 3.7 كيلوگرم
• پايه سابووفر 250 میلی متر × 70 میلی متر × 464.1 میلی متر 6 کیلوگرم
JIG-XT3
• پایه اصلی 900 میلی متر × 70 میلی متر × 396.5 میلی متر 19.3 كيلوگرم
JIG-CT780
• پایه اصلی 1,200 میلی متر × 70 میلی متر × 396.5 میلی متر 21.9 کیلوگرم
• پايه سابووفر 200 میلی متر × 70 میلی متر × 434 میلی متر 5.3 کیلوگرم
JIG-CT380
• پایه اصلی 900 میلی متر × 70 میلی متر × 396.5 میلی متر 19.3 كيلوگرم
• پايه سابووفر 200 میلی متر × 70 میلی متر × 434 میلی متر 5.3 كيلوگرم

طراحی و مشخصات بدون اعلان قبلی ممکن است تغییر کنند.

Page 42

از محلول هایی مانند بنزین، تیز، پاک کننده های موجود در بازار، یا اسپری ضد استاتیک در نظر گرفته شده برای LP های وانیلی استفاده نکنید.

Page 43

درباره ټيز کردن

برای تمیز کردن محفظه، پانل و کنترل ها از یک پارچه نرم که کمی با محلول تمیز کننده ملایم مرطوب شده استفاده کنید. از پد ساینده، پودر تمیزکننده یا محلول هایی مانند الکل یا بنزین استفاده نکنید.

ساير اطلاعات

در مورد ایمنی

  • اگر جسم جامد یا مایع وارد محفظه شد، قبل از راه اندازی مجدد، اتصال سیستم را قطع کرده و توسط یک فرد واجد شرایط آن را بررسی کنید.
    • با دستان خیس سیم برق متناوب را لمس نکنید. اینکار می تواند موجب شوک الکتریکی شود. از سیستم بالا نروید، زیرا ممکن است بیفتید و آسیب ببینید، یا سیستم آسیب ببیند. جنای، به غیر از تلمیزیون و Sound Bar را دوی.
      • چیزی به عیر از تلویزیوں و Sound Bar را روی سیستم قرار ندھید.
        • در مورد منبع برق
    • قبل از راه اندازی سیستم، بررسی کنید که ولتاژ مورد استفاده با منبع نیروی محلی مشابه باشد. ولتاژ مورد استفاده در پلاک اسم در پشت سیستم نشان داده شده است.
    • اگر نمی خواهید از سیستم برای مدت زمان طولانی استفاده کنید، سیستم را از پریز دیوار جدا کنید. برای جدا کردن سیم برق متناوب خود دوشاخه را بگیرید، هرگز سیم را نکشید.

وقتی داخل دستگاه گرم می شود هر چند دستگاه در طول کار کردن گرم می شود، این نشانه نقص در عملکرد نیست. اگر به طور مستمر از این دستگاه با صدای بلند استفاده می کنید، دمای محفظه در قسمت بالا، طرفین و پایین بسیار زیاد می شود. برای جلوگیری از سوختن، به محفظه دست نزنید.

در مورد مکان • سیستم را در مکانی قرار دهید که تهویه هوای مناسب داشته باشد تا از گرم شدن داخل سیستم جلوگیری شود.

Page 44

درباره نشانگرهای LED • سفید (در بالا و پایین پانل جلو) • آب (در روی دکمه ها)

وقتی دیسک نمایشی را قرار می دهید و نمایش شروع می شود، نشانگر LED سفید روشن شده و نشانگر LED آبی چشمک می زند. اگر دکمه را فشار دهید، نشانگر LED آبی دکمه برای حدود 5 ثانیه روشن می شوند. سپس نشانگر شروع به چشمک زدن می کند. مَامی نشانگرهای LED هنگامی که سینی دیسک باز است یا دیسکی قرار داده نشده، خاموش می شوند.

عوض كردن برجسب POP

می توانید برچسب POP پانل جلوی پایه اصلی و پایه ساب ووفر را عوض کنید. مراجعه کنید "مرحله 2: وارد کردن برچسب POP" (صفحه 8) تا پانل جلو را جدا و وصل کنید.

Page 45

فقط IIG-ST9 NT3/IIG-XT3

آ. دکمه DEMO ◄ این دکمه را برای شروع نمایش فشار دهید. 2. دکمه Hi-Res (مقط JIG-ST9_NT3/JIG-XT3 فال این دکمه را برای شنیدن صدا با وضوح بالا فشار دهید. 3. دکمه را برای شنیدن صدا با وضوح بالا فشار دهید. 3. دکمه را برای لذت بردن از موسیقی از طریق اتصال BLUETOOTH فشار دهید. 3. دستگاه HI-Res فشار دهید. 3. دستگاه Bluetooth مربوط به BLUETOOTH فود با عمل دوسید. 4. برای جفت سازی دستگاه BLUETOOTH خود با rad مربوط به sound Ba فشار دهید. 4. برای جفت سازی دستگاه BLUETOOTH خود با rad Norde (ماد از دار ان این در دان از موسیقی از طریق اتصال Bluetoth مربوط به sound Ba فشار دهید. 4. برای جفت سازی دستگاه HI-TOOTH خود با rad Norde (ماد از در ان دنبال کنید. 5. دستگاه HI-TOOTH را در حالت جفت سازی تنظیم کنید. 5. نمای Bluetoot (برای مثال "HT-NT3") را روی نمایشگر دستگاه خود انتخاب کنید. 6. یعد از کامل شدن جفت سازی، دستگاه بطور خودکار به rad banc وصل می شود. 5. پخش را روی دستگاه خود شروع کنید. اکنون می توانید از موسیقی از طریق سیستم خود لذت ببرید. 6. پخش را روی دستگاه خود شروع کنید. اکنون می توانید از موسیقی از طریق سیستم خود لذت ببرید. 7. می می این ییج را برای تنظیم میزان صدا بچرخانید.

Page 46

بعد از اینکه پایه اصلی را روشن کردید و هیچ دیسکی در سینی نیست، صفحه [Easy Initial Settings] روی صفحه تلویزیون ظاهر می شود. پس از اینکه دیسک نمایشی را در سینی وارد کردید، صفحه [Easy Initial Settings] ناپدید می شود.

3 ▲ را فشار دهید و دیسکی را در سینی دیسک قرار دهید. 4 ▲ را برای بستن سینی دیسک فشار دهید. پخش شروع می شود. ملاحظة سعی نکنید سینی دیسک را به زور ببندید زیرا ممکن است باعث اشکال در عملکرد آن شود. بای تنظیم محاد دست مدیر نمان بخش دیسک غارش بر(1)/ (دمشن )آماده به کار) دای جرم 5 ثانیه راین نگه دارد.

Page 47

(3) ورقه محافظ روی دو نوار دو طرفه ای که در مرحله (2) وصل کرده اید را جدا کنید. 4 Sound Bar را روی پایه اصلی قرار دهید. 5 سیم برق متناوب (سیم اصلی) را به Bar کنید. 6 سیم برق متناوب پایه اصلی را وصل کنید.

ملاحظة

(فقط JIG-ST9_NT3/JIG-CT780/JIG-CT380)

قبل از قرار دادن دیسک نمایشی، اتصال بی سیم جهت اتصال Sound Bar با سابووفر (عملکرد Secure Link یا LINK) را مشخص کنید و از آن مطمئن گردید. در خصوص جزئیات مربوط به عملکرد Secure Link یا LINK، به دفترچه دستورالعمل های راه اندازی ارائه شده به همراه Bar Sound Bar مراجعه کنید.

Page 48

برای HT-ST9

برای HT-NT3

برای HT-CT780

برای HT-CT380

ظيم كردن

Page 49

مرحله 4: وصل کردن پایه اصلی

تا زمانی که سایر اتصالات انجام نشده اند سیم برق متناوب پایه اصلی را به پریز دیوار وصل نکنید. مراحل زیر را دنبال کنید.

پایه اصلی را به فیش HDMI IN 1 مربوط به Sound Bar وصل کنید.

مدل های JIG-ST9_NT3 و HT-NT3 به عنوان نمونه استفاده شده اند.

  • ارارائه شده) برای اتصال فیش HDMI OUT مربوط به Sound Bar به فیش HDMI OUT مربوط به Sound Bar به فیش HDMI IUT تا بویزیون استفاده کنید تا بتوانید نمایش را ببینید.
    • 3 (فقط JIG-ST9_NT3/JIG-CT780/JIG-CT380) با استفاده از دو نوار دو طرفه (ارائه شده) Sound Bar (را به پایه اصلی وصل کنید. (1) ورقه های محافظ روی نوارهای دو طرفه را جدا کنید.
Page 50

تنظيم كردن

مرحله 3: نصب پایه تلویزیون (فقط JIG-ST9_NT3)

یایه تلویزیون ارائه شده را روی یایه اصلی نصب کنید به طوری که صفحه تلویزیون با Sound Bar مسدود نشود.

1 پایه تلویزیون را وارونه کنید. 2 محمد محم

3 همان طور که در شکل زیر نشان داده شده است، پایه تلویزیون را روی پایه اصلی قرار دهید به طوری که پانل های پشت آنها با هم تراز باشند. مای پهلو پایه تلویزیون پایه اصلی ب

Page 51

مرحله 2: وارد کردن برچسب POP برای پیاده کردن پانل جلو ترتیب شهاره مراحل را در نمودار زیر دنبال کنید. سپس برچسب POP را وارد کنید. پانل جلو را با انجام شماره مراحل زیر بصورت برعکس وصل کنید. مدل JIG-ST9_NT3 به عنوان غونه استفاده شده است. بابة اصل

پيد سبووتر (فقط HT-ST9_NT3/HT-CT780/HT-CT380)

Page 52

تنظيم كردن

مرحله 1: قرار دادن سیستم

مدل JIG-ST9_NT3 به عنوان نمونه استفاده شده است.

Page 53

JIG-CT380

(برای مدل HT-CT380 طراحی شده است) • پایه اصلی (1)

• ىابە سابەۋە (1)

(1) High Speed HDMI cable •

• نوارهای دو طرفه (برای وصل کردن Sound Bar به

دستورالعمل های راه اندازی

Page 54

دستورالعمل های راه اندازی

5PR

Page 55

جدول المحتويات

باز کردن بسته بندی5
تنظيم كردن
مرحله 1: قرار دادن سیستم7
مرحله 2: وارد کردن برچسب POP
مرحله 3: نصب پایه تلویزیون
(فقط JIG-ST9_NT3)
مرحله 4: وصل كردن پايه اصلى
مرحله 5: وارد کردن دیسک نمایشی
نحوه استفاده
نحوه استفاده
مشخصات دکمه/پیچ
نحوه استفاده
مشخصات دکمه/پیچ
عوض کردن برچسب POP
نحوه استفاده
مشخصات دکمه/پیچ
عوض کردن برچسب POP
سایر اطلاعات
نحوه استفاده
مشخصات دکمه/پیچ
نحوه استفاده
مشخصات دکمه/پیچ
نحوه استفاده
مشخصات دکمه/پیچ
Page 56

• آرم های "DVD+RW"، "Blu-ray DiscTM" "DVD -RW" "DVD+R", "DVD-RW" "DVD و "DVD علامت های تجاری هستند. • Atlan 2 در CD" علامت های تجاری هستند. • علامت کلمه ®BLUETOOTH و و آرم ها علامت های تجاری ثبت شده متعلق به Sony Corporation می باشند و هر نوع استفاده از این علامت ها توسط علامت های تجاری و نام های تجاری متعلق به مالکان مربوطه آنهاست. • سایر علامت های تجاری، علامت های تجاری مالکان مربوطه آنهاست. • سایر نام های سیستم و محصول بطور کلی علامت های تجاری یا علامت های تجاری ثبت شده سازندگان می باشند. علامت های TM و ® در این سند نشان داده نشده است.

کد منطقه (فقط BD-ROM/DVD VIDEO) سیستم دارای یک کد منطقه است که در قسمت خارجی عقبی پایه اصلی چاپ شده است و فقط یک BD-ROM/DVD VIDEO (فقط پخش) دارای برچسب کدهای منطقه مشابه یا 🍘 را پخش می کند.

Page 57
هشدار

دستگاه را در یک فضای محدود مانند قفسه کتاب یا کابینت توکار نصب نکنید. برای کاهش خطر آتش سوزی، روزنه های تهویه هوای دستگاه را با روزنامه، سفره، پرده و دیگر وسایل نپوشانید. شمت های روشن) قرار ندهید. شمع های روشن) قرار ندهید. برای کاهش خطر آتش سوزی یا شوک الکتریکی، این شدن قرار ندهید، و از قرار دادن چیزهایی که با مایعات شدن قرار ندهید، و از قرار دادن چیزهایی که با مایعات برای اجتناب از آسیب، این دستگاه باید طبق دستورالعمل برای اجتناب از آسیب، این دستگاه باید طبق دستورالعمل این نصب بطور ایمن در محفظه قرار گیرد. انجام شود. افتادن سیستم حتماً توسط دو نفر یا بیشتر شخصی و/یا خسارت مالی شود. این دستگاه فقط برای استفاده در داخل ساختمان است.

در مورد منبع برق • تا زمانی که دستگاه به پریز برق متناوب وصل باشد اتصال آن از منبع برق اصلی قطع نمی شود حتی اگر خود دستگاه خاموش شده باشد. • چون از دوشاخه اصلی برای قطع اتصال دستگاه از برق اصلی استفاده می شود، دستگاه را به یک پریز برق متناوب که به راحتی قابل دسترسی است وصل کنید. به محض مشاهده هر چیز غیرعادی در دستگاه، فوراً دوشاخه اصلی را از پریز برق متناوب جدا کنید.

کابل های توصیه شده برای اتصال به کامپیوترهای میزبان و/یا وسایل جانبی، از کابلها و اتصالاتی با محافظ مناسب و دارای اتصال زمین استفاده کنید.

استفاده از تجهیزات نوری با این محصول آسیب به چشم را افزایش می دهد. زیرا نور لیزر استفاده شده در این Home Theatre را باز کنید. درا بز کنید.

بخش دریافت کننده این دستگاه بعنوان یک محصول CLASS 3R LASER طبقه بندی می شود. هنگام باز شدن محفظه محفاظت از لیزر، اشعه های قابل رؤیت و غیر قابل رؤیت ساتع می شوند، مراقب باشید چشم شما در معرض تابش مستقیم قرار نداشته باشد. این علامت بر روی محفظه محافظت از لیزر در داخل ضمیمه پخش کننده در پایه اصلی قرار دارد.

حقوق کپی برداری و علامت های تجاری High-Definition می باشد. (Multimedia Interface (HDMITM عبارت های HDMI او High-Definition علامت HDMI High-Definition و آرم HDMI علامت های تجاری یا علامت های تجاری ثبت شده HDMI Licensing LLC هستند.

• DVD Format علامت تجاری /DVD Logo علامت تجاری /DVD Format است. "Blu-rayTM" ، "Blu-ray DiscTM" ، "Blu-ray 3DTM" و آرم ها علامت های تجاری Blu-ray Disc Association هستند.

Page 58

Page 59

المواصفات

متطلبات الطاقة

220 فولت - 240 فولت تيار متردد، 60/50 هرتز

استهلاك الطاقة

تشغيل: 14 واط

الاستعداد للتشغيل:

0.5 واط (في وضع توفير الطاقة)

الطراز الأبعاد (عرض/ارتفاع/عمق) (تقريباً) الكتلة (تقريباً)
JIG-ST9_NT3
• الحامل الشريطي 1,200 مم × 70 مم × 396.5 مم 21.9 کجم
• حامل التلفزيون 1,200 مم × 60 مم × 215 مم 3.7 کجم
• حامل مضخم الصوت 250 مم × 70 مم × 464.1 مم 6 کجم
JIG-XT3
• الحامل الشريطي 900 مم × 70 مم × 396.5 مم 19.3 کجم
JIG-CT780
• الحامل الشريطي 1,200 مم × 70 مم × 396.5 مم 21.9 کجم
• حامل مضخم الصوت 200 مم × 70 مم × 434 مم 5.3 کجم
JIG-CT380
• الحامل الشريطي 900 مم × 70 مم × 396.5 مم 19.3 کجم
• حامل مضخم الصوت 200 مم × 70 مم × 434 مم 5.3 کجم

التصميم والمواصفات عرضة للتغيير دون إشعار.

Page 60

تحرى الخلل وإصلاحه ذا واجهت أنًا من الصعوبات التالية أثناء تشغيل النظام. • الن /الن الدوار (Hi-Res ، TEMO) Bluetooth، 🕂 الالالية (— الالعمار. • لا يوجد اخراج عبر التوصيل منفذ HDMI. • مؤشر LED الأزرق لا يضيء. → تحقق من اتصال كيار HDMI بطريقة صحيحة وراحكام ➡ تحقق من أنه قد تم إدخال قرص العرض التوضيحى بشكل صحيح. ← افصل سلك التباد المتحدد ثم صله مرة أخرى إذا استمرت المشكلة، فتحقق من التوصيلات بالحامل لشہ بطی. سريسي. ← () اقاب الحامل الشديط بدأسًا على عقب 2 قم بفك جميع البراغي الموجودة في الجزء السفلي من الحامل الشريطي. 3 افتح الغطاء الموجود في الجزء السفلي من الحامل الشريطي. عقق من توصيل جميع التوصيلات بشكل صحيح وباحكام ذا استمرت أنة مشكلة، فاستشر أقرب وكبل تسويق .Sony

ملاحظات حول الاسطوانات لا تستخدم الا قاص العاض التوضيحي المزود بشكل منفصل. حول التعامل مع الاسطوانات للمحافظة على نظافة الأسطوانة، أمسك الأسطوانة من عوافها. لا تلمس السطح. • لا تعرّض الأسطوانة لأشعة الشمس المباشرة أو مصادر الحارق - در الحارة، مثل أناسب الهواء الساخن، أو تتركها داخل سيارة واقفة تحت أشعة الشمس مباشرة، ذلك أن درجة الحرارة قد ترتفع بشكل كبير داخل السيارة. بعد التشغيل، احفظ الأسطوانة داخل عليتها. حول التنظيف قبل التشغيل، نظف الأسطوانة يقطعة قماش نظيفة. مسح الاسطوانة من المركز إلى الخارج. تجنب استخدام مذيبات مثل البنزين أو مخفف الدهان

تجنب استخدام مذيبات مثل البنزين أو مخفف الدهان أو المنظفات المتوفرة في الأسواق أو البخاخ المقاوم للشحنات الساكنة المعد لأسطوانات الفىنيل vinyl LPs.

علومات إضافية

Page 61

قبل توصيل أجهزة أخرى، تأكد من إيقاف تشغيل النظام ون: ع القايس. إذا تم أحضار النظام مناشرة من مكان بارد إلى مكان دافئ، أو وضع في غرفة رطبة للغاية، فقد تتكاثف لرطوبة على العدسات داخل المشغل بالحامل الشريطي. ذا حصل ذلك، يمكن ان لا يعمل النظام يصورة صحيحة. في هذه الحالة، انزع الإسطوانة واترك النظام في حالة تشغيل لمدة حوالي نصف ساعة لغاية ان تتبخر الرطوبة.

حول التنظيف نظّف الكاسنة واللوحة وأزرار التحكم بقطعة قماش ناعمة مبالة قليلاً محامل تنظيف متعادل لا تستعمل اي ذمع من اللياد الكاشط، مسجوق التنظيف او مواد مذربة مثل الكحمل اماليندين

مؤهلين قبل تشغيله ماة أخاء • تحنب لمس سلك التبار المتردد بأبد مبللة. عما، ذلك لا تتسلق فوق النظام، لأنك رما تسقط وتعرض نفسك للإصابة أو تتسبب في تلف النظام. الا تضع أى شيء بخلاف التلفزيون وشريط الصوت على النظام. حمل مصادر الطاقة • قبل استخدام النظام، تحقق من مطابقة الجهد الكهربي للتشغيل للجهد الكهربي لمصدر الإمداد بالطاقة المحلى لديك. يتضح الجهد الكهربي للتشغيل على لوحة الاسم لموجودة في الجزء الخلفي من النظام. إذا كنت لا تربد استخدام النظام لفتة زمنية طميلة. فاحرص على فصل النظام عن مأخذ الحائط. لفصل سلك طاقة التيار المتردد AC، امسك القايس نفسه؛ لا تسحب

احتياطات

السلك مطلقاً.

للذة عن الأمان · إذا سقط أي جسم صلب أو مادة سائلة على الكانينة، افصل الكابل الخاص بالنظام وافحصه لدى أشخاص

Page 62

نبذة عن مؤشرات LED • أبيض (أعلى وأسفل اللوحة الأمامية) • أزرق (على الأزرار)

عندما تقوم بإدخال قرص العرض التوضيحي ويبدأ العرض، يضيء مؤشر LED الأبيض ويومض مؤشر LED الأزرق. إذا ضغطت على الزر، يضيء مؤشر LED الأزرق الخاص بالزر لمدة 5 دقائق تقريبًا. ثم يستمر المؤشر في الوميض. تنطفئ جميع مؤشرات LED عند فتح درج القرص أو عند عدم إدخال أي قرص.

تغيير ملصق POP

مِكنك تغيير ملصق POP في اللوحة الأمامية بالحامل الشريطي وحامل المضخم. نظر "الخطوة 2: إدخال ملصق POP" (صفحة 8) لفك اللوحة الأمامية وتجميعها.

فية الاستخدام

Page 63

مواصفات الزر/الزر الدوار

قم بإدارته لضبط مستوى الصوت.

Page 64

Page 65

(2) قم بإزالة صفيحة الحماية الموجودة بالشريطين مزدوجي الجانب واللذين قمت بتركيبهما في الخطوة (2). 4 ضع شريط الصوت على الحامل الشريطي. 5 قم بتوصيل سلك التيار المتردد الخاص بشريط الصوت والتلفاز. 6 قم بتوصيل سلك التيار المتردد الخاص بالحامل الشريطي.

ملاحظة

(JIG-ST9_NT3/JIG-CT780/JIG-CT380 فقط) فقط

تأكد من تحديد الاتصال اللاسلكي لتوصيل شريط الصوت بمضخم الصوت (وظيفة Secure Link أو LINK ) قبل أن تقوم بإدراج قرص العرض التوضيحي. للتعرف على تفاصيل حول وظيفة Secure Link أو LINK ، راجع دليل التشغيل المرفق بشريط الصوت.

Page 66

② قم بتركيب الأشرطة مزدوجة الجانب بالجزء السفلي من شريط الصوت. نوصيك بإرفاق الأشرطة مزدوجة الجانب إلى المكان المميز باللون الرمادي في الرسوم التوضيحية أدناه.

للطراز HT-ST9

للطراز HT-CT780

للطراز HT-CT380

Page 67

الخطوة 4: توصيل الحامل الشريطي تجنب توصيل سلك التيار المتردد الخاص بالحامل الشريطي بمأخذ الحائط (الخطوط الرئيسية) حتى يتم الانتهاء من إنشاء جميع التوصيلات الأخرى اتبع الخطوات الواردة أدناه. 1 قم بتوصيل الحامل الشريطي بقبس HDMI IN 1 الخاص بالشريط الصوت.

يُستخدم الطراز HT-NT3 و HT-NT3 كمثال.

  • استخدم كبل HDMI عالي السرعة (مرفق) لتوصيل مقبس HDMI OUT الخاص بشريط الصوت عقبس HDMI OUT الخاص بشريط الصوت عقبس HDMI IN الخاص بالتلفاز لتتمكن من مشاهدة العرض التوضيحي.
    • 3 JIG-ST9_NT3/JIG-CT780/JIG-CT380) فقط) استخدم الشريطين مزدوجي الجانب (مرفقان) لتركيب شريط الصوت بالحامل الشريطي. (1) قم بإزالة صفائح الحماية الموجودة بالأشرطة مزدوجة الجانب.

Page 68

Page 69

حس ستحم (علوت HT-ST9 NT3/HT-CT780/HT-CT380) فقط)

Page 70

الخطوة 1: وضع النظام

يُستخدم الطراز JIG-ST9_NT3 كمثال.

Page 71

JIG-CT380

(مصمم للطراز HT-CT380)

• حامل مضخم الصوت (1)

عدد كابل HDMI عالي السرعة (1)

الأشرطة مزدوجة الجانب (لتركيب شريط الصوت بالحامل الشريطي) (2)

دليل التشغيل

Page 72

AR

Page 73
جدول المحتويات فتح وتفريغ العبوة... الإعداد الخطوة 1: وضع النظام ... الخطوة 2: إدخال ملصق POP ..... 8..... الخطوة 3: تركيب حامل التلفزيون الطراز IIG-ST9 NT3 فقط) .................................... الخطوة 4: توصيل الحامل الشريطي.... 10..... الخطوة 5: إدراج قرص العرض التوضيحى .......13 كيفية الاستخدام 14... مواصفات الزر/الزر الدوار ..... 15.. تغيير ملصق POP.. معلومات إضافية احتىاطات..... 16. 17 ملاحظات حول الاسطوانات 17 تحري الخلا ، و اصلاحه 18..... المواصفات.....
Page 74

• الشعارات "DVD+RW" و "Blu-ray Disc™ و "DVD-RW" و "DVD-RW" و "DVD+R" و "DVD-RW" و "DVD vIDEO" و "DVD VIDEO" • علامة الكلمة "DVD VIDEO وشعاراتها هي علامات تجارية مسجلة تمتلكها شركة علامات تجارية مسجلة تمتلكها شركة Bluetooth SIG, Inc. Sony Corporation ويكون أي استخدام لهذه العلامات بواسطة شركة Blueton التجارية والأسماء التجارية الأخرى هي خاصة مالكيها المعنيين. • وبوجه عام، تعتبر أسماء الأنظمة والمنتجات الأخرى علامات تجارية أو ها غير موضحتين في هذا التصيح. العلامات التجارية موا غير موضحتين في هذا

رمز المنطقة (اسطوانات BD-ROM/DVD فقط) يحتوي النظام على رمز منطقة مطبوع على الجزء الخلفي الخارجي من الحامل الشريطي ولن يقوم بتشغيل سوى أقراص BD-ROM/DVD VIDEO (التشغيل فقط) الملصق عليها رموز المنطقة ذاتها أو علم.

Page 75

تحذير

لا تركُّب الجهاز في مكان محصور، مثل خزانة الكتب أو ئايىنة داخلىة. تقليل من خطر نشوب حريق، لا تغطى فتحات تهوية الحهاز يورق الصحف أو أغطية المائدة أو الستائر، أو ما الى ذلك. لا تعرّض الحماز إلى مصادر اللمب المكشوفة (على سبيل المثال، شموع مشتعلة). -للتقليل من خطر التعرض لصدمة كم بائنة أه نشمت وردق لا تعرض الحماز إلى قطرات أو ارتشاق السوائل عریق کے حروق کی وربی کے لیے ہے۔ ۱۸ تضع أحسام مملماءة بالسوائل، مثل أوانی الزهور، علی لحبلولة دون التعرض للإصابة، يجب تركيب هذا الجهاز على الخزانة بإحكام حسب تعليمات التشغيل. مند فك التغليف أو التعامل مع النظام،تأكد من حمله واسطة شخصن أو أكثر. فقد يسبب سقوط النظام حرحًا لنخصيًا و/أو ضررًا للممتلكات. فقط استعمال داخل المنزل.

حول مصادر الطاقة • هذه الوحدة غير مفصولة من الطاقة الرئيسية طالما أنها موصولة بفتحة التيار المتردد AC ، حتى وإن كانت • نظرًا لأن قابس الطاقة الرئيسية مستعمل لفصل الوحدة من الطاقة الرئيسية، صل الوحدة بفتحة تيار متردد AC يمكن الوصول إليها بسهولة. إذا لاحظت أي شيء غير طبيعي في الوحدة، افصل قابس الطاقة الرئيسية من فتحة التيار المتردد AC على الفور.

الكابلات الموصى بها يتعين استخدام كابلات وموصلات مؤرضة جيدة العزل للتوصيل بأجهزة الكمبيوتر المضيفة و/أو الأجهزة الطرفية.

يؤدي استعمال الأدوات البصرية مع هذا المنتج إلى زيادة الخطر على العين. نظرًا لأن أشعة الليزر المستخدمة في نظام Home Theatre System هذا ضارة بالعين، لا تحاول فك الكابينة.

وحدة الالتقاط لهذا الجهاز مصنفة كمنتج ليزر من االفئة CLASS 3R LASER. تنبعث أشعة ليزر مرئية وغير مرئية عند فتح حجيرة الوقاية من الليزر، لذلك احرص على تجنب تعرّض العين لهذه الأشعة مباشرة. هذه العلامة موجودة على حجيرة الوقاية من الليزر داخل حاوية المشغل بالحامل الشريطي.

حقوق النشر و العلامات التجارية • يشمل هذا النظام تقنية High-Definition. Multimedia Interface (HDMI) HDMI High-Definition و HDMI هوي المصطلح Multimedia Interface علامات تجارية او علامات تجارية مسجلة لشركة علامات تجارية او علامات تجارية مسجلة لشركة DVD Logo في علامة تجارية لشركة DVD Logo .Format/Logo Licensing Corporation • تعد "Blu-ray Disc و "Blu-ray 3D

Page 76

SONY

©2015 Sony Corporation Printed in Malaysia

http://www.sony.net/

4-569-676- 41 (1)

-

JIG-ST9_NT3/JIG-XT3/JIG-CT780/JIG-CT380

Loading...