

Page 1
4-425-006-11(1)
Digital HD Video
Camera Recorder
Operating Guide
Table of contents
Getting started
Recording/Playback
Advanced operations
Editing
Saving images with an
external device
Customizing your camcorder
Others/Index
HXR-NX30E/NX30P
Page 2

Read this first
About language setting
The on-screen displays in each local language
are used for illustrating the operating
procedures. Change the screen language before
sin
g the camcorder if necessary (p. 19).
u
On recording
Before starting to record, test the recording
function to make sure the image and sound are
recorded without any problems.
Compensation for the contents of recordings
cannot be provided, even if recording or
playback is not possible due to a malfunction of
the camcorder, recording media, etc.
TV color systems differ depending on the
country/region. To view your recordings on a
TV, you need a PAL system-based TV.
Television programs, films, video tapes,
and other materials may be copyrighted.
Unauthorized recording of such materials may
be contrary to the copyright laws.
Because of the way that the image device
(CMOS sensor) reads out image signals, the
following phenomena may occur.
The subjects passing by the frame rapidly
might appear crooked depending on the
recording conditions. (This phenomenon may
be notable in displays having high motion
resolution.)
Horizontal lines appear on the screen during
recording under fluorescent lights. The
phenomena can be reduced by adjusting the
h
utter speed (p. 68).
s
Images on the screen look horizontally
divided when a subject is lighted with a flash.
The phenomena can be reduced by using a
slower shutter speed.
Notes on use
Do not do any of the following. Otherwise, the
recording media may be damaged, recorded
images may be impossible to play back or may
be lost, or other malfunctions could occur.
ejecting the memory card when the access
lamp (p. 23) is lit or flashing
removing the battery pack or AC Adaptor
from the camcorder, or applying mechanical
shock or vibration to the camcorder when the
(Movie)/ (Photo) lamps (p. 25, 26) or
the access lamp (p. 23) are lit or flashing
When the camcorder is connected to other
devices through a USB connection and the
power of the camcorder is turned on, do not
close the LCD panel. The image data that has
been recorded may be lost.
Use the camcorder in accordance with local
regulations.
LCD Panel , viewfinder
The LCD screen and viewfinder are
manufactured using extremely high-precision
technology, so over 99.99% of the pixels are
operational for effective use. However, there
may be some tiny black points and/or bright
points (white, red, blue, or green in color) that
appear constantly on the LCD screen. These
points are normal results of the manufacturing
process and do not affect the recording in any
way.
Black points
White, red, blue or green points
GB
2
Page 3

About this manual, illustrations and
on-screen displays
The example images used in this manual for
illustration purposes are captured using a
digital still camera, and therefore may appear
different from images and screen indicators that
actually appear on your camcorder. And, the
illustrations of your camcorder and its screen
indication are exaggerated or simplified for
understandability.
Design and specifications of your camcorder
and accessories are subject to change without
notice.
In this manual, the internal memory of the
camcorder and the memory card are called
“recording media.”
In this manual, the DVD disc recorded with
high definition image quality (HD) is called
AVCHD recording disc.
GB
3
Page 4

Table of contents
Read this first . .. . . . .. .. . . . .. . . . .. .. . . . .. . . . .. .. . . . .. . . . .. .. . . . .. . . . .. .. . . . .. . . . .. .. . . . .. . . . .. .. . . . .. 2
Parts and controls . . . .. . . . .. .. . . . .. . . . .. .. . . . .. . . . .. .. . . . .. . . . .. .. . . . .. . . . .. .. . . . .. . . . .. .. . . . .. . . . .. 7
Getting started
Supplied Items. .. .. . . . .. .. . .. .. . . . .. .. . .. .. . . . .. .. . .. .. . . . .. .. . .. .. . . . .. .. . .. .. . . . .. .. . .. .. . . . .. .. 11
Attaching the supplied microphone and lens hood . .. . . . .. .. . .. .. . . . .. .. . .. .. . . . .. .. . .. . 12
Attaching the XLR Adaptor . . . . . . .. .. . . . .. . . . .. .. . . . .. . . . .. .. . . . .. . . . .. .. . . . .. . . . .. .. . 12
Attaching the microphone . . .. . . . .. . . . .. .. . . . .. . . . .. .. . . . .. . . . .. .. . . . .. . . . .. .. . . . .. . . 12
Attaching the lens hood . . . . . . .. . . . .. .. . . . .. . . . .. .. . . . .. . . . .. .. . . . .. . . . .. .. . . . .. . . . .. .. 14
Charging the battery pack . . . . . . . .. . . . .. .. . . . .. . . . .. .. . . . .. . . . .. .. . . . .. . . . .. .. . . . .. . . . .. .. . . . .. 15
Charging the battery pack using your computer . . .. . .. .. . . . .. . . . .. .. . . . .. . . . .. . 16
Charging the battery pack abroad . . . . . . . . . . . . .. .. . . . .. . . . .. .. . . . .. . . . .. .. . . . .. . . . .. 18
Turning the power on, and setting the date and time . .. . . . .. .. . . . .. . . . .. .. . . . .. . . . .. .. . . 19
Changing the language setting . . .. . .. .. . . . .. . . . .. .. . . . .. . . . .. .. . . . .. . . . .. .. . . . .. . . . . 19
Preparing the recording media . . . . . . . . . .. . . . .. .. . . . .. . . . .. .. . . . .. . . . .. .. . . . .. . . . .. .. . . . .. . . . . 23
Selecting a recording medium . . . . . . . .. . . . .. .. . . . .. . . . .. .. . . . .. . . . .. .. . . . .. . . . .. .. . . . 23
Inserting a memory card . . . . . . . . . . . . .. .. . .. .. . . . .. .. . .. .. . . . .. .. . .. .. . . . .. .. . .. .. . . . .. 23
Recording/Playback
Recording . . .. . . . .. .. . . . .. . . . .. .. . . . .. . . . .. .. . . . .. . . . .. .. . . . .. . . . .. .. . . . .. . . . .. .. . . . .. . . . .. .. . . . .. . . 25
Recording movies . . .. . .. .. . .. .. . . . .. .. . .. .. . . . .. .. . .. .. . . . .. .. . .. .. . . . .. .. . .. .. . . . .. .. . 25
Shooting photos . .. . . . .. . . . .. .. . . . .. . . . .. .. . . . .. . . . .. .. . . . .. . . . .. .. . . . .. . . . .. .. . . . .. . . . . 26
Zooming . .. . . . .. .. . . . .. . . . .. .. . . . .. . . . .. .. . . . .. . . . .. .. . . . .. . . . .. .. . . . .. . . . .. .. . . . .. . . . .. .. 29
Playback . . .. . .. .. . . . .. . . . .. .. . . . .. . . . .. .. . . . .. . . . .. .. . . . .. . . . .. .. . . . .. . . . .. .. . . . .. . . . .. .. . . . .. . . . .. 30
Operating buttons while playing . . . . . .. .. . . . .. . . . .. .. . . . .. . . . .. .. . . . .. . . . .. .. . . . .. . . 31
Advanced operations
Recording people clearly . .. . .. .. . . . .. .. . .. .. . . . .. .. . .. .. . . . .. .. . .. .. . . . .. .. . .. .. . . . .. .. . .. .. . . . 34
Recording the selected subject clearly (Face Priority) . . . .. .. . .. .. . . . .. .. . .. .. . . . 34
Capturing smiles automatically (Smile Shutter) . . . . .. .. . . . .. . . . .. .. . . . .. . . . .. .. . . 34
Recording movies in various situations. . . . . . . . . . .. . . . .. .. . . . .. . . . .. .. . . . .. . . . .. .. . . . .. . . . .. . 35
Selecting the suitable setting automatically for the recording situation
(Intelligent Auto) . . .. . .. .. . . . .. . . . .. .. . . . .. . . . .. .. . . . .. . . . .. .. . . . .. . . . .. .. . . . .. . . . .. .. . . . 35
Reducing camera-shake (
Recording in dark places (NightShot) . . . . . . . . . . . .. .. . . . .. . . . .. .. . . . .. . . . .. .. . . . .. . . . 37
Recording movies in dim places (Video Light) . . . . . .. . . . .. .. . . . .. . . . .. .. . . . .. . . . .. 37
GB
4
SteadyShot) . . .. . .. .. . . . .. . . . .. .. . . . .. . . . .. .. . . . .. . . . 36
Page 5

Recording images with the selected image quality . . . . . . . .. . . . .. .. . . . .. . . . .. .. . . . .. . . . .. . 38
Selecting the recording format . . . . . . . . .. .. . .. .. . . . .. .. . .. .. . . . .. .. . .. .. . . . .. .. . .. .. . 38
Changing the image quality of photos . . . . . . . .. .. . . . .. . . . .. .. . . . .. . . . .. .. . . . .. . . . .. 38
Using the manual adjustment features . . .. .. . . . .. . . . .. .. . . . .. . . . .. .. . . . .. . . . .. .. . . . .. . . . .. .. 39
Shooting images with the iris priority mode . . .. . .. .. . . . .. . . . .. .. . . . .. . . . .. .. . . . .. 39
Shooting images with the Shutter Speed priority mode . .. . .. .. . . . .. .. . .. .. . . 39
Controlling the image settings manually with the MANUAL dial . .. .. . . . .. . . 40
Audio setup . . . . . . . . . . .. .. . . . .. . . . .. .. . . . .. . . . .. .. . . . .. . . . .. .. . . . .. . . . .. .. . . . .. . . . .. .. . . . .. . . . .. .. . 41
Select the method for inputting sound . . . . . . . . . . .. . . . .. .. . . . .. . . . .. .. . . . .. . . . .. .. . 41
Using the built-in microphone . . . . . . . .. .. . . . .. . . . .. .. . . . .. . . . .. .. . . . .. . . . .. .. . . . .. . . . 41
Using an external microphone (sold separately) . .. .. . . . .. . . . .. .. . . . .. . . . .. .. . . . . 41
Using the supplied microphone . . .. .. . . . .. . . . .. .. . . . .. . . . .. .. . . . .. . . . .. .. . . . .. . . . .. . 41
Adjusting the recording level . .. . .. .. . .. .. . . . .. .. . .. .. . . . .. .. . .. .. . . . .. .. . .. .. . . . .. .. 42
Reducing wind noise .. . . . .. . . . .. .. . . . .. . . . .. .. . . . .. . . . .. .. . . . .. . . . .. .. . . . .. . . . .. .. . . . . 42
Using an external audio device . . .. .. . . . .. . . . .. .. . . . .. . . . .. .. . . . .. . . . .. .. . . . .. . . . .. .. 43
Recording information on your location
Playing images on a TV . . . . . .. . . . .. .. . . . .. . . . .. .. . . . .. . . . .. .. . . . .. . . . .. .. . . . .. . . . .. .. . . . .. . . . .. . 45
Using the built-in projector .. . . . .. . . . .. .. . . . .. . . . .. .. . . . .. . . . .. .. . . . .. . . . .. .. . . . .. . . . .. .. . . . .. . 47
(GPS) . . . . . . . .. .. . .. .. . . . .. .. . .. .. . . . .. .. . .. .. . . . .. . 44
Editing
Editing on your camcorder . . .. . .. .. . . . .. . . . .. .. . . . .. . . . .. .. . . . .. . . . .. .. . . . .. . . . .. .. . . . .. . . . .. .. 49
Deleting movies and photos . .. . .. . . . .. .. . . . .. . . . .. .. . . . .. . . . .. .. . . . .. . . . .. .. . . . .. . . . 49
Dividing a movie . . . . . . . . . . . .. . . . .. .. . . . .. . . . .. .. . . . .. . . . .. .. . . . .. . . . .. .. . . . .. . . . .. .. . . . . 49
Capturing a photo from a movie . . . .. . . . .. .. . . . .. . . . .. .. . . . .. . . . .. .. . . . .. . . . .. .. . . . . 50
Saving images with an external device
Dubbing guide . . . . . .. . . . .. .. . . . .. . . . .. .. . . . .. . . . .. .. . . . .. . . . .. .. . . . .. . . . .. .. . . . .. . . . .. .. . . . .. . . . . 51
The devices on which the created disc can be played back . . . . . . . . . . . . . .. .. . . . 51
Creating a disc with the recorder .. . . . .. .. . .. .. . . . .. .. . .. .. . . . .. .. . .. .. . . . .. .. . .. .. . . . .. .. . .. . 52
Creating a standard definition image quality (STD) disc with a recorder,
etc. . . . . .. . . . .. .. . . . .. . . . .. .. . . . .. . . . .. .. . . . .. . . . .. .. . . . .. . . . .. .. . . . .. . . . .. .. . . . .. . . . .. .. . . . . 52
Saving images on an external media device . . . . . . . . . . . .. .. . .. .. . . . .. .. . .. .. . . . .. .. . .. .. . . . 53
Saving images with a computer . . . . . . . . . . . .. . . . .. .. . . . .. . . . .. .. . . . .. . . . .. .. . . . .. . . . .. .. . . . .. . 55
Preparing a computer (Windows) .. .. . . . .. . . . .. .. . . . .. . . . .. .. . . . .. . . . .. .. . . . .. . . . .. . 55
Step 1 Checking the computer system . . . . . . . .. .. . . . .. . . . .. .. . . . .. . . . .. .. . . . .. . . . .. 55
Step 2 Installing the supplied software “Content Management Utility” . . . . . 56
Table of contents
GB
5
Page 6

Customizing your camcorder
Using menus .. . . . .. .. . .. .. . . . .. .. . .. .. . . . .. .. . .. .. . . . .. .. . .. .. . . . .. .. . .. .. . . . .. .. . .. .. . . . .. .. . .. .. 58
Menu lists . . . . . . . . . .. .. . . . .. . . . .. .. . . . .. . . . .. .. . . . .. . . . .. .. . . . .. . . . .. .. . . . .. . . . .. .. . . . .. . . . .. .. . . . .. 60
Shooting Mode(Items for selecting a shooting mode) . . . .. . . . .. .. . . . .. . . . .. .. . . . .. . . . .. .. . . . .. . . 64
Camera/Audio(Items for customized shooting) . .. . . . .. .. . . . .. . . . .. .. . . . .. . . . .. .. . . . .. . . . .. .. . 66
Rec/Media SET(Items for setting up image quality or the recording media) . . . . . . . . . . . .. .. . . . .. . . . 77
TC/UB(Items for setting up the time code or user bit) . . . . . . . . . . . . . .. .. . . . .. . . . .. .. . . . .. . . . .. .. . . . .. 79
Edit/Copy(Items for editing) .. . . . .. . . . .. .. . . . .. . . . .. .. . . . .. . . . .. .. . . . .. . . . .. .. . . . .. . . . .. .. . . . .. . 80
Setup(Other setup items) . . . . . . . . . . . .. .. . .. .. . . . .. .. . .. .. . . . .. .. . .. .. . . . .. .. . .. .. . . . .. .. . .. .. . . 82
Others/Index
Troubleshooting . . . . . . . . . .. . . . .. .. . . . .. . . . .. .. . . . .. . . . .. .. . . . .. . . . .. .. . . . .. . . . .. .. . . . .. . . . .. .. . . . 87
Self-diagnosis display/Warning indicators . . . . . .. .. . .. .. . . . .. .. . .. .. . . . .. .. . .. .. . . . .. .. . .. .. 94
Recording time of movies/number of recordable photos .. . . . .. .. . . . .. . . . .. .. . . . .. . . . .. 98
Expected time of recording and playback with each battery pack .. . . . .. . . . . 98
Expected recording time of movies . . . .. . . . .. .. . . . .. . . . .. .. . . . .. . . . .. .. . . . .. . . . .. .. . 99
Expected number of recordable photos . . .. .. . .. .. . . . .. .. . .. .. . . . .. .. . .. .. . . . .. .. 100
Using your camcorder abroad . . .. . . . .. . . . .. .. . . . .. . . . .. .. . . . .. . . . .. .. . . . .. . . . .. .. . . . .. . . . .. .. 101
Maintenance and precautions. . . . . . . . . . .. .. . . . .. . . . .. .. . . . .. . . . .. .. . . . .. . . . .. .. . . . .. . . . .. .. . . 103
About the AVCHD format . . .. . . . .. .. . . . .. . . . .. .. . . . .. . . . .. .. . . . .. . . . .. .. . . . .. . . . .. .. . 103
About GPS . . . . .. . . . .. .. . . . .. . . . .. .. . . . .. . . . .. .. . . . .. . . . .. .. . . . .. . . . .. .. . . . .. . . . .. .. . . . .. . 103
About the memory card . . . . . .. . . . .. .. . . . .. . . . .. .. . . . .. . . . .. .. . . . .. . . . .. .. . . . .. . . . .. .. 104
About the “InfoLITHIUM” battery pack . . . .. .. . . . .. . . . .. .. . . . .. . . . .. .. . . . .. . . . .. .. . 105
About x.v.Color . .. .. . .. .. . . . .. .. . .. .. . . . .. .. . .. .. . . . .. .. . .. .. . . . .. .. . .. .. . . . .. .. . .. .. . . . 106
About handling of your camcorder .. . . . .. . . . .. .. . . . .. . . . .. .. . . . .. . . . .. .. . . . .. . . . .. 106
Specifications .. . . . .. . . . .. .. . . . .. . . . .. .. . . . .. . . . .. .. . . . .. . . . .. .. . . . .. . . . .. .. . . . .. . . . .. .. . . . .. . . . .. 112
Screen indicators . . . .. .. . . . .. . . . .. .. . . . .. . . . .. .. . . . .. . . . .. .. . . . .. . . . .. .. . . . .. . . . .. .. . . . .. . . . .. .. . 116
Index . . . . .. . . . .. .. . . . .. . . . .. .. . . . .. . . . .. .. . . . .. . . . .. .. . . . .. . . . .. .. . . . .. . . . .. .. . . . .. . . . .. .. . . . .. . . . .. 118
GB
6
Page 7
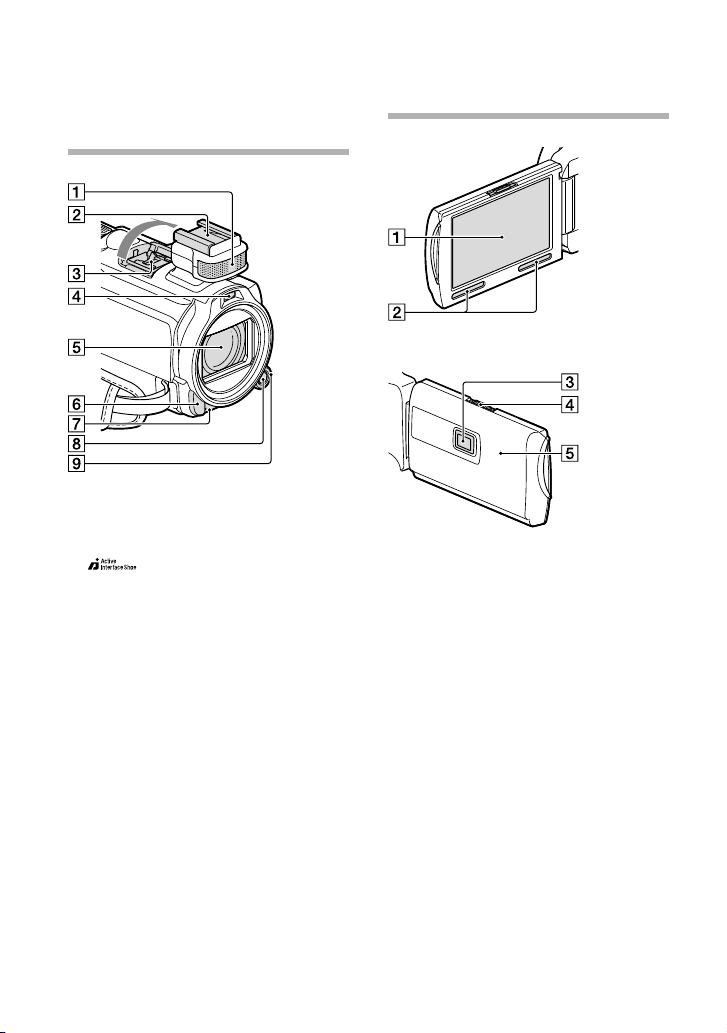
Parts and controls
Figures in ( ) are reference pages.
Built-in microphone (41)
Accessory Shoe (12)
Active Interface Shoe
Flash/Video light
Lens (Carl Zeiss lens)
Remote sensor/Infrared port
Camera recording lamp (85)
The camera recording lamp lights up in red
during recording. The lamp flashes when the
remaining recording media capacity or battery
power is low.
MANUAL button (40)
MANUAL dial (40)
LCD screen/Touch panel (19, 21)
If you rotate the LCD panel 180 degrees, you
can close the LCD panel with the LCD screen
facing out. This is convenient during playback
operations.
Speakers
Projector lens (47)
PROJECTOR FOCUS lever (47)
GPS antenna (44)
A GPS antenna is located in the LCD panel.
GB
7
Page 8
8
GB
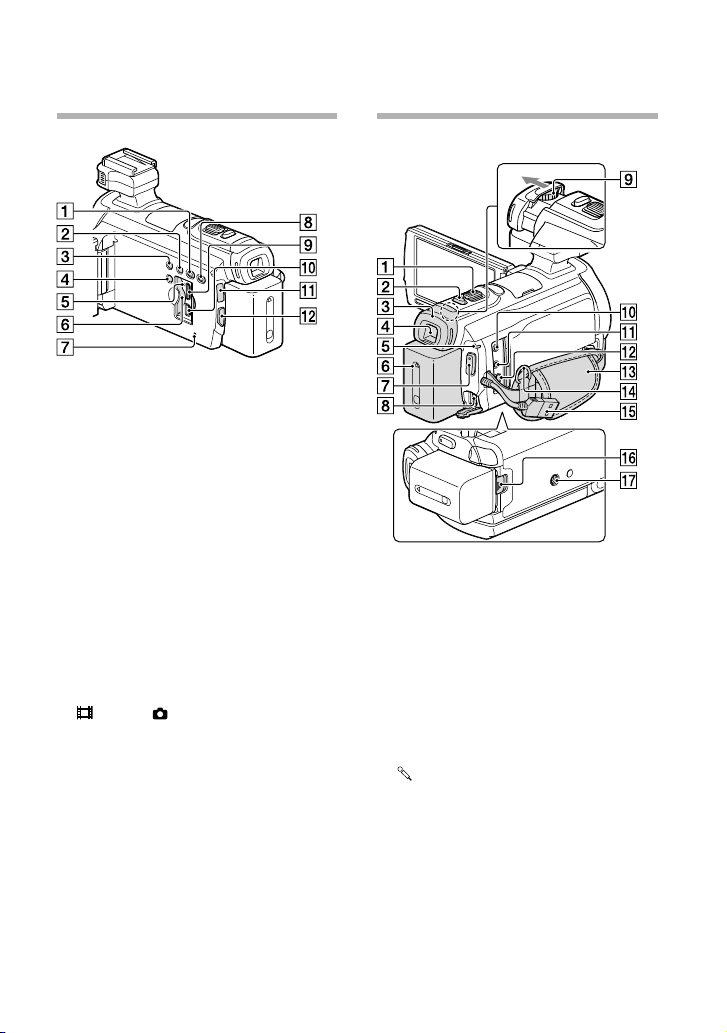
DISP (DISPLAY) button (21)
LIGHT (Video Light) button (37)
NIGHTSHOT button (37)
POWER button
Memory card access lamp (23)
While the lamp is lit or flashing, the
camcorder is reading or writing data.
Memory card slot (23)
RESET button
Press RESET using a pointed object.
Press RESET to initialize all the settings
including the clock setting.
PROJECTOR button (47)
HDMI OUT jack (45)
(USB) jack (53)
(Movie)/ (Photo) lamp (25, 26)
MODE button (25, 26)
Power zoom lever (29)
FIXED SHOT/PHOTO button (26)
Eyecup
Viewfinder (20)
CHG (charge) lamp (15)
Battery pack (15)
START/STOP button (26)
DC IN jack (15)
Viewfinder lens adjustment lever (20)
(microphone) jack (PLUG IN POWER)
(headphones) jack
A/V Remote Connector (45)
Grip belt
Loop for a shoulder belt
Built-in USB Cable (16)
BATT (battery) release lever (17)
Tripod receptacle
Attach a tripod (sold separately: the length of
the screw must be less than 5.5 mm (7/32 in.)).
Page 9
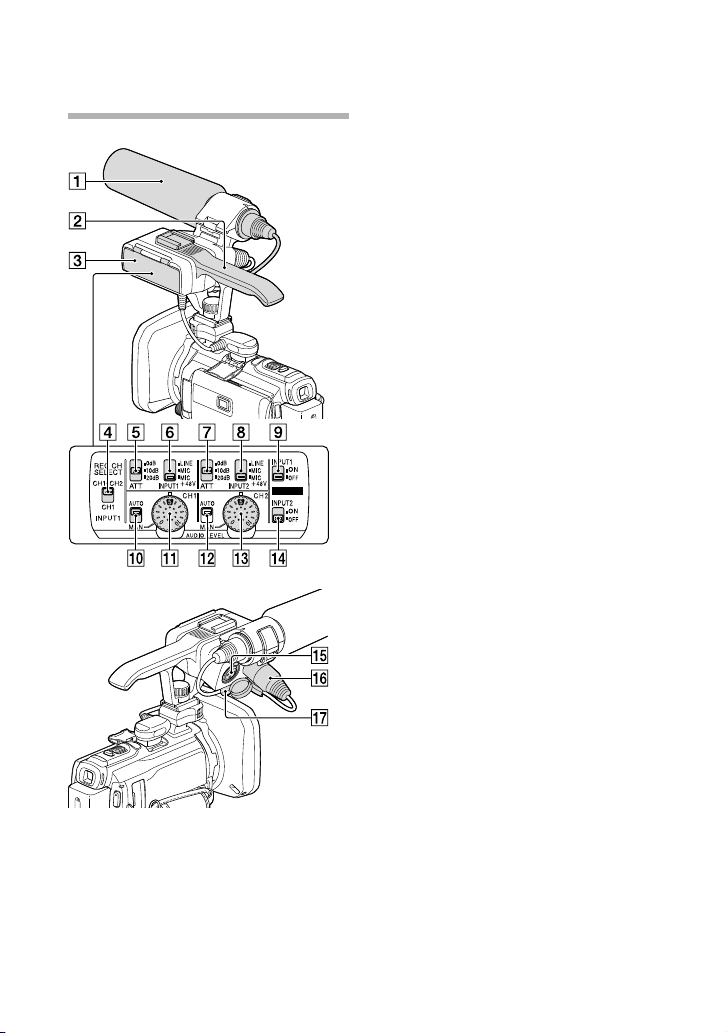
ATT (INPUT2) switch (42)
INPUT2 (LINE/MIC/MIC+48V) switch (42)
LOW CUT (INPUT1) switch (42)
AUTO/MAN (CH1) switch (42)
AUDIO LEVEL (CH1) dial (42)
AUTO/MAN (CH2) switch (42)
AUDIO LEVEL (CH2) dial (42)
LOW CUT (INPUT2) switch (42)
INPUT2 jack (41)
INPUT1 jack (41)
Cable holder (13)
Microphone (12)
Handgrip
XLR Adaptor (12)
REC CH SELECT (INPUT1) switch (42)
ATT (INPUT1) switch (42)
INPUT1 (LINE/MIC/MIC+48V) switch (42)
GB
9
Page 10
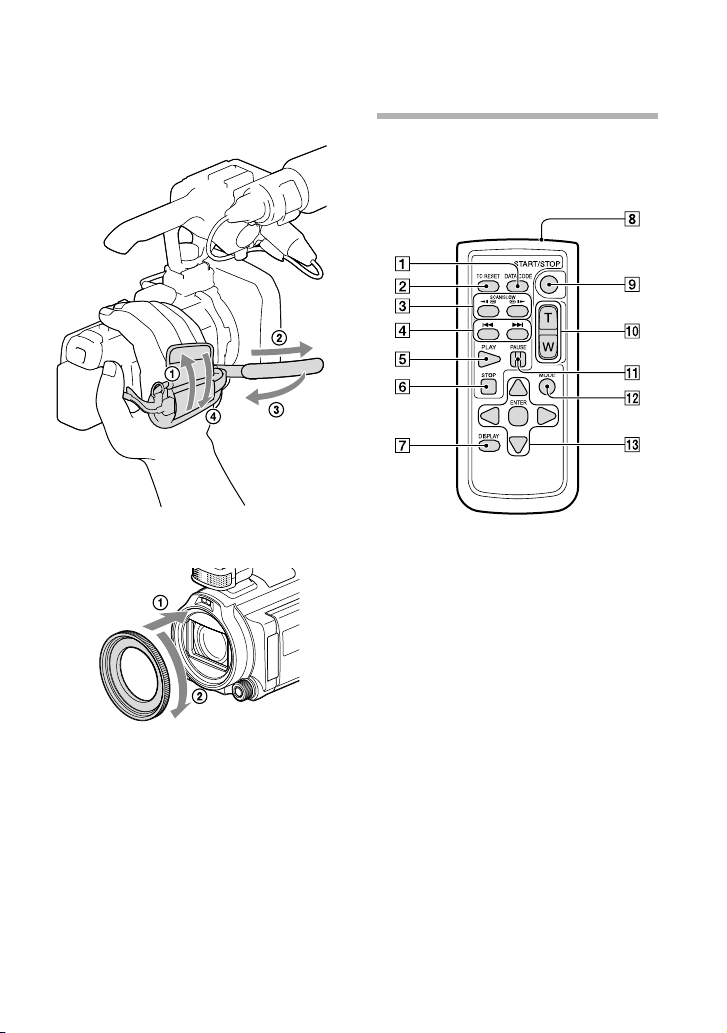
To fasten the grip belt
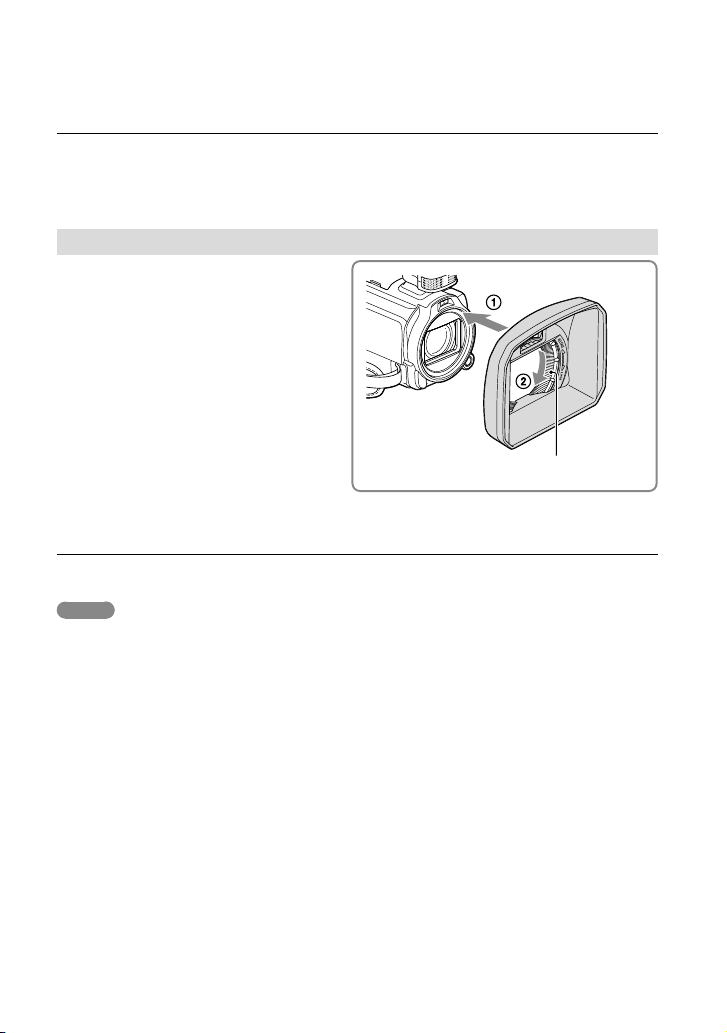
To attach the Step Down Ring
Align the Step Down Ring with the
camcorder properly (), then turn it in the
direction of the arrow until the Step Down
Ring is locked in place ().
You can change to the filter diameter to
37mm (1 1/2 in.) by attaching the Step Down
Ring, allowing you to use the recommended
conversion lens.
You cannot attach the wide end conversion lens/
filter, if the Step Down Ring is attached.
To remove Step Down Ring, turn it in the
opposite direction from that of the arrow.
GB
10
Wireless Remote Commander
The wireless remote commander is useful
when you use the projector.
DATA CODE button (82)
TC RESET button (79)
SCAN/SLOW buttons (32)
/ (Previous/Next) buttons (31)
PLAY button
STOP button
DISPLAY button (21)
Transmitter
START/STOP button (25)
Power zoom buttons (29)
PAUSE button
MODE button (30)
Displays an Index screen during playback.
////ENTER buttons
When you press any of these buttons, the light
blue frame appears on the LCD screen. Select
a desired button or an item with ///,
then press ENTER to enter.
Page 11
Getting started
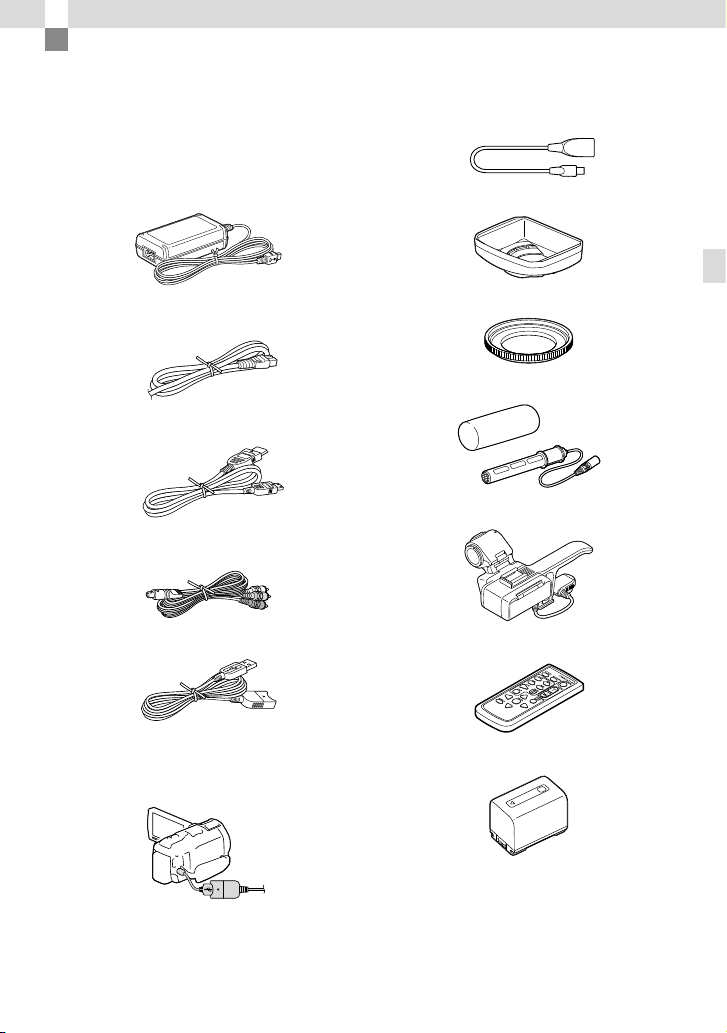
Supplied Items
The numbers in ( ) are the supplied
quantity.
Camcorder (1)
AC Adaptor (1)
Power cord (Mains lead) (1)
HDMI cable (1)
A/V connecting cable (1)
USB connection support cable (1)
USB Adaptor Cable (1)
Lens hood (1)
Getting started
Step Down Ring (1)
Wind Screen (1), Microphone (ECM-XM1) (1)
XLR Adaptor (1)
Wireless Remote Commander (1)
The USB connection support cable is designed
for use with this camcorder only. Use this cable
when the Built-in USB Cable of the camcorder
(p. 16) is too short for connection.
Rechargeable battery pack NP-FV70 (1)
CD-ROM “Content Management Utility” (1)
CD-ROM “Manuals for Digital HD Video Camera Recorder”
(1)
“
perating Guide” (2)
O
GB
11
Page 12
12
GB
Attaching the supplied microphone and lens hood
You do not need to attach the XLR Adaptor or microphone when you use the built-in
microphone.
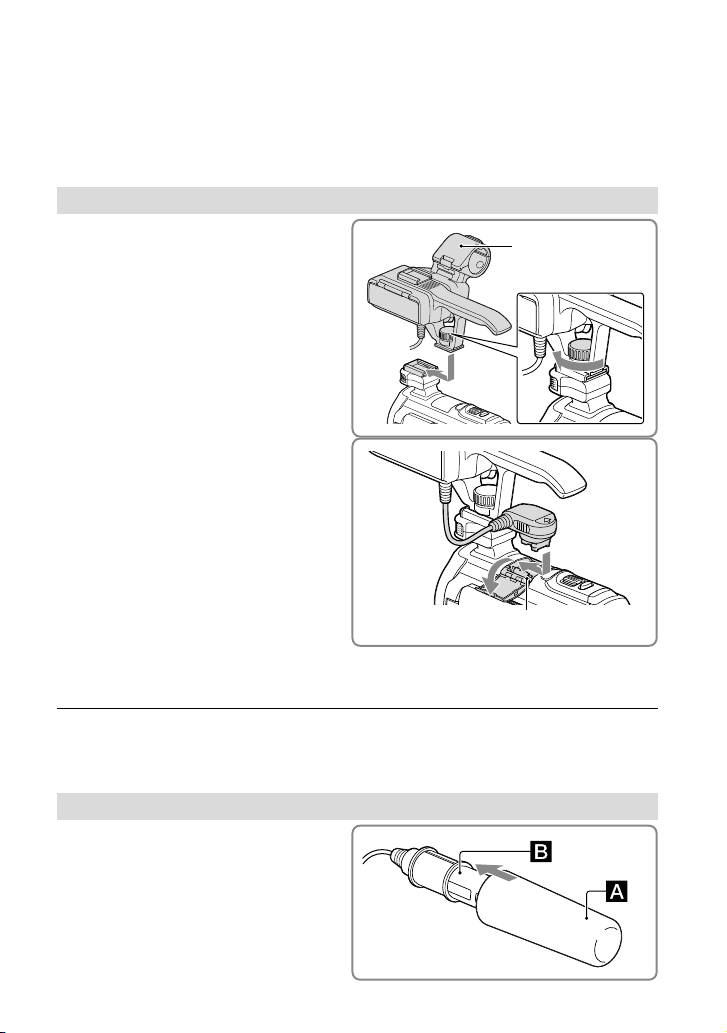
Attaching the XLR Adaptor
Attach the XLR Adaptor to the
1
accessory shoe on the camcorder
and tighten the screw of the XLR
Adaptor.
Connect the plug of the XLR
2
Adaptor to the Active Interface
Shoe of the camcorder.
XLR Adaptor
Active Interface Shoe
When detaching the XLR Adaptor
Unplug the connector plug of the XLR Adaptor from the Active Interface Shoe beforehand.
Detach the XLR Adaptor after having loosened the screw of the XLR Adaptor.
Attaching the microphone
Attach the wind screen to the
1
microphone .
Page 13
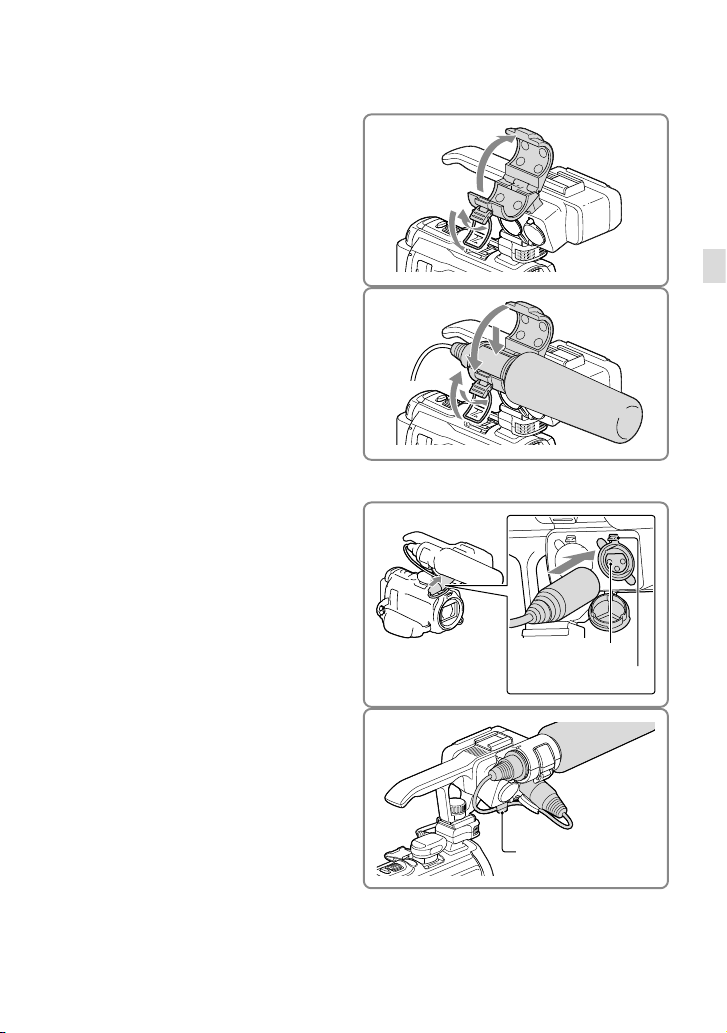
Unlock the stopper of the
2
microphone holder and open the
cover.
Align the convex part of the
3
microphone with the concave
part of the holder, and then place
the microphone into the holder.
Close the cover and lock the
stopper securely.
Be sure to place the microphone with
the model name (ECM-XM1) facing
upward.
Connect the plug of the
4
microphone to the INPUT1
connector of the XLR Adaptor.
Put the microphone cable into
5
the cable holder.
See page 41 on the settings for the
audio recording.
Getting started
INPUT1 jack
Release lever
Hook the cable in the
outer cable holder.
GB
13
Page 14
14
GB
When detaching the microphone cable
1 Detach the microphone from the microphone holder.
2 Unplug the microphone plug while pressing the release lever down.
Attaching the lens hood
Align the lens hood with the
1
camcorder properly (), then
turn the securing ring of the lens
hood in the direction of the arrow
().
Securing ring
To remove the lens hood
Turn the securing ring of the lens hood in the opposite direction from that of attach.
Notes
Remove the lens hood when you record movies using the NightShot function. If you do not do so, the
shadow of the lens hood will be reflected and recorded in your movies.
Remove the lens hood when you operate the camcorder with the supplied remote commander.
Page 15
Charging the battery pack
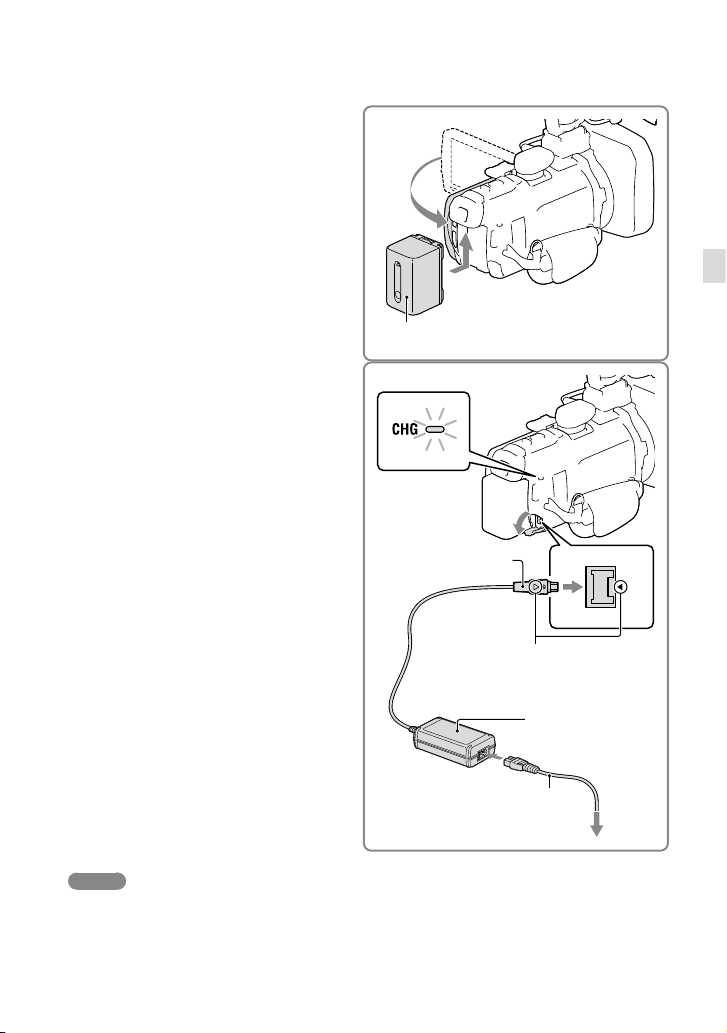
Close the LCD screen after
1
replacing the viewfinder and
attach the battery pack.
Connect the AC Adaptor () and
2
the power cord (mains lead) () to
your camcorder and the wall outlet
(wall socket).
The CHG (charge) lamp turns on.
The CHG (charge) lamp turns off when the
battery pack is fully charged. Disconnect the
AC Adaptor from the DC IN jack of your
camcorder.
CHG (charge)
lamp
Battery pack
DC plug
Getting started
DC IN jack
Align the mark on
the DC plug with that
on the DC IN jack
To the wall outlet (wall socket)
Notes
You cannot attach any “InfoLITHIUM” battery pack other than the V series to your camcorder.
GB
15
Page 16
16
GB
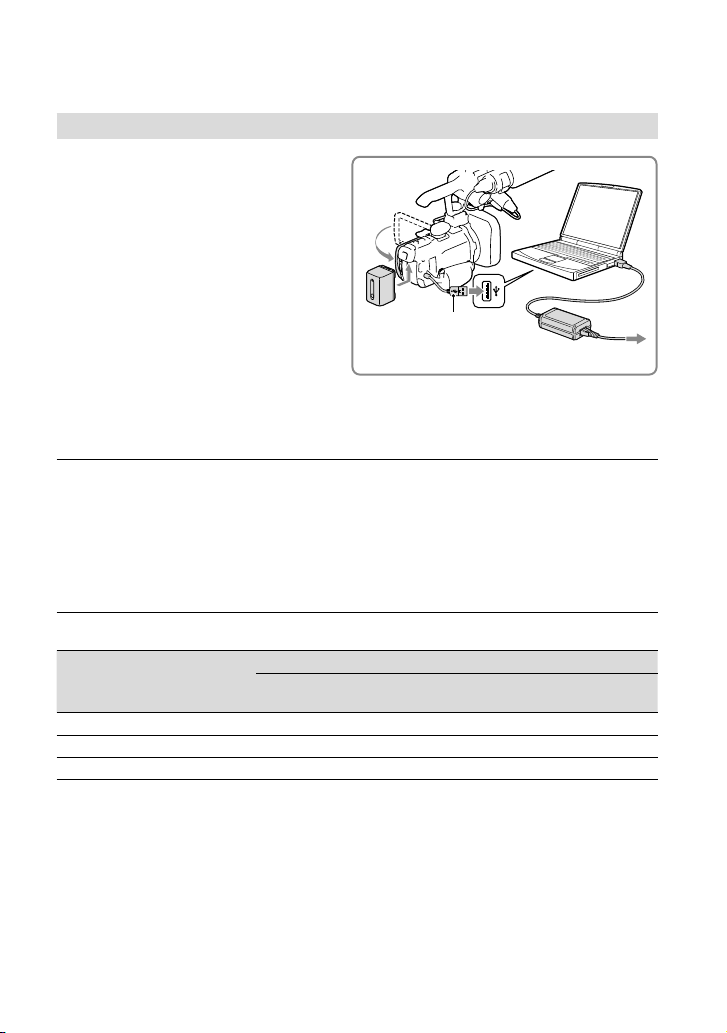
Charging the battery pack using your computer
Turn off your camcorder and connect
the camcorder to a running computer
using the Built-in USB Cable.
Built-in USB Cable
To the wall outlet (wall socket)
To charge the battery from a wall outlet (wall socket) using the Built-in USB
Cable
You can charge the battery by connecting the Built-in USB Cable to a wall outlet (wall socket)
using an AC-UD10 USB charger/AC Adaptor (sold separately). You cannot use a Sony CPAH2R, CP-AL, or AC-UP100 portable power supply device (sold separately) to charge the
camcorder.
Charging time
Approximate time (min.) required when you fully charge a fully discharged battery pack.
Battery pack
NP-FV50 155 280
NP-FV70 (supplied) 195 545
NP-FV100 390 1,000
The charging times shown in the table above are measured when charging the camcorder at a
temperature of 25 °C (77 °F). It is recommended that you charge the battery in a temperature range of 10
°C to 30 °C (50 °F to 86 °F).
* The charging times are measured without using the USB connection support cable.
AC Adaptor
Charging time
Built-in USB Cable
using your computer)
* (when
Page 17
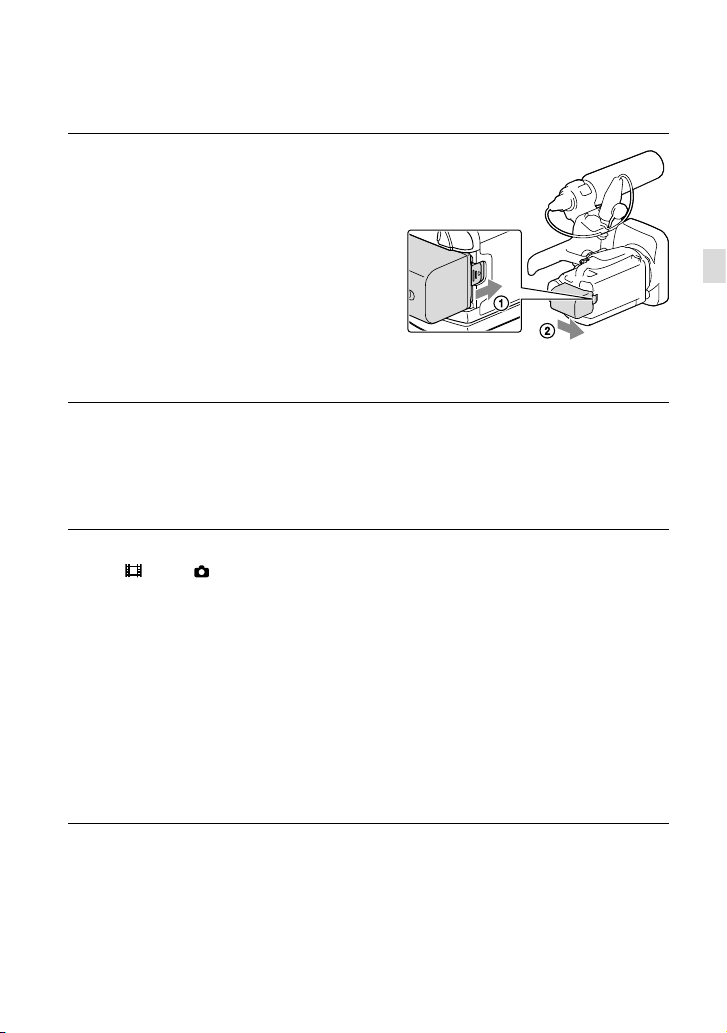
To remove the battery pack
Close the LCD screen. Slide the BATT
(battery) release lever () and remove the
battery pack ().
To use a wall outlet (wall socket) as a power source
Make the same connections as those for charging the battery pack.
Even if the battery pack is attached, the battery pack is not discharged.
Notes on the battery pack
When you remove the battery pack or disconnect the AC Adaptor, turn the camcorder off and make sure
that the
The CHG (charge) lamp flashes during charging under the following conditions:
When attaching a video light (sold separately), it is recommended that you use an NP-FV70 or NP-FV100
battery pack.
You cannot use the NP-FV30 “InfoLITHIUM” battery pack with your camcorder.
(Movie)/ (Photo) lamps (p. 25, 26) and the access lamp (p. 23) are turned off.
The battery pack is not attached correctly.
The battery pack is damaged.
The temperature of the battery pack is low.
Remove the battery pack from your camcorder and put it in a warm place.
The temperature of the battery pack is high.
Remove the battery pack from your camcorder and put it in a cool place.
Getting started
Notes on the AC Adaptor
Use the nearby wall outlet (wall socket) when using the AC Adaptor. Disconnect the AC Adaptor from
the wall outlet (wall socket) immediately if any malfunction occurs while using your camcorder.
Do not use the AC Adaptor placed in a narrow space, such as between a wall and furniture.
Do not short-circuit the DC plug of the AC Adaptor or battery terminal with any metallic objects. This
may cause a malfunction.
Disconnect the AC Adaptor from the camcorder, holding both the camcorder and the DC plug.
GB
17
Page 18

18
GB
Recording time, Playing time (p. 98)
Remaining battery indicator (p. 26)
arging the battery pack abroad (p. 18)
Ch
Charging the battery pack abroad
You can charge the battery pack in any countries/regions using the AC Adaptor supplied with
your camcorder within the AC 100 V - 240 V, 50 Hz/60 Hz range. Do not use an electronic
voltage transformer.
Page 19
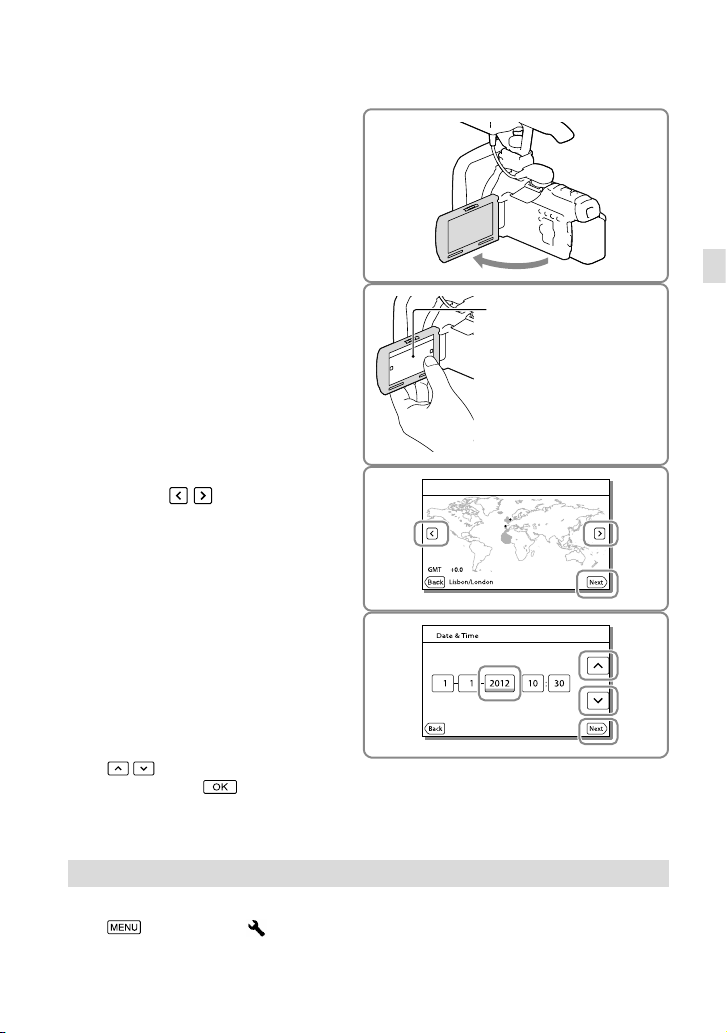
Turning the power on, and setting the date and time
Open the LCD screen of your
1
camcorder and turn the power
on.
You can also turn on the camcorder by
pressing POWER (p. 8).
Select the desired language, then
2
select [Next].
Select the desired geographical
3
area with
/ , then select
[Next].
Set [Summer Time], select the
4
date format and the date and
time.
If you set [Summer Time] to [On], the
clock advances 1 hour.
When you select the date and time, select
one of the items and adjust the value with
/ .
When you select
setting operation is complete.
, the date and time
Touch the button on the
Getting started
LCD screen.
Changing the language setting
You can change the on-screen displays to show messages in a specified language.
Select [Setup] [ General Settings] [Language Setting] a desired language.
GB
19
Page 20
20
GB
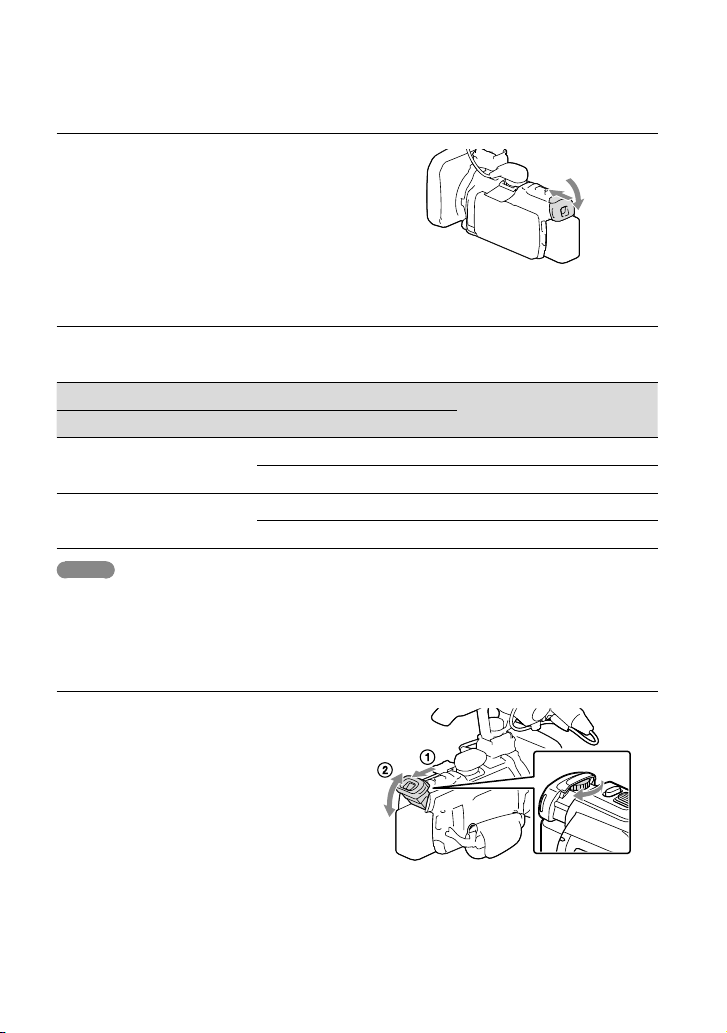
To turn off the power
Close the LCD screen or press the POWER
button (p. 8).
If the viewfinder is pulled out, retract the
viewfinder as shown in the illustration on
the right.
On turning the camcorder on or off using the LCD screen or the viewfinder
The power of the camcorder is turned on or off depending on the status of the LCD screen or
the viewfinder.
Status
LCD screen Viewfinder
Power of the camcorder
Open Retracted On
Pulled out On
Closed Retracted Off
Pulled out On
Notes
Even if the LCD screen is closed, if the viewfinder is pulled out, the camcorder is not turned off. When
you turn off the power of the camcorder, make sure that the viewfinder is retracted to the original
position.
When you make recording with the viewfinder only
Pull out the viewfinder () and close the
LCD panel and then adjust the angle you
). If the indicator on the viewfinder
want (
appears blurred, adjust the appearance using
the viewfinder lens adjustment lever located
on the above of the viewfinder.
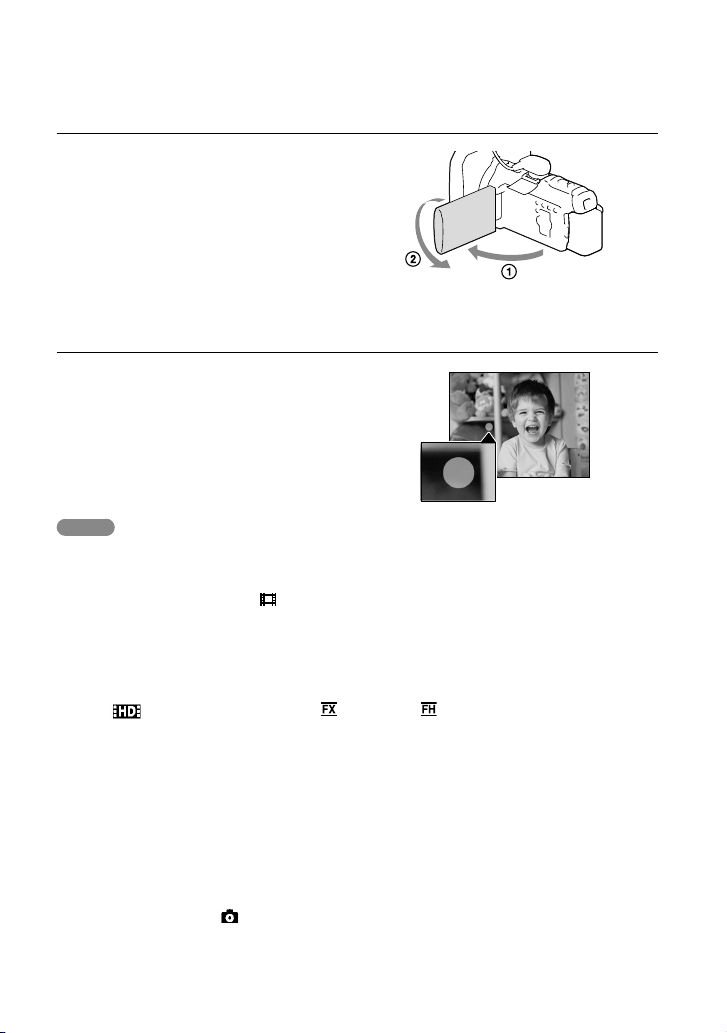
Page 21
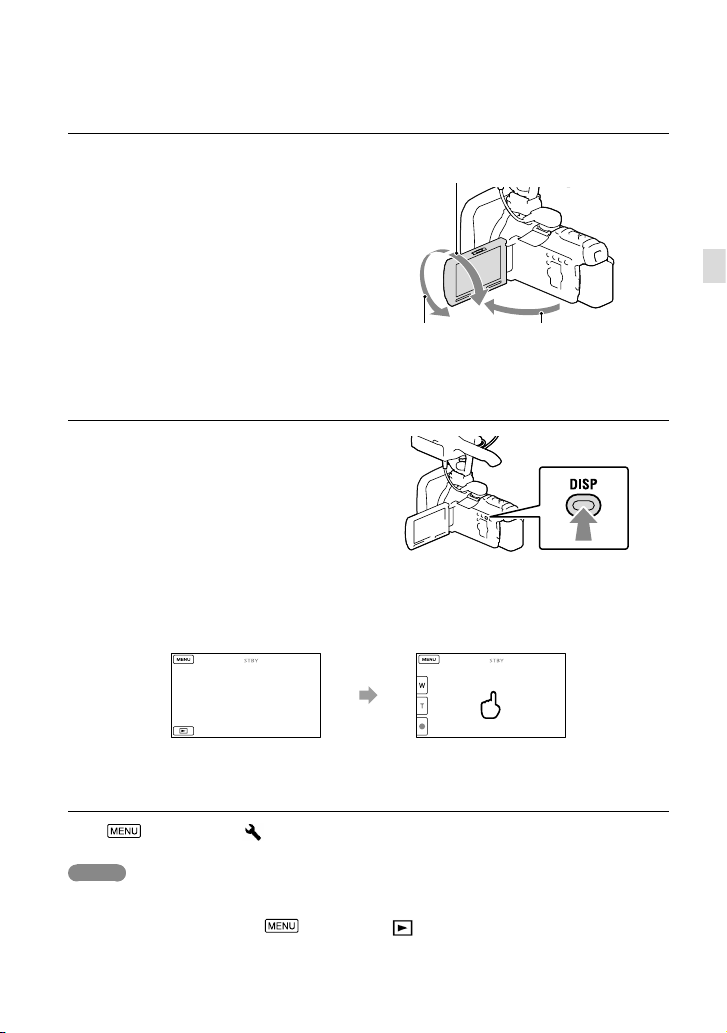
To adjust the angle of the LCD panel
First open the LCD panel 90 degrees to the
camcorder (), and then adjust the angle
90 degrees (max.)
().
180 degrees (max.)
90 degrees to the camcorder
Changing the display on the LCD screen
Press the DISP (DISPLAY) button to cycle the
screen display in the following order.
Recording: Detailed display simple
display nondisplay
Playing: Detailed display simple display
In the default setting, the screen display changes to the simple display after about 3 seconds ([Display
Setting], p. 84). The display changes to the detailed display when you touch anywhere on the screen
except the buttons on the LCD screen so that you can use items.
about 3sec
after
Getting started
To turn on the beep sound
Select [Setup] [ General Settings] [Beep] [On].
Notes
The recording date, time and condition, and coordinates are recorded automatically on the recording
media. They are not displayed during recording. However, you can check them as [Data Code] during
playback. To display them, select
desired item.
[Setup] [ Playback Settings] [Data Code] the
GB
21
Page 22

22
GB
Once the clock is set, the clock time is automatically adjusted with [Auto Clock ADJ ] and [Auto Area
ADJ] set to [On]. The clock may not be adjusted to the correct time automatically, depending on the
country/region selected for your camcorder. In this case, set [Auto Clock ADJ ] and [Auto Area ADJ] to
[Off].
To set the date and time again: [Date & Time Setting] (p. 85)
To calibrate the touch panel: [Calibration] (p. 110)
Page 23
Preparing the recording media
The recording media that can be used are displayed on the screen of your camcorder as
following icons.
Default recording medium Alternative recording medium
Memory card Internal memory
Notes
You cannot select a different recording medium for movies and for photos.
Selecting a recording medium
Select [Rec/Media SET]
[Media Select] the desired
medium.
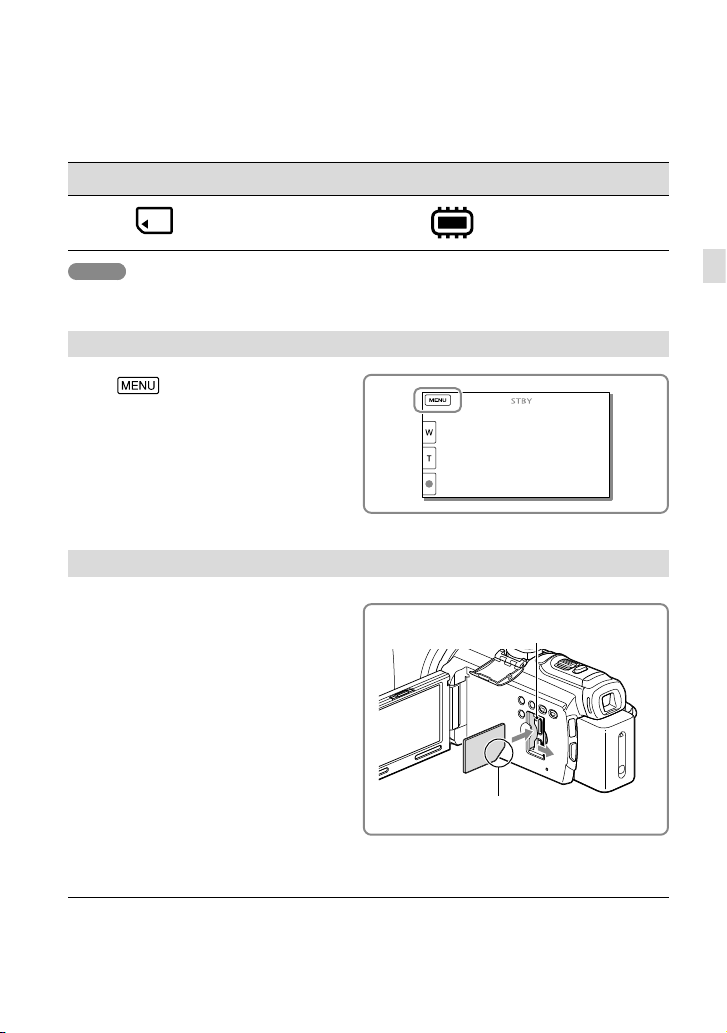
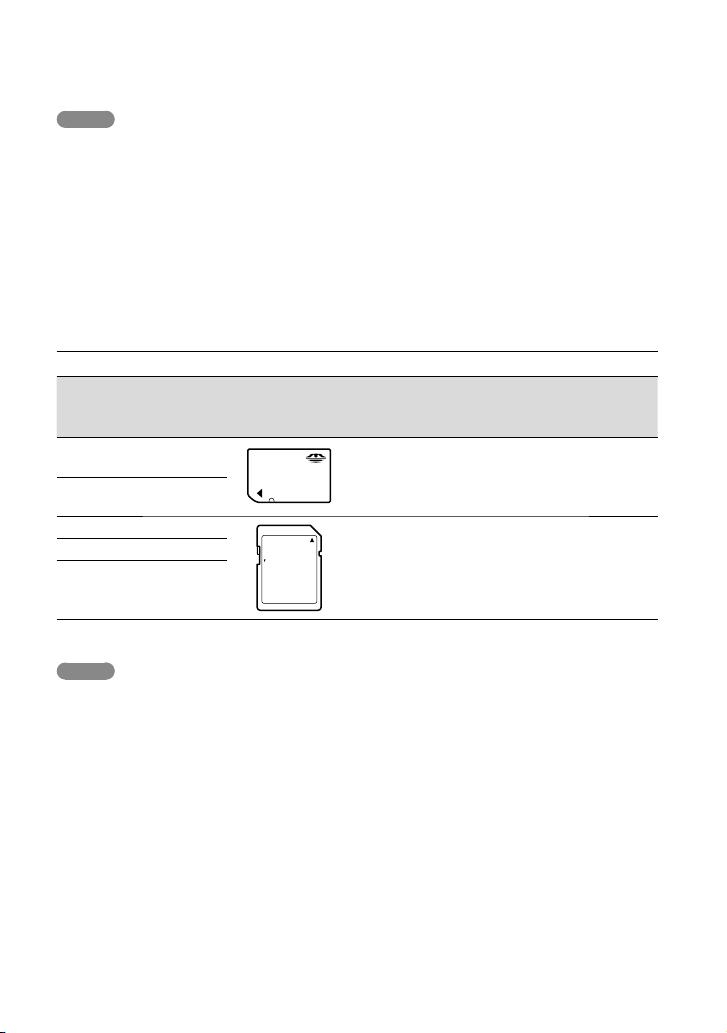
Inserting a memory card
Open the cover, and insert the
memory card until it clicks.
The [Preparing image database file. Please wait.]
screen appears if you insert a new memory card.
Wait until the screen disappears.
Insert the card with the notched corner in the
direction as illustrated.
Getting started
Access lamp
To eject the memory card
Open the cover and lightly push the memory card in once.
GB
23
Page 24
Notes
To ensure stable operation of the memory card, it is recommended to format the memory card with your
mcorder before the first use (p. 78). Formatting the memory card will erase all the data stored on it and
ca
the data will be irrecoverable. Save your important data on your PC, etc.
If [Failed to create a new Image Database File. It may be possible that there is not enough free space.] is
s
played, format the memory card (p. 78).
di
Confirm the direction of the memory card. If you forcibly insert the memory card in the wrong direction,
the memory card, memory card slot, or image data may be damaged.
When inserting or ejecting the memory card, be careful so that the memory card does not pop out and
drop.
Types of memory card you can use with your camcorder
SD Speed
Class
Capacity
(operation
Described in this
manual
verified)
“Memory Stick PRO Duo”
media (Mark2)
“Memory Stick PRO-HG
—
Up to
32 GB
“Memory Stick PRO
Duo” media
Duo” media
SD memory card
SDHC memory card
SDXC memory card
Operation with all memory cards is not assured.
Notes
A MultiMediaCard cannot be used with this camcorder.
Movies recorded on SDXC memory cards cannot be imported to or played back on computers or AV
devices not supporting the exFAT* file system by connecting the camcorder to these devices with the
USB cable. Confirm in advance that the connecting equipment is supporting the exFAT system. If you
connect an equipment not supporting the exFAT system and the format screen appears, do not perform
the format. All the data recorded will be lost.
* The exFAT is a file system that is used for SDXC memory cards.
Class 4 or
faster
Up to
64 GB
SD card
Recording/playback/editing media: Screen indicators during recording (p. 116)
Recording time of movies/number of recordable photos (p. 98)
24
GB
Page 25
Recording/Playback
Recording
In the default setting, movies and photos are recorded on the memory card. Movies are
recorded with high definition image quality (HD).
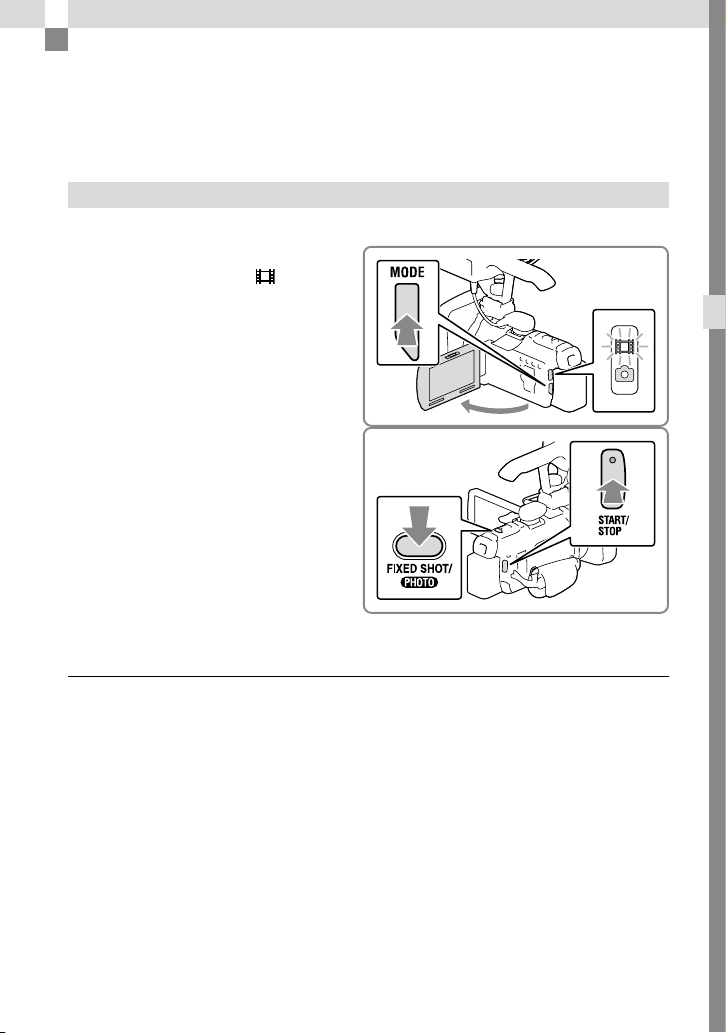
Recording movies
Open the LCD screen and press
1
MODE to turn on the
lamp.
Press START/STOP to start
2
recording.
To stop recording, press START/STOP
again.
(Movie)
Recording/Playback
Recording photos while recording a movie (Dual Capture)
Set the [FIXED SHOT/PHOTO] setting to [PHOTO] and then press the FIXED SHOT/
PHOTO button.
If you set the [FIXED SHOT/PHOTO] setting to [FIXED SHOT], you cannot record photos while
recording a movie.
GB
25
Page 26
26
GB
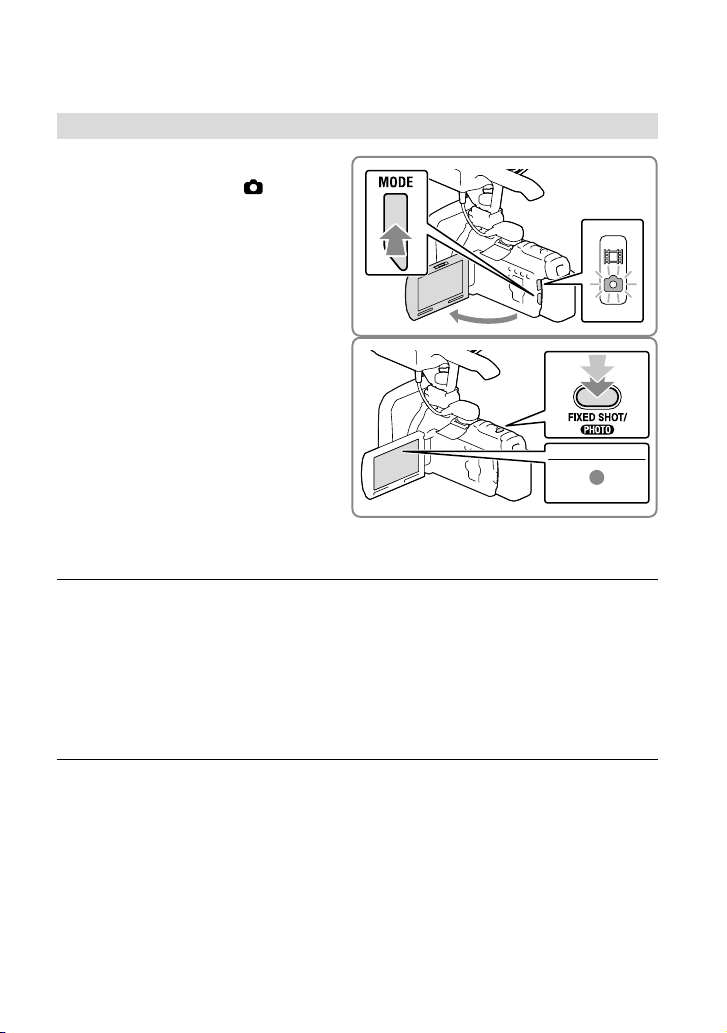
Shooting photos
Open the LCD screen and press
1
MODE to turn on the
(Photo)
lamp.
Press FIXED SHOT/PHOTO lightly
2
to adjust the focus, then press it
fully.
When the focus is adjusted properly,
AE/AF lock indicator appears on the LCD
screen.
The [FIXED SHOT/PHOTO] setting is set
to [PHOTO] in photo recording mode.
To display items on the LCD screen
Items on the LCD screen disappear if you do not operate the camcorder for a few seconds
after you turn the camcorder on or switch between the movie recording and photo shooting
modes.
Touch anywhere except the buttons on the LCD screen to display information on icons with
functions convenient for recording.
Screen indicators during recording
Described here are icons for both movie recording and photo recording modes. Refer to the
page in ( ) for details.
Page 27
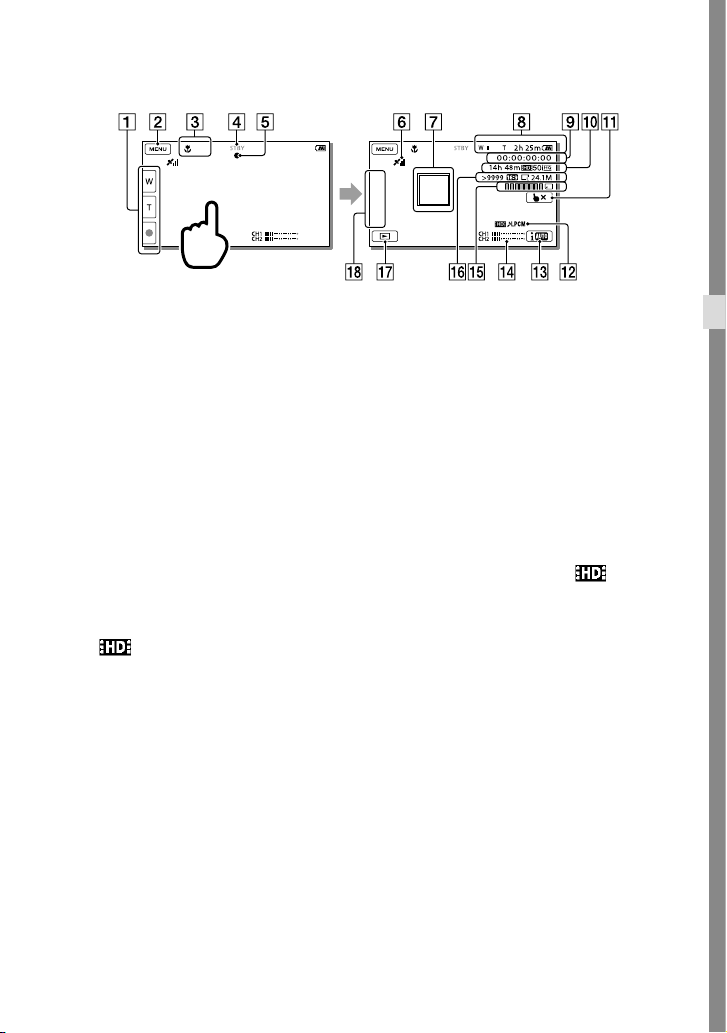
Zoom button (W: Wide/T: Telephoto), START/STOP button (in movie recording mode),
PHOTO button (in photo recording mode)
MENU button (58)
Status detected by Intelligent Auto (35)
Recording status ([STBY]/[REC])
AE/AF (automatic exposure/automatic focus) lock (26)
GPS triangulating status (44)
Tracking focus (34)
Zoom, Remaining battery
Time code
Estimated recording remaining time, Recording image quality (HD/STD),
Format (38)
Tracking focus cancel button (34)
Audio Format
Intelligent Auto button (35)
Audio Level Display (76)
Capturing a photo, Recording/playback/editing media (23)
Approximate number of recordable photos, Aspect ratio (16:9 or 4:3), Photo size (L/M/S)
View Images button (30)
My Button (you can assign your favorite functions to icons displayed in this area) (75)
Recording/Playback
Rec
GB
27
Page 28
28
GB
To record in mirror mode
Open the LCD panel 90 degrees to the
camcorder (), then rotate it 180 degrees to
the lens side ().
A mirror-image of the subject appears on the
LCD screen, but the image will be normal
when recorded.
If white circular spots appear on photos
This is caused by particles (dust, pollen,
etc.) floating close to the lens. When they
are accentuated by the camcorder’s flash,
they appear as white circular spots.
To reduce the white circular spots, light the
room and shoot the subject without a flash.
Notes
If you close the LCD screen while recording movies, the camcorder stops recording.
The maximum continuous recordable time of movies is about 13 hours.
When a movie file exceeds 2 GB, the next movie file is created automatically.
The flash does not work while the
The following states will be indicated if data is still being written onto the recording media after
recording has finished. During this time, do not apply shock or vibration to the camcorder, or remove the
battery or AC Adaptor.
cces
s lamp (p. 23) is lit or flashing
A
The media icon in the upper right of the LCD screen is flashing
When [
Rec Format] is set to [1080/25p ] or [1080/25p ], you cannot record photos while the
camcorder is in movie recording mode.
The LCD screen of your camcorder can display recording images across the entire screen (full pixel
display). However, this may cause slight trimming of the top, bottom, right, and left edges of images when
played back on a TV which is not compatible with full pixel display. It is recommended you record images
th [Guide Frame] set to [On] and using the outer frame of [Guide Frame] (p. 75) as a guide.
i
w
Recording time, recordable number of photos (p. 98)
[Media Select] (p. 23)
sh] (p. 73)
[Fla
splay items on the LCD screen all the time: [Display Setting] (p. 84)
To di
To change the image size: [
Recordable time, remaining capacity [Media Info] (p. 77)
(movie) lamp is lit.
Image Size] (p. 38)
Page 29
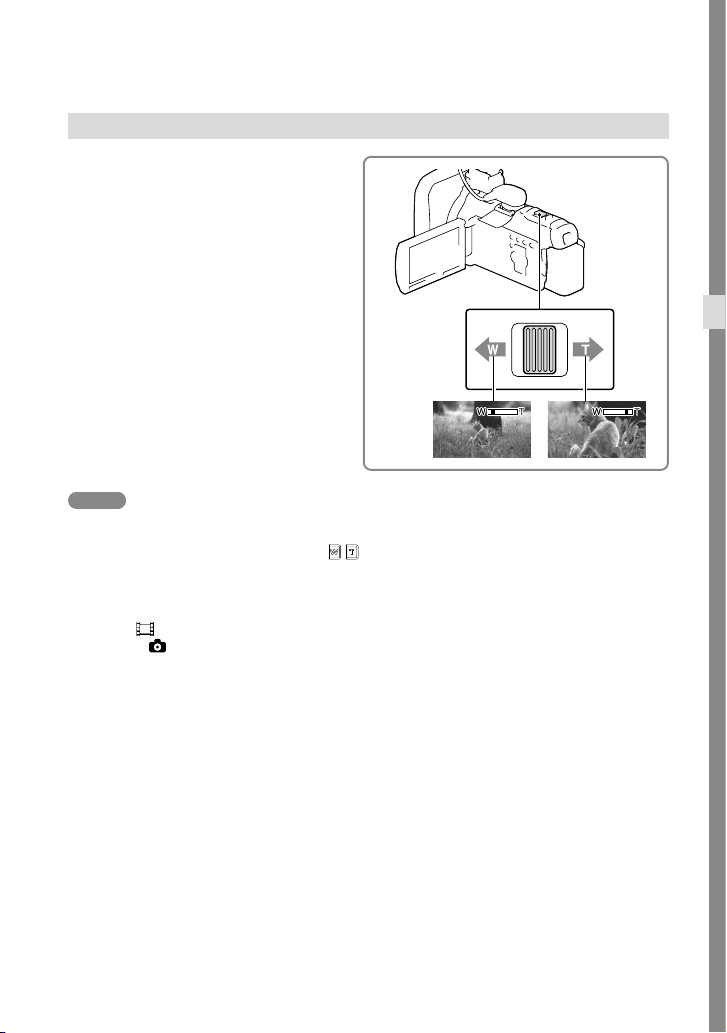
Zooming
Move the power zoom lever to
magnify or reduce the size of the
image.
W (Wide angle): Wider range of view
T (Telephoto): Close view
You can magnify images up to 17 times
(Extended Zoom) the original size with the
power zoom lever.
Move the power zoom lever slightly for a slower
zoom. Move it further for a faster zoom.
Notes
Be sure to keep your finger on the power zoom lever. If you move your finger off the power zoom lever,
the operation sound of the power zoom lever may also be recorded.
You cannot change the zoom speed with the
The minimum possible distance between camcorder and subject while maintaining sharp focus is about 1
cm (about 13/32 in.) for wide angle and about 80 cm (about 31 1/2 in.) for telephoto.
You can magnify images up to 10 times using optical zooming in the following cases:
When [
When the
SteadyShot] is set to other than [Active]
(Photo) is lit
Further zooming: [Digital Zoom] (p. 71)
/ button on the LCD screen.
Recording/Playback
GB
29
Page 30
30
GB
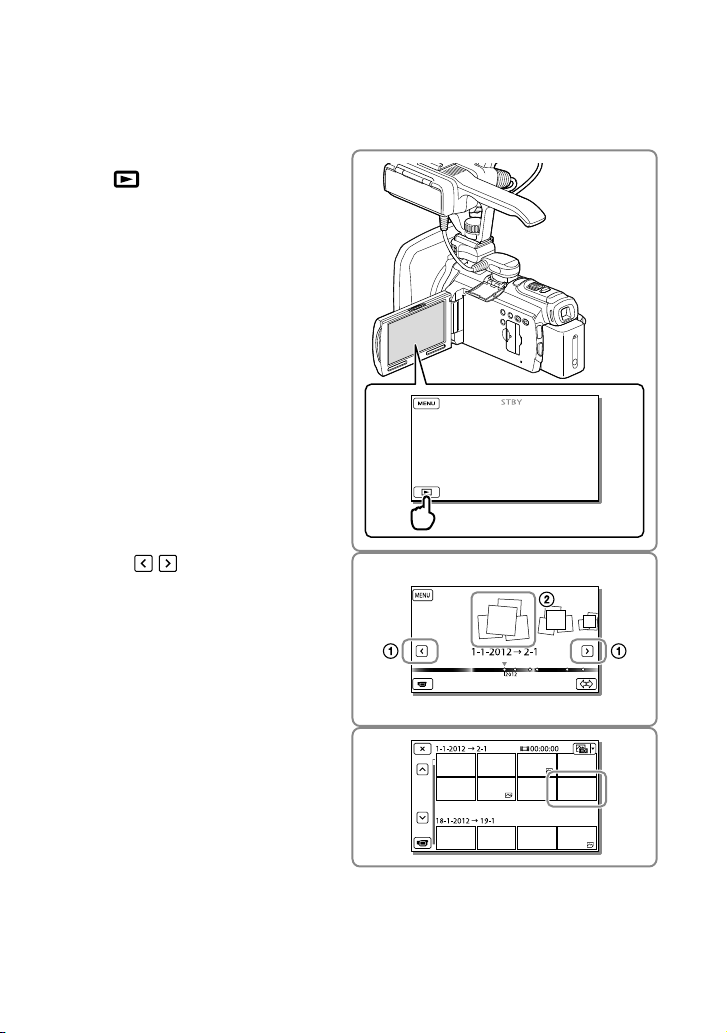
Playback
You can search for recorded images by date and time of recording (Event view).
Open the LCD screen and press
1
the
button on the LCD screen
to enter the playback mode.
Select / to move the desired
2
event to the center () and then
select it ().
The camcorder displays recorded images as
an event automatically, based on the date
and time.
Select the image.
3
The camcorder plays from the selected
image to the last image in the event.
Page 31

Screen display on the Event View screen
To the MENU screen
Event name
To the previous event
Change to the movie/
photo recording mode
Event name Recorded time/number of photos
To go back to the Event
Reduced-size images which enable you to view many images at the same time on an index screen are
called “thumbnails.”
Notes
To prevent your image data from being lost, save all your recorded images on external media periodically.
.
(p
View screen
Previous/next
Change to the movie/
photo recording mode
Last played image
51)
Remaining battery
Events
To the next event
Time-line bar
Change Event Scale button
Switch Image Type button
Movie
Photo
Recording/Playback
Operating buttons while playing
Items on the LCD screen disappear if you do not attempt to operate the camcorder for a few
seconds. To display the items again, touch the LCD screen.
GB
31
Page 32

32
GB
While playing a movie
Volume
Delete
Context
To stop
Previous
To fast-reverse
Next
To fast-forward
To pause/play
While viewing photos
Operating buttons while viewing photos will be changed depends on the setting of Switch
Image Type button (p. 31).
(Movie/photo) (default setting)
Delete
Next
Previous
(photo)
Delete
Context
To play/pause movies
and photos in the order
recorded
Previous
Next
To start/stop slide show
Page 33

As you repeat selecting / during playback, movies are played as fast as about 5 times about 10
times about 30 times about 60 times.
/ during pause to play movies slowly.
Select
To repeat Slideshow, select
[Slideshow Set].
To play back images with other devices
You may not be able to play back normally images recorded on your camcorder with other devices. Also,
you may not be able to play back images recorded on other devices with your camcorder.
Standard definition image quality (STD) movies recorded on SD memory cards cannot be played on AV
equipment of other manufacturers.
Recording/Playback
GB
33
Page 34

Advanced operations
REC
REC
W
T
REC
REC
AUTO
Recording people clearly
Recording the selected subject clearly (Face Priority)
Your camcorder can track a face you select
and adjust the focus, exposure, and skin
tone of the face automatically.
Touch one of the faces targeted.
is displayed.
Notes
The subject you touched may not be detected,
depending on the surrounding brightness or
hairstyle of the subject.
Make sure to set the [Face Detection] setting to
other than [Off] ([Auto] is the default setting).
To record subjects other than people
(Tracking focus)
Touch the subject you want to record.
Your camcorder adjusts the focus
automatically.
Release selection
Release selectionThe double-lined frame
Capturing smiles automatically (Smile Shutter)
A photo is recorded automatically when
the camcorder detects the smile of a
person during movie recording (p. 73).
([Dual Capture] is the default setting.)
34
The camcorder is
The camcorder is
GB
detecting a face.
detecting a smile
(orange).
Page 35

Notes
When [
use the Smile Shutter function while recording
movies. Furthermore, when [
is set to [1080/25p
cannot use the Smile Shutter function, either.
Smiles may not be detected depending on
recording conditions, subject conditions, and
the setting of your camcorder.
Rec Format] is set to [1080/50p
], [1080/50i ] or [720/50p ], you cannot
Rec Format]
] or [1080/25p ], you
[Smile Sensitivity] (p. 73)
Recording movies in various situations
Selecting the suitable setting automatically for the recording situation (Intelligent Auto)
Your camcorder records movies after
selecting the most suitable setting for the
subjects or the situation automatically.
([Off] is the default setting.) When the
camcorder detects a subject, the icons that
correspond to the detected conditions are
displayed.
Select [On] at the
right bottom of the recording screen
of movies or photos.
Face detection:
The camcorder detects faces, and adjusts
the focus, color and exposure.
(Portrait), (Baby)
Scene detection:
The camcorder selects the most effective
setting automatically, depending on the
scene.
(Backlight),
Scene),
(Macro)
Camera-shake detection:
The camcorder detects whether camerashake occurs or not, and makes the
optimum compensation.
(Walk), (Tripod)
To cancel the Intelligent Auto function, select
[Off].
(Landscape), (Night
(Spotlight), (Low light),
Advanced operations
GB
35
Page 36

To record images brighter than those
recorded using the Intelligent Auto
function
Select [Camera/Audio]
Manual Settings] [Low Lux].
[
Notes
The camcorder may not detect the expected
scene or subject, depending on the recording
conditions.
Reducing camera-shake
SteadyShot)
(
The camcorder has a balanced SteadyShot
function that allows you to reduce the
camera-shake when shooting with
zooming, as well as when shooting with a
wide-angle shot. ([Standard] is the default
setting.)
Select [Camera/Audio]
1
[
[
Camera Settings]
SteadyShot].
Standard:
The camcorder reduces camera-shake using
the balanced SteadyShot function in wideangle shooting.
Off:
The camcorder does not use the balanced
SteadyShot function.
To further reduce camera-shake
(FIXED SHOT)
By fixing the composition, you can steady
the shot when recording movies.
Select [Camera/Audio]
1
[
Camera Settings]
[FIXED SHOT/PHOTO] [FIXED
SHOT].
Press FIXED SHOT/PHOTO button
2
(p. 25).
To cancel the FIXED SHOT function, press
FIXED SHOT/PHOTO button again.
When you attempt operations such as pan and
tilt, turn Off the FIXED SHOT function.
Select the desired item.
2
Active:
In addition to the balanced SteadyShot
function, the camcorder compensates for
camera-shake in the vertical and horizontal
directions.
GB
36
Notes
The angle of view will be changed after
changing the settings of the [
function.
You can magnify images up to 10 times using
optical zooming in the following cases:
When [
[Active]
When the
SteadyShot] is set to other than
(Photo) is lit
SteadyShot]
Page 37

Recording in dark places (NightShot)
You can record images even in total
darkness.
Press NIGHTSHOT.
Recording movies in dim places (Video Light)
Press LIGHT.
Flash/
Video light
Advanced operations
Infrared port
appears.
To cancel the NightShot function, press
NIGHTSHOT again.
Notes
Do not cover the infrared port. Infrared rays are
required when using NightShot.
When recording movies using the NightShot
function, remove the lens hood (supplied), the
Step Down Ring (supplied), and the conversion
lens (sold separately).
Using NightShot in bright places will cause a
malfunction of your camcorder.
[Focus] (p. 67)
[Low Lux] (p. 69)
Each time you press the LIGHT button, the
indicator changes as follows.
Off (no indicator) Auto (
) ...
On (
Notes
Keep a distance of about 0.3 m to 1.5 m (1
foot to 5 feet) between the camcorder and the
subject.
The video light generates strong light. Do not
use the video light directly in front of the eyes
at close range.
The battery drains quickly while using the video
light.
When you shoot photos, the video light turns
off and will work as a flash.
)
[Light Bright] (p. 76)
GB
37
Page 38

Recording images
For selecting the still image size.
Image Size
L
( 2.1 M )
16:9
M
16:9
S
16:9
L
( VGA )
4:3
M
4:3
S
4:3
16:9
L
( 5.0 M )
( 24.1 M )
( 12.3 M )
( 18.1 M )
with the selected
image quality
Selecting the recording format
You can select the recording format
(bit-rate, image size, frame rate, scanning
system). In the default setting, [1080/50i
] is selected.
To change the setting
Press [Rec/Media SET]
1
[
Select the desired item.
2
Setting value Description
1080/50p
1080/50i
1080/50i
1080/50i
1080/50i
1080/25p
1080/25p
720/50p
720/50p
GB
38
Rec Format].
Bit-rate
PS: max. 28 Mbps
FX: max. 24 Mbps
FH: approx. 17 Mbps
(average)
HQ: approx. 9 Mbps
(average)
LP: approx. 5 Mbps
(average)
Image size
PS: 1920×1080
FX:
1920×1080/1280×720
FH:
1920×1080/1280×720
HQ: 1440×1080
LP: 1440×1080
Frame rate
either 25, or 50
Scanning system
i: interlace
p: progressive
Setting value
If you select [1080/25p ], for example,
movies are recorded with following format.
1080: Effective scanning lines
25: Frame rate
p: Scanning system
: Recording mode
Notes
Movies recorded with the recording mode set to
PS or FX on [
an external media device only (p. 53, 55).
The recording format of [576/50i
automatically selected for the standard image
quality (STD) recording.
Rec Format] can be saved on
] is
Changing the image quality of photos
The number of photos you can shoot
differs, depending on the image size
selected.
Select [Rec/Media SET]
1
[
Image Size].
Select the desired image size.
2
Notes
The image size selected with this setting takes
effect for photos taken by the Dual Capture
un
ction (p. 25).
f
Number of recordable photos (p. 100)
Page 39

Using the manual adjustment features
Shooting images with the iris priority mode
Changing IRIS parameter changes the
range that is in focus.
Select [Camera/Audio]
1
[
Manual Settings]
[IRIS] [Manual].
Select / to adjust the iris.
2
F-value
As the F-value (aperture value)
becomes smaller, the iris opens and
the background blurs.
To change the atmosphere of image
by the IRIS parameter
Smaller F-value (opening the iris) narrows
the range that is in focus. Larger F-value
(narrowing down the iris) widens the range
that is in focus. Open the iris to blur the
background, or narrow down the iris to
sharpen the whole image.
Notes
Even if you open the IRIS wider (a smaller
F-value) than F3.4 when you set the zoom lever
to the W (Wide angle) side, the IRIS is reset
to F3.4 as you move the zoom lever to the T
(Telephoto) side.
Shooting images with the Shutter Speed priority mode
You can express the movement of a moving
subject in various way by adjusting the
shutter speed. When shooting a mountain
stream, for example, a splash of water will
be captured clearly with high speed shutter,
or a trailing image of water with low speed
shutter.
Select [Camera/Audio]
1
[
Manual Settings]
[Shutter Speed] [Manual].
Select / to adjust the
2
shutter speed.
As the value becomes smaller (slower
shutter speed), a trailing image of the
movement of the subject is captured.
Notes
When you record images under a fluorescent
lamp, sodium lamp, or mercury lamp,
horizontal stripes may appear, flicker may
occur, or color may change. In this case, change
the shutter speed according to the power supply
frequency in your region.
Advanced operations
GB
39
Page 40

Controlling the image settings manually with the MANUAL dial
It is convenient to make manual
adjustments using the MANUAL dial,
by assigning a menu item ([Focus] in the
default setting) to the MANUAL dial.
MANUAL button
MANUAL dial
Press MANUAL to switch to the
1
manual operation mode.
Pressing MANUAL switches the
operation mode between manual and
automatic.
Rotate the dial to make
2
adjustment.
Items you can control with the
MANUAL dial
[Focus] (p. 67)
[Exposure] (p. 67)
[IRIS] (p. 68)
[Shutter Speed] (p. 68)
[AE Shift] (p. 68)
[White Balance Shift] (p. 69)
To assign the menu item to the
MANUAL dial
Press and hold MANUAL down
1
for a few seconds.
[Dial Setting] screen appears.
Rotate the MANUAL dial and
2
select the item to be assigned.
Select [RESET] to reset the items adjusted
manually to the default settings.
Press MANUAL.
3
The camera data that appears on the
LCD screen will differ, depending on
the recording settings of the camcorder.
The settings will be displayed with the
following icons.
: Automatic
: Exposure is set manually.
: IRIS priority
: Shutter speed priority
Notes
Manual settings will be retained even if you
change the assigned item of the MANUAL dial.
However, if you set [Exposure] after setting
[AE Shift] manually, [Exposure] will override
[AE Shift].
If you set either one of [Exposure], [IRIS], or
[Shutter Speed], the settings of other 2 items
are canceled.
[Data Code] (p. 82)
40
GB
Page 41

Audio setup
XLR Adaptor
Using the supplied microphone
Attach the XLR Adaptor when you use the
supplied microphone (ECM-XM1). You can
record monaural sound with the superdirectional microphone.
MIC input jack
Built-in microphone
Select the method for inputting sound
You can select the method for inputting
sound on the camcorder from 3 types;
built-in microphone, MIC input jack or
XLR Adaptor.
Depending on the connection status of
MIC input jack and XLR Adaptor, the order
of priority to be selected is as follows.
MIC input jack XLR Adaptor built-in
microphone
Using the built-in microphone
Detach the XLR Adaptor when you use the
built-in microphone. You can record stereo
sound.
Notes
To reduce wind noise, set [Int. Mic. Wind NR]
. 74).
to [On] (p
Using an external microphone (sold separately)
When an external microphone is connected
to the MIC input jack, sound is switched to
that of the external microphone.
Sound is not switched during recording.
Advanced operations
Inputting external sound
INPUT1 jack
INPUT2 jack
GB
41
Page 42

Selecting a sound source
INPUT1 (LINE/MIC/MIC+48V) switch
INPUT2 (LINE/MIC/MIC+48V) switch
Selecting a sound source level
ATT (INPUT1) switch
ATT (INPUT2) switch
Adjusting the recording level
You can adjust the recording level input
from the INPUT1 /INPUT2 jacks.
You cannot adjust the recording level of the
built-in microphone and MIC input jack.
Set the AUTO/MAN (CH1/CH2)
1
switch of the channel to be
adjusted ( or ) to MAN.
Selecting channel setting for
recording
REC CH SELECT (INPUT1) switch
Selecting the recording level
AUTO/MAN (CH1) switch
AUDIO LEVEL (CH1) dial
AUTO/MAN (CH2) switch
AUDIO LEVEL (CH2) dial
Switching wind noise reduction to
ON/OFF
LOW CUT (INPUT1) switch
LOW CUT (INPUT2) switch
Attach the XLR Adaptor (p. 12),
1
and connect the supplied
microphone to INPUT1 jack .
Set the INPUT1 (LINE/MIC/
2
MIC+48V) switch to MIC+48V.
Set the REC CH SELECT (INPUT1)
3
switch to CH1·CH2
This setting enables recording on both
CH1, CH2. Set the switch to CH1 if
you want to record on CH1 only.
GB
42
Turn the AUDIO LEVEL dial or
2
to adjust the volume to the
proper level.
Confirm that the volume is at the
proper level with headphones or Audio
vel Display (p. 76).
Le
To restore automatic adjustment
Set the AUTO/MAN (CH1/CH2) switch
or to AUTO.
Reducing wind noise
You can reduce wind noise input from the
INPUT1/INPUT2 jacks or .
Set the LOW CUT (INPUT1) switch
or LOW CUT (INPUT2) switch to
ON.
Notes
You can select [
[Linear PCM] or [Dolby Digital] when
recording in high definition image quality
(HD).
You can adjust the volume of the headphones or
eaker with [Volume] (p. 75).
p
s
You can set [Audio Output Timing] of
e
adphones and audio output jacks (p. 75).
h
Audio Format] from
Page 43

Using an external audio device
Set as follows when you use a microphone
other than the supplied microphone or an
external audio device (mixer, etc.).
Select the sound source to be
1
input.
Set the INPUT1/INPUT2 (LINE/MIC/
MIC+48V) switch or according
to the device to be connected to the
INPUT1/INPUT2 jacks or .
External audio device (mixer, etc.): LINE
Dynamic microphone or microphone
with built-in battery: MIC
icr
ophone that is 48 V phantom power
M
compliant: MIC+48V
Notes
If you connect a device that does not support
48
V phantom power, malfunction may result
from setting this switch to MIC+48V. Check
before connecting the device.
If noise from the unused jack bothers you, set
the INPUT1/INPUT2 (LINE/MIC/MIC+48V)
switch of the unused jack ( or ) to LINE.
Set the input level of the
2
microphone
When the INPUT1/INPUT2
(LINE/MIC/MIC+48V) switch or
is set to MIC or MIC+48V, you
can set the input level with the ATT
(INPUT1/INPUT2) switch or .
Adjust according to the microphone
sensitivity.
ATT 10dB is recommended when you use
the supplied microphone (ECM-XM1).
The input levels are as follows.
ATT 0dB: -60dBu
ATT 10dB: -50dBu
ATT 20dB: -40dBu
Notes
When the INPUT1/INPUT2 (LINE/MIC/
MIC+48V) switch or is set to LINE, the
input level is fixed to +4dBu. Even if you reset
the ATT switch, the input level does not change.
Set the channel to be recorded.
3
You can select the channel to be
recorded with the REC CH SELECT
(INPUT1) switch .
The position
of the REC
CH SELECT
(INPUT1)
switch
CH1·CH2 INPUT1 CH1
CH1 INPUT1
Notes
To use a stereo microphone with 2 XLR (3PIN)
plugs, connect Lch to the INPUT1 jack and
Rch to the INPUT2 jack , and set the REC
CH SELECT (INPUT1) switch to CH1.
Audio recorded on CH1,
CH2
INPUT2
Advanced operations
CH2
CH1
CH2
GB
43
Page 44

Recording
information on your
location
The camcorder records information on
the location when movies or photos are
recorded (the default setting).
(GPS)
If you do not want to record location
information
Select
[
[Setup]
General Settings] [GPS
Setting] [Off].
GPS triangulating status
Searching for the
satellites
Number of dots
changes
Triangulating
Triangulating meters Unable to record
Images will be registered using
the location information that was
previously obtained.
Unable to
triangulate
location information
Notes
It may take a while before the camcorder starts
triangulating.
Use the GPS function outdoors and in open
areas, as the radio signals can best be received
in such areas.
If data on your current location
cannot be obtained
A display that allows you to triangulate the
location again appears. In this case, follow
the instructions that appears on the LCD
screen.
Hints for better reception
Use the GPS function outdoors and in open
areas.
For details on locations or situations where
radio signals cannot be received, refer to
a
ge 103.
p
Rotate the LCD panel to direct the GPS antenna
.
7) towards the sky. Do not place your hand
(p
on the GPS antenna.
44
GB
Page 45

Notes
In the following situations, the current location
of the camcorder shown on the map may be
different from the actual location. The margin
of error can be as wide as several hundred
meters.
When the camcorder receives GPS signals
that have been reflected off the surrounding
buildings
When the GPS signal is too weak
Playing images on a TV
Connection methods and the image quality
viewed on the TV screen differ depending
on what type of TV is connected, and the
connectors used.
Connecting to a high
definition TV
HDMI
Cable
(supplied)
* If the TV does not have the HDMI input jack,
use the A/V connecting cable for connection.
1
2
3
*
Switch the input on the TV to the
connected jack.
Connect the camcorder to a TV.
Play a movie or a photo on the
camcorder (p. 30).
Connecting to a nonhigh definition 16:9
(wide) or 4:3 TV
A/V
connecting
cable
(supplied)
Input
Yellow
White
Red
Signal flow
Advanced operations
GB
45
Page 46

Notes
Refer to the instruction manuals of the TV as
well.
Use the supplied AC Adaptor as the power
source (p. 17).
When movies are recorded with standard
definition image quality (STD), they are played
back in standard definition image quality (STD)
even on a high definition TV.
When you play back standard definition image
quality (STD) movies on a 4:3 TV that is not
compatible with the 16:9 signal, set [
Mode] to [4:3] to record movies with 4:3 aspect
ratio.
If you connect your camcorder to the TV using
more than one type of cable to output images,
HDMI output takes priority.
The camcorder does not support the S-Video
output.
This camcorder is not compatible with
“BRAVIA” sync.
Wide
On an HDMI cable
Use an HDMI cable with the HDMI logo.
Use an HDMI mini connector on one end
(for the camcorder), and a plug suitable for
connecting your TV on the other end.
Copyright-protected images are not output
from the HDMI OUT jack of your camcorder.
Some TVs may not function correctly (e.g., no
sound or image) with this connection.
Do not connect the camcorder HDMI OUT
jack to an external device HDMI OUT jack, as
malfunction may result.
HDMI (High Definition Multimedia Interface)
is an interface to send both video/audio signals.
The HDMI OUT jack outputs high quality
images and digital audio.
When your TV is monaural (When
your TV has only one audio input
jack)
Connect the yellow plug of the A/V
connecting cable to the video input jack
and connect the white (left channel) or red
(right channel) plug to the audio input jack
of your TV or VCR.
When connecting to your TV via a
VCR
Connect your camcorder to the LINE IN
input on the VCR using the A/V connecting
cable. Set the input selector on the VCR to
LINE (VIDEO 1, VIDEO 2, etc.).
Setting the aspect ratio supported by the TV:
[TV Type] (p. 83)
If your TV/VCR has a 21-pin adaptor
(EUROCONNECTOR)
Use a 21-pin adaptor (sold separately) to
view playback pictures.
TV/VCR
46
GB
Page 47

Using the built-in projector
You can use a flat surface such as a wall as
a screen to view recorded images using the
built-in projector.
Notes
The LCD screen turns off while an image
is being projected. Use the power zoom
lever/FIXED SHOT/PHOTO button or wireless
remote commander to operate the camcorder.
Face the projector lens towards a
1
surface, such as a wall, and then
press PROJECTOR.
When the operating guide
2
screen appears, select [Project].
Adjust the focus of the projected
3
image using the PROJECTOR
FOCUS lever.
PROJECTOR FOCUS lever
The projected image is larger when the
distance between your camcorder and the
reflecting surface increase.
It is recommended that you place the
camcorder about 0.5 m (1.6 feet) or further
away from the surface that the images are
to be projected onto.
Move the power zoom lever
4
to select the image you want
to play, then press FIXED
SHOT/PHOTO button to begin
playback.
Power zoom lever
Advanced operations
This screen appears the first time you use
the built-in projector.
FIXED SHOT/PHOTO button
Use the power zoom lever to move the
selection frame that appears on the LCD
screen and press the FIXED SHOT/
PHOTO button to start playing the framed
item.
For details on playback, see page 30.
GB
47
Page 48

When you use the wireless remote
commander, use /// to move the
selection frame and press ENTER to start
playing the framed item.
To turn off the projector, press
PROJECTOR.
Notes
Be careful of the following operations or
situations while using the projector.
Make sure not to project images towards the
eyes.
Make sure not to touch the projector lens.
The LCD screen and the projector lens
become hot while in use.
Using the projector shortens battery life.
The following operations are unavailable while
you are using the projector.
Operation of the camcorder with the LCD
screen closed
Several other functions
48
GB
Page 49

Editing
Editing on your camcorder
Notes
You cannot restore images once they are
deleted. Save important movies and photos in
advance.
Do not remove the battery pack or the AC
Adaptor from your camcorder while deleting
or dividing the images. It may damage the
recording media.
Do not eject the memory card while deleting or
dividing images from the memory card.
Deleting movies and photos
Select [Edit/Copy]
1
[Delete].
Select [Multiple Images], and
2
then select the type of image
you want to delete.
To delete all movies/photos in the
selected date at one time
1 In step 2, select [All In Event].
2 Select the date you want to delete using
/ , and then select .
To delete a part of a movie
You can divide a movie and delete it.
Release protection: [Protect] (p. 80)
[Format] (p. 78)
Dividing a movie
Select [Divide] on the
1
movie playback screen.
Editing
Add check marks to the movies
3
or photos to be deleted and
select
.
GB
49
Page 50

Select the point where you want
2
to divide the movie into scenes
using
/ , and then select
.
A B
A: Returns to the beginning of the selected
movie
B: Adjusts the dividing point with more
precision
Notes
A slight difference may occur from the point
where you select and the actual dividing point,
as your camcorder selects the dividing point
based on about half-second increments.
Some basic editing operations can be done on
the camcorder. Use commercially available
software for more advanced editing.
Select the point where you want
2
to capture a photo using
/ , and then select .
A B
A: Returns to the beginning of the selected
movie
B: Adjusts the capturing point with more
precision
If the movie was recorded with one of
the following image quality levels, the
image size will be set as shown below.
High definition image quality (HD): 2.1
M (16:9)
Wide aspect ratio (16:9) with standard
definition image quality (STD): 0.2 M
(16:9)
4:3 aspect ratio with standard definition
image quality (STD): 0.3 M (4:3)
Capturing a photo from a movie
You can capture images from movies
recorded in the internal recording medium.
Select [Photo Capture] that
1
appears on the playback screen
of a movie.
GB
50
On recording date and time of
captured photos
The recording date and time of captured photos
are the same as the recording date and time of
the movies.
If the movie you are capturing from has no data
code, the recording date and time of the photo
will be the date and time you captured from
the movie.
Page 51

Saving images with an external device
Dubbing guide
You can save high definition image quality (HD) movies using an external device. Select the
method to be used according to the device.
External devices Connecting cable Page
Hard disk recorder, etc.
Saving images on a DVD disc with
standard definition image quality
A/V connecting cable
(supplied)
52
(STD).
External media device
Saving images on an external
media device with high definition
image quality (HD).
USB Adaptor
Cable VMC-UAM1
(supplied)
53
Movies that are recorded with standard definition image quality (STD)
Use the A/V connecting cable to connect the camcorder to an external device in which images
are saved.
Notes
Movies recorded with the recording mode set to PS or FX on [
external media device only.
Rec Format] can be saved on an
The devices on which the created disc can be played back
DVD disc with high definition image quality (HD)
AVCHD format playback devices, such as a Sony Blu-ray disc player or a PlayStation
3
DVD disc with standard definition image quality (STD)
Ordinary DVD playback devices, such as a DVD player.
Saving images with an external device
Notes
The AVCHD recording disc can be played back only on AVCHD format compatible devices.
Discs with high definition image quality (HD) images recorded should not be used in DVD players/
recorders. Because DVD players/recorders are not compatible with the AVCHD format, DVD players/
recorders may fail to eject the disc.
Always maintain your PlayStation
PlayStation
3 may not be available in some countries/regions.
3 to use the latest version of the PlayStation3 system software. The
GB
51
Page 52

52
GB
Creating a disc with the recorder
Creating a standard definition image quality (STD) disc with a recorder, etc.
Connect your camcorder to a disc recorder
with the A/V connecting cable. You
can copy images played back on your
camcorder on a disc or video cassette.
Insert the recording medium
1
in the recording device (a disc
recorder, etc.).
If your recording device has an input
selector, set it to the input mode.
Connect your camcorder to the
2
recording device with the A/V
connecting cable.
A/V
connecting
cable
(supplied)
Red White Yellow
Signal flow
Connect your camcorder to the input jacks
of the recording device.
Start playback on your
3
camcorder, and record it on the
Input
recording device.
When dubbing is finished, stop
4
the recording device, and then
your camcorder.
Notes
Connect your camcorder to the wall outlet (wall
socket) using the supplied AC Adaptor for this
operation (p. 17)
Refer to the instruction manual supplied with
the device connected.
Page 53

You cannot copy images to recorders connected
with an HDMI cable.
Since copying is performed via analog data
transfer, the image quality may deteriorate.
High definition image quality (HD) movies
will be copied with standard definition image
quality (STD).
When you connect a monaural device, connect
the yellow plug of the A/V connecting cable
to the video input jack, and the white (left
channel) or the red (right channel) plug to the
audio input jack on the device.
Copying date and time information: [Data
Code] (p. 82)
Using 4:3 screen size display device: [TV Type]
(p. 83)
Saving images on an external media device
You can save movies and photos on an
external media device (USB storage
devices), such as an external hard disk
drive. The following functions will be
available after you have saved your images
on an external media device.
You can connect your camcorder and the
external media device, and then play back
images stored on the external media device
.
54).
(p
You can import images saved on the external
media device to your computer by using the
supplied software “Content Management
Utility.”
Notes
For this operation, you need the USB Adaptor
Cable VMC-UAM1 (supplied).
Connect the AC Adaptor and the power
cord (mains lead) to the DC IN jack of your
camcorder and the wall outlet (wall socket).
Refer to the instruction manual supplied with
the external media device.
Connect your camcorder and the
1
external media device using the
USB Adaptor Cable (supplied).
Saving images with an external device
USB Adaptor Cable
VMC-UAM1
(supplied)
GB
53
Page 54

54
GB
Make sure not to disconnect the USB
cable while [Preparing image database
file. Please wait.] is displayed on the LCD
screen.
If [Repair Img. DB F.] is displayed on the
camcorder screen, select
Select [Copy.] on the camcorder
2
screen.
Movies and photos that are stored on
one of the camcorder’s recording media
selected in [Media Select], and that have
not yet been saved on external media
device can be saved on the connected
media device at this time.
This operation is available only when
there are newly recorded images in your
camcorder.
To disconnect the external media device,
select
playback standby mode (either Event View
or Event Index is displayed).
while the camcorder is in the
To play back images in the external
media device on the camcorder
Select [Play without copying.] in step 2 and
select the image you want to view.
You can also view images on a TV connected to
your camcorder (p. 45).
When an external media device is connected,
will appear on the Event View screen.
To delete images in the external
media device
1 Select [Play without copying.] in step 2.
.
2 Select
and then follow the instructions that
[Edit/Copy] [Delete],
appear on the LCD screen to delete
images.
To save the desired images in the
camcorder to the external media
device
1 Select [Play without copying.] in step 2.
2 Select
and then follow the instructions that
appear on the LCD screen to save images.
If you want to copy images that have not yet
been copied, select
[Direct Copy] while your camcorder is
connected to the external media device.
Notes
You cannot use the following devices as an
external media device.
media devices with a capacity exceeding 2 TB
ordinary disc drive such as CD or DVD drive
media devices connected via a USB hub
media devices with built-in USB hub
card reader
You may not be able to use external media
devices with a code function.
The FAT file system is available for your
camcorder. If the storage medium of the
external device was formatted for the NTFS file
system, etc., format the external media device
using the camcorder before use. The format
screen appears when an external media device
is connected to your camcorder. Make sure that
important data has not previously been saved
on the external media device before you format
it using the camcorder.
Operation is not assured with every device
satisfying requirements for operating.
[Edit/Copy] [Copy],
[Edit/Copy]
Page 55

For details on available external media devices,
go to the Sony support website in your
country/region.
The number of scenes you can save on the
external media device are as follows. However,
even if the external media device has free space,
you cannot save scenes exceeding the following
number.
High definition image quality (HD) movies:
Max. 3,999
Standard definition image quality (STD)
movies: Max. 9,999
Photos: Max. 40,000
The number of scenes may be smaller
depending on the type of images recorded.
If your camcorder does not recognize the
external media device, try the following
operations.
Reconnect the USB Adaptor Cable to your
camcorder.
If the external media device has the AC power
cord (mains lead), connect it to the wall outlet
(wall socket).
You cannot copy images from an external media
device to the internal recording medium on the
camcorder.
Saving images with a computer
Preparing a computer (Windows)
You can perform following operations using
“Content Management Utility.”
Importing images to a computer
Viewing imported images
Detecting and correcting flash bands
To save movies using a computer, install
the software from the supplied CD-ROM
“Content Management Utility” beforehand.
Use commercially available software to edit
images or create discs.
Step 1 Checking the computer system
1
OS*
Microsoft Windows XP SP3*2/Windows Vista
3
SP2
*
/Windows 7 SP1
CPU
e an Intel Core 2 Duo 2.80 GHz CPU
Us
equivalent or faster to play back videos with
high definition image quality (HD) in the
highest quality.
Videos with high definition image quality
(HD) recorded in other than the highest
quality may be played back with a slower
CPU.
Depending on the performance of your
video card, videos with high definition image
quality (HD) recorded using the highest
quality may be played back with a slower
CPU than that recommended above.
For the following operations, an Intel
P
en
tium III 1 GHz or faster is necessary.
Importing movies to the computer
Processing with standard definition image
quality (STD)
Memory
For Windows XP: 512 MB or more (1 GB or
more is recommended.)
Fo
r Windows Vista/Windows 7: 1 GB or
more
Saving images with an external device
GB
55
Page 56

56
GB
Hard disk
Disk volume required for installation:
proximately 100 MB
Ap
Only the NTFS or exFAT file system can be
used to import or register videos for viewing
to a hard disk.
Display
Minimum 1,024 × 768 dots
Others
USB port (this must be provided as standard,
High-Speed USB (USB 2.0 compatible)) (CDROM drive is necessary for installation)
1
*
Standard installation is required. Operation is
not assured if the OS has been upgraded or in
a multi-boot environment.
2
*
64-bit editions and Starter (Edition) are not
supported.
3
*
Starter (Edition) is not supported.
Notes
Operation with all computer environments is
not assured.
The supplied software “Content Management
Utility” is not supported by Macintosh
computers.
Step 2 Installing the supplied software “Content Management Utility”
Install “Content Management Utility”
before connecting your camcorder to a
computer.
Confirm that your camcorder is
1
not connected to the computer.
Turn on the computer.
2
Log on as an Administrator for
installation.
Close all applications running on the
computer before installing the software.
Place the supplied CD-ROM
3
“Content Management Utility” in
the disc drive of your computer.
The installation screen appears.
If the screen does not appear, click
[Start] [Computer] (in Windows
XP, [My Computer]), then double-click
[SONYCMU(E:)] (CD-ROM).
Select the language for the
4
application to be installed, then
click [OK].
When the install wizard screen
5
appears, click [Next].
Confirm the license agreement,
6
and if you accept the terms,
select [I accept the terms in the
license agreement], then click
[OK].
Select the drive or folder to
7
install the application, then click
[Next].
Select the option to create the
8
desk-top shortcut, then click
[Next].
Turn on your camcorder, then
9
connect the camcorder to the
computer using the supplied
USB cable.
Page 57

Touch [USB Connect] on the
10
camcorder screen.
If the [USB Connect] screen does not
appear, touch
Connection] [USB Connect].
Click [Next].
11
Follow the on-screen instructions
12
to install the software.
Restart the computer if required to
complete the installation.
When the installation is completed,
the following icon will appear,
depending on the selection in step 8.
Remove the CD-ROM from the
13
computer.
[Setup] [
To disconnect your camcorder from
the computer
Click the icon at the bottom right of
the desktop of the computer [Safely
remove USB Mass Storage DeviceDrive].
To play images recorded on the
camcorder, using a computer
See Help of the supplied CD-ROM
“Content Management Utility.”
Notes
When importing a long movie or edited
image, use the supplied software “Content
Management Utility.” If you use any other
software, images may not be imported properly.
If file size exceeds 2 GB during a long recording,
a new file is created automatically, resulting
in the movie being divided into multiple files
when you view the recording media directly
from your computer after recording.
If you import images without using supplied
“Content Management Utility,” files
automatically created (due to the 2 GB limit)
may not be concatenated. Even if you usually
use other editing software, use the supplied
software “Content Management Utility” to
import images to the computer to ensure files
are concatenated and imported to the computer.
Saving images with an external device
Touch [Yes] on the camcorder
screen.
sconnect the USB cable.
Di
GB
57
Page 58

Customizing your camcorder
Using menus
The camcorder has various menu items under each of 6 menu categories.
Shooting Mode (Items for selecting a shooting mode) p. 64
Camera/Audio (Items for customized shooting) p. 66
Rec/Media SET (Items for setting up image quality or the recording media)
TC/UB (Items for setting up the time code or user bit) p. 79
Edit/Copy (Items for editing images such as copy or protect) p. 80
Setup (Other setup items) p. 82
Select .
1
Select a category.
2
Select your desired menu item.
3
p. 77
58
Scrolls the
menu items
up or down
Notes
Select
GB
to finish setting the menu or to return to the previous menu screen.
Page 59

To find a menu item quickly
The [Camera/Audio] and [Setup] menus have
sub-categories. Select the sub-category icon so
that the LCD screen displays the list of menus
in the sub-category selected.
When you cannot select a menu item
Grayed out menu items or settings are not
available.
When you select the grayed out menu item,
your camcorder displays the reason why you
cannot select the menu item or the instruction
of under which condition you can set the
menu item.
Sub-category icons
Customizing your camcorder
GB
59
Page 60

Menu lists
Shooting Mode
Movie
Photo
Smth Slw REC
Golf Shot
Camera/Audio
Manual Settings
White Balance
Spot Meter/Fcs
Spot Meter
Spot Focus
Exposure
Focus
IRIS
Shutter Speed
AGC Limit
AE Shift
White Balance Shift
Low Lux
Camera Settings
Scene Selection
Tele Macro
FIXED SHOT/PHOTO
Digital Zoom
Conversion Lens
GB
60
Cinematone
Fader
Self-Timer
SteadyShot
SteadyShot
Records movies. 64
Shoots photos. 64
Records fast moving subjects in slow-motion. 64
Divides two seconds of fast movement into frames
which are then recorded as a movie and photos.
Adjusts the color balance to the brightness of the
recording environment.
Adjusts the brightness and focus for the selected
subject simultaneously.
Adjusts the brightness of images to a subject you
touch on the screen.
Focuses on a subject you touch on the screen. 67
Adjusts the brightness of movies and photos. 67
Focuses manually. 67
Adjusts the iris. 68
Adjusts the shutter speed. 68
Selects the upper limit for the Auto Gain Control
(AGC).
Adjusts the exposure manually. 68
Adjusts the white balance manually. 69
Records bright color images in the dim. 69
Selects an appropriate recording setting according
to the type of scene, such as night view or beach.
Adjusts the color of the movie to resemble the
atmosphere of films when recording.
Fades scenes in or out. 70
Sets the self-timer when your camcorder is in
photo recording mode.
Shoots a subject in focus with the background out
of focus.
Sets the SteadyShot function when recording
movies.
Sets the SteadyShot function when shooting
photos.
Selects a function to assign to the FIXED SHOT/
PHOTO button.
Sets the maximum zoom level of the digital zoom
that exceeds the zoom level of the optical zoom.
Sets the type of an attached conversion lens (sold
separately).
64
66
66
67
68
69
70
70
70
36
71
36
71
71
Page 61

Auto Back Light
Dial Setting
NIGHTSHOT Light
Color Bar
Color Bar Tone
Face
Face Detection
Smile Shutter
Smile Sensitivity
Flash
Flash
Flash Level
Red Eye Reduction
Audio
Audio Format
Blt-in Zoom Mic
Int. Mic. Wind NR
Micref Level
Audio Output Timing
Volume
Shooting Assist
My Button
Expanded Focus
Guide Frame
Zebra
Peaking
Light Bright
Audio Level Display
Adjusts the exposure for backlit subjects
automatically.
Assigns a function to the MANUAL dial. 40
Records clearer images when using the NightShot
function.
Displays color bars on the screen 72
Outputs audio tone signals. 72
Adjusts the image quality of the face(s)
automatically.
Automatically takes a shot whenever a smile is
detected.
Sets the smile detection sensitivity using the smile
shutter function.
Sets how the flash is activated when shooting
photos.
Sets the brightness of flash. 74
Prevents redeye when shooting with flash. 74
Switches the audio format. 74
Records movies with vivid sound appropriate to
the zoom position.
Reduces the wind noise. 74
Sets the microphone level. 74
You can set echo control when recording. 75
Adjusts the volume of playback sound. 75
Registers MENU items on My Buttons. 75
Magnifies the image that appears at the center of
the screen by about 2.0 times.
Displays the frame to make sure the subject is
horizontal or vertical.
Displays a zebra pattern as a guide for adjusting
brightness.
Displays an image on the screen with its outlines
enhanced in order to help you to adjust the focus.
Adjusts the brightness of the video light. 76
Displays the audio level on the LCD screen. 76
72
72
72
73
73
73
Customizing your camcorder
74
75
75
76
76
GB
61
Page 62

Rec/Media SET
/ Setting
Media Select
Rec Format
Wide Mode
x.v.Color
Image Size
Media Info
Format
Repair Img. DB F.
File Number
TC/UB
TC/UB Disp
TC Preset
UB Preset
TC Run
TC Make
UB Time Rec
Edit/Copy
Delete
Protect
Copy
Direct Copy
Sets image quality for recording, playback, or
editing movies.
Sets the type of media to be used for recording
movies or photos.
Sets the recording format. 38
Selects the aspect ratio when recording with
standard definition image quality (STD).
Records wider range of colors. 77
Sets the photo size. 38
Displays information on the recording media, such
as free space.
Deletes all data on the internal recording media or
a memory card.
Repairs the image database file on the internal
recording media or a memory card.
Sets how to assign the file number. 78
Switchs to display the time code and user bit. 79
Sets the time code. 79
Sets the user bit. 79
Selects how the time code advances. 79
Selects the recording type on the recording media. 79
Selects whether or not to save the actual time in
the user bit code.
Deletes movies or photos.
Protects movies or photos to avoid deleting.
Copies movies or photos.
Copies images stored on the internal recording
medium or on a memory card to some type of
external media.
77
23
77
77
78
95
80
49
80
81
81
62
GB
Page 63

Setup
Playback Settings
Data Code
Connection
Disp Output
TV Type
HDMI Resolution
HDMI TC Output
USB Connect
General Settings
Beep
LCD Brightness
Display Setting
GPS Information
GPS Setting
REC Lamp
Remote Ctrl
Language Setting
Calibration
Battery Info
Clock Settings
Date & Time Setting
Area Setting
Auto Clock ADJ
Auto Area ADJ
Sets how to assign the file number. 82
Selects where to output the display information,
such as time code.
Converts the signal depending on the TV
connected.
Selects the output image resolution when
connecting your camcorder to a TV with the
HDMI cable (supplied).
Transfers time code, user bit data to the device
connected with the HDMI cable (supplied).
Selects which type of media on the camcorder is
to be used when the camcorder is connected to an
external device via USB.
Sets whether the camcorder sounds operation
beeps or not.
Adjusts the brightness of the LCD screen. 84
Sets the duration that icons or indicators are
displayed on the LCD screen.
Displays location information. 84
Sets the GPS. 85
Sets the recording lamp to light up or not. 85
Sets whether the Wireless Remote Commander is
to be used or not.
Sets the display language. 85
Adjusts the touch panel. 110
Displays the battery information. 85
Sets the [Date & Time Format], [Summer Time],
or [Date & Time].
Adjusts for a time difference without stopping the
clock.
Maintains accurate time automatically. 86
Compensates for time differences automatically
by acquiring location information from the GPS
system.
83
83
83
84
84
84
Customizing your camcorder
84
85
85
86
86
GB
63
Page 64

Shooting Mode
(Items for selecting a shooting
mode)
See “Using menus” (p. 58) on the operation.
Movie
You can record movies.
Photo
You can shoot photos.
Smth Slw REC (Smooth
slow rec)
The camcorder records approximately
3-second-long fast actions or motions as an
approximately 12-second-long slow-motion
movie.
Press START/STOP on the [Smth Slw REC]
screen.
[Recording...] disappears, when recording
is finished.
To change the timing at which the
camcorder starts recording
Select [ ]/[ ] to make the setting.
Notes
You cannot record sound.
Image quality is not as good as that of normal
recording.
Rec Format] will be set to [1080/50i
[
] automatically.
Golf Shot
Divides 2 seconds of fast movement into
frames which are then recorded as a
movie and photos. You can view a series
of movement when playing back, which is
convenient in cases such as checking golf
swing or tennis form.
On the [Golf Shot] screen, frame the
subject in the white frame in the center of
the screen, then press START/STOP right
after the subject has taken a swing.
[3sec After] (default setting)
The camcorder records a movie of
approximately 3 seconds after the START/STOP
button is pressed.
[3sec Before]
The camcorder records a movie of
approximately 3 seconds before the START/
STOP button is pressed.
GB
64
Timing that the camcorder starts
recording
If the moment when the largest sound in
one second after the START/STOP button
is pressed has been detected, the camcorder
assumes the moment as the sound of a club
hitting the ball.
Page 65

When the sound of a club hitting the ball
is detected, the recording time period is
automatically adjusted according to at that
moment.
The point
when you press
The sound of a club
hitting the ball
The camcorder records images
in this 2 seconds period.
START/STOP
To check your form using self-timer
Select [ ]/[ ] [On].
The camcorder starts countdown of the
timer after you press the START/STOP
button.
The point when the count reaches 0 is
assumed as the moment of impact and
motion before and after 0 is recorded.
Notes
If the camcorder cannot detect the sound
of a club hitting the ball, the camcorder
automatically sets the impact point at 0.5
second before the START/STOP button has
been pressed, and records a movie in the time
period between 1.5 seconds before the impact
point to 0.5 second after the impact point.
The size of photos becomes 1,920 1,080.
You cannot record sound.
Image quality is not as good as that of normal
recording.
Rec Format] will be set to [1080/50i
[
] automatically.
Impact sound may be detected by the built-in
microphone even when an external microphone
or XLR Adaptor is attached.
The image recorded may be noisy when your
camcorder has failed to analyze the shot
properly because there may be movement in
background of the [Golf Shot] recording screen.
It is recommended that you record images
under stable conditions (for example, using a
tripod).
Customizing your camcorder
GB
65
Page 66

Camera/Audio
(Items for customized
shooting)
See “Using menus” (p. 58) on the operation.
The default settings are marked with .
White Balance
You can adjust the color balance to the
recording environment.
One Push ( )
The white balance will be adjusted
according to the ambient light.
Select [ ].
Keep framing white object such as a
piece of paper, to fill the screen under
the same lightning conditions as you will
shoot the subject.
Select [ ].
If the lighting conditions changed by
bringing your camcorder outdoors from
inside the house, or vice versa, you need to
redo the [One Push] procedure to readjust
the white balance.
Auto (
)
The white balance is adjusted automatically.
If you have changed the battery pack
while [Auto] was selected, or taken your
camcorder outdoors after inside use (or
vice versa), aim your camcorder at a nearby
white object for about 10 seconds for better
color balance adjustment.
Outdoor ( )
The white balance is appropriately adjusted
for the following recording conditions:
Outdoors
Night views, neon signs and fireworks
Sunrise or sunset
Under daylight fluorescent lamps
Indoor ()
The white balance is appropriately adjusted
for the following recording conditions:
Indoors
At party scenes or studios where the
lighting conditions change quickly
Under video lamps in a studio, or under
sodium lamps or incandescent-like color
lamps
GB
66
Notes
Set [White Balance] to [Auto] or adjust the
color in [One Push] under white or cool white
fluorescent lamps.
While the camcorder is recording a movie,
is grayed out and [One Push] cannot be set.
If you set [White Balance], [Scene Selection] is
set to [Auto].
Spot Meter/Fcs (Spot meter/
focus)
Exposure and focus can be adjusted for the
selected subject automatically.
Touch the subject of which you want to
adjust the brightness and focus.
To adjust the brightness and focus
automatically, touch [Auto].
Notes
[Exposure] and [Focus] are automatically set to
[Manual].
Page 67

Spot Meter (Flexible spot
meter)
Exposure can be adjusted and set for
the selected subject automatically. This
function is useful when there is strong
contrast between the subject and the
background, such as subjects in the
spotlight on stage.
Touch the subject of which you want to
adjust the exposure.
To return the setting to automatic exposure,
touch [Auto].
Notes
[Exposure] is automatically set to [Manual].
Spot Focus
Focus can be adjusted automatically for the
subject selected.
Auto
The exposure is adjusted automatically.
Manual
Select if the subject is white or the
backlight is bright, or select
subject is black or the light is dim.
if the
Focus
You can adjust the focus manually. You can
select this function also when you want to
focus on a certain subject intentionally.
Auto
The focus is adjusted automatically.
Manual
Adjust the focus using (nearby
subject) or
appears when the focus cannot be
adjusted any closer, and
the focus cannot be adjusted farther away.
(distant subject).
appears when
Customizing your camcorder
Touch the subject of which you want to
adjust the focus.
To adjust the focus automatically, touch
[Auto].
Notes
[Focus] is automatically set to [Manual].
Exposure
You can fix the brightness of a picture
manually. Adjust the brightness when the
subject is too bright or too dark.
To adjust the focus
It is easier to focus on the subject by
moving the power zoom lever towards
T (telephoto) to adjust the focus, then
towards W (wide angle) to adjust the zoom
for recording. When you want to record
a subject at close range, move the power
zoom lever to W (wide angle), then adjust
the focus.
GB
67
Page 68

On focal distance information
Your camcorder displays the focal distance
information for a few seconds when the
focus mode is switched from automatic
to manual or when you set the focus
manually. You can use this information as
a guide when the subject is dark and focus
adjustment is difficult. (This information
will not appear correctly if a conversion
lens (sold separately) is being used.)
Notes
When you set [Focus] to [Manual], appears.
The minimum possible distance between the
camcorder and subject while maintaining sharp
focus is about 1 cm (about 13/32 in.) for wide
angle and about 80 cm (about 31 1/2 in.) for
telephoto.
IRIS
You can shoot images with the IRIS priority
mode. If you adjust the IRIS, you can
sharpen the subject with its background
blurred or sharpen the whole image.
Auto
Adjusts IRIS automatically.
Manual
Adjust the IRIS by selecting to
sharpen the whole image (increase the IRIS
parameter), and
with its background blurred (decrease the
IRIS parameter)..
to sharpen the subject
Shutter Speed
You can shoot images with the Shutter
Speed priority mode. When you shoot a
moving subject at a higher shutter speed,
it appears as if frozen on the image. At a
lower shutter speed, the subject appears as
if it is flowing.
GB
68
Auto
Adjusts the shutter speed automatically.
Manual
Adjust the shutter speed using to
increase the shutter speed, and
decrease the shutter speed.
to
AGC Limit
You can select the upper limit for the AGC
(Auto Gain Control) to record dim scenes
as they look.
Off
Adjusts the exposure automatically.
24dB/21dB/18dB/15dB/12dB/9dB/
6dB/3dB/0dB (
The gain is automatically adjusted up to the
selected limit.
Notes
The upper limit you can select for the AGC
(Auto Gain Control) depends on the status of
the camcorder.
When the camcorder is set to the movie
recording mode, the upper limit is 24 dB.
When the camcorder is set to the photo
shooting mode, the upper limit is 21 dB.
When the camcorder is set to use [Smth Slw
REC], the upper limit is 15 dB.
At a higher gain, the brightness becomes
more appropriate in dim scenes, but the noise
increases. At a lower gain, the noise decreases,
but the shutter speed becomes slower to
compensate for the lack of brightness, causing
camera-shake or subject blur.
)
AE Shift
You can adjust the exposure based on
the results of the automatic exposure
measurement.
Page 69

Off
Adjusts the exposure automatically.
On (Adjusted number and EV)
Adjust the automatic exposure level using
when the subject is white or the
background is bright, and
subject is dark or the light is dim.
when the
White Balance Shift
You can adjust the white balance manually.
Off
Adjusts the white balance automatically.
On ( and adjusted number)
Adjust the white balance using when
the images appear bluish, and
images appear reddish.
when the
Low Lux
You can record bright color images, even in
dim light.
Off
The Low Lux function is not used.
On ( )
The Low Lux function is used.
Scene Selection
You can record images effectively in various
situations.
(Auto)
Adjusts image quality automatically.
(Night Scene)*
Maintains the darkening
atmosphere of the distant
surroundings in twilight
scenes.
1
(Night Portrait)
Enables to take photos of
people and background
using a flash.
(Sunrise&Sunset)*
Reproduces the atmosphere
of scenes such as sunsets or
sunrises.
(Fireworks)*
Takes spectacular shots of
fireworks.
(Landscape)*
Shoots distant subjects
clearly. This setting also
prevents your camcorder
from focusing on glass or
metal mesh in windows
between the camcorder and
the subject.
1
1
1
(Portrait)
Brings out the subject such
as people or flowers while
creating a soft background.
(Spotlight)*
Prevents people’s faces from
appearing excessively white
when subjects are lit by
strong light.
(Beach)*
Takes the vivid blue of the
ocean or a lake.
(Snow)*
Takes bright pictures of a
white landscape.
1
*
Adjusted to focus on subjects farther away
only.
2
*
Adjusted not to focus on subjects a short
distance away.
2
2
2
Customizing your camcorder
GB
69
Page 70

Notes
Even if you set [Night Portrait], the setting
changes to [Auto] when the
is lit.
If you set [Scene Selection], the [White
Balance], [IRIS] and [Shutter Speed] settings
are canceled.
(Movie) lamp
Cinematone
The camcorder automatically adjusts the
image quality of the movie to resemble the
atmosphere of film camera images when
recording a movie.
Off
Does not use the Cinematone function.
On
Uses the Cinematone function.
Notes
When you switch the [
function on or off, the image will be paused
temporarily.
Cinematone]
Fader
You can record a transition with the
following effects adding to the interval
between scenes.
Select the desired effect in [STBY] (to
fading in) or [REC] (to fading out) mode.
Off
Does not use an effect.
White Fader ( )
Fades in/out with the white effect.
Out In
Black Fader ( )
Fades in/out with the black effect.
The thumbnails of movie recorded using
[Black Fader] may be difficult to see on Event
View or other screens.
Out In
Notes
When you press START/STOP the setting is
cleared.
Self-Timer
Press FIXED SHOT/PHOTO to start the
count down. A photo is recorded after
about 10 seconds.
Off
Cancels the self-timer.
On ( )
Starts the self-timer recording. To cancel the
recording, touch [Reset].
Tele Macro
This is useful to shoot small subjects, such
as flowers or insects. You can blur out
backgrounds and the subject stands out
clearer.
Off
Cancels Tele Macro. (Tele Macro is also
canceled when you move the zoom lever to
the W side.)
70
GB
Page 71

On ( )
The zoom (p. 29) moves to the top of the T
(telephoto) side automatically and allows
recording subjects at close range down to
b
out 32 cm (12 5/8 in.).
a
Notes
When recording a distant subject, focusing may
be difficult and can take some time.
d
just the focus manually ([Focus], p. 67) when
A
it is hard to focus automatically.
SteadyShot
See page 36.
SteadyShot
You can compensate for camera shake.
SteadyShot] to [Off] ( ) when
Set [
using a tripod (sold separately), then the
image becomes natural.
On
The SteadyShot function is used.
Off ( )
The SteadyShot function is not used.
FIXED SHOT/PHOTO
You can assign a function to the FIXED
SHOT/PHOTO button (p. 25). This setting
is available when the
FIXED SHOT
This function further reduces camera shake.
PHOTO
This function is used when shooting photos.
(Movie) lamp is lit.
Digital Zoom
You can select the maximum zoom level.
Note that the image quality decreases when
you use the digital zoom.
The zooming zone appears when you set
[120×].
Off
Digital zoom cannot be used.
120×
Up to 120× zoom is performed digitally.
Conversion Lens
Set this menu item when you want to use
a conversion lens (sold separately) that is
compatible with your camcorder.
When using a conversion lens (sold
separately), use this function to record
using the optimum compensation for
camera shake and focus for the lens.
Off
Select this when you do not use a conversion
lens.
Wide Conversion ( )
Select this when you use a wide end
conversion lens.
Tele Conversion ( )
Select this when you use a tele-conversion
lens.
Notes
If you select [Wide Conversion], the SteadyShot
function will be canceled.
Customizing your camcorder
GB
71
Page 72

Auto Back Light
Your camcorder adjusts the exposure for
backlit subjects automatically.
On
Adjusts the exposure for backlit subjects
automatically.
Off
Does not adjust the exposure for backlit
subjects.
Dial Setting
See page 40.
NIGHTSHOT Light
When using the NightShot function (p. 37),
you can record clearer images by activating
[NIGHTSHOT Light], which emits infrared
light (invisible).
On
Emits infrared light.
Off
Does not emit infrared light.
you to adjust colors when you view movies
recorded with your camcorder on a TV or
a monitor.
Off
Does not display color bars.
On
Displays color bars.
Notes
This function is automatically set to [Off]
when you switch your camcorder to the photo
recording, playback mode, or turn off the
camcorder.
You cannot change the setting during recording
or expanded focus operation.
Color Bar Tone
Outputs audio tone signals (1 kHz: full
bit -20 dB) when you set [Color Bar] and
[Color Bar Tone] to [On].
Off
Does not output audio tone signals.
On
Outputs audio tone signals.
Notes
Do not cover the infrared port (p. 37) with your
fingers or other objects.
Remove the lens hood or the Step Down Ring
(supplied) before using [NIGHTSHOT Light],
because the lens hood or the Step Down
Ring may prevent the infrared function from
working properly.
Remove the conversion lens (sold separately).
The maximum shooting distance using
[NIGHTSHOT Light] is about 3 m (10 feet).
Color Bar
You can display or record color bars in the
movie recording mode. This function helps
GB
72
Face Detection
You can set the camcorder to detect a face
automatically.
Your camcorder adjusts the focus/color/
exposure automatically for the face of the
selected subject.
Auto
Detects faces without distinction between
adults and children.
Child Priority ( )
Gives faces of children priority.
Adult Priority ( )
Gives faces of adults priority.
Page 73

Off ( )
Does not detect faces.
Recording conditions for better face
detection performance
Shoot in a sufficiently bright place.
The subject is not wearing glasses, a hat or
mask.
The subject faces directly towards the camera.
Notes
Faces may not be detected depending on
recording conditions, subject conditions, and
the setting of your camcorder.
Recording the selected subject clearly (Face
Priority) (p. 34)
le Shutter] (p. 73)
[Smi
Smile Shutter
The shutter is released automatically when
the camcorder detects a smile.
If you do not want to take photos
automatically, select [Off ].
Dual Capture
Only during movie recording, the shutter is
released automatically, when the camcorder
detects a smile.
Always On
The shutter is released when the camcorder
detects a smile whenever the camcorder is in
recording mode.
Off ( )
Smiles are not detected, so photos are not
recorded automatically.
Notes
Smiles may not be detected depending on
recording conditions, subject conditions, and
the setting of your camcorder.
Smile Sensitivity
Sets the smile detection sensitivity for using
the Smile Shutter function.
Big Smile
Detects a big smile.
Normal Smile
Detects a normal smile.
Slight Smile
Detects even a slight smile.
Flash
You can select the flash setting when you
record photos using the built-in flash, or
an external flash (sold separately) that is
compatible with your camcorder.
Auto
Automatically flashes when there is
insufficient ambient light.
On ( )
Always uses the flash regardless of the
surrounding brightness.
Off ( )
Records without flash.
Notes
The recommended distance to the subject when
using the built-in flash is approximately 0.3 m
to 1.5 m (1 foot to 5 feet).
Remove any dust from the surface of the flash
before using it. Flash effect may be impaired if
heat discoloration or dust obscures the lamp.
The flash does not flash while the
lamp is lit.
A shadow may be produced on photos if you
use the flash when you take photos with the
conversion lens (sold separately) attached.
(Movie)
Customizing your camcorder
GB
73
Page 74

Flash Level
You can select the brightness of the flash
light.
You can set this function when you
record photos using the built-in flash, or
an external flash (sold separately) that is
compatible with your camcorder.
)
High (
Makes the flash level higher.
Normal (
Normal flash level
)
Low ( )
Makes the flash level lower.
Red Eye Reduction
You can prevent redeye by activating the
pre-flash before the flash flashes.
You can set this function when you
record photos using the built-in flash, or
an external flash (sold separately) that is
compatible with your camcorder.
Off
Does not use Red Eye Reduction to prevent
redeye.
On ( )
Uses Red Eye Reduction to prevent redeye.
Notes
The redeye reduction may not produce the
desired effect due to individual differences and
other conditions.
The redeye function does not work with
automatic recording by [Smile Shutter].
Audio Format
You can set the audio format for high
definition image quality (HD) recording.
GB
74
Linear PCM (
Records in Linear PCM system.
)
Dolby Digital ( )
Records in Dolby Digital system.
Notes
Audio format is fixed to [Dolby Digital] with
the standard definition image quality (STD)
recording.
Blt-in Zoom Mic
You can record a movie with vivid sound
appropriate to the zoom position.
Off
The microphone does not record sound
following zooming in or out.
On ( )
The microphone records sound following
zooming in or out.
Int. Mic. Wind NR
Your camcorder records a movie with
less wind noise input from the built-in
microphone.
Off
Disables wind noise reduction.
On ( )
Enables wind noise reduction.
Micref Level (Microphone
reference level)
You can select the microphone level for
recording sound.
Normal
Records various ambient sounds, converting
them into the appropriate level.
Page 75

Low ( )
Records ambient sound faithfully. Select
[Low] when you want to record an exciting
and powerful sound in a concert hall, etc.
(This setting is not suitable for recording
conversations.)
Select one of the My Buttons to which the
menu item will be assigned.
Audio Output Timing
You can set the audio output timing during
recording.
Live
Remove echo caused from the difference
between the actual sound heard during
recording and that heard through
headphones.
Lip Sync
Resolves sync issues between picture and
sound.
Volume
You can adjust the volume of playback
sound by touching
/ .
My Button
You can assign functions that you
frequently use when recording to one of the
My Buttons.
After selecting [My Button], select the
menu item that you want to assign to a
My Button using
/ .
Select .
Expanded Focus
You can magnify an image that appears at
the center of the LCD screen by about 2.0
times to confirm the sharpness of the focus.
Off
Does not magnify images.
On
Magnify images.
Notes
Even though the images has been magnifyed
on the camcorder, the recorded image is not
magnified.
The image that is output to an external device is
not magnified.
Guide Frame
You can display the frame and check
that the subject is horizontal or vertical.
Positioning the subject at the cross point
of the guide frame makes a balanced
composition. The frame is not recorded.
Off
Does not display the guide frame.
Customizing your camcorder
GB
75
Page 76

On
Displays the guide frame.
Notes
The outer frame of [Guide Frame] shows the
display area of a TV which is not compatible
with full pixel display.
Zebra
You can display a zebra pattern as a guide
for adjusting brightness. The zebra pattern
will not be recorded with the image.
Off
Does not display the zebra pattern.
(70)
Displays the zebra pattern over the part of
an image that exceeds the brightness level of
about 70 IRE
Displays the zebra pattern over the part of
an image that exceeds the brightness level of
about 100 IRE
* IRE (Institute of Radio Engineers) is a measure
of the video signal level that is used as the bases
of brightness; the reference level (pedestal
level) is set to 0 (%) and the maximum level
(completely white level) is set to 100 (%).
Notes
With a subject that exceeds a brightness level of
100 IRE, the image may become overexposed.
*.
(100)
*.
Peaking
You can display an image on the screen
with its outlines enhanced with colors. This
function helps you to adjust the focus. The
enhanced outlines will not be recorded on
the image.
Off
Does not display the enhanced outlines.
(White)
Displays the enhanced outlines in white.
(Red)
Displays the enhanced outlines in red.
(Yellow)
Displays the enhanced outlines in yellow.
Notes
The enhanced outlines may not appear in a
dark location.
Light Bright
You can set the brightness of the video
light.
Standard
Standard brightness.
Bright
Select this mode when you find the video
light is not bright enough.
Audio Level Display
You can select whether or not to display the
audio level meter.
On
Displays the audio level meter.
Off
Does not display the audio level meter.
76
GB
Page 77

Rec/Media SET
(Items for setting up image
quality or the recording media)
See “Using menus” (p. 58) on the operation.
The default settings are marked with .
/ Setting
You can select the image quality of movies.
HD Quality
Records movies in High definition image
quality (HD).
STD Quality
Records movies in standard definition
image quality (STD). This setting is highly
compatible with other playback devices.
Notes
When you play or edit movies, only movies with
the selected image quality will be displayed on
your camcorder.
Media Select
See page 23.
Notes
For details on the holizontal/vertical ratio of
the TV that will be connected, refer to the
instruction manuals of the TV.
[TV Type] (p. 83)
x.v.Color
You can capture wider range of colors.
Various colors such as the brilliant color of
flowers and turquoise blue of the sea can
be more faithfully reproduced. Refer to the
instruction manuals of the TV.
Off
Records in ordinary color range.
On ( )
Select this setting if the recorded movies will
be played back on an x.v.Color-compliant TV.
Notes
If the movie recorded with this function [On] is
played back on a non-x.v.Color-compliant TV,
the color may not be reproduced correctly.
Customizing your camcorder
Rec Format
See page 38.
Wide Mode
When recording standard definition image
quality (STD) movies, you can select the
horizontal to vertical ratio.
16:9 WIDE
Records movies to the full screen on a 16:9
(wide) TV screen.
4:3 ( )
Records movies to the full screen on a 4:3
TV screen.
Image Size
See page 38.
Media Info
You can check the remaining recordable
time for movies and the approximate free
and used media space of the recording
media.
Note
Since there is a management file area, the
used space is not displayed as 0 % even if you
er
form [Format]. (p. 78)
p
Selecting a recording medium (p. 23)
GB
77
Page 78

Format
Formatting deletes all the movies and
photos to recover recordable free space.
Select the recording medium that you want
to format, and then select
Notes
Connect your camcorder to the wall outlet
(wall socket) using the supplied AC Adaptor for
hi
s operation (p. 15).
t
To avoid the loss of important images, you
should save them before formatting the
recording media.
Protected movies and photos will also be
deleted.
Make sure not to do the following while
[Executing...] is displayed.
Open/Close the LCD screen.
Operate buttons on the camcorder.
Eject the memory card from your camcorder.
Disconnect the AC Adaptor.
.
To prevent data on the internal
memory from being recovered
When you dispose of or transfer the
camcorder, it is recommended that you
perform [Empty] to prevent the leakage of
your personal data.
When the internal memory is selected on
the [Format] screen, select [Empty].
To avoid the loss of important images, they
should be saved on a computer or other devices
before performing [Empty].
Disconnect all cables except the AC Adaptor.
Do not disconnect the AC Adaptor during the
operation.
While deleting data, do not apply any vibrations
or shocks to your camcorder.
You can check the time that the camcorder will
take to delete data on the LCD screen.
If you stop performing [Empty] while
[Executing...] appears, be sure to complete the
operation by performing [Format] or [Empty]
when you use the camcorder next time.
Repair Img. DB F.
See page 95.
File Number
You can select the way to assign file number
of photos.
Series
Assigns file numbers of photos in sequence.
The file number becomes larger each time
you record a photo.
Even if the memory card is replaced with
another one, the file number is assigned in
sequence.
Reset
Assigns file numbers in sequence, following
the largest file number existing on the
recording medium.
When the memory card is replaced with
another one, the file number is assigned for
each memory card.
You cannot perform [Empty] unless you
connect the AC Adaptor to the wall outlet (wall
socket).
GB
78
Page 79

TC/UB
(Items for setting up the time
code or user bit)
See “Using menus” (p. 58) on the operation.
The default settings are marked with .
TC/UB Disp
You can toggle between the time code and
user bit displays.
TC
Displays the time code.
U-Bit
Displays the user bit.
TC Preset
You can preset the time code.
Select the 2 digits you want to set, then
set the value with
You can set the time code between 00:00:00:00
and 23:59:59:24.
Set other digits by repeating step and
touch [OK].
To reset the time code
Select [Reset] on the [TC Preset] display or
press the TC RESET button on the Wireless
Remote Commander.
UB Preset
You can preset the user bit.
Select the 2 digits you want to set, then
set the value with
Set other digits by repeating step and
touch [OK].
/ .
/ .
To reset the user bit
Select [Reset] on the [UB Preset] display.
TC Run
You can select how the time code advances.
Rec Run
Advances the time code only during
recording. Select this setting to record the
time code continuous from the last time code
of the previous recording.
Free Run
Advances the time code regardless of
operation of your camcorder.
Notes
Even if the time code advances in the [Rec
Run] mode, the time code may not be recorded
sequentially in the following cases.
When the recording format is changed.
When the recording media is removed.
TC Make
Preset
Records the newly set time code on the
recording media.
Regenerate
Reads the last time code of the previous
recording from the recording media and
records the new time code consecutively
from the last time code during the backspace
editing.
The time code runs in [Rec Run] mode
regardless of the setting of [TC Run].
Customizing your camcorder
GB
79
Page 80

UB Time Rec
Off
Does not save the actual time in the user bit
code.
On
Saves the actual time in the user bit code.
Notes
The last 2 digits are fixed to 00 when it is set
to [On].
Edit/Copy
(Items for editing)
See “Using menus” (p. 58) on the operation.
Delete
See page 49.
Protect
Protect movies and photos to avoid deleting
them by mistake.
will be displayed on the protected
images.
ultiple Images
M
Y
ou can select one or more images and
“protect” them.
Select the type of image you want to
protect.
Add check marks to the desired
images.
80
You can select multiple images.
Select the image with so that the mark
disappears and you can remove the protection.
Select .
Set All In Event
You can protect all images in the selected
date at one time.
Select the date you want to protect using
/ .
You cannot select multiple dates.
Select .
GB
Page 81

Remove All In Event
You can remove the protection from all
images in the selected date at one time.
select the date you want to remove the
protection using
You cannot select multiple dates.
/ .
Select .
Copy
You can copy images recorded on the
internal recording medium of your
camcorder to the memory card. The
original copy of the image will not be
deleted after the copy operation has been
completed.
Select the source and the destination for the
images to be copied after you select [Copy].
ultiple Images
M
Y
ou can select and copy one or more
images.
Select the type of image you want to copy.
Add check marks to the desired
images.
Select the date you want to copy using
/ .
You cannot select multiple dates.
Select .
Notes
[Copy] can be selected when the camcorder is
set to playback mode. Press
and select
When you record an image on the memory card
for the first time, create the image database file
by selecting
[Repair Img. DB F.] [Memory Card].
Connect your camcorder to the wall outlet
(wall socket) using the supplied AC Adaptor to
prevent your camcorder from running out of
power during copy.
[Edit/Copy] [Copy].
[Rec/Media SET]
(View Images)
Checking the image copied: [Media Select]
(p. 23)
Saving images on an external media device
a
sily (p. 53)
e
Direct Copy
You can save images on an external media
device (USB storage device) manually while
the device is connected to your camcorder.
You can perform this operation while the
camcorder is displaying the event view of
the external device connected.
53.
e page
e
S
Customizing your camcorder
You can select multiple images.
Select .
All In Event
You can copy all images in the selected date
at one time.
Select the type of image you want to copy.
GB
81
Page 82

Setup
(Other setup items)
See “Using menus” (p. 58) on the operation.
The default settings are marked with .
Data Code
During playback, your camcorder displays
the information recorded automatically at
the time of recording. You can check the
following information.
Off
Data code is not displayed.
Date/Time
Date
Time
Camera Data
Movie
Photo
SteadyShot off
White Balance
Shutter Speed
IRIS (Aperture value)
Gain
Brightness
Exposure
Flash
Coordinates
82
Latitude
Longitude
Notes
The data code is displayed on the TV screen if
you connect your camcorder to a TV.
Depending on the recording media condition,
bars [-- -- --] appear.
GB
Page 83

Disp Output
You can select where to output the display
information, such as time code.
LCD Panel
Outputs the information to the LCD screen
and viewfinder.
V-Out/Panel
Outputs the information to the TV screen,
viewfinder, and LCD screen.
TV Type
You need to convert the signal depending
on the TV connected when playing back
movies and photos. The recorded movies
and photos are played back as following
illustrations.
16:9
Select this to view your movies on a 16:9
(wide) TV.
Movies and photos
recorded in 16:9
(wide) mode
4:3
Select this to view your movies and photos on
a 4:3 standard TV.
Movies and photos
recorded in 16:9
(wide) mode
Movies and photos
recorded in 4:3 mode
Movies and photos
recorded in 4:3 mode
Notes
Horizontal to vertical ratio of high definition
image quality (HD) movies is 16:9.
HDMI Resolution
Select the output image resolution when
connecting your camcorder to a TV with an
HDMI cable.
1080p/576p
Outputs high definition image quality (HD)
movies with a 1080p signal and standard
image quality (STD) movies with a 576p
signal.
Select this setting when you watch movies
that have been recorded with [
Format] set to [1080/50p
compliant TV.
1080i/576i
Outputs high definition image quality (HD)
movies with a 1080i signal and standard
image quality (STD) movies with a 576i
signal.
720p/576p
Outputs high definition image quality (HD)
movies with a 720p signal and standard image
quality (STD) movies with a 576p signal.
576p
Outputs the 576p signal.
576i
Outputs the 576i signal.
Notes
When [
[720p/576p] or [576p], HDMI signals cannot be
output during recording.
Rec Format] is set to [1080/50p
] and [HDMI Resolution] is set to
Rec
], on the 50p
Customizing your camcorder
GB
83
Page 84

HDMI TC Output
You can transfer time code, user bit data to
the device connected with the HDMI cable.
Off
Does not output time code, user bit code.
On
Outputs time code, user bit code.
USB Connect
Select this item when [USB Select] does not
appear on the LCD screen by connecting
the camcorder to a computer with the USB
cable.
Beep
Off
Cancels the melody.
On
A melody sounds when you start/stop
recording, or operate the touch panel.
LCD Brightness
You can adjust the brightness of the LCD
screen.
Normal
Normal setting (normal brightness).
Bright
Select this when the LCD screen is not bright
enough.
This adjustment does not affect the recorded
images in any way.
Display Setting
You can set the duration of displaying the
icons or indicators on the LCD screen.
GB
84
Auto
Displays for about 3 seconds. The rec & zoom
buttons on the LCD screen are displayed.
On
Always displays. The rec & zoom buttons on
the LCD screen are not displayed.
GPS Information
The camcorder can display location
information.
Satellite icons
Triangulating gauge
Information for the location that
was previously obtained.
Update
How to check the triangulating
information
Color of the satellites/
triangulating gauge
/ (black)
/ (gray)
/ (brown)
/ (ocher)
/ (green)
Status
No signal, but orbit
information for the
satellite is available.
33 % of the satellite orbit
information has been
obtained.
66 % of the satellite orbit
information has been
obtained.
99 % of the satellite orbit
information has been
obtained.
Triangulating is completed
and the satellite is
currently being used.
Page 85

If data on your current information
cannot be obtained
The camcorder starts the triangulating
priority mode. As the camcorder turns
other functions off to search for satellites,
obtaining triangulating information can
take priority.
Remote Ctrl (Remote control)
On
Select this when you use the supplied Wireless
Remote Commander (p. 10).
Off
Select this when you do not use the supplied
Wireless Remote Commander.
To update the location information
Select [Update].
To close the triangulating
information screen
Select .
GPS Setting
You can select whether the camcorder
receives or does not receive GPS signals.
On
Receives GPS signals.
The location information will not be recorded
until triangulating is finished successfully.
Off
Does not receive GPS signals.
The location information that has previously
been recorded will be invalid.
REC Lamp
You can make the camera recording lamp
on the front of your camcorder not to turn
on. (Default: [On])
Language Setting
You can select the language to be used on
the LCD screen.
The camcorder offers [ENG[SIMP]]
(simplified English) for when you cannot
find your native tongue among the options.
Calibration
See page 110.
Battery Info
You can check the estimated remaining
capacity of the battery.
Date & Time Setting
Date & Time Format
You can select one from 4 types of date and
time formats.
Customizing your camcorder
GB
85
Page 86

Summer Time
You can change this setting without
stopping the clock.
Off
Does not set the summertime.
On
Sets the summertime. The clock is set to
move the time forward 1 hour.
Date & Time
See page 19.
Area Setting
You can adjust time difference without
stopping the clock. Select your local area
when using the camcorder in other time
zones. Refer to the world time difference
information on page 102.
Auto Clock ADJ
The camcorder can maintain accurate
time automatically by acquiring time
information from the GPS system.
On
Maintains accurate time automatically.
Off
Does not maintain accurate time using the
GPS system.
The clock may not be adjusted to the correct
time automatically using the GPS system,
depending on the country/region selected for
your camcorder. In this case, set [Auto Clock
ADJ ] to [Off].
Auto Area ADJ
The camcorder can compensate for time
differences automatically by acquiring
location information from the GPS system.
On
Compensates for time differences
automatically.
Off
Does not compensate for time differences
automatically.
Notes
You must set the date and time on your
a
mcorder before use (p. 19).
c
The camcorder may not compensate for the
time difference automatically, depending on the
country/region selected for your camcorder. In
this case, set [Auto Area ADJ] to [Off].
Notes
You must set the date and time on your
a
mcorder before use (p. 19).
c
There may be discrepancies of a few seconds
even if [Auto Clock ADJ ] is activated.
This function automatically adjusts the clock
when the camcorder receives GPS signals and
finishes triangulating successfully while the
power is on. Once the clock is adjusted, it will
not be adjusted until the next time you turn the
camcorder on again.
GB
86
Page 87

Others/Index
Troubleshooting
If you run into any problems using your
camcorder, follow the steps below.
Check the list (p. 87 to 93), and
inspect your camcorder.
Disconnect the power source, attach
the power source again after about 1
minute, and turn the camcorder on.
Press RESET (p. 8) using a pointed
object, and turn the camcorder on.
If you press RESET, all settings,
including the clock setting, are reset.
Contact your Sony dealer or local
authorized Sony service facility.
Your camcorder may be required to initialize
or change the current internal memory of your
camcorder, depending on the problem. In the
event of this, the data stored on the internal
memory will be deleted. Be sure to save the
data on the internal memory on other media
(backup) before sending your camcorder for
repair. We will not compensate you for any loss
of internal memory data.
During repair, we may check a minimum
amount of data stored on the internal memory
in order to investigate the problem. However,
your Sony dealer will neither copy nor retain
your data.
Overall operations/Wireless Remote
Commander ..................................................... p
Batteries/power sources .................................p.
LCD screen/viewfinder ..................................p.
Memory card ................................................... p.
Recording ......................................................... p.
Playback ...........................................................p.
Playing back images stored on memory card on
other devices .................................................... p
Editing movies/photos on your camcorder
........................................................................... p. 93
Playback on the TV ........................................p
Copying/Connecting to other devices .........p. 93
onnecting to a computer ............................. p.
C
Overall operations/Wireless
Remote Commander
The power does not turn on.
Attach a charged battery pack to the
camcorder (p. 15).
The plug of the AC Adaptor has been
disconnected from the wall outlet (wall
socket). Connect it to the wall outlet (wall
s
o
cket) (p. 15).
The camcorder does not operate even
when the power is set to on.
It takes a few seconds for your camcorder to
be ready to shoot after the power is turned on.
This is not a malfunction.
Disconnect the AC Adaptor from the wall
outlet (wall socket) or remove the battery
pack, then reconnect it after about 1 minute.
If the functions still do not work, press RESET
(p
. 8) using a thin object. (If you press RESET,
all settings, including the clock setting, are
reset.)
The temperature of your camcorder is
extremely high. Turn off your camcorder and
leave it for a while in a cool place.
The temperature of your camcorder is
extremely low. Leave your camcorder with
the power of your camcorder on. If you still
87
.
88
89
89
90
92
.
92
cannot operate your camcorder, turn off your
camcorder and take it to a warm place. Leave
the camcorder there for a while, then turn on
your camcorder.
.
93
93
Others/Index
GB
87
Page 88

88
GB
The menu settings have been changed
automatically.
While Intelligent Auto is active, some menu
settings related to image quality will be
changed automatically.
The following menu items return to the
default settings when you switch among movie
recording, photo recording and playback
modes.
[ Fader]
Self-Timer]
[
[Tele Macro]
Your camcorder gets warm.
Your camcorder may become warm during
operation. This is not a malfunction.
A rattling noise can be heard when you
shake the camcorder.
If no noise is heard when the camcorder is
turned on and is in the movie/photo recording
mode, the noise is produced by the movement
of the internal lens. This is not a malfunction.
Intelligent Auto is canceled.
The Intelligent Auto setting is canceled if you
change the following settings:
[Smth Slw REC]
[Golf Shot]
[White Balance]
[Spot Meter/Fcs]
[Spot Meter]
[Spot Focus]
[Exposure]
[Focus]
[IRIS]
[Shutter Speed]
[AGC Limit]
[AE Shift]
[White Balance Shift]
[Low Lux]
[Scene Selection]
Cinematone]
[
[Tele Macro]
[ SteadyShot]
SteadyShot]
[
[Auto Back Light]
[Face Detection]
The supplied Wireless Remote
Commander does not function.
Set [Remote Ctrl] to [On] (p. 85).
Insert a battery into the battery holder with
the +/– polarities correctly matching the
+/– m
rks (p. 109).
a
Remove any obstructions between the
Wireless Remote Commander and the remote
sensor.
Point the remote sensor away from strong light
sources such as direct sunlight or overhead
lighting. Otherwise, the Wireless Remote
Commander may not function properly.
Another DVD device malfunctions when
you use the supplied Wireless Remote
Commander.
Select a commander mode other than DVD 2
for your DVD device, or cover the sensor of
your DVD device with black paper.
Batteries/power sources
The power abruptly turns off.
Use the AC Adaptor.
Charge the battery pack (p. 15).
The CHG (charge) lamp does not light
while the battery pack is being charged.
Close the LCD screen (p. 15).
Attach the battery pack to the camcorder
cor
rectly (p. 15).
Connect the power cord (mains lead) to the
wall outlet (wall socket) properly.
Th
e battery charge is completed (p. 15).
Page 89

The CHG (charge) lamp flashes while the
battery pack is being charged.
When the battery is being charged using the
Built-in USB Cable, disconnect the Built-in
USB Cable and connect it again.
If the temperature of the battery pack is too
high or too low, you may not be able to charge
i
t (p
. 15).
Attach the battery pack to the camcorder
co
rectly (p. 15). If the problem persists,
r
disconnect the AC Adaptor from the wall
outlet (wall socket) and contact your Sony
dealer. The battery pack may be damaged.
The remaining battery time indicator does
not indicate the correct time.
The ambient temperature is too high or too
low. This is not a malfunction.
The battery pack has not been charged
enough. Fully charge the battery again. If the
problem persists, replace the battery pack with
a n
e
w one (p. 106).
The indicated time may not be correct
depending on the environment of use.
The battery pack is quickly discharged.
The ambient temperature is too high or low.
This is not a malfunction.
The battery pack has not been charged
enough. Fully charge the battery again. If the
problem persists, replace the battery pack with
a n
e
w one (p. 106).
The buttons do not appear on the touch
panel.
Touch the LCD screen lightly.
Press the DISP button (p.21).
Press DISPLAY on the Wireless Remote
C
mmander (p. 10).
o
The buttons on the touch panel do not
work correctly or do not work at all.
Adjust the touch panel ([Calibration]) (p. 110).
The buttons on the touch panel quickly
disappear.
Set [Display Setting] to [On] (p. 84).
There are dots in the shape of a grid on
the screen.
These points are a normal result of the
manufacturing process of the screen and do
not affect the recording in any way.
The image in the viewfinder is not clear.
Move the viewfinder lens adjustment lever
until the image appears clearly (p. 20).
The image in the viewfinder has
disappeared.
Close the LCD panel. Even if the viewfinder
is pulled out, no image is displayed in the
viewfinder when the LCD panel is open (p.
20).
Others/Index
LCD screen/viewfinder
Menu items are grayed out.
You cannot select grayed items in the current
recording/playback situation.
There are some functions you cannot activate
simultaneously.
Memory card
Operations using the memory card
cannot be performed.
If you use the memory card formatted on a
computer, format it again on your camcorder
(p.
78).
GB
89
Page 90

90
GB
Images stored on the memory card
cannot be deleted.
The maximum number of images that you can
delete on the index screen at one time is 100.
You cannot delete the protected images.
The data file name is not indicated
correctly or flashes.
The file is damaged.
The file format is not supported by your
ca
mcorder (p. 78).
Recording
Refer also to “Memory card” (p. 89).
Pressing START/STOP or FIXED SHOT/
PHOTO does not record images.
The playback screen is displayed. Press MODE
to turn on the
(Movie) or (Photo) lamp
(p. 25, 26).
Your camcorder is recording the image you
have just shot on the recording media. You
cannot make new recording during this
period.
The recording media is full. Delete
unn
ecessary images (p. 49).
Total number of movie scenes or photos
exceeds the recordable capacity of your
c
amcorder. Delete unnecessary images (p. 49).
The temperature of your camcorder is
extremely high. Turn off your camcorder and
leave it for a while in a cool place.
The temperature of your camcorder is
extremely low. Turn off your camcorder and
take it to a warm place. Leave the camcorder
there for a while, then turn on the camcorder.
Photos cannot be recorded.
You cannot record photos together with:
[Smth Slw REC]
[Golf Shot]
Fader]
[
The camcorder cannot shoot photos while it
is in the movie recording mode, depending on
the setting of [
Rec Format].
The access lamp remains lit or flashing
even if recording was stopped.
Your camcorder is recording the scene you
have just shot on the memory card.
The imaging field looks different.
The imaging field may look different
depending on the condition of your
camcorder. This is not a malfunction.
The flash does not work.
You cannot record with the built-in flash
while:
the (Movie) lamp is on
[Conversion Lens] is set to other than [Off]
Even if auto flash or Auto redeye reduction is
selected, you cannot use the flash with:
NightShot
manually-set [IRIS] or [Shutter Speed] (when
either one of them has been assigned to the
MANUAL dial)
[Spot Meter/Fcs]
[Spot Meter]
[Manual] in [Exposure]
[Night Scene], [Sunrise&Sunset], [Fireworks],
[Landscape], [Spotlight], [Beach] or [Snow]
in [Scene Selection]
The actual recording time for movies is
less than the expected recording time of
the recording media.
Depending on the recording conditions, the
time available for recording may be shorter
(p.
98), for example when recording a fast
moving object, etc.
The camcorder stops operating.
The temperature of your camcorder is
extremely high. Turn off your camcorder and
leave it for a while in a cool place.
Page 91

The temperature of your camcorder is
extremely low. Turn off your camcorder and
take it to a warm place. Leave the camcorder
there for a while, then turn on the camcorder.
If you keep applying vibration on the
camcorder, recording may stop.
There is a time difference between the
point when START/STOP is pressed and
the point that the recording movie is
started or stopped actually.
On your camcorder, there may be a slight
time difference between the point where you
press START/STOP and the actual point that
recording movie starts/stops. This is not a
malfunction.
The horizontal to vertical ratio of the
movie (16:9 (wide)/4:3) cannot be
changed.
The horizontal to vertical ratio of high
definition image quality (HD) movies is 16:9
(wide).
The auto focus does not function.
Set [Focus] to [Auto] (p. 67).
The recording conditions are not suitable for
au
to focus. Adjust the focus manually (p. 67).
SteadyShot does not function.
Set [ SteadyShot] to [Active] or [Standard]
(p. 36), [
Even if [
[Standard], [
camcorder may not be able to compensate for
excessive vibrations.
Set [Conversion Lens] to [Off] (p. 71).
SteadyShot] to [On] (p. 71).
SteadyShot] is set to [Active] or
SteadyShot] to [On], your
Images cannot be recorded or played
back correctly.
If you record and delete images repeatedly for
a long time, the files on the recording media
may become fragmented and images cannot
be recorded or played back correctly. After
backing up the images on other media, format
the recording media on your camcorder (p.
78).
The subjects passing by the screen very
fast appear crooked.
This is called the focal plane phenomenon.
This is not a malfunction. Because of the way
the image device (CMOS sensor) reads out
image signals, the subjects passing by the lens
rapidly might appear crooked depending on
the recording conditions.
The color of the image is not correctly
displayed.
Press NIGHTSHOT to cancel the NightShot
function (p. 37).
The screen image is bright, and the
subject does not appear on the screen.
Press NIGHTSHOT to cancel the NightShot
function (p. 37).
Horizontal stripes appear on the images.
This occurs when recording images under a
fluorescent lamp, sodium lamp, or mercury
la
mp. This is not a malfunction.
Black bands appear when you record a TV
screen or computer screen.
Set [ SteadyShot] to an option except for
[Active] (p. 36).
Others/Index
[LCD Brightness ] cannot be adjusted.
You cannot adjust [LCD Brightness ] when:
The LCD panel is closed on your camcorder
with the LCD screen facing out.
The power is supplied from the AC Adaptor.
GB
91
Page 92

92
GB
Sound is not recorded correctly.
Connect the microphone again in the same
way as when you start recording movies.
Photos are recorded automatically.
In the default setting, photos are recorded
automatically when the camcorder detects a
smile ([Smile Shutter]) (p. 73).
The time code is not recorded in
sequence.
The time code may not be recorded
sequentially if you change the settings of
[
/ Setting] or [ Rec Format].
Playback
Images cannot be played back.
Select the type of recording media you want to
play back (p. 23).
Select the image quality of the movie you want
t
lay back (p. 38).
o p
Images recorded on other devices may not be
played back. This is not a malfunction.
is indicated on a thumbnail.
This may appear on an image recorded on
other devices, edited on a computer, etc.
You removed the AC Adaptor or the battery
pack while the recording media icon at the top
right corner of the screen flashes, or before
the access lamp is turned off after recording.
This may damage your image data and
displayed.
is indicated on a thumbnail.
The image database file may be damaged.
Check the database file by touching
[Rec/Media SET] [Repair Img. DB F.]
the recording medium. If it still appears, delete
the image with
(p. 49).
No sound or only a quiet sound is heard
during playback.
Turn up the volume (p. 75).
When you record sound with [Micref Level]
(p.
74) set to [Low], the recorded sound may
be difficult to hear.
Sounds cannot be recorded while shooting
with
[Smth Slw REC] or [Golf Shot].
is
Photos cannot be played back.
Photos cannot be played back if you have
modified files or folders, or have edited the
data on a computer. (The file name flashes in
that case.) This is not a malfunction.
The movie freezes.
Photos which were recorded while recording
a movie are played back. In the default
setting, movies and photos are played back
continuously. When you set the Switch Image
Type button to [
Movie], you can play
movies only.
appears on the LCD screen.
This appears when you play back movies
recorded with 5.1ch surround sound. 5.1ch
surround sound is down-mixed to 2ch stereo
and played back on your camcorder.
Playing back images stored on
memory card on other devices
Images cannot be played back or the
memory card is not recognized.
The playback device does not support playing
back memory cards (p. 33).
Page 93

Editing movies/photos on your
camcorder
Unable to edit.
Unable to edit because of the condition of the
image.
A movie cannot be divided.
A movie that is too short cannot be divided.
Release the protection, and then divide.
A photo cannot be captured from a
movie.
The recording media where you want to save
photos is full.
The image appears distorted on the 4:3
TV.
This happens when viewing an image
recorded in the 16:9 (wide) mode on a 4:3 TV.
Set [T
V Type] correctly (p. 83) and play back
the image.
Black bands appear at the top and bottom
of the screen of the 4:3 TV.
This happens when viewing an image recorded
in the 16:9 (wide) mode on a 4:3 TV. This is
not a malfunction.
Copying/Connecting to other
devices
Playback on the TV
Neither image nor sound is played on the
connected TV.
Images are not output from the HDMI OUT
jack, if copyright protection signals are
recorded in the images.
The top, bottom, right, and left edges
of images are trimmed slightly on a
connected TV.
The LCD screen of your camcorder can
display recording images across the entire
screen (full pixel display). However, this may
cause slight trimming of the top, bottom, right,
and left edges of images when played back on
a TV which is not compatible with full pixel
display.
It is recommended you record images using
t
h
e outer frame of [Guide Frame] (p. 75) as
a guide.
Images are not copied correctly.
You cannot copy images using the HDMI
cable.
The A/V connecting cable is not connected
properly. Make sure to connect the cable to the
in
put jack of another device (p. 52).
Connecting to a computer
The computer does not recognize the
camcorder.
Disconnect devices from the USB jack of the
computer other than the keyboard, mouse,
and your camcorder.
Disconnect the Built-in USB Cable from the
computer, and restart the computer, then
connect the computer and your camcorder
again in the correct order.
When both the Built-in USB Cable and the
USB jack of the camcorder are connected
to the external devices at the same time,
disconnect one that is not connected to a
computer.
Others/Index
GB
93
Page 94

94
GB
Self-diagnosis
display/Warning
Movies cannot be viewed or copied to a
computer.
Disconnect the Built-in USB Cable from the
computer, and turn on your camcorder, then
connect the cable again.
You need to install the supplied “Content
Management Utility” to copy movies from
y
o
ur camcorder to your computer (p. 56).
The computer freezes.
Disconnect the Built-in USB Cable from the
computer, and restart the computer, then
connect the computer and your camcorder
again in the correct order.
indicators
When an error occurs, a warning indicator
appears on the LCD screen.
You can fix some problems associated with
the symptoms yourself. If the problem
persists even after you have tried a couple
of times, contact your Sony dealer or local
authorized Sony service facility. In this case,
when you contact them, give them all the
numbers of the error code beginning with
C or E.
You may hear a melody when some warning
indicators appear on the screen.
C:(or E:) : (Self-diagnosis display)
C:04:
The battery pack is not an “InfoLITHIUM”
battery pack (V series). Use an
“InfoLITHIUM” battery pack (V series)
(p
. 105).
Connect the DC plug of the AC Adaptor to the
D
ack of your camcorder securely (p. 15).
C IN j
C:06:
The battery pack temperature is high. Change
the battery pack or place it in a cool place.
C:13: / C:32:
Remove the power source. Reconnect it and
operate your camcorder again.
E::
Follow the steps from on page 87.
(Battery level warning)
The battery pack is nearly used up.
Depending on the operating environment or
battery conditions, may flash, even if there
Page 95

are about 20 minutes remaining.
(Warning indicator pertaining to
battery pack temperature)
The battery pack temperature is high. Change
the battery pack or place it in a cool place.
(Warning indicator pertaining to
memory card)
Slow flashing
Free spaces for recording images are running
out. For the type of memory card you can use
with your camcorder, see page 24.
N
o memory card is inserted (p. 23).
Fast flashing
There are not enough free spaces for recording
images. After storing the images on other
m
e
dia (p. 51), delete unnecessary images, or
fo
rmat the memory card (p. 78).
The image database file may be damaged.
Check the database file by touching
[Rec/Media SET] [Repair Img. DB F.]
the recording medium.
The memory card is damaged.
(Warning indicator pertaining to
memory card formatting)
The memory card is damaged.
The memory card is not formatted correctly
(p.
78).
(Warning indicator pertaining to
incompatible memory card)
Incompatible memory card is inserted (p. 24).
(Warning indicator pertaining to
the write-protect of the memory card)
The memory card is write-protected.
Access to the memory card was restricted on
another device.
(Warning indicator pertaining to the
external media device)
The image database file may be damaged.
Check the database file by touching
[Rec/Media SET] [Repair Img. DB F.]
the recording medium.
The external media device is damaged.
(Warning indicator pertaining to
formatting of the external media device)
The external media device is damaged.
The external media device is not formatted
correctly.
(Warning indicator pertaining to the
flash)
Fast flashing
There is something wrong with the flash.
(Warning indicator pertaining to
camera-shake warning)
The amount of lights is not sufficient, so
camera-shake easily occurs. Use the flash.
The camcorder is unsteady, so camera-shake
easily occurs. Hold the camcorder steadily
with both hands and record the image.
However, note that the camera-shake warning
indicator does not disappear.
(Warning indicator pertaining to
photo recording)
The recording media is full.
Photos cannot be recorded during processing.
Wait for a while, then record.
When [
], [1080/50i ] or [720/50p ], you
cannot capture photos while recording movies.
Furthermore, if [
[1080/25p
record photos while the camcorder is in movie
recording standby mode.
Rec Format] is set to [1080/50p
Rec Format] is set to
] or [1080/25p ], you cannot
Others/Index
GB
95
Page 96

96
GB
Description of warning messages
If messages appear on the screen, follow the
instructions.
Recording media
Cannot recognize the internal memory.
Format and use again.
The internal recording medium of the
camcorder is set differently from the default
fo
rmat. Performing [Format] (p. 78) may
enable you to use your camcorder. This
will delete all data in the internal recording
medium.
Data error.
An error occurred during reading or writing
the internal recording media of the camcorder.
If the message is preceded by a GPS indicator,
there may be some trouble with the GPS
receiver. Turn on your camcorder again.
This may occur when you keep applying shock
on the camcorder.
Movies recorded on other devices may not be
played back.
The Image Database File is damaged. Do
you want to create a new file?
HD movie management information is
damaged. Create new information?
The management file is damaged. When you
select
There is no Image Database File Movies
cannot be recorded or played Create a
new file?
You cannot record or play back movies
because no movie management information
exists. If you select [Yes], new management
information is created and you can record or
play back movies.
, a new management file is created.
There is no HD movie management
information. Create new information?
You cannot record or play back movies
because no high definition image quality (HD)
movie management information exists. If you
select [Yes], new management information
is created and you can record or play back
movies with high definition image quality
(HD).
You can record standard definition image
quality (STD) movies or photos.
Inconsistencies found in image database
file. Do you want to repair the image
database file?
The Image Database File is damaged. Do
you want to repair the Image Database
File?
Inconsistencies found in image database
file. Cannot record or play HD movies. Do
you want to repair the image database
file?
The management file is damaged. When you
select
, a new management file is created.
Inconsistencies found in the image
database file. Back up and recover.
Recover, then import using the included
PC software.
Inconsistencies occur in the image database
file because high definition image quality
(HD) movie management information
is damaged. If you select
management information is created by
backing up a high definition image quality
(HD) movie. The backed up movies cannot be
recognized. If you connect to a computer that
has been installed with the supplied software
“Content Management Utility,” you can copy
the backed up high definition image quality
(HD) movies.
, new
Page 97

Buffer overflow. Writing to the media was
not completed in time.
You have performed recording and erasing
operations repeatedly, or a memory card that
has been formatted by other device is used.
Copy and take data backup to other device
(such as a computer), and then format the
m
em
ory card on the camcorder (p. 78).
The size of the inserted memory card is not
sufficient for copying the movie(s). Use the
r
ecommended memory card (p. 24).
Recovering data.
Your camcorder tries to recover data
automatically if the data writing was not
performed properly.
Cannot recover data.
Writing data onto the media of the camcorder
has failed. Attempts were made to recover the
data, but they were unsuccessful.
Reinsert the memory card.
Reinsert the memory card a few times. If even
then the indicator flashes, the memory card
could be damaged. Try with another memory
card.
Cannot recognize this memory card.
Format and use again.
Format the memory card (p. 78). Note that if
you format the memory card, all the recorded
movies and photos are deleted.
Still picture folder is full. Cannot record
still pictures.
You cannot create folders exceeding
999MSDCF. You cannot create or delete
created folders using your camcorder.
F
rmat the memory card (p. 78), or delete
o
folders using your computer.
This memory card may not be able to
record or play movies.
Use a memory card recommended for your
camcorder (p. 24).
This memory card may not be able to
record or play images correctly.
Use a memory card recommended for your
camcorder (p. 24).
Contact your Sony dealer.
Do not eject the memory card during
writing. Data may be damaged.
Reinsert the memory card.
External media cannot execute functions.
Check the data base file by touching
[Rec/Media SET] [Repair Img. DB F.]
the recording medium.
If even then the indicator flashes, reconnect
the external media device, and then perform
the format. Note that if you format the
external media device, all the recorded movies
and photos in it are deleted.
If you cannot perform the format, the
external media may not be supported by the
camcorder, or it may be damaged. Try with
another external media.
Unable to access external media.
Use the external media device in stable
condition (the environment such as no
vibration and room temperature, etc.).
Make sure to the power source of the external
media device is connected.
Other
Maximum number of images already
selected.
You can select only 100 images at one time for:
Deleting movies/photos
Others/Index
GB
97
Page 98

98
GB
Protecting movies/photos, or releasing the
protection
Copying movies/photos
Data protected.
You tried to delete protected data. Release the
protection of the data.
Recording time of movies/number of recordable photos
“HD” stands for high definition image
quality, and “STD” stands for standard
definition image quality.
Expected time of recording and playback with each battery pack
Recording time
Approximate time available when you use a
fully charged battery pack.
(unit: minute)
Battery pack
Continuous
recording time
Image quality HD STD HD STD
NP-FV50
NP-FV70
(supplied)
NP-FV100
90 95 45 45
95 100 45 50
185 205 90 100
195 210 95 105
375 405 185 200
395 415 190 205
Typical recording
time
Top: When the LCD screen is opened
Bottom: When recording with the viewfinder
without opening the LCD screen
Each recording time is measured in the
following conditions.
When recording high definition image
quality (HD) with [
[1080/50i
When the XLR Adaptor and supplied
microphone are attached.
Typical recording time shows the time when
you repeat recording start/stop, switching the
MODE lamp, and zooming.
Times measured when using the camcorder at
C (77 °F). 10 C to 30 C (50 °F to 86 °F) is
25
recommended.
The recording and playback time will be
shorter when you use your camcorder in low
temperatures.
].
Rec Format] set to
Page 99

The recording and playback time will be shorter
depending on the conditions under which you
use your camcorder.
Playing time
Approximate time available when you use a
fully charged battery pack.
(unit: minute)
Battery pack
Image quality HD STD
NP-FV50
NP-FV70 (supplied)
NP-FV100
Top: When the LCD screen is opened
Bottom: When playing with the viewfinder
without opening the LCD screen
190 215
200 225
395 440
415 465
785 870
830 925
Expected recording time of
movies
Internal memory
High definition image quality (HD) in h (hour) and min
(minute)
Recording mode Recording time
7 h 30 min (7 h 30 min)
7 h 55 min (7 h 55 min)
8 h 45 min (8 h 45 min)
9 h 20 min (9 h 20 min)
11 h 40 min (11 h 40 min)
12 h 50 min (12 h 50 min)
19 h 25 min (15 h 15 min)
22 h 45 min (17 h 15 min)
30 h 45 min (26 h 30 min)
39 h 55 min (32 h 35 min)
Top: When [ Audio Format] is set to
[Linear PCM]
Bottom: When [
[Dolby Digital]
Audio Format] is set to
Standard definition image quality (STD) in h (hour) and
min (minute)
Recording mode Recording time
23 h 50 min (21 h 50 min)
You can record movies of a maximum of 3,999
scenes with high definition image quality (HD),
and 9,999 scenes with standard definition image
quality (STD).
The maximum continuous recording time of
movies is approximately 13 hours.
Your camcorder uses the VBR (Variable Bit
Rate) format to automatically adjust image
quality to suit the recording scene. This
technology causes fluctuations in the recording
time of the media. Movies containing quickly
moving and complex images are recorded at
a higher bit-rate, and this reduces the overall
recording time.
Notes
The number in ( ) is the minimum recordable
time.
Memory card
High definition image quality (HD)
(unit: minute)
2 GB 4 GB 8 GB 16 GB 32 GB
8
(8)15(15)35(35)70(70)
9
(9)15(15)35(35)75(75)
9
(9)20(20)40(40)80(80)
10
(10)20(20)40(40)90(90)
145
(145)
150
(150)
170
(170)
180
(180)
Others/Index
GB
99
Page 100

100
GB
(unit: minute)
2 GB 4 GB 8 GB 16 GB 32 GB
10
(10)25(25)55(55)
10
(10)25(25)60(60)
20
(15)45(35)90(70)
25
(15)50(40)
30
(30)70(60)
45
(35)90(75)
Top: When [ Audio Format] is set to
[Linear PCM]
Bottom: When [
[Dolby Digital]
Audio Format] is set to
105
(80)
145
(125)
185
(155)
110
(110)
120
(120)
185
(145)
215
(165)
295
(250)
380
(310)
(225)
(245)
(290)
(330)
(510)
(630)
Standard definition image quality (STD)
(unit: minute)
2 GB 4 GB 8 GB 16 GB 32 GB
25
(25)55(50)
When using a Sony memory card.
Notes
The recordable time may vary depending on the
recording and subject conditions and [
Format] (p. 38).
The number in ( ) is the minimum recordable
time.
110
(100)
225
(210)
(420)
Expected number of recordable photos
Internal memory
You can record the maximum 40,000
photos.
225
245
375
440
590
770
460
Rec
Memory card
24.1M
2 GB 200
4 GB 400
8 GB 810
16 GB 1600
32 GB 3250
When using a Sony memory card.
The number of recordable photos of memory
card shown is for the maximum image size
of your camcorder. The actual number of
recordable photos is displayed on the LCD
een during recording (p. 116).
cr
s
The number of recordable photos of memory
card may vary depending on the recording
conditions.
Notes
The unique pixel array of Sony’s ClearVid and
the image processing system allow still image
resolution equivalent to the sizes described.
On bit-rate and recording pixels
The bit-rate, pixels and aspect ratio of each
recording mode for movies (movie + audio,
etc.)
High definition image quality (HD):
PS: Max. 28 Mbps 1,920 1,080 pixels/16:9
FX: Max. 24 Mbps 1,920 1,080 pixels/16:9,
1,280 720 pixels/16:9
FH: Approx. 17 Mbps (average) 1,920 1,080
pixels/16:9, 1,280 720 pixels/16:9
HQ: Approx. 9 Mbps (average) 1,440 1,080
pixels/16:9
LP: Approx. 5 Mbps (average) 1,440 1,080
pixels/16:9
Standard definition image quality (STD):
HQ: Approx. 9 Mbps (average) 720 576
pixels/16:9, 4:3
 Loading...