

Page 1
User Guide
1
PrintSearch
Top page
Operation Search
Before use
Getting started
Recording
Playback
Playing images on a TV
Saving images with a
computer
Using the Wi-Fi function
Customizing your
camcorder
Troubleshooting
Maintenance and
precautions
Contents list
HDR-MV1
Music Video Recorder User Guide
Use this manual if you encounter any problems, or have any questions about the
camcorder.
Back to top
Copyright 2013 Sony Corporation
Page 2
User Guide
2
Operation Search
Before use
PrintSearch
Top page > Operation Search
Operation Search
Getting started
Recording
Playback
Playing images on a TV
Saving images with a
computer
Using the Wi-Fi function
Customizing your
camcorder
Troubleshooting
Maintenance and
precautions
Contents list
Operation Search
Search by operation
Back to top
Copyright 2013 Sony Corporation
Page 3
User Guide
3
Operation Search
Before use
PrintSearch
Top page > Before use
Before use
Getting started
Recording
Playback
Playing images on a TV
Saving images with a
computer
Using the Wi-Fi function
Customizing your
camcorder
Troubleshooting
Maintenance and
precautions
Contents list
How to use this User Guide
How to use this User Guide
Parts and controls/Screen indicators
Parts and controls
Screen indicators
About language setting
About language setting
Operating your camcorder
Selecting items on the LCD screen
Back to top
Copyright 2013 Sony Corporation
Page 4
User Guide
4
Operation Search
Before use
PrintSearch
Top page > Getting started
Getting started
Getting started
Recording
Playback
Playing images on a TV
Saving images with a
computer
Using the Wi-Fi function
Customizing your
camcorder
Troubleshooting
Maintenance and
precautions
Contents list
Checking the supplied items
Supplied items
Power supply
Attaching the battery pack
Charging the battery using your computer
Charging the battery using the AC Adaptor (sold separately)
Using the camcorder while supplying it with power
Turning the power on, and setting the date and time
Turning the power on, and setting the date and time
Preparing the recording media
Inserting a memory card
Back to top
Copyright 2013 Sony Corporation
Page 5
User Guide
5
Operation Search
Before use
PrintSearch
Top page > Recording
Recording
Getting started
Recording
Playback
Playing images on a TV
Saving images with a
computer
Using the Wi-Fi function
Customizing your
camcorder
Troubleshooting
Maintenance and
precautions
Contents list
Recording
Shooting movies
Recording sound
Screen indicators during recording
Useful functions for recording
Intelligent Auto
Audio monitoring
Back to top
Copyright 2013 Sony Corporation
Page 6
User Guide
6
Operation Search
Before use
PrintSearch
Top page > Playback
Playback
Getting started
Recording
Playback
Playing images on a TV
Saving images with a
computer
Using the Wi-Fi function
Customizing your
camcorder
Troubleshooting
Maintenance and
precautions
Contents list
Playback
Playing movies/audio files
Back to top
Copyright 2013 Sony Corporation
Page 7
User Guide
7
Operation Search
Before use
PrintSearch
Top page > Playing images on a TV
Playing images on a TV
Getting started
Recording
Playback
Playing images on a TV
Saving images with a
computer
Using the Wi-Fi function
Customizing your
camcorder
Troubleshooting
Maintenance and
precautions
Contents list
Playing images on a high definition TV
Connecting the camcorder to a high definition TV
Playing images on a TV supporting “BRAVIA” Sync
Using “BRAVIA” Sync
Back to top
Copyright 2013 Sony Corporation
Page 8
User Guide
8
Operation Search
Before use
PrintSearch
Top page > Saving images with a computer
Saving images with a computer
Getting started
Recording
Playback
Playing images on a TV
Saving images with a
computer
Using the Wi-Fi function
Customizing your
camcorder
Troubleshooting
Maintenance and
precautions
Contents list
Saving contents with a computer
What you can do using a computer
Checking the computer system
Installing the editing/management software in your computer
Starting the editing/management software
Importing files to your computer without using software
Back to top
Copyright 2013 Sony Corporation
Page 9
User Guide
9
Operation Search
Before use
PrintSearch
Top page > Using the Wi-Fi function
Using the Wi-Fi function
Getting started
Recording
Playback
Playing images on a TV
Saving images with a
computer
Using the Wi-Fi function
Customizing your
camcorder
Troubleshooting
Maintenance and
precautions
Contents list
Using the Wi - Fi function
What you can do using the Wi- Fi function
Control your camcorder via smartphone
Using your smartphone or tablet as a remote control without using
NFC
Using your smartphone or tablet as a remote control using NFC
Sending movies to the smartphone
Transferring movies to your smartphone or tablet without using NFC
Transferring movies to your smartphone or tablet using NFC
Connecting a smartphone
Connecting to your Android smartphone or tablet
Connecting to your iPhone or iPad
Connecting to your NFC- compatible Android smartphone or tablet
Installing the PlayMemories Mobile
On the “PlayMemories Mobile” software
Copyright 2013 Sony Corporation
Back to top
Page 10
User Guide
10
Operation Search
Before use
PrintSearch
Top page > Customizing your camcorder
Customizing your camcorder
Getting started
Recording
Playback
Playing images on a TV
Saving images with a
computer
Using the Wi-Fi function
Customizing your
camcorder
Troubleshooting
Maintenance and
precautions
Contents list
Using menu items
Setting up menu items
Recording Mode
Movie
Audio
Camera/Audio
White Balance
Exposure
Low Lux
Scene Selection
Fader
Auto Back Light
Face Detection
Audio Format
Low Cut Filter
Int. Mic. Rec. Level
Ext. Mic. Rec. Level
Audio Output Timing
Volume
Ext. Audio Input Set
Ctrl with Smartphone
My Button
Grid Line
Display Setting
Audio Level Display
Auto Monitor Off
Image Quality/Size
REC Mode
Playback Function
Playback Function
Page 11

Edit/Copy
11
Send to Smartphone
Delete
Protect
Setup
Media Info
Format
Repair Img. DB F.
File Number
Edit Device Name
SSID/PW Reset
HDMI Resolution
CTRL FOR HDMI (Control for HDMI)
USB Connect
USB Power Supply
USB LUN Setting
Beep
Monitor Brightness
Language Setting
Airplane Mode
Power Save
Initialize
Date & Time Setting
Area Setting
Copyright 2013 Sony Corporation
Back to top
Page 12
User Guide
12
Operation Search
Before use
PrintSearch
Top page > Troubleshooting
Troubleshooting
Getting started
Recording
Playback
Playing images on a TV
Saving images with a
computer
Using the Wi-Fi function
Customizing your
camcorder
Troubleshooting
Maintenance and
precautions
Contents list
If you have problems
If you have problems
Troubleshooting
Overall operations
Batteries/power sources
LCD screen
Memory card
Recording
Playback
Playback on the TV
Connecting to a computer
Wi-Fi
Self-diagnosis display/Warning indicators
Self- diagnosis display
Warning Indicators
Copyright 2013 Sony Corporation
Back to top
Page 13
User Guide
13
Operation Search
Before use
PrintSearch
Top page > Maintenance and precautions
Maintenance and precautions
Getting started
Recording
Playback
Playing images on a TV
Saving images with a
computer
Using the Wi-Fi function
Customizing your
camcorder
Troubleshooting
Maintenance and
precautions
Contents list
Maintenance and precautions
About the memory card
About the battery pack
About handling of your camcorder
On use and care
On moisture condensation
On charging the pre-installed rechargeable battery
Note on disposal/transfer of the memory card
Recording time of movies/sound
Charging time
Expected time of recording and playback with the battery pack
Expected shooting time of movies
Expected recording time of sound
Using your camcorder abroad
Using your camcorder abroad
On trademarks
On trademarks
License
Notes on the License
Specifications
Specifications
Copyright 2013 Sony Corporation
Back to top
Page 14
User Guide
Inserting a memory card
14
PrintSearch
Top page > Contents list
Operation Search
Before use
Getting started
Recording
Playback
Playing images on a TV
Saving images with a
computer
Using the Wi-Fi function
Customizing your
camcorder
Troubleshooting
Maintenance and
precautions
Contents list
Contents list
Operation Search
Operation Search
Search by operation
Back to top
Before use
How to use this User Guide
How to use this User Guide
Parts and controls/Screen indicators
Parts and controls
Screen indicators
About language setting
About language setting
Operating your camcorder
Selecting items on the LCD screen
Back to top
Getting started
Checking the supplied items
Supplied items
Power supply
Attaching the battery pack
Charging the battery using your computer
Charging the battery using the AC Adaptor (sold separately)
Using the camcorder while supplying it with power
Turning the power on, and setting the date and time
Turning the power on, and setting the date and time
Preparing the recording media
Page 15

Recording
15
Recording
Shooting movies
Recording sound
Screen indicators during recording
Useful functions for recording
Intelligent Auto
Audio monitoring
Playback
Playback
Playing movies/audio files
Back to top
Back to top
Playing images on a TV
Playing images on a high definition TV
Connecting the camcorder to a high definition TV
Playing images on a TV supporting “BRAVIA” Sync
Using “BRAVIA” Sync
Saving images with a computer
Saving contents with a computer
What you can do using a computer
Checking the computer system
Installing the editing/management software in your computer
Starting the editing/management software
Back to top
Back to top
Importing files to your computer without using software
Back to top
Using the Wi-Fi function
Using the Wi - Fi function
What you can do using the Wi- Fi function
Page 16

Control your camcorder via smartphone
Using your smartphone or tablet as a remote control without using
Ctrl with Smartphone
16
NFC
Using your smartphone or tablet as a remote control using NFC
Sending movies to the smartphone
Transferring movies to your smartphone or tablet without using NFC
Transferring movies to your smartphone or tablet using NFC
Connecting a smartphone
Connecting to your Android smartphone or tablet
Connecting to your iPhone or iPad
Connecting to your NFC- compatible Android smartphone or tablet
Installing the PlayMemories Mobile
On the “PlayMemories Mobile” software
Customizing your camcorder
Back to top
Using menu items
Setting up menu items
Recording Mode
Movie
Audio
Camera/Audio
White Balance
Exposure
Low Lux
Scene Selection
Fader
Auto Back Light
Face Detection
Audio Format
Low Cut Filter
Int. Mic. Rec. Level
Ext. Mic. Rec. Level
Audio Output Timing
Volume
Ext. Audio Input Set
Page 17

My Button
17
Grid Line
Display Setting
Audio Level Display
Auto Monitor Off
Image Quality/Size
REC Mode
Playback Function
Playback Function
Edit/Copy
Send to Smartphone
Delete
Protect
Setup
Media Info
Format
Repair Img. DB F.
File Number
Edit Device Name
SSID/PW Reset
HDMI Resolution
CTRL FOR HDMI (Control for HDMI)
USB Connect
USB Power Supply
USB LUN Setting
Beep
Monitor Brightness
Language Setting
Airplane Mode
Power Save
Initialize
Date & Time Setting
Area Setting
Back to top
Troubleshooting
Page 18

If you have problems
If you have problems
18
Troubleshooting
Overall operations
Batteries/power sources
LCD screen
Memory card
Recording
Playback
Playback on the TV
Connecting to a computer
Wi-Fi
Self-diagnosis display/Warning indicators
Self- diagnosis display
Warning Indicators
Back to top
Maintenance and precautions
Maintenance and precautions
About the memory card
About the battery pack
About handling of your camcorder
On use and care
On moisture condensation
On charging the pre-installed rechargeable battery
Note on disposal/transfer of the memory card
Recording time of movies/sound
Charging time
Expected time of recording and playback with the battery pack
Expected shooting time of movies
Expected recording time of sound
Using your camcorder abroad
Using your camcorder abroad
On trademarks
On trademarks
License
Page 19

Notes on the License
Specifications
19
Specifications
Copyright 2013 Sony Corporation
Back to top
Page 20
User Guide
20
Operation Search
PrintSearch
Top page > Operation Search > Operation Search > Search by operation
Before use
Getting started
Recording
Playback
Playing images on a TV
Saving images with a
computer
Using the Wi-Fi function
Customizing your
camcorder
Troubleshooting
Maintenance and
precautions
Contents list
Search by operation
Setting the date and time
Date & Time Setting
Area Setting
Identifying part names
Parts and controls
Recording audio files
Recording sound
Selecting the suitable setting automatically for the
recording situation
Useful functions for recording
Recording people clearly
Face Detection
Scene Selection (Spotlight)
Selecting a movie shooting mode
REC Mode
Changing the audio recording format
Audio Format
Adjusting the internal microphone level
Int. Mic. Rec. Level
Reducing low frequency sound such as noise from air
conditioners
Low Cut Filter
Monitoring sound
Audio monitoring
Synchronizing the monitored sound with the LCD screen
or with movies output via HDMI
Audio Output Timing
Using an external MTR or microphone
Ext. Audio Input Set
Shooting movies in a dim place
Page 21

Low Lux
Recording faces of people on a stage clearly
21
Scene Selection (Spotlight)
Saving battery power
Power Save
Recording without worrying about the remaining battery
power
Using the camcorder while supplying it with power
Playing images on a TV
Connecting the camcorder to a high definition TV
Deleting files
Delete
Back to top
Copyright 2013 Sony Corporation
Page 22
User Guide
22
Operation Search
Before use
Getting started
PrintSearch
Top page > Before use > How to use this User Guide > How to use this User
Guide
How to use this User Guide
Recording
Playback
Playing images on a TV
Saving images with a
computer
Using the Wi-Fi function
Customizing your
camcorder
Troubleshooting
Maintenance and
precautions
Contents list
Selecting a topic to display
Searching a topic by keyword
Returning to a previous page
Printing out a page
Marks and notations used in this User Guide
This User Guide explains how to use each function of the camcorder, how to
change settings, and how to troubleshoot a problem.
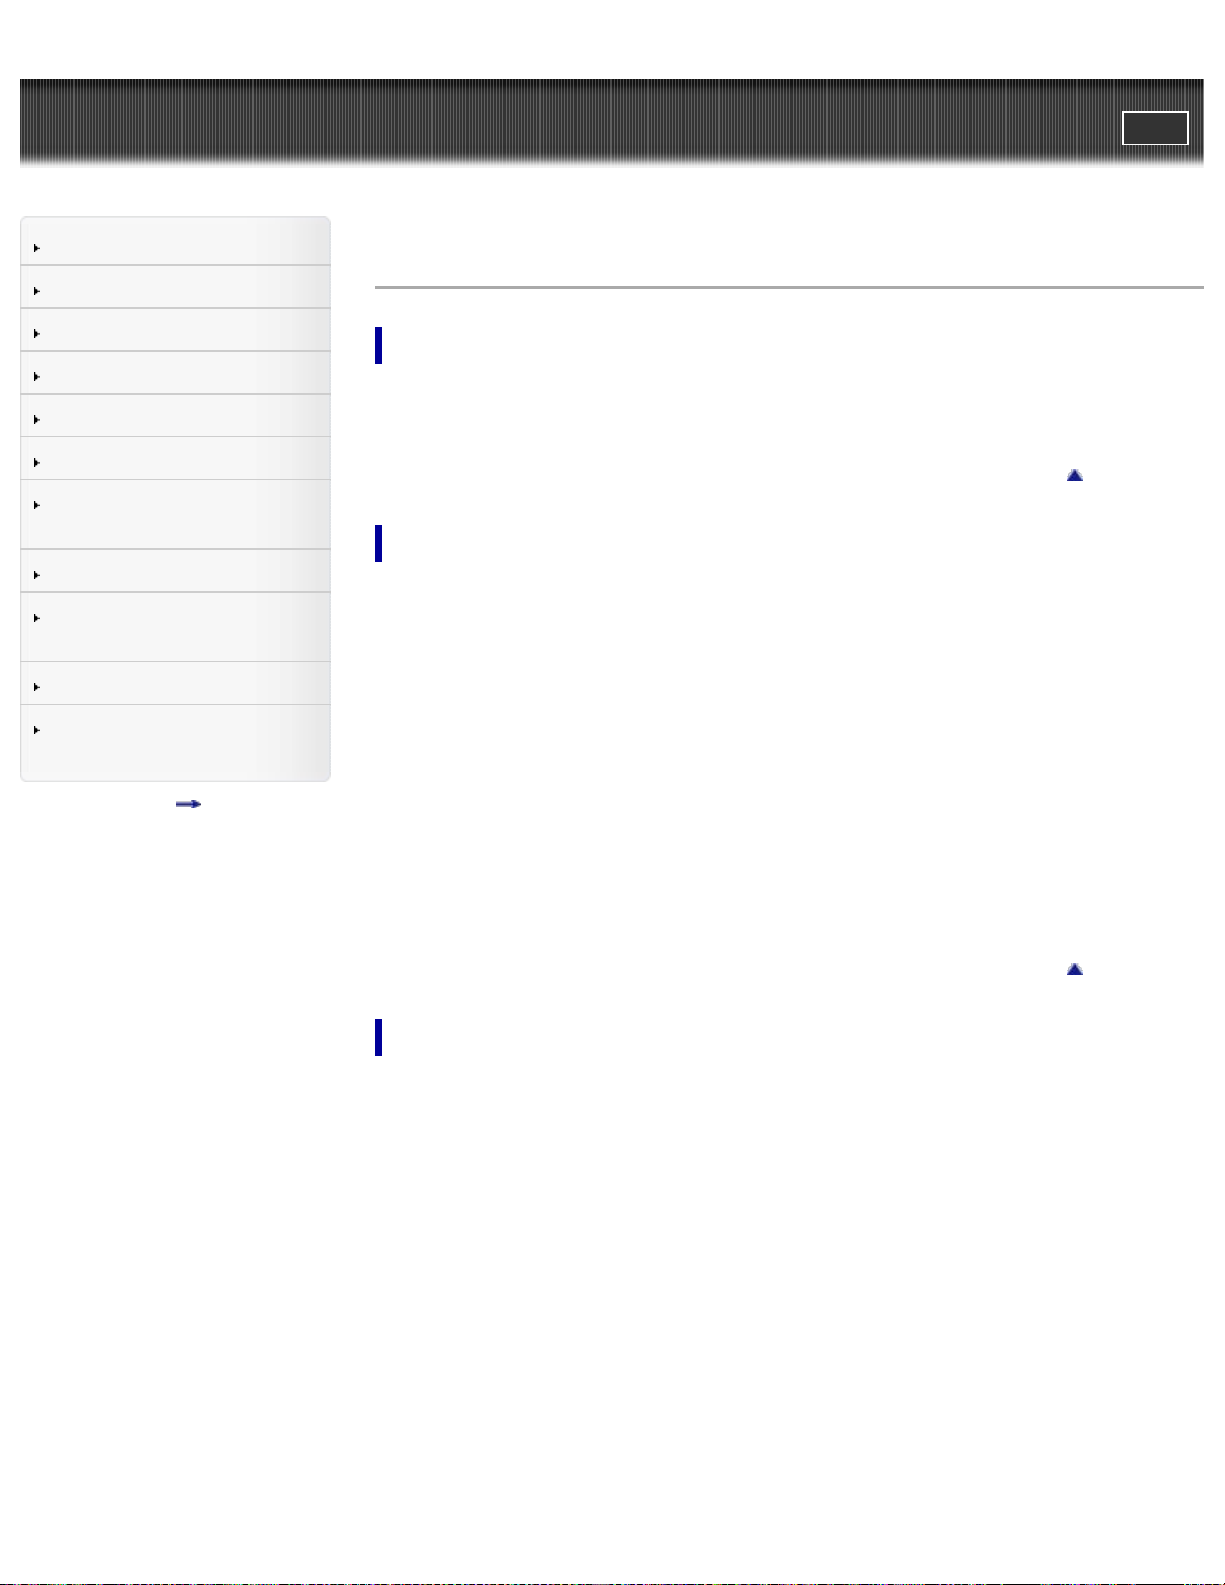
Selecting a topic to display
The following illustrations take Internet Explorer 7 as an example.
1. Click a title in the side bar on the left of the browser window.
A list of topic titles appears in the right pane.
2. Click a topic title in the list.
Descriptions appear in the right pane.
Page 23
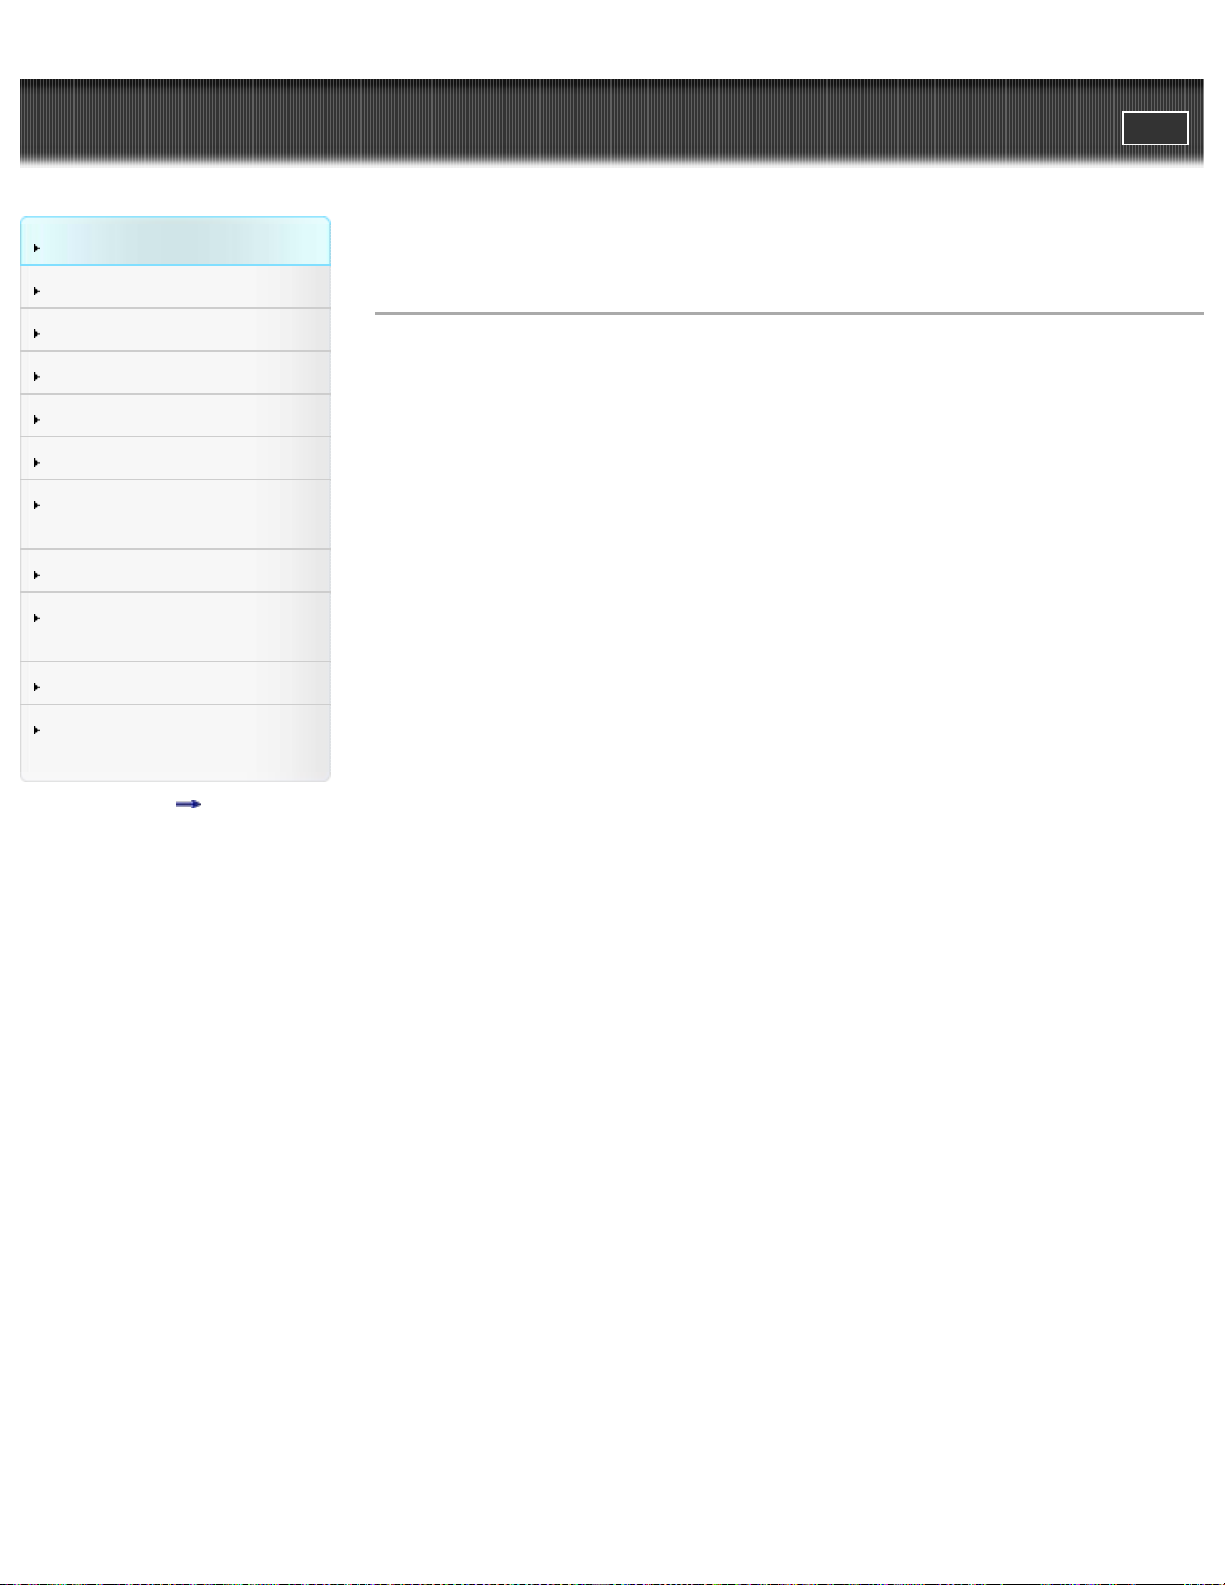
Changing the font size
23
Change the font size by changing the setting of your web browser. For how to
change the font size setting, refer to the Help of your web browser.
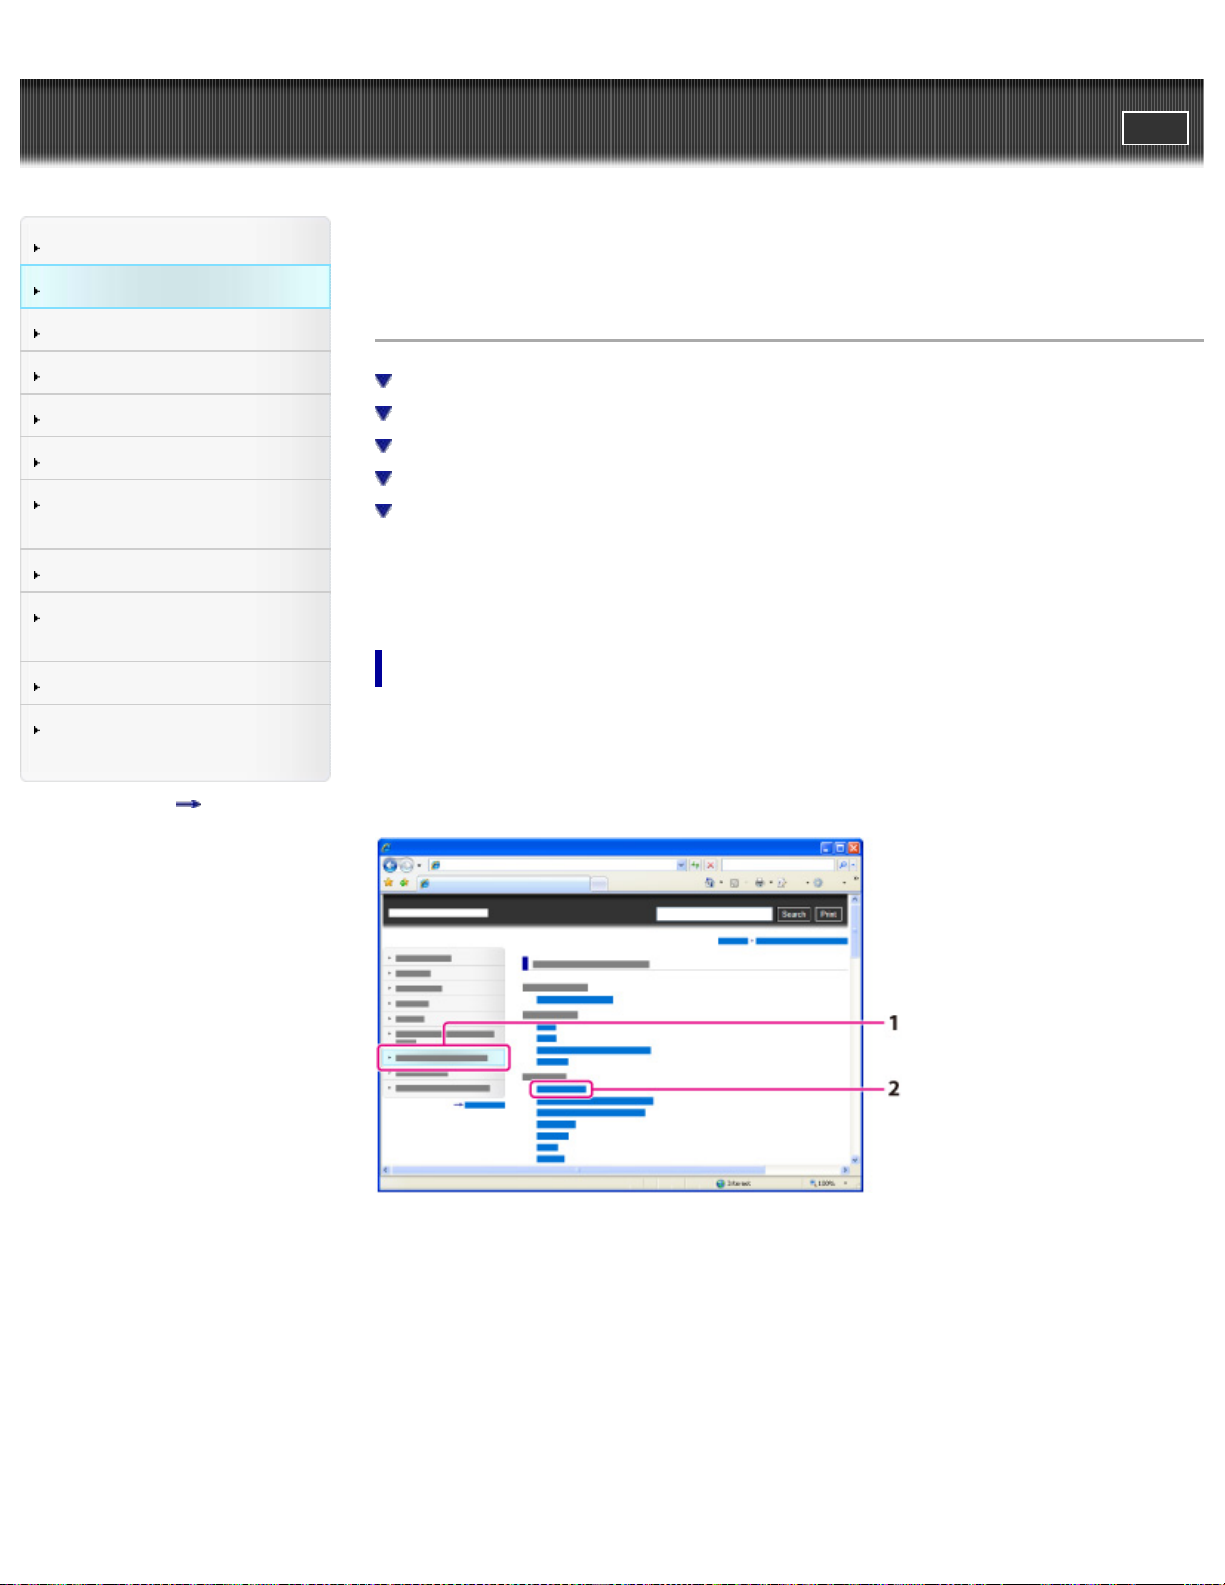
Searching a topic by keyword
Enter the keyword in the search window, then click the [Search] button.
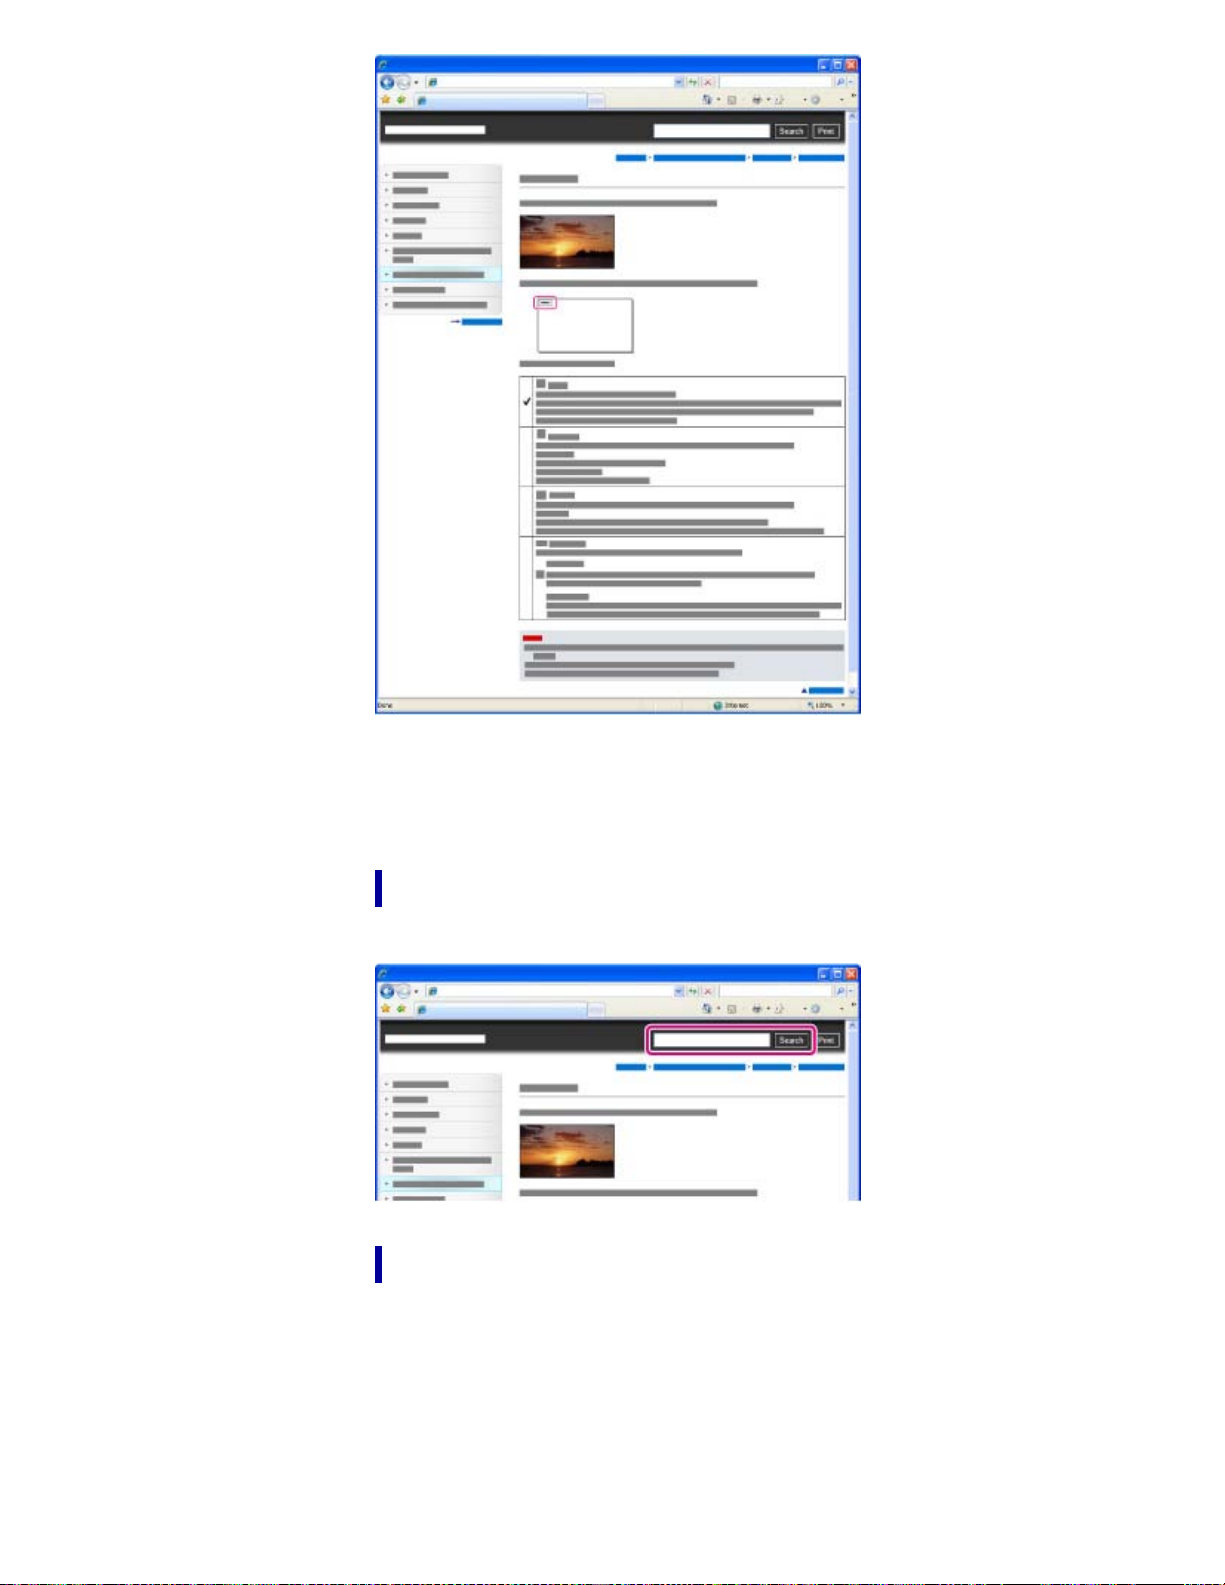
Returning to a previous page
Use the back button of your web browser or the breadcrumb trail navigation (A) to
return to a page you previously viewed.
Page 24
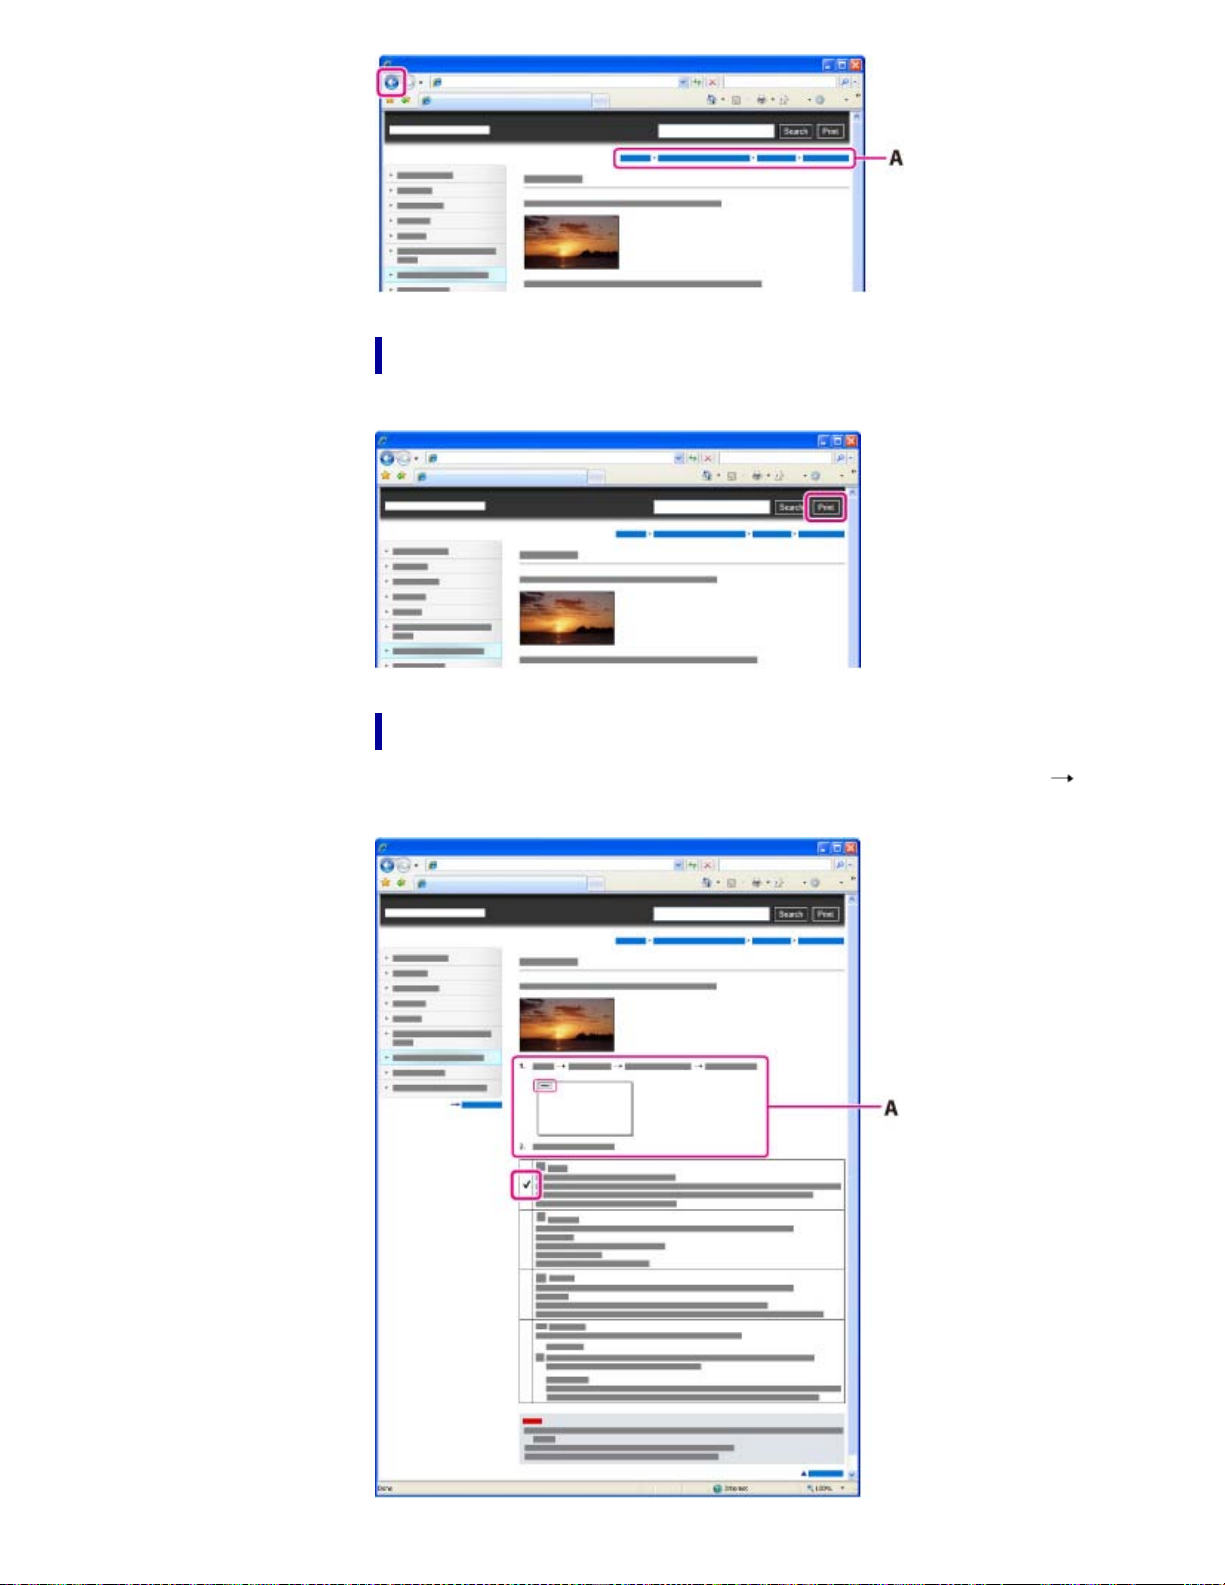
Printing out a page
24
Click the [Print] button to print out a page you are viewing.
Marks and notations used in this User Guide
In this User Guide, the sequence of operations is shown by arrows ( ) (A).
Operate the camcorder in the order indicated.
Page 25

Icons in the operating procedure sentences appear when the camcorder is in its
25
default settings.
The default setting is indicated by
.
Back to top
Copyright 2013 Sony Corporation
Page 26
User Guide
26
Operation Search
PrintSearch
Top page > Before use > Parts and controls/Screen indicators > Parts and controls
Before use
Getting started
Recording
Playback
Playing images on a TV
Saving images with a
computer
Using the Wi-Fi function
Customizing your
camcorder
Troubleshooting
Maintenance and
precautions
Contents list
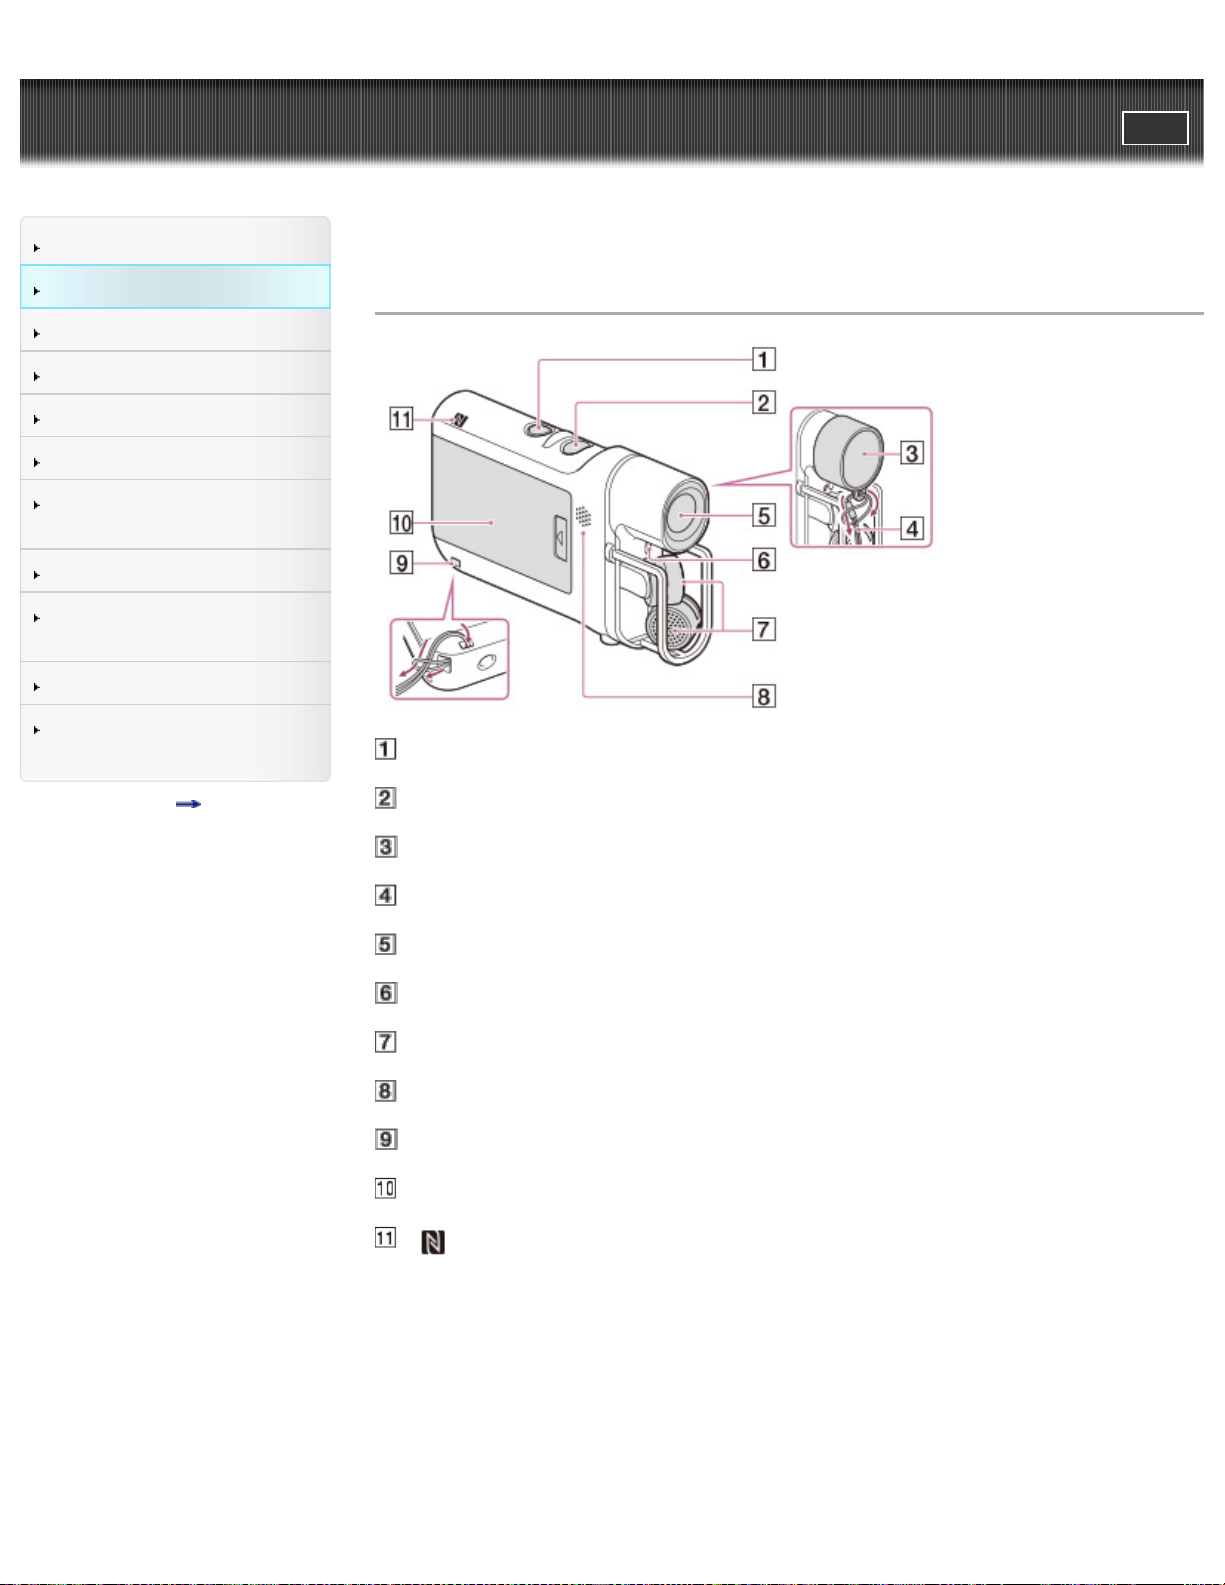
Parts and controls
START/STOP button
POWER button
Lens cap
Cap string
Lens
Recording lamp
Microphones
Speaker
Loop for the cap string/the strap
Battery cover
(N mark)
NFC: Near Field Communication
Page 27
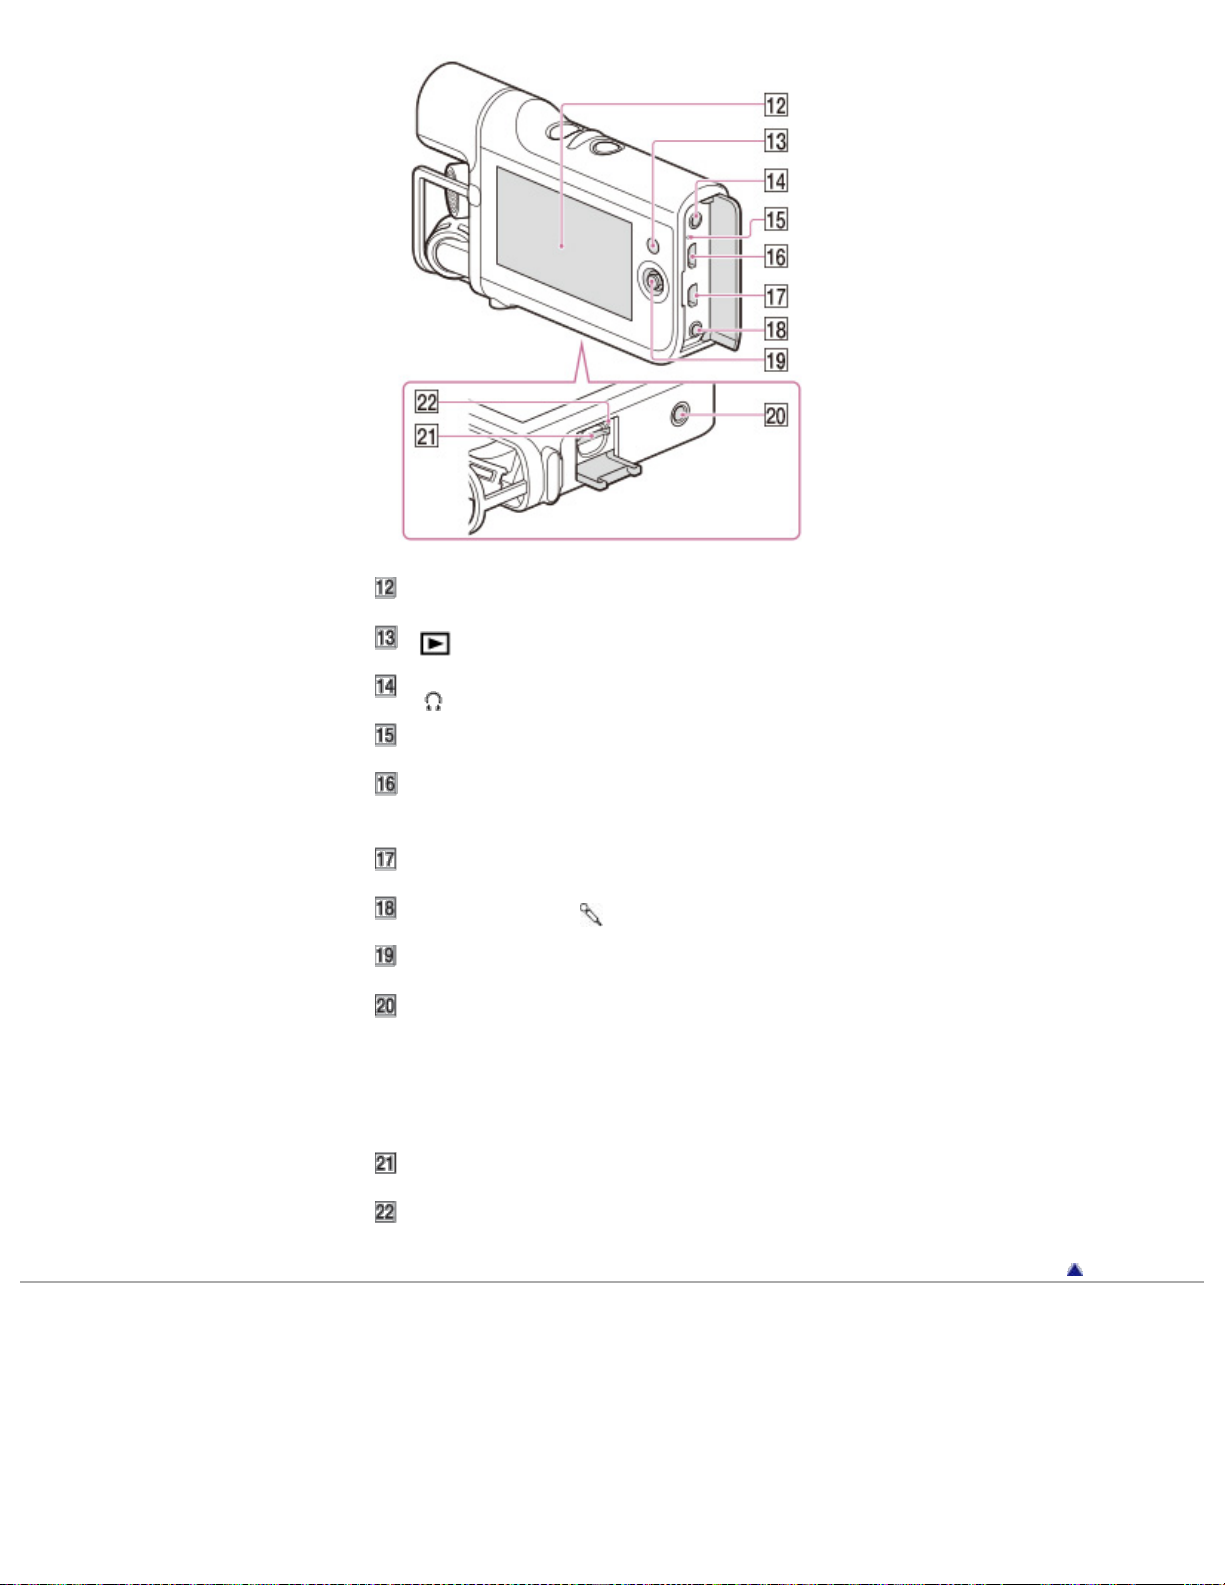
LCD screen
27
(Playback) button
(headphones) jack
CHG (charge) lamp
Multi/Micro USB Terminal
Supports Micro USB compatible devices.
Micro HDMI OUT jack
LINE IN jack/
(microphone) jack (PLUG IN POWER)
Multi-selector
Tripod receptacle
Attach a tripod (sold separately: the length of the screw must be less than 5.5
mm (7/32 in.)).
Depending on the specifications of the tripod, your camcorder may not attach in
the proper direction.
Memory card slot
Memory card access lamp
Back to top
Copyright 2013 Sony Corporation
Page 28
User Guide
28
Operation Search
PrintSearch
Top page > Before use > Parts and controls/Screen indicators > Screen indicators
Before use
Getting started
Recording
Playback
Playing images on a TV
Saving images with a
computer
Using the Wi-Fi function
Customizing your
camcorder
Troubleshooting
Maintenance and
precautions
Contents list
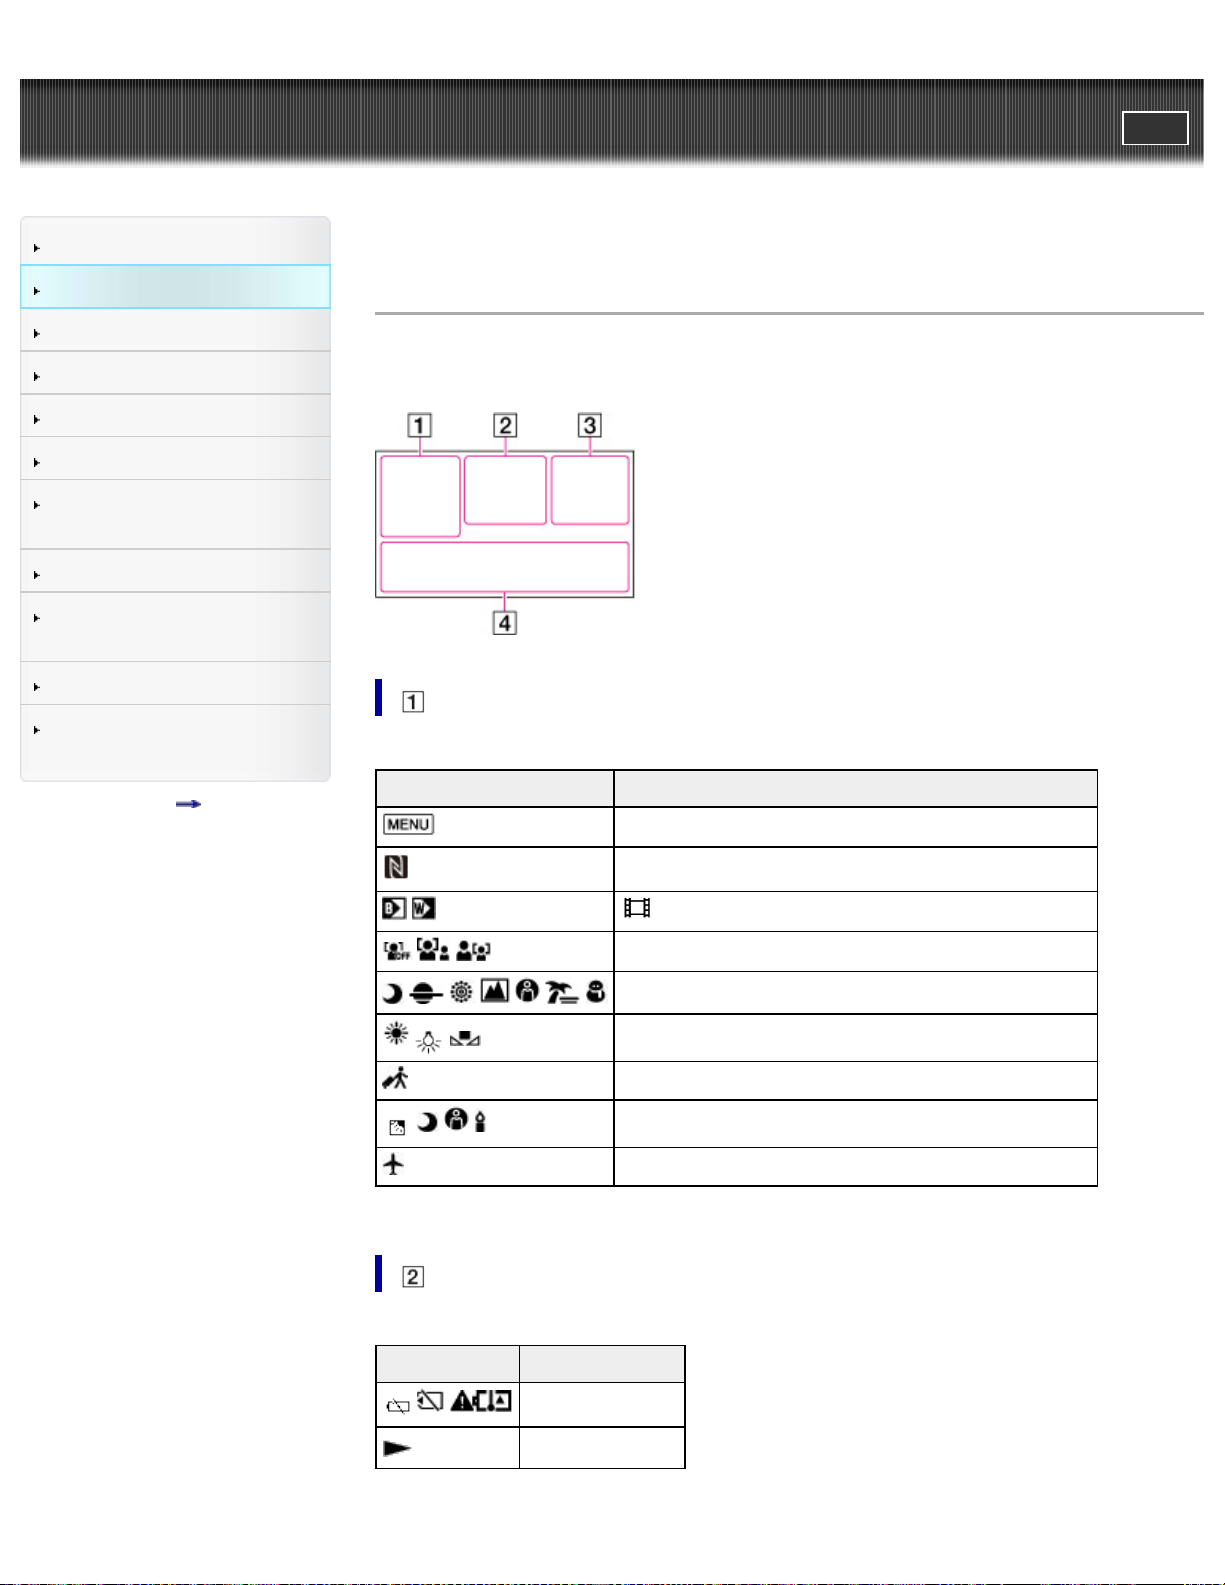
Screen indicators
The following indicators appear when you change the settings.
Check also for the indicators that appear during recording or playing.
Indicator Meaning
MENU button
Indicator Meaning
Warning
Playback mode
NFC
Fader
Face Detection
Scene Selection
White Balance
Destination
Intelligent Auto (face detection/scene detection)
Airplane Mode
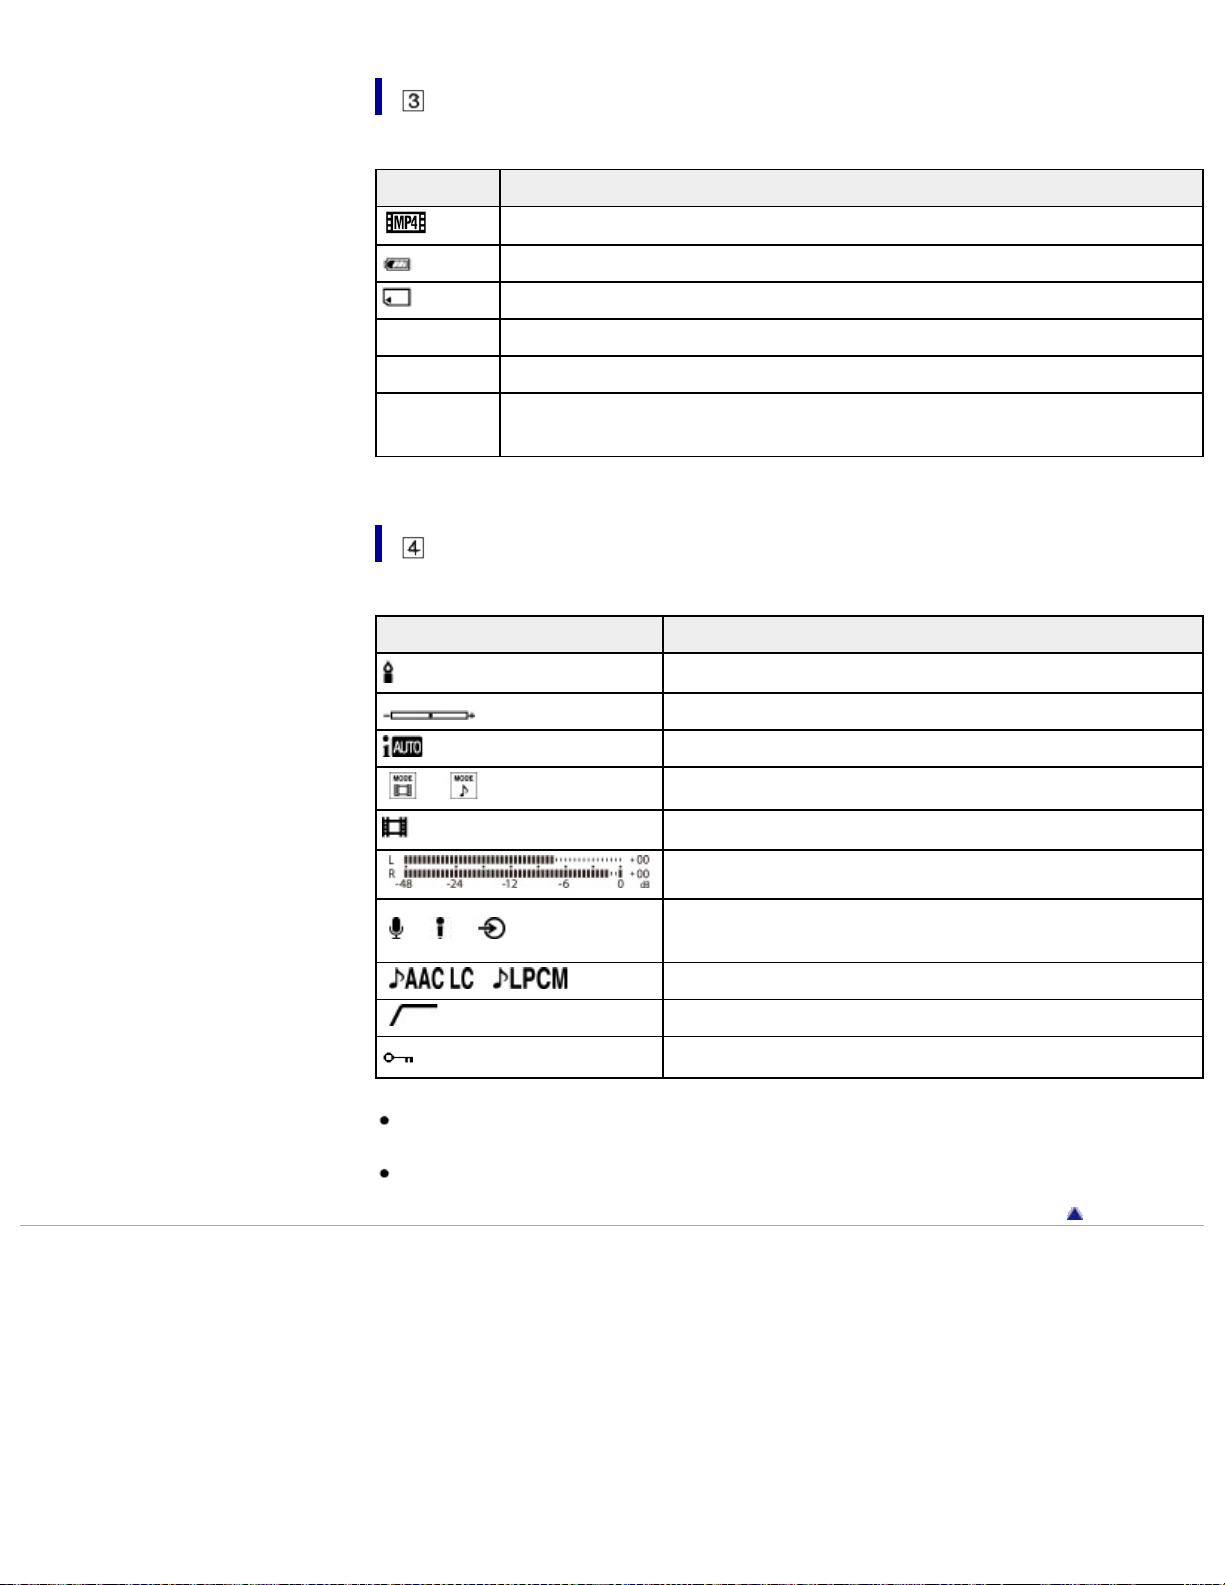
Page 29
29
Indicator Meaning
720
0:00:00 Counter (hour:minute:second)
00min Estimated remaining recording time
100/112
Recording image quality (MP4), shooting mode (1080/720)
Remaining battery
Recording/playback/editing media
Current playing movie or audio file number/Number of total recorded
movies or audio files
Indicator Meaning
Low Lux
Exposure
Intelligent Auto
/
Mode switching
101-0005
/ /
Audio Format
Indicators and their positions are approximate and may differ from what you
actually see.
Some indicators may not appear, depending on your camcorder model.
Copyright 2013 Sony Corporation
Data file type/name
Audio level meter
Audio input settings (internal microphone/external
microphone/other devices)
Low Cut Filter
Protect
Back to top
Page 30

User Guide
30
Operation Search
PrintSearch
Top page > Before use > About language setting > About language setting
Before use
Getting started
Recording
Playback
Playing images on a TV
Saving images with a
computer
Using the Wi-Fi function
Customizing your
camcorder
Troubleshooting
Maintenance and
precautions
Contents list
About language setting
Change the screen language before using the camcorder if necessary. The onscreen displays in each local language are used for illustrating the operating
procedures. [Details]
Select
desired language.
[Setup] [ General Settings] [Language Setting] a
Back to top
Copyright 2013 Sony Corporation
Page 31

User Guide
31
Operation Search
Before use
Getting started
PrintSearch
Top page > Before use > Operating your camcorder > Selecting items on the LCD
screen
Selecting items on the LCD screen
Recording
Playback
Playing images on a TV
Saving images with a
computer
Using the Wi-Fi function
Customizing your
camcorder
Troubleshooting
Maintenance and
precautions
Contents list
1. Move the multi-selector towards / / / to select the desired item.
2. Press the center of the multi-selector to enter.
Back to top
Copyright 2013 Sony Corporation
Page 32

User Guide
32
Operation Search
PrintSearch
Top page > Getting started > Checking the supplied items > Supplied items
Before use
Getting started
Recording
Playback
Playing images on a TV
Saving images with a
computer
Using the Wi-Fi function
Customizing your
camcorder
Troubleshooting
Maintenance and
precautions
Contents list
Supplied items
The numbers in ( ) indicate the supplied quantity.
Camcorder (1)
USB cable (Micro USB cable) (1)
Rechargeable battery pack NP-BX1 (1)
Lens cap (1)
Cap string (1)
“Operating Guide” (1)
Notes
The editing/management software can be downloaded from the Sony website.
[Details]
Back to top
Copyright 2013 Sony Corporation
Page 33

User Guide
33
Operation Search
PrintSearch
Top page > Getting started > Power supply > Attaching the battery pack
Before use
Getting started
Recording
Playback
Playing images on a TV
Saving images with a
computer
Using the Wi-Fi function
Customizing your
camcorder
Troubleshooting
Maintenance and
precautions
Contents list
Attaching the battery pack
1. Remove the battery cover.
A: Battery cover
2. Attach the battery pack in the direction of the arrows.
A: Notch
3. Attach the battery cover.
Page 34

Notes
34
You can use only NP-BX1 (supplied) with your camcorder.
In the default setting, the camcorder turns itself off not to consume the battery
power when no operations are performed for about 5 minutes ([Power Save]).
To prevent staining the terminal, short-circuiting, etc., be sure to use a plastic
bag to keep away from metal materials when carrying or storing the battery
pack.
To remove the battery pack
Turn off your camcorder, remove the battery cover, and then remove the battery
pack.
Be careful not to drop the battery pack.
To check the remaining battery power
An icon indicating the remaining battery power is displayed.
High Low Empty
It will take approximately 1 minute to display the correct remaining battery power.
The remaining battery power may not be displayed correctly depending on
ambient conditions and the environment in which you are using your camcorder.
Your camcorder cannot display the remaining battery life in minutes using the
“InfoLITHIUM” battery.
Back to top
Copyright 2013 Sony Corporation
Page 35

User Guide
35
Operation Search
Before use
Getting started
PrintSearch
Top page > Getting started > Power supply > Charging the battery using your
computer
Charging the battery using your computer
Recording
Playback
Playing images on a TV
Saving images with a
computer
Using the Wi-Fi function
Customizing your
camcorder
Troubleshooting
Maintenance and
precautions
Contents list
1. Attach the battery pack. [Details]
2. When the camcorder is on, press the POWER button to turn it off.
A: POWER button
3. Open the jack cover, and then connect the camcorder to a running computer
using the USB cable (supplied).
A: USB jack (computer)
B: CHG (charge) lamp
C: Jack cover
D: USB cable (supplied)
The CHG (charge) lamp is lit.
The CHG (charge) lamp turns off when the battery pack is fully charged.
Disconnect the USB cable (supplied) from your camcorder.
Page 36

Charging time
Approximately 245 minutes are required to fully charge a fully discharged battery
36
pack.
The charging time is measured when charging the camcorder at a room
temperature of 25 °C (77 °F). It is recommended that you charge the battery in a
temperature range of 10 °C to 30 °C (50 °F to 86 °F).
Back to top
Copyright 2013 Sony Corporation
Page 37

User Guide
37
Operation Search
Before use
Getting started
Recording
PrintSearch
Top page > Getting started > Power supply > Charging the battery using the AC
Adaptor (sold separately)
Charging the battery using the AC Adaptor (sold
separately)
Playback
Playing images on a TV
Saving images with a
computer
Using the Wi-Fi function
Customizing your
camcorder
Troubleshooting
Maintenance and
precautions
Contents list
1. Attach the battery pack. [Details]
2. When the camcorder is on, press the POWER button to turn it off.
A: POWER button
3. Open the jack cover, and then connect the camcorder to a wall outlet (wall
socket) using the USB cable (supplied) and AC-UD10 AC Adaptor (sold
separately).
A: CHG (charge) lamp
B: Jack cover
C: USB cable (supplied)
D: AC-UD10 (sold separately)
Charging time
Page 38

Approximately 155 minutes are required to fully charge a fully discharged battery
pack.
38
The charging time is measured when charging the camcorder at a room
temperature of 25 °C (77 °F). It is recommended that you charge the battery in a
temperature range of 10 °C to 30 °C (50 °F to 86 °F).
Back to top
Copyright 2013 Sony Corporation
Page 39

User Guide
39
Operation Search
Before use
Getting started
Recording
PrintSearch
Top page > Getting started > Power supply > Using the camcorder while supplying
it with power
Using the camcorder while supplying it with
power
Playback
Playing images on a TV
Saving images with a
computer
Using the Wi-Fi function
Customizing your
camcorder
Troubleshooting
Maintenance and
precautions
Contents list
You can use the camcorder while supplying power by connecting the AC-UD10 AC
Adaptor (sold separately) to the camcorder.
1. Attach the battery pack. [Details]
2. Open the jack cover, and then connect the camcorder to a wall outlet (wall
socket) using the USB cable (supplied) and AC-UD10 AC Adaptor (sold
separately).
A: CHG (charge) lamp
B: Jack cover
C: USB cable (supplied)
D: AC-UD10 (sold separately)
3. Press the POWER button to turn on the camcorder for using it.
A: POWER button
Page 40

Notes
You may not be able to supply power to the camcorder without the battery pack
40
attached.
Supplying power to the camcorder from a computer
By connecting the camcorder to a computer using the USB cable (supplied), you
can play back or import files to the computer while supplying power to the
camcorder.
Notes
The recording function is not available while supplying power from the
computer.
When you connect the camcorder to a computer using the USB cable during
playback, the USB connection screen appears. It will turn to the playback
screen if you select
Copyright 2013 Sony Corporation
[yes].
Back to top
Page 41

User Guide
41
Operation Search
Before use
Getting started
Recording
PrintSearch
Top page > Getting started > Turning the power on, and setting the date and
time > Turning the power on, and setting the date and time
Turning the power on, and setting the date and
time
Playback
Playing images on a TV
Saving images with a
computer
Using the Wi-Fi function
Customizing your
camcorder
Troubleshooting
Maintenance and
precautions
Contents list
1. Turn on the camcorder by pressing the POWER button.
A: POWER button
2. Select the desired language, using the multi-selector.
3. Select the desired geographical area with / , then select [Next].
4. Set [Daylight Savings] or [Summer Time], select the date format and the date
and time.
If you set [Daylight Savings] or [Summer Time] to [On], the clock advances 1
hour.
When you select the date and time, select one of the items and adjust the
value with
When you select
/ .
, the date and time setting operation is complete.
Page 42

To change the language setting
42
You can change the on-screen displays to show messages in a specified language.
Select
desired language.
[Setup] [ General Settings] [Language Setting] a
To turn off the power
Press the POWER button.
Related topics
To set the date and time again: [Date & Time Setting]
Back to top
Copyright 2013 Sony Corporation
Page 43

User Guide
43
Operation Search
Before use
Getting started
PrintSearch
Top page > Getting started > Preparing the recording media > Inserting a memory
card
Inserting a memory card
Recording
Playback
Playing images on a TV
Saving images with a
computer
Using the Wi-Fi function
Customizing your
camcorder
Troubleshooting
Maintenance and
precautions
Contents list
1. Open the memory card cover.
2. Install a memory card straight in the direction illustrated.
3. Close the memory card cover.
A: When inserting a microSD memory card
B: Terminal
C: When inserting “Memory Stick Micro” media
D: Printed surface
E: Memory card cover
Notes
The [Preparing image database file. Please wait.] screen appears if you insert a
new memory card. Wait until the screen disappears.
Insert the memory card straight in the right direction so that the camcorder can
recognize it.
Make sure any warning message related to the memory card is not displayed.
[Details]
If you insert a memory card in the wrong direction or at an angle, you cannot
use it.
Do not insert more than 1 memory card.
To ensure stable operation of the memory card, it is recommended to format
the memory card with your camcorder before the first use. Formatting the
memory card will erase all the data stored on it and the data will be
irrecoverable. Save your important data on your computer, etc.
If [Failed to create a new Image Database File. It may be possible that there is
not enough free space.] is displayed, format the memory card. [Details]
Page 44

Confirm the direction of the memory card. If you forcibly insert the memory card
in the wrong direction, the memory card, memory card slot, or recorded files
44
may be damaged.
Insert a memory card that fits the memory card slot size. Otherwise, it will
cause a malfunction.
When inserting or ejecting the memory card, be careful so that the memory
card does not pop out and drop.
Types of memory card you can use with your
camcorder
Capacity
(operation
verified)
microSD memory card
microSDHC memory
card
microSDXC memory
card
“Memory Stick Micro”
media (Mark2)
Operation with all memory cards is not assured.
Notes
Movies saved on the microSDXC memory cards cannot be imported to or
played back on computers or AV devices not supporting the exFAT* file system
by connecting the camcorder to these devices with the USB cable. Confirm in
advance that the connecting equipment is supporting the exFAT system. If you
connect an equipment not supporting the exFAT system and the format screen
appears, do not perform the format. All the data saved will be lost.
* The exFAT is a file system that is used for the microSDXC memory cards.
Up to 32 GB
Up to 64 GB
Up to 16 GB —
SD Speed
Class
Class 4 or
faster
Described in
this manual
microSD card
“Memory Stick
Micro” media
To eject the memory card
Open the memory card cover and lightly push the memory card in once.
Related topics
Confirming the recording media: Screen indicators during recording
Expected shooting time of movies
Back to top
Copyright 2013 Sony Corporation
Page 45

User Guide
45
Operation Search
PrintSearch
Top page > Recording > Recording > Shooting movies
Before use
Getting started
Recording
Playback
Playing images on a TV
Saving images with a
computer
Using the Wi-Fi function
Customizing your
camcorder
Troubleshooting
Maintenance and
precautions
Contents list
Shooting movies
Movies are shot in the MP4 format ([Audio Format] is [AAC LC] in the default
setting).
1. Press the POWER button to turn on the camcorder.
A: POWER button
2. Press START/STOP to start shooting.
The LCD screen will be dimmed about 3 seconds after starting shooting (in
the default setting).
To stop shooting, press START/STOP again.
Notes
The maximum continuous shooting time of movies is about 13 hours.
Page 46

When a movie file exceeds 4 GB, the next movie file is created automatically.
The following states will be indicated if data is still being written onto the
46
recording media after shooting has finished. During this time, do not apply
shock or vibration to the camcorder, or remove the battery pack or AC Adaptor
(sold separately).
Access lamp is lit or flashing
The media icon in the upper right of the LCD screen is on
The LCD screen of your camcorder can display shooting movies across the
entire screen (full pixel display). However, this may cause slight trimming of the
top, bottom, right, and left edges of movies when played back on a TV which is
not compatible with full pixel display. It is recommended you shoot movies with
[Grid Line] set to [On] and using the outer frame of [Grid Line] as a guide.
Since the camcorder is equipped with a high-sensitivity microphone, noise or
operation sound may be recorded in the following situations.
When shooting by holding the camcorder
When operating the multi-selector
Related topics
Expected shooting time of movies
To hide items on the LCD screen: [Display Setting]
Recordable time, remaining capacity: [Media Info]
Changing the audio recording format: [Audio Format]
Canceling the LCD screen automatic lights-out function: [Auto Monitor Off]
Recording sound: [Recording sound]
Copyright 2013 Sony Corporation
Back to top
Page 47

User Guide
47
Operation Search
PrintSearch
Top page > Recording > Recording > Recording sound
Before use
Getting started
Recording
Playback
Playing images on a TV
Saving images with a
computer
Using the Wi-Fi function
Customizing your
camcorder
Troubleshooting
Maintenance and
precautions
Contents list
Recording sound
Sound is recorded as a WAV file.
1. Press the POWER button to turn on the camcorder.
A: POWER button
2. Select the
The camcorder enters sound recording mode.
button.
3. Press START/STOP to start recording sound.
Page 48

To stop recording, press START/STOP again.
48
Notes
When the file size exceeds 2 GB (approximately 2 hours 50 minutes when
recording continuously), recording stops.
Functions available in sound recording mode
The following functions are available.
[Ctrl with Smartphone]
[Low Cut Filter]
[Int. Mic. Rec. Level]
[Ext. Mic. Rec. Level]
[Volume]
[Ext. Audio Input Set]
[My Button]
[Display Setting]
[Audio Level Display]
[Auto Monitor Off]
Functions available for audio files
The following functions are available.
[Delete]
[Protect]
Related topics
Expected recording time of sound
Back to top
Copyright 2013 Sony Corporation
Page 49

User Guide
49
Operation Search
PrintSearch
Top page > Recording > Recording > Screen indicators during recording
Before use
Getting started
Recording
Playback
Playing images on a TV
Saving images with a
computer
Using the Wi-Fi function
Customizing your
camcorder
Troubleshooting
Maintenance and
precautions
Contents list
Screen indicators during recording
Described here are icons for both movie shooting and sound recording modes.
MENU button
Status detected by Intelligent Auto
NFC connection
Recording status ([STBY]/[REC])
Remaining battery
Counter (hour: minute: second), Recording media
Estimated recording remaining time, Recording format, Movie
size
Audio input settings
Audio recording format for movies
Mode switching button
Intelligent Auto button
Audio level meter
My Button (you can assign your favorite functions to icons
displayed in this area)
Back to top
Copyright 2013 Sony Corporation
Page 50

User Guide
50
Operation Search
PrintSearch
Top page > Recording > Useful functions for recording > Intelligent Auto
Before use
Getting started
Recording
Playback
Playing images on a TV
Saving images with a
computer
Using the Wi-Fi function
Customizing your
camcorder
Troubleshooting
Maintenance and
precautions
Contents list
Intelligent Auto
Your camcorder shoots movies after selecting the most suitable setting for the
subjects or the situation automatically. ([On] is the default setting.)
1. Select
2. Point the camcorder toward the subject and start shooting.
The icons that correspond to the conditions detected are displayed.
[On] on the shooting screen.
Scene detection: (Backlight), (Night Scene), (Spotlight), (Low light)
To cancel the Intelligent Auto function, select [Off] on the shooting
screen.
Notes
The camcorder may not detect the expected scene or subject, depending on the
shooting conditions.
Related topics
[Low Lux]
Back to top
Copyright 2013 Sony Corporation
Page 51

User Guide
51
Operation Search
PrintSearch
Top page > Recording > Useful functions for recording > Audio monitoring
Before use
Getting started
Recording
Playback
Playing images on a TV
Saving images with a
computer
Using the Wi-Fi function
Customizing your
camcorder
Troubleshooting
Maintenance and
precautions
Contents list
Audio monitoring
1. Connect headphones (sold separately) to the (headphones) jack.
To adjust the volume from the headphones, in recording standby mode,
select
Copyright 2013 Sony Corporation
on the LCD screen.
Back to top
Page 52

User Guide
52
Operation Search
PrintSearch
Top page > Playback > Playback > Playing movies/audio files
Before use
Getting started
Recording
Playback
Playing images on a TV
Saving images with a
computer
Using the Wi-Fi function
Customizing your
camcorder
Troubleshooting
Maintenance and
precautions
Contents list
Playing movies/audio files
1. Press the POWER button to turn on the camcorder.
A: POWER button
2. Press
(Playback) to enter playback mode.
3. Select the desired type of file ([ MOVIE] or [ AUDIO]).
4. Select your desired file.
Page 53

The camcorder plays from the selected file to the last file.
53
5. Select the appropriate buttons on the LCD screen for various playback
operations.
Volume
Delete
/
/
Fast-reverse/fast-forward
Play/Pause
Stop / Repeat an audio file
/
Previous/Next
Some buttons described above may not appear, depending on the file being
played back.
As you repeat selecting
about 5 times
Select
/ during pause to play movies slowly.
about 10 times about 30 times about 60 times.
/ during playback, files are played as fast as
Playback screen
: Date
: MENU
Page 54

: To the previous event
: Previous
54
: Next
: To the next event
: To the movie/sound recording screen
: Last played file
: Total recorded time in the Event
: Switch the type of playback file (movie/audio)
Reduced-size images which enable you to view many images at the same time
on an index screen are called “thumbnails.”
On the audio file index screen, the file format, recorded time and file number
appear.
To play back files with other devices
You may not be able to play back files recorded on your camcorder with other
devices normally. Also, you may not be able to play back files recorded on other
devices with your camcorder.
Notes
To prevent your file data from being lost, save all your recorded files on
external media periodically.
Copyright 2013 Sony Corporation
Back to top
Page 55

User Guide
55
Operation Search
Before use
Getting started
Recording
Playback
Playing images on a TV
Saving images with a
computer
Using the Wi-Fi function
Customizing your
camcorder
Troubleshooting
Maintenance and
precautions
Contents list
PrintSearch
Top page > Playing images on a TV > Playing images on a high definition
TV > Connecting the camcorder to a high definition TV
Connecting the camcorder to a high definition TV
:Signal flow
1. Switch the input on the TV to the connected jack.
2. Connect the HDMI cable (
the camcorder and to the HDMI IN jack (
sold separately) to the HDMI OUT jack ( ) on
) on the TV.
3. Play a movie on the camcorder.
On an HDMI cable (sold separately)
Using an authorized HDMI cable with the HDMI logo or a Sony HDMI cable is
recommended.
Use an HDMI micro connector on one end (for the camcorder), and a plug
suitable for connecting your TV on the other end.
Copyright-protected images are not output from the HDMI OUT jack of your
camcorder.
Some TVs may not function correctly (e.g., no sound or image) with this
connection.
Do not connect the camcorder HDMI OUT jack to an external device HDMI OUT
jack, as malfunction may result.
HDMI (High-Definition Multimedia Interface) is an interface to send both
video/audio signals. The HDMI OUT jack outputs high quality images and digital
audio.
Notes
Refer to the instruction manuals of the TV as well.
Back to top
Copyright 2013 Sony Corporation
Page 56

User Guide
56
Operation Search
Before use
Getting started
PrintSearch
Top page > Playing images on a TV > Playing images on a TV supporting
“BRAVIA” Sync > Using “BRAVIA” Sync
Using “BRAVIA” Sync
Recording
Playback
Playing images on a TV
Saving images with a
computer
Using the Wi-Fi function
Customizing your
camcorder
Troubleshooting
Maintenance and
precautions
Contents list
You can operate your camcorder with the remote commander of your TV by
connecting your camcorder to a “BRAVIA” Sync compatible TV launched in 2008 or
later with the HDMI cable (sold separately).
Notes
There may be some operations you cannot do with the remote commander.
Set [CTRL FOR HDMI] to [On].
Also set your TV accordingly. Refer to the instruction manual of the TV for
details.
The operation of “BRAVIA” Sync differs according to each model of BRAVIA.
Refer to the instruction manual of your TV for details.
If you turn off the TV, your camcorder is turned off simultaneously.
Back to top
Copyright 2013 Sony Corporation
Page 57

User Guide
57
Operation Search
Before use
Getting started
PrintSearch
Top page > Saving images with a computer > Saving contents with a
computer > What you can do using a computer
What you can do using a computer
Recording
Playback
Playing images on a TV
Saving images with a
computer
Using the Wi-Fi function
Customizing your
camcorder
Troubleshooting
Maintenance and
precautions
Contents list
You can edit your recorded files and post your movie files to video-file sharing sites
using the editing/management software.
Visit the following website to download the software.
www.sony.net/pm/mvr/
Notes
An Internet connection is required to install the software.
Back to top
Copyright 2013 Sony Corporation
Page 58

User Guide
58
Operation Search
Before use
Getting started
PrintSearch
Top page > Saving images with a computer > Saving contents with a
computer > Checking the computer system
Checking the computer system
Recording
Playback
Playing images on a TV
Saving images with a
computer
Using the Wi-Fi function
Customizing your
camcorder
Troubleshooting
Maintenance and
precautions
Contents list
You can check the system requirements for software at the following URL.
www.sony.net/pm/mvr/
Back to top
Copyright 2013 Sony Corporation
Page 59

User Guide
59
Operation Search
Before use
Getting started
Recording
PrintSearch
Top page > Saving images with a computer > Saving contents with a
computer > Installing the editing/management software in your computer
Installing the editing/management software in
your computer
Playback
Playing images on a TV
Saving images with a
computer
Using the Wi-Fi function
Customizing your
camcorder
Troubleshooting
Maintenance and
precautions
Contents list
1. Access the following download page using an Internet browser on your
computer, and then install the software following the on-screen instructions.
www.sony.net/pm/mvr/
Back to top
Copyright 2013 Sony Corporation
Page 60

User Guide
60
Operation Search
Before use
Getting started
PrintSearch
Top page > Saving images with a computer > Saving contents with a
computer > Starting the editing/management software
Starting the editing/management software
Recording
Playback
Playing images on a TV
Saving images with a
computer
Using the Wi-Fi function
Customizing your
camcorder
Troubleshooting
Maintenance and
precautions
Contents list
Windows
1. Double-click the software icon on the desktop.
When using Windows 8, select the software icon from the start screen.
Mac
1. Double-click the software icon in the Applications folder.
The editing/management software starts.
Back to top
Copyright 2013 Sony Corporation
Page 61

User Guide
61
Operation Search
Before use
Getting started
Recording
PrintSearch
Top page > Saving images with a computer > Saving contents with a
computer > Importing files to your computer without using software
Importing files to your computer without using
software
Playback
Playing images on a TV
Saving images with a
computer
Using the Wi-Fi function
Customizing your
camcorder
Troubleshooting
Maintenance and
precautions
Contents list
When the AutoPlay Wizard appears on the computer screen after making a USB
connection between the camera and a computer, click [Open folder to view files]
[OK] one of the folders on the table below, and then copy your desired files to
your computer.
About file names
File type Memory card Folder File name
MP4
WAV
microSD
MP_ROOT
Memory Stick Micro
microSD PRIVATE/AUDIO
Memory Stick Micro AUDIO
stands for file numbers (0001 to 9999).
Copyright 2013 Sony Corporation
MAH0
WAAV
.MP4
.WAV
Back to top
Page 62

User Guide
62
Operation Search
Before use
Getting started
PrintSearch
Top page > Using the Wi-Fi function > Using the Wi-Fi function > What you can do
using the Wi-Fi function
What you can do using the Wi - Fi function
Recording
Playback
Playing images on a TV
Saving images with a
computer
Using the Wi-Fi function
Customizing your
camcorder
Troubleshooting
Maintenance and
precautions
Contents list
The Wi-Fi function of your camcorder allows you to do the following operations.
Transferring movies to your smartphone or tablet
Prepare your smartphone or tablet.
Operating the camcorder with your smartphone or
tablet
Prepare your smartphone or tablet.
Notes
You cannot save recorded files on your computer or transfer audio files to your
smartphone or tablet using the Wi-Fi function of your camcorder.
You cannot use the Wi-Fi function of your camcorder to connect to a public
wireless network.
Wi-Fi functions introduced in this User Guide are not guaranteed to work on all
smartphones or tablets.
The information on supported OS versions is as of September 1, 2013.
Page 63

Related topics
63
Transferring movies to your smartphone or tablet without using NFC
Transferring movies to your smartphone or tablet using NFC
Using your smartphone or tablet as a remote control without using NFC
Using your smartphone or tablet as a remote control using NFC
Copyright 2013 Sony Corporation
Back to top
Page 64

User Guide
64
Operation Search
Before use
PrintSearch
Top page > Using the Wi-Fi function > Control your camcorder via
smartphone > Using your smartphone or tablet as a remote control without using
NFC
Getting started
Recording
Playback
Playing images on a TV
Saving images with a
computer
Using the Wi-Fi function
Customizing your
camcorder
Troubleshooting
Maintenance and
precautions
Contents list
Using your smartphone or tablet as a remote
control without using NFC
You can operate the camcorder using your smartphone or tablet as a remote
control.
1. Install “PlayMemories Mobile” onto your smartphone or tablet.
If the “PlayMemories Mobile” software is already installed on your
smartphone or tablet, upgrade it to the latest version.
Refer to the “PlayMemories Mobile” support web page
(http://www.sony.net/pmm/) for the latest information of supported OS.
“PlayMemories Mobile” is not guaranteed to work on all smartphones or
tablets.
2. Select
You can also enter the recording mode, and then select
[Camera/Audio] [ Recording Assist] [Ctrl with Smartphone].
The SSID and password appear and the camcorder will be connectable from
your smartphone or tablet.
on the recording screen of the camcorder.
A: SSID
B: Password
3. Connect the smartphone or tablet to the camcorder by making operations on the
smartphone or tablet.
When you use an Android smartphone, on the smartphone, start up the
“PlayMemories Mobile,” then select the SSID displayed on the camcorder,
and then enter the password displayed on the camcorder.
When you use an iPhone or iPad, select [Settings]
displayed on the camcorder, and then start up “PlayMemories Mobile.”
You are only required to enter the password the first time.
4. Operate the camcorder using the smartphone or tablet.
[Wi-Fi] the SSID
Page 65

A: START/STOP button
65
B: File type
Notes
Files will be saved not on the smartphone or tablet but on the camcorder.
The application operation method and screen display are subject to change due
to future updates.
Related topics
On the “PlayMemories Mobile” software
Connecting to your Android smartphone or tablet
Connecting to your iPhone or iPad
Back to top
Copyright 2013 Sony Corporation
Page 66

User Guide
66
Operation Search
Before use
Getting started
Recording
PrintSearch
Top page > Using the Wi-Fi function > Control your camcorder via
smartphone > Using your smartphone or tablet as a remote control using NFC
Using your smartphone or tablet as a remote
control using NFC
Playback
Playing images on a TV
Saving images with a
computer
Using the Wi-Fi function
Customizing your
camcorder
Troubleshooting
Maintenance and
precautions
Contents list
You can operate the camcorder using your NFC-compatible Android smartphone or
tablet as a remote control.
1. Install “PlayMemories Mobile” onto your smartphone or tablet.
If the “PlayMemories Mobile” software is already installed on your
smartphone or tablet, upgrade it to the latest version.
Refer to the “PlayMemories Mobile” support web page
(http://www.sony.net/pmm/) for the latest information of supported OS.
“PlayMemories Mobile” is not guaranteed to work on all smartphones or
tablets.
2. Select [Settings] on the smartphone, then select [More...] and place a
checkmark next to [NFC].
3. In recording mode, touch
tablet.
on the camcorder to on your smartphone or
Cancel the sleep function and screen-lock on your smartphone or tablet in
advance.
Make sure that
Keep the smartphone or tablet in contact with the camcorder for one or two
seconds until “PlayMemories Mobile” starts.
If the connection is not established using NFC, try to establish the connection
following the procedure in “Connecting to your Android smartphone or tablet.”
[Details]
4. Operate the camcorder using the smartphone or tablet.
is displayed on the LCD screen of the camcorder.
Page 67

A: START/STOP button
67
B: File type
Notes
Files will be recorded not on the smartphone or tablet but on the camcorder.
The application operation method and screen display are subject to change due
to future updates.
Related topics
On the “PlayMemories Mobile” software
Connecting to your NFC-compatible Android smartphone or tablet
Back to top
Copyright 2013 Sony Corporation
Page 68

User Guide
68
Operation Search
Before use
Getting started
Recording
PrintSearch
Top page > Using the Wi-Fi function > Sending movies to the
smartphone > Transferring movies to your smartphone or tablet without using NFC
Transferring movies to your smartphone or tablet
without using NFC
Playback
Playing images on a TV
Saving images with a
computer
Using the Wi-Fi function
Customizing your
camcorder
Troubleshooting
Maintenance and
precautions
Contents list
You can transfer movies to your smartphone or tablet.
1. Install “PlayMemories Mobile” onto your smartphone or tablet.
If the “PlayMemories Mobile” software is already installed on your
smartphone or tablet, upgrade it to the latest version.
Refer to the “PlayMemories Mobile” support web page
(http://www.sony.net/pmm/) for the latest information of supported OS.
“PlayMemories Mobile” is not guaranteed to work on all smartphones or
tablets.
2. Press
(Playback) to enter playback mode.
Select [ MOVIE] as the file type to play back. [Details]
3. Select
Device].
When [Select on Smartphone] is selected, all movies saved on the memory
card will be displayed on the smartphone.
4. Add a check mark
[Edit/Copy] [Send to Smartphone] [Select on This
to the desired movie, and then select .
Page 69

The SSID and password appear and the camcorder will be connectable from
69
your smartphone or tablet.
A: SSID
B: Password
5. Connect the smartphone or tablet to the camcorder by making operations on the
smartphone or tablet.
When you use an Android smartphone, on the smartphone, start up the
“PlayMemories Mobile,” then select the SSID displayed on the camcorder,
and then enter the password displayed on the camcorder.
When you use an iPhone or iPad, select [Settings]
[Wi-Fi] the SSID
displayed on the camcorder, and then start up “PlayMemories Mobile.”
You are only required to enter the password the first time.
Movies stored on the camcorder will be transferred to the smartphone or
tablet.
Transferred movies will be stored in Gallery/Album on an Android
smartphone/tablet or in Album on an iPhone/iPad.
Notes
You cannot transfer audio files to your smartphone or tablet.
If any movies are not recorded on your camcorder, [Send to Smartphone] does
not work.
Related topics
On the “PlayMemories Mobile” software
Connecting to your Android smartphone or tablet
Connecting to your NFC-compatible Android smartphone or tablet
Connecting to your iPhone or iPad
Page 70

Back to top
Copyright 2013 Sony Corporation
70
Page 71

User Guide
71
Operation Search
Before use
Getting started
Recording
PrintSearch
Top page > Using the Wi-Fi function > Sending movies to the
smartphone > Transferring movies to your smartphone or tablet using NFC
Transferring movies to your smartphone or tablet
using NFC
Playback
Playing images on a TV
Saving images with a
computer
Using the Wi-Fi function
Customizing your
camcorder
Troubleshooting
Maintenance and
precautions
Contents list
You can transfer movies to your NFC-compatible Android smartphone or tablet.
1. Install “PlayMemories Mobile” onto your smartphone or tablet.
If the “PlayMemories Mobile” software is already installed on your
smartphone or tablet, upgrade it to the latest version.
Refer to the “PlayMemories Mobile” support web page
(http://www.sony.net/pmm/) for the latest information of supported OS.
“PlayMemories Mobile” is not guaranteed to work on all smartphones or
tablets.
2. Press
movie.
3. Select [Settings] on the smartphone, then select [More...] and place a
checkmark next to [NFC].
(Playback) to enter playback mode, and then play back your desired
4. Touch on the camcorder to on your smartphone or tablet.
Cancel the sleep function and screen-lock on your smartphone or tablet in
advance.
Make sure that
is displayed on the LCD screen of the camcorder.
Page 72

Keep the smartphone or tablet in contact with the camcorder for one or two
seconds until “PlayMemories Mobile” starts.
72
If the connection is not established using NFC, try to establish the connection
following the procedure in “Transferring movies to your smartphone or tablet
without using NFC.” [Details]
5. Movies stored on the camcorder will be transferred to the smartphone or tablet.
Transferred movies will be stored on Android Gallery.
Notes
You cannot transfer audio files to your smartphone or tablet.
If any movies are not recorded on your camcorder, [Send to Smartphone] does
not work.
Related topics
On the “PlayMemories Mobile” software
Connecting to your NFC-compatible Android smartphone or tablet
Connecting to your Android smartphone or tablet
Transferring movies to your smartphone or tablet without using NFC
Copyright 2013 Sony Corporation
Back to top
Page 73

User Guide
73
Operation Search
Before use
Getting started
PrintSearch
Top page > Using the Wi-Fi function > Connecting a smartphone > Connecting to
your Android smartphone or tablet
Connecting to your Android smartphone or tablet
Recording
Playback
Playing images on a TV
Saving images with a
computer
Using the Wi-Fi function
Customizing your
camcorder
Troubleshooting
Maintenance and
precautions
Contents list
You can connect your Android smartphone or tablet to your camcorder as shown
below. From [Send to Smartphone] or [Ctrl with Smartphone], display the password
and the SSID on the LCD screen of the camcorder.
1. Start up “PlayMemories Mobile.”
2. On your smartphone, select the SSID (device name) displayed on the
camcorder.
3. On your smartphone, enter the password displayed on the camcorder.
Page 74

Related topics
74
On the “PlayMemories Mobile” software
Transferring movies to your smartphone or tablet without using NFC
Using your smartphone or tablet as a remote control without using NFC
Copyright 2013 Sony Corporation
Back to top
Page 75

User Guide
75
Operation Search
Before use
Getting started
PrintSearch
Top page > Using the Wi-Fi function > Connecting a smartphone > Connecting to
your iPhone or iPad
Connecting to your iPhone or iPad
Recording
Playback
Playing images on a TV
Saving images with a
computer
Using the Wi-Fi function
Customizing your
camcorder
Troubleshooting
Maintenance and
precautions
Contents list
You can connect your iPhone or iPad to your camcorder as shown below. From
[Send to Smartphone] or [Ctrl with Smartphone], display the password and the
SSID on the LCD screen of the camcorder.
1. Open the settings menu of your iPhone.
2. Select Wi-Fi.
3. On your iPhone, select the SSID (device name) displayed on the camcorder.
4. On your iPhone, enter the password displayed on the camcorder.
Page 76

5. Confirm that your iPhone is connected to the SSID displayed on the camcorder.
76
6. Return to Home and start up “PlayMemories Mobile.”
Related topics
On the “PlayMemories Mobile” software
Transferring movies to your smartphone or tablet without using NFC
Using your smartphone or tablet as a remote control without using NFC
Copyright 2013 Sony Corporation
Back to top
Page 77

User Guide
77
Operation Search
Before use
Getting started
Recording
PrintSearch
Top page > Using the Wi-Fi function > Connecting a smartphone > Connecting to
your NFC-compatible Android smartphone or tablet
Connecting to your NFC-compatible Android
smartphone or tablet
Playback
Playing images on a TV
Saving images with a
computer
Using the Wi-Fi function
Customizing your
camcorder
Troubleshooting
Maintenance and
precautions
Contents list
You can connect your NFC-compatible Android smartphone or tablet to your
camcorder easily.
1. Touch
them.
Cancel the sleep function and screen-lock on your smartphone or tablet in
advance.
on the camcorder to on your smartphone or tablet to connect
Make sure that
Keep the smartphone or tablet in contact with the camcorder for one or two
seconds until “PlayMemories Mobile” starts.
If the connection is not established using NFC, try to establish the connection
following the procedure in “Connecting to your Android smartphone or tablet.”
[Details]
is displayed on the LCD screen of the camcorder.
What you can do via NFC connection
Operations available by touching the camcorder with your NFC-compatible
smartphone differ depending on the conditions of the camcorder.
When the camcorder is in recording mode
[Ctrl with Smartphone] starts up.
When the camcorder is in movie playback mode
[Send to Smartphone] starts up.
Notes
Page 78

To use the one-touch functions of the camcorder, an NFC-compatible
smartphone or tablet is required.
78
NFC (Near Field Communication) is an international standard for short-range
wireless communication technology.
Related topics
On the “PlayMemories Mobile” software
Transferring movies to your smartphone or tablet using NFC
Using your smartphone or tablet as a remote control using NFC
Connecting to your Android smartphone or tablet
Copyright 2013 Sony Corporation
Back to top
Page 79

User Guide
79
Operation Search
Before use
Getting started
PrintSearch
Top page > Using the Wi-Fi function > Installing the PlayMemories Mobile > On the
“PlayMemories Mobile” software
On the “PlayMemories Mobile” software
Recording
Playback
Playing images on a TV
Saving images with a
computer
Using the Wi-Fi function
Customizing your
camcorder
Troubleshooting
Maintenance and
precautions
Contents list
To perform the operations such as [Ctrl with Smartphone] and [Send to
Smartphone], “PlayMemories Mobile” is necessary. Install it from the application
store of your smartphone or tablet. If the “PlayMemories Mobile” software is already
installed on your smartphone or tablet, upgrade it to the latest version.
For details on “PlayMemories Mobile,” refer to the “PlayMemories Mobile” support
page (http://www.sony.net/pmm/).
Back to top
Copyright 2013 Sony Corporation
Page 80

User Guide
80
Operation Search
Before use
Getting started
PrintSearch
Top page > Customizing your camcorder > Using menu items > Setting up menu
items
Setting up menu items
Recording
Playback
Playing images on a TV
Saving images with a
computer
Using the Wi-Fi function
Customizing your
camcorder
Troubleshooting
Maintenance and
precautions
Contents list
The camcorder has various menu items under each of 6 menu categories.
Recording Mode (Items for selecting a recording mode)
Camera/Audio (Items for customized recording)
Image Quality/Size (Items for setting up image quality or size)
Playback Function (Items for playback)
Edit/Copy (Items for editing images such as transferring to a smartphone or
protecting)
Setup (Other setup items)
1. Select
2. Select a category.
.
3. Select your desired menu item.
Notes
Select
to finish setting the menu or to return to the previous screen.
To find a menu item quickly
Page 81

The [Camera/Audio] and [Setup] menus have sub-categories. Select the sub-
category icon so that the LCD screen displays the list of menus in the sub-category
81
selected.
A: Sub-category icons
When you cannot select a menu item
Grayed out menu items or settings are not available.
Your camcorder displays the reason why you cannot select the menu item or the
instruction of under which condition you can set the menu item.
Copyright 2013 Sony Corporation
Back to top
Page 82

User Guide
82
Operation Search
PrintSearch
Top page > Customizing your camcorder > Recording Mode > Movie
Before use
Getting started
Recording
Playback
Playing images on a TV
Saving images with a
computer
Using the Wi-Fi function
Customizing your
camcorder
Troubleshooting
Maintenance and
precautions
Contents list
Movie
Enters the movie shooting mode. The settings can be done with on the
recording screen as well.
1.
[Recording Mode] [Movie].
Back to top
Copyright 2013 Sony Corporation
Page 83

User Guide
83
Operation Search
PrintSearch
Top page > Customizing your camcorder > Recording Mode > Audio
Before use
Getting started
Recording
Playback
Playing images on a TV
Saving images with a
computer
Using the Wi-Fi function
Customizing your
camcorder
Troubleshooting
Maintenance and
precautions
Contents list
Audio
Records sound (WAV file). The settings can be done with on the recording
screen as well.
1.
Related topics
Recording sound
[Recording Mode] [Audio].
Back to top
Copyright 2013 Sony Corporation
Page 84

User Guide
84
Operation Search
PrintSearch
Top page > Customizing your camcorder > Camera/Audio > White Balance
Before use
Getting started
Recording
Playback
Playing images on a TV
Saving images with a
computer
Using the Wi-Fi function
Customizing your
camcorder
Troubleshooting
Maintenance and
precautions
Contents list
White Balance
You can adjust the color balance to the shooting environment.
1. [Camera/Audio] [ Manual Settings] [White Balance].
2. Select the desired item.
(Auto)
The white balance is adjusted automatically.
If you have changed the battery pack while [Auto] was selected, or taken your
camcorder outdoors after inside use (or vice versa), aim your camcorder at a
nearby white object for about 10 seconds for better color balance adjustment.
(Outdoor)
The white balance is appropriately adjusted for the following shooting
conditions:
Outdoors
Night views, neon signs and fireworks
Sunrise or sunset
Under daylight fluorescent lamps
(Indoor)
The white balance is appropriately adjusted for the following shooting
conditions:
Indoors
At party scenes or studios where the lighting conditions change quickly
Under video lamps in a studio, or under sodium lamps or incandescent-like
color lamps
(One Push)
The white balance will be adjusted according to the ambient light.
Select [
].
Page 85

Keep framing white object such as a piece of paper, to fill the screen under
85
the same lightning conditions as you will shoot the subject.
Select [
].
If the lighting conditions changed by bringing your camcorder outdoors from
inside the house, or vice versa, you need to redo the [One Push] procedure
to readjust the white balance.
Notes
Set [White Balance] to [Auto] or adjust the color in [One Push] under white or
cool white fluorescent lamps.
While you are shooting a movie,
(One Push) cannot be set.
If you set [White Balance], [Scene Selection] is set to [Auto].
Back to top
Copyright 2013 Sony Corporation
Page 86

User Guide
86
Operation Search
PrintSearch
Top page > Customizing your camcorder > Camera/Audio > Exposure
Before use
Getting started
Recording
Playback
Playing images on a TV
Saving images with a
computer
Using the Wi-Fi function
Customizing your
camcorder
Troubleshooting
Maintenance and
precautions
Contents list
Exposure
You can fix the brightness of a movie manually. Adjust the brightness when the
subject is too bright or too dark.
1.
2. Select the desired item.
[Camera/Audio] [ Manual Settings] [Exposure].
Auto
The exposure is adjusted automatically.
Manual
Select
the subject is black or the light is dim.
if the subject is white or the backlight is bright, or select if
Back to top
Copyright 2013 Sony Corporation
Page 87

User Guide
87
Operation Search
PrintSearch
Top page > Customizing your camcorder > Camera/Audio > Low Lux
Before use
Getting started
Recording
Playback
Playing images on a TV
Saving images with a
computer
Using the Wi-Fi function
Customizing your
camcorder
Troubleshooting
Maintenance and
precautions
Contents list
Low Lux
You can shoot bright color movies, even in dim light.
1.
2. Select the desired item.
[Camera/Audio] [ Manual Settings] [Low Lux].
Off
The Low Lux function is not used.
On (
The Low Lux function is used.
)
Copyright 2013 Sony Corporation
Back to top
Page 88

User Guide
(Beach)
88
Operation Search
PrintSearch
Top page > Customizing your camcorder > Camera/Audio > Scene Selection
Before use
Getting started
Recording
Playback
Playing images on a TV
Saving images with a
computer
Using the Wi-Fi function
Customizing your
camcorder
Troubleshooting
Maintenance and
precautions
Contents list
Scene Selection
You can shoot movies effectively in various situations.
1.
2. Select the desired item.
[Camera/Audio] [ Camera Settings] [Scene Selection].
(Auto)
Adjusts image quality automatically.
(Night Scene)
Maintains the darkening atmosphere of the distant
surroundings in night scenes.
(Sunrise&Sunset)
Reproduces the atmosphere of scenes such as sunsets
or sunrises.
(Fireworks)
Takes spectacular shots of fireworks.
(Landscape)
Shoots subjects adjusting the color according to the sky
or greenery color.
(Spotlight)
Prevents people’s faces from appearing excessively
white when subjects are lit by strong light.
Page 89

Takes the vivid blue of the ocean or a lake.
89
(Snow)
Takes bright movies of a white landscape.
Notes
If you set [Scene Selection], the [White Balance] setting is canceled.
Copyright 2013 Sony Corporation
Back to top
Page 90

User Guide
90
Operation Search
PrintSearch
Top page > Customizing your camcorder > Camera/Audio > Fader
Before use
Getting started
Recording
Playback
Playing images on a TV
Saving images with a
computer
Using the Wi-Fi function
Customizing your
camcorder
Troubleshooting
Maintenance and
precautions
Contents list
Fader
You can shoot a transition with the following effects adding to the interval between
scenes.
Select the desired effect in [STBY] (to fading in) or [REC] (to fading out) mode.
1.
2. Select the desired item.
[Camera/Audio] [ Camera Settings] [ Fader].
Off
Does not use an effect.
White Fader (
Fades in/out with the white effect.
Out
In
)
Black Fader ( )
Fades in/out with the black effect.
Movies shot using the [Black Fader] effect may appear dark on the index
screen.
Out
Notes
When you press START/STOP, the setting is cleared.
In
Back to top
Page 91

Copyright 2013 Sony Corporation
91
Page 92

User Guide
92
Operation Search
PrintSearch
Top page > Customizing your camcorder > Camera/Audio > Auto Back Light
Before use
Getting started
Recording
Playback
Playing images on a TV
Saving images with a
computer
Using the Wi-Fi function
Customizing your
camcorder
Troubleshooting
Maintenance and
precautions
Contents list
Auto Back Light
Your camcorder adjusts the exposure for backlit subjects automatically.
1.
2. Select the desired item.
[Camera/Audio] [ Camera Settings] [Auto Back Light].
On
The exposure for backlit subjects is adjusted automatically.
Off
Does not adjust the exposure for backlit subjects.
Copyright 2013 Sony Corporation
Back to top
Page 93

User Guide
93
Operation Search
PrintSearch
Top page > Customizing your camcorder > Camera/Audio > Face Detection
Before use
Getting started
Recording
Playback
Playing images on a TV
Saving images with a
computer
Using the Wi-Fi function
Customizing your
camcorder
Troubleshooting
Maintenance and
precautions
Contents list
Face Detection
You can set the camcorder to detect a face automatically.
Your camcorder adjusts the color/exposure automatically for the face of the
selected subject.
1.
2. Select the desired item.
[Camera/Audio] [ Face] [Face Detection].
Auto
Detects faces without distinction between adults and children.
Child Priority (
Gives faces of children priority.
)
Adult Priority ( )
Gives faces of adults priority.
Off (
Does not detect faces.
)
Shooting conditions for better face detection
performance
Shoot in a sufficiently bright place.
The subject is not wearing glasses, a hat or mask.
The subject faces directly towards the camcorder.
Notes
Faces may not be detected depending on shooting conditions.
Copyright 2013 Sony Corporation
Back to top
Page 94

User Guide
94
Operation Search
PrintSearch
Top page > Customizing your camcorder > Camera/Audio > Audio Format
Before use
Getting started
Recording
Playback
Playing images on a TV
Saving images with a
computer
Using the Wi-Fi function
Customizing your
camcorder
Troubleshooting
Maintenance and
precautions
Contents list
Audio Format
You can select your desired audio format for movie shooting.
1.
2. Select the desired item.
[Camera/Audio] [ Audio] [Audio Format].
Linear PCM (
Records in the Linear PCM format.
AAC LC ( )
Records in the AAC LC format which is suitable for file sharing.
)
Notes
MP4 movies shot with [Audio Format] set to [Linear PCM] cannot be played
back on some equipment or services, including Blu-ray Disc players (including
Sony products). For detailed information, check the camcorder support page
before use.
Back to top
Copyright 2013 Sony Corporation
Page 95

User Guide
95
Operation Search
PrintSearch
Top page > Customizing your camcorder > Camera/Audio > Low Cut Filter
Before use
Getting started
Recording
Playback
Playing images on a TV
Saving images with a
computer
Using the Wi-Fi function
Customizing your
camcorder
Troubleshooting
Maintenance and
precautions
Contents list
Low Cut Filter
This function allows you to cut noise in the low frequency range during recording.
Use this function to reduce noise from fixtures such as air conditioners or projector
fans or when recording in a small music venues surrounded by concrete walls.
1.
2. Select the desired item.
[Camera/Audio] [ Audio] [Low Cut Filter].
Off
Records low frequency sound without reducing noise.
On (
Reduces noise in the low frequency range during recording.
)
Copyright 2013 Sony Corporation
Back to top
Page 96

User Guide
96
Operation Search
PrintSearch
Top page > Customizing your camcorder > Camera/Audio > Int. Mic. Rec. Level
Before use
Getting started
Recording
Playback
Playing images on a TV
Saving images with a
computer
Using the Wi-Fi function
Customizing your
camcorder
Troubleshooting
Maintenance and
precautions
Contents list
Int. Mic. Rec. Level
You can adjust recording sensitivity when using the internal microphone.
1.
2. Press to boost the recording level and to lower the recording level.
Notes
[Camera/Audio] [ Audio] [Int. Mic. Rec. Level].
± appears next to the internal microphone (
Select [RESET] to restore to the default setting.
When connecting an external device such as an MTR or external microphone to
the LINE IN/
recording level of the internal microphone.
We recommend that you check and adjust the recording level wearing
headphones.
When continuously recording loud sound, lower the recording level in advance
to record dynamic sound.
Regardless of the setting value of the recording level, the limiter is always
available.
(microphone) jack (PLUG IN POWER), you cannot adjust the
) indicator.
Back to top
Copyright 2013 Sony Corporation
Page 97

User Guide
97
Operation Search
PrintSearch
Top page > Customizing your camcorder > Camera/Audio > Ext. Mic. Rec. Level
Before use
Getting started
Recording
Playback
Playing images on a TV
Saving images with a
computer
Using the Wi-Fi function
Customizing your
camcorder
Troubleshooting
Maintenance and
precautions
Contents list
Ext. Mic. Rec. Level
You can adjust recording sensitivity when using an external microphone.
1.
2. Press to boost the recording level and to lower the recording level.
Notes
[Camera/Audio] [ Audio] [Ext. Mic. Rec. Level].
± appears next to the external microphone (
Select [RESET] to restore to the default setting.
The setting will not be activate when [Ext. Audio Input Set] is set to [Other
Device].
We recommend that you check and adjust the recording level wearing
headphones.
When continuously recording loud sound, lower the recording level in advance
to record dynamic sound.
Regardless of the setting value of the recording level, the limiter is always
available.
If an external microphone or the like is not connected to the LINE IN/
(microphone) jack (PLUG IN POWER), you cannot adjust the recording level.
) indicator.
Back to top
Copyright 2013 Sony Corporation
Page 98

User Guide
98
Operation Search
PrintSearch
Top page > Customizing your camcorder > Camera/Audio > Audio Output Timing
Before use
Getting started
Recording
Playback
Playing images on a TV
Saving images with a
computer
Using the Wi-Fi function
Customizing your
camcorder
Troubleshooting
Maintenance and
precautions
Contents list
Audio Output Timing
You can set the timing to output sound when shooting a movie.
1.
2. Select the desired item.
[Camera/Audio] [ Audio] [Audio Output Timing].
Live
Outputs the sound without delaying during recording.
Lip Sync
Synchronizes sound to the movie during shooting and outputs.
Copyright 2013 Sony Corporation
Back to top
Page 99

User Guide
99
Operation Search
PrintSearch
Top page > Customizing your camcorder > Camera/Audio > Volume
Before use
Getting started
Recording
Playback
Playing images on a TV
Saving images with a
computer
Using the Wi-Fi function
Customizing your
camcorder
Troubleshooting
Maintenance and
precautions
Contents list
Volume
You can adjust the sound volume during playback.
1.
2. Adjust the volume by pressing / .
[Camera/Audio] [ Audio] [Volume].
Copyright 2013 Sony Corporation
Back to top
Page 100

User Guide
100
Operation Search
PrintSearch
Top page > Customizing your camcorder > Camera/Audio > Ext. Audio Input Set
Before use
Getting started
Recording
Playback
Playing images on a TV
Saving images with a
computer
Using the Wi-Fi function
Customizing your
camcorder
Troubleshooting
Maintenance and
precautions
Contents list
Ext. Audio Input Set
You can set the suitable sound for the connected device.
1. Connect an external device to the LINE IN/
POWER).
The [Ext. Audio Input Set (Ext. Audio Input Set)] screen appears.
If the [Ext. Audio Input Set (Ext. Audio Input Set)] screen does not appear,
select
[Camera/Audio] [ Audio] [Ext. Audio Input Set].
(microphone) jack (PLUG IN
2. Select the connected external device.
External Microphone (
Suitable setting for an external microphone. Allows you to set [Ext. Mic. Rec.
Level].
Other Device ( )
Suitable setting for devices other than a microphone.
Related topics
[Ext. Mic. Rec. Level]
Copyright 2013 Sony Corporation
)
Back to top
 Loading...