

Page 1
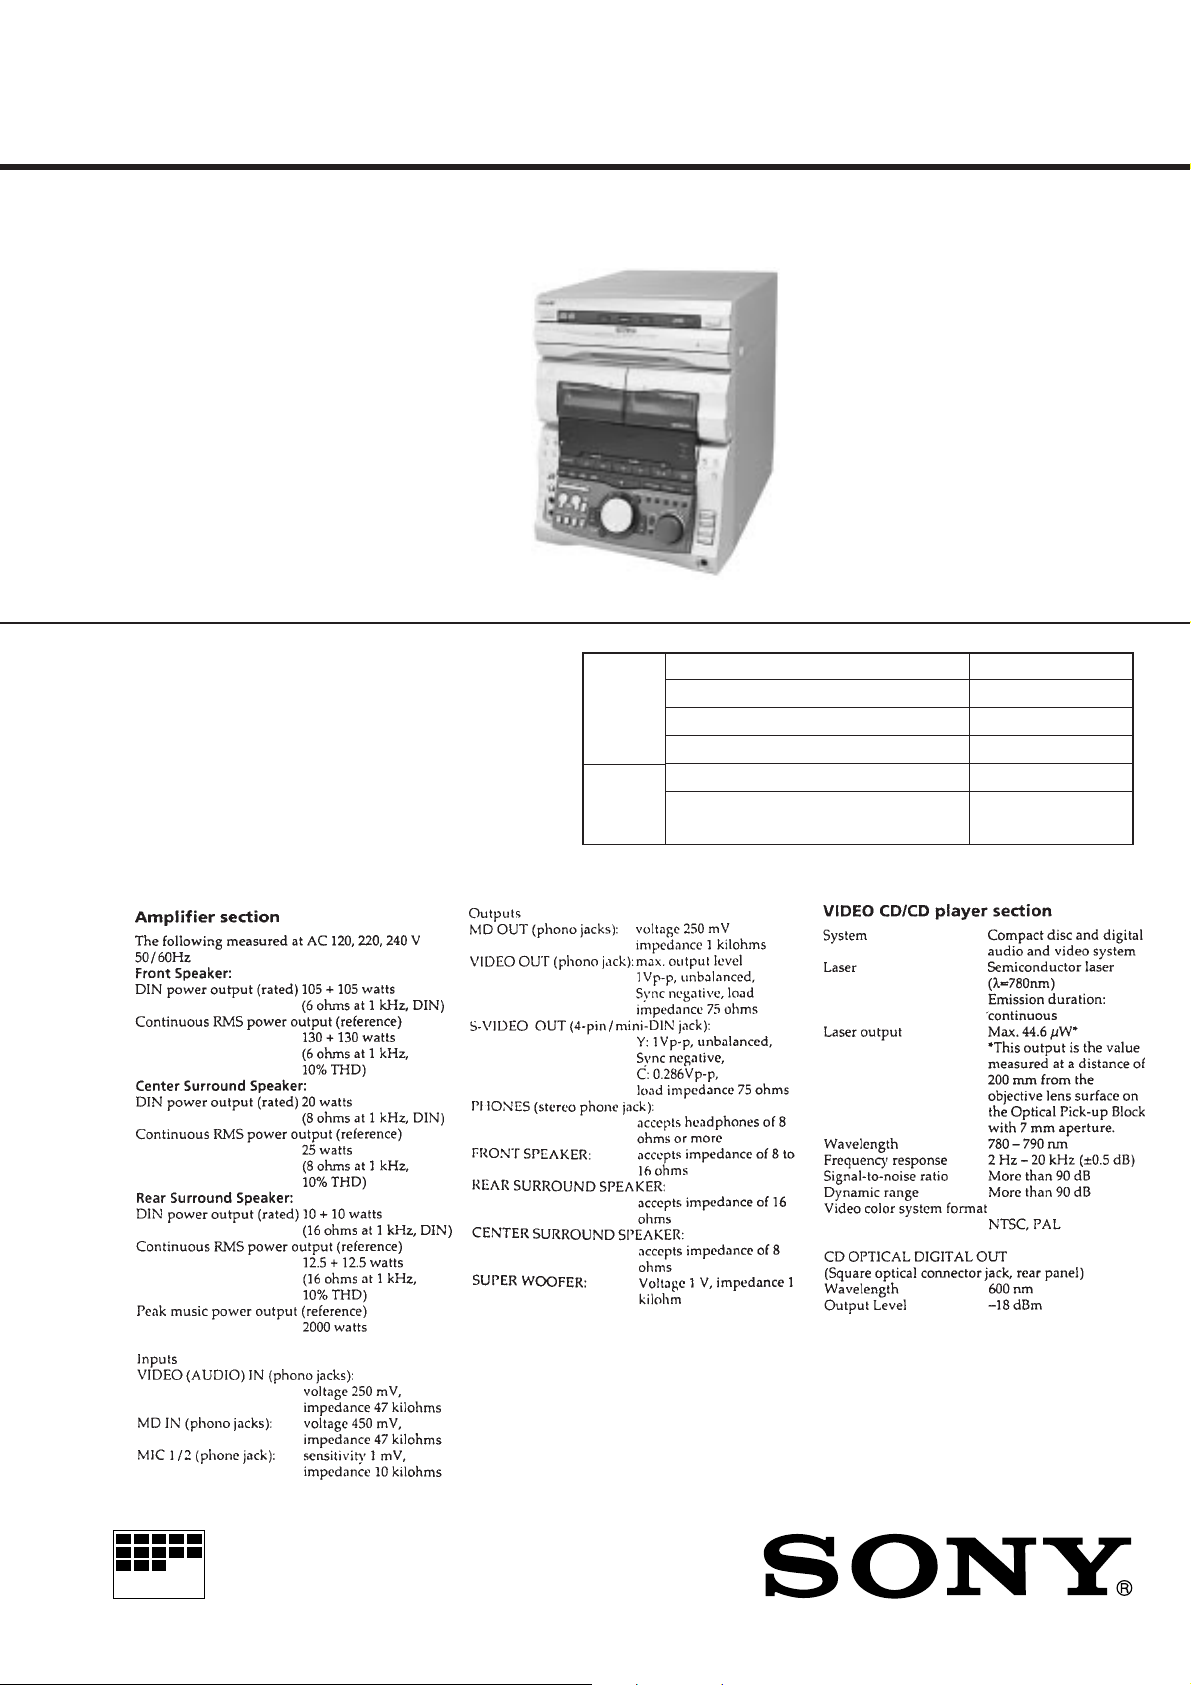
HCD-V919A V
SERVICE MANUAL
HCD-V919AV is the Amplifier, Video CD
player, Tape Deck and Tuner section in
MHC-V919AV.
This stereo system is equipped with the Dolby Btype noise reduction system and Dolby Pro Logic
Surround decoder*.
* Manufactured under license from Dolby Laboratories Licensing Corporation.
DOLBY , the doub le-D symbol a and “PR O LOGIC”
are trademarks of Dolby Laboratories Licensing Corporation.
CD
Section
Tape
Deck
Section
E Model
Chinese Model
Model Name Using Similar Mechanism HCD-V717
CD Mechanism Type CDM38L-5BD24AL
Base Unit Name BU-5BD24AL
Optical Pick-up Name KSS-213D/Q-NP
Model Name Using Similar Mechanism HCD-V717
Tape Transport Mechanism Type
TCM-230AWR1/
230PWR1
SPECIFICATIONS
– Continued on next page –
MICROFILM
MINI Hi-Fi COMPONENT SYSTEM
Page 2
TABLE OF CONTENTS
1. SERVICING NOTES.............................................. 3
2. GENERAL .................................................................. 6
3. DISASSEMBLY ........................................................ 10
4. TEST MODE............................................................. 13
5. MECHANICAL ADJUSTMENTS...................... 16
6. ELECTRICAL ADJUSTMENTS
DECK Section................................................................ 16
CD Section ..................................................................... 19
VIDEO Section .............................................................. 21
7. DIAGRAMS
7-1. Block Diagram – SERVO Section –............................. 23
7-2. Block Diagram – AUDIO/VIDEO CD Section – ........ 25
7-3. Block Diagram – TAPE DECK Section – .................... 27
7-4. Block Diagram – MAIN Section (1/2) – ...................... 29
7-5. Block Diagram – MAIN Section (2/2) – ...................... 31
7-6. Block Diagram – DISPLAY/KEY CONTROL/
POWER SUPPLY Section – .......................................... 33
7-7. Note for Printed Wiring Boards and
Schematic Diagrams ...................................................... 36
7-8. Printed Wiring Board – BD Section –.......................... 37
7-9. Schematic Diagram – BD Section –............................ 39
7-10. Printed Wiring Board – VIDEO Section – ................... 41
7-11. Schematic Diagram – VIDEO Section (1/2) – ............ 43
7-12. Schematic Diagram – VIDEO Section (2/2) –............ 45
7-13. Printed Wiring Boards – CD MOTOR Section –......... 47
7-14. Schematic Diagram – CD MOTOR Section – ............ 49
7-15. Printed Wiring Board – TAPE DECK Section – .......... 51
7-16. Schematic Diagram – TAPE DECK Section –............ 53
7-17. Printed Wiring Board – LEAF SW Section – .............. 55
7-18. Schematic Diagram – LEAF SW Section – ................ 55
7-19. Printed Wiring Board – MAIN Section –..................... 57
7-20. Schematic Diagram – MAIN Section (1/4) –.............. 59
7-21. Schematic Diagram – MAIN Section (2/4) –............... 61
7-22. Schematic Diagram – MAIN Section (3/4) –............... 63
7-23. Schematic Diagram – MAIN Section (4/4) –............... 65
7-24. Printed Wiring Board – PANEL Section –................... 67
7-25. Schematic Diagram – PANEL Section –...................... 69
7-26. Printed Wiring Boards – DISPLAY Section – ............. 71
7-27. Schematic Diagram – DISPLAY Section –................. 73
7-28. Schematic Diagram
– MIC/HEADPHONE Section – ................................... 75
7-29. Printed Wiring Boards
– MIC/HEADPHONE Section – ................................... 76
7-30. Printed Wiring Board – POWER AMP Section –........ 77
7-31. Schematic Diagram – POWER AMP Section – ........... 79
7-32. Schematic Diagram
– TRANSFORMER Section –....................................... 81
7-33. Printed Wiring Board
– TRANSFORMER Section –....................................... 83
7-34. Printed Wiring Board – SURROUND Section – ......... 84
7-35. Schematic Diagram – SURROUND Section – ............ 85
7-36. IC Pin Function Description .......................................... 94
8. EXPLODED VIEWS...............................................106
9. ELECTRICAL PARTS LIST ..............................114
– 2 –
Page 3
SECTION 1
SERVICING NOTES
SELF-DIAGNOSIS
This unit is equipped with a self-diagnosis function.
The function is used for diagnosing the conditions of the circuits
of the VIDEO board.
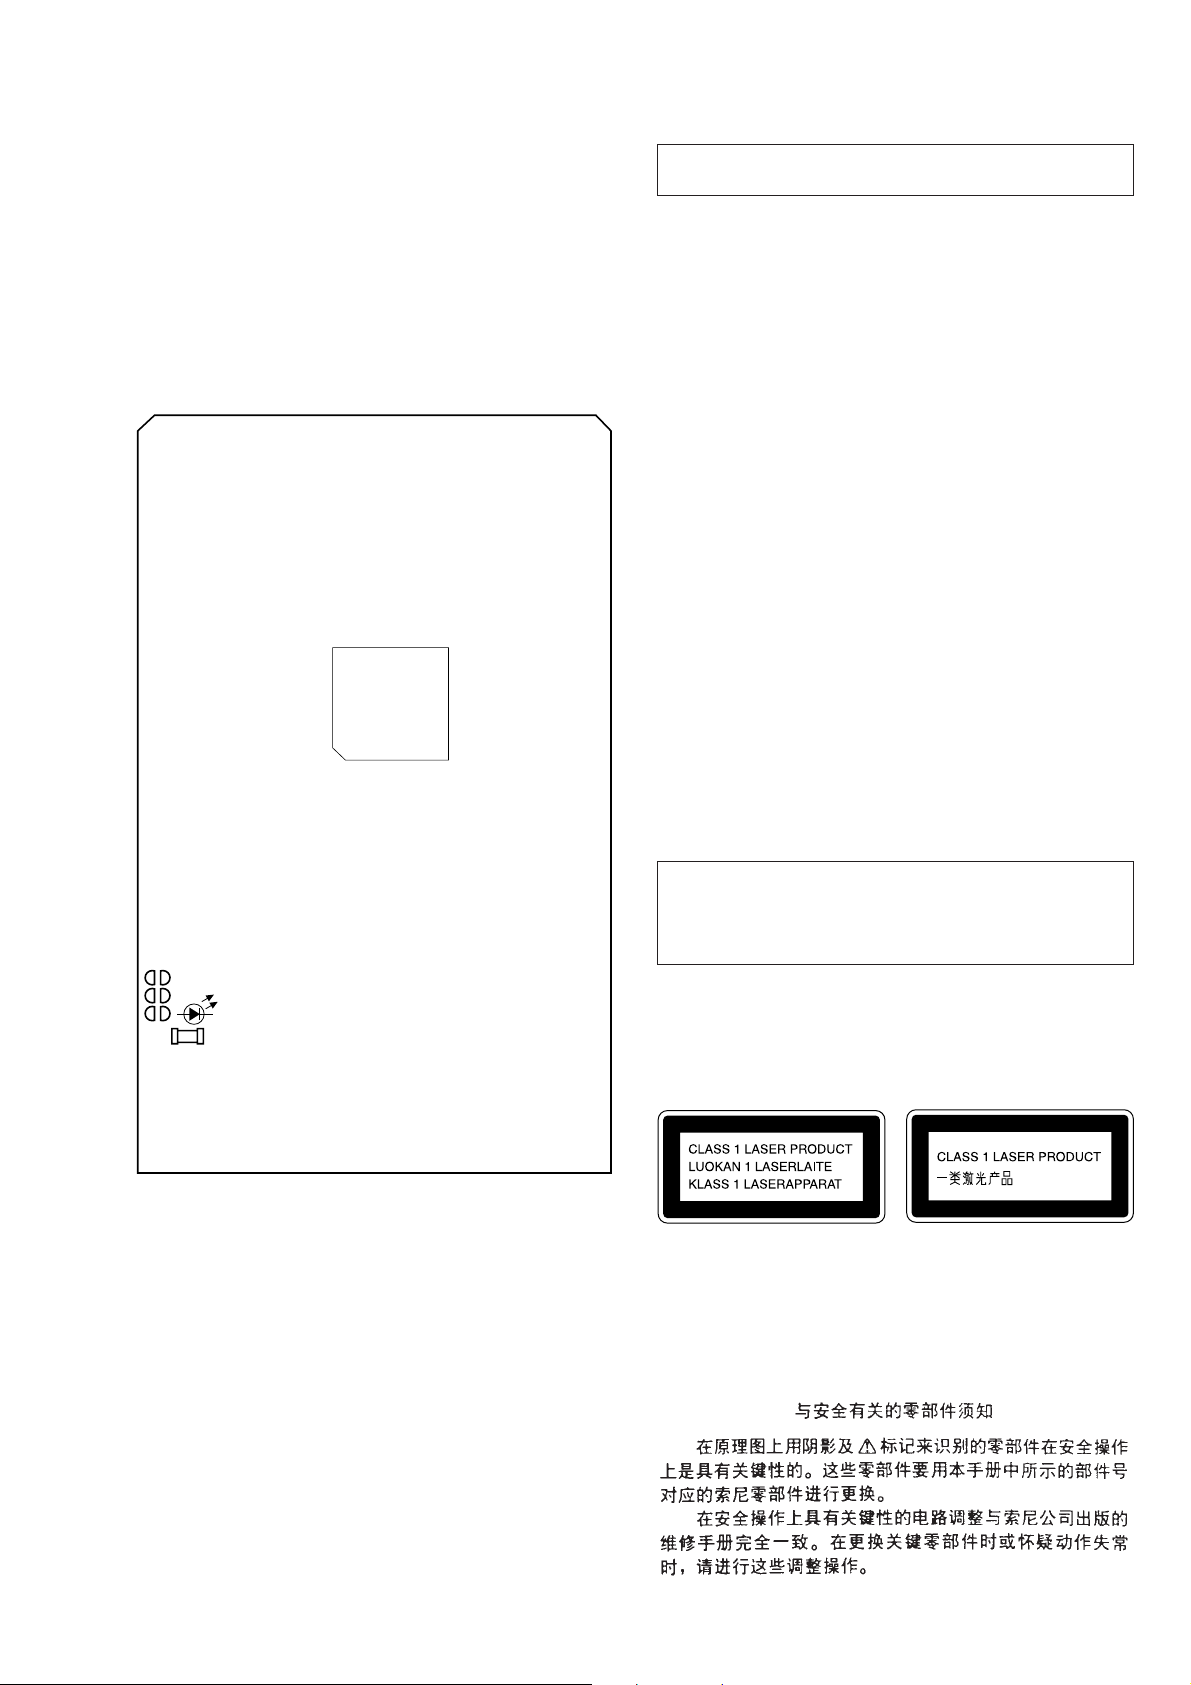
The circuits can be determined if normal or abnormal by the lighting of D502 of the VIDEO board.
Lighting of D502
When lit : Operates normally
Blinks repeatedly : The circuit may be faulty.
[VIDEO Board] (Side A)
IC505
NOTES ON HANDLING THE OPTICAL PICK-UP
BLOCK OR BASE UNIT
The laser diode in the optical pick-up block may suffer electrostatic break-down because of the potential difference generated
by the charged electrostatic load, etc. on clothing and the human
body.
During repair, pay attention to electrostatic break-down and also
use the procedure in the printed matter which is included in the
repair parts.
The flexible board is easily damaged and should be handled with
care.
NOTES ON LASER DIODE EMISSION CHECK
The laser beam on this model is concentrated so as to be focused
on the disc reflective surface by the objective lens in the optical
pick-up block. Therefore, when checking the laser diode emission, observe from more than 30 cm away from the objective lens.
Notes on chip component replacement
• Never reuse a disconnected chip component.
• Notice that the minus side of a tantalum capacitor may be damaged by heat.
Flexible Circuit Board Repairing
• Keep the temperature of the soldering iron around 270 ˚C during repairing.
• Do not touch the soldering iron on the same conductor of the
circuit board (within 3 times).
• Be careful not to apply force on the conductor when soldering
or unsoldering.
D502
SAFETY-RELATED COMPONENT WARNING!!
COMPONENTS IDENTIFIED BY MARK ! OR DOTTED
LINE WITH MARK ! ON THE SCHEMATIC DIAGRAMS
AND IN THE PARTS LIST ARE CRITICAL TO SAFE
OPERATION. REPLACE THESE COMPONENTS WITH
SONY PARTS WHOSE PART NUMBERS APPEAR AS
SHOWN IN THIS MANU AL OR IN SUPPLEMENTS PUBLISHED BY SONY.
CAUTION
Use of controls or adjustments or performance of procedures
other than those specified herein may result in hazardous radiation exposure.
This appliance is classified as a CLASS 1 LASER product.
The CLASS 1 LASER PRODUCT MARKING is located on
the rear exterior.
Laser component in this product is capable of emitting radiation
exceeding the limit for Class 1.
The following caution label is located inside the unit.
– 3 –
Page 4
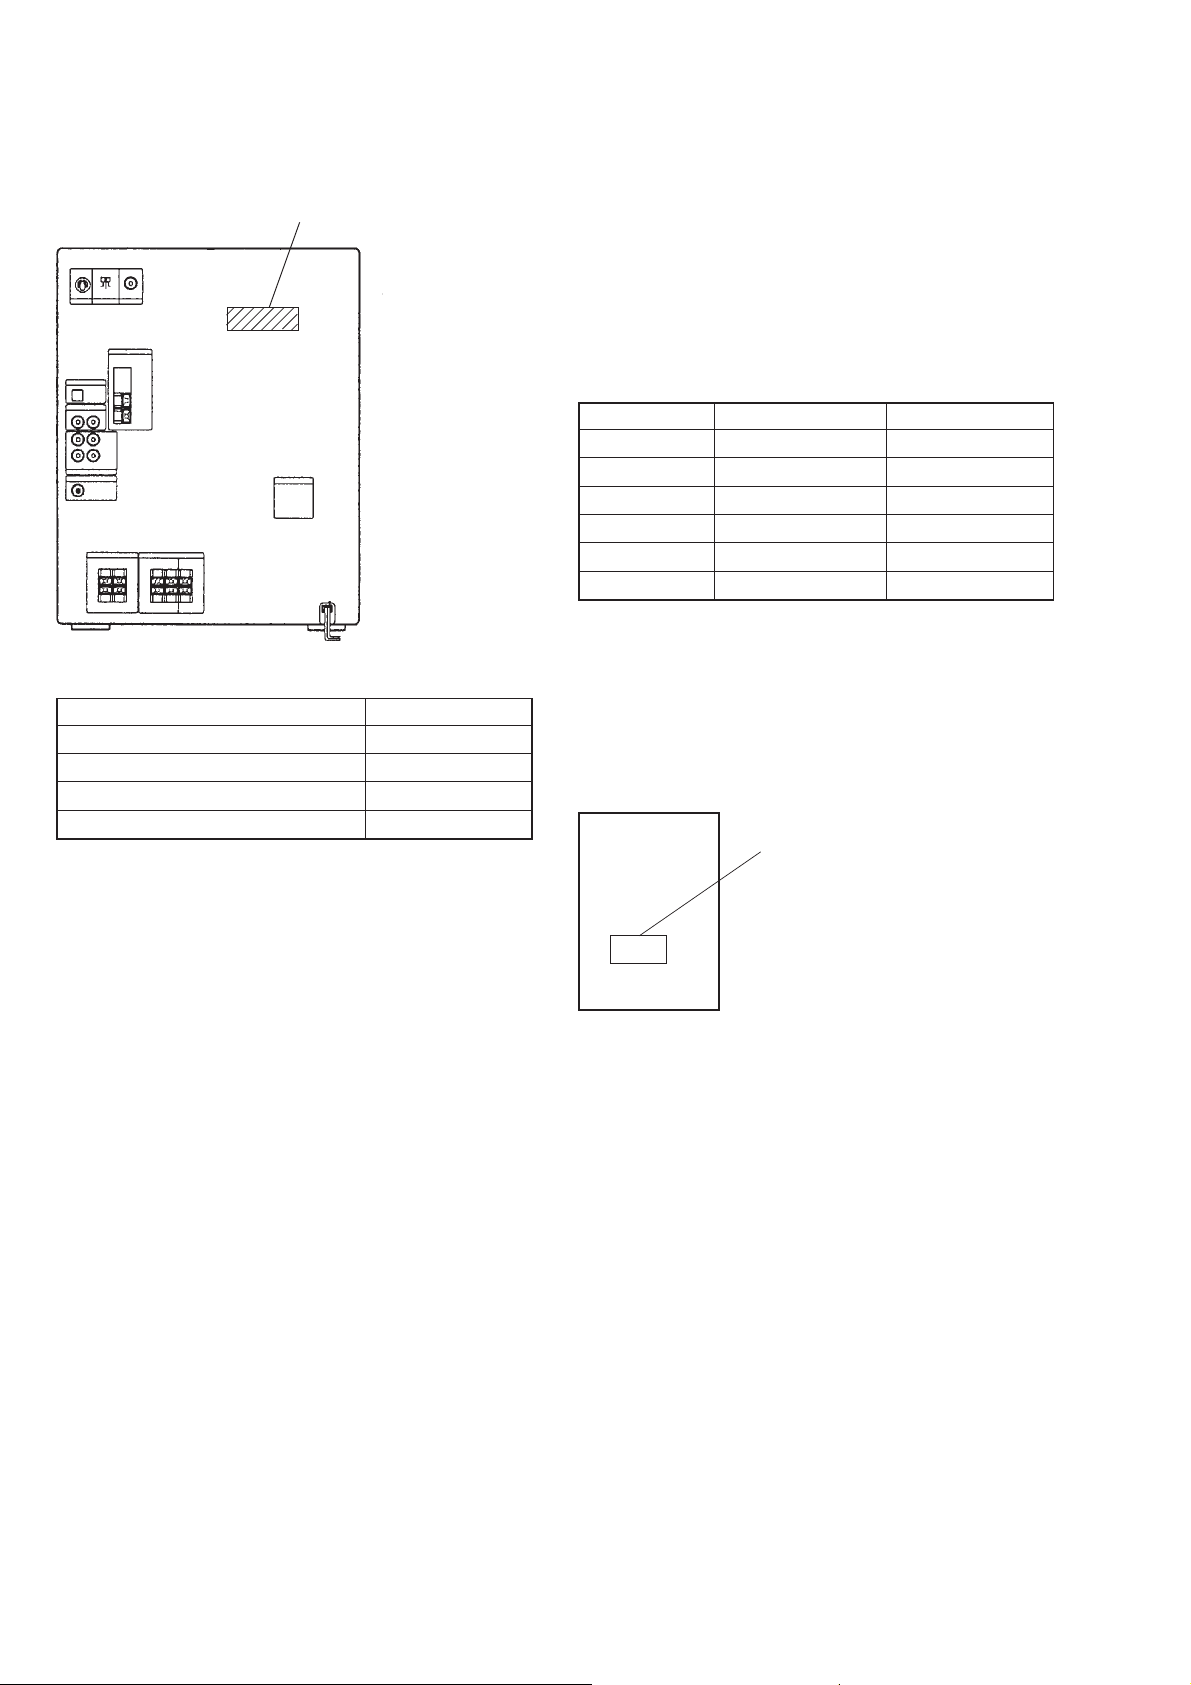
MODEL IDENTIFICATION
– Back Panel –
PART No.
MODEL PART No.
Malaysia and Singapore models 4-900-722-0π
Chinese model 4-900-722-1π
Indonesia model 4-900-722-2π
Thai model 4-900-722-3π
IC502 OF VIDEO BOARD
IC502 of the VIDEO board consists of the former type and new
type. The following table shows the differences between the two
types.
Only spare parts for the new type IC502 are supplied.
Units using the former IC502 will not function when replaced with
the new type without performing the following procedure.
Consequently, replace IC502 of units using the former type according to the following procedure.
Table of Differences
FORMER TYPE NEW TYPE
C407, 408 MOUNT NO MOUNT
IC502 M30620MC-302FP M30620MC-305FP
JW421, JW422 NO MOUNT MOUNT
IC402 MOUNT NO MOUNT
R413, 421, 422 MOUNT NO MOUNT
X401 MOUNT NO MOUNT
Replacing Procedure
1. Remove IC402.
2. Solder JW421 and JW422, or short-circuit with a lead wire,
etc.
3. Replace IC502 with a new one.
How to Differentiate
[VIDEO board] (Side A)
Those with IC402 : FORMER TYPE
Those without IC402: NEW TYPE
– 4 –
Page 5
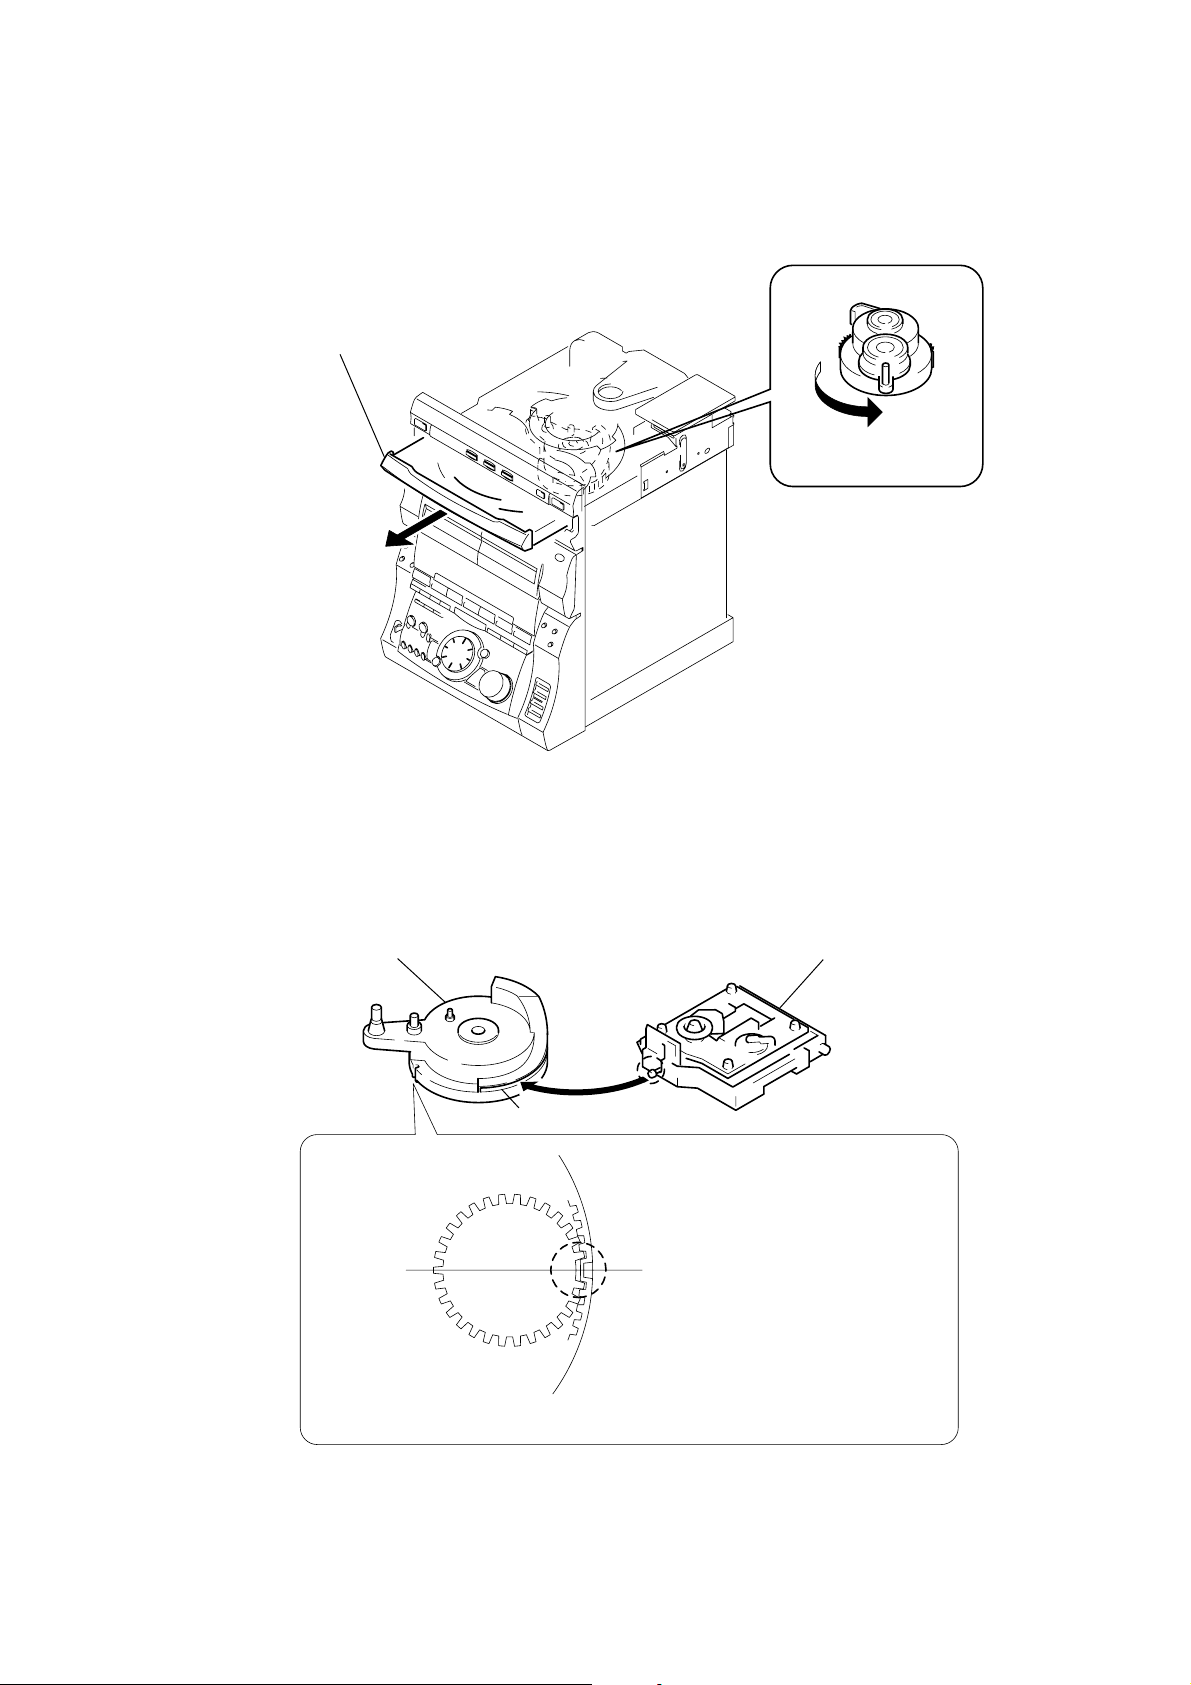
HOW TO OPEN THE DISC TRAY WHEN POWER SWITCH
e
TURNS OFF
1
Remove the case.
3
pull-out the disc tray.
2
Turn the cam to the
direction of arrow.
NOTE FOR INSTALLATION (ROTARY ENCODER)
BU cam
groove
Note: When attaching the Base unit, Insert th
section A into the groove of BU cam.
section A
Note:When attaching the BU cam,
engage the Rotary encoder
switch as shown in the figure.
– 5 –
Page 6
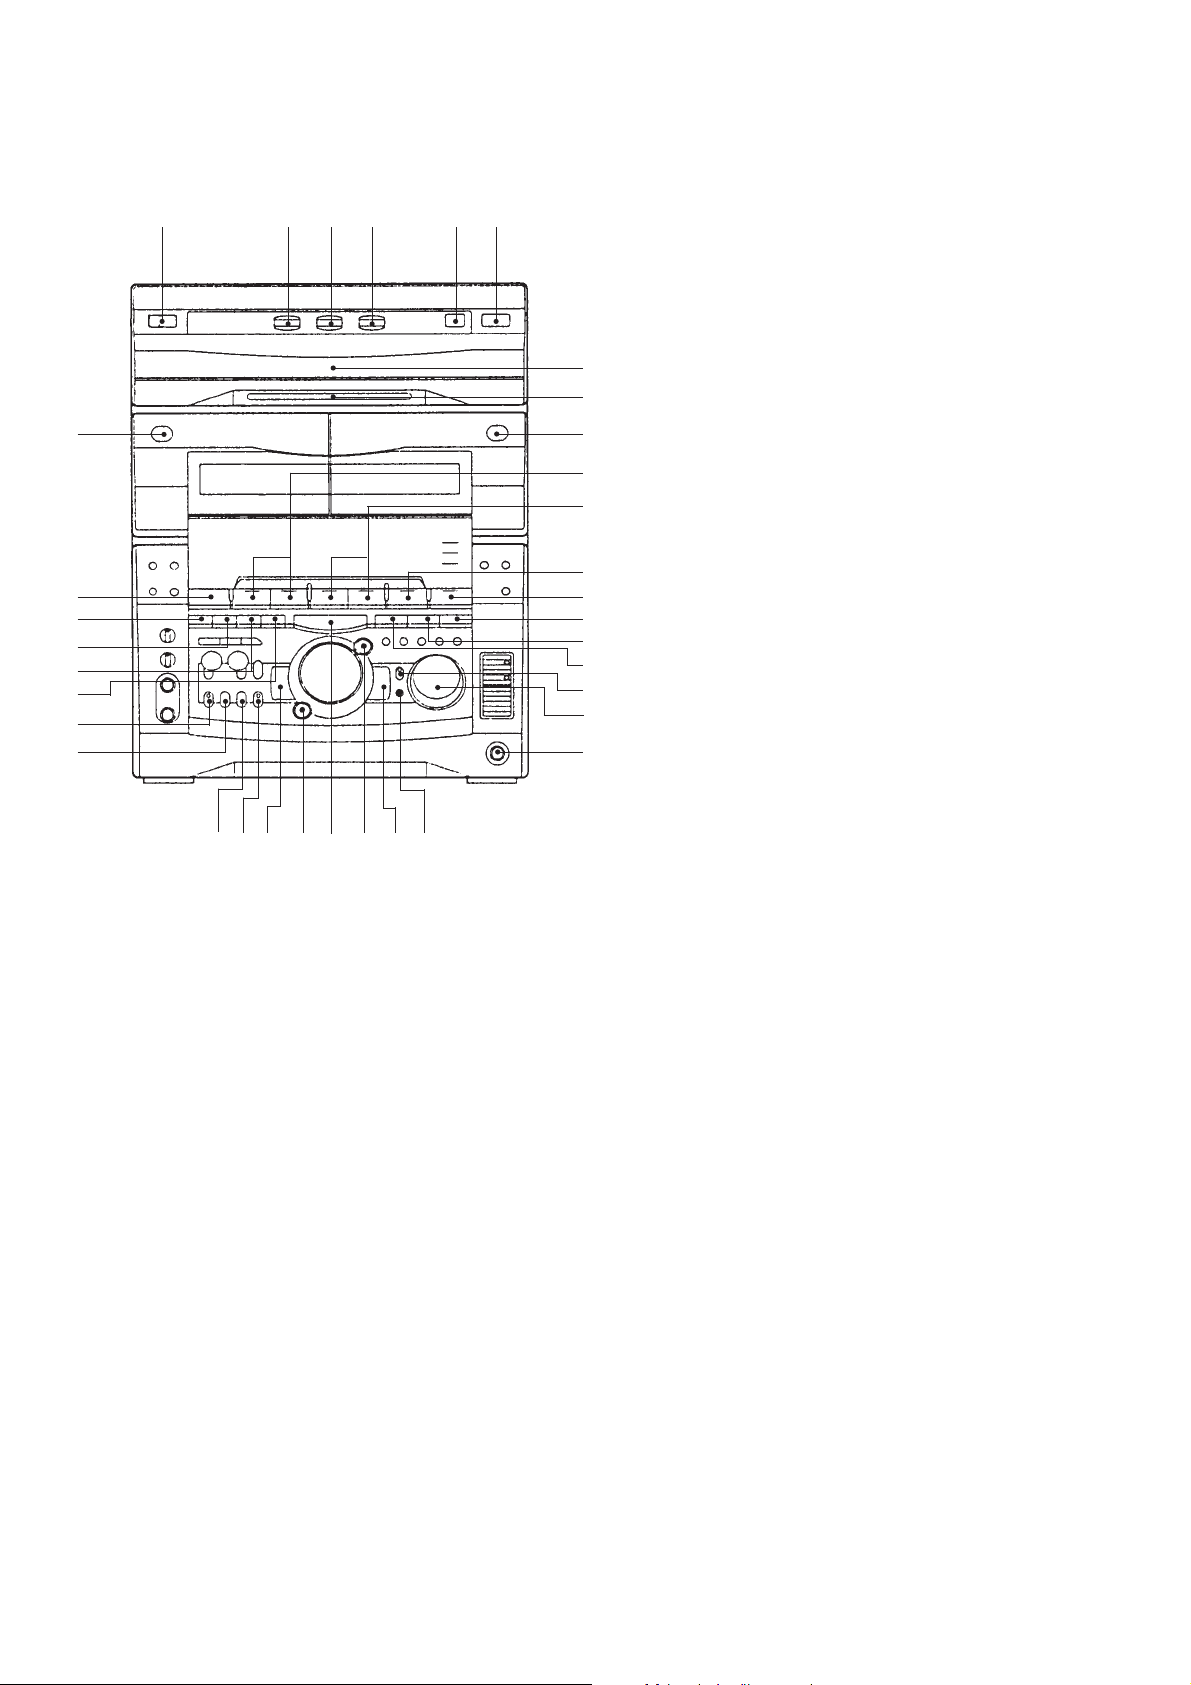
LOCATION OF CONTROLS
• Front view
SECTION 2
GENERAL
#¢
#¢
#£
#™
#¡
#º
@ª
@•
1 2 3 4 576
@£
@™ @¡@¢@∞@§@¶
@º
8
9
0
!¡
!™
!£
!¢
!∞
!§
!¶
!•
!ª
1 1/u (POWER) button
2 DISC 1 button and indicator
3 DISC 2 button and indicator
4 DISC 3 button and indicator
5 DISC SKIP/EX-CHANGE button
6 § button
7 Disc tray
8 Decoration
9 § button (Deck B)
0 Deck A 9, ( buttons and indicators
!¡ Deck B 9, ( buttons and indicators
!™ CD ^ button and indicator
!£ TUNER, BAND button
!¢ PRO LOGIC button and indicator
!∞ DSP button and indicator
!§ KARAOKE PON/MPX button
!¶ GROOVE button and indicator
!• VOLUME knob
!ª PHONES jack
@º DBFB button
@¡ –, 0 button and indicator
@™ ENTER/NEXT button and indicator
@£ p button
@¢ AUTO BPM button and indicator
@∞ +, ) button and indicator
@§ BEAT, JAM button and indicator
@¶ BEAT, SPEED button
@• BEAT, SELECT button
@ª BEAT, ON/OFF button and indicator
#º P FILE MEMORY button
#¡ GEQ CONTROL button
#™ FILE SELECT button
#£ EFFECT button and indicator
#¢ FUNCTION button
#∞ § button (Deck A)
– 6 –
Page 7
^§
^∞
^¢
^£
^™
^¡
^º
%ª
%•
%¶
%§
%£
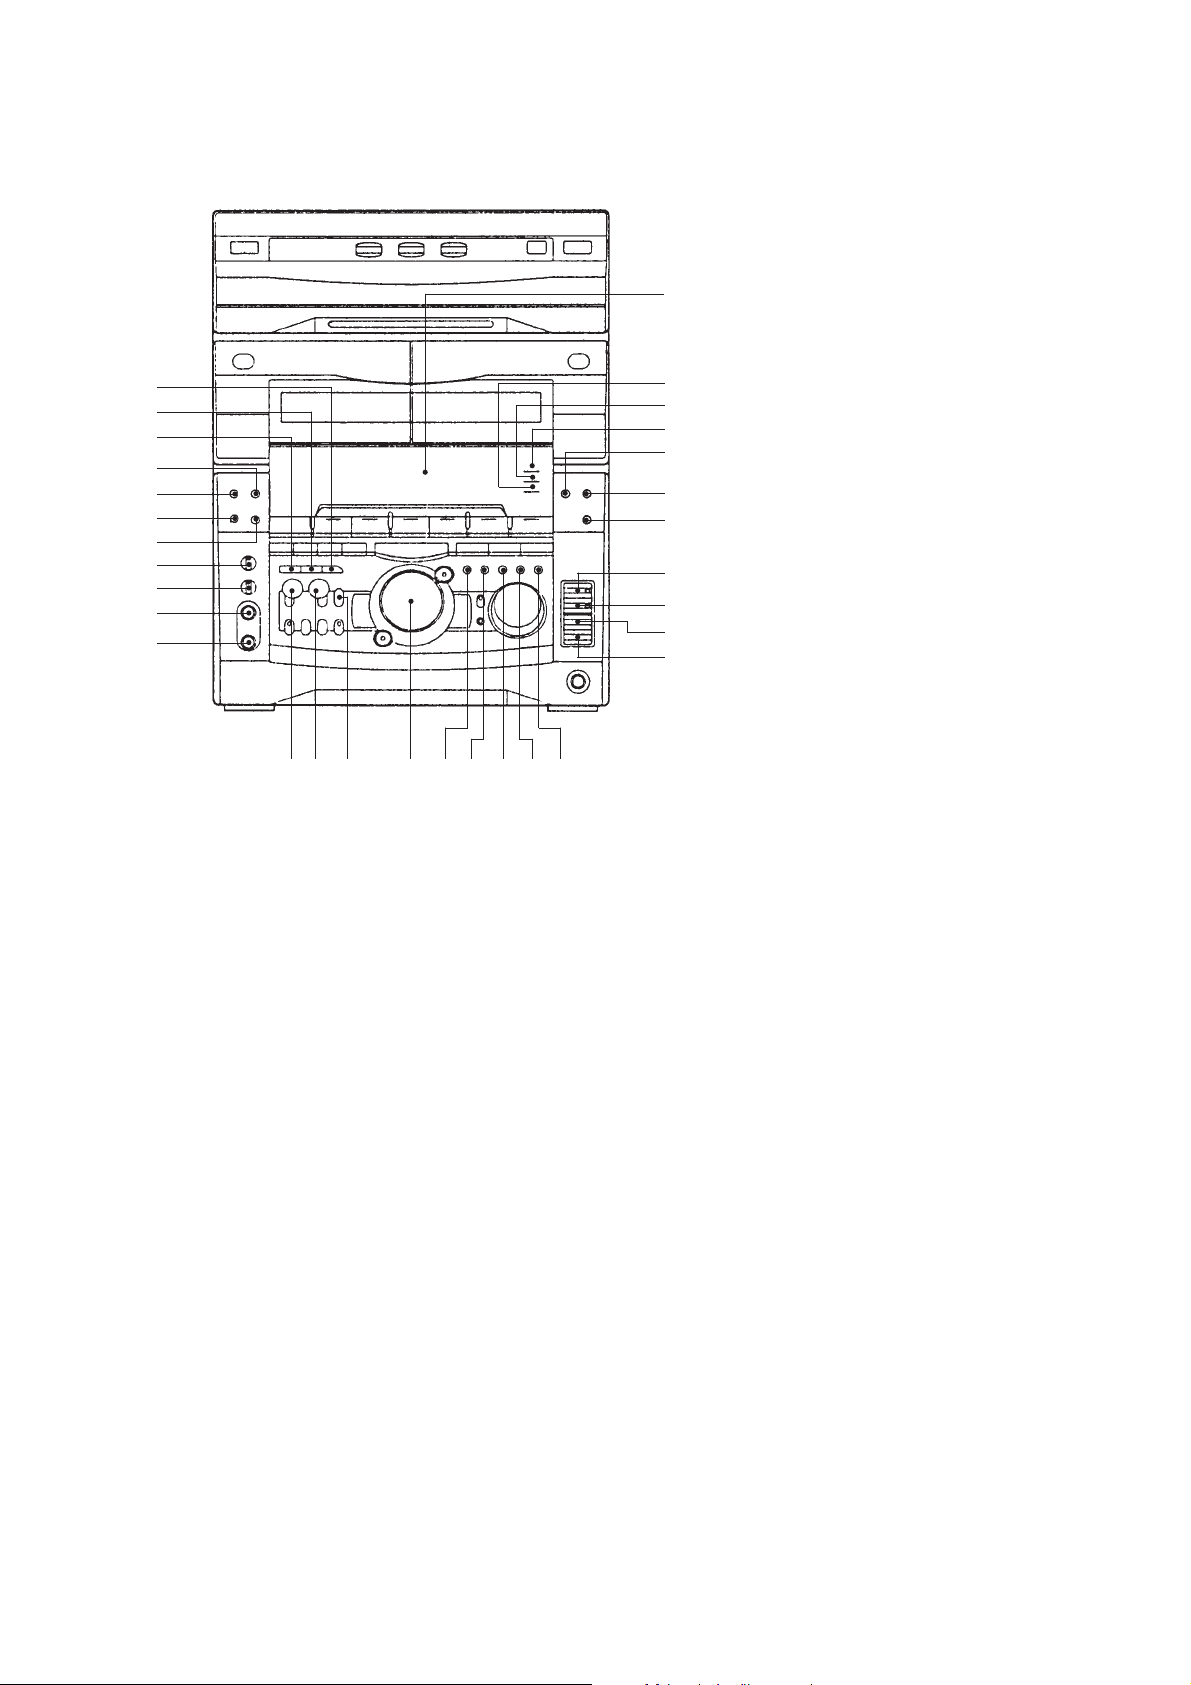
#§ Display window
#¶ PBC OFF indicator
#§
#¶
#•
#ª
$º
$¡
$™
$£
$¢
$∞
$§
%™ $ª $• $¶%º%¡%¢%∞
#• PBC indicator
#ª VIDEO CD indicator
$º PLAY MODE, DOLBY NR,
TUNER MEMORY button
$¡ EDIT, DIRECTION button
$™ REPEAT, STEREO/MONO button
$£ r REC button and indicator
$¢ P PAUSE button and indicator
$∞ HI-DUB button
$§ CD SYNC button
$¶ NEXT button
$• PREV button
$ª RETURN button
%º SELECT button
%¡ ACTIVE button
%™ JOG dial
%£ BEAT LEVEL button
%¢ PAD B button
%∞ P AD A button
%§ MIC 2 jack
%¶ MIC 1 jack
%• MIC LEVEL knob
%ª ECHO LEVEL knob
^º DEMO button
^¡ DISPLAY button
^™ CLOCK/TIMER SET button
^£ TIMER/SELECT button
^¢ CD LOOP button
^∞ CD FLASH button
^§ CD NON-STOP button and indicator
– 7 –
Page 8
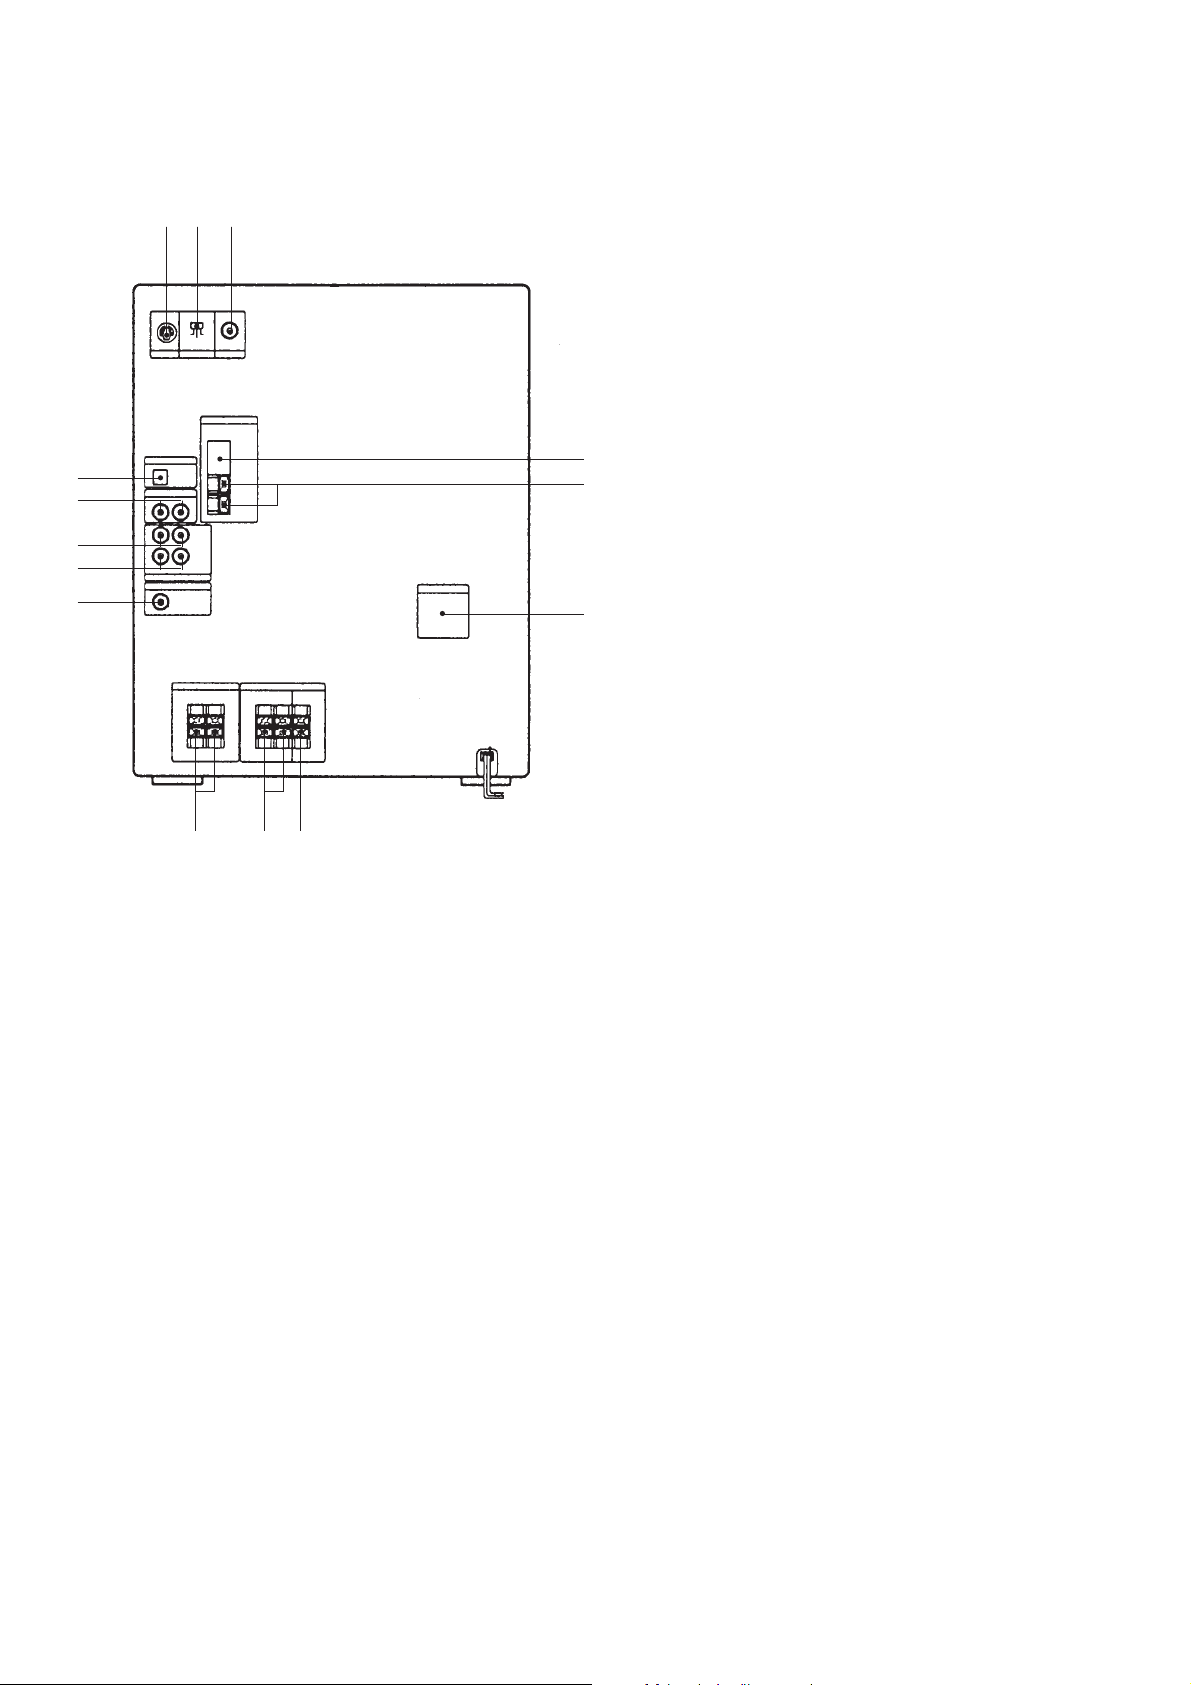
• Rear view
!¢
!£
!™
!¡
0
1 2 3
4
5
6
1 S VIDEO OUT jack
2 SYSTEM SELECT switch
3 VIDEO OUT jack
4 FM antenna terminal
5 AM antenna terminals
6 VOLTAGE SELECTOR switch
7 SURROUND SPEAKER, CENTER terminals
8 SURROUND SPEAKER, REAR terminals
9 FRONT SPEAKER terminals
0 SUPER WOOFER jack
!¡ MD OUT jacks
!™ MD IN jacks
!£ VIDEO (AUDIO) IN jacks
!¢ CD DIGITAL OUT, OPTICAL connector
789
– 8 –
Page 9
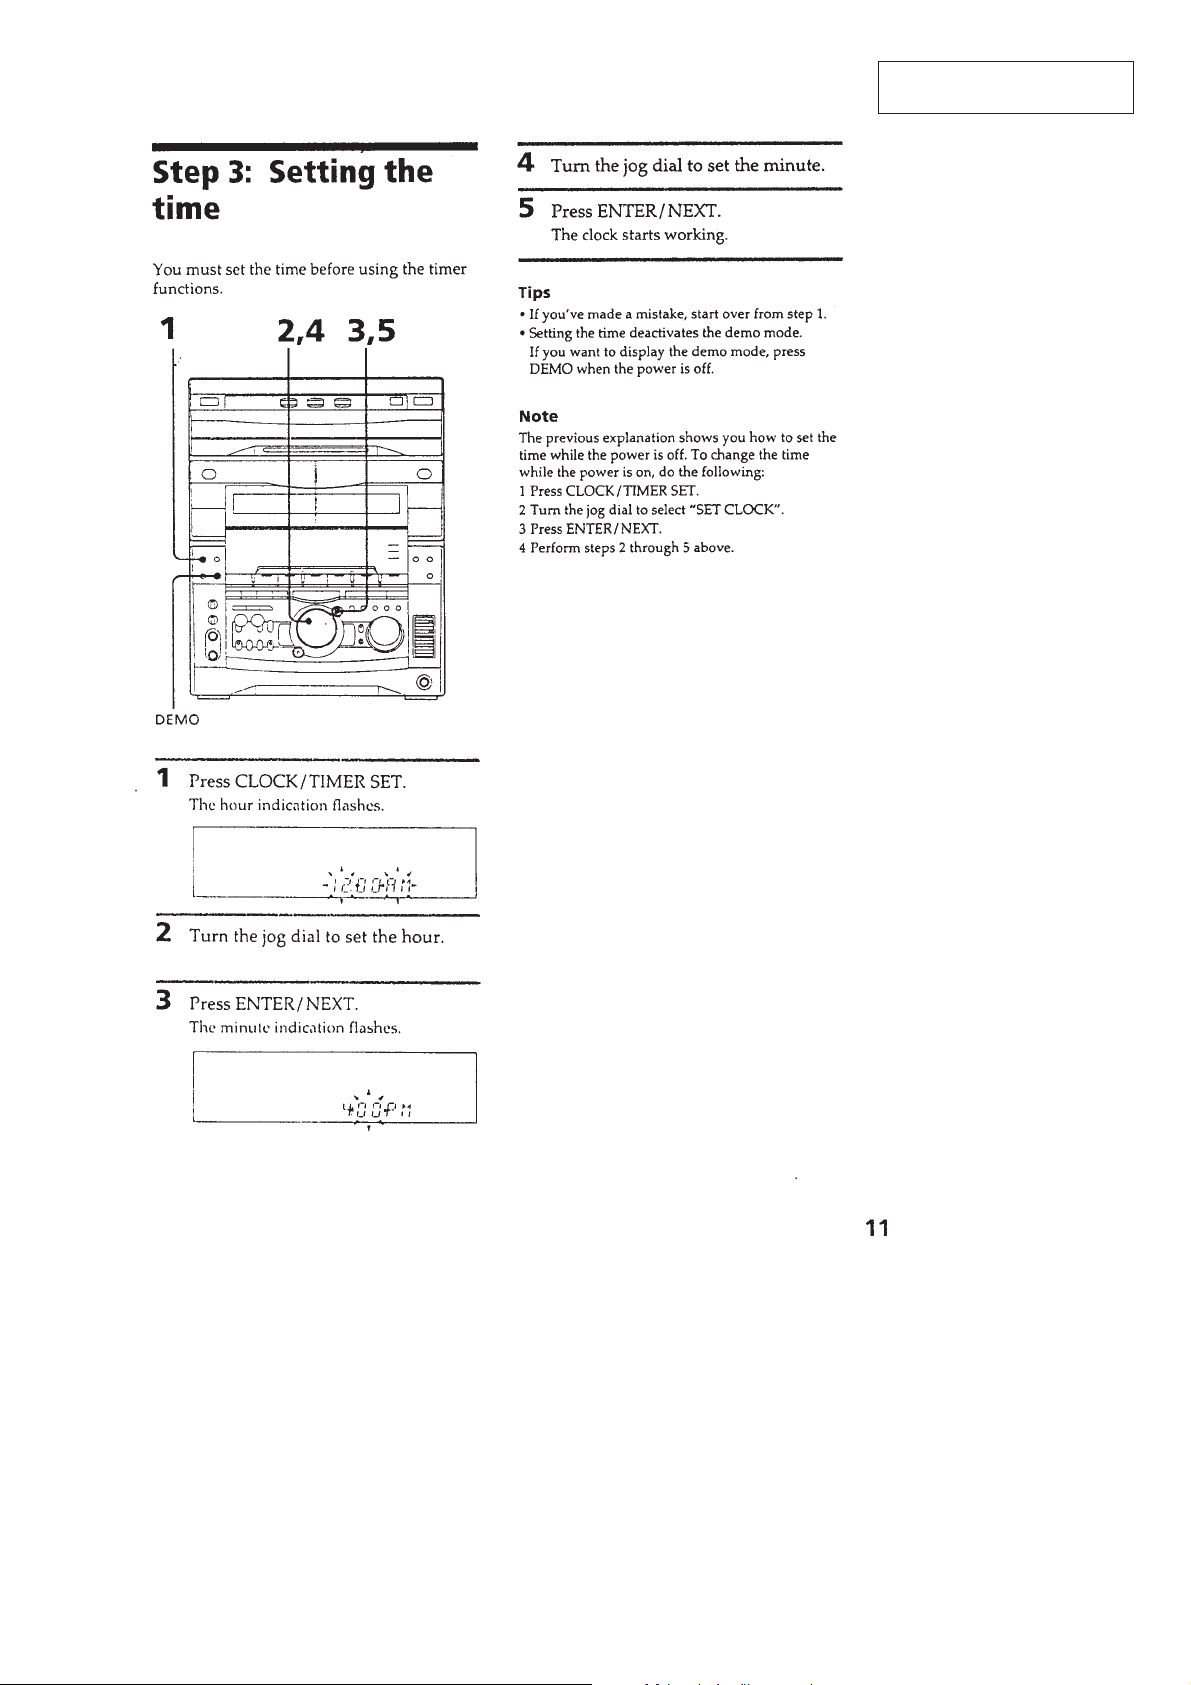
This section is extracted from
instruction manual.
– 9 –
Page 10
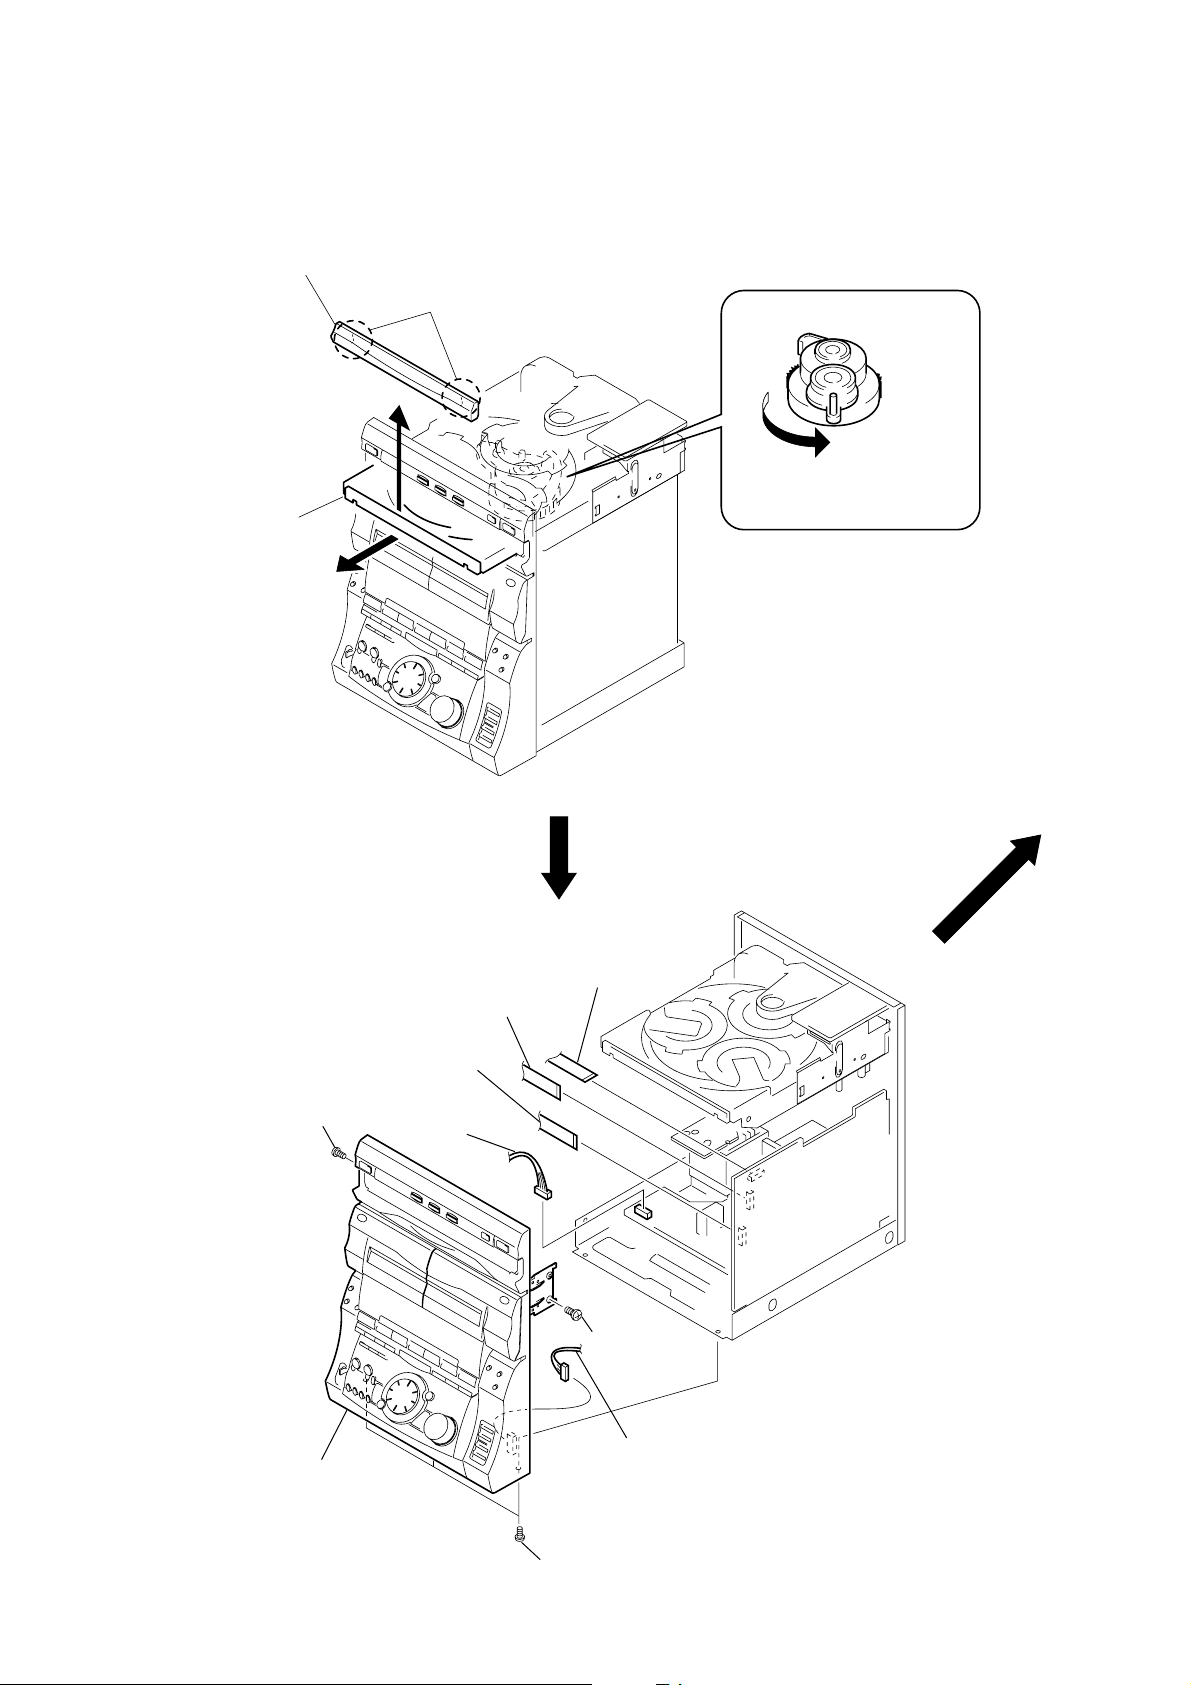
SECTION 3
DISASSEMBLY
Note: Follow the disassembly procedure in the numerical order given.
LOADING PANEL
4
loading panel
3
two claws
2
Pull-out the disc tray.
1
Turn the cam to the direction
of arrow.
FRONT PANEL
2
screw
(BVTP3 × 10)
5
front panel assembly
4
flat type wire
(CN101)
3
connector
(CN203)
4
flat type wire
(CN106)
4
flat type wire
(CN107)
2
screw
(BVTP3 × 10)
3
connector
(CN752)
1
three screws
(BVTP3 × 8)
– 10 –
Page 11
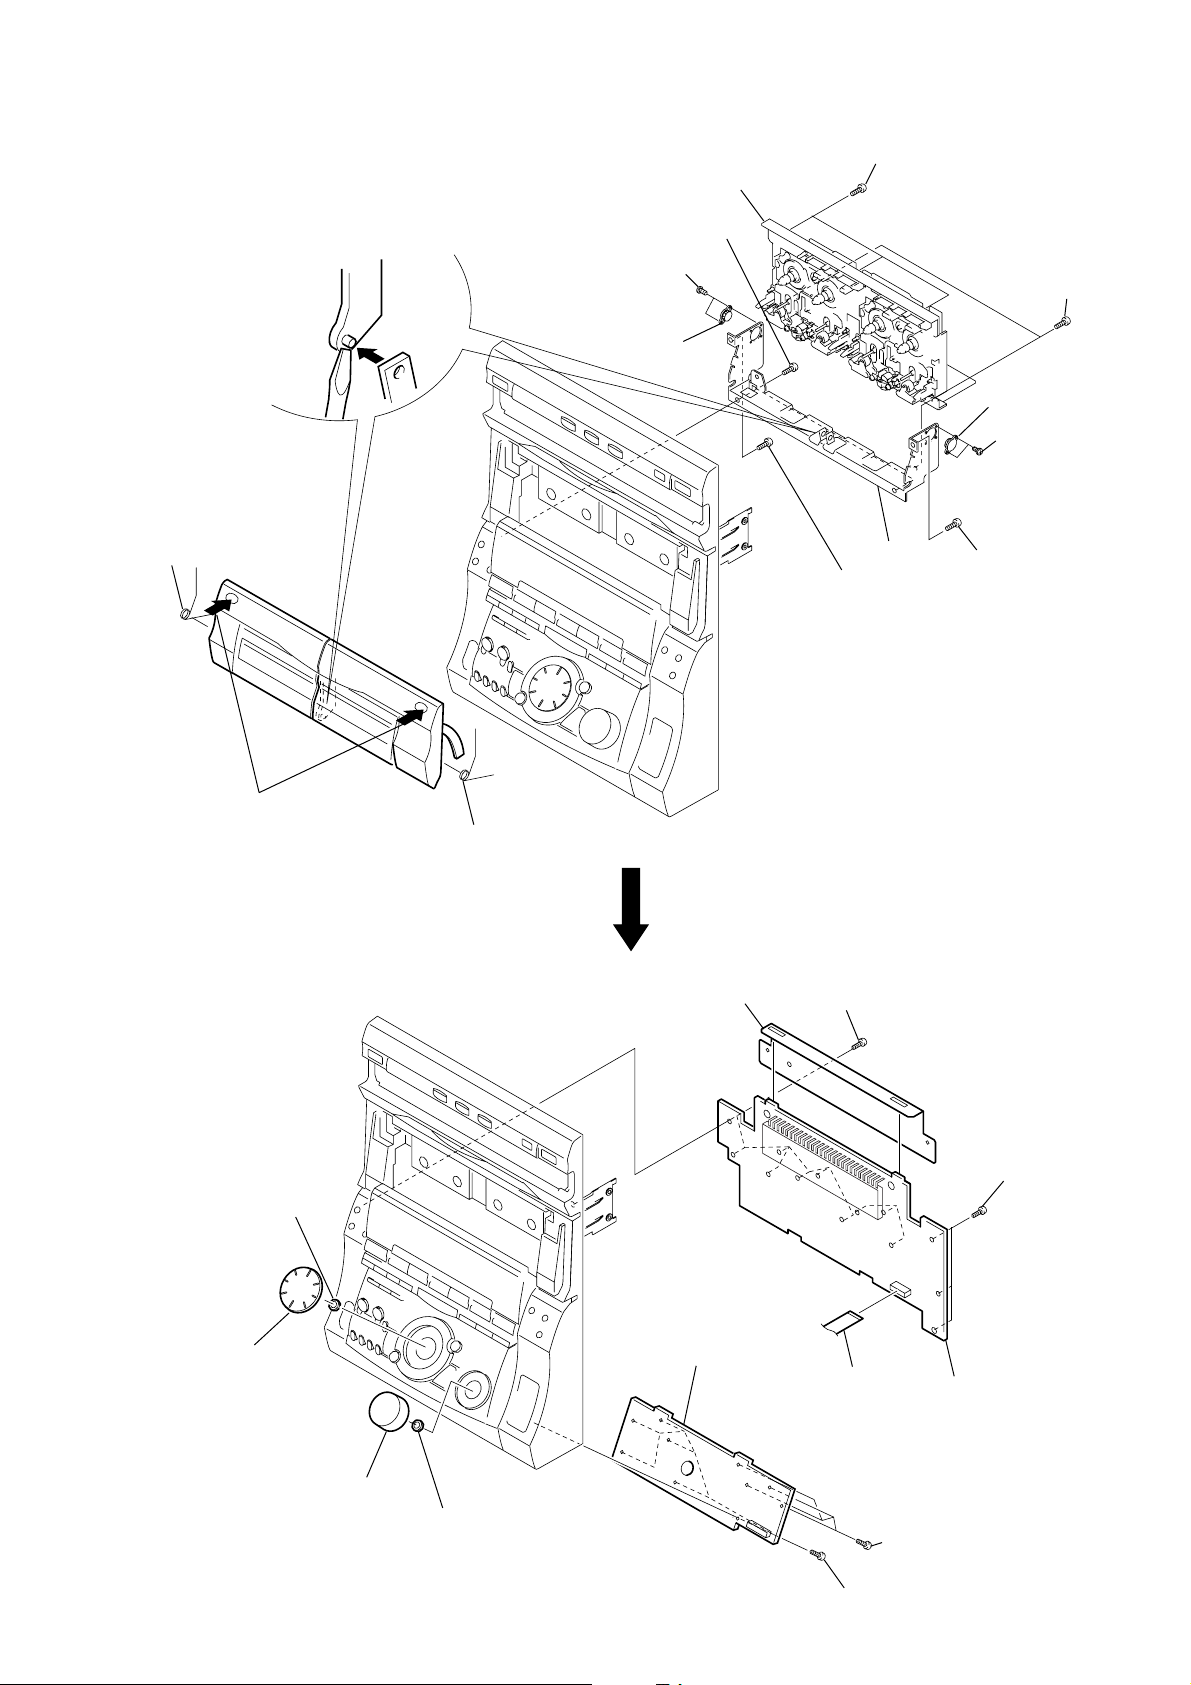
CASSETTE MECHANISM DECK
1
two screws
(BVTT2
×
4)
1
two screws
(BVTT2
×
4)
6
three screws
(BVTP2.6
×
8)
6
two screws
(BVTP2.6
×
8)
8
two screws
(BVTP2.6
×
8)
6
screw
(BVTP2.6
×
8)
6
screw
(BVTP2.6
×
8)
9
bracket
7
mechanism deck
2
damper, oil
2
damper, oil
3
Push the cassette lids.
4
Remove the cassette lids.
5
spring
5
spring
)
PANEL BOARD AND CONT-PANEL BOARD
6
5
konb (Jog)
nut
7
konb
(Volume)
8
nut
0
CONT-PANEL board
3
shield
1
ten screws
(BVTP2.6
4
flat type wire
(CN602)
×
8)
9
four screws
(BVTP2.6
1
three screws
(BVTP2.6
2
PANEL board
×
8)
×
8
– 11 –
9
six screws
(BVTP2.6
×
8)
Page 12
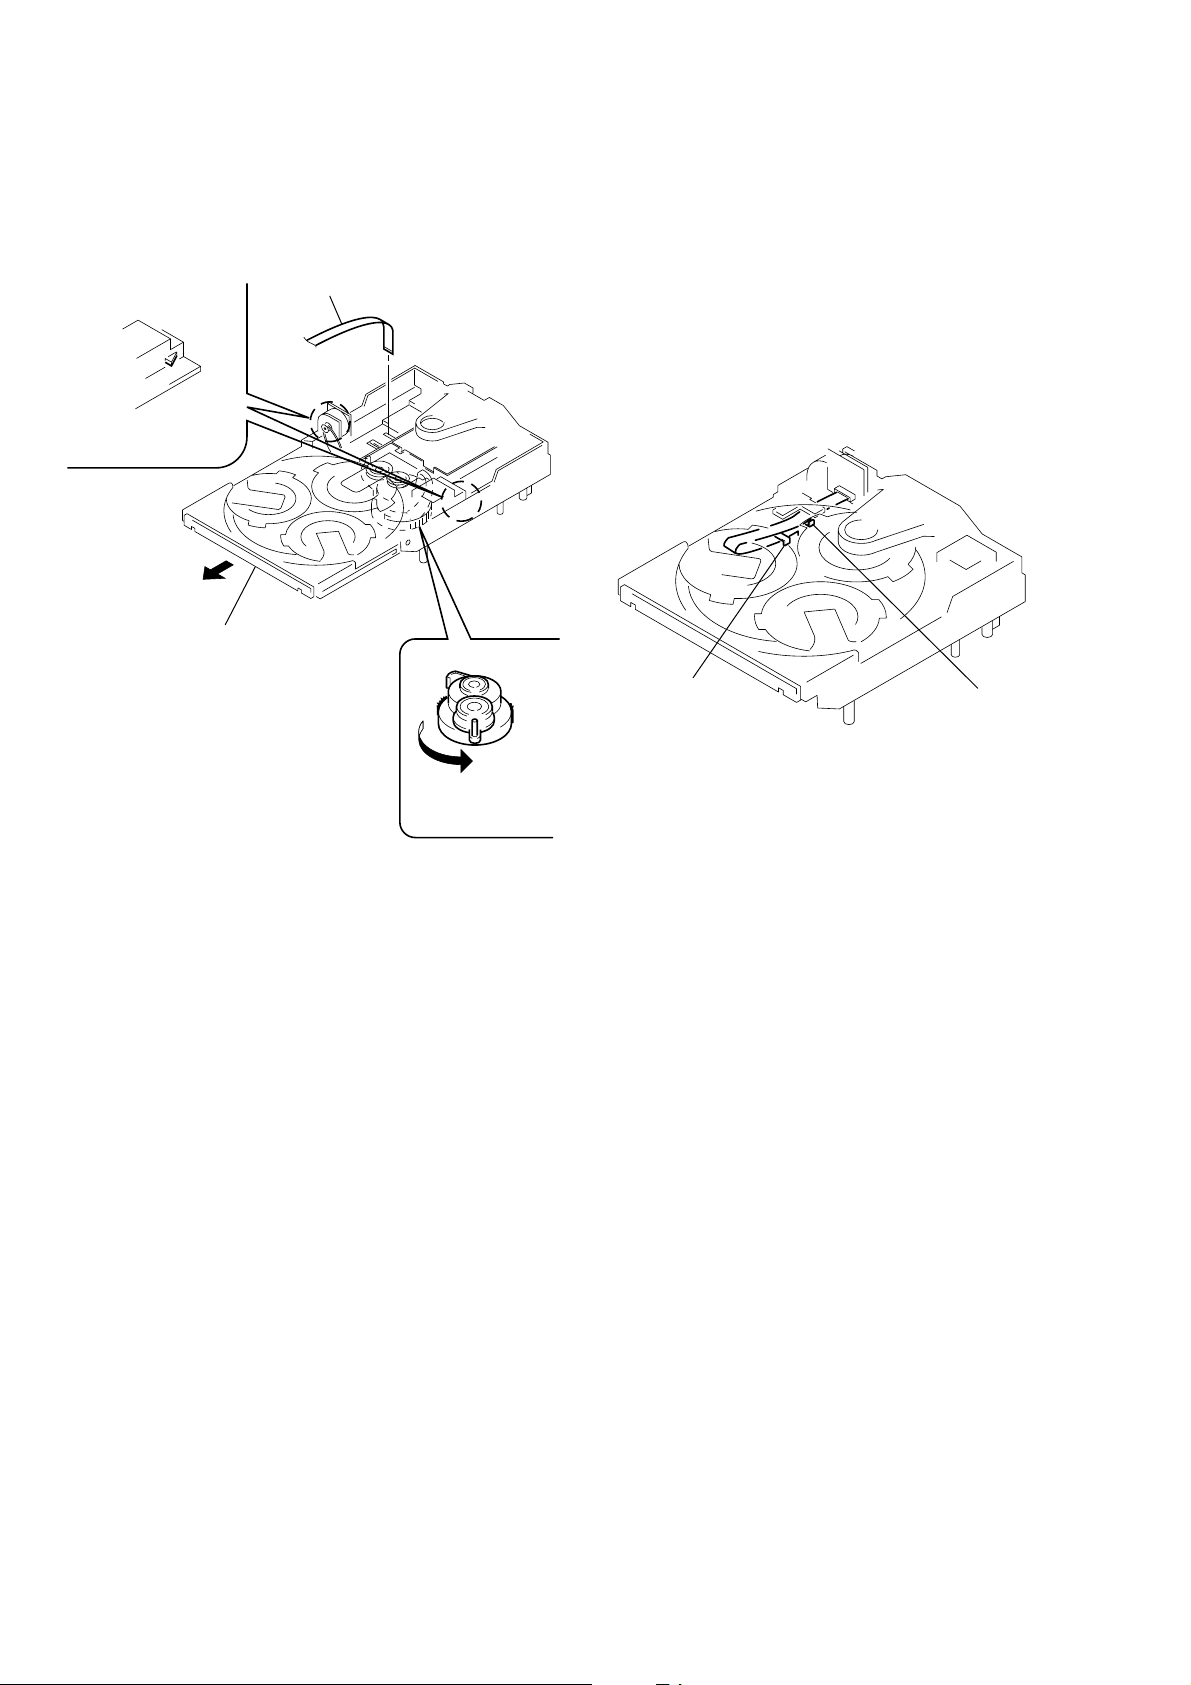
DISC TRAY
(Perform after removing the front panel.)
3
flat type wire (8 core)
4
two claws
2
Pull-out the disc tray.
5
Remove the disc tray.
Note: When installing the Disc tray, pull around the flat type wire to
pass through the claw
claw
A
A
and claw B, as shown in the figure.
claw
B
1
Turn the cam the
direction of arrow.
– 12 –
Page 13

SECTION 4
TEST MODE
[MC Cold Reset]
• The cold reset clears all data including preset data stored in the
RAM to initial conditions. Execute this mode when returning
the set to the customer.
Procedure:
1. Press three buttons p , [ENTER/NEXT], and I/u simulta-
neously.
2. The fluorescent indicator tube becomes blank instantaneously,
and the set is reset.
[CD Delivery Mode]
• This mode moves the pick-up to the position durable to vibration. Use this mode when returning the set to the customer after
repair.
Procedure:
1. Press I/u button to turn the set ON.
2. Press [CDLOOP] button and I/u button simultaneously.
3. A message “LOCK” is displayed on the fluorescent indicator
tube, and the CD delivery mode is set.
[MC Hot Reset]
• This mode resets the set with the preset data kept stored in the
memory. The hot reset mode functions same as if the power
cord is plugged in and out.
Procedure:
1. Press three buttons p , [ENTER/NEXT], and [DISC1] simul-
taneously.
2. The fluorescent indicator tube becomes blank instantaneously,
and the set is reset.
[Sled Servo Mode]
• This mode can run the CD sled motor freely. Use this mode, for
instance, when cleaning the pick-up.
Procedure:
1. Press I/u button to turn the set ON.
2. Select the function “CD”.
3. Press three buttons p , [ENTER/NEXT], and § simulta-
neously.
4. The Sled Servo mode is selected, if “CD” is blanking on the
fluorescent indicator tube.
5. With the CD in stop status, press ) + button to move the
pick-up to outside track, or – 0 button to inside track.
6. To exit from this mode, perform as follows:
1) Move the pick-up to the most inside track.
2) Press three buttons in the same manner as step 3.
Note: • Always move the pick-up to most inside track when exiting from
this mode. Otherwise, a disc will not be unloaded.
• Do not run the sled motor excessively , otherwise the gear can be
chipped.
[Change-over of MW Tuner Step between 9 kHz and
10 kHz]
• A step of MW channels can be changed over between 9 kHz
and 10 kHz.
Procedure:
1. Press I/u button to turn the set ON.
2. Select the function “TUNER”, and press [TUNERBAND]
button to select the BAND “MW”.
3. Press I/u button to turn the set OFF.
4. Press [ENTER/NEXT] and I/u buttons simultaneously, and
the display of fluorescent indicator tube changes to “MW 9 k
STEP” or “MW 10 k STEP”, and thus the channel step is
changed over.
[LED and Fluorescent Indicator Tube All Lit, Key Check
Mode]
Procedure:
1. Press three buttons p , [ENTER/NEXT], and [DISC2] simul-
taneously.
2. LEDs and fluorescent indicator tube are all turned on.
Press [DISC2] button, and the key check mode is activated.
3. In the key check mode, the fluorescent indicator tube displays
“K 1 J0 V0”. Each time a button is pressed, “K” value increases. However , once a button is pressed, it is no longer taken
into account.
“J” value increases like 1, 2, 3 ... if rotating [JOG] dial in “+”
direction, or it decreases like 0, 9, 8 ... if rotating in “–” direction.
“V” value increases like 1, 2, 3 ... if rotating [VOLUME] knob
in “+” direction, or it decreases like 0, 9, 8 ... if rotating in
“–” direction.
4. To exit from this mode, press three buttons in the same man-
ner as step 1, or disconnect the power cord.
– 13 –
Page 14
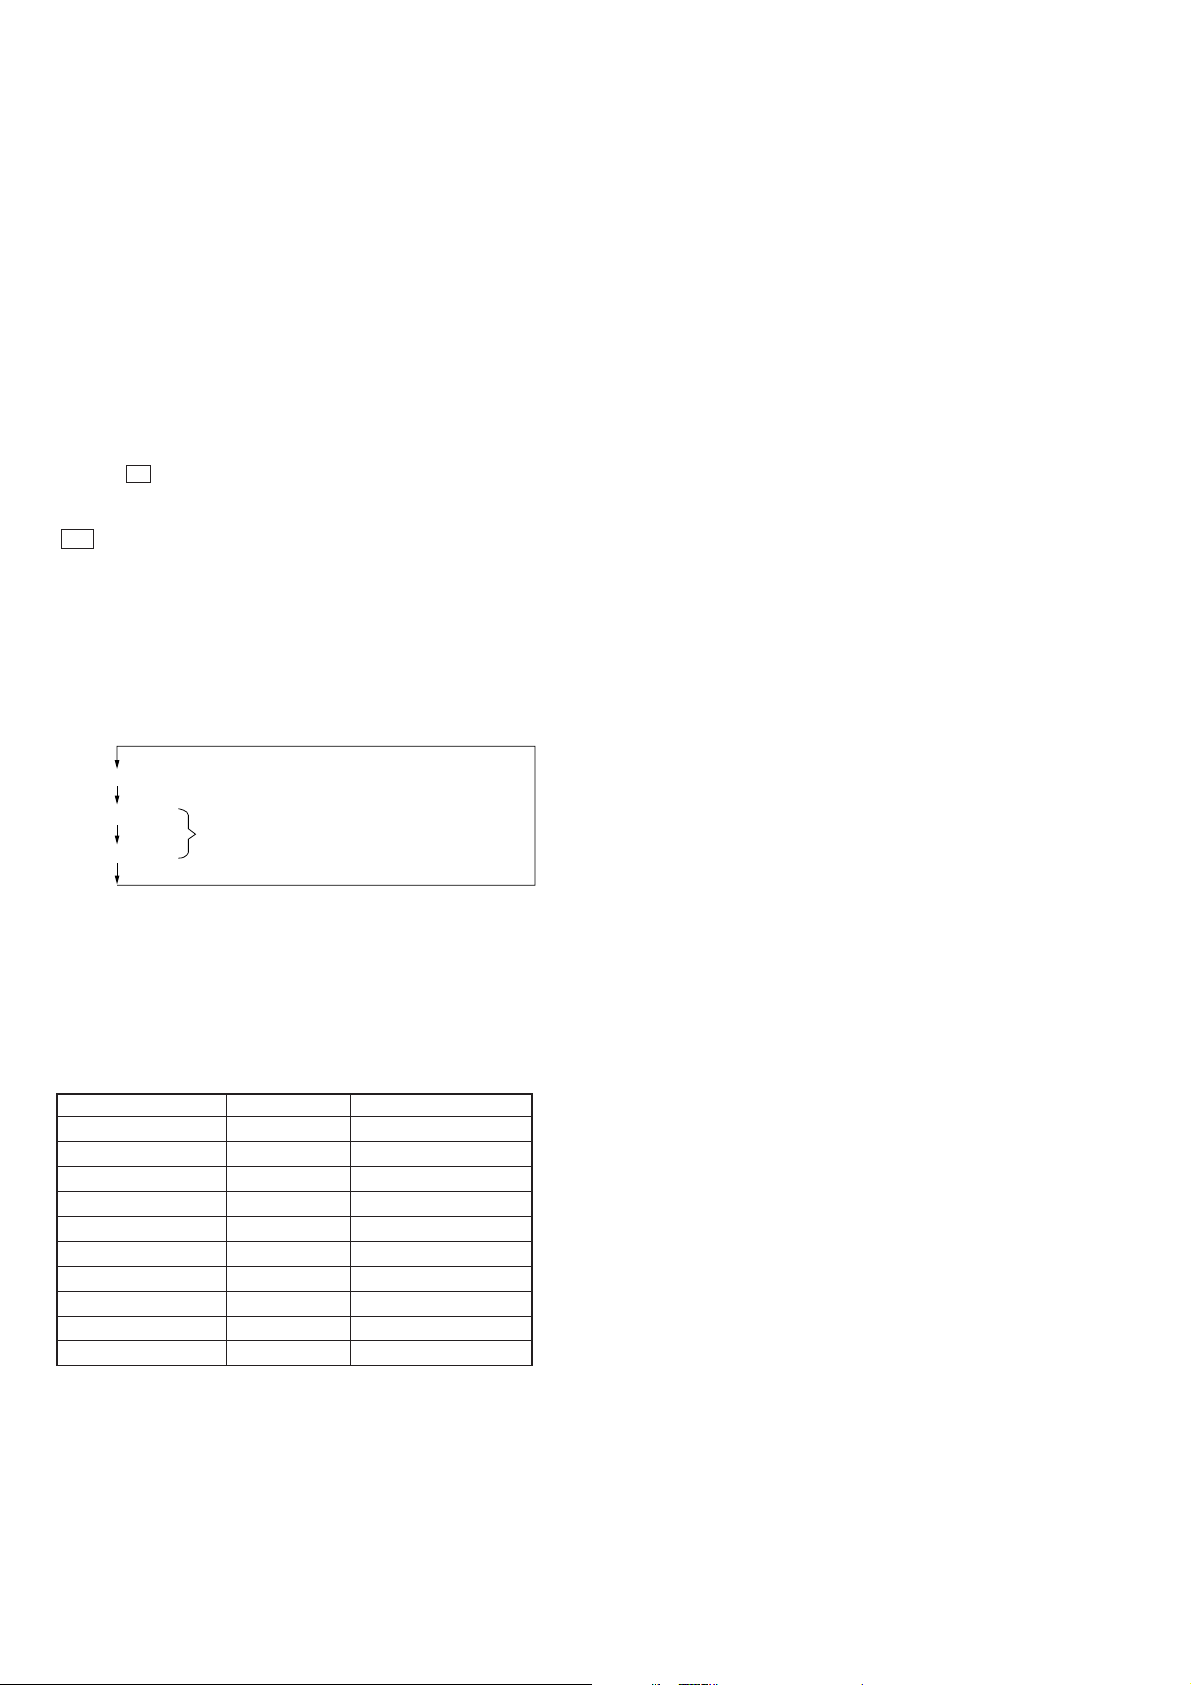
[Aging Mode]
This mode can be used for checking the operations of the CD player
and tape deck.
• When problems occur:
Aging stops. If currently aging the tape deck, the state when
aging stops will be displayed on the fluorescent display tube.
• When no problems:
Aging continues.
Preparations:
• Set the CD on the DISC 1 tray.
• Insert a commercially available tape for recording (tapes which
contents can be erased, etc.) in decks A and B.
Setting the aging mode:
Press the p button, [ENTER/NEXT] button, and
[DISCSKIP/EX-CHANGE] button together . When the aging mode
is set, the CD roulette work blinks. To exit the mode, press the
I/u button and turn OFF the power.
Sequence:
The aging mode is executed in the following sequence.
If the function is set to “CD” when the aging mode is set, aging is
performed starting from the CD player. When set to “TAPE A” or
“TAPE B” aging is started from deck A.
If the function is to others aging will not be stated until the function is switched to CD or TAPE.
Aging of CD player (12 minutes)
Operations during aging
• Operations are performed in the following sequence during aging.
<CD player>
1. The CD tray rotates and disc 1 is selected.
2. Chucking is performed.
3. TOC is read.
4. Track 1 played back for 8 seconds.
5. The CD tray opens and closes again.
6. 1 to 5 is repeated.
7. After 12 minutes of aging, aging is switched to the tape deck.
<Tape Deck>
1. The tape in deck A is rewound to the head.
2. The FWD side is played back for 2 minutes.
3. The tape is fast forwarded (FF) for 20 seconds. The following
procedure is performed when the tape end is reached before
the 20 seconds.
4. The REV side is played back for 2 minutes.
5. The tape is rewound to the head (REW).
6. The tape in deck B is rewound to the head.
7. The FWD side is played back for 2 minutes.
8. The tape is fast forwarded (FF) for 20 seconds. The following
procedure is performed when the tape end is reached before
the 20 seconds.
9. The REV side is played back for 2 minutes.
10. The tape is rewound to the head (REW).
11. Aging is switched to the CD player.
Aging of deck A
Aging of deck B
Maximum about 12 minutes
Display of status:
• The aging status is displayed on the fluorescent display tube.
(Only when executing the tape deck section.)
• During the aging of the tape deck, the operations performed
will be displayed. If operations ended abnormally, this will be
displayed at the fluorescent indicator tube.
Tape Deck
Display of Operations Operation Timing of Ending
T APE A AG-1 TAPE A REW Shutoff
T APE A AG-2 TAPE A FWD 2 minute playback
TAPE A AG-3 TAPE A FF 20 seconds or shutoff
T APE A AG-4 TAPE A REV 2 minutes playback
T APE A AG-5 TAPE A REW Shutoff
TAPE B AG-1 TAPE B REW Shutoff
TAPE B AG-2 TAPE B FWD 2 minute playback
TAPE B AG-3 TAPE B FF 20 seconds or shutoff
TAPE B AG-4 TAPE B REV 2 minute playback
TAPE B AG-5 TAPE B REW Shutoff
– 14 –
Page 15
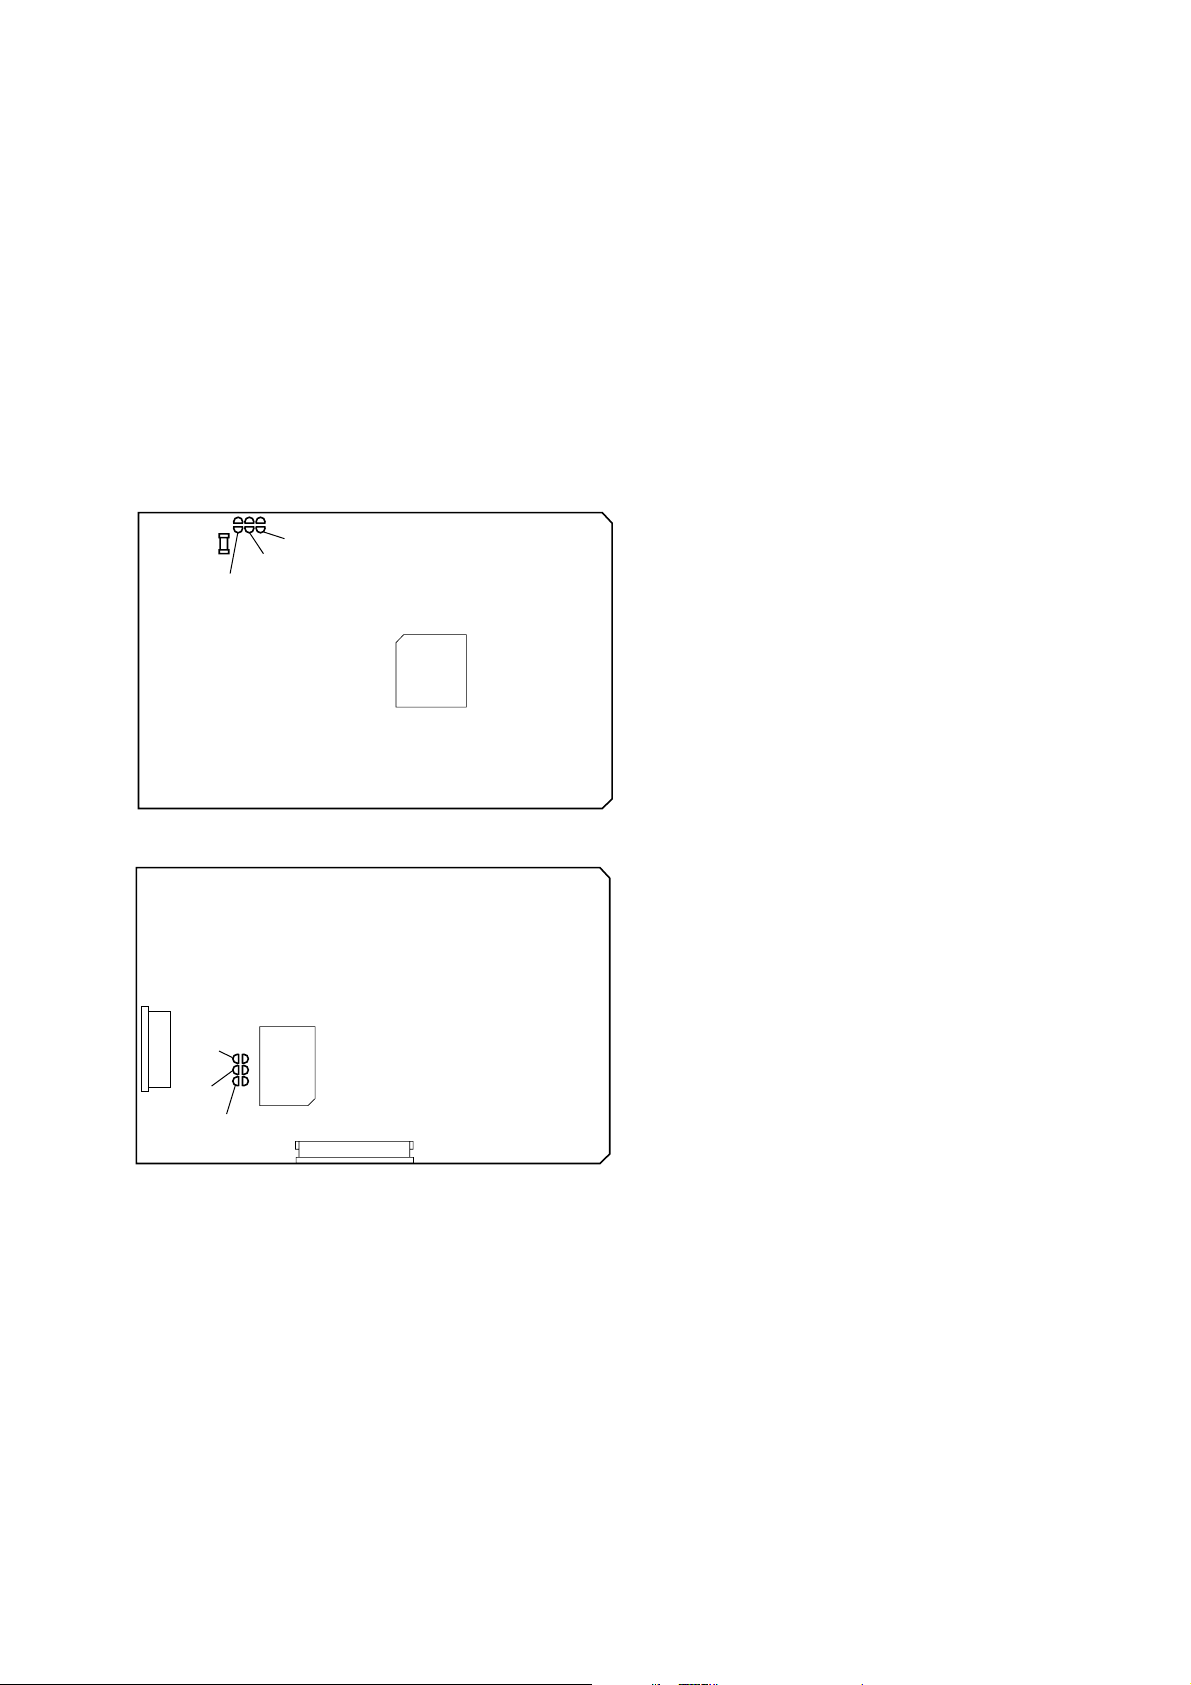
[VIDEO CD Color-bars Mode]
On this mode, the data of the color-bars signal as a picture signal
and the 1 kHz sine wave signal as a sound signal are output by the
mechanism controller (IC502) for the video CD signal check.
When measurement of the voltage and waveform on the VIDEO
board, perform it in this mode.
For reference, the color-bars signal can be observed at J302
(VIDEO OUT) and the sound signal can be observed at J101
(VIDEO/MD (AUDIO) OUT) using an oscilloscope.
Procedure:
1. Connect the lead wire to both ends of the land of SL503 of the
VIDEO board.
2. Turn the power on. Press [FUNCTION] button to select CD.
3. After 2 or 3 seconds later, connect the lead wire.
4. After measuring, remove the lead wire connected.
[VIDEO board] (Side A)
D502
SL501
[VIDEO board] (Side B)
SL503
CN503
SL502
SL501
SL503
SL502
IC502
IC505
CN501
– 15 –
Page 16
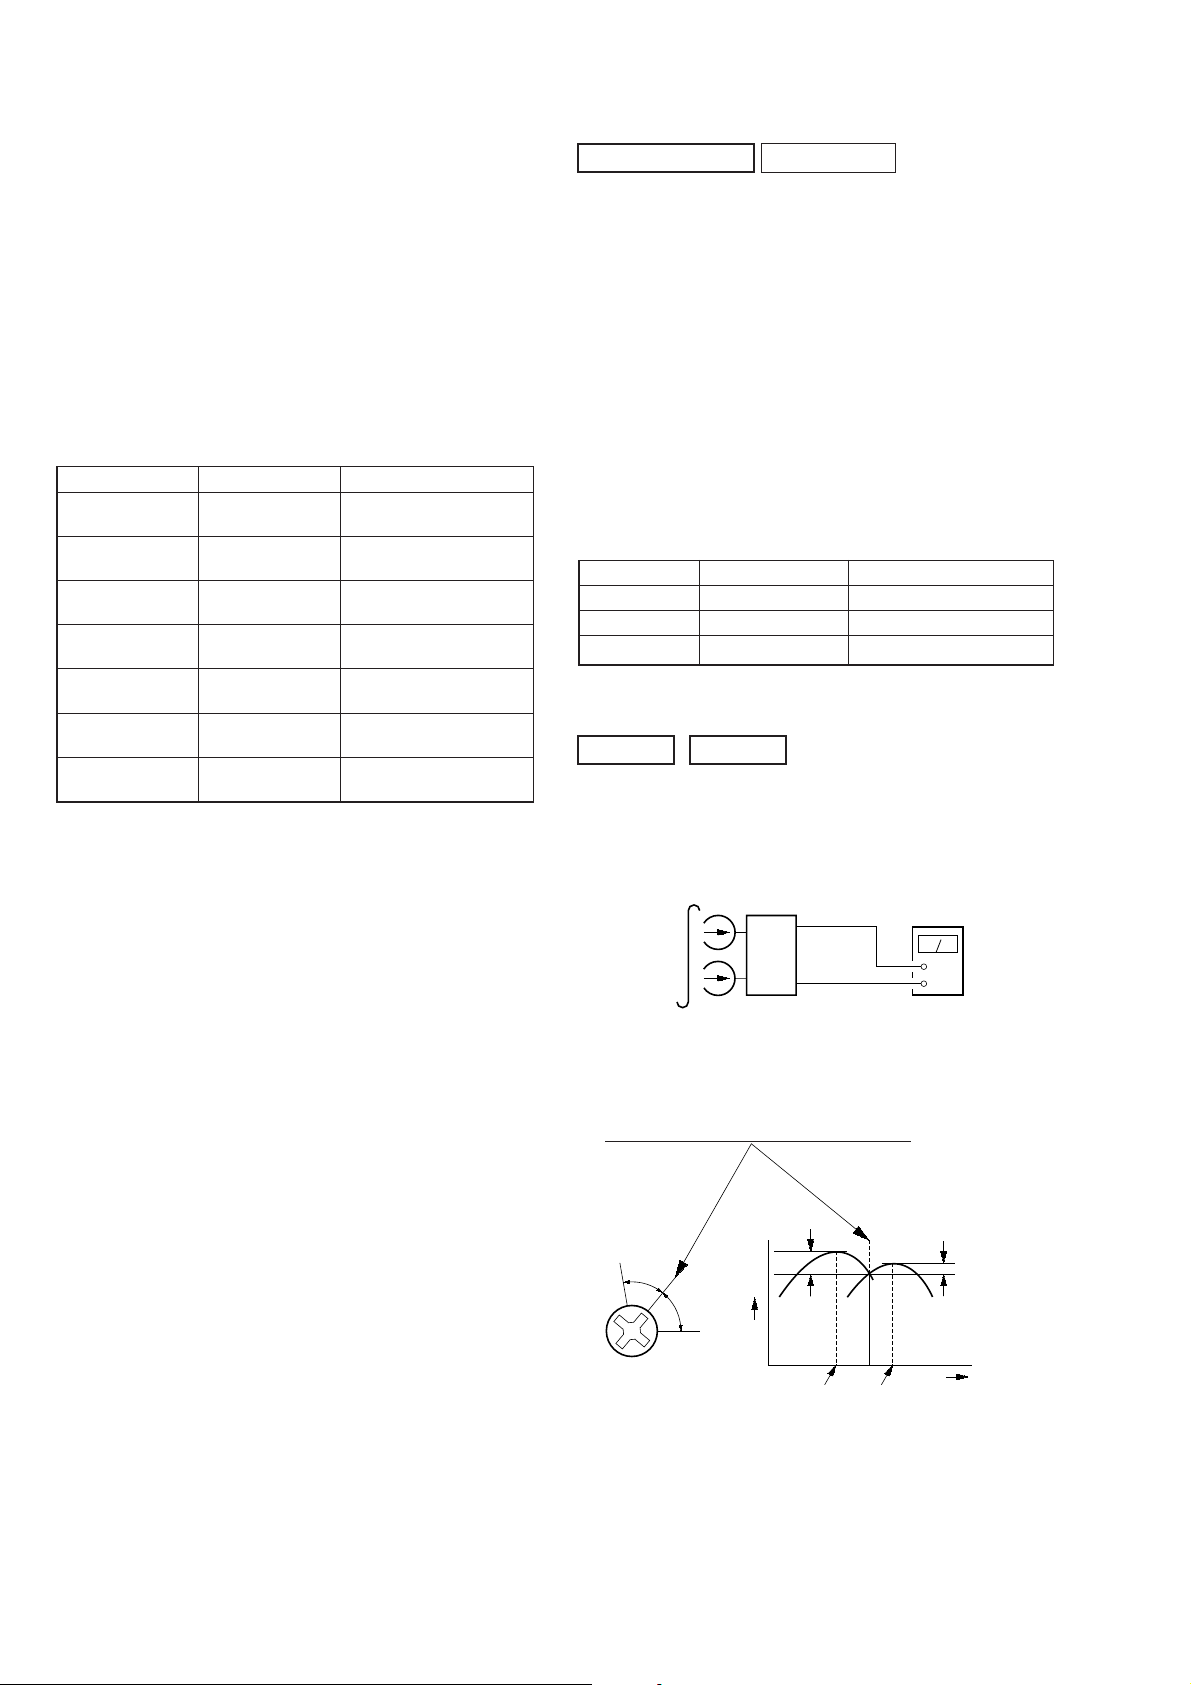
SECTION 5
MECHANICAL ADJUSTMENTS
SECTION 6
ELECTRICAL ADJUSTMENTS
Precaution
1. Clean the following parts with a denatured alcohol-moistened
swab:
record/playback heads pinch rollers
erase head rubber belts
capstan idlers
2. Demagnetize the record/playback head with a head demagnetizer.
3. Do not use a magnetized screwdriver for the adjustments.
4. After the adjustments, apply suitable locking compound to the
parts adjusted.
5. The adjustments should be performed with the rated power
supply voltage unless otherwise noted.
Torque Measurement
Mode Torqu Meter Meter Reading
FWD CQ-102C
FWD
Back Tension (0.02 – 0.08 oz•inch)
REV CQ-102RC
REV
Back Tension (0.02 – 0.08 oz•inch)
FF/REW CQ-201B
FWD tension CQ-403A
REV tension CQ-403R
CQ-102C
CQ-102RC
31 to 71 g•cm
(0.43 – 0.98 oz•inch)
2 to 6 g•cm
31 to 71 g•cm
(0.43 – 0.98 oz•inch)
2 to 6 g•cm
71 to 143 g•cm
(0.98 – 1.99 oz•inch)
100 g or more
(3.53 oz or more)
100 g or more
(3.53 oz or more)
DECK SECTION 0 dB=0.775 V
1. Demagnetize the record/playback head with a head demagnetizer.
2. Do not use a magnetized screwdriver for the adjustments.
3. After the adjustments, apply suitable locking compound to the
parts adjust.
4. The adjustments should be performed with the rated power
supply voltage unless otherwise noted.
5. The adjustments should be performed in the order given in
this service manual. (As a general rule, playback circuit adjustment should be completed before performing recording
circuit adjustment.)
6. The adjustments should be performed for both L-CH and RCH.
7. Switches and controls should be set as follows unless otherwise specified.
• Test Tape
Tape Signal Used for
P-4-A100 10 kHz, –10 dB Azimuth Adjustment
WS-48B 3 kHz, 0 dB Tape Speed Adjustment
P-4-L300 315 Hz, 0 dB Level Adjustment
Record/Playback Head Azimuth Adjustment
DECK A DECK B
Note: Perform this adjustments for both decks
Procedure:
1. Mode: Playback (FWD)
test tape
P-4-A100
(10 kHz, –10 dB)
MAIN board
CN301
1
(L-CH)
Pin
Pin
3
(R-CH)
level meter
set
MAIN board
CN301
Pin
2
(GND)
+
–
2. Turn the adjustment screw and check output peaks. If the peaks
do not match for L-CH and R-CH, turn the adjustment screw
so that outputs match within 1dB of peak.
Output
level
within
1dB
L-CH
peak
R-CH
peak
within
1dB
Screw
position
L-CH
peak
Screw
position
R-CH
peak
– 16 –
Page 17
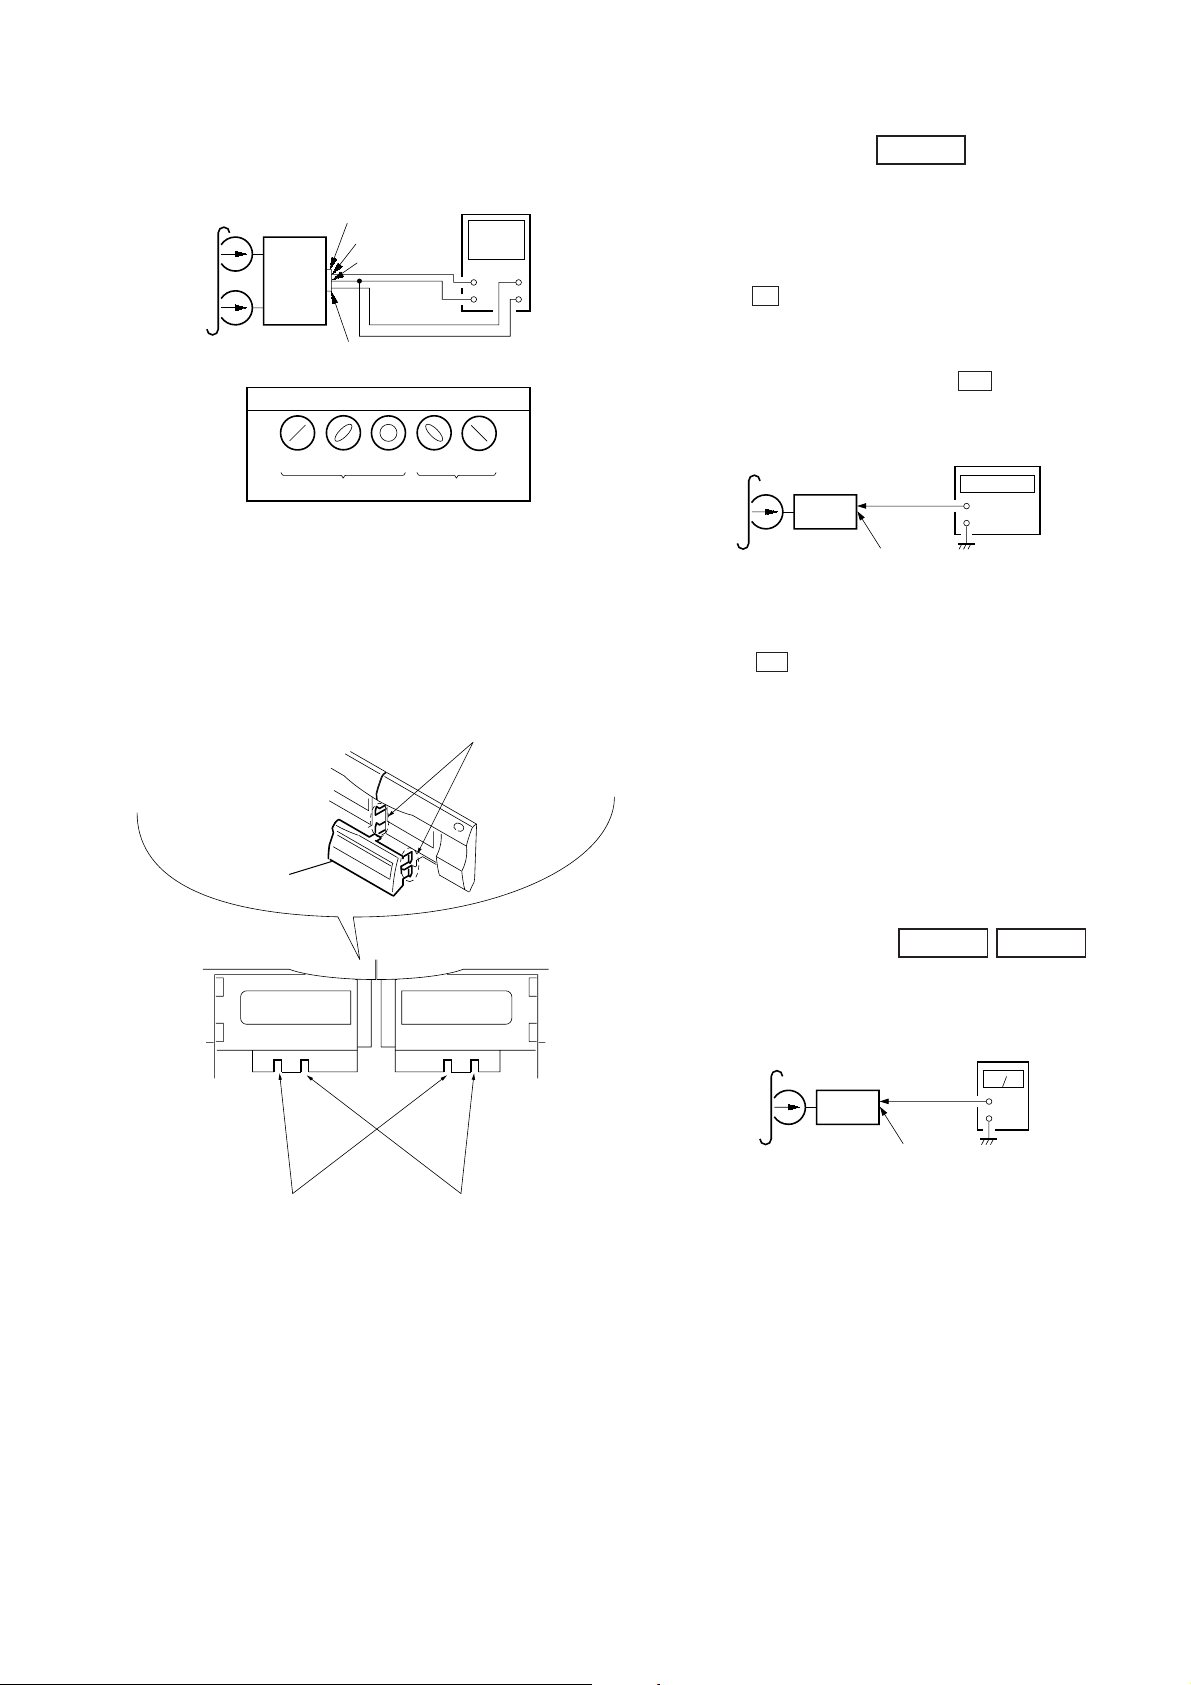
3. Mode: Playback (FWD)
(
)
test tape
P-4-A100
(10 kHz, –10 dB)
set
(pin
waveform of oscilloscope
in phase 45 °90 °135 °180
good
MAIN board
CN301
(pin
1
(pin 2: GND)
3
: R-CH)
: L-CH)
wrong
oscilloscope
H
V
°
Tape Speed Adjustment DECK B
Note: Start the Tape Speed adjustment as below after setting to the test
mode.
In the test mode, the tape speed is high during pressing the
[HI-DUB] button.
Procedure:
1. Turn the power switch on.
2. Press the p button, [ENTER/NEXT] button and [DISC3] button
simultaneously.
(The “VOLUME” on the fluorescent indicator tube will blink
while in the test mode.)
To exit from the test mode, press the I/u button.
Mode: Playback
test tape
WS-48B
(3 kHz, 0 dB)
set
frequency counter
+
–
4. Repeat setps 1 to 3 in playback (REV) mode.
5. After the adjustments, apply suitable locking compound to the
pats adjusted.
Adjustment Location:Playback Head (Deck A).
Record/Playback/Erase Head (Deck B).
1
Remove the four claws
2
Window
MAIN board
CN301 (Pin
1
: L-CH)
Pin 3 : R-CH
1. Insert the WS-48B into the deck B.
2. Press the · button on the deck B.
3. Press the [HI-DUB] button in playback mode.
Then at HIGH speed mode.
4. Adjust RV1001 on the LEAF SW board do that frequency
counter reads 6,000 ± 180 Hz.
5. Press the [HI-DUB] button.
Then back to NORMAL speed mode.
6. Adjust RV1002 on the LEAF SW board so that frequency
counter reads 3,000 ± 90 Hz.
Adjustment Location: LEAF SW board
Sample value of Wow and Flutter: 0.3% or less W.RMS (JIS)
(WS-48B)
Playback level Adjustment
DECK A DECK B
Procedure:
Mode: Playback
test tape
P-4-L300
(315 Hz, 0 dB)
set
level meter
+
–
MAIN board
CN301 (Pin
Reverse Foward
(Pin
1
3
: L-CH)
: R-CH)
Deck A is RV311 (L-CH) and RV411 (R-CH), Deck B is RV301
(L-CH) and RV401 (R-CH) so that adjustment within adjustment
level as follows.
Adjustment Level:
CN301 PB level: 301.5 to 338.3 mV (–8.2 to –7.2 dB) level
difference between the channels: within ± 0.5 dB
Adjustment Location: AUDIO board
– 17 –
Page 18
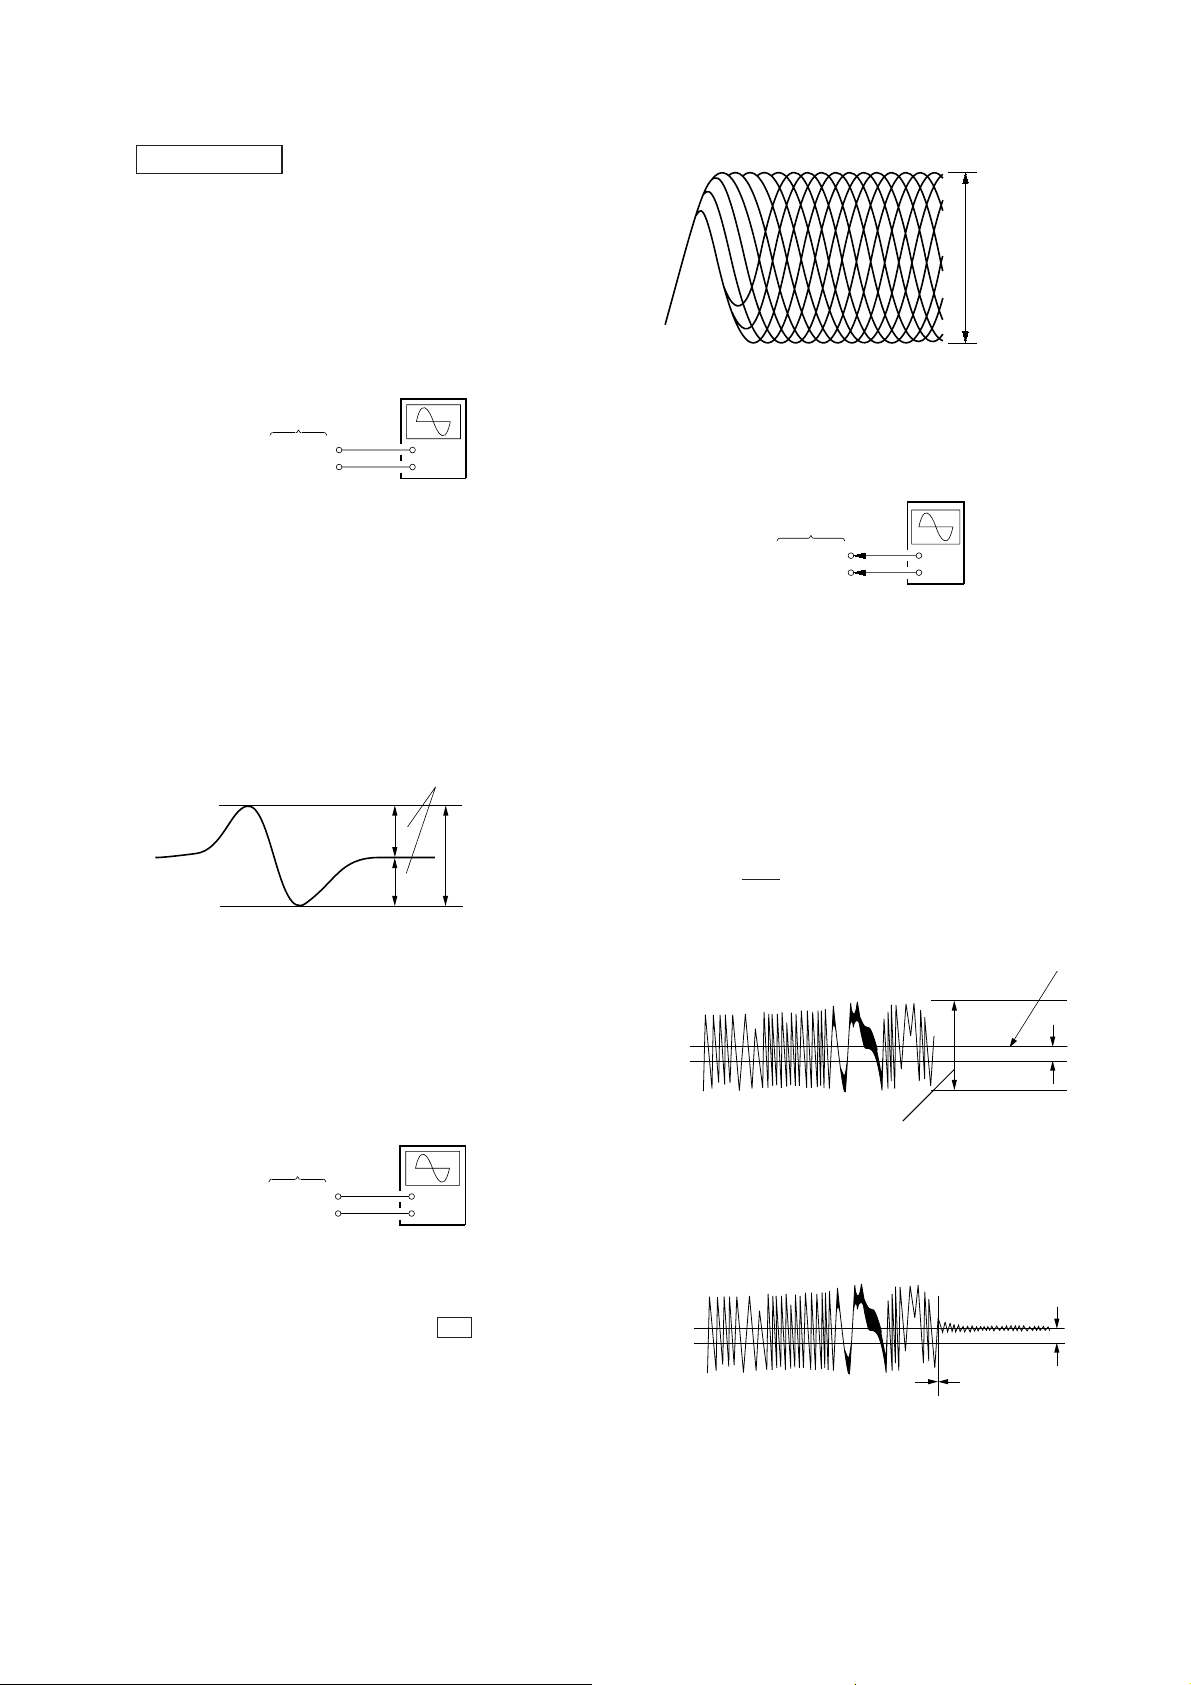
REC Bias Adjustment DECK B
r
r
Procedure:
INTRODUCTION
When set to the test mode performed in T ape Speed Adjustment,
when the tape is rewound after recording, the “REC memory mode”
which rewinds only the recorded portion and playback is set.
This “REC memory mode” is convenient for performing this adjustment. During recording, the input signal FUNCTION will automatically switch to VIDEO.
(After recording, press the – 0 button without stopping will
return to the position where recording was started.)
1. Press [FUNCTION] button to select VIDEO. (This step is not
necessary if the above test mode has already been set.)
2. Insert a tape into deck B.
3. After press [REC] button, press P button, then recording
r
start.
4. Mode: Record
AF OSC
+
–
MD/VIDEO (AUDIO) IN
1) 315 Hz
2) 10 kHz
attenuator
+–+
50 mV (–23.8 dB)
600
Ω
–
set
blank tape
CN-123
4. Mode: Record
MD/VIDEO (AUDIO) IN
AF OSC
+
–
315 Hz, 50 mV (–23.8 dB)
600
attenuator
+–+
–
Ω
blank tape
CS-123
set
5. Mode: Playback
recorded
portion
set
MAIN board
CN301 (Pin
(Pin
level mete
1
: L-CH)
3
: R-CH)
+
–
6. Confirm playback the signal recorded in step 3 become adjustable level as follows.
If these levels do not adjustable level, adjustment the RV301
(L-CH) and R V351 (R-CH) on the MAIN board to repeat steps
4 and 5.
Adjustable level:
CN301 PB level: 47.2 to 53.0 mV (–24.3 to –23.3 dB)
Adjustment Location: MAIN board
5. Mode: Playback
recorded
portion
set
MAIN board
CN301 (Pin
(Pin
level mete
1
: L-CH)
3
: R-CH)
+
–
6. Confirm playback the signal recorded in step 3 become adjustable level as follows.
If these levels do not adjustable level, adjustment the RV341
(L-CH) and RV441 (R-CH) on the AUDIO board to repeat
steps 4 and 5.
Adjustable level: Playback output of 315 Hz to playback output
of 10 kHz: ± 1.0 dB
Adjustment Location: AUDIO board
REC Level Adjustment DECK B
Procedure:
INTRODUCTION
When set to the test mode performed in T ape Speed Adjustment,
when the tape is rewound after recording, the “REC memory mode”
which rewinds only the recorded portion and playback is set.
This “REC memory mode” is convenient for performing this adjustment. During recording, the input signal FUNCTION will automatically switch to VIDEO.
(After recording, press the – 0 button without stopping will
return to the position where recording was started.)
Adjustment Location:
[MAIN Board] (Component Side)
REC LEVEL
[AUDIO Board] (Component Side)
RV441
RV401
RV301
LR
PB LEVEL
– DECK B –
IC602
RV341
RL
REC BIAS
CN601
RV301
L
IC301
RV351
R
RV311
LR
PB LEVEL
– DECK A –
1 3
CN301
RV411
1. Press [FUNCTION] button to select VIDEO. (This step is not
necessary if the above test mode has already been set.)
2. Insert a tape into deck B.
3. After press [REC] button, press P button, then recording
start.
r
[LEAF SW Board] (Component Side)
TAPE SPEED
(NORMAL) (HIGH)
RV1002
RV1001
– 18 –
CN1001
Page 19
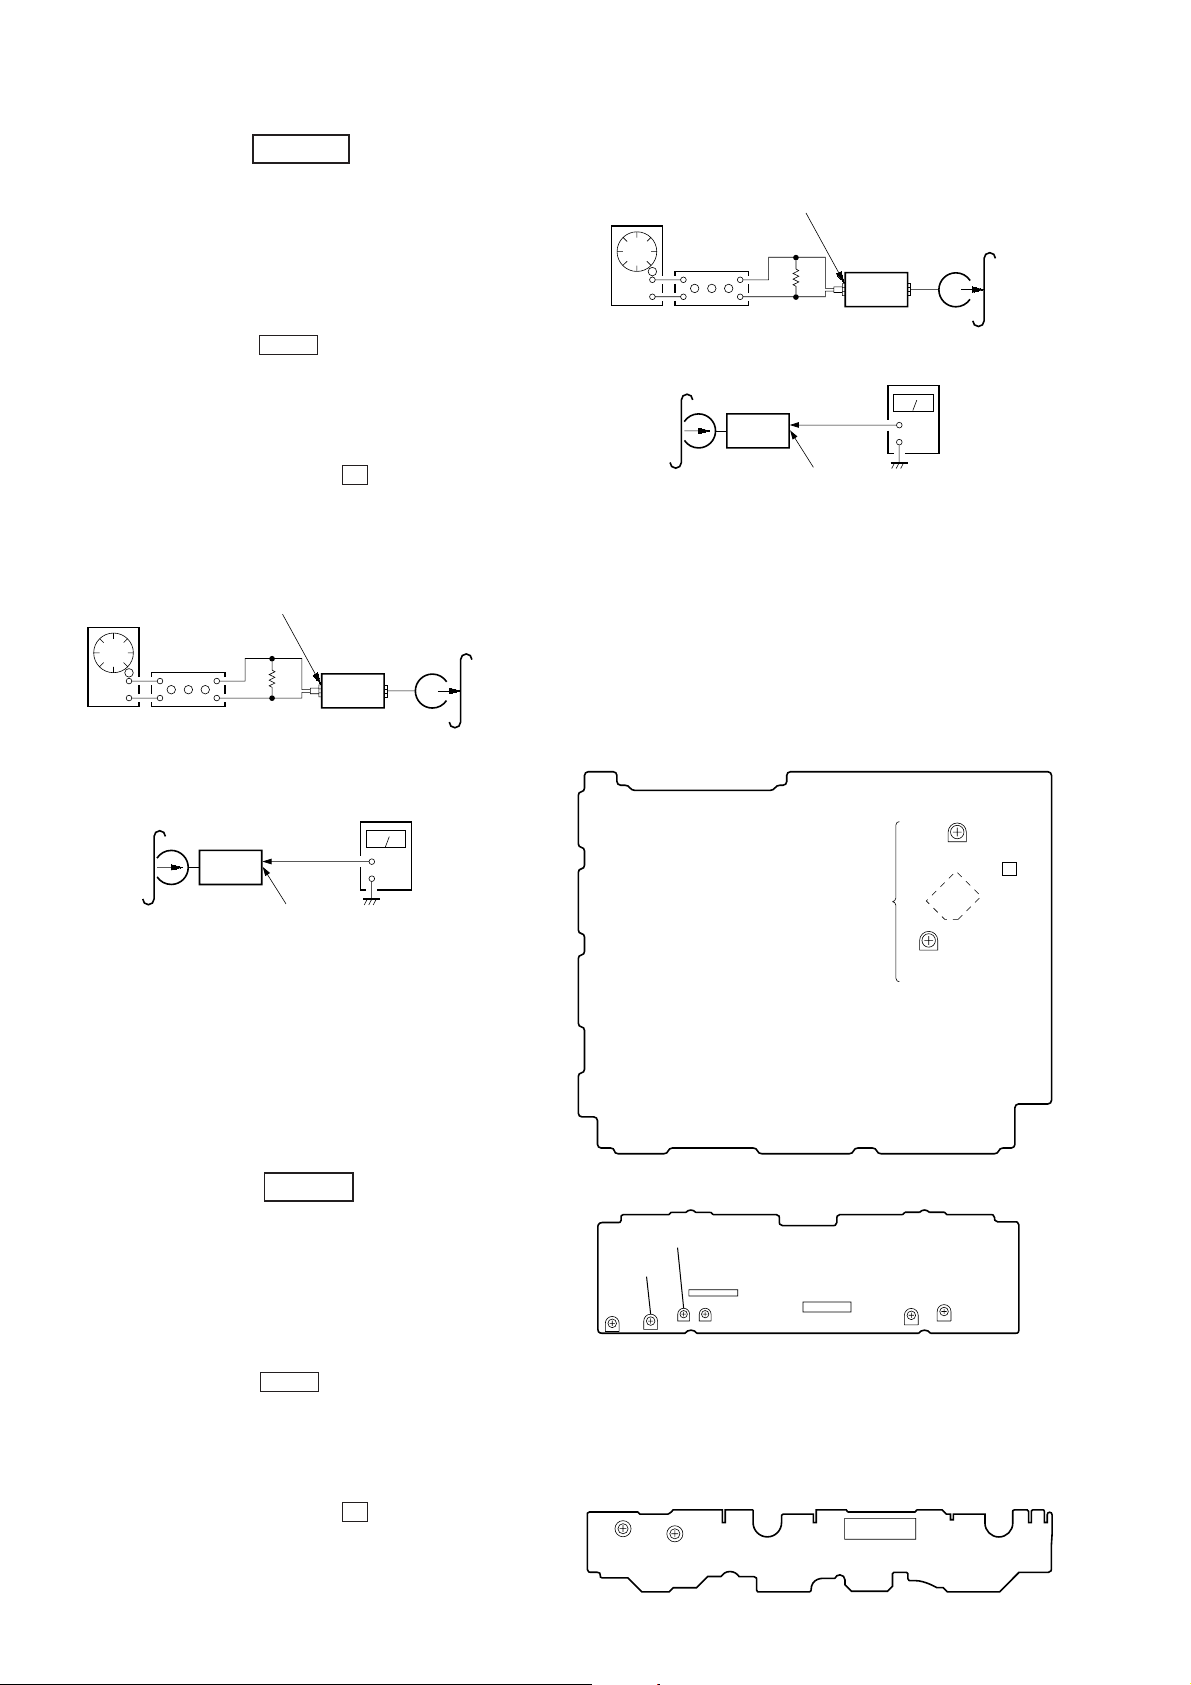
CD SECTION
VOLT/DIV: 200 mV
TIME/DIV: 500 ns
(with the 10: 1 probe
in use)
level: 1.3 Vp-p
+0.25
–0.20
+
–
BD board
TP (TE)
TP (VC)
oscilloscope
C (DC
voltage)
0 V
Tracking servo
Sled servo
OFF
Tracking servo
Sled servo
ON
Notes:
1. CD block basically constructed to operate without adjustment. Therefore, check each item in order given.
2. Use YEDS-18 disc (Part No.: 3-702-101-01) unless otherwise indicated.
3. Use the oscilloscope with more than 10 MΩ impedance.
4. Clean an object lens by an applicator with neutral detergent when the
signal level is low than specified value with the following checks.
S-Curve Check
Connection:
BD board
TP (FE)
TP (VC)
Procedure:
1. Connect the oscilloscope to TP (FE) and TP (VC) on BD board.
2. Connect between test point TP (FOK) and GND by lead wire.
3. Turned power switch on.
4. Put disc (YEDS-18) in and turned power switch on again and
actuate the focus search. (actuate the focus search when disc
table is moving in and out.)
5. Confirm that the oscilloscope waveform (S-curve) is symmetri-
cal between A and B. And confirm peak to peak level within
3.0 ± 1.0 Vp-p.
S-curve waveform
oscilloscope
+
–
symmetry
A
within 3.0 ± 1.0 Vp-p
B
RF signal waveform
When observing the eye pattern, set the oscilloscope for A C range
and raise vertical sensitivity.
E-F Balance (Traverse) check
Connection:
Procedure:
1. Short-circuit SL502 of the VIDEO board to GND.
2. Connect oscilloscope to test point TP (TE) on BD board.
3. Turned Power switch on. Press [FUNCTION] button to select
CD.
4. Put disc (YEDS-18) in to play the number five track.
5. Press the [PLAYMODE] button.
(The tracking servo and the sledding servo are turned OFF.)
6. Check the level B of the oscilloscope’s waveform and the A
(DC voltage) of the center of the Traverse waveform.
Confirm the following:
A
× 100 = less than ± 22 (%)
B
6. After check, remove the lead wire connected in step 2.
Note: • Try to measure several times to make sure tha t the ratio of A : B
or B : A is more than 10 : 7.
• Take sweep time as long as possible and light up the brightness
to obtain best waveform.
RF Level Check
Connection:
oscilloscope
(AC range)
BD board
TP (RF)
TP (VC)
+
–
Procedure:
1. Connect the oscilloscope to TP (RF) and TP (VC) on BD board.
2. Turned power switch on.
3. Put disc (YEDS-18) in and press the fl button.
4. Confirm that the oscilloscope waveform is clear and check RF
signal level is correct or not.
Note: Clear RF signal waveform means that the shape “≈” can be clearly
distinguished at the center of the waveform.
Traverse waveform
Center of the waveform
B
0 V
level: 1.3 ± 0.6 Vp-p
A (DC
voltage)
7. Press the [PLAYMODE] button. (The tracking serv o and sledding servo are turned ON.) Confirm the C (DC voltage) is almost equal to the A (DC voltage) is step 6.
Traverse waveform
8. Desolder the short-land (SL502) short-circuited at step 1.
– 19 –
Page 20
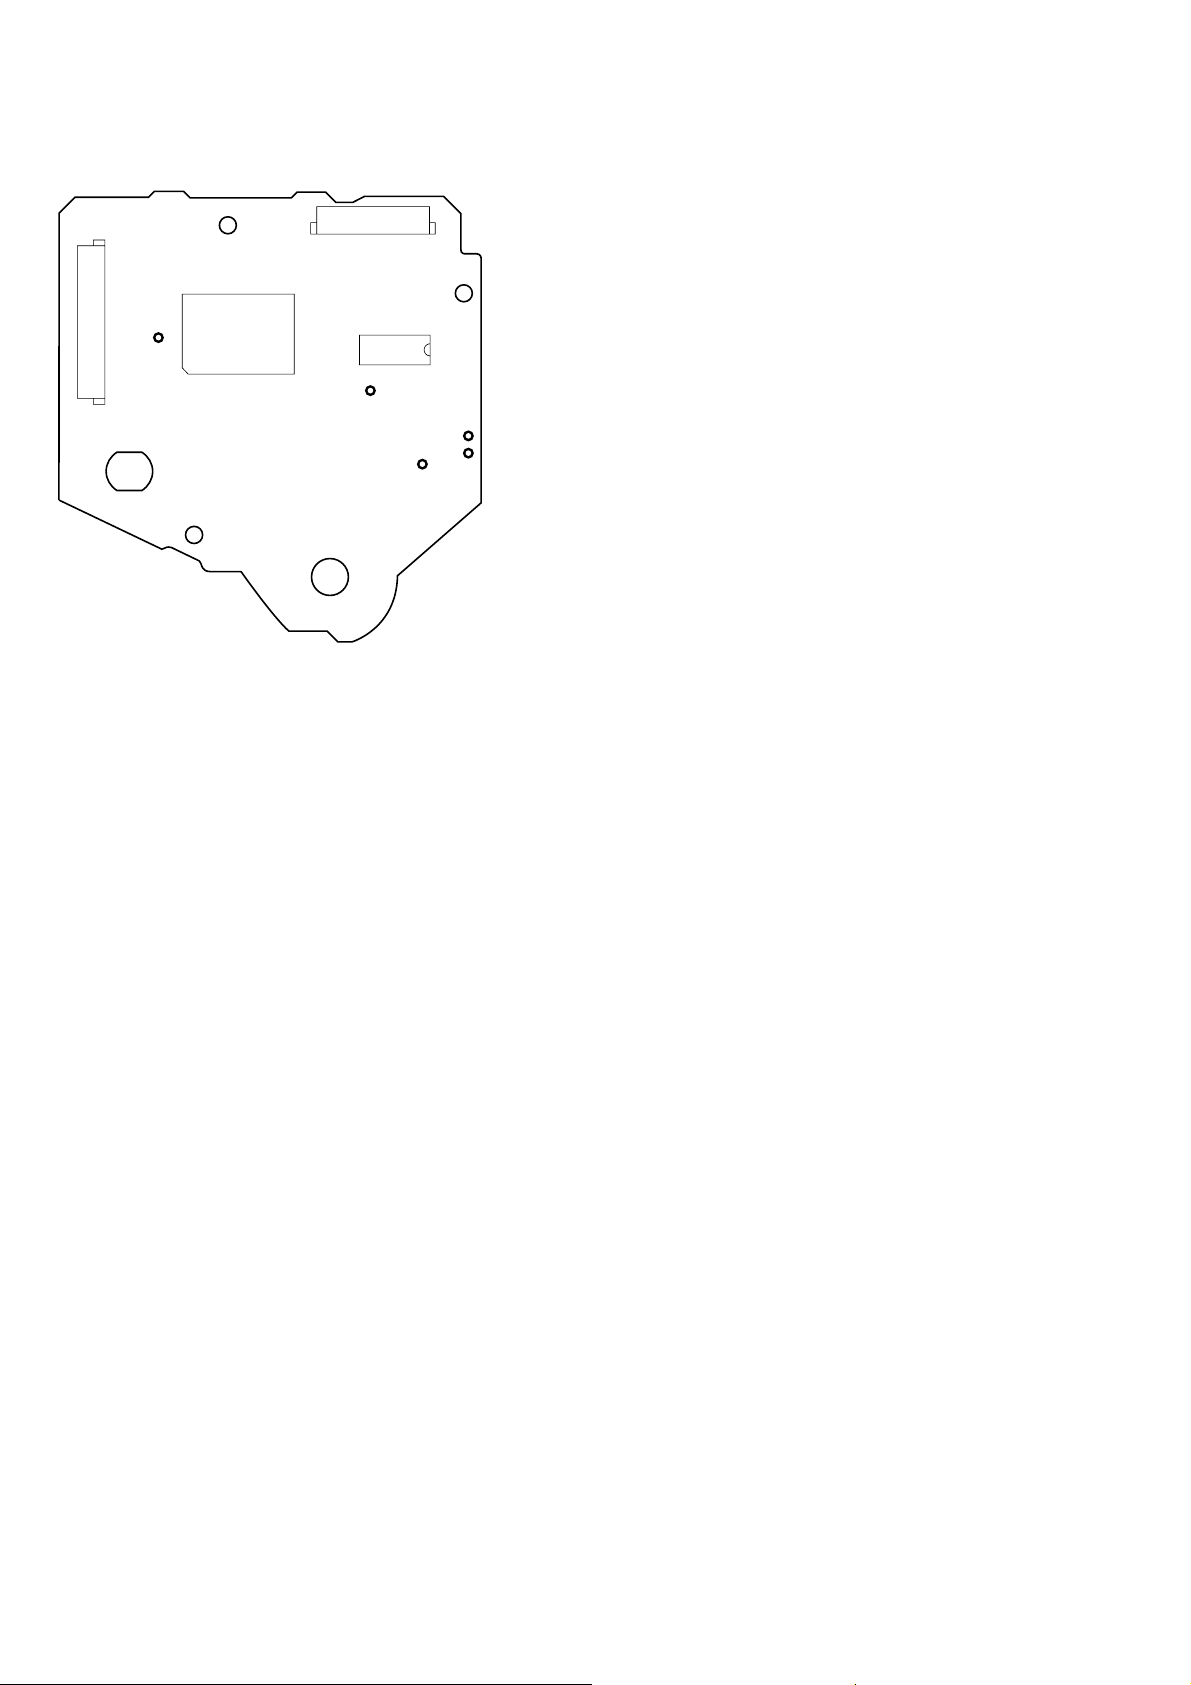
Connection Location:
)
[BD Board] (Side A)
CN102
CN101
TP
(FOK)
IC101
TP
(TE)
IC103
TP (RF)
TP (VC
TP
(FE)
– 20 –
Page 21
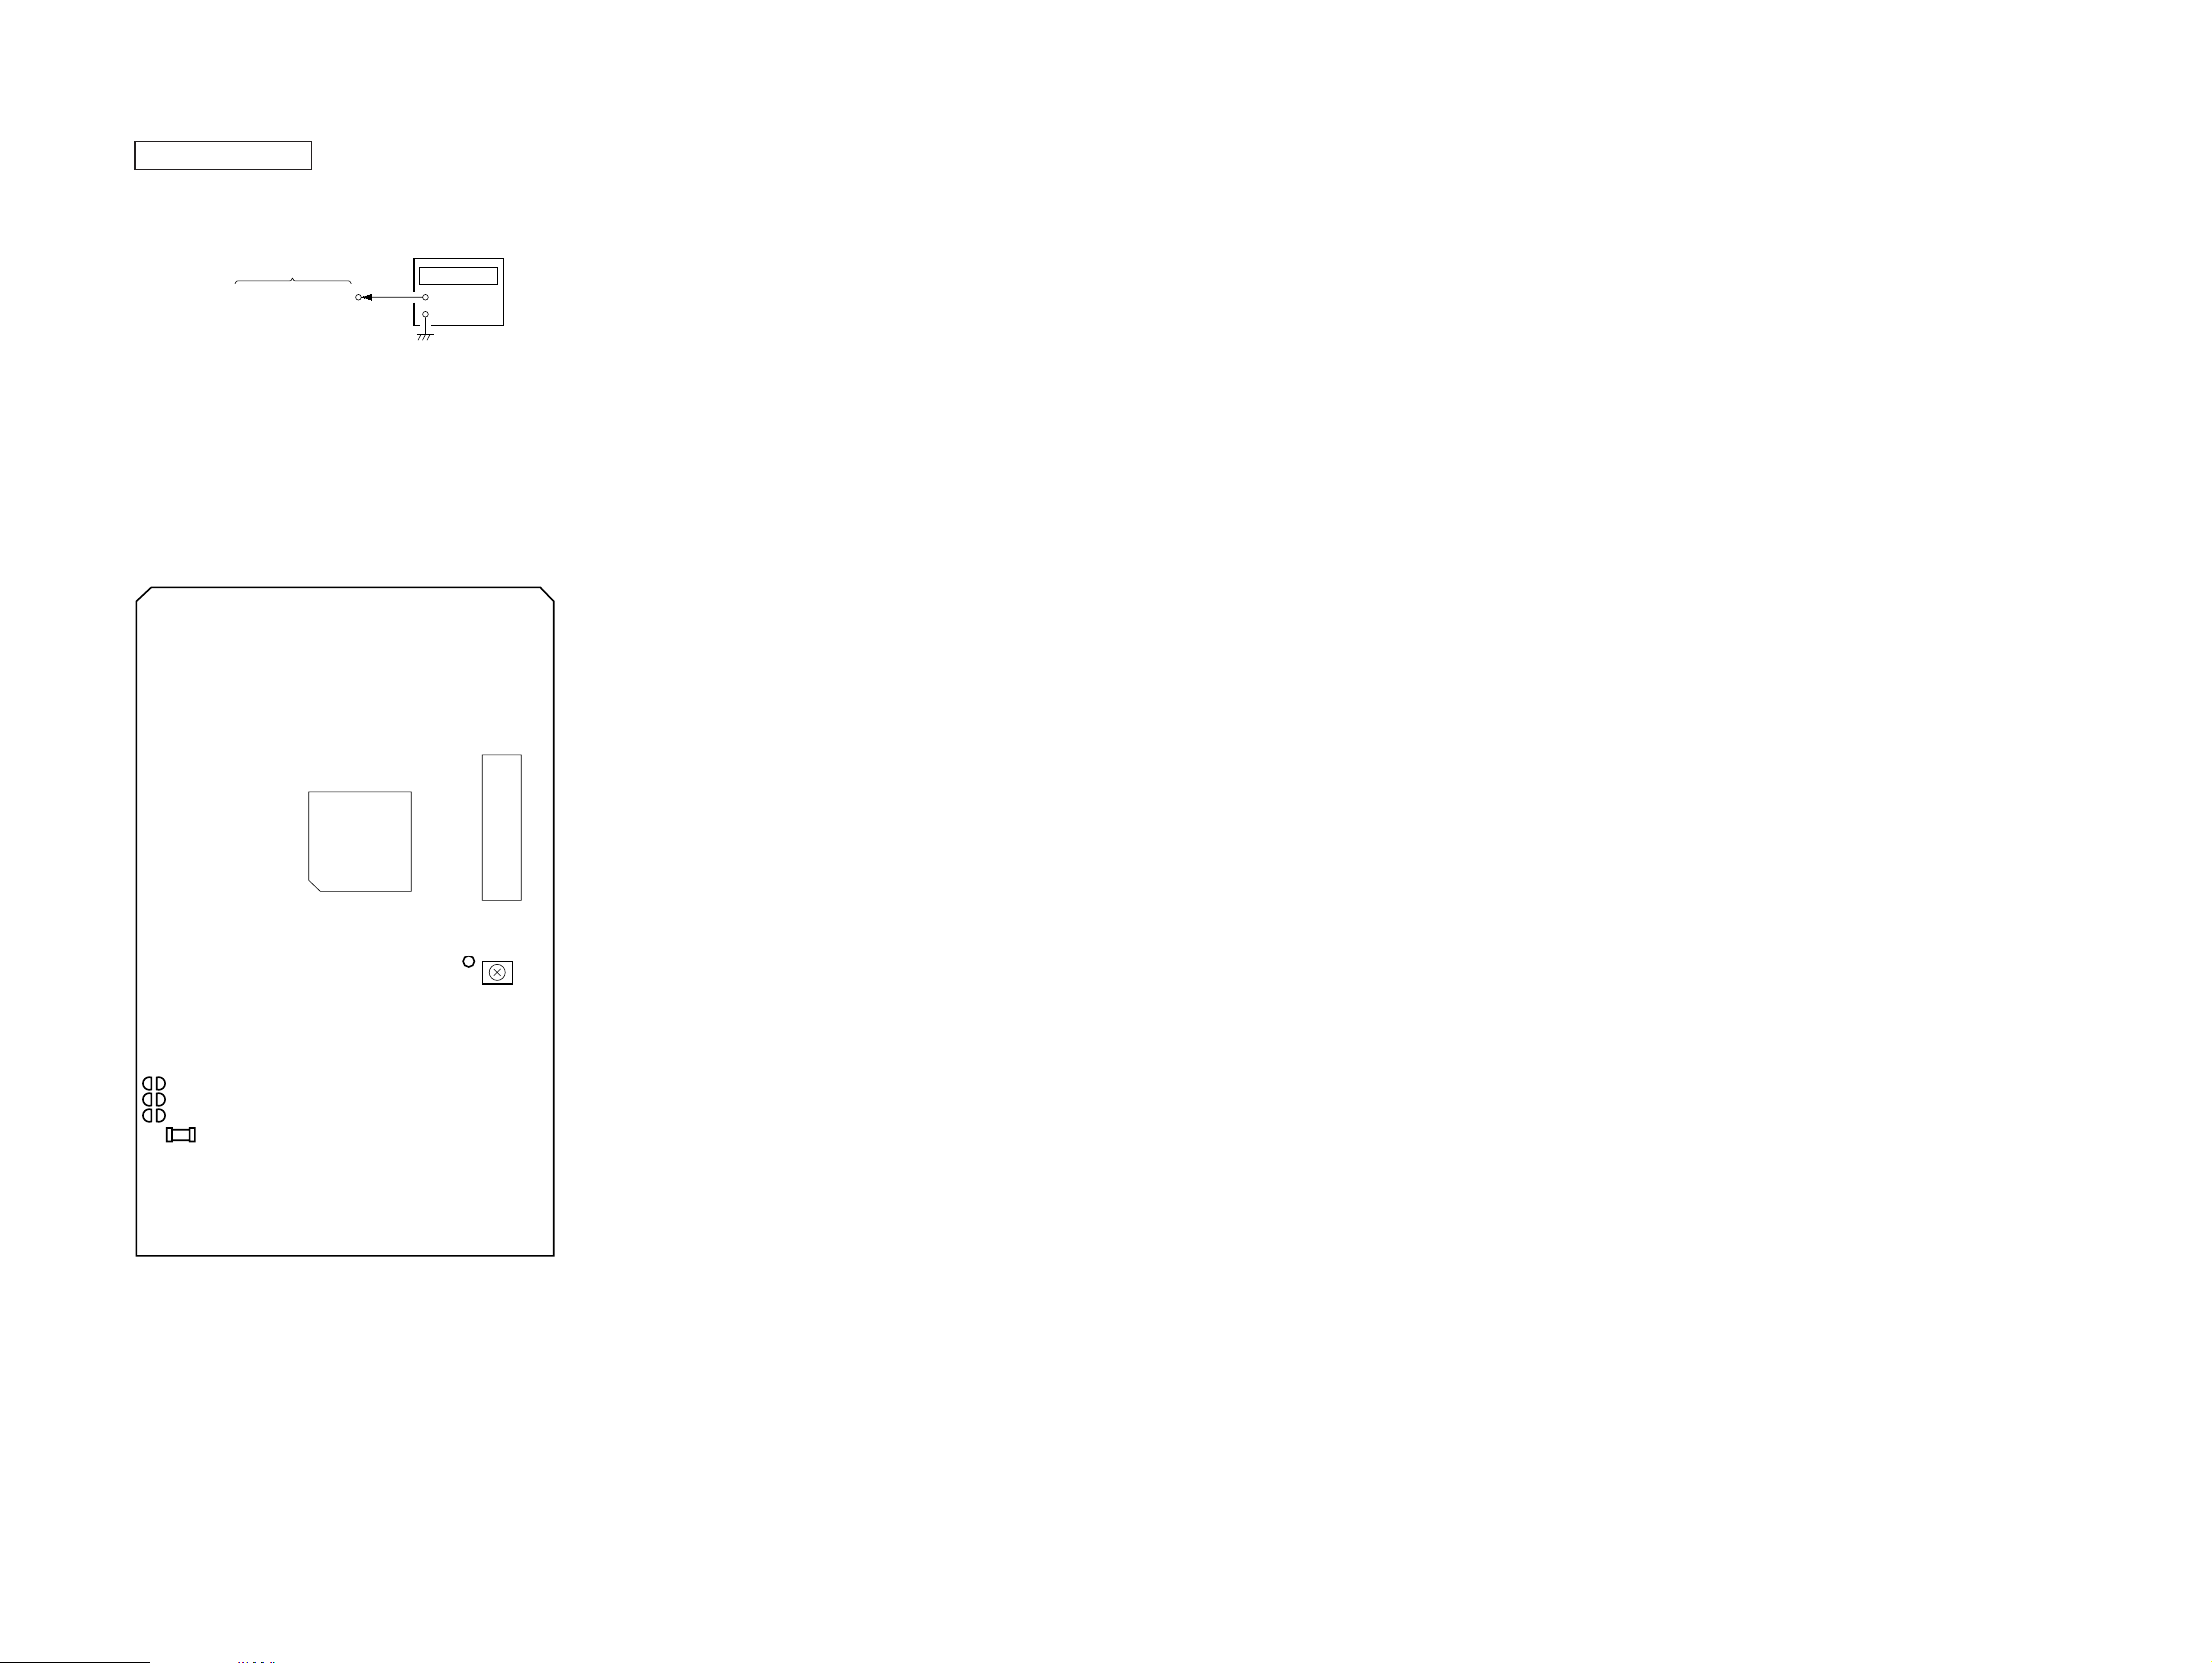
VIDEO SECTION
Frequency Adjustment
Connection:
VIDEO board
TP508 (27 MHz)
frequency counter
+
–
Procedure:
1. Connect the frequency counter to TP508 (27 MHz) on VIDEO
board.
2. Turned power switch on.
3. Press the [FUNCTION] button to select the CD.
4. Adjust CT503 on the VIDEO board so that the frequency
counter reading 27.0 MHz ± 80 Hz at stop status.
Adjustment Location:
[VIDEO Board] (Side A)
IC507
IC505
TP508
(27 MHz)
CT503
VIDEO
Frequency
Adjustment
– 21 –
Page 22
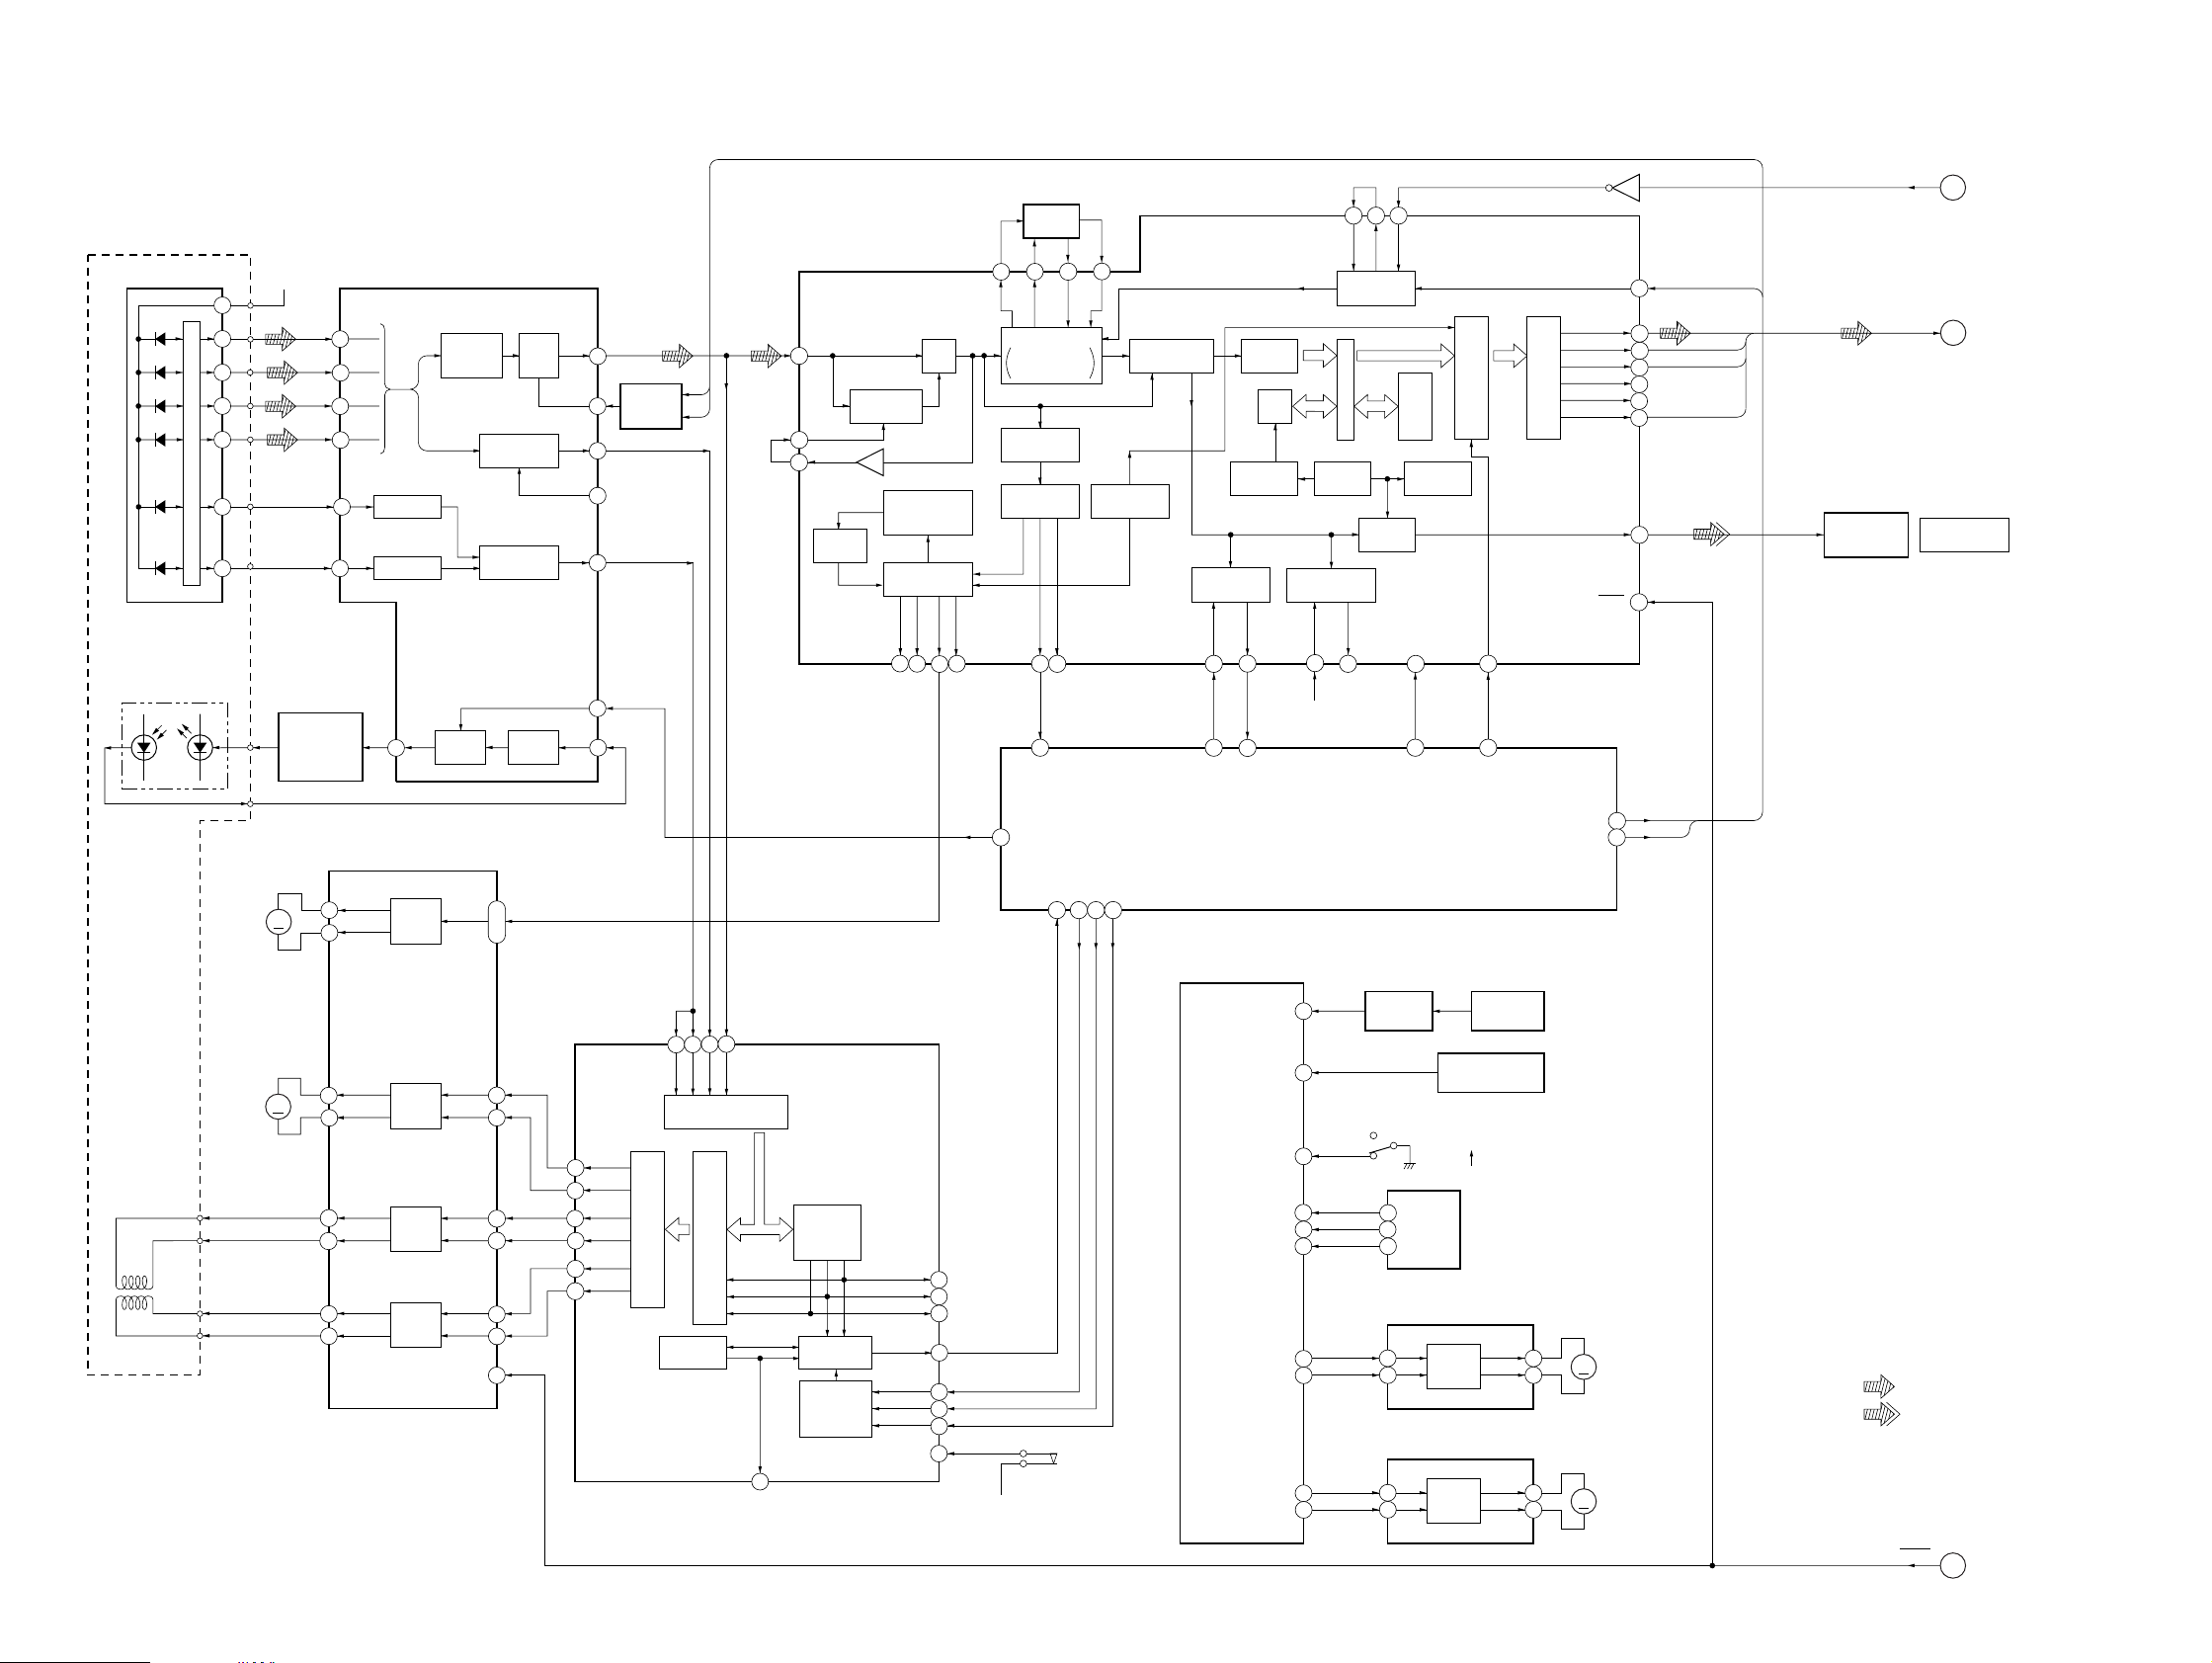
HCD-V919AV
SECTION 7
DIAGRAMS
7-1. BLOCK DIAGRAM – SERVO Section –
FOCUS/TRACKING ERROR AMP
A
3
B
4
C
5
D
6
F
F I-V AMP
8
E
9
E I-V AMP
LD
1
FOCUS/TRACKING COIL DRIVE,
SPINDLE/SLED MOTOR DRIVE
IC102
OUT+
MOTOR
OUT–
DRIVE
OUT+
MOTOR
OUT–
DRIVE
OUT–
COIL
OUT+
DRIVE
OUT+
COIL
OUT–
DRIVE
OPTICAL PICK-UP
(KSS-213D/Q-NP)
2-AXIS
DEVICE
(TRACKING)
(FOCUS)
05
DETECTOR
A
B
C
D
F
E
LASER DIODE
PD
I-V AMP
10
LD
(SPINDLE)
7
4
2
1
5
6
M101
(SLED)
M102
A+5V
AUTOMATIC
M
M
POWER
CONTROL
Q101
27
26
13
12
2
1
16
17
RF AMP,
IC103
RF
SUMMING
AMP
APC LD
AMP
IN+
IN–
IN–
IN+
IN–
IN+
MUTE
FOCUS
ERROR AMP
TRACKING
ERROR AMP
APC PD
AMP
IN+, IN–
23, 24
9
10
4
5
19
20
15
RF EQ
AMP
RFO
RFE
FE BIAS
LDON
100
10
IC104
6320
FILTER
32
34
33
MDP
MDS
97
31
FILO
DIGITAL PLL
VARI-PITCH
DOUBLE SPEED
PROTECTOR
TIMING
GENERATOR 1
28
LDON
A+5V
PCO
SYNC
SCOR
74
18
S101
(LIMIT)
WFCK
73
SCOR
1
CLTV
SENSE
3
FILI
TIMING
GENERATOR 2
DSP LATCH
DSP CLK
DSP DATA
4
5
EFM
DEMODULATOR
SYSTEM CONTROLLER
ADDRESS
GENERATOR
SUBCODE Q
PROCESSOR
SUBQ
SQCK
77
78
37
36
SUBQ CLK
IC501 (1/3)
DISC-SENS
TBL-SENS
OUT-OPEN
LOAD-OUT
REGISTER
32K
RAM
SUBQ DATA
CD MECHANISM
ENC1
ENC2
ENC3
LOAD-IN
TBL-L
TBL-R
PRIORITY
ENCODER
SUBCODE P – W
PROCESSOR
EXCK
76
D+5V
CONTROLLER
IC502 (1/2)
75
76
81
80
79
78
63
64
60
61
DIGITAL SIGNAL PROCESSOR
IC101 (1/2)
16
RF EQ
SWITCH
17
Q102, 103
FE
15
14
TE
13
19
PD
2
SFDR
SRDR
2
TFDR
4
TRDR
6
FFDR
8
FRDR
CTL1
CTL2
26
29
28
27
FE
TE
SE
RFDC
A/D
CONVERTER
PWM GENERATOR
FOCUS/TRACKING/SLED
SERVO DSP
FOCUS/TRACKING/SLED
SERVO
INTERFACE
COUT
89
RFAC
36
ASYI
38
ASYO
39
NOISE
SHAPER
DIGITAL SERVO
PROCESSOR
MIRR/DFCT/
FOK
DETECTOR
SERVO AUTO
SEQUENCER
CPU
INTERFACE
ASYMMETRY
CORRECTOR
IC101 (2/2)
MIX
18-TIMES
OVERSAMPLING
FILTER
CLV
PROCESSOR
MON
FSW
94
95
96
FOK
93
MIRR
91
DFCT
92
SENS
80
DATA
86
CLOK
88
XLAT
87
99
SSTP
62
XTAI
VCKI
XTAO
CLOCK
GENERATOR
INTERNAL BUS
SBSO
75
ERROR
CORRECTOR
PEAK
DETECTOR
DIGITAL
OUT
SCLK
83
2
SENSE CLK
LEVEL SHIFT
Q701
DISC TRAY SENSOR
(OPEN/CLOSE DET)
4
ROTARY
2
ENCODER
S811
3
DISC TRAY SLIDE MOTOR DRIVE
10
DISC TRAY TURN MOTOR DRIVE
IC801
FIN
MOTOR
RIN
DRIVE
2
IC701
IN1
3
MOTOR
IN2
DRIVE
6
D/A DIGITAL
PROCESSOR
MUTE
79
10
DISC SENSOR
IC702
S801
CLOSE
OPEN
DSP MUTE
IC703
OUT1
OUT2
OUT1
OUT2
PROCESSOR
SERIAL/PARALLEL
CTRL1
CTRL2
7
M
4
7
M
2
XTSL
64
DATA
46
BCLK
47
LRCK
45
GFS
54
RFCK
55
C2PO
56
DOUT
71
81
XRST
CTL1
11
CTL2
27
M801
(DISC TRAY SLIDE)
M701
(DISC TRAY TURN)
CTL1
DATA
BCK
LRCK
C2PO
TRANSCEIVER
MCLK
33.8MHz
DATA, BCK,
LRCK, C2PO
OPTICAL
IC391
• SIGNAL PATH
: CD PLAY
: DIGITAL OUT
(Page 25)
A
(Page 25)
B
CD DIGITAL OUT
OPTICAL
– 23 – – 24 –
RESET
C
(Page 26)
Page 23
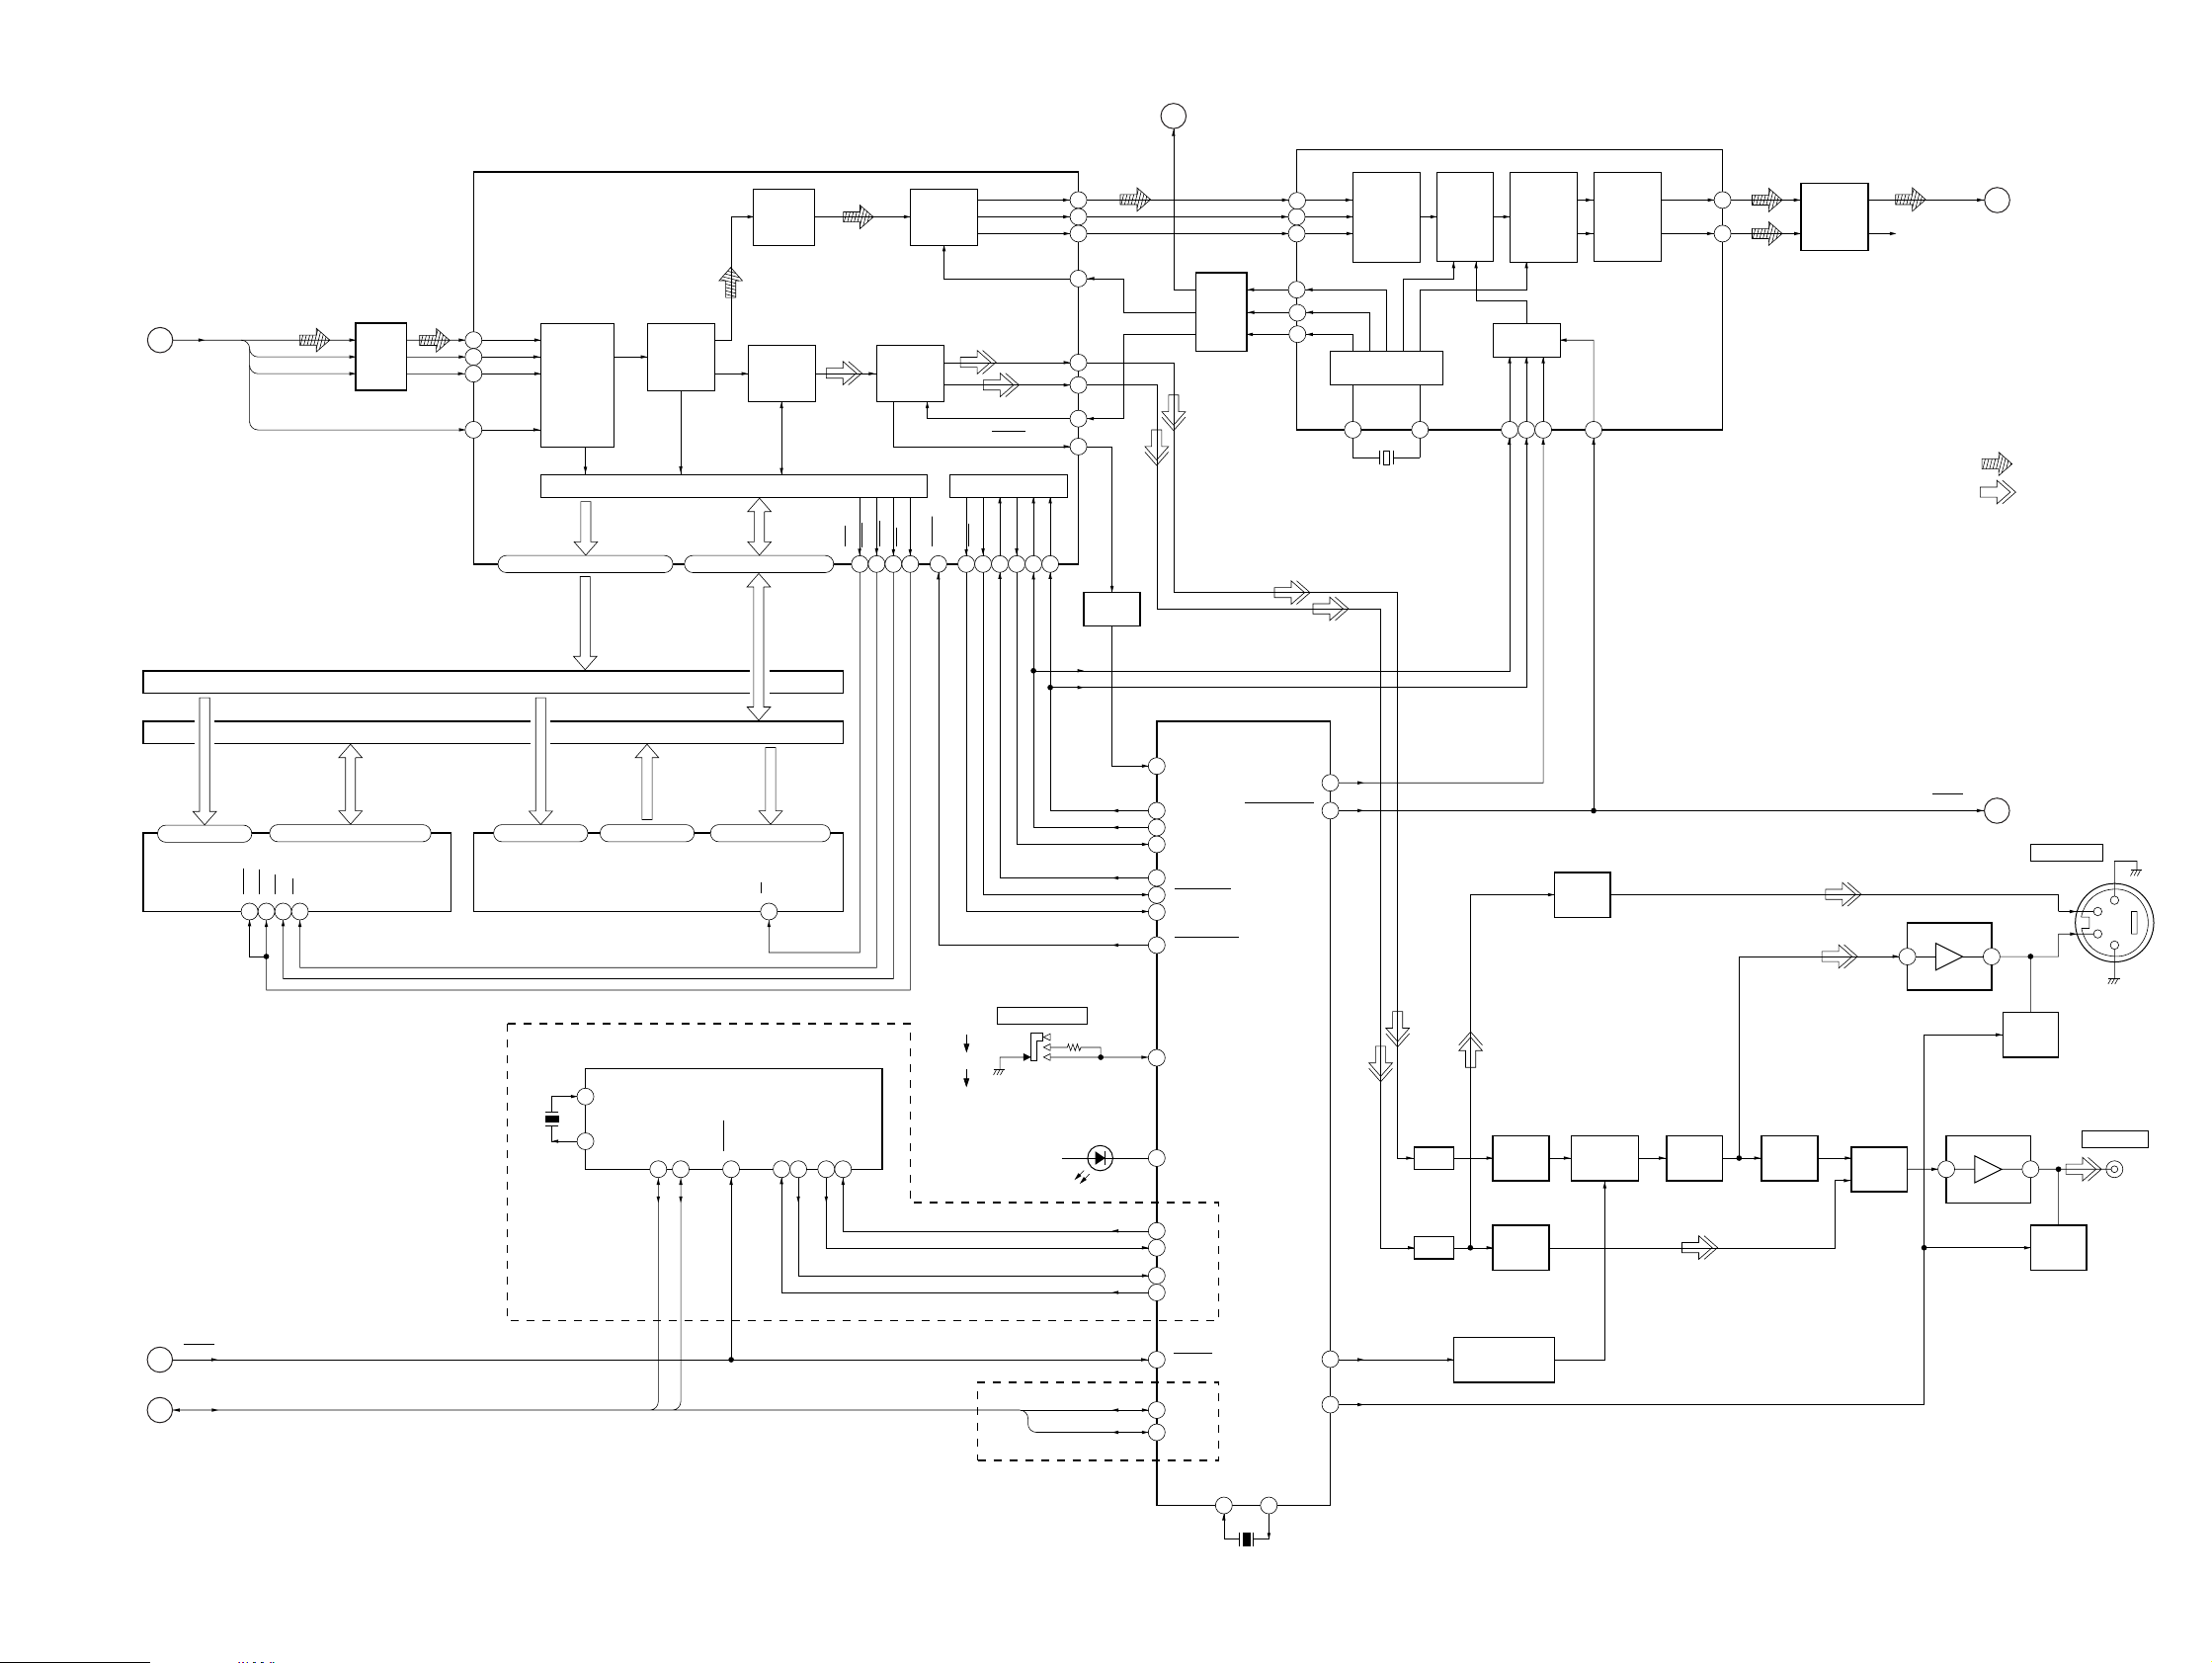
HCD-V919AV
7-2. BLOCK DIAGRAM – AUDIO/VIDEO CD Section –
MPEG VIDEO/AUDIO DECODER,
VIDEO SIGNAL PROCESSOR
IC505
DATA, BCK,
B
(Page 24)
LRCK, C2PO
DATA
BCK
LRCK
C2PO
LEVEL
SHIFT
IC501
CD-DATA
4
CD-BCK
3
CD-LRCK
5
CD-C2PO
6
ADDRESS BUS
CD-ROM
INTERFACE
CIRCUIT
MA0 – MA10
58 – 56, 54, 52 – 50, 48, 46 – 44 10 – 15, 17, 19, 21, 23 – 29
A0 – A10
MPEG
SYSTEM
DECODER
D-RAM/ROM INTERFACE
MD0 – MD15
MPEG
AUDIO
DECODER
MPEG
VIDEO
DECODER
D0 – D15
MCE
37
VIDEO
PROCESS
CIRCUIT
RAS0
MWE
38 42 40
AUDIO
INTERFACE
CIRCUIT
CAS
60
DA-DATA
DA-LRCK
DA-XCLK
PGIO2/VSYNC/CSYNC
CPU INTERFACE
HRDY
HSEL
HD-OUT
HINT
RESET
113
114 121
112
DA-BCK
Y-OUT
C-OUT
VCK-IN
HD-IN
119
117
HCK
(Page 24)
A
MCLK
33.8MHz
110
111
108
86
69
75
106
93
BUFFER
Q502
DATA
CLK
OSC
BUFFER
IC504
DATA
18
BCK
17
LRCK
19
768FSO
21
384FSO
20
MCKO
4
INPUT
INTERFACE
CIRCUIT
TIMING CONTROL/
CLOCK GENERATOR
XT2
X503
27MHz
XT1
DIGITAL FILTER,
D/A CONVERTER
DIGITAL
FILTER,
NOISE
SHAPER
CIRCUIT
IC509
D/A
CONVERTER
MODE
CONTROL
MC
MD
9 724 1
8
(Page 29)
R-CH
CD-L
• SIGNAL PATH
E
VOUTL
LOW-PASS
FILER
ML
RSTB
10
VOUTR
14
11
LOW-PASS
FILER
IC101
: CD PLAY (AUDIO)
: CD PLAY (VIDEO)
16 – 19, 22 – 26
D-RAM
IC507
(Page 30)
D
F
(Page 29)
A0 – A8
A0 – A8
RESET
DATA, CLK
05
UCAS
LCAS
14 132928
RAS
DQ1 – DQ16
WE
D0 – D15
DATA BUS
PROGRAM ROM
A0 – A10
12 – 5, 27, 26, 23
A0 – A10
IC506
X401
8MHz
FORMER TYPE
BUS
45
D0 – D7
13 – 15, 17 – 212 – 5, 7 – 10, 31 – 34, 36 – 39
O0 – O7
XIN
19
XOUT
20
12C.DATA
14 13
DATA
12C.CLK
CLK
D8 – D14
25, 4, 28, 29, 3, 2, 30
A11 – A17
22
EXPANSION
IC402
RESET
CLK1
33
DATA1O
31
32
DATA1I
CL680 SEL
CE
S501
SYSTEM SELECT
NTSC
AUTO
PAL
D502
RXD
UTAU
TXD
UTAI
10918
1112
NEW TYPE
(SELF DIAGNOSIS)
DATA
CLK
21
20
CL680 HINT
CL680 HRDY
23
24
CL680 RESET
CD MECHANISM CONTROLLER
93
NT/PAL
TEST LED
73
72
UTOI
19
ITOU
29
RXD
30
TXD
12
XRESET
29
CLK
DATA
30
DEVICE RESET
IC502 (2/2)
SHARPNESS
XIN
DF LATCH
VMUTE
XOUT
1315
22
77
VIDEO
BUFFER
Q303
B.P.F.
B.P.F.
34
65
VIDEO
BUFFER
Q301
VIDEO
BUFFER
Q304
SHARPNESS
CONTROL SWITCH
Q306
SHARPNESS
FILTER
Q302
VIDEO
BUFFER
Q307
VIDEO
BUFFER
Q308
Y/C MIX
Q310
RESET
VIDEO AMP
IC401 (1/2)
VIDEO AMP
IC401 (2/2)
(Page 24)
C
13
S VIDEO OUT
C
Y
VIDEO
MUTE
Q453
75
VIDEO
MUTE
J301
Q454
1
3
4
2
J302
VIDEO OUT
– 25 –
X501
10MHz
– 26 –
Page 24
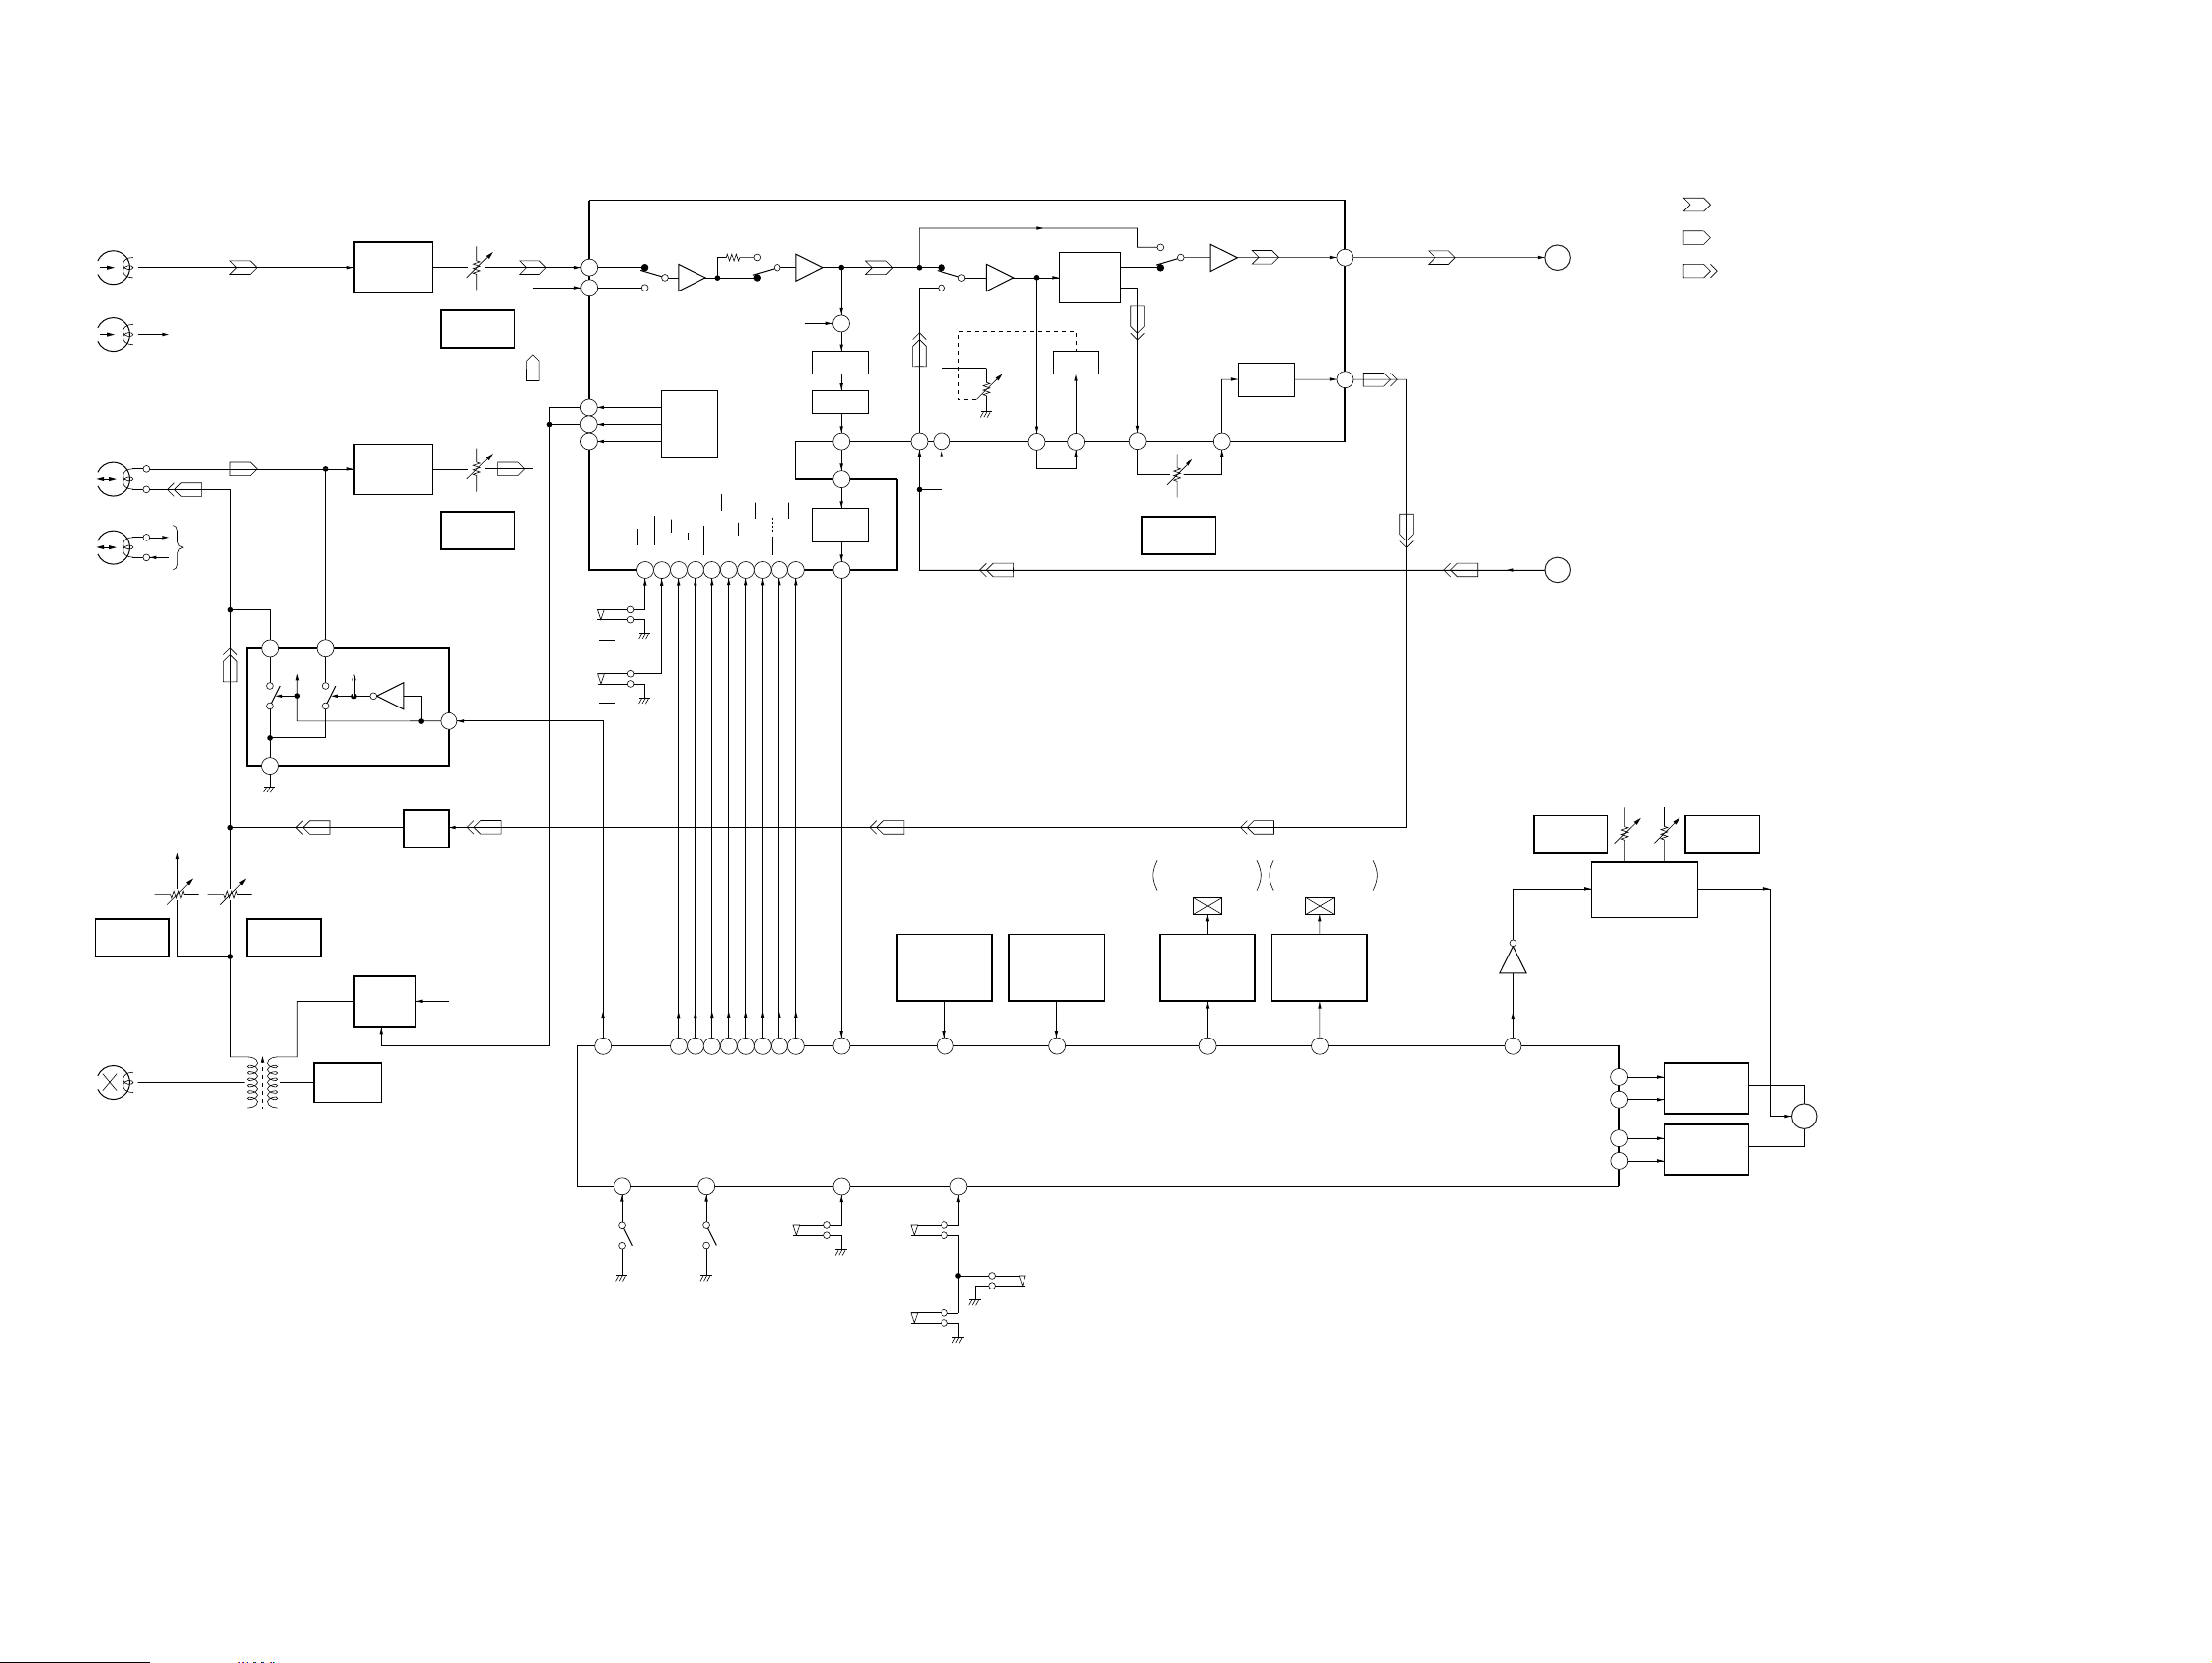
HCD-V919AV
7-3. BLOCK DIAGRAM – TAPE DECK Section –
HP101
(PLAYBACK)
L-CH
R-CH R-CH
HRPE101 (1/2)
(RECORD/PLAYBACK)
L-CH
R-CH R-CH
3
R-CH
PB EQ AMP
(DECK A)
IC611
PB EQ AMP
(DECK B)
IC601
REC/PB SWITCHING
IC602
1
R-CH
RV311
PB LEVEL (L)
(DECK A)
RV301
PB LEVEL (L)
(DECK B)
4
DECK PROCESS
DECK A/B SELECT, PB/REC EQ AMP,
DOLBY NR AMP, ALC, AMS
AIN (L)
48
BIN (L)
46
BIAS (N)
33
BIAS (C)
32
31
S1004
(DECK A 120/70)
S1008
(DECK B 120/70)
BIAS (M)
CONTROL
B NORM/CROM
A 120/70
19
IC301
BIAS
CIRCUIT
ALC ON/OFF
PB A/B
1516182022 23242517
70
120
BIAS ON/OFF
NORM/HIGH
RM ON/OFF
R-CH
NR ON/OFF
REC/PB/PASS
LM ON/OFF
+
L.P.F.
BUFFER
28
27
AMS
CIRCUIT
26
MAOUT
MSIN
MSOUT
RIN (L)
43
ALC (L)
44
DOLBY PASS
ROUT (L)
ALC
35 34
DOLBY NR
AMP
CIRCUIT
ALC
IN (L)
REC OUT (L)
39
RV301
REC LEVEL (L)
(DECK B)
EQ IN (L)
38
REC
EQ AMP
PB OUT (L)
EQ OUT
• SIGNAL PATH
: PLAYBACK (DECK A)
40
(L)
36
PB-L
REC-L
G
(Page 29)
H
(Page 30)
: PLAYBACK (DECK B)
: RECORD
RV441
REC BIAS (R)
(DECK B)
HRPE101 (2/2)
(ERASE)
R-CH
2
RV341
REC BIAS (L)
(DECK B)
BIAS OSC
T621
BIAS OSC
Q621, 622
REC BIAS
SWITCH
Q623
05
C331, L331
BIAS
TRAP
B+
(A+7V)
97
TC-RELAY
A-PLAY-SW
95 96
S1001
(DECK A PLAY)
9994939290 898887
BIAS
PB-A/B
EQ-H/N
REC-MUTE
ALC-ON/OFF
S1002
(DECK B PLAY)
NR-ON/OFF
B-PLAY-SW
S1003
(DECK A HALF)
TC-MUTE
R/P-PASS
31
AMS-IN
A-HALF
98
ROTATION
DETECT SENSOR
(DECK A)
IC1001
S1006
(DECK B HALF)
S1009
(DECK B REC)
26
A-SHUT
B-HALF
28
ROTATION
DETECT SENSOR
(DECK B)
IC1002
27
B-SHUT
S1005
(DECK A REC)
SL1
TRIGGER PLUNGER
DECK A
TRIGGER
PLUNGER DRIVE
(DECK A)
Q333, 334
84
SYSTEM CONTROLLER
IC501 (2/3)
A-TRG
SL2
TRIGGER PLUNGER
DECK B
TRIGGER
PLUNGER DRIVE
(DECK B)
Q331, 332
83
B-TRG
Q335
82
CAP-M-H/L
RV1001
TAPE SPEED
(HIGH)
CAPM-CNT1P
CAPM-CNT2P
CAPM-CNT1M
CAPM-CNT2M
CAPSTAN MOTOR
CONTROL SWITCH
Q1001
17
77
85
86
RV1002
TAPE SPEED
(NORMAL)
CAPSTAN
MOTOR DRIVE
Q336 – 339
CAPSTAN
MOTOR DRIVE
Q340 – 343
M
M1
(CAPSTAN)
– 27 –
– 28 –
Page 25
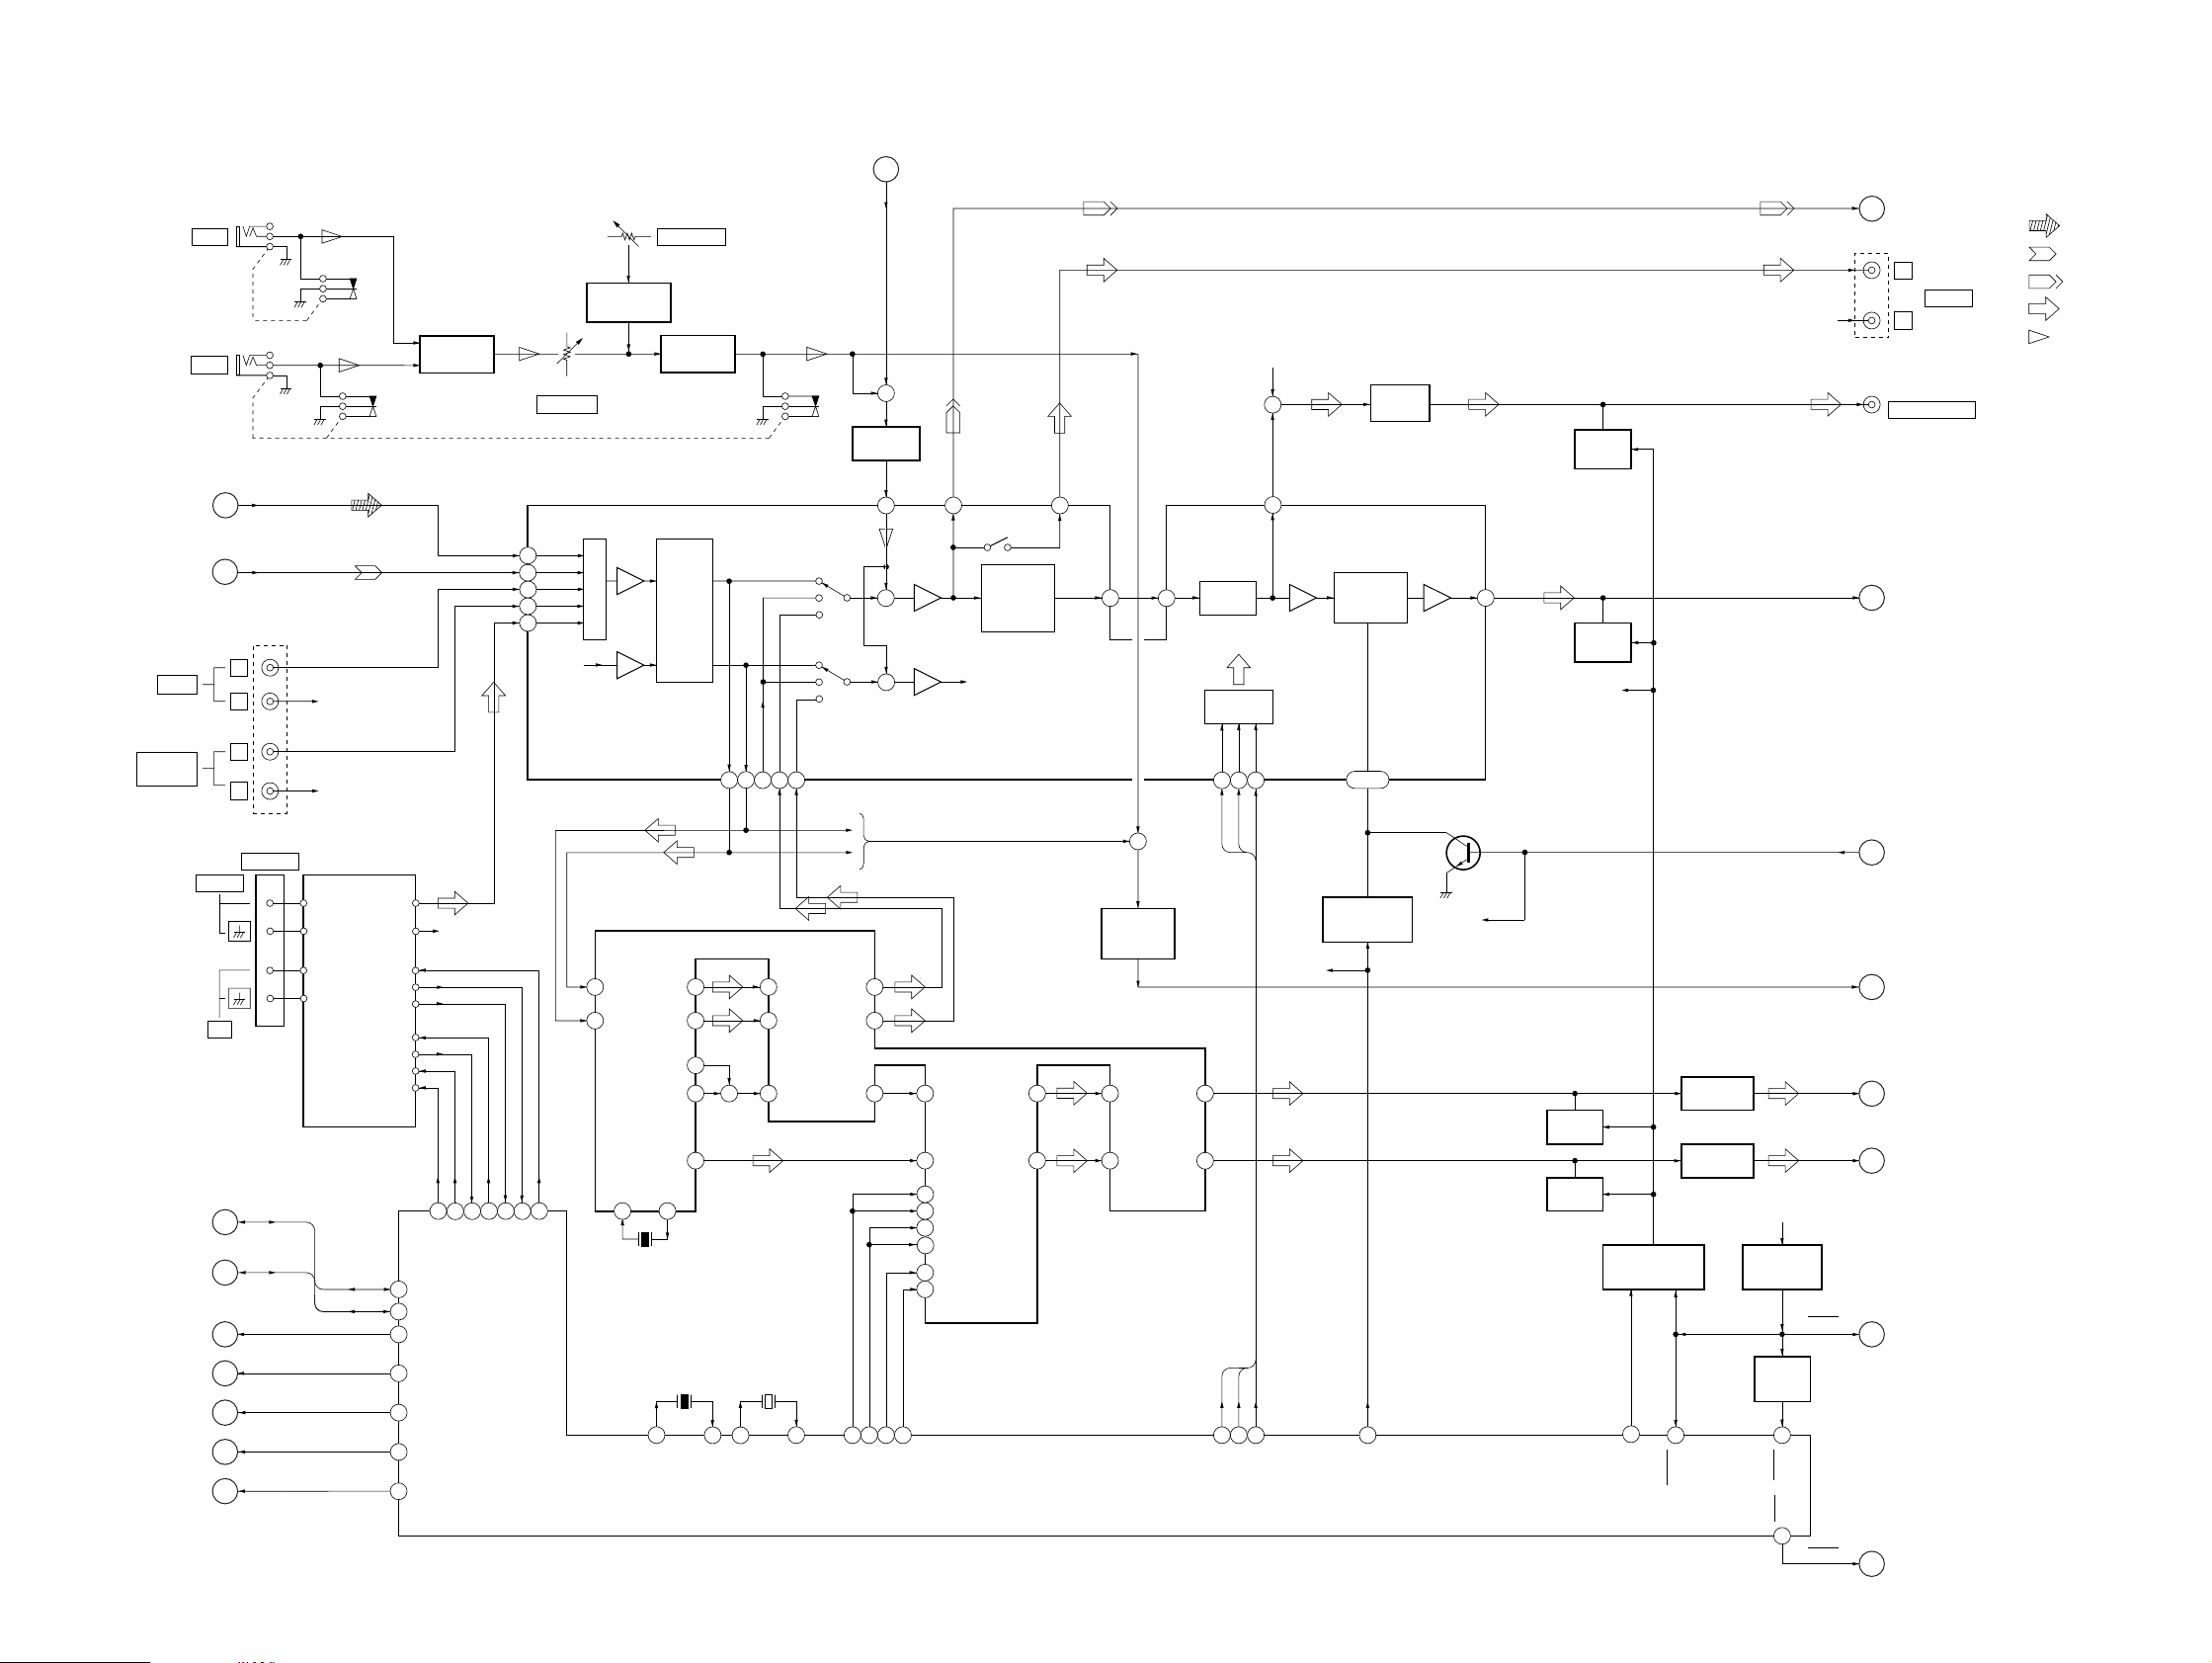
7-4. BLOCK DIAGRAM – MAIN Section (1/2) –
J750
MIC 2
J751
MIC 1
MIC AMP
IC750 (1/2)
RV750
MIC LEVEL
DIGITAL ECHO
IC751
RV751
ECHO LEVEL
MIC AMP
IC750 (2/2)
(Page 33)
I
DJ SIG
+
BUFFER
IC411
R-CH
+
LINE AMP
IC191
MUTING
Q191
REC-L
R-CH
(Page 28)
H
L
R
SUPER WOOFER
J101 (2/2)
MD OUT
J191
HCD-V919AV
• SIGNAL PATH
: CD PLAY
: TAPE PLAY
: RECORD
: TUNER (FM/AM)
: MIC INPUT
(Page 26)
(Page 28)
MD IN
VIDEO
(AUDIO) IN
(Page 25)
(Page 33)
(Page 34)
(Page 34)
(Page 32)
(Page 32)
(Page 32)
E
G
FM 75Ω
AM
F
P
Q
R
S
T
U
CD-L
PB-L
J101 (1/2)
L
R
L
R
ANTENNA
DATA, CLK
DATA, CLK
POWER
CD-POWER
STK-MUTE
F-RELAY
PL-RELAY
R-CH
R-CH
FM/AM TUNER UNIT
FM ANT
FM ANT
AM ANT
AM ANT
ST-MUTE
ST-DOUT
DATA
CLK
ST-L
ST-R
STEREO
TUNED
ST-DIN
ST-CLK
ST-CE
55
56
5
46
100
6
8
05
R-CH
68
65
ST-CE
IIC-DATA
IIC-CLK
POWER
CD-POWER
STK-MUTE
F-RELAY
PL-RELAY
66
ST-DIN
ST-CLK
67
ST-DOUT
IN B2
68
IN C2
67
IN A2
69
IN F2
64
IN D2
66
R-CH
GRAPHIC EQUALIZER CONTROL,
ELECTRICAL VOLUME
69
72
70
TUNED
STEREO
ST-MUTE
INPUT SELECT
IC111
LT-IN
61
RT-IN
62
DELAY OUT
OSC
46
X201
8MHz
SOUND
CONTROL
CIRCUIT
L-OUT
R-OUT
S-OUT
C-OUT
47
10
X2
OSC
X501
5MHz
VOLUME
COMMAND
CPU
INTERFACE
DATA
CLOCK
32 34
33
52 51
M62442-DATA
40
VOL OUT2
LATCH
3
M62442-CLK
M62442-LATCH
R-CH
BASS BOOST
CONTROL
CIRCUIT
BB B2,
BB A2
38, 39
DBFB CONTROL
SWITCH
Q111
2 16 15
DBFB-H/L
BUF
OUT2
36
FEED BACK SWITCH
Q112
R-CH
MUTING
Q292
MUTING
Q291
MUTING
Q113
R-CH
MUTING CONTROL
Q141, 143
1
SWITCH
LINE-MUTE
LINE AMP
IC291 (1/2)
LINE AMP
IC291 (2/2)
AC-CUT
FEED BACK
CENTER
+5V
RESET SIGNAL
GENERATOR
IC951
RESET
SWITCH
Q951
RESET
XRST
57
L-CH
SPEANA
REAR
RESET
RESET
J
K
L
M
N
O
D
(Page 31)
(Page 31)
(Page 33)
(Page 31)
(Page 31)
(Page 33)
(Page 25)
KEY IN2
60
KEY IN1
KEY OUT
5
75 59 6
DOUT2
DOUT1
2
MIC IN
+
+
REC
58
A2
EQUALIZER
R-CH
GRAPHIC
CONTROL
CIRCUIT
REC
B2
57
F OUT2
VOL
42
IN2
41
CONTROL
+
SPEANA
MIXING AMP
IC401
12
11
17
10
9
14
15
16
+
X502
32.768kHz
11
13
X1
XT2
L-IN
R-IN
S-IN
14
XT1
L-OUT
R-OUT
S-OUT
50 49 42 41
24
21
39
PL-CLK
PL-DATA
PL-LAT
PL-VOL
38
18
51
53
50
54
52
49
S-VOL
IN
C-VOL
IN
DATA
DATA
CLK
CLK
ENABLE
ENABLE2
DOLBY SURROUND
PRO LOGIC PROCESSOR
IC201
S-VOL
36
OUT
C-VOL
27
OUT
SYSTEM CONTROLLER
IC501 (3/3)
S-OP
S-OP
35
IN
C-OP
28
IN
OUT
C-OP
OUT
33
31
– 29 –
– 30 –
Page 26
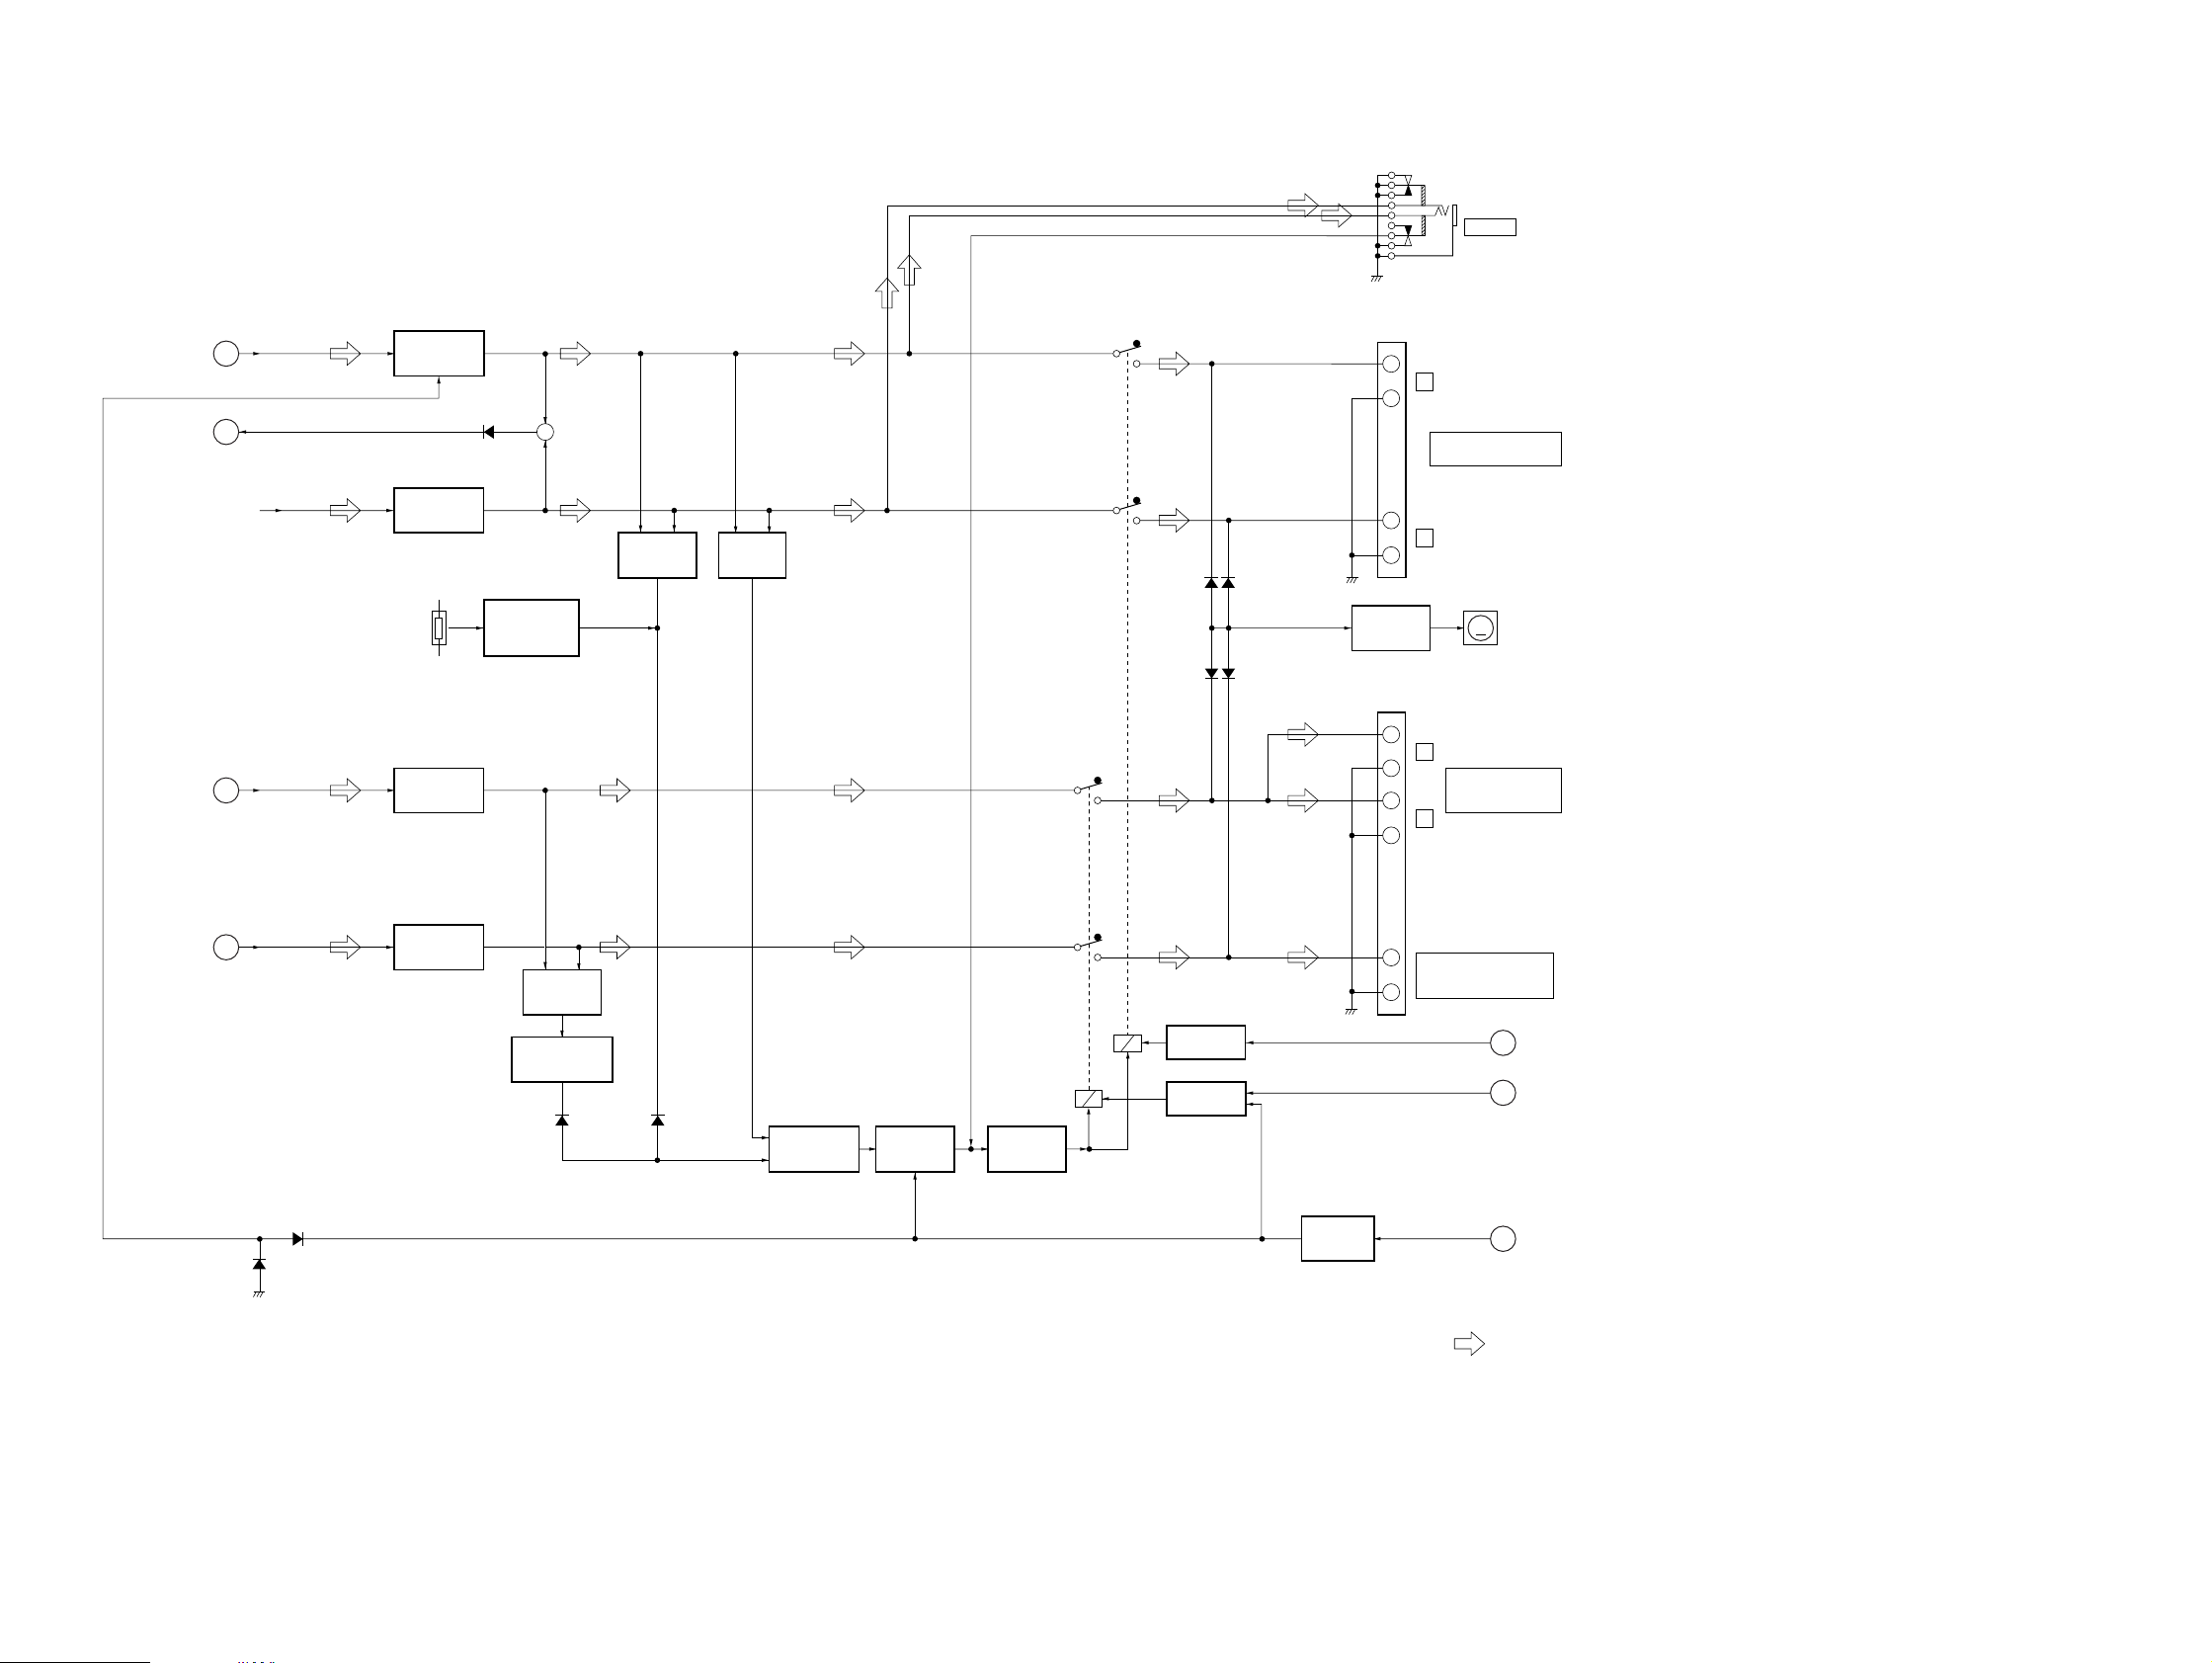
HCD-V919AV
7-5. BLOCK DIAGRAM – MAIN Section (2/2) –
J755
PHONES
(Page 30)
(Page 30)
(Page 30)
-1
+
L
–
TM401
FRONT SPEAKER
IMPEDANCE USE 6 – 16Ω
-2
+
R
–
D406
D405
D407
D408
FAN MOTOR
DRIVE
Q961, 962
TM402
M901
M
(FAN)
8
12
D311
15
TEMPERATURE
DETECT SWITCH
Q321, 322
+
OVER LOAD
DETECT
Q201, 251
DC DETECT
SWITCH
Q306, 307
L-CH
J
FEED BACK
K
R-CH
3
20
THP321
POWER AMP
IC201 (1/2)
POWER AMP
IC201 (2/2)
+
L
REAR
M
18
POWER AMP
IC601 (1/2)
13
-1
–
+
SURROUND SPEAKER
IMPEDANCE USE 16Ω
R
REAR
–
Q302
RY403
-2
+
SURROUND SPEAKER
CENTER
IMPEDANCE USE 8 – 16Ω
–
F-RELAY
PL-RELAY
STK-MUTE
T
U
S
(Page 29)
(Page 29)
(Page 29)
RY401
RELAY DRIVE
Q401, 402
RELAY DRIVE
Q404 – 406
STANDBY
SWITCH
Q142
(Page 30)
05
CENTER
N
D332
D331
1
POWER AMP
IC601 (2/2)
18
OVER LOAD
DETECT
Q601, 651
OVER LOAD
DETECT SWITCH
Q604
D604
D321
OVER LOAD
DETECT SWITCH
Q301, 303
MUTE SWITCH
Q304, 305
PROTECTOR
• SIGNAL PATH
: TUNER (FM/AM)
– 31 –
– 32 –
Page 27
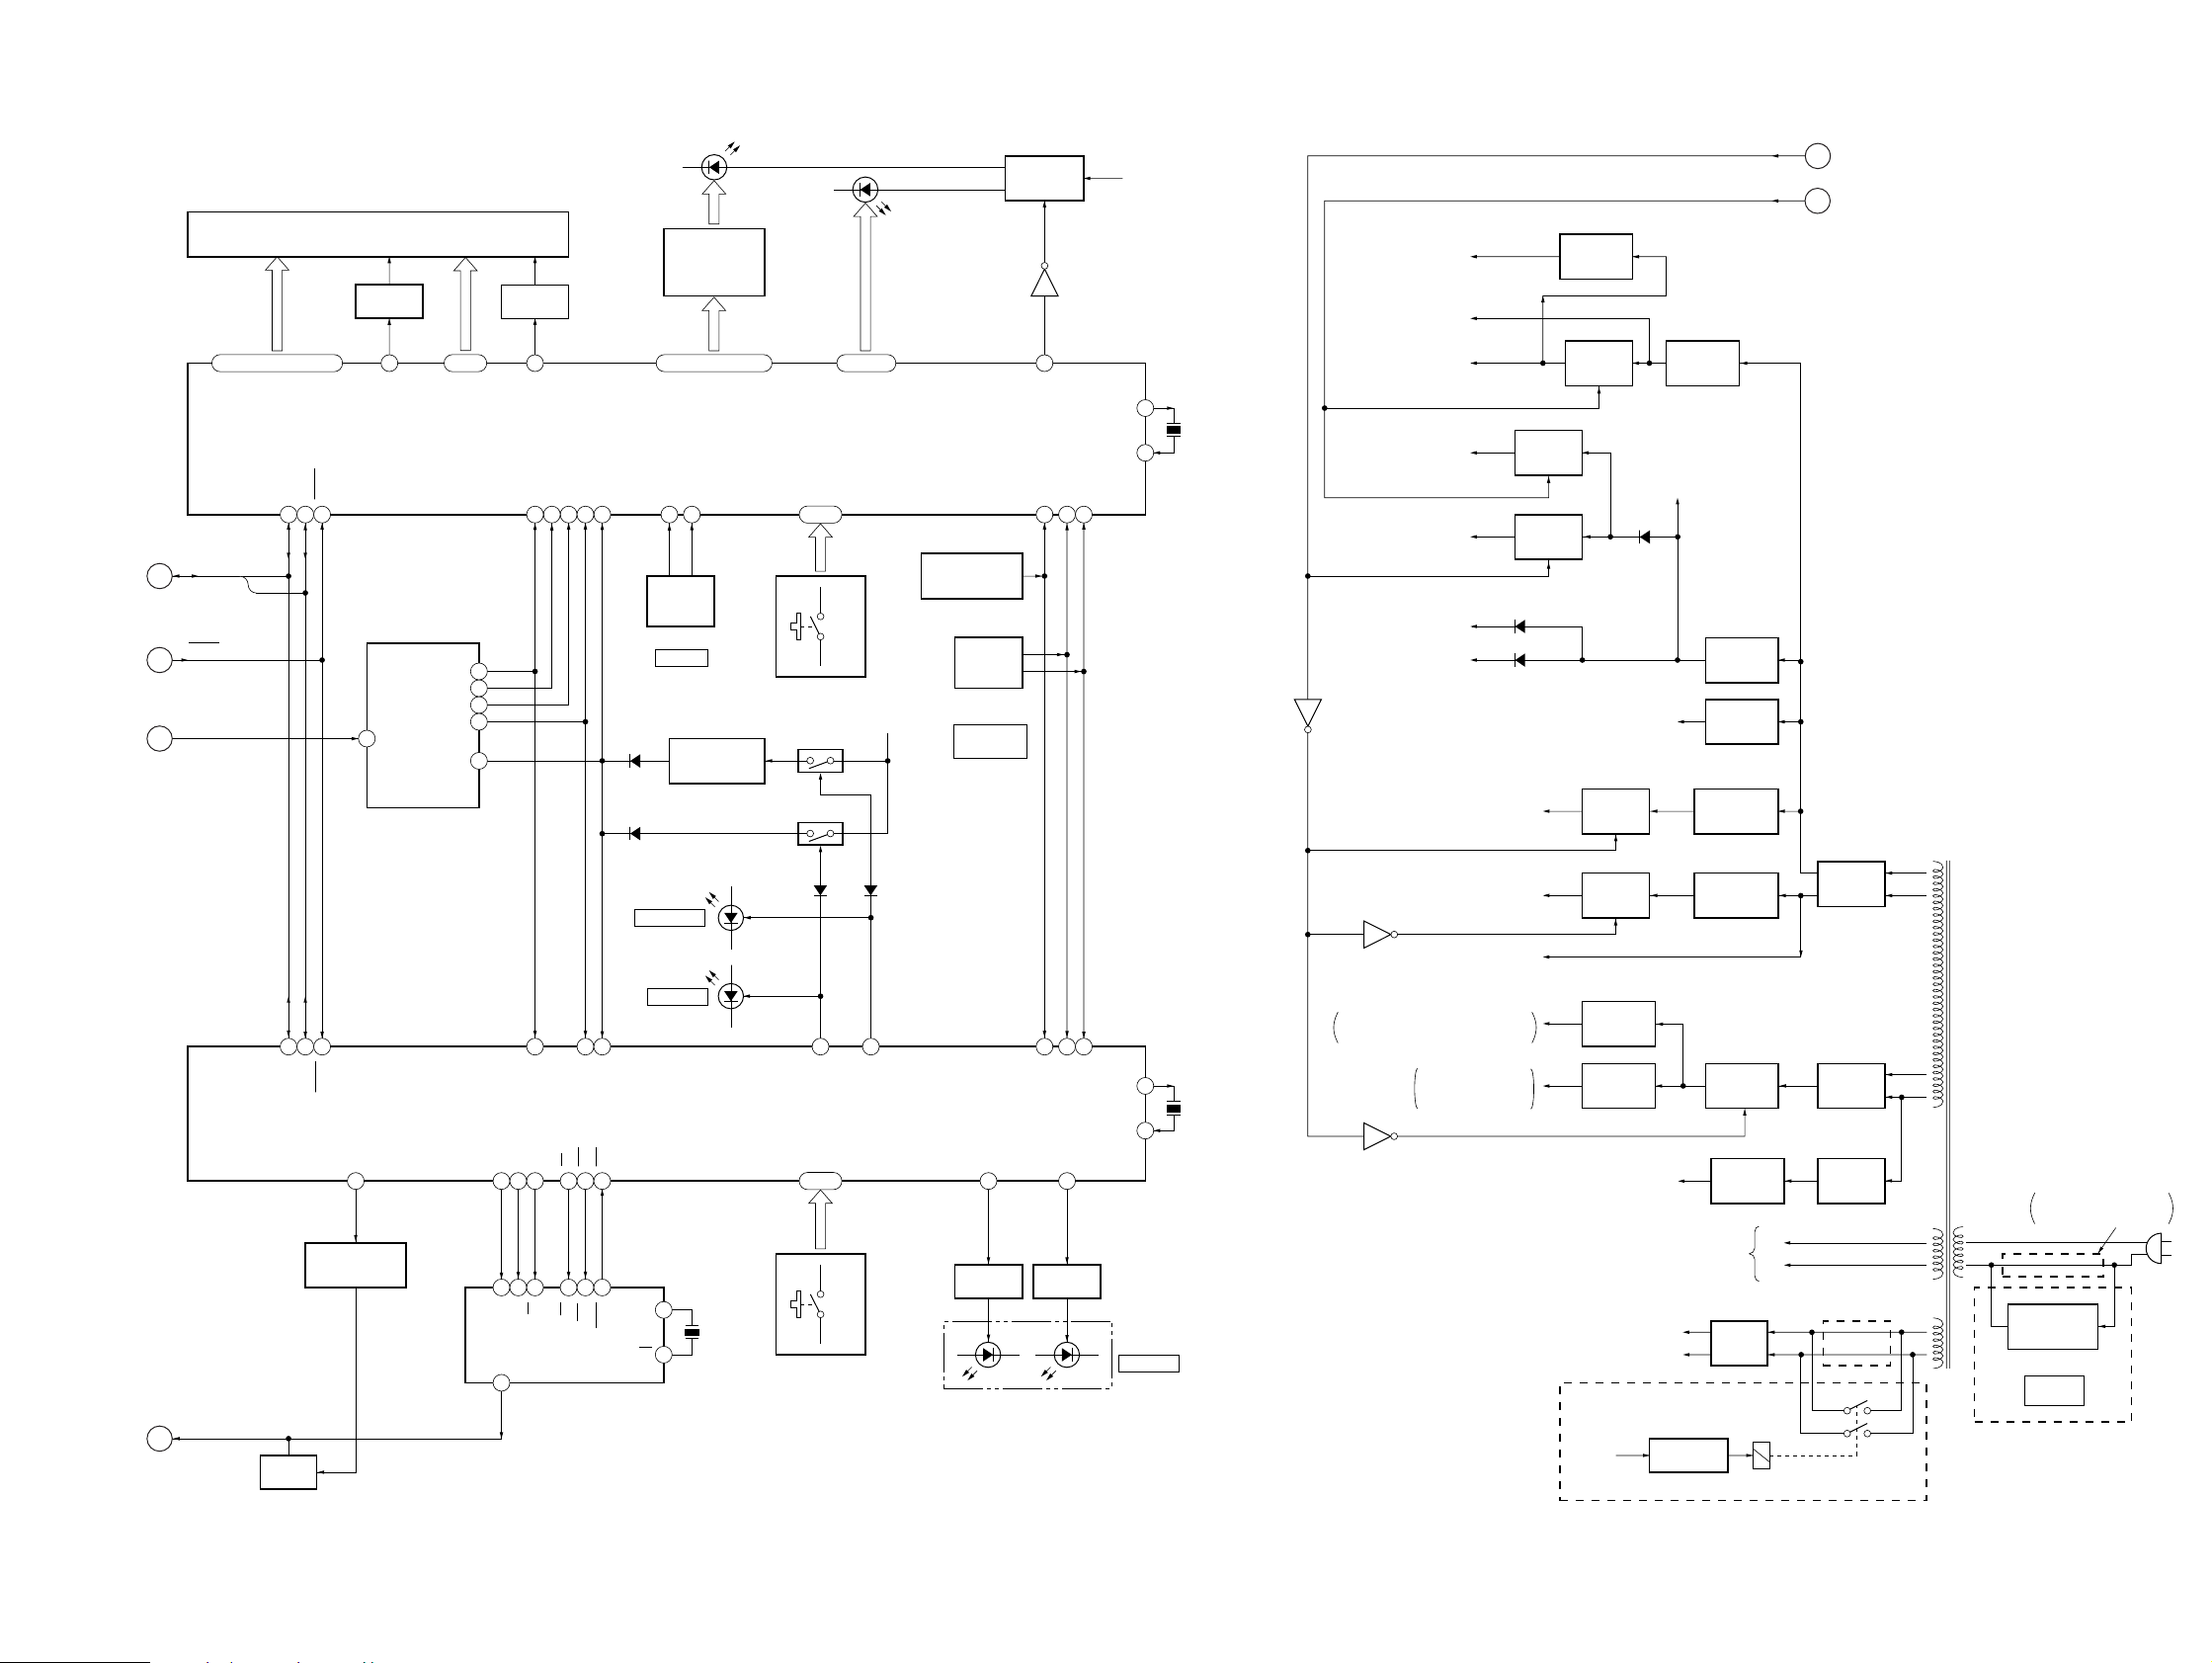
7-6. BLOCK DIAGRAM – DISPLAY/KEY CONTROL/POWER SUPPLY Section –
HCD-V919AV
P
(Page 29)
O
(Page 30)
L
(Page 30)
I
(Page 29)
05
54 – 69, 72 – 70, 77 – 73
SEG1 – SEG24
DATA,
CLK
RESET
SPEANA
DJ SIG
DATA
CLK
FLUORESCENT INDICATOR TUBE
SDA
2324
18
12C DATA
DJ MUTE
Q411
ND601
GRID DRIVE
SCL
RESET
BAND-PASS FILTER
4
RESET
12C CLK
MUTE
5
DJ MUTE
CONTROL SWITCH
Q851
Q701
53
GR13
LINE IN
IC603
42 – 52
GR2 – GR12
F01
17
F02
16
15
F03
14
F04
13
L+R
GRID DRIVE
Q702
CLK
DATA
15
15SI14
SD
AOUT
23
D610, 612, 620 – 628,
D631 – 633, 640 – 644,
D651, 652, 655, 656
41
GR1
SPEANA-1
SPEANA-3
SPEANA-2
36
37
34
35
33
36
BPF/LOW
LAT
CH
16 13 12
8 16 17 20
ST
CH
CSV
IC851
LED1– LED8, LED12 – LED15
L+R
SPEANA-4
32
ENCODER
D804
D807
BEAT ON/OFF
BEAT JAM
3719104
L+R
BPF/HIGH
LED DRIVE, KEY CONTROL
BSY
RST
11
XT
RST
BUSY
XT
D613 – 618,
D629, 630
LED DRIVE
Q604, 607 – 611,
Q613 – 615, 618,
Q856, 857
79, 80, 1 – 6, 15 – 18
FLUORESCENT INDICATOR TUBE DRIVE,
LED DRIVE, KEY CONTROL
IC601
VOL-A
VOL-B
19
20
ROTARY
S602
S602
VOLUME
TIME CONSTANT
SWITCH
Q958
D801
D802
CSV CONTROL,
IC801
2
4.09MHz
3
X851
KEY-0 – KEY-3
26 – 29
S604 – 619, 621 – 642,
S652 – 654, 656 – 659
Q959
Q960
D805
63
BOMBER-LED
KEY0, KEY1
38, 39
S801 – 808
11, 12, 14
LED9 – LED11
+5V
D806
64
ON/OFF-LED
REMOTE CONTROL
RECEIVER
IC602
(JOG DIAL)
= ↔ +
Q959, 960
SPEANA MUTE
SWITCH
LED DRIVE
ROTARY
ENCODER
S601
S601
DJ MIX
BPM-LED-A
62
Q854
(GREEN)
B+ SWITCH
Q601, 602
Q603
25
L.SEL
SIRCS
JOG-A
33
21
29
27
JOG A
SIRCS
BPM-LED-B
6114
LED DRIVE
Q855
(ORANGE)
22
28
X-OUT
JOG-B
X-OUT
JOG B
LED +5.6V
X-IN
X-IN
AUTO BPM
8
9
2
3
D803
X601
8MHz
X501
8MHz
+3.3V
MPEG VIDEO/AUDIO
DECODER (IC505) B+
D+5V (UNSW)
VIDEO CD SECTION B+
D+5V (SW)
VIDEO CD SECTION B+
+5V
VIDEO CD SECTION B+
AUDIO D+5V
D+5V
(PANEL SECTION B+)
SYSTEM CONTROLLER
(IC501) B+
Q937
A+7V
(TC, AUDIO SECTION B+)
A–7V
(TC, AUDIO SECTION B–)
Q905
CAPSTAN MOTOR DRIVE CIRCUIT,
TRIGGER PLUNGER DRIVE CIRCUIT B+
Q912
FAN MOTOR B–
+12V
ST+10V
FM/AM TUNER UNIT,
DOLBY SURROUND
PRO LOGIC (IC201) B+
REGULATOR
SWITCH
Q935, 936
B+
SWITCH
Q931, 932
B+
SWITCH
Q933, 934
D602, 603
D956
POWER AMP (IC201, 601) B+
POWER AMP (IC201) B–
+3.3V
Q531
LED +5.6V
+7V
TO
(ND601)
RELAY DRIVE
+5V
REGULATOR
IC932
REGULATOR
REGULATOR
REGULATOR
REGULATOR
Q911, 913
REGULATOR
Q101
B+
D932
(CD M+7V)
B+
SWITCH
Q901, 902
B–
SWITCH
Q903, 904
+12V
REGULATOR
IC911
+10V
REGULATOR
IC921
–35V
FL DRIVER (IC601)
FLUORESCENT INDICATOR TUBE
A+7V
POWER
CD-POWER
+5.6V
IC931
+7V
IC941
+7V
IC901
–7V
IC902
B+
SWITCH
–35V
Q111
RECT
D101
RY101
Q
R
VF1
VF2
(Except Chinese model)
(Page 29)
(Page 29)
RECT
D102
RECT
D103, 104
RECT
D111, 112
(Chinese model)
POWER TRANSFORMER
T501
(Malaysia, Singapore, Indonesia models)
Except Malaysia, Singapore,
Indonesia models
VOLTAGE
SELECT SWITCH
S501
S501
VOLTAGE
SELECTOR
AC IN
– 33 –
– 34 –
Page 28
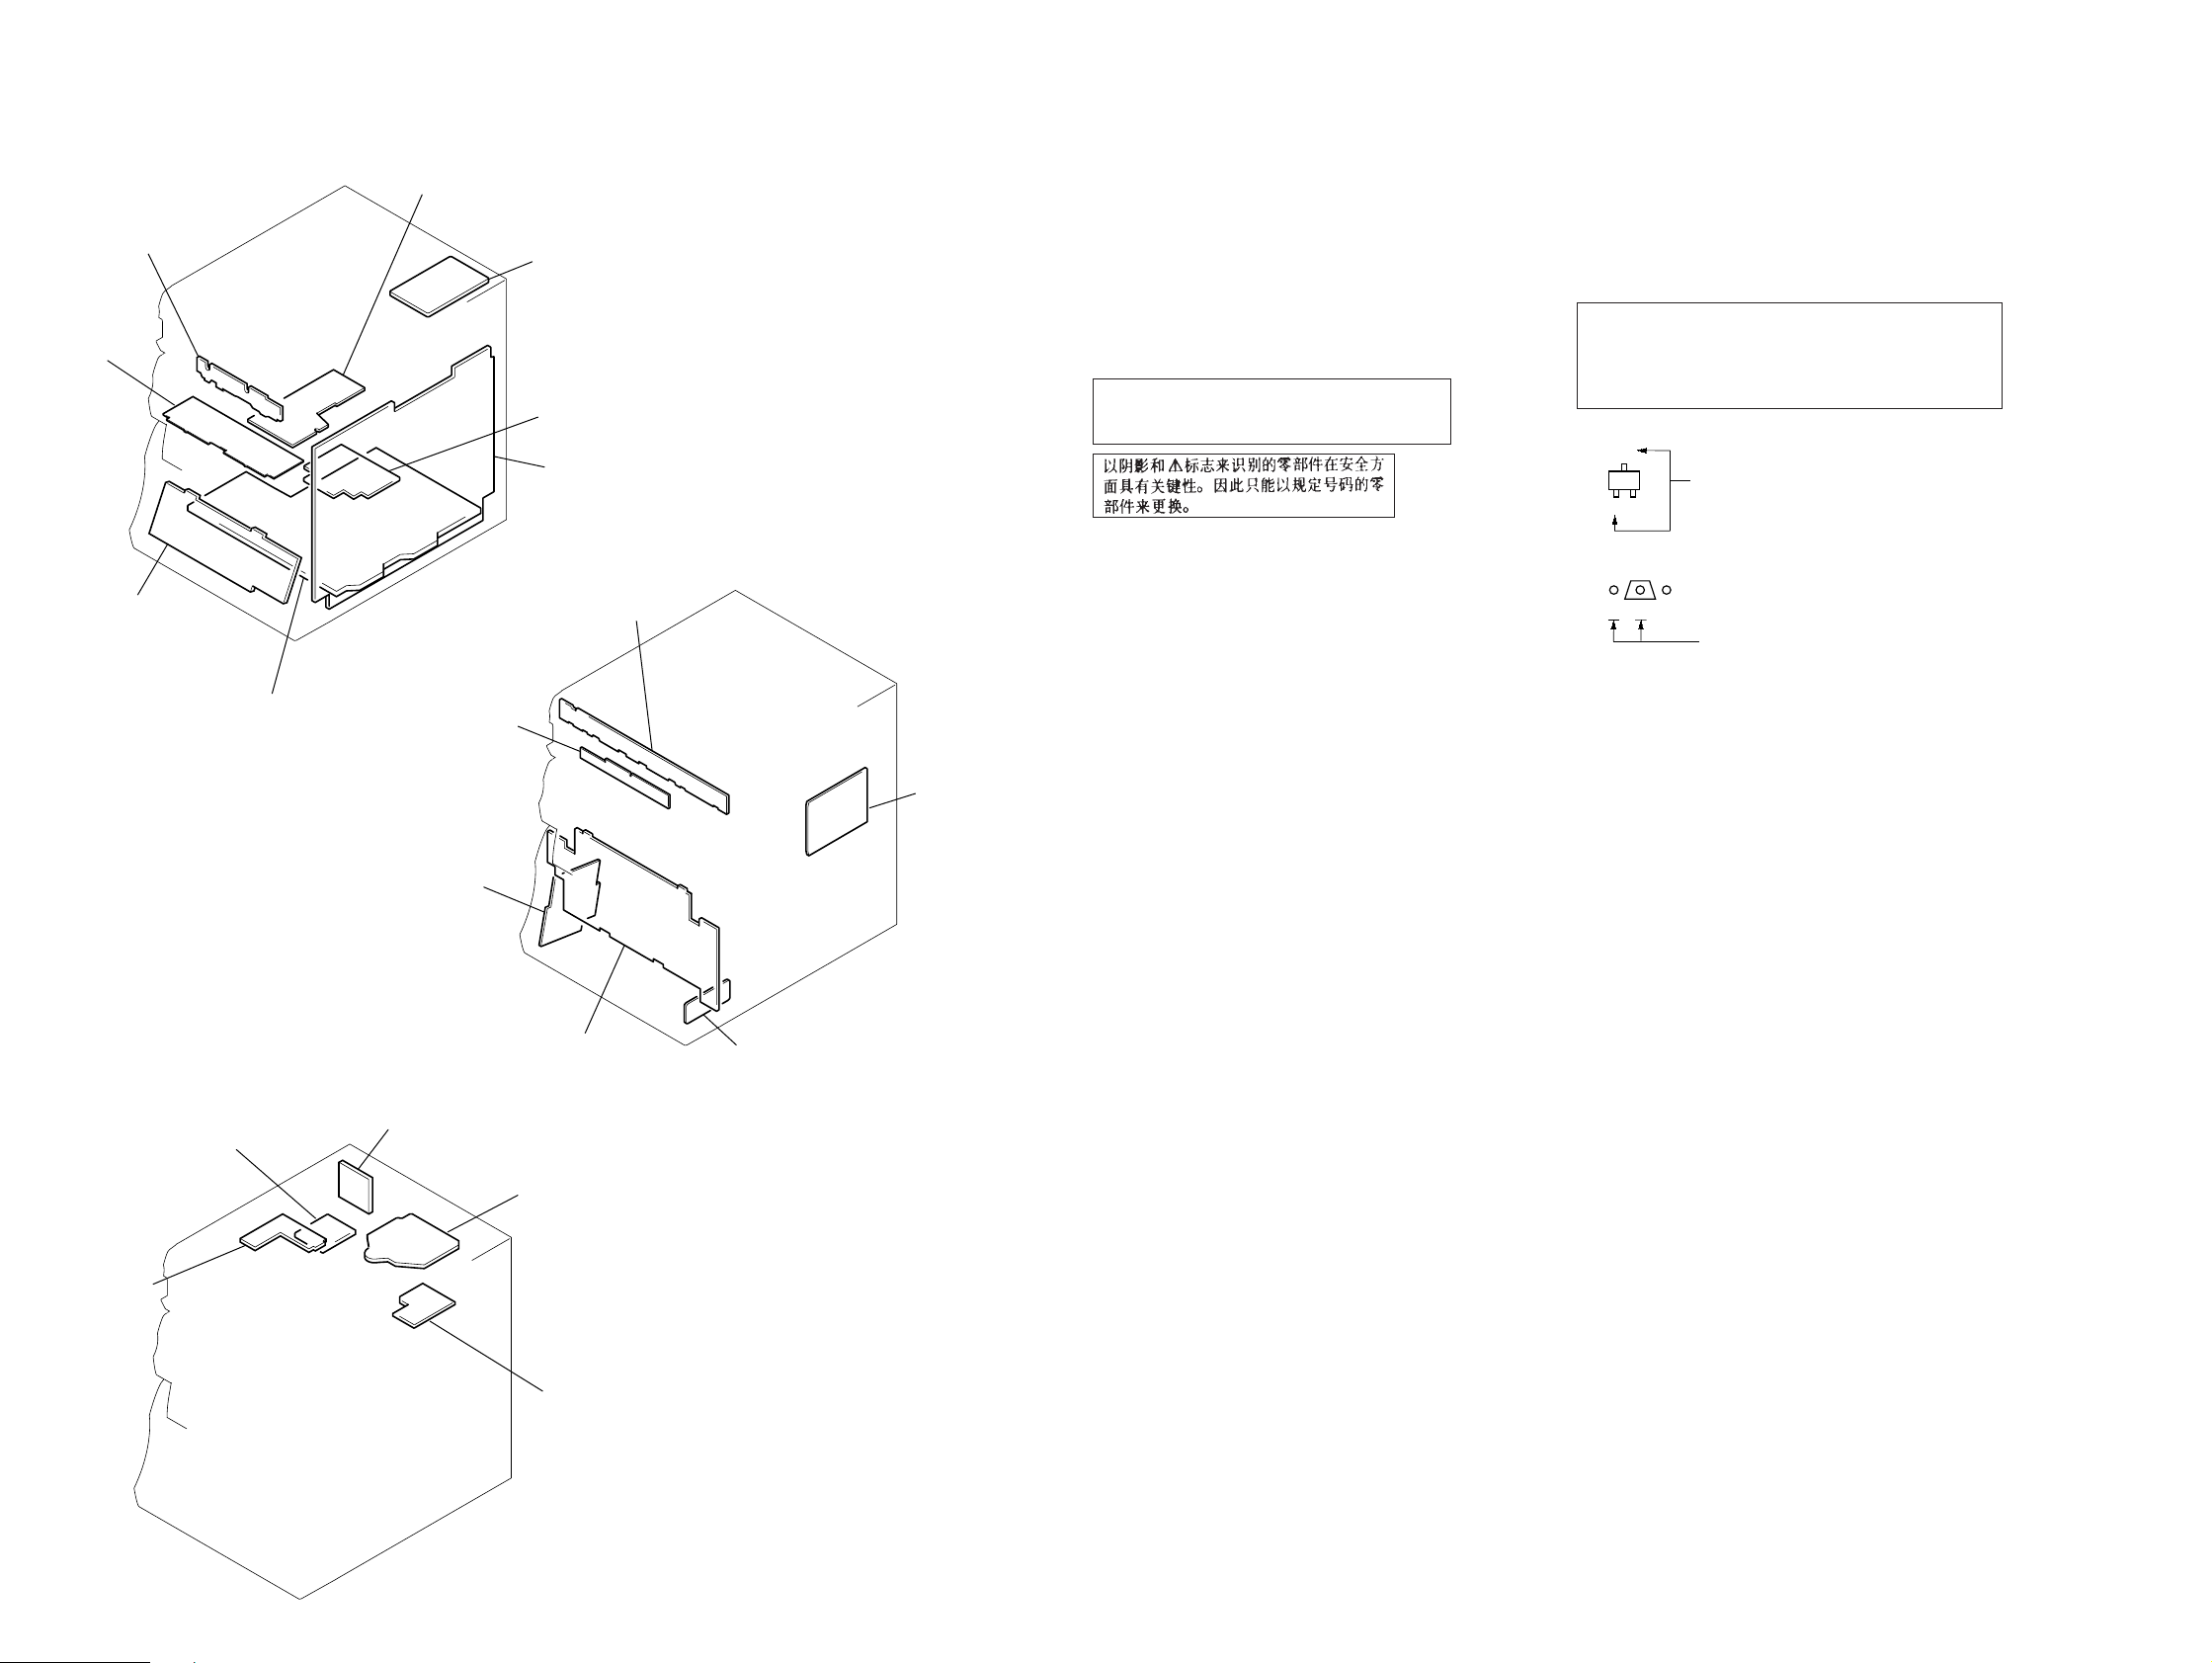
• Circuit Boards Location
d
)
d
7-7. NOTE FOR PRINTED WIRING BOARDS AND SCHEMATIC DIAGRAMS
LEAF SW board
AUDIO board
CONT-PANEL board
POWER AMP board
TRANSFORMER board
DECORATION board
MIC board
VIDEO board
SURROUND boar
MAIN board
CD-SW board
TUNER(FM/AM
Note on Schematic Diagrams:
• All capacitors are in µF unless otherwise noted. pF: µµF
50 WV or less are not indicated except for electrolytics
and tantalums.
• All resistors are in Ω and 1/
specified.
¢
•
• 2 : nonflammable resistor.
• 5 : fusible resistor.
• C : panel designation.
• U : B+ Line.
• V : B– Line.
• H : adjustment for repair.
• Voltages and waveforms are taken with a VOM (Input
• Waveforms are taken with a oscilloscope.
• Circled numbers refer to waveforms.
• Signal path.
• Abbreviation
: internal component.
The components identified by mark ! or dotted
line with mark ! are critical for safety.
Replace only with part number specified.
impedance 10 MΩ).
Voltage variations may be noted due to normal production tolerances.
Voltage variations may be noted due to normal production tolerances.
F : TUNER (FM/AM)
E : PLAYBACK (DECK A)
d : PLAYBACK (DECK B)
G : RECORD
J : CD PLAY (AUDIO)
L : CD PLAY (VIDEO)
c : DIGITAL OUT
N : MIC INPUT
CH : Chinese model.
IA : Indonesia model.
MY : Malaysia model.
SP : Singapore model.
TH : Thai model.
4
W or less unless otherwise
Note on Printed Wiring Boards:
• X : parts extracted from the component side.
• p : parts mounted on the conductor side.
®
•
• b : Pattern from the side which enables seeing.
(The other layers' patterns are not indicated.)
Caution:
Pattern face side: Parts on the pattern face side seen from
(Side B) the pattern face are indicated.
Parts face side: Parts on the parts face side seen from
(Side A) the parts face are indicated.
• Indication of transistor.
: Through hole.
C
Q
B
E
Q
B
CE
These are omitted.
These are omitted.
SENSOR board
CONNECTOR board
MOTOR (TURN) board
PANEL board
BD board
MOTOR (SLIDE) boar
HEADPHONE board
– 35 –
– 36 –
Page 29
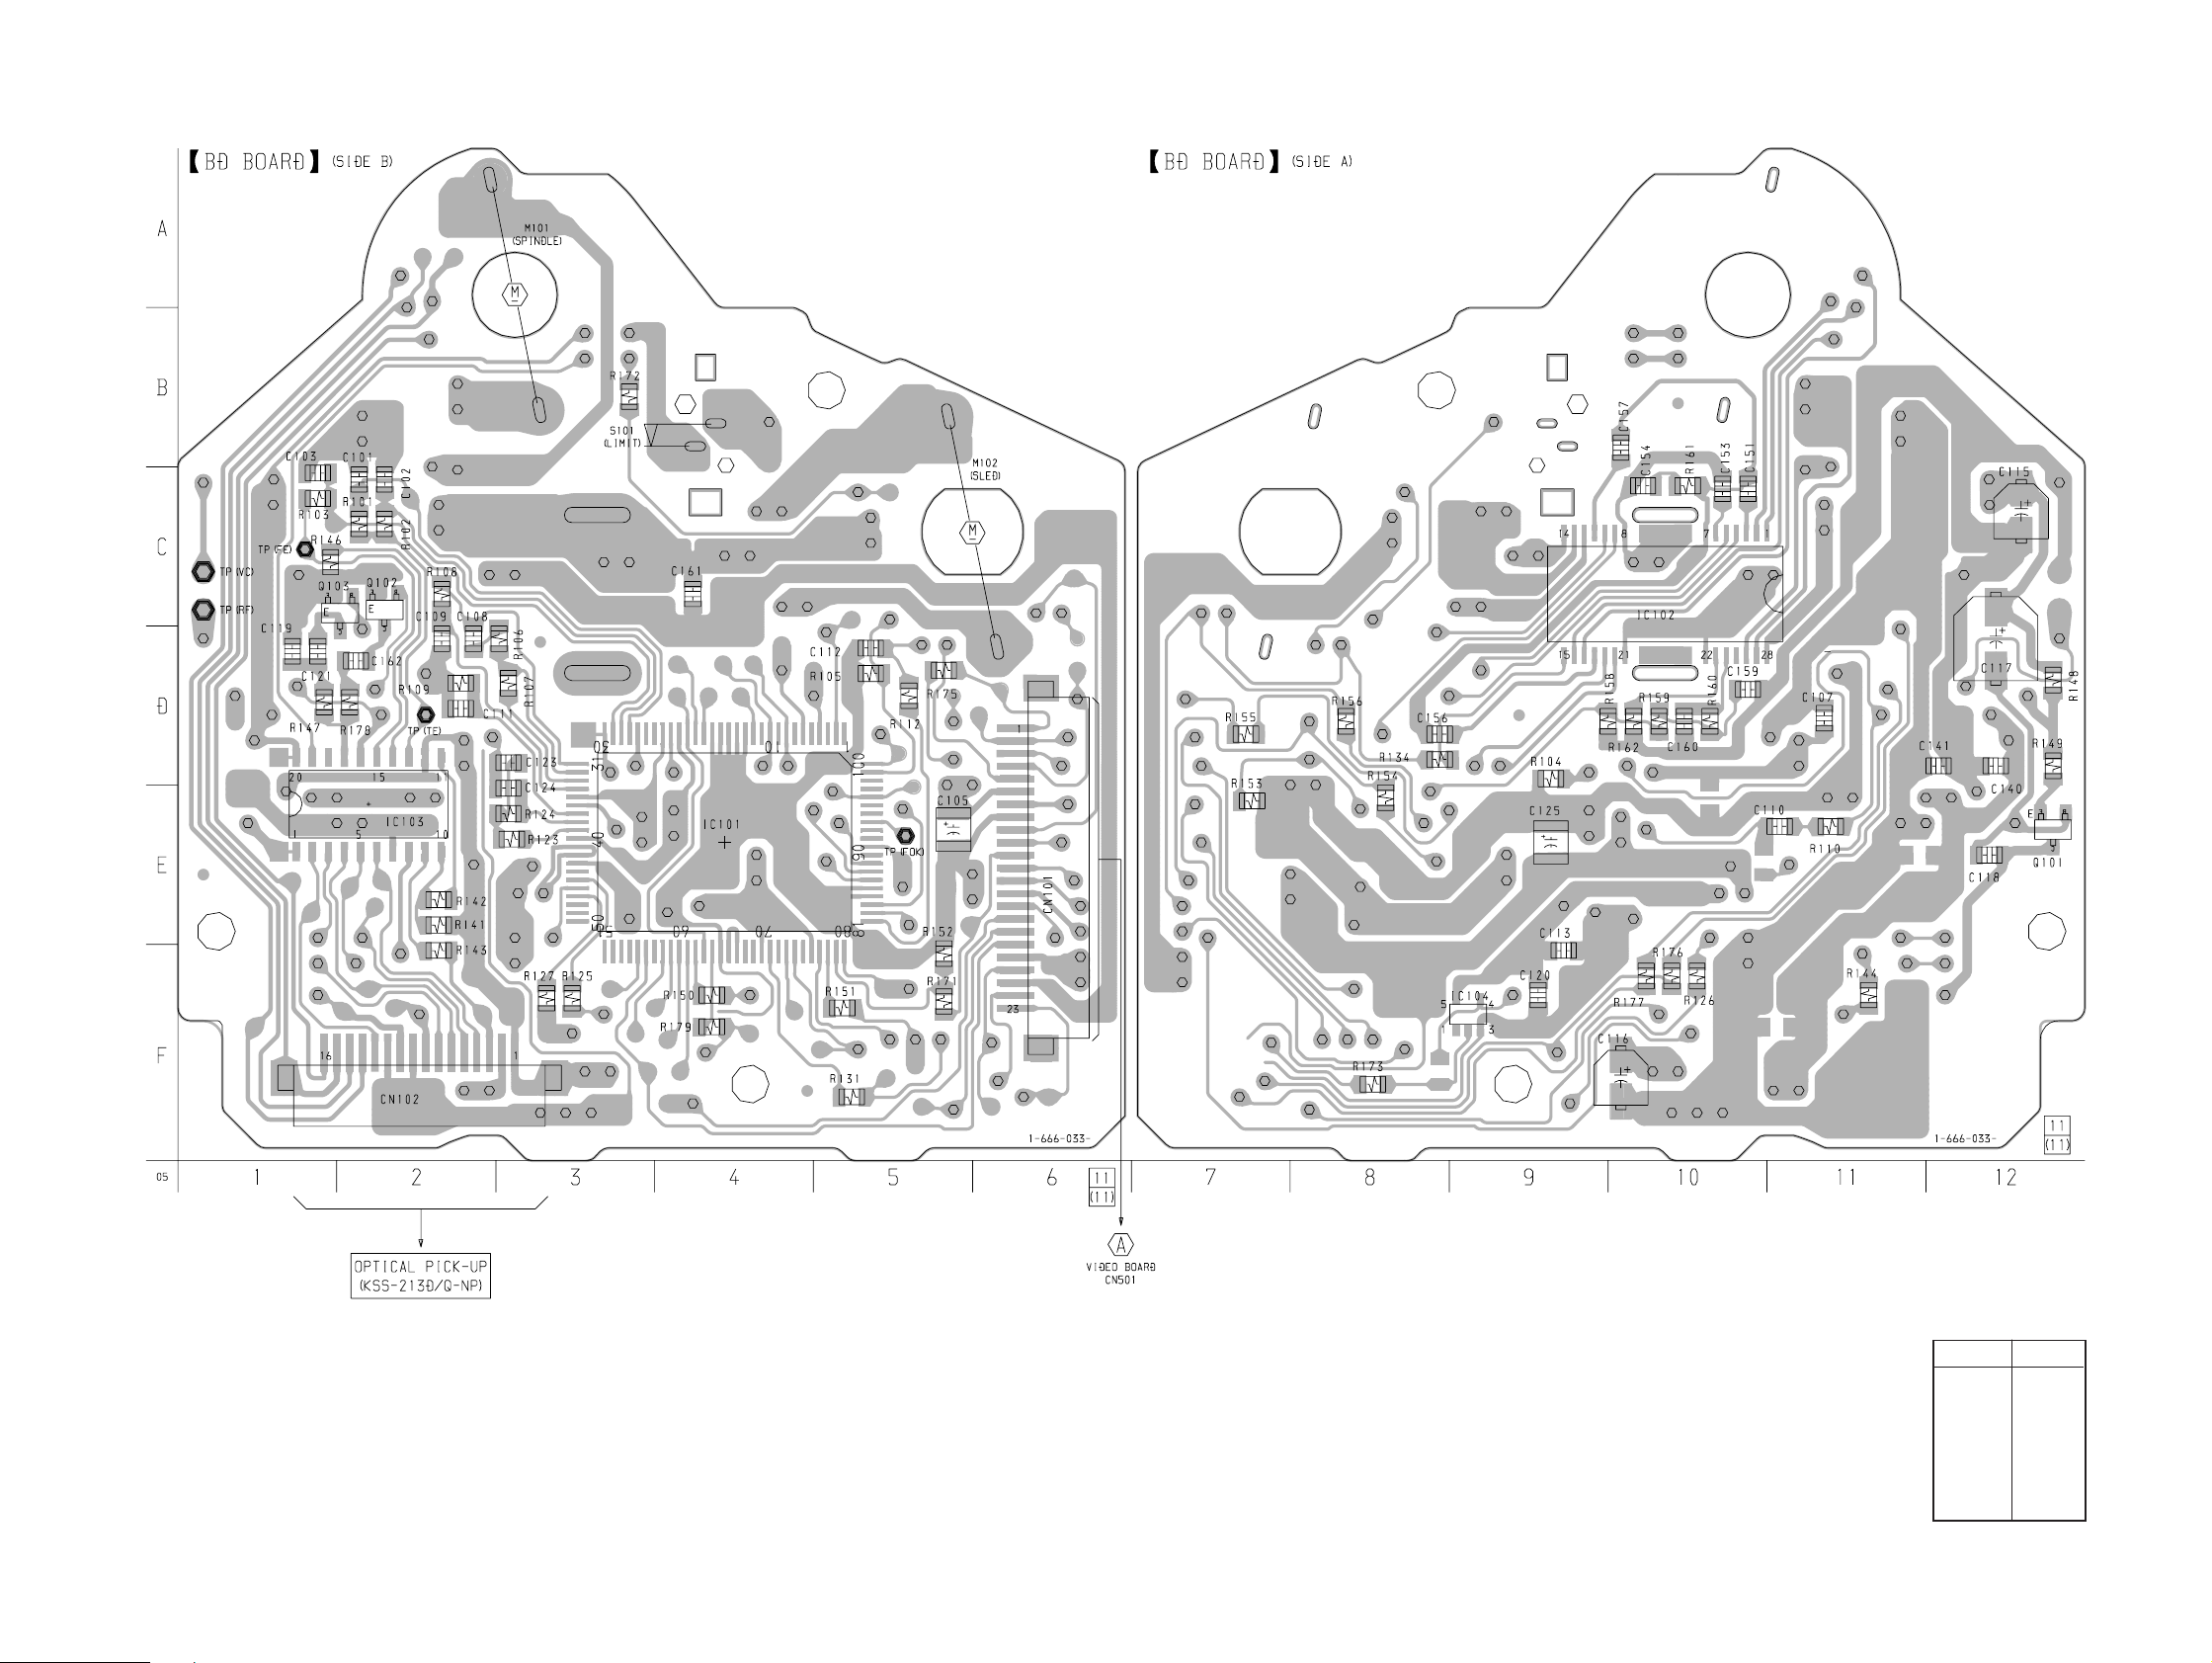
7-8. PRINTED WIRING BOARDS – BD Section – • See page 35 for Circuit Boards Location.
HCD-V919AV
– 37 –
(Page 42)
• Semiconductor
Location
Ref. No. Location
IC101 E-4
IC102 C-10
IC103 E-2
IC104 F-9
Q101 E-12
Q102 C-2
Q103 C-2
– 38 –
Page 30
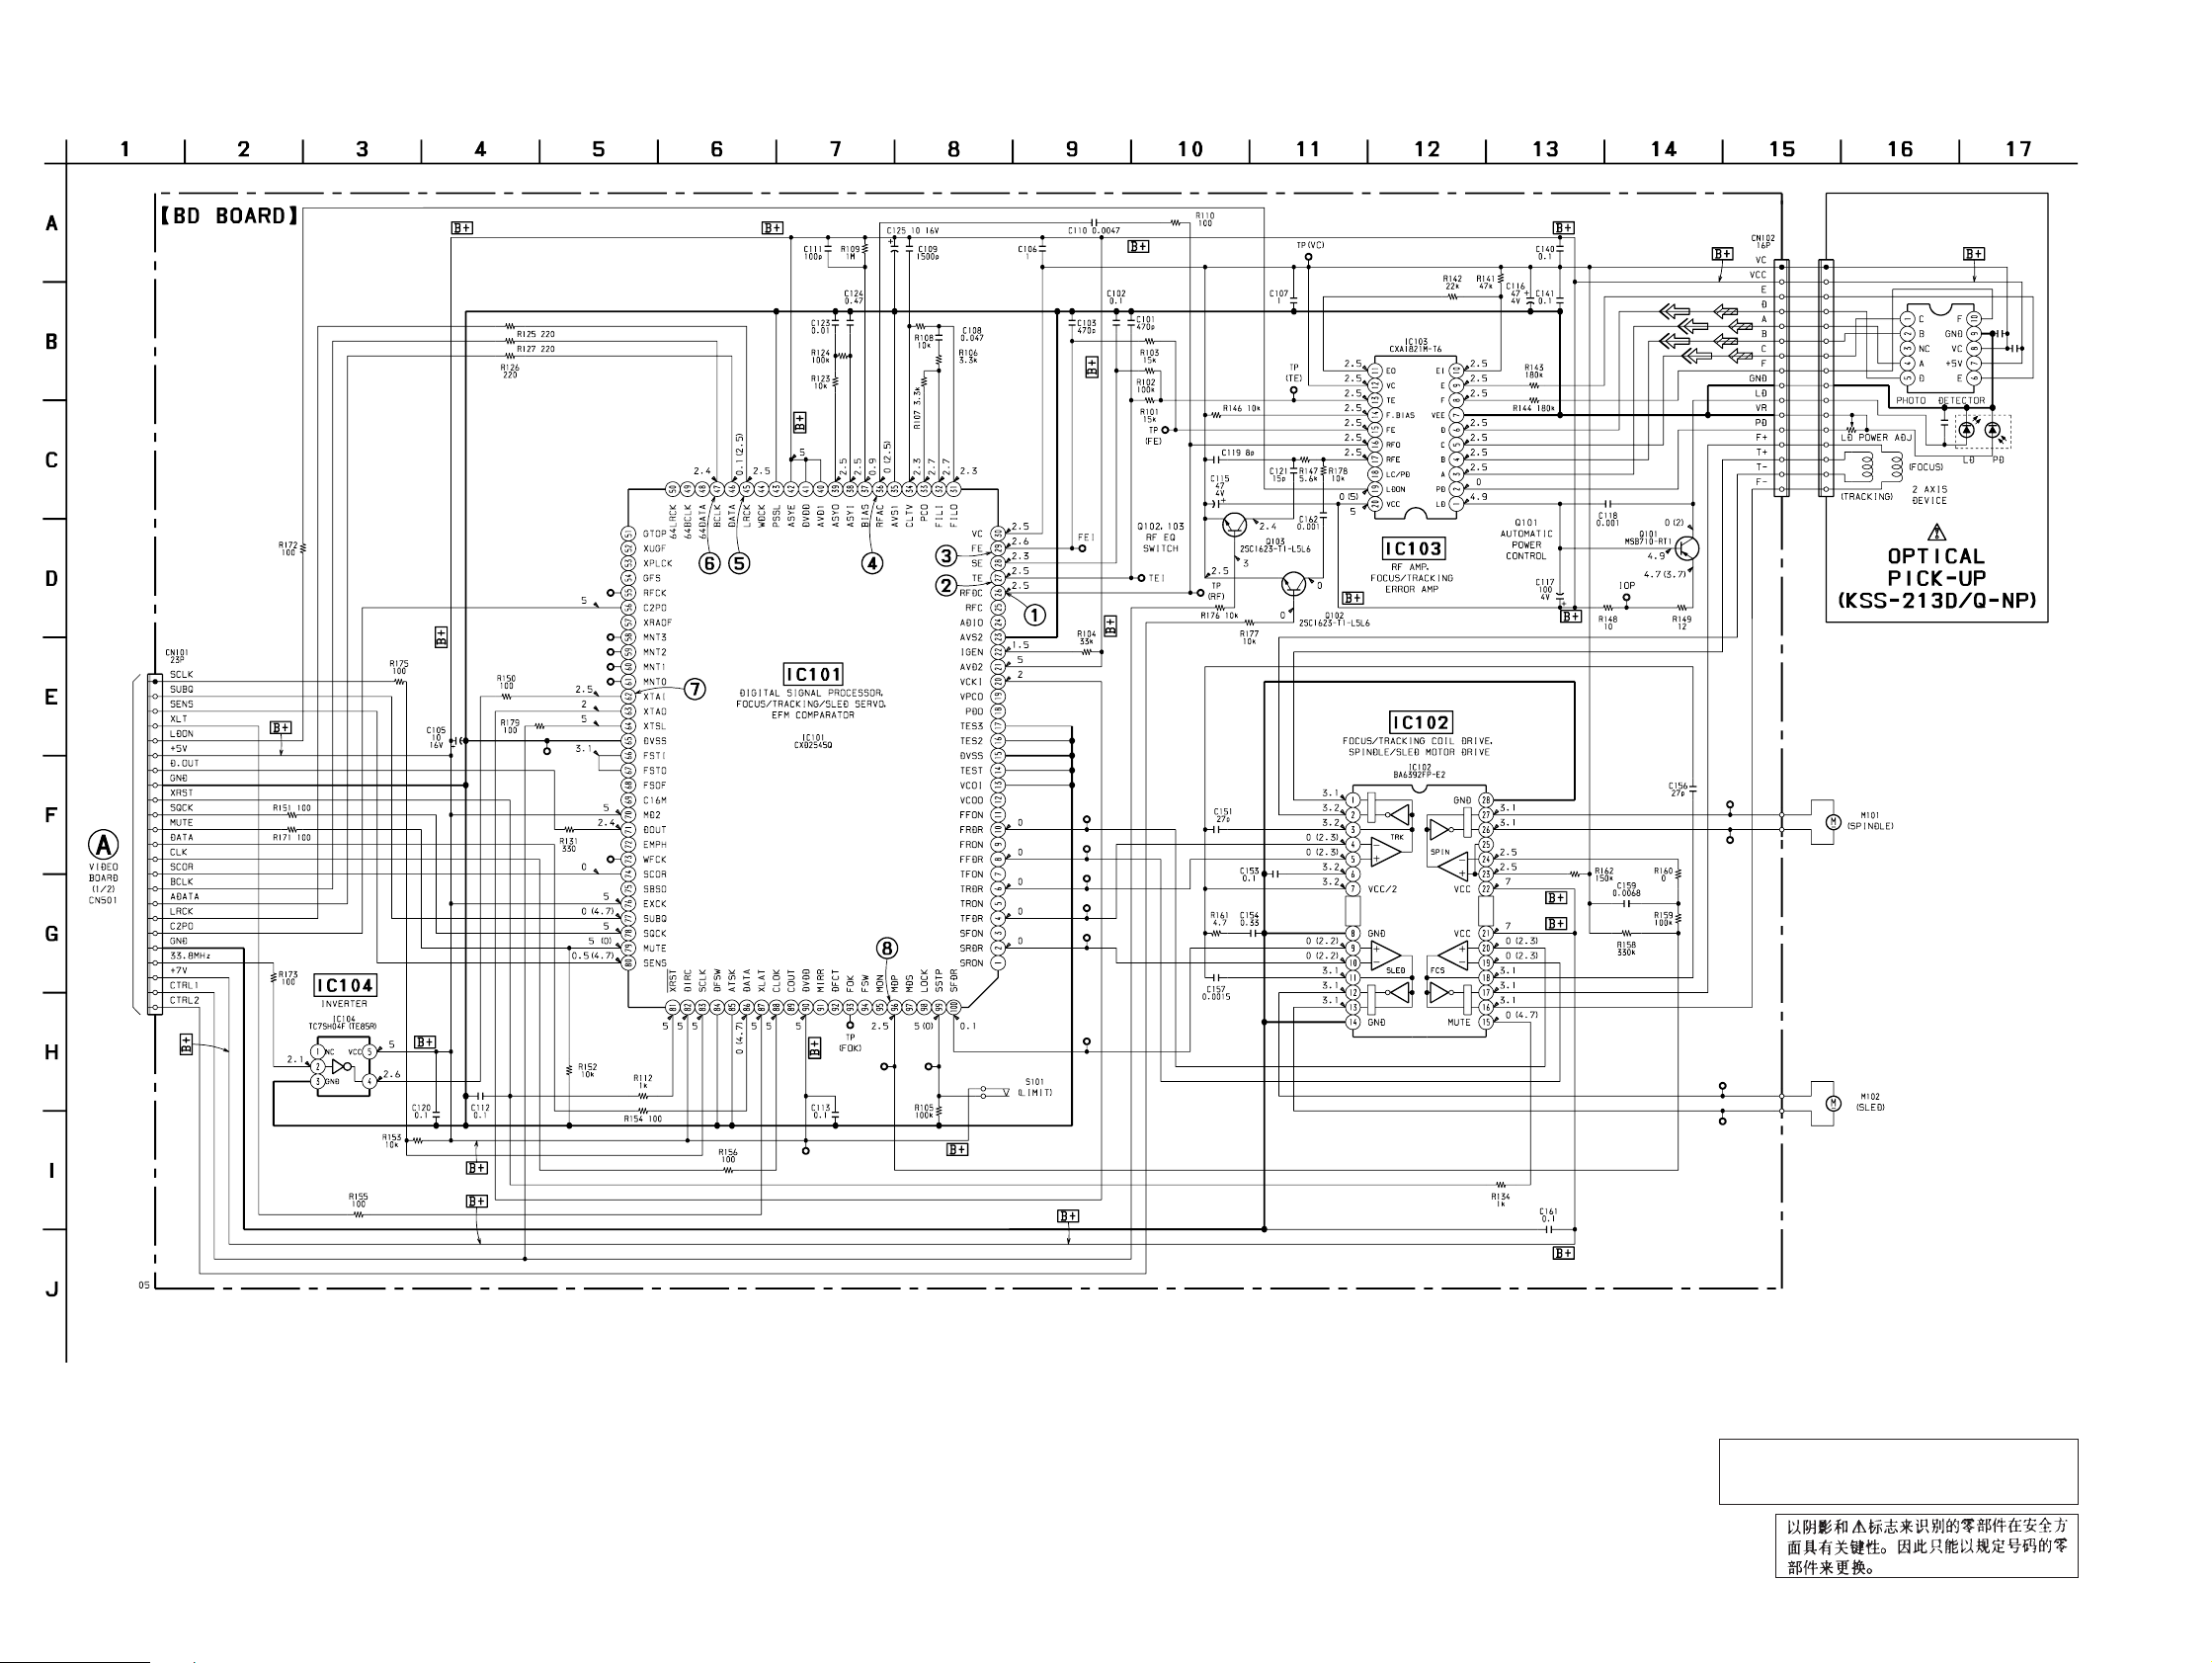
HCD-V919AV
7-9. SCHEMATIC DIAGRAM – BD Section – • See page 86 for Waveforms. • See page 90 and 91 for IC Block Diagrams.
(Page 43)
The components identified by mark ! or dotted
line with mark ! are critical for safety.
Replace only with part number specified.
• V oltages and w av eforms are dc with respect to ground in
CD play mode.
no mark : CD stop
( ) : CD play
– 39 –
– 40 –
Page 31
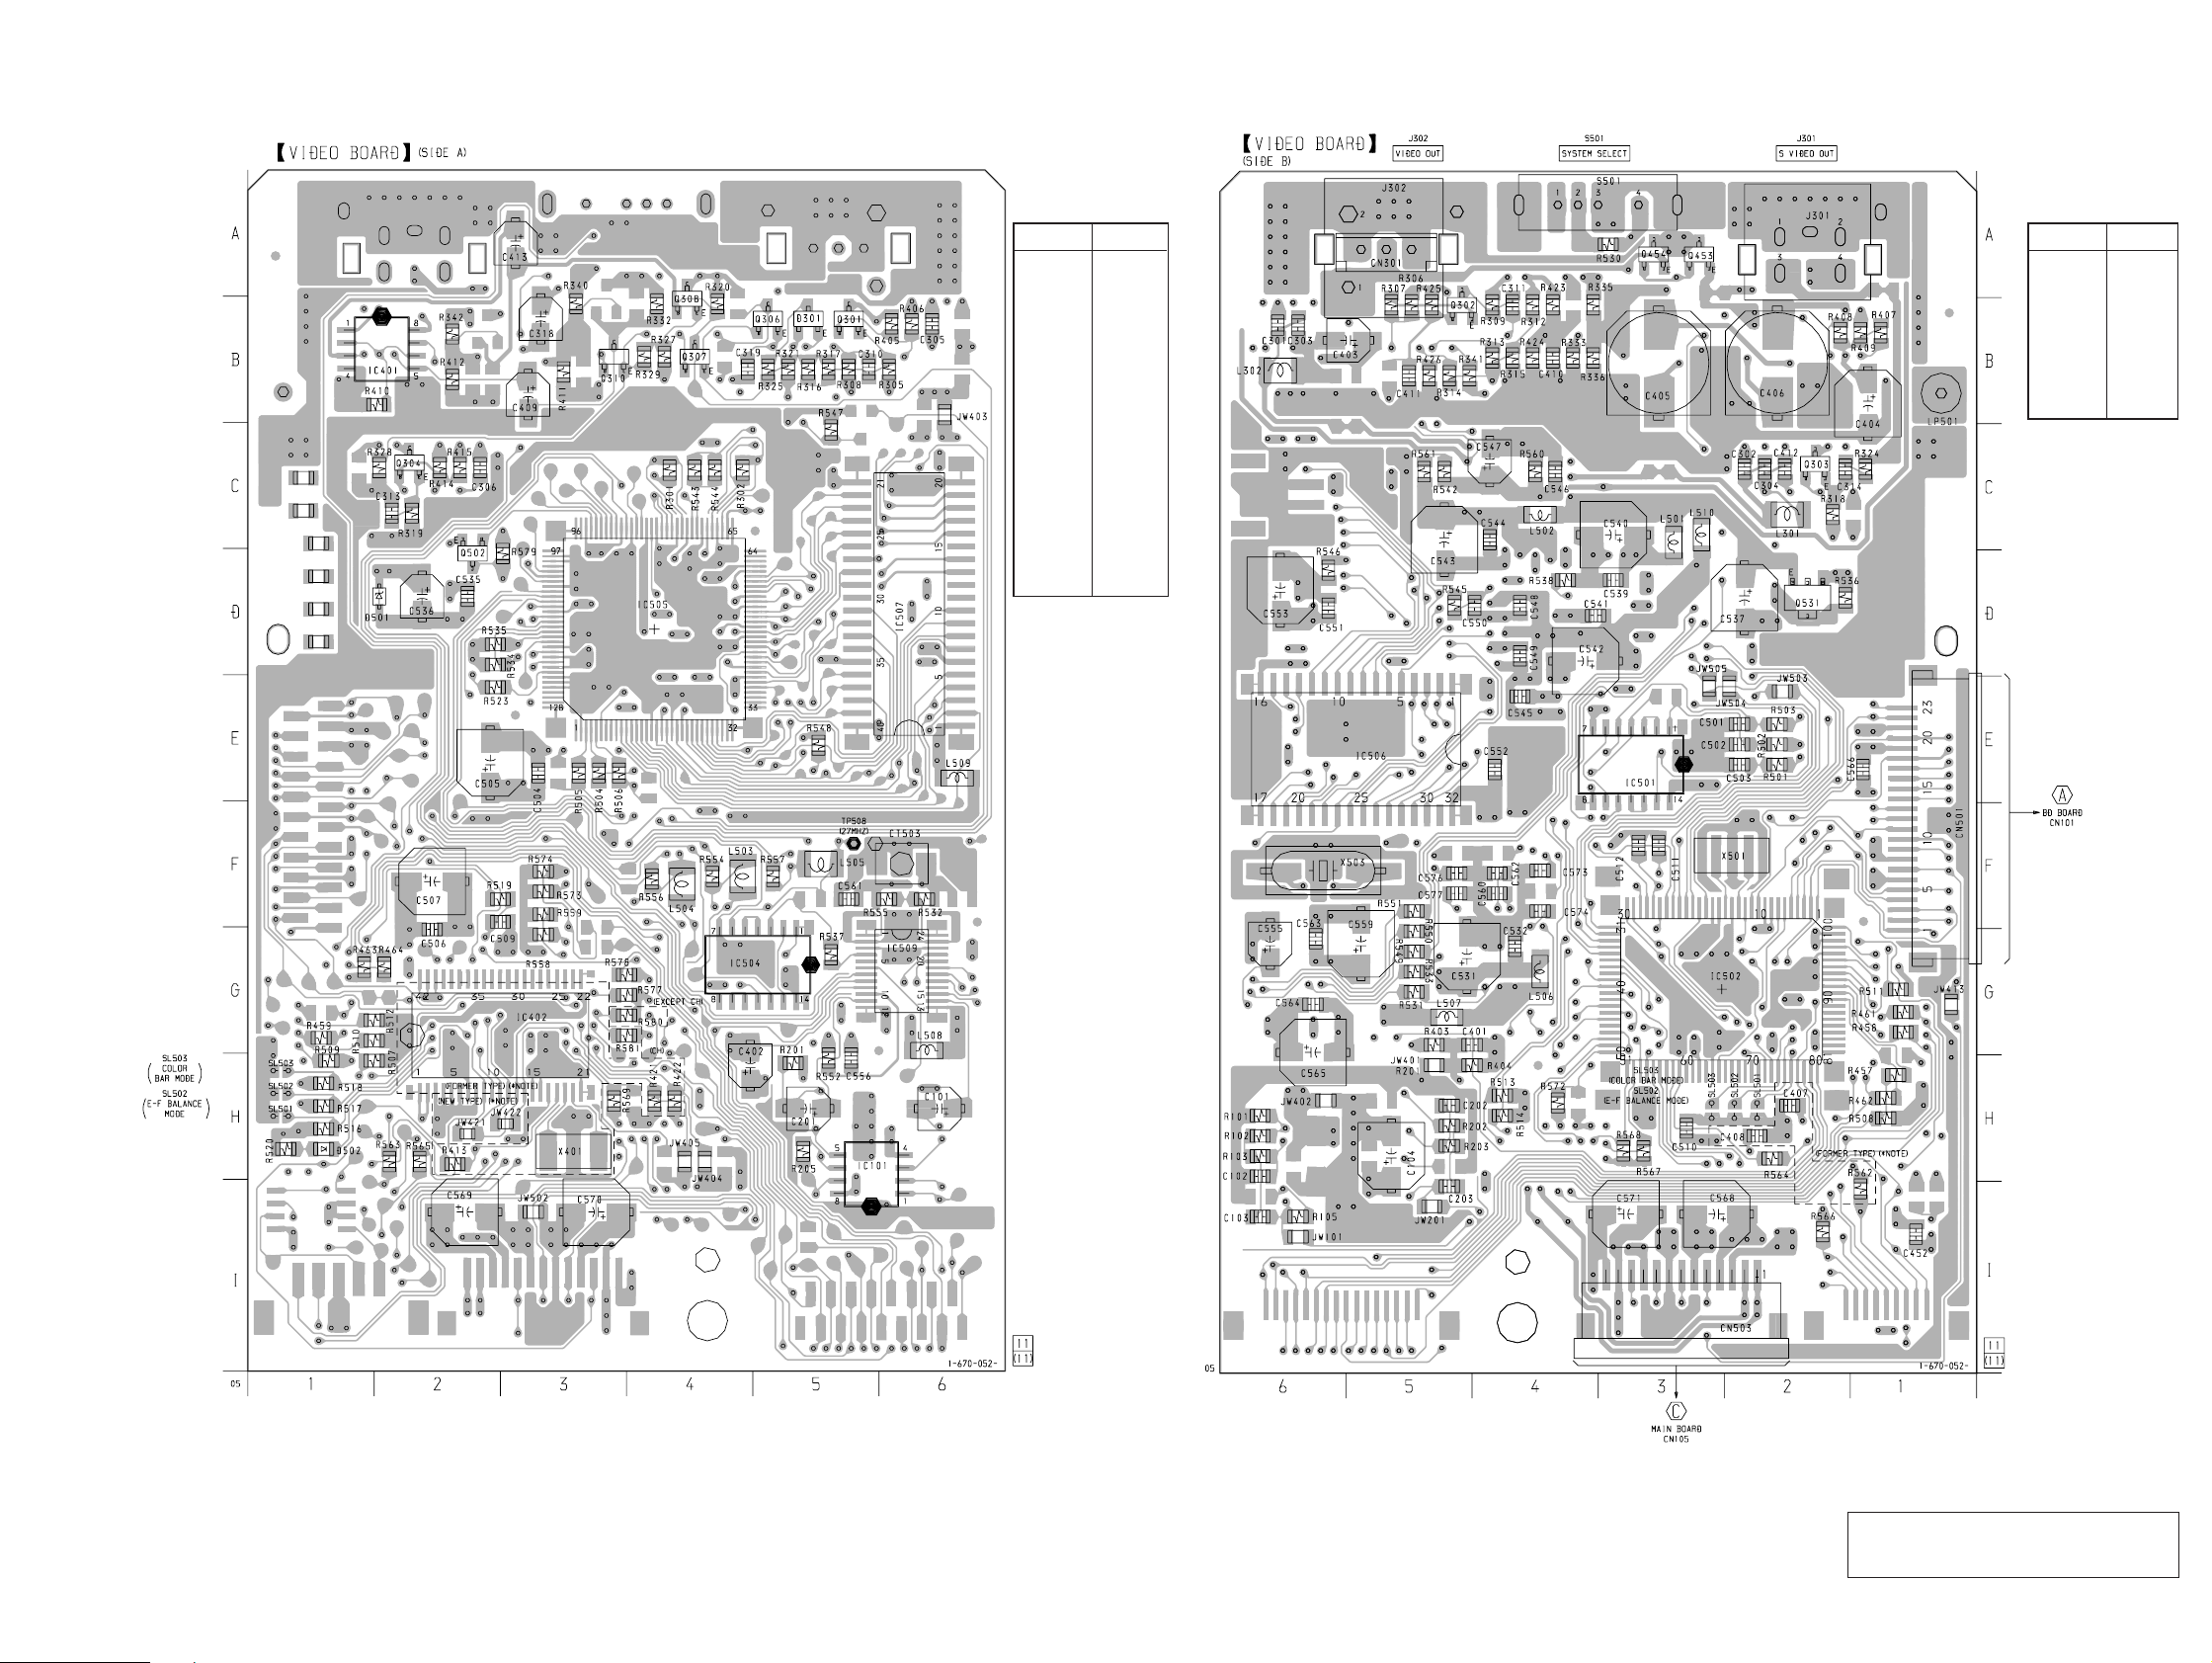
7-10. PRINTED WIRING BOARD – VIDEO Section – • See page 35 for Circuit Boards Location.
HCD-V919AV
• Semiconductor
Location
Ref. No. Location
D301 B-5
D501 D-2
D502 H-1
IC101 H-5
IC401 B-2
IC402 G-3
IC504 G-4
IC505 D-4
IC507 D-6
IC509 G-6
Q301 B-5
Q304 C-2
Q306 B-5
Q307 B-4
Q308 B-4
Q310 B-3
Q502 D-2
• Semiconductor
Location
Ref. No. Location
IC501 E-3
IC502 G-3
IC506 E-5
Q302 B-5
Q303 C-2
Q453 A-3
Q454 A-3
Q531 D-2
(Page 37)
– 41 –
(Page 58)
*Note
When replacing IC502, refer to “IC502 of
VIDEO board” in “Servicing Notes” (page 4).
– 42 –
Page 32
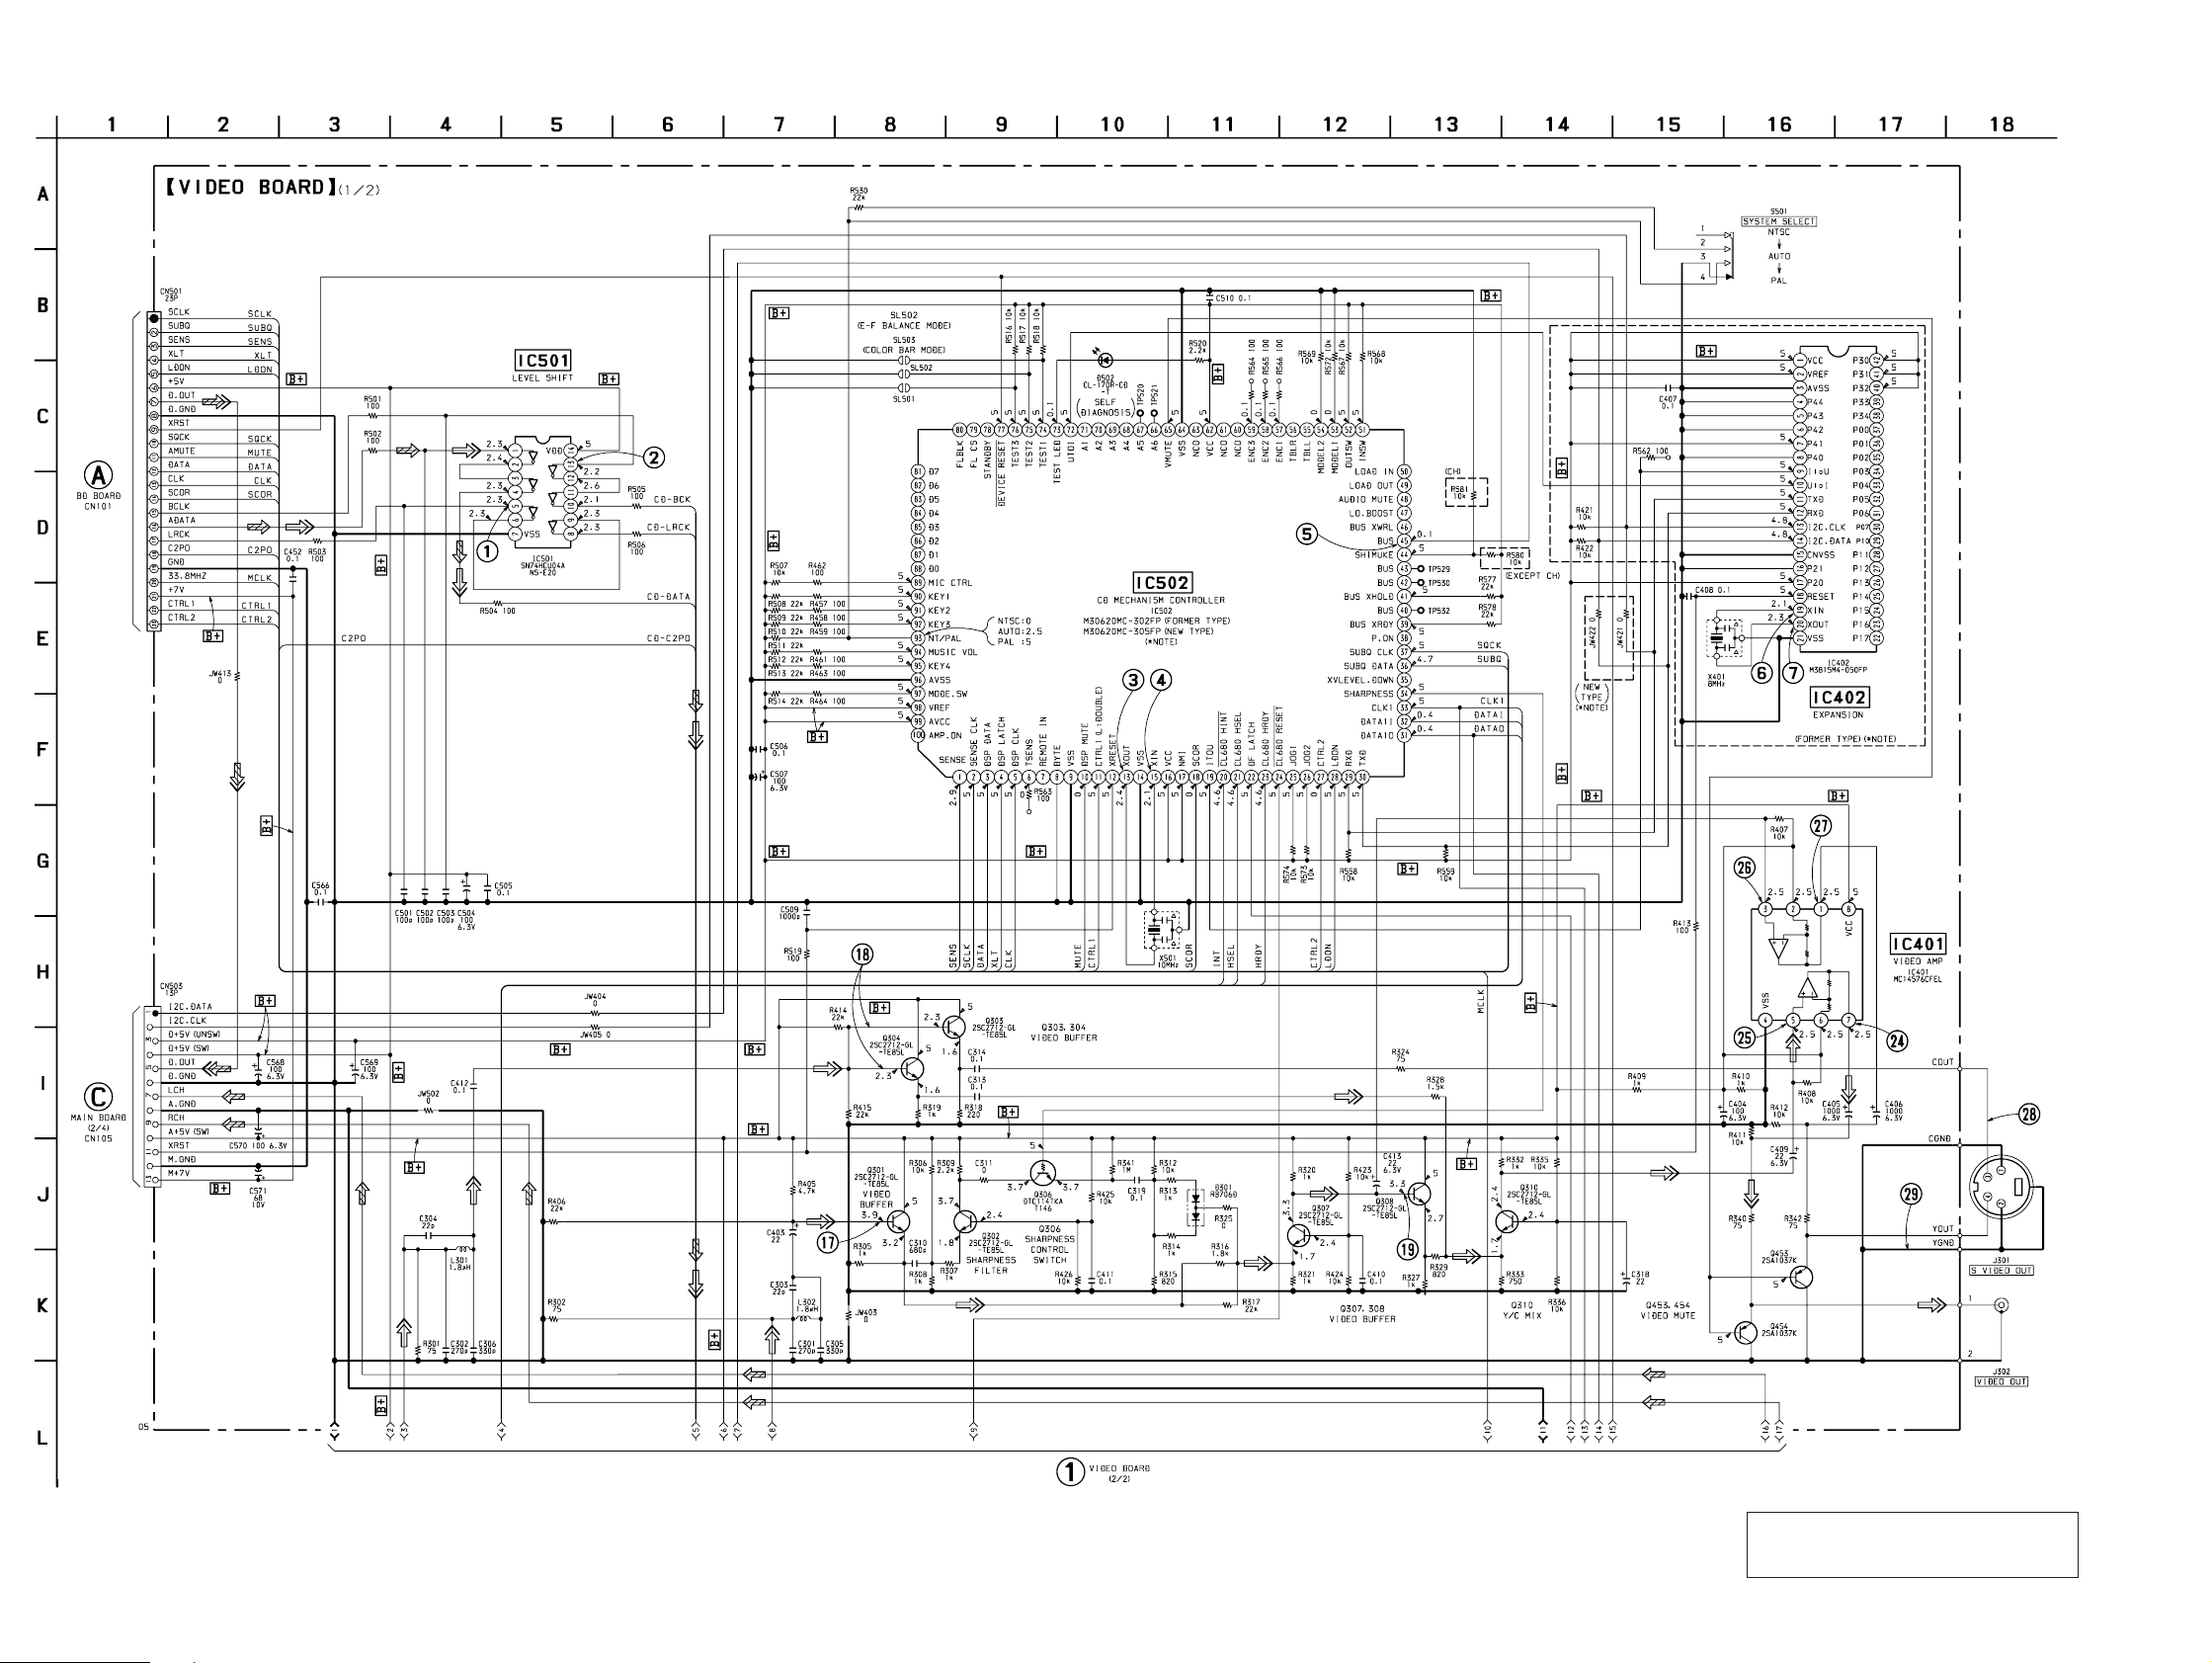
HCD-V919AV
7-11. SCHEMATIC DIAGRAM – VIDEO Section (1/2) – • See page 91 for IC Block Diagram.
(Page 39)
(Page 62)
– 43 –
(Page 45)
• V oltages and w av eforms are dc with respect to ground in
VIDEO CD play mode.
no mark : VIDEO CD play
– 44 –
*Note
When replacing IC502, refer to “IC502 of
VIDEO board” in “Servicing Notes” (page 4).
Page 33
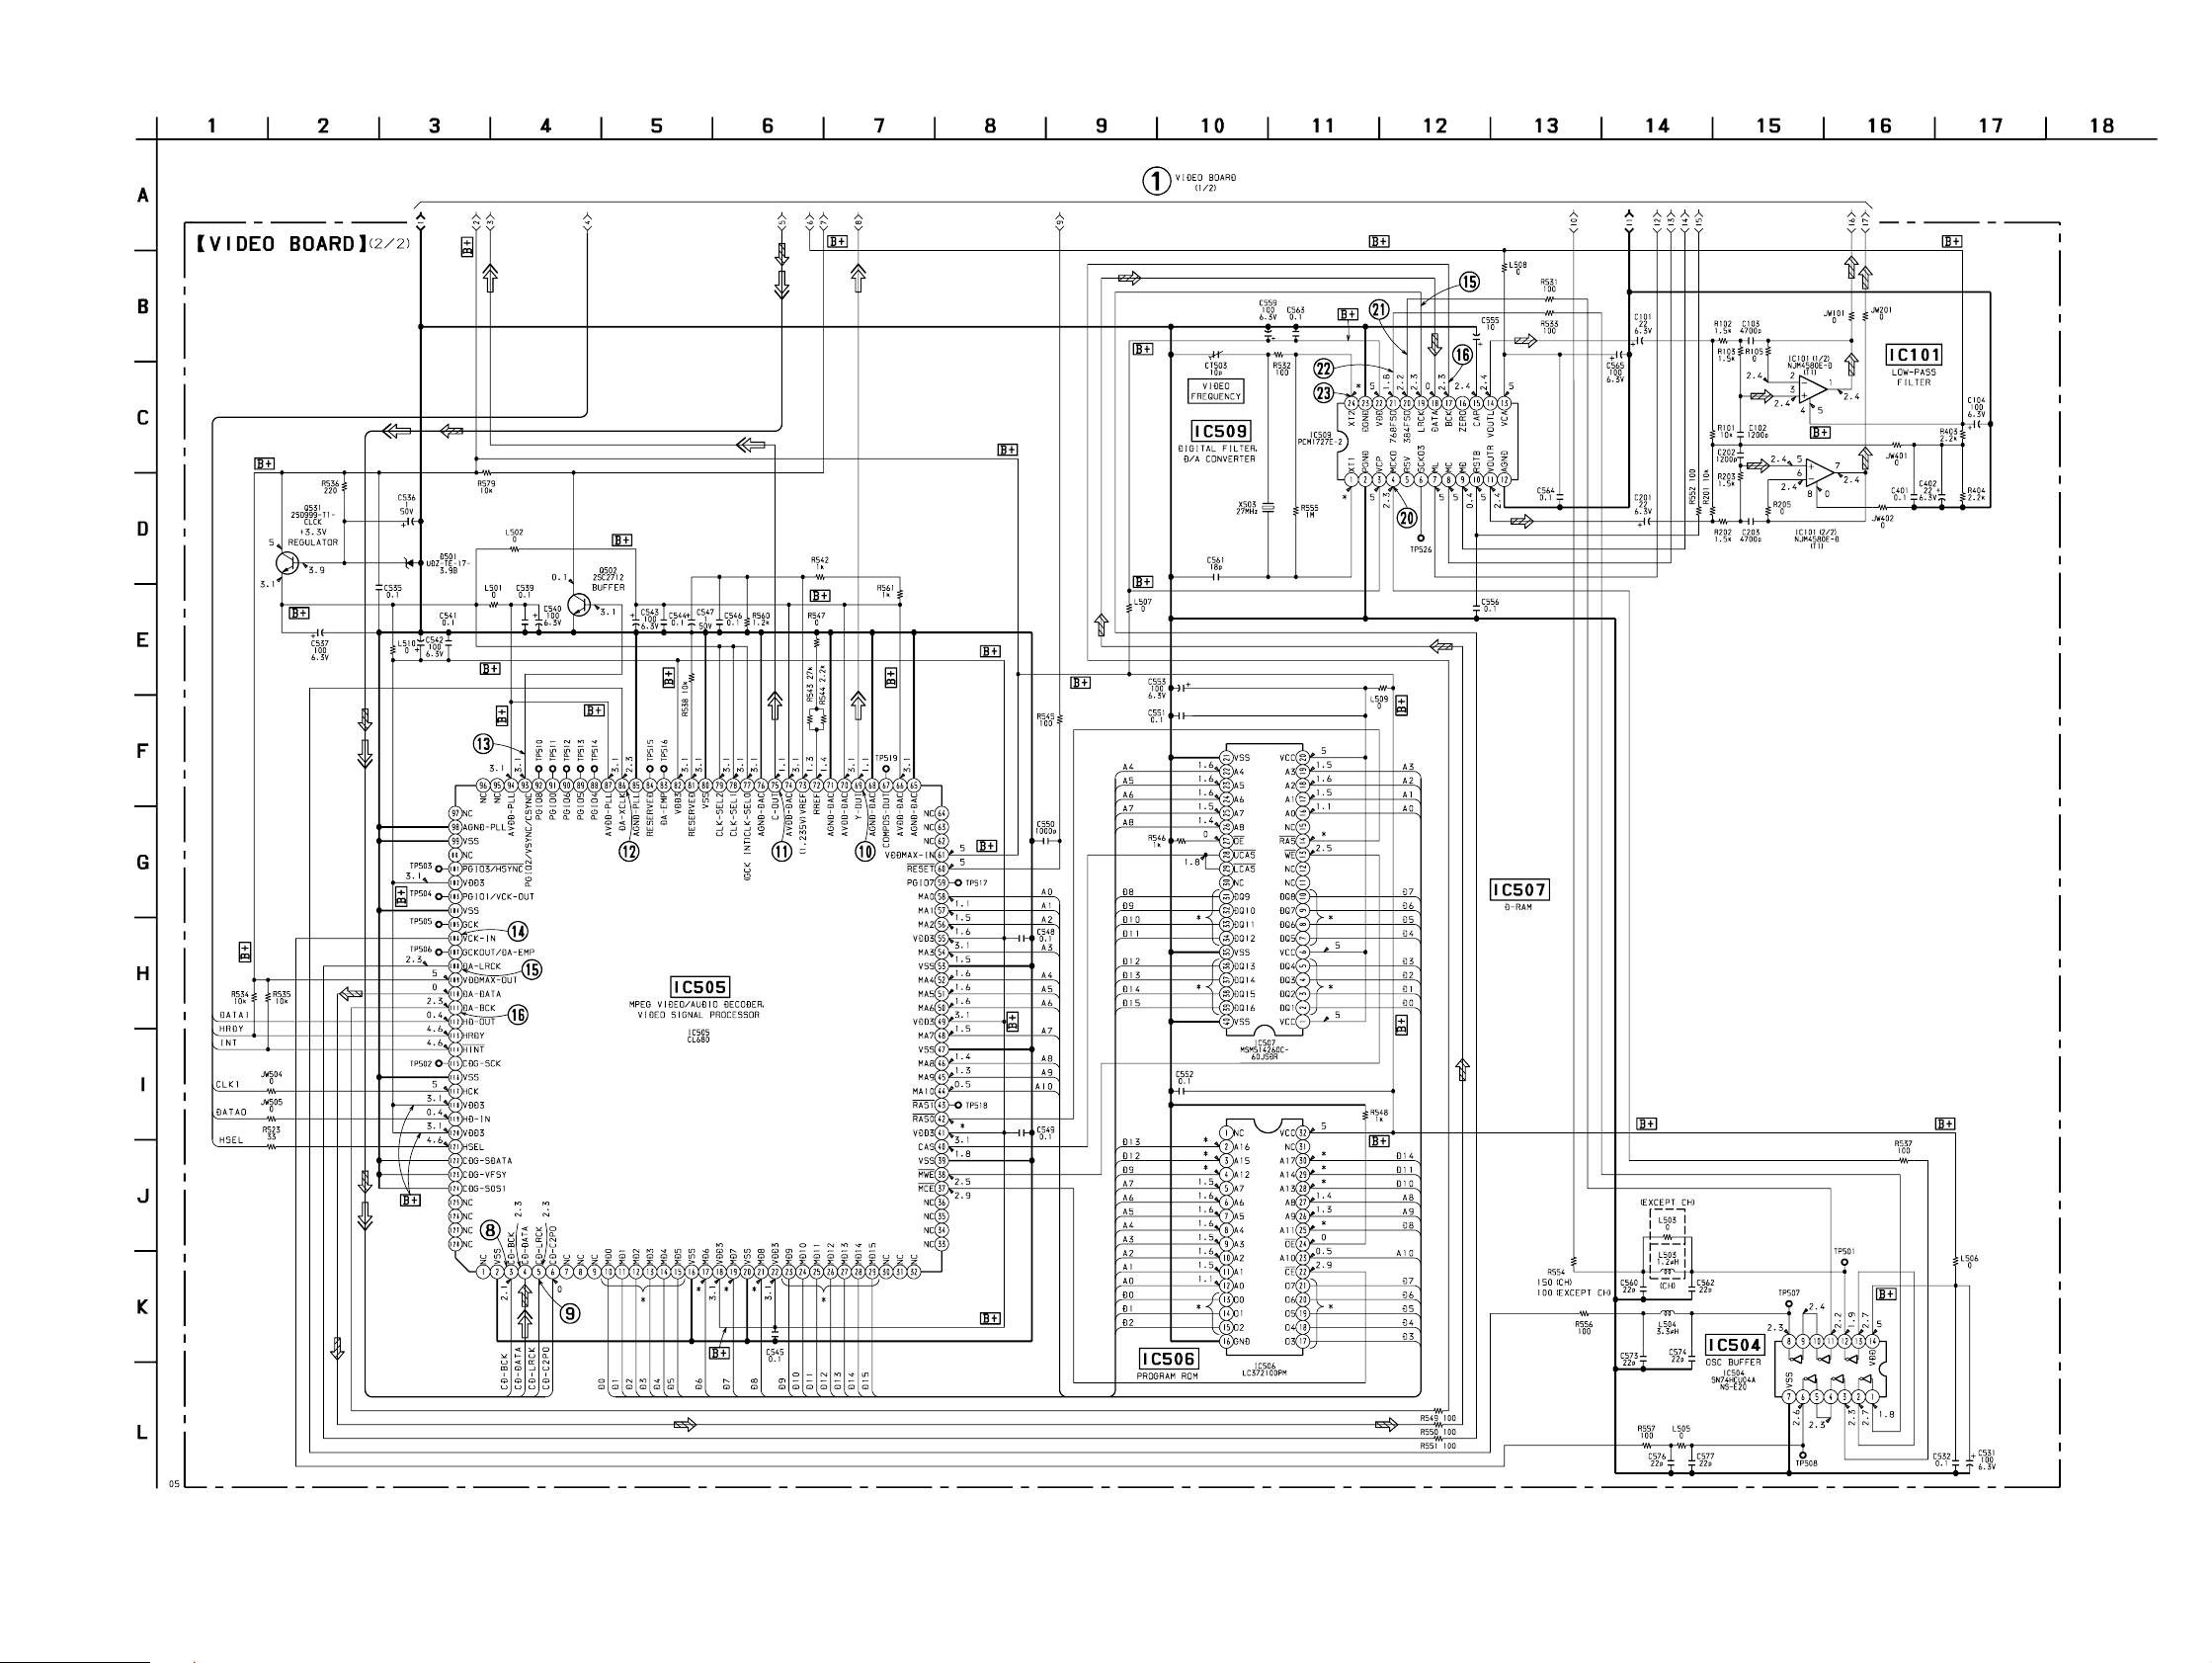
7-12. SCHEMATIC DIAGRAM – VIDEO Section (2/2) – • See page 86 to 88 for Waveforms. • See page 91 for IC Block Diagram.
(Page 43)
HCD-V919AV
– 45 –
– 46 –
Page 34
HCD-V919AV
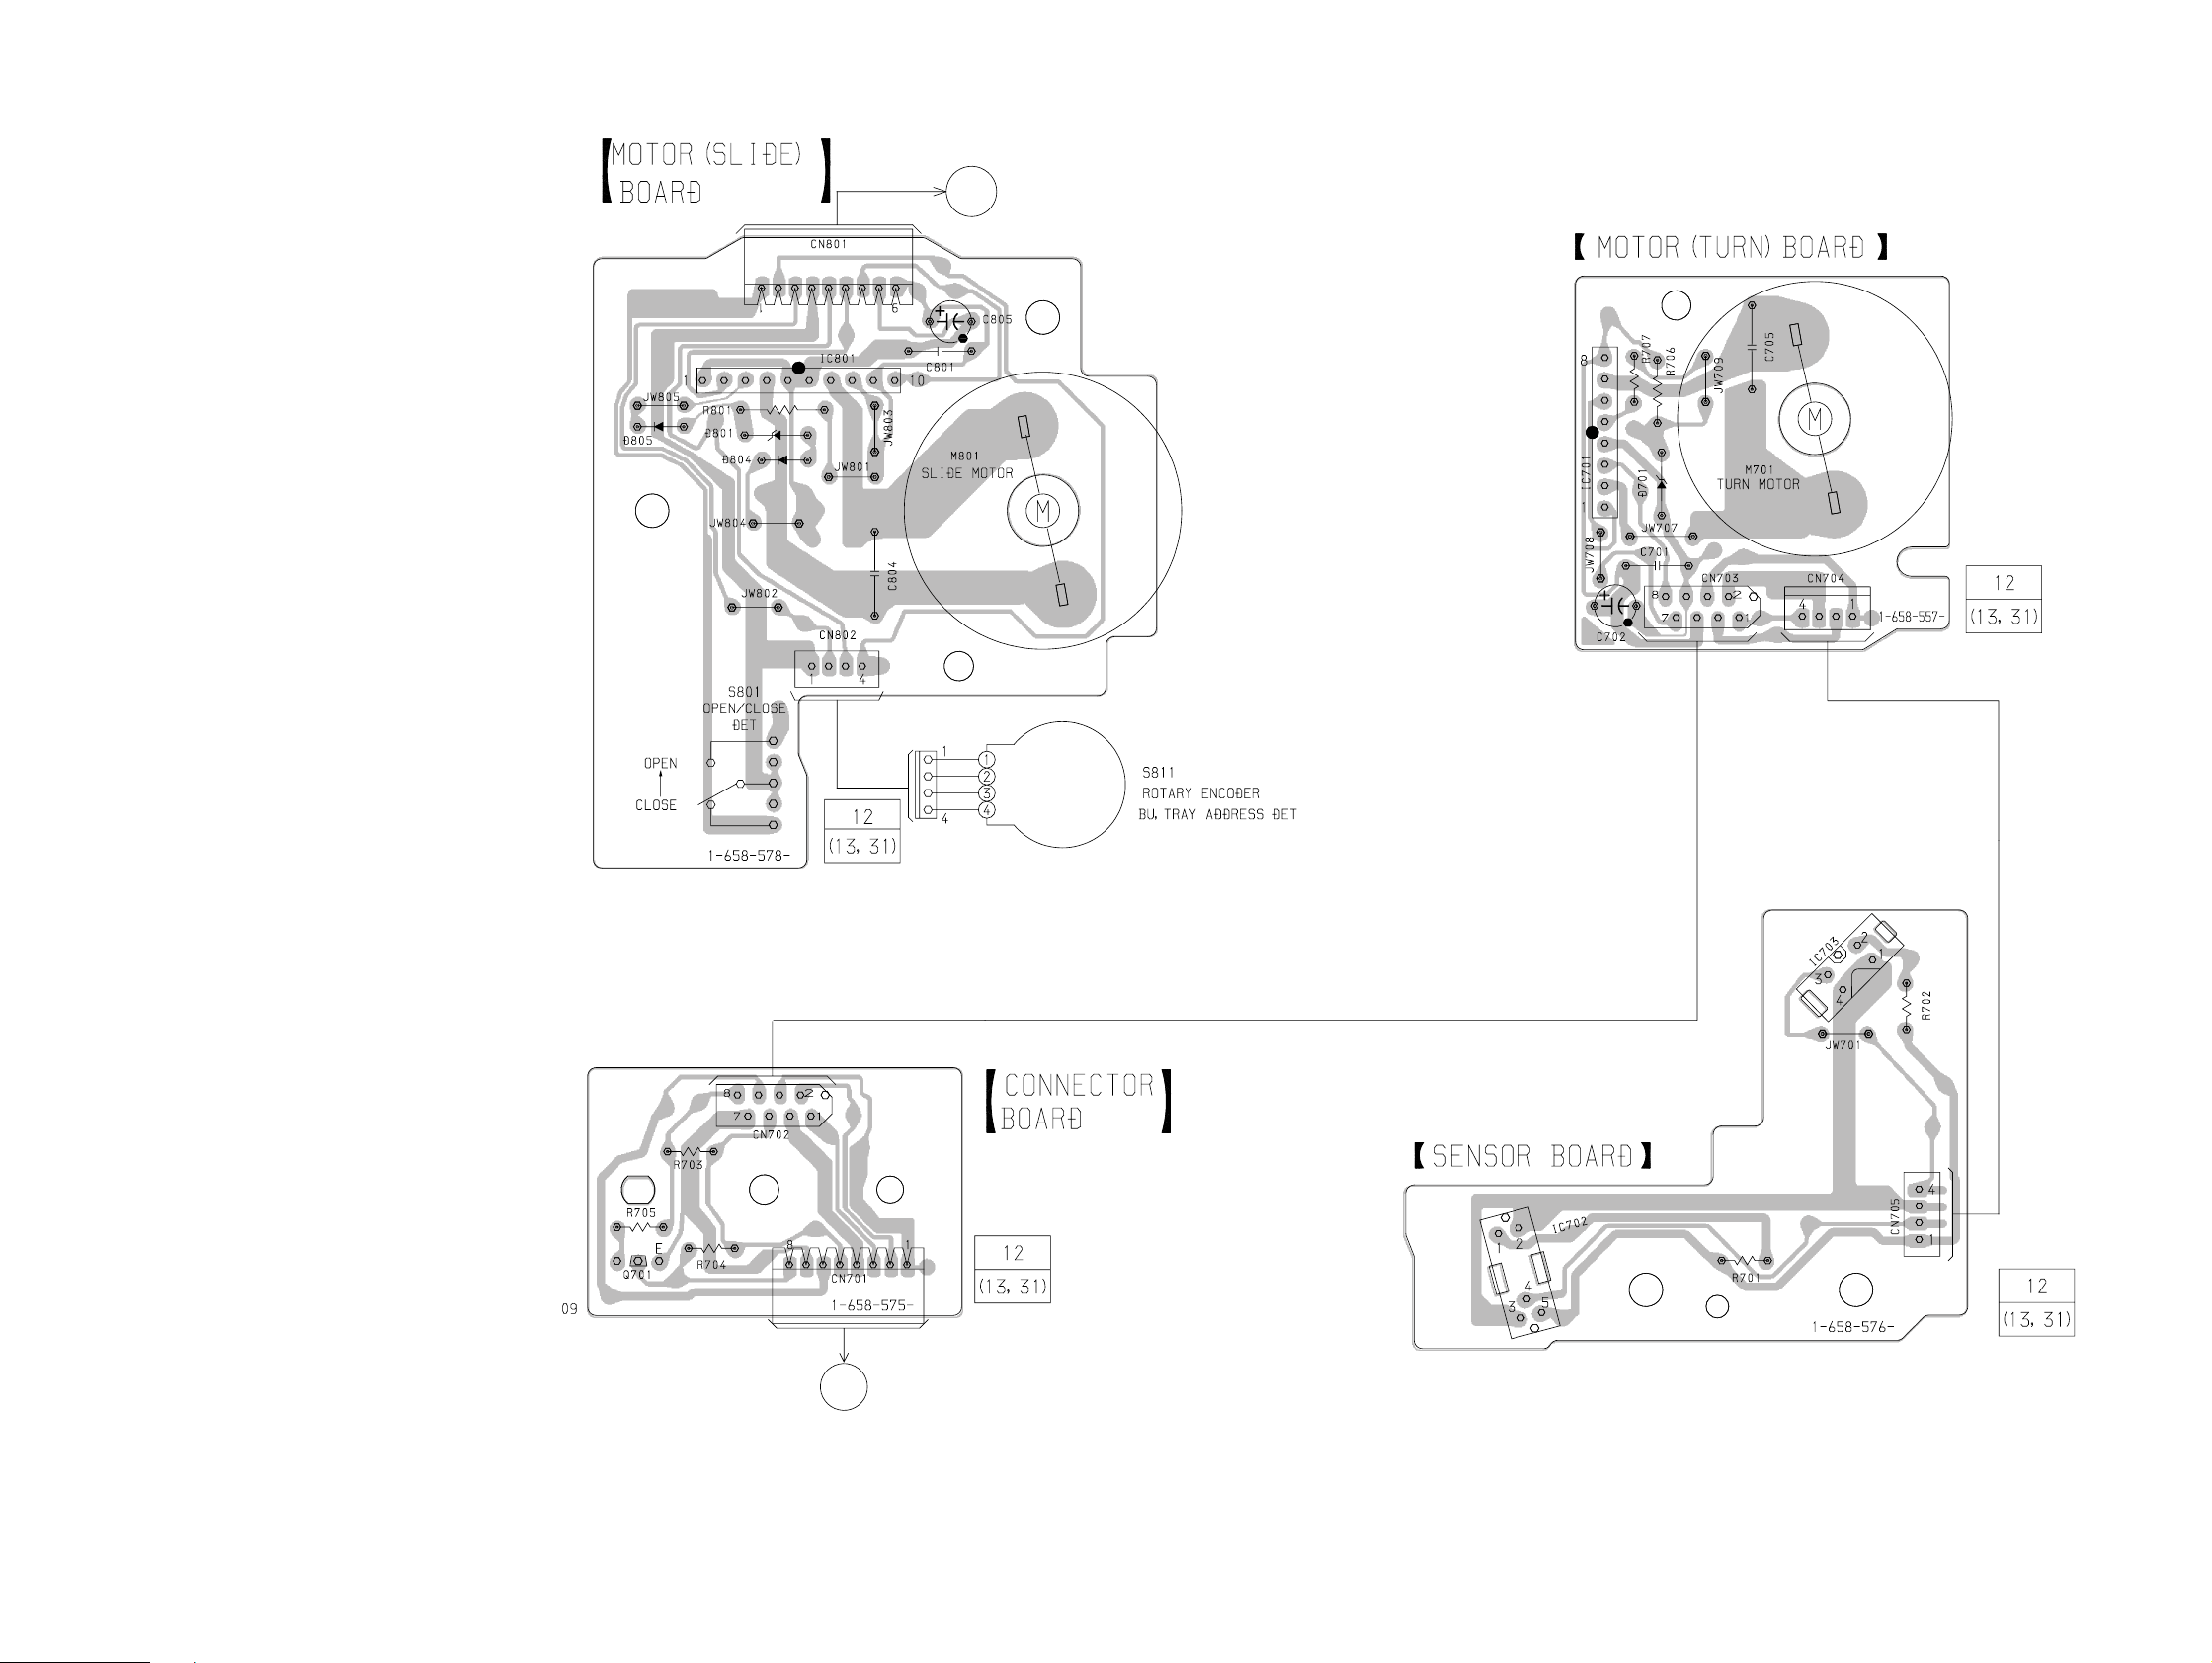
7-13. PRINTED WIRING BOARDS – CD MOTOR Section – • See page 35 for Circuit Boards Location.
(Page 58)
F
MAIN BOARD
CN104
– 47 –
(Page 58)
E
MAIN BOARD
CN103
– 48 –
Page 35
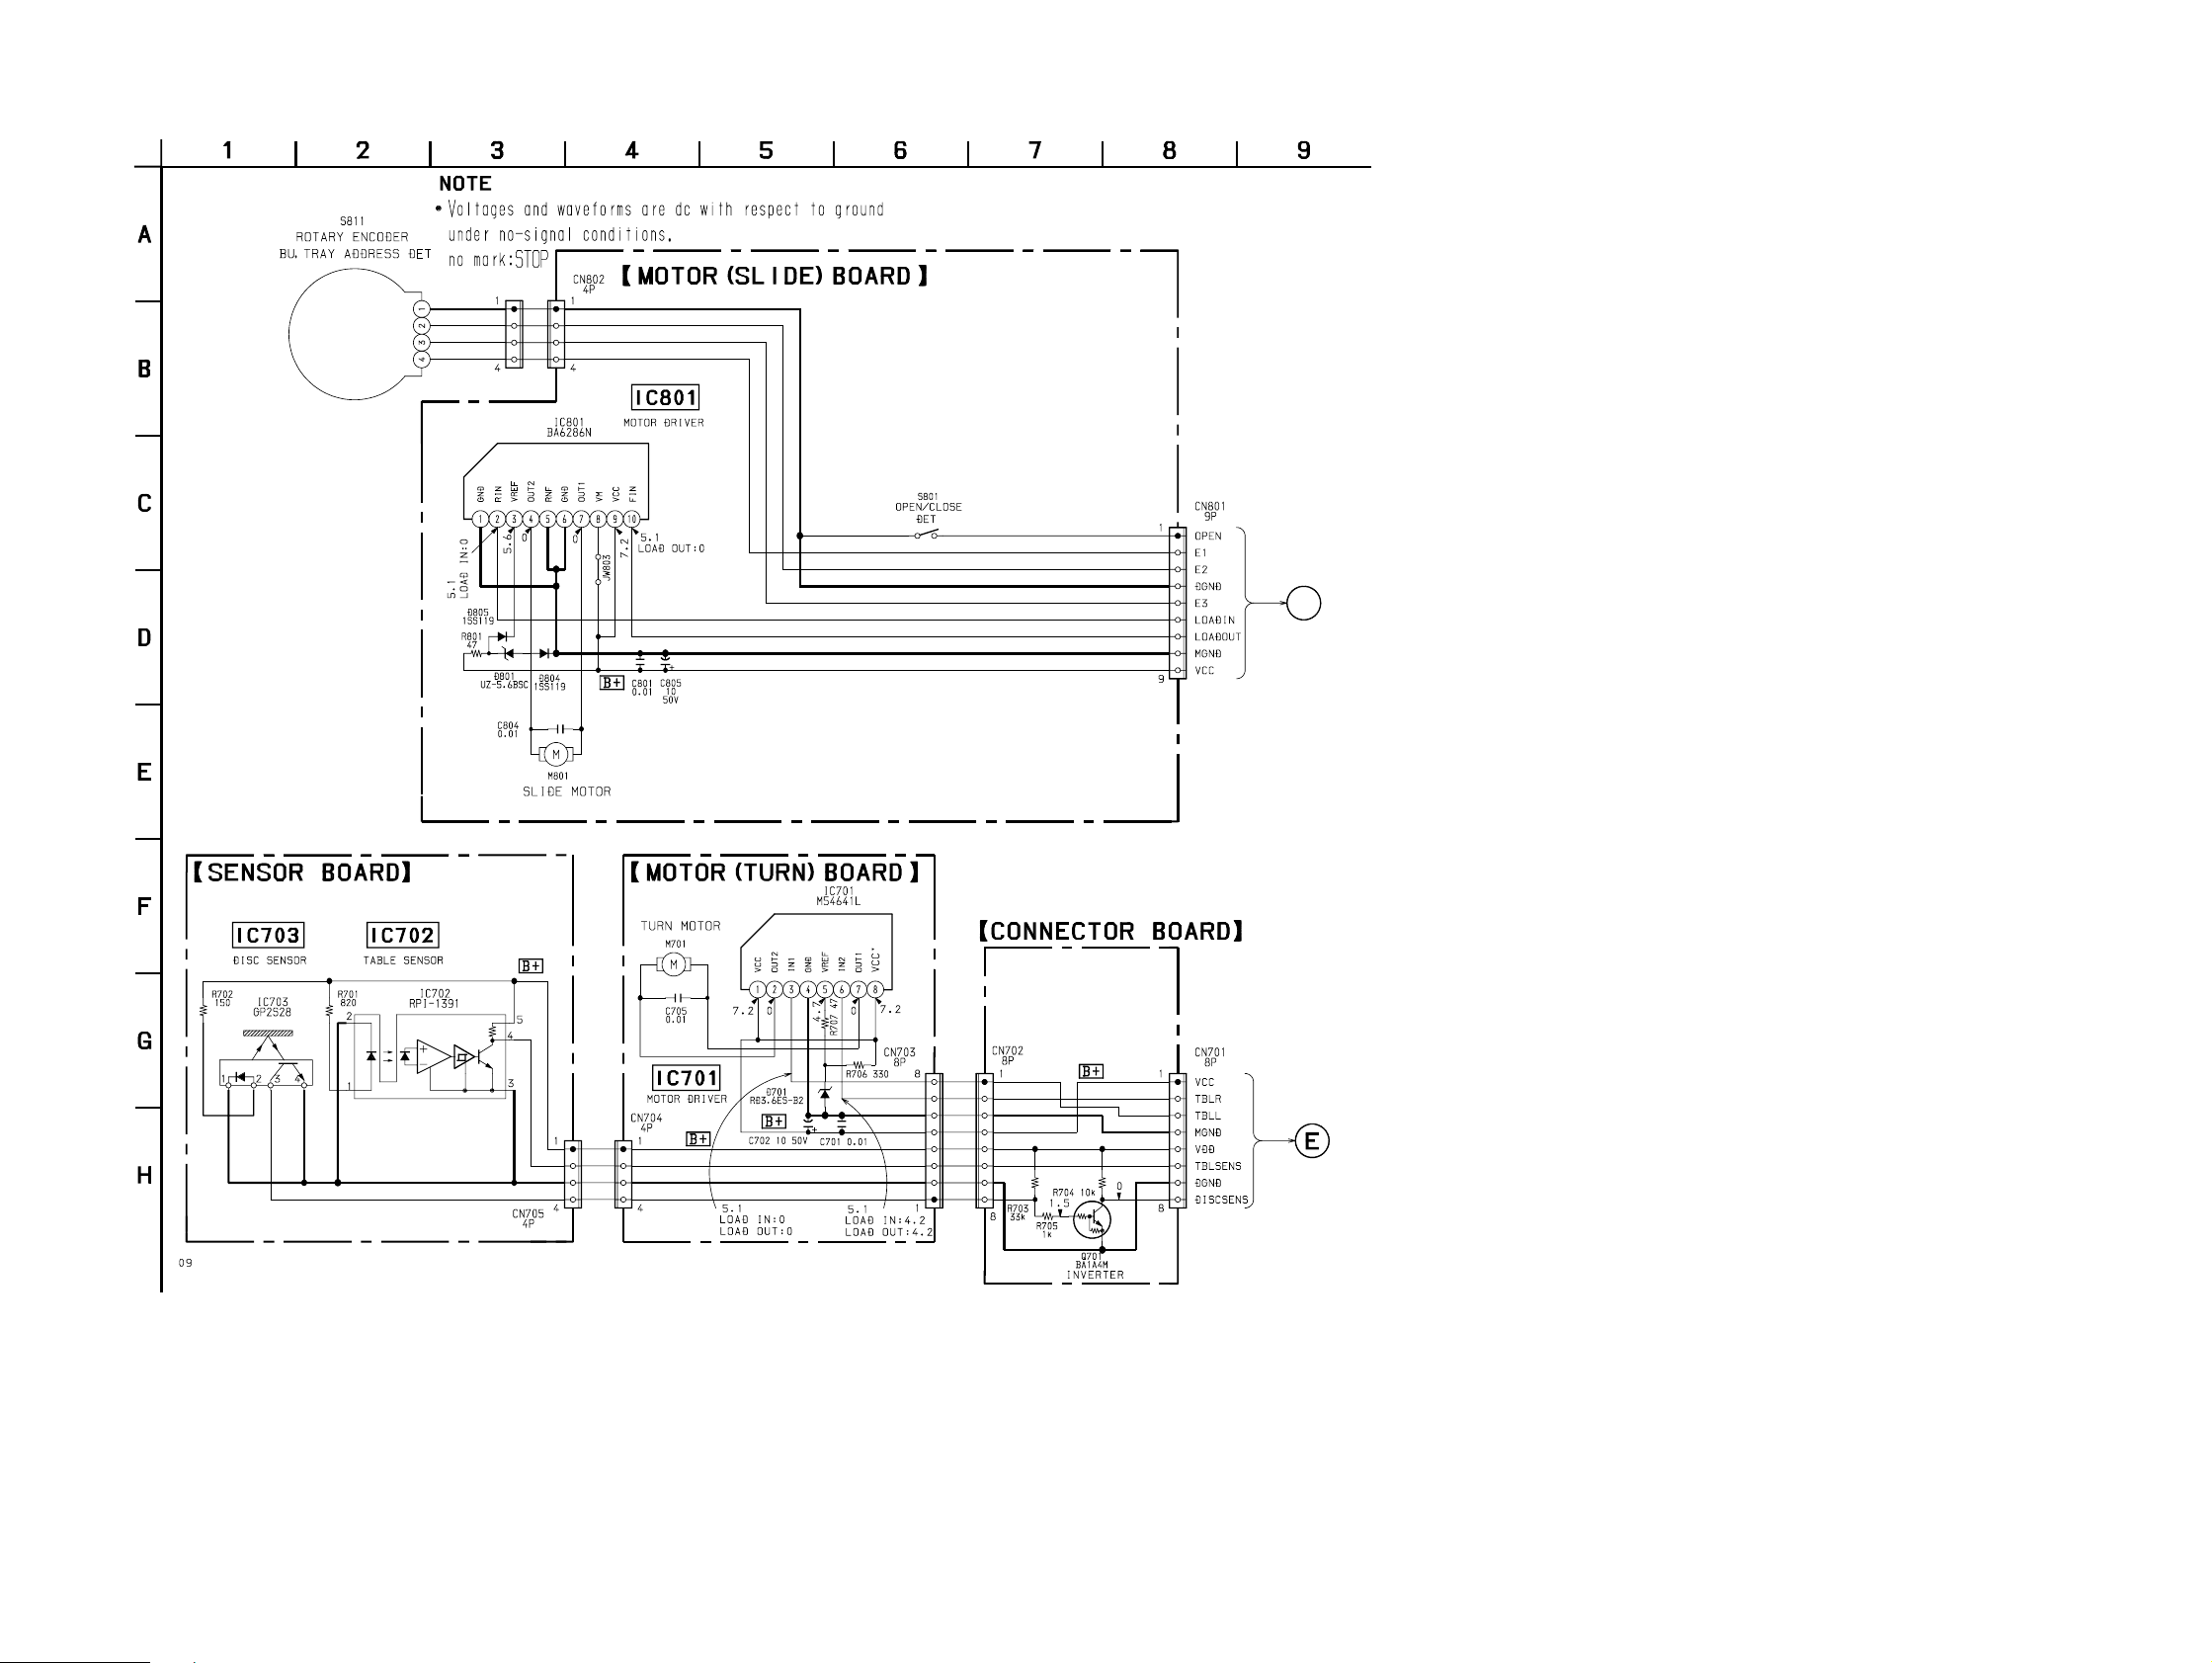
7-14. SCHEMATIC DIAGRAM – CD MOTOR Section – • See page 92 for IC Block Diagrams.
F
(Page 62)
HCD-V919AV
MAIN BOARD
CN104
– 49 –
MAIN BOARD
CN103
(Page 62)
– 50 –
Page 36
HCD-V919AV
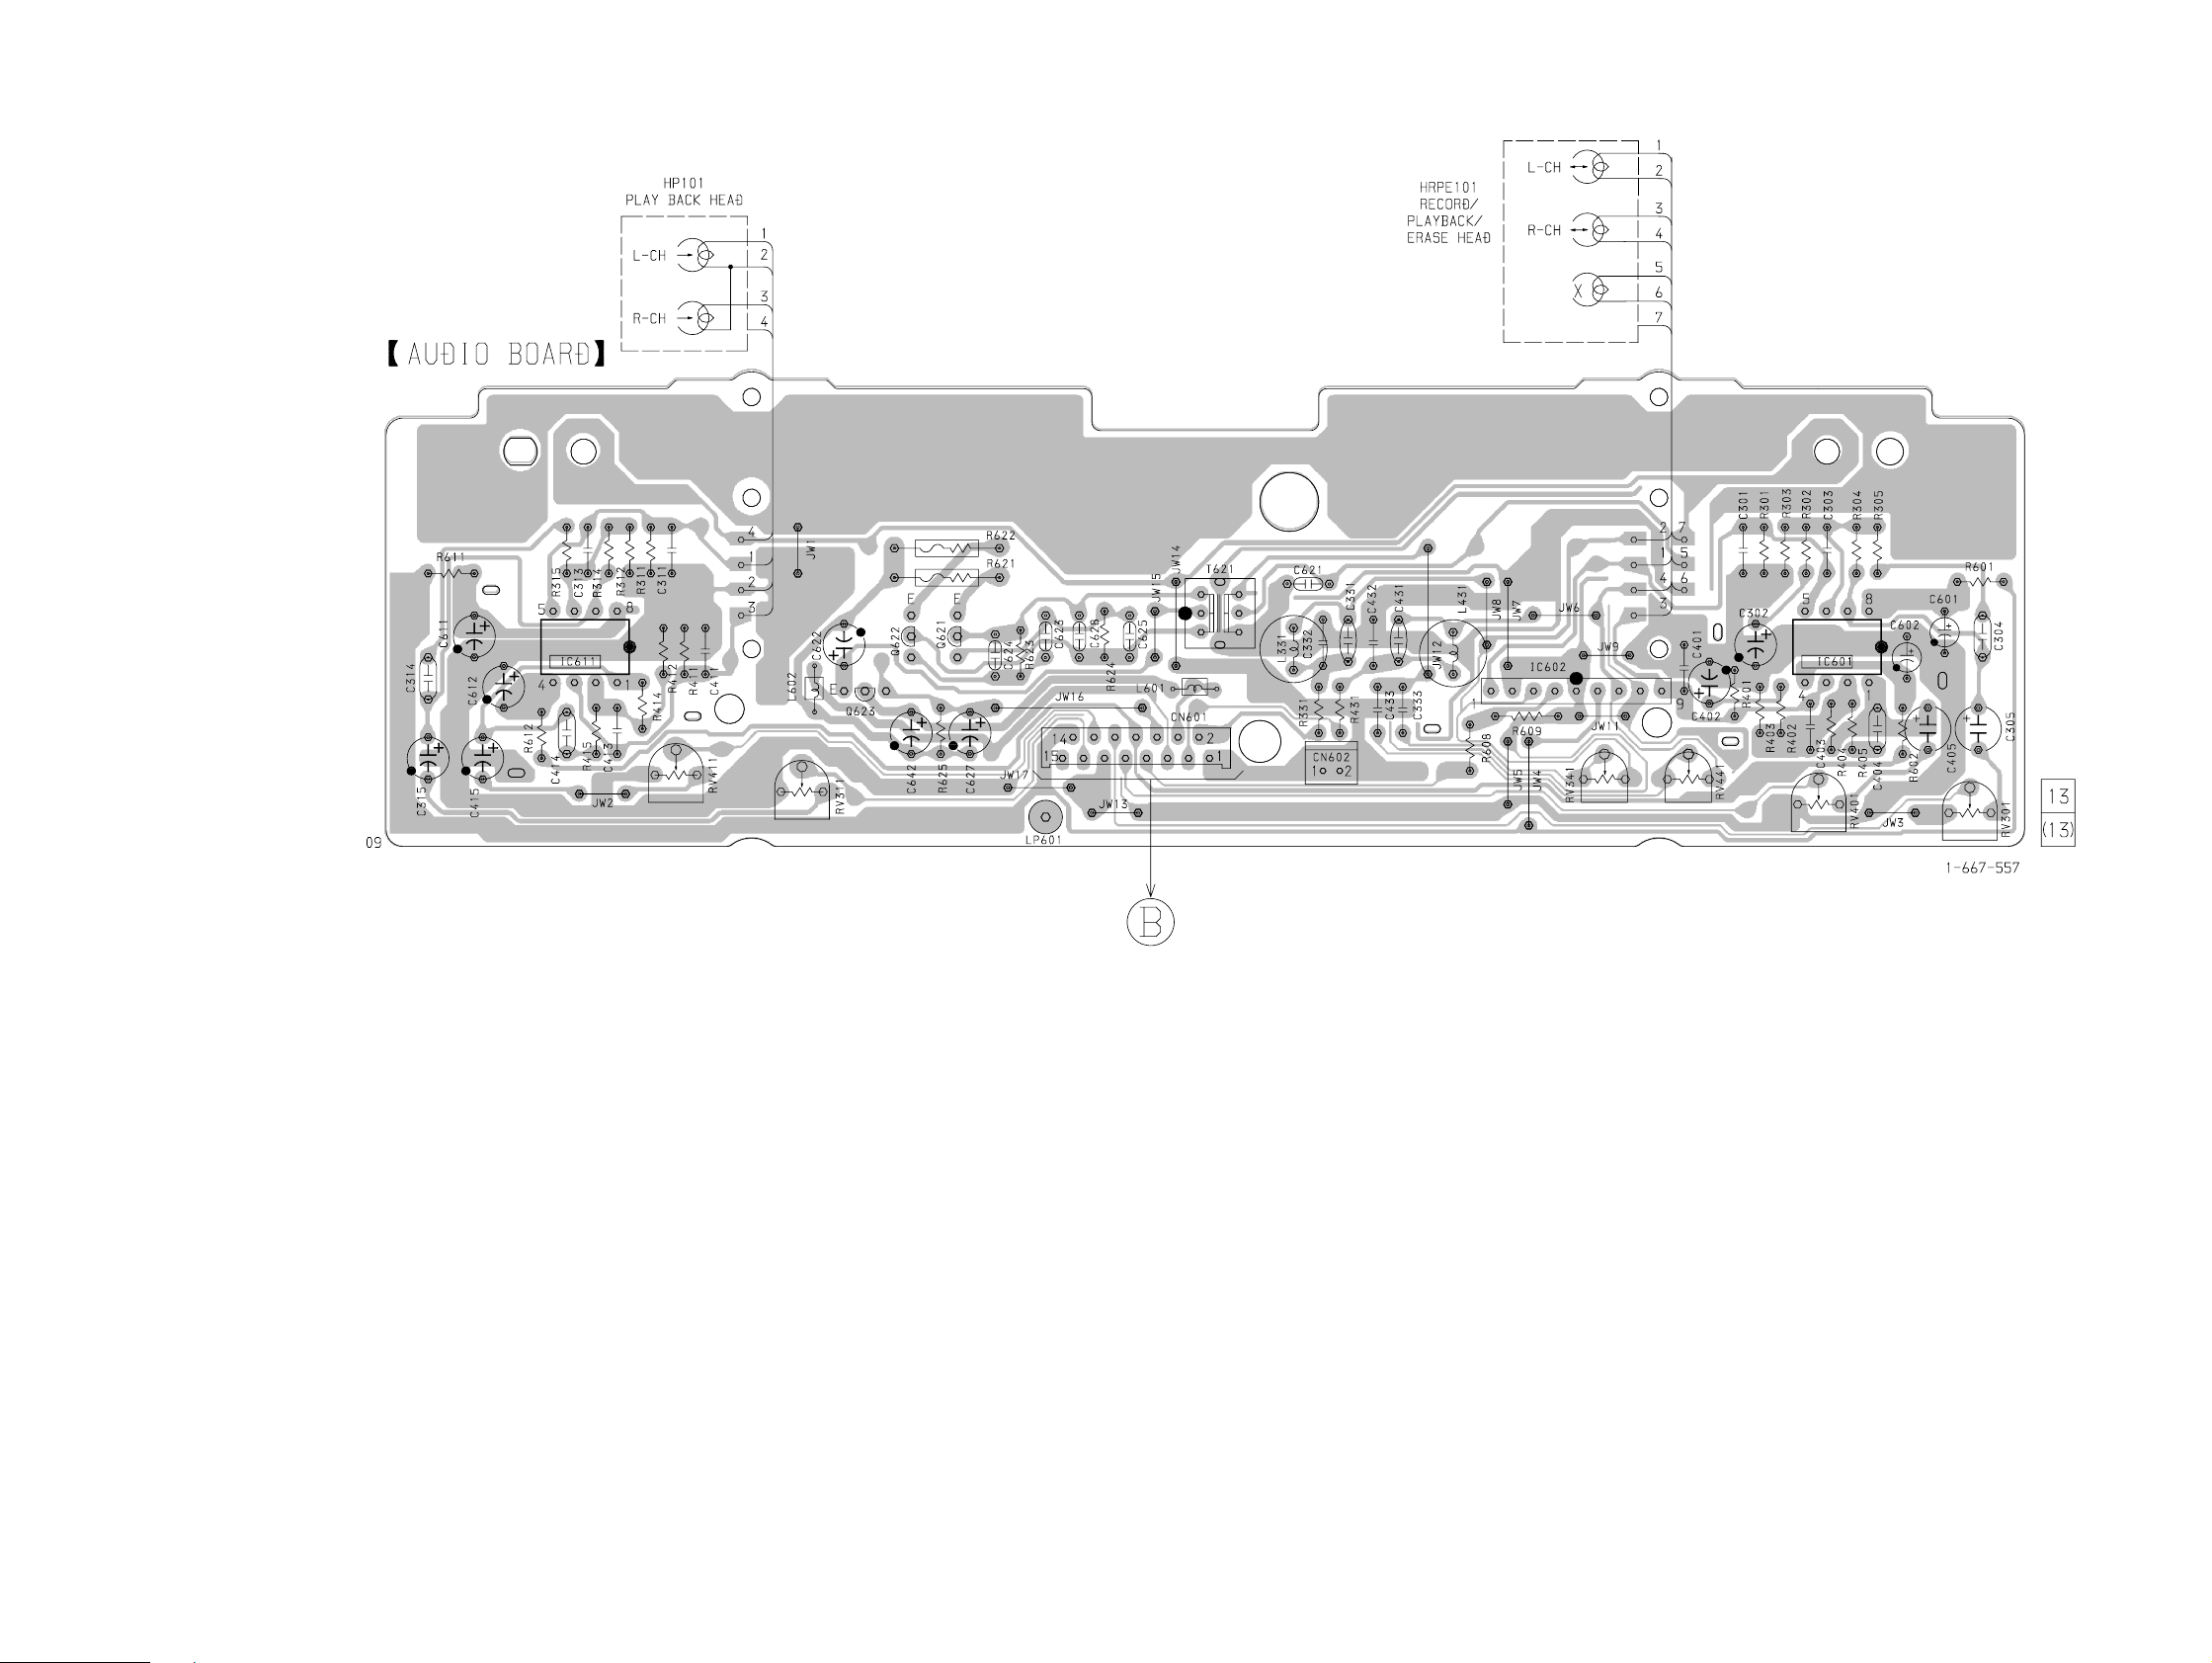
7-15. PRINTED WIRING BOARD – TAPE DECK Section – • See page 35 for Circuit Boards Location.
MAIN BOARD
CN106
(Page 57)
– 51 –
– 52 –
Page 37
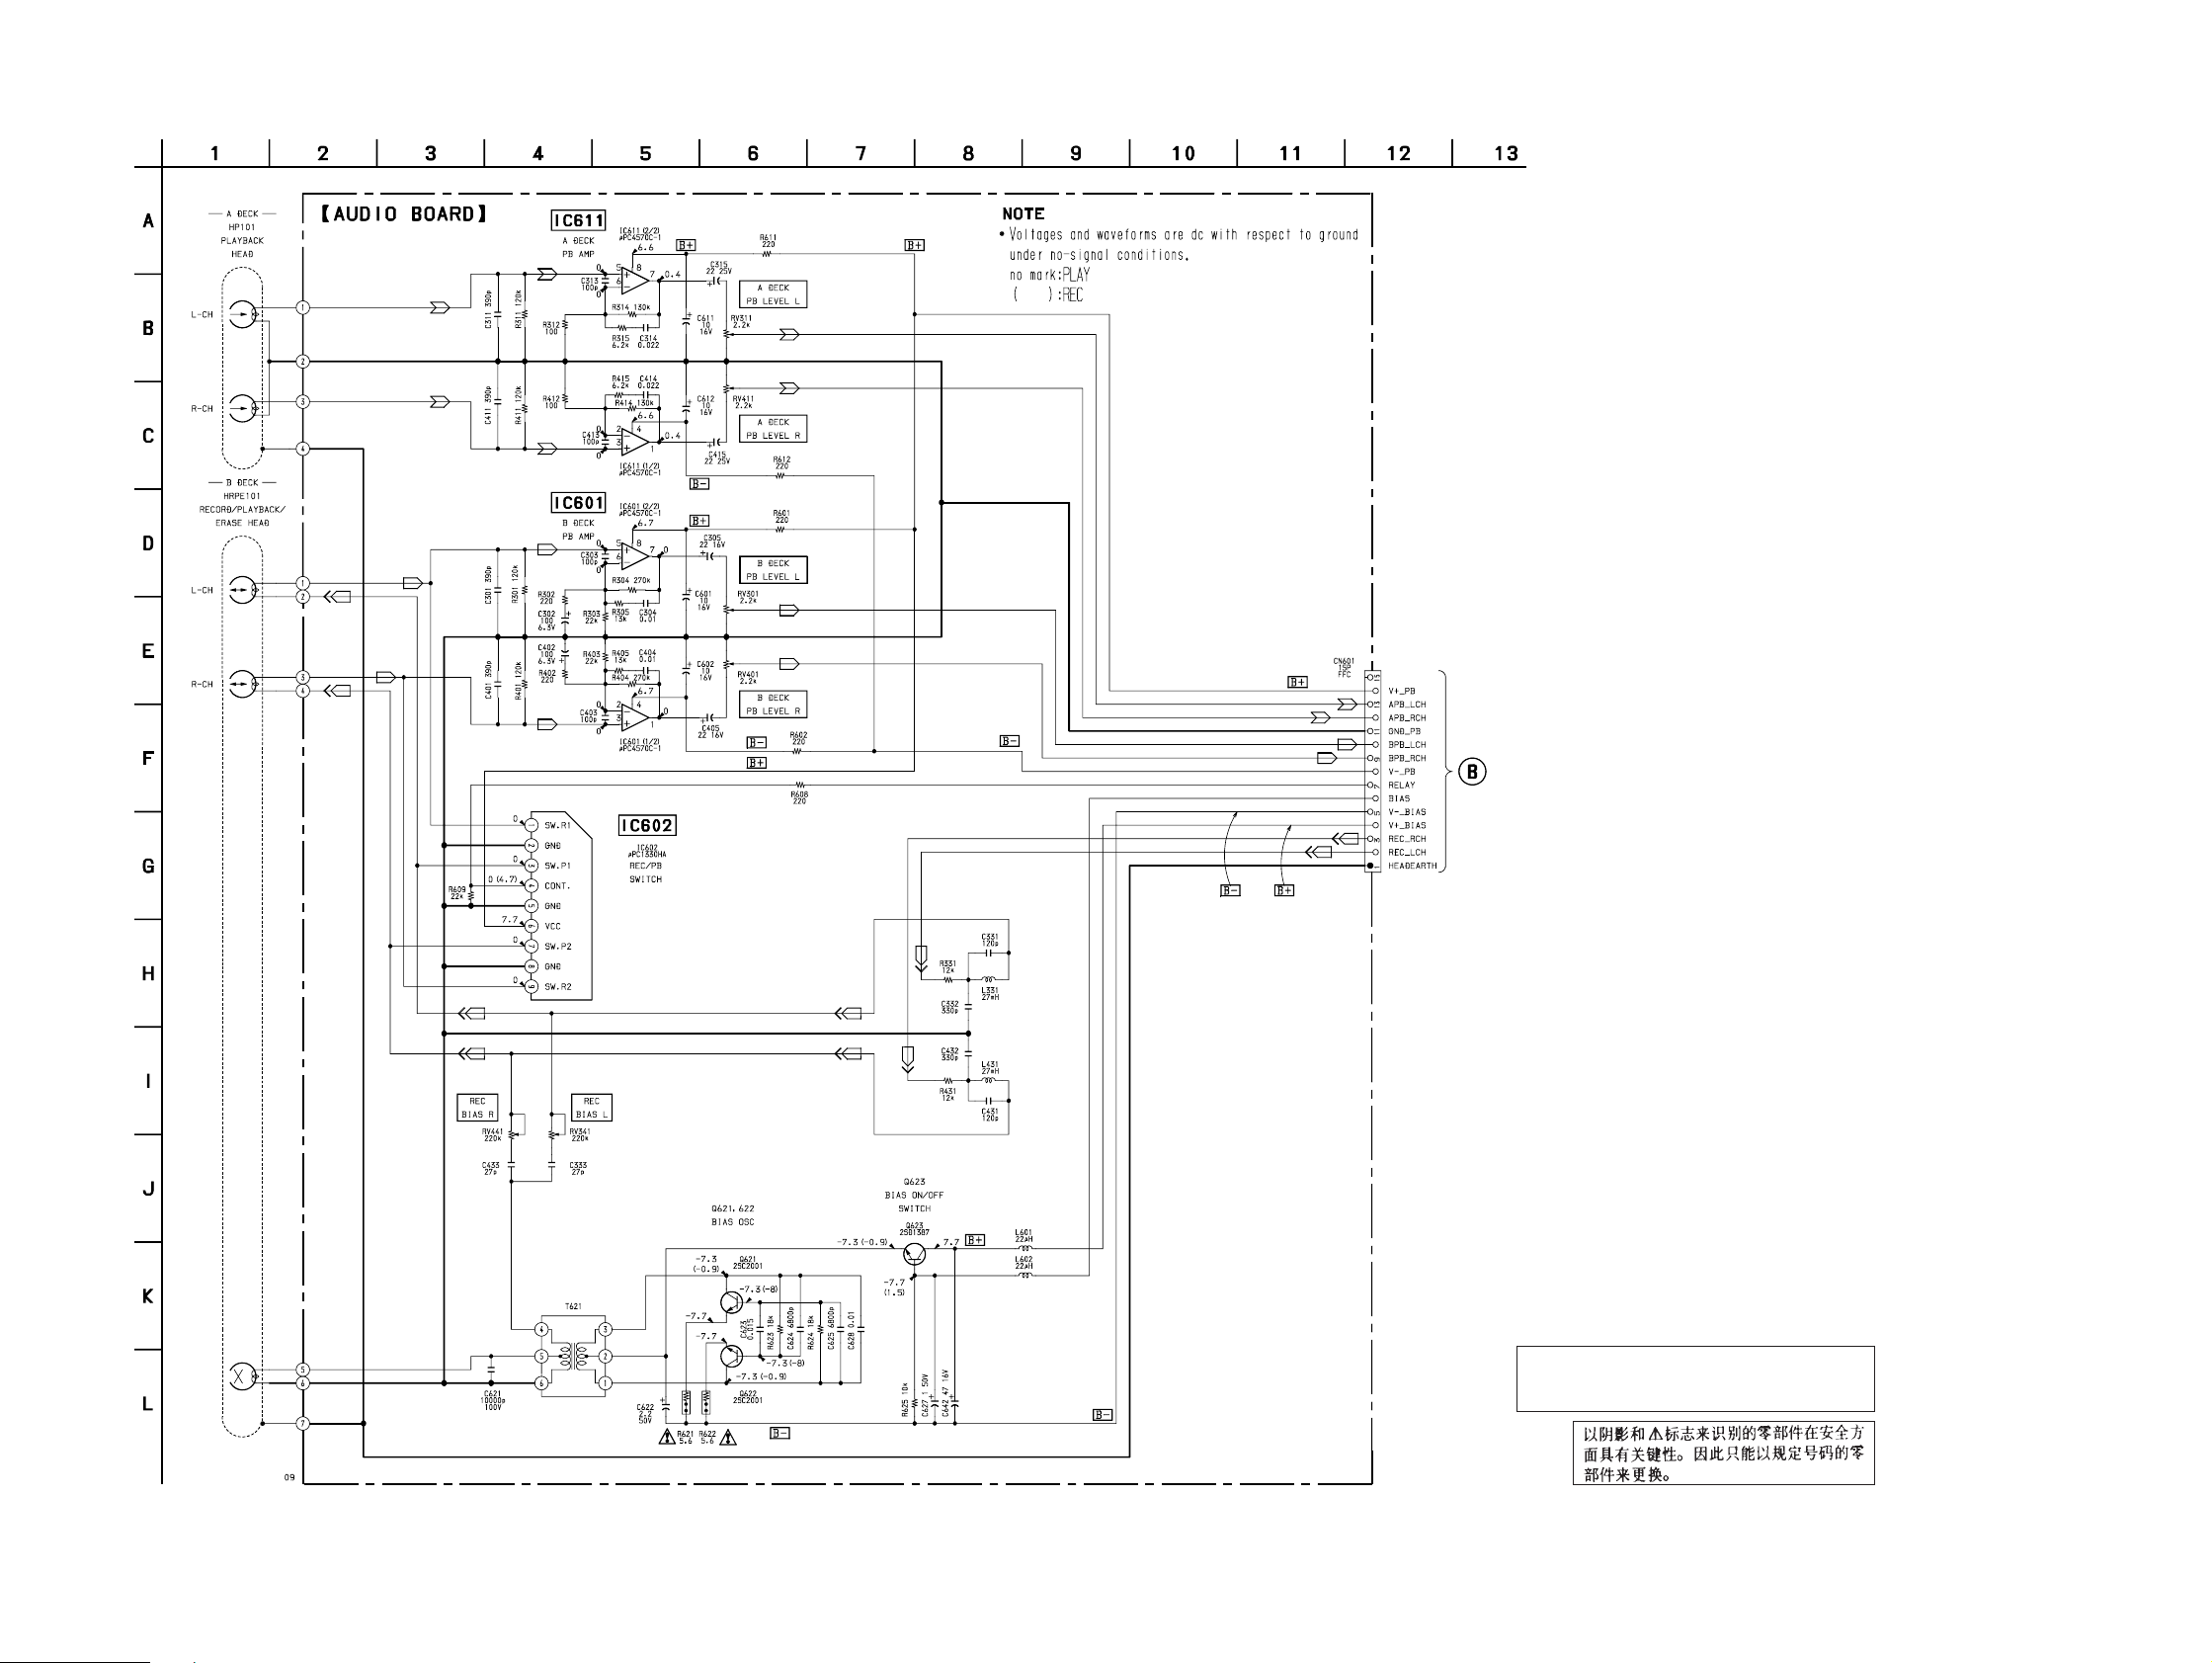
7-16. SCHEMATIC DIAGRAM – TAPE DECK Section – • See page 92 for IC Block Diagram.
HCD-V919AV
MAIN BOARD
(Page 60)
CN106
– 53 –
The components identified by mark ! or dotted
line with mark ! are critical for safety.
Replace only with part number specified.
– 54 –
Page 38
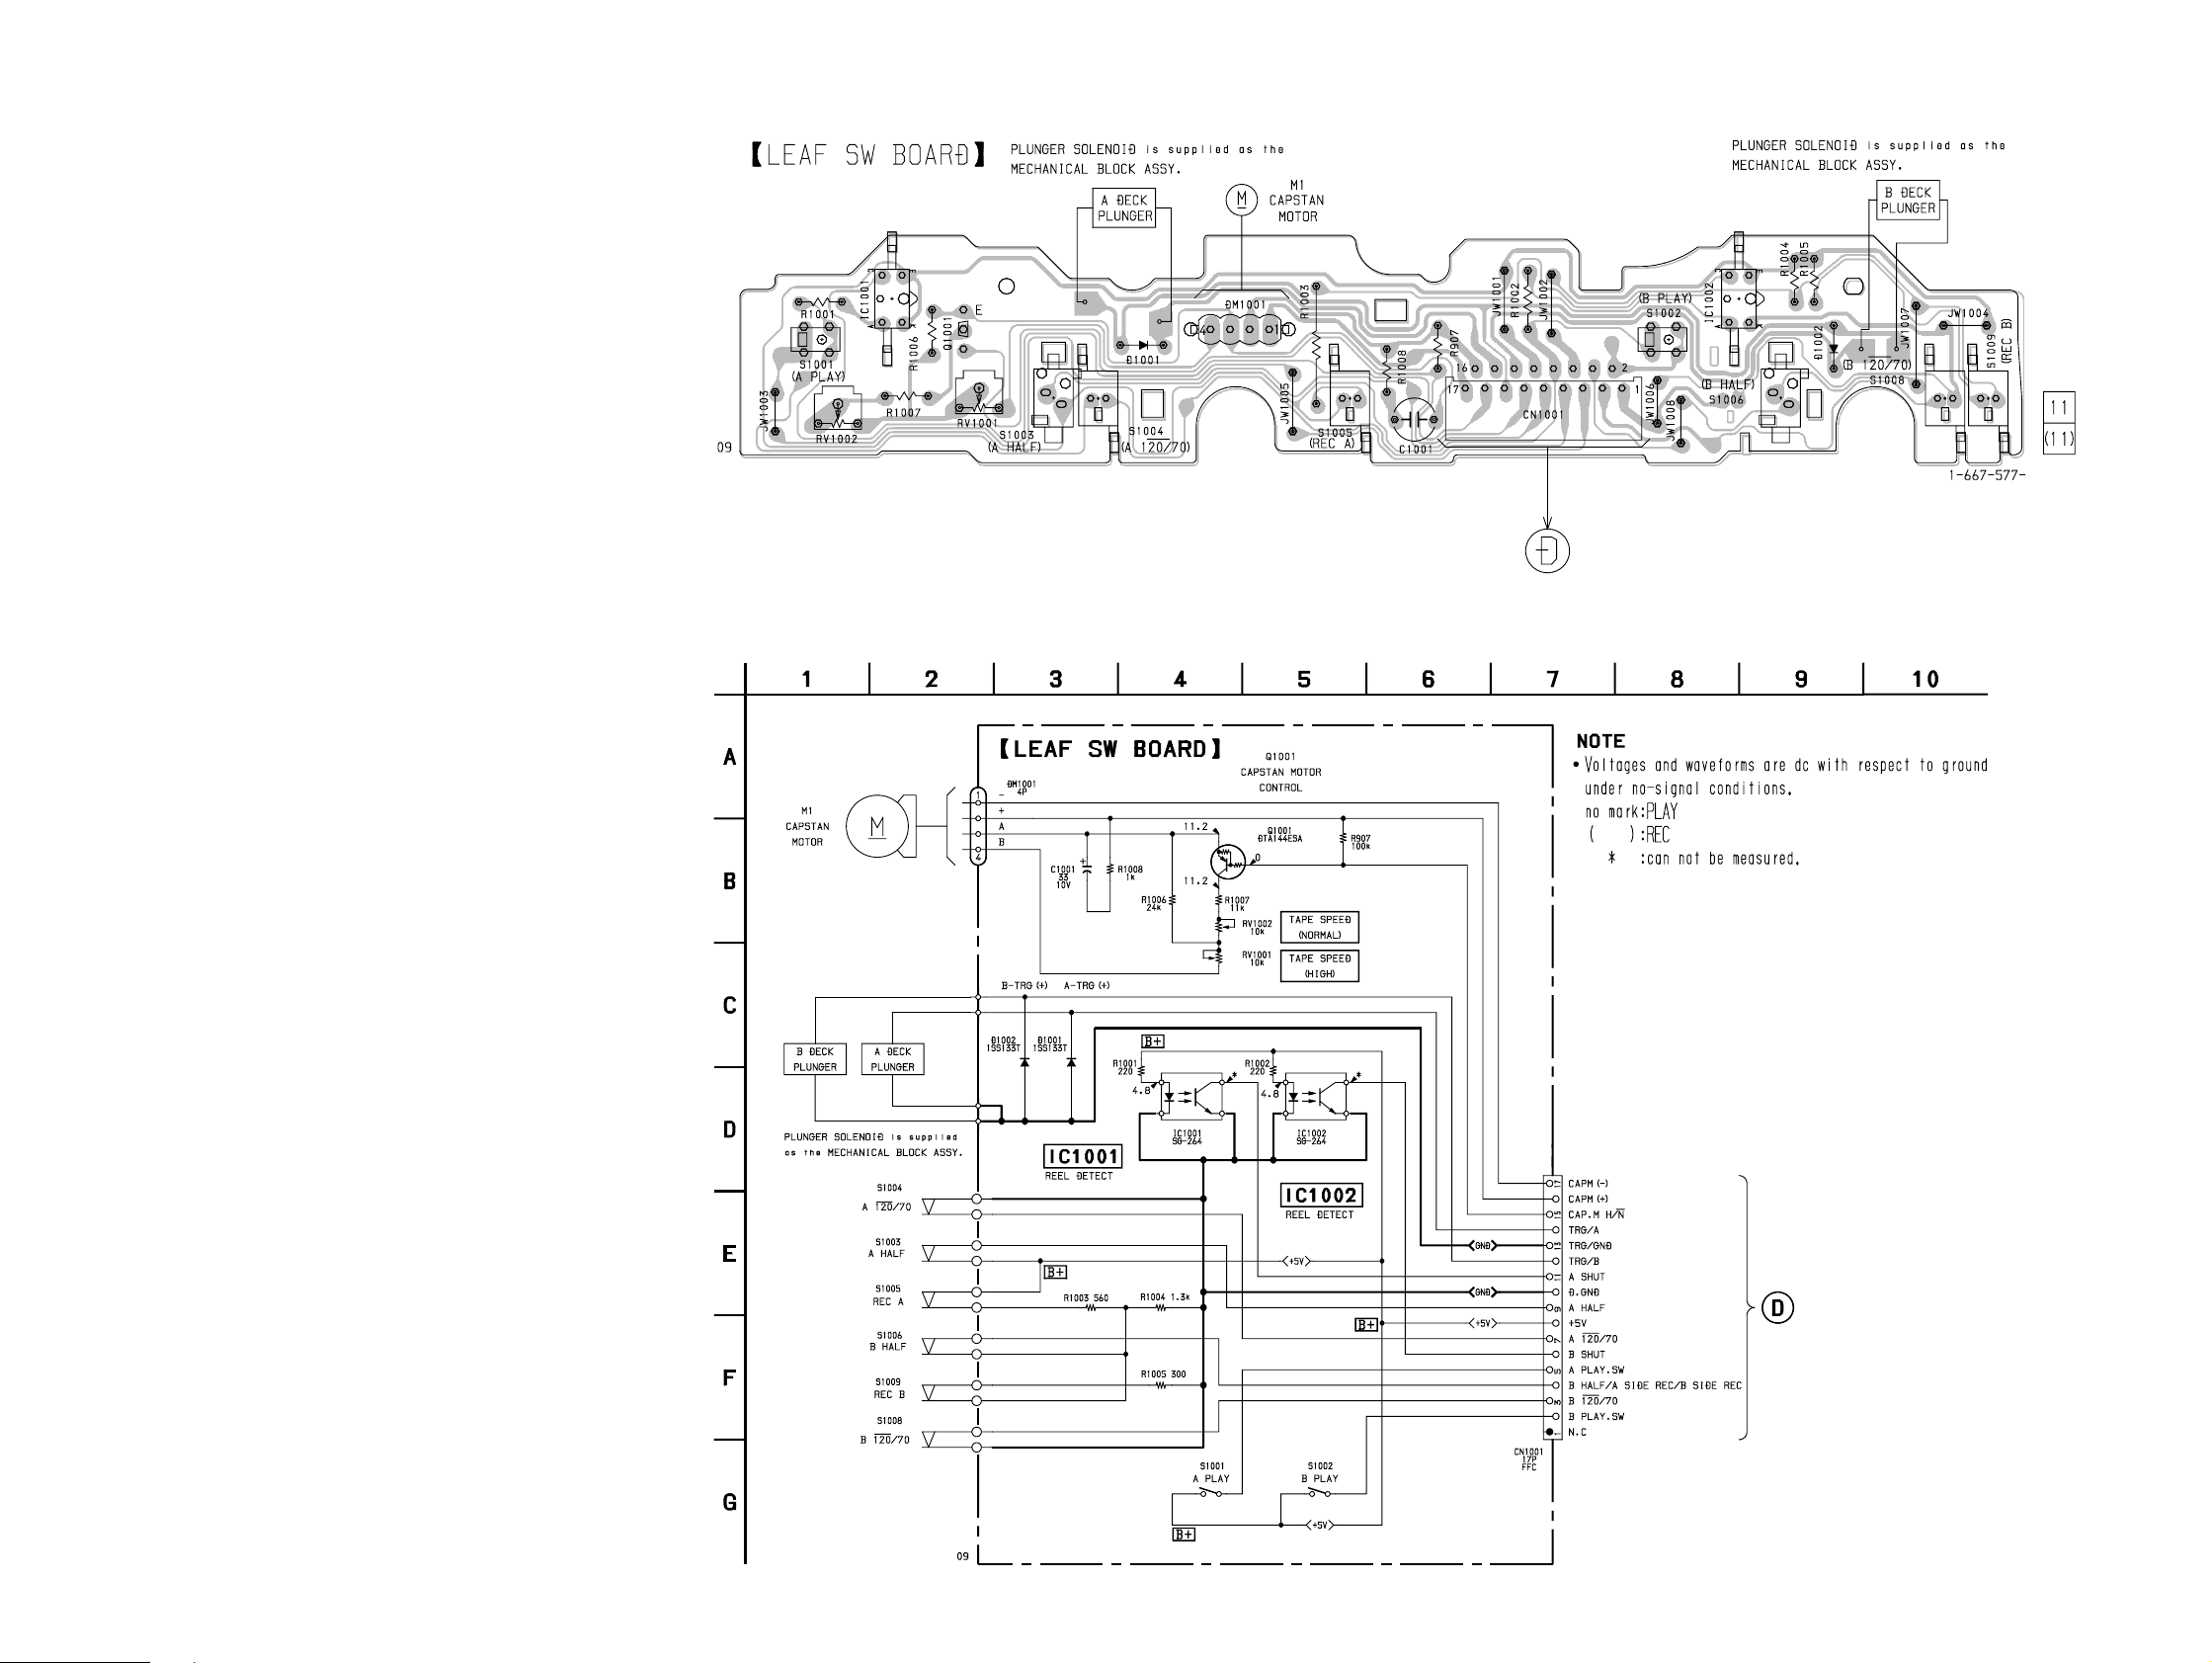
HCD-V919AV
7-17. PRINTED WIRING BOARD – LEAF SW Section – • See page 35 for Circuit Boards Location.
MAIN BOARD
CN107
(Page 57)
7-18. SCHEMATIC DIAGRAM – LEAF SW Section –
– 55 –
MAIN BOARD
CN107
(Page 60)
– 56 –
Page 39
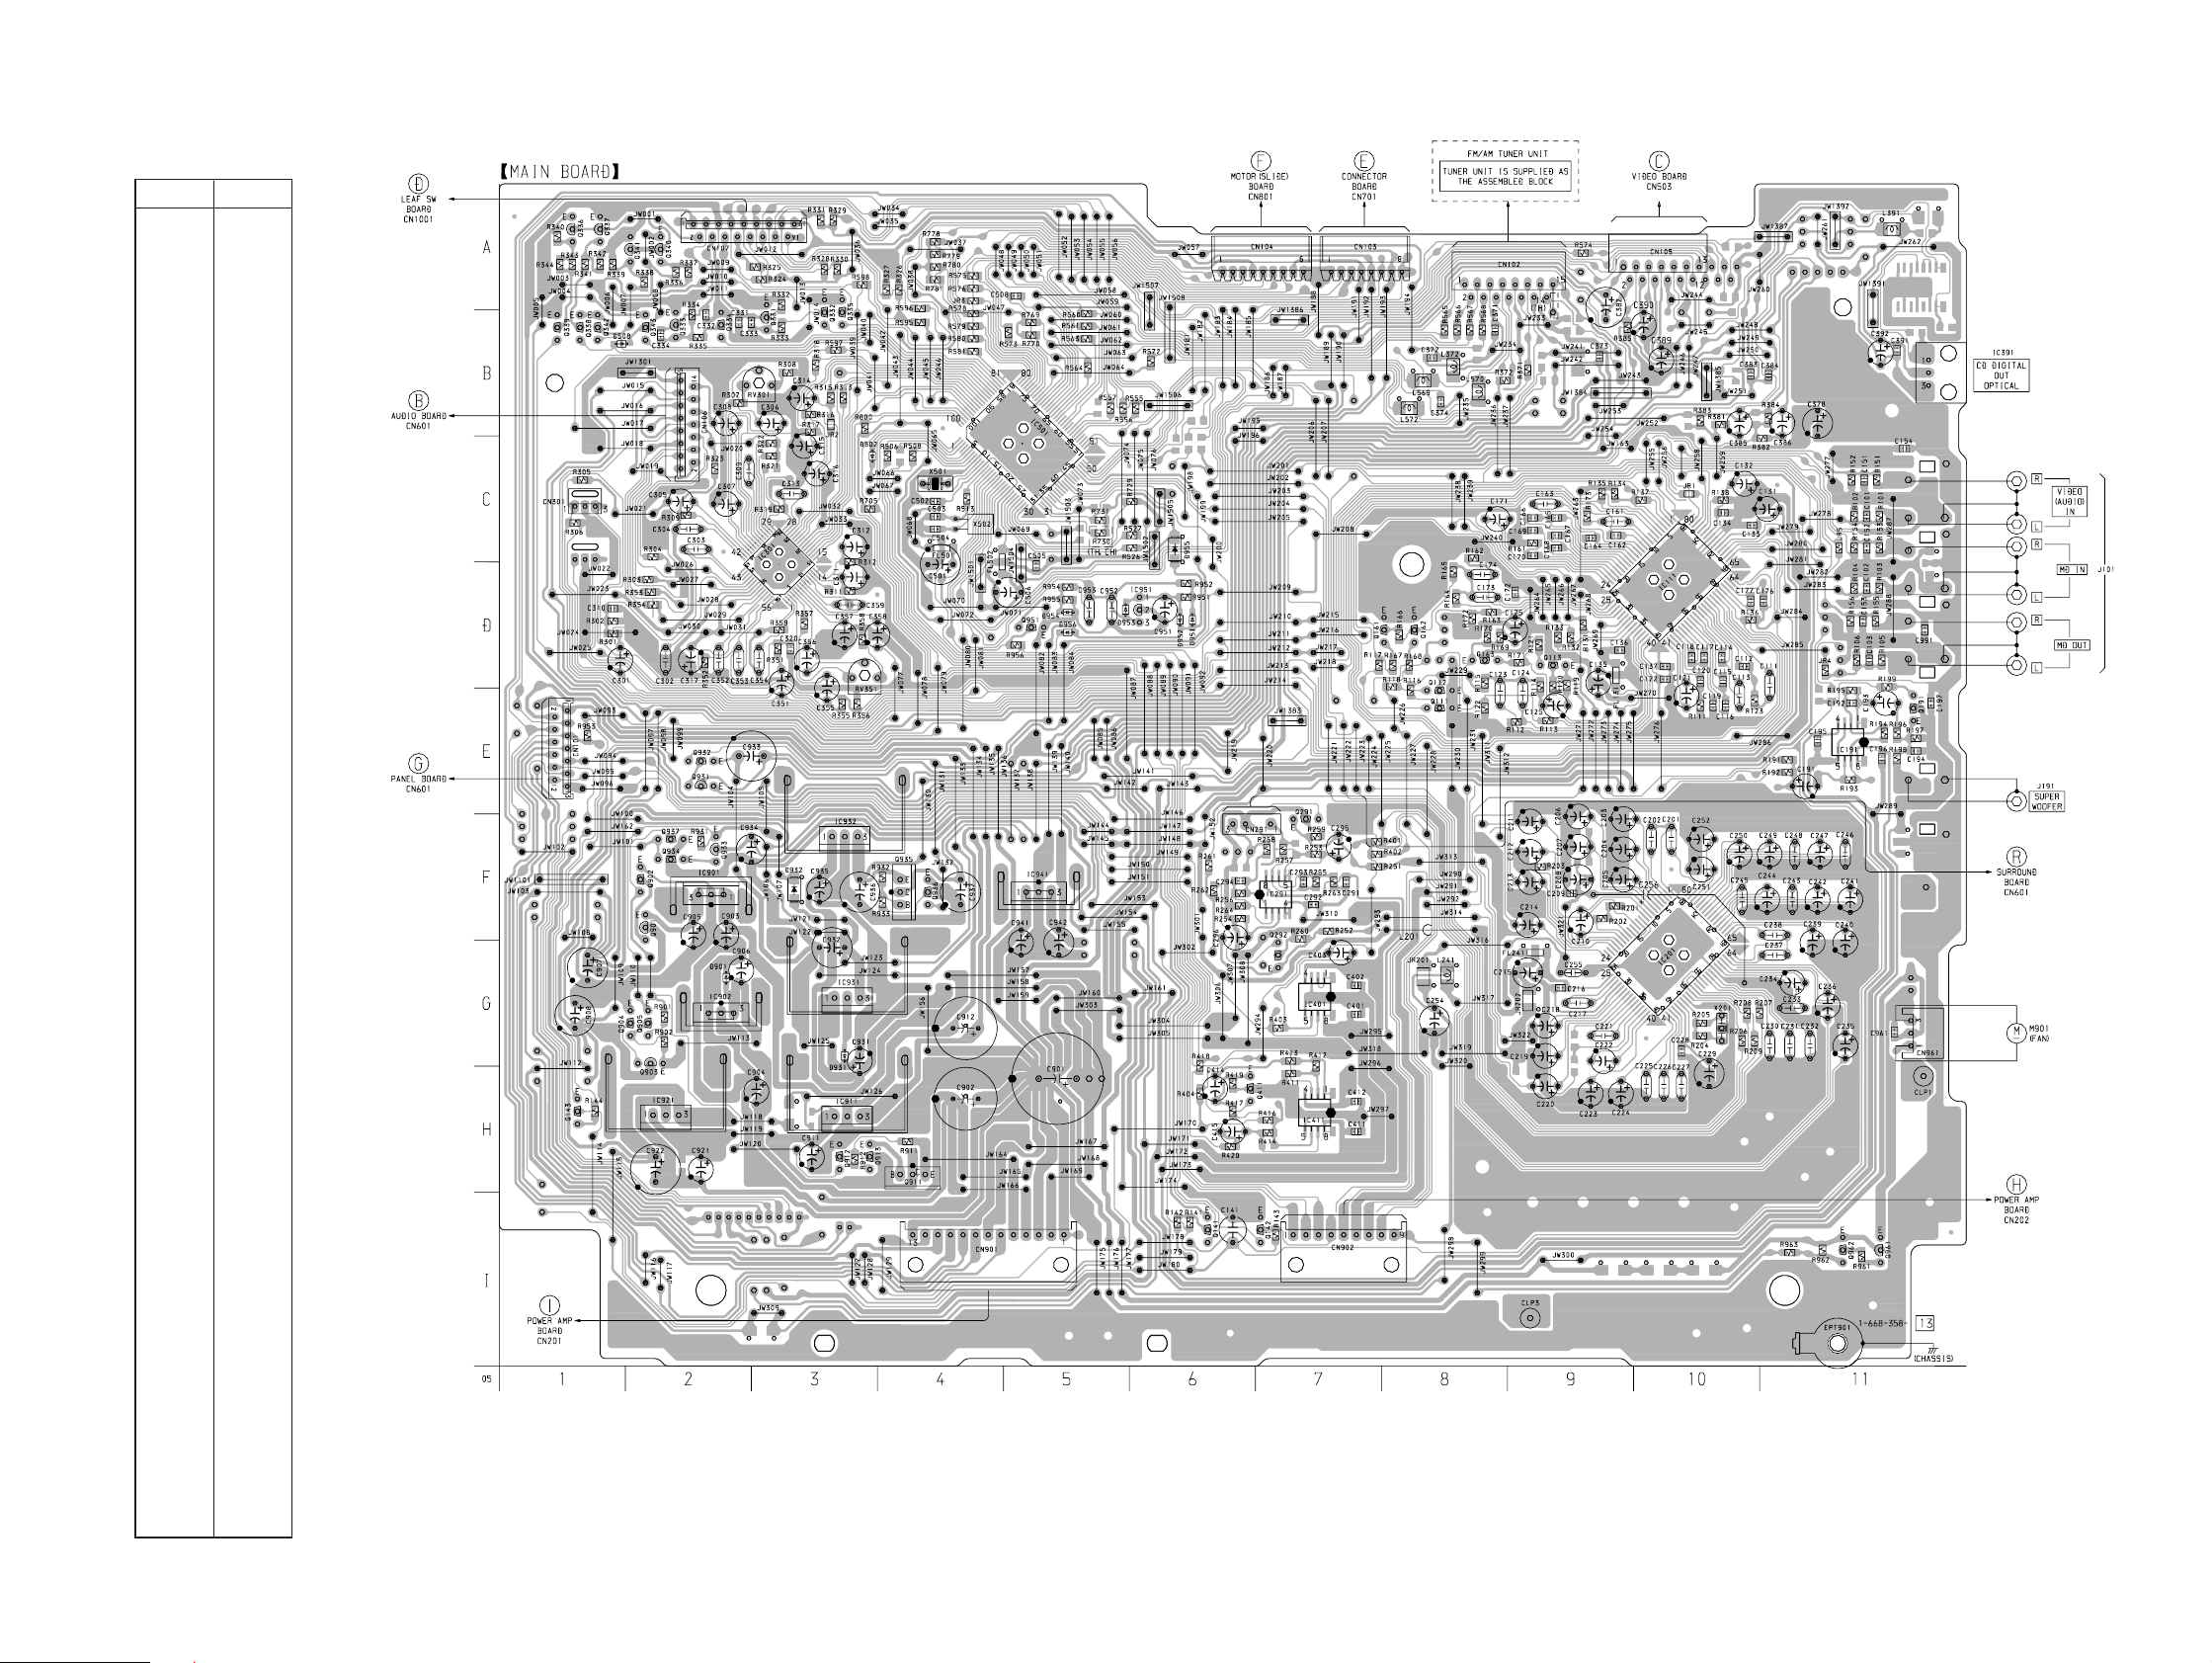
7-19. PRINTED WIRING BOARD – MAIN Section – • See page 35 for Circuit Boards Location.
HCD-V919AV
• Semiconductor
Location
Ref. No. Location
D502 C-3
D508 B-1
D901 G-2
D931 G-3
D932 F-3
D951 D-6
D952 D-6
D953 D-5
D954 D-5
D955 C-6
D956 D-5
IC111 D-10
IC191 E-11
IC201 G-10
IC291 F-7
IC301 D-3
IC391 B-11
IC401 G-7
IC411 H-7
IC501 C-5
IC901 F-2
IC902 G-2
IC911 H-3
IC921 H-2
IC931 G-3
IC932 F-3
IC941 F-5
IC951 D-6
(Page 42)(Page 47)(Page 47)
(Page 56)
(Page 52)
Q111 E-8
Q112 E-8
Q113 D-9
Q141 I-6
Q142 I-7
Q143 H-1
Q161 D-8
Q162 D-8
Q163 D-8
Q191 E-11
Q291 F-7
Q292 G-7
Q331 B-3
Q332 B-3
Q333 B-2
Q334 B-2
Q335 B-3
Q336 A-1
Q337 A-1
Q338 B-1
Q339 B-1
Q340 A-2
Q341 A-2
Q342 B-1
Q343 B-2
Q411 H-6
Q901 F-2
Q902 F-2
Q903 H-2
Q904 G-2
Q905 G-2
Q911 H-4
Q912 H-3
Q913 H-3
Q931 E-2
Q932 E-2
Q933 F-2
Q934 F-2
Q935 F-4
Q936 F-4
Q937 F-2
Q951 D-5
Q961 I-11
Q962 I-11
(Page 67)
(Page 84)
(Page 77)
(Page 77)
– 57 –
– 58 –
Page 40
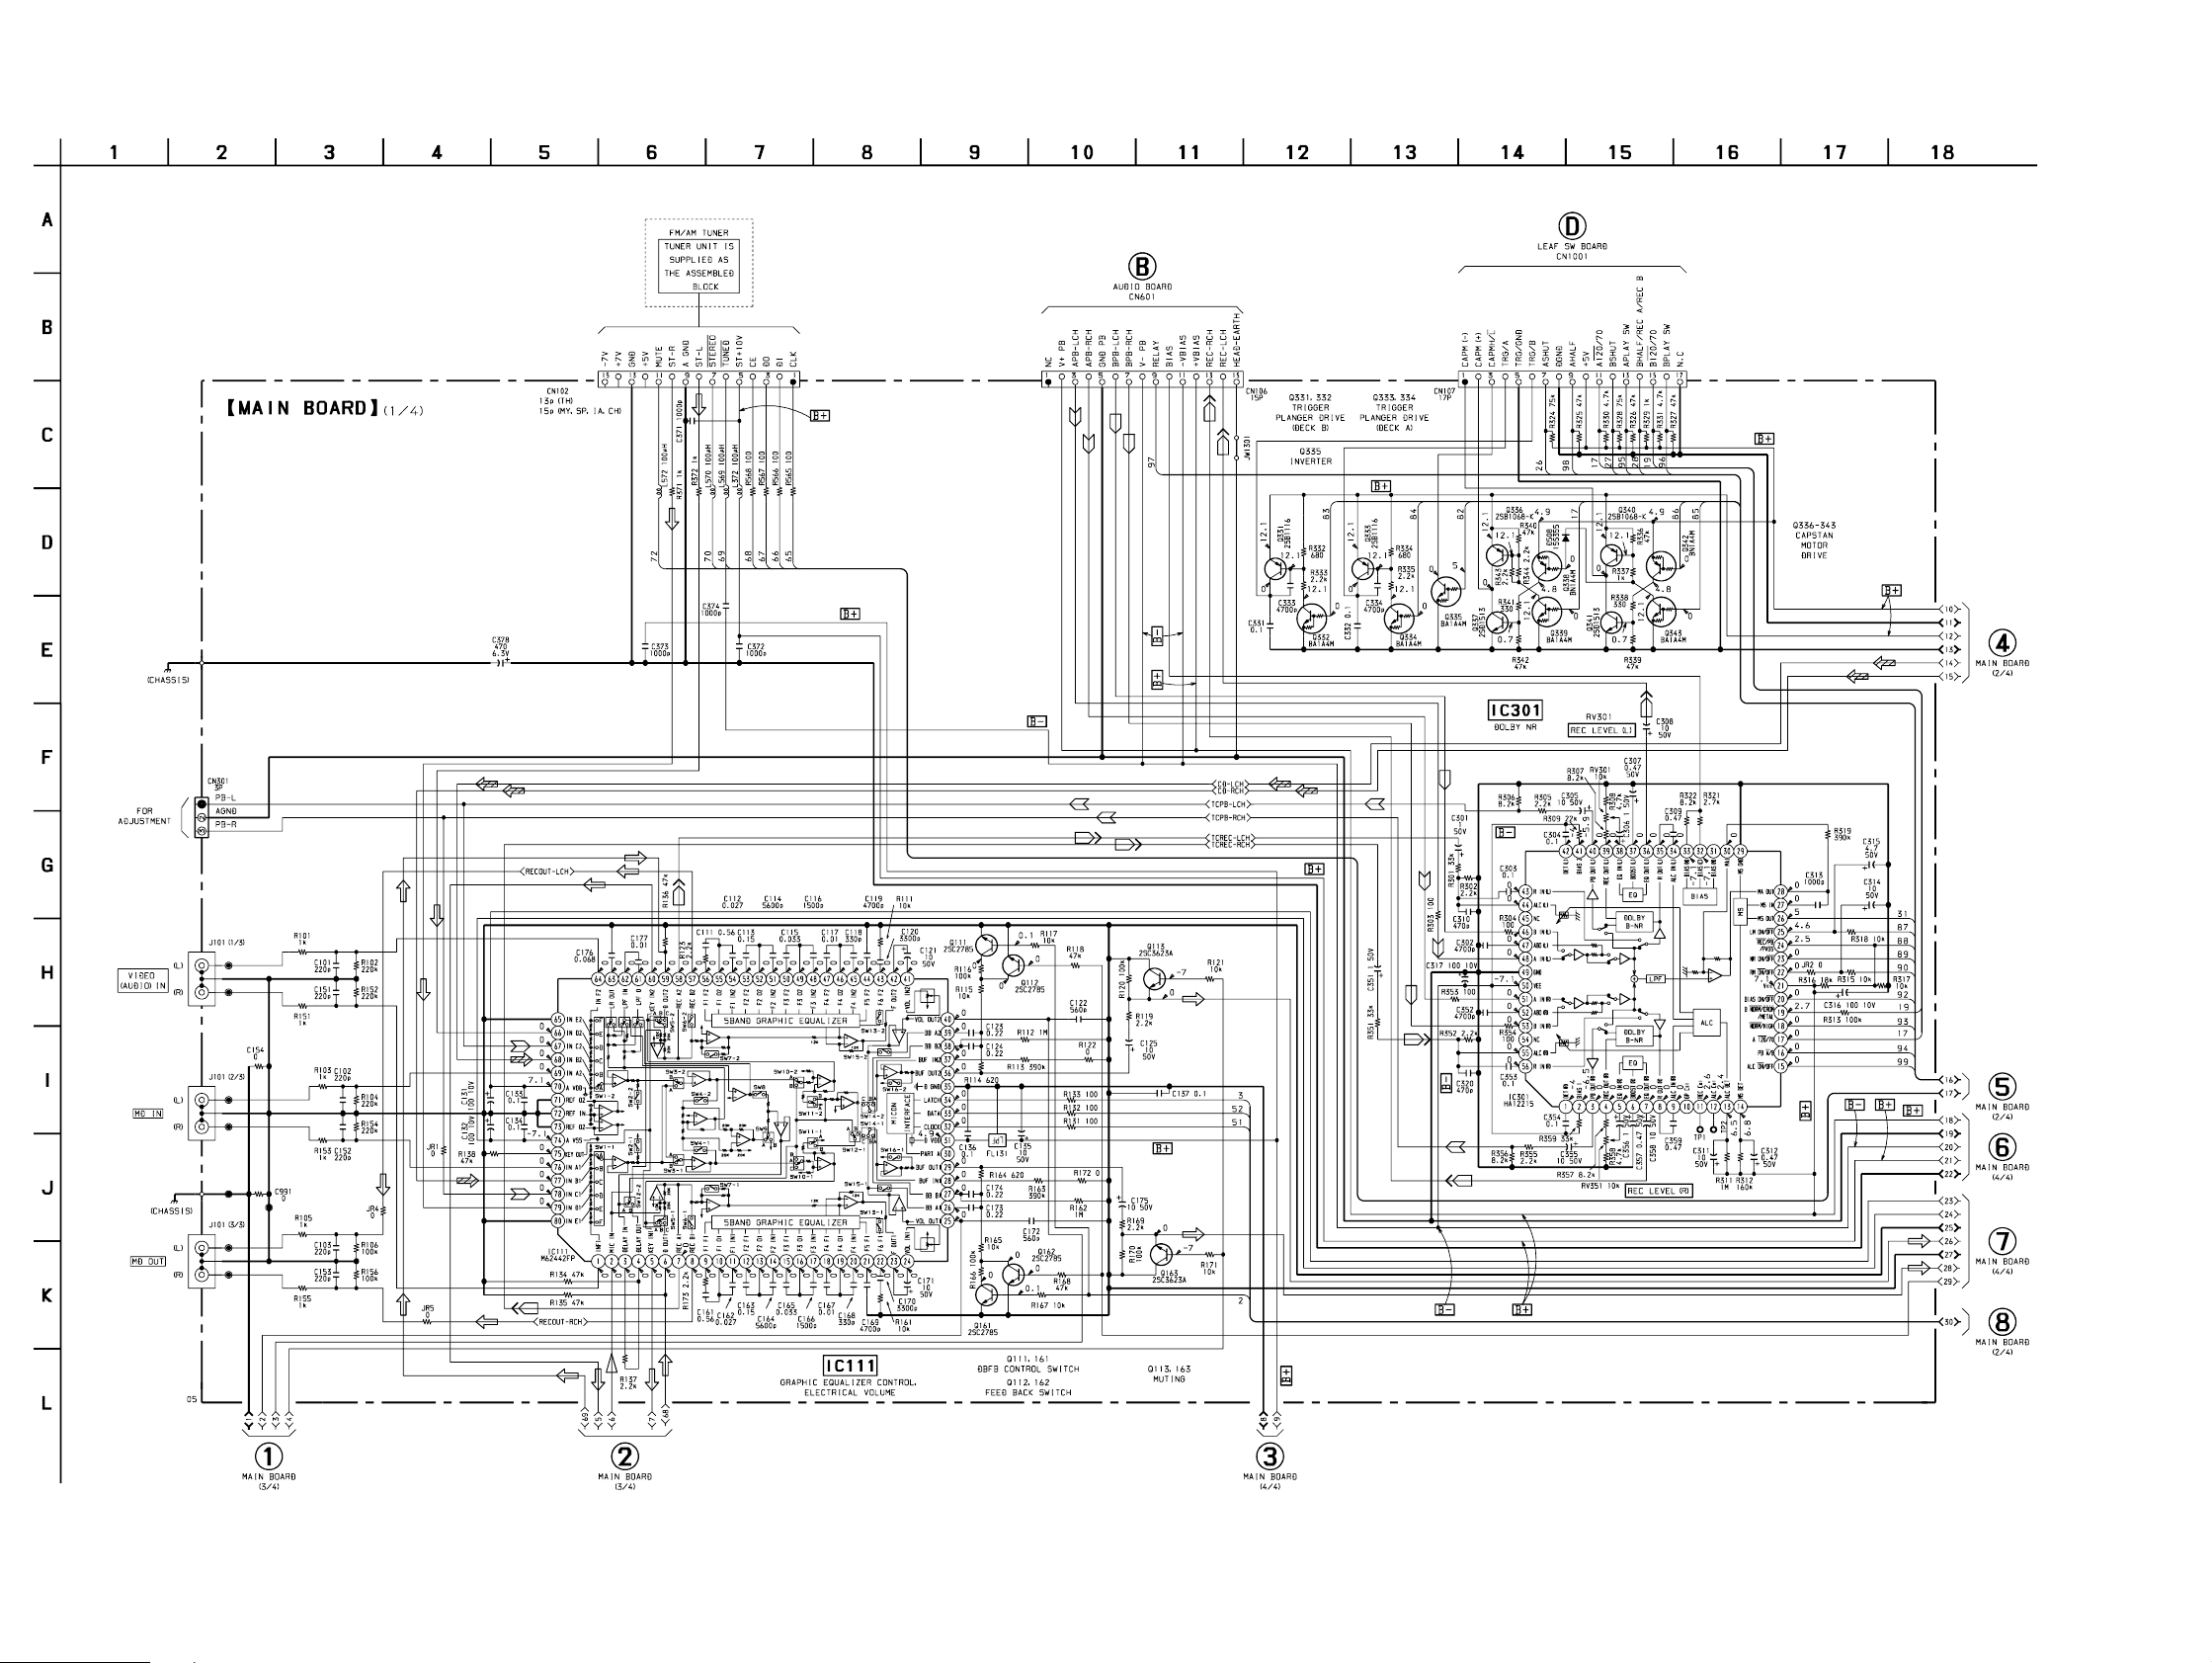
HCD-V919AV
7-20. SCHEMATIC DIAGRAM – MAIN Section (1/4) –
(Page 56)
(Page 54)
(Page 61)
(Page 61)
(Page 65)
(Page 63)
– 59 –
(Page 63)
(Page 65)
(Page 61)
(Page 65)
• Voltages and waveforms are dc with respect to ground
under no-signal (detuned) conditions.
no mark : FM
– 60 –
Page 41
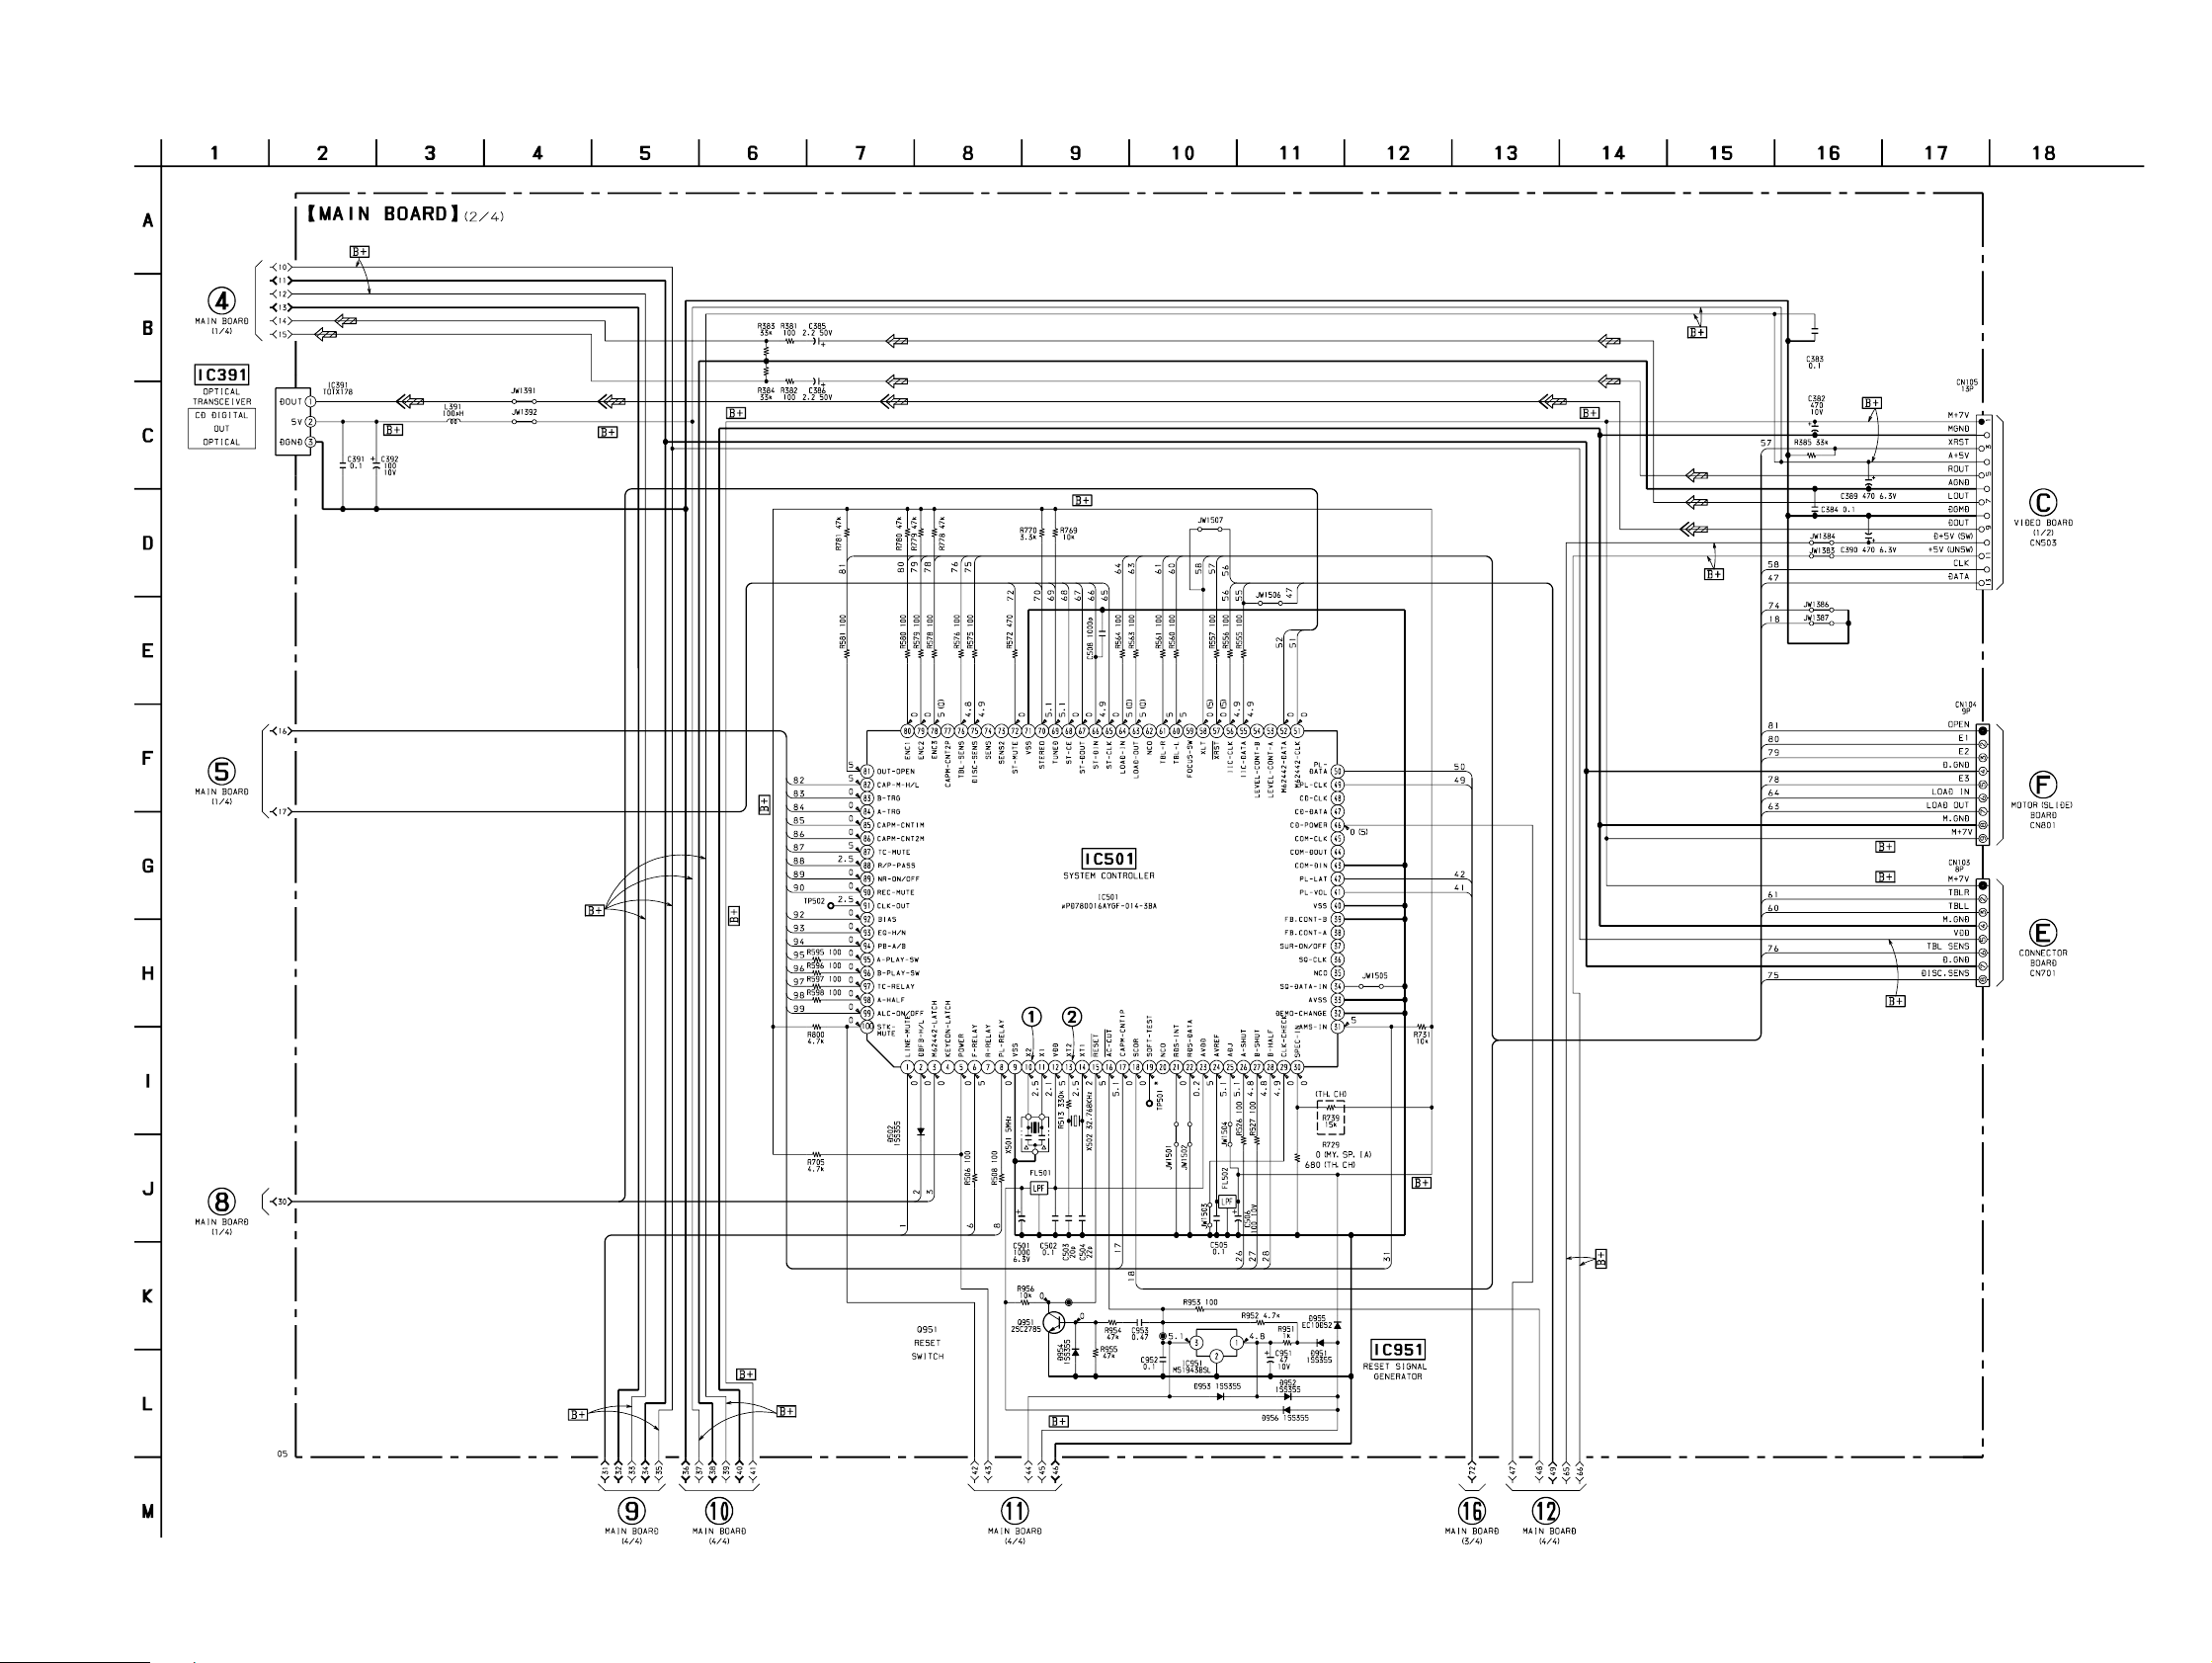
7-21. SCHEMATIC DIAGRAM – MAIN Section (2/4) – • See page 88 for Waveforms.
(Page 60)
HCD-V919AV
(Page 43)
(Page 60)
(Page 60)
(Page 50)
(Page 50)
• Voltages and waveforms are dc with respect to ground
under no-signal (detuned) conditions.
no mark : FM
( ) : CD PLAY
: Impossible to measure
∗
(Page 65) (Page 65)
– 61 –
(Page 66)
(Page 64) (Page 66)
– 62 –
Page 42
HCD-V919AV
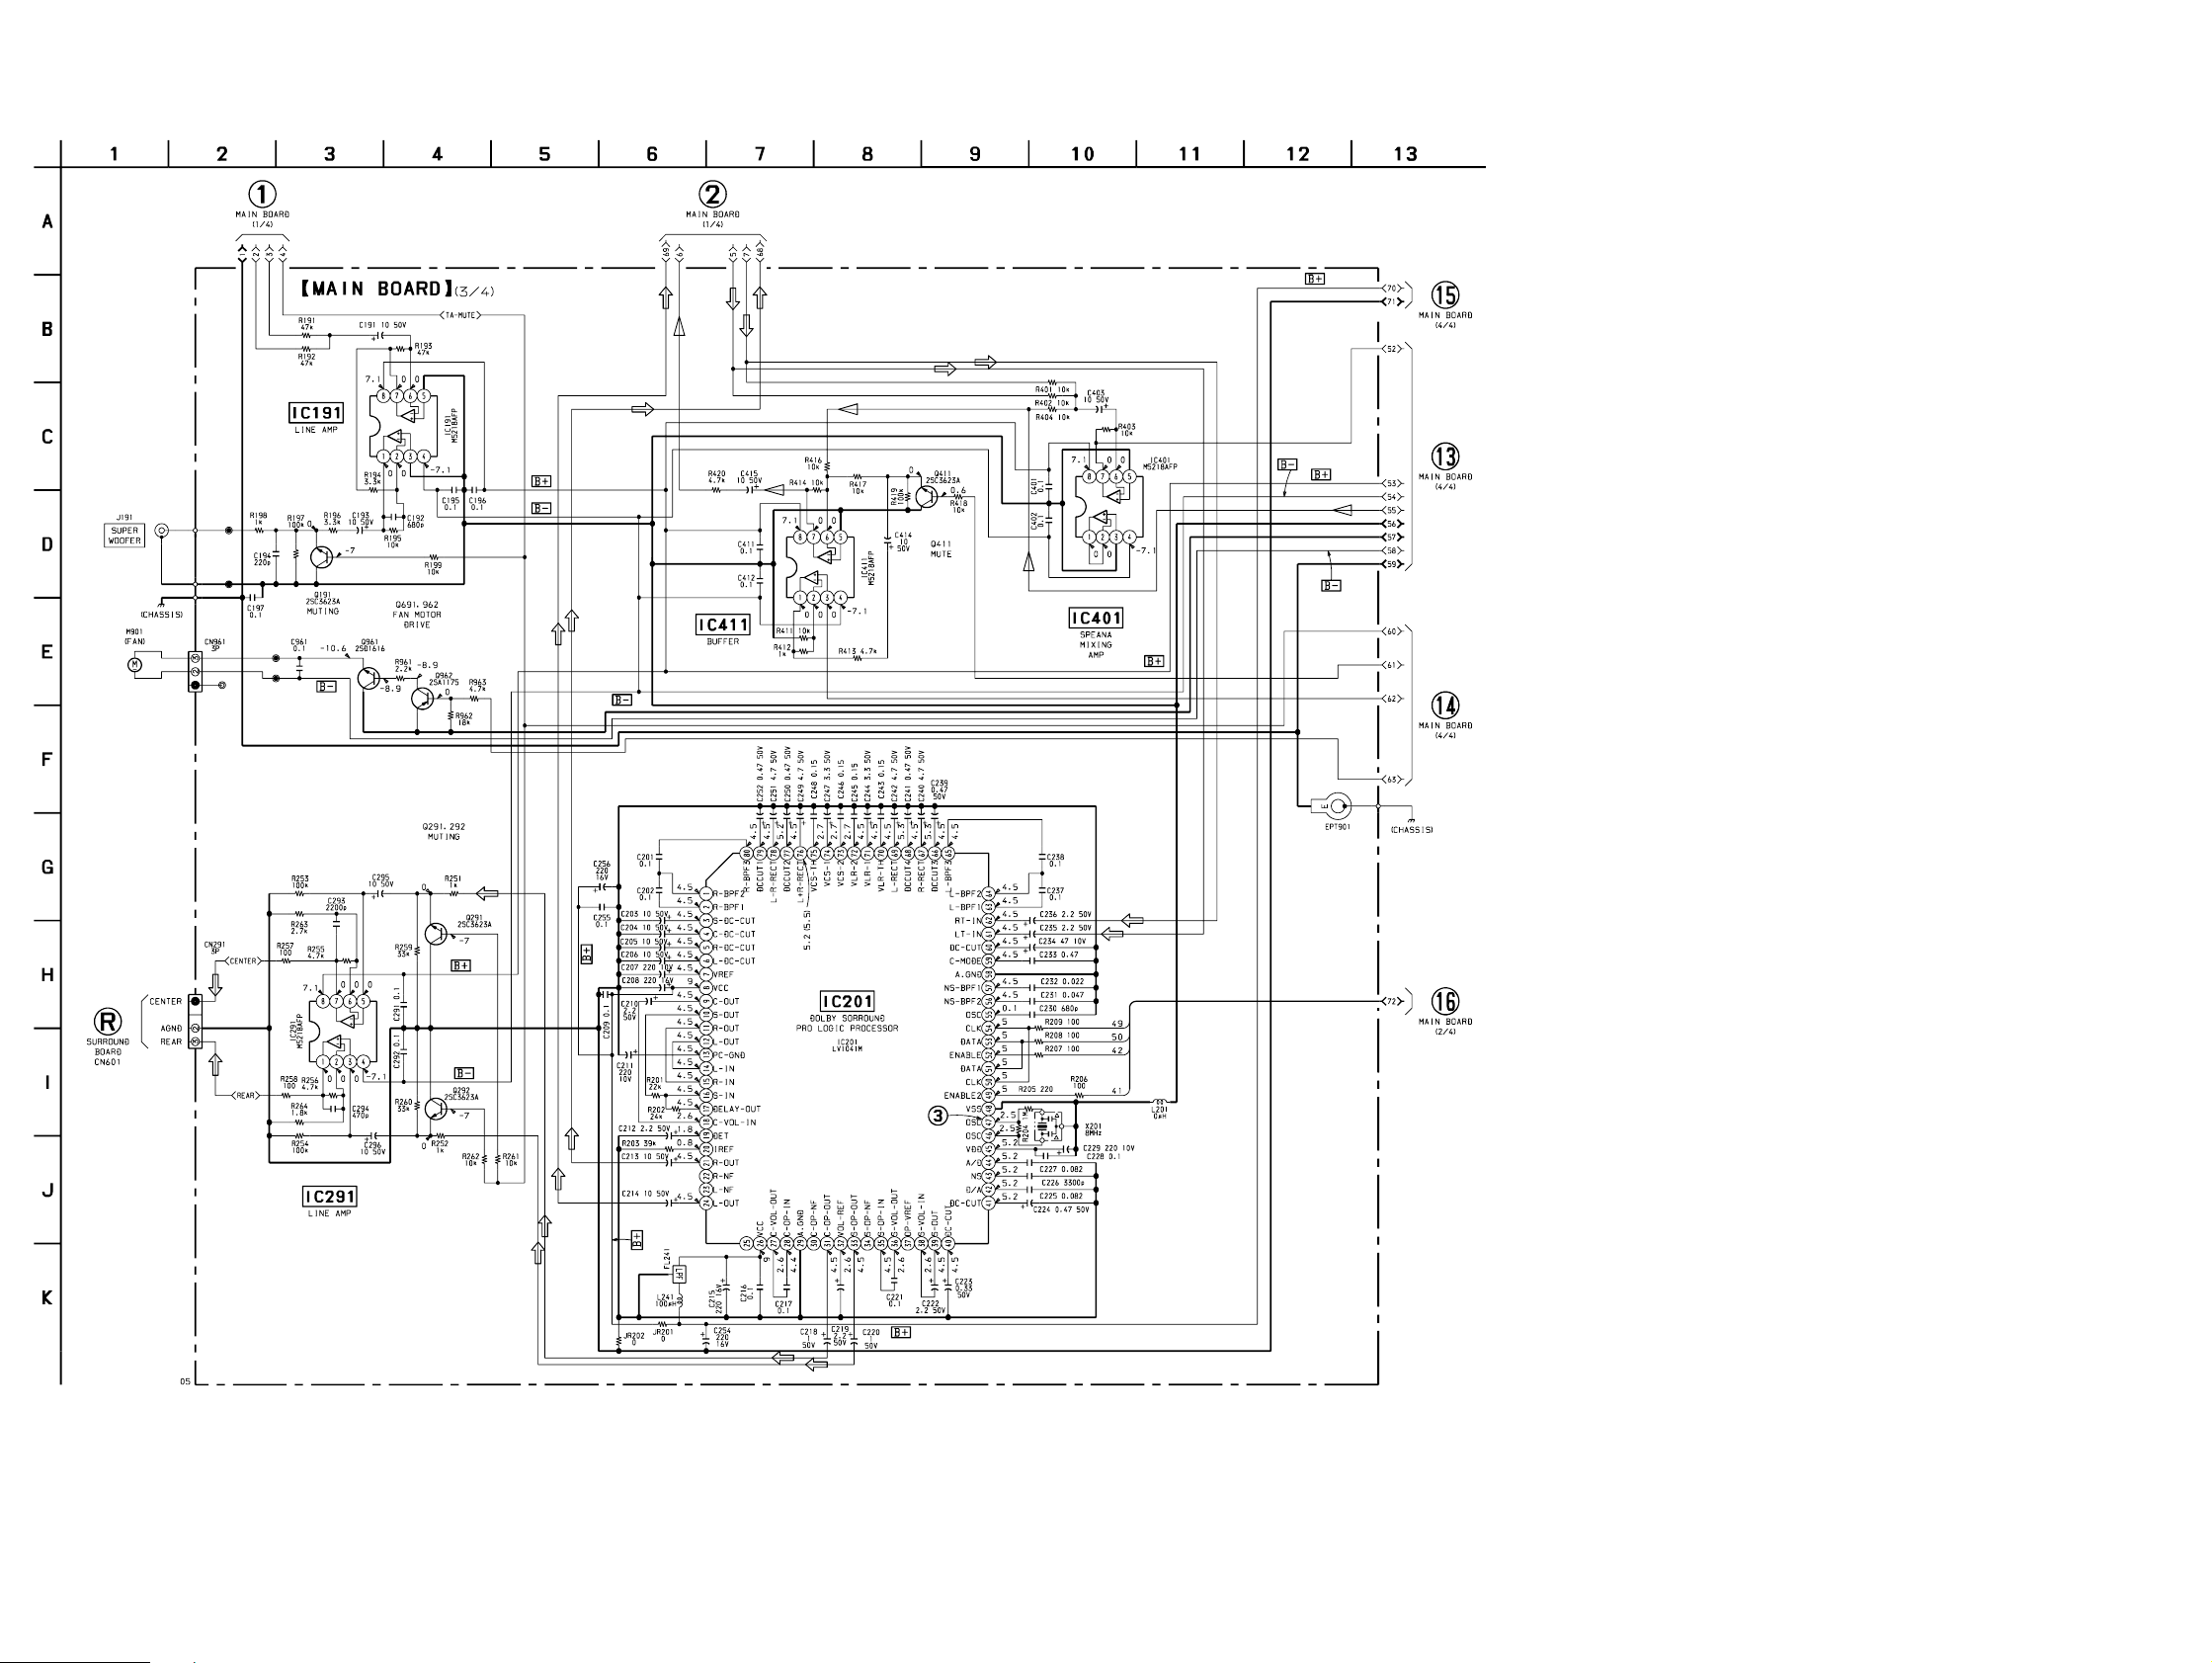
7-22. SCHEMATIC DIAGRAM – MAIN Section (3/4) – • See page 93 for IC Block Diagrams.
(Page 59)
(Page 59)
(Page 65)
(Page 65)
(Page 65)
(Page 85)
(Page 62)
• Voltages and waveforms are dc with respect to ground
under no-signal (detuned) conditions.
no mark : FM
– 63 –
– 64 –
Page 43
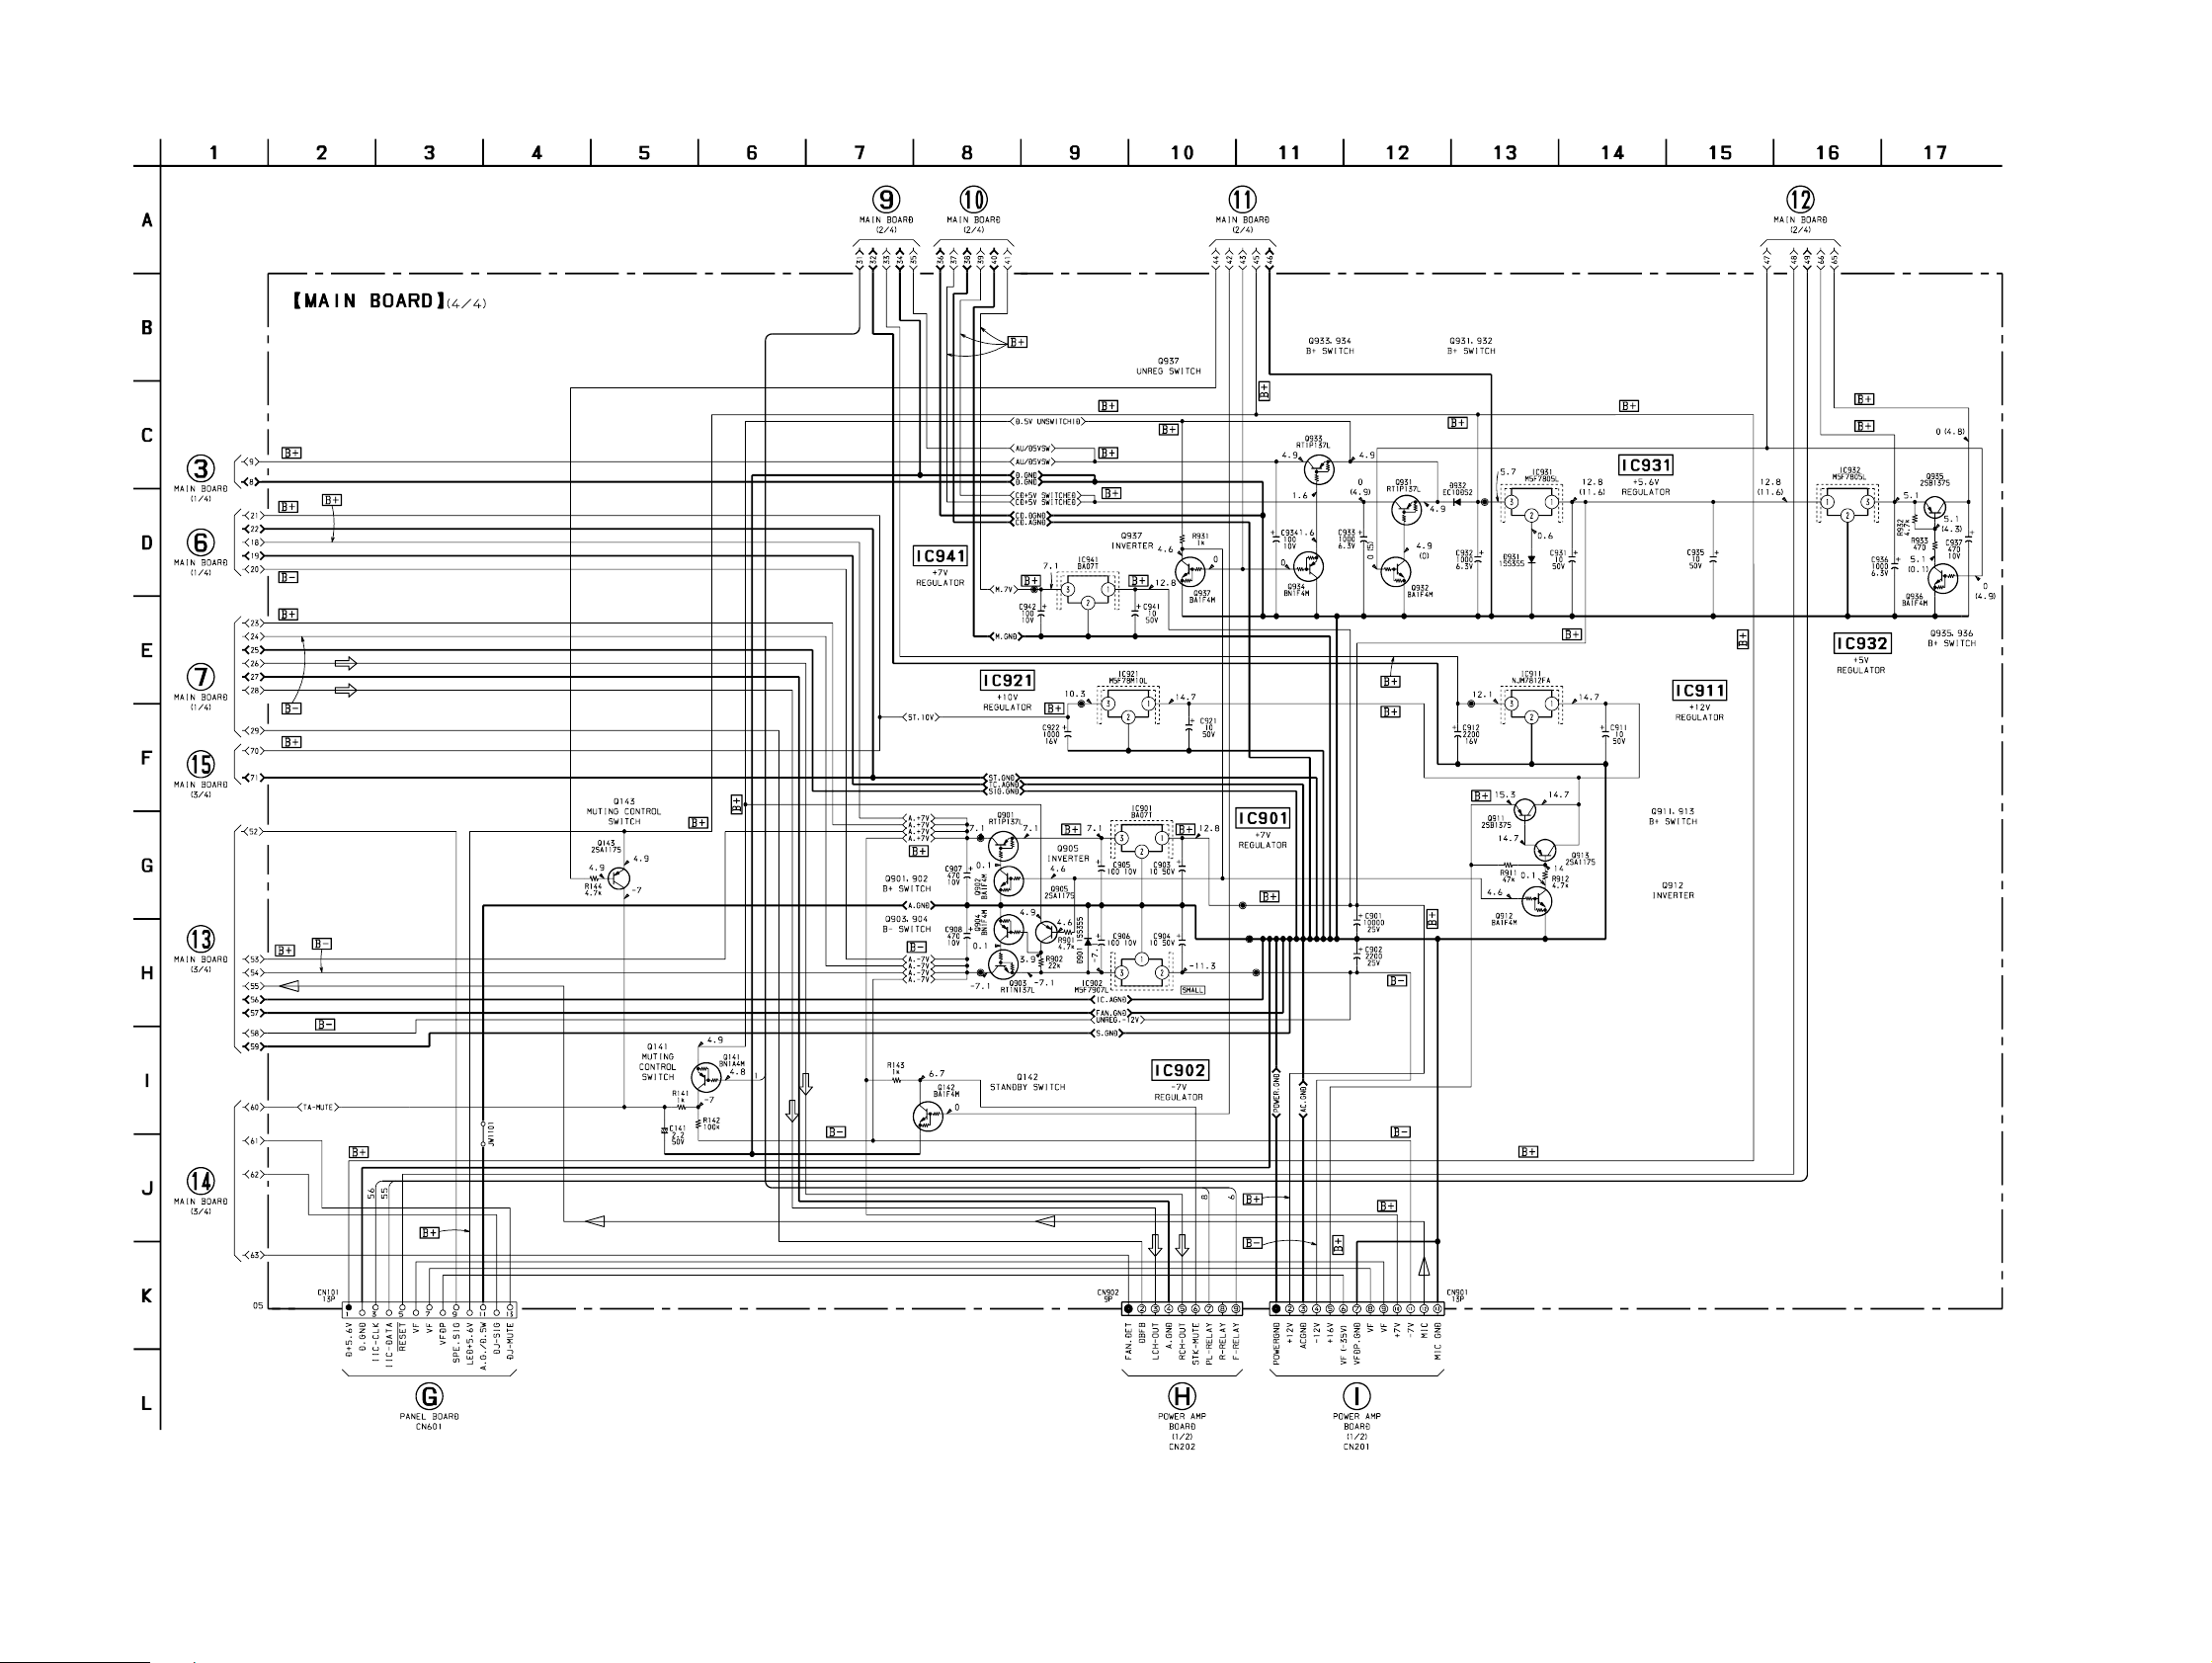
7-23. SCHEMATIC DIAGRAM – MAIN Section (4/4) –
HCD-V919AV
(Page 60)
(Page 60)
(Page 60)
(Page 61)
(Page 61) (Page 61)
(Page 62)
(Page 64)
(Page 64)
(Page 64)
(Page 69)
– 65 –
(Page 79)
(Page 79)
– 66 –
• Voltages and waveforms are dc with respect to ground
under no-signal (detuned) conditions.
no mark : FM
( ) : CD PLAY
: Impossible to measure
∗
Page 44
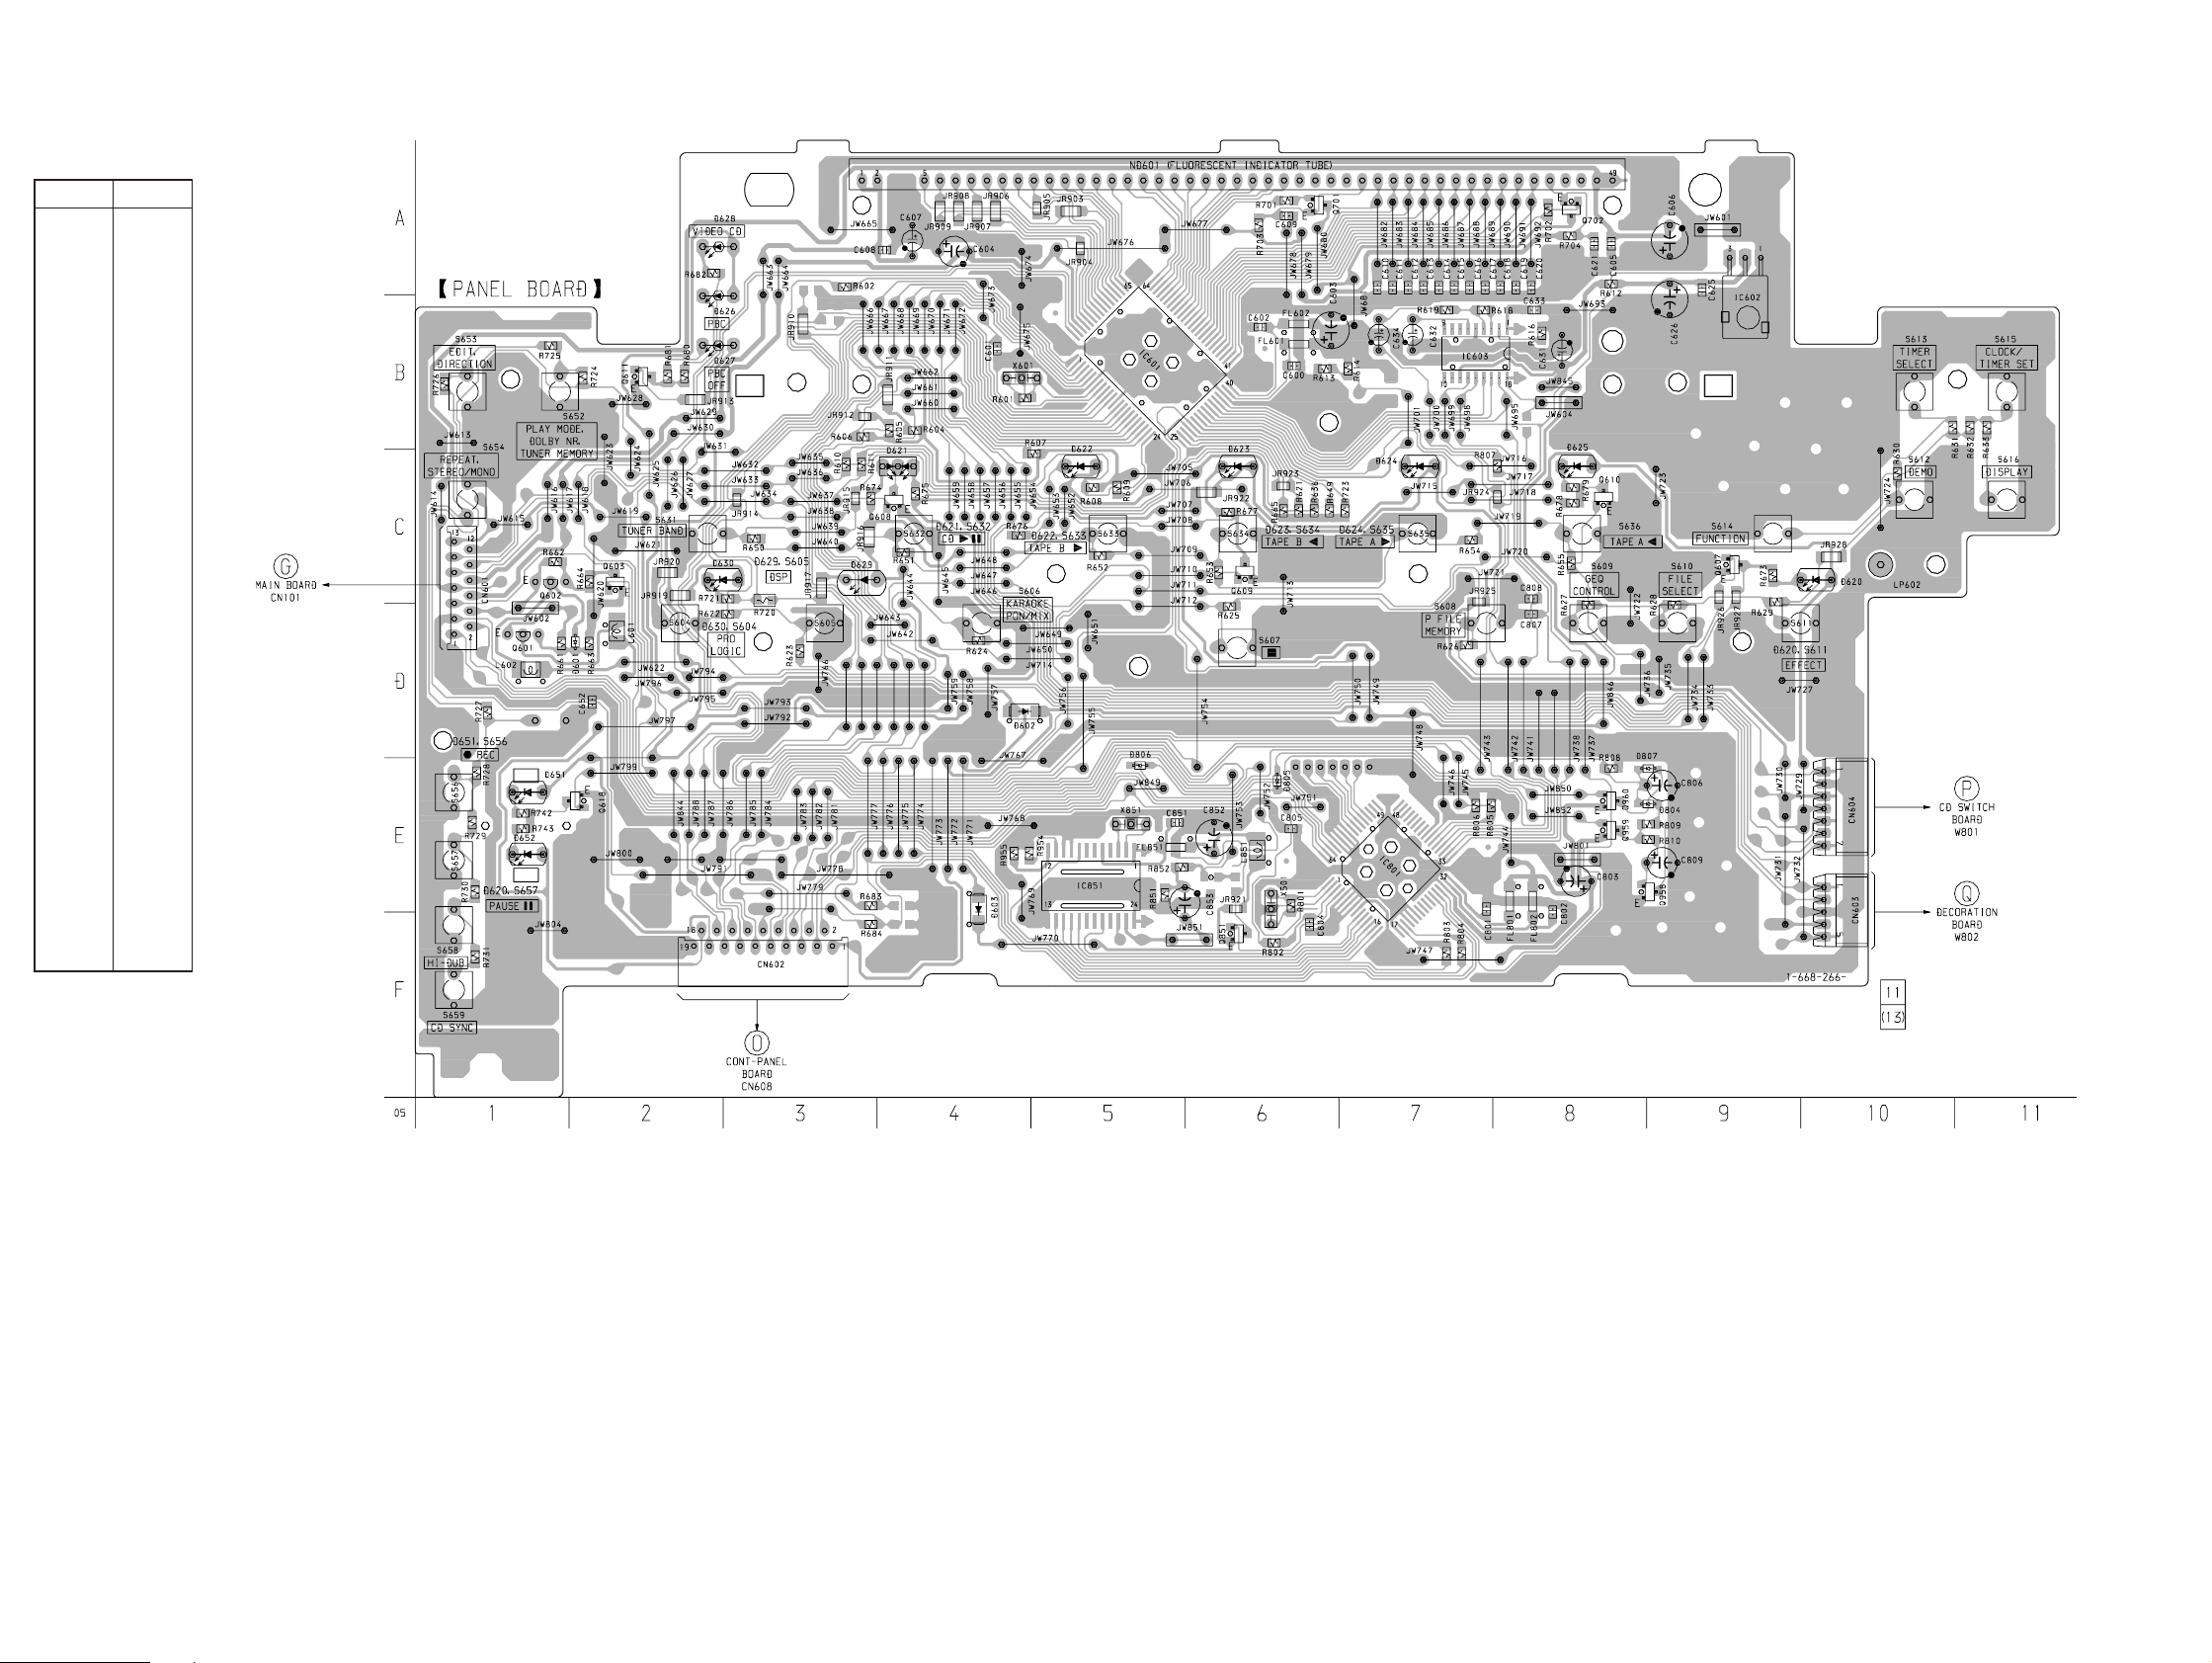
HCD-V919AV
• Semiconductor
Location
Ref. No. Location
D601 D-2
D602 D-4
D603 E-4
D620 C-10
D621 C-4
D622 C-5
D623 C-6
D624 C-7
D625 C-8
D626 A-2
D627 B-2
D628 A-2
D629 C-3
D630 C-2
D651 E-1
D652 E-1
D804 E-9
D805 E-6
D806 E-5
D807 E-9
7-24. PRINTED WIRING BOARD – PANEL Section – • See page 35 for Circuit Boards Location.
IC601 B-5
IC602 A-9
IC603 B-7
IC801 E-7
IC851 E-5
Q601 D-1
Q602 C-1
Q603 C-2
Q607 C-9
Q608 C-4
Q609 C-6
Q610 C-8
Q611 B-2
Q618 E-2
Q701 A-6
Q702 A-8
Q851 F-6
Q958 E-9
Q959 E-8
Q960 E-8
(Page 57)
(Page 72)
(Page 72)
(Page 71)
– 67 –
– 68 –
Page 45
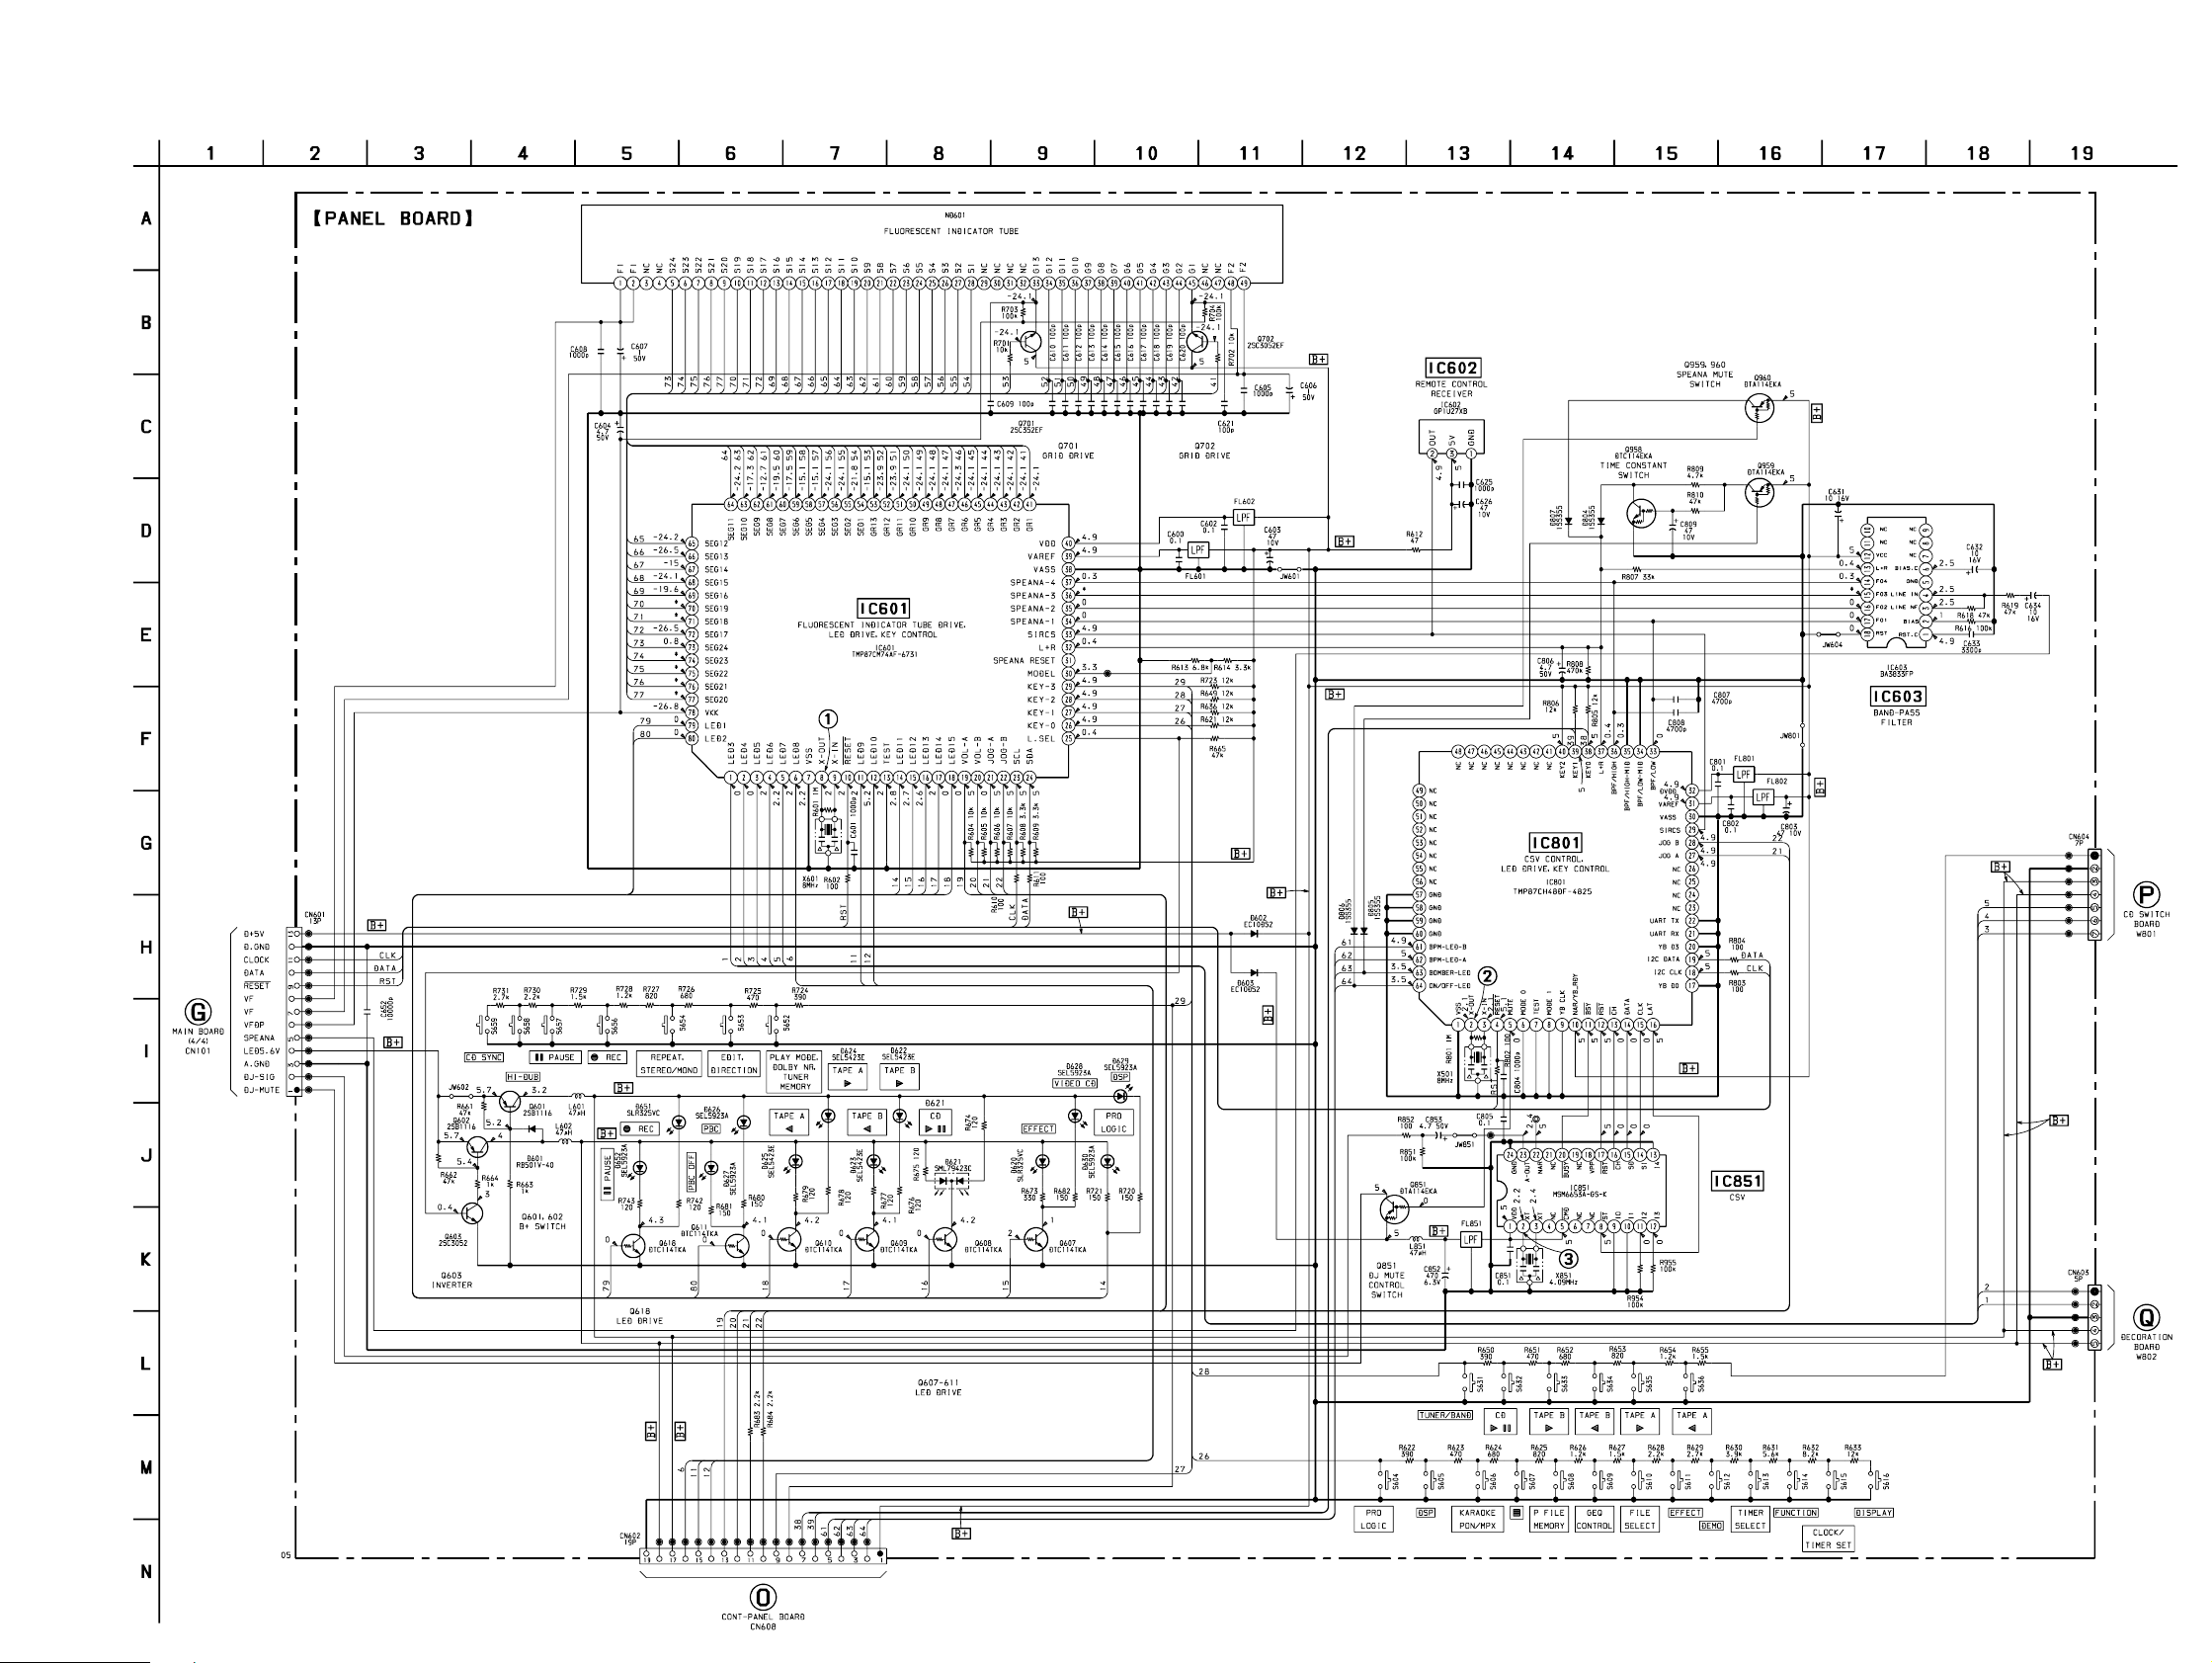
7-25. SCHEMATIC DIAGRAM – PANEL Section – • See page 89 for Waveforms. • See page 92 for IC Block Diagrams.
• Voltages and waveforms are dc with respect to ground
under no-signal (detuned) conditions.
no mark : FM
: Impossible to measure
∗
HCD-V919AV
(Page
65)
(Page 73)
(Page 73)
– 69 –
(Page 74)
– 70 –
Page 46
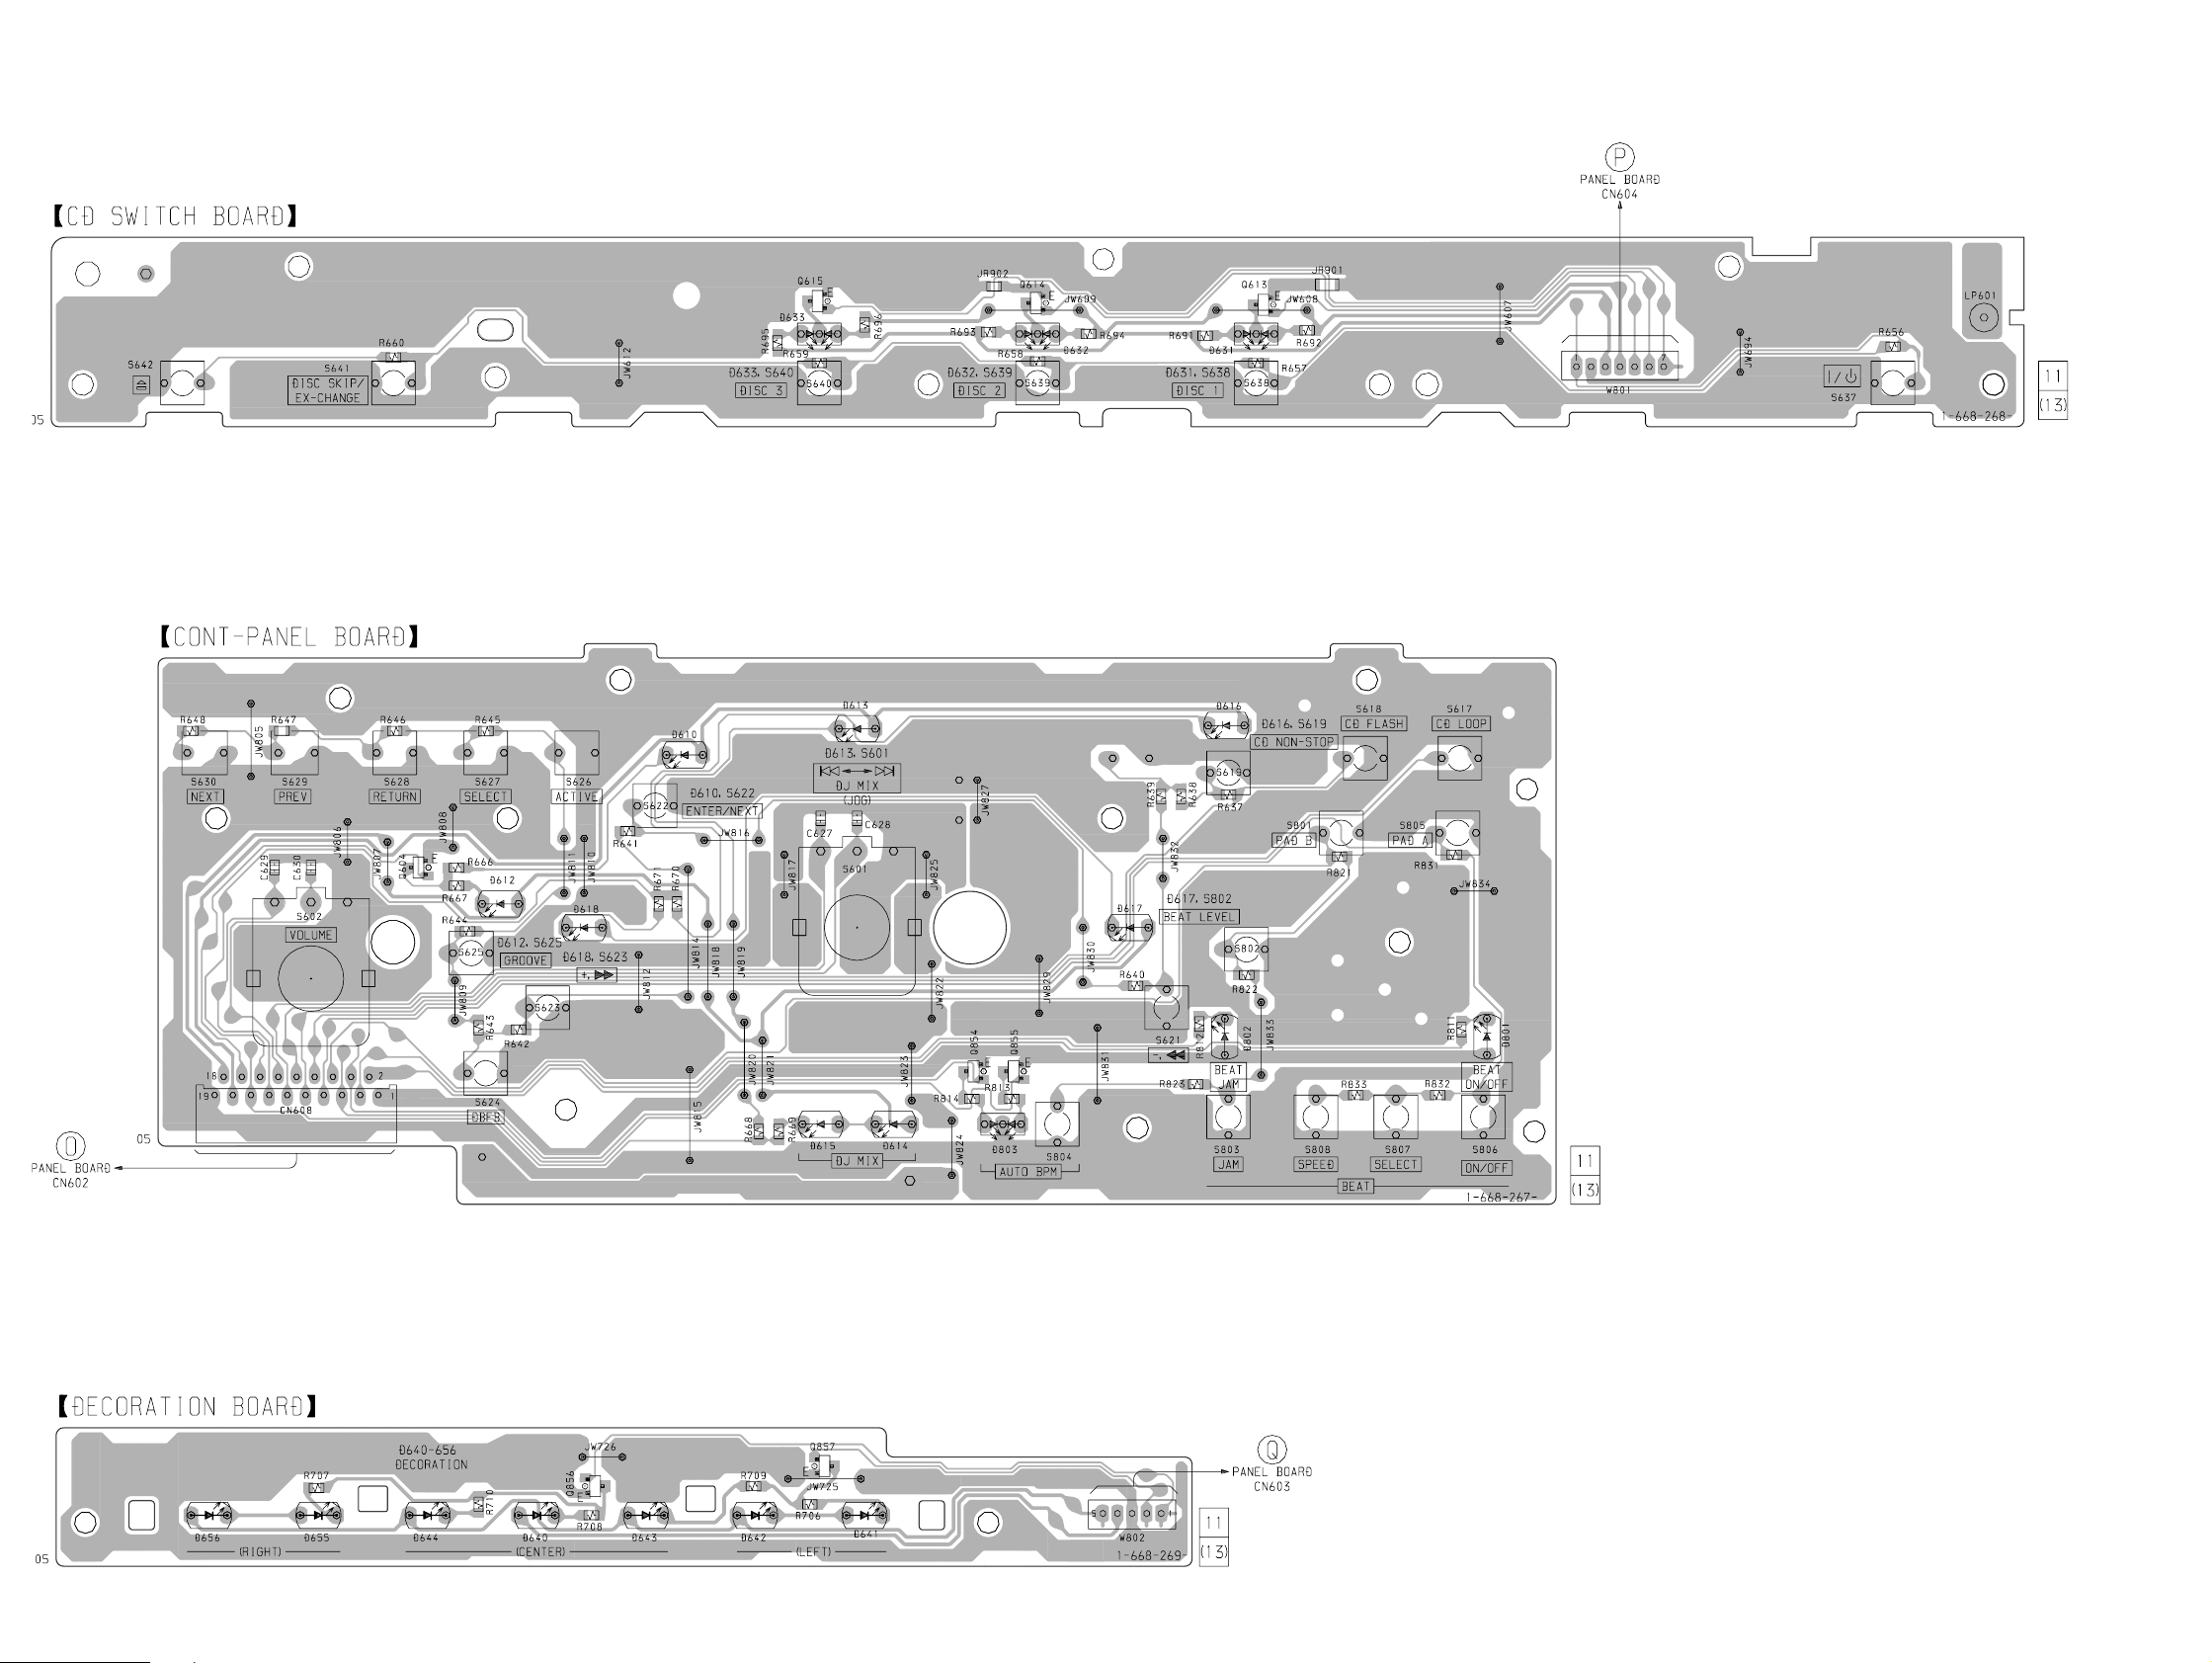
HCD-V919AV
7-26. PRINTED WIRING BOARDS – DISPLAY Section – • See page 35 for Circuit Boards Location.
(Page 68)
(Page 67)
– 71 –
(Page 68)
– 72 –
Page 47
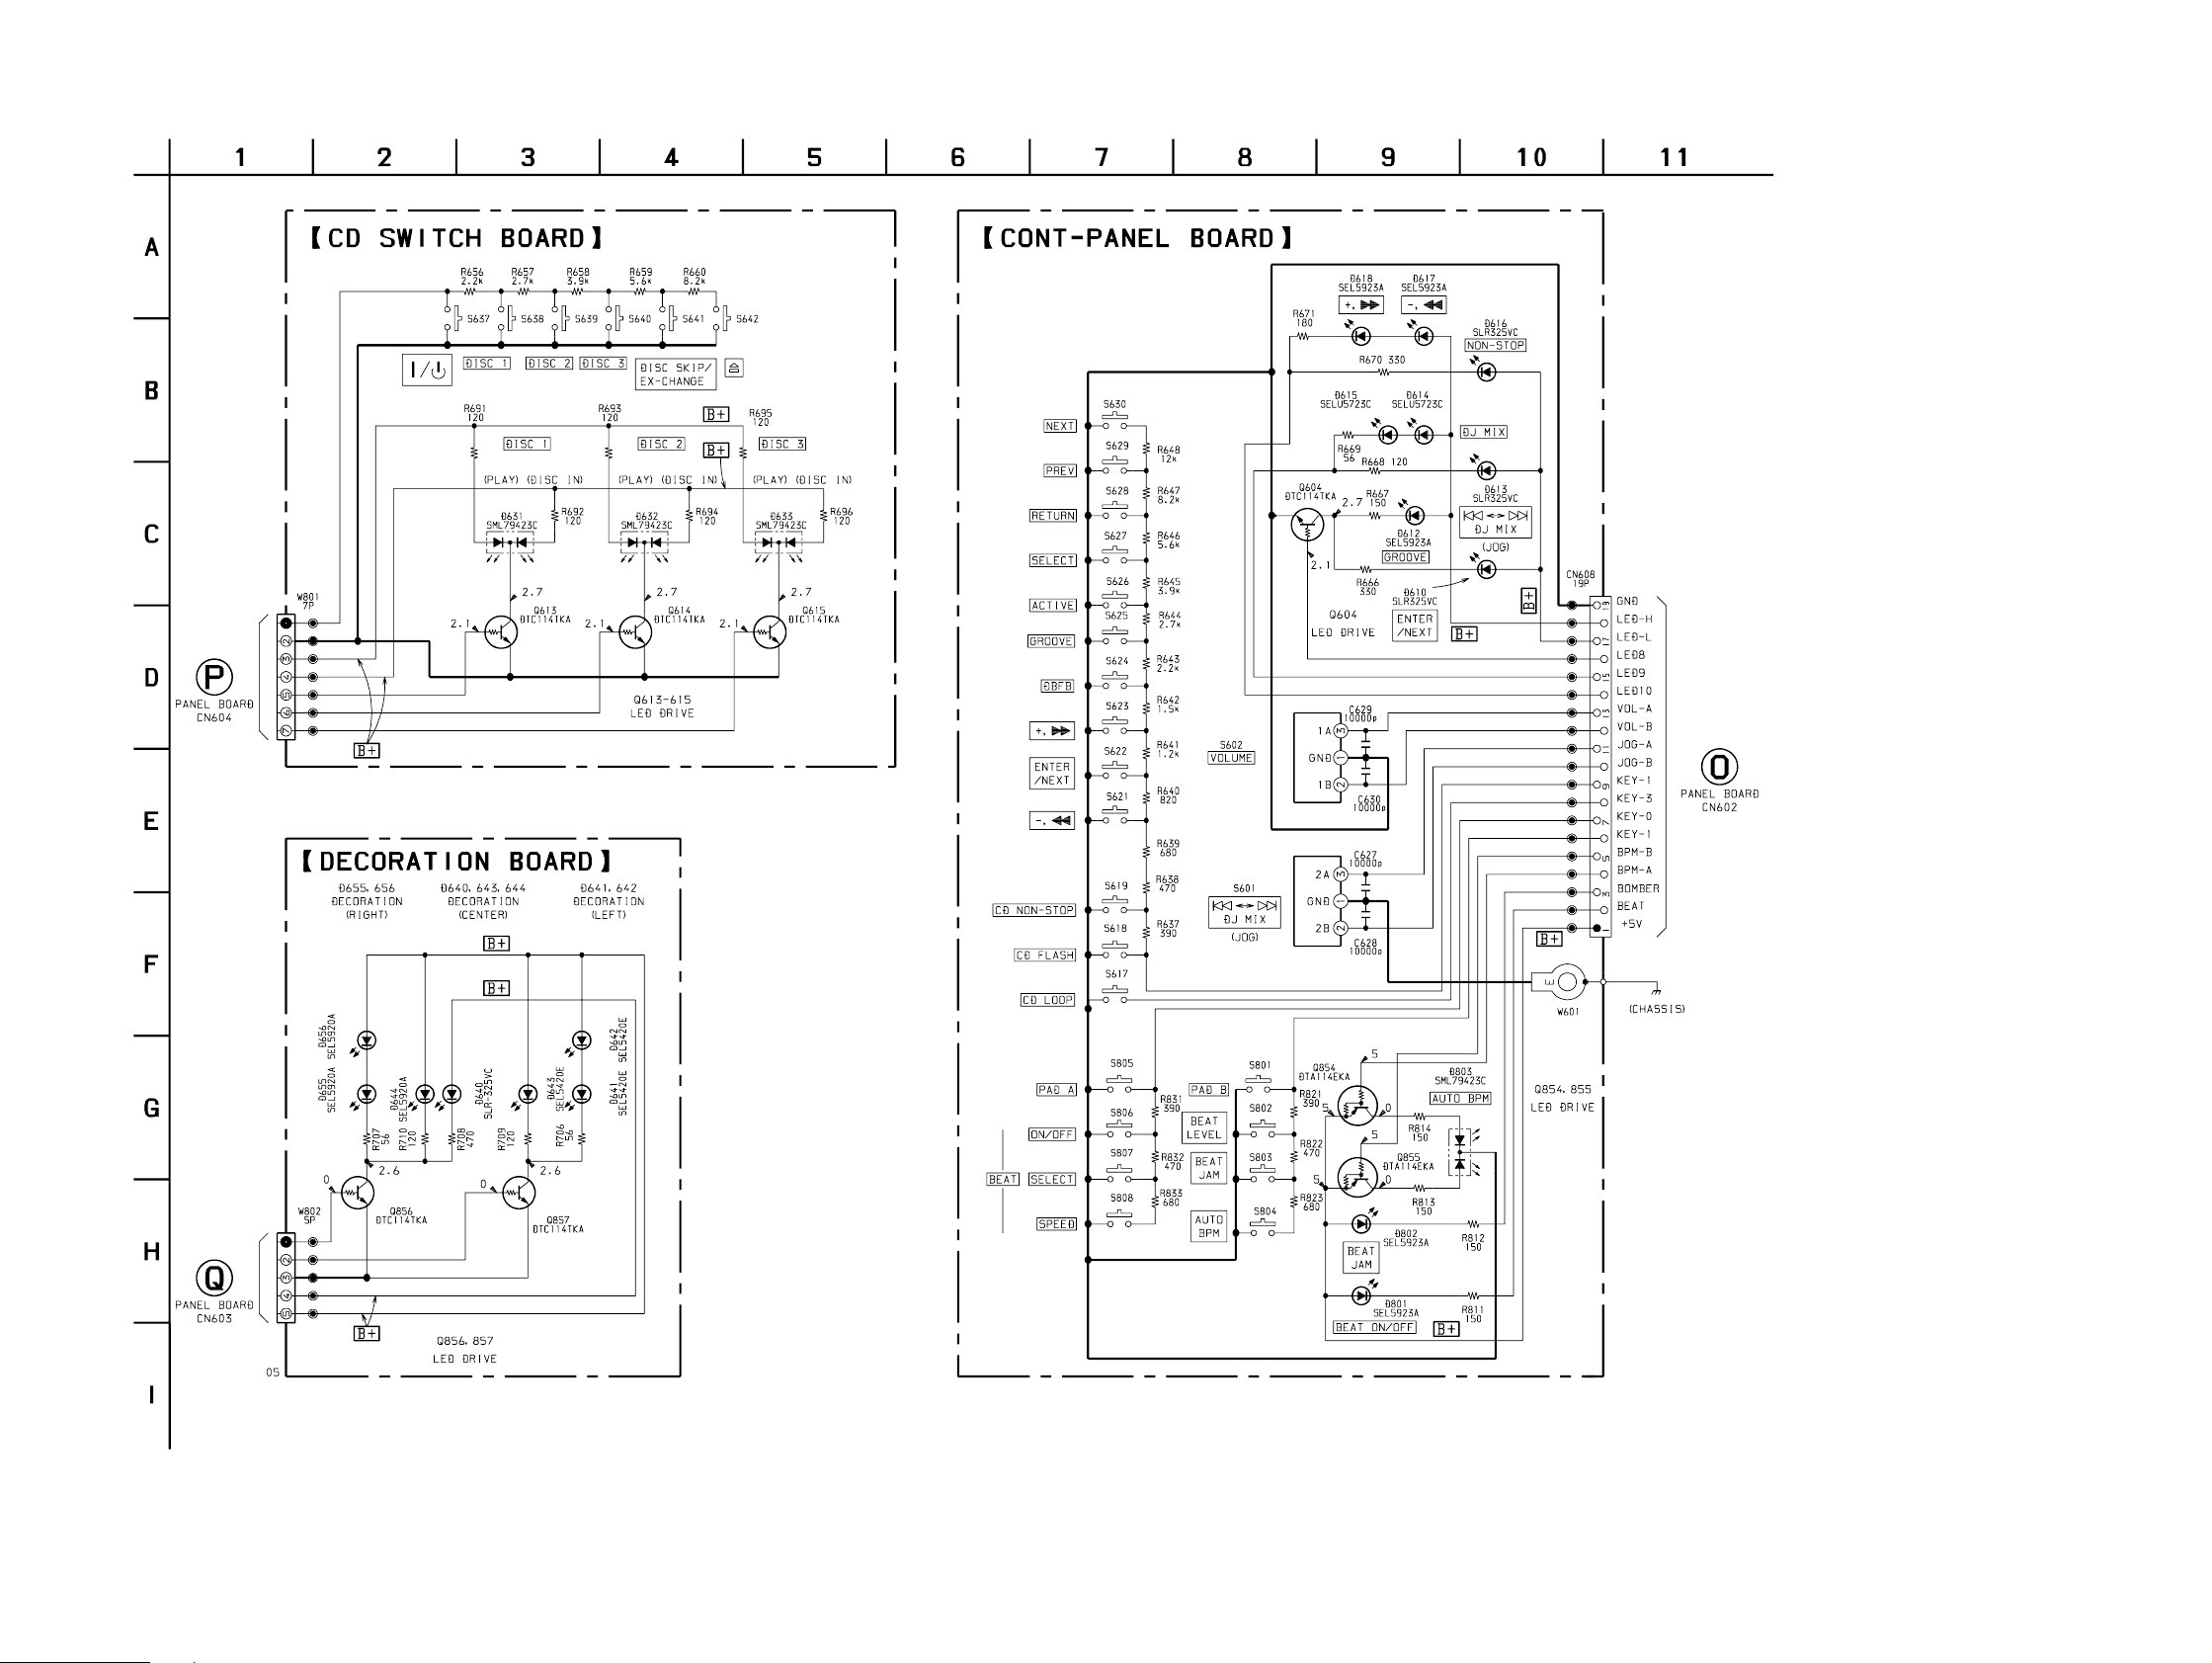
7-27. SCHEMATIC DIAGRAM – DISPLAY Section –
HCD-V919AV
(Page 70)
(Page 69)
(Page 70)
• Voltages and waveforms are dc with respect to ground
under no-signal (detuned) conditions.
no mark : FM
– 73 –
– 74 –
Page 48
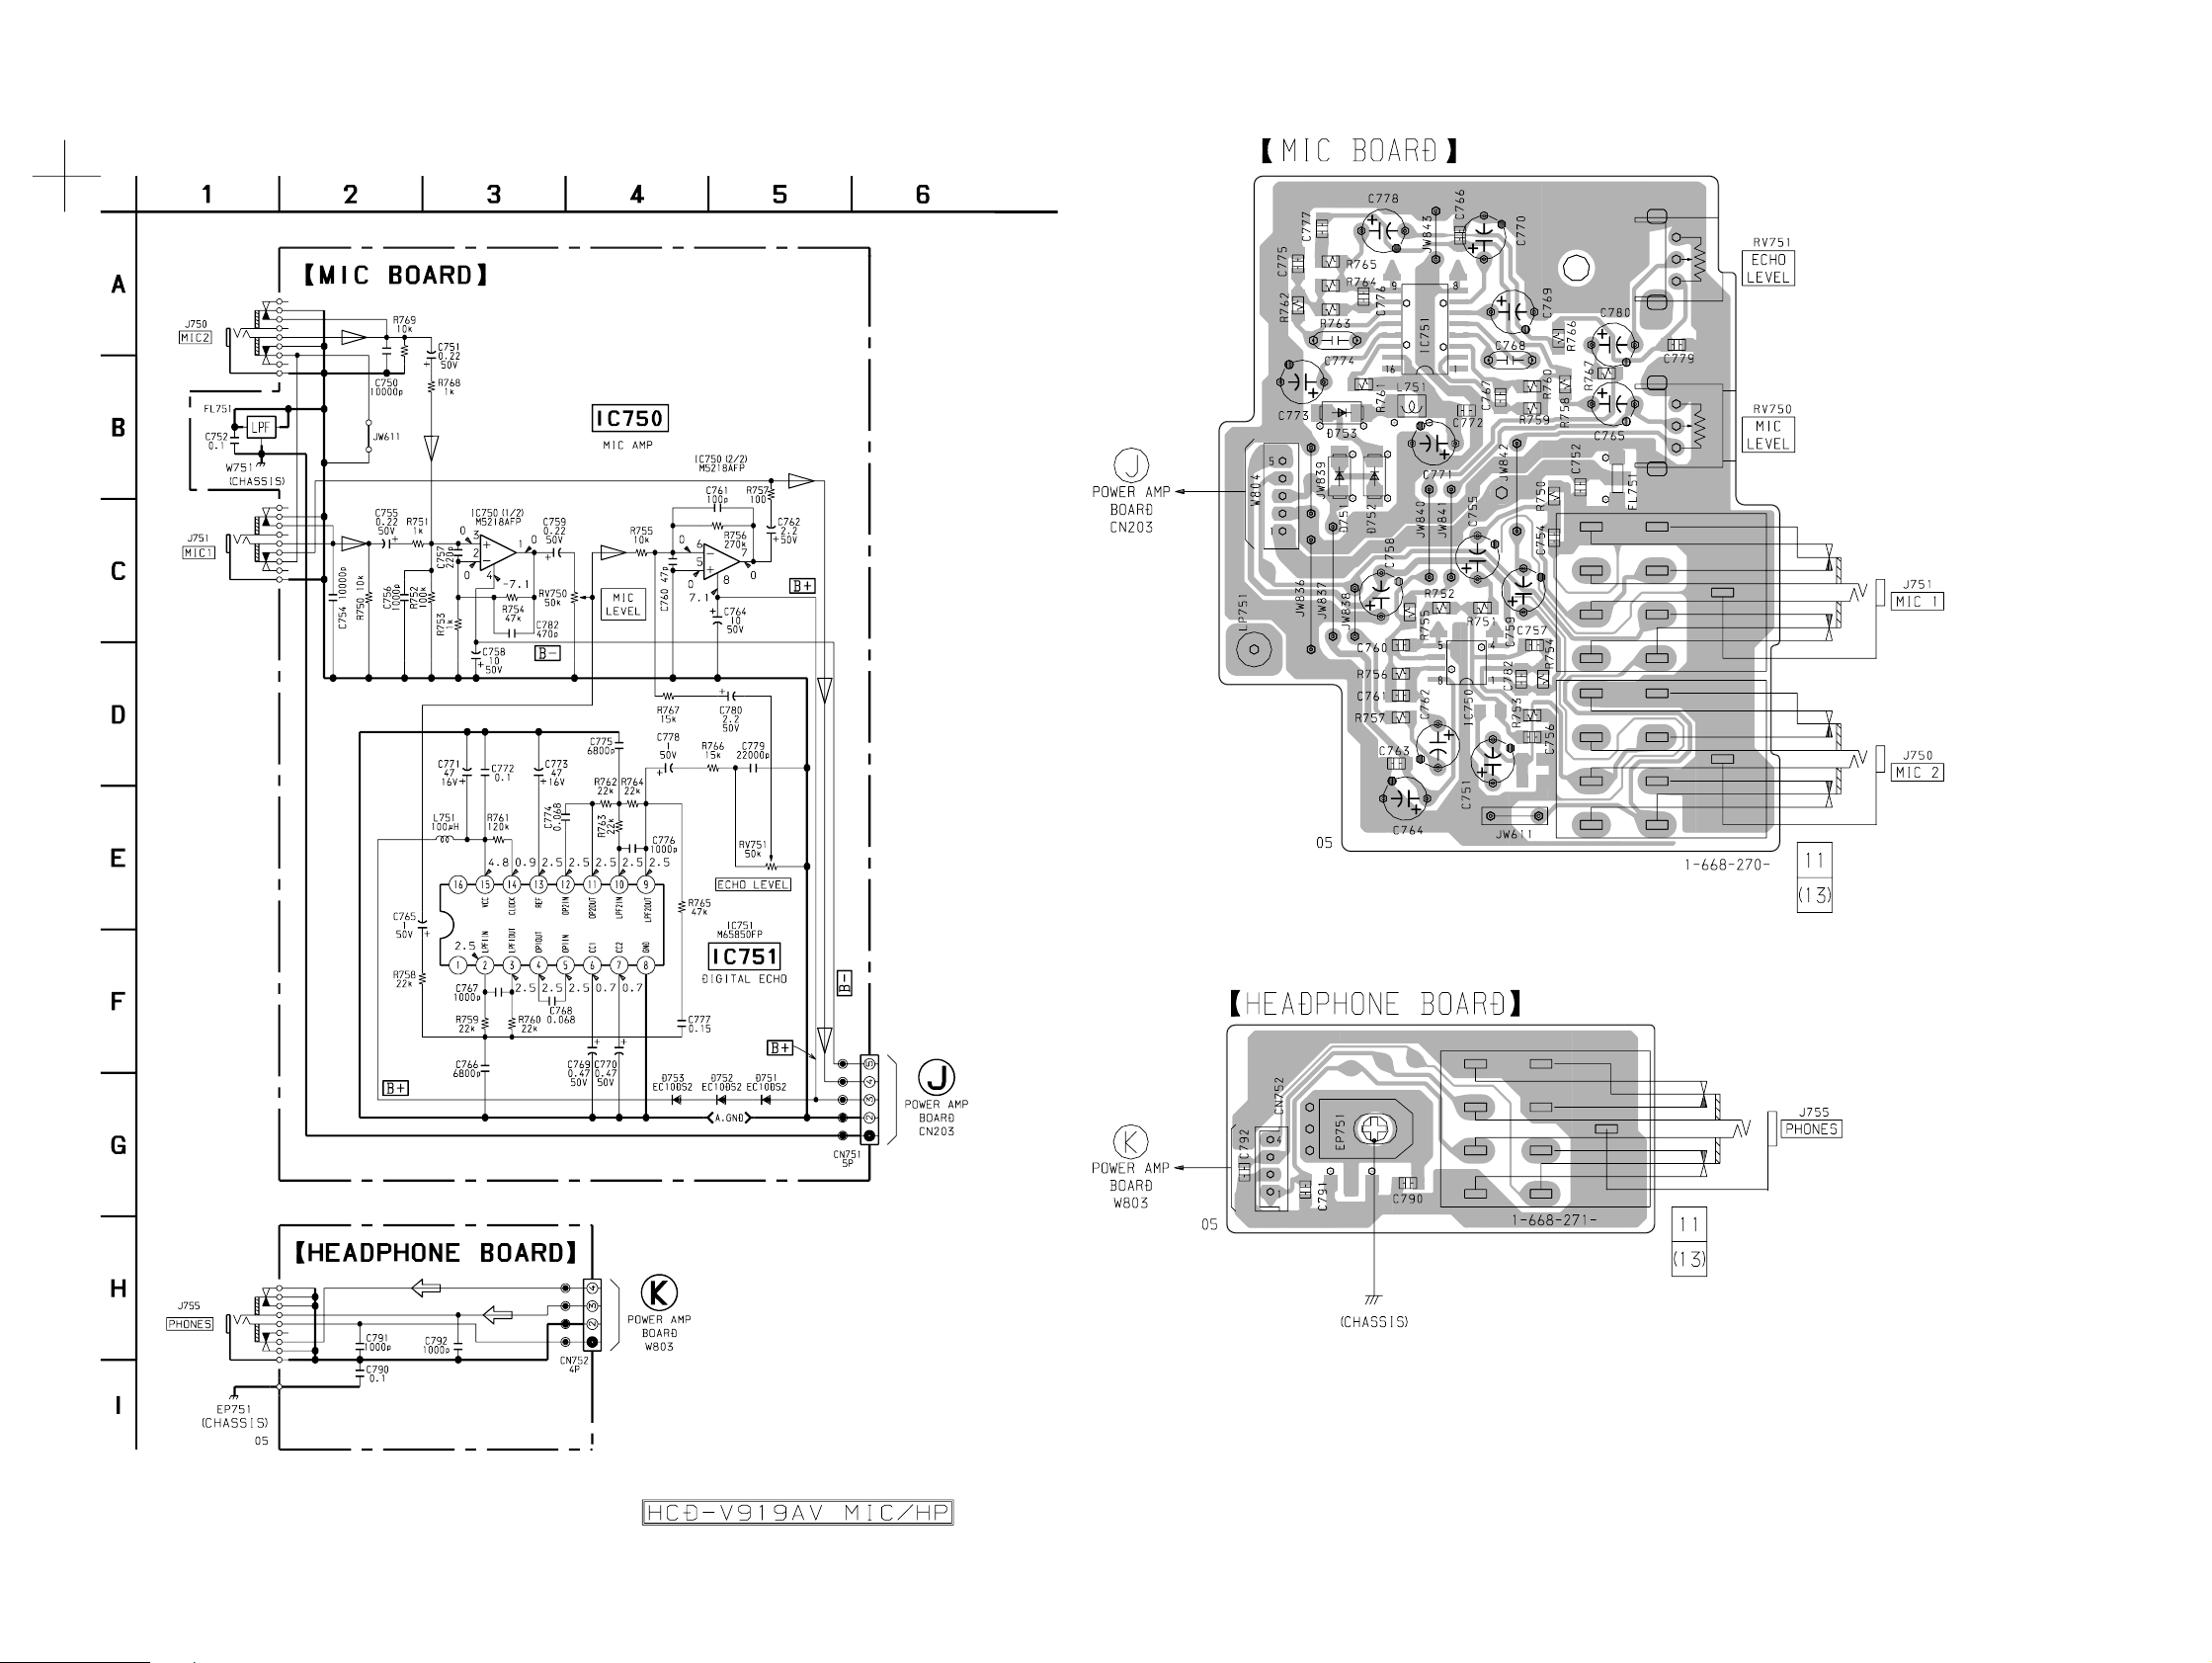
HCD-V919AV
7-28. SCHEMATIC DIAGRAM – MIC/HEADPHONE Section –
• See page 92 for IC Block Diagrams.
7-29. PRINTED WIRING BOARDS – MIC/HEADPHONE Section –
• See page 35 for Circuit Boards Location.
(Page 78)
– 75 –
(Page 79)
(Page 77)
(Page 79)
• Voltages and waveforms are dc with respect to ground
under no-signal (detuned) conditions.
no mark : FM
– 76 –
Page 49
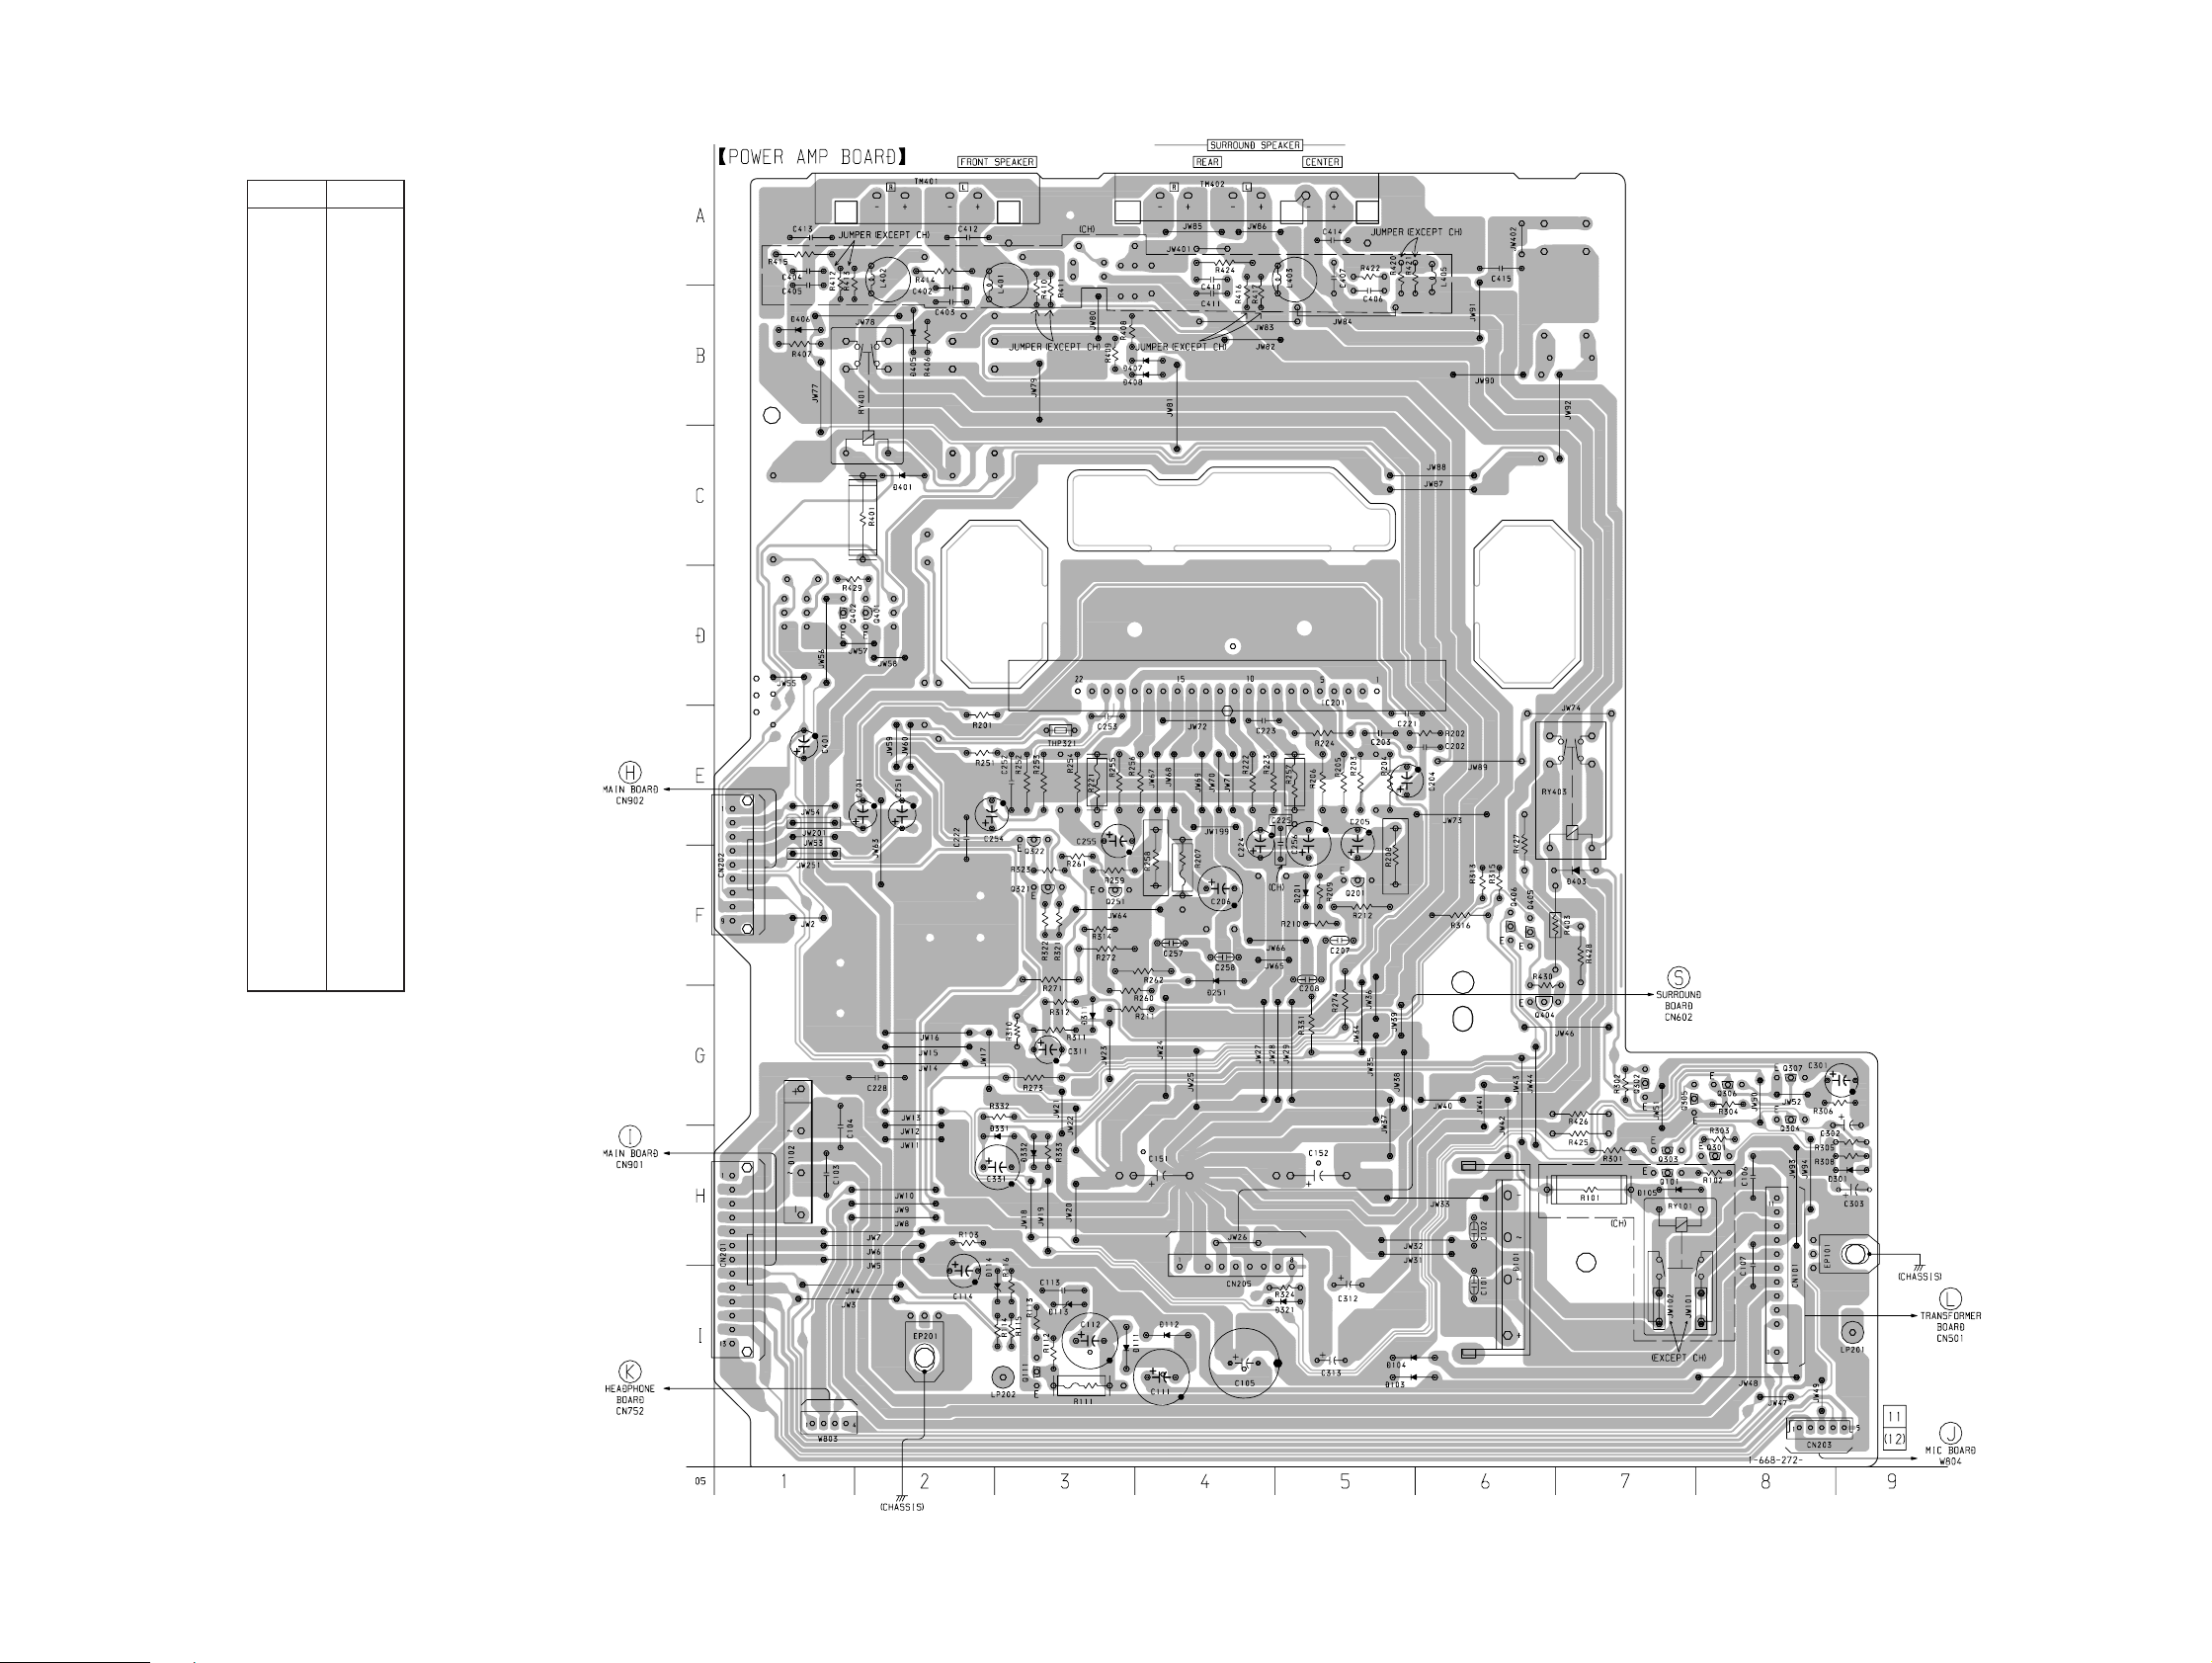
• Semiconductor
Location
Ref. No. Location
D101 H-6
D102 H-1
D103 I-5
D104 I-5
D105 H-7
D111 I-3
D112 I-4
D113 I-3
D114 I-3
D201 F-5
D251 F-4
D301 H-9
D311 G-3
D321 I-5
D331 H-3
D332 H-3
D401 C-2
D403 F-7
D405 B-2
D406 B-1
D407 B-4
D408 B-4
HCD-V919AV
7-30. PRINTED WIRING BOARD – POWER AMP Section – • See page 35 for Circuit Boards Location.
IC201 D-5
Q101 H-7
Q111 I-3
Q201 F-5
Q251 F-3
Q301 H-8
Q302 G-7
Q303 H-7
Q304 G-8
Q305 G-7
Q306 G-8
Q307 G-8
Q321 F-3
Q322 E-3
Q401 D-2
Q402 D-1
Q404 G-6
Q405 F-6
Q406 F-6
(Page 58)
(Page 84)
(Page 57)
(Page 76)
– 77 –
(Page 83)
(Page 76)
– 78 –
Page 50
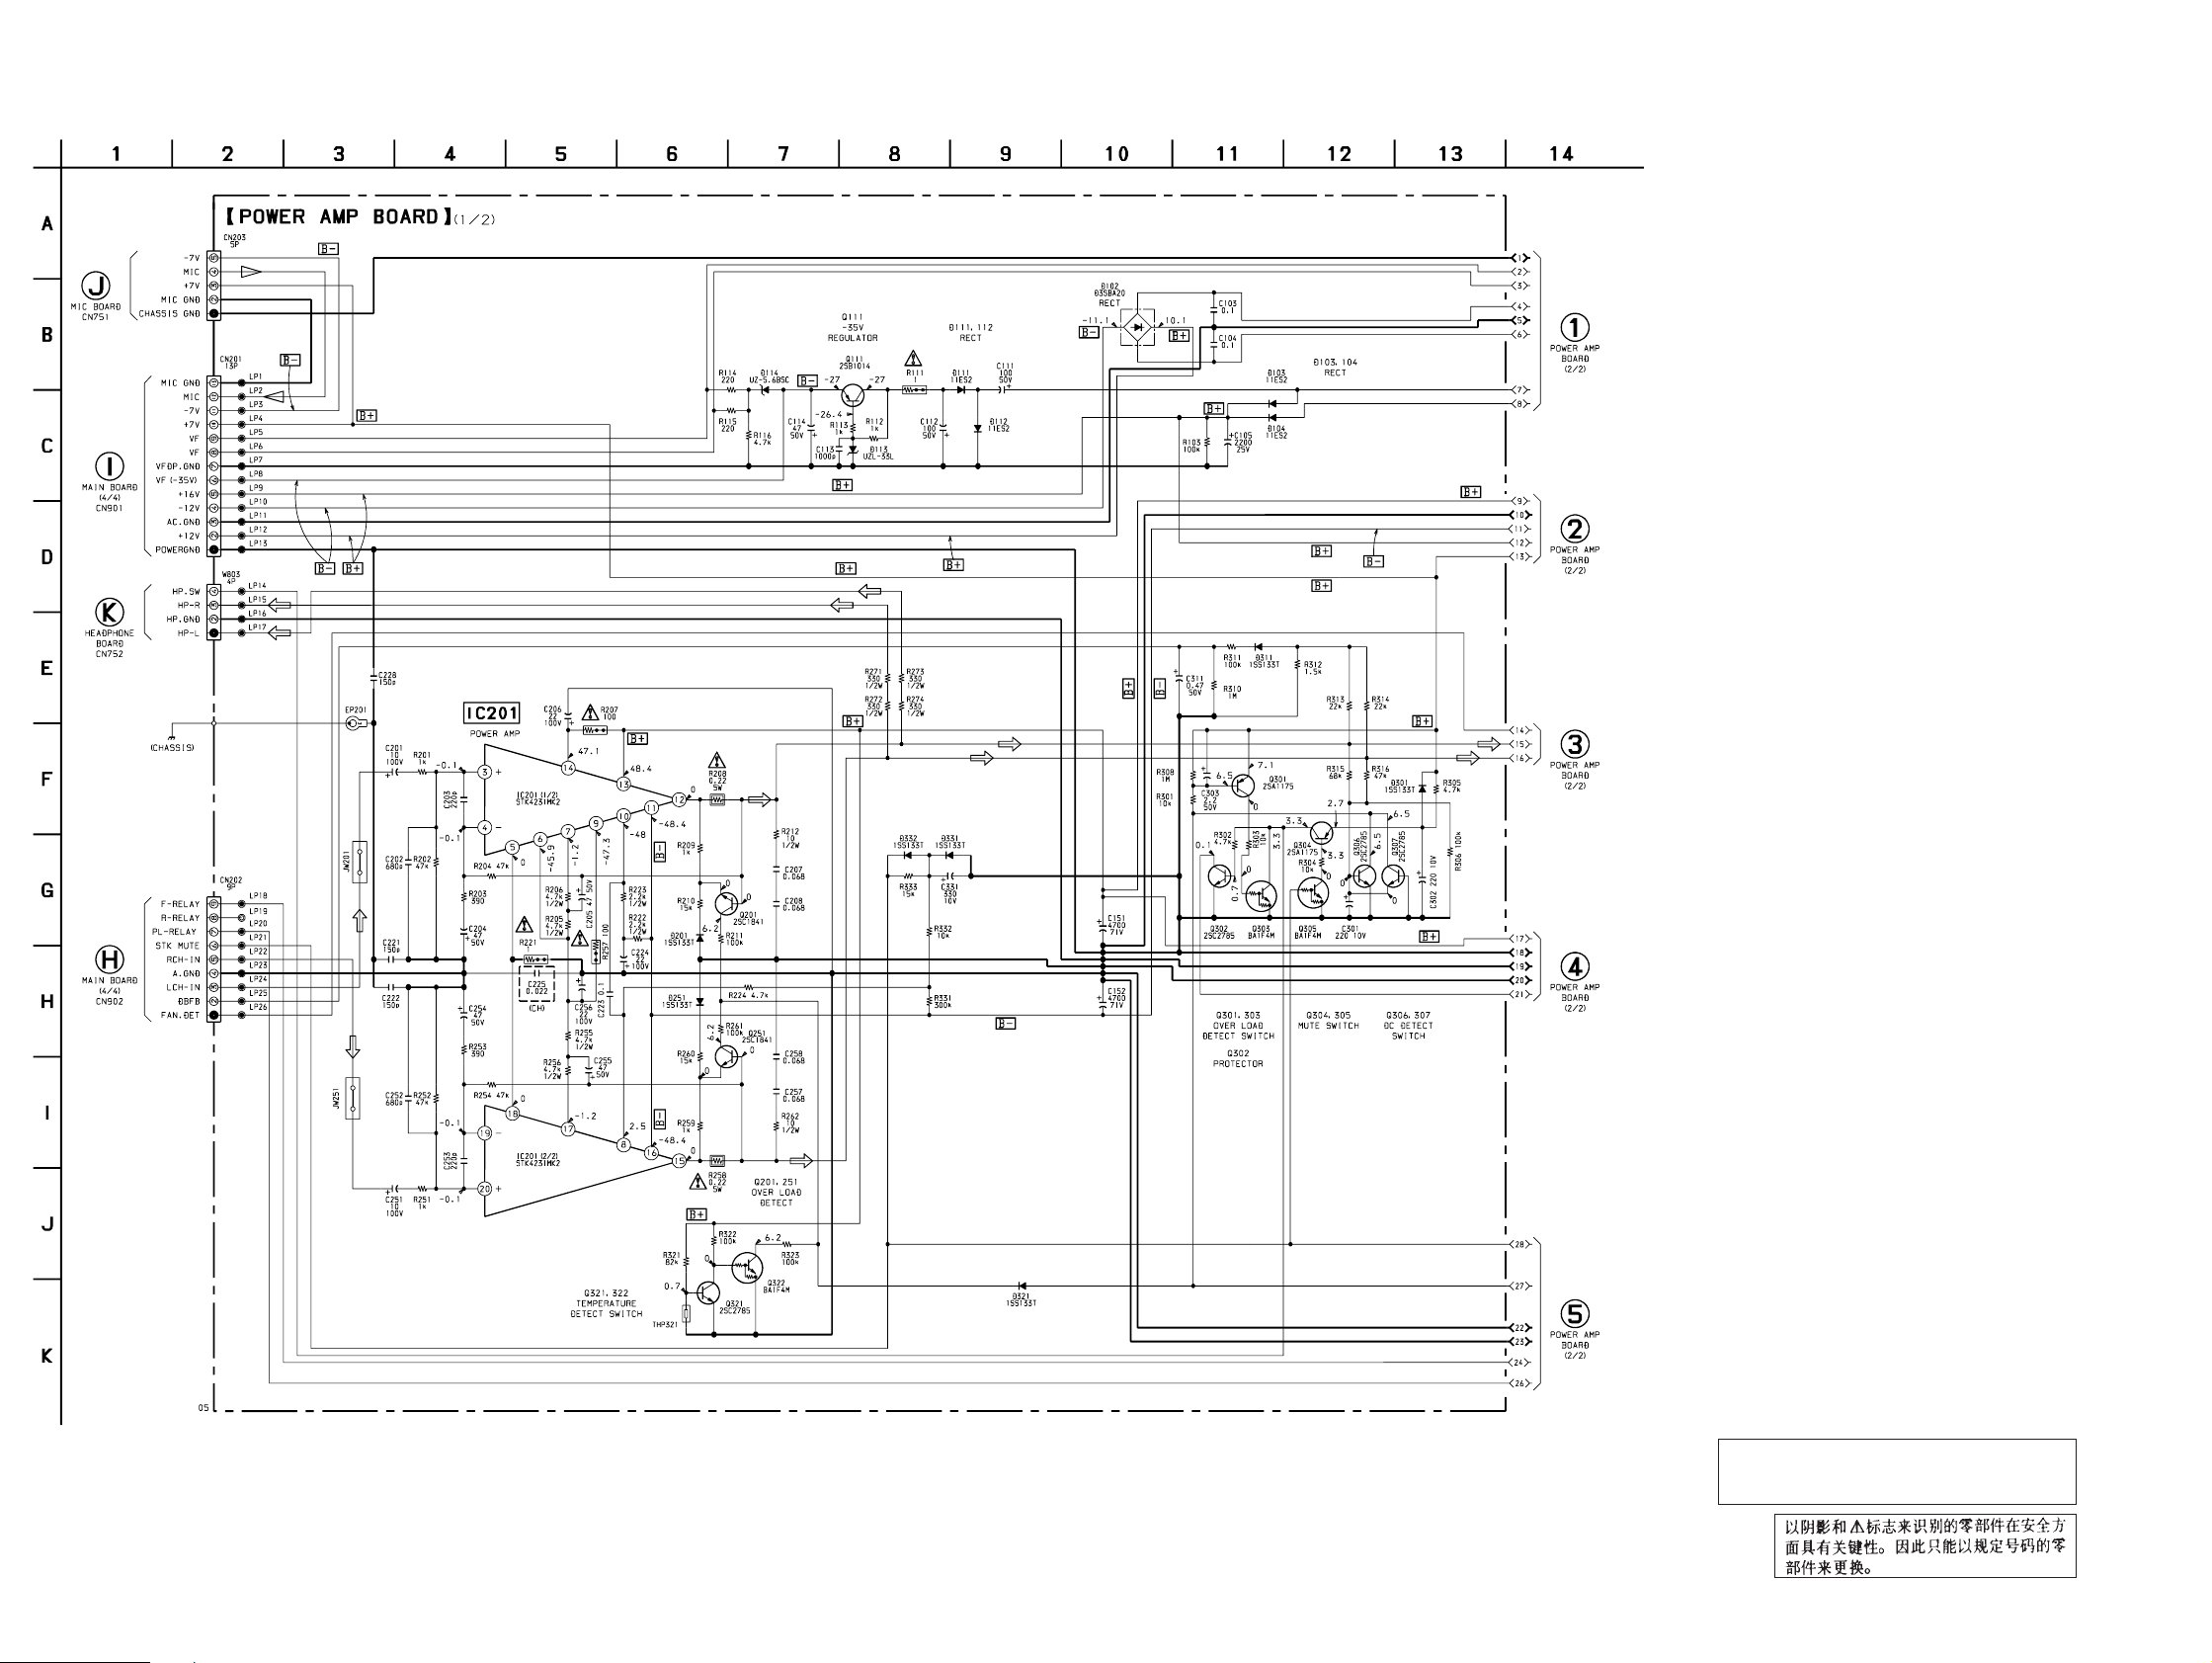
HCD-V919AV
7-31. SCHEMATIC DIAGRAM – POWER AMP Section –
(Page 75)
(Page 66)
(Page 81)
(Page 81)
(Page 75)
(Page 66)
(Page 81)
(Page 81)
– 79 –
(Page 81)
• Voltages and waveforms are dc with respect to ground
under no-signal (detuned) conditions.
no mark : FM
– 80 –
The components identified by mark ! or dotted
line with mark ! are critical for safety.
Replace only with part number specified.
Page 51
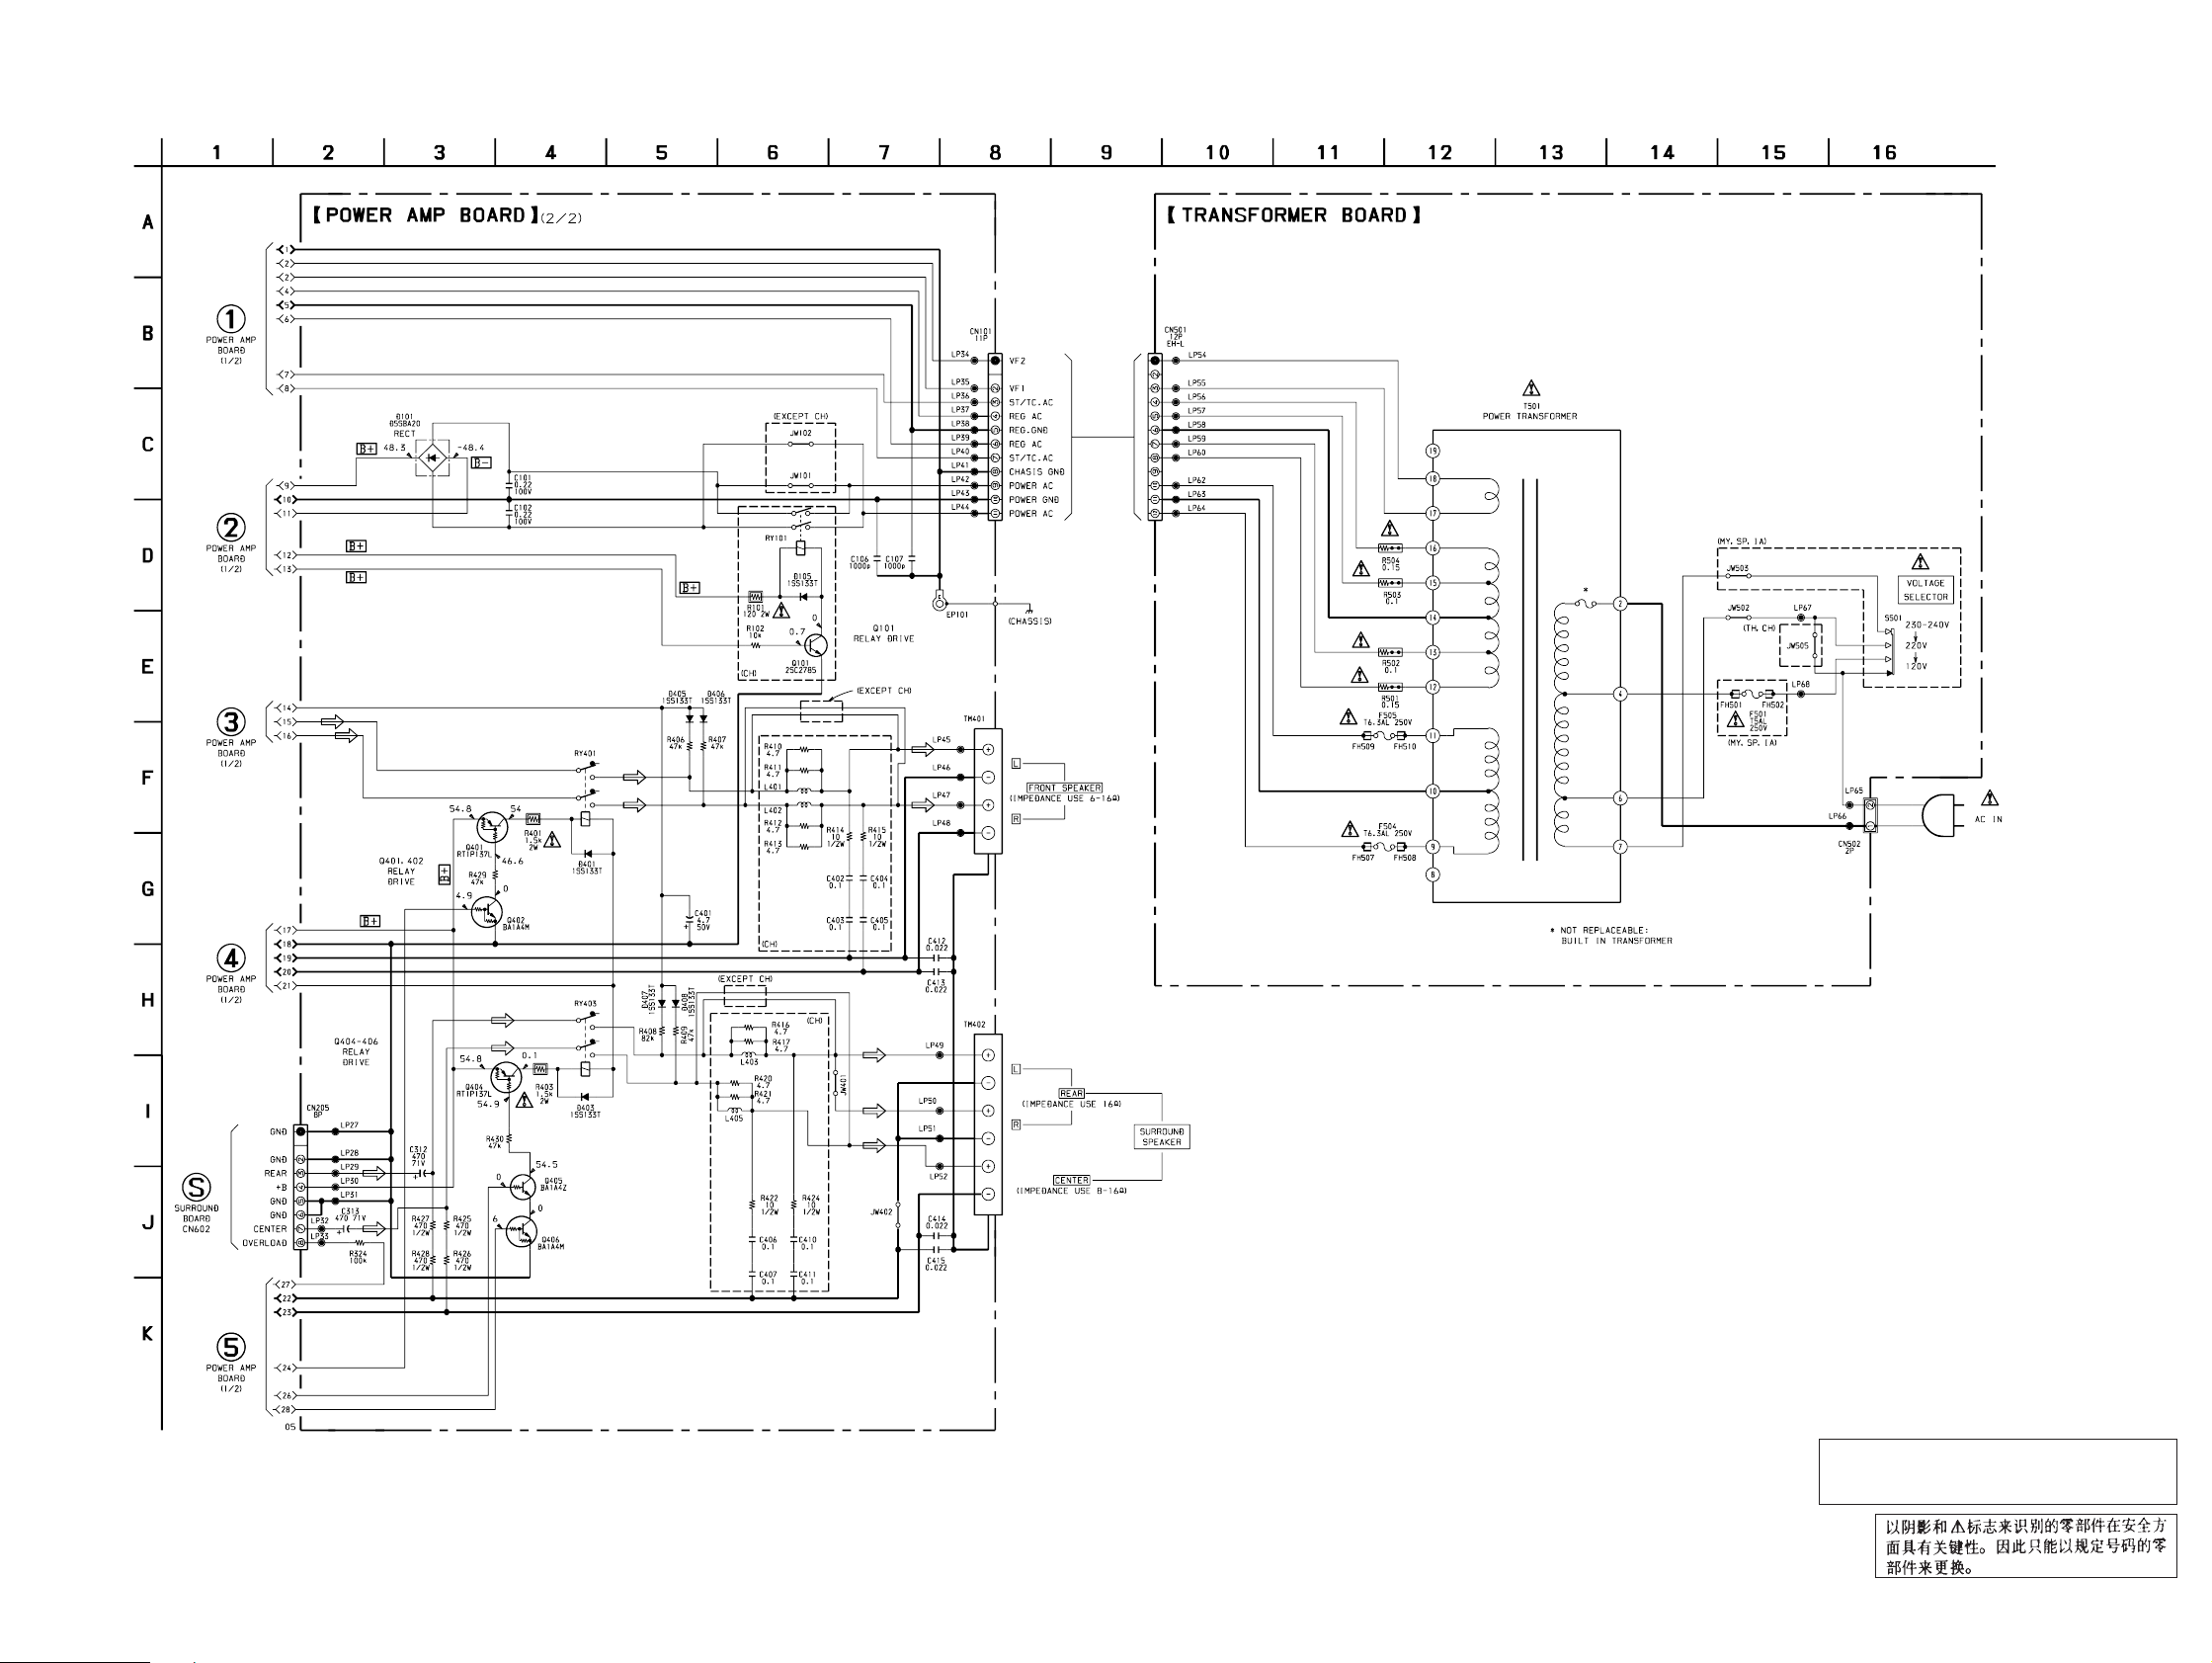
7-32. SCHEMATIC DIAGRAM – TRANSFORMER Section – • See page 83 for Printed Wiring Board. (POWER BOARD) • See page 83 for Printed Wiring Board. (TRANSFORMER BOARD)
(Page 80)
(Page 80)
HCD-V919AV
(Page 80)
(Page 80)
(Page
85)
(Page 80)
– 81 –
• Voltages and waveforms are dc with respect to ground
under no-signal (detuned) conditions.
no mark : FM
– 82 –
The components identified by mark ! or dotted
line with mark ! are critical for safety.
Replace only with part number specified.
Page 52
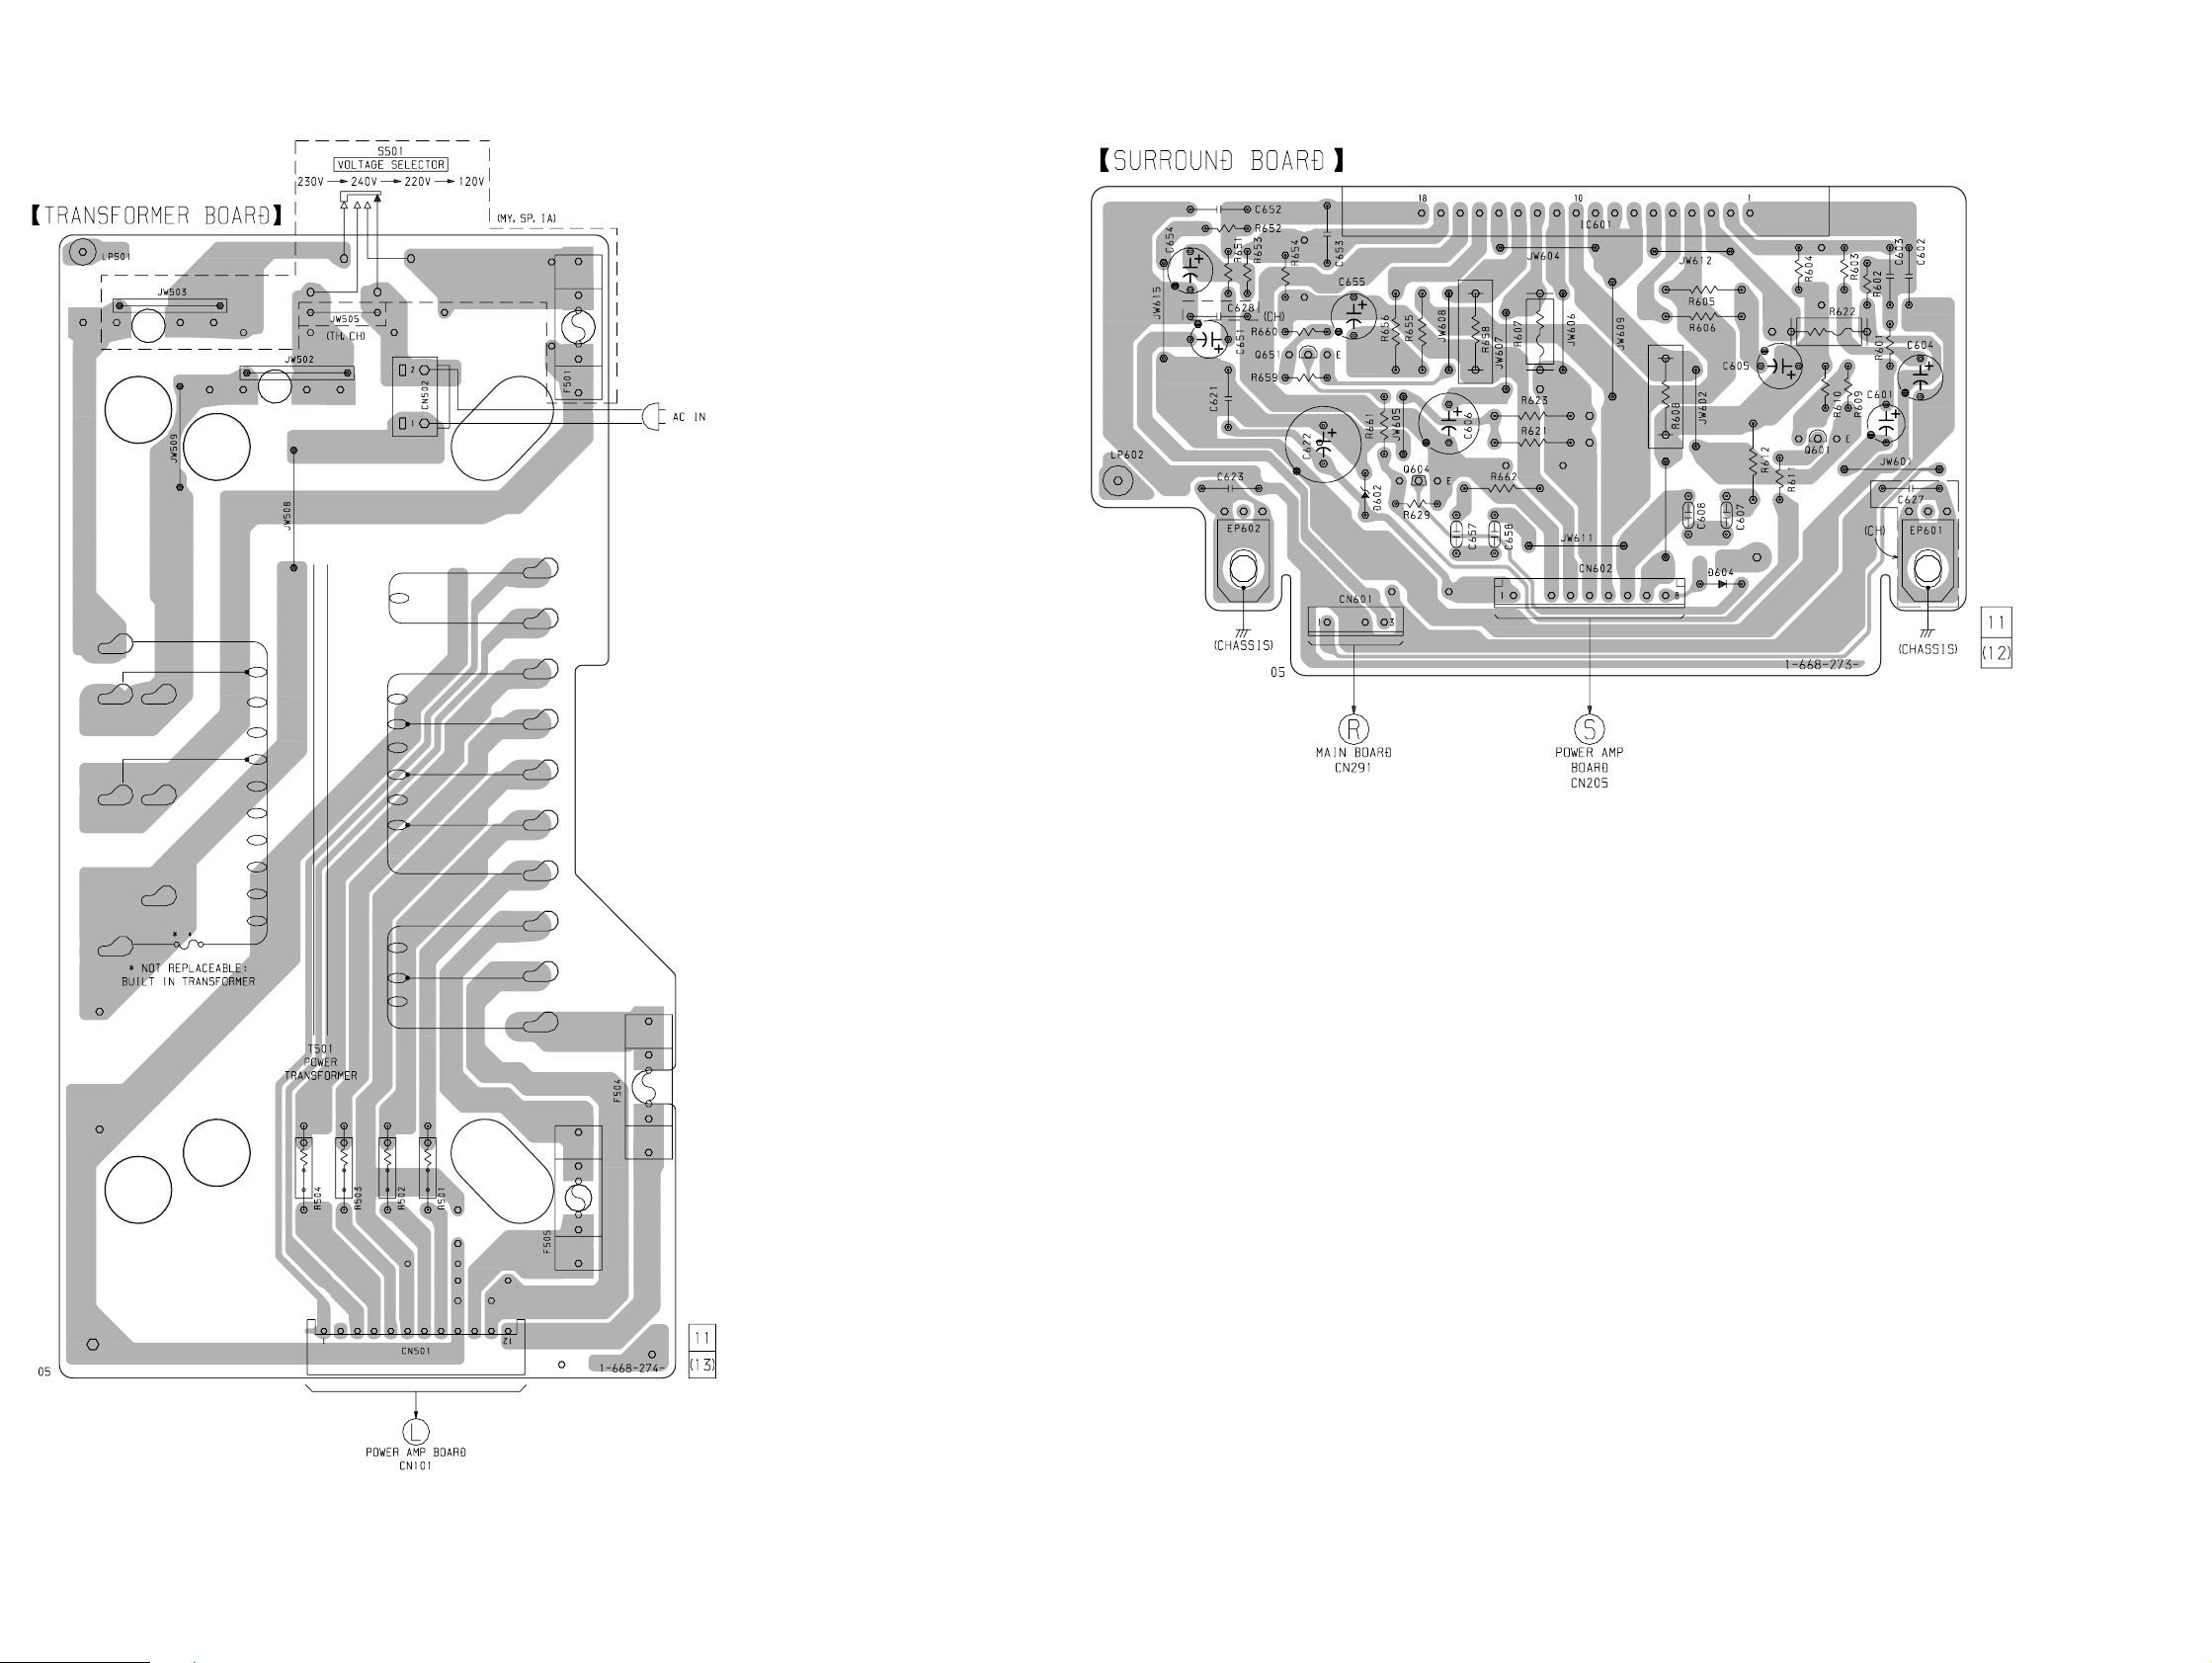
HCD-V919AV
7-33. PRINTED WIRING BOARD – TRANSFORMER Section – • See page 35 for Circuit Boards Location.
7-34. PRINTED WIRING BOARD – SURROUND Section –
• See page 35 for Circuit Boards Location.
(Page 58)
(Page 78)
(Page 78)
– 83 –
– 84 –
Page 53
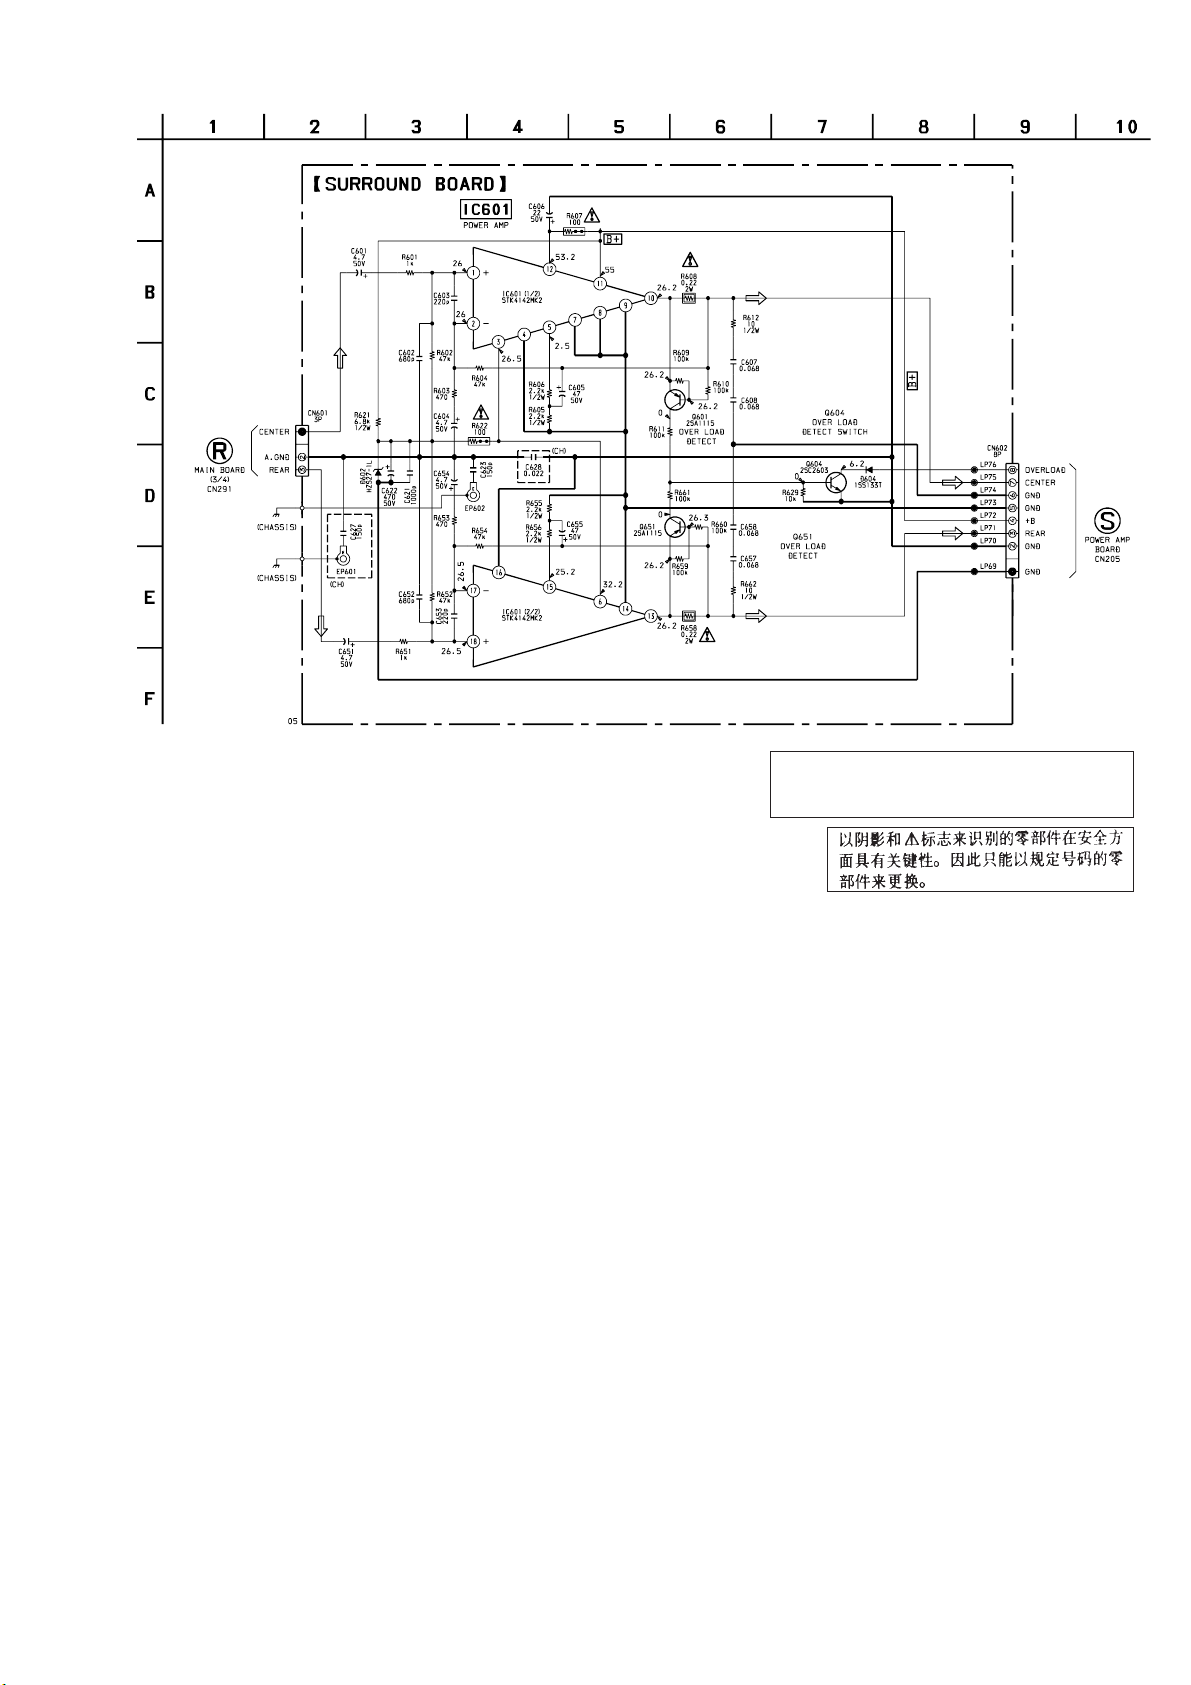
7-35. SCHEMATIC DIAGRAM – SURROUND Section –
(Page 63)
HCD-V919AV
(Page
81)
• Voltages and waveforms are dc with respect to ground
under no-signal (detuned) conditions.
no mark : FM
The components identified by mark ! or dotted
line with mark ! are critical for safety.
Replace only with part number specified.
– 85 –
Page 54
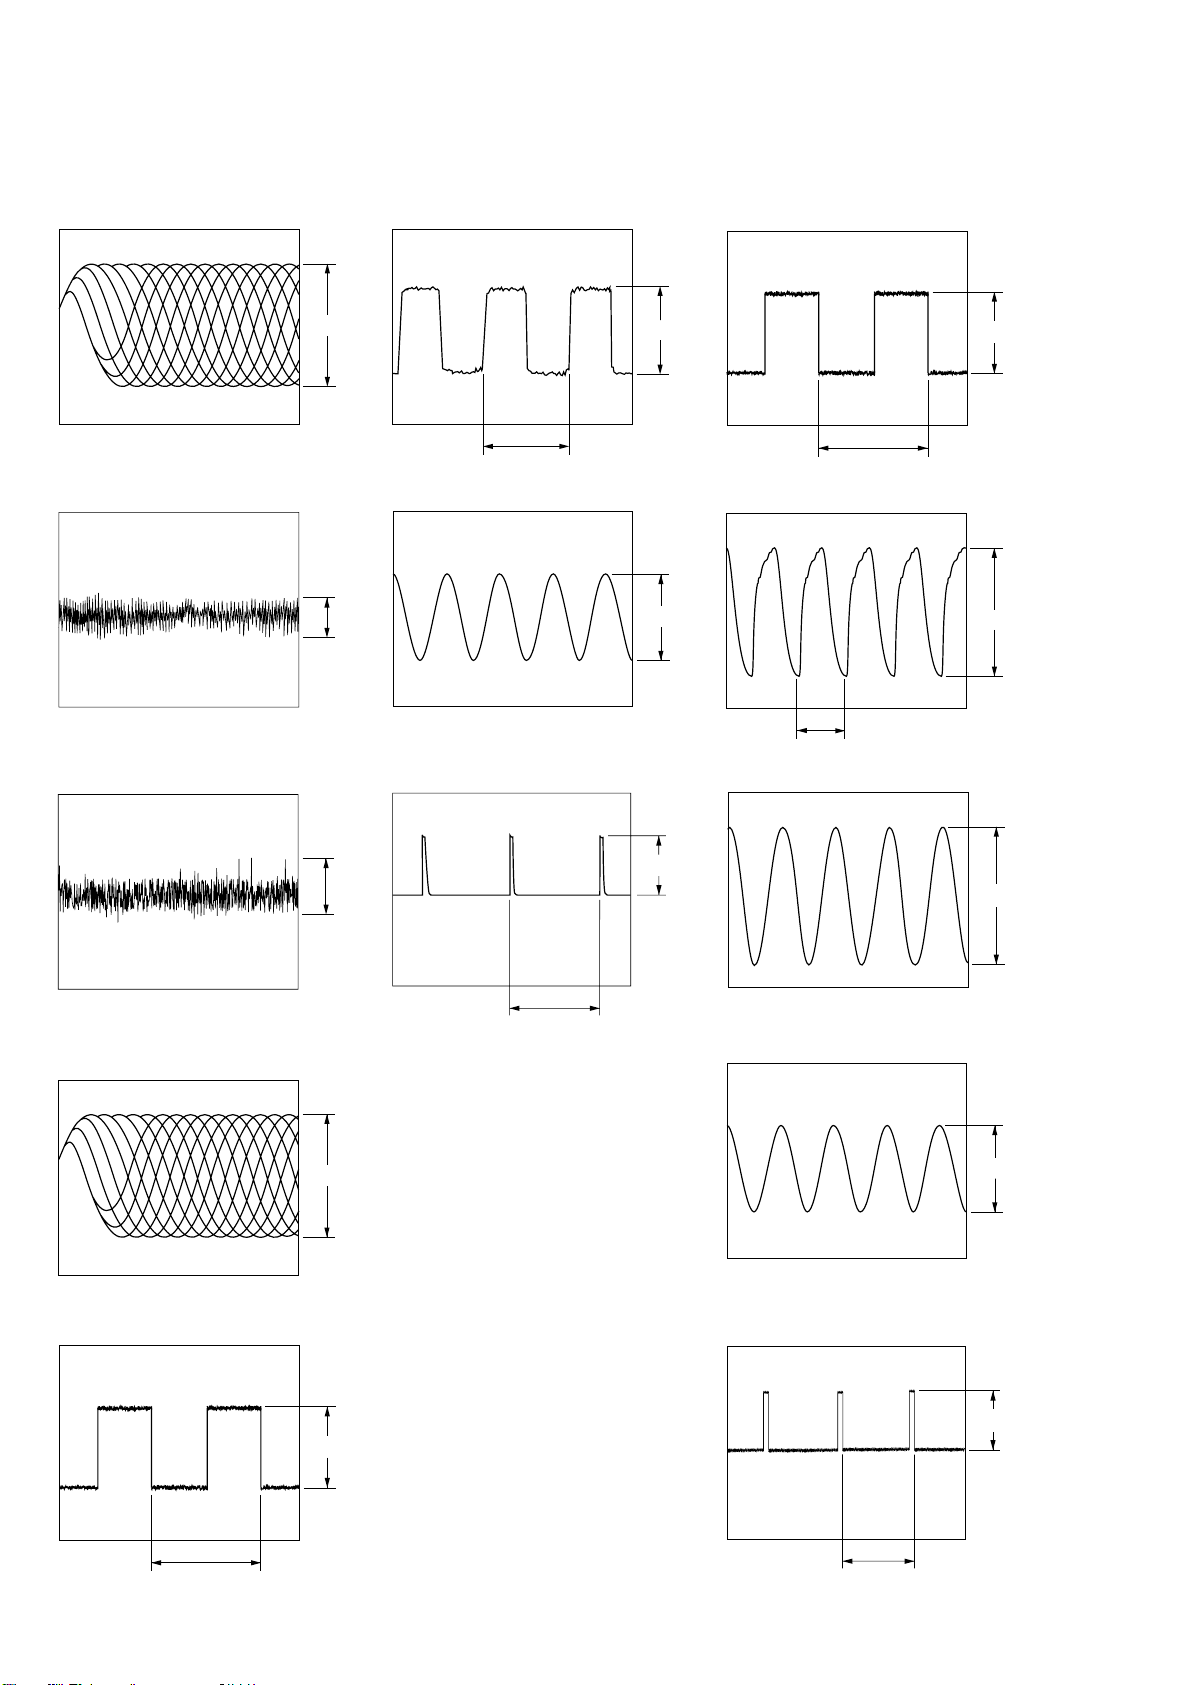
• Wavef orms
– BD Board –
1 IC101 @§ (RFDC)
200 mV/DIV, 500 ns/DIV
6 IC101 $¶ (BCLK)
+0.25
1.3 Vp-p
–0.20
5.2 Vp-p
– VIDEO Board –
1 IC501 5 (LRCK)
5 Vp-p
2 IC101 @¶ (TE)
200 mV/DIV, 100 µs/DIV
3 IC101 @ª (FE)
200 mV/DIV, 50 ns/DIV
4 IC101 #§ (RFAC)
200 mV/DIV, 500 ns/DIV
Approx.
500 mVp-p
Approx.
200 mVp-p
474 ns
7 IC101 ^™ (XTAI)
16.9344 MHz
8 IC101 (§ (MDP)
7.5
22.8 µs
2 IC501 !£ (BCLK)
5.2 Vp-p
4.4 Vp-p
472 ns
3 IC502 !£ (XOUT)
2.6 Vp-p
4.1 Vp-p
µ
s
10 MHz
4 IC502 !∞ (XIN)
5 IC101 $∞ (LRCK)
22.7 µs
+0.25
1.3 Vp-p
–0.20
5.2 Vp-p
3.3 Vp-p
10 MHz
5 IC502 $∞ (BUS)
4.8 Vp-p
16.7 ms
– 86 –
Page 55
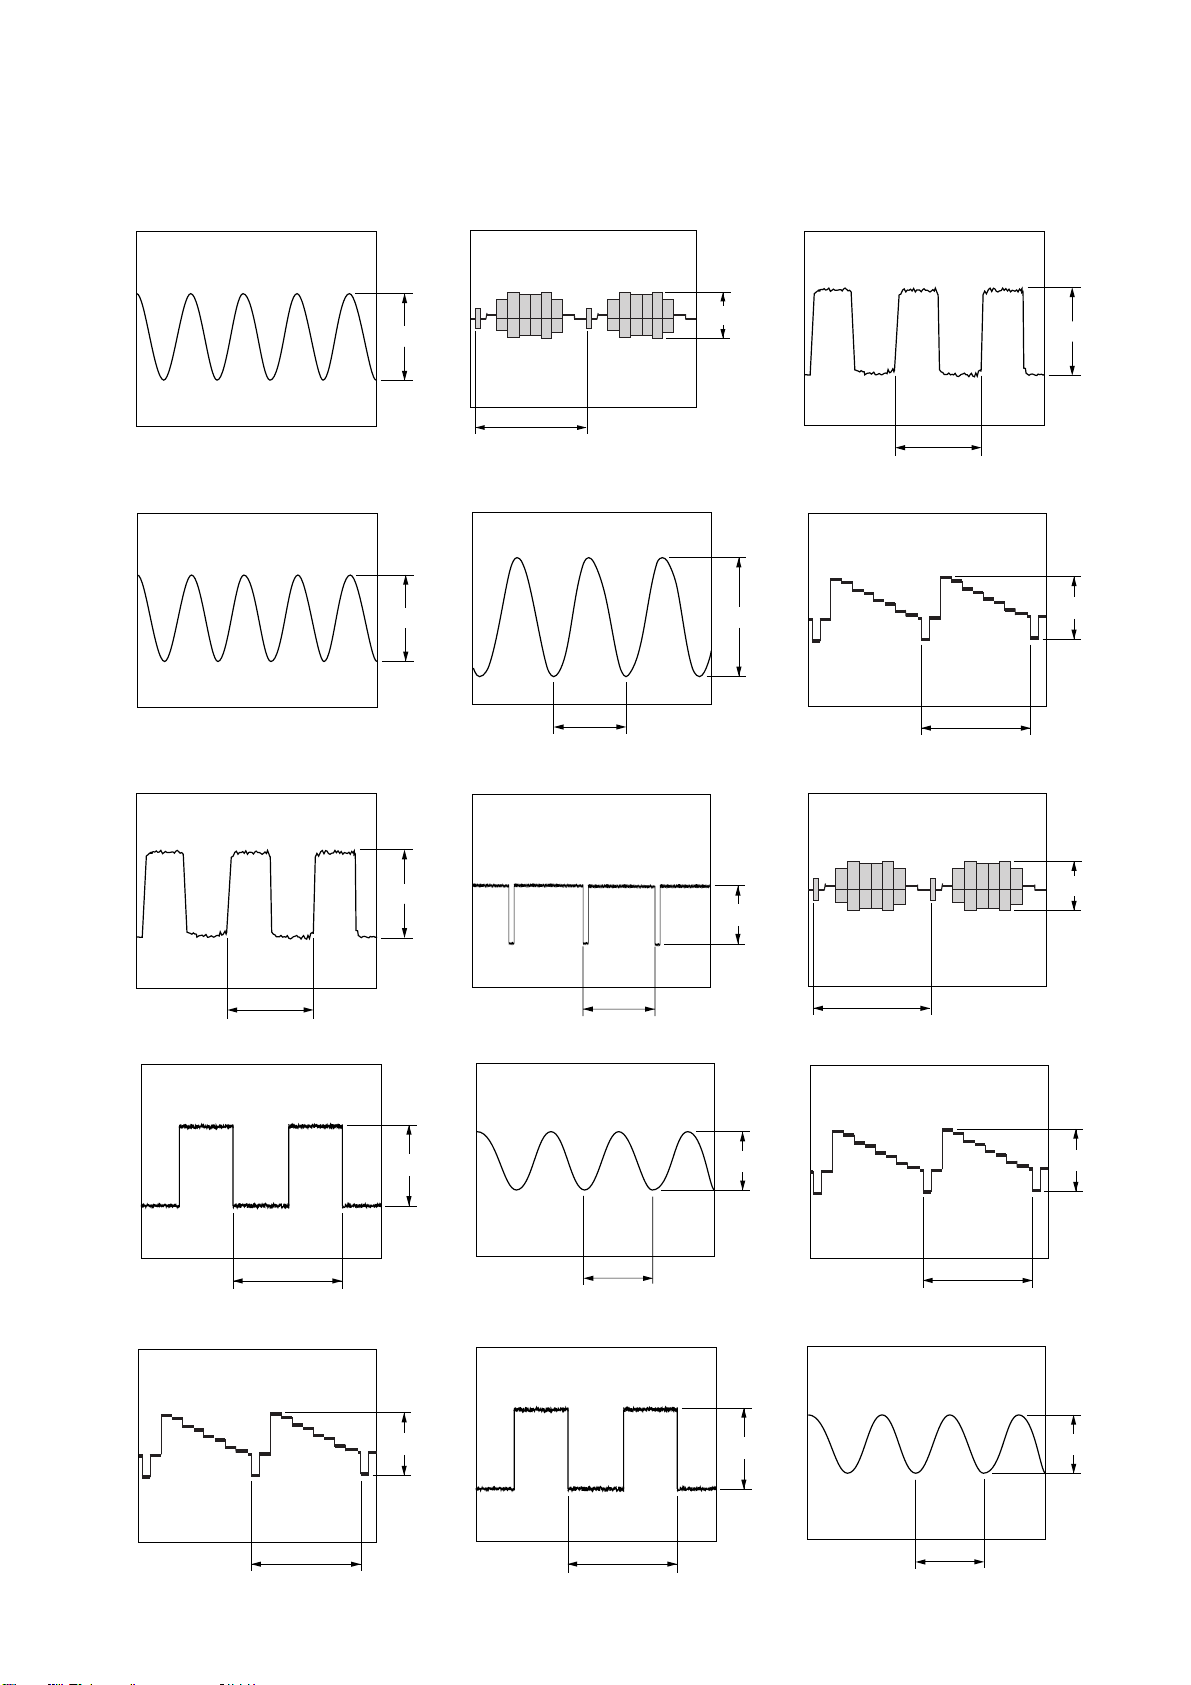
4.8 Vp-p
472 ns
6 IC402 !ª (XIN)
H
1 Vp-p
!¡ IC505 &∞ (C-OUT)
!§ IC505 `⁄⁄⁄ (DA-BCK), IC509 !¶ (BCK)
8.1 MHz
7 IC402 @º (XOUT)
8.1 MHz
8 IC505 3 (CD-BCK)
3.4 Vp-p
4.2 Vp-p
4.8 Vp-p
0.5 Vp-p
H
!™ IC505 *§ (DA-XCLK)
5.2 Vp-p
60 ns
!£ IC505 (£ (PGIO2/VSYNK/CSYNK)
3.1 Vp-p
!¶ Q301 (Base)
1.8 Vp-p
H
!• Q303, 304 (Base)
472 ns
9 IC505 5 (CD-LRCK)
22.8 µs
0 IC505 ^ª (Y-OUT)
!¢ IC505 `⁄‚fl (VCK-IN)
4.8 Vp-p
16.7 ms
4.3 Vp-p
!ª Q308 (Base)
0.9 Vp-p
H
8.7 ms
1.7 Vp-p
!∞ IC505 `⁄‚° (DA-LRCK), IC509 !ª (LRCK)
6 Vp-p
@º IC509 4 (MCKO)
4.9 Vp-p
H
22.6 µs
37 ns
– 87 –
Page 56
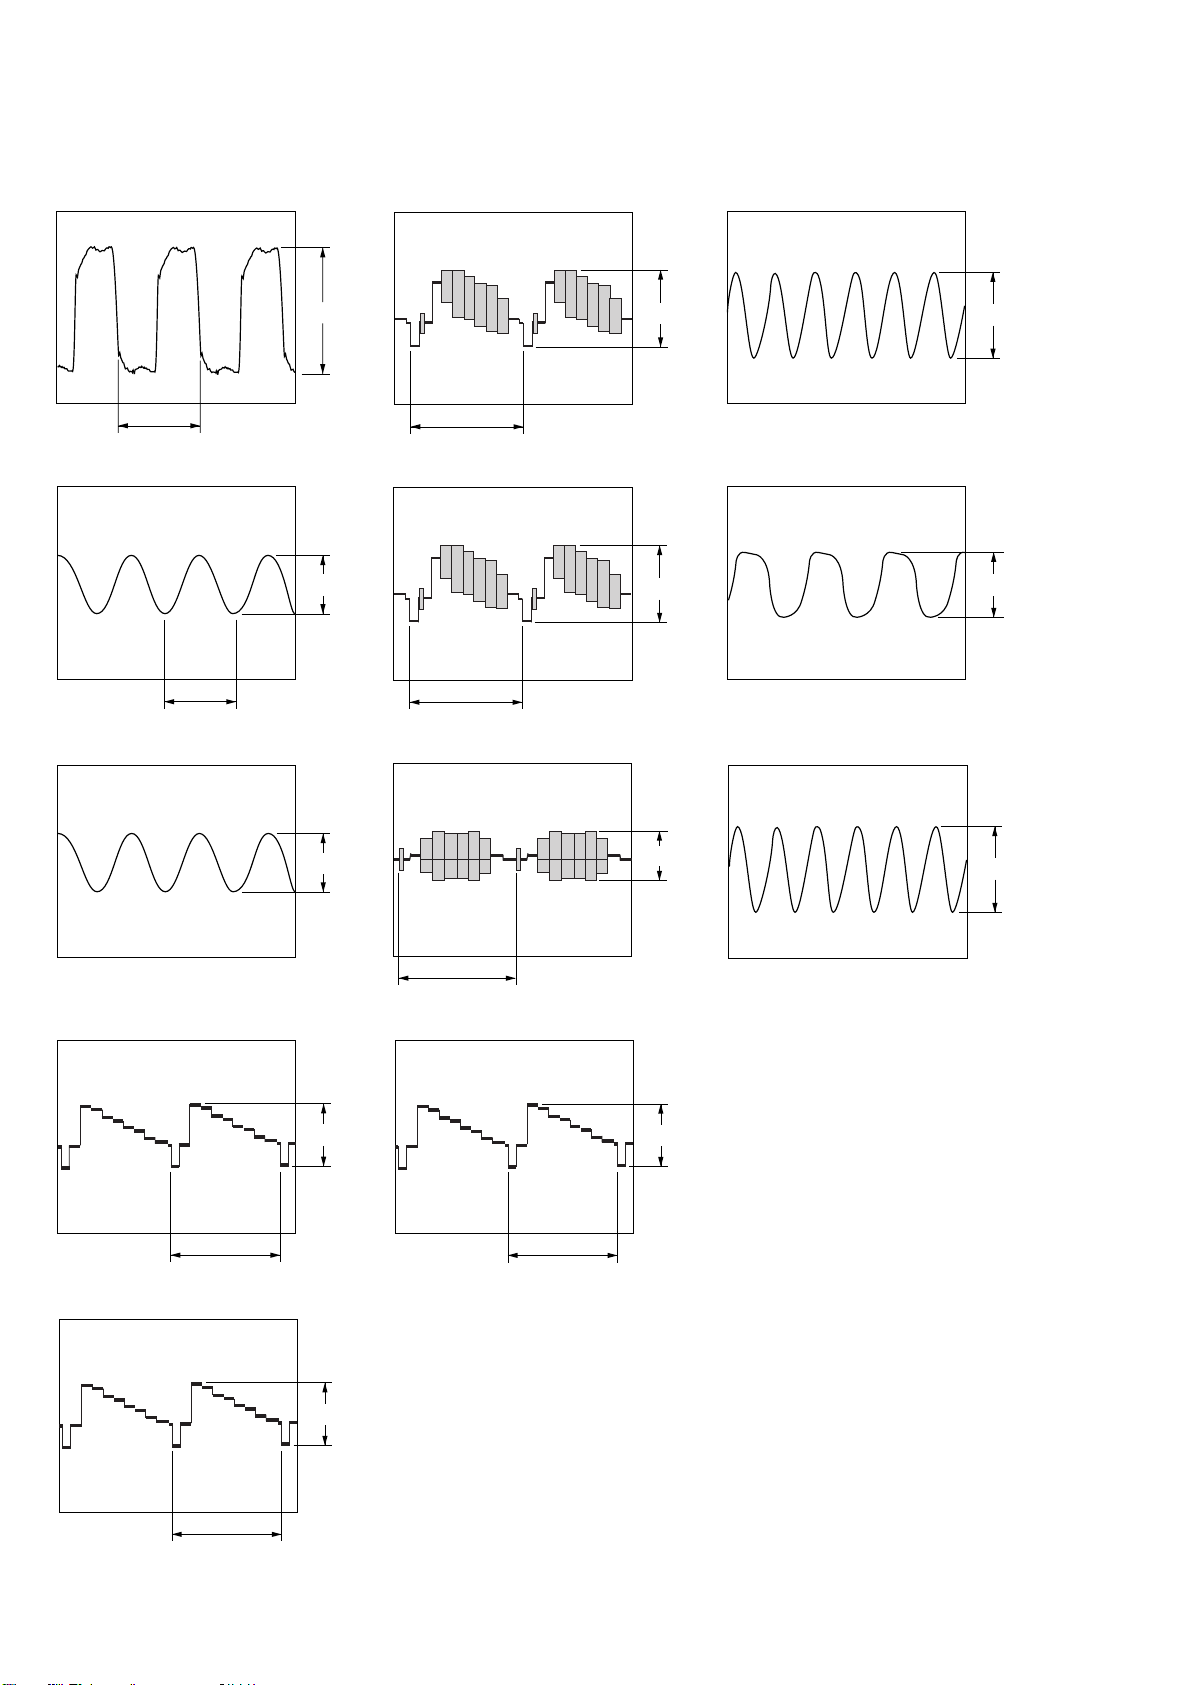
@¡ IC509 @º (384FSO)
5 Vp-p
32.768 kHz
@§ IC401 3
– MAIN Board –
1 IC501 0 (X2)
5.1 Vp-p
H
59 ns
@™ IC509 @¡ (768FSO)
4.8 Vp-p
30 ns
@£ IC509 @¢ (XT2) @• J301 3 (COUT)
1 Vp-p
@¶ IC401 1
H
1 Vp-p
2 Vp-p
1 Vp-p
5.5 Vp-p
5 MHz
2 IC501 !£ (XT2)
3 IC201 $¶ (OSC)
4.4 Vp-p
@¢ IC401 7
@∞ IC401 5
27 MHz
H
@ª J301 4 (YOUT)
1.8 Vp-p
H
1 Vp-p
H
H
1.7 Vp-p
8 MHz
– 88 –
Page 57
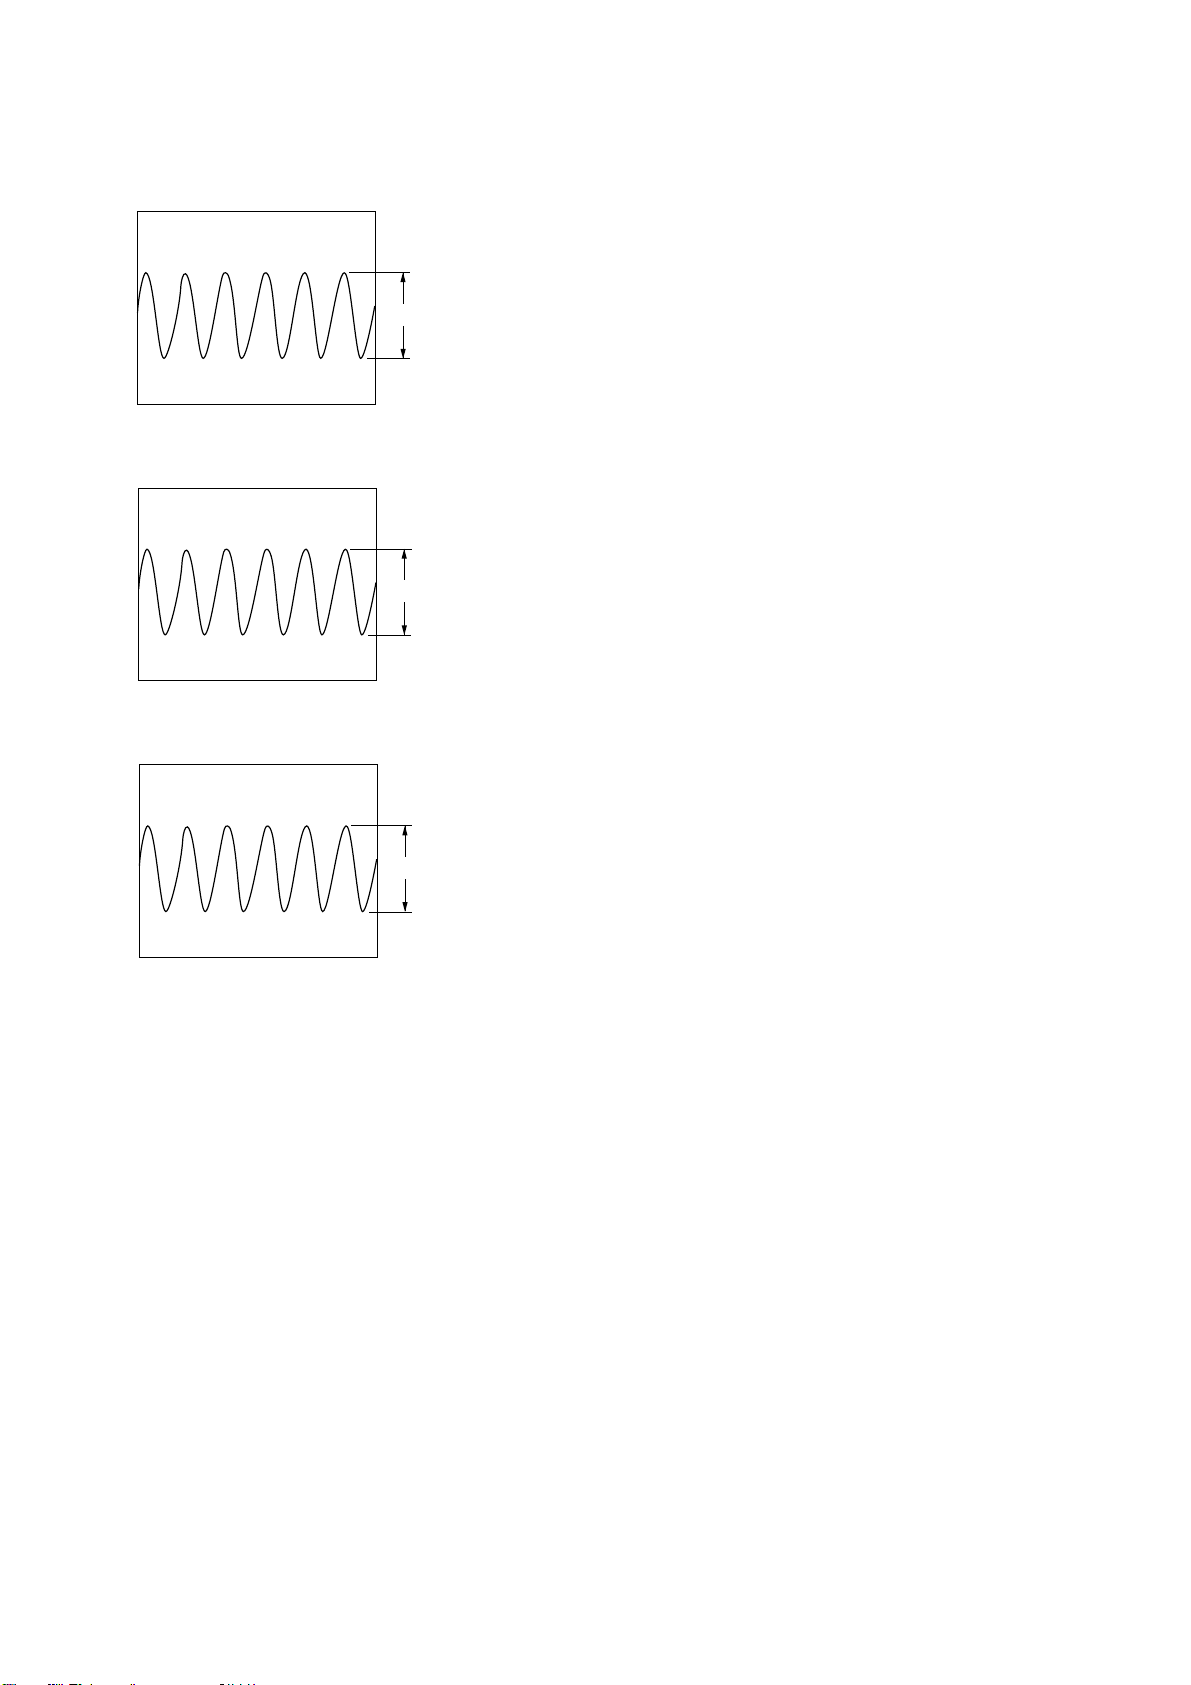
– PANEL Board –
1 IC601 8 (X-OUT)
8 MHz
2 IC801 2 (X-OUT)
8 MHz
4 Vp-p
4.3 Vp-p
3 IC851 2 (XT)
4.09 MHz
3.6 Vp-p
– 89 –
Page 58
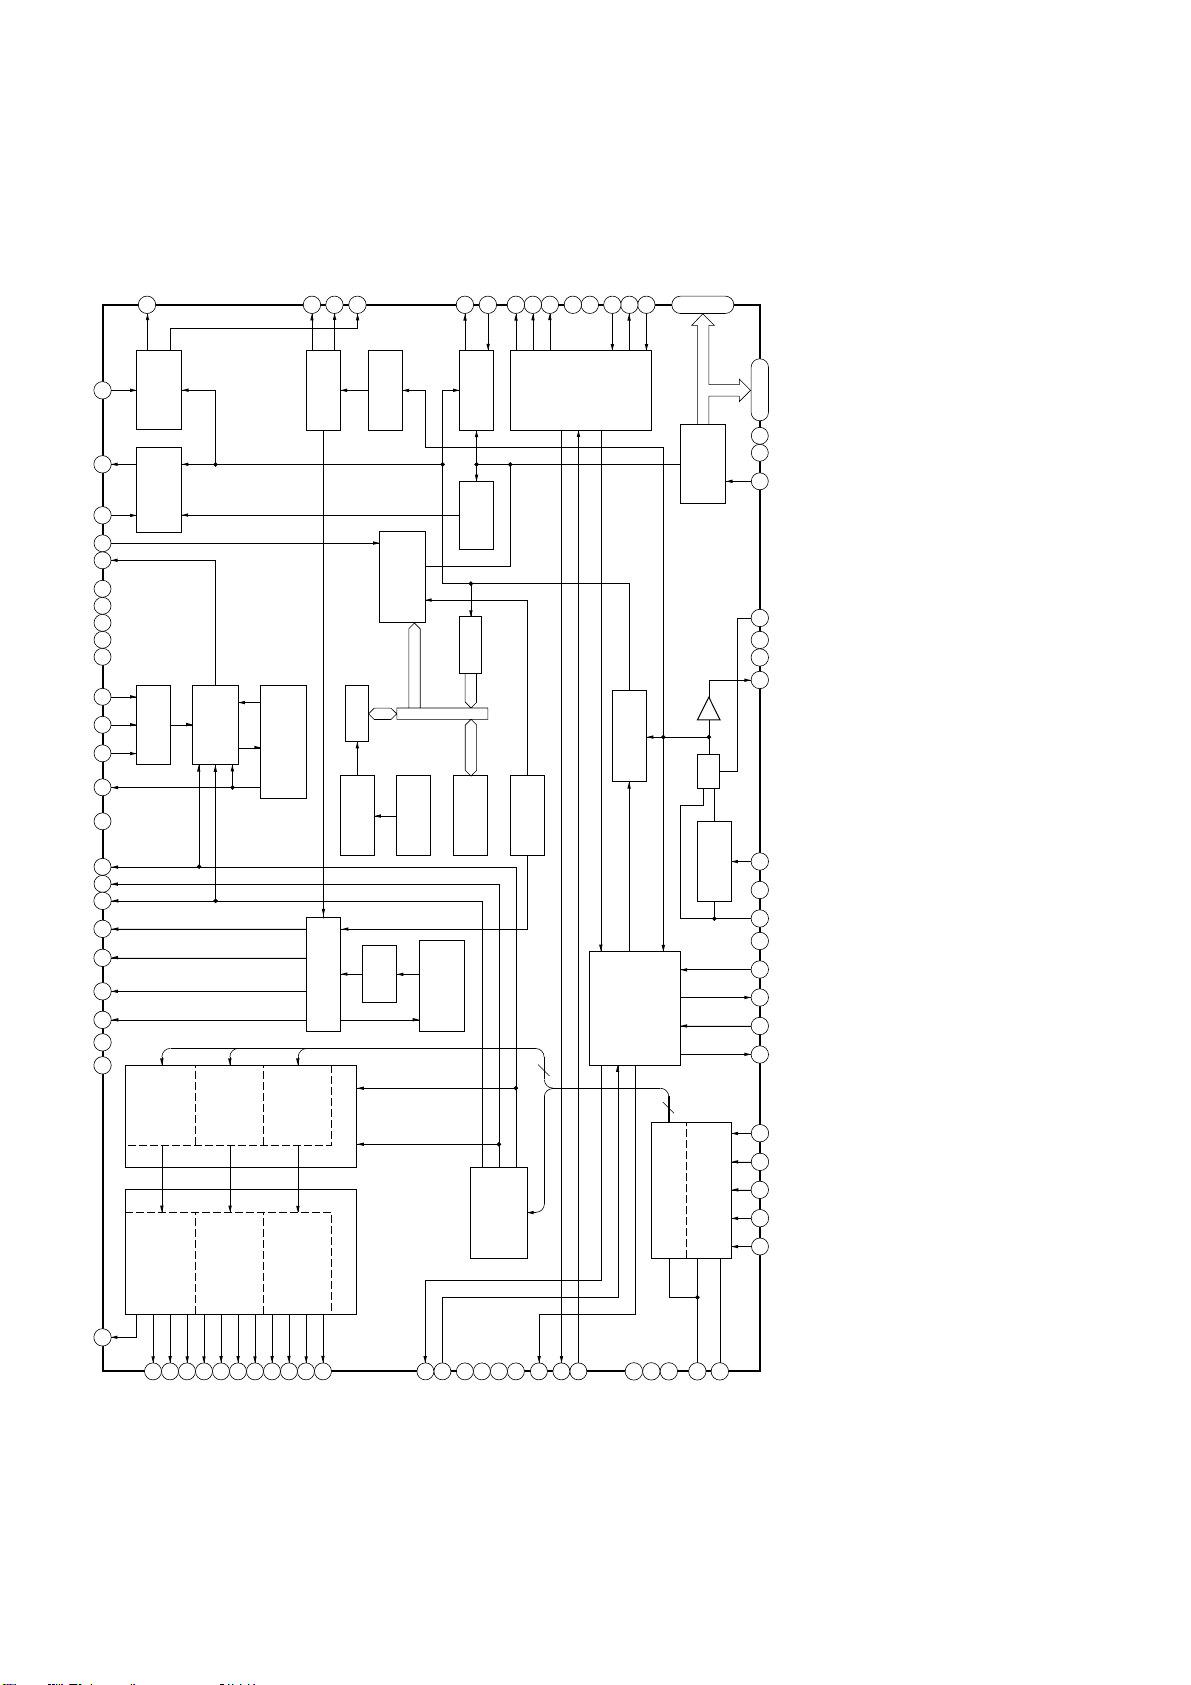
• IC Block Diagrams
– BD Board –
IC101 CXD2545Q
SBSO
EXCK
SQSO
SQCK
MUTE
SENS
XRST
DIRC
SCLK
DFSW
ATSK
DATA
XLAT
CLOK
COUT
ADD
MIRR
DFCT
FOK
FSW
MON
MDP
MDS
LOCK
SSTP
76
77
78
79
80
81
82
83
84
85
86
87
88
89
90
91
92
93
94
95
96
97
98
99
P-W
SUBCODE
PROCESSOR
Q
SUBCODE
PROCESSOR
CPU
CPU
INTERFACE
INTERFACE
SERVO
AUTO
SEQUENCER
SCOR
TIMING
SERVO
INTERFACE
MICRO PROGRAM
CLV
WFCK
EMPH
SYNC
GENERATOR 1
32K RAM
CPU
ADDRESS
INTERFACE
GENERATOR
NOISE
PROCESSOR
PROTECTOR
D/A
DIGITAL
PROCESSOR
CPU
ENCODER
PRIORITY
INTERFACE
SHAPER
D OUT
OUT
DIGITAL
PEAK
RESISTER
CPU
ERROR
INTERFACE
CORRECTOR
FILTER
18-TIMES
OVER SAMPLING
MD2
C16M
DETECTOR
CPU
TIMING
FSTI
FSTO
C4M
CLOCK
GENERATOR
INTERFACE
GENERATOR 2
3
DVSS
XTAI
XTAO
XTSL
6263646566676869707172737475
EFM
CPU
INTERFACE
DEMODULATOR
PLL
DIGITAL
VARI-PITCH
DA01|DA11
61 – 51
SERIAL
PARALLEL
PROCESSOR
MUX
CPU
ASYMMETRY
DOUBLE SPEED
46
DA16
|
50
DA12
LRCK
45
44
WDCK
43
PSSL
ASYE
42
ADD
41
AVDD
40
ASYO
39
ASYI
38
INTERFACE
BIAS
37
CORRECTION
RFAC
36
AVSS
35
CLTV
34
PCO
33
FILI
32
FILO
31
|
SFDR
SLED
SERVO
TRACKING
SLED PWM
GENERATOR
TRACKING PWM
100
2 345 6 7 8 9 10 11 201918171615141312
1
TFDR
SFON
SRDR
TRON
SRON
SERVO
GENERATOR
FFDR
TFON
TRDR
FOCUS
SERVO
GENERATOR
FOCUS PWM
FFON
FRON
FRDR
SERVO DSP
PWM GENERATOR
VCO0
VCO1
TEST
MIRR
DVSS
DFCT
TES2
FOK DETECTOR
PDO
TES3
VPCO
VCKI
4
A/D
SWITCH
CONVERTER
21 22 23 24 25
IGEN
ADIO
AVSS
AVDD
&
BUFFER
RFC
VC
30
FE
29
SE
28
TE
27
26
RFDC
– 90 –
Page 59
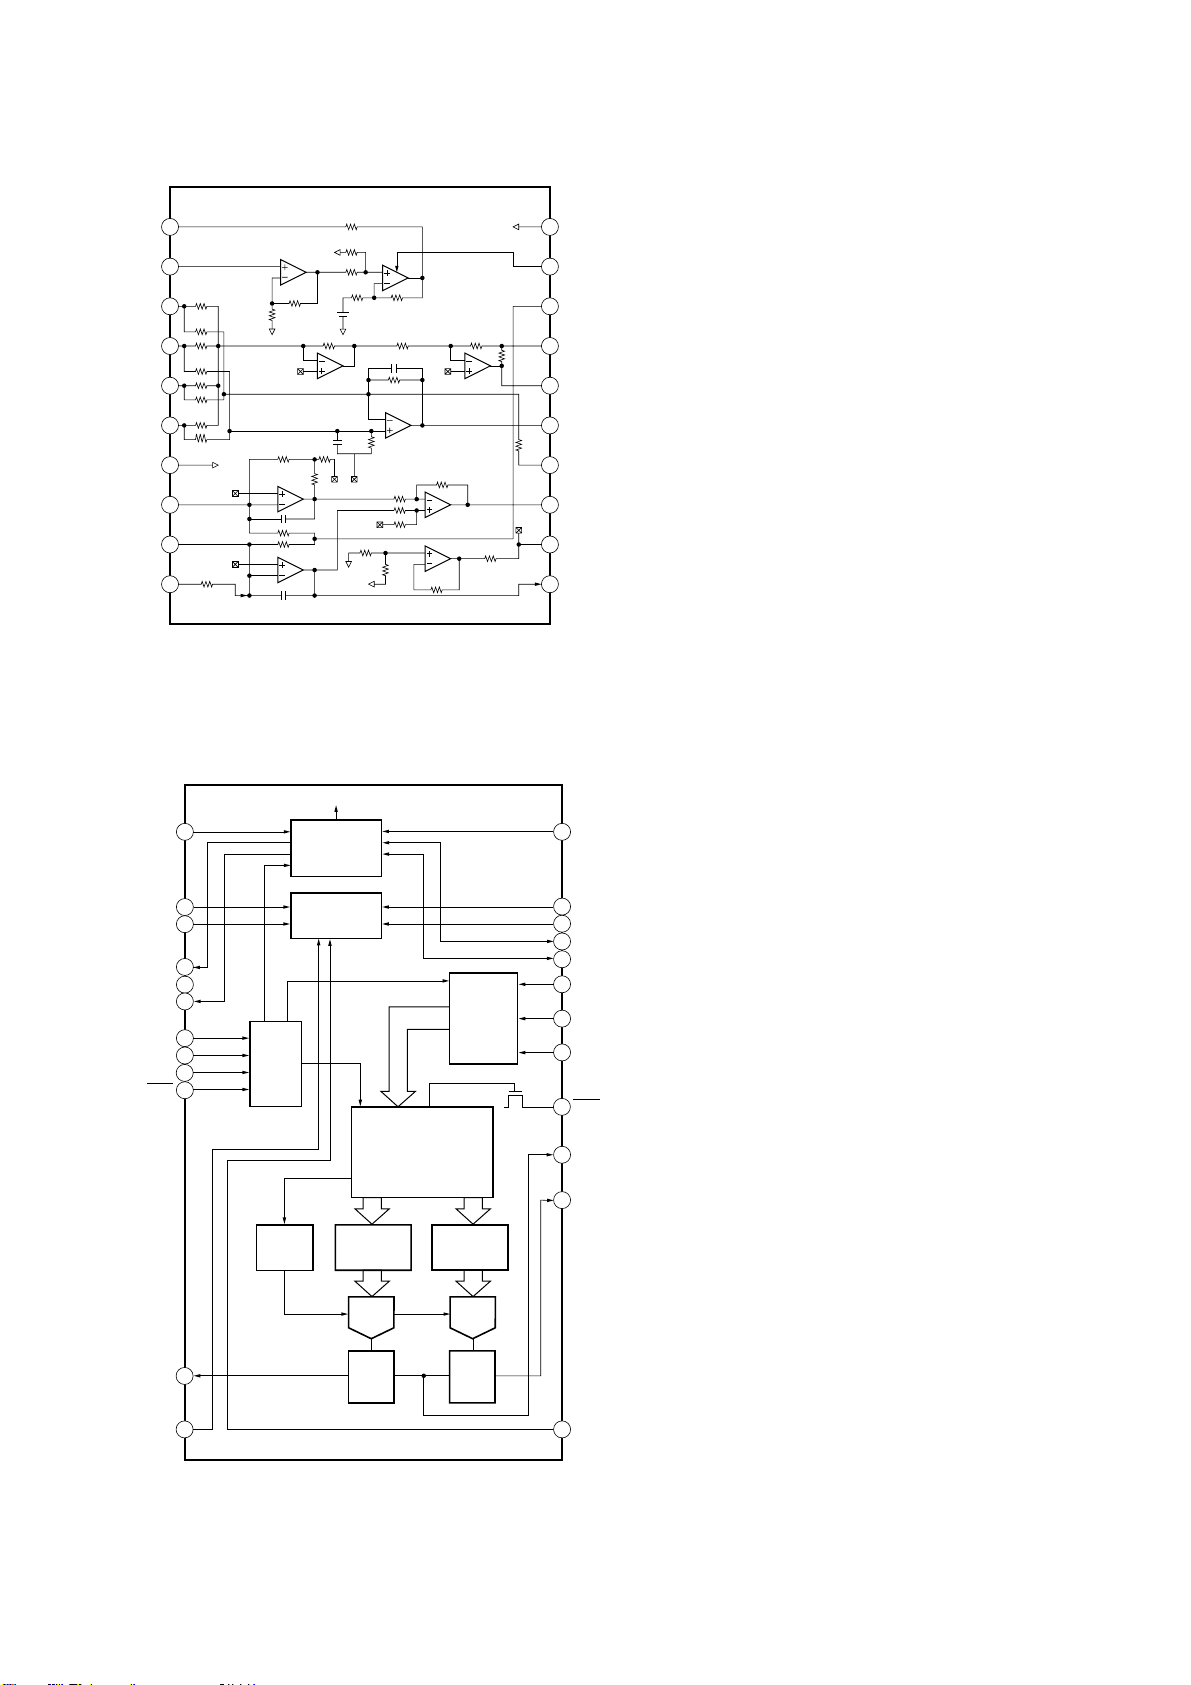
IC103 CXA1821M-T6
1
LD VCCVCC
2
PD LD ON
A LC/PD
3
B RFE
4
C RFO
5
D FE
6
VEE FE BIAS
F TE
E VC
EI EO
VEE
7
VC
8
9
VC
10
VCC
VREF
VEE
VC
RF SUMMING AMP
VC
VEE
APC LD AMP
VEE
FOCUS ERROR AMP
TRACKING ERROR AMP
VC
VC
VCC
RF EQ AMP
VC
VC BUFFER
20
19
18
17
16
15
14
13
VC
12
11
–VIDEO Board –
IC509 PCM1727E-2/T2
384fs
XT1
PGND
VCP
NCKO
RSV
SCKO3
ML
MC
MC
RSTB
VOUTR
MODE
CONTROL
BPZ
CONTROL
CLOCK MANAGER
•
DUAL PLL
POWER
SUPPLY
MULTI LEVEL
MODULATOR
5 LEVEL
DAC
CR LPF
OUTPUT
AMP
8 TIME OVER
SAMPLING DIGITAL
FILTER
•
FUNCTION
CONTROL
∆Σ
•
MULTI LEVEL
MODULATOR
AUDIO
DATA INPUT
INTERFACE
∆Σ
5 LEVEL
DAC
CR LPF
•
OUTPUT
AMP
OPEN
24
23
22
21
20
19
18
17
16
15
14
XT2
DGND
VDD
SCKO1
SCKO2
LRCK
DATA
BCK
ZERO
CAP
VOUTL
1
2
3
4
5
6
7
8
9
10
11
AGND
12
13
VCA
– 91 –
Page 60
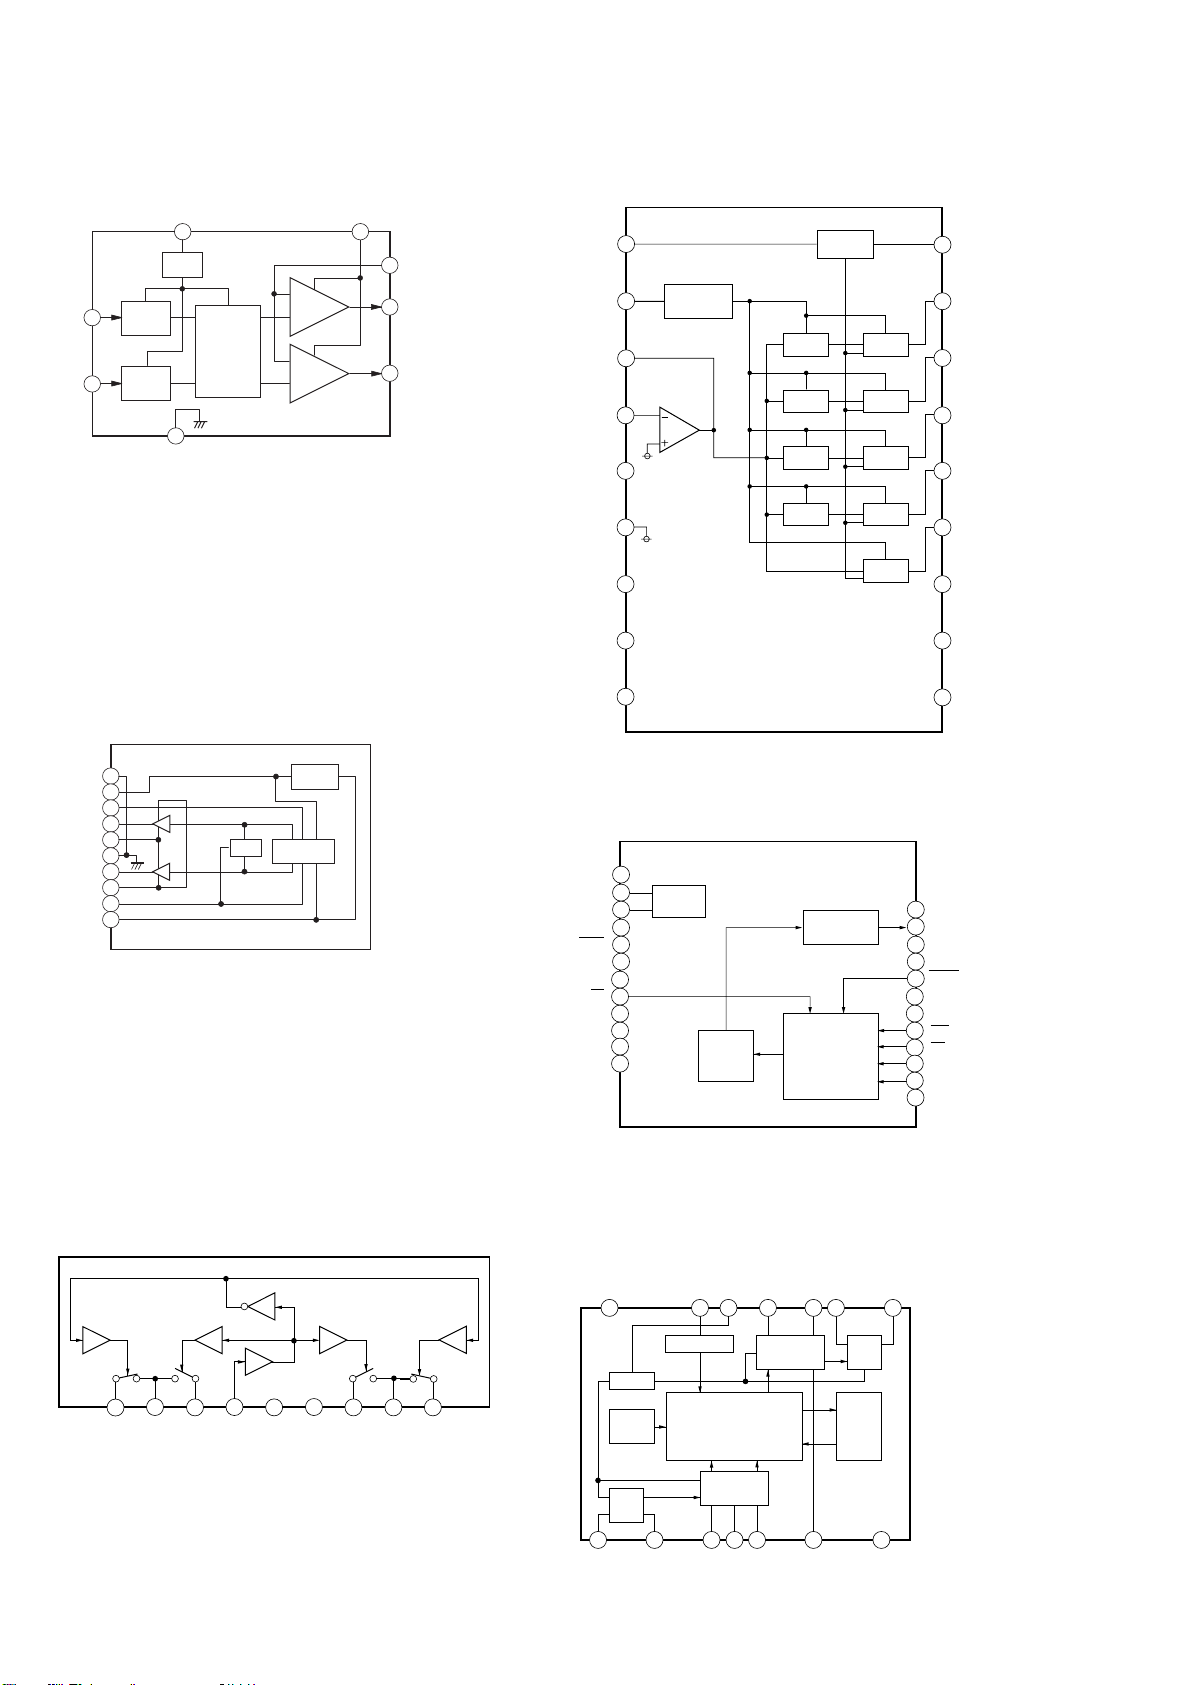
– MOTOR (TURN) Board –
IC701 M54641L
VCC VCC
1
REG
IN1
IN2
INPUT
3
AMP.
CONTROL
INPUT
6
AMP.
4
GND
POWER
AMP.
POWER
AMP.
– PANEL Board –
IC603 BA3833F-E2
8
REFERENCE
5
OUT2
2
OUT1
7
RESET
C
PREF
LINE
NF
LINE
GND
1
REFFERENCE
2
CURRENT
3
4
IN
5
RESET
BPF
BPF DET
BPF DET
DET
18
RESET
17
f01
16
f02
15
f03
14
f04
– MOTOR (SLIDE) Board –
IC801 BA6286N
GND
1
RIN
2
VREF
3
OUT2
4
RNF
GND
OUT1
VCC
5
6
7
VM
8
9
FIN
10
TSD
POWER
SAVE
CONTROL
LOGIC
BIAS
6
Bias
C
7
NC
8
NC
9
NC
BPF DET
IC851 MSM6653A-517GS-K
1
VDD
XT
2
OSC
3
XT
NC
4
5
CMD
6
NC
NC
7
ST
8
9
I0
I1
10
I2
11
12
I3
ROM
INTER FACE
SOUND
MIX
µ CON
DET
13
f
12
VCC
11
NC
10
NC
24
GND
23
A-OUT
NAR
22
NC
21
BUSY
20
NC
19
VPP
18
17
RST
16
CH
15
SD
14
SI
13
I4
– AUDIO Board –
IC602 µPC1330HA
2
1
SW R1 GND SW P1
3
4
CONT
INVERTER
COMPARATER
5
VCC
GND
6
SW P2 GND
7 8 9
SW R2
– MIC Board –
IC751 M65850FP-E1
VCC
1/2 VCC
AUTO
RESET
LPF1
1
LPF1IN
– 92 –
CLOCK
REF
OP2IN
OP2OUT
LPF2IN
OSCILLATOR
CLOCK
RESET
CONTROL
D1
2 345 6 7
OP1OUT
LPF1OUT
MAIN
A/D
DO0
OP1IN
DO1
CC1
D/A
MO
LPF2
20KBIT
SRAM
MI
CC2
LPF2OUT
891014 13 12 11
GND
Page 61
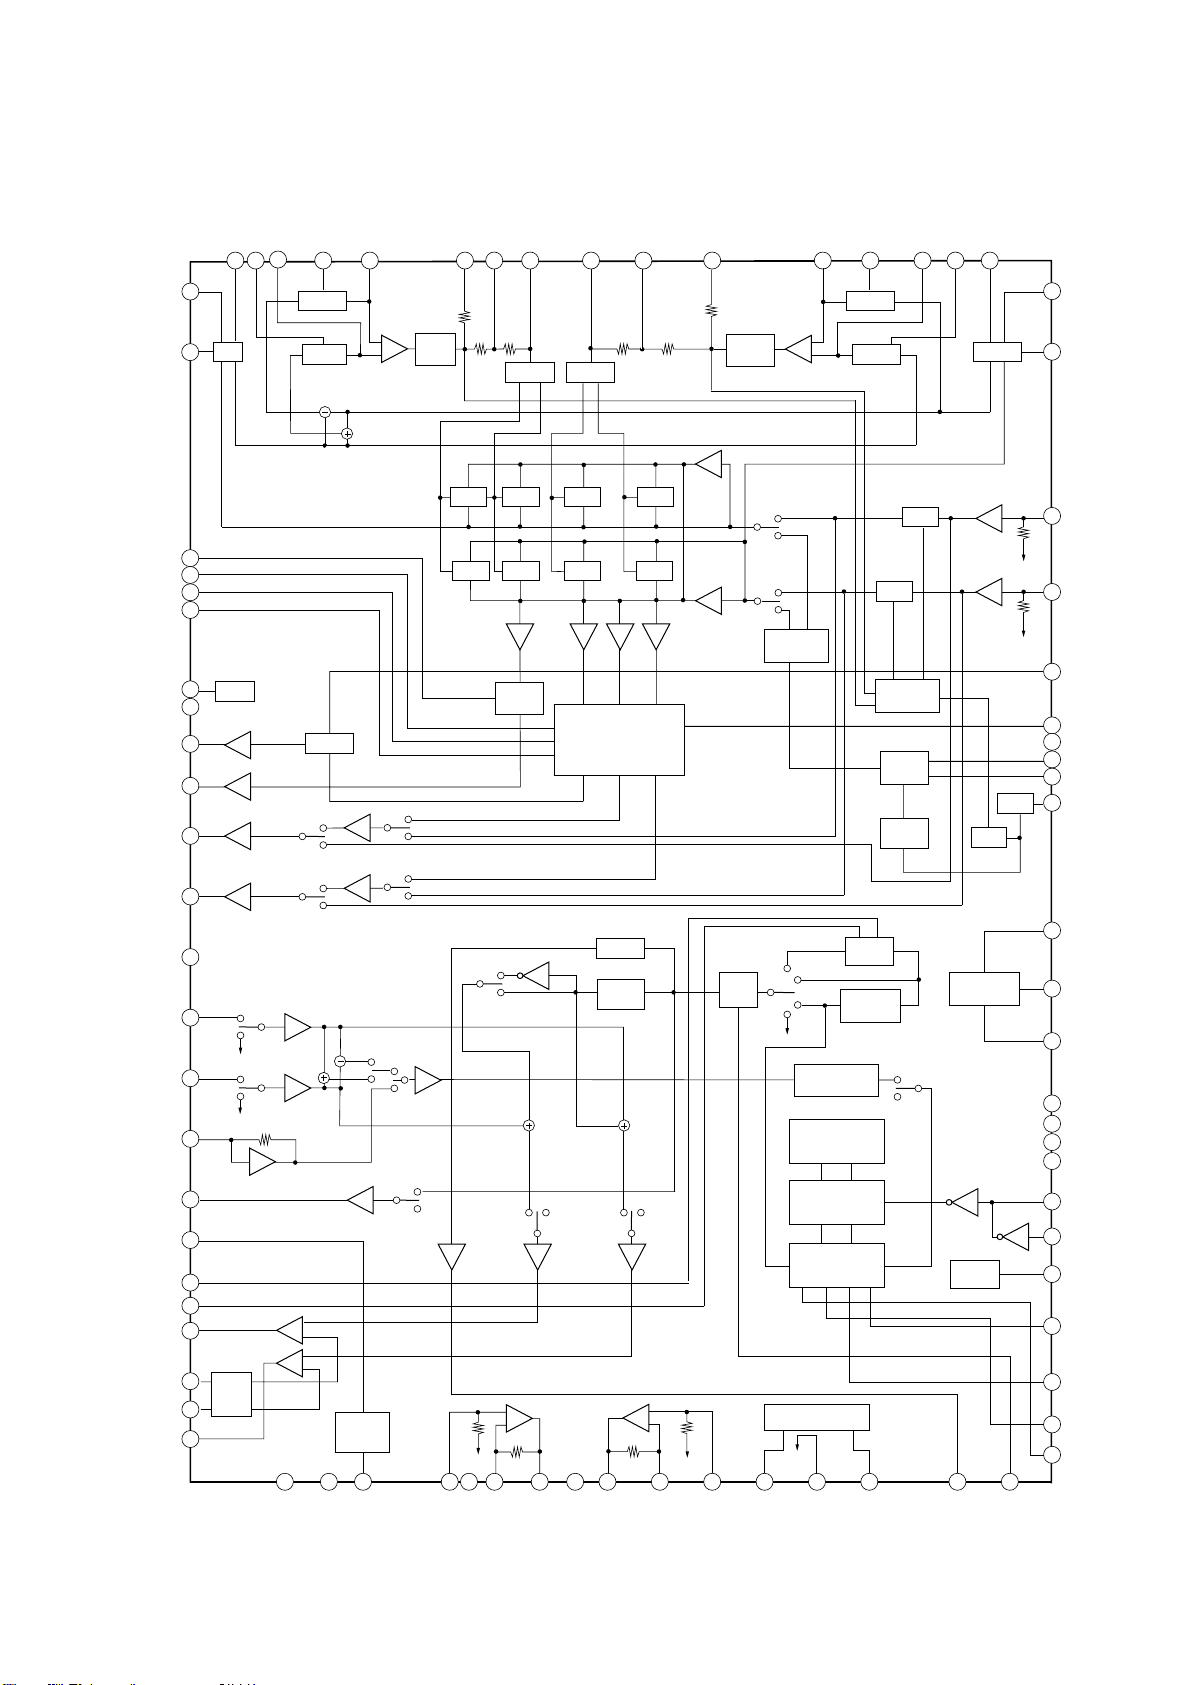
– MAIN Board –
IC201 LV1041M
DC CUT1
R DET3
L-R RECT
DC CUT2
L+R RECT
VCS TH
VCS 1
VCS 2
VLR 2
VLR 1
VLR TH
L RECT
DC CUT4
R RECT
DC CUT3
L BPF3
R BPF2
R BPF1
S DC OUT
C DC OUT
R DC OUT
L DC OUT
V REF
VCC
C OUT
S OUT
R OUT
L OUT
GND
L IN
R IN
S IN
DELAY OUT
C VOL IN
DET
IREF
R OUT
R NF
L NF
L OUT
78
80
79
1
BPF
2
3
4
5
6
7
V REF
8
9
C
10
S
R
11
L
12
12
13
SW
P
B
P
B
S
NF
14
15
16
17
18
19
20
20
21
22
23
24
77
76
RECT
L
P
P
B
S
C VOL OUT
LOGIC
FF
VCA VCA
VCA VCA VCA VCA
P
B
P
B
S
P
B
S
2928
C OP IN
RECT
STRIM
P
R
B
P
B
L
26
MASTER
VCC
B
VOL
27
R
R
L
25
7475
MODE
P
B
30
GND
C OP NF
73
LOGIC LOGIC
VCA VCA
S
P
BB
C
31
32
C OP OUT
72
C MODE
STRIM
33
VOL REF
VOL/
MUTE
P
LR
S OP OUT
71
67
66
DATA
DECODER
VDD
39
S OUT
IEV
65
64
L BPF2
BPF
63
L BPF1
62
DC CUT
61
60
59
58
57
56
55
54
53
52
51
50
49
48
47
46
45
44
43
42
41
RT IN
LT IN
DC CUT
C MODE
GND
NS BPF1
NS BPF2
OSC
CLK
DATA
ENABLE
DATA
CLK
ENABLE2
VSS
OSC
OSC
VDD
A/D
NS
D/A
DC CUT
R
L
OSC
40
68
6970
RECT
LOGIC
FF
P
B
P
B
CH
CONTROL
P
DC
CUT
S
34
35
S OP IN
S OP NF
B
C
D
MASTER VOL
S VOL OUT
IN
FILTER
SRAM
PCM
CONTROL
PCM
3736
OP VREF
RECT
B NR
OUT
FILTER
38
VOL
BPF
CONTROL
NOISE
FILTER
NOISE
GEN
P
B
S VOL IN
VOL
– 93 –
Page 62
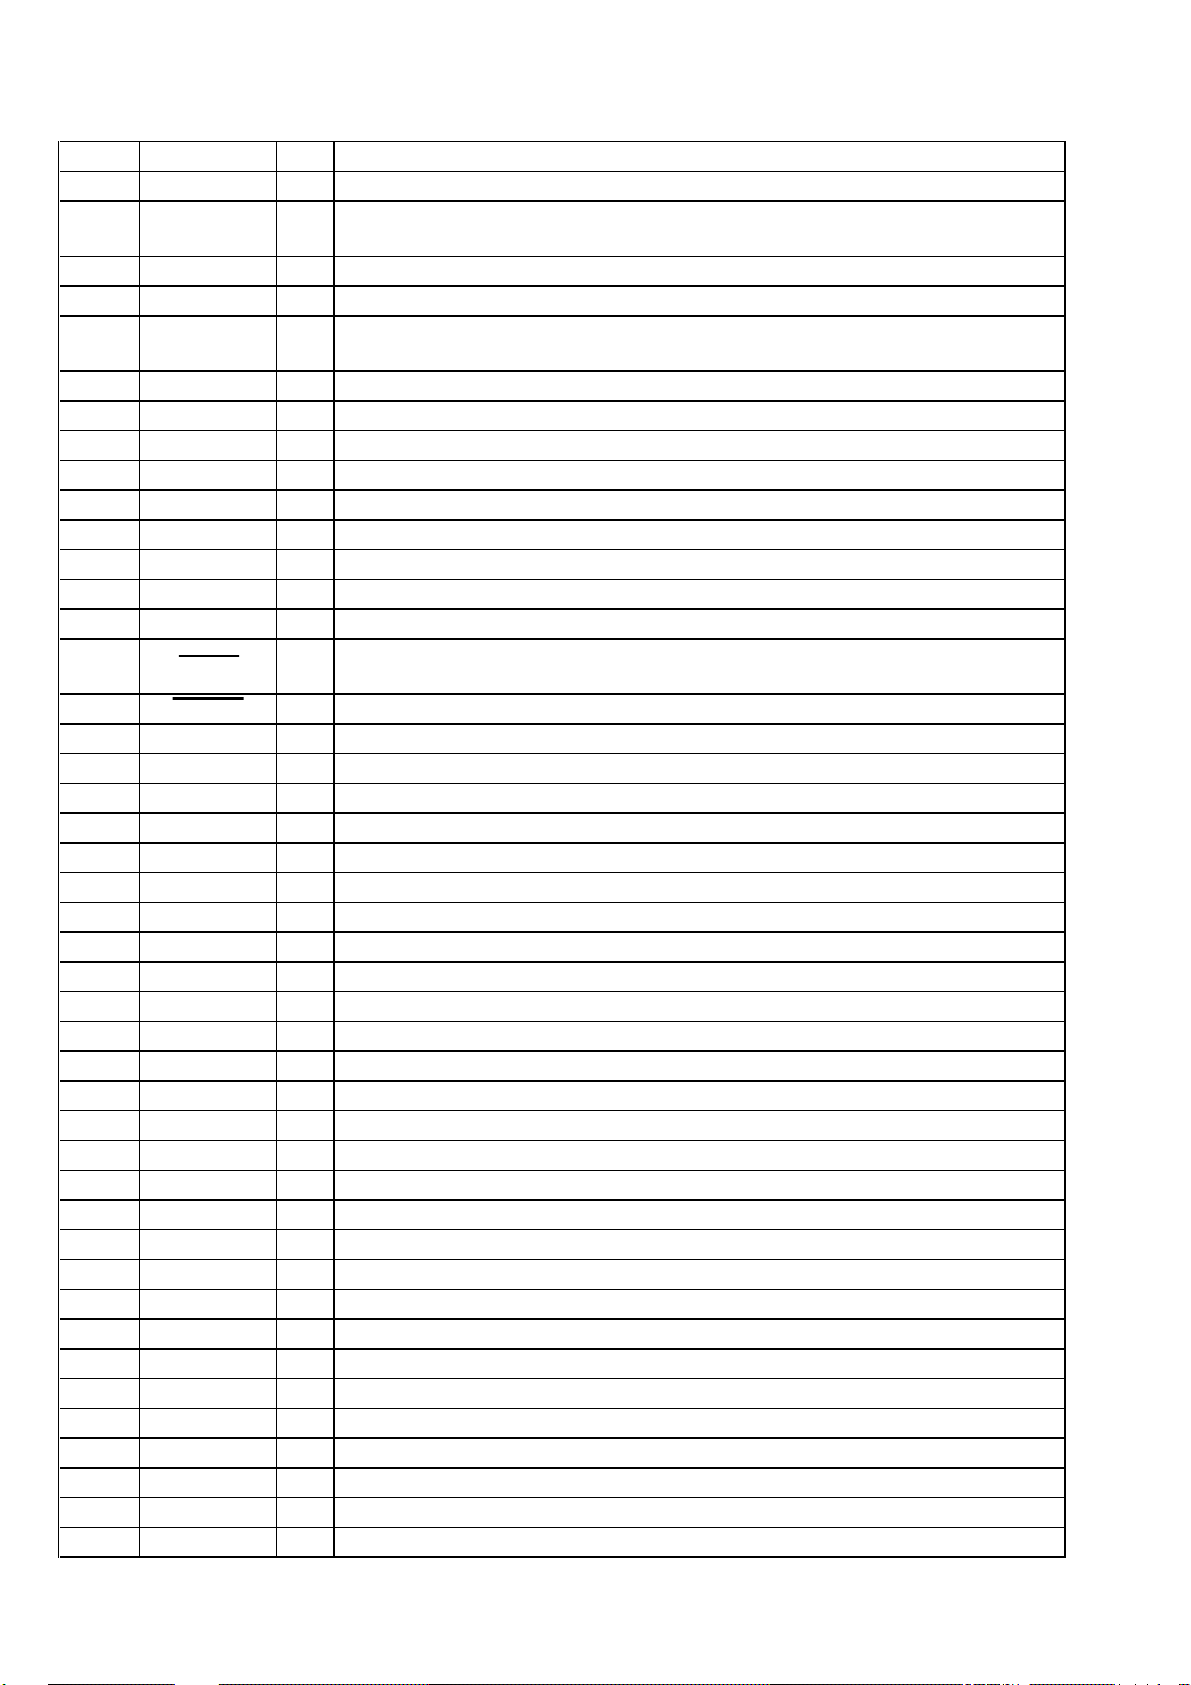
7-36. IC PIN FUNCTION DESCRIPTION
• MAIN BOARD IC501 µPD780016AYGF-014-3BA (SYSTEM CONTROLLER)
Pin No. Pin Name I/O Function
1 LINE-MUTE O
2 DBFB-H/L O
M62442-LATCH
3
KEYCON-LATCH
4
5 POWER O
6 F-RELAY O
7 R-RELAY O
8 PL-RELAY O
9 VSS —
10 X2 O
11 X1 I
12 VDD —
13 XT2 O
14 XT1 I
15 RESET I
16 AC-CUT I
17 CAPM-CNT1P O
18 SCOR I
19 SOFT-TEST O
20 NCO O
21 RDS-INT I
22 RDS-DATA I
23 AVDD —
24 AVREF I
25 ADJ I
26 A-SHUT I
27 B-SHUT I
28 B-HALF I
29 CLK-CHECK I
30 SPEC-IN I
31 AMS-IN I
DEMO-CHANGE
32
33 AVSS —
34 SQ-DATA-IN I
35 NCO O
36
37
38
39 FB. CONT-B I
40 VSS —
41 PL-VOL O
42 PL-LAT O
43 COM-DIN I
44 COM-DOUT O
SQ-CLK
SUR-ON/OFF
FB. CONT-A
Line muting on/off control signal output terminal “L”: muting on
DBFB normal/high selection signal output to the M62442FP (IC101)
“L”: DBFB high, “H”: DBFB low
O
Serial data latch pulse output to the M62442FP (IC101)
O
Serial data latch pulse output terminal Not used (open)
Power on/off control signal output for the audio system (+5V) and deck, panel, audio system
(+7V) “L”: power on, “H”: standby
Relay drive signal output for the front speaker protect “H”: on
Relay drive signal output for the speaker protect “H”: on Not used (open)
Relay drive signal output for the rear and center speaker protect “H”: on
Ground terminal
Main system clock output terminal (5 MHz)
Main system clock input terminal (5 MHz)
Power supply terminal (+5V)
Sub system clock output terminal (32.768 kHz)
Sub system clock input terminal (32.768 kHz)
System reset signal input from the reset signal generator (IC951) “L”: reset
For several hundreds msec. after the power supply rises, “L” is input, then it changes to “H”
AC off detection signal input from the reset signal generator (IC951)
Capstan motor (M1) drive signal output terminal
Subcode sync (S0+S1) detection signal input terminal Not used (fixed at “L”)
Output terminal for the software test (open)
Not used (open)
Serial data reading clock signal input terminal Not used (fixed at “L”)
Serial data input terminal Not used (fixed at “L”)
Power supply terminal (+5V) (for A/D conversion)
Reference voltage (+5V) input terminal (for A/D conversion)
Setting terminal for the CD test mode Normally: fixed at “H”
Shut off detection signal input from the deck-A side reel pulse detector (IC1001)
Shut off detection signal input from the deck-B side reel pulse detector (IC1002)
Detection input from the deck-B half detect switch (S1006)
Not used (fixed at “L”)
Setting terminal for the version
Automatic music sensor detection signal input from the HA12215F (IC301)
I
Setting terminal for the demonstration H/L Fixed at “L”
Ground terminal (for A/D conversion)
Sub-code Q data input terminal Not used (fixed at “L”)
Not used (open)
O
Sub-code Q data reading clock signal output terminal Not used (open)
O
Not used (open)
O
Not used (open)
Not used (fixed at “L”)
Ground terminal
Serial data latch pulse output to the LV1041M (IC201)
Serial data latch pulse output to the LV1041M (IC201)
Serial data input terminal Not used (fixed at “L”)
Serial data output terminal Not used (open)
– 94 –
Page 63
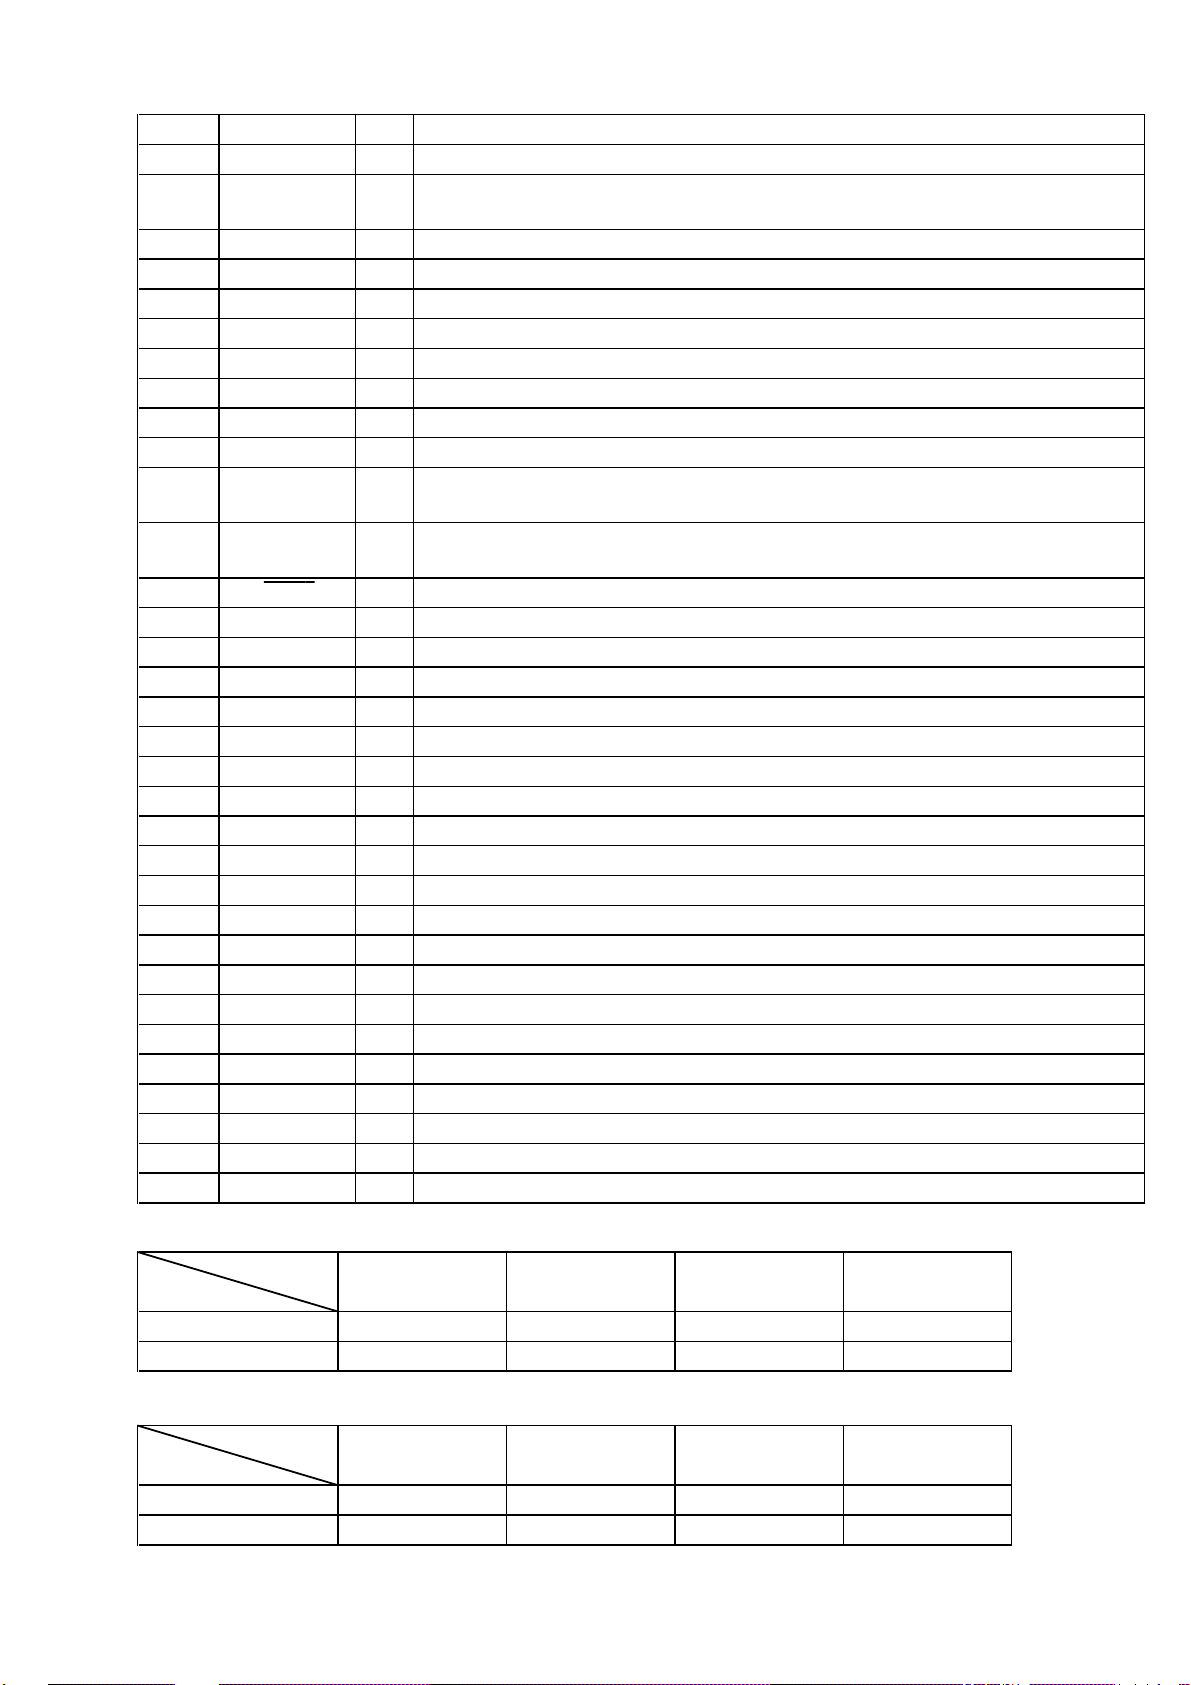
Pin No. Pin Name I/O Function
45 COM-CLK O
46 CD-POWER O
47 CD-DATA O
48 CD-CLK O
49 PL-CLK O
50 PL-DATA O
51 M62442-CLK O
52 M62442-DATA O
53
54
55 IIC-DATA I/O
56 IIC-CLK I/O
57 XRST O
58 XLT O
59 FOCUS-SW O
60 TBL-L O
61 TBL-R O
62 NCO O
63 LOAD-OUT O
64 LOAD-IN O
65 ST-CLK O
66 ST-DIN I
67 ST-DOUT O
68 ST-CE O
69 TUNED I
70 STEREO I
71 VSS —
72 ST-MUTE O
73 SENS2 I
74 SENS I
75 DISC-SENS I
76 TBL-SENS I
77 CAPM-CNT2P O
LEVEL-CONT-A
LEVEL-CONT-B
Serial data transfer clock signal output terminal Not used (open)
Power on/off control signal output for the CD and video CD section
“H”: power on, “L”: standby
Serial data output terminal Not used (open)
Serial data transfer clock signal output terminal Not used (open)
Serial data transfer clock signal output to the LV1041M (IC201)
Serial data output to the LV1041M (IC201)
Serial data transfer clock signal output to the M62442FP (IC101)
Serial data output to the M62442FP (IC101)
O
Level control signal output terminal Not used (open)
O
Level control signal output terminal Not used (open)
Communication data bus with the CD mechanism controller (IC502), fluorescent indicator tube
driver (IC601) and CSV control (IC801)
Communication data reading clock signal input or transfer clock signal output with the CD
mechanism controller (IC502), fluorescent indicator tube driver (IC601) and CSV control (IC801)
Reset signal output to the CD mechanism controller (IC502) “L”: reset
Serial data latch pulse output terminal Not used (open)
Focus control signal output terminal Not used (open)
Motor drive signal output to the disc tray turn motor driver (IC701) *1
Motor drive signal output to the disc tray turn motor driver (IC701) *1
Not used (open)
Motor drive signal output to the disc tray slide motor driver (IC801) *2
Motor drive signal output to the disc tray slide motor driver (IC801) *2
PLL serial data transfer clock signal output to the FM/AM tuner unit
PLL serial data input from the FM/AM tuner unit
PLL serial data output to the FM/AM tuner unit
PLL chip enable signal output to the FM/AM tuner unit
Tuning detection signal input from the FM/AM tuner unit “L”: tuned
FM stereo detection signal input from the FM/AM tuner unit “L”: stereo
Ground terminal
Tuner muting control signal output to the FM/AM tuner unit “L”: muting on
Internal status (SENSE) signal input terminal Not used (fixed at “L”)
Internal status (SENSE) signal input terminal Not used (fixed at “L”)
Disc status detection signal input from the disc sensor (IC703)
Disc tray status detection signal input from the disc tray sensor (IC702)
Capstan motor (M1) drive signal output terminal
*1 Disc tray turn motor (M701) control
Mode
Terminal
TBL-L (pin ^º)
TBL-R (pin ^¡)
STOP
“H” “L” “H” “L”
“H” “H” “L” “L”
*2 Disc tray slide motor (M801) control
Mode
Terminal
LOAD-OUT (pin ^£)
LOAD-IN (pin ^¢)
STOP TABLE IN TABLE OUT BRAKE
“H” “H” “L” “L”
“H” “L” “H” “L”
COUNTER-
CLOCKWISE
– 95 –
CLOCKWISE BRAKE
Page 64
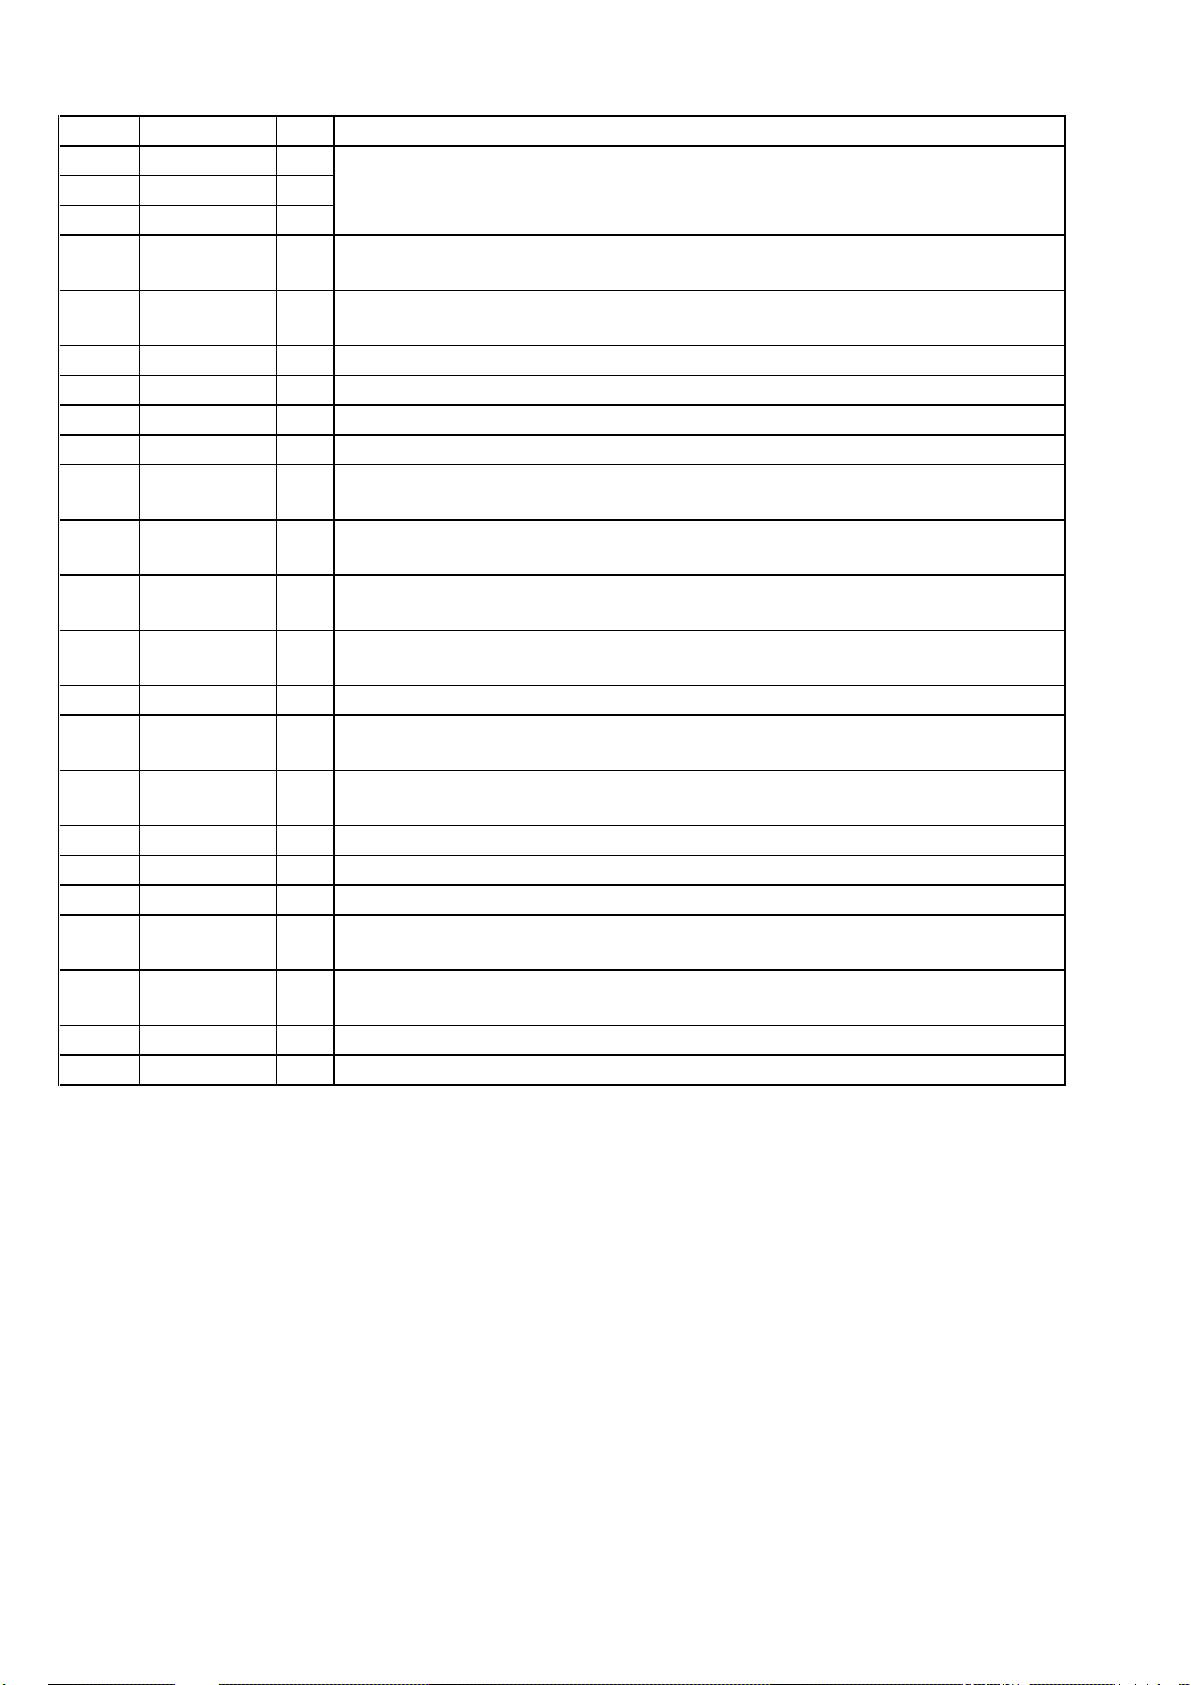
Pin No. Pin Name I/O Function
78 ENC3 I
79 ENC2 I
80 ENC1 I
81 OUT-OPEN I
82 CAP-M-H/L O
83 B-TRG O
85 CAPM-CNT1M O
86 CAPM-CNT2M O
87 TC-MUTE O
88 R/P-PASS O
89 NR-ON/OFF O
90 REC-MUTE O
91 CLK-OUT O
92 BIAS O
93 EQ-H/N O
94 PB-A/B O
95 A-PLAY-SW I
96 B-PLAY-SW I
97 TC-RELAY O
98 A-HALF I
99 ALC-ON/OFF O
100 STK-MUTE O
Detection signal input from the disc tray address detect rotary encoder (S811)
Detection signal input from the disc tray open/close detect switch (S801)
“L”: open, “H”: close
High/normal speed selection signal output of the capstan motor (M1)
“L”: high speed, “H”: normal speed
Deck-B side trigger plunger (SL2) drive signal output terminal
Deck-A side trigger plunger (SL1) drive signal output terminal
Capstan motor (M1) drive signal output terminal
Capstan motor (M1) drive signal output terminal
Line muting on/off selection signal output to the HA12215F (IC301)
“L”: muting off, “H”: muting on
Recording/playback/pass selection signal output to the HA12215F (IC301)
“L”: recording mode
Dolby NR on/off selection signal output to the HA12215F (IC301)
“L”: dolby off, “H”: dolby on
Recording muting on/off selection signal output to the HA12215F (IC301)
“L”: muting on, “H”: muting off
Clock output for the check Not used (open)
Recording bias on/off selection signal output to the HA12215F (IC301)
“L”: bias off, “H”: bias on
Normal/high speed selection signal output to the HA12215F (IC301)
“L”: normal speed, “H”: high speed
Deck-A/B selection signal output to the HA12215F (IC301) “L”: deck-A, “H”: deck-B
Detection input from the deck- A play detect switch (S1001) “H”: deck-A play
Detection input from the deck- B play detect switch (S1002) “H”: deck-B play
Recording/playback select signal output to the REC/PB switch (IC602)
“L”: playback, “H”: recording
Detection input from the deck-A cassette detect switch (S1003)
“L”: cassette in, “H”: no cassette
Automatic limiter control signal output to the HA12215F (IC301) “L”: limiter on
Power amplifier on/off selection signal output terminal “L”: on, “H”: standby
– 96 –
Page 65
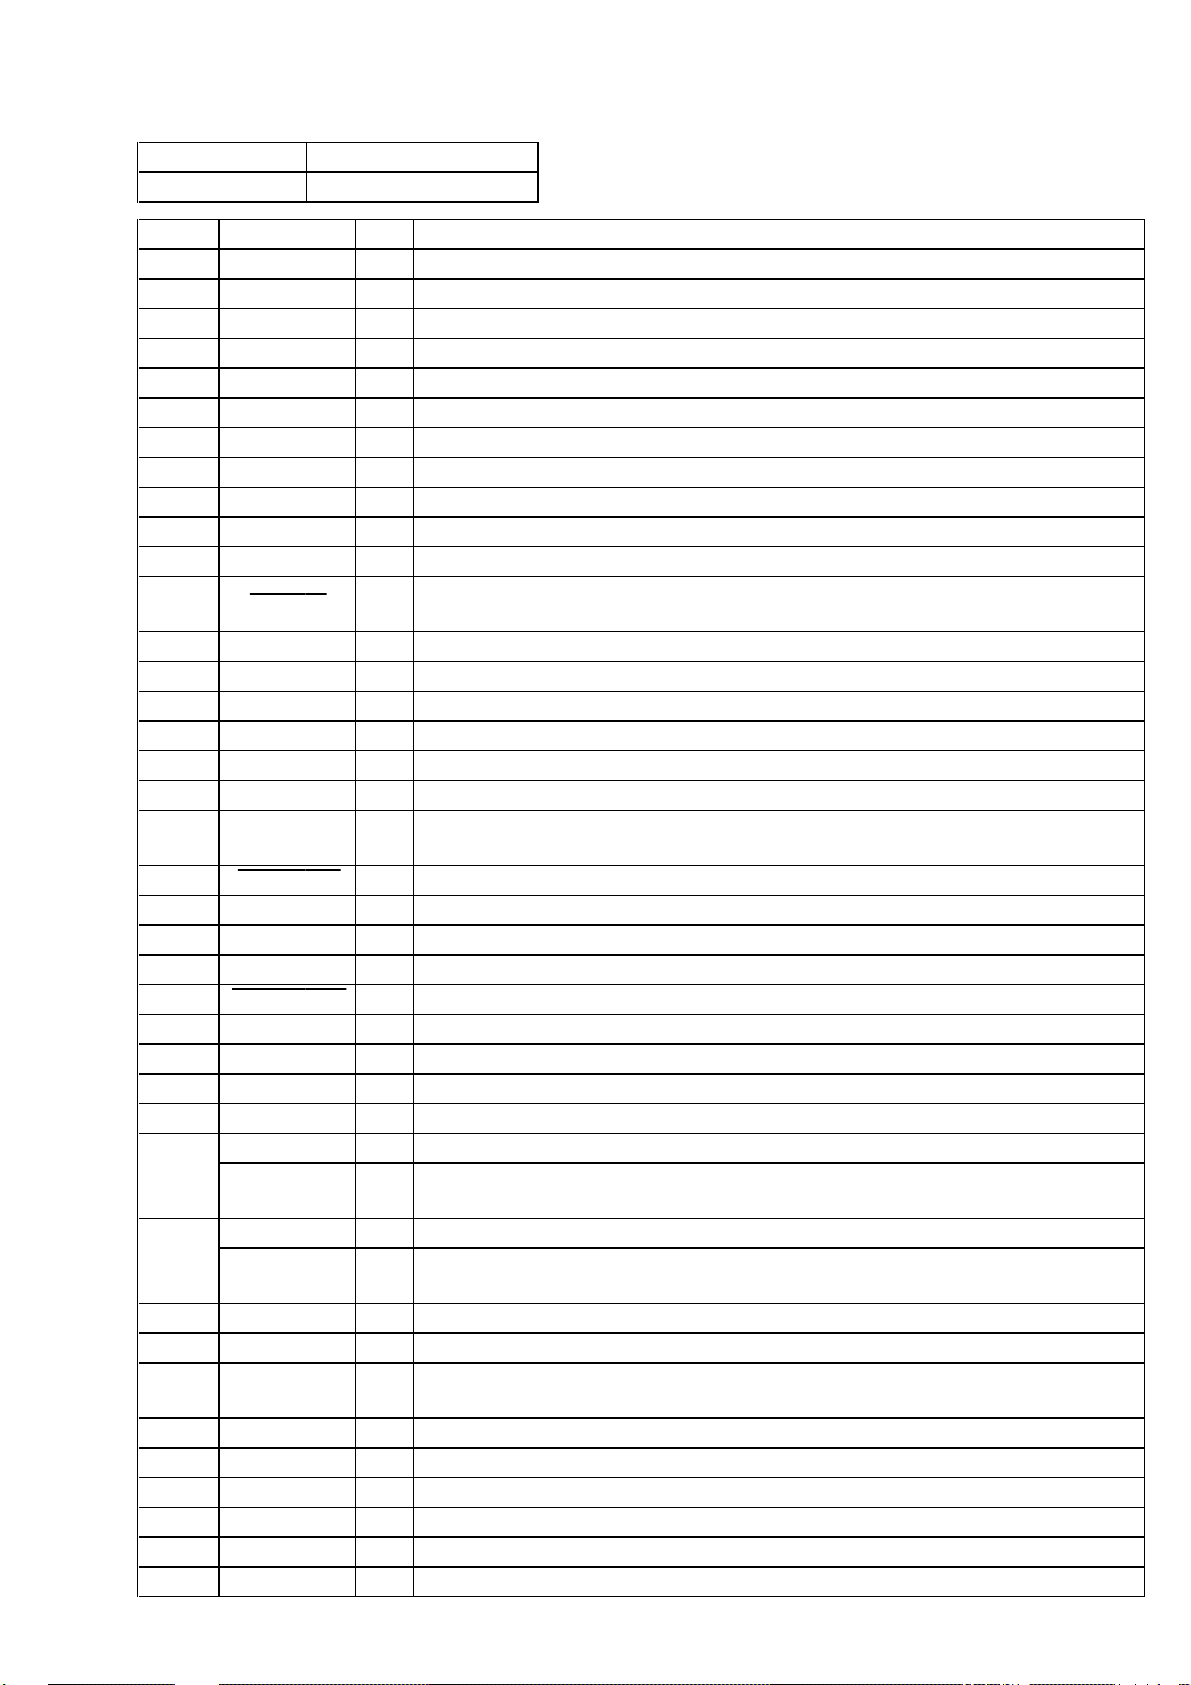
• VIDEO BOARD IC502 (CD MECHANISM CONTROLLER)
Former type M30620MC-302FP
New type M30620MC-305FP
Pin No. Pin Name I/O Function
1 SENSE I
2 SENSE CLK O
3 DSP DATA O
4 DSP LATCH O
5 DSP CLK O
6 TSENS I
7 REMOTE IN I
8 BYTE I
9 VSS —
10 DSP MUTE O
11 CTRL1 O
12 XRESET I
13 XOUT O
14 VSS —
15 XIN I
16 VCC —
17 NMI I
18 SCOR I
19 ITOU I
20 CL680 HINT I
21 CL680 SEL O
22 DF LATCH O
23 CL680 HRDY I
24 CL680 RESET O
25 JOG1 I
26 JOG2 I
27 CTRL2 O
28 LDON O
RXD I
29
30
31 DATA1O O
32 DATA1I I
33 CLK1 O
34 SHARPNESS O
35
36 SUBQ DATA I
37
38 P.ON O
39 BUS XRDY I
CLK I/O
TXD O
DATA I/O
XVLEVEL. DOWN
SUBQ CLK
Internal status (SENSE) signal input from the CXD2545Q (IC101)
Sense serial data reading clock signal output to the CXD2545Q (IC101)
Serial data output to the CXD2545Q (IC101)
Serial data latch pulse output to the CXD2545Q (IC101)
Serial data transfer clock signal output to the CXD2545Q (IC101)
Disc tray status detection signal input terminal Not used (open)
Remote control signal input terminal Not used (open)
External data bus line byte selection signal input “L”: 16 bit, “H”: 8 bit (fixed at “L”)
Ground terminal
Muting on/off control signal output to the CXD2545Q (IC101) “H”: muting on
RF equalizer selection signal output terminal “L”: double speed
Reset signal input from the system controller (IC501) “L”: reset
For several hundreds msec. after the power supply rises, “L” is input, then it changes to “H”
Main system clock output terminal (10 MHz)
Ground terminal
Main system clock input terminal (10 MHz)
Power supply terminal (+5V)
Non-maskable interrupt input terminal (fixed at “H” in this set)
Subcode sync (S0+S1) detection signal input from the CXD2545Q (IC101)
Former type: UART communication data input from the expansion (IC402)
New type: Not used (open)
Interrupt request signal input from the MPEG video/audio decoder (IC505)
Command selection signal output to the MPEG video/audio decoder (IC505)
Serial data latch pulse output to the D/A converter (IC509) “L” active
Ready status detection signal input from the MPEG video/audio decoder (IC505)
Reset signal output to the MPEG video/audio decoder (IC505) “L”: reset
Rotary encoder jog dial pulse input terminal Not used (fixed at “H”)
Rotary encoder jog dial pulse input terminal Not used (fixed at “H”)
RF equalizer selection signal output terminal “H”: double speed
Laser on/off selection signal output to the CXA1821M (IC103) “H”: laser on
Former type: Communication data receive input from the expansion (IC402)
New type: Communication data reading clock signal input or transfer clock signal output with the
system controller (IC501), fluorescent indicator tube driver (IC601) and CSV control (IC801)
Former type: Communication data transmit output to the expansion (IC402)
New type: Communication data bus with the system controller (IC501), fluorescent indicator tube
driver (IC601) and CSV control (IC801)
Serial data output to the MPEG video/audio decoder (IC505) and D/A converter (IC509)
Serial data input from the MPEG video/audio decoder (IC505)
Serial data transfer clock signal output to the MPEG video/audio decoder (IC505) and D/A
converter (IC509)
Sharpness control signal output of the video signal (Y signal) “H” active (“L”: normal)
O
Not used (open)
Sub-code Q data input from the CXD2545Q (IC101)
O
Sub-code Q data reading clock signal output to the CXD2545Q (IC101)
Power on/off control signal output terminal Not used (open)
Ready signal input terminal Not used (fixed at “H”)
– 97 –
Page 66
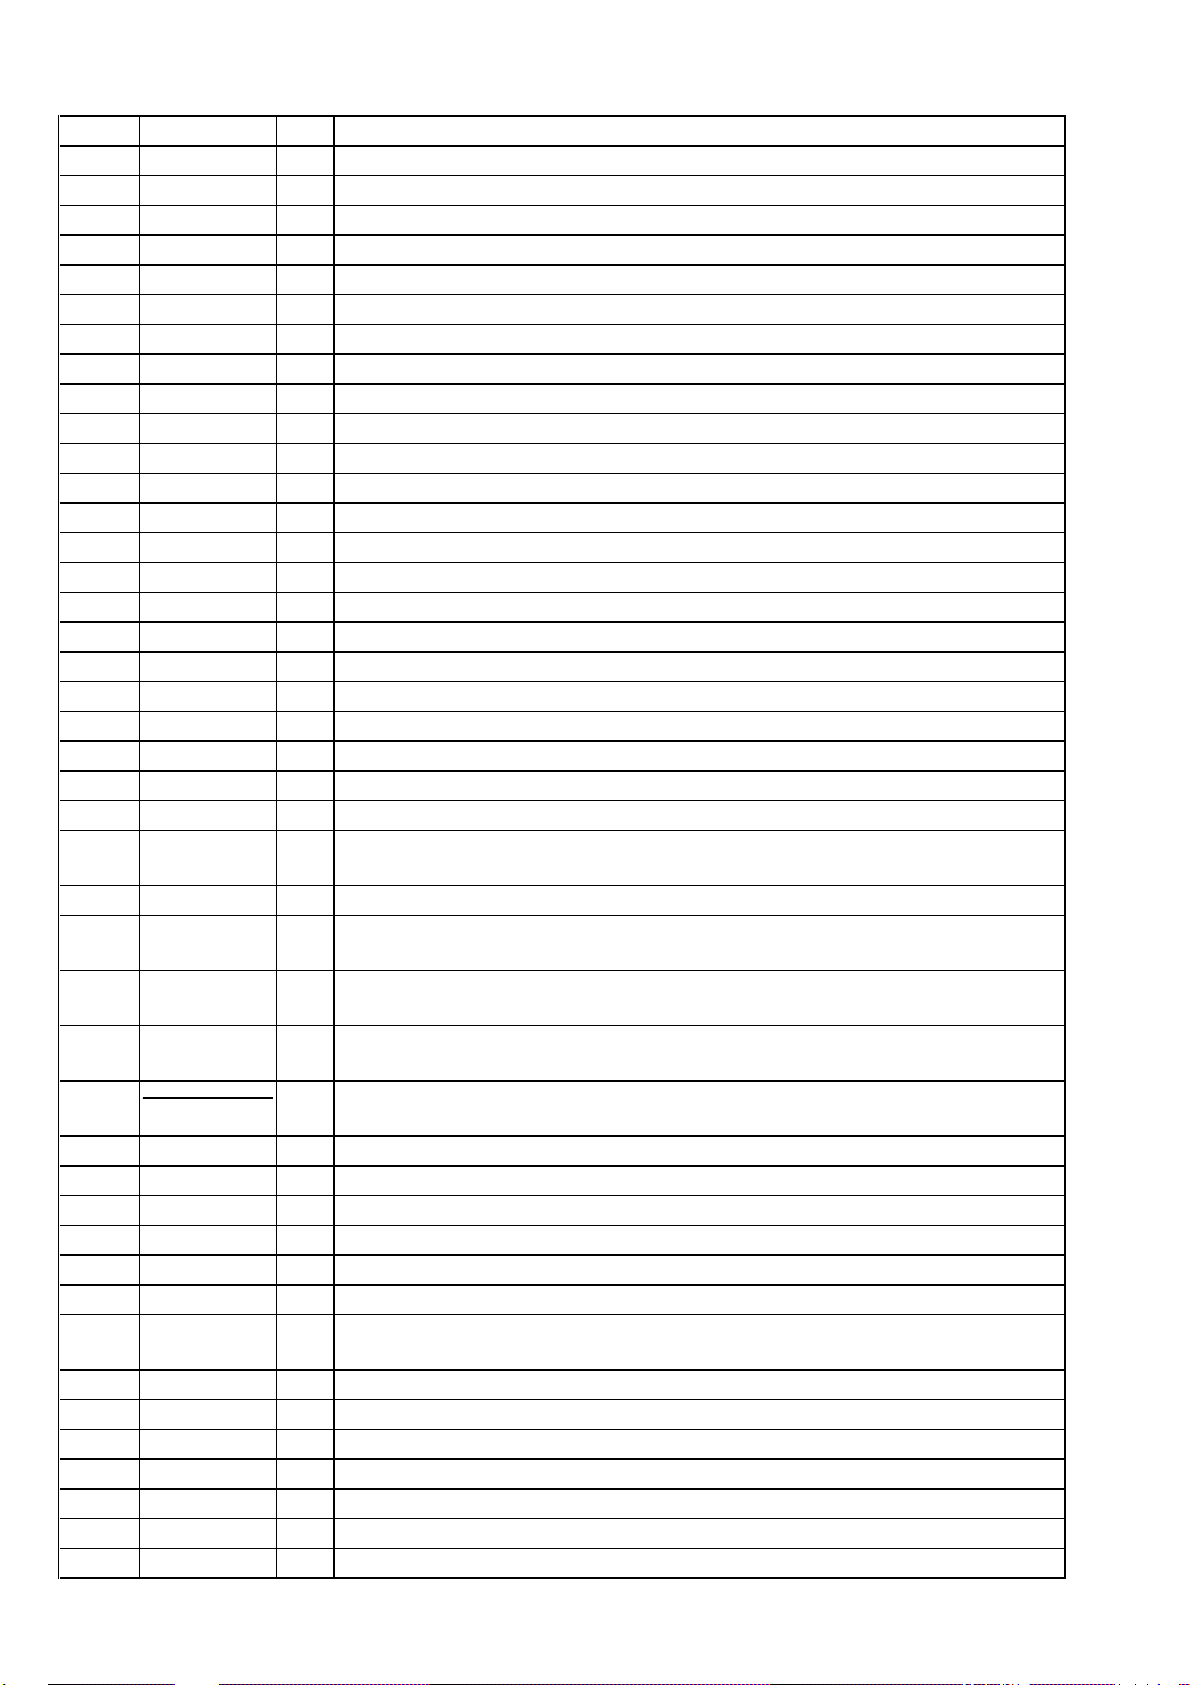
Pin No. Pin Name I/O Function
40 BUS O
41 BUS XHOLD I
42, 43 BUS O
44 SHIMUKE I
45 BUS I
46 BUS XWRL O
47 LO.BOOST O
48 AUDIO MUTE O
49 LOAD OUT O
50 LOAD IN O
51 INSW I
52 OUTSW I
53 MODEL1 I
54 MODEL2 I
55 TBLL O
56 TBLR O
57 to 59 ENC1 to ENC3 I
60, 61 NCO O
62 VCC —
63 NCO O
64 VSS —
65 VMUTE O
66 to 71 A6 to A1 O
72 UTOI O
73 TEST LED O
74 TEST1 I
75 TEST2 I
76 TEST3 I
77 DEVICE RESET O
78 STANDBY O
79 FL CS O
80 FLBLK O
81 to 88 D7 to D0 I/O
89 MIC CTRL O
90 to 92 KEY1 to KEY3 I
93 NT/PAL I
94 MUSIC VOL I
95 KEY4 I
96 AVSS —
97 MODE. SW I
98 VREF I
99 AVCC —
100 AMP. ON O
Not used (open)
Hold signal input terminal Not used (fixed at “H”)
Not used (open)
Destination setting terminal “L”: Chinese, “H”: English
Vertical synchronized signal input from the MPEG video/audio decoder (IC505) “L” active
Not used (open)
Low boost control signal output terminal Not used (open)
Audio muting on/off control signal output terminal “L”: muting on Not used (open)
Loading motor drive signal output terminal Not used (open)
Loading motor drive signal output terminal Not used (open)
Disc detection (load in) switch input terminal Not used (fixed at “H”)
Disc detection (load out) switch input terminal Not used (fixed at “H”)
Destination setting terminal (fixed at “L”)
Destination setting terminal (fixed at “L”)
Table motor drive signal output terminal Not used (open)
Table motor drive signal output terminal Not used (open)
Disc tray address detection signal input terminal Not used (open)
Not used (open)
Power supply terminal (+5V)
Not used (open)
Ground terminal
Video muting on/off control signal output terminal “L”: muting on
Address signal output for the external device Not used (open)
Former type: UART communication data output to the expansion (IC402)
New type: Not used (open)
LED drive signal output for the self diagnosis indicator (D502) Normally: “L” (LED on)
Setting terminal for the test mode 1 (for VCD check)
Normally: fixed at “H” (“L”: test mode)
Setting terminal for the test mode 2 (for SERVO check)
Normally: fixed at “H” (“L”: test mode)
Setting terminal for the test mode 3 Normally: fixed at “H” (“L”: test mode)
Not used (fixed at “H”)
System reset signal output to the CXD2545Q (IC101), BA6392FP (IC102) and D/A converter
(IC509) “L”: reset
Standby on/off control signal output terminal Not used (open)
Chip select signal output terminal Not used (open)
Blank control signal output terminal Not used (open)
Two-way data bus with the external device Not used (open)
Mic control signal output terminal Not used
Key input terminal Not used
Video system select switch (S501) input terminal
“L”: PAL, “H”: NTSC, Center voltage: AUTO
Volume input terminal Not used
Key input terminal Not used
Ground terminal (for A/D conversion)
Mode switch input terminal Not used
Reference voltage (+5V) input terminal (for A/D conversion)
Power supply terminal (+5V) (for A/D conversion)
Power amplifier on/off selection signal output terminal Not used (open)
– 98 –
Page 67
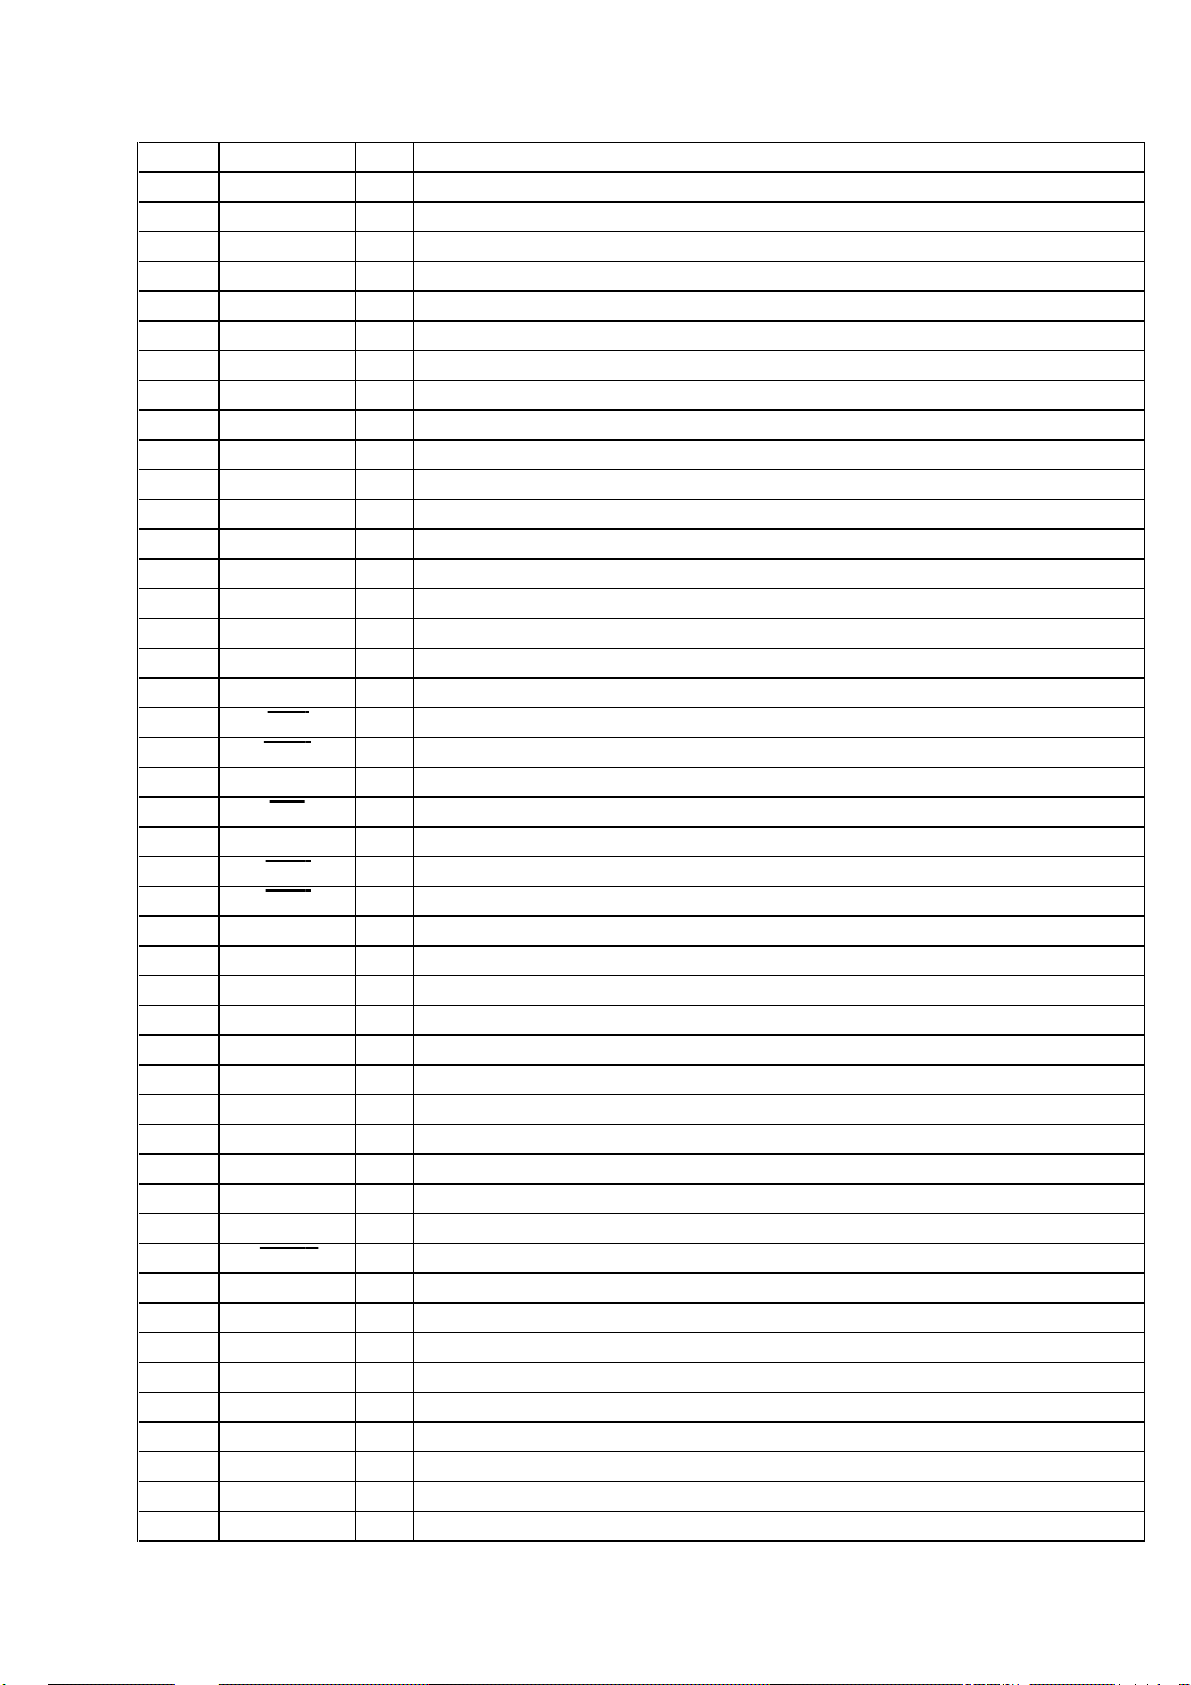
• VIDEO BOARD IC505 CL680T-D1 (MPEG VIDEO/AUDIO DECODER, VIDEO SIGNAL PROCESSOR)
Pin No. Pin Name I/O Function
1NCO
2 VSS —
3 CD-BCK I
4 CD-DATA I
5 CD-LRCK I
6 CD-C2PO I
7 to 9 NC O
10 to 15 MD0 to MD5 I/O
16 VSS —
17 MD6 I/O
18 VDD3 —
19 MD7 I/O
20 VSS —
21 MD8 I/O
22 VDD3 —
23 to 28 MD9 to MD14 I/O
29 MD15 I/O
30 to 36 NC O
37 MCE O
38 MWE O
39 VSS —
40 CAS O
41 VDD3 —
42 RAS0 O
43 RAS1 O
44, 45 MA10, MA9 O
46 MA8 O
47 VSS —
48 MA7 O
49 VDD3 —
50 to 52 MA6 to MA4 O
53 VSS —
54 MA3 O
55 VDD3 —
56 to 58 MA2 to MA0 O
59 PGIO7 I/O
60 RESET I
61 VDDMAX-IN I
62 to 64 NC O
65 AGND-DAC —
66 AVDD-DAC —
67 COMPOS OUT O
68 AGND-DAC —
69 Y-OUT O
70 AVDD-DAC —
71 AGND-DAC —
Not used (open)
Ground terminal
CD decode bit clock signal (2.8224 MHz) input from the CXD2545Q (IC101)
CD decode data input from the CXD2545Q (IC101)
CD decode L/R sampling clock signal (44.1 kHz) input from the CXD2545Q (IC101)
CD decode C2 error data input from the CXD2545Q (IC101)
Not used (open)
Two-way data bus with the program ROM (IC506) and D-RAM (IC507)
Ground terminal
Two-way data bus with the program ROM (IC506) and D-RAM (IC507)
Power supply terminal (+3.3V)
Two-way data bus with the program ROM (IC506) and D-RAM (IC507)
Ground terminal
Two-way data bus with the program ROM (IC506) and D-RAM (IC507)
Power supply terminal (+3.3V)
Two-way data bus with the program ROM (IC506) and D-RAM (IC507)
Two-way data bus with the program ROM (IC506)
Not used (open)
Chip enable signal output to the program ROM (IC506)
Write enable signal output to the D-RAM (IC507)
Ground terminal
Column address strobe signal output to the D-RAM (IC507)
Power supply terminal (+3.3V)
Row address strobe signal output to the D-RAM (IC507)
Row address strobe signal output terminal Not used (open)
Address signal output to the program ROM (IC506)
Address signal output to the program ROM (IC506) and D-RAM (IC507)
Ground terminal
Address signal output to the program ROM (IC506) and D-RAM (IC507)
Power supply terminal (+3.3V)
Address signal output to the program ROM (IC506) and D-RAM (IC507)
Ground terminal
Address signal output to the program ROM (IC506) and D-RAM (IC507)
Power supply terminal (+3.3V)
Address signal output to the program ROM (IC506) and D-RAM (IC507)
Not used (open)
Reset signal input from the CD mechanism controller (IC502) “L”: reset
Fix the maximum input voltage each input terminal and in/out terminal
Not used (open)
Ground terminal (for D/A converter)
Power supply terminal (+3.3V) (for D/A converter)
Composite video signal output terminal Not used (open)
Ground terminal (for D/A converter)
Luminance video signal output terminal
Power supply terminal (+3.3V) (for D/A converter)
Ground terminal (for D/A converter)
– 99 –
Page 68
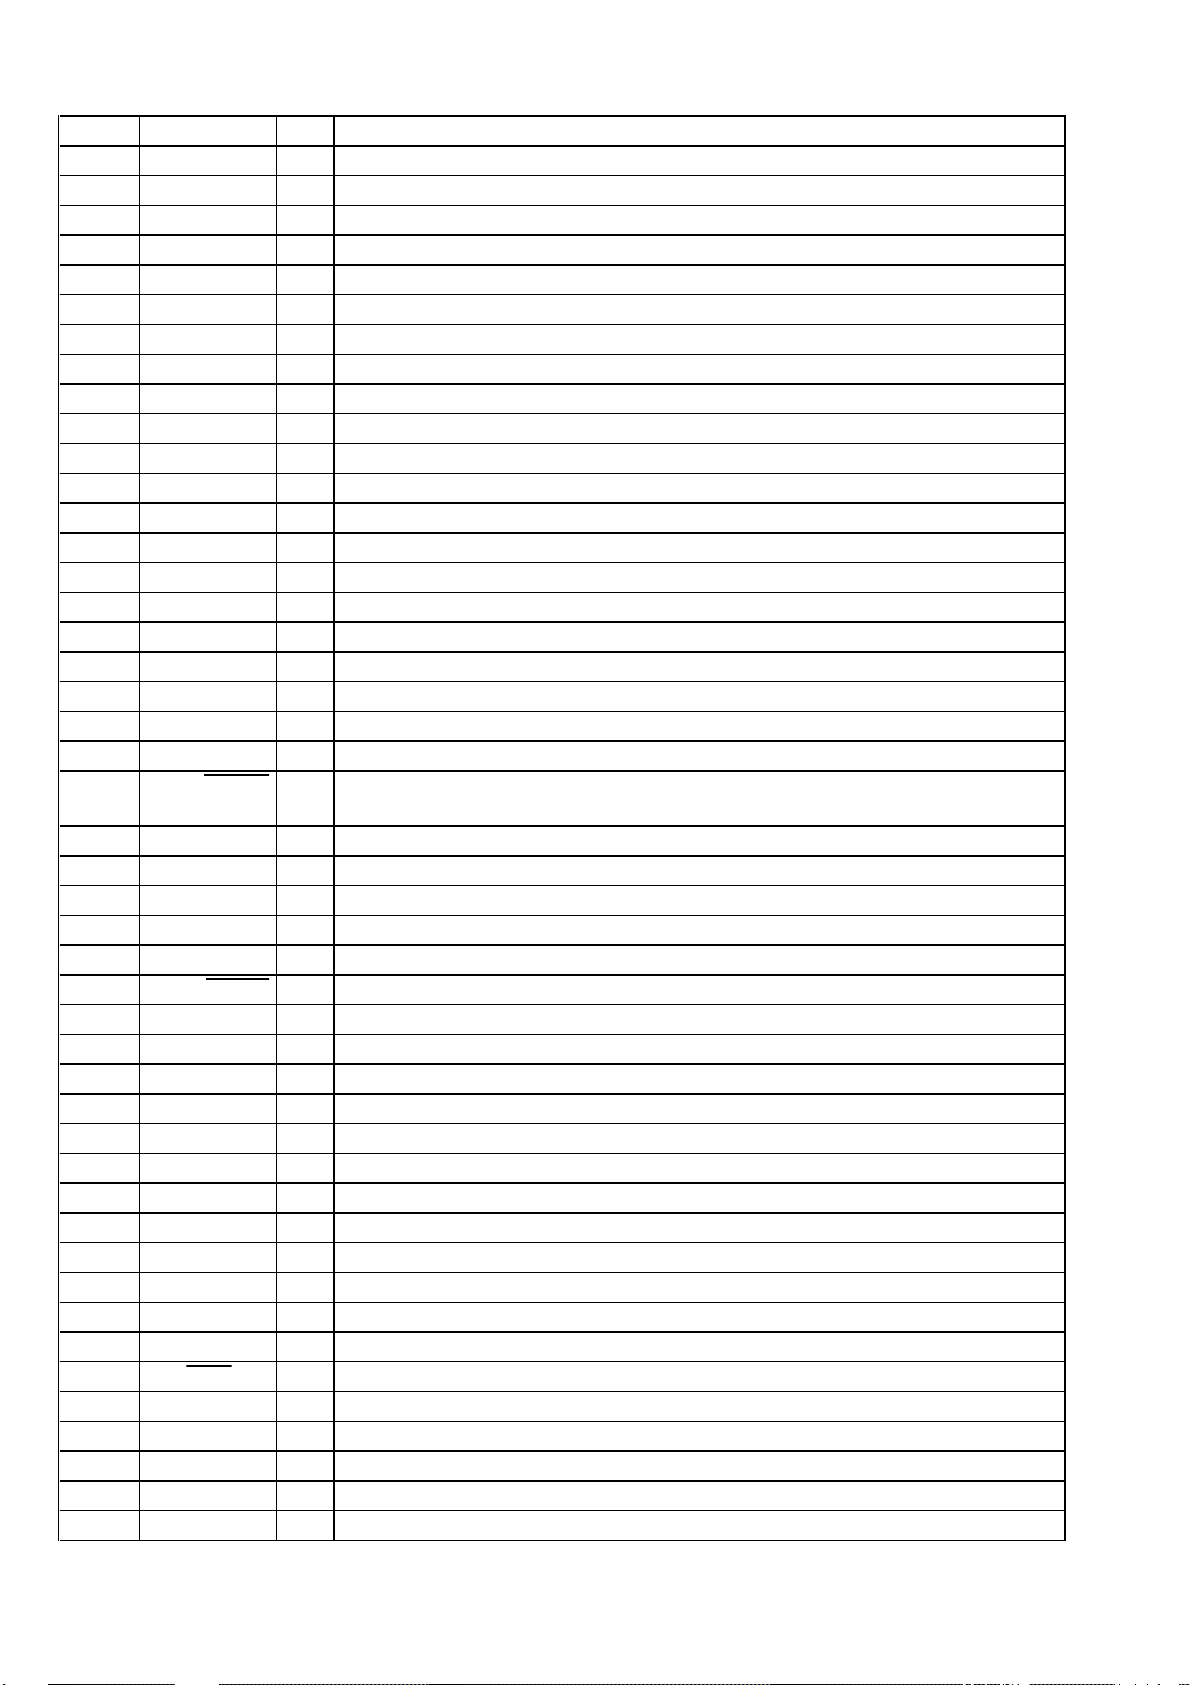
Pin No. Pin Name I/O Function
72 RREF I
73 VREF O
74 AVDD-DAC —
75 C-OUT O
76 AGND-DAC —
77 CLK-SEL0 I
78 CLK-SEL1 I
79 CLK-SEL2 I
80 VSS —
81 RESERVED I
82 VDD3 —
83 DA-EMP O
84 RESERVED O
85 AGND-PLL —
86 DA-XCLK I
87 AVDD-PLL —
88 PGIO4 I/O
89 PGIO5 I/O
90 PGIO6 I/O
91 PGIO0 I/O
92 PGIO8 I/O
PGIO2/VSYNC/
93
94 AVDD-PLL —
95 to 97 NC O
98 AGND-PLL —
99 VSS —
100 NC O
101
102 VDD3 —
103
104 VSS —
105 GCK I
106 VCK-IN I
107
108 DA-LRCK O
109 VDDMAX-OUT O
110 DA-DATA O
111 DA-BCK O
112 HD-OUT O
113 HRDY O
114 HINT O
115 CDG-SCK I/O
116 VSS —
117 HCK I
118 VDD3 —
119 HD-IN I
CSYNC
PGIO3/HSYNC
PGIO1/VCK-OUT
GCKOUT/DA-EMP
Fix the video signal output level control
Reference voltage (+1.235V) output terminal
Power supply terminal (+3.3V) (for D/A converter)
Chrominance video signal output terminal
Ground terminal (for D/A converter)
GCK (pin `⁄‚fi) selection terminal “L”: external clock, “H”: internal clock (fixed at “H”)
DA-XCLK (pin *§) selection (1) terminal Fixed at “H” in this set
DA-XCLK (pin *§) selection (2) terminal Fixed at “H” in this set
Ground terminal
Selection the operation clock 42.336 MHz (fixed at “L”)
Power supply terminal (+3.3V)
Not used (open)
Not used (open)
Ground terminal (for PLL system)
Main reference clock signal (16.9344 MHz=384fs) from the D/A converter (IC509)
Power supply terminal (+3.3V) (for PLL system)
Not used (open)
Not used (open)
Not used (open)
Not used (open)
Not used (open)
O
Vertical synchronized signal output to the CD mechanism controller (IC502)
Power supply terminal (+3.3V) (for PLL system)
Not used (open)
Ground terminal (for PLL system)
Ground terminal
Not used (open)
I/O
Not used (open)
Power supply terminal (+3.3V)
I/O
Not used (open)
Ground terminal
Not used (open)
Main clock for video signal processor input from the D/A converter (IC509)
O
Not used (open)
Digital audio L/R sampling clock signal (44.1 kHz) output to the D/A converter (IC509)
Fix the maximum output voltage (+5V) certain output terminal
Digital audio data output to the D/A converter (IC509)
Digital audio bit clock signal (2.8224 MHz) output to the D/A converter (IC509)
Serial data output to the CD mechanism controller (IC502)
Ready signal output to the CD mechanism controller (IC502)
Interrupt request signal output to the CD mechanism controller (IC502)
Not used (open)
Ground terminal
Serial data transfer clock signal input from the CD mechanism controller (IC502)
Power supply terminal (+3.3V)
Serial data input from the CD mechanism controller (IC502)
– 100 –
Page 69

Pin No. Pin Name I/O Function
120 VDD3 —
121 HSEL I
122 CDG-SDATA I
123 CDG-VFSY I
124 CDG-S0S1 I
125 to 128 NC O
Power supply terminal (+3.3V)
Command selection signal input from the CD mechanism controller (IC502)
Not used (fixed at “L”)
Not used (fixed at “L”)
Not used (fixed at “L”)
Not used (open)
– 101 –
Page 70
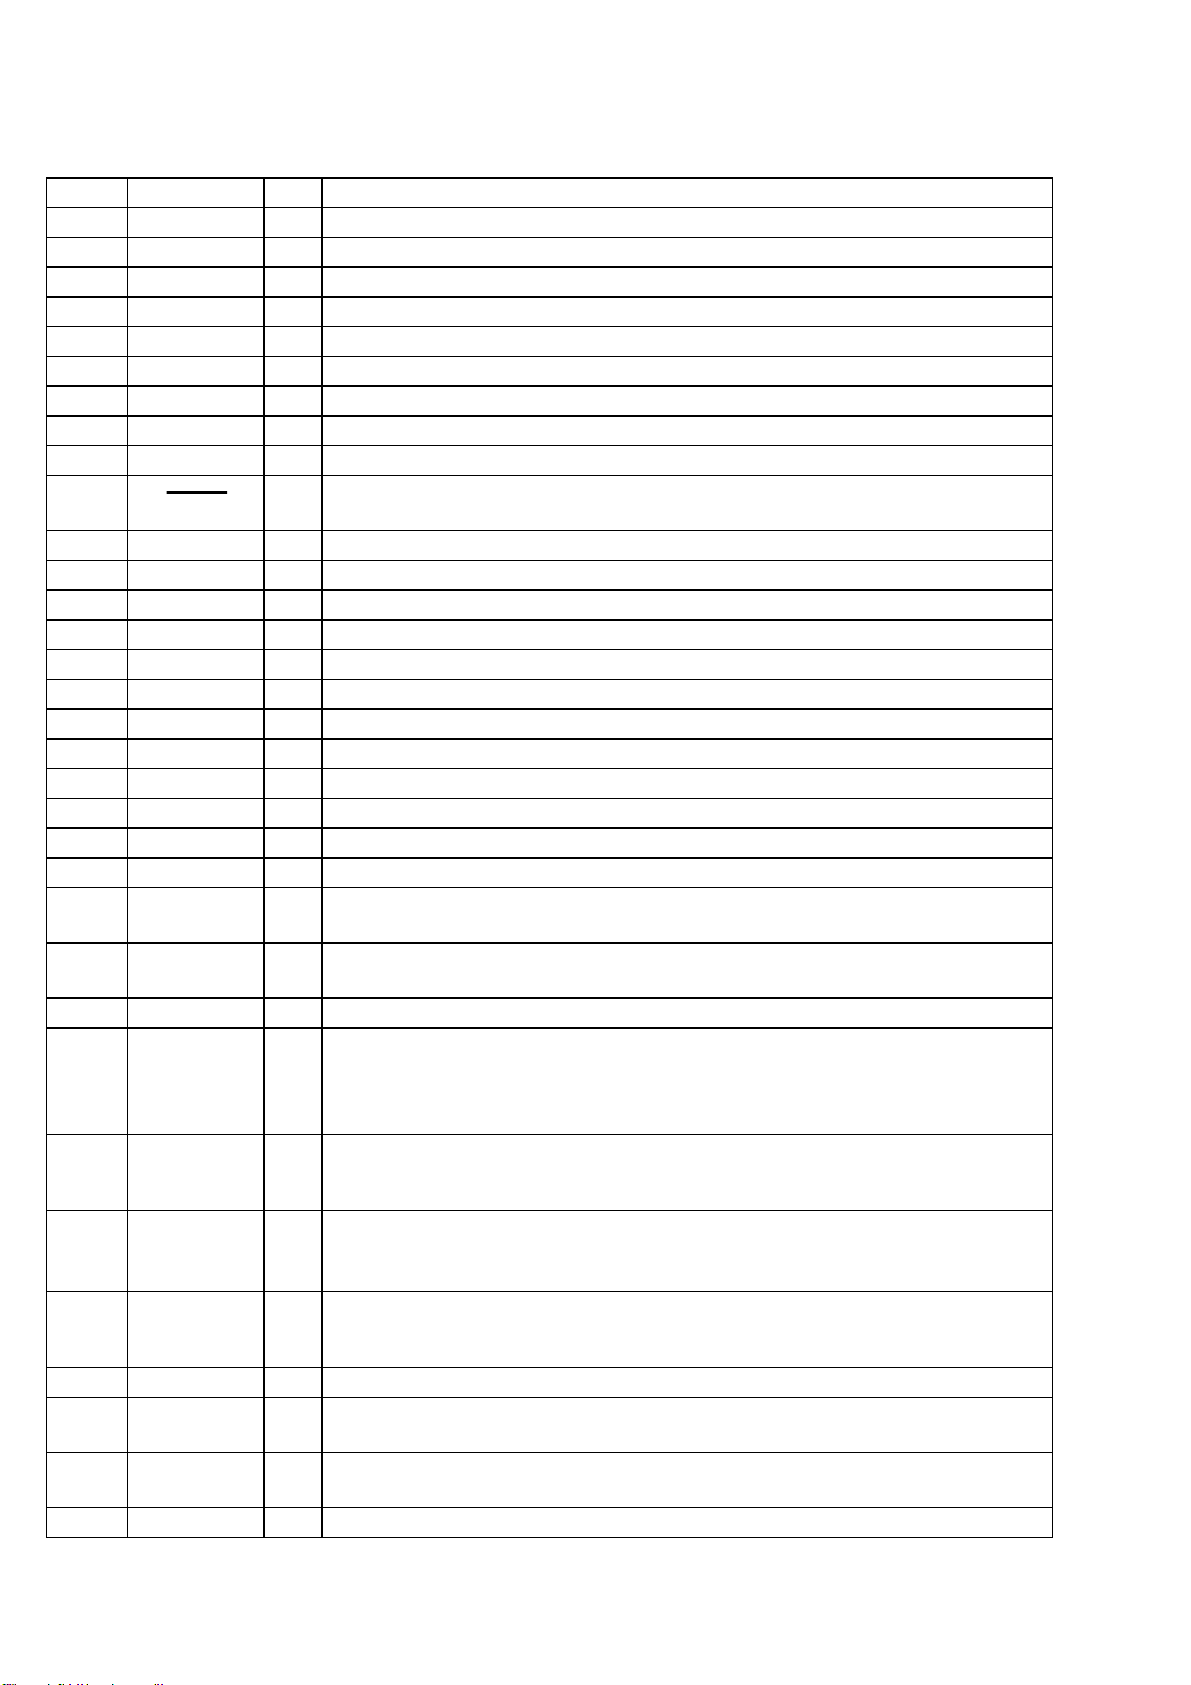
• PANEL BOARD IC601 TMP87CM74AF-6731
(FLUORESCENT INDICATOR TUBE DRIVE, LED DRIVE, KEY CONTROL)
Pin No. Pin Name I/O Function
1 LED3 O
2 LED4 O
3 LED5 O
4 LED6 O
5 LED7 O
6 LED8 O
7 VSS —
8 X-OUT O
9 X-IN I
10 RESET I
11 LED9 O
12 LED10 O
13 TEST I
14 LED11 O
15 LED12 O
16 LED13 O
17 LED14 O
18 LED15 O
19 VOL-A I
20 VOL-B I
21 JOG-A I
22 JOG-B I
23 SCL I/O
24 SDA I/O
25 L.SEL O
LED drive signal output terminal (for decoration LED)
LED drive signal output terminal (for decoration LED)
LED drive signal output terminal (DISC 3)
LED drive signal output terminal (DISC 2)
LED drive signal output terminal (DISC 1)
LED drive signal output terminal (ENTER/NEXT, GROOVE)
Ground terminal
System clock output terminal (8 MHz)
System clock input terminal (8 MHz)
System reset signal input from the reset signal generator (IC951) “L”: reset
For several hundreds msec. after the power supply rises, “L” is input, then it changes to “H”
LED drive signal output terminal (JOG, DJ MIX)
LED drive signal output terminal (CD NON-STOP, + ), – 0)
Connected to ground
LED drive signal output terminal (PRO LOGIC, DSP)
LED drive signal output terminal (EFFECT, VIDEO CD)
LED drive signal output terminal (CD ( P)
LED drive signal output terminal (TAPE B (/9)
LED drive signal output terminal (TAPE A (/9)
Rotary encoder pulse input from the S602 (VOLUME)
Rotary encoder pulse input from the S602 (VOLUME)
Jog dial pulse input from the S601 (= ↔ + DJ MIX)
Jog dial pulse input from the S601 (= ↔ + DJ MIX)
Communication data reading clock signal input or transfer clock signal output with the system
controller (IC501), CD mechanism controller (IC502) and CSV control (IC801)
Communication data bus with the system controller (IC501), CD mechanism controller (IC502)
and CSV control (IC801)
LED selection signal output terminal
26 KEY-0 I
27 KEY-1 I
28 KEY-2 I
29 KEY-3 I
30 MODEL I
31
32 L+R I
33 SIRCS I
SPEANA
RESET
Key input terminal (A/D input) (S604 to 616)
PRO LOGIC, DSP, KARAOKE PON/MPX, p, P FILE MEMORY, GEQ CONTROL, FILE
SELECT, EFFECT, DEMO, TIMER SELECT, FUNCTION, CLOCK/TIMER SET,
DISPLAY keys input
Key input terminal (A/D input) (S618, 619, 621 to 630)
CD FLASH, CD NON-STOP, – 0, ENTER/NEXT, + ) , DBFB, GROOVE, ACTIVE,
SELECT, RETURN, PREV, NEXT keys input
Key input terminal (A/D input) (S631 to 642)
TUNER BAND, CD ( P, TAPE B (/9, TAPE A (/9, I/u (POWER), DISC 1/2/3,
DISC SKIP/EX-CHANGE, 6 keys input
Key input terminal (A/D input) (S617, 652 to 654, 656 to 659)
CD LOOP, PLAY MODE/DOLBY NR/TUNER MEMORY, EDIT/DIRECTION, REPEAT
STEREO/MONO, r REC, P PAUSE, HI-DUB, CD SYNC keys input
Destination setting terminal
O
Reset signal output terminal “H”: reset Not used (open)
Spectrum analyzer drive signal input from the spectrum analyzer band-pass filter (IC603)
(for VACS, non-stop signal)
Remote control signal input from the remote control receiver (IC602)
– 102 –
Page 71
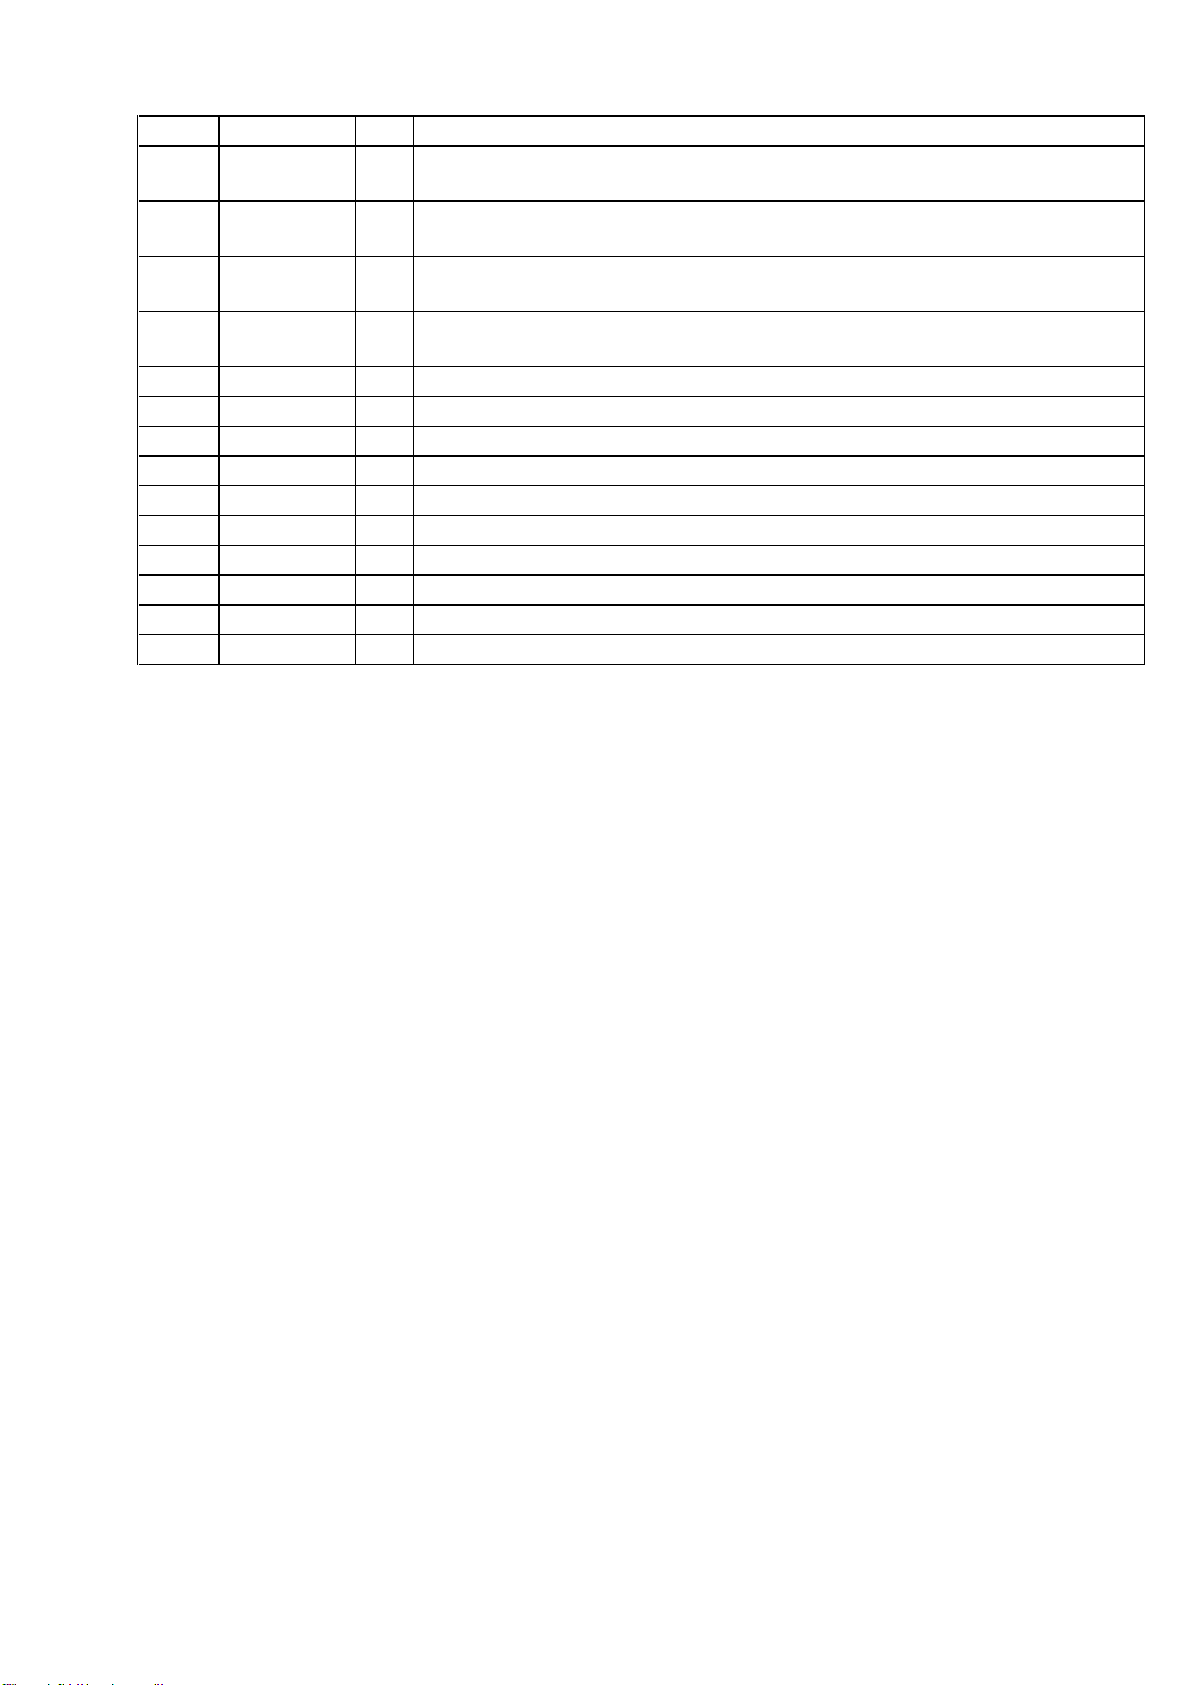
Pin No. Pin Name I/O Function
34 SPEANA-1 I
35 SPEANA-2 I
36 SPEANA-3 I
37 SPEANA-4 I
38 VASS —
39 VAREF I
40 VDD —
41 to 53 GR1 to GR13 O
54 to 69
70 to 72
73 to 77
SEG1 to SEG16
SEG19 to SEG17
SEG24 to SEG20
78 VKK —
79 LED1 O
80 LED2 O
Spectrum analyzer drive signal input from the spectrum analyzer band-pass filter (IC603)
(for low frequency)
Spectrum analyzer drive signal input from the spectrum analyzer band-pass filter (IC603)
(for low and middle frequency)
Spectrum analyzer drive signal input from the spectrum analyzer band-pass filter (IC603)
(for middle and high frequency)
Spectrum analyzer drive signal input from the spectrum analyzer band-pass filter (IC603)
(for high frequency)
Ground terminal (for A/D conversion)
Reference voltage (+5V) input terminal (for A/D conversion)
Power supply terminal (+5V)
Grid drive signal output to the fluorescent indicator tube (ND601)
O
Segment drive signal output to the fluorescent indicator tube (ND601)
O
Segment drive signal output to the fluorescent indicator tube (ND601)
O
Segment drive signal output to the fluorescent indicator tube (ND601)
Power supply terminal (–35V) (for fluorescent indicator tube drive)
LED drive signal output terminal (r REC, P PAUSE)
LED drive signal output terminal (PBC, PBC OFF)
– 103 –
Page 72
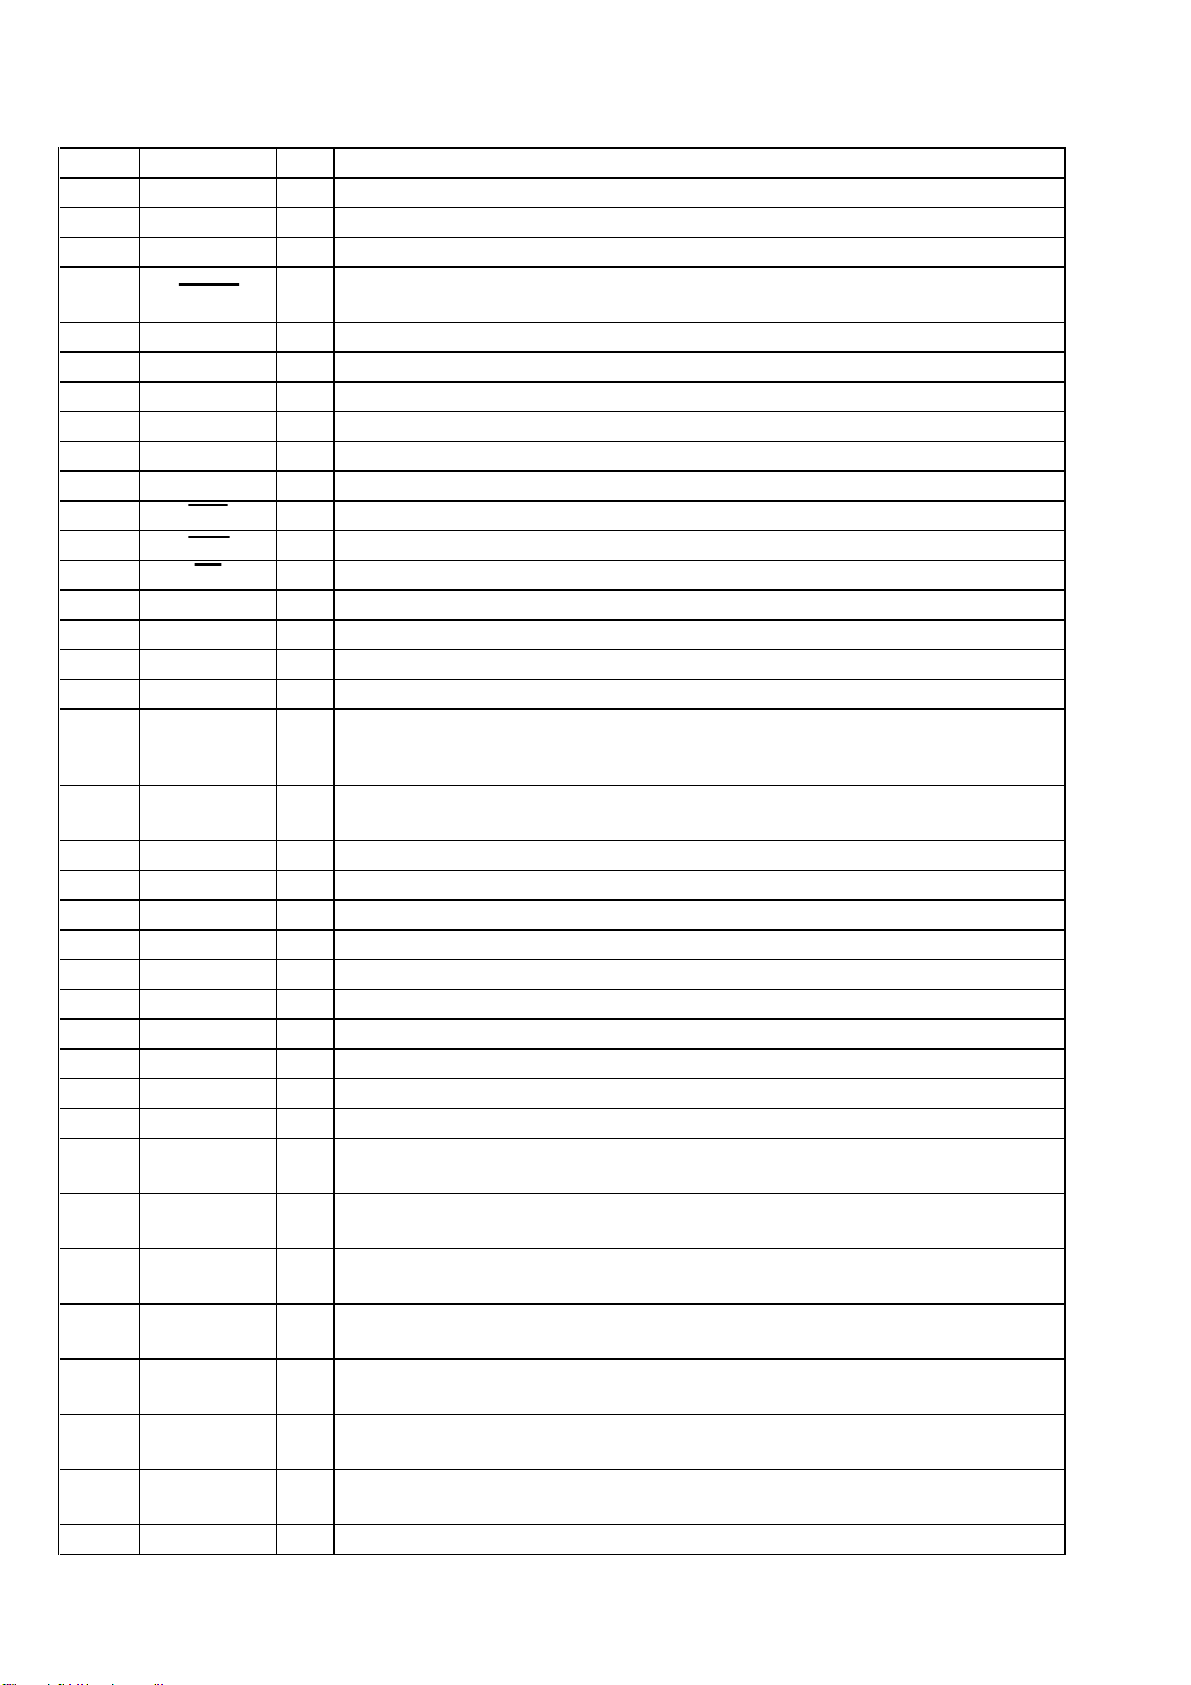
• PANEL BOARD IC801 TMP87CH48DF-4825 (CSV CONTROL, LED DRIVE, KEY CONTROL)
Pin No. Pin Name I/O Function
1 VSS —
2 X-OUT O
3 X-IN I
4 RESET I
5 MUTE O
6 MODE 0 I
7 TEST I
8 MODE 1 I
9 YB CLK O
10 NAR/YB RDY I
11 BSY I
12 RST O
13 CH O
14 DATA O
15 CLK O
16 LAT O
17 YB D0 I
18 12C CLK I/O
19 12C DATA I/O
20 YB D3 I
21 UART RX I
22 UART TX O
23 to 26 NC O
27 JOG A I
28 JOG B I
29 SIRCS I
30 VASS —
31 VAREF I
32 DVDD —
33 BPF/LOW I
34 BPF/LOW-MID I
35 BPF/HIGH-MID I
36 BPF/HIGH I
37 L+R I
38 KEY0 I
39 KEY1 I
40 KEY2 I
Ground terminal
System clock output terminal (8 MHz)
System clock input terminal (8 MHz)
System reset signal input from the reset signal generator (IC951) “L”: reset
For several hundreds msec. after the power supply rises, “L” is input, then it changes to “H”
DJ muting on/off control signal output terminal “L”: muting on
Setting terminal for the CPU operational mode (fixed at “L” in this set)
Connected to ground
Setting terminal for the CPU operational mode (fixed at “L” in this set)
Not used (pull down)
Not used (fixed at “H”)
Busy signal input from the MSM6653A (IC851) “L”: busy status
Reset signal output to the MSM6653A (IC851) “L”: reset
Channel selection signal output to the MSM6653A (IC851) “L” active
Serial data output to the MSM6653A (IC851)
Serial data transfer clock signal output to the MSM6653A (IC851)
Serial data latch pulse output to the MSM6653A (IC851)
Not used (fixed at “L”)
Communication data reading clock signal input or transfer clock signal output with the system
controller (IC501), CD mechanism controller (IC502) and fluorescent indicator tube driver
(IC601)
Communication data bus with the system controller (IC501), CD mechanism controller (IC502)
and fluorescent indicator tube driver (IC601)
Not used (fixed at “L”)
Not used (fixed at “L”)
Not used (pull down)
Not used (open)
Jog dial pulse input from the S601 (= ↔ + DJ MIX)
Jog dial pulse input from the S601 (= ↔ + DJ MIX)
Remote control signal input from the remote control receiver (IC602)
Ground terminal (for A/D conversion)
Reference voltage (+5V) input terminal (for A/D conversion)
Power supply terminal (+5V)
Spectrum analyzer drive signal input from the spectrum analyzer band-pass filter (IC603)
(for low frequency)
Spectrum analyzer drive signal input terminal (for low and middle frequency)
Not used (fixed at “L”)
Spectrum analyzer drive signal input terminal (for middle and high frequency)
Not used (fixed at “L”)
Spectrum analyzer drive signal input from the spectrum analyzer band-pass filter (IC603)
(for high frequency)
Spectrum analyzer drive signal input from the spectrum analyzer band-pass filter (IC603)
(for VACS, non-stop signal)
Key input terminal (A/D input) (S805 to 808)
A PAD, BEAT ON/OFF, BEAT SELECT, BEAT SPEED keys input
Key input terminal (A/D input) (S801 to 804)
B PAD, BEAT LEVEL, BEAT JAM, AUTO BPM keys input
Key input terminal (A/D input) Not used (fixed at “H”)
– 104 –
Page 73

Pin No. Pin Name I/O Function
41 to 56 NC O
57 to 60 GND —
61 BPM LED-B O
62 BPM-LED-A O
63 BOMBER-LED O
64 ON/OFF-LED O
Not used (open)
Ground terminal
LED drive signal output terminal (AUTO BPM) “L”: LED on
LED drive signal output terminal (AUTO BPM) “L”: LED on
LED drive signal output terminal (BEAT JAM) “L”: LED on
LED drive signal output terminal (BEAT ON/OFF) “L”: LED on
– 105 –
Page 74
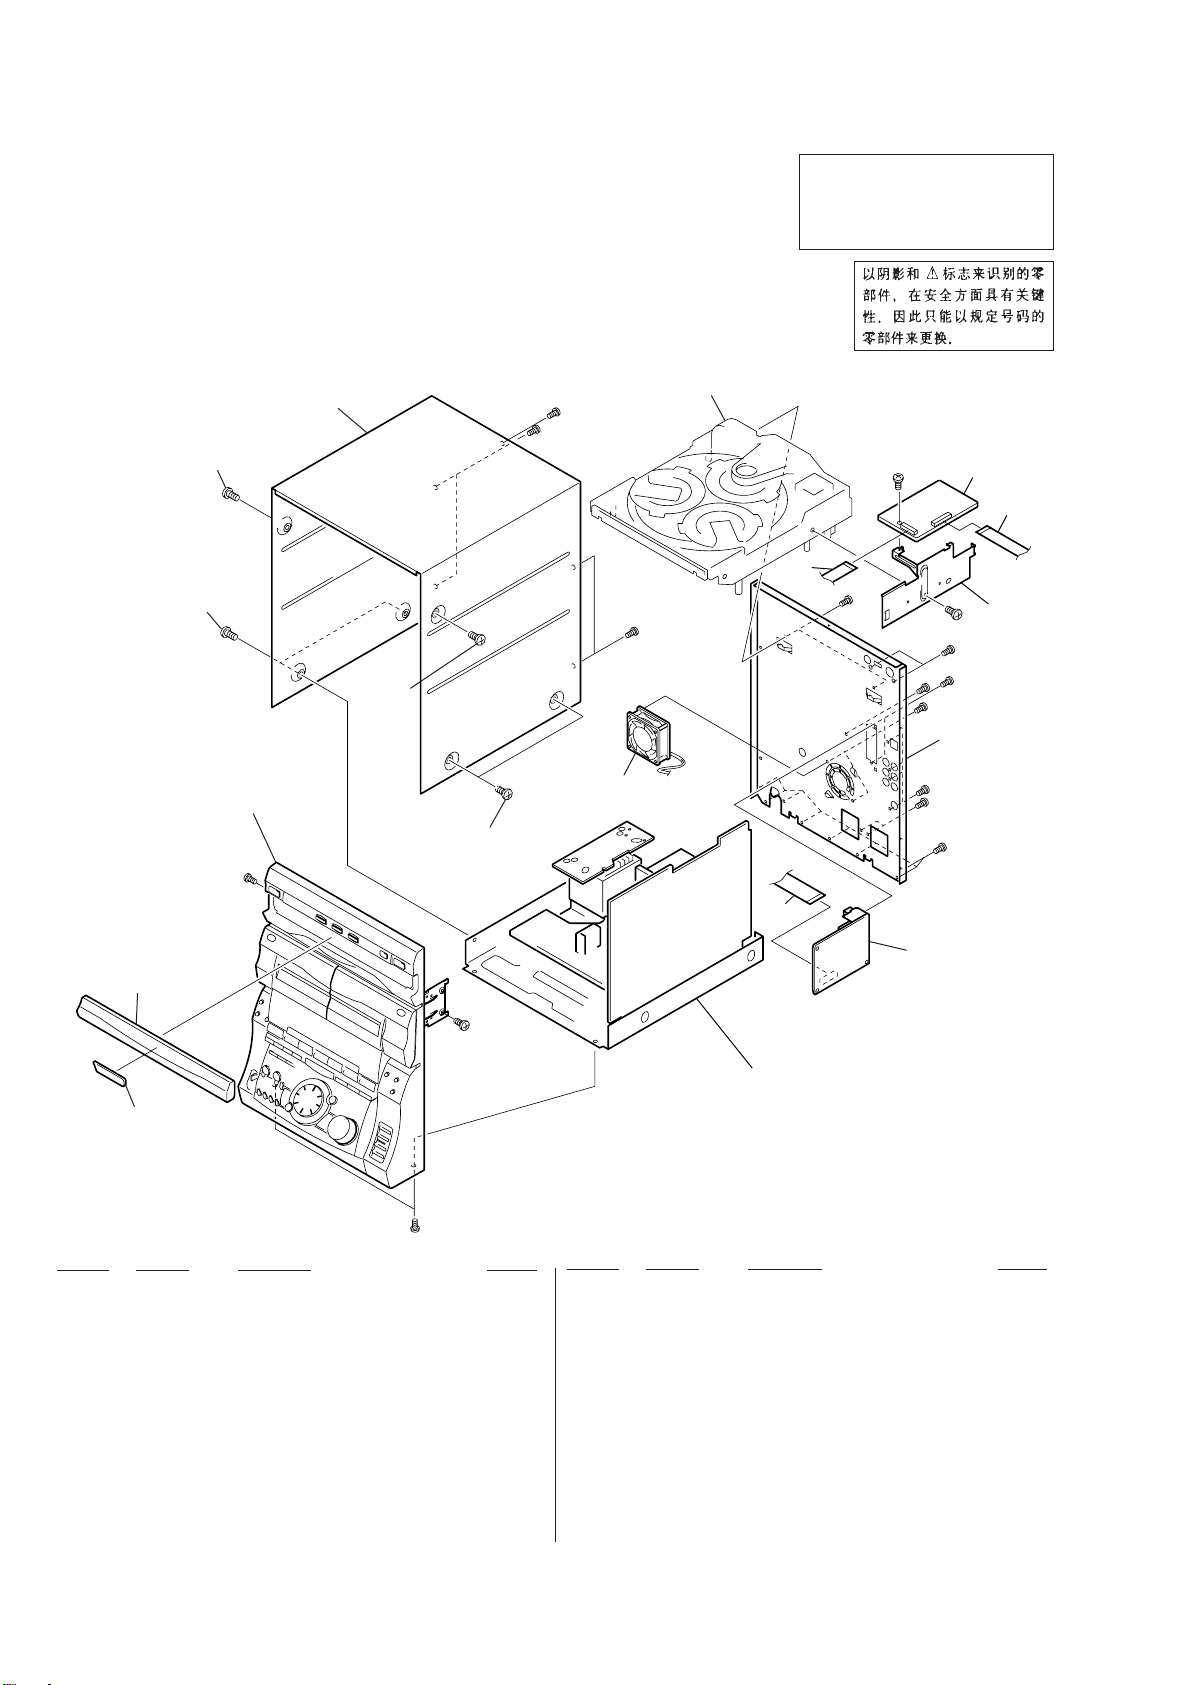
SECTION 8
d
EXPLODED VIEWS
NOTE:
• -XX and -X mean standardized parts, so they
may have some difference from the original
one.
• Color Indication of Appearance Parts
Example:
KNOB, BALANCE (WHITE) . . . (RED)
• Abbreviation
CH : Chinese
IA : Indonesia
MY : Malaysia
↑↑
Parts Color Cabinet's Color
SP : Singapore
TH : Thai
1
(1) CASE SECTION
2
3
• Items marked “*” are not stocked since they
are seldom required for routine service. Some
delay should be anticipated when ordering
these items.
• The mechanical parts with no reference number in the exploded views are not supplied.
• Hardware (# mark) list are given in the last of
the electrical parts list.
CDM38L-5BD24AL
#2
#2
#2
2
The components identified by
mark ! or dotted line with mark
! are critical for safety.
Replace only with part number
specified.
#2
11
10
#2
#2
#5
#1
#2
#2
5
9
not
supplie
Front panel section
3
#3
4
#3
7
#2
Ref. No. Part No. Description Remark
* 1 4-996-816-61 CASE (TH)
* 1 4-996-816-81 CASE (EXCEPT TH)
2 3-363-099-71 SCREW (CASE 3 TP2)
3 3-363-099-01 SCREW (CASE 3 TP2) (TH)
3 3-363-099-11 SCREW (CASE 3 TP2) (EXCEPT TH)
4 4-900-740-11 PANEL, LOADING
* 5 4-900-722-01 PANEL, BACK (SP, MY)
* 5 4-900-722-11 PANEL, BACK (CH)
* 5 4-900-722-21 PANEL, BACK (IA)
* 5 4-900-722-31 PANEL, BACK (TH)
6 1-233-545-11 TUNER, FM/AM (TH)
M901
#2
#2
#2
8
6
Chassis section
Ref. No. Part No. Description Remark
6 1-693-381-11 TUNER, FM/AM (CH)
6 1-693-421-11 TUNER, FM/AM (SP, MY, IA)
7 4-991-781-01 EMBLEM (VCD)
8 1-751-688-11 WIRE (FLAT TYPE) (13 CORE) (TH)
8 1-773-009-11 WIRE (FLAT TYPE) (15 CORE) (150 mm)
9 1-775-212-11 WIRE (FLAT TYPE) (23 CORE)
10 1-690-589-31 WIRE (FLAT TYPE) (13 CORE)
* 11 A-4414-186-A VIDEO BOARD, COMPLETE (EXCEPT CH)
* 11 A-4724-279-A VIDEO BOARD, COMPLETE (CH)
M901 1-763-048-21 FAN, D.C.
(EXCEPT TH)
– 106 –
Page 75
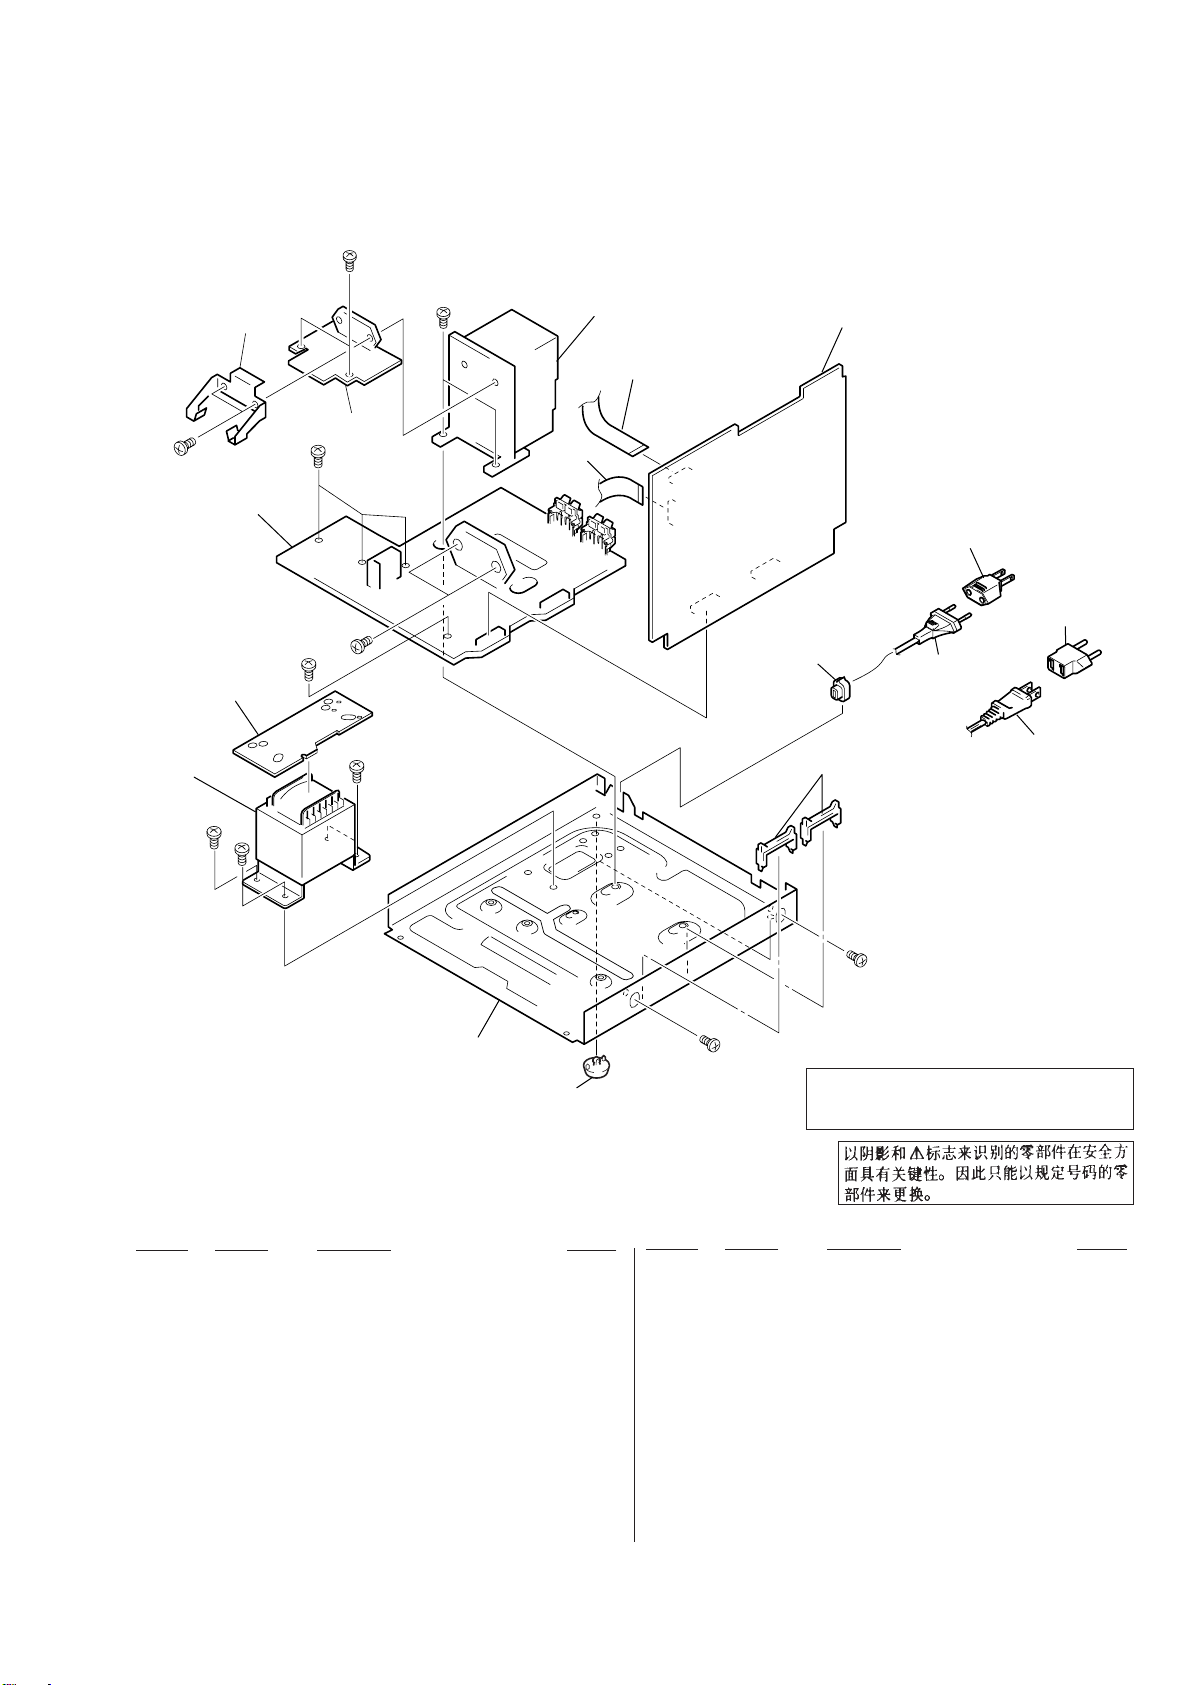
(2) CHASSIS SECTION
51
52
53
54
60
55
#5
#5
#5
#5
T501
not supplied
not supplied
#5
#4
#6 #6
#6
56
57
58
(SP,MY)
58
(IA)
59
(SP,MY)
59
(IA,TH,CH)
61
not supplied
#5
#4
Ref. No. Part No. Description Remark
* 51 A-4407-298-A POWER AMP BOARD, COMPLETE (SP, MY, IA)
* 51 A-4407-409-A POWER AMP BOARD, COMPLETE (TH)
* 51 A-4414-058-A POWER AMP BOARD, COMPLETE (CH)
* 52 1-668-274-11 TRANSFORMER BOARD
* 53 A-4414-052-A MAIN BOARD, COMPLETE (SP, MY, IA)
The components identified by mark ! or dotted
line with mark ! are critical for safety.
Replace only with part number specified.
Ref. No. Part No. Description Remark
57 4-965-822-01 FOOT
! 58 1-569-007-11 ADAPTOR, CONVERSION 2P (IA)
! 58 1-569-008-21 ADAPTOR, CONVERSION 2P (SP, MY)
! 59 1-558-943-41 CORD, POWER (IA, TH)
! 59 1-575-651-21 CORD, POWER (SP, MY)
* 53 A-4414-056-A MAIN BOARD, COMPLETE (CH)
* 53 A-4414-637-A MAIN BOARD, COMPLETE (TH)
54 1-773-043-11 WIRE (FLAT TYPE) (17 CORE)
55 3-703-244-00 BUSHING (FBS001), CORD (SP, MY, CH)
55 3-703-571-11 BUSHING (S) (4516), CORD (TH)
55 4-966-266-01 BUSHING (S) (FBS002), CORD (IA)
* 56 4-988-533-01 HOLDER, PWB
– 107 –
! 59 1-782-510-11 CORD, POWER (CH)
60 1-783-898-11 WIRE (FLAT TYPE) (15 CORE)
* 61 A-4407-766-A SURROUND BOARD, COMPLETE (TH)
* 61 A-4414-862-A SURROUND BOARD, COMPLETE (SP, MY, IA)
* 61 A-4417-262-A SURROUND BOARD, COMPLETT (CH)
! T501 1-431-828-11 TRANSFORMER, POWER
Page 76
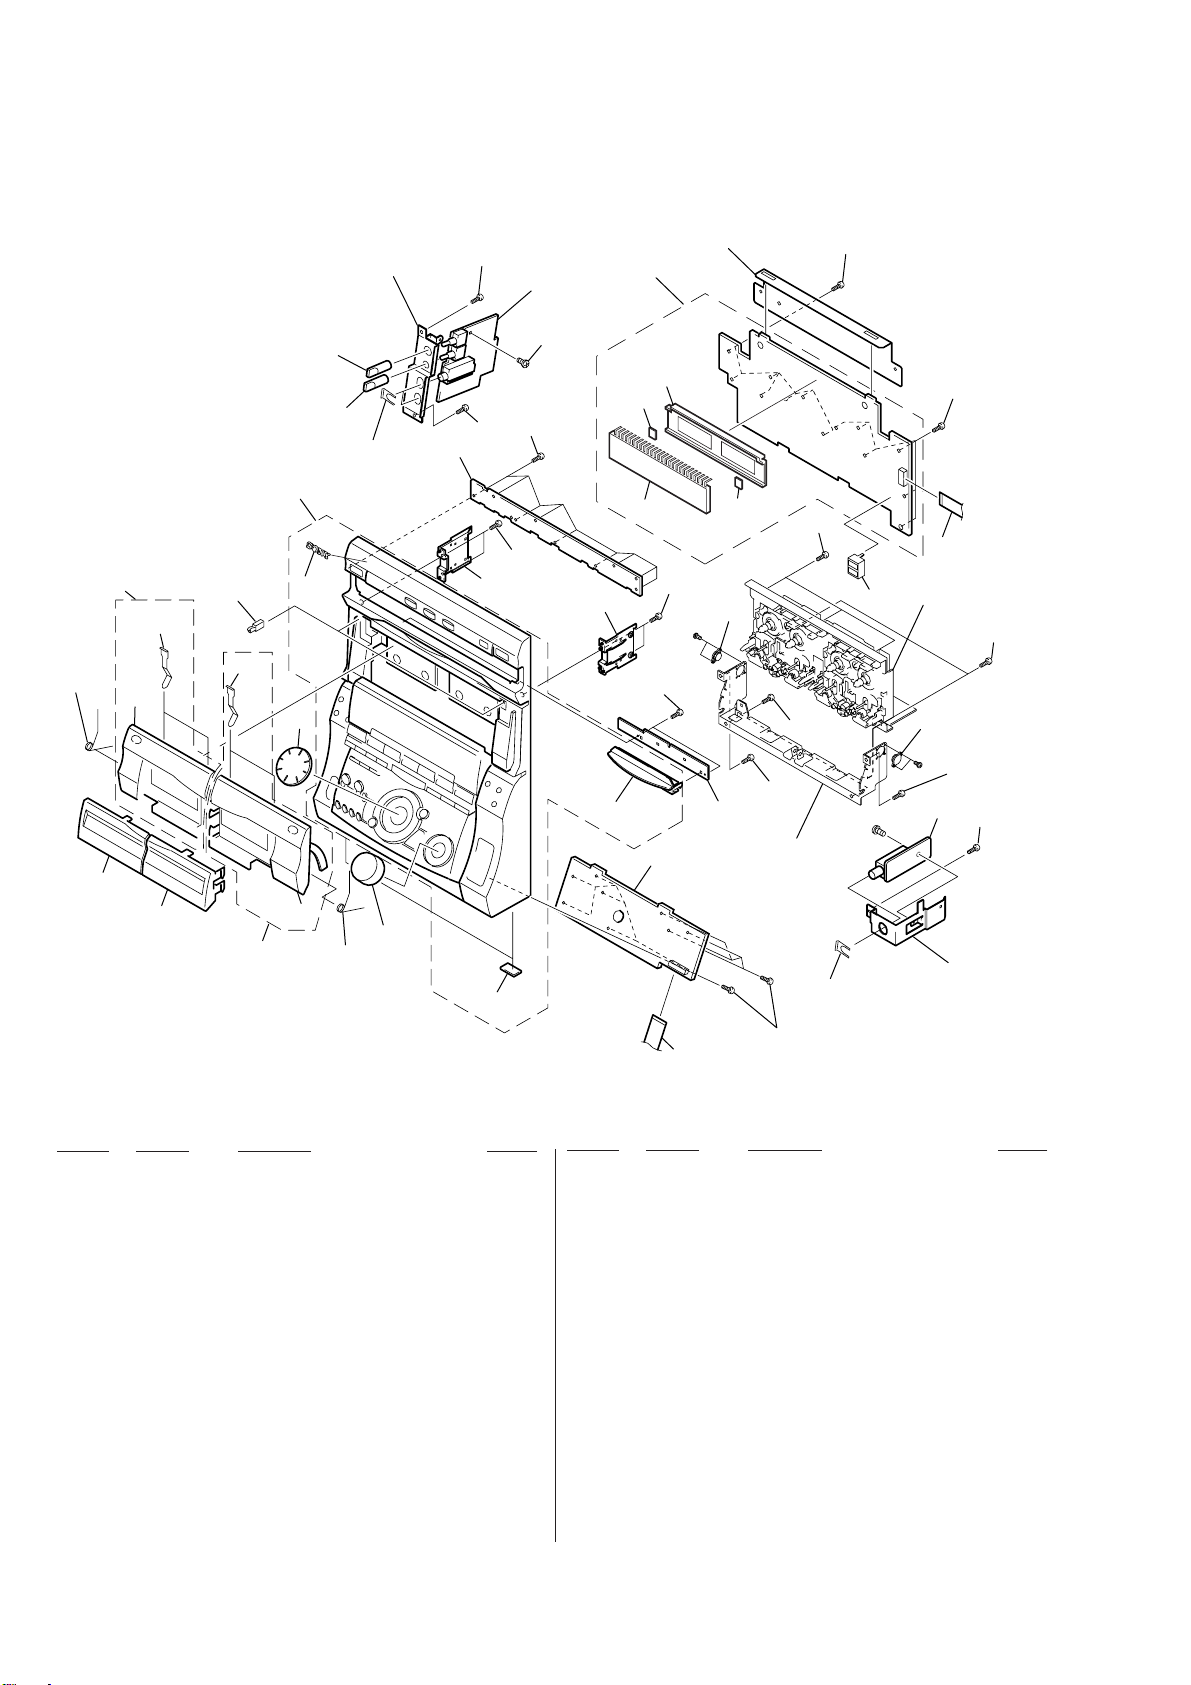
(3) FRONT PANEL SECTION
105
101
127
103
107
102
129
107
128
125
125
supplied with
J750,751
110
111
108
104
not supplied
109
106
117
123
123
116
112
126
123
123
123
118
120
ND601
116
123
not supplied
113
119
123
130
not supplied
120
122
#7
114
123
123
123
123
not supplied
supplied
with J755
123
115
#2
123
121
TCM230AWR1
TCM230PWR1
123
122
#7
123
124
123
not supplied
Ref. No. Part No. Description Remark
101 4-996-808-01 WINDOW (TCL)
102 4-996-809-01 WINDOW (TCR)
103 4-996-799-01 LID (A), CASSETTE
104 4-996-800-01 LID (B), CASSETTE
105 4-900-600-01 SPRING (A DECK)
106 4-900-601-01 SPRING (B DECK)
107 4-959-229-11 DETENT, CASSETTE
108 4-996-810-01 KNOB (JOG)
109 4-996-811-01 KNOB (VOL)
110 X-4949-983-1 PANEL ASSY, FRONT
111 4-962-708-21 EMBLEM (4-A), SONY
112 4-988-663-01 FOOT (FELT)
* 113 A-4414-044-A CONT-PANEL BOARD, COMPLETE
* 114 1-668-269-11 DECORATION BOARD
115 4-996-812-01 HOLDER (LED)
116 4-996-716-01 HOLDER (CDM)
– 108 –
Ref. No. Part No. Description Remark
* 117 1-668-268-11 CD SWITCH BOARD
* 118 A-4414-054-A PANEL BOARD, COMPLETE (EXCEPT TH)
* 118 A-4414-635-A PANEL BOARD, COMPLETE (TH)
* 119 4-996-796-11 HOLDER, FL TUBE
* 120 4-932-810-31 CUSHION (FL)
121 1-769-972-11 WIRE (FLAT TYPE) (13 CORE)
* 122 3-973-975-21 DAMPER, OIL
123 4-951-620-01 SCREW (2.6X8), +BVTP
* 124 1-668-271-11 HEADPHONE BOARD
125 4-986-893-51 KNOB (MICROPHONE)
* 126 A-4414-041-A MIC BOARD, COMPLETE
127 X-4949-941-1 LID (L) ASSY, CASSETTE
128 X-4949-942-1 LID (R) ASSY, CASSETTE
129 4-995-081-01 LATCH, DC
130 1-773-108-11 WIRE (FLAT TYPE) (19 CORE)
ND601 1-517-731-21 INDICATOR TUBE, FLUORESCENT
Page 77
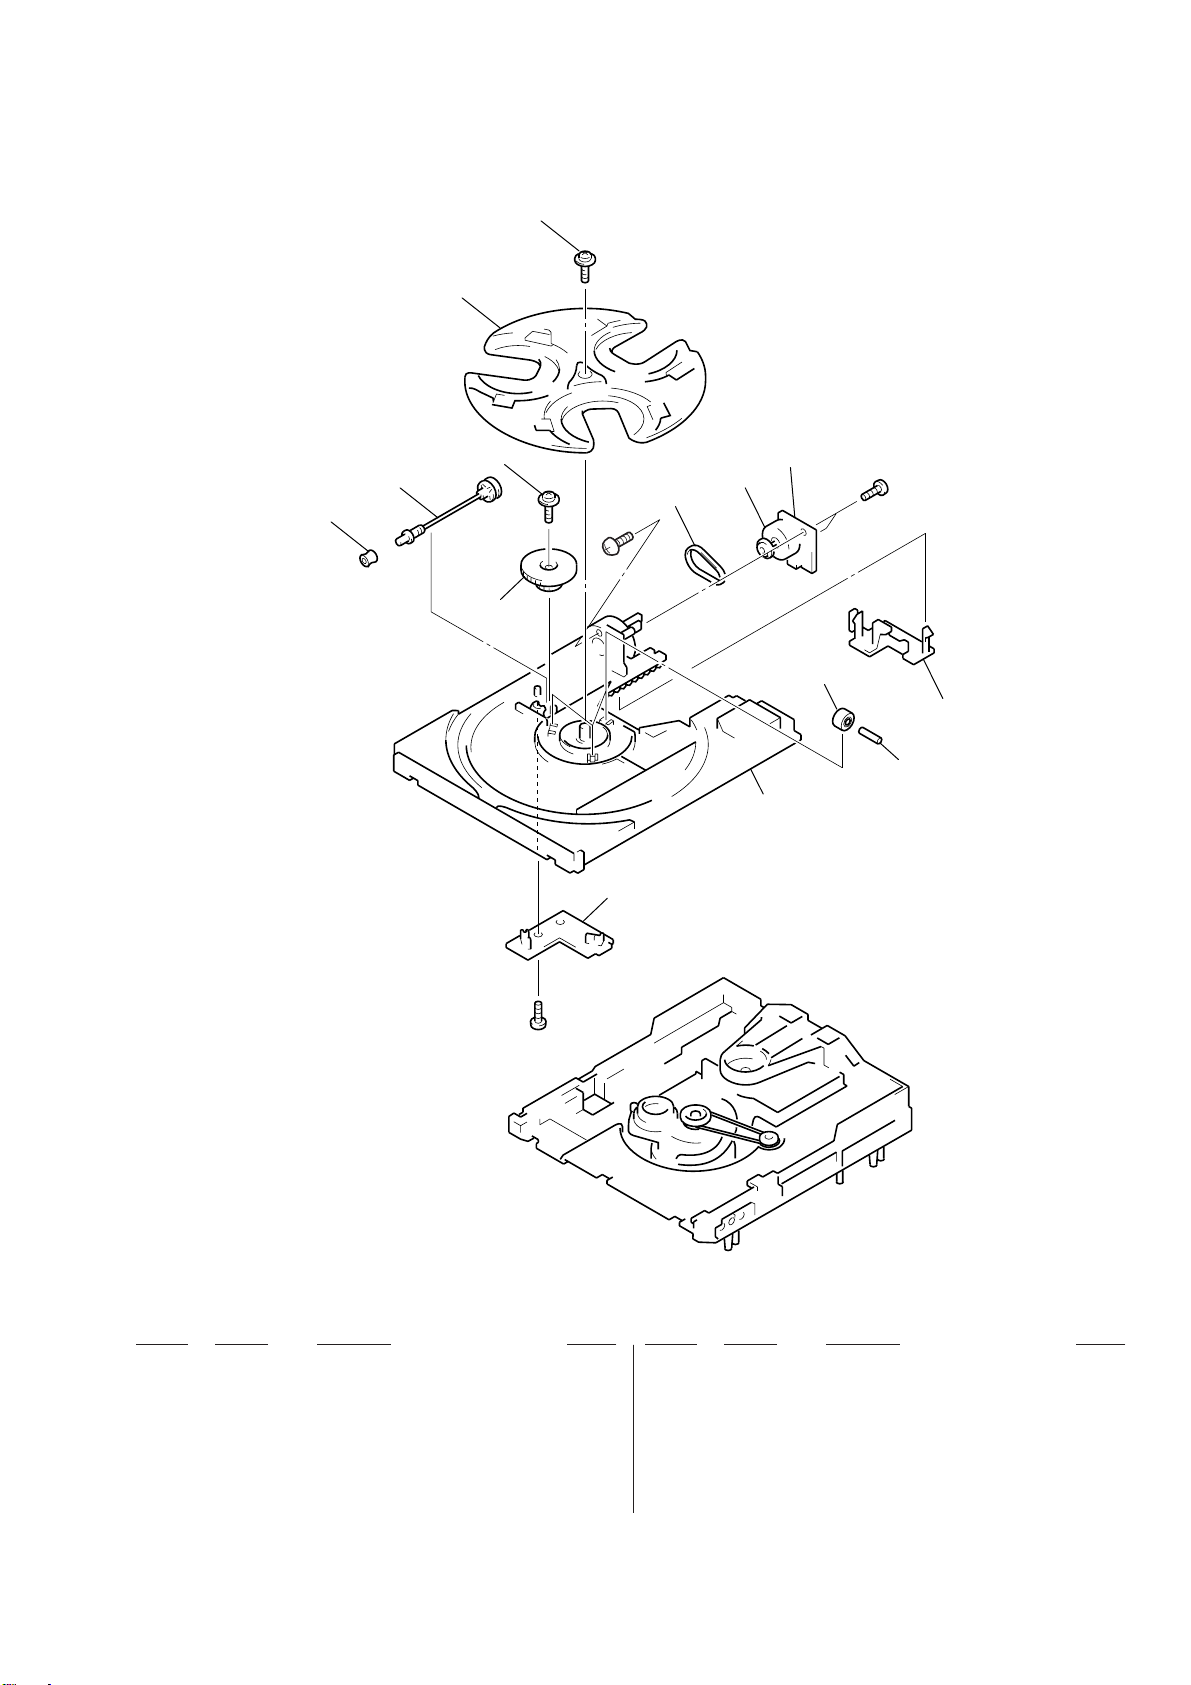
(4) CD MECHANISM DECK SECTION-1
(CDM38L-5BD24AL)
201
202
211
203
201
205
#8
209
204
M701
212
206
#2
207
208
210
#2
Ref. No. Part No. Description Remark Ref. No. Part No. Description Remark
201 4-981-789-11 BRACKET (2), YOKE
202 4-977-945-01 TRAY (TURN)
203 X-4946-665-1 SHAFT ASSY, WORM
204 4-977-943-01 BELT (TURN) (1.2)
205 4-977-956-01 WHEEL, WORM
* 206 1-658-577-11 MOTOR (TURN) BOARD
207 4-988-162-01 ROLLER
208 4-977-941-01 BEARING (WORM)
* 209 1-658-576-11 SENSOR BOARD
210 4-934-376-01 SHAFT (ROLLER)
211 4-981-187-01 COLLAR (WORM)
212 4-977-944-01 TRAY (SLIDE)
M701 A-4672-004-A MOTOR ASSY (TURN)
– 109 –
Page 78
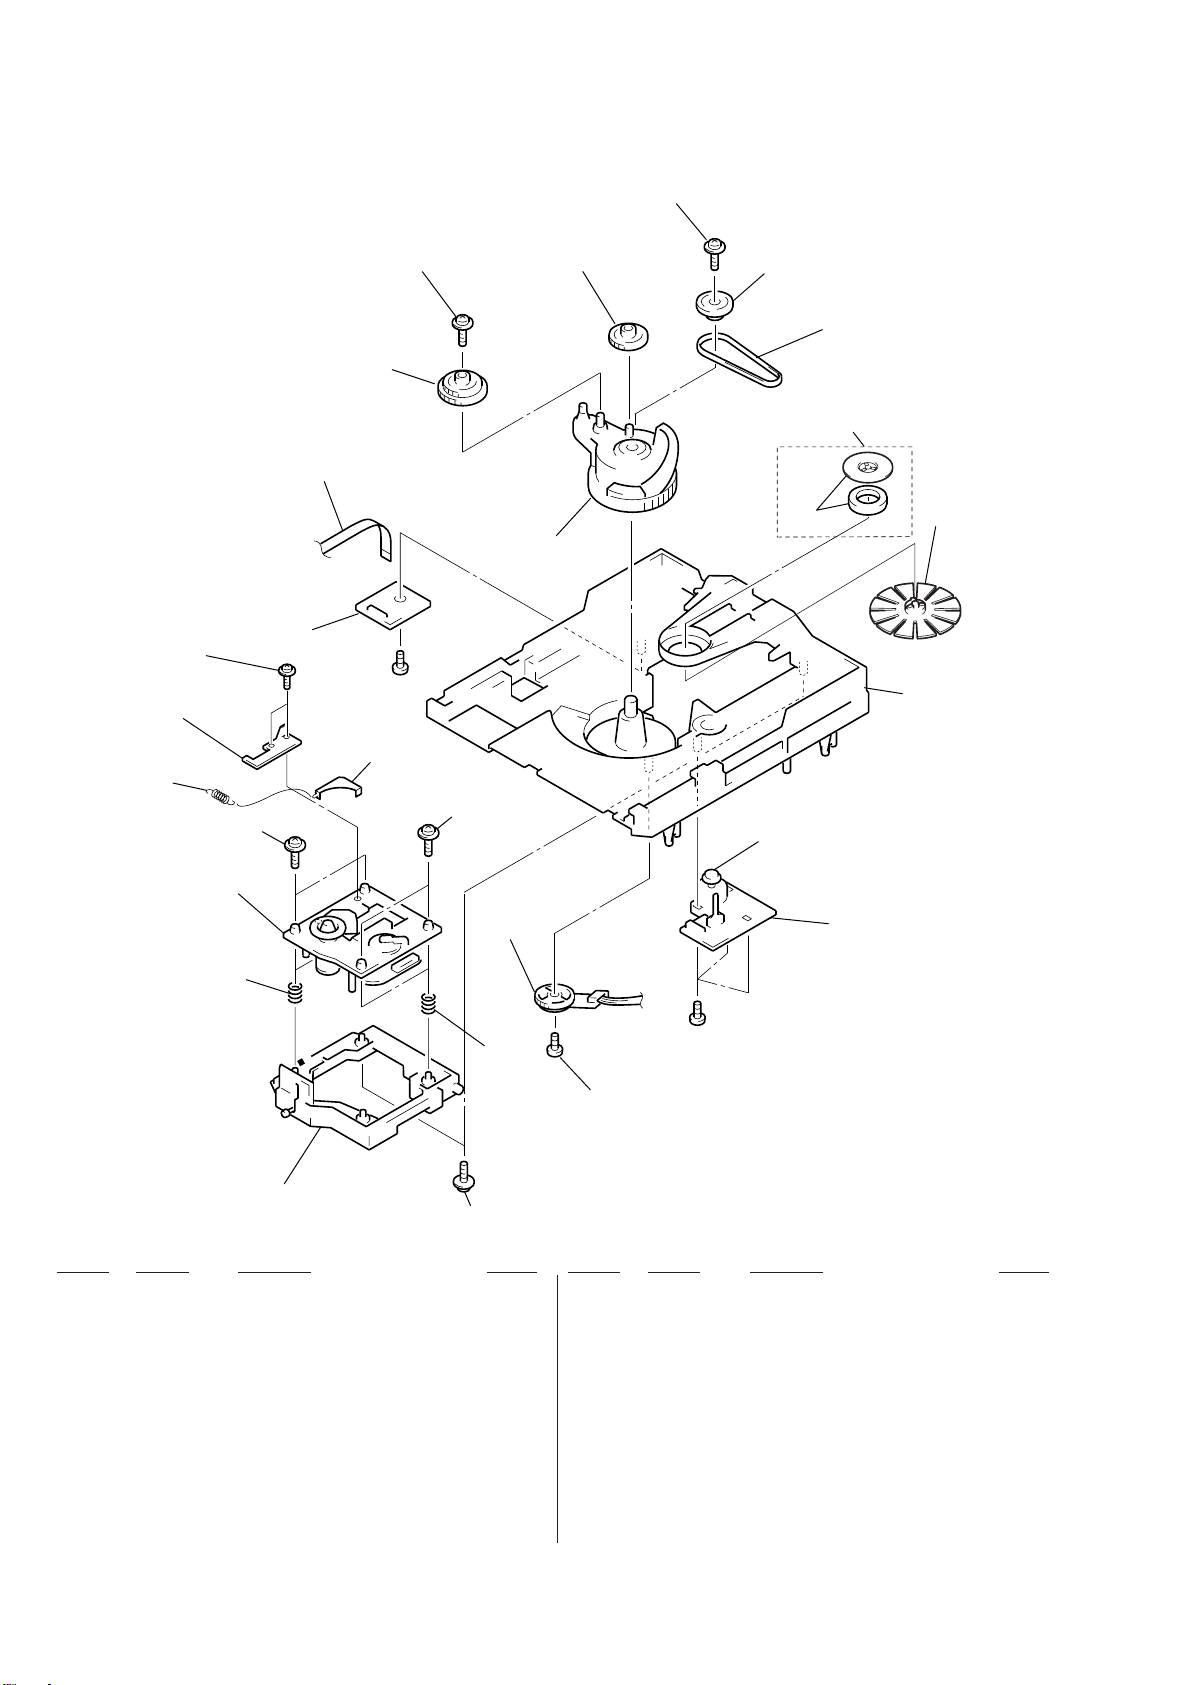
(5) CD MECHANISM DECK SECTION-2
(CDM38L-5BD24AL)
251
267
268
266
261
259
258
254
269
#2
251
261
256
253
252
not
supplied
M801
255
257
270
260
BU-5BD24AL
S811
263
263
265
251
Ref. No. Part No. Description Remark
251 4-981-789-11 BRACKET (2), YOKE
252 4-977-954-01 PULLEY (SL)
253 4-977-953-01 GEAR (SL-A)
254 4-977-955-01 GEAR (SL-B)
255 4-977-942-01 BELT (SL) (1.4)
256 X-4946-667-1 CAM ASSY, BU
257 1-452-925-11 MAGNET ASSY
258 1-776-042-11 WIRE (FLAT TYPE) (8 CORE)
* 259 1-658-575-11 CONNECTOR BOARD
* 260 X-4946-668-1 CHASSIS (CDM) ASSY
262
#2
264
Ref. No. Part No. Description Remark
* 262 1-658-578-11 MOTOR (SLIDE) BOARD
263 4-982-447-01 SPRING (BU), COMPRESSION
264 4-951-620-41 SCREW (2.6), +BVTP
* 265 X-4946-666-1 HOLDER (BU) ASSY
266 4-989-494-01 SCREW (SLIDER), STEP
267 4-989-492-11 SLIDER (38)
268 4-989-819-11 SPRING, TENSION
269 4-989-491-11 COVER, LENS
270 4-994-963-01 PULLEY (LBT), PRESS
M801 A-4672-004-A MOTOR ASSY (SLIDE)
261 4-985-672-01 SCREW (+PTPWH M2.6), FLOATING
S811 1-473-335-11 ENCODER, ROTARY (BU, TRAY ADDRESS DET)
– 110 –
Page 79
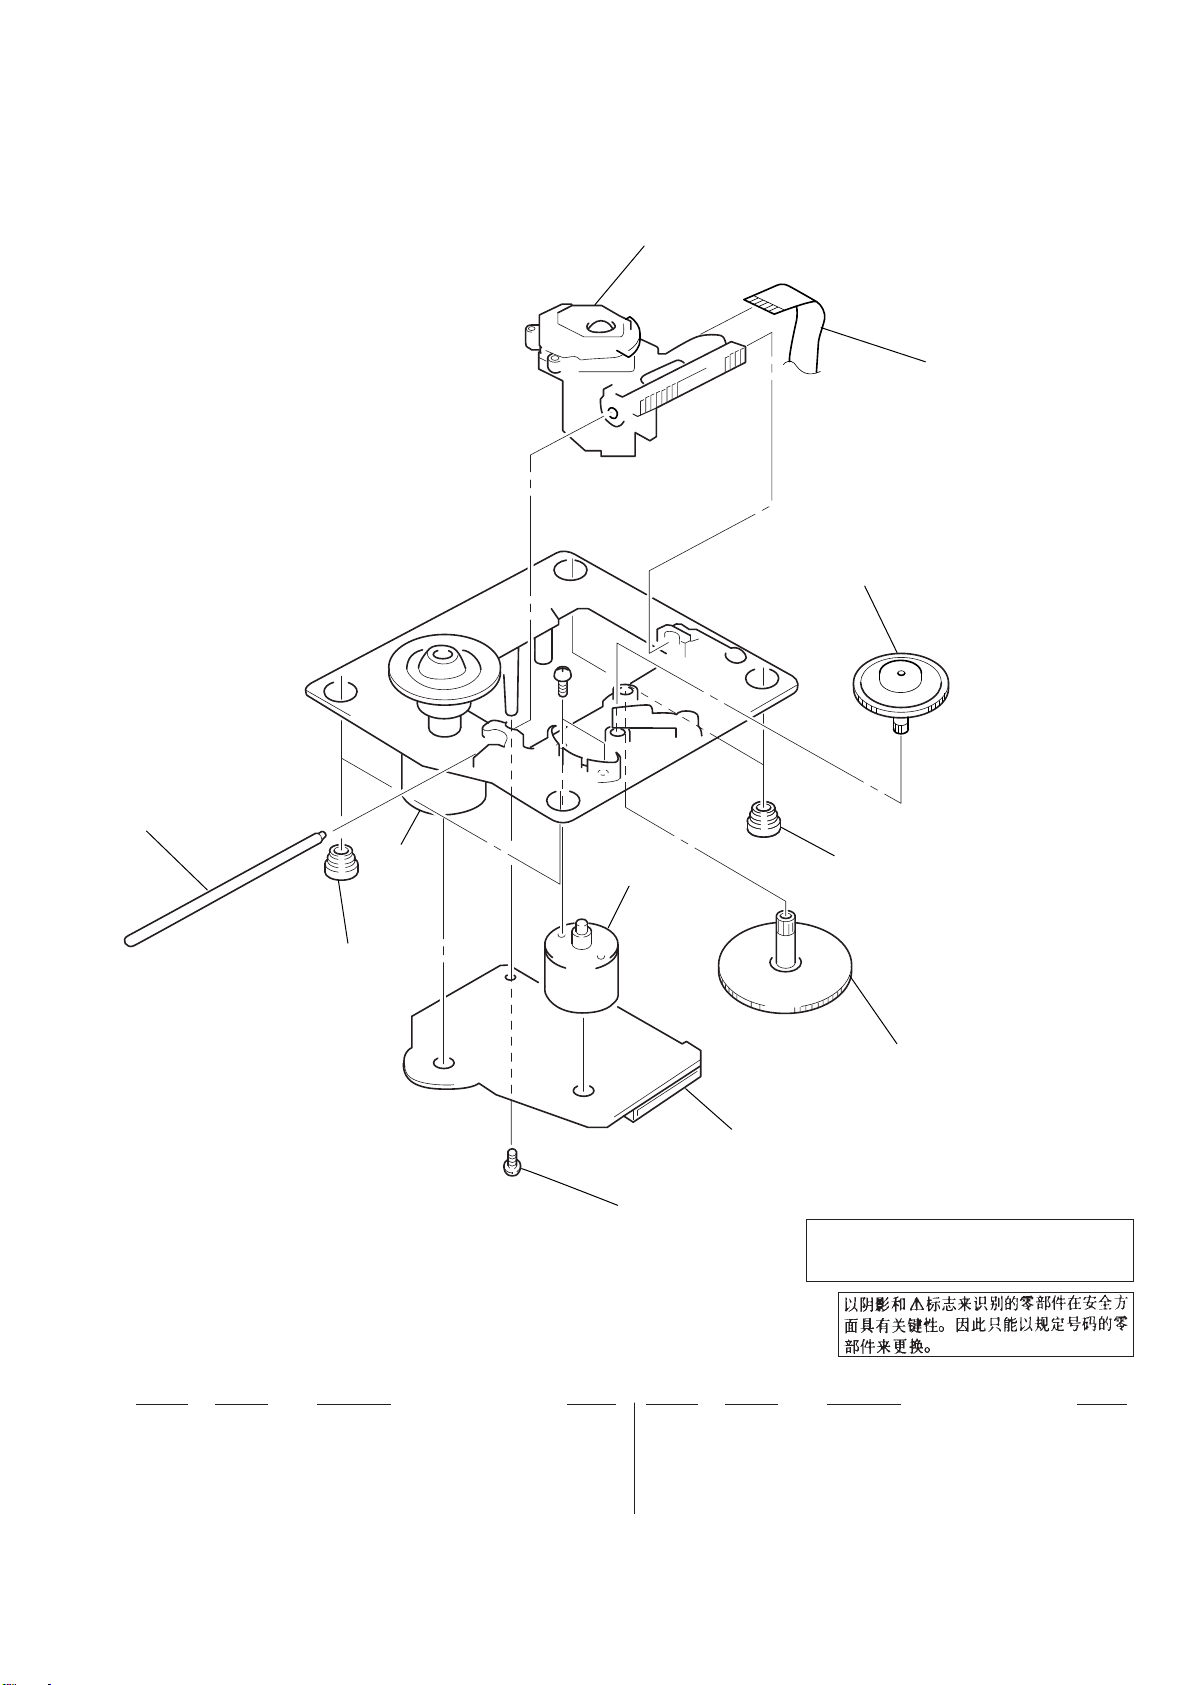
(6) BASE UNIT SECTION
(BU-5BD24AL)
301
302
303
#9
305
M101
M102
304
304
306
307
308
The components identified by mark ! or dotted
line with mark ! are critical for safety.
Replace only with part number specified.
Ref. No. Part No. Description Remark Ref. No. Part No. Description Remark
! 301 8-820-020-02 OPTICAL PICK-UP KSS-213D/Q-NP
302 1-769-069-11 WIRE (FLAT TYPE) (16 CORE)
303 4-917-567-01 GEAR (M)
304 4-951-940-01 INSULATOR (BU)
305 4-917-565-01 SHAFT, SLED
306 4-917-564-01 GEAR (P), FLATNESS
* 307 A-4699-697-A BD BOARD, COMPLETE
308 4-951-620-01 SCREW (2.6X8), +BVTP
M101 A-4917-523-A MOTOR ASSY (SPINDLE)
M102 A-4917-504-A MOTOR ASSY (SLED)
– 111 –
Page 80
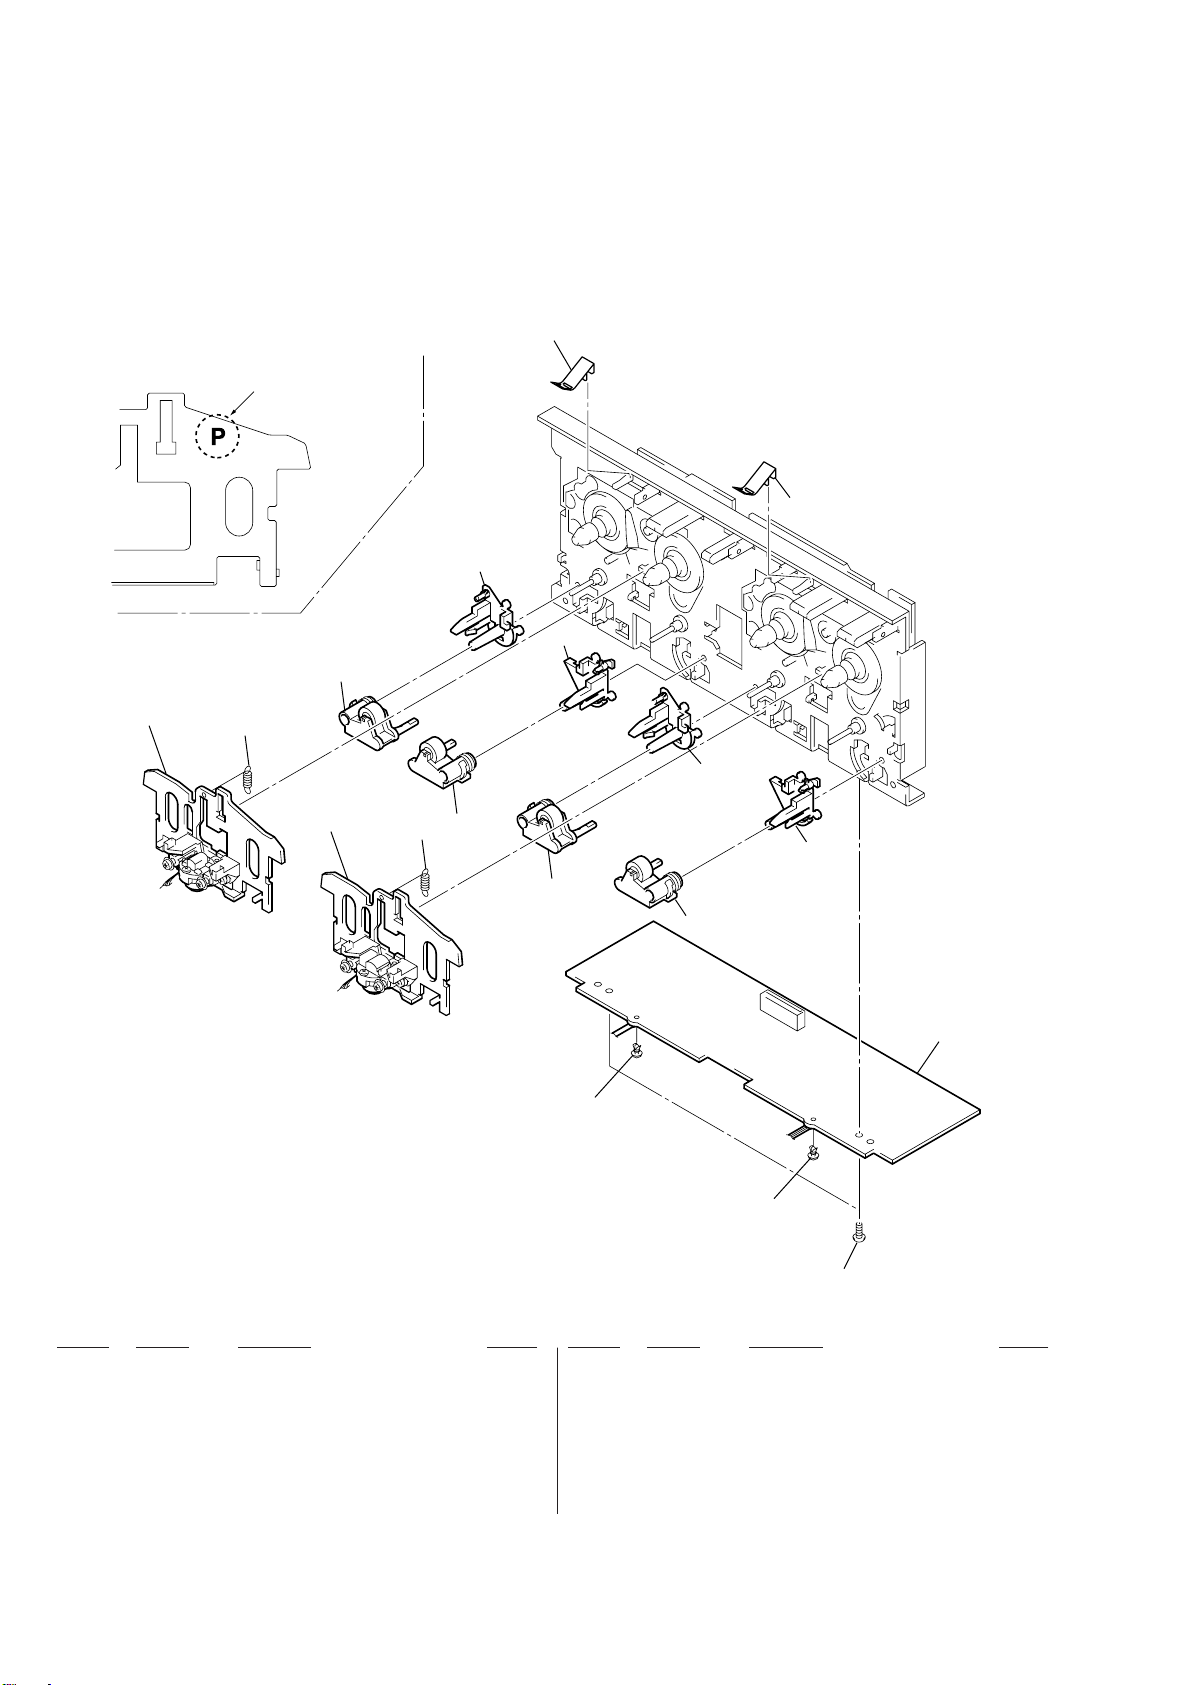
(7) TAPE MECHANISM DECK SECTION-1
TCM-230AWR1
(
TCM-230PWR1
*
NOTE: Two types of parts which are not interchangeable are available
for the Head deck (A) ASSY and Head deck (B) ASSY.
When replacing the parts, refer to the following figure, and use
the appropriate part
)
408
Parts with “P” mark: 230PWR1
Parts without “P” mark: 230AWR1
407
404
408
406
HP101
403
HRPE101
403
407
405
406
404
405
409
402
402
401
Ref. No. Part No. Description Remark
401 3-376-464-11 SCREW (+PTT 2.6X6), GROUND POINT
402 3-911-116-21 RIVET, PUSH
403 3-016-574-01 SPRING (HEAD), TENSION
404 X-3374-156-1 PINCH LEVER (REV) ASSY
405 X-3374-155-1 PINCH LEVER (FWD) ASSY
406 3-016-564-01 BASE (PINCH LEVER FWD)
407 3-016-565-01 BASE (PINCH LEVER REV)
– 112 –
Ref. No. Part No. Description Remark
408 3-016-567-01 SPRING (CASSETTE), LEAF
* 409 A-2007-731-A AUDIO BOARD, COMPLETE
HP101 A-2056-681-A DECK (A) ASSY, HEAD (230AWR1) (*NOTE)
HP101 A-2056-683-A DECK (A) ASSY, HEAD (230PWR1) (*NOTE)
HRPE101A-2056-682-A DECK (B) ASSY, HEAD (230AWR1) (*NOTE)
HRPE101A-2056-684-A DECK (B) ASSY, HEAD (230PWR1) (*NOTE)
Page 81
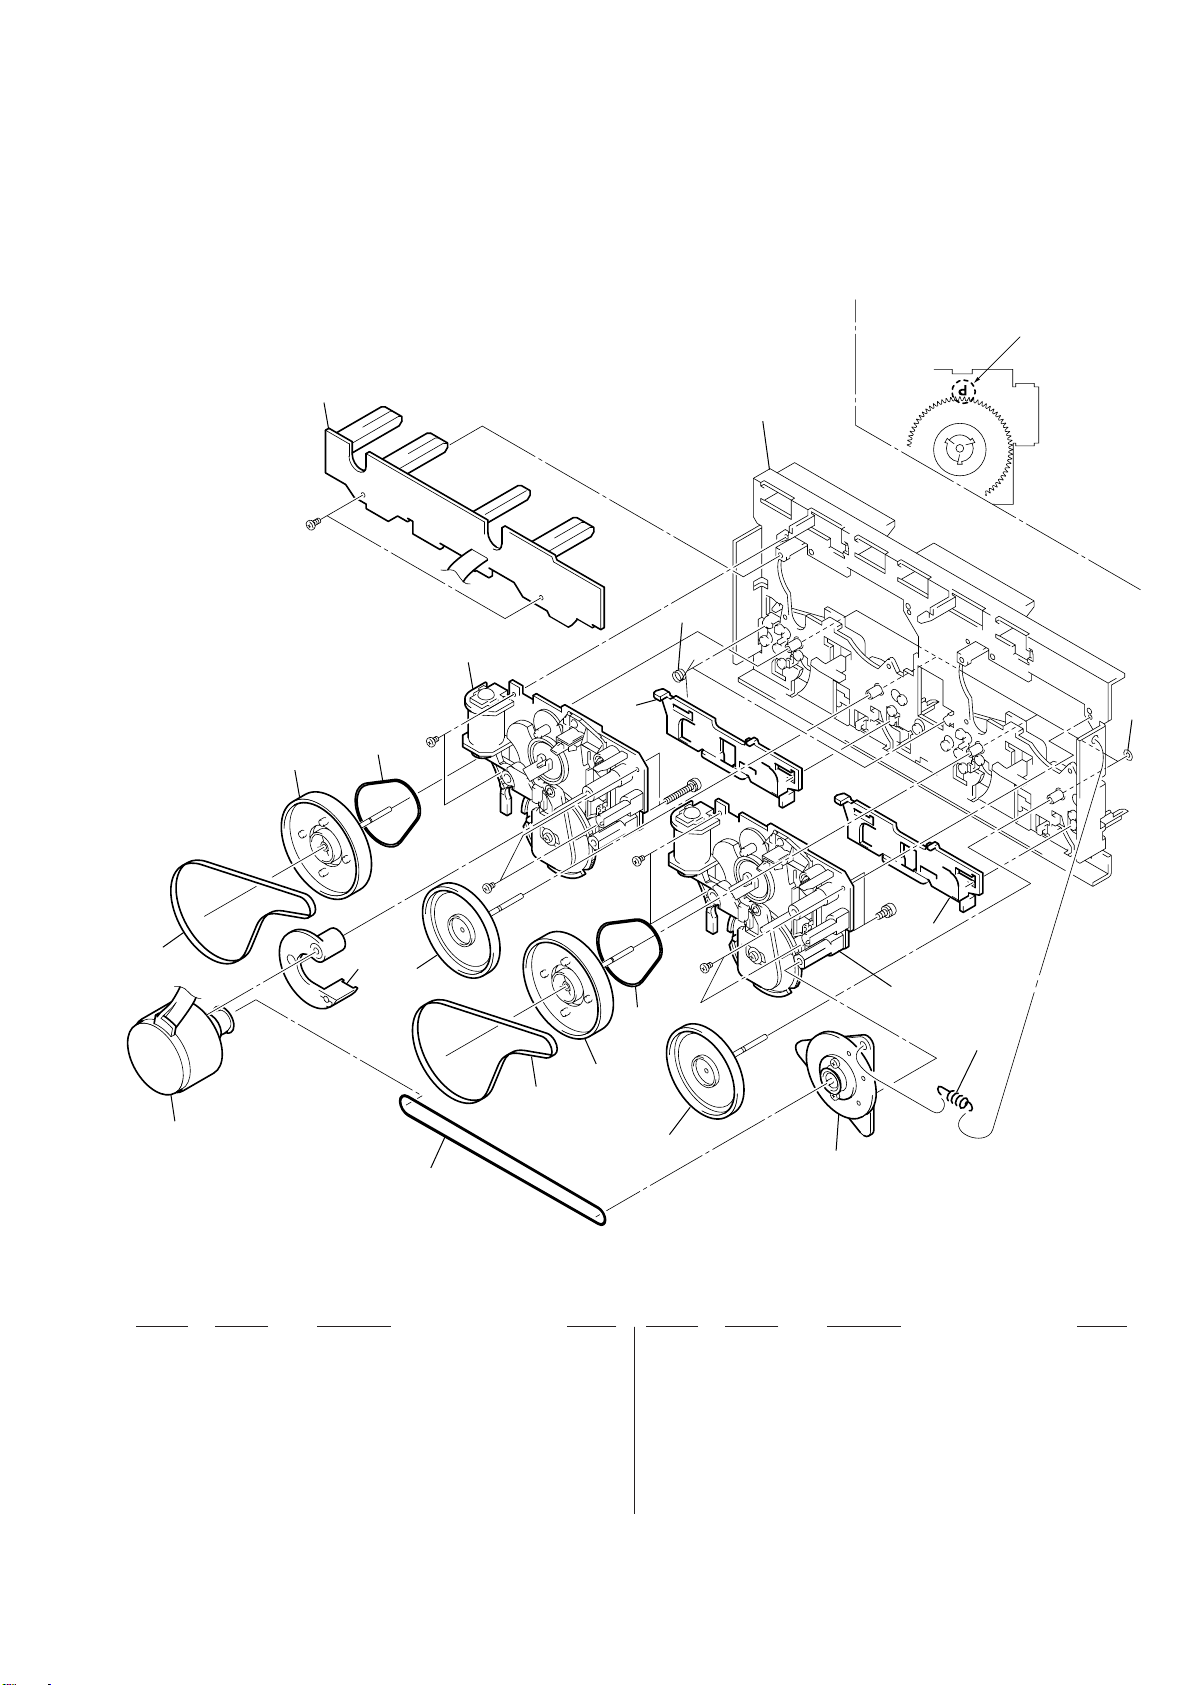
(8) TAPE MECHANISM DECK SECTION-2
TCM-230AWR1
(
TCM-230PWR1
)
*
NOTE: Two types of parts which are not interchangeable are available
for the mechanical block assembly. When replacing the parts,
refer to the following figure, and use the appropriate part.
Parts with “P” mark: 230PWR1
Parts without “P” mark: 230AWR1
452
455
#7
461
458
454
456
#10
459
#10
460
#10
458
462
#12
#10
451
463
#11
460
459
464
M1
453
* 451 X-3374-214-3 CHASSIS ASSY, MAIN
452 3-016-570-01 BELT (CAPSTAN)
453 3-016-569-01 BELT (TENSION)
454 3-017-360-01 BRACKET (MOTOR)
455 X-3374-234-8 FLYWHEEL (FWD) ASSY
456 X-3374-235-1 FLYWHEEL (REV) ASSY
457 X-3374-238-1 PULLEY ASSY, TENSION
458 3-024-405-01 BELT (FR2)
455
452
456
457
Ref. No. Part No. Description RemarkRef. No. Part No. Description Remark
459 A-2004-629-A MECHANICAL BLOCK ASSY (230AWR1) (*NOTE)
459 A-2004-630-A MECHANICAL BLOCK ASSY (230PWR1) (*NOTE)
460 3-016-566-01 SLIDER, REVERSE
* 461 A-2007-732-A LEAF SW BOARD, COMPLETE
462 3-016-575-01 SPRING, TORSION
463 3-019-208-01 WASHER, STOPPER
464 3-027-453-01 SPRING (GROUND), TENSION
M1 A-2004-628-A MOTOR ASSY, CAPSTAN
– 113 –
Page 82
AUDIO
SECTION 9
ELECTRICAL PARTS LIST
NOTE:
• Due to standardization, replacements in the
parts list may be different from the parts specified in the diagrams or the components used
on the set.
• -XX and -X mean standardized parts, so they
may have some difference from the original
one.
• RESISTORS
All resistors are in ohms.
METAL: Metal-film resistor.
METAL OXIDE: Metal oxide-film resistor.
F: nonflammable
• Abbreviation
CH : Chinese
IA : Indonesia
MY : Malaysia
Ref. No. Part No. Description Remark Ref. No. Part No. Description Remark
* A-2007-731-A AUDIO BOARD, COMPLETE
C301 1-162-289-31 CERAMIC 390PF 10% 50V
C302 1-126-968-11 ELECT 100uF 20% 6.3V
C303 1-162-282-31 CERAMIC 100PF 10% 50V
C304 1-130-483-00 MYLAR 0.01uF 5% 50V
C305 1-107-715-11 ELECT 22uF 20% 16V
C311 1-162-289-31 CERAMIC 390PF 10% 50V
C313 1-162-282-31 CERAMIC 100PF 10% 50V
C314 1-130-487-00 MYLAR 0.022uF 5% 50V
C315 1-126-233-11 ELECT 22uF 20% 50V
C331 1-137-427-11 FILM 120PF 5% 50V
C332 1-162-288-31 CERAMIC 330PF 10% 50V
C333 1-162-209-31 CERAMIC 27PF 5% 50V
C401 1-162-289-31 CERAMIC 390PF 10% 50V
C402 1-126-968-11 ELECT 100uF 20% 6.3V
C403 1-162-282-31 CERAMIC 100PF 10% 50V
C404 1-130-483-00 MYLAR 0.01uF 5% 50V
C405 1-107-715-11 ELECT 22uF 20% 16V
C411 1-162-289-31 CERAMIC 390PF 10% 50V
C413 1-162-282-31 CERAMIC 100PF 10% 50V
C414 1-130-487-00 MYLAR 0.022uF 5% 50V
C415 1-126-233-11 ELECT 22uF 20% 50V
C431 1-137-427-11 FILM 120PF 5% 50V
C432 1-162-288-31 CERAMIC 330PF 10% 50V
C433 1-162-209-31 CERAMIC 27PF 5% 50V
C601 1-104-396-11 ELECT 10uF 20% 16V
C602 1-104-396-11 ELECT 10uF 20% 16V
C611 1-104-396-11 ELECT 10uF 20% 16V
C612 1-104-396-11 ELECT 10uF 20% 16V
C621 1-137-150-11 FILM 0.01uF 5% 100V
C622 1-126-961-11 ELECT 2.2uF 20% 50V
C623 1-136-155-00 FILM 0.015uF 5% 50V
C624 1-130-481-00 MYLAR 0.0068uF 5% 50V
C625 1-130-481-00 MYLAR 0.0068uF 5% 50V
C627 1-124-903-11 ELECT 1uF 20% 50V
C628 1-136-153-00 FILM 0.01uF 5% 50V
C642 1-104-664-11 ELECT 47uF 20% 16V
CN601 1-695-338-11 PIN, CONNECTOR (PC BOARD) 15P
SP : Singapore
TH : Thai
**********************
< CAPACITOR >
< CONNECTOR >
• Items marked “*” are not stocked since they
are seldom required for routine service.
Some delay should be anticipated when ordering these items.
• SEMICONDUCTORS
In each case, u: µ, for example:
uA. . : µA. . uPA. . : µPA. .
uPB. . : µPB. . uPC. . : µPC. .
uPD. . : µPD. .
• CAPACITORS
uF: µF
• COILS
uH: µH
IC601 8-759-111-44 IC uPC4570C-1
IC602 8-759-143-54 IC uPC1330HA
IC611 8-759-111-44 IC uPC4570C-1
L331 1-410-780-11 INDUCTOR 27mH
L431 1-410-780-11 INDUCTOR 27mH
L601 1-414-193-41 INDUCTOR 220uH
L602 1-414-193-41 INDUCTOR 220uH
Q621 8-729-142-46 TRANSISTOR 2SC2001-LK
Q622 8-729-142-46 TRANSISTOR 2SC2001-LK
Q623 8-729-801-93 TRANSISTOR 2SD1387
R301 1-247-881-00 CARBON 120K 5% 1/4W
R302 1-249-409-11 CARBON 220 5% 1/4W
R303 1-249-433-11 CARBON 22K 5% 1/4W
R304 1-247-889-00 CARBON 270K 5% 1/4W
R305 1-247-858-11 CARBON 13K 5% 1/4W
R311 1-247-881-00 CARBON 120K 5% 1/4W
R312 1-247-807-31 CARBON 100 5% 1/4W
R314 1-247-882-11 CARBON 130K 5% 1/4W
R315 1-247-850-11 CARBON 6.2K 5% 1/4W
R331 1-249-430-11 CARBON 12K 5% 1/4W
R401 1-247-881-00 CARBON 120K 5% 1/4W
R402 1-249-409-11 CARBON 220 5% 1/4W
R403 1-249-433-11 CARBON 22K 5% 1/4W
R404 1-247-889-00 CARBON 270K 5% 1/4W
R405 1-247-858-11 CARBON 13K 5% 1/4W
R411 1-247-881-00 CARBON 120K 5% 1/4W
R412 1-247-807-31 CARBON 100 5% 1/4W
R414 1-247-882-11 CARBON 130K 5% 1/4W
R415 1-247-850-11 CARBON 6.2K 5% 1/4W
R431 1-249-430-11 CARBON 12K 5% 1/4W
R601 1-249-409-11 CARBON 220 5% 1/4W
R602 1-249-409-11 CARBON 220 5% 1/4W
R608 1-249-409-11 CARBON 220 5% 1/4W
R609 1-249-433-11 CARBON 22K 5% 1/4W
R611 1-249-409-11 CARBON 220 5% 1/4W
The components identified by
mark ! or dotted line with mark
! are critical for safety.
Replace only with part number
specified.
When indicating parts by reference
number, please include the board.
< IC >
< COIL >
< TRANSISTOR >
< RESISTOR >
– 114 –
Page 83
AUDIO BD
Ref. No. Part No. Description Remark
R612 1-249-409-11 CARBON 220 5% 1/4W
! R621 1-212-851-00 FUSIBLE 5.6 5% 1/4W F
! R622 1-212-851-00 FUSIBLE 5.6 5% 1/4W F
R623 1-249-432-11 CARBON 18K 5% 1/4W
R624 1-249-432-11 CARBON 18K 5% 1/4W
R625 1-249-429-11 CARBON 10K 5% 1/4W
< VARIABLE RESISTOR >
RV301 1-238-598-11 RES, ADJ, CARBON 2.2K
RV311 1-238-598-11 RES, ADJ, CARBON 2.2K
RV341 1-241-768-11 RES, ADJ, CARBON 220K
RV401 1-238-598-11 RES, ADJ, CARBON 2.2K
RV411 1-238-598-11 RES, ADJ, CARBON 2.2K
RV441 1-241-768-11 RES, ADJ, CARBON 220K
< TRANSFORMER >
T621 1-423-980-11 TRANSFORMER, BIAS OSCILLATION
************************************************************
* A-4699-697-A BD BOARD, COMPLETE
*******************
< CAPACITOR >
C101 1-163-005-11 CERAMIC CHIP 470PF 10% 50V
C102 1-163-038-00 CERAMIC CHIP 0.1uF 25V
C103 1-163-005-11 CERAMIC CHIP 470PF 10% 50V
C105 1-104-913-11 TANTAL. CHIP 10uF 20% 16V
C106 1-164-346-11 CERAMIC CHIP 1uF 16V
C107 1-164-346-11 CERAMIC CHIP 1uF 16V
C108 1-163-035-00 CERAMIC CHIP 0.047uF 50V
C109 1-163-145-00 CERAMIC CHIP 0.0015uF 5% 50V
C110 1-163-017-00 CERAMIC CHIP 0.0047uF 5% 50V
C111 1-163-251-11 CERAMIC CHIP 100PF 5% 50V
C112 1-163-038-00 CERAMIC CHIP 0.1uF 25V
C113 1-163-038-00 CERAMIC CHIP 0.1uF 25V
C115 1-126-607-11 ELECT CHIP 47uF 20% 4V
C116 1-126-607-11 ELECT CHIP 47uF 20% 4V
C117 1-126-209-11 ELECT CHIP 100uF 20% 4V
C118 1-163-275-11 CERAMIC CHIP 0.001uF 5% 50V
C119 1-163-091-00 CERAMIC CHIP 8PF 50V
C120 1-163-038-00 CERAMIC CHIP 0.1uF 25V
C121 1-163-231-11 CERAMIC CHIP 15PF 5% 50V
C123 1-163-021-91 CERAMIC CHIP 0.01uF 10% 50V
C124 1-164-005-11 CERAMIC CHIP 0.47uF 25V
C125 1-104-913-11 TANTAL. CHIP 10uF 20% 16V
C140 1-163-038-00 CERAMIC CHIP 0.1uF 25V
C141 1-163-038-00 CERAMIC CHIP 0.1uF 25V
C151 1-163-237-11 CERAMIC CHIP 27PF 5% 50V
C153 1-163-038-00 CERAMIC CHIP 0.1uF 25V
C154 1-164-336-11 CERAMIC CHIP 0.33uF 25V
C156 1-163-237-11 CERAMIC CHIP 27PF 5% 50V
C157 1-163-145-00 CERAMIC CHIP 0.0015uF 5% 50V
C159 1-163-019-00 CERAMIC CHIP 0.0068uF 10% 50V
C161 1-163-038-00 CERAMIC CHIP 0.1uF 25V
C162 1-163-275-11 CERAMIC CHIP 0.001uF 5% 50V
Ref. No. Part No. Description Remark
< CONNECTOR >
CN101 1-770-706-11 CONNECTOR, FFC/FPC 23P
CN102 1-770-425-11 CONNECTOR, FFC/FPC 16P
< IC >
IC101 8-752-369-78 IC CXD2545Q
IC102 8-759-455-91 IC BA6392FP-E2
IC103 8-752-072-45 IC CXA1821M-T6
IC104 8-759-398-25 IC TC7SH04F (TE85L)
< TRANSISTOR >
Q101 8-729-010-08 TRANSISTOR MSB710-R
Q102 8-729-120-28 TRANSISTOR 2SC1623-L5L6
Q103 8-729-120-28 TRANSISTOR 2SC1623-L5L6
< RESISTOR >
R101 1-216-077-00 METAL CHIP 15K 5% 1/10W
R102 1-216-097-00 RES,CHIP 100K 5% 1/10W
R103 1-216-077-00 METAL CHIP 15K 5% 1/10W
R104 1-216-085-00 METAL CHIP 33K 5% 1/10W
R105 1-216-097-00 RES,CHIP 100K 5% 1/10W
R106 1-216-061-00 METAL CHIP 3.3K 5% 1/10W
R107 1-216-061-00 METAL CHIP 3.3K 5% 1/10W
R108 1-216-073-00 METAL CHIP 10K 5% 1/10W
R109 1-216-121-00 RES,CHIP 1M 5% 1/10W
R110 1-216-025-00 RES,CHIP 100 5% 1/10W
R112 1-216-049-11 RES,CHIP 1K 5% 1/10W
R123 1-216-073-00 METAL CHIP 10K 5% 1/10W
R124 1-216-097-00 RES,CHIP 100K 5% 1/10W
R125 1-216-033-00 METAL CHIP 220 5% 1/10W
R126 1-216-033-00 METAL CHIP 220 5% 1/10W
R127 1-216-033-00 METAL CHIP 220 5% 1/10W
R131 1-216-037-00 METAL CHIP 330 5% 1/10W
R134 1-216-049-11 RES,CHIP 1K 5% 1/10W
R141 1-216-089-00 RES,CHIP 47K 5% 1/10W
R142 1-216-081-00 METAL CHIP 22K 5% 1/10W
R143 1-216-103-00 METAL CHIP 180K 5% 1/10W
R144 1-216-103-00 METAL CHIP 180K 5% 1/10W
R146 1-216-073-00 METAL CHIP 10K 5% 1/10W
R147 1-216-067-00 METAL CHIP 5.6K 5% 1/10W
R148 1-216-001-00 METAL CHIP 10 5% 1/10W
R149 1-216-003-11 RES,CHIP 12 5% 1/10W
R150 1-216-025-00 RES,CHIP 100 5% 1/10W
R151 1-216-025-00 RES,CHIP 100 5% 1/10W
R152 1-216-073-00 METAL CHIP 10K 5% 1/10W
R153 1-216-073-00 METAL CHIP 10K 5% 1/10W
R154 1-216-025-00 RES,CHIP 100 5% 1/10W
R155 1-216-025-00 RES,CHIP 100 5% 1/10W
R156 1-216-025-00 RES,CHIP 100 5% 1/10W
R158 1-216-109-00 METAL CHIP 330K 5% 1/10W
R159 1-216-097-00 RES,CHIP 100K 5% 1/10W
R160 1-216-295-00 SHORT 0
R161 1-216-308-00 METAL CHIP 4.7 5% 1/10W
R162 1-216-101-00 METAL CHIP 150K 5% 1/10W
R171 1-216-025-00 RES,CHIP 100 5% 1/10W
R172 1-216-025-00 RES,CHIP 100 5% 1/10W
– 115 –
R173 1-216-025-00 RES,CHIP 100 5% 1/10W
The components identified by mark ! or dotted
line with mark ! are critical for safety.
Replace only with part number specified.
Page 84

BD CD SWITCH CONNECTOR CONT-PANEL
Ref. No. Part No. Description Remark
R175 1-216-025-00 RES,CHIP 100 5% 1/10W
R176 1-216-073-00 METAL CHIP 10K 5% 1/10W
R177 1-216-073-00 METAL CHIP 10K 5% 1/10W
R178 1-216-073-00 METAL CHIP 10K 5% 1/10W
R179 1-216-025-00 RES,CHIP 100 5% 1/10W
< SWITCH >
S101 1-572-085-11 SWITCH, LEAF (LIMIT)
************************************************************
* 1-668-268-11 CD SWITCH BOARD
****************
< DIODE >
D631 8-719-056-13 LED SML79423C-TP15 (DISC 1)
D632 8-719-056-13 LED SML79423C-TP15 (DISC 2)
D633 8-719-056-13 LED SML79423C-TP15 (DISC 3)
< SHORT >
JR901 1-216-296-00 SHORT 0
JR902 1-216-295-00 SHORT 0
< TRANSISTOR >
Q613 8-729-027-60 TRANSISTOR DTC144TKA-T146
Q614 8-729-027-60 TRANSISTOR DTC144TKA-T146
Q615 8-729-027-60 TRANSISTOR DTC144TKA-T146
< RESISTOR >
Ref. No. Part No. Description Remark
< TRANSISTOR >
Q701 8-729-900-80 TRANSISTOR DTC114ES
< RESISTOR >
R703 1-249-435-11 CARBON 33K 5% 1/4W
R704 1-249-429-11 CARBON 10K 5% 1/4W
R705 1-249-417-11 CARBON 1K 5% 1/4W
************************************************************
* A-4414-044-A CONT-PANEL BOARD, COMPLETE
**************************
< CAPACITOR >
C627 1-163-021-00 CERAMIC CHIP 0.01uF 10% 50V
C628 1-163-021-00 CERAMIC CHIP 0.01uF 10% 50V
C629 1-163-021-00 CERAMIC CHIP 0.01uF 10% 50V
C630 1-163-021-00 CERAMIC CHIP 0.01uF 10% 50V
< CONNECTOR >
* CN608 1-568-862-11 SOCKET, CONNECTOR 19P
< DIODE >
D610 8-719-063-93 LED SLR325VC-N-T32 (ENTER/NEXT)
D612 8-719-057-97 LED SEL5923A-TP15 (GROOVE)
D613 8-719-063-93 LED SLR325VC-N-T32
(= ˜ +, DJ MIX (JOG))
D614 8-719-064-65 LED SELU5723C-TP15 (DJ MIX)
D615 8-719-064-65 LED SELU5723C-TP15 (DJ MIX)
R656 1-216-057-00 METAL CHIP 2.2K 5% 1/10W
R657 1-216-059-00 METAL CHIP 2.7K 5% 1/10W
R658 1-216-063-00 RES, CHIP 3.9K 5% 1/10W
R659 1-216-067-00 METAL CHIP 5.6K 5% 1/10W
R660 1-216-071-00 METAL CHIP 8.2K 5% 1/10W
R691 1-216-027-00 METAL CHIP 120 5% 1/10W
R692 1-216-027-00 METAL CHIP 120 5% 1/10W
R693 1-216-027-00 METAL CHIP 120 5% 1/10W
R694 1-216-027-00 METAL CHIP 120 5% 1/10W
R695 1-216-027-00 METAL CHIP 120 5% 1/10W
R696 1-216-027-00 METAL CHIP 120 5% 1/10W
< SWITCH >
S637 1-762-875-21 SWITCH, KEYBOARD (1/u)
S638 1-762-875-21 SWITCH, KEYBOARD (DISC 1)
S639 1-762-875-21 SWITCH, KEYBOARD (DISC 2)
S640 1-762-875-21 SWITCH, KEYBOARD (DISC 3)
S641 1-762-875-21 SWITCH, KEYBOARD (DISC SKIP/EX-CHANGE)
S642 1-762-875-21 SWITCH, KEYBOARD (§)
************************************************************
* 1-658-575-11 CONNECTOR BOARD
*****************
< CONNECTOR >
* CN701 1-568-946-11 PIN, CONNECTOR 8P
CN702 1-750-413-11 CONNECTOR, FFC/FPC 8P
D616 8-719-063-93 LED SLR325VC-N-T32 (CD NON-STOP)
D617 8-719-057-97 LED SEL5923A-TP15 (–, 0)
D618 8-719-057-97 LED SEL5923A-TP15 (+, ))
D801 8-719-057-97 LED SEL5923A-TP15 (BEAT, ON/OFF)
D802 8-719-057-97 LED SEL5923A-TP15 (BEAT, JAM)
D803 8-719-056-13 LED SML79423C-TP15 (AUTO BPM)
< TRANSISTOR >
Q604 8-729-027-60 TRANSISTOR DTC144TKA-T146
Q854 8-729-027-23 TRANSISTOR DTA114EKA-T146
Q855 8-729-027-23 TRANSISTOR DTA114EKA-T146
< RESISTOR >
R637 1-216-039-00 METAL CHIP 390 5% 1/10W
R638 1-216-041-00 METAL CHIP 470 5% 1/10W
R639 1-216-045-00 METAL CHIP 680 5% 1/10W
R640 1-216-047-00 RES, CHIP 820 5% 1/10W
R641 1-216-051-00 METAL CHIP 1.2K 5% 1/10W
R642 1-216-053-00 METAL CHIP 1.5K 5% 1/10W
R643 1-216-057-00 METAL CHIP 2.2K 5% 1/10W
R644 1-216-059-00 METAL CHIP 2.7K 5% 1/10W
R645 1-216-063-00 RES, CHIP 3.9K 5% 1/10W
R646 1-216-067-00 METAL CHIP 5.6K 5% 1/10W
R647 1-216-071-00 METAL CHIP 8.2K 5% 1/10W
R648 1-216-075-00 METAL CHIP 12K 5% 1/10W
R666 1-216-037-00 METAL CHIP 330 5% 1/10W
R667 1-216-029-00 METAL CHIP 150 5% 1/10W
R668 1-216-027-00 METAL CHIP 120 5% 1/10W
– 116 –
R669 1-216-019-00 METAL CHIP 56 5% 1/10W
Page 85
CONT-PANEL DECORATION HEADPHONE LEAF SW
Ref. No. Part No. Description Remark
R670 1-216-037-00 METAL CHIP 330 5% 1/10W
R671 1-216-031-00 METAL CHIP 180 5% 1/10W
R811 1-216-029-00 METAL CHIP 150 5% 1/10W
R812 1-216-029-00 METAL CHIP 150 5% 1/10W
R813 1-216-029-00 METAL CHIP 150 5% 1/10W
R814 1-216-029-00 METAL CHIP 150 5% 1/10W
R821 1-216-039-00 METAL CHIP 390 5% 1/10W
R822 1-216-041-00 METAL CHIP 470 5% 1/10W
R823 1-216-045-00 METAL CHIP 680 5% 1/10W
R831 1-216-039-00 METAL CHIP 390 5% 1/10W
R832 1-216-041-00 METAL CHIP 470 5% 1/10W
R833 1-216-045-00 METAL CHIP 680 5% 1/10W
< SWITCH >
S601 1-473-534-11 ENCODER, ROTARY
(= ˜ +, DJ MIX (JOG))
S602 1-473-392-11 ENCODER, ROTARY (VOLUME)
S617 1-762-875-21 SWITCH, KEYBOARD (CD LOOP)
S618 1-762-875-21 SWITCH, KEYBOARD (CD FLASH)
S619 1-762-875-21 SWITCH, KEYBOARD (CD NON-STOP)
S621 1-762-875-21 SWITCH, KEYBOARD (–, 0)
S622 1-762-875-21 SWITCH, KEYBOARD (ENTER/NEXT)
S623 1-762-875-21 SWITCH, KEYBOARD (+, ))
S624 1-762-875-21 SWITCH, KEYBOARD (DBFB)
S625 1-762-875-21 SWITCH, KEYBOARD (GROOVE)
S626 1-762-875-21 SWITCH, KEYBOARD (ACTIVE)
S627 1-762-875-21 SWITCH, KEYBOARD (SELECT)
S628 1-762-875-21 SWITCH, KEYBOARD (RETURN)
S629 1-762-875-21 SWITCH, KEYBOARD (PREV)
S630 1-762-875-21 SWITCH, KEYBOARD (NEXT)
S801 1-762-875-21 SWITCH, KEYBOARD (PAD B)
S802 1-762-875-21 SWITCH, KEYBOARD (BEAT LEVEL)
S803 1-762-875-21 SWITCH, KEYBOARD (BEAT JAM)
S804 1-762-875-21 SWITCH, KEYBOARD (AUTO BPM)
S805 1-762-875-21 SWITCH, KEYBOARD (PAD A)
S806 1-762-875-21 SWITCH, KEYBOARD (BEAT ON/OFF)
S807 1-762-875-21 SWITCH, KEYBOARD (BEAT SELECT)
S808 1-762-875-21 SWITCH, KEYBOARD (BEAT SPEED)
< LEAD >
W601 1-775-377-61 LEAD (WITH CONNECTOR)
************************************************************
* 1-668-269-11 DECORATION BOARD
*****************
Ref. No. Part No. Description Remark
Q857 8-729-027-60 TRANSISTOR DTC144TKA-T146
< RESISTOR >
R706 1-216-019-00 METAL CHIP 56 5% 1/10W
R707 1-216-019-00 METAL CHIP 56 5% 1/10W
R708 1-216-041-00 METAL CHIP 470 5% 1/10W
R709 1-216-027-00 METAL CHIP 120 5% 1/10W
R710 1-216-027-00 METAL CHIP 120 5% 1/10W
************************************************************
* 1-668-271-11 HEADPHONE BOARD
*****************
< CAPACITOR >
C790 1-163-038-00 CERAMIC CHIP 0.1uF 25V
C791 1-163-009-11 CERAMIC CHIP 0.001uF 10% 50V
C792 1-163-009-11 CERAMIC CHIP 0.001uF 10% 50V
< CONNECTOR >
CN752 1-506-469-11 PIN, CONNECTOR 4P
< EARTH TERMINAL >
* EP751 1-537-738-21 TERMINAL, EARTH
< JACK >
J755 1-785-200-11 JACK (LARGE TYPE) (PHONES)
************************************************************
* A-2007-732-A LEAF SW BOARD, COMPLETE
************************
< CAPACITOR >
C1001 1-107-716-11 ELECT 33uF 20% 10V
< CONNECTOR >
CN1001 1-784-459-11 CONNECTOR, FFC/FPC 17P
< DIODE >
D1001 8-719-911-19 DIODE 1SS119
D1002 8-719-911-19 DIODE 1SS119
< CONNECTOR >
* DM1001 1-784-581-11 HOLDER, CABLE (2.5MM PITCH) 4P
< DIODE >
D640 8-719-063-93 LED SLR325VC-N-T32
(DECORATION (CENTER))
D641 8-719-032-86 LED SEL5420E (DECORATION (LEFT))
D642 8-719-032-86 LED SEL5420E (DECORATION (LEFT))
D643 8-719-032-86 LED SEL5420E (DECORATION (CENTER))
D644 8-719-033-06 LED SEL5920A (DECORATION (CENTER))
D655 8-719-033-06 LED SEL5920A (DECORATION (RIGHT))
D656 8-719-033-06 LED SEL5920A (DECORATION (RIGHT))
< TRANSISTOR >
Q856 8-729-027-60 TRANSISTOR DTC144TKA-T146
< PHOTO INTERRUPTER >
IC1001 8-749-014-38 PHOTO INTERRUPTER SG-264
IC1002 8-749-014-38 PHOTO INTERRUPTER SG-264
< TRANSISTOR >
Q1001 8-729-029-56 TRANSISTOR DTA144ESA
< RESISTOR >
R907 1-247-879-11 CARBON 100K 5% 1/4W
R1001 1-249-409-11 CARBON 220 5% 1/4W
R1002 1-249-409-11 CARBON 220 5% 1/4W
R1003 1-249-414-11 CARBON 560 5% 1/4W
– 117 –
Page 86

LEAF SW MAIN
Ref. No. Part No. Description Remark
R1004 1-247-834-11 CARBON 1.3K 5% 1/4W
R1005 1-247-818-11 CARBON 300 5% 1/4W
R1006 1-247-864-11 CARBON 24K 5% 1/4W
R1007 1-247-856-00 CARBON 11K 5% 1/4W
R1008 1-249-417-11 CARBON 1K 5% 1/4W
< VARIABLE RESISTOR >
RV1001 1-241-785-11 RES, ADJ, CARBON 10K
RV1002 1-241-785-11 RES, ADJ, CARBON 10K
< SWITCH >
S1001 1-570-953-11 SWITCH, PUSH (1 KEY) (A PLAY)
S1002 1-570-953-11 SWITCH, PUSH (1 KEY) (B PLAY)
S1003 1-771-333-11 SWITCH, LEAF (A HALF)
S1004 1-771-205-11 SWITCH, LEAF (A 120/70)
S1005 1-771-205-11 SWITCH, LEAF (REC A)
S1006 1-771-333-11 SWITCH, LEAF (B HALF)
S1008 1-771-205-11 SWITCH, LEAF (B 120/70)
S1009 1-771-205-11 SWITCH, LEAF (REC B)
************************************************************
* A-4414-052-A MAIN BOARD, COMPLETE (MY, SP, IA)
* A-4414-056-A MAIN BOARD, COMPLETE (CH)
* A-4414-637-A MAIN BOARD, COMPLETE (TH)
**********************
7-685-646-79 SCREW +BVTP 3X8 TYPE2 N-S
< CAPACITOR >
C101 1-163-001-11 CERAMIC CHIP 220PF 10% 50V
C102 1-163-001-11 CERAMIC CHIP 220PF 10% 50V
C103 1-163-001-11 CERAMIC CHIP 220PF 10% 50V
C111 1-137-195-11 FILM 0.56uF 5% 50V
C112 1-163-986-00 CERAMIC CHIP 0.027uF 10% 25V
C113 1-136-167-00 FILM 0.15uF 5% 50V
C114 1-163-018-00 CERAMIC CHIP 0.0056uF 5% 50V
C115 1-163-989-11 CERAMIC CHIP 0.033uF 10% 25V
C116 1-163-011-11 CERAMIC CHIP 0.0015uF 10% 50V
C117 1-163-021-00 CERAMIC CHIP 0.01uF 10% 50V
C118 1-163-003-11 CERAMIC CHIP 330PF 10% 50V
C119 1-163-017-00 CERAMIC CHIP 0.0047uF 5% 50V
C120 1-164-182-11 CERAMIC CHIP 0.0033uF 10% 50V
C121 1-126-964-11 ELECT 10uF 20% 50V
C122 1-163-006-11 CERAMIC CHIP 560PF 10% 50V
C123 1-136-169-00 FILM 0.22uF 5% 50V
C124 1-136-169-00 FILM 0.22uF 5% 50V
C125 1-126-964-11 ELECT 10uF 20% 50V
C131 1-104-665-11 ELECT 100uF 20% 10V
C132 1-104-665-11 ELECT 100uF 20% 10V
C133 1-163-038-00 CERAMIC CHIP 0.1uF 25V
C134 1-163-038-00 CERAMIC CHIP 0.1uF 25V
C135 1-126-964-11 ELECT 10uF 20% 50V
C136 1-163-038-00 CERAMIC CHIP 0.1uF 25V
C137 1-163-038-00 CERAMIC CHIP 0.1uF 25V
C141 1-109-953-11 ELECT 2.2uF 20% 50V
C151 1-163-001-11 CERAMIC CHIP 220PF 10% 50V
C152 1-163-001-11 CERAMIC CHIP 220PF 10% 50V
C153 1-163-001-11 CERAMIC CHIP 220PF 10% 50V
C154 1-216-295-00 SHORT 0
Ref. No. Part No. Description Remark
C161 1-137-195-11 FILM 0.56uF 5% 50V
C162 1-163-986-00 CERAMIC CHIP 0.027uF 10% 25V
C163 1-136-167-00 FILM 0.15uF 5% 50V
C164 1-163-018-00 CERAMIC CHIP 0.0056uF 5% 50V
C165 1-163-989-11 CERAMIC CHIP 0.033uF 10% 25V
C166 1-163-011-11 CERAMIC CHIP 0.0015uF 10% 50V
C167 1-163-021-00 CERAMIC CHIP 0.01uF 10% 50V
C168 1-163-003-11 CERAMIC CHIP 330PF 10% 50V
C169 1-163-017-00 CERAMIC CHIP 0.0047uF 5% 50V
C170 1-164-182-11 CERAMIC CHIP 0.0033uF 10% 50V
C171 1-126-964-11 ELECT 10uF 20% 50V
C172 1-163-006-11 CERAMIC CHIP 560PF 10% 50V
C173 1-136-169-00 FILM 0.22uF 5% 50V
C174 1-136-169-00 FILM 0.22uF 5% 50V
C175 1-126-964-11 ELECT 10uF 20% 50V
C176 1-164-344-11 CERAMIC CHIP 0.068uF 10% 25V
C177 1-163-021-00 CERAMIC CHIP 0.01uF 10% 50V
C191 1-126-964-11 ELECT 10uF 20% 50V
C192 1-163-007-11 CERAMIC CHIP 680PF 10% 50V
C193 1-126-964-11 ELECT 10uF 20% 50V
C194 1-163-001-11 CERAMIC CHIP 220PF 10% 50V
C195 1-163-038-00 CERAMIC CHIP 0.1uF 25V
C196 1-163-038-00 CERAMIC CHIP 0.1uF 25V
C197 1-216-295-00 SHORT 0
C201 1-136-165-00 FILM 0.1uF 5% 50V
C202 1-136-165-00 FILM 0.1uF 5% 50V
C203 1-126-964-11 ELECT 10uF 20% 50V
C204 1-126-964-11 ELECT 10uF 20% 50V
C205 1-126-964-11 ELECT 10uF 20% 50V
C206 1-126-964-11 ELECT 10uF 20% 50V
C207 1-126-934-11 ELECT 220uF 20% 10V
C208 1-126-934-11 ELECT 220uF 20% 16V
C209 1-163-038-00 CERAMIC CHIP 0.1uF 25V
C210 1-126-961-11 ELECT 2.2uF 20% 50V
C211 1-126-934-11 ELECT 220uF 20% 10V
C212 1-126-961-11 ELECT 2.2uF 20% 50V
C213 1-126-964-11 ELECT 10uF 20% 50V
C214 1-126-964-11 ELECT 10uF 20% 50V
C215 1-126-934-11 ELECT 220uF 20% 16V
C216 1-163-038-00 CERAMIC CHIP 0.1uF 25V
C217 1-136-165-00 FILM 0.1uF 5% 50V
C218 1-126-960-11 ELECT 1uF 20% 50V
C219 1-126-961-11 ELECT 2.2uF 20% 50V
C220 1-126-960-11 ELECT 1uF 20% 50V
C221 1-136-165-00 FILM 0.1uF 5% 50V
C222 1-126-961-11 ELECT 2.2uF 20% 50V
C223 1-124-252-00 ELECT 0.33uF 20% 50V
C224 1-126-959-11 ELECT 0.47uF 20% 50V
C225 1-136-164-00 FILM 0.082uF 5% 50V
C226 1-130-477-00 MYLAR 0.0033uF 5% 50V
C227 1-136-164-00 FILM 0.082uF 5% 50V
C228 1-163-038-00 CERAMIC CHIP 0.1uF 25V
C229 1-126-934-11 ELECT 220uF 20% 10V
C230 1-130-469-00 MYLAR 680PF 5% 50V
C231 1-136-161-00 FILM 0.047uF 5% 50V
C232 1-136-157-00 FILM 0.022uF 5% 50V
C233 1-136-173-00 FILM 0.47uF 5% 50V
– 118 –
Page 87

MAIN
Ref. No. Part No. Description Remark
C234 1-104-664-11 ELECT 47uF 20% 10V
C235 1-126-961-11 ELECT 2.2uF 20% 50V
C236 1-126-961-11 ELECT 2.2uF 20% 50V
C237 1-136-165-00 FILM 0.1uF 5% 50V
C238 1-136-165-00 FILM 0.1uF 5% 50V
C239 1-126-959-11 ELECT 0.47uF 20% 50V
C240 1-126-963-11 ELECT 4.7uF 20% 50V
C241 1-126-959-11 ELECT 0.47uF 20% 50V
C242 1-126-963-11 ELECT 4.7uF 20% 50V
C243 1-136-167-00 FILM 0.15uF 5% 50V
C244 1-126-962-11 ELECT 3.3uF 20% 50V
C245 1-136-167-00 FILM 0.15uF 5% 50V
C246 1-136-167-00 FILM 0.15uF 5% 50V
C247 1-126-962-11 ELECT 3.3uF 20% 50V
C248 1-136-167-00 FILM 0.15uF 5% 50V
C249 1-126-963-11 ELECT 4.7uF 20% 50V
C250 1-126-959-11 ELECT 0.47uF 20% 50V
C251 1-126-963-11 ELECT 4.7uF 20% 50V
C252 1-126-959-11 ELECT 0.47uF 20% 50V
C254 1-126-934-11 ELECT 220uF 20% 16V
C255 1-136-165-00 FILM 0.1uF 5% 50V
C256 1-126-934-11 ELECT 220uF 20% 16V
C291 1-163-038-00 CERAMIC CHIP 0.1uF 25V
C292 1-163-038-00 CERAMIC CHIP 0.1uF 25V
C293 1-164-161-11 CERAMIC CHIP 0.0022uF 10% 100V
C294 1-163-005-11 CERAMIC CHIP 470PF 10% 50V
C295 1-126-964-11 ELECT 10uF 20% 50V
C296 1-126-964-11 ELECT 10uF 20% 50V
C301 1-126-960-11 ELECT 1uF 20% 50V
C302 1-130-479-00 MYLAR 0.0047uF 5% 50V
C303 1-136-165-00 FILM 0.1uF 5% 50V
C304 1-136-165-00 FILM 0.1uF 5% 50V
C305 1-126-964-11 ELECT 10uF 20% 50V
C306 1-126-960-11 ELECT 1uF 20% 50V
C307 1-126-959-11 ELECT 0.47uF 20% 50V
C308 1-126-964-11 ELECT 10uF 20% 50V
C309 1-136-173-00 FILM 0.47uF 5% 50V
C310 1-163-005-11 CERAMIC CHIP 470PF 10% 50V
C311 1-126-964-11 ELECT 10uF 20% 50V
C312 1-126-959-11 ELECT 0.47uF 20% 50V
C313 1-130-471-00 MYLAR 0.001uF 5% 50V
C314 1-126-964-11 ELECT 10uF 20% 50V
C315 1-126-963-11 ELECT 4.7uF 20% 50V
C316 1-104-665-11 ELECT 100uF 20% 10V
C317 1-104-665-11 ELECT 100uF 20% 10V
C320 1-163-005-11 CERAMIC CHIP 470PF 10% 50V
C331 1-163-038-00 CERAMIC CHIP 0.1uF 25V
C332 1-163-038-00 CERAMIC CHIP 0.1uF 25V
C333 1-163-017-00 CERAMIC CHIP 0.0047uF 5% 50V
C334 1-163-017-00 CERAMIC CHIP 0.0047uF 5% 50V
C351 1-126-960-11 ELECT 1uF 20% 50V
C352 1-130-479-00 MYLAR 0.0047uF 5% 50V
C353 1-136-165-00 FILM 0.1uF 5% 50V
C354 1-136-165-00 FILM 0.1uF 5% 50V
C355 1-126-964-11 ELECT 10uF 20% 50V
C356 1-126-960-11 ELECT 1uF 20% 50V
C357 1-126-959-11 ELECT 0.47uF 20% 50V
Ref. No. Part No. Description Remark
C358 1-126-964-11 ELECT 10uF 20% 50V
C359 1-136-173-00 FILM 0.47uF 5% 50V
C371 1-163-009-11 CERAMIC CHIP 0.001uF 10% 50V
C372 1-163-009-11 CERAMIC CHIP 0.001uF 10% 50V
C373 1-163-009-11 CERAMIC CHIP 0.001uF 10% 50V
C374 1-163-009-11 CERAMIC CHIP 0.001uF 10% 50V
C378 1-126-935-11 ELECT 470uF 20% 6.3V
C382 1-126-925-11 ELECT 470uF 20% 10V
C383 1-163-038-00 CERAMIC CHIP 0.1uF 25V
C384 1-163-038-00 CERAMIC CHIP 0.1uF 25V
C385 1-126-961-11 ELECT 2.2uF 20% 50V
C386 1-126-961-11 ELECT 2.2uF 20% 50V
C389 1-126-935-11 ELECT 470uF 20% 6.3V
C390 1-126-935-11 ELECT 470uF 20% 6.3V
C391 1-163-038-00 CERAMIC CHIP 0.1uF 25V
C392 1-104-665-11 ELECT 100uF 20% 10V
C401 1-163-038-00 CERAMIC CHIP 0.1uF 25V
C402 1-163-038-00 CERAMIC CHIP 0.1uF 25V
C403 1-126-964-11 ELECT 10uF 20% 50V
C411 1-163-038-00 CERAMIC CHIP 0.1uF 25V
C412 1-163-038-00 CERAMIC CHIP 0.1uF 25V
C414 1-126-964-11 ELECT 10uF 20% 50V
C415 1-126-964-11 ELECT 10uF 20% 50V
C501 1-126-916-11 ELECT 1000uF 20% 6.3V
C502 1-163-038-00 CERAMIC CHIP 0.1uF 25V
C503 1-163-234-11 CERAMIC CHIP 20PF 5% 50V
C504 1-163-235-11 CERAMIC CHIP 22PF 5% 50V
C505 1-163-038-00 CERAMIC CHIP 0.1uF 25V
C506 1-104-665-11 ELECT 100uF 20% 10V
C508 1-163-009-11 CERAMIC CHIP 0.001uF 10% 50V
C901 1-111-235-61 ELECT 10000uF 20% 25V
C902 1-126-943-11 ELECT 2200uF 20% 25V
C903 1-126-964-11 ELECT 10uF 20% 50V
C904 1-126-964-11 ELECT 10uF 20% 50V
C905 1-104-665-11 ELECT 100uF 20% 10V
C906 1-104-665-11 ELECT 100uF 20% 10V
C907 1-126-925-11 ELECT 470uF 20% 10V
C908 1-126-925-11 ELECT 470uF 20% 10V
C911 1-126-964-11 ELECT 10uF 20% 50V
C912 1-126-768-11 ELECT 2200uF 20% 16V
C921 1-126-964-11 ELECT 10uF 20% 50V
C922 1-126-767-11 ELECT 1000uF 20% 16V
C931 1-126-964-11 ELECT 10uF 20% 50V
C932 1-126-916-11 ELECT 1000uF 20% 6.3V
C933 1-126-916-11 ELECT 1000uF 20% 6.3V
C934 1-104-665-11 ELECT 100uF 20% 10V
C935 1-126-964-11 ELECT 10uF 20% 50V
C936 1-126-916-11 ELECT 1000uF 20% 6.3V
C937 1-126-925-11 ELECT 470uF 20% 10V
C941 1-126-964-11 ELECT 10uF 20% 50V
C942 1-104-665-11 ELECT 100uF 20% 10V
C951 1-104-664-11 ELECT 47uF 20% 10V
C952 1-136-165-00 FILM 0.1uF 5% 50V
C953 1-136-173-00 FILM 0.47uF 5% 50V
C961 1-163-038-00 CERAMIC CHIP 0.1uF 25V
C991 1-216-295-00 SHORT 0
– 119 –
Page 88

MAIN
Ref. No. Part No. Description Remark
< CONNECTOR >
* CN101 1-568-832-11 SOCKET, CONNECTOR 13P
CN102 1-784-600-11 SOCKET, CONNECTOR (NON ZIF)15P
(EXCEPT TH)
CN102 1-784-601-11 SOCKET, CONNECTOR (NON ZIF)13P (TH)
* CN103 1-568-946-11 PIN, CONNECTOR 8P
* CN104 1-568-947-11 PIN, CONNECTOR 9P
* CN105 1-568-856-11 SOCKET, CONNECTOR 13P
CN106 1-568-834-11 SOCKET, CONNECTOR 15P
* CN107 1-568-836-11 SOCKET, CONNECTOR 17P
* CN301 1-568-449-11 HOUSING, CONNECTOR(PC BOARD)3P
CN901 1-778-982-11 CONNECTOR, BOARD TO BOARD 13P
CN902 1-770-728-11 CONNECTOR, BOARD TO BOARD 9P
* CN961 1-564-518-11 PLUG, CONNECTOR 3P
< DIODE >
D502 8-719-988-62 DIODE 1SS355
D508 8-719-988-62 DIODE 1SS355
D901 8-719-988-62 DIODE 1SS355
D931 8-719-988-62 DIODE 1SS355
D932 8-719-210-33 DIODE EC10DS2
D951 8-719-988-62 DIODE 1SS355
D952 8-719-988-62 DIODE 1SS355
D953 8-719-988-62 DIODE 1SS355
D954 8-719-988-62 DIODE 1SS355
D955 8-719-210-33 DIODE EC10DS2
D956 8-719-988-62 DIODE 1SS355
Ref. No. Part No. Description Remark
< JACK >
J101 1-774-411-11 JACK, PIN 6P (VIDE0 (AUDIO) IN, MD IN/OUT)
J191 1-774-785-11 JACK, PIN 1P (SUPER WOOFER)
< SHORT >
JR1 1-216-295-00 SHORT 0
JR2 1-216-295-00 SHORT 0
JR4 1-216-295-00 SHORT 0
JR5 1-216-295-00 SHORT 0
JR201 1-216-296-00 SHORT 0
JR202 1-216-296-00 SHORT 0
< COIL >
L201 1-412-473-21 INDUCTOR 0uH
L241 1-412-032-11 INDUCTOR CHIP 100uH
L372 1-412-032-11 INDUCTOR CHIP 100uH
L391 1-412-032-11 INDUCTOR CHIP 100uH
L569 1-412-032-11 INDUCTOR CHIP 100uH
L570 1-412-032-11 INDUCTOR CHIP 100uH
L572 1-412-032-11 INDUCTOR CHIP 100uH
< TRANSISTOR >
Q111 8-729-119-78 TRANSISTOR 2SC403SP-51
Q112 8-729-119-78 TRANSISTOR 2SC403SP-51
Q113 8-729-141-30 TRANSISTOR 2SC3623A-LK
Q141 8-729-422-57 TRANSISTOR UN4111
Q142 8-729-900-36 TRANSISTOR DTC124ES
< GROUND PLATE >
* EPT901 4-870-539-11 PLATE, GROUND
< FILTER >
FL131 1-233-289-21 FILTER, EMI (SMD)
FL241 1-233-289-21 FILTER, EMI (SMD)
FL501 1-233-289-21 FILTER, EMI (SMD)
FL502 1-233-289-21 FILTER, EMI (SMD)
< IC >
IC111 8-759-495-24 IC M62442FP-TP
IC191 8-759-636-55 IC M5218AFP
IC201 8-759-526-39 IC LV1041M
IC291 8-759-636-55 IC M5218AFP
IC301 8-759-495-26 IC HA12215
IC391 8-749-923-04 IC TOTX178 (CD DIGITAL OUT, OPTICAL)
IC401 8-759-636-55 IC M5218AFP
IC411 8-759-636-55 IC M5218AFP
IC501 8-759-546-35 IC uPD780016AYGF-014-3BA
IC901 8-759-450-49 IC BA07T
IC902 8-759-604-90 IC M5F7907L
IC911 8-759-231-58 IC TA7812S
IC921 8-759-604-38 IC M5F78M10
IC931 8-759-231-53 IC TA7805S
IC932 8-759-231-53 IC TA7805S
IC941 8-759-450-49 IC BA07T
IC951 8-759-635-63 IC M51943BSL
Q143 8-729-119-76 TRANSISTOR 2SA1175-HFE
Q161 8-729-119-78 TRANSISTOR 2SC403SP-51
Q162 8-729-119-78 TRANSISTOR 2SC403SP-51
Q163 8-729-141-30 TRANSISTOR 2SC3623A-LK
Q191 8-729-141-30 TRANSISTOR 2SC3623A-LK
Q291 8-729-141-30 TRANSISTOR 2SC3623A-LK
Q292 8-729-141-30 TRANSISTOR 2SC3623A-LK
Q331 8-729-118-00 TRANSISTOR 2SB1116-L
Q332 8-729-900-80 TRANSISTOR DTC114ES
Q333 8-729-118-00 TRANSISTOR 2SB1116-L
Q334 8-729-900-80 TRANSISTOR DTC114ES
Q335 8-729-900-80 TRANSISTOR DTC114ES
Q336 8-729-116-59 TRANSISTOR 2SB1068TP
Q337 8-729-045-21 TRANSISTOR 2SD1513TP-LK
Q338 8-729-422-57 TRANSISTOR UN4111
Q339 8-729-900-80 TRANSISTOR DTC114ES
Q340 8-729-116-59 TRANSISTOR 2SB1068TP
Q341 8-729-045-21 TRANSISTOR 2SD1513TP-LK
Q342 8-729-422-57 TRANSISTOR UN4111
Q343 8-729-900-80 TRANSISTOR DTC114ES
Q411 8-729-141-30 TRANSISTOR 2SC3623A-LK
Q901 8-729-040-20 TRANSISTOR RT1P137L-TP
Q902 8-729-900-36 TRANSISTOR DTC124ES
Q903 8-729-040-19 TRANSISTOR RT1N137L-TP
Q904 8-729-900-63 TRANSISTOR DTA124ES
Q905 8-729-119-76 TRANSISTOR 2SA1175-HFE
Q911 8-729-141-83 TRANSISTOR 2SB1094-LK
Q912 8-729-900-36 TRANSISTOR DTC124ES
Q913 8-729-119-76 TRANSISTOR 2SA1175-HFE
Q931 8-729-040-20 TRANSISTOR RT1P137L-TP
– 120 –
Page 89

MAIN
Ref. No. Part No. Description Remark
Q932 8-729-900-36 TRANSISTOR DTC124ES
Q933 8-729-040-20 TRANSISTOR RT1P137L-TP
Q934 8-729-900-63 TRANSISTOR DTA124ES
Q935 8-729-141-83 TRANSISTOR 2SB1094-LK
Q936 8-729-900-36 TRANSISTOR DTC124ES
Q937 8-729-900-36 TRANSISTOR DTC124ES
Q951 8-729-119-78 TRANSISTOR 2SC403SP-51
Q961 8-729-111-29 TRANSISTOR 2SD1616A-K
Q962 8-729-119-76 TRANSISTOR 2SA1175-HFE
< RESISTOR >
R101 1-216-049-11 RES, CHIP 1K 5% 1/10W
R102 1-216-105-00 RES, CHIP 220K 5% 1/10W
R103 1-216-049-11 RES, CHIP 1K 5% 1/10W
R104 1-216-105-00 RES, CHIP 220K 5% 1/10W
R105 1-216-049-11 RES, CHIP 1K 5% 1/10W
R106 1-216-097-00 RES, CHIP 100K 5% 1/10W
R111 1-216-073-00 METAL CHIP 10K 5% 1/10W
R112 1-216-121-00 RES, CHIP 1M 5% 1/10W
R113 1-216-111-00 METAL CHIP 390K 5% 1/10W
R114 1-216-044-00 METAL CHIP 620 5% 1/10W
R115 1-216-073-00 METAL CHIP 10K 5% 1/10W
R116 1-216-097-00 RES, CHIP 100K 5% 1/10W
R117 1-216-073-00 METAL CHIP 10K 5% 1/10W
R118 1-216-089-00 RES, CHIP 47K 5% 1/10W
R119 1-216-057-00 METAL CHIP 2.2K 5% 1/10W
R120 1-216-097-00 RES, CHIP 100K 5% 1/10W
R121 1-216-073-00 METAL CHIP 10K 5% 1/10W
R122 1-216-295-00 SHORT 0
R123 1-216-057-00 METAL CHIP 2.2K 5% 1/10W
R131 1-216-025-00 RES, CHIP 100 5% 1/10W
R132 1-216-025-00 RES, CHIP 100 5% 1/10W
R133 1-216-025-00 RES, CHIP 100 5% 1/10W
R134 1-216-089-00 RES, CHIP 47K 5% 1/10W
R135 1-216-089-00 RES, CHIP 47K 5% 1/10W
R136 1-216-089-00 RES, CHIP 47K 5% 1/10W
R137 1-216-057-00 METAL CHIP 2.2K 5% 1/10W
R138 1-216-089-00 RES, CHIP 47K 5% 1/10W
R141 1-216-049-11 RES, CHIP 1K 5% 1/10W
R142 1-216-097-00 RES, CHIP 100K 5% 1/10W
R143 1-216-049-11 RES, CHIP 1K 5% 1/10W
R144 1-216-065-00 RES, CHIP 4.7K 5% 1/10W
R151 1-216-049-11 RES, CHIP 1K 5% 1/10W
R152 1-216-105-00 RES, CHIP 220K 5% 1/10W
R153 1-216-049-11 RES, CHIP 1K 5% 1/10W
R154 1-216-105-00 RES, CHIP 220K 5% 1/10W
R155 1-216-049-11 RES, CHIP 1K 5% 1/10W
R156 1-216-097-00 RES, CHIP 100K 5% 1/10W
R161 1-216-073-00 METAL CHIP 10K 5% 1/10W
R162 1-216-121-00 RES, CHIP 1M 5% 1/10W
R163 1-216-111-00 METAL CHIP 390K 5% 1/10W
R164 1-216-044-00 METAL CHIP 620 5% 1/10W
R165 1-216-073-00 METAL CHIP 10K 5% 1/10W
R166 1-216-097-00 RES, CHIP 100K 5% 1/10W
R167 1-216-073-00 METAL CHIP 10K 5% 1/10W
R168 1-216-089-00 RES, CHIP 47K 5% 1/10W
R169 1-216-057-00 METAL CHIP 2.2K 5% 1/10W
R170 1-216-097-00 RES, CHIP 100K 5% 1/10W
Ref. No. Part No. Description Remark
R171 1-216-073-00 METAL CHIP 10K 5% 1/10W
R172 1-216-295-00 SHORT 0
R173 1-216-057-00 METAL CHIP 2.2K 5% 1/10W
R191 1-216-089-00 RES, CHIP 47K 5% 1/10W
R192 1-216-089-00 RES, CHIP 47K 5% 1/10W
R193 1-216-089-00 RES, CHIP 47K 5% 1/10W
R194 1-216-061-00 METAL CHIP 3.3K 5% 1/10W
R195 1-216-073-00 METAL CHIP 10K 5% 1/10W
R196 1-216-061-00 METAL CHIP 3.3K 5% 1/10W
R197 1-216-097-00 RES, CHIP 100K 5% 1/10W
R198 1-216-049-11 RES, CHIP 1K 5% 1/10W
R199 1-216-073-00 METAL CHIP 10K 5% 1/10W
R201 1-216-081-00 METAL CHIP 22K 5% 1/10W
R202 1-216-082-00 RES, CHIP 24K 5% 1/10W
R203 1-216-689-11 METAL CHIP 39K 0.5% 1/10W
R204 1-216-121-00 RES, CHIP 1M 5% 1/10W
R205 1-216-033-00 METAL CHIP 220 5% 1/10W
R206 1-216-025-00 RES, CHIP 100 5% 1/10W
R207 1-216-025-00 RES, CHIP 100 5% 1/10W
R208 1-216-025-00 RES, CHIP 100 5% 1/10W
R209 1-216-025-00 RES, CHIP 100 5% 1/10W
R251 1-216-049-11 RES, CHIP 1K 5% 1/10W
R252 1-216-049-11 RES, CHIP 1K 5% 1/10W
R253 1-216-097-00 RES, CHIP 100K 5% 1/10W
R254 1-216-097-00 RES, CHIP 100K 5% 1/10W
R255 1-216-065-00 RES, CHIP 4.7K 5% 1/10W
R256 1-216-065-00 RES, CHIP 4.7K 5% 1/10W
R257 1-216-025-00 RES, CHIP 100 5% 1/10W
R258 1-216-025-00 RES, CHIP 100 5% 1/10W
R259 1-216-085-00 METAL CHIP 33K 5% 1/10W
R260 1-216-085-00 METAL CHIP 33K 5% 1/10W
R261 1-216-073-00 METAL CHIP 10K 5% 1/10W
R262 1-216-073-00 METAL CHIP 10K 5% 1/10W
R263 1-216-059-00 METAL CHIP 2.7K 5% 1/10W
R264 1-216-055-00 METAL CHIP 1.8K 5% 1/10W
R301 1-216-085-00 METAL CHIP 33K 5% 1/10W
R302 1-216-057-00 METAL CHIP 2.2K 5% 1/10W
R303 1-216-025-00 RES, CHIP 100 5% 1/10W
R304 1-216-025-00 RES, CHIP 100 5% 1/10W
R305 1-216-057-00 METAL CHIP 2.2K 5% 1/10W
R306 1-216-071-00 METAL CHIP 8.2K 5% 1/10W
R307 1-216-071-00 METAL CHIP 8.2K 5% 1/10W
R308 1-216-065-00 RES, CHIP 4.7K 5% 1/10W
R309 1-216-081-00 METAL CHIP 22K 5% 1/10W
R311 1-216-121-00 RES, CHIP 1M 5% 1/10W
R312 1-216-102-00 RES, CHIP 160K 5% 1/10W
R313 1-216-097-00 RES, CHIP 100K 5% 1/10W
R315 1-216-073-00 METAL CHIP 10K 5% 1/10W
R316 1-216-079-00 METAL CHIP 18K 5% 1/10W
R317 1-216-073-00 METAL CHIP 10K 5% 1/10W
R318 1-216-073-00 METAL CHIP 10K 5% 1/10W
R319 1-216-111-00 METAL CHIP 390K 5% 1/10W
R321 1-216-059-00 METAL CHIP 2.7K 5% 1/10W
R322 1-216-071-00 METAL CHIP 8.2K 5% 1/10W
R324 1-216-094-00 RES, CHIP 75K 5% 1/10W
R325 1-216-089-00 RES, CHIP 47K 5% 1/10W
R326 1-216-089-00 RES, CHIP 47K 5% 1/10W
R327 1-216-089-00 RES, CHIP 47K 5% 1/10W
– 121 –
Page 90

MAIN
Ref. No. Part No. Description Remark
R328 1-216-094-00 RES, CHIP 75K 5% 1/10W
R329 1-216-049-11 RES, CHIP 1K 5% 1/10W
R330 1-216-065-00 RES, CHIP 4.7K 5% 1/10W
R331 1-216-065-00 RES, CHIP 4.7K 5% 1/10W
R332 1-216-045-00 METAL CHIP 680 5% 1/10W
R333 1-216-057-00 METAL CHIP 2.2K 5% 1/10W
R334 1-216-045-00 METAL CHIP 680 5% 1/10W
R335 1-216-057-00 METAL CHIP 2.2K 5% 1/10W
R336 1-216-089-00 RES, CHIP 47K 5% 1/10W
R337 1-216-049-11 RES, CHIP 1K 5% 1/10W
R338 1-216-037-00 METAL CHIP 330 5% 1/10W
R339 1-216-089-00 RES, CHIP 47K 5% 1/10W
R340 1-216-089-00 RES, CHIP 47K 5% 1/10W
R341 1-216-037-00 METAL CHIP 330 5% 1/10W
R342 1-216-089-00 RES, CHIP 47K 5% 1/10W
R343 1-216-057-00 METAL CHIP 2.2K 5% 1/10W
R344 1-216-057-00 METAL CHIP 2.2K 5% 1/10W
R351 1-216-085-00 METAL CHIP 33K 5% 1/10W
R352 1-216-057-00 METAL CHIP 2.2K 5% 1/10W
R353 1-216-025-00 RES, CHIP 100 5% 1/10W
R354 1-216-025-00 RES, CHIP 100 5% 1/10W
R355 1-216-057-00 METAL CHIP 2.2K 5% 1/10W
R356 1-216-071-00 METAL CHIP 8.2K 5% 1/10W
R357 1-216-071-00 METAL CHIP 8.2K 5% 1/10W
R358 1-216-065-00 RES, CHIP 4.7K 5% 1/10W
R359 1-216-085-00 METAL CHIP 33K 5% 1/10W
R371 1-216-049-11 RES, CHIP 1K 5% 1/10W
R372 1-216-049-11 RES, CHIP 1K 5% 1/10W
R381 1-216-025-00 RES, CHIP 100 5% 1/10W
R382 1-216-025-00 RES, CHIP 100 5% 1/10W
R383 1-216-085-00 METAL CHIP 33K 5% 1/10W
R384 1-216-085-00 METAL CHIP 33K 5% 1/10W
R385 1-216-085-00 METAL CHIP 33K 5% 1/10W
R401 1-216-073-00 METAL CHIP 10K 5% 1/10W
R402 1-216-073-00 METAL CHIP 10K 5% 1/10W
R403 1-216-073-00 METAL CHIP 10K 5% 1/10W
R404 1-216-073-00 METAL CHIP 10K 5% 1/10W
R411 1-216-073-00 METAL CHIP 10K 5% 1/10W
R412 1-216-049-11 RES, CHIP 1K 5% 1/10W
R413 1-216-065-00 RES, CHIP 4.7K 5% 1/10W
R414 1-216-073-00 METAL CHIP 10K 5% 1/10W
R416 1-216-073-00 METAL CHIP 10K 5% 1/10W
R417 1-216-073-00 METAL CHIP 10K 5% 1/10W
R418 1-216-073-00 METAL CHIP 10K 5% 1/10W
R419 1-216-097-00 RES, CHIP 100K 5% 1/10W
R420 1-216-065-00 RES, CHIP 4.7K 5% 1/10W
R506 1-216-025-00 RES, CHIP 100 5% 1/10W
R508 1-216-025-00 RES, CHIP 100 5% 1/10W
R513 1-216-109-00 METAL CHIP 330K 5% 1/10W
R526 1-216-025-00 RES, CHIP 100 5% 1/10W
Ref. No. Part No. Description Remark
R565 1-216-025-00 RES, CHIP 100 5% 1/10W
R566 1-216-025-00 RES, CHIP 100 5% 1/10W
R567 1-216-025-00 RES, CHIP 100 5% 1/10W
R568 1-216-025-00 RES, CHIP 100 5% 1/10W
R572 1-216-041-00 METAL CHIP 470 5% 1/10W
R575 1-216-025-00 RES, CHIP 100 5% 1/10W
R576 1-216-025-00 RES, CHIP 100 5% 1/10W
R578 1-216-025-00 RES, CHIP 100 5% 1/10W
R579 1-216-025-00 RES, CHIP 100 5% 1/10W
R580 1-216-025-00 RES, CHIP 100 5% 1/10W
R581 1-216-025-00 RES, CHIP 100 5% 1/10W
R595 1-216-025-00 RES, CHIP 100 5% 1/10W
R596 1-216-025-00 RES, CHIP 100 5% 1/10W
R597 1-216-025-00 RES, CHIP 100 5% 1/10W
R598 1-216-025-00 RES, CHIP 100 5% 1/10W
R705 1-216-065-00 RES, CHIP 4.7K 5% 1/10W
R729 1-216-295-00 SHORT 0 (MY, SP, IA)
R729 1-216-045-00 METAL CHIP 680 5% 1/10W
(TH, CH)
R730 1-216-077-00 METAL CHIP 15K 5% 1/10W
(TH, CH)
R731 1-216-073-00 METAL CHIP 10K 5% 1/10W
R769 1-216-073-00 METAL CHIP 10K 5% 1/10W
R770 1-216-061-00 METAL CHIP 3.3K 5% 1/10W
R778 1-216-089-00 RES, CHIP 47K 5% 1/10W
R779 1-216-089-00 RES, CHIP 47K 5% 1/10W
R780 1-216-089-00 RES, CHIP 47K 5% 1/10W
R781 1-216-089-00 RES, CHIP 47K 5% 1/10W
R800 1-216-065-00 RES, CHIP 4.7K 5% 1/10W
R901 1-216-065-00 RES, CHIP 4.7K 5% 1/10W
R902 1-216-081-00 METAL CHIP 22K 5% 1/10W
R911 1-216-089-00 RES, CHIP 47K 5% 1/10W
R912 1-216-065-00 RES, CHIP 4.7K 5% 1/10W
R931 1-216-049-11 RES, CHIP 1K 5% 1/10W
R932 1-216-065-00 RES, CHIP 4.7K 5% 1/10W
R933 1-216-041-00 METAL CHIP 470 5% 1/10W
R951 1-216-049-11 RES, CHIP 1K 5% 1/10W
R952 1-216-065-00 RES, CHIP 4.7K 5% 1/10W
R953 1-216-025-00 RES, CHIP 100 5% 1/10W
R954 1-216-089-00 RES, CHIP 47K 5% 1/10W
R955 1-216-089-00 RES, CHIP 47K 5% 1/10W
R956 1-216-073-00 METAL CHIP 10K 5% 1/10W
R961 1-216-057-00 METAL CHIP 2.2K 5% 1/10W
R962 1-216-079-00 METAL CHIP 18K 5% 1/10W
R963 1-216-065-00 RES, CHIP 4.7K 5% 1/10W
< VARIABLE RESISTOR >
RV301 1-241-764-11 RES, ADJ, CARBON 10K
RV351 1-241-764-11 RES, ADJ, CARBON 10K
R527 1-216-025-00 RES, CHIP 100 5% 1/10W
R555 1-216-025-00 RES, CHIP 100 5% 1/10W
R556 1-216-025-00 RES, CHIP 100 5% 1/10W
R557 1-216-025-00 RES, CHIP 100 5% 1/10W
R560 1-216-025-00 RES, CHIP 100 5% 1/10W
R561 1-216-025-00 RES, CHIP 100 5% 1/10W
R563 1-216-025-00 RES, CHIP 100 5% 1/10W
R564 1-216-025-00 RES, CHIP 100 5% 1/10W
< VIBRATOR >
X201 1-579-125-11 VIBRATOR, CERAMIC (8MHz)
X501 1-579-233-11 VIBRATOR, CERAMIC (5MHz)
X502 1-567-098-41 VIBRATOR, CRYSTAL (32.768kHz)
************************************************************
– 122 –
Page 91

MIC MOTOR (SLIDE) MOTOR (TURN)
Ref. No. Part No. Description Remark
* A-4414-041-A MIC BOARD, COMPLETE
*******************
< CAPACITOR >
C750 1-163-021-00 CERAMIC CHIP 0.01uF 10% 50V
C751 1-126-957-11 ELECT 0.22uF 20% 50V
C752 1-163-038-00 CERAMIC CHIP 0.1uF 25V
C754 1-163-021-00 CERAMIC CHIP 0.01uF 10% 50V
C755 1-126-957-11 ELECT 0.22uF 20% 50V
C756 1-163-009-11 CERAMIC CHIP 0.001uF 10% 50V
C757 1-163-001-11 CERAMIC CHIP 220PF 10% 50V
C758 1-126-964-11 ELECT 10uF 20% 50V
C759 1-126-957-11 ELECT 0.22uF 20% 50V
C760 1-163-243-11 CERAMIC CHIP 47PF 5% 50V
C761 1-163-251-11 CERAMIC CHIP 100PF 5% 50V
C762 1-126-961-11 ELECT 2.2uF 20% 50V
C764 1-126-964-11 ELECT 10uF 20% 50V
C765 1-126-960-11 ELECT 1uF 20% 50V
C766 1-163-019-00 CERAMIC CHIP 0.0068uF 10% 50V
C767 1-163-009-11 CERAMIC CHIP 0.001uF 10% 50V
C768 1-136-495-11 FILM 0.068uF 5% 50V
C769 1-126-959-11 ELECT 0.47uF 20% 50V
C770 1-126-959-11 ELECT 0.47uF 20% 50V
C771 1-104-664-11 ELECT 47uF 20% 16V
C772 1-163-038-00 CERAMIC CHIP 0.1uF 25V
C773 1-104-664-11 ELECT 47uF 20% 16V
C774 1-136-495-11 FILM 0.068uF 5% 50V
C775 1-163-019-00 CERAMIC CHIP 0.0068uF 10% 50V
C776 1-163-009-11 CERAMIC CHIP 0.001uF 10% 50V
C777 1-164-492-11 CERAMIC CHIP 0.15uF 10% 16V
C778 1-126-960-11 ELECT 1uF 20% 50V
C779 1-163-037-11 CERAMIC CHIP 0.022uF 10% 25V
C780 1-126-961-11 ELECT 2.2uF 20% 50V
C782 1-163-005-11 CERAMIC CHIP 470PF 10% 50V
Ref. No. Part No. Description Remark
R752 1-216-097-00 RES, CHIP 100K 5% 1/10W
R753 1-216-049-11 RES, CHIP 1K 5% 1/10W
R754 1-216-089-00 RES, CHIP 47K 5% 1/10W
R755 1-216-073-00 METAL CHIP 10K 5% 1/10W
R756 1-216-107-00 METAL CHIP 270K 5% 1/10W
R757 1-216-025-00 RES, CHIP 100 5% 1/10W
R758 1-216-081-00 METAL CHIP 22K 5% 1/10W
R759 1-216-081-00 METAL CHIP 22K 5% 1/10W
R760 1-216-081-00 METAL CHIP 22K 5% 1/10W
R761 1-216-099-00 METAL CHIP 120K 5% 1/10W
R762 1-216-081-00 METAL CHIP 22K 5% 1/10W
R763 1-216-081-00 METAL CHIP 22K 5% 1/10W
R764 1-216-081-00 METAL CHIP 22K 5% 1/10W
R765 1-216-089-00 RES, CHIP 47K 5% 1/10W
R766 1-216-077-00 METAL CHIP 15K 5% 1/10W
R767 1-216-077-00 METAL CHIP 15K 5% 1/10W
R768 1-216-049-11 RES, CHIP 1K 5% 1/10W
R769 1-216-073-00 METAL CHIP 10K 5% 1/10W
< VARIABLE RESISTOR >
RV750 1-225-587-11 RES, VAR, CARBON 50K (MIC LEVEL)
RV751 1-225-587-11 RES, VAR, CARBON 50K (ECHO LEVEL)
************************************************************
* 1-658-578-11 MOTOR (SLIDE) BOARD
********************
< CAPACITOR >
C801 1-162-306-11 CERAMIC 0.01uF 20% 16V
C804 1-162-306-11 CERAMIC 0.01uF 20% 16V
C805 1-126-964-11 ELECT 10uF 20% 50V
< CONNECTOR >
* CN801 1-568-947-11 PIN, CONNECTOR 9P
< DIODE >
D751 8-719-210-33 DIODE EC10DS2
D752 8-719-210-33 DIODE EC10DS2
D753 8-719-210-33 DIODE EC10DS2
< FILTER >
FL751 1-233-289-21 FILTER, EMI (SMD)
< IC >
IC750 8-759-636-55 IC M5218AFP
IC751 8-759-496-41 IC M65850FP-E1
< JACK >
J750 1-785-200-11 JACK (LARGE TYPE) (MIC 2)
J751 1-785-200-11 JACK (LARGE TYPE) (MIC 1)
< COIL >
L751 1-412-032-11 INDUCTOR CHIP 100uH
< RESISTOR >
R750 1-216-073-00 METAL CHIP 10K 5% 1/10W
R751 1-216-049-11 RES, CHIP 1K 5% 1/10W
< DIODE >
D801 8-719-921-48 DIODE MTZJ-T-72-5.6C
D804 8-719-911-19 DIODE 1SS119
D805 8-719-911-19 DIODE 1SS119
< IC >
IC801 8-759-274-09 IC BA6286N
< RESISTOR >
R801 1-249-401-11 CARBON 47 5% 1/4W
< SWITCH >
S801 1-762-527-11 SWITCH, ROTARY (OPEN/CLOSE DET)
************************************************************
* 1-658-577-11 MOTOR (TURN) BOARD
*******************
< CAPACITOR >
C701 1-162-306-11 CERAMIC 0.01uF 20% 16V
C702 1-126-964-11 ELECT 10uF 20% 50V
C705 1-162-306-11 CERAMIC 0.01uF 20% 16V
– 123 –
Page 92

MOTOR (TURN) PANEL
Ref. No. Part No. Description Remark
< CONNECTOR >
CN703 1-750-413-11 CONNECTOR, FFC/FPC 8P
CN704 1-506-469-11 PIN, CONNECTOR 4P
< DIODE >
D701 8-719-983-66 DIODE MTZJ-T-72-3.6B
< IC >
IC701 8-759-633-65 IC M54641L
< RESISTOR >
R706 1-249-411-11 CARBON 330 5% 1/4W
R707 1-249-401-11 CARBON 47 5% 1/4W
************************************************************
* A-4414-054-A PANEL BOARD, COMPLETE (EXCEPT TH)
* A-4414-635-A PANEL BOARD, COMPLETE (TH)
*********************
* 4-932-810-31 CUSHION (FL)
* 4-996-796-11 HOLDER, FL TUBE
< CAPACITOR >
C600 1-163-038-00 CERAMIC CHIP 0.1uF 25V
C601 1-163-009-11 CERAMIC CHIP 0.001uF 10% 50V
C602 1-163-038-00 CERAMIC CHIP 0.1uF 25V
C603 1-124-589-11 ELECT 47uF 20% 16V
C604 1-126-163-11 ELECT 4.7uF 20% 50V
C605 1-163-009-11 CERAMIC CHIP 0.001uF 10% 50V
C606 1-126-160-11 ELECT 1uF 20% 50V
C607 1-126-160-11 ELECT 1uF 20% 50V
C608 1-163-009-11 CERAMIC CHIP 0.001uF 10% 50V
C609 1-163-251-11 CERAMIC CHIP 100PF 5% 50V
C610 1-163-251-11 CERAMIC CHIP 100PF 5% 50V
C611 1-163-251-11 CERAMIC CHIP 100PF 5% 50V
C612 1-163-251-11 CERAMIC CHIP 100PF 5% 50V
C613 1-163-251-11 CERAMIC CHIP 100PF 5% 50V
C614 1-163-251-11 CERAMIC CHIP 100PF 5% 50V
C615 1-163-251-11 CERAMIC CHIP 100PF 5% 50V
C616 1-163-251-11 CERAMIC CHIP 100PF 5% 50V
C617 1-163-251-11 CERAMIC CHIP 100PF 5% 50V
C618 1-163-251-11 CERAMIC CHIP 100PF 5% 50V
C619 1-163-251-11 CERAMIC CHIP 100PF 5% 50V
C620 1-163-251-11 CERAMIC CHIP 100PF 5% 50V
C621 1-163-251-11 CERAMIC CHIP 100PF 5% 50V
C625 1-163-009-11 CERAMIC CHIP 0.001uF 10% 50V
C626 1-124-589-11 ELECT 47uF 20% 16V
C631 1-126-157-11 ELECT 10uF 20% 16V
C632 1-126-157-11 ELECT 10uF 20% 16V
C633 1-164-182-11 CERAMIC CHIP 0.0033uF 10% 50V
C634 1-126-157-11 ELECT 10uF 20% 16V
C652 1-163-021-00 CERAMIC CHIP 0.01uF 10% 50V
C801 1-163-038-00 CERAMIC CHIP 0.1uF 25V
C802 1-163-038-00 CERAMIC CHIP 0.1uF 25V
C803 1-124-589-11 ELECT 47uF 20% 16V
C804 1-163-009-11 CERAMIC CHIP 0.001uF 10% 50V
C805 1-163-038-00 CERAMIC CHIP 0.1uF 25V
C806 1-126-963-11 ELECT 4.7uF 20% 50V
Ref. No. Part No. Description Remark
C807 1-163-017-00 CERAMIC CHIP 0.0047uF 5% 50V
C808 1-163-017-00 CERAMIC CHIP 0.0047uF 5% 50V
C809 1-104-664-11 ELECT 47uF 20% 10V
C851 1-163-038-00 CERAMIC CHIP 0.1uF 25V
C852 1-126-935-11 ELECT 470uF 20% 6.3V
C853 1-126-963-11 ELECT 4.7uF 20% 50V
< CONNECTOR >
* CN601 1-568-832-11 SOCKET, CONNECTOR 13P
CN602 1-764-698-11 SOCKET, CONNECTOR (NON ZIF)19P
* CN603 1-568-943-11 PIN, CONNECTOR 5P
CN604 1-506-486-11 PIN, CONNECTOR 7P
< DIODE >
D601 8-719-058-24 DIODE RB501V-40TE-17
D602 8-719-210-33 DIODE EC10DS2
D603 8-719-210-33 DIODE EC10DS2
D620 8-719-063-93 LED SLR325VC-N-T32 (EFFECT)
D621 8-719-056-13 LED SML79423C-TP15 (CD, ^)
D622 8-719-058-03 LED SEL5423E-TP15 (TAPE B, 9)
D623 8-719-058-03 LED SEL5423E-TP15 (TAPE B, ()
D624 8-719-058-03 LED SEL5423E-TP15 (TAPE A, 9)
D625 8-719-058-03 LED SEL5423E-TP15 (TAPE A, ()
D626 8-719-057-97 LED SEL5923A-TP15 (PBC)
D627 8-719-057-97 LED SEL5923A-TP15 (PBC OFF)
D628 8-719-057-97 LED SEL5923A-TP15 (VIDEO CD)
D629 8-719-057-97 LED SEL5923A-TP15 (DSP)
D630 8-719-057-97 LED SEL5923A-TP15 (PRO LOGIC)
D651 8-719-063-93 LED SLR325VC-N-T32 (r REC)
D652 8-719-057-97 LED SEL5923A-TP15 (P PAUSE)
D804 8-719-988-62 DIODE 1SS355
D805 8-719-988-62 DIODE 1SS355
D806 8-719-988-62 DIODE 1SS355
D807 8-719-988-62 DIODE 1SS355
< FILTER >
FL601 1-233-289-21 FILTER, EMI (SMD)
FL602 1-233-289-21 FILTER, EMI (SMD)
FL801 1-233-289-21 FILTER, EMI (SMD)
FL802 1-233-289-21 FILTER, EMI (SMD)
FL851 1-233-289-21 FILTER, EMI (SMD)
< IC >
IC601 8-759-546-36 IC TMP87CM74AF-6731
IC602 8-749-011-22 IC GP1U27X
IC603 8-759-495-25 IC BA3833F-E2
IC801 8-759-496-11 IC TMP87CH48DF-4825
IC851 8-759-498-98 IC MSM6653A-517GS-K
< SHORT >
JR903 1-216-296-00 SHORT 0
JR904 1-216-296-00 SHORT 0
JR905 1-216-296-00 SHORT 0
JR906 1-216-295-00 SHORT 0
JR907 1-216-296-00 SHORT 0
JR908 1-216-296-00 SHORT 0
JR909 1-216-296-00 SHORT 0
JR910 1-216-296-00 SHORT 0
JR911 1-216-296-00 SHORT 0
– 124 –
Page 93

PANEL
Ref. No. Part No. Description Remark
JR912 1-216-295-00 SHORT 0
JR913 1-216-296-00 SHORT 0
JR914 1-216-296-00 SHORT 0
JR915 1-216-296-00 SHORT 0
JR916 1-216-296-00 SHORT 0
JR917 1-216-296-00 SHORT 0
JR918 1-216-296-00 SHORT 0
JR919 1-216-295-00 SHORT 0
JR920 1-216-295-00 SHORT 0
JR921 1-216-295-00 SHORT 0
JR922 1-216-295-00 SHORT 0
JR923 1-216-296-00 SHORT 0
JR925 1-216-295-00 SHORT 0
JR926 1-216-295-00 SHORT 0
JR927 1-216-295-00 SHORT 0
JR928 1-216-296-00 SHORT 0
< COIL >
L601 1-412-031-11 INDUCTOR CHIP 47uH
L602 1-412-031-11 INDUCTOR CHIP 47uH
L851 1-412-031-11 INDUCTOR CHIP 47uH
< FLUORECENT INDICATOR TUBE >
ND601 1-517-731-21 INDICATOR TUBE, FLUORESCENT
< TRANSISTOR >
Q601 8-729-118-00 TRANSISTOR 2SB1116-L
Q602 8-729-118-00 TRANSISTOR 2SB1116-L
Q603 8-729-120-28 TRANSISTOR 2SC1623-L5L6
Q607 8-729-027-60 TRANSISTOR DTC144TKA-T146
Q608 8-729-027-60 TRANSISTOR DTC144TKA-T146
Q609 8-729-027-60 TRANSISTOR DTC144TKA-T146
Q610 8-729-027-60 TRANSISTOR DTC144TKA-T146
Q611 8-729-027-60 TRANSISTOR DTC144TKA-T146
Q618 8-729-027-60 TRANSISTOR DTC144TKA-T146
Q701 8-729-120-28 TRANSISTOR 2SC1623-L5L6
Q702 8-729-120-28 TRANSISTOR 2SC1623-L5L6
Q851 8-729-027-23 TRANSISTOR DTA114EKA-T146
Q958 8-729-900-53 TRANSISTOR DTC114EK
Q959 8-729-027-23 TRANSISTOR DTA114EKA-T146
Q960 8-729-027-23 TRANSISTOR DTA114EKA-T146
< RESISTOR >
R601 1-216-121-00 RES, CHIP 1M 5% 1/10W
R602 1-216-025-00 RES, CHIP 100 5% 1/10W
R604 1-216-073-00 METAL CHIP 10K 5% 1/10W
R605 1-216-073-00 METAL CHIP 10K 5% 1/10W
R606 1-216-073-00 METAL CHIP 10K 5% 1/10W
R607 1-216-073-00 METAL CHIP 10K 5% 1/10W
R608 1-216-061-00 METAL CHIP 3.3K 5% 1/10W
R609 1-216-061-00 METAL CHIP 3.3K 5% 1/10W
R610 1-216-025-00 RES, CHIP 100 5% 1/10W
R611 1-216-025-00 RES, CHIP 100 5% 1/10W
R612 1-216-017-00 RES, CHIP 47 5% 1/10W
R613 1-216-069-00 METAL CHIP 6.8K 5% 1/10W
R614 1-216-061-00 METAL CHIP 3.3K 5% 1/10W
R616 1-216-097-00 RES, CHIP 100K 5% 1/10W
R618 1-216-089-00 RES, CHIP 47K 5% 1/10W
Ref. No. Part No. Description Remark
R619 1-216-089-00 RES, CHIP 47K 5% 1/10W
R621 1-216-075-00 METAL CHIP 12K 5% 1/10W
R622 1-216-039-00 METAL CHIP 390 5% 1/10W
R623 1-216-041-00 METAL CHIP 470 5% 1/10W
R624 1-216-045-00 METAL CHIP 680 5% 1/10W
R625 1-216-047-00 RES, CHIP 820 5% 1/10W
R626 1-216-051-00 METAL CHIP 1.2K 5% 1/10W
R627 1-216-053-00 METAL CHIP 1.5K 5% 1/10W
R628 1-216-057-00 METAL CHIP 2.2K 5% 1/10W
R629 1-216-059-00 METAL CHIP 2.7K 5% 1/10W
R630 1-216-063-00 RES, CHIP 3.9K 5% 1/10W
R631 1-216-067-00 METAL CHIP 5.6K 5% 1/10W
R632 1-216-071-00 METAL CHIP 8.2K 5% 1/10W
R633 1-216-075-00 METAL CHIP 12K 5% 1/10W
R636 1-216-075-00 METAL CHIP 12K 5% 1/10W
R649 1-216-075-00 METAL CHIP 12K 5% 1/10W
R650 1-216-039-00 METAL CHIP 390 5% 1/10W
R651 1-216-041-00 METAL CHIP 470 5% 1/10W
R652 1-216-045-00 METAL CHIP 680 5% 1/10W
R653 1-216-047-00 RES, CHIP 820 5% 1/10W
R654 1-216-051-00 METAL CHIP 1.2K 5% 1/10W
R655 1-216-053-00 METAL CHIP 1.5K 5% 1/10W
R661 1-216-089-00 RES, CHIP 47K 5% 1/10W
R662 1-216-089-00 RES, CHIP 47K 5% 1/10W
R663 1-216-049-11 RES, CHIP 1K 5% 1/10W
R664 1-216-049-11 RES, CHIP 1K 5% 1/10W
R665 1-216-089-00 RES, CHIP 47K 5% 1/10W
R673 1-216-037-00 METAL CHIP 330 5% 1/10W
R674 1-216-027-00 METAL CHIP 120 5% 1/10W
R675 1-216-027-00 METAL CHIP 120 5% 1/10W
R676 1-216-027-00 METAL CHIP 120 5% 1/10W
R677 1-216-027-00 METAL CHIP 120 5% 1/10W
R678 1-216-027-00 METAL CHIP 120 5% 1/10W
R679 1-216-027-00 METAL CHIP 120 5% 1/10W
R680 1-216-029-00 METAL CHIP 150 5% 1/10W
R681 1-216-029-00 METAL CHIP 150 5% 1/10W
R682 1-216-029-00 METAL CHIP 150 5% 1/10W
R683 1-216-057-00 METAL CHIP 2.2K 5% 1/10W
R684 1-216-057-00 METAL CHIP 2.2K 5% 1/10W
R701 1-216-073-00 METAL CHIP 10K 5% 1/10W
R702 1-216-073-00 METAL CHIP 10K 5% 1/10W
R703 1-216-097-00 RES, CHIP 100K 5% 1/10W
R704 1-216-097-00 RES, CHIP 100K 5% 1/10W
R720 1-216-029-00 METAL CHIP 150 5% 1/10W
R721 1-216-029-00 METAL CHIP 150 5% 1/10W
R723 1-216-075-00 METAL CHIP 12K 5% 1/10W
R724 1-216-039-00 METAL CHIP 390 5% 1/10W
R725 1-216-041-00 METAL CHIP 470 5% 1/10W
R726 1-216-045-00 METAL CHIP 680 5% 1/10W
R727 1-216-047-00 RES, CHIP 820 5% 1/10W
R728 1-216-051-00 METAL CHIP 1.2K 5% 1/10W
R729 1-216-053-00 METAL CHIP 1.5K 5% 1/10W
R730 1-216-057-00 METAL CHIP 2.2K 5% 1/10W
R731 1-216-059-00 METAL CHIP 2.7K 5% 1/10W
R742 1-216-027-00 METAL CHIP 120 5% 1/10W
R743 1-216-027-00 METAL CHIP 120 5% 1/10W
R801 1-216-121-00 RES, CHIP 1M 5% 1/10W
– 125 –
Page 94

PANEL POWER AMP
Ref. No. Part No. Description Remark
R802 1-216-025-00 RES, CHIP 100 5% 1/10W
R803 1-216-025-00 RES, CHIP 100 5% 1/10W
R804 1-216-025-00 RES, CHIP 100 5% 1/10W
R805 1-216-075-00 METAL CHIP 12K 5% 1/10W
R806 1-216-075-00 METAL CHIP 12K 5% 1/10W
R807 1-216-085-00 METAL CHIP 33K 5% 1/10W
R808 1-216-113-00 METAL CHIP 470K 5% 1/10W
R809 1-216-065-00 RES, CHIP 4.7K 5% 1/10W
R810 1-216-089-00 RES, CHIP 47K 5% 1/10W
R851 1-216-097-00 RES, CHIP 100K 5% 1/10W
R852 1-216-025-00 RES, CHIP 100 5% 1/10W
R954 1-216-097-00 RES, CHIP 100K 5% 1/10W
R955 1-216-097-00 RES, CHIP 100K 5% 1/10W
< SWITCH >
S604 1-762-875-21 SWITCH, KEYBOARD (PRO LOGIC)
S605 1-762-875-21 SWITCH, KEYBOARD (DSP)
S606 1-762-875-21 SWITCH, KEYBOARD (KARAOKE PON/MPX)
S607 1-762-875-21 SWITCH, KEYBOARD (p)
S608 1-762-875-21 SWITCH, KEYBOARD (P FILE MEMORY)
S609 1-762-875-21 SWITCH, KEYBOARD (GEQ CONTROL)
S610 1-762-875-21 SWITCH, KEYBOARD (FILE SELECT)
S611 1-762-875-21 SWITCH, KEYBOARD (EFFECT)
S612 1-762-875-21 SWITCH, KEYBOARD (DEMO)
S613 1-762-875-21 SWITCH, KEYBOARD (TIMER SELECT)
S614 1-762-875-21 SWITCH, KEYBOARD (FUNCTION)
S615 1-762-875-21 SWITCH, KEYBOARD (CLOCK/TIMER SET)
S616 1-762-875-21 SWITCH, KEYBOARD (DISPLAY)
S631 1-762-875-21 SWITCH, KEYBOARD (TUNER, BAND)
S632 1-762-875-21 SWITCH, KEYBOARD (CD, ^)
S633 1-762-875-21 SWITCH, KEYBOARD (TAPE B, 9)
S634 1-762-875-21 SWITCH, KEYBOARD (TAPE B, ()
S635 1-762-875-21 SWITCH, KEYBOARD (TAPE A, 9)
S636 1-762-875-21 SWITCH, KEYBOARD (TAPE A, ()
S652 1-762-875-21 SWITCH, KEYBOARD
(PLAY MODE, DOLBY NR, TUNER MEMORY)
S653 1-762-875-21 SWITCH, KEYBOARD (EDIT, DIRECTION)
S654 1-762-875-21 SWITCH, KEYBOARD
(REPEAT, STEREO/MONO)
S656 1-762-875-21 SWITCH, KEYBOARD (r REC)
S657 1-762-875-21 SWITCH, KEYBOARD (P PAUSE)
S658 1-762-875-21 SWITCH, KEYBOARD (HI-DUB)
S659 1-762-875-21 SWITCH, KEYBOARD (CD SYNC)
< VIBRATOR >
Ref. No. Part No. Description Remark
C104 1-164-159-21 CERAMIC 0.1uF 50V
C105 1-126-943-11 ELECT 2200uF 20% 25V
C106 1-162-294-31 CERAMIC 0.001uF 10% 50V
C107 1-162-294-31 CERAMIC 0.001uF 10% 50V
C111 1-126-968-11 ELECT 100uF 20% 50V
C112 1-126-968-11 ELECT 100uF 20% 50V
C113 1-162-294-31 CERAMIC 0.001uF 10% 50V
C114 1-126-967-11 ELECT 47uF 20% 50V
C151 1-128-493-11 ELECT 4700uF 20% 71V
C152 1-128-493-11 ELECT 4700uF 20% 71V
C201 1-128-582-11 ELECT 10uF 20% 100V
C202 1-162-292-31 CERAMIC 680PF 10% 50V
C203 1-162-286-21 CERAMIC 220PF 10% 50V
C204 1-126-967-11 ELECT 47uF 20% 50V
C205 1-126-967-11 ELECT 47uF 20% 50V
C206 1-128-560-11 ELECT 22uF 20% 100V
C207 1-130-493-00 MYLAR 0.068uF 5% 50V
C208 1-130-493-00 MYLAR 0.068uF 5% 50V
C221 1-162-284-31 CERAMIC 150PF 10% 50V
C222 1-162-284-31 CERAMIC 150PF 10% 50V
C223 1-164-159-21 CERAMIC 0.1uF 50V
C224 1-128-560-11 ELECT 22uF 20% 100V
C225 1-161-494-00 CERAMIC 0.022uF 25V
(CH)
C228 1-162-284-31 CERAMIC 150PF 10% 50V
C251 1-128-582-11 ELECT 10uF 20% 100V
C252 1-162-292-31 CERAMIC 680PF 10% 50V
C253 1-162-286-21 CERAMIC 220PF 10% 50V
C254 1-126-967-11 ELECT 47uF 20% 50V
C255 1-126-967-11 ELECT 47uF 20% 50V
C256 1-128-560-11 ELECT 22uF 20% 100V
C257 1-130-493-00 MYLAR 0.068uF 5% 50V
C258 1-130-493-00 MYLAR 0.068uF 5% 50V
C301 1-126-934-11 ELECT 220uF 20% 10V
C302 1-126-934-11 ELECT 220uF 20% 10V
C303 1-126-961-11 ELECT 2.2uF 20% 50V
C311 1-126-959-11 ELECT 0.47uF 20% 50V
C312 1-128-573-11 ELECT 470uF 20% 71V
C313 1-128-573-11 ELECT 470uF 20% 71V
C331 1-126-924-11 ELECT 330uF 20% 10V
C401 1-126-963-11 ELECT 4.7uF 20% 50V
C402 1-164-159-21 CERAMIC 0.1uF 50V
(CH)
C403 1-164-159-21 CERAMIC 0.1uF 50V
(CH)
X501 1-579-125-11 VIBRATOR, CERAMIC (8MHz)
X601 1-579-125-11 VIBRATOR, CERAMIC (8MHz)
X851 1-767-353-11 VIBRATOR, CERAMIC (4.09MHz)
************************************************************
* A-4407-298-A POWER AMP BOARD, COMPLETE (MY, SP, IA)
* A-4407-409-A POWER AMP BOARD, COMPLETE (TH)
* A-4414-058-A POWER AMP BOARD, COMPLETE (CH)
***************************
< CAPACITOR >
C101 1-130-781-00 FILM 0.22uF 10% 100V
C102 1-130-781-00 FILM 0.22uF 10% 100V
C103 1-164-159-21 CERAMIC 0.1uF 50V
– 126 –
C404 1-164-159-21 CERAMIC 0.1uF 50V
(CH)
C405 1-164-159-21 CERAMIC 0.1uF 50V
(CH)
C406 1-164-159-21 CERAMIC 0.1uF 50V
(CH)
C407 1-164-159-21 CERAMIC 0.1uF 50V
(CH)
C410 1-164-159-21 CERAMIC 0.1uF 50V
(CH)
C411 1-164-159-21 CERAMIC 0.1uF 50V
(CH)
C412 1-161-494-00 CERAMIC 0.022uF 25V
C413 1-161-494-00 CERAMIC 0.022uF 25V
Page 95
POWER AMP
Ref. No. Part No. Description Remark
C414 1-161-494-00 CERAMIC 0.022uF 25V
C415 1-161-494-00 CERAMIC 0.022uF 25V
< CONNECTOR >
CN201 1-778-981-11 CONNECTOR, BOARD TO BOARD 13P
CN202 1-770-724-11 CONNECTOR, BOARD TO BOARD 9P
* CN203 1-573-128-11 PIN, CONNECTOR 5P
< DIODE >
D101 8-719-510-68 DIODE D5SBA20F01
D102 8-719-028-23 DIODE D3SBA20-4101
D103 8-719-200-82 DIODE 11ES2
D104 8-719-200-82 DIODE 11ES2
D105 8-719-911-19 DIODE 1SS119 (CH)
D111 8-719-200-82 DIODE 11ES2
D112 8-719-200-82 DIODE 11ES2
D113 8-719-936-50 DIODE HZS33-2LTD
D114 8-719-109-89 DIODE RD5.6ESB2
D201 8-719-991-33 DIODE 1SS133T-77
D251 8-719-991-33 DIODE 1SS133T-77
D301 8-719-991-33 DIODE 1SS133T-77
D311 8-719-991-33 DIODE 1SS133T-77
D321 8-719-991-33 DIODE 1SS133T-77
D331 8-719-991-33 DIODE 1SS133T-77
D332 8-719-991-33 DIODE 1SS133T-77
D401 8-719-991-33 DIODE 1SS133T-77
D403 8-719-991-33 DIODE 1SS133T-77
D405 8-719-991-33 DIODE 1SS133T-77
D406 8-719-991-33 DIODE 1SS133T-77
D407 8-719-991-33 DIODE 1SS133T-77
D408 8-719-991-33 DIODE 1SS133T-77
< EARTH TERMINAL >
* EP101 1-537-738-21 TERMINAL, EARTH
* EP201 1-537-738-21 TERMINAL, EARTH
Ref. No. Part No. Description Remark
Q321 8-729-119-78 TRANSISTOR 2SC403SP-51
Q322 8-729-900-36 TRANSISTOR DTC124ES
Q401 8-729-040-20 TRANSISTOR RT1P137L-TP
Q402 8-729-900-80 TRANSISTOR DTC114ES
Q404 8-729-040-20 TRANSISTOR RT1P137L-TP
Q405 8-729-904-39 TRANSISTOR DTC114TS
Q406 8-729-900-80 TRANSISTOR DTC114ES
< RESISTOR >
! R101 1-216-451-11 METAL OXIDE 120 5% 2W F
(CH)
R102 1-249-429-11 CARBON 10K 5% 1/4W
(CH)
R103 1-249-441-11 CARBON 100K 5% 1/4W
! R111 1-217-637-00 FUSIBLE 1 5% 1/4W F
R112 1-249-417-11 CARBON 1K 5% 1/4W
R113 1-249-417-11 CARBON 1K 5% 1/4W
R114 1-247-815-91 CARBON 220 5% 1/4W
R115 1-247-815-91 CARBON 220 5% 1/4W
R116 1-249-425-11 CARBON 4.7K 5% 1/4W
R201 1-249-417-11 CARBON 1K 5% 1/4W
R202 1-249-437-11 CARBON 47K 5% 1/4W
R203 1-249-412-11 CARBON 390 5% 1/4W
R204 1-249-437-11 CARBON 47K 5% 1/4W
R205 1-260-107-11 CARBON 4.7K 5% 1/2W
R206 1-260-107-11 CARBON 4.7K 5% 1/2W
! R207 1-212-881-11 FUSIBLE 100 5% 1/4W F
! R208 1-220-893-11 METAL 0.22 10% 5W F
R209 1-249-417-11 CARBON 1K 5% 1/4W
R210 1-249-431-11 CARBON 15K 5% 1/4W
R211 1-249-441-11 CARBON 100K 5% 1/4W
R212 1-260-076-11 CARBON 10 5% 1/2W
! R221 1-217-637-00 FUSIBLE 1 5% 1/4W F
R222 1-260-103-11 CARBON 2.2K 5% 1/2W
R223 1-260-103-11 CARBON 2.2K 5% 1/2W
R224 1-249-425-11 CARBON 4.7K 5% 1/4W
< IC >
IC201 8-749-921-68 IC STK-4231MK2
< COIL >
L401 1-420-872-00 COIL, AIR-CORE (CH)
L402 1-420-872-00 COIL, AIR-CORE (CH)
L403 1-420-872-00 COIL, AIR-CORE (CH)
L405 1-420-872-00 COIL, AIR-CORE (CH)
< TRANSISTOR >
Q101 8-729-119-78 TRANSISTOR 2SC403SP-51 (CH)
Q111 8-729-118-01 TRANSISTOR 2SB1116
Q201 8-729-140-84 TRANSISTOR 2SC1841-PAFAEA
Q251 8-729-140-84 TRANSISTOR 2SC1841-PAFAEA
Q301 8-729-119-76 TRANSISTOR 2SA1175-HFE
Q302 8-729-119-78 TRANSISTOR 2SC403SP-51
Q303 8-729-900-36 TRANSISTOR DTC124ES
Q304 8-729-119-76 TRANSISTOR 2SA1175-HFE
Q305 8-729-900-36 TRANSISTOR DTC124ES
Q306 8-729-119-78 TRANSISTOR 2SC403SP-51
Q307 8-729-119-78 TRANSISTOR 2SC403SP-51
R251 1-249-417-11 CARBON 1K 5% 1/4W
R252 1-249-437-11 CARBON 47K 5% 1/4W
R253 1-249-412-11 CARBON 390 5% 1/4W
R254 1-249-437-11 CARBON 47K 5% 1/4W
R255 1-260-107-11 CARBON 4.7K 5% 1/2W
R256 1-260-107-11 CARBON 4.7K 5% 1/2W
! R257 1-212-881-11 FUSIBLE 100 5% 1/4W F
! R258 1-220-893-11 METAL 0.22 10% 5W F
R259 1-249-417-11 CARBON 1K 5% 1/4W
R260 1-249-431-11 CARBON 15K 5% 1/4W
R261 1-249-441-11 CARBON 100K 5% 1/4W
R262 1-260-076-11 CARBON 10 5% 1/2W
R271 1-260-093-11 CARBON 330 5% 1/2W
R272 1-260-093-11 CARBON 330 5% 1/2W
R273 1-260-093-11 CARBON 330 5% 1/2W
R274 1-260-093-11 CARBON 330 5% 1/2W
R301 1-249-429-11 CARBON 10K 5% 1/4W
R302 1-249-425-11 CARBON 4.7K 5% 1/4W
R303 1-249-429-11 CARBON 10K 5% 1/4W
R304 1-249-429-11 CARBON 10K 5% 1/4W
R305 1-249-425-11 CARBON 4.7K 5% 1/4W
R306 1-249-441-11 CARBON 100K 5% 1/4W
The components identified by mark ! or dotted
line with mark ! are critical for safety.
– 127 –
Replace only with part number specified.
Page 96
POWER AMP SENSOR SURROUND
Ref. No. Part No. Description Remark
R308 1-247-903-00 CARBON 1M 5% 1/4W
R310 1-247-903-00 CARBON 1M 5% 1/4W
R311 1-249-441-11 CARBON 100K 5% 1/4W
R312 1-249-419-11 CARBON 1.5K 5% 1/4W
R313 1-247-863-91 CARBON 22K 5% 1/4W
R314 1-247-863-91 CARBON 22K 5% 1/4W
R315 1-249-439-11 CARBON 68K 5% 1/4W
R316 1-249-437-11 CARBON 47K 5% 1/4W
R321 1-249-440-11 CARBON 82K 5% 1/4W
R322 1-249-441-11 CARBON 100K 5% 1/4W
R323 1-249-441-11 CARBON 100K 5% 1/4W
R324 1-249-441-11 CARBON 100K 5% 1/4W
R331 1-247-890-11 CARBON 300K 5% 1/4W
R332 1-249-429-11 CARBON 10K 5% 1/4W
R333 1-249-431-11 CARBON 15K 5% 1/4W
! R401 1-215-893-11 METAL OXIDE 1.5K 5% 2W F
! R403 1-215-893-11 METAL OXIDE 1.5K 5% 2W F
R406 1-249-437-11 CARBON 47K 5% 1/4W
R407 1-249-437-11 CARBON 47K 5% 1/4W
R408 1-249-440-11 CARBON 82K 5% 1/4W
R409 1-249-437-11 CARBON 47K 5% 1/4W
R410 1-249-389-11 CARBON 4.7 5% 1/4W
(CH)
R411 1-249-389-11 CARBON 4.7 5% 1/4W
(CH)
R412 1-249-389-11 CARBON 4.7 5% 1/4W
(CH)
R413 1-249-389-11 CARBON 4.7 5% 1/4W
(CH)
R414 1-260-076-11 CARBON 10 5% 1/2W
(CH)
R415 1-260-076-11 CARBON 10 5% 1/2W
(CH)
R416 1-249-389-11 CARBON 4.7 5% 1/4W
(CH)
Ref. No. Part No. Description Remark
< TERMINAL >
TM401 1-537-842-11 TERMINAL BOARD (FRONT SPEAKER)
TM402 1-537-510-11 TERMINAL BOARD (SPEAKER) (6P)
(SURROUND SPEAKER)
************************************************************
* 1-658-576-11 SENSOR BOARD
**************
< PHOTO INTERRUPTER/REFLECTOR >
IC702 8-749-924-18 PHOTO INTERRUPTER RPI-1391
IC703 8-749-924-30 PHOTO REFLECTOR GP2S28
< RESISTOR >
R701 1-249-416-11 CARBON 820 5% 1/4W
R702 1-249-407-11 CARBON 150 5% 1/4W
************************************************************
* A-4407-766-A SURROUND BOARD, COMPLETE (TH)
* A-4414-862-A SURROUND BOARD, COMPLETE (MY, SP, IA)
* A-4417-262-A SURROUND BOARD, COMPLETE (CH)
***************************
< CAPACITOR >
C601 1-126-965-11 ELECT 22uF 20% 50V
C602 1-162-292-31 CERAMIC 680PF 10% 50V
C603 1-162-286-21 CERAMIC 220PF 10% 50V
C604 1-126-963-11 ELECT 4.7uF 20% 50V
C605 1-126-967-11 ELECT 47uF 20% 50V
C606 1-126-965-11 ELECT 22uF 20% 50V
C607 1-130-493-00 MYLAR 0.068uF 5% 50V
C608 1-130-493-00 MYLAR 0.068uF 5% 50V
C621 1-162-294-31 CERAMIC 0.001uF 10% 50V
C622 1-126-971-11 ELECT 470uF 20% 50V
R417 1-249-389-11 CARBON 4.7 5% 1/4W
R420 1-249-389-11 CARBON 4.7 5% 1/4W
R421 1-249-389-11 CARBON 4.7 5% 1/4W
R422 1-260-076-11 CARBON 10 5% 1/2W
R424 1-260-076-11 CARBON 10 5% 1/2W
R425 1-260-095-11 CARBON 470 5% 1/2W
R426 1-260-095-11 CARBON 470 5% 1/2W
R427 1-260-095-11 CARBON 470 5% 1/2W
R428 1-260-095-11 CARBON 470 5% 1/2W
R429 1-249-437-11 CARBON 47K 5% 1/4W
R430 1-249-437-11 CARBON 47K 5% 1/4W
< RELAY >
RY101 1-755-195-11 RELAY (CH)
RY401 1-755-168-11 RELAY
RY403 1-515-920-11 RELAY (24V)
< THERMISTOR >
THP321 1-807-796-11 THERMISTOR
(CH)
(CH)
(CH)
(CH)
(CH)
C623 1-162-284-31 CERAMIC 150PF 10% 50V
C627 1-162-284-31 CERAMIC 150PF 10% 50V
(CH)
C628 1-161-494-00 CERAMIC 0.022uF 25V
(CH)
C651 1-126-965-11 ELECT 22uF 20% 50V
C652 1-162-292-31 CERAMIC 680PF 10% 50V
C653 1-162-286-21 CERAMIC 220PF 10% 50V
C654 1-126-963-11 ELECT 4.7uF 20% 50V
C655 1-126-967-11 ELECT 47uF 20% 50V
C657 1-130-493-00 MYLAR 0.068uF 5% 50V
C658 1-130-493-00 MYLAR 0.068uF 5% 50V
< CONNECTOR >
CN601 1-691-765-11 PLUG (MICRO CONNECTOR) 3P
CN602 1-691-770-11 PLUG (MICRO CONNECTOR) 8P
< DIODE >
D602 8-719-934-17 DIODE HZS27-1L
D604 8-719-991-33 DIODE 1SS133T-77
– 128 –
The components identified by mark ! or dotted
line with mark ! are critical for safety.
Replace only with part number specified.
Page 97
SURROUND TRANSFORMER VIDEO
Ref. No. Part No. Description Remark
< EARTH TERMINAL >
* EP601 1-537-738-21 TERMINAL, EARTH (CH)
* EP602 1-537-738-21 TERMINAL, EARTH
< IC >
IC601 8-749-900-96 IC STK-4142MK2
< TRANSISTOR >
Q601 8-729-119-76 TRANSISTOR 2SA1175-HFE
Q604 8-729-119-78 TRANSISTOR 2SC403SP-51
Q651 8-729-119-76 TRANSISTOR 2SA1175-HFE
< RESISTOR >
R601 1-249-417-11 CARBON 1K 5% 1/4W
R602 1-249-437-11 CARBON 47K 5% 1/4W
R603 1-249-413-11 CARBON 470 5% 1/4W
R604 1-249-437-11 CARBON 47K 5% 1/4W
R605 1-260-103-11 CARBON 2.2K 5% 1/2W
R606 1-260-103-11 CARBON 2.2K 5% 1/2W
! R607 1-212-881-11 FUSIBLE 100 5% 1/4W F
! R608 1-220-755-11 METAL 0.22 10% 2W F
R609 1-249-441-11 CARBON 100K 5% 1/4W
R610 1-249-441-11 CARBON 100K 5% 1/4W
R611 1-249-441-11 CARBON 100K 5% 1/4W
R612 1-260-076-11 CARBON 10 5% 1/2W
R621 1-260-109-11 CARBON 6.8K 5% 1/2W
! R622 1-212-881-11 FUSIBLE 100 5% 1/4W F
R629 1-249-429-11 CARBON 10K 5% 1/4W
R651 1-249-417-11 CARBON 1K 5% 1/4W
R652 1-249-437-11 CARBON 47K 5% 1/4W
R653 1-249-413-11 CARBON 470 5% 1/4W
R654 1-249-437-11 CARBON 47K 5% 1/4W
R655 1-260-103-11 CARBON 2.2K 5% 1/2W
R656 1-260-103-11 CARBON 2.2K 5% 1/2W
! R658 1-220-755-11 METAL 0.22 10% 2W F
R659 1-249-441-11 CARBON 100K 5% 1/4W
R660 1-249-441-11 CARBON 100K 5% 1/4W
R661 1-249-441-11 CARBON 100K 5% 1/4W
R662 1-260-076-11 CARBON 10 5% 1/2W
************************************************************
* 1-668-274-11 TRANSFORMER BOARD
*******************
< CONNECTOR >
* CN501 1-564-527-11 PLUG, CONNECTOR 12P
CN502 1-774-108-11 PIN, CONNECTOR (PC BOARD)
Ref. No. Part No. Description Remark
FH508 1-533-233-21 HOLDER, FUSE
FH509 1-533-233-21 HOLDER, FUSE
FH510 1-533-233-21 HOLDER, FUSE
< RESISTOR >
! R501 1-219-120-11 FUSIBLE 0.15 5% 1/4W F
! R502 1-219-119-81 FUSIBLE 0.1 5% 1/4W F
! R503 1-219-119-81 FUSIBLE 0.1 5% 1/4W F
! R504 1-219-120-11 FUSIBLE 0.15 5% 1/4W F
< SWITCH >
! S501 1-771-291-11 SWITCH, POWER (VOLTAGE SELECTOR)
(MY, SP, IA)
< TRANSFORMER >
! T501 1-431-828-11 TRANSFORMER, POWER
************************************************************
* A-4414-186-A VIDEO BOARD, COMPLETE (EXCEPT CH)
* A-4724-279-A VIDEO BOARD, COMPLETE (CH)
**********************
< CAPACITOR/SHORT >
C101 1-124-778-00 ELECT CHIP 22uF 20% 6.3V
C102 1-163-143-00 CERAMIC CHIP 0.0012uF 5% 50V
C103 1-163-017-00 CERAMIC CHIP 0.0047uF 5% 50V
C104 1-126-206-11 ELECT CHIP 100uF 20% 6.3V
C201 1-124-778-00 ELECT CHIP 22uF 20% 6.3V
C202 1-163-143-00 CERAMIC CHIP 0.0012uF 5% 50V
C203 1-163-017-00 CERAMIC CHIP 0.0047uF 5% 50V
C301 1-163-127-00 CERAMIC CHIP 270PF 5% 50V
C302 1-163-127-00 CERAMIC CHIP 270PF 5% 50V
C303 1-163-235-11 CERAMIC CHIP 22PF 5% 50V
C304 1-163-235-11 CERAMIC CHIP 22PF 5% 50V
C305 1-163-263-11 CERAMIC CHIP 330PF 5% 50V
C306 1-163-263-11 CERAMIC CHIP 330PF 5% 50V
C310 1-163-137-00 CERAMIC CHIP 680PF 5% 50V
C311 1-216-295-00 SHORT 0
C313 1-165-319-11 CERAMIC CHIP 0.1uF 50V
C314 1-165-319-11 CERAMIC CHIP 0.1uF 50V
C318 1-124-778-00 ELECT CHIP 22uF 20% 6.3V
C319 1-165-319-11 CERAMIC CHIP 0.1uF 50V
C401 1-165-319-11 CERAMIC CHIP 0.1uF 50V
C402 1-124-778-00 ELECT CHIP 22uF 20% 6.3V
C403 1-124-778-00 ELECT CHIP 22uF 20% 6.3V
C404 1-126-206-11 ELECT CHIP 100uF 20% 6.3V
C405 1-110-530-11 ELECT CHIP 1000uF 20% 6.3V
C406 1-110-530-11 ELECT CHIP 1000uF 20% 6.3V
< FUSE >
! F501 1-532-505-31 FUSE (T5AL/250V) (MY, SP, IA)
! F505 1-532-506-31 FUSE (T6.3AL/250V)
! F506 1-532-506-31 FUSE (T6.3AL/250V)
< FUSE HOLDER >
FH501 1-533-233-21 HOLDER, FUSE (MY, SP, IA)
FH502 1-533-233-21 HOLDER, FUSE (MY, SP, IA)
FH507 1-533-233-21 HOLDER, FUSE
*NOTE
When replacing IC502, refer to “IC502 of
VIDEO board” in “Servicing Notes” (Page 4).
– 129 –
C407 1-165-319-11 CERAMIC CHIP 0.1uF 50V
C408 1-165-319-11 CERAMIC CHIP 0.1uF 50V
C409 1-124-778-00 ELECT CHIP 22uF 20% 6.3V
C410 1-165-319-11 CERAMIC CHIP 0.1uF 50V
C411 1-165-319-11 CERAMIC CHIP 0.1uF 50V
The components identified by mark ! or dotted
line with mark ! are critical for safety.
Replace only with part number specified.
(FORMER TYPE) (*NOTE)
(FORMER TYPE) (*NOTE)
Page 98

VIDEO
Ref. No. Part No. Description Remark
C412 1-165-319-11 CERAMIC CHIP 0.1uF 50V
C413 1-124-778-00 ELECT CHIP 22uF 20% 6.3V
C452 1-165-319-11 CERAMIC CHIP 0.1uF 50V
C501 1-163-251-11 CERAMIC CHIP 100PF 5% 50V
C502 1-163-251-11 CERAMIC CHIP 100PF 5% 50V
C503 1-163-251-11 CERAMIC CHIP 100PF 5% 50V
C504 1-165-319-11 CERAMIC CHIP 0.1uF 50V
C505 1-126-206-11 ELECT CHIP 100uF 20% 6.3V
C506 1-165-319-11 CERAMIC CHIP 0.1uF 50V
C507 1-126-206-11 ELECT CHIP 100uF 20% 6.3V
C509 1-163-275-11 CERAMIC CHIP 0.001uF 5% 50V
C510 1-165-319-11 CERAMIC CHIP 0.1uF 50V
C531 1-126-206-11 ELECT CHIP 100uF 20% 6.3V
C532 1-165-319-11 CERAMIC CHIP 0.1uF 50V
C535 1-165-319-11 CERAMIC CHIP 0.1uF 50V
C536 1-126-193-11 ELECT CHIP 1uF 20% 50V
C537 1-126-206-11 ELECT CHIP 100uF 20% 6.3V
C539 1-165-319-11 CERAMIC CHIP 0.1uF 50V
C540 1-126-206-11 ELECT CHIP 100uF 20% 6.3V
C541 1-165-319-11 CERAMIC CHIP 0.1uF 50V
C542 1-126-206-11 ELECT CHIP 100uF 20% 6.3V
C543 1-126-206-11 ELECT CHIP 100uF 20% 6.3V
C544 1-165-319-11 CERAMIC CHIP 0.1uF 50V
C545 1-165-319-11 CERAMIC CHIP 0.1uF 50V
C546 1-165-319-11 CERAMIC CHIP 0.1uF 50V
C547 1-126-193-11 ELECT CHIP 1uF 20% 50V
C548 1-165-319-11 CERAMIC CHIP 0.1uF 50V
C549 1-165-319-11 CERAMIC CHIP 0.1uF 50V
C550 1-163-275-11 CERAMIC CHIP 0.001uF 5% 50V
C551 1-165-319-11 CERAMIC CHIP 0.1uF 50V
C552 1-165-319-11 CERAMIC CHIP 0.1uF 50V
C553 1-126-206-11 ELECT CHIP 100uF 20% 6.3V
C555 1-124-779-00 ELECT CHIP 10uF 20% 16V
C556 1-165-319-11 CERAMIC CHIP 0.1uF 50V
C559 1-126-206-11 ELECT CHIP 100uF 20% 6.3V
C560 1-163-235-11 CERAMIC CHIP 22PF 5% 50V
C561 1-163-099-00 CERAMIC CHIP 18PF 5% 50V
C562 1-163-235-11 CERAMIC CHIP 22PF 5% 50V
C563 1-165-319-11 CERAMIC CHIP 0.1uF 50V
C564 1-165-319-11 CERAMIC CHIP 0.1uF 50V
Ref. No. Part No. Description Remark
< DIODE >
D301 8-719-054-23 DIODE RB706D-40-T146
D501 8-719-422-12 DIODE MA8039
D502 8-719-018-51 DIODE CL-170R-CD
< IC >
IC101 8-759-701-39 IC NJM3404AM
IC401 8-759-262-00 IC MC14576CF
IC402 8-759-535-49 IC M38513M4-050FP
(FORMER TYPE) (*NOTE)
IC501 8-759-269-92 IC SN74HCU04ANS-E20
IC502 8-759-535-47 IC M30620MC-302FP
(FORMER TYPE) (*NOTE)
IC502 8-759-549-26 IC M30620-305FP (NEW TYPE) (*NOTE)
IC504 8-759-269-92 IC SN74HCU04ANS-E20
IC505 8-759-535-48 IC CL680T-D1
IC506 8-759-535-61 IC LC372100PM-H95
IC507 8-759-342-01 IC MB814260-70PJER
IC509 8-759-535-62 IC PCM1727E-2/T2
< JACK >
J301 1-537-943-11 TERMINAL, S (S VIDEO OUT)
J302 1-774-227-11 JACK, PIN 1P (VIDEO OUT)
< SHORT >
JW101 1-216-295-00 SHORT 0
JW201 1-216-295-00 SHORT 0
JW401 1-216-295-00 SHORT 0
JW402 1-216-295-00 SHORT 0
JW403 1-216-295-00 SHORT 0
JW404 1-216-295-00 SHORT 0
JW405 1-216-295-00 SHORT 0
JW413 1-216-295-00 SHORT 0
JW421 1-216-295-00 SHORT 0 (NEW TYPE) (*NOTE)
JW422 1-216-295-00 SHORT 0 (NEW TYPE) (*NOTE)
JW502 1-216-295-00 SHORT 0
JW503 1-216-295-00 SHORT 0
JW504 1-216-295-00 SHORT 0
JW505 1-216-295-00 SHORT 0
C565 1-126-206-11 ELECT CHIP 100uF 20% 6.3V
C566 1-165-319-11 CERAMIC CHIP 0.1uF 50V
C568 1-126-206-11 ELECT CHIP 100uF 20% 6.3V
C569 1-126-206-11 ELECT CHIP 100uF 20% 6.3V
C570 1-126-206-11 ELECT CHIP 100uF 20% 6.3V
C571 1-128-065-11 ELECT CHIP 68uF 20% 10V
C573 1-163-235-11 CERAMIC CHIP 22PF 5% 50V
C574 1-163-235-11 CERAMIC CHIP 22PF 5% 50V
C576 1-163-235-11 CERAMIC CHIP 22PF 5% 50V
C577 1-163-235-11 CERAMIC CHIP 22PF 5% 50V
< CONNECTOR >
CN501 1-770-706-11 CONNECTOR, FFC/FPC 23P
CN503 1-779-416-11 CONNECTOR,FFC(LIF(NON-ZIF))13P
< TRIMMER >
CT503 1-141-539-11 CAP, ADJ 10PF
– 130 –
< COIL/SHORT >
L301 1-410-372-21 INDUCTOR CHIP 1.8uH
L302 1-410-372-21 INDUCTOR CHIP 1.8uH
L501 1-216-296-00 SHORT 0
L502 1-216-296-00 SHORT 0
L503 1-216-296-00 SHORT 0 (EXCEPT CH)
L503 1-410-370-41 INDUCTOR CHIP 1.2uH (CH)
L504 1-410-375-11 INDUCTOR CHIP 3.3uH
L505 1-216-296-00 SHORT 0
L506 1-216-296-00 SHORT 0
L507 1-216-296-00 SHORT 0
L508 1-216-296-00 SHORT 0
L509 1-216-296-00 SHORT 0
L510 1-216-296-00 SHORT 0
< TRANSISTOR >
Q301 8-729-024-91 TRANSISTOR 2SC2712-GL-TE85L
*NOTE
When replacing IC502, refer to “IC502 of
VIDEO board” in “Servicing Notes” (Page 4).
Page 99

VIDEO
Ref. No. Part No. Description Remark
Q302 8-729-024-91 TRANSISTOR 2SC2712-GL-TE85L
Q303 8-729-024-91 TRANSISTOR 2SC2712-GL-TE85L
Q304 8-729-024-91 TRANSISTOR 2SC2712-GL-TE85L
Q306 8-729-027-60 TRANSISTOR DTC144TKA-T146
Q307 8-729-024-91 TRANSISTOR 2SC2712-GL-TE85L
Q308 8-729-024-91 TRANSISTOR 2SC2712-GL-TE85L
Q310 8-729-024-91 TRANSISTOR 2SC2712-GL-TE85L
Q453 8-729-216-22 TRANSISTOR 2SA1162-G
Q454 8-729-216-22 TRANSISTOR 2SA1162-G
Q502 8-729-024-91 TRANSISTOR 2SC2712-GL-TE85L
Q531 8-729-140-75 TRANSISTOR 2SD999-CLCK
< RESISTOR >
R101 1-216-073-00 METAL CHIP 10K 5% 1/10W
R102 1-208-441-61 RES,CHIP 1.5K 2% 1/10W
R103 1-208-441-61 RES,CHIP 1.5K 2% 1/10W
R105 1-216-295-00 SHORT 0
R201 1-216-073-00 METAL CHIP 10K 5% 1/10W
R202 1-208-441-61 RES,CHIP 1.5K 2% 1/10W
R203 1-208-441-61 RES,CHIP 1.5K 2% 1/10W
R205 1-216-295-00 SHORT 0
R301 1-216-624-11 METAL CHIP 75 0.5% 1/10W
R302 1-216-624-11 METAL CHIP 75 0.5% 1/10W
Ref. No. Part No. Description Remark
R411 1-216-073-00 METAL CHIP 10K 5% 1/10W
R412 1-216-073-00 METAL CHIP 10K 5% 1/10W
R413 1-216-025-00 RES,CHIP 100 5% 1/10W
(FORMER TYPE) (*NOTE)
R414 1-216-081-00 METAL CHIP 22K 5% 1/10W
R415 1-216-081-00 METAL CHIP 22K 5% 1/10W
R421 1-216-073-00 METAL CHIP 10K 5% 1/10W
(FORMER TYPE) (*NOTE)
R422 1-216-073-00 METAL CHIP 10K 5% 1/10W
(FORMER TYPE) (*NOTE)
R423 1-216-073-00 METAL CHIP 10K 5% 1/10W
R424 1-216-073-00 METAL CHIP 10K 5% 1/10W
R425 1-216-073-00 METAL CHIP 10K 5% 1/10W
R426 1-216-073-00 METAL CHIP 10K 5% 1/10W
R457 1-216-025-00 RES,CHIP 100 5% 1/10W
R458 1-216-025-00 RES,CHIP 100 5% 1/10W
R459 1-216-025-00 RES,CHIP 100 5% 1/10W
R461 1-216-025-00 RES,CHIP 100 5% 1/10W
R462 1-216-025-00 RES,CHIP 100 5% 1/10W
R463 1-216-025-00 RES,CHIP 100 5% 1/10W
R464 1-216-025-00 RES,CHIP 100 5% 1/10W
R501 1-216-025-00 RES,CHIP 100 5% 1/10W
R502 1-216-025-00 RES,CHIP 100 5% 1/10W
R305 1-216-049-11 RES,CHIP 1K 5% 1/10W
R306 1-216-073-00 METAL CHIP 10K 5% 1/10W
R307 1-216-049-11 RES,CHIP 1K 5% 1/10W
R308 1-216-049-11 RES,CHIP 1K 5% 1/10W
R309 1-216-057-00 METAL CHIP 2.2K 5% 1/10W
R312 1-216-073-00 METAL CHIP 10K 5% 1/10W
R313 1-216-049-11 RES,CHIP 1K 5% 1/10W
R314 1-216-049-11 RES,CHIP 1K 5% 1/10W
R315 1-216-047-00 RES,CHIP 820 5% 1/10W
R316 1-216-657-11 METAL CHIP 1.8K 0.5% 1/10W
R317 1-216-683-11 METAL CHIP 22K 0.5% 1/10W
R318 1-216-033-00 METAL CHIP 220 5% 1/10W
R319 1-216-049-11 RES,CHIP 1K 5% 1/10W
R320 1-216-651-11 METAL CHIP 1K 0.5% 1/10W
R321 1-216-049-11 RES,CHIP 1K 5% 1/10W
R324 1-216-022-00 METAL CHIP 75 5% 1/10W
R325 1-216-295-00 SHORT 0
R327 1-216-049-11 RES,CHIP 1K 5% 1/10W
R328 1-216-655-11 METAL CHIP 1.5K 0.5% 1/10W
R329 1-216-649-11 METAL CHIP 820 0.5% 1/10W
R332 1-216-651-11 METAL CHIP 1K 0.5% 1/10W
R333 1-216-046-00 METAL CHIP 750 5% 1/10W
R335 1-216-073-00 METAL CHIP 10K 5% 1/10W
R336 1-216-073-00 METAL CHIP 10K 5% 1/10W
R340 1-216-022-00 METAL CHIP 75 5% 1/10W
R503 1-216-025-00 RES,CHIP 100 5% 1/10W
R504 1-216-025-00 RES,CHIP 100 5% 1/10W
R505 1-216-025-00 RES,CHIP 100 5% 1/10W
R506 1-216-025-00 RES,CHIP 100 5% 1/10W
R507 1-216-073-00 METAL CHIP 10K 5% 1/10W
R508 1-216-081-00 METAL CHIP 22K 5% 1/10W
R509 1-216-081-00 METAL CHIP 22K 5% 1/10W
R510 1-216-081-00 METAL CHIP 22K 5% 1/10W
R511 1-216-081-00 METAL CHIP 22K 5% 1/10W
R512 1-216-081-00 METAL CHIP 22K 5% 1/10W
R513 1-216-081-00 METAL CHIP 22K 5% 1/10W
R514 1-216-081-00 METAL CHIP 22K 5% 1/10W
R516 1-216-073-00 METAL CHIP 10K 5% 1/10W
R517 1-216-073-00 METAL CHIP 10K 5% 1/10W
R518 1-216-073-00 METAL CHIP 10K 5% 1/10W
R519 1-216-025-00 RES,CHIP 100 5% 1/10W
R520 1-216-057-00 METAL CHIP 2.2K 5% 1/10W
R523 1-216-013-00 METAL CHIP 33 5% 1/10W
R530 1-216-081-00 METAL CHIP 22K 5% 1/10W
R531 1-216-025-00 RES,CHIP 100 5% 1/10W
R532 1-216-025-00 RES,CHIP 100 5% 1/10W
R533 1-216-025-00 RES,CHIP 100 5% 1/10W
R534 1-216-073-00 METAL CHIP 10K 5% 1/10W
R535 1-216-073-00 METAL CHIP 10K 5% 1/10W
R536 1-216-033-00 METAL CHIP 220 5% 1/10W
R341 1-216-121-00 RES,CHIP 1M 5% 1/10W
R342 1-216-022-00 METAL CHIP 75 5% 1/10W
R403 1-216-057-00 METAL CHIP 2.2K 5% 1/10W
R404 1-216-057-00 METAL CHIP 2.2K 5% 1/10W
R405 1-216-065-00 RES,CHIP 4.7K 5% 1/10W
R406 1-216-081-00 METAL CHIP 22K 5% 1/10W
R407 1-216-073-00 METAL CHIP 10K 5% 1/10W
R408 1-216-073-00 METAL CHIP 10K 5% 1/10W
R409 1-216-049-11 RES,CHIP 1K 5% 1/10W
R410 1-216-049-11 RES,CHIP 1K 5% 1/10W
– 131 –
R537 1-216-025-00 RES,CHIP 100 5% 1/10W
R538 1-216-073-00 METAL CHIP 10K 5% 1/10W
R542 1-216-049-11 RES,CHIP 1K 5% 1/10W
R543 1-216-685-11 METAL CHIP 27K 0.5% 1/10W
R544 1-216-659-11 METAL CHIP 2.2K 0.5% 1/10W
R545 1-216-025-00 RES,CHIP 100 5% 1/10W
R546 1-216-049-11 RES,CHIP 1K 5% 1/10W
R547 1-216-295-00 SHORT 0
R548 1-216-049-11 RES,CHIP 1K 5% 1/10W
R549 1-216-025-00 RES,CHIP 100 5% 1/10W
*NOTE
When replacing IC502, refer to “IC502 of
VIDEO board” in “Servicing Notes” (Page 4).
Page 100
HCD-V919A V
VIDEO
Ref. No. Part No. Description Remark
R550 1-216-025-00 RES,CHIP 100 5% 1/10W
R551 1-216-025-00 RES,CHIP 100 5% 1/10W
R552 1-216-025-00 RES,CHIP 100 5% 1/10W
R554 1-216-025-00 RES,CHIP 100 5% 1/10W
(EXCEPT CH)
R554 1-216-029-00 RES,CHIP 150 5% 1/10W
(CH)
R555 1-216-121-00 RES,CHIP 1M 5% 1/10W
R556 1-216-025-00 RES,CHIP 100 5% 1/10W
R557 1-216-025-00 RES,CHIP 100 5% 1/10W
R558 1-216-073-00 METAL CHIP 10K 5% 1/10W
R559 1-216-073-00 METAL CHIP 10K 5% 1/10W
R560 1-216-051-00 METAL CHIP 1.2K 5% 1/10W
R561 1-216-049-11 RES,CHIP 1K 5% 1/10W
R562 1-216-025-00 RES,CHIP 100 5% 1/10W
(FORMER TYPE) (*NOTE)
R563 1-216-025-00 RES,CHIP 100 5% 1/10W
R564 1-216-025-00 RES,CHIP 100 5% 1/10W
R565 1-216-025-00 RES,CHIP 100 5% 1/10W
R566 1-216-025-00 RES,CHIP 100 5% 1/10W
R567 1-216-073-00 METAL CHIP 10K 5% 1/10W
R568 1-216-073-00 METAL CHIP 10K 5% 1/10W
R569 1-216-073-00 METAL CHIP 10K 5% 1/10W
Ref. No. Part No. Description Remark
! 59 1-558-943-41 CORD, POWER (IA, TH)
! 59 1-575-651-21 CORD, POWER (SP, MY)
! 59 1-782-510-11 CORD, POWER (CH)
60 1-783-898-11 WIRE (FLAT TYPE) (15 CORE)
121 1-769-972-11 WIRE (FLAT TYPE) (13 CORE)
130 1-773-108-11 WIRE (FLAT TYPE) (19 CORE)
257 1-452-925-11 MAGNET ASSY
258 1-776-042-11 WIRE (FLAT TYPE) (8 CORE)
! 301 8-820-020-02 OPTICAL PICK-UP KSS-213D/Q-NP
302 1-769-069-11 WIRE (FLAT TYPE) (16 CORE)
HP101 A-2056-681-A DECK (A) ASSY, HEAD
HP101 A-2056-683-A DECK (A) ASSY, HEAD (230PWR1)
HRPE101A-2056-682-A DECK (B) ASSY, HEAD
HRPE101A-2056-684-A DECK (B) ASSY, HEAD (230PWR1)
M1 A-2004-628-A MOTOR ASSY, CAPSTAN
M101 A-4917-523-A MOTOR ASSY (SPINDLE)
M102 A-4917-504-A MOTOR ASSY (SLED)
M701 A-4672-004-A MOTOR ASSY (TURN)
M801 A-4672-004-A MOTOR ASSY (SLIDE)
M901 1-763-048-21 FAN, D.C.
S811 1-473-335-11 ENCODER, ROTARY (BU, TRAY ADDRESS DET)
! T501 1-431-828-11 TRANSFORMER, POWER
************************************************************
R572 1-216-073-00 METAL CHIP 10K 5% 1/10W
R573 1-216-073-00 METAL CHIP 10K 5% 1/10W
R574 1-216-073-00 METAL CHIP 10K 5% 1/10W
R577 1-216-081-00 METAL CHIP 22K 5% 1/10W
R578 1-216-081-00 METAL CHIP 22K 5% 1/10W
R579 1-216-073-00 METAL CHIP 10K 5% 1/10W
R580 1-216-073-00 METAL CHIP 10K 5% 1/10W
(EXCEPT CH)
R581 1-216-073-00 METAL CHIP 10K 5% 1/10W
(CH)
< SWITCH >
S501 1-571-395-11 SWITCH, SLIDE (SYSTEM SELECT)
< VIBRATOR >
X401 1-767-261-21 VIBRATOR, CERAMIC (8MHz)
(FORMER TYPE) (*NOTE)
X501 1-767-510-11 VIBRATOR, CERAMIC (10MHz)
X503 1-767-519-11 VIBRATOR, CRYSTAL (27MHz)
************************************************************
MISCELLANEOUS
**************
6 1-233-545-11 TUNER, FM/AM (TH)
6 1-693-381-11 TUNER, FM/AM (CH)
6 1-693-421-11 TUNER, FM/AM (SP, MY, IA)
8 1-751-688-11 WIRE (FLAT TYPE) (13 CORE) (TH)
8 1-773-009-11 WIRE (FLAT TYPE) (15 CORE) (150 mm)
(EXCEPT TH)
**************
HARDWARE LIST
**************
#1 7-685-872-09 SCREW +BVTT 3X8 (S)
#2 7-685-646-79 SCREW +BVTP 3X8 TYPE2 N-S
#3 7-685-647-79 SCREW +BVTP 3X10 TYPE2 N-S
#4 7-685-650-79 SCREW +BVTP 3X16 TYPE2 IT-3
#5 7-685-871-01 SCREW +BVTT 3X6 (S)
#6 7-685-880-09 SCREW +BVTT 4X6 (S)
#7 7-685-851-04 SCREW +BVTT 2X4 (S)
#8 7-621-775-10 SCREW +B 2.6X4
#9 7-621-255-15 SCREW +P 2X3
#10 7-685-850-04 SCREW +BVTT 2X3 (S)
#11 7-628-254-15 SCREW +PS 2.6X6
#12 7-628-254-50 SCREW +PS 2.6X16
The components identified by mark ! or dotted
line with mark ! are critical for safety.
Replace only with part number specified.
9 1-775-212-11 WIRE (FLAT TYPE) (23 CORE)
10 1-690-589-31 WIRE (FLAT TYPE) (13 CORE)
54 1-773-043-11 WIRE (FLAT TYPE) (17 CORE)
! 58 1-569-007-11 ADAPTOR, CONVERSION 2P (IA)
! 58 1-569-008-21 ADAPTOR, CONVERSION 2P (SP, MY)
Sony Corporation
9-922-923-11
Home A&V Products Company
– 132 –
*NOTE
When replacing IC502, refer to “IC502 of
VIDEO board” in “Servicing Notes” (Page 4).
Printed in Singapore © 1998. 7
Published by Quality Assurance Dept.
98G0570085-1D
(Shibaura)
 Loading...