

Page 1
4-672-781-11 (1)
Network File Server
User’s Guide
Before operating the unit, please read this manual
thoroughly and retain it for future reference.
FSV-M3
© 2003 Sony Corporation. All rights reserved.
Page 2

Table of Contents
Chapter 1 Introduction
Chapter 2 Basic Use
Overview.......................................................................4
Features and Functions..............................................5
Front................................................................................5
Rear.................................................................................6
Prerequisite Knowledge for Using This Server ........7
System Requirements .................................................7
About This Manual ......................................................8
How to Use the Administration Guide............................8
How to Use the Online Help...........................................8
Overview.......................................................................9
Basic Installation.........................................................9
Installing FSV-Central for M3 .....................................9
Setting Up the Server for Use...................................10
Basic Operations.......................................................11
Browser.........................................................................11
Setting the System Administrator Password..........14
Setting the Date and Time ........................................14
Setting the System Language..................................15
Configuring Windows Network Settings.................16
Registering Users......................................................16
Registering Local Set Users..........................................17
Changing the User Password ........................................19
Creating Shares.........................................................20
Manual Share Creation..................................................20
Automatic Share Creation.............................................22
Storing Files and Folders in Shares ........................24
Access from Windows 95/98/NT..................................24
Access from Windows Me/2000...................................25
Access from Windows XP Professional .......................27
Access from UNIX/Linux.............................................27
Shutting Down/Restarting the System....................28
Shutting Down or Restarting the System from
the Browser..........................................................28
LED Indicators...........................................................29
Data Backup...............................................................29
2
Page 3

Chapter 3 Using the FSV-M3 Administration Console
Overview.....................................................................30
System Menu .............................................................31
System Settings.............................................................31
Date & Time..................................................................32
Alerts.............................................................................33
Software Update............................................................34
Shutdown/Reboot..........................................................35
Network Menu............................................................36
TCP/IP...........................................................................36
Windows .......................................................................38
UNIX.............................................................................39
FTP................................................................................40
SNMP............................................................................42
Storage Menu............................ ..... ..... .... ...................42
Device ...........................................................................43
RAID Group..................................................................47
Share..............................................................................48
User Quotas...................................................................55
Security Menu............................................................58
Share Folders.................................................................58
Users..............................................................................59
Status Menu...............................................................62
System...........................................................................63
Disk Usage....................................................................63
Current Users ................................................................63
Login History................................................................64
Event Log......................................................................65
FSV-M3 Limitations...................................................66
Alerts Table................................................................67
SNMP Traps Table.....................................................69
Appendix
Precautions................................................................71
Troubleshooting........................................................71
Specifications............................................................73
Glossary.....................................................................74
Index...........................................................................77
Program ©2003 Wistron Corporation
Documentation ©2003 Sony Corporation
©2003 Sony Corporation
Trademarks
• Sony and StorStation are trademarks or registered trademarks of Sony Corporation in this country, other countries, or both.
• Internet Explorer , M icro soft, W ind ow s, Wi ndo ws 9 5, W in do w s 98 , Windows Me, Windows NT, W indo w s 2 000 , a nd W indo ws XP Pr ofe ssi onal ar e ei the r r eg ister ed
trademarks or trademarks of Microsoft Corporation in the United States and/or other countries.
• Linux is either a registered trademark or trademark of Linus Torvalds in the United States and/or other countries.
• Red Hat is a registered trademark or trademark of Red Hat, Inc. in the United States and/or other countries.
• Solaris and NFS are registered trademarks or trademarks of Sun Microsystems, Inc. in the United States and/or other countries.
• Adobe, Acrobat, and Acrobat Reader are either registered trademarks or trademarks of Adobe Systems Incorporated in the United States and/or other countries.
• Ethernet is a registered trademark of Fuji Xerox Co., Ltd.
• Other products or system names appearing in this document are trademarks or registered trademarks of their respective owners.
Further, the or symbols are not used in the text.
3
Page 4

Overview
Introduction
The FSV-M3 is a dedicated file server that can be connected directly to a
network. Because the FSV-M3 is preconfigured for use as a file server, mini mal
work is necessary to put it into operation.
Can be manage d through a Web browser (via the Web
Administration Console)
Operations (such as configuring individual settings, managi ng users and shares,
shutting down the system, etc.) can be controlled remotely through a Web
browser.
Supports file sharing in Windows and UNIX environments
Files can be shared among cl ient computers running Windows 95, Windows 98,
Windows 98 SE, Windows Me, Windows XP Professional, Windows NT 4.0,
Windows 2000, UNIX, and Linux. Computers with different op erating syst ems
can be used to view and edit the same file. Also, you can limit user access to the
server and set access permissions for each share.
Chapter
1
Chapter 1 Introduction
4
Page 5
Features and Functions
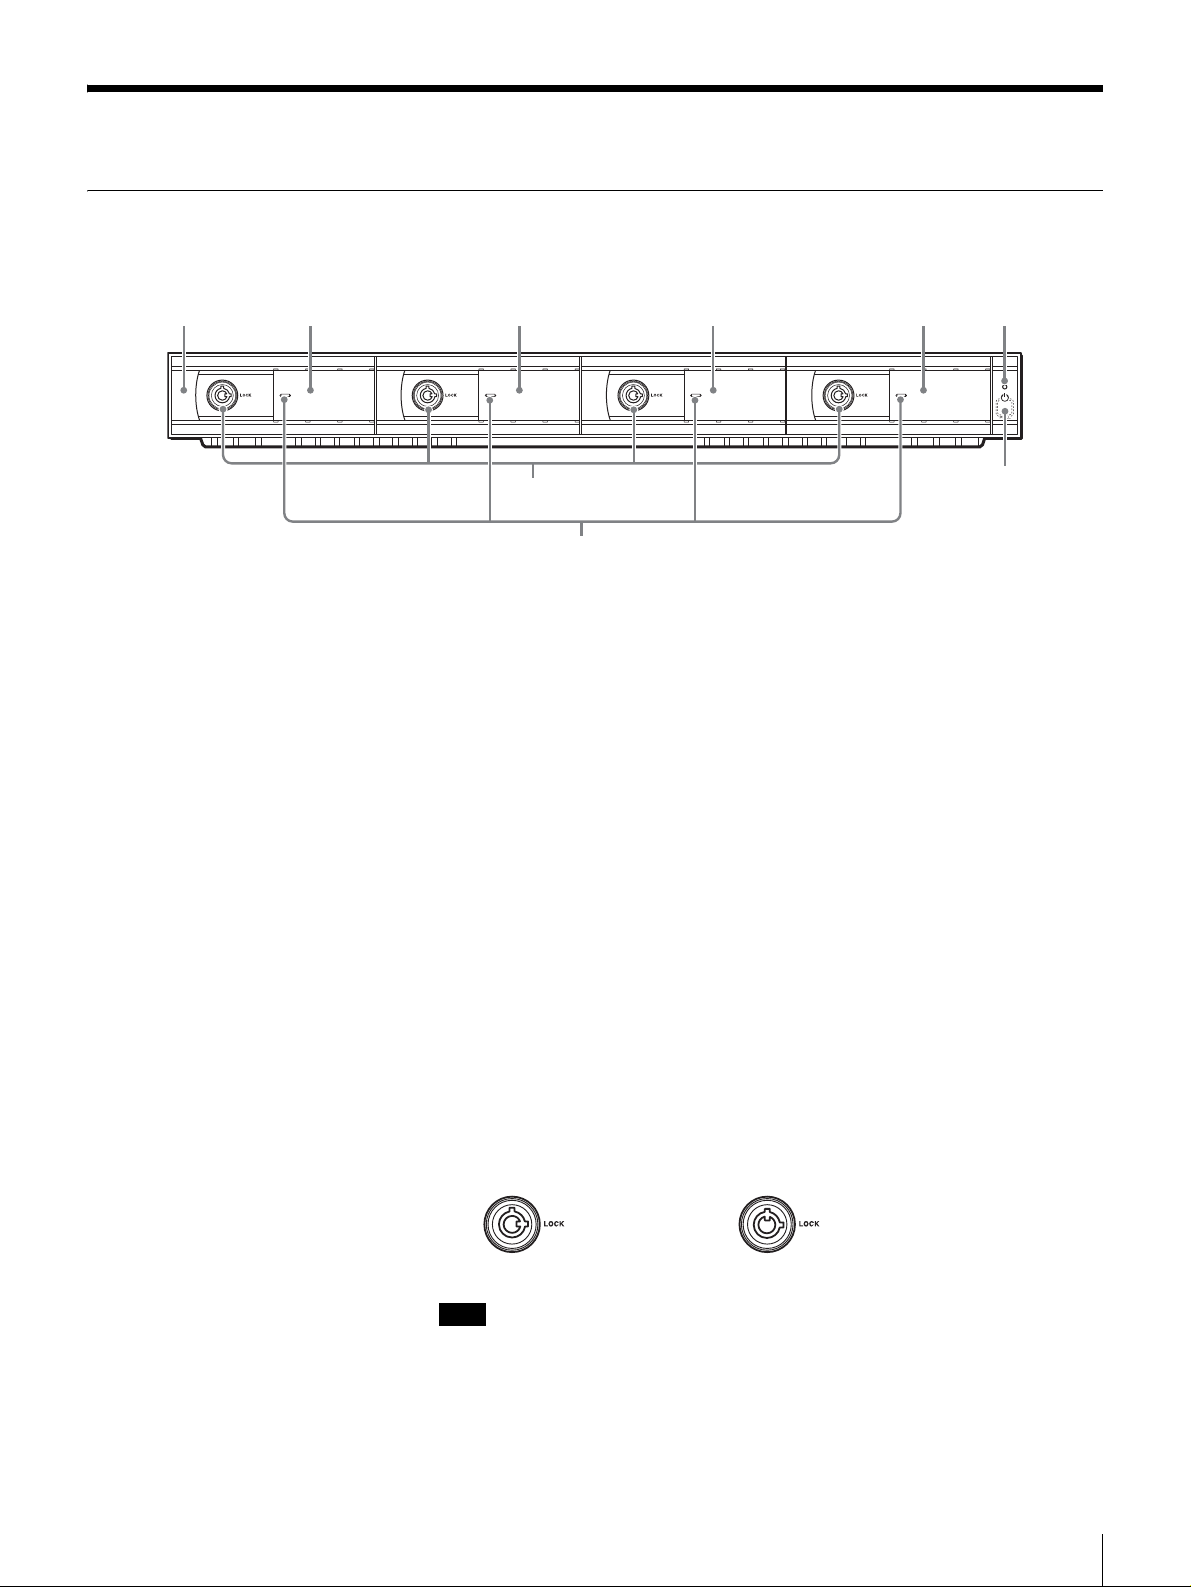
12 3 4 56
Front
8
9
A Drive bay door latch
Latch used to open and replace the hard drive.
B Drive 0 (HDD 0)
C Drive 1 (HDD 1)
D Drive 2 (HDD 2)
E Drive 3 (HDD 3)
F Power indicator LED
Lights up when the power is turned on.
G Power button
Lift the cover to access the switch that controls the power to th e server.
7
H Key holes
Locks the drive using the supplied HDD tray keys.
You can distinguish the locked position from th e unl ock ed position by looking
at the key hole, as illustrated here.
HDD tray is locked HDD tray is unlocked
Note
The drives are locked when the FSV-M3 is shipped from the factory.
I Drive LED
Lights up when the drive is accessed or in the standby mode.
Chapter 1 Introduction
5
Page 6
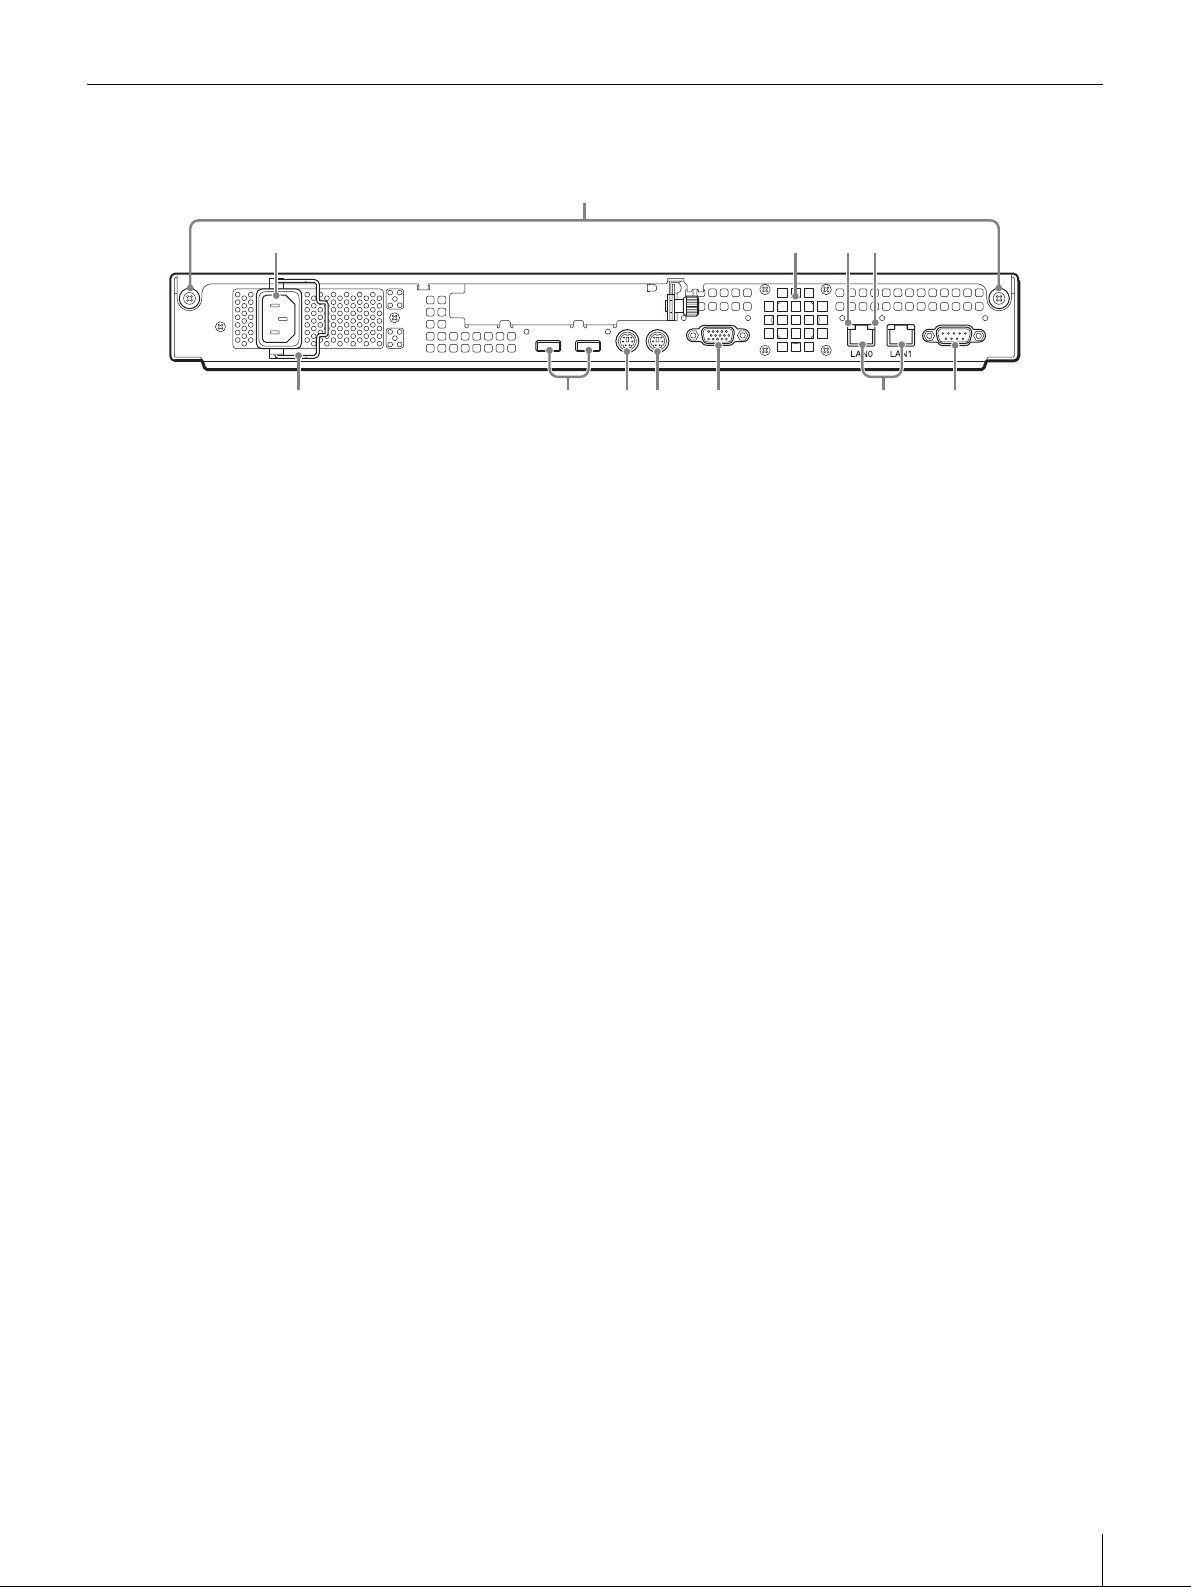
Rear
1
6890q
234 5
s
A Cover fasteners
Service cover fasteners.
B Power supply connector
Plug the provided power cord into this connector.
C Fan
Be careful not to block t he fan's ventilation holes. If the ventilation holes are
blocked, overheating could lead to fire or damage the unit.
D LINK LED
Lights up when the FSV-M3 is connected to a Gigabit hub.
E ACT LED
Lights up when network activity takes place.
F RS232 serial connector
Connector for a UPS device.
G LAN connector (LAN 0, LAN 1)
For connecting a 10 Base-T, 100 Base-TX, or 1000 Base-T network cable.
7qa
H VGA console connector
For maintenance purposes only.
I PS/2 mouse connector
For maintenance purposes only.
J PS/2 keyboard connector
For maintenance purposes only.
K USB connectors
For maintenance purposes only.
L Power cord safety clip
Used to prevent the power cord from disconnecting.
Chapter 1 Introduction
6
Page 7

Prerequisite Knowledge for Using This Serv er
As a prerequisite for using this server, you should be familiar with computers
and networks. For example, you need to understand the following terms. A
glossary of technical terms is included at the end of this manual.
• TCP/IP Communication Protocol (IP Address, Domain Name, Host Name,
Subnet Mask, Gateway, DNS, SNMP)
• LAN Equipment (Router, HUB, 1000 Base-TX, 100 Base-TX, 10 Base-T)
• Internet So ftware
- Electronic Mail (SMTP)
-Browser
• Computer (Windows 95, Windows 98, Windows 98 SE, Windows Me,
Windows XP Professional, Windows NT 4.0, Windows 2000, UNIX, Linux)
- Network Settings (Workgroup Name, PDC)
- File, Directory (Folder)
System Requirement s
The hardware and software required to use this server are as follows.
Computer for Setup
Prepare a computer that can run one of the following browsers.
• Browser Software
- Microsoft Internet Explorer 5.0, 5.5, or 6.0 (for Windows)
Client Computers
Prepare client computers that meet the following requirements.
• PC/ AT co mp uter meetin g the foll owin g perfo rman ce requirements:
- Operating system: Microsoft Windows 95, Microsoft Windows 98,
Microsoft Windows 98 SE, Microsoft Windows Me, Microsoft Windows
XP Professional, Microsoft Windows NT 4.0, Microsoft Windows 2000
- LAN port
• UNIX/Linux computers meeting the following requirements:
- Operating system:
UNIX: Solaris 7, Solaris 8
Linux: RedHat 7.1, RedHat 7.2, RedHat 7.3
- LAN port
Miscellaneous
• N etwork switch (100/10 Base-T)
• 1000 Base-T/100 Base-TX/10 Base-T cable
Chapter 1 Introduction
7
Page 8
About This Manual
This manual explains how the system admini st r ato r shoul d set up the FS V-M3
and make all necessary settings.
For detailed informat ion on u sing the FS V-M3 Admin istratio n Console, pl ease
refer to the Online Help together with this manual.
How to Use the Administrat ion Guide
Displaying the A dministration Guide
On the FSV-M3 Administrati on Console page, point to (Information icon),
and then click “Manual” on the menu that appears. The Administration Guide
(this document) appears.
For details on the FSV-M3 Administration Console, see Chapter 3, “Using the
FSV-M3 Administration Console” (page 30).
Quitting the Administration Guide
Click the “Close” butto n of Adobe Acrobat Reader or your browser . (Example:
in Windows)
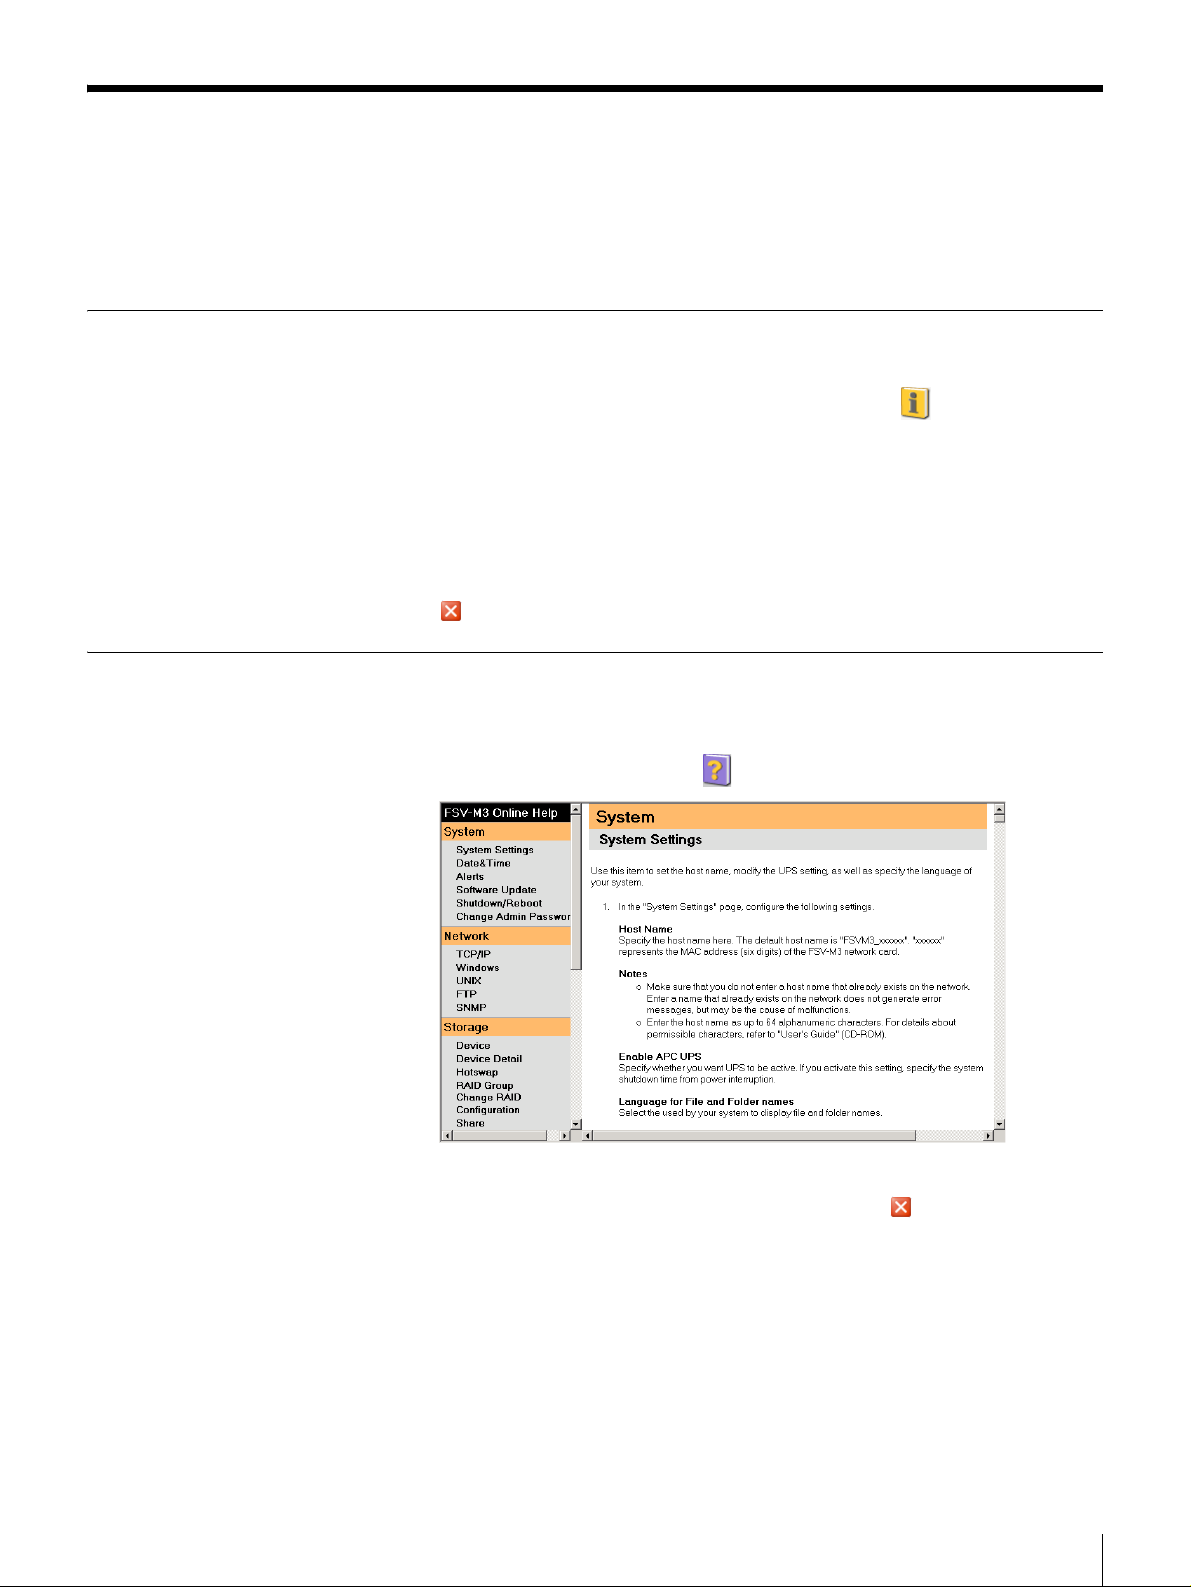
How to Use the Online Help
Displaying the Online Help
To display the Online Help for an individual screen of the FSV-M3
Administration Console, click on the upper-right corner of the screen.
Quitting the Online Help
Click the “Close” button of your browser. (Example: in Windows)
Chapter 1 Introduction
8
Page 9

Overview
Basic Installa tion
Basic Use
This chapter explains the basic server configuration, use r registration, and share
creatio n required to enable use of the s erver.
For details about indi vidu al items on the FSV-M3 Admin istrat ion Consol e, see
Chapter 3, “Using the FSV-M3 Administration Console” (page 30).
Make sure you have the foll owing items bef ore you connect the FSV-M3 to the
network.
Chapter
2
x Ethernet connection (at least 1)
x TCP/IP network
x Cat-5 cables
x Windows client computer running FSV-Central for M3
x Client computer with Web browser (Windows Internet Explorer 5.0,
5.5, or 6.0)
Installing FSV-Central for M3
The default static IP address of the FSV-M3 is 192.168.0.100. If you need to
change the IP address, you must install FSV-Central for M3 on a PC that is
connected to the same network as the FSV-M3.
For details about how to install FSV-Central for M3, refer to the Installation
Guide.
Chapter 2 Basic Use
9
Page 10

Setting Up the Server for Use
Once the server is connected to the network, perform the following setup
procedure to allow users to access the server.
1
Set the system administrator password (page 14).
The administrator password is extremely important for sy stem security. Be
sure to set the system administrator password before performing the
following setup.
2
Set the date and time (page 14).
3
Specify the default language (page 15).
4
Configure the settings according to the operating
system.
Configure the settings according to the operating system of the client
computer.
• Configure settings for Windows (page 38).
Configure Windows network-related settings, such as the workgroup
name.
• Configure settings for UNIX (page 39).
Configure NFS-related settings.
5
Register users (page 16).
Register the users who will be using the server.
By integrating the FS V-M3 into a Windows Domain System, you can
administer users using a domain controller. For details, see Chapter 3,
“Windows” (page 38).
6
Create shares (page 20).
Create shares that will be accessed by the users.
You can create user shares automatically by using the automatic share
creation function. For details, see Chapter 3, “Automatic Share Creation”
(page 51).
Chapter 2 Basic Use
10
Page 11

Basic Operatio ns
Browser
A Web browser is used to perform basic administrative operations.
Access the FSV-M3 Administration Console through a browser. On the FSVM3 Top Page you can see the “Change User Password” and “Administrator
Login” menus.
When you click “Administrator Login”, the FSV-M3 Administration Console
(menu exclusively for administrators) appears. You must enter the administrator
password. The administrator password is not necessary to change the user
password.
For details on the FSV-M3 Administration Con s ole, see to Chapter 3, “Using
the FSV-M3 Administration Console” (page 30).
Caution
Make sure your browser is JavaScript enabled. With Internet Explorer 5.0,
select “Tools”- “Internet Options” - “Security” - “C ust om Level ” - “Scripting”
- “Active Scripting” - “Enable”.
You can perform the following operations by accessing the FSV-M3
Administration Console through your Web browser.
• Configure TC/I P settings
• Confi gure system setti ngs
• Change or set the system administrator password
• Manage users
• Manage shares
• Configure RAID
• Check the server status
• Restart and shut down the system
• Update the system software
Making Settings and Administering with a Browser
Use a browser to access and use the FSV-M3 Administration Console.
1
Start the browser on the client computer.
2
Enter “http://xxx.xxx .xxx.xxx/” in the “Address” or “Location” box (where
“xxx.xxx.xxx.xxx” is the IP address of the server).
Notes
• The SOFTWARE LICENSE AGREEMENT page appears the first time
you access the FSV-M3 Top Page.
• Part of the software installed on the FSV-M3 uses GPL/LGPL software.
It is not covered by the clauses of the software license agreement to
which you agreed. You are permitted to obtain, modify, and r edistri bute
its source code. For details, ref er to “GPL/LPGL” supplied with the FSVM3.
3
After reading the software license agreement, click “Agree” and the FSVM3 Top Page appears.
Chapter 2 Basic Use
11
Page 12
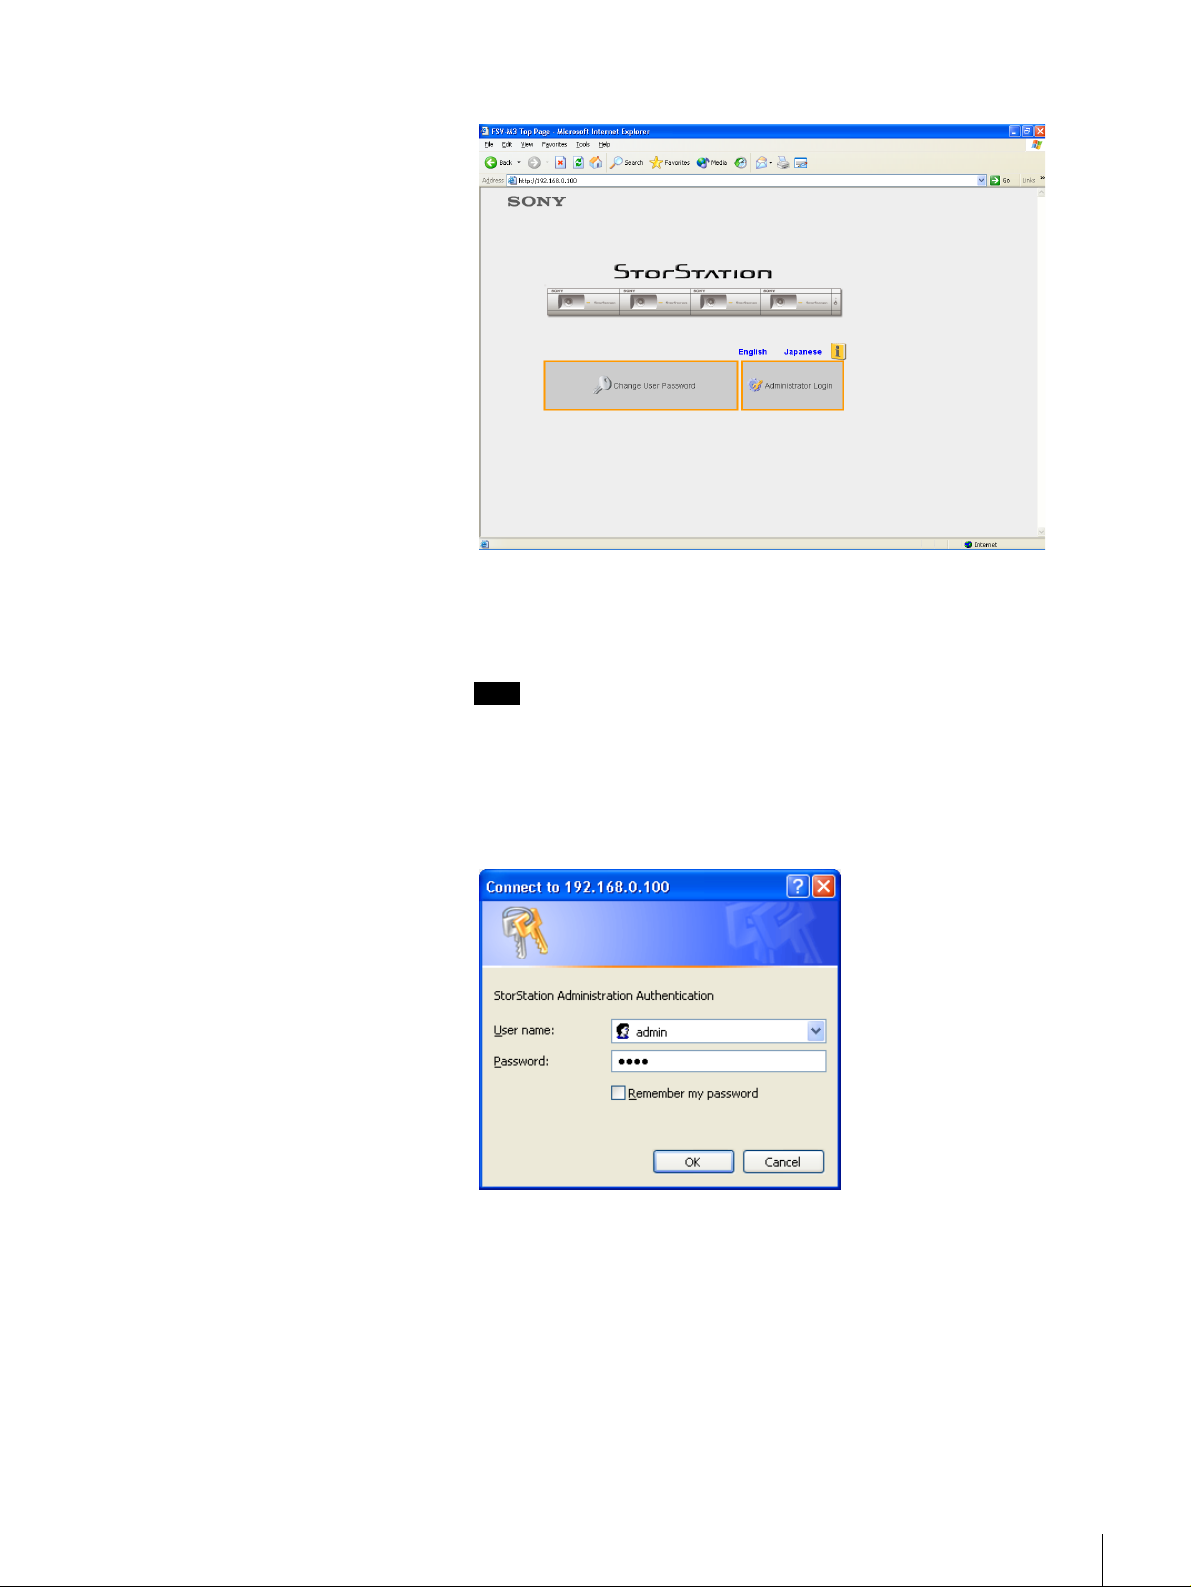
The FSV-M3 Top Page appears.
4
Click “Administrator Login”.
A dialog box allowing you to enter the user name and password appears.
Note
Each time you access the FSV-M3 Administra tion Consol e, you must enter
the user name and password. The default user name is “admin” and the
default password is “sony”.
5
Enter “admin” in the “User Name” box, and then enter “sony” in the
“Password” box.
6
Click “OK”.
Chapter 2 Basic Use
12
Page 13
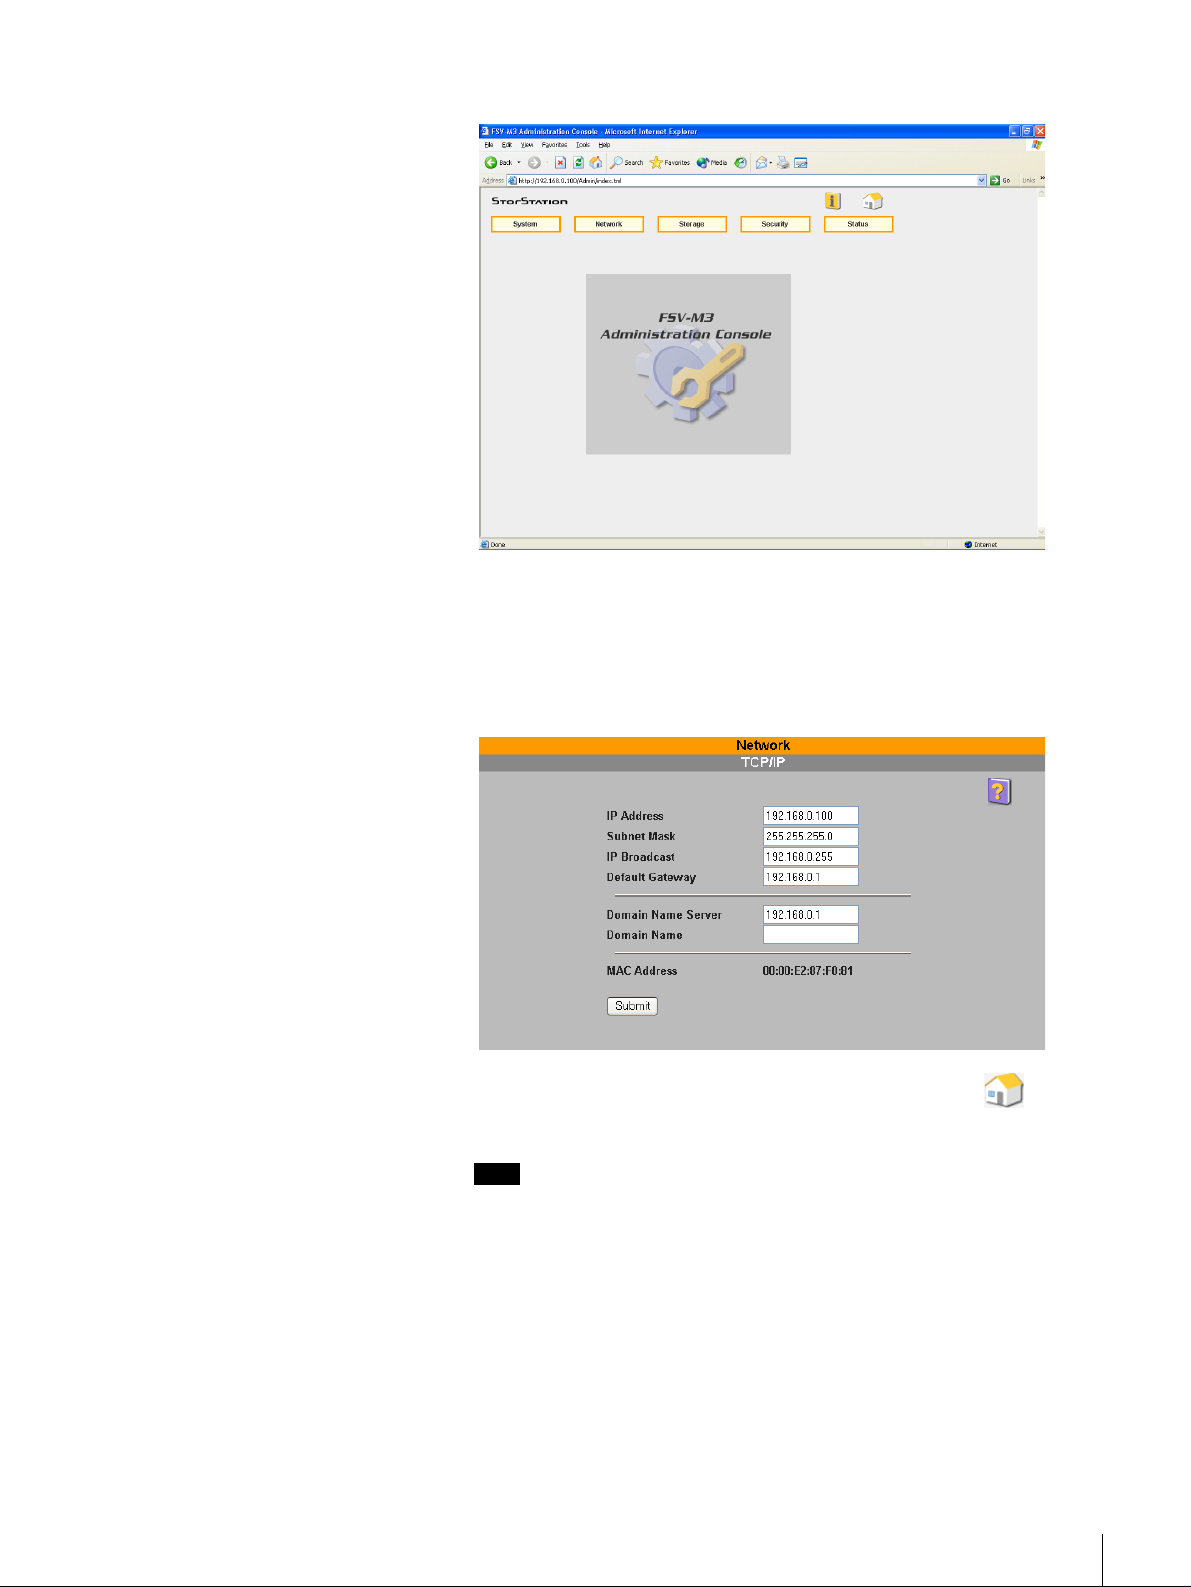
The FSV-M3 Administration Console appears.
7
Point at a menu and a shortcut menu app ears. Cli ck the command that yo u
want to use.
The corresponding page appears.
(Example) The “Net work” - “TCP/IP” pa ge
8
To return to the FSV-M3 A dministration Console, click the (home)
icon.
Note
Sony strongly recommends that you change the system administrator
password when you access the FSV-M3 Administration Console for the
first time. For information on how to set the administrator pass word, see
“Setting the System Adm inistrator Password” (page 14) in this chapter.
Chapter 2 Basic Use
13
Page 14
Setting the System Administrator Password
The administrator password is extremely important for system security. When
you access the FSV-M3 Administration Console for the first time, be sure to
change the system administrator password before configuring the settings.
Furthermore, guard the administrator password carefully.
Set or change the system administrator password through the FSV-M3
Administration Console.
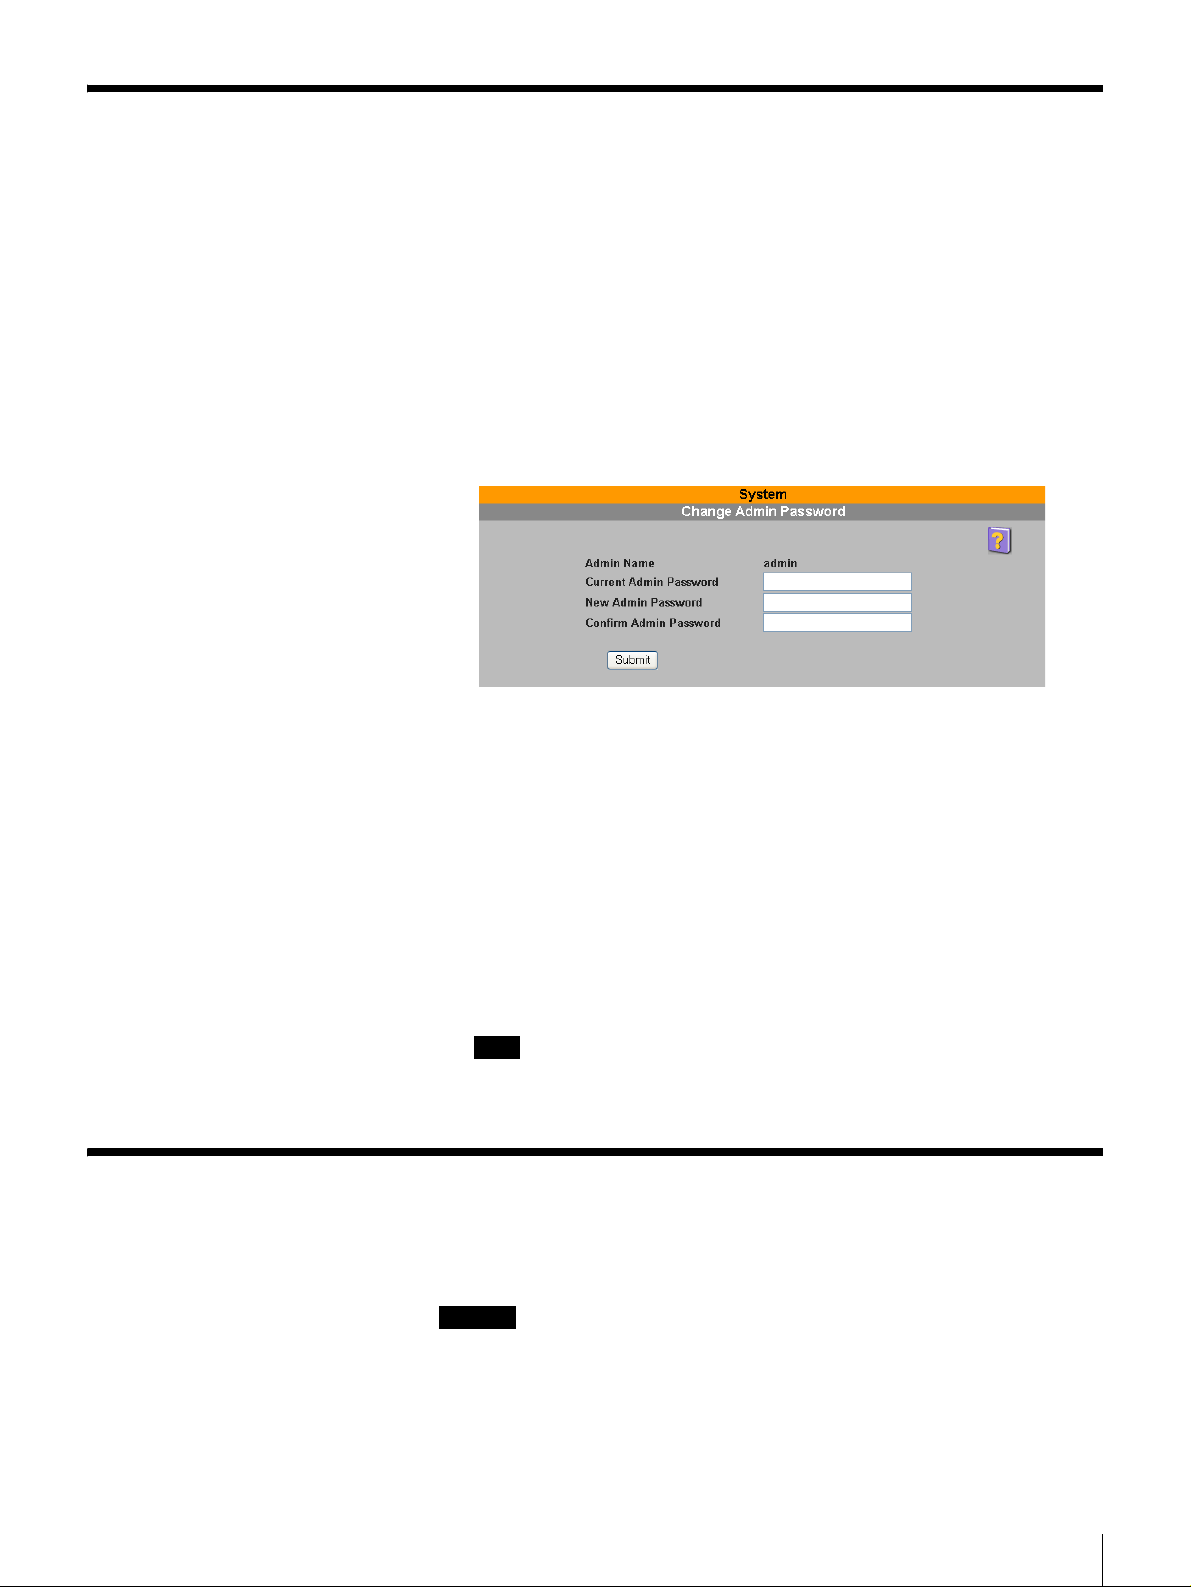
1
On the FSV-M3 Administration Console, click “System” - “Change Admin
Password”.
The “Change Admin Password” page appears.
2
In the “Current Admin Password” box, enter the current administrator
password.
3
In the “New Admin Password” box, ent er a new password of five or more
alphanumeric characters.
For details about permissible characters, see Chapter 3, “FSV-M3
Limitations” (page 66).
4
In the “Confirm Admin Password” box, re-enter the new password.
5
Click the “Submit” button.
Note
You cannot change the administrator name (“admin”).
Setting the Date and Time
Before using this server, set the date and time.
Caution
Make sure that the date and time are the same for all client computers and the
server. If the date and time are not the same, files may be mistakenly overwritten
or other problems occur.
1
On the FSV-M3 Administration Console, click “System” - “Date & Time”.
Chapter 2 Basic Use
14
Page 15
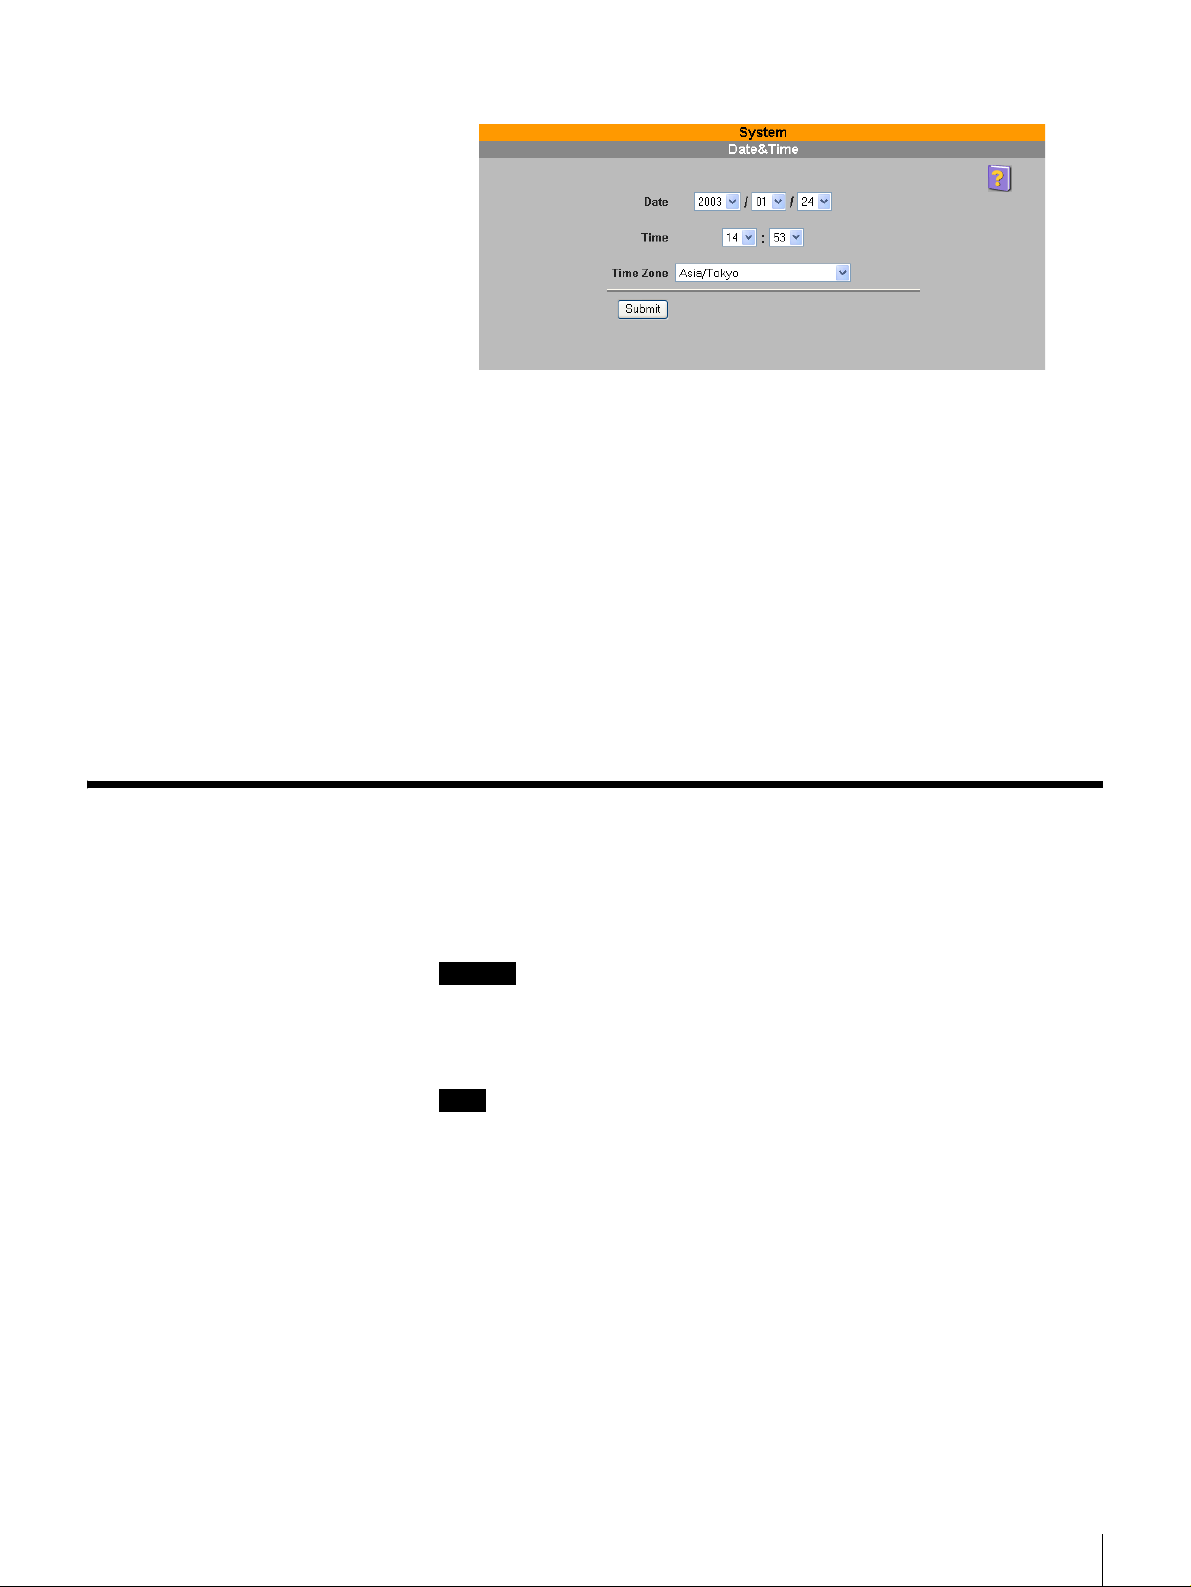
The “Date & Time” page appears.
2
Configure the items below.
Date
Select the date as Year/Month/Day (2003/11/25).
Time
Select the time as Hours/Minutes (13:30).
Time Zone
Select the local time zone from the list.
3
Click the “Submit” button.
The information set above is reflected in the “Date & Time” page.
Setting the System Language
Before beginning to use the FSV-M3, make sure that you specify the system
language of the client computer used to access the server.
Warning
If you change this setting , file and share n ames may be displayed inco rrectly, or
may no longer be accessible. Also, if you use the server and then change this
setting, files and shares created before the change may no longer be accessible.
Note
The only available languages are English and Japanese.
1
On the FSV-M3 Administration Console, click “System” - “System
Settings”.
Chapter 2 Basic Use
15
Page 16
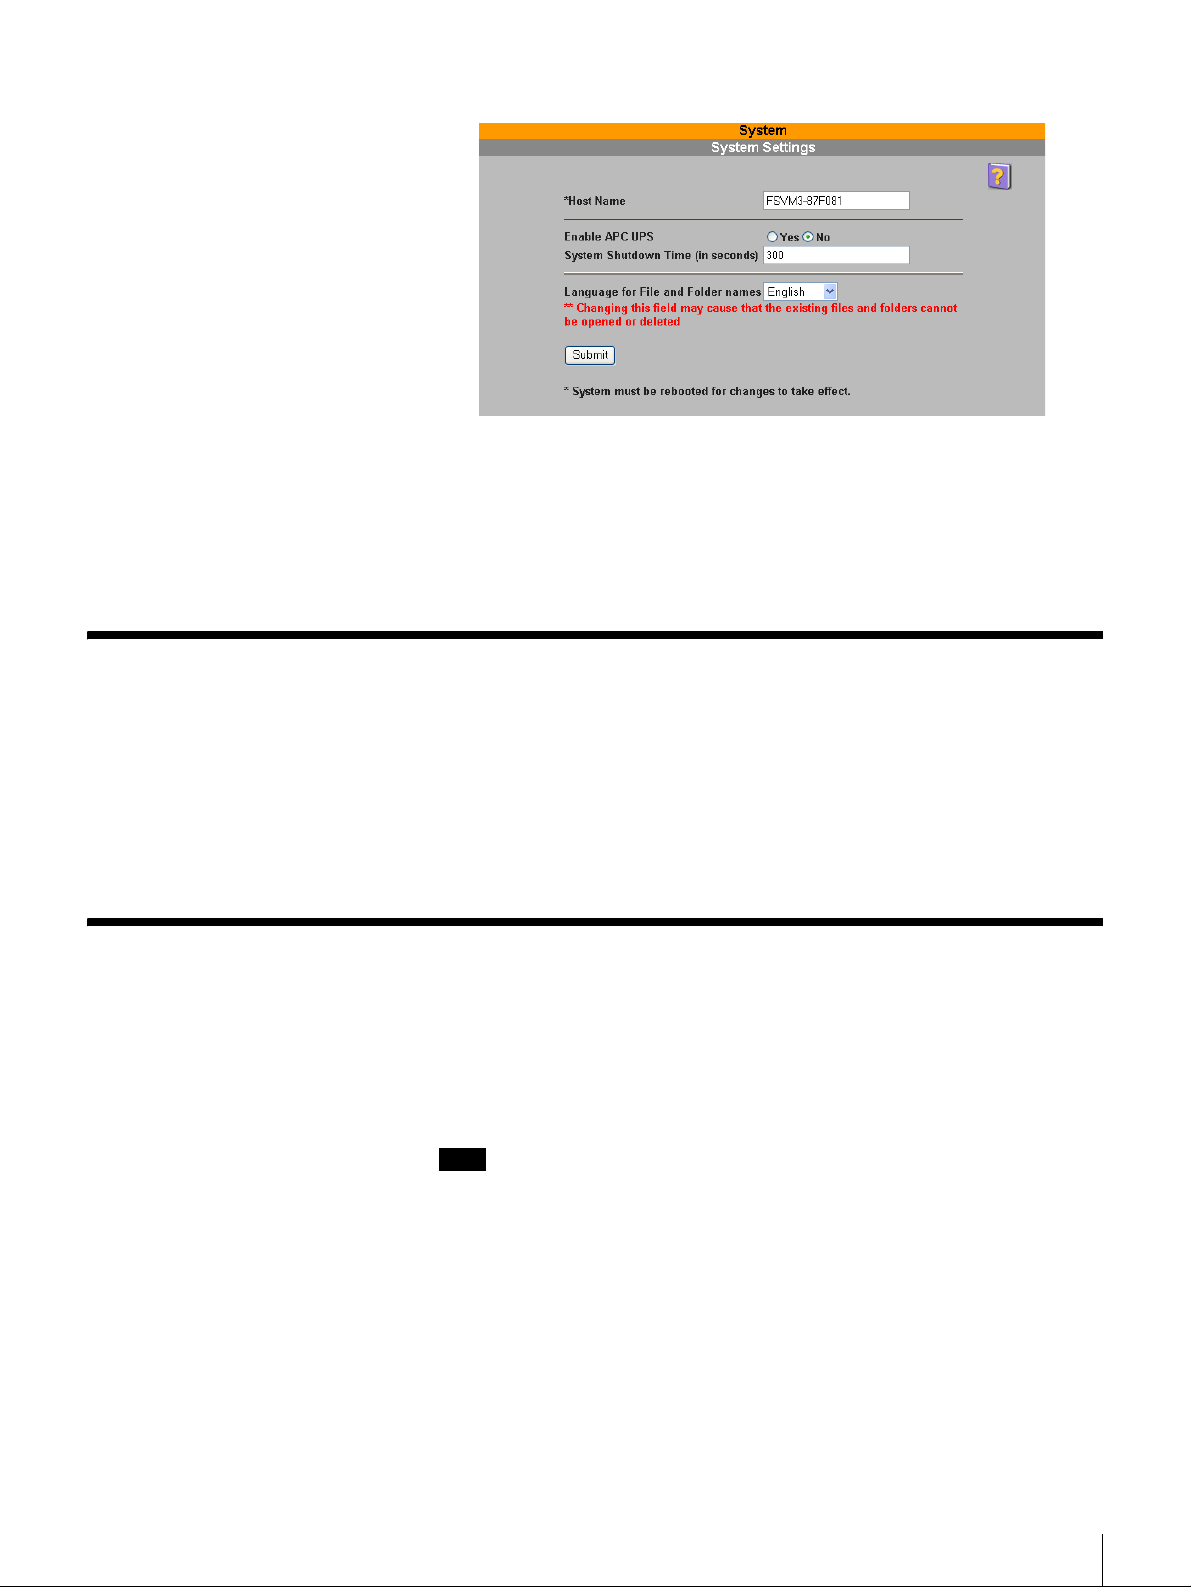
The “System Settings” page appears.
2
Select “English” in the “Language for File and Folder names” list.
3
Click the “Submit” button.
The setting is reflected in the “System Settings” page.
Configuring Windows Network Settings
When using this server through Windows, you must configure the Windows
settings in the FSV-M3 Administration Console. To configure the settings, in
the FSV-M3 Administration Console, click “Network” - “Windows”.
For information about how to configure the settin gs, see “Windows” in Chapter
3, “Using the FSV-M3 Administration Console” (page 30).
Registering Users
Registration is required for those users who want to access this file server. This
section explains how to register and administer users. A user name and
password is required for persons to access the shares on the file server via
HTTP, CIFS (Windows Network), or FTP (Internet File Transfer Protocol).
Note
The NFS (Network File Service) protocol does not have provisions to allow
authentication and authorizat ion at a user level. NFS client s are authorized at the
client's IP address level. Thus, any user who has access to an authorized NFS
client has access to shares on the file server.
For the other access protocols (CIFS, FTP, HTTP), there are two sets of users
that can access the file server.
•Local set
This set contains users that are registered manually and appear i n the server’s
user list. These are referred to as “local set users”. Th ey are maint ained fro m
“Security” - “Users”. These users can change their passwords from the FSVM3 Top Page.
Chapter 2 Basic Use
16
Page 17
• Windows set
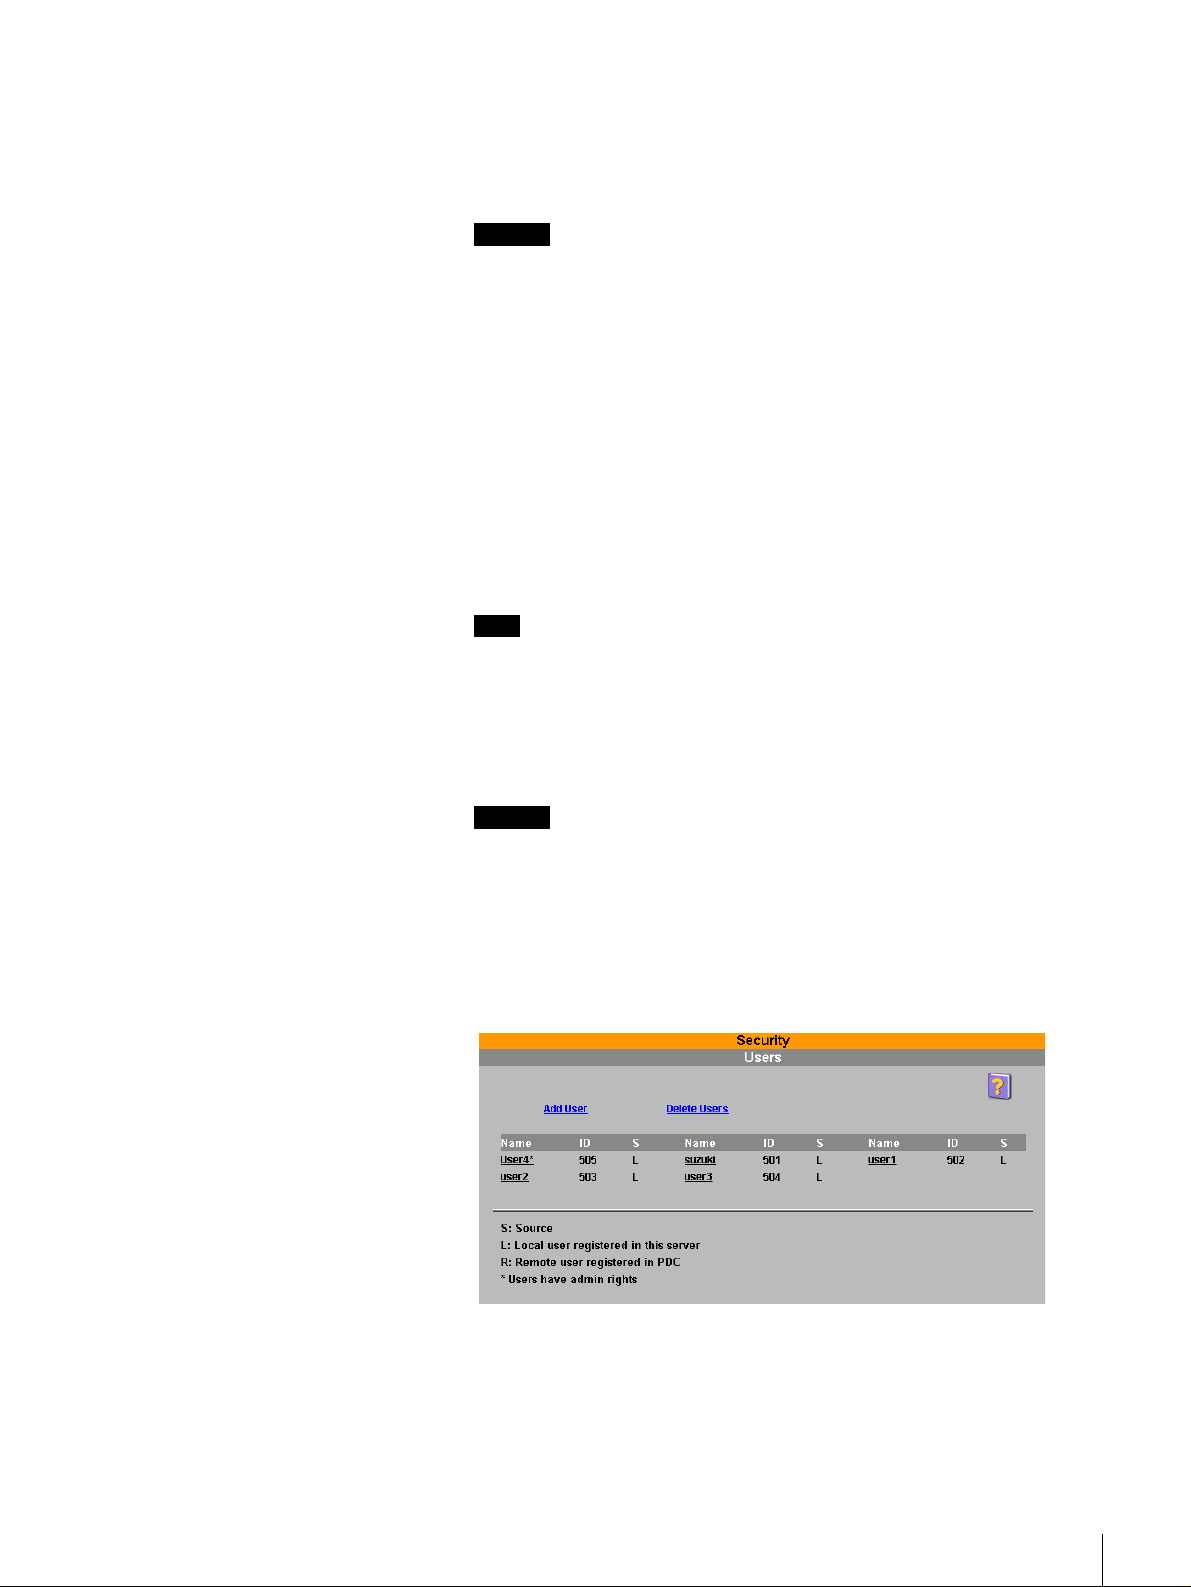
Indications in the “Users” Page
In the “Users” page of the Security menu, each use r set is represented as follows
in the Source column ( [S]: user registration location).
• If the user is a local set user: L (Local; the user is registered on the FSV-M3)
• If the user is a Windows set user: R (Remote; the user is registered in the
Note
You can configure the settings need ed t o use th e FS V-M3 in co mbi nat ion with
a Windows domain from “Network” - “Windows”. For details, see “Network
Menu” (page 36) in Chapter 3, “Using the FSV-M3 Administration Console”.
Registering Local Set Users
Register local set users through the FSV-M3 Administration Console.
This set contains users main tained on a Windows Primar y Domain Controller.
They appear when the FSV-M3 is used in combination with a Windows
domain. These are referred to as “Windows set users”. You cannot create,
modify, or delete these users from “Security” - “Users”. Because the FSV-M3
does not maintain the passwor ds of th ese users, cha nge the pa ssword with the
PDC.
PDC).
1
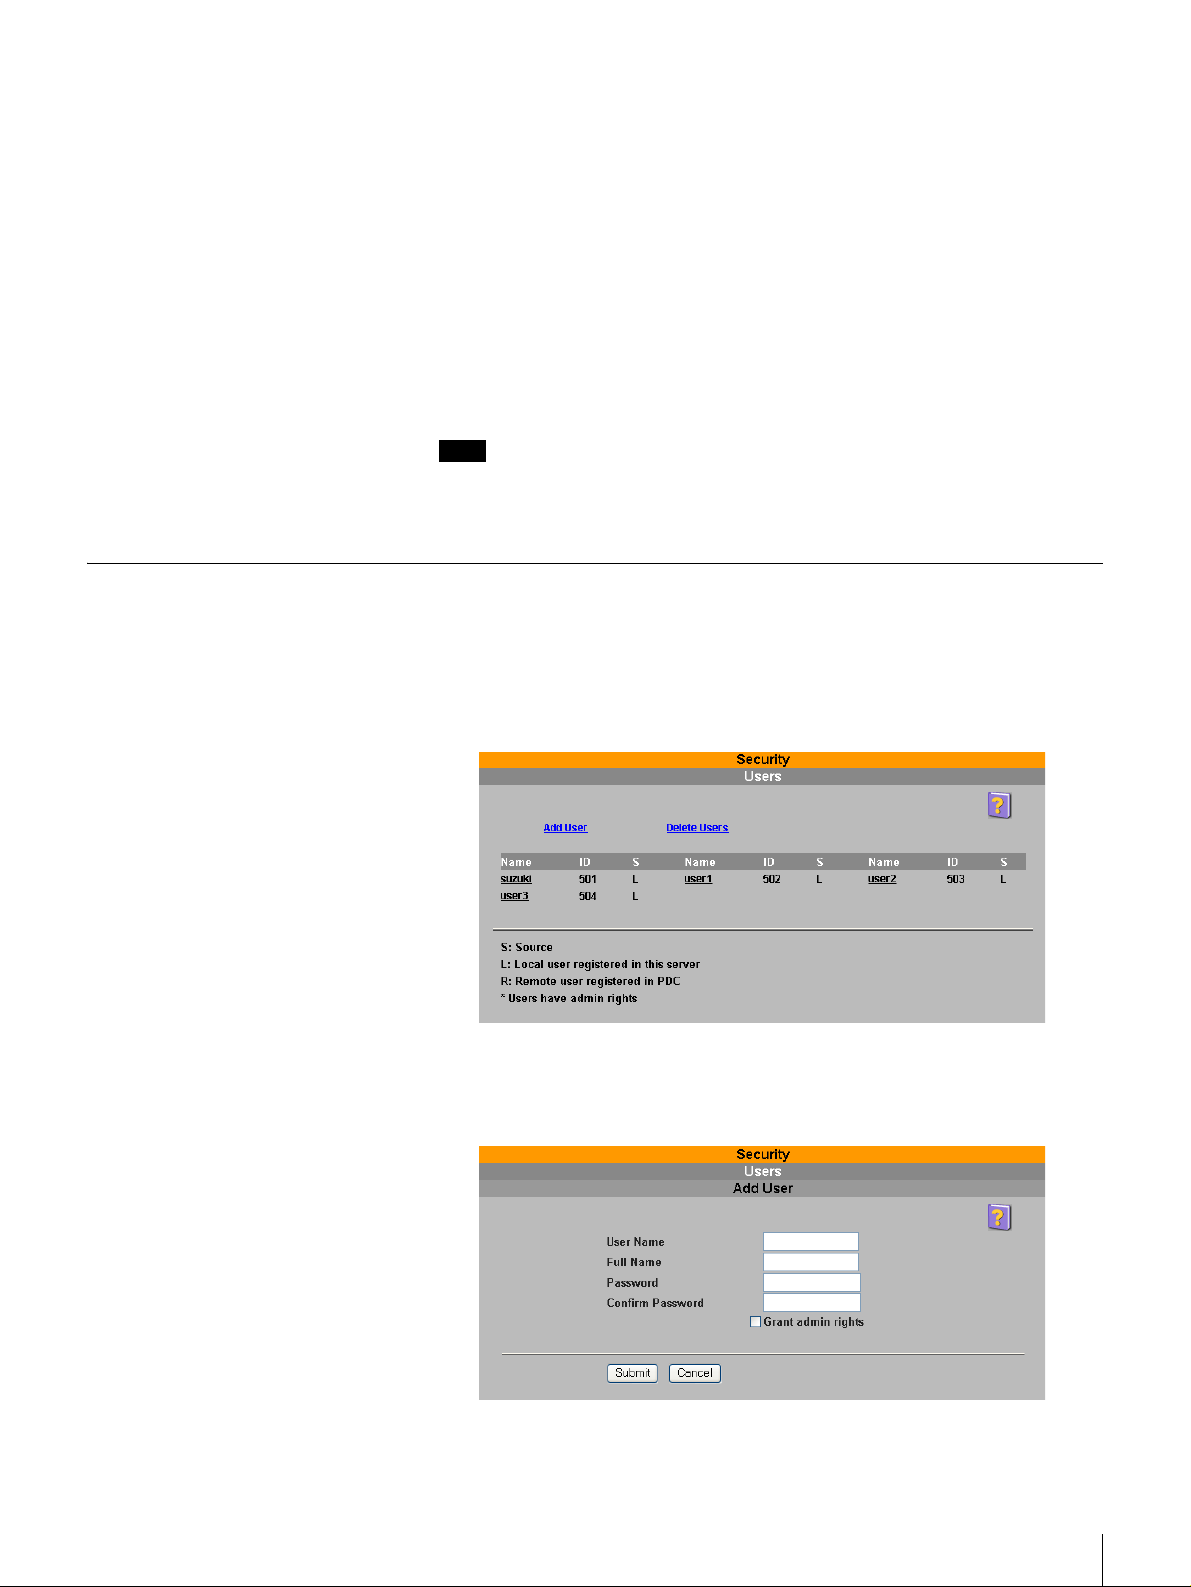
On the FSV-M3 Administration Console, click “Security” - “Users”.
The “Users” page appears.
2
Click “Add User”.
The “Add User” page appears.
Chapter 2 Basic Use
17
Page 18
3
Enter the items below.
User Name
Enter a user name of up to 32 alphanumeric characters. For details about
permissible characters, see Chapter 3, “FSV-M3 Limitations” (page 66).
Important
When registering users from Windows 95, Windows 98, or Windows Me,
be sure to enter the same user name as the user's Windows logon name.
Full Name
Enter the full name of the user using up to 49 alphanumeric characters. For
details about permissible ch aracters, see Chapter 3, “FSV-M3 Limitations”
(page 66).
Password
Enter a user password of five or more alphan umeric characters. For details
about permissible characters, see Chapter 3, “FSV-M3 Limitations” (page
66).
Confirm Password
Re-enter the same password.
Note
Local users can change their own passwords. For details, see “Changing the
User Password” (page 19).
Grant admin rights
Select this check box if you want to gr ant this u ser admi nistr ative r ights to
the server.
Important
Users to whom you grant administrative rights have access to all the
functions of the FSV-M3 and can perform all the operations explained in
this document. Exercise care before granting administrative rights to a user.
4
Click the “Submit” button.
This uploads the new user registration data to the “Users” page on the
server.
Chapter 2 Basic Use
18
Page 19
Changing the User Password
Users can change their own passwords.
1
2
3
4
Start the browser on a computer.
Enter “http://xxx.xxx .xxx.xxx/” in the “Address” or “Location” box (where
“xxx.xxx.xxx.xxx” is the IP address of the server).
The FSV-M3 Top Page appears.
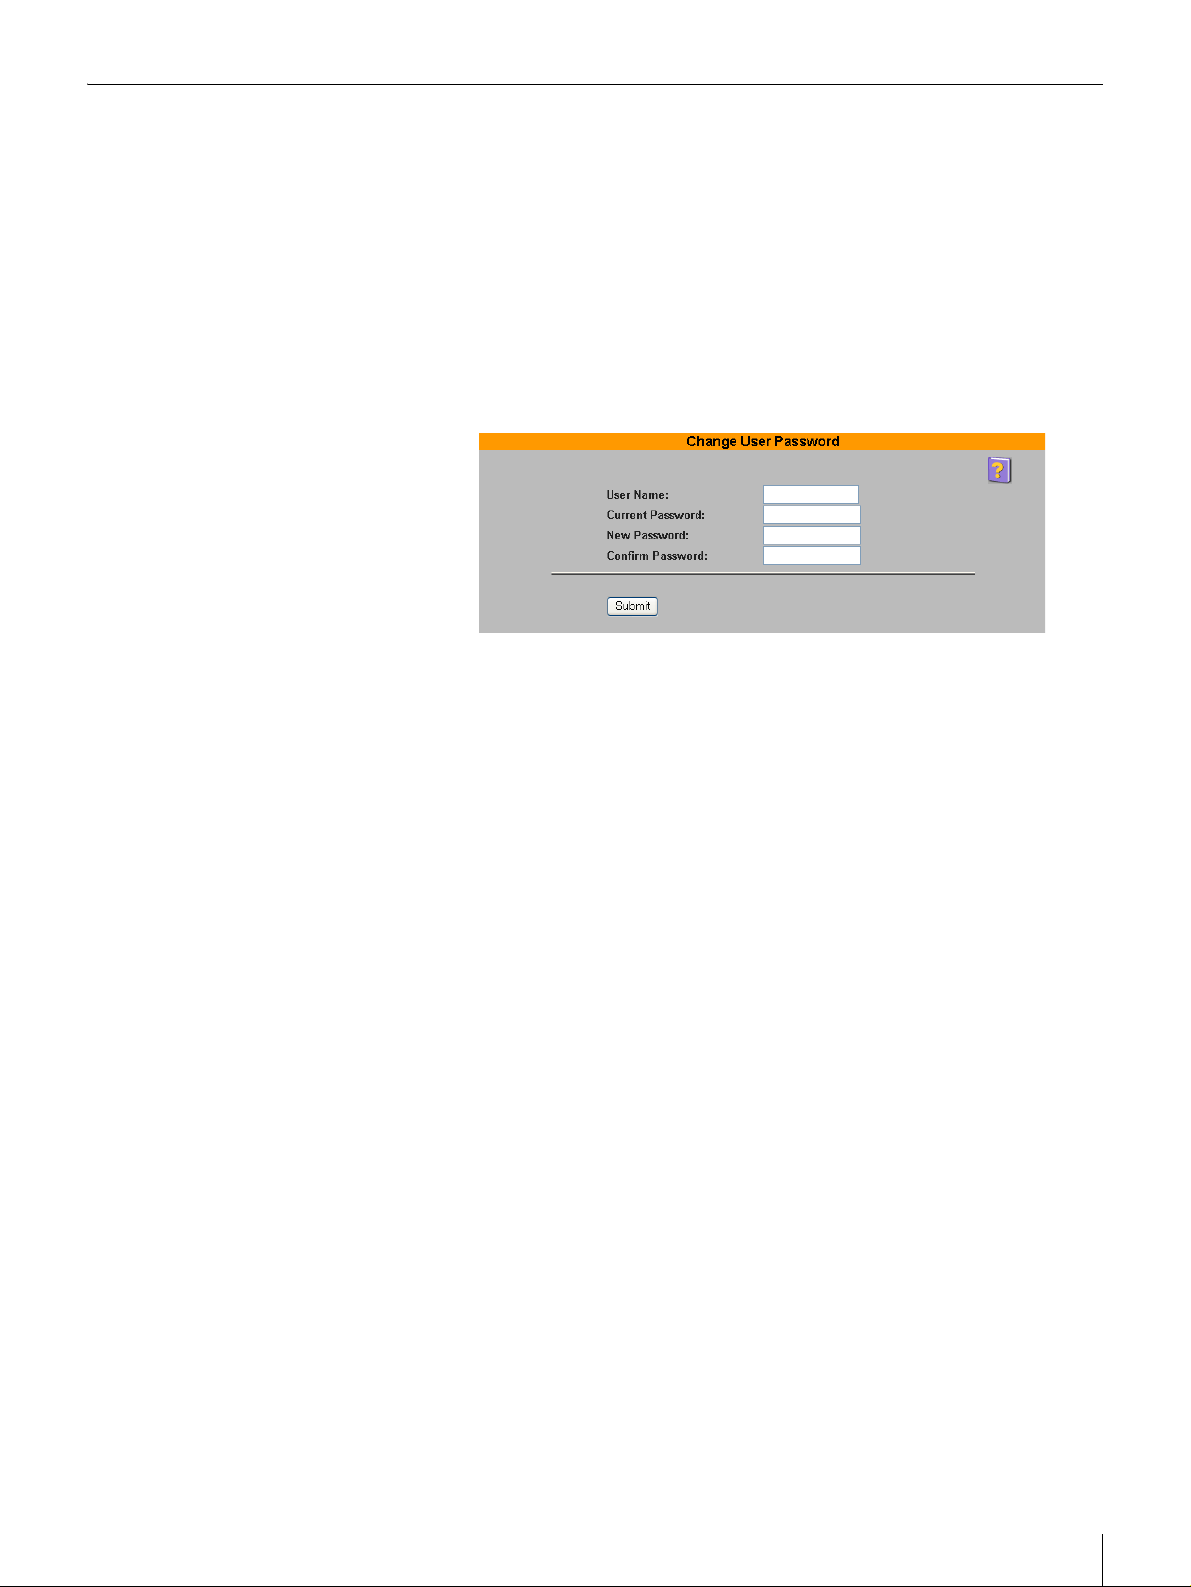
Click “Change User Password”.
The “Change User Password” page appears.
In the “User Name” box, enter the name of a registered user.
5
In the “Current Password” box, enter the current password.
6
In the “New Password” box, enter a new password of five or more
alphanumeric characters.
For details about permissible characters, see Chapter 3, “FSV-M3
Limitations” (page 66).
7
In the “Confirm Password” box, re-enter the new password.
8
Click the “Submit” button.
A message appears indicating that settings are complete.
Chapter 2 Basic Use
19
Page 20
Creating Shares
Manual Share Creation
Users can create shares on the server using the FSV-M3 Administration
Console. Users can create files and folders in the shares they create. There are
two ways of creating shares.
Manual share creation
The system administrator can create shares manually with the FSV-M3
Administration Console.
Automatic share creation
The system creates a default share for each user when the user accesses a
specific URL through a Web browser. The shares created this way belong to
their specific users, but use the default permissions defined by the system
administrator. For details about the automatic creation of shares, see
“Automatic Share Creation” (page 22).
Create shares manually through the FSV-M3 Administration Console as
follows.
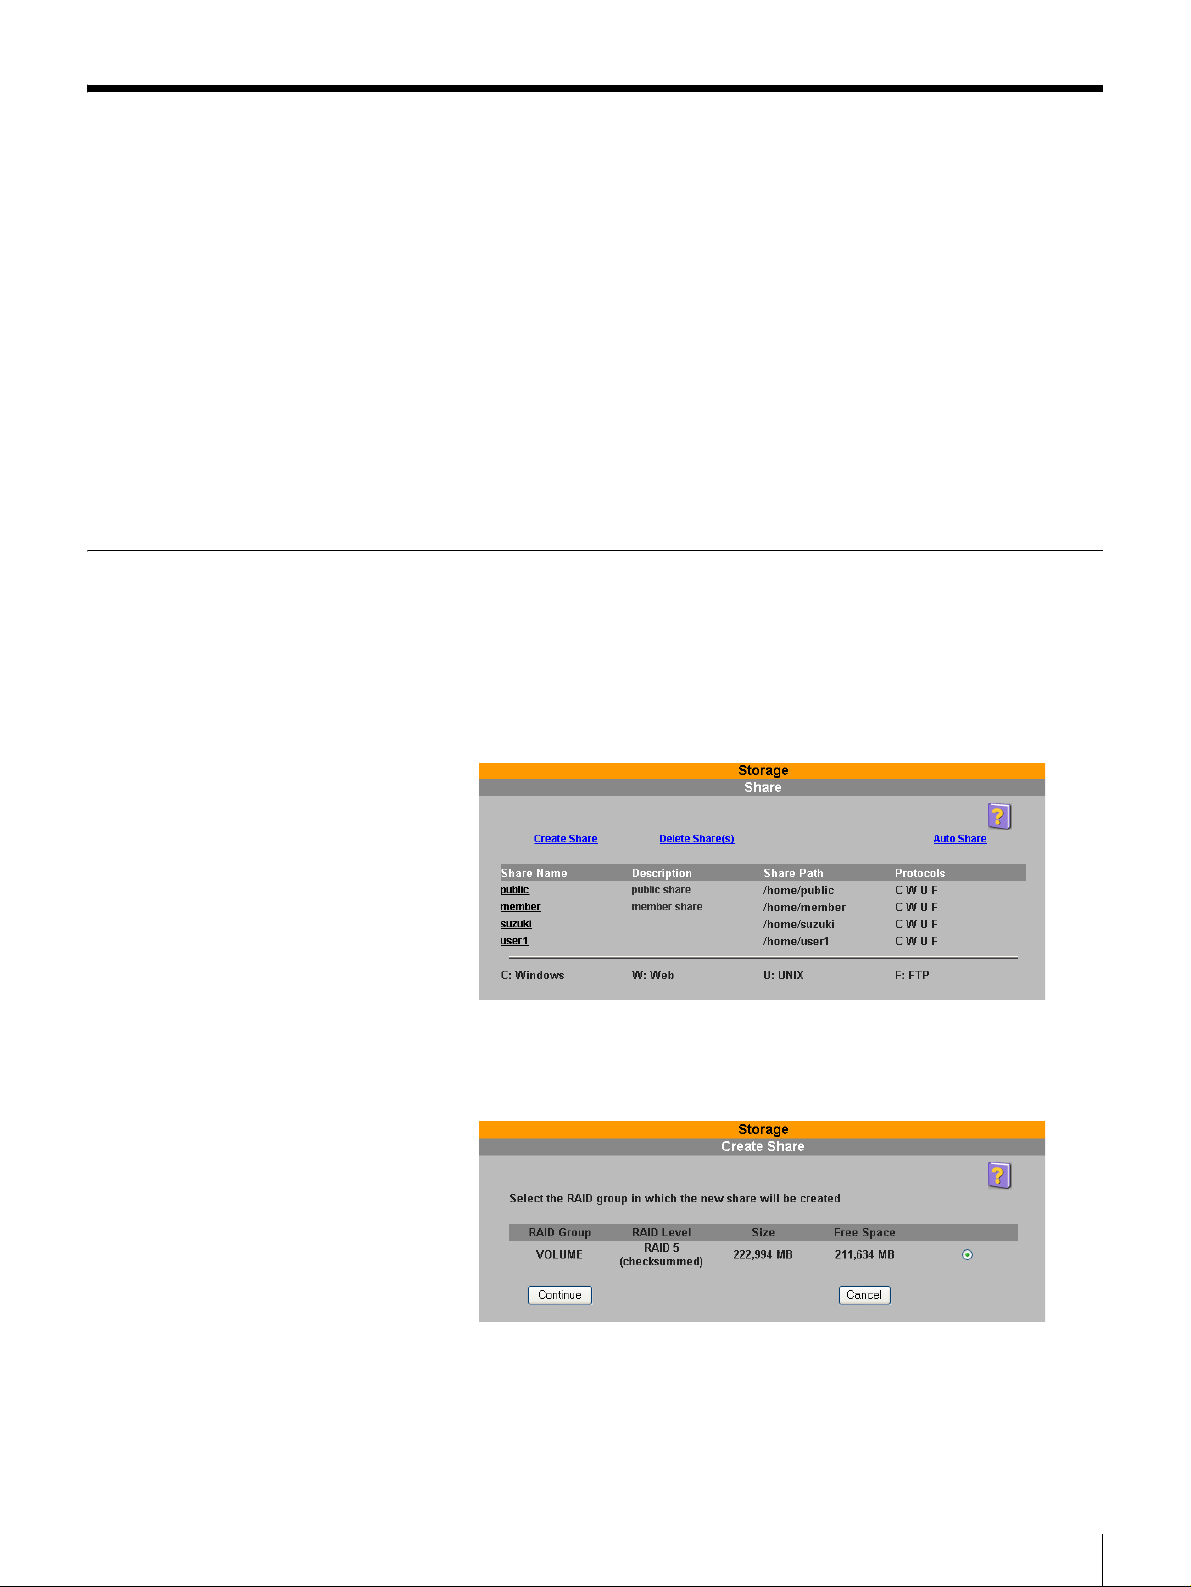
1
Click “Storage” - “Share” on the FSV-M3 Administration Console.
The “Share” page appears.
2
Click “Create Share”.
The “Create Share” page appears.
Chapter 2 Basic Use
20
Page 21
3
Select the RAID group of the share that you want to create.
Note
The RAID group name varies depending on the RAID configuration as
follows.
• If the RAID configuration is RAID 5 (default), only one RAID group
name appears. This name is “VOLUME”.
• If the RAID configuration is RAID 1, two RAID group names appear.
These names are “VOLUME 0” and “VOLUME 1”.
For details about changing the RAID group configuration, see “RAID
Group” (page 47).
For details about the automatic creation of shares, see “Automatic Share
Creation” (page 51).
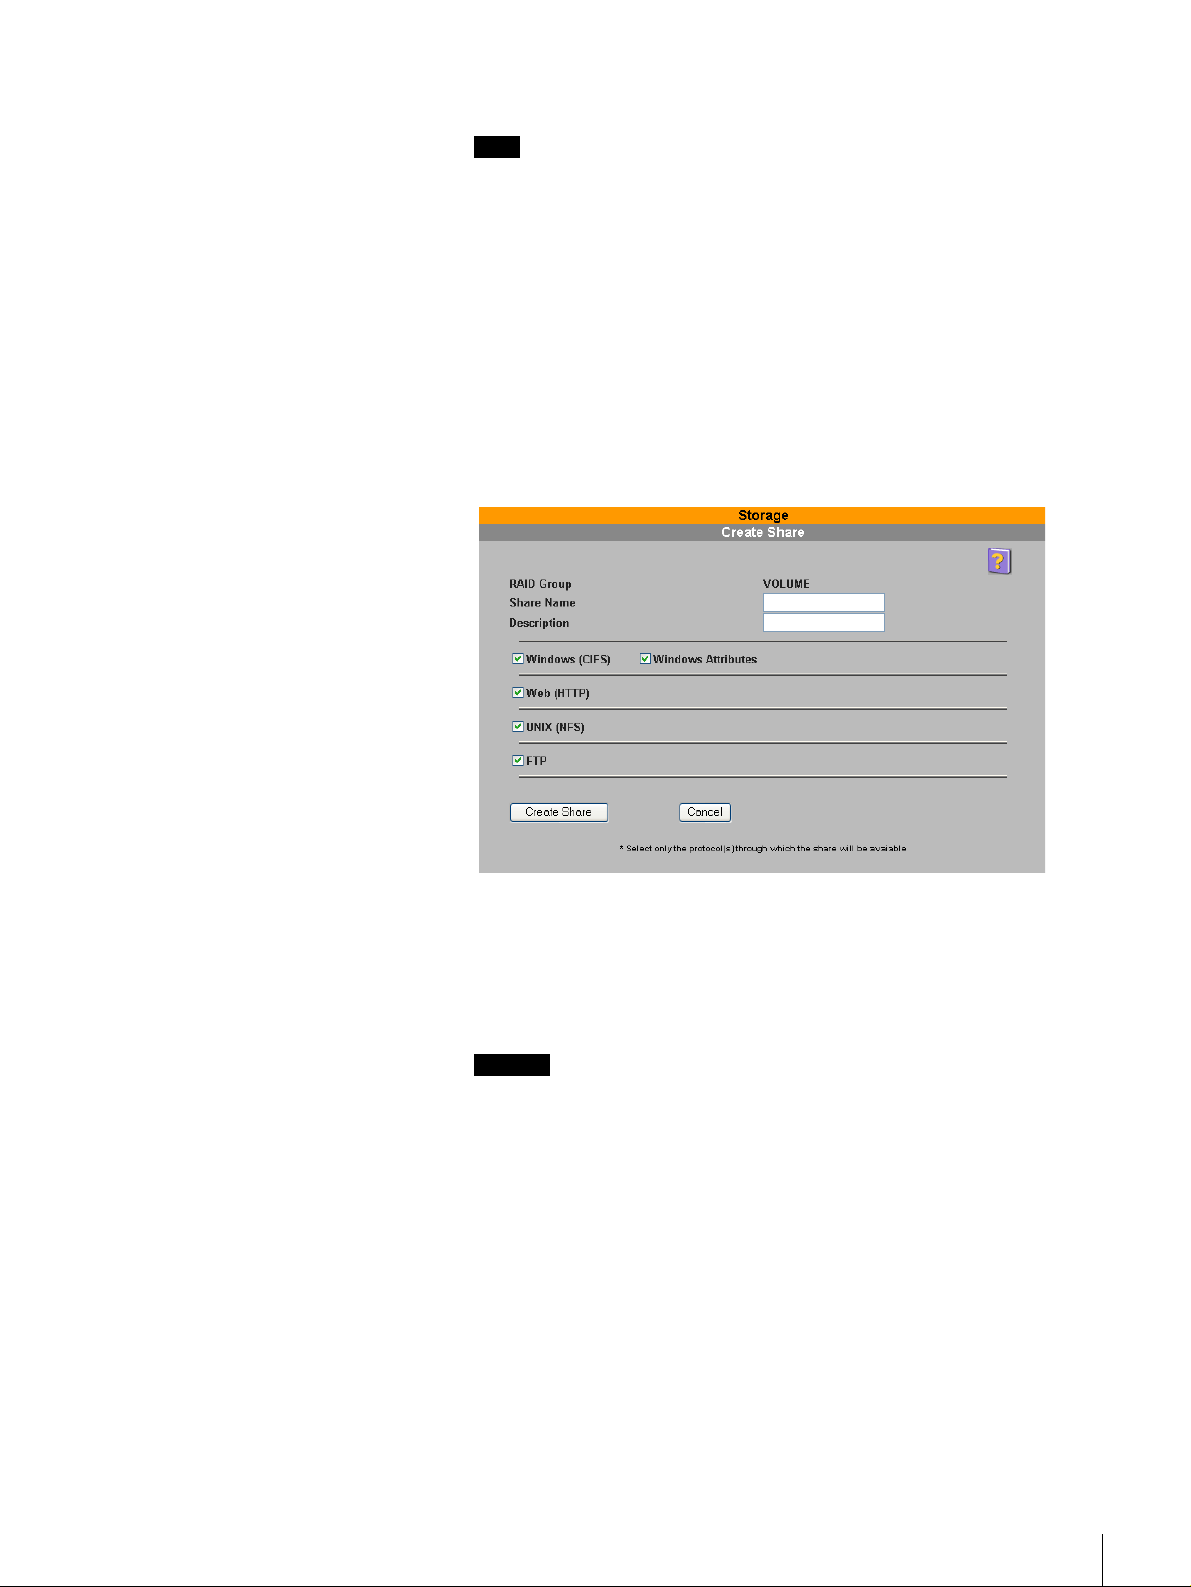
4
Click the “Continue” button.
The following page appears.
5
Configure the following settings.
Share Name
The share name is a string of up to 80 alphanumeric characters. For details
about permissible characters, see “FSV-M3 Limitations” (page 66).
Caution
• You cannot assign share names that have already been assigned. Further,
the FSV-M3 does not distinguish between uppercase and lowercase
characters. (Example: “abc,” “ABC,” and “Abc” are all recognized as the
same name.)
• When using Windows 95, Windows 98, Windows Me, or Win dows NT,
enter the share name as up to 11 alphanumeric characters.
Description
Enter a description of up to 256 alphanumeric characters regarding the
share. For details about permissible characters, see Chapter 3, “FSV-M3
Limitations” (page 66).
Windows (CIFS)
Select this check box if you want thi s share to be accessible from Windo ws.
Windows Attributes
Select this check box if you want the share to retain Windows attributes
such as “read-only”, “hidden”, “system file”, or “archive”.
Chapter 2 Basic Use
21
Page 22
Note
These attributes may conflict with file permissions used by UNIX/Linux
clients. Do not select this check box if these shares are used by UNIX/
Linux clients.
Web (HTTP)
Select this check box if you want this share to be accessible from a Web
browser.
UNIX (NFS)
Select this check box if you want this share to be accessible to UNIX/Linux
clients.
FTP
Select this check box if you want this share to be accessible through FTP.
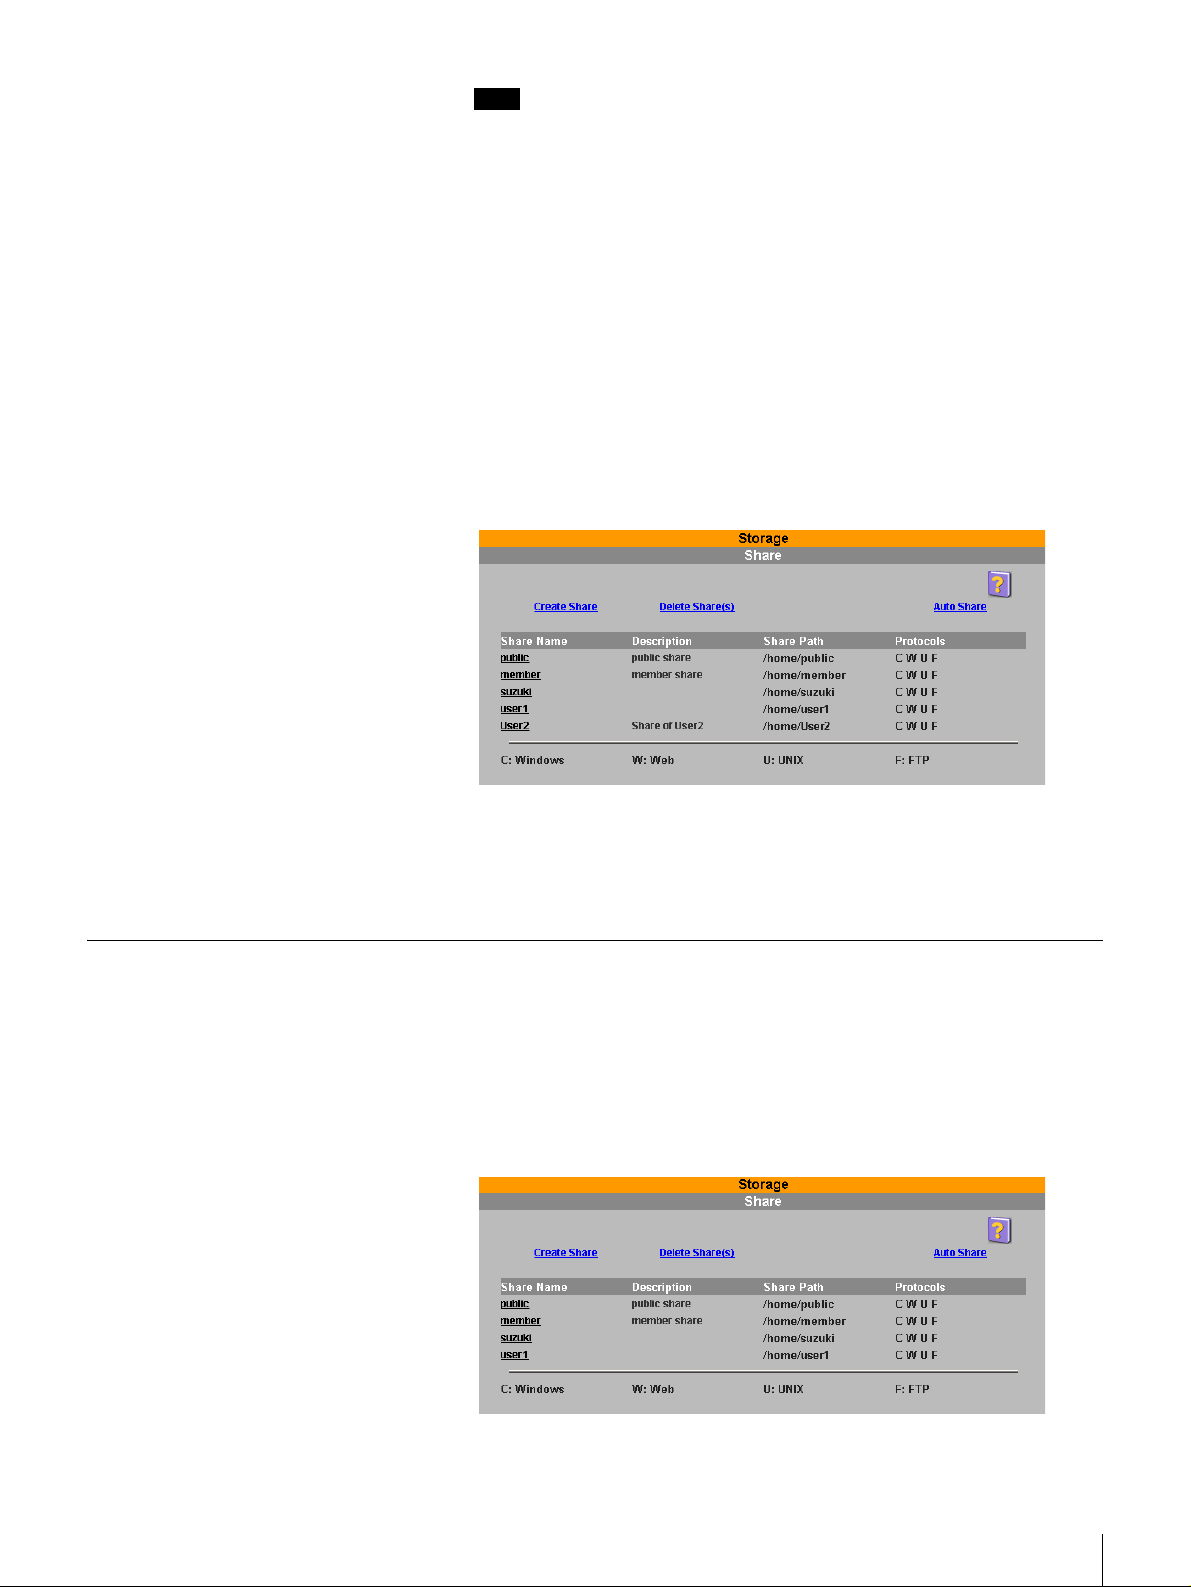
6
Click the “Create Share” button.
The settings are reflected in the “Share” page.
Automatic Share Creation
7
Set share security.
For details about how to set share security, see “Setting Share Folder
Security” (page 58).
The FSV-M3 can be configured to automatically create shares. Shares are
created when users access a specific URL for the first time through a Web
browser. The shares are given the name of the users.
1
On the FSV-M3 Administration Console click “Storage” - “Share”.
The “Share” page appears.
Chapter 2 Basic Use
22
Page 23
2
Click “Auto Share”.
The “Auto Share” page appears.
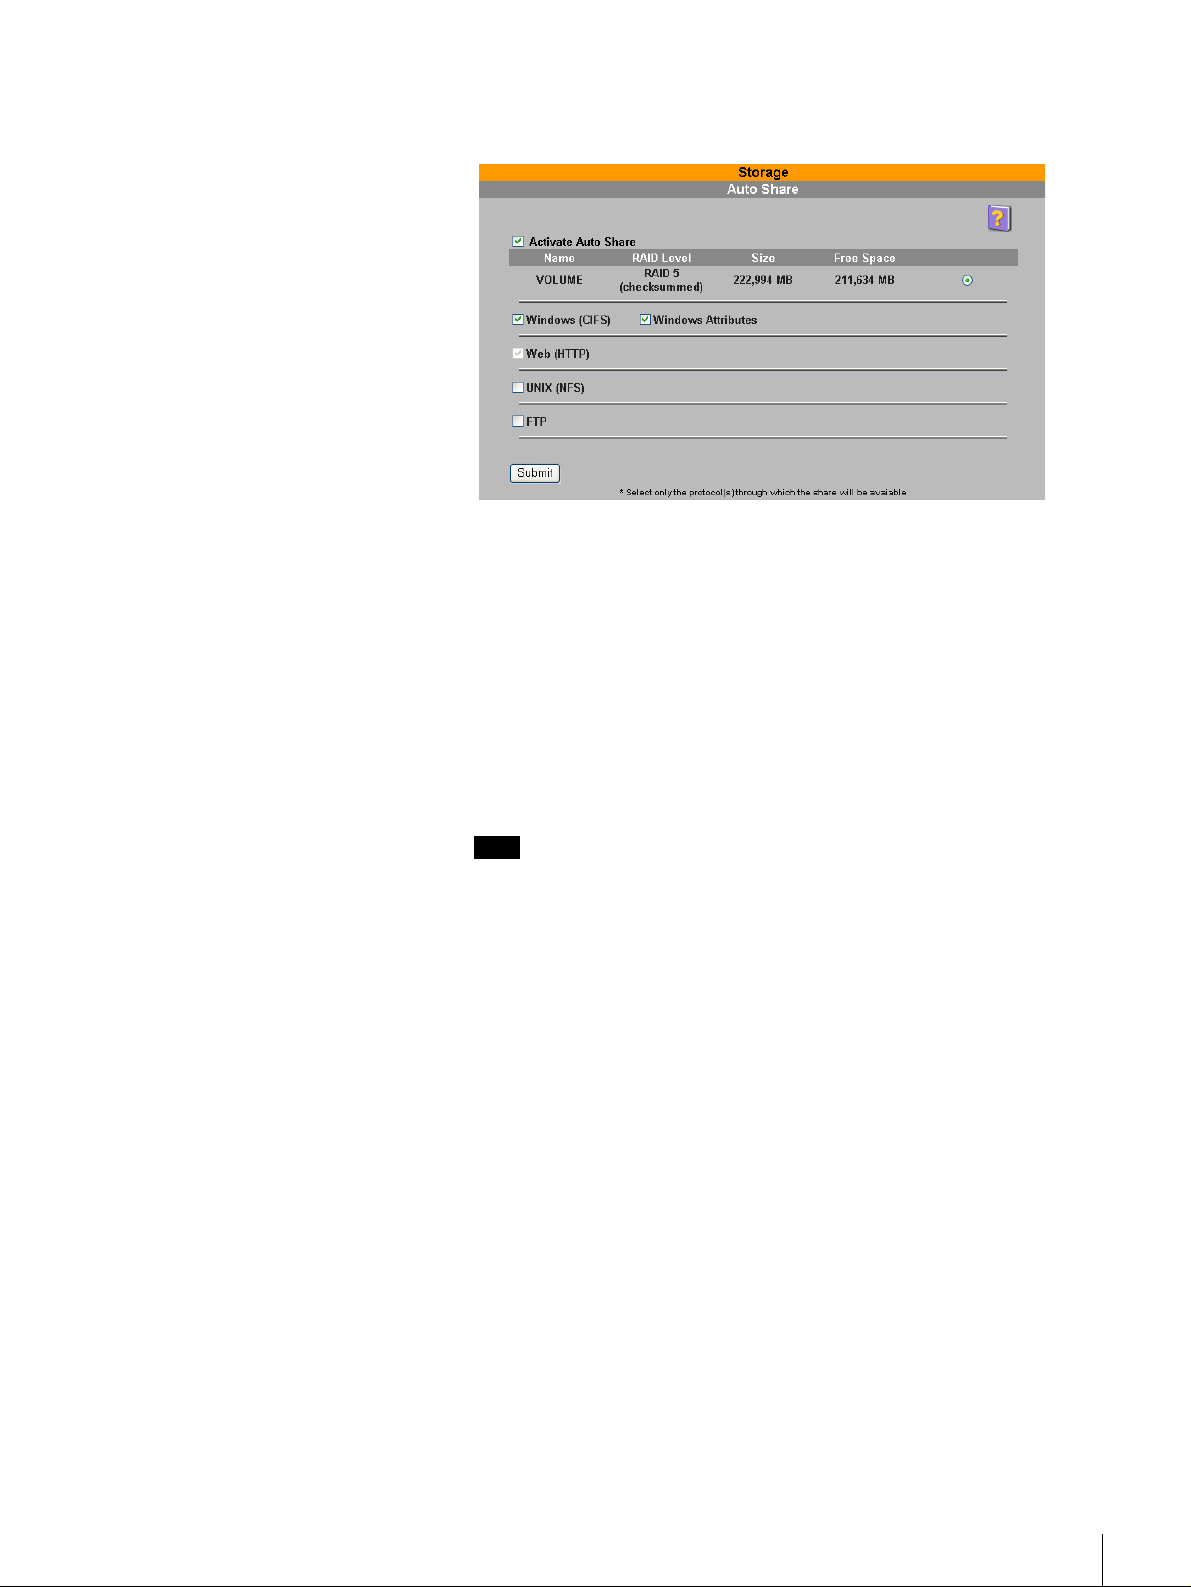
3
Configure the following settings.
Activate Auto Share
Select this check box if you want the FSV-M3 to create shares
automatically.
Windows (CIFS)
Select this check box if you want thi s share to be accessible from Windo ws.
Windows Attributes
Select this check box if you want the share to retain Windows attributes
such as “read-only”, “hidden”, “system file”, or “archive”.
Note
These attributes may conflict with file permissions used by UNIX/Linux
clients. Do not select this check box if these shares are used by UNIX/
Linux clients.
Web (HTTP)
Because this item is absolutely necessary for automatic share creation, yo u
cannot clear this check box.
UNIX (NFS)
Select this check box if you want this share to be accessible to UNIX/Linux
clients.
FTP
Select this check box if you want this share to be accessible through FTP.
Chapter 2 Basic Use
23
Page 24

4
Click the “Submit” button.
Shares are created the first time users access a specific URL through a Web
browser (see “Important”, below). The shares are given the name of the
users. (See the note below.)
Important
A share is created for a user when the user accesses the URL below. The
share is given the name of the user.
URL http://HOSTNAME_or_IP/home/user name
HOSTNAME_or_IP: host name or IP address of the FSV-M3.
user name: name of the user registered on the FSV-M3.
(Example) If the user name is “tiger”, then the URL is:
http://HOSTNAME_or_IP/home/tiger
Notes
• To access your share, enter the your user name as follows in the password
authentication dialog box.
- Local set users: user name
- Windows set users: domain name\user name
• Because the share is given the same name as the user, if the user name
exceeds 12 characters, so does the share name. However, shares with
names of more than 12 characters can not be accessed with Windo ws 95,
98, Me, or NT. For details, see “Share” (page 48).
Storing Files and Folders in Shares
Files and folders (directories) can be created in shares created with the FSV-M3
Administration Console. Also, the manner in which shares are accessed varies
depending on the operating system of the client computer.
Caution
When there is a sudden loss of power to the unit due to a power failure or turning
the unit off improperly, sto red files or files being edited may be dama ged. Make
sure you back up your data frequently. For more details regarding backup, see
“Data Backup” (page 29).
Access from Windows 95/98/NT
1
Double-click Network Computer on the desktop.
2
Double-click Entire Network.
For Windows NT, double-click Microsoft Windows Network.
The workgroup to which the FSV-M3 is assigned appears.
If a new workgroup has been set, it may take some time before the
workgroup appears.
If the workgroup does not appear, proceed to step 4.
Chapter 2 Basic Use
24
Page 25

3
Double-click the workgroup.
The server appears. Proceed to step 6.
If the server does not appear, proceed to step 4.
4
When the workgroup or server does not appear, search for it using the
following procedure.
(1)Click the “Start” button, then click “Search” - “Other Computers”.
(2)Enter the host name of the server in the “Name” box, then click “Start
Searching”.
The host name of the server can be checked from the FSV-M3
Administration Console or in Control Panel.
(3)If the server is found, proceed to step 6.
If the server does not appear, proceed to step 5.
5
Proceed as follows if the above is unsuccessful.
(1)Double-click My Computer on the desktop.
(2)In the Address bar of the My Computer window, enter two backsl ashes
(\\) followed by the host na me of the server.
Example: \\fsvm3
(3)Press the “Enter” key of your keyboard.
(4)If the server is found, proceed to step 6.
If the server does not appear, click “Network” - “Windows” on the
FSV-M3 Administration Console, and confirm that the parameters are
suitable for your network environment.
6
Double-click the server.
(1)The user name/password input dialog box appears (with Windows 95,
(2) Click the desired share (folder).
Notes
• If the user was not created with the FSV-M3 Administration Console,
• If the parameters in “Network” - “Windows” on the FSV-M3
Access from Windows Me/2000
1
Double-click My Network Places on the desktop.
Windows 98, and Windows Me, the password input dialog box
appears). Enter the user name and password created with the FSV-M3
Administration Console. (This dialog box may not always appear.)
When the password is authenticated, the registered shares (folders)
appear.
The folders and files stored in the share appear.
password authentication fails. Furthermore, when you access the server
through Windows 95, Windows 98, or Windows Me and the logon name
differs from the user name created with the FSV-M3 Administration
Console, password authentication also fails.
Administration Console are not suitable for your network environment,
password authentication fails.
Chapter 2 Basic Use
25
Page 26

2
Double-click Entire Network.
For Windows 2000, click Entire Contents, then click Microsoft Windows
Network.
The workgroup to which the FSV-M3 is assigned appears.
If a new workgroup has been set, it may take some time before the
workgroup appears.
If the workgroup does not appear, proceed to step 4.
3
Double-click the workgroup.
The server appears. Proceed to step 6.
If the server does not appear, proceed to step 4.
4
When the workgroup or server does not appear, search for it using the
following procedure.
(1)Click the “Start” button, then click “Search” - “For Files or Folders”.
(2)In the “Search for other items” column, click “Computers”.
(3)Enter the host name of the server in the “Computer Name” box, then
click “Search Now”.
The host name of the server can be checked from the FSV-M3
Administration Console or in the Control Panel.
(4)If the server is found, proceed to step 6.
If the server does not appear, proceed to step 5.
5
Proceed as follows if the above is unsuccessful.
(1)Double-click My Computer on the desktop.
(2)In the Address bar of the My Computer window, enter two backsl ashes
(\\) followed by the host na me of the server.
(Example) \\fsvm3
(3)Press the “Enter” key of your keyboard.
(4)If the server is found, proceed to step 6.
If the server does not appear, click “Network” - “Windows” on the
FSV-M3 Administration Console, and confirm that the parameters are
suitable for your network environment.
6
Double-click the server.
(1)The user name and password input dialog box appears (with Windows
Me, the password input dialog box appears). Enter the user name and
password created with the FSV-M3 Administration Console. (This
dialog box may not always appear.)
When the password is authenticated, the registered shares (folders)
appear.
(2)Double-click the desired share (folder).
The folders and files stored in the share appear.
Notes
• If the user was not created with the FSV-M3 Administration Console,
password authentication fails. Furthermore, when you access the server
through Windows Me and the logon name differs from the user name
created with the FSV-M3 Administration Console, password
authentication also fails.
• If the parameters in “Network” - “Windows” on the FSV-M3
Administration Console are not suitable for your network environment,
password authentication fails.
Chapter 2 Basic Use
26
Page 27

Access from Windows XP Professional
1
Click the “Start” button, then click “Search”.
2
Under “What do you want to search for?”, click “Computers or people”.
(1)Click “A computer on the network”.
(2)Enter the host name of the server in “Computer name”, and then click
“Search”.
You can find the host name of the server on the FSV-M3
Administration Console.
If the server is found, proceed to step 4.
3
Proceed as follows if the above is unsuccessful.
(1)Click the “Start” button, then click “My Computer”.
(2)In the Address bar of the My Computer window, enter two backsl ashes
(\\) followed by the host na me of the server.
(Example) \\fsvm3
(3)Press the “Enter” key of your keyboard.
(4)If the server is found, proceed to step 4.
If the server does not appear, click “Network” - “Windows” on the
FSV-M3 Administration Console, and confirm that the parameters are
suitable for your network environment.
Access from UNIX/Linux
4
Double-click the server.
(1)The user name and password input dialog box appears. Enter the user
name and password created with t he FSV-M3 Admin istration Consol e.
(This dialog box may not always appear.)
When the password is authenticated, the registered shares (folders)
appear.
(2)Double-click the desired share (folder).
The folders and files stored in the share appear.
Notes
• If the user was not created with the FSV-M3 Administration Console,
password authentication fails.
• If the parameters in “Network” - “Windows” on the FSV-M3
Administration Console are not suitable for your network environment,
password authentication fails. If the parameters are co rrect but password
authentication still fails, restart Windows XP.
All shares are created under the /home directory. Mount them as follows:
(Example) To mount a share to the /mnt directory on the client
mount -t nfs <host name or IP address of the FSV-M3>:/home/<share name> /
mnt
Mounting procedures vary depending on the operating system.
Chapter 2 Basic Use
27
Page 28

Shutting Down/Restarting the System
The system can be shut down with the browser.
Caution
• After the system is shut down, the server power goes off automatically.
• When shutting down the system, do not use the power switch.
• When the system shuts down, all services running on the server are forcibly
terminated. Before shutting down the system, make sure that there are no
users currently accessing th e server. If you shut do wn t he sy stem while a file
is being edited, the contents of the file may be damaged.
Shutting Down or Restarting the System from the Browser
1
On the FSV-M3 Administration Console, click “System” - “Shutdown/
Reboot”.
The “Shutdown/Reboot” page appears.
2
To shut down the server, click the “Shutdown” button.
To reboot the server, click the “Reboot” button.
Approximately 60 seconds later, the system shuts down.
After the system shuts down, the server power goes off automatically.
Forcibly Shutting Down the FSV-M3 in an Emergency
In the case of an emergency, you can shut down the FSV-M3 by pressing
the power switch for at least four seconds. However, keep in mind that
shutting down the server in this manner may damage the file system. If this
happens, the file system will attempt to repair itself the next time the FSVM3 starts. (The more data on the FS V-M3, the longer th e file system takes
to repair itself.)
If the file system cannot repair itself, some or all the data may be lost.
Therefore, never shut down the FSV-M3 using the power switch, other than
in an emergency.
Chapter 2 Basic Use
28
Page 29

LED Indicators
There are the LED indicators on the front and rear on the FSV-M3 that indicate
its operational status.
Front
LED Green Amber Status
Power On Off The power is on and unit is
ready to operate.
Off Off The power is off.
On On The system is in the process of
powering up or shutting down.
HDD On Off The HDD is being accessed.
Off On The HDD is in the idle state.
Off Off The hard disk can be safely
removed. F or detail s about how
to replace a hard disk, see
“Replacing a Hard Disk” (page
43).
Notes
• When you are continuously accessing the HDD for some time, the LED
indicator lights green continuously. When yo u access t he HDD sporadi cal ly,
the LED indicator alternates between green and amber.
• To replace a hard disk, be sure to perform the procedure outlined in
“Replacing a Hard Disk” (page 43).
Data Backup
Rear
LED On Off
LINK
(Green)
ACT
(Green)
The FSV-M3 is conn ected t o an
active Gigabit ethernet hub.
There is activity on the network. There is no activity on the
The FSV - M 3 is not conne cte d
to an active Gigabit Ethernet
hub.
network.
The data stored on the server can be copied to other computers c onnected to t he
network for backup.
Sony recommends that you periodi cally back up data as a preca ution against the
unlikely occurrence of problems.
Caution
Sony does not bear any respon sibility for parti al or tot al loss of data due to hard
disk malfunctions of or mishandling by users.
Chapter 2 Basic Use
29
Page 30

Using the FSV-M3
Administration Console
Overview
The FSV-M3 Administration Console can be used to co nfigure and operat e the
server. This chapter explains each menu on the FSV-M3 Administration
Console.
For information on how to access the FSV-M3 Administration Console through
a browser, see “Browser” (page 11) in Chapter 2, “Basic Use”.
The following menus are included in the FSV-M3 Administration Console.
•System Menu
Used to perform system-related operations such as shutting down and
rebooting the system, as well as update the system software.
•Network Menu
Used to configure TCP/IP and other network settings.
• Storage Menu
Used to administer devices and shares.
• Security Menu
Used to manage user and share security.
•Status Menu
Used to view general system info , disk usage, cur rent users, logi n history, e tc.
Chapter
3
Caution
Make sure that your browser is JavaScr ipt enabled . With Int ernet Exp lorer 5.0,
select “Tools” - “Internet Options” - “Security” - “Custom Level” - “S cripting”
- “Active Scripting” - “Enable”.
Chapter 3 Using the FSV-M3 Administration Console
30
Page 31

System Menu
System Settings
On the System menu, you can configure, update, and shutdown/reboot the
system.
The System menu consists of the following items.
• System Settings
•Date & Time
•Alerts
Used to specify an e-mail addre ss and server to which automatic e-mail
notification is sent when an error occurs in the system.
• Software Update
Used to update the software of the FSV-M3 with new features or patches.
• Shutdown/Reboot
Used to shut down and/or reboot the system.
• Change Admin Password
Used to change the administrator password.
Use this item to set the host name, modify the UPS setting, as well a s specify
the language of your system.
1
On the FSV-M3 Administration Console, click “System” - “System
Settings”.
The “System Settings” page appears.
2
Configure the following settings.
Host Name
Specify the host name here. The default host name is “FSVM3_xxxxxx”.
“xxxxxx” represents the MAC address (six digits) of the FSV-M3 network
card.
Notes
• Make sure that you do not enter a host name that already exists on the
network. Enter a name that already exists on the network does not
generate error messages, but may be the cause of malfunctions.
• Enter the host name as up to 64 alphanumeric characters. For details
about permissible characters, see “FSV-M3 Limitations” (page 66).
Chapter 3 Using the FSV-M3 Administration Console
31
Page 32

Date & Time
Enable APC UPS
Specify whether you want UPS to be active. If you activate this setting,
specify the system shutdown time from power interruption.
Language for File and Folder names
Select the used by your system to display file and folder names.
Warning
If you change this setting, file and share names may be displayed
incorrectly, or may no longer be accessible. Also, if you use the server and
then change this setting, files and shares created before the change may no
longer be accessible.
3
Click the “Submit” button for changes to take effect.
Note
If you change the host name, it is necessary to reboot the server.
Use this item to set the date and time.
1
On the FSV-M3 Administration Console, click “System” - “Date & Time”.
The “Date & Time” page appears.
2
Configure the items below.
Date
Select the date as Year/Month/Day (2003/11/25).
Time
Select the time as Hours/Minutes (13:30).
Time Zone
Select the local time zone from the list.
3
Click the “Submit” button.
The information set above is reflected in the “Date & Time” page.
Chapter 3 Using the FSV-M3 Administration Console
32
Page 33

Alerts
Use this item to configure e-mail and SNMP not ification of specified event
traps. Traps are available for various errors that may occur during operation.
Note
For details about e-mail alerts, see “Alerts Table” (page 67). For details about
SNMP traps, see “SNMP Traps Table” (page 69).
1
On the FSV-M3 Administration Console, click “System” - “Alerts”.
The “Alerts” page appears.
2
Activate e-mail notification of system errors.
Enable Alerts
Select “Yes” if you want to receive e-mail notificatio ns of system errors.
SMTP Server IP
When “Enable Alerts” is set to “Yes”, enter the SMTP server IP address.
Recipient
When “Enable Alerts” is set to “Yes”, enter the e-mail address of the
recipient of the e-mail notifications. You can enter several e-mail addresses
in this box. To do so, separate addresses with a comma. You can enter up
to 80 alphanumeric characters (commas included) in this box.
3
Activate SNMP alert s .
Enable Traps
Select “Yes” if you want to receive trap setting messages by SNMP.
Trap Host IP
When “Enable Traps” is set to “Yes”, enter the trap host IP address.
Community
When “Enable Alerts” is set to “Yes”, enter the SNMP community name.
4
Select which events you want to be notified of by e-mail and/or SNMP.
When server reboot s
You are notified when the server reboots.
Chapter 3 Using the FSV-M3 Administration Console
33
Page 34

When hard drive fails
You are notified when a hard disk malfunctions.
When RAID group rebuilds
You are notified when the RAID group rebuilds.
When RAID group is full
You are notified when the user data of RAID group reaches 100%.
When RAID reconfiguration completes
You are notified when the reconfiguration of a RAID is complete.
When hardware monitor abnormal
You are notified when the hardware monitor is behaving abnormally.
When UPS power failed or restored
You are notified when UPS is con nected and it de tects a po wer failure and
when the power is restored after a power failure.
5
Click the “Submit” button.
A message appears indicating that the settings are complete.
6
Click “OK”.
Note
When all the necessary settings are completed in the “Alerts” page, click
“Send Test Alert” to send an alert and SNMP trap test.
Software Update
Use this item to install software updates with new features or software patches.
Caution
• Never install or update software other than that distributed by Sony for the
FSV-M3. Installing or updating other software may destroy data or damage
the system.
• Before you update the software, make sure that no users are currently
accessing the server. You can check for active users with “Current Users” on
the Status menu. If any users are found, instruct them to disconnect from the
server.
• Operation of the server is not assured if t he update is not i nstalled from a Sony
package file.
1
Copy the package file (distributed by Sony) to the hard disk of the
computer.
Caution
Enter a copy destination that does not contain any of the following
characters in the “Software File” box of the screen in step 2.
Hyphens “-”, underscores “_”, or position markers (in Windows, “\” and
“:”).
(Example) C:\Windows\temp
Note
Download the package file from the StorStation Web site
(http://www.sony.co.jp/en/Products/storagesolution/)
Chapter 3 Using the FSV-M3 Administration Console
34
Page 35

2
On the FSV-M3 Administration Console, click “System” - “Software
Update”.
The “Software Update” page appears.
3
Click “Browse” and specify the package file copied to the hard disk of the
computer in step 1, then click “Open”.
4
Click the “Update” button.
5
When the confirmation message appears, click “OK”.
The software update process starts.
Do not perform any op erations until the upda te is complete.
Shutdown/Reboot
When the update is comple te, a message appears indicat ing that t he update
was completed successfully. Some software display a message that prompt
you to restart the system. In this case, restart the system by following the
instructions of the message.
6
When the software update is complete, confirm that it was properly updated
by verifying “Current OS Version” in the “Software Update” page.
• If you need to reboot the system, confirm once the system has restarted.
• If you do no need to reboot the system, click the “Refresh” butt on of your
browser.
In “Shutdown/Reboot”, the system can be shut down or restarted.
Caution
• After the system shuts down, the server power goes off automatically.
• When shutting down the system, do not use the power switch.
• When the system shuts down, all services running on the server are forcibly
terminated. Before shutting down the system, make sure that no users are
currently accessing the server. If you shut down the system while a file is
being edited, the contents of the file may be damaged.
1
On the FSV-M3 Administration Console, click “System” - “Shutdown/
Reboot”.
Chapter 3 Using the FSV-M3 Administration Console
35
Page 36

Network Menu
The “Shutdown/Reboot” page appears.
2
To shut down the server, click the “Shutdown” button.
To reboot the server, click on the “Reboot” button.
The Shutdown/Reboot confirmation page appears.
3
Click the “OK” button.
Approximately 60 seconds later, the system shuts down.
After the system shuts down, the server power goes off automatically.
TCP/IP
In the Network menu, you can configure TCP/IP and other network settings.
The Network menu consists of the following items.
•TCP/IP
Used to configure TCP/I P network settings.
• Windows
Used to configure settings for client s using the CIFS protocol.
•UNIX
Used to configure settin gs for UNIX/L inux based clien ts usin g NFS pr otoc ol.
•FTP
Used to configure File Transfer Protocol for published shares.
•SNMP
Used to configure settings for the SNMP agent.
Use this item to make TCP/IP network settings.
1
On the FSV-M3 Administration Console, click “Network” - “TCP/IP”.
Chapter 3 Using the FSV-M3 Administration Console
36
Page 37

The “TCP/IP” page appears.
Note
Depending on the settings of your Web browser, the pages displayed
previously may be cached. Update the contents of the page that you are
viewing to view the latest information.
2
Configure the items below.
IP Address
Enter the IP address.
Caution
• Enter an IP address only after confirming that there are n o other machines
with the same IP address on the same network. No error message is
displayed to alert you if there is more than one machine with the same
parameters set. Take care not to set the same parameters as another
machine, as this can result in malfunction.
• Because of IP address allocation restrictions, some addresses cannot be
set. Even if they are set, they are not applied by the system.
(Example) 244.0.0.0 to 255.255.255.255
0.0.0.0
127.0.0.1
etc.
Subnet Mask
Enter the subnet mask.
Caution
Because of subnet mask allocation restrictions, some values cannot be set.
Even if they are set, they are not applied by the system.
IP Broadcast
Enter the IP broadcast address.
Default Gateway
Enter the default gateway address.
Note
If this setting is not necessary, leave it blank.
Domain Name Server
Enter the IP address of the primary DNS server.
Chapter 3 Using the FSV-M3 Administration Console
37
Page 38

Windows
Note
If this setting is not necessary, leave it blank.
Domain Name
Enter a domain name of up to 80 alphanumeric characters. For details about
permissible characters, see “FSV-M3 Limitations” (page 66).
MAC Address
Displays the server’s internal network card MAC address (hardware
address). However, regardless of what network port the FSV-M3 is
physically connected to (LAN 0 o r LAN 1), t he MAC address d isplayed i s
that of the NIC corresponding to LAN 0.
3
Click the “Submit” button.
The settings are applied.
Note
Any changes on this page will cause all the file server protocols (CIFS,
NFS, FTP, HTTP) to be restarted. Any file access connections will be
disrupted. Please ensure that no users are currently accessing shares.
Configure these settings for clients using Windows computers.
1
On the FSV-M3 Administration Console, click “Network” - “Windows”.
The “Windows” page appears.
Chapter 3 Using the FSV-M3 Administration Console
38
Page 39

2
Configure the items below.
Note
The CIFS file server is always enabled. When this screen is updated, the
CIFS file server is restarted to us e the new information.
Workgroup/Domain Name
Enter a workgroup or domain name of up to 80 alphanumeric characters.
For details about permissibl e characters, see “FSV-M3 L imitations” (p age
66).
WINS Server
When using the server on multiple subnets, enter the IP address of the
WINS server that you want to browse. If you do not want to browse a
WINS Server, leave this box empty.
Join Domain
Select this check box if you want to join a Windows domain and let the
domain controller perform user authentication.
PDC IP/Name
This is the IP address or nam e of the primary domain cont roller.
PDC Administrator Name
Enter the name of the PDC administrator here.
UNIX
PDC Administrator Password
Enter the password of the PDC administrator here.
3
Click the “Submit” button.
The settings are reflected in the “Windows” page.
Caution
Clicking the “Submit” button restarts the Windows network service.
Confirm that there are no users currently accessing the server before
clicking “Submit”.
Configure these settings for clients using UNIX/Linux computers.
In “UNIX”, you can start or stop the NFS (Network File System) service and
configure NFS settings.
Caution
Before changing settings on this menu, you must first make shares accessible
through UNIX/Linux from “Storage” - “Share”. For details, see “Share” (page
48). All the shares made accessible in this way are affected by the settings in the
“UNIX” page.
1
On the FSV-M3 Administration Console, click “Network” - “UNIX”.
Chapter 3 Using the FSV-M3 Administration Console
39
Page 40

The “UNIX” page appears.
2
Configure the following items.
Enabled
Select “Yes” to enable the NFS service on the file server.
Important
If you select “Yes” and do not specify a ddresses for “Valid client addresses
or subnet addresses”, all the shares can be mo unted from client compu ters.
If you do not plan to use shares through client computers, make sure that
you select “No”.
Valid client addresses or subnet addresses
Enter the IP address of computers or subnets that are authorized to access
shares.
Enter subnet addresses as follows.
(Example) If the subnet is “192.168.5”, enter [192].[168].[5].[*]
Note
You can specify a maximum of five addresses.
3
Click the “Submit” button.
Mounting Shares on Client Computers
To mount shares on a UNIX or Linux computer, follow the example that
follows:
mount -t nfs <host name or IP address of the FSV-M3>:/home/<share name> /
mnt
Note
If you want to access shares through an NFS client, you must set the server
security to “Public Access” in the Security menu. For details about share
security, see “Setting Share Folder Security” (page 58).
FTP
Configure these se ttings for clients using th e FTP protocol.
1
On the FSV-M3 Administration Console, click “Network” - “FTP”.
Chapter 3 Using the FSV-M3 Administration Console
40
Page 41

The “FTP” page appears.
2
Configure the following items.
Enabled
Select “Yes” if you want to allow the shares on the server to be accessed
through FTP.
Allow Anonymous
Select “Yes” to allow guests to access the file server. Guests are users that
have not been registered and have no authentication rights.
The shares accessible to anonymous users are determined by the setti ngs in
the “Security” - “Share Folders”. If a share is set for public access,
anonymous users can access it. For details, see “Setting Share Folder
Security” (page 58).
Accessing Shares Through FTP
3
Click the “Submit” button.
Access shares through FTP by performing the following.
FTP access with a Web browser
Type “ftp://<host name or IP address of the FSV-M3>/home/<share name>” in
the Address or Location box of your browser.
FTP access with a text console
1
Type “ftp <host name or IP address of the FSV-M3>”, and then press the
Enter key.
2
Type you password.
When your password is authenticated, the following appears.
ftp>
3
Using the change directory command (cd), access the share that you want.
For example,
ftp>cd/home/<share name>
Caution
Japanese files and folders names are saved using the EUC character code.
Depending on the software used by your FTP client, some file and/or folder
names may not be displayed properly.
Chapter 3 Using the FSV-M3 Administration Console
41
Page 42

SNMP
Configure these settings for the SNMP agent.
1
On the FSV-M3 Administration Console, click “Network” - “SNMP”.
The “SNMP” page appears.
2
Configure the following items.
Enable SNMP Agent
Select the “Yes” radio button to enable the SNMP agent on the file server.
SNMP Community Name
Enter the SNMP community name.
Storage Menu
System Contact
Enter the system contact name.
System Location
Enter the system location.
Note
For details about permissibl e characters, see “FSV-M3 L imitations” (p age
66).
3
Click the “Submit” button.
Use the Storage menu to change hard disks on the fly, con figure RAID grou ps,
manage shares, etc.
The Storage menu consists of the following items.
•Device
Verify the status of the hard disk, and if it is malfunctioning, you can replace
it on the fly.
• RAID Group
Used to configure RAID.
•Share
Used to create, delete, and modify shares, as well as activate/deactivate
automatic share creation.
Chapter 3 Using the FSV-M3 Administration Console
42
Page 43

•User Quotas
Used to control user disk space allocation.
Device
Verify the status of the hard di sk, and i f i t is malfu ncti oni ng, you can repl ace it
on the fly.
Verifyi ng the Status of a Hard Disk
1
On the FSV-M3 Administration Console, click “Storage” - “Device”.
The “Device” page appears.
The “Device” page displays information about the status of the hard disks
in the server.
HDD Number
Displays the hard disk loc a tion.
Model
Displays the hard disk model name.
Size
Displays the capacity of the hard disk.
Status
Displays the current status of the hard disk.
In Use [5/5]: Operating normally. (Background color is white.)
In Use [x/5] (x<5): There is a problem with a partition of the hard disk.
(Background color is yellow.)
Inactive: The hard disk was removed using “Hotremove”.
Important
Each FSV-M3 hard disk has five partitions. The numbers in brackets next
to “In Use” represent these partitions.
• When you see [5/5], all the partitions of the hard disk are normal.
• When you see [x/5] (x<5), x partitions are normal and the remaining 5-x
partitions are problematic. Because the FSV-M3 uses RAID
configuration (RAID 1 and RAID 5), even if some hard disk partitions
are problematic, the FSV-M3 can still operate normally at reduced
performance levels. Therefore, it is i mportant that you replace a hard disk
when a problem arises with a partition by performing the procedure
outlined in “Replacing a Hard Disk,” below.
Replacing a Hard Disk
If a FSV-M3 hard disk malfunctions, you can replace it on the fly, while the
server is running.
Chapter 3 Using the FSV-M3 Administration Console
43
Page 44

1
Prepare a new hard disk.
2
On the FSV-M3 Administration Console, click “Storage” - “Device”.
The “Device” page appears.
You can quickly ascertain when a problem arises with a hard disk, as the
Status column shows [x/5] (x<5) and the background color is yellow.
3
Click the hard disk that you need to replace in the “HDD Number” column.
The “Device Detail” page appears.
When a problem arises with a hard disk the Status column shows [x/5]
(x<5) and the background color is yellow.
4
Click the “Hotremove” button.
The “Hotswap” page appears.
5
Click the “Continue” button.
6
When the following page appears, wait until the LED indicator goes off.
Chapter 3 Using the FSV-M3 Administration Console
44
Page 45

When it is safe to remove the ha rd disk , the f ollo wing scree n appe ars. The
Status column displays “Inactive”.
Note
Do not remove the hard disk before the LED indicator goes out and
“Inactive” appears on the screen. If you do so, t he entire system may cease
to function. Further, if you do not complete the replacement of the hard disk
with hotswap correctly, the data on the hard disks may be damaged.
7
Unlock the hard disk using t he provided key, raise the hard disk handle, and
then pull it to remove the hard disk.
8
Insert the new hard disk , i nsert it, and then lock it in pla ce using the
provided key.
9
Click the “Hotadd” button.
The “Hotswap” page appears.
10
Click the “Continue” button.
The following screen appears and the FSV-M3 front LED indicator lights
amber.
Chapter 3 Using the FSV-M3 Administration Console
45
Page 46

The RAID recovery begins and the “Device Detail” page appears.
“recovering” appears in the Status column and the background color is
yellow.
When the recovery is complete, the Status returns to “In Use [5/5]”, which
completes the hard disk replacement.
Notes
Observe the following when replacing a hard disk with the procedure
above.
• When you have physically replaced a hard disk, you MUST perform the
procedure above from step 9 (per for m t he h ota dd p rocedur e). If you fail
to do so, you will be unable to use the new hard disk. Further, if you fail
to perform the hotadd procedure and r estart the FSV-M3, probl ems may
arise and your data be damaged.
• Do not use hard disks other than the ones specified by Sony. Using such
hard disks may prevent the FSV-M3 from starting and/or damage your
data.
• Do not change the order of hard disks. Changing the order of the hard
disks can damage the data on the FSV-M3.
• Failing to replace a damaged hard disk before shutt ing down, turning off,
or restarting the FSV-M3 may prevent it from starting and/or damage
your data.
• It is impossible to restore the system if two or more hard disks
malfunction or are pulled out of the FSV-M3 simultaneously.
• It is impossible to replace a hard disk with hotswap when the system is
performing a RAID recovery.
• Depending on the nature of the hard disk problem, you may not be able
to search for some items with the system.
• Do not use hotswap to replace a hard disk when the system is starting or
being accessed.
Recommendations
• Replace a hard disk as soon as it develops a problem. However, make
sure that no one is accessing the system before proceeding.
• Replace hard disks with new hard disks.
Chapter 3 Using the FSV-M3 Administration Console
46
Page 47

RAID Group
Change the RAID configuration.
By default, the RAID level is “RAID 5”, which means that all four hard disks
are viewed as one big stora ge area. If you want the system to view the hard disks
as two storage areas, change the setting to “RAID 1”.
Caution
When you change the RAID configuration, all the user data on the server are
deleted. Automatic share creation is also deactivated. If you wa nt to reactivate
automatic share creation, click “Storage” - “Share” a nd react iv ate t he fun ct ion.
For details about this procedure, see Chapter 2, “Automatic Share Creation”
(page 22).
1
On the FSV-M3 Administration Console, cli ck “Storage” - “RAID Group”.
The “RAID Group” page appears.
2
Click “Change RAID Configuration”.
The “Change RAID Configuration” page appears.
3
Click the “Continue” button.
Chapter 3 Using the FSV-M3 Administration Console
47
Page 48

The following page appears.
4
Enter the administrator password, and then click the “Continue” button.
The following page appears.
Share
5
Select “RAID 1”, and then click the “Continue” button.
A confirmation message appears.
6
Click “Yes”.
All the data on the server is dele ted and settings are reset. Resetti ng may
take up to one hour.
Note
It is also possible to change the RAID configuration from RAID 1 to RAID
5. Doing so also deletes all the user data on the server.
Create and delete shares, as well as configuring access settings. There are two
methods for creating shares.
• Manual share creation
The system administrator can create shares manually with the FSV-M3
Administration Console.
• Automatic share creation
The system creates a default share for users when they access a specific URL
through a Web browser and pass user authentication. The shares created this
way belong to their specifi c users, bu t use th e defaul t permi ssion s defined by
the system administrator.
Chapter 3 Using the FSV-M3 Administration Console
48
Page 49

Manual Share Creati on
Create shares manually through the FSV-M3 Administration Console as
follows.
1
On the FSV-M3 Administration Console, click “Storage” - “Share”.
The “Share” page appears.
2
Click “Create Share”.
The “Create Share” page appears.
3
Select the RAID group the share that you want to create.
Note
The RAID group name varies depending on the RAID configuration as
follows.
• If the RAID configuration is RAID 5 (default), only one RAID group
name appears. This name is “VOLUME”.
• If the RAID configuration is RAID 1, two RAID group names appear.
These names are “VOLUME 0” and “VOLUME 1”.
For details about changing the RAID group configuration, see “RAID
Group” (page 47).
4
Click the “Continue” button.
Chapter 3 Using the FSV-M3 Administration Console
49
Page 50

The following page appears.
5
Configure the following settings.
Share Name
The share name is a string of up to 80 alphanumeric characters. For details
about permissible characters, see “FSV-M3 Limitations” (page 66).
Caution
• You cannot assign share names that have already been assigned. Further,
the FSV-M3 does not distinguish between uppercase and lowercase
characters. (Example: “abc,” “ABC,” and “Abc” are all recognized as the
same name.)
• When using Windows 95, Windows 98, Windows Me, or Win dows NT,
enter the share name as up to 11 alphanumeric characters.
Description
Enter a description of up to 256 alphanumeric characters regarding the
share. For details about permissible characters, see “FSV-M3 Limitations”
(page 66).
Windows (CIFS)
Select this check box if you want thi s share to be accessible from Windo ws.
Windows Attributes
Select this check box if you want the share to retain Windows attributes
such as “read-only”, “hidden”, “system file”, or “archive”.
Note
These attributes may conflict with file permissions used by UNIX/Linux
clients. Do not select this check box if these shares are used by UNIX/
Linux clients.
Web (HTTP)
Select this check box if you want this share to be accessible from a Web
browser.
UNIX (NFS)
Select this check box if you want this share to be accessible to UNIX/Linux
clients.
FTP
Select this check box if you want this share to be accessible through FTP.
Chapter 3 Using the FSV-M3 Administration Console
50
Page 51

Automatic Share Creat ion
6
Click the “Create Share” button.
The settings are reflected in the “Share” page.
The FSV-M3 can be configured to automatically create shares. Shares are
created when users access a specific URL for the first time through a Web
browser. The shares are given the name of the registered users.
1
On the FSV-M3 Administration Console click “Storage” - “Share”.
The “Share” page appears.
2
Click “Auto Share”.
The “Auto Share” page appears.
Chapter 3 Using the FSV-M3 Administration Console
51
Page 52

3
Configure the following settings.
Activate Auto Share
Select the check box if you want the FSV-M3 to create shares
automatically, and then click the RAID group where they are created.
Windows (CIFS)
Select this check box if you want thi s share to be accessible from Windo ws.
Windows Attributes
Select this check box if you want the share to retain Windows attributes
such as “read-only”, “hidden”, “system file”, or “archive”.
Note
These attributes may conflict with file permissions used by UNIX/Linux
clients. Do not select this check box if these shares are used by UNIX/
Linux clients.
Web (HTTP)
Because this item is absolutely necessary for automatic share creation, yo u
cannot clear this check box.
UNIX (NFS)
Select this check box if you want this share to be accessible to UNIX/Linux
clients.
FTP
Select this check box if you want this share to be accessible through FTP.
4
Click the “Submit” button.
Share is created the first time users access a specific URL through a Web
browser (see “Important”, below). The shares are given the name of the
users. (See the note below.)
Important
A share is created for a user when the user accesses the URL below. The
share is given the name of the user.
URL http://HOSTNAME_or_IP/home/user name
HOSTNAME_or_IP: host name or IP address of the FSV-M3.
user name: name of the user registered on the FSV-M3.
(Example) If the user name is “tiger”, then the URL is:
http://HOSTNAME_or_IP/home/tiger
Notes
• To access your share, enter the your user name as follows in the password
authentication dialog box.
- Local set users: user name
- Windows set users: domain name\user name
• Because the share is given the same name as the user, if the user name
exceeds 12 characters, so does the share name. However, shares with
names of more than 12 characters can not be accessed with Windo ws 95,
98, Me, or NT. For details, see page 48.
Chapter 3 Using the FSV-M3 Administration Console
52
Page 53

Share Modification
1
In the “Share” page, click the share that you want to modify.
The “Edit Share” page appears.
2
Modify the following items.
Description
Enter a description of up to 256 alphanumeric characters regarding the
share. For details about permissible characters, see “FSV-M3 Limitations”
(page 66).
Windows (CIFS)
Select this check box if you want thi s share to be accessible from Windo ws.
Windows Attributes
Select this check box if you want the share to retain Windows attributes
such as “read-only”, “hidden”, “system file”, or “archive”.
Note
These attributes may conflict with file permissions used by UNIX/Linux
clients. Do not select this check box if these shares are used by UNIX/
Linux clients.
Web (HTTP)
Select this check box if you want this share to be accessible from a Web
browser.
UNIX (NFS)
Select this check box if you want this share to be accessible to UNIX/Linux
clients.
FTP
Select this check box if you want this share to be accessible through FTP.
3
Click the “Update Share” button.
The modifications are reflected in the “Share” page.
Chapter 3 Using the FSV-M3 Administration Console
53
Page 54

Share Deletion
When you delete a share, all the files that it contains are also deleted. Before
deleting a share, make sure that there are no use rs accessing the share or fi les in
the share.
1
In the “Share” page, click “Delete Share(s)”.
The “Delete Shares” page appears.
2
Select the check boxes of the shares that you want to delete.
3
Click the “Delete Share(s)” button.
The following page appears.
4
Click the “Delete Share(s)” button.
The changes are reflected in the “Share” page.
Chapter 3 Using the FSV-M3 Administration Console
54
Page 55

User Quotas
Configuring User Quotas
Control the maximum amount of disk space of each user.
Note
When enabling or recalculating user quot as in this menu, the more user data and
registered users, the longer the operations take.
1
On the FSV-M3 Administration Console, click “St orage” - “User Quotas”.
The “User Quotas” page appears.
2
If the Quota Status is “DISABLED”, click the volume where you want to
activate the user quotas.
If the Quota Status is “ENABLED”, proceed to step 5.
The following page appears.
3
Click the “Enable” button.
The following page appears.
Chapter 3 Using the FSV-M3 Administration Console
55
Page 56

4
Click the “Continue” button.
The “User Quotas” page reappears and the Quota Status is now
“ENABLED”.
5
Click the volume where you want to activate the user quotas.
6
To verify the amount of disk space currently used by each user, click the
“Recalculate” button.
The result is indicated in the “In Use” column. (If there are many users or
disk usage is high, this may take some time.)
7
Specify the maximum disk space that you want to allocate to each
authorized user.
Note
If you do not want to specify a u ser quota for a speci fic user, specify “ 0” in
the box.
8
Click the “Submit” button.
The settings are reflected in the “User Quotas” page.
Chapter 3 Using the FSV-M3 Administration Console
56
Page 57

Disabling User Quotas
1
In the “User Quotas” page, click the volume where you want to d isable user
quotas.
The following page appears.
2
Click the “Disable” button.
A confirmation message appears.
3
Click the “Continue” button.
The “User Quotas” page reappears and the Quota Status is now
“DISABLED”.
Chapter 3 Using the FSV-M3 Administration Console
57
Page 58

Security Menu
Share Folders
Setting Share Folder Security
Use the Security menu to manage users and shares.
This Security menu con s ists of the following items.
•Share Folders
Used to manage share security.
•Users
Used to register and delete users.
1
On the FSV-M3 Administration Console, click “Security” - “Share
Folders”.
The “Share Folders” page appears.
2
Click one of the share names.
The following page appears.
3
Click “Public Access” or “Set User R/W Access”.
Public Access
Select Public Access to make thi s share accessi bl e to any user. The access
permission becomes R/W.
Chapter 3 Using the FSV-M3 Administration Console
58
Page 59

Users
Set User R/W Access
Select Set User R/W Access to make this share accessible to selected users
only.
4
Select the check boxes of the permissions that you want to give to each
user.
5
Click the “Submit” button.
The settings are applied to the shares.
Note
If you want to access sh ares through a n NFS client , you must set the server
security to “Public Access” in the Security menu.
Add or delete FSV-M3 users.
There exists two types of users on the FSV-M3.
• Local set users
Users that are registered manually are referred to as “local set users”. They are
maintained from “Security” - “Users”.
• Windows set users
Users maintained on a Windows Primary Domain Controller. They appear
when the FSV-M3 is used in combination with a Windows domain and are
referred to as “Windows set users”. You cannot create, modify, or delete these
users from “Security” - “Users”.
Adding Local Set Users
Note
You can configure the settings need ed t o use th e FS V-M3 in co mbi nat ion with
a Windows domain from “Network” - “Windows”. For details about how to
configure the settings, see “Windows” (page 38) in this chapter.
Register local set users on the FSV-M3 Administration Console.
1
On the FSV-M3 Administration Console, click “Security” - “Users”.
The “Users” page appears.
Chapter 3 Using the FSV-M3 Administration Console
59
Page 60

2
Click “Add User”.
The “Add User” page appears.
3
Enter the items below.
User Name
Enter a user name of up to 32 alphanumeric characters. For details about
permissible characters, see “FSV-M3 Limitations” (page 66).
Important
When registering users from Windows 95, Windows 98, or Windows Me,
be sure to enter the same user name as the user's Windows logon name.
Full Name
Enter the full name of the user using up to 49 characters. For details about
permissible characters, see “FSV-M3 Limitations” (page 66).
Password
Enter a user password of five or more alphan umeric characters. For details
about permissible characters, see “FSV-M3 Limitations” (page 66).
Confirm Password
Re-enter the user password.
Note
Users can change passwords by themselves. See “Changing the User
Password” (page 19) in Chapter 2, “Basic Use”.
Grant admin rights
Select this check box if you want to gr ant this u ser admi nistr ative r ights to
the server.
Important
Users to whom you grant administrative rights have access to all the
functions of the FSV-M3 and can perform all the operations explained in
this document. Exercise care before granting administrative rights to a user.
4
Click the “Submit” button.
Chapter 3 Using the FSV-M3 Administration Console
60
Page 61

Modifying Local Set Users
The settings are reflected in the “Users” page.
1
In the “Users” page, click the name of the local set user that you want to
modify.
The “Edit User” page appears.
2
Modify the items below, as necessary.
Full Name
Enter the full name of the user using up to 49 characters. For details about
permissible characters, see “FSV-M3 Limitations” (page 66).
Password
Enter a user password of five or more alphan umeric characters. For details
about permissible characters, see “FSV-M3 Limitations” (page 66).
Confirm Password
Re-enter the user password.
Note
Users can change their own p asswords. See “Changing the User Password”
(page 19) in Chapter 2, “Basic Use”.
Grant admin rights
Select this check box if you want to gr ant this u ser admi nistr ative r ights to
the server.
3
Click the “Submit” button.
The modified settings are reflected in the “Users” page.
Chapter 3 Using the FSV-M3 Administration Console
61
Page 62

Deleting Local Set Users
1
In the “Users” page, click “Delete Users”.
The “Delete User” page appears.
2
Click the user that you want to delete.
3
Click the “Delete” button.
A confirmation message appears.
4
Click the “Delete” button.
Status Menu
A message indicating that the deletion is complete appears.
5
Click “Return”.
The results are reflected in the “Users” page.
Note
Only local users can be removed. Users from a Windows PDC domain are
not maintained locally. Also, any files or folders created by a user are not
removed from the system.
Use the Status menu to view system information, access the list of users
currently accessing the server, logon history, and event logs.
The Status menu consists of following items:
•System
Used to view overall system and hardware status.
•Disk Usage
Used to view disk usage.
• Current Us ers
Used to view users currently logged on to the server.
•Login History
Used to view user logon history.
• Event Log
Used to view logged system events.
Chapter 3 Using the FSV-M3 Administration Console
62
Page 63

System
View the host name, status of the network card, internal temperature of the
server, status of the fan, etc.
1
On the FSV-M3 Administration Console, click “Status” - “System”.
The “System” page appears.
Disk Usage
Current Users
View the RAID level per volume, as well as remaining disk space and status.
1
On the FSV-M3 Administration Console, click “Status” - “Disk Usage”.
The “Disk Usage” page appears.
View the users currently logged on to the server.
Before proceeding with the following procedure make sure that there are no
users performing the following operations.
• Modifying or deleting shares.
• Modifying RAID configuration.
• Performing shutdown or reboot procedures.
• Interrupting or restarting services.
• Upgrading the system version.
•Etc.
Chapter 3 Using the FSV-M3 Administration Console
63
Page 64

1
On the FSV-M3 Administration Console, click “Status” - “Current Users”.
The “Current Users” page appears.
You can modify the display of this page to suit your needs. Click the
display method that you want.
All Login Types
Click to display all the users currently accessing the server.
HTTP Only
Click to display only the users a ccessing the serve r through a We b browser.
CIFS Only
Click to display only the users accessing the server through Windows.
FTP Only
Click to display only the users accessing the server through FTP.
Login History
NFS Only
Click to display only the users accessing the server through NFS.
View a log of how many times users have logged on to the server.
1
On the FSV-M3 Administration Console, click “Status” - “Logi n History”.
The “Login History” page appears.
You can modify the display of this page to suit your needs. Click the
display method that you want.
All Login Types
Click to display all the users that accessed the server.
HTTP Only
Click to display only the users who accessed the server through a Web
browser.
Chapter 3 Using the FSV-M3 Administration Console
64
Page 65

Event Log
CIFS Only
Click to display only the users who accessed the server through Windows.
FTP Only
Click to display only the users who accessed the server through FTP.
NFS Only
Click to display only the users who accessed the server through NFS.
2
To clear the log, click the “Clear Log” button.
View the system event log.
1
On the FSV-M3 Administration Console, click “Status” - “Event Log”.
The “Event Log” page appears.
2
To clear the event log, click the “Clear Event Log” button.
You can modify the display of this page to suit your needs. Click the
display method that you want.
Summary
Click to display the e vent log summary.
Details
Click to display the details of the event log.
System Log
Click to display the system log.
Chapter 3 Using the FSV-M3 Administration Console
65
Page 66

FSV-M3 Limitations
The FSV-M3 has the follo wing limitations.
FSV-M3 System Limitations
• Maximum number of shares that can be mounted or shared simultaneously on
the FSV-M3: 250.
• Max number of local set users: 1000
• Highest supported year: 2038
FSV-M3 Administration Console Strings
The following is a list of permissible characters for FSV-M3 text boxes.
Shares
Text box Length Permissible
Host Name Up to 64
characters
Domain Name Up to 80
Workgroup/
Domain Name
User Name Up to 32
Full Name Up to 49
Pass word 5 characters
Share Name Up to 80
Description Up to 256
characters
Up to 80
characters
characters
characters
or more
characters
characters
characters
Alphanumeric
characters and
hyphens.
Alphanumeric
characters, periods,
and hyphens.
Alphanumeric
characters, periods,
and hyphens.
Alphanumeric
characters, hyphens,
underscores, periods,
and plus signs.
Any alphanumeric
character and
symbols ex cept
? * " \ / < > ' ` : &
Alphanumeric
characters, hyphens,
underscores, periods,
and plus signs.
Any alphanumeric
character and symbol
except spaces and
? * " \ / < > : | %
Any alphanumeric
character and symbol.
Limitations
Hyphens cannot be first in
the character string.
Hyphens cannot be first in
the character string. The
character string must be 63
characters or less between
the first character and the
period.
Hyphens cannot be first in
the character string. The
character string must be 63
characters or less between
the first character and the
period. Enter the workg roup
and domain name so that
they can be differentiated
within 15 characters of the
first.
Periods cannot be the first
in the character string.
Chapter 3 Using the FSV-M3 Administration Console
66
Page 67

Note
If the share name is longer than 12 characters, it cannot be accessed by
computers running on Windows Me, Windows 98 SE, Windows NT 4.0, or
earlier operating systems.
Static IP
Text box Length Permissible characters
IP Address Up to 15 0 to 9, period (.)
Subnet Mask Up to 15 0 to 9, period (.)
IP Broadcast Up to 15 0 to 9, period (.)
Default Gateway Up to 15 0 to 9, period (.)
DNS Server Up to 15 0 to 9, period (.)
WINS Server Up to 15 0 to 9, period (.)
E-mail Alert Recipient
E-mail addresses must be separated by commas (,) and the recipient field can
contain up to 80 characters including commas.
SNMP Traps and Agent
Alerts Table
Text box Length Permissible characters
Trap Host IP Up to 15 0 to 9, period (.)
Community Up to 15 Alphanumeric characters
SNMP
Community Name
System Contact Up to 255 No restrictions
System Location Up to 255 No restrictions
Up to 32 Alphanumeric characters
When alerts are activated in “System” - “Alert”, you are notified of the events
that you selected by e-mail. Events are as follows.
Event E-mail subject E-mail contents Explanation
The server restarts [$serial] Reboot $hostname system
A hard disk is
malfunctioning
[$serial] HDD
FAULTYALERT
will be reboot
$hostname: The
following HDD
partition has been
set faulty: $hdd &
$partition
Notifies you that
the server restarts.
Notifies you of a
hard disk
malfunction.
Chapter 3 Using the FSV-M3 Administration Console
67
Page 68

Event E-mail subject E-mail contents Explanation
A RAID group is
being rebuilt
A RAID group is
completely full
The RAID
reconfiguration is
complete
The hardware
monitor has
detected an
anomaly
A UPS interruption
and power
restoration we re
detected
Test [$serial] test alert $hostname: This is
[$serial] RAID
GROUP REBUIDS
ALERT
[$serial] RAID
FULL ALERT
[$serial] RAID
CONFIGURATION
CHANGED
[$serial] Hardware
abnormal
[$serial] UPS
Power failed
[$serial] UPS
Power restored
[$serial] UPS low
battery
$hostname: The
following RAID
Group is
rebuilding: $vol
$hostname: The
following RAID
Group has
completed
rebuilding: $vol
$hostname: The
following RAID
Group is close to
full: $vol
$hostname: RAID
CONFIGURATION
HAS BEEN
CHANGED TO
OPTION 1 - RAID5
$vol ready
$hostname: RAID
CONFIGURATION
HAS BEEN
CHANGED TO
OPTION 2 - RAID1
$vol ready
$hostname: CPU
temperature is
$temp (higher than
threshold 70"C) ·
$hostname: $fan
speed is abnormal
UPS connected to
Server
"$hostname"was
power failu re at
$date
UPS connected to
Server
"$hostname"was
power restore at
$date
UPS connected to
Server
"$hostname"has
been in low battery
since $date
alert event test
mail
Notifies you that a
RAID group is
being rebuilt.
Notifies you that
the RAID group
rebuild is complete.
Notifies you that
the user data of a
RAID group has
reached 100%.
Notifies you that
the RAID
reconfiguration
from RAID 1 to
RAID 5 is
complete.
Notifies you that
the RAID
reconfiguration
from RAID 5 to
RAID 1 is
complete.
Notifies you that
the CPU
temperature
exceeds 70°C.
Notifies you that a
problem with the
fan was detected.
Notifies you that
UPS has detected
a power
interruption.
Notifies you that
UPS has detected
that power was
restored since a
power interruption.
Notifies you that
the UPS's batteries
are failing.
Test message.
Notes
• “$serial” represents the product’s serial number.
• “$hostname” represents the server’s host name.
• “$hdd” represents the hard disk number (HDD0 to HDD3).
• “$partition” represen ts the name of a partition.
• “$vol” represents the name of a RAID volume (VOLUME, VOLUME0, or
VOLUME1).
• “$fan” represents the fan number.
• “$date” represents the date.
Chapter 3 Using the FSV-M3 Administration Console
68
Page 69

SNMP Traps Table
When SNMP traps are activated in “System” - “Alert”, you are notified of the
events that you selected. Events are as follows.
Event Trap type Specific
The server
restarts
A hard disk is
malfunctioning
A RAID group
is being rebuilt
A RAID group
is completely
full
The RAID
reconfiguration
is complete
The hardware
monitor has
detected an
anomaly
enterprise
Specific
enterprise
Specific
enterprise
Specific
enterprise
Specific
enterprise
Specific
enterprise
Specific
type
12020 [$serial] Reboot $hostname system
13010 [$serial] HDD
14010 [$serial] RAID
15010 [$serial] RAID
18010 [$serial] RAID
16010 [$serial] Hardware
Message 1
(Variable Biding)
F AULTY ALER T
GROUP REBUIDS
ALERT
FULL ALERT
CONFIGURATION
CHANGED
abnormal
Message 2
(Variable Biding)
will be reboot
$hostname: The
following HDD
partition has been
set faulty: $hdd &
$partition
$hostname: The
following RAID
Group is rebui lding:
$vol
$hostname: The
following RAID
Group has
completed
rebuilding: $vol
$hostname: The
following RAID
Group is close to
full: $volume
$hostname: RAID
CONFIGURATION
HAS BEEN
CHANGED TO
OPTION 1 - RAID5
$vol ready
$hostname: RAID
CONFIGURATION
HAS BEEN
CHANGED TO
OPTION 2 - RAID1
$vol ready
$hostname: CPU
temperature is
$temp (higher than
threshold 70"C) ·
$hostname: $fan
speed is abnormal
Explanation
Notifies you that the
server restarts.
Notifies you of a
hard disk
malfunction.
Notifies you that a
RAID group is
being rebuilt.
Notifies you that the
RAID group rebuild
is complete.
Notifies you that the
user data of a RAI D
group has rea ched
100%.
Notifies you that the
RAID
reconfiguration
from RAID 1 to
RAID 5 is complete.
Notifies you that the
RAID
reconfiguration
from RAID 5 to
RAID 1 is complete.
Notifies you that the
CPU temperature
exceeds 70°C.
Notifies you that a
problem with the
fan was detec ted.
Chapter 3 Using the FSV-M3 Administration Console
69
Page 70

Event Trap type Specific
type
A UPS
interruption and
power
restoration
were detected
Test enterprise
enterprise
Specific
Specific
Notes
20010 [$serial] UPS
9999 [$serial] test alert $hostname: This is
• “$serial” represents the product’s serial number.
• “$hostname” represents the server’s host name.
• “$hdd” represents the hard disk number (HDD0 to HDD3).
• “$partition” represen ts the name of a partition.
• “$vol” represents the name of a RAID volume (VOLUME, VOLUME0, or
VOLUME1).
• “$fan” represents the fan number.
• “$date” represents the date.
Message 1
(Variable Biding)
Power failed
[$serial] UPS
Power restored
[$serial] UPS low
battery
Message 2
(Variable Biding)
$hostname: UPS
connected to
Server was power
failure at $date
$hostname: UPS
connected to
Server was power
restore at $date
$hostname: UPS
connected to
Server has been in
low battery since
$date
alert event test mail
Explanation
Notifies you that
UPS has detected
a power
interruption.
Notifies you that
UPS has detected
that power was
restored since a
power interruption.
Notifies you that the
UPS’s bat teries are
failing.
Test message.
Chapter 3 Using the FSV-M3 Administration Console
70
Page 71

Precautions
Troubleshooting
Appendix
Please observe the following precautions when using the equipment.
• It is not possible to install any software into the equipment other than software
supplied by Sony specifically for use with the equipment.
• Do not connect the server directly to the Internet, as illegal access may resul t.
Take adequate care regarding the way the system is set up.
• Sony does not accept any liability for loss of user data resulting from
equipment malfunction or user operations.
Before contacting a Sony Technical Center, please check the following items.
Contact the Sony Support Center if the problem persists.
The server does not work.
• Verify that the power switch is turned on.
• Verify that the power cable is connected correctly.
• Turn off the server by pressing the power switch. Restart the server.
• During the startup procedure, the server checks the file system. The length of
this check varies depending on the amount of data on the server (in some
extreme case, it can take as long as two hours).
The server cannot be accessed from a browser
• Verify whether the network cable is connected correctly.
• V erify whether t he LINK LED and ACT LED are lit.
• Verify whether the IP address entered on the browser is correct. The current
IP address can be checked from FSV-Central for M3.
• Verify whether any other devices are using the same IP address as the server.
• Verify the network cable with other computers to make sure it is not faulty.
• Verify whether there is a problem with the connection between the network
hub and the computer or server, or the hub connectors.
Appendix
71
Page 72

The server cannot be found on the network from Windows
• Verify the server host name, then search for the computer again. If you
configured the network or Windows settings using the FSV-M3
Administration Console, it might take some time for the settings to be applied.
The host name can be checked on the FSV-M3 Administration Console
(“System” - “System Settings”), for example.
A share on the server cannot be accessed from Windows
• Verify the share access permissions. The share access permissions can be
checked on the FSV-M3 Administration Console (“Security” - “Share
Folders”).
• Verify whether the settings in “Network” - “Windows” (on the FSV-M3
Administration Console) are appropriately config ured for the current network
environment and operating system.
• When using Windows 95, Windows 98, or Windows Me, verify whether the
Windows logon name and the name registered in the server are the same.
• After registering a user, if you changed the settings with the FSV-M3
Administration Console, make sure th at you set the user password again (even
if it has not changed).
• Verify whether the user intending to access the server is registered. To
authenticate the ide nt ity of users with the FSV-M3, registration is necessary.
• Verify whether there is a computer with the same name and IP address on your
network.
A share cannot be mounted from UNIX/Linux
• Verify whether the UNIX network service (NFS) is active on the server. The
current state of the network service can be checked from the FSV-M3
Administration Console (“Network” - “UNIX”).
• Verify whether the share to be mounted is set to allow access from UNIX/
Linux. The share settings can be checked on the FSV-M3 Administration
Console (“Storage” - “Share”).
• Verify whether the share to be mounted is in the correct location. For
information on how to mount shares, see “Access from UNIX/Linux” (page
27) in Chapter 2, “Basic Use”.
The files cannot be stored in the server
• Verify the free disk space of the server. Delete files that are no longer needed
as soon as possible to create more disk space. The cu rrent free disk space can
be checked from the FSV-M3 Administration Console (“Status” - “Disk
Usage”).
• Verify the share access permissions and space limitation. The access
permissions of the share can be checked in “Security” - “Share Folder” of the
FSV-M3 Administration Console.
The actual size of t he four hard disks is less than the
specified size
When using four hard disks with t he FSV-M3 RAID configuration is performed ,
therefore the actual hard disk space that i s availabl e to users is slight ly less that
the specifications. The actual hard disk space available to users is:
• RAID 5: approx. 210 GB (FSV-M3/320)
• RAID 1: approx. 77 GB ×2 (FSV-M3/320 )
Appendix
72
Page 73

Specifications
Hardware
Hard disk drive 80 GB (FSV-M3/320) (4)
User area
• RAID 5: appr ox. 210 GB (FSV-M3/32 0)
• RAID 1: approx. 77 GB ×2 (FSV-M3/320)
External connectors
Ethernet 10 Base-T/100 Base-TX/1000 Base-T (RJ-45) (2)
Operating environment
Temperature: 5 to 35°C
Humidity: 20 to 80%
(Avoid condens ation)
Rated Voltage AC 100-127/200-240 V (50/60 Hz)
Rated Current 5.5 A/2.75 A
External dimensions
440 (W) × 43.5 (H) × 564 (D) mm (excluding projections)
17.3 (W) × 1.7 (H) × 22.2 (D) in.
Weight About 11.2 kg
About 24.6 lb.
Notice: Specifications and outward appearance of the FSV-M3 are subject to
change without notice.
This product uses GPL/LGPL soft ware. Users have the right to obtain, modify
and to redistribute the source code.
For details, refer to “GPL/LGPL”, supplied with the FSV-M3 .
Appendix
73
Page 74

Glossary
10Base-T
A UTP cable consisting of 4 pairs of
two wires (8 conductors) each,
twisted together into a single,
unshielded set (i.e., the cable is not
enclosed in a metallic mesh for
blocking electromagnetic noise).
Also referred to as a twisted pa ir
cable, it is commonly used for
connection in Ethernet-based local
area networks.
A cable of this type is capable of
carrying unmodulated signal data at
the rate of 10 megabits per second
over distances of up to 100 meters
(with the 10 Mbps base ban d system).
100Base-TX
A UTP cable consisting of 4 pairs of
two wires (8 conductors) each,
twisted together into a single,
unshielded set (i.e., the cable is not
enclosed in a metallic mesh to block
electromagnetic noise). This is
referred to as a twisted pair cable, and
100Base-TX cables meet the
Category 5 specifications for such
cables.
A cable of this type is capable of
carrying unmodulated signal data at
the rate of 100 megabits per second
over distances of up to 100 meters
(with a 100 Mbps base band system) .
It is used for connection to l ocal area
networks using fast Ethernet, which
operate at speeds in excess of 10
Mbps (data transfer at the rate of 10
megabits per second).
Capacity limit
To limit the a mount of disk space t hat
a particular user can use. Also
referred to as a quota or disk quota.
CIFS (Common Internet File
System)
A protocol (established set of means
and procedures for conducting data
communication) that enable s file
sharing between Windows
computers. Basically the same as the
SMB (Server Message Block)
protocol jointly developed by
Microsoft and Intel, it was later
renamed to promote use on the
Internet. The two protocols have
basically the same specifications, and
the names are used interchangeably.
Sometimes written CIFS /SMB.
Client computer
A computer that is connected to a
server in a network envi ronment, and
which receives service from a server.
Default gateway
With TCP/IP networks, a dev ice tha t
serves as a bridge for data
communication between two
networks, or between devices that are
not located within the same network.
Ordinarily, this is the IP address of a
router.
Directory
A storage location for files. Also
referred to as a folder.
Disk capacity
The measure of space available for
saving programs and files.
DNS (Domain Name System)
A distributed database system (i.e., a
database in which another server
continues providing information if
trouble causes a particular server to
go down) for managing information
such as IP addresses and host names.
Capable of identifying devices from
host names or objects from URLs
(Uniform Resources Locator: a
system used for specifying the
locations of files and other resources
on the Internet and intranets) even
when corresponding IP addresses are
not known. (Example: http://
www.fsv.sony.co.jp) Also capable of
finding IP addresses from host
names.
DNS (primary) server
The DNS server that has primary
responsibility for handling inquiries
from clients and other DNS servers.
Domain name
The name that indicates a network
consisting of hosts that are connected
to the internet and the servers at the
heart of that network. As with IP
addresses, domain names must not be
duplicated. A domain name is
delimited by commas, and ordinaril y
the elements are given in order of
decreasing scope from the right. For
example: With “fsv.sony.co.jp”,
“fsv” indicates the host (a computer),
“sony” designates the Sony network,
“co” indicates a company or
commercial business, and “jp”
indicates Japan. In other words,
“fsv.sony.co.jp” indicates the
computer fsv belonging to the
company Sony in Japan.
FAT16
File system used by Windows 3.1 and
Windows 95.
FAT32
File system used by Windows 95
(OSR 2.0 and higher), Windows 98,
Windows Me, Windows 2000, and
Windows XP.
File system
A system for recording information
used when reading or writing files,
such as the storage location, the date,
and the owner.
Folder
A storage location for files. Also
referred to as a directory.
Host name
A unique name assigned to a device
(such as a computer) connected to a
TCP/IP network. Also referred to as a
machine name or PC name.
Glossary
74
Page 75

Hub
A switching device through which a
number of devices (such as
computers) can be connected to a
network. Since connect ed devices are
arrayed with the hub at the center,
this type of connection is referred to
as a star topology. Most hubs used
with the Internet are equipped with
signal amplifier (repeater) to support
physical extensions.
IP address
An identifier used to indicate the
addresses of devices (such as
computers) that are connected to a
network. Since this identifier is used
to designate a particular destination
during data exchange, each IP
address must be unique. The address
consists of four period-delimited
fields, each consisting of a number
from 0 to 255. (In other words, a
group of four 8-bi t decimal numbers,
where a bit is the smallest unit of data
handled by a computer, and
represents a 1-digit binary nu mber of
0 or 1. With 8 bits, 28 or 256 values
can be represented; e.g.,
123.234.231.241)
LAN (Local Area Network)
A network encompassing a relat ively
limited area, such as a building, a
floor, an organization, or a company.
The distance covered typically
ranges from a few meters to a few
kilometers.
LED (Light-emitting Diode)
A diode that emits light, and is used
as a status indicator.
Log
A record of events occurring during
system operation, along with their
times of occurrence; or, the file
containing such a record. For
example, an error log contains a list
of errors occurring in the system,
while an access log records access to
the server.
MAC (Media Access Con trol)
address
A number that is assigned to each
NIC (Network Interface Card; also
referred to as LAN card or LAN
board, a NIC is installed in the
computer to allow connection to a
network, and is equipped with a port
for connection to a 100Base-TX,
10Base-T, or other network cable.)
The numbers are not duplicated
anywhere in the world. Used for
physical communication within the
network, they are converted to IP
addresses by the NIC driver software.
With Windows, it is called the
adapter address.
Mount
To make accessible, either by
connection to the computer itself, or
by placement on the hard disk drive
or other storage medium of a
computer on the network.
Network card
A device installed in a computer or
router to enable connection to a
network. Equipped with a port
(connector) for connecti on to a 1000
Base-T, 100 Base-TX, 10 Base-T, or
other network cable. Also referred to
as a LAN card, LAN board, or NIC
(network interface card.
Network system
A system for sharing resources such
as files and printers.
NFS (Network File System)
A method for sharing files over a
network. NFS makes it possible to
use files located on another co mputer
on the network as if they were located
on your own machine. A trademark
of Sun Microsyste ms, it is primarily
used with UNIX, but has also been
adapted for use with Windows
computers.
NTFS
File system used by Windows NT,
Windows 2000, and Windows XP.
Compared to the FAT file system, the
NTFS provides improved security
and can control access from other
operating systems.
Operating system
Basic software that manages and
controls operation of a computer.
(Example: Windows, UNIX)
Rack mount
Ordinarily, a 19-inch rack (cabinet)
in which servers or disk units made to
fit such a rack are mounted. A rack
mount kit is hardware for mounting
devices in such a rack.
Router
A repeater for connecting networks
to one another. Determines the
optimum path (route) for forwarding
received data. A router provides
control over a higher level of
processing than a device such as a
hub, and is used in constructing
medium- to large-scale networks.
Server
A computer that provides a variety of
types of service. Examples include
file servers, WEB servers, and
database servers.
Service
A task (also referred to as a process,
viewed from the system as a single
processing unit) or a pplication that
resides in the system and runs in the
background (i.e., consta ntly runs, but
is not controlled by the user). Also
referred to as a daemon or driver.
Share
Folders (directories) that can be
shared between Windows and UNIX/
Linux.
SMTP (Simple Ma il Transfer
Protocol)
A protocol (established set of means
and procedures for conducting data
communication) used for sending
mail over the Intern et or an intranet.
Using during transmission by client
PCs, and for communication between
servers. POP (Post Office Protocol)
is used for receiving mail from a
server.)
SMTP server
A server used for sending mail via the
Internet or an intranet.
Glossary
75
Page 76

Subnet mask
A number that is used for dividing IP
addresses used on a TCP/IP network
into network numbers and host
numbers. This method is used to
allow different networks that are
connected through a router to
recognize that they are different
networks. (Example) When the
subnet mask is 255.255.255.0, in the
IP address 123.234.56.78, the
123.234.56 is the network number,
and 78 is the host number. In this
case, up to 254 terminals can be
connected to the network.
TCP/IP protocol
The term generally used to refer to
the established set of means and
procedures by which devices
connected to a TCP/IP network
communicate with one another. TCP/
IP is the most widely used of the
various protocols extant, and is also
used on the Internet.
Web server
A server machine that distributes data
for viewing over the Web, or the
service provided by such a machine.
Also referred to as a WWW (World
Wide Web) server.
Windows network
A network built from ma chines that
use a Microsoft operating system,
such as Windows or MS-DOS. Uses
a protocol (established set of means
and procedures for conducting data
communication) called NetBEUI.
WINS (Windows Internet
Naming Service)
A service for managing IP addresses
and host names in a Windows
environment. Allows host names to
be identified from IP addresses.
Workgroup name
A grouping of devices co nnected to a
Windows network for the pur pose of
sharing resources such as files and
servers. Specifying a particular
workgroup name makes it possible to
share network resources with other
devices using the same name.
Glossary
76
Page 77

Index
A
Adding local set users .................. 59
Administration Guide ..................... 8
Administrator password ............... 14
Alert .............................................. 33
Alerts table ................................... 67
Automatic share creation ........ 22, 51
B
Backup .......................................... 29
Basic installation ............................ 9
Basic operations ........................... 11
Browser ........................................ 11
C
Configuring user quotas ............... 55
Creating shares ............................. 20
Current Users ................................ 63
M
Manual share creation ............ 20, 49
Modifying local set users ............. 61
N
Network menu .............................. 36
O
Online Help .................................... 8
P
Password ................................ 14, 19
Precautions ................................... 71
Prerequisite knowledge .................. 7
R
RAID group ................................. 47
Registering local set users ............ 17
Registering users .......................... 16
Replacing a hard disk ................... 43
Restart .................................... 28, 35
U
UNIX ........................................... 39
User password .............................. 19
User Quotas ................................. 55
User sets ....................................... 16
Users ...................................... 16, 59
V
Verifying the status of a hard
disk ........................................... 43
W
Windows ...................................... 38
Windows Network Settings ......... 16
Windows set user ......................... 17
D
Data backup .................................. 29
Date and Time ........................ 14, 32
Deleting local set users ................. 62
Device ........................................... 43
Disabling user quotas ................... 57
Disk Usage ................................... 63
E
Event Log ..................................... 65
F
Features .......................................... 5
FSV-Central for M3 ....................... 9
FSV-M3 Administration Console
11, 30
FSV-M3 limitations ...................... 66
FSV-M3 Top Page ....................... 11
FTP ............................................... 40
Functions ........................................ 5
H
Help ................................................ 8
L
LED indicators ............................. 29
Local set user .................... 16, 17, 59
Login History ............................... 64
S
Security menu .............................. 58
Setting share folder security ......... 58
Setup ............................................ 10
Share ................................ 20, 24, 48
Share deletion ............................... 54
Share folders ................................ 58
Share modification ....................... 53
Shutdown ............................... 28, 35
Shutdown/Reboot ......................... 35
SNMP ........................................... 42
SNMP traps table ......................... 69
Software update ........................... 34
Specifications ............................... 73
status menu ................................... 62
Storage menu ............................... 42
Storing files and folders in
shares ........................................ 24
System .......................................... 63
System language .......................... 15
System menu ................................ 31
System requirements ...................... 7
System Settings ............................ 31
T
TCP/IP .......................................... 36
Time ............................................. 14
Troubleshooting ........................... 71
Index
77
Page 78

Sony Corporation
StorStation Web site
http://www.sony.co.jp/en/Products/storagesolution/
 Loading...