


4-658-048-12 (1)
Network File Server
Operating Instructions
Before operating the unit, please read this manual
thoroughly and retain it for future reference.
FSV-E1
© 2001 Sony Corporation. All rights reserved.

Table of Contents
Chapter 1 Introduction
Chapter 2 Basic Use
Overview.......................................................................4
Features and Functions..............................................5
Front................................................................................5
Rear.................................................................................6
Prerequisite Knowledge for Using This Server ........6
System Requirements .................................................7
About This Manual ......................................................7
How To Use the Online Manual .....................................7
How To Use the Online Help..........................................8
Overview.......................................................................9
Setting Up the Server for Use.....................................9
Basic Operations.......................................................10
Control Panel.................................................................10
Browser.........................................................................11
Setting or Changing the System Administrator
Password.............................................................13
Setting the Date and Time ........................................14
Registering Users......................................................15
Registering Users..........................................................16
Changing the User Password ........................................18
Creating Folders........................................................19
Storing Files in Folders.............................................22
Access from Windows 95/98/NT..................................23
Access from Windows Me/2000...................................23
Access from UNIX/Linux.............................................24
Access from the Macintosh...........................................24
Saving Settings (Backup).........................................25
Shutting Down the System.......................................25
Shutting Down the System from the Control Panel......25
Shutting Down the System from the Browser ..............26
LED Indicators...........................................................27
Data Backup...............................................................28
Chapter 3 Using the Control Panel
Overview.....................................................................29
Configuration Menu.............................................. .....29
Enter Password..............................................................30
Network.........................................................................31
2

Reboot System ..............................................................32
Shutdown System..........................................................33
Display Mode................................................................33
View Status Menu......................................................34
View Disk Space Menu ..............................................36
Chapter 4 Using the FSV-E1 Administration Menu
Overview.....................................................................38
System Configuration Menu.....................................38
Network.........................................................................39
Date & Time..................................................................40
Alert Email....................................................................41
Password .......................................................................42
Windows .......................................................................42
UNIX.............................................................................44
Macintosh......................................................................47
User Management Menu...........................................48
Users..............................................................................48
Folders...........................................................................51
Maintenance Menu ....................................................55
Status.............................................................................55
Shutdown ......................................................................57
Updating Software ........................................................58
Online Document Menu ............................................60
Appendix
Program ©2001 Sony Corporation
Documentation ©2001 Sony Corporation
©2001 Sony Corporation
Precautions................................................................61
Messages Displayed on the LCD Panel...................61
Adjust the Contrast of the Liquid Crystal Display. .65
Resetting System ......................................................65
Repairing the File System.............................................65
System Restore..............................................................66
Formatting the User Area..............................................68
Restoring the Server to the Factory Default
Configuration ......................................................69
List of Error Messages Sent by Alert Email............69
List of Error Logs ......................................................70
Troubleshooting........................................................71
Main Specifications...................................................73
Hardware....................................................................... 73
Glossary.....................................................................74
Index...........................................................................77
Trademarks
Sony and StorStation are trademarks or registered trademarks of Sony Corporation in this contry, other countries, or both.
Other product names are trademarks or registered trademarks of their respective owners in this country, other countries, or both.
3

Overview
Introduction
The FSV-E1 is a ded icated file server that can b e con nected d irectly to a
network. Because the F SV-E1 is pre-configured for use as a file server, minimal
work is necessary to put it into operation.
Can be managed throu gh a web bro wser
Most operations (such as configuring individua l settings, man aging u sers and
folders, shutting down the system, etc.) can be controlled remotely through a
web browser.
Supports file sharing in Windows, Macintosh and UNIX
environments
Files can be shared among client computers running under Windo ws 9 5,
Windows 98, W indows 98SE, W indows Me, W indows NT 4.0, Wind ows 2000,
Macintosh, UNIX , and Linux. Comp uters with different operating systems can
be used to view and edit the sam e file. Also, you can limit user access to the
server and set access permissions for each folde r.
Chapter
1
Chapter 1 Introduction
4
Features and Functions
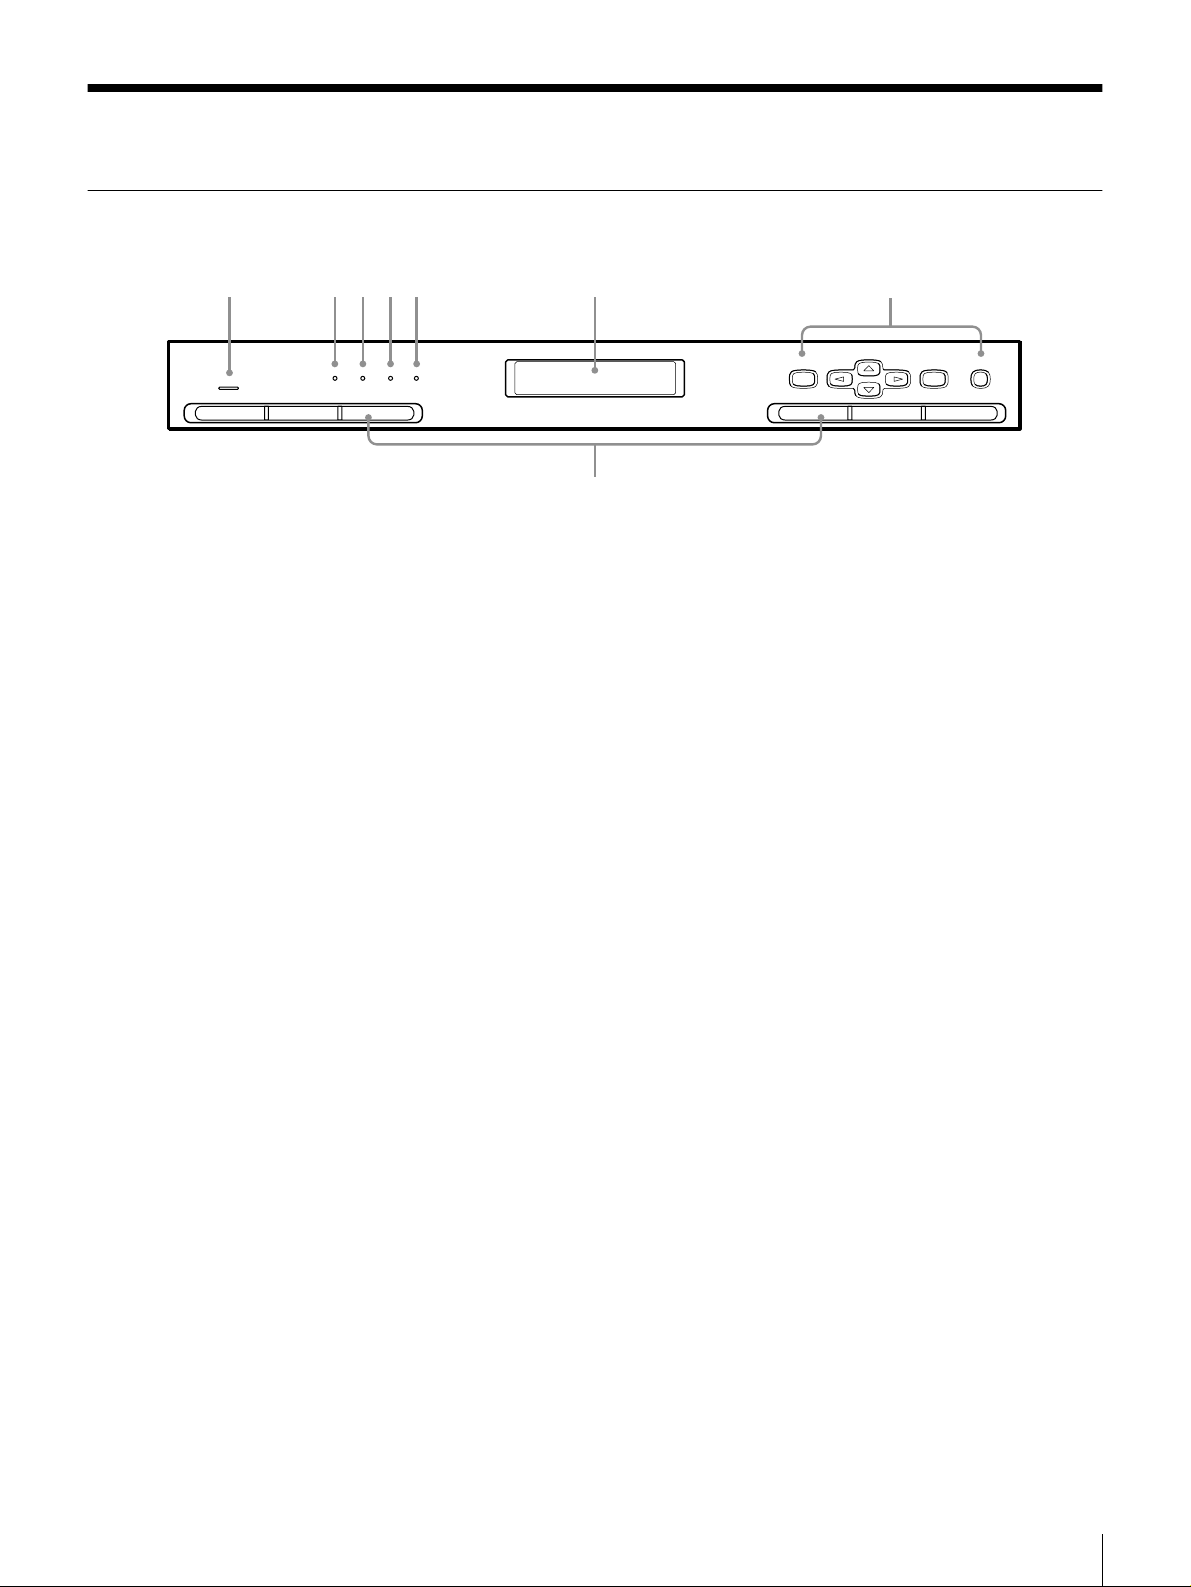
Front
1 2 3 45
POWER
SYSTEMHDD100MLAN
6
MENU
8
7
ENTER CANCEL
AAAA Power indicator LED
Lights when the power is turned on.
BBBB Network ind icator LED
Lights when there is activity on the network.
CCCC 100Base -TX n etwork indicator L ED
Lights when the server is connected to a 100 B ase-T X network.
DDDD Hard disk indicator LE D
Lights when the hard disk is being accessed.
EEEE System indicator LED
Lights when the system is running normally.
FFFF Liquid-crystal display
Displays information such as the operating status. When the server is idle, a
preset message is displayed.
GGGG Control buttons
Used for controlling the server through the C ontrol Panel Menu.
HHHH Ventilation holes
Please be careful not to block the ventilation holes. If the ventilation holes are
blocked, overheating could lead to fire or other dam age.
Chapter 1 Introduction
5

Rear
54231
6
AAAA Power switch
BBBB LINK LED
Lights when the server is connected to an active h ub.
CCCC ACT LED
Lights when there is activity on the network.
DDDD Power supply connector
Plug t h e provi d e d pow e r c o r d into this co n n e ctor.
EEEE Fan
Be careful not to block the fan's ventilation holes. If the ventilation holes are
blocked, overheating could lead to fire or other dam age.
FFFF LAN connector
Connect a 10Base-T/100 Base -TX network cable here.
Prerequisite Knowledge for Using This Server
As a prerequisite for using this server, you should be fam iliar with com puters
and networks. For example, you ne ed to understand the following terms. A
glossary of technical terms is included at the end of this manual.
• TCP/IP Com m unication Protocol (IP Address, Dom ain N ame, Host Name,
Subnet Mask, Gateway, DHCP, DNS)
• LAN Equipm ents (Router, HUB, 100Base-T X, 10Base-T)
• Internet Software
- Electronic Mail (SMTP)
-Browser
• Computer (Windo ws 9 5, Windows 98, Windows 98SE, Windows M e,
Windows NT 4.0, W indows 2000 , M acOS, UNIX, Linux)
- Network Settings (Workgroup Na m e, Zone Name)
- File, Directory (Folder)
Chapter 1 Introduction
6

System Requirements
The hardware and software required to use this server are as follows.
Comp u ter for S e tu p
Prepare a computer that can run o ne o f the following browsers.
• Browser Software
- Microsoft Internet Explorer 5.0 (for Windows)
- Netscape Commun icator 4.7 (for Windows)
- Netscape Commun icator 4.7 (for M a cintosh)
- Netscape Commun icator 4.7 (for So laris and Linux)
Client Co mputers
Prepare client computers that m eet the following requirements.
• PC/AT com pu ter m e eting the follow ing performance requirements:
- Operating system: Microsoft W indo w s 95, Microsoft Windows 9 8,
Microsoft Window s 98SE , M icroso ft Windows Me, M icrosoft Windows
NT 4.0, Microsoft Windows 2000
- LAN port
• Macintosh (or compatible) meeting the following requiremen ts:
- Operating system: Mac O S 9, M a c OS
- LAN port
• UNIX/Linux com p u ters me eting the follow ing requirements:
- Operating system:
UNIX: So laris 7, Solaris 8
Linux: RedHat 7.0, RedHat 7.1
- LAN port
Χ
Others
• Hub (100/10Base-T)
• 100Base-TX/10Base-T ca ble
About This Manual
This manual explains how the system administrator can set up the server and
make necessary settings.
For detailed information on using this server and the functions of the menu and
buttons, please refer to the Online He lp together w ith this manual.
How To Use the Online Manual
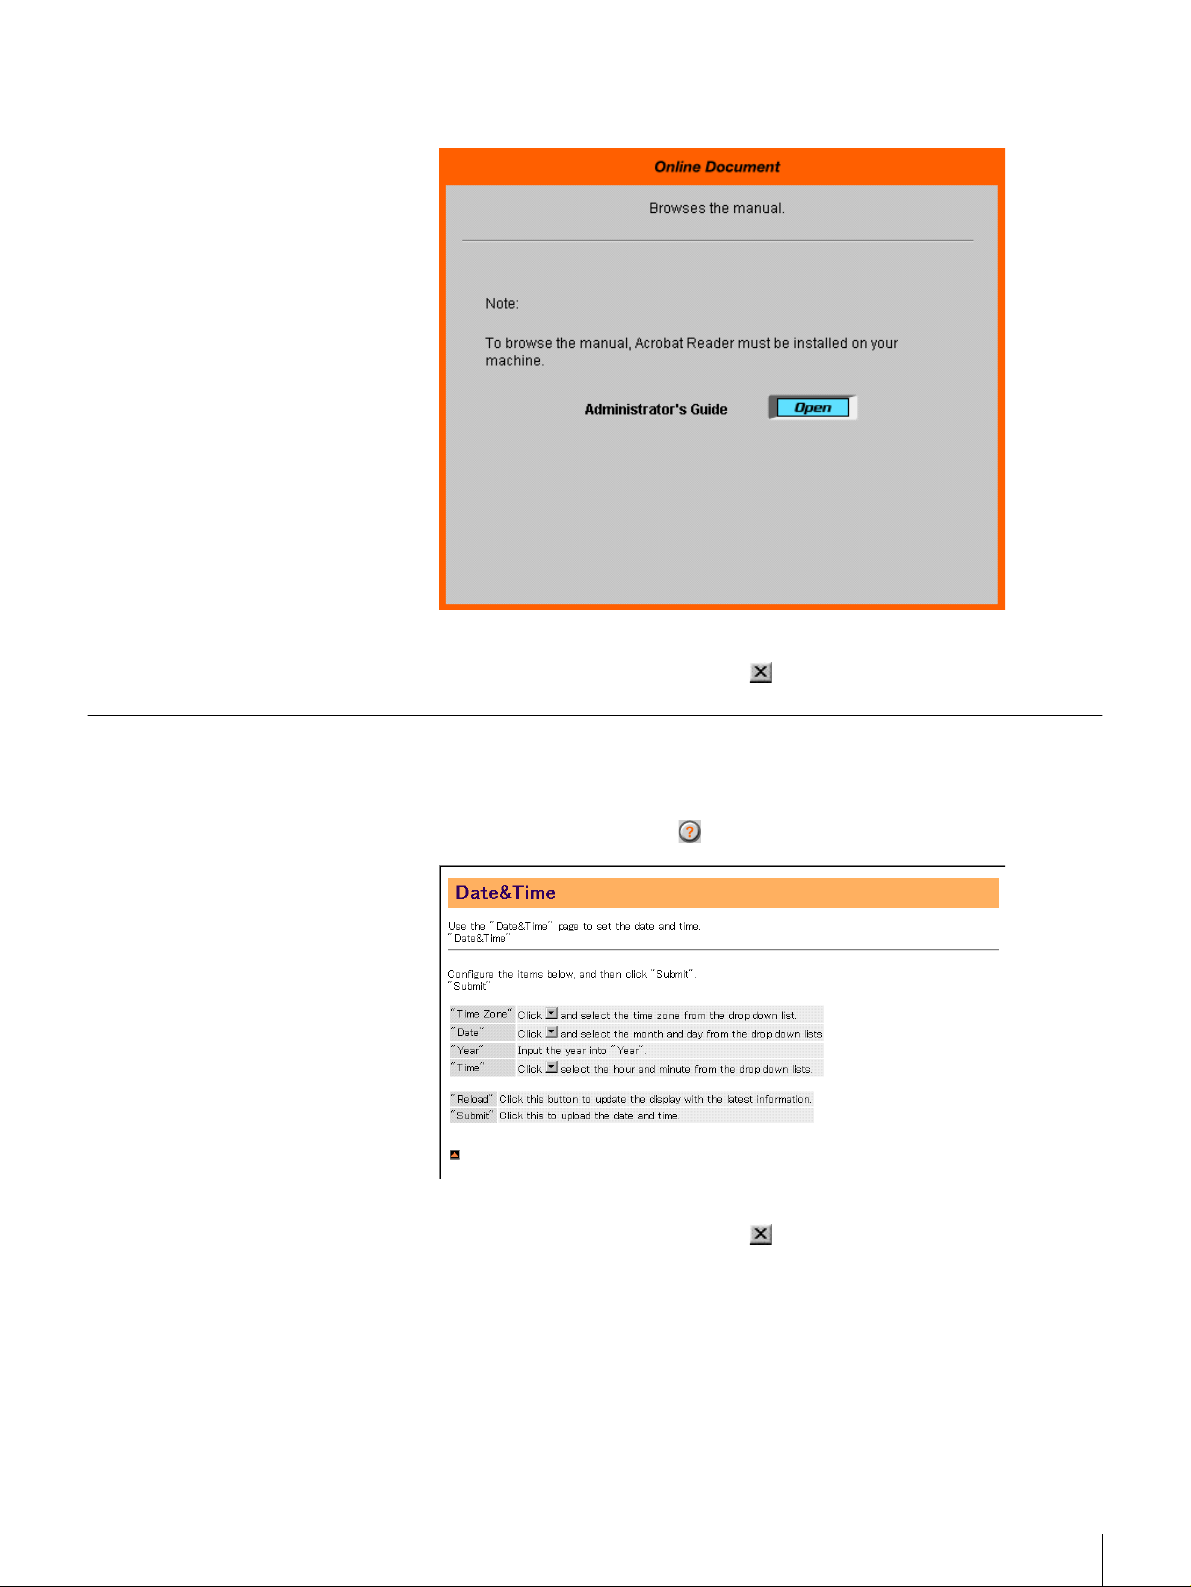
Displaying the Online Manua l
Click “Online Document” on the FSV-E1 A dministration Menu. After the
“Online Docum ent” page appears, click the “Open” button. The O nline Manual
(this manual) appears.
Chapter 1 Introduction
7
For details on the FSV-E1 Ad ministration Menu , refer to Chapter 4, “Using the
FSV-E1 Administration Menu” (page 38).
Quitting the Online Manual
Click the “Close” button. (Example: in Windows)
How To Use the Online Help
Displaying the Online Help
To display the Online H elp for an individual screen in the FSV-E1
Administration Menu , click in the lower left of the screen.
Quitting the O n line H elp
Click the “Close” button. (Example: in Windows)
Chapter 1 Introduction
8

Basic Use
Overview
This chapter explains control panel and browser operation, user registration,
folder creation, and operations and settings required to manage the server.
For details on individual items in the Con trol Panel Menu and FS V-E1
Administration Menu , see Chapter 3, “Using the C ontrol Panel” (page 29), and
Chapter 4, “Using the FSV-E 1 Administration Menu” (page 3 8).
Setting Up the Server for Use
Once the server is connected to the network, do the following set-up procedure
to allow users to access the server. For information on how to set up the network,
refer to the “Installation Guide”.
Chapter
2
1
Set the system administrator password. (page 13)
The administrator passwo rd is extremely imp ortant for system security. Be
sure to set the system administrator passw ord befo re perform ing the
following setup.
2
Set the date and time. (page 14)
3
Register users. (page 15)
Register users who will be using the server.
4
Create folders. (page 19)
Create folders that will be accessed by users.
5
Configure the settings according to the operating
system.
Chapter 2 Basic Use
9

Basic Operations
Control Panel
Configure the settings according to the operating system of the client
computer.
• Configure settings for Window s. (page 42 )
Configure Window s n etwo rk related settings, such as the w o rkg roup
name.
• Configure settings for UNIX . (page 44)
Configure NFS related settings.
• Configure settings for Macintosh. (page 47 )
Configure AppleTalk related settings.
The control panel (which consists of an LCD panel and con trol buttons on the
front surface of the device) and browser are used to p erform basic server
operations.
Use the control panel to make the sy stem and network settings, to restart or shut
down the system, and to d isplay the system's operational status.
For details on the control panel menu, refer to Cha pter 3, “Using the Co ntrol
Panel” (page 29).
By using the control panel, the following tasks can be accomplished.
• Configure network related settings
• Restart or shut down the system
• Set messages to display on the LCD panel when the server is idle
• Check system's operational status
• Check the usage condition of the hard disk.
Note
Some of the setups and ope rations can b e perform ed through a browser.
Operations of the Control Buttons
The following buttons are on the c ontrol panel. Use these buttons to operate the
Control Panel M en u.
[MENU] button
The Control Panel Menu appears.
b
b button, BBBB button
bb
Moves the cursor left and right. These buttons are u sed to select va lues and to
specify the positions of letters and numbers.
v
v button, VVVV button
vv
These buttons are used to select a me nu and to input letters and numbers.
• Press v to move to the previou s m enu, and V to move to the ne xt m enu.
• Press v to cycle forwards through letters and numbers one at a time, and V to
cycle backwards.
[ENTE R] button
This button is used to finalize the displayed menu or value, and to execu te
operations.
Chapter 2 Basic Use
10

Browser
• Finalizes or executes the displayed menu or ope ration.
• Saves the values.
Note
Input a space to delete an unwan ted charac ter.
[CANCEL] button
Aborts the current operation and returns to the previous menu.
Access the FSV-E1 A dministration Menu through a brow ser. Most settings and
operations of the server can be perform ed through a browser, such as ma king the
settings related to the system and network, mana ging users a nd folders, and
restarting or shutting down the system.
For details on the FSV-E1 Ad ministration Menu , refer to Chapter 4, “Using the
FSV-E1 Administration Menu” (page 38).
Caution
Make sure your brow ser is configured to enable JavaScript. With Internet
Explorer 5.0, select “Tools”- “Internet Options” - “S ecurity” - “Custom Level”
- “Scripting” - “Active Scripting” - “Enable”.
Operating with a Browser
Using a browser, the following tasks can b e acco m p lished by accessing the
FSV-E1 Administration Menu.
• Configure network settings
• Configure system settings
• Change or set the system adm inistrator passw ord
• Manage users
• Manage folders
• Check status
• Restart and shutdown the system
• Update the system software
Use a browser to access and use the FSV-E1 Administration Menu.
Launch the browser on the client com p uter.
1
Enter “http://XXX.XXX.XXX.XXX/” in the “Address” or “Location”
2
field.
For “XXX.XXX.XXX.XXX”, enter the IP address of the server.
(Example) 112.131.0.1
The “Enter Netwo rk Pa sswo rd” dialog b ox appears.
Note
Each time you access the FSV-E 1 Administration Menu , you must enter the
user name and passw ord. When the device is shipped from the factory, the
default user name is “admin” and the default password is “admin”.
Enter “admin” in the “User N ame” field. Enter “adm in” in the “Password”
3
field.
Chapter 2 Basic Use
11
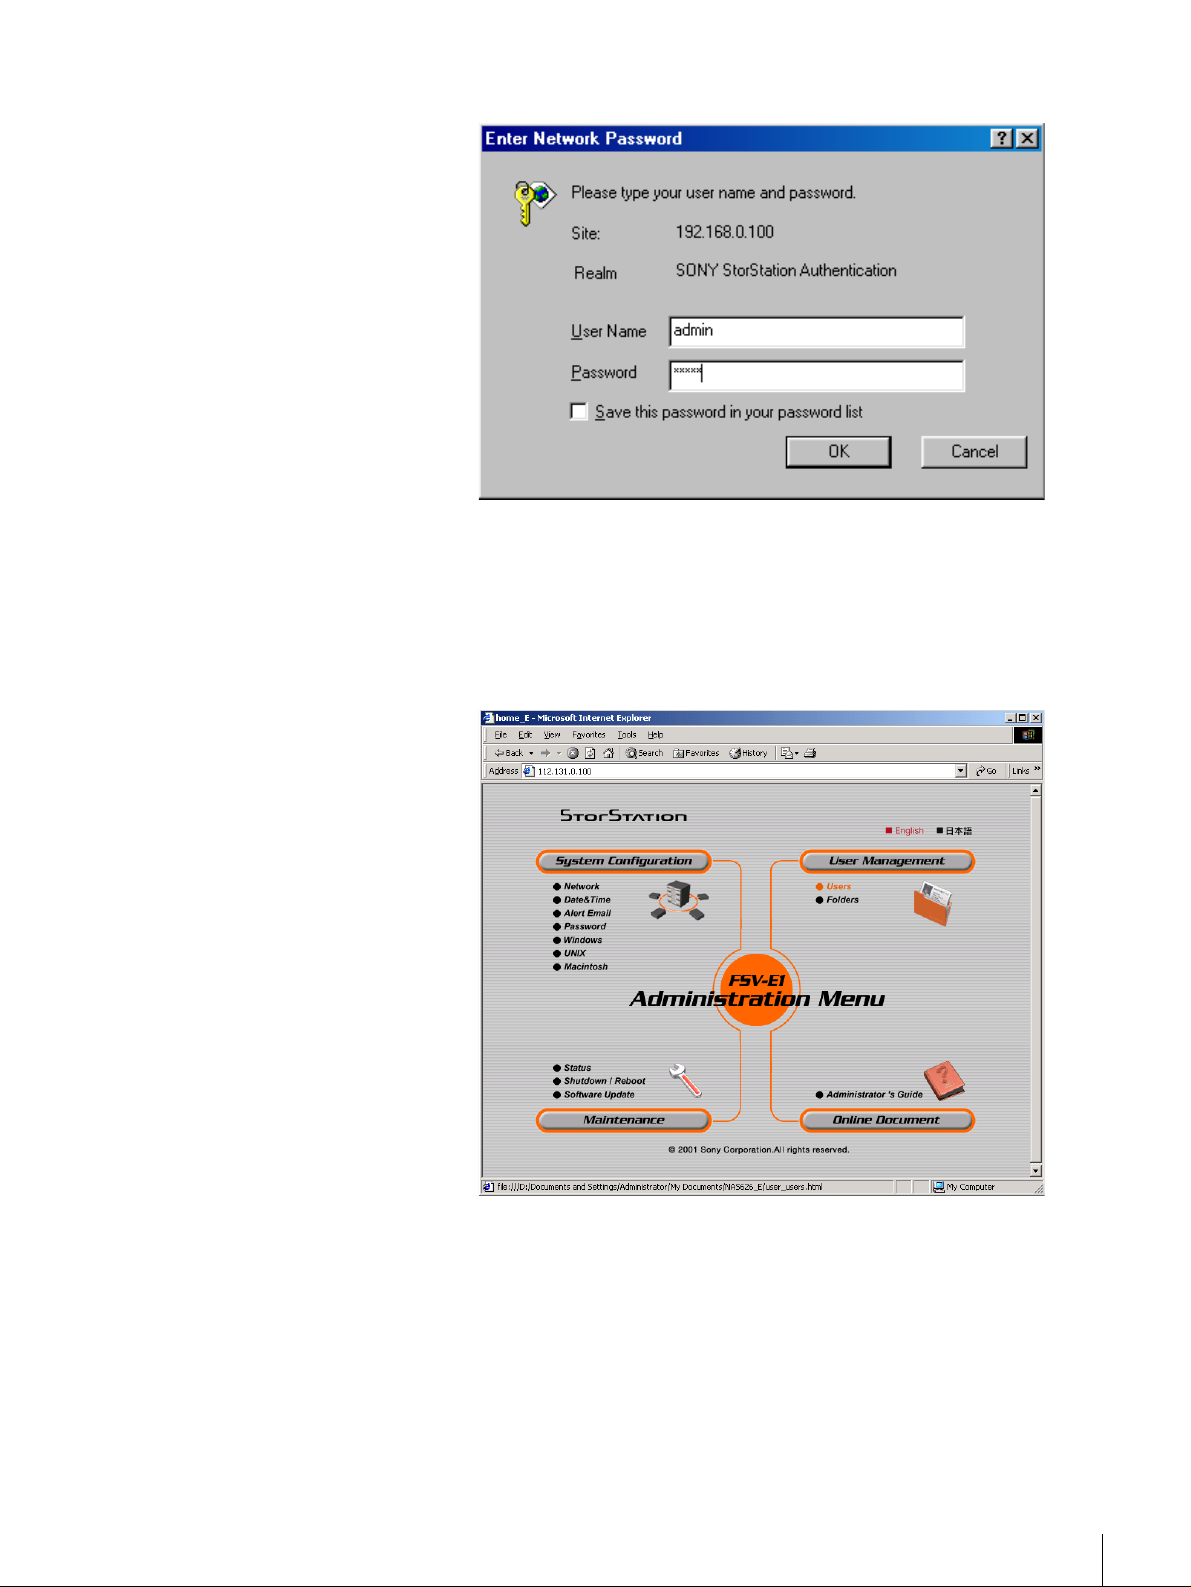
(Example) When using M icrosoft Internet Explorer 5.0
Click “OK”.
4
The top page of the FSV-E1 A dministration Menu appears.
(When the FSV-E1 Administration M e n u is accesse d for the first tim e, a
software license agreement is displayed.)
(Example) When using M icrosoft Internet Explorer
Click the button corresponding to the men u yo u want to use.
5
The page corresponding to the selected m en u appears.
Chapter 2 Basic Use
12
(Example) The “System Co nfiguration” page
To return to the top page, click .
6
Note
Sony strongly recomm ends that y ou ch ange the system administrator
password before configuring the server. For information o n how to set the
administrator password, refer to “Setting or Changing the Sy stem
Administrator Passwo rd” (page 13) of this ch apter.
Setting or Changing the System Administrator Password
The administrator password is extremely important for system security. When
you access the FSV-E1 A d ministration Menu, be sure to change the system
administrator password before configuring the settings. Furthermore, guard the
administrator password carefully.
Set or change the system adm inistrator passwo rd throug h the FS V-E1
Administration Menu .
Click “System Configu ration” on the FSV -E1 Administration Menu, and
1
then click “Password”.
You can also directly click “Password”, wh ich is located be low “ System
Configuration”.
Chapter 2 Basic Use
13
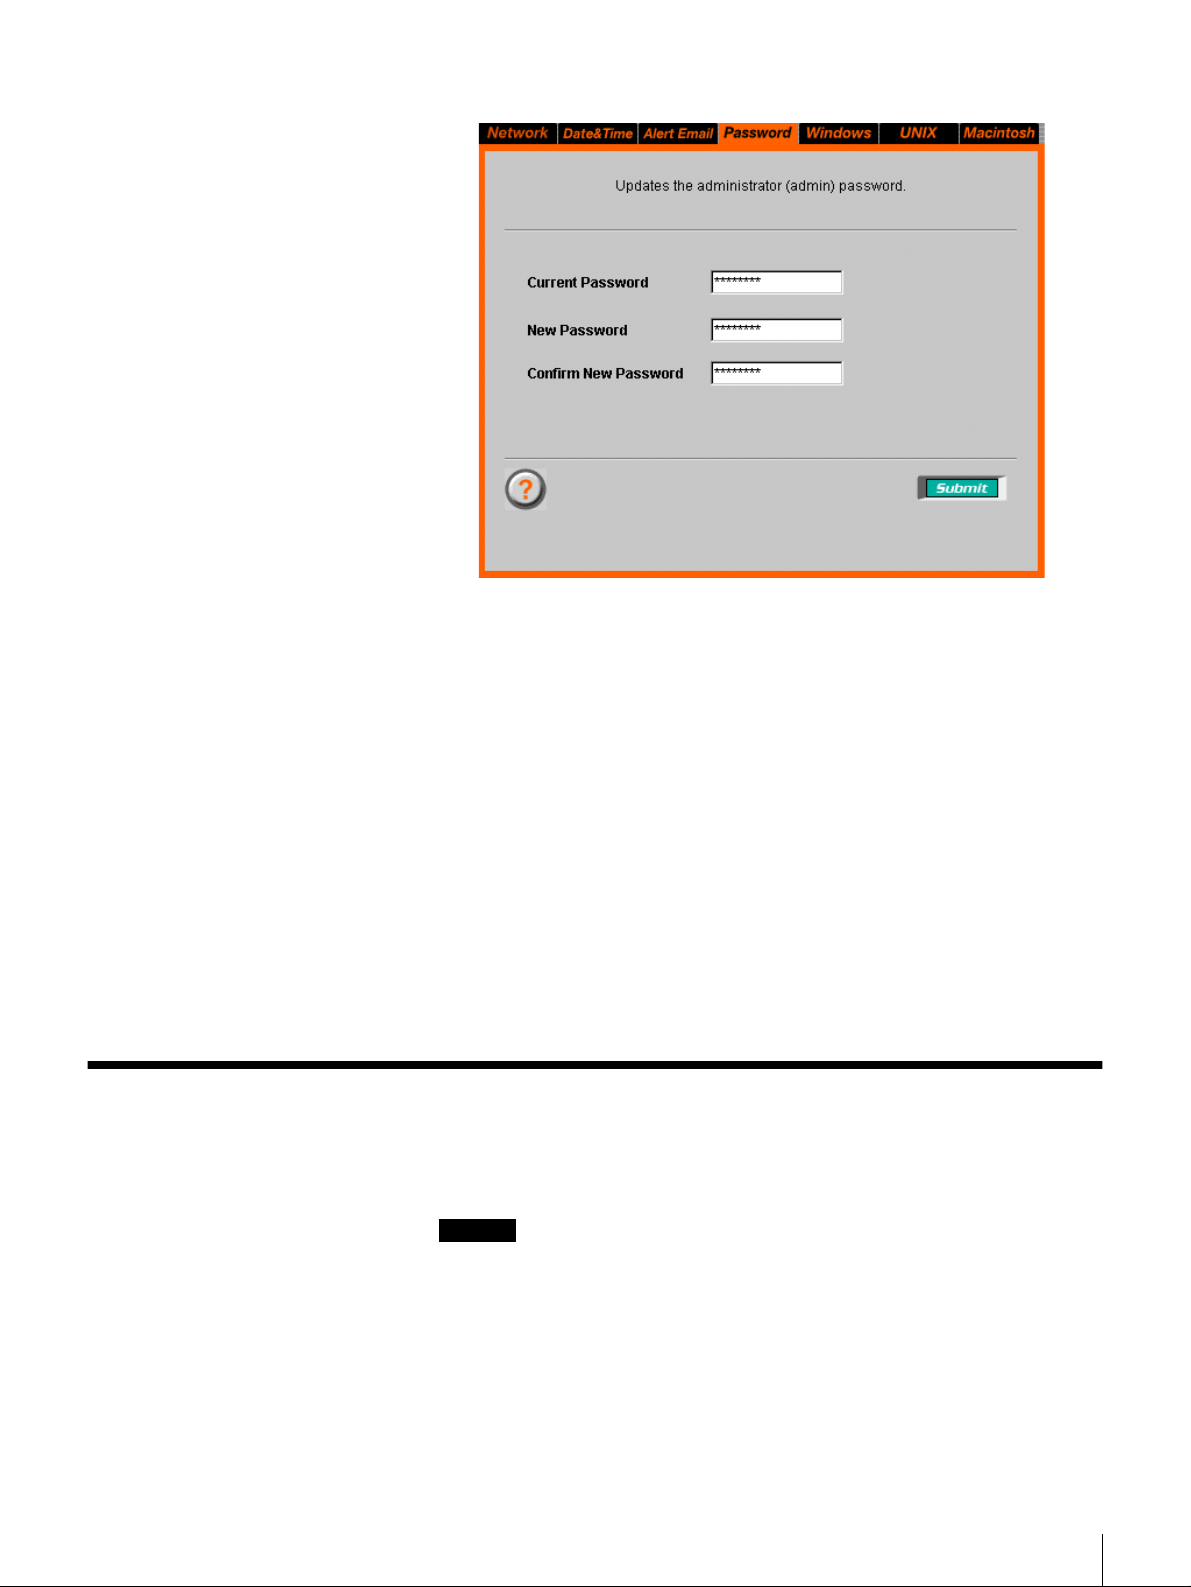
The “Password” p age ap pears.
In the “Current Password” field, enter the current password.
2
If you are setting the password for the first time, en ter “adm in”.
In the “New Passw ord” field, enter the new p assw ord as up to 8
3
alphanumeric characters and symbols.
See the online help for characters that can be used in passw ords.
In the “Confirm Passw ord” field, re-en ter the sam e password.
4
Click “Submit”.
5
A message app ears indicating that Settings are complete, and the passw ord
is set or changed.
Click “OK”.
6
Setting the Date and Time
Before using this server, set the date and time.
Caution
Make sure the date and tim e are set the same for all client computers and the
server. If the date and time are not set the sam e, files may be m istaken ly
overwritten or other trouble may occur.
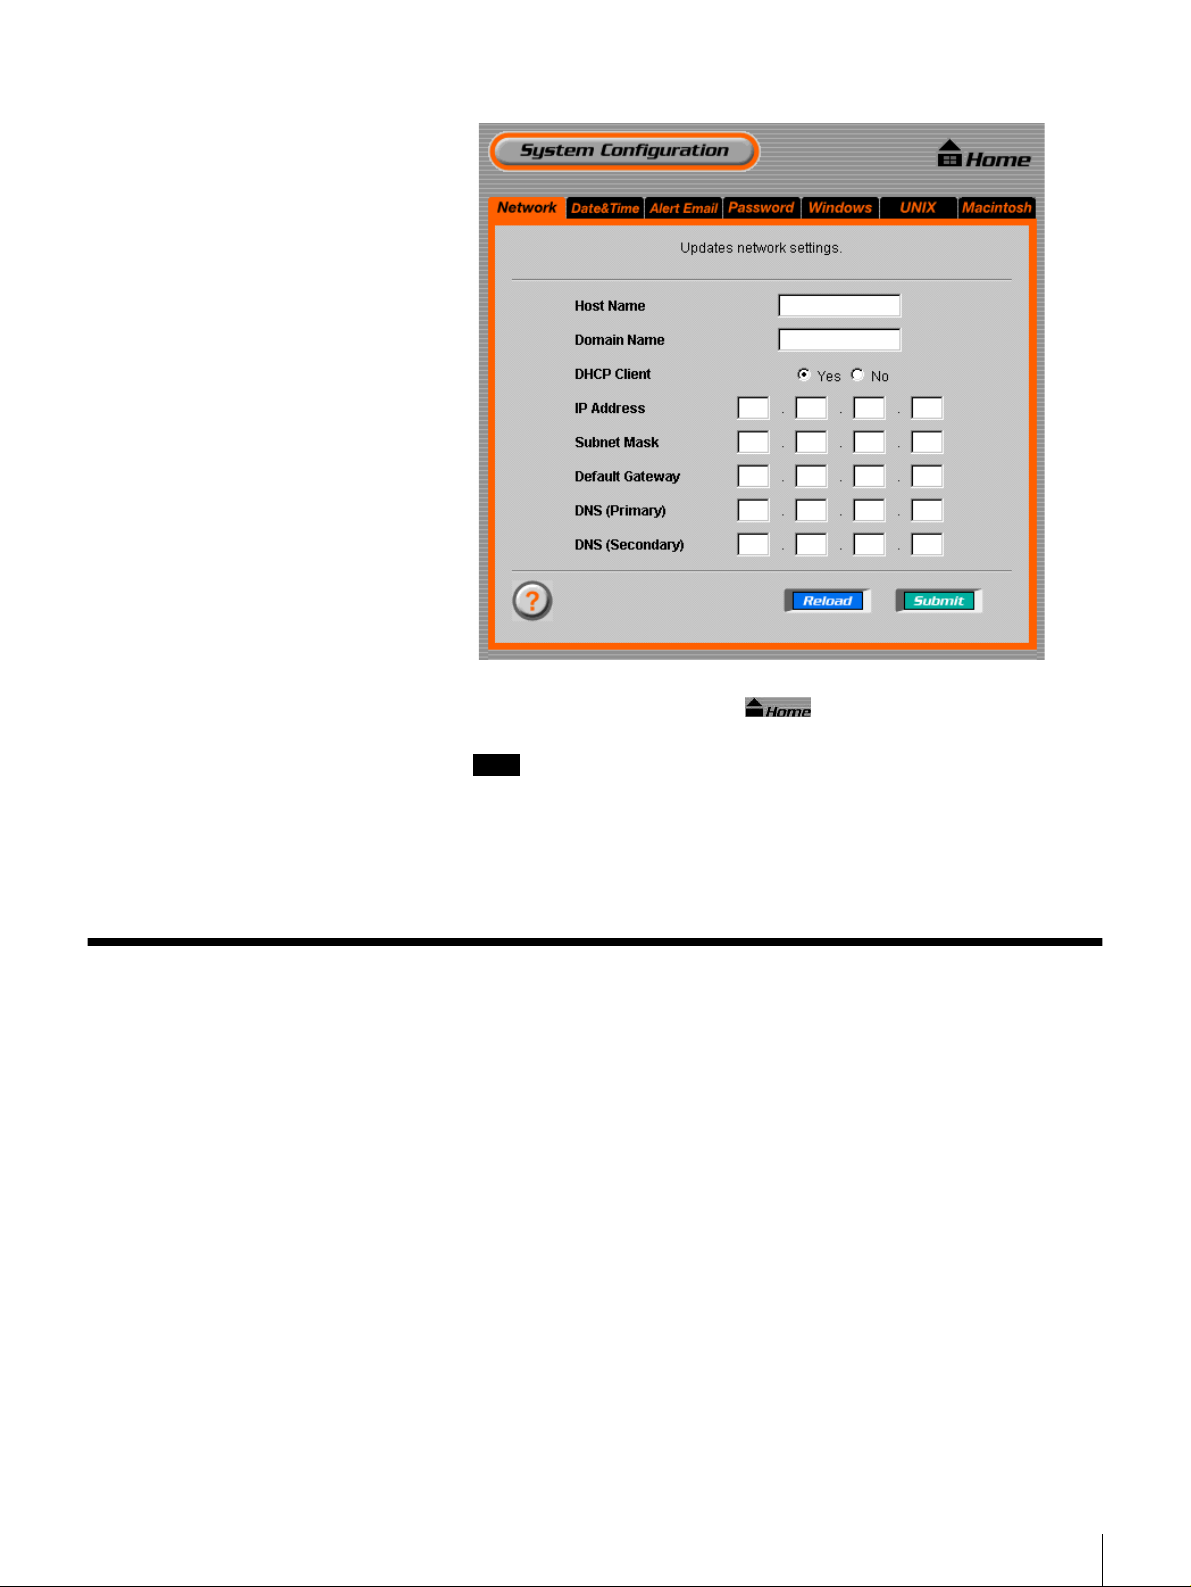
Click “System Configuration” on the FSV-E1 Administration Menu, then
1
click “Date & Time ”.
You can also directly click “Date & Time” which is located below “System
Configuraion”.
Chapter 2 Basic Use
14
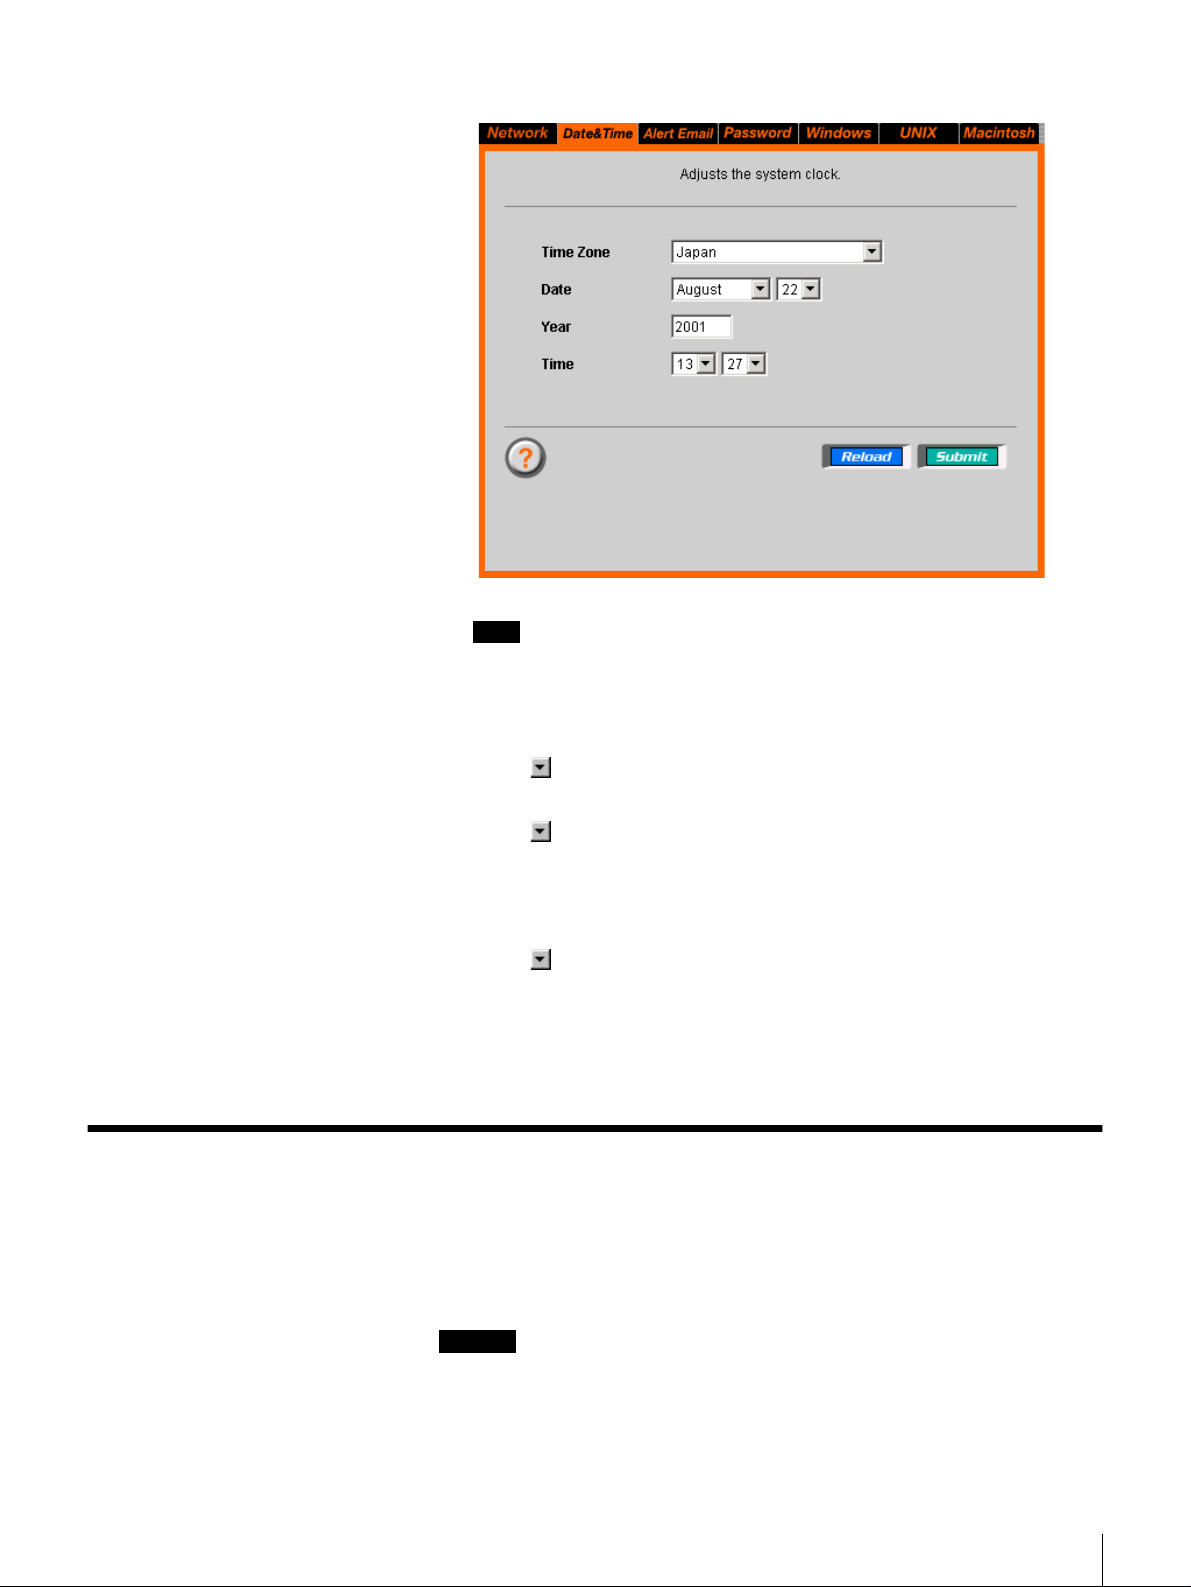
The “Date & T ime” page appears.
Note
Click “Reload” to update the display w ith the latest information.
Registering Users
Configure the items below.
2
Time Zone
Click and select the time zone from the drop dow n list.
Date
Click and select the month and day from the drop down lists.
Year
Enter the year in the “Year” field.
Time
Click and select the hour and minu te from the dro p dow n lists.
Click “Submit”.
3
The information set above is reflected in the “Da te & Time” page.
Register Window s users of this server.
This section explains how to register users and ch ange user passwords.
Caution
When adding users or folders, m a ke sure there are no Windows users who a re
currently accessing the server. Window s ne twork service rebo ots during
processing for new users or folders, wh ich may result in data loss that users are
currently editing.
Chapter 2 Basic Use
15
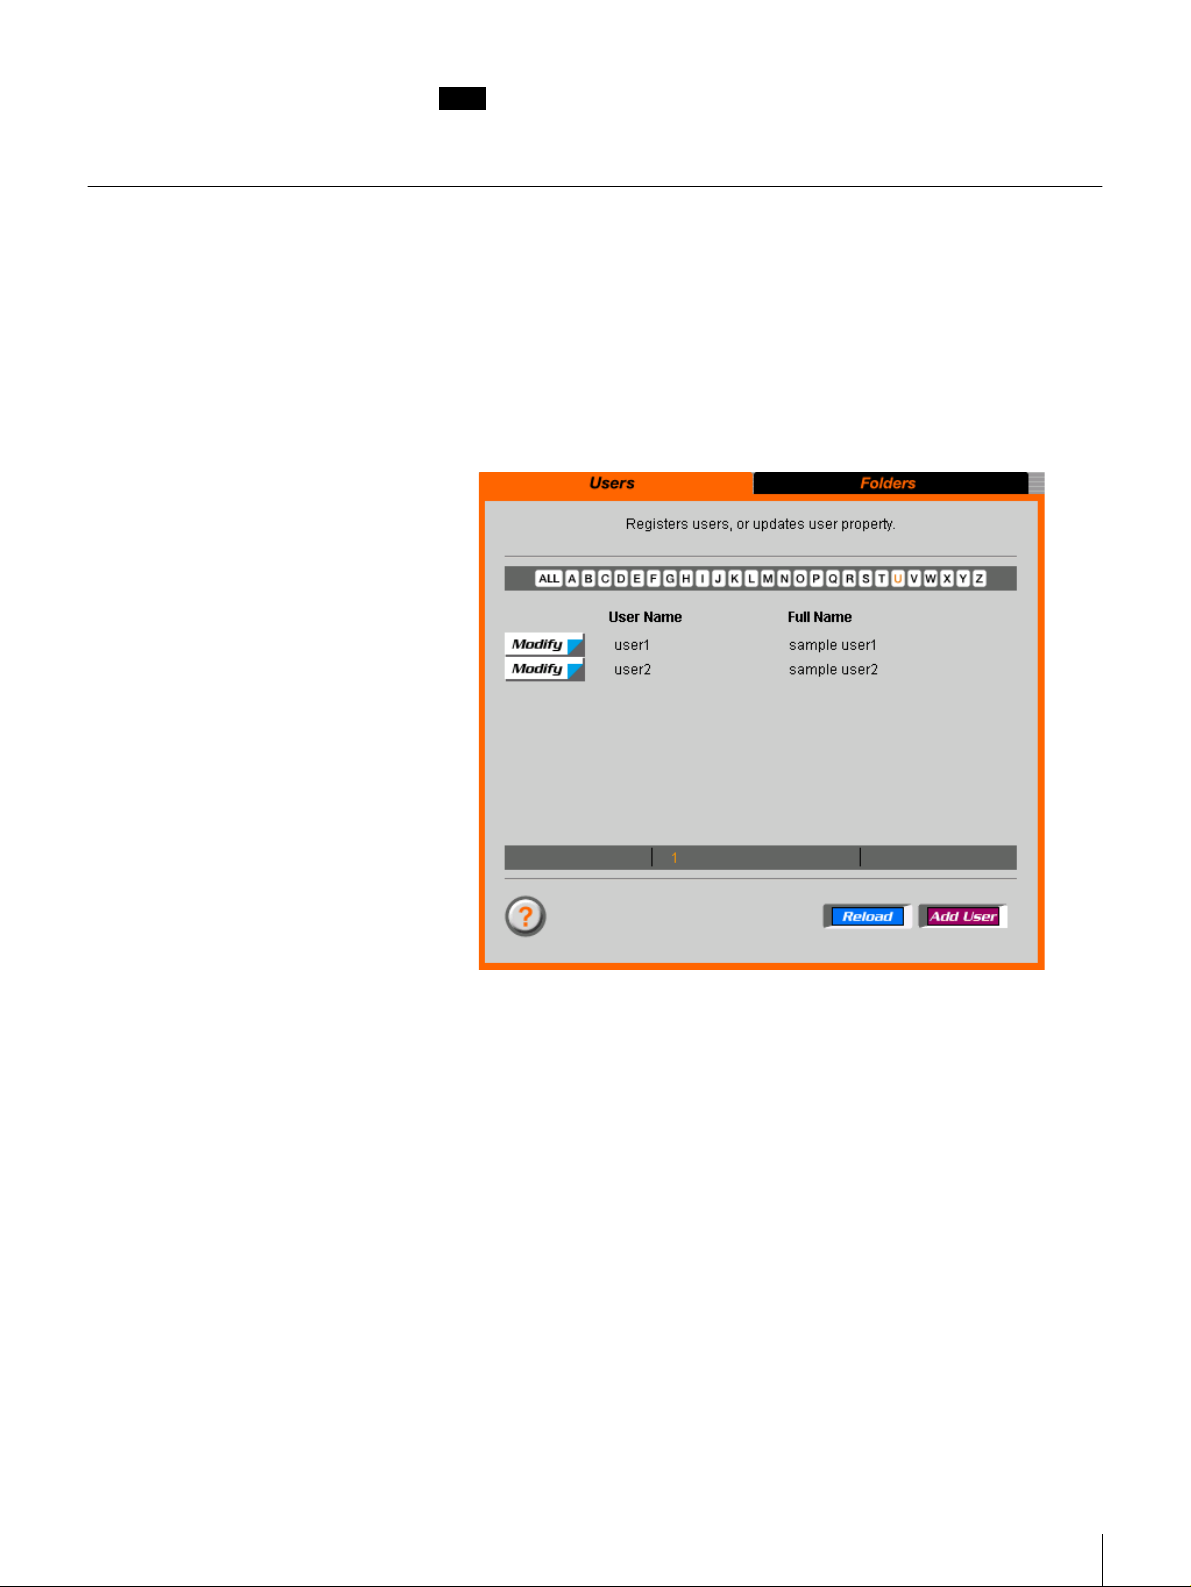
Registering Users
Note
If a user is accessing the server from UNIX/Linux or Macintosh, the user do es
not have to be registered.
Register users through the FSV-E1 Administration Menu. Up to 200 u sers can
be registered.
Click “User Mana gement” on the FSV-E1 A d ministration Menu.
1
You can also directly click “Users” which is located below “User
Management”.
The “Users” page appears.
Click “Add User”.
2
Chapter 2 Basic Use
16
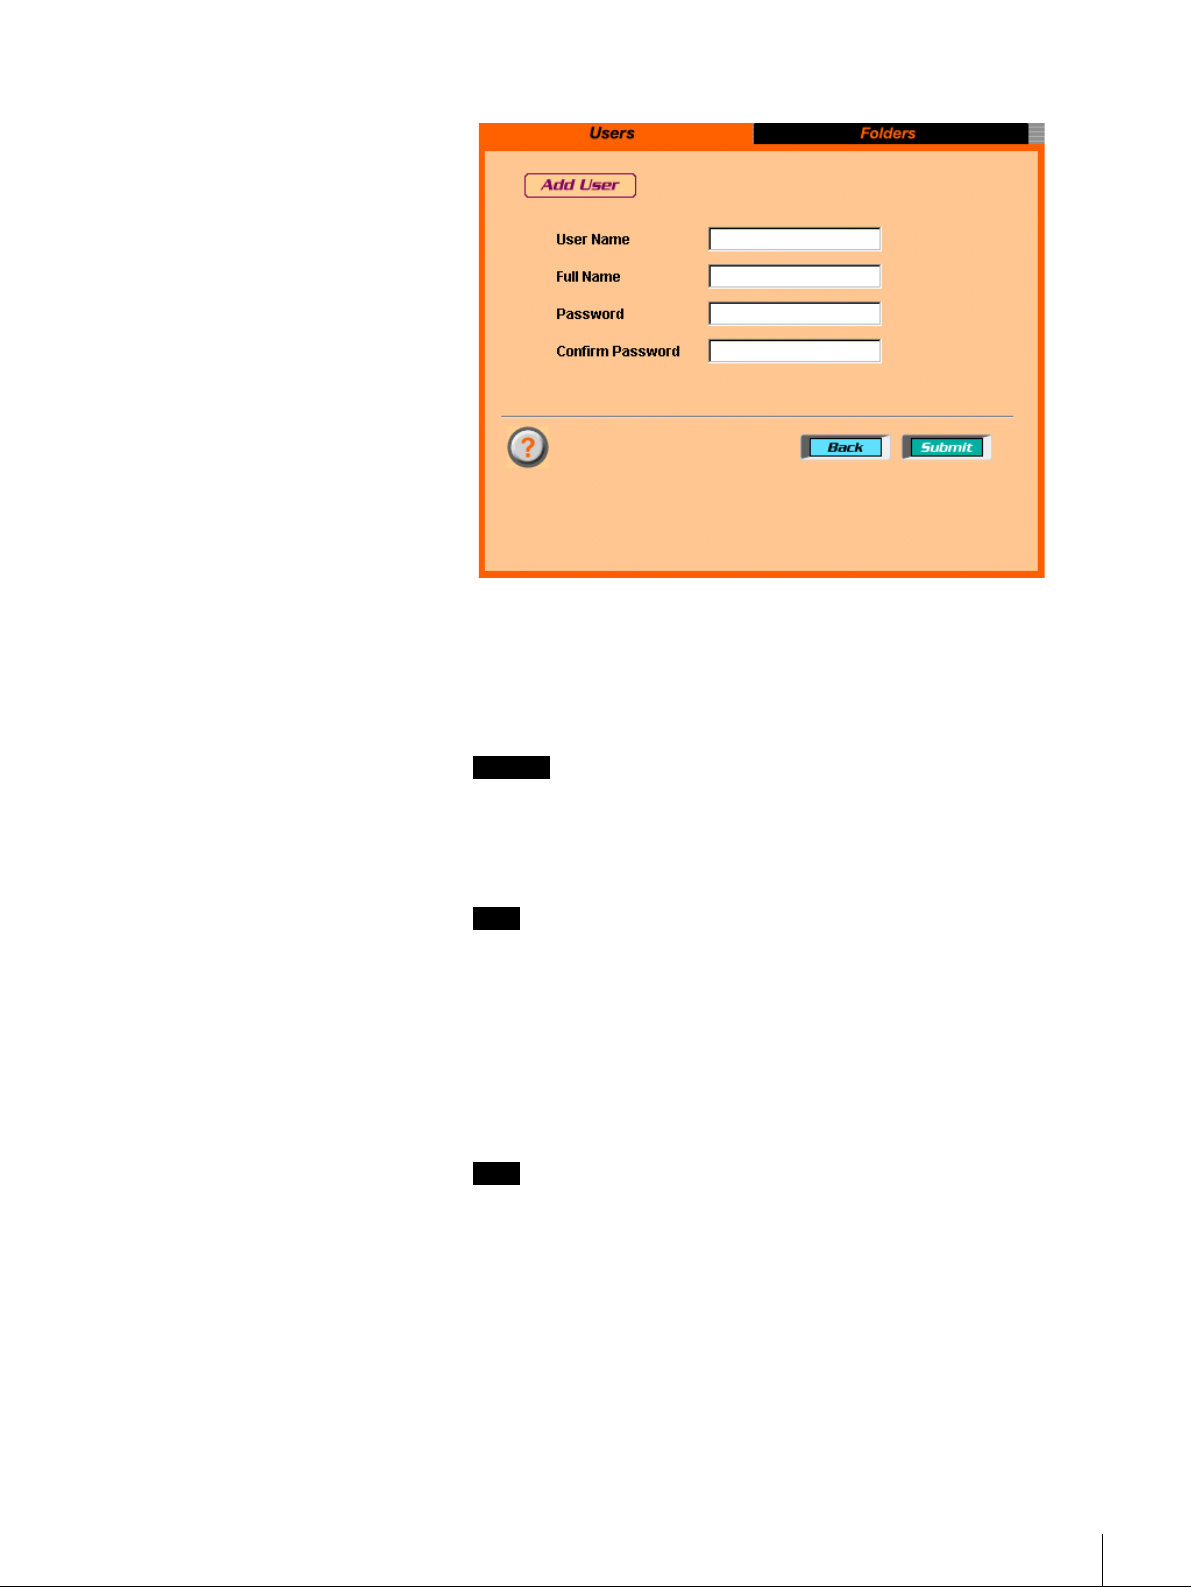
The “Add U ser” pag e app ears.
Enter the items below.
3
User Name
Enter the user name as up to 8 alphanumeric characters, including hyphens
“-” if necessary. Make sure the first character is a letter, not a number.
Caution
You cannot assign user names o r folder names that have already been
assigned. Further, the FSV-E1 doe s not distinguish between upper case an d
lower case characters. (Example: “abc,” “ABC,” and “Abc ” are all
recognized as the same name.)
Note
Enter the same user name as the u ser Windows log-on nam e.
Full Name
Enter the full name of the user as up to 20 characters. See the o n line help
for characters that can be used in full nam es.
Password
Enter the user password as up to 8 a lphanum eric ch aracters and symbols
See the online help for characters that can be used in passw ords.
Note
Users can change passwords b y themselves. Refer to “Changing the Use r
Password” (page 18) of this cha pter.
Confirm Password
Re-enter the same passw ord.
Click “Submit”.
4
This uploads the new user registration data to the “Users” pa ge on the
server.
Chapter 2 Basic Use
17
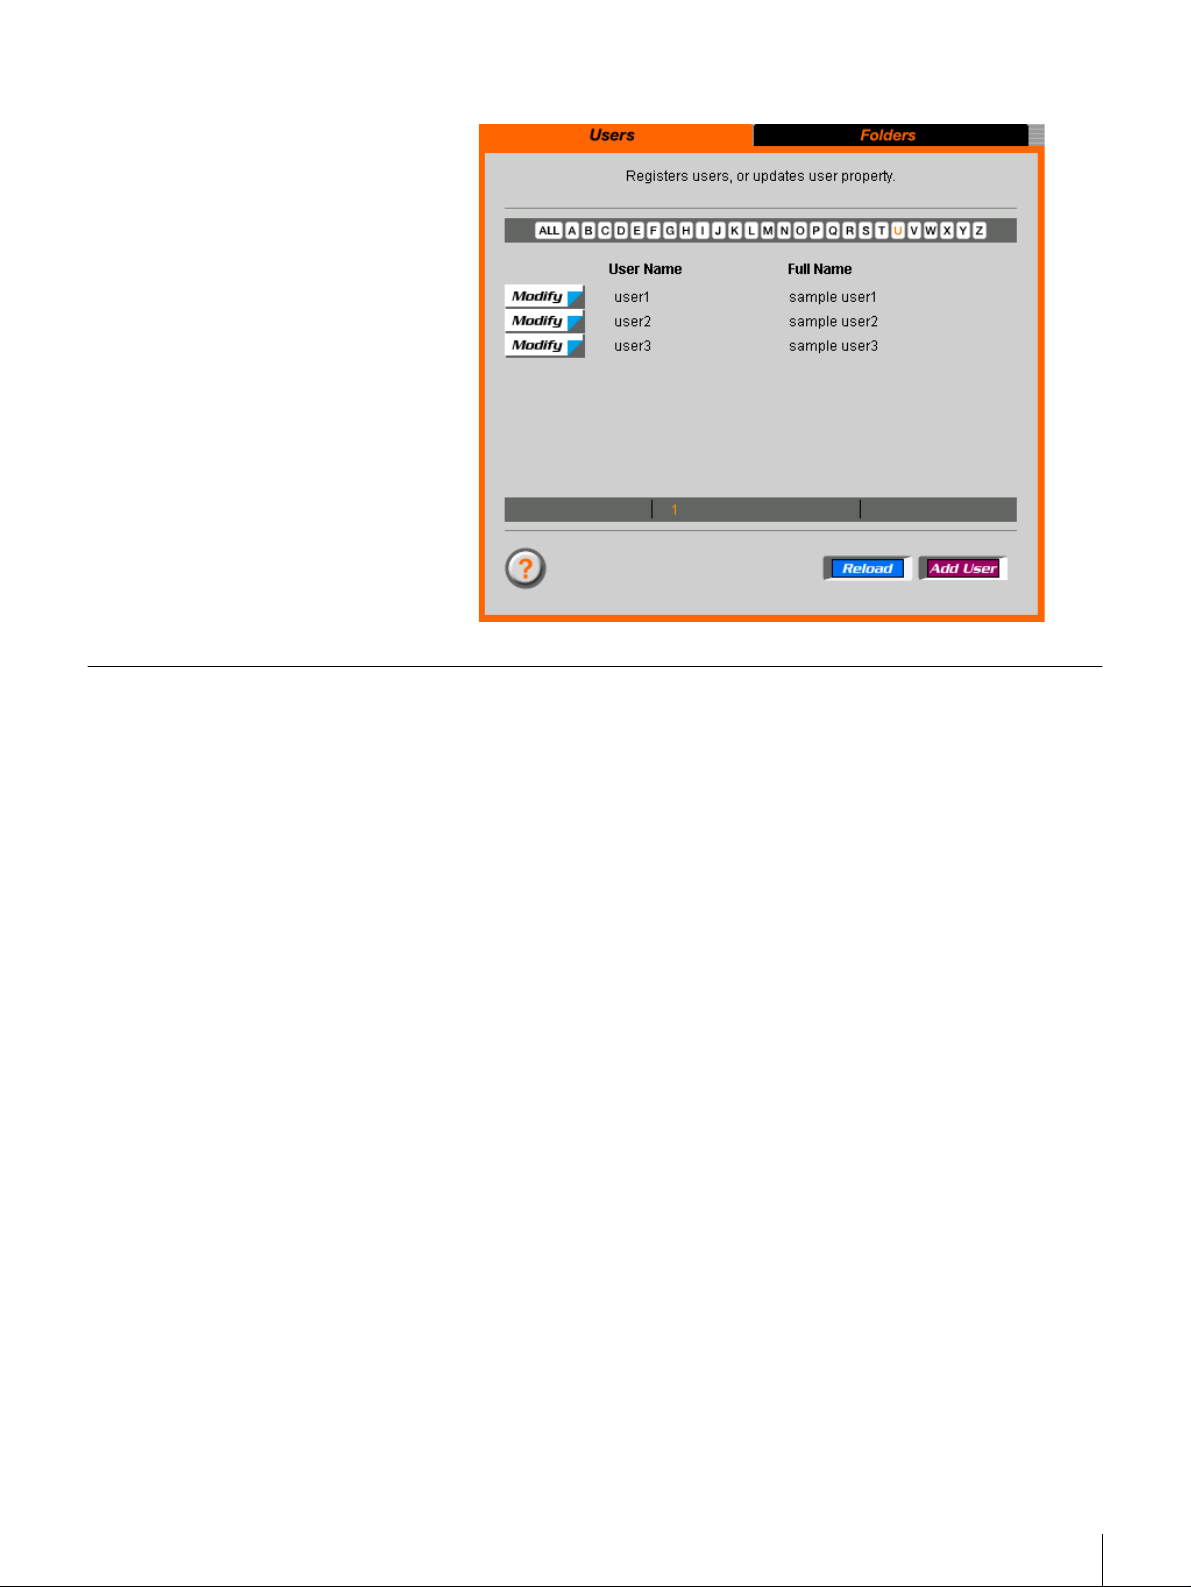
If the user does not appear in the page, click the “Reload” button.
Changing the User Passwor d
Users can change passw ords by themselves.
1
2
3
Launch the browser on a computer.
Enter “http://XXX.XXX.XXX.XXX/password/index.html” in the
“Address” or “Location” field.
For “XXX.XXX.XXX.XXX”, enter the IP address of the server.
The “User Passw ord” p age ap pears.
Click “English” at the upper right of the screen.
Chapter 2 Basic Use
18
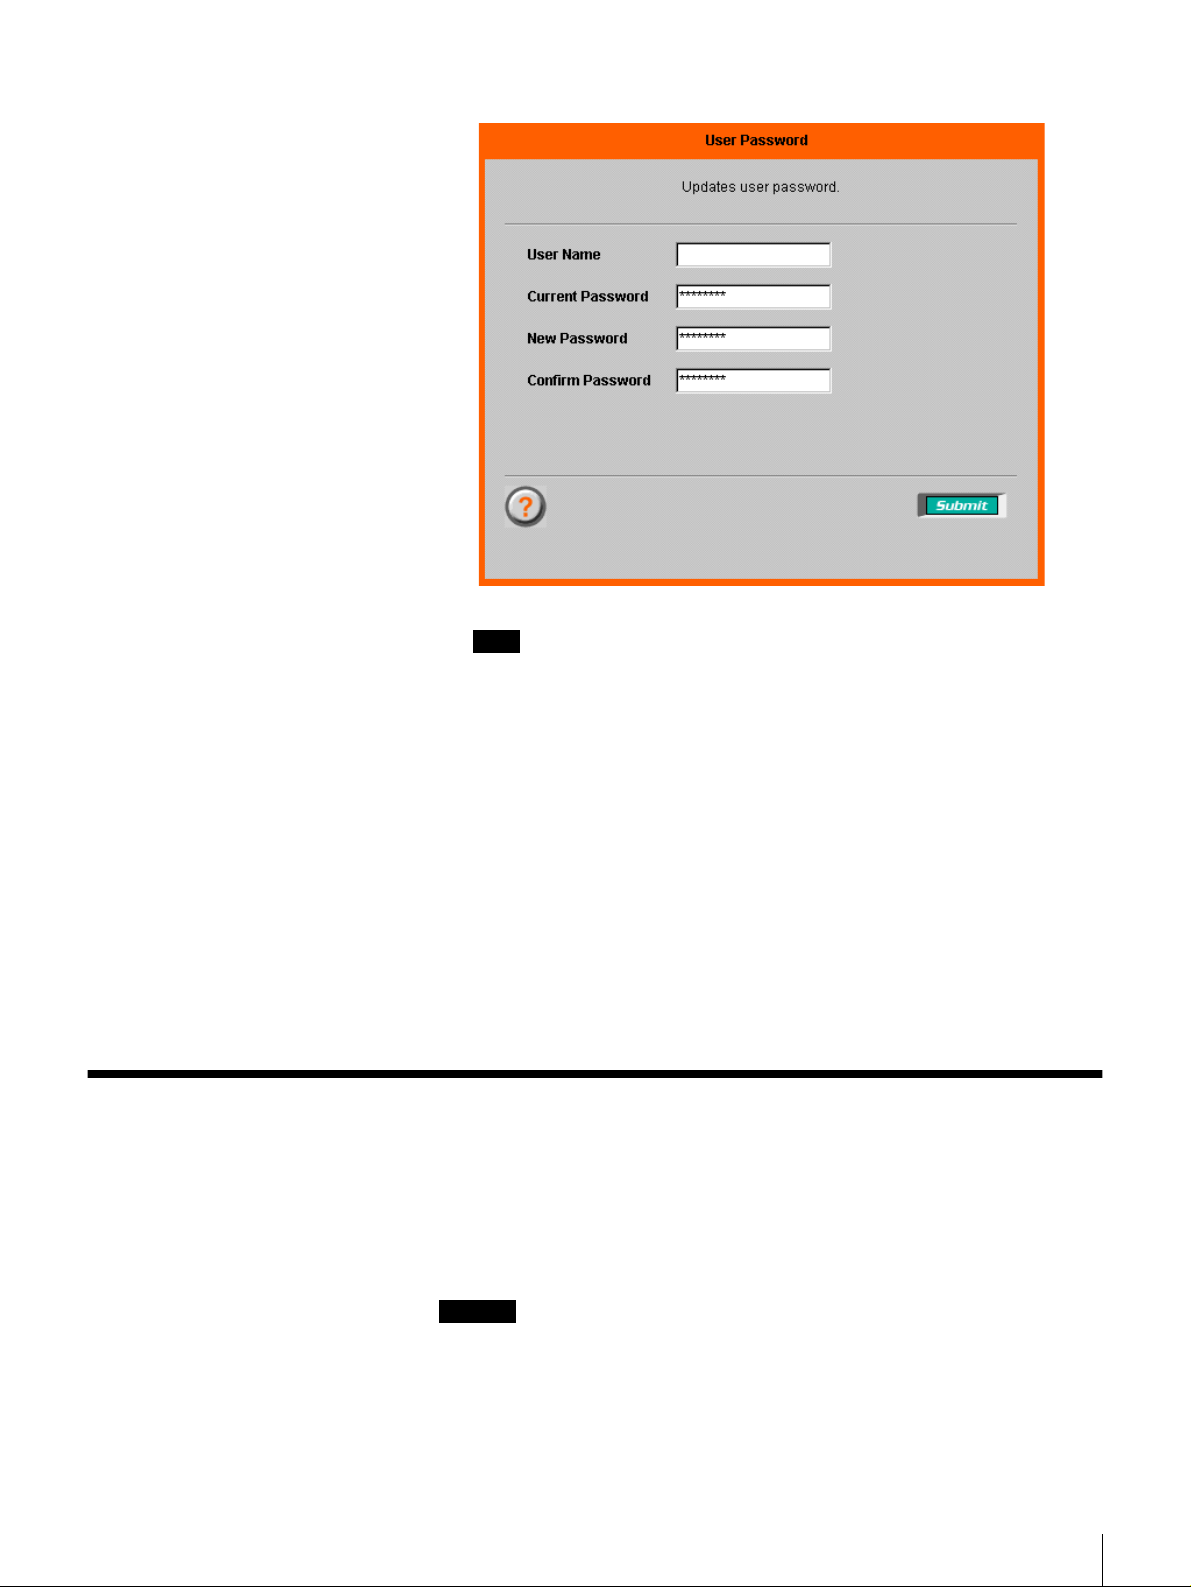
The “User Passw ord” p age ap pears.
Note
The user password can be changed in the Japa nese pa ge as w ell.
Creating Folders
In the “Current Password” field, enter the current password.
4
In the “New Passw ord” field, enter the new p assw ord as up to 8
5
alphanumeric characters and sym bols. See the online h elp for cha racters
that can be used in passwords.
In the “Confirm New P assword” field, re-enter the same password.
6
Click “Submit”.
7
A message appe ars indicating that settings are com plete.
Click “OK”.
8
Folders can be created on this server for use by clients. Up to 200 folders can b e
created, and access permissions can be set for individua l folders.
Create folders through the FSV-E 1 Administration Menu as follows.
Caution
When adding users or folders, m a ke sure there are no Windows users who a re
currently accessing the server. Window s ne twork service rebo ots during
processing for new users or folders, wh ich may result in data loss that users are
currently editing.
Chapter 2 Basic Use
19
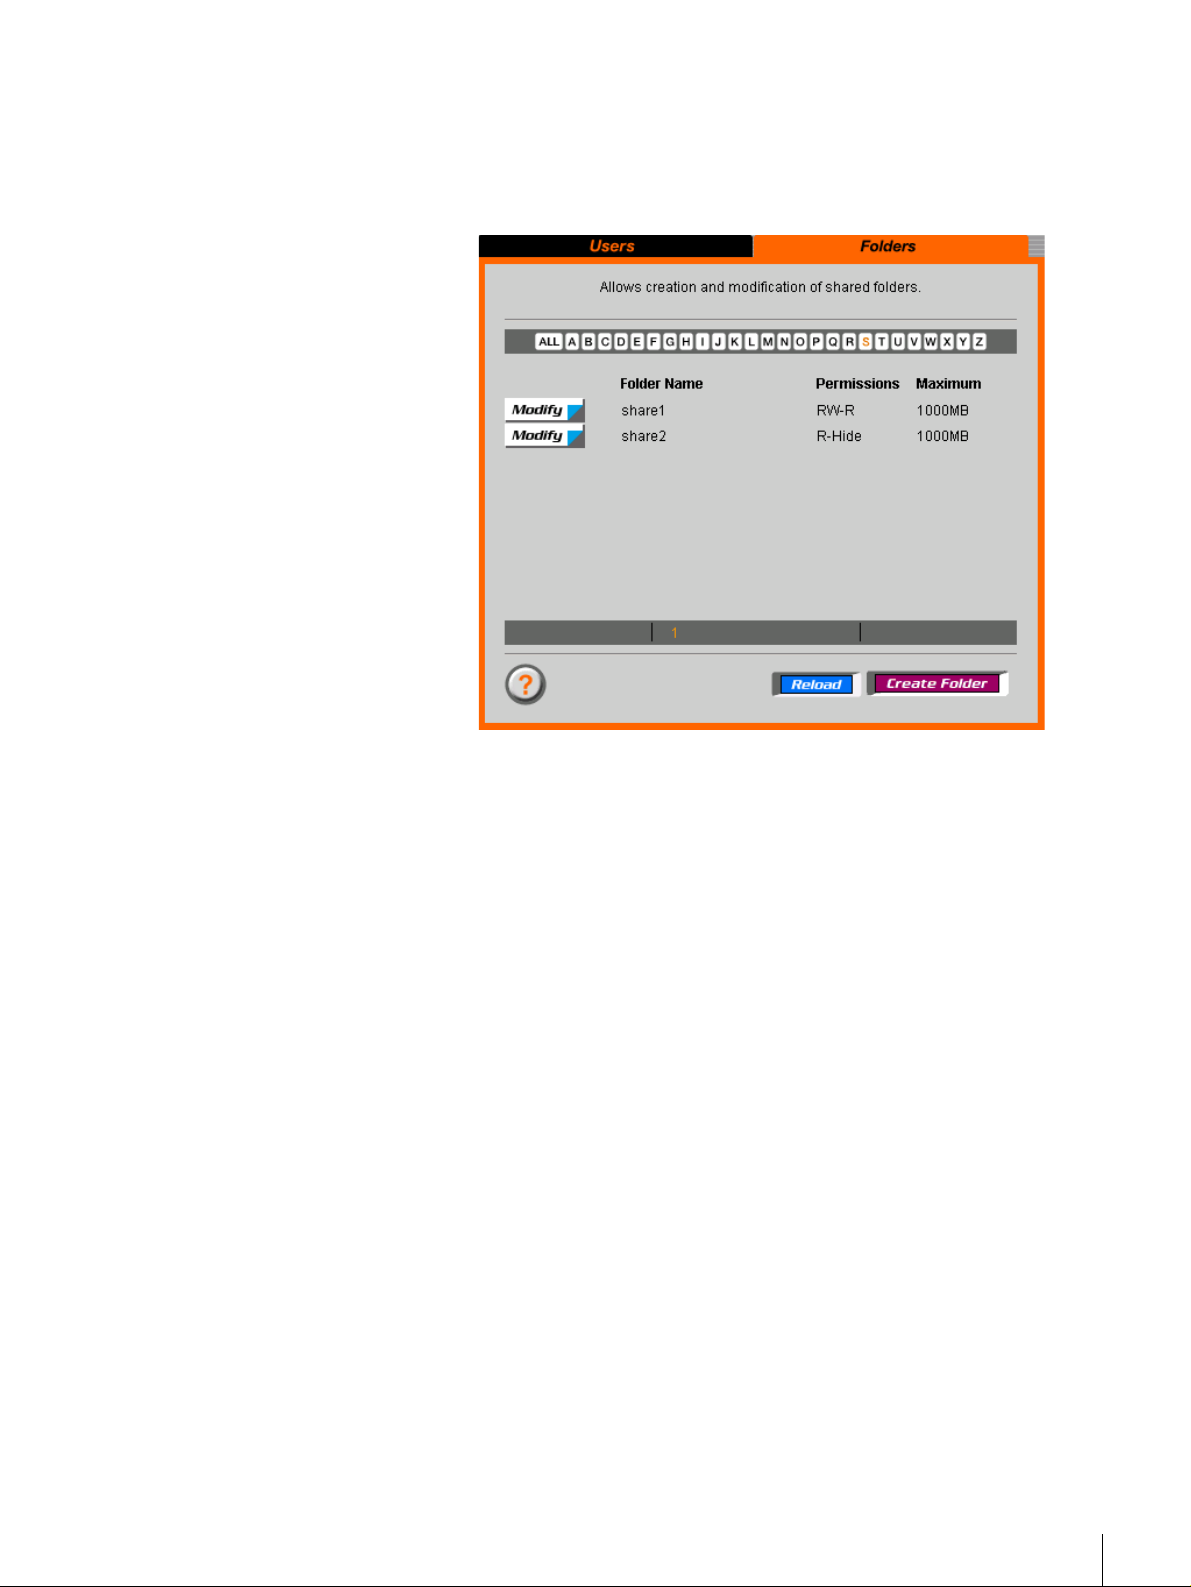
Click “User Management” on the FSV-E1 Administration Menu, then click
1
“Folders”.
You can also directly click “Folders”, which is located below “User
Management”.
The “Folders” page appears.
Click “Create Folder”.
2
Chapter 2 Basic Use
20
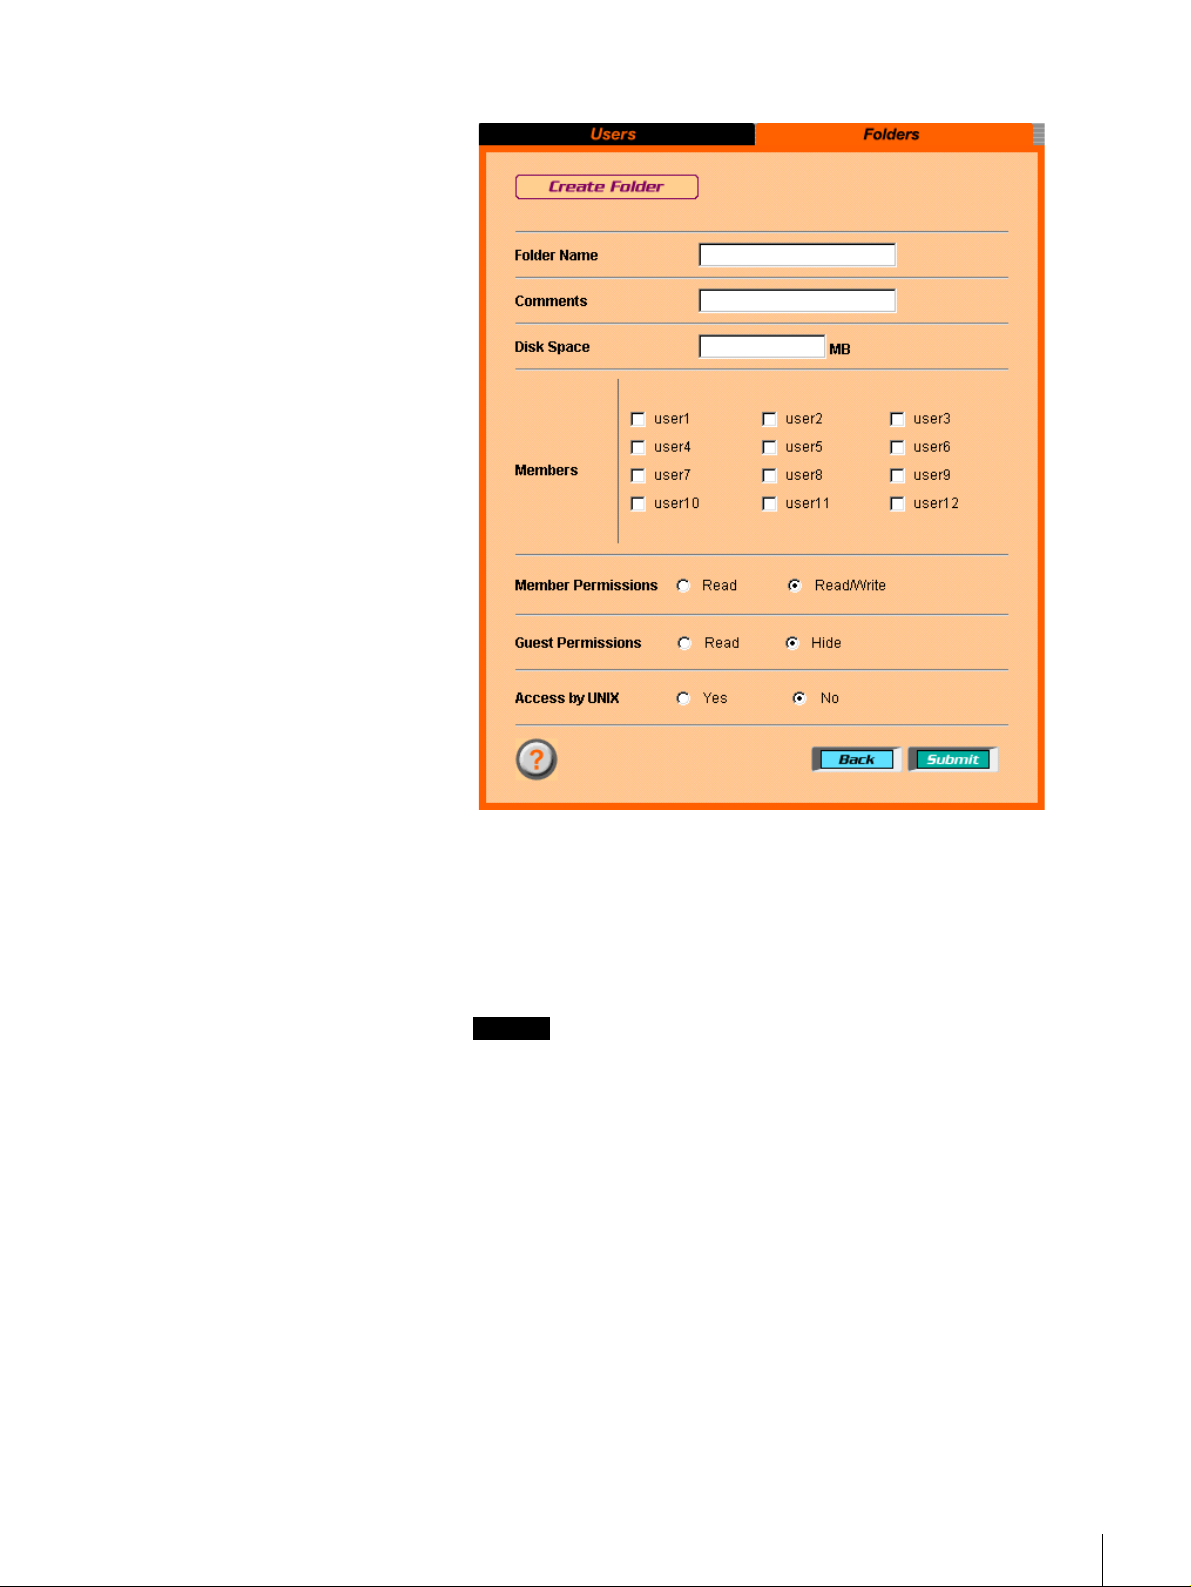
The “Create Folder” page app ears.
Enter the items below.
3
Folder Name
Enter the folder name as up to 8 alpha numeric characters, including
hyphens “-” if necessary. Make sure the first character is a letter, not a
number.
Caution
You cannot assign user nam es or folder n ames that have already been
assigned. Further, the FSV-E1 does not distinguish between upper case an d
lower case characters. (Example: “abc ,” “A BC,” and “Abc” are all
recognized as the same nam e.)
Comments
Enter any comm ent regard ing the folder as up to 2 0 cha racters. See the
online help for characters that can be used in comments.
Disk Space
Enter the maximum amount of disk space that can be u sed by the folder.
• It is not possible to set 0MB as the disk sp ace.
• Leave this field blank if you do not wan t to set the disk space.
• This setting does not reserve disk space. (Even if you set a v alue, disk
space is not reserved.)
Members
Select users to who will be granted access to the folder.
Chapter 2 Basic Use
21

Me mber Perm issio ns
Select the type of access permission for the folder.
Read
Allows users only to view the con tents of the folder.
Read/Write
Allows users to view the folde r contents and w rite to it.
Guest Permissions
Select the type of access permission to be granted to users that are no t
selected in “Members”.
Read
Enables users only to view the contents of the folder.
Hide
Hides the contents in the folder from users w ho a re not selected in
“Members.”
Access by UNIX
Click to select whether or not the folder can be ac cessed from UNIX .
If “Yes” is selected, the folder names and the ir access perm issions are
displayed on the “UNIX” page.
Click “Submit”.
4
Uploads the created folder data to the “Folders” p age.
If the folder does not appear on the page, click the “Re load” b utton.
Storing Files in Folders
Files and folders (directories) can be created in the “public” folder or in folders
created with the FSV-E1 Adm inistration M enu. Ho wever, only the “public”
folder can be accessed from the Macintosh.
Chapter 2 Basic Use
22

Also, the manner in wh ich folders are ac cessed v aries depen ding o n the
operating system of the client com puter.
Caution
When sudden loss of power to the unit due to a po wer failure or turning the unit
off improperly, stored files or files being edited may be dam a ge d. M ak e sure
you back up your data frequ ently. For m o re details regarding b ackup , refer to
“Data Backup” (page 28).
Note
The “public” folder is a folder created at the factory before shipm ent. T he
“public” folder cannot be deleted.
Access from Windows 95/98/NT
Double-click the network comp uter icon o n the de sktop.
1
Double-click the Entire Netwo rk icon.
2
For Windows NT , double-click the Microsoft Windows N etwork icon.
The icon appears for the workgro up to w h ich the FSV -E 1 is assigned .
If a new workgroup has b een set, it m ay take some time before the
workgroup icon is displayed.
If the workgroup icon is not displayed, perform step 5.
Double-click the workgroup icon.
3
The server icon is displayed.
If the server icon is not displayed, perform step 5.
Double-click the server icon.
4
Folders registered in the server are displayed. When y ou click o n a folder,
the folders and files saved in that folder are displayed.
When the w orkgroup icon or server icon is not displayed, search for it using
5
the following procedure.
(1)Click the “Start” button, then click “Search” - “Other Comp uters”.
(2)Enter the host name of the server in the “Name” field, then click “Start
(3)If the server is found, double-click the server icon.
Access from Windows Me/2000
Searching”.
The host name of the server can be ch ecked in the FS V-E 1
Administration Menu o r in the con trol panel.
Folders registered in the server are displayed. When you click a folder,
all the files and folders stored in that folder are displayed.
If the server is not found, wait a few minutes then try searching again.
Double-click the My Network Places icon on the desktop.
1
Double-click the Entire Netwo rk icon.
2
For Windows 2000 , click entire contents, then click on the M icrosoft
Windows N etwo rk icon.
The icon appears for the workgro up to w h ich the FSV -E 1 is assigned .
Chapter 2 Basic Use
23

If a new workgroup has b een set, it m ay take some time before the
workgroup icon is displayed.
If the workgroup icon is not displayed, perform step 5.
Double-click the workgroup icon.
3
The server icon is displayed.
If the server icon is not displayed, perform step 5.
Double-click the server icon.
4
Folders registered in the server are displayed. When y ou click o n a folder,
the folders and files saved in that folder are displayed.
When the w orkgroup icon or server icon is not displayed, search for it using
5
the following procedure.
(1)Click the “Start” button, then click “Search” - “For Files or Folders”.
(2)In the “Search for other items” column, click “Computers”.
(3)Enter the host name of the server in the “Computer N ame” field, then
click “Search Now”.
The host name of the server can be ch ecked in the FS V-E 1
Administration Menu o r in the con trol panel.
(4)If the server is found, double-click the server icon.
Folders registered in the server are displayed. When you click a folder,
all the files and folders stored in that folder are displayed.
If the server is not found, wait a few minutes then try searching again.
Access from UNIX/Linux
Access from the Macintosh
All folders are created under the /hom e d irectory. M ou n t them as follows:
(Exam ple) To mo unt the “p ublic” folder to the /mn t directory on the
client
mount -t nfs fsv-e1:/home/pub lic /mnt
Mounting procedures vary d epen ding on the operating system .
Click the “Apple” menu, click “N e twork Browser” or “Chooser”, then
1
click the “AppleShare” icon.
Select the host name of the server displayed in the “S elect a file server”,
2
then click “OK”.
The host name of the server can be checked in the FSV -E1 Adm inistration
Menu or in the control pan el.
• If the host name is not displayed, click “Server IP A ddress” and enter the
server IP address. The server IP address can be check ed in the FSV-E1
Administration Menu or in the co ntrol panel.
If you are asked for a user name, select “G uest”, then click “OK”.
3
Select “public” (which is displayed in the dialog box), then click “O K ”.
The “public” icon is created on the desktop.
Chapter 2 Basic Use
24
 Loading...