

Page 1
4-573-404-11(1)
FM/AM
Digital Media
Player
The warranty for this product is included in this manual
(page 35, 36).
La garantie de ce produit est inclus dans le présent manuel
(page 37).
Owner’s Record
The model and serial numbers are located on the bottom of the unit.
Record the serial number in the spaces provided below.
Refer to these numbers whenever you call upon your Sony dealer
regarding this product.
Model No. DSX-A400BT
Serial No.
To cancel the demonstration (DEMO) display, see page 19.
For the connection/installation, see page 30.
Pour annuler l’affichage de démonstration (DEMO),
reportez-vous à la page 20.
Pour le raccordement/l’installation, reportez-vous à la page 32.
Para cancelar la pantalla de demostración (DEMO), consulte
la página 19.
Para la conexión/instalación, consulte la página 30.
Operating Instructions
Mode d’emploi
Manual de instrucciones
GB
FR
ES
DSX-A400BT
Page 2

For safety, be sure to install this unit in the
dashboard of the car as the rear side of the unit
becomes hot during use.
For details, see “Connection/Installation”
(page 30).
The nameplate indicating operating voltage, etc., is
located on the bottom of the chassis.
Warning
FOR THE CUSTOMERS IN THE USA. NOT
APPLICABLE IN CANADA, INCLUDING IN THE
PROVINCE OF QUEBEC.
POUR LES CLIENTS AUX ÉTATS-UNIS. NON
APPLICABLE AU CANADA, Y COMPRIS LA
PROVINCE DE QUÉBEC.
This equipment has been tested and found to
comply with the limits for a Class B digital device,
pursuant to Part 15 of the FCC Rules.
These limits are designed to provide reasonable
protection against harmful interference in a
residential installation. This equipment
generates, uses, and can radiate radio frequency
energy and, if not installed and used in
accordance with the instructions, may cause
harmful interference to radio communications.
However, there is no guarantee that interference
will not occur in a particular installation. If this
equipment does cause harmful interference to
radio or television reception, which can be
determined by turning the equipment off and
on, the user is encouraged to try to correct the
interference by one or more of the following
measures:
Reorient or relocate the receiving antenna.
Increase the separation between the
equipment and receiver.
Connect the equipment into an outlet on a
circuit different from that to which the receiver
is connected.
Consult the dealer or an experienced radio/TV
technician for help.
You are cautioned that any changes or
modifications not expressly approved in this
manual could void your authority to operate this
equipment.
2GB
Page 3

This device complies with Part 15 of the FCC Rules
and Industry Canada's licence-exempt RSSs.
Operation is subject to the following two
conditions:
(1) This device may not cause interference; and
(2) This device must accept any interference,
including interference that may cause undesired
operation of the device.
This transmitter must not be co-located or operated
in conjunction with any other antenna or
transmitter.
Under Industry Canada regulations, this radio
transmitter may only operate using an antenna of a
type and maximum (or lesser) gain approved for
the transmitter by Industry Canada. To reduce
potential radio interference to other users, the
antenna type and its gain should be so chosen that
the equivalent isotropically radiated power (e.i.r.p.)
is not more than that necessary for successful
communication.
This equipment complies with FCC/IC radiation
exposure limits set forth for an uncontrolled
environment and meets the FCC radio frequency
(RF) Exposure Guidelines and RSS-102 of the IC
radio frequency (RF) Exposure rules. This
equipment has very low levels of RF energy that is
deemed to comply without maximum permissive
exposure evaluation (MPE). But it is desirable that it
should be installed and operated keeping the
radiator at least 20 cm or more away from person’s
body.
For the State of California, USA only
Perchlorate Material – special handling may apply,
See
www.dtsc.ca.gov/hazardouswaste/perchlorate
Note on the lithium battery
Do not expose the battery to excessive heat such as
direct sunlight, fire or the like.
Warning if your car’s ignition has no ACC
position
Be sure to set the AUTO OFF function (page 19).
The unit will shut off completely and
automatically in the set time after the unit is
turned off, which prevents battery drain. If you
do not set the AUTO OFF function, press and hold
OFF until the display disappears each time you
turn the ignition off.
Disclaimer regarding services offered by
third parties
Services offered by third parties may be changed,
suspended, or terminated without prior notice.
Sony does not bear any responsibility in these sorts
of situations.
3GB
Page 4

Important notice
Caution
IN NO EVENT SHALL SONY BE LIABLE FOR ANY
INCIDENTAL, INDIRECT OR CONSEQUENTIAL
DAMAGES OR OTHER DAMAGES INCLUDING,
WITHOUT LIMITATION, LOSS OF PROFITS, LOSS OF
REVENUE, LOSS OF DATA, LOSS OF USE OF THE
PRODUCT OR ANY ASSOCIATED EQUIPMENT,
DOWNTIME, AND PURCHASER’S TIME RELATED TO
OR ARISING OUT OF THE USE OF THIS PRODUCT, ITS
HARDWARE AND/OR ITS SOFTWARE.
Dear customer, this product includes a radio
transmitter.
Please check your vehicle operation manual or
contact the manufacturer of your vehicle or your
vehicle dealer, before you install this product into
your vehicle.
Emergency calls
This BLUETOOTH car handsfree and the electronic
device connected to the handsfree operate using
radio signals, cellular, and landline networks as well
as user-programmed function, which cannot
guarantee connection under all conditions.
Therefore do not rely solely upon any electronic
device for essential communications (such as
medical emergencies).
On BLUETOOTH communication
Microwaves emitting from a BLUETOOTH device
may affect the operation of electronic medical
devices. Turn off this unit and other BLUETOOTH
devices in the following locations, as it may cause
an accident.
where inflammable gas is present, in a hospital,
train, airplane, or petrol station
near automatic doors or a fire alarm
This unit supports security capabilities that
comply with the BLUETOOTH standard to provide
a secure connection when the BLUETOOTH
wireless technology is used, but security may not
be enough depending on the setting. Be careful
when communicating using BLUETOOTH wireless
technology.
We do not take any responsibility for the leakage
of information during BLUETOOTH
communication.
If you have any questions or problems concerning
your unit that are not covered in this manual,
consult your nearest Sony dealer.
4GB
Page 5
Table of Contents
Warning. . . . . . . . . . . . . . . . . . . . . . . . . . . . . . . . . . . 2
Guide to Parts and Controls . . . . . . . . . . . . . . . . . . 6
Getting Started
Detaching the Front Panel. . . . . . . . . . . . . . . . . . . . 8
Setting the Clock . . . . . . . . . . . . . . . . . . . . . . . . . . . 9
Preparing a BLUETOOTH Device . . . . . . . . . . . . . . . 9
Connecting a USB Device . . . . . . . . . . . . . . . . . . . . 11
Connecting Other Portable Audio Device . . . . . . . 11
Listening to the Radio
Listening to the Radio . . . . . . . . . . . . . . . . . . . . . . . 12
Using Radio Data System (RDS) . . . . . . . . . . . . . . . 12
Playback
Playing a USB Device . . . . . . . . . . . . . . . . . . . . . . . . 13
Playing a BLUETOOTH Device . . . . . . . . . . . . . . . . . 13
Searching and Playing Tracks . . . . . . . . . . . . . . . . 14
Listening to Pandora®
Setting up Pandora® . . . . . . . . . . . . . . . . . . . . . . . . 15
Streaming Pandora®. . . . . . . . . . . . . . . . . . . . . . . . . 15
Available Operations in Pandora®. . . . . . . . . . . . . . 15
Handsfree Calling (via BLUETOOTH
only)
Receiving a Call . . . . . . . . . . . . . . . . . . . . . . . . . . . 16
Making a Call . . . . . . . . . . . . . . . . . . . . . . . . . . . . . 16
Available Operations during Call . . . . . . . . . . . . . . 17
Settings
Canceling the DEMO Mode. . . . . . . . . . . . . . . . . . . 19
Basic Setting Operation . . . . . . . . . . . . . . . . . . . . . 19
General Setup (GENERAL) . . . . . . . . . . . . . . . . . . . . 19
Sound Setup (SOUND) . . . . . . . . . . . . . . . . . . . . . . . 19
Display Setup (DISPLAY) . . . . . . . . . . . . . . . . . . . . 20
BLUETOOTH Setup (BT) . . . . . . . . . . . . . . . . . . . . . 20
Additional Information
Precautions . . . . . . . . . . . . . . . . . . . . . . . . . . . . . . . 21
Maintenance . . . . . . . . . . . . . . . . . . . . . . . . . . . . . . 22
Specifications. . . . . . . . . . . . . . . . . . . . . . . . . . . . . . 23
Troubleshooting . . . . . . . . . . . . . . . . . . . . . . . . . . . 25
Connection/Installation
Cautions . . . . . . . . . . . . . . . . . . . . . . . . . . . . . . . . . 30
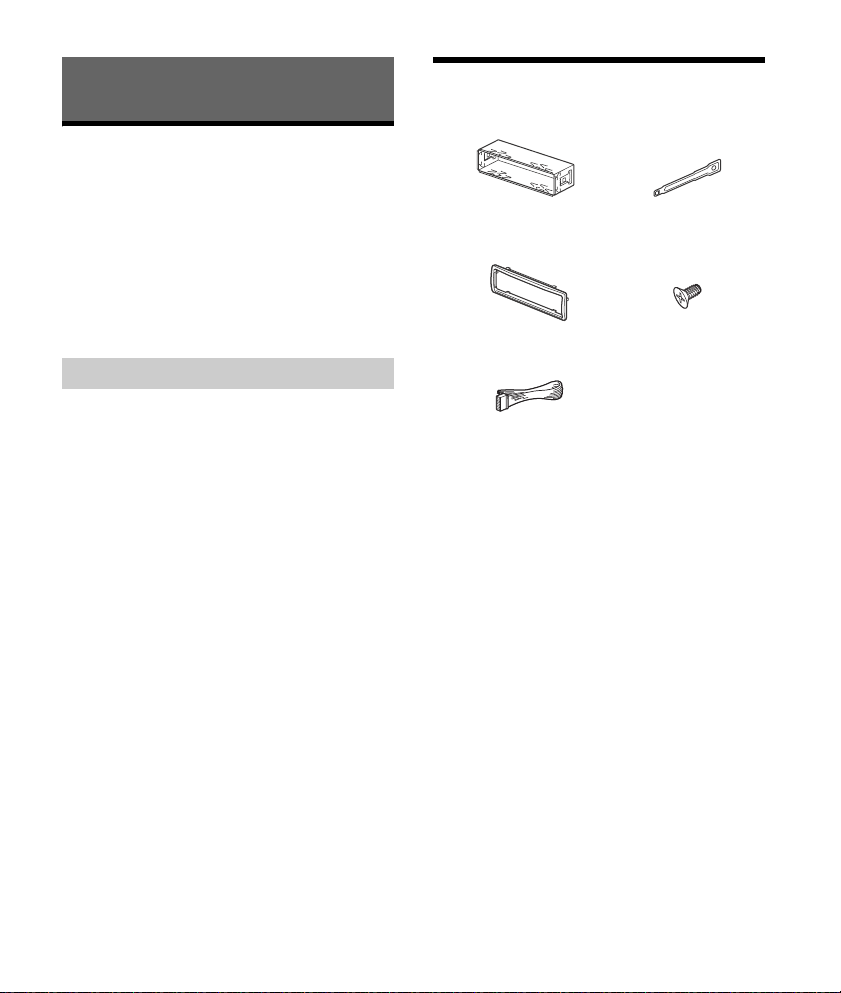
Parts List for Installation . . . . . . . . . . . . . . . . . . . . 30
Connection . . . . . . . . . . . . . . . . . . . . . . . . . . . . . . . . 31
Installation . . . . . . . . . . . . . . . . . . . . . . . . . . . . . . . . 33
Important notice
The warranty for this product is included in this
manual (page 35, 36). Keep this manual for
future use.
Useful Functions
Using Siri Eyes Free . . . . . . . . . . . . . . . . . . . . . . . . 18
5GB
Page 6
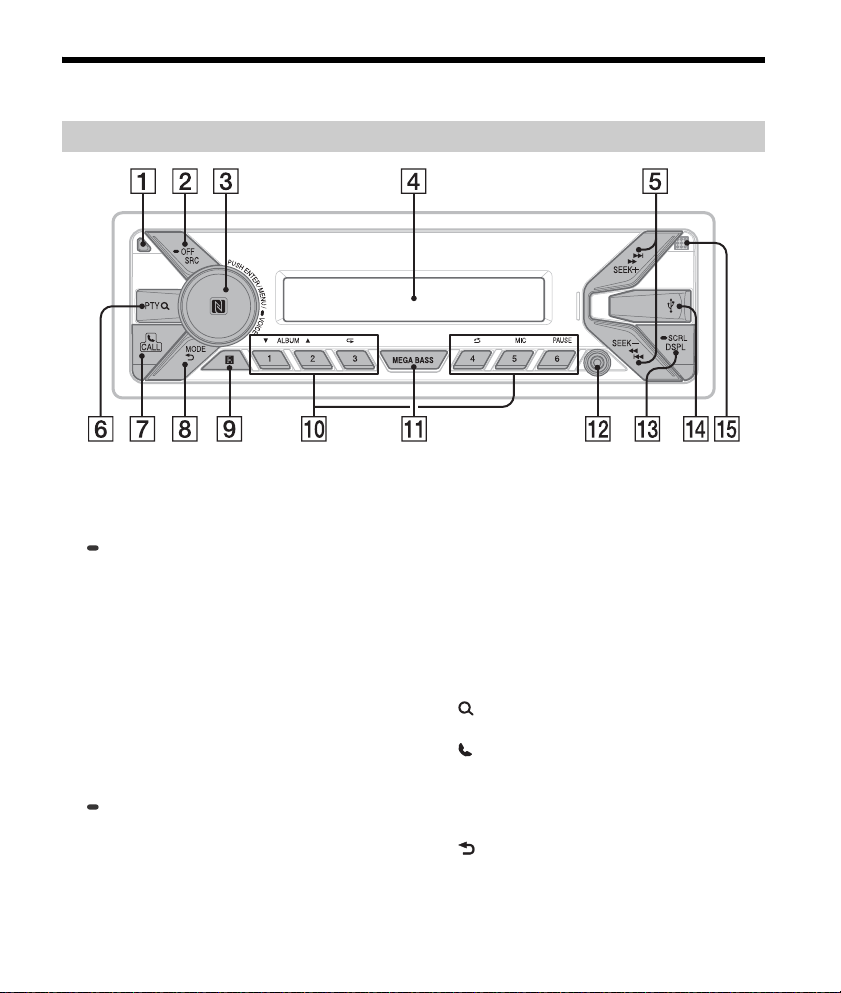
Guide to Parts and Controls
Main unit
Front panel release button
SRC (source)
Turn o n t he p ow er.
Change the source.
OFF
Press and hold for 1 second to turn the source
off and display the clock.
Press and hold for more than 2 seconds to turn
off the power and the display.
If the unit is turned off and the display
disappears, operation by the remote
commander is not available.
Control dial
Rotate to adjust the volume.
PUSH ENTER
Enter the selected item.
MENU*
Open the setup menu.
VOICE (page 17, 18)
Press and hold for more than 2 seconds to
activate voice dial or the Siri function (iPhone
only).
6GB
N-Mark
Touch the control dial with Android™
smartphone to make Bluetooth® connection.
* Not available when the BT phone is selected.
Display window
SEEK +/–
Tune in radio stations automatically. Press and
hold to tune manually.
/ (prev/next)
/ (fast-reverse/fast-forward)
PTY (program type)
Select PTY in RDS.
(browse) (page 14, 15)
Enter the browse mode during playback.
CALL
Enter the call menu. Receive/end a call.
Press and hold for more than 2 seconds to
switch the BLUETOOTH signal.
MODE (page 12, 13, 15, 17)
(back)
Return to the previous display.
Receptor for the remote commander
Page 7
Number buttons (1 to 6)
Receive stored radio stations. Press and hold to
store stations.
Call a stored phone number. Press and hold to
store a phone number.
ALBUM /
Skip an album for audio device. Press and hold
to skip albums continuously.
Press to thumbs up, or to thumbs down in
Pandora® (page 15).
(repeat)
(shuffle)
MIC (page 17)
PAU SE
MEGA BASS
Reinforces bass sound in synchronization with
the volume level. Press to change the MEGA
BASS setting: [1], [2], [OFF].
AUX input jack
DSPL (display)
Press to change display items.
SCRL (scroll)
Press and hold to scroll a display item.
USB port
Microphone (inner panel)
In order for the handsfree function to work
properly, do not cover the microphone with
tape, etc.
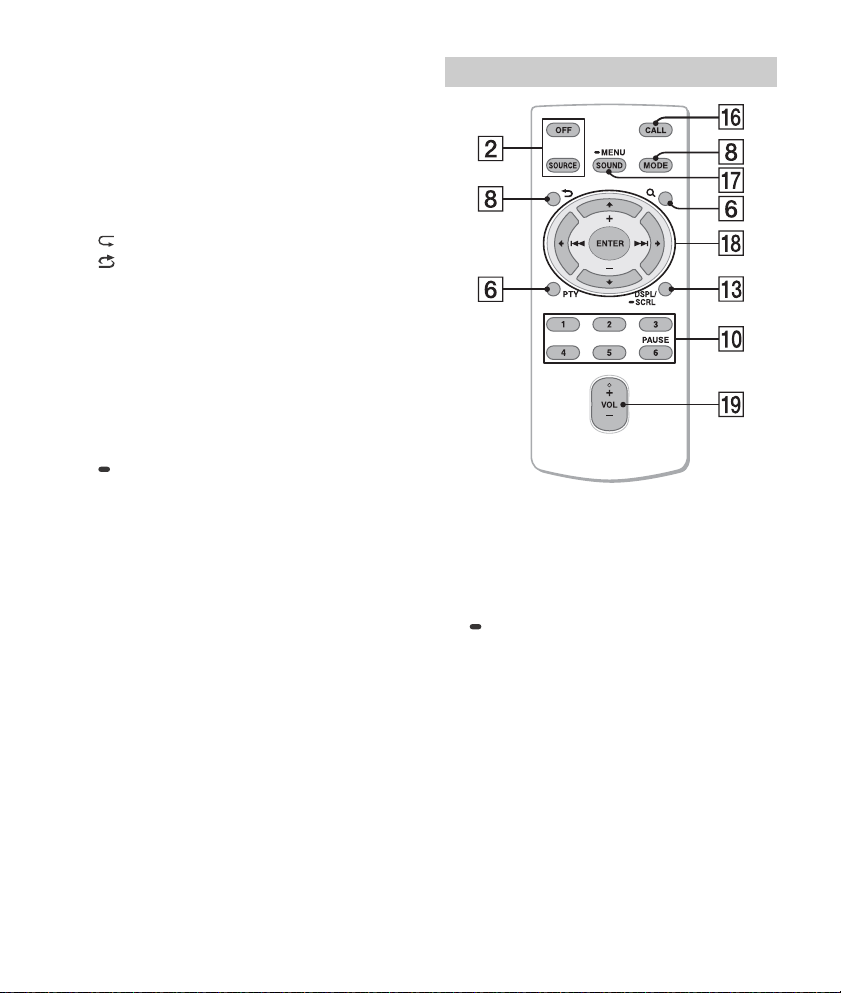
RM-X231 Remote commander
The VOL (volume) + button has a tactile dot.
CALL
Enter the call menu. Receive/end a call.
SOUND*
Open the SOUND menu directly.
MENU*
Press and hold to open the setup menu.
* Not available when the BT phone is selected.
///
Select a setup item, etc.
ENTER
Enter the selected item.
/ (prev/next)
+/– (album +/–)
VOL (volume) +/–
7GB
Page 8
Remove the insulation film before use.
Getting Started
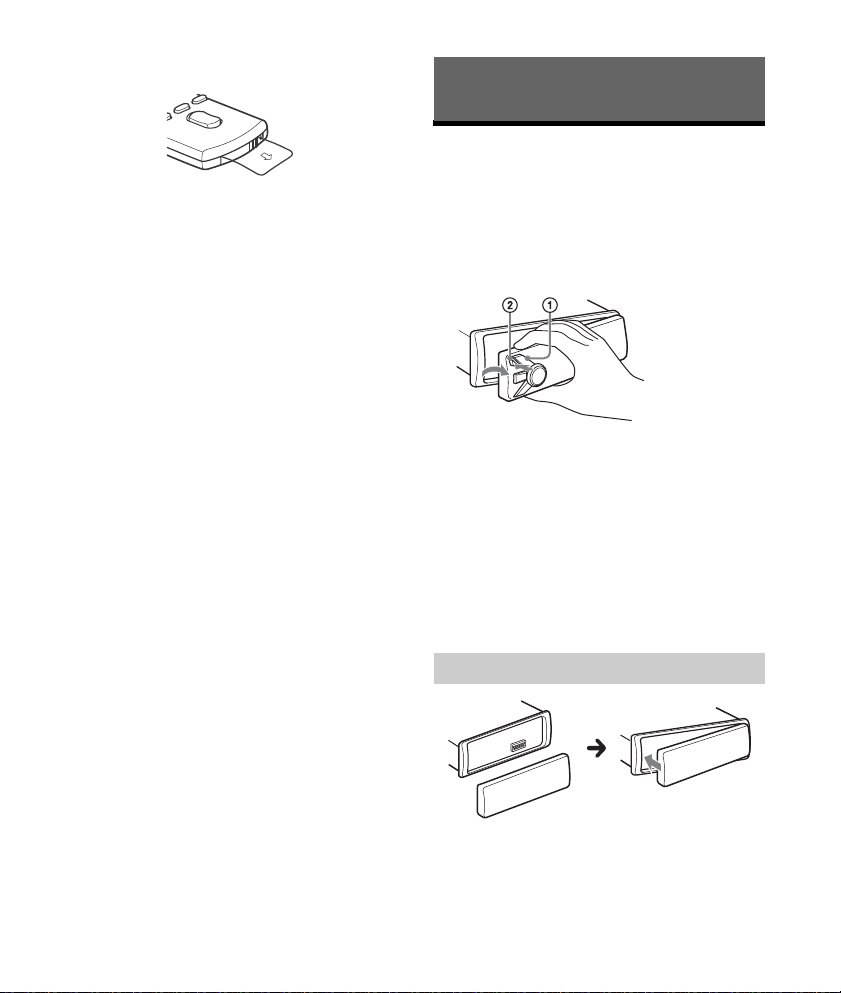
Detaching the Front Panel
You can detach the front panel of this unit to
prevent theft.
1 Press and hold OFF until the unit turns
off, press the front panel release button
, then pull the panel towards you to
remove.
Caution alarm
If you turn the ignition switch to the OFF position
without detaching the front panel, the caution
alarm will sound for a few seconds. The alarm will
only sound if the built-in amplifier is used.
Serial numbers
Make sure the serial numbers on the bottom of the
unit and the back of the front panel are matched
correctly. Otherwise you cannot make BLUETOOTH
pairing, connection and disconnection by NFC.
8GB
Attaching the front panel
Page 9
Setting the Clock
1 Press MENU, rotate the control dial to
select [SET GENERAL], then press it.
2 Rotate the control dial to select [SET
CLOCK-ADJ], then press it.
The hour indication flashes.
3 Rotate the control dial to set the hour
and minute.
To move the digital indication, press SEEK +/–.
4 After setting the minute, press MENU.
The setup is complete and the clock starts.
To display the clock
Press DSPL.
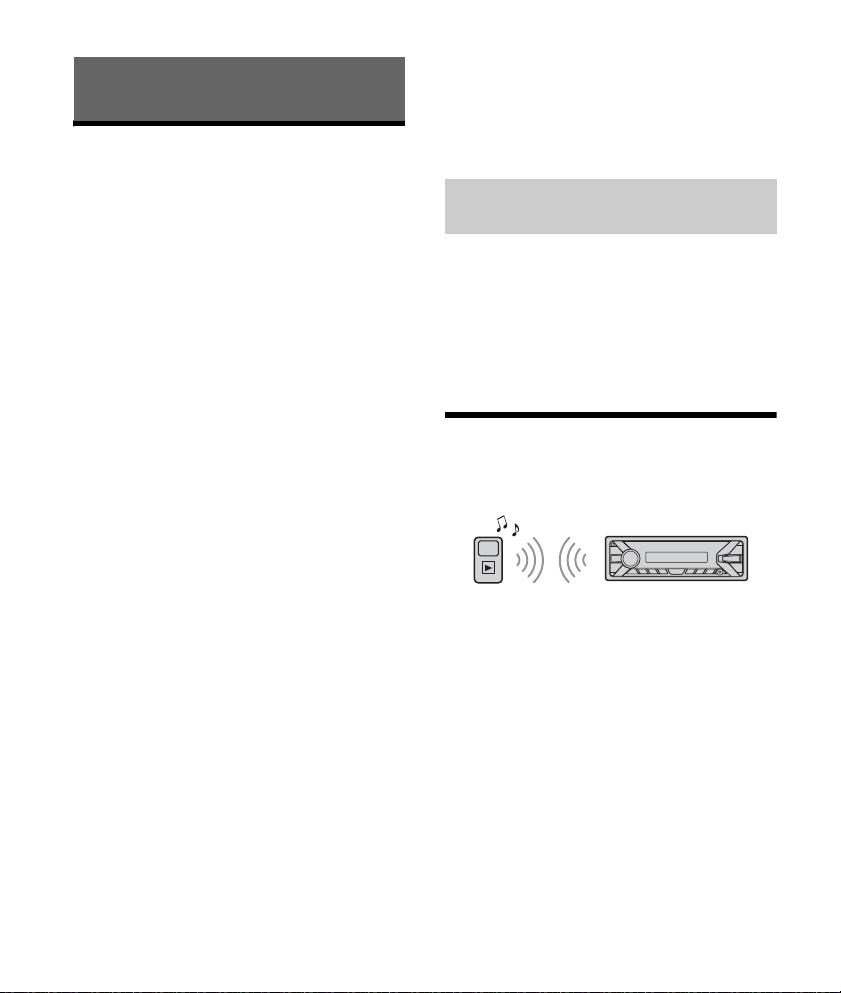
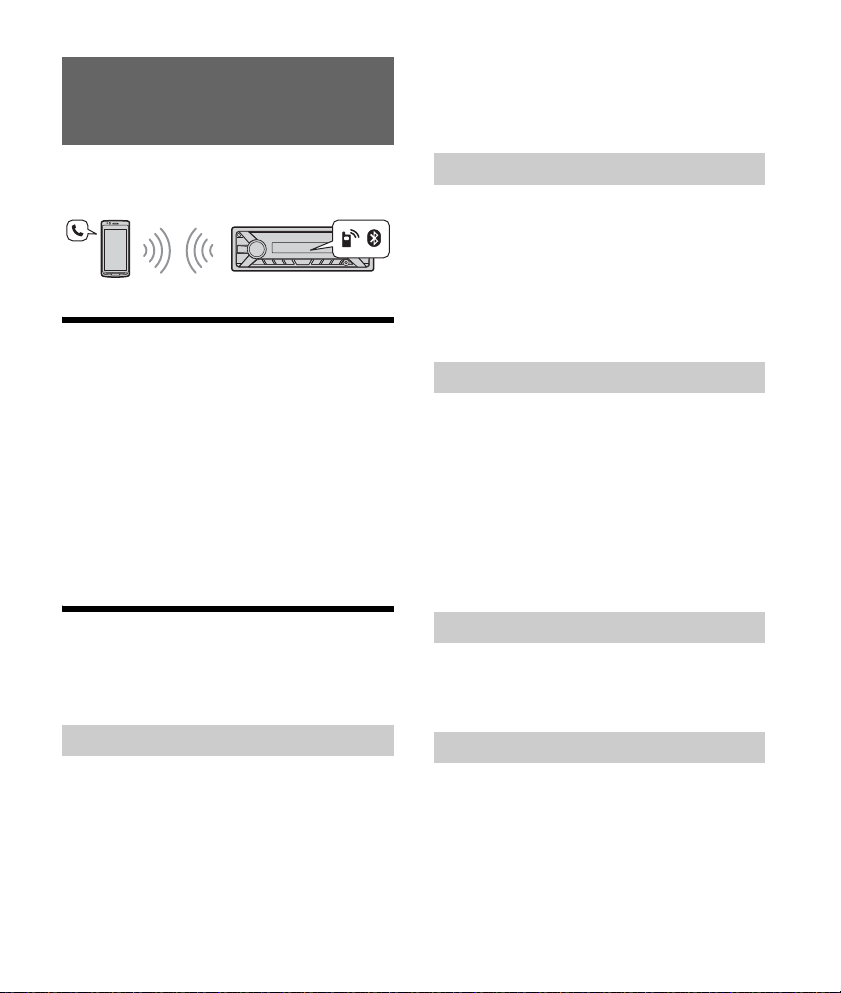
Preparing a BLUETOOTH Device
You can enjoy music, or perform handsfree calling
depending on the BLUETOOTH compatible device
such as a smartphone, cellular phone and audio
device (hereafter “BLUETOOTH device” if not
otherwise specified). For details on connecting,
refer to the operating instructions supplied with the
device.
Before connecting the device, turn down the
volume of this unit; otherwise, loud sound may
result.
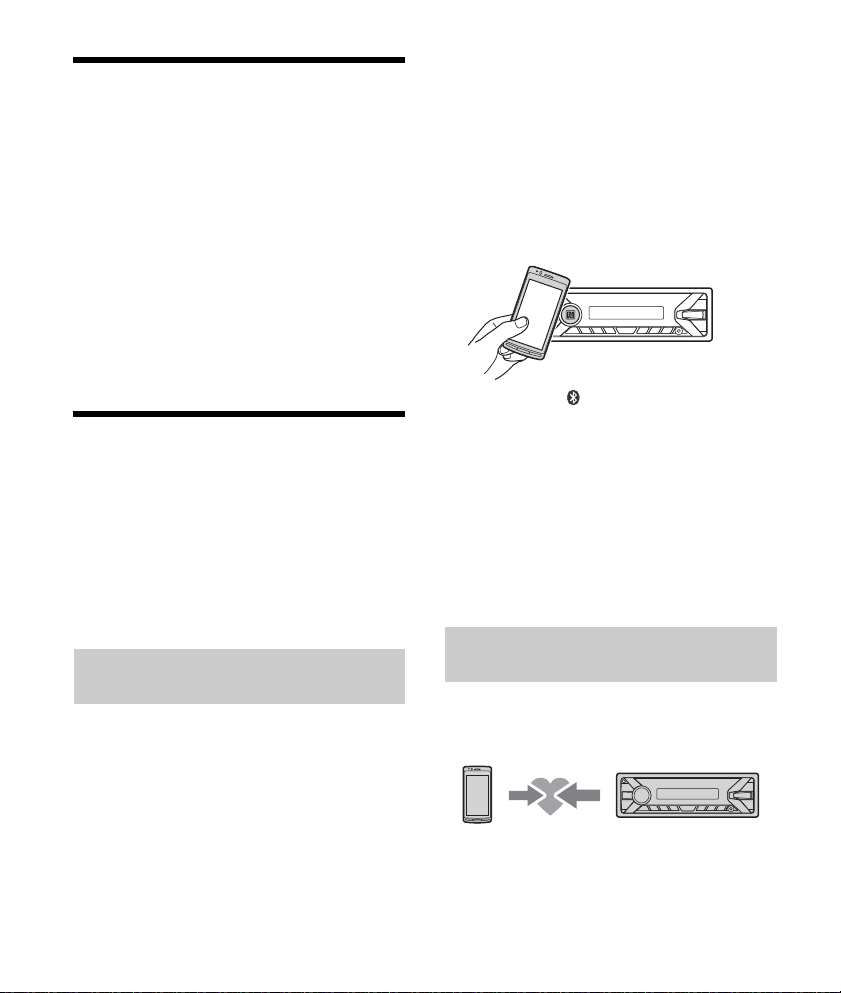
Connecting with a Smartphone by One
touch (NFC)
By touching the control dial on the unit with an
NFC* compatible smartphone, the unit is paired and
connected with the smartphone automatically.
* NFC (Near Field Communication) is a technology
enabling short-range wireless communication
between various devices, such as mobile phones and
IC tags. Thanks to the NFC function, data
communication can be achieved easily just by
touching the relevant symbol or designated location
on NFC compatible devices.
For a smartphone with Android OS 4.0 or lower
installed, downloading the app “NFC Easy Connect”
available at Google Play™ is required. The app may
not be downloadable in some countries/regions.
1 Activate the NFC function on the
smartphone.
For details, refer to the operating instructions
supplied with the smartphone.
2 Touch the N-Mark part of the unit with
the N-Mark part of the smartphone.
Make sure th at lights up on the displ ay of th e
unit.
To disconnect by One touch
Touch the N-Mark part of the unit with the N-Mark
part of the smartphone again.
Notes
When making the connection, handle the
smartphone carefully to prevent scratches.
One touch connection is not possible when the unit is
already connected to another NFC compatible device.
In this case, disconnect the other device, and make
connection with the smartphone again.
Pairing and connecting with a
BLUETOOTH device
When connecting a BLUETOOTH device for the first
time, mutual registration (called “pairing”) is
required. Pairing enables this unit and other devices
to recognize each other.
1 Place the BLUETOOTH device within 1 m
(3 ft) of this unit.
9GB
Page 10
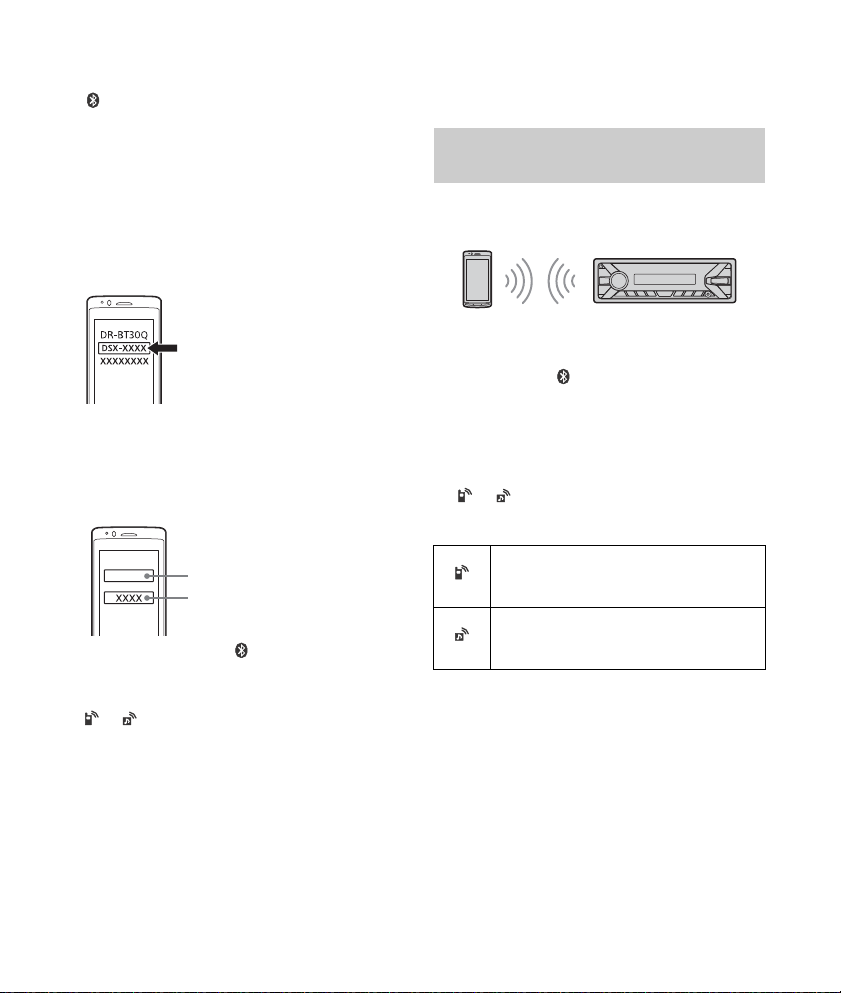
2 Press CALL, rotate the control dial to
[0000]
Input passkey
select [SET PAIRING], then press it.
flashes while the unit is in pairing standby
mode.
3 Perform pairing on the BLUETOOTH
device so it detects this unit.
4 Select [DSX-XXXX] (your model name)
shown in the display of the BLUETOOTH
device.
If your model name does not appear, repeat
from step 2.
5 If passkey* input is required on the
BLUETOOTH device, input [0000].
* Passkey may be called “Passcode,” “PIN code,”
“PIN number” or “Password,” etc., depending on
the device.
When pairing is made, stays lit.
6 Select this unit on the BLUETOOTH device
to establish the BLUETOOTH connection.
or lights up when the connection is made.
Note
While connecting to a BLUETOOTH device, this unit
cannot be detected from another device. To enable
detection, enter the pairing mode and search for this
unit from another device.
To start playback
For details, see “Playing a BLUETOOTH Device”
(page 13).
To cancel pairing
Perform step 2 to cancel the pairing mode after this
unit and the BLUETOOTH device are paired.
Connecting with a paired BLUETOOTH
device
To use a paired device, connection with this unit is
required. Some paired devices will connect
automatically.
1 Press CALL, rotate the control dial to
select [SET BT SIGNL], then press it.
Make sure that lights up.
2 Activate the BLUETOOTH function on the
BLUETOOTH device.
3 Operate the BLUETOOTH device to
connect to this unit.
or lights up.
Icons in the display:
Lights up when handsfree calling is
available by enabling the HFP (Handsfree
Profile).
Lights up when the audio device is
playable by enabling the A2DP
(Advanced Audio Distribution Profile).
To connect the last-connected device from
this unit
Activate the BLUETOOTH function on the
BLUETOOTH device.
Press SRC to select [BT PHONE] or [BT AUDIO].
Press ENTER to connect with the cellular phone, or
PAUSE to connect with the audio device.
Note
While streaming BLUETOOTH audio, you cannot
connect from this unit to the cellular phone. Connect
from the cellular phone to this unit instead.
10GB
Page 11
Tip
With BLUETOOTH signal on: when the ignition is turned
to on, this unit reconnects automatically to the lastconnected cellular phone.
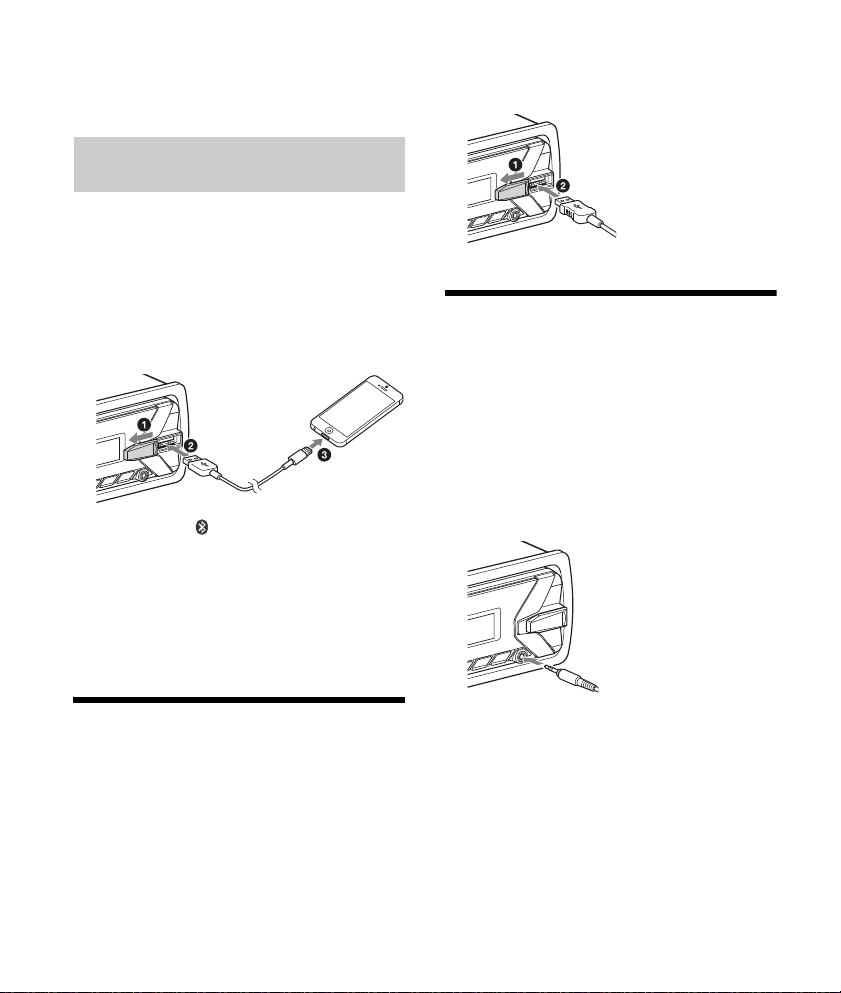
Connecting with an iPhone/iPod
(BLUETOOTH Auto Pairing)
When an iPhone/iPod with iOS5 or later installed is
connected to the USB port, the unit is paired and
connected with the iPhone/iPod automatically.
To enable BLUETOOTH Auto Pairing, make sure
[AUTOPAIR] in [BT] is set to [ON] (page 20).
1 Activate the BLUETOOTH function on the
iPhone/iPod.
2 Connect an iPhone/iPod to the USB port.
Make sure that lights up on the display of the
unit.
Notes
BLUETOOTH Auto Pairing is not possible if the unit is
already connected to another BLUETOOTH device. In
this case, disconnect the other device, then connect
the iPhone/iPod again.
If BLUETOOTH Auto Pairing is not established, see
“Preparing a BLUETOOTH Device” for details (page 9).
2 Connect the USB device to the unit.
To connect an iPod/iPhone, use the USB
connection cable for iPod (not supplied).
Connecting Other Portable
Audio Device
1 Turn off the portable audio device.
2 Turn down the volume on the unit.
3 Connect the portable audio device to the
AUX input jack (stereo mini jack) on the
unit with a connecting cord (not
supplied)*.
* Be sure to use a straight type plug.
Connecting a USB Device
1 Turn down the volume on the unit.
4 Press SRC to select [AUX].
To match the volume level of the connected
device to other sources
Start playback of the portable audio device at a
moderate volume, and set your usual listening
volume on the unit.
Press MENU, then select [SET SOUND] [SET AUX
VOL] (page 20).
11GB
Page 12

Listening to the Radio
Listening to the Radio
To listen to the radio, press SRC to select [TUNER].
Storing automatically (BTM)
1 Press MODE to change the band (FM1,
FM2, FM3, AM1 or AM2).
2 Press MENU, rotate the control dial to
select [SET GENERAL], then press it.
3 Rotate the control dial to select [SET
BTM], then press it.
The unit stores stations in order of frequency on
the number buttons.
Tuning
1 Press MODE to change the band (FM1,
FM2, FM3, AM1 or AM2).
2 Perform tuning.
To tune manually
Press and hold SEEK +/– to locate the
approximate frequency, then press SEEK +/–
repeatedly to fine adjust to the desired
frequency.
To tune automatically
Press SEEK +/–.
Scanning stops when the unit receives a station.
Storing manually
1 While receiving the station that you want
to store, press and hold a number button
(1 to 6) until [MEM] appears.
Receiving the stored stations
1 Select the band, then press a number
button (1 to 6).
Using Radio Data System (RDS)
Selecting program types (PTY)
1 Press PTY during FM reception.
2 Rotate the control dial until the desired
program type appears, then press it.
The unit starts to search for a station
broadcasting the selected program type.
Typ e of p rogram s
NEWS (News), INFORM (Information), SPORTS
(Sports), TA LK (Talk), ROCK (Rock), CLS ROCK
(Classic Rock), ADLT HIT (Adult Hits), SOFT RCK (Soft
Rock), TOP 40 (Top 40), COUNTRY (Country),
OLDIES (Oldies), SOFT (Soft), NOSTALGA
(Nostalgia), JAZZ (Jazz), CLASSICL (Classical),
R & B (Rhythm and Blues), SOFT R&B (Soft Rhythm
and Blues), LANGUAGE (Foreign Language), REL
MUSC (Religious Music), REL TALK (Religious Talk),
PERSNLTY (Personality), PUBLIC (Public), COLLEGE
(College), HABL ESP (Spanish Talk), MUSC ESP
(Spanish Music), HIP HOP (Hip-Hop), WEATHER
(Weather)
Setting clock time (CT)
The CT data from the RDS transmission sets the
clock.
1 Set [SET CT-ON] in [SET GENERAL]
(page 19).
12GB
Page 13
Playback
Playing a USB Device
In these Operating Instructions, “iPod” is used as a
general reference for the iPod functions on an iPod
and iPhone, unless otherwise specified by the text
or illustrations.
For details on the compatibility of your iPod, see
“About iPod” (page 22) or visit the support site on
the back cover.
MSC (Mass Storage Class) and MTP (Media Transfer
Protocol) type USB devices (such as a USB flash
drive, digital media player, Android smartphone)
compliant with the USB standard can be used.
Depending on the digital media player or Android
smartphone, setting the USB connection mode to
MTP is required.
Notes
For details on the compatibility of your USB device,
visit the support site on the back cover.
Playback of the following files is not supported.
MP3/WMA/FLAC:
copyright-protected files
DRM (Digital Rights Management) files
Multi-channel audio files
MP3/WMA:
lossless compression files
1 Connect a USB device to the USB port
(page 11).
Playback starts.
If a device is already connected, to start
playback, press SRC to select [USB] ([IPD]
appears in the display when the iPod is
recognized).
2 Adjust the volume on this unit.
To stop playback
Press and hold OFF for 1 second.
To remove the device
Stop playback, then remove the device.
Caution for iPhone
When you connect an iPhone via USB, phone call
volume is controlled by the iPhone, not the unit. Do
not inadvertently increase the volume on the unit
during a call, as a sudden loud sound may result
when the call ends.
Operating an iPod directly (Passenger
control)
1 During playback, press and hold MODE
until [MODE IPOD] appears.
Operations of the iPod become available.
Note that the volume can be adjusted only by
the unit.
To exit passenger control
Press and hold MODE until [MODE AUDIO] appears.
Playing a BLUETOOTH Device
You can play contents on a connected device that
supports BLUETOOTH A2DP (Advanced Audio
Distribution Profile).
1 Make BLUETOOTH connection with the
audio device (page 9).
2 Press SRC to select [BT AUDIO].
3 Operate the audio device to start
playback.
4 Adjust the volume on this unit.
Notes
Depending on the audio device, information such as
title, track number/time and playback status may not
be displayed on this unit.
Even if the source is changed on this unit, playback of
the audio device does not stop.
13GB
Page 14

To match the volume level of the BLUETOOTH
device to other sources
Start playback of the BLUETOOTH audio device at a
moderate volume, and set your usual listening
volume on the unit.
Press MENU, then select [SET SOUND] [SET BTA
VOL] (page 20).
Searching and Playing Tracks
Repeat play and shuffle play
1 During playback, press (repeat) or
(shuffle) repeatedly to select the desired
play mode.
Playback in the selected play mode may take
time to start.
Available play modes differ depending on the
selected sound source.
Searching a track by name (QuickBrowZer™)
1 During USB playback, press (browse)*
to display the list of search categories.
When the track list appears, press (back)
repeatedly to display the desired search
category.
* During USB playback, press (browse) for more
than 2 seconds to directly return to the beginning
of the category list.
2 Rotate the control dial to select the
desired search category, then press it to
confirm.
3 Repeat step 2 to search the desired track.
Playback starts.
To ex i t the Quick -BrowZe r m o de
Press (browse).
Searching by skipping items
(Jump mode)
1 Press (browse).
2 Press SEEK +.
3 Rotate the control dial to select the item.
The list is jumped in steps of 10% of the total
number of items.
4 Press ENTER to return to the Quick-
BrowZer mode.
The selected item appears.
5 Rotate the control dial to select the
desired item, then press it.
Playback starts.
14GB
Page 15

Listening to Pandora®
Pandora® is available to stream music through your
iPhone and Android smartphone. You can control
Pandora® on a USB-connected iPhone or
BLUETOOTH-connected Android smartphone from
this unit.
Pandora® is only available in certain countries.
Please visit
http://www.pandora.com/legal
for more information.
If the device number appears
Make sure that the same numbers are displayed
(e.g., 123456) in this unit and the mobile device,
then press ENTER on this unit and select [Yes] on
the mobile device.
When activating the BLUETOOTH function
You can adjust the volume level.
Press MENU, then select [SET SOUND] [SET BTA
VOL] (page 20).
Available Operations in
Pandora®
Setting up Pandora®
1 Check the compatibility of your mobile
device by visiting the support site on the
back cover.
2 Download the latest version of the
Pandora® application from your
smartphone’s app store. A list of
compatible devices can be found at
www.pandora.com/everywhere/mobile
Streaming Pandora®
1 Connect this unit with the mobile device.
iPhone via USB (page 11)
Android smartphone via BLUETOOTH function
(page 9)
2 Press SRC to select [PANDORA USB] or
[BT PANDORA].
3 Launch Pandora® application on your
mobile device.
4 Press PAUSE to start playback.
“Thumbs” feedback
“Thumbs Up” or “Thumbs Down” feedback allows
you to personalize stations.
1 During playback, press (Thumbs Up) or
(Thumbs Down).
Using the station list
The station list allows you to easily select a desired
station.
1 During playback, press (browse).
2 Press SEEK + to select the sorting order
[BY DATE] or [A TO Z].
3 Rotate the control dial to select the
desired station, then press it.
Playback starts.
Bookmarking
The track currently being played can be
bookmarked and stored in your Pandora® account.
1 During playback, press MODE.
15GB
Page 16
Handsfree Calling (via BLUETOOTH
only)
4 Rotate the control dial to select a
number from the number list, then press
it.
The phone call starts.
To use a cellular phone, connect it wit h this u nit. For
details, see “Preparing a BLUETOOTH Device”
(page 9).
Receiving a Call
1 Press CALL when a call is received with a
ringtone.
The phone call starts.
Note
The ringtone and talker’s voice are output only from the
front speakers.
To reject the call
Press and hold OFF for 1 second.
To en d th e ca l l
Press CALL again.
Making a Call
You can make a call from the phonebook or call
history when a cellular phone supporting PBAP
(Phone Book Access Profile) is connected.
From the phonebook
1 Press CALL, rotate the control dial to
select [PHONE BOOK], then press it.
2 Rotate the control dial to select an initial
from the initial list, then press it.
3 Rotate the control dial to select a name
from the name list, then press it.
From the call history
1 Press CALL, rotate the control dial to
select [RECENT CALL], then press it.
A list of the call history appears.
2 Rotate the control dial to select a name
or phone number from the call history,
then press it.
The phone call starts.
By phone number input
1 Press CALL, rotate the control dial to
select [DIAL NUMBER], then press it.
2 Rotate the control dial to enter the
phone number, and lastly select [ ]
(space), then press ENTER*.
The phone call starts.
* To move the digital indication, press SEEK +/–.
Note
[_] appears instead of [#] on the display.
By redial
1 Press CALL, rotate the control dial to
select [REDIAL], then press it.
The phone call starts.
By preset number
1 Press SRC to select [BT PHONE].
2 Press a number button (1 to 6) to select
the contact you want to call.
3 Press ENTER.
The phone call starts.
16GB
Page 17

Presetting phone numbers
You can store up to 6 contacts in the preset dial.
1 Select a phone number that you want to store in
the preset dial, from the phonebook, call history or
by inputting the phone number directly.
The phone number appears in the display of this
unit.
2 Press and hold a number button (1 to 6) until [MEM]
appears.
The contact is stored in the selected preset number.
By voice tags
You can make a call by saying the voice tag stored
in a connected cellular phone that has a voice
dialing function.
1 Press CALL, rotate the control dial to
select [VOICE DIAL], then press it.
Alternatively, press and hold VOICE for more
than 2 seconds.
2 Say the voice tag stored on the cellular
phone.
Your voice is recognized, and the call is made.
To cancel voice dialing
Press VOICE.
Available Operations during
Call
To adjust the ringtone volume
Rotate the control dial while receiving a call.
To adjust the talker’s voice volume
Rotate the control dial during a call.
To adjust the volume for the other party (Mic
gain adjustment)
Press MIC.
Adjustable volume levels: [MIC-LOW], [MIC-MID],
[MIC-HI].
To reduce echo and noise (Echo Canceler/
Noise Canceler Mode)
Press and hold MIC.
Settable mode: [EC/NC-1], [EC/NC-2].
To switch between handsfree mode and
handheld mode
During a call, press MODE to switch the phone call
audio between the unit and cellular phone.
Note
Depending on the cellular phone, this operation may
not be available.
17GB
Page 18

Useful Functions
Using Siri Eyes Free
Siri Eyes Free allows you to use an iPhone
handsfree by simply speaking into the microphone.
This function requires you to connect an iPhone to
the unit via BLUETOOTH. Availability is limited
iPhone 4s or later. Make sure that your iPhone is
running the latest iOS version.
You must complete BLUETOOTH registration and
connection configurations for the iPhone with the
unit in advance. For details, see “Preparing a
BLUETOOTH Device” (page 9).
1 Activate the Siri function on the iPhone.
For details, refer to the operating instructions
supplied with the iPhone.
2 Press and hold VOICE for more than
2seconds.
The voice command display appears.
3 After the iPhone beeps, speak into the
microphone.
The iPhone beeps again, then Siri starts
responding.
To dea c t ivate Si r i Eyes Free
Press VOICE.
Notes
The iPhone may not recognize your voice depending
on usage conditions. (For example, if you are in a
moving car.)
Siri Eyes Free may not function properly, or the
response time may lag in locations where iPhone
signals are difficult to receive.
Depending on the iPhone’s operating condition, Siri
Eyes Free may not function properly, or may quit.
If you play a track with an iPhone using the
BLUETOOTH audio connection, when the track starts
playback via BLUETOOTH, Siri Eyes Free automatically
quits and the unit switches to the BLUETOOTH audio
source.
When Siri Eyes Free is activated during audio
playback, the unit may switch to the BLUETOOTH
audio source even if you do not specify a track to play.
When connecting the iP hone to the USB port, Siri Eyes
Free may not function properly, or may quit.
When connecting the iPhone to the unit via USB, do
not activate Siri with the iPhone. Siri Eyes Free may
not function properly, or may quit.
There is no audio sound while Siri Eyes Free is
activated.
18GB
Page 19

Settings
Canceling the DEMO Mode
You can cancel the demonstration display which
appears when the source is off and the clock is
displayed.
1 Press MENU, rotate the control dial to
select [SET GENERAL], then press it.
2 Rotate the control dial to select [SET
DEMO], then press it.
3 Rotate the control dial to select [SET
DEMO-OFF], then press it.
The setting is complete.
4 Press (back) twice.
The display returns to normal reception/play
mode.
Basic Setting Operation
You can set items in the following setup categories:
General setup (GENERAL), Sound setup (SOUND),
Display setup (DISPLAY), BLUETOOTH setup (BT)
(Not available when the BT phone is selected.)
1 Press MENU.
2 Rotate the control dial to select the setup
category, then press it.
The items that can be set differ depending on
the source and settings.
3 Rotate the control dial to select the
options, then press it.
To return to the previous display
Press (back).
General Setup (GENERAL)
DEMO (demonstration)
Activates the demonstration: [ON], [OFF].
CLOCK-ADJ (clock adjust) (page 9)
CAUT ALM (caution alarm)
Activates the caution alarm: [ON], [OFF]
(page 8).
(Available only while the source is off and the
clock is displayed.)
BEEP
Activates the beep sound: [ON], [OFF].
AUTO OFF
Shuts off automatically after a desired time
when the unit is turned off: [NO], [30S] (30
seconds), [30M] (30 minutes), [60M] (60
minutes).
CT (clock time)
Activates the CT function: [ON], [OFF].
BTM (best tuning memory) (page 12)
(Available only when the tuner is selected.)
Sound Setup (SOUND)
This setup menu is available when any source
except for the BT phone is selected.
EQ5 PRESET
Selects an equalizer curve from 10 equalizer
curves or off: [OFF], [R&B], [ROCK], [POP],
[DANCE], [HIP-HOP], [ELECTRONICA], [JAZZ],
[SOUL], [COUNTRY], [CUSTOM].
The equalizer curve setting can be memorized
for each source.
19GB
Page 20

EQ5 SETTING
Sets [CUSTOM] of EQ5.
BASE
Selects a preset equalizer curve as a basis for
further customizing: [BAND1] (low frequency),
[BAND2] (mid-low frequency), [BAND3] (mid
frequency), [BAND4] (mid-high frequency),
[BAND5] (high frequency).
The volume level is adjustable in 1 dB steps,
from -10 dB to +10 dB.
BALANCE
Adjusts the sound balance: [RIGHT-15] –
[CENTER] – [LEFT-15].
FADER
Adjusts the relative level: [FRONT-15] – [CENTER]
– [REAR-15].
S.WOOFER (subwoofer)
SW LEVEL (subwoofer level)
Adjusts the subwoofer volume level:
[+6 dB] – [0 dB] – [-6 dB], [ATT].
([ATT] is displayed at the lowest setting.)
SW PHASE (subwoofer phase)
Selects the subwoofer phase: [NORM], [REV].
LPF FREQ (low pass filter frequency)
Selects the subwoofer cut-off frequency: [80Hz],
[100Hz], [120Hz].
AUX VOL (AUX volume level)
Adjusts the volume level for each connected
auxiliary device: [+18 dB] – [0 dB] – [-8 dB].
This setting negates the need to adjust the
volume level between sources.
BTA VOL (BLUETOOTH audio volume level)
Adjusts the volume level for each connected
BLUETOOTH device: [+6 dB] – [0 dB] – [-6 dB].
This setting negates the need to adjust the
volume level between sources.
Display Setup (DISPLAY)
DIMMER
Changes the display brightness: [ON], [OFF].
SND SYNC (sound synchronization)
Activates the synchronization of the illumination
with the sound: [ON], [OFF].
AUTO SCR (auto scroll)
Scrolls long items automatically: [ON], [OFF].
(Not available when the AUX or tuner is
selected.)
BLUETOOTH Setup (BT)
PAI RIN G (page 9)
PHONE BOOK (page 16)
REDIAL (page 16)
RECENT CALL (page 16)
VOICE DIAL (page 17)
DIAL NUMBER (page 16)
RINGTONE
Selects whether this unit or the connected
cellular phone outputs the ringtone: [1] (this
unit), [2] (cellular phone).
AUTO ANS (auto answer)
Sets this unit to answer an incoming call
automatically: [OFF], [1] (about 3 seconds), [2]
(about 10 seconds).
AUTOPAIR (auto pairing)
Start BLUETOOTH pairing automatically when
iOS device version 5.0 or later is connected via
USB: [ON], [OFF].
BT SIGNL (BLUETOOTH signal) (page 10)
Activates/deactivates the BLUETOOTH function.
20GB
Page 21
BT INIT (BLUETOOTH initialize)
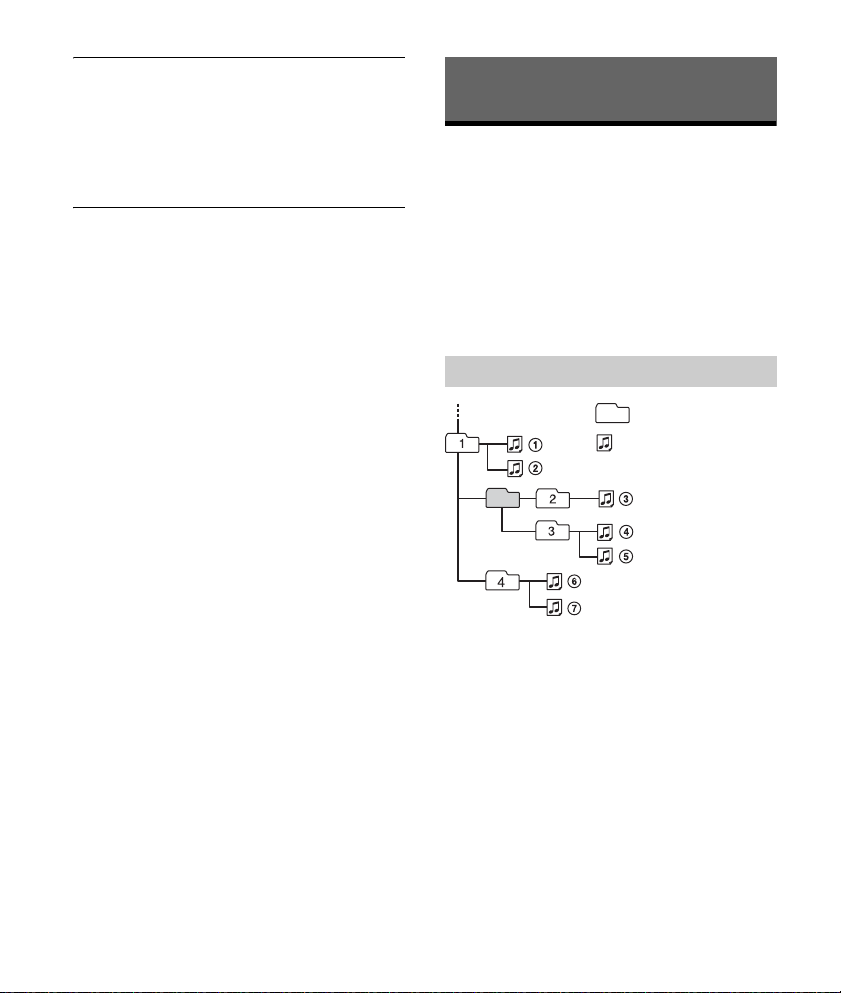
Folder (albu m)
Audio file (track)
Initializes all the BLUETOOTH related settings
(pairing information, preset number, device
information, etc.): [YES], [NO].
When disposing the unit, initialize all the
settings.
(Available only while the source is off and the
clock is displayed.)
Additional Information
Precautions
Cool off the unit beforehand if your car has been
parked in direct sunlight.
Do not leave the front panel or audio devices
brought in inside the car, or it may cause
malfunction due to high temperature in direct
sunlight.
Power antenna (aerial) extends automatically.
To maintain high sound quality
Do not splash liquid onto the unit.
Playback order of audio files
21GB
Page 22

About iPod
+ side up
You can connect to the following iPod models.
Update your iPod devices to the latest software
before use.
Compatible iPhone/iPod models
Compatible Model USB
iPhone 6 Plus
iPhone 6
iPhone 5s
iPhone 5c
iPhone 5
iPhone 4s
iPhone 4
iPhone 3GS
iPod touch
(5th generation)
iPod touch
(4th generation)
iPod touch
(3rd generation)
iPod classic
iPod nano
(7th generation)
iPod nano
(6th generation)
iPod nano
(5th generation)
“Made for iPod,” and “Made for iPhone,” mean
that an electronic accessory has been designed to
connect specifically to iPod or iPhone,
respectively, and has been certified by the
developer to meet Apple performance standards.
Apple is not responsible for the operation of this
device or its compliance with safety and
regulatory standards. Please note that the use of
this accessory with iPod or iPhone may affect
wireless performance.
If you have any questions or problems concerning
your unit that are not covered in this manual,
consult your nearest Sony dealer.
Maintenance
Replacing the lithium battery of the remote
commander
Under normal conditions, the battery will last
approximately 1 year. (The service life may be
shorter, depending on the conditions of use.)
When the battery becomes weak, the range of the
remote commander becomes shorter.
CAUTION
Danger of explosion if battery is incorrectly
replaced. Replaced only with the same or
equivalent type.
Notes on the lithium battery
Keep the lithium battery out of the reach of children.
Should the battery be swallowed, immediately
consult a doctor.
Wipe the battery with a dry cloth to ensure a good
contact.
Be sure to observe the correct polarity when installing
the battery.
Do not hold the battery with metallic tweezers,
otherwise a short-circuit may occur.
Cleaning the connectors
The unit may not function properly if the
connectors between the unit and the front panel
are not clean. In order to prevent this, detach the
front panel (page 8) and clean the connectors with
a cotton swab. Do not apply too much force.
Otherwise, the connectors may be damaged.
22GB
Page 23

Notes
For safety, turn off the ignition before cleaning the
connectors, and remove the key from the ignition
switch.
Never touch the connectors directly with your fingers
or with any metal device.
Specifications
FOR THE CUSTOMERS IN THE USA. NOT
APPLICABLE IN CANADA, INCLUDING IN THE
PROVINCE OF QUEBEC.
POUR LES CLIENTS AUX ÉTATS-UNIS. NON
APPLICABLE AU CANADA, Y COMPRIS LA
PROVINCE DE QUÉBEC.
AUDIO POWER SPECIFICATIONS
Tuner section
FM
Tuning range: 87.5 – 107.9 MHz
Antenna (aerial) terminal:
Intermediate frequency:
Usable sensitivity: 7 dBf
Selectivity: 75 dB at 400 kHz
Signal-to-noise ratio: 73 dB
Separation: 50 dB at 1 kHz
Frequency response: 20 – 15,000 Hz
AM
Tuning range: 530 – 1,710 kHz
CEA2006 Standard
Power Output: 17 Watts RMS × 4 at 4
Ohms < 1% THD+N
SN Ratio: 80 dBA
(reference: 1 Watt into 4 Ohms)
External antenna (aerial) connector
FM CCIR: -1,956.5 to -487.3 kHz and
+500.0 to +2,095.4 kHz
Antenna (aerial) terminal:
External antenna (aerial) connector
Sensitivity: 26 μV
USB Player section
Interface: USB (Full-speed)
Maximum current: 1 A
The maximum number of recognizable tracks:
folders (albums): 256
files (tracks) per folder: 256
Corresponding codec:
MP3 (.mp3)
Bit rate: 8 – 320 kbps (Supports VBR (Variable
Bit Rate))
Sampling rate: 16 – 48 kHz
WMA (.wma)
Bit rate: 32 – 192 kbps (Supports VBR (Variable
Bit Rate))
Sampling rate: 32 kHz, 44.1 kHz, 48 kHz
FLAC (.flac)
Bit depth: 16 bit, 24 bit
Sampling rate: 44.1 kHz, 48 kHz
Wireless Communication
Communication System:
BLUETOOTH Standard version 3.0
Output:
BLUETOOTH Standard Power Class 2
(Max. +4 dBm)
Maximum communication range:
Line of sight approx. 10 m (33 ft)*
Frequency band:
2.4 GHz band (2.4000 – 2.4835 GHz)
Modulation method: FHSS
Compatible BLUETOOTH Profiles*
A2DP (Advanced Audio Distribution Profile) 1.3
AVRCP (Audio Video Remote Control Profile) 1.3
HFP (Handsfree Profile) 1.6
PBAP (Phone Book Access Profile)
Corresponding codec:
SBC (.sbc)
*1 The actual range will vary depending on factors such
as obstacles between devices, magnetic fields
around a microwave oven, static electricity,
reception sensitivity, antenna (aerial)’s performance,
operating system, software application, etc.
*2 BLUETOOTH standard profiles indicate the purpose
of BLUETOOTH communication between devices.
1
2
:
23GB
Page 24

Power amplifier section
Output: Speaker outputs
Speaker impedance: 4 – 8 ohms
Maximum power output: 55 W × 4 (at 4 ohms)
General
Outputs:
Audio outputs terminal (rear, sub)
Power antenna (aerial)/Power amplifier control
terminal (REM OUT)
Inputs:
Remote controller input terminal
Antenna (aerial) input terminal
AUX input jack (stereo mini jack)
USB port
Power requirements: 12 V DC car battery (negative
ground (earth))
Rated current consumption: 10 A
Dimensions:
Approx. 178 mm × 50 mm × 120 mm
1
(7
/8 in × 2 in × 4 3/4 in) (w/h/d)
Mounting dimensions:
Approx. 182 mm × 53 mm × 102 mm
1
(7
/4 in × 2 1/8 in × 4 1/8 in) (w/h/d)
Mass: Approx. 0.7 kg (1 lb 9 oz)
Package contents:
Main unit (1)
Remote commander (1): RM-X231
Parts for installation and connections (1 set)
Your dealer may not handle some of the above
listed accessories. Please ask the dealer for detailed
information.
Design and specifications are subject to change
without notice.
Copyrights
The Bluetooth® word mark and logos are registered
trademarks owned by Bluetooth SIG, Inc. and any
use of such marks by Sony Corporation is under
license. Other trademarks and trade names are
those of their respective owners.
The N-Mark is a trademark or registered trademark
of NFC Forum, Inc. in the United States and in other
countries.
Windows Media is either a registered trademark or
trademark of Microsoft Corporation in the United
States and/or other countries.
This product is protected by certain intellectual
property rights of Microsoft Corporation. Use or
distribution of such technology outside of this
product is prohibited without a license from
Microsoft or an authorized Microsoft subsidiary.
iPhone, iPod, iPod classic, iPod nano, iPod touch,
and Siri are trademarks of Apple Inc., registered in
the U.S. and other countries.
MPEG Layer-3 audio coding technology and patents
licensed from Fraunhofer IIS and Thomson.
Pandora®, the Pandora® logo, and the Pandora®
trade dress are trademarks or registered
trademarks of Pandora Media, Inc., used with
permission.
Google, Google Play and Android are trademarks of
Google Inc.
libFLAC
Copyright (C) 2000-2009 Josh Coalson
Copyright (C) 2011-2013 Xiph.Org Foundation
Redistribution and use in source and binary forms,
with or without modification, are permitted
provided that the following conditions are met:
Redistributions of source code must retain the
above copyright notice, this list of conditions and
the following disclaimer.
24GB
Page 25

Redistributions in binary form must reproduce
the above copyright notice, this list of conditions
and the following disclaimer in the
documentation and/or other materials provided
with the distribution.
Neither the name of the Xiph.org Foundation nor
the names of its contributors may be used to
endorse or promote products derived from this
software without specific prior written
permission.
THIS SOFTWARE IS PROVIDED BY THE COPYRIGHT
HOLDERS AND CONTRIBUTORS “AS IS” AND ANY
EXPRESS OR IMPLIED WARRANTIES, INCLUDING,
BUT NOT LIMITED TO, THE IMPLIED WARRANTIES OF
MERCHANTABILITY AND FITNESS FOR A
PARTICULAR PURPOSE ARE DISCLAIMED. IN NO
EVENT SHALL THE FOUNDATION OR CONTRIBUTORS
BE LIABLE FOR ANY DIRECT, INDIRECT, INCIDENTAL,
SPECIAL, EXEMPLARY, OR CONSEQUENTIAL
DAMAGES (INCLUDING, BUT NOT LIMITED TO,
PROCUREMENT OF SUBSTITUTE GOODS OR
SERVICES; LOSS OF USE, DATA, OR PROFITS; OR
BUSINESS INTERRUPTION) HOWEVER CAUSED AND
ON ANY THEORY OF LIABILITY, WHETHER IN
CONTRACT, STRICT LIABILITY, OR TORT (INCLUDING
NEGLIGENCE OR OTHERWISE) ARISING IN ANY WAY
OUT OF THE USE OF THIS SOFTWARE, EVEN IF
ADVISED OF THE POSSIBILITY OF SUCH DAMAGE.
Troubleshooting
The following checklist will help you remedy
problems you may encounter with your unit.
Before going through the checklist below, check
the connection and operating procedures.
For details on using the fuse and removing the unit
from the dashboard, see “Connection/Installation”
(page 30).
If the problem is not solved, visit the support site on
the back cover.
General
No power is being supplied to the unit.
If the unit is turned off and the display
disappears, the unit cannot be operated with the
remote commander.
Tu rn on t he uni t.
No sound or the sound is very low.
The position of the fader control [FADER] is not
set for a 2-speaker system.
The volume of the unit and/or connected device
is very low.
Increase the volume of the unit and connected
device.
No beep sound.
An optional power amplifier is connected and
you are not using the built-in amplifier.
The contents of the memory have been erased.
The power supply lead or battery has been
disconnected or not connected properly.
Stored stations and correct time are erased.
The fuse has blown.
Makes a noise when the position of the ignition
is switched.
The leads are not matched correctly with the car’s
accessory power connector.
During playback or reception, the demonstration
mode starts.
If no operation is performed for 5 minutes with
[DEMO-ON] set, the demonstration mode starts.
Set [DEMO-OFF] (page 19).
25GB
Page 26
The display disappears from/does not appear in
the display window.
The dimmer is set to [DIM-ON] (page 20).
The display disappears if you press and hold OFF.
Press OFF on the unit until the display appears.
The connectors are dirty (page 22).
The display/illumination flashes.
The power supply is not sufficient.
Check that the car battery supplies enough
power to the unit. (The power requirement is
12 V DC.)
The operation buttons do not function.
The connection is not correct.
Check the connection of the unit.
If the situation does not improve, press DSPL
and (back)/MODE for more than 2 seconds
to reset the unit.
The contents stored in memory are erased.
For your safety, do not reset the unit while you
are driving.
USB device playback
You cannot play items via a USB hub.
This unit cannot recognize USB devices via a USB
hub.
A USB device takes longer to play.
The USB device contains files with a complicated
tree structure.
The sound is intermittent.
The sound may be intermittent at a high-bit-rate.
DRM (Digital Rights Management) files may not
be playable in some cases.
Audio file cannot be played.
USB device formatted with file systems other
than FAT16 or FAT32 are unsupported.*
* This unit supports FAT16 and FAT32, but some USB
device may not support all of these FAT. For details,
refer to the operating instruction of each USB device
or contact the manufacturer.
Radio reception
Stations cannot be received.
The sound is hampered by noises.
The connection is not correct.
If your car has built-in radio antenna (aerial) in
the rear/side glass, connect an REM OUT lead
(blue/white striped) or accessory power supply
lead (red) to the power supply lead of a car’s
antenna (aerial) booster.
Check the connection of the car antenna
(aerial).
If the auto antenna (aerial) will not extend,
check the connection of the power antenna
(aerial) control lead.
Preset tuning is not possible.
The broadcast signal is too weak.
RDS
PTY displays [- - - - - - - -].
The current station is not an RDS station.
RDS data has not been received.
The station does not specify the program type.
26GB
NFC function
One touch connection (NFC) is not possible.
If the smartphone does not respond to the
touching.
Check that the NFC function of the smartphone
is turned on.
Move the N-Mark part of the smartphone
closer to the N-Mark part on this unit.
If the smartphone is in a case, remove it.
NFC receiving sensitivity depends on the device.
If One touch connection with the smartphone
fails several times, make BLUETOOTH connection
manually.
BLUETOOTH function
The connecting device cannot detect this unit.
Before the pairing is made, set this unit to pairing
standby mode.
While connected to a BLUETOOTH device, this
unit cannot be detected from another device.
Disconnect the current connection and search
for this unit from another device.
When the device pairing is made, set the
BLUETOOTH signal output to on (page 10).
Page 27

Connection is not possible.
The connection is controlled from one side (this
unit or BLUETOOTH device), but not both.
Connect to this unit from a BLUETOOTH device
or vice versa.
The name of the detected device does not
appear.
Depending on the status of the other device, it
may not be possible to obtain the name.
No ringtone.
Adjust the volume by rotating the control dial
while receiving a call.
Depending on the connecting device, the
ringtone may not be sent properly.
Set [RINGTONE] to [1] (page 20).
The front speakers are not connected to the unit.
Connect the front speakers to the unit. The
ringtone is output only from the front speakers.
The talker’s voice cannot be heard.
The front speakers are not connected to the unit.
Connect the front speakers to the unit. The
talker’s voice is output only from the front
speakers.
A call partner says that the volume is too low or
high.
Adjust the volume accordingly using mic gain
adjustment (page 17).
Echo or noise occurs in phone call conversations.
Lower the volume.
Set EC/NC Mode to [EC/NC-1] or [EC/NC-2]
(page 17).
If the ambient noise other than the phone call
sound is loud, try reducing this noise.
E.g.: If a window is open and road noise, etc., is
loud, shut the window. If an air conditioner is
loud, lower the air conditioner.
The phone is not connected.
When BLUETOOTH audio is played, the phone is
not connected even if you press CALL.
Connect from the phone.
The phone sound quality is poor.
Phone sound quality depends on reception
conditions of cellular phone.
Move your car to a place where you can
enhance the cellular phone’s signal if the
reception is poor.
The volume of the connected audio device is low
(high).
Volume level will differ depending on the audio
device.
Adjust the volume of the connected audio
device or this unit.
The sound skips during playback of a
BLUETOOTH audio device.
Reduce the distance between the unit and the
BLUETOOTH audio device.
If the BLUETOOTH audio device is stored in a case
which interrupts the signal, remove the audio
device from the case during use.
Several BLUETOOTH devices or other devices
which emit radio waves are in use nearby.
Turn off the other devices.
Increase the distance from the other devices.
The playback sound stops momentarily when the
connection between this unit and the cellular
phone is being made. This is not a malfunction.
The connected BLUETOOTH audio device cannot
be controlled.
Check that the connected BLUETOOTH audio
device supports AVRCP.
Some functions do not work.
Check if the connecting device supports the
functions in question.
A call is answered unintentionally.
The connecting phone is set to answer a call
automatically.
Pairing failed due to a timeout.
Depending on the connecting device, the time
limit for pairing may be short.
Try completing the pairing within the time.
BLUETOOTH function cannot operate.
Turn off the unit by pressing OFF for more than
2 seconds, then turn the unit on again.
27GB
Page 28
No sound is output from the car speakers during
handsfree call.
If the sound is output from the cellular phone, set
the cellular phone to output the sound from the
car speakers.
Siri Eyes Free is not activated.
Perform the handsfree registration for an iPhone
that supports Siri Eyes Free.
Set the Siri function on the iPhone to on.
Cancel the BLUETOOTH connection with the
iPhone and the unit, and reconnect.
Pandora® operation
Pandora® connection is not possible.
Shut down the Pandora® application on the
mobile device, and then launch it again.
Error displays/Messages
HUB NO SUPRT: USB hubs are not supported.
IPD STOP: iPod playback has finished.
Operate your iPod/iPhone to start playback.
NO DEV: A USB device is not connected or
recognized.
Make sure the USB device or USB cable is securely
connected.
OVERLOAD: The USB device is overloaded.
Disconnect the USB device, then press SRC to
select another source.
The USB device has a fault, or an unsupported
device is connected.
READ: Now reading information.
Wait until reading is complete and playback
starts automatically. This may take some time
depending on the disc structure.
USB ERROR: The USB device cannot be played.
Connect the USB device again.
USB NO MUSIC: There is no playable file.
Connect a USB device containing playable files
(page 23).
USB NO SUPRT: The USB device is not supported.
For details on the compatibility of your USB
device, visit the support site on the back cover.
For BLUETOOTH function:
ERROR: The selected operation could not be
performed.
Wait for a while, then try again.
NO DEV: The BLUETOOTH device is not connected
or recognized.
Make sure the BLUETOOTH device is securely
connected, or the BLUETOOTH connection is
established with the BLUETOOTH device.
P EMPTY: No phone numbers are stored.
UNKNOWN: A name or phone number cannot be
displayed.
WITHHELD: The phone number is hidden by the
caller.
For Pandora® operation:
CANNOT SKIP: Skipping tracks is not allowed.
Wait until the commercial ends, next track
begins, or select another station on the list.
Pandora® limits the number of skips allowed on
their service.
NO NETWORK: The network connection is unstable
or lost.
Make the network connection again on the
device, or wait until the network connection is
established.
NO STATION - PLEASE - CREATE - STATION - IN PANDORA APP: No stations on your account.
Create the station on the mobile device.
28GB
Page 29

NOT ALLOWED: The selected operation is not
allowed.
“Thumbs” feedback is not allowed.
Wait until the commercial ends.
S ome functions, such as Shared Station, d o not
permit feedback. Wait until the next track
begins, or select another station on the list.
Bookmark is not allowed.
Wait until the commercial ends.
Select another track or station, then try it again.
PAN ERROR: The selected operation could not be
performed.
Wait for a while, then try again.
PAN MAI NT: The Pandora® server is under
maintenance.
Wait for a while, then try again.
PAN NO SUPRT: The connected device is not
supported.
For details of compatible devices, visit the
support site.
PAN OPE N AP P: Pandora® is not running when
connecting via the USB port.
Launch the Pandora® application on the iPhone.
PAN OPEN APP - PRESS PAUSE: Pandora® is not
running when connecting via the BLUETOOTH
function.
Launch the Pandora® application on the mobile
device, then press PAUSE.
PAN RESTRICT: Pandora® is not available outside
your country.
PLEASE LOGIN - PANDORA APP: You are not
logged into your Pandora® account.
Disconnect the device, log into your Pandora®
account, then connect the device again.
UPDATE PAN: An old version of Pandora® is
connected.
Update the Pandora® application to the latest
version.
If these solutions do not help improve the situation,
consult your nearest Sony dealer.
29GB
Page 30
Connection/Installation
× 4
5 × max. 8 mm
(7/32 × max. 5/16 in)
× 2
Cautions
Run all ground (earth) leads to a common
ground (earth) point.
Do not get the leads trapped under a screw, or
caught in moving parts (e.g., seat railing).
Before making connections, turn the car ignition
off to avoid short circuits.
Connect the yellow and red power supply leads
only after all other leads have been connected.
Be sure to insulate any loose unconnected leads
with electrical tape for safety.
Precautions
Choose the installation location carefully so that
the unit will not interfere with normal driving
operations.
Avoid installing the unit in areas subject to dust,
dirt, excessive vibration, or high temperature,
such as in direct sunlight or near heater ducts.
Use only the supplied mounting hardware for a
safe and secure installation.
Note on the power supply lead (yellow)
When connecting this unit in combination with other
stereo components, the amperage rating of the car
circuit to which the unit is connected must be higher
than the sum of each component’s fuse amperage
rating.
Mounting angle adjustment
Adjust the mounting angle to less than 45°.
Parts List for Installation
This parts list does not include all the package
contents.
The bracket and the protection collar are
attached to the unit before shipping. Before
mounting the unit, use the release keys to
remove the bracket from the unit. For details,
see “Removing the protection collar and the
bracket” (page 33).
Keep the release keys for future use as they are
also necessary if you remove the unit from your
car.
30GB
Page 31

Connection
from a wired remote control
(not supplied)*
4
White
White/black striped
Gray
Black
Yel l o w
Red
Blue/white striped
from a car antenna
(aerial)
Front speaker*1*
2
Rear speaker*1*
2
Gray/black strip ed
Green
Green/black striped
Purple
Purple/black striped
*
3
*
3
Subwoofer*
1
Power amplifier*
1
For details, see “Mak ing
connections” (page 32).
*1 Not supplied
*2 Speaker impedance: 4 – 8 Ω × 4
*3 RCA pin cord (not supplied)
*4 Depending on the type of car, use an adaptor for a
wired remote control (not supplied).
31GB
Page 32

Making connections
Front speaker
Subwoofer
To a common ground (earth) point
First connect the black ground (earth) lead, then
connect the yellow and red power supply leads.
To the +12 V power terminal which is
energized at all times
Be sure to first connect the black ground (earth)
lead to a common ground (earth) point.
To the +12 V power terminal which is
energized when the ignition switch is set to
the accessory position
If there is no accessory position, connect to the
+12 V power (battery) terminal which is
energized at all times.
Be sure to first connect the black ground (earth)
lead to a common ground (earth) point.
To the power antenna (aerial) control lead or
the power supply lead of the antenna (aerial)
booster
It is not necessary to connect this lead if there is
no power antenna (aerial) or antenna (aerial)
booster, or with a manually-operated telescopic
antenna (aerial).
To AMP REMOTE IN of an optional power
amplifier
This connection is only for amplifiers and a
power antenna (aerial). Connecting any other
system may damage the unit.
Subwoofer Easy Connection
You can use a subwoofer without a power amplifier
when it is connected to a rear speaker cord.
Memory hold connection
When the yellow power supply lead is connected,
power will always be supplied to the memory
circuit even when the ignition switch is turned off.
Speaker connection
Before connecting the speakers, turn the unit off.
Use speakers with an impedance of 4 to 8 ohms,
and with adequate power handling capacities to
avoid damage.
Note
Use a subwoofer with an impedance of 4 to 8 ohms,
and with adequate power handling capacities to avoid
damage.
32GB
Page 33
Installation
Face the hook inwards.
Screw
Box
182 mm (7 1/4 in)
53 mm (2 1/8 in)
Catch
Removing the protection collar and the
bracket
Before installing the unit, remove the protection
collar and the bracket from the unit.
1 Pinch both edges of the protection collar
, then pull it out.
Mounting the unit in the dashboard
Before installing, make sure the catches on both
sides of the bracket are bent inwards 2 mm (
in). When mounting in a Japanese car, see
“Mounting the unit in a Japanese car” (page 34).
1 Position the bracket inside the
dashboard, then bend the claws outward
for a tight fit.
3
/32
2 Insert both release keys until they
click, and pull down the bracket , then
pull up the unit to separate.
Note
Before installing this unit, remove the screw and box on
the back of the unit. Do not use the previous parts you
removed when installing the unit.
2 Mount the unit onto the bracket , then
attach the protection collar .
Notes
If the catches are straight or bent outwards, the unit
will not be installed securely and may spring out.
Make sure the 4 catches on the protection collar
are properly engaged in the slots of the unit.
33GB
Page 34

Mounting the unit in a Japanese car
to dashboard/center console
Existing parts supplied with
your car
Bracket
Bracket
to dashboard/center console
Existing parts supplied with
your car
Bracket
Bracket
Fuse (10 A)
You may not be able to install this unit in some
makes of Japanese cars. In such a case, consult your
Sony dealer.
TOYOTA
NISSAN
Fuse replacement
When replacing the fuse, be sure
to use one matching the
amperage rating stated on the
original fuse. If the fuse blows,
check the power connection and
replace the fuse. If the fuse blows
again after replacement, there
may be an internal malfunction. In such a case,
consult your nearest Sony dealer.
Note
To prevent malfunction, install only with the supplied
screws .
Detaching and attaching the front panel
For details, see “Detaching the Front Panel”
(page 8).
34GB
Page 35

35GB
Page 36

36GB
Page 37

Page 38

Pour plus de sécurité, installez cet appareil dans
le tableau de bord du véhicule, car la section
arrière de l’appareil devient chaude en cours de
fonctionnement.
Pour plus de détails, reportez-vous à la section
« Raccordement/Installation » (page 32).
La plaque signalétique indiquant la tension
d’alimentation, etc. se trouve sur le dessous du
châssis.
Avertissement
Le présent appareil est conforme aux CNR
d’Industrie Canada applicables aux appareils radio
exempts de licence.
L’exploitation est autorisée aux deux conditions
suivantes :
(1) l’appareil ne doit pas produire de brouillage;
(2) l’utilisateur de l’appareil doit accepter tout
brouillage radioélectrique subi, même si le
brouillage est susceptible d’en compromettre le
fonctionnement.
Cet équipement ne doit pas être placé au même
endroit ni utilisé avec une autre antenne ou un
autre émetteur.
Conformément à la réglementation d’Industrie
Canada, le présent émetteur radio peut fonctionner
avec une antenne d’un type et d’un gain maximal
(ou inférieur) approuvé pour l’émetteur par
Industrie Canada. Dans le but de réduire les risques
de brouillage radioélectrique à l’intention des
autres utilisateurs, il faut choisir le type d’antenne
et son gain de sorte que la puissance isotrope
rayonnée équivalente (p.i.r.e.) ne dépasse pas
l’intensité nécessaire à l’établissement d’une
communication satisfaisante.
Cet équipement est conforme aux limites
d’exposition aux rayonnements énoncées pour un
environnement non contrôlé et respecte les règles
les radioélectriques (RF) de la FCC lignes directrices
d’exposition et d’exposition aux fréquences
radioélectriques (RF) CNR-102 de l’IC. Cet
équipement émet une énergie RF très faible qui est
considérée conforme sans évaluation de
l’exposition maximale autorisée. Cependant, cet
équipement doit être installé et utilisé en gardant
une distance de 20 cm ou plus entre le dispositif
rayonnant et le corps.
Remarque sur la pile au lithium
N’exposez pas la pile à une chaleur excessive
comme à la lumière directe du soleil, au feu ou
autre.
Avertissement si le contact de votre
véhicule ne comporte pas de position ACC
Veillez à régler la fonction AUTO OFF (page 20).
L’appareil s’éteint complètement et
automatiquement après le laps de temps choisi
une fois l’appareil arrêté afin d’éviter que la
batterie ne se décharge. Si vous ne réglez pas la
fonction AUTO OFF, appuyez sur la touche OFF et
maintenez-la enfoncée jusqu’à ce que l’affichage
disparaisse chaque fois que vous coupez le
contact.
Avis d’exclusion de responsabilité relatif aux
services proposés par des tiers
Les services proposés par des tiers peuvent être
modifiés, suspendus ou clôturés sans avis
préalable. Sony n’assume aucune responsabilité
dans ce genre de situation.
2FR
Page 39

Avis important
Attention
SONY NE PEUT EN AUCUN CAS ÊTRE TENU
RESPONSABLE DE TOUT DOMMAGE DIRECT,
INDIRECT OU CONSÉCUTIF OU DE TOUT AUTRE
DOMMAGE, Y COMPRIS, SANS LIMITATION, TOUTE
PERTE DE PROFITS, DE REVENU, DE DONNÉES,
D’UTILISATION DU PRODUIT OU DE TOUT APPAREIL
ASSOCIÉ, DE DISPONIBILITÉ ET DE TEMPS DE
L’UTILISATEUR LIÉE À OU DÉCOULANT DE
L’UTILISATION DE CE PRODUIT, MATÉRIEL ET/OU
LOG ICIE L.
Cher client, ce produit comprend un émetteur radio.
Veuillez consulter le mode d’emploi de votre
véhicule ou contacter le constructeur ou le
concessionnaire de votre véhicule avant d’installer
ce produit dans votre véhicule.
Appels d’urgence
Cet appareil mains libres BLUETOOTH et l’appareil
électronique connecté au système mains libres
fonctionnent grâce à des signaux radio, des
réseaux cellulaires et terrestres, ainsi que des
fonctions programmées par l’utilisateur, qui ne
peuvent garantir la connexion dans toutes les
conditions.
Par conséquent, ne vous fiez pas uniquement sur
les périphériques électroniques pour vos
communications importantes (telles que les
urgences médicales).
Communication BLUETOOTH
Les émissions d’hyperfréquences d’un
périphérique BLUETOOTH peuvent perturber le
fonctionnement des appareils médicaux
électroniques. Pour éviter de causer un accident,
éteignez cet appareil et les autres périphériques
BLUETOOTH dans les endroits suivants :
endroits où du gaz inflammable est présent,
dans un hôpital, un train, un avion ou une
station-service
à proximité de portes automatiques ou d’un
avertisseur d’incendie
Cet appareil prend en charge les capacités de
sécurité conformes à la norme BLUETOOTH pour
offrir une connexion sécurisée lors de l’utilisation
de la technologie BLUETOOTH sans fil; cependant,
la sécurité peut être insuffisante selon le réglage.
Soyez prudent lorsque vous communiquez au
moyen de la technologie BLUETOOTH sans fil.
Nous ne pouvons être tenus responsables de la
fuite d’informations lors d’une communication
BLUETOOTH.
Si vous avez des questions ou des problèmes
concernant cet appareil qui ne sont pas abordés
dans ce mode d’emploi, contactez votre détaillant
Sony le plus proche.
3FR
Page 40

Table des matières
Avertissement . . . . . . . . . . . . . . . . . . . . . . . . . . . . . . 2
Guide des pièces et commandes . . . . . . . . . . . . . . 5
Préparation
Retrait de la façade . . . . . . . . . . . . . . . . . . . . . . . . . . 7
Réglage de l’horloge . . . . . . . . . . . . . . . . . . . . . . . . 8
Préparation d’un périphérique BLUETOOTH . . . . . . 8
Raccordement d’un périphérique USB . . . . . . . . . 11
Raccordement d’un autre appareil audio
portatif . . . . . . . . . . . . . . . . . . . . . . . . . . . . . . . . 11
Écoute de la radio
Écoute de la radio . . . . . . . . . . . . . . . . . . . . . . . . . . 12
Utilisation du RDS (système de
radiocommunication de données) . . . . . . . . . 12
Lecture
Lecture d’un périphérique USB . . . . . . . . . . . . . . . 13
Lecture d’un périphérique BLUETOOTH . . . . . . . . 14
Recherche et lecture des plages . . . . . . . . . . . . . . 14
Écoute de Pandora®
Configuration de Pandora® . . . . . . . . . . . . . . . . . . 15
Transmission en continu Pandora® . . . . . . . . . . . . 16
Opérations disponibles dans Pandora® . . . . . . . . 16
Appel en mains libres (via BLUETOOTH
uniquement)
Réception d’un appel . . . . . . . . . . . . . . . . . . . . . . . 17
Faire un appel . . . . . . . . . . . . . . . . . . . . . . . . . . . . . 17
Opérations disponibles en cours d’appel . . . . . . . 18
Réglages
Annulation du mode DEMO. . . . . . . . . . . . . . . . . . 20
Configuration de base . . . . . . . . . . . . . . . . . . . . . . 20
Configuration générale (GENERAL) . . . . . . . . . . . . 20
Configuration sonore (SOUND) . . . . . . . . . . . . . . . 21
Configuration d’affichage (DISPLAY). . . . . . . . . . . 21
Configuration BLUETOOTH (BT) . . . . . . . . . . . . . . . 22
Informations complémentaires
Précautions . . . . . . . . . . . . . . . . . . . . . . . . . . . . . . . 22
Entretien . . . . . . . . . . . . . . . . . . . . . . . . . . . . . . . . . 23
Caractéristiques techniques . . . . . . . . . . . . . . . . . 24
Dépannage . . . . . . . . . . . . . . . . . . . . . . . . . . . . . . . 26
Raccordement/Installation
Mises en garde . . . . . . . . . . . . . . . . . . . . . . . . . . . . 32
Liste des pièces nécessaires à l’installation . . . . . 32
Raccordement. . . . . . . . . . . . . . . . . . . . . . . . . . . . . 33
Installation . . . . . . . . . . . . . . . . . . . . . . . . . . . . . . . 35
Avis important
La garantie de ce produit est inclus dans le
présent manuel (page 37). Conservez le présent
manuel pour référence ultérieure.
Fonctions pratiques
Utilisation de Siri Eyes Free. . . . . . . . . . . . . . . . . . . 19
4FR
Page 41

Guide des pièces et commandes
Appareil principal
Touche de déverrouillage de la façade
SRC (source)
Permet de mettre l’appareil en marche.
Permet de changer la source.
OFF
Appuyez sur la touche et maintenez-la
enfoncée pendant 1 seconde pour désactiver la
source et afficher l’horloge.
Appuyez sur la touche et maintenez-la
enfoncée pendant plus de 2 secondes pour
éteindre l’appareil et l’affichage.
Si l’appareil est éteint et que l’affichage
disparaît, le fonctionnement par télécommande
est désactivé.
Molette de réglage
Tournez pour régler le volume.
PUSH ENTER
Permet d’entrer l’élément sélectionné.
MENU*
Permet d’ouvrir le menu de configuration.
VOICE (pages 18, 19)
Appuyez sur la touche et maintenez-la
enfoncée pendant plus de 2 secondes pour
activer la composition vocale ou la fonction Siri
(iPhone uniquement).
Symbole N
Touchez à la molette de réglage avec un
téléphone intelligent Android™ pour établir une
connexion Bluetooth®.
* Non disponible lorsque le téléphone BT est
sélectionné.
Fenêtre d’affichage
SEEK +/–
Permet de syntoniser automatiquement des
stations de radio. Appuyez sur la touche et
maintenez-la enfoncée pour syntoniser des
stations manuellement.
/ (précédente/suivante)
/ (retour rapide/avance rapide)
PTY (type d’émission)
Permet de sélectionner PTY en mode RDS.
(navigation) (pages 15, 16)
Permet d’accéder au mode de navigation
pendant la lecture.
5FR
Page 42

CALL
Permet d’accéder au menu d’appel. Permet de
recevoir/mettre fin à un appel.
Appuyez sur la touche et maintenez-la
enfoncée pendant plus de 2 secondes pour
sélectionner le signal BLUETOOTH.
MODE (pages 12, 14, 16, 18)
(retour)
Permet de retourner à l’écran précédent.
Récepteur de télécommande
Touches numériques (1 à 6)
Permettent de capter des stations de radio
mémorisées. Appuyez sur la touche et
maintenez-la enfoncée pour mémoriser des
stations.
Permettent de composer un numéro de
téléphone mémorisé. Appuyez sur la touche et
maintenez-la enfoncée pour mémoriser un
numéro de téléphone.
ALBUM /
Permet de sauter un album sur un appareil
audio. Appuyez sur la touche et maintenez-la
enfoncée pour sauter des albums en continu.
Appuyez sur pour laisser une appréciation
positive ou sur pour laisser une appréciation
négative dans Pandora® (page 16).
(répétition)
(aléatoire)
MIC (page 18)
PAU SE
MEGA BASS
Permet d’accentuer les graves en
synchronisation avec le niveau de volume.
Appuyez sur la touche pour modifier le réglage
MEGA BASS : [1], [2], [OFF].
Prise d’entrée AUX
DSPL (affichage)
Appuyez sur la touche pour changer les
éléments d’affichage.
SCRL (défilement)
Appuyez sur la touche et maintenez-la
enfoncée pour faire défiler un élément
d’affichage.
Port USB
Microphone (panneau interne)
Pour que la fonction mains libres puisse
fonctionner correctement, ne couvrez pas le
microphone avec du ruban adhésif, etc.
Télé commande RM-X231
La touche VOL (volume) + comporte un point
tactile.
CALL
Permet d’accéder au menu d’appel. Permet de
recevoir/mettre fin à un appel.
SOUND*
Permet d’ouvrir le menu SOUND directement.
MENU*
Appuyez sur la touche et maintenez-la
enfoncée pour ouvrir le menu de configuration.
* Non disponible lorsque le téléphone BT est
sélectionné.
6FR
Page 43

///
Permet de sélectionner un élément de
configuration, etc.
ENTER
Permet d’entrer l’élément sélectionné.
/ (précédente/suivante)
+/– (album +/–)
VOL (volume) +/–
Retirez la feuille de protection avant l’utilisation.
Préparation
Retrait de la façade
Vous pouvez retirer la façade de cet appareil pour le
protéger du vol.
1 Appuyez sur la touche OFF et
maintenez-la enfoncée jusqu’à ce que
l’appareil s’éteigne. Appuyez sur la
touche de déverrouillage de la façade ,
puis retirez la façade en la tirant vers
vous.
Alarme d’avertissement
Si vous mettez la clé de contact en position OFF
sans retirer la façade, l’alarme d’avertissement
retentit pendant quelques secondes. L’alarme
retentit uniquement lorsque l’amplificateur intégré
est utilisé.
Numéros de série
Assurez-vous que le numéro de série indiqué sous
l’appareil correspond bien à celui indiqué à l’arrière
de la façade. Sinon, vous ne pourrez pas établir le
pairage BLUETOOTH ou effectuer la connexion et la
déconnexion à l’aide de la fonction NFC.
Installation de la façade
7FR
Page 44

Réglage de l’horloge
1 Appuyez sur MENU, tournez la molette
de réglage pour sélectionner [SET
GENERAL], puis appuyez dessus.
2 Tournez la molette de réglage pour
sélectionner [SET CLOCK-ADJ], puis
appuyez dessus.
L’indication des heures clignote.
3 Tournez la molette de réglage pour
régler l’heure et les minutes.
Appuyez sur SEEK +/– pour déplacer l’indication
numérique.
4 Appuyez sur MENU après avoir réglé les
minutes.
Le réglage est terminé et l’horloge démarre.
Affichage de l’horloge
Appuyez sur la touche DSPL.
Préparation d’un périphérique
BLUETOOTH
Vous pouvez écouter de la musique ou effectuer un
appel en mains libres selon le périphérique
compatible BLUETOOTH, tel que téléphone
intelligent, téléphone cellulaire ou périphérique
audio (ci-après nommé « périphérique
BLUETOOTH », sauf en cas d’indication différente).
Pour plus de détails sur la connexion, reportez-vous
au mode d’emploi fourni avec le périphérique.
Avant de connecter le périphérique, diminuez le
volume de cet appareil; sinon, une accentuation du
volume pourrait se produire.
Connexion par simple contact avec un
téléphone intelligent (NFC)
Lorsque vous touchez la molette de réglage de
l’appareil avec un téléphone intelligent compatible
NFC*, l’appareil est automatiquement jumelé et
connecté avec le téléphone intelligent.
* La technologie NFC (Near Field Communication –
Communication en champ proche) permet d’établir
une communication sans fil à courte portée entre
différents périphériques, tels que des téléphones
cellulaires et des étiquettes CI. Grâce à la fonction
NFC, la communication des données peut être
réalisée en touchant simplement le symbole
correspondant ou la zone spécifiée sur les
périphériques compatibles NFC.
Pour les téléphones intelligents avec Android
OS 4.0 ou version antérieure, le téléchargement de
l’application « NFC Easy Connect » à partir de
Google Play™ est requis. Il est possible que
l’application ne soit pas disponible en
téléchargement dans certains pays/certaines
régions.
1 Activez la fonction NFC sur le téléphone
intelligent.
Pour plus de détails, reportez-vous au mode
d’emploi fourni avec le téléphone intelligent.
2 Touchez le symbole N de l’appareil avec
le symbole N du téléphone intelligent.
Assurez-vous que s’allume dans la fenêtre
d’affichage de l’appareil.
8FR
Page 45
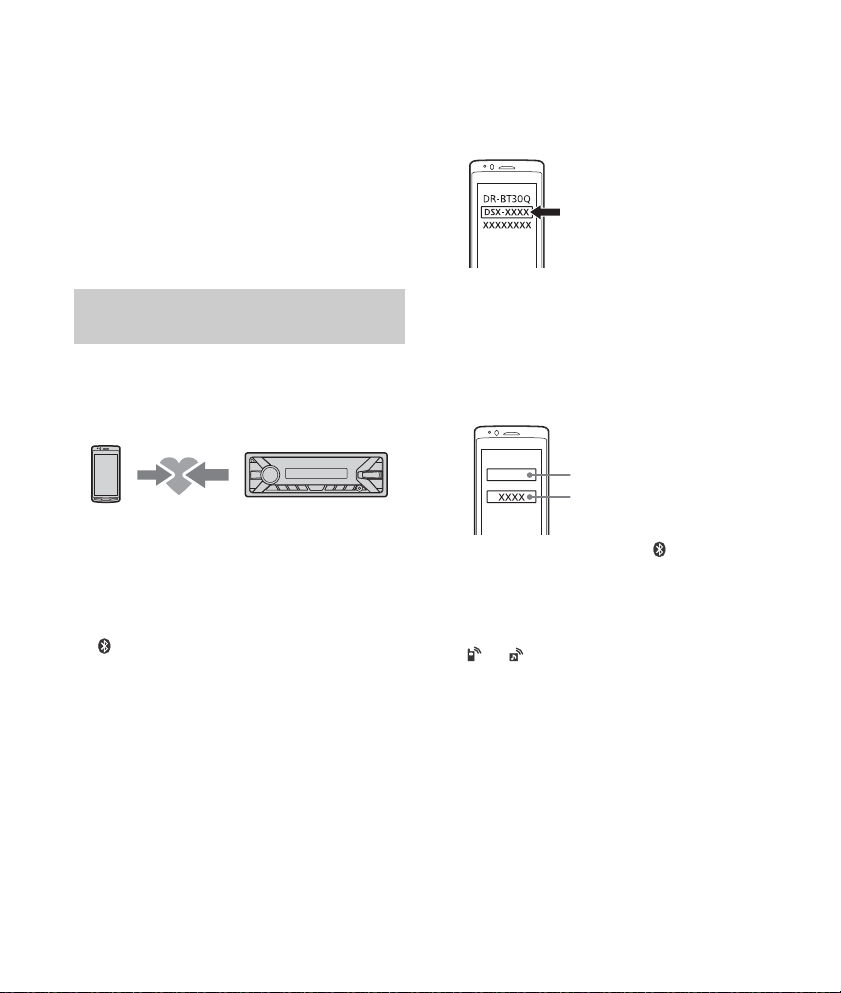
Pour effectuer la déconnexion par simple
[0000]
Entrez le code d’authentification
contact
Touchez de nouveau le symbole N de l’appareil
avec le symbole N du téléphone intelligent.
Remarques
Pendant que vous établissez la connexion, manipulez
le téléphone intelligent avec soin pour éviter de
l’égratigner.
Il n’est pas possible d’établir la connexion par simple
contact lorsque l’appareil est déjà connecté à un
autre périphérique compatible NFC. En pareil cas,
déconnectez l’autre périphérique, puis établissez de
nouveau la connexion avec le téléphone intelligent.
4 Sélectionnez [DSX-XXXX] (le nom de
votre modèle) sur l’affichage du
périphérique BLUETOOTH.
Si le nom de votre modèle n’apparaît pas,
recommencez la procédure à partir de l’étape 2.
Pairage et connexion avec un
périphérique BLUETOOTH
Lorsque vous connectez un périphérique
BLUETOOTH pour la première fois, un
enregistrement mutuel (nommé « pairage ») est
nécessaire. Le pairage permet à cet appareil et aux
autres périphériques de se reconnaître entre eux.
1 Placez le périphérique BLUETOOTH à 1 m
(3 pi) maximum de cet appareil.
2 Appuyez sur la touche CALL, tournez la
molette de réglage pour sélectionner
[SET PAIRING], puis appuyez dessus.
clignote pendant que l’appareil est en mode
de veille de pairage.
3 Procédez au pairage sur le périphérique
BLUETOOTH afin qu’il détecte cet
appareil.
5 Si la saisie d’un code d’authentification*
est requise sur le périphérique
BLUETOOTH, saisissez [0000].
* Le code d’authentification peut également être
nommé « clé d’authentification », « code NIP »,
«numéro NIP» ou «mot de passe», etc., en
fonction du périphérique.
Une fois le pairage effectué, demeure
allumé.
6 Sélectionnez cet appareil sur le
périphérique BLUETOOTH pour établir la
connexion BLUETOOTH.
ou s’allume lorsque la connexion est
établie.
Remarque
Pendant la connexion à un périphérique BLUETOOTH,
cet appareil ne peut pas être détecté par un autre
périphérique. Pour permettre la détection, accédez au
mode de pairage et recherchez cet appareil à partir de
l’autre périphérique.
Pour démarrer la lecture
Pour plus de détails, reportez-vous à la section
« Lecture d’un périphérique BLUETOOTH »
(page 14).
9FR
Page 46
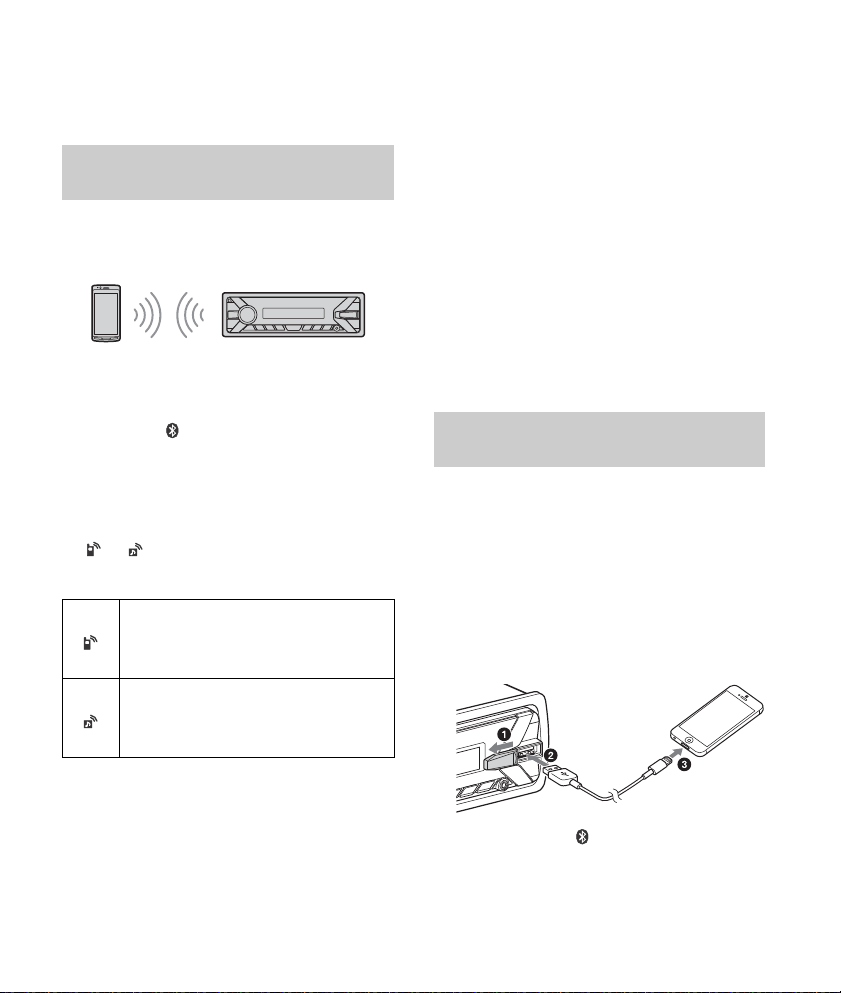
Annulation du pairage
Effectuez l’étape 2 pour quitter le mode de pairage
après avoir jumelé cet appareil et le périphérique
BLUETOOTH.
Connexion avec un périphérique
BLUETOOTH jumelé
Pour utiliser le périphérique une fois le pairage
effectué, établissez la connexion à cet appareil.
Certains périphériques jumelés se connectent
automatiquement.
1 Appuyez sur la touche CALL, tournez la
molette de réglage pour sélectionner
[SET BT SIGNL], puis appuyez dessus.
Vérifiez que s’allume.
2 Activez la fonction BLUETOOTH sur le
périphérique BLUETOOTH.
3 Réglez le périphérique BLUETOOTH afin
qu’il se connecte à cet appareil.
ou s’allume.
Icônes dans la fenêtre d’affichage :
S’allume lorsque la fonction d’appel en
mains libres est disponible grâce à
l’activation du profil HFP (Handsfree
Profile).
S’allume lorsque la lecture du
périphérique audio est possible grâce à
l’activation du profil A2DP (Advanced
Audio Distribution Profile).
Connexion au dernier périphérique connecté
à partir de cet appareil
Activez la fonction BLUETOOTH sur le périphérique
BLUETOOTH.
Appuyez sur SRC pour sélectionner [BT PHONE] ou
[BT AUDIO].
Appuyez sur ENTER pour connecter l’appareil au
téléphone cellulaire ou sur PAUSE pour le connecter
au périphérique audio.
Remarque
Pendant la transmission BLUETOOTH audio en continu,
vous ne pouvez pas établir la connexion au téléphone
cellulaire à partir de cet appareil. Établissez plutôt la
connexion à cet appareil à partir du téléphone
cellulaire.
Conseil
Avec le signal BLUETOOTH activé : lorsque la clé de
contact est tournée sur la position ON, cet appareil se
reconnecte automatiquement au dernier téléphone
cellulaire connecté.
Raccordement d’un iPhone/iPod
(pairage BLUETOOTH automatique)
Lorsqu’un iPhone/iPod muni d’iOS5 ou version
ultérieure est raccordé au port USB, l’appareil est
automatiquement jumelé et connecté avec le
iPhone/iPod.
Pour permettre le pairage BLUETOOTH
automatique, assurez-vous de régler [AUTOPAIR]
dans [BT] à [ON] (page 22).
1 Activez la fonction BLUETOOTH sur le
iPhone/iPod.
2 Raccordez un iPhone/iPod au port USB.
10FR
Assurez-vous que s’allume dans la fenêtre
d’affichage de l’appareil.
Page 47
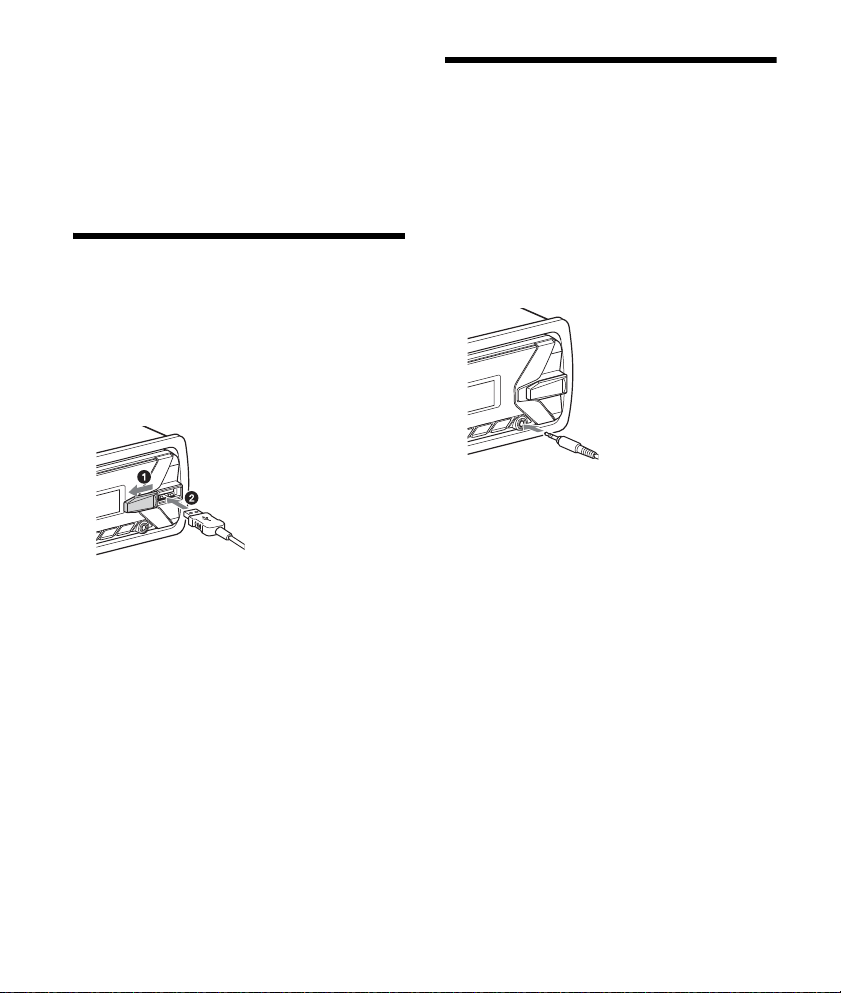
Remarques
Le pairage BLUETOOTH automatique ne démarrera
pas si l’appareil est déjà raccordé à un autre
périphérique BLUETOOTH. Dans ce cas, déconnectez
l’autre périphérique, puis raccordez à nouveau le
iPhone/iPod.
Si le pairage BLUETOOTH automatique n’est pas
établi, reportez-vous à la section « Préparation d’un
périphérique BLUETOOTH » pour plus de détails
(page 8).
Raccordement d’un
périphérique USB
1 Réduisez le volume de l’appareil.
2 Raccordez le périphérique USB à
l’appareil.
Pour raccorder un iPod/iPhone, utilisez le câble
de raccordement USB pour iPod (non fourni).
Raccordement d’un autre
appareil audio portatif
1 Éteignez l’appareil audio portatif.
2 Réduisez le volume de l’appareil.
3 Raccordez l’appareil audio portatif à la
prise d’entrée AUX (mini-prise stéréo) de
l’appareil à l’aide d’un câble de
raccordement (non fourni)*.
* Veillez à utiliser une fiche droite.
4 Appuyez sur SRC pour sélectionner
[AUX].
Pour faire correspondre le niveau de volume
de l’appareil raccordé à celui des autres
sources
Démarrez la lecture sur l’appareil audio portatif
avec un niveau de volume modéré, puis réglez
votre appareil sur le volume d’écoute habituel.
Appuyez sur MENU, puis sélectionnez [SET SOUND]
[SET AUX VOL] (page 21).
11FR
Page 48

Écoute de la radio
Écoute de la radio
Pour écouter la radio, appuyez sur SRC pour
sélectionner [TUNER].
Mémorisation manuelle
1 Lorsque vous captez la station que vous
souhaitez mémoriser, appuyez sur une
touche numérique (1 à 6) et maintenez-la
enfoncée jusqu’à ce que [MEM]
apparaisse.
Mémorisation automatique (BTM)
1 Appuyez sur MODE pour changer de
bande (FM1, FM2, FM3, AM1 ou AM2).
2 Appuyez sur MENU, tournez la molette
de réglage pour sélectionner [SET
GENERAL], puis appuyez dessus.
3 Tournez la molette de réglage pour
sélectionner [SET BTM], puis appuyez
dessus.
L’appareil mémorise les stations sur les touches
numériques en respectant l’ordre des
fréquences.
Syntonisation
1 Appuyez sur MODE pour changer de
bande (FM1, FM2, FM3, AM1 ou AM2).
2 Réglez la fréquence.
Pour syntoniser des stations manuellement
Appuyez sur la touche SEEK +/– et maintenez-la
enfoncée pour localiser la fréquence
approximativement, puis appuyez plusieurs fois
sur SEEK +/– pour régler la fréquence souhaitée
avec précision.
Pour syntoniser des stations automatiquement
Appuyez sur SEEK +/–.
Le balayage s’interrompt lorsque l’appareil
capte une station.
Réception des stations mémorisées
1 Sélectionnez la bande, puis appuyez sur
une touche numérique (1 à 6).
Utilisation du RDS (système de
radiocommunication de
données)
Sélection des types d’émission (PTY)
1
Appuyez sur PTY pendant la réception FM.
2 Tournez la molette de réglage jusqu’à ce
que le type d’émission souhaité
apparaisse, puis appuyez dessus.
L’appareil commence à chercher une station
diffusant le type d’émission sélectionné.
Type d’émission
NEWS (nouvelles), INFORM (information), SPORTS
(sports), TA LK (infovariétés), ROCK (rock), CLS
ROCK (rock classique), ADLT HIT (succès adultes),
SOFT RCK (rock détente), TOP 40 (palmarès),
COUNTRY (country), OLDIES (anciens succès), SOFT
(détente), NOSTALGA (nostalgie), JAZZ (jazz),
CLASSICL (classique), R & B (rhythm and blues),
SOFT R&B (rhythm and blues léger), LANGUAGE
(langue étrangère), REL MUSC (musique religieuse),
REL TALK (infovariétés religieuses), PERSNLTY
(personnalités), PUBLIC (publique), COLLEGE
(collège), HABL ESP (discussion en espagnol),
MUSC ESP (musique espagnole), HIP HOP (hiphop), WEATHER (météo)
12FR
Page 49

Réglage de l’heure (CT)
Les données CT de la transmission RDS règlent
l’horloge.
1 Réglez l’appareil à [SET CT-ON] dans [SET
GENERAL] (page 20).
Lecture
Lecture d’un périphérique USB
Dans ce mode d’emploi, « iPod » est utilisé comme
référence générale pour des fonctions iPod sur les
iPod et iPhone, sauf mention contraire dans le texte
ou les illustrations.
Pour plus de détails sur la compatibilité de votre
iPod, reportez-vous à la section « À propos du
iPod » (page 23) ou visitez notre site d’assistance à
l’adresse indiquée sur la couverture arrière.
Vous pouvez utiliser des périphériques USB de type
MSC (stockage de masse) ou MTP (protocole de
transfert des médias) (par exemple, mémoire flash
USB, lecteur média numérique, téléphone
intelligent Android) conformes à la norme USB.
Selon le lecteur média numérique ou le téléphone
intelligent Android, il peut être nécessaire de régler
le mode de connexion USB à MTP.
Remarques
Pour plus de détails sur la compatibilité de votre
périphérique USB, visitez notre site d’assistance à
l’adresse indiquée sur la couverture arrière.
La lecture des fichiers suivants n’est pas prise en
charge.
MP3/WMA/FLAC :
fichiers avec protection des droits d’auteur
fichiers DRM (Gestion des droits numériques)
fichiers audio multicanal
MP3/WMA :
fichiers avec compression sans perte
1 Raccordez un périphérique USB au port
USB (page 11).
La lecture commence.
Si un périphérique est déjà raccordé, appuyez
sur SRC pour sélectionner [USB] afin de lancer la
lecture ([IPD] apparaît dans l’affichage lorsque
le iPod est reconnu).
2 Réglez le volume sur cet appareil.
Pour arrêter la lecture
Appuyez sur la touche OFF et maintenez-la
enfoncée pendant 1 seconde.
13FR
Page 50
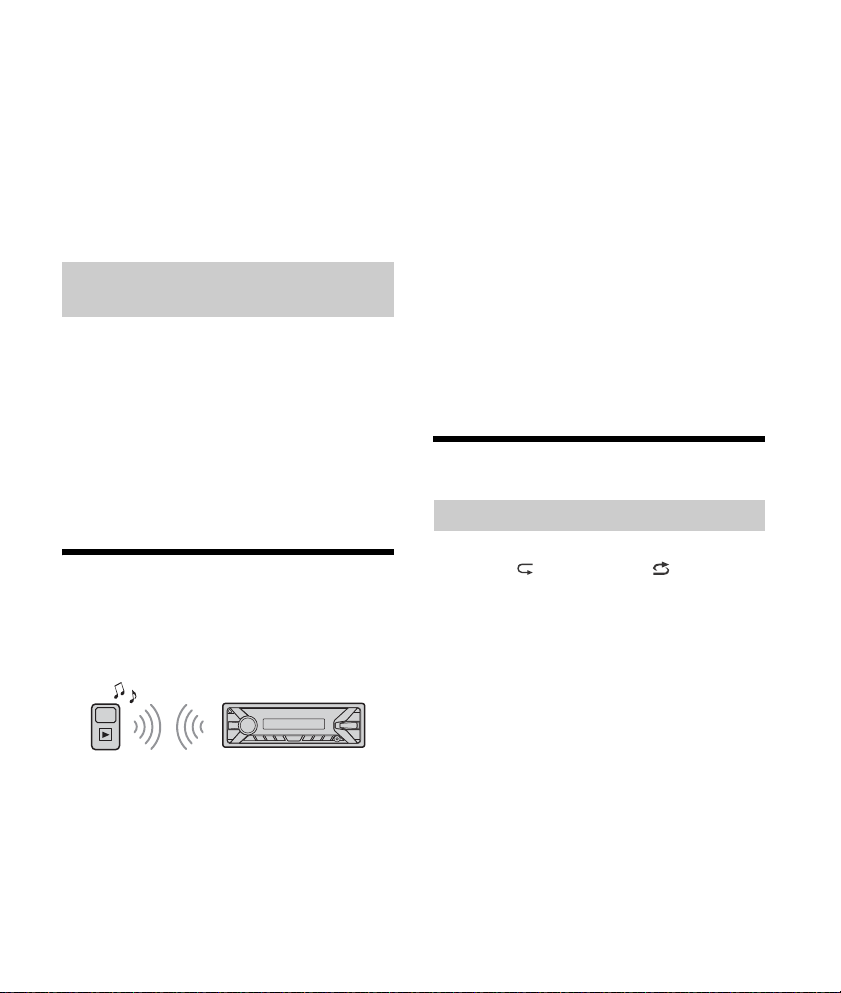
Pour retirer le périphérique
Arrêtez la lecture, puis retirez le périphérique.
Précaution relative au iPhone
Lorsque vous raccordez un iPhone via un câble USB,
le volume de l’appel téléphonique est contrôlé par
le iPhone plutôt que par l’appareil. N’augmentez
pas le volume de l’appareil par inadvertance
pendant un appel téléphonique, car cela causerait
une accentuation soudaine du volume après
l’appel.
Commande directe d’un iPod
(Commande passager)
1 En cours de lecture, appuyez sur la
touche MODE et maintenez-la enfoncée
jusqu’à ce que [MODE IPOD] apparaisse.
Les fonctions du iPod deviennent alors
disponibles.
Veuillez noter que le volume peut être réglé
uniquement par l’appareil.
Pour désactiver la commande passager
Appuyez sur la touche MODE et maintenez-la
enfoncée jusqu’à ce que [MODE AUDIO] apparaisse.
Lecture d’un périphérique
BLUETOOTH
Vous pouvez lire les contenus d’un périphérique
connecté qui prend en charge le profil BLUETOOTH
A2DP (Advanced Audio Distribution Profile).
3 Faites fonctionner le périphérique audio
pour démarrer la lecture.
4 Réglez le volume sur cet appareil.
Remarques
Selon le périphérique audio utilisé, les informations
telles que le titre, le numéro de plage/la durée et
l’état de lecture peuvent ne pas s’afficher sur cet
appareil.
Même si vous changez la source sur cet appareil, la
lecture ne s’interrompt pas sur le périphérique audio.
Pour faire correspondre le niveau de volume
du périphérique BLUETOOTH à celui des
autres sources
Démarrez la lecture sur le périphérique audio
BLUETOOTH avec un niveau de volume modéré,
puis réglez votre appareil sur le volume d’écoute
habituel.
Appuyez sur MENU, puis sélectionnez [SET SOUND]
[SET BTA VOL] (page 21).
Recherche et lecture des plages
Lecture répétée et lecture aléatoire
1 En cours de lecture, appuyez plusieurs
fois sur (répétition) ou (aléatoire)
pour sélectionner le mode de lecture
souhaité.
La lecture dans le mode de lecture sélectionné
peut prendre un instant à démarrer.
Les modes de lecture disponibles diffèrent selon la
source sonore sélectionnée.
1 Établissez une connexion BLUETOOTH
avec le périphérique audio (page 9).
2 Appuyez sur SRC pour sélectionner [BT
AUDIO].
14FR
Page 51

Recherche d’une plage par nom (QuickBrowZer™)
1 En cours de lecture USB, appuyez sur
(navigation)* pour afficher la liste des
catégories de recherche.
Lorsque la liste de plages apparaît, appuyez
plusieurs fois sur (retour) pour afficher la
catégorie de recherche souhaitée.
* En cours de lecture USB, appuyez sur
(navigation) pendant plus de 2 secondes pour
retourner directement au début de la liste des
catégo ries.
2 Tournez la molette de réglage pour
sélectionner la catégorie de recherche de
votre choix, puis appuyez pour valider.
3 Répétez l’étape 2 pour rechercher la
plage souhaitée.
La lecture commence.
Pour quitter le mode Quick-BrowZer
Appuyez sur (navigation).
Recherche d’éléments par saut
(mode Saut)
1 Appuyez sur (navigation).
2 Appuyez sur SEEK +.
3 Tournez la molette de réglage pour
sélectionner l’élément.
L’appareil effectue des sauts dans la liste par
incréments de 10 % du nombre total
d’éléments.
4 Appuyez sur ENTER pour retourner au
mode Quick-BrowZer.
L’élément sélectionné apparaît.
5 Tournez la molette de réglage pour
sélectionner l’élément de votre choix,
puis appuyez dessus.
La lecture commence.
Écoute de Pandora®
Pandora® est disponible pour la transmission de
musique en continu à l’aide de votre iPhone et
téléphone intelligent Android. Vous pouvez
commander Pandora® sur un iPhone raccordé via
USB ou un téléphone intelligent Android connecté
via BLUETOOTH à partir de cet appareil.
Pandora® est disponible uniquement dans certains
pays. Veuillez visiter
http://www.pandora.com/legal
pour plus d’informations.
Configuration de Pandora®
1 Pour plus de détails sur la compatibilité
de votre périphérique mobile, visitez le
site d’assistance à l’adresse indiquée sur
la couverture arrière.
2 Pour télécharger la plus récente version
de l’application Pandora®, visitez le
magasin d’applications de votre
téléphone intelligent. Vous trouverez
une liste des périphériques compatibles
au
www.pandora.com/everywhere/mobile
15FR
Page 52

Transmission en continu
Pandora®
Opérations disponibles dans
Pandora®
1 Connectez cet appareil avec le
périphérique mobile.
iPhone via USB (page 11)
Téléphone intelligent Android via fonction
BLUETOOTH (page 9)
2 Appuyez sur SRC pour sélectionner
[PANDORA USB] ou [BT PANDORA].
3 Démarrez l’application Pandora® sur le
périphérique mobile.
4 Appuyez sur PAUSE pour démarrer la
lecture.
Si le numéro de périphérique s’affiche
Assurez-vous que les mêmes numéros s’affichent
(par exemple, 123456) sur cet appareil et le
périphérique mobile, puis appuyez sur la touche
ENTER de cet appareil et sélectionnez [Oui] sur le
périphérique mobile.
Lors de l’activation de la fonction
BLUETOOTH
Vous pouvez régler le niveau de volume.
Appuyez sur MENU, puis sélectionnez [SET SOUND]
[SET BTA VOL] (page 21).
Appréciation positive ou négative
L’appréciation positive ou négative vous permet de
personnaliser les stations.
1 En cours de lecture, appuyez sur
(appréciation positive) ou
(appréciation négative).
Utilisation de la liste des stations
La liste des stations vous permet de sélectionner
facilement la station souhaitée.
1 En cours de lecture, appuyez sur
(navigation).
2 Appuyez sur SEEK + pour sélectionner
l’ordre de tri [BY DATE] ou [A TO Z].
3 Tournez la molette de réglage pour
sélectionner la station de votre choix,
puis appuyez dessus.
La lecture commence.
Mise en signet
La plage en cours de lecture peut être mise en
signet et mémorisée dans votre compte Pandora®.
1 En cours de lecture, appuyez sur MODE.
16FR
Page 53

Appel en mains libres (via BLUETOOTH
uniquement)
Pour utiliser un téléphone cellulaire, connectez-le à
cet appareil. Pour plus de détails, reportez-vous à la
section « Préparation d’un périphérique
BLUETOOTH » (page 8).
Réception d’un appel
1 Appuyez sur la touche CALL lors de la
réception d’un appel avec une sonnerie.
L’appel téléphonique commence.
Remarque
La sonnerie et la voix de l’appelant sont émises
uniquement par les haut-parleurs avant.
Pour refuser l’appel
Appuyez sur la touche OFF et maintenez-la
enfoncée pendant 1 seconde.
Pour terminer l’appel
Appuyez sur la touche CALL à nouveau.
Faire un appel
Lorsque vous connectez un téléphone cellulaire qui
prend en charge le profil PBAP (Phone Book Access
Profile), vous pouvez faire un appel à partir du
répertoire ou de l’historique des appels.
À partir du répertoire
1 Appuyez sur la touche CALL, tournez la
molette de réglage pour sélectionner
[PHONE BOOK], puis appuyez dessus.
2 Tournez la molette de réglage pour
sélectionner une initiale dans la liste des
initiales, puis appuyez dessus.
3 Tournez la molette de réglage pour
sélectionner un nom dans la liste des
noms, puis appuyez dessus.
4 Tournez la molette de réglage pour
sélectionner un numéro dans la liste des
numéros, puis appuyez dessus.
L’appel téléphonique commence.
À partir de l’historique des appels
1 Appuyez sur la touche CALL, tournez la
molette de réglage pour sélectionner
[RECENT CALL], puis appuyez dessus.
Une liste de l’historique des appels apparaît.
2 Tournez la molette de réglage pour
sélectionner un nom ou un numéro de
téléphone à partir de l’historique des
appels, puis appuyez dessus.
L’appel téléphonique commence.
Par saisie du numéro de téléphone
1 Appuyez sur la touche CALL, tournez la
molette de réglage pour sélectionner
[DIAL NUMBER], puis appuyez dessus.
2 Tournez la molette de réglage pour
entrer le numéro de téléphone,
sélectionnez [ ] (espace), puis appuyez
sur ENTER*.
L’appel téléphonique commence.
* Appuyez sur SEEK +/– pour déplacer l’indication
numérique.
Remarque
[_] s’affiche à la place de [#] dans la fenêtre d’affichage.
17FR
Page 54

Par recomposition
1 Appuyez sur la touche CALL, tournez la
molette de réglage pour sélectionner
[REDIAL], puis appuyez dessus.
L’appel téléphonique commence.
2 Prononcez le repère vocal mémorisé sur
le téléphone cellulaire.
Votre voix est reconnue et l’appel est effectué.
Pour annuler la composition vocale
Appuyez sur VOICE.
À l’aide d’un numéro de présélection
1 Appuyez sur SRC pour sélectionner [BT
PHONE].
2 Appuyez sur une touche numérique (1 à
6) pour sélectionner le contact que vous
souhaitez appeler.
3 Appuyez sur ENTER.
L’appel téléphonique commence.
Préréglage des numéros de téléphone
Vous pouvez mémoriser un maximum de
6 contacts dans la fonction de présélection.
1 Sélectionnez un numéro de téléphone que vous
souhaitez mémoriser dans la fonction de
présélection à partir du répertoire ou de
l’historique des appels, ou en entrant le numéro de
téléphone directement.
Le numéro de téléphone apparaît dans la fenêtre
d’affichage de cet appareil.
2 Appuyez sur une touche numérique (1 à 6) et
maintenez-la enfoncée jusqu’à ce que [MEM]
apparaisse.
Le contact est mémorisé dans le numéro de
présélection sélectionné.
À l’aide de repères vocaux
Vous pouvez effectuer un appel en prononçant le
repère vocal mémorisé sur un téléphone cellulaire
connecté muni d’une fonction de composition
vocale.
1 Appuyez sur la touche CALL, tournez la
molette de réglage pour sélectionner
[VOICE DIAL], puis appuyez dessus.
Ou encore, appuyez sur la touche VOICE et
maintenez-la enfoncée pendant plus de
2secondes.
Opérations disponibles en
cours d’appel
Pour régler le volume de la sonnerie
Tournez la molette de réglage pendant la réception
d’un appel.
Pour régler le volume de la voix de
l’appelant
Tournez la molette de réglage pendant un appel.
Réglage du volume pour le correspondant
(Réglage de gain de micro)
Appuyez sur MIC.
Niveaux de volume réglables : [MIC-LOW], [MICMID], [MIC-HI].
Pour atténuer l’écho et les bruits (Mode
Correcteur d’écho/Correcteur de bruits)
Appuyez sur la touche MIC et maintenez-la
enfoncée.
Modes disponibles : [EC/NC-1], [EC/NC-2].
Pour alterner entre le mode mains libres et
le mode téléphone cellulaire
Pendant un appel, appuyez sur MODE pour faire
passer le son de l’appel téléphonique entre
l’appareil et le téléphone cellulaire.
Remarque
Selon le téléphone cellulaire utilisé, cette opération
pourrait ne pas être disponible.
18FR
Page 55

Fonctions pratiques
Utilisation de Siri Eyes Free
Siri Eyes Free vous permet d’utiliser un iPhone en
mains libres en parlant simplement dans le
microphone. Cette fonction nécessite la connexion
d’un iPhone à l’appareil via BLUETOOTH. La
disponibilité est limitée aux iPhone 4s ou modèles
ultérieurs. Assurez-vous que votre iPhone utilise la
plus récente version d’iOS.
Vous devez effectuer préalablement les
configurations d’enregistrement et de connexion
BLUETOOTH avec l’appareil pour le iPhone. Pour
plus de détails, reportez-vous à la section
« Préparation d’un périphérique BLUETOOTH »
(page 8).
1 Activez la fonction Siri sur votre iPhone.
Pour plus de détails, reportez-vous au mode
d’emploi fourni avec le iPhone.
2 Appuyez sur la touche VOICE et
maintenez-la enfoncée pendant plus de
2 secondes.
L’affichage de commande vocale apparaît.
3 Après le bip émis par le iPhone, parlez
dans le microphone.
Le iPhone émet un bip à nouveau, puis la
fonction Siri commence à répondre.
Pour désactiver Siri Eyes Free
Appuyez sur VOICE.
Remarques
Le iPhone pourrait ne pas reconnaître votre voix,
selon les conditions d’utilisation. (Par exemple, si
vous êtes dans un véhicule en mouvement.)
Siri Eyes Free pourrait ne pas fonctionner
correctement ou le temps de réponse pourrait
présenter un décalage dans les endroits où les
signaux du iPhone sont difficiles à recevoir.
Selon les conditions d’utilisation du iPhone, la
fonction Siri Eyes Free pourrait ne pas fonctionner
correctement ou être désactivée.
Si vous effectuez la lecture d’une plage avec un
iPhone en utilisant la connexion audio BLUETOOTH,
lors du démarrage de la lecture via BLUETOOTH, la
fonction Siri Eyes Free est automatiquement
désactivée et l’appareil passe à la source audio
BLUETOOTH.
Lorsque la fonction Siri Eyes Free est activée pendant
la lecture audio, l’appareil pourrait passer à la source
audio BLUETOOTH même si vous ne spécifiez aucune
plage pour la lecture.
Lors du raccordement du iPhone au port USB, la
fonction Siri Eyes Free pourrait ne pas fonctionner
correctement ou être désactivée.
Lors du raccordement du iPhone à l’appareil via USB,
n’activez pas Siri avec le iPhone. La fonction Siri Eyes
Free pourrait ne pas fonctionner correctement ou être
désactivée.
Aucun son n’est audible pendant que la fonction Siri
Eyes Free est activée.
19FR
Page 56

Réglages
Annulation du mode DEMO
Vous pouvez désactiver l’affichage de
démonstration qui apparaît lorsque la source est
désactivée et que l’horloge est affichée.
1 Appuyez sur MENU, tournez la molette
de réglage pour sélectionner [SET
GENERAL], puis appuyez dessus.
2 Tournez la molette de réglage pour
sélectionner [SET DEMO], puis appuyez
dessus.
3 Tournez la molette de réglage pour
sélectionner [SET DEMO-OFF], puis
appuyez dessus.
Le réglage est terminé.
4 Appuyez deux fois sur (retour).
La fenêtre d’affichage retourne au mode de
réception/lecture normal.
Configuration de base
Vous pouvez configurer des paramètres dans les
catégories de configuration suivantes :
Configuration générale (GENERAL), Configuration
sonore (SOUND), Configuration d’affichage
(DISPLAY), Configuration BLUETOOTH (BT)
(Non disponible lorsque le téléphone BT est
sélectionné.)
1 Appuyez sur MENU.
2 Tournez la molette de réglage pour
sélectionner la catégorie de
configuration, puis appuyez dessus.
Les paramètres peuvent être réglés selon la
source et le réglage.
3 Tournez la molette de réglage pour
sélectionner les options, puis appuyez
dessus.
Pour retourner à l’écran précédent
Appuyez sur (retour).
Configuration générale
(GENERAL)
DEMO (démonstration)
Permet d’activer le mode de démonstration :
[ON], [OFF].
CLOCK-ADJ (réglage de l’horloge) (page 8)
CAUT ALM (alarme d’avertissement)
Permet d’activer l’alarme d’avertissement : [ON],
[OFF] (page 7).
(Disponible uniquement lorsque la source est
désactivée et que l’horloge est affichée.)
BEEP
Permet d’activer le bip : [ON], [OFF].
AUTO OFF
Permet d’éteindre automatiquement après un
laps de temps souhaité lors de l’arrêt de
l’appareil : [NO], [30S] (30 secondes), [30M]
(30 minutes), [60M] (60 minutes).
CT (heure)
Permet d’activer la fonction CT : [ON], [OFF].
BTM (mémorisation des meilleurs accords)
(page 12)
(Disponible uniquement lorsque le récepteur est
sélectionné.)
20FR
Page 57

Configuration sonore (SOUND)
Ce menu de configuration est disponible lorsqu’une
source autre que le téléphone BT est sélectionnée.
EQ5 PRESET
Permet de sélectionner une courbe d’égaliseur
parmi 10 courbes d’égaliseur ou de désactiver la
fonction : [OFF], [R&B], [ROCK], [POP], [DANCE],
[HIP-HOP], [ELECTRONICA], [JAZZ], [SOUL],
[COUNTRY], [CUSTOM].
Le réglage de courbe d’égaliseur peut être
mémorisé pour chaque source.
EQ5 SETTING
Permet de sélectionner l’option [CUSTOM] de la
fonction EQ5.
BASE
Permet de sélectionner une courbe d’égaliseur
préréglée comme point de départ pour apporter
des modifications : [BAND1] (basses fréquences),
[BAND2] (fréquences moyennes-basses),
[BAND3] (moyennes fréquences), [BAND4]
(fréquences moyennes-hautes), [BAND5]
(hautes fréquences).
Le niveau de volume peut être réglé par
incréments de 1 dB, de -10 dB à +10 dB.
BALANCE
Permet de régler l’équilibre du son : [RIGHT-15] –
[CENTER] – [LEFT-15].
FAD ER
Permet de régler le niveau relatif : [FRONT-15] –
[CENTER] – [REAR-15].
S.WOOFER (caisson de graves)
SW LEVEL (niveau du caisson de graves)
Permet de régler le niveau du caisson de
graves : [+6 dB] – [0 dB] – [-6 dB], [ATT].
([ATT] est affiché au réglage le plus bas.)
SW PHASE (phase du caisson de graves)
Permet de sélectionner la phase du caisson de
graves : [NORM], [REV].
LPF FREQ (fréquence de filtre passe-bas)
Permet de sélectionner la fréquence de coupure
du caisson de graves : [80Hz], [100Hz], [120Hz].
AUX VOL (niveau de volume AUX)
Permet de régler le niveau de volu me de ch aque
périphérique auxiliaire raccordé : [+18 dB] –
[0 dB] – [-8 dB].
Ce réglage évite de régler le niveau de volume
entre les sources.
BTA VOL (niveau de volume du périphérique audio
BLUETOOTH)
Permet de régler le niveau de volu me de ch aque
périphérique BLUETOOTH connecté : [+6 dB] –
[0 dB] – [-6 dB].
Ce réglage évite de régler le niveau de volume
entre les sources.
Configuration d’affichage
(DISPLAY)
DIMMER
Permet de modifier la luminosité de la fenêtre
d’affichage : [ON], [OFF].
SND SYNC (synchronisation sonore)
Permet d’activer la synchronisation de l’éclairage
avec le son : [ON], [OFF].
AUTO SCR (défilement automatique)
Permet de faire défiler automatiquement les
éléments longs : [ON], [OFF].
(Non disponible lorsque AUX ou le récepteur est
sélectionné.)
21FR
Page 58

Configuration BLUETOOTH (BT)
Dossier (album)
Fichier audio (plage)
PAIRING (page 9)
PHONE BOOK (page 17)
REDIAL (page 18)
RECENT CALL (page 17)
VOICE DIAL (page 18)
DIAL NUMBER (page 17)
RINGTONE
Permet de sélectionner la sonnerie de cet
appareil ou du téléphone cellulaire connecté : [1]
(cet appareil), [2] (téléphone cellulaire).
AUTO ANS (réponse automatique)
Permet de configurer cet appareil pour répondre
automatiquement aux appels reçus : [OFF], [1]
(environ 3 secondes), [2] (environ 10 secondes).
AUTOPAIR (pairage automatique)
Permet de démarrer le pairage BLUETOOTH
automatiquement lorsqu’un périphérique avec
iOS version 5.0 ou ultérieure est raccordé via
USB : [ON], [OFF].
BT SIGNL (signal BLUETOOTH) (page 10)
Permet d’activer/de désactiver la fonction
BLUETOOTH.
BT INIT (initialisation BLUETOOTH)
Permet d’initialiser tous les réglages
BLUETOOTH (informations de pairage, numéro
de présélection, informations sur le
périphérique, etc.) : [YES], [NO].
Avant de mettre l’appareil au rebut, initialisez
tous les réglages.
(Disponible uniquement lorsque la source est
désactivée et que l’horloge est affichée.)
Informations complémentaires
Précautions
Si votre véhicule est resté stationné en plein
soleil, laissez l’appareil refroidir avant de l’utiliser.
Ne laissez pas la façade ou les appareils audio à
l’intérieur du véhicule, car la température élevée
résultant du rayonnement direct du soleil pourrait
causer un problème de fonctionnement.
L’antenne électrique se déploie
automatiquement.
Pour conserver un son de haute qualité
Ne renversez pas de liquide sur l’appareil.
Ordre de lecture des fichiers audio
22FR
Page 59
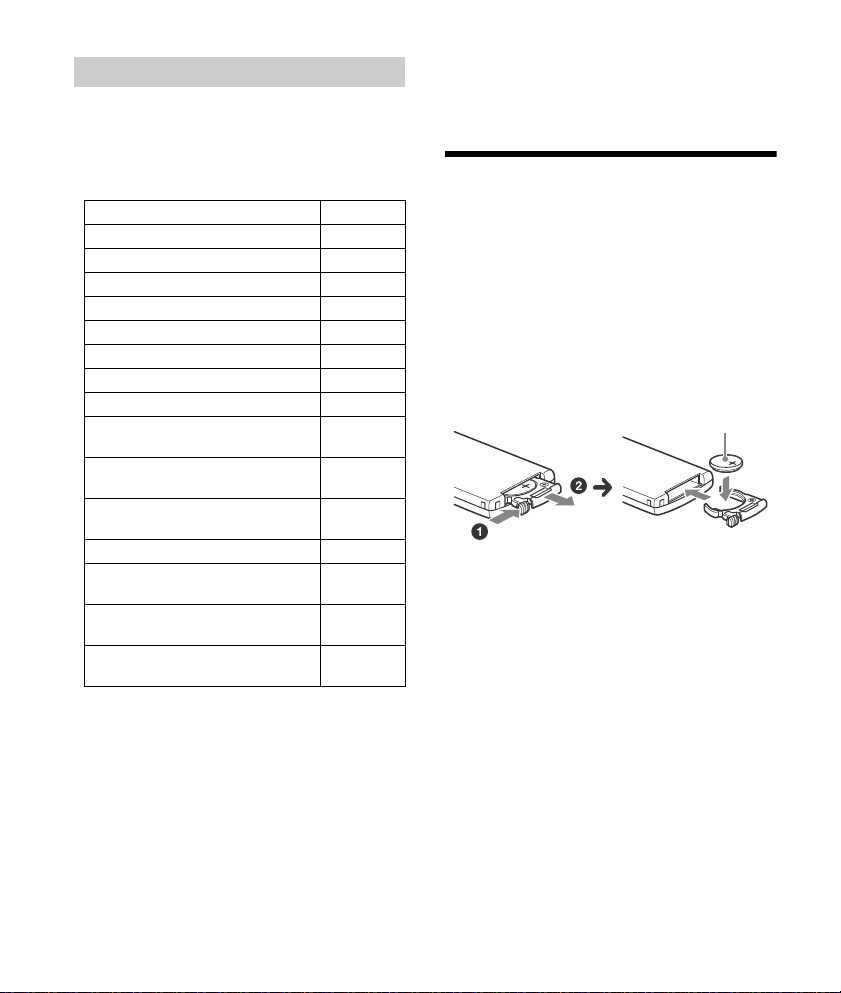
À propos du iPod
Pôle + vers le haut
Vous pouvez raccorder cet appareil aux modèles
d’iPod suivants. Mettez vos périphériques iPod à
jour avec le logiciel le plus récent avant toute
utilisation.
Modèles de iPhone/iPod compatibles
Modèle compatible USB
iPhone 6 Plus
iPhone 6
iPhone 5s
iPhone 5c
iPhone 5
iPhone 4s
iPhone 4
iPhone 3GS
iPod touch
(5ème génération)
iPod touch
(4ème génération)
iPod touch
(3ème génération)
iPod classic
iPod nano
(7ème génération)
iPod nano
(6ème génération)
iPod nano
(5ème génération)
« Made for iPod » et « Made for iPhone » signifient
qu’un accessoire électronique a été conçu pour
être connecté spécifiquement à un iPod ou un
iPhone, respectivement, et qu’il a été certifié par
le développeur comme étant conforme aux
normes de performances Apple. Apple n’est pas
responsable du bon fonctionnement de cet
appareil ni de sa conformité aux normes et
réglementations de sécurité. Veuillez noter que
l’utilisation de cet accessoire avec un iPod ou un
iPhone peut affecter les performances des
transmissions sans fil.
Si vous avez des questions ou des problèmes
concernant cet appareil qui ne sont pas abordés
dans ce mode d’emploi, contactez votre détaillant
Sony le plus proche.
Entretien
Remplacement de la pile au lithium de la
télécommande
Sous des conditions normales d’utilisation, la pile
durera environ 1 an (selon les conditions
d’utilisation, la durée de vie utile peut être réduite).
Lorsque la pile est faible, la portée de la
télécommande diminue.
ATT ENTIO N
La pile pourrait exploser si elle n’est pas remplacée
correctement. Remplacez-la uniquement avec le
même type de pile ou un type équivalent.
Remarques sur la pile au lithium
Tenez la pile au lithium hors de la portée des enfants.
En cas d’ingestion de la pile, consultez
immédiatement un médecin.
Essuyez la pile avec un chiffon sec pour assurer un
bon contact.
Veillez à re specter la polarité lors de l’installation de l a
pile.
Ne tenez pas la pile avec des pinces métalliques, car
cela pourrait causer un court-circuit.
23FR
Page 60
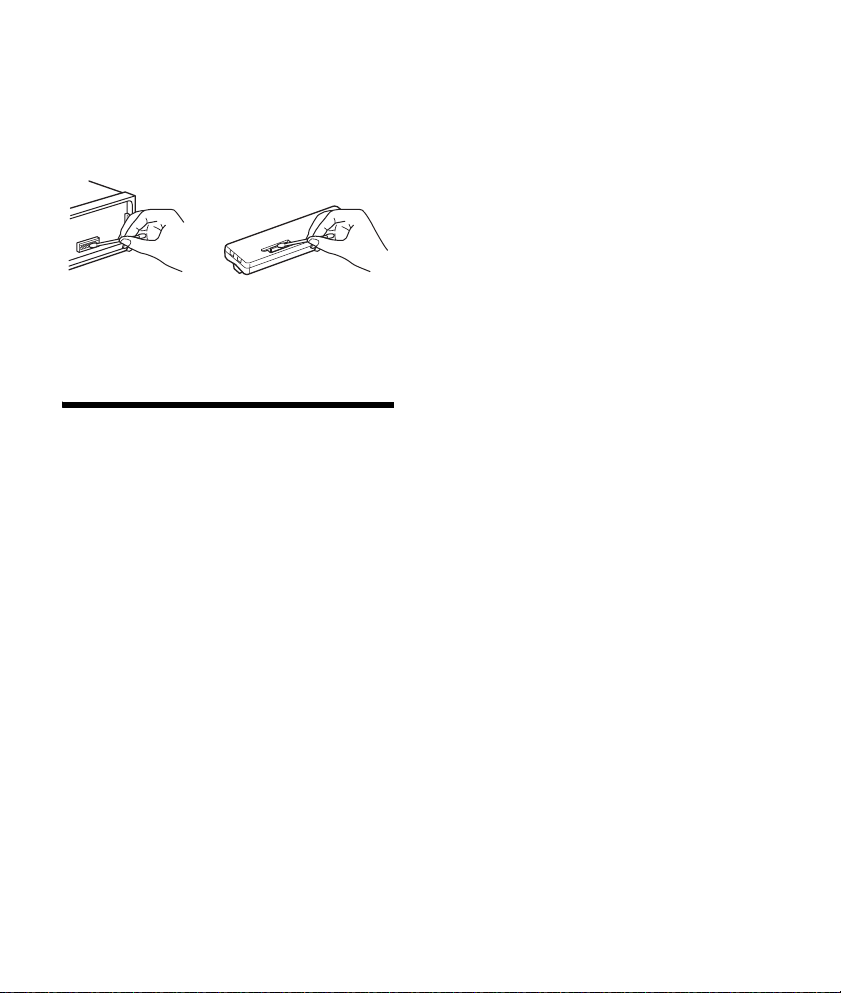
Nettoyage des connecteurs
L’appareil peut ne pas fonctionner correctement si
les connecteurs entre l’appareil et la façade sont
sales. Pour éviter cette situation, retirez la façade
(page 7) et nettoyez les connecteurs avec un cotontige. N’exercez pas une pression trop forte, car vous
pourriez endommager les connecteurs.
Remarques
Pour plus de sécurité, coupez le contact avant de
nettoyer les connecteurs et retirez la clé de contact.
Ne touchez jamais les connecteurs directement avec
les doigts ou avec un objet métallique.
Caractéristiques techniques
Radio
FM
Plage de syntonisation : 87,5 à 107,9 MHz
Borne d’antenne :
Connecteur d’antenne externe
Fréquence intermédiaire :
FM CCIR : -1 956,5 à -487,3 kHz et
+500,0 à +2 095,4 kHz
Sensibilité utile : 7 dBf
Sélectivité : 75 dB à 400 kHz
Rapport signal/bruit : 73 dB
Séparation : 50 dB à 1 kHz
Réponse en fréquence : 20 à 15 000 Hz
AM
Plage de syntonisation : 530 à 1 710 kHz
Borne d’antenne :
Connecteur d’antenne externe
Sensibilité : 26 μV
Lecteur USB
Interface : USB (pleine vitesse)
Courant maximal : 1 A
Nombre maximal de plages reconnaissables :
dossiers (albums) : 256
fichiers (plages) par dossier : 256
Codecs correspondants :
MP3 (.mp3)
Débit binaire : 8 à 320 kbit/s (Prise en charge
du débit binaire variable (VBR))
Fréquence d’échantillonnage : 16 à 48 kHz
WMA (.wma)
Débit binaire : 32 à 192 kbit/s (Prise en charge
du débit binaire variable (VBR))
Fréquence d’échantillonnage : 32 kHz,
44,1 kHz, 48 kHz
FLAC (.flac)
Résolution : 16 bits, 24 bits
Fréquence d’échantillonnage : 44,1 kHz,
48 kHz
Communication sans fil
Système de communication :
Norme BLUETOOTH version 3.0
Sortie :
Norme BLUETOOTH Power Class 2
(Max. +4 dBm)
Portée de communication maximale :
En ligne directe, environ 10 m (33 pi)*
Bande de fréquence :
Bande de 2,4 GHz (2,4000 à 2,4835 GHz)
Méthode de modulation : FHSS
Profils BLUETOOTH compatibles*
A2DP (Advanced Audio Distribution Profile) 1.3
AVRCP (Audio Video Remote Control Profile) 1.3
HFP (Handsfree Profile) 1.6
PBAP (Phone Book Access Profile)
Codecs correspondants :
SBC (.sbc)
*1 La portée réelle varie en fonction de nombreux
facteurs, tels que la présence d’obstacles entre les
périphériques, les champs magnétiques autour des
fours à micro-ondes, l’électricité statique, la
sensibilité de la réception, les performances de
l’antenne, le système d’exploitation, les applications
logicielles, etc.
*2 Les profils standard BLUETOOTH sont destinés à la
communication BLUETOOTH entre les périphériques.
1
2
:
24FR
Page 61

Amplificateur de puissance
Sorties : Sorties de haut-parleurs
Impédance des haut-parleurs : 4 à 8 ohms
Puissance de sortie maximale : 55 W × 4 (à 4 ohms)
Généralités
Sorties :
Borne de sorties audio (arrière, caisson de
graves)
Borne de commande de relais d’antenne
électrique/d’amplificateur de puissance (REM
OUT)
Entrées :
Borne d’entrée de télécommande
Borne d’entrée de l’antenne
Prise d’entrée AUX (mini-prise stéréo)
Port USB
Alimentation requise : Batterie de véhicule 12 V CC
(masse négative)
Consommation de courant nominale : 10 A
Dimensions :
Environ 178 mm × 50 mm × 120 mm
1
(7
/8 po × 2 po × 4 3/4 po) (l/h/p)
Dimensions de montage :
Environ 182 mm × 53 mm × 102 mm
1
(7
/4 po × 21/8 po × 4 1/8 po) (l/h/p)
Poids : Environ 0,7 kg (1 lb 9 oz)
Contenu de l’emballage :
Appareil principal (1)
Télécommande (1) : RM-X231
Composants destinés à l’installation et aux
raccordements (1 jeu)
Il est possible que votre détaillant ne dispose pas
de certains accessoires énoncés ci-dessus. Veuillez
vous adresser à lui pour tout renseignement
complémentaire.
La conception et les caractéristiques techniques
sont sujettes à modification sans préavis.
Droits d’auteur
La marque et les logos Bluetooth® sont des
marques déposées de Bluetooth SIG, Inc. qui sont
utilisées sous licence uniquement par Sony
Corporation. Les autres marques de commerce et
noms de commerce appartiennent à leurs
propriétaires respectifs.
Le symbole N est une marque de commerce de NFC
Forum, Inc. déposée ou non, aux États-Unis et dans
d’autres pays.
Windows Media est une marque déposée ou une
marque de commerce de Microsoft Corporation aux
États-Unis et/ou dans les autres pays.
Ce produit est protégé par des droits de propriété
intellectuelle de Microsoft Corporation. Toute
utilisation ou diffusion de la technologie décrite
sortant du cadre de l’utilisation de ce produit est
interdite sans licence accordée par Microsoft ou
une filiale autorisée de Microsoft.
iPhone, iPod, iPod classic, iPod nano, iPod touch et
Siri sont des marques de Apple Inc., déposées aux
États-Unis et dans d’autres pays/régions.
Licence de la technologie de codage audio MPEG
Layer-3 et des brevets obtenue de Fraunhofer IIS et
Thomson.
Pandora®, le logo Pandora® et la présentation
Pandora® sont des marques commerciales ou des
marques déposées de Pandora Media, Inc., utilisées
avec permission.
Google, Google Play et Android sont des marques
de Google Inc.
25FR
Page 62

libFLAC
Copyright (C) 2000-2009 Josh Coalson
Copyright (C) 2011-2013 Fondation Xiph.Org
La redistribution et l’utilisation sous formes binaire
et source, avec ou sans modification, sont permises
sous réserve des conditions suivantes :
Les redistributions du code source doivent
conserver l’avis de droit d’auteur ci-dessus, cette
liste de conditions et la renonciation suivante.
Les redistributions sous forme binaire doivent
reproduire l’avis de droit d’auteur ci-dessus, cette
liste de conditions et la renonciation suivante
dans la documentation et/ou tout autre matériel
fourni lors de la distribution.
Ni le nom de la Fondation Xiph.org ni les noms de
ses contributeurs ne doivent être utilisés pour
endosser ou promouvoir les produits dérivés de
ce logiciel sans autorisation écrite préalable.
CE LOGICIEL EST FOURNI «TEL QUEL » PAR LES
DÉTENTEURS DE DROITS D’AUTEUR ET
CONTRIBUTEURS, ET TOUTES LES GARANTIES
EXPRESSES OU IMPLICITES, Y COMPRIS, SANS EN
EXCLURE D’AUTRES, LES GARANTIES IMPLICITES DE
VALEUR MARCHANDE ET D’ADAPTATION À UN
USAGE PARTICULIER SONT DÉCLINÉES. LA
FONDATION OU LES CONTRIBUTEURS NE PEUVENT
EN AUCUN CAS ÊTRE TENUS RESPONSABLES DES
DOMMAGES DIRECTS, INDIRECTS, ACCESSOIRES,
SPÉCIAUX, EXEMPLAIRES OU CONSÉCUTIFS (Y
COMPRIS, SANS EN EXCLURE D’AUTRES,
L’APPROVISIONNEMENT DE BIENS OU DE SERVICES
DE REMPLACEMENT; LA PERTE D’UTILISATION, DE
DONNÉES OU DE PROFITS; OU L’INTERRUPTION
D’ACTIVITÉS COMMERCIALES) QUELLES QU’EN
SOIENT LA CAUSE ET LA THÉORIE DE
RESPONSABILITÉ, PAR CONTRAT, RESPONSABILITÉ
ABSOLUE OU CIVILE (Y COMPRIS LA NÉGLIGENCE OU
AUTRE) SURVENANT DE QUELQUE FAÇON QUI SOIT
DE L’UTILISATION DE CE LOGICIEL, MÊME SI AVERTIS
DE LA POSSIBILITÉ DE TELS DOMMAGES.
Dépannage
La liste de vérification suivante vous aidera à
remédier aux problèmes que vous pourriez
rencontrer avec cet appareil.
Avant de passer en revue la liste ci-dessous, vérifiez
les procédures de raccordement et d’utilisation.
Pour plus de détails sur l’utilisation du fusible et le
retrait de l’appareil du tableau de bord, reportezvous à « Raccordement/Installation » (page 32).
Si vous ne parvenez pas à régler le problème,
visitez le site d’assistance à l’adresse indiquée sur la
couverture arrière.
Généralités
L’appareil n’est pas alimenté.
Si l’appareil est éteint et que l’affichage disparaît,
il est impossible de commander l’appareil avec la
télécommande.
Mettez l’appareil en marche.
Aucun son n’est émis ou le son est très faible.
La position de la commande d’équilibre avant/
arrière [FADER] n’est pas réglée pour un système
à 2 haut-parleurs.
Le volume de l’appareil et/ou du périphérique
connecté est très faible.
Augmentez le volume de l’appareil et du
périphérique connecté.
Aucun bip n’est émis.
Un amplificateur de puissance en option est
raccordé et vous n’utilisez pas l’amplificateur
intégré.
Le contenu de la mémoire a été effacé.
Le câble d’alimentation ou la batterie a été
déconnecté(e) ou n’est pas raccordé(e)
correctement.
Les stations mémorisées sont effacées et l’heure
est remise à zéro.
Le fusible est grillé.
Émission d’un bruit lorsque la position de la clé
de contact est modifiée.
Les câbles ne sont pas raccordés correctement au
connecteur d’alimentation du véhicule destiné
aux accessoires.
26FR
Page 63

Pendant la lecture ou la réception, l’écran du
mode de démonstration apparaît.
Si aucune opération n’est effectuée pendant
5 minutes alors que le réglage [DEMO-ON] est
sélectionné, l’écran du mode de démonstration
apparaît.
Sélectionnez le réglage [DEMO-OFF] (page 20).
L’affichage disparaît de la fenêtre d’affichage ou
il n’apparaît pas.
Le régulateur de luminosité est réglé à [DIM-ON]
(page 21).
L’affichage est désactivé si vous maintenez la
touche OFF enfoncée.
Maintenez enfoncée la touche OFF de l’appareil
jusqu’à ce que l’affichage apparaisse.
Les connecteurs sont sales (page 24).
L’affichage/l’éclairage clignote.
L’alimentation est insuffisante.
Vérifiez que la batterie du véhicule fournit une
alimentation suffisante à l’appareil.
(L’alimentation requise est 12 V CC.)
Les touches de commande ne fonctionnent pas.
Le raccordement est incorrect.
Vérifiez le raccordement de l’appareil.
Si la situation ne s’améliore pas, appuyez sur
DSPL et (retour)/MODE pendant plus de 2
secondes pour réinitialiser l’appareil.
Les contenus de la mémoire sont effacés.
Pour votre sécurité, ne réinitialisez pas
l’appareil pendant que vous conduisez.
Réception radio
Impossible de capter les stations.
Le son est parasité.
Le raccordement est incorrect.
Si votre véhicule est équipé d’une antenne de
radio intégrée dans la fenêtre arrière ou
latérale, raccordez un câble REM OUT (rayé
bleu/blanc) ou un câble d’alimentation
d’accessoires (rouge) au câble d’alimentation
de l’amplificateur d’antenne du véhicule.
Vérifiez le raccordement de l’antenne du
véhicule.
Si l’antenne automatique ne se déploie pas,
vérifiez le raccordement du câble de
commande d’antenne électrique.
Impossible de capter une station
présélectionnée.
Le signal capté est trop faible.
RDS
PTY affiche [- - - - - - - -].
La station captée n’est pas une station RDS.
Aucune donnée RDS n’a été reçue.
La station ne spécifie pas le type d’émission.
Lecture de périphérique USB
Impossible de lire des éléments à l’aide d’un
concentrateur USB.
Cet appareil ne peut pas reconnaître les
périphériques USB raccordés au moyen d’un
concentrateur USB.
La lecture sur un périphérique USB exige un délai
de démarrage plus long.
Le périphérique USB contient des fichiers avec
une hiérarchie de dossiers complexe.
Le son est intermittent.
Il est possible que le son soit intermittent à un
débit binaire élevé.
La lecture des fichiers DRM (Gestion des droits
numériques) pourrait être impossible dans
certains cas.
Impossible de lire le fichier audio.
Les systèmes de fichier autres que FAT16 ou
FAT32 d’un périphérique USB ne sont pas pris en
charge.*
* Cet appareil prend en charge les systèmes FAT16 et
FAT32. Par contre, certains périphériques USB
pourraient ne pas prendre en charge ces systèmes
FAT. Pour plus de détails, reportez-vous au mode
d’emploi de chacun des périphériques USB ou
communiquez avec le fabricant.
27FR
Page 64

Fonction NFC
Impossible d’établir la connexion par simple
contact (NFC).
Si le téléphone intelligent ne répond pas au
contact.
Vérifiez que la fonction NFC du téléphone
intelligent est activée.
Rapprochez le symbole N du téléphone
intelligent du symbole N de cet appareil.
Si le téléphone intelligent est placé dans un
étui, retirez ce dernier.
La sensibilité de réception NFC varie en fonction
du périphérique.
Si la connexion par simple contact avec le
téléphone intelligent échoue à plusieurs reprises,
établissez la connexion BLUETOOTH
manuellement.
Fonction BLUETOOTH
Le périphérique à connecter ne détecte pas cet
appareil.
Avant d’effectuer le pairage, réglez cet appareil
en mode de veille de pairage.
Pendant la connexion avec un périphérique
BLUETOOTH, cet appareil ne peut pas être
détecté par un autre périphérique.
Désactivez la connexion en cours et recherchez
cet appareil à partir de l’autre périphérique.
Une fois le pairage du périphérique effectué,
activez la transmission du signal BLUETOOTH
(page 10).
Impossible d’établir la connexion.
La connexion est contrôlée à partir d’un côté (cet
appareil ou le périphérique BLUETOOTH), mais
pas des deux.
Établissez la connexion à cet appareil à partir
d’un périphérique BLUETOOTH ou vice versa.
Le nom du périphérique détecté ne s’affiche pas.
Selon l’état de l’autre périphérique, il peut être
impossible d’obtenir un nom.
Pas de sonnerie.
Réglez le volume en tournant la molette de
réglage pendant la réception d’un appel.
Selon le périphérique à connecter, la sonnerie
peut ne pas être émise correctement.
Réglez [RINGTONE] sur [1] (page 22).
Les haut-parleurs avant ne sont pas raccordés à
l’appareil.
Raccordez les haut-parleurs avant à l’appareil.
La sonnerie est émise uniquement par les
haut-parleurs avant.
La voix de l’appelant est inaudible.
Les haut-parleurs avant ne sont pas raccordés à
l’appareil.
Raccordez les haut-parleurs avant à l’appareil.
La voix de l’appelant est émise uniquement par
les haut-parleurs avant.
Un interlocuteur trouve le volume trop faible ou
trop élevé.
Réglez le volume en conséquence à l’aide du
réglage de gain de micro (page 18).
Il y a de l’écho ou des parasites pendant les
conversations téléphoniques.
Réduisez le volume.
Réglez le mode EC/NC sur [EC/NC-1] ou [EC/NC-2]
(page 18).
Si le niveau de bruit environnant est plus élevé
que celui de l’appel téléphonique, essayez de
réduire ce bruit.
Par exemple, si une fenêtre est ouverte et que le
niveau de bruit de la rue, etc., est élevé, fermez la
fenêtre. Si la climatisation produit beaucoup de
bruit, réduisez son intensité.
Le téléphone n’est pas connecté.
Pendant la lecture d’un périphérique audio
BLUETOOTH, le téléphone n’est pas connecté,
même si vous appuyez sur la touche CALL.
Établissez la connexion à partir du téléphone.
La qualité sonore du téléphone est mauvaise.
La qualité sonore du téléphone dépend des
conditions de réception du téléphone cellulaire.
Si la réception est mauvaise, déplacez votre
véhicule dans un endroit permettant
d’améliorer la réception du signal.
28FR
Page 65

Le volume du périphérique audio connecté est
faible (ou élevé).
Le niveau de volume varie d’un périphérique
audio à l’autre.
Réglez le volume du périphérique audio
connecté ou de cet appareil.
Le son est saccadé pendant la lecture d’un
périphérique audio BLUETOOTH.
Réduisez la distance entre l’appareil et le
périphérique audio BLUETOOTH.
Si le périphérique audio BLUETOOTH est rangé
dans un étui qui interrompt le signal, sortez-le de
cet étui pendant l’utilisation.
Plusieurs périphériques BLUETOOTH ou autres
périphériques qui émettent des ondes radio sont
utilisés à proximité.
Éteignez les autres périphériques.
Augmentez la distance des autres
périphériques.
Le son de la lecture s’interrompt
momentanément lorsque la connexion entre cet
appareil et le téléphone cellulaire est en cours. Il
ne s’agit pas d’un problème de fonctionnement.
Impossible de commander le périphérique audio
BLUETOOTH connecté.
Assurez-vous que le périphérique audio
BLUETOOTH connecté soit compatible avec le
profil AVRCP.
Certaines fonctions sont inopérantes.
Assurez-vous que le périphérique à connecter
soit compatible avec les fonctions en question.
Un appel commence involontairement.
Le téléphone à connecter est réglé pour répondre
à un appel automatiquement.
Échec du pairage dans le temps alloué.
Selon le périphérique à connecter, le temps
alloué pour le pairage peut être court.
Essayez de terminer le pairage dans le temps
alloué.
La fonction BLUETOOTH est inopérante.
Appuyez sur OFF pendant plus de 2 secondes
pour éteindre l’appareil, puis rallumez-le.
Aucun son n’est émis par les haut-parleurs du
véhicule lors d’un appel en mains libres.
Si le son est émis par le téléphone cellulaire,
réglez ce dernier de façon à ce qu’il émette le son
au moyen des haut-parleurs du véhicule.
La fonction Siri Eyes Free n’est pas activée.
Procédez à l’enregistrement mains libres d’un
iPhone prenant en charge Siri Eyes Free.
Activez la fonction Siri sur le iPhone.
Annulez la connexion BLUETOOTH entre le
iPhone et l’appareil, puis rétablissez la connexion.
Utilisation de Pandora®
Impossible d’établir la connexion Pandora®.
Fermez l’application Pandora® sur le périphérique
mobile, puis redémarrez-la.
Affichage des erreurs et messages
HUB NO SUPRT : Les concentrateurs USB ne sont
pas pris en charge.
IPD STOP : La lecture iPod est terminée.
Faites fonctionner le iPod/iPhone pour démarrer
la lecture.
NO DEV : Le périphérique USB n’est pas raccordé ni
reconnu.
Assurez-vous que le périphérique USB ou son
câble est solidement raccordé.
OVERLOAD : Le périphérique USB est saturé.
Débranchez le périphérique USB, puis changez la
source en appuyant sur SRC.
Le périphérique USB présente une défaillance ou
un périphérique non pris en charge est raccordé.
READ : En cours de lecture.
Attendez que la lecture soit terminée et la lecture
commence automatiquement. Selon la structure
du disque, cette opération peut prendre
quelques instants.
USB ERROR : Le périphérique USB ne peut pas être
lu.
Raccordez le périphérique USB de nouveau.
29FR
Page 66

USB NO MUSIC : Il n’y a aucun fichier à lire.
Raccordez un périphérique USB avec des fichiers
lisibles (page 24).
USB NO SUPRT : Le périphérique USB n’est pas pris
en charge.
Pour plus de détails sur la compatibilité de votre
périphérique USB, visitez notre site d’assistance à
l’adresse indiquée sur la couverture arrière.
Pour la fonction BLUETOOTH :
ERROR : La fonction sélectionnée n’a pas pu être
exécutée.
Attendez un instant, puis essayez à nouveau.
NO DEV : Le périphérique BLUETOOTH n’est pas
raccordé ni reconnu.
Assurez-vous que le périphérique BLUETOOTH
est solidement raccordé ou que la connexion
BLUETOOTH est établie avec le périphérique
BLUETOOTH.
P EMPTY : Aucun numéro de téléphone n’est
mémorisé.
UNKNOWN : Un nom ou numéro de téléphone ne
peut pas être affiché.
WITHHELD : Le numéro de téléphone est caché par
l’appelant.
Pour l’utilisation de Pandora® :
CANNOT SKIP : Le saut des plages n’est pas
permis.
Attendez la fin du message publicitaire ou le
début de la plage suivante ou sélectionnez une
autre station dans la liste. Pandora® limite le
nombre de sauts permis sur leur service.
NO NETWORK : La connexion au réseau est
instable ou perdue.
Établissez de nouveau la connexion entre le
réseau et le périphérique ou attendez
l’établissement d’une connexion réseau.
NO STATION - PLEASE - CREATE - STATION - IN PAN DOR A APP : Votre compte ne contient aucune
station.
Créez la station sur votre périphérique mobile.
NOT ALLOWED : La fonction sélectionnée est
interdite.
Il n’est pas permis de laisser une appréciation.
Attendez que le message publicitaire se
termine.
Certaines fonctions, telles que la station
partagée, ne permettent pas de laisser une
appréciation. Attendez le début de la plage
suivante ou sélectionnez une autre station
dans la liste.
La mise en signet n’est pas permise.
Attendez que le message publicitaire se
termine.
Sélectionnez une autre plage ou station, puis
essayez à nouveau.
PAN ERROR : La fonction sélectionnée n’a pu être
exécutée.
Attendez un instant, puis essayez à nouveau.
PAN MAI NT : Le serveur Pandora® est en cours
d’entretien.
Attendez un instant, puis essayez à nouveau.
PAN NO SUPRT : Le périphérique raccordé n’est pas
pris en charge.
Pour plus de détails sur les périphériques
compatibles, visitez le site d’assistance.
PAN OPE N AP P : Pandora® ne fonctionne pas lors
du raccordement via le port USB.
Démarrez l’application Pandora® sur le iPhone.
PAN OPE N AP P - P RES S PAU SE : Pan dora® ne
fonctionne pas lors de la connexion via la fonction
BLUETOOTH.
Démarrez l’application Pandora® sur le
périphérique mobile, puis appuyez sur PAUSE.
PAN RESTRICT : Pandora® n’est pas offert à
l’extérieur de votre pays.
30FR
Page 67

PLEASE LOGIN - PANDORA APP : Aucune session
n’est ouverte à votre compte Pandora®.
Débranchez le périphérique, ouvrez une session
à votre compte Pandora®, puis raccordez-le de
nouveau.
UPDATE PAN : L’application Pandora® fonctionne
avec une ancienne version.
Mettez à jour l’application Pandora® à la dernière
version.
Si ces solutions ne permettent pas d’améliorer la
situation, contactez votre détaillant Sony le plus
proche.
31FR
Page 68

Raccordement/Installation
× 4
5×max. 8mm
(7/32 ×max. 5/16 po)
× 2
Mises en garde
Rassemblez tous les câbles de mises à la masse
en un point de masse commun.
Évitez de fixer des vis sur les câbles ou de coincer
ceux-ci dans les pièces mobiles (par exemple, le
rail du siège).
Avant d’effectuer les raccordements, coupez le
contact du véhicule pour éviter un court-circuit.
Raccordez les câbles d’alimentation jaune et
rouge seulement après avoir terminé le
raccordement de tous les autres câbles.
Pour des raisons de sécurité, veillez à isoler avec
du ruban isolant tout câble libre non raccordé.
Précautions
Choisissez soigneusement l’emplacement
d’installation pour que l’appareil ne gêne pas le
conducteur pendant la conduite.
Évitez d’installer l’appareil à un endroit exposé à
la poussière, à la saleté, à des vibrations
excessives ou à des températures élevées comme
en plein soleil ou à proximité de conduits de
chauffage.
Pour garantir un montage sûr, n’utilisez que la
quincaillerie fournie.
Remarque concernant le câble d’alimentation (jaune)
Lorsque cet appareil est raccordé à d’autres éléments
stéréo, la valeur nominale du circuit du véhicule sur
lequel l’appareil sera raccordé doit être supérieure à la
somme des fusibles de chaque élément.
Réglage de l’angle de montage
Réglez l’inclinaison à un angle inférieur à
45 degrés.
Liste des pièces nécessaires à
l’installation
Cette liste de pièces ne comprend pas tout le
contenu de l’emballage.
Le support et le tour de protection sont fixés
en usine. Avant l’installation de l’appareil, utilisez
les clés de déblocage pour détacher le support
de l’appareil. Pour plus de détails, reportezvous à la section « Retrait du tour de protection et
du support » (page 35).
Conservez les clés de déblocage pour une
utilisation ultérieure, car vous en aurez également
besoin pour retirer l’appareil du véhicule.
32FR
Page 69

Raccordement
d’une télécommande filaire
(non fournie)*
4
Blanc
Rayé blanc/noir
Gris
Noir
Jaune
Rouge
Rayé bleu/bl anc
d’une antenne de véhicule
Haut-parleur avant*1*
2
Haut-parleur arrière*1*
2
Rayé gris/noir
Vert
Rayé vert/noir
Violet
Rayé viole t/noir
*
3
*
3
Caisson de graves*
1
Amplificateur de puissance*
1
Pour plus de détails, reportezvous à la section
« Raccordements » (page 34).
*1 Non fourni
*2 Impédance des haut-parleurs : 4 à 8 ohms × 4
*3 Cordon à broche RCA (non fourni)
*4 Selo n le type de véhicule, util isez un adaptateur pour
une télécommande filaire (non fourni).
33FR
Page 70

Raccordements
Haut-parleur avant
Caisson de graves
À un point de mise à la masse commun
Raccordez d’abord le câble de mise à la masse
noir et ensuite les câbles d’alimentation jaune
et rouge.
À la borne d’alimentation +12 V qui est
alimentée en permanence
Raccordez d’abord le câble de mise à la masse
noir à un point de mise à la masse commun.
À la borne d’alimentation +12 V qui est
alimentée lorsque la clé de contact est à la
position accessoires
S’il n’y a pas de position accessoires, raccordez
la borne d’alimentation (batterie) +12 V qui est
alimentée en permanence.
Raccordez d’abord le câble de mise à la masse
noir à un point de mise à la masse commun.
Au câble de commande d’antenne électrique
ou au câble d’alimentation de l’amplificateur
d’antenne
Il n’est pas nécessaire de raccorder ce câble s’il
n’y a pas d’antenne électrique ni d’amplificateur
d’antenne ou avec une antenne télescopique
manuelle.
Au niveau de AMP REMOTE IN de
l’amplificateur de puissance en option
Ce raccordement s’applique uniquement aux
amplificateurs et à une antenne électrique. Le
raccordement de tout autre système risque
d’endommager l’appareil.
Raccordement facile d’un caisson de
graves
Vous pouvez utiliser un caisson de graves sans
amplificateur de puissance lorsque vous effectuez
le raccordement au cordon de haut-parleur arrière.
Remarque
Utilisez un caisson de graves avec une impédance de
4 à 8 ohms avec une capacité électrique adéquate pour
éviter de l’endommager.
Raccordement pour la conservation de la
mémoire
Lorsque le câble d’alimentation jaune est raccordé,
le circuit de la mémoire est alimenté en
permanence même si la clé de contact est à la
position d’arrêt.
Raccordement des haut-parleurs
Avant de raccorder les haut-parleurs, éteignez
l’appareil.
Utilisez des haut-parleurs avec une impédance de
4 à 8 ohms avec une capacité électrique
adéquate pour éviter de les endommager.
34FR
Page 71

Installation
Tourner le crochet vers l’intérieur.
Vis
Boîtier
182 mm (71/4 po)
53 mm (21/8 po)
Loquet
Retrait du tour de protection et du
support
Avant d’installer l’appareil, retirez le tour de
protection et le support de l’appareil.
1 Pincez les deux bords du tour de
protection , puis sortez-le.
2 Insérez les clés de déblocage en
même temps jusqu’au déclic. Tirez le
support vers le bas, puis tirez sur
l’appareil vers le haut pour les séparer.
Installation de l’appareil dans le
tableau de bord
Avant l’installation, assurez-vous que les loquets
des deux côtés du support sont bien pliés de
3
2mm (
/32 po) vers l’intérieur. Lors de l’installation
de l’appareil dans un véhicule japonais, consultez
« Installation de l’appareil dans un véhicule
japonais » (page 36).
1 Positionnez le support à l’intérieur du
tableau de bord, puis pliez les griffes
vers l’extérieur pour assurer une prise
correcte.
2 Insérez l’appareil dans le support ,
puis fixez le tour de protection .
Remarque
Avant d’installer cet appareil, retirez la vis et le boîtier à
l’arrière de l’appareil. N’utilisez pas les pièces retirées
précédemment lors de l’installation de l’appareil.
Remarques
Si les loquets sont droits ou pliés vers l’extérieur,
l’appareil ne peut pas être fixé solidement et peut se
détacher.
Assurez-vous que les 4 loquets situés sur le tour de
protection sont correctement engagés dans les
fentes de l’appareil.
35FR
Page 72

Installation de l’appareil dans un
vers le tableau de bord/la console
centrale
Pièces existantes fournies
avec la voiture
Support
Support
vers le tableau de bord/la console
centrale
Pièces existantes fournies
avec la voiture
Support
Support
Fusible ( 10 A)
véhicule japonais
Cet appareil ne peut pas être installé dans certaines
voitures japonaises. Dans ce cas, consultez votre
détaillant Sony.
TOYOTA
NISSAN
Remplacement du fusible
Lorsque vous remplacez le fusible,
veillez à utiliser un fusible dont
l’intensité, en ampères,
correspond à la valeur indiquée
sur le fusible original. Si le fusible
grille, vérifiez le raccordement de
l’alimentation et remplacez le
fusible. Si le fusible neuf grille également, il est
possible que l’appareil soit défectueux. Dans ce cas,
consultez votre détaillant Sony le plus proche.
Remarque
Pour éviter tout problème de fonctionnement, utilisez
uniquement les vis fournies pour l’installation.
Retrait et fixation de la façade
Pour plus de détails, reportez-vous à la section
« Retrait de la façade » (page 7).
36FR
Page 73

37FR
Page 74

Para mayor seguridad, asegúrese de instalar esta
unidad en el panel del auto ya que la parte
trasera de la unidad se calienta durante el uso.
Para obtener más información, consulte
“Conexión/Instalación” (página 30).
La placa de características que indica el voltaje de
funcionamiento, etc., está situada en la parte
inferior del chasis.
Nota sobre la pila de litio
No exponga la pila a fuentes de calor excesivo
como luz solar directa, fuego o similar.
Advertencia: si el encendido del automóvil
no dispone de una posición ACC
Asegúrese de ajustar la función AUTO OFF
(página 20). La unidad se apagará completa y
automáticamente en el tiempo establecido
después de apagarla, lo cual evita que se agote
la batería. Si no ajusta la función AUTO OFF,
mantenga presionado OFF hasta que se apague
la pantalla cada vez que apague el motor.
Exención de responsabilidad sobre los
servicios prestados por otros proveedores
Los servicios prestados por otros proveedores están
sujetos a cambios, anulaciones o interrupciones sin
previo aviso. Sony no asume responsabilidad
alguna en estas situaciones.
2ES
Page 75

Aviso importante
Precaución
SONY NO SERÁ RESPONSABLE DE NINGÚN DAÑO
INCIDENTAL, INDIRECTO O DERIVADO NI DE OTROS
DAÑOS QUE INCLUYEN, ENTRE OTROS, PÉRDIDA DE
GANANCIAS, PÉRDIDA DE INGRESOS, PÉRDIDA DE
DATOS, PÉRDIDA DE LA UTILIDAD DEL PRODUCTO O
DE CUALQUIER EQUIPO RELACIONADO, TIEMPO DE
INACTIVIDAD Y TIEMPO DEL COMPRADOR
RELACIONADO CON LA UTILIZACIÓN DE ESTE
PRODUCTO, SU HARDWARE Y SU SOFTWARE, O QUE
RESULTEN DE DICHA UTILIZACIÓN.
Estimado cliente, este producto incluye un radio
transmisor.
Corrobore el manual de operación de su automóvil
o contacte al fabricante o al vendedor de su
automóvil antes de instalar el producto en este.
Llamadas de emergencia
El dispositivo de manos libres BLUETOOTH para
automóviles y el dispositivo electrónico conectados
al manos libres funcionan utilizando redes de
señales de radio, celulares y terrestres así como
también la función programada por el usuario, que
no pueden garantizar la conexión en todas las
condiciones.
Por lo tanto, no dependa únicamente de un
dispositivo electrónico para las comunicaciones
esenciales (como las emergencias médicas).
Acerca de la comunicación BLUETOOTH
Las microondas que emite un dispositivo
BLUETOOTH pueden afectar el funcionamiento de
dispositivos médicos electrónicos. Apague esta
unidad y los demás dispositivos BLUETOOTH en
los lugares siguientes ya que podrían provocar un
accidente.
Lugares con presencia de gas inflamable,
hospitales, trenes, aviones o gasolineras
Lugares cerca de puertas automáticas o
alarmas de incendios
Esta unidad admite recursos de seguridad que
cumplen con el estándar BLUETOOTH para
proporcionar una conexión segura al utilizar la
tecnología inalámbrica BLUETOOTH, pero es
posible que la seguridad sea insuficiente según el
ajuste. Tenga cuidado al realizar una
comunicación con la tecnología inalámbrica
BLUETOOTH.
No se aceptan responsabilidades por la pérdida
de información que pudiera producirse durante
una comunicación BLUETOOTH.
Si desea realizar alguna consulta o solucionar algún
problema relativo a la unidad que no se traten en
este manual, póngase en contacto con el
distribuidor Sony más cercano.
3ES
Page 76

Tabla de contenidos
Guía para las partes y los controles. . . . . . . . . . . . . 5
Procedimientos iniciales
Extracción del panel frontal . . . . . . . . . . . . . . . . . . . 7
Ajuste del reloj. . . . . . . . . . . . . . . . . . . . . . . . . . . . . . 8
Preparación del dispositivo BLUETOOTH . . . . . . . . 8
Conexión de un dispositivo USB . . . . . . . . . . . . . . 11
Conexión de otro dispositivo de audio
portátil . . . . . . . . . . . . . . . . . . . . . . . . . . . . . . . . 11
Escuchar la radio
Escuchar la radio . . . . . . . . . . . . . . . . . . . . . . . . . . . 12
Usar el RDS (Sistema de datos de radio). . . . . . . . 12
Reproducción
Reproducción de un dispositivo USB . . . . . . . . . . 13
Reproducción de un dispositivo BLUETOOTH. . . . 13
Búsqueda y reproducción de pistas . . . . . . . . . . . 14
Escuchar Pandora®
Configuración de Pandora® . . . . . . . . . . . . . . . . . . 15
Reproducción en Pandora® . . . . . . . . . . . . . . . . . . 15
Operaciones disponibles en Pandora® . . . . . . . . . 15
Llamada con manos libres (sólo a
través de BLUETOOTH)
Recepción de llamadas . . . . . . . . . . . . . . . . . . . . . 16
Realización de llamadas . . . . . . . . . . . . . . . . . . . . . 16
Tareas disponibles durante la llamada . . . . . . . . . 18
Ajustes
Cancelación del modo DEMO . . . . . . . . . . . . . . . . 19
Operación básica de ajustes . . . . . . . . . . . . . . . . . 19
Configuración General (GENERAL) . . . . . . . . . . . . 20
Configuración del Sonido (SOUND). . . . . . . . . . . . 20
Configuración de Pantalla (DISPLAY) . . . . . . . . . . 21
Configuración BLUETOOTH (BT). . . . . . . . . . . . . . . 21
Información complementaria
Precauciones. . . . . . . . . . . . . . . . . . . . . . . . . . . . . . 22
Mantenimiento . . . . . . . . . . . . . . . . . . . . . . . . . . . . 23
Especificaciones . . . . . . . . . . . . . . . . . . . . . . . . . . . 23
Solución de problemas . . . . . . . . . . . . . . . . . . . . . 25
Conexión/Instalación
Advertencias . . . . . . . . . . . . . . . . . . . . . . . . . . . . . . 30
Lista de piezas para la instalación . . . . . . . . . . . . 30
Conexión . . . . . . . . . . . . . . . . . . . . . . . . . . . . . . . . . 31
Instalación . . . . . . . . . . . . . . . . . . . . . . . . . . . . . . . . 33
Funciones útiles
Utilizar Siri Eyes Free . . . . . . . . . . . . . . . . . . . . . . . . 18
4ES
Page 77

Guía para las partes y los controles
Unidad principal
Botón de desbloqueo del panel frontal
SRC (fuente)
Para encender la unidad.
Para cambiar la fuente.
OFF
Manténgalo presionado durante 1 segundo para
apagar la fuente y mostrar el reloj en la pantalla.
Manténgalo presionado durante más de
2 segundos para apagar la unidad y la pantalla.
Si se apaga la unidad y la pantalla desaparece,
la operación mediante el control remoto no se
encuentra disponible.
Control de sincronización
Gírelo para ajustar el volumen.
PUSH ENTER
Ingresar el elemento seleccionado.
MENU*
Para abrir el menú de configuración.
VOICE (página 17, 18)
Mantenga presionado por más de 2 segundos
para activar el marcado por voz o la función Siri
(solo iPhone).
Marca N
Toque el selector del control con un smartphone
Android™ para establecer conexión Bluetooth®.
* No disponible cuando está seleccionado el
teléfono BT.
Ventana de visualización
SEEK +/–
Para sintonizar emisoras de radio en forma
automática. Manténgalo presionado para
sintonizarlas en forma manual.
/ (anterior/siguiente)
/ (avance rápido/retroceso rápido)
PTY (tipo de programa)
Seleccione PTY en RDS.
(navegar) (página 14, 15)
Para entrar al modo de navegación durante la
reproducción.
CALL
Acceda al menú de llamada. Reciba/Finalice
una llamada.
Manténgalo presionado por más de 2 segundos
para cambiar la señal de BLUETOOTH.
5ES
Page 78

MODE (página 12, 13, 16, 18)
(volver)
Para volver a la pantalla anterior.
Receptor para el control remoto
Botones numéricos (1 al 6)
Para recibir las emisoras almacenadas.
Manténgalo presionado para almacenarlas en
forma manual.
Llame a un número almacenado. Manténgalo
apretado para guardar un número telefónico.
ALBUM /
Para saltearse un álbum en el dispositivo de
audio. Manténgalo apretado para saltear
álbumes en forma continua.
Presione para indicar que algo le gustó o
para indicar que algo no le gustó en Pandora®
(página 15).
(repetir)
(reproducción aleatoria)
MIC (página 18)
PAU SE
MEGA BASS
Refuerza los sonidos graves en sincronización
con el nivel del volumen. Presione para cambiar
la configuración del MEGA BASS: [1], [2], [OFF].
Toma de entrada AUX
DSPL (pantalla)
Presione para cambiar los elementos de la
pantalla.
SCRL (desplazamiento)
Manténgalo apretado para desplazarse a un
elemento de pantalla.
Puerto USB
Micrófono (panel interno)
Para que la función manos libre trabaje
correctamente, no cubra el micrófono con cinta,
etc.
Control remoto RM-X231
El botón VOL (volumen) + tiene un punto sensible al
tacto.
CALL
Acceda al menú de llamada. Reciba/Finalice
una llamada.
SOUND*
Abra el menú SOUND directamente.
MENU*
Manténgalo presionado para abrir el menú de
configuración.
* No disponible cuando está seleccionado el
teléfono BT.
///
Seleccione un elemento de configuración, etc.
ENTER
Ingresar el elemento seleccionado.
/ (anterior/siguiente)
+/– (álbum +/–)
VOL (volumen) +/–
6ES
Page 79

Retire la película de aislamiento antes del uso.
Procedimientos iniciales
Extracción del panel frontal
Es posible extraer el panel frontal de la unidad para
evitar que la roben.
1 Mantenga presionado OFF hasta que
la unidad se apague, presione el botón
de desbloqueo del panel frontal ,
luego deslice el panel hacia usted para
quitarlo.
Alarma de precaución
Si gira el interruptor de la llave de encendido hasta
la posición OFF sin haber extraído el panel frontal,
la alarma de precaución sonará durante unos
segundos. La alarma sonará solamente si se utiliza
el amplificador incorporado.
Números de serie
Asegúrese de que los números de serie al final de la
unidad coincidan correctamente con los de la parte
posterior del panel frontal. De lo contrario, no se
podrá emparejar, conectarse o desconectarse a
BLUETOOTH por NFC.
Colocación del panel frontal
7ES
Page 80

Ajuste del reloj
1 Presione MENU, gire el selector de
control para seleccionar [SET GENERAL] y,
a continuación, presiónelo.
2 Gire el selector de control para
seleccionar [SET CLOCK-ADJ] y, a
continuación, presiónelo.
La indicación de la hora parpadea.
3 Gire el selector de control para ajustar la
hora y los minutos.
Para mover la indicación digital, presione SEEK
+/–.
4 Una vez ajustados los minutos, presione
MENU.
El ajuste se completa y el reloj se pone en
funcionamiento.
Para visualizar el reloj
Presione DSPL.
Preparación del dispositivo
BLUETOOTH
Puede disfrutar de música o realizar llamadas con
manos libres dependiendo del dispositivo
compatible de BLUETOOTH, como un smartphone,
un teléfono celular o un dispositivo de audio (de
aquí en adelante “dispositivo BLUETOOTH” a no ser
que se especifique de otra forma). Para obtener
más información acerca de la conexión, consulte las
instrucciones de funcionamiento que se
suministran con el dispositivo.
Antes de conectar el dispositivo, apague el
volumen de esta unidad; si no lo hace, puede oírse
un sonido fuerte.
Conectar con un Smartphone a través
de One touch (NFC)
Al tocar el selector del control de la unidad con un
smartphone compatible con NFC*, la unidad está
emparejada y automáticamente conectada con el
smartphone.
* NFC (Transmisión de datos en proximidad) es una
tecnología que permite la comunicación inalámbrica
de corto rango entre varios dispositivos, como
teléfonos móviles y etiquetas de IC. Gracias a la
función de NFC, la comunicación de datos se puede
alcanzar fácilmente con sólo tocar el símbolo
correspondiente o ubicación señalada en dispositivos
compatibles con tecnología NFC.
Para un smartphone con Android OS 4,0 o inferior
instalado, se requiere descargar la aplicación “NFC
Easy Connect” disponibles en Google Play™. Es
posible que la aplicación no esté disponible para su
descarga en algunos países/regiones.
1 Activación de la función NFC en un
smartphone.
Para obtener más información, consulte las
instrucciones de funcionamiento que se
suministran con el smartphone.
2 Toque la parte marca N de la unidad con
la parte marca N del smartphone.
Asegúrese de que se encienda en la pantalla
de la unidad.
Para desconectar mediante One touch
Toque nuevamente la parte marca N de la unidad
con la parte marca N del smartphone.
8ES
Page 81
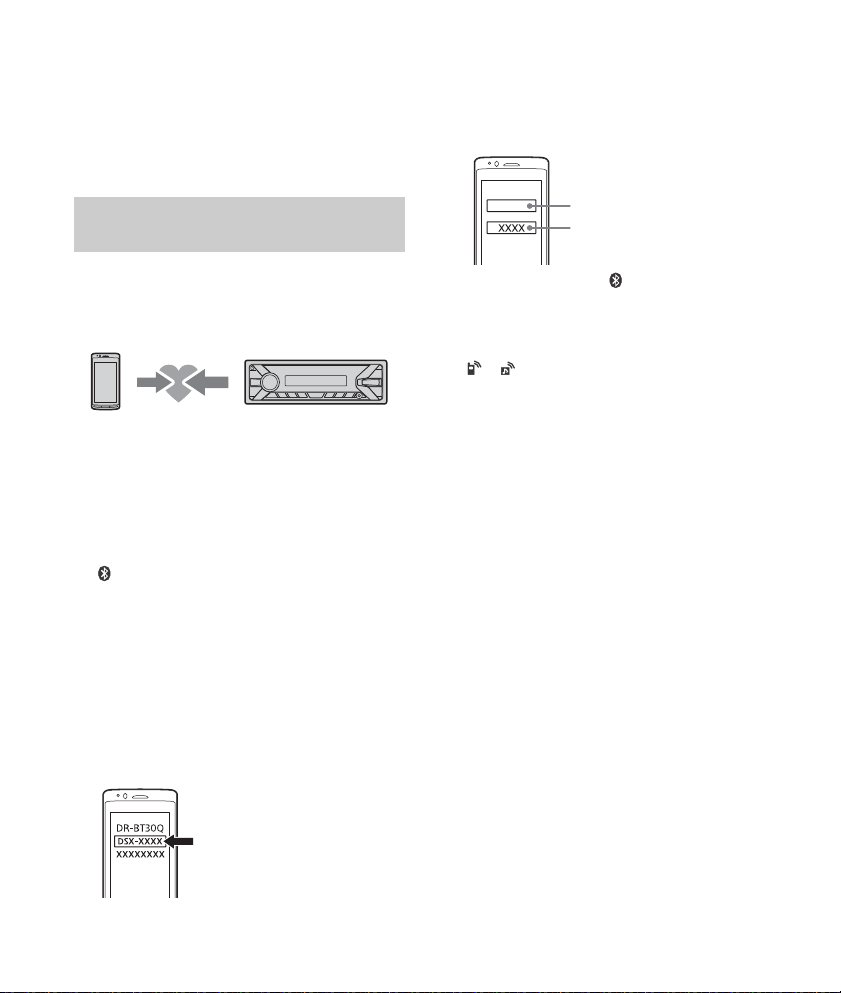
Notas
[0000]
Introduzca la clave
Al realizar la conexión, manipule el smartphone
cuidadosamente para evitar raspaduras.
La conexión One touch no es posible cuando la
unidad ya está conectada a otro dispositivo
compatible con tecnología NFC. En este caso,
desconecte el dispositivo y haga conexión con el
smartphone nuevo.
Emparejamiento y conexión con otro
dispositivo BLUETOOTH
Cuando conecte un dispositivo BLUETOOTH por
primera vez es necesario el registro de ambos
dispositivos (denominado “emparejamiento”). El
emparejamiento permite que la unidad y otros
dispositivos se reconozcan entre sí.
1 Coloque el dispositivo BLUETOOTH
dentro de 1 m de distancia respecto de la
unidad.
2 Presione CALL, gire el selector de control
para seleccionar [SET PAIRING] y, a
continuación, presiónelo.
parpadea mientras la unidad se está
emparejando en modo de espera.
3 Realice el emparejamiento en el
dispositivo BLUETOOTH para detectar
esta unidad.
4 Seleccione [DSX-XXXX] (el nombre de su
modelo) que se muestra en la pantalla
del dispositivo de BLUETOOTH.
Si el nombre de su modelo no aparece, repita
desde el paso 2.
5 Si se requiere una clave* en el dispositivo
BLUETOOTH, escriba [0000].
* La clave de paso puede denominarse “clave de
acceso”, “código PIN”, “número PIN” o
“contraseña”, etc., en función del dispositivo.
Cuando se empareja, queda encendida.
6 Seleccione esta unidad en el dispositivo
BLUETOOTH para establecer la conexión
BLUETOOTH.
o se enciende cuando la conexión está
establecida.
Nota
Mientras se conecta a un dispositivo BLUETOOTH, esta
unidad no puede detectarse desde otro dispositivo.
Para habilitar la detección, acceda al modo de
emparejamiento y busque esta unidad desde otro
dispositivo.
Para comenzar la reproducción
Para obtener más información, consulte
“Reproducción de un dispositivo BLUETOOTH”
(página 13).
Para cancelar el emparejamiento
Realizar el paso 2 para cancelar el modo de
emparejamiento luego de que esta unidad y el
dispositivo BLUETOOTH estén emparejados.
9ES
Page 82

Conexión con un dispositivo
BLUETOOTH emparejado
Para utilizar un dispositivo emparejado, es
necesaria la conexión con esta unidad. Algunos
dispositivos emparejados se conectarán
automáticamente.
1 Presione CALL, gire el selector de control
para seleccionar [SET BT SIGNL] y, a
continuación, presiónelo.
Asegúrese de que se encienda.
2 Active la función BLUETOOTH en el
dispositivo BLUETOOTH.
3 Inicie el dispositivo BLUETOOTH para
conectarlo a esta unidad.
o se enciende.
Íconos en la pantalla:
Las luces se encienden cuando la
llamada manos libres está disponible al
permitir el HFP (Perfil manos libres).
Las luces se encienden cuando el
dispositivo de audio se puede reproducir
al permitir el A2DP (Perfil de distribución
de audio avanzado).
Para conectar el dispositivo que se conectó
por última vez en esta unidad
Active la función BLUETOOTH en el dispositivo
BLUETOOTH.
Presione SRC para seleccionar [BT PHONE] o [BT
AUDIO].
Presione ENTER para conectar con el teléfono
celular, o PAUSE para conectar con el dispositivo de
audio.
Nota
Mientras trasmite audio BLUETOOTH, no puede realizar
la conexión de esta unidad al teléfono celular. Realice
en cambio la conexión desde el teléfono celular a la
unidad.
Sugerencia
Con la señal BLUETOOTH activada: si el encendido se
ajusta en la posición ON, la unidad vuelve a conectarse
automáticamente al último teléfono celular conectado.
Conectar con un iPhone/iPod
(Autoemparejamiento con BLUETOOTH)
Cuando un iPhone/iPod con iOS5 o superior
instalado se conecta al puerto USB, la unidad se
empareja y conecta con el iPhone/iPod
automáticamente.
Para permitir el autoemparejamiento con
BLUETOOTH, asegúrese de que [AUTOPAIR] en [BT]
esté configurada en [ON] (página 21).
1 Active la función BLUETOOTH en el
iPhone/iPod.
2 Conecte el iPhone/iPod al puerto USB.
Asegúrese de que se encienda en la pantalla
de la unidad.
Notas
La conexión autoemparejamiento con BLUETOOTH no
es posible cuando la unidad ya está conectada a otro
dispositivo BLUETOOTH. En este caso, desconecte el
otro dispositivo, luego vuelva a conectar el iPhone/
iPod.
Si el autoemparejamiento con BLUETOOTH no está
establecido, vea “Preparación del dispositivo
BLUETOOTH” para más detalles (página 8).
10ES
Page 83

Conexión de un dispositivo USB
1 Baje el volumen de la unidad.
2 Conecte el dispositivo USB a la unidad.
Para conectar un iPod/iPhone, utilice el cable de
conexión USB para iPod (no suministrado).
Conexión de otro dispositivo de
audio portátil
1 Apague el dispositivo de audio portátil.
2 Baje el volumen de la unidad.
3 Conecte el dispositivo de audio portátil a
la toma de entrada AUX (minitoma
estéreo) en la unidad con un cable de
conexión (no suministrado)*.
* Asegúrese de utilizar un tapón de respiradero.
Coincidencia del nivel de volumen del
dispositivo conectado con otras fuentes
Comience la reproducción del dispositivo de audio
portátil en un nivel moderado y configure su nivel
habitual de volumen en la unidad.
Presione MENU, luego seleccione [SET SOUND]
[SET AUX VOL] (página 21).
4 Presione SRC para seleccionar [AUX].
11ES
Page 84

Escuchar la radio
Escuchar la radio
Para escuchar una estación de radio, presione SRC
para seleccionar [TUNER].
Almacenamiento automático (BTM)
1 Presione MODE para cambiar la banda
de radio (FM1, FM2, FM3, AM1 o AM2).
2 Presione MENU, gire el selector de
control para seleccionar [SET GENERAL] y,
a continuación, presiónelo.
3 Gire el selector de control para
seleccionar [SET BTM] y, a continuación,
presiónelo.
La unidad almacena las emisoras en el orden de
frecuencia en los botones numéricos.
Sintonización
1 Presione MODE para cambiar la banda
de radio (FM1, FM2, FM3, AM1 o AM2).
2 Realice la sintonización.
Para realizar la sintonización manual
Mantenga presionado SEEK +/– para ubicar la
frecuencia aproximada y, a continuación,
presiónelo repetidas veces para ajustar la
frecuencia deseada con mayor precisión.
Para realizar la sintonización automática
Presione SEEK +/–.
La búsqueda se detiene cuando la unidad
recibe una emisora.
Almacenamiento manual
1 Mientras recibe la emisora que desea
almacenar, mantenga presionado un
botón numérico (de 1 a 6) hasta que
aparezca [MEM].
Recepción de las emisoras almacenadas
1 Seleccione la banda y, a continuación,
presione un botón numérico (de 1 a 6).
Usar el RDS (Sistema de datos
de radio)
Selección de tipos de programa (PTY)
1 Presione PTY durante la recepción FM.
2 Gire el selector de control hasta que
aparezca el tipo de programa deseado y,
a continuación, presiónelo.
La unidad comienza a buscar una estación que
emita el tipo de programa seleccionado.
Tipos de programas
NEWS (Noticias), INFORM (Información), SPORTS
(Deportes), TA LK (Debate), ROCK (Rock), CLS ROCK
(Rock clásico), ADLT HIT (Música para adultos),
SOFT RCK (Rock suave), TOP 40 (Los 40 mejores),
COUNTRY (Música Country), OLDIES (Música de
décadas pasadas), SOFT (Lentos), NOSTALGA
(Nostalgia), JAZZ (Jazz), CLASSICL (Clásica),
R & B (Ritmo y Blues), SOFT R&B (Ritmo suave y
Blues), LANGUAGE (Idioma extranjero), REL MUSC
(Música religiosa), REL TALK (Programa religioso),
PERSNLTY (Personalidad), PUBLIC (Público),
COLLEGE (Univ.), HABL ESP (Hablar Español), MUSC
ESP (Música en Español), HIP HOP (Hip-Hop),
WEATHER (Clima)
Ajuste de hora del reloj (CT)
Los datos CT de la transmisión RDS ajustan el reloj.
1 Ajuste [SET CT-ON] en [SET GENERAL]
(página 20).
12ES
Page 85

Reproducción
Reproducción de un dispositivo
USB
En este Manual de instrucciones, “iPod” se utiliza
como referencia general para las funciones del iPod
en un iPod y un iPhone, a menos que se
especifique lo contrario en el texto o en las
ilustraciones.
Para obtener más información acerca de la
compatibilidad de su iPod, consulte “Acerca de
iPod” (página 22) o visite el sitio web de soporte
técnico que figura en la cubierta posterior.
Pueden utilizarse dispositivos de tipo USB (como
USB flash drive, reproductor de multimedia digital,
smartphone Android) compatibles con el estándar
USB, de tipo MSC (Clase de Almacenamiento
Masivo) y MTP (Protocolo de Transferencia
Multimedia).
Según el smartphone Android o el reproductor
multimedia, se requiere que se ajuste el modo de
conexión USB a MTP.
Notas
Para obtener más información acerca de la
compatibilidad del dispositivo USB, visite el sitio web
de soporte técnico que figura en la cubierta posterior.
No es posible reproducir los archivos que se indican a
continuación.
MP3/WMA/FLAC:
archivos protegidos por derechos de autor
archivos DRM (Gestión de derechos digitales)
archivos de audio de canales múltiples
MP3/WMA:
archivos con formato de compresión sin pérdida
1 Conecte el dispositivo USB al puerto USB
(página 11).
Se inicia la reproducción.
Si ya está conectado un dispositivo, para iniciar
la reproducción pulse SRC para seleccionar
[USB] ([IPD] aparece en la pantalla cuando se
reconoce el iPod).
2 Ajuste el volumen de esta unidad.
Para detener la reproducción
Mantenga presionado OFF por 1 segundo.
Para extraer el dispositivo
Detenga la reproducción y extraiga el dispositivo.
Precaución para iPhone
Al conectar un iPhone mediante USB, el volumen
de las llamadas telefónicas es controlado por el
iPhone, y no por la unidad. No aumente el volumen
de la unidad involuntariamente durante un
llamado, ya que un sonido fuerte repentino puede
aparecer cuando la llamada finalice.
Utilización directa del iPod (Control de
pasajero)
1 Durante la reproducción, mantenga
apretado MODE hasta que aparezca
[MODE IPOD].
Los funcionamientos del iPod están disponibles.
Tenga en cuenta que solamente es posible
ajustar el volumen en la unidad.
Para salir del modo de control de pasajero
Mantenga presionado MODE para que aparezca
[MODE AUDIO].
Reproducción de un dispositivo
BLUETOOTH
Puede reproducir contenido en un dispositivo
conectado que sea compatible con BLUETOOTH
A2DP (Perfil de distribución de audio avanzado).
1 Haga una conexión BLUETOOTH con el
dispositivo de audio (página 9).
2 Presione SRC para seleccionar [BT
AUDIO].
13ES
Page 86

3 Para comenzar la reproducción, utilice
las funciones del dispositivo de audio.
4 Ajuste el volumen de esta unidad.
Notas
En función del dispositivo de audio, es posible que no
se muestre en esta unidad cierta información como,
por ejemplo, el título, el número de pista y la duración
y el estado de la reproducción.
Incluso si se cambia la fuente en la unidad, la
reproducción de la señal del dispositivo de audio no
se interrumpe.
Para hacer coincidir el nivel de volumen del
dispositivo BLUETOOTH con otras fuentes
Comience la reproducción del dispositivo de audio
portátil BLUETOOTH en un nivel moderado y
configure su nivel habitual de volumen en la
unidad.
Presione MENU, luego seleccione [SET SOUND]
[SET BTA VOL] (página 21).
Búsqueda y reproducción de
pistas
Búsqueda de una pista por nombre
(Quick-BrowZer™)
1 Durante la reproducción de los
dispositivos de audio USB, presione
(navegar)* para que aparezca la lista
de categorías de búsqueda.
Cuando aparece la lista de pistas, presione
(volver) repetidamente hasta que aparezca
la categoría de búsqueda deseada.
* Durante la reproducción USB, presione
(navegar) durante más de 2 segundos para
volver directamente al inicio de la lista de
catego rías.
2 Gire el selector de control para
seleccionar la categoría de búsqueda
deseada y, a continuación, presiónelo
para confirmarla.
3 Repita el paso 2 para buscar la pista
deseada.
Se inicia la reproducción.
Para salir del modo Quick-BrowZer
Presione (navegar).
Reproducción repetida y aleatoria
1 Durante la reproducción, presione
(repetir) o (aleatorio)
repetidamente para seleccionar el modo
de reproducción deseado.
La reproducción en el modo de reproducción
seleccionado puede tardar en comenzar.
Los modos de reproducción disponibles varían en
función de la fuente de sonido seleccionada.
14ES
Buscar salteando elementos
(Modo saltar)
1 Presione (navegar).
2 Presione SEEK +.
3 Gire el selector de control para
seleccionar el elemento.
Se realizan omisiones en pasos del 10 % de la
cantidad total de elementos presentes en la
lista.
4 Presione ENTER para volver al modo
Quick-BrowZer.
Aparecerá el elemento seleccionado.
5 Gire el selector de control para
seleccionar el elemento deseado y, a
continuación, presiónelo.
Se inicia la reproducción.
Page 87

Escuchar Pandora®
Pandora® está disponible para reproducir música a
través de su iPhone y smartphone Android. Puede
controlar Pandora® a través de un teléfono iPhone
conectado como USB a esta unidad, o un
smartphone Android conectado a esta unidad por
BLUETOOTH.
Pandora® no está disponible en algunos países. Por
favor visite
http://www.pandora.com/legal
para más información.
Configuración de Pandora®
4 Presione PAUSE para comenzar la
reproducción.
Si aparece el número de dispositivo
Asegúrese de que se muestren los mismos
números (por ejemplo, 123456) en esta unidad y en
el dispositivo móvil, luego presione ENTER en esta
unidad y seleccione [Sí] en el dispositivo móvil.
Cuando la función BLUETOOTH está activada
Puede ajustar el nivel de volumen.
Presione MENU, luego seleccione [SET SOUND]
[SET BTA VOL] (página 21).
Operaciones disponibles en
Pandora®
1 Para obtener más información acerca de
la compatibilidad del dispositivo móvil,
visite el sitio web de soporte técnico que
figura en la cubierta posterior.
2 Descargue la última versión de la
aplicación Pandora® de la tienda de
aplicaciones de su smartphone. En
www.pandora.com/everywhere/mobile
encontrará una lista de los dispositivos
compatibles.
Reproducción en Pandora®
1 Conecte el dispositivo móvil a esta
unidad.
iPhone vía USB (página 11)
Smartphone Android vía función BLUETOOTH
(página 9)
2 Presione SRC para seleccionar
[PANDORA USB] o [BT PANDORA].
3 Abra la aplicación Pandora® en su
dispositivo móvil.
Comentarios “Thumbs”
Los comentarios “Pulgar hacia arriba” o “Pulgar
hacia abajo” permiten personalizar las estaciones.
1 Durante la reproducción, presione
(pulgar hacia arriba) o (pulgar hacia
abajo).
Usar la lista de estaciones
La lista de estaciones permite seleccionar
fácilmente una estación deseada.
1 Durante la reproducción, presione
(navegar).
2 Presione SEEK + para seleccionar el
orden de clasificación [BY DATE] o [A TO
Z].
3 Gire el selector de control para
seleccionar la estación deseada y, a
continuación, presiónela.
Se inicia la reproducción.
15ES
Page 88

Marcar como favorito
La pista que se está reproduciendo se puede
marcar como favorita y almacenar en su cuenta
Pandora® .
1 Durante la reproducción, presione
MODE.
Llamada con manos libres (sólo a
través de BLUETOOTH)
Para usar un teléfono celular, conéctelo a esta
unidad. Para obtener más información, consulte
“Preparación del dispositivo BLUETOOTH”
(página 8).
Recepción de llamadas
1 Presione CALL cuando reciba una
llamada con un tono de llamada.
Comienza la llamada telefónica.
Nota
El tono de llamada y la voz del auricular sólo salen de
los altavoces frontales.
Para rechazar la llamada
Mantenga presionado OFF por 1 segundo.
Para finalizar una llamada
Presione CALL nuevamente.
Realización de llamadas
Puede realizar una llamada desde la libreta de
direcciones o desde el historial de llamadas cuando
un teléfono celular que sea compatible con PBAP
(Perfil de acceso a la agenda telefónica) esté
conectado.
16ES
Desde la libreta de direcciones
1 Presione CALL, gire el selector de control
para seleccionar [PHONE BOOK] y, a
continuación, presiónelo.
Page 89

2 Gire el selector de control para
seleccionar una inicial de la lista de
iniciales y, a continuación, presiónelo.
3 Gire el selector de control para
seleccionar un nombre de la lista de
nombres y, a continuación, presiónelo.
4 Gire el selector de control para
seleccionar un número de la lista de
números y, a continuación, presiónelo.
Comienza la llamada telefónica.
Desde el historial de llamadas
1 Presione CALL, gire el selector de control
para seleccionar [RECENT CALL] y, a
continuación, presiónelo.
Aparece una lista del historial de llamadas.
2 Gire el selector de control para
seleccionar un nombre o un número
telefónico del historial de llamadas y, a
continuación, presiónelo.
Comienza la llamada telefónica.
Desde la introducción de un número de
teléfono
1 Presione CALL, gire el selector de control
para seleccionar [DIAL NUMBER] y, a
continuación, presiónelo.
2 Gire el selector de control para ingresar
el número de teléfono y finalmente
seleccione [ ] (espacio), luego, presione
el botón ENTER*.
Comienza la llamada telefónica.
* Para mover la indicación digital, presione
SEEK +/–.
Nota
En la pantalla aparecerá [_] en lugar de [#] .
Desde repetición de llamada
1 Presione CALL, gire el selector de control
para seleccionar [REDIAL] y, a
continuación, presiónelo.
Comienza la llamada telefónica.
Desde números preestablecidos
1 Presione SRC para seleccionar [BT
PHONE].
2 Presione un botón numérico (1 a 6) para
seleccionar el contacto al que desea
llamar.
3 Presione ENTER.
Comienza la llamada telefónica.
Marcación predefinida de números
telefónicos
Es posible almacenar hasta 6 contactos en la
marcación preajustada.
1 Seleccione un número de teléfono que desee
almacenar en la marcación predefinida, de la
agenda telefónica, el historial de llamadas o bien
ingresando directamente el número.
El número de teléfono aparecerá en la pantalla de
esta unidad.
2 Mantenga presionado un botón de número (de 1 a
6) hasta que [MEM] aparezca.
El contacto se almacena en el número preajustado
que seleccione.
Desde etiquetas de voz
Haga una llamada al decir la etiqueta de voz
almacenada en un teléfono celular conectado que
tenga una función de marcado por voz.
1 Presione CALL, gire el selector de control
para seleccionar [VOICE DIAL] y, a
continuación, presiónelo.
Alternativamente, mantenga presionado VOICE
por más de 2 segundos.
17ES
Page 90

2 Mencione la etiqueta de voz almacenada
en el teléfono celular.
Se reconocerá su voz y se realizará la llamada.
Para cancelar el marcado por voz
Presione VOICE.
Tareas disponibles durante la
llamada
Para ajustar el volumen del tono de llamada
Gire el selector de control mientras recibe la
llamada.
Para ajustar el volumen del auricular
Gire el selector de control durante una llamada.
Para ajustar el volumen para otra persona
(Ajuste de ganancia de micrófono)
Presione MIC.
Niveles de volumen ajustables: [MIC-LOW], [MICMID], [MIC-HI].
Para reducir el eco y el ruido (Cancelador de
ecos/Modo cancelador de ruidos)
Mantenga presionado MIC.
Modo ajustable: [EC/NC-1], [EC/NC-2].
Para cambiar entre el modo manos libres y el
modo manual
Durante una llamada, presione MODE para cambiar
el audio de la llamada telefónica entre la unidad y
un teléfono celular.
Nota
Según el teléfono celular, esta operación puede no
estar disponible.
Funciones útiles
Utilizar Siri Eyes Free
Siri Eyes Free le permite utilizar el manos libres de
iPhone al simplemente hablar al micrófono. Esta
función requiere que conecte el iPhone a la unidad
a través de BLUETOOTH. La disponibilidad está
limitada a iPhone 4s o superior. Asegúrese de que
su iPhone tenga la última versión de iOS.
Primero debe completar el registro de BLUETOOTH
y las configuraciones de conexión para el iPhone
con la unidad. Para obtener más información,
consulte “Preparación del dispositivo BLUETOOTH”
(página 8).
1 Active la función Siri en el iPhone.
Para más detalles, consulte las instrucciones de
funcionamiento que se suministran con el
iPhone.
2 Mantenga presionado VOICE por más de
2 segundos.
La pantalla de comando de voz aparece.
3 Luego de que el iPhone produzca un bip,
hable al micrófono.
El iPhone vuelve a producir un bip y luego Siri
comienza a responder.
Para desactivar Siri Eyes Free
Presione VOICE.
Notas
El iPhone puede no reconocer su voz dependiendo de
las condiciones de uso. (Por ejemplo, si se encuentra
en un automóvil en movimiento).
Siri Eyes Free puede no funcionar correctamente o el
tiempo de respuesta puede retrasarse en lugares
donde las señales de iPhone son difíciles de recibir.
Dependiendo de la condición de funcionamiento de
iPhone, Siri Eyes Free puede no funcionar
correctamente o dejar de hacerlo.
Si reproduce una pista con el iPhone utilizando la
conexión de audio por BLUETOOTH, cuando la pista
comienza la reproducción a través de BLUETOOTH, la
función Siri Eyes Free automáticamente deja de
funcionar y la unidad cambia a la fuente de audio
BLUETOOTH.
18ES
Page 91

Cuando Siri Eyes Free está activado durante la
reproducción de audio, la unidad puede cambiar a la
fuente de audio de BLUETOOTH así no haya
especificado que se reproduzca una pista.
Cuando conecte el iPhone al puerto USB, Siri Eyes
Free puede no funcionar correctamente o dejar de
hacerlo.
Cuando conecte el iPhone a la unidad a través de un
puerto USB, no active Siri con el iPhone. Siri Eyes Free
puede no funcionar correctamente o dejar de hacerlo.
No habrá ningún sonido de audio mientras Siri Eyes
Free esté activado.
Ajustes
Cancelación del modo DEMO
Puede cancelar la pantalla de muestra que aparece
cuando la fuente está apagada y se muestra el
reloj.
1 Presione MENU, gire el selector de
control p ara seleccio nar [SET GENERAL] y,
a continuación, presiónelo.
2 Gire el selector de control para
seleccionar [SET DEMO] y, a
continuación, presiónelo.
3 Gire el selector de control para
seleccionar [SET DEMO-OFF] y, a
continuación, presiónelo.
El ajuste finalizó.
4 Presione (volver) dos veces.
La pantalla vuelve al modo de recepción/
reproducción normal.
Operación básica de ajustes
Puede seleccionar elementos de las siguientes
categorías de configuración:
Configuración general (GENERAL), configuración de
sonido (SOUND), configuración de pantalla
(DISPLAY), configuración de BLUETOOTH (BT)
(No disponible cuando está seleccionado el BT
phone).
1 Presione MENU.
2 Gire el selector de control para
seleccionar la categoría de configuración
y, a continuación, presiónela.
Los elementos que pueden establecerse
difieren según la fuente y los ajustes.
3 Gire el selector de control para
seleccionar las opciones y, a
continuación, presiónelas.
19ES
Page 92
Para regresar a la pantalla anterior
Presione (volver).
Configuración General
(GENERAL)
DEMO (demostración)
Activa la demostración: [ON], [OFF].
CLOCK-ADJ (ajuste del reloj) (página 8)
CAUT ALM (alarma de precaución)
Activa la alarma de precaución: [ON], [OFF]
(página 7).
(Disponible solamente mientras la fuente esté
apagada y se muestre el reloj).
BEEP
Activa el sonido de los pitidos: [ON], [OFF].
AUTO OFF
Permite apagar la alimentación
automáticamente una vez transcurrido un
período deseado cuando la unidad está
apagada: [NO], [30S] (30 segundos), [30M]
(30 minutos), [60M] (60 minutos).
CT (hora del reloj)
Activa la función CT: [ON], [OFF].
BTM (memoria de mejor sintonización) (página 12)
(Solamente estará disponible cuando la
sintonización esté seleccionada).
Configuración del Sonido
(SOUND)
Este menú de configuración está disponible cuando
se selecciona cualquier fuente excepto el BT phone.
EQ5 PRESET
Selecciona una curva ecualizadora de 10 curvas
ecualizadoras o de:
[OFF], [R&B], [ROCK], [POP], [DANCE], [HIP-HOP],
[ELECTRONICA], [JAZZ], [SOUL], [COUNTRY],
[CUSTOM].
El ajuste de la curva de ecualizador se puede
memorizar para cada fuente.
EQ5 SETTING
Establece [CUSTOM] de EQ5.
BASE
Selecciona una curva del ecualizador
predeterminada como base para otra
personalización: [BAND1] (frecuencia baja),
[BAND2] (frecuencia baja-media), [BAND3]
(frecuencia media), [BAND4] (frecuencia mediaalta), [BAND5] (frecuencia alta).
El nivel del volumen se ajusta en pasos de 1 dB,
de -10 dB a +10 dB.
BALANCE
Permite ajustar el balance de sonido:
[RIGHT-15] – [CENTER] – [LEFT-15].
FAD ER
Permite ajustar el nivel relativo: [FRONT-15] –
[CENTER] – [REAR-15].
S.WOOFER (altavoz potenciador de graves)
SW LEVEL (nivel del subwoofer)
Ajusta el nivel de volumen del altavoz
potenciador de graves:
[+6 dB] – [0 dB] – [-6 dB], [ATT].
([ATT] aparece en pantalla con el ajuste más
bajo).
SW PHASE (fase de altavoz potenciador de
graves)
Selecciona la fase del altavoz potenciador de
graves: [NORM], [REV].
LPF FREQ (frecuencia de filtro de paso bajo)
Selecciona la frecuencia de corte del altavoz
potenciador de graves: [80Hz], [100Hz], [120Hz].
20ES
Page 93

AUX VOL (nivel de volumen AUX)
Ajusta el nivel de volumen de cada dispositivo
auxiliar conectado: [+18 dB] – [0 dB] – [-8 dB].
Este ajuste elimina la necesidad de ajustar el
nivel de volumen entre fuentes.
BTA VOL (nivel de volumen de audio BLUETOOTH)
Ajusta el nivel de volumen de cada dispositivo
BLUETOOTH conectado: [+6 dB] – [0 dB] –
[-6 dB].
Este ajuste elimina la necesidad de ajustar el
nivel de volumen entre fuentes.
Configuración de Pantalla
(DISPLAY)
DIMMER
Cambia el brillo de la pantalla: [ON], [OFF].
SND SYNC (sincronización de sonidos)
Activa la sincronización de la iluminación con el
sonido: [ON], [OFF].
AUTO SCR (desplazamiento automático)
Permite desplazarse por los elementos de la
pantalla automáticamente: [ON], [OFF].
(No disponible cuando está seleccionado el AUX
o sintonizador).
Configuración BLUETOOTH (BT)
PAI RIN G (página 9)
PHONE BOOK (página 16)
REDIAL (página 17)
RECENT CALL (página 17)
VOICE DIAL (página 17)
DIAL NUMBER (página 17)
RINGTONE
Selecciona si esta unidad o el teléfono celular
conectado emite el tono de llamadas: [1] (esta
unidad), [2] (teléfono celular).
AUTO ANS (respuesta automática)
Ajusta la unidad para que responda
automáticamente una llamada entrante: [OFF],
[1] (aproximadamente 3 segundos), [2]
(aproximadamente 10 segundos).
AUTOPAIR (autoemparejamiento)
Enciende el BLUETOOTH emparejándose
automáticamente cuando el dispositivo iOS
versión 5.0, o posterior, está conectado
mediante USB: [ON], [OFF].
BT SIGNL (Señal BLUETOOTH) (página 10)
Activa/desactiva la función BLUETOOTH.
BT INIT (Inicialización de la tecnología BLUETOOTH)
Inicia todos los ajustes relacionados con
BLUETOOTH (información de emparejamiento,
número predefinido, información de dispositivo,
etc.): [YES], [NO].
Cuando se desecha la unidad, se inicializan
todos los ajustes.
(Disponible solamente mientras la fuente esté
apagada y se muestre el reloj).
21ES
Page 94

Información complementaria
Carpeta (álbum)
Archivo de audio (pista)
Precauciones
Deje que la unidad se enfríe antes de usarla si el
automóvil ha estado estacionado bajo la luz
directa del sol.
No deje el panel frontal o los dispositivos de
audio dentro del vehículo o podría causar fallas
en el funcionamiento debido a las altas
temperaturas bajo la luz directa del sol.
La antena de alimentación se extiende
automáticamente.
Para mantener una alta calidad de sonido
No derrame ningún tipo de líquido sobre la unidad.
Orden de reproducción de archivos de
audio
Acerca de iPod
Puede conectarse a los siguientes modelos de
iPod. Actualice sus dispositivos iPod a la última
versión de software antes de utilizarlos.
Modelos compatibles de iPhone/iPod
Modelo compatible USB
iPhone 6 Plus
iPhone 6
Modelo compatible USB
iPhone 5s
iPhone 5c
iPhone 5
iPhone 4s
iPhone 4
iPhone 3GS
iPod touch
(5ª generación)
iPod touch
(4ª generación)
iPod touch
(3ª generación)
iPod classic
iPod nano
(7ª generación)
iPod nano
(6ª generación)
iPod nano
(5ª generación)
“Made for iPod” y “Made for iPhone” indican que
un accesorio electrónico se diseñó para
conectarse específicamente a los dispositivos
iPod o iPhone respectivamente, y que el
fabricante obtuvo la certificación necesaria para
que cumpla con los estándares de rendimiento de
Apple. Apple no se hace responsable del
funcionamiento de este dispositivo en
cumplimiento de los estándares de seguridad y
normativa. Tenga en cuenta que el uso de este
accesorio con el iPod o el iPhone puede afectar al
rendimiento inalámbrico.
Si desea realizar alguna consulta o solucionar algún
problema relativo a la unidad que no se trate en
este manual, póngase en contacto con el
distribuidor Sony más cercano.
22ES
Page 95

Mantenimiento
Lado + hacia arriba
Sustitución de la pila de litio del control
remoto
Bajo condiciones normales, la batería durará
aproximadamente 1 año. (La vida útil puede ser
más corta, dependiendo de las condiciones de
uso).
El alcance del control remoto disminuye a medida
que se agota la pila.
ADVERTENCIA
Peligro de explosión si la batería se reemplaza
incorrectamente. Reemplazarla solamente con una
igual o equivalente.
Notas sobre la pila de litio
Mantenga la pila de litio fuera del alcance de los
niños. Si se ingiere, póngase en contacto
inmediatamente con un médico.
Limpie la batería con un paño seco para asegurar un
buen contacto.
Asegúrese de respetar la polaridad al instalarla.
No sujete la pila con pinzas metálicas, ya que podría
producirse un cortocircuito.
Limpieza de los conectores
Es posible que la unidad no funcione
correctamente si los conectores entre esta y el
panel frontal están sucios. Para evitar esta
situación, extraiga el panel frontal (página 7) y
limpie los conectores con un hisopo de algodón.
Realice esta operación con suavidad. De lo
contrario, los conectores pueden dañarse.
Notas
Por razones de seguridad, apague el motor antes de
limpiar los conectores y extraiga la llave del
interruptor de la llave de encendido.
No toque nunca los conectores directamente con los
dedos ni con ningún dispositivo metálico.
Especificaciones
Sección del sintonizador
FM
Rango de sintonización: 87,5 – 107,9 MHz
Terminal de antena:
Conector de antena externa
Frecuencia intermedia:
FM CCIR: -1 956,5 a -487,3 kHz y
+500,0 a +2 095,4 kHz
Sensibilidad útil: 7 dBf
Selectividad: de 75 dB a 400 kHz
Relación señal-ruido: 73 dB
Separación: de 50 dB a 1 kHz
Respuesta de frecuencia: 20 – 15 000 Hz
AM
Rango de sintonización: 530 – 1 710 kHz
Terminal de antena:
Conector de antena externa
Sensibilidad: 26 μV
Sección Reproductora de USB
Interfaz: USB (máxima velocidad)
Corriente máxima: 1 A
El número máximo de pistas reconocibles:
carpetas (álbumes): 256
archivos (pistas) por carpeta: 256
Códec correspondientes:
MP3 (.mp3)
Tasa de bits: 8 – 320 kbps (Compatible con
VBR (Tasa de bits variable))
Tasa de muestreo: 16 – 48 kHz
WMA (.wma)
Tasa de bits: 32 – 192 kbps (Compatible con
VBR (Tasa de bits variable))
Tasa de muestreo: 32 kHz, 44,1 kHz, 48 kHz
FLAC (.flac)
Profundidad de bit: 16 bit, 24 bit
Tasa de muestreo: 44,1 kHz, 48 kHz
23ES
Page 96

Comunicación inalámbrica
Sistema de comunicación:
BLUETOOTH versión estándar 3,0
Salida:
BLUETOOTH Clase 2 energía estándar
(Max. +4 dBm)
Rango máximo de comunicación:
Línea de visión aprox. 10 m*
Banda de frecuencias:
banda 2,4 GHz (2,4000 – 2,4835 GHz)
Método de modulación: FHSS
Perfiles de BLUETOOTH compatible*
A2DP (Perfil de distribución de audio avanzado)
1,3
AVRCP (Perfil de control remoto de audio y
video) 1,3
HFP (Perfil manos libres) 1,6
PBAP (Perfil de acceso a la agenda telefónica)
Códec correspondiente:
SBC (.sbc)
*1 El alcance real variará según factores, como los
obstáculos entre los dispositivos, los campos
magnéticos alrededor de un horno de microondas,
la electricidad estática, la sensibilidad de recepción,
el funcionamiento de la antena, el sistema
operativo, la aplicación del software, etc.
*2 Los perfiles estándar BLUETOOTH indican el
propósito de la comunicación BLUETOOTH entre
dispositivos.
1
2
:
Sección del amplificador de corriente
Salida: salidas de altavoz
Impedancia de altavoz: 4 – 8 Ω
Salida de potencia máxima: 55 W × 4 (a 4 Ω)
Generales
Salidas:
Terminal de salidas de audio (posterior, sub)
Antena de alimentación/Terminal de control del
amplificador de potencia (REM OUT)
Entradas:
Terminal de entrada del control remoto
Terminal de entrada de la antena
Toma de entrada AUX (minitoma estéreo)
Puerto USB
Requisitos de alimentación: batería de automóvil
de cc 12 V (masa negativa)
Tasa de consumo actual: 10 A
Dimensiones:
Aprox. 178 mm × 50 mm × 120 mm (an/al/prf)
Dimensiones de montaje:
Aprox. 182 mm × 53 mm × 102 mm (an/al/prf)
Masa: Aprox. 0,7 kg
Contenidos del paquete:
Unidad principal (1)
Control remoto (1): RM-X231
Componentes de instalación y conexiones
(1 juego)
Es posible que su distribuidor no comercialice
algunos de los accesorios que figuran en la lista
anterior. Solicite información detallada.
El diseño y las especificaciones están sujetos a
cambios sin previo aviso.
Derechos de autor
La marca de la palabra y logotipos Bluetooth® son
marcas comerciales registradas y son propiedad de
Bluetooth SIG, Inc., y Sony Corporation posee
licencia para utilizar cualquiera de dichas marcas.
Otras marcas registradas y nombres comerciales
pertenecen a sus respectivos propietarios.
La marca N es una marca comercial o marca
registrada de NFC Forum, Inc. en los Estados Unidos
y en otro países.
Windows Media es una marca comercial registrada
o una marca comercial de Microsoft Corporation en
los EE. UU. y otros países.
Este producto está protegido por los derechos de
propiedad intelectual de Microsoft Corporation.
Queda prohibido el uso o la distribución de esta
tecnología fuera de este producto si no se dispone
de una licencia de Microsoft o una división
autorizada de Microsoft.
iPhone, iPod, iPod classic, iPod nano, iPod touch y
Siri son marcas comerciales de Apple Inc.,
registradas en los Estados Unidos y otros países.
Tecnología de codificación de audio MPEG Layer-3 y
patentes bajo licencia de Fraunhofer IIS y Thomson.
24ES
Page 97

Pandora®, el logotipo de Pandora® y la imagen de la
marca Pandora® son marcas comerciales o marcas
comerciales registradas de Pandora Media, Inc.,
utilizadas con autorización.
Google, Google Play y Android son marcas
comerciales de Google Inc.
libFLAC
Copyright (C) 2000-2009 Josh Coalson
Copyright (C) 2011-2013 Xiph.Org Foundation
La redistribución y el uso en formas binarias y de
fuente, con o sin modificación, están permitidos
siempre y cuando se cumplan las siguientes
condiciones:
Las redistribuciones de los códigos fuente deben
retener la nota de copyright antes mencionada,
esta lista de condiciones y el siguiente aviso.
Las redistribuciones en forma binaria deben
reproducir la noticia de copyright antes
mencionada, la lista de condiciones y el siguiente
aviso en el documento u otros materiales
provistos con la distribución.
Ni el nombre de Xiph.org Foundation o los
nombres de sus contribuidores deben utilizarse
para promocionar o publicitar los productos
derivados de este software sin la autorización
previa por escrito.
ESTE SOFTWARE ES PROVISTO POR LOS DUEÑOS Y
CONTRIBUIDORES DEL COPYRIGHT “COMO ES” Y
CUALQUIER GARANTÍA EXPRESA O IMPLÍCITA, QUE
INCLUYE PERO NO SE LIMITA, A LAS GARANTÍAS
IMPLÍCITAS DE MERCANTIBILIDAD O APTITUD PARA
UN PROPÓSITO PARTICULAR ESTÁN DENEGADAS.
BAJO NINGÚN PUNTO DE VISTA DEBERÁN LOS
CONTRIBUIDORES SER RESPONSABLES POR
CUALQUIER DAÑO DIRECTO, INDIRECTO, ESPECIAL,
EJEMPLAR O COMO CONSECUENCIA (LO QUE
INCLUYE PERO NO SE LIMITA A LA ADQUISICIÓN DE
BIENES SUSTITUTOS O SERVICIOS; PÉRDIDA DE USO,
INFORMACIÓN O GANANCIAS; O INTERRUPCIÓN
COMERCIAL) SIN IMPORTAR CUAL SEA LA CAUSA Y
EN CUALQUIER TEORÍA DE RESPONSABILIDAD, YA
SEA POR CONTRATO, RESPONSABILIDAD ESTRICTA
O RESPONSABILIDAD EXTRACONTRACTUAL (LO QUE
INCLUYE NEGLIGENCIA U OTROS) QUE SURJA DE
CUALQUIER MANERA DEL USO DE ESTE SOFTWARE,
AÚN SI HA SIDO ADVERTIDO DE LA POSIBILIDAD DE
TAL DAÑO.
Solución de problemas
La siguiente lista de comprobación le ayudará a
solucionar los problemas que puedan producirse
con la unidad.
Antes de consultarla, revise los procedimientos de
conexión y de funcionamiento.
Para más detalles sobre el uso del fusible y sobre
cómo quitar la unidad del tablero, ver “Conexión/
Instalación” (página 30).
Si el problema no se resuelve, visite el sitio web de
soporte técnico que figura en la cubierta posterior.
Generales
La unidad no recibe alimentación.
Si la unidad está apagada y la pantalla
desaparece, no se puede operar con el control
remoto.
Encienda la unidad.
No hay sonido o el sonido es muy bajo.
La posición del control de equilibrio [FADER] no
está ajustada para un sistema de 2 altavoces.
El volumen de la unidad o dispositivo conectado
es muy bajo.
Aumente el volumen de la unidad o del
dispositivo conectado.
No se escuchan pitidos.
Se encuentra conectado un amplificador de
potencia opcional y no está usando el
amplificador integrado.
El contenido de la memoria se borró.
Se desconectó la batería o el cable de fuente de
alimentación, o no están conectados
correctamente.
Las emisoras almacenadas y la hora correcta se
borraron.
El fusible se fundió.
Se escucha un ruido cuando se cambia la
posición de la llave de encendido.
Los cables no se conectaron de forma correcta al
conector de alimentación auxiliar del automóvil.
25ES
Page 98

Durante la reproducción o la recepción, el modo
demostración se inicia.
Si no se realiza ninguna operación durante
5 minutos y la opción [DEMO-ON] está ajustada,
se iniciará el modo de demostración.
Ajuste [DEMO-OFF] (página 20).
Las indicaciones desaparecen del visualizador o
no aparecen en él.
El atenuador está ajustado en [DIM-ON]
(página 21).
La pantalla se apaga si mantiene presionado OFF.
Presione OFF en la unidad hasta que se ilumine
la pantalla.
Los conectores están sucios (página 23).
La pantalla/iluminación parpadea.
El suministro de energía no es suficiente.
Compruebe que la batería del automóvil
suministre energía suficiente a la unidad. (Los
requisitos de alimentación son de 12 V cc).
Los botones de operación no funcionan.
La conexión no es correcta.
Revise la conexión de la unidad.
Si la situación no mejora, presionar DSPL y
(volver)/MODE por más de 2 segundos para
realizar la restauración de la unidad.
Los contenidos almacenados en la memoria
son eliminados.
Por su seguridad, no realice la restauración de
la unidad mientras maneja.
Recepción de radio
No es posible recibir emisoras.
El sonido está obstaculizado por los ruidos.
La conexión no es correcta.
Si su automóvil cuenta con una antena de radio
incluida en el vidrio lateral o posterior, conecte
un cable REM OUT (con rayas azules y blancas)
o un cable de fuente de alimentación accesorio
(rojo) al cable de fuente de alimentación del
amplificador de señal de la antena del
automóvil.
Compruebe la conexión de la antena del
automóvil.
Si la antena del automóvil no se extiende,
compruebe la conexión del cable de control de
la antena motorizada.
No es posible utilizar la sintonización
programada.
La señal de emisión es demasiado débil.
RDS
PTY muestra [- - - - - - - -].
La emisora actual no es una emisora RDS.
No se recibieron datos RDS.
La emisora no especifica el tipo de programa.
Reproducción en dispositivo USB
No es posible reproducir elementos a través de
un concentrador USB.
Esta unidad no puede reconocer dispositivos USB
a través de un concentrador USB.
El dispositivo USB tarda en reproducirse.
El dispositivo USB contiene archivos con una
estructura de árbol compleja.
El sonido es discontinuo.
Es posible que la discontinuidad del sonido se
deba una tasa alta de bits.
Es posible que, en algunos casos, los archivos
DRM (Administración de los derechos digitales)
no puedan reproducirse.
Un archivo de audio no puede reproducirse.
Los dispositivos USB formateados con sistemas
de archivos distintos a FAT16 o FAT32 no son
soportados.*
* Esta unidad soporta FAT16 y FAT32, pero algunos
dispositivos USB pueden no soportar todos estos FAT.
Para detalles, refiérase a la instrucción de operación
de cada dispositivo USB o contacte al fabricante.
Función NFC
La conexión One touch (NFC) no es posible.
Si el smartphone no responde al tacto.
Revise que la función NFC del smartphone esté
encendida.
Mueva la parte marca N del smartphone de
modo de acercarla a la parte marca N de esta
unidad.
Si el smartphone se encuentra dentro de un
estuche, quítelo.
26ES
Page 99

La sensibilidad de recepción NFC depende del
dispositivo.
Si la conexión One touch con el smartphone falla
varias veces, haga la conexión a BLUETOOTH en
forma manual.
Función BLUETOOTH
El dispositivo de conexión no puede detectar
esta unidad.
Antes de realizar el emparejamiento, configure
esta unidad en el modo de espera del
emparejamiento.
Mientras se conecta al otro dispositivo
BLUETOOTH, esta unidad no puede detectarse
desde otro dispositivo.
Desconecte la conexión actual y busque esta
unidad desde otro dispositivo.
Una vez realizado el emparejamiento del
dispositivo, active la salida de señal de
BLUETOOTH (página 10).
No es posible realizar la conexión.
La conexión se controla de un solo lado (esta
unidad o dispositivo BLUETOOTH) pero no de
ambos lados.
Conecte esta unidad a un dispositivo
BLUETOOTH o viceversa.
No aparece el nombre del dispositivo detectado.
Según el estado del otro dispositivo, es posible
que no se pueda obtener el nombre.
No se emite ningún tono de llamada.
Ajuste el volumen girando el selector de control
mientras recibe una llamada.
Según el dispositivo de conexión, es posible que
el tono de llamada no se emita correctamente.
Ajuste [RINGTONE] en [1] (página 21).
Los altavoces frontales no están conectados a la
unidad.
Conecte los altavoces frontales a la unidad. El
tono de llamada suena solamente desde los
altavoces frontales.
No se puede ajustar el volumen de la voz de la
persona que habla.
Los altavoces frontales no están conectados a la
unidad.
Conecte los altavoces frontales a la unidad. La
voz del que habla y la voz del auricular sólo
salen de los altavoces frontales.
El interlocutor de una llamada le notifica que el
volumen es demasiado bajo o demasiado alto.
Ajuste el volumen según corresponda mediante
la ganancia de micrófono (página 18).
Se producen ecos o ruidos durante las
conversaciones telefónicas.
Baje el volumen.
Ajuste el modo EC/NC en [EC/NC-1] o [EC/NC-2]
(página 18).
Si el sonido ambiente que no sea el sonido de la
llamada de teléfono es alto, intente reducir el
ruido.
Por ej.: si una ventana está abierta y se oye ruido
de la calle, etc., fuerte, cierre la ventana. Si el aire
acondicionado está alto, bájelo.
El teléfono no está conectado.
Durante la reproducción de audio BLUETOOTH, el
teléfono no está conectado aunque presione
CALL.
Realice la conexión desde el teléfono.
La calidad de sonido del teléfono es baja.
La calidad del sonido del teléfono depende de las
condiciones de recepción del teléfono celular.
Mueva el automóvil a un lugar en el que pueda
mejorar la señal del teléfono celular si la
recepción es de mala calidad.
El volumen de l dispositivo de audio conectado es
bajo (alto).
El nivel de volumen cambiará dependiendo del
dispositivo de audio.
Ajuste el volumen del dispositivo de audio
conectado o de esta unidad.
El sonido salta durante la reproducción de un
dispositivo de audio BLUETOOTH.
Reduzca la distancia entre la unidad y el
dispositivo de audio BLUETOOTH.
Si el dispositivo de audio BLUETOOTH está
guardado en un estuche que interrumpe la señal,
retírelo mientras lo utilice.
27ES
Page 100

En los alrededores se están utilizando varios
dispositivos BLUETOOTH u otros dispositivos que
emiten ondas de radio.
Apague los otros dispositivos.
Aumente la distancia entre la unidad y los otros
dispositivos.
El sonido de reproducción se detiene
momentáneamente mientras se establece la
conexión entre esta unidad y el teléfono celular.
No se trata de una falla de funcionamiento.
No es posible controlar el dispositivo de audio
BLUETOOTH conectado.
Compruebe que el dispositivo de audio
BLUETOOTH conectado sea compatible con
AVRCP.
Algunas funciones no están disponibles.
Compruebe que el dispositivo de conexión sea
compatible con las funciones en cuestión.
Se contesta una llamada accidentalmente.
El teléfono conectado está configurado para
responder una llamada automáticamente.
El emparejamiento ha fallado porque se ha
superado el tiempo establecido.
Según el dispositivo de conexión, es posible que
el tiempo para el emparejamiento sea escaso.
Intente completar el emparejamiento en el
tiempo establecido.
No es posible utilizar la función BLUETOOTH.
Apague la unidad presionando OFF durante más
de 2 segundos, luego vuelva a encender la
unidad.
Durante la llamada con manos libres, los
altavoces del automóvil no emiten ningún
sonido.
Si el sonido de salida viene del teléfono celular,
ajuste el teléfono para que el sonido se emita por
los altavoces del automóvil.
Siri Eyes Free no está activado.
Realice el registro de manos libres para un
iPhone compatible con Siri Eyes Free.
Configure la función Siri en el iPhone para
continuar.
Cancele la conexión BLUETOOTH con el iPhone y
la unidad y reconecte.
Operación de Pandora®
No es posible establecer la conexión con
Pandora® .
Cierre la aplicación Pandora® en el dispositivo
móvil, y luego iníciela de nuevo.
Mensajes/indicaciones de error
HUB NO SUPRT: Los concentradores USB no son
compatibles.
IPD STOP: La reproducción del iPod ha finalizado.
Accione su iPod/iPhone para comenzar la
reproducción.
NO DEV: No reconoce un dispositivo USB o no está
conectado.
Asegúrese de que el dispositivo USB o el cable
USB esté conectado de forma segura.
OVERLOAD: El dispositivo USB se encuentra
sobrecargado.
Desconecte el dispositivo USB, luego presione
SRC para seleccionar otra fuente.
El dispositivo USB tiene una falla, o se ha
conectado un dispositivo incompatible.
READ: Leyendo información.
Espere hasta que finalice la lectura y se inicie la
reproducción automáticamente. Esto puede
tardar un poco según la organización del archivo.
USB ERROR: No puede reproducirse el dispositivo
USB.
Conecte el dispositivo USB nuevamente.
USB NO MUSIC: No existe un archivo reproducible.
Conecte un dispositivo USB que contenga
archivos reproducibles (página 23).
USB NO SUPRT: El dispositivo USB no es
compatible.
Para obtener más información acerca de la
compatibilidad del dispositivo USB, visite el sitio
web de soporte técnico que figura en la cubierta
posterior.
28ES
 Loading...