

4-697-417-11(1)
DAB/FM/MW/LW
Digital Media
Player
To cancel the demonstration (DEMO) display, see page 12.
For the connection/installation, see page 22.
Zum Deaktivieren der Demo-Anzeige (DEMO) schlagen Sie
bitte auf Seite 14 nach.
Informationen zum Anschluss und zur Installation finden Sie auf
Seite 25.
Pour annuler la démonstration (DEMO), reportez-vous à la
page 14.
Pour le raccordement/l’installation, reportez-vous à la page 24.
Per annullare la dimostrazione (DEMO), vedere pagina 14.
Per l’installazione e i collegamenti, consultare pagina 25.
Para cancelar la pantalla de demostración (DEMO), consulte
la página 14.
Para la conexión/instalación, consulte la página 24.
Operating Instructions
Bedienungsanleitung
Mode d’emploi
Istruzioni per l’uso
Manual de instrucciones
GB
DE
FR
IT
ES
DSX-A310DAB

For safety, be sure to install this unit in the
dashboard of the car as the rear side of the unit
becomes hot during use.
For details, see “Connection/Installation”
(page 22).
Made in Thailand
The nameplate indicating operating voltage, etc., is
located on the bottom of the chassis.
Hereby, Sony Corporation declares that this
equipment is in compliance with Directive 2014/53/
EU.
The full text of the EU declaration of conformity is
available at the following internet address:
http://www.compliance.sony.de/
This equipment is intended to be used with the
approved version(s) of software that are indicated
in the EU Declaration of Conformity.
The software loaded on this equipment is verified
to comply with the essential requirements of the
Directive 2014/53/EU.
Software version: 1_
The software version can be checked in the
firmware setup item of the general setup menu.
Notice for customers: the following
information is only applicable to equipment
sold in countries applying EU Directives
This product has been manufactured by or on
behalf of Sony Corporation.
EU Importer: Sony Europe Limited.
Inquiries to the EU Importer or related to product
compliance in Europe should be sent to the
manufacturer’s authorized representative, Sony
Belgium, bijkantoor van Sony Europe Limited, Da
Vincilaan 7-D1, 1935 Zaventem, Belgium.
Disposal of waste batteries and
electrical and electronic
equipment (applicable in the
European Union and other
European countries with separate
collection systems)
This symbol on the product, the battery or on the
packaging indicates that the product and the
battery shall not be treated as household waste. On
certain batteries this symbol might be used in
combination with a chemical symbol. The chemical
symbols for mercury (Hg) or lead (Pb) are added if
the battery contains more than 0.0005% mercury or
0.004% lead. By ensuring these products and
batteries are disposed of correctly, you will help
prevent potentially negative consequences for the
environment and human health which could
otherwise be caused by inappropriate waste
handling. The recycling of the materials will help to
conserve natural resources.
In case of products that for safety, performance or
data integrity reasons require a permanent
connection with an incorporated battery, this
battery should be replaced by qualified service staff
only. To ensure that the battery and the electrical
and electronic equipment will be treated properly,
hand over these products at end-of-life to the
applicable collection point for the recycling of
electrical and electronic equipment. For all other
batteries, please view the section on how to
remove the battery from the product safely. Hand
the battery over to the applicable collection point
for the recycling of waste batteries. For more
detailed information about recycling of this product
or battery, please contact your local Civic Office,
your household waste disposal service or the shop
where you purchased the product or battery.
Warning if your car’s ignition has no ACC
position
Be sure to set the AUTO OFF function (page 13).
The unit will shut off completely and
automatically in the set time after the unit is
turned off and the clock is displayed (i.e. press
and hold SRC for 1 second), which prevents
battery drain. If you do not set the AUTO OFF
function, press and hold OFF until the display
disappears each time you turn the ignition off.
Disclaimer regarding services offered by third
parties
Services offered by third parties may be changed,
suspended, or terminated without prior notice.
Sony does not bear any responsibility in these sorts
of situations.
2GB
Table of Contents
Guide to Parts and Controls . . . . . . . . . . . . . . . . . . 4
Getting Started
Detaching the Front Panel. . . . . . . . . . . . . . . . . . . . 5
Resetting the Unit . . . . . . . . . . . . . . . . . . . . . . . . . . 6
Setting the Clock . . . . . . . . . . . . . . . . . . . . . . . . . . . 6
Checking the Battery Voltage . . . . . . . . . . . . . . . . . 6
Connecting a USB Device . . . . . . . . . . . . . . . . . . . . 6
Connecting Other Portable Audio Device . . . . . . . 7
Listening to the Radio
Listening to the Radio . . . . . . . . . . . . . . . . . . . . . . . 7
Receiving DAB . . . . . . . . . . . . . . . . . . . . . . . . . . . . . 7
Using FM/MW/LW . . . . . . . . . . . . . . . . . . . . . . . . . . 9
Using Radio Data System (RDS) . . . . . . . . . . . . . . . 9
Playback
Playing a USB Device . . . . . . . . . . . . . . . . . . . . . . . . 11
Searching and Playing Tracks . . . . . . . . . . . . . . . . . 11
Settings
Canceling the DEMO Mode . . . . . . . . . . . . . . . . . . . 12
Basic Setting Operation . . . . . . . . . . . . . . . . . . . . . . 12
General Setup (GENERAL) . . . . . . . . . . . . . . . . . . . . 13
Sound Setup (SOUND) . . . . . . . . . . . . . . . . . . . . . . 14
Display Setup (DISPLAY) . . . . . . . . . . . . . . . . . . . . . 15
Connection/Installation
Cautions . . . . . . . . . . . . . . . . . . . . . . . . . . . . . . . . . . 22
Parts List for Installation . . . . . . . . . . . . . . . . . . . . . 22
Connection . . . . . . . . . . . . . . . . . . . . . . . . . . . . . . . . 23
Installation . . . . . . . . . . . . . . . . . . . . . . . . . . . . . . . . 25
Additional Information
Updating the Firmware . . . . . . . . . . . . . . . . . . . . . . 15
Precautions. . . . . . . . . . . . . . . . . . . . . . . . . . . . . . . . 15
Maintenance. . . . . . . . . . . . . . . . . . . . . . . . . . . . . . 16
Specifications . . . . . . . . . . . . . . . . . . . . . . . . . . . . . 16
Troubleshooting. . . . . . . . . . . . . . . . . . . . . . . . . . . 18
Messages . . . . . . . . . . . . . . . . . . . . . . . . . . . . . . . . 20
3GB
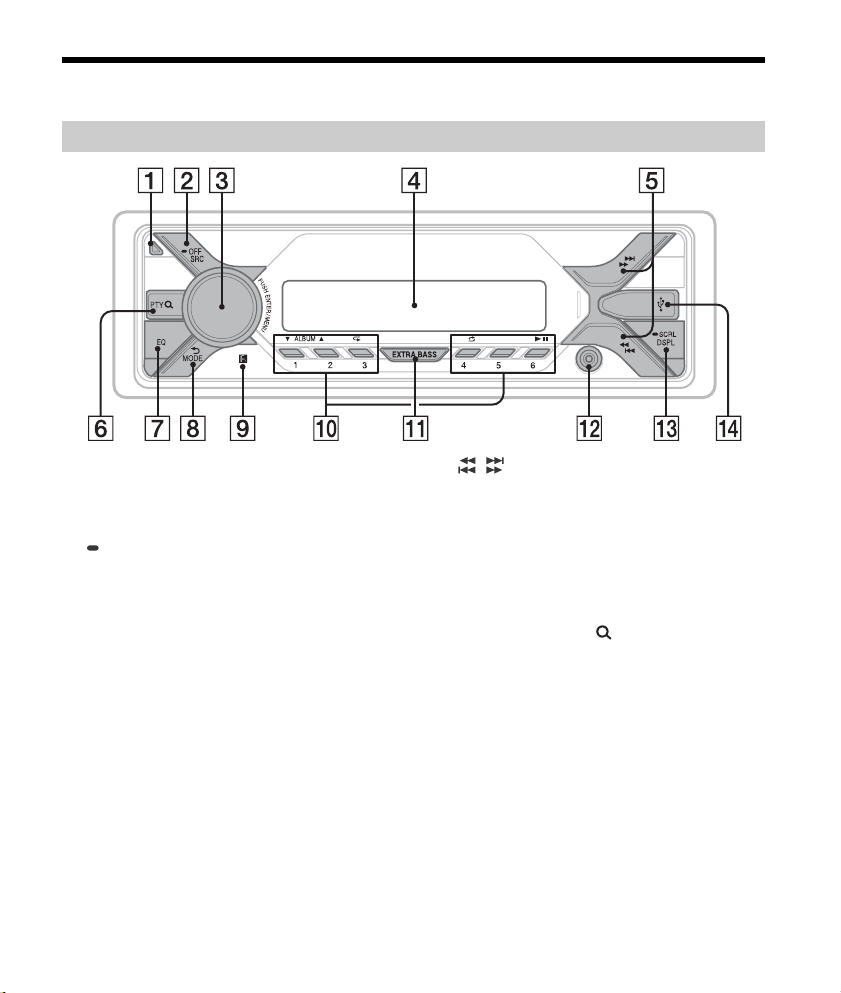
Guide to Parts and Controls
Main unit
Front panel release button
SRC (source)
Turn on th e p ower.
Change the source.
OFF
Press and hold for 1 second to turn the source
off and display the clock.
Press and hold for more than 2 seconds to turn
off the power and the display.
Control dial
Rotate to adjust the volume.
PUSH ENTER
Enter the selected item.
Press SRC, rotate then press to change the
source (timeout in 2 seconds).
MENU
Open the setup menu.
Display window
4GB
/ (SEEK –/+)
During DAB reception:
Select a service. Press and hold to search for an
ensemble.
During FM/MW/LW reception:
Tune in radio stations automatically. Press and
hold to tune manually.
/ (prev/next)
/ (fast-reverse/fast-forward)
PTY (program type)/ (browse) (page 8, 12)
During DAB reception:
Enter the browse mode. Press twice to select
PTY.
During FM reception:
Select PTY in RDS.
During playback:
Enter the browse mode.
(Not available when a USB device in Android™
mode or iPod is connected.)
EQ (equalizer)
Select an equalizer curve.
(back)
Return to the previous display.
MODE (page 7, 8, 9)
Receptor for the remote commander
Number buttons (1 to 6)
Receive stored DAB services or radio stations.
Press and hold to store DAB services or radio
stations.
ALBUM /
Skip an album for audio device. Press and hold
to skip albums continuously.
(Not available when a USB device in Android
mode or iPod is connected.)
(repeat)
(Not available when a USB device in Android
mode is connected.)
(shuffle)
(Not available when a USB device in Android
mode is connected.)
(play/pause)
EXTRA BASS
Reinforces bass sound in synchronization with
the volume level. Press to change the EXTRA
BASS setting: [1], [2], [OFF].
AUX input jack
DSPL (display)
Press to change display items.
SCRL (scroll)
Press and hold to scroll a display item.
USB port
Getting Started
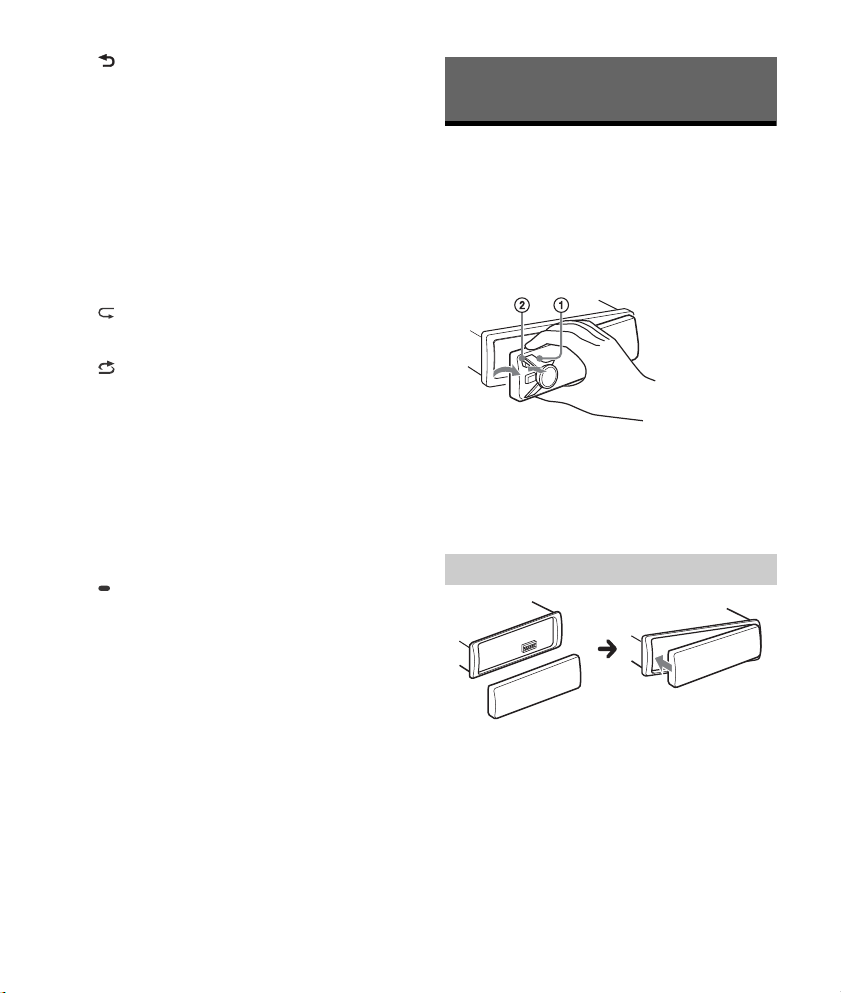
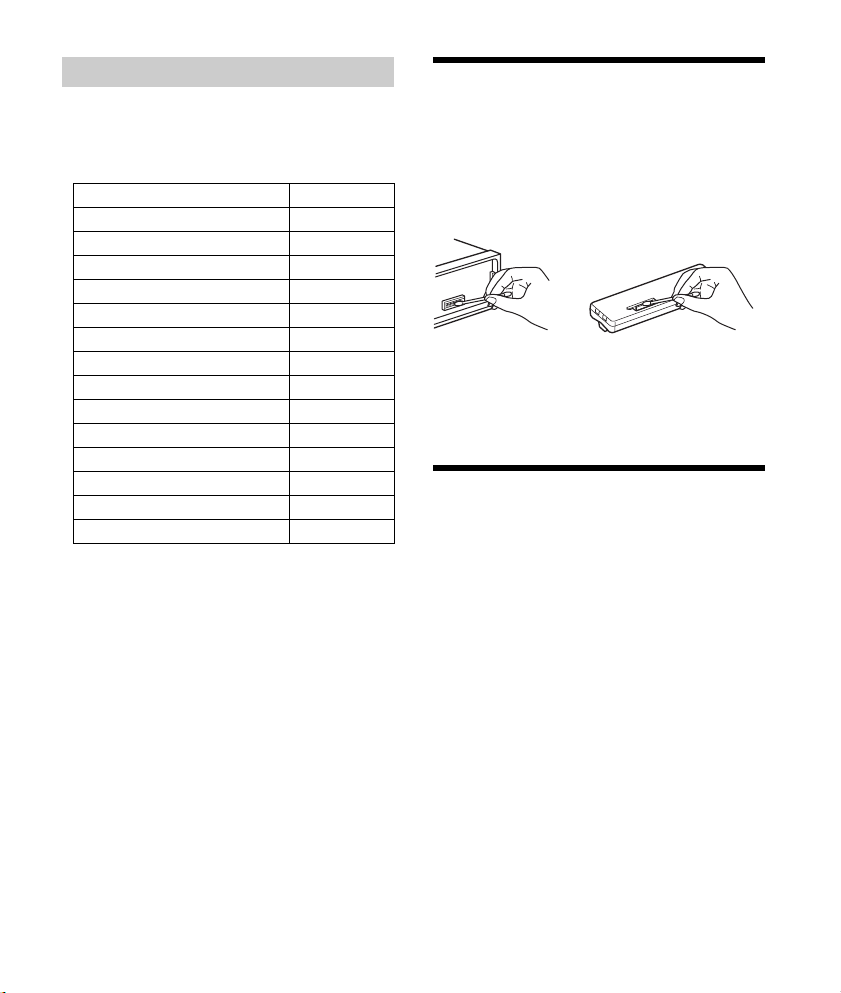
Detaching the Front Panel
You can detach the front panel of this unit to
prevent theft.
1 Press and hold OFF until the unit turns
off, press the front panel release button
, then pull the panel towards you to
remove.
Caution alarm
If you turn the ignition switch to the OFF position
without detaching the front panel, the caution
alarm will sound for a few seconds. The alarm will
only sound if the built-in amplifier is used.
Attaching the front panel
5GB
Resetting the Unit
Before operating the unit for the first time, or after
replacing the car battery or changing connections,
you must reset the unit.
1 Press DSPL and (back)/MODE for
more than 2 seconds.
Note
Resetting the unit will erase the clock setting and some
stored contents.
Checking the Battery Voltage
You can check the current battery voltage. (Not
available while the source is off and the clock is
displayed.)
1 Press DSPL repeatedly until the battery
voltage display appears.
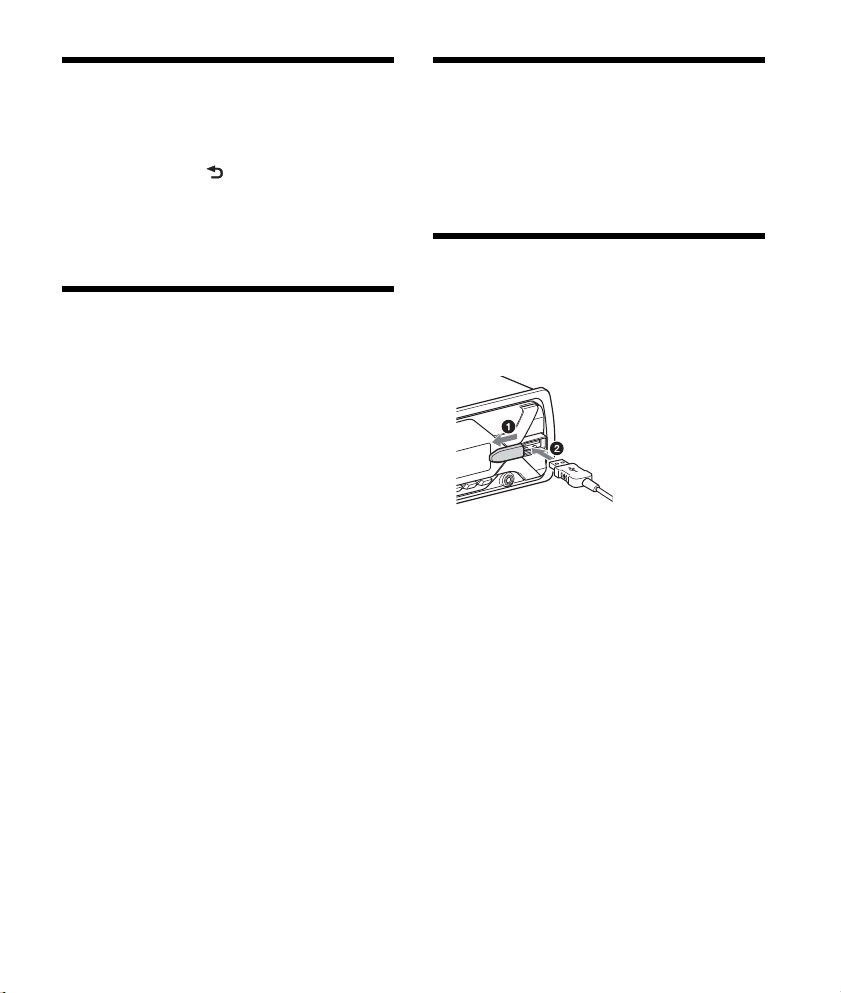
Connecting a USB Device
Setting the Clock
1 Press MENU, rotate the control dial to
select [GENERAL], then press it.
2 Rotate the control dial to select [SET
CLOCK-ADJ], then press it.
The hour indication flashes.
3 Rotate the control dial to set the hour
and minute.
To move the digital indication, press /
(SEEK –/+).
4 After setting the minute, press MENU.
The setup is complete and the clock starts.
To display the clock
Press DSPL.
1 Turn down the volume on the unit.
2 Connect the USB device to the unit.
To connect an iPod/iPhone, use the USB
connection cable for iPod (not supplied).
6GB
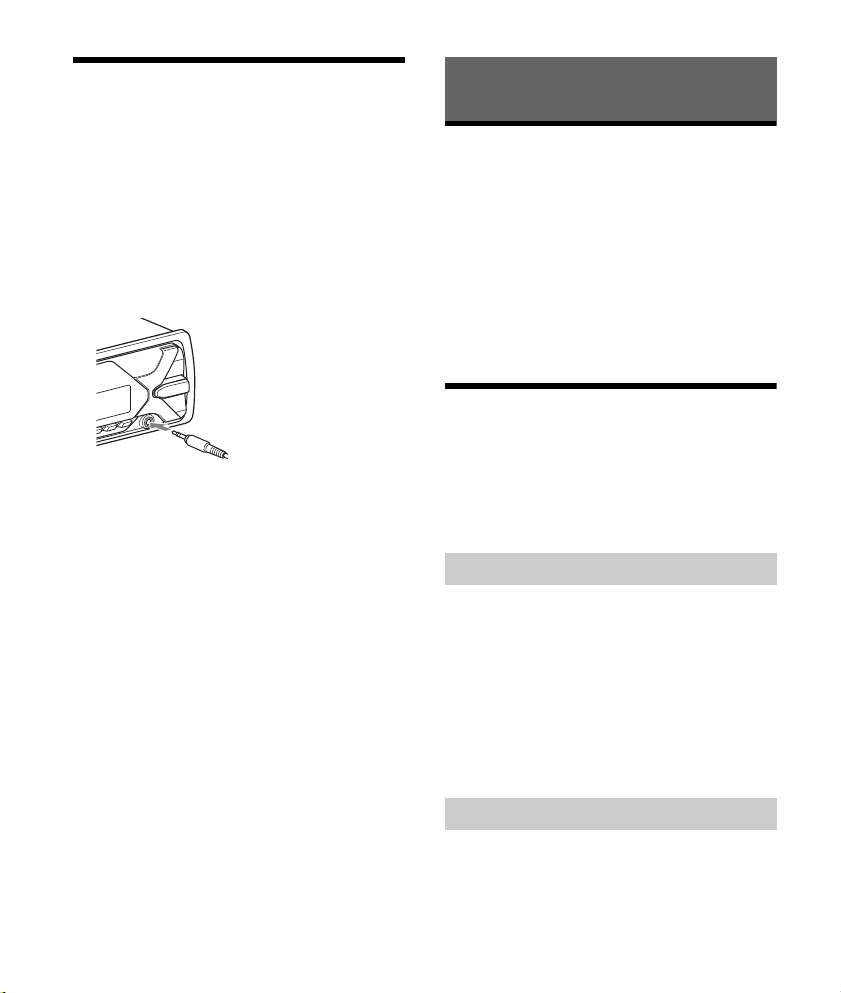
Connecting Other Portable
Audio Device
1 Turn off the portable audio device.
2 Turn down the volume on the unit.
3 Connect the portable audio device to the
AUX input jack (stereo mini jack) on the
unit with a connecting cord (not
supplied)*.
* Be sure to use a straight type plug.
4 Press SRC to select [AUX].
To match the volume level of the connected
device to other sources
Start playback of the portable audio device at a
moderate volume, and set your usual listening
volume on the unit.
Press MENU, then select [SOUND] [SET AUX VOL]
(page 14).
Listening to the Radio
Listening to the Radio
To listen to the radio, press SRC to select [TUNER].
When the DAB band is selected for the first time
after replacing the car battery or changing the
connections, the initial scan starts automatically.
Allow the initial scan to finish. (If interrupted, the
initial scan will start again the next time you select
the DAB band.) If no DAB station is stored by the
initial scan, perform an auto scan (page 8).
Tip
Set [SET ANT-PWR] to [ON] (default) or [OFF] depending
on the type of DAB antenna (aerial) (page 14).
Receiving DAB
DAB (Digital Audio Broadcasting) is a transmission
system on terrestrial networks. DAB stations bundle
radio programs (“services”) into an ensemble, and
each service contains one or more components.
The same service can sometimes be received on
different frequencies.
Searching for a service manually
1 Press MODE to select [DB1], [DB2] or
[DB3].
2 Press / (SEEK –/+) to search
within an ensemble for a service; press
and hold / (SEEK –/+) to search
for different ensembles.
Scanning stops when the unit receives a
service/ensemble. Search until the desired
service is received.
Storing a service manually
1 While receiving the service that you want
to store, press and hold a number button
(1 to 6) until [MEM] appears.
7GB
Receiving stored services
1 After selecting the desired band, press a
number button (1 to 6).
Searching for a service by name (QuickBrowZer™)
You can display a list of services for easy searching.
1 During DAB reception, press (browse).
The unit enters Quick-BrowZer mode, and the
list of services appears.
2 Rotate the control dial to select the
desired service, then press it.
Reception starts.
To exit t he Qu ick-BrowZer m ode
Press (back).
Setting DAB announcements
If you enable DAB announcements, DAB
announcements can interrupt the currently
selected source.
1 Press MENU, rotate the control dial to
select [GENERAL], then press it.
2 Rotate the control dial to select [SET
ANNOUNCE], then press it.
3 Rotate the control dial to select [SET
ANNC-ON] or [SET ANNC-OFF], then press
it.
Note
During a DAB announcement, the volume is adjusted to
the level set for TA in RDS (page 9).
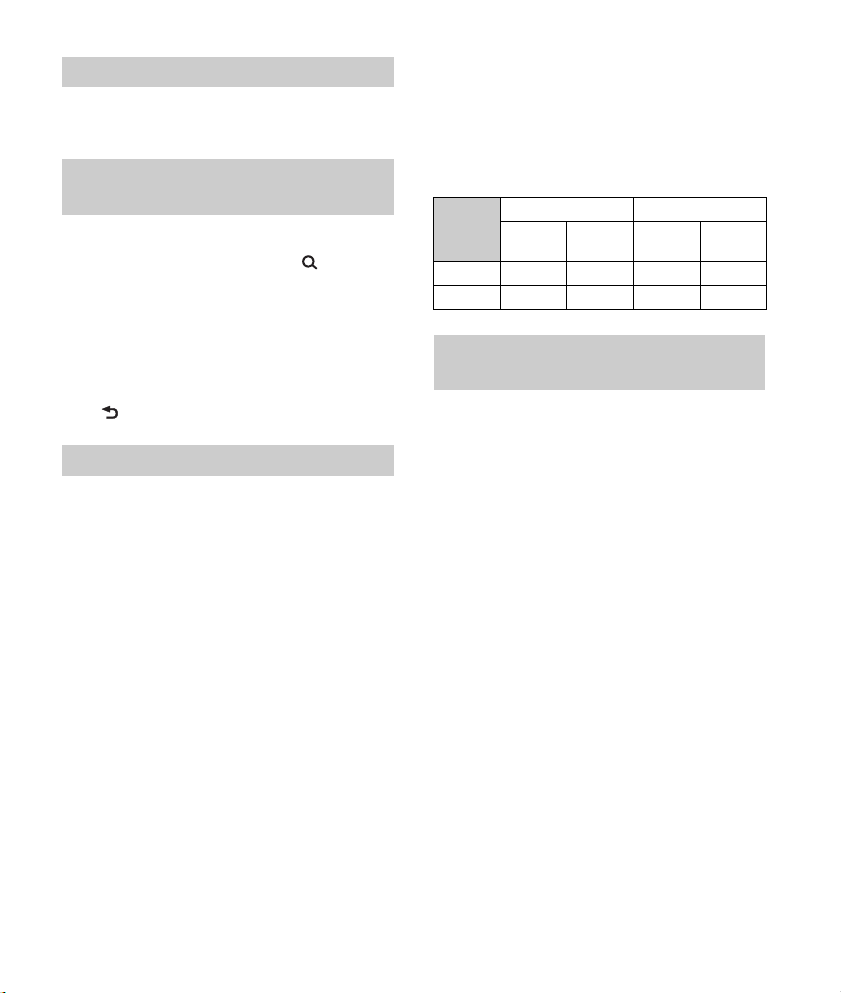
To listen to the same or similar program
even during weak reception
Set [SET SOFTLINK] to [ON] (page 14).
[FM-LINK] lights up when the corresponding FM
program is being received.
“Hard Link” follows the same program, and “Soft
Link” follows a similar program.
SOFT
LINK
OFF
ON
DAB FM
Hard
Link
Soft
Link
Hard
Link
Soft
Link
Updating the service list automatically
(Auto scan)
1 Press MODE to select [DB1], [DB2] or
[DB3].
2 Press MENU, rotate the control dial to
select [GENERAL], then press it.
3 Rotate the control dial to select [SET
AUTOSCAN], then press it.
The unit updates the list of services in QuickBrowZer mode.
8GB

Using FM/MW/LW
Using Radio Data System (RDS)
Storing automatically (BTM)
1 Press MODE to change the band (FM1,
FM2, MW or LW).
2 Press MENU, rotate the control dial to
select [GENERAL], then press it.
3 Rotate the control dial to select [SET
BTM], then press it.
The unit stores stations in order of frequency on
the number buttons.
Tuning
1 Press MODE to change the band (FM1,
FM2, MW or LW).
2 Perform tuning.
To tune manually
Press and hold / (SEEK –/+) to locate
the approximate frequency, then press /
(SEEK –/+) repeatedly to fine adjust to the
desired frequency.
To tune automatically
Press / (SEEK –/+).
Scanning stops when the unit receives a station.
Storing manually
1 While receiving the station that you want
to store, press and hold a number button
(1 to 6) until [MEM] appears.
Receiving the stored stations
1 Select the band, then press a number
button (1 to 6).
Setting alternative frequencies (AF) and
traffic announcement (TA)
AF continuously retunes the station to the strongest
signal in a network, and TA provides current traffic
information or traffic programs (TP) if received.
1 Press MENU, rotate the control dial to
select [GENERAL], then press it.
2 Rotate the control dial to select [SET AF/
TA] , th en pre ss it.
3 Rotate the control dial to select [SET AF-
ON], [SET TA-ON], [SET AF/TA-ON] or [SET
AF/TA-OFF], then press it.
To store RDS stations with the AF and TA
setting
You can preset RDS stations along with an AF/TA
setting. Set AF/TA, then store the station with BTM
or manually. If you preset manually, you can also
preset non-RDS stations.
To receive emergency announcements
With AF or TA on, emergency announcements will
automatically interrupt the currently selected
source.
To adjust the volume level during a traffic
announcement
Level will be stored into memory for subsequent
traffic announcements, independently from the
regular volume level.
To stay with one regional program
(REGIONAL)
When the AF and REGIONAL functions are on, you
will not be switched to another regional station
with a stronger frequency. If you leave this regional
program’s reception area, set [SET REG-OFF] in
[GENERAL] during FM reception (page 13).
This function does not work in the UK and some
other areas.
9GB

Local Link function (UK only)
This function enables you to select other local
stations in the area, even if they are not stored on
your number buttons.
During FM reception, press a number button (1 to 6)
on which a local station is stored. Within 5 seconds,
press again a number button of the local station.
Repeat this procedure until the local station is
received.
Selecting program types (PTY)
Use PTY to display or search for a desired program
type.
During DAB reception
1 Press PTY twice.
2 Rotate the control dial until the desired
program type appears, then press it.
The unit lists all services in the selected program
type.
3 Rotate the control dial until the desired
service appears, then press it.
Reception starts.
During FM reception
1 Press PTY.
2 Rotate the control dial until the desired
program type appears, then press it.
The unit starts to search for a station
broadcasting the selected program type.
Typ e of programs
NONE (No Program Type), NEWS (News), AFFAIRS
(Current Affairs), INFO (Information), SPORT
(Sports), EDUCATE (Education), DRAMA (Drama),
CULTURE (Culture), SCIENCE (Science), VARI ED
(Varied), POP M (Pop Music), ROCK M (Rock Music),
EASY M (M.O.R. Music), LIGHT M (Light classical),
CLASSICS (Serious classical), OTH ER M (Other
Music), WEATHER (Weather), FINANCE (Finance),
CHILDREN (Children’s program), SOCIAL A (Social
Affairs), RELIGION (Religion), PHONE IN (Phone In),
TRAVEL (Travel), LEISURE (Leisure), JAZZ (Jazz
Music), COUNTRY (Country Music), NATION M
(National Music), OLDIES (Oldies Music), FOLK M
(Folk Music), DOCUMENT (Documentary)
Setting clock time (CT)
The CT data from the RDS transmission sets the
clock.
1 Set [SET CT] in [GENERAL] to [SET CT-ON]
(page 13).
10GB

Playback
Playing a USB Device
In these Operating Instructions, “iPod” is used as a
general reference for the iPod functions on an iPod
and iPhone, unless otherwise specified by the text
or illustrations.
For details on the compatibility of your iPod, see
“About iPod” (page 16) or visit the support site on
the back cover.
AOA (Android Open Accessory) 2.0, MSC (Mass
Storage Class) and MTP (Media Transfer Protocol)
type USB devices* compliant with the USB standard
can be used. Depending on the USB device, the
Android mode or MSC/MTP mode can be selected
on the unit.
Some digital media players or Android
smartphones may require setting to MTP mode.
* e.g., a USB flash drive, digital media player,
Android smartphone
Notes
For details on the compatibility of your USB device,
visit the support site on the back cover.
Smartphones with Android OS 4.1 or higher installed
support Android Open Accessory 2.0 (AOA 2.0).
However, some smartphones may not fully support
AOA 2.0 even if Android OS 4.1 or higher is installed.
For details on the compatibility of your Android
smartphone, visit the support site on the back cover.
Playback of the following files is not supported.
MP3/WMA/FLAC:
copyright-protected files
DRM (Digital Rights Management) files
Multi-channel audio files
MP3/WMA:
lossless compression files
Before making a connection, select the USB mode
(Android mode or MSC/MTP mode) depending on
the USB device (page 13).
1 Connect a USB device to the USB port
(page 6).
Playback starts.
If a device is already connected, to start
playback, press SRC to select [USB] ([IPD]
appears in the display when the iPod is
recognized).
2 Adjust the volume on this unit.
To stop playback
Press and hold OFF for 1 second.
To remove the device
Stop playback, then remove the device.
Caution for iPhone
When you connect an iPhone via USB, phone call
volume is controlled by the iPhone, not the unit. Do
not inadvertently increase the volume on the unit
during a call, as a sudden loud sound may result
when the call ends.
Searching and Playing Tracks
Repeat play and shuffle play
Not available when a USB device in Android mode is
connected.
1 During playback, press (repeat) or
(shuffle) repeatedly to select the desired
play mode.
Playback in the selected play mode may take
time to start.
Available play modes differ depending on the
selected sound source.
11GB
Searching a track by name (QuickBrowZer™)
Not available when a USB device in Android mode
or iPod is connected.
1 During USB playback, press (browse)*
to display the list of search categories.
When the track list appears, press (back)
repeatedly to display the desired search
category.
* During USB playback, press (browse) for more
than 2 seconds to directly return to the beginning
of the category list.
2 Rotate the control dial to select the
desired search category, then press it to
confirm.
3 Repeat step 2 to search the desired track.
Playback starts.
To exit t he Qu ick-BrowZer m ode
Press (browse).
Settings
Canceling the DEMO Mode
You can cancel the demonstration display which
appears when the source is off and the clock is
displayed.
1 Press MENU, rotate the control dial to
select [GENERAL], then press it.
2 Rotate the control dial to select [SET
DEMO], then press it.
3 Rotate the control dial to select [SET
DEMO-OFF], then press it.
The setting is complete.
4 Press (back) twice.
The display returns to normal reception/play
mode.
Searching by skipping items
(Jump mode)
Not available when a USB device in Android mode
or iPod is connected.
1 Press (browse).
2 Press (SEEK +).
3 Rotate the control dial to select the item.
The list is jumped in steps of 10% of the total
number of items.
4 Press ENTER to return to the Quick-
BrowZer mode.
The selected item appears.
5 Rotate the control dial to select the
desired item, then press it.
Playback starts.
12GB
Basic Setting Operation
You can set items in the following setup categories:
General setup (GENERAL), Sound setup (SOUND),
Display setup (DISPLAY)
1 Press MENU.
2 Rotate the control dial to select the setup
category, then press it.
The items that can be set differ depending on
the source and settings.
3 Rotate the control dial to select the
options, then press it.
To return to the previous display
Press (back).

General Setup (GENERAL)
DEMO (demonstration)
Activates the demonstration: [ON], [OFF].
CLOCK-ADJ (clock adjust) (page 6)
CAUT ALM (caution alarm)
Activates the caution alarm: [ON], [OFF] (page 5).
(Available only while the source is off and the
clock is displayed.)
BEEP
Activates the beep sound: [ON], [OFF].
AUTO OFF
Shuts off automatically after a certain time when
the unit is turned off and the clock is displayed
(i.e. press and hold SRC for 1 second): [ON] (30
minutes), [OFF].
STEERING
Registers/resets the setting of the steering
wheel remote control.
(Available when connected with the connection
cable (not supplied).) (Available only while the
source is off and the clock is displayed.)
STR CONTROL (steering control)
Selects the input mode of the connected remote
control. To prevent a malfunction, be sure to
match the input mode with the connected
remote control before use.
CUSTOM
Input mode for the steering wheel remote
control
PRESET
Input mode for the wired remote control
excluding the steering wheel remote control
(automatically selected when [RESET
CUSTOM] is performed.)
EDIT CUSTOM
Registers the functions (SOURCE, ATT, VOL +/–,
SEEK +/–) to the steering wheel remote control:
Rotate the control dial to select the function
you want to assign to the steering wheel
remote control, then press it.
While [REGISTER] is blinking, press and hold
the button on the steering wheel remote
control you want to assign the function to.
When registration is complete, [REGISTERED]
is displayed.
To register other functions, repeat steps
and .
(Available only when [STR CONTROL] is set to
[CUSTOM].)
RESET CUSTOM
Resets the setting of the steering wheel remote
control: [YES], [NO].
(Available only when [STR CONTROL] is set to
[CUSTOM].)
Notes
While making settings, only button operation on
the unit is available. For safety, park your car
before making this setting.
If an error occurs while registering, all the
previously-registe red informa tion remains. Restart
registration from the function where the error
occurred.
This function may not be available on some
vehicles. For details on the compatibility of your
vehicle, visit the support site on the back cover.
USB MODE
Changes the USB mode: [ANDROID], [MSC/MTP].
(Available only when the USB source is selected.)
CT (clock time)
Activates the CT function: [ON], [OFF].
AF/TA (alternative frequencies/traffic
announcement)
Selects the alternative frequencies (AF) and
traffic announcement (TA) setting: [AF-ON], [TAON], [AF/TA-ON], [AF/TA-OFF].
(Available when any source is selected.)
REGIONAL
Restricts reception to a specific region: [ON],
[OFF]. (Available only when FM is received.)
BTM (best tuning memory) (page 9)
(Available only when the tuner (FM/MW/LW) is
selected.)
ANNOUNCE (announcement)
Enables broadcast announcements: [ON], [OFF].
(Available when any source is selected.)
13GB

SOFTLINK
Searches for and tunes to the similar program
automatically when the signal of the current
program is too weak to receive: [ON], [OFF].
(Available only during DAB reception.)
ANT-PWR (antenna power)
Supplies power to the DAB antenna (aerial) input
terminal: [ON], [OFF]. (Available only when the
unit is turned off or during DAB reception.)
AUTOSCAN (auto scan)
Performs an auto scan to update the list of
services in Quick-BrowZer mode. (Available only
during DAB reception.)
FIRMWARE
(Available only while the source is off and the
clock is displayed.)
Checks/updates the firmware version. For
details, visit the support site on the back cover.
FW VERSION (firmware version)
Displays current firmware version.
FW UPDATE (firmware update)
Enters firmware update process: [YES], [NO].
Updating the firmware takes a few minutes to
complete. During the update, do not turn the
ignition to the OFF position, nor remove the USB
device.
Sound Setup (SOUND)
This setup menu is available when any source is
selected.
EQ10 PRESET
Selects an equalizer curve from 10 equalizer
curves or off:
[OFF], [R&B], [ROCK], [POP], [HIP-HOP], [EDM],
[JAZZ], [SOUL], [COUNTRY], [KARAOKE]*,
[CUSTOM].
The equalizer curve setting can be memorized
for each source.
* [KARAOKE] reduces the vocal sound but cannot
be fully removed during playback. Also, using a
microphone is not supported.
EQ10 CUSTOM
Sets [CUSTOM] of EQ10.
Setting the equalizer curve:
[BAND1] 32 Hz, [BAND2] 63 Hz, [BAND3] 125 Hz,
[BAND4] 250 Hz, [BAND5] 500 Hz, [BAND6] 1 kHz,
[BAND7] 2 kHz, [BAND8] 4 kHz, [BAND9] 8 kHz,
[BAND10] 16 kHz.
The volume level is adjustable in 1 dB steps,
from -6 dB to +6 dB.
BALANCE
Adjusts the sound balance: [RIGHT-15] –
[CENTER] – [LEFT-15].
FAD ER
Adjusts the relative level: [FRONT-15] – [CENTER]
– [REAR-15].
AUX VOL (AUX volume)
Adjusts the volume level for each connected
auxiliary device: [+18 dB] – [0 dB] – [-8 dB].
This setting negates the need to adjust the
volume level between sources.
(Available only when the AUX is selected.)
14GB

Display Setup (DISPLAY)
Folder (alb um)
Audio file (track)
DIMMER
Changes the display brightness: [ON], [OFF],
[CLK] (clock).
To set this function to be active only during a
fixed period, select [CLK], then set the start and
end times.
– To set the brightness when the dimmer
function is activated:
Set [DIMMER] to [ON], then adjust
[BRIGHTNESS].
– To set the brightness when the dimmer
function is deactivated:
Set [DIMMER] to [OFF], then adjust
[BRIGHTNESS].
The brightness setting is stored and applied
when the dimmer function is activated or
deactivated.
BRIGHTNESS
Adjusts the display brightness. The brightness
level is adjustable: [1] – [10].
SND SYNC (sound synchronization)
Activates the synchronization of the illumination
with the sound: [ON], [OFF].
AUTO SCR (auto scroll)
Scrolls long items automatically: [ON], [OFF].
(Not available when the AUX or tuner (FM/MW/
LW) is selected.)
Additional Information
Updating the Firmware
To update the firmware, visit the support site on the
back cover, then follow the online instructions.
Notes
Using a USB device (not supplied) is required for
updating the firmware. Store the updater in the USB
device, and connect the device to the USB port, then
perform the update operation.
Updating the firmware takes a few minutes to
complete. During the update, do not turn the ignition
to the OFF position, nor remove the USB device.
Precautions
Cool off the unit beforehand if your car has been
parked in direct sunlight.
Do not leave the front panel or audio devices
brought in inside the car, or it may cause
malfunction due to high temperature in direct
sunlight.
Power antenna (aerial) extends automatically.
To maintain high sound quality
Do not splash liquid onto the unit.
Playback order of audio files
15GB
About iPod
You can connect to the following iPod models.
Update your iPod devices to the latest software
before use.
Compatible iPhone/iPod models
Compatible Model USB
iPhone 7 Plus
iPhone 7
iPhone SE
iPhone 6s Plus
iPhone 6s
iPhone 6 Plus
iPhone 6
iPhone 5s
iPhone 5c
iPhone 5
iPhone 4s
iPod touch (6th generation)
iPod touch (5th generation)
iPod nano (7th generation)
“Made for iPod,” and “Made for iPhone,” mean
that an electronic accessory has been designed to
connect specifically to iPod or iPhone,
respectively, and has been certified by the
developer to meet Apple performance standards.
Apple is not responsible for the operation of this
device or its compliance with safety and
regulatory standards. Please note that the use of
this accessory with iPod or iPhone may affect
wireless performance.
If you have any questions or problems concerning
your unit that are not covered in this manual,
consult your nearest Sony dealer.
Maintenance
Cleaning the connectors
The unit may not function properly if the
connectors between the unit and the front panel
are not clean. In order to prevent this, detach the
front panel (page 5) and clean the connectors with
a cotton swab. Do not apply too much force.
Otherwise, the connectors may be damaged.
Notes
For safety, turn off the ignition before cleaning the
connectors, and remove the key from the ignition
switch.
Never touch the connectors directly with your fingers
or with any metal device.
Specifications
Tuner section
DAB/DAB+
Tuning range: 174.928 MHz – 239.200 MHz
Antenna (aerial) terminal:
External antenna (aerial) connector
FM
Tuning range:
87.5 MHz – 108.0 MHz
Antenna (aerial) terminal:
External antenna (aerial) connector
Usable sensitivity: 7 dBf
Selectivity: 75 dB at 400 kHz
Signal-to-noise ratio: 73 dB
Separation: 50 dB at 1 kHz
Frequency response: 20 Hz – 15,000 Hz
16GB

MW/LW
Tuning range:
MW: 531 kHz – 1,602 kHz
LW: 153 kHz – 279 kHz
Antenna (aerial) terminal:
External antenna (aerial) connector
Sensitivity: MW: 26 V, LW: 50 V
USB Player section
Interface: USB (Full-speed)
Maximum current: 1 A
Maximum number of recognizable folders and files:
Folders (albums): 256
Files (tracks) per folder: 256
Compatible Android Open Accessory protocol
(AOA): 2.0
Corresponding codec:
MP3 (.mp3)
Bit rate: 8 kbps – 320 kbps (Supports VBR
(Variable Bit Rate))
Sampling rate: 16 kHz – 48 kHz
WMA (.wma)
Bit rate: 32 kbps – 192 kbps (Supports VBR
(Variable Bit Rate))
Sampling rate: 32 kHz, 44.1 kHz, 48 kHz
FLAC (.flac)
Bit depth: 16 bit, 24 bit
Sampling rate: 44.1 kHz, 48 kHz
Power amplifier section
Output: Speaker outputs
Speaker impedance: 4 – 8
Maximum power output: 55 W × 4 (at 4 )
General
Outputs:
Audio outputs terminal (REAR)
Power antenna (aerial)/Power amplifier control
terminal (REM OUT)
Inputs:
Remote controller input terminal
DAB antenna (aerial) input terminal
FM/MW/LW antenna (aerial) input terminal
AUX input jack (stereo mini jack)
USB port
Power requirements: 12 V DC car battery (negative
ground (earth))
Rated current consumption: 10 A
Dimensions:
Approx. 178 mm × 50 mm × 119 mm
1
(7
/8 in × 2 in × 4 3/4 in) (w/h/d)
Mounting dimensions:
Approx. 182 mm × 53 mm × 102 mm
1
(7
/4 in × 2 1/8 in × 4 1/8 in) (w/h/d)
Mass: Approx. 0.7 kg (1 lb 9 oz)
Package contents:
Main unit (1)
Parts for installation and connections (1 set)
Your dealer may not handle some of the above
listed accessories. Please ask the dealer for detailed
information.
Design and specifications are subject to change
without notice.
Copyrights
Windows Media is either a registered trademark or
trademark of Microsoft Corporation in the United
States and/or other countries.
This product is protected by certain intellectual
property rights of Microsoft Corporation. Use or
distribution of such technology outside of this
product is prohibited without a license from
Microsoft or an authorized Microsoft subsidiary.
iPhone, iPod, iPod classic, iPod nano, and iPod
touch are trademarks of Apple Inc., registered in
the U.S. and other countries.
MPEG Layer-3 audio coding technology and patents
licensed from Fraunhofer IIS and Thomson.
Android is a trademark of Google Inc.
libFLAC
Copyright (C) 2000-2009 Josh Coalson
Copyright (C) 2011-2013 Xiph.Org Foundation
Redistribution and use in source and binary forms,
with or without modification, are permitted
provided that the following conditions are met:
Redistributions of source code must retain the
above copyright notice, this list of conditions and
the following disclaimer.
17GB
Redistributions in binary form must reproduce
the above copyright notice, this list of conditions
and the following disclaimer in the
documentation and/or other materials provided
with the distribution.
Neither the name of the Xiph.org Foundation nor
the names of its contributors may be used to
endorse or promote products derived from this
software without specific prior written
permission.
THIS SOFTWARE IS PROVIDED BY THE COPYRIGHT
HOLDERS AND CONTRIBUTORS “AS IS” AND ANY
EXPRESS OR IMPLIED WARRANTIES, INCLUDING,
BUT NOT LIMITED TO, THE IMPLIED WARRANTIES OF
MERCHANTABILITY AND FITNESS FOR A
PARTICULAR PURPOSE ARE DISCLAIMED. IN NO
EVENT SHALL THE FOUNDATION OR CONTRIBUTORS
BE LIABLE FOR ANY DIRECT, INDIRECT, INCIDENTAL,
SPECIAL, EXEMPLARY, OR CONSEQUENTIAL
DAMAGES (INCLUDING, BUT NOT LIMITED TO,
PROCUREMENT OF SUBSTITUTE GOODS OR
SERVICES; LOSS OF USE, DATA, OR PROFITS; OR
BUSINESS INTERRUPTION) HOWEVER CAUSED AND
ON ANY THEORY OF LIABILITY, WHETHER IN
CONTRACT, STRICT LIABILITY, OR TORT (INCLUDING
NEGLIGENCE OR OTHERWISE) ARISING IN ANY WAY
OUT OF THE USE OF THIS SOFTWARE, EVEN IF
ADVISED OF THE POSSIBILITY OF SUCH DAMAGE.
Troubleshooting
The following checklist will help you remedy
problems you may encounter with your unit.
Before going through the checklist below, check
the connection and operating procedures.
For details on using the fuse and removing the unit
from the dashboard, see “Connection/Installation”
(page 22).
If the problem is not solved, visit the support site on
the back cover.
Increase the volume of the unit and connected
device.
No beep sound.
An optional power amplifier is connected and
you are not using the built-in amplifier.
The contents of the memory have been erased.
The power supply lead or battery has been
disconnected or not connected properly.
Stored stations and correct time are erased.
The fuse has blown.
Makes a noise when the position of the ignition
is switched.
The leads are not matched correctly with the car’s
accessory power connector.
During playback or reception, the demonstration
mode starts.
If no operation is performed for 5 minutes with
[DEMO-ON] set, the demonstration mode starts.
Set [DEMO-OFF] (page 13).
The display disappears from/does not appear in
the display window.
The dimmer is set to [DIM-ON] (page 15).
The display disappears if you press and hold OFF.
Press OFF on the unit until the display appears.
The connectors are dirty (page 16).
The display/illumination flashes.
The power supply is not sufficient.
Check that the car battery supplies enough
power to the unit. (The power requirement is
12 V DC.)
The operation buttons do not function.
Press DSPL and (back)/MODE for more than
2 seconds to reset the unit.
The contents stored in memory are erased.
For your safety, do not reset the unit while you
are driving.
General
No sound or the sound is very low.
The position of the fader control [FADER] is not
set for a 2-speaker system.
The volume of the unit and/or connected device
is very low.
18GB
Radio reception
Stations cannot be received.
The sound is hampered by noises.
The connection is not correct.

Check the connection of the car antenna
(aerial).
If the auto antenna (aerial) will not extend,
check the connection of the power antenna
(aerial) control lead.
See [NO SERV] (page 20) for details when the DAB
signal cannot be received.
Preset tuning is not possible.
The broadcast signal is too weak.
RDS
The SEEK starts after a few seconds of listening.
The station is non-TP or has weak signal.
Deactivate TA (page 9).
No traffic announcements.
Activate TA (page 9).
The station does not broadcast any traffic
announcements despite being TP.
Tune in another station.
Disable DAB announcements (page 8).
Traffic announcements are disabled while DAB
announcements are enabled.
PTY displays [- - - - - - - -].
The current station is not an RDS station.
RDS data has not been received.
The station does not specify the program type.
Program service name flashes.
There is no alternative frequency for the current
station.
Press (SEEK –/+) while the program
service name is flashing. [PI SEEK] appears and
the unit starts searching for another frequency
with the same PI (program identification) data.
The sound is intermittent.
The sound may be intermittent at a high-bit-rate.
DRM (Digital Rights Management) files may not
be playable in some cases.
Audio file cannot be played.
USB device formatted with file systems other
than FAT16 or FAT32 are unsup ported.*
* This unit supports FAT16 and FAT32, but some USB
device may not support all of these FAT. For details,
refer to the operating instruction of each USB device
or contact the manufacturer.
Operations for skipping an album, skipping
items (Jump mode), and searching a track by
name (Quick-BrowZer) cannot be performed.
These operations cannot be performed when a
USB device in Android mode or iPod is
connected.
Set [USB MODE] to [MSC/MTP] (page 13).
Remove the iPod.
The USB mode of the device is not set to the
appropriate mode.
Make sure that the USB mode of the device is
set to MSC/MTP mode.
The sound cannot be output during playback in
Android mode.
While the unit is in Android mode, the sound
outputs only from the Android smartphone.
Check the status of the audio playback
application on the Android smartphone.
Playback may not perform properly depending
on the Android smartphone.
USB device playback
You cannot play items via a USB hub.
This unit cannot recognize USB devices via a USB
hub.
A USB device takes longer to play.
The USB device contains files with a complicated
tree structure.
19GB
Messages
The following messages may appear or flash during
operation.
HUB NO SUPRT: USB hubs are not supported.
INVALID
The selected operation could be invalid.
[USB MODE] cannot be changed during iPod
playback.
IPD STOP: iPod playback has finished.
Operate your iPod/iPhone to start playback.
NO AF: No alternative frequencies.
Press (SEEK –/+) while the program
service name is flashing. The unit starts searching
for another frequency with the same PI (program
identification) data ([PI SEEK] appears).
NO DATA
There is no DAB service for the selected program
type.
Press (back).
NO INFO (no information)
There is no label information for the current DAB
service.
NO SERV (no service)
The DAB signal cannot be received.
Perform an auto scan (page 8).
Check the connection of the DAB antenna
(aerial).
Check that [ANT-PWR] is set to [ON] (page 14).
NO TP: No traffic programs.
The unit will continue searching for available TP
stations.
NOT SUPPORT - ANDROID MODE
A USB device not supporting AOA (Android Open
Accessory) 2.0 is connected to the unit while [USB
MODE] is set to [ANDROID].
Set [USB MODE] to [MSC/MTP] (page 13).
OVERLOAD: The USB device is overloaded.
Disconnect the USB device, then press SRC to
select another source.
The USB device has a fault, or an unsupported
device is connected.
READ: Now reading information.
Wait until reading is complete and playback
starts automatically. This may take some time
depending on the file organization.
RECEIVING
The DAB band is selected and the unit is waiting
to receive a service.
USB ERROR: The USB device cannot be played.
Connect the USB device again.
USB NO DEV: A USB device is not connected or
recognized.
Make sure the USB device or USB cable is securely
connected.
USB NO MUSIC: There is no playable file.
Connect a USB device containing playable files
(page 17).
USB NO SUPRT: The USB device is not supported.
For details on the compatibility of your USB
device, visit the support site on the back cover.
For steering wheel remote control
operation:
ERROR: An error occurred during the function
registration.
Register again from the function where the error
occurred (page 13).
TIMEOUT: The function registration failed due to a
timeout.
Try completing the registration while [REGISTER]
is blinking (about 6 seconds) (page 13).
For firmware update operation:
FILE ERROR: The updater is not stored in the USB
device.
Store the updater in the USB device, then try
again (page 15).
20GB

UPDATE ERROR PRESS ENTER: Firmware update is
not completed properly.
Press ENTER to clear the message, then try again.
During the update, do not turn the ignition to the
OFF position, nor remove the USB device
(page 15).
Insert the USB device storing the updater, and
then press ENTER.
If these solutions do not help improve the situation,
consult your nearest Sony dealer.
21GB
Connection/Installation
× 2
Cautions
Run all ground (earth) leads to a common
ground (earth) point.
Do not get the leads trapped under a screw, or
caught in moving parts (e.g., seat railing).
Before making connections, turn the car ignition
off to avoid short circuits.
Connect the power supply lead to the unit and
speakers before connecting it to the auxiliary
power connector.
Be sure to insulate any loose unconnected leads
with electrical tape for safety.
Precautions
Choose the installation location carefully so that
the unit will not interfere with normal driving
operations.
Avoid installing the unit in areas subject to dust,
dirt, excessive vibration, or high temperature,
such as in direct sunlight or near heater ducts.
Use only the supplied mounting hardware for a
safe and secure installation.
Note on the power supply lead (yellow)
When connecting this unit in combination with other
stereo components, the amperage rating of the car
circuit to which the unit is connected must be higher
than the sum of each component’s fuse amperage
rating.
Mounting angle adjustment
Adjust the mounting angle to less than 45°.
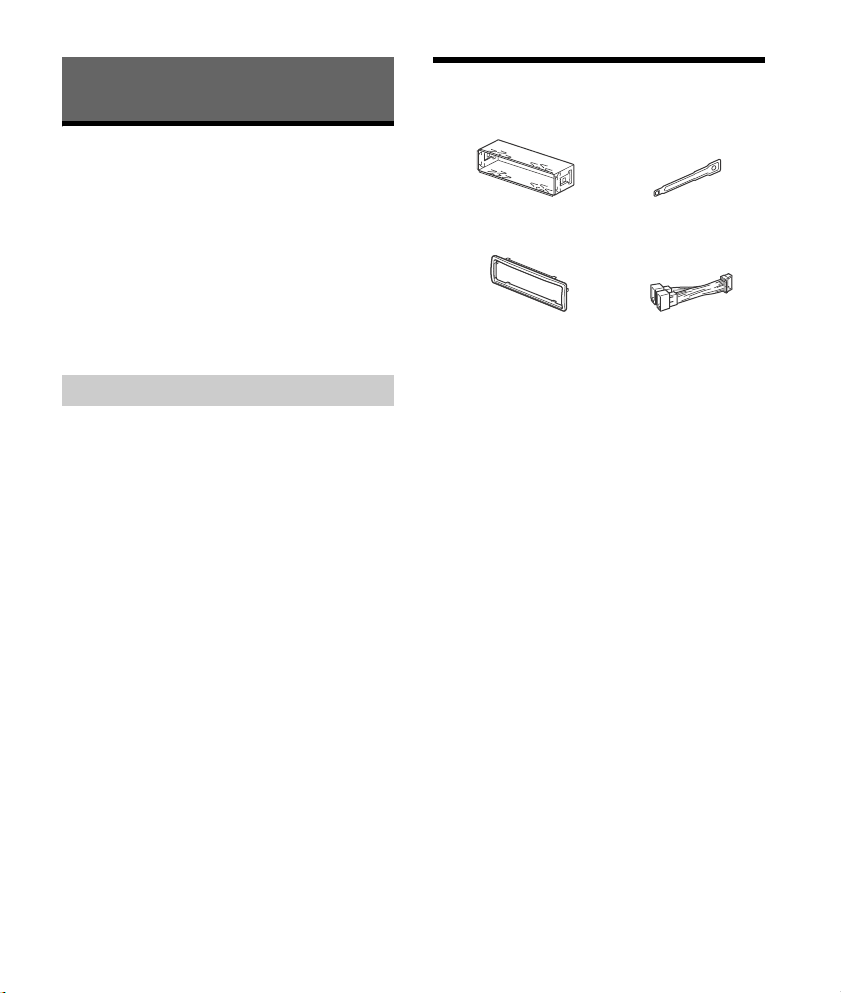
Parts List for Installation
This parts list does not include all the package
contents.
The bracket and the protection collar are
attached to the unit before shipping. Before
mounting the unit, use the release keys to
remove the bracket from the unit. For details,
see “Removing the protection collar and the
bracket” (page 25).
Keep the release keys for future use as they are
also necessary if you remove the unit from your
car.
22GB
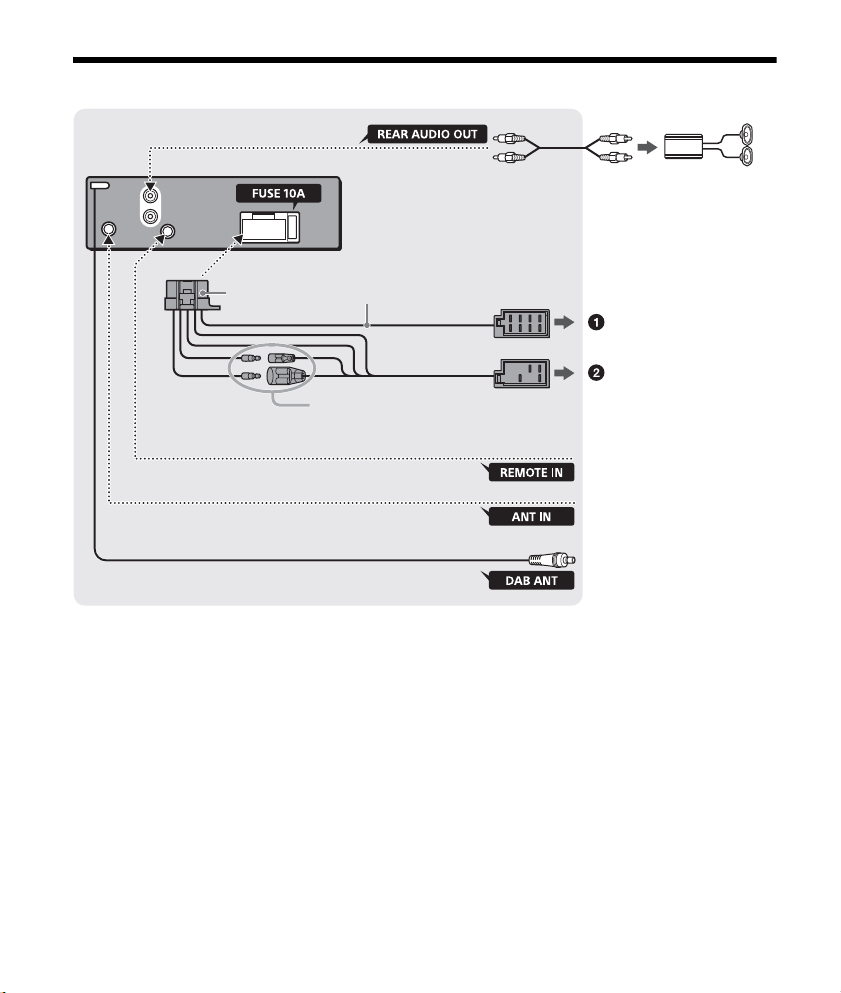
Connection
from a wired remote control
(not supplied)*
4
See “Power connection diagram” (page 25)
for details.
from a car antenna (aerial)*
5
*
3
Power amplifier*
1
For details, see “Making
connections” (page 24).
*
2
from DAB antenna (aerial)
(not supplied)*
6
*1 Not supplied
*2 Speaker impedance: 4 – 8 × 4
*3 RCA pin cord (not supplied)
*4 Depending on the type of car, use an adaptor for a
wired remote control (not supplied). For details on
using the wired remote control, see “Using the wired
remote control” (page 25).
*5 Depending on the type of car, use an adaptor (not
supplied) if the antenna connector does not fit.
*6 Set [SET ANT-PWR] to [ON] (default) or [OFF]
depending on the type of DAB antenna (aerial)
(page 14).
Max. supply current 0.1 A
23GB
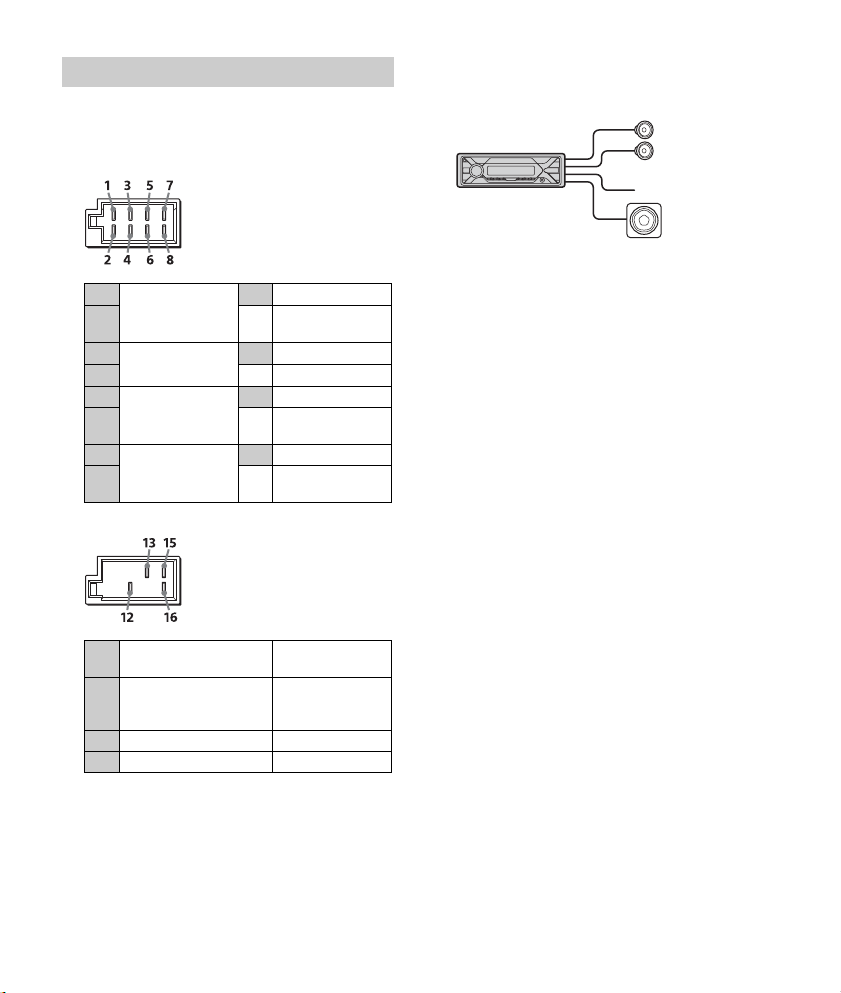
Making connections
Front speaker
Subwoofer
If you have a power antenna (aerial) without a relay
box, connecting this unit with the supplied power
supply lead may damage the antenna (aerial).
To the car’s speaker connector
1
Rear speaker
(right)
2
3
Front speaker
(right)
4
5
Front speaker
(left)
6
7
Rear speaker
(left)
8
To the car’s power connector
Purple
Purple/black
striped
Gray
Gray/black striped
White
White/black
striped
Green
Green/black
striped
Subwoofer Easy Connection
You can use a subwoofer without a power amplifier
when it is connected to a rear speaker cord.
Notes
Preparation of the rear speaker cords is required.
Use a subwoofer with an impedance of 4 to 8 ,
and with adequate power handling capacities to
avoid damage.
Memory hold connection
When the yellow power supply lead is connected,
power will always be supplied to the memory
circuit even when the ignition switch is turned off.
Speaker connection
Before connecting the speakers, turn the unit off.
Use speakers with an impedance of 4 to 8 ,
and with adequate power handling capacities to
avoid damage.
continuous power
12
supply
power antenna (aerial) /
13
power amplifier control
(REM OUT)
15 switched power supply Red
16 ground (earth) Black
24GB
Yel lo w
Blue/white striped
Power connection diagram
Auxiliary power connector
Red Red
Yellow Yellow
Red Red
Yellow Yellow
Red
Red
Yel l o w
Yellow
Face the hook inwards.
Make sure your car’s auxiliary power connector, and
match the connections of cords correctly
depending on the car.
After matching the connections and switching
power supply leads correctly, connect the unit to
the car’s power supply. If you have any questions
and problems connecting your unit that are not
covered in this manual, consult the car dealer.
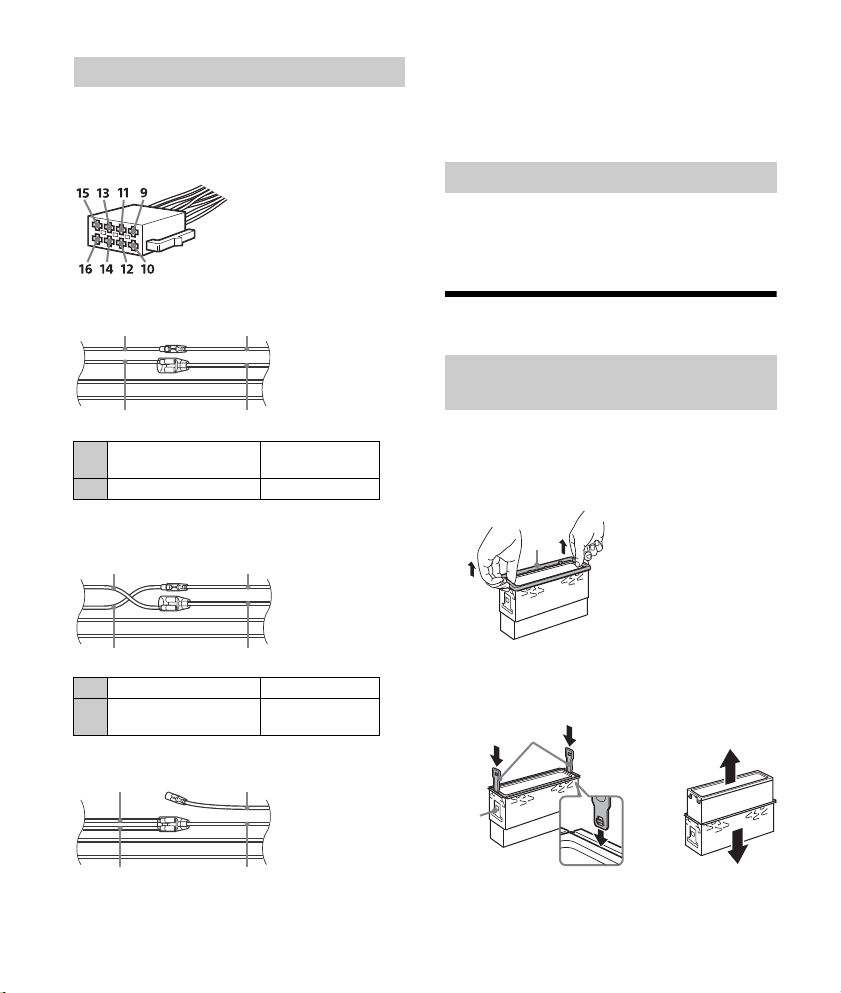
Using the wired remote control
1 To enable the wired remote control, set
[STR CONTROL] in [SET STEERING] to
[PRESET] (page 13).
Common connection
continuous power
12
supply
15 switched power supply Red
When the positions of the red and yellow
leads are inverted
12 switched power supply Yellow
continuous power
15
supply
When the car without ACC position
Installation
Removing the protection collar and the
bracket
Before installing the unit, remove the protection
Yellow
Red
collar and the bracket from the unit.
1 Pinch both edges of the protection collar
, then pull it out.
2 Insert both release keys until they
click, and pull down the bracket , then
pull up the unit to separate.
25GB
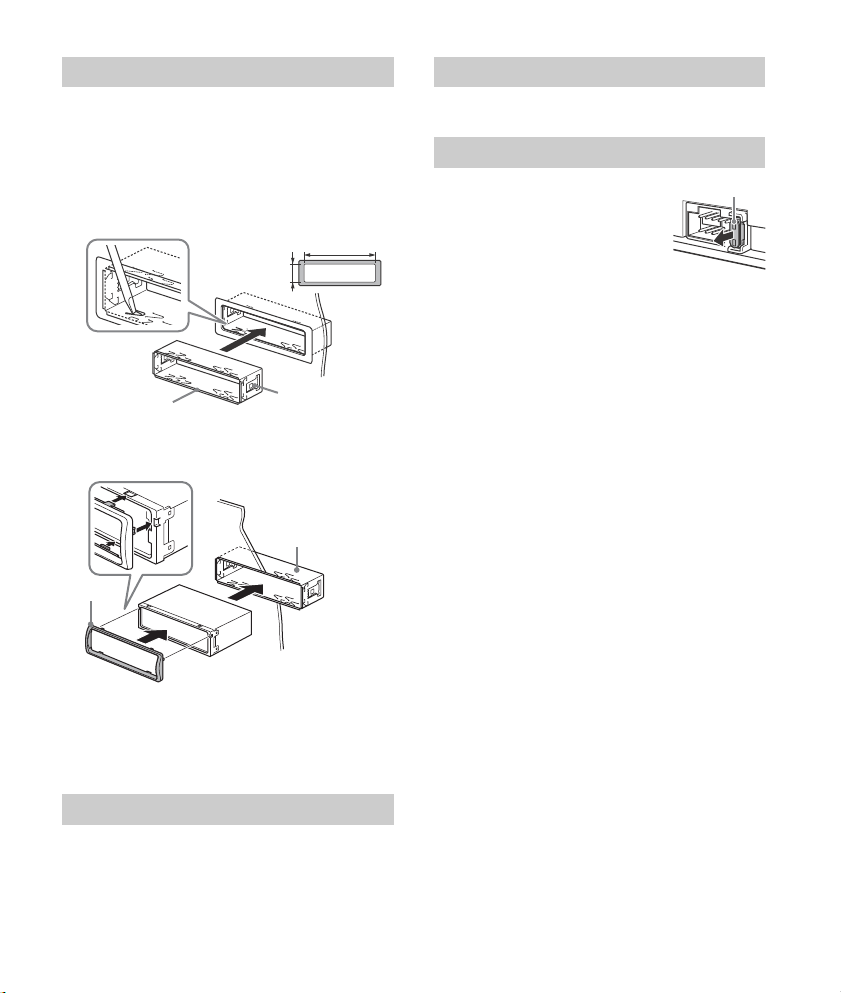
Mounting the unit in the dashboard
182 mm (7 1/4 in)
53 mm (2 1/8 in)
Catch
Fuse (10 A)
Before installing, make sure the catches on both
sides of the bracket are bent inwards 2 mm (
in).
3
/32
1 Position the bracket inside the
dashboard, then bend the claws outward
for a tight fit.
2 Mount the unit onto the bracket , then
attach the protection collar .
Resetting the unit
For details, see “Resetting the Unit” (page 6).
Fuse replacement
When replacing the fuse, be sure
to use one matching the
amperage rating stated on the
original fuse. If the fuse blows,
check the power connection and
replace the fuse. If the fuse blows
again after replacement, there
may be an internal malfunction. In such a case,
consult your nearest Sony dealer.
Notes
If the catches are straight or bent outwards, the unit
will not be installed securely and may spring out.
Make sure the 4 catches on the protection collar
are properly engaged in the slots of the unit.
Detaching and attaching the front panel
For details, see “Detaching the Front Panel”
(page 5).
26GB

Für mögliche spätere Service-Anfragen, notieren
Sie sich bitte vor der Installation Ihres Gerätes hier
die Seriennummer:
S/N: ___________________________
Hinweis: Die 7-stellige Seriennummer finden Sie
oben auf der Verpackung des Gerätes oder unten
auf dem Gerät selber.
Installieren Sie das Gerät aus Sicherheitsgründen
unbedingt im Armaturenbrett des Fahrzeugs,
denn die Rückseite des Geräts erwärmt sich bei
Betrieb.
Erläuterungen dazu finden Sie unter „Anschluss/
Installation“ (Seite 25).
Hergestellt in Thailand
Das Typenschild mit Betriebsspannung usw.
befindet sich an der Geräteunterseite.
Hiermit erklärt Sony Corporation, dass diese
Funkanlage der Richtlinie 2014/53/EU entspricht.
Der vollständige Text der EU-Konformitätserklärung
ist unter der folgenden Internetadresse verfügbar:
http://www.compliance.sony.de/
Dieses Gerät ist auf den Gebrauch mit der/den
zulässigen Softwareversion(en) ausgelegt, die in
der EU-Konformitätserklärung angegeben ist/sind.
Die Software, mit der dieses Gerät ausgestattet ist,
entspricht den grundlegenden Anforderungen der
Richtlinie 2014/53/EU.
Softwareversion: 1_
Die Softwareversion kann unter dem Punkt
Firmware-Konfiguration des Menüs Allgemeine
Einstellungen überprüft werden.
Hinweis für Kunden: Die folgenden
Informationen gelten nur für Geräte, die in
Ländern verkauft werden, in denen EURichtlinien gelten
Dieses Produkt wurde von oder für die Sony
Corporation hergestellt.
EU Importeur: Sony Europe Limited.
Anfragen an den Importeur oder zur
Produktkonformität auf Grundlage der
Gesetzgebung in Europa senden Sie bitte an den
Bevollmächtigten Sony Belgium, bijkantoor van
Sony Europe Limited, Da Vincilaan 7-D1, 1935
Zaventem, Belgien.
Entsorgung von gebrauchten
Batterien und Akkus und
gebrauchten elektrischen und
elektronischen Geräten
(anzuwenden in den Ländern der
Europäischen Union und anderen
europäischen Ländern mit einem separaten
Sammelsystem für diese Produkte)
Das Symbol auf der Batterie/dem Akku, dem
Produkt oder der Verpackung weist darauf hin, dass
das Produkt oder die Batterie/der Akku nicht als
normaler Haushaltsabfall zu behandeln sind.
Ein zusätzliches chemisches Symbol Pb (Blei) oder
Hg (Quecksilber) unter der durchgestrichenen
Mülltonne bedeutet, dass die Batterie/der Akku
einen Anteil von mehr als 0,0005% Quecksilber
oder 0,004% Blei enthält.
Durch Ihren Beitrag zum korrekten Entsorgen des
Produktes und der Batterie schützen Sie die Umwelt
und die Gesundheit Ihrer Mitmenschen. Umwelt
und Gesundheit werden durch falsches Entsorgen
gefährdet. Materialrecycling hilft, den Verbrauch
von Rohstoffen zu verringern.
Bei Produkten, die auf Grund ihrer Sicherheit, der
Funktionalität oder als Sicherung vor Datenverlust
eine ständige Verbindung zur eingebauten Batterie
benötigen, sollte die Batterie nur durch
qualifiziertes Servicepersonal ausgetauscht
werden.
Um sicherzustellen, dass das Produkt und die
Batterie korrekt entsorgt werden, geben Sie das
Produkt zwecks Entsorgung an einer
Annahmestelle für das Recycling von elektrischen
und elektronischen Geräten ab.
Für alle anderen Batterien entnehmen Sie die
Batterie bitte entsprechend dem Kapitel über die
sichere Entfernung der Batterie. Geben Sie die
Batterie an einer Annahmestelle für das Recycling
von Batterien/Akkus ab.
Weitere Informationen über das Recycling dieses
Produkts oder der Batterie erhalten Sie von Ihrer
Gemeinde, den kommunalen
Entsorgungsbetrieben oder dem Geschäft, in dem
Sie das Produkt gekauft haben.
2DE

Hinweis für Lithiumbatterien: Bitte geben Sie nur
entladene Batterien an den Sammelstellen ab.
Wegen Kurzschlussgefahr überkleben Sie bitte die
Pole der Batterie mit Klebestreifen. Sie erkennen
Lithiumbatterien an den Abkürzungen Li oder CR.
Warnhinweis, wenn die Zündung Ihres
Fahrzeugs nicht über eine Zubehörposition
(ACC oder I) verfügt
Aktivieren Sie unbedingt die Abschaltautomatik
(AUTO OFF) (Seite 15). Nach dem Ausschalten
und dem Anzeigen der Uhrzeit (d. h. halten Sie
SRC 1 Sekunde lang gedrückt), wird das Gerät
dann nach der voreingestellten Zeit automatisch
vollständig abgeschaltet, so dass der
Autobatterie kein Strom mehr entzogen wird.
Wenn Sie die Abschaltautomatik (AUTO OFF)
nicht aktivieren, müssen Sie jedes Mal, wenn Sie
die Zündung ausschalten, die Taste OFF gedrückt
halten, bis die Anzeige ausgeblendet wird.
Haftungsausschluss für von Dritten
angebotene Dienste
Von Dritten angebotene Dienste können ohne
vorherige Ankündigung geändert, ausgesetzt oder
eingestellt werden. Sony übernimmt in diesen
Fällen keine Haftung.
3DE

Inhalt
Lage und Funktion der Teile und Bedienelemente
. . . . . . . . . . . . . . . . . . . . . . . . . . . . . . . . . . . . . . . 5
Vorbereitungen
Abnehmen der Frontplatte. . . . . . . . . . . . . . . . . . . . 6
Zurücksetzen des Geräts . . . . . . . . . . . . . . . . . . . . . 7
Einstellen der Uhr . . . . . . . . . . . . . . . . . . . . . . . . . . . 7
Überprüfen der Batteriespannung . . . . . . . . . . . . . 7
Anschließen eines USB-Geräts . . . . . . . . . . . . . . . . 7
Anschließen eines anderen tragbaren Audiogeräts
. . . . . . . . . . . . . . . . . . . . . . . . . . . . . . . . . . . . . . . 8
Radioempfang
Radioempfang. . . . . . . . . . . . . . . . . . . . . . . . . . . . . . 8
DAB-Empfang . . . . . . . . . . . . . . . . . . . . . . . . . . . . . . 8
FM/MW/LW-Empfang. . . . . . . . . . . . . . . . . . . . . . . 10
Das Radiodatensystem (RDS). . . . . . . . . . . . . . . . . 10
Wiedergabe
Wiedergabe mit einem USB-Gerät . . . . . . . . . . . . 12
Suchen und Wiedergeben von Titeln . . . . . . . . . . 13
Einstellungen
Beenden des DEMO-Modus. . . . . . . . . . . . . . . . . . 14
Grundlegende Einstellschritte . . . . . . . . . . . . . . . . 14
Allgemeine Einstellungen (GENERAL) . . . . . . . . . . 15
Klangeinstellungen (SOUND) . . . . . . . . . . . . . . . . . 16
Anzeigeeinstellungen (DISPLAY) . . . . . . . . . . . . . . 17
Anschluss/Installation
Vorsichtsmaßnahmen . . . . . . . . . . . . . . . . . . . . . . 25
Teileliste für die Installation. . . . . . . . . . . . . . . . . . 25
Anschluss . . . . . . . . . . . . . . . . . . . . . . . . . . . . . . . . 26
Installation . . . . . . . . . . . . . . . . . . . . . . . . . . . . . . . 29
Weitere Informationen
Aktualisieren der Firmware . . . . . . . . . . . . . . . . . . 18
Sicherheitsmaßnahmen. . . . . . . . . . . . . . . . . . . . . 18
Wartung . . . . . . . . . . . . . . . . . . . . . . . . . . . . . . . . . . 19
Technische Daten . . . . . . . . . . . . . . . . . . . . . . . . . . 19
Störungsbehebung . . . . . . . . . . . . . . . . . . . . . . . . . 21
Meldungen . . . . . . . . . . . . . . . . . . . . . . . . . . . . . . . 23
4DE
 Loading...