

Page 1
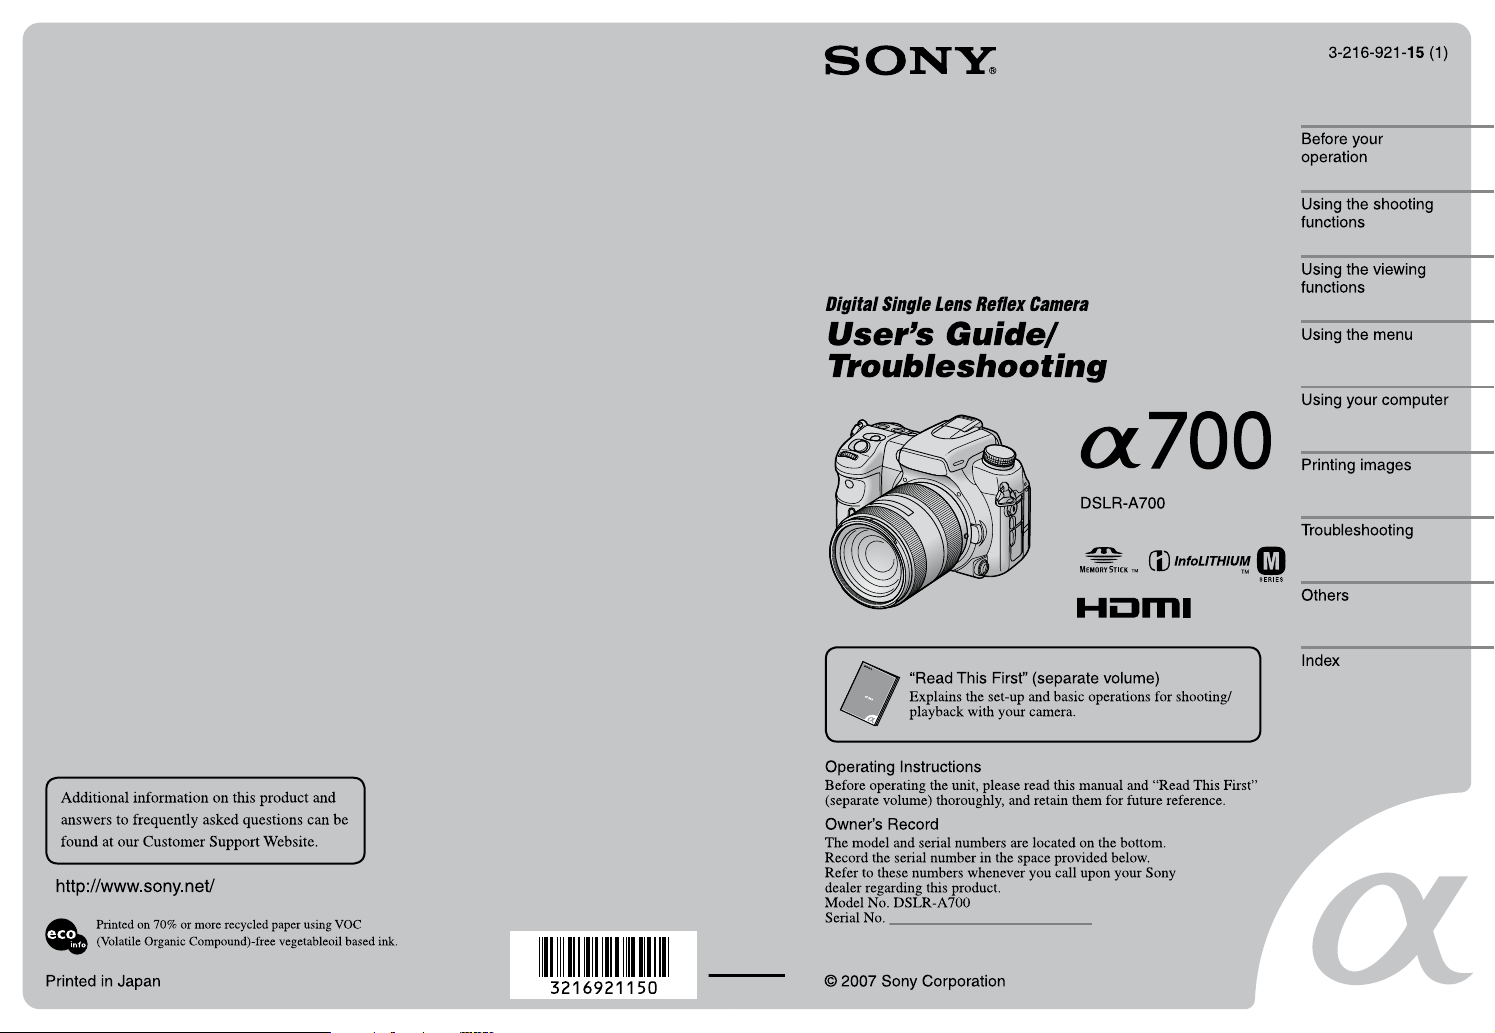
Digital Single Lens Reflex Camera
User’s Guide/
Troubleshooting
Before your
operation
Using the shooting
functions
Using the viewing
functions
Using the menu
Using your computer
Printing images
Troubleshooting
Others
“Read This First” (separate volume)
Explains the set-up and basic operations for shooting/
playback with your camera.
Index
Page 2
WARNING
To reduce fire or shock hazard, do
not expose the unit to rain or
moisture.
For Customers in the U.S.A.
This symbol is intended to
alert the user to the presence
of uninsulated “dangerous
voltage” within the product's
enclosure that may be of
sufficient magnitude to
constitute a risk of electric
shock to persons.
This symbol is intended to
alert the user to the presence
of important operating and
maintenance (servicing)
instructions in the literature
accompanying the appliance.
2
Page 3

IMPORTANT SAFEGUARDS
For your protection, please read these safety
instructions completely before operating
the appliance, and keep this manual for
future reference.
Carefully observe all warnings, precautions
and instructions on the appliance, or the one
described in the operating instructions and
adhere to them.
Use
Power Sources
This set should be operated only from the type of
power source indicated on the marking label. If
you are not sure of the type of electrical power
supplied to your home, consult your dealer or
local power company. For those sets designed to
operate from battery power, or other sources, refer
to the operating instructions.
Polarization
This set may be equipped with a polarized ac
power cord plug (a plug having one blade wider
than the other).
This plug will fit into the power outlet only one
way. This is a safety feature. If you are unable to
insert the plug fully into the outlet, try reversing
the plug. If the plug should still fail to fit, contact
your electrician to have a suitable outlet installed.
Do not defeat the safety purpose of the polarized
plug by forcing it in.
Overloading
Do not overload wall outlets, extension cords or
convenience receptacles beyond their capacity,
since this can result in fire or electric shock.
Object and Liquid Entry
Never push objects of any kind into the set
through openings as they may touch dangerous
voltage points or short out parts that could result
in a fire or electric shock. Never spill liquid of any
kind on the set.
Attachments
Do not use attachments not recommended by the
manufacturer, as they may cause hazards.
Cleaning
Unplug the set from the wall outlet before
cleaning or polishing it. Do not use liquid cleaners
or aerosol cleaners. Use a cloth lightly dampened
with water for cleaning the exterior of the set.
Installation
Water and Moisture
Do not use power-line operated sets near water –
for example, near a bathtub, washbowl, kitchen
sink, or laundry tub, in a wet basement, or near a
swimming pool, etc.
Power-Cord Protection
Route the power cord so that it is not likely to be
walked on or pinched by items placed upon or
against them, paying particular attention to the
plugs, receptacles, and the point where the cord
exits from the appliance.
Accessories
Do not place the set on an unstable cart, stand,
tripod, bracket, or table. The set may fall, causing
serious injury to a child or an adult, and serious
damage to the set. Use only a cart, stand, tripod,
bracket, or table recommended by the
manufacturer.
Ventilation
The slots and openings in the cabinet are provided
for necessary ventilation. To ensure reliable
operation of the set, and to protect it from
overheating, these slots and openings must never
be blocked or covered.
– Never cover the slots and openings with a cloth
or other materials.
– Never block the slots and openings by placing
the set on a bed, sofa, rug, or other similar
surface.
– Never place the set in a confined space, such as
a bookcase, or built-in cabinet, unless proper
ventilation is provided.
– Do not place the set near or over a radiator or
heat register, or where it is exposed to direct
sunlight.
3
Page 4

Lightning
For added protection for this set during a lightning
storm, or when it is left unattended and unused for
long periods of time, unplug it from the wall
outlet and disconnect the antenna or cable system.
This will prevent damage to the set due to
lightning and power-line surges.
Service
Damage Requiring Service
Unplug the set from the wall outlet and refer
servicing to qualified service personnel under the
following conditions:
– When the power cord or plug is damaged or
frayed.
– If liquid has been spilled or objects have fallen
into the set.
– If the set has been exposed to rain or water.
– If the set has been subject to excessive shock by
being dropped, or the cabinet has been
damaged.
– If the set does not operate normally when
following the operating instructions. Adjust
only those controls that are specified in the
operating instructions. Improper adjustment of
other controls may result in damage and will
often require extensive work by a qualified
technician to restore the set to normal operation.
– When the set exhibits a distinct change in
performance – this indicates a need for service.
Servicing
Do not attempt to service the set yourself as
opening or removing covers may expose you to
dangerous voltage or other hazards.
Refer all servicing to qualified service personnel.
Safety Check
Upon completion of any service or repairs to the
set, ask the service technician to perform routine
safety checks (as specified by the manufacturer)
to determine that the set is in safe operating
condition.
Replacement parts
When replacement parts are required, be sure the
service technician has used replacement parts
specified by the manufacturer that have the same
characteristics as the original parts.
Unauthorized substitutions may result in fire,
electric shock, or other hazards.
4
Page 5

Read this first
CAUTION
Replace the battery with the specified type
only. Otherwise, fire or injury may result.
Do not expose the batteries to excessive heat such
as sunshine, fire or the like.
For Customers in the U.S.A. and
Canada
RECYCLING LITHIUM-ION BATTERIES
Lithium-Ion batteries are
recyclable.
You can help preserve our
environment by returning your
used rechargeable batteries to
the collection and recycling
location nearest you.
For more information regarding recycling of
rechargeable batteries, call toll free
1-800-822-8837, or visit http://www.rbrc.org/
Caution: Do not handle damaged or leaking
Lithium-Ion batteries.
Battery pack
This device complies with Part 15 of the FCC
Rules, Operation is subject to the following two
conditions:
(1) This device may not cause harmful
interference, and (2) this device must accept any
interference received, including interference that
may cause undesired operation.
This Class B digital apparatus complies with
Canadian ICES-003.
For Customers in the U.S.A.
If you have any questions about this product, you
may call:
Sony Customer Information Services Center
1-800-222-SONY (7669)
The number below is for the FCC related matters
only.
Regulatory Information
Declaration of Conformity
Trade Name: SONY
Model No.: DSLR-A700
Responsible Party: Sony Electronics Inc.
Address: 16530 Via Esprillo,
San Diego, CA 92127 U.S.A.
Telephone No.: 858-942-2230
This device complies with Part 15 of the FCC
Rules. Operation is subject to the following
two conditions: (1) This device may not cause
harmful interference, and (2) this device must
accept any interference received, including
interference that may cause undesired
operation.
CAUTION
You are cautioned that any changes or
modifications not expressly approved in this
manual could void your authority to operate this
equipment.
Note:
This equipment has been tested and found to
comply with the limits for a Class B digital
device, pursuant to Part 15 of the FCC Rules.
These limits are designed to provide reasonable
protection against harmful interference in a
residential installation. This equipment generates,
uses, and can radiate radio frequency energy and,
if not installed and used in accordance with the
instructions, may cause harmful interference to
radio communications. However, there is no
guarantee that interference will not occur in a
particular installation. If this equipment does
cause harmful interference to radio or television
reception, which can be determined by turning the
equipment off and on, the user is encouraged to
try to correct the interference by one or more of
the following measures:
– Reorient or relocate the receiving antenna.
– Increase the separation between the
equipment and receiver.
– Connect the equipment into an outlet on a
circuit different from that to which the
receiver is connected.
– Consult the dealer or an experienced radio/TV
technician for help.
5
Page 6

The supplied interface cable must be used with the
equipment in order to comply with the limits for a
digital device pursuant to Subpart B of Part 15 of
FCC Rules.
For the State of California, USA
only
Perchlorate Material - special handling may
apply, See
www.dtsc.ca.gov/hazardouswaste/perchlorate
Perchlorate Material: Lithium battery contains
perchlorate.
For Customers in Europe
This product has been tested and found compliant
with the limits set out in the EMC Directive for
using connection cables shorter than 3 meters (9.8
feet).
Attention
The electromagnetic fields at the specific
frequencies may influence the picture and sound
of this unit.
Notice
If static electricity or electromagnetism causes
data transfer to discontinue midway (fail), restart
the application or disconnect and connect the
communication cable (USB, etc.) again.
Disposal of Old Electrical & Electronic
Equipment (Applicable in the
European Union and other European
countries with separate collection
systems)
will help prevent potential negative consequences
for the environment and human health, which
could otherwise be caused by inappropriate waste
handling of this product. The recycling of
materials will help to conserve natural resources.
For more detailed information about recycling of
this product, please contact your local Civic
Office, your household waste disposal service or
the shop where you purchased the product.
Applicable Accessories: Remote Commander
Notice for customers in the
United Kingdom
A moulded plug complying with BS 1363 is fitted
to this equipment for your safety and
convenience.
Should the fuse in the plug supplied need to be
replaced, a fuse of the same rating as the supplied
one and approved by ASTA or BSI to BS 1362,
(i.e., marked with an or mark) must be
used.
If the plug supplied with this equipment has a
detachable fuse cover, be sure to attach the fuse
cover after you change the fuse. Never use the
plug without the fuse cover. If you should lose the
fuse cover, please contact your nearest Sony
service station.
Notice for the customers in the
countries applying EU Directives
The manufacturer of this product is Sony
Corporation, 1-7-1 Konan Minato-ku Tokyo, 1080075 Japan. The Authorized Representative for
EMC and product safety is Sony Deutschland
GmbH, Hedelfinger Strasse 61, 70327 Stuttgart,
Germany. For any service or guarantee matters
please refer to the addresses given in separate
service or guarantee documents.
This symbol on the product or on its packaging
indicates that this product shall not be treated as
household waste. Instead it shall be handed over
to the applicable collection point for the recycling
of electrical and electronic equipment. By
ensuring this product is disposed of correctly, you
6
Page 7
Notes on using your camera
Notes on types of “Memory Stick” that
can be used (not supplied)
You can use a “Memory Stick Duo” with
your camera. A “Memory Stick” cannot be
used with your camera.
“Memory Stick Duo”
“Memory Stick”
• For details on “Memory Stick Duo”, see
page 161.
Notes on the “InfoLITHIUM” battery
pack
• Charge the NP-FM500H (supplied) battery pack
before using the camera for the first time.
t step 1 in “Read This First”)
(
• The battery pack can be charged even if it is not
completely discharged. Also, even if the battery
pack is not fully charged, you can use the
partially charged capacity of the battery pack as
is.
• If you do not intend to use the battery pack for a
long time, use up the existing charge and
remove it from your camera, then store it in a
cool, dry place. This is to maintain the battery
pack functions (page 163).
• For details on the battery pack, see page 163.
No compensation for contents of the
recording
The contents of the recording cannot be
compensated for if recording or playback is not
possible due to a malfunction of your camera or a
memory card, etc.
Notes on recording/playback
• Before you record one-time events, make a trial
recording to make sure that the camera is
working correctly.
• This camera is designed to be dust- and
moisture-resistant but not to be waterproof and
splash-proof. When using the camera in the rain,
be careful not to get the camera and lens wet.
Clean the camera after use if the camera
becomes dirty. With water, sand, dust, salt, etc.,
left on the camera, the camera may cause a
malfunction. Read also “Precautions” (page
168).
• Do not look at the sun or a strong light through a
removed lens or the viewfinder. This may cause
irrecoverable damage to your eyes. Or it may
cause a malfunction of your camera.
• Do not use the camera near a location that
generates strong radio waves or emits radiation.
The camera may not be able to record or play
back properly.
• Using the camera in sandy or dusty locations
may cause malfunctions.
• If moisture condensation occurs, remove it
before using the camera (page 168).
• Do not shake or strike the camera. In addition to
malfunctions and an inability to record images,
this may render the memory card unusable, or
cause image data breakdown, damage or loss.
• Clean the flash surface before use. The heat of
flash emission may cause dirt on the flash
surface to become discolored or to stick to the
flash surface, resulting in insufficient light
emission.
• Keep the camera, supplied accessories, etc., out
of the reach of children. The battery pack, the
accessory shoe cap, etc., may be swallowed. If
such a problem occurs, consult a doctor
immediately.
Back up recommendation
To avoid the potential risk of data loss, always
copy (back up) data to other medium.
7
Page 8
Notes on the LCD monitor and lens
• The LCD monitor is manufactured using
extremely high-precision technology so over
99.99% of the pixels are operational for
effective use. However, there may be some tiny
black points and/or bright points (white, red,
blue or green in color) that constantly appear on
the LCD monitor. These points are normal in the
manufacturing process and do not affect the
images in any way.
Black, white, red, blue
and green points
On image data compatibility
• This camera conforms with DCF (Design rule
for Camera File system) universal standard
established by JEITA (Japan Electronics and
Information Technology Industries
Association).
• Playback of images recorded with your camera
on other equipment and playback of images
recorded or edited with other equipment on your
camera are not guaranteed.
Warning on copyright
Television programs, films, videotapes, and other
materials may be copyrighted. Unauthorized
recording of such materials may be contrary to the
provisions of the copyright laws.
• Do not expose the camera to direct sunlight. If
sunlight is focused on a nearby object, it may
cause a fire. When you must place the camera
under direct sunlight, attach the lens cap.
• Images may trail across on the LCD monitor in
a cold location. This is not a malfunction. When
turning on the camera in a cold location, the
LCD monitor may become temporarily dark.
When the camera warms up, the monitor will
function normally.
• Do not press against the LCD monitor. The
monitor may be discolored and that may cause a
malfunction.
On focal length
The picture angle of this camera is narrower than
that of a 35 mm-format film camera. You can find
the approximate equivalent of the focal length of a
35 mm-format film camera, and shoot with the
same picture angle, by increasing the focal length
of your lens by half.
For example, by using a 50 mm lens, you can get
the approximate equivalent of a 75 mm lens of a
35 mm-format film camera.
The pictures used in this manual
The photographs used as examples of pictures in
this manual are reproduced images, and are not
actual images shot using this camera.
8
Page 9

Table of contents
IMPORTANT SAFEGUARDS ...................................................................3
Read this first ............................................................................................5
Notes on using your camera .....................................................................7
Before your operation
Identifying parts .......................................................................................14
Indicators on the monitor .........................................................................19
Switching the recording information display ............................................23
Number of images ...................................................................................24
The number of images that can be recorded when using the battery pack
................................................................................................................28
Basic operation........................................................................................29
How to use the multi-selector.......................................................................... 29
How to use the Fn (Function) button ............................................................... 30
How to use the menu....................................................................................... 32
Using the shooting functions
Using the mode dial.................................................................................34
Scene Selection............................................................................................... 35
Shooting with program auto – P ...................................................................... 36
Shooting with aperture priority mode – A ........................................................ 37
Shooting with shutter speed priority mode – S................................................ 39
Shooting with manual exposure mode – M ..................................................... 41
Exposure .................................................................................................45
Adjusting the exposure ................................................................................... 45
Locking the exposure (AE lock)...................................................................... 46
Selecting the metering mode .......................................................................... 48
Focus.......................................................................................................49
Setting the AF area.......................................................................................... 49
Selecting the focus mode................................................................................ 52
Switching the AF/MF easily ............................................................................. 53
Using AF illuminator ........................................................................................ 54
Drive mode ..............................................................................................55
Shooting continuously ..................................................................................... 56
Using the self-timer ......................................................................................... 57
Shooting images with the exposure shifted – Bracket: Cont./Bracket: Single
......................................................................................................................... 57
Shooting with the WB bracket ......................................................................... 59
Shooting with the DRO advanced bracket...................................................... 59
Shooting with the Remote Commander........................................................... 60
9
Page 10

Image processing and color.................................................................... 61
Adjusting the white balance ............................................................................ 61
Setting ISO....................................................................................................... 64
Using the D-Range Optimizer ......................................................................... 66
Using a Creative Style ..................................................................................... 67
Flash ....................................................................................................... 73
Selecting the flash mode.................................................................................73
Using the flash compensation.........................................................................75
Shooting with Slow Sync (Shooting the dark background with flash) .............77
Using the flash sync terminal ..........................................................................77
Other operations ..................................................................................... 79
Registering your own settings ......................................................................... 79
Using the C (Custom) button........................................................................... 81
Using the viewing functions
Viewing images....................................................................................... 83
Switching the playback screen ....................................................................... 83
Switching to the index screen .........................................................................84
Displaying the histogram................................................................................. 85
Enlarging images.............................................................................................86
Rotating an image ........................................................................................... 88
Viewing images on a TV screen ............................................................. 89
Operating with the Remote Commander.........................................................91
Using the menu
Menu list.................................................................................................. 92
Recording menu 1 ............................................................................ 94
Image size
Aspect ratio
Quality
D-RangeOptimizer
Creative Style
Custom button
Exposure step
Recording menu 2 ............................................................................ 99
Flash mode
Flash control
Power ratio
Flash compens.
ISO Auto max.
ISO Auto min.
10
Page 11

Recording menu 3 ..........................................................................101
AF-A setup
AF area
Priority setup
AF illuminator
AF w/ shutter
Long exp.NR
High ISO NR
Recording menu 4 ..........................................................................104
Memory
Rec mode reset
Custom menu 1................................................................................105
Eye-Start AF
EyeStart trigr.
AF/MF button
AF/MF control
AF drive speed
AF area disp.
FocusHoldButton
Custom menu 2................................................................................107
AEL button
Ctrl dial setup
Dial exp.comp
Ctrl dial lock
Button ops.
Release w/oCard
Release w/oLens
Custom menu 3................................................................................110
Red eye reduc.
Exp.comp.set
Bracket order
Auto review
Auto off w/ VF
Rec.info.disp.
Img.orientation
Custom menu 4................................................................................113
Custom reset
11
Page 12

Playback menu 1............................................................................ 114
Delete
Format
Protect
DPOF setup
Date imprint
Index print
PlaybackDisplay
Playback menu 2............................................................................ 119
Slide show
Interval
Setup menu 1 ................................................................................. 120
LCD brightness
Info.disp.time
Power save
Video output
HDMI output
Language
Date/Time setup
Setup menu 2 ................................................................................. 123
Memory card
File number
Folder name
Select folder
New folder
USB connection
MassStrg.card
Setup menu 3 ................................................................................. 125
Menu start
Delete confirm.
Audio signals
Cleaning mode
Reset default
12
Page 13

Using your computer
Enjoying your computer.........................................................................127
Connecting the camera and your computer ..........................................129
Copying images to your computer.........................................................130
Image file storage destinations and file names.....................................133
Copying images stored on a computer to a memory card and viewing the
images...................................................................................................134
Using the software (supplied) ................................................................135
Installing the software............................................................................136
Using the “Picture Motion Browser”....................................................... 137
Using the “Image Data Converter SR” ..................................................139
Using the “Image Data Lightbox SR”.....................................................140
Using the “Remote Camera Control”.....................................................142
Printing images
How to print images...............................................................................145
Printing images directly using a PictBridge compliant printer................146
Troubleshooting
Troubleshooting.....................................................................................149
Warning messages................................................................................ 158
Others
On the memory card (not supplied).......................................................161
On the “InfoLITHIUM” battery pack .......................................................163
On the battery charger ..........................................................................164
Optional accessories .............................................................................165
Precautions ...........................................................................................168
Specifications ........................................................................................170
Reset default .........................................................................................172
Index 176
13
Page 14
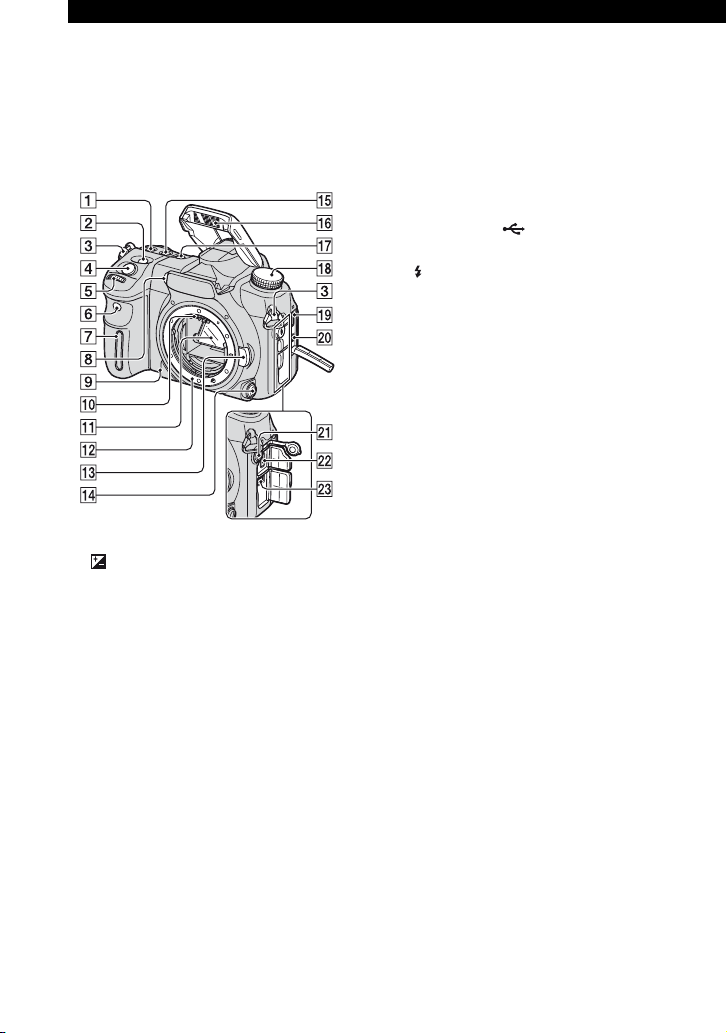
Before your operation
Identifying parts
Camera
* Do not directly touch these parts.
See the pages in parentheses for details of
operation.
A ISO button (64)
B (Exposure) button (45)
C Hooks for shoulder strap (17)
D Shutter button (
First”)
E Front control dial (30, 107)
F Remote sensor (60)
G Grip sensor (105)
H AF illuminator (54, 102)/Self-timer
lamp (57)
I Depth-of-field preview button (39)
J Lens contacts*
K Mirror*
L Lens mount
M Lens release button (
This First”)
N Focus mode lever (52, 101)
O WB (White Balance) button (61)
t step 5 in “Read This
t step 2 in “Read
P Built-in flash* (
First”)
Q DRIVE button (55)
R Mode dial (34)
S HDMI terminal (90, 121, 148)
T VIDEO OUT/ (USB) terminal (89,
129)
U Flash sync terminal (77)
V REMOTE terminal (166)
W DC IN terminal (165)
t step 5 in “Read This
14
Page 15
A Viewfinder (t step 5 in “Read This
First”)
B Eyepiece sensors (111)
C POWER switch (
t step 4 in “Read
This First”)
D MENU button (32)
E DISP (Display) button (23, 83)
F (Delete) button (
t step 6 in “Read
This First”)
G (Playback) button (
t step 6 in
“Read This First”)
H LCD monitor (20, 23)
I Multi-selector (29)
J For shooting: C (Custom) button (81,
98)
For viewing: (Histogram) button
(85)
K For shooting: Fn (Function) button (30)
For viewing: (Rotate) button (88)
L Accessory shoe (166)
M Diopter-adjustment dial (
t step 5 in
“Read This First”)
N Metering mode lever (48)
O For shooting: AEL (AE lock) button
(43, 46)/SLOW SYNC button (77)
For viewing: (Index) button (84)
P Image sensor position mark (50)
Q For shooting: AF/MF (Auto focus/
manual focus) button (53)
For viewing: (Enlarge) button (86)
R Rear control dial (30, 107)
S Access lamp (
t step 3 in “Read This
First”)
T (Super SteadyShot) switch (
t step
5 in “Read This First”)
U Memory card cover (
t step 3 in “Read
This First”)
V “Memory Stick Duo” insertion slot (
step 3 in “Read This First”)
W CF card insertion slot (
t step 3 in
“Read This First”)
X CF card eject lever (
t step 3 in “Read
This First”)
Before your operation
t
15
Page 16
A Tripod receptacle
• Use a tripod with a screw length of less than
5.5 mm (7/32 inch). You will be unable to
firmly secure the camera to tripods having
screws longer than 5.5 mm (7/32 inch), and
may damage the camera.
B Battery cover open lever (t step 1 in
“Read This First”)
C Lock lever (
t step 1 in “Read This
First”)
D Battery insertion slot (
t step 1 in
“Read This First”)
E Battery cover (
t step 1 in “Read This
First”)
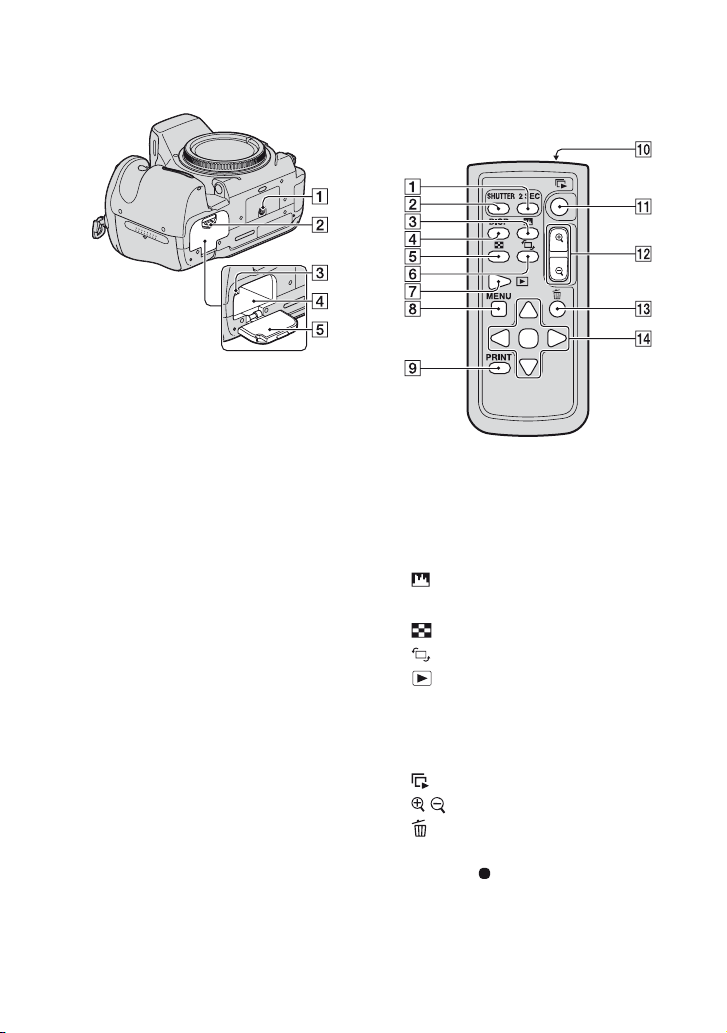
Remote Commander
• With the exception of the 2 SEC and SHUTTER
buttons, the buttons only work when the camera
is connected to a TV (pages 60, 91, 148).
A 2 SEC (shutter release in 2 seconds)
button
B SHUTTER button
C (Histogram) button (85)
D DISP (Display) button (83)
E (Index) button (84)
F (Rotate) button (88)
G (Playback) button (83)
H MENU button (32)
I PRINT button (148)
J Transmitter
K (Slide show) button (119)
L / (Scale up/down) buttons (86)
M (Delete) button (
This First”)
N v/V/b/B/ (29)
t step 6 in “Read
16
Page 17
• Remove the insulation sheet before using the
Remote Commander.
Insulation sheet
• Point the Remote Commander at the remote
sensor on the front of the camera in order to
operate the camera (page 14).
To change the battery of the Remote
Commander
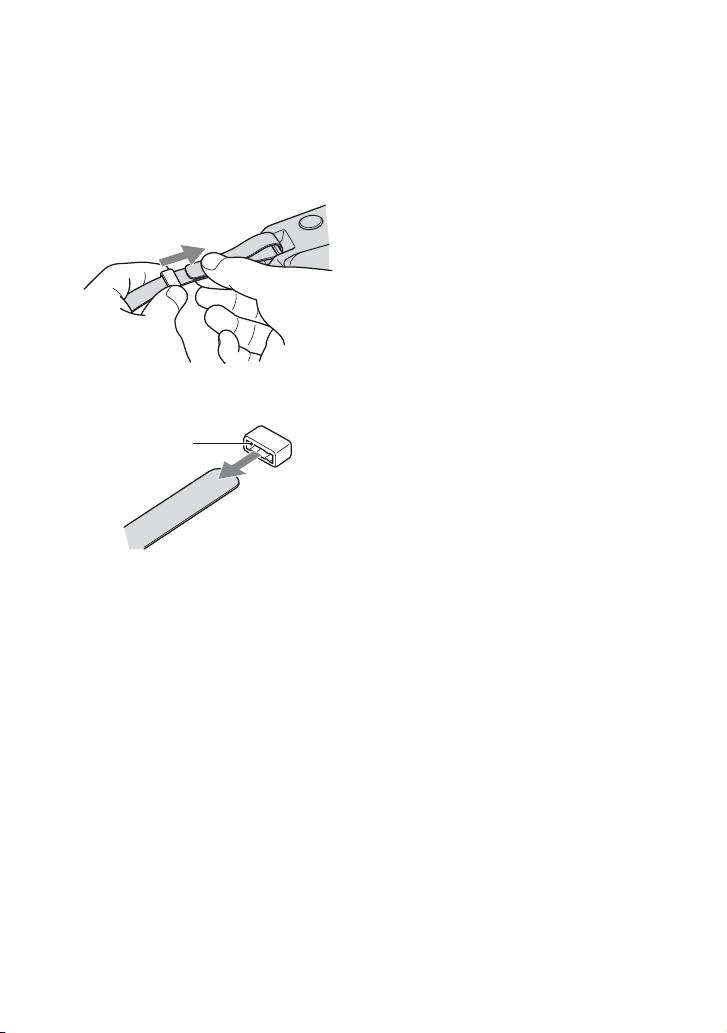
1 While pressing on the tab, inset your
fingernail into the slit to pull out the
battery case.
2 Place a new battery with the + side facing
up.
3 Insert the battery case back into the
Remote Commander until it clicks.
Tab
WAR NING
Battery may explode if mistreated. Do
not recharge, disassemble or dispose of
in fire.
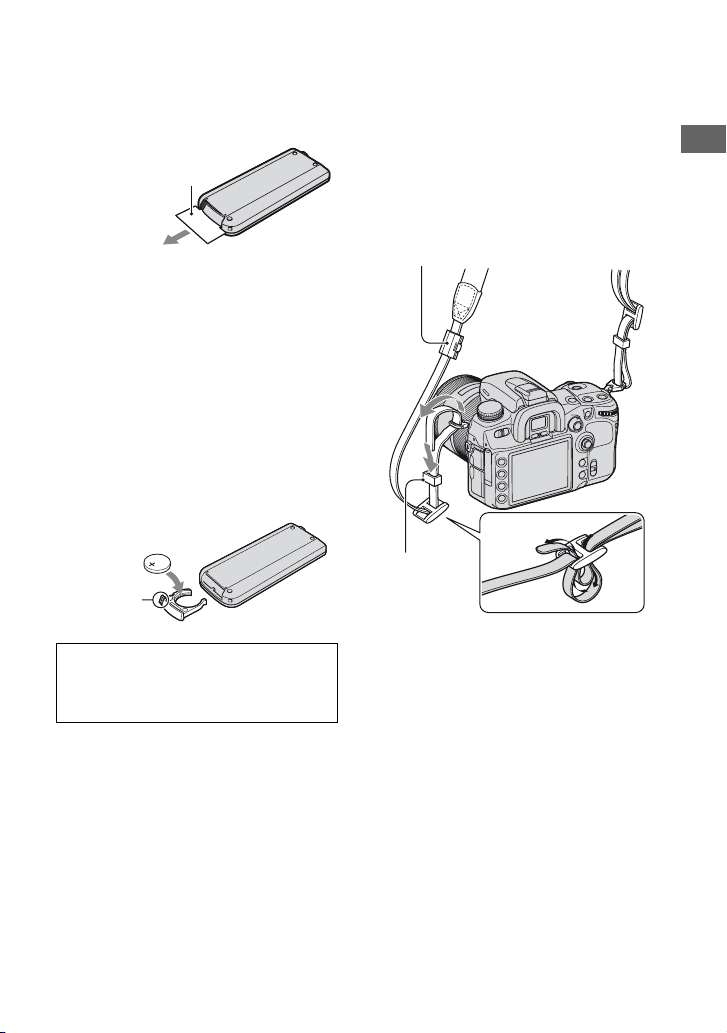
Attaching the shoulder strap
This camera has two hooks to attach the
shoulder strap. Attach the end of the strap
without the remote commander clip on the
grip side of the camera. Attach the other
end of the strap on the other side of the
camera.
Remote commander clip
Holder Ring
Before your operation
• When the lithium battery becomes weak, the
operating distance of the Remote Commander
may shorten, or the Remote Commander may
not function properly. In this case, replace the
battery with a Sony CR2025 lithium battery.
Use of another battery may present a risk of fire
or explosion.
17
Page 18
When threading the strap through the
holder ring, hold the tip of the strap with
your finger, and slide the holder ring rather
than the tip of the strap into position to
secure the strap.
If the holder ring comes off the strap, put it
back on the strap from the notched side.
Notched side
18
Page 19
Indicators on the monitor
See the pages in parentheses for details of
operation.
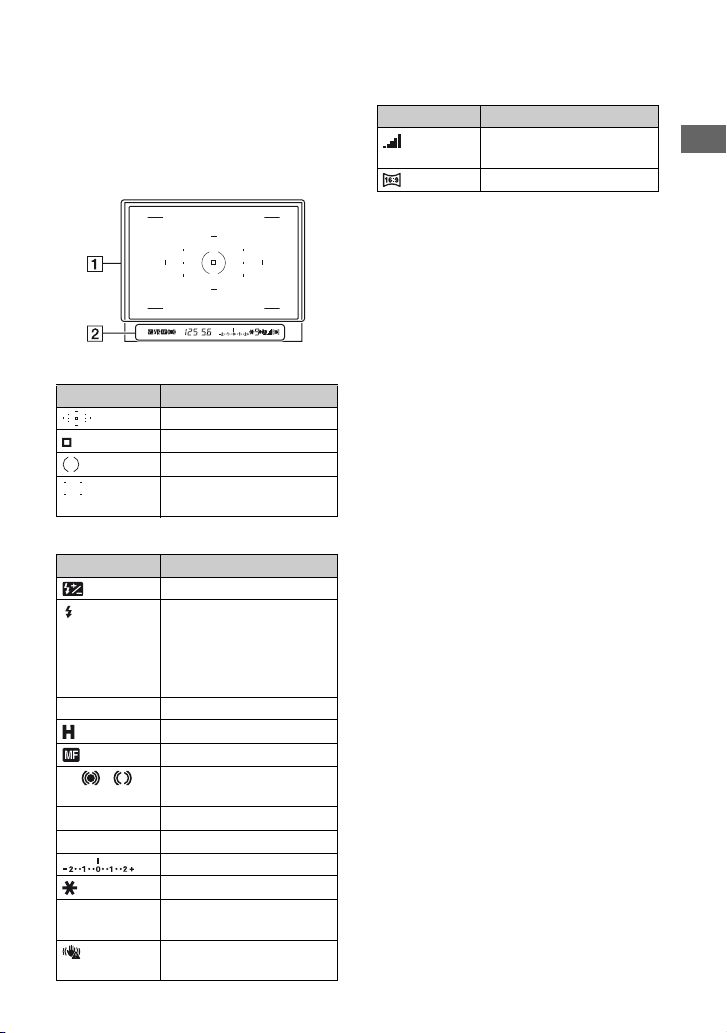
Viewfinder
A
Display Indication
Local AF area (49)
Spot AF area (49)
Spot metering area (48)
Shooting area for aspect
ratio 16:9 (95)
B
Display Indication
Flash-compensation (75)
Flashing: The flash is being
charged
Lit: The flash has been
charged (t step 5 in “Read
This First”)
WL Wireless flash (73)
High-speed sync (167)
Manual focus (53)
z Focus (t step 5 in “Read
This First”)
125 Shutter speed (39)
5.6 Aperture (37)
EV scale (42, 47, 58)
AE lock (46)
9 Shots-remaining counter
(56)
Camera-shake warning (t
step 5 in “Read This First”)
Display Indication
Super SteadyShot scale (t
step 5 in “Read This First”)
Aspect ratio 16:9 (95)
Before your operation
19
Page 20

LCD monitor (Recording information
display)
• The illustration above is for the full display in
the horizontal position (page 23).
A
Display Indication
Register number (79)
P A S M Mode dial (34)
C
Display Indication
Drive mode (55)
Focus mode (52)
AF area (49)
Metering (48)
D-range optimizer (66)
Creative Style (67)
1/125 Shutter speed (39)
F5.6 Aperture (37)
+2.0 Exposure (45)
AE lock (46)
B
Display Indication
Flash mode (73)/Red-eye
reduction (110)
Exposure-compensation
(45)/Metered Manual (42)
Flash-compensation (75)
EV scale (42, 47, 58)
ISO AUTO ISO sensitivity (64)
20
+1 +1
+1 +1
+1
AWB +1
5500K M1
Contrast, Saturation,
Sharpness, Brightness,
Zone Matching (68)
White balance (Auto,
Preset, Color temperature,
Color filter, Custom) (61)
D
Display Indication
90% Battery remaining (t step
100 Remaining number of
1 in “Read This First”)
Image quality (96)
Image size (94)
Memory card (123)
recordable images (24)
Page 21

E
Operation guide
The next operation may be indicated on the
lower portion of the LCD monitor. The
icons indicate the following meanings.
Display Indication
Multi-selector bB
Multi-selector vV
Multi-selector vVbB
z Center of the multi-selector
MENU button
Returns with MENU
Delete button
Enlarge button
C button
Fn button
button
Front or rear control dial
Front control dial
Rear control dial
LCD monitor (single-image playback)
Display Indication
Memory card (123)
100-0003 Folder - file number (133)
- Protect (115)
DPOF3 DPOF set (116)
Image quality (96)
Image size (94)
Battery remaining (t step
1 in “Read This First”)
1/30 Shutter speed (39)
F4.0 Aperture (37)
ISO 400 ISO sensitivity (64)
2007 1 1
10:37PM
3/7 File number/total number
Date of recording
of images
Before your operation
21
Page 22
LCD monitor (Histogram display)
Display Indication
Creative Style (67)
A
Display Indication
Memory card (123)
100-0003 Folder - file number (133)
- Protect (115)
DPOF3 DPOF set (116)
Image quality (96)
Image size (94)
Battery remaining (t step
1 in “Read This First”)
Playback image (85)
B
Display Indication
Histogram (85)
P A S M Mode dial (34)
1/125 Shutter speed (39)
F3.5 Aperture (37)
ISO100 ISO sensitivity (64)
–0.3 EV scale (45)
–0.3 Flash-compensation (75)
Metering mode (48)
35mm Focal length (8)
AWB +1
5500K M1
2007 1 1
10:37PM
3/7 File number/total number
White balance (Auto,
Preset, Color temperature,
Color filter, Custom) (61)
D-range optimizer (66)
Date of recording
of images
22
Page 23

Switching the recording information display
When recording, the LCD monitor displays various recording information.
Press the DISP (Display) button to switch between the detailed display and the enlarged
display. You can choose to turn off the display to minimize battery consumption.
When you rotate the camera to a vertical position, the display automatically rotates to adjust to
the camera position.
Horizontal position
Before your operation
Detailed display
DISP (Display) button
Enlarged display
No display
Vertical position
Detailed display
DISP (Display) button
• The instructions in this operating instructions are based on the detailed display in the horizontal position.
(The upper-left illustration.)
• You can choose to keep the display from rotating in the vertical position with [Rec.info.disp.] in the
Custom menu (page 112)
• You can adjust the brightness of the LCD monitor by pressing the DISP (Display) button a little longer
(page 120).
• For the screen displayed in playback mode, see page 83.
Enlarged display
No display
23
Page 24
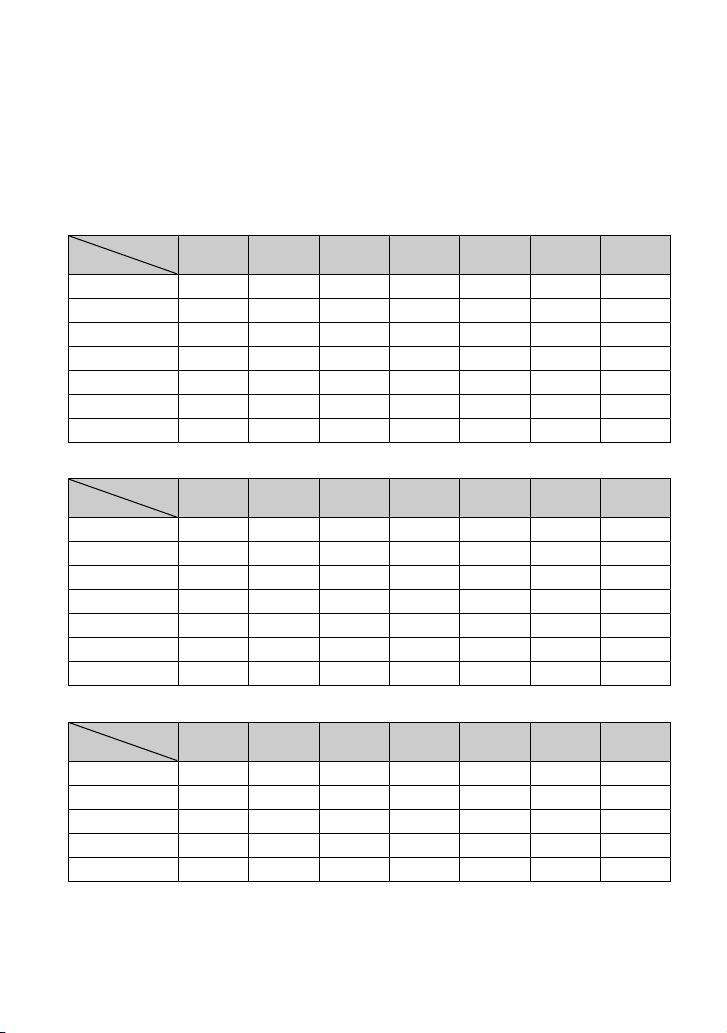
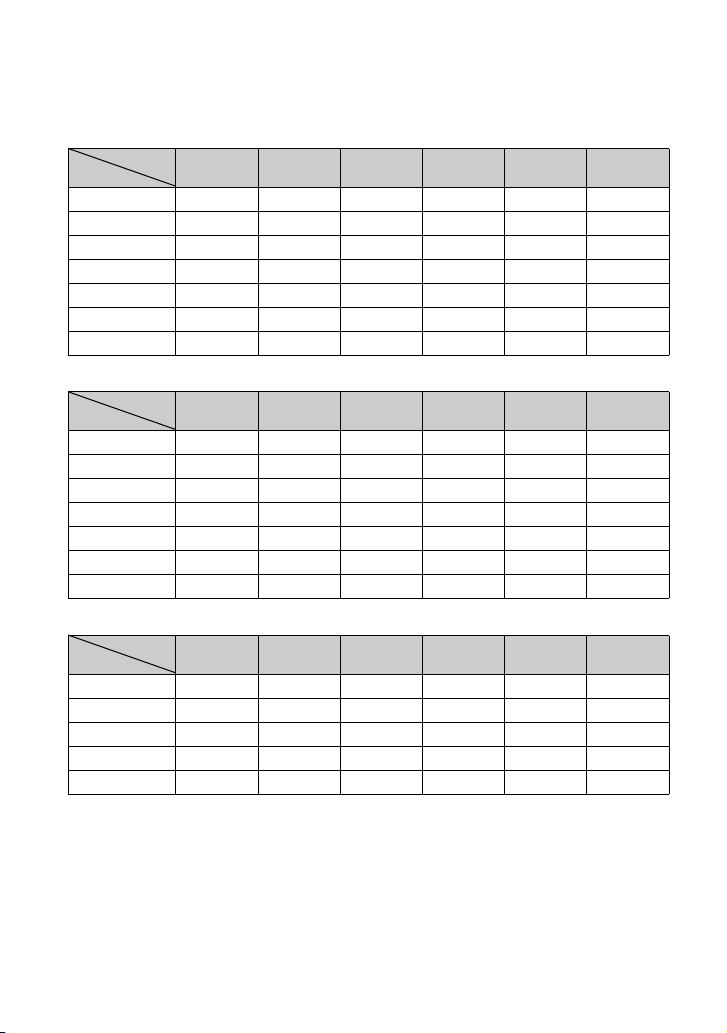
Number of images
The tables show the approximate number of images that can be recorded on a memory card
formatted with this camera. The values may vary depending on the shooting conditions.
The number of images
“Memory Stick Duo”
Image size: L 12M (Aspect ratio: 3:2)
Capacity
Size
Standard 31 57 120 245 496 982 1973
Fine 21 38 81 167 338 669 1344
Extra fine 11 20 43 89 180 358 720
cRAW & JPEG 6 11 24 51 103 204 410
RAW & JPEG 4 8 18 38 77 153 309
cRAW 9 17 35 73 148 293 590
RAW
128MB 256MB 512MB 1GB 2GB 4GB 8GB
6112450100199401
Image size: L 10M (Aspect ratio: 16:9) (Units: Images)
Capacity
Size
Standard 36 65 136 280 565 1120 2250
Fine 24 44 94 193 390 773 1553
Extra fine 13 24 51 105 212 420 844
cRAW & JPEG 6 12 25 53 107 212 427
RAW & JPEG 5 9 19 39 80 158 318
cRAW 9 17 35 73 148 293 590
RAW
128MB 256MB 512MB 1GB 2GB 4GB 8GB
6112450100199401
(Units: Images)
Image size: M 6.4M (Aspect ratio: 3:2) (Units: Images)
Capacity
Size
Standard 50 89 188 385 776 1536 3087
Fine 35 63 134 275 555 1099 2208
Extra fine 19 35 75 154 311 617 1240
cRAW & JPEG 7 13 28 57 117 231 465
RAW & JPEG 5 9 20 42 85 169 339
128MB 256MB 512MB 1GB 2GB 4GB 8GB
24
Page 25
Image size: M 5.4M (Aspect ratio: 16:9) (Units: Images)
Capacity
Size
Standard 56 99 209 429 865 1712 3439
Fine 40 72 152 312 630 1248 2508
Extra fine 22 41 87 178 360 713 1433
cRAW & JPEG 7 13 29 59 120 237 477
RAW & JPEG 5 9 21 43 86 172 345
128MB 256MB 512MB 1GB 2GB 4GB 8GB
Image size: S 3.0M (Aspect ratio: 3:2) (Units: Images)
Capacity
Size
Standard 74 132 276 566 1142 2262 4543
Fine 56 101 212 435 877 1737 3489
Extra fine 33 59 125 256 517 1024 2057
cRAW & JPEG 8 14 30 62 126 251 504
RAW & JPEG 5 10 21 44 90 179 359
128MB 256MB 512MB 1GB 2GB 4GB 8GB
Image size: S 2.6M (Aspect ratio: 16:9) (Units: Images)
Capacity
Size
Standard 81 145 305 625 1262 2497 5016
Fine 62 112 236 484 977 1933 3883
Extra fine 38 68 143 294 593 1175 2360
cRAW & JPEG 8 14 31 63 128 255 512
RAW & JPEG 5 10 22 45 91 181 363
128MB 256MB 512MB 1GB 2GB 4GB 8GB
Before your operation
25
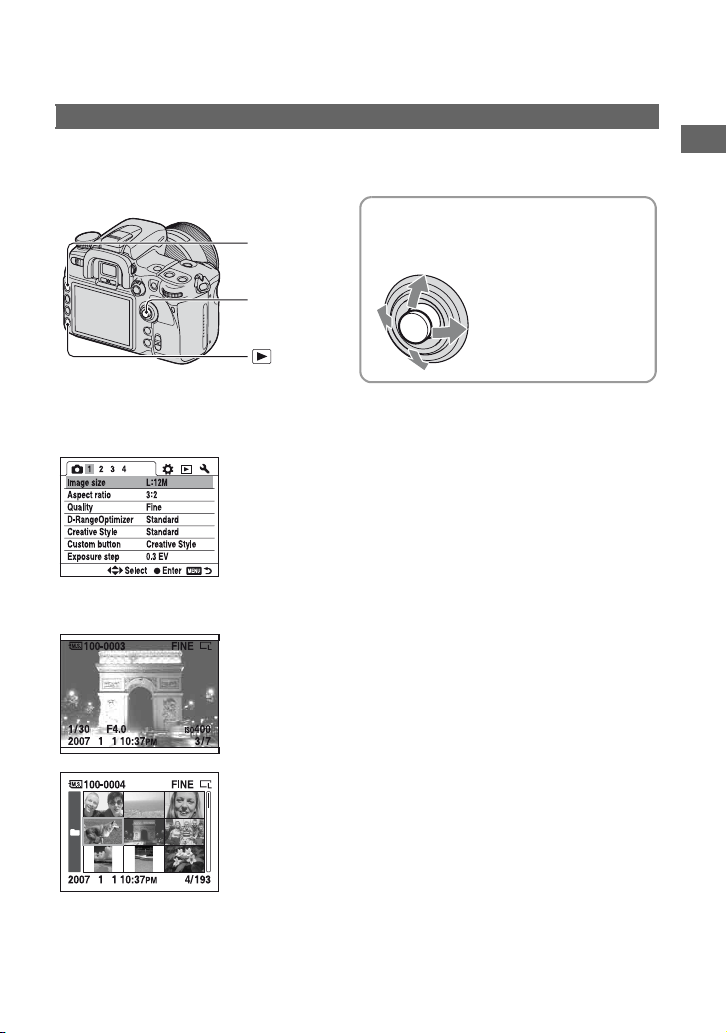
Page 26
CF card
Image size: L 12M (Aspect ratio: 3:2)
Capacity
Size
Standard 64 129 255 500 1001 2000
Fine 43 87 174 341 682 1363
Extra fine 23 46 93 182 365 730
cRAW & JPEG 13 26 53 103 208 415
RAW & JPEG 10 20 40 78 156 313
cRAW 19 38 76 149 299 598
RAW
256MB 512MB 1GB 2GB 4GB 8GB
13 26 52 101 203 406
(Units: Images)
Image size: L 10M (Aspect ratio: 16:9) (Units: Images)
Capacity
Size
Standard 73 147 291 570 1142 2281
Fine 50 101 201 393 788 1574
Extra fine 27 55 109 214 428 856
cRAW & JPEG 13 27 55 108 217 433
RAW & JPEG 10 20 41 80 161 323
cRAW 19 38 76 149 299 598
RAW
256MB 512MB 1GB 2GB 4GB 8GB
13 26 52 101 203 406
Image size: M 6.4M (Aspect ratio: 3:2) (Units: Images)
Capacity
Size
Standard 100 202 400 783 1567 3129
Fine 71 144 286 560 1121 2239
Extra fine 40 81 160 314 629 1257
cRAW & JPEG 15 30 60 118 236 472
RAW & JPEG 11 22 44 86 172 344
256MB 512MB 1GB 2GB 4GB 8GB
26
Page 27

Image size: M 5.4M (Aspect ratio: 16:9) (Units: Images)
Capacity
Size
Standard 112 225 446 872 1746 3487
Fine 81 164 325 636 1273 2542
Extra fine 46 93 185 363 727 1452
cRAW & JPEG 15 31 61 121 242 484
RAW & JPEG 11 22 44 87 175 350
256MB 512MB 1GB 2GB 4GB 8GB
Image size: S 3.0M (Aspect ratio: 3:2) (Units: Images)
Capacity
Size
Standard 148 298 589 1152 2307 4605
Fine 113 228 452 885 1772 3537
Extra fine 66 134 266 522 1044 2086
cRAW & JPEG 16 33 65 128 256 511
RAW & JPEG 11 23 46 91 182 364
256MB 512MB 1GB 2GB 4GB 8GB
Image size: S 2.6M (Aspect ratio: 16:9) (Units: Images)
Capacity
Size
Standard 163 329 650 1273 2547 5085
Fine 126 254 503 985 1972 3937
Extra fine 76 154 306 598 1198 2392
cRAW & JPEG 16 33 66 130 260 519
RAW & JPEG 11 23 47 92 184 368
256MB 512MB 1GB 2GB 4GB 8GB
Before your operation
27
Page 28

The number of images that can be recorded when using the battery pack
The table shows the approximate number of
images that can be recorded when you use
the camera with the battery pack (supplied)
at full capacity and at an ambient
temperature of 25°C (77°F). The numbers
of images that can be recorded take into
account changing the memory card as
necessary.
Note that the actual numbers may be less
than those indicated depending on the
conditions of use.
Memory card No. of images
“Memory Stick Duo” Approx. 650
CF card Approx. 650
• Shooting in the following situations:
– [Quality] is set to [Fine].
– Focus mode is set to AF-A (Automatic AF).
– Shooting once every 30 seconds.
– The flash strobes once every two times.
– The power turns on and off once every ten
times.
• The measurement method is based on the CIPA
standard.
(CIPA: Camera & Imaging Products
Association)
• The number of shooting images does not
change, regardless of image size.
• The battery capacity decreases as the number of
uses increases and also over time (page 163).
• The number of images that can be recorded is
decreased under the following conditions:
– The surrounding temperature is low.
– The flash is used frequently.
– The camera has been turned on and off many
times.
– Focus mode is set to AF-C (Continuous AF).
– The battery power is low.
• When using a Microdrive, the number of images
recordable may differ.
28
Page 29
Basic operation
How to use the multi-selector
You can select and execute the various functions using the multi-selector. While viewing
images, you can select playback images using the multi-selector.
The directions in which the multi-selector is
MENU button
Multi-selector
(Playback)
button
moved are expressed as follows in this
operating instructions.
Up: v
Down: V
To the right: B
To the left: b
Examples:
To select menu items
Moving the multi-selector to v/V/b/B moves the cursor in
the corresponding direction. Pressing the center of the
multi-selector enters the selected item.
To select playback images
On the single screen
Select a previous or next image by moving the multiselector to b/B.
Before your operation
On the index screen
Select the desired image by moving the multi-selector to v/
V/b/B.
29
Page 30
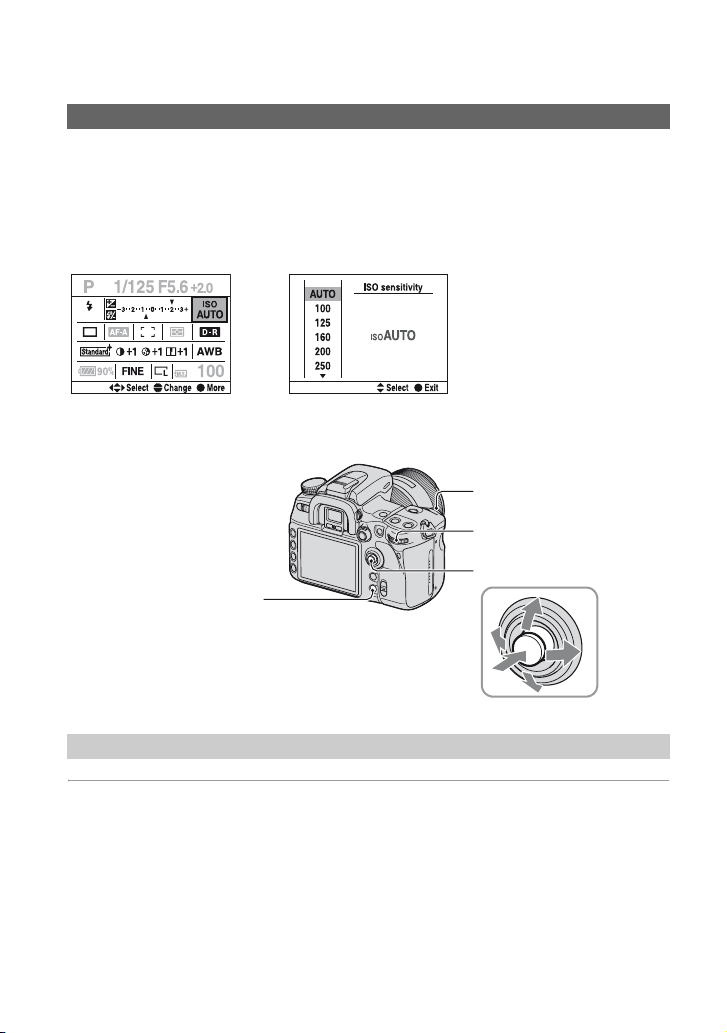
How to use the Fn (Function) button
Using the Fn (Function) button, you can switch the recording information screen (page 23) to
the Quick Navi screen. On the Quick Navi screen, you can change settings directly. In
addition to the Quick Navi screen that can be controlled from the recording information
screen, the Exclusive disp screen that switches the display to each exclusive screen is
available.
In this operating instructions, examples use the Quick Navi screen for explanations.
Quick Navi screen
Fn (Function) button
Exclusive disp screen
Front control dial
Rear control dial
Multi-selector
How to operate on the Quick Navi screen
1 Press the Fn (Function) button so that the Quick Navi screen appears.
30
Page 31

2 Select the desired item with the multi-selector.
3 Set the item with the front or rear control dial.
For details on how to set up each item, see the corresponding page.
• When using Creative Style (page 67), some of the setup tasks can be accomplished only on the Exclusive
disp screen.
How to operate on the Exclusive disp screen
1 Follow steps 1 and 2 on the procedure of “How to operate on the Quick Navi
screen”.
2 Press the center of the multi-selector so that the
Exclusive disp screen appears.
Before your operation
3 Set up with the multi-selector.
For details on how to set up each item, see the corresponding page.
• You can also substitute the front and rear control dials for the multi-selector.
31
Page 32

Operations available from the Quick Navi screen are:
Exposure page 45
AF area page 49
Drive mode page 55
White Balance page 61
ISO page 64
D-Range Optimizer page 66
Creative Style* page 67
Flash mode* page 73
Flash compensation page 75
Image size page 94
Image quality page 96
* Unavailable on the enlarged display screen (page 23). Operate from the Recording menu.
Gray items are not available.
How to use the menu
MENU button
Multi-selector
1 Press the MENU button to display the menu.
2 Move the multi-selector to b/B to select the
desired menu page.
Recording menu [1, 2, 3, 4]
Custom menu [1, 2, 3, 4]
Playback menu [1, 2]
Setup menu [1, 2, 3]
32
Menu now
selected
Menus not
selected
Page 33

3 Move the multi-selector to v/V to select the
desired item, then press the center.
4 Move the multi-selector to v/V to select the
desired setting, then press the center.
5 Press the MENU button to turn off the menu.
The menu is also turned off if you press the shutter button halfway down.
• When setting the menu, you can substitute the front or rear control dial for the multi-selector. Rotating the
front control dial moves the cursor to v/V and rotating the rear control dial moves it to b/B.
• During operation, if you press the MENU button, the setup is canceled.
• When you display a menu, you can display the previously selected menu first with [Menu start] in the
Setup menu (page 125).
Before your operation
33
Page 34

Using the shooting functions
Using the mode dial
Set the mode dial to the desired function.
Mode dial
Recording modes
: Auto adjustment mode
Allows easy shooting with the settings adjusted automatically, depending entirely
on the camera.
: Scene Selection mode
Allows you to shoot with preset settings according to the scene (page 35).
P: Program auto mode
Allows you to shoot with the exposure adjusted automatically (both the shutter
speed and the aperture value). The other settings can be adjusted, and your setting
values can be saved (page 36).
A: Aperture priority mode
Allows you to shoot after adjusting the aperture value manually (page 37).
t step 5 in “Read This First”
S: Shutter speed priority mode
Allows you to shoot after adjusting the shutter speed manually (page 39).
M: Manual exposure mode
Allows you to shoot after adjusting the exposure manually (both the shutter speed
and the aperture value) (page 41).
MR: Memory recall mode
Allows you to recall a setup registered in [Memory] in the Recording menu
(page 79).
34
Page 35

Scene Selection
You can shoot with the following preset settings according to the scene.
• You can change any of the settings except Creative Style (page 67) but the settings are reset by choosing
another mode or turning off the power.
Portrait
Shoots with backgrounds blur away, and the subject is sharpened.
• To blur the background more, using the telephoto position of the lens is more
effective.
• It is recommended that you use the flash when the subject is backlit. Also, when
you do not use the flash, it is recommended that you use the lens hood to prevent
unnecessary light from seeping into the lens.
Landscape
Shoots scenery with vivid and sharp colors.
• It is recommended that you push down the flash not to fire the flash.
• The shutter speed becomes slower when the subject is dark. If appears in the
viewfinder, be careful about camera shake or use a tripod. The Super
SteadyShot function is also effective.
Macro
Shoots close subjects such as flowers, insects.
You can achieve clear and sharp focus.
• When shooting with the built-in flash within the range of 1 m (39 3/8 inches),
shadows may appear on the lower part of the image. Do not use with the built-in
flash.
• The minimum recording distance is not changed even if you select Macro. To
shoot a larger image, using a macro lens is recommended.
Sports action
Shoots moving subjects outdoors or in bright places.
• The camera continues to focus while the shutter button is pressed and held
halfway down (Continuous AF, page 52).
• The camera shoots the image continuously while the shutter button is pressed
(Continuous adv., page 56).
• Do not use the flash if the subject is out of the flash range (Push the built-in flash
back down). Flash range
t page 65
Sunset
Shoots the red of the sunset beautifully.
Using the shooting functions
35
Page 36

Night view/portrait
• The shutter speed is slower, so using a tripod is recommended. The Super SteadyShot function is also
effective.
Night portrait
Shoots portraits in night scenes.
Pull up the flash to use it.
• Take care that the subject does not move to prevent the image from blurring.
Night view
Shoots night scenes at a distance without losing the dark atmosphere of
the surroundings.
Do not use the flash (Push the flash back down).
• The picture may not be taken properly when shooting a wholly dark night scene.
Shooting with program auto – P
In program auto mode, the camera automatically adjusts the shutter speed and the aperture
according to the brightness of the subject just as in the auto adjustment mode (mode dial:
AUTO).
z The difference between auto adjustment mode and program auto mode
In both auto adjustment and program auto mode, the shutter speed and aperture are automatically
adjusted.
You can change other settings. In auto adjustment mode, the new settings will be reset when another
mode is selected or the power is turned off.
In program auto mode, the new settings will be maintained if another mode has been selected or the
power has been turned off.
When the camera is in auto adjustment mode and the flash is up, the camera flashes automatically
whenever it is necessary. When the camera is in program auto mode and the flash is up, the camera
always flashes when it shoots.
Program shift
You can temporarily change the aperture value and shutter speed combination that was
adjusted by the camera.
There are two methods for the program shift function.
shift: You can choose the desired shutter speed. The aperture value is adjusted
P
S
automatically.
shift: You can choose the desired aperture value. The shutter speed is adjusted
P
A
automatically.
36
Page 37

Mode dial
1 Set the mode dial to P.
2 Hold the grip and look into the viewfinder or press the shutter button halfway down until the
shutter speed and aperture value are displayed in the viewfinder.
3 While the shutter speed and aperture value are displayed, select the shutter speed using the front
control dial or select the aperture value using the rear control dial.
PS shift PA shift
Front control dial
Shutter button
Rear control dial
Using the shooting functions
Front control
dial
• You can switch the PS shift and the PA shift with [Ctrl dial setup] in the Custom menu (page 107).
• When the shutter speed and the aperture value are displayed, you no longer have to keep pressing the
shutter button.
• When the shutter speed and the aperture value disappear seconds later, the adjusted values also disappear.
• When the flash is pulled up, you cannot select the program shift. When the program shift is turned on,
pulling up the flash cancels the program shift.
Rear control
dial
Shooting with aperture priority mode – A
You can adjust the aperture manually. If you open the aperture (a smaller F-number), the infocus range becomes narrower. Only the main subject is then in focus. When the aperture is
closed (a larger F-number), the in-focus range becomes wider. The whole image is sharpened.
The shutter speed is automatically adjusted.
Open the aperture
Close the aperture
37
Page 38

Mode dial
Front control dial
Rear control dial
1 Set the mode dial to A.
2 Select an aperture value using the front or rear control dial.
• The aperture range depends on the lens.
• The aperture value is adjusted in 1/3 EV increments. You can set this exposure step to 1/2 EV
increments with [Exposure step] in the Recording menu (page 98).
• If the proper exposure is not obtained after making the settings, the shutter speed on the LCD monitor and
in the viewfinder flashes when the shutter button is pressed halfway down. You can shoot at this point, but
adjusting again is recommended.
• When the flash is pulled up, the flash fires regardless of the amount of ambient light (page 73).
• When using the flash, if you close the aperture (a larger F-number), the flash light does not reach a distant
subject. Opening the aperture (a smaller F-number) is recommended.
• If you close the aperture (a larger F-number), the amount of light passing through the lens is decreased
and the shutter speed becomes slower. Using a tripod is recommended.
z Shooting techniques
The depth of field is the in-focus range. Opening the aperture makes the depth of field shallower (the infocus range becomes narrower) and closing the aperture makes the depth of field wider (the in-focus
range becomes wider).
Open the aperture
The subject is sharpened with
its background blurred.
Close the aperture
Over a wide range, both
nearby and faraway subjects
are brought into focus.
Adjust the aperture to suit your purpose, either to sharpen the specific area of image, or to focus on the
entire image.
38
Page 39

z Depth-of-field preview
The viewfinder shows an image captured with the widest aperture. The change in aperture affects the
sharpness of the subject image, creating a discrepancy between the sharpness seen in the viewfinder and
in the actual picture. The preview function enables you to see the image with the aperture used in the
actual shooting, allowing you to check the approximate sharpness of the subject image before the actual
shooting.
Using the shooting functions
Depth-of-field preview
button
Press the depth-of-field preview button after the subject is in focus.
While the button is held down, the aperture is narrowed to match the aperture value displayed in the
viewfinder.
• The image in the viewfinder will be darker.
• When the focus is not fixed and the depth-of-field preview button is pressed, you cannot take a picture.
To take a picture, press the depth-of-field preview button with z lit in the viewfinder.
• With a lens equipped with a focus hold button, you can set the camera to perform the preview function
using the focus hold button with [FocusHoldButton] in the Custom menu (page 106).
Shooting with shutter speed priority mode – S
You can adjust the shutter speed manually. If you shoot a moving subject at a higher shutter
speed, it appears as if frozen on the image. At a lower shutter speed, the subject appears as if it
flowing.
Aperture value is automatically adjusted.
High shutter speed
Slow shutter speed
39
Page 40

Mode dial
Front control dial
Rear control dial
1 Set the mode dial to S.
2 Select a shutter speed using the front or rear control dial.
• You can adjust the shutter speed between 30 and 1/8000 second. You can adjust it between 30 and
1/200 second (with the Super SteadyShot function activated) or 30 and 1/250 second (with the Super
SteadyShot function deactivated) when using the flash.
• The shutter speed is adjusted in 1/3 EV increments. You can set this exposure step to 1/2 EV
increments with [Exposure step] in the Recording menu (page 98).
• If the proper exposure is not obtained after making the settings, the aperture value on the LCD monitor
and in the viewfinder flashes when the shutter button is pressed halfway down. You can shoot at this
point, but adjusting again is recommended.
• When the flash is pulled up, the flash fires regardless of the amount of ambient light (page 73).
• When using the flash, if you close the aperture (a larger F-number) by making the shutter speed slower,
the flash light does not reach a distant subject.
• When the shutter speed is one second or more, the noise reduction (Long exp.NR) will be done after
shooting (page 103).
• The (Camera-shake warning) indicator does not appear in the shutter speed priority mode.
z Shooting techniques
When shooting a moving person, car, or spindrift, etc., using the high shutter speed,
you can express moment that is beyond what the human eye can see.
40
When shooting a subject such as the flow of a river at a slower shutter speed, you can
create an image that captures the subject’s flowing movement. In such cases, use of a
tripod is recommended to prevent camera shake.
Page 41

Shooting with manual exposure mode – M
Manual exposure
You can manually adjust the shutter speed and aperture values.
This mode is useful when you maintain the setting of the shutter speed and the aperture value
or when you use an exposure meter.
Using the shooting functions
Mode dial
1 Set the mode dial to M.
2 Select a shutter speed using the front control dial and an aperture value using the rear control
dial.
Front control
dial
• “BULB” (Bulb shooting) is indicated next to “30” (page 43).
• In the manual exposure mode, even when [ISO sensitivity] (page 64) is set to [AUTO], it is fixed to ISO
200.
• You can exchange their functions of the front and rear control dials with [Ctrl dial setup] in the Custom
menu (page 107).
• When the flash is pulled up, the flash fires regardless of the amount of ambient light (page 73).
• The (Camera-shake warning) indicator does not appear in the manual exposure mode.
Rear control
dial
Front control dial
Rear control dial
41
Page 42

z EV scale
The EV scale on the LCD monitor and in the viewfinder indicates the difference between the standard
exposure (0.0 EV) determined by the camera meter and the set exposure determined by the shutter speed,
and the aperture specified by the photographer (Metered Manual).
The set exposure
specified by the
photographer is the same
as the exposure
determined by the meter.
The set exposure
specified by the
photographer is 1.0 EV
more (+) than the
standard exposure
determined by the meter.
The b B arrow appears if
the set exposure is
beyond the range of the
EV scale. The arrow
starts flashing if the
difference becomes
greater.
LCD
monitor
Viewfinder
: Metered Manual
• If the exposure is adjusted, the standard exposure (0.0 EV) is shifted by just the corresponding amount of
the adjustment.
z How to use the AEL button in manual mode
While you press and hold the AEL (AE lock) button, the exposure determined by the meter is locked as the
standard exposure (0.0 EV). When you recompose your shot with the AEL (AE lock) button pressed, an
exposure value within the spot metering circle appears as the second standard index.
The following illustrations show a case where the set exposure specified by the photographer is 1.0 EV
more than the locked standard exposure determined by the meter. When the composition is changed in the
viewfinder, the exposure within the spot metering circle is 0.7 EV more than the set exposure, thereby
making it 1.7 EV more than the standard exposure determined by the meter.
The exposure specified
Spot metering circle
by the photographer
42
The exposure within the
spot metering circle
when you recompose
your shot.
Page 43

Manual shift
You can change the shutter speed and aperture value combination without changing the
exposure in manual mode.
Mode dial
1 Set the mode dial to M.
2 Select a shutter speed and aperture value (page 41).
3 Press and hold the AEL (AE lock) button and turn the front control dial to select the desired
shutter speed and aperture value combination.
Front control dial
AEL (AE lock) button
BULB (long exposure) shooting
As long as the shutter button is pressed, the shutter remains open. You can shoot trails of light,
such as fireworks. Attach a tripod to the camera when using the bulb shooting function.
Mode dial
Front control dial
Shutter button
Using the shooting functions
Rear control dial
43
Page 44

1 Set the mode dial to M.
2 Rotate the front control dial to the left until [BULB] is indicated.
3 Rotate the rear control dial to select the aperture.
4 Attach the eyepiece cover (See below).
5 Press and hold the shutter button for the duration of the shooting.
• You can shoot in bulb exposure mode up to about four and a half hours using a fully charged battery pack.
• After shooting, the noise reduction will be done for the same amount of time that the shutter was open.
When the message “Processing...” appears, you cannot do any further shooting. You can cancel this
function with [Long exp.NR] in the Recording menu (page 103).
• The Super SteadyShot function is automatically turned off.
• The higher the ISO sensitivity, or the longer the exposure time, the more outstanding the noise on the
monitor.
• To reduce camera-shake, connecting the Remote Commander is recommended (pages 60, 166).
To attach the eyepiece cover
When the shutter is released without the use of the viewfinder, as in bulb exposure or shooting with the
self-timer, attach the eyepiece cover to prevent light from entering through the viewfinder and affecting
the exposure.
1 Carefully slide the eyecup off by pushing on each side of the eyecup.
2 Slide the eyepiece cover over the viewfinder. The cover is normally attached to the shoulder
strap.
44
Page 45

Exposure
Exposure is the amount of light that the camera will receive when you release the shutter. The
exposure is automatically set to the proper value in the auto adjustment mode. However, you
can set the exposure to your desired setting in the following setup.
Adjusting the exposure
You can manually shift the exposure value determined by the camera. Use this mode when
you brighten or darken the overall screen.
(Exposure) button
Multi-selector
1 Press the (Exposure) button to display the Exposure comp. screen.
The compensation level is also checked on the EV scale in the
viewfinder.
2 Adjust the exposure with b/B on the multi-selector.
Toward +: Brightens an image.
0: The exposure is determined automatically
by the camera.
Toward –
• You can substitute the Fn (Function) button for the (Exposure) button (page 30).
• The exposure is compensated by 1/3 of a step between ±3.0 EV. You can set this exposure step to 1/2 EV
increments with [Exposure step] in the Recording menu (page 98).
Toward +
Toward –: Darkens an image.
Using the shooting functions
45
Page 46

z Shooting techniques
When shooting a whitish overall image such as a backlit subject or a snowy scene, the camera judges that
the subject is too bright and may set a darker exposure for the image. In such cases, adjustment of the
exposure in the + plus direction is effective.
Adjust in the + direction
When shooting a darker overall image, the camera judges that the subject is too dark and may set a
brighter exposure for the image. In such cases, adjustment of the exposure in the – minus direction is
effective.
Adjust in the – direction
Locking the exposure (AE lock)
You can fix the exposure before deciding on the composition when taking a picture. This is
effective when the metering object and focusing object are different, or when you want to
shoot continuously while keeping the same exposure value.
Shutter button
AEL (AE lock) button
1 Target the subject for which you want to meter the exposure.
• Adjust the focus (you do not need to lock the focus.)
2 Press the AEL (AE lock) button.
• lights up in the viewfinder and on the LCD monitor to indicate that the exposure is locked.
3 While pressing the AEL (AE lock) button, recompose the image, if necessary, and press the
shutter button to take the picture.
• If the AEL (AE lock) button is kept down after a shot, you can continue to shoot with the same exposure
value. The setting is canceled when the button is released.
• When the flash is fired in a mode other than shutter speed priority mode or manual mode, the slow sync
shooting is performed (page 77).
46
Page 47

• You can set the camera to keep the exposure value after releasing the AEL (AE lock) button or to
temporarily perform spot metering with [AEL button] in the Custom menu (page 107).
About the EV scale when the AEL (AE lock) button is pressed
While you press the AEL (AE lock) button, an exposure value determined by the camera is
locked as the standard value (0). At the same time, an exposure value within the spot metering
circle appears as the second standard index.
• If the exposure is beyond the range of the EV scale, bB appears at the end of the EV scale. The bB starts
flashing if the difference becomes any greater.
Example: When the composition is determined in the scene below and the AEL (AE lock)
button is pressed
2 Bright area
Spot metering circle
1 Slightly darker area
The indicator displays are as follows when the AEL (AE lock) button is pressed.
AEL (AE lock) button is
pressed
Multi segment/
Center weighted metering
The locked exposure
Recompose on 1 while
holding the AEL (AE lock)
button down
The locked exposure
Recompose on 2 while
holding the AEL (AE lock)
button down
Using the shooting functions
The light level within the
spot metering circle is
0.3 EV less than the locked
exposure (varies according to
the recomposition of the
shot).
Spot metering
The locked exposure is
equal to the light level
within the spot metering
circle.
The light level of 1 is
1.3 EV less than the locked
exposure (varies according
to the recomposition of the
shot).
The locked exposure
The light level of 1 is
1.0 EV less than the locked
exposure (varies according
to the recomposition of the
shot).
Turn the camera on 2 and
the light level of 2 is
displayed. The arrow
indicates 2 will white out.
47
Page 48

Selecting the metering mode
You can select a metering mode (a method whereby the camera measures the brightness of a
subject).
Metering mode lever
Set the metering mode lever to the desired mode.
(Multi segment)
This divides the whole screen into 40 segments to measure light (40-segment honeycomb
pattern metering). This is suitable for general shooting, including shooting into direct sunlight.
(Center weighted)
While emphasizing the central area of the screen, this mode measures the average brightness
of the entire screen. If you shoot directly into the sunlight or the subject is not in the center of
the image, you must use exposure compensation (page 45).
(Spot)
This mode measures light only in the spot metering circle in the center of the frame. This is
suitable for shooting a subject with strong contrast or measuring the light of a specific area of
the screen. If the area to be measured is not in the center of the screen, use AE lock to take the
picture (page 46).
Spot metering area
Position of the subject.
z Multi segment metering
The screen of this camera is equipped with 39 honeycomb sharped metering
elements and one metering element that covers the surrounding area. These
elements work in sync with auto focus, allowing the camera to accurately
measure the position and brightness of the subject in order to determine the
exposure.
• In multi segment metering, if the focus is locked, the exposure (the shutter
speed and the aperture) is locked simultaneously (only when (Singleshot AF) or (Automatic AF)).
48
Page 49

Focus
When you hold the grip and look into the viewfinder, or press the shutter button halfway
down, the camera adjusts the focus automatically (Auto focus). Make it a habit to press the
shutter button only halfway down to confirm that the subject is visually in focus.
Setting the AF area
You can change the focus method. Change the method when it is difficult to get the proper
focus.
Front control dial
Multi-selector
Fn (Function) button
1 Press the Fn (Function) button to display the Quick Navi screen (page 30).
2 Select the AF area item with the multi-selector.
3 Select the desired mode with front or rear control dial.
• After selecting the AF area in step 2, if you press the center of the multi-selector, the screen switches to
the Exclusive disp screen. On this screen, select the desired mode with v/V on the multi-selector, then
press the center.
• You can also select the AF area from the Recording menu (page 101).
(Wide)
The camera determines which of the 11 AF area is used in
focusing within the wide AF area.
Rear control dial
( : The default setting)
Using the shooting functions
AF area
49
Page 50

(Spot)
The camera uses the spot AF area exclusively.
Spot AF area
(Local)
Choose a local AF area from the 11 areas. Select a local AF area
that you want to activate the focus with the multi-selector. Press
the center of the multi-selector to use the spot AF area in focusing.
Local AF area
Spot AF area
• After shooting, area selection is still available. Be sure not to
move the multi-selector unless it is necessary.
• The local AF area that was used to focus on is illuminated briefly.
• The local AF area may not be illuminated when continuous shooting is performed or when the shutter
button is pressed all the way down without pause.
Subjects that may require special focusing:
Using the auto focus, it is hard to focus on the following subjects. In such cases, use the focus lock shooting
feature (page 51) or manual focus (page 53).
– A subject that is low in contrast, such as blue sky or a white wall.
– Two subjects at different distances overlapping in the AF area.
– A subject that is composed of repeating patterns, such as the facade of a building.
– A subject that is very bright or glittering, such as the sun, the body of an automobile, or the surface of
water.
To measure the exact distance to the subject
The mark located on the top of the camera shows the location of the
image sensor*. When you measure the exact distance between the camera and
the subject, refer to the position of the horizontal line.
* The image sensor is the part of the camera that acts as the film.
50
Page 51

z Shooting techniques
When the subject is outside the AF area (Focus-lock)
If the subject is off-center and outside the AF area, the
background within the AF area will be in focus and the
subject will be out of focus. To prevent this, lock the focus
by following the steps below.
1 Place the subject within the AF area and press the shutter button halfway down.
2 Keep the shutter button halfway down, and put the subject back in the original position to re-
compose the shot.
12
3 Press the shutter button fully down to take the picture.
If anything but the subject is in the AF area
When (Wide) is selected (the default setting), an undesired subject that is located in another area
may be in focus. In such cases, pressing the center of the multi-selector focuses on the center area even if
(Spot) is not selected.
Press and hold the center of the multi-selector, then shoot the subject.
Using the shooting functions
51
Page 52

Selecting the focus mode
You can select the focus operation mode.
Focusing ring
Set the focus mode lever to the desired mode.
Focus mode lever
Auto focus
S ( Single-shot AF)
The camera focuses on and the focus is locked when you press the shutter button halfway
down. This mode is used when shooting a motionless subject.
A ( Automatic AF)
This AF mode automatically switches between Single-shot AF and Continuous AF. When you
press and hold the shutter button, if the subject is motionless, the focus is locked and if the
subject is in motion, the camera continues to focus. This mode is used in various situations.
• You can substitute DMF (Direct Manual Focus) for AF-A with [AF-A setup] in the Recording menu
(page 101).
C ( Continuous AF)
In this mode, the camera continues to focus while the shutter button is pressed and held
halfway down. This mode is used when the subject is in motion.
• If the Wide AF area is selected, the AF area switches to match the position of the subject.
• The audio signal will not sound when the subject is in focus.
52
Page 53

Manual focus
MF ( Manual focus)
You can set the distance of a subject.
Rotate the focusing ring of the lens to achieve a sharp focus.
• In the case of a subject that can be focused in auto focus mode, the z indicator lights up in the viewfinder
when the focus is confirmed. When the Wide AF area is used, the center area is used, and when the Local
AF area is used, the area that is selected with the multi-selector is used.
• To obtain steady exposure in manual focus mode, the camera uses the distance information to determine
the exposure. To improve the precision of the distance information, the camera resets the focal length to
(infinity) when the POWER switch is set to ON.
• When using a tele converter, etc., rotation of the focusing ring may not be smooth.
Switching the AF/MF easily
The focus mode can be switched not only with the focus mode lever located on the front of the
camera, but also with the AF/MF button located on the rear. You can switch between auto
focus and manual focus without relaxing your position (AF/MF control).
Focusing ring
AF/MF button
In auto focus mode
By pressing the AF/MF button, the focus mode is switched temporarily to the manual focus.
Press and hold the AF/MF button and adjust the focus by rotating the focusing ring.
Using the shooting functions
In manual focus mode
By pressing the AF/MF button, the focus mode is switched temporarily to the auto focus and
the focus is locked. In the case where the manual focus is used mainly, this is convenient to
activate the auto focus only when you need to use it.
• You can set the AF/MF button to work as the AF lock button with [AF/MF button] in the Custom menu
(page 105).
• You can maintain the selected mode without pressing and holding the AF/MF button with [AF/MF
control] in the Custom menu (page 106).
53
Page 54

Using AF illuminator
In the auto focus mode, even when you shoot a subject under dark conditions or a low contrast
subject, the AF illuminator allows the camera to focus more easily on a subject.
Press the shutter button half way down, a red illuminator is automatically emitted until the
focus is locked to focus more easily on a subject.
AF illuminator
• The range of the AF illuminator is approximately 1 to 7 m (3.3 to 23 feet).
• AF illuminator does not operate when the focus mode is set to Continuous AF or the subject is moving.
(The or indicator lights in the viewfinder)
• The AF illuminator may not operate with focal lengths of 300 mm or longer.
• When an external flash is attached, the AF illuminator of the external flash is used.
• You can deactivate the AF illuminator with [AF illuminator] in the Recording menu (page 102).
• The AF illuminator does not operate when the center area is not selected with AF area set to Local AF
area.
54
Page 55

Drive mode
You can use continuous shooting, self-timer, bracket, and shooting using the Remote
Commander, with the DRIVE button.
DRIVE button
Multi-selector
1 Press DRIVE to display the drive mode screen.
2 Select the desired mode with v/V on the multi-selector, then select the
desired setting with b/B on the multi-selector.
Using the shooting functions
Select the mode
Select the setting
3 Press the center of the multi-selector to turn off the screen.
( : The default setting)
Single-shot adv.
• Also used for canceling other drive modes.
• You can substitute the Fn (Function) button for the DRIVE button (page 30).
Continuous adv. (page 56)
Self-timer (page 57)
Bracket: Cont. (page 57)
Bracket: Single (page 58)
WB bracket (page 59)
DRO adv. bracket (page 59)
Remote Commander (page 60)
55
Page 56

For details on the operation 1 page 55
Shooting continuously
When you press and hold the shutter button, the camera records the images continuously.
Shoots at a maximum of 5 images per second*
Shoots at a maximum of 3 images per second*
* Our measurement conditions: [Image size] is set to [L:12M], [Quality] is set to [Fine], the focus mode is
set to (Single-shot AF) or (Manual focus), and the shutter speed is 1/250 second or faster.
However, the speed of continuous shooting is slower when shooting under dark conditions or the DRange Optimizer is set to (Advanced Auto) or (Advanced: Level).
• The number of images that can be shot continuously is indicated in the viewfinder, and when shooting
continuously, this number decreases.
After the images have been recorded on the memory card, the number returns to the original number,
depending on the camera memory buffer.
• When the built-in flash is fired, images are shot after the flash has been charged.
• When the focus mode is set to Continuous AF or Automatic AF, the focus is set separately on each image.
When set to Single-shot AF, the focus is fixed on the first image.
• The last image is displayed in auto review.
• The number of continuous shooting images obtainable has an upper limit.
The maximum number of continuous shots
RAW
18 images
cRAW 25 images
RAW & JPEG 12 images
cRAW & JPEG 12 images
Extra fine 16 images
Fine/Standard No limit (Until the memory card is full)
• These numbers depend on the writing speed of a memory card, the shooting condition, etc. So, use the
table only as a guide.
56
Page 57

For details on the operation 1 page 55
Using the self-timer
After you press the shutter button, the shutter will be released either about ten seconds or two
seconds later. The 10-second self-timer is convenient when the photographer appears in a
photo and the 2-second self-timer is convenient to reduce the camera-shake because the mirror
is pulled up beforehand.
Check that the focus is confirmed on the subject, then press the shutter button.
10sec self-timer
2sec self-timer
• When using the 10-second self-timer, the self-timer lamp located on the front side flashes before the
shutter is released. The countdown sound also starts.
• To cancel the activated 10-second self-timer, press the DRIVE button. You cannot cancel the 2-second
self-timer in the middle.
• When there is bright lighting, a reflector or something similar behind the camera, and you press the shutter
button without looking into the viewfinder, use the eyepiece cover attached on the shoulder strap to
prevent unnecessary lighting from seeping through the viewfinder and affecting the exposure (page 44).
Shooting images with the exposure shifted – Bracket: Cont./Bracket: Single
An accurate exposure setting is required for some shooting. In such cases, a photographer
continuously shoots some images with the exposure shifted, aside from the correct exposure
image.
Using the shooting functions
Correct
– direction + direction
Bracket: Cont.
Press and hold the shutter button until the recording stops.
Shoots three images continuously with the exposure shifted by 0.3 of a step.
Shoots five images continuously with the exposure shifted by 0.3 of a step.
Shoots three images continuously with the exposure shifted by 0.5 of a step.
Shoots five images continuously with the exposure shifted by 0.5 of a step.
Shoots three images continuously with the exposure shifted by 0.7 of a step.
Shoots five images continuously with the exposure shifted by 0.7 of a step.
57
Page 58

For details on the operation 1 page 55
Bracket: Single
Press the shutter button shot by shot.
Shoots three images shot by shot with the exposure shifted by 0.3 of a step.
Shoots five images shot by shot with the exposure shifted by 0.3 of a step.
Shoots three images shot by shot with the exposure shifted by 0.5 of a step.
Shoots five images shot by shot with the exposure shifted by 0.5 of a step.
Shoots three images shot by shot with the exposure shifted by 0.7 of a step.
Shoots five images shot by shot with the exposure shifted by 0.7 of a step.
• When using the flash, press the shutter button shot by shot regardless of the setting.
• The following is an example of shooting order. You can change the order with [Bracket order] in the
Custom menu (page 111).
Three shots : 0
Five shots : 0
• The base exposure is set at the first shot in the bracket. The base exposure moves if exposure
compensation is used.
• Normally, the focal point changes in every shooting. The focal point is fixed only in continuous bracket
shooting when the focus mode is set to Single-shot AF or Automatic AF with an still subject.
• When the flash is not used, ambient* bracket shooting is performed and the shutter speed and aperture are
changed to accommodate bracket shooting. When the flash is used, flash bracket shooting is performed
and the flash light is changed.
• In ambient bracket shooting, the shutter speed and aperture change in program auto mode, the shutter
speed changes in aperture priority mode, and aperture changes in shutter speed priority mode. Normally,
the shutter speed changes in manual mode. You can change the aperture by pressing and holding the AEL
(AE Lock) button while taking a picture.
* Ambient light: Any light other than the flash light that shines on the scene for an extended period of
time, such as natural light, a light bulb, or a fluorescent light.
t -0.3 t +0.3
t –0.5 t +0.5 t –1.0 t +1.0
The EV scale in bracket shooting
When bracket shooting is selected, the EV scale is changed.
Ambient bracket
0.3 steps, three shots
Exposure compensation 0
Ambient bracket
0.5 steps, five shots
Exposure compensation
Flash bracket
0.7 steps, three shots
Flash compensation –1.0
1.0
LCD
monitor
Shown in the top row. Shown in the top row. Shown in the bottom
row.
Viewfinder
• In ambient bracket shooting, the EV scale appears in the viewfinder, too, but it does not appear in flash
bracket shooting.
58
Page 59

For details on the operation 1 page 55
• When the bracket shooting starts, the indexes that indicate already recorded images start to disappear one
by one.
• When Single bracket is selected, if the shutter button is pressed halfway down and released, “br 1”
appears for the ambient light bracket and “Fbr 1” appears for the flash bracket in the viewfinder. When
bracket shooting starts, it indicates what number the next frame is, for instance, “br 2”, “br 3”.
Shooting with the WB bracket
Based on the selected white balance, three pictures are taken while automatically shifting the
color temperature. One shot records three images in the order of “an image with normal white
balance”, “– side (an image with paler colors)”, and “+ side (an image with reddish colors)”.
Shifts the white balance by 10 mired* when taking a picture.
Shifts the white balance by 20 mired* when taking a picture.
* Mired: a unit to indicate the color conversion quality in color temperature filters.
• Only the image recorded last is displayed in auto review (page 111).
Shooting with the DRO advanced bracket
DRO advanced bracket shooting takes three pictures while separately optimizing the gradation
and colors in each image area. One shot records three images in the following order: “low”
t “high”.
“mid”
t
(DRO: D-Range Optimizer)
Lowers the DRO bracket when taking a picture.
Amplifies the DRO bracket when taking a picture.
• When DRO advanced bracket shooting is selected, the D-Range Optimizer setting (page 66) is
temporarily deactivated.
• Correction with DRO advanced bracket has no effect on RAW files.
Using the shooting functions
59
Page 60

For details on the operation 1 page 55
Shooting with the Remote Commander
To shoot with the Remote Commander, set the drive mode to (Remote Commander).
Transmitter
SHUTTER button
When the button is pressed, the shutter is released right away.
2 SEC button
After you press the button, the shutter is released about two seconds
later.
Verify that the subject is visually in focus, and point the transmitter at the remote sensor
located on the front of the camera, then press the SHUTTER or 2 SEC button.
• You cannot use the other drive modes (Continuous advanced, etc.).
• To lock the focus (focus lock shooting, page 51), press the shutter button on the camera halfway down and
release the button, then shoot with the Remote Commander. After shooting, the focus remains locked.
Any operation on the camera will release the focus lock.
• In BULB shooting (page 43), the camera starts exposure right away when you press the SHUTTER
button, and the camera starts exposure two seconds later when you press the 2 SEC button. By pressing
the SHUTTER or 2 SEC button again, the exposure will be done right away.
• The other buttons are used when the camera is connected to a TV (pages 91, 148).
60
Page 61

Image processing and color
This section explains how to set up the ISO sensitivity of the image sensor, color processing
that is a unique feature of digital cameras, Creative Style for various scenes, etc.
Adjusting the white balance
The color of the subject is affected by the lighting conditions.
Example: The color of an image affected by light sources
Weather/lighting
Characteristics of
light
The color tones are adjusted automatically in the auto white balance mode.
However, you can adjust color tones manually with the white balance mode.
1 Press the WB (White Balance) button to display the White balance mode screen.
Daylight Cloudy Fluorescent Incandescent
White (standard) Bluish Green-tinged Reddish
Front control dial
WB (White Balance) button
Multi-selector
Rear control dial
Using the shooting functions
61
Page 62

2 Select the desired mode with v/V on the multi-selector, then make fine adjustments with b/B, if
necessary.
• Adjusting toward + increases the color temperature and the image turns reddish. Adjusting toward decreases the color temperature and the image turns paler.
Select the desired mode
Adjust the color temperature
( : The default setting)
AWB (Auto WB)
(Daylight)
(Shade)
(Cloudy)
(Tungsten)
(Fluorescent)
(Flash)
ColorTemperature/Color
Adjusts the white balance automatically.
Adjusts for outdoors, sunlit subjects (+3 to –3).
Adjusts for shady conditions on a clear day (+3 to –3).
Adjusts for a cloudy sky (+3 to –3).
Adjusts for incandescent lighting or video light such as at
photography studios (+3 to –3).
Adjusts for fluorescent lighting (+4 to –2).
Adjusts for flash condition (+3 to –3).
See the following page.
filter
(Custom 1 – 3/Custom
Uses the custom white balance. See page 63.
setup)
• You can substitute the Fn (Function) button for the WB (White Balance) button (page 30).
ColorTemperature/Color filter
You can set the white balance using a color temperature.
Based on using the set color temperature as the standard, the color can be compensated from G
(Green) to M (Magenta) just like using a CC (Color Compensation) filter for photography.
• When setting the color temperature measured by the color meter, test shooting is recommended before the
actual photo is taken.
62
Page 63

1 Select a “ColorTemperature” or “Color filter” item with v/V on the multi-selector.
2 Adjust with b/B.
• The color temperature can be selected between 2500K and 9900K.
• The color filter value can be selected between G9 and M9. The increment is equivalent to the CC filter
number 5.
3 Press the center of the multi-selector after the setting is completed.
Custom white balance
In a scene where the ambient light consists of multiple types of light source, use of custom
white balance is recommended in order to accurately reproduce the whiteness. Up to three
settings are registered.
1 Select a custom white balance item with v/V on the multi-selector.
2 Switch the item with b/B.
To register a setting
1 Select [ SET], then press the center of the multi-selector to display the register screen.
Using the shooting functions
63
Page 64

2 Hold the camera so that the white area fully covers the spot-metering circle and press the shutter
button down.
The register selection screen appears.
3 Select a memory number with b/B, then press the center.
To call the custom white balance setting
Select the desired number.
• The custom white balance setting registered in this operation is effective until a new setting is registered.
(The setting is retained after the power is turned off.)
• If the flash is used when the shutter button is pressed, a custom white balance is registered with the flash
light taken into account. Take pictures with the flash in later shootings.
• The message “Custom WB error” indicates that the value is beyond the expected range. (When the flash is
used on a subject in close proximity or a subject with a bright color is in the frame.) If you register this
value, the indicator turns yellow on the recording information display on the LCD monitor. You can
shoot at this point, but it is recommended that you set the white balance again to get a more correct white
balance value.
Setting ISO
Sensitivity to light is expressed by the ISO number (recommended exposure index). The
larger the number from the standard (ISO 200), the higher the sensitivity.
ISO button
Multi-selector
64
Page 65

1 Press the ISO button to display the ISO screen.
2 Select the desired value with v/V on the multi-selector.
• ISO can be set from [AUTO] and between 100 and 6400.
• ISO numbers that are higher than ISO 3200 increase the appearance of noise.
• You can use the front or rear control dial instead. The number is incremented by 1 step using the front
control dial and it is incremented by 1/3 step using the rear control dial.
• You can substitute the Fn (Function) button for the ISO button (page 30). As in this case above, the
number is incremented by 1 step using the front control dial and it is incremented by 1/3 step using the
rear control dial.
• When ISO is set to [AUTO] and the mode dial is set to P, A, or S, the ISO sensitivity is automatically
adjusted between ISO 200 and ISO 800. You can change the maximum and minimum values with [ISO
Auto max.] and [ISO Auto min.] in the Recording menu (page 100). If the mode dial is set to M, it is
fixed at ISO 200.
• The built-in flash range (the range within which the correct exposure is provided) depends on the aperture
value and ISO sensitivity. Refer to the following table to determine the shooting distance.
Aperture
AUTO
100
200
400
ISO setting
800
1600
3200
6400
F2.8 F4.0 F5.6
2 – 12 m
(6.6 – 40 feet)
1 – 4.3 m
(3.3 – 14 feet)
1 – 6 m
(3.3 – 20 feet)
1.4 – 8.6 m
(4.6 – 28 feet)
2 – 12 m
(6.6 – 40 feet)
2.8 – 17 m
(9 – 56
feet
4 – 24 m
(13 – 79
feet
5.6 – 34 m
(18 – 112
feet
)
)
)
1.4 – 8.6 m
(4.6 – 28 feet)
1 – 3 m
(3.3 – 10 feet)
1 – 4.3 m
(3.3 – 14 feet)
1 – 6 m
(3.3 – 20 feet)
1.4 – 8.6 m
(4.6 – 28 feet)
2 – 12 m
(6.6 – 40 feet)
2.8 – 17 m
(9 – 56
feet
4 – 24 m
(13 – 79
feet
)
)
1 – 6 m
(3.3 – 20 feet)
1 – 2.1 m
(3.3 – 7 feet)
1 – 3 m
(3.3 – 10 feet)
1 – 4.3 m
(3.3 – 14 feet)
1 – 6 m
(3.3 – 20 feet)
1.4 – 8.6 m
(4.6 – 28 feet)
2 – 12 m
(6.6 – 40
feet
2.8 – 17 m
(9 – 56
feet
)
)
Using the shooting functions
65
Page 66

Using the D-Range Optimizer
The camera analyzes the shooting conditions and automatically corrects the image to improve
the image quality.
Front control dial
Multi-selector
Fn (Function) button
1 Press the Fn (Function) button to display the Quick Navi screen (page 30).
2 Select the D-Range Optimizer item with the multi-selector.
3 Select the desired mode with the front control dial.
• When selecting Advanced: Level, adjust the level with the rear control dial.
• After selecting the D-Range Optimizer item in step 2, if you press the center of the multi-selector, the
screen switches to the Exclusive disp screen. On this screen, select the desired mode with v/V on the
multi-selector, then press the center. When in Advanced: Level, adjust the level with b/B.
• You can also switch the screen to the Exclusive disp screen from the Recording menu (page 97).
(Off)
(Standard)
(Advanced Auto)
(Advanced: Level)
–
Does not correct brightness or contrast.
Adjusts the brightness and contrast of the whole screen.
Automatically, optimizes the contrast and the color reproduction
of the recorded image by area.
Optimizes the contrast and the color reproduction of the recorded
image by area. The optimizing level is selected between
(weak) and (strong) in five levels.
Rear control dial
• Standard is effective when the screen is wholly dark such as with a backlit subject and Advanced is
effective when the difference between the bright and dark portions on the screen is extremely large.
66
Page 67

• The default setting is as follows:
– In auto adjustment mode: Advanced Auto
– In program auto, aperture priority, shutter speed priority, or manual exposure mode: Standard
– In Scene Selection mode: Unfixed, depending on the selected mode
• When using AE lock, the camera automatically corrects the locked image.
• When in Continuous advance mode, the correction is fixed onto the first image, the same correction is
used for the second or later images.
• D-Range Optimizer other than (Standard) has no effect on RAW files. Correct images using the D-
Range Optimizer function of “Image Data Converter SR.”
• When DRO advanced bracket shooting is selected, the setting here is temporarily deactivated.
Using a Creative Style
This camera is pre-programmed with image styles optimal for various scenes and purposes.
You can take a picture with an appropriate color balance and tone.
The camera is equipped with four unswitchable styles (“Standard”, “Vivid”, “Neutral”, and
“Adobe RGB”) and three styleboxes, to which you can assign image styles of your choosing.
“Portrait”, “Landscape”, and “B/W” are assigned to the styleboxes as the default settings.
To take pictures with the styleboxes as they are.
t See “Basic operation” (page 69).
To take pictures with an image style (see “Image styles”, (page 68)) assigned to the stylebox.
t See “Advanced operation” (page 70).
• If the Scene Selection is used, you cannot change the settings for the Creative Style.
You can adjust the contrast for each image style separately. The switchable image styles and
unswitchable ones have different items that can be adjusted.
Using the shooting functions
67
Page 68

Unswitchable image styles:
“Standard”, “Vivid”, “Neutral”, and
“Adobe RGB”
Switchable image styles: Stylebox
a – c
Adjustable Items
Item Contrast Saturation Sharpness Brightness Zone
Unswitchable image
styles
Switchable image
styles
* When “B/W” or “Sepia” is selected, you cannot adjust the saturation.
• These adjustments are not always necessary. You can make an adjustment for each image style. (If
one style is in multiple styleboxes, separate adjustments can be made on each of them.)
• When you need to adjust contrast, saturation, and sharpness before other items, select “Standard”
image style to make the adjustments.
–3 to +3 –3 to +3 –3 to +3 not
adjustable
–3 to +3 –3 to +3* –3 to +3 –3 to +3 –1 to +2
Matching
not
adjustable
Image styles
( : The default setting)
(Standard)
(Vivid)
(Neutral)
(Adobe RGB)
(Clear)
(Deep)
(Light)
For capturing various scenes with rich gradation and beautiful
colors.
The saturation and contrast are heightened for capturing
striking images of colorful scenes and subjects such as
flowers, spring greenery, blue sky, or ocean views.
The saturation and sharpness are lowered for capturing
images in a quiet tone. This is also suitable for capturing
image material to be modified with a computer.
For capturing images in Adobe RGB color space.
For capturing images in a clear tone with limpid colors in the
highlighted area, suitable for capturing radiant light.
For capturing images with deep and dense color expressions,
suited to capturing the solid presence of the subject.
For capturing images with bright and uncomplicated color
expressions, suited to capturing refreshingly light ambience.
68
Page 69

(Portrait)
(Landscape)
(Sunset)
(Night view)
(Autumn leaves)
(B/W)
(Sepia)
Basic operation
For capturing the skin color in a soft tone, ideally suited to
capturing portraits.
The saturation, contrast, and sharpness are heightened for
capturing vivid and crisp scenery. Distant landscapes also
stand out more.
For capturing the beautiful red of the setting sun.
The contrast is attenuated for capturing a nightscape that is
more faithful to the real view.
For capturing autumn scenes, vividly highlighting the red and
yellow of coloring leaves.
For capturing images in black and white monotone.
For capturing images in sepia monotone.
Front control dial
Using the shooting functions
Multi-selector
Fn (Function) button
1 Press the Fn (Function) button to display the Quick Navi screen (page 30).
• When the enlarged display screen is used (page 23), you cannot display the Quick Navi screen. In this
case, set up from the menu.
2 Select a Creative Style item with the multi-selector.
• If you do not make adjustments on contrast, etc., you can make other settings from this menu using
the front or rear control dial.
Rear control dial
69
Page 70

3 Press the center to display the Creative Style screen.
• You can select this screen from the Recording menu (page 97).
4 Select the desired image style with v/V on the multi-selector.
• You can select “Standard”, “Vivid”, “Neutral”, “Adobe RGB”, “Portrait”, “Landscape”, and “B/W”
with the default setting. To select other image styles, see “Advanced operation” (below).
5 To adjust (Contrast), (Saturation), and (Sharpness), select the item with b/B and make
adjustments with v/V.
6 Press the center of the multi-selector after the setting is completed.
Advanced operation
Of the seven image styles explained in “Basic operation”, the last three styles are Styleboxes 1
– 3, which can be switched.
Example: When you have assigned “Standard” to one stylebox and “Landscape” to two
styleboxes.
Unswitchable
Switchable
Standard
Vivid
Neutral
Adobe RGB
Standard
Landscape
Landscape
Saturation, contrast, and sharpness can be adjusted.
Brightness and Zone Matching can be adjusted, in addition
to saturation, contrast, and sharpness.
Different adjustments can be set for each “Landscape”.
70
Page 71

To switch image styles for the stylebox
1 Display the Creative Style screen (steps 1 to 3 on page 69).
2 Select a switchable stylebox with v/V on the multi-selector.
3 Move the cursor to the right side with B, and select an image style with v/V.
4 To adjust (Contrast), (Saturation), (Sharpness), (Brightness), and (Zone
Matching), select an item with b/B and make adjustments with v/V.
5 Press the center of the multi-selector after the setting is completed.
Zone Matching
Image styles in the switchable style boxes can adjust the Zone Matching.
You can keep the image from becoming overexposed or underexposed.
This function is also available for a RAW file.
–1
0
+1 to +2
This keeps the image from becoming underexposed with
shooting a high-keyed subject. Use in low-key
(predominantly dark) scenes is recommended, as the image
tends to become whitish.
Zone Matching is not performed.
This keeps the image from becoming overexposed with
shooting a low-keyed subject. Use in high-key
(predominantly light) scenes is recommended, as the image
tends to have heightened noise level.
Using the shooting functions
• When Zone Matching is not set to 0, the contrast cannot be adjusted.
• Refer to the following table to determine the flash range.
71
Page 72

(At ISO 100)
Aperture
–1
Zone
Matching
+1
+2
About Adobe RGB color space
Adobe RGB color space has a wide range of color reproduction, compared to sRGB that is the standard
color space of the digital camera. If the main purpose is to print out the image, especially when a large part
of the subject is vivid green or red, Adobe RGB is more effective than other sRGB color modes.
• The file name of the image starts with “_DSC”.
About color matching in Adobe RGB
When displaying images that were recorded with Adobe RGB on non-Adobe RGB-compliant devices, or on
the LCD monitor on the rear of the camera, images are displayed with low saturation. To edit or print
images recorded with Adobe RGB, use applications or printers that support color management and DCF2.0
option color space. Using some applications and printers that do not support color management may result
in or print images that do not reproduce faithful color.
F2.8 F4.0 F5.6
1.7 – 10 m
(5.6 – 33 feet)
2.4 – 14 m
(7.9 – 46 feet)
2.8 – 17 m
(9 – 56 feet)
1.2 – 7 m
(3.9 – 23 feet)
1.7 – 10 m
(5.6 – 33 feet)
2 – 12 m
(6.6 – 40 feet)
1 – 5 m
(3.3 – 17 feet)
1.2 – 7 m
(3.9 – 23 feet)
1.4 – 8.6 m
(4.6 – 28 feet)
72
Page 73

Flash
This section explains the various shooting functions with the flash.
Selecting the flash mode
If the built-in flash is pulled up, the flash fires automatically when the surroundings are dark in
auto adjustment or Scene Selection mode. You can intentionally change the flash mode.
Front control dial
Using the shooting functions
Multi-selector
Fn (Function) button
1 Press the Fn (Function) button to display the Quick Navi screen (page 30).
• When the enlarged display screen is used (page 23), you cannot display the Quick Navi screen. In this
case, set up from the menu.
2 Select a Flash item with the multi-selector.
3 Select the desired mode with the front or rear control dial.
• The flash indicator is displayed only when the flash is pulled up.
• After selecting the flash item in step 2, if you press the center of the multi-selector, the screen switches
to the Exclusive disp screen. On this screen, select the desired mode with v/V on the multi-selector, then
press the center.
• You can also select the flash mode from the Recording menu (page 99).
Rear control dial
( : The default setting)
(Autoflash)
(Fill-flash)
Fires if it is dark or against light.
• This is not selectable when the mode dial is set to P, A, S, or M.
Fires whenever the built-in flash is pulled up.
73
Page 74

(Rear sync.)
Ordinarily, the flash is fired right after the shutter has been
released, then objects illuminated by other light sources are
captured. This causes certain subjects, such as trailing light,
to appear unnatural when the slower shutter speed is used.
In rear sync mode, the objects illuminated by other light
sources are captured first, then the flash is fired. You can
capture a flowing light or the trail of a moving subject in a
more realistic way when shooting a moving subject using a
slower shutter speed with the flash.
(Wireless)
Using an external flash (not supplied) mounted on the camera
may make certain pictures appear too flat. In such a case, an
off-camera flash in a proper position can create more contrast,
resulting in a more three-dimensional picture.
This camera can do this shooting without a cable using the
flash light to transmit the signal between the camera and the
flash (Wireless flash shooting).
• Wireless flash shooting requires the flash HVL-F56AM or
HVL-F36AM (not supplied).
To perform wireless flash shooting
1 Attach the external flash to the camera (page 166) and turn on the camera and the external flash.
2 Select (Wireless).
3 Remove the external flash from the camera and pull up the built-in flash on the camera.
“WL” appears in the viewfinder and on the LCD monitor.
4 Determine the position of the camera and the external flash.
5 Make sure the built-in flash and the external flash are fully charged.
• The built-in flash is fully charged when appears in the viewfinder.
• The external flash is fully charged when appears on the back of the external flash and the red lamp
flashes on the front of the flash.
6 Press the AEL (AE Lock) button on the camera to test fire the flash.
• If the flash does not fire, change the camera, external flash, or subject position.
7 Check both flashes again to make sure they are fully charged. Press the shutter button to take a
picture.
• Turn off the wireless flash mode after wireless flash shooting. (You can either deactivate the camera and
the external flash separately, or you can attach the external flash to the camera and select a different flash
mode, as shown on page 73). If the built-in flash is used while the wireless flash mode is still active,
inaccurate flash exposures will result.
• You can select the wireless setting on the camera and the external flash separately. See page 73 to set the
camera. To set the external flash, refer to the operating instructions supplied with it.
74
Page 75

If the operation and the function of the AEL (AE Lock) button have been changed
When using the wireless flash, it is recommended that you set [AEL button] (page 107) to [AEL hold] or
[ AEL hold] in the Custom menu.
If you select a setting that is retained after the button has been released ([AEL toggle]/[ AEL toggle]) the
camera is in slow sync recording mode while “AEL” appears in the viewfinder and on the LCD monitor.
Every test fire will cause the slow sync recording mode to switch on and off.
About the position of the camera and the flash
This camera uses the flash light of its built-in flash to send a signal to the off-camera flash to fire. Take note
of the following points to ensure proper transmission of the signal.
• Wireless flash shooting should be performed in a dark environment such as indoors, etc.
• We recommend that you place the camera and the external flash in the gray area within radius 5 m
(16.4 ft) as illustrated below. For more information about flash range, also refer to the operating
instructions supplied with your flash.
• Do not place the external flash directly behind the subject.
z About the wireless flash channels
Change the channel of the external flash when another photographer is using a wireless flash nearby and
his/her built-in flash light triggers firing of your flash.
To change the channel of the external flash, refer to the operating instructions supplied with it.
Using the shooting functions
Using the flash compensation
When shooting with the flash, you can adjust the amount of flash light alone, without
changing the exposure compensation. You can change the exposure of a subject which is
within the flash range, while leaving the exposure of the background, which is out of the flash
range, as it is.
75
Page 76

Front control dial
Multi-selector
Rear control dial
Fn (Function) button
1 Press the Fn (Function) button to display the Quick Navi screen (page 30).
2 Select the flash compensation item with the multi-selector.
Flash compensation item
3 Select the desired value with the front or rear control dial.
• When the Exclusive disp screen is displayed in step 2, select the desired value with b/B on the multi-
selector.
• You can also select the Exclusive disp screen from the Recording menu (page 100).
• You can set the degree of compensation in 1/3 increments within ±3.0. You can set this exposure step to
1/2 EV increments with [Exposure step] in the Recording menu (page 98).
• When the built-in flash is pulled up, the set flash compensation value is displayed on the LCD monitor.
• When you press the shutter button halfway down, appears in the viewfinder.
• When performing flash compensation with the built-in flash, the positive effect may not be visible due to
the limited amount of flash light, if the subject is at or around the maximum range for the flash. If the
subject is very close, the negative effect may not be visible.
z Exposure compensation and flash compensation
Exposure compensation changes the shutter speed, aperture, and ISO sensitivity (when [AUTO] is
selected) to perform the compensation. If the flash is used, the amount of flash light is also changed*.
On the other hand, flash compensation only changes the amount of flash light, thereby controlling the
relative effect of the flash light on the whole picture. For instance, if you want to reduce the flash light,
you can set the flash compensation on the slightly negative side and at the same time set the exposure
compensation on the positive side to adjust the brightness of the entire picture.
* You can keep the amount of flash light from changing with the exposure compensation with
[Exp.comp.set] in the Custom menu (page 110).
76
Page 77

Shooting with Slow Sync (Shooting the dark background with flash)
When you shoot a portrait outdoors at night with a dark background, a normal use of flash will
capture a clear image of the subject, but the background is out of flash range and will be too
dark. In such a case, slow sync shooting (shooting with the flash and a slow shutter speed)
allows you to capture a clear image of both the subject and the background.
Flash
SLOW SYNC button
1 Pull up the built-in flash.
2 Shoot with the SLOW SYNC button pressed.
in the viewfinder and on the LCD monitor lights up to indicate the exposure is locked.
• Use of a tripod is recommended because of the slower shutter speed.
• In shutter speed priority mode or manual mode, slow sync shooting is not available using the AEL (AE
lock) button.
• You can set the camera to keep the slow sync mode after the SLOW SYNC button is released with [AEL
button] in the Custom menu (page 107).
Using the flash sync terminal
You can use a flash equipped with a flash sync cord.
Using the shooting functions
Flash sync terminal
Open the cover of the flash sync terminal and plug the cord in.
• Select the manual exposure mode and set the shutter speed to 1/200 second with the Super SteadyShot on
or 1/250 second with the Super SteadyShot off. If the shutter speed recommended on the flash is slower
than that, use the recommended speed or an even slower speed.
• Use a flash with a flash sync voltage of 400V or less.
77
Page 78

• Before you connect the flash sync cord to the Flash sync terminal, turn off the power of the connected
flash. If the power is on, it may flash when you connect the cord.
• The flash will always be full emission. Flash compensation (page 75) cannot be used. You can perform
bracket shooting while holding down the AEL (AE lock) button (the aperture is adjusted, page 46).
• Using auto white balance is not recommended. Use custom white balance to gain more precise white
balance.
• You can use a flash equipped with a flash sync terminal of the opposite polarity.
78
Page 79

Other operations
Registering your own settings
You can register a combination of frequently used modes and settings in the memory. You can
recall the registered settings by selecting “MR” on the mode dial.
Mode dial
MENU button
Multi-selector
To register a setting
1 Put the camera on the setting you want to register. See the next page for the items that can be
registered.
• The items to be registered include all the functions and recording menus with exclusive buttons and
levers. You cannot register only some of the items.
2 Press the MENU button to display the menu screen.
3 Select Recording menu t [4] t [Memory] with the multi-selector (page 32).
4 Press the center of the multi-selector to display the Select register screen.
The memory information set in step 1 (the current setting on the camera) will be displayed.
Using the shooting functions
5 Select the number you want to register with b/B, then press the center.
• You can register up to three settings.
• You can rewrite the settings as many times as you like.
79
Page 80

Items that can be registered Page numbers in parentheses
Recording mode1) (34) Drive mode (55) ISO sensitivity (64)
White Balance2) (61) Exposure comp. (45) Metering mode (48)
Focus mode (52) Image size (94) Aspect ratio (95)
Image quality (96) D-Range Optimizer (66) Creative Style3) (67)
Custom button (81) Exposure step (98) Flash mode (73)
Flash control (99) Power ratio (100) Flash compens. (75)
ISO Auto max. (100) ISO Auto min. (100) AF-A setup (101)
AF area (49) AF area position (49) Priority setup (102)
AF illuminator (54) AF w/ shutter (102) Long exp.NR (103)
High ISO NR (103)
1)
When the mode dial is set to A, the aperture value is also registered, when set to S, the shutter speed value
is also registered, and when set to M, the aperture and shutter speed values are also registered. Program
shift and manual shift cannot be registered.
2)
The number and the settings will be registered with the custom white balance.
3)
Contrast, saturation, sharpness, brightness, and Zone Matching will be registered at the same time.
To recall the saved settings
1 Set the mode dial to MR to display the Memory recall screen.
2 Select the number to be recalled with b/B on the multi-selector, and press the center.
• After you have recalled a setting, the actual setting will not correspond to the positions of the dials and
levers on the camera. Refer to the information displayed on the LCD monitor when you take pictures.
• You can change the settings after you have recalled a saved setting. A new setting can be registered by
following the steps in “To register a setting”.
80
Page 81

Using the C (Custom) button
You can assign a function of your choosing to the C (Custom) button. Press the button and the
setting screen of the selected function is displayed.
Creative Style (page 67) is assigned to the C button as the default setting.
Using the shooting functions
MENU button
Multi-selector
C (Custom) button
To assign a function
1 Press the MENU button to display the menu screen.
2 Select Recording menu t [1] t [Custom button] with the multi-selector (page 32).
3 Press the center of the multi-selector.
4 Select the item to be assigned with v/V and press the center.
( : The default setting)
AF lock
AF/MF control
D.O.F.preview
ISO
White balance
Exposure comp.
Functions as the AF lock button (page 105).
Functions as the AF/MF button (page 53).
Functions as the Depth-of-field preview button (page 39).
Functions as the ISO button (page 64).
Functions as the white balance button (page 61).
Functions as the exposure button (page 45).
81
Page 82

Flash compens.
Drive mode
AF area
Image size
Quality
Creative Style
D-RangeOptimizer
Flash mode
Memory
Displays the flash compensation setup screen (page 75).
Functions as the DRIVE button (page 55).
Displays the AF area setup screen (page 49).
Displays the image size setup screen (page 94).
Displays the image quality setup screen (page 96).
Displays the Creative Style setup screen (page 67).
Displays the D-Range Optimizer setup screen (page 66).
Displays the flash mode screen (page 73).
Displays the register setup screen (page 79).
To use the assigned function
Press the C (Custom) button.
The assigned function is activated or its menu screen is displayed.
82
Page 83

Using the viewing functions
Viewing images
Pressing the (Playback) button turns the camera to the playback mode and an image is
displayed on the LCD monitor.
Multi-selector
(Playback) button
Select an image with b/B.
Switching the playback screen
During playback, each time you press the DISP (Display) button, the screen changes as
follows.
DISP (Display) button
Latest recording history,
up to five images.
With recording data
With recording data
Without recording
data
Using the viewing functions
• The DISP (Display) button switches the recording data display on and off in other playback modes, such
as on an enlarged screen.
83
Page 84

Switching to the index screen
Pressing the (Index) button switches to the index screen. Each time you press the DISP
(Display) button, the screen changes as follows.
Multi-selector
(Index) button
DISP (Display) button
(Delete) button
9-image index
(Index) button
25-image index 4-image index
multi-selector
Select an image with v/V/b/B
(Index) button or the center of the
Rotating the rear dial switches the index images screen-by-screen. This is convenient when
you want to switch to the next screen quickly.
To select the folder
1 Select the folder bar with b/B on the multi-selector, then press the center.
The currently selected folder/The total number of folders
The currently number of images contained in the folder
84
Folder bar
Page 85

2 Select the desired folder with v/V, then press the center.
To delete all the images in the folder
1 Select the folder you want to delete with v/V on the multi-selector.
2 Press the (Delete) button.
3 Select “Delete” with v, then press the center.
• You can set the confirmation screen to [Delete], as previously selected with [Delete confirm.] in the
Setup menu (page 125).
• When you want to delete selected images, see page 114.
• Once you have deleted an image, you cannot restore it.
• Protected images cannot be deleted.
Displaying the histogram
Pressing the (Histogram) button displays the histogram and recording data of the
displayed image. Pressing it again turns the screen to a previous screen.
(Histogram) button
Using the viewing functions
When the image has a high-key or
low-key portion, that portion is
illuminated on the histogram display
(Luminance limit warning).
Luminance
R (Red)
G (Green)
B (Blue)
85
Page 86

z About Histogram
Number of pixels
Dark Light
A histogram is the luminance distribution that shows how many
pixels of a particular brightness exist in the picture. This camera
has four histogram displays that are separately for luminance and
RGB, and each shows the brightness on the horizontal axis (left
side is black, right side is white) and the number of pixels on the
vertical axis. The exposure compensation will change the
histogram accordingly. Below is an example.
Use the exposure
compensation on
the positive side.
This compensation
brightens the whole
picture, making the
entire histogram shift
to the bright side (right
side). If the exposure
compensation is
applied on the negative
side, the histogram will
shift to the other side.
Both ends of the histogram consist only of data of 100% black or white*. Checking the histogram allows
you to know the status of the image beforehand.
* To be exact, a color image is expressed with RGB. Thus, the white is equal to R255, G255, B255, and
the black is equal to R0, G0, B0.
Enlarging images
An image can be enlarged for closer examination.
(Enlarge) button
Multi-selector
Front control dial
Rear control dial
(Playback) button
86
Page 87

1 Display the image you want to enlarge, then press the (Enlarge) button.
The center of the image is enlarged.
2 Scale up or down the image with the rear control dial.
3 Select the portion you want to enlarge with v/V/b/B on the multi-selector.
• Each time you press the center of the multi-selector, the screen changes between the enlarged screen
and the whole screen.
The portion to be
enlarged if the
center is pressed
The map of the enlarged portion
• You can select an image with the front control dial.
4 Press the (Enlarge) or (Playback) button so that enlarged playback is canceled and the
screen returns to the screen that was displayed before enlarging.
The scaling range is as follows.
Image size Scaling range
L Approx. ×1.1 – ×13
M Approx. ×1.1 – ×10
S Approx. ×1.1 – ×6.7
Using the viewing functions
87
Page 88

Rotating an image
At the default setting, images shot in the portrait orientation are played back in the portrait
orientation. You can rotate images in the following way, if necessary.
(Playback) button
(Rotate) button
1 Display the image you want to rotate, then press the (Rotate) button.
The screen used for rotating images appears.
2 Press the center of the multi-selector to rotate the image to your desired orientation.
3 Press the (Playback) or (Rotate) button to return to the normal screen.
• Once you rotate the image, the image is played back in the rotated position, even if you turn off the power.
• When you copy rotated images to a computer, “Picture Motion Browser” contained on the CD-ROM
(supplied) can display the rotated images correctly. However, the images may not be rotated depending on
the software.
88
Page 89

Viewing images on a TV screen
You can view images on a TV screen by connecting the camera to a TV.
Turn off both your camera and the TV before connecting the camera and the TV.
1 Connect the camera to the TV.
1 To video input
jack
2 To the VIDEO
OUT terminal
Video cable
2 Turn on the TV and switch the input.
• See also the operating instructions supplied with the TV.
3 Turn on the camera, and press (Playback).
Images shot with the camera appear on the TV screen.
Select the desired image with b/B on the multi-selector.
Multi-selector
(Playback) button
• When using your camera abroad, it may be necessary to switch the video signal output to match that
of your TV system (page 121).
• The LCD monitor on the rear of the camera does not turned on.
• The quality of images displayed on a TV connected with a video cable is lower for different systems,
compared to images displayed on an HDTV connected with an HDMI cable or on a PC monitor.
Using the viewing functions
89
Page 90

When using an HDTV equipped with an HDMI connector
If you are using an HDTV equipped with an HDMI connector, you can view images higher
image quality by using an HDMI cable (not supplied).
1 To the HDMI
connector
HDMI cable
(not supplied)
1 Connect the camera to the TV with the HDMI cable.
2 Turn on the TV and switch the input.
3 Turn on the camera.
The camera turns to the playback mode automatically.
• Use an HDMI cable with the HDMI logo.
• Use an HDMI mini connector on one end (for the camera), and a connector suitable for connection to your
TV on the other end.
• By connecting your camera to Sony’s VIDEO-A compatible TV using an HDMI cable, TV sets suitable
image quality for viewing still picture automatically. Please refer to the operating instructions of Sony’s
VIDEO-A compatible TV for more details.
• Some devices may not work properly.
• Do not connect the output connector of the device with the HDMI terminal on the camera. This may cause
a malfunction.
• You can change the type of output signal with [HDMI output] in the Setup menu (page 121).
2 To the
HDMI
terminal
On “PhotoTV HD”
This camera is compatible with the “PhotoTV HD” standard.
By connecting Sony’s PhotoTV HD-compatible devices using an HDMI cable, whole new
world of photos can be enjoyed in breathtaking Full HD quality.
PhotoTV HD allows for a highly-detailed, photo-like expression of subtle textures and colors.
On TV color systems
If you want to view images on a TV screen, you need a TV with a video input jack and the
video cable. The color system of the TV must match that of your digital still camera. Check
the following lists for the TV color system of the country or region where the camera is used.
NTSC system
Bahama Islands, Bolivia, Canada, Central America, Chile, Colombia, Ecuador, Jamaica,
Japan, Korea, Mexico, Peru, Surinam, Taiwan, the Philippines, the U.S.A., Venezuela, etc.
90
Page 91

PAL system
Australia, Austria, Belgium, China, Czech Republic, Denmark, Finland, Germany, Holland,
Hong Kong, Hungary, Italy, Kuwait, Malaysia, New Zealand, Norway, Poland, Portugal,
Singapore, Slovak Republic, Spain, Sweden, Switzerland, Thailand, United Kingdom, etc.
PAL-M system
Brazil
PAL-N system
Argentina, Paraguay, Uruguay
SECAM system
Bulgaria, France, Guiana, Iran, Iraq, Monaco, Russia, Ukraine, etc.
Operating with the Remote Commander
Connecting the camera to a TV and turning to the playback mode allows you to play back
images using the Remote Commander. Most of the buttons on the Remote Commander have
the same functions as the buttons on the camera.
Buttons on the Remote Commander Page
(Histogram)
A
DISP (Display)
B
(Index)
C
(Rotate)
D
(Playback)
E
MENU
F
(Slide show)
G
/ (Scale up/down)
H
(Delete)
I
85
83
84
88
83
32
119
86
t step 6 in “Read
This First”
J
v/V/b/B/
29
Using the viewing functions
• The other buttons are used when the camera is in recording mode or is connected to a PictBridge printer
(pages 60, 148).
Slide show
The (Slide show) button on the Remote Commander easily starts/stops a slide show (page
119). During a slide show, the following operations are available from the Remote
Commander.
• Displaying the previous/next image with b/B.
• Pausing/playing back the slide show with .
91
Page 92

Using the menu
Menu list
For details on how to operate the menu, see page 32.
Recording menu (pages 94 to 104)
1 2
Image size
Aspect ratio
Quality
D-RangeOptimizer
Creative Style
Custom button
Exposure step
3 4
AF-A setup
AF area
Priority setup
AF illuminator
AF w/ shutter
Long exp.NR
High ISO NR
Custom menu (pages 105 to 113)
1 2
Eye-Start AF
EyeStart trigr.
AF/MF button
AF/MF control
AF drive speed
AF area disp.
FocusHoldButton
3 4
Red eye reduc.
Exp.comp.set
Bracket order
Auto review
Auto off w/ VF
Rec.info.disp.
Img.orientation
Flash mode
Flash control
• Power ratio
Flash compens.
ISO Auto max.
ISO Auto min.
Memory
Rec mode reset
AEL button
Ctrl dial setup
Dial exp.comp
Ctrl dial lock
Button ops.
Release w/oCard
Release w/oLens
Custom reset
92
Page 93

Playback menu (pages 114 to 119)
1 2
Delete
Format
Protect
DPOF setup
• Date imprint
• Index print
PlaybackDisplay
Setup menu (pages 120 to 126)
1 2 3
LCD brightness
Info.disp.time
Power save
Video output
HDMI output
Language
Date/Time setup
Memory card
File number
Folder name
Select folder
• New folder
USB connection
• MassStrg.card
For details on the operation 1 page 32
Slide show
• Interval
Using the menu
Menu start
Delete confirm.
Audio signals
Cleaning mode
Reset default
93
Page 94

Recording menu 1
Recording menu
For details on the operation 1 page 32
The default settings are marked with .
Image size
A digital image is made up of a collection of small dots called pixels.
“Image size” is shown by the number of pixels. Although you cannot see the differences on
the screen of the camera, the fine detail and data processing time differ when the image is
printed or displayed on a computer screen.
Pixel
Pixels
1 Image size: L
2 Image size: S
Many pixels
(Fine image
quality and large
file size)
Few pixels
(Rough image
quality but small
file size)
[Aspect ratio]: [3:2]
L:12M
M:6.4M
S:3.0M
4272 × 2848 pixels
3104 × 2064 pixels
2128 × 1424 pixels
[Aspect ratio]: [16:9]
L:10M
M:5.4M
S:2.6M
• When you select a RAW file with [Quality], the image size of the RAW file corresponds to L. This size is
not displayed on the LCD monitor.
• You can also use the Fn (Function) button for operations (page 30).
4272 × 2400 pixels
3104 × 1744 pixels
2128 × 1200 pixels
94
Page 95

For details on the operation 1 page 32
z Selecting image size for use
Refer to the following table when selecting the image size.
Image size Usage guidelines No. of
L Larger
M For printing in A4 size or high density images in
S For recording a large number of images
Smaller
* This is a size larger than A3 size. You can print images with a margin around the A3 size image.
For storing important images or printing A3/A3+*
size or fine A4 size images
A5 size
For creating web pages
images
Printing
Less
More
Aspect ratio
You can select the aspect ratio to suit your purpose.
3:2
16:9
A normal ratio.
An HDTV ratio. [16:9] is recommended when viewing on an
HDTV.
Fine
Rough
Recording menu
When [16:9] is selected, make your composition in this area.
• RAW files recorded in 16:9 ratio are displayed in 16:9 ratio using compatible software, such as “Image
Data Converter SR”, but they are displayed in 3:2 ratio if the software is not compatible with this ratio.
95
Page 96

For details on the operation 1 page 32
Quality
The image compression rate determines the image quality. As the file size of the
uncompressed image will be larger, it is common for a digital camera to compress the
recorded image.
RAW ( )
cRAW* ()
RAW & JPEG ( )
cRAW & JPEG* ()
Extra fine ( )
Fine ( )
Standard ( )
File format: RAW (raw data)
A RAW file is the raw material to be processed on the
computer for professional purposes. The file can be opened
with the “Image Data Converter SR” provided on the CDROM (supplied) (page 139). “c” of “cRAW” means
“compressed”.
• The image size is fixed to the maximum size. The image size is
not displayed on the LCD monitor.
File format: RAW (raw data) + JPEG
A RAW image and a JPEG image are created at the same
time. This is suitable when you need two image files, a JPEG
for viewing, and a RAW for editing. The image quality is
fixed to [Fine].
File format: JPEG
The image is compressed in the JPEG format
when recorded. The higher the compression
rate, the smaller the file size. This will allow
more files to be recorded in one memory
card, but the image quality will be lower.
Once the image quality is lowered, it cannot
be restored on a computer afterwards. If you
plan to process or edit the image file later,
consider the image quality carefully when
selecting the setting.
Compression
ratio
Low
High
* The data is compressed up to about 60 to 70% compared to an image not compressed. Use this setting
when you want to increase the number of images that can be taken.
• You can also use the Fn (Function) button for operation (page 30).
• For details on the number of images that can be taken when the image quality is changed, see page 24.
z About RAW files
The RAW format file is the raw data yet to go through any kind of digital processing. A RAW file is
different from a more common file format such as JPEG in that it is the raw material to be processed for
professional purposes. You need the “Image Data Converter SR” software included on the CD-ROM
(supplied) in order to open a RAW file recorded on this camera. With this software, a RAW file can be
opened and converted to a common format, such as JPEG or TIFF, and its white balance, color saturation,
contrast, etc., can be readjusted.
96
Page 97

For details on the operation 1 page 32
• Recording a RAW format image entails the following limitations.
– The RAW file cannot be printed using a DPOF (print) designated printer or a PictBridge compliant
printer.
– Unlike a JPEG image, a RAW image does not go through any basic image processing, so its colors
cannot be accurately reproduced in playback mode or on an auto review screen. If the data is correctly
recorded, accurate colors can be reproduced on a computer.
• You cannot verify the effects of D-Range Optimizer other than those of (Standard) if you play back
and enlarge an image recorded in RAW or cRAW format.
D-RangeOptimizer
You can analyze the recorded scene and make automatic adjustments to optimize the image
quality.
Off ( )
For details, see page 66.
Standard ( )
Advanced Auto ( )
Advanced: Level ( )
–
Creative Style
You can select image styles most suitable for the recorded scenes and purposes.
Standard ( )
For details, see page 67.
Vivid ( )
Neutral ( )
Adobe RGB ( )
1
2
3
Recording menu
97
Page 98

Custom button
You can assign a function to the C (Custom) button.
AF lock
AF/MF control
D.O.F.preview
ISO
White balance
Exposure comp.
Flash compens.
Drive mode
AF area
Image size
Quality
Creative Style
D-RangeOptimizer
Flash mode
Memory
For details, see page 81.
For details on the operation 1 page 32
Exposure step
You can select a 0.5 or 0.3 compensation increment for shutter speed, aperture, and exposure.
0.5 EV
0.3 EV
Changes in 1/2 EV steps
Changes in 1/3 EV steps
98
Page 99

Recording menu 2
The default settings are marked with .
Flash mode
You can select the flash mode.
Autoflash ( )
Fill-flash ( )
Rear sync. ( )
Wireless ( )
For details, see page 73.
For details on the operation 1 page 32
Flash control
You can select the flash control mode to set the amount of flash light.
ADI flash
Pre-flash TTL
Manual flash
ADI: Advanced Distance Integration
TTL: Through the lens
• When the distance between the subject and the external flash (not supplied) cannot be determined,
(wireless flash shooting using an external flash (not supplied), shooting with an off-camera flash using a
cable, shooting with a macro twin flash, etc.) the camera automatically selects Pre-flash TTL mode.
• Select [Pre-flash TTL] in the following cases, as the camera cannot obtain accurate distance information
with ADI flash.
– A wide panel is attached to the HVL-F36AM flash.
– A diffuser is used for flash shooting.
– A filter with an exposure factor, such as an ND filter, is used.
– A close-up lens is used.
• ADI flash is only available in combination with the lens that is provided with a distance encoder. To
determine the lens is equipped with a distance encoder, refer to the operating instructions supplied with
the lens.
A pre-flash is fired right before shooting, and the camera sets
the amount of flash light by measuring the amount of
reflected light from the pre-flash and the associated distance
information.
A pre-flash is fired right before shooting, and the camera sets
the amount of flash light by measuring only the amount of
reflected light from the pre-flash. The distance information is
not used in the calculation.
The built-in flash fires with certain amount of flash light
regardless of the brightness of a subject. This option is
disabled when [Autoflash] is selected.
Recording menu
99
Page 100

For details on the operation 1 page 32
Power ratio
You can select the amount of light when [Flash control] is set to [Manual flash].
1/1
1/2
1/4
1/8
1/16
• Under the condition in meter at ISO 100
Guide number approx. 12
Guide number approx. 8.4
Guide number approx. 6
Guide number approx. 4.2
Guide number approx. 3
Flash compens.
For details, see page 75.
ISO Auto max.
You can select the upper limit of an ISO AUTO value when the mode dial is set to P, A, or S,
and ISO is set to [AUTO].
1600
800
400
Automatically adjusts ISO with the selected value set to the
upper limit.
ISO Auto min.
You can select the lower limit of an ISO AUTO value when the mode dial is set to P, A, or S,
and ISO is set to [AUTO].
400
200
Automatically adjusts ISO with the selected value set to the
lower limit.
100
 Loading...