

Page 1

Cyber-shot User Guide
1
PrintSearch
Top page
Before Use
Confirming the operation
method
Shooting
Viewing
Useful shooting functions
Useful viewing functions
Changing settings
Viewing images on a TV
Using with your computer
Printing
Troubleshooting
Precautions/About this camera
Contents list
DSC-TF1
User Guide
Use this manual if you encounter any problems, or have any questions about the camera.
Back to top
Copyright 2013 Sony Corporation
Page 2
Cyber-shot User Guide
2
PrintSearch
Top page > Before Use
Before Use
Confirming the operation
method
Shooting
Viewing
Useful shooting functions
Useful viewing functions
Changing settings
Viewing images on a TV
Using with your computer
Printing
Troubleshooting
Precautions/About this camera
Contents list
Before Use
How to use this User Guide
How to use this User Guide
Names of parts and list of icons displayed on the screen
Names of parts
List of icons displayed on the screen
Using the wrist strap
Using the wrist strap
Using the internal memory
Using the internal memory
Using the In-Camera guide
In-Camera Guide
Back to top
Copyright 2013 Sony Corporation
Page 3
Cyber-shot User Guide
3
PrintSearch
Top page > Confirming the operation method
Before Use
Confirming the operation
method
Shooting
Viewing
Useful shooting functions
Useful viewing functions
Changing settings
Viewing images on a TV
Using with your computer
Printing
Troubleshooting
Precautions/About this camera
Contents list
Confirming the operation method
Confirming the operation method
Using the control button
Using MENU items (Shooting)
Using MENU items (Viewing)
Changing camera settings
Back to top
Copyright 2013 Sony Corporation
Page 4
Cyber-shot User Guide
4
PrintSearch
Top page > Shooting
Before Use
Confirming the operation
method
Shooting
Viewing
Useful shooting functions
Useful viewing functions
Changing settings
Viewing images on a TV
Using with your computer
Printing
Troubleshooting
Precautions/About this camera
Contents list
Shooting
Shooting still images
Shooting still images
Zoom
Shooting movies
Shooting movies
Selecting the shooting mode based on the subject
List of mode button functions
REC Mode
Intelligent Auto
Program Auto
Picture Effect
Scene Selection
Shooting panoramic images
Back to top
Copyright 2013 Sony Corporation
Page 5
Cyber-shot User Guide
5
PrintSearch
Top page > Viewing
Before Use
Confirming the operation
method
Shooting
Viewing
Useful shooting functions
Useful viewing functions
Changing settings
Viewing images on a TV
Using with your computer
Printing
Troubleshooting
Precautions/About this camera
Contents list
Viewing
Viewing still images
Viewing still images
Playback zoom
Image Index
Deleting images
Deleting images
Viewing movies
Viewing movies
Viewing panorama images
Scrolling panoramic images for display
Back to top
Copyright 2013 Sony Corporation
Page 6
Cyber-shot User Guide
6
PrintSearch
Top page > Useful shooting functions
Before Use
Confirming the operation
method
Shooting
Viewing
Useful shooting functions
Useful viewing functions
Changing settings
Viewing images on a TV
Using with your computer
Printing
Troubleshooting
Precautions/About this camera
Contents list
Useful shooting functions
Functions available for each shooting mode
Functions available for each shooting mode
MENU items available for each shooting mode
Using shooting functions
Tracking focus
Flash
Self-Timer
Movie shooting scene
Panorama Shooting Scene
Easy Mode
Color hue
Extracted Color
Soft Skin Effect
Still Image Size / Panorama Image Size / Movie Size
Shooting Direction
Macro
Exposure Compensation
ISO
White Balance
Underwater White Balance
Focus
Metering Mode
Cont. Shooting Settings
Smile Shutter
Smile Detection Sensitivity
Face Detection
DRO
Back to top
Copyright 2013 Sony Corporation
Page 7
Cyber-shot User Guide
7
PrintSearch
Top page > Useful viewing functions
Before Use
Confirming the operation
method
Shooting
Viewing
Useful shooting functions
Useful viewing functions
Changing settings
Viewing images on a TV
Using with your computer
Printing
Troubleshooting
Precautions/About this camera
Contents list
Useful viewing functions
List of viewing MENU items
List of viewing MENU items
MENU items (Viewing)
Easy Mode
Beauty Effect
Retouch
Delete
Slideshow
Protect
Print (DPOF)
Rotate
Back to top
Copyright 2013 Sony Corporation
Page 8
Cyber-shot User Guide
8
PrintSearch
Top page > Changing settings
Before Use
Confirming the operation
method
Shooting
Viewing
Useful shooting functions
Useful viewing functions
Changing settings
Viewing images on a TV
Using with your computer
Printing
Troubleshooting
Precautions/About this camera
Contents list
Changing settings
Shooting Settings
AF Illuminator
Grid Line
Disp. Resolution
Digital Zoom
Red Eye Reduction
Write Date
Main Settings
Beep
Panel Brightness
Language Setting
Display color
Initialize
Display Setting
Function Guide
Video Out
USB Connect Setting
USB Power Supply
LUN Setting
Power Save
Memory Card Tool/Internal Memory Tool
Format
Create REC.Folder
Change REC.Folder
Delete REC.Folder
Copy
File Number
Clock Settings
Area Setting
Date & Time Setting
Copyright 2013 Sony Corporation
Back to top
Page 9
Cyber-shot User Guide
9
PrintSearch
Top page > Viewing images on a TV
Before Use
Confirming the operation
method
Shooting
Viewing
Useful shooting functions
Useful viewing functions
Changing settings
Viewing images on a TV
Using with your computer
Printing
Troubleshooting
Precautions/About this camera
Contents list
Viewing images on a TV
Viewing an image on a Standard Definition (SD) TV
Viewing an image on a Standard Definition (SD) TV
Back to top
Copyright 2013 Sony Corporation
Page 10
Cyber-shot User Guide
10
PrintSearch
Top page > Using with your computer
Before Use
Confirming the operation
method
Shooting
Viewing
Useful shooting functions
Useful viewing functions
Changing settings
Viewing images on a TV
Using with your computer
Printing
Troubleshooting
Precautions/About this camera
Contents list
Using with your computer
Recommended computer environment
Recommended computer environment
Using the software
“PlayMemories Home” (Windows)
Installing “PlayMemories Home” (Windows)
Software for Mac
Importing images to a computer
Connecting the camera to the computer
Importing images to a computer
Disconnecting the camera from the computer
Back to top
Copyright 2013 Sony Corporation
Page 11
Cyber-shot User Guide
11
PrintSearch
Top page > Printing
Before Use
Confirming the operation
method
Shooting
Viewing
Useful shooting functions
Useful viewing functions
Changing settings
Viewing images on a TV
Using with your computer
Printing
Troubleshooting
Precautions/About this camera
Contents list
Printing
Printing still images
Printing still images
Back to top
Copyright 2013 Sony Corporation
Page 12

Cyber-shot User Guide
12
PrintSearch
Top page > Troubleshooting
Before Use
Confirming the operation
method
Shooting
Viewing
Useful shooting functions
Useful viewing functions
Changing settings
Viewing images on a TV
Using with your computer
Printing
Troubleshooting
Precautions/About this camera
Contents list
Troubleshooting
If you have problems
If you have problems
Troubleshooting
Battery pack and power
Shooting still images/movies
Viewing images
Computers
Memory card
Internal memory
Printing
Others
Warning indicators and messages
Messages
Situations this camera has difficulty handling
Situations this camera has difficulty handling
Back to top
Copyright 2013 Sony Corporation
Page 13
Cyber-shot User Guide
13
PrintSearch
Top page > Precautions/About this camera
Before Use
Confirming the operation
method
Shooting
Viewing
Useful shooting functions
Useful viewing functions
Changing settings
Viewing images on a TV
Using with your computer
Printing
Troubleshooting
Precautions/About this camera
Contents list
Precautions/About this camera
Precautions
Precautions
Backup of various settings, date and time
Battery pack
Notes on charging the battery pack
Memory card
On cleaning
On cleaning
Number of still images and recordable time of movies
Number of still images
Recordable time of movies
Using the camera abroad
On TV color systems
Trademarks
Trademarks
Back to top
Copyright 2013 Sony Corporation
Page 14
Cyber-shot User Guide
Back to top
14
PrintSearch
Top page > Contents list
Before Use
Confirming the operation
method
Shooting
Viewing
Useful shooting functions
Useful viewing functions
Changing settings
Viewing images on a TV
Using with your computer
Printing
Troubleshooting
Precautions/About this camera
Contents list
Contents list
Before Use
How to use this User Guide
How to use this User Guide
Names of parts and list of icons displayed on the screen
Names of parts
List of icons displayed on the screen
Using the wrist strap
Using the wrist strap
Using the internal memory
Using the internal memory
Using the In-Camera guide
In-Camera Guide
Back to top
Confirming the operation method
Confirming the operation method
Using the control button
Using MENU items (Shooting)
Using MENU items (Viewing)
Changing camera settings
Shooting
Shooting still images
Shooting still images
Zoom
Shooting movies
Shooting movies
Selecting the shooting mode based on the subject
List of mode button functions
REC Mode
Intelligent Auto
Program Auto
Picture Effect
Scene Selection
Shooting panoramic images
Back to top
Page 15

Viewing
15
Viewing still images
Viewing still images
Playback zoom
Image Index
Deleting images
Deleting images
Viewing movies
Viewing movies
Viewing panorama images
Scrolling panoramic images for display
Useful shooting functions
Functions available for each shooting mode
Functions available for each shooting mode
MENU items available for each shooting mode
Using shooting functions
Tracking focus
Flash
Self-Timer
Movie shooting scene
Panorama Shooting Scene
Easy Mode
Color hue
Extracted Color
Soft Skin Effect
Still Image Size / Panorama Image Size / Movie Size
Shooting Direction
Macro
Exposure Compensation
ISO
White Balance
Underwater White Balance
Focus
Metering Mode
Cont. Shooting Settings
Smile Shutter
Smile Detection Sensitivity
Face Detection
DRO
Back to top
Back to top
Useful viewing functions
List of viewing MENU items
Page 16

List of viewing MENU items
16
MENU items (Viewing)
Easy Mode
Beauty Effect
Retouch
Delete
Slideshow
Protect
Print (DPOF)
Rotate
Changing settings
Shooting Settings
AF Illuminator
Grid Line
Disp. Resolution
Digital Zoom
Red Eye Reduction
Write Date
Back to top
Main Settings
Beep
Panel Brightness
Language Setting
Display color
Initialize
Display Setting
Function Guide
Video Out
USB Connect Setting
USB Power Supply
LUN Setting
Power Save
Memory Card Tool/Internal Memory Tool
Format
Create REC.Folder
Change REC.Folder
Delete REC.Folder
Copy
File Number
Clock Settings
Area Setting
Date & Time Setting
Back to top
Viewing images on a TV
Page 17

Viewing an image on a Standard Definition (SD) TV
Viewing an image on a Standard Definition (SD) TV
17
Using with your computer
Recommended computer environment
Recommended computer environment
Using the software
“PlayMemories Home” (Windows)
Installing “PlayMemories Home” (Windows)
Software for Mac
Importing images to a computer
Connecting the camera to the computer
Importing images to a computer
Disconnecting the camera from the computer
Printing
Printing still images
Printing still images
Back to top
Back to top
Troubleshooting
If you have problems
If you have problems
Troubleshooting
Battery pack and power
Shooting still images/movies
Viewing images
Computers
Memory card
Internal memory
Printing
Others
Warning indicators and messages
Messages
Situations this camera has difficulty handling
Situations this camera has difficulty handling
Back to top
Back to top
Precautions/About this camera
Precautions
Precautions
Backup of various settings, date and time
Battery pack
Page 18

Notes on charging the battery pack
18
Memory card
On cleaning
On cleaning
Number of still images and recordable time of movies
Number of still images
Recordable time of movies
Using the camera abroad
On TV color systems
Trademarks
Trademarks
Copyright 2013 Sony Corporation
Back to top
Page 19
Cyber-shot User Guide
19
Before Use
PrintSearch
Top page > Before Use > How to use this User Guide > How to use this User Guide
Confirming the operation
method
Shooting
Viewing
Useful shooting functions
Useful viewing functions
Changing settings
Viewing images on a TV
Using with your computer
Printing
Troubleshooting
Precautions/About this camera
Contents list
How to use this User Guide
Selecting a topic to display
Searching a topic by keyword
Returning to a previous page
Printing out a page
Marks and notations used in this User Guide
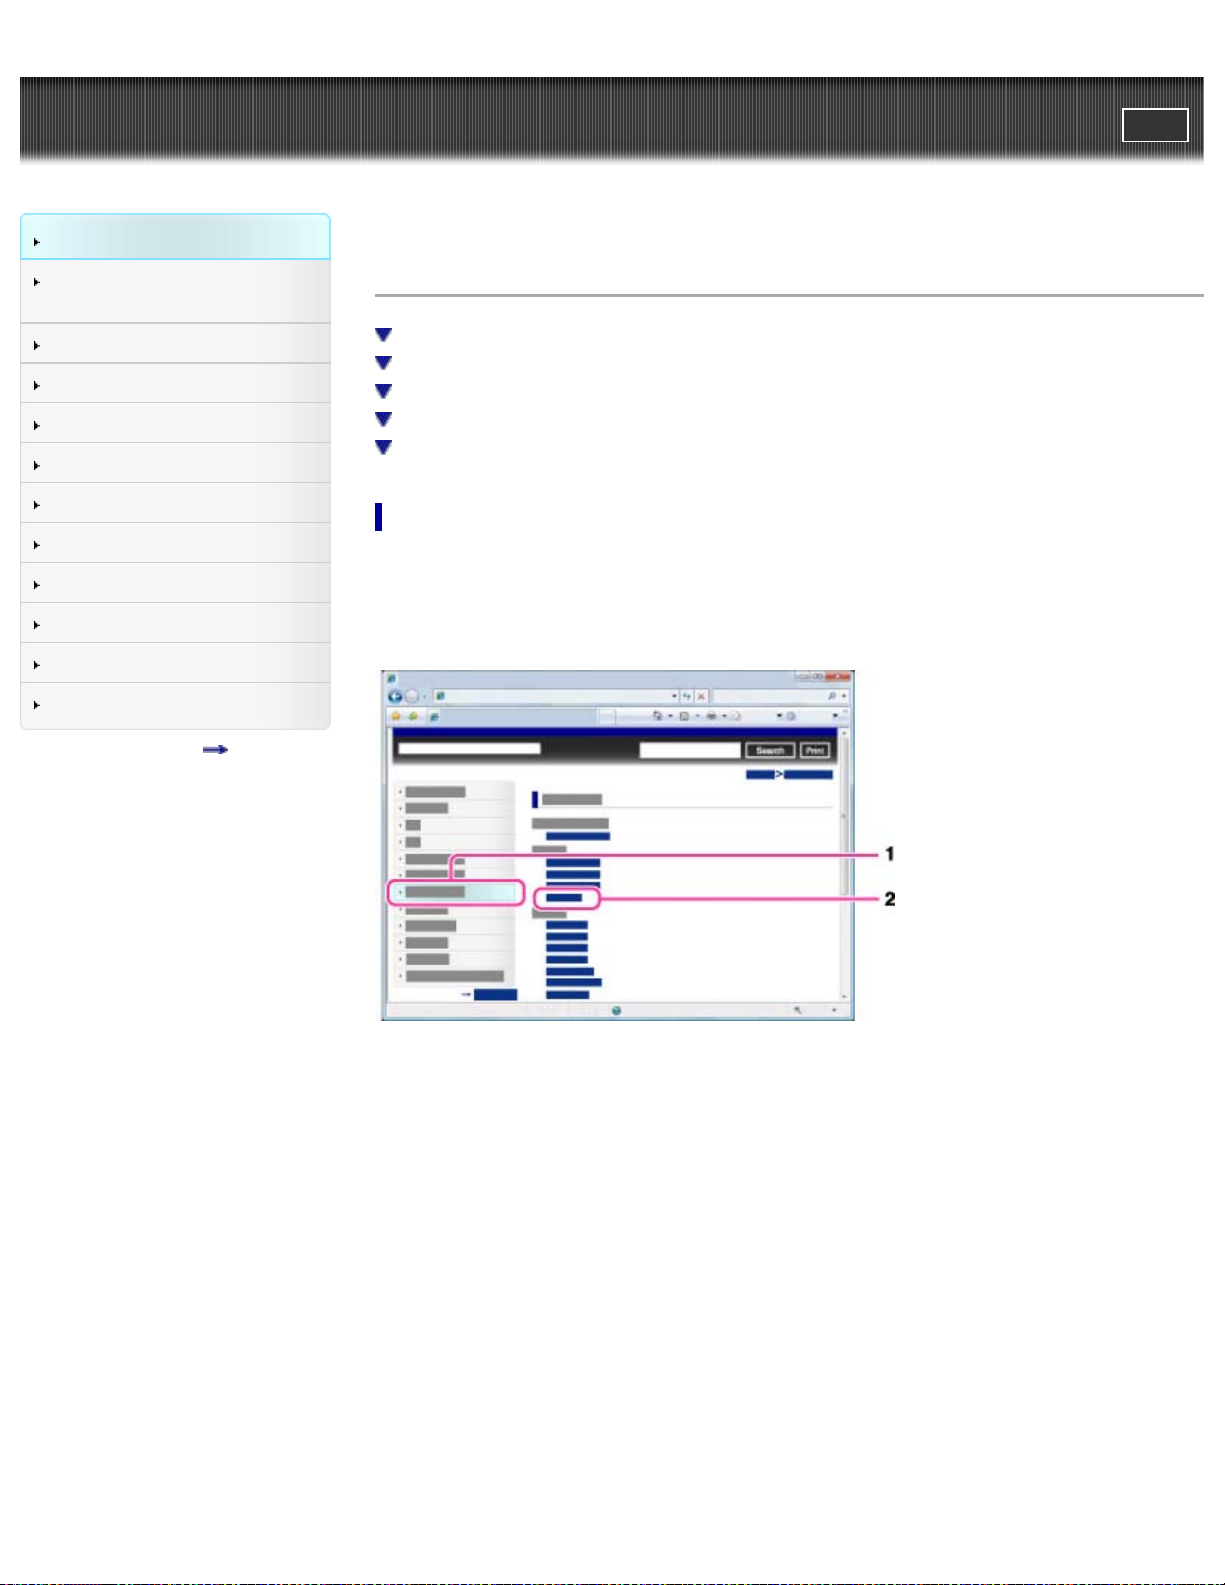
Selecting a topic to display
The following illustrations take Internet Explorer 7 as an example.
1. Click a title in the side bar on the left of the browser window.
The title’s topic list appears in the right pane.
2. Click a topic title in the list.
Descriptions appear in the right pane.
Page 20
Changing the font size
20
Change the font size by changing the setting of your web browser. For how to change the font size
setting, refer to the Help of your web browser.
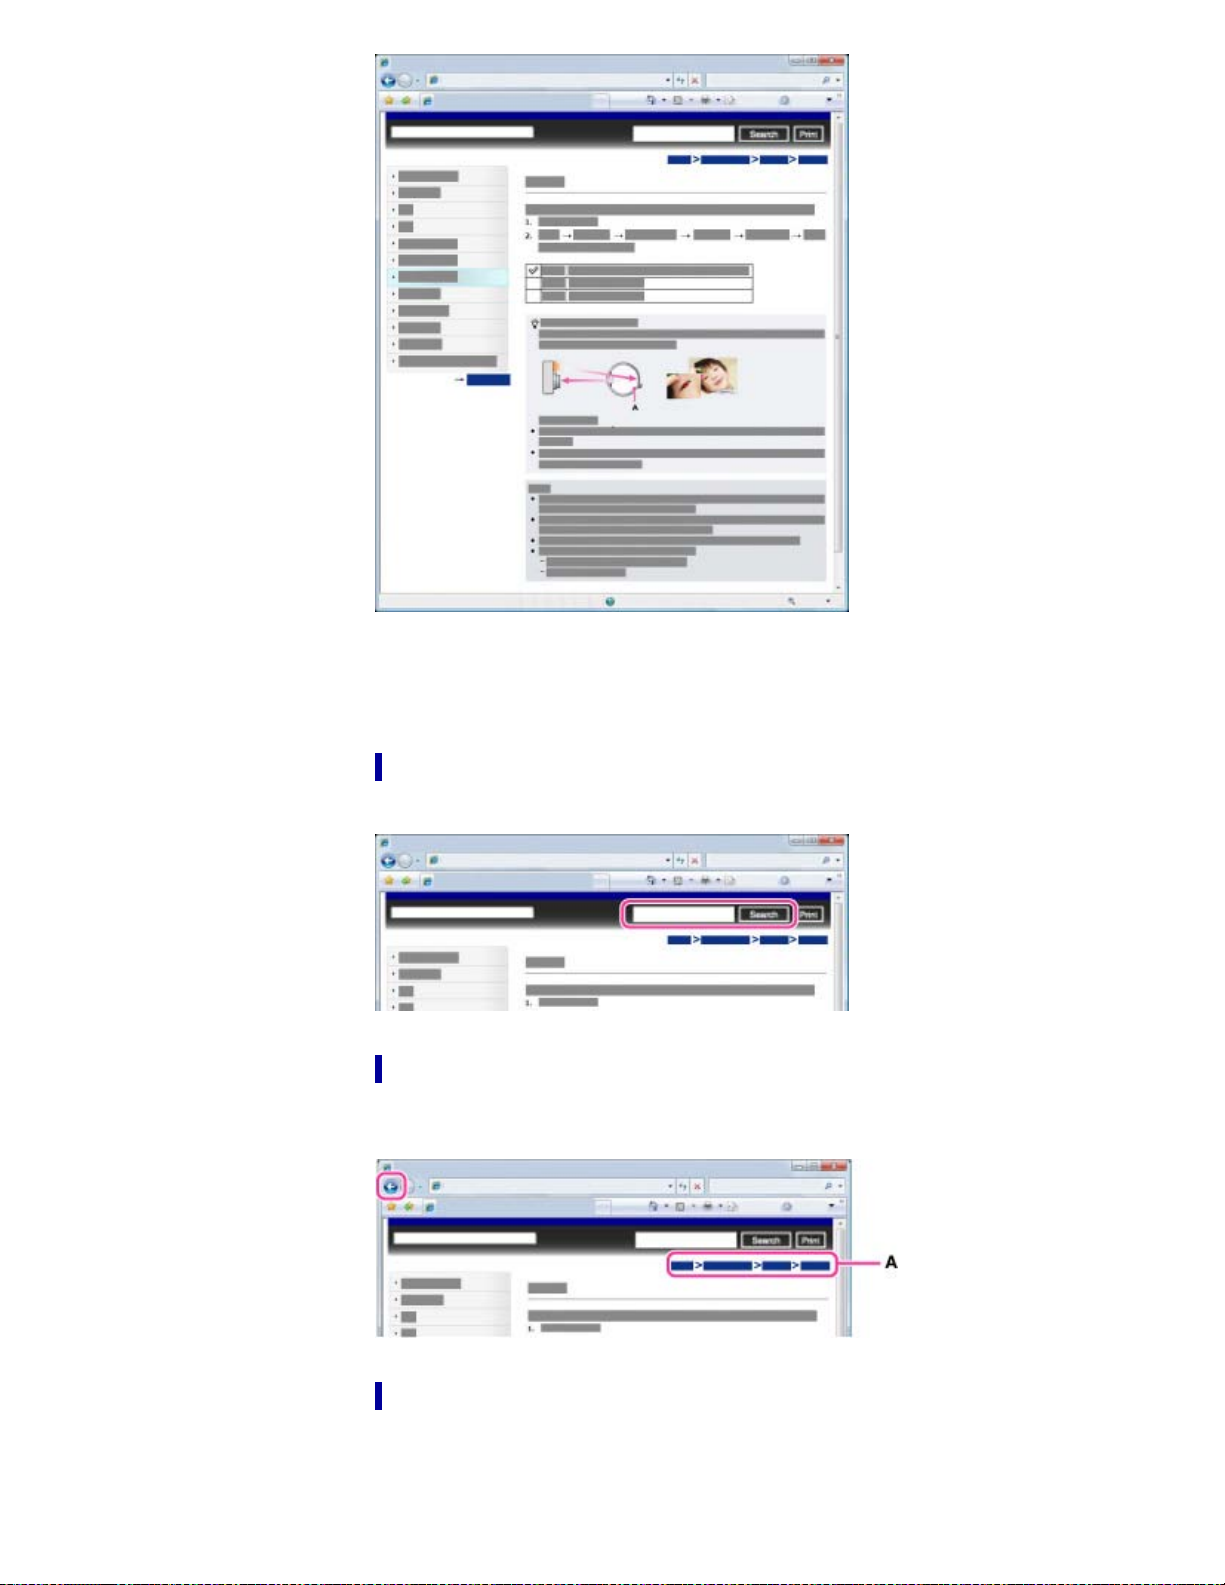
Searching a topic by keyword
Enter the keyword in the search window, then click the [Search] button.
Returning to a previous page
Use the browser’s back button to return to a previously viewed page, or use the breadcrumb trail
navigation (A) to display the desired page.
Printing out a page
Click the [Print] button to print out the page you are viewing.
Page 21
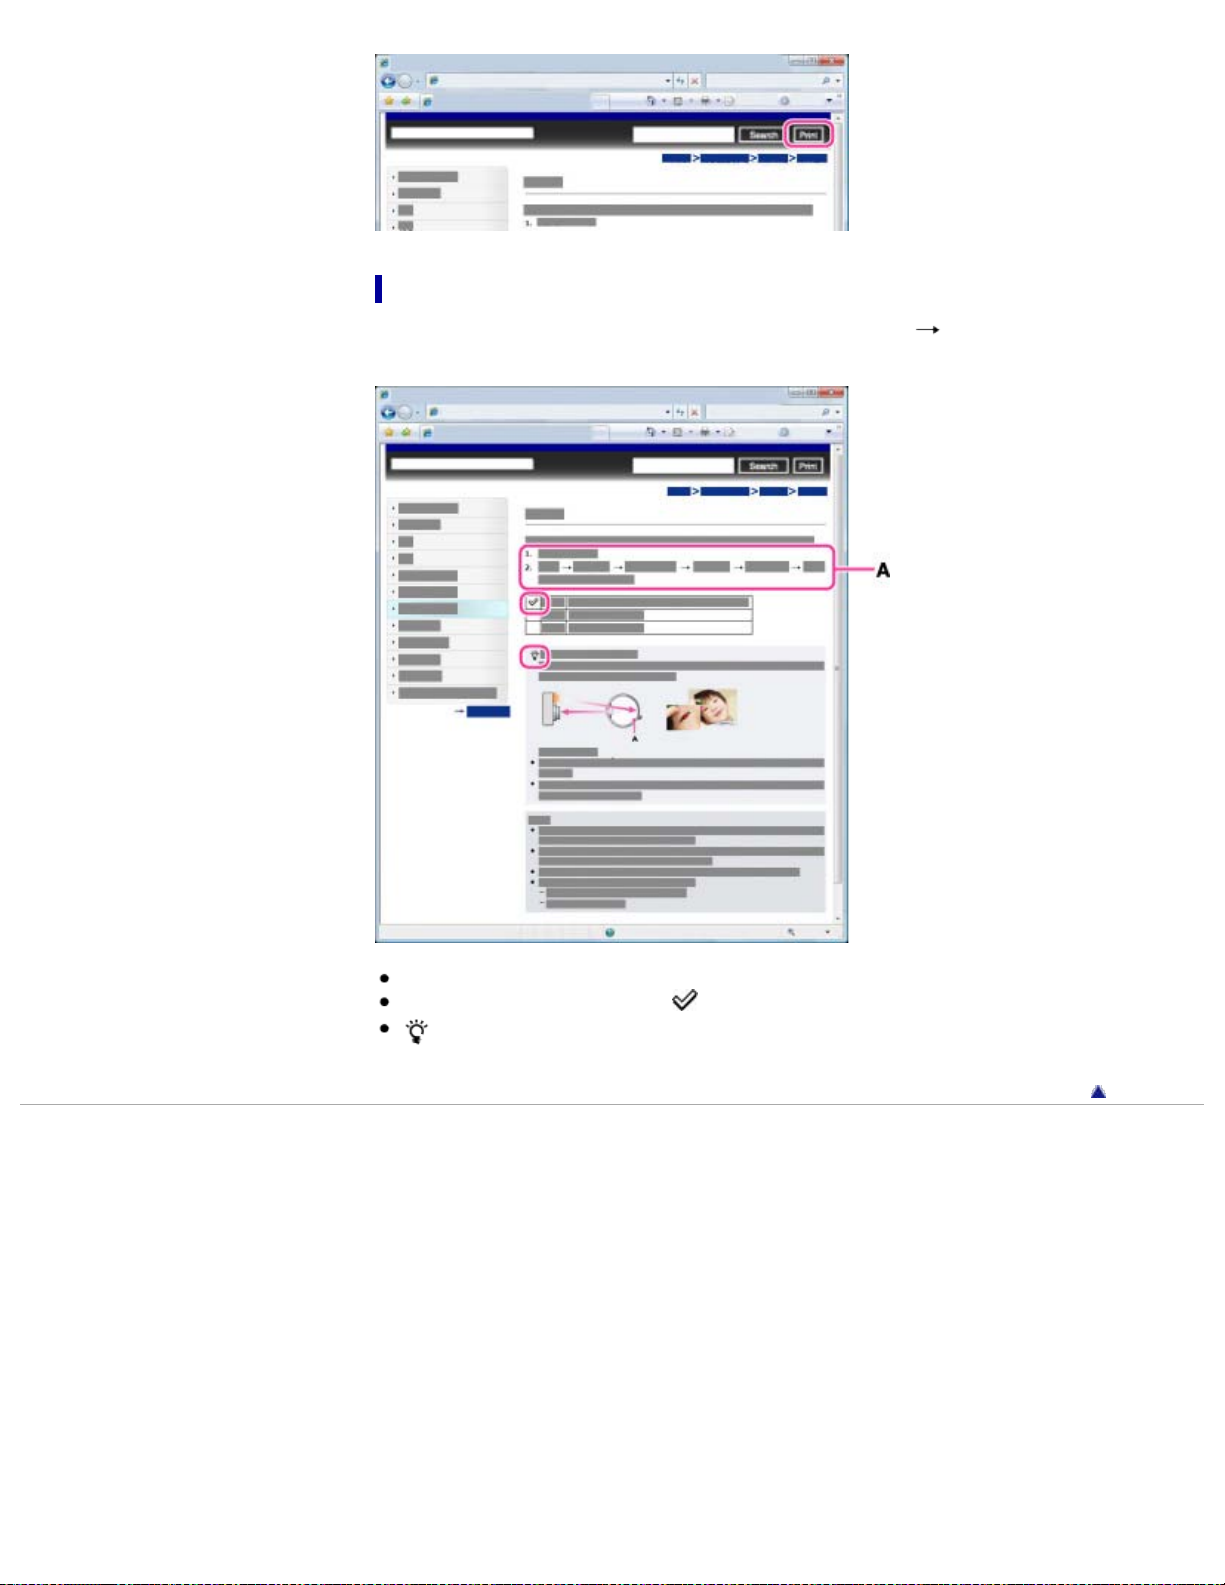
Marks and notations used in this User Guide
21
In this User Guide, the sequence of operations is shown by arrows ( ) (A).
Operate the camera in the order indicated.
Icons in the operating procedure sentences appear when the camera is in its default settings.
The default setting is indicated by
indicates information that is useful to know.
Copyright 2013 Sony Corporation
.
Back to top
Page 22
Cyber-shot User Guide
22
Before Use
PrintSearch
Top page > Before Use > Names of parts and list of icons displayed on the screen > Names of parts
Confirming the operation
method
Shooting
Viewing
Useful shooting functions
Useful viewing functions
Changing settings
Viewing images on a TV
Using with your computer
Printing
Troubleshooting
Precautions/About this camera
Contents list
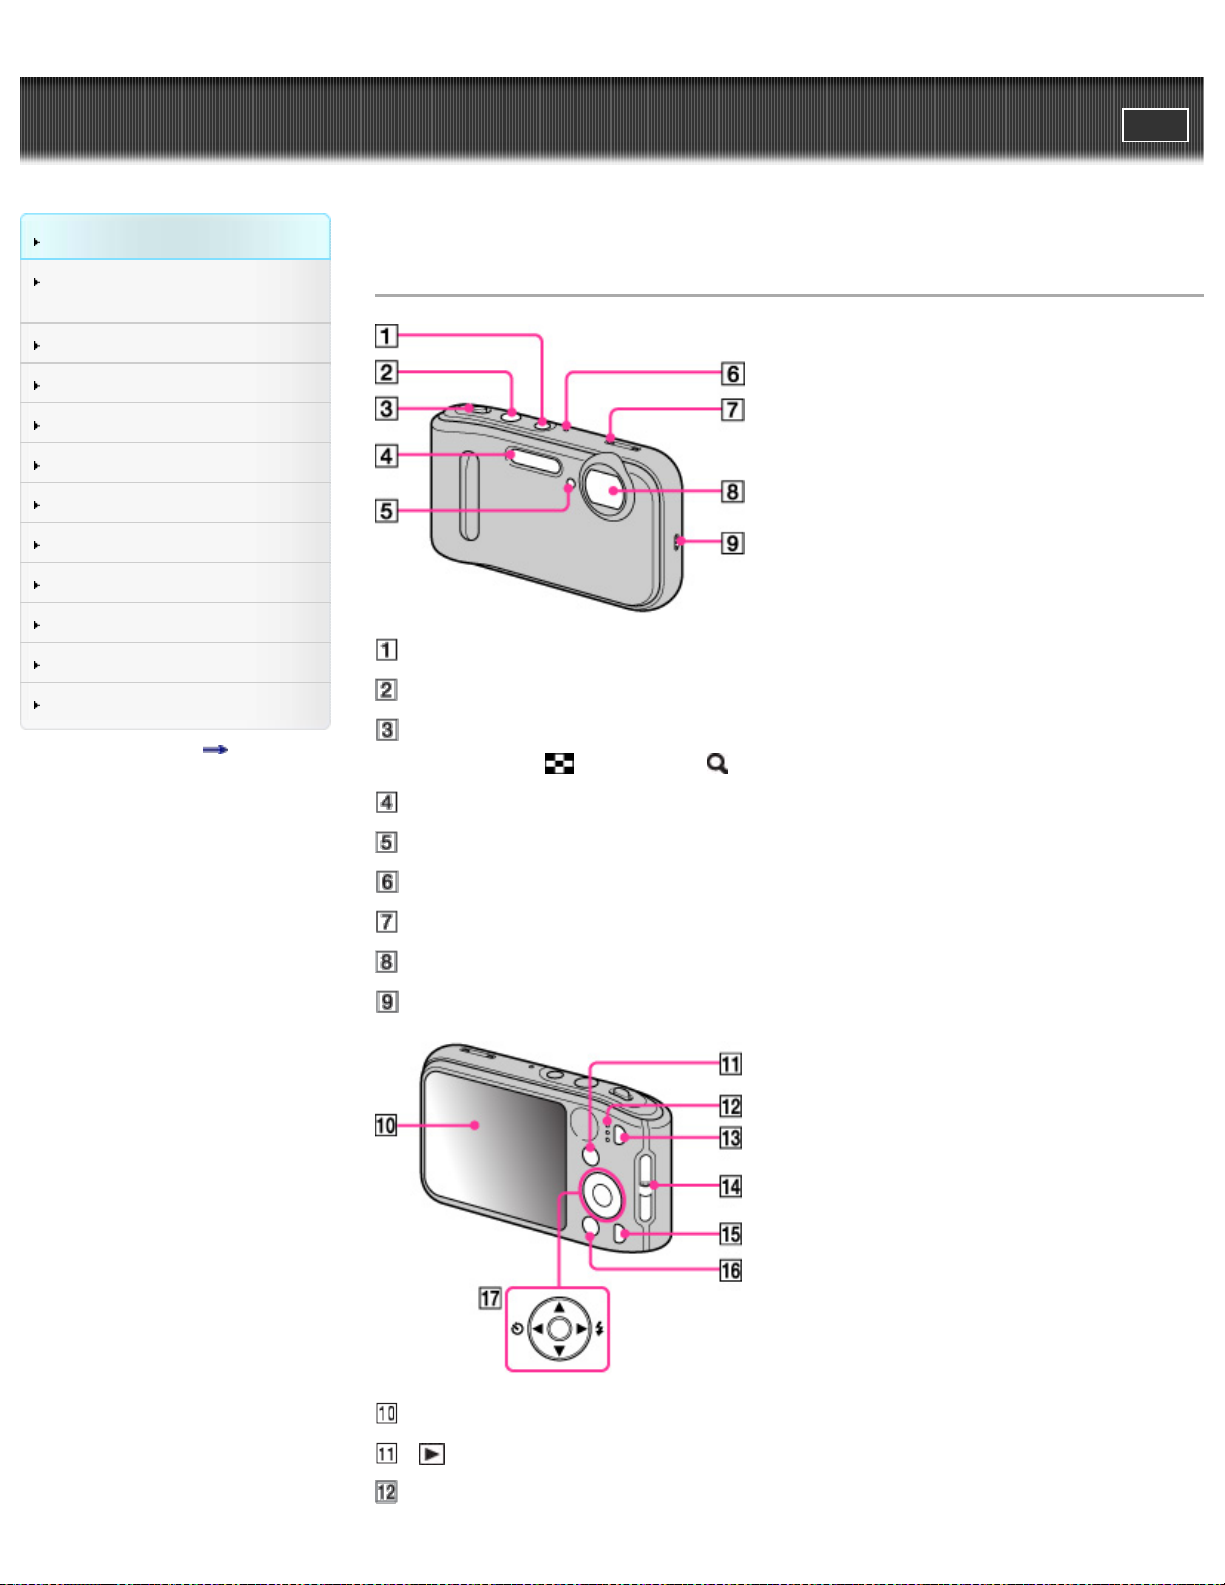
Names of parts
ON/OFF (Power) button
Shutter button
For shooting: W/T (zoom) lever
For viewing:
Flash
Self-timer lamp/Smile Shutter lamp/AF illuminator
(Index) lever/ (Playback zoom) lever
Charge lamp/Light sensor
Microphone
Lens
Speaker
LCD screen
(Playback) button
Mode lamp
Page 23
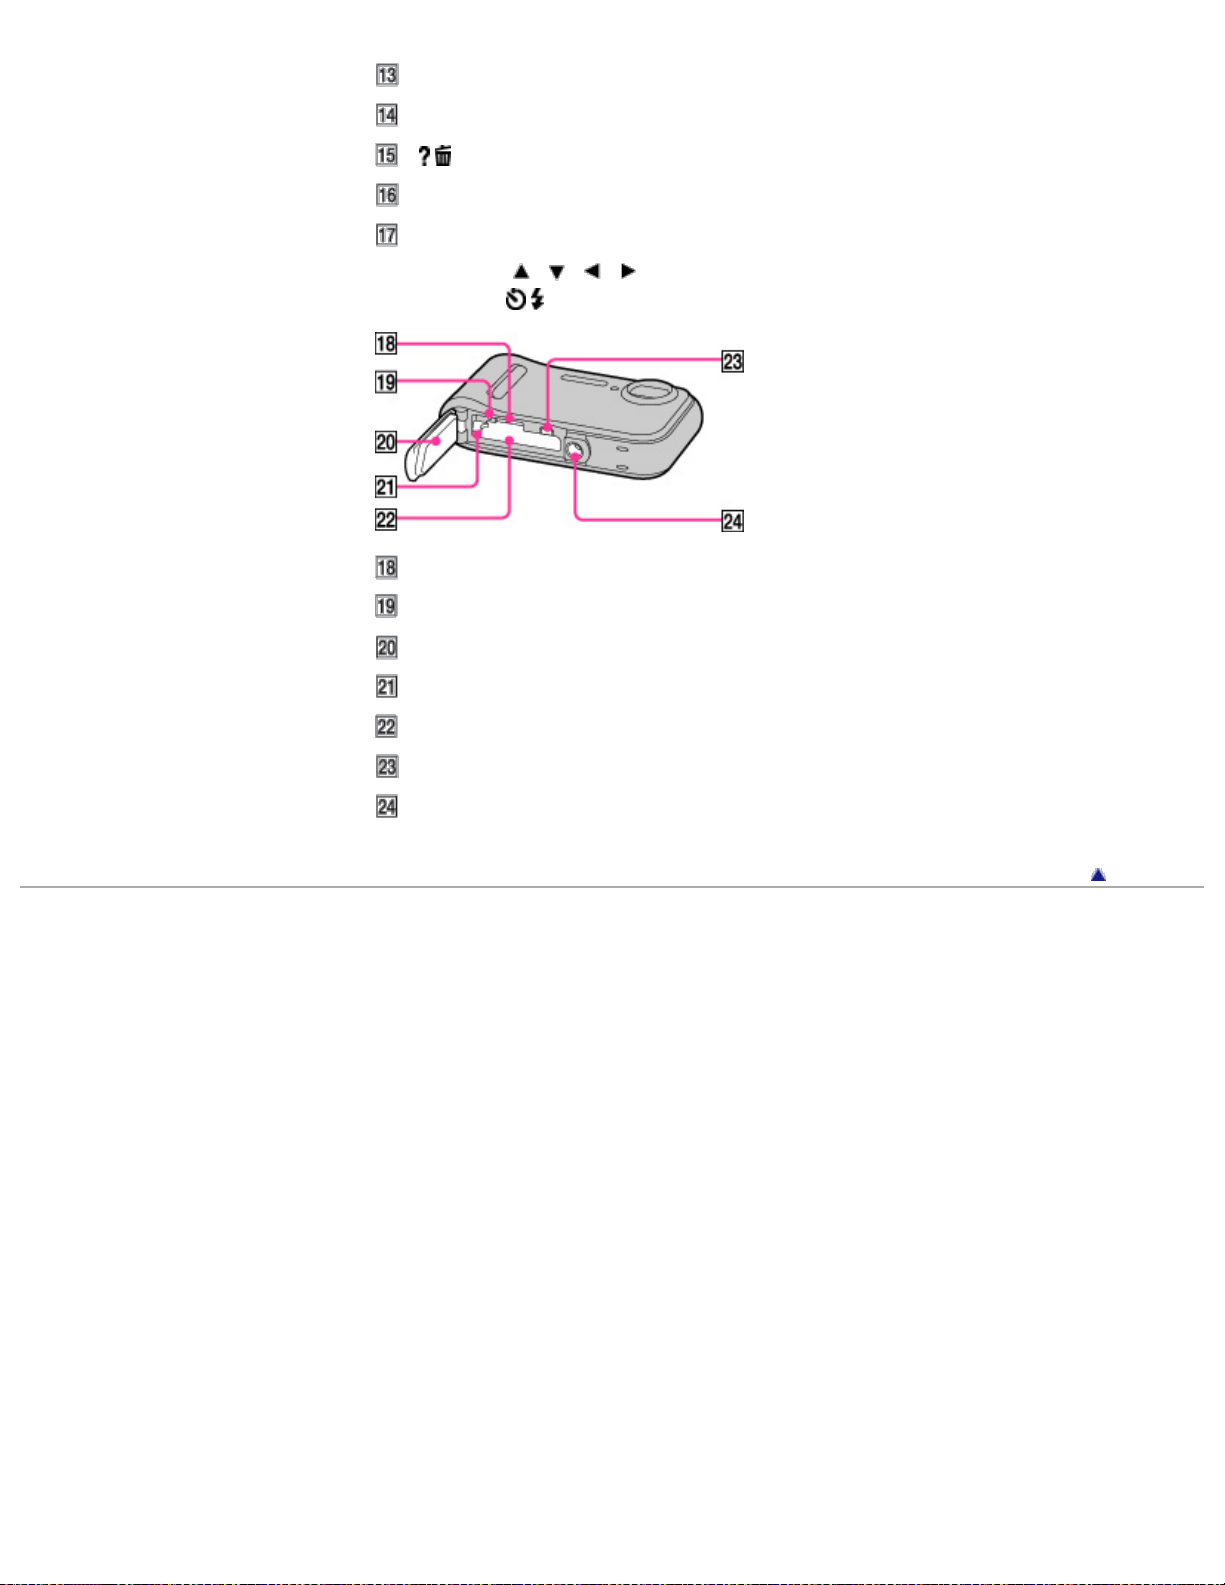
Mode button
23
Hook for wrist strap
/ (In-Camera Guide/Delete) button
MENU button
Control button
MENU on:
/ / /
MENU off: /
Memory card slot
Access lamp
Battery/Memory card cover
Battery eject lever
Battery insertion slot
USB / A/V OUT terminal
Tripod socket hole
Copyright 2013 Sony Corporation
Back to top
Page 24
Cyber-shot User Guide
24
Before Use
PrintSearch
Top page > Before Use > Names of parts and list of icons displayed on the screen > List of icons
displayed on the screen
Confirming the operation
method
Shooting
Viewing
Useful shooting functions
Useful viewing functions
Changing settings
Viewing images on a TV
Using with your computer
Printing
Troubleshooting
Precautions/About this camera
Contents list
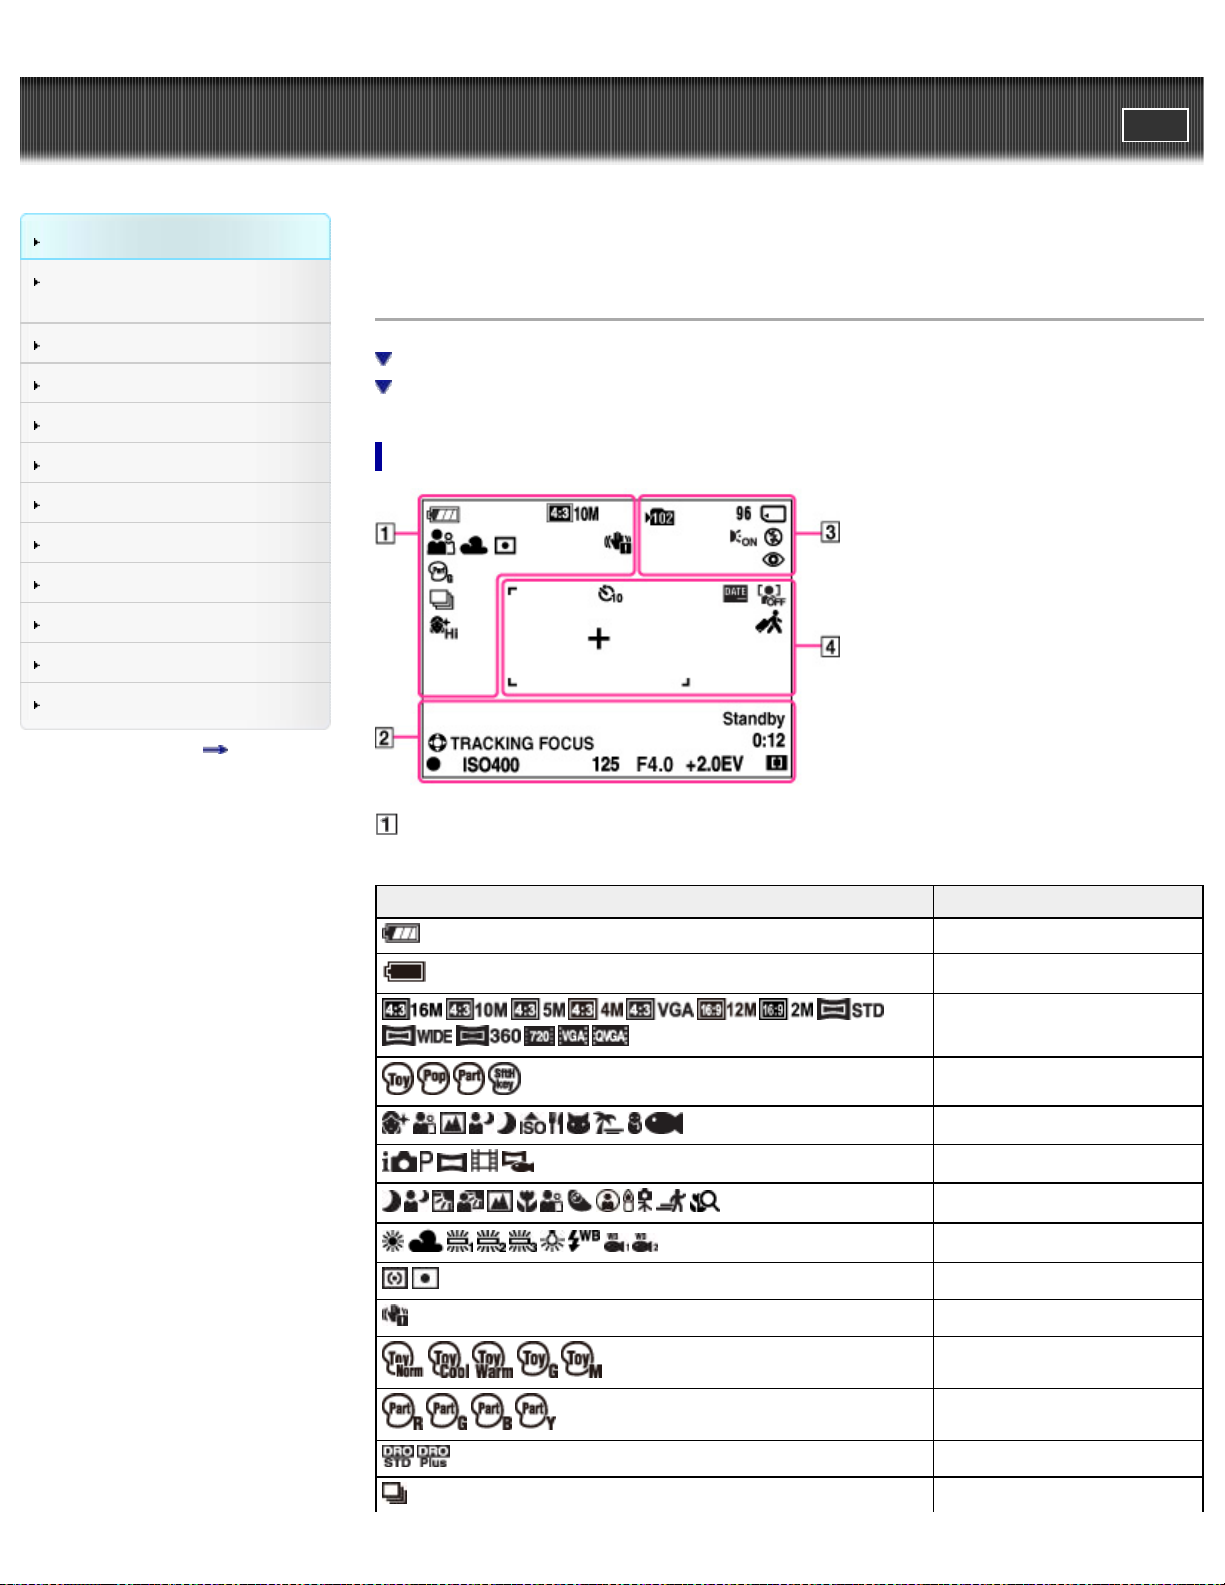
List of icons displayed on the screen
List of shooting mode icons
List of viewing mode icons
List of shooting mode icons
Display Indication
Battery charge remaining
Low battery warning
Image size/Panorama image
size/Movie size
Picture Effect
Scene Selection
Shooting mode
Scene Recognition icon
White Balance
Metering Mode
Vibration warning
Color hue
Extracted Color
DRO
Cont. Shooting Settings
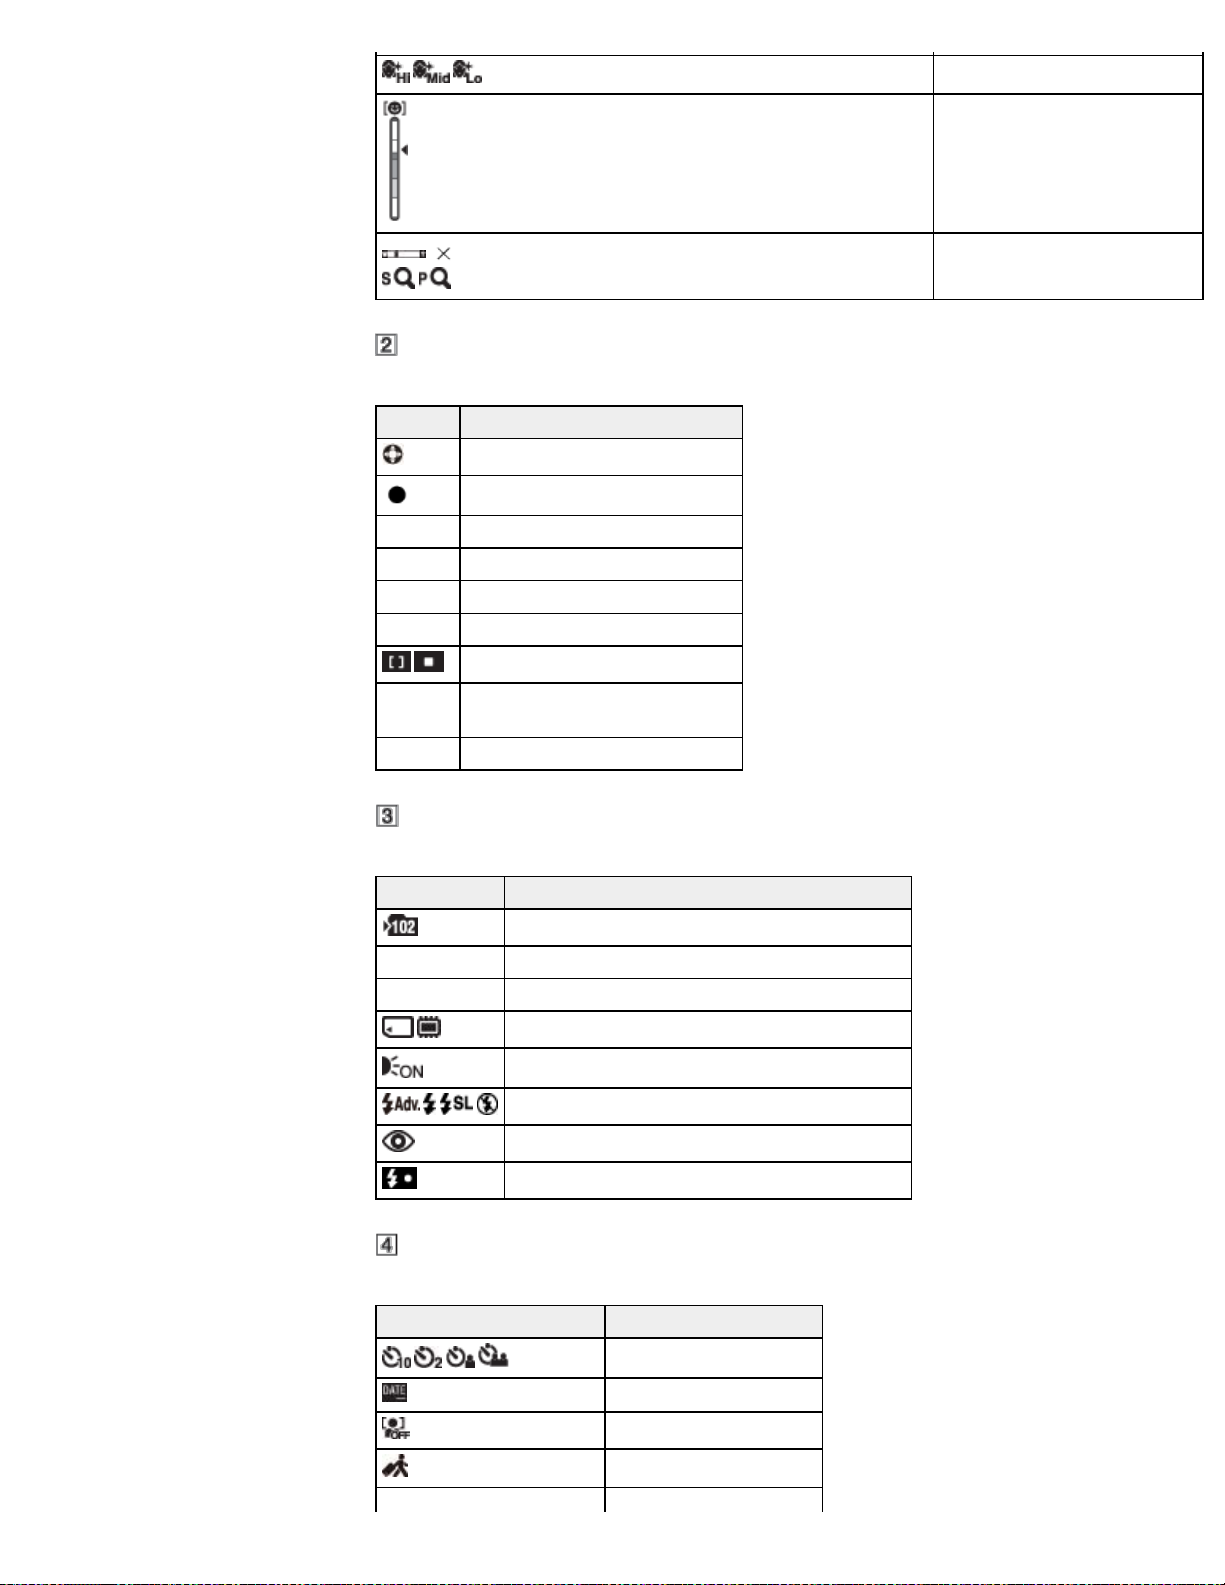
Page 25
25
Soft Skin Effect
Smile Detection Sensitivity
indicator
1.4
Display Indication
Tracking focus
AE/AF lock
ISO400 ISO number
125 Shutter speed
F4.0 Aperture value
+2.0EV Exposure Compensation
AF range finder frame indicator
REC
Standby
Recording a movie/Movie standby
0:12 Recording time (m:s)
Zoom scaling
Display Indication
Recording folder
96 Number of recordable images
100Min Recordable time
Recording media (Memory card, internal memory)
AF Illuminator
Flash mode
Red-eye reduction
Flash charging
Display Indication
Self-timer
Write Date
Face detection
Destination
Page 26
26
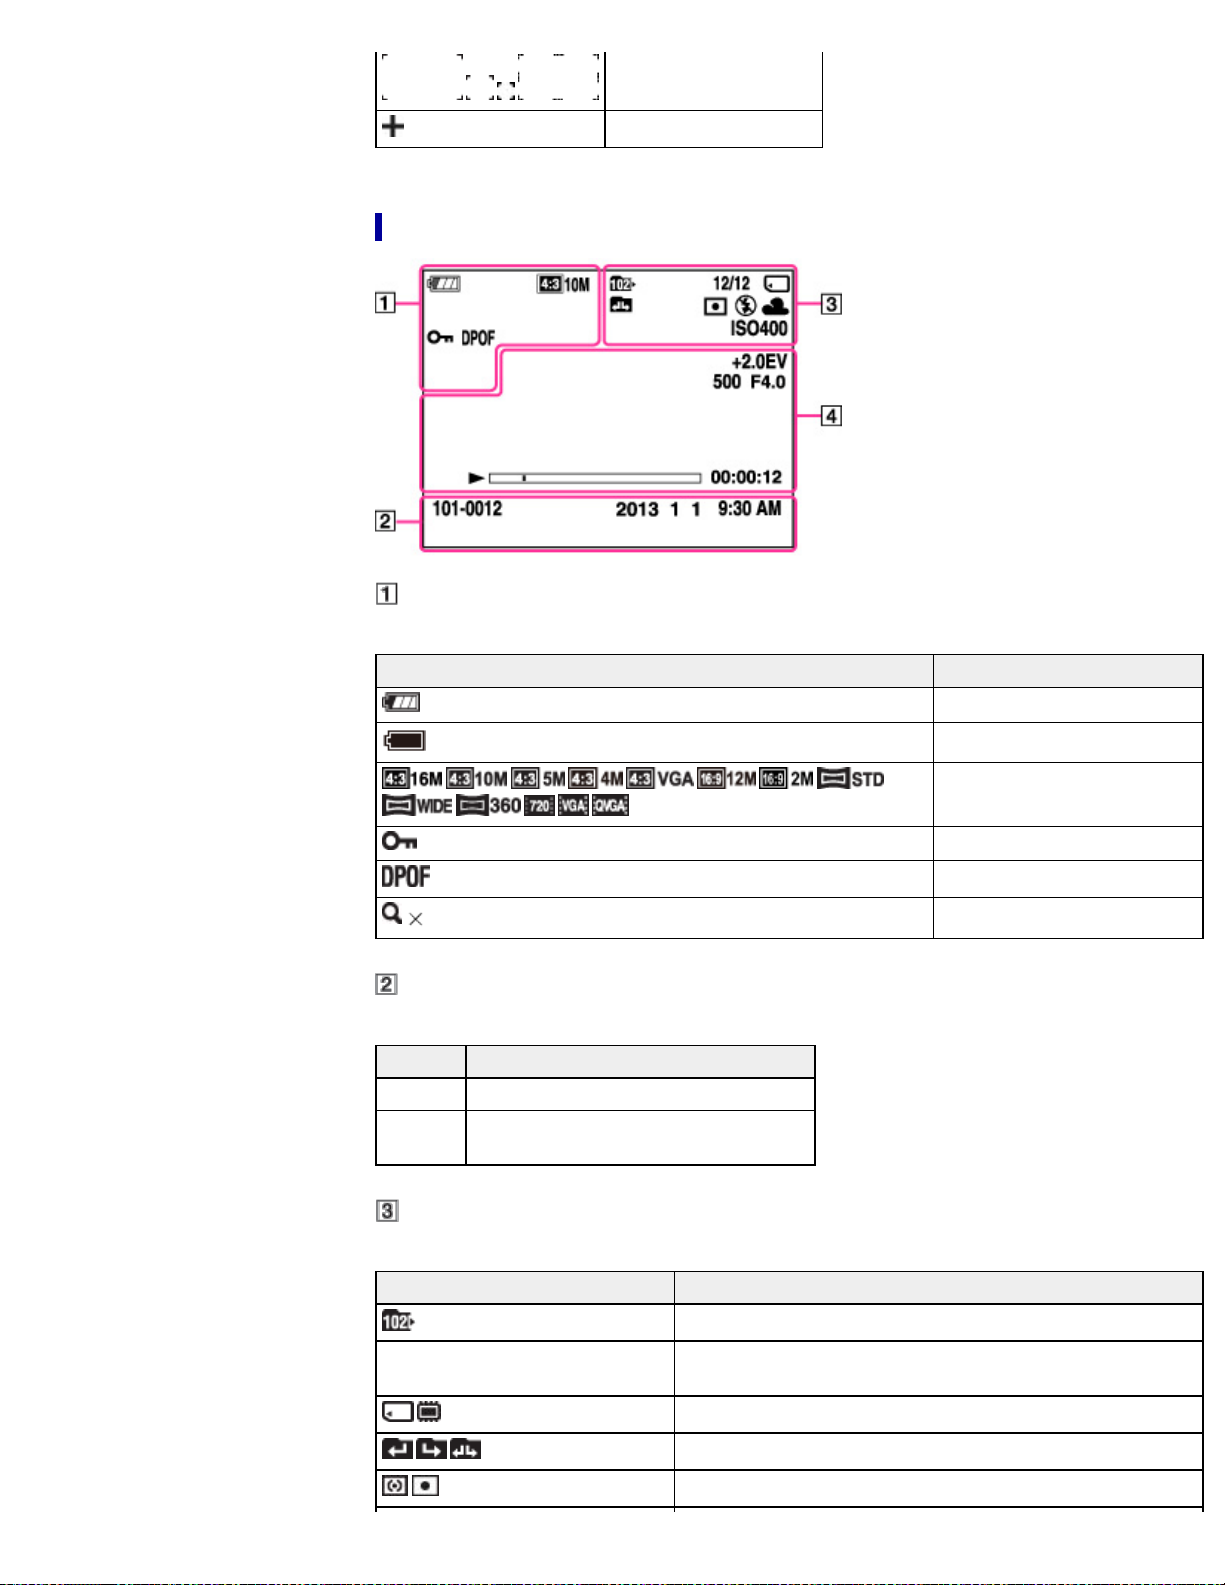
AF range finder frame
Spot metering cross-hairs
List of viewing mode icons
Display Indication
Battery charge remaining
Low battery warning
2.0 Playback zoom
Display Indication
101-0012 Folder-file number
2013-1-1
9:30 AM
Recorded date/time of the playback image
Image size/Panorama image
size/Movie size
Protect
Print order (DPOF)
Display Indication
Playback folder
12/12
Image number/Number of images recorded in selected date
range, folder
Playback media (Memory card, internal memory)
Changing folders
Metering Mode
Page 27
27
Flash mode
White Balance
ISO400 ISO number
Display Indication
+2.0EV Exposure Compensation
500 Shutter speed
F4.0 Aperture value
Playback
Playback bar
00:00:12 Counter
Volume
Copyright 2013 Sony Corporation
Back to top
Page 28
Cyber-shot User Guide
28
Before Use
PrintSearch
Top page > Before Use > Using the wrist strap > Using the wrist strap
Confirming the operation
method
Shooting
Viewing
Useful shooting functions
Useful viewing functions
Changing settings
Viewing images on a TV
Using with your computer
Printing
Troubleshooting
Precautions/About this camera
Contents list
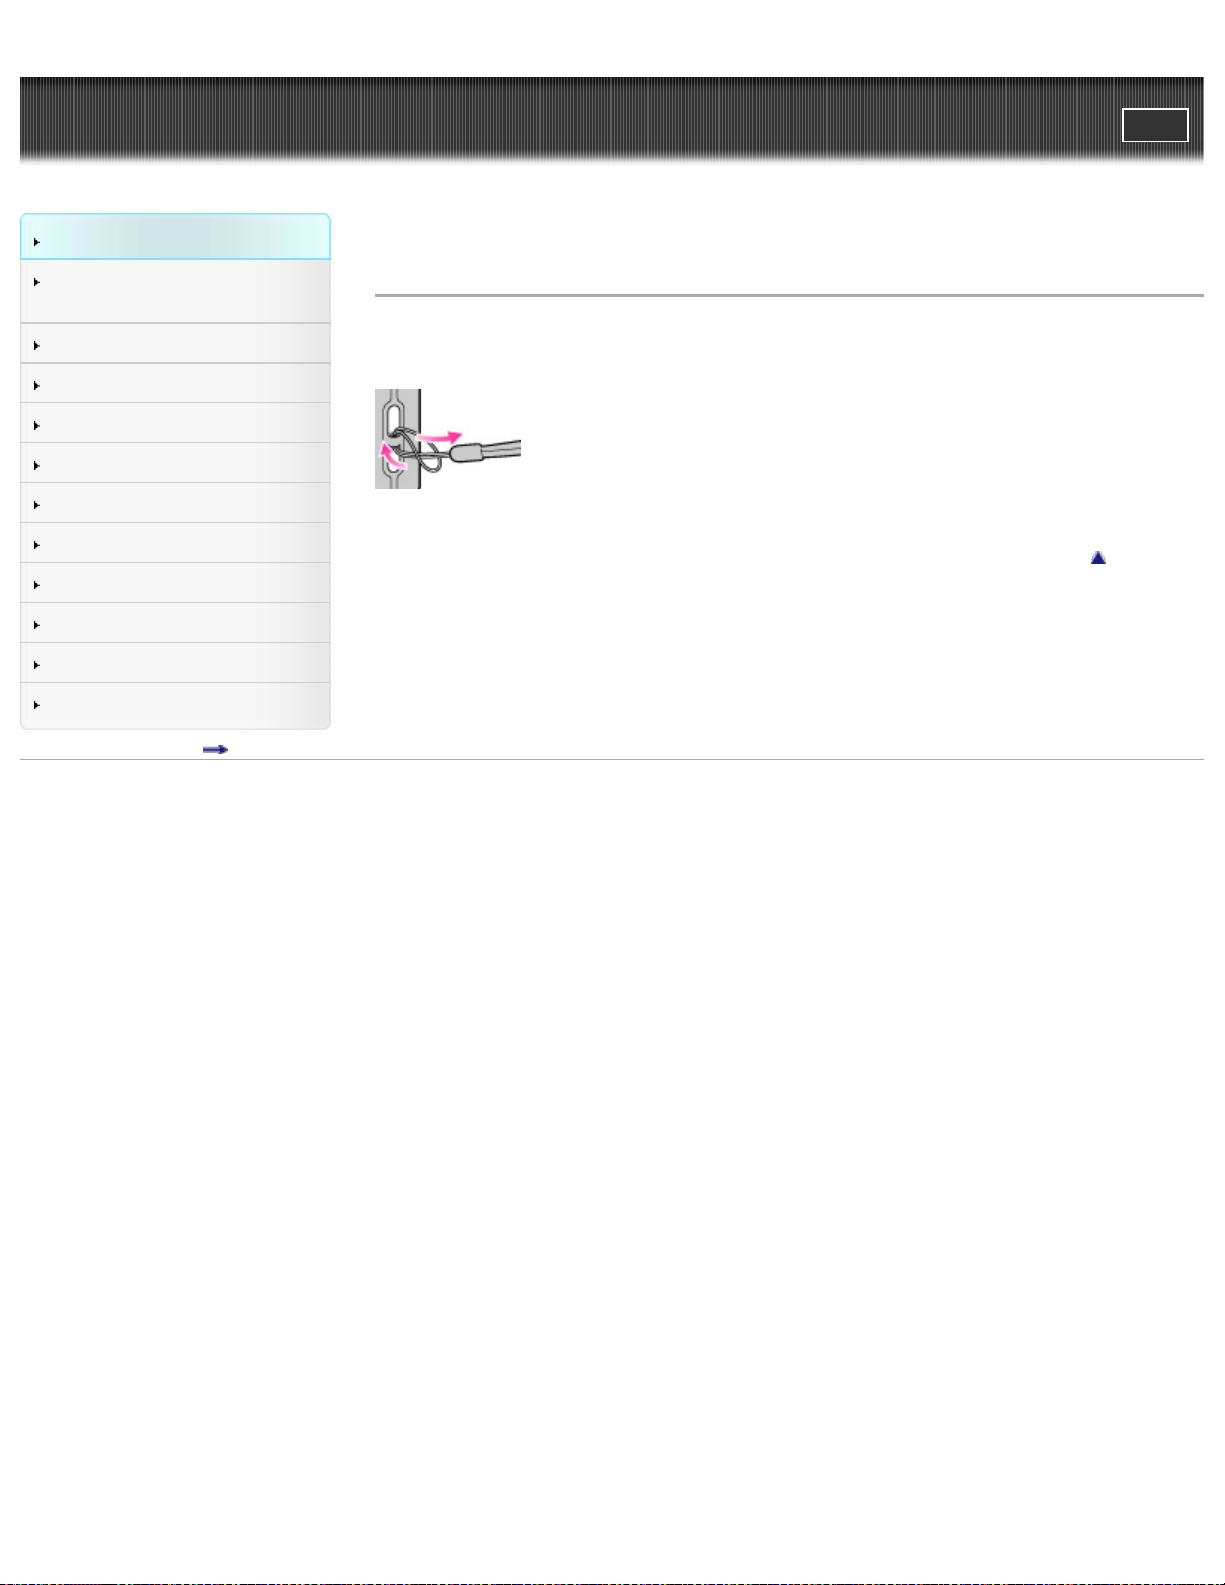
Using the wrist strap
Attach the strap and place your hand through the loop to prevent the camera from being submerged or
damage by being dropped.
Back to top
Copyright 2013 Sony Corporation
Page 29

Cyber-shot User Guide
29
Before Use
PrintSearch
Top page > Before Use > Using the internal memory > Using the internal memory
Confirming the operation
method
Shooting
Viewing
Useful shooting functions
Useful viewing functions
Changing settings
Viewing images on a TV
Using with your computer
Printing
Troubleshooting
Precautions/About this camera
Contents list
Using the internal memory
On image data stored in the internal memory
The camera has approximately 43 MB of internal memory. You can record images on the internal
memory when there is no memory card inserted in the camera.
When a memory card is inserted
[Recording]: Images are recorded on the memory card.
[Playback]: Images on the memory card are played back.
[Menu, Settings, etc.]: Various functions can be performed on images on the memory card.
When there is no memory card inserted
[Recording]: Images are recorded using the internal memory.
You cannot record movies to the internal memory when the movie image size is [1280x720].
[Playback]: Images stored in the internal memory are played back.
[Menu, Settings, etc.]: Various functions can be performed on images in the internal memory.
On image data stored in the internal memory
We recommend that you copy (back up) data using one of the following methods.
To copy (back up) data on a hard disk of your computer
Without a memory card inserted in the camera, import the images into a computer. [Details]
To copy (back up) data on a memory card
Prepare a memory card with sufficient free capacity, then copy the images in the internal memory to the
memory card. [Details]
Notes
You cannot transfer image data on a memory card to the internal memory.
By making a USB connection between the camera and a computer with a USB cable, you can
transfer data stored in the internal memory to a computer. However you cannot transfer data on a
computer to the internal memory.
Back to top
Copyright 2013 Sony Corporation
Page 30
Cyber-shot User Guide
30
Before Use
PrintSearch
Top page > Before Use > Using the In-Camera guide > In-Camera Guide
Confirming the operation
method
Shooting
Viewing
Useful shooting functions
Useful viewing functions
Changing settings
Viewing images on a TV
Using with your computer
Printing
Troubleshooting
Precautions/About this camera
Contents list
In-Camera Guide
This camera contains an internal function guide. This allows you to search the camera’s functions
according to your needs.
You can use the selected function after reading the guide.
1. Press the MENU button.
2. Select the desired MENU item using
3. Press the
The operation guide for the MENU item you have selected in step 2 is displayed.
4. Use
When [Use this function] is displayed on the screen, select it to switch to that mode.
If you press the
search the guide using keywords or icons.
Notes
/ (In-Camera Guide) button is not available in Easy Mode.
Depending on the selected functions, the operation guide and details may not be displayed.
/ (In-Camera Guide) button.
/ to switch among summary, operation and detail screens.
/ (In-Camera Guide) button when the MENU screen is not displayed, you can
Copyright 2013 Sony Corporation
/ on the control button.
Back to top
Page 31

Cyber-shot User Guide
31
Before Use
PrintSearch
Top page > Confirming the operation method > Confirming the operation method > Using the control
button
Confirming the operation
method
Shooting
Viewing
Useful shooting functions
Useful viewing functions
Changing settings
Viewing images on a TV
Using with your computer
Printing
Troubleshooting
Precautions/About this camera
Contents list
Using the control button
Moving the selection frame on the MENU screen, etc.
Selecting an image to be played back
The following functions are located on the right/left side of the control button: (Self-Timer) and
(Flash).
Press the control button toward each icon to enter the setup screen for each function.
Press the up/down/right/left side of the control button following the screen to move the selection frame.
Press
Moving the selection frame on the MENU screen, etc.
in the center of the control button to set the selected item.
Press the up/down/right/left side of the control button to move the selection frame.
Selecting an image to be played back
Press the right or left side of the control button to play back the next/previous image.
Copyright 2013 Sony Corporation
Back to top
Page 32

Cyber-shot User Guide
32
Before Use
PrintSearch
Top page > Confirming the operation method > Confirming the operation method > Using MENU items
(Shooting)
Confirming the operation
method
Shooting
Viewing
Useful shooting functions
Useful viewing functions
Changing settings
Viewing images on a TV
Using with your computer
Printing
Troubleshooting
Precautions/About this camera
Contents list
Using MENU items (Shooting)
You can select the various shooting functions easily from the MENU button.
1. Press the ON/OFF (Power) button and set the camera to shooting mode.
2. Press the MENU button to display the Menu screen.
3. Select the desired menu item with / / / on the control button.
4. Press the MENU button to close the Menu screen.
Copyright 2013 Sony Corporation
Back to top
Page 33

Cyber-shot User Guide
33
Before Use
PrintSearch
Top page > Confirming the operation method > Confirming the operation method > Using MENU items
(Viewing)
Confirming the operation
method
Shooting
Viewing
Useful shooting functions
Useful viewing functions
Changing settings
Viewing images on a TV
Using with your computer
Printing
Troubleshooting
Precautions/About this camera
Contents list
Using MENU items (Viewing)
You can select the various viewing functions easily from the MENU button.
1. Press the
2. Press the MENU button to display the Menu screen.
3. Select the desired menu item with / / / on the control button.
(Playback) button to switch to playback mode.
4. Press on the control button.
Copyright 2013 Sony Corporation
Back to top
Page 34

Cyber-shot User Guide
34
Before Use
PrintSearch
Top page > Confirming the operation method > Confirming the operation method > Changing camera
settings
Confirming the operation
method
Shooting
Viewing
Useful shooting functions
Useful viewing functions
Changing settings
Viewing images on a TV
Using with your computer
Printing
Troubleshooting
Precautions/About this camera
Contents list
Changing camera settings
You can change the settings on the [Settings] screen.
1. Press the MENU button to display the Menu screen.
2. Select (Settings) with / on the control button, then press to display the setup screen.
3. Select the desired category by using / / / , then press to display the setup screen.
4. Select the desired setting, then press .
Notes
[Shooting Settings] appears only when settings have been entered from shooting mode.
[Memory Card Tool] appears only when a memory card is inserted in the camera, while [Internal
Memory Tool] appears only when a memory card is not inserted.
Back to top
Copyright 2013 Sony Corporation
Page 35

Cyber-shot User Guide
35
Before Use
PrintSearch
Top page > Shooting > Shooting still images > Shooting still images
Confirming the operation
method
Shooting
Viewing
Useful shooting functions
Useful viewing functions
Changing settings
Viewing images on a TV
Using with your computer
Printing
Troubleshooting
Precautions/About this camera
Contents list
Shooting still images
1. Press the mode button to switch to (Still Image).
2. Hold the camera steady as illustrated.
3. Press the shutter button halfway down to focus.
When the image is in focus, a beep sounds and the
indicator lights.
The shortest shooting distance is approximately 1 cm (0.39 inches) (W), 50 cm (1.64 ft) (T) (from
the lens).
4. Press the shutter button fully down.
Do not put your fingers on the flash or lens when shooting.
If you shoot a still image of a subject that is difficult to focus on
When the camera cannot focus on the subject automatically, the AE/AF lock indicator changes to
slowly flashing and the beep does not sound. Either recompose the shot or change the focus
setting. [Details]
Page 36

Focusing may be difficult in the following situations:
36
It is dark and the subject is distant.
The contrast between the subject and the background is poor.
The subject is seen through glass.
The subject is moving quickly.
There is reflective light or shiny surfaces.
The subject is backlit or there is a flashing light.
Related Topic
Viewing still images
Still Image Size / Panorama Image Size / Movie Size
Copyright 2013 Sony Corporation
Back to top
Page 37

Cyber-shot User Guide
37
Before Use
PrintSearch
Top page > Shooting > Shooting still images > Zoom
Confirming the operation
method
Shooting
Viewing
Useful shooting functions
Useful viewing functions
Changing settings
Viewing images on a TV
Using with your computer
Printing
Troubleshooting
Precautions/About this camera
Contents list
Zoom
You can enlarge the image when shooting. The camera’s optical zoom function can enlarge images up
to 4×.
1. Move the W/T (zoom) lever.
Move the W/T (zoom) lever to the T side to zoom in, W side to zoom out.
When the zoom scale exceeds 4×, set [Digital Zoom]. [Details]
Notes
Zoom is locked to the W side in Sweep Panorama mode or Magnifying Glass mode.
The operating sound of the lever may be recorded when the zoom function operates while shooting
a movie.
Copyright 2013 Sony Corporation
Back to top
Page 38

Cyber-shot User Guide
38
Before Use
PrintSearch
Top page > Shooting > Shooting movies > Shooting movies
Confirming the operation
method
Shooting
Viewing
Useful shooting functions
Useful viewing functions
Changing settings
Viewing images on a TV
Using with your computer
Printing
Troubleshooting
Precautions/About this camera
Contents list
Shooting movies
1. Press the mode button to switch to (Movie Mode).
2. Press the shutter button to start recording.
3. Press the shutter button again to stop recording.
Notes
The operating sound of the lever may be recorded when the zoom function operates while shooting
a movie.
You can shoot continuously for approximately 29 minutes at a time when the temperature is 25°C
(77°F) and camera is set to the factory settings. When shooting stops, you can press the shutter
button again to restart shooting. Depending on the temperature when shooting, recording may
automatically stop to protect the camera.
Related Topic
Zoom
Movie shooting scene
Picture Effect
Back to top
Copyright 2013 Sony Corporation
Page 39

Cyber-shot User Guide
39
Before Use
PrintSearch
Top page > Shooting > Selecting the shooting mode based on the subject > List of mode button
functions
Confirming the operation
method
Shooting
Viewing
Useful shooting functions
Useful viewing functions
Changing settings
Viewing images on a TV
Using with your computer
Printing
Troubleshooting
Precautions/About this camera
Contents list
List of mode button functions
Press the mode button to switch to (Still Image), (Sweep Panorama) or (Movie Mode).
(Still
Image)
(Sweep
Panorama)
(Movie
Mode)
Allows you to shoot still images. You can set the desired still image shooting mode
using MENU
Allows you to shoot a panorama image by composing images.
Allows you to record movies. Press the shutter button down fully to start recording, and
then press the shutter button again to end recording.
(REC Mode)
Related Topic
Intelligent Auto
Program Auto
Picture Effect
Scene Selection
Shooting panoramic images
Shooting movies
Copyright 2013 Sony Corporation
Back to top
Page 40

Cyber-shot User Guide
40
Before Use
PrintSearch
Top page > Shooting > Selecting the shooting mode based on the subject > REC Mode
Confirming the operation
method
Shooting
Viewing
Useful shooting functions
Useful viewing functions
Changing settings
Viewing images on a TV
Using with your computer
Printing
Troubleshooting
Precautions/About this camera
Contents list
REC Mode
You can select the still image shooting mode when the shooting mode is set to [Still Image].
1. MENU
Auto)
(Program
Auto)
Effect)
Selection)
(REC Mode) desired mode
(Intelligent
(Picture
(Scene
Copyright 2013 Sony Corporation
Allows you to shoot with the setting adjusted automatically. [Details]
Allows you to shoot with the exposure adjusted automatically (both the shutter
speed and the aperture value). [Details]
Also you can select various settings using the menu.
Allows you to shoot a still image with original texture, according to the desired
effect. [Details]
Allows you to shoot with preset settings according to the scene. [Details]
Back to top
Page 41

Cyber-shot User Guide
41
Before Use
PrintSearch
Top page > Shooting > Selecting the shooting mode based on the subject > Intelligent Auto
Confirming the operation
method
Shooting
Viewing
Useful shooting functions
Useful viewing functions
Changing settings
Viewing images on a TV
Using with your computer
Printing
Troubleshooting
Precautions/About this camera
Contents list
Intelligent Auto
Allows you to shoot still images with the settings adjusted automatically.
1. Press the mode button to switch to
2. MENU
3. Shoot with the shutter button.
(REC Mode) (Intelligent Auto)
Scene Recognition
Scene Recognition operates in Intelligent Auto mode. This function lets the camera automatically
recognize the shooting conditions and shoot the image.
In Scene Recognition, the position of an icon displayed on the LCD screen is different depending on the
circumstances. It depends on whether the camera recognizes a scene or condition.
If the camera recognizes a scene, icons and guides such as
Portrait),
(Magnifying Glass), (Spotlight) or (Low Light), are displayed on the first line. If the camera
recognizes a condition, icons such as
camera may recognize both the scene and condition, or just one.
(Night Scene), (Backlight Portrait), (Backlight), (Landscape), (Macro),
(Still Image).
(Portrait), (Infant), (Night
(Tripod) or (Move) are displayed on the second line. The
Related Topic
Functions available for each shooting mode
MENU items available for each shooting mode
Back to top
Copyright 2013 Sony Corporation
Page 42

Cyber-shot User Guide
42
Before Use
PrintSearch
Top page > Shooting > Selecting the shooting mode based on the subject > Program Auto
Confirming the operation
method
Shooting
Viewing
Useful shooting functions
Useful viewing functions
Changing settings
Viewing images on a TV
Using with your computer
Printing
Troubleshooting
Precautions/About this camera
Contents list
Program Auto
Allows you to shoot with the exposure adjusted automatically (both the shutter speed and the aperture
value). Also you can select various settings using the menu.
1. Press the mode button to switch to
2. MENU
3. Shoot with the shutter button.
Related Topic
Functions available for each shooting mode
MENU items available for each shooting mode
(REC Mode) (Program Auto)
Copyright 2013 Sony Corporation
(Still Image).
Back to top
Page 43

Cyber-shot User Guide
43
Before Use
PrintSearch
Top page > Shooting > Selecting the shooting mode based on the subject > Picture Effect
Confirming the operation
method
Shooting
Viewing
Useful shooting functions
Useful viewing functions
Changing settings
Viewing images on a TV
Using with your computer
Printing
Troubleshooting
Precautions/About this camera
Contents list
Picture Effect
Allows you to shoot a still image with original texture, according to the desired effect.
1. Press the mode button to switch to
2. MENU
mode
(Toy
camera)
(REC Mode) (Picture Effect) on the control button desired
If you want to select another Picture Effect mode, select from MENU.
Allows you to shoot images with effects such as tunnel effect, high contrast, or color cast as
if they were shot with a toy camera. You can change the color hue using MENU
hue].
Allows you to shoot a pop art-like colorful image with emphasis on the color tone.
(Still Image).
[Color
(Pop
Color)
(Partial
Color)
(Soft
Highkey)
Allows you to shoot an image that makes a strong impression by leaving a specified color on
portions of a monochrome image. You can select the color to extract using MENU
[Extracted Color].
Allows you to shoot soft, clear images with an emphasis on brightness.
Page 44

Use the following procedures to add effects to panoramic images and movies.
44
When
(Sweep Panorama) mode is selected:
MENU
[Panorama Shooting Scene] [Picture Effect] desired mode
[Toy camera] cannot be used for [Panorama Shooting Scene].
When
(Movie Mode) is selected:
MENU
[Movie shooting scene] [Picture Effect] desired mode
[Toy camera] cannot be used for [Movie shooting scene].
Related Topic
Color hue
Extracted Color
Functions available for each shooting mode
MENU items available for each shooting mode
Panorama Shooting Scene
Movie shooting scene
Copyright 2013 Sony Corporation
Back to top
Page 45

Cyber-shot User Guide
45
Before Use
PrintSearch
Top page > Shooting > Selecting the shooting mode based on the subject > Scene Selection
Confirming the operation
method
Shooting
Viewing
Useful shooting functions
Useful viewing functions
Changing settings
Viewing images on a TV
Using with your computer
Printing
Troubleshooting
Precautions/About this camera
Contents list
Scene Selection
Allows you to shoot with preset settings according to the scene.
1. Press the mode button to switch to
2. MENU
mode
If you want to select another Scene Selection mode, select from MENU.
(Soft
Skin)
(Soft
Snap)
(REC Mode) (Scene Selection) on the control button desired
Allows you to shoot faces for smoothness.
Allows you to shoot images with a softer atmosphere for portraits and flowers, etc.
(Still Image).
(Landscape)
(Night
Portrait)
(Night
Allows easy shooting of distant scenes by focusing in the distance. Shoots a clear sky,
trees and flowers in vivid colors.
Allows you to shoot sharp images of people with a night view in the background,
without compromising the atmosphere.
Allows you to shoot night scenes at far distance without losing the dark atmosphere of
the surroundings.
Page 46

Scene)
46
(High
Sensitivity)
(Gourmet)
Allows you to shoot images without a flash under low light conditions, reducing blur.
Allows you to shoot food arrangements in delicious and bright colors.
Allows you to shoot images of your pet with the best settings.
(Pet)
(Beach)
(Snow)
Allows you to shoot scenes on the beach in bright and vivid colors even under the
sunlight.
Allows you to record clear images preventing sunken colors in snowy scenes or other
places where the whole screen appears white.
Allows you to shoot underwater in natural colors.
(Underwater)
Page 47

Notes
47
When you shoot images using
(Night Portrait) or (Night Scene) modes, the shutter speed is
slower and the images tend to blur. To prevent blurring, the use of a tripod is recommended.
Related Topic
Functions available for each shooting mode
MENU items available for each shooting mode
Copyright 2013 Sony Corporation
Back to top
Page 48

Cyber-shot User Guide
48
Before Use
PrintSearch
Top page > Shooting > Selecting the shooting mode based on the subject > Shooting panoramic
images
Confirming the operation
method
Shooting
Viewing
Useful shooting functions
Useful viewing functions
Changing settings
Viewing images on a TV
Using with your computer
Printing
Troubleshooting
Precautions/About this camera
Contents list
Shooting panoramic images
Allows you to create a panoramic image from composite images.
1. Press the mode button to switch to (Sweep Panorama).
2. Align the camera with the end of the subject to be shot and press the shutter button fully.
3. Pan the camera to the end of the guide (A), following the indicator on the screen.
Tips for shooting a panoramic image
Pan the camera in an arc at a constant velocity in the direction indicated on the screen. Subjects at
rest are more suited for panoramic shots than moving subjects.
Radius as short as possible.
Page 49

Vertical direction
49
Horizontal direction
First press the shutter button halfway so that you can lock the focus and exposure. Then press the
shutter button fully down and pan or tilt the camera.
If a section with greatly varied shapes or scenery is concentrated along a screen edge, the image
composition may fail. In such a case, adjust the frame composition so that the section is in the
center of the image, then shoot again.
To shoot a 360 degree panoramic image
This camera is equipped with a panorama shooting function, capable of shooting a nearly 360
degree panoramic image.
Shoot a panoramic image by selecting MENU
set [Panorama Image Size] to [360°]. Recorded
panoramic images can be scrolled normally when played on the camera.
Press MENU [Shooting Direction] select [Right] or [Left]. [Up] and [Down] cannot be
selected for [Shooting Direction] when shooting 360 degree panoramic images.
The image actually recorded may not cover 360 degrees, depending on the subject or the way it is
shot.
Notes
If you cannot pan the camera across the entire subject within the given time, a gray area occurs in
the composite image. If this happens, move the camera faster to record a full panoramic image.
Since several images are stitched together, the stitched part will not be recorded smoothly.
When the whole angle of panoramic shooting and the AE/AF locked angle are very different in
brightness, color and focus, the shooting will not be successful. If this happens, change the AE/AF
locked angle and shoot again.
You cannot create panoramic images in the following situations:
You pan the camera too quickly or too slowly.
There is too much camera shake.
Related Topic
Scrolling panoramic images for display
Shooting Direction
Still Image Size / Panorama Image Size / Movie Size
Functions available for each shooting mode
MENU items available for each shooting mode
Panorama Shooting Scene
Picture Effect
Page 50

Copyright 2013 Sony Corporation
50
Back to top
Page 51

Cyber-shot User Guide
51
Before Use
PrintSearch
Top page > Viewing > Viewing still images > Viewing still images
Confirming the operation
method
Shooting
Viewing
Useful shooting functions
Useful viewing functions
Changing settings
Viewing images on a TV
Using with your computer
Printing
Troubleshooting
Precautions/About this camera
Contents list
Viewing still images
1. Set the camera to playback mode.
2. Select an image with the control button.
Back to top
Copyright 2013 Sony Corporation
Page 52

Cyber-shot User Guide
52
Before Use
PrintSearch
Top page > Viewing > Viewing still images > Playback zoom
Confirming the operation
method
Shooting
Viewing
Useful shooting functions
Useful viewing functions
Changing settings
Viewing images on a TV
Using with your computer
Printing
Troubleshooting
Precautions/About this camera
Contents list
Playback zoom
Enlarges the image being played back.
1. Set the camera to playback mode.
2. Move the W/T (zoom) lever to the T side (
3. Adjust the position using
The frame in the lower left of the image shows which part of the total image is being displayed.
4. Change the zoom scale with the W/T (zoom) lever.
Move the W/T (zoom) lever to the T side (
Press
on the control button to cancel playback zoom.
/ / / on the control button.
) during still image playback.
) to zoom in, W side ( ) to zoom out.
To save enlarged images
You can save an enlarged image by using the trimming function.
Press MENU
[Retouch] [Trimming (Resize)].
Copyright 2013 Sony Corporation
Back to top
Page 53

Cyber-shot User Guide
53
Before Use
PrintSearch
Top page > Viewing > Viewing still images > Image Index
Confirming the operation
method
Shooting
Viewing
Useful shooting functions
Useful viewing functions
Changing settings
Viewing images on a TV
Using with your computer
Printing
Troubleshooting
Precautions/About this camera
Contents list
Image Index
Displaying images of the desired folder
Displays multiple images at the same time.
1. Set the camera to playback mode.
2. Move the W/T (zoom) lever to the W side (
Move the lever again to display an index screen with more images.
3. To return to the single-image screen, select an image with the control button, then press
Displaying images of the desired folder
Select the left side bar with the control button, then select the desired folder with / .
) to display the image index screen.
.
Copyright 2013 Sony Corporation
Back to top
Page 54

Cyber-shot User Guide
54
Before Use
PrintSearch
Top page > Viewing > Deleting images > Deleting images
Confirming the operation
method
Shooting
Viewing
Useful shooting functions
Useful viewing functions
Changing settings
Viewing images on a TV
Using with your computer
Printing
Troubleshooting
Precautions/About this camera
Contents list
Deleting images
Allows you to select unwanted images for deletion.
You can also delete images from the MENU button. [Details]
1. Set the camera to playback mode.
/ (Delete) button desired mode on the control button
2.
3. Press [OK]
All in This Folder Deletes all images in the selected folder at once.
Multiple Images
This Image Deletes the currently displayed image.
Cancel Cancels the deletion.
You can switch between index and single-image mode when selecting images
Move the W/T (zoom) lever to the T side (
the lever to the W side (
.
Allows you to select and delete multiple images.
After step 2, select an image to be deleted, then press .
To cancel the selection, press
MENU [OK]
) in index mode to return to single-image mode, and move
) in single-image mode to return to index mode.
again to cancel the mark.
Notes
In Easy Mode, you can only delete the currently displayed image.
Related Topic
Delete
Back to top
Copyright 2013 Sony Corporation
Page 55

Cyber-shot User Guide
55
Before Use
PrintSearch
Top page > Viewing > Viewing movies > Viewing movies
Confirming the operation
method
Shooting
Viewing
Useful shooting functions
Useful viewing functions
Changing settings
Viewing images on a TV
Using with your computer
Printing
Troubleshooting
Precautions/About this camera
Contents list
Viewing movies
1. Set the camera to playback mode.
2. Select a movie with the control button.
3. Press
The playback bar appears, and a movie playback starts.
On the movie viewing screen
Select the image you want to display using / on the control button, and press .
The Playback bar appears, you can check a playback position of a movie.
.
Control button Action during playback
Play/Pause
Fast forward
Fast rewind
Displays the control screen.
Adjust the volume with
Notes
You may not be able to play back some images shot using other cameras.
Copyright 2013 Sony Corporation
/ on the control button, then press .
Back to top
Page 56

Cyber-shot User Guide
56
Before Use
PrintSearch
Top page > Viewing > Viewing panorama images > Scrolling panoramic images for display
Confirming the operation
method
Shooting
Viewing
Useful shooting functions
Useful viewing functions
Changing settings
Viewing images on a TV
Using with your computer
Printing
Troubleshooting
Precautions/About this camera
Contents list
Scrolling panoramic images for display
You can scroll panoramic images by pressing the center button on the control button while panoramic
images are being displayed.
A: Shows the displayed area of the whole panoramic image
Control button Action
on the control button Starts scrolling playback/pauses scrolling playback
/ / / on the control button Scrolls images
W side of W/T (zoom) lever Displays the whole image
Panorama images recorded using another camera may not scroll correctly when played.
Copyright 2013 Sony Corporation
Back to top
Page 57

Cyber-shot User Guide
57
Before Use
PrintSearch
Top page > Useful shooting functions > Functions available for each shooting mode > Functions
available for each shooting mode
Confirming the operation
method
Shooting
Viewing
Useful shooting functions
Useful viewing functions
Changing settings
Viewing images on a TV
Using with your computer
Printing
Troubleshooting
Precautions/About this camera
Contents list
Functions available for each shooting mode
Functions available in REC modes
Functions available in Scene Selection
Functions available in Picture Effect
In the table below, a check mark indicates a function that can be changed, while — indicates function
that cannot be changed. The icons below [Flash] and [Self-Timer] indicate the available modes.
Functions available in REC modes
Flash Self-Timer Face Detection Smile Shutter Tracking focus
(Intelligent Auto)
(Program Auto)
(Sweep Panorama)
(Movie Mode)
— — — —
— — — —
Functions available in Scene Selection
Flash Self-Timer Face Detection Smile Shutter Tracking focus
(Soft Skin)
(Soft Snap)
(Landscape)
(Night Portrait)
(Night Scene)
(High Sensitivity)
(Gourmet)
(Pet)
(Beach)
(Snow)
(Underwater)
— — —
— — —
— —
— —
— — —
Functions available in Picture Effect
Page 58

Flash Self-Timer Face Detection Smile Shutter Tracking focus
58
(Toy camera)
(Pop Color)
(Partial Color)
(Soft High-key)
Copyright 2013 Sony Corporation
—
—
—
—
Back to top
Page 59

Cyber-shot User Guide
Face Detection
59
Before Use
PrintSearch
Top page > Useful shooting functions > Functions available for each shooting mode > MENU items
available for each shooting mode
Confirming the operation
method
Shooting
Viewing
Useful shooting functions
Useful viewing functions
Changing settings
Viewing images on a TV
Using with your computer
Printing
Troubleshooting
Precautions/About this camera
Contents list
MENU items available for each shooting mode
MENU items available in Scene Selection/Picture Effect mode
In the table below, a check mark indicates settings that can be changed, while – indicates settings that
cannot be changed. A setting may be fixed or restricted depending on the shooting mode. For details,
see each topic.
Mode button
Menu items
REC Mode
Panorama Shooting Scene
Movie shooting scene
Scene Selection
Picture Effect
Easy Mode
Color hue
Extracted Color
Soft Skin Effect
Still Image Size *
1
Shooting Direction
Panorama Image Size
Movie Size
Macro
Exposure Compensation
ISO
White Balance
Underwater White Balance
Focus
Metering Mode *
2
Cont. Shooting Settings
Smile Shutter
Smile Detection Sensitivity
Page 60

DRO
60
In-Camera Guide
(Settings)
*1 In [Advanced Flash] mode, the maximum still image size you can select is [4M].
*2 In Movie Mode, [Spot] cannot be selected.
MENU items available in Scene Selection/Picture Effect mode
The icons below or indicate the available modes.
Menu items
Panorama Shooting
Scene
Movie shooting scene
Scene Selection
Picture Effect
Easy Mode
Color hue
Extracted Color
Soft Skin Effect*
1
Still Image Size
Shooting Direction
Panorama Image Size
Movie Size
Macro
(Still
images)
(Panoramic
images)
(Movies)
Exposure
Compensation
ISO
White Balance*
2
Underwater White
Balance
Focus
Metering Mode
Cont. Shooting
Settings
Smile Shutter
Smile Detection
Page 61

Sensitivity
61
Face Detection
DRO
In-Camera Guide
(Settings)
*1 [Off] cannot be selected for [Soft Skin Effect] when Scene Selection is set to (Soft Skin).
*2 [Flash] cannot be selected for [White Balance] when Scene Selection is set to
(High Sensitivity).
Copyright 2013 Sony Corporation
Back to top
Page 62

Cyber-shot User Guide
62
Before Use
PrintSearch
Top page > Useful shooting functions > Using shooting functions > Tracking focus
Confirming the operation
method
Shooting
Viewing
Useful shooting functions
Useful viewing functions
Changing settings
Viewing images on a TV
Using with your computer
Printing
Troubleshooting
Precautions/About this camera
Contents list
Tracking focus
The camera tracks the subject and adjusts the focus automatically even when the subject is moving.
1. Press the mode button to switch to
2. Point the camera at the subject, and press
The target frame appears.
3. Place the target frame over the subject you want to focus on, and press .
Tracking begins.
4. Press the shutter button to shoot the image.
Tracking a face
If you use the tracking focus function while the Face Detection function is activated, you can select a
face to be given priority and register that face with the camera.
(Still Image).
on the control button.
Notes
When you use the Digital Zoom, the tracking focus function is not available
Tracking focus will automatically be canceled when the subject disappears from the screen or has
failed to be tracked.
Related Topic
Face Detection
Functions available for each shooting mode
Copyright 2013 Sony Corporation
Back to top
Page 63

Cyber-shot User Guide
63
Before Use
PrintSearch
Top page > Useful shooting functions > Using shooting functions > Flash
Confirming the operation
method
Shooting
Viewing
Useful shooting functions
Useful viewing functions
Changing settings
Viewing images on a TV
Using with your computer
Printing
Troubleshooting
Precautions/About this camera
Contents list
Flash
1. Press (Flash) on the control button.
2. Select the desired mode with the control button.
(Advanced
Flash)
(Auto)
(On)
(Slow
Synchro)
(Off)
When “White circular spots” appears in flash photos
These spots are caused by particles (dust, pollen, mist, floating object underwater, etc.) floating
close to the lens. When they are accentuated by the camera’s flash, they appear as white circular
spots.
Flash to a farther distance by increasing the upper limit value of ISO
sensitivity.
Flash automatically operates in dark locations or when there is a backlight.
Flash always operates.
Flash always operates.
The shutter speed is slow in a dark place to clearly shoot background that is
out of flash light.
Flash does not operate.
How can the “White circular spots” be reduced?
Light the room and shoot the subject without flash.
If you select
Notes
The flash strobes twice. The first flash adjusts the light quantity.
While charging the flash,
You cannot use the flash during burst shooting.
(Advanced Flash) can be selected only in [Intelligent Auto] mode. When (Advanced
Flash) is selected, the maximum size of [Still Image Size] is [4M]. If [Still Image Size] is set to larger
than [4M], [Still Image Size] is set to [4M] automatically.
Related Topic
Functions available for each shooting mode
(High Sensitivity) mode in Scene Selection, [Flash] is automatically set to [Off].
is displayed.
Back to top
Copyright 2013 Sony Corporation
Page 64

64
Page 65

Cyber-shot User Guide
65
Before Use
PrintSearch
Top page > Useful shooting functions > Using shooting functions > Self-Timer
Confirming the operation
method
Shooting
Viewing
Useful shooting functions
Useful viewing functions
Changing settings
Viewing images on a TV
Using with your computer
Printing
Troubleshooting
Precautions/About this camera
Contents list
Self-Timer
Automatic shooting with Self-portrait timer
1. Press
2. Select the desired mode with the control button.
Tips for preventing blur
If your hands or body move while holding the camera and pressing the shutter button, “Camera
shake” occurs.
Camera shake occurs frequently under low-light or slow shutter speed conditions, such as those
encountered in
(Self-Timer) on the control button.
(Off)
(10sec)
(2sec)
(Self-portrait
One Person)
(Self-portrait
Two People)
Does not use the self-timer.
Sets the self-timer to a 10-second delay.
When you press the shutter button, the self-timer lamp flashes and a beep
sounds until the shutter operates.
To cancel, press
Sets the self-timer to a 2-second delay.
Sets the self-timer to Self-portrait timer.
When the camera detects the specified number of faces, a beep sounds,
and the shutter operates 2 seconds later.
(Night Portrait) or (Night Scene) mode.
again.
To reduce camera shake, set the self-timer to a 2-second delay and brace your arms against your
sides after pressing the shutter button.
Automatic shooting with Self - portrait timer
Point the lens at yourself so that the selected number of faces is reflected in the screen. The shutter
operates automatically. Do not move your camera after the beep sounds.
Page 66

Related Topic
Functions available for each shooting mode
66
Back to top
Copyright 2013 Sony Corporation
Page 67

Cyber-shot User Guide
67
Before Use
PrintSearch
Top page > Useful shooting functions > Using shooting functions > Movie shooting scene
Confirming the operation
method
Shooting
Viewing
Useful shooting functions
Useful viewing functions
Changing settings
Viewing images on a TV
Using with your computer
Printing
Troubleshooting
Precautions/About this camera
Contents list
Movie shooting scene
You can select the movie shooting mode when the camera is set to [Movie Mode].
1. MENU
Effect)
(Underwater)
Related Topic
Picture Effect
(Movie shooting scene) desired mode
(Auto)
(Picture
Copyright 2013 Sony Corporation
Allows you to shoot movies with the settings adjusted automatically. [Details]
Allows you to shoot movies with an original texture according to the desired
effect.
Allows you to shoot movies underwater in natural colors.
Back to top
Page 68

Cyber-shot User Guide
68
Before Use
PrintSearch
Top page > Useful shooting functions > Using shooting functions > Panorama Shooting Scene
Confirming the operation
method
Shooting
Viewing
Useful shooting functions
Useful viewing functions
Changing settings
Viewing images on a TV
Using with your computer
Printing
Troubleshooting
Precautions/About this camera
Contents list
Panorama Shooting Scene
Allows you to shoot with preset settings according to the scene when the camera is in [Sweep
Panorama] mode.
1. MENU
Panorama)
Related Topic
Picture Effect
(Panorama Shooting Scene) desired mode
(Sweep Panorama)
(Picture Effect)
(Underwater Sweep
Copyright 2013 Sony Corporation
Shoots a regular panoramic image.
Allows you to shoot a panoramic image with an original texture
according to the desired effect.
Allows you to shoot images underwater in natural color in Sweep
Panorama mode.
Back to top
Page 69

Cyber-shot User Guide
69
Before Use
PrintSearch
Top page > Useful shooting functions > Using shooting functions > Easy Mode
Confirming the operation
method
Shooting
Viewing
Useful shooting functions
Useful viewing functions
Changing settings
Viewing images on a TV
Using with your computer
Printing
Troubleshooting
Precautions/About this camera
Contents list
Easy Mode
Scene Recognition
Shooting functions available in Easy Mode (Shooting)
Allows you to shoot still images using the minimum necessary functions.
The text size increases and indicators become easier to see.
1. MENU
2. [OK]
3. Shoot with the shutter button.
To end Easy Mode, MENU [Exit Easy Mode]
Notes
The battery power may decrease faster because the screen brightness increases automatically.
Scene Recognition
Scene Recognition operates in Easy Mode. This function lets the camera automatically recognize the
shooting conditions and shoot an image.
(Easy Mode) on the control button.
For details, see “Scene Recognition”. [Details]
Shooting functions available in Easy Mode (Shooting)
Still Image
Size
Self-Timer
Flash
MENU [Still Image Size] on the control button desired mode
Select between [Large] or [Small] size.
on the control button desired mode
Select between [10sec] or [Off] mode.
on the control button desired mode
Select between [Auto] or [Off] mode.
Copyright 2013 Sony Corporation
Back to top
Page 70

Cyber-shot User Guide
70
Before Use
PrintSearch
Top page > Useful shooting functions > Using shooting functions > Color hue
Confirming the operation
method
Shooting
Viewing
Useful shooting functions
Useful viewing functions
Changing settings
Viewing images on a TV
Using with your computer
Printing
Troubleshooting
Precautions/About this camera
Contents list
Color hue
When you select [Toy camera] in Picture Effect, adjust the color hue.
1. MENU
Notes
It is recommended that you shoot a test image in advance for some subjects.
Related Topic
Picture Effect
MENU items available for each shooting mode
(Color hue) desired mode
(Normal)
(Cool hue)
(Warm hue)
(Green hue)
(Magenta hue)
Adds a normal hue and darkens the surroundings.
Adds a cool bluish hue and darkens the surroundings.
Adds a warm reddish hue and darkens the surroundings.
Adds a green filter-like hue and darkens the surroundings.
Adds a magenta filter-like hue and darkens the surroundings.
Copyright 2013 Sony Corporation
Back to top
Page 71

Cyber-shot User Guide
71
Before Use
PrintSearch
Top page > Useful shooting functions > Using shooting functions > Extracted Color
Confirming the operation
method
Shooting
Viewing
Useful shooting functions
Useful viewing functions
Changing settings
Viewing images on a TV
Using with your computer
Printing
Troubleshooting
Precautions/About this camera
Contents list
Extracted Color
When you select [Partial Color] in Picture Effect, select the color to extract.
1. MENU
Notes
Images may not retain the selected color, depending on the subject.
Related Topic
Picture Effect
MENU items available for each shooting mode
(Extracted Color) desired mode
(Red)
(Green)
(Blue)
(Yellow)
Extracts red only.
Extracts green only.
Extracts blue only.
Extracts yellow only.
Copyright 2013 Sony Corporation
Back to top
Page 72

Cyber-shot User Guide
72
Before Use
PrintSearch
Top page > Useful shooting functions > Using shooting functions > Soft Skin Effect
Confirming the operation
method
Shooting
Viewing
Useful shooting functions
Useful viewing functions
Changing settings
Viewing images on a TV
Using with your computer
Printing
Troubleshooting
Precautions/About this camera
Contents list
Soft Skin Effect
When the Face Detection function is activated, sets whether to use the Soft Skin Effect, and the effect
level.
1. MENU
Notes
The [Soft Skin Effect] may not be visible depending on the subject.
Related Topic
MENU items available for each shooting mode
(Soft Skin Effect) desired mode
(Off)
(Low)
(High)
Does not use the Soft Skin Effect.
Adds light, moderate or strong Soft Skin Effect.
(Mid)
Copyright 2013 Sony Corporation
Back to top
Page 73

Cyber-shot User Guide
73
Before Use
PrintSearch
Top page > Useful shooting functions > Using shooting functions > Still Image Size / Panorama Image
Size / Movie Size
Confirming the operation
method
Shooting
Viewing
Useful shooting functions
Useful viewing functions
Changing settings
Viewing images on a TV
Using with your computer
Printing
Troubleshooting
Precautions/About this camera
Contents list
Still Image Size / Panorama Image Size / Movie Size
Image size when shooting still images
Image size in Easy Mode
Image size when shooting Sweep Panorama
Image size when shooting movies
The image size determines the size of the image file that is recorded when you take an image.
The larger the image size, the more detail will be reproduced when the image is printed on large-format
paper. The smaller the image size, the more images can be recorded.
Image size when shooting still images
1. MENU (Still Image Size) desired size
Still Image Size
(Horizontal × Vertical)
(4608×3456)
(3648×2736)
(2592×1944)
Usage guidelines
For prints up to A3+ size
For prints up to A3 size
For prints from 10×15 cm up to
A4 size
Number
of
images
Less
Printing
Fine
(2304 × 1728)
You can select [4M] only when the
flash mode is set to [Advanced
Flash].
(640×480)
(4608×2592)
(1920×1080)
Notes
When you print still images recorded at a 16:9 aspect ratio or panorama images, both edges may
be cut off.
For prints from 10×15 cm up to
A4 size
For e-mail attachments
For viewing on a high-definition
TV and printing up to A3 size
For viewing on a high-definition
TV
More
Less
More
Image size in Easy Mode
1. MENU [Still Image Size] desired size
Rough
Fine
Rough
Page 74

Large Shoots images in [16M] size.
74
Small Shoots images in [5M] size.
Image size when shooting Sweep Panorama
1. MENU (Panorama Image Size) desired size
(Standard)
(Horizontal: 4912 × 1080)
(Vertical: 3424 × 1920)
(Wide)
(Horizontal: 7152 × 1080)
(Vertical: 4912 × 1920)
(360°)
Horizontal: 11520 × 1080
Shoots images using standard size.
Shoots images using wide size.
Shoots 360-degree images.
Image size when shooting movies
The larger the size of the movie image, the higher the image quality.
The movies shot with this camera will be recorded in AVI (Motion JPEG), Approx. 30fps format.
1. MENU
Movie Size Usage guidelines
(Movie Size) desired size
1280x720
VGA (640 × 480)
QVGA (320 × 240)
For viewing on a high-definition TV.
For viewing on a TV screen.
For sending as an e-mail attachment.
Back to top
Copyright 2013 Sony Corporation
Page 75

Cyber-shot User Guide
75
Before Use
PrintSearch
Top page > Useful shooting functions > Using shooting functions > Shooting Direction
Confirming the operation
method
Shooting
Viewing
Useful shooting functions
Useful viewing functions
Changing settings
Viewing images on a TV
Using with your computer
Printing
Troubleshooting
Precautions/About this camera
Contents list
Shooting Direction
Set the direction in which the camera will be panned when shooting in Sweep Panorama mode.
1. MENU
(Up)
(Down)
Notes
[Up] and [Down] cannot be selected when [Image Size] is set to [360°].
Related Topic
Shooting panoramic images
(Shooting Direction) desired direction
(Right) Pan from left to right.
(Left) Pan from right to left.
Pan from down to up.
Pan from up to down.
Back to top
Copyright 2013 Sony Corporation
Page 76

Cyber-shot User Guide
76
Before Use
PrintSearch
Top page > Useful shooting functions > Using shooting functions > Macro
Confirming the operation
method
Shooting
Viewing
Useful shooting functions
Useful viewing functions
Changing settings
Viewing images on a TV
Using with your computer
Printing
Troubleshooting
Precautions/About this camera
Contents list
Macro
Use this setting to capture beautiful close-up images of small subjects such as insects or flowers.
1. MENU
(Magnifying
Glass)
Notes
[Macro] is set to [Auto] in the following situations:
When the Smile Shutter function is activated
In Easy Mode
When [Self-Timer] is set to [Self-portrait One Person] or [Self-portrait Two People]
Note the following points when using the [Magnifying Glass] mode.
You cannot use the Scene Recognition or Face Detection functions.
This mode is canceled if you turn off the power or switch the shooting mode to another one.
The flash mode settings you can use in this mode are [On] or [Off] only.
The focus speed becomes slower.
(Macro) desired mode
(Auto)
The camera adjusts the focus automatically from distant subjects to close-up.
Use this mode to shoot at close distances. Locked to the W side: Approximately
1 cm to 20 cm (0.39 inches to 7.87 inches)
Related Topic
MENU items available for each shooting mode
Copyright 2013 Sony Corporation
Back to top
Page 77

Cyber-shot User Guide
77
Before Use
PrintSearch
Top page > Useful shooting functions > Using shooting functions > Exposure Compensation
Confirming the operation
method
Shooting
Viewing
Useful shooting functions
Useful viewing functions
Changing settings
Viewing images on a TV
Using with your computer
Printing
Troubleshooting
Precautions/About this camera
Contents list
Exposure Compensation
You can adjust the exposure manually in 1/3 EV steps in a range of –2.0 EV to +2.0 EV.
1. MENU
Adjusting the exposure for better looking images
A: Overexposure (too much light)
B: Correct exposure
C: Underexposure (too little light)
When the image shot is overexposed, adjust [Exposure Compensation] to the minus side.
When the image shot is underexposed, adjust [Exposure Compensation] to the plus side.
Notes
If you shoot a subject in extremely bright or dark conditions, or when you use the flash, the
exposure adjustment may not be effective.
(Exposure Compensation) desired Exposure Compensation setting
Related Topic
MENU items available for each shooting mode
Copyright 2013 Sony Corporation
Back to top
Page 78

Cyber-shot User Guide
78
Before Use
PrintSearch
Top page > Useful shooting functions > Using shooting functions > ISO
Confirming the operation
method
Shooting
Viewing
Useful shooting functions
Useful viewing functions
Changing settings
Viewing images on a TV
Using with your computer
Printing
Troubleshooting
Precautions/About this camera
Contents list
ISO
Adjusts the luminous sensitivity when the camera is set to Program Auto. In Movie mode, [ISO] is fixed
to [Auto].
1. MENU
/ /
Adjusting ISO Sensitivity (Recommended Exposure Index)
ISO sensitivity is a speed rating for recording media that incorporates an image sensor that receives
light. Even when the exposure is the same, images differ depending on the ISO sensitivity.
High ISO sensitivity
(ISO) desired mode
(Auto)
/ / /
Sets the ISO sensitivity automatically.
You can reduce image blurring in dark locations or with moving subjects by
increasing the ISO sensitivity (select a larger number).
Records a bright image even in dark locations while increasing shutter speed to reduce blur.
However, the image tends to be noisy.
Low ISO sensitivity
Records a smoother image.
However, when the exposure is insufficient, the image may be darker.
Related Topic
MENU items available for each shooting mode
Back to top
Page 79

Copyright 2013 Sony Corporation
79
Page 80

Cyber-shot User Guide
80
Before Use
PrintSearch
Top page > Useful shooting functions > Using shooting functions > White Balance
Confirming the operation
method
Shooting
Viewing
Useful shooting functions
Useful viewing functions
Changing settings
Viewing images on a TV
Using with your computer
Printing
Troubleshooting
Precautions/About this camera
Contents list
White Balance
Adjusts color tones according to the surrounding light conditions. Use this function if the image color
appears unnatural.
1. MENU
Balance 1)
Balance 2)
Balance 3)
(White Balance) desired mode
(Auto)
(Daylight)
(Cloudy)
(Fluorescent White
(Fluorescent White
(Fluorescent White
(Incandescent)
(Flash)
Adjusts the white balance automatically so that the colors appear
natural.
Adjusts for outdoors conditions on a fine day, evening views, night
scenes, neon signs, fireworks, etc.
Adjusts for a cloudy sky or a shady location.
[Fluorescent White Balance 1]: Adjusts for white fluorescent lighting.
[Fluorescent White Balance 2]: Adjusts for natural white fluorescent
lighting.
[Fluorescent White Balance 3]: Adjusts for daylight fluorescent lighting.
Adjusts for places under incandescent lamp, or under bright lighting,
such as in a photo studio.
Adjusts for flash conditions.
Effects of lighting conditions
The apparent color of the subject is affected by the lighting conditions.
The color tones are adjusted automatically, but you can adjust color tones manually using the White
Balance function.
Daylight (White as Standard)
Cloudy (Bluish)
Page 81

Fluorescent (Green-tinged)
81
Incandescent (Reddish)
Notes
When shooting with a flash in other than [Flash] mode, [White Balance] is set to [Auto].
When [Flash] is [On] or [Slow Synchro], the white balance can only be adjusted to [Auto] or [Flash].
Related Topic
MENU items available for each shooting mode
Back to top
Copyright 2013 Sony Corporation
Page 82

Cyber-shot User Guide
82
Before Use
PrintSearch
Top page > Useful shooting functions > Using shooting functions > Underwater White Balance
Confirming the operation
method
Shooting
Viewing
Useful shooting functions
Useful viewing functions
Changing settings
Viewing images on a TV
Using with your computer
Printing
Troubleshooting
Precautions/About this camera
Contents list
Underwater White Balance
Adjusts the color tones when the camera is set to [Underwater] mode in [Scene Selection], [Underwater]
mode in [Movie shooting scene] or [Underwater Sweep Panorama] in [Panorama Shooting Scene].
1. MENU
(Underwater 1)
(Underwater 2)
Notes
Depending on the color of the water, Underwater White Balance may not work correctly even
though you select [Underwater 1] or [Underwater 2].
Related Topic
MENU items available for each shooting mode
(Underwater White Balance) desired mode
(Auto)
Automatically adjusts the color tones for underwater conditions to make the
colors appear natural.
Adjusts for underwater conditions where blue is strong.
Adjusts for underwater conditions where green is strong.
Copyright 2013 Sony Corporation
Back to top
Page 83

Cyber-shot User Guide
83
Before Use
PrintSearch
Top page > Useful shooting functions > Using shooting functions > Focus
Confirming the operation
method
Shooting
Viewing
Useful shooting functions
Useful viewing functions
Changing settings
Viewing images on a TV
Using with your computer
Printing
Troubleshooting
Precautions/About this camera
Contents list
Focus
Focusing on subjects near the edge of the screen
You can change the focus method. Use the menu when it is difficult to get the proper focus in auto focus
mode.
AF stands for “Auto Focus,” a function that adjusts the focus automatically.
The selected AF range finder frame appears on the screen.
1. MENU
(Multi
AF)
(Focus) desired mode
Focuses on a subject in all ranges of the finder frame automatically.
When you press the shutter button halfway down in still image shooting mode, a green
frame is displayed around the area that is in focus.
When the Face Detection function is active, AF operates with priority on faces.
When Scene Selection is set to
underwater shooting. When focus is achieved by half pressing the shutter button, a
large frame is displayed in green.
Focuses on a subject in the center of the finder frame automatically. Using the AF lock
function together, you can compose the image the way you want.
(Underwater), focus operation is adjusted to
(Center
AF)
Notes
When you use [Digital Zoom] or [AF Illuminator], the AF range finder frame is disabled and appears
in a dotted line. In this case, the camera works to focus on the subjects at the center of the screen.
If the tracking focus is activated, the camera focuses with priority on the subject to be tracked.
Focusing on subjects near the edge of the screen
If the subject is out of focus, do as follows:
Page 84

1. Recompose the shot so that the subject is centered in the AF range finder (A), and press the
84
shutter button halfway to focus on the subject (AF lock).
2. When the AE/AF lock indicator (B) stops flashing and remains on, return to the fully composed shot,
and press the shutter button fully down.
Related Topic
Tracking focus
MENU items available for each shooting mode
Back to top
Copyright 2013 Sony Corporation
Page 85

Cyber-shot User Guide
85
Before Use
PrintSearch
Top page > Useful shooting functions > Using shooting functions > Metering Mode
Confirming the operation
method
Shooting
Viewing
Useful shooting functions
Useful viewing functions
Changing settings
Viewing images on a TV
Using with your computer
Printing
Troubleshooting
Precautions/About this camera
Contents list
Metering Mode
Selects the metering mode that sets which part of the subject to measure to determine the exposure.
1. MENU
(Multi)
(Center)
(Spot)
(Metering Mode) desired mode
Divides into multiple regions and measures each region. The camera determines a wellbalanced exposure (Multi-pattern metering).
Measures the center of the image, and determines the exposure based on the
brightness of the subject there (Center-weighted metering).
Align the spot metering cross hairs (A) on the subject to meter one part of the subject
(Spot metering). This function is useful when the subject is backlit or when there is
strong contrast between the subject and the background.
Related Topic
MENU items available for each shooting mode
Copyright 2013 Sony Corporation
Back to top
Page 86

Cyber-shot User Guide
86
Before Use
PrintSearch
Top page > Useful shooting functions > Using shooting functions > Cont. Shooting Settings
Confirming the operation
method
Shooting
Viewing
Useful shooting functions
Useful viewing functions
Changing settings
Viewing images on a TV
Using with your computer
Printing
Troubleshooting
Precautions/About this camera
Contents list
Cont. Shooting Settings
You can select Single Shooting or Continuous Shooting as the shooting mode.
1. MENU
Shooting)
(Continuous
Shooting)
Notes
[Flash] is set to [Off].
When recording with the self-timer, a series of up to 5 images is recorded.
The recording interval becomes longer, depending on the setting for the image size.
[Focus], [White Balance], and [Exposure Compensation] are adjusted for the first image, and these
settings are also used for the other images.
When the internal memory or a memory card is full, the burst stops.
Related Topic
MENU items available for each shooting mode
(Cont. Shooting Settings) desired mode
(Single
The camera shoots a single image.
The camera shoots up to 100 frames and up to approximately 1 frame per
second when you continue to hold down the shutter button.
Copyright 2013 Sony Corporation
Back to top
Page 87

Cyber-shot User Guide
87
Before Use
PrintSearch
Top page > Useful shooting functions > Using shooting functions > Smile Shutter
Confirming the operation
method
Shooting
Viewing
Useful shooting functions
Useful viewing functions
Changing settings
Viewing images on a TV
Using with your computer
Printing
Troubleshooting
Precautions/About this camera
Contents list
Smile Shutter
When the camera detects a smile, the shutter is released automatically.
1. MENU (Smile Shutter) [On]
2. Wait for a smile to be detected.
When a smile is detected and the smile level exceeds the
records images automatically.
Does not use the [Smile Shutter] function.
(Off)
Uses the [Smile Shutter] function.
(On)
point on the indicator, the camera
Tips for better capturing of smiles
Do not cover the eyes with bangs. Do not obscure the face by hat, mask,
sunglasses, etc.
Try to orient the face in front of the camera and be as level as possible. Keep
the eyes narrowed.
Give a clear smile with an open mouth. The smile is easier to detect when
the teeth are showing.
The shutter operates when any person whose face is being detected smiles.
If a smile is not detected, select MENU
[Slight Smile].
[Smile Detection Sensitivity], then set the value to
Page 88

Notes
88
Shooting using the Smile Shutter ends automatically when either the memory card or internal
memory becomes full.
Smiles may not be detected correctly depending on the conditions.
You cannot use the digital zoom function.
Related Topic
Smile Detection Sensitivity
Functions available for each shooting mode
MENU items available for each shooting mode
Copyright 2013 Sony Corporation
Back to top
Page 89

Cyber-shot User Guide
89
Before Use
PrintSearch
Top page > Useful shooting functions > Using shooting functions > Smile Detection Sensitivity
Confirming the operation
method
Shooting
Viewing
Useful shooting functions
Useful viewing functions
Changing settings
Viewing images on a TV
Using with your computer
Printing
Troubleshooting
Precautions/About this camera
Contents list
Smile Detection Sensitivity
Sets the sensitivity of the Smile Shutter function for detecting smiles.
1. MENU
Notes
Smiles may not be detected correctly depending on the conditions.
Related Topic
Smile Shutter
MENU items available for each shooting mode
(Smile Detection Sensitivity) desired mode
(Big Smile)
(Normal Smile)
(Slight Smile)
Copyright 2013 Sony Corporation
Detects a big, normal or slight smile.
Back to top
Page 90

Cyber-shot User Guide
90
Before Use
PrintSearch
Top page > Useful shooting functions > Using shooting functions > Face Detection
Confirming the operation
method
Shooting
Viewing
Useful shooting functions
Useful viewing functions
Changing settings
Viewing images on a TV
Using with your computer
Printing
Troubleshooting
Precautions/About this camera
Contents list
Face Detection
When the Face Detection function is used, the camera detects the faces of your subjects and adjusts the
focus, flash, exposure, white balance and red-eye reduction settings automatically.
1. MENU (Face Detection) desired mode
(Off)
(Auto)
Notes
[Off] is not available when [Self-Timer] is set to [Self-portrait One Person] or [Self-portrait Two
People].
You can select [Face Detection] only when the focus mode is set to [Multi AF] and the metering
mode is set to [Multi].
The Face Detection function does not operate when you use the digital zoom.
Up to 8 faces of your subjects can be detected.
During Smile Shutter shooting, [Face Detection] is automatically set to [Auto] even if it is set to
[Off].
Cannot use Face Detection.
Selects the face the camera is to automatically focus on.
Related Topic
Tracking focus
MENU items available for each shooting mode
Back to top
Copyright 2013 Sony Corporation
Page 91

Cyber-shot User Guide
91
Before Use
PrintSearch
Top page > Useful shooting functions > Using shooting functions > DRO
Confirming the operation
method
Shooting
Viewing
Useful shooting functions
Useful viewing functions
Changing settings
Viewing images on a TV
Using with your computer
Printing
Troubleshooting
Precautions/About this camera
Contents list
DRO
The camera analyzes the shooting scene and automatically corrects the brightness and contrast to
improve the image quality.
DRO stands for “Dynamic Range Optimizer,” a function that automatically optimizes the difference
between light and dark parts of an image.
1. MENU
Notes
Depending on shooting conditions, it may not be possible to obtain correction effects.
Only [ISO AUTO] or values from [ISO 100] to [ISO 800] can be set for the ISO value when [DRO
plus] is set.
(REC Mode) (Program Auto) (DRO) desired mode
(Off)
(DRO Standard)
(DRO plus)
Copyright 2013 Sony Corporation
Does not adjust.
Adjusts the brightness and contrast of the images automatically.
Adjusts image brightness and contrast automatically and strongly.
Back to top
Page 92

Cyber-shot User Guide
92
Before Use
PrintSearch
Top page > Useful viewing functions > List of viewing MENU items > List of viewing MENU items
Confirming the operation
method
Shooting
Viewing
Useful shooting functions
Useful viewing functions
Changing settings
Viewing images on a TV
Using with your computer
Printing
Troubleshooting
Precautions/About this camera
Contents list
List of viewing MENU items
Menu items Memory card Internal Memory
(Easy Mode)
(Beauty Effect)
(Retouch)
(Delete)
(Slideshow)
(Protect)
Print (DPOF) —
(Rotate)
(In-Camera Guide)
(Settings)
Notes
Only the items that are available for each mode are displayed on the screen.
Copyright 2013 Sony Corporation
Back to top
Page 93

Cyber-shot User Guide
93
Before Use
PrintSearch
Top page > Useful viewing functions > MENU items (Viewing) > Easy Mode
Confirming the operation
method
Shooting
Viewing
Useful shooting functions
Useful viewing functions
Changing settings
Viewing images on a TV
Using with your computer
Printing
Troubleshooting
Precautions/About this camera
Contents list
Easy Mode
When viewing still images in Easy Mode, the playback screen text becomes larger, and the indicators
become easier to see.
1. Set the camera to playback mode.
2. MENU
To end Easy Mode, MENU [Exit Easy Mode].
Notes
The battery charge is used up more quickly because the screen brightness increases automatically.
The shooting mode also changes to [Easy Mode].
Viewing functions available in Easy Mode
In Easy Mode, only the deletion function is available.
(Delete)
MENU
(Easy Mode) [OK] on the control button
You can delete the currently displayed image.
You can delete the currently displayed image using [1 image], and delete all images in a
folder when the memory card is selected or all images in the internal memory (if selected)
using [All].
Select [Exit Easy Mode]
[OK] to exit Easy Mode.
Copyright 2013 Sony Corporation
Back to top
Page 94

Cyber-shot User Guide
94
Before Use
PrintSearch
Top page > Useful viewing functions > MENU items (Viewing) > Beauty Effect
Confirming the operation
method
Shooting
Viewing
Useful shooting functions
Useful viewing functions
Changing settings
Viewing images on a TV
Using with your computer
Printing
Troubleshooting
Precautions/About this camera
Contents list
Beauty Effect
Allows you to apply the Beauty Effect to retouch the still image of a person and make it look better, for
example, retouching for smoother skin, larger eyes, and whiter teeth.
You can set the effects from level 1 to 5. An image on which the Beauty Effect is used is saved as a new
file. The original image is retained as is.
1. Set the camera to playback mode.
2. MENU
3. Select a face you want to use the Beauty Effect for.
4. Select the desired effect and perform retouching according to the operation method in each mode.
(Skin Toning)
(Skin
Smoothing)
(Shine
Removal)
(Eye
Widening)
(Beauty Effect) on the control button.
Retouch the image to change the skin color to the desired effect.
Select the desired base skin color using / and press .
Increase or decrease the color using / .
Retouch the image to remove age spots and wrinkles from the skin.
Increase or decrease the effect using
Retouch the image to suppress the oily skin look.
Increase or decrease the effect using
Retouch the image to enlarge the eyes.
Increase or decrease the effect using
/ .
/ .
/ .
(Teeth
Whitening)
Notes
You cannot use [Beauty Effect] for the following images:
Panoramic images
Movies
You cannot use the Beauty Effect on an extremely small facial image.
To use the Beauty Effect on two or more faces, select the same image again after the effect has
been applied once and then use the effect on another face.
The Beauty Effect may not work properly for some images.
Copyright 2013 Sony Corporation
Retouch the image to whiten the teeth. You may not be able to whiten teeth for
some images.
Increase or decrease teeth whiteness using
/ .
Back to top
Page 95

Cyber-shot User Guide
95
Before Use
PrintSearch
Top page > Useful viewing functions > MENU items (Viewing) > Retouch
Confirming the operation
method
Shooting
Viewing
Useful shooting functions
Useful viewing functions
Changing settings
Viewing images on a TV
Using with your computer
Printing
Troubleshooting
Precautions/About this camera
Contents list
Retouch
Retouches a recorded image and saves it as a new file. The original image is retained.
1. Set the camera to playback mode.
2. MENU
3. Perform retouching according to the operation method in each mode.
(Trimming
(Resize))
(Retouch) desired mode on the control button
Records a zoomed playback image.
Move the lever to the T side to zoom in, to the W side to zoom out.
Set the zoom point with the control button.
MENU select an image size to save
The quality of trimmed images may deteriorate.
The image size that you can trim may vary depending on the image.
Sharpens the image within a chosen frame.
(Unsharp
masking)
Select the area (frame) of the desired image to retouch with the control button
MENU.
Depending on the image, sufficient correction may not be applied and the image
quality may deteriorate.
Notes
You cannot retouch the panoramic images or movies.
Back to top
Copyright 2013 Sony Corporation
Page 96

Cyber-shot User Guide
96
Before Use
PrintSearch
Top page > Useful viewing functions > MENU items (Viewing) > Delete
Confirming the operation
method
Shooting
Viewing
Useful shooting functions
Useful viewing functions
Changing settings
Viewing images on a TV
Using with your computer
Printing
Troubleshooting
Precautions/About this camera
Contents list
Delete
Allows you to select unwanted images for deletion.
You can also delete image using
1. Set the camera to playback mode.
2. MENU
3. [OK]
(This Image)
(Multiple Images)
(All in This Folder)
Notes
In Easy Mode, you can select from [1 image] or [All].
(Delete) desired mode on the control button
Deletes the currently displayed image in single-image mode.
Allows you to select and delete multiple images.
To cancel the selection, press
Deletes all still images and movies in the selected folder at once.
/ (Delete) button [Details].
After step 2, select an image to be deleted, then press .
MENU [OK]
again to cancel the mark.
Related Topic
Deleting images
Copyright 2013 Sony Corporation
Back to top
Page 97

Cyber-shot User Guide
97
Before Use
PrintSearch
Top page > Useful viewing functions > MENU items (Viewing) > Slideshow
Confirming the operation
method
Shooting
Viewing
Useful shooting functions
Useful viewing functions
Changing settings
Viewing images on a TV
Using with your computer
Printing
Troubleshooting
Precautions/About this camera
Contents list
Slideshow
Images are automatically played back in succession.
1. Set the camera to playback mode.
2. MENU
3. Select a desired setting.
4. [Start]
5. Press to end the slideshow.
Notes
You cannot play back movies or panorama images.
Playback Selection
Selects the group of images to be shown.
All Plays a slideshow of all the images in order.
Folder Plays a slideshow of images in the currently selected folder.
(Slideshow) on the control button.
Notes
This setting is fixed to [Folder] when the internal memory is used to record images.
Interval
Sets the screen switching interval.
1 sec
3 sec
5 sec
10 sec
Switches the screen at the selected interval.
Repeat
Turns slideshow repeat on or off.
On Plays back images in a continuous loop.
Off After all the images have been played back, the slideshow ends.
Page 98

Copyright 2013 Sony Corporation
98
Back to top
Page 99

Cyber-shot User Guide
99
Before Use
PrintSearch
Top page > Useful viewing functions > MENU items (Viewing) > Protect
Confirming the operation
method
Shooting
Viewing
Useful shooting functions
Useful viewing functions
Changing settings
Viewing images on a TV
Using with your computer
Printing
Troubleshooting
Precautions/About this camera
Contents list
Protect
To cancel protection
Protects recorded images against accidental erasure.
The
1. Set the camera to playback mode.
2. MENU
Select the image for which you want to cancel protection, and unlock it by pressing on the control
button as the same procedure to protect it. The
mark is displayed for registered images.
(Protect) desired mode on the control button
(This Image)
(Multiple Images)
Protects the currently displayed image in single-image mode.
You can select and protect multiple images.
After step 2, select an image to be protected, then press .
To cancel the selection, press
MENU [OK]
To cancel protection
Copyright 2013 Sony Corporation
again to cancel the mark.
indicator disappears, and the protection is released.
Back to top
Page 100

Cyber-shot User Guide
100
Before Use
PrintSearch
Top page > Useful viewing functions > MENU items (Viewing) > Print (DPOF)
Confirming the operation
method
Shooting
Viewing
Useful shooting functions
Useful viewing functions
Changing settings
Viewing images on a TV
Using with your computer
Printing
Troubleshooting
Precautions/About this camera
Contents list
Print (DPOF)
Clearing the DPOF mark
DPOF (Digital Print Order Format) is a function that allows you to specify the images of the memory card
that you want to print out later.
The
1. Set the camera to playback mode.
2. MENU
Notes
(Print order) mark is displayed for registered images.
desired mode on the control button
(This Image)
(Multiple Images)
The
Movies
Images in the internal memory
You can add a
(Print order) mark cannot be added to the following images:
Orders printing the currently displayed image in single-image mode.
You can select and order multiple images to be printed.
After step 2, select an image to be printed, then press .
To cancel the selection, press
MENU [OK]
(Print order) mark to a maximum 999 images.
again to cancel the mark.
Clearing the DPOF mark
Select the image to clear the DPOF registration, then press on the control button in the same
procedure as when making a
cleared.
Related Topic
Printing still images
Copyright 2013 Sony Corporation
mark. The mark disappears and the DPOF registration is
Back to top
 Loading...