

Page 1

3-068-188-11(1)
Digital Still
Camera
Operating Instructions
Before operati ng t h e unit, please read thi s ma nual thoroughly, and retain
it for futur e reference.
Owner’s Record
The model and serial numbers are located on the bottom. Record the
serial number in th e space provided below. Refer to these numbers
whenever you call upon you r Sony dealer regarding this product.
Model No. DSC-S75/S85
Serial No. ______ __________________
DSC-S75/S85
©2001 Sony Corporation
Page 2

W ARNING
To prevent fire or shock hazard, do
not expose the unit to rain or
moisture.
For the Customers in the
U.S.A.
This symbol is intended to
alert the user to the presence
of uninsulated “dangerous
voltage” within the
product’s enclosure that
may be of sufficient
magnitude to constitute a
risk of elec tr ic shock to
persons.
This symbol is intended to
alert the user to the presence
of important operating and
maintenance (servicing)
instructions in the lite rature
accompanyin g the
appliance.
Never expose the battery pack to
temperature above 60°C (140°F), such as in
a car parked in the sun or under direct
sunlight.
If you have any questions about this product,
you may call:
Sony Customer Information Services Center
1-800-222-SONY (7669)
The number below is for the FCC related
matters only.
Regulatory Information
CAUTION
You are cautioned that any changes or
modifications not expressly approved in this
manual could void your authority to operate
this equipment.
2
Page 3

Note:
This equipment has been tested and found to
comply with the limits for a Class B digital
device, pursuant to Part 15 of the FCC
Rules. These limits are de s ig n ed to provide
reasonable protection agains t ha rmf ul
interference in a residential installation. This
equipment generates, uses, and can radiate
radio frequency energy and, if not installed
and used in accordance with the
instructions, may cau se harmful interf erence
to radio communications. However, there is
no guarantee that in terfere nce wi ll n ot occu r
in a particular installation. If this equipment
does cause harmful interference to radio or
television reception, which can be
determined by turning the equipment off and
on, the user is encouraged to try to correct
the interference by one or more of the
following measures:
— Reorient or relocate the receiving
antenna.
— Increase the separation between the
equipment and receiver.
— Connect the equipment into an outlet
on a circuit different from that to which
the receiver is connected.
— Consult the dealer or an experience d
radio/TV technician for help.
The supplied in terface cable must be u se d
with the equipment in order to comply with
the limits for a digital device pursuant to
Subpart B of Part 15 of FCC Rules.
For the Customers in the
U.S.A.
Caution:
Do not handle damaged or leak ing li thium
ion battery.
Notice for the Customers in
the United Kingdom
A moulded plug complying with B51363 is
fitted to this equipment for your safety a nd
convenience.
Should the fuse in the plug supplied need to
be replaced, a 5 AMP fuse approved by
ASTA or BSI to BS1362, (i.e., marked with
or mark) must be used.
If the plug supplied with this equipment has
a detachable fuse cov er, be sure to attach t he
fuse cover after you change the fuse. Never
use the plug without the fuse cover. If you
should lose the cover, please contact your
nearest Sony service station.
For the Customers in
Germany
Directive: EMC Directive 89/336/EE C,
92/31/EEC
This equipment complies with the EMC
regulations when used under the following
circumstances:
•
Residential area
•
Business district
•
Light-i ndustry district
(This equipment complies with the EMC
standard regulations EN55022 Clas s B. )
DISPOSAL OF LITHIUM ION
BA TTERY .
LITHIUM ION BATTERY.
DISPOSE OF PROPERLY.
You can return your unwanted lithium ion
batteries to your nearest Sony Service
Center.
Note:
In some areas the di sposal of lithium ion
batteries in household or business trash may
be prohibited.
For the Sony Servi ce Center near est yo u call
1-800-222-SONY (United States only)
Attention for the Cu stomers in
Europe
This product has been tested and found
compliant with the limits sets out on the
EMC Directive for using connection cables
shorter than 3 meters.
The electromagnetic f i elds at the specific
frequencies may influe nc e th e picture and
sound of this camera.
3
Page 4

“Memory Stick”
N50
For the Customers in the
U.S.A. and Canada
THIS CLASS B DIGITAL DEVICE
COMPLIES WITH PART 15 OF THE FCC
RULES AND THE CANADIAN ICES-003
OPERATION IS SUBJECT TO THE
FOLLOWING TWO CONDITIONS:
(1) THIS DEVICE MAY NOT CAUSE
HARMFUL INTERFERENCE, AND
(2) THIS DEVICE MUST ACCEPT ANY
INTERFERENCE RECEIVED,
INCLUDING INTERFERENCE THAT
MA Y CAUSE UNDESIRED OPERATION.
Be sure to read the following
before using your camera
Trial recording
Before you record one-time events, you may
want to make a trial recordin g to ma ke sur e
that the camera is working correctly.
No compensation for contents of
the recording
Contents of the recordin g cannot be
compensated for if recording or pla yba c k is
not possible due to a malfuncti on of your
camera or recording medium, etc.
Notes on image data compatibility
•
This camera conforms with the Design
Rules for Camera File Sy stems universal
standard es tablished by the JE ITA (Japan
Electric and Information Technology
Industries Association). You cannot play
back on your camera still images recorded
on other equipment (DCR-TRV890E/
TRV900/TRV900E, DSC-D700, DSCD770) that does no t conform with this
universal standard. (These models are not
sold in some areas.)
•
Playback of images recorded with your
camera on other equipment and pla yba c k
of images recorded or edited wit h othe r
equipment on your camera are not
guaranteed.
Precaution on copyright
Tele vision programs, films, video tapes, and
other materials may be copyrighted.
Unauthorized recording of such materials
may be contrary to the provision of the
copyright laws.
Do not shake or strike the camera
In addition to malfunctions and inability to
record images, this may render the
“Memory Stick” unusable or ima ge data
breakdown, damage or loss may occur.
Do not aim the camera at the sun
or other bright light
This may cause irrecoverable damage to
your eyes.
LCD screen, LCD finder (only
models with a finder) and lens
•
The LCD screen and the LCD finder are
manufactured using extremely highprecision technology so over 99.99% of
the pixels are operational for effective use.
However, there may be some tiny black
points and/or bright points (white, red,
blue or green in color) that constantly
appear on the LCD screen and the LCD
finder. These points are normal in the
manufacturing process and do not affect
the recording in any way.
•
Be careful when placing the camera near a
window or outdoors. Exposing the LCD
screen, the finder or the lens to direct
sunlight for long periods may cause
malfunctions.
Do not get the camera wet
When taking pictures outdoors in the rain or
under similar conditions, be car eful not to
get the camera wet. If moisture
condensation occurs, refer to page 83 and
follow the instructions on how to remove it
before using the camera.
Back up recommendation
To avoid the potential risk of data loss,
always copy (back up) data to a disk.
Handling of the movable lens
This camera uses a movable lens.
Be careful no t to strike or app ly ex cessive
force to the lens portion.
4
Page 5

When the camera is used for long
periods
Note that the camera body may become hot.
Notice
If static electricity or electromagnetism
causes data transfer to dis co ntinue midway
(fail), restart the application or disconnect
and connect the USB cable again.
About the Carl Zeiss lens
This camera is eq uipped with a Ca rl Zei ss
lens which is capable of reproducing fine
images. The lens for this camera uses the
MTF* measurement system for cameras
developed jointly by Carl Zeiss, in
Germany, and Sony Corporation, and
offers the same quality as other Carl
Zeiss lenses.
MTF is the abbreviation of Modulation
∗
Transfer Function/Factor, a numeric
value indicating the amount of light
from a specific part of the subject
gathered at the corresponding posi tion
in the image.
5
Page 6

Introduction
Checks the image after recording images
Recording still images:
page 19
Playing back still images:
page 28
Deleting images (DELETE):
page 71
Captures images with your computer
You can copy images ont o your computer and view and modify images or attach
images to e-mail on your computer using the supplied USB cable and application
software.
Viewing images using a personal com put er: page 31
Recording still images for e-mail (E-MAIL): page 55
Records a moving picture (MPEG Movie or Clip Motion)
according to your purpose
The digital still camera can record a moving
picture with audio (MPEG MOVIE):
page 26
Selects the recording mode from various types of recordings
according to your situation
Creating Clip Motion Files: page 59
Adding audio files to stil l images (VOICE): page 56
Recording text documents (TEXT): page 57
Recording still images as uncompressed files (TIFF): page 58
6
Page 7

Table of contents
Getting started
Identifying the parts ..............................8
Preparing the power supply ................10
Setting the date and time .....................15
Inserting the “Memory Stick” .............17
Basic operations
B
Recording
Recording still images ........ ................19
Recording moving images ..................26
B
Playback
Playing back still images ....................28
Playing back moving images .............. 29
Viewing images using a personal
computer ...................................... 31
Image file storage destinations and image
files ...............................................38
Advanced operations
Before performing advanced operations
How to use the mode dial .............. ..... 40
How to use the control button .............41
How to use the jog dial .......................42
Setting th e image size
(IMAGE SIZE) ............................ 48
B
Various recording
Recording with the ex posure fixed
(AE LOCK) .................................. 50
Recording with the m anual
adjustments ..................................51
Records images according to
shooting conditions
(SCENE SELECTION) ...............52
Recording two or three images
continuously ................................. 53
Recording th ree image s with the exposure
shifted (DSC-S85 only)
(EXP BRKTG) .............................54
Recording still images for e-mail
(E-MAIL) ..................................... 55
Adding audio files to still images
(VOICE) ....................................... 56
Recording text documents (TEXT) ..... 57
Recording still images as uncompresse d
files (TIFF) ...................................58
Creating Clip Motion Files ................. 59
Setting the distance to the subj ect .. ... .. 60
Recording images in macro ................ 61
Adjusting the exposure
(EXPOSURE) .............................. 61
Adjusting the whit e ba la nce
(WHITE BALANCE) ..................62
Enjoying picture effects
(P. EFFECT) ................................63
Recordin g the date and tim e on the still
image (DATE/TIME) ..................64
Using the spot light-metering
function ........................................ 65
B
Various playback
Playing back three or nine images
at once ..................... .....................66
Enlarging a part of the still image
(Zoom and trimming) ...................67
Playing back the still images in order
(SLIDE) ....................................... 68
Rotating a still image (ROTATE) .......69
Viewing images on a TV screen .........70
B
Editing
Deleting images (DELETE) ................71
Preventing ac c idental erasure
(PROTECT) ................................. 72
Changing the recorded still image size
(RESIZE) ..................................... 74
Copying images (COPY) ....................75
Selecting still images to print
(PRINT) ....................................... 76
Dividing a moving ima g e fi le
(DIVIDE) ..................................... 78
Changing the setup settings
(SETUP) ....................................... 80
Additional information
Precautions .......................................... 83
On “Memory Sticks” .......................... 84
About “InfoLITHIU M” battery
pack .............................................. 85
Using your camera abroad ..................86
Troubleshooting .................................. 87
Warning and notice messages .............94
Self-diagnosis display .........................96
Specifications ...................................... 97
Display window indicators .................98
LCD screen indicators ........................99
Index ................................................. 102
7
Page 8

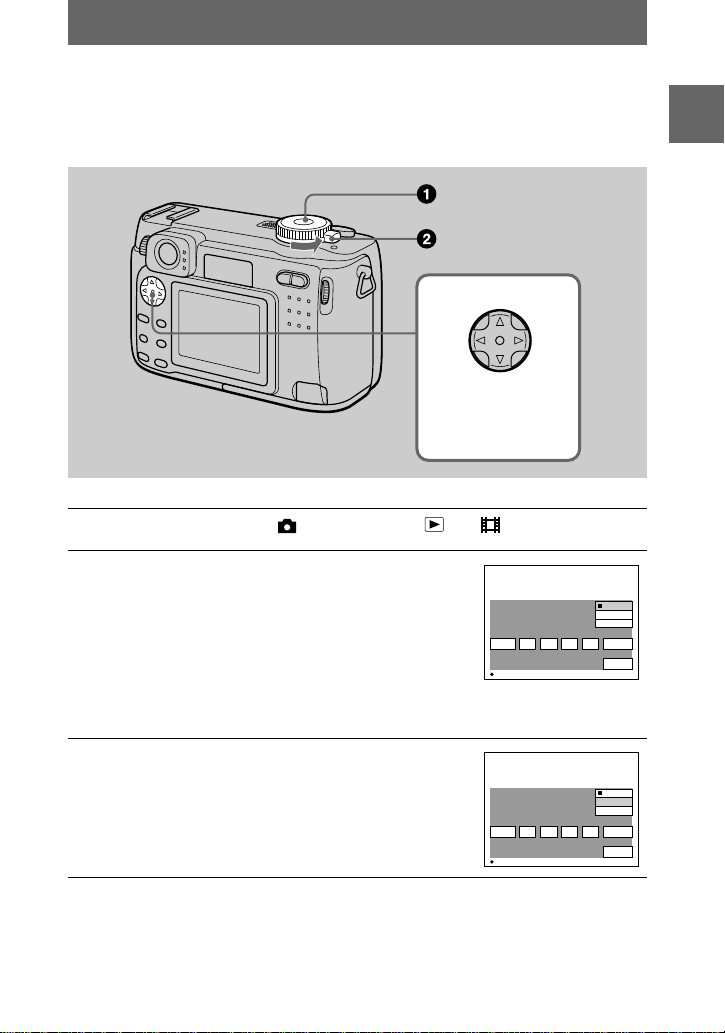
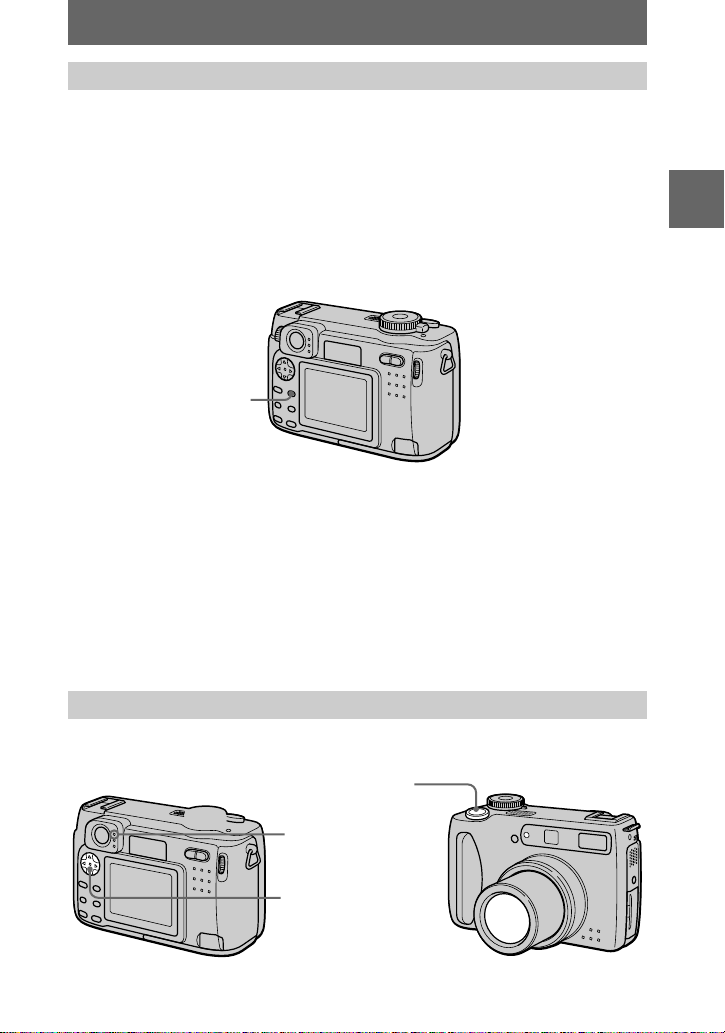
Getting started
Identifying the parts
See the pages in parentheses for de ta i ls of operation.
A Shutter button (19, 27)
B Self-timer (23, 27)/
AF illuminator (25)
C Photocell window for flash
Do not block while recording with
the flash.
D Finder window
E Lens
When cleaning the lens, first return
the lens to the fully retracted
position and turn off the power,
then gently wipe the lens.
F Tripod receptacle (bottom
surface)
Use a tripod with a screw length of
less than 5.5 mm (7/32 inch). You
will be unable to firmly secure the
camera to tripods havin g l o nger
screws, and may damage the
camera.
8
G Built-in microphone
Do not touch while recording.
H Accessory shoe
I Hook for lens cap/strap
J Flash (24)
K Speaker
L ACC (Accessory) jack
M USB jack (33, 35)
N A/V OUT jack (70)
Audio output is monaural.
O Lens cap (supplied)
Be sure to remove the lens cap
before recording.
Page 9

Getting started
A Finder adjustment dial (21)
B Finder
Self-timer/recording lamp (red)
AE/AF lock la m p (g r e e n )
Flash charge lamp (orange)
(24)
C Control button (18, 41)
D MENU button (41)
E (Exposure) butt on (61 )
F FOCUS button (60)
G AE LOCK button (50)
H (spot meter) button (65)
I DSPL/LCD ON/OFF button (23)
J LCD screen
K Display window
L Mode dial (18, 40)
: To record still images,
VOICE mode audio data
: To playback or edit
images
: To record movi ng image s
or Clip Motion images
SET UP:To set the setup items
SCN: To record in the SCENE
SELECTION mode
M: To record w i th the
manual adjust m ent
A: To record in the aperture
priority mode
S: To record in the shutter
speed priority mode
M POWER switch (15)
N POWER ON/OFF (C HG) lamp
(15)
O Hook for strap
P Jog dial (42)
Q Zoom button (for recording) (22)/
INDEX/z oom butt on
(for playback) (67)
R DC IN jack (11, 14)
S RESET button (87)
T Access lamp (17)
U Battery ejesct lever (10)
V Battery/“Memory Stick” cover
9
Page 10

Preparing the power supply
Installing the battery pack
Your camera operates only with the “InfoLITHIUM” NP-FM50 battery pack* (M
series). You cannot use any other battery pa ck. See page 85 for more information
about “InfoLITHIUM” battery pack.
Open the battery/“Memory Stick” cover.
1
Slide the cover in the direction of the arrow.
Install the battery pack.
2
Insert the battery pack with the v mark facing toward the battery compartment
as illustrated.
Close the battery/“Memory Stick” cover.
3
To remove the battery pack
Open the battery/“Memory Stick” cover. Slide the battery eject lever
downward, and remove the battery pack.
Be careful not to drop the battery pack when removing it.
* What is “InfoLITHIUM”?
“InfoLITHIUM” is a lithium ion battery pack which can exchange information such as battery
consumption with compatible video equipment. This unit is compatible with the
“InfoLITHIUM” battery pack (M series). “Inf oLITHIUM” M series battery packs have the
mark. “InfoLITHIUM” is a trademark of Sony Corporation.
10
Page 11

Charging the battery pack
You cannot charge the bat te ry pack while your camera is turned on. Be s ure to turn
off your camera .
DC IN jack cover
To the wall outlet (mains)
Battery pack (M series)
Power cord
(mains lead)
AC-L10A/B/C AC power adaptor (supplied)
Inser t the batter y pack into your c amera.
1
Open the DC IN jack cover and connect the DC connecting cable to
2
the DC IN jack of your camera with the v mark facing up.
Connect the power cord (mains lead) to the AC power adaptor and
3
then to a wall outlet (mains).
The battery indicator flashes when charging begins. When the flashing
stops and the FULL indi cator appears in the di splay window, charging is
completed.
Getting started
After charging the battery pack
Disconnect the AC power adaptor from the DC IN jack on your camera.
Battery remaining indicator
The LCD screen on the camera shows the remaining time for which you can still
record or play back images.
This indication may not be entirely accurat e depending on the condi t io ns of use and
the operating environment.
Charging at 10°C to 30°C (50°F to 86°F) circumstances is recommended .
Using your camera abroad
For details, see page 86.
11
Page 12

NP-FM50 battery pack
When you record images in an extremely cold location or using the LCD screen, the
operating time becomes short. When using the ca mera in an e x tremely cold location,
place the battery pack in your pocket or ot her place to keep it warm, then insert the
battery pack into the camera just before recording. When using a pocket heater, take
care not to let the heater directly contact the battery.
Charging time
Battery pack Full charge (min.)
NP-FM50 (supplied) Approx. 150
Approximate time to charge a completely discharged battery pack using the
AC-L10A/B/C AC power adaptor at a temp erature of 25°C (77°F).
Battery life and number of images that can be recorded/played
back
Still image recording*
NP-FM50 (supplied)
Battery life (min.) Number of images
LCD screen O N Approx. 150 Approx. 2500
LCD screen OFF Approx. 180 Approx. 30 00
Still image playback**
NP-FM50 (supplied)
Battery life (min.) Number of images
LCD screen O N Approx. 270 Approx. 5000
Approximate battery life and number of images that can be recorded/played back
with a fully charged bat te ry pack at a temperatur e of 25°C (77°F), 640×480 i m age
size, standard pi cture quality and in N O RMAL recording mode.
Recording at about 4-seco nd intervals
∗
Playing back single image s in order at about 3-second intervals
∗∗
Moving image recording
NP-FM50 (supplied)
LCD screen OFF (min.) LCD screen ON (min.)
Continuous recor di ng Approx. 210 Approx. 170
Approximate recording time with a fully charged battery pack at a temperature of
25°C (77°F) an d 160×112 image size.
12
Page 13

Notes
•
The battery life and number of images will be decreased if you use your camera at low
temperatures, use the flas h , rep eatedly turn the power on/off or use the zoom.
•
The numbers of images shown on tables above are as a guide. The n umbers may be smaller
depending on conditions.
•
The capacity of the “Memory Stick” is limited. The above figures are a guide when you
continuously record/play back while replacing the “Memory Stick.”
•
“----” appears in the display window u nti l the batt ery usable time is calculated.
•
During charging, the indicators in the display window may not appear correctly or may flash in
the following cases.
— When the battery pack is not ins ta ll ed corr ec tl y.
— When the AC power adaptor is disconnected.
— When the battery pack has mal functioned.
•
When you turn the LCD screen on and off, it takes about one minute for the correct battery
remaining time to appear.
•
If sufficient battery remaining time is indicated but the power runs out soon, fully charge the
battery so that the correc t ba ttery remaining time appea r s.
•
Do not short the DC plug of the AC power adaptor with a metallic object, as this may cause
malfunction.
Getting started
13
Page 14

Using the AC power adaptor
To the wall outlet (mains)
DC IN jack
cover
AC-L10A/L10B/L10C AC power adaptor (supplied)
Open the DC IN jack cover and connect the DC connecting cable to
1
the DC IN jack of your camera with the v mark facing up.
Connect the power cord (mains lea d) to th e AC power adaptor and
2
then to a wall outlet (mains).
Using a car battery
Use Sony DC adaptor/charger (not supplied).
When using the AC power adaptor
Be sure to use it near the wall outlet. If a malfunction occurs, disconnect the plug
from the wall outlet.
Power cord
(mains lead)
14
Page 15
Setting the date and time
2001
/:/
1
1
12 00
AM
Y / M / D
D / M / Y
OK
CANCEL
M / D / Y
CLOCK SET
OK
2001
/:/
1
1
12 00
AM
Y / M / D
D / M / Y
OK
CANCEL
M / D / Y
CLOCK SET
OK
When you first use your camera, set the date and time. If these are not set, the
CLOCK SET scre en appears whenever you turn on you r ca mera.
Control button
Select the item with
, then set with
vVbB
the center z.
Set the mode dial to , S, A, M, SCN, , or .
1
Slide the POWER switch in the direction of
2
the arrow to turn o n the power.
The POWER ON/OFF (CHG) lamp (green) lights
up.
The CLOCK SET scr een appears on the LCD
screen.
To change the date and time, set the mode dial to
SET UP (page 81) and perform the procedure from
step 3.
Getting started
Select the desired date display format with
3
on the control button, then press the
v/V
center z.
Select from [Y/M/D] (year/ mon t h/day), [M/D/Y]
(month/day/year) or [D/M/Y] (day/month/year).
15
Page 16

Select the year, month, day, ho ur or m inute
2001
/:/
1
1
12 00
AM
Y / M / D
D / M / Y
OK
CANCEL
M / D / Y
CLOCK SET
OK
2001
/:/
1
7
12 00
AM
Y / M / D
D / M / Y
OK
CANCEL
M / D / Y
CLOCK SET
OK
2001
/:/
4
7
10 30
PM
Y / M / D
D / M / Y
OK
CANCEL
M / D / Y
CLOCK SET
OK
4
item you want to set with b/B on the control
button.
The item to be set is indicated with v/V.
Set the numeric value with v/V on the
5
control button, then press the center z to
enter it.
After ent e ring the nu mber, v/V moves to the next
item.
If you selected [D/M/Y] in step 3, set the time on a
24-hour cycle.
Select [OK] with B on the control button,
6
then press the center z at the desired
moment to begin clock movement.
The date and time are entered.
To cancel the date and time setting
Select [CANCEL] with v/V/b/B on the control button, then press the center z.
Note
If the rechargeable button battery is ever fully discharged (page 84), the CLOCK SET screen will
appear again. When this happens, reset the date and time, by starting from step 3 above.
16
Page 17

Inserting the “Memory Stick”
Access lamp
Open the battery/“Memory Stick” cover.
1
Slide the cover in the direction of the arrow.
Insert the “Memory Stick.”
2
Insert the “Memory Stick” with the B mark facing toward the battery
compartment as illustrated until it clicks.
Close the battery/“ M emory Stick” cover.
3
Removing the “Memory Stick”
Open the battery/“Memory Stick” cover, then press the “Memory Stick” once ligh tly.
Notes
•
Insert the “Memory Stick” firmly until it clicks, otherwise a message such as “MEMORY
STICK ERROR” will be displayed.
•
Never remove the “Memory Stick” or turn off the power while the access lamp is lit up.
•
You cannot record or edit images on a “Memory Stick” if the erasure prevention switch is set to
the LOCK position.
Connector
Getting started
Erasure
prevention
switch
Label space
The position and shape of the erasu re prevention swit ch may differ dependin g on the type s of
“Memory Stick” used.
17
Page 18

Basic operations
Recording
B
Basic operations
How to use the mode dial
The mode dial switches the function which is used for recording, playback, or
editing. Set the dial as follows before starting to operate your camera.
: To record still images, VOICE mode audio data
: To play back or edit images
: To record moving images or Clip Motion images
SET UP: To set the setup items (The SET UP position
changes the settings of infrequently-used
items.)
SCN: To record in the SCENE SELECTION mode (Set in
advance the SCENE SELECTION in SET UP
screen)
M: To record with the shutter speed and aperture set
manually
A: To record in the aperture priority mode
S: To record in the shutter speed priority mode
How to use the control button
When the menu is not di splayed, the control button is used to perform the fol lowing
operations.
18
(v): Recording with flash
(V): Recording with self-timer
7
(b): Checking the last recorded image
(B): Recording close subjects
Page 19

Recording still images
Still images are recorded in JPEG format.
Before recording still images, slide the POWER switch in the direction of the arrow
to turn on the power and insert a “Memory Stick.”
POWER switch
Set the mode dial to , S, A, M or SCN.
1
Press and hold the shutter button halfway down.
2
The image freezes momentarily, but is not yet recorded. While the AE/AF lock
indicator z is flashing, the camera automatically adjus ts th e e x po su re and
focus of the captur ed image. When the ca mera finishes the autom at i c
adjustments, the AE/AF lock indicator z stops flashing, th en lights up and the
camera is ready for recording.*
If you release the shutter button, the recording will be can celed.
BB
B
B
Recording
AE/AF lock indicator (green) flashes t lights up
19
Page 20

Press the shutter button fully down.
3
The shutter sounds .
“RECORDING” appears on the LCD screen, and the image will be recorded on
the “Memory Stick.” When “RECOR D I N G ” disappears, you can record the
next image.
RECORDING
If the flashing AE/AF lock indicator changes to flashing slowly, the subject may be difficult to
∗
focus on (dark, poor contrast) or the subje c t ma y be extrem ely cl ose . Release the shutter
button, then focu s again.
Auto power-off function
If you do not operate the camera for about three minutes during recording or
playback, the camera turns off automatically to prevent wearing down the battery. To
use the camera a gain, slid e the PO WE R switc h in th e dire ctio n of the arro w to t urn on
the camera again. The auto power-off function only operates when the camera is
operating using a battery pack. The auto power-off also will not operate when playing
back moving images or playing back a SLIDE SHOW (page 68), or when a
connector is plugged into the USB jack, the DC IN jack or the A/V OUT jack.
The number of images you can record on a “Memory Stick”
(8 MB or 16 MB)
See pages 49 and 55 to 60.
Notes
•
Do not touch the lens portion while it is operating.
•
When recording a bright subject, the LCD screen color may change after AE/AF lock, but this
does not affect the recorded image.
•
When you press the shutter button fully down at once in step 2, the camera starts recording
after the automatic adjustment is complete. However, the recording cannot be carried out while
the flash charge lamp (page 21) is flashing. (During this time, the camera is charging the
flash.)
20
Page 21

Recording images with the finder
You can extend the battery time by turning off the LCD screen and recording using
the finder. Turn the finder adjustment dial until the image appears clearly within the
finder, then record the image.
Finder adjustment dial
DSPL/LCD ON/OFF
Indicators in the finder
Recording lamp (red)
AE/AF lock lamp (green)
Flash charge lamp (orange)
Checking the last recorded image (Quick Review)
You can check the last recorded image by clearing the menu from the screen
(page 41) and pressing b (7) on the control button.
To return to the normal recording mode: press lightly on the shutter button or
press b (7) again.
To delete the image: 1. Press MENU. 2. Select [DELETE] with B on the control
button, then press the center z. 3. Select [OK] with v on the control button, then
press the center z.
BB
B
B
Recording
21
Page 22

22
Page 23
The indicators on the LCD screen
Each time you pre ss D SPL/LCD ON/OFF, t he status of the LCD screen changes as
follows:
The LCD backlight is turned on.
(All the available indicators are turned on.)
r
The LCD backlight is turned on.
(Warning messages and manual adjustment items which are set using the jog dial
are turned on.)
r
The LCD backlight is turned off.
DSPL/LCD ON/OFF
See page 99 for a detailed descripti on of the indicated items .
Notes
•
Because of the difference of the portion of the finder and the lens, use the LCD screen when
you record a subject closer than 1 m (3 1/4 feet).
•
You cannot turn off the LCD screen when [DEMO] or [CONVERSION LENS] are set to [ON]
in the SET UP settings.
•
You cannot turn off the LCD backlight in SET UP and when displaying the menu.
•
You cannot turn off the self-timer indicators and som e of th e ind ic at or s use d in a dvanced
operations.
•
The indicators on the LCD screen are not reco rd ed .
BB
B
B
Recording
Using the self-timer
When you use the self-timer function, the subject is recorded about 10 seconds after
you press the sh ut te r button.
23
Page 24

Clear the menu ( page 41), then press the control button V ( ). The (self-timer)
indicator appears on the LCD screen, and about 10 seconds after you press the shutter
button, the subject is recorded. The self-timer lamp flashes an d t he be ep sounds after
you press the shutter button until the shutter is released. To cancel the self-timer
recording, pre ss the control button V ( ) again.
Recording images with the flash
The factory setting is auto (no indicator). In this mode, the flash automatically
strobes when t he surroundings is dark. To change the flash mode, clear t he menu
(page 41), then press th e
control button v (
) repeatedly so that the flash mode
indicator appe ars on the LCD screen.
Control b utton v ()
Each time you press the control button v ( ), the indicat or changes as follows.
(No indicator) t t t (No indicator)
Forced flash: The fl ash strobes regardless of the surround in g brightness.
No flash: The flash does not st r obe.
You can change the brightness of the flash with [ ±] (FLASH LEVEL) in the menu
settings (page 45).
To reduce the red-eye phenomenon
Set [RED EYE REDUCTION] to [ON] in the setup settings, the flash strobes before
recording to red uce the red-eye phenomenon (page 80) . When [ON] is selected,
appears on the LCD sc reen.
Notes
•
When [ISO] is set to [AUTO] in the menu settings, the recommended shooti ng distance using
the built-in flash is 0.3 m to 3.0 m ( 11 7 /8 inches to 9 feet 10 1/8 inches). When it is not set to
[AUTO], the flash may be ineffective even if the flash level is changed.
•
Attaching a conversion lens (not supplied) may block the ligh t from the flas h or cause the len s
shadow to appear.
•
You cannot use an external flash (not supplied) and the built-in flash at the same time.
•
Red-eye reduction may not produce the desired effects depending on individual differences, the
distance to the subject, if the subject does not see the pre-strobe, or other conditions.
•
Red-eye reduction effects are also difficult to obtain if you set the shutter to a slow speed in the
shutter speed priority mode.
•
The flash effect is not obtained easily when you use for c ed flash in a bright loc at ion .
•
While charging the flash, the flash charge lamp flashes. After the charging is complete, the
lamp goes ou t.
24
Page 25

•
The flash does not function when record ing moving images (excluding Clip Motion) or
recording in BURST mode or in EXP BRKTG (DSC-S85 only) mode.
Recording images with the AF illuminator
The AF illuminator is fil l li ght to f ocus on a subjec t easi ly. Set [AF ILLUMINATOR]
(page 80) to [ON] in the setup settings, appears on the LCD screen and the AF
illuminator emits light when the shutter button is pressed halfway. It keeps emitting
light until the focus is locked.
AF illuminator
Notes
•
If AF illuminator light does not reac h the subject sufficiently or the subject has no contrast,
focus will not be achieved. (Approximate 0.3 to 3.0 m (11 7/8 inches to 9 feet 10 1/8 inches)
distance is recommende d.)
•
In TWILIGHT mode of the SCENE SELECTION function (page 52), the AF illuminator will
emit only when the flash mode is set to (Forced fla sh).
•
The AF illuminator will not emit when the LANDSCAPE mode of the SCENE SELECTION
function (page 52) is selected or [CONVERSION LENS] (page 81) is set to [ON] in the setup
settings.
•
Focus is achieved as long as AF illuminator light reache s to the subject even if its light is
slightly out of the middle position of the subject.
•
The AF illuminator does not operate when adjusting focus manually.
•
The AF illuminator is a very bright light. Although it is safe to use, avoid shining it directly into
someone’s eyes at a close distance.
BB
B
B
Recording
25
Page 26

Recording moving images
CAMERA
SCENE SELECTION:
MOVING IMAGE:
DATE/TIME:
DIGITAL ZOOM:
BRACKET STEP:
RED EYE REDUCTION:
AF ILLUMINATOR:
TWILIGHT
MPEG MOVIE
OFF
OFF
±0.7EV
OFF
ON
PAGE SELECT
MPEG MOVIE
CLIP MOTION
CAMERA
SCENE SELECTION:
MOMOVING IMAVING IMAGE:GE:
DATE/TIME:
DIGITAL ZOOM:
BRACKET STEP:
RED EYE REDUCTION:
AF ILLUMINATOR:
OK
CAMERA
SCENE SELECTION:
MOVING IMAGE:
DATE/TIME:
DIGITAL ZOOM:
BRACKET STEP:
RED EYE REDUCTION:
AF ILLUMINATOR:
TWILIGHT
MPEG MOVIE
OFF
OFF
±0.7EV
OFF
ON
PAGE SELECT
Moving images with audio are recorded in MPEG format (page 39).
To record mov i ng i mages, slide the POWER switch in the directio n of the arrow to
turn on the power an d insert a “Memory Stick.”
POWER switch
DSPL/LCD ON/OFF
Set the mode dial to SET UP.
1
Select [ ] (CAMERA) with v/V on the
2
control button, then press B.
Select [MOVING IMAGE] with v/V on the
3
control button, then press B.
Select [MPEG MOVIE] with v/V on the
4
control button, then press the center z.
Select the mode dial to .
5
26
Page 27

Press the shutter button fully down.
6
“REC” appears on the LCD screen, and recording of the image and sound on
the “Memory Stick ” begin s.
Press the shutter button fully down again to stop recording.
7
The recording st o ps.
When selecting the 320 (HQ) size: The recording stops in approximate 15
seconds (page 48).
When selecting the 320×240 or 160×112 sizes: The recording stops when the
“Memory Stick” is full.
For details on the image size, see “Setting the image size (IMAGE SIZE)” on
page 48.
Using the self-timer
When you use the self-timer function, the subject is recorded about 10 seconds after
you press the sh ut te r button.
Clear the menu (page 41), then press the control button V ( ). The (self-timer)
indicator appears on the LCD screen, and the recording starts about 10 seconds after
you press the shutter button. The self-timer lamp flashes and the beep sounds after
you press the shutter button until the shutter is released. To stop the self-timer
recording, press the control button V ( ) again.
LCD screen indicators during recording
Each time you pre ss D SPL/LCD ON/OFF, t he status of the LCD screen changes as
follows: all indicators on t indicators off t LCD screen off.
These indicator s a re not recorded. See pa ge 100 for a detailed description of the
indicators.
BB
B
B
Recording
27
Page 28
Playback
FILE BACK/NEXT VOLUME
10:30
PM
2001 7 4100-0028
6/8
640
B
Playing back still images
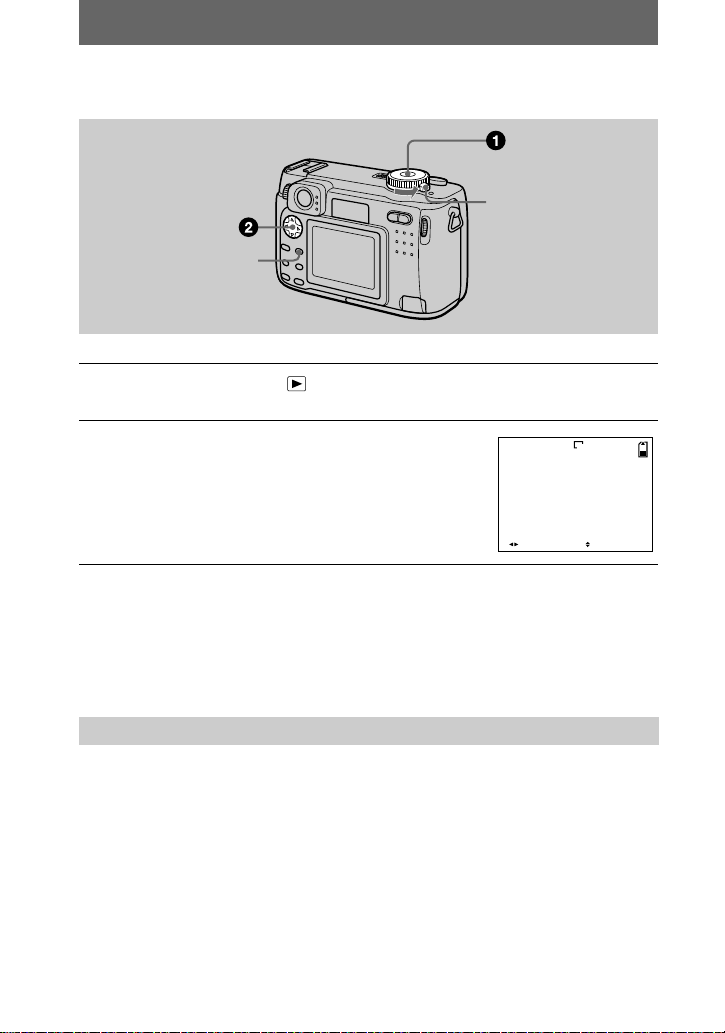
POWER switch
DSPL/LCD ON/OFF
Set the mode dial to .
1
The last recorded image (still or moving ) appears on the LCD s cr een.
Select the desired still image with the
2
control button b/B.
: To display the preceding image.
b
: To display the next image.
B
Notes
•
You might not b e able to corre ctly play back images recorded with this ca mera on other
equipment.
•
You cannot play back on this camera images larger than the maximum image size that can be
recorded with this camera.
•
A rough image is played back, followed by the normal image.
LCD screen indicators during still image playback
Each time you pr ess DSPL/LCD ON/OFF, th e st atus of the LCD scree n changes as
follows: all indicators on t indicators off t LCD screen off.
See page 101 for a deta i l ed description of the indicators.
28
Page 29

Playing back moving images
FILE BACK/NEXT VOLUMEPLAY
6/8
0:02
10:30
PM
2001 7 4MOV 00001
VOLUMESTOP REV/CUE
6/8
0:02
10:30
PM
2001 7 4MOV 00001
Playback bar
POWER switch
DSPL/LCD ON/OFF
Set the mode dial to .
1
The last recorded image (still or moving) appears on the LCD screen.
Select the desired moving image with the
2
control button b/B.
Moving images are displayed one-size smaller than
still images.
: To display the preceding image.
b
: To display the next image.
B
Select the center z to start the playback.
3
The moving image and sou nd are played back.
During playback, B (playback) appea rs on t he LCD
screen.
To advance or rewind, press the control button b/B
during play back.
BB
B
B
Playback
To pause playback
Press the center z on the control button to st op the playback.
To advance or rewind the moving image
Press the control button b/B during playback.
To return to the normal playback, press the center z on the control button.
29
Page 30

Moving images recorded with the image of [320 (HQ)]
(page 48)
The images are displayed over the entire screen in steps 2 and 3.
Adjusting the volume
Press the control button v/V to adjust the volume.
LCD screen indicators during moving image playback
Each time you pr ess DSPL/LCD ON/OFF, th e st atus of the LCD scree n changes as
follows: all indicators on t indicators off t LCD screen off.
See page 101 for a deta i l ed description of the indicators.
30
Page 31

Viewing images using a personal computer
You can view data recorded w i th your camera on a personal computer, modify and
attach it to e-mail using application software. This section describes the method for
viewing images on a personal computer using the supplied USB cable.
There are two ways to make t h e USB connection, which are the normal connection
and the PTP connection (page 81). This is set using [USB CONNECT] in the setup
settings. Users w ill be informed at th e Sony website when PTP connection is
supported. Here describes the way using the [NORMAL] setting.
The factory setting of USB mode is [NORMAL].
The mode can be checked and set as foll ows.
1
Set the mode dial to SET UP.
2
Select [SETUP2] with v/V, then press B.
3
Select [USB CONNECT] with v/V, then press B.
4
Select the connection mode w ith v/V.
The USB cable is used to connect the camera to a personal computer so that
operations can be performed on im age files recorded in a “ M emory Stick” from th e
personal computer.
In order to use the US B cable, a USB driver must be install ed in the personal
computer beforehand.
Be sure to also refer to the operation manuals for your personal computer and the
application software.
Notes
•
Data recorded with yo ur cam era is stored in the following formats. Make sure that ap p li cations
that support these file formats are inst alle d on your pe rs ona l computer.
— Still images (other than TEXT mode, uncompressed mode and Clip Motion): JPEG format
— Moving images /audio: MPEG format
— Uncompressed mode still images: TIFF format
— TEXT mode/Clip Motion: GIF format
•
Depending on your application software, the file size may increase when you open a still image
file.
•
When you copy the image to the camera from your computer, which was modified with a
retouching software and was converted to another file format, the “FILE ERROR” messag e
may appear and you may be unable to open the im age.
•
Depending on your application software, only the first frame of the Clip Motion file may be
played back.
Communications with your computer (for Windows only)
Communications betwe en your came r a and your computer may not recover after recovering
from Suspend or Sleep.
BB
B
B
Playback
31
Page 32

Recommended Windows environment
OS: Microsoft Windows 98, Windows 98SE, Windows 2000 Professional, Windows
Millennium Edition
The above OS is required to be installed at the factory.
Operation is not assured in an environment upgrade d to the ope r at ing systems described
above.
CPU: MMX Pentium 200 MHz or faster
The USB connector must be provided as standard.
Recommended Macintosh environment
Macintosh computer with the Mac OS 8.5.1/8.6/9.0/9.1 sta ndard installation
However, note that the update to Mac OS 9.0/9.1 should be used for the following models.
•
iMac with the Mac OS 8.6 factory pre-insta lle d a nd a slot loa d i ng type CD- ROM drive
•
iBook or Power Mac G4 with the Mac OS 8.6 factory pre-installed
Macintosh computer with Mac OSX (v10.0)
The USB connector must be provided as standard.
QuickTime 3.0 or newer must be installed (to play back moving pic ture s) .
Notes
•
If you connect two or more USB equipment to a si ngle pe r sona l c omputer at the same time,
some equipment may not operate dep ending on the type of USB equipment.
•
Operations are not guaranteed when using a hub.
•
Operations are not guaranteed for all the recommended computer environments mentioned
above.
•
32
Page 33

Installing the USB driver
Before connecting your camera to your personal computer, install the USB driver to
the computer. The USB driver is included with the application software in the CDROM which is supplied with your camera.
Be sure to complete installation of the USB driver before connecting the
USB cable. If you connect the USB cable first, you will be unable to
install the USB driver properly .
See page 93 for corrective measures if the USB cable was connected before installing
the driver and the driver software could not be installed correctly.
For Windows 98/98SE/Me and Windows 2000 users
Turn on your personal computer and allow Windows to load.
1
Do not connect the US B cable in this step.
Insert the supplied CD-ROM in the CD-ROM drive of your personal
2
computer.
The application software screen appears.
Click “USB Driver Installation for Windows 98/98SE/Me and
3
Windows 2000”.
USB driver installation starts.
Follow the on-screen messages to install the USB driver.
4
Your personal computer may restart.
Connect the USB jack (mini-B) on your camera with the USB
5
connector on your personal computer using the supplied USB
cable.
to the USB connector
Personal computer
Insert a “Memor y Stick” into your camera, connect the AC power
6
adaptor and turn on your camera.
“USB MODE” appears on the LCD screen of your camera and the camera is set
to communicatio n st andby mode. Your person al computer recogniz es the
camera, and the Windows Add H ardware Wizard starts.
USB cable
to the USB jack
(mini-B)
Push the
connector in as
far as it will go.
BB
B
B
Playback
33
Page 34

Follow the on-screen messages to have the Add Hardware Wizard
7
recognize the ha rdware.
The Add Hardware Wizard star ts twice because two different U SB dr ivers are
to be installed. Be sure to allo w the i nstallation to complete wit hout interru pting
it.
Notes
•
Do not connect the USB cable before the USB driver insta llation is completed in step 4.
•
In step 7, make sure that a “Memory Stick” is inserted into your camera before installing the
USB driver. Otherwise, you will be unab le to install the USB driver.
For Macintosh users
• When using MacOS9.1/MacOSX (v10.0)
It is not necessary to install the USB driver. The Macintosh recognizes the camera as
a drive simply by connecting it to the Macintosh with the USB cable.
• When using MacOS8.5.1/8.6/9.0
Follow the procedures below to install the driver.
Turn on your personal computer and allow the Mac OS to load.
1
Insert the supplied CD-ROM in the CD-ROM drive of your personal
2
computer.
Double-clic k the CD-ROM drive icon to open the window.
3
Double-click the icon of the hard disk containing the OS to open
4
the window.
Move the following two files from the window opened in step 3 to
5
the “System Folder” icon in the window opened in step 4 (drag
and dro p).
•
Sony USB Driver
•
Sony USB Shim
When “Put these items into the Extensions folder?” appears, click
6
“OK.”
Restart your personal computer.
7
34
Page 35

Viewing images
When viewing moving images on a Windows system, RealPlayer, Windows Media
Player or ot her mo v ing ima ge p layb ack app li catio ns mus t be i ns talle d. Whe n viewing
moving images on a Ma ci nt osh system, QuickTime3.0 or l at er m ust be installed.
Turn on the power of your personal computer and allow Windows
1
or Mac OS to load.
Connect the USB jack (mini-B) on the camera with the USB
2
connector on your personal computer using the supplied USB
cable.
Insert a “Memor y S tick” into your came ra , an d connect the AC
3
power adaptor to your camera and then to a wall outlet (mains).
Turn on the power of your camera.
4
“USB MODE” appears on the LCD screen of the camera.
For Windows 98/98SE/Me and Windows 2000 users
BB
B
B
Playback
Open “ My Computer” on Windows and double click the newly
5
recognized drive. (Example: “Removable Disk (E:)”)
The folders insid e th e “M emory Stick” are displayed.
If the drive is not recognized, s ee “Troubleshooting” on page 87.
35
Page 36

Select and double-click the desired image/sound file from the
6
folder.
For the detailed folder and file name, see “Image file storage destinations and
image files” on page 38.
Desired file type Double-click in this order
Still ima g e “Dcim” folder
“100msdcf” folder
t
t
Moving image* “Mssony” foldert“Moml0001” foldertImage file*
Audio* “Mssony” foldert“Momlv100” foldertAudio file*
Clip Motion
“Dcim” folder
“100msdcf” folder
t
t
image
E-mail image
“Mssony” folder t“Imcif100” folder
t
TIFF image
(uncompressed)
Copying a file to the hard disk of your personal computer before viewing it is
∗
recommended. If you play back the file directly from the “Memory Stick”, the ima ge
and sound may break off.
For Macintosh users
Follow the procedure 1 – 4 on page 35.
Double click the newl y recognized icon on the desktop.
5
The folders inside the “Memory Stick” are displayed.
Select and double-click the desired image/sound file from the
6
folder.
Image file
Image file
Image file
Notes on using your personal computer
“Memory Stick”
•
Operation is not guaranteed if you are u sin g a “Memo ry Sti ck ” that was formatted with a
personal computer, or if you used a personal computer to fo rma t the “Memory Stick” in your
camera through a USB connection.
•
Do not optimize the “Memory Stick” on a Windows machine. This will shorten the “Memory
Stick” life.
•
Do not compress the data on the “Memory Stick.” Compressed files cannot be played back on
your cam era.
36
Page 37

For Windows Me and Windows 2000 users
The following procedures are recommended when disconnecting the USB cable from
your personal computer or ejecting the “Memory Stick” from the camera while it is
connected to your personal computer.
1
Stop the drive by clicking on the “Unplug/Eject” icon in the task tray.
2
When the message appears confirming the safe removal of the hardware,
disconnect the US B cable or eject the “Mem ory Stick”.
Software
•
Depending on your application software, the file size may increase when you open a still image
file.
•
When you load an image modified using the su pplied retouch software from your personal
computer to the camera or when you dir e c tly modify the image on the camera, the ima ge
format will differ so the “FILE ERROR” message may appear and you may be unable to open
the file.
•
Depending on your application software, only the first frame of the Clip Motion file may be
played back.
Communications with your personal computer (for Windows
only)
Communications between your came r a and your personal computer may not recover after
recovering from Suspend, Resume, or Sleep.
BB
B
B
Playback
37
Page 38

Image file storage destinations and image files
Image files recorded with your camera are grouped in folders by recording mode.
The meanings of the file names are as follows.
within the range from 0001 to 9999.
For Windows Me users (The drive recognizing the camera is
“E.”)
Folder containing still image, TEXT mode image
and Clip Motion image data
Folder containing E-MAIL mode and TIFF mode
image data
Folder containing moving image data
Folder containing VOICE mode audio data
Folder File Meaning
100MSDCF DSC0
CLP0
CLP0
MBL0
MBL0
TXT0
TXT0
ssss
ssss
ssss
ssss
ssss
.JPG
.GIF
.THM•Index image file of Clip Motion file
ssss
ssss
.GIF
.THM•Index image file of Clip Motion file
.GIF
.THM•Index image file of still image file
ssss
•
Still image file recorded normally
•
Still image file recorded in
– E-MAIL mode (page 55)
– TIFF mode (page 58)
– VOICE mode (page 56)
– Burst mode (page 53)
•
Clip Motion file recorded in NORMAL
mode (page 59)
recorded in NORMAL mod e
•
Clip Mot ion file recorded in MOBILE
mode (page 59)
recorded in MOBILE mode
•
Still image file reco rded in TEXT mode
(page 57)
recorded in TEXT mode
stands for any number
38
Page 39

Folder File Meaning
IMCIF100 DSC0
ssss
.JPG
•
Small-size image file recorded in
E-MAIL mode (page 55)
DSC0
ssss
.TIF
•
Uncompressed image file recorded in
TIFF mode (page 58)
MOML0001 MOV0
MOMLV100 DSC0
ssss
ssss
.MPG•Moving image file recorde d norma lly
.MPG•Audio file recorded in VOICE mode
(page 56)
The numerical por ti o ns of the following files are the same.
– A small-size image file recorded in E-MAIL mode and its corresponding image file
– An unc ompressed image file recorded in TIFF mode and its corr es pondi ng image file
– An audio file recorded in VOICE mode and its corresponding image file
– An image file recorded in TEXT mode and its corresponding index image file
– A n im age file rec or ded with C lip Motion and its corresponding ind ex image file
Tips
The digital still camera saves recorded images as digital data. The format of the
saved data is called as the file format. The formats that can be used with this
camera are as fo llows:
JPEG format
Most digital still cameras, operating systems of computers, and browser
software adopt this format. This format is able to compress files without
appreciable dete ri oration. However, if the image is compresse d and saved on
repeated occasions, the image will deteriorate. This camera records still images
using the JPEG format for normal recording.
GIF format
Using this format, the image wil l not deterio rate e ven if the image is c ompressed
and saved on repeated occasions. This format limits the number of colors to
256 colors. This camera records still images using the GIF format in Clip
Motion (page 59) or TEXT mode (page 57).
BB
B
B
Playback
TIFF format
Stores shooting images without c omp re ssion, so the image does not deteriorate.
Most of operatin g systems and applic ations correspo nd to this format. This
camera records still images using the TIFF format for the TIFF mode (page 58).
MPEG format
This format is very typical for moving images. This camera records audio using
the MPEG format for the moving images re cording and the VOICE mode
(page 56).
39
Page 40

Advanced operations
Before performing advanced operations
This section describes the basic control methods that are frequently used for
“ A dvanced oper ations.”
How to use the mode dial
The mode dial switches the function which is used for recording, playback, or
editing. Set the dial as follows before starting to operate your camera.
: To record still images, VOICE mode audio
data
: To play back or edit images
: To record moving images or Clip Motion
images
SET UP: To set the setup items (The SET UP
position changes the settings of
infrequently-used items.)
SCN: To record in the SCENE SELECTION mode
M: To record with the shutter speed and
aperture set manually
A: To record in the aperture priority mode
S: To record in the shutter speed priority
mode
40
Page 41

How to use the control button
CAMERA
SCENE SELECTION:
MOVING IMAGE:
DATE/TIME:
DIGITAL ZOOM:
BRACKET STEP:
RED EYE REDUCTION:
AF ILLUMINATOR:
TWILIGHT
MPEG MOVIE
OFF
ON
±0.7EV
OFF
ON
SELECT
When the menu or setup screen is displayed, the control button is used to select the
buttons, images and m enu items displayed on t he LCD screen of your camera and
modify the settings. The operation methods that are frequently used for “Advanced
operations” are described below.
Turning on/off the operation buttons (menu) on the LCD screen
Press MENU to display/
clear the menu on the
LCD screen.
ONE PHSH
AUTO
IN DOOR
OUT DOOR
WHITE BAL
ISO
Menu
MODE
Before performing advanced operations
Setting up the items in the setup or menu
Set the mode dial to SET UP so that th e
1
setup screen appears, or press M ENU so
that the menu appears.
41
Page 42

When the mode dial is set to SET UP or :
MODE
ISO
AUTO
IN DOOR
OUT DOOR
ONE PHSH
WHITE BAL
2
1
Press v/V/b/B on the control button to select the item you want to set up.
2
Press the center z on the control button to enter the item.
When the mode dial is set to , S, A, M,
SCN, or :
Press v/V/b/B on the control button to select the
setting of the item.
The selected setti ng is turned to yellow, and the
setup is complete.
How to use the jog dial
The functions which are used frequently in recording are set up using the jog dial and
the following direct buttons. The jog dial is used to change the value in manual
adjustments.
Mode dial (S, A, M)
Select Set
FOCUS
Set the mode dial to S, A, or M.
1
The adjustable value number appears at the right corner on the LCD .
42
Page 43

Turn the jog dial to select the item or value
9
M
Yel low
9
M
Yel lo w
2
number you want to adjust.
•
When the indication b at the right corner on the
LCD screen is in yellow, you can select the item.
In such cases, go to step 3.
•
When the value number at the right corner on the
LCD screen is in yellow, you can adjust the value.
(When you pres s FOCUS, the 9 mark appears on
value number position.)
When you adjust only the value, the adjustment is
complete.
Press the jog dial.
3
The value number turn s to yellow. To adjust the value, rep eat step 2.
Viewing the ne x t/previous image using the jo g d ial durin g pl ayback
When the mode dial is set to , you can easily view the next/previous image by
turning the jog dia l.
Before performing advanced operations
43
Page 44

Menu settings
Menu items that can be modified differ depending on the positions of the m ode dial.
The LCD screen shows only the items you can operate at the moment. Factory
settings are indicated with x.
When the mode dial is set to /SCN/S/A/M
Item Setting Description
WB
(WHITE
BAL)
ISO 400
(IMAGE
SIZE)
(P. QUALITY)
ONE PUSH
AUTO
x
IN DOOR
OUT DOOR
200
100
AUTO
x
2272×1704
x
(DSC-S85 only)
2048×1536
x
(DSC-S75 only)
2272 (3:2)
(DSC-S85 only)
2048 (3:2)
(DSC-S75 only)
1600×1200
1280×960
640×480
FINE Records still images in the fine image quality
x
STANDARD Records still images in the standard image
Sets the white balance (page 62).
Selects the ISO film s peed. When recordi ng
under dark situations or recording a fast-moving
subject, use a high-number setting. When you
record high-quality images, use a low-number
setting (except when the mode dial is set to
SCN).
Selects the image size when recording still
images.
mode.
quality mode.
44
Page 45

Item Setting Description
MODE
(REC
MODE)
±
(FLASH
LEVEL)
PFX
(P. EFFECT)
(
SHARPNESS
TIFF Records a TIFF (uncompressed) file in ad di ti on
TEXT Records a GIF file in black-and-white (page 57).
VOICE Records an audio file (with a still image) in
E-MAIL Records a small-size (320×240) JPEG file in
EXP BRKTG
(DSC-S85 only )
BURST3
(DSC-S85 only )
BURST2
(DSC-S75 only )
NORMAL Records an image using the normal recording
x
HIGH Makes the flash level higher tha n normal.
NORMAL Normal setting.
x
LOW Makes the flash level lower than normal.
SOLARIZE
B&W
SEPIA
NEG.ART
OFF
x
)+2+1
0
x
–1
–2
to the JPEG file (page 58).
addition to the JPEG file (page 56).
addition to the selected image size (page 55).
Records three images with the exposure value of
each ima g e slightly shifted (page 53) .
Records three i m a ges continuously (page 53).
Records two images continuously (page 53).
mode.
Sets the image special effects (page 63).
Adjusts the sharpness of the image.
The indicator appears (excep t w hen the
setting is 0).
Before performing advanced operations
When the mode dial is set to (MOVING IMAGE is set to
MPEG MOVIE in the setup settings.)
Item Setting Description
WB
(WHITE
BAL)
(IMAGE
SIZE)
ONE PUSH
AUTO
x
IN DOOR
OUT DOOR
320 (HQ)
320×240
160×112
x
Sets the white balance (page 62).
Selects the MPEG image size when recording
moving images (page 48).
45
Page 46

Item Setting Description
PFX
(P. EFFECT)
When the mode dial is set to (MOVING IMAGE is set to CLIP
MOTION in the setup settings.)
Item Setting Description
WB
(WHITE
BAL)
(IMAGE
SIZE)
±
(FLASH
LEVEL)
PFX
(P. EFFECT)
(
SHARPNESS
SOLARIZE
B&W
SEPIA
NEG.ART
OFF
x
ONE PUSH
AUTO
x
IN DOOR
OUT DOOR
NORMAL
x
MOBILE
HIGH Makes the flash level higher than normal.
NORMAL Normal setti ng.
x
LOW Makes the flash level lower than normal.
SOLARIZE
B&W
SEPIA
NEG.ART
OFF
x
+2
)
+1
0
x
–1
–2
Sets the image special effects (page 63).
Sets the white balance (page 62).
Selects the Clip Motion image size (page 59).
Sets the image special effects (page 63).
Adjusts the sharpness of the image .
The indicator a ppears (except when the
setting is 0).
46
Page 47

When the mode dial is set to
Item Setting Description
DELETE OK Deletes t h e displaye d image (page 71).
CANCEL Cancels deleting of the image.
PROTECT – Protects ima ges against accide ntal erasure
PRINT – Marks the print mark on still images (page 76).
SLIDE*
COPY OK Copies an image (p age 75).
RESIZE* 2272×1704
ROTATE*
DIVIDE* OK
Only in single-image mode.
∗
INTERVAL
REPEAT
START Starts the slide show.
CANCEL Cancels t he slide show.
CANCEL Cancels copyi ng of the image.
(DSC-S85 only )
2048×1536
(DSC-S75 only )
1600×1200
1280×960
640×480
CANCEL
OK
CANCEL
CANCEL
(page 72).
Sets the slide show interval.
3 sec/5 sec/10 sec/30 sec/1 min
x
ON/OFF
x
Changes the reco rded image size (page 74).
Rotates the still image (page 69).
Divides a moving image (page 78).
Before performing advanced operations
47
Page 48

Setting the image size (IMAGE SIZE)
Set the mode dial to , SCN, S, A, M, or .
1
Press MENU.
2
The menu appears.
Select the desired image s iz e from [ ] (IMAGE SIZE) and press
3
.
v/V
Still image sizes:
DSC-S85
2272×1704, 2272 (3:2)*, 1600×1200, 1280×960, 640×480
DSC-S75
2048×1536, 2048 (3:2)*, 1600×1200, 1280×960, 640×480
The image is recorded in the ratio of three to two to fit the printing paper size. Using this
∗
image size, the margin of an image is not printed out. However, the slight amount of the
upper and lower black portions are displa ye d on the LCD sc r e en.
Moving image (MPEG movie) sizes:
320 (HQ)*, 320×2 40, 160×112
High Quality mode
∗
Clip Motion sizes:
NORMAL (160×120), MOBILE (80×72)
48
Page 49

The number of images* or the time** that you can record on a “Memory
Stick” (8 MB or 16 MB)***
Still images:
Image size Usage
2272×1704
(DSC-S85 only)
2272 (3:2)
(DSC-S85 only)
2048×1536
(DSC-S75 only)
2048 (3:2)
(DSC-S75 only)
Modifying images Approx. 7 (14) A ppr ox. 4 (8)
Printing in 3:2 ratio Approx. 7 (14) Approx. 4 (8)
Modifying images Approx. 9 (18) Approx. 5 (10)
Printing in 3:2 ratio Approx. 9 (18) Approx. 5 (10)
1600×1200 Printing in A4 format
STANDARD FINE
Approx. 15 (30) Approx. 8 (16)
Quality
1280×960 Printing in post card size Approx. 22 (44) Approx. 12 (24)
640×480 Attaching to e-mail Approx. 118 (240) Approx. 48 (96)
Moving images:
Image size Usage
Number of images or time
320 (HQ) Viewing on TV Approx. 20 (40) sec.
320×240 Viewing on web site
160×112 Attaching to e-mail
MOBILE
(80×72)
NORMAL
(160×120)****
When MODE (REC MODE) is set to NORMAL.
∗
The maximum recor ding time in continuous recor ding.
∗∗
The numbers in the parentheses indicate the number of images or the amount of recordable
∗∗∗
time on a “Memory Stick” (16 MB).
When recording 10 frames per Cl ip Motion file.
∗∗∗∗
Remaining number of recordable images or recordable time (page 99)
The actual number of remaining image s or rec or da ble time may differ depending on the
recording conditions.
— Approx. 350 (450)
— Approx. 40 (80)
Approx. 80 (160) sec.
Approx. 320 (640) sec.
Before performing advanced operations
49
Page 50

Various recording
B
Recording with the exposure fixed (AE LOCK)
Mode dial: /S/A/M/SCN
Once you press AE LO CK, the
exposure, now captured, is fixed. For
instance, this function is convenient in
the following use:
Measure the exposure of the desired
portion of the su bj ect using the spot
light-meter i ng function and fix its
exposure value by pressing AE LOCK.
Then, recompo se the picture.
1
3,4
2
1
Set the mode dial to , S, A,
M or SCN.
2
Target the subject that has
desired exposure value, then
press AE LOCK.
The exposure is fixed and the AEL mark appears.
3
Target the subject you want
to record and press and hold
the shutter button halfway
down.
The focus is automatically
adjusted.
4
Press down the shutter
button.
To release AE LOCK
Carry out one of the fo l lowings :
•
Press AE LOCK again after step 2.
•
Release your finger from the shutter
button after step 3.
•
Press down the shutter b u tto n in st ep
4
.
50
Page 51

Recording with the manual adjustments
Mode dial: S/A/M
Shutter speed priority mode
Once the shutter speed is adjusted
manually, the aperture will be
automatically adjusted to the suitable
value to attain correct exposure
according to the brightness of the
subject. Using the higher s hutter speed,
you can record a fast- m ovin g subject
with its motion frozen. And using the
lower shutter speed, you can record the
flow motion of a moving subject.
1
2
1
Set the mode dial to S.
2
Select a shutter speed wi th
the jog dial, then press the
jog dial.
The shutter speed can be selected
from 8'' to 1/1000.
1
2
1
Set the mode dial to A.
2
Select an aperture value with
the jog dial, then press the
jog dial.
The aperture value can be selected
from F2 to F8.
Manual exposure mode
You can manually adjust the shutter
speed and aperture values to achieve
the desired shooting condition
according to yo ur purpose. The
exposure value appears on the LC D
screen (page 61). And you can also
adjust the aperture value and the
shutter speed value according to your
taste. 0 EV is the most suitable value
set by the camera.
BB
B
B
Various recording
Aperture priority mode
Once the aperture is adjusted manually,
the shutter speed will be automatically
adjusted to the suitable value to attain
correct exposure a ccording to the
brightness of the subje ct . Selecting a
lower aperture value opens the lens iris.
Using a lower aperture value, you can
record a subject with it s background
unclear. And using a higher aperture
value, you can record both the subject
and the background stan d out clearly .
1
Set the mode dial to M.
51
Page 52

2
Select the apertur e value
indication with the jog dial,
then pres s t he jog dial.
3
Select the aperture value with
the jog dial, then press the
jog dial.
4
Select the shutter speed
value indication with the jog
dial, then press the jog dial.
5
Select the shutter speed
value with the jog dial, then
press the jog dial.
For details on av aila ble v alu es, see
“Shutter speed priority mode” on
page 51, or “Aperture priority
mode” on page51.
Note
If the setting is not appropriate in aperture
priority mode, shutter speed priority mode,
or manual e xposure mode, th e setting val u e
indicator on the LCD screen flashes. You
can record in this setting, w e, however,
recommend that you adjust the fla she dvalue again.
Records images according to shooting conditions (SCENE SELECTION)
Mode dial: SCN
This camera has preset three SCENE
SELECTION modes. Each mode is
suitable for the following situations;
night scene, land scape, and portra it.
1
Set the mode dial to SET UP.
The setup screen appears.
2
Select [ ] (CAMERA) with
, [SCENE SELECTION]
v/V
with B/v/V, then press B.
3
Select the desired settin g,
then press z.
TWILIGHT mode
Allows you to record br ig ht
subjects in dark p la ces without
losing the dark atmosphere of the
surroundings. Th e shutter speed
becomes slower, so we
recommend that you use a tripod
to prevent shaking.
LANDSCAPE mode
Focuses only on a distant subject
to record landscapes, etc.
PORTRAIT mode
Suits for portrait recordings.
Backgrounds blurred away, and the
frontward person is sharpened.
4
Set the mode dial to SCN.
The selected setting is loaded.
52
Page 53

To cancel the SCENE
3
2
1
4
SELECTION function
Set the mode dial to , S, A, M, ,
or .
Notes
•
You can focus only on distant subjects in
LANDSCAPE mode.
•
Set the forced flash when you use the
flash in the following modes:
— TWILIGHT mode
— LANDSCAPE mode
•
When using the SCENE SELECTION
mode, the AF illuminato r (page 25) does
not emit in the following conditions:
— TWILIGHT mode: when the flash
mode is not set to the forced flash
mode
— LANDSCAPE mode: you cannot use
the AF illuminator.
Recording two or three images continuously
Mode dial: /S/A/M/SCN
You can continuously record two
images with DSC-S75 and three
images with DSC-S85.
Tips
Under normal recording conditions, th e
camera automatically makes various
adjustments, such as those for the focus,
iris, exposure, an d whit e ba lance, as it
shoots. However, you may not be able to
carry out your desired shooting
depending on shooting conditions. The
SCENE SELECTION function provides
you with near-optimum adjustments to
suit your shooting situation.
1
Set the mode dial to , S, A,
M or SCN.
2
Press MENU.
The menu appear s.
3
Select [MODE] (REC MODE)
with b/B, [BURST3] (DSCS85 only) or [BURST2] (DSCS75 onl y) with v/V.
4
Record the image.
BB
B
B
Various recording
To return to normal
recording mode
Select [NORMAL] with v/V in step 3.
Notes
•
You cannot use the flash in this mode.
•
During recordi n g in this mode, the image
is not displayed on the LCD screen. Ma ke
the composition before pressing the shutter
button.
•
The recording interval is approximate 0.6
second.
•
You cannot select a shutter speed slower
than 1” when recording images
continuously.
53
Page 54

Recording three images with the exposure shifted (DSC-S85 only) (EXP BRKTG)
Mode dial: /S/A/M/SCN
The camera continuously records three
images with eac h exposure value
shifted. The exposure compensation
value can be set between ±1.0EV from
the correct expo sure value by 1/3 step.
1,4
7
2,3,6
5
1
Set the mode dial to SET UP.
The setup screen appears.
2
Select [ ] (CAMERA) with
, [BRACKET STEP] with
v/V
, then press B.
B/v/V
3
Select the desired bracket
step value, then press z.
±1.0EV: Shifts th e exposure value
by plus or minus 1.0EV.
±0.7EV: Shifts th e exposure value
by plus or minus 0.7EV.
±0.3EV: Shifts th e exposure value
by plus or minus 0.3EV.
4
Set the mode dial to , S, A,
M, or SCN.
5
Press MENU.
The menu appear s.
6
Select [MODE] (REC MODE)
with b/B, [EXP BRKTG] with
.
v/V
7
Record the image.
To return to normal
recording mode
Select [NORMAL] with v/V in step 6.
Notes
•
You cannot use the flash in this mode.
•
During recording, the image is not
displayed on the LCD screen. Make the
composition before pressing the shutter
button.
•
Focus and white balance are adjusted for
the first image and these settings are also
used for the other images.
•
When the exposure is manually adjusted,
the adjuste d value is used for the center
value.
•
The recording interval is approximate
0.6 second.
•
You cannot select a shutter speed slower
than 1” when recording images
continuously.
54
Page 55

Recording still
images for e-mail
(E-MAIL)
Mode dial: /S/A/M/SCN
In the E-MAIL mode, a small-size
image which is suitable for e-mail
transmission is also recorded at the
same time as recording a normal still
image. (The size of the normal st ill
image is set using [ ] (IMAGE
SIZE) in the menu settings (page 48).)
1
4
3
2
1
Set the mode dial to , S, A,
M or SCN.
2
Press MENU.
The menu appear s.
3
Select [MODE] (REC MODE)
with b/B, [E-MAIL] with v/V.
4
Record the image.
The number of images that you can
record on a “Memory Stick” (8 MB
or 16 MB)* in E-MAIL mode
Image size
2272×1704
(DSC-S85
only)
2272 (3:2)
(DSC-S85
only)
2048×1536
(DSC-S75
only)
2048 (3:2)
(DSC-S75
only)
1600×1200
1280×960
640×480
*
The numbers in the parentheses indicate
the number of images or the amount of
recordable time on a “Memory Sti c k”
(16 MB).
Remaini ng number of recorda ble
images (page 99)
The actual number of remaini ng im ag es
may differ depending on the recording
conditions.
Quality
STANDARD
Approx. 7
(14)
Approx. 7
(14)
Approx. 8
(17)
Approx. 8
(17)
Approx.
14 (28)
Approx.
21 (42)
Approx.
95 (192)
FINE
Approx. 3
(7)
Approx. 3
(7)
Approx. 4
(9)
Approx. 4
(9)
Approx. 8
(16)
Approx.
12 (24)
Approx.
43 (87)
BB
B
B
Various recording
To return to normal
recording mode
Select [NORMAL] with v/V in step 3.
55
Page 56

Adding audio files to still images (VOICE)
Mode dial: /S/A/M/SCN
In the VOICE mode, the audio is also
recorded at th e same time as recording
a still image. You can vividly record
the situation with audio.
1
4
3
2
1
Set the mode dial to , S, A,
M or SCN.
2
Press MENU.
The menu appear s.
3
Select [MODE] (REC MODE)
with b/B, [VOICE] with v/V.
4
Record the image.
If you press and release the
shutter button,
recorded for five seconds.
If you hold down the shutter
button,
sound is recorded until
you release the s hutter button for
up to 40 seconds.
sound is
The number of images that you can
record on a “Memory Stick” (8 MB
or 16 MB)* in VOICE mode**
Image size
2272×1704
(DSC-S85
only)
2272 (3:2)
(DSC-S85
only)
2048×1536
(DSC-S75
only)
2048 (3:2)
(DSC-S75
only)
1600×1200
1280×960
640×480
*
The numbers in the pa r en theses indicate
the number of images or the amount of
recordable time on a “Memory St ick” ( 16
MB).
**
When recording 5-second audio.
To return to normal
recording mode
Select [NORMAL] with v/V in step3.
Quality
STANDARD
Approx. 7
(13)
Approx. 7
(13)
Approx. 8
(16)
Approx. 8
(16)
Approx.
13 (26)
Approx.
19 (38)
Approx.
56 (120)
FINE
Approx. 3
(7)
Approx. 3
(7)
Approx. 4
(9)
Approx. 4
(9)
Approx. 7
(14)
Approx.
11 (22)
Approx.
34 (68)
56
Page 57

Recording text documents (TEXT)
Mode dial:
The TEXT mode is suitable for
recording a document to emphasize its
character by the black and white
colors. The LCD scr een also turns to
black and whit e, and the image is
recorded in the GIF format.
1
Set the mode dial to .
2
Press MENU.
The menu appear s.
3
Select [MODE] (REC MODE)
with b/B, [TEXT] with v/V.
4
Record the image.
BB
B
B
Various recording
57
Page 58

Recording still images as uncompressed files (TIFF)
Mode dial: /S/A/M/SCN
Records the images without
compression, so the image does not
deteriorate. Images recorded in this
mode are suitable for printing with a
high-quality ima ge. The JPEG
(compressed) format image is als o
recorded with the TIFF format image.
1
Set the mode dial to , S, A,
M or SCN.
2
Press MENU.
The menu appear s.
3
Select [MODE] (REC MODE)
with b/B, [TIFF] with v/V.
4
58
Page 59

Creating Clip Motion Files
Mode dial:
Clip Motion is an animation function
that plays back still images in
succession. The images are stored in
GIF format, which is convenient for
creating home pages or attaching
images to an e-mail.
1,3
6,7
2,5,8
4
1
Set the mode dial to SET UP.
The setup scree n appears.
2
Select [ ] (CAMERA) with
, [MOVI NG IMAGE] with
v/V
, [CLIP MOTION] with
B/v/V
, then press z.
v/V
3
Set the mode dial to .
4
Press MENU.
The menu appear s.
5
Select [ ] (IMAGE SIZE)
with b/B, the desired mode
with v/V.
NORMAL (160×120)
Clip Motion of up to 10 frames can
be recorded. This is su itable for
use on home pages, etc.
MOBILE (80×72)
Clip Motion of up to 2 frames can
be recorded. This is su itable for
use with portable data terminals.
6
Record the image f or the first
frame.
MAKING "CLIP MOTION"
Before carrying out step 8, the
images are tempor ar i ly st ored in
memory. These images are not
recorded on the “ Memory Stick”,
yet.
7
Record the im age f or t he ne xt
frame.
Image recording can be repeated
up to the maximum number of
recordable frames.
8
Press z.
All the frame images are recorded
on the “Memory Stick”.
To delete some or all the
frame images while making
a Clip Motion recording
1
Press the control butt on b (7) in
step 6 or 7.
The recorded fra me images are
played back in turn and stop at the
last image.
2
Press MENU, and select [DELETE
LAST] or [DELETE ALL], then
press z.
3
Select [OK], then press z.
When [DELETE LAST] is selected
in step 2, each time you repea t
steps 1 through 3, the recorded
frame is deleted fro m th e newes t
one.
BB
B
B
Various recording
59
Page 60

The number of Clip Motion frames
that you can record on a “Memory
Stick” (8 MB or 16 MB)*
Image size Number of images
NORMAL
(160×120)
MOBILE
(80×72)
*
The numbers in the parentheses indi c ate
the number of images or the amount of
recordable time on a “Memory Stick ” (16
MB).
When recording 10 frames per Clip
∗∗
Motion file
Notes
•
You cannot change the image size partway
through a Clip Motion recordi ng.
•
Reading and writing data take more ti me
than normal image recordi ng.
•
Due to the limitations of the GIF forma t,
the number of colors for Clip Motion
images is reduced to 256 colors or less.
Therefore, the picture q ua li t y may
deteriorate for some images .
•
The file size is reduced in MOBILE mode ,
so the picture quality deteriora te s.
•
GIF files not created on this camera may
not be displayed correctly.
•
All the frame images are immedia tely
recorded on the “Memory Stick” if the
mode dial is switched or th e power is
turned off.
Approx. 40 ( 80)**
Approx. 350 (4 50)
60
Setting the distance to the subject
Mode dial: /S/A/M/SCN/
Normally the focus is automatically
adjusted. This function is useful when
the auto focus does not work well such
as in dark places.
1
Set the mode dial to , S, A,
M, SCN or .
2
Press FOCUS.
The focus is fixed and the 9
(manual focu s) indicator appe ar s.
3
Turn the jog dial to select the
desired focus setting.
You can select from 15 focus
settings (unit: m) in cl uding the 9
position:
0.1, 0.2, 0.3, 0.5, 0.8, 1.0, 1. 5, 2. 0,
3.0, 5.0, 7.0, 10.0, 15. 0 and ∞
(infinity)
To reactivate auto focusing
Press FOCUS again and the focal point
information di sappears.
Notes
•
Focal point information may not
completely show the correct distance. Use
the information as a guide.
•
The focus pr eset cannot be set when
attaching a conversion lens.
•
Focusing error increases if the lens is
pointed up or down.
•
If you shoot a subject within 0.2 m
(7 7/8 inches) while the zoom is set to the
T side, you cannot get a clear focus. In
such cases, the focal point info rm ation
flashes. Press the zoom W button until the
indicator stops flashing .
Page 61

Recording images in
2
1
3
macro
Mode dial: /S/A/M/SCN/
The macro reco rding is used when
zooming up a little subject, such as
flowers, insects.
1
2
Adjusting the exposure (EXPOSURE)
Mode dial : /S/A/SCN/
Adjusts the ex posure v alue which is set
in the automatic adjustment.
1
Set the mode dial to , S, A,
M, SCN or .
2
Clear the menu, and press
the control button B ().
The (macro) indicato r appears
on the LCD scre en.
You can record a subject as close
as about 4 cm (1 5/8 inches) from
the lens surface wi th the zoom set
all the way to the W side, or about
20 cm (8 inches) with the zoom set
all the way to the T side.
To return to normal
recording mode
Press the control button B ( ) again.
The indicator disappears.
Notes
•
You cannot record images in macro with
the LANDSCAPE mode of the SCENE
SELECTION function.
•
When recording images in macro, use the
LCD screen. If you record using the finder,
the range visible in the finder may differ
from the actu al recording ra n g e.
1
Set the mode dial to , S, A,
SCN or
2
Press .
3
Select the desired exposure
value with the jog dial.
Adjust the exposure v al ue while
checking the brightness of the
background.
Y ou can select values ranging from
+2.0 EV to –2.0 EV in steps of 1/3
EV.
Note
If a subject is under extremely bright or dark
situations, or the fl ash is used, the exposure
adjustment may not be effective.
.
BB
B
B
Various recording
61
Page 62

Tips
3
2
1
Normally, the camera automatically
adjusts the exposure. If the color o f th e
image is too dark or bright as illustrated
below, we recommend that you adjust the
exposure manually. When recording a
backlighted subject or a subject in the
snow, set it to wa rd +, and when r ecord ing
a dark subject with fully displayed on the
LCD screen, set it toward –.
Set the exposure
toward +
Set the exposure
toward –
62
Adjusting the white balance (WHITE BALANCE)
Mode dial: /S/A/M/SCN/
Normally, the white balance is
automatical ly adju st ed (AUTO). Wh en
you record with the shooting condition
fixed or under the specific light in g
condition, you can manually adjust the
white balance.
1
Set the mode dial to , S, A,
M, SCN or .
2
Press MENU.
The menu appears.
3
Select [WB] (WHITE BAL)
with b/B, the desired setting
with v/V.
ONE PUSH ( )
Adjusting the white balance
depending on the ligh t s our ce
AUTO (No indicator)
Adjusts the white balance
automatically
Under fluorescent lighting
IN DOOR (n)
•
Places where the lighting
condition ch anges quickly
•
Under bright lighting such as
photography studios
•
Under sodium or mercury lamps
OUT DOOR ( )
Recording a sunrise/ sunset, night
scene, neon signs, or fireworks
Page 63

To shoot in one-push white
3
2
1
balance mode
1
Select [ONE PUSH]. The
indicator appears.
2
Shoot a white object such as paper
full under the same situation you
will shoot.
3
Press v.
The indicator flashes quickly.
When the white balance has been
adjusted and stored in the memory,
the indicator stops flashing.
To reactivate auto adjustment
Select [AUTO] with v/V in step 3.
Enjoying picture effects (P. EFFECT)
Mode dial: /S/A/M/SCN/
You can digitally process imag es to
obtain special effect.
Notes
•
The indicator means:
Slow flashing: white balance is not set or
was not able to be set.
Quick flashing: white balance is being
adjusted (after you pressed v).
Lit steady: white balance has been se t.
•
If the indicator keeps flashing even
when you press v, record in automatic
white balance mode.
Tips
The image is susceptible to lighting
conditions. The image looks blu e und er
sunlight in the summer, and looks red
under mercury lamps. Human eyes can
resolve these problem s. H owever, the
camera cannot resolve the problem
without making adjustmen ts. Norma lly,
the camera adjusts it automatically, but, if
the image appears in s tr ange colors, we
recommend that you change the white
balance mode.
1
Set the mode dial to , S, A,
M, SCN or .
2
Press MENU.
The menu appear s.
3
Select [PFX] (P . EFFECT) with
, the desired mode with
b/B
.
v/V
SOLARIZE
The light contrast is clearer and the
picture looks like an illustration.
B&W
The picture i s monochrome (black
and white).
SEPIA
The picture is sepia-toned like an
old photograph.
NEG.ART
The color and brightne ss of the
picture are reversed as in a
negative.
OFF
Does not use the pict ur e effect
function.
To cancel picture effect
Select [OFF] with v/V in step 3.
BB
B
B
Various recording
63
Page 64

Recording the date and time on the still image (DATE/TIME)
Mode dial: /S/A/M/SCN
1,4
5
2,3
1
Set the mode dial to SET UP.
The setup screen appears.
2
Select [ ] (CAMERA) with
, [DATE/TIME] with B/v/V,
v/V
then press B.
3
Select the date and time
setting with v/V, then press
.
z
DAY & TIME
Imposes the date , ho ur, and
minute.
DATE
Imposes the year, month, and day.
OFF
Does not impose the date and ti me.
4
Set the mode dial to , S, A,
M, or SCN.
5
Record the image.
The date and ti me do no t appear on
the LCD screen during shooting.
These appear during playback
only.
Notes
•
If you select [DATE] in step 3, the date is
imposed onto the ima g e in the order
selected with “Setting the date and time”
(page 15).
•
The date and time are not superimpose d
onto moving images or Clip Motion
images.
64
2001 7 4
Page 65

Using the spot lightmetering function
Mode dial: /S/A/M/SCN/
Use this function when there is
backlight or when there is strong
contrast between the subject and the
background, etc. Position the point you
want to record on the spot lightmetering cross hair.
Press to activate the
spot light-metering function.
Position the point you want to record at
the spot light-metering cross hair.
Record the picture when the automatic
adjustment has been completed.
BB
B
B
Various recording
65
Page 66

Various playback
CLIP TEXT
APERTURE VALUE :
SHUTTER SPEED :
EXPOSURE VALUE :
F2.2
1/125
0.0
10:30
PM
2001 7 4100-0005
SINGLE DISPLAY
B
Playing back three or nine images at once
Mode dial:
Y ou can display multiple images o n the
LCD screen at one time using the
zoom buttons.
1
2
1
Set the mode dial to .
2
Press the zoom W button
repeatedly.
The LCD screen display changes
as follows:
•
Single (s ingle-ima ge) screen
•
Triple-image screen
The image indicated by the yellow
frame in the index sc reen is
displayed in the middle of the
triple-image screen with the
recording info r mation. To display
the other inform ation, press the
control button v/V.
The follo wing mark s are di splaye d
on each image according to the
image type and settings.
: Moving image file
: VOICE mode file
: E-mail file
: Print mark
- : Protect mark
TEXT: TEXT file
TIFF: TIFF file
CLIP: Clip Motion file
(No mark): Normal recordin g (no
settings)
2001 7 4100-0001
FILE BACK/NEXT VOLUME
•
Index (nine-image) screen
CLIP TEXT
SINGLE DISPLAY
66
10:30
PM
To display the next
(previous) index screen
Press the control button v/V/b/B.
To return to normal playback
(single-image)
•
Press the zoom T button re peatedly.
•
Press the control butt on z.
Note
When viewing an image recorded in Clip
Motion or TEXT mode on the index screen,
the image may appear different from the
actual image.
Page 67

Tips
2,4
3
1
When the triple-i mag e screen is
displayed, pressing MENU opens the
menu including [PRINT], [PROTECT],
and [DELETE]. For details on these
items, see pages 71, 72, or 76. To close
the menu, press MENU again. The menu
disappears and the recording information
is indicated.
Enlarging a part of the still image (Zoom and trimming)
Mode dial:
1
Set the mode dial to .
2
Display the image to be
enlarged.
3
Zoom in/out the image with
the zoom T/W buttons.
4
Press the con t rol butt on
repeatedly to select th e
desired portion of the image.
: The image moves downward
v
: The image moves upward
V
: The image moves rightward
b
: The image moves leftward
B
To return to the normal size
Press the control button z.
BB
B
B
Various playback
To record an enlarged image
(trimming)
1
Press MENU after zooming.
2
Select [TRIMMING] with B, then
press z.
3
Select the image size with v/V,
then press z.
The image is recorded and the
image on the LCD screen returns
to the normal size after recording.
67
Page 68

Notes
3,4
2
1
•
You cannot zoom moving images.
•
You can zoom images recorded in TEXT
mode, but cannot trim them .
•
Zoom scaling is up to 5× regardless of the
original image size.
•
The quality of enlarged images may be
deteriorated.
•
The original data is left even if you enlarge
the image.
•
The enlarged image is recorded as the
newest file.
•
If you trim an image, the rema ining
“Memory Stick” capacity will be
decreased.
•
If the remaining “Memory Stick” capacity
is not sufficient, you may be unable to trim
an image.
•
You cannot trim to an image of 3:2.
•
You cannot trim uncompressed (TIFF)
images.
Playing back the still images in order (SLIDE)
Mode dial:
This functio n is usef ul fo r chec king the
recorded imag es or for presentations,
etc.
1
Set the mode dial to .
2
Press MENU.
The menu appears.
3
Select [SLIDE] with b/B, then
press z.
Set the following items.
INTERVAL
You can select from 1 min (one
minute), 30 sec (30 sec onds),
10 sec (10 seconds), 5 s ec
(5 seconds), or 3sec (3 seconds).
REPEAT
ON: Plays back imag es in a
continuous loop.
OFF: After all images have been
played back, the sl i de show ends.
4
Select [ST AR T] with v/V/b/B,
then press z.
The slide show begins.
To cancel the SLIDE SHOW
68
setting
Select [CANCEL] w ith v/V/b/B in
step 3, then press z.
Page 69

To stop the SLIDE SHOW
3,4
2
1
playback
Press z, select [EXIT] with B, then
press z.
To skip to the next/previous
image during the SLIDE
SHOW
Press B (next) or b (previous).
Note
The interval setting time may vary
depending on the image size.
Rotating a still image (ROTATE)
Mode dial:
You can rotate the image recorded in
portrait orientation and display it in
landscape orientation.
1
Set the mode dial to , and
display the image to rotate.
2
Press MENU.
The menu appear s.
3
Select [ROTATE] with
then press z.
4
Select [ , ] with v/V, then
rotate the image with b/B.
Select [OK] with v/V, then
press z.
b/B
,
BB
B
B
Various playback
To cancel rotation
Select [CANCEL] with v/V in step 4,
then press z.
Notes
•
You cannot rotate protected or
uncompressed images, or images r ecor de d
in TEXT mode.
•
You may not be able to rotate images
recorded with other equipment.
•
Also, when viewing images on a computer,
the image rotation inf or mation may not be
reflected depending on the applica ti on
software.
69
Page 70

Viewing images on a TV screen
Mode dial:
Before connecting your camera, be
sure to turn off the TV.
Set the TV/VIDEO
switch to
“VIDEO”.
A/V connecting cable
1
Connect the A/V connecting
cable to the A/V OUT jack of
your camera and to the
audio/video input jacks of the
TV.
If your TV has stereo type input
jacks, connect the audio plug
(black) of the A/ V connecting
cable to the Lch jack.
2
Turn on the TV and start
playback on your camera.
The playback image appears on
the TV screen.
Notes
•
You cannot use a TV that has an antenna
(aerial) connector only.
•
When viewing a still image on the TV, the
black band may appear around the im ag e.
(supplied)
to A/V OUT
jack
70
Page 71

Editing
B
In index mode
Deleting images (DELETE)
Mode dial:
You can delete unwanted files.
In single-image or tripleimage mode
2,4,5
3
1
Set the mode dial to .
2
In single-image mode:
Display the image you want to
delete with b/B.
In triple-image mode:
Press th e z oom W butto n twice in
the single-image mode to turn to
the triple-image mode. Display the
image you want to delete with
.
b/B
3
Press MENU.
The menu appear s.
4
Select [DELETE] with b/B in
single-image mode, or with
in triple-image mode,
v/V
then press z.
5
Select [OK] with v/V, then
press z.
The image (or the middlepositioned image in triple-image
mode) is deleted.
1
W
3,4,5
2
1
Set the mode dial to , then
display the index screen with
the zoom W butto n .
2
Press MENU.
The menu appear s.
3
Select [DELETE] with b/B,
then press z.
4
Select [ALL] or [SELECT]
with b/B, then press z.
5
When you select [ALL]
Select [ENTER] with b/B, then
press z.
All the unprotected images are
deleted.
When you select [SELECT]
The frame of the selected image
turns green.
1
Select the images to be deleted
with the control button, then
press z.
To cancel, press z again.
Repeat this step to select other
images.
The (delete) indicator
appears on the se l ect ed images.
MENU
SET TO NEXT
2
Press MENU.
3
Select [OK] with b/B, then
press z.
1
W
BB
B
B
Editing
71
Page 72

2,4
3
1
W
To cancel deleting
Select [CANCEL] with b/B in step 4
or [EXIT] with b/B in step 5, then
press z.
Note
If there are fil es on the “M emory Sti ck” wit h
names having the same last 4 digits as the
file name of the image to be deleted, these
files are also deleted at the same time.
Preventing accidental erasure (PROTECT)
Mode dial:
Protects images agai nst accidental
erasure.
In single-image or tripleimage mode
1
Set the mode dial to .
2
In single-image mode
Display the image you want to
protect with b/B.
In triple -image mode
Press the zoom W button twice in
the single-image mode to turn to
the triple-image mode.
Display the image you want to
protect with b/B.
3
Press MENU.
The menu appears.
4
Select [PROTECT] with b/B
in single-image mode, or with
in triple-image m ode,
v/V
then press z.
The displayed im age (or the
middle-positioned image in tripleimage mode) is protected.
The - indicator appears on the
image.
72
To release protection
Press z again in step 4. - indicator
disappears.
Page 73

In index mode
3,4,5
2
1
Set the mode dial to , then
display the index screen with
the zoom W button.
2
Press MENU.
The menu appear s.
3
Select [PROTECT] with b/B,
then press z.
4
Select [ALL] or [SELECT]
with b/B, then press z.
5
When you select [ALL]
Select [ON] with b/B, then press
.
z
All the images in the “Memory
Stick” are protected.
When you select [SELECT]
The frame of the s el ected image
turns green.
1
Select the images to be
protected with the control
button, then press z.
To cancel, pre ss z again.
Repeat this step to select other
images.
The - indicator appears on
the selected images.
1
W
To release protection
If you selected [ALL] in step 4, select
[OFF] with b/B, then press z. If you
selected [SELECT] in step 4, select the
images to be unprotected with v/V/b/
, then press z. Repeat this step to
B
select other images. When you have
selected all the images to be
unprotected, press MENU and select
[OK] with b/B, then press z.
To cancel protection
Select [CANCEL] with b/B in step 4
or [EXIT] with b/B in step 5, then
press z.
BB
B
B
Editing
-
MENU
SET TO NEXT
2
Press MENU.
3
Select [OK] with b/B, then
press z.
73
Page 74

Changing the recorded still image size (RESIZE)
Mode dial:
You can change the image size of the
recorded image.
1
3,4
2
1
Set the mode dial to , then
display the image of which
you want to change the size.
2
Press MENU.
The menu appear s.
3
Select [RESIZE] with b/B,
then press z.
4
Select the desired size with
, then press z.
v/V
2272×1704 (DS C-S85 only) ,
2048×1536 (DS C-S75 only),
1600×1200, 1280×960, 640×480
The resized image is re cor ded.
Notes
•
The original im age is retained even after
resizing.
•
You cannot change the size of image s
recorded in TEXT mode, moving images,
uncompressed ima ges, or Clip Motion
images.
•
The resized image is recorded as the
newest file.
•
If you resize an image, the remain in g
“Memory Stick” capacity will be
decreased.
•
When you change from a small size to a
large size, the picture quality deteriorates.
•
If the remaining “Memory Stick ” cap acity
is not sufficient, you may not be able to
resize an image.
•
You cannot resize to an image of 3:2.
•
When you resize a 3:2 image, the uppe r
and lower black portions are displayed on
the LCD screen.
To cancel changing the size
Select [CANCEL] with v/V in step 4,
then press z.
74
Page 75

Copying images (COPY)
Mode dial:
You can copy images to an ot her
“Memory Stick . ”
In single mode
1
3
2
1
Set the mode dial to , then
display the image which you
want to copy.
2
Press MENU.
The menu appear s.
3
Select [COPY] with b/B, [OK]
with v/V, then press z.
“MEMORY STICK ACCESS”
appears.
4
When “CHANGE MEMORY
STICK” appears, eject the
“Memory Stick.”
“INSERT MEMORY STICK”
appears.
5
Insert the “Memory Stick” on
which to copy the image.
“RECORDING” appears. When
copying is completed,
“COMPLETE” appears.
T o end copying, select [EXIT]
with v/V, then press z.
To copy the image to
another “Memory Stick”
Select [CONTINUE] with v/V, press
, then repeat steps 4 and 5.
z
In index mode
3,4,6
2,5
1
Set the mode dial to , then
display the index screen with
the zoom W butt o n .
2
Press MENU.
The menu appear s.
3
Select [COPY] with b/B, then
press z. Select [Select] with
, then press z.
b/B
The frame of the selected image
turns green.
4
Select the image to c opy with
the control button, then
press z.
To cancel, pres s z again. Repeat
this step to select other images.
The (select) indicato r appears
on the image.
MENU
SET
5
Press MENU.
The menu appear s.
6
Select [OK] with b/B, then
press z.
“MEMORY STICK ACCESS”
appears.
TO NEXT
1
W
BB
B
B
Editing
75
Page 76

7
2,4
3
1
W
When “CHANGE MEMORY
STICK” is displayed, eject the
“Memory Stick.”
“INSERT MEMORY STICK”
appears.
8
Insert another “Memory
Stick.”
“RECORDING” appears. When
copying is completed ,
“COMPLETE” appe ar s.
To end copying, select [EXIT]
with v/V, then press z.
To copy the image to
another “Memory Stick”
Select [CONTINUE] with v/V in step
8
, press z, then repeat steps 7 and 8.
To cancel copying part-way
Select [CANCEL] with b/B in step 3
or [EXIT] with b/B in step 6, then
press z.
Selecting still images to print (PRINT)
Mode dial:
You can mark a print mark on still
images recorded w it h your camera.
This mark is convenient when you
have images printed at a sho p th at
conforms with the DPOF (Digital Print
Order Format) standard.
.
In single-image or tripleimage mode
Notes
•
If you do not select [EXIT] after
“COMPLETE” appears and instead insert
a new “Memory Stick,” the same image is
copied again.
•
You cannot copy uncompressed images.
•
You cannot copy images that are bigger
than 5 MB at once. If “NOT ENOUGH
MEMORY” appears or flashes on the
INDEX screen, cancel some images to
copy and try again.
1
Set the mode dial to .
2
In single-image mode
Display the image you want to
print with b/B.
In triple -image mode
Press the zoom W button twice in
the single-image mode to turn to
the triple-image mode.
Display the image you want to
print with b/B.
3
Press MENU.
The menu appears.
4
Select [PRINT] with b/B in
single-image mode, or with
in triple-image m ode,
v/V
then press z.
The (print) mark is marked on
the displayed image (or the
middle-positioned image in tripleimage mode).
76
Page 77

To unmark the print mark
Press z again in step 4. mark
disappears.
In index mode
1
Set the mode dial to , then
display the index screen with
the zoom W button.
2
Press MENU.
The menu appear s.
3
Select [PRINT] with b/B, then
press z.
4
Select [SELECT] with b/B,
then press z.
When marking the mark, you
cannot select [ALL].
The frame of the s el ected image
turns green.
5
Select the images to be
marked with the control
button, then press z.
To cancel, press z again.
Repeat this step to select other
images. The mark appear s on
the selected image.
BB
B
B
Editing
6
Press MENU.
The menu appear s.
7
Select [OK] with b/B, then
press z.
77
Page 78

Dividing a moving image file (DIVIDE)
Mode dial:
You can divide moving images
recorded in MPEG MO VIE mode. This
is convenient when ther e is not enou gh
space on a “Memory Stick” or when
attaching moving images to e- m ails.
1
3,4,5
2
1
Set the mode dial to and
display the moving image
you want to divide.
2
Press MENU.
The menu appear s.
3
Select [DIVIDE] with b/B,
then press z, select [OK]
with v/V, then press z.
4
Play the moving image.
If you press z at the divide point,
[c,C] (frame forward, frame
reverse), [OK], [CANCEL] and
[EXIT] appear on the s creen. If
you select [c,C] with v/V,
you can finely adjust the divide
location using b/B.
If you select [CANCEL], moving
image playback restarts and you
can reselect the divide location.
5
When you have decided the
divide point, select [OK] with
, then press z.
v/V
6
[OK], [CANCEL] and [EXIT]
appear on the screen. Selec t
[OK] with v/V, then press z.
The moving image file is divided.
You cannot divide the
following types of files:
•
Clip Motion files
•
Still image files
•
Moving image fil es that are too short
to divide
The file number changes as
follows when you divide a
file.
<eg.> If you divide the
MOV00003.mpg file, the divided file
numbers become MOV00004.mpg and
MOV00005.mpg, and
MOV0 0003.mpg is skipped. The
divided files are saved as the latest
files.
1
2
MOV00004.mpg
1 2 MOV00005.mpg
Divided at the designated point
To cancel file division
Press [EXIT]. The image playback
screen appears.
To delete unwanted portions
1
Display the portio n of the moving
image you want to delete and press
MENU.
2
Select [DELETE] with b/B, then
press z.
3
Select [OK] with v/V, then pres s
.
z
MOV00003.mpg
DIVIDE point
78
Page 79

Step 1: Divide the unwanted scene A.
g
1
MOV00002.mpg
3AB
DIVIDE point
Step 2: Divide the unwanted scene B.
MOV00004.mpg
1 MOV00005.mpg3 B
A
DIVIDE point
Step 3: Delete the unwanted
scenes A and B.
MOV00004.mpg
13
AB
MOV00007.mp
MOV00006.mpg
DELETEDELETE
Step 4: Only the desired scene
remains.
13
MOV00006.mpg
Notes
•
You cannot divide Clip Motion files.
•
You cannot recombine divided files.
•
The original undivided file is not saved.
BB
B
B
Editing
79
Page 80

Changing the setup settings (SETUP)
Set the mode dial to SET UP. The setup screen appears. You can set up the following
items with the control button. Factory settings are indicated with x.
CAMERA
Item Setting Description
SCENE
SELECTION
MOVING
IMAGE
DATE/TIME DAY & TIME
DIGITAL ZOOMxON Uses digital zoom (page 22).
BRACKET STEP
(DSC-S85 only)
RED EYE
REDUCTION
AF
ILLUMINATOR
SETUP 1
Item Setting Description
FORMAT OK Formats a “Memory Stick ”.
FILE NUMBERxSERIES Assigns numbers to files in sequence even if
TWILIGHT
x
LANDSCAPE
PORTRAIT
MPEG MOVIE Records the MPEG movie (pages 26, 59).
x
CLIP MOTION Records the Cli p M o tion.
DATE
OFF
x
OFF Does not use digital zoom.
±1.0EV
±0.7EV
x
±0.3EV
ON
OFF
x
ON
x
OFF
CANCEL Cancels formatting of a “M emory Stick”.
RESET Resets the file numbering each time the
Selects the SCENE SELECTION mode that
is assigned to the SC N position (page 52).
Sets whether to insert the date and time into
the image (page 64).
Sets the exposure compensatio n value w hen
recording three images with each exposure
value shifted (page 53)
Reduces the red-eye phenomenon (page 24).
Uses when it is hard to focus on the subject
under dark situations (page 25).
Note that form atting erases all th e
information recorded on a “Memory Stick”,
including even erasure protected images
(page 96).
the “Memory Sti ck” is changed.
“Memory Stick” is changed.
80
Page 81

Item Setting Description
CONVERSION
LENS
/
LANGUAGE
CLOCK SET OK Sets the date and time (Perform the
SETUP 2
Item Setting Description
LCD
BRIGHTNESS
LCD
BACKLIGHT
BEEP SHUTTER Turns on the shutter sound only. (The shutter
VIDEO OUT NTSC Sets the video output signal to NTSC mode
USB CONNECT PTP Switches the USB mode (page 31).
ON Sets to “ON” when using the VCL-MHG07
OFF
x
ENGLISH Displays the menu items in English.
x
/JPN Displays the menu items in Japanese.
CANCEL
BRIGHT
NORMAL
x
DARK
BRIGHT
NORMAL
x
ON Turns on the beep/shutter sound (when you
x
OFF Turns off the beep / shutter sound.
PAL Sets the video output signal to PAL mode
NORMAL
x
conversion lens (not supplied). At this time,
the zoom function does not work and you
cannot turn off the LCD scr een.
Also, note that th e VAD-S70 adap t or ring
needed to mount the conversion lens to your
camera is not sold in some countries and
regions.
procedure from st ep 3 on page 15).
Selects the LCD brightness.
This has no effect on the recorded images.
Displayed only when using your camer a
with the battery pack:
Selects the brightness of t he LCD back light.
Lets you set the brig ht ness of the LCD
backlight to [BRIGHT] or [NORMAL].
Selecting [BRIGHT] makes the screen
bright and easy to see when using the
camera outdoors or in other bright locations,
but also uses up the batte ry charge faster.
sound is heard wh en you press the shutter
button.)
press the control button/shutter button).
(e.g., Japan, the USA) (page 86).
(e.g., Europe) (page86).
BB
B
B
Editing
81
Page 82

Item Setting Description
DEMO
ON/STBY Displayed only when you use your camera
x
OFF
with the AC power adaptor. [DEMO] is set
to [STBY] at the fact or y and the
demonstration starts about 10 minutes after
you have set the mode dial to , S, A, or
M. To cancel the demonstration, turn off the
power.
Notes on [DATE/TIME]
•
The date and time do not appear on the LCD screen dur ing shooting. These appear during
playback.
•
The date and time are not superimpos ed onto moving images and Clip Motion image s.
82
Page 83

Additional information
Precautions
On cleaning
Cleaning the LCD screen
Wipe the screen surf ace with a cleaning
cloth (not supplied) or a LCD cleanin g kit
(not supplied) to remove fingerprints, dust,
etc.
Cleaning the camera surface
Clean the camera surface with a soft clot h
slightly moistened with water, then wipe the
surface dry. Do not use any type of solvent
such as thinner, alcohol or benzine as this
may damage the finish or the casing.
After using your camera at the
seashore or other dusty locations
Clean your camera carefully. Otherwise, the
salty air may corrode the metal fitti ngs or
dust may enter the inside of your cam e ra,
causing a malfunc tion.
Note on operating
temperature
Y our camera is designed for use between the
temperatures of 0°C and 40°C (32°F and
104°F). Recording in extremely cold or hot
places that exceed this range is not
recommended.
On moisture condensation
If the camera is brought directly from a cold
to a warm location, or is placed in a very
damp room, moisture may condense inside
or outside the cam era. Shoul d t his o ccur, the
camera will not operate properly.
Moisture condensation oc c urs
easily when:
•
The camera is brought from a cold location
such as a ski slope into a warmly heated
room.
•
The camera is taken from an airconditioned room or car interior to the hot
outdoors, etc.
How to prevent moisture
condensation
When bringing the camera from a cold place
to a warm place, seal the cam era in a plastic
bag and allow it to adapt to conditions at the
new location over a period of time (about an
hour).
If moisture condensation occurs
Turn off the camera and wait about an hour
for the moisture to evaporate. Note that if
you attempt to recor d w ith moisture
remaining inside the lens, you will be unable
to record clear images.
On AC power adaptor
•
Unplug the unit from the wall outlet
(mains) when you are not using the unit for
a long time.
•
To disconnect the po wer cord (m ains lead ),
pull it out by the plug. Never pull the
power cord (mains lead) itself.
•
Do not operate the unit with a damaged
cord (mains lead) or if the unit has been
dropped or damaged.
•
Do not bend the power cord (mains lead)
forcibly, or place a heavy object on it. This
will damage th e cord (mains lead) and may
cause fire or electrical shock.
•
Prevent metallic objects f rom coming into
contact with the metal parts of the
connecting section. If this happens, a short
may occur and the unit may be damage d.
•
Always keep metal contacts clean.
•
Do not disassemble the unit.
•
Do not apply mechanical shock or drop the
unit.
•
While the unit is in use, particularly during
charging, keep it away from AM receivers
and video equipment. AM reception and
video operation are disturbed.
•
The unit becomes warm during use. This is
not a malfunction.
•
Do not place the unit in locations that are:
—Extremely hot or col d
—Dusty or dirty
—Very humid
—Vibrating
Additional information
83
Page 84

On battery pack
•
Use only the specified charger with the
charging function.
•
T o pre ven t accide nt from a short circuit, do
not allow metal objects to come int o
contact with the battery terminals.
•
Keep the battery pack away from fire.
•
Never expose the battery pack to
temperatures above 60°C (140°F), such as
in a car parked in the sun or under direct
sunlight.
•
Keep the battery pack dry.
•
Do not expose the battery pack to any
mechanical shock.
•
Do not disassemble nor modify the battery
pack.
•
Install the battery pack to the camera
securely.
•
Charging while some cap a city remains
does not affect the original battery
capacity.
If any problem occurs, unplug your camera
and contact your nearest Sony dealer.
On internal rechargeable
button battery
This camera has an internal rechargeable
button battery for mainta ining the date and
time and other settings regardless of whether
the power is on or off. This rechargeable
button battery is constantly charged as long
as you are using the camera. However, if
you use the camera for only short periods it
discharges gradually, and if you do not use
the camera at all for about one month it
becomes completely discharged. In this
case, be sure to charge this rechargeable
button battery befor e using the camera.
However, even if this rechargeable button
battery is not charged, you can still use the
camera as long as you do not record the date
and time.
Charging method
Connect the c a mera to a wall outlet (mains)
with the AC power adaptor, or install a
charged battery pack , an d le ave the camera
for 24 hours or more with the POWER
switch set to OFF.
On “Memory Sticks”
“Memory Stick” is a new compact, portable
and versatile IC recording medium with a
data capacity that exceeds a floppy disk.
“Memory Stick” is specially de signed for
exchanging and sharing digital data among
“Memory Stick” compatible products.
Because it is removable, “Memory Stick”
can also be used for external data storage.
There are two types of “Memory Sticks”:
general “Memory Stick s” and “MagicGate
Memory Sticks” that are eq uip ped with the
MagicGate* copyright protection
technology.
You can use both types of “Memory Stic k”
with your camera. However, because your
camera does not support the Magi cGa t e
standards, data r ecorded with your c amera is
not subject to MagicGate copyright
protection.
MagicGate is copyright protection
∗
technology that uses encryption
technology.
Notes
•
Do not remove the “Memory Stick” while
reading or writing data.
•
Data may be damaged if:
—you remove the “Memory Stick” or turn
off your camera while reading or
writing data.
—you use the “Memory Stick” in a
location subject to th e effects of static
electricity or noise.
•
Do not attach any other ma terial than the
supplied label on the labeling pos ition.
•
Attach the label so that it does not stick out
from the proper attachment loc at ion.
•
When you carry or store the “Memory
Stick,” put it in its supplied case.
•
Do not touch the terminals of a “Memory
Stick” with your hand or a metal object.
•
Do not strike, bend or drop the “Memory
Stick.”
•
Do not disassemble or modify the
“Memory Stick.”
•
Do not allow the “Memory Sti ck ” to get
wet.
84
Page 85

“Memory Stick”, , “MagicGate
Memory Stick” and are trademarks of
Sony Corporation.
“MagicGate” and are
trademarks of Sony Corporation.
About “InfoLITHIUM” battery pack
What is the “InfoLITHIUM” battery
pack?
The “InfoLITHIUM” battery pack is a
lithium-ion battery pack tha t has functions
for communicating information relate d to
operating conditions between yo ur came r a
and the AC power adaptor.
The “InfoLITHIUM” battery pack
calculates the po wer consu mption accord ing
to the operating conditions of your camera,
and displays the remain ing ba ttery time in
minutes.
Charging the battery pack
•
Be sure to charge the battery pack before
you start using your camera.
•
We recommend charging the battery pack
in an ambient temperature of between
10°C to 30°C (50°F to 86°F) until the
FULL indicator appears, indicating that the
battery pack is fully charged. If you charge
the battery pack out side of thi s temperatur e
range, you may not be able to efficiently
charge the battery pack.
•
After charging is completed, disconn ect
the AC po wer adaptor from th e DC IN jack
on your camera or remove the battery
pack.
Effective use of the battery pack
•
Battery performance decreases in lowtemperature surrou ndings. So, the t ime that
the battery pack can be used is shorter in
cold places. We recommend the following
to use the battery pack longer :
—Put the battery pack in a p oc k et close to
your body to warm it up, and insert it in
your camera immediately before you
start taking shots.
•
Frequently using the LCD panel or
frequently operating the zoom wears out
the battery pack faster.
•
Be certain to turn the POWER switch to
off when not taking shots or playing back
on your camera.
•
We recommend having spare batteries
handy for two or three times the expected
shooting time, and make trial shots before
taking the actual shots.
•
Do not expose the battery pack to water.
The battery pack is not water-resistant.
Remaining battery time indicator
•
If the power goes off although the battery
remaining indicator indicates that the
battery pack has enough power to operate,
charge the battery pack fully again so tha t
the indication on the battery remaining
indicator is correct. No te, ho we ver, that the
correct battery indic ation sometimes will
not be restored if it is used in high
temperatures for a long time or left in a
fully charged state, or the battery pack is
frequently used. Regard the remaining
battery time indication as the approximat e
shooting time.
How to store the battery pack
•
If the battery pack will not be used for a
long time, use up the battery pack after
fully charging it once per ye ar . Re mov e the
battery pack from your camera, then store
it in a dry, cool place. This is to maintain
the battery pack’s functions.
•
To use the battery pack up on your camera,
leave the PO WER swi tch to on in slid e sho w
playback mode until the power goes off.
Battery life
•
The battery life is limited. Battery capacity
decreases little by little a s you use it more
and more, and as time passes. When the
battery operating time is shortened
considerably, a probable cause is that the
battery pack has reached the end of its life.
Please buy a new bat tery pack.
•
The battery life varies acco rd i n g to how it
is stored and operating conditions and
environment for each battery pack.
Additional information
85
Page 86

Using your camera abroad
Power sources
You can use your camera in any
country or area with the supplied
battery charger within 100 V to 240 V
AC, 50/60 Hz. Use a commercially
available AC plug adaptor
necessary, depending on the design of
the wall outlet (mains)
AC-L10A/
L10B/L10C
Watching the playback picture on
TV
If you want to view the playback
picture on a TV , you need a TV having
a video input jack an d a video
connecting cable.
The color sy st em of the TV must be
the same as that of your digital still
camera. Check the following list:
NTSC system
Bahama Islands, Bolivia, Canada,
Central America, Chile, Columbia,
Ecuador, Jamaica, Japan, Korea,
Mexico, Peru, Surinam, Taiwan, the
Philippines, the U.S.A., Venezuela, etc.
PAL system
Australia, Austria, Belgium, China,
Denmark, Finland, Germany, Great
Britain, Holland, Hong Kong, Italy,
Kuwait, Malaysia, New Zealand,
Norway, Portugal, Singapore, Spain,
Sweden, Switze r la nd, Thailand, etc.
PAL-M system
Brazil
PAL-N system
Argentina, Paraguay, Uruguay
[b]
.
[a]
, if
SECAM system
Bulgaria, Czech Republic, France,
Guiana, Hungary, Iran, Iraq, Monaco,
Poland, Russia, Slovak Republic,
Ukraine, etc.
86
Page 87

Troubleshooting
If you experience trouble with your camera, first check the following items. Should
your camera still not operate properly after you have made these checks, press the
reset button located on the bottom. (If you press the reset button, the date and time
setting is cleare d. ) S hould your camera stil l not operate properly, consult your Sony
dealer or local authorized Sony service facility. If code displays (C:
appear on the LCD screen, the self-diagnosis display function is working
(page 96).
Symptom Cause and/or Solution
•
Your camera does not
work.
Your camera cannot
record images.
The LCD screen does not
light when the power is
turned on.
You are not using an “InfoLITHIUM” batter y pack.
Use an “InfoLITHIUM” battery pack (page 10).
t
•
The battery level is low (the E indicator appears
on the LCD screen).
Charge the battery pack (page 11).
t
•
The AC power adaptor is not connected securely.
Connect it firmly to the DC IN jack of your
t
camera and a wall outlet (mains) (pages 11, 14).
•
The built-in microcomputer is not working
properly.
Disconnect and then reconnect all power
t
sources after one minute. Then turn the power
on by sliding the PO WER switch an d check th at
the camera works properly. Press the reset
button located on the bottom using a sharppointed object.
•
You cannot record im ages while charging the flash.
•
The mode dial is set to or SET UP.
Set it to , S, A, M, SCN or (pages 19,
t
26).
•
No “Memory Stick” has been inserted into your
camera.
Insert a “Memory Sti ck ” (page 17).
t
•
The write-protect tab on the “Memory Stick” is set
to LOCK.
Set it to the recording position.
t
•
The power was turned off with the LCD screen set
to OFF the last time the camera was used.
The camera retains the settings from the last
t
time it was used. If you turn the power off with
the LCD screen set to OFF, the LCD is still set
to OFF the next time you turn the power on.
ss
ss:ss
ssss
ss
ssss
)
Additional information
87
Page 88

Symptom Cause and/or Solution
The picture is out of focus. •Your camera is not in macro recording mode w h e n
The resizing functi on does
not work.
Images record ed in TEXT
mode are blurry.
You cannot record images
in TEXT mode.
You cannot display a print
mark.
The picture is noisy.
The picture is too dark.
you shoot a subject that is within 50 cm (19 3/4
inches) from the lens.
Set the macro recording mode (page61).
t
•
The LANDSCAPE mode of the SCENE
SELECTION function is selected.
Cancel the fun ct io n .
t
•
The focus preset is selected.
Cancel the function (page 60).
t
•
[CONVERSION LENS] is set to [ON].
Set it to [O FF] (page 81).
t
•
You cannot resize moving images, text images, Clip
Motion and uncompressed images.
•
Light is not striking the subject evenly.
Adjust so that the lighting strikes the subject
t
evenly.
•
The mode dial is set to .
Set the mode dial to .
t
•
You cannot display print marks on moving images,
text images and Clip Motion images.
•
Your camera is placed near a TV or other
equipment that us es strong magnets.
Move your camera away from the TV, etc.
t
•
You are shooting a subject with a light source
behind the subject.
Adjust the exposure (page 61) .
t
•
The brightness of th e LCD screen is too low.
Adjust the brightness of the LCD screen
t
(page 81).
88
Page 89

Symptom Cause and/or Solution
The flash does not work. •The flash is set to .
Set the flash to auto (no indicator) or
t
(page 24).
•
The camera is in one of the foll owing SC ENE
SELECTION modes: TWILIGHT or
LANDSCAPE.
Cancel the SCENE SELECTION function
t
(page 52) or set the flash to .
•
The mode dial is set to , SETUP or (MPEG
MOVIE).
Set it to .
t
•
[MODE] (REC MODE) is set to [BURST3] or
[BRKTG] (DSC-S85 only), or [BURST2] (DSCS75 only) in the menu settings.
Set it to other modes.
t
•
The date and time are
recorded incorrectly.
Vertical streaks a ppear
when you are shoo ting a
very bright subject.
The battery life is short.
The battery remaining
indicator is incorrect.
Or sufficient battery
remaining indicator is
displayed but the power
runs out soon.
The date and time are not set correctly.
Set the correct date and time (page 15).
t
•
The smear phenomenon is happening.
This is not a malfunction.
t
•
You are recording/ pl aying back images under
extremely cold temperatures.
•
The battery pack is not cha rged enough.
Charge the battery pack fully.
t
•
The battery pack is dead.
Replace the battery pack with a new one
t
(page 85).
•
You have used the camera for a long time in an
extremely hot or an extremely cold location.
•
The battery pack is dead.
Replace the battery pack with a new one
t
(page 85).
•
The battery pack is discharged.
Install a charged battery pack (pages 10, 11).
t
•
A deviation has occurred in the remaining battery
time.
Fully charge the battery pack (page11).
t
Additional information
89
Page 90

Symptom Cause and/or Solution
•
Nothing appear s i n the
display window or the
indicators flash during
charging.
You cannot charge the
battery.
The POWER ON/OFF
(CHG) indica t or flashes.
The zoom does not work. •[CONVERSION LENS] in the setup setting is set
Digital zoom does not
function.
Your camera canno t p lay
back images.
The image and sound are
interfered by noise when
you play back an image on
a personal compu te r.
The image cannot be
played back on a personal
computer.
Your camera cannot delete
an image.
The AC power adaptor is disconnected.
Firmly connect the power c ord to t he wall outlet
t
(page 14).
•
The battery pack is not i nst alled correctly.
Install the battery pack correctly (page 10).
t
•
Charging is completed.
•
The camera is turned on.
Turn the camera off (page 11).
t
•
The battery pack is not i nst alled correctly.
Install the battery pack correctly (page 10).
t
•
The battery pack has m al f unctioned.
Contact your So ny deal er or local authorize d
t
Sony servic e facility.
to [ON].
Set it to [O FF] (page 81).
t
•
The zoom cannot be used when recording a moving
image with [MOVING IMAGE] set to [MPEG
MOVIE].
•
The digital zoom ca nnot be used when recordi ng a
moving image with [MOVING IMAGE] set to
[MPEG MOVIE], or the LCD screen is OFF.
•
[DIGITAL ZOOM] is set to [OFF].
Set [DIGITAL ZOOM] to [ON] in the menu
t
settings.
•
The mode dial is set to , , M, A, S, SCN or
SET UP.
Set it to (pages 28, 29).
t
•
You are playing bac k th e file directly from the
“Memory Stick.”
Copy the file to the hard dis k of the personal
t
computer and th en play back the file from the
hard disk (page 36).
Consult the pers onal computer or software
t
manufacturer.
•
The image is protecte d.
Cancel the protection (page 72).
t
90
Page 91

Additional information
Page 92

Symptom Cause and/or Solution
•
Your personal computer
does not recognize your
camera.
No function works though
the power is on.
The battery level is low.
Use the AC power adaptor (page14).
t
•
The camera is turned off.
Turn on the camera.
t
•
The USB cable is not connected firmly.
Disconnect the USB cable, and connect it again
t
firmly. Make sure that “USB MODE” is
displayed on the LCD screen (pag es 33, 35).
•
The USB connect ors on yo ur pers onal co mputer ar e
connected to other equipment besides the keyboard,
the mouse, and your camera.
Disconnect t he U SB cables except fo r t he ones
t
connected to the keyboard, the mouse, and your
camera.
•
The USB driver is not installed.
Install the USB driver (page 33).
t
•
[USB CONNECT] is set to [ PTP] in the setu p set tings .
Set it to [NORMAL] (page 81).
t
•
Since the camera is connected to a computer with
the USB cabl e before installi ng the USB driver, t he
drive is not recognized by the computer.
Delete the drive which is not recognized, then
t
install the USB driver. For details, see the
procedure on page 93.
Remove the battery pack, then install it again
t
after about one minute. If the function still do
not work, press the reset button located on the
bottom using a sharp-pointed object. (If you
press the reset button, the date and time settin g
is cleared.)
92
Page 93

Reinstall the USB driver when using Windows 98, Windows
98SE, Windows Me and Windows 2000 Professional
Perform all steps without skipping.
Turn on your computer and allow Windows to load.
1
Connect the USB jack on the camera and the computer with the
2
supplied USB cable.
Insert a “Memory Stick”.
3
Connect the AC power adaptor to your camera and then to a w a ll
4
outlet (mains), and turn on the power of your camera.
Open “Device Manager” on Win dows.
5
For Windows 98, Windows 98SE an d Windows Me users:
Open [Control Panel] from [ My Computer], then double-click
1
[System].
“System properties” is displayed. Click the [Device Manager] tab located at
2
the top.
Click [ Sony DSC] in [ Other devices], then click the [Delete (E)]
3
button located at the lower-righ t co rner.
For Windows 2000 Professional users:
*
Log in with the permission of administrator.
Open [Control Panel] from [ My Computer], then double-click
1
[System].
“System properties” is displayed. Click the [Hardware] tab located at the top,
2
then click the [Devic e Manager ( D
Click [View] in [Device Manager], then click [Devices by type (E)].
3
Right-click [ Sony DSC] in [ Ot her devices], then click [Del e te (E)].
4
)] button.
Additional information
After the message appears to verify that you delete the device, click
6
“OK.”
Turn off the camera, disconnect the USB cable, and res tart the
7
computer.
Install the USB driver in the supplied CD-ROM to the computer
8
following the procedure on page 33.
93
Page 94

Warning and notice messages
Various messages appear on the LCD screen. Check the corres ponding descripti ons
in the following list.
Message Meaning
NO MEMORY STICK No “Memory Stic k” has been inserted.
SYSTEM ERROR Turn the power off and on again.
MEMORY STICK ERROR
FORMAT ERROR Failed to format the “Memory Stick.”
MEMORY STICK LOCKED The wr i te -p ro te ct ta b on the “Memory
NO MEMORY SPACE The capacity of the “Memory St i ck” is
NO FILE No image has been recorded on the
FILE ERROR An error occurred while playing back the
FILE PROTECT The image is protected against erasure.
for “InfoLITHIUM” battery only The battery is not the “InfoLITHIUM”
NOT ENOUGH MEMORY The images you want to copy are too big
COPY ERROR Copying was not performed correctly, or
DIRECTORY ERROR A directory with the same name already
IMAGE SIZE OVER You are playing back an image of a size
INVA LID OPERATION You are playing back a file that wa s
•
The inserted “Memory Stick” cannot
be used with your camera, or is
damaged.
•
The “Memory Stick” is not inserted
correctly.
Stick” is set to the LOCK position.
full, and you cann ot record or copy
images.
“Memory Stick . ”
image.
type.
to copy with your camera.
the “Memory Stick” was removed during
copying.
exists on the “Memory Stick”.
that cannot be played back with your
camera.
created on equipment other than your
camera.
94
Page 95

Message Meaning
E
LENS CAP ATTACHED Th e lens cap is still attached to the lens.
CANNOT DIVIDE • The file is not long enough to be
TURN THE POWER OFF AND ON
AGAIN
The battery level is low or zero.
Depending on the conditions of use or
the type of battery pack, the indicator
may flash even though there is still 5 to
10 minutes of remaining battery time
left.
divided.
• The file is not a moving image.
The shutter speed is too slow . (Mount the
camera on a tripod or otherwise secure
the camera in pl ace.)
A malfunction occurs on the lens.
Additional information
95
Page 96

Self-diagnosis display
C:32:ss
Self-diagnosis display
•
C:ss:
ss
You can reverse the camera
malfunction yourself.
•
E:ss:
ss
Contact your Sony dealer or local
authorized Sony service facility.
Your camera has a self-diagnosis display. This
function displays the camera condition on the
LCD screen with a combination of a letter and
four digits of numbers. If this occurs, check the
following code chart. The code informs you of the
camera’s current condition. The la st two di gi t s
(indicated by ss) will differ depending on the
state of the camer a.
First three digits Cause and/or Corrective Action
•
C:32:
ss
C:13:
ss
E:61:
ss
E:91:
ss
If you are unable to solve the problem even after trying the corrective
actions a few times and when the camera is not reset even if you press the
reset button located on the bottom, contact your Sony dealer or local
authorized Sony service facility.
There is trouble wit h your camera’s hardware or
zooming function.
Turn the power off and on again.
t
•
An unformatted “Memory Stick” is inserted.
Format the “Memor y St i ck” (page 80 ).
t
•
The inserted “Me mory Stick” cannot be used with
your camera, or is damaged.
Insert a new “Memor y Stick” (page 17).
t
•
The camera cannot read or write data on the
“Memory Stick”.
Re-insert the “Memory Stick” several times.
t
•
A camera malfunct ion that you cannot reverse has
occurred.
Contact your So ny deal er or local authorize d
t
Sony service facility and inform them of the 5digit service code. (example: E:61:10)
When a self-diagnosis display appears
The error displa y appears on the disp l ay w i ndow (page 98).
96
Page 97

Specifications
System
Image device
DSC-S85: 8.98 mm (1/1.8
type) color CCD
DSC-S75: 8.93 mm (1/1.8
type) color CCD
Lens
3× zoom lens
f = 7 – 21 mm (9/32 – 27/32
inches)
(34 – 102 mm (1 3/8 – 4 1/8
inches) when converted into a
35 mm still camera)
F = 2.0 – 2.5
Exposure control
Automatic exposure, Shutter
speed priority, Aperture
priority, Manual exposure
White balance
Automatic, Indoor, Outdoor,
One-push
Data system
Movie: MPEG1
Still: JPEG, GIF (in TEXT
mode, Clip Motion), TIFF
Audio with still image:
MPEG1 (Monaural)
Recording medium
“Memory Stick”
Flash
Recommended recording
distance (ISO is set to AUTO):
0.3m to 3.0m (117/8inches
to 9 feet 10 1/8 inches)
Output connector
A/V OUT (Monaural)
Minijack
Video: 1 Vp-p, 75Ω,
unbalanced, sync negative
Audio: 327 mV (at a 47 kΩ
load)
Output impedance: 2.2 k
USB jack
mini-B
ACC (Accessory) jack
Minijack
Ω
LCD screen
Used LCD panel
4.6 cm (1.8 type) TFT (Thin
Film Transistor active matrix)
drive
Total number of dots
123 200 (560×220) dots
General
Used battery pack
NP-FM50
Power requirements
7.2 V
Powe r consumption
(during recording )
3.0 W
Operation temperature
0°C to 40°C
(32°F to 104°F)
Storage temperature
–20°C to +60°C
(–4°F to +140°F)
Maximum dimensions
117×71×64 mm
(4 5/8×2 7/8×2 5/8 inches)
(w/h/d)
Mass
Approx. 462 g (1 lb)
(including battery pack NPFM50, “Memory Stick,”
shoulder strap and lens cap
etc.)
Built-in microphone
Electret condenser microphone
Built-in speaker
Dynamic speaker
AC-L10A/B/C
AC power adaptor
Power requirements
100 to 240 V AC, 50/60 Hz
Rated output voltage
DC 8.4 V, 1.5 A in operating
mode
Operation temperature
0°C to 40°C (32°F to 104°F)
Storage temperature
–20°C to +60°C
(–4°F to +140°F )
Maximum dimensions
125×39×62 mm
(5×1 9/16×2 1/2 inches)
(w/h/d)
Mass
Approx. 280 g (10 oz)
NP-FM50 battery pack
Used battery
Lithium ion battery
Maximum voltage
DC 8.4 V
Nominal voltage
DC 7.2 V
Capacity
8.5 Wh (1 180 mAh)
Accessories
A/V connecting cable (1)
NP-FM50 battery pack (1)
AC-L10A/B/C AC power
adaptor (1)
Power cor d (1 )
USB cable (1)
Lens cap (1)
Lens cap strap (1)
Shoulder strap (1)
“Memory Stick” (16 MB)
(DSC-S85), (8 MB) (DSCS75) (1)
CD-ROM (USB driver SPVD-
004) (1)
Operating Instructions (1)
Design and specifications are
subject to change without
notice.
Additional information
97
Page 98

Display window indicators
A AE lock indicat or
B Battery remaining indicator
C EV indicator/Focus lock
indicator
D “Memory Stick” mark
E Remaining number of
recordable images indicator
(+999 is displayed for 999 or
more images)/EV level
indicator/Focus distance
indicator/Battery usable time
indicator (displayed only
during charging)/Minutes
indicator for the remaining
recordable time of moving
images
F Aperture value indicator/
Seconds indicator for the
remaining recordable time of
moving images
G Shutter speed indicator
USB indicator
Error display
: Some kind of misoperation
has occurred. Check the selfdiagnosis display on the LCD
screen (page 96) and take the
appropriate cor rective action.
: A problem has occurred
with lens dr i ve. Turn the camera on
and off several times, and if the
problem persists, contact your
Sony dealer or authoriz ed Sony
service facili t y.
H Flash mode indicator
I Spot light-meteri ng indicator
J Self-timer indicator
K Macro mode indicator
98
Page 99

LCD screen indicators
The indicators during recording still images
1
2
3
4
5
6
7
890 qsqa
min
SOLARIZE
+
WHITE BAL
wa
qd
qf
qg
qh
qj
qk
ql
w;
MODEISO
A Battery remaining indicator
B Flash mode/red eye reduction/
white balance/AF illuminat or
indicator
C Date/time/conversion lens/ISO
number indicator
D Sharpness indicator
E Picture effect indicator
F AF frame
G Spot light-metering cross hair
H AE/AF lock ind icator
I Recording mode indicator
J Image size indicator
K Image quality indicat or
L Mode dial indicator
M Remaining number of
recordable images indicator/
Self-diagnosis function
indicator
N Remaining memory capacity
indicator
O Macro /focus mode 9
indicator/Focus preset value
P EV level indicator
Q Aperture value indicator
R Shutter speed indicator
S Self-timer indicator
T Light amount warning indicator
U Menu and guide menu
Pressing MENU switches the
menu on/off.
Additional information
99
Page 100

The indicators during recording moving images
1
2
3
4
WHITE BAL
A Battery remaining indicator
B White balance indicator
C Conver s ion lens indicator
D Picture effect indicator
E AE lock indicat or
F Recording mode indicator
G Image size indicator
H Recording time (maximum
recordable time) indicator/
Self-diagnosis function
indicator
min
SOLARIZE
6578
STBY
9
0
qa
+
qs
qd
PFX
I Remaining memory capacity
J Macro /focus mode 9
K EV level indicator
L Self-timer indicator
M Spot light-meteri ng c ross hair
N Menu and guid e m e nu
qf
indicator
indicator/Focus preset value
Pressing MENU switches the
menu on/off.
100
 Loading...