

Page 1
4-465-973-21(1)
Digital Still Camera / Instruction Manual GB
Appareil photo numérique / Mode d’emploi FR
Cámara fotografía digital / Manual de instrucciones ES
DSC-RX100M2
Page 2
English
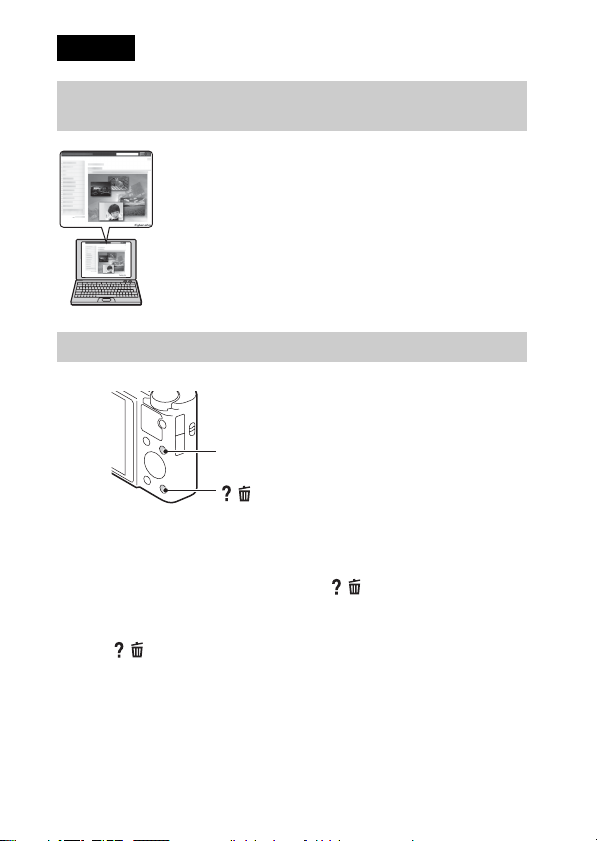
Learning more about the camera (“Cyber-shot User Guide”)
“Cyber-shot User Guide” is an on-line manual. Refer to it for
in-depth instructions on the many functions of the camera.
1 Access the Sony support page.
http://www.sony.net/SonyInfo/Support/
2 Select your country or region.
3 Search for the model name of your camera within the
support page.
• Check the model name on the bottom of your camera.
Viewing the Guide
This camera is equipped with a built-in instruction guide.
MENU
/ (In-Camera Guide)
In-Camera Guide
The camera displays explanations for MENU items and the setting values.
1 Press the MENU button.
2 Select the desired MENU item, then press / (In-Camera Guide) button.
Shooting Tip
The camera displays shooting tips for the shooting mode selected.
1 Press / (In-Camera Guide) button in shooting mode.
2 Select the desired shooting tip, then press
The shooting tip is displayed.
• You can scroll the screen using v/V and change shooting tips using
b/B.
z on the control wheel.
GB
2
Page 3

Owner’s Record
The model and serial numbers are located on the bottom. Record the serial number in the
space provided below. Refer to these numbers whenever you call your Sony dealer
regarding this product.
Model No. DSC-RX100M2
Serial No. _____________________________
Model No. AC-UB10/AC-UB10B/AC-UB10C/AC-UB10D
Serial No. _____________________________
WARNING
To reduce fire or shock hazard, do not expose the unit to rain or
moisture.
IMPORTANT SAFETY INSTRUCTIONS
-SAVE THESE INSTRUCTIONS
DANGER
TO REDUCE THE RISK OF FIRE OR ELECTRIC
SHOCK, CAREFULLY FOLLOW THESE
INSTRUCTIONS
If the shape of the plug does not fit the power outlet, use an attachment plug adaptor of the
proper configuration for the power outlet.
CAUTION
[ Battery pack
If the battery pack is mishandled, the battery pack can burst, cause a fire or even chemical
burns. Observe the following cautions.
• Do not disassemble.
• Do not crush and do not expose the battery pack to any shock or force such as
hammering, dropping or stepping on it.
• Do not short circuit and do not allow metal objects to come into contact with the battery
terminals.
• Do not expose to high temperature above 60°C (140°F) such as in direct sunlight or in a
car parked in the sun.
• Do not incinerate or dispose of in fire.
• Do not handle damaged or leaking lithium ion batteries.
GB
GB
3
Page 4

• Be sure to charge the battery pack using a genuine Sony battery charger or a device that
can charge the battery pack.
• Keep the battery pack out of the reach of small children.
• Keep the battery pack dry.
• Replace only with the same or equivalent type recommended by Sony.
• Dispose of used battery packs promptly as described in the instructions.
[ AC Adaptor
Use the nearby wall outlet (wall socket) when using the AC Adaptor. Disconnect the AC
Adaptor from the wall outlet (wall socket) immediately if any malfunction occurs while
using the apparatus.
For Customers in the U.S.A. and Canada
[ RECYCLING LITHIUM-ION BATTERIES
Lithium-Ion batteries are recyclable.
You can help preserve our environment by returning your used
rechargeable batteries to the collection and recycling location nearest
you.
For more information regarding recycling of rechargeable batteries,
call toll free
1-800-822-8837, or visit http://www.rbrc.org/
Caution: Do not handle damaged or leaking Lithium-Ion batteries.
[ Battery pack
This device complies with Part 15 of the FCC Rules. Operation is subject to the following
two conditions:
(1) This device may not cause harmful interference, and (2) this device must accept any
interference received, including interference that may cause undesired operation.
CAN ICES-3 B/NMB-3 B
This equipment complies with FCC/IC radiation exposure limits set forth for an
uncontrolled environment and meets the FCC radio frequency (RF) Exposure Guidelines
in Supplement C to OET65 and RSS-102 of the IC radio frequency (RF) Exposure rules.
This equipment has very low levels of RF energy that are deemed to comply without
testing of specific absorption ratio (SAR).
GB
4
Page 5

For Customers in the U.S.A.
UL is an internationally recognized safety organization.
The UL Mark on the product means it has been UL Listed.
If you have any questions about this product, you may call:
Sony Customer Information Center
1-800-222-SONY (7669).
The number below is for the FCC related matters only.
[ Regulatory Information
Declaration of Conformity
Trade Name: SONY
Model No.: DSC-RX100M2
Responsible Party: Sony Electronics Inc.
Address: 16530 Via Esprillo,
Telephone No.: 858-942-2230
This device complies with Part15 of the FCC Rules. Operation is subject to the
following two conditions: (1) This device may not cause harmful interference, and (2)
this device must accept any interference received, including interference that may cause
undesired operation.
This equipment must not be co-located or operated in conjunction with any other antenna
or transmitter.
[ CAUTION
You are cautioned that any changes or modifications not expressly approved in this manual
could void your authority to operate this equipment.
[ Note:
This equipment has been tested and found to comply with the limits for a Class B digital
device, pursuant to Part 15 of the FCC Rules.
These limits are designed to provide reasonable protection against harmful interference in
a residential installation. This equipment generates, uses, and can radiate radio frequency
energy and, if not installed and used in accordance with the instructions, may cause
harmful interference to radio communications. However, there is no guarantee that
interference will not occur in a particular installation. If this equipment does cause harmful
interference to radio or television reception, which can be determined by turning the
equipment off and on, the user is encouraged to try to correct the interference by one or
more of the following measures:
– Reorient or relocate the receiving antenna.
– Increase the separation between the equipment and receiver.
– Connect the equipment into an outlet on a circuit different from that to which the
receiver is connected.
– Consult the dealer or an experienced radio/TV technician for help.
San Diego, CA 92127 U.S.A.
GB
GB
5
Page 6

The supplied interface cable must be used with the equipment in order to comply with the
limits for a digital device pursuant to Subpart B of Part 15 of FCC Rules.
For Customers in Canada
This device complies with Industry Canada licence-exempt RSS standard(s).
Operation is subject to the following two conditions: (1) this device may not cause
interference, and (2) this device must accept any interference, including interference that
may cause undesired operation of the device.
For Customers in Europe
[ Notice for the customers in the countries applying EU Directives
This product has been manufactured by or on behalf of Sony Corporation, 1-7-1 Konan
Minato-ku Tokyo, 108-0075 Japan. Inquiries related to product compliance based on
European Union legislation shall be addressed to the authorized representative, Sony
Deutschland GmbH, Hedelfinger Strasse 61, 70327 Stuttgart, Germany. For any service or
guarantee matters, please refer to the addresses provided in the separate service or
guarantee documents.
Hereby, Sony Corporation, declares that this DSC-RX100M2 Digital Still Camera is in
compliance with the essential requirements and other relevant provisions of the Directive
1999/5/EC. For details, please access the following URL:
http://www.compliance.sony.de/
This product has been tested and found compliant with the limits set out in the EMC
regulation for using connection cables shorter than 3 meters (9.8 feet).
[ Attention
The electromagnetic fields at the specific frequencies may influence the picture and sound
of this unit.
[ Notice
If static electricity or electromagnetism causes data transfer to discontinue midway (fail),
restart the application or disconnect and connect the communication cable (USB, etc.)
again.
GB
6
Page 7
[ Disposal of Old Electrical & Electronic Equipment (Applicable in
the European Union and other European countries with separate
collection systems)
This symbol on the product or on its packaging indicates that this product
shall not be treated as household waste. Instead it shall be handed over to
the applicable collection point for the recycling of electrical and electronic
equipment. By ensuring this product is disposed of correctly, you will help
prevent potential negative consequences for the environment and human
health, which could otherwise be caused by inappropriate waste handling
of this product. The recycling of materials will help to conserve natural
please contact your local Civic Office, your household waste disposal service or the shop
where you purchased the product.
resources. For more detailed information about recycling of this product,
[ Disposal of waste batteries (applicable in the European Union
and other European countries with separate collection systems)
This symbol on the battery or on the packaging indicates that the battery
provided with this product shall not be treated as household waste.
On certain batteries this symbol might be used in combination with a
chemical symbol. The chemical symbols for mercury (Hg) or lead (Pb) are
added if the battery contains more than 0.0005% mercury or 0.004% lead.
potentially negative consequences for the environment and human health which could
otherwise be caused by inappropriate waste handling of the battery. The recycling of the
materials will help to conserve natural resources.
In case of products that for safety, performance or data integrity reasons require a
permanent connection with an incorporated battery, this battery should be replaced by
qualified service staff only. To ensure that the battery will be treated properly, hand over
the product at end-of-life to the applicable collection point for the recycling of electrical
and electronic equipment.
For all other batteries, please view the section on how to remove the battery from the
product safely.
Hand the battery over to the applicable collection point for the recycling of waste batteries.
For more detailed information about recycling of this product or battery, please contact
your local Civic Office, your household waste disposal service or the shop where you
purchased the product.
By ensuring these batteries are disposed of correctly, you will help prevent
GB
Notice for customers in the United Kingdom
A moulded plug complying with BS 1363 is fitted to this equipment for your safety and
convenience.
Should the fuse in the plug supplied need to be replaced, a fuse of the same rating as the
supplied one and approved by ASTA or BSI to BS 1362, (i.e., marked with an or
mark) must be used.
GB
7
Page 8
If the plug supplied with this equipment has a detachable fuse cover, be sure to attach the
fuse cover after you change the fuse. Never use the plug without the fuse cover. If you
should lose the fuse cover, please contact your nearest Sony service station.
For Customers in Singapore
Checking the supplied items
The number in parentheses indicates the number of pieces.
• Camera (1)
• Rechargeable battery pack NP-BX1 (1)
• Micro USB cable (1)
• AC Adaptor AC-UB10/UB10B/UB10C/UB10D (1)
• Power cord (mains lead) (not supplied in the USA and Canada) (1)
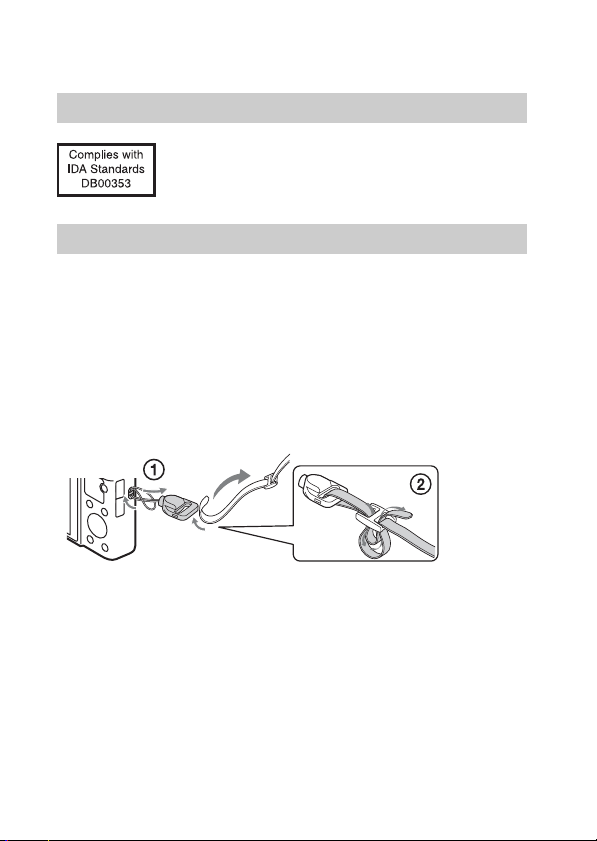
• Wrist strap (1)
• Strap adapter (2)
(Strap adapters are used to attach the shoulder strap (sold separately), as
illustrated.)
• Instruction Manual (this manual) (1)
GB
8
Page 9
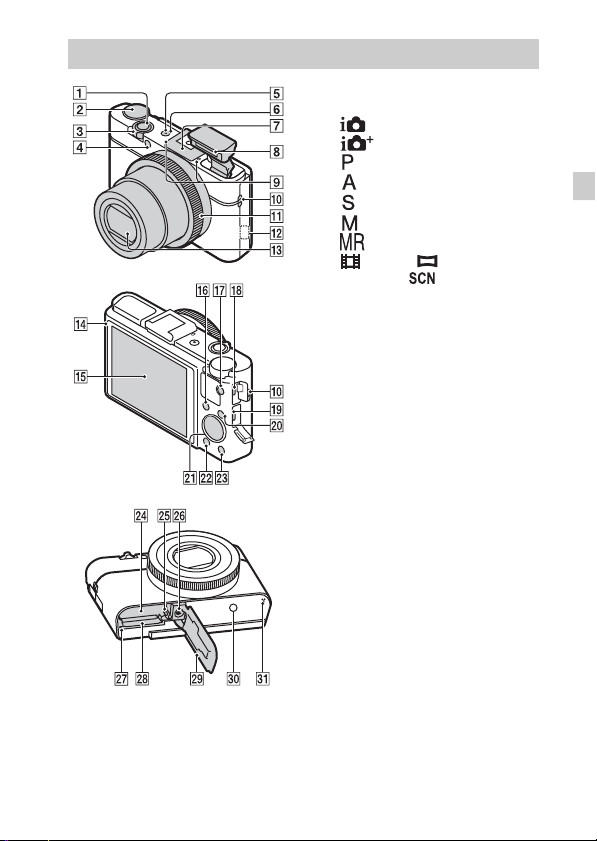
Identifying parts
A Shutter button
B Mode dial
(Intelligent Auto)/
(Superior Auto)/
(Program Auto)/
(Aperture Priority)/
(Shutter Priority)/
(Manual Exposure)/
(Memory recall)/
(Movie)/ (Sweep
Panorama)/ (Scene
Selection)
C For shooting: W/T (zoom) lever
For viewing: Index/Playback
zoom lever
D Self-timer lamp/Smile Shutter
lamp/AF illuminator
E Power/Charge lamp
F ON/OFF (Power) button
G Multi interface shoe*
H Flash
• Do not cover the flash with your
fingers.
• When using the flash, the flash
pops up automatically. If not
using the flash, press it down
manually.
I Microphone
J Hook for strap
K Control Ring
L Wi-Fi sensor (built-in)
M Lens
N Light sensor
O LCD screen
P Fn (Function) button
Q MOVIE (Movie) button
GB
GB
9
Page 10

R Multi Terminal
• Supports Micro USB compatible
device.
S HDMI micro jack
T MENU button
U Control wheel
V (Playback) button
W / (In-Camera Guide/Delete)
button
X Battery insertion slot
Y Battery eject lever
Z Tripod socket hole
• Use a tripod with a screw less
than 5.5 mm (7/32 inches) long.
Otherwise, you cannot firmly
secure the camera, and damage to
the camera may occur.
wj Access lamp
wk Memory card slot
wl Battery/Memory card cover
e; (N Mark)
• Touch the mark when you
connect the camera to a
smartphone equipped with the
NFC function.
• NFC (Near Field
Communication) is an
international standard of the
short-range wireless
communication technology.
ea Speaker
* For details on compatible accessories
for the multi interface shoe, visit the
Sony web site, or consult your Sony
dealer or local authorized Sony
service facility. You can also use
accessories that are compatible with
the accessory shoe. Operations with
other manufacturers’ accessories are
not guaranteed.
10
GB
Page 11

Inserting the battery pack
Battery eject lever
Open the cover.
1
Insert the battery pack.
2
• While pressing the battery eject lever, insert the battery pack as
illustrated. Make sure that the battery eject lever locks after insertion.
• Closing the cover with the battery inserted incorrectly may damage the
camera.
GB
GB
11
Page 12
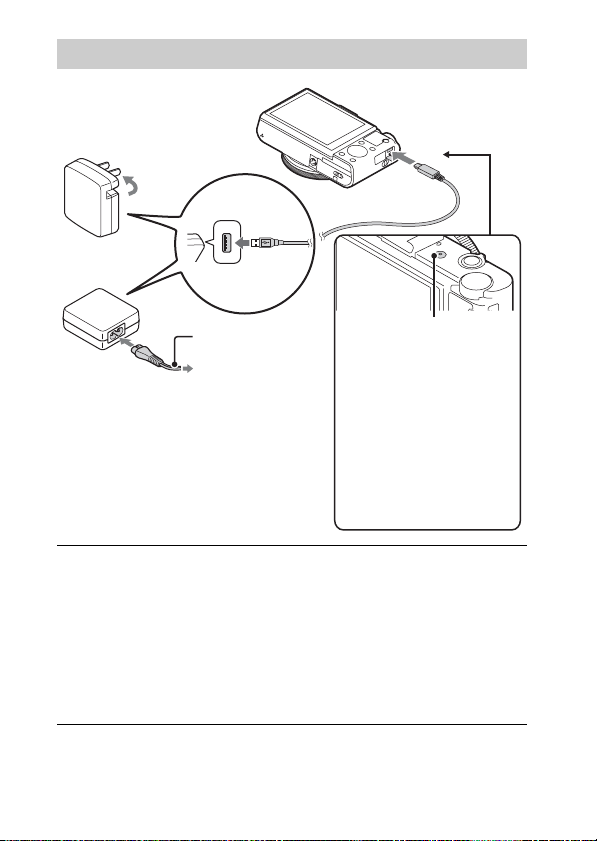
Charging the battery pack
For customers in the USA
and Canada
Power cord
(Mains lead)
For customers in countries/regions
other than the USA and Canada
Connect the camera to the AC Adaptor (supplied),
1
using the micro USB cable (supplied).
Connect the AC Adaptor to the wall outlet (wall socket).
2
The Power/Charge lamp lights orange, and charging starts.
• Turn off the camera while charging the battery.
• You can charge the battery pack even when it is partially charged.
• When the Power/Charge lamp flashes and charging is not finished,
remove and re-insert the battery pack.
GB
Power/Charge lamp
Lit: Charging
Off: Charging finished
Flashing:
Charging error or
charging paused
temporarily because the
camera is not within the
proper temperature range
12
Page 13

Notes
• If the Power/Charge lamp on the camera flashes when the AC Adaptor is
connected to the wall outlet (wall socket), this indicates that charging is
temporarily stopped because the temperature is outside the recommended range.
When the temperature gets back within the appropriate range, the charging
resumes. We recommend charging the battery pack in an ambient temperature of
between 10°C to 30°C (50ºF to 86ºF).
• The battery pack may not be effectively charged if the terminal section of the
battery is dirty. In this case, wipe any dust off lightly using a soft cloth or a cotton
swab to clean the terminal section of the battery.
• Connect the AC Adaptor (supplied) to the nearest wall outlet (wall socket). If
malfunctions occur while using the AC Adaptor, disconnect the plug from the wall
outlet (wall socket) immediately to disconnect from the power source.
• When charging is finished, disconnect the AC Adaptor from the wall outlet (wall
socket).
• Be sure to use only genuine Sony brand battery packs, micro USB cable (supplied)
and AC Adaptor (supplied).
• Power is not supplied during shooting/playback if the camera is connected to a
wall outlet with the supplied AC adaptor. To supply power to the camera during
shooting/playback, use the AC-UD10 (sold separately) or AC-UD11 (sold
separately) AC adaptor.
• The AC Adaptor AC-UD11 (sold separately) may not be available in some
countries/regions.
x
Charging time (Full charge)
The charging time is approximately 230 min. using the AC Adaptor
(supplied).
Notes
• The above charging time applies when charging a fully depleted battery pack at a
temperature of 25°C (77°F). Charging may take longer depending on conditions of
use and circumstances.
GB
GB
13
Page 14
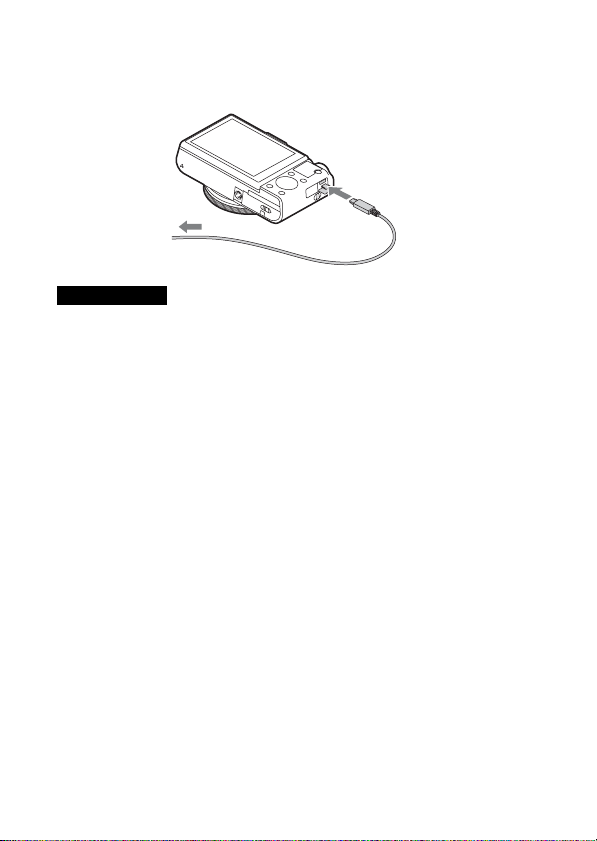
x
Charging by connecting to a computer
The battery pack can be charged by connecting the camera to a computer using
a micro USB cable.
To a USB jack
Notes
• Note the following points when charging via a computer:
– If the camera is connected to a laptop computer that is not connected to a power
source, the laptop battery level decreases. Do not charge for an extended period
of time.
– Do not turn on/off or restart the computer, or wake the computer to resume from
sleep mode when a USB connection has been established between the computer
and the camera. The camera may cause a malfunction. Before turning on/off, or
restarting the computer or waking the computer from sleep mode, disconnect the
camera and the computer.
– No guarantees are made for charging using a custom-built computer or a
modified computer.
14
GB
Page 15

x
Battery life and number of images that can be
recorded and played back
Battery life Number of images
Shooting (still images) Approx. 175 min. Approx. 350 images
Typical movie shooting Approx. 45 min. —
Continuous movie shooting Approx. 80 min. —
Viewing (still images) Approx. 250 min. Approx. 5000 images
Notes
• The above number of images applies when the battery pack is fully charged. The
number of images may decrease depending on the conditions of use.
• The number of images that can be recorded is for shooting under the following
conditions:
– Using Sony “Memory Stick PRO Duo” (Mark2) media (sold separately)
– The battery pack is used at an ambient temperature of 25°C (77°F).
• The number for “Shooting (still images)” is based on the CIPA standard, and is for
shooting under the following conditions:
(CIPA: Camera & Imaging Products Association)
– DISP is set to [Display All Info.].
– Shooting once every 30 seconds.
– The zoom is switched alternately between the W and T ends.
– The flash strobes once every two times.
– The power turns on and off once every ten times.
• The numbers of minutes for movie shooting are based on the CIPA standard, and
are for shooting under the following conditions:
– Record Setting: 60i 17M(FH)/50i 17M(FH)
– Typical movie shooting: Battery life based on repeatedly starting/stopping
shooting, zooming, turning on/off, etc.
– Continuous movie shooting: Battery life based on non-stop shooting until the
limit (29 minutes) has been reached, and then continued by pressing the MOVIE
button again. Other functions, such as zooming, are not operated.
GB
GB
15
Page 16

Inserting a memory card (sold separately)
Ensure the notched corner
faces correctly.
Open the cover.
1
Insert the memory card (sold separately).
2
• With the notched corner facing as illustrated, insert the memory card
until it clicks into place.
Close the cover.
3
16
GB
Page 17

x
Memory cards that can be used
Memory card For still images For movies
A Memory Stick XC-HG Duo
Memory Stick PRO Duo (Mark2 only)
B
Memory Stick PRO-HG Duo
C Memory Stick Micro (M2) (Mark2 only)
SD memory card (Class 4 or faster)
D
SDHC memory card (Class 4 or faster)
SDXC memory card (Class 4 or faster)
microSD memory card (Class 4 or faster)
E
microSDHC memory card (Class 4 or faster)
microSDXC memory card (Class 4 or faster)
• In this manual, the products in the table are collectively referred to as follows:
A: “Memory Stick XC Duo” media
B: “Memory Stick PRO Duo” media
C: “Memory Stick Micro” media
D: SD card
E: microSD memory card
Notes
• When using “Memory Stick Micro” media or microSD memory cards with this
camera, make sure to use with the appropriate adaptor.
x
To remove the memory card/battery pack
Memory card: Push the memory card in once to eject the memory card.
Battery pack: Slide the battery eject lever. Be sure not to drop the battery pack.
Notes
• Never remove the memory card/battery pack when the access lamp (page 9) is lit.
This may cause damage to data in the memory card.
GB
GB
17
Page 18

Setting the clock
ON/OFF (Power)
Power/Charge lamp (green)
Control wheel
Select items: b/B
Set the numeric value of date and
time:
v/V//
z
Set:
Press the ON/OFF (Power) button.
1
Date & Time setting is displayed when you turn on the camera for the first
time.
• It may take time for the power to turn on and allow operation.
Check that [Enter] is selected on the screen, then press
2
z on the control wheel.
Select a desired geographic location by following the
3
on-screen instructions, then press z.
Set [Daylight Svg.:], date and [Date Format:], then
4
press z.
• Midnight is indicated as 12:00 AM, and noon as 12:00 PM.
Check that [Enter] is selected, then press z.
5
18
GB
Page 19
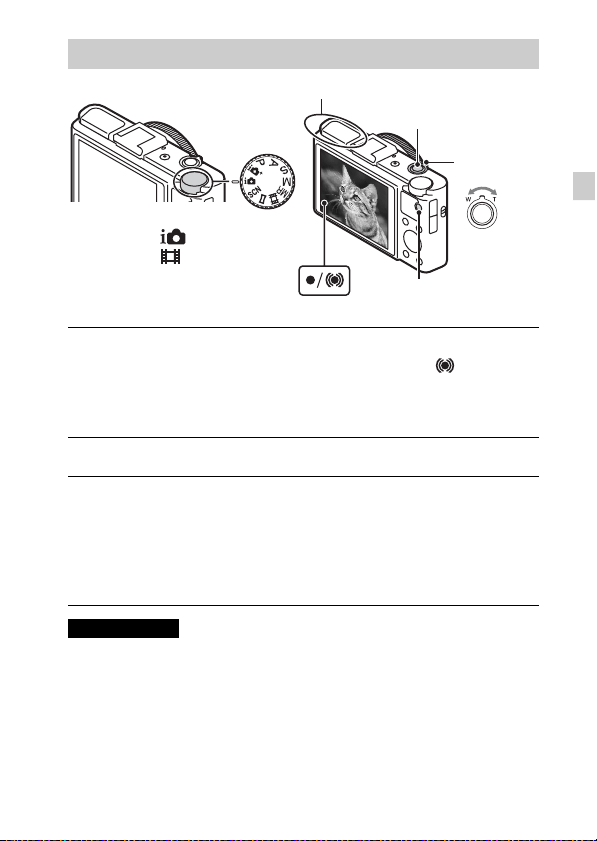
Shooting still images/movies
Do not cover the flash.
Shutter button
W/T (zoom)
lever
Mode dial
: Intelligent Auto
: Movie
MOVIE
Shooting still images
Press the shutter button halfway down to focus.
1
When the image is in focus, a beep sounds and the z or indicator
lights.
Press the shutter button fully down to shoot an image.
2
Shooting movies
Press the MOVIE (Movie) button to start recording.
1
• Use the W/T (zoom) lever to change the zoom scale.
• Press the shutter button to shoot still images while continuing to record
the movie.
Press the MOVIE button again to stop recording.
2
Notes
• Do not pull up the flash manually. This may cause a malfunction.
• When using the zoom function while shooting a movie, the sound of the camera
operating will be recorded. The sound of the MOVIE button operating may also be
recorded when movie recording is finished.
• Continuous shooting is possible for approximately 29 minutes at one time at the
camera’s default settings and when the temperature is approximately 25°C (77°F).
When movie recording is finished, you can restart recording by pressing the
MOVIE button again. Recording may stop to protect the camera depending on the
ambient temperature.
W: zoom out
T: zoom in
GB
GB
19
Page 20
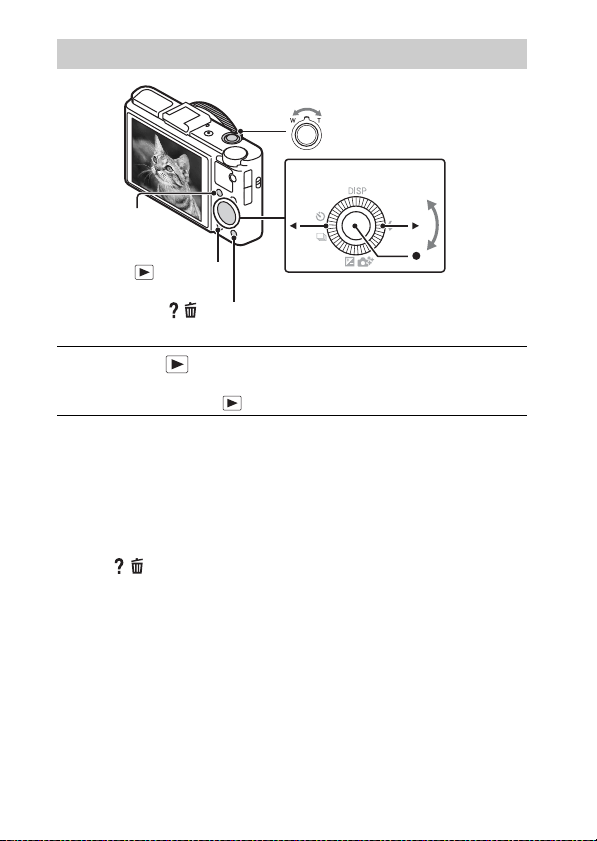
Viewing images
Fn (Function)
W: zoom out
T: zoom in
Control wheel
(Playback)
/ (Delete)
Press the (Playback) button.
1
• You can switch the display mode between still images and movies by
selecting MENU t 1 t [Still/Movie Select].
x
Selecting next/previous image
Select an image by pressing B (next)/b (previous) on the control wheel or by
turning the control wheel. Press z in the center of the control wheel to view
movies.
x
Deleting an image
1 Press / (Delete) button.
2 Select [Delete] with v on the control wheel, then press z.
x
Rotating an image
Press the Fn (Function) button.
x
Returning to shooting images
Press the shutter button halfway down.
GB
Select images: B (next)/b (previous) or
turn the control wheel
Set: z
20
Page 21
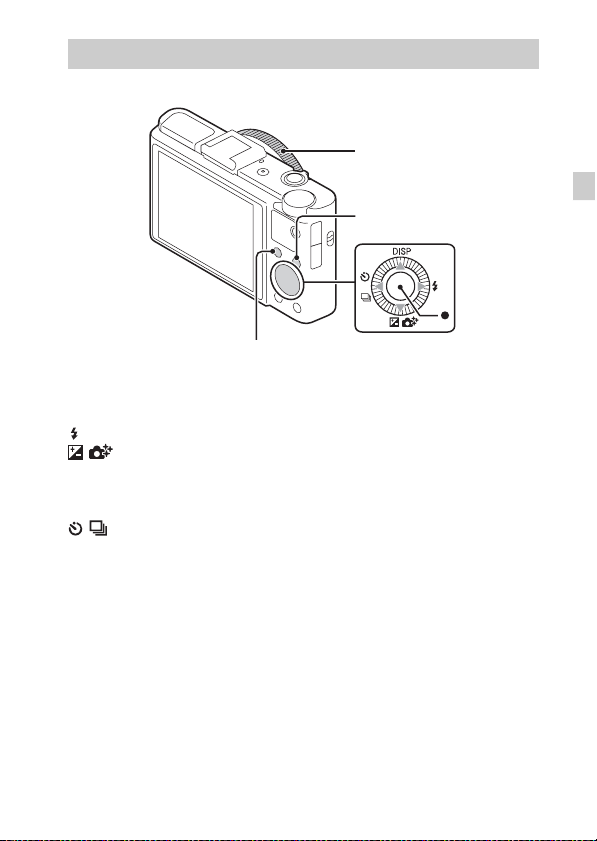
Introduction of other functions
Other functions can be operated using the control wheel, MENU button, etc.
Control Ring
MENU
GB
Fn (Function)
x
Control wheel
DISP (Display Contents): Allows you to change the screen display.
(Flash Mode): Allows you to select a flash mode for still images.
/ (Exposure Comp./Photo Creativity): Allows you to adjust image
brightness. Allows you to change [Bkground Defocus], [Brightness], [Color],
[Vividness] and [Picture Effect] when shooting mode is set to [Intelligent
Auto] or [Superior Auto].
/ (Drive Mode): Allows you to use the self-timer and burst shooting
mode.
z (Tracking focus): The camera tracks the subject and adjusts focus
automatically even when the subject is moving.
Control wheel
GB
21
Page 22

x
Fn (Function) button
Allows you to register seven functions and recall those functions when
shooting.
1 Press the Fn (Function) button.
2 Select the desired function by pressing the Fn (Function) button
repeatedly, or using b/B on the control wheel.
3 Select the setting value by turning the control wheel or Control Ring.
x
Control Ring
Your favorite functions can be assigned to the Control Ring; when shooting,
established settings can be changed just by turning the Control Ring.
x
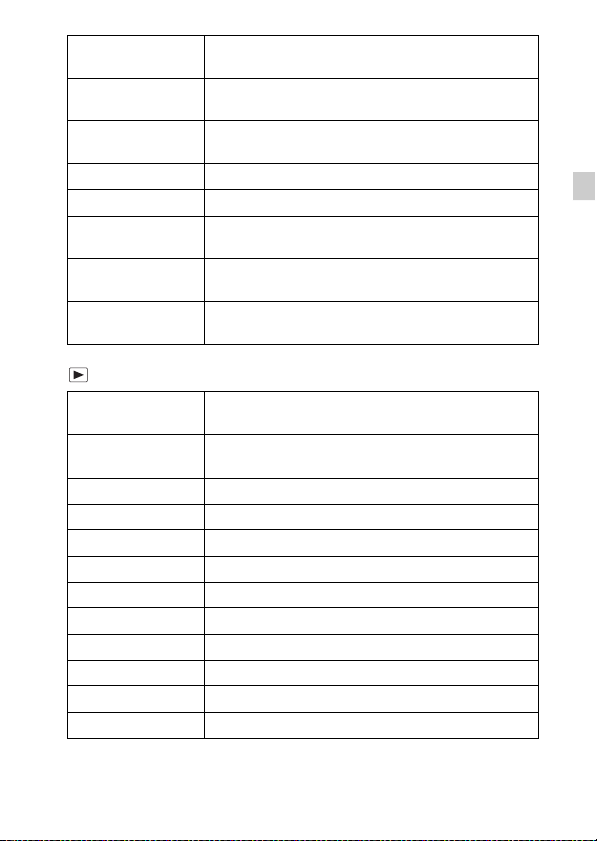
Menu Items
Still shooting menu
Image size Selects the size of still images.
Aspect Ratio Selects the aspect ratio for still images.
Quality Sets the image quality for still images.
Panorama: Size Selects the size of panoramic images.
Panorama:
Direction
Ctrl with
Smartphone
Drive Mode Sets the drive mode, such as for continuous shooting.
Flash Mode Sets the flash settings.
Focus Mode Selects the focus method.
Autofocus Area Selects the area of focus.
Soft Skin Effect Sets the Soft Skin Effect and the effect level.
Smile/Face Detect.
Auto Object
Framing
GB
22
Sets the shooting direction for panoramic images.
Shoots still images and movies by controlling the camera
remotely by a smartphone.
Selects to detect faces and adjust various settings
automatically. Sets to automatically release the shutter
when a smile is detected.
Analyzes the scene when capturing faces, close-ups, or
subjects tracked by Tracking Focus function, and
automatically trims and saves another copy of the image
with a more impressive composition.
Page 23

ISO Adjusts the luminous sensitivity.
Metering Mode
Flash Comp. Adjusts the intensity of flash output.
White Balance Adjusts color tones of an image.
DRO/Auto HDR Compensates automatically for brightness and contrast.
Creative Style Selects the desired image processing.
Picture Effect
Clear Image Zoom
Digital Zoom
Long Exposure NR
High ISO NR
AF Illuminator
SteadyShot Sets SteadyShot.
Color Space Changes the range of reproducible colors.
Shooting Tip List Accesses all shooting tips.
Write Date Sets whether to record a shooting date on the still image.
Scene Selection
Memory recall
Memory Registers the desired modes or camera settings.
Selects the metering mode that sets which part of the
subject to measure to determine the exposure.
Selects the desired effect filter to achieve a more
impressive and artistic expression.
Provides a higher-quality zoomed image than with
Digital Zoom.
Provides zoomed images at higher magnification than
with Clear Image Zoom.
Sets noise reduction processing for shots with a shutter
speed of 1/3 second or longer.
Sets noise reduction processing for high-sensitivity
shooting.
Sets the AF illuminator, which provides light for a dark
scene to aid focusing.
Selects pre-set settings to match various scene
conditions.
Selects settings you want to recall when the mode dial is
set to [Memory recall].
GB
GB
23
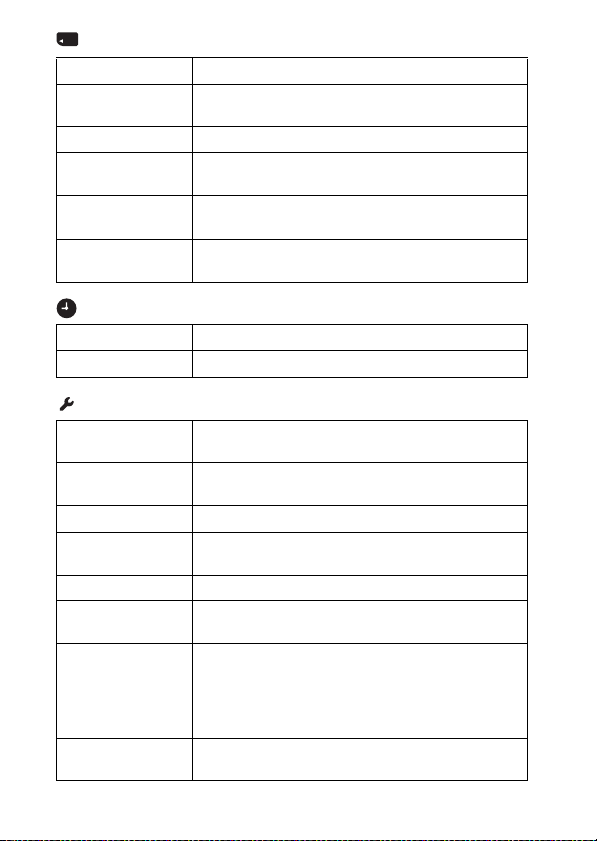
Page 24

Movie shooting menu
File Format Selects the movie file format.
Record Setting Selects the size of the recorded movie frame.
Image Size(Dual
Rec)
SteadyShot Sets SteadyShot.
Audio Recording Sets whether to record audio when shooting a movie.
Wind Noise
Reduct.
Movie Selects the exposure mode to suit your subject or effect.
Sets the still image size shot when recording a movie.
Reduces wind noise during movie recording.
Custom menu
FINDER/LCD
Setting
Red Eye Reduction Reduces the red-eye phenomenon when using flash.
Grid Line
Auto Review
DISP Button
Peaking Level
Peaking Color Sets the color used for the peaking function.
Control Ring Assigns the desired functions to the Control Ring.
Zoom Func. on
Ring
Control Ring
Display
Function Button
GB
When using a electronic viewfinder (sold separately),
sets the method for switching between the electronic
viewfinder and screen.
Sets a grid line display to enable alignment to a structural
outline.
Sets auto review to display the captured image after
shooting.
Sets the screen display modes that can be selected by
pressing DISP on the control wheel.
Enhances the outline of in-focus ranges with a specific
color when focusing manually.
Sets the zooming function of the control ring.
When you select [Step], you can move a zoom position
to a fixed step of the focal length.
Sets whether to display animation when operating the
Control Ring.
Customizes the functions displayed when the Fn
(Function) button is pressed.
24
Page 25
Func. of Center
Button
Func. of Left
Button
Func. of Right
Button
MOVIE Button Sets whether to always activate the MOVIE button.
MF Assist Displays an enlarged image when focusing manually.
Focus Magnif.
Time
Face Priority
Tracking
Face Registration
Assigns the desired functions to the center button.
Assigns the desired functions to the left button.
Assigns the desired functions to the right button.
Sets the length of time the image will be shown in an
enlarged form.
Sets whether to track faces as a priority when tracking.
Registers or changes the person to be given priority in
the focus.
Playback menu
Send to
Smartphone
Send to Computer
View on TV
Still/Movie Select Switches between still image/movie displays.
Delete Deletes an image.
Slide Show Shows a slide show.
Image Index Displays multiple images at the same time.
Protect Protects the images.
Specify Printing Adds a print order mark to a still image.
Picture Effect Adds various textures to images.
Volume Settings Adjusts the volume.
Playback Display Sets how to play back an image recorded in portrait.
Transfers images to display on a smartphone.
Backs up images by transferring them to a computer
connected to a network.
You can view images on a network-enabled TV.
GB
GB
25
Page 26
Memory Card Tool menu
Format Formats the memory card.
File Number
Select REC Folder Changes the selected folder for storing images.
New Folder
Recover Image DB
Display Card
Space
Sets the method used to assign file numbers to still
images and movies.
Creates a new folder for storing still images and movies
(MP4).
Recovers the image database file and enables recording
and playback.
Displays the remaining recording time of movies and the
recordable number of still images on the memory card.
Clock setup menu
Date/Time Setup Sets date and time, and daylight savings.
Area Setting Sets the location of use.
Setup menu
Menu start
Mode Dial Guide
LCD Brightness Sets the screen brightness.
Viewfinder Bright.
Power Save Sets the level of the power saving feature.
Power Saving Start
Time
PAL/NTSC
Selector
(only for 1080 50i
compatible
models)
Upload Settings
GB
Sets the default position of the cursor on the menu to the
top item or the last-selected item.
Turns the mode dial guide (the explanation of each
shooting mode) on or off.
When using an electronic viewfinder (sold separately),
sets the brightness of the electronic viewfinder.
Sets the length of time until the camera turns off
automatically.
By changing the TV format of the device, shooting in a
different movie format is possible.
Sets the upload function of the camera when using an
1
*
Eye-Fi card.
26
Page 27

HDMI Resolution
CTRL FOR HDMI
USB Connection Sets the USB connection method.
USB LUN Setting
USB Power Supply Sets whether to supply power using a USB connection.
Audio signals Sets the operating sound of the camera.
WPS Push
Access Point
Settings
Edit Device Name
Disp MAC Address Displays the MAC address of the camera.
SSID/PW Reset
Airplane Mode
Version Displays the camera software version.
Language Selects the language.
Drop Sensor Sets the [Drop Sensor] function.
Demo Mode Sets demonstration playback of a movie to on or off.
Initialize Restores settings to their defaults.
*1
Appears when an Eye-Fi card (sold separately) is inserted into the camera.
Sets the resolution when the camera is connected to an
HDMI TV.
Operates the camera from a TV that supports
“BRAVIA” Sync.
Enhances compatibility by limiting the functions of USB
connection.
You can register the access point to the camera easily by
pushing the WPS button.
You can register your access point manually.
You can change the device name under Wi-Fi Direct,
etc.
Resets the SSID and password of smartphone
connection.
You can set this device to not perform wireless
communications.
GB
GB
27
Page 28
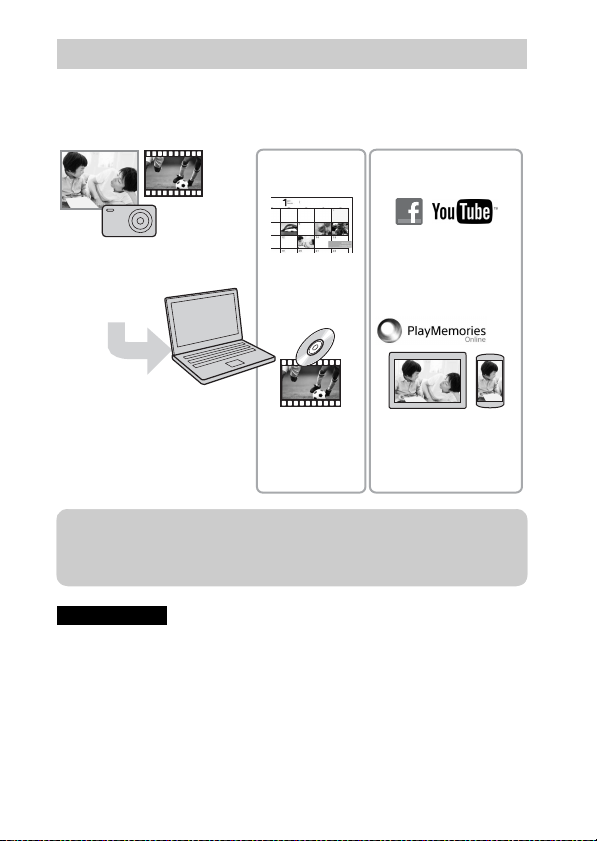
Features of “PlayMemories Home”
The software “PlayMemories Home” allows you to import still images and
movies to your computer and use them. “PlayMemories Home” is required for
importing AVCHD movies to your computer.
Sharing images
Uploading images to
network services
Sharing images on
“PlayMemories
Online”
Importing images from
your camera
Organizing
Viewing images
on Calendar
Creating movie
discs
z Downloading “PlayMemories Home” (for Windows only)
You can download “PlayMemories Home” from the following URL:
www.sony.net/pm
Notes
• An Internet connection is required to install “PlayMemories Home”.
• An Internet connection is required to use “PlayMemories Online” or other network
services. “PlayMemories Online” or other network services may not be available
in some countries or regions.
• “PlayMemories Home” is not compatible with Macs. Use the applications that are
installed on your Mac. For details, visit the following URL:
http://www.sony.co.jp/imsoft/Mac/
GB
28
Page 29

x
Installing “PlayMemories Home” on a computer
Using the Internet browser on your computer, go to the
1
following URL, then click [Install] t [Run].
www.sony.net/pm
Follow the instructions
2
on the screen to
complete the
installation.
• When the message to connect
the camera to a computer is
displayed, connect the camera
and computer using the micro
USB cable (supplied).
x
Viewing “PlayMemories Home Help Guide”
For details on how to use “PlayMemories Home”, refer to the “PlayMemories
Home Help Guide”.
Double-click the [PlayMemories Home Help Guide] icon
1
on the desktop.
• To access the “PlayMemories Home Help Guide” from the start menu:
Click [Start] t [All Programs] t [PlayMemories Home] t
[PlayMemories Home Help Guide].
• For Windows 8, select the [PlayMemories Home] icon from the Start
screen to start [PlayMemories Home], then select [PlayMemories Home
Help Guide] from [Help] menu.
• For details on “PlayMemories Home”, you can also see the “Cyber-shot User
Guide” (page 2) or the following PlayMemories Home support page (English
only):
http://www.sony.co.jp/pmh-se/
To a USB jack
To the Multi
Terminal
GB
GB
29
Page 30

Features of “Image Data Converter”
Below are examples of the functions available when you use “Image Data
Converter”.
• You can edit RAW images using multiple correction functions, such as tone
curve or sharpness.
• You can adjust images using white balance, aperture and Creative Style, etc.
• You can save displayed and edited still images to your computer.
There are two ways to save RAW images: save and leave as RAW data or
save in a general-purpose file format.
• You can display and compare the RAW images/JPEG images that are shot
with this camera.
• You can rank images in five levels.
• You can set the color label.
x
Installing “Image Data Converter”
Download the software from the following URL and
1
install it on your computer.
Windows: http://www.sony.co.jp/imsoft/Win/
Mac: http://www.sony.co.jp/imsoft/Mac/
x
Viewing “Image Data Converter Guide”
For details on how to use “Image Data Converter,” refer to the “Image Data
Converter Guide.”
For Windows:
1
Click [Start] t [All Programs] t [Image Data Converter]
t [Help]t [Image Data Converter Ver.4].
For Mac:
Start Finder t [Applications] t [Image Data Converter]
t [Image Data Converter Ver.4] t In the menu bar,
choose “Help” t “Image Data Converter Guide.”
• For Windows 8, start “Image Data Converter Ver.4” t In the menu
bar, choose “Help” t “Image Data Converter Guide.”
• For details on “Image Data Converter,” you can also see the
“Cyber-shot User Guide” (page 2) or the following “Image Data
Converter” support page (English only):
GB
30
http://www.sony.co.jp/ids-se/
Page 31

Number of still images and recordable time of movies
The number of still images and recordable time may vary depending on the
shooting conditions and the memory card.
x
Still images
Image size: L: 20M
When [Aspect Ratio] is set to [3:2]*
Capacity
Quality
Standard 295 images
Fine 170 images
RAW & JPEG 58 images
RAW 88 images
* When the [Aspect Ratio] is set to other than [3:2], you can record more pictures
than shown above. (Except when [Quality] is set to [RAW].)
x
Movies
The table below shows the approximate maximum recording times. These are
the total times for all movie files. Continuous shooting is possible for
approximately 29 minutes (a product specification limit). The maximum
continuous recording time of an MP4 (12M) format movie is about 15 minutes
(limited by the 2 GB file size restriction).
(h (hour), m (minute))
Capacity
Record Setting
60i 24M(FX)/50i 24M(FX) 10 m
60i 17M(FH)/50i 17M(FH) 10 m
60p 28M(PS)/50p 28M(PS) 9 m
24p 24M(FX)/25p 24M(FX) 10 m
24p 17M(FH)/25p 17M(FH) 10 m
1440×1080 12M 15 m
VGA 3M 1 h 10 m
2 GB
2 GB
GB
GB
31
Page 32

• The recordable time of movies varies because the camera is equipped with VBR
(Variable Bit-Rate), which automatically adjusts image quality depending on the
shooting scene. When you record a fast-moving subject, the image is clearer but
the recordable time is shorter because more memory is required for recording.
The recordable time also varies depending on the shooting conditions, the subject
or the image quality/size settings.
Notes on using the camera
Functions built into this camera
• This manual describes 1080 60i-compatible devices and 1080 50i-compatible
devices.
To check whether your camera is a 1080 60i-compatible device or 1080 50icompatible device, check for the following marks on the bottom of the camera.
1080 60i-compatible device: 60i
1080 50i-compatible device: 50i
• This camera is compatible with 1080 60p or 50p-format movies. Unlike standard
recording modes up to now, which record in an interlacing method, this camera
records using a progressive method. This increases the resolution, and provides a
smoother, more realistic image.
On use and care
Avoid rough handling, disassembling, modifying, physical shock, or impact such as
hammering, dropping, or stepping on the product. Be particularly careful of the lens.
Notes on recording/playback
• Before you start recording, make a trial recording to make sure that the camera is
working correctly.
• The camera is neither dust-proof, nor splash-proof, nor water-proof.
• Avoid exposing the camera to water. If water enters inside the camera, a
malfunction may occur. In some cases, the camera cannot be repaired.
• Do not aim the camera at the sun or other bright light. It may cause the
malfunction of the camera.
• If moisture condensation occurs, remove it before using the camera.
• Do not shake or strike the camera. It may cause a malfunction and you may not be
able to record images. Furthermore, the recording media may become unusable or
image data may be damaged.
Do not use/store the camera in the following places
• In an extremely hot, cold or humid place
In places such as in a car parked in the sun, the camera body may become
deformed and this may cause a malfunction.
• Storing under direct sunlight or near a heater
The camera body may become discolored or deformed, and this may cause a
GB
malfunction.
32
Page 33

• In a location subject to rocking vibration
• Near a location that generates strong radio waves, emits radiation or is strongly
magnetic place. Otherwise, the camera may not properly record or play back
images.
• In sandy or dusty places
Be careful not to let sand or dust get into the camera. This may cause the camera to
malfunction, and in some cases this malfunction cannot be repaired.
On carrying
Do not sit down in a chair or other place with the camera in the back pocket of your
trousers or skirt, as this may cause malfunction or damage the camera.
Carl Zeiss lens
The camera is equipped with a Carl Zeiss lens which is capable of reproducing sharp
images with excellent contrast. The lens for the camera has been produced under a
quality assurance system certified by Carl Zeiss in accordance with the quality
standards of Carl Zeiss in Germany.
Notes on the screen
The screen is manufactured using extremely high-precision technology so over
99.99% of the pixels are operational for effective use. However, some tiny black
and/or bright dots (white, red, blue or green) may appear on the screen. These dots
are a normal result of the manufacturing process, and do not affect the recording.
Notes on the flash
• Do not carry the camera by the flash unit, or use excessive strength on it.
• If water, dust or sand get into the open flash unit, it may cause a malfunction.
On camera’s temperature
Your camera and battery may get hot due to continuous use, but it is not a
malfunction.
On the overheat protection
Depending on the camera and battery temperature, you may be unable to record
movies or the power may turn off automatically to protect the camera.
A message will be displayed on the screen before the power turns off or you can no
longer record movies. In this case, leave the power off and wait until the camera and
battery temperature goes down. If you turn on the power without letting the camera
and battery cool enough, the power may turn off again or you may be unable to
record movies.
On charging the battery
If you charge a battery that has not been used for a long time, you may be unable to
charge it to the proper capacity.
This is due to the battery characteristics, and is not a malfunction. Charge the battery
again.
GB
GB
33
Page 34

Warning on copyright
Television programs, films, videotapes, and other materials may be copyrighted.
Unauthorized recording of such materials may be contrary to the provisions of the
copyright laws.
No compensation for damaged content or recording failure
Sony cannot compensate for failure to record or loss or damage of recorded content
due to a malfunction of the camera or recording media, etc.
Cleaning the camera surface
Clean the camera surface with a soft cloth slightly moistened with water, then wipe
the surface with a dry cloth. To prevent damage to the finish or casing:
– Do not expose the camera to chemical products such as thinner, benzine, alcohol,
disposable cloths, insect repellent, sunscreen or insecticide.
Maintaining the screen
• Hand cream or moisturizer left on the screen may dissolve its coating. If you get
any on the screen, wipe it off immediately.
• Wiping forcefully with tissue paper or other materials can damage the coating.
• If fingerprints or debris are stuck to the screen, we recommend that you gently
remove any debris and then wipe the screen clean with a soft cloth.
Note on wireless LAN
We assume no responsibility whatsoever for any damage caused by unauthorized
access to, or unauthorized use of, destinations loaded on the camera, resulting from
loss or theft.
Note on disposal/transfer of the camera
To protect personal data, perform the following when disposing of or transferring
the camera.
• Reset all camera settings by performing [Initialize] (page 27).
• Delete all registered people’s faces from [Face Registration] (page 25).
34
GB
Page 35

Specifications
Camera
[System]
Image device: 13.2 mm × 8.8 mm
(1.0 type) Exmor R CMOS sensor
Total pixel number of camera:
Approx. 20.9 Megapixels
Effective pixel number of camera:
Approx. 20.2 Megapixels
Lens: Carl Zeiss Vario-Sonnar T
zoom lens
f = 10.4 mm – 37.1 mm (28 mm –
100 mm (35 mm film equivalent))
F1.8 (W) – F4.9 (T)
While shooting movies (16:9):
29 mm – 105 mm
While shooting movies (4:3):
36 mm – 128 mm
*1
When [SteadyShot] is set to
[Standard]
SteadyShot: Optical
Exposure control: Automatic exposure,
Aperture priority, Shutter priority,
Manual exposure, Scene Selection
White balance: Automatic, Daylight,
Shade, Cloudy, Incandescent,
Fluorescent (Warm White/
Cool White/Day White/Daylight),
Flash, Color temperature/Color
filter, Custom
File format:
Still images: JPEG (DCF, Exif,
MPF Baseline) compliant, RAW
(Sony ARW 2.3 Format), DPOF
compatible
Movies (AVCHD format):
AVCHD format Ver. 2.0
compatible
Video: MPEG-4 AVC/H.264
*1
*1
*
3.6×
Audio: Dolby Digital 2ch,
equipped with Dolby Digital Stereo
Creator
• Manufactured under license from
Dolby Laboratories.
Movies (MP4 format):
Video: MPEG-4 AVC/H.264
Audio: MPEG-4 AAC-LC 2ch
Recording media: “Memory Stick XC
Duo” media, “Memory Stick PRO
Duo” media, “Memory Stick
Micro” media, SD cards, microSD
memory cards
Flash: Flash range (ISO sensitivity
(Recommended Exposure Index)
set to Auto):
Approx. 0.3 m to 15.0 m
(0.98 ft. to 49.21 ft.) (W)
Approx. 0.55 m to 5.7 m
(1.80 ft. to 18.70 ft.) (T)
[Input and Output connectors]
HDMI connector: HDMI micro jack
Multi Terminal*:
USB communication
USB communication: Hi-Speed USB
(USB 2.0)
* Supports Micro USB compatible
device.
[Screen]
LCD screen:
7.5 cm (3.0 type) TFT drive
Total number of dots:
1 228 800 dots
GB
GB
35
Page 36

[Power, general]
Power: Rechargeable battery pack
NP-BX1, 3.6 V
AC Adaptor AC-UB10/UB10B/
UB10C/UB10D, 5 V
Power consumption (during shooting):
Approx. 1.5 W
Operating temperature: 0 °C to 40 °C
(32 °F to 104 °F)
Storage temperature: –20 °C to +60 °C
(–4 °F to +140 °F)
Dimensions (CIPA compliant):
101.6 mm × 58.1 mm × 38.3 mm
(4 inches × 2 3/8 inches ×
1 9/16 inches) (W/H/D)
Mass (CIPA compliant) (including NP-
BX1 battery pack, “Memory Stick
Duo” media):
Approx. 281 g (9.9 oz)
Microphone: Stereo
Speaker: Monaural
Exif Print: Compatible
PRINT Image Matching III:
Compatible
[Wireless LAN]
Supported standard: IEEE 802.11 b/g/n
Frequency: 2.4GHz
Supported security protocols: WEP/
WPA-PSK/WPA2-PSK
Configuration method: WPS (Wi-Fi
Protected Setup) / manual
Access method: Infrastructure Mode
NFC: NFC Forum Type 3 Tag
compliant
AC Adaptor AC-UB10/UB10B/
UB10C/UB10D
Power requirements: AC 100 V to
240 V, 50 Hz/60 Hz, 70 mA
Output voltage: DC 5 V, 0.5 A
Operating temperature: 0 °C to 40 °C
(32 °F to 104 °F)
Storage temperature: –20 °C to +60 °C
(–4 °F to +140 °F)
Dimensions:
Approx. 50 mm × 22 mm × 54 mm
(2 inches × 7/8 inches ×
2 1/4 inches) (W/H/D)
Mass:
For the USA and Canada: Approx.
48 g (1.7 oz)
For countries or regions other than
the USA and Canada: Approx. 43 g
(1.5 oz)
Rechargeable battery pack
NP-BX1
Used battery: Lithium-ion battery
Maximum voltage: DC 4.2 V
Nominal voltage: DC 3.6 V
Maximum charge voltage: DC 4.2 V
Maximum charge current: 1.89 A
Capacity: 4.5 Wh (1 240 mAh)
Design and specifications are subject to
change without notice.
36
GB
Page 37

Trademarks
• The following marks are trademarks
of Sony Corporation.
, “Cyber-shot,”
“Memory Stick XC-HG Duo,”
“Memory Stick PRO Duo,”
“Memory Stick PRO-HG Duo,”
“Memory Stick Duo,” “Memory
Stick Micro”
• “AVCHD Progressive” and
“AVCHD Progressive” logotype are
trademarks of Panasonic Corporation
and Sony Corporation.
• Dolby and the double-D symbol are
trademarks of Dolby Laboratories.
• The terms HDMI and HDMI HighDefinition Multimedia Interface, and
the HDMI Logo are trademarks or
registered trademarks of HDMI
Licensing LLC in the United States
and other countries.
• Windows is registered trademark of
Microsoft Corporation in the United
States and/or other countries.
• Mac, App Store are registered
trademarks of Apple Inc.
• iOS is a registered trademark or
trademark of Cisco Systems, Inc.
and/or its affiliates in the United
States and certain other countries.
• SDXC logo is a trademark of SD-3C,
LLC.
• Android, Google Play are trademarks
of Google Inc.
• Wi-Fi, the Wi-Fi logo, Wi-Fi
PROTECTED SET-UP are registered
trademarks of the Wi-Fi Alliance.
• The N Mark is a trademark or
registered trademark of NFC Forum,
Inc. in the United States and in other
countries.
• DLNA and DLNA CERTIFIED are
trademarks of Digital Living
Network Alliance.
• “ ” and “PlayStation” are
registered trademarks of Sony
Computer Entertainment Inc.
• Facebook and the “f” logo are
trademarks or registered trademarks
of Facebook, Inc.
• YouTube and the YouTube logo are
trademarks or registered trademarks
of Google Inc.
• Eye-Fi is a trademark of Eye-Fi, Inc.
• In addition, system and product
names used in this manual are, in
general, trademarks or registered
trademarks of their respective
developers or manufacturers.
However, the ™ or ® marks are not
used in all cases in this manual.
• Add further enjoyment with your
PlayStation 3 by downloading the
application for PlayStation 3 from
PlayStation Store (where available.)
• The application for PlayStation 3
requires PlayStation Network
account and application download.
Accessible in areas where the
PlayStation Store is available.
Additional information on this
product and answers to frequently
asked questions can be found at
our Customer Support Website.
GB
GB
37
Page 38

Français
Mieux connaître votre appareil (« Guide de l’utilisateur du Cyber-shot »)
Le « Guide de l’utilisateur du Cyber-shot » est un manuel en
ligne. Reportez-vous y pour des instructions approfondies sur
les nombreuses fonctions de l’appareil.
1 Accédez à la page de support Sony.
http://www.sony.net/SonyInfo/Support/
2 Sélectionnez votre pays ou région.
3 Recherchez le nom de modèle de votre appareil sur la
page de support.
• Vérifiez le nom de modèle sur la face inférieure de
votre appareil.
Consultation du guide
Cet appareil est équipé d’un guide d’instructions intégré.
MENU
/ (Guide intégré à l’app.)
Guide intégré à l’app.
L’appareil photo affiche des explications des éléments de MENU et des
valeurs de réglage.
1 Appuyez sur la touche MENU.
2 Sélectionnez le paramètre MENU souhaité, puis appuyez sur la touche
/ (Guide intégré à l’app.).
Conseil de prise de vue
L’appareil affiche des conseils de prise de vue adaptés au mode de prise de vue
sélectionné.
1 Appuyez sur la touche / (Guide intégré à l’app.) en mode de prise de
vue.
FR
2
Page 39

2 Sélectionnez le conseil de prise de vue souhaité, puis appuyez sur z de la
molette de commande.
Le conseil de prise de vue s’affiche.
• Vous pouvez faire défiler l’écran à l’aide de v/V et changer les conseils
de prise de vue au moyen de b/B.
Aide-mémoire
Les numéros de modèle et de série se situent sous l’appareil. Prendre en note le numéro de
série dans l’espace prévu ci-dessous. Se reporter à ces numéros lors des communications
avec le détaillant Sony au sujet de ce produit.
Modèle no DSC-RX100M2
No de série ____________________________
Modèle no AC-UB10/AC-UB10B/AC-UB10C/AC-UB10D
No de série ____________________________
AVERTISSEMENT
Afin de réduire les risques d’incendie ou de décharge électrique,
n’exposez pas cet appareil à la pluie ou à l’humidité.
IMPORTANTES INSTRUCTIONS DE SECURITE
- CONSERVEZ CES INSTRUCTIONS
DANGER
AFIN DE REDUIRE LE RISQUE D’INCENDIE OU DE
DECHARGE ELECTRIQUE, SUIVEZ EXACTEMENT CES
INSTRUCTIONS
Si la forme de la fiche ne correspond pas à la prise secteur, utilisez un adaptateur de fiche
accessoire de configuration correcte pour la prise secteur.
FR
ATTENTION
[ Batterie
Toute erreur de manipulation de la batterie peut provoquer son explosion, entraîner un
incendie, voire même des brûlures de substances chimiques. Respectez les précautions
suivantes :
• Ne démontez pas la batterie.
• N’écrasez et n’exposez pas la batterie à des chocs ou à une force extérieure. Vous ne
devez pas la frapper avec un marteau, la laisser tomber ou marcher dessus.
FR
3
Page 40

• Ne court-circuitez pas les bornes de la batterie et maintenez-les à l’écart de tout contact
avec des objets métalliques.
• N’exposez pas la batterie à des températures supérieures à 60 °C (140 °F), notamment
les rayons directs du soleil ou l’habitacle d’un véhicule garé au soleil.
• N’incinérez pas la batterie et ne la jetez pas au feu.
• Ne manipulez jamais des batteries lithium ion qui sont endommagées ou présentent une
fuite.
• Veillez à recharger la batterie à l’aide d’un chargeur Sony authentique ou d’un appareil
capable de la recharger.
• Tenez la batterie hors de la portée des petits enfants.
• Gardez la batterie au sec.
• Remplacez-la uniquement par une batterie de même type ou d’un type équivalent
recommandé par Sony.
• Mettez les batteries au rebut sans attendre, de la manière décrite dans les instructions.
[ Adaptateur secteur
Lorsque vous utilisez l’adaptateur secteur, branchez-le à une prise murale se trouvant à
proximité. En cas de dysfonctionnement lors de l’utilisation de l’appareil, débranchez
immédiatement l’adaptateur secteur de la prise murale.
Pour les utilisateurs au Canada
[ RECYCLAGE DES ACCUMULATEURS AUX IONS DE LITHIUM
Les accumulateurs aux ions de lithium sont recyclables.
Vous pouvez contribuer à préserver l’environnement en rapportant les
piles usagées dans un point de collecte et de recyclage le plus proche.
Pour plus d’informations sur le recyclage des accumulateurs,
téléphonez au numéro gratuit 1-800-822-8837 (Etats-Unis et Canada
uniquement), ou visitez
http://www.rbrc.org/
Avertissement : Ne pas utiliser des accumulateurs aux ions de lithium qui sont
endommagés ou qui fuient.
[ Batterie
Cet appareil est conforme à la section 15 des règlements FCC. Son fonctionnement est
soumis aux deux conditions suivantes : (1) cet appareil ne doit pas provoquer
d’interférences nuisibles, (2) cet appareil doit accepter toute interférence, y compris celles
susceptibles de provoquer son fonctionnement indésirable.
CAN ICES-3 B/NMB-3 B
FR
4
Page 41

Cet appareil est conforme aux exigences de la FCC (Commission américaine des
communications) et d’IC (Industrie Canada) relatives aux limites d’exposition aux
radiations énoncées pour un environnement non contrôlé. Il est également conforme aux
directives de la FCC en matière d’exposition aux fréquences radioélectriques (RF)
énoncées au Supplément C de l’OET65, ainsi qu’aux normes d’IC relatives à l’exposition
aux fréquences radioélectriques énoncées au CNR-102 (Cahier des charges sur les normes
radioélectriques).
Cet appareil présente des niveaux très peu élevés d’énergie RF, réputés conformes sans test
du débit d’absorption spécifique (SAR).
À l’intention des clients aux É.-U.
UL est une organisation de sécurité reconnue internationalement.
La marque UL sur le produit signifie que celui-ci est listé par UL.
Pour toute question au sujet de cet appareil, appeler :
Sony Centre d’information à la clientèle
1-800-222-SONY (7669).
Le numéro ci-dessous concerne seulement les questions relevant de la Commission
fédérale des communications des États-Unis (FCC).
[ Information réglementaire
Déclaration de conformité
Nom commercial : SONY
No de modèle : DSC-RX100M2
Responsable : Sony Electronics Inc.
Adresse : 16530 Via Esprillo, San Diego, CA 92127 É.-U.
No de téléphone : 858-942-2230
Cet appareil est conforme à la Partie 15 de la réglementation de la FCC des États-Unis.
Son utilisation est sujette aux deux conditions suivantes : (1) Cet appareil ne doit pas
générer d’interférences nuisibles et (2) il doit être en mesure d’accepter toute
interférence reçue, y compris les interférences pouvant générer un fonctionnement
indésirable.
Cet équipement ne doit pas être co-situé ou utilisé en conjonction avec une autre antenne
ou émetteur.
[ AVERTISSEMENT
Par la présente, vous êtes avisé du fait que tout changement ou toute modification ne
faisant pas l’objet d’une autorisation expresse dans le présent manuel pourrait annuler
votre droit d’utiliser l’appareil.
FR
FR
5
Page 42

[ Note :
L’appareil a été testé et est conforme aux exigences d’un appareil numérique de Classe B,
conformément à la Partie 15 de la réglementation de la FCC.
Ces critères sont conçus pour fournir une protection raisonnable contre les interférences
nuisibles dans un environnement résidentiel. L’appareil génère, utilise et peut émettre des
fréquences radio ; s’il n’est pas installé et utilisé conformément aux instructions, il pourrait
provoquer des interférences nuisibles aux communications radio. Cependant, il n’est pas
possible de garantir que des interférences ne seront pas provoquées dans certaines
conditions particulières. Si l’appareil devait provoquer des interférences nuisibles à la
réception radio ou à la télévision, ce qui peut être démontré en allumant et éteignant
l’appareil, il est recommandé à l’utilisateur d’essayer de corriger cette situation par l’une
ou l’autre des mesures suivantes :
– Réorienter ou déplacer l’antenne réceptrice.
– Augmenter la distance entre l’appareil et le récepteur.
– Brancher l’appareil dans une prise ou sur un circuit différent de celui sur lequel le
récepteur est branché.
– Consulter le détaillant ou un technicien expérimenté en radio/téléviseurs.
Le câble d’interface fourni doit être utilisé avec l’appareil pour que celui-ci soit conforme
aux critères régissant les appareils numériques, conformément à la sous-partie B de la
Partie 15 de la réglementation de la FCC.
Pour les utilisateurs au Canada
Le présent appareil est conforme aux CNR d’Industrie Canada applicables aux appareils
radio exempts de licence. L’exploitation est autorisée aux deux conditions suivantes : (1)
l’appareil ne doit pas produire de brouillage, et (2) cet appareil doit accepter tout
brouillage, y compris un brouillage qui pourrait provoquer un fonctionnement inopportun
de l’appareil.
Note pour les clients européens
[ Avis aux consommateurs des pays appliquant les Directives UE
Ce produit a été fabriqué par ou pour le compte de Sony Corporation, 1-7-1 Konan Minatoku Tokyo, 108-0075 Japon. Toutes les questions relatives à la conformité des produits
basées sur la législation européenne doivent être adressées à son représentant, Sony
Deutschland Gmbh, Hedelfinger Strasse 61, 70327 Stuttgart, Allemagne.
Pour toute question relative au Service Après-Vente ou à la Garantie, merci de bien vouloir
vous référer aux coordonnées qui vous sont communiquées dans les documents « Service
(SAV) » ou Garantie.
FR
6
Page 43

Par la présente Sony Corporation déclare que l’appareil photo numérique
(DSC-RX100M2) est conforme aux exigences essentielles et aux autres dispositions
pertinentes de la directive 1999/5/CE. Pour toute information complémentaire, veuillez
consulter l’URL suivante:
http://www.compliance.sony.de/
Cet appareil a été testé et jugé conforme aux limites établies par la réglementation EMC
visant l’utilisation de câbles de connexion de moins de 3 mètres (9,8 pi.).
[ Attention
Le champ électromagnétique à des fréquences particulières peut avoir une incidence sur
l’image et le son de cet appareil.
[ Avis
Si l’électricité statique ou les champs électrostatiques entraînent une interruption lors du
transfert des données (échec), redémarrez l’application ou débranchez, puis rebranchez le
câble de connexion (USB, etc.).
[ Traitement des appareils électriques et électroniques en fin de
vie (Applicable dans les pays de l’Union Européenne et aux
autres pays européens disposant de systèmes de collecte
sélective)
Ce symbole, apposé sur le produit ou sur son emballage, indique que ce
produit ne doit pas être traité avec les déchets ménagers. Il doit être remis
à un point de collecte approprié pour le recyclage des équipements
électriques et électroniques. En vous assurant que ce produit sont mis au
rebut de façon appropriée, vous participez activement à la prévention des
conséquences négatives que leur mauvais traitement pourrait provoquer
sur l’environnement et sur la santé humaine. Le recyclage des matériaux
toute information complémentaire au sujet du recyclage de ce produit, vous pouvez
contacter votre municipalité, votre déchetterie locale ou le point de vente où vous avez
acheté le produit.
contribue par ailleurs à la préservation des ressources naturelles. Pour
FR
FR
7
Page 44

[ Elimination des piles et accumulateurs usagés (Applicable dans
les pays de l’Union Européenne et aux autres pays européens
disposant de systèmes de collecte sélective)
Ce symbole, apposé sur les piles et accumulateurs ou sur les emballages,
indique que les piles et accumulateurs fournis avec ce produit ne doivent
pas être traités comme de simples déchets ménagers.
Sur certains types de piles, ce symbole apparaît parfois combiné avec un
symbole chimique. Les symboles pour le mercure (Hg) ou le plomb (Pb)
0,004% de plomb.
En vous assurant que ces piles et accumulateurs sont mis au rebut de façon appropriée,
vous participez activement à la prévention des conséquences négatives que leur mauvais
traitement pourrait provoquer sur l’environnement et sur la santé humaine. Le recyclage
des matériaux contribue par ailleurs à la préservation des ressources naturelles.
Pour les produits qui pour des raisons de sécurité, de performance ou d’intégrité de
données nécessitent une connexion permanente à une pile ou à un accumulateur, il
conviendra de vous rapprocher d’un service technique qualifié pour effectuer son
remplacement.
En rapportant votre appareil électrique en fin de vie à un point de collecte approprié vous
vous assurez que la pile ou l’accumulateur incorporé sera traité correctement.
Pour tous les autres cas de figure et afin d’enlever les piles ou accumulateurs en toute
sécurité de votre appareil, reportez-vous au manuel d’utilisation. Rapportez les piles ou
accumulateurs usagés au point de collecte approprié pour le recyclage.
Pour toute information complémentaire au sujet du recyclage de ce produit ou des piles et
accumulateurs, vous pouvez contacter votre municipalité, votre déchetterie locale ou le
point de vente où vous avez acheté ce produit.
sont rajoutés lorsque ces piles contiennent plus de 0,0005% de mercure ou
Pour les utilisateurs au Royaume-Uni
Une fiche moulée conforme à BS 1363 est installée sur cet équipement pour votre sécurité
et commodité.
Si le fusible dans la fiche fournie doit être remplacé, un fusible de même ampérage que
celui fourni et approuvé par ASTA ou BSI à BS 1362, (c’est-à-dire portant une marque
ou ) doit être utilisé.
Si la fiche fournie avec cet équipement comporte un couvercle de fusible détachable,
assurez-vous de remettre en place le couvercle de fusible après avoir remplacé le fusible.
N’utilisez jamais la fiche sans le couvercle de fusible. Si vous perdez le couvercle de
fusible, veuillez contacter le service après-vente Sony le plus proche.
Pour les clients à Singapour
FR
8
Page 45

Vérification des éléments fournis
Le nombre entre parenthèses indique le nombre d’unités.
• Appareil photo (1)
• Batterie rechargeable NP-BX1 (1)
• Câble micro-USB (1)
• Adaptateur secteur AC-UB10/UB10B/UB10C/UB10D (1)
• Cordon d’alimentation (non fourni aux États-Unis et au Canada) (1)
• Dragonne (1)
• Adaptateur pour bandouliére (2)
(Les adaptateurs pour bandouliére vous permettent de fixer une bandouliére
(vendue séparément), tel qu’illustré ci-dessous.)
• Mode d’emploi (ce manuel) (1)
FR
FR
9
Page 46

Identification des pièces
FR
10
A Déclencheur
B Sélecteur de mode
(Auto intelligent)/
(Automatique supérieur)/
(Programme Auto)/
(Priorité ouvert.)/
(Priorité vitesse)/
(Exposition manuelle)/
(Rappel de mémoire)/
(Film)/
(Panor. par balayage)/
(Sélection scène)
C Pour la prise de vue : bouton
W/T (zoom)
Pour la visualisation : bouton
d’index/zoom de lecture
D Témoin de retardateur/Témoin
de détection de sourire/
Illuminateur AF
E Témoin d’alimentation/
chargement
F Touche ON/OFF (Alimentation)
G Sabot multi-interface*
H Flash
• Ne couvrez pas le flash avec les
doigts.
• Lorsque vous utilisez le flash,
celui-ci sort automatiquement. Si
vous n’utilisez pas le flash,
rabaissez-le manuellement.
I Micro
J Crochet pour sangle
K Bague de commande
L Capteur Wi-Fi (intégré)
M Objectif
N Capteur de lumière
O Écran LCD
P Touche Fn (Fonction)
Page 47

Q Touche MOVIE (Film)
R Borne polyvalente
• Prend en charge les dispositifs
compatibles micro-USB.
S Micro-prise HDMI
T Touche MENU
U Molette de commande
V Touche (Lecture)
W Touche / (Guide intégré à
l’app./Supprimer)
X Fente d’insertion de la batterie
Y Bouton d’éjection de la batterie
Z Douille de trépied
• Utilisez un trépied dont la vis
mesure moins de 5,5 mm
(7/32 po). Sinon vous ne pouvez
pas fixer convenablement
l’appareil et vous risquez de
l’endommager.
wj Témoin d’accès
wk Fente de carte mémoire
wl Couvercle de batterie/carte
mémoire
e; (Repère N)
• Lorsque vous connectez
l’appareil photo à un smartphone
équipé de la fonction NFC,
mettez leurs repères en contact.
• NFC (Near Field
Communication) est une norme
internationale de la technologie
de communication sans fil à
courte distance.
ea Haut-parleur
* Pour plus d’informations sur les
accessoires compatibles avec le sabot
multi-interface, visitez le site Web
Sony ou consultez votre revendeur
Sony, ou encore un centre de service
après-vente Sony agréé. Vous pouvez
également utiliser des accessoires
compatibles avec la griffe porteaccessoires. Le fonctionnement des
accessoires d’autres marques n’est
pas garanti.
FR
FR
11
Page 48

Insertion de la batterie
Bouton d’éjection de la batterie
Ouvrez le couvercle.
1
Insérez la batterie.
2
• Tout en appuyant sur le bouton d’éjection de la batterie, insérez-la de la
manière illustrée. Assurez-vous que le bouton d’éjection de la batterie se
verrouille après l’insertion.
• La fermeture du couvercle alors que la batterie n’est pas correctement
insérée peut endommager l’appareil.
12
FR
Page 49

Chargement de la batterie
Pour les clients résidant aux
États-Unis et au Canada
FR
Cordon
d’alimentation
Pour les clients résidant dans des
pays/régions autres que les États-Unis
et le Canada
Raccordez l’appareil à l’adaptateur secteur (fourni) à
1
l’aide du câble micro-USB (fourni).
Branchez l’adaptateur secteur sur une prise murale.
2
Le témoin d’alimentation/chargement s’allume en orange et le
chargement commence.
• Mettez l’appareil hors tension pendant le chargement de la batterie.
• Vous pouvez charger la batterie même si elle est partiellement chargée.
• Lorsque le témoin d’alimentation/chargement clignote et que le
chargement n’est pas terminé, retirez la batterie et réinsérez-la.
Témoin d’alimentation/
chargement
Allumé : charge en cours
Éteint : chargement terminé
Clignotant :
erreur de chargement ou
chargement
temporairement
suspendu, car la
température de l’appareil
n’est pas comprise dans
la plage correcte
FR
13
Page 50

Remarques
• Si le témoin d’alimentation/chargement de l’appareil clignote lorsque l’adaptateur
secteur est branché sur une prise murale, cela indique que la charge est
interrompue temporairement parce que la température se situe hors de la plage
recommandée. Lorsque la température revient dans la plage appropriée, le
chargement reprend. Nous vous recommandons de recharger la batterie à une
température ambiante comprise entre 10 °C et 30 °C (50 ºF à 86 ºF).
• Il se peut que la batterie ne soit pas effectivement chargée si la borne de la batterie
est sale. Dans ce cas, éliminez délicatement la poussière à l’aide d’un chiffon ou
d’un coton-tige pour nettoyer la borne de la batterie.
• Branchez l’adaptateur secteur (fourni) sur la prise murale la plus proche. En cas
d’anomalie en cours de fonctionnement de l’adaptateur secteur, débranchez
immédiatement la fiche de la prise murale pour le déconnecter de la source
d’alimentation.
• Lorsque le chargement est terminé, débranchez l’adaptateur secteur de la prise
murale.
• Veillez à utiliser exclusivement des batteries, un câble micro-USB (fourni) et un
adaptateur secteur (fourni) Sony authentiques.
• L’appareil n’est pas alimenté pendant la prise de vue/lecture s’il est raccordé à une
prise murale à l’aide de l’adaptateur secteur fourni. Pour alimenter l’appareil
pendant la prise de vue/lecture, utilisez l’adaptateur secteur AC-UD10 (vendu
séparément) ou AC-UD11 (vendu séparément).
• Il est possible que l’adaptateur secteur AC-UD11 (vendu séparément) ne soit pas
disponible dans certains pays/régions.
x
Durée de chargement (Charge complète)
La durée de chargement est d’environ 230 min avec l’adaptateur secteur
(fourni).
Remarques
• La durée de chargement ci-dessus s’applique en cas de chargement d’une batterie
complètement déchargée, à une température de 25 °C (77 °F). Selon les conditions
d’utilisation et les circonstances, le chargement peut être plus long.
14
FR
Page 51

x
Chargement par raccordement à un ordinateur
La batterie peut être chargée en raccordant l’appareil à un ordinateur à l’aide
d’un câble micro-USB.
Vers une prise USB
Remarques
• Notez les points suivants en cas de chargement via un ordinateur :
– Si l’appareil est connecté à un ordinateur portable qui n’est pas raccordé à une
source d’alimentation, le niveau de la batterie du portable diminue. Évitez tout
chargement prolongé.
– Ne mettez pas l’ordinateur sous/hors tension, ne le redémarrez pas et ne le sortez
pas du mode veille quand une connexion USB a été établie entre lui et l’appareil.
L’appareil peut provoquer un dysfonctionnement. Avant de mettre l’ordinateur
sous/hors tension, de le redémarrer ou de lui faire quitter le mode veille,
déconnectez-le de l’appareil.
– Il n’y a aucune garantie que le chargement réussisse avec un ordinateur modifié
ou assemblé par son propriétaire.
FR
FR
15
Page 52

x
Autonomie de la batterie et nombre d’images pouvant
être enregistrées et visualisées
Autonomie de la
batterie
Prise de vue (photos) Environ 175 min Environ 350 images
Enregistrement de film
standard
Enregistrement de film en
continu
Visualisation (photos) Environ 250 min Environ 5000 images
Remarques
• Le nombre d’images ci-dessus est valable lorsque la batterie est complètement
chargée. Il se peut que le nombre d’images soit moins élevé selon les conditions
d’utilisation.
• Le nombre d’images pouvant être enregistrées correspond aux conditions de prise
de vue suivantes :
– Utilisation d’un « Memory Stick PRO Duo » (Mark2) Sony (vendu séparément)
– La batterie est utilisée à une température ambiante de 25 °C (77 °F).
• Le nombre de « Prise de vue (photos) » repose sur la norme CIPA et correspond à
une prise de vue dans les conditions suivantes :
(CIPA : Camera & Imaging Products Association)
– DISP est réglé sur [Afficher toutes infos].
– Une prise de vue toutes les 30 secondes.
– Zoom commuté alternativement entre le côté W et le côté T.
– Flash déclenché une fois sur deux.
– Mise sous et hors tension une fois sur dix.
• Les nombres de minutes d’enregistrement des films reposent sur la norme CIPA et
correspondent à une prise de vue dans les conditions suivantes :
– Réglage d’enregistr. : 60i 17M(FH)/50i 17M(FH)
– Enregistrement de film standard : autonomie de la batterie fondée sur une prise
de vue lancée/arrêtée à plusieurs reprises, avec zoom, mise sous/hors tension,
etc.
– Enregistrement de film en continu : autonomie de la batterie fondée sur une prise
de vue ininterrompue jusqu’à ce que la limite (29 minutes) soit atteinte, puis
poursuivie via un nouvel appui sur la touche MOVIE. Les autres fonctions, telles
que le zoom, ne sont pas utilisées.
Environ 45 min —
Environ 80 min —
Nombre d’images
16
FR
Page 53

Insertion d’une carte mémoire (vendue séparément)
Assurez-vous que le coin
entaillé est correctement
orienté.
Ouvrez le couvercle.
1
Insérez la carte mémoire (vendue séparément).
2
• Le coin entaillé étant orienté dans le sens illustré, insérez la carte
mémoire jusqu’à ce qu’elle se mette en place avec un déclic.
Fermez le couvercle.
3
FR
FR
17
Page 54

x
Cartes mémoire compatibles
Carte mémoire Pour les photos Pour les films
A Memory Stick XC-HG Duo
Memory Stick PRO Duo (Mark2
B
Memory Stick PRO-HG Duo
Memory Stick Micro (M2) (Mark2
C
Carte mémoire SD (Classe 4 ou plus
Carte mémoire SDHC (Classe 4 ou plus
D
Carte mémoire SDXC (Classe 4 ou plus
Carte mémoire microSD (Classe 4 ou plus
Carte mémoire microSDHC (Classe 4 ou plus
E
Carte mémoire microSDXC (Classe 4 ou plus
• Dans ce manuel, les produits repris dans le tableau sont collectivement désignés
comme suit :
A : « Memory Stick XC Duo »
B : « Memory Stick PRO Duo »
C : « Memory Stick Micro »
D : carte SD
E : carte mémoire microSD
Remarques
• Lorsque vous insérez des cartes mémoire « Memory Stick Micro » ou microSD
dans cet appareil, veillez à utiliser l’adaptateur approprié.
seulement)
seulement)
rapide)
rapide)
rapide)
rapide)
rapide)
rapide)
x
Pour retirer la carte mémoire/la batterie
Carte mémoire : appuyez une fois sur la carte mémoire pour l’éjecter.
Batterie : faites glisser le bouton d’éjection de la batterie. Veillez à ne pas
laisser tomber la batterie.
FR
18
Page 55

Remarques
• Ne retirez jamais la carte mémoire/la batterie lorsque le témoin d’accès (page 10)
est allumé. Cela pourrait endommager les données de la carte mémoire.
Réglage de l’horloge
ON/OFF (Alimentation)
Témoin d’alimentation/chargement (vert)
Molette de commande
Sélection des paramètres : b/B
Réglage de la valeur numérique de la
date et de l’heure :
Réglage :
Appuyez sur la touche ON/OFF (Alimentation).
1
Le réglage Date & Heure s’affiche la première fois que vous mettez
l’appareil sous tension.
• La mise sous tension peut prendre un certain temps avant que
l’utilisation soit possible.
Assurez-vous que [Entrer] est sélectionné à l’écran,
2
puis appuyez sur z de la molette de commande.
v/V//
z
FR
Sélectionnez l’emplacement géographique souhaité en
3
suivant les instructions affichées, puis appuyez sur z.
Réglez [Heure d’été :], la date et [Format Date :], puis
4
appuyez sur z.
• Minuit est indiqué par 12:00 AM et midi par 12:00 PM.
FR
19
Page 56

Assurez-vous que [Entrer] est sélectionné, puis
5
appuyez sur z.
Prise de vue de photos/films
Ne recouvrez pas le flash.
Déclencheur
Sélecteur de mode
: Auto intelligent
: Film
MOVIE
Prise de vue de photos
Enfoncez le déclencheur à mi-course pour effectuer la
1
mise au point.
Lorsque l’image est mise au point, un bip retentit et l’indicateur z ou
s’allume.
Appuyez à fond sur le déclencheur pour prendre une
2
photo.
Enregistrement de films
Appuyez sur la touche MOVIE (Film) pour démarrer
1
l’enregistrement.
• Utilisez le bouton W/T (zoom) pour changer l’échelle de zoom.
• Appuyez sur le déclencheur pour prendre des photos tout en continuant
à enregistrer le film.
Appuyez à nouveau sur la touche MOVIE pour arrêter
2
l’enregistrement.
FR
20
Bouton
W/T (zoom)
W : zoom
arrière
T : zoom
avant
Page 57

Remarques
• N’extrayez pas manuellement le flash en tirant dessus. Cela peut provoquer une
anomalie.
• Lorsque vous utilisez le zoom alors que vous enregistrez un film, les sons de
fonctionnement de l’appareil sont enregistrés. Il se peut que les sons de
fonctionnement de la touche MOVIE soient aussi enregistrés lorsque
l’enregistrement du film est terminé.
• Une prise de vue continue est possible pendant environ 29 minutes avec les
réglages par défaut de l’appareil, lorsque la température est d’environ 25 °C
(77 °F). Lorsque l’enregistrement d’un film est terminé, vous pouvez redémarrer
l’enregistrement en appuyant à nouveau sur la touche MOVIE. Selon la
température ambiante, il se peut que l’enregistrement s’arrête pour protéger
l’appareil.
Visualisation des images
W : zoom arrière
T : zoom avant
Molette de commande
Fn (Fonction)
FR
(Lecture)
/ (Supprimer)
Appuyez sur la touche (Lecture).
1
• Vous pouvez basculer le mode d’affichage entre les photos et les films
en sélectionnant MENU t 1 t [Sélection photo/film].
Sélection d’images :
B (suivante)/
b (précédente) ou
tournez la molette de
commande
Réglage : z
FR
21
Page 58

x
Sélection de l’image suivante/précédente
Sélectionnez une image en appuyant sur B (suivante)/b (précédente) de la
molette de commande ou en tournant celle-ci. Appuyez sur z au centre de la
molette de commande pour regarder les films.
x
Suppression d’une image
1 Appuyez sur la touche / (Supprimer).
2 Sélectionnez [Supprimer] avec v de la molette de commande, puis
appuyez sur z.
x
Rotation d’une image
Appuyez sur la touche Fn (Fonction).
x
Retour à la prise de vue
Enfoncez le déclencheur à mi-course.
Présentation des autres fonctions
D’autres fonctions peuvent être pilotées à l’aide de la molette de commande,
de la touche MENU, etc.
Bague de commande
MENU
22
Fn (Fonction)
FR
Molette de commande
Page 59

x
Molette de commande
DISP (Contenus d’affichage) : permet de changer l’affichage sur écran.
(Mode Flash) : permet de sélectionner un mode flash pour les photos.
/ (Correction exposition/Créativité photo) : permet de régler la
luminosité de l’image. Vous permet de modifier [Flou d’arr-plan],
[Luminosité], [Couleur], [Eclat] et [Effet de photo] lorsque le mode de prise de
vue est réglé sur [Auto intelligent] ou [Automatique supérieur].
/ (Entraînement) : vous permet d’utiliser le retardateur et le mode de
prise de vue en rafale.
z (Mise au pt continue) : l’appareil suit le sujet et règle automatiquement la
mise au point, même lorsqu’il est en mouvement.
x
Touche Fn (Fonction)
Vous permet d’enregistrer sept fonctions et de les rappeler au moment de la
prise de vue.
1 Appuyez sur la touche Fn (Fonction).
2 Sélectionnez la fonction souhaitée en appuyant à plusieurs reprises sur la
touche Fn (Fonction) ou au moyen de b/B de la molette de commande.
3 Sélectionnez la valeur du réglage en tournant la molette de commande ou
la bague de commande.
x
Bague de commande
Vos fonctions favorites peuvent être affectées à la molette de commande ; au
moment de la prise de vue, les paramètres définis peuvent être modifiés par
simple rotation de la bague de commande.
FR
FR
23
Page 60

x
Paramètres du menu
Menu de prise de vue de photos
Taille d’image Sélectionne la taille des photos.
Ratio d’aspect Sélectionne le rapport d’aspect des photos.
Qualité Définit la qualité des photos.
Panorama : taille Sélectionne la taille des images panoramiques.
Panorama : orient.
Contrôl. via
smartph.
Entraînement
Mode Flash Définit les réglages du flash.
Mode de mise au
point
Zone d’autofocus Sélectionne la zone de mise au point.
Effet peau douce Règle l’Effet peau douce et son niveau.
Sourire/Dét. visage
Cadrage
automatique
ISO Règle la sensibilité à la lumière.
Mode de mesure
Correct.flash Règle l’intensité de l’éclair du flash.
Bal. des blancs Règle les tonalités de couleur d’une image.
Opti Dyn/HDR aut Corrige automatiquement la luminosité et le contraste.
FR
Modes créatifs Sélectionne le traitement d’image souhaité.
Définit l’orientation de la prise de vue des images
panoramiques.
Enregistre des photos et des films en contrôlant à
distance l’appareil photo à l’aide d’un smartphone.
Définit le mode d’entraînement, notamment la prise de
vue en continu.
Sélectionne la méthode de mise au point.
Sélectionne la détection de visages et règle
automatiquement divers paramètres. Active le
déclenchement automatique du déclencheur lorsqu’un
sourire est détecté.
Analyse la scène lors de la capture de visages, de grosplans ou de sujets suivis au moyen de la fonction Mise au
point continue et rogne automatiquement, puis enregistre
une autre copie de l’image avec une composition plus
vivante.
Sélectionne le mode de mesure qui définit la partie du
sujet à mesurer pour déterminer l’exposition.
24
Page 61

Effet de photo
Zoom « Clear
Image »
Zoom numérique
RB Pose longue
RB ISO élevée
Illuminateur AF
SteadyShot Active SteadyShot.
Espace colorim. Modifie la plage des couleurs reproductibles.
Conseils pr prise
vue
Inscrire date
Sélection scène
Rappel de
mémoire
Mémoire
Sélectionne le filtre d’effet souhaité pour obtenir une
expression plus vivante et plus artistique.
Offre une image agrandie de meilleure qualité par
rapport au zoom numérique.
Agrandit les images avec un grossissement supérieur par
rapport à Zoom « Clear Image ».
Active le traitement de réduction du bruit des vues prises
avec une vitesse d’obturation égale ou supérieure à
1/3 seconde.
Active le traitement de réduction du bruit des prises de
vue en sensibilité élevée.
Active l’illuminateur AF qui facilite la mise au point en
apportant de la lumière à une scène sombre.
Accède à tous les conseils de prise de vue.
Définit si la date de prise de vue est enregistrée sur la
photo.
Sélectionne les paramètres prédéfinis correspondant aux
diverses conditions de scène.
Sélectionne les paramètres que vous souhaitez rappeler
lorsque le sélecteur de mode est réglé sur [Rappel de
mémoire].
Enregistre les modes souhaités ou les paramètres de
l’appareil.
FR
FR
25
Page 62

Menu d’enregistrement de films
Format fichier Sélectionne le format de fichier du film.
Réglage
d’enregistr.
Taille d’img(Dual
Rec)
SteadyShot Active SteadyShot.
Enregistrement
audio
Réduction bruit
vent
Film
Sélectionne la taille de l’image enregistrée du film.
Définit la taille de la photo prise pendant
l’enregistrement d’un film.
Définit si le son est enregistré en même temps qu’un
film.
Réduit le bruit du vent pendant l’enregistrement d’un
film.
Sélectionne le mode d’exposition adapté au sujet ou à
l’effet choisi.
Menu personnalisé
Régl. FINDER/LCD
Réd. yeux rouges
Quadrillage
Affichage
instantané
Bouton DISP
Niveau
d’intensification
Couleur
d’intensification
Bague de
commande
FR
Lorsque vous utilisez un viseur électronique (vendu
séparément), définit la méthode de basculement entre le
viseur électronique et l’écran.
Réduit le phénomène des yeux rouges lors de
l’utilisation du flash.
Active l’affichage d’un quadrillage qui permet
l’alignement correct du sujet.
Active l’affichage instantané de l’image après la prise de
vue.
Définit les modes d’affichage à l’écran qui peuvent être
sélectionnés en appuyant sur DISP de la molette de
commande.
Améliore les contours du sujet au sein des plages de mise
au point, avec une couleur particulière en cas de mise au
point manuelle.
Définit la couleur utilisée pour la fonction
d’intensification.
Affecte les fonctions souhaitées à la bague de
commande.
26
Page 63

Active la fonction de zoom de la bague de commande.
Fnct. Zoom s.
bague
Aff. bague
commande
Bouton de fonction
Fonct. touche
centrale
Fonction touche
gauche
Fonction touche
droite
Bouton MOVIE Définit si la fonction MOVIE est toujours activée.
Aide MF
Temps gross. mise
au p.
Suivi priorité sur
visage
Enregistrement
visage
Lorsque vous sélectionnez [Incrément], vous pouvez
déplacer une position de zoom jusqu’à un niveau fixe de
la distance focale.
Définit si l’animation est affichée lorsque vous utilisez la
bague de commande.
Personnalise les fonctions affichées lorsque la touche
Fn (Fonction) est enfoncée.
Affecte les fonctions souhaitées à la touche centrale.
Affecte les fonctions souhaitées à la touche gauche.
Affecte les fonctions souhaitées à la touche droite.
Affiche une image agrandie lors de la mise au point
manuelle.
Définit la durée d’affichage de l’image sous sa forme
agrandie.
Définit si le suivi des visages est prioritaire en mode de
suivi.
Enregistre ou modifie la personne à laquelle la priorité
est accordée lors de la mise au point.
Menu de lecture
Envoy. vers
smartph.
Envoyer vers
l’ordinateur
Visionner sur TV
Sélection photo/
film
Supprimer Supprime une image.
Diaporama Affiche un diaporama.
Transfère les images pour les afficher sur un smartphone.
Sauvegarde les images en les transférant vers un
ordinateur connecté à un réseau.
Vous pouvez visualiser les images sur un téléviseur
compatible réseau.
Bascule l’affichage entre les photos/films.
FR
FR
27
Page 64

Index d’images Affiche plusieurs images simultanément.
Protéger Protège les images.
Spécifier
impression
Effet de photo Ajoute diverses textures aux images.
Réglages du
volume
Affichage lecture
Ajoute un repère de commande d’impression à une
photo.
Règle le volume.
Détermine le mode de lecture d’une image enregistrée en
mode portrait.
Menu des outils de carte mémoire
Formater Formate la carte mémoire.
N° de fichier
Sélect. dossier
REC
Création d’un
dossier
Récup. BD images
Afficher espace
carte
Définit la méthode d’affectation des numéros de fichiers
aux photos et films.
Change le dossier sélectionné pour le stockage des
images.
Crée un nouveau dossier pour le stockage des photos et
des films (MP4).
Récupère le fichier de base de données des images et
active l’enregistrement ainsi que la lecture.
Affiche la durée d’enregistrement des films restante ainsi
que le nombre de photos enregistrables sur la carte
mémoire.
Menu de réglage de l’horloge
Rég. date/heure Règle la date et l’heure ainsi que l’heure d’été.
Réglage zone Définit l’emplacement d’utilisation.
28
FR
Page 65

Menu de réglage
Démarrer menu
Guide sél. de mode
Luminosité LCD Règle la luminosité de l’écran.
Luminosité du
viseur
Économie
d’énergie
Heure début écon.
éner.
Sélecteur PAL/
NTSC
(uniquement pour
les modèles
compatibles 1080
50i)
Réglages
téléchargt.
Résolution HDMI
COMMANDE
HDMI
Connexion USB Active la méthode de connexion USB.
Réglage USB LUN
Alimentation USB
Signal sonore
WPS Push
Réglages point
d’accès
1
*
Définit la première ou la dernière option du menu
comme position par défaut du curseur.
Active ou désactive le guide du sélecteur de mode
(l’explication de chaque mode de prise de vue).
Règle la luminosité du viseur électronique (vendu
séparément), le cas échéant.
Définit le niveau de la fonction d’économie d’énergie.
Définit la durée qui précède la mise hors tension
automatique de l’appareil.
En modifiant le format TV du dispositif, il est possible
d’enregistrer dans un autre format de film.
Active la fonction de téléchargement de l’appareil en cas
d’utilisation d’une carte Eye-Fi.
Définit la résolution lorsque l’appareil est raccordé à un
téléviseur HDMI.
Commande l’appareil à partir d’un téléviseur qui prend
en charge « BRAVIA » Sync.
Améliore la compatibilité en limitant les fonctions de la
connexion USB.
Définit si l’alimentation est possible à l’aide d’une
connexion USB.
Active les signaux sonores de fonctionnement de
l’appareil.
Vous pouvez facilement mémoriser le point d’accès sur
l’appareil photo en appuyant sur la touche WPS.
Vous pouvez mémoriser manuellement votre point
d’accès.
FR
FR
29
Page 66

Éditer Nom
Dispositif
Affich. Adresse
MAC
Réinit. SSID/MdP
Mode avion
Version Affiche la version du logiciel de l’appareil.
Langue Sélectionne la langue.
Capt. chute Active la fonction [Capt. chute].
Mode Démo
Initialiser Restaure les valeurs par défaut des paramètres.
*1
Apparaît lorsqu’une carte Eye-Fi (vendue séparément) est insérée dans l’appareil.
Vous pouvez modifier le nom du dispositif sous Wi-Fi
Direct, etc.
Affiche l’adresse MAC de l’appareil.
Réinitialise le SSID et le mot de passe de connexion d’un
smartphone.
Vous pouvez régler ce dispositif de manière à désactiver
les communications sans fil.
Active ou désactive la lecture de démonstration d’un
film.
30
FR
Page 67

Fonctions de « PlayMemories Home »
Le logiciel « PlayMemories Home » vous permet d’importer des photos et des
films sur votre ordinateur et de les utiliser. « PlayMemories Home » est requis
pour l’importation des films AVCHD sur votre ordinateur.
Partage des images
Téléchargement
d’images vers des
services réseau
Partage des images
sur « PlayMemories
Online »
Importation d’images
depuis votre appareil photo
Organisation
Visualisation
d’images sur le
Calendrier
Création de
disques de
films
z Téléchargement de « PlayMemories Home » (pour Windows
uniquement)
Vous pouvez télécharger « PlayMemories Home » à partir de l’URL suivante :
www.sony.net/pm
Remarques
• Une connexion Internet est nécessaire pour installer « PlayMemories Home ».
• Une connexion Internet est nécessaire pour utiliser « PlayMemories Online » ou
d’autres services réseau. Il se peut que « PlayMemories Online » ou d’autres
services réseau ne soient pas disponibles dans certains pays ou régions.
• « PlayMemories Home » n’est pas compatible avec le Mac. Utilisez des
applications installées sur votre Mac. Pour plus d’informations, visitez l’URL
suivante :
http://www.sony.co.jp/imsoft/Mac/
FR
FR
31
Page 68

x
Installation de « PlayMemories Home » sur un
ordinateur
À l’aide du navigateur Internet de votre ordinateur,
1
accédez à l’URL suivante, puis cliquez sur [Installation]
t [Exécuter].
www.sony.net/pm
Suivez les instructions
2
affichées pour terminer
l’installation.
• Lorsque le message de
connexion de l’appareil photo
à un ordinateur s’affiche,
raccordez l’appareil photo à
l’ordinateur à l’aide du câble
micro-USB (fourni).
x
Affichage du « Guide d’assistance de PlayMemories
Vers une prise USB
Home »
Pour plus d’informations sur l’utilisation de « PlayMemories Home »,
reportez-vous au « Guide d’assistance de PlayMemories Home ».
Double-cliquez sur l’icône [Guide d’assistance de
1
PlayMemories Home] sur le bureau.
• Pour accéder au « Guide d’assistance de PlayMemories Home » à partir
du menu démarrer : cliquez sur [Démarrer] t [Tous les programmes]
t [PlayMemories Home] t [Guide d’assistance de PlayMemories
Home].
• Pour Windows 8, sélectionnez l’icône [PlayMemories Home] à partir du
menu Démarrer pour démarrer [PlayMemories Home], puis
sélectionnez [Guide d’assistance de PlayMemories Home] dans le menu
[Aide].
• Pour plus d’informations sur « PlayMemories Home », vous pouvez
également consulter le « Guide de l’utilisateur du Cyber-shot » (page 2) ou la
page de support PlayMemories Home suivante (en anglais uniquement) :
http://www.sony.co.jp/pmh-se/
FR
32
Vers la borne
polyvalente
Page 69

Fonctions de « Image Data Converter »
Vous trouverez ci-dessous des exemples des fonctions disponibles lorsque
vous utilisez « Image Data Converter ».
• Vous pouvez modifier des images RAW à l’aide de plusieurs fonctions de
correction, notamment la courbe des tons ou la netteté.
• Vous pouvez régler les images au moyen de la balance des blancs, de
l’ouverture et des Modes créatifs, par exemple.
• Vous pouvez enregistrer sur votre ordinateur les photos affichées et
modifiées.
Les images RAW peuvent être enregistrées de deux manières : enregistrer et
conserver sous forme de données RAW ou enregistrer dans un format de
fichier général.
• Vous pouvez afficher et comparer les images RAW/JPEG prises à l’aide de
cet appareil photo.
• Vous pouvez classer les images en cinq niveaux.
• Vous pouvez définir l’étiquette de couleur.
x
Installation de « Image Data Converter »
Téléchargez le logiciel à partir de l’URL suivante et
1
installez-le sur votre ordinateur.
Windows : http://www.sony.co.jp/imsoft/Win/
Mac : http://www.sony.co.jp/imsoft/Mac/
FR
FR
33
Page 70

x
Affichage du « Mode d’emploi d’Image Data
Converter »
Pour plus d’informations sur l’utilisation du « Image Data Converter »,
reportez-vous au « Mode d’emploi d’Image Data Converter ».
Pour Windows :
1
Cliquez sur [Démarrer] t [Tous les programmes] t
[Image Data Converter] t [Aide] t [Image Data
Converter Ver.4].
Pour Mac :
Démarrez Finder t [Applications] t [Image Data
Converter] t [Image Data Converter Ver.4] t Dans la
barre de menus, choisissez « Aide » t « Mode d’emploi
d’Image Data Converter ».
• Pour Windows 8, démarrez « Image Data Converter Ver.4 » t Dans la
barre de menus, choisissez « Aide » t « Mode d’emploi d’Image Data
Converter ».
• Pour plus d’informations sur le « Image Data Converter », vous pouvez
également consulter le « Guide de l’utilisateur du Cyber-shot » (page 2)
ou la page de support « Image Data Converter » suivante (en anglais
uniquement) :
http://www.sony.co.jp/ids-se/
34
FR
Page 71

Nombre de photos et durée d’enregistrements des films
Le nombre de photos et le temps d’enregistrement peuvent varier en fonction
des conditions de prise de vue et de la carte mémoire.
x
Photos
Taille d’image : L: 20M
Lorsque [Ratio d’aspect] est réglé sur [3:2]*
Capacité
Qualité
Standard 295 images
Fine 170 images
RAW & JPEG 58 images
RAW 88 images
* Lorsque [Ratio d’aspect] a une valeur différente de [3:2], vous pouvez enregistrer
un nombre d’images supérieur à ceux indiqués ci-dessus. (Sauf si [Qualité] est
réglé sur [RAW].)
x
Films
Le tableau ci-dessous indique les durées d’enregistrement maximales
approximatives. Ce sont les durées totales pour tous les fichiers de film. Une
prise de vue continue est possible pendant environ 29 minutes (limite des
spécifications du produit). La durée d’enregistrement continu maximale d’un
film au format MP4 (12M) est d’environ 15 minutes (limitée par la restriction
de taille de fichier de 2 Go).
(h (heures), m (minutes))
Capacité
Réglage d’enregistr.
60i 24M(FX)/50i 24M(FX) 10 m
60i 17M(FH)/50i 17M(FH) 10 m
60p 28M(PS)/50p 28M(PS) 9 m
24p 24M(FX)/25p 24M(FX) 10 m
24p 17M(FH)/25p 17M(FH) 10 m
1440×1080 12M 15 m
VGA 3M 1 h 10 m
2Go
2Go
FR
FR
35
Page 72

• La durée d’enregistrement des films varie parce que l’appareil photo est équipé de
la fonction VBR (Variable Bit Rate) qui règle automatiquement la qualité de
l’image en fonction de la scène filmée. Lorsque vous enregistrez un sujet qui se
déplace rapidement, l’image est plus nette, mais la durée d’enregistrement plus
courte car il faut davantage de mémoire pour enregistrer.
La durée d’enregistrement varie également selon les conditions de prise de vue, le
sujet ou les paramètres de qualité/format des images.
Remarques sur l’utilisation de l’appareil
Fonctions incorporées dans cet appareil
• Ce manuel décrit des dispositifs compatibles 1080 60i et des dispositifs
compatibles 1080 50i.
Pour vérifier si votre appareil est un dispositif compatible 1080 60i ou un
dispositif compatible 1080 50i, regardez si les indications suivantes figurent sur le
dessous de l’appareil.
Dispositifs compatibles 1080 60i : 60i
Dispositifs compatibles 1080 50i : 50i
• Cet appareil est compatible avec les films au format 1080 60p ou 50p.
Contrairement aux modes d’enregistrement standard vus jusqu’à présent, qui
enregistrent selon une méthode d’entrelacement, cet appareil enregistre en
appliquant une méthode progressive. Cela améliore la résolution et permet
d’obtenir une image plus fluide et plus réaliste.
Utilisation et entretien
Évitez toute manipulation brusque, tout démontage, toute modification de l’appareil,
tout choc mécanique et tout impact tel que celui d’un marteau, d’une chute ou du
piétinement du produit. Prenez tout particulièrement soin de l’objectif.
Remarques sur l’enregistrement/lecture
• Avant de commencer à enregistrer, effectuez un essai pour être sûr que l’appareil
fonctionne correctement.
• L’appareil n’est pas étanche à la poussière, aux éclaboussures et à l’eau.
• Évitez d’exposer l’appareil à l’eau. Si de l’eau pénètre dans l’appareil, cela peut
engendrer une anomalie de fonctionnement. Dans certains cas, l’appareil ne pourra
pas être réparé.
• Ne dirigez pas l’appareil vers le soleil ou une lumière vive. Cela pourrait entraîner
une anomalie de fonctionnement de l’appareil.
• Si de l’humidité venait à se condenser, éliminez-la avant d’utiliser l’appareil.
• Ne secouez pas et ne heurtez pas l’appareil. Cela peut provoquer une anomalie de
fonctionnement et empêcher l’enregistrement des images. En outre, le support
d’enregistrement pourrait être inutilisable ou les données d’image être
endommagées.
FR
36
Page 73

N’utilisez/ne rangez pas l’appareil dans les endroits suivants
• Dans un endroit extrêmement chaud, froid ou humide
Dans des endroits tels qu’un véhicule stationné en plein soleil, le boîtier de
l’appareil peut se déformer et ceci peut provoquer un dysfonctionnement.
• Rangement en plein soleil ou à proximité d’un appareil de chauffage
Le boîtier de l’appareil risque de se décolorer ou de se déformer et cela peut
provoquer un dysfonctionnement.
• Endroit soumis à des vibrations oscillantes
• Près d’un endroit qui génère de fortes ondes radio, émet des rayonnements ou est
fortement magnétique. À défaut, l’appareil risque de ne pas pouvoir enregistrer ou
lire correctement les images.
• Dans des endroits poussiéreux ou sablonneux
Veillez à ce que du sable ou de la poussière ne pénètre pas dans l’appareil. Ceci
risquerait d’entraîner un dysfonctionnement de l’appareil qui peut, dans certains
cas, être irréparable.
Transport
Ne vous asseyez pas sur une chaise ou ailleurs avec l’appareil glissé dans la poche
arrière de votre pantalon ou de votre jupe, car cela pourrait provoquer un
dysfonctionnement ou endommager l’appareil.
Objectif Carl Zeiss
L’appareil est équipé d’un objectif Carl Zeiss capable de restituer des images nettes
avec un excellent contraste. L’objectif de l’appareil a été fabriqué d’après un
système d’assurance de qualité certifié par Carl Zeiss en conformité avec les normes
de qualité de Carl Zeiss en Allemagne.
Remarques sur l’écran
L’écran est fabriqué avec une technologie d’extrêmement haute précision et plus de
99,99 % des pixels sont donc opérationnels pour une utilisation effective. Il se peut
toutefois que de minuscules points noirs et/ou brillants (blancs, rouges, bleus ou
verts) apparaissent sur l’écran. Ces points sont un résultat normal du procédé de
fabrication et n’affectent pas l’enregistrement.
Remarques sur le flash
• Ne tenez pas l’appareil par le flash et ne le soumettez pas à une force excessive.
• Si de l’eau, de la poussière ou du sable pénètre dans le flash alors que celui-ci est
ouvert, cela risque d’entraver son bon fonctionnement.
Température de l’appareil
En cas d’utilisation continue, votre appareil photo et la batterie peuvent chauffer,
mais il ne s’agit pas d’un dysfonctionnement.
FR
FR
37
Page 74

Protection contre la surchauffe
Selon la température de l’appareil et de la batterie, il se peut que vous ne puissiez
pas enregistrer de films ou que l’alimentation se coupe automatiquement pour
protéger l’appareil.
Un message s’affiche sur l’écran avant que l’alimentation se coupe ou que vous ne
puissiez plus enregistrer de films. Dans ce cas, laissez l’appareil hors tension et
attendez que la température de l’appareil et de la batterie baisse. Si vous mettez
l’appareil sous tension sans laisser l’appareil et la batterie refroidir suffisamment, il
se peut que l’alimentation se coupe à nouveau ou que vous ne puissiez pas
enregistrer de films.
Chargement de la batterie
Si vous chargez une batterie qui n’a pas été utilisée depuis longtemps, il se peut que
vous ne puissiez pas la charger à la capacité correcte.
Cela est dû aux caractéristiques de la batterie et il ne s’agit pas d’un
dysfonctionnement. Chargez à nouveau la batterie.
Avertissement sur les droits d’auteur
Les émissions de télévision, films, cassettes vidéo et autres œuvres peuvent être
protégés par des droits d’auteur. L’enregistrement non autorisé de telles œuvres peut
constituer une infraction à la loi sur les droits d’auteur.
Absence d’indemnisation en cas de contenu endommagé ou
d’enregistrement manqué
Sony ne peut accorder aucune indemnisation en cas d’enregistrement manqué ou
pour la perte ou la détérioration du contenu enregistré en raison d’un
dysfonctionnement de l’appareil photo ou du support d’enregistrement, etc.
Nettoyage de l’extérieur de l’appareil
Nettoyez l’extérieur de l’appareil avec un chiffon doux légèrement imbibé d’eau,
puis essuyez-le avec un chiffon sec. Afin d’éviter d’endommager la finition ou le
boîtier :
– N’exposez pas l’appareil à des produits chimiques tels que diluants, benzine,
alcool, lingettes jetables, insectifuges, écrans solaires ou insecticides.
Entretien de l’écran
• Si vous laissez de la crème pour les mains ou du lait hydratant sur l’écran, cela
risque de dissoudre son revêtement. Si un tel produit se trouve sur l’écran,
essuyez-le immédiatement.
• Frotter trop vigoureusement avec du papier absorbant ou d’autres matériaux risque
d’endommager le revêtement.
• Si des traces de doigt ou des débris adhèrent à l’écran, il est recommandé
d’éliminer délicatement les débris, puis d’essuyer l’écran à l’aide d’un chiffon
doux.
38
FR
Page 75

Remarque sur le LAN sans fil
Nous déclinons toute responsabilité pour d’éventuels dommages causés par un accès
non autorisé aux destinations chargées sur l’appareil photo, ou par une utilisation
non autorisée de celles-ci, à la suite d’une perte ou d’un vol.
Remarque sur la mise au rebut/transfert de l’appareil photo
Pour protéger vos données personnelles, procédez comme suit lors de la mise au
rebut ou du transfert de l’appareil photo.
• Réinitialisez tous les paramètres de l’appareil photo en exécutant [Initialiser]
(page 30).
• Supprimez tous les visages enregistrés, à partir de [Enregistrement visage]
(page 27).
FR
FR
39
Page 76

Spécifications
Appareil photo
[Système]
Dispositif d’image : Capteur Exmor R
CMOS 13,2 mm × 8,8 mm
(type 1,0)
Nombre total de pixels de l’appareil :
Environ 20,9 Mégapixels
Nombre de pixels utiles de l’appareil :
Environ 20,2 Mégapixels
Objectif : Objectif zoom Carl Zeiss
Vario-Sonnar T
f = 10,4 mm – 37,1 mm (28 mm –
100 mm (équivalent avec un film
35 mm))
F1,8 (W) – F4,9 (T)
Pendant l’enregistrement de films
(16:9) : 29 mm – 105 mm
Pendant l’enregistrement de films
(4:3) : 36 mm – 128 mm
*1
Lorsque [SteadyShot] est réglé
sur [Standard]
SteadyShot : Optique
Contrôle de l’exposition : Exposition
automatique, Priorité à l’ouverture,
Priorité au déclencheur, Exposition
manuelle, Sélection de scène
Balance des blancs : Automatique,
Lumière jour, Ombre, Nuageux,
Incandescent, Fluorescent (Blanc
chaud/Blanc froid/Blanc neutre/
Lumière jour), Flash, Température
de couleur/Filtre de couleur,
Personnalisé
Format de fichier :
Photos : Conformes à JPEG
(DCF, Exif, MPF Baseline),
RAW (Format Sony ARW 2.3),
compatibles DPOF
Films (format AVCHD) :
FR
Compatible avec le format
40
AVCHD Ver. 2.0
*
3,6×
Vidéo : MPEG-4 AVC/H.264
Audio : Dolby Digital 2 canaux,
équipé de Dolby Digital Stereo
Creator
• Fabriqué sous licence de Dolby
Laboratories.
Films (format MP4) :
Vidéo : MPEG-4 AVC/H.264
Audio : MPEG-4 AAC-LC
2 canaux
Supports d’enregistrement : « Memory
Stick XC Duo », « Memory Stick
PRO Duo », « Memory Stick
Micro », cartes SD, cartes mémoire
microSD
Flash : Portée du flash (Sensibilité ISO
*1
*1
(Indice de lumination
recommandé) réglée sur Auto) :
Environ 0,3 m à 15,0 m
(0,98 pi à 49,21 pi) (W)
Environ 0,55 m à 5,7 m
(1,80 pi à 18,70 pi) (T)
[Connecteurs d’entrée et de sortie]
Connecteur HDMI : Micro-prise
HDMI
Borne polyvalente* :
Communication USB
Communication USB : Hi-Speed USB
(USB 2.0)
* Prend en charge les dispositifs
compatibles micro-USB.
[Écran]
Écran LCD :
Matrice active TFT 7,5 cm
(type 3,0)
Nombre total de points :
1 228 800 points
Page 77

[Alimentation, caractéristiques
générales]
Alimentation : Batterie rechargeable
NP-BX1, 3,6 V
Adaptateur secteur AC-UB10/
UB10B/UB10C/UB10D, 5 V
Consommation électrique (pendant la
prise de vue) : Environ 1,5 W
Température de fonctionnement :
0 °C à 40 °C (32 °F à 104 °F)
Température de stockage :
–20 °C à +60 °C (–4 °F à +140 °F)
Dimensions (conformes à CIPA) :
101,6 mm × 58,1 mm × 38,3 mm
(4 po × 2 3/8 po × 1 9/16 po)
(L/H/P)
Poids (conforme à CIPA) (y compris
une batterie NP-BX1, une
« Memory Stick Duo ») :
Environ 281 g (9,9 oz)
Micro : Stéréo
Haut-parleur : Mono
Exif Print : Compatible
PRINT Image Matching III :
Compatible
[LAN sans fil]
Norme prise en charge :
IEEE 802.11 b/g/n
Fréquence : 2,4 GHz
Protocoles de sécurité pris en charge :
WEP/WPA-PSK/WPA2-PSK
Méthode de configuration :
WPS (Wi-Fi Protected Setup) /
manuelle
Méthode d’accès : Mode infrastructure
NFC : Conforme à NFC Forum Type 3
Tag
Adaptateur secteur AC-UB10/
UB10B/UB10C/UB10D
Alimentation requise : 100 V à 240 V
CA, 50 Hz/60 Hz, 70 mA
Tension de sortie : 5 V CC, 0,5 A
Température de fonctionnement :
0°C à 40°C (32°F à 104°F)
Température de stockage :
–20 °C à +60 °C (–4 °F à +140 °F)
Dimensions :
Environ 50 mm × 22 mm × 54 mm
(2 po × 7/8 po × 2 1/4 po) (L/H/P)
Poids :
Pour les États-Unis et le Canada :
Environ 48 g (1,7 oz)
Pour les pays ou régions autres que
les États-Unis et le Canada :
Environ 43 g (1,5 oz)
Batterie rechargeable NP-BX1
Batterie utilisée : Batterie Lithium-ion
Tension maximale : 4,2 V CC
Tension nominale : 3,6 V CC
Tension de charge maximale : 4,2 V
CC
Courant de charge maximal : 1,89 A
Capacité : 4,5 Wh (1 240 mAh)
La conception et les spécifications sont
susceptibles de modifications sans
préavis.
FR
FR
41
Page 78

Marques
• Les indications suivantes sont des
marques commerciales de Sony
Corporation.
, « Cyber-shot »,
« Memory Stick XC-HG Duo »,
« Memory Stick PRO Duo »,
« Memory Stick PRO-HG Duo »,
« Memory Stick Duo », « Memory
Stick Micro »
• « AVCHD Progressive » et le logo
« AVCHD Progressive » sont des
marques commerciales de Panasonic
Corporation et de Sony Corporation.
• Dolby et le symbole du double D sont
des marques commerciales de Dolby
Laboratories.
• Les termes HDMI et HDMI HighDefinition Multimedia Interface,
ainsi que le logo HDMI sont des
marques commerciales ou déposées
de HDMI Licensing LLC aux ÉtatsUnis et dans d’autres pays.
• Windows est une marque déposée de
Microsoft Corporation aux ÉtatsUnis et/ou dans d’autres pays.
• Mac, App Store sont des marques
déposées d’Apple Inc.
• iOS est une marque déposée ou une
marque commerciale de Cisco
Systems, Inc. et/ou de ses filiales aux
États-Unis et dans certains autres
pays.
• Le logo SDXC est une marque
commerciale de SD-3C, LLC.
• Android, Google Play sont des
marques commerciales de Google
Inc.
• Wi-Fi, le logo Wi-Fi, Wi-Fi
PROTECTED SET-UP sont des
marques déposées de la Wi-Fi
Alliance.
FR
42
• N Mark est une marque commerciale
ou une marque déposée de NFC
Forum, Inc. aux États-Unis et dans
d’autres pays.
• DLNA et DLNA CERTIFIED sont
des marques commerciales de Digital
Living Network Alliance.
• « » et « PlayStation » sont des
marques déposées de Sony Computer
Entertainment Inc.
• Facebook et le logo « f » sont des
marques commerciales ou déposées
de Facebook, Inc.
• YouTube et le logo YouTube sont
des marques commerciales ou
déposées de Google Inc.
• Eye-Fi est une marque commerciale
de Eye-Fi, Inc.
• De plus, les noms de système et de
produit utilisés dans ce manuel sont
généralement des marques
commerciales ou des marques
déposées de leurs créateurs ou
fabricants respectifs. Toutefois, les
indications ™ ou ® ne sont pas
toujours utilisées dans ce manuel.
• Prenez encore plus de plaisir avec
votre PlayStation 3 en téléchargeant
l’application pour PlayStation 3 sur
PlayStation Store (où il est
disponible).
• L’application pour PlayStation 3
nécessite un compte PlayStation
Network et doit être téléchargée.
Accessible dans les régions où le
PlayStation Store est disponible.
Page 79

Des informations complémentaires
sur ce produit et des réponses à des
questions fréquemment posées
sont disponibles sur notre site Web
d’assistance client.
FR
FR
43
Page 80

Español
Para saber más sobre la cámara (“Guía del usuario de Cyber-shot”)
La “Guía del usuario de Cyber-shot” es un manual on-line.
Consúltela para ver instrucciones exhaustivas sobre las
muchas funciones de la cámara.
1 Acceda a la página de atención al cliente de Sony.
http://www.sony.net/SonyInfo/Support/
2 Seleccione su país o región.
3 Busque el nombre del modelo de su cámara en la página
de atención al cliente.
• Compruebe el nombre del modelo en la parte inferior de
su cámara.
Visionado de la guía
Esta cámara está equipada con una guía de instrucciones incorporada.
MENU
/ (Guía en la cámara)
Guía en la cámara
La cámara muestra explicaciones para los elementos de MENU y los valores
de ajuste.
1 Pulse el botón MENU.
2 Seleccione el elemento de MENU deseado, después pulse el botón
/ (Guía en la cámara).
Consejo para la toma de imagen
La cámara muestra consejos para la toma de imagen para el modo de toma
seleccionado.
1 Pulse el botón / (Guía en la cámara) en el modo de toma.
2 Seleccione el consejo para la toma de imagen deseada, después pulse
la rueda de control.
ES
Se muestra el consejo para la toma de imagen.
2
z en
Page 81

• Puede desplazar la pantalla utilizando v/V y cambiar los consejos para la
toma de imagen utilizando b/B.
Nombre del producto: Cámara Digital
Modelo: DSC-RX100M2
POR FAVOR LEA DETALLADAMENTE ESTE MANUAL DE INSTRUCCIONES
ANTES DE CONECTAR Y OPERAR ESTE EQUIPO.
RECUERDE QUE UN MAL USO DE SU APARATO PODRÍA ANULAR LA
GARANTÍA.
AVISO
Para reducir el riesgo de incendio o descarga eléctrica, no
exponga la unidad a la lluvia ni a la humedad.
INSTRUCCIONES DE SEGURIDAD IMPORTANTES
-GUARDE ESTAS INSTRUCCIONES
PELIGRO
PARA REDUCIR EL RIESGO DE INCENDIO O DESCARGA
ELÉCTRICA, SIGA ATENTAMENTE ESTAS INSTRUCCIONES
PRECAUCIÓN
[ Batería
Si la batería se manipula indebidamente, puede explotar y causar un incendio o provocarle
quemaduras químicas. Tenga en cuenta las siguientes precauciones.
• No desmonte el producto.
• No aplaste ni exponga la batería a impactos tales como golpes o caídas, ni la deje caer o
la pise.
• No provoque un cortocircuito en la batería ni permita que objetos metálicos entren en
contacto con sus terminales.
• No exponga la batería a temperaturas superiores a 60 °C como a la luz solar directa, o en
el interior de un automóvil estacionado al sol.
• No la incinere ni la arroje al fuego.
• No manipule baterías de iones de litio dañadas o con fugas.
• Asegúrese de cargar la batería con un cargador de baterías original de Sony o con un
dispositivo que pueda cargarla.
• Mantenga la batería fuera del alcance de niños pequeños.
• Mantenga la batería seca.
• Sustitúyala únicamente por otra del mismo tipo o equivalente recomendada por Sony.
ES
ES
3
Page 82

• Deshágase de la baterías usada lo antes posible según el procedimiento que se describe
en las instrucciones.
[ Adaptador de alimentación de ca (FUENTE DE ALIMENTACIÓN)
Utilice una toma de corriente de la pared cercana cuando utilice el adaptador de
alimentación de ca (FUENTE DE ALIMENTACIÓN). Desconecte el adaptador de
alimentación de ca (FUENTE DE ALIMENTACIÓN) de la toma de corriente de la pared
inmediatamente si se produce algún malfuncionamiento mientras utiliza el aparato.
Atención para los clientes en Europa
[ Aviso para los clientes de países en los que se aplican las
directivas de la UE
Este producto ha sido fabricado por, o en nombre de Sony Corporation, 1-7-1 Konan
Minato-ku Tokyo, 108-0075 Japón. Las consultas relacionadas con la conformidad del
producto basadas en la legislación de la Unión Europea deben dirigirse al representante
autorizado, Sony Deutschland GmbH, Hedelfinger Strasse 61, 70327 Stuttgart, Alemania.
Para cualquier asunto relacionado con el servicio o la garantía, por favor diríjase a la
dirección indicada en los documentos de servicio o garantía adjuntados con el producto.
Por medio de la presente Sony Corporation declara que esta Cámara fotografíca digital
DSC-RX100M2 cumple con los requisitos esenciales y cualesquiera otras disposiciones
aplicables o exigibles de la Directiva 1999/5/CE. Para mayor información, por favor
consulte el siguiente URL:
http://www.compliance.sony.de/
Este producto ha sido probado y cumple con los límites estipulados por el reglamento
EMC para utilizar cables de conexión de menos de 3 metros de longitud.
[ Atención
Los campos electromagnéticos a frecuencias específicas podrán influir en la imagen y el
sonido de esta unidad.
[ Aviso
Si la electricidad estática o el electromagnetismo interrumpen la transmisión de datos
(fallo), reinicie la aplicación o desconecte el cable de comunicación (USB, etc.) y vuelva a
conectarlo.
ES
4
Page 83

[ Tratamiento de los equipos eléctricos y electrónicos al final de
su vida útil (aplicable en la Unión Europea y en países europeos
con sistemas de tratamiento selectivo de residuos)
Este símbolo en el equipo o en su embalaje indica que el presente
producto no puede ser tratado como residuos doméstico normal. Debe
entregarse en el correspondiente punto de recogida de equipos eléctricos y
electrónicos. Al asegurarse de que este producto se desecha
correctamente, usted ayuda a prevenir las consecuencias potencialmente
negativas para el medio ambiente y la salud humana que podrían derivarse
de la incorrecta manipulación en el momento de deshacerse de este
naturales. Para recibir información detallada sobre el reciclaje de este producto, póngase en
contacto con el ayuntamiento, el punto de recogida más cercano o el establecimiento donde
ha adquirido el producto.
producto. El reciclaje de materiales ayuda a conservar los recursos
[ Tratamiento de las baterías al final de su vida útil (aplicable en la
Unión Europea y en países europeos con sistemas de
tratamiento selectivo de residuos)
Este símbolo en la batería o en el embalaje indica que la batería
proporcionada con este producto no puede ser tratada como un residuo
doméstico normal.
En algunas baterías este símbolo puede utilizarse en combinación con un
símbolo químico. El símbolo químico del mercurio (Hg) o del plomo (Pb)
0,004% de plomo.
Al asegurarse de que estas baterías se desechan correctamente, usted ayuda a prevenir las
consecuencias potencialmente negativas para el medio ambiente y la salud humana que
podrían derivarse de la incorrecta manipulación en el momento de deshacerse de la
batería. El reciclaje de materiales ayuda a conservar los recursos naturales.
En el caso de productos que por razones de seguridad, rendimiento o mantenimiento de
datos sea necesaria una conexión permanente con la batería incorporada, esta batería solo
deberá ser reemplazada por personal técnico cualificado para ello.
Para asegurarse de que la batería será tratada correctamente, entregue el producto al final
de su vida útil en un punto de recogida para el reciclado de aparatos eléctricos y
electrónicos.
Para las demás baterías, consulte la sección donde se indica cómo extraer la batería del
producto de forma segura. Deposite la batería en el correspondiente punto de recogida para
el reciclado de baterías.
Para recibir información detallada sobre el reciclaje de este producto o de la batería,
póngase en contacto con el ayuntamiento, el punto de recogida más cercano o el
establecimiento donde ha adquirido el producto.
se añadirá si la batería contiene más del 0,0005% de mercurio o del
ES
ES
5
Page 84

[ AVISO IMPORTANTE PARA COFETEL
La operación de este equipo está sujeta a las siguientes dos condiciones: (1) es posible que
este equipo o dispositivo no cause interferencia perjudicial y (2) este equipo o dispositivo
debe aceptar cualquier interferencia, incluyendo la que pueda causar su operación no
deseada.
Para consultar la información relacionada al número del certificado de COFETEL,
refiérase a la etiqueta del empaque y/o del producto.
Comprobación de los artículos suministrados
El número entre paréntesis indica el número de piezas.
• Cámara (1)
• Batería recargable NP-BX1 (1)
• Cable micro USB (1)
• Adaptador de alimentación de ca (FUENTE DE ALIMENTACIÓN)
AC-UB10/UB10B/UB10C/UB10D (1)
• Cable de alimentación (no suministrado en EE. UU. y Canadá) (1)
• Correa para muñeca (1)
• Adaptador de correa (2)
(Para colocar la correa de bandolera (se vende por separado), se utilizan
adaptadores de correa, como se muestra en la ilustración.)
• Manual de instrucciones (este manual) (1)
ES
6
Page 85

Identificación de las partes
A Botón del disparador
B Dial de modo
(Auto. inteligente)/
(Automático superior)/
(Programa auto.)/
(Priorid. abertura)/
(Prior. tiempo expos.)/
(Exposición manual)/
(Recuperar memoria)/
(Película)/
(Barrido panorámico)/
(Selección escena)
C Para tomar imágenes: palanca
W/T (zoom)
Para visualizar: palanca de
índice/zoom de reproducción
D Lámpara del autodisparador/
Lámpara del captador de
sonrisas/Iluminador AF
E Lámpara de alimentación/carga
F Botón ON/OFF (Alimentación)
G Zapata de interfaz múltiple*
H Flash
• No cubra el flash con los dedos.
• Cuando se utiliza el flash, el flash
asoma de repente
automáticamente. Si no está
utilizando el flash, bájelo
manualmente.
I Micrófono
J Gancho para correa
K Anillo de control
L Sensor Wi-Fi (incorporado)
M Objetivo
N Sensor de luz
O Pantalla LCD
P Botón Fn (Función)
ES
ES
7
Page 86

Q Botón MOVIE (Película)
R Terminal múltiple
• Admite dispositivos micro USB
compatibles.
S Microtoma HDMI
T Botón MENU
U Rueda de control
V Botón (Reproducción)
W Botón / (Guía en la cámara/
Eliminar)
X Ranura de inserción de la batería
Y Palanca de expulsión de la
batería
Z Orificio roscado para el trípode
• Utilice un trípode con un tornillo
de menos de 5,5 mm de largo. De
lo contrario, no podrá sujetar
firmemente la cámara, y es
posible que la cámara se dañe.
wj Lámpara de acceso
wk Ranura de tarjeta de memoria
wl Tapa de la batería/tarjeta de
memoria
e; (marca N)
• Toque la marca cuando conecte
la cámara a un teléfono
inteligente equipado con la
función NFC.
• NFC (Near Field
Communication) es un estándar
internacional de tecnología de
comunicación inalámbrica de
corto alcance.
ea Altavoz
* Para obtener más información acerca
de los accesorios compatibles para la
zapata de interfaz múltiple, consulte
la página web de Sony o póngase en
contacto con el distribuidor de Sony o
con el servicio de reparación
autorizado de Sony. También puede
utilizar accesorios compatibles con la
zapata para accesorios. No se
garantiza el funcionamiento con
accesorios de otros fabricantes.
ES
8
Page 87

Inserción de la batería
Palanca de expulsión de la batería
Abra la tapa.
1
Inserte la batería.
2
• Mientras pulsa la palanca de expulsión de la batería, inserte la batería
como se muestra en la ilustración. Asegúrese de que la palanca de
expulsión de la batería se bloquea después de insertarla.
• El cerrar la tapa con la batería insertada incorrectamente podrá dañar la
cámara.
ES
ES
9
Page 88

Carga de la batería
Para clientes en EE. UU. y
Canadá
Cable de
alimentación
Para clientes en países/regiones
distintos de EE. UU. y Canadá
Conecte la cámara al adaptador de alimentación de ca
1
(FUENTE DE ALIMENTACIÓN) (suministrado)
Lámpara de alimentación/
carga
Iluminada: cargando
Apagada: la carga ha
terminado
Parpadea:
error de carga o la carga
se ha detenido
temporalmente debido a
que la cámara no se
encuentra dentro del
intervalo de temperatura
adecuado
mediante el cable micro USB (suministrado).
Conecte el adaptador de alimentación de ca (FUENTE
2
DE ALIMENTACIÓN) a la toma de corriente de la
pared.
Se ilumina en naranja la lámpara de alimentación/carga y comienza la
carga.
• Apague la cámara mientras carga la batería.
• Puede cargar la batería incluso cuando esté parcialmente cargada.
• Cuando la lámpara de alimentación/carga parpadee y la carga no haya
ES
10
finalizado, extraiga la batería y vuelva a insertarla.
Page 89

Notas
• Si la lámpara de alimentación/carga de la cámara parpadea cuando el adaptador de
alimentación de ca (FUENTE DE ALIMENTACIÓN) está conectado a la toma de
corriente de la pared, indica que la carga se ha detenido temporalmente porque la
temperatura está fuera del rango recomendado. Cuando la temperatura vuelve
dentro del rango apropiado, se reanuda la carga. Le recomendamos cargar la
batería a una temperatura ambiente de entre 10 °C a 30 °C
• Es posible que la batería no se cargue eficazmente si la sección del terminal de la
batería está sucia. En este caso, quite el polvo ligeramente utilizando un paño
suave o un bastoncillo de algodón para limpiar la sección del terminal de la
batería.
• Conecte el adaptador de alimentación de ca (FUENTE DE ALIMENTACIÓN)
(suministrado) a la toma de corriente de la pared más cercana. Si se produce algún
fallo de funcionamiento mientras se utiliza el adaptador de alimentación de ca
(FUENTE DE ALIMENTACIÓN), desenchufe la clavija de la toma de corriente
de la pared inmediatamente para desconectarlo de la fuente de alimentación.
• Cuando termine la carga, desconecte el adaptador de alimentación de ca
(FUENTE DE ALIMENTACIÓN) de la toma de corriente de la pared.
• Asegúrese de utilizar solamente baterías, cable micro USB (suministrado) y
adaptador de alimentación de ca (FUENTE DE ALIMENTACIÓN)
(suministrado) de la marca Sony genuinos.
• No se suministra alimentación durante la toma o reproducción de imágenes si la
cámara está conectada a una toma de corriente de la pared con un adaptador de
alimentación de ca (FUENTE DE ALIMENTACIÓN). Para suministrar
alimentación a la cámara durante la toma o reproducción de imágenes, utilice el
adaptador de alimentación de ca (FUENTE DE ALIMENTACIÓN) AC-UD10 (se
vende por separado) o el AC-UD11 (se vende por separado).
• El adaptador de alimentación de ca (FUENTE DE ALIMENTACIÓN) AC-UD11
(se vende por separado) puede no estar disponible en algunos países o regiones.
x
Tiempo de carga (Carga completa)
El tiempo de carga es de aproximadamente 230 min utilizando el adaptador de
alimentación de ca (FUENTE DE ALIMENTACIÓN) (suministrado).
Notas
• El tiempo de carga anterior corresponde a la carga de la batería totalmente
descargada a una temperatura de 25 °C La carga podrá llevar más tiempo
dependiendo de las condiciones de utilización y las circunstancias.
ES
ES
11
Page 90

x
Carga conectando a un ordenador
La batería se puede cargar conectando la cámara a un ordenador utilizando el
cable micro USB.
A una toma USB
Notas
• Tenga en cuenta los puntos siguientes cuando cargue a través de un ordenador:
– Si conecta la cámara a un ordenador portátil que no está conectado a la fuente de
corriente, el nivel de la batería del portátil disminuirá. No cargue durante un
periodo de tiempo prolongado.
– No encienda/apague o reinicie el ordenador, ni lo reanude desde el modo de
ahorro de energía cuando se encuentre establecida una conexión USB entre el
ordenador y la cámara. La cámara podría causar un mal funcionamiento. Antes
de encender/apagar, o reiniciar el ordenador o reanudarlo desde el modo de
ahorro de energía, desconecte la cámara y el ordenador.
– No existen garantías para la carga utilizando un ordenador de diseño particular o
un ordenador modificado.
12
ES
Page 91

x
Duración de la batería y número de imágenes que se
pueden grabar y reproducir
Duración de la batería Número de imágenes
Tomar (imágenes fijas) Aprox. 175 min Aprox. 350 imágenes
Toma típica de película Aprox. 45 min —
Toma continua de película Aprox. 80 min —
Ver (imágenes fijas) Aprox. 250 min Aprox. 5000 imágenes
Notas
• El número de arriba de imágenes se aplica cuando la batería está completamente
cargada. El número de imágenes podrá disminuir dependiendo de las condiciones
de uso.
• El número de imágenes que se puede grabar es cuando las tomas se hacen en las
condiciones siguientes:
– Si se utiliza un “Memory Stick PRO Duo” (Mark2) de Sony (se vende por
separado)
– Si la batería se utiliza a una temperatura ambiente de 25 °C
• El número para “Tomar (imágenes fijas)” está basado en el estándar CIPA, y es
tomando imágenes en las condiciones siguientes:
(CIPA: Camera & Imaging Products Association)
– DISP está ajustado en [Mostrar toda info.].
– Tomando una imagen cada 30 segundo.
– Se cambia el zoom alternativamente entre los extremos W y T.
– El flash destella una de cada dos veces.
– La alimentación se activa y desactiva una vez cada diez veces.
• El número de minuto para la toma de películas se basa en el estándar CIPA, y es
para la toma en las condiciones siguientes:
– Grabar ajuste: 60i 17M(FH)/50i 17M(FH)
– Toma típica de película: la vida de la batería se basa en el inicio/parada repetidas
de toma, zoom, encendido/apagado, etc.
– Toma continua de película: la vida de la batería se basa en la toma sin detención
hasta alcanzar el límite (29 minuto) y, a continuación, volver a pulsar el botón
MOVIE. Otras funciones, como hacer zoom, no se activan.
ES
ES
13
Page 92

Inserción de una tarjeta de memoria (se vende por separado)
Asegúrese de que la esquina
cortada está orientada
correctamente.
Abra la tapa.
1
Inserte la tarjeta de memoria (se vende por separado).
2
• Con la esquina cortada orientada como en la ilustración, inserte la tarjeta
de memoria hasta que encaje en su sitio con un chasquido.
Cierre la tapa.
3
14
ES
Page 93

x
Tarjetas de memoria que se pueden utilizar
Tarjeta de memoria
A Memory Stick XC-HG Duo
Memory Stick PRO Duo (Mark2
B
Memory Stick PRO-HG Duo
Memory Stick Micro (M2) (Mark2
C
Tarjeta de memoria SD (Clase 4 o más
Tarjeta de memoria SDHC (Clase 4 o más
D
Tarjeta de memoria SDXC (Clase 4 o más
Tarjeta de memoria microSD (Clase 4 o más
Tarjeta de memoria
E
microSDHC
Tarjeta de memoria
microSDXC
• En este manual, los productos en la tabla se conocen colectivamente con el
nombre siguiente:
A: “Memory Stick XC Duo”
B: “Memory Stick PRO Duo”
C: “Memory Stick Micro”
D: tarjeta SD
E: tarjeta de memoria microSD
Notas
• Cuando utilice “Memory Stick Micro” o tarjetas de memoria microSD con esta
cámara, asegúrese de utilizar el adaptador apropiado.
Para imágenes
fijas
Para películas
solamente)
solamente)
rápida)
rápida)
rápida)
rápida)
(Clase 4 o más
rápida)
(Clase 4 o más
rápida)
ES
x
Para extraer la tarjeta de memoria/batería
Tarjeta de memoria: empuje la tarjeta de memoria hacia dentro una vez para
expulsar la tarjeta de memoria.
Batería: deslice la palanca de expulsión de la batería. Asegúrese de no dejar
caer la batería.
ES
15
Page 94

Notas
• No extraiga nunca la tarjeta de memoria/batería cuando la lámpara de acceso
(página 7) esté encendida. Esto podría ocasionar daños a los datos en la tarjeta de
memoria.
Ajuste del reloj
ON/OFF (Alimentación)
Lámpara de alimentación/carga (verde)
Rueda de control
Seleccione elementos: b/B
Ajuste el valor numérico de fecha y
v/V//
hora:
z
Ajuste:
Pulse el botón ON/OFF (Alimentación).
1
Cuando encienda la cámara por primera vez se visualizará el ajuste de
Fecha y Hora.
• Es posible que lleve algún tiempo en conectarse la alimentación y
permitir realizar operaciones.
Compruebe que está seleccionado [Intro] en la pantalla,
2
después pulse z en la rueda de control.
Seleccione un lugar geográfico deseado siguiendo las
3
instrucciones en pantalla, después pulse z.
Ajuste [Horario verano:], fecha y [Formato fecha:],
4
después pulse z.
• Medianoche se indica como 12:00 AM, y mediodía como 12:00 PM.
ES
16
Page 95

Compruebe que está seleccionado [Intro], después
5
pulse z.
Toma de imágenes fijas/películas
No cubra el flash.
Botón del disparador
Palanca
W/T (zoom)
Dial de modo
: Auto. inteligente
: Película
MOVIE
Toma de imágenes fijas
Pulse el botón del disparador hasta la mitad para
1
enfocar.
Cuando la imagen está enfocada, suena un pitido y se ilumina el indicador
z o .
Pulse el botón del disparador a fondo para tomar una
2
imagen.
Toma de películas
Pulse el botón MOVIE (Película) para comenzar a
1
grabar.
• Utilice la palanca W/T (zoom) para cambiar la escala del zoom.
• Pulse el botón del disparador para tomar imágenes fijas mientras
continúa grabando la película.
Pulse el botón MOVIE otra vez para detener la
2
grabación.
W: alejar con
zoom
T: acercar
con zoom
ES
ES
17
Page 96

Notas
• No levante el flash manualmente. Ello podría ocasionar un mal funcionamiento.
• Cuando utilice la función del zoom mientras toma una película, se grabará el
sonido del funcionamiento de la cámara. Es posible que tamb ién se grabe el sonido
del botón MOVIE funcionando cuando termine la grabación de película.
• Se puede filmar continuamente durante 29 minuto aproximadamente de una vez
con los ajustes predeterminados de la cámara y cuando la temperatura es de
aproximadamente 25 °C Cuando termine la grabación de película, puede volver a
grabar pulsando el botón MOVIE otra vez. Es posible que la grabación se detenga
para proteger la cámara dependiendo de la temperatura ambiente.
Visualización de imágenes
W: alejar con zoom
T: acercar con zoom
Rueda de control
Fn (Función)
(Reproducción)
/ (Borrar)
Pulse el botón (Reproducción).
1
• Puede cambiar el modo de visualización entre imágenes fija y películas
seleccionando MENU t 1 t [Selec. im. fija/pelíc.].
x
Selección de la imagen siguiente/anterior
Seleccione una imagen pulsando B (siguiente)/b (anterior) del rueda de
control o girando la rueda de control. Pulse z en el centro de la rueda de
control para ver películas.
ES
Seleccione imágenes:
B (siguiente)/
b (anterior) o gire la
rueda de control
Ajuste: z
18
Page 97

x
Eliminación de una imagen
1 Pulse el botón / (Borrar).
2 Seleccione [Borrar] con v de la rueda de control, después pulse z.
x
Rotación de una imagen
Pulse el botón Fn (Función).
x
Para volver a la toma de imágenes
Pulse el botón del disparador hasta la mitad.
Presentación de otras funciones
Las otras funciones se pueden realizar utilizando la rueda de control, el botón
MENU, etc.
Anillo de control
MENU
Fn (Función)
Rueda de control
ES
ES
19
Page 98

x
Rueda de control
DISP (Mostrar contenido): le permite cambiar la visualización en la pantalla.
(Modo flash): le permite seleccionar un modo de flash para imágenes fijas.
/ (Compensar exp./Creatividad fotogr.): le permite ajustar el brillo de la
imagen. Le permite cambiar [Desenf. del fondo], [Brillo], [Color], [Vividez] y
[Efecto de foto] cuando el modo de toma está ajustado en [Auto. inteligente] o
[Automático superior].
/ (Modo manejo): le permite utilizar el autodisparador y el modo de toma
con ráfaga.
z (Enfoque seguido): la cámara sigue al motivo y ajusta el enfoque
automáticamente incluso cuando el motivo se está moviendo.
x
Botón Fn (Función)
Le permite registrar siete funciones e invocar esas funciones cuando hace la
toma.
1 Pulse el botón Fn (Función).
2 Seleccione la función deseada pulsando el botón Fn (Función) varias veces
o utilizando b/B en la rueda de control.
3 Seleccione el valor del ajuste girando la rueda de control o el anillo de
control.
x
Anillo de control
Las funciones favoritas se pueden asignar al anillo control; al hacer la toma,
los ajustes establecidos se pueden cambiar simplemente girando el anillo de
control.
20
ES
Page 99

x
Elementos del menú
Menú de toma de imágenes fijas
Tamaño de imagen Selecciona el tamaño de las imágenes fijas.
Relación de
aspecto
Calidad Ajusta la calidad de imagen para las imágenes fijas.
Panorama: tamaño Selecciona el tamaño de las imágenes panorámicas.
Panorama:
dirección
Control. con
smartph.
Modo manejo
Modo flash Establece los ajustes del flash.
Modo de enfoque Selecciona el método de enfoque.
Área enf. auto. Selecciona el área de enfoque.
Efecto piel suave Ajusta el Efecto piel suave y el nivel del efecto.
Sonrisa/Detec.
cara
Encuadre
automático
ISO Ajusta la sensibilidad luminosa.
Modo medición
Compensac. flash Ajusta la intensidad del destello del flash.
Balance blanco Ajusta los tonos de color de una imagen.
DRO/HDR
automát.
Selecciona la relación de aspecto para las imágenes fijas.
Ajusta la dirección de toma para las imágenes
panorámicas.
Toma imágenes fijas y películas controlando
remotamente la cámara a través de un teléfono
inteligente.
Ajusta el modo de manejo, tal como para la toma
continua.
Selecciona la detección de caras y hace varios ajustes
automáticamente. Ajusta para que la cámara accione
automáticamente el obturador cuando se detecta una
sonrisa.
Analiza la escena cuando se captura una cara, primeros
planos o sujetos seguidos por la función Enfoque
seguido, y automáticamente recorta y guarda otra copia
de la imagen con una composición más impresionante.
Selecciona el modo de medición que establece qué parte
del motivo se mide para determinar la exposición.
Compensa automáticamente el brillo y contraste.
ES
ES
21
Page 100

Estilo creativo Selecciona el procesamiento de imagen deseado.
Efecto de foto
Zoom Imag. Clara
Zoom digital
RR Exp.Larga
RR ISO Alta
Iluminador AF
SteadyShot Ajusta SteadyShot.
Rango color Cambia la gama de colores reproducibles.
Consejos de toma Accede a todos los consejos para la toma de imagen.
Inscribir fecha
Selección escena
Recuperar
memoria
Memoria Registra los modos o ajustes de la cámara deseados.
Selecciona el filtro de efecto deseado para conseguir una
expresión más impresionante y artística.
Ofrece una imagen acercada con zoom de mayor calidad
que con el zoom digital.
Ofrece imágenes acercadas con zoom de mayor aumento
que con Zoom Imag. Clara.
Ajusta el procesamiento de reducción de ruido para
tomas con un tiempo de exposición de 1/3 segundo o
más.
Ajusta el procesamiento de reducción de ruido para toma
de imágenes de alta sensibilidad.
Ajusta el iluminador AF, que proporciona luz en
entornos oscuros para facilitar el enfoque.
Ajusta si debe grabarse la fecha de una toma en la
imagen fija.
Selecciona ajustes preajustados para corresponder con
varias condiciones de escena.
Selecciona los ajustes que desea invocar cuando el dial
de modo está ajustado en [Recuperar memoria].
Menú de toma de película
Formato de archivo Selecciona el formato de archivo de película.
Grabar ajuste Selecciona el tamaño del fotograma de película grabado.
Tamaño imgn(Dual
Rec)
SteadyShot Ajusta SteadyShot.
Grabación de
ES
sonido
Ajusta el tamaño de la imagen fija tomada cuando se
graba una película.
Ajusta si debe grabarse audio cuando se toma una
película.
22
 Loading...