

Page 1

DSC-D700
3-865-496-13 (1)
Digital
Still Camera
Operating Instructions
Before operating the unit, please read this manual thoroughly, and retain it for future
reference.
Owner’s Record
The model and serial numbers are located on the bottom. Record the serial number in
the space provided below. Refer to these numbers whenever you call upon your Sony
dealer regarding this product.
Model No. DSC-D700
Serial No.
Sony Corporation Printed in Japan
For information regarding the DSC-D700, please
see our Internet home page at
http://www.world.sony.com/DSC-D700
DSC-D700
1998 by Sony Corporation
Page 2

WARNING
Introduction
To prevent fire or shock hazard, do not expose the unit to
rain or moisture.
To avoid electrical shock, do not open the cabinet. Refer
servicing to qualified personnel only.
CAUTION
Danger of explosion if battery is incorrectly replaced.
Replace only with the same or equivalent type recommended by the manufacturer.
Dispose of used batteries according to the manufacturer’s instructions.
For the customers in the U.S.A.
This equipment has been tested and found to comply with the limits for a Class B digital device,
pursuant to Part 15 of the FCC Rules. These limits are designed to provide reasonable protection
against harmful interference in a residential installation.
This equipment generates, uses, and can radiate radio frequency energy and, if not installed and
used in accordance with the instructions, may cause harmful interference to radio communications.
However, there is no guarantee that interference will not occur in a particular installation. If this
equipment does cause harmful interference to radio or television reception, which can be
determined by turning the equipment off and on, the user is encouraged to try to correct the
interference by one or more of the following measures:
– Reorient or relocate the receiving antenna.
– Increase the separation between the equipment and receiver.
– Connect the equipment into an outlet on a circuit different from that to which the receiver is
connected.
– Consult the dealer or an experienced radio/TV technician for help.
You are cautioned that any changes or modifications not expressly approved in this manual could
void your authority to operate this equipment.
This device requires shielded interface cable to comply with FCC emission limits.
For the Customers in the U.S.A. and CANADA
DISPOSAL OF LITHIUM ION BATTERY.
LITHIUM ION BATTERY.
DISPOSE OF PROPERLY.
You can return your unwanted lithium ion batteries to your nearest Sony Service Center or Factory
Service Center.
Note: In some areas the disposal of lithium ion batteries in household or business trash may be
prohibited.
For the Sony Service Center nearest you call 1-800-222-SONY (United States only).
For the SONY Factory Service Center nearest you call 416-499-SONY (Canada only).
Caution: Do not handle damaged or leaking lithium ion batteries.
GB
2
Page 3

Contents
Battery Safety Precautions ...... 5
Operation Precautions.............. 7
To Maintain the Efficiency of the
Camera ....................................... 7
Please Read This....................... 8
Checking the Supplied
Accessories ............................. 10
Features ................................... 11
Locations and Functions of
Parts
Front ............................................................... 13
Rear ................................................................ 14
Top.................................................................. 17
Bottom ............................................................ 19
LCD Panel ...................................................... 20
LCD Monitor .................................................. 21
Viewfinder ...................................................... 22
Preparations
Charging the Battery Pack.............................. 23
Installation of the Battery Pack ...................... 24
Setting the Time and Date .............................. 26
Preparing the Card .......................................... 28
Initializing a Card ........................................... 30
Attaching the Viewfinder Cap ........................ 31
Attaching the Neck Strap Belt ........................ 32
Putting the Camera in a Semi-Soft Case ........ 33
Taking a Picture
Taking Pictures ............................................... 34
Locking the Focus .......................................... 37
Setting the Focus Manually ............................ 38
Viewing
Checking the Picture Content ......................... 39
Viewing Pictures on a Television ................... 44
Using a PC Card Reader................................. 44
Using the PC Card/Parallel Port Adaptor ....... 45
Advanced Operations
Settings
Choosing the Shooting Mode ......................... 51
Choosing Picture Size .................................... 53
Choosing the Picture Quality Mode ............... 54
Choosing the Picture Taking Brightness (EV
compensation) ................................................ 56
Adjusting for Natural Color Tone (White
Balance Adjustment) ...................................... 57
Changing the ISO Sensitivity ......................... 59
Choosing a Light Meter Reading Method ...... 60
Resetting the Content of the Settings ............. 62
Saving the Content of Settings ....................... 63
Reading the Saved Settings ............................ 64
Making a Folder to Save Pictures................... 65
Attaching Keywords (ID Numbers) to Pictures
........................................................................ 66
Miscellaneous Settings ................................... 71
Taking a Picture
Shooting with the Flash .................................. 74
Adjusting White Balance when Taking Pictures
with the Flash ................................................. 76
Continuous Shooting ...................................... 78
Taking a Picture at Regular Intervals (Interval
Shooting) ........................................................ 80
Taking a Picture with the Self-Timer ............. 81
Checking Pictures Directly After Shooting
(Review Function) .......................................... 82
continued on next page
3
GB
Introduction
Page 4

Playback
Introduction
Rotating the Picture ........................................ 83
Viewing an Enlarged Picture .......................... 84
Erasing
Erasing All Pictures ........................................ 87
Erasing Selected Pictures ............................... 88
Erasing Pictures during Playback ................... 90
Making it Impossible to Erase Important
Pictures (Protect) ............................................ 92
Miscellaneous
Setting the LCD Monitor Display .................. 94
Adjusting Picture Display on the
LCD Monitor .................................................. 96
Operating the Wireless Remote Control......... 98
Using a Wall Socket........................................ 99
Menu Summary ..................... 101
Maintenance .......................... 105
Troubleshooting .................... 106
Warning Indicators................ 109
Error Messages ..................... 112
Using Overseas ..................... 114
Specifications........................ 115
Index....................................... 118
GB
4
Page 5

Battery Safety Precautions
Follow the safety advice below to avoid leakage, internal heating, fires, explosions or accidental
ingestion of batteries.
DANGER (This applies only to battery packs)
• Only charge the battery with the supplied charger.
• Do not put the battery into fire. Do not short it out or dissassemble it.
Do not heat in a microwave or conventional oven. If you carry or store the battery with
metal objects such as coins or hairpins, shorts may occur.
• Do not recharge or leave the battery pack near fire or under the hot sun.
• If you accidentally get liquid that has leaked from the battery in your eyes, flush with
clean water and consult a doctor immediately.
WARNINGS
• Keep the lithium button battery out of the reach of children. In the case of accidental
ingestion, consult a doctor immediately.
• Do not put the battery into fire. Do not short it out, disassemble or heat it.
• Use only the specified type of battery.
NOTES
• Be sure the + or - signs are aligned correctly when inserting the battery.
• Remove the battery when it is empty or if the camera is not used for a long time.
If battery leakage occurs, wipe the battery case dry and insert a new battery. If liquid from battery
leakage happens to get on your clothes or body, wash well with water.
Danger of explosion if battery is incorrectly replaced.
Replace only with the same or equivalent type recommended by the manufacturer.
Dispose of used batteries according to the manufacturer’s instructions.
Introduction
5
GB
Page 6

Operation Precautions
Places you should not leave
your camera
Introduction
Do not operate or store your camera in places
such as those listed below.
Doing so may lead to the breakdown of your
camera.
• Unusually hot places
If left in very hot places such as under the sun
or in a car with the windows closed in
summer, warping to the body or breakdown
may occur.
• In direct sunlight or near heating
equipment
Warping or breakdown may occur.
• Places subject to strong vibrations
• Places subject to strong magnetism
• Sandy or dusty places
When using the camera at the seaside,
beaches, or otherwise sandy places,
take care to keep the camera free of sand
particles. Breakdown which might not be
able to be repaired may occur .
• Don't keep the lens or viewfinder
pointed toward the sun.
Direct sunlight can harm the internal
components of the digital still camera. Take
care when leaving the camera outside or in a
window.
Maintenance
If dirty, wipe clean with a soft cloth.
Care of the camera body
• If the camera is very dirty, wipe with a soft
coth moistened with a thin solution of neutral
detergent. Wipe dry with a cloth.
• Do not use alcohol, thinner or benzine on the
unit. Such solvents may remove paint from
the cabinet.
• When using a chemically treated cloth,
follow the manufacturer's instructions.
• If volatile liquids such as insecticide are left
for a long time on the rubber or plastic parts,
they may remove paint from the cabinet.
Lens care
Remove dust from the surface of the lens with a
blower or soft brush. If the lens is very dirty,
wipe with a lens cleaning tissue.
Operation
• Don't use in places with strong
electromagnetic or radial waves.
You won't be able to correctly record or play
back.
• Don't use near TV, AM radio or FM
tuners.
TV, AM radio or FM tuners will interfere
with digital recording.
• Don't connect the AC power adaptor
or battery charger to such devices as
electric transformers.
Internal heating or breakdown may occur.
GB
6
Page 7

To Maintain the Efficiency of the Camera
Operating and Storage Places
To avoid possible breakdown, do not use or store the camera in the following places:
• Extremely hot or cold places (The operating temperature is 0°C to +40°C (32°F to
104°F))
• In direct sunlight for long periods or near heating equipment
• Humid or dusty places
• Where it is exposed to rain
• Places subject to strong vibrations
• Near sources of strong magnetism
• Near sources of powerful electromagnetic radiation, such as TV or radio
transmitters
Heat Emission
Do not wrap the camera in cloth or other materials when operating the camera. Doing
so will raise the internal temperature and may cause breakdown.
Transportation
When transporting the camera, pack it in the original carton and packing materials, or
similar packaging, to protect it from strong shocks during transportation.
Care
• Use a blower brush to remove dirt or dust from the surface of the lens or viewfinder.
• Lightly wipe the outside surface of the camera with a dry, soft cloth to remove dirt.
If the body is very dirty, wipe it with a cloth moistened with a small amount of
neutral detergent. Wipe dry with a cloth.
• Volatile liquids such as alcohol, benzine, thinner, or insecticide will damage the
surface finish.
Introduction
continued on next page
7
GB
Page 8

Please Read This
Test Shooting
Introduction
No Compensation for Picture Content
Copyright Laws
Power Adaptor
Battery Pack
Before shooting, take a few test shots to make sure pictures are being taken normally.
If a picture is not recorded due to a problem with the digital still camera, the
recording content cannot be compensated.
Pictures that you take with your digital still camera other than for personal enjoyment
cannot be used without permission from the copyright owner in accordance with
copyright laws. Be aware that even taking pictures of events like concerts,
performances or exhibits for your personal enjoyment may be subject to the same
copyright laws.
With this unit, use the battery charger BC-V615 (supplied). When connecting to a
wall socket, the AC power adaptor/charger AC-V700 is necessary.
The battery pack can also be purchased separately.
To buy one, please check with your nearest Sony dealer.
Use the InfoLITHIUM battery pack NP-F550 (supplied) or NP-F530. Other battery
packs cannot be used. Be sure to charge the battery pack before using for the first
time.
8
GB
Page 9

Memory Stick and PC Card
Insert Sony Memory Stick MSA-8A (8MB) or MSA-4A (4MB) (not supplied) into
Memory Stick/PC Card Adaptor MSAC-PC1 for use with the digital still camera.
The following PC cards may be used in the digital still camera:
• PC cards that conform to PC card standard 6.1
• Flash memory card ATA Type II
• Those with power specifications of 5V or 3.3V/5V
3-volt products cannot be used in the camera. Using incompatible cards in the camera
may lead to breakdown.
Camera Playback Data
• Picture data recorded by the camera may be played back on the camera
• Picture data that has been edited on a personal computer or processed may not be
played back by the camera even if it is recorded by the camera.
Data Recorded on the PC Card
Picture data is recorded in the following formats:
IMJP XXXX (folder name)/MVC XXXXX.jpg (file name)
(When the mode menu quality settings are High, Middle, and Low.)
IMTIXXXX (folder name)/MVCXXXXX.tif (file name)
(When the mode menu quality setting is Super.)
* Picture is only indicated as XXXX/XXXXX on the LCD monitor.
Introduction
9
GB
Page 10
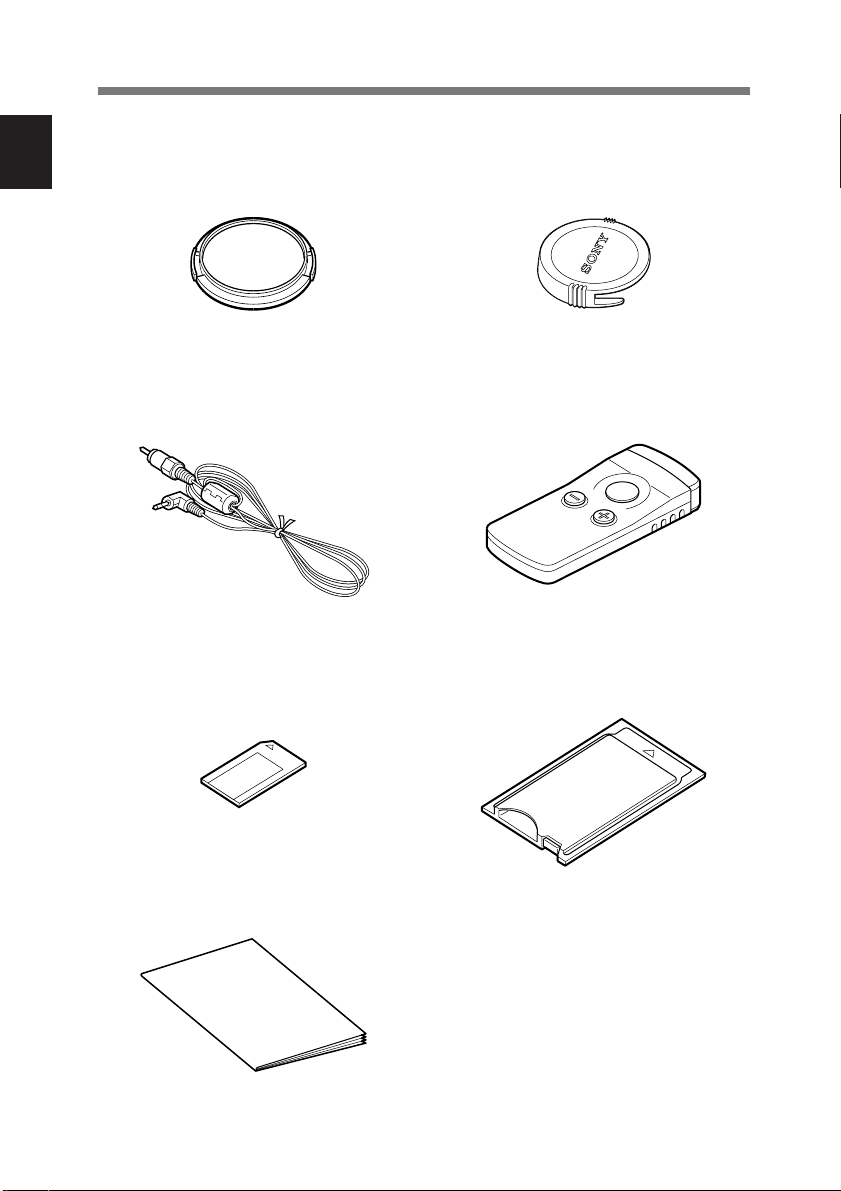
Checking the Supplied Accessories
Before using the camera, make sure you have the following supplied accessories.
Introduction
Lens cap (1, fitted on the camera)
Video cable (1)
Memory Stick (1)
Viewfinder cap (1)
Wireless remote control (1)
Memory Stick/PC Card Adaptor (1)
10
GB
User's manual (1)
Rechargeble battery pack NP-F550 (1)
Battery charger BC-V615 (1)
Neck strap belt BLT-10(H) (1)
PC Card/Parallel port Adaptor MSAC-PR1 (1)
Page 11

Features
1/2 Inch 1,500,000 Pixel CCD
The digital still camera comes equipped with an all-pixel reading 1/2 inch CCD with
1,500,000 effective picture dots. The unit also uses a primary color filter and 1344 ×
1024 pixel high-resolution to reproduce the natural colors and resolution of
photographs.
5× Wide Zoom Lens
To make the most of the high-resolution CCD, the camera is equipped with a 5× wide
zoom lens for focal distances of 28 mm to 140 mm (equivalent to 35 mm film
cameras). Use together with 2× digital zoom to reach the maximum of 10× zoom.
*The resolution changes to 640 × 480 pixels when using digital zoom.
Two Finders: Viewfinder and Large LCD
The camera comes equipped with a viewfinder and a 2.5 inch low-temperature,
polysilicon TFT color LCD with CRT contrast, resolution, and response speed.
Precision Speed Auto Focus
With the auto focus function, you can automatically focus on subjects. By pressing
the shutter button halfway, you can lock the focus at a fixed position and change the
composition before taking the picture.
Four Exposure Modes for Various Picture Taking Conditions
Light meter readings are first output from the CCD and then, depending on the picture
taking conditions, one of four modes is chosen: Easy Program Exposure Mode for
general picture-taking, Shutter Speed Priority Mode, Aperture Priority Mode and
Manual Mode.
Introduction
Two Frames/Second High Speed Picture Taking with Buffer Memory
Loading
Equipped with a continuous picture taking mode, the camera can take 2 frames per
second of high-speed picture taking in 640 × 480 size, low mode.
continued on next page
11
GB
Page 12

Taking Pictures for a Longer Period with the InfoLITHIUM Battery
and Power Saving Option
Introduction
Loading to a Video Output Terminal
Using the PC Card and Memory Stick
Using the InfoLITHIUM battery, you can take about two hours of continuous picture
taking (with the LCD monitor off.) Also, if the power is on and the camera is not
operated for approximately one minute, power to the camera shuts off. If the camera
is not operated for about 5 minutes, the whole unit shuts off (Auto Power Off
function)
If the unit is connected to a television by the supplied video cable, pictures taken by
the digital still camera can easily be played back on the television. This can be a
particularly powerful display tool for presentations for meetings and such.
The digital still camera uses the highly reliable PC card (PCMCIA ATA TYPE II) and
long-lasting memory stick (for use when inserted in the Memory Stick/PC Card
Adaptor) as the image recording medium.
12
GB
Page 13

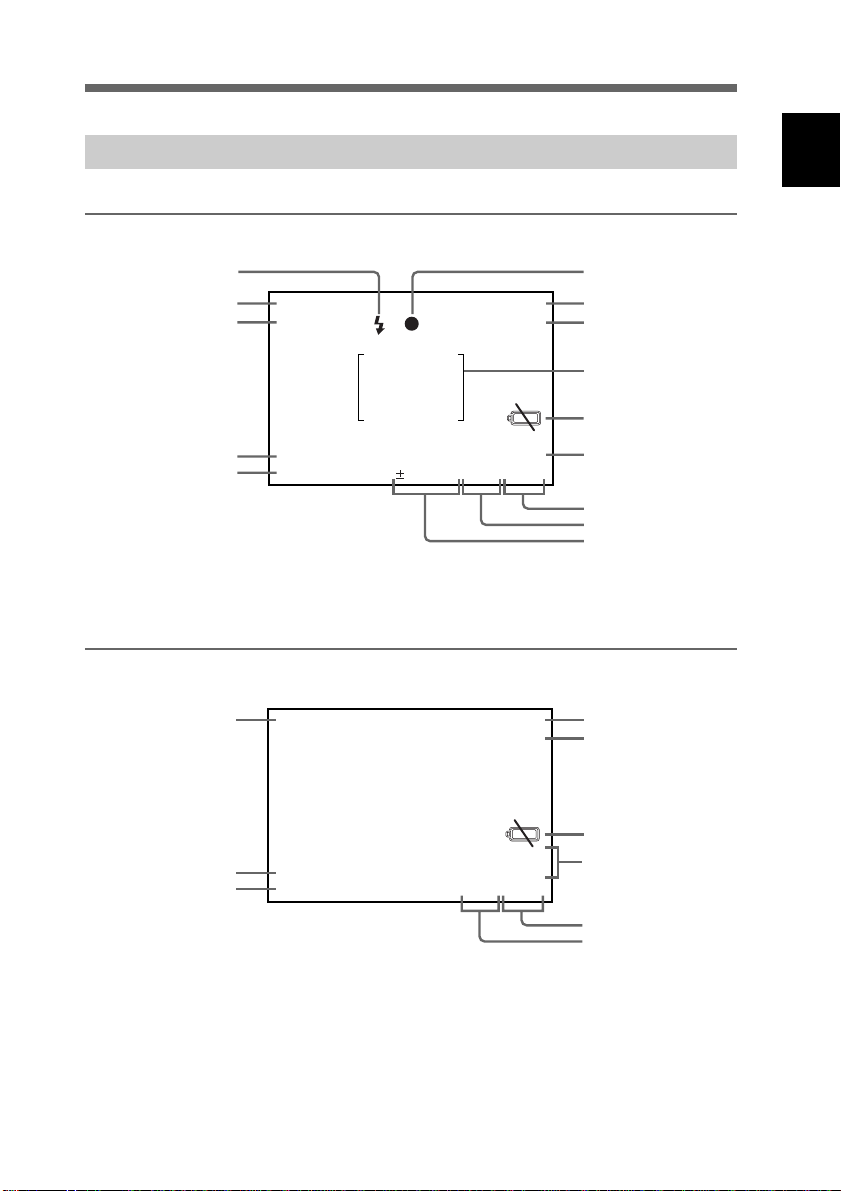
Locations and Functions of Parts
Front
1 2
6
Locations and Functions of Parts
5
WB
4
3
1 Flash
The camera has a built-in Guide Number GN10 flash. To use the flash, press the popup key. The cover will open and the flash warms up. The flash is stored when you
close the cover.
2 Pop-up Key
Press the pop-up key to open the flash cover.
3 5× Zoom Lens
You can manually adjust the zoom lens (28 mm to 140 mm (5×) on a 35 mm film
camera) by rotating the zoom ring. After adjusting the zoom, manually adjust the focus
with the focus ring.
4 White Balance Button
When HOLD is set in the WB (white balance) mode, white balance can be adjusted by
pressing this button.
5 Self-Timer Lamp
When taking a picture with the self-timer, this lamp flashes when the release button is
pressed. As the shutter release time draws near, the intervals between flashes become
gradually shorter. The shutter is released when the light becomes constant.
6 Remote Control Signal Receiver
Receives infrared signals transmitted by the wireless remote control.
13
GB
Page 14
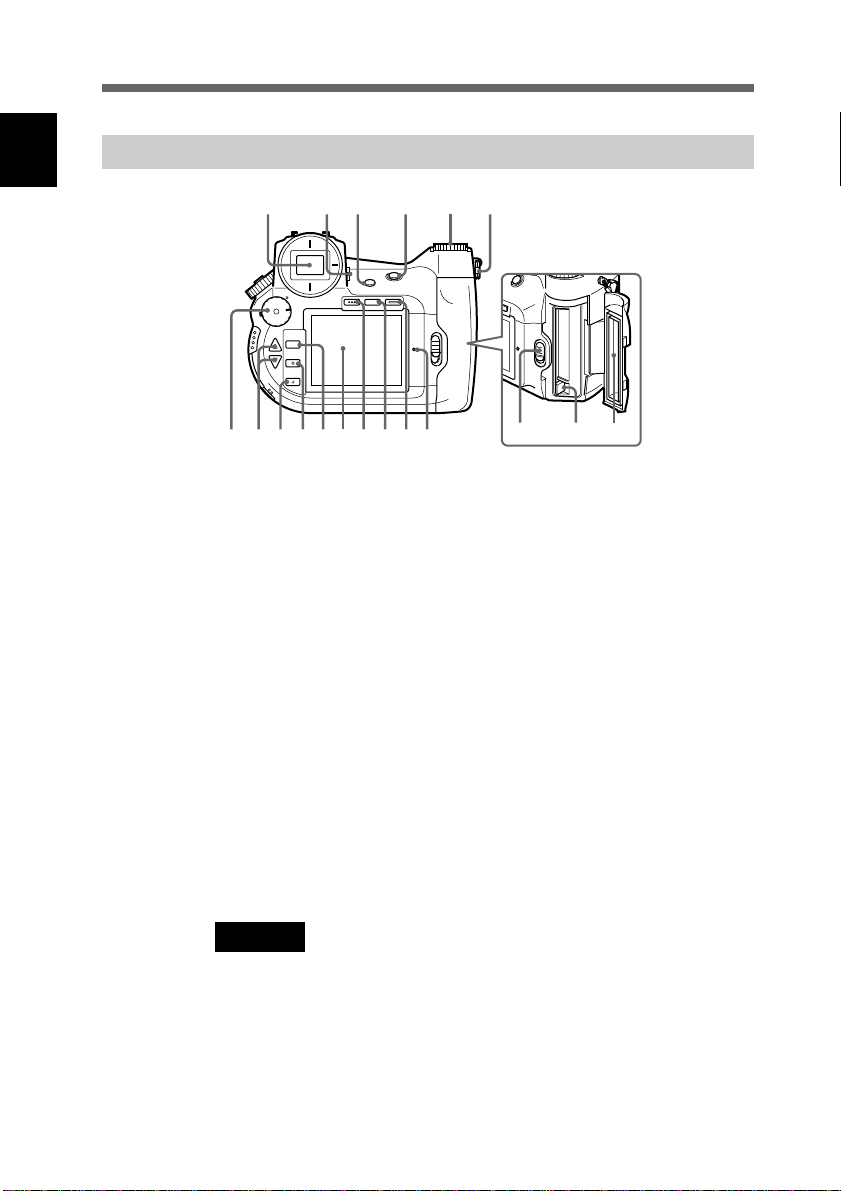
Rear
Locations and Functions of Parts
1
•
OFF
•
CAM
•
PLAY
MENU
EXCUTE
EXIT
!§ !∞ !¢ !¡ 7!™
!£ 890
AE-LOCK
R-REVIEW
INDEX
DISP LCD
52 3 4
6
!• !ª!¶
1 Viewfinder
Lets you frame the picture.
2 Eyesight Adjustment Lever
Adjusts the level of the viewfinder to suit the eyesight of the picture taker.
3 Review Button
Lets you view and play back pictures during the time set in the REVIEW TIME of the
custom menu when pressed directly after taking a picture.
4 AE-LOCK Button
The exposure value is locked each time you press the AE lock button.
If the AE-LOCK button is pressed again or the release button is pressed, the lock
function is cancelled the next time the camera is used.
14
5 Shift Dial
Sets the picture quality and size (when the camera is in CAM mode) and changes the
pictures that are played back (when the camera is in PLAY mode).
6 Neck Strap Belt Holder
Where the neck strap belt is attached.
Caution
Don't rotate the metal fittings on the holder.
GB
Page 15

7 Access Lamp
Lights in red when a card is accessed by the camera during picture taking or playback.
Caution
When the access lamp is lit, do not eject the card or turn off the power source. The
PC Card or Memory Stick may be damaged.
Note
The PC Card and the Memory Stick installed in the Memory Stick/PC Card
Adaptor are both referred to here as CARD.
8 LCD Button
Switches the LCD monitor on and off.
9 INDEX Button
Switches playback to index when pressed while in PLAY mode.
0 DISP (display) Button
Turns LCD monitor information display on or off.
!¡ LCD Monitor
Lets you read necessary picture taking information, frame shots, and view recorded
pictures.
!™ MENU Button
Brings up the menu on the LCD monitor to change the settings of the camera or cards.
!£ EXECUTE Button
Lets you choose items when adjusting settings in the menu.
Locations and Functions of Parts
!¢ EXIT Button
Returns you to the previous item or screen when changing settings in the menu.
!∞ UP4/DOWN$ Button
Selects menu items and changes values.
continued on next page
15
GB
Page 16

!§ Power/Mode Dial
Selects camera conditions when turned while the mode lock (green) is held down.
Locations and Functions of Parts
• OFF
Turns the power off.
• CAM
Allows you to take pictures (CAM mode).
• PLAY
Allows you to play back the pictures you have taken (PLAY mode).
Note
LCD Monitor Display
When the power/mode dial is turned to CAM, the LCD monitor remains off. If
necessary, press the LCD button to turn the LCD monitor on.
When the power/mode dial is turned to PLAY, the LCD monitor automatically
turns on.
!¶ Card Cover Lock
Slide this lock to enable card insertion or ejection.
!• Card Eject Button
Press this button to eject cards.
!ª Card Cover
Open or close this cover to set the card in place or to eject it.
16
GB
Page 17
Top
ISO
US
SIZE
QUAL
DRIVE
WB
AE
A
2 31
EV
SIZE
QUAL
USER
DRIVE
ISO
WB
!™
!¡
0
AE
9 6
AE-LOCK
R-REVIEW
48 7
5!£
1 Focus Ring
Rotate left or right to adjust the focus.
2 Zoom Ring
Rotate left or right to adjust the zoom ratio of the zoom lens.
3 Release Button
Operates the shutter when shooting.
4 [r] (Spot Light Meter Reading Switch) Button
By turning the shift dial while pressing this button, you can choose from Spot (® Spot
light meter reading) or Average ([ ]: average light meter reading) to measure the light
needed for proper exposure.
Locations and Functions of Parts
5 (EV) Button
By turning the shift dial while pressing this button, you can correct the exposure when
taking pictures.
6 LCD Panel
Picture taking settings, such as shutter speed and aperture, are displayed on the LCD
panel.
7 Hot Shoe
Attach external flashes here.
8 Focus Mode Switch
Switches from auto to manual when the camera is in auto focus mode.
continued on next page
17
GB
Page 18

9 Mode Dial
Pressing the shift button (top button) after it has been adjusted to the desired position
Locations and Functions of Parts
sets the picture size and quality (in CAM mode) and changes the picture to be played
back (in PLAY mode).
0 Connector Cover
To view pictures on a television, open this cover and connect the video cable (supplied)
to the video output terminal.
!¡ Connector Cover Lock
Slide this lock to open the connector cover.
!™ Video Output Terminal
To view pictures on the television, connect the video cable (supplied) here.
!£ Shift Button
Pressing this button after moving the mode dial to its desired position sets the picture
quality or picture size (in CAM mode) or changes the picture to be played back (in
PLAY mode).
18
GB
Page 19
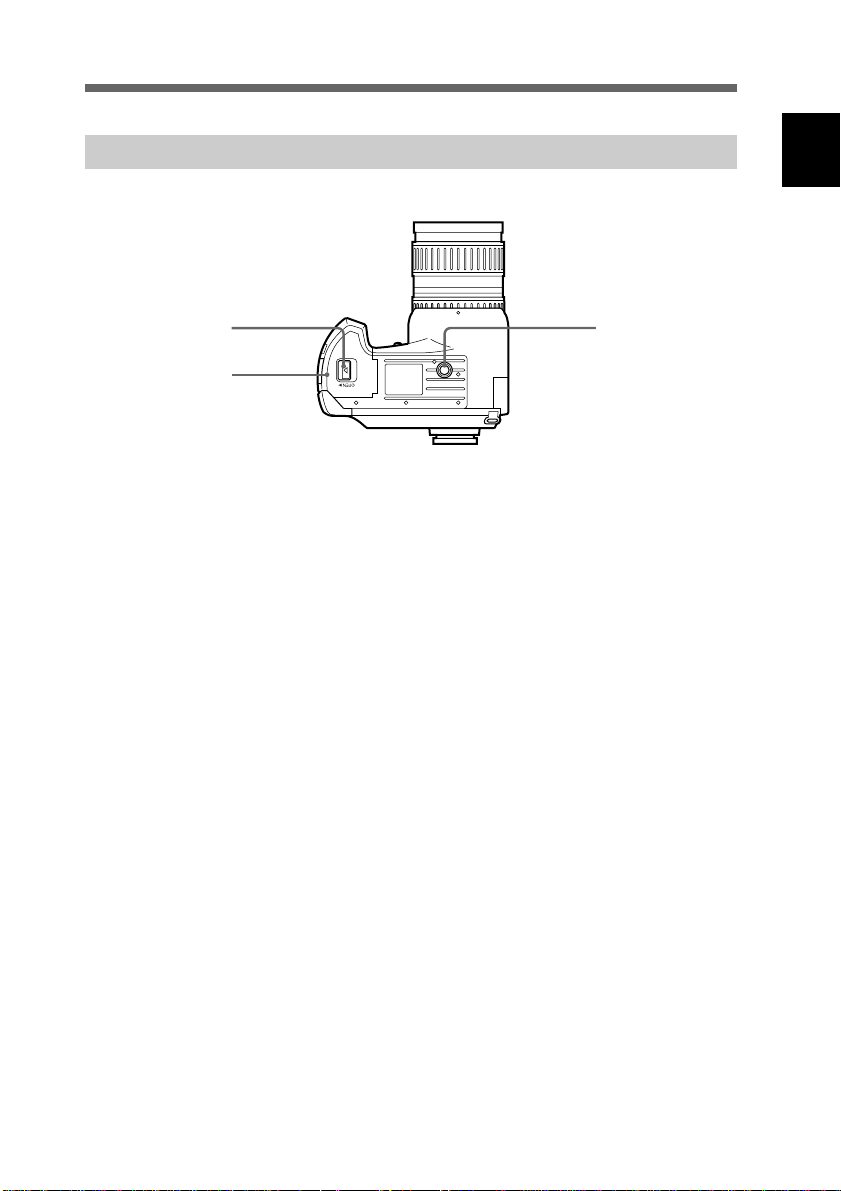
Bottom
Locations and Functions of Parts
3
2
1 Tripod Hole
Attach a tripod here. Standards are as listed below.
ISO Standard l=4.5mm +/- 0.2mm
ASA Standard l=0.197 inch
2 Battery Cover
Open or close this cover to insert or take out the battery pack.
3 Battery Cover Lock
Slide this lock to insert or take out the battery pack.
1
19
GB
Page 20

LCD Panel
Locations and Functions of Parts
CAM Mode
Focus mode
Shutter speed
ISO Sensitivity
Picture taking mode
Picture number
EV compensation
Aperture
Battery indicator
Picture size
Card indicator
Flash mode
Interval/self-timer/
single picture/continuous
picture taking indicator
PLAY Mode
Picture number
In CAM mode, when the release button is pressed while pressing the shift button,
the shutter speed indicator changes to the remaining shot number indicator and the
aperture indicator changes to remaining shooting time.
Because the remaining shooting time is only displayed in two spaces, any time over
99 minutes is displayed as 99.
The viewfinder display is changed in the same way.
Picture quality
WB (white balance) mode
Battery indicator
Card indicator
Note
20
GB
Page 21
LCD Monitor
CAM mode
Locations and Functions of Parts
Flash indicator
CAM Mode
WB (white
balance) mode
Picture folder name/
Keyword
file name
* Remaining shooting time is not displayed when using AC power adaptor/charger AC-V700.
Usually the remaining shooting time is displayed. When the battery gets weak, the battery indicator
flashes.
CAM
WB-auto
PICTURE01
1234/12345
No.10267
1344/High
0
0.25EV 2000 F4.0
PLAY Mode
PLAY mode indicator
Picture folder name/file
Keyword
name
PLAY
PICTURE01
1234/12345
P No.10267
1344/High/0
1999-07-04
10:18:36
2000 F4.0
AF focus indicator
Picture number
Picture size/quality
AF/AE frame
Battery indicator
(/Remaining shooting
time*)
Remaining shot
number
Aperture
Shutter speed
EV compensation
Protect/Picture number
Picture size/Quality/
Revolutions
Battery indicator
(/Remaining playback
time*)
Date/Time
Aperture
Shutter speed
* Usually remaining playback time is displayed. When the battery gets weak, the battery indicator
flashes.
The remaining playback time is not displayed when using AC power adaptor/charger AC-V700.
21
GB
Page 22

Viewfinder
Locations and Functions of Parts
AE LOCK
Shutter speed
EV compensation/
aperture*
* The EV compensation is displayed when EV Button is pressed.
5.6 2000 WB [ ]
Light meter
White balance
Flash indicator
AF focus indicator
22
GB
Page 23
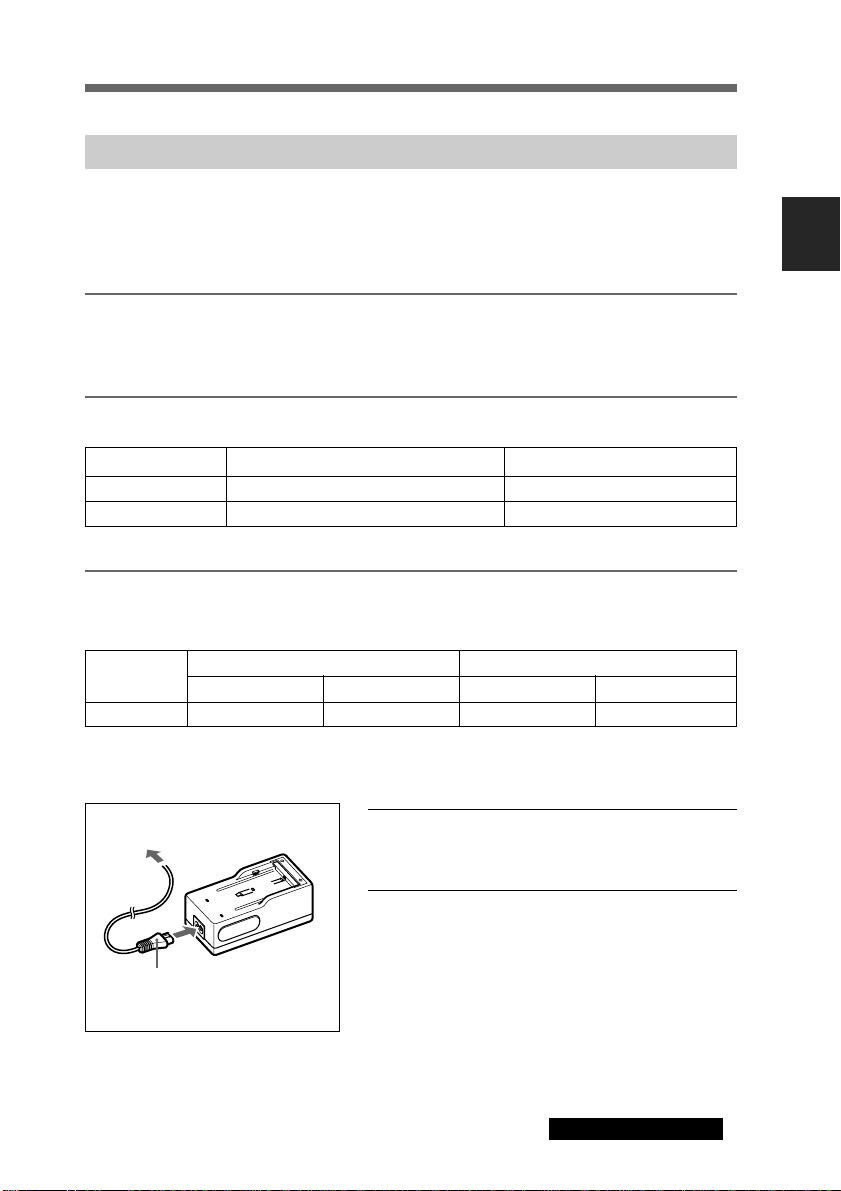
Preparations
Charging the Battery Pack
Charge the battery pack with the battery charger BC-V615 (supplied).
Charge the battery pack before using the camera for the first time.
Charge the battery when necessary, as indicated by the remaining shooting time on the LCD monitor
or the battery indicator on the LCD panel.
Battery Pack Charging Time
When it is time to charge the battery, the battery indicator on the LCD panel flashes. For further
reference see “Warning Indicators” (page 109).
Battery Pack Charging Time
Battery Charger Charging time for practical use* Time for full charge
BC-V615 Approx. 180 minutes Approx. 240 minutes
AC-V700 Approx. 55 minutes Approx. 115 minutes
* The time needed for charging an empty NP-F550 battery pack.
Continuous Use with the Battery Pack
The usage time with a fully charged battery:
Preparations
Battery Pack
NP-F550 Approx. 2.5 hours Approx. 1.5 hours Approx. 5 hours Approx. 2.5 hours
* Times shown are standard values for continuous general photography at 20˚C (68˚F) with the flash
off. The time is reduced by repeatedly turning the power on and off.
LCD monitor off LCD monitor on LCD monitor off LCD monitor on
2
Shooting time* Playback time
1 Connect the AC power cable to the battery
charger.
2 Plug the AC plug of the AC power cable into a
wall socket.
1
continued on next page
23
GB
Page 24
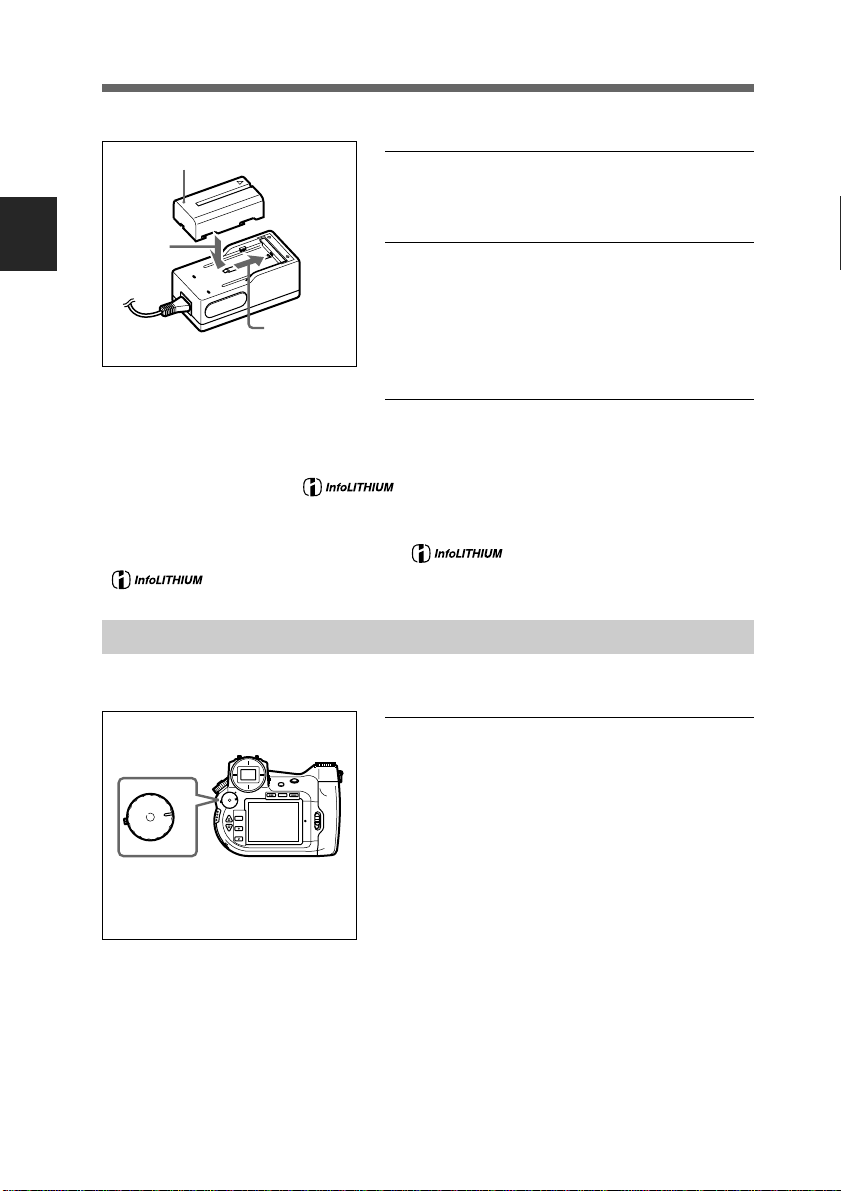
3
3 Making sure the 4 mark is pointed in the right
direction, place the battery pack in the hollow of
the battery charger.
4(a)
Preparations
This camera can only use ™ batteries.
The InfoLITHIUM battery is a new type of lithium ion battery that transmits data on its condition to
InfoLITHIUM-compatible equipment. The digital still camera supports the InfoLITHIUM battery.
The InfoLITHIUM battery is recognized by the mark.
* ™ is a trademark of the Sony Corporation.
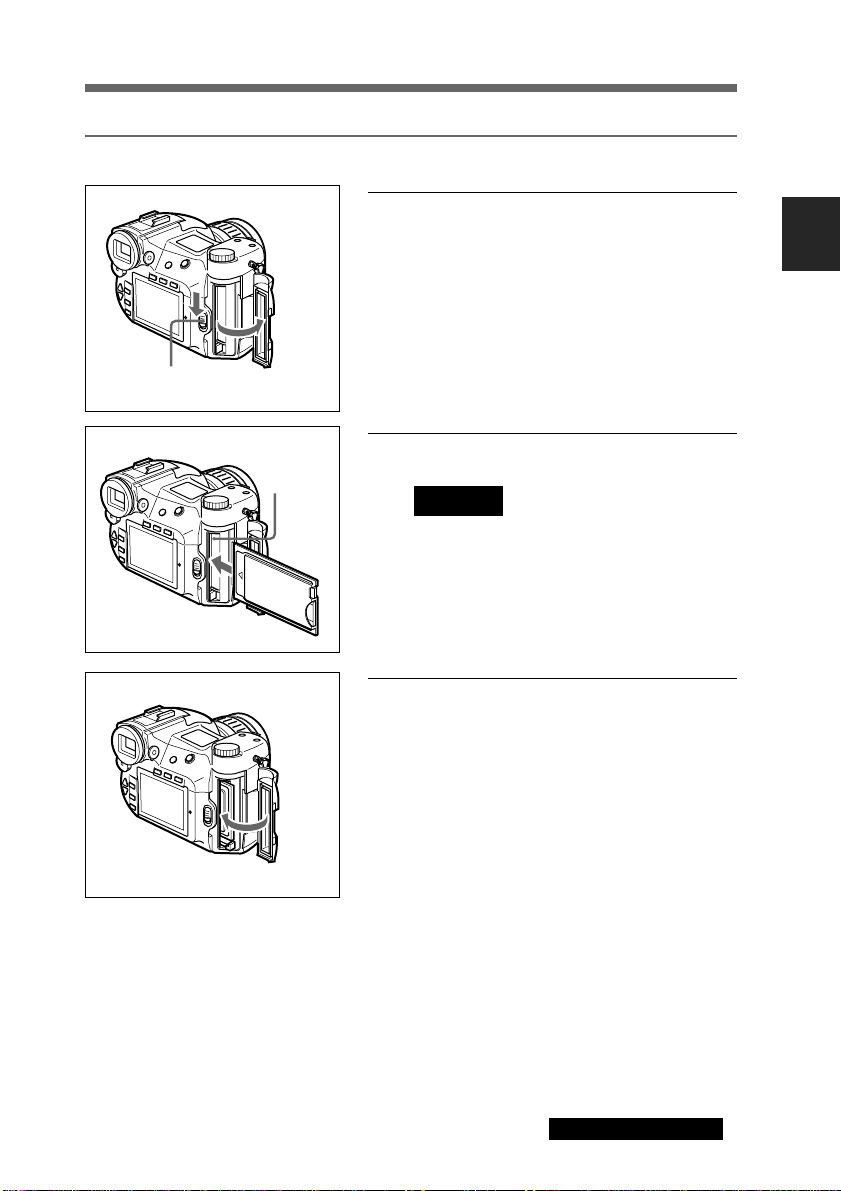
Installation of the Battery Pack
After charging the battery, install it in the camera.
•
4 Pushing the battery pack down (a), slide it fully
into the charger (b).
4(b)
When charging starts, the charging lamp lights in
amber. When charging is complete, the light goes
out.
5 After charging has finished, remove the battery
pack.
1 Make sure the camera power/mode dial is set to
AE-LOCK
R-REVIEW
INDEX
DISP LCD
•
OFF
•
CAM
•
PLAY
OFF
CAM
MENU
EXCUTE
EXIT
•
•
PLAY
the OFF position.
24
1
GB
Page 25
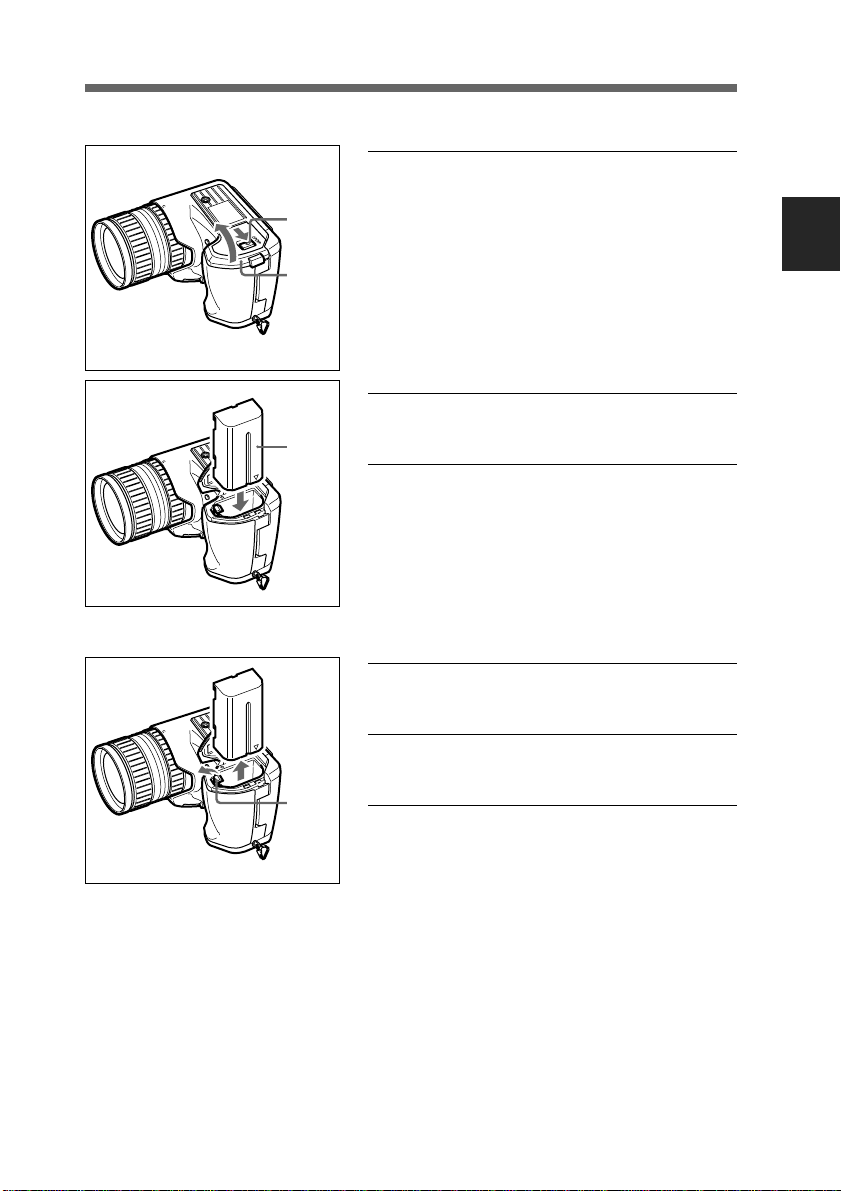
2(a)
2 Slide the battery cover lock in the direction of the
4 mark (a), and open the battery cover (b).
2(b)
3
3
Preparations
3 Insert the battery 4 mark side first until it firmly
locks in place.
4 Close the battery cover.
Removing the Battery
1 Make sure the camera power/mode dial is set to
the OFF position.
2 Slide the battery cover lock in the direction of the
4 mark and open the battery cover.
3 Rotate the battery cover lock to the outside and
remove the battery pack.
25
GB
Page 26
Setting the Time and Date
The shooting time and date are recorded automatically with information from the camera's internal
clock. Set the clock to ensure the correct time and date are recorded.
Preparations
3~
9
1
•
OFF
•
CAM
•
PLAY
MENU
2
EXCUTE
1 While pressing the mode lock (green), turn the
power/mode dial to CAM mode.
2 Press the MENU button.
The LCD monitor turns on and the menu is
displayed.
4~9
EXIT
3 Press the 4(UP)/$(DOWN) buttons to select
“Date & Time”.
CAMERA MENU
Custom
PC Card INIT
User File Save
New Folder
ID Set
WB Flash
Date & Time
Display Set
4 Press the EXECUTE button.
The DATE & TIME menu is displayed.
5 Select “Set” using the 4(UP)/$(DOWN) buttons
and then press the EXECUTE button.
The year can now be set.
DATE & TIME
26
GB
Set -07-04 20:45:58
Date Form yyyy-mm-dd
1999
Page 27
6 Set the year using the 4(UP)/$(DOWN) buttons
and then press the EXECUTE button.
The month can now be set.
•
•
CAM
•
PLAY
MENU
EXCUTE
EXIT
OFF
10,11
7 Set the month, day, hour, minutes and seconds in
the same way as explained in step 5.
8 Select “Date Form” using the 4(UP)/$(DOWN)
buttons and then press the EXECUTE button.
You can now select the date display format.
9 Select the date display format using the 4(UP)/
$(DOWN) buttons and then press the EXECUTE
button.
You can choose from the following 3 date display
formats. [yyyy] indicates year, [mm] indicates
month and [dd] indicates day.
yyyy-mm-dd (ex:1999-07-04)
dd-mm-yyyy (ex:04-07-1999)
mm-dd-yyyy (ex:07-04-1999)
10 Press the EXIT button.
The time and date are set and the menu returns on
the LCD monitor.
11 Press the EXIT button.
The menu disappears from the monitor.
Preparations
Keeping correct time
A separate lithium button battery is used by the
camera to power the internal clock. When turning
the power dial to CAM or PLAY from OFF, if the
message “Date & Time not set” appears, it is time
to charge the lithium button battery.
Inquire about charging the battery at the store
where you bought the camera or at any Sony
service center.
27
GB
Page 28
Preparing the Card
The picture is saved on the PC Card inserted in the camera (not supplied) or on the Memory Stick.
Insert the Memory Stick in the Memory Stick/PC Card Adaptor and then insert the adaptor into the
camera.
Preparations
In this guide the Memory Stick, when inserted in the Memory Stick/PC Card Adaptor, and the PC
Card are referred to as Card.
Inserting the Memory Stick in the Memory Stick/PC Card Adaptor
1
1 Making sure the side of the Memory Stick with
the 4 mark is facing up, insert it into the Memory
Stick/PC Card Adaptor until it is locked firmly in
place.
To Take out the Memory Stick from
the Memory Stick/PC Card Adaptor
1 Push the EJECT button on the Memory Stick/PC
Card Adaptor.
28
GB
1
2 Pull out the Memory Stick.
2
Page 29
Inserting the Card
1(a)
1 Slide the card cover bar lock downward (a) and
open the card cover (b).
Preparations
1(b)
2 Insert the card in the camera.
2
Caution
Make sure to insert the card in the proper
direction. Forcing the card may result in
damage to the camera and/or the card.
If you insert a card that has never been
initialized, FORMAT ERROR flashes on
the LCD monitor. Initialize the card. (Page
30)
3 Close the card cover.
3
continued on next page
29
GB
Page 30
To Remove the Card
1 Open the card cover.
Preparations
Initializing a Card
Uninitialized PC cards cannot be used in the camera. Before use, cards must first be initialized using
the camera.
Caution
If you initialize a card that has data recorded on it, all recorded data, including
protected picture data, will be erased.
3
1
2 Push the card eject button.
3 Pull out the card.
3
2
1
•
OFF
•
CAM
•
PLAY
MENU
2
EXCUTE
4
EXIT
1 While pressing the mode lock (green), turn the
power/mode dial to CAM mode.
Note
Initializing PC cards is explained here with the
power source/mode dial set to CAM mode, but
the same operation can be performed in PLAY
mode.
2 Press the MENU button.
30
The LCD monitor turns on and the menu is
displayed.
GB
Page 31

3 Select “PC Card INIT” using the 4(UP)/
$(DOWN) buttons and then press the EXECUTE
button.
The message “Initialize OK?” appears.
4 Press the EXECUTE button.
Initialization begins.
When initialization is complete, the LCD monitor
returns to the normal display (as shown in step 1).
Do not take out the card during
initialization. Initialization cannot proceed
normally.
Attaching the Viewfinder Cap
CAMERA MENU
Custom
PC Card INIT
User File Save
New Folder
ID Set
WB Flash
Date & Time
Display Set
Caution
Preparations
Place the cap on the viewfinder when taking pictures with the LCD monitor under strong sunlight,
such as outdoors. Keeping the cap on the viewfinder prevents strong rays of light from affecting the
recorded pictures.
USER
ISO
SIZE
AE
QUAL
DRIVE
WB
31
GB
Page 32

Attaching the Neck Strap Belt
Attach the neck strap belt BLT-10(H) (supplied) to the camera for ease of carrying.
Preparations
1 Pull the belt through the neck strap belt holder on
the camera.
2 Pull the belt as shown in the diagram to adjust the
length.
32
GB
Page 33

3 Attach the belt on the opposite side of the camera
in the same way.
Putting the Camera in a Semi-Soft Case
Put the camera in semi-soft case LCM-D700 (not supplied) for convenience and ease of carrying.
Preparations
33
GB
Page 34

Taking a Picture
Taking Pictures
Taking pictures is easy with automatic focus.
In this manual, taking pictures while looking through the viewfinder is explained, but you can take
pictures while looking through either the viewfinder or the LCD monitor.
2
Taking a Picture
3
4
1 Take off the lens cap.
•
OFF
•
CAM
•
PLAY
MENU
EXCUTE
EXIT
2 While pressing down the mode lock (green), turn
the power/mode dial to CAM mode.
The indicators in the viewfinder turn on.
3 Turn the eyesight adjustment lever to where you
can clearly see the circle in the center of the
viewfinder.
4 If there is insufficient light to shoot the subject
(shutter speed or F-stop flashes), press the pop-up
5
ISO
USER
AE
SIZE
QUAL
DRIVE
WB
AF
MF
key to open the flash.
In conditions where it is necessary to use the
flash, the flash indicator blinks, and flash
preparation begins.
The flash indicator lights when the flash is ready
for use.
34
5 Set the focus mode switch to AF.
GB
Page 35

6 Center the subject on which you'd like to focus in
the AF/AE frame.
AF/AE Frame
2000 5.6
7 Adjust the zoom by rotating the zoom ring left or
Taking a Picture
7
8,9
SIZE
QUAL
USER
DRIVE
ISO
WB
AE
EV
AE-LOCK
R-REVIEW
right.
8 Press the release button halfway.
The AF LOCK indicator in the viewfinder
flashes. When the subject is focused, the
indicator stays lit.
2000 5.6
AF LOCK Indicator
9 Press the release button completely.
When the access lamp lights, the picture is being
recorded on the card.
When the access lamp goes out, recording on the
card is completed and the camera is ready to take
the next picture.
Caution
When the access lamp is lit, do not
remove the card or turn off the power.
You may damage the PC Card or Memory
Stick.
continued on next page
35
GB
Page 36

2000 5.6
2000 5.6
10
Taking a Picture
Auto Focus
This camera employs an auto focus mechanism. When auto focus is turned on, the camera
automatically focuses on the picture subject. Auto focus is turned on by setting the focus mode
switch to AF. Centering the AF frame on the subject and pressing the release button halfway focuses
the picture frame.
When the picture is in focus, the AF focusing mark in the LCD monitor and viewfinder changes as
follows. Check the mark before making the exposure, and if the picture is not in focus, let go of the
release button and press it halfway again to refocus.
• On the LCD monitor
When the release button is pressed halfway,
the AF focusing mark flashes green.
•
•
CAM
•
PLAY
MENU
EXCUTE
EXIT
OFF
10 Turning the power/mode dial to OFF turns the
power off.
Note
If you do not operate the camera for about one
minute when the camera is on in the CAM mode,
the LCD monitor automatically shuts off (Standby
Mode).
Also, if the camera is not touched for
approximately four minutes after that, the camera
automatically shuts completely off.
When the picture is focused, the indicator lights a
steady green. If the picture cannot be focused, the
indicator lights a steady red.
36
• In the viewfinder
When the release button is pressed halfway,
the AF focusing mark flashes.
2000 5.6
GB
When the picture is focused, the
indicator lights steadily.
When the picture cannot be focused,
the indicator continues flashing.
Page 37

Locking the Focus
When you focus the picture by pressing the release button halfway, the focus is set at that distance
until you release the button. This is called Focus Lock. If you want to take a picture of a subject on
the edge of the picture composition, engaging Focus Lock allows you to move the camera and then
take the picture.
1 Center the subject in the viewfinder and press the
release button halfway.
The focus is fixed.
1~3
SIZE
QUAL
USER
DRIVE
ISO
WB
AE
EV
AE-LOCK
R-REVIEW
2 Move the camera to frame the composition you
want.
3 Press the release button down completely.
Taking a Picture
Note
AE-LOCK
When you press the release button halfway to set
the focus, the exposure value is also set. This is
indicated by the AE-LOCK indicator in the
viewfinder and by highlighted display of the
exposure value and shutter speed on the LCD
monitor.
Also, if you frame a subject that you'd like to
manually set the exposure for and press the AELOCK button, the exposure for that subject is
fixed.
Use this function when it is necessary to change
the picture composition after deciding the
exposure. This is effective for picture taking
under such conditions as where there is backlight.
To cancel AE-Lock, press the AE-LOCK button
again, or press any other operation button.
37
GB
Page 38

Setting the Focus Manually
You can set the focus manually with this camera.
There are situations in which it is better to set the focus manually than use the auto focus function.
2
Taking a Picture
Situations in which auto focus may not work well
• When there is a very bright object near the subject;
• When the subject is near a highly reflected surface such as mirrors or polished metals;
• For subjects with non-reflective surfaces such as a black sweater;
• On subjects with small surface areas such as wire netting or lattices;
• On subjects with ephemeral shapes, such as smoke, flames or fireworks;
• On subjects with extremely low contrast;
• On subjects without vertical lines such as Venetian blinds;
• When the subject is moving fast.
1 Set the auto focus mode switch to MF.
USER
ISO
SIZE
AE
QUAL
DRIVE
WB
2 Adjust the focus by turning the focus ring left or
right.
MF
AF
1
Notes
• The focus ring can be rotated completely in
either direction.
• Set the focus after adjusting the zoom. If you
set the appropriate zoom distance first, you can
get a more accurate focus.
Situations in which it is better to focus manually
• When the subject and its surroundings are both dark;
• When the subject offers little contrast on the screen, such as with walls or the sky;
• When the background is too bright or the contrast between the background and the
subject is too great;
• When the subject has a fine, repeating pattern such as stripes;
• When the subject is behind a window that is dirty or wet;
• When there is a wire fence in front of the subject;
• When the subject is bright, emits or reflects light;
• When you want to take pictures of still subjects with a tripod.
GB
38
Page 39

Viewing
Checking the Picture Content
Below are the different ways for playing back recorded pictures.
• Viewing pictures in succession
Pictures are played back one by one in sequence.
• Viewing pictures in an automatic cycle
Pictures are automatically played back in a cycle.
• Viewing the picture index
Pictures are displayed all at once. This is a convenient way to search for a specific
picture.
Viewing Pictures in Succession
1
•
2
AE-LOCK
R-REVIEW
INDEX
DISP LCD
•
OFF
•
CAM
•
PLAY
MENU
•
OFF
EXCUTE
•
CAM
EXIT
PLAY
1 While pressing the mode lock (green), turn the
power/mode dial to PLAY.
The access lamp lights and the camera reads the
last picture taken.
When the access lamp goes out, reading is
finished, and the picture is played back.
2 Rotate the shift dial to change the picture.
Viewing
USER
ISO
SIZE
AE
QUAL
DRIVE
WB
SEARCH
29
0001/00008
Turning the wheel right plays back the next
picture; turning the wheel left plays back the
previous picture.
Note
While pressing down the shift button, turn the
shift dial to choose which picture to play back.
USER
ISO
SIZE
AE
QUAL
DRIVE
W
B
No.8
1344/Hi/0
1999-07-04
21:11:01
45 F2.4
When you release the shift button, the picture you
have chosen plays back immediately. (Picture
Search).
In Picture Search, when you rotate the shift dial
while holding down both the shift button and the
release button, you can skip 50 pictures at a time.
continued on next page
39
GB
Page 40

Viewing
3
•
•
CAM
•
PLAY
MENU
EXCUTE
EXIT
OFF
Viewing Pictures in an Automatic Cycle
Pictures are automatically played back frame by frame.
power.
Note
If the camera is on but not operated for about
three minutes, power to the LCD monitor shuts
off (Standby Mode). Also, if the camera is not
operated for approximately another two minutes,
the camera shuts off completely. In Standby
Mode you can return to the playback condition by
touching any button, dial or switch on the camera.
When the camera has shut itself completely off,
you can return to the playback condition by
pressing the release button.
3 Turn the power/mode dial to OFF to turn off the
40
GB
3~
6
1
1 While pressing the mode lock (green), rotate the
power/mode dial to PLAY.
•
OFF
•
CAM
•
PLAY
MENU
EXCUTE
EXIT
2
3~7
7
The access lamp lights as the camera reads the
last picture taken.
Reading is finished when the access lamp goes
out. The picture is played back.
2 Press the MENU button.
The menu is displayed on the LCD monitor.
3 Select “Auto Play” using the 4(UP)/$(DOWN)
buttons and then press EXECUTE.
PLAY MENU
Rotate
D.Zoom
Auto Play
Protect
Delete
PC Card INIT
ID Set
LCD Set
Display Set
The Auto Play menu is displayed.
Page 41

4 Select “Interval Time” using the 4(UP)/
$(DOWN) buttons and then press EXECUTE.
You can now set the number of seconds to display
one picture.
Auto Play
Start
Interval Time 2 sec
5 Select the display interval time using the 4(UP)/
$(DOWN) buttons and then press the EXECUTE
button.
Note
You can set the interval time between the range of
1 to 30 seconds (in 1 second units). However,
depending on the playback quality and size, the
set time might be overridden.
6 Select “Start” using the 4(UP)/$(DOWN)
buttons and then press EXECUTE.
The pictures are automatically cycled for the
period of time you set.
When all the recorded pictures have been played
back, playback is repeated from the first picture.
7 To pause playback, press the EXECUTE button.
Playback momentarily stops. To cancel the pause
function, press the EXECUTE button again.
Note
When you press EXIT while in pause, playback
stops in mid-sequence and the LCD monitor
returns to the Auto Play menu.
To restart playback, press the EXECUTE button
again.
Viewing
continued on next page
41
GB
Page 42

Viewing
8
SIZE
QUAL
USER
DRIVE
ISO
WB
AE
Viewing the Picture Index
EV
AE-LOCK
R-REVIEW
8 To end automatic playback, press the release
button halfway.
Automatic playback ends and the image
appearing when you pressed the release button is
displayed.
9 Turn the power/mode dial to OFF to turn the
camera off.
Note
When the camera is set to automatic playback, the
Auto Power Off function does not work.
42
GB
1
3
1 While pressing the mode lock (green), turn the
power/mode dial to PLAY.
The access lamp lights and the camera reads the
AE-LOCK
R-REVIEW
INDEX
DISP LCD
•
OFF
•
CAM
•
PLAY
MENU
•
OFF
EXCUTE
•
CAM
EXIT
•
PLAY
last recorded picture.
Reading is finished when the access lamp goes
out, and the picture is played back.
2 Press the INDEX button.
4
The LCD monitor display switches to index view.
INDEX
INDEX
Page 43

3 Rotate the shift dial to select a picture.
The color of the picture you have chosen changes
and information about that picture, such as date
and exposure, is displayed.
USER
ISO
SIZE
AE
QUAL
DRIVE
WB
Note
In Index Mode, when you rotate the shift dial
while holding down the shift button, you can
jump ten frames to choose a picture.
USER
ISO
SIZE
AE
QUAL
DRIVE
W
B
When you rotate the shift dial while holding down
the shift button and the release button
simultaneously, you can jump 50 frames to
choose a picture.
Viewing
4 To close index view, press the INDEX button
again.
The pictures that you selected are played back one
at a time.
5
•
•
CAM
•
PLAY
MENU
EXCUTE
EXIT
OFF
5 Turn the power/mode dial to OFF to turn the
power off.
Note
If the camera is on but not operated for about
three minutes, the LCD monitor shuts off
(Standby Mode). Also, if the camera is not
operated for approximately another two minutes,
the camera shuts off completely. In Standby
Mode you can return to the playback condition by
touching any button, dial or switch on the camera.
When the camera has shut itself completely off,
you can return to the playback condition by
pressing the release button.
43
GB
Page 44

Viewing Pictures on a Television
You can view pictures taken with the digital still camera on a television when it is connected to the
TV's video terminal. This is convenient for adjusting the focus and viewing pictures in succession.
1 Use the video cable (supplied) to connect the
2
camera video output terminal to the television
video terminal.
Viewing
1
USER
ISO
SIZE
AE
QUAL
DRIVE
WB
It is not possible to connect to a television
that only has an antenna input terminal.
2 Set the television TV/video switch to VIDEO.
3 Play back the pictures through the camera.
Note
You can turn the LCD monitor display off by
pressing the LCD button.
Using a PC Card Reader
When you connect a PC card reader on your computer and install the driver, the card is recognized as
a drive. In this way, you can manage pictures saved on the card as computer files.
For further details on the PC card reader or driver, please refer to the PC card reader user's manual.
For further details about managing pictures on your computer, please see the user's manual for the
picture processing application or the application's help function.
Note
44
GB
Page 45

Using the PC Card/Parallel Port Adaptor
When you connect the MSAC-PR1 PC card/parallel port adaptor on your computer and install the
MSAC-PR1 device driver, the card is recognized as a drive. In this way, you can manage pictures
saved on the card as computer files.
The methods of connecting the PC card/parallel port adaptor to the computer and installing the PC
card/parallel port adaptor driver are explained in this guide.
For further details about managing pictures on your computer, please see the user's manual for the
picture processing application or the application's help function.
Connecting the PC Card/Parallel Port Adaptor
The PC card/parallel port adaptor connects to the parallel port connection terminal used by the
computer keyboard.
Be sure the computer is turned off when you connect the adaptor.
Note
The PC card/parallel port adaptor uses energy supplied by the computer keyboard
connection terminal. In some cases, insufficient energy is supplied by laptop
computers. In such cases, use the PC card slot on your laptop computer.
Computer
Keyboard
connection
terminal
D-sub 25 pin connector (female)
Camera (PC card/
parallel port adaptor)
D-sub 25 pin connector (male)
Printer cable
Viewing
Converter
Power/access lamp
Eject button
PC card insertion slot
DC plug
DC jack
Power (connection) cable DIN 5 pin connector (male)
connector
Mini DIN 6 pin connector (male)
• Of the 2 DIN terminals, connect to the one that serves as the computer keyboard
connection terminal.
• Between the camera and the keyboard, adjust the size of the DIN connector of the
keyboard and the power cable using a converter connector.
• There is no need to connect to the keyboard with laptop computers.
• If a printer will not be used, there is no need to connect the printer cable.
continued on next page
Keyboard
45
GB
Page 46

Viewing
Installing the Driver
1 Insert the supplied CD-ROM into the CD-ROM drive.
The “Sony MSAC-PR1 Setup” dialog box appears.
2 Click “Install Sony MSAC-PR1 Drivers”.
The “Setup Language” dialog box appears.
3 Select a language and click [Next].
The “Welcome” dialog box appears.
46
GB
Page 47

4 Click [Next].
The “Software License Agreement” dialog box appears.
5 After reading and agreeing with the terms of the Software License Agreement, Click
[Yes].
The “Choose Destination Location” dialog box appears.
6 Specify a destination folder for installation and click [Next].
The “Select Program Folder” dialog box appears.
Viewing
continued on next page
47
GB
Page 48

Viewing
7 Specify a program folder name and click [Next].
The “Start Copying Files” dialog box appears.
8 Confirm the displayed installation settings and click [Next].
Installation starts and the “Sony MSAC-PR1 Drive Identification” dialog box
appears.
48
GB
Page 49

9 Confirm the drive name of the PC card/parallel port adaptor and click [OK].
The “Setup Complete” dialog box appears.
10 Click [Finish].
In step 9, if the “Yes, I want to read the README file now” box is checked, the
README document is displayed. Installation is complete.
Inserting the Card
When you insert the card into the PC Card/Parallel port Adaptor, the drive that was specified as the
drive name in step 8 of the "Install Driver" directions (page 48) is recognized. You can now manage
the card contents on your computer.
Viewing
Note
When using the Memory Stick, insert the Memory Stick into the Memory Stick/PC
Card Adaptor.
1
1 Make sure the power/access lamp is not flashing.
Caution
If you insert the card when the power/
access lamp is flashing, you may damage
the PC Card or Memory Stick.
2
2 Make sure the 4 mark is facing up and slowly
slide the card into the card insertion slot.
continued on next page
49
GB
Page 50

Taking Out the Card
Viewing
1
2
1 Make sure the power/access lamp is not flashing.
Caution
Do not take out the card when the power/
access lamp is flashing. Doing so may
result in damage to your PC Card or
Memory Stick.
2 Press the eject button and slowly pull out the card.
Uninstalling the Driver
If the MSAC-PR1 device driver is no longer necessary, you may remove it from your computer using
the steps below.
1 Click [Start] in the task bar, and then open [Program] from the [Start] menu and click
on [Sony MSAC-PR1]-[Uninstall].
The uninstall confirmation dialog box is displayed.
2 Click [Yes].
The uninstall program starts. The dialog box “Remove Programs From Your
Computer” is displayed and file erasure begins.
3 When uninstallation is complete, click [OK].
50
GB
Page 51

Advanced Operations Settings
Choosing the Shooting Mode
Choose the shooting mode from the choices Program AE (Program), Aperture Priority AE
(Aperture), Shutter Speed Priority AE (Shutter) or Manual Exposure (Manual).
3~
6
1
•
OFF
•
CAM
•
PLAY
MENU
1 While pressing the mode lock (green), turn the
power/mode dial to CAM.
2 Press the LCD button to turn the LCD monitor
ON.
2
EXCUTE
4~6
EXIT
Note
Settings can also be confirmed on the LCD panel.
When checking the settings on the LCD panel,
this step is not necessary.
3 Turn the mode dial to AE and press the shift
button.
The shooting mode menu is displayed.
Advanced Operations Settings
4 While pressing the shift button, rotate the shift
dial to choose a shooting mode.
CAM
AE MODE
Program
Aperture
Shutter
Manual
Program (Program AE)
In this mode, the aperture and shutter speed are
both changed simultaneously according to the
brightness of the subject. The correct exposure is
automatically chosen.
Aperture (Aperture Priority AE)
When the aperture is fixed, the shutter speed is
automatically changed according to the brightness
of the subject to obtain the correct exposure.
continued on next page
51
GB
Page 52

Advanced Operations Settings
Note
After deciding the shooting mode, select the shutter speed and/or aperture as explained below.
Program AE
Turn the shift dial to choose a fixed shutter speed and aperture combination.
Aperture Priority AE
Turn the shift dial to the desired aperture.
Shutter Speed Priority AE
Turn the shift dial to the desired shutter speed.
Manual Exposure
Turn the shift dial to choose the shutter speed. While pressing the button, turn the shift dial to
choose the aperture.
Shutter (Shutter Speed Priority AE)
When the shutter speed is fixed, the aperture is
automatically changed according to the brightness
of the subject to obtain the correct exposure.
Manual (Manual Exposure)
You can decide the exposure by setting the shutter
speed and aperture manually.
Note
Shooting modes are indicated on the LCD panel
as P (Program AE), A (Aperture priority AE), S
(Shutter Speed priority AE), and M (Manual
Exposure).
5 Release the shift button.
When the shooting mode is set, exit the menu.
The camera is ready to take pictures.
52
GB
Page 53

Choosing Picture Size
Choose the picture size to be recorded during shooting from among the following: 1344 × 1024, 640
× 480, ×2D. Zoom. The larger the size, the fewer the number of pictures that can be recorded.
3~5
4
QUAL
DRIVE
SIZE
USER
WB
ISO
AE
1 While pressing the mode lock (green), turn the
power/mode dial to CAM.
2 Press the LCD button to turn the LCD monitor
3
USER
ISO
SIZE
QUAL
SIZE
DRIVE
WB
•
OFF
•
CAM
•
PLAY
2
ON.
Note
Settings can also be confirmed on the LCD panel.
When checking the settings on the LCD panel,
this step is not necessary.
3 Turn the mode dial to SIZE and press the shift
button.
The PICTURE SIZE menu is displayed.
Advanced Operations Settings
4 While pressing the shift button, rotate the shift
dial to choose a picture size.
CAM
PICTURE SIZE
1344x1024
640 x 480
X2 D.Zoom
1344 x 1024
Records pictures in 1344 × 1024 pixel format.
640 x 480
Records pictures in 640 × 480 pixel format.
x2 D. Zoom
The mode for shooting pictures at 2× the virtual
focal distance (about 56 to 280mm for 35mm film
cameras). Pictures shot with ×2D. Zoom are
recorded in 640 × 480 pixel format.
continued on next page
53
GB
Page 54

Choosing the Picture Quality Mode
Advanced Operations Settings
Choose the picture quality of shots recorded during shooting. You can choose from Super, High,
Middle and Low. The number of pictures you can take differs depending on the picture quality.
Because the picture frame narrows in this mode,
check shots with the LCD monitor. You cannot
check the true picture frame in the viewfinder.
Note
Picture size settings are indicated on the LCD
panel as 1344 (1344 × 1024), 640 (640 ×
480), and (×2 D. Zoom).
5 Release the shift button.
When the picture size is set, exit the menu. The
camera is ready to take pictures.
54
GB
3~
4
DRIVE
WB
QUAL
SIZE
USER
AE
5
ISO
3
USER
ISO
SIZE
QUAL
SIZE
DRIVE
WB
•
OFF
•
CAM
•
PLAY
2
1
1 While pressing the mode lock (green)turn the
power/mode dial to CAM.
2 Press the LCD button to turn on the LCD monitor.
Note
Settings can also be confirmed on the LCD panel.
When checking the settings on the LCD panel,
this step is not necessary.
3 Turn the mode dial to QLTY and press the shift
button.
The QUALITY menu appears.
Page 55

4 Rotate the shift dial while pressing the shift
button. Choose a picture quality mode.
CAM
QUALITY
Super
High
Middle
Low
Picture Size Super High Middle Low
1344 × 1024 high compression Approx.1/4 Approx.1/8 Approx.1/16
640 × 480 ×2D. Zoom high compression Approx.1/3 Approx.1/6 Approx.1/12
TIFF RGB picture JPEG Y-C compressed picture
Super
Select this to get the highest quality picture.
High
Select this when you want to give your picture
quality priority over the number of pictures.
Middle
Select this to shoot with average picture quality.
Low
Select this to give the number of pictures priority
over the picture quality.
Advanced Operations Settings
Note
Picture quality is indicated on the LCD panel as S
(Super), H (High), M (Middle), and L (Low).
5 Release the shift button.
When the picture quality mode is set, exit the
menu. The camera is ready to take pictures.
55
GB
Page 56

Choosing the Picture Taking Brightness (EV compensation)
When a shooting mode other than manual exposure (Manual) is chosen, you can adjust the brightness
to fit the shooting conditions.
1
•
OFF
•
CAM
•
PLAY
AE-LOCK
R-REVIEW
INDEX
DISP LCD
•
OFF
•
CAM
•
PLAY
MENU
EXCUTE
EXIT
2
Advanced Operations Settings
EV
SIZE
QUAL
USER
DRIVE
ISO
WB
AE
AE-LOCK
R-REVIEW
3,4
3
1 While pressing the mode lock (green), turn the
power/mode dial to CAM.
2 Press the LCD button to turn on the LCD monitor.
Note
Settings can also be confirmed on the LCD panel.
When checking the settings on the LCD panel,
this step is not necessary.
3 Rotate the shift dial while pressing the EV button
to adjust the brightness.
CAM
WB-Hold
0001/00172 300 F3.4
+0.50EV
Brightness correction (EV compensation)
No.12
1344/High
51
You can tune within the range from -2.0 EV to
+2.0 EV (in 0.25 EV units).
4 Release the EV button.
56
The brightness correction is set.
GB
Page 57

Adjusting for Natural Color Tone (White Balance Adjustment)
This camera comes equipped with the white balance function to give a more natural color tone to
your pictures in a variety of shooting conditions.
Choose a white balance mode from Auto White Balance (Auto), White Balance Hold (Hold),
Outdoor (Outdoor), and Indoor (Indoor). With White Balance Hold you can adjust the most
appropriate white balance for the shooting condition.
Note
White balance is the balance of the level of white among the channels of R (red), G (green), and B
(Blue) in a digital camera. If a picture is taken with this balance properly adjusted, reds or blues do
not overwhelm the composition and a white subject is shot with appropriate level of white.
Choosing the White Balance Mode
3~
4
AE
WB
DRIVE
ISO
USER
QUAL
5
SIZE
3
USER
ISO
SIZE
QUAL
SIZE
DRIVE
WB
•
OFF
•
CAM
•
PLAY
2
1
1 While pressing the mode lock (green), turn the
power mode/dial to CAM.
2 Press the LCD button to turn on the LCD monitor.
Note
Settings can also be confirmed on the LCD panel.
When checking the settings on the LCD panel,
this step is not necessary.
Advanced Operations Settings
3 Turn the mode dial to WB and press the shift
button.
The WB MODE menu appears.
4 While pressing the shift button, rotate the shift
dial to choose the white balance mode.
CAM
WB MODE
Auto
Hold
Outdoor
Indoor
continued on next page
57
GB
Page 58

Advanced Operations Settings
Auto (Auto White Balance)
This is the default. White balance is
automatically adjusted to give a natural color tone
according to the amount of light when shooting.
Hold (White Balance Hold)
Choose this when you want better color
reproduction or you are shooting a monochrome
subject and background. Press the WB button to
adjust the white balance. For further information
refer to the Adjusting the White Balance Hold
section below.
Outdoor (Outdoor)
White balance is automatically adjusted to attain
natural colors when shooting outdoors.
Indoor (Indoor)
White balance is automatically adjusted to attain
natural colors when shooting indoors.
Note
White balance modes are indicated as ATW
(Auto), WB/HOLD (Hold), [ ] (Outdoor), and
[ ] (Indoor] on the LCD panel.
5 Release the shift button.
After the white balance mode is set, exit the
menu. The camera is ready to take pictures.
Adjusting White Balance with White Balance Hold
1 Choose WHITE BALANCE HOLD as the white
balance mode.
2 Point the camera at a completely white subject
WB
until it fills the viewfinder.
3 Push the WB button.
58
3
GB
WB is indicated in the viewfinder and the white
balance adjustment begins.
Page 59

When the WB indicator disappears, white balance
adjustment is complete.
The camera is ready to take pictures.
The white balance you have chosen is valid until
you readjust it.
Note
When the WB indicator flashes, the white
level was not successfully adjusted.
Press any other operation button to leave
this mode, then begin the white balance
adjustment process again.
Changing the ISO Sensitivity
You can the get the same effect with this mode as is achieved by using films with different ISO
sensitivities in film cameras. You can choose from ISO 100, 200 and 400.
3~5
4
USER
ISO
SIZE
AE
QUAL
DRIVE
WB
3
USER
ISO
SIZE
QUAL
SIZE
DRIVE
WB
•
OFF
•
CAM
•
PLAY
2
1 While pressing the mode lock (green), turn the
power/mode dial to CAM mode.
2 Push the LCD button to turn on the LCD monitor.
Note
Settings can also be confirmed on the LCD panel.
When checking the settings on the LCD panel,
this step is not necessary.
1
Advanced Operations Settings
3 Turn the mode dial to ISO and then press the shift
button.
The ISO MODE menu appears.
continued on next page
59
GB
Page 60

4 Rotate the shift dial while pressing the shift
button. Choose an ISO sensitivity.
CAM
ISO MODE
100
200
400
100
Sets photographic sensitivity equal to ISO 100.
200
Sets sensitivity equal to ISO 200.
400
Sets sensitivity equal to ISO 400.
Advanced Operations Settings
Choosing a Light Meter Reading Method
According to the picture taking conditions and purpose, you can choose the lighted area to be
AVERAGE ([ ]) or SPOT ([®]) to measure light for the exposure.
1
•
OFF
•
CAM
•
PLAY
AE-LOCK
R-REVIEW
INDEX
DISP LCD
•
OFF
•
CAM
•
PLAY
MENU
EXCUTE
EXIT
2
5 Release the shift button.
After the ISO sensitivity is set, exit the menu.
The camera is ready to take pictures.
1 While pressing the mode lock (green), turn the
power/mode dial to CAM.
2 Press the LCD button to turn the LCD monitor on.
Note
Settings can also be confirmed on the LCD panel.
When checking the settings on the LCD panel,
this step is not necessary.
60
GB
Page 61

3 While pressing the [r] button (SPOT light meter
switch button), turn the shift dial to choose the
light meter reading method.
3,4
SIZE
QUAL
USER
DRIVE
ISO
WB
AE
EV
AE-LOCK
R-REVIEW
3
CAM
LIGHT METERING
AVERAGE
SPOT
AVERAGE (light meter for average
light at the center)
Appropriate for average picture taking conditions.
Takes the average light meter reading of the
whole screen after you have placed the focal point
in the center of the viewfinder.
SPOT (Spot Light Meter)
Takes the light meter reading of a small range
located in the central part of the viewfinder. This
is effective for taking pictures of subjects
surrounded by a lot of light, or that is backlit.
Note
Light meter options are indicated in the
finderview as [ ] (AVERAGE) and [®] (SPOT).
Advanced Operations Settings
4 Release the [r] button.
After the light meter has been set, the camera is
ready to take pictures.
61
GB
Page 62

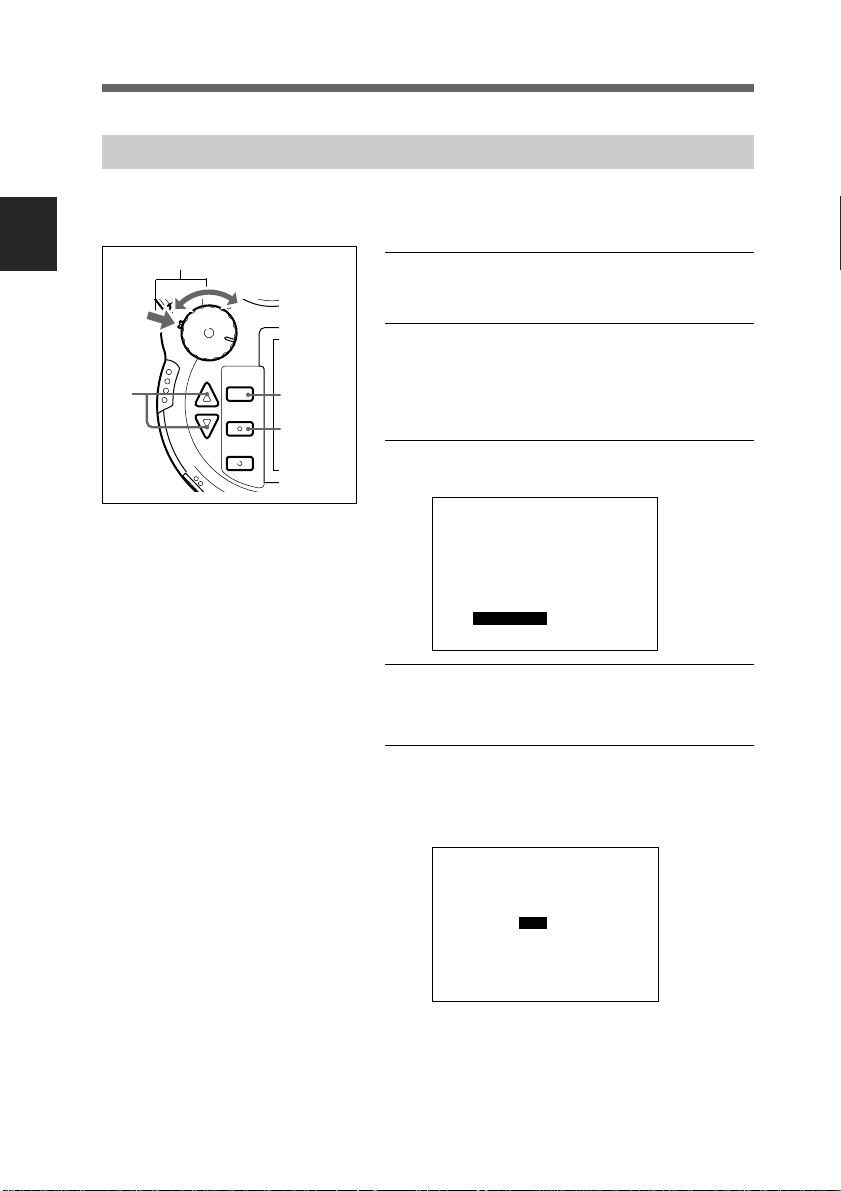
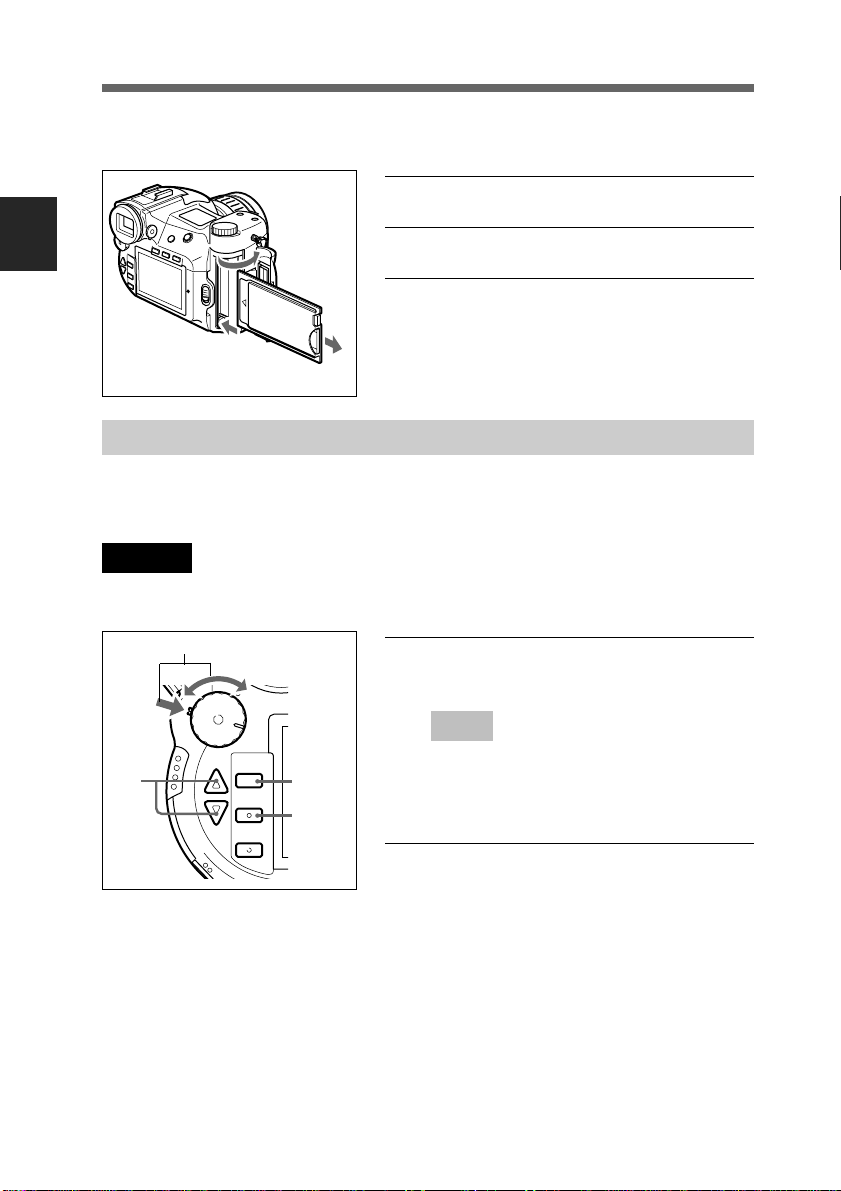
Resetting the Content of the Settings
Resetting the modes returns the following settings to those set forth by the factory.
• mode dial settings
• Miscellaneous Settings (page 71)
4
SIZE
QUAL
USER
DRIVE
ISO
WB
3~5
AE
3
USER
ISO
SIZE
QUAL
SIZE
DRIVE
WB
•
OFF
•
CAM
•
PLAY
2
1
Advanced Operations Settings
1 While pressing the mode lock (green), turn the
power/mode dial to CAM mode.
2 Press the LCD button to turn on the LCD monitor.
Note
Settings can also be confirmed on the LCD panel.
When checking the settings on the LCD panel,
this step is not necessary.
3 Turn the mode dial to USER and then press the
shift button.
The USER FILE menu appears.
4 While pressing the shift button, turn the shift dial
to choose NO. 0 (reset).
CAM
USER FILE
____ __________
No.0 (reset)
No.1 1999-07-04
No.2 1999-07-04
No.3 1999-07-04
5 Release the shift button.
62
When the settings are reset, exit the menu. The
camera is ready to take pictures.
GB
Page 63

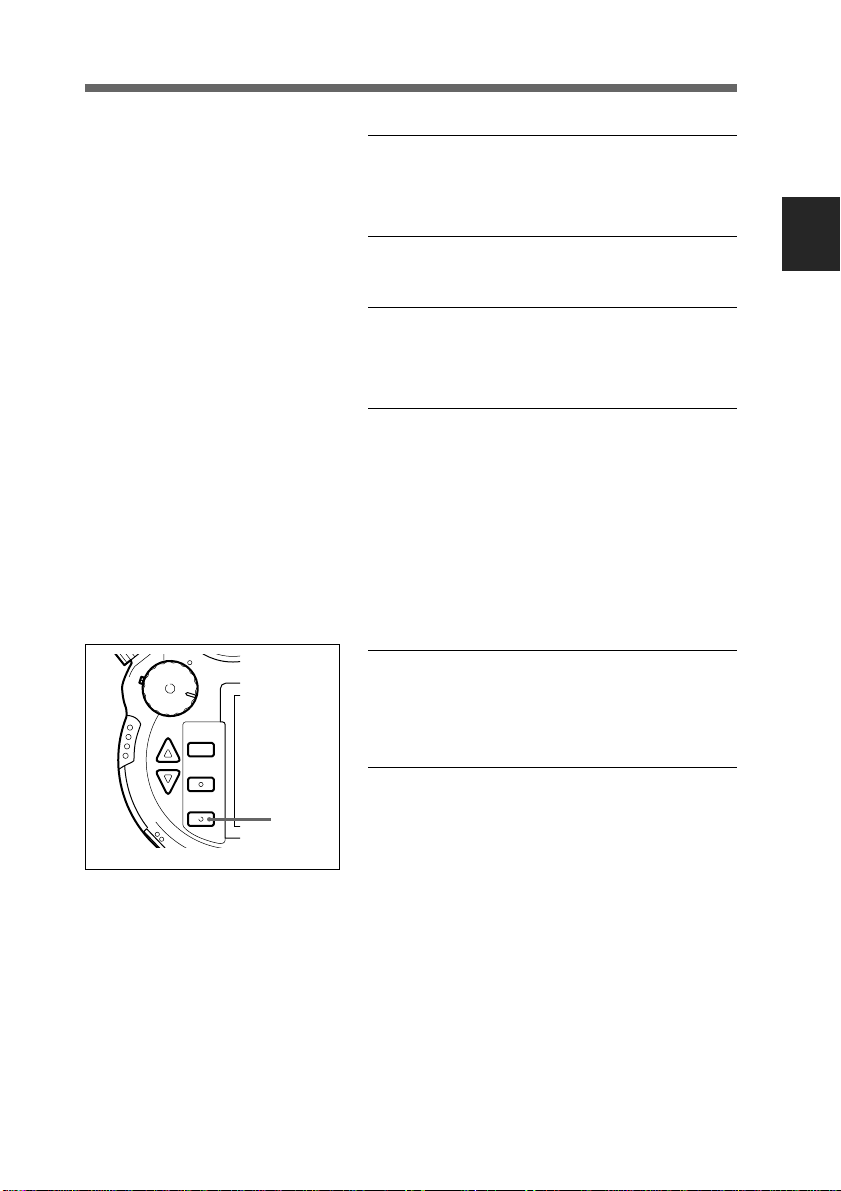
Saving the Content of Settings
You can save the content of the following settings in up to 3 user files.
• mode dial settings
• the content of Miscellaneous Settings (page 71)
3~
5
1
•
OFF
•
CAM
•
PLAY
MENU
EXCUTE
EXIT
2
3~6
1 While pressing the mode lock (green), turn the
power/mode dial to CAM mode.
2 Press the MENU button.
The LCD monitor turns on and the menu is
displayed.
3 Choose “User File Save” using the 4(UP)/
$(DOWN) buttons.
CAMERA MENU
Custom
PC Card INIT
New Folder
User File Save
New Folder
ID Set
WB Flash
Date & Time
Display Set
Advanced Operations Settings
4 Press the EXECUTE button.
The USER FILE SAVE menu appears.
5 Using the 4(UP)/$(DOWN) buttons, choose a
user file number from No. 1 to No. 3.
USER FILE SAVE
No.1(User1) 1999-07-04
No.2(User2) 1999-07-04
No.3(User3) 1999-07-04
continued on next page
63
GB
Page 64

6 Press the EXECUTE button.
The setting content is saved as a user file with the
chosen file number. The date and time the file is
saved is also displayed.
•
OFF
•
CAM
•
PLAY
MENU
EXCUTE
EXIT
7,8
Advanced Operations Settings
Reading the Saved Settings
Reading the user file you have saved sets the same content in the user file.
4
SIZE
QUAL
USER
DRIVE
ISO
WB
3~5
AE
3
USER
ISO
SIZE
QUAL
SIZE
DRIVE
WB
•
OFF
•
CAM
•
PLAY
2
1
7 Press the EXIT button.
The LCD monitor display returns to the menu.
8 Press the EXIT button.
After exiting the menu, the camera is ready to
take pictures.
1 While pressing the mode lock (green), turn the
power/mode dial to CAM mode.
2 Press the LCD button to turn the LCD monitor on.
Note
Settings can also be confirmed on the LCD panel.
When checking the settings on the LCD panel,
this step is not necessary.
64
3 Turn the mode dial to USER and press the shift
button.
The USER FILE menu appears.
GB
Page 65

4 While pressing the shift button, turn the shift dial
to choose a user file number from No. 1 to No. 3.
CAM
USER FILE
____ __________
No.0 (reset)
No.1 1999-07-04
No.2 1999-07-04
No.3 1999-07-04
5 Release the shift button.
The content of the selected user file number is
changed, and the camera is ready to take pictures.
Making a Folder to Save Pictures
When you make a folder on a card, picures are thereafter saved in that folder. In this way you can
manage pictures as you take them.
1 While pressing the mode lock (green), turn the
1
•
OFF
•
CAM
•
PLAY
MENU
EXCUTE
3
EXIT
2
4,5
power/mode dial to CAM mode.
2 Press the MENU button.
The LCD monitor turns on and the menu is
displayed.
3 Choose “New Folder” using the 4(UP)/
$(DOWN) buttons.
CAMERA MENU
Custom
PC Card INIT
User File Save
New Folder
ID Set
WB Flash
Date & Time
Display Set
Advanced Operations Settings
continued on next page
65
GB
Page 66

Attaching Keywords (ID Numbers) to Pictures
Advanced Operations Settings
You can attach a keyword of up to 16 letters to a picture. The keyword is displayed when the picture
is played back.
You can specify a keyword for a picture before taking it, or attach or change the keyword after the
picture has been taken.
Note
You cannot attach a keyword to or change a keyword on a protected picture.
4 Press the EXECUTE button.
The message “Add No.xxxx Folder OK?”
appears. [xxxx] is the automatically attached
folder name.
5 Press the EXECUTE button.
The folder is created, and the camera is ready to
take pictures.
Pictures are thereafter saved in that folder.
Note
You can create about 510 folders on a card.
Specifying a Keyword Before Shooting
1
•
OFF
•
CAM
•
PLAY
MENU
EXCUTE
EXIT
2
3~9
66
3~
6
GB
1 While pressing the mode lock (green), turn the
power/mode dial to CAM.
2 Press the MENU button.
The LCD monitor turns on, and the menu is
displayed.
Page 67

3 Select “ID Set” using the 4(UP)/$(DOWN)
buttons.
CAMERA MENU
Custom
PC Card INIT
User File Save
New Folder
ID Set
WB Flash
Date & Time
Display Set
4 Press the EXECUTE button.
The keyword screen is displayed.
ID SET
MODE Off
ID No. [0123456789012345]
END BS CLR SPC
0123456789!"#$%&'
ABCDEFGHIJKLMNOPQRS
TUVWXYZ*+,-./;:<=>? 100MIN
abcdefghijklmnopqrs
tuvwxyz@[¥]^_{ }
P No.99
5 Select “Mode” using the 4(UP)/$(DOWN)
buttons and press the EXECUTE button.
You can now change the mode setting.
6 Select “Off”, “Hold” or “Inc” using the 4(UP)/
$(DOWN) buttons and press the EXECUTE
button.
Advanced Operations Settings
Off
Choose “Off” if you don't want to attach a
keyword to a picture or to invalidate an existing
keyword.
Hold
Choose “Hold” if you want to attach the same
keyword to all pictures.
continued on next page
67
GB
Page 68

Advanced Operations Settings
Inc
Choose “Inc” if you want the number of the
picture to be automatically included at the end of
keyword every time you take a picture.
(ex.) The keyword is PICTURE01
1st picture : PICTURE01
2nd picture : PICTURE02
9th picture : PICTURE09
10th picture : PICTURE10
Note
When the automatic counter reaches [99], the
number returns to [00] the next time you take a
picture.
The LCD monitor display returns to the keyword
screen.
7 Choose “ID No.” using the 4(UP)/$(DOWN)
buttons and press the EXECUTE button.
You can now input a keyword.
8 Choose a letter to enter using the 4(UP)/
$(DOWN) buttons and press the EXECUTE
button.
68
The letter you have chosen is input.
Repeat this step to enter the keyword. You can
input up to 16 letters.
Note
Input begins from the 16th character space. If
you want to input from a space in the middle,
press the EXECUTE button until the cursor is
automatically displayed in the correct place and
then continue.
GB
Page 69

•
•
CAM
•
PLAY
MENU
EXCUTE
OFF
9 If you finish inputting the keyword before
reaching the 16-letter limit, move the cursor to
END and press the EXECUTE button.
10 Press the EXIT button.
EXIT
10,11
The display on the LCD monitor returns to the
menu.
11 Press the EXIT button.
The menu disappears, and the camera is ready to
take pictures.
Adding or Changing a Keyword to a Picture that has Already been
Taken
4~6
1
•
OFF
•
CAM
•
PLAY
MENU
EXCUTE
3
5,6
EXIT
1 While pressing the mode lock (green), turn the
power/mode dial to PLAY.
The LCD monitor tuns on.
2 Display the picture to which you want to add or
change the keyword.
3 Press the MENU button.
The menu appears.
4 Select “ID Set” using the 4(UP)/$(DOWN)
buttons.
PLAY MENU
Rotate
D.Zoom
Auto Play
Protect
Delete
PC Card INIT
ID Set
LCD Set
Display Set
Advanced Operations Settings
continued on next page
69
GB
Page 70

5 Press the EXECUTE button.
The keyword input screen is displayed.
If a keyword has already been attached to the
picture, that keyword is displayed.
ID SET
ID No. [0123456789012345]
END BS CLR SPC
0123456789!"#$%&'
ABCDEFGHIJKLMNOPQRS
TUVWXYZ*+,-./;:<=>? 100MIN
abcdefghijklmnopqrs
tuvwxyz@[¥]^_{ }
0001/00009
P No.99
6 Choose the letter you'd like to enter using the
4(UP)/$(DOWN) buttons. Press the EXECUTE
button.
Advanced Operations Settings
•
OFF
•
CAM
•
PLAY
MENU
EXCUTE
EXIT
8,9
The letter you have chosen is input.
Repeat this set to enter the keyword. You can
input up to 16 letters.
Note
If you want to enter the whole keyword again, set
the cursor to CLR and press the EXECUTE
button.
7 If you finish inputting the keyword before
reaching the 16-letter limit, move the cursor to
END and press the EXECUTE button.
The keyword is attached and the LCD monitor
returns to the menu display. Proceed to step 9.
8 Press the EXIT button.
The keyword is attached and the LCD monitor
returns to the menu display.
9 Press the EXIT button.
The menu disappears.
70
GB
Page 71

Miscellaneous Settings
The following settings are available with the digital still camera.
• Auto Power Off Function
• Interval Shooting (page 80)
• Review Function (page 82)
• Self-Timer
• Sharpness
3~
6
1
1 While pressing the mode lock (green), turn the
power/mode dial to CAM.
•
OFF
•
•
PLAY
MENU
EXCUTE
EXIT
CAM
2
4,5
2 Press the MENU button.
The LCD monitor turns on and the menu is
displayed.
3 Choose “Custom” using the 4(UP)/$(DOWN)
buttons.
CAMERA MENU
Custom
PC Card INIT
User File Save
New Folder
ID Set
WB Flash
Date & Time
Display Set
Advanced Operations Settings
4 Press the EXECUTE button.
The CUSTOM menu is displayed.
CUSTOM
Power Save
Interval Rec Time 01:00:00
Review off
Review Time 5 sec
Self-Timer 10 sec
Sharpness Soft/Normal/Hard
on
continued on next page
71
GB
Page 72

Advanced Operations Settings
5 Choose the item you would like to set using the
4(UP)/$(DOWN) buttons and press the
EXECUTE button.
You can set the item you selected.
Power Save (Auto Power Off Function)
• When set to ON, power to the LCD monitor is
automatically turned off after approximately 1
minute (in CAM mode; approximately 3
minutes in PLAY mode) if the camera is not
operated during that time, and power to the
entire camera is turned off after approximately
4 more minutes (in CAM mode; approximately
2 more minutes in PLAY mode).
• When set to OFF, the power will not turn off
over the passage of time.
Interval Rec Time (Interval Shooting)
The interval in this function can be set within the
range of 1 second to 99 hours, 59 minutes, 59
seconds (in one-second units).
Depending on the picture size and quality mode
during shooting, the set interval may not be kept.
Review (Automatic Review Function)
Sets the method of picture display directly after
shooting.
• When set to ON, pictures are automatically
displayed at the time of shooting. The display
time is set in the REVIEW TIME setting.
• When set to OFF, the last picture is displayed
when you press the REVIEW button.
Review Time
When Review is on or when the REVIEW button
is pressed, the picture display time can be set for
an interval within the range of 1 to 10 seconds (in
one-second units).
Self-Timer
Sets the interval from when you press the
RELEASE button to the time the shutter clicks
within a range of 1 to 30 seconds (in one-second
units).
72
GB
Page 73

Sharpness
Sets the sharpness of the outline of the recorded
picture.
• When set to SOFT, the picture outline is gently
blurred.
• When set to NORMAL, the picture is standard.
• When set to HARD, the picture edges are
clearly outlined.
6 Set the value using the 4(UP)/$(DOWN) buttons
and press the EXECUTE button.
The LCD monitor display returns to the custom
menu. If you want to continue, you can set
another item at this time.
•
•
CAM
•
PLAY
MENU
EXCUTE
EXIT
OFF
7,8
7 Press the EXIT button.
The LCD monitor display returns to menu.
8 Press the EXIT button.
The menu disappears and the camera is ready to
take pictures.
Advanced Operations Settings
73
GB
Page 74

Advanced Operations Taking a Picture
Shooting with the Flash
Use the flash when taking pictures in dark places, such as indoors.
A flash is built-in in the unit.
Depending on shooting conditions, choose a flash mode from among Auto, On, Off, and External.
When shooting in the External mode, attach an external flash to the hot shoe to take flash pictures.
Advanced Operations Taking a Picture
Flash Mode Usage Guide
Shooting Condition Setting
Normal Auto
The subject is lit from behind. On
You want to use a flash during
daytime.
When you want to capture the Off
natural lighting of candle-lit
scenes, sunsets, etc.
When you don’t want the flash to
go off accidentally.
Setting the Flash Mode
74
GB
3~5
4
AE
ISO
WB
USER
DRIVE
SIZE
QUAL
1 While pressing the mode lock (green), turn the
power/mode dial to CAM.
2 Press the LCD button to turn the LCD monitor on.
3
USER
ISO
SIZE
QUAL
SIZE
DRIVE
WB
•
OFF
•
CAM
•
PLAY
2
Note
Settings can also be confirmed on the LCD panel.
When checking the settings on the LCD panel,
this step is not necessary.
1
3 Turn the mode dial to and press the shift
button.
This is the default mode.
Page 75

Note Concerning Use of the
Built-in Flash
When photos are taken using the
built-in flash, occlusion of light
from the flash can occur under the
following circumstances, resulting
in a shadow at the bottom of the
recorded image. If this occurs,
change the zoom setting or use the
optional external flash unit, as
appropriate.
• When shots are taken at the wideangle setting (f = 5.2 mm)
• When shots are taken at the
telephoto setting (f = 26 mm) of a
subject range of less than 1 meter
• When a lens hood or lens
protection filter is attached to the
lens
4 While pressing the shift button, turn the shift dial
to select a flash mode.
CAM
FLASH
Auto
On
Off
External
Auto
In conditions of insufficient light, the flash
automatically goes off. This is the default mode.
On
Choose this mode when you want the flash to go
off, for situations such as taking a picture of a
subject that is backlit.
Off
Choose this mode when you want to take a picture
with natural lighting or you don't want a strobe
effect in your picture.
External
Choose this mode when you want to take a picture
of a subject far from the camera and the light
from the built-in flash is insufficient.
In such a case, attach an external flash to take
pictures.
Note
Advanced Operations Taking a Picture
Pop-up key
Flash modes are indicated on the LCD panel as
(Auto), (On), (Off), and
(External).
5 Press the shift button.
AE
WB
ISO
DRIVE
USER
QUAL
SIZE
The flash mode is set and the menu disappears.
Unless the shooting mode is set to manual
exposure, the shutter speed indicator or the
aperture indicator flashes when it is necessary to
use the flash. When this happens, press the Popup key to open the built-in flash, or attach an
external flash to the hot shoe.
continued on next page
75
GB
Page 76

Advanced Operations Taking a Picture
Flashing Continuously lit
Adjusting White Balance when Taking Pictures with the Flash
You can adjust the white balance when using the flash.
If the flash mode is set to Auto or On, when the
flash indicator flashes, the flash is warming up.
When the flash lamp light becomes constant, the
flash is ready for use.
Note
When using the built-in flash, press the pop-up
AE
WB
ISO
DRIVE
USER
QUAL
SIZE
key to open it.
When finished with the flash, push the top of the
flash down to close.
1
3~
9
76
GB
•
•
CAM
•
PLAY
MENU
EXCUTE
EXIT
OFF
2
4~9
1 While pressing the mode lock (green), turn the
power/mode dial to CAM.
2 Press the MENU button.
The LCD monitor turns on and the menu is
displayed.
3 Select “WB Flash” using the 4(UP)/$(DOWN)
buttons.
CAMERA MENU
Custom
PC Card INIT
User File Save
New Folder
ID Set
WB Flash
Date & Time
Display Set
Page 77

4 Press the EXECUTE button.
The WB FLASH menu is displayed.
5 Select “Flash Mode” using the 4(UP)/$(DOWN)
buttons and press the EXECUTE button.
WB FLASH
Flash Mode /External
Interval 10 sec(3~10)
Start
You can now set the flash mode.
Internal
6 Choose “Internal” (built-in flash) or “External”
(external flash) using the 4(UP)/$(DOWN)
buttons and press the EXECUTE button.
Choose “Internal” to use the built-in flash or
“External” to use the external flash and press the
EXECUTE button.
7 If you chose “External” in step 6, select “Interval”
using the 4(UP)/$(DOWN) buttons and press the
EXECUTE button.
You can choose the interval during which to have
the flash light.
Set an interval within the range of 3 to 10 seconds
(in one-second units) using the 4(UP)/$(DOWN)
buttons and press the EXECUTE button.
Advanced Operations Taking a Picture
Note
When using an external flash, set the amount of
light for the flash before adjusting the white
balance to avoid extreme brightness or darkness
in your pictures.
8 Point the camera toward a completely white
subject until it completely fills the viewfinder.
continued on next page
77
GB
Page 78

Advanced Operations Taking a Picture
Continuous Shooting
In this mode you can continuously shoot pictures until you reach the maximum number by keeping
the release button pressed.
9 Select “Start” using the 4(UP)/$(DOWN)
buttons and then press EXECUTE.
“WB” is displayed in the viewfinder and white
balance adjustment begins.
After the flash lights about 10 times, the WB
indicator goes off. The white balance adjustment
is complete.
The white balance value is valid until it is
adjusted again.
Note
When the WB indicator flashes, the white
balance is not successfully being
adjusted. Exit this mode by pressing any
operation button besides the WB button
and readjust the white balance again.
78
GB
3~5
4
WB
DRIVE
QUAL
AE
ISO
SIZE
USER
1 While pressing the mode lock (green), turn the
power/mode dial to CAM.
2 Turn the LCD monitor on by pressing the LCD
3
USER
ISO
SIZE
QUAL
SIZE
DRIVE
WB
•
OFF
•
CAM
•
PLAY
2
1
button.
Note
Settings can also be confirmed on the LCD panel.
When checking the settings on the LCD panel,
this step is not necessary.
3 Turn the mode dial to DRIVE and press the shift
button.
The DRIVE menu appears.
Page 79

4 While pressing the shift button, turn the shift dial
to select “Cont1” or “Cont2.”
CAM
DRIVE
1Shot
Cont1
Cont2
Self Timer
Interval Rec
Cont1
In this mode, when the shooting mode is set to a
mode other than manual exposure, the exposure is
automatically adjusted every time a picture is
taken.
Cont2
In this mode, the settings of the first picture are
kept as pictures are taken in succession.
The continuous picture taking speed is faster in
this mode than that in Cont1.
Note
These modes are indicated on the LCD panel as 1
(Cont1) and 2 (Cont2).
5 Release the shift button.
Advanced Operations Taking a Picture
The continuous shooting mode is set, and the
menu disappears. When taking pictures, keeping
the release button pressed activates continuous
shooting.
Auto focus will not work during continuous
shooting. Set the focus before you start
continuous shooting.
continued on next page
79
GB
Page 80

Taking a Picture at Regular Intervals (Interval Shooting)
In this mode, after pressing the release button, pictures are continuously taken at regular intervals.
How to set the shooting interval is described in the Miscellaneous Settings section (page 71).
3~5
3
•
OFF
•
CAM
•
PLAY
1
Advanced Operations Taking a Picture
4
WB
DRIVE
QUAL
AE
ISO
SIZE
USER
1 While pressing the mode lock (green), turn the
power/mode lock to CAM.
2 Press the LCD button to turn the LCD monitor on.
USER
ISO
SIZE
QUAL
SIZE
DRIVE
WB
2
Note
Settings can also be confirmed on the LCD panel.
When checking the settings on the LCD panel,
this step is not necessary.
3 Turn the mode dial to DRIVE and press the shift
button.
The DRIVE menu appears.
4 While pressing the shift button, turn the shift dial
to select “Interval Rec.”
CAM
DRIVE
1Shot
Cont1
Cont2
Self Timer
Interval Rec
Note
This option is indicated on the LCD panel as INT.
80
5 Release the shift button.
The interval time is set, and the menu disappears.
When you press the release button, interval
shooting starts.
To stop interval shooting, set another shooting
method besides interval shooting or set the power/
mode dial to OFF or PLAY.
GB
Page 81

Taking a Picture with the Self-Timer
In this mode, after pressing the release button, the shutter automatically clicks after a set period of
time.
How to set the time between the pressing of the release button and the shutter release is described in
the Miscellaneous Settings section (page 71).
3~5
4
WB
DRIVE
QUAL
AE
ISO
SIZE
USER
3
USER
ISO
SIZE
QUAL
SIZE
DRIVE
WB
•
OFF
•
CAM
•
PLAY
2
1
1 While pressing the mode lock (green), turn the
power/mode dial to CAM.
2 Press the LCD button to turn the LCD monitor on.
Note
Settings can also be confirmed on the LCD panel.
When checking the settings on the LCD panel,
this step is not necessary.
Advanced Operations Taking a Picture
3 Turn the mode dial to DRIVE and press the shift
button.
The DRIVE menu appears.
4 While pressing the shift button, turn the shift dial
to select “Self Timer.”
CAM
DRIVE
1Shot
Cont1
Cont2
Self Timer
Interval Rec
5 Release the shift button.
The self-timer is set and the menu disappears.
When you press the release button completely, the
self-timer starts.
Note
When taking photographs in the auto focus mode,
press the release button halfway to focus, then
press it all the way to take the shot.
81
GB
Page 82

Checking Pictures Directly After Shooting (Review Function)
When the REVIEW button is pressed directly after taking a picture, the picture is displayed on the
LCD monitor in this mode.
When you turn the review function on in Miscellaneous Settings, pictures are displayed
automatically, without having to press the REVIEW button.
Advanced Operations Taking a Picture
82
GB
Page 83

Advanced Operations Playback
Rotating the Picture
You can rotate the picture 90° clockwise or counter-clockwise, or 180° during playback.
3~
6
1
•
OFF
•
CAM
•
PLAY
MENU
EXCUTE
EXIT
2
4~6
1 While pressing the mode lock (green), turn the
power/mode dial to PLAY.
The LCD monitor turns on.
2 Push the MENU button.
The menu is displayed on the LCD monitor.
3 Choose “Rotate” using the 4(UP)/$ (DOWN)
buttons.
PLAY MENU
Rotate
D.Zoom
Auto Play
Protect
Delete
PC Card INIT
ID Set
LCD Set
Display Set
Advanced Operations Playback
4 Press the EXECUTE button.
The ROTATE menu is displayed.
5 Choose an angle of rotation using the 4(UP)/
$(DOWN) buttons and then press the
EXECUTE button.
ROTATE
90 cw
90 ccw
180
90° cw (rotation of 90° to the right)
Rotates the picture 90° clockwise.
90° ccw (rotation of 90° to the left)
Rotates the picture 90° counter-clockwise.
180° (rotation of 180°)
Rotates the picture 180°.
continued on next page
83
GB
Page 84

The picture is displayed at the angle of rotation
chosen.
6 Rotate the picture as described in step 5 as often
as necessary.
•
OFF
•
•
PLAY
MENU
EXCUTE
CAM
The LCD monitor returns to the menu display.
Note, however, that infomation of rotation
changes made to protected pictures is not saved.
8 Press the EXIT button.
7 Press the EXIT button.
EXIT
Advanced Operations Playback
Viewing an Enlarged Picture
You can view an enlarged detail of a picture during playback.
1
•
3~
6
PLAY
MENU
EXCUTE
EXIT
•
•
CAM
OFF
7, 8
2
4~6
The menu disappears.
1 While pressing the mode lock (green), turn the
power/mode dial to PLAY.
The LCD monitor turns on.
2 Press the MENU button.
The menu is displayed on the LCD monitor.
3 Select “D. Zoom” using the 4(UP)/$(DOWN)
buttons.
PLAY MENU
Rotate
D.Zoom
Auto Play
Protect
Delete
PC Card INIT
ID Set
LCD Set
Display Set
84
GB
Page 85

4 Press the EXECUTE button.
The area of the picture to be enlarged is framed
with a green line.
No.1
0001/00001
5 Select the area to be enlarged using the 4(UP)/
$(DOWN) buttons.
The frame moves left when the 4(UP) button is
pressed.
The frame moves right when the $(DOWN)
button is pushed.
No.1
0001/00001
Advanced Operations Playback
6 Press the EXECUTE button.
The selected area is enlarged and displayed, and
the position of the enlarged area is displayed in
the upper left corner.
No.1
0001/00001
enlarged area
continued on next page
85
GB
Page 86

Note
While viewing this screen, you can change the
area to be enlarged by pressing the 4(UP)/
$(DOWN) buttons.
7 Press the EXIT button.
The enlargement indicator is cancelled.
•
PLAY
MENU
•
OFF
•
CAM
8 Press the EXIT button.
EXCUTE
EXIT
7~9
Advanced Operations Playback
The menu returns to the LCD monitor display.
9 Press the EXIT button.
The menu disappears.
86
GB
Page 87

Advanced Operations Erasing
Erasing All Pictures
You can erase all saved pictures that are no longer needed from the card. However, you cannot
erase pictures that have been protected.
3~
5
1
•
OFF
•
CAM
•
PLAY
MENU
1 While pressing the mode lock (green), turn the
power/mode dial to PLAY.
The LCD monitor turns on.
2 Press the MENU button.
2
EXCUTE
4~6
EXIT
The menu appears on the LCD monitor.
3 Select “Delete” using the 4(UP)/$ (DOWN)
buttons.
PLAY MENU
Rotate
D.Zoom
Auto Play
Protect
Delete
PC Card INIT
ID Set
LCD Set
Display Set
Advanced Operations Erasing
4 Press the EXECUTE button.
The Delete menu appears.
Delete
1 Shot
Select
All
5 Select “All” using the 4(UP)/$(DOWN) buttons
and then press the EXECUTE button.
The message "Do you delete all images?"
appears.
Note
To cancel erase, press the EXIT button.
continued on next page
87
GB
Page 88

6 Press the EXECUTE buttons.
Picture erasing begins.
When deletion is finished, the LCD monitor
display returns to the state shown in step 1.
Caution
Do not remove the card during picture
deletion. Damage to the Memory Stick or
PC Card may occur.
Erasing Selected Pictures
You can erase selected saved pictures, with the exception of protected pictures, from the card.
Advanced Operations Erasing
3~
5
8
1
•
OFF
•
CAM
•
PLAY
MENU
EXIT
2
4~9
EXCUTE
1 While pressing the mode lock (green), turn the
power/mode dial to PLAY.
The LCD monitor turns on.
2 Press the MENU button.
The menu is displayed on the LCD monitor.
3 Choose “Delete” using the 4(UP)/$(DOWN)
buttons.
PLAY MENU
Rotate
D.Zoom
Auto Play
Protect
Delete
PC Card INIT
ID Set
LCD Set
Display Set
4 Press the EXECUTE buttons.
The Delete menu is displayed.
Delete
1 shot
Select
All
88
GB
Page 89

5 Choose “Select” using the 4(UP)/$ (DOWN)
buttons and then press the EXECUTE button.
The screen from which to choose pictures for
deletion appears.
6
6 Turn the shift dial to the picture you would like
to erase and press the EXECUTE button.
The chosen picture is marked.
Mark
AE-LOCK
R-REVIEW
INDEX
DISP LCD
•
OFF
•
CAM
•
PLAY
MENU
EXCUTE
EXIT
Advanced Operations Erasing
Note
Protected pictures cannot be chosen.
7 Repeat step 6 to choose other pictures to be
erased.
8 Press the $ (DOWN) button.
The message "Do you delete x image(s)?" is
displayed. [x] is the number of pictures chosen.
Note
To cancel deletion, press the EXIT button.
continued on next page
89
GB
Page 90

9 Press the EXECUTE button.
Picture erasing begins.
When deletion is finished, the LCD monitor
returns to the state shown in step 5.
Caution
Do not remove the card during picture
deletion. Damage to the Memory Stick or
PC Card may occur.
Advanced Operations Erasing
You can erase pictures shown on the LCD monitor during playback. However, protected pictures
cannot be erased.
•
•
•
PLAY
MENU
EXCUTE
EXIT
OFF
CAM
10~12
10 Press the EXIT button.
The LCD monitor display returns to the state
shown in step 4.
11 Press the EXIT button.
The LCD monitor display returns to the menu.
12 Press the EXIT button.
The menu disappears.
Erasing Pictures during Playback
3~
5
1
•
OFF
•
CAM
•
PLAY
MENU
2
EXCUTE
4~6
EXIT
1 While pressing the mode lock (green), turn the
power/mode dial to PLAY.
The LCD monitor turns on.
2 Press the MENU button.
The menu is displayed on the LCD monitor.
90
GB
Page 91

3 Select “Delete” using the 4(UP)/$ (DOWN)
buttons.
PLAY MENU
Rotate
D.Zoom
Auto Play
Protect
Delete
PC Card INIT
ID Set
LCD Set
Display Set
4 Press the EXECUTE button.
The Delete menu is displayed.
5 Select “1 Shot” using the 4(UP)/$(DOWN)
buttons and then press the EXECUTE button.
Delete
1 Shot
Select
All
The message "Do you delete this image?"
appears.
Advanced Operations Erasing
Note
To cancel erase, press the EXIT button.
6 Press the EXECUTE button.
Picture erasing begins.
When deletion is finished, the LCD monitor
returns to the state shown in step 4.
Caution
Do not remove the card during picture
deletion. Damage to the Memory Stick or
PC Card may occur.
continued on next page
91
GB
Page 92

•
•
•
PLAY
MENU
EXCUTE
EXIT
OFF
CAM
7 Press the EXIT button.
The LCD monitor display returns to the menu.
8 Press the EXIT button.
The menu disappears.
7, 8
Making it Impossible to Erase Important Pictures (Protect)
You can save pictures from being accidentally erased. This is called "protecting" the picture.
You can protect pictures when they are shown on the LCD monitor during playback.
Advanced Operations Erasing
3~
5
1
1 While pressing the mode lock (green), turn the
power/mode dial to PLAY.
•
•
PLAY
MENU
•
CAM
OFF
The LCD monitor turns on.
2 Press the MENU button.
2
EXCUTE
The menu is displayed on the LCD monitor.
4, 5
EXIT
3 Select “Protect” using the 4(UP)/$(DOWN)
buttons.
PLAY MENU
Rotate
D.Zoom
Auto Play
Protect
Delete
PC Card INIT
ID Set
LCD Set
Display Set
92
GB
Page 93

4 Press the EXECUTE button.
PROTECT
All on
All off
1 Shot on/off
PROTECT
P No.3
0001/00008
All on
All off
1 Shot on/off
The PROTECT menu is displayed.
5 Choose “1 Shot on/off” using the 4(UP)/
$(DOWN) buttons and then press the
EXECUTE button.
The chosen picture is protected, indicated by a P
on the LCD monitor.
Notes
• When you perform the same operation on a
picture that has already been protected, the
protect function is removed.
• When you select “All on” or “All off” from
the PROTECT menu and press the EXECUTE
button, all the pictures are protected, or
protect is removed from all pictures.
Advanced Operations Erasing
•
OFF
•
CAM
•
PLAY
MENU
EXCUTE
EXIT
6,7
6 Press the EXIT button.
The LCD monitor display returns to the menu.
7 Press the EXIT button.
The menu disappears.
93
GB
Page 94

Advanced Operations Miscellaneous
Setting the LCD Monitor Display
You can set whether or not the LCD monitor displays necessary information for playback or taking a
picture, such as picture size or AF/AE frame.
1
3~
6
Advanced Operations Miscellaneous
•
•
CAM
•
PLAY
MENU
EXCUTE
EXIT
OFF
2
4~6
1 While pressing the mode lock (green), turn the
power/mode dial to CAM.
Note
In this section, setting the LCD monitor display is
explained while the power/mode dial is set to
CAM, but the same operation can be done while
the power/mode dial is set to PLAY.
2 Press the MENU button.
The LCD monitor turns on, and the menu is
displayed.
3 Select “Display Set” using the 4(UP)/$(DOWN)
buttons.
CAMERA MENU
Custom
PC Card INIT
User File Save
New Folder
ID Set
WB Flash
Date & Time
Display Set
4 Press the EXECUTE button.
94
The display set menu appears.
GB
Page 95

5 Select the item you want to set using the 4(UP)/
$(DOWN) buttons and press the EXECUTE
button.
The selected item is ready to change.
DISPLAY SET
Size/Qlty/Rotate
Folder/File Name on
ID No. on
Date/Time on
Remaining Shot on
Tv/Av/Evcomp on
AF/AE Frame on
on
6 Select “on” or “off” using the 4(UP)/$(DOWN)
buttons and then press the EXECUTE button.
Items which can be set are listed below:
Size/Qlty/Rotate (Picture size/Picture quality/
Rotation)
Folder/File Name
ID No. (Keyword)
Date/Time
Remaining Shot
Tv/Av/Evcomp (Shutter Speed/Aperture/EV
compensation)
AF/AE Frame
When each item is set to on or off, the LCD
display returns to the state shown in step 3.
If you want to change the settings of other items,
return to step 5 and repeat the same operation.
Advanced Operations Miscellaneous
•
•
CAM
•
PLAY
MENU
EXCUTE
EXIT
OFF
7, 8
7 Press the EXIT button.
The LCD monitor display returns to the menu.
8 Press the EXIT button.
The menu disappears.
95
GB
Page 96

Adjusting Picture Display on the LCD Monitor
Adjusts picture display items such as contrast, brightness, and display range on the LCD monitor.
1
3~
6
Advanced Operations Miscellaneous
•
•
CAM
•
PLAY
MENU
EXCUTE
EXIT
OFF
2
4~6
1 While pressing the mode lock (green), turn the
power/mode dial to PLAY.
The LCD monitor turns on.
2 Press the MENU button.
The menu is displayed on the LCD monitor.
3 Select “LCD Set” using the 4(UP)/$(DOWN)
buttons.
PLAY MENU
Rotate
D.Zoom
Auto Play
Protect
Delete
PC Card INIT
ID Set
LCD Set
Display Set
4 Press the EXECUTE button.
The LCD set menu is displayed.
5 Select an item using the 4(UP)/$(DOWN)
buttons and then press the EXECUTE button.
You can set the chosen item.
LCD SET
96
GB
0
Contrast
Bright 0
Color 0
Picture 0
Disp Area Normal
Page 97

•
•
CAM
•
PLAY
MENU
EXCUTE
OFF
6 Choose a value using the 4(UP)/$(DOWN)
buttons and press the EXECUTE button.
The items you can set are listed below:
Contrast, Bright, Color or Picture
Contrast, brightness, color density or picture
sharpness can be set within a -10 to +10 range (in
units of 1).
Disp Area (Display area)
When NORMAL is chosen, the picture is
displayed after being resized to fit the frame
100%.
When OVER is chosen, the picture is displayed
without being resized.
When the values for the chosen items have been
set, the LCD display returns to the state shown in
step 5.
If you want to set another item, repeat the same
operation from step 5.
7 Press the EXIT button.
The LCD monitor returns to the menu.
8 Press the EXIT button.
Advanced Operations Miscellaneous
EXIT
7, 8
The menu disappears.
97
GB
Page 98

Operating the Wireless Remote Control
Using the supplied wireless remote control RM-S7D, you can perform the same release button and
shift dial operations as on the camera unit.
The remote control is convenient when you want to take pictures away from the camera or for
playing back pictures on a television.
Send buttons
Send buttons function the
same as the shift dial on
the camera unit.
(Only play back pictures in
succession when used in
PLAY mode).
Note
Advanced Operations Miscellaneous
The self-timer lamp on the front of the camera lights up briefly as signals from the remote control are
received.
When you push the release button with the focus mode switch set to AF, the focus is automatically
set before the picture is taken. There is a short time lag from the time you press the release button
until the picture is taken.
If you want to take a picture without the time lag set the focus mode switch to MF. After manually
adjusting the focus, press the release button to take the picture.
Inserting the Battery into the Remote Control
Release button
(Effective in CAM mode)
98
1 Slide the battery cover in the direction of the 4
mark while pushing the cover.
GB
Page 99

2 Insert a lithium button battery CR2025 into the
battery case, making sure the + (plus) side is
visible.
3 Return the battery cover to its original position.
Using a Wall Socket
To take or play back pictures without using a battery, plug the camera into a wall socket using the
battery charger AC-V700 (not supplied) and DC power cable DK-415 (supplied with the AC-V700).
Advanced Operations Miscellaneous
2
1 Connect the DC power cable and the AC power
cable to the battery charger.
2 Plug the AC plug from the power cable into the
wall socket.
1
1
continued on next page
99
GB
Page 100

3
•
OFF
•
CAM
•
PLAY
Advanced Operations Miscellaneous
3 Make sure the power/mode dial on the camera is
AE-LOCK
R-REVIEW
DISP LCD
INDEX
•
OFF
•
CAM
•
PLAY
MENU
EXCUTE
EXIT
set to OFF.
4 Slide the battery cover lock in the direction of the
4
(a)
4
(b)
4 mark (a), and open the battery cover (b).
5 Remove the rubber from inside the battery cover.
6 Insert the DC power cable connector 4 mark side
first into the battery case until it locks firmly into
place.
6
7 Put the cable into the battery cover groove and
close the battery cover.
100
GB
 Loading...