

Page 1
Basic Operation Guide (Software Version 1.5.50)
Welcome to the world of Digital Paper!
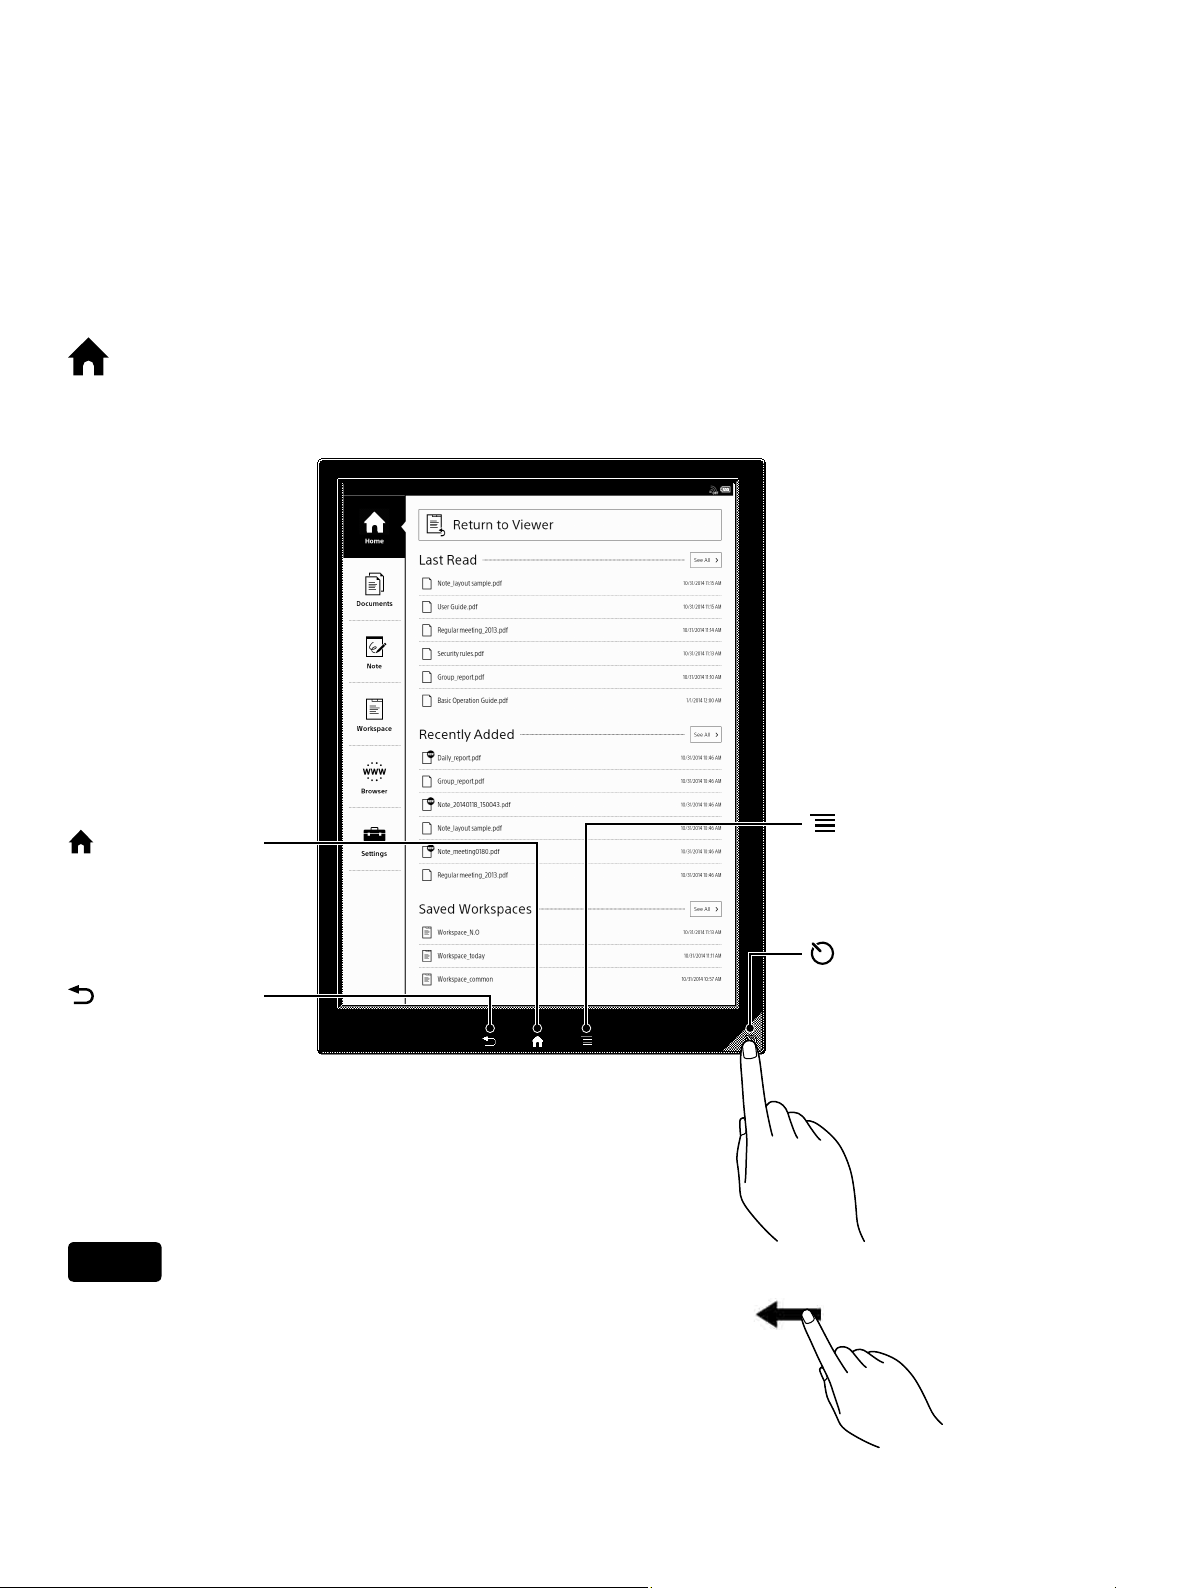
[Home] Screen
(Home) button
Displays the top screen
(the [Home] screen).
(Back) button
Returns to the previous
screen.
Tip
•Swipe your finger on the touchscreen to turn pages.
(Menu) button
Displays the available option
menu for each application.
(Power) button
(Sleep mode cancel button)
Turns the device on/off, and
cancels sleep mode.
1/9
Page 2
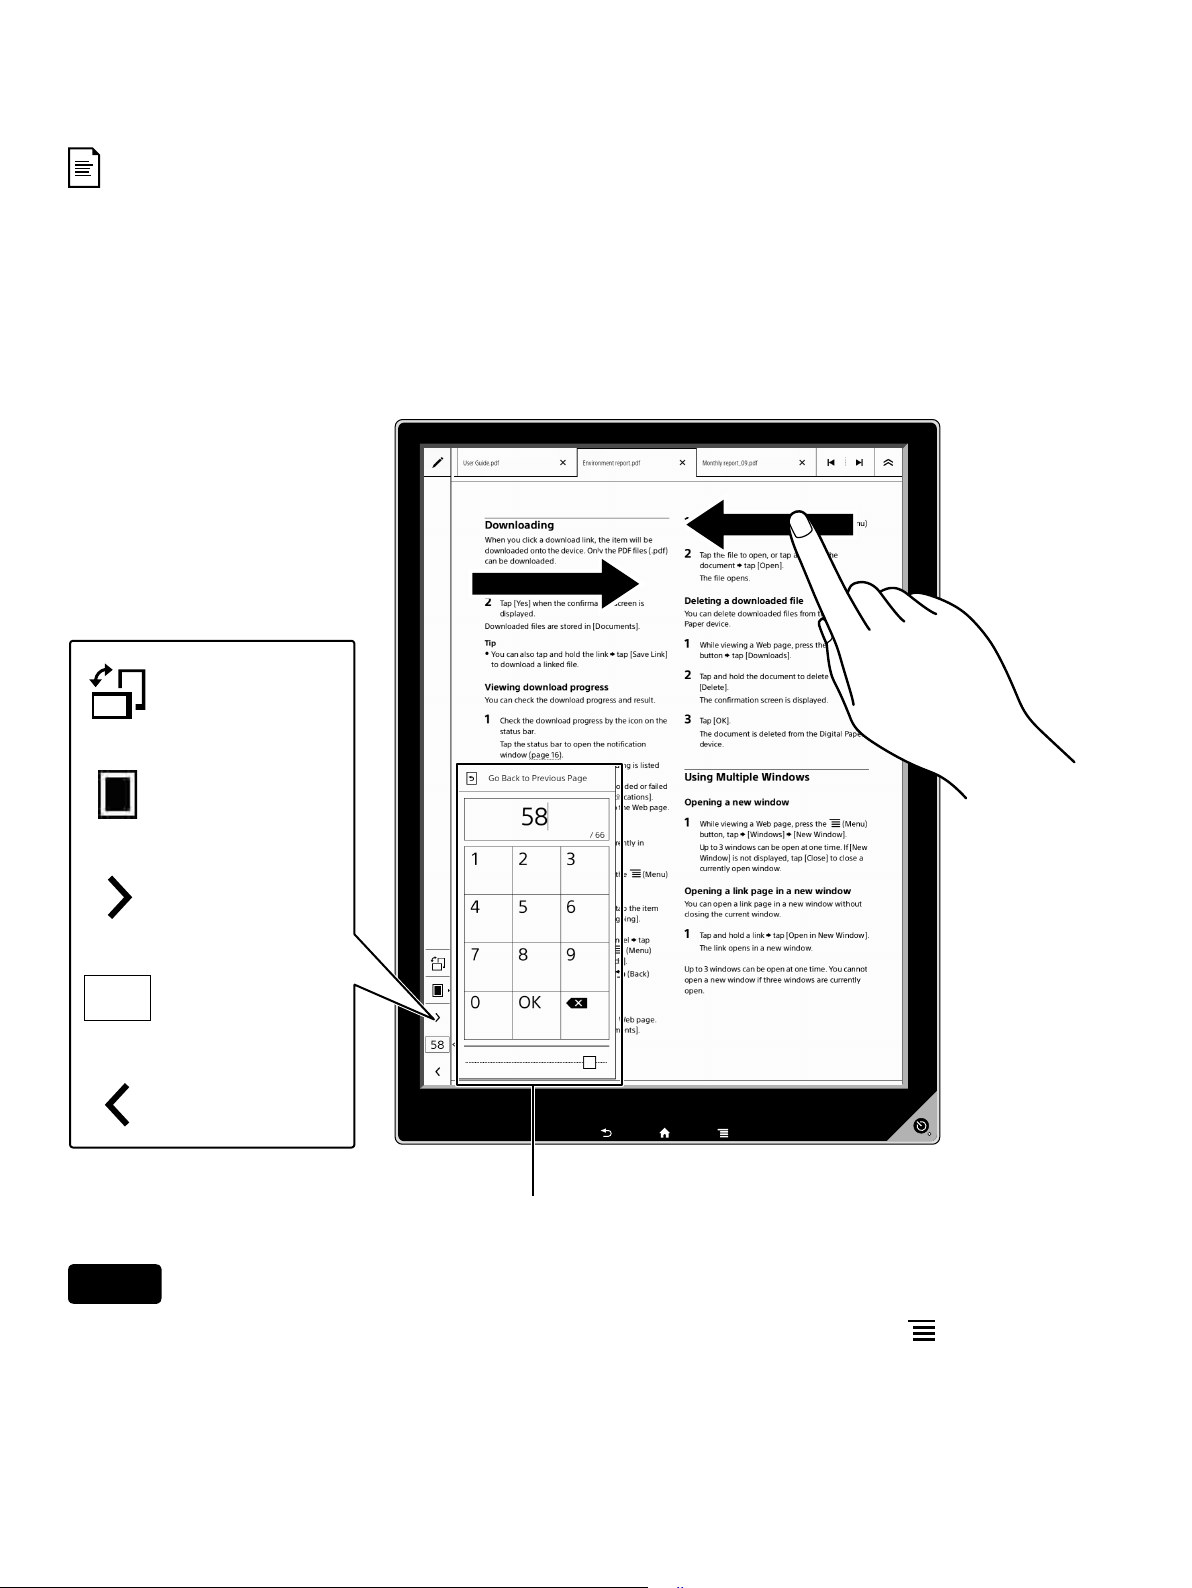
Document Page
The files that can be accessed on the Digital Paper device are called “documents.”
Tapping [Documents] on the [Home] screen and then tapping the name of the
document you want to open from the document list that appears will display the
“Document Page.”
The document list also includes the notes created on the device.
Swipe to turn to
the next page
Swipe to turn to
the previous page
Orientation
Switches to the
thumbnail view
(2, 4 or 9 pages
view)
Displays the
next page
58
Page indicator
Displays the
previous page
Tap the page indicator on the toolbar to display the page control box. You can enter a page
number and move to the specified page. Tap the page number and tap [OK].
Tip
•For some documents, pages turn in the opposite direction. Press the (Menu) button
and change the direction from the option menu.
•Swipe and hold your finger on the touchscreen to turn pages continuously. Release
your finger to stop.
2/9
Page 3
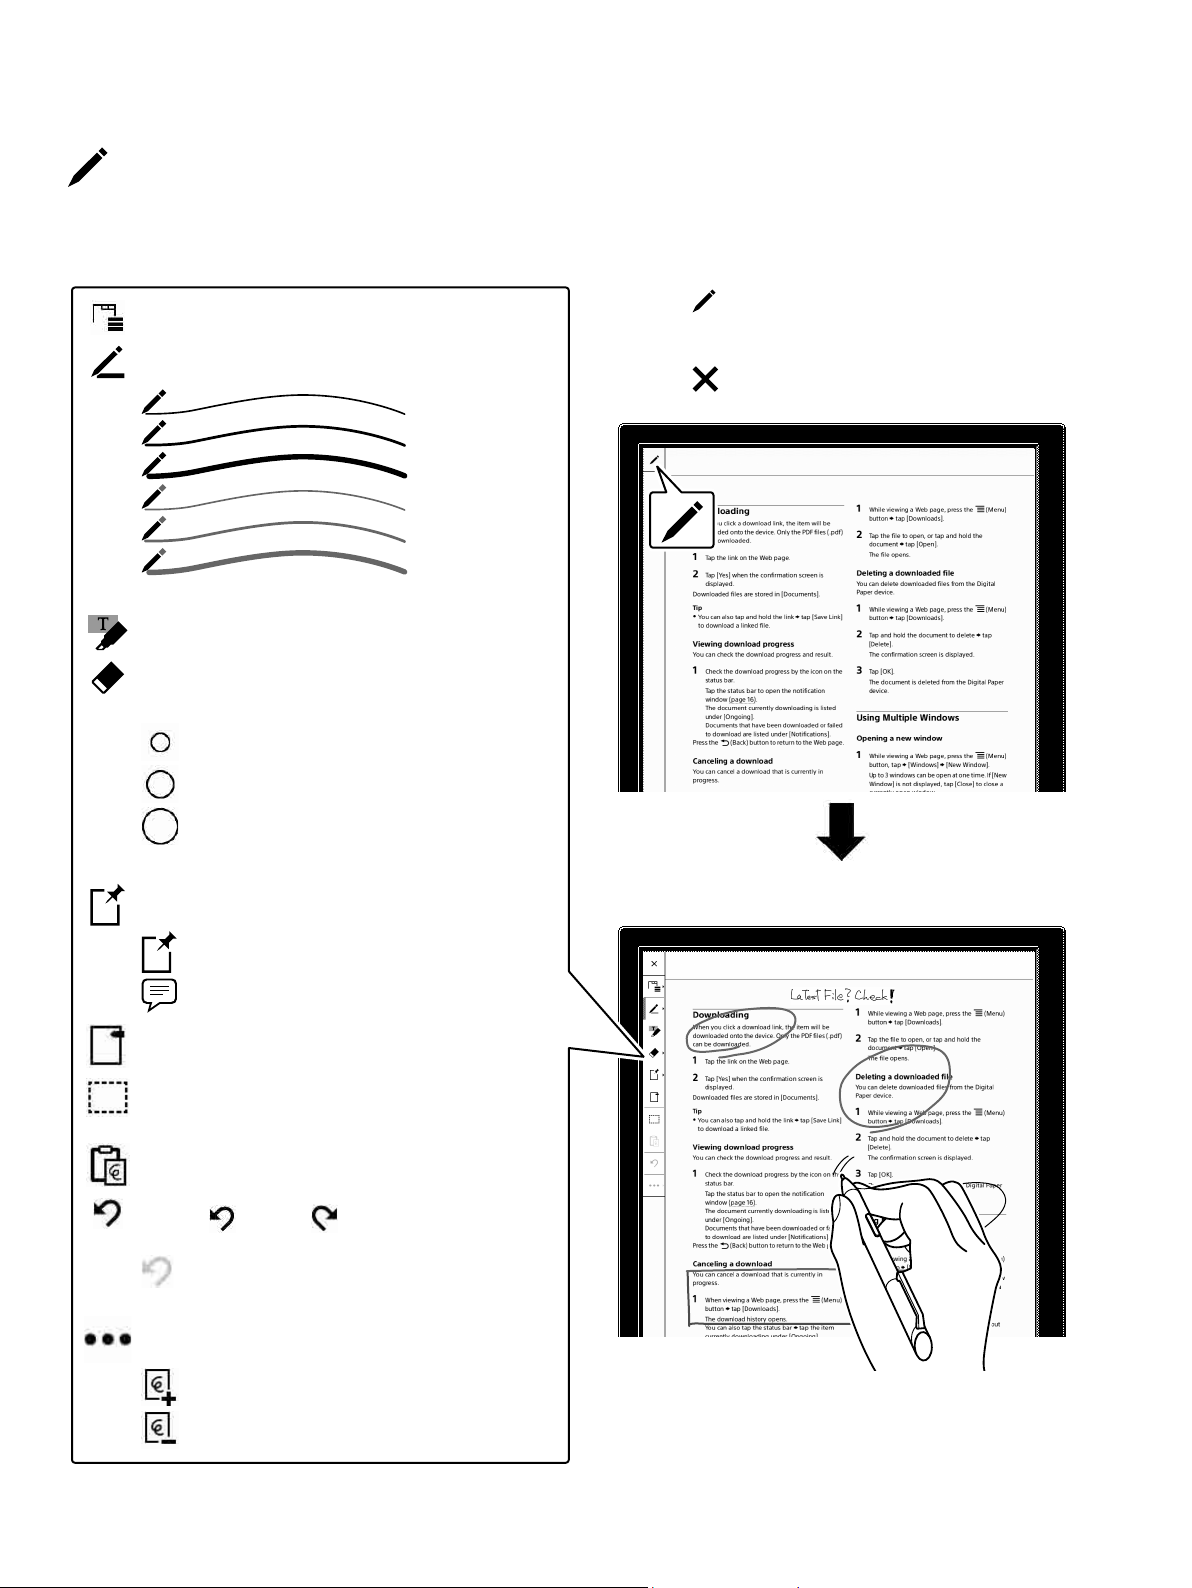
Toolbar Icons
Toolbar icons enable you to add annotations on a document.
Shows the tab list
Handwriting annotation:
Blue/Fine
Blue/Medium
Blue/Bold
Red/Fine
Red/Medium
Red/Bold
Select a pen type.
Highlights text
Erases a handwriting annotation or
highlight
Small
Medium
Large
Select an eraser size.
Sticky Note:
1 Tap while the document or note is
displayed.
The toolbar icons are displayed.
Tap
to hide them.
The settings are retained.
2 Tap an icon on the toolbar for operations
such as writing or deleting annotations.
Sticky Note (Handwriting)
Sticky Note (Text)
Sets a bookmark on the page (on/off)
Select a handwriting annotation to
move/copy/cut
Paste a handwriting annotation
Undo ( )/redo ( ) an operation such as
handwriting or eraser
appears when undo/redo is
unavailable.
Inserts/deletes a note page:
Insert New Page
Delete Current Page
The default setting for the toolbar position is
[Left]. To change the position to [Right], tap
[Settings] [Application Preferences]
[Documents] [Toolbar Position] [Right].
3/9
Page 4

Handwriting, Eraser
This page describes operations for writing/erasing on a document.
Handwriting words or pictures
Selecting the width and type of pen
Tap
(Handwriting) on the
toolbar to select the type of
pen.
Blue and red lines will appear as black and gray respectively on the
You can handwrite words or pictures
with the supplied stylus.
Digital Paper device. However, they will be displayed as blue and red
when transferred to a computer.
The handwriting icon on the toolbar shows the selected pen type.
Erasing a handwriting annotation or highlight
Blue/Fine
Blue/Medium
Blue/Bold
Red/Fine
Red/Medium
Red/Bold
Press the stylus button to switch to Eraser mode.
To change the eraser size, tap
and select [Small]/[Medium]/[Large] from the menu.
When you tap
selected. To return to Handwriting mode, tap
(Handwriting) on the toolbar.
(Eraser) on the toolbar, Eraser mode is
(Eraser) on the toolbar
While pressing the stylus button, drag the
stylus across the handwriting annotation or
highlight and then lift the stylus. The
selected part of the handwriting or highlight
will be erased.
4/9
Page 5

Zoom In/Out
You can zoom in or out on a document page.
Zooming in
Tap (next page)
(previous
or
page) to navigate
pages while
zoomed in.
Pinch out (touch the screen with two fingers
and open them) to zoom in on the display.
The zoom icon appears and
the page is zoomed in.
Tip
•You can handwrite annotations with the stylus while zoomed in.
•Drag your finger to reposition the page while zoomed in.
Zooming out
Pinch in (touch the screen with two fingers
and close them) to zoom out on the display.
Press the
standard size.
(Back) button to return to the
5/9
Page 6

Tab Panel, Tab List
Operating the tabs allows you to browse multiple open documents. Up to 3 tabs for
open documents are displayed in the tab panel. All the open documents are displayed
vertically in the tab list.
Tab panel
When the tab panel is hidden, tap the tab panel area to
display it. Tap a tab to switch to the selected document.
Tab panel close icon
Tap to close the tab panel. Tap the tab
panel area to display the tab panel
Tab panel area
again.
Tab List
Tap on the toolbar to display
the open files in the vertical tab
list.
Tip
•To close an open file, tap on the associated tab.
•To open a file that is not displayed in the tab list, open a file from the document list on
the [Home] screen.
•Saving all the open files as a Workspace allows you to open them at one time. Press
the (Menu) button and tap [Save Workspace] in the option menu to save them.
Even after closing the files, you can open the files simultaneously from [Workspace] on
the [Home] screen.
6/9
Page 7

Note
A PDF file that is created on the Digital Paper device is called “note.” You can select a
notebook template when creating a new note.
1 Press the (Home) button, and tap
[Note] [Create New Note]. Select a
template from the Notebook Template
selection screen, and tap [OK].
A new note will be created.
2 Write on the note with the stylus.
To change the file name of a note, press the
(Menu) button while the note is open
and tap [Rename] from the option menu.
Tip
•The first page is created by default. Turn the last page to add a new page at end of the
file. Tap (Insert/Delete Page) on the toolbar and tap (Insert New Page) to insert
a new page before the current page.
•You can use the PDF files of your choice as note templates. Save the PDF file that you
want to use as a template to the [note_template] folder in the internal memory of the
Digital Paper device.
7/9
Page 8

Using PDF Forms
Input information by tapping with the stylus or your finger.
You can easily fill in check boxes or radio buttons on questionnaires.
This device supports the following PDF
forms.
•Check box ( / )
Tap to switch the check box on/off.
•Radio button ( / )
Tap to select a radio button.
•Drop down list/List box
Tap to display the list.
•Text field
Tap to display the text input box () and
on-screen keyboard ().
Input text and tap [Save] to confirm the
text input.
Tip
•Tap (ENTER) to insert a line break in a text field where multiple lines can be
entered.
8/9
Page 9

Using Screen Transfer
You can project the screen of your Digital Paper device onto a computer screen.
By using this function you can work while sharing the screen of the Digital Paper on a
monitor during group work or conferences.
Features
•When displayed from a projector (connected to the computer), more than one person
can view the Digital Paper device screen at the same time.
•You can display PDF files from your Digital Paper device on a computer screen in color.
•Handwriting on the Digital Paper device is displayed in blue and red on a computer
screen.
•You can operate a Digital Paper device while charging it from a computer.
Share
Before using
The dedicated application and driver need to be installed onto the computer before
using the [Screen Transfer] function.
For details, check the information provided on Digital Paper’s product page.
http://www.sony.com/digitalpapersupport
1 Press the (Home) button on the device, tap [Settings] [System Management] [Screen Transfer],
and check the check box.
2 Connect the device to your computer using the supplied USB cable.
3 Start the dedicated application, “DP Display Output,” installed on your computer.
Tip
•When transferring documents, change the [Screen Transfer] setting to off and
temporarily remove the USB cable. Then reconnect the device to the computer using
the USB cable.
9/9
 Loading...