

Page 1
4-548-269-13(2)
Digital Paper System
User Guide
Software Version 1.5.50
DPT-S1
© 2015 Sony Corporation
Page 2

Table of Contents
Getting Started
New Features and Functions .......................... 5
New Functions in Ver.1.5.50 ...................... 5
Main Function Improvements
in Ver.1.5.50............................................ 5
New Functions from Ver.1.3....................... 5
Main Function Improvements
from Ver.1.3 ............................................ 6
Welcome!......................................................... 7
Features of the Digital Paper Device.......... 7
About this User Guide................................. 7
Battery ............................................................ 8
Charging the Digital Paper Device ............ 8
Maximizing Battery Life ............................ 10
Browsing Document Lists
Document Lists.............................................. 23
Browsing Document List Pages................ 23
Tools......................................................... 24
Browsing in Document View and Folder
View ...................................................... 24
Displaying a Document Thumbnail......... 24
Finding a Document with a Keyword...... 24
Option Menu in Document Lists.................... 25
Sending Documents to Network Drive.... 26
Opening Multiple Documents
Simultaneously...................................... 27
Deleting Multiple Documents
Simultaneously..................................... 28
Creating a New Folder ............................. 29
Option Menu for the Selected Documents
and Folders........................................... 29
Power On/Off ................................................ 10
Turning the Power On/Off (Shutdown).... 10
Parts and Controls ......................................... 12
Overview ................................................... 12
Buttons...................................................... 13
Stylus......................................................... 13
microSD Card Slot ..................................... 14
Digital Paper Device Security ................... 14
Basic Operations
Touchscreen Operations ............................... 16
[Home] Screen ............................................... 17
[Home] Screen and Applications.............. 17
On-Screen Keyboard .................................... 20
Transferring Documents (PDF)
Transferring Documents (PDF) from a
Computer....................................................... 21
Reading
Reading Documents..................................... 30
Opening a Document .............................. 30
Turning a Page......................................... 30
Turning Pages Continuously ................... 30
Changing the Page Turn Preference........ 31
Navigating Pages...................................... 31
Using the Page Control Box...................... 32
Thumbnail View ........................................ 33
Zooming in the Display............................ 34
Operating Tabs ......................................... 35
Setting the Bookmark to On/Off............. 36
Searching Pages by Keyword................... 37
Using Menu Items.................................... 38
Using the [Workspace] Application............... 38
Registering a Workspace......................... 38
Opening a Workspace ............................. 39
Saving a Workspace................................. 39
Deleting/Renaming a Workspace........... 40
Transferring Documents (PDF) to the
Computer....................................................... 22
Writing
Handwriting/Annotating the Document....... 41
Using the Toolbar...................................... 41
Handwriting a Note on a Page ................ 42
2
Page 3

Moving/Copying/Pasting/Cutting .......... 43
Highlighting Words on a Page ................ 44
Using the Eraser....................................... 45
Undoing/Redoing the Previous
Operation ............................................. 46
Disabling Gestures................................... 46
Adding a Sticky Note (Handwriting)........ 46
Adding a Sticky Note (Text) to a Page...... 47
Displaying Annotation List ...................... 48
Annotation Settings ...................................... 51
Limit Editing Annotations......................... 51
Configuring the Pen Button Settings ....... 51
Set Pen Grip Style ..................................... 51
Performing Advanced Calibration ............ 52
Using PDF Forms ........................................... 53
Using the [Note] Application ........................ 54
Creating a New Note................................ 54
Changing Filename of a Note................... 55
Inserting a New Page to the Last Page of
Note ....................................................... 55
Inserting a Page in the Middle of the
Note ....................................................... 55
Deleting a Note Page............................... 56
Setting the Notebook Template.............. 56
Adding Notebook Template.................... 56
Selecting the Destination to Save the Note
(Synchronization with Server) .............. 56
Using Screen Transfer.................................... 57
Network
Setting up a Wi-Fi® Network......................... 58
Preparing to Set Up a Wi-Fi
Connection ........................................... 58
Selecting a Connection Type................... 58
Browsing the Web .................................... 67
Zooming in on the Web............................ 67
Downloading............................................. 67
Using Multiple Windows.......................... 68
Bookmarks and History............................ 68
Browser Settings...................................... 69
Using Menu Items.................................... 70
Using ShareFile.............................................. 71
Enabling ShareFile .................................... 71
Using the ShareFile Application ............... 71
Settings
Changing the Settings................................... 72
Changing the Settings .............................. 72
General Setting ......................................... 72
Wireless Network Settings........................ 72
Server Settings.......................................... 72
Application Preferences ........................... 73
Date & Time Settings................................ 73
System Management................................ 74
Initialization............................................... 74
About......................................................... 75
Device Shutdown...................................... 75
Other Information
Troubleshooting............................................ 76
Troubleshooting Tips................................ 76
Re-attaching the Stylus Holder ................ 76
Replacing the Tip ...................................... 76
Digital Paper Device.................................. 77
Wireless Connectivity................................ 78
Reading Documents ................................. 79
Connecting to Your Computer ................ 80
microSD Card ........................................... 80
Using the Network Drive .............................. 64
Setting the Network Drive ....................... 64
Synchronizing the Digital Paper Device with
the Network Drive ................................ 65
Opening a Synchronized Document in the
Digital Paper Device............................. 66
Deleting a Synchronized Document ....... 66
Using Menu Items.................................... 66
Browser ......................................................... 67
Precautions.................................................... 81
Safety Information .................................... 81
Applications on the Digital Paper
Device ................................................... 82
Notes on microSD Cards.......................... 84
Legal Notice................................................... 85
Appendix ...................................................... 86
Specifications........................................... 86
Supported File Types ................................ 87
3
Page 4

System Requirements.............................. 88
Limited Warranty and Service ...................... 89
Limited Warranty ..................................... 89
Service ...................................................... 89
4
Page 5
Getting Started
Save destination for notes
You can specify a network drive folder as the save
destination for new notes when using network drive
(page 73).
New Features and Functions
New Functions in Ver.1.5.50
In Ver.1.5.50, the functions below are added.
Added thumbnail view
2-page view is added to the Thumbnail view
(page 33).
Using ShareFile
You can use the ShareFile application on the Digital
Paper device (page 71).
Additional thick line function for stylus
An additional thick line has been added to the stylus
in handwriting mode (page 42).
Selecting a note template
Allows you to quickly select a different template when
creating a new note. You can quickly create a new
note when the template format is selected (page 54).
Main Function Improvements in Ver.1.5.50
Stylus support for PDF form
You can enter data into PDF forms using the stylus
(page 53).
Proxy server settings
You can set a proxy server for each wireless LAN
router (page 62).
Time Server (NTP Server) Support
Allows you to synchronize the clock using a Network
Time Protocol (NTP) server (page 73).
Adjusting the size of eraser
Allows you to change the size of the eraser (page 45).
Navigating pages while zoomed in
You can move to another page even while the display
is zoomed in (page 34).
Navigating and Moving/Copying/Pasting/
Cutting handwriting annotations
You can move/copy/paste/cut handwriting
annotations and navigate using the stylus (page 43).
Changing the file name of a document/
note
You can rename a document or note which is open in
the device (page 38, 55).
Improved pen selection menu
The menu to select the line color and line thickness is
easier to understand (page 42).
Advanced Calibration
Advanced Calibration for pen tip position is improved
(page 52).
Device buttons disabled (handwriting)
The (Back), (Home), (Menu), (Power)
buttons on the device are disabled when handwriting
on the screen using the stylus (page 42).
New Functions from Ver.1.3
In Ver.1.3, the functions below are added.
Toolbar
You can display the toolbar at all times outside the
document (page 31).
5
Page 6

The toolbar is displayed at the left side of the screen
by default. You can change the toolbar position to the
right side to suit your preference (page 73).
You can tap [Hide Toolbar] to hide the toolbar while
you concentrate on reading (page 30).
Stylus button modes
The stylus button can be set to three possible modes:
Highlight active, Eraser active, Button inactive
(handwriting only) (page 45).
Handwriting while zoomed in
You can handwrite while the display is zoomed in
(page 34).
Undo/redo function
The undo/redo icons are added on the toolbar. You
can undo/redo the previous operation such as
handwriting or erasing (page 42).
Creating/deleting a folder
You can create/delete a folder (page 25).
Tab List
The Tab List can be displayed by tapping the Tab List
icon on the toolbar of an opened document
(page 35).
Strengthening the device lock password
You can enter between 1 and 20 alphanumeric
characters and symbols as your device lock password
(page 14).
Internal memory encryption
You can secure your content further by choosing to
encrypt the internal memory. When internal memory
encryption is enabled, you must enter your memory
encryption password after each restart (page 15).
Disabling Gestures
This function prevents you from accidentally turning
pages, zooming in, etc., by touching the screen with
your sleeve or hand while handwriting (page 46).
Creating notes within folders
You can create a new note by tapping [Create new
note under current folder] in the document folder
view (page 54).
Inserting (adding)/deleting pages
You can insert a new page (page 55) or delete the
current page (page 56) in a Note.
Selecting note template
You can select a template or use your favorite PDF file
as a template (page 56).
Preventing other people from deleting
annotations
You can prevent annotations (writing, sticky notes,
highlighting, bookmarks, etc.) from being edited or
deleted by another person (page 51).
Duplicating a file
You can duplicate a file on the Document or Note list
screens (page 29).
PDF form support
You can enter data using various PDF Form elements
(page 53).
Main Function Improvements from Ver.1.3
Navigating pages
The page navigation icons and the page indicator
stay on the toolbar. You can move to another page
easily (page 31).
Orientation
By tapping the orientation icon on the toolbar, you
can rotate the screen easily (page 31).
Improvement of the red pen display
Lines are immediately displayed in gray after being
drawn with the red pen (page 42).
Displaying the remaining battery
When the charge/battery status icon turns into , a
screen indicating that the battery level is too low
appears (page 9).
6
Page 7

Welcome!
Note
Features of the Digital Paper Device
Wide, slim and lightweight e-paper screen
The flexible e-paper screen provides a large A4-size
yet lightweight display.
Supplied dedicated stylus for small letter writing
The electromagnetic induction-type stylus enables
easy writing of small characters.
Hybrid touchscreen for writing with your finger or
supplied stylus
The optical and electromagnetic induction
touchscreen allows you to flip through pages or
operate menus with a finger, as well as write
characters or draw pictures with the supplied stylus.
Carry thousands of personal documents anywhere
you go
You can carry a large number of PDF files: easily
transferred from your computer to the Digital Paper
device.
The internal memory of the Digital Paper device can
store about 2,800 files*. The Digital Paper device
supports microSD memory cards of up to 32 GB to
further increase data storage capacity.
* Based on 1 MB one file
High speed visual search by changing page view
By displaying 2, 4, or 9 pages in one screen, you can
search through many pages visually at high speed.
An annotation icon is displayed on the pages that
contain any kind of annotation, including sticky
notes (handwritten or typed).
Moreover, by moving your finger in the direction to
turn a page, then holding it, you can flip pages at
high speed.
Easy file transfer between the Digital Paper device
and a computer via USB connection
By connecting the Digital Paper device to your
computer with a USB cable, you can transfer files
easily. Annotations on the Digital Paper device are
embedded in a PDF file, and can be read and edited
on your computer.
Synchronization with a network drive via Wi-Fi
connection
You can access a specific network drive, and then
synchronize documents on the Digital Paper device
with documents on the network drive.
About this User Guide
Please read the Quick Start Guide in this package and
the Basic Operation Guide in the Digital Paper device
to help you get started.
This User Guide provides detailed instructions on the
operation of your Digital Paper device.
Writing/drawing like that of a digital notebook
You can use the supplied stylus to hand write notes
or draw pictures with fine lines in a document. You
can also highlight words and add bookmarks or
sticky notes (handwritten or typed). You can select
a folder and template when creating a new note.
Digital Paper device lock
You can lock the Digital Paper device with a
password of up to 20 alphanumeric characters.
Documents cannot be read without inputting the
device lock password, even if the Digital Paper
device is turned on.
Screenshots in the User Guide may depict screens
different from the device.
Names of persons and documents in this guide are
provided as examples only, and do not in any way
represent any specific person or existing document.
Searching for a specific topic in this User
Guide
Use the [Table of Contents] feature of your Digital
Paper device to search for topics, and then tap a topic
to jump to it.
While viewing this User Guide on your device, press
the (Menu) button tap [Table of Contents] to
view the Table of Contents.
7
Page 8

Jumping to a linked section in this User
Ȫ
AC outlet
AC adapter
Guide
Tap the link indicated with a dotted underlined
section title or # to jump to the page indicated.
To return to the page you were previously viewing,
tap [Go Back to Previous Page] in the page control box
(page 32).
Battery
Charging the Digital Paper Device
The charge/battery status icon at the right side of the
status bar shows the battery level (page 9).
When the battery level becomes low, select either
one of the methods below to charge the device.
Micro USB connector
Charge indicator
Charging via an AC outlet
1 Connect one end of the supplied USB cable to the
micro USB connector of your device, and the
other end to the supplied AC adapter.
2 Connect the AC adapter to an AC outlet.
The icon turns into and the Charge indicator
will light up red while charging. When charging is
complete, the icon turns into and the
indicator turns off.
8
Page 9
Note
Charge the device within the recommended
Note
Note
temperature range of 5 °C to 35 °C (41 °F to 95 °F).
If the room is too hot or cold, disconnect the USB
cable from the device, adjust room temperature
accordingly, then reconnect the USB cable to charge
the device.
Tip
It takes approximately 2.5 hours to fully charge the
device when the battery is drained.
Charging via your computer
1 Power on your computer.
2 Connect the Digital Paper device to your
computer with the supplied USB cable.
The icon turns into and the Charge indicator
will light up red while charging. When charging is
complete, the icon turns into and the
indicator turns off.
Even if a dedicated application for the [Screen
Transfer] function is not launched on your
computer, the device will keep charging if [Screen
Transfer] is on, and you can operate the device
while it is charging.
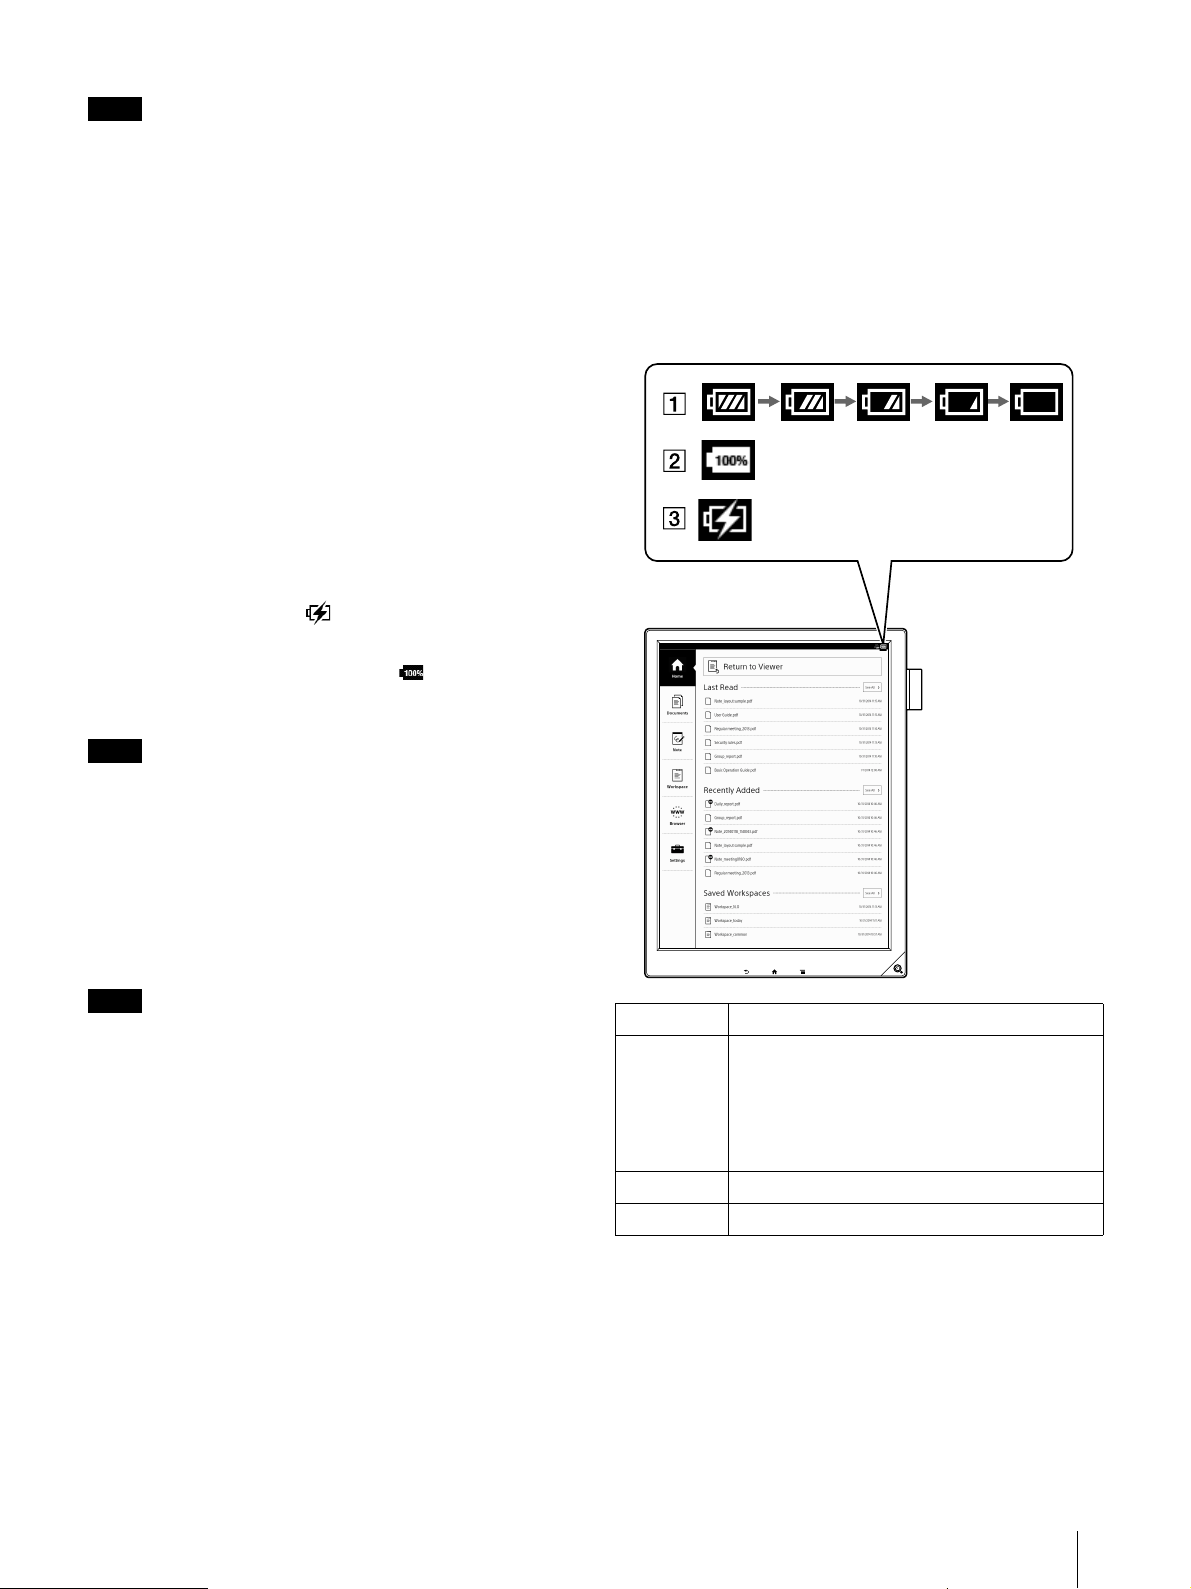
Charge/Battery status icon
The charge/battery status icon shows the charging
status or remaining battery level.
When connected to a computer and with [Screen
Transfer] set to off (page 74), the device will be in
transfer mode. It will continue to charge but cannot
be operated.
3 When charging is complete, disconnect the USB
cable from the device and your computer.
Your computer must be turned on to charge the
Digital Paper device.
The device will not be charged if your computer
enters sleep mode, standby mode or hibernation.
Keep your computer turned on with a stable and
continuous power supply while charging the
device.
The (Power) button cannot be used when the
device is connected to your computer.
Tip
It takes approximately 3.5 hours to fully charge the
device when the battery is drained.
The device will be charged through the computer
when using the [Screen Transfer] function.
Number Description
Four bars in the battery icon indicate a fully
charged or almost-fully charged battery.
The number of bars decreases with battery
consumption. Zero bars indicate that the
battery has almost no remaining charge.
The battery is fully charged.
The battery is charging.
9
Page 10
Note
When the charge/battery status icon turns into ,
Note
Ȫ
a screen indicating that the battery level is too low
appears. In this case, tap [OK] and charge the
device.
When the charge/battery status icon turns into ,
an edited document is saved and becomes readonly. Then a screen indicating that editing cannot
be done appears. In this case, tap [OK] and charge
the device.
Maximizing Battery Life
Turn off (shutdown) (page 10) the device when it is
not going to be in use for a prolonged period of
time.
Do not leave the device with the battery depleted
for a prolonged period of time. Battery capacity
may decrease (page 72).
Use and store the device within the recommended
temperature range of 5°C to 35°C (41°F to 95°F).
Turn off the Wi-Fi function when no wireless
communication is necessary (page 72).
Turn on [Wireless Standby] (page 72).
Set [Auto Sync] to Off so as not to synchronize the
Digital Paper device and network drive (page 72).
Battery life decreases in the following
cases
Document related operations
Frequent handwriting
Frequent annotation and keyword searches
Displaying graphic-intensive documents or Web
sites
Server Settings related operations
Setting [Auto Sync] to On
Wi-Fi related operations
Wi-Fi communications
Displaying the [Wi-Fi Settings] screen continuously
Setting [Wireless Standby] to Off
microSD card related operations
Displaying a document in a microSD card
Frequent insertion and removal of a microSD card
Loading a large volume of content stored on a
microSD card
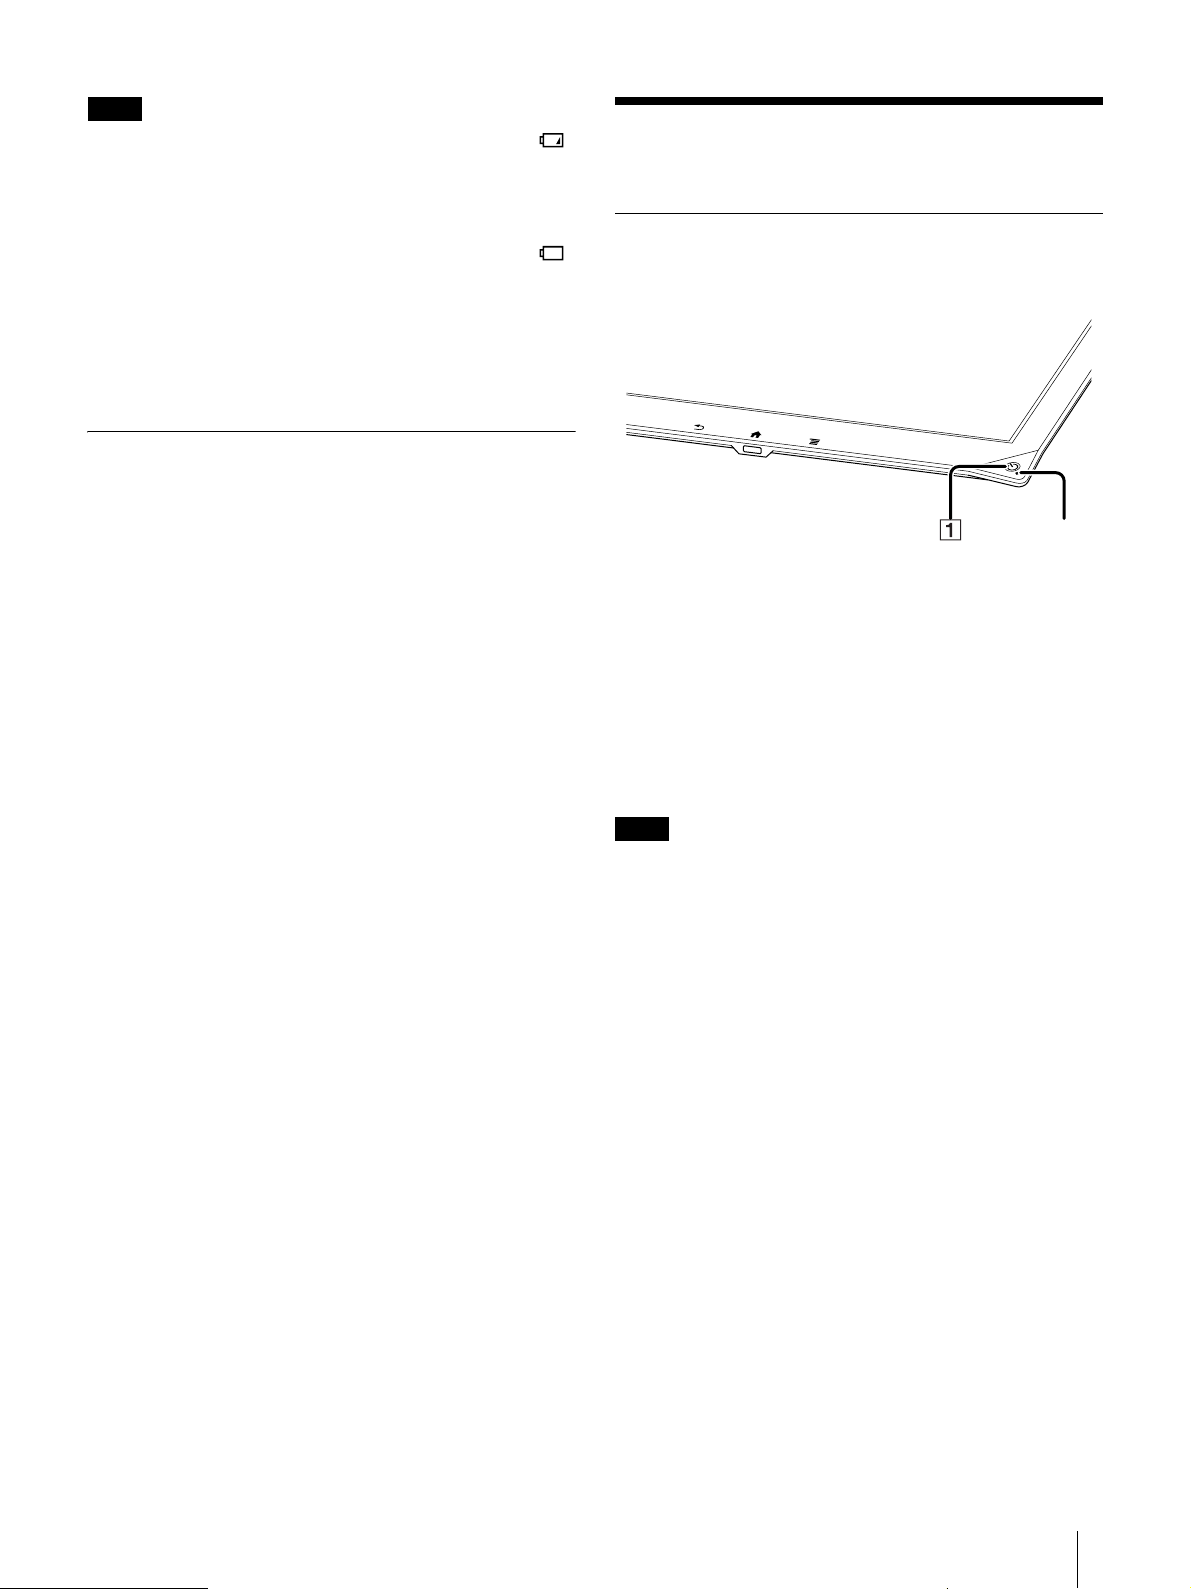
Power On/Off
Turning the Power On/Off (Shutdown)
(Power) button
Charge indicator
Turning on the power
1 Press the (Power) button.
If the Charge indicator blinks red 3 times upon
pressing the (Power) button, it shows that the
device battery is completely depleted.
To charge the device, insert the supplied USB cable
into the micro USB port and connect it to the
supplied AC adapter, or connect the device to a
computer using the USB cable.
Turning off the power (Shutdown)
1 Press and hold the (Power) button for about 3
seconds.
2 Tap [Yes] to turn off the Digital Paper device.
Turning it off reduces battery consumption more
than the sleep mode. Sony recommends that you
turn off (shutdown) the device when it is not
going to be in use for a prolonged period of time.
10
Page 11

Tip
You can also turn off the device from [Settings].
To turn off, tap [Settings] [Device Shutdown]
[Yes] on the Home screen.
Sleep mode
To extend battery life and prevent unintentional
operation of the touchscreen, set the Digital Paper
device to sleep mode by pressing the (Power)
button. The standby screen appears.
To wake the device, press the (Power) button again.
Automatic power-saving
The Digital Paper device will enter sleep mode after
about 1 hour of inactivity. After 3 days in sleep mode,
it will turn off (shut down) automatically. The
automatic power-saving cannot be turned off.
11
Page 12
Parts and Controls
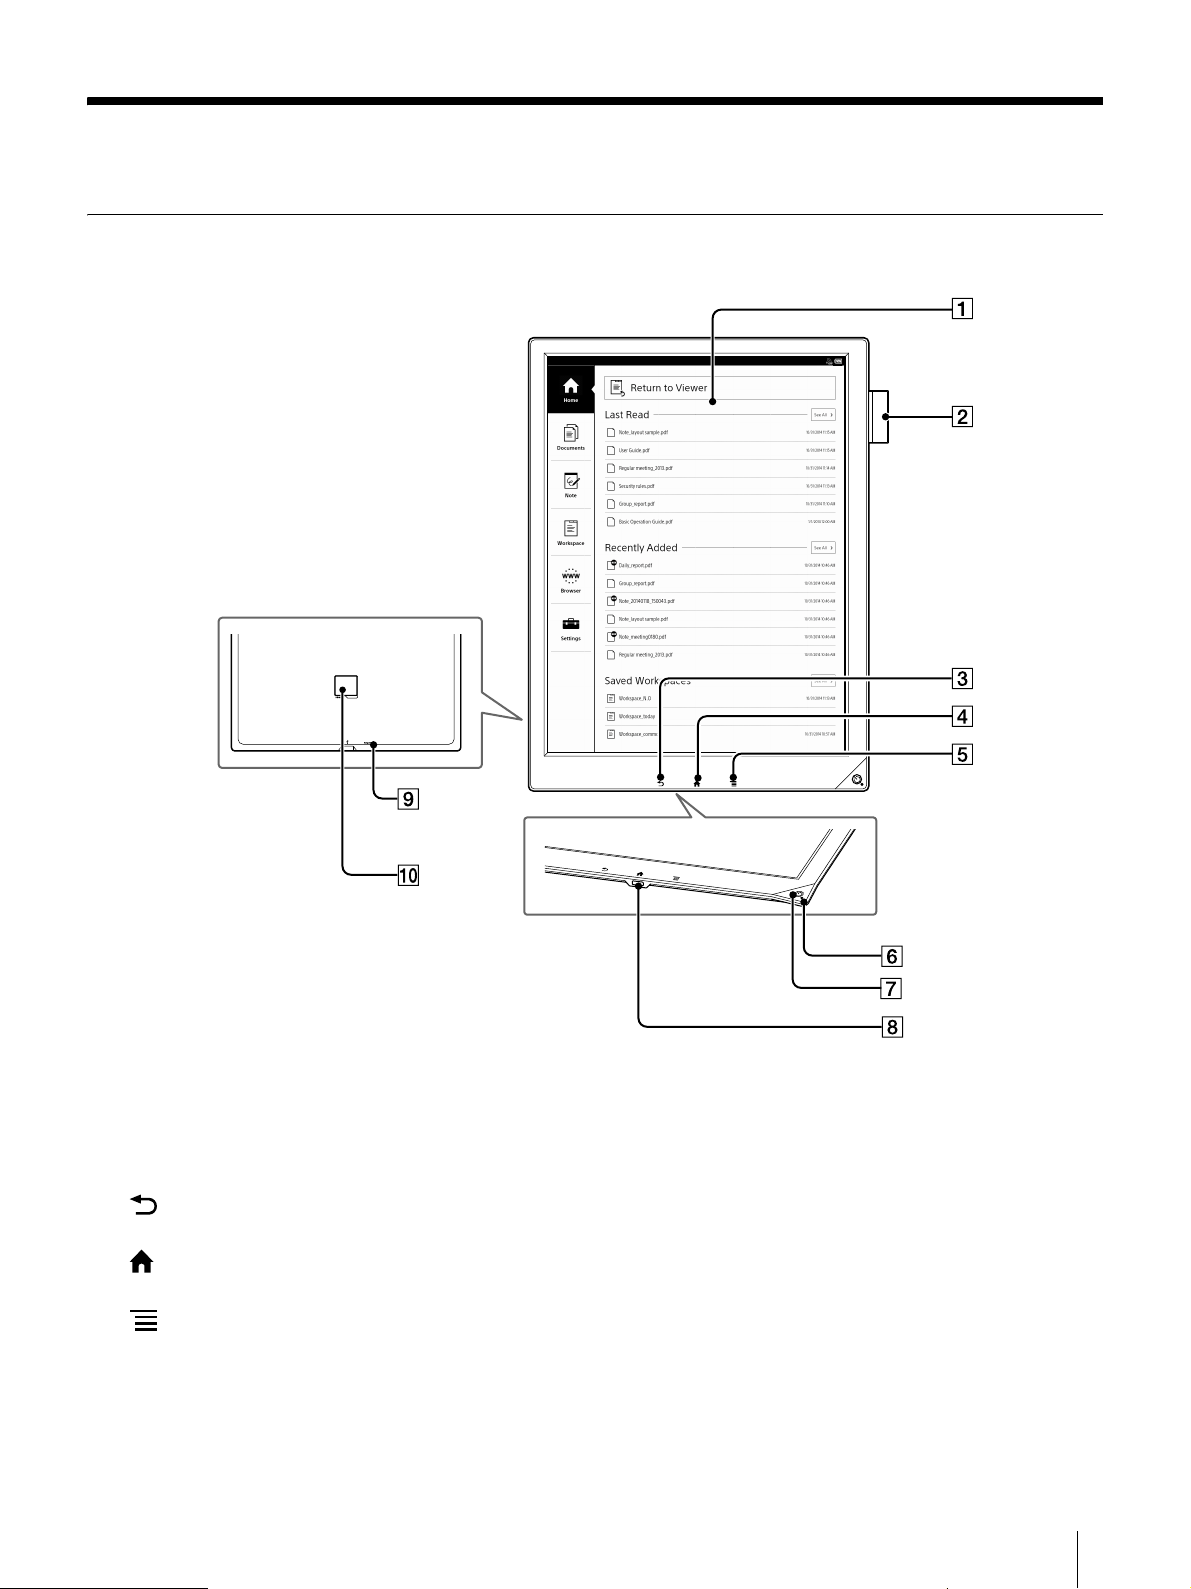
Overview
This section describes the parts and controls of the Digital Paper device.
Touchscreen
Stylus holder
(Back) button
(Home) button
(Menu) button
Charge indicator
(Power) button
Micro USB connector
RESET button
microSD card slot
12
Page 13
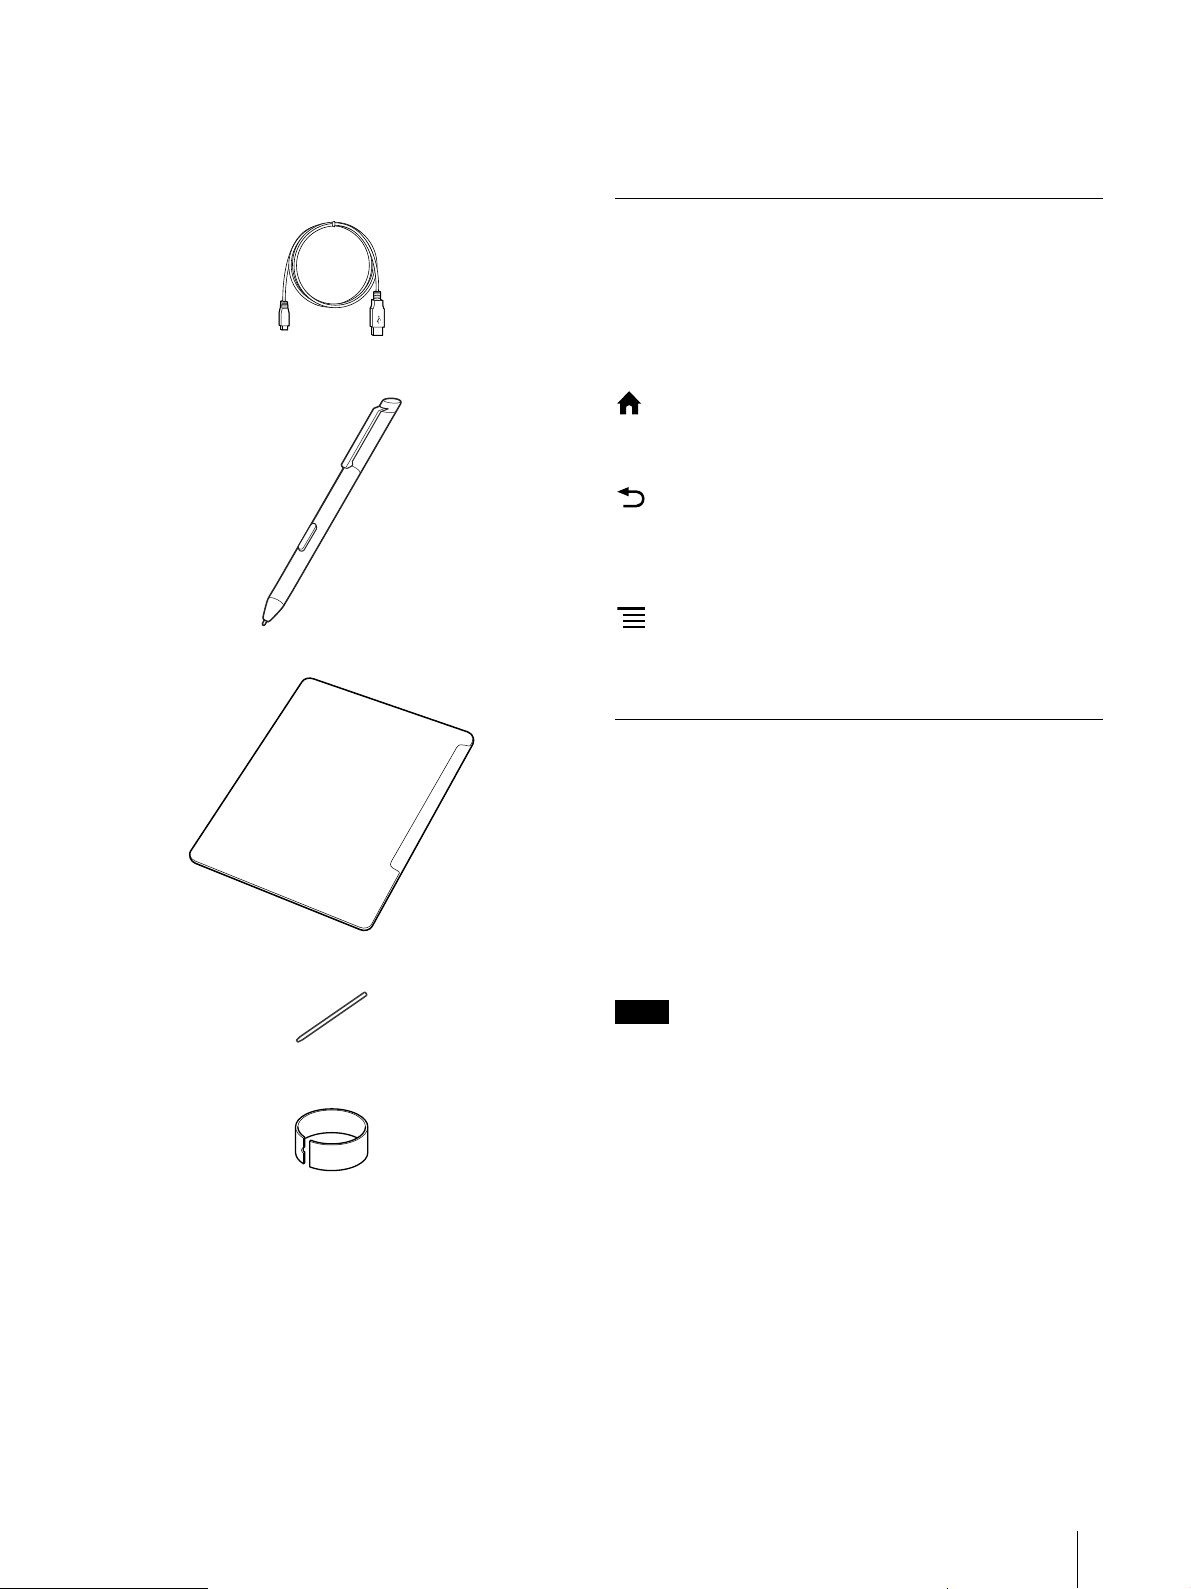
Supplied accessories
Note
AC adapter × 1
USB cable × 1
Stylus × 1
Sleeve case × 1
* For more details on the supplied replacement tip,
refer to the Quick Start Guide.
Buttons
(Power)
Turns the device on/off, and sets it to sleep mode
(page 10).
(Home)
Displays the [Home] screen.
(Back)
Returns to the previous screen, or returns to the
document list from a document.
(Menu)
Displays the usable option menu on each screen.
Replacement tips*
Tip puller × 1
Tip
The stylus tip wears out with use.
Sony recommends that you replace the stylus tip
when it wears down to 1.5 mm or less.
Please check the information about supply
accessories provided on Digital Paper device’s
product page.
http://www.sony.com/digitalpapersupport
Stylus
The supplied stylus enables you to handwrite
memos, highlight the documents, and annotate on
the touchscreen.
While pressing the stylus button, trace text or
highlight to erase from the touchscreen.*
* You can change the pen button settings in the
settings menu (page 51).
Use only the supplied stylus. Use of another stylus
may cause incorrect operation.
When the stylus is not in use, place it in the stylus
holder of the Digital Paper device. If the tip of the
stylus is continually pressed in the holder, it may
lose sensitivity.
13
Page 14
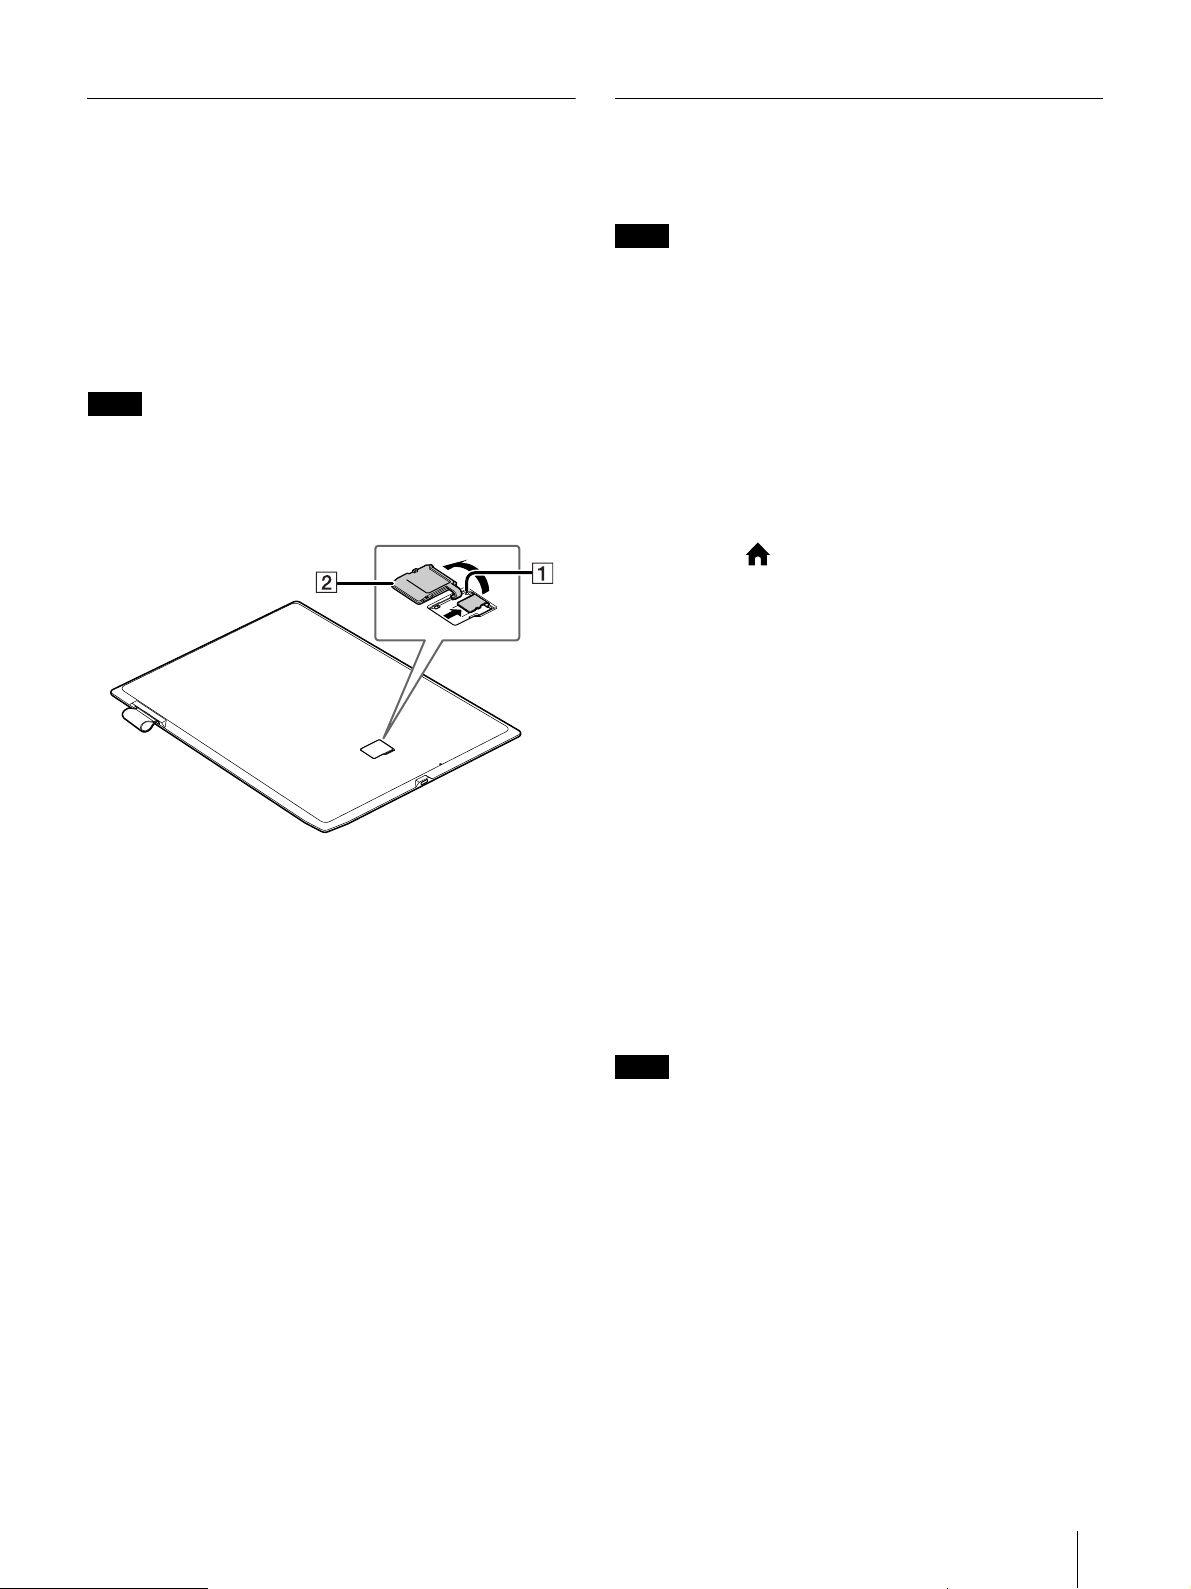
microSD Card Slot
Note
Note
Note
Digital Paper Device Security
The microSD card slot is located on the back of the
device. Hold the microSD card with the contacts
facing down and the arrow pointing toward the
microSD card slot, and then insert it until it clicks into
place. The access indicator lights up in orange while
the device is accessing the microSD card.
Close the slot cover when using a microSD card.
To format a microSD card, see page 74.
Do not remove the microSD card while the access
indicator is lit.
To remove a microSD card, push it in once, then
slide it out slowly with your finger.
You can lock the Digital Paper device or enable
internal memory encryption for security.
Be sure to remember your password.
Sony recommends that you use passwords that
have a mix of 6 or more letters and numbers.
Do not create passwords that other people could
easily guess. Change your passwords periodically.
Locking the Digital Paper Device
You can help prevent others from viewing data in the
device by locking it.
1 Press the (Home) button and tap [Settings].
2 Tap [System Management] [Device Lock]
[Device Lock] [Enable] [OK].
3 Enter your device lock password.
You can enter between 1 and 20 alphanumeric
characters and symbols as your device lock
password.
microSD access indicator
Slot cover
4 Enter the password again to confirm and tap
[OK].
When the device lock is on, the password entry
screen is displayed after the device is turned on or
when the device is woken from sleep mode.
Enter your password and tap [OK] to release the
device lock.
You cannot use the Tab key and Space key when
entering the password.
Caution regarding your password
If you forget your password, the device must be
shipped to the Sony Support Center to be unlocked.
Please note that this will result in loss of all saved
content and settings.
14
Page 15

Internal Memory Encryption
Note
You may secure your content further by choosing to
encrypt the internal memory. After internal memory
encryption is enabled, you must enter your memory
encryption password when powering on the device.
1 Press the (Home) button and tap [Settings].
2 Tap [System Management] [Internal Memory
Encryption] [Internal Memory Encryption]
[Enable] [OK].
The device restarts.
3 Enter your password.
You can enter between 6 and 20 alphanumeric
characters and symbols as your memory
encryption password.
4 Enter the password again to confirm and tap
[OK].
All the data saved in the internal memory are
deleted before memory encryption is enabled.
Memory encryption results in 300 MB less available
space in the internal memory.
You cannot encrypt a microSD card.
If you forget your password, contact the Sony
Support Center.
In order to disable the internal memory encryption,
all the content on the device will be deleted.
The deleted data cannot be restored.
You cannot use the Tab key and Space key when
entering the password.
Tip
When device lock and internal memory encryption
are both enabled, upon startup you must enter your
password for internal memory encryption as well as
your password for device lock.
Sony recommends that you create a backup in the
computer for the documents you want to retain
before encrypting internal memory.
15
Page 16
Basic Operations
Touchscreen Operations
The touchscreen recognizes the following gestures.
You can also use the supplied stylus for more precise
touchscreen operation.
Operation with the stylus makes it easier to select
small items or specific areas of text.
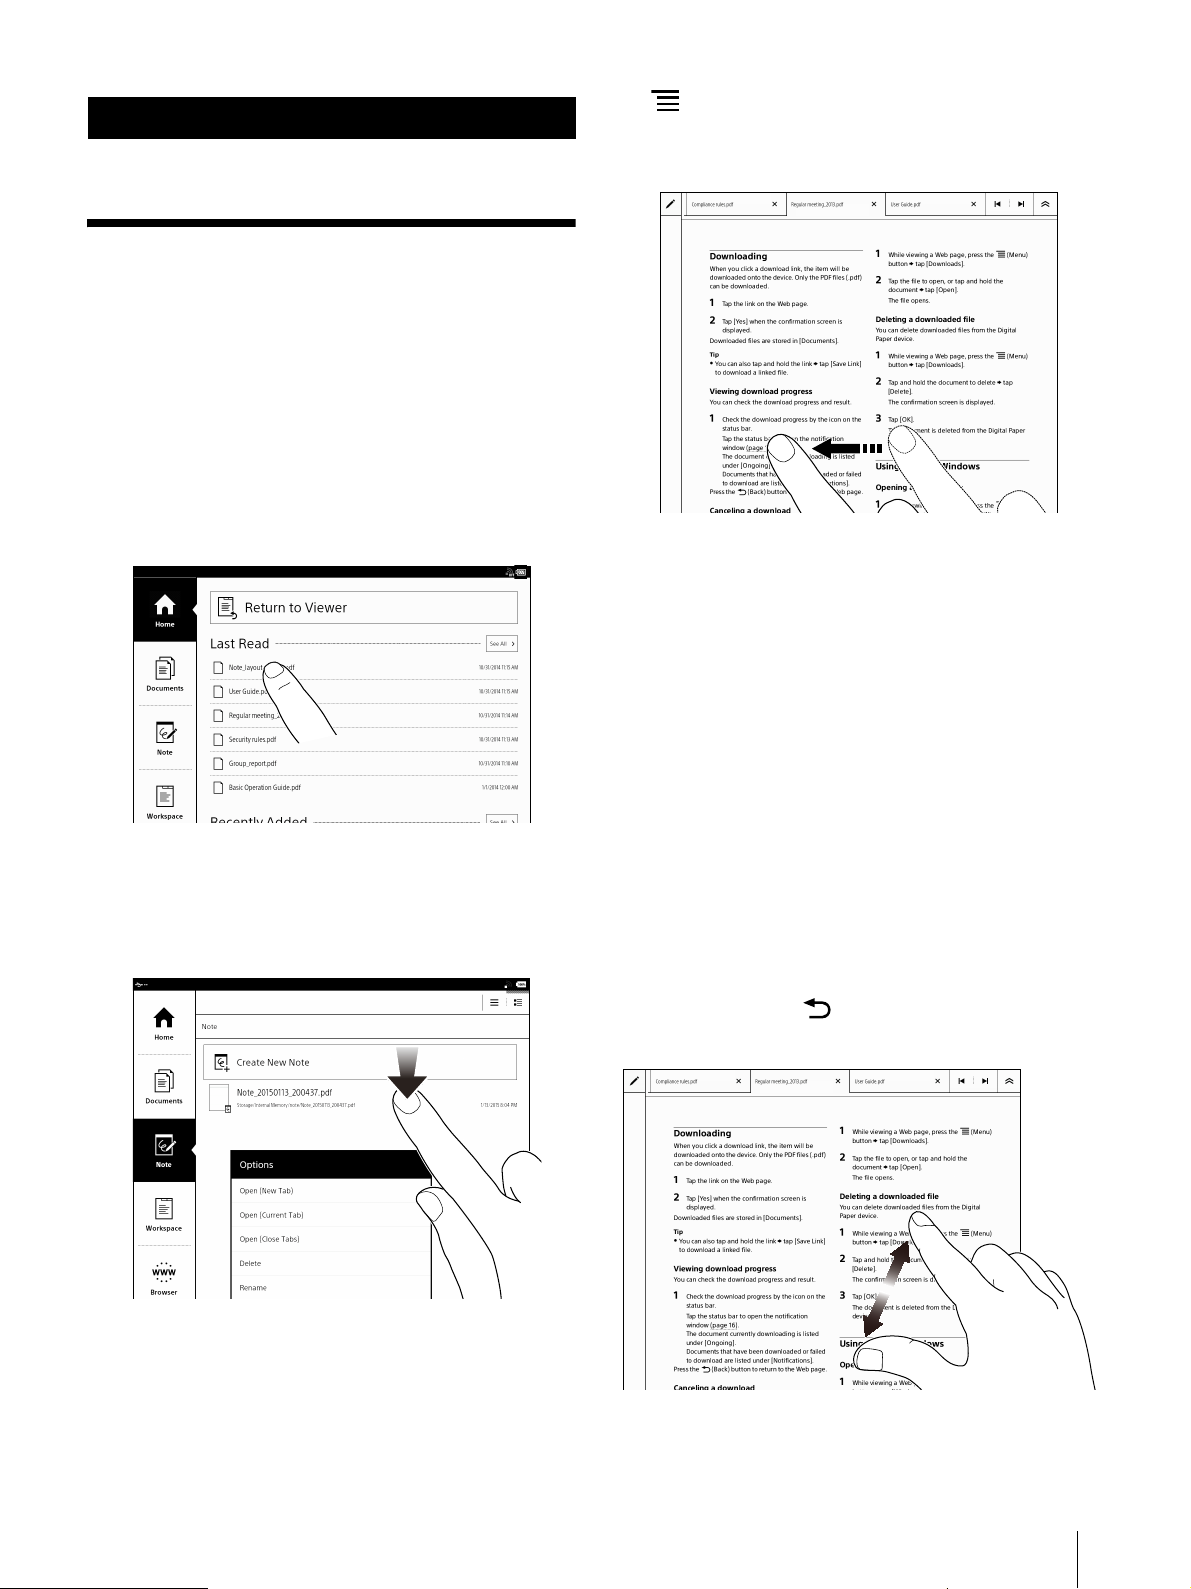
Tap
Gently tap the icons and menu items on the screen
with the stylus or fingers to select and open them.
the (Menu) button tap [Page Flow]. You can also
navigate pages of document lists by swiping up or
down.
Swipe and hold
Swipe and hold your finger on the touchscreen to turn
multiple pages continuously.
Remove your finger to stop turning the pages
(page 30).
Tap and hold
Tap and hold your finger to display a pop-up menu for
available operations.
Pinch in/out
Pinch in using two fingers to switch to thumbnail view
when viewing a document in standard size.
With every pinch in the view will change from 2-page
view 4-page view 9-page view (page 33).
Pinch out using two fingers to return to the previous
size.
Pinch out using two fingers to zoom in when viewing
the document in standard size.
Pinch in or press the (Back) button to return to the
standard size (page 34).
Swipe
Turn the page. You can slide an open document to the
right or left to navigate to the previous/next page. To
change the page flow direction for a document, press
16
Page 17
Tip
Note
When you tap a desired page in 2, 4, or 9 page view,
it will display as one page.
[Home] Screen
Drag
Touch and drag your finger to reposition a zoomed-in
page. The page is repositioned after you release your
finger (page 34).
You cannot operate the device using your fingers if
the stylus is touching the screen or is near the
screen.
[Disable Gestures] disables touch operations such
as swipe page navigation or pinching in/out to
change the page view (page 46).
[Home] Screen and Applications
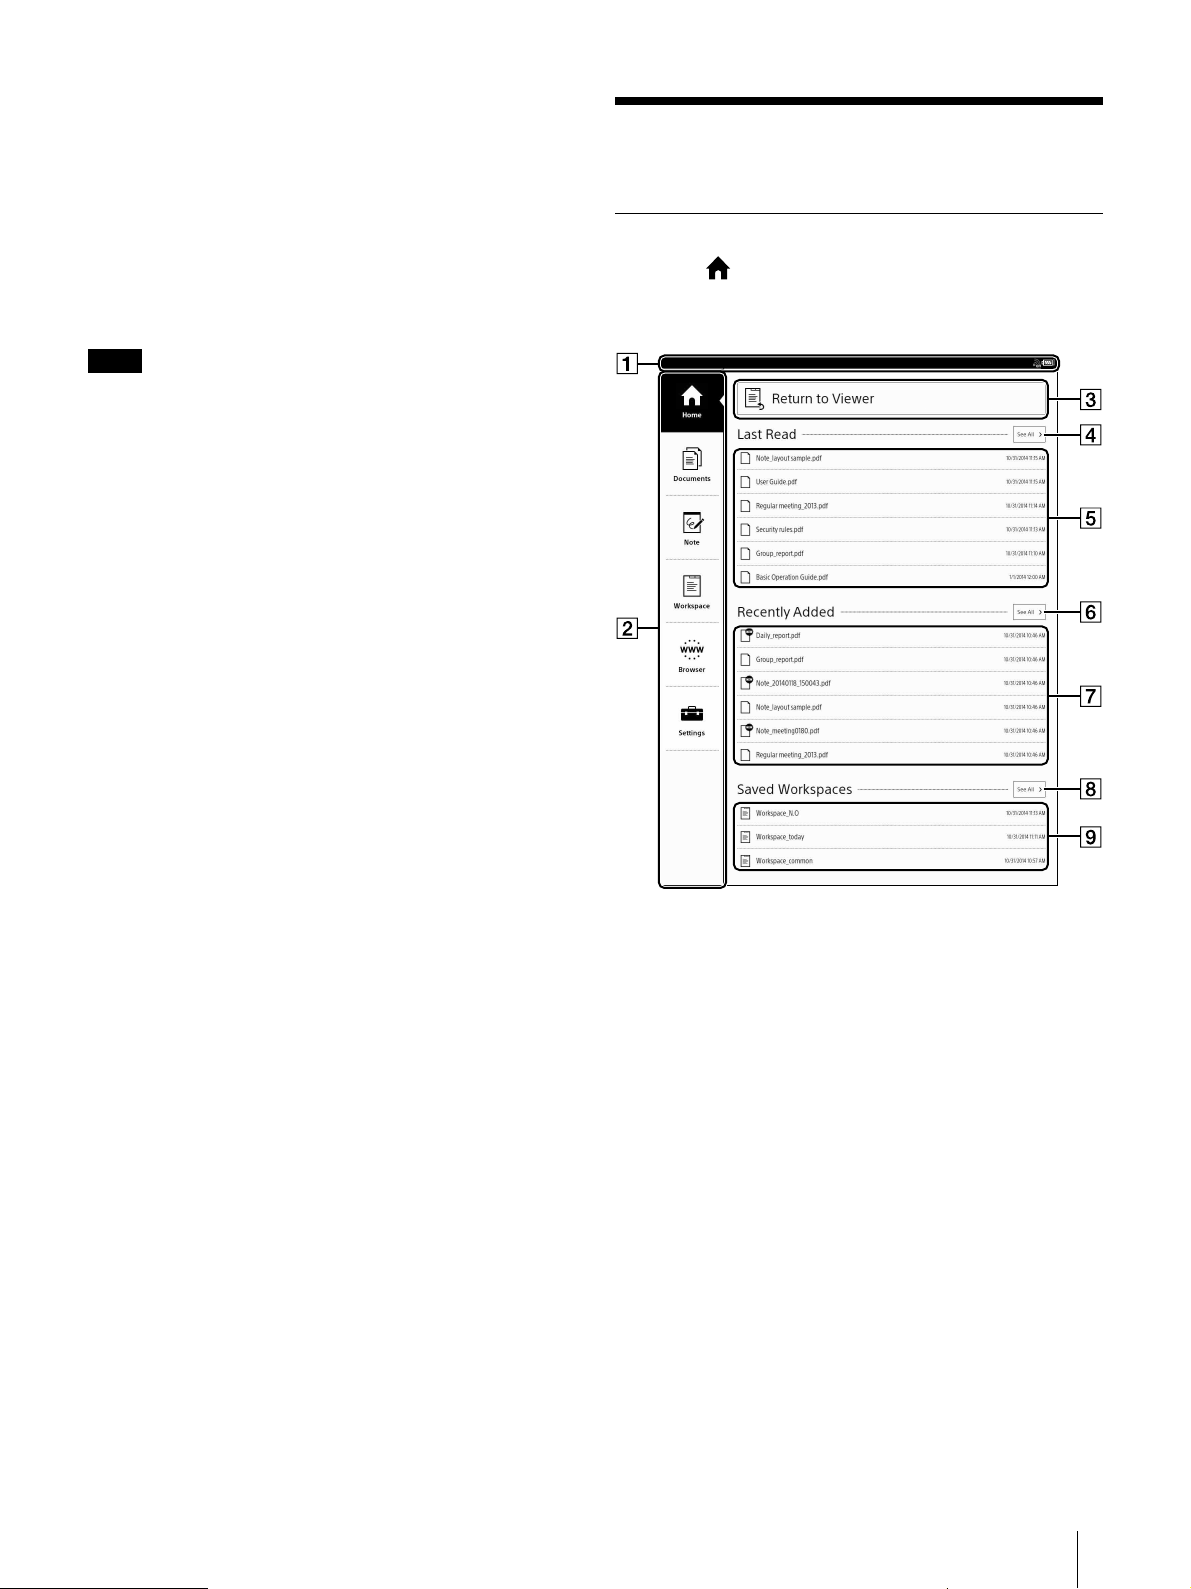
Press the (Home) button to display the [Home]
screen. The [Home] screen allows you to navigate
between applications on the Digital Paper device.
Status bar
Displays the status icons.
If you tap the Status bar, a screen-wide
notification window of the current status of the
device will be displayed. Tap again to return to
the previous screen. (Page 18)
If a user name is set, it will be displayed under the
status bar.
Applications
Return to Viewer
Returns to the document which was opened
before switching to the [Home] screen.
Displays a list of all the recently opened
documents over the entire screen.
17
Page 18
Last read (up to 6 files are shown as per the order
Note
in which they were read)
Displays a list of all the recently added
documents over the entire screen.
Recently Added (up to 6 files are shown as per
the order in which they were read)
Displays a list of all the recently saved
Workspaces
Saved Workspaces (up to 3 files are shown as per
the order in which they were saved)
Tip
The most recently opened documents are shown
under [Last Read] column on the [Home] screen.
Tap [Return to Viewer] to view the last read page.
The most recently added documents are displayed
under [Recently Added] column on the [Home]
screen.
Application
Tap on each icon to switch to the following screen.
Application Description
[Home] Displays the [Home] screen.
[Documents] Lists the documents in the Digital
Paper device (page 23).
[Note] Lists the notes (page 54).
[Workspace] Lists the Workspaces (page 38).
[Browser] Launches the Web browser
(page 67).
[Settings] Accesses the Digital Paper device
settings (page 72).
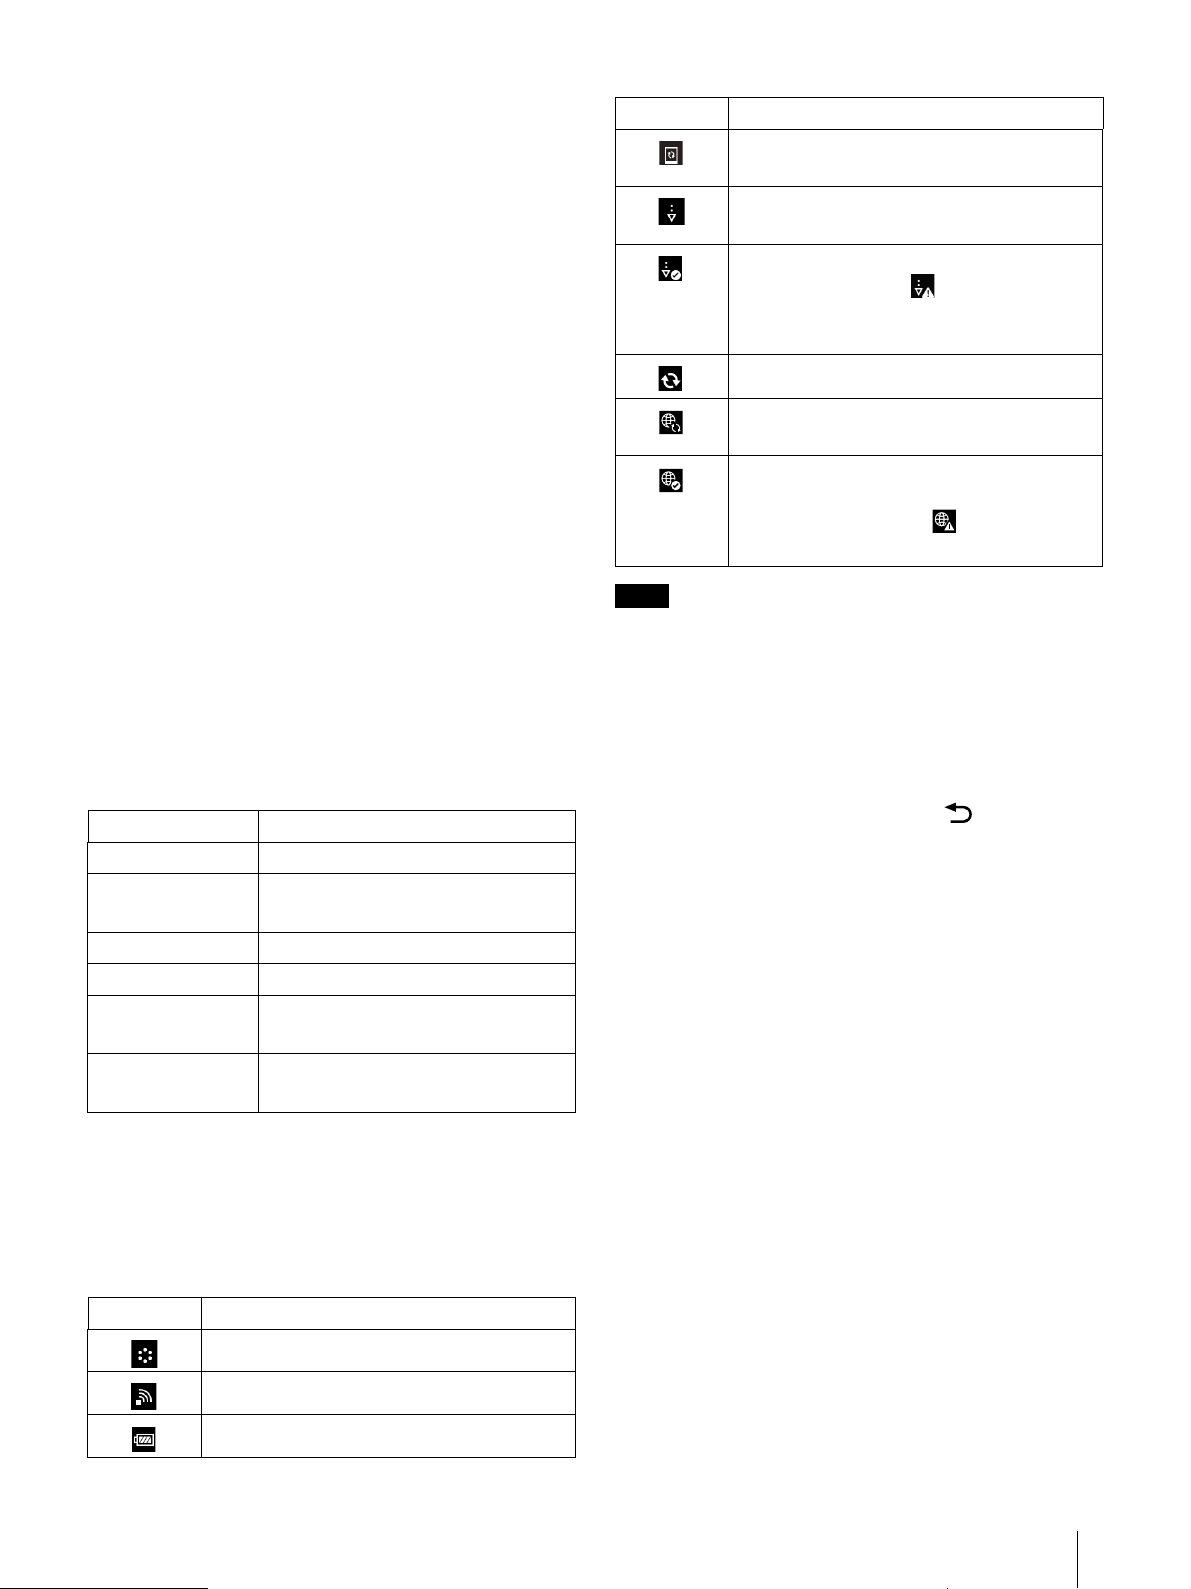
Icon Indication
The icon appears when new system
software is found.
Downloading a document or software
update.
A download has completed.
If downloading fails, will be displayed.
This icon is also shown when system
software download is complete.
Updating database.
Synchronization between Digital Paper
device and network drive is in progress.
Synchronization between the Digital Paper
device and network drive has completed.
If synchronization fails, will be
displayed.
Depending on the situation, not all icons will be
displayed at once.
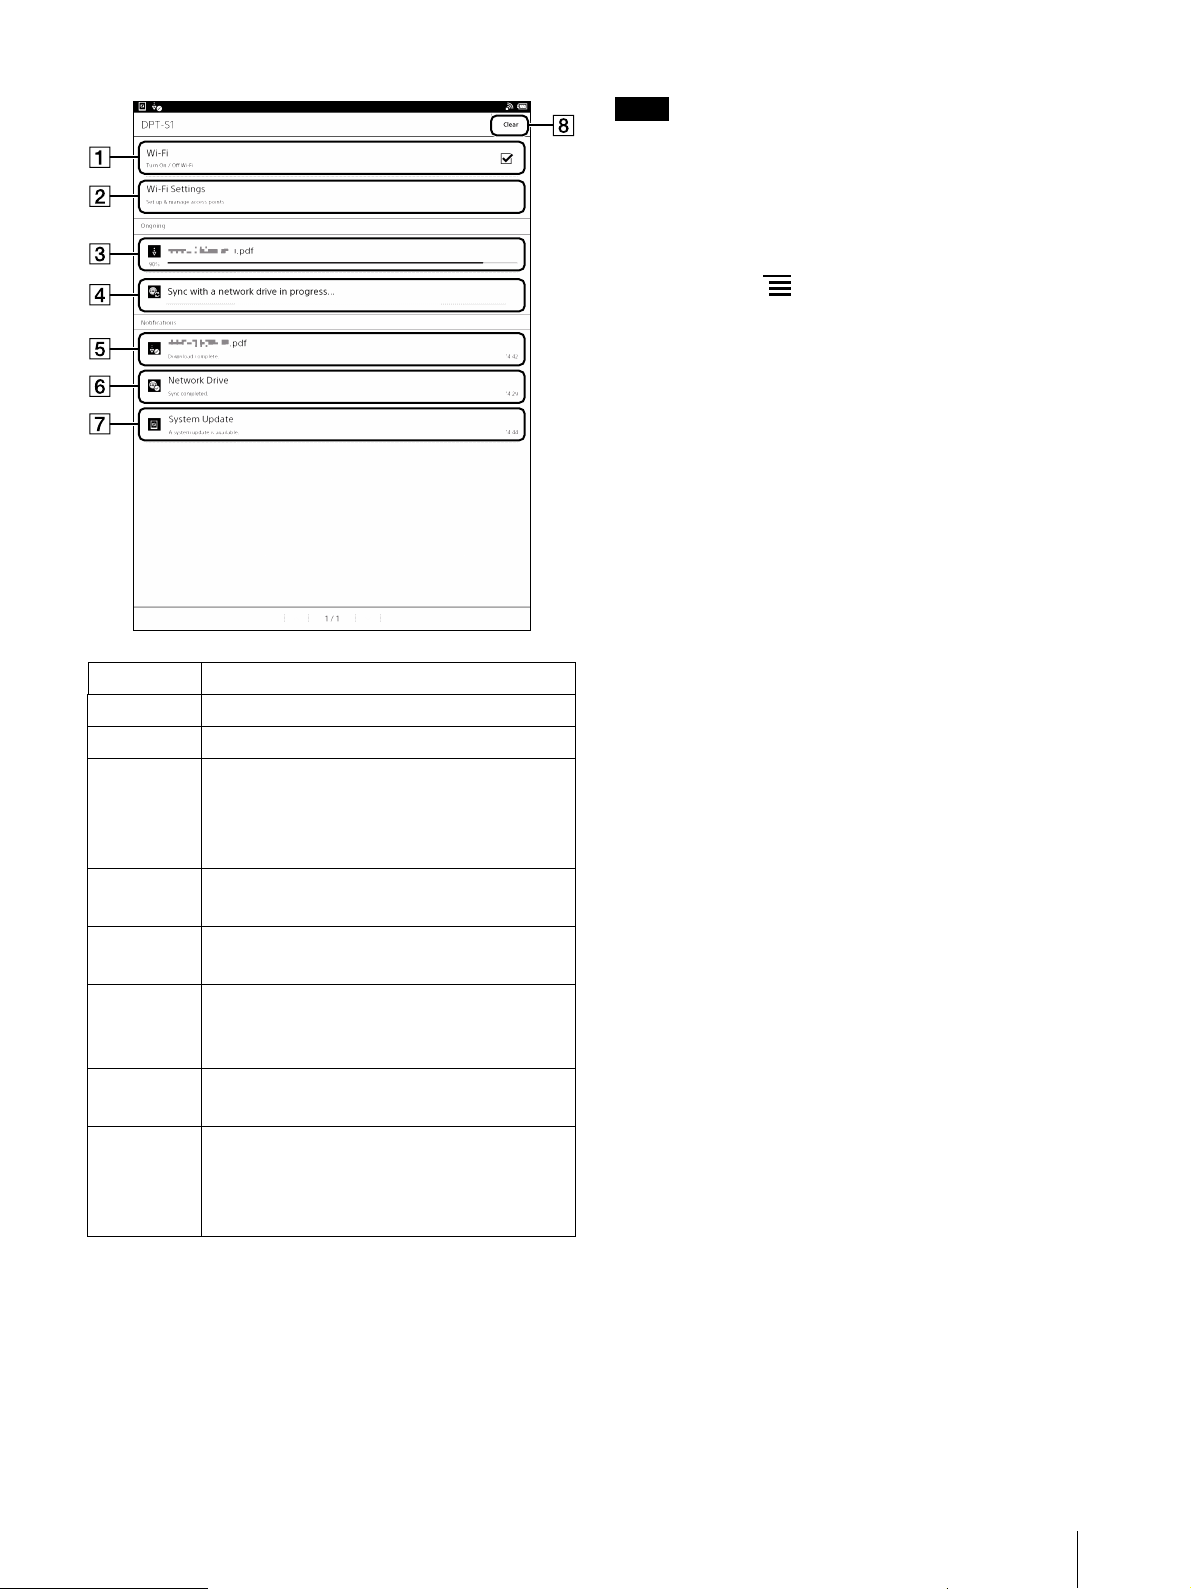
Displaying the notification window of the status bar
If you tap the status bar, a screen-wide notification
window of the current status of the device will be
displayed.
Tap the status bar again or press the (Back) button
to return to the previous screen.
The notification window allows you to turn On/Off
and configure the Wi-Fi function, and check the
status of all operations on the notifications bar.
Status bar
Various information such as Wi-Fi status, battery level
and downloading status are displayed as icons.
Description of status bar icons
Icon Indication
Connecting to a network.
Wi-Fi network signal strength (page 58).
Current battery level (page 9).
18
Page 19
Note
Number Description
Turn [Wi-Fi] on/off (page 58).
Go to the [Wi-Fi Settings] screen (page 58).
Displays the status of items that are
downloading from the Web.
The progress bar indicates the progress/
status of the download.
Displayed when the Digital Paper device
and network drive are synchronizing.
An item that has been downloaded. Tap to
open the downloaded document.
Displays the synchronization result. If
synchronization fails, tap to check the
contents of the error.
Displayed when a new software update is
found.
[Clear] will only be displayed when there is
some notification information.
Tap [Clear] to clear the icon notifications on
the status bar.
Depending on the status of the Digital Paper device,
other items may also appear in the notification
window.
Time display
If you press the (Menu) button on the Home
screen, time will be displayed for approximately five
seconds on the left side of the status bar.
Clearing the icons of the status bar
When icons are shown on the status bar, tap the
status bar to view the notification window and then
tap [Clear] to clear all the icons.
19
Page 20
On-Screen Keyboard
Note
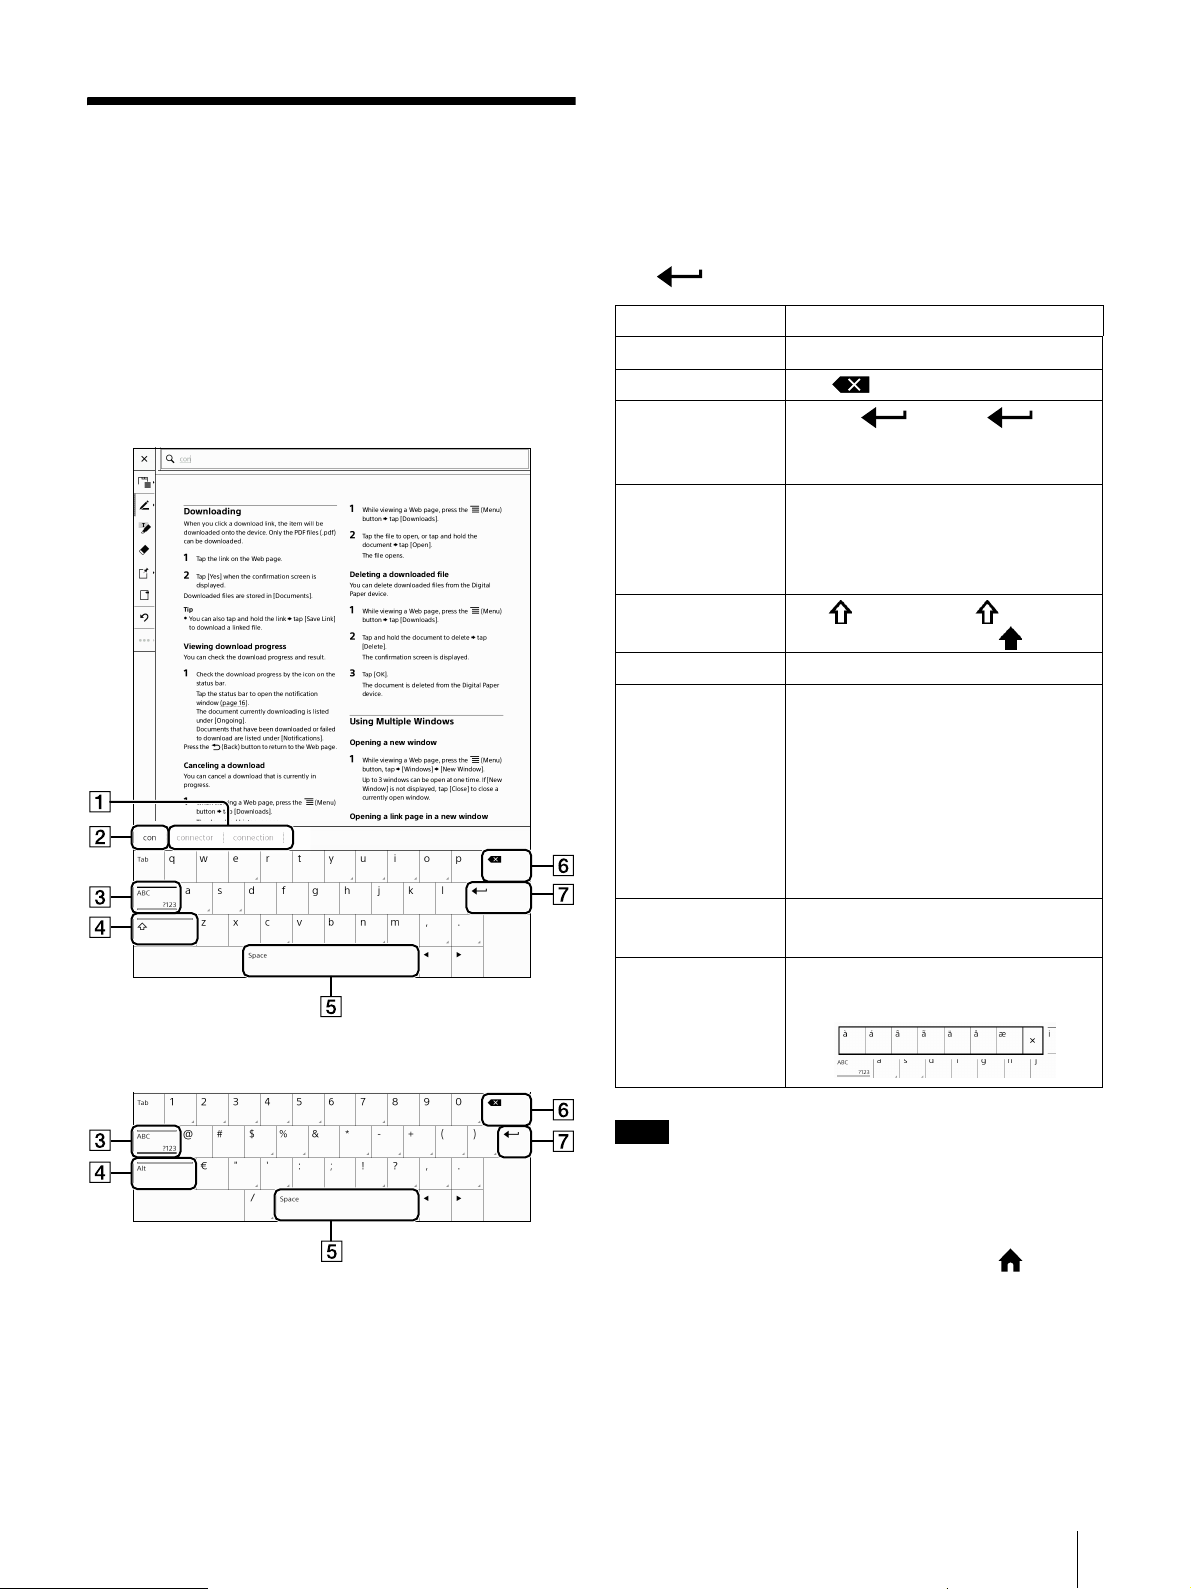
The on-screen keyboard will be displayed
automatically for the menus where text is to be
entered.
Shift key/[Alt]
Space
Backspace
Use the on-screen keyboard to perform actions such
as changing the file name, writing a sticky note (text),
inputting a search keyword, or entering text in the
text field of PDF form.
On-screen keyboard layout
(Line feed icon)
To Do t hi s
Input text Tap the input area to input text.
Delete a character Tap .
Insert line feed Tap the key. The key is
enabled only when multi-line input
is available.
Switch the
keyboard type
Capitalize letters Tap . Tap and hold to activate
Enter a space Tap the space key.
Enter a previously
registered word
Move the cursor in
the input area
Type extended
characters
Tap [?123] to display the symbol
keyboard. Tap [Alt] to switch to
additional characters. Tap [ABC] to
return to the alphabetical keys.
caps lock. To cancel, tap again.
A list of words you registered to the
keyboard history is displayed next to
the current word input box. Tap the
desired word to enter it. Tap and
hold the current word input box to
register the word in it to the
keyboard history. (The word must be
at least 3 letters.)
Tap the location to which you want
to move or tap or .
Tap and hold a key and select an
extended character.
On-screen number keyboard layout
Keyboard history
Current word input box
[ABC]/[?123]
The available types of keyboards and input
methods differ depending on the application.
Tip
To clear the keyboard history, press the (Home)
button tap [Settings] [Initialization] [Clear
Keyboard History].
20
Page 21
Note
Transferring Documents (PDF)
Transferring Documents (PDF) from a Computer
You can drag and drop documents from your
computer to the Digital Paper device.
Confirm whether [Settings] [System
Management] [Screen Transfer] is turned off
(page 74).
If [Screen Transfer] is on, the computer will not be
able to recognize the device and transfer the
documents.
You can transfer files other than those in PDF
format, however, only PDF files (.pdf) will be
displayed on the device.
A file of a maximum size of 1 GB can be transferred.
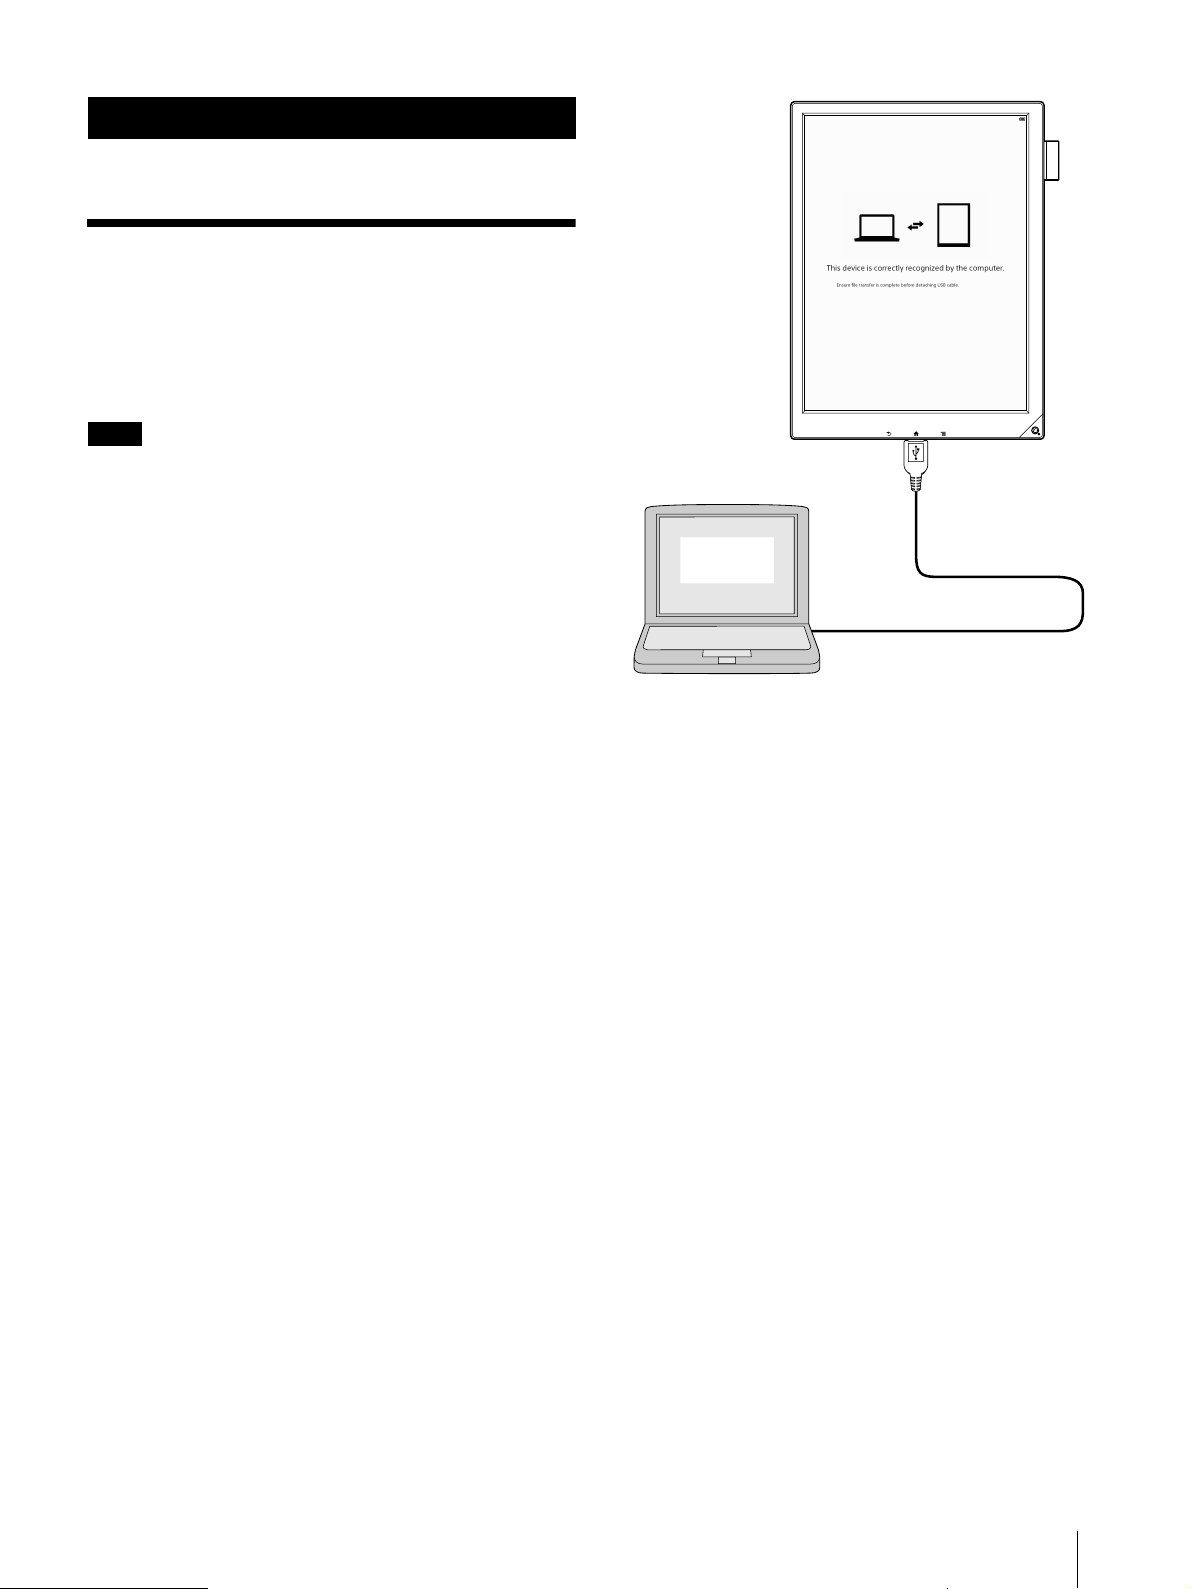
1 Connect the Digital Paper device to your
computer with the supplied USB cable.
[This device is correctly recognized by the
computer.] will be displayed on the device screen
and the computer will show the device as an
external device [DPT-S1].
2 Add documents to the Digital Paper device from
your computer.
For Windows users:
Click [Computer] or [My Computer] from the
[Start] menu (for Windows 8/8.1, open computer
from explorer) Double click [DPT-S1] drive
Drag the document you want to transfer and
drop it in the folder.
For Macintosh users:
Double click [DPT-S1] on the desktop Drag the
document you want to transfer and drop it in the
folder.
If you create a folder in the Digital Paper device
from your computer, that folder will be displayed
under [Folders] in document list on the device.
This is convenient when organizing the
documents in the desired folders.
3 When the transfer is complete, end the
connection on your computer and then
disconnect the USB cable from the device and
your computer.
The transferred documents will be displayed in
[Documents] on the [Home] screen.
21
Page 22

Transferring Documents
Note
(PDF) to the Computer
1 Connect the Digital Paper device to your
computer with the supplied USB cable.
[This device is correctly recognized by the
computer.] will be displayed on the device screen
and the computer will show the device as an
external device [DPT-S1].
2 As explained in Step 2 of “Transferring
Documents (PDF) from a Computer” (page 21),
double click the [DPT-S1] drive (or [DPT-S1]).
3 Drag the document you want to transfer and
drop it into the folder on your computer.
Other Precautions
If you use certain special characters for a folder
name or filename, the name may not be displayed
correctly.
The character limit for filenames is 249 characters.
Sony recommends that you create a backup of the
contents of the device on your computer in case of
accidental deletion or corruption due to operation
error.
When transferring important documents to the
device, set a password for opening the documents.
You can browse the documents on the device after
entering the password.
We will not be able to compensate for any data
related to documents or sticky notes that might get
deleted or damaged due to error in the device or
computer, or due to failed download or transfer of
the documents.
4 When the transfer is complete, end the
connection on your computer and then
disconnect the USB cable from the device and
your computer.
Caution when transferring
Removing the USB cable while the document is
being transferred might corrupt the data.
Follow the procedure below when disconnecting
the device from your computer.
For Windows users:
Use [Safely Remove Hardware] function before
disconnecting the USB cable.
For Macintosh users:
Click the Eject icon, finish the removing procedure,
then disconnect the USB cable.
Caution when deleting documents
Do not delete the [database], [.dps_device_system],
or [note_template] folder on the [DPT-S1] drive.
When using a microSD card, do not delete the
[PRIVATE/SONY/Digital_Paper] folder on the
microSD card.
Caution when initializing
Do not initialize the device or the microSD card from
your computer.
If initialized from the computer, the documents in
the documents list may not be displayed.
Initialize only using [Format Memory] on the device
(page 75).
Tip
For details on supported file formats, see page 87.
You can also transfer content via a microSD card.
To transfer data from your computer to a microSD
card, insert the microSD card in the device, and drag
and drop the required content to the microSD drive.
22
Page 23
Browsing Document Lists
Document Lists
The files that can be accessed through the Digital
Paper device are called ‘documents’.
Tapping the [Documents] tab on the [Home] screen
and then tapping the document name you want to
open from the list of documents displayed on the
device will display the [Document Display Screen].
The document lists also include the notes created on
the device.
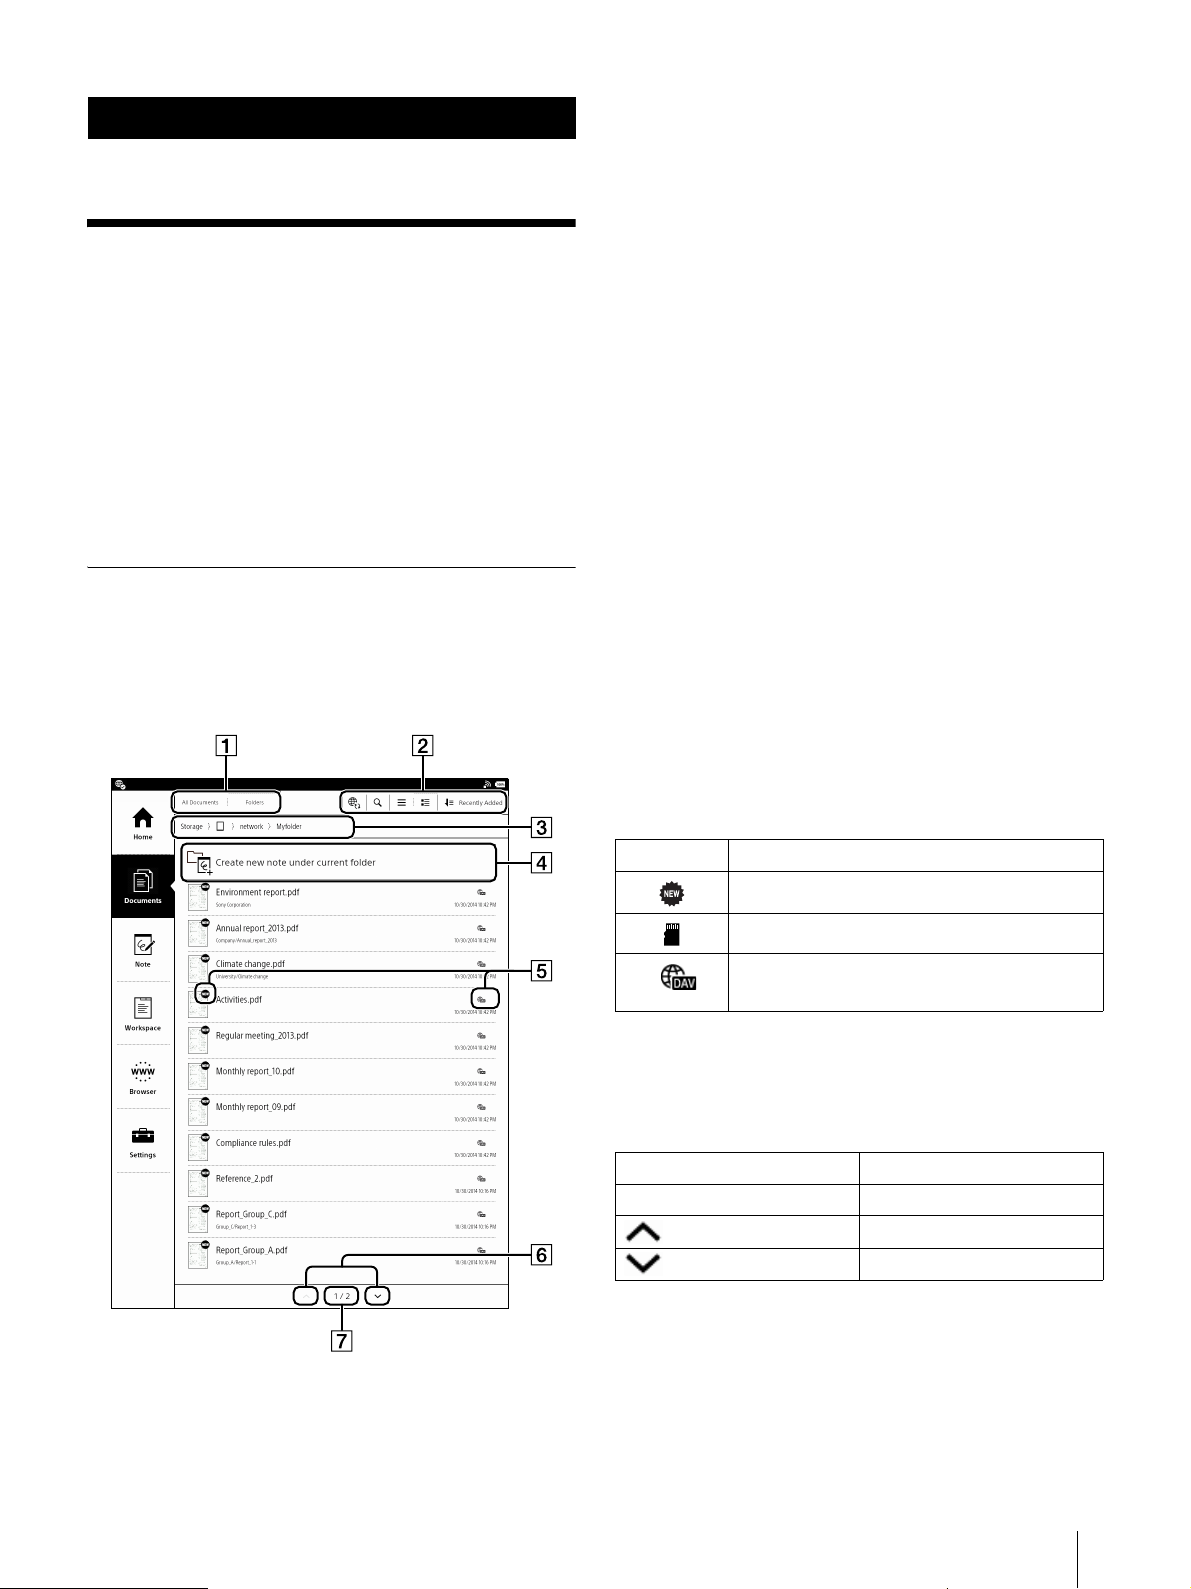
Browsing Document List Pages
View change icons
The documents can be viewed in [All Documents]
or [Folders] view.
Tool icons
Folder path view
Displays the current folder path.
You can tap the path to move to other folders.
[Create new note under current folder]
In [Folders] view, you can select a folder to create
a new note in it.
In [All Documents] view, use [Create New Note]
option to create a new note without selecting the
folder. The newly created note is stored in the
[Note] folder.
The Digital Paper device organizes your documents
into the [Documents] application.
Document list pages allow you to sort documents, as
well as search for documents on the device.
Status icons
Page navigation icons
Page indicator
Status icons
Icon Description
The item has not been opened.
The item is stored on the microSD card.
The item is synchronized with the network
drive (page 64).
Navigating pages of the document list
You can turn the pages of the document list by
swiping up and down.
Navigation method Description
Page indicator Display the current page.
(page navigation icon) View the previous item.
(page navigation icon) View the next item.
Tip
Tap and hold the page navigation icon to turn pages
continuously every 10 pages.
23
Page 24
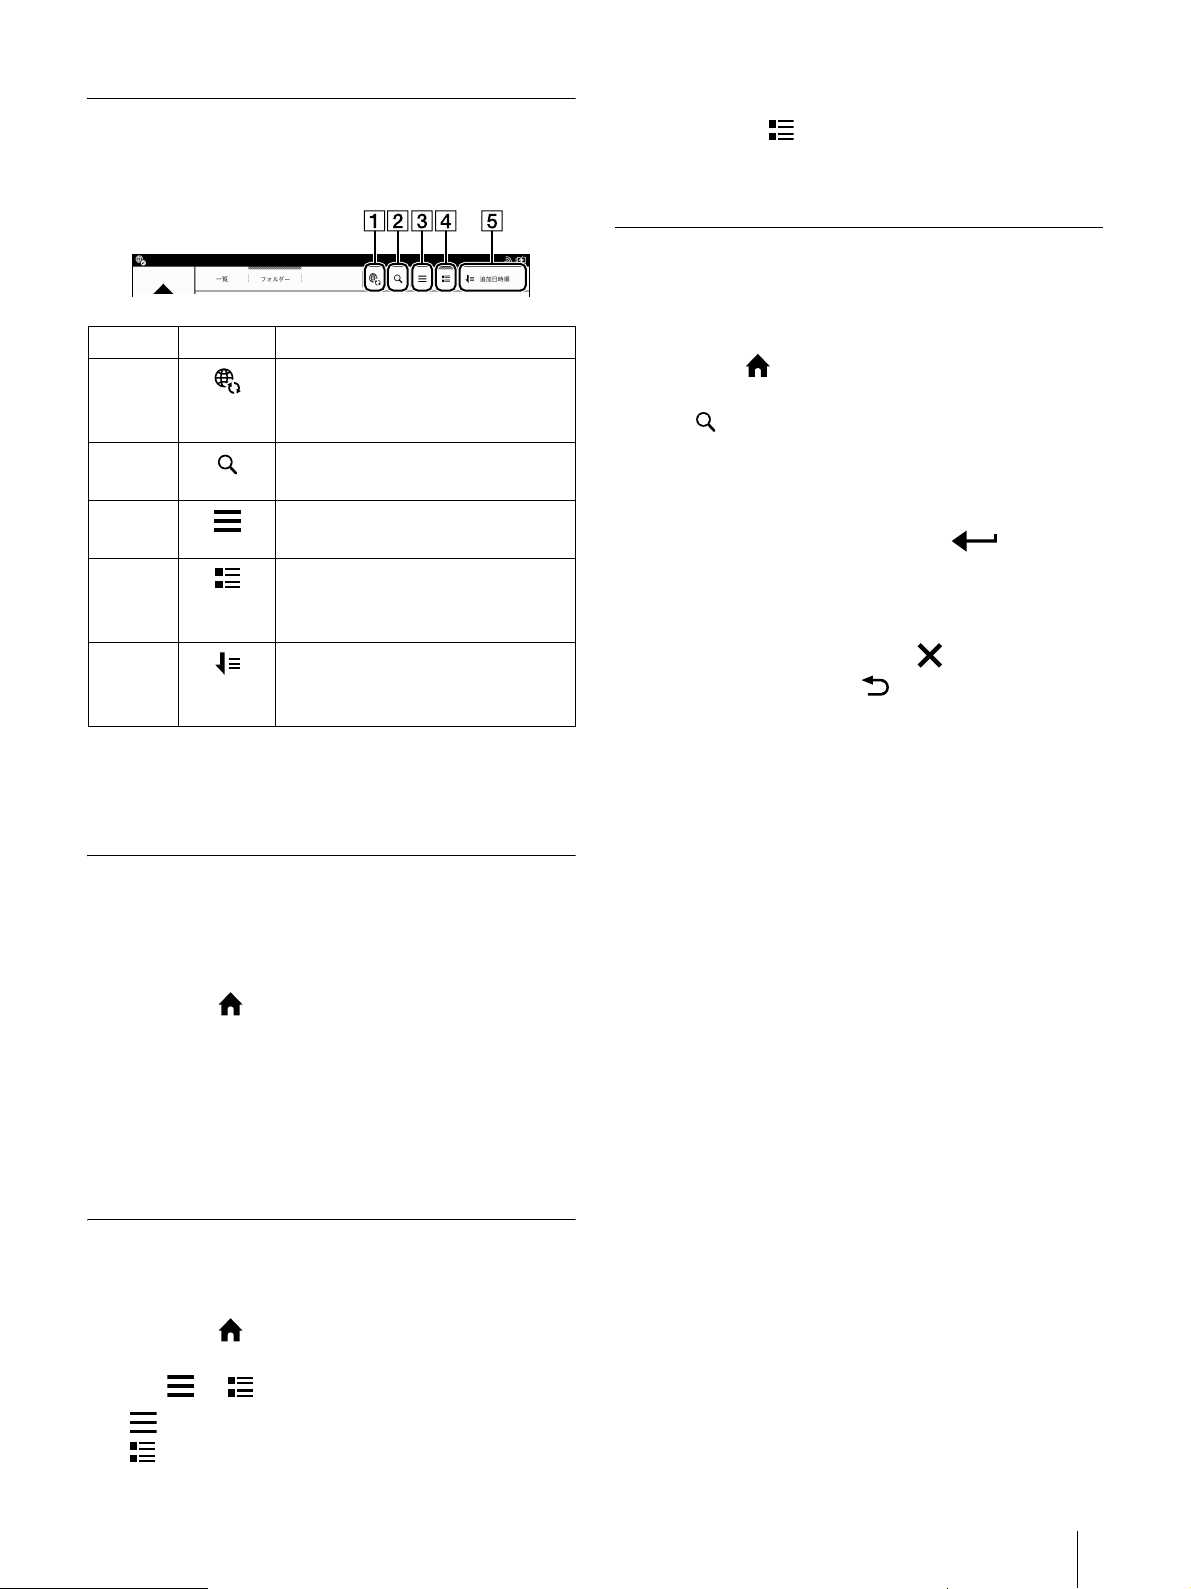
Tools
*
Below is a list of the tools available on the document
list page.
Number Tool icon Description
Synchronizes documents with the
Digital Paper device and network
drive (page 65).
Finds content with a keyword
(page 24).
Displays icon and file name in a
line (page 24).
Displays the details of the
document such as thumbnails
(page 24).
Changes the sort order by file
name, author name, recently
added, etc.
* Displayed only when documents on the network
drive are displayed in folder view.
Tip
When you tap , the document title and author
name can be seen.
Finding a Document with a Keyword
You can find a specific document quickly with a
keyword search.
1 Press the (Home) button tap [Documents].
2 Tap .
The keyword input area and the on-screen
keyboard appear.
3 Input a search keyword and tap .
The view shows only the documents that satisfy
the search criteria.
To exit the search result view, tap (close) at the top
of the screen, or press the (Back) button.
Tip
When you browse the document list in the folder
view, you can search for the document within the
folder and its sub-folder.
Browsing in Document View and Folder View
Document can be displayed as list or folder view.
1 Press the (Home) button tap [Documents].
2 Tap [All Documents] or [Folders].
[All Documents] displays a list of content.
[Folders] displays a list of content with folder
view.
Displaying a Document Thumbnail
Document lists can be displayed with thumbnail view.
1 Press the (Home) button tap [Documents].
2 Tap or .
displays document lists with file type icons.
displays document lists with thumbnails.
24
Page 25
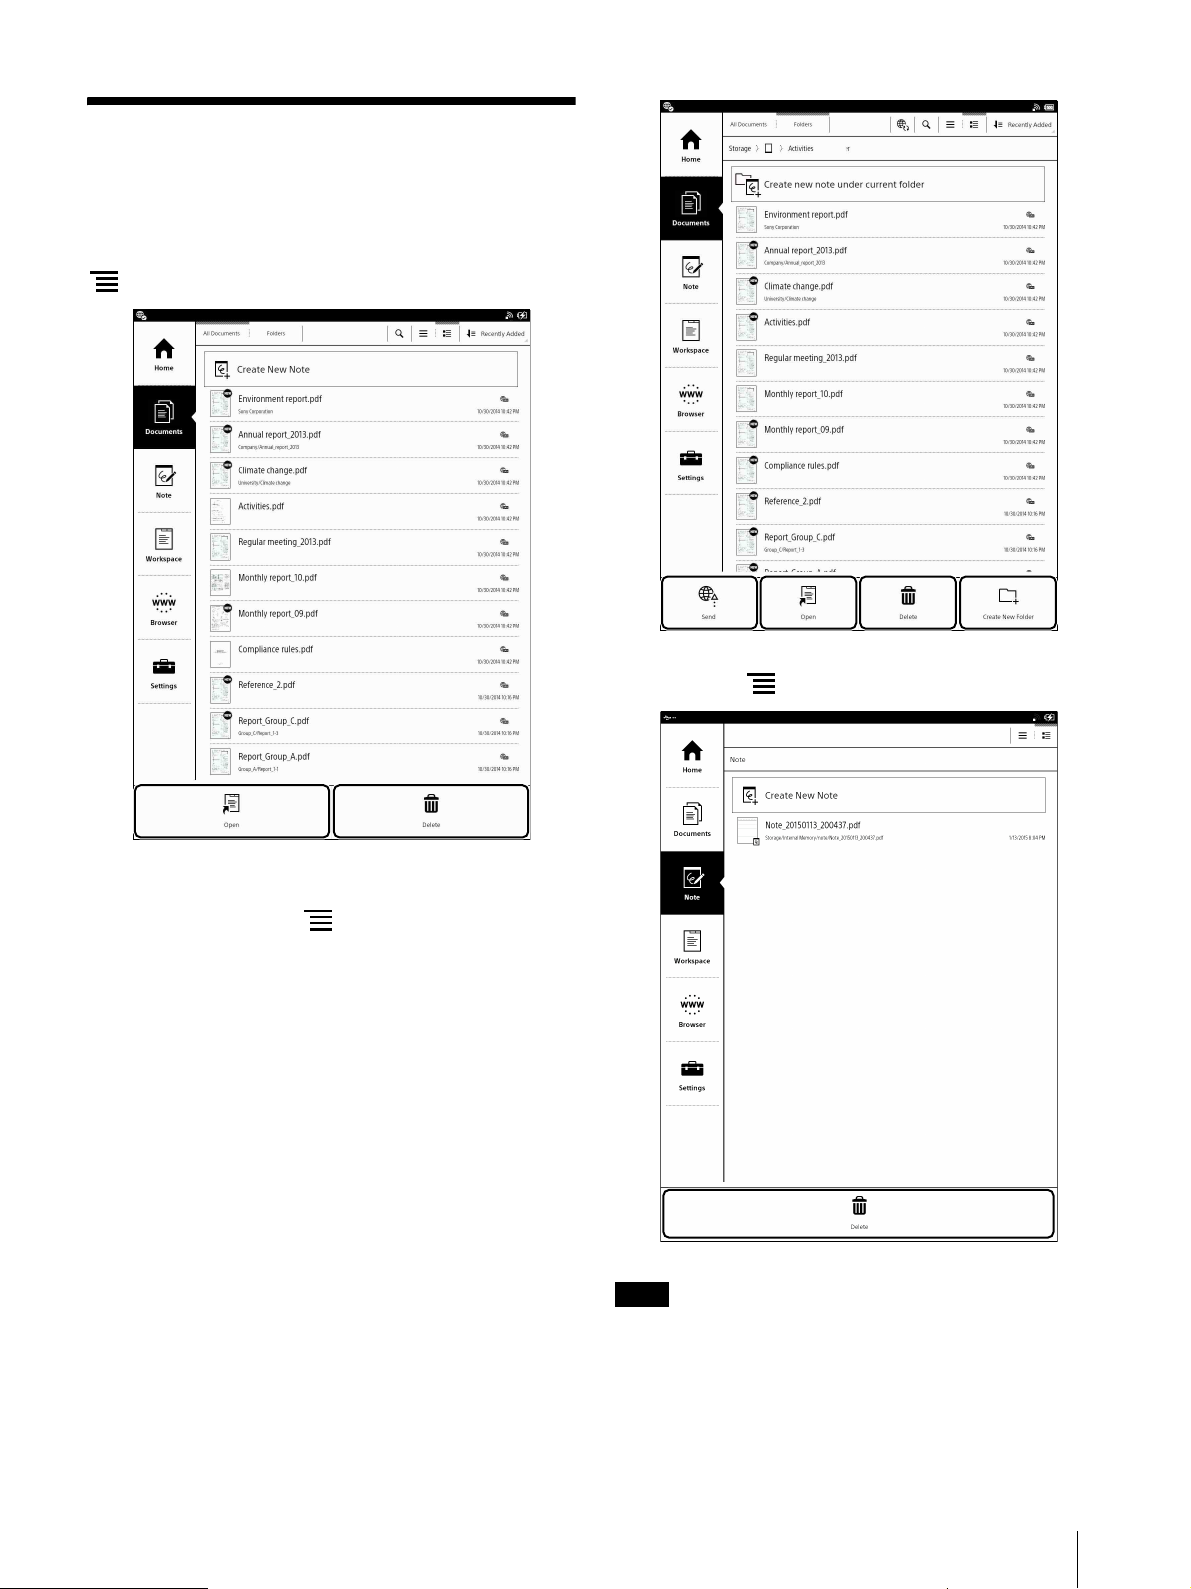
Option Menu in
Note
Document Lists
The [Open] and [Delete] options are available when
you tap [Documents] [All Documents] and press the
(Menu) button.
The [Delete] option is available when you tap [Note]
and press the (Menu) button.
The [Send], [Open], [Delete] and [Create New Folder]
options are available when you tap [Documents]
[Folders] and press the (Menu) button.
The [Send] option is available only when the
network server is configured and the target folder is
displayed.
25
Page 26
Tip
Note
The document list also includes the notes created
on this device.
Sending Multiple Synchronized
Documents Simultaneously
1 Connect to a Wi-Fi Network.
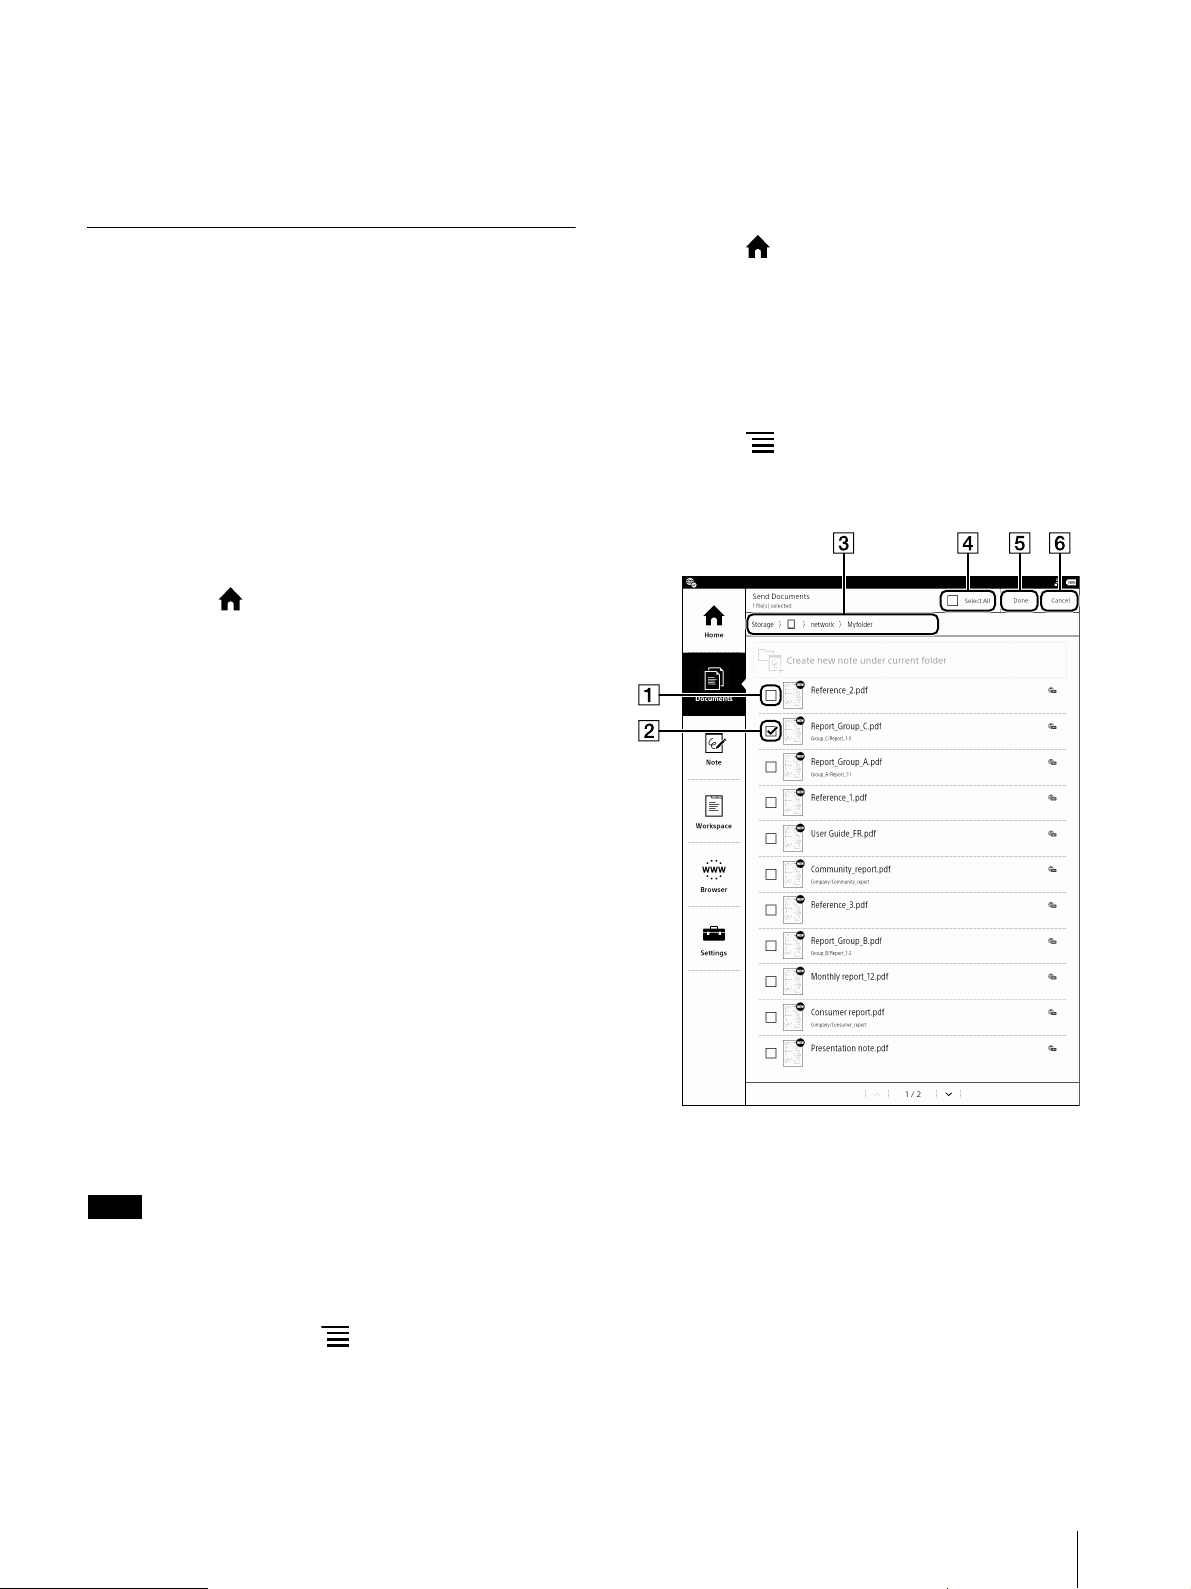
Sending Documents to Network Drive
You can transfer a copy of a document from this
device to another destination by selecting the folder
of another user (or users) on the network drive.
Once sent, the name of the document name changes
as follows: “Original document
name_from_synchronized folder
name_date_time.pdf”.
1 Connect to a Wi-Fi Network.
2 Press the (Home) button and tap
[Documents].
3 Tap [All Documents] or [Folders].
4 Tap and hold the document you want to send
and tap [Send] from the option menu.
Selection screen for selecting the destination is
displayed.
2 Press the (Home) button and tap
[Documents].
3 Tap [Folders] and select [Internal Memory]
[network] at the path display of the folder.
Tap the folder you want to send.
4 Press the (Menu) button and tap [Send].
A check box is displayed on the left side of the
document.
5 Tap the destination to select the check box.
Tap [Select All] to send the selected document to
all destinations.
6 Tap [OK].
The confirmation screen is displayed.
7 Ta p [ Ye s ] .
The document is sent to the hierarchy just below
the specified destination folder.
If the destination folder has a document with a
same name, then the file is overwritten.
Tip
Alternatively, press the (Menu) button and tap
[Send] while the document is displayed.
Check box Off
Check box On (target to send)
Folder path view
[Select All]
[Done]
[Cancel]
26
Page 27
5 Tap the document you want to send to select the
check box.
If you want to select all the check boxes, tap
[Select All].
6 Tap [Don e ] .
Selection screen for selecting the destination is
displayed.
7 Tap the destination to select the check box.
Tap [Select All] to send the selected document to
all destinations.
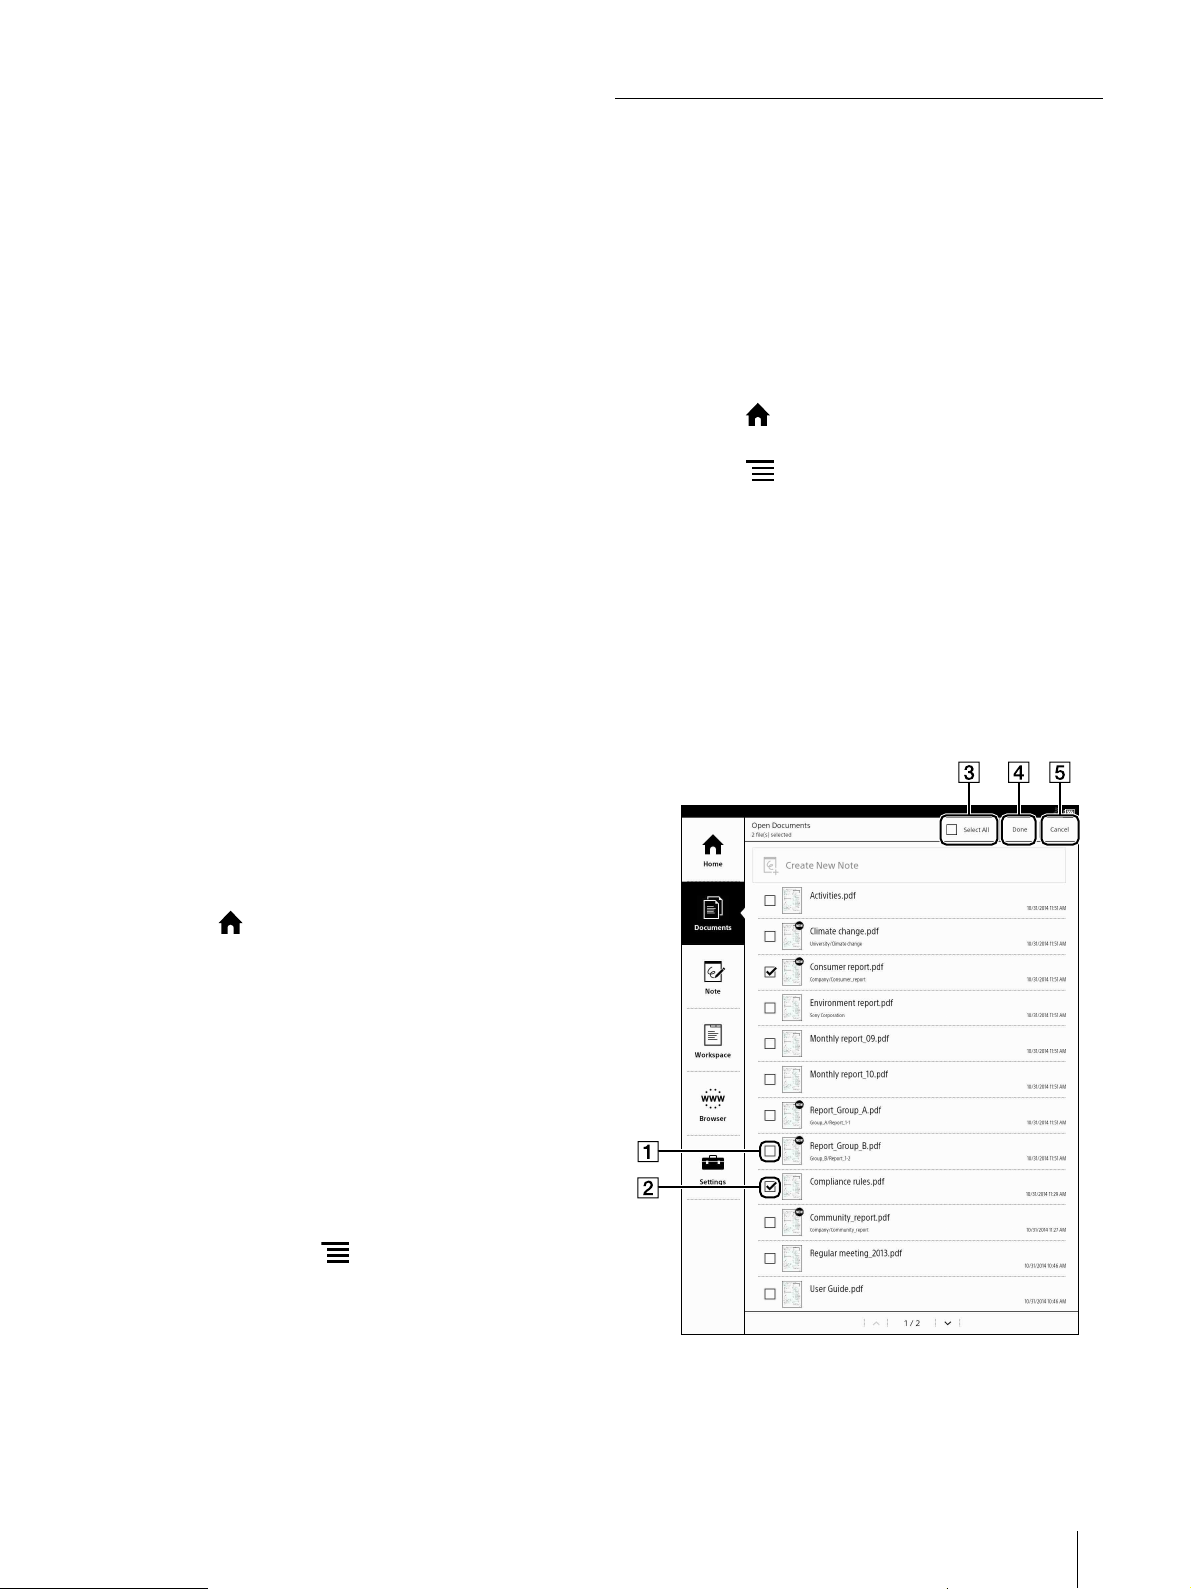
Opening Multiple Documents Simultaneously
When multiple documents are opened
simultaneously, all the open documents (tabs) will
close and only the files you select using the “open”
function will open.
If you want to simultaneously open documents
stored in different folders, saving the documents as a
workspace with a specific name is convenient.
1 Press the (Home) button tap [Documents].
8 Tap [OK].
The confirmation screen is displayed.
9 Tap [Yes].
Replying to a Document
You can reply to a document when the Digital Paper
device can identify the sender from the name of the
document (page 26). The replied document will be
stored in the network drive. When the sender
synchronizes with the network drive, the document
will be replied.
1 Connect to a Wi-Fi Network.
2 Press the (Home) button and tap
[Documents].
3 Tap [All Documents] or [Folders].
2 Press the (Menu) button.
3 Tap [Open].
[Open documents after closing all currently open
tabs. Do you continue?] is displayed on the
confirmation screen.
4 Tap [Yes].
The check box is displayed at left side of the
document.
4 Tap and hold the document you want to reply to
and tap on [Reply] in the option menu.
The confirmation screen is displayed.
5 Tap [Ye s ] .
Tip
Alternatively, press the (Menu) button and tap
[Send] while the document is displayed.
Check box Off
Check box On (target to open)
27
Page 28

[Select All]
[Done]
[Cancel]
5 Tap a document you want to open. A checkmark
will appear in its checkbox.
Tap [Select All] to set all checkboxes on.
6 Tap [Don e ] .
The selected documents open and will be
displayed in tabs.
Press the (Back) button to return to the document
list.
Deleting Multiple Documents Simultaneously
You can delete multiple items at one time. This is
convenient for clearing up space on the Digital Paper
device.
The following instructions use the [Documents]
application as an example.
The document list also includes the notes.
1 Press the (Home) button tap [Documents].
2 Press the (Menu) button.
3 Tap [Delete].
Boxes appear next to the thumbnails or list
entries.
Check box Off
Check box On (target to delete)
[Select All]
[Done]
[Cancel]
4 Tap to check the items to delete.
Check the check box of [Select All] if you wish to
delete all items.
5 Tap [D one].
The confirmation screen is displayed.
6 Tap [Yes].
The selected items are deleted from the device.
28
Page 29

Note
Sony recommends that you create a backup of all
Note
the documents that you want to save on your
computer, before deleting the documents directly
from the device.
Documents and folders deleted from the device
cannot be recovered.
Creating a New Folder
1 Press the (Home) button and tap
[Documents].
2 Tap [Folders].
The folder path is displayed on the top of the
screen.
3 Go to the path where you want to create a new
folder.
4 Press the (Menu) button and tap [Create New
Folder].
A pop-up menu of [Create New Folder] is
displayed.
5 Enter the folder name and tap [OK].
Option Menu for the Selected Documents and Folders
When the option menu is displayed in the documents
or note list, you can perform actions such as opening
documents or folders, and renaming or deleting a
document.
1 Press the (Home) button, then tap
[Documents] or [Note].
Option Menu for Notes and Documents
Option Description
[Open (New Tab)] Opens the document or note in a
new tab.
[Open (Current
Tab )]
[Open (Close
Tab s) ]
[Delete] Deletes the document or note.
[Rename] Renames the document or note.
[Duplicate] Duplicates the document or note.
[Send] Sends a copy of the document or
[Reply] Returns the document or note to the
Option Menu for Folder
Opens the document or note in the
current tab.
Closes all tabs and opens the
document or note.
note to the network drive from this
device (page 26). This option is
displayed only if the [Network Drive
Settings] are complete.
sender (page 27). This option is
displayed if the [Network Drive
Settings] are complete and this
device can identify the sender from
the document name.
2 Tap and hold the document you want to edit.
The option items appear.
Option Description
[Delete] Deletes a folder.
Sony recommends that you create a backup of all
the documents that you want to save on your
computer, before deleting the documents directly
from the device.
29
Page 30

Note
Reading
When the [Page Flow] is set to [Right to Left]
Swipe from right to left.
When the [Page Flow] is set to [Left to Right]
Swipe from left to right.
Reading Documents
Opening a Document
1 Press the (Home) button tap [Documents].
The document list opens (page 23).
2 Tap a document.
The document opens.
You can also open a document by tapping and
holding the document you want to open.
For page navigation, see page 31.
Tip
If you press the (Menu) button and tap [Hide
Toolbar] to hide the toolbar (full-screen) while the
document is displayed, you can concentrate on
reading it. The show toolbar/hide toolbar setting is
retained until it is changed.
For Toolbar, see page 31.
Hide the toolbar to expand the page to full screen to
makes it easier to read a letter-sized document.
Tip
You can also turn the pages using the toolbar.
For details, see “Navigating Pages” (page 31).
To change the page flow, see “Changing the Page
Turn Preference” (page 31).
Turning Pages Continuously
1 Swipe (move your finger) in the direction of the
next page and hold the screen without lifting
your finger while the document is displayed.
Turning a Page
1 Swipe in the direction of the next page with your
finger (move your finger) while the document is
displayed.
Documents of many pages can be flipped just
like flipping through a book.
Lift your finger at the page you want to stop at to
halt the continuous page turning.
When the display is zoomed, the position of the
page moves and hence continuous page turning is
not possible.
30
Page 31

Changing the Page Turn Preference
1 Press the (Menu) button and tap [Page Flow]
while the document is displayed (except when
the display is zoomed).
Pop-up for [Page Flow] is displayed.
2 Tap [Right to Left] or [Left to Right].
[Right to Left]: Page turns when swiping from
right to left
[Left to Right]: Page turns when swiping from
left to right
Toolbar/Tab Panel Display screen
Navigating Pages
There are several ways to operate on the pages.
Toolbar Icon Display
The toolbar is displayed vertically below this icon
when it is tapped.
Once the toolbar is displayed the icon is changed
to .
Tab Panel Display
The tab panel is displayed when you tap this
area.
Tap to hide the tab panel.
View/Hide toolbar
When the toolbar is hidden, the (toolbar) icon
is displayed. When you tap this icon, it changes
to and the toolbar is displayed.
Toolbar icon (page 41)
Use this toolbar to access the Tabs List, select
attributes of the stylus, attach annotations, and
bookmark or add/delete pages.
Orientation
Tap to rotate the screen from vertical position to
horizontal.
Thumbnail views
Switching between 2 pages/ 4 pages/ 9 pages
view (page 33).
Page navigation icons
Tap [] or [] to turn 1 page at a time.
Even when the [Disable Gestures] setting is on,
you can use stylus or your finger to use the
options of the toolbar.
31
Page 32

Page indicator
Tap to display the page control box (page 32).
Using the Page Control Box
Tab panel (page 35)
Up to 3 tabs of open documents are displayed.
You can display a different document by tapping
its tab.
Tip
An open document can also be selected
directly from the Tab List at the top of the
toolbar (page 36).
Tap this area to add a bookmark (page 36)
You can turn the bookmark On/Off by using the
Bookmark icon in the toolbar.
Pop-up menu (page 37)
Tapping and holding the text will display the
highlight and search pop-up menu.
Touch operations
Swipe (page 16)
Zoom in/Zoom out (page 34)
1 Tap the page indicator while the document is
displayed.
The page control box is displayed.
Option Menu for Page
Option Menu (page 38)
(Menu) button (page 13)
[Go Back to Previous Page]
Message displayed when a different page is
selected using a dot underlined link.
Page of document currently being displayed
Number input keypad
Slider
Move to the corresponding page by positioning
the slider.
Tot a l p ag es
Total number of pages in the document that is
currently displayed.
2 Use the number input keypad to enter the page
number.
32
Page 33

3 Tap [OK].
Jumps to the specified page.
Thumbnail View
The thumbnail view is convenient for searching
through a document that has many pages: similar to
flipping through a book.
You can flip through consecutive pages (page 30) in
the thumbnail view.
Once the corresponding page is displayed, you can
tap that page to view it on the screen.
On a screen, you can display 2 pages/4 pages/9
pages thumbnails.
This preference is applied only to the document that
is currently being displayed.
Displaying 2 pages/4 pages/9 pages
thumbnail view by pinching in
Tip
If the following operations are carried out while the
document is displayed in a 2-page view/4-page
view/9-page thumbnail view, the display will return
to the standard size:
When pinch out is repeated
When on bottom-right of the screen is tapped
When any of the pages is tapped
Displaying 2-page view/4-page view/9page thumbnail view using the toolbar
1 Tap the icon (Switching page view) while the
document is displayed.
2 Tap the icon of corresponding thumbnail view.
Thumbnail icons when document is vertically
displayed
Icon Description
1 Pinch in the screen (touch the screen with 2
fingers and bring them closer together) while the
document is displayed in standard size.
With every pinch in, the view will change from 2page view 4-page view 9-page view.
1 page is displayed on a screen.
2 pages are displayed on a screen.
4 pages are displayed on a screen.
9 pages are displayed on a screen.
Thumbnail icons when document is horizontally
displayed
Icon Description
1 page is displayed on a screen.
2 pages are displayed on a screen.
4 pages are displayed on a screen.
9 pages are displayed on a screen.
33
Page 34

Tip
Note
Screen rotated
If you tap of the toolbar in thumbnail view, the
screen can be viewed horizontally or vertically.
Example) 2-page thumbnail view
Zooming in the Display
1 Pinch out using two fingers when viewing the
document in standard size.
The display zooms in and [Zoom] appears at the
bottom of the screen.
Pinching in/out further zooms the display in/out.
Status indication of zoom
2 Drag your fingers to reposition.
Repositions the zoomed in screen.
Tip
Press (Back) button to return to default size.
Available operations while zooming in
Operations available in the toolbar while zooming in
are as follows.
Selecting the types of handwriting and lines
(page 42)
Selecting Eraser mode and the size of the eraser
Undo/redo the previous operation
Moving to another page
Navigating pages while zoomed in
You can turn pages retaining the display position and
zoom ratio while the display is zoomed in.
To turn a page, tap the Page Turn Preference icon and
enter the page number in the page control box.
If you turn the last page of the note, a page is added
to the note while retaining the zoom ratio.
34
Page 35

Dragging your finger while the display is zoomed in
repositions the display, and the page cannot be
turned.
Tip
If the toolbar icon and the toolbar are hidden (full-
screen view), you can handwrite with the type of
pen selected before zooming in the view.
When the display is zoomed in, you cannot use the
highlight function even if [Pen Button Settings] is
set to [Highlight active] (page 44).
Only the eraser function is enabled.
Display can be zoomed in approximately 2.5 times.
When the tab is closed, the right tab shifts to the
left.
Left scroll icon
Displays the document on the left tab.
Right scroll icon
Displays the document on the right tab.
Tab panel close icon
Closes the tab panel.
Tap the tab panel display area to display the tab
panel again.
Operating Tabs
Tab operation allows you to browse multiple
documents.
Tabs are not displayed in the preset default.
1 Tap the top of the screen while the document is
displayed.
The tab panel appears.
Tip
The document name is displayed on the tab.
A maximum of three tabs can be shown on the
screen.
If you delete the document from your computer or
remove the microSD memory card (when the
document is saved in the microSD memory card) or
delete the file while viewing a document, only tabs
remain. Then, the message “Cannot display
document. Cannot find file.” is displayed.
In this case, close the unnecessary tabs with the
close tab icon.
Tab close icon
Closes the opened document when tapped.
35
Page 36

Displaying the tab list
You can select a document from the tab list.
1 Tap (Tab List) on the toolbar.
Tab list appears.
Tab list examples
File name and total number of pages of the
document are displayed.
File names that are long and thus do not fit in the tab
area may be displayed partially followed by ellipsis
(...).
Adding a duplicate tab (copying the tab)
You can display a document as another tab.
The newly added tab will be placed to the right of the
active tab.
With the same document displayed in different tabs,
you can check different pages by switching between
the tabs.
1 Press the (Menu) button and tap [Duplicate
Tab].
The same document will be displayed in the
newly added tab.
Page display is retained in both the tabs.
Tab List
Tab close icon
Closes the targeted tab.
Previous list view icon
Current page indicator
Next list view icon
2 Tap the document you want to open in the tab
list.
The selected document is displayed on the
screen.
Tip
As the same document is displayed in two tabs, the
contents are the same.
Setting the Bookmark to On/Off
You can add a bookmark to a page.
1 Tap (bookmark) on the toolbar.
A bookmark appears on the top-right corner of
the page.
36
Page 37

2 Drag the edge of the highlight bar over other
Note
words to be searched.
3 Tap [Search] in the pop-up menu.
A page that includes the keyword is displayed.
4 Tap or in the search box at the top of the
screen.
The page turns to the previous/next page that
contains the keyword.
To cancel, tap (close) in the top-right corner of the
screen.
Bookmark
Tip
To delete a bookmark, tap (bookmark) on the
toolbar or tap the displayed bookmark.
To search for the bookmark in the currently open
document, press the (Menu) button and tap
[Annotation List] (page 48).
If you switch the orientation of the screen, the
position or size of the bookmark may change.
Removing a bookmark
1 Tap (bookmark) on the toolbar.
Tip
Tap the bookmark to delete it.
Searching Pages by Keyword
You can select a string as keyword and search a
document.
1 Tap and hold the first word of the string you want
to search for.
Tip
End cursors are not displayed when selecting a link
word.
You can search for a keyword at the Google Web
site. Select a keyword and tap [Google] in the popup menu. The [Browser] application will open to the
Google Web site and search for the word. (A Wi-Fi
network connection is necessary (page 58).) To
return to a document, press the (Menu) button
tap [Return to Viewer].
Tap [Highlight] in the pop-up menu, as shown in
Step 3, to highlight the selected string.
Search by typing a keyword using the onscreen keyboard
1 Press the (Menu) button, tap [Search], and
enter the keyword using the on-screen keyboard.
Searched keywords appear outlined.
Similar words from the same page will be
displayed simultaneously.
By pressing , similar words from the next
page will be displayed in outlined characters.
The highlight bar appears.
Keyword search is not case sensitive.
37
Page 38

Using Menu Items
Below is a list of option items available when you
press the (Menu) button from the document
viewer.
Option Description
[Send]* Transfers or returns the currently
open document from the device to
the network drive (page 26).
[Save Workspace] Saves the currently opened tabs as a
new Workspace or overwrites the old
one (page 38).
[Change File
Name]
[Duplicate Tab] Adds a duplicate tab to the right of
[Annotation List] Opens the annotation list (page 48).
[Table of Contents] Opens the table of contents.
[Search] Searches for a keyword (or string) in
[Page Flow] Changes the page flow of a
[Disable
Gestures]/[Enable
Gestures]
[Hide Toolbar]/
[Show Toolbar]
Changes the file name of the opened
document.
the currently active tab.
This item is not available for a file
with no table of contents.
an open document (page 37).
document by setting the swipe
direction for turning pages: either
from right-to-left (default), or from
left-to-right.
Disables some finger touch
gestures, such as swipe page
navigation or pinching in/out to
change the page view.
Prevents you from accidentally
touching the screen with your
sleeve, etc.
You can tap an item in the toolbar
with your finger even when the
gestures are disabled.
Tap again to enable gestures.
Turns toolbar on (show) or off (hide).
When hiding the toolbar to switch to
the full-screen, you can concentrate
on reading.
Using the [Workspace] Application
You can name and save the documents opened in
multiple tabs as they are.
By preserving the current tab status and page
location, a registered Workspace allows you to
resume your work from the preserved tab status.
Tip
Individual documents remain the same: a
document viewed in a Workspace is the same
document file that is viewed by itself; therefore, any
annotations added to a document in a Workspace
exists when the document is opened outside the
Workspace.
Registering a Workspace
You can save the currently open documents as
Workspace.
1 Press the (Menu) button on the display
screen of the open document and tap [Save
Workspace].
* If the [Network Drive Settings] are not set up, this
item is not available and will not be displayed.
[Save as New] screen will be displayed.
38
Page 39

2 Tap the input area and enter the Workspace
Note
name using the on-screen keyboard, then tap
[Yes].
The current status of the tabs and all open
documents are saved as Workspace.
Opening a Workspace
When you open a workspace, all the current tabs
will be closed and replaced by the selected
workspace.
To add a document to an open workspace, open the
document and select [Overwrite] when saving the
workspace. Follow the same procedure for deleting
tabs.
Saving a Workspace
You can modify existing Workspaces by adding
additional documents or notes.
1 Press the (Menu) button on the display
screen of the open document and tap [Save
Workspace].
The confirmation pop-up menu will be displayed.
2 Tap [Overwrite]/[Save As New].
[Overwrite]: Overwrite and save the current
workspace.
[Save As New]: Allows you to save the current
workspace with a different name (e.g., the
default name generated by the device).
Change the workspace name, and tap [Yes] in
the dialog box for [Save As New].
1 Press the (Home) button and tap
[Workspace].
2 Select a Workspace to open from the list of
Workspaces.
The confirmation pop-up menu will be displayed.
3 Tap [Yes].
Opening from [Saved Workspaces]
You can also open a workspace from [Saved
Workspaces] on the Home menu.
Up to 3 Workspaces are displayed in [Saved
Workspaces].
If you want to display three or more workspaces, tap
[See All] on the right-side of the screen.
39
Page 40

Deleting/Renaming a Workspace
Note
1 Press the (Home) button and tap
[Workspace].
2 Tap and hold the Workspace you want to edit,
then tap [Delete]/[Rename] from the options
menu.
Even if you delete the Workspace, documents
opened in the tab will not be deleted.
The currently opened tabs are not closed by
deleting a Workspace.
40
Page 41

Note
Writing
Tip
The document being edited will get saved when
you enter the standby mode by pressing the Power
button.
Handwriting/Annotating the Document
You can add various annotations* such as directly
writing on the document, highlighting the text and
adding sticky notes (text and handwriting).
* Annotations are markups which can be inserted in a
PDF document.
Annotations in the Digital Paper device include
handwriting, highlighting, adding sticky notes
(handwriting or text), bookmarks.
The annotated documents will be saved
automatically in the following cases:
When closing a document or note
When switching a tab
When entering stand-by mode
The (Back) button, (Home) button,
(Menu) button, and (Power) buttons on the
device are disabled when writing on the screen
using the stylus.
These buttons are however enabled after a certain
period of time when the stylus remains in contact
with the screen for a long time.
When the charge/battery status icon turns into ,
a screen indicating that the battery level is too low
is displayed.
In this case, tap [OK] and charge the device.
When the charge/battery status icon turns into ,
an edited document is saved and becomes readonly. Then a screen indicating that editing cannot
be done appears.
In this case, tap [OK] and charge the device.
For secured PDF files where annotating is forbidden
in the advanced settings, “(Protected)” appears at
the beginning of the file name on this device, the
annotation icons on the toolbar are disabled, and
annotations cannot be inserted.
To check for detailed information, refer to the User
Guide for PDF Viewer.
Using the Toolbar
You can use the icons on the Toolbar to add
annotations.
The toolbar is set to hide by default. Tap to display
the toolbar.
Once the toolbar appears, the icon changes from
to .
Tip
The show toolbar/hide toolbar setting is retained
until the toolbar icon is tapped again.
Tab List icon (page 36)
Handwriting icon (page 42)
Highlight icon (page 44)
Eraser icon (page 45)
41
Page 42

Sticky Note (Handwriting) icon (page 46)/Sticky
Note (Text) icon (page 47)
Bookmark icon (page 36)
Select range icon (page 43)
Handwriting a Note on a Page
You can use the stylus to draw directly on a page.
Firmly place the palm of your hand on the screen and
start writing in the same manner as that of writing
using pen and paper.
Paste icon (page 44)
Undo/Redo icon (page 46)
Tip
The following icons switch mode when tapped
once, and change the function when tapped the
second time.
Handwriting icon: Allows you to select the pen type
Eraser icon: Allows you to select the size of eraser
Sticky Notes icon: Allows you to select [Handwrite]
and [Text]. For details, see the respective operation
procedure.
Changing the toolbar position to right
The default setting for Toolbar position is [Left].
Left-handed people and others can change the
position to [Right] if they wish.
1 Tap [Settings] [Application Preferences]
[Documents] [Toolbar Position] [Right]
(page 73).
1 Tap the (Handwriting) icon on the toolbar to
select the handwriting mode.
Tap the (Handwriting) icon once more to
select the pen type from the displayed options.
The selected pen type is retained until it is
changed.
2 Handwrite with the stylus.
Hiding the toolbar
If you choose to hide the toolbar, the screen will zoom
in and display a full-screen view.
1 Press the (Menu) button and tap [Hide
Toolbar] when viewing a document.
To unhide the toolbar, tap [Show Toolbar].
Blue/Fine
Blue/Medium
Blue/Bold
Red/Fine
Red/Medium
Red/Bold
42
Page 43

Lines drawn in red are displayed as gray lines on the
Note
screen of the device. However, red lines will be
displayed on files transferred to a computer.
You can use the stylus (handwrite) while resting
your hands on the touchscreen.
Tap [ Setti n gs] [System Management] [Pen
Settings] [Pen Button Settings] to set how the
stylus operates on a document with its stylus
button held down (page 74).
[Eraser active] is set by default. You can select
[Highlight active] to highlight and [Button inactive
(handwriting only)] to handwrite even while
pushing the stylus button. You can select your
favorite mode.
The (Back), (Home), (Menu), and
(Power) buttons on the device are disabled when
handwriting on the screen using the stylus.
When the stylus remains in contact with the screen
for a long time, these buttons however are enabled
after a certain time period.
Tip
To undo/redo handwriting, tap (Undo) or
(Redo) on the toolbar.
If the page is mistakenly flipped due to brushing
your arm against the screen while writing on the
screen, turn on the “Disable Gestures” function
(page 46).
Turning the function on prevents accidental flipping
of pages, making it easier to concentrate on writing.
2 Place the stylus in the middle of the dotted-line-
frame ( ) without touching the pop-up menu
and drag the selected annotation to the desired
location.
The dotted line frame follows the movement of
the stylus.
3 Move the stylus away from the screen and tap
[Done] in the pop-up menu.
Moving/Copying/Pasting/Cutting
You can move/copy/paste/cut the handwriting
annotations by using the stylus.
You can copy/paste the handwriting annotations
among different documents viewed through the
Digital Paper device.
Moving a handwriting annotation
1 Tap (Select) on the toolbar and enclose the
handwriting in a frame by dragging your stylus
diagonally across the handwriting you want to
move.
A dotted lined frame is displayed.
Copying/Cutting a handwriting
annotation
1 Tap (Select) on the toolbar and enclose the
handwriting in a frame by dragging your stylus
diagonally across the handwriting you want to
copy or cut.
A dotted lined frame is displayed.
2 Tap [Copy] or [Cut] in the pop-up menu.
Tip
You can select a broad area to delete handwriting
by selecting [Cut].
43
Page 44

Pasting a handwriting annotation
Note
Note
Note
1 Tap (Paste) on the toolbar.
The handwriting annotation saved on the
clipboard through the previous [Copy] or [Cut]
operation is displayed in the middle of the
screen.
2 Place the stylus inside the dotted line frame ( )
around the annotation to drag it to the desired
location. Move the stylus away from the screen
and tap [Done] in the pop-up menu.
information is not embedded cannot be
highlighted.
You cannot highlight the handwritten comments.
You cannot highlight comments that do not contain
text.
Tip
To search for a highlighted word in the currently
open document, press the (Menu) button tap
[Annotation List] (page 48).
When using your finger
Tip
Annotations done by another author in documents,
for which editing or deleting annotations by other
authors is not allowed (page 51), cannot be moved,
copied, or cut.
The pasted annotation is attributed to the author
who has pasted it.
Only one copied or cut annotation is retained on the
clipboard to enable repetitive pasting of the same
annotation.
The handwriting annotations can only be selected
or dragged using the stylus.
The annotations cannot be moved, copied, pasted
or cut when the screen is zoomed in.
Highlighting Words on a Page
You can use the stylus or your finger to highlight
words directly on a page.
1 Tap and hold the first word of the section that you
want to highlight.
When using the stylus
1 Tap (Highlight) and stroke the section that
you want to highlight.
The selected words are highlighted.
When [Pen Button Settings] in [Pen Settings] is set
to [Highlight active], you can highlight while
pushing the stylus button (page 74).
The text in the scanned documents (images on the
entire page) or the documents in which font
Pop-up menu
Highlight bar edge
2 Drag the edge of the highlight bar with your
finger until you highlight all of the necessary text.
3 Tap [Highlight] from the pop-up menu.
The text is highlighted.
The text cannot be highlighted when the view is
zoomed in.
44
Page 45

Tip
Note
Note
In highlight bar edge, the following operations are
possible besides [Highlight] on pop-up menu:
[Search]: You can search the selected string/text in
a document.
[Google]: You can search the selected string/text on
Google through browser.
Using the Eraser
Erasing while pushing stylus button
1 While pushing the stylus button, move the stylus
across the handwriting or highlight, then lift the
stylus.
The handwriting or highlighted words will be
erased. The handwriting will be erased per line
segment.
The first tap on the Eraser icon switches the mode,
and the second tap on the icon changes the size of
the eraser.
Tap the Handwriting icon on the toolbar to return to
Handwriting mode.
Sticky notes cannot be deleted using the eraser
(pages 46, 47).
Changing the size of the eraser
In Eraser mode, tap (Eraser) on the toolbar using
the stylus or your finger to select the size of the eraser
from [Small], [Medium], and [Large].
Once the size of the eraser is changed, the mode is
set to Eraser mode. Select the Handwriting icon
to return to the pen mode.
The eraser can be used by pushing the stylus button
only when [Pen Button Settings] are set to [Eraser
active] (page 74).
Tip
A line can be erased by selecting just a part of the
line, then moving the stylus away from the screen.
In this device, unlike erasing a line drawn on paper
using a pencil, you do not need to select the entire
line to erase it.
Carefully select multiple lines to erase them all at
once.
Selecting Eraser mode on the toolbar
You can switch to Eraser mode by tapping the
(Eraser) icon on the toolbar.
45
Page 46

An animated circle is set for the eraser animation by
Note
Note
Example of erasing on real paper
Example of erasing with this device
default. You can set the animated circle to OFF
(page 74).
Cut part of a line with [Cutting a handwriting
annotation]’s range selection to separate the line
into two parts.
Disabling Gestures
This function prevents you from accidentally turning
pages, zooming in, etc., by touching the screen with
your sleeve or hand while handwriting.
When gestures are disabled, operations such as
turning a page by using swipe as well as changing the
page view using Pinch in/Pinch out will be disabled.
1 Press the (Menu) button while the document
is displayed, and tap [Disable Gestures].
To enable gestures, press the (Menu) button
and tap [Enable Gestures].
When the gestures are disabled and the page view
is switched to thumbnail view, gestures are
enabled, and when the page view is switched back
to one screen view from thumbnail view, the
gestures remain disabled.
To turn a page while the gestures are disabled, tap
[<] or [>] on the toolbar.
Tip
When gestures are disabled, you can perform
toolbar and tab list operations and select an item in
the option menu with your finger.
Undoing/Redoing the Previous Operation
You can undo/redo the previous operation such as
handwriting or erasing.
1 Tap (Undo) on the toolbar.
The previous operation such as handwriting or
eraser is undone.
To redo the operation, tap (Redo).
You can undo/redo only the last operation; not
operations performed before that.
The undo/redo range depends on the timing that a
change is embedded in the PDF.
To undo/redo detailed changes, write on the screen
by finely adjusting the timing of moving the stylus
away from the screen.
Deletion of a highlight or sticky notes cannot be
undone.
Adding a Sticky Note (Handwriting)
You can handwrite text or drawing as a sticky note on
a page.
1 Tap the icon (Sticky Note (Handwriting)) or the
icon (Sticky Note (Text)) on the toolbar.
When tapped on the icon (Sticky Note (Text)),
tap the same icon once more and then tap Sticky
Note (Handwriting) under the sub menu.
(By tapping once on the Sticky Note icon, you can
change the mode, and by tapping the icon
second time, you can change to ‘Handwriting’ or
‘Text’ mode.)
2 Tap the place where you want to add the
Sticky Note (Handwriting) by using the stylus.
The editing screen for the sticky note
(handwriting) is displayed.
46
Page 47

Note
Editing a sticky note (handwriting)
1 Tap (Sticky Note (Handwriting)) on the page
with your finger.
The sticky note (handwriting) appears.
When you tap a sticky note (handwriting) on the
page with a stylus, ensure that the (Sticky Note
(Handwriting)) icon on the toolbar is in the
selected state.
2 Edit the sticky note (handwriting).
3 Tap [Save].
Deleting a sticky note (handwriting)
1 Display the sticky note (handwriting) and tap
[Delete] [YES].
Sticky Note (Handwriting) icon
Handwriting icon (Blue/Fine)
Handwriting icon (Blue/Medium)
Handwriting icon (Red/Fine)
Handwriting icon (Red/Medium)
Eraser icon
[Save]
3 Tap the Handwriting and Eraser icons to draw a
picture or write text with the stylus.
4 Tap [Sa v e ] .
You cannot use [Bold line] in Sticky Note
(Handwriting).
Adding a Sticky Note (Text) to a Page
You can input a comment using the on-screen
keyboard and add that comment as a sticky note to a
page.
1 Tap the icon (Sticky Note (Handwriting)) or the
icon (Sticky Note (Text)) on the toolbar.
When tapped on (Sticky Note (Handwriting)),
tap on the same icon once more and then tap
[Sticky Note (Text)] under the sub menu.
(By tapping the Sticky Note icon once, you can
change the mode, and by tapping the icon
second time, you can change to [Handwriting] or
[Text] mode.)
2 Tap the place where you want to add the
(Sticky Note (Text)).
The editing screen for the sticky note (text) and
the on-screen keyboard are displayed.
Tip
The sticky note is embedded as an attached PDF file
in the document. Therefore, the annotations
created on this device can also be viewed on
computer.
47
Page 48

Tip
Note
To display the editing screen with the stylus rather
than your finger, select the (Sticky Note (Text))
icon on the toolbar before tapping the (Sticky
Note (Text)) icon on the page.
2 Tap [Edit].
The on-screen keyboard appears.
3 Edit the text using the on-screen keyboard.
4 Tap [Sa v e ] .
The sticky note (text) and on-screen keyboard
close.
Deleting a sticky note (text)
1 Display the sticky note (text) and tap [Delete]
[Yes].
Sticky Note (Text) Icon
[Save]
Input area
On-screen keyboard
3 Enter the text using the on-screen keyboard.
4 Tap [Sa v e ] .
Tip
Sticky notes (text) are embedded into PDF files as
annotations. This enables you to search for strings
of text within sticky notes (text) when using a
computer or from the annotation list on the device.
Editing a sticky note (text)
1 Tap the (Sticky Note (Text)) icon on the page
with your finger.
Displaying Annotation List
You can search, filter, sort or view annotations
(bookmarks, highlights, sticky notes (text), or sticky
notes (handwriting)) in the current document.
1 Press the (Menu) button and tap on
[Annotation List] while the document is
displayed.
The annotation list appears on the left side of the
screen and the preview of the displayed
document is displayed on the right side.
A search is conducted in the current document to
display the annotations list, so it may take a while
depending on the number of annotations.
The editing screen appears.
48
Page 49

Viewing pages with annotations in
preview
1 Tap the annotation you want to view from the
annotation list.
The page with the selected annotation is
displayed in the preview area.
Returning to normal view from preview
1 Tap [Close] or the preview area to return from
preview to normal view.
The annotation list closes, and the screen
switches to normal view.
Annotation types
Bookmark
Annotation list
Previous list icon
Page indicator
Next list icon
Search icon
Filter icon
Sort icon
Tap to close the annotation list
Preview area
Tip
When you tap and hold the previous list or next list
icon, pages of the lists turn continuously.
Tap on the document in preview display (right side
of the screen), or press the (Back) button to
return to the document.
Handwriting
Highlight
Sticky Note (Text)
Sticky Note (Handwriting)
49
Page 50

Searching annotations by keyword
You can search annotations by entering a keyword.
Targeted items
The targeted item type is limited to 140 characters.
Text on a page with a bookmark
Highlighted text
Annotation author name
Sticky note (text) text
1 Tap (Search).
2 Type a search keyword using the on-screen
keyboard.
3 Tap of the on-screen keyboard.
The list of annotations matching the search
keyword is displayed.
2 Remove the checks by tapping the check box of
annotations types you do not want to display.
3 Tap [OK].
4 Tap the annotation.
The tapped annotation is displayed by reversing
the black/white color in the preview.
When the page is changed by tapping, the
previewed page changes.
Tap (Close) in the top-right corner of the screen to
cancel the search.
Tip
You can search the annotation by user name.
You can search the annotations with a user name
set on the device. Therefore, if a forwarded
document has annotations that were added by
multiple members, each user name can be filtered
in this device.
Filtering by annotation type
You can filter the annotations by bookmark
(displayed as [Page Flag]), handwriting, highlight,
sticky note (text), or sticky note (handwriting).
1 Tap (Filter).
The pop-up menu for annotation types is
displayed.
By default, all the check boxes are checked.
Sorting the annotations
You can sort the annotations by page order, name of
the author who added the annotation, annotation
type, or by date when the annotation are updated.
1 Tap (Sort).
A pop-up menu appears.
2 Select and tap the sort type.
Annotations appear sorted.
Tip
After filtering, you can further refine the search by
searching annotation list by keyword.
50
Page 51

Annotation Settings
Note
Note
Limit Editing Annotations
from toolbar. However, if the stylus button is set to
Eraser mode, the user can switch to Eraser mode
only when the button is pressed while in the
Handwriting mode.
User names can be set such that the created
annotations (such as bookmark, handwrite, highlight,
Sticky Note (Text), Sticky Note (Handwriting)) cannot
be edited and deleted by other user names.
1 Press the (Home) button and tap [Settings].
2 Tap [Application Preferences] [Documents]
[Limit Editing Annotations].
3 Tap [On].
The settings of [Limit Editing Annotations] depend
on individual Digital Paper device settings.
Conditions to use this function are as given below:
User names must be set for any Digital Paper
device where documents are handed over.
[Limit Editing Annotations] should be set to On for
Digital Paper device on the receiving end.
Tip
Please set the user name by going to [Settings]
[General Setting] [User Name].
Set Pen Grip Style
Pen Grip Style is set to right-handed (straight wrist) in
the default settings.
You may change the grip style to right-handed,
“Hooked” wrist/left-handed, straight wrist/lefthanded, “Hooked” wrist.
Settings are applied as per the gripping hand.
1 Press the (Home) button and tap [Settings].
2 Tap [System Management] [Pen Settings]
[Pen Grip Style].
3 Select the grip style closest to your own grip style
out of the 4 types of pen grip style and tap [OK].
Configuring the Pen Button Settings
The default setting for when you hold the stylus
button and trace the screen is set to Eraser.
You can also change it to Highlight or Off (with
handwriting).
1 Press the (Home) button and tap [Settings].
2 Tap [System Management] [Pen Settings]
[Pen Button Settings].
3 Tap on the operation for when the button is
pressed.
Tip
Handwriting icon must be selected to return to the
Handwriting mode after changing to Eraser mode
If the pen grip style is not matched to the user’s,
there may be a gap between the pen point position
and the position of the written line. Please make
sure to perform advanced calibration after setting
Pen Grip Style.
51
Page 52

Performing Advanced Calibration
You can rectify the gap in the position where the pen
is aimed and the written position.
Since there are individual differences in the Pen Grip
Styles, please adjust as per your own style.
4 Tap [Next].
Manual correction screen is displayed.
1 Press the (Home) button and tap [Settings].
2 Tap [System Management] [Pen Settings]
[Advanced Calibration].
Trial writing screen is displayed.
3 Trace the dotted line of and in the area in
the center of the screen using the pen with your
usual grip style.
The drawn line is not displayed on the dotted line
when tracing.
The drawn line will be displayed after moving the
pen away.
Moreover, a black line is displayed at the upper
side of the area when tracing.
5 Move the written line by tapping the top-down-
left-right arrow icons, adjusting it such that it
matches the dotted line.
If you want to erase the line written here, tap [Erase].
Please trace on the dotted line in your usual writing
style.
Since the differences in the lines written here are
adjusted on the subsequent screen, do not worry
about the difference between the dotted lines and
the written lines.
6 Tap [Next] when the position has more or less
matched the dotted line.
The confirmation screen is displayed.
7 Trace the dotted line again, similar to Step 3.
In case you still feel that there is a gap between
the dotted lines and the written lines, tap
[Recalibrate] to return to the previous screen.
The written line will be displayed on the
confirmation screen, adjust the position again
similar to Step 5.
Once the position adjustment is complete, tap
[Next] to trace the dotted line.
52
Page 53

8 Tap [Save] when the dotted line and written line
Note
Note
match.
Return to Pen Settings screen.
You can return to the Manual correction screen by
tapping [Recalibrate] on the Confirmation screen.
You can return to the trial writing screen by
tapping [Back] and retry trial writing.
If the Pen Grip Style is changed after Advanced
Calibration, the gap in the position where pen is
aimed and the written position cannot be corrected,
therefore you have to re-perform the Advanced
Calibration.
Using PDF Forms
The Digital Paper device supports the following PDF
forms, and input is possible by pen or touch (finger).
Check box
Radio button
Drop down list
List box
Text f ield
Check box ( / )
Tap to switch the check box to On/Off.
Radio button ( / )
Tap to select a radio button.
Text input box
On-screen keyboard
Tip
This function is convenient for filling out
questionnaires and tallying on the computer.
Tap (ENTER) to insert a line feed in a text field
where multiple lines can be input.
If the text field view area is small, the text is not
displayed on the PDF of the Digital Paper device.
However, input values are saved in the text input
box and will be recognized as text.
To confirm the input text, tap the text field to open
the text input box.
Drop down list/ List box
Tap to display the list.
Text field
Tap to display the text input box and on-screen
keyboard.
Input text using the on-screen keyboard and tap
[Save] to confirm the text input.
In PDF files with security settings enabled, input is
possible only for the PDF forms and annotations
where input is allowed in the Advanced Settings.
For details, please check the manual of the PDF
Viewer used.
53
Page 54

Displays the File list for notes
Using the [Note] Application
You can create a note.
Also, you can edit a note and insert/delete a page.
Creating a New Note
There are two methods to create a new note:
Create a note from the list in [Note] or [Documents]
tab.
Create a note in a specified folder from
[Documents].
Tip
Newly created notes will be saved as a PDF.
Only a list of notes is displayed from [Note] in the
Home menu.
In the detailed display, the file path is displayed on
the second line where you can confirm the saved
location.
2 Tap [Create New Note].
Notebook Template selection screen is displayed.
3 Select the template to be used and tap [OK].
A new note of 1 page will be created.
Creating by specifying a folder from
[Documents]
1 Press the (Home) button and tap [Folders] tab
in [Documents].
Creating from the [Note] or [Documents]
list
1 Press the (Home) button and tap [Note] or tap
the [All Documents] tab in [Documents].
The following screen is an example of note list.
Displays only the icon and filename
Folder path view
[Folders] tab
[Create new note under current folder]
Folders/Files list
2 Tap the folder where note is to be saved.
You can go to other folders on tapping the
displayed path of the folder.
If you want to create a new folder to save the
note, press the (Menu) button, and tap
[Create New Folder] enter a folder name and
then tap [OK].
Displays the note details such as thumbnails
Displays the path of the note on the second line.
[Create New Note]
54
Page 55

3 Tap [Create new note under current folder].
Notebook Template selection screen is displayed.
2 Press the (Menu) button and tap [Change File
Name].
3 Enter the file name using the on-screen keyboard
and tap [OK].
To change the file name from the notes list
Tap & hold the note to change the file name, and tap
[Rename] from Options menu.
Inserting a New Page to the Last Page of Note
1 Swipe the screen on the last page of the note or
go to the last page from toolbar.
1 page is automatically added to the last page of
note.
4 Select the template to be used and tap [OK].
A new note of 1 page will be created.
Tip
If the check box for [Always use this template (Do
not display this dialog in future)] is set to On on the
template selection screen, the selected template is
reflected in the settings and the template selection
screen is not displayed from the next time onwards
when creating a note.
If you want to display the template selection screen,
tap [Settings] [Application Preferences] [Note
Template] from the application list, and select
[Select a template every time (display a dialog when
a new note is created)].
You can also set the template as a fixed template
from the Settings menu beforehand (page 56).
Changing Filename of a Note
Inserting a Page in the Middle of the Note
1 Open the created note.
A note is automatically named when created newly.
However, you can later rename the note .
1 Open the note which you want to rename.
55
Page 56

2 Tap (More ) [Insert New Page] on the
Note
Note
Note
toolbar.
A new page is inserted before the currently
displayed page.
Tip
If you want to display the template selection screen
each time a new note is created, tap [Display
template option each time a note is created].
Deleting a Note Page
1 Tap (More ) [Delete Current Page] on the
toolbar.
2 “Delete current page?” Tap [Yes] on this screen.
Currently displayed page will be deleted.
Be careful since the deleted page cannot be
restored.
Setting the Notebook Template
You can set a template beforehand when creating a
new note.
1 Press the (Home) button and tap [Settings].
2 Tap [Application Preferences] [Notebook
Template].
3 Tap the template to be used.
Adding Notebook Template
You can use your favorite PDF as a template.
1 Connect the Digital Paper device to your
computer with the supplied USB cable.
2 Save the PDF to be used as a template in the
[note_template] folder in the internal memory of
the device.
3 Press the (Home) button of the device and tap
[Settings] [Application Preferences] [Note
Template], then tap the saved PDF.
Turn off password security for the PDF file to be
used as a template.
If adding annotations to the template PDF file is not
allowed, users cannot add annotations to the notes
created from the template.
Tip
When adding a new page to the note, the first page
of PDF used as a template is added.
You can also use the Notebook Templates by
downloading them from the product page of Digital
Paper device.
http://www.sony.com/digitalpapersupport
Selecting the Destination to Save the Note (Synchronization with Server)
When creating a new note from the note list, if you
specify the save destination as a folder from the
network drive, then you can synchronize the created
note (page 73).
If you set the type of template to be used at this
screen, the template format for new notes gets
fixed.
56
Page 57

Using Screen Transfer
Note
Note
You can project the screen of Digital Paper device on
a computer.
By using this function you can work while sharing the
screen of Digital Paper device on the monitor during
group work or conferences.
The computer dedicated application and driver
need to be installed when using the [Screen
Transfer] function.
For details, check the information provided on
Digital Paper device’s product page.
http://www.sony.com/digitalpapersupport
computer.] is displayed and transfer is possible.
(Page 74)
1 Press the (Home) button on the device, tap
[Settings] [System Management] [Screen
Transfer], and check the check box.
2 Connect the device to your computer using the
supplied USB cable.
3 Start the dedicated application “DP Display
Output” installed on your computer.
Contents displayed on the Digital Paper device
are displayed on the computer.
It may take some time to display the contents of
Digital Paper device on your computer.
Tip
The [Screen Transfer] function allows you to charge
the device through your computer while operating
the device.
When transferring documents, change the [Screen
Transfer] settings to Off and remove the USB cable
once.
When the USB is connected to the computer again,
[This device is correctly recognized by the
57
Page 58

Note
Network
Home Hotspot and Office
No
Case B
No
Case C
YES
YES
No
1. Are you using a home or
office Wi-Fi connection?
2. Is your Wi-Fi router WPS*
compatible?
3. Does your Wi-Fi router
have a WPS button?
Case D
YES
Case A
Setting up a Wi-Fi® Network
Tip
Alternatively, you can tap the status bar tap [Wi-
Fi] to turn on the Wi-Fi (page 18).
Turn off [Wi-Fi] when it is not in use in order to
extend the battery life of the device (page 72).
Tap [Wireless Standby] and set the check box on to
extend the battery-usage time (page 72).
You must turn on the wireless LAN (Wi-Fi) network
settings in the Digital Paper device to connect to the
Wi-Fi network.
Tip
Supported security methods are WEP, WPA/WPA2
PSK, and 802.1x EAP.
Wi-Fi status icons
The following icons in the status bar indicate the
status of the Wi-Fi connection.
Icon Status
Wi-Fi is activated. The number of bars
indicates the Wi-Fi signal strength.
Wi-Fi is in standby mode (page 72).
There is no Wi-Fi access point.
The [Wi-Fi] setting is turned off.
Preparing to Set Up a Wi-Fi
Selecting a Connection Type
Depending on your Wi-Fi environment, connect to an
access point via one of the following methods. The
following questions will determine the most suitable
case for setting the Wi-Fi network connection.
Internet
Connection
Before connecting to a Wi-Fi access point, turn on
[Wi-Fi] on the Digital Paper device.
1 Press the (Home) button tap [Settings]
[Wireless Network Settings].
2 Tap [Wi-Fi] to check the check box.
A check indicates that [Wi-Fi] is turned on. Wi-Fi
is turned on by default.
* WPS: Wi-Fi Protected Setup
Customers shall be responsible to pay the
applicable Internet connection and communication
fees when using a Wi-Fi router.
Wireless communication exposes risks to
wiretapping, manipulation and illegal invasion into
the network.
Unless absolutely necessary, Sony recommends
58
Page 59

that you use safe security methods (WPA/WPA2PSK, etc.) and avoid non secure or WEP access.
Case A
Connecting to a Wi-Fi router with a WPS button
(page 59)
Case B
Connecting to a Wi-Fi router with WPS PIN input
(page 59)
Case C
Connecting to a Wi-Fi router by selecting a network
name (page 60)
“WPS” button
Case D
Connecting to a public Wi-Fi network (page 60)
Other than case A to D (Manual setup)
Set up a Wi-Fi network connection manually when
connecting to an access point for which the SSID is
hidden (page 61).
Case A: Connecting to a Wi-Fi router with a
WPS button
The Digital Paper device is compatible with WPS (WiFi Protected Setup), which lets you easily make a WiFi connection using the “WPS” button on your WPScompatible Wi-Fi router.
1 Turn on [Wi-Fi] on the device (page 58).
2 Tap [Wi-Fi Settings].
3 Tap [WPS Push-Button Configuration] [Start].
5 After the setup completion screen appears, tap
[OK].
You can check the Wi-Fi connection status by the
Wi-Fi icon on the status bar (page 58).
For details on Wi-Fi settings, see page 63.
Case B: Connecting to a Wi-Fi router with
WPS PIN input
If your WPS-compatible Wi-Fi router does not support
push-button configuration, connect by using a PIN
(Personal Identification Number).
1 Turn on [Wi-Fi] on the device (page 58).
2 Tap [Wi-Fi Settings].
3 Tap [Add Wi-Fi Network] [WPS PIN Method]
[Start].
4 On your Wi-Fi router, press the “WPS”* button
within 2 minutes.
The device automatically attempts to establish a
Wi-Fi connection.
* The name of the button on your Wi-Fi router may
vary.
A PIN code will be shown on the screen of the
device.
4 Enter the PIN code into your Wi-Fi router.
Refer to your Wi-Fi router’s instruction manual for
details.
5 Tap [OK] on the screen of the device.
59
Page 60

After a moment, the device connects to the Wi-Fi
Note
Note
network automatically.
You can check the Wi-Fi connection status by the
Wi-Fi icon on the status bar (page 58).
For details on Wi-Fi settings, see page 63.
Case C: Connecting to a Wi-Fi router
without WPS support
Connect to one of the available Wi-Fi networks listed.
Depending on the security method of the Wi-Fi
router, a password may be required.
For an access point that is secured by 802.1x EAP,
additional settings are required. For details, see
“Other than case A to D” (page 61).
Number Description
Network SSID (Service Set Identifier)
Security method
Secured Wi-Fi network.
When connecting to the network, enter the
password. A password may also be called a
WEP key, WPA key, encryption key, network
key, etc.
Unsecured Wi-Fi network
Page indicator
Page turn icons
4 Tap your Wi-Fi router’s SSID in the [Wi-Fi
Networks] list.
For details on the Wi-Fi router’s SSID, refer to your
Wi-Fi router’s instruction manual.
1 Turn on [Wi-Fi] on the device (page 58).
2 Tap [Wi-Fi Settings].
3 Tap [Sca n].
The available access points are listed under [WiFi Networks].
5 If prompted for a password, tap the input area
and enter the password using the on-screen
keyboard.
Perform steps 5-7 in “Setting the proxy server”
(page 62) when setting up the proxy server
settings in every Wi-Fi router.
Tip
You can confirm the password to be entered by
turning on the [Show Password] settings.
6 Tap [Connect].
The device connects to the Wi-Fi network.
You can check the Wi-Fi connection status by the
Wi-Fi icon on the status bar (page 58).
For details on Wi-Fi settings, see page 63.
Case D: Connecting to a public Wi-Fi
network
Connect to one of the available public Wi-Fi networks.
Connecting to a public Wi-Fi network may require a
user ID and password. For details, contact the
homepage, etc., of the Wi-Fi service provider.
1 Turn on [Wi-Fi] on the device (page 58).
2 Tap [Wi-Fi Settings].
60
Page 61

3 Tap [Sca n]
The available access points are listed under [WiFi Networks].
Number Description
Network SSID (Service Set Identifier)
Security method
Secured Wi-Fi network.
When connecting to the network, enter the
password. A password may also be called a
WEP key, WPA key, encryption key, network
key, etc.
Unsecured Wi-Fi network
Page indicator
Page turn icons
You can check the Wi-Fi connection status by the
Wi-Fi icon on the status bar (page 58).
For details on Wi-Fi settings, see page 63.
Other than case A to D: Manually
connecting to an unlisted access point
When connecting to a Wi-Fi network in an office or
group, check with the network administrator for
details on installing the certification and proxy server
settings.
When connecting to a Wi-Fi network at home, it is not
necessary to install certification, or perform proxy
server settings. See “Manually setting a Wi-Fi
connection” (page 62).
Installing the certification
Transfer and install the CA certificate and user
certificate from the computer to the Digital Paper
device. It only requires the user certificate to use TLS
under 802.1x EAP.
1 Connect the Digital Paper device to your
computer using the supplied USB cable. Then
transfer the CA certificate and user certification to
the root folder of internal memory.
To transfer the certification, see page 21.
2 Turn on [Wi-Fi] on the device (page 58).
3 Tap [Wi-Fi Settings].
4 Tap your Wi-Fi router’s SSID in the [Wi-Fi
Networks] list.
5 If prompted for a password, tap the input area
and enter the password using the on-screen
keyboard.
6 Tap [Connect].
The [Browser] application may start
automatically to connect to a public access point.
Otherwise, press the (Home) button, then tap
[Browser].
7 Follow the instructions shown on the [Browser]
screen to complete the Wi-Fi connection.
4 Press the (Menu) button tap [Advanced].
5 Tap [Install certificates].
6 Tap the certificate that you want to install.
61
Page 62

7 When selecting the user certificate, enter the
password using the on-screen keyboard, then
tap [OK].
8 Enter the certification name using the on-screen
keyboard, then tap [OK].
Press the (Back) button to close the settings.
Setting the proxy server
When connecting via proxy server, settings are
necessary.
1 Turn on [Wi-Fi] on the device (page 58).
2 Tap [Wi-Fi Settings].
3 Tap your Wi-Fi router’s SSID in the [Wi-Fi
Networks] list.
If you select a connected Wi-Fi network , tap [Edit
these network settings].
4 If prompted for a password, tap the input area
and enter the password using the on-screen
keyboard.
5 Tap [Use a proxy server].
The check box is checked.
[Use a proxy server]
[Address]
[Port]
6 Tap [Address] and input a valid address of the
proxy server using the on-screen keyboard.
7 Tap [Port] and input a valid port number using
the on-screen keyboard.
8 Tap [Connect].
If you have selected a connected Wi-Fi network in
Step 3, tap [Save].
Manually setting a Wi-Fi connection
1 Turn on [Wi-Fi] on the device (page 58).
2 Tap [Wi-Fi Settings].
3 Tap [Add Wi-Fi Network].
4 Tap [Manual Registration].
62
Page 63

5 Register the settings.
The option items differ depending on the security
method. For further setting information, contact
the network administrator.
Item Description
[SSID] Enters the SSID (Service Set Identifier),
using the on-screen keyboard.
[Security
Method]
[EAP method]* Selects the authentication method.
[Phase 2
authentication]*
[CA certificate]* Selects the CA certificate.
[User
certificate]*
[Identity]* Enters the user ID using the on-screen
[Anonymous
identity]*
[Password] When connecting to a secured Wi-Fi
[Show
Password]
[Use a proxy
server]
Selects the security method
corresponding to the Wi-Fi router.
Selects Phase 2 authentication.
Selects the user certificate when [TLS]
is selected in [EAP method].
keyboard.
Enters an anonymous user ID using the
on-screen keyboard when [PEAP] is
selected in [EAP method].
network, enter the password using the
on-screen keyboard. A password may
also be called a WEP key, WPA key,
encryption key, network key, etc. It is
not necessary to enter the password
when [TLS] is selected in [EAP method].
You can confirm the password to be
entered by turning on the setting.
You can input the [Address] and [Port]
by turning on the setting.
* Appears only when [802.1x EAP] in [Security
Method] is selected.
6 Tap [Save].
The Digital Paper device connects to the wireless
network.
You can check the Wi-Fi connection status by the
Wi-Fi icon on the status bar (page 58).
For details on Wi-Fi settings, see page 63.
General notes on Wi-Fi connectivity
Tap the network SSID (network identifier) in the [Wi-
Fi Networks] list to view the connection information.
Before setting the Wi-Fi network connection, refer
to the instructions of the Wi-Fi router, and check the
SSID and security method.
You can configure up to 20 Wi-Fi network
connections.
The device does not support certain custom Wi-Fi
network security systems. For details, refer to your
Wi-Fi router’s instruction manual.
If you change the password of the connected Wi-Fi
router, enter the new password and reconnect it.
To use a static IP address, press the (Menu)
button in [Wi-Fi Settings] tap [Advanced] tap
[Use Static IP]. Select the option and enter the
address. When the setting is completed, press the
(Back) button to return to [Wi-Fi Settings].
Do not change this setting unless instructed to by a
network administrator, as the Wi-Fi network
connection may not be established correctly.
If the SSID is hidden on the Wi-Fi router, it will not be
displayed in the [Wi-Fi Networks] list of the device.
In this case, manually set up the Wi-Fi network.
The access point may filter access by MAC address.
Check the MAC address by pressing the (Home)
button tap [Settings] [About] [Device
Information], then register the MAC address with
the access point to establish a Wi-Fi connection.
To check the network speed and security method
for the connected Wi-Fi network, press the
(Menu) button in [Wi-Fi Settings] tap [Connection
Information].
An access point, once configured, can be connected
to again simply by tapping it in the [Wi-Fi Networks]
list and tapping [Connect].
63
Page 64

Using the Network Drive
If the server configuration is as follows:
“/” Destination Folder
“/user1” sync folder
“/user2”
By using the WebDAV protocol, you can access a
specific network drive to synchronize documents
between the Digital Paper device and the network
drive, or transfer documents from the device to the
network drive. Connect to a Wi-Fi network
beforehand (page 58).
Setting the Network Drive
You can set the log in information, On/Off of Auto
Sync, and download destination. Check with the
network administrator for setup information.
1 Press the (Home) button tap [Settings]
[Server Settings].
2 Tap [Network Drive Settings].
3 Tap [Server Settin gs ] tap the input area and
enter each item using the on-screen keyboard.
Item Description
[Password] Enters the password to log in the
network drive.
[Sync folder
(path on the
server)]
[Destination
folder (path on
the server)]
1
Server name
*
Enter the URL name beginning with “https:” or
“http:”.
2
Port Number (Reference)
*
In general, when you access a server through
“http:”, specify 80 as the port number, and when
you access a server through “https:”, specify 443.
When connecting to a WebDAV server, check with
the server administrator for details.
3
Relative path under the server URL
*
Specify the relative path of the folder under the
server URL.
Enters the sync folder (relative path*
for the network drive.
Enters the destination folder (relative
3
) when transferring to the
path*
network drive.
3
)
Item Description
[Server] Enters the URL of the network drive.*
[Port] Enters the port number.*
[Login name] Enters the username to log in the
network drive.
Input “/” to configure the Destination Folder.
Input “/user1” to configure the sync folder.
4 Tap [OK] when the setting is finished.
5 Tap [Auto Sync], then select [On] or [Off].
When [Auto Sync] is set to [On], the Digital Paper
device and network drive are synchronized about
every 90 minutes.
6 Tap [Download Destination] and then select the
download destination of the file synchronized
with the network drive.
When setting [SD Card] as the destination, insert
1
2
a microSD card beforehand.
Tip
If you change [Server Settings] or [Download
Destination], the previous synchronized documents
64
Page 65

will be deleted. Before changing it, synchronize the
Note
documents in the Digital Paper device with the
network drive.
Synchronizing the Digital Paper Device with the Network Drive
A document added/refreshed/deleted and then
synchronized in the Digital Paper device will be
added/refreshed/deleted in the network drive.
A document added and then synchronized in the
network drive will be added in the Digital Paper
device.
If a document is refreshed or deleted in the network
drive and then synchronized, the change will not be
reflected in the Digital Paper device.
When refreshing or deleting a document, perform
the action in the Digital Paper device.
1 Connect to the Wi-Fi network.
2 Press the (Home) button tap [Documents].
3 Tap [Folders] and select [Storage] in folder path
view select a network.
Folder path view
Sync icon
4 Tap (Sync).
The documents in the folders of the Digital Paper
device and the network drive are synchronized.
The status or result of synchronization is
displayed in the status bar (page 18). To check for
detailed information, tap the status bar to display
the notification window.
Tip
When [Auto Sync] is set to [On], the Digital Paper
device and the network drive is synchronized
automatically (page 64).
Folder names and file names are not case-sensitive
for the synchronization.
(Example: “aaa.pdf” and “AAA.pdf” are considered
to be the same file)
Therefore, in the synchronized folder of the network
drive, do not create folders or files that are casesensitive (upper/lower case).
If you use punctuation below for the folder name or
file name, it may fail to synchronize.
“:”(colon), “;”(semicolon), “/” (slash), “\”(backslash),
“|” (pipe), “,”(comma), “*” (asterisk), “?”(question
mark),” “ “(quotation mark), “<”,”>”(angle brackets)
Cancel the synchronization
1 Tap (Cancel Sync) during the synchronization.
To cancel auto synchronization, press the
(Home) button tap [Documents] (Cancel
Sync).
65
Page 66

Opening a Synchronized Document in the Digital Paper Device
You can open a synchronized document from
[Documents] in the Digital Paper device.
2 Tap and hold the document you want to delete
and tap [Delete] from the option menu.
The confirmation screen is displayed.
3 Tap [Yes].
1 Press the (Home) button tap [Documents].
Tip
When deleting multiple documents at one time,
press the (Menu) button tap [Delete]. For
details, see page 28.
A document deleted and synchronized in the
network drive will not be deleted in the Digital
Paper device.
Using Menu Items
You can transfer or delete a document when you
press the (Menu) button on the synchronized
documents list.
For more details on the menu items, see page 25.
Also, if you tap and hold a document to display the
option menu, you can select how to open the
document or rename it.
For more details on the option menu, see page 25.
2 Tap the document you want to open.
The document opens.
For more details on opening a document, see
page 30.
Tip
You can open the document from [All Documents]
and [Folders].
For details on document lists, see page 23. For
details on the page control, see page 31.
Deleting a Synchronized Document
When a synchronized document is deleted in the
Digital Paper device, the document is deleted from
the network drive the next time synchronization is
performed.
1 Press the (Home) button tap [Documents].
66
Page 67

Browser
Note
The Digital Paper device has a Web browser that
enables you to visit Web pages and download PDF
files. Connect to the Wi-Fi network beforehand
(page 58).
Downloading
When you click a download link, the item will be
downloaded onto the device. Only the PDF files (.pdf)
can be downloaded.
1 Tap the link on the Web page.
Downloaded files are stored in [Documents].
Browsing the Web
1 Connect to the Wi-Fi network.
2 Press the (Home) button tap [Browser].
3 Navigate to a Web page.
Tap (Bookmarks) tap a Web page, or
Tap the URL box and type the URL address
using the on-screen keyboard, and tap [Go].
4 Browse the Web page.
Swipe your finger or use the stylus on the
touchscreen to scroll up/down a Web page.
Tap and drag to move the view area.
Press the (Back) button to return to the
previous Web page.
You must agree to the terms and conditions before
using the [Browser] application. Please read the
terms and conditions carefully. When you tap
[Accept], the [Browser] application opens.
Tip
To return to your last read document, press the
(Menu) button tap [Return to Viewer].
Tip
You can also tap and hold the link tap [Save Link]
to download a linked file.
Viewing download progress
You can check the download progress and result.
1 Check the download progress by the icon on the
status bar.
Tap the status bar to open the notification
window (page 18).
The document currently downloading is listed
under [Ongoing].
Documents that have been downloaded or failed
to download are listed under [Notifications].
To return to the Web page, press the (Back)
button.
Canceling a download
You can cancel a download that is currently in
progress.
1 While downloading a document, press the
(Menu) button tap [Downloads].
The download history opens.
You can also tap the status bar tap the item
currently downloading under [Ongoing].
Zooming in on the Web
Pinch out to zoom in.
Pinch in to zoom out.
Double-tap to fit the page to the window size.
To exit zoom mode, pinch in or double tap again.
If scrolled while in zoom mode, the zoom buttons are
shown at the bottom-left of the screen.
2 Tap and hold the document to cancel tap
[Cancel Download], or press the (Menu)
button tap [Cancel All Downloads].
To return to the Web page, press the (Back)
button.
Opening a downloaded file
You can view files downloaded from a Web page.
Downloaded files are stored in [Documents].
67
Page 68

1 While viewing a Web page, press the (Menu)
button tap [Downloads].
1 While viewing a Web page, press the (Menu)
button tap [Windows].
2 Tap the file to open, or tap and hold the
document tap [Open].
The file opens.
Deleting a downloaded file
You can delete downloaded files from the Digital
Paper device.
1 While viewing a Web page, press the (Menu)
button tap [Downloads].
2 Tap and hold the document to delete tap
[Delete].
The confirmation screen is displayed.
3 Tap [OK].
The document is deleted from the Digital Paper
device.
Using Multiple Windows
2 Select the window you want to view.
Closing the browser window
You can close browser windows.
1 When viewing a Web page, press the (Menu)
button tap [Windows].
2 Tap [Close].
The window is closed.
Tip
When all windows are closed, the browser home
page is automatically opened.
Bookmarks and History
Bookmarking a Web page
You can bookmark your favorite Web pages to review
them quickly.
Opening a new window
1 While viewing a Web page, press the (Menu)
button, tap [Windows] [New Window].
Up to 3 windows can be open at one time. If [New
Window] is not displayed, tap [Close] to close a
currently open window.
Opening a link page in a new window
You can open a link page in a new window without
closing the current window.
1 Tap and hold a link tap [Open in New Window].
The link opens in a new window.
Up to 3 windows can be open at one time. You cannot
open a new window if 3 windows are currently open.
Changing the browser window in view
When you have more than one browser window
open, you can change the window in view.
1 Visit the Web page that you want to bookmark.
2 Add the current site to the bookmarks.
Press the (Menu) button tap [Add
Bookmark], or
Tap (Bookmarks) next to the URL box tap
[Add bookmark...].
3 If you want to change the name, tap the input
area under [Name] and enter a new name using
the on-screen keyboard.
4 Tap [OK].
The current Web page is added to the bookmark
list.
Opening a bookmarked Web page
You can quickly return to your favorite Web pages
using bookmarks.
1 When viewing a Web page, tap (Bookmarks)
next to the URL box.
68
Page 69

The bookmark list opens.
2 Tap the Web page to open.
Editing a bookmark
You can change a bookmark name or address (URL) if
necessary.
A list of Web pages that you have previously
visited opens.
3 Tap the document to open in the browser.
Deleting browsing history
You can remove entries from the browsing history.
1 When viewing a Web page, tap (Bookmarks)
next to the URL box.
The bookmark list opens.
2 Tap and hold the bookmark to edit tap [Edit
Bookmark].
3 Tap the input area under [Name]/[Location] and
change the name/URL using the on-screen
keyboard.
4 Tap [OK ].
To return to the Web page, press the (Back)
button.
Deleting bookmarks
You can remove bookmarks from the bookmark list.
1 When viewing a Web page, tap (Bookmarks)
next to the URL box.
The bookmark list opens.
2 Tap and hold the bookmark to remove tap
[Delete Bookmark].
3 Tap [OK].
The bookmark is removed from the list.
To return to the Web page, press the (Back)
button.
Opening a previously visited Web page
You can view a list of Web pages that you have
previously visited.
1 When viewing a Web page, tap (Bookmarks)
next to the URL box.
2 Tap [History].
1 When viewing a Web page, tap (Bookmarks)
next to the URL box.
2 Tap [History].
A list of Web pages that you have previously
visited opens.
3 Tap and hold the entry to remove from the list
tap [Remove from History].
To return to the Web page, press the (Back)
button.
Tip
You can delete all the browsing history by pressing
the (Menu) button tapping [Clear History] in
Step 3.
Browser Settings
You can change the following browser settings to
your preference. When viewing a Web page, press the
(Menu) button and tap [Settings] to change the
settings.
Setting Description
[Default Zoom] Sets the default zoom ratio. [Medium] is
set by default.
[Open Pages in
Overview]
[Text Encoding] Sets the default text encoding.
[Block Pop-up
Windows]
[Load Images] Loads images on a Web page. Enabled
Opens the page scaled to the window
size. Enabled by default.
[Unicode (UTF-8)] is set by default. The
browser supports the following
encodings:
Latin-1 (ISO-8859-1)
Unicode (UTF-8)
Blocks pop-up windows. Enabled by
default.
by default.
69
Page 70

Setting Description
[Auto-fit Pages] Formats Web pages to the window size.
Enabled by default.
[Enable
JavaScript]
[Set Home
Page]
[Page
Information]
[Clear Cache] Empties the cache.
[Clear History] Deletes the browsing history.
[Accept
Cookies]
[Clear All
Cookie Data]
[Remember
Form Data]
[Clear Form
Data]
[Remember
Passwords]
[Clear
Passwords]
[Reset to
Default]
[Points to note
when using
Internet
Browser]
Enables JavaScript. Enabled by default.
Sets the default Web page to display as
the home page.
Displays the details of a Web page.
Accepts cookies from Web pages.
Enabled by default.
Removes all cookies.
Allows the browser to remember the
search and form history. Enabled by
default.
Empties the search and form history.
Allows the browser to remember
entered passwords. Enabled by default.
Deletes passwords saved by the
browser.
Restores the default settings, and
deletes all browser data.
Displays the terms and conditions of
use of the browser.
Using Menu Items
Below is a list of option items available when you
press the (Menu) button from a browser window.
Option Description
[Browse Home] Displays the home page (page 69).
[Refresh]/
[Stop]
[Forward] Advances to a previously viewed page.
[Return to
Viewer]
[Windows] Opens the window list (page 68).
[Add
Bookmark]
[Page
Information]
[Downloads] Opens the download history (page 67).
[Settings] Changes the browser settings
Refreshes the content displayed on a
Web page. While refreshing, [Stop] will
be displayed, and you can stop the
refreshing.
Closes the [Browser] application and
returns to the last read page of your last
read document.
Bookmarks a Web page (page 68).
Opens the page information.
(page 69).
To return to the Web page you were browsing, press
the (Back) button.
70
Page 71

Using ShareFile
Note
You can use the ShareFile application on the Digital
Paper device.
For details about ShareFile, visit the following URL:
http://www.sharefile.com
Enabling ShareFile
1 Press the (Home) button tap [Settings].
2 Tap [Application Preferences] [Enable
ShareFile].
3 Select [Enable] and tap [OK].
The [ShareFile] icon appears on the [Home]
screen and enables you to use ShareFile.
Using the ShareFile Application
1 Press the (Home) button tap [ShareFile].
The application launches, and the ShareFile
screen is displayed.
Follow the instructions on the screen to operate
ShareFile.
If you perform [Reset Device], the ShareFile setting
returns to [Disable].
71
Page 72

Settings
Note
Changing the Settings
Changing the Settings
The [Settings] application allows you to personalize
the Digital Paper device, set the date and time,
configure the Wi-Fi connection, and other device
settings.
General Setting
Setting Description
[User Name] Sets the user name to help identify
the user of the Digital Paper device,
and the author name of an
annotation.
The user name will be shown in the
top-right corner of the [Home]
screen.
Tip
When [Limit Editing Annotations]
(page 51) is set to On, be sure to
set the user name here.
Wireless Network Settings
Setting Description
[Wi-Fi] Turns Wi-Fi on/off (page 58).
Setting Description
[Wireless Standby] Wireless standby helps avoid
unnecessary battery consumption
caused by wireless communication.
If you do not perform any wireless
operations for more than 10 minutes,
the wireless feature automatically
enters standby mode.
Accessing the [Browser]
application from wireless standby
mode takes more time than
accessing when the Digital Paper
device is connected to the wireless
network.
If you deactivate wireless standby,
the Digital Paper device retains a
wireless connection at all times,
resulting in higher battery
consumption.
[Wi-Fi Settings] Wi-Fi settings enable the Digital
Paper device to use local Wi-Fi
networks to connect to the Internet
(page 58).
Server Settings
Network Drive Settings
Setting Description
[Server Settings] Sets the network drive settings
(page 64). Check with the network
administrator for setup information.
Tip
If you change [Server Settings], the
previous synchronized documents
in the network drive will be
deleted. Before changing, it is
recommended to synchronize the
documents in the Digital Paper
device with the network drive.
[Auto Sync] Sets Auto Sync to [On] or [Off]. When
[Auto Sync] is set to [On], the Digital
Paper device and network drive are
synchronized about every 90
minutes.
72
Page 73

Note
Note
Setting Description
Note
[Download
Destination]
[Clear Settings] Deletes the network server settings.
Sets the destination for
synchronized documents
downloaded from the browser.
Select either [Internal Memory] or
[SD Card].
If you change the destination, the
documents in the previous save
destination will be deleted.
Sony recommends that you
synchronize the documents in the
Digital Paper device with the
network drive, before changing
the save destination.
If you select [Clear Settings], all the
files in the Digital Paper device
synchronized with the network
drive will be deleted.
Setting Description
[Notebook
Template]
Selects a note template used when
creating a new note. You can select
only one template.
Tip
You can add your favorite PDF file
as a template (page 56).
You can set [Select a template
every time (display a dialog when
a new note is created)] and select a
template from the list when
creating a new note.
[Settings for
Destination of
Saving Note]
As a destination for saving a newly
created note, you can specify a
folder from the network drive.
Tip
You can specify the folder only
when the use for the network drive
has been set.
[Enable ShareFile] Sets whether to enable the ShareFile
application. Select [Enable] to use
the application from the [Home]
screen.
Application Preferences
Setting Description
[Documents] Sets preferences for all documents.
[Refresh Display]: Refreshes the
display at each page turn.
[Limit Editing Annotations]: Set to
On if you want to limit the editing or
erasing of annotations created
under other user names.
[Toolbar Position]: Sets the toolbar
setting to left or right.
Tip
The toolbar is displayed at the left
side of the screen by default. Lefthanded people may prefer to
display the toolbar at the right side
of the screen.
[Enable Web
Browser]
[Browser Settings] Sets the browser preferences.
[Download
Destination for
Web Browser]
Sets whether to enable the Web
browser.
Sets the destination for files
downloaded from the browser.
Select [Internal Memory] or [SD
Card].
Date & Time Settings
Setting Description
[Date] Sets the date.
[Time] Sets the time.
[24-Hour Format] Checks to display time in 24 hour-
format.
[Time Zone] Sets the time zone.
[Time Server] Selects NTP Server used to match the
clock of the Digital Paper device.
[Public Time Server]: Publicly
available NTP Server
[Input the Server Address]: Any NTP
Server (input the address manually)
Setup a Wi-Fi network beforehand
(page 58).
Tip
When the Wi-Fi connection is turned on, the Digital
Paper device’s time setting is adjusted
automatically.
73
Page 74

System Management
Note
Note
Note
Setting Description
[Screen Transfer]* When [Screen Transfer] is set to On,
you can view the screen of the
Digital Paper device on the computer
display if the device is connected to
the computer via USB cable.
Note that when sending
documents from the computer
and the Digital Paper device via
USB cable, the connection can be
established only when the [Screen
Transfer] is set to Off.
Tip
You can operate the Digital Paper
device while charging it via
computer by using this function.
[Device Lock] You can set between 1 to 20
alphanumeric characters and
symbols as a password to lock your
device (page 14).
[Internal Memory
Encryption]
Encrypts the internal memory of the
device.
When the internal memory
encryption is set to On, you must
enter your memory encrypted
password when turning On the
device (page 15).
Setting Description
[Pen Settings] [Pen Grip Style]:
Selects the style that is closest to the
way you hold your stylus.
[Advanced Calibration]:
Adjusts positioning between the
written line and the stylus tip
(page 52).
[Pen Button Settings]:
Set [Highlight active]/[Eraser active]/
[Button inactive (handwriting only)]
when the stylus button is pressed
and dragged.
If the button is set to Off, only
handwriting is enabled even when
the button is pressed.
The initial settings are [Eraser active].
[Eraser Animation]:
Sets whether to display a circle as
the range of erasing when using the
eraser (page 45).
[Update Software] Checks the software update
information for the device.
* A computer specific application needs to be
installed when using the [Screen Transfer] function.
For details, please check the information provided
on Digital Paper device’s product page.
http://www.sony.com/digitalpapersupport
Initialization
Setting Description
[Reset Device] Formats the internal memory and
resets all settings.
Resetting initializes the internal
memory.
After formatting, the device will
shut down.
[Reset Device to
Use Solution Only]
Changes the device to Solution Only
settings.
Resetting initializes the internal
memory.
After formatting, the device will
shut down.
74
Page 75

Note
Setting Description
[Clear Keyboard
History]
[Format Memory] Allows you to format the Digital
Deletes words registered to the onscreen keyboard history.
Paper device’s internal memory or
the microSD card.
If you have formatted the device or
microSD card on your computer,
the device may not be able to
display transferred content. In this
case, use the device’s [Format
Memory] function to reformat the
device and your microSD card.
Please note that the internal
memory data will be deleted on
formatting the internal memory
and microSD memory card.
Tip
Before formatting, make sure to
back up data you wish to keep to a
computer.
About
Setting Description
[Device
Information]
[Legal
Information]
[Regulatory
Information]
[End User License
Agreement]
Displays the device details including
the memory capacity and MAC
address in use.
Displays trademark and copyright
information.
Displays the information below.
The Declaration of Conformity
(DoC) logo and the FCC Identifier
(FCC ID) based on the FCC Rules
The VCCI mark based on RULES
FOR VOLUNTARY CONTROL
MEASURES
The marks and registration
numbers of the radio wave and
radio communication acts
Displays the terms and conditions on
use of the device.
Device Shutdown
Enables you to shut down (turn off) the device.
75
Page 76

Note
Note
Other Information
Replacing the tip when it
becomes shorter than
1.5 mm (1/16 inch)
Troubleshooting
Troubleshooting Tips
Troubleshooting tips may help you quickly resolve
technical issues.
1 Charge the Digital Paper device completely.
2 Restart the device.
Press the (Power) button to restart the device.
3 Reset the device.
Press the RESET button with a small pin or clip.
Screen becomes static.
Press the (Power) button to restart the device
and display the [Home] screen.
Bookmarks, highlights, sticky notes or setting
information may be deleted by resetting.
Do not push the RESET button with a breakable
point, such as the lead of a mechanical pencil. It can
block the RESET button.
Replacing the Tip
The effectiveness of the supplied tip differs from that
of the attached tip. Sony recommends replacing the
tip when it becomes shorter than 1.5 mm (1/16 inch).
Replacement tips and a tip puller are supplied with
the Digital Paper device.
1 Pinch the tip firmly with the supplied tip puller,
then pull it out squarely.
2 Check the orientation of the replacement tip,
pinch it with the tip puller, then push it squarely
into the stylus.
3 Push the tip firmly with your finger.
Re-attaching the Stylus Holder
If the stylus holder becomes detached, re-attach it as
illustrated below.
Keep out of reach of children, as the tip may be
swallowed. If the stylus is in your mouth, the stylus
tip or the button may fall out.
Pressing on the tip with excessive pressure will wear
it out more quickly.
76
Page 77

Tip
Replace the stylus tip periodically to prevent
damage to the Digital Paper device and maintain
smooth operation.
If you have used the supplied replacement tips,
new stylus tips are sold separately.
Digital Paper Device
Power On/Off
The Digital Paper device will not turn on.
The device cannot be operated if connected to your
computer and set to transfer data. Use the Safely
Remove Hardware function of your computer, and
then disconnect the USB cable from the device.
Moisture condensation may have occurred. Wait for
a few hours, then turn it on.
If the battery is completely depleted, you may not
be able to turn on the device.
Charge the device by connecting it to the supplied
AC adapter or your computer via the supplied USB
cable, and the device will turn on.
If the device still does not turn on, press the
(Power) button.
If the Charge indicator blinks red 3 times upon
pressing the (Power) button, it shows that the
device battery is completely depleted.
To charge the device, insert the supplied USB cable
into the micro USB port and connect it to the
supplied AC adapter, or connect the device to a
computer using the supplied USB cable.
If the battery is completely depleted, it may take up
to 5 minutes for the device to turn on.
The Digital Paper device automatically enters sleep
mode or turns off.
To conserve the battery’s charge, the device
includes automatic power saving modes. The
device will enter sleep mode after 1 hour of
inactivity. After 3 days* in sleep mode, it will shut
down/power off automatically.
* If the battery’s charge is low, the device may
automatically turn off within 3 days.
Battery
Cannot charge the Digital Paper device.
If you use equipment other than the supplied USB
cable or AC adapter to charge the device, it may not
charge correctly. We do not guarantee the
performance and safety of the device.
To charge the device, use only the supplied USB
cable, or the supplied AC adapter (page 8).
If you are charging from the USB port on your
computer, make sure that the device is connected
directly to the USB port with the supplied USB cable.
If you connect the computer using a USB hub, we do
not guarantee the performance of the device.
The battery has not been given enough time to fully
charge. Charge the device until the icon changes
to the icon. (The charge icon does not indicate
the remaining battery power while charging.)
If you are charging from a USB port on your
computer, your computer must be turned on to
charge the device. The device will not be charged if
your computer enters sleep mode, standby mode
or hibernation. Keep your computer turned on with
a stable and continuous power supply while
charging the device.
When you set [Screen Transfer] to On and charge
the device by connecting the device to your
computer via USB cable, check if the dedicated
driver is installed onto the computer (page 57).
The device cannot be charged through the
computer if the installation of the driver is not
completed.
If your computer enters sleep mode while the
device is connected and charging, the device
battery’s charge will gradually drain, the device will
shut down and its battery will not charge. In this
case, disconnect the USB cable from the device,
wake the computer from sleep mode, then
reconnect the USB cable to the device.
Your computer may not be supplying sufficient
power. If you connect the device to your laptop
computer, maintain a stable and continuous power
supply to the laptop computer while charging the
device.
77
Page 78

Charge the device within the recommended
temperature range of 5 °C to 35 °C (41 °F to 95 °F).
If the room is too hot or cold, disconnect the USB
cable from the device, adjust the room
temperature, then reconnect the USB cable to
charge the device.
Battery life seems short.
The device may not have been fully charged. Make
sure that you charge it until changes to .
The operating temperature is below 5 °C (41 °F). This
is due to the battery characteristics and not a
malfunction.
The device requires power while in sleep mode. If
you are not planning to use the device, turn it off
instead of leaving it in sleep mode.
If you are not browsing on the Web, exit [Browser]
by pressing the (Home) button.
The device battery gradually discharges when not
in use for a prolonged period of time. Before turning
on the device after the device has not been used for
a long time, recharge it.
Turn off the Wi-Fi function (page 58) when not
using the network or turn on [Wireless Standby]
(page 72).
If you are charging the device during data transfer
and the computer enters sleep mode, standby
mode or hibernation, the device will be unable to
charge, and the battery may drain. Confirm that
your computer turns on and charging is complete
before you transfer documents.
The hours of continuous battery-usage time
specified in the catalog, Web site, and user guide,
are based on the assumed frequency of use.
Hours of continuous battery-usage time will vary in
accordance with the usage environment and the
frequency of use.
High frequency of manual input (handwriting)
particularly shortens the battery-usage time.
(page 86)
Touchscreen
The Digital Paper device does not wake up or start
immediately.
When using the device in an environment that is too
cold, the screen may change at a slower speed.
Use the device within the recommended
temperature range of 5 °C (41 °F) to 35 °C (95 °F) to
retain the normal state of the display.
The screen is not displayed.
Restart the device (page 76).
Characters are not displayed.
Some user-defined characters or special symbols
may not be displayed.
The touchscreen responds slowly.
If the touchscreen becomes dirty, it may not
function correctly. Clean the touchscreen with a soft
cloth, such as a cleaning cloth for eyeglasses.
Cannot pinch in or out.
The touchscreen may not respond if things other
than two fingers are in contact with the screen.
The stylus tip position and written line are offset.
Check the pen grip style settings. Press the
(Home) button, tap [Settings] [System
Management] [Pen Settings] [Pen Grip Style] to
adjust the setting (page 51).
Adjust the position of the stylus tip. Press the
(Home) button, tap [Settings] [System
Management] [Pen Settings] [Advanced
Calibration] to adjust the setting (page 52).
Wireless Connectivity
Wi-Fi connection
The Digital Paper device does not connect to the WiFi network.
Check the remaining battery level. When the
battery level is too low, the network feature does
not turn on. Charge the device for a few minutes,
then try again.
Make sure that Wi-Fi is turned on and check the
signal strength of the access point.
Tap [Wi-Fi Settings] [Scan] to select an available
access point.
Make sure that the security method (WEP, WPA/
WPA2 PSK, 802.1x EAP), the static IP address and the
proxy settings are correct.
Check that the access point supports the security
method of the device. Also, check the encryption
key of the access point.
78
Page 79

Public Wi-Fi networks may require a user ID and
password. In this case, you must enter the correct
user ID and password to establish a network
connection.
The access point has the MAC address filter
enabled. To check the MAC address, press the
(Home) button tap [Settings] [About] [Device
Information]. Make sure that this MAC address is
accepted by the access point.
The Wi-Fi network settings of the access point are
not correct. Adjust the settings as described in the
manuals that came with the access point and in any
information provided by the network administrator.
The device is too far from the access point. Move it
closer to the access point.
Obstacles such as walls, metal or concrete between
the device and an access point may adversely affect
the connection. Try moving the device to a different
location.
There is other equipment nearby using the 2.4 GHz
frequency band (such as a cordless phone, a
microwave oven, or Bluetooth computer
equipment). Turn off the Wi-Fi function of other
equipment, or move this device away.
The Wi-Fi network service is temporarily not
available or degraded. Check with the network
administrator for the status.
Cannot find the access point in the Wi-Fi networks
list.
If the access point is set to not broadcast its SSID
(Service Set Identifier) to users (stealth setting), the
access point may not be shown on the Wi-Fi
network list. Tap [Add Wi-Fi Network] and enter the
SSID manually (page 62).
Network drive
Cannot find the destination.
Check the network connection (page 78).
There is a problem with the Destination folder (path
on the server) or network drive. Check with the
network administrator.
When selecting [Reply], the Digital Paper device
identifies the sender by the file name automatically.
Check that the destination name included in the file
name is in the Destination folder list (page 26).
Browser
A Web page is not displayed properly.
The Wi-Fi network connection may have been
interrupted. Make sure that Wi-Fi is turned on and
set up correctly, check the signal strength of the
access point, then refresh the Web page.
Due to the vast range of standards and
technologies used to design Web pages, it is not
possible to guarantee that all pages will be
displayed correctly.
When you zoom in/out a Web page, the screen may
be too bright to read. This is not a malfunction.
Reading Documents
Cannot open a document.
The document may be an unsupported file type. For
details on supported file types, see page 87.
[Return to Viewer] does not work, or the bookmark
is missing.
If the file status has changed (such as in the case
below), data under [Return to Viewer] or notes may
be deleted.
A PDF file is edited.
Cannot find content on the Digital Paper device.
If you have formatted the device on your computer,
the device may not be able to display transferred
content. In this case, use the device’s [Format
Memory] function to reformat the device (page 74).
Do not delete the [database], [.dps_device_system],
or [note_template] folder on the [DPT-S1] drive
when the device is connected to the computer.
When using a microSD card, do not delete the
[PRIVATE/SONY/Digital_Paper] folder on the
microSD card.
If you edit the above folders, documents or notes
may get deleted.
Cannot annotate documents
When a document is protected (page 41) or opened
as read-only, you cannot annotate, comment, edit,
save, or delete the document.
The document is opened as read-only in following
cases.
The file is “read-only.”
79
Page 80

For PDF files where annotating is set to forbidden
in the security settings; (Protected) appears at the
beginning of the PDF file name on the device and
you cannot add any annotation on that file.
The internal memory or the microSD card has less
free space.
The remaining battery charge is too low.
The text in the scanned documents (images on the
entire page) or the documents in which font
information is not embedded cannot be
highlighted.
Cannot edit or delete annotations
When [Limit Editing Annotations] is set to On, you
cannot edit or delete other users’ annotations
(page 51).
Cannot open sticky notes using the stylus
To open a sticky note, tap it with your finger.
Alternatively, set to the sticky note mode (Sticky
Note (Handwriting)/Sticky Note (Text)) on the
toolbar, then tap it with your finger or stylus.
Connecting to Your Computer
The computer does not detect the Digital Paper
device.
It may take a while for the computer to detect the
device.
Make sure that the device is connected directly to
the USB port with the supplied USB cable. Do not
use a USB hub.
When [Settings] [System Management] [Screen
Transfer] on the [Home] screen is turned on, the
computer cannot recognize the device even if the
USB cable is connected to the computer.
Turn off [Sc reen Transfer], re move the USB cabl e,
and reconnect the device and the computer via USB
cable. (page 74)
Try connecting to a different USB port on the
computer.
Try disconnecting the device and connecting it
again.
Restart the device if the issue is not resolved with
the above settings (page 76).
Cannot transfer content to the Digital Paper device.
There may not be enough space on the internal
memory of the device or the microSD card. Check
[About] for the amount of free space on the internal
memory (page 75). Delete some content to make
some space on the device or memory card.
microSD Card
The Digital Paper device cannot detect a microSD
card, or cannot open an item stored on a microSD
card.
If you have formatted the microSD card on the
computer, the device may not be able to display
transferred content. Use the device to format the
microSD card (page 74).
It may take a while for the device to detect the
microSD card and load all files stored on it. Wait a
little longer after inserting the microSD card into the
card slot.
Make sure tha t the mi croSD card is s uppo rte d by t he
device (page 84).
Make sure that the microSD card is inserted properly
(page 14).
Make sure that the gold contact point of the
microSD card and the card slot are clean. If dirty or
dusty, clean them carefully.
Cannot move a document to the microSD card.
You cannot move a document directly from the
internal memory to a microSD card. Connect the
Digital Paper device to a computer, then move the
document via the computer.
80
Page 81

Precautions
Safety Information
Handling the Digital Paper device
If the device causes interference to radio or
television reception, turn the device off and move it
away from the radio or television.
Refrain from using the device according to the in-
flight announcements during take off or landing in
an aircraft.
When you put the device into a bag, make sure no
objects with sharp or hard edges come into direct
contact with the device.
When you carry the device, it is recommended to
use the supplied sleeve case.
Do not drop, or put any heavy object on top of the
device or apply a strong shock to the device. It may
cause a malfunction or damage.
Never subject the device to extremes of light,
temperature, moisture or vibration.
If part of the device that generates heat contacts
your skin for a prolonged period, you may suffer
from symptom of burn, such as redness, swelling,
even if temperature is moderate. Avoid prolonged
contact, especially if you have sensitive skin.
Do not leave the device on an unstable surface.
Do not poke people using the supplied stylus.
Do not treat or use the supplied stylus roughly, such
as bending it, or scratching the touchscreen with it.
Use the supplied stylus only for touchscreen
operations.
Do not use the stylus if it is damaged or deformed.
Do not subject the stylus to shock or vibration.
Do not apply any excessive pressure to the stylus tip
and stylus button during operation.
Do not keep the stylus tip pressed while the stylus
is not in use.
Do not locate the stylus close to a magnet.
If any object is placed on the touchscreen, it may
cause a malfunction. When not in use, leave the
device in sleep mode, or turn it off.
When using the device internationally, it is your
responsibility to ensure that it is used in compliance
with the following specifications:
AC voltage
Wireless products regulations
Other safety regulations or requirements
Be sure not to short-circuit the terminals of the
device with metallic objects.
Never leave the device exposed to high
temperature, such as in a car parked in the sun or
under direct sunlight.
Connect the AC adapter to an easily accessible AC
outlet. Should you notice an abnormality in the AC
adapter, disconnect it from the AC outlet.
Avoiding water and moisture
Note that condensation may form temporarily in
cases such as when the player is moved quickly
from a low-temperature environment to a high
temperature environment or used in a room that
has a heater just turned on. Condensation creates a
phenomenon where moisture in the air adheres to
surfaces such as metal panels, etc., and then
changes to liquid. If condensation forms in the
device, leave it turned off until the condensation
disappears. If you use the device with condensation
present, a malfunction may result.
The Digital Paper device is not waterproof.
Remember to follow the precautions below.
Be careful not to drop the device into a sink or
other container filled with water.
Do not use the device in humid locations or bad
weather, such as in the rain or snow.
Do not get the device wet.
If you touch the device with wet hands, or put it in a
damp article of clothing, the device may get wet and
this may cause a malfunction.
Charging the Digital Paper device
Heat may build up in the device while charging, or if
it is used for an extended period of time.
Use the supplied USB cable or the AC adapter only.
Do not use any other USB cable or AC adapter.
Never wrap the device in anything when it is being
charged. Heat build-up in the device may cause
malfunction or damage.
81
Page 82

If the battery lasts only half the normal time even
after being fully charged, it may be reaching the
end of its life.
When using the device in a cold environment, the
screen may change at slower speed. This is not a
malfunction.
Cleaning the Digital Paper device
Clean the device with a soft cloth, such as a
cleaning cloth for eyeglasses. Make sure that there
is no dust o r dirt on the soft cloth, as the device m ay
be damaged.
Do not use any type of abrasive pad, scouring
powder or solvent, such as alcohol or benzene, as it
may mar the finish of the case.
Wipe the stylus with a dry cloth when it gets dirty.
Tapping or dragging on the touchscreen using a
dirty stylus may damage the surface.
Be sure to keep the device away from water or spills.
Regulatory information
This device displays the information below.
The Declaration of Conformity (DoC) logo and the
FCC Identifier (FCC ID) based on the FCC Rules
The VCCI mark based on RULES FOR VOLUNTARY
CONTROL MEASURES
The marks and registration numbers of the radio
wave and radio communication acts
You can display these marks or registration numbers.
Tap [Settings] in the [Home] screen, then tap [About]
[Regulatory Information].
If you cannot display the marks or registration
numbers due to a malfunction, contact the Sony
Support Center.
End User License Agreement
You can display the End User License Agreement
from the [Settings].
Tap [Settings] in the [Home] screen, then tap
[About] [End User License Agreement].
Display
The display is made of plastic film to be thin and
lightweight. When the Digital Paper device is
illuminated, distortion of the plastic film may occur.
This is not malfunction.
Do not apply excessive pressure to the touchscreen.
The color or brightness may become uneven, and
may cause malfunction to the device.
Wi-Fi connectivity
The Wireless LAN functionality has passed Wi-Fi
certification and complies with the interoperability
specifications established by WFA (Wi-Fi Alliance).
Wireless feature
Turn off the wireless feature when you are in a
location in which radio communications are
prohibited. When you are in such a location, you
must obtain permission from the appropriate
authorities before enabling the wireless feature of
this device.
Turn off the wireless feature in health care facilities
where any regulations posted in such areas instruct
you to do so. Hospitals or health care facilities may
be using equipment that could be affected by radio
frequency (RF) energy which is generated by
wireless communication.
Do not use your device near medical equipment
without first obtaining permission to do so.
General notes on using the Wi-Fi (Wireless LAN)
function.
In some countries or regions, use of Wi-Fi products
may be restricted by the local regulations (e.g.
limited number of channels).
Applications on the Digital Paper Device
Disclaimer: In no event will SONY be liable for any
financial damage, or loss of profits, including claims
made by third parties, arising out of the use of the
software supplied with this device.
Sony is not responsible for incomplete recording/
downloading or damaged data due to problems of
the device or computer.
Copyright laws prohibit reproducing the software or
the manual accompanying it in whole or in part, or
renting the software without the permission of the
copyright holder.
Due to continued efforts to improve quality,
software specifications may be changed without
notice.
82
Page 83

Operation of this device with software other than
that provided is not covered by the warranty.
Depending on the types of the text and characters,
the text shown on the device may not be displayed
properly. This is due to:
The capacity of the device.
The device is not functioning normally.
Content information is written in the language or
the character that is not supported by the device.
We do not guarantee all the languages will be able
to be displayed properly on your device.
User-created characters and some special
characters may not be displayed.
Touchscreen
Do not press the screen or screen frame strongly or
rub the screen. When operating the Digital Paper
device, touch it softly.
You can use the stylus while resting your hands on
the touchscreen. When the stylus is near the
touchscreen, the finger operation is inactive.
Digital Paper device Disposal Reference
The built-in rechargeable battery of the device is
recyclable. Do not remove the battery yourself;
consult the Sony Support Center.
For customers in the USA
FCC Compliance Statement
NOTE:
This equipment has been tested and found to comply
with the limits for a Class B digital device, pursuant to
Part 15 of the FCC Rules. These limits are designed to
provide reasonable protection against harmful
interference in a residential installation. This
equipment generates, uses and can radiate radio
frequency energy and, if not installed and used in
accordance with the instructions, may cause harmful
interference to radio communications.
However, there is no guarantee that interference will
not occur in a particular installation. If this equipment
does cause harmful interference to radio or television
reception, which can be determined by turning the
equipment off and on, the user is encouraged to try
to correct the interference by one or more of the
following measures:
Reorient or relocate the receiving antenna.
Increase the separation between the equipment
and receiver.
Connect the equipment into an outlet on a circuit
different from that to which the receiver is
connected.
Consult the dealer or an experienced radio/TV
technician for help.
You are cautioned that any changes or modifications
not expressly approved in this manual could void your
authority to operate this equipment.
Declaration of Conformity
Trade Name: SONY
Model No.: DPT-S1
Responsible Party: Sony Electronics Inc.
Address: 16535 Via Esprillo, San Diego, CA92127
U.S.A.
Telephone Number: 858-942-2230
This device complies with Part 15 of the FCC Rules.
Operation is subject to the following two
conditions: (1) this device may not cause harmful
interference, and (2) this device must accept any
interference received, including interference that
may cause undesired operation of the device.
In order to comply with FCC radio-frequency
radiation exposure guidelines for an uncontrolled
exposure, this device and its antenna must not be
co-located or operating in conjunction with any
other antenna or transmitter.
FCC Radiation Exposure Statement
This equipment complies with FCC radiation exposure
limits set forth for an uncontrolled environment and
meets the FCC radio frequency (RF) Exposure
Guidelines.
This equipment has very low levels of RF energy that
are deemed to comply without testing of specific
absorption ratio (SAR).
Notice for customers: the following information is
only applicable to equipment sold in countries
applying EU directives
This product has been manufactured by or on behalf
of Sony Corporation, 1-7-1 Konan Minato-ku Tokyo,
108-0075 Japan. Inquiries related to product
compliance based on European Union legislation
shall be addressed to the authorized representative,
Sony Deutschland GmbH, Hedelfinger Strasse 61,
70327 Stuttgart, Germany. For any service or
83
Page 84

guarantee matters, please refer to the addresses
provided in the separate service or guarantee
documents.
Hereby, Sony Corp. declares that this equipment is in
compliance with the essential requirements and
other relevant provisions of Directive 1999/5/EC.
For details, please access the following URL
http://www.compliance.sony.de/
The validity of the CE marking is restricted to only
those countries where it is legally enforced, which
includes the countries in the EEA (European Economic
Area).
Disposal of Old Electrical & Electronic
Equipment
(Applicable in the European Union and
other European countries with separate
collection systems)
This symbol on the product or on its packaging
indicates that this product shall not be treated as
household waste. Instead it shall be handed over to
the applicable collection point for the recycling of
electrical and electronic equipment. By ensuring this
product is disposed of correctly, you will help prevent
potential negative consequences for the environment
and human health, which could otherwise be caused
by inappropriate waste handling of this product. The
recycling of materials will help to conserve natural
resources. For more detailed information about
recycling of this product, please contact your local
Civic Office, your household waste disposal service or
the shop where you purchased the product.
Notes on microSD Cards
SD cards are made to standards and are commonly
used as storage media for portable devices. microSD
and microSDHC cards are members of the SD card
family.
The device supports the following card types.
microSD and microSDHC cards
Up to 32 GB
microSD cards of up to 32 GB has been tested to work
with the device; however, not all microSD cards are
guaranteed to work.
Precautions
Insert into the correct slot with the card’s label side
up until it clicks into place.
To avoid a choking hazard, keep the microSD card
out of the reach of children.
Do not touch the gold contact point of the microSD
card.
Do not disassemble or modify a memory card.
Do not allow a memory card to get wet.
Avoid the following to prevent data damage. Sony
does not provide any guarantee for damaged data.
Remove a memory card or turn off the device
while reading or writing data.
Operate the device in the location where static
charge or electrical noise is present.
Do not strike, bend, drop, disassemble, open, crush,
deform, puncture, shred, microwave, incinerate or
paint the microSD card.
Do not use force, a thin stick or tweezers to remove
the microSD card. If you cannot remove the microSD
card, contact the Sony Support Center.
Do not remove the microSD card or turn off the
device while data on the memory card is being
edited or accessed. Otherwise, edited data will not
be saved.
Do not insert a deformed microSD card into the
device.
If you change or erase a folder name via computer,
or move a file to a folder other than “database”,
there is a possibility that data recorded in a memory
card might be lost or become unreadable by this
product.
You can use a microSD card (less than 2 GB) and
microSDHC card (less than 32 GB), but CPRM
(Content Protection for Recordable Media) is not
supported.
microSDXC card is not supported.
FAT (File Allocation Table) is supported.
exFAT (Extended File Allocation Table) is not
supported.
Formatting a microSD card
You can use the device to format a microSD card if
necessary.
WARNING
Formatting the microSD card will delete all files stored
on it.
84
Page 85

1 Press the (Home) button tap [Settings]
[Initialization] [Format Memory] [SD Card].
Legal Notice
2 Tap [Yes].
To ca nce l , t a p [ N o].
It may take a few minutes to finish formatting the
microSD card.
Cannot guarantee the data
Sony is not responsible for damaged (or deleted) data
due to problems with the device or computer.
Backup
Sony recommends that you create a backup of the
contents of the device in case of operation error or
data corruption.
The contents of each book pre-loaded on this product
are copyrighted works, edited with the cooperation of
the publisher.
Copyright laws prohibit copying the data of this
product or the contents of this manual (illustrations,
related documents, etc.) in whole or in part without
the permission of the copyright holder. Additionally,
use of the data of this product or the contents of this
manual is not allowed without Sony’s permission
except for personal use.
Sony, the Sony logo are either trademarks or
registered trademarks of Sony Corporation.
Microsoft, Windows, Windows Vista and Windows
Media are trademarks or registered trademarks of
Microsoft Corporation in the United States and / or
other countries.
Macintosh and Mac OS are trademarks of Apple Inc.,
registered in the U.S. and other countries.
This DPT-S1 contains Adobe® Reader® Mobile
software under license from Adobe Systems
Incorporated, Copyright © 1995-2011 Adobe
Systems Incorporated. All rights reserved. Adobe
and Reader are trademarks of Adobe Systems
Incorporated.
This product includes software developed by the
OpenSSL Project for use in the OpenSSL Toolkit.
(http://www. openssl.org/) Copyright © 1998-2011
The OpenSSL Project. All rights reserved.
Wi-Fi, the Wi-Fi CERTIFIED logo, WPA, WPA2 and Wi-
Fi Protected Setup are trademarks or registered
trademarks of Wi-Fi Alliance.
Google is a trademark of Google Inc.
Foxit PDF SDK Copyright © 2013, Foxit Corporation
www.foxitsoftware.com, All rights reserved
Portions of this software are Copyright ©2005
The FreeType Project (www.freetype.org). All rights
reserved.
This software is based in part on the work of the
Independent JPEG Group.
ShareFile is a trademark of Citrix Systems, Inc. and/
or one or more of its subsidiaries, and may be
registered in the United States Patent and
Trademark Office and in other countries.
All other system names and product names
appearing in this document are the registered
trademarks or trademarks of their respective owners.
85
Page 86

Further, the trademark™ and registered trademark ®
symbols are not indicated throughout this document.
Program © 2014 Sony Corporation
Documentation © 2014 Sony Corporation
Appendix
Specifications
The device’s specifications are as follows.
Model name
DPT-S1
Basic information
Display 338.0 mm (13.3 inch) diagonal
electrophoretic display
1200 × 1600 pixel, 16-level gray
scale
Touchscreen The optical and electromagnetic
induction touchscreen
Internal memory
capacity (for data
storage)/User
available capacity
Storable PDF file in
the internal memory
Interface microSD card slot*2, micro USB
Approx. 4.0 GB/Approx. 2.8 GB
Depending on size of pre-loaded.
Available memory capacity may
vary.
Approx. 2,800 files*
terminal
1
Power source
Battery Built-in rechargeable battery
Computer-based
charging
Supplied AC adapterbased charging
Battery life
(continuous
page turn)
Operating/Charging
temperature
Maximum
Battery
Page turn Approx. 24,000 continuous
Approx. 3.5 hours
Approx. 2.5 hours
Wi-Fi Off: 3 weeks*
Wi-Fi On: 2 weeks*
page turns when reading
5
only*
5°C to 35°C (41°F to 95°F)
3
4
86
Page 87

Wi-Fi*
Wireless standards IEEE 802.11b/g/n compliant
Frequency band 2.4 GHz band
Wireless security WEP, WPA/WPA2 PSK, 802.1x EAP
Connection type WPS (Wi-Fi Protected Setup)/
Wi-Fi authentication Supported
6
Manual setup
Dimensions/Mass
Dimensions (w/h/d) Approx. 233 × 310 × 6.8mm (9 1/4
× 12 1/4 × 9/32 inches)*
Mass Approx. 358 g (12.6 oz)
USB cable length Approx. 1.5 m (59 1/8 inches)
Supplied items AC adapter, USB cable, Quick Start
Guide, Basic Operation Guide*
User Guide*8, Stylus, Sleeve case,
Warranty card, Replacement tips,
Tip puller
Design and specifications are subject to change
without notice.
1
*
Based on assumption that each PDF file is
approximately 1 MB.
2
You can use a microSD card (less than 2 GB) and
*
microSDHC card (less than 32 GB), but CPRM
(Content Protection for Recordable Media) is not
supported.
microSDXC card is not supported. FAT (File
Allocation Table) is supported. exFAT (Extended File
Allocation Table) is not supported.
3
Using the Digital Paper device under the following
*
conditions:
Viewing text-based PDF documents for 60
minutes/day at the rate of approx. 2 minutes per
page. Manual input using the stylus for 10
seconds per page while the indicated remaining
battery life is between ~ .
Actual hours of continuous battery life will vary in
accordance with the usage environment and
equipment settings.
4
Using the Digital Paper device under the following
*
conditions:
Viewing text-based PDF documents for 60
minutes/day at the rate of approx. 2 minutes per
page; manual input using the stylus for 10
seconds per page
7
Wireless standby On
Auto Sync Off
Synchronizing a document with the network
drive twice a day
Transferring a document to the network drive
once a week
Actual hours of continuous battery life will vary in
accordance with the usage environment and
equipment settings.
Continuous battery life may be reduced in locations
with poor signal strength. Actual time used
depends on the customer’s communication usage
environment and product settings.
5
Using the Digital Paper device under the following
*
conditions:
Approx. 1.2 seconds/1 page, continuously turning
8
,
pages
Wi-Fi function Off
Actual hours of continuous battery life will vary in
accordance with the status of the usage
environment and equipment.
6
The communication speed may vary depending on
*
factors such as the distance and/or obstacles
between communication devices, the signal
strength, and line congestion.
DPT-S1 is for domestic use.
There may be restrictions on viewing or using some
Web pages. Also, this device cannot display Flash
content and is not compatible with video playback.
Supported file format content can be downloaded.
Some Web pages cannot be downloaded.
7
External dimensions excluding stylus holder.
*
8
Included with this device.
*
Supported File Types
The following files can be transferred to the Digital
Paper device.
However, depending on the file size and format, it
may not be possible to view some data. File
extensions are shown in parentheses below.
Documents
PDF files (.pdf)*
* Compliant with PDF 1.7 specifications.
The device does not support PDFs with extended
features of Adobe extension level 1-8.
87
Page 88

System Requirements
Operating System* Details
Microsoft Windows 10
(32/64 bit)
Microsoft Windows 8.1
(32/64 bit)
Microsoft Windows 8
(32/64 bit)
Microsoft Windows 7
(32/64 bit)
Microsoft Windows Vista
(32/64 bit)
Mac OS X OS X v10.11 (64 bit only)
Windows 10 Home
Windows 10 Pro
Windows 10 Enterprise
Windows 10 Education
Windows 8.1 Update
Windows 8.1 Pro Update
Windows 8.1 Enterprise
Update
Windows 8
Windows 8 Pro
Windows 8 Enterprise
Windows 7 Starter with
Service Pack 1 or later
Windows 7 Home Premium
with Service Pack 1 or later
Windows 7 Professional with
Service Pack 1 or later
Windows 7 Enterprise with
Service Pack 1 or later
Windows 7 Ultimate SP1
Windows Vista Home Basic
with Service Pack 2 or later
Windows Vista Home
Premium with Service Pack 2
or later
Windows Vista Business with
Service Pack 2 or later
Windows Vista Enterprise
with Service Pack 2 or later
Windows Vista Ultimate with
Service Pack 2 or later
OS X v10.10.3 (64 bit only)
OS X v10.9.5 (64 bit only)
OS X v10.8.5 (64 bit only)
OS X v10.7.5 (64 bit only)
Computer with a non-standard operating system
Computer with multiple operating systems (multi-
boot)
* Operating systems that can recognize this device as
an external storage device connected via USB.
The following system environments are not
supported.
Self-constructed computer
88
Page 89

Limited Warranty and Service
Limited Warranty
This warranty card is included with the Digital Paper
device. Please keep it for future reference.
Please check the coverage period of the warranty
card.
Service
Check the Digital Paper device itself first
should a problem occur
See “Troubleshooting” (page 76).
In the event you cannot recover the Digital
Paper device
Consult the Sony Support Center. Please provide the
below information.
Model name (Description on the back panel)
Serial number (Description in the microSD card slot
cover)
Purchase date
Warranty repair period
Sony will repair the Digital Paper device based on
stipulations of the warranty card. This device contains
consumable parts - even if the warranty is still valid,
repair service may be subject to fees for replacing
such parts. Refer to the warranty card for details.
Please refer to the PC support site for additional
details.
http://www.sony.com/digitalpapersupport
89
 Loading...