

Page 1

3-253-605-13 (1)
Portable
CD Player
Operating Instructions GB
使用說明書 CT
使用说明书 CS
“WALKMAN” is a registered trademark of Sony Corporation to represent Headphone
Stereo products.
is a trademark of Sony Corporation.
D-NE1
© 2003 Sony Corporation
Page 2

WARNING
To prevent fire or shock
hazard, do not expose the unit
to rain or moisture.
Do not install the appliance in a confined
space, such as a bookcase or built-in
cabinet.
To prevent fire, do not cover the ventilation
of the apparatus with newspapers, tablecloths, curtains, etc. And don’t place lighted
candles on the apparatus.
To prevent fire or shock hazard, do not place
objects filled with liquids, such as vases, on
the apparatus.
Certain countries may regulate disposal of
the battery used to power this product. Please
consult with your local authority.
CAUTION
• INVISIBLE LASER RADIATION
WHEN OPEN
• DO NOT STARE INTO BEAM OR
VIEW DIRECTLY WITH OPTICAL
INSTRUMENTS
The validity of the CE marking is restricted
to only those countries where it is legally
enforced, mainly in the countries EEA
(European Economic Area).
ATRAC3plus and ATRAC3 are trademarks
of Sony Corporation.
2-GB
Page 3

Table of Contents
Enjoy your ATRAC CD
Walkman!
Create original ATRAC CDs ! ..................... 4
Music sources playable on this CD player .. 6
ATRAC3plus and ATRAC3......................... 6
MP3 files ..................................................... 6
Difference between ATRAC3plus/ATRAC3
and MP3 .................................................. 8
Getting started
Locating the controls ................................... 9
Checking the supplied accessories ............ 12
Playing an audio CD or
ATRAC3plus/ATRAC3/MP3 files
1.Connect your CD player........................ 13
2.Insert a CD. ........................................... 13
3.Play a CD. ............................................. 14
Playback options
Playing tracks in random order
(Shuffle play)......................................... 19
Playing all files in a selected group in
random order (Group shuffle play)
(ATRAC CD/MP3 CD only) ................. 19
Playing your favorite tracks by adding
Bookmarks (Bookmark track play) ....... 20
Playing your favorite play lists
(m3u play list play)
(MP3 CD only)...................................... 21
Playing tracks in your favorite order
(PGM play)............................................ 22
Available features
The G-PRO TECTION function................. 23
Checking the time remaining on the CD and
the number of tracks left (audio CD) .... 23
Checking information on an ATRAC CD,
MP3 CD ................................................ 24
Emphasizing the bass sound (SOUND) .... 24
Protecting your hearing (AVLS)................ 25
Locking the controls (HOLD) ................... 25
Turning off the operation beep sound........ 26
Turning off the LCD’s backlight ............... 26
Connecting your CD player
Connecting a stereo system ....................... 27
Connecting to a power source
Using the rechargeable batteries................ 28
Using the dry batteries............................... 31
Notes on the power source ........................ 32
Additional information
Precautions ................................................ 33
Maintenance .............................................. 34
Troubleshooting ......................................... 35
Specifications ............................................ 38
Optional accessories .................................. 39
GB
3-GB
Page 4
Enjoy your ATRAC CD Walkman!
Thank you for purchasing the D-NE1. This CD Walkman is called an “ATRAC CD Walkman,”
because you can enjoy “ATRAC CDs” on it.
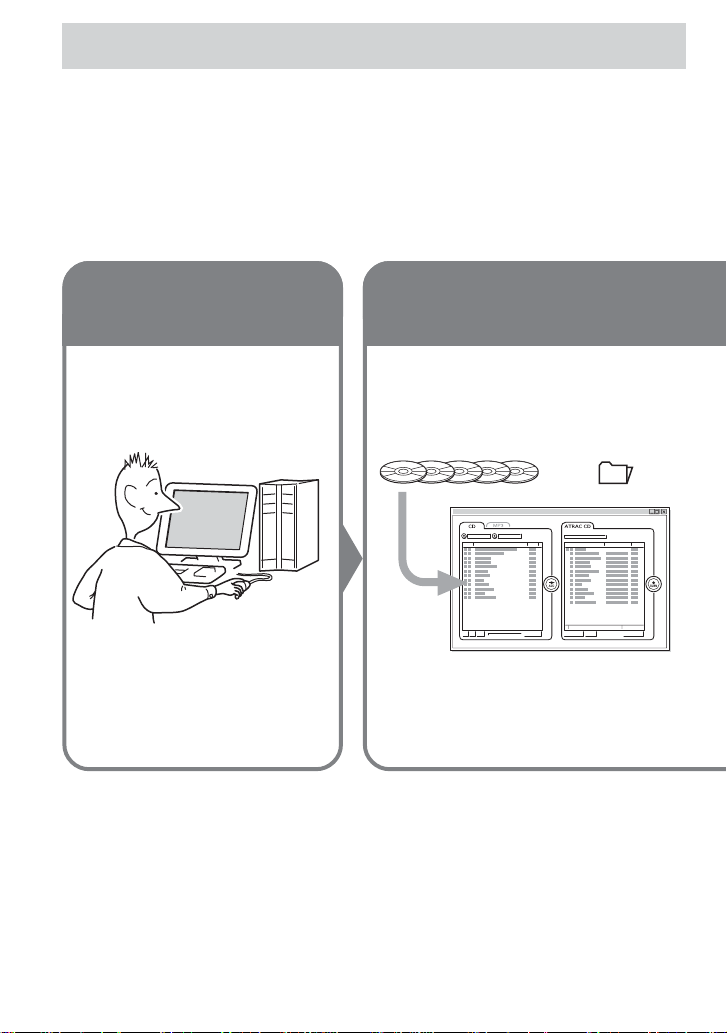
Create original ATRAC CDs !
You can make your own ATRAC CD.
The procedure is very simple. Just perform Steps 1, 2 and 3.
Step 1
Install
Install the supplied
“SonicStage Simple Burner”
software.
How to use the SonicStage Simple Burner
Refer to the supplied booklet “SonicStage Simple Burner.”
Step 2
Burn
Create a disc image and burn it on
a CD-R/RW using your PC.
Audio CDs
Audio data is converted to the ATRAC3plus/
ATRAC3 format by the SonicStage Simple
Burner.
MP3 files
or
,
4-GB
Page 5
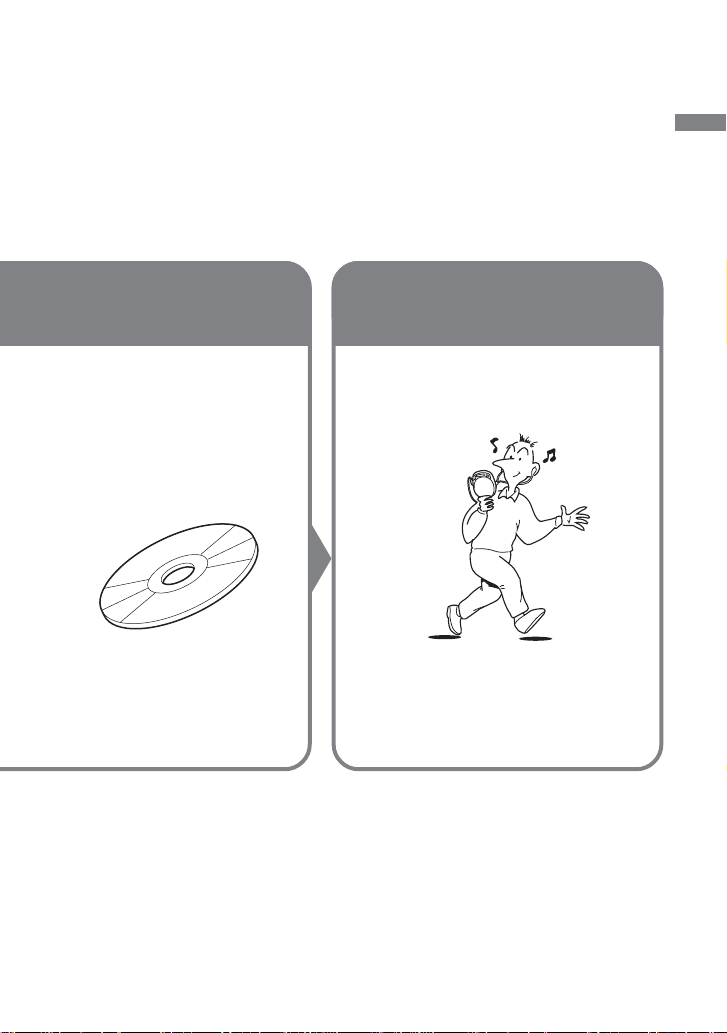
What is an ATRAC CD?
An ATRAC CD is a CD-R/RW on which audio data compressed in the ATRAC3plus/ATRAC3
format has been recorded. About 30 audio CDs can be recorded on a CD-R/RW.* You can also
record MP3 files by converting the files to the ATRAC3plus/ATRAC3 format.
*When total playing time of one CD (album) is estimated at 60 minutes and you are recording on a 700 MB
CD-R/RW at 48 kbps in ATRAC3plus format.
Step 3
Listen
You can enjoy listening to your
own ATRAC CDs on your ATRAC
CD Walkman.
ATRAC CD
Enjoy your ATRAC CD Walkman!
What is the ATRAC3plus/ATRAC3
format?
Refer to pages 6 - 8 of this manual.
You can also enjoy audio CDs on
your CD Walkman.
5-GB
Page 6

Music sources playable on this CD player
You can play the following 3 music sources on this CD player:
• Audio CDs
•ATRAC3plus/ATRAC3 format files
• MP3 files
Usable disc formats
You can use ISO 9660 Level 1/2 and Joliet extension format discs only.
ATRAC3plus and ATRAC3
“ATRAC3plus,” which stands for “Adaptive Transform Acoustic Coding3plus” is audio
compression technology, developed from the ATRAC3 format. Though the ATRAC3plus format
can compress music content to about 1/20 of its original size, you can still enjoy high quality
sound. The available transfer bit rates are 64 kbps and 48 kbps.
“ATRAC3,” which stands for “Adaptive Transform Acoustic Coding3” is audio compression
technology that satisfies the demand for high sound quality and high compression rates. The
ATRAC3 format can compress music content to about 1/10 of their original size, which
contributes to reduction of the media volume. The available transfer bit rates are 132 kbps,
105 kbps and 66 kbps.
The usable number of groups and files
• Maximum number of groups: 255
• Maximum number of files: 999
For details, refer to the supplied booklet “SonicStage Simple Burner.”
Note on saving files on the media
Do not save files in other formats or unnecessary groups on a disc that has ATRAC3plus/
ATRAC3 files.
MP3 files
MP3, which stands for MPEG-1 Audio Layer3, a standard for audio files compression supported
by the Motion Picture Experts Group, an ISO (International Organization for Standardization)
working group, enables compression of audio files to about 1/10 of the data size of a standard
compact disc. Since the MP3 encoding algorithm is public, there are various encoders/decoders
that are compliant with this standard, including freeware that is available for no charge. Thus, the
MP3 standard is widely used in the computer field.
6-GB
Page 7

The major specifications of the acceptable disc format are:
•Maximum directory levels: 8
• Acceptable characters for a file/folder name:
A - Z, a- z, 0 - 9, _ (underscore)
Notes
•When naming files, be sure to add the file extension “mp3” to the file name.
• If you add the extension “mp3” to a file other than an MP3 file, the player will not be able to recognize the
file properly.
•The file name does not correspond to the ID3 tag*.
* ID3 tag is a format for adding certain information (track name, album name, artist name, etc.) to MP3 files.
The usable number of groups and files
• Maximum number of groups: 100
• Maximum number of files: 400
Settings for compression and writing software
•This CD player supports MP3 files with the following specifications: transfer bit rate:
16 - 320 kbps and sampling frequencies: 32/44.1/ 48 kHz. Variable Bit Rate (VBR) is also
supported.
To compress a source for an MP3 file, we recommend setting the transfer bit rate of the
compression software to “44.1 kHz, ” “128 kbps,” and “Constant Bit Rate.”
•To record up to the maximum capacity, set to “halting of writing.”
•To record at one time up to the maximum capacity on media that has nothing recorded on it,
set to “Disc at Once.”
Notes on saving files on the media
• Do not save files in other formats or unnecessary folders on a disc that has MP3 files.
•When a disc is inserted, the CD player reads all the information of folders and files on that
disc. If there are many folders on the disc, it may take a long time for play to begin or for the
next file to start playback.
Enjoy your ATRAC CD Walkman!
7-GB
Page 8

Difference between ATRAC3plus/ATRAC3 and
MP3
Groups and folders
The ATRAC3plus/ATRAC3 format has a very simple structure. It consists of “files” and
“groups. ” A “file” is equivalent to a “track” of an audio CD. A “group” is a bundle of files and is
equivalent to an “album.” A “group” has no directory-type structure (a new group cannot be
made within an existing group). This CD player is designed to recognize an MP3 file folder as a
“group” so that it can play CD-Rs/RWs recorded in both the ATRAC3plus/ATRAC3 format and
those recorded in the MP3 format with the same operation.
Displaying the track name, etc.
When playing a CD having ATRAC3plus/ATRAC3 files or MP3 files on this CD player, track
names, artist names and album names are displayed. This CD player conforms to Version 1.1/2.2/
2.3 of the ID3 tag format.
Notes
•This CD player cannot record music content on recordable media, such as CD-Rs/RWs.
• CD-Rs/RWs recorded in the ATRAC3plus/ATRAC3 format cannot be played on your computer.
• Playback capability may vary depending on the quality of the disc and the condition of the recording device.
8-GB
Page 9
Getting started
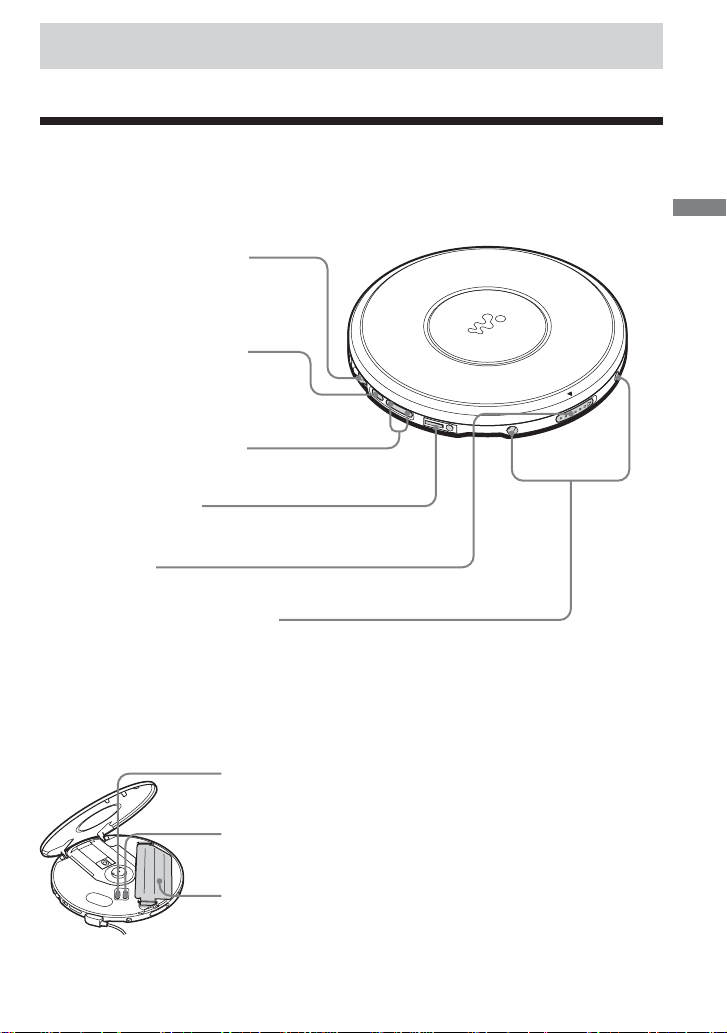
Locating the controls
For details, see pages in parentheses.
CD player (front)
1 Jog lever (u (play/pause)•
./> (AMS/search))
(pages 13, 14, 20 - 22)
2 x (stop) /CHARGE button•
CHARGE lamp
(pages 14, 25, 26, 28, 29)
3 VOL (volume) +*/– buttons
(page 14)
4 i (headphones) jack
(page 13)
5 OPEN switch
(page 13)
6 Terminals for the charging stand
(pages 28, 34)
CD player (inside)
7 AVLS switch
(page 25)
Getting started
*The button has a tactile dot.
8 G-PROTECTION switch
(page 23)
9 Battery compartment
(page 28, 30)
(Continued)
9-GB
Page 10

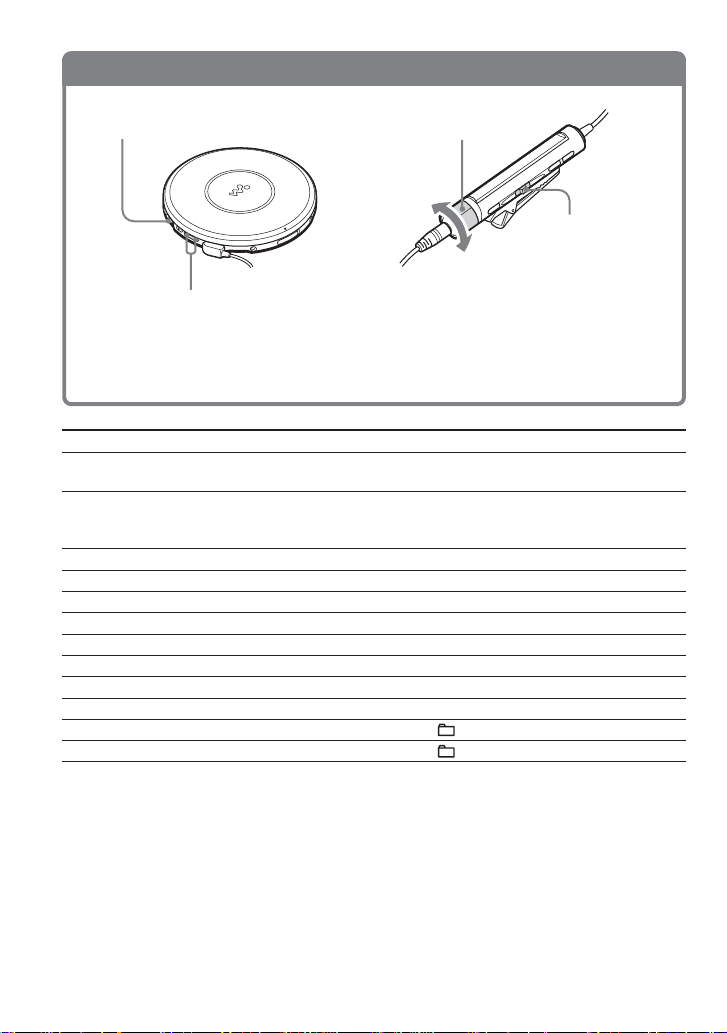
Locating the controls
CD player (rear)
Remote control
0 EXT BATT (external battery)/
DC IN 4.5 V (external power input)
jack (pages 13, 29, 31)
qa LINE OUT (OPTICAL) jack
(page 27)
qs +/– buttons
(pages 14, 22)
qd HOLD switch
(page 25)
qf x (stop) button (pages 14, 26)
qg VOL (volume) +/– control
(page 14)
ql Clip (page 11)
w; HOLD switch
(page 25)
wa DISPLAY button
(pages 15, 23, 24)
Note
Use only the supplied remote control. You cannot operate this CD player with the remote control supplied with
other CD players.
qh Display
(pages 15, 18, 21 - 25)
qj +/– buttons
(pages 14, 22)
qk Jog lever (u (play/pause)•
ENT (enter)•
./> (AMS/search))
(pages 14, 18, 20 - 22)
ws SOUND button
(page 24)
wd P MODE/
(play mode/repeat) button
(pages 18 - 22, 26)
10-GB
Page 11

To use the clip on the remote control
You can remove the clip from the remote control and change the direction of the clip.
To remove
To attach in the reverse direction
,
You can pass the cord of the remote control through its clip.
Getting started
Using the carrying pouch
You can carry your player and its battery case together using the supplied carrying pouch. Insert
them into the proper places in the pouch as illustrated below.
11-GB
Page 12

Checking the supplied accessories
AC power adaptor
AC-ES455K (1)
Rechargeable batteries (2)
Battery carrying case (1)
Headphones/earphones (1)
Charging stand (1)
Carrying pouch (1)
External battery case (1)
AC plug adaptor (1)*
CD-ROM (SonicStage Simple Burner) (1)
User’s guide for SonicStage Simple Burner
(1)
* Supplied with JEB model only
Remote control (1)
12-GB
Page 13

Playing an audio CD or
ATRAC3plus/ATRAC3/MP3 files
You can also use rechargeable batteries or dry batteries as a power source.
1
. Connect your CD player.
1 Connect the AC power adaptor.
2 Connect the headphones/earphones
with remote control.
For models supplied with the AC plug
adaptor
If the AC power adaptor does not fit the
AC outlet, use the AC plug adaptor.
For models supplied with the remote
control
• Connect the plug of the headphones/
earphones to the remote control.
• Connect the headphones/earphones to
the remote control firmly. A loose
connection may cause noise during
playback.
to EXT BATT/DC IN 4.5 V
AC power
adaptor
Jog lever
to an AC outlet
to i (headphones)
Playing an audio CD or ATRAC3plus/ATRAC3/MP3 files
2
. Insert a CD.
1 Slide OPEN to open the CD
player lid.
OPEN switch
2 Place the CD on the tray and close
the lid.
Label side up
(Continued)
13-GB
Page 14
3
. Play a CD.
Jog lever
VOL + / –
Jog lever
VOL + / –
1 Press the jog lever.
2 Adjust the volume by pressing
VOL + or –.
1 Press the jog lever.
2 Adjust the volume by turning
VOL +/ –.
To Do this
Play (from the point you stopped) Press the jog lever.
Playback starts from the point you stopped.
Play (from the first track) While the CD player is stopped, press and hold
the jog lever until the play of the first track
starts.
Pause/resume play after pause Press the jog lever.
Stop Press x (x/CHARGE for the CD player).*
Find the beginning of the current track (AMS*1) Flick the jog lever toward . once.*
Find the beginning of the previous tracks (AMS)
Flick the jog lever toward . repeatedly.*
Find the beginning of the next track (AMS) Flick the jog lever toward > once.*
Find the beginning of the succeeding tracks (AMS)
Go backwards quickly Hold the jog lever toward ..*
Go forward quickly Hold the jog lever toward >.*
Jump to succeeding groups*
Jump to previous groups*
4
4
Flick the jog lever toward > repeatedly.*
2
2
Press + repeatedly.
Press – repeatedly.
2
2
2, *3
2, *3
2, *3
*1 Automatic Music Sensor
*2 These operations can be done during both play and pause.
*3 After you have played the last track, you can return to the beginning of the first track by flicking the jog
lever toward >. Similarly, if you are at the first track, you can locate the last track by flicking the jog
lever toward ..
*4 Only when you play an ATRAC CD or MP3 CD
14-GB
Page 15

Removing the CD
Remove the CD while pressing the pivot
in the center of the tray.
About CD-Rs/RWs
This CD player can play CD-Rs/RWs recorded in the CD-DA format*, but playback capability
may vary depending on the quality of the disc and the condition of the recording device.
* CD-DA is the abbreviation for Compact Disc Digital Audio. It is a recording standard used for the Audio
CDs.
Music discs encoded with copyright protection technologies
This product is designed to play back discs that conform to the Compact Disc (CD) standard.
Recently, various music discs encoded with copyright protection technologies are marketed by
some record companies. Please be aware that among those discs, there are some that do not
conform to the CD standard and may not be playable by this product.
About the display on the remote control
While the CD player is playing, the following indications appear in the display.
You can also check the remaining time, track name, etc. using DISPLAY (see pages 23 and 24. )
While playing an audio CD
Playing an audio CD or ATRAC3plus/ATRAC3/MP3 files
Track number Playing time
While playing an audio CD
containing CD text information
Track number
Track name/Playing time
While playing an ATRAC3plus/
ATRAC3/MP3 file
Notes
•The characters A - Z, a - z, 0 - 9, and _ can be displayed on this CD player.
• Before playing a file, the CD player reads all file and group information on the CD. “READING” is
displayed. Depending on the content of the CD, it may take some time to accomplish this reading.
File name/Playing timeFile number
(Continued)
15-GB
Page 16

Example of ATRAC3plus/ATRAC3 groups and files
Group
ATRAC3plus/ATRAC3
file
1
1
2
3
2
4
5
3
6
7
8
9
4
q;
qa
qs
File mode (normal play)
Group mode (when selected “ ” using P MODE/ (see page 18) )
Notes
• Maximum number of groups: 255
Maximum number of files: 999
•When referring to ATRAC CDs, “group” is equivalent to an “album” and “file” is equivalent to a “track.”
Plays all ATRAC3plus/ATRAC3 files from 1, 2, 3...qa, qs.
Plays all ATRAC3plus/ATRAC3 files in the selected group.
16-GB
Page 17

Example of group structure and playing order (MP3 CD)
The playing order of groups and files is as follows:
CD-R
CD-RW
1
1
Group
MP3 file
2
3
2
File mode (normal play)
Plays all MP3 files from 1, 2, 3...9, 0.
Group mode (when selected “ ” using P MODE/ (see page 18) )
Plays all MP3 files in the selected group.
(Example: If you select group 3, the CD player plays file 4. If you select group 4,
the CD player plays file 5 and 6.)
3
4
4
5
6
Playing an audio CD or ATRAC3plus/ATRAC3/MP3 files
5
6
7
8
9
q;
Notes
•A group that does not include an MP3 file is skipped.
• Maximum number of groups: 100
Maximum number of files: 400
• Maximum directory levels: 8
•When referring to MP3 CDs, “group” is equivalent to an “album” and “file” is equivalent to a “track.”
17-GB
Page 18

Playback options
You can enjoy various playback options using the P MODE/ (play mode/repeat) button and
the jog lever.
Display
Play mode
CD text information, ATRAC3plus/ATRAC3/
MP3 file information, playing time, etc. are
displayed.
*1 ATRAC CD/MP3 CD only
*2 Only when Bookmarks have been
added to the tracks/files
*3 MP3 CD only
*4 Play lists (m3u) recorded in MP3
CD format only
*5 Only when the programmed tracks
are played back
Jog lever
• Press.
You can add Bookmarks to the tracks.
You can also enter the selected tracks
for PGM play.
•Flick toward > or ..
You can select tracks for PGM play
mode.
P MODE/ button
If you press the button during playback,
you can change the play mode.
During playback, if you press and hold
the button until “ ” appears, you can
play tracks repeatedly in the play mode
that was selected using P MODE/ .
B
No indication
(Normal play)
r
1
“ ”*
(Play all files in a selected
group)
r
“1”
(Play a single track)
r
“SHUF”
(Play tracks in random order)
r
“ SHUF”*
(Play files in a selected group in
random order)
“ ”*
(Play tracks with Bookmarks)
“ ”*
(Play play lists*4 selected)
“PGM”*
(Play tracks in your favorite
order)
1
r
2
r
3
r
5
18-GB
Page 19

Playing tracks in random order (Shuffle play)
During playback, press P MODE/ repeatedly until “SHUF” appears.
In shuffle mode, the CD player plays all files on all CDs in random order.
Playing all files in a selected group in random
order (Group shuffle play) (ATRAC CD/MP3 CD only)
During playback, press P MODE/ repeatedly until “ SHUF” appear s.
In group shuffle mode, the CD player plays all files in a selected group in random order.
Playback options
19-GB
Page 20
Playing your favorite tracks by adding
Bookmarks (Bookmark track play)
While playing an audio CD
You can add Bookmarks to up to 99 tracks for each CD (up to 10 CDs).
While playing an ATRAC CD
You can add Bookmarks to up to 999 tracks for each CD (up to 5 CDs).
While playing an MP3 CD
You can add Bookmarks to up to 400 tracks for each CD (up to 10 CDs).
To add Bookmarks
1 During playback of the track to where you want to add a Bookmark, press and hold the jog
lever until “ (Bookmark)” flashes in the display.
When the Bookmark has been added successfully, “ ” flashes slower.
2 Repeat step 1 to add Bookmarks to the tracks you want.
To listen to the tracks with Bookmarks
1 Press P MODE/ repeatedly until “ ” flashes.
2 Press the jog lever.
“ ” lights up in the display and the playback of the tracks with Bookmarks starts.
To remove the Bookmarks
During playback of the track with a Bookmark, press and hold the jog lever until “ ” disappears
from the display.
To check the tracks with Bookmarks
During playback of the tracks with Bookmarks, “ ” flashes slowly in the display.
Notes
• During playback of tracks with Bookmarks, tracks are played in order of track number, and not in the order
you added the Bookmarks.
• If you try to add Bookmarks to the tracks on the 11th CD (on a 6th CD when playing ATRAC CDs), the
Bookmarks of the CD you played back first will be erased.
• If you remove all power sources, all Bookmarks stored in memory will be erased.
• If you continue playing the CD player on the rechargeable batteries without charging the batteries even
though “Lobatt” is displayed, all Bookmarks stored in memory will be erased.
20-GB
Page 21

Playing your favorite play lists (m3u play list play)
(MP3 CD only)
You can play your favorite m3u play lists.*
* An “m3u play list” is a file for which an MP3 file playing order has been encoded. To use the play list
function, record MP3 files on a CD-R/RW using encoding software that supports the m3u format.
During playback, press P MODE/ repeatedly until “ ” appears.
1
Play list
Flick the jog lever toward . or > to select a play list you want.
2
Press the jog lever.
3
Note
You can only play the top two play lists displayed on your screen on this CD player.
Playback options
21-GB
Page 22

Playing tracks in your favorite order (PGM play)
You can program the CD player to play up to 64 tracks in your favorite order.
During stop, press DISPLAY. While the indications are displayed, press
1
P MODE/ repeatedly until “PGM” appears.
Audio CD ATRAC CD/MP3 CD
Flick the jog lever toward > or . to select a track.
2
When playing an ATRAC CD/MP3 CD, you can also select a group using + or –.
Audio CD ATRAC CD/MP3 CD
Playing order Playing order File name
To enter the selected track, press and hold the jog lever until the playing order
3
increases by one .
Audio CD ATRAC CD/MP3 CD
Repeat steps 2 and 3 to select the tracks in your favorite order.
4
Press the jog lever to start the PGM play.
5
To check the program
During programming:
Press the jog lever repeatedly before step 5.
During stop:
Press DISPLAY. While the indications are displayed, press P MODE/ repeatedly until
“PGM” flashes, then press the jog lever repeatedly.
Each time you press the jog lever, the track number appears.
Notes
•When you finish entering the 64th track in step 3, the first selected track (audio CD)/the first selected file
name (ATRAC CD/MP3 CD) appears in the display.
• If you select more than 64 tracks, the first selected tracks are erased.
Track number
22-GB
Page 23

B
Available features
The G-PROTECTION
function
The G-PROTECTION function has been
developed to provide excellent protection
against sound skipping while jogging.
When you set the G-PROTECTION switch
on your CD player to “2”, the GPROTECTION function will be enhanced
compared to “1.”
To walk with the CD player and enjoy high
quality CD sound using the Gfunction, set the G-PROTECTION switch to
“1.” While taking harder exercise, it is
recommended that you set it to “2.”
Note
Sound may skip:
– if the CD player receives stronger continuous
shock than expected,
– if a dirty or scratched CD is played or
–when using poor-quality CD-Rs/RWs or
if there is a problem with the original recording
device or application software.
PROTECTION
Checking the time
remaining on the CD
and the number of
tracks left (audio CD)
Each time you press DISPLAY, the display
changes as follows.
For an audio CD containing CD text
information, information in parentheses also
appears.
t Track number and elapsed playing time
(name of the current track)
r
Track number and remaining time of the
current track
(name of the current track/artist name)
r
The number of tracks left* and the time
remaining on the CD*
(album name/artist name)
* Not displayed during Single play, Shuffle play or
Bookmark track play.
Available features
23-GB
Page 24

Checking information
on an ATRAC CD, MP3
CD
You can check information on an ATRAC
CD/MP3 CD using DISPLAY.
You can also check ID3 tag information if
the file has that information stored.
Each time you press DISPLAY, the display
changes as follows:
t File number, file name and elapsed
playing time
r
File number, artist name/CODEC
information*, remaining time of
the current file
r
Group name
*Variable bit rate and sampling frequencies
Notes
• If the group does not have a group name,
“ROOT” appears in the display.
• If the file does not have ID3 tag information,
“- - - -” appears in the display.
Emphasizing the bass
sound
You can emphasize the bass-boosted sound.
Press SOUND to select “SOUND 1” or
“SOUND 2.”
“SOUND 2” enhances the bass sound more
than “SOUND 1.”
Note
If the sound is distorted when using the SOUND
function, turn down the volume.
(SOUND)
No indication
(Normal play)
“SOUND 1”
“SOUND 2”
The selected sound mode is displayed.
24-GB
Page 25

Protecting your hearing
(AVLS)
The AVLS (Automatic Volume Limiter
System) function keeps down the maximum
volume to protect your hearing.
Set AVLS (under the lid, on the main
unit) to “LIMIT.”
Appears when the volume is turned up
and beyond a certain level.
To turn off the AVLS function
Set A VLS to “NORM.”
Locking the controls
(HOLD)
You can lock the controls on your CD player
to prevent accidental button presses.
Slide HOLD in the direction of the
arrow.
CHARGE lamp flashes if you press
any button when the HOLD function
is activated.
You can use the HOLD function with both
the CD player and remote control. You can
still operate your CD player using the remote
control when HOLD on the remote control is
set to off.
To unlock the controls
Slide HOLD in the opposite direction of the
arrow.
Note
Even if the HOLD function is working, “HOLD”
will not appear in the display of the remote control.
Available features
25-GB
Page 26
Turning off the
operation beep sound
You can turn off the beep sound that is heard
from your headphones/earphones when you
operate your CD player.
Remove the power source (AC
1
power adaptor, rechargeable
batteries or dry batteries) from the
CD player.
Connect the power source while
2
pressing x (x/CHARGE for the
CD player).
To turn on the beep sound
Remove the power source and then connect
the power source without pressing x or
x/CHARGE.
Turning off the LCD’s
backlight
While you are using the rechargeable
batteries or dry batteries, the LCD’s
backlight turns on for about 5 seconds every
time you press a button. However, you can
turn off the backlight to save the battery
power.
Remove the rechargeable
1
batteries and dry batteries from
the CD player.
Insert the batteries while pressing
2
P MODE/ .
To turn on the LCD’s backlight
Remove the batteries and then insert them
without pressing P MODE/ .
About the LCD’s backlight
The LCD’s backlight is always turned on
when using the AC power adaptor.
26-GB
Page 27

B
Connecting your CD player
Connecting a stereo
system
You can listen to CDs through a stereo
system and record CDs on a cassette tape and
a MiniDisc. For details, see the instruction
manual that comes with the connected
device.
Be sure to turn off all connected devices
before making connections.
to LINE OUT
(OPTICAL)
Optical
digital
connecting
cord
MiniDisc
recorder, DAT
deck, etc.
Stereo system,
cassette recorder,
radio cassette
recorder, etc.
Connecting
cord
Left (white)
Right (red)
Notes
• Before you play a CD, turn down the volume of
the connected device to avoid damaging the
connected speakers.
• Use the AC power adaptor for recording. If you
use the rechargeable batteries or dry batteries as a
power source, the batteries may become
completely depleted during recording.
• Adjust the volume properly on the connected
device so that the sound will not be distorted.
•This CD player uses the Serial Copy
Management System, which allows only firstgeneration digital copies to be made. When
recording or playing an ATRAC CD/MP3 CD
using a connected device, use only the analog
connecting cord.
When using the connecting cord
•You cannot adjust the volume of output
from the i jack using VOL +/– on the CD
player or the remote control.
• If the sound is distorted, connect the device
to the i jack.
When using the optical digital
connecting cord
To record a CD on a MiniDisc, DAT, etc.,
make sure that the CD player is in pause
before operating the recording procedures.
About the G-PROTECTION and
SOUND functions when using the
connecting cord or optical digital
connecting cord
•To record high quality CD sound, set the
G-PROTECTION switch to “1.”
•The SOUND function works only on the
output sound from the i jack and not work
on the output sound from the LINE OUT
(OPTICAL) jack.
Connecting your CD player
27-GB
Page 28

B
Connecting to a power source
You can use the following power sources:
• Rechargeable batteries
•AC power adaptor (see “Playing an audio
CD or ATRAC3plus/ATRAC3/MP3 files”)
• LR6 (size AA) alkaline batteries (external
battery case)
For the battery life and charging time of the
rechargeable battery, see “Specifications.”
Using the rechargeable
batteries
Charge the rechargeable batteries
before using it for the first time.
You can use only the following rechargeable
batteries for your CD player.
• NH-14WM (A) (supplied)
Open the battery compartment lid
1
inside your CD player.
Connect the AC power adaptor to
3
the DC IN 4.5 V jack of the
supplied charging stand and an
AC outlet. Then place the CD
player on the supplied charging
stand, aligning the V mark on the
CD player with the v mark on the
stand.
If the AC power adaptor does not fit the
AC outlet, use the AC plug adaptor.
CHARGE lamp
to DC IN 4.5 V
Align V with v.
Insert two rechargeable batteries
2
by matching the 3 to the diagram
in the battery compartment and
close the lid until it clicks into
place.
Insert the # end first
(for both batteries).
28-GB
AC power adaptor
to an AC outlet
Page 29

Charging of the batteries starts.
In the display of the remote control,
“Charging” indication flashes and the
indicator sections of light up in
succession. The CHARGE lamp lights
up on the CD player.
When the batteries are completely
charged, all indications in the display
disappear and the CHARGE lamp goes
off.
To charge the rechargeable batteries
without using the supplied charging
stand
Connect the AC power adaptor to the EXT
BATT/DC IN 4.5 V jack of your CD player
and an AC outlet, then press x/CHARGE to
start charging.
x/CHARGE
button•CHARGE
lamp
to EXT BATT/
DC IN 4.5 V
AC power adaptor
to an AC outlet
Notes
•When charging the batteries using the charging
stand, be sure to remove the external battery
case.
• During charging, the CD player and the
rechargeable batteries become hot. This poses no
danger.
• If you press the jog lever during charging,
charging stops and playback of the CD starts.
• If you place the CD player on the charging stand
during playback, playback stops and charging
starts.
• Place the CD player on the charging stand
securely, aligning the V mark on the CD player
with the v mark on the stand. Make sure that the
CHARGE lamp on the CD player lights up.
Wrong placement interrupts charging or
playback.
(Continued)
29-GB
Connecting to a power source
Page 30
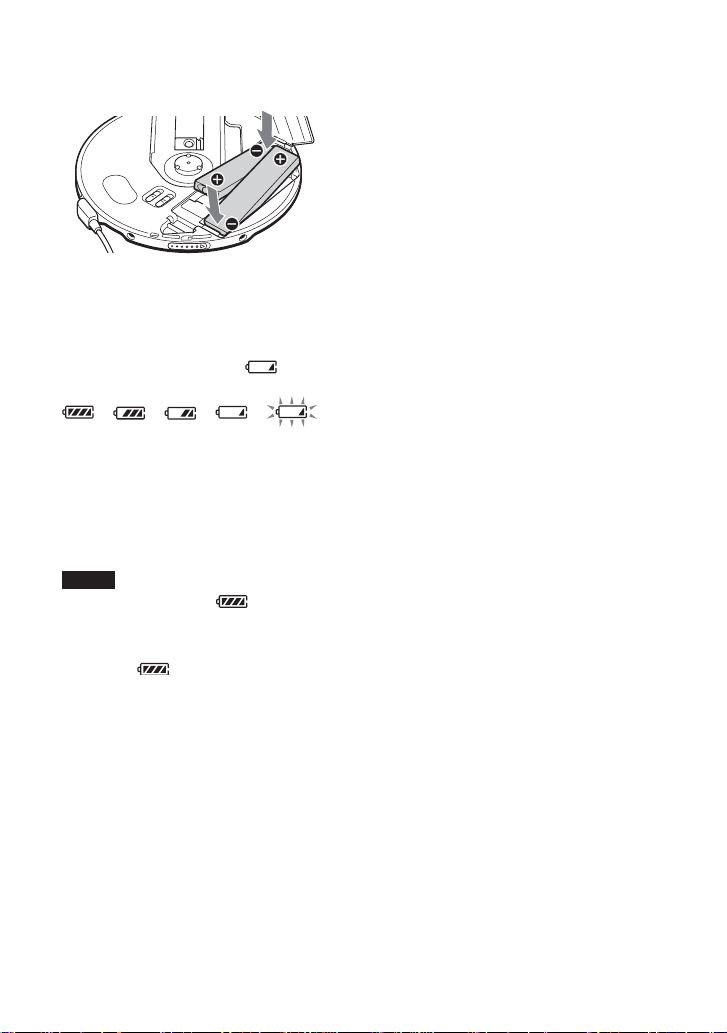
To remove the rechargeable batteries
Push # end to remove the batteries.
When to charge the rechargeable
batteries
You can check the remaining power of the
batteries in the display.
Replace the batteries when “ ” flashes.
t t t t t
Lobatt*
* Beep sounds.
To keep the original battery capacity for a
long time, charge the batteries only when
they are completely depleted.
Notes
•The indicator sections of roughly show the
remaining battery power. One section does not
always indicate one-fourth of the battery power.
• Depending on operating conditions, the indicator
sections of
may increase or decrease.
When to replace the rechargeable
batteries
If the battery life becomes shorter by about
half, replace the batteries with new
rechargeable batteries.
Note on the rechargeable batteries
If the batteries are new or have not been used
for a long time, they may not be charged
completely. In that case, charge them until
the CHARGE lamp goes off and then use the
CD player until the batteries are depleted
completely (“Lobatt” appears in the display).
Repeat this procedure several times.
Note on carrying the rechargeable
batteries
Use the supplied battery carrying case to
prevent unexpected heat. If the rechargeable
batteries and the metallic objects are
contacted, heat or fire may occur due to a
short circuit.
Notes on the supplied charging stand
•The supplied charging stand can be used
only with this CD player. No other model
can be charged using this stand.
•When using the supplied charging stand,
charge the NH-14WM (A) rechargeable
battery only. Do not charge any other
battery.
• During charging, the CD player and the
rechargeable batteries become hot. This
poses no danger.
• Do not place coins or other metallic
objects on the charging stand. If the
terminal on the charging stand is
accidentally brought into contact with a
metallic object, it may short-circuit and
begin to heat up.
30-GB
Page 31

Using the dry batteries
Make sure to use the supplied external
battery case.
Use only the following dry battery type for
your CD player:
• LR6 (size AA) alkaline batteries
Align the lines below PUSH as
1
illustrated, then draw out the
battery case while pressing PUSH.
Align
Connect the external battery case
3
to the CD player.
to EXT BATT/
DC IN 4.5 V
When to replace the batteries
You can check the remaining power of the
batteries in the display.
Replace the batteries when “ ” flashes.
With the v side
down
Insert two LR6 (size AA) alkaline
2
batteries by matching the 3 to the
diagram in the battery case. Insert
the battery case and lock the case
by turning LOCK in the direction
of the arrow.
t t t t t
Lobatt*
* Beep sounds.
When the batteries are depleted, replace both
batteries with new ones.
The batteries in the CD player and external
battery case are discharged simultaneously.
Notes
•Be sure to remove the AC power adaptor when
attaching the external battery case.
•When using the rechargeable batteries and dry
batteries together to extend power, use a fully
charged rechargeable batteries and new dry
batteries.
31-GB
Connecting to a power source
Page 32

Notes on the power
source
Disconnect all power sources when the CD
player is not used for a long time.
On AC power adaptor
•Use only the AC power adaptor supplied.
If your CD player is not supplied with the
one, use the AC-E45HG AC power
adaptor. Do not use any other AC power
adaptor. It may cause a malfunction.
Polarity of the plug
• Do not touch the AC power adaptor with
wet hands.
• Connect the AC power adaptor to an easily
accessible AC outlet. Should you notice an
abnormality in the AC power adaptor,
disconnect it from the AC outlet
immediately.
On rechargeable batteries
and dry batteries
• Do not charge the dry batteries.
• Do not throw the batteries into fire.
• Do not carry the batteries with coins or
other metallic objects. It can generate heat
if the positive and negative terminals of the
battery are accidentally contacted by a
metallic object.
• Do not mix rechargeable batteries with dry
batteries.
•Do not mix new batteries with old ones.
• Do not use different types of batteries
together.
• When the batteries are not to be used for a
long time, remove them.
• If battery leakage occurs, wipe off any
deposit in the battery compartment, and
install new batteries. In case the deposit
adheres to you, wash it off thoroughly.
32-GB
Page 33

B
Additional information
Precautions
On safety
• Should any solid objects or liquid fall into
the CD player, unplug it and have it
checked by qualified personnel before
operating it any further.
• Do not put any foreign objects in the DC
IN 4.5 V (external power input) jack.
On the CD player
•Keep the lens on the CD player clean and
do not touch it. If you do so, the lens may
be damaged and the CD player will not
operate properly.
• Do not put any heavy object on top of the
CD player. The CD player and the CD may
be damaged.
• Do not leave the CD player in a location
near heat sources, or in a place subject to
direct sunlight, excessive dust or sand,
moisture, rain, mechanical shock,
unleveled surface, or in a car with its
windows closed.
• If the CD player causes interference to the
radio or television reception, turn off the
CD player or move it away from the radio
or television.
• Discs with non-standard shapes (e.g.,
heart, square, star) cannot be played on this
CD player. Attempting to do so may
damage the CD player. Do not use such
discs.
• Do not expose the CD to direct sunlight or
heat sources such as hot air ducts. Do not
leave the CD in a car parked under direct
sunlight.
On headphones/earphones
Road safety
Do not use headphones/earphones while
driving, cycling, or operating any motorized
vehicle. It may create a traffic hazard and is
illegal in some areas. It can also be
potentially dangerous to play your headsets
at high volume while walking, especially at
pedestrian crossings. You should exercise
extreme caution or discontinue use in
potentially hazardous situations.
Preventing hearing damage
Avoid using headphones/earphones at high
volume. Hearing experts advise against
continuous, loud and extended play. If you
experience a ringing in your ears, reduce
volume or discontinue use.
Consideration for others
Keep the volume at a moderate level. This
will allow you to hear outside sounds and to
be considerate to the people around you.
On handling CDs
•To keep the CD clean, handle it by its
edge. Do not touch the surface.
• Do not stick paper or tape onto the CD.
Not these ways
Additional information
33-GB
Page 34

Maintenance
To clean the casing
Use a soft cloth slightly moistened in water
or a mild detergent solution. Do not use
alcohol, benzine or thinner.
To clean the terminals
If the terminals on the charging stand or on
the CD player become dirty, the batteries
may not be charged properly. Clean the
terminals with a cotton swab or a dry cloth
periodically as illustrated below.
Terminals
Terminals
34-GB
Page 35

Troubleshooting
Should any problem persist after you have checked these symptoms, consult your nearest Sony
dealer.
Symptom
The volume does not
increase even if you turn
VOL +/– in the + direction
repeatedly (even if you press
VOL + repeatedly on the CD
player).
Cannot adjust the volume.
No sound, or noise is heard.
Certain files cannot be
played.
The playing time is too short
when powered with the dry
batteries.
The playing time is too short
when powered with the
rechargeable batteries.
“Lobatt” appears in the
display. The CD does not
play.
“HI dc In” appears in the
display.
Cause and/or corrective action
c Set the AVLS switch to “NORM.” (page 25)
c The headphones/earphones are connected to the LINE OUT
(OPTICAL) jack. Connect them to the i (headphones) jack.
(page 13)
c The headphones/earphones are connected to the LINE OUT
(OPTICAL) jack. Connect them to the i (headphones) jack.
(page 13)
c Connect the headphones/earphones plugs firmly. (page 13)
c Plugs are dirty. Clean the headphones/earphones plugs with a dry
soft cloth periodically.
c You tried to play files saved in a format that is not compatible with
this CD player. (page 6)
c Check that you are using alkaline batteries and not manganese
batteries. (page 31)
c Replace the batteries with new LR6 (size AA) alkaline batteries.
(page 31)
c Charge and discharge the rechargeable batteries several times.
(pages 28 - 30)
c The rechargeable batteries are used up completely. Charge the
batteries. (page 28)
c Replace the batteries with new LR6 (size AA) alkaline batteries.
(page 31)
c An AC power adaptor which is rated higher than the one supplied
or recommended is being used. Use only the supplied AC power
adaptor or the car battery cord recommended in “Optional
accessories.” (pages 38, 39)
(Continued)
35-GB
Additional information
Page 36

Troubleshooting
Symptom
The CD does not play or
“No disc” appears in the
display when a CD is placed
in the CD player.
CHARGE lamp flashes on the
CD player when you press a
button, and the CD does not
play.
Cannot adjust the volume
with VOL +/– on the CD
player.
During recording with optical
digital connection, the track
number cannot be recorded
correctly.
The rechargeable batteries
cannot be charged.
Playback starts from the
point you stopped. (resume
function)
Rustling noise is heard from
the CD.
When using with a connected
stereo system, the sound is
distorted or noisy.
Cause and/or corrective action
c The buttons are locked. Slide the HOLD switch back. (page 25)
c The CD is dirty or defective. (page 33)
c Check that the CD is inserted with the label side up. (page 13)
c Moisture condensation has occurred.
Leave the CD player aside for several hours until the moisture
evaporates.
c Close the lid of the battery compartment firmly. (page 28)
c Make sure the batteries are inserted correctly. (pages 28, 31)
c Connect the AC power adaptor to an AC outlet securely. (page 13)
c Press the jog lever after one second or more has passed since the
AC power adaptor was connected.
c The CD-R/RW is blank.
c There is a problem with the quality of the CD-R/RW, recording
device, or application software.
c Files in two or more formats have been recorded on the same CD-
R/RW. (page 7)
c The buttons are locked. Slide the HOLD switch back. (page 25)
c The CD player is connected to an audio device. Adjust the volume
using the volume control on the connected device. (page 27)
c Record the track number again using a MiniDisc recorder, DAT
recorder, etc. (page 27)
c See the instruction manual that comes with the recording device.
(page 27)
c The terminals on the CD player or the charging stand are dirty.
Wipe them with a dry soft cloth.
c The CD is playing. Stop playing.
c The external battery case is connected to the CD player. Remove it
and start charging again.
c The CD player is not placed securely on the charging stand. Place
the player on the stand, aligning the V mark on the player and the
v mark on the stand. Make sure that the CHARGE lamp lights up.
(page 28)
c The resume function is working. To start play from the first track,
press the jog lever during stop until the first track starts playing, or
open the lid of the CD player. Or remove all power sources, then
insert the batteries or connect the AC power adaptor again.
(pages 13, 28, 31)
c
Close the lid of the battery compartment firmly. (page 28)
c
Adjust the volume of the connected device. (page 27)
36-GB
Page 37

Symptom
During playback of an
CD or
MP3 CD, the CD does
not rotate but you can hear
the sound normally.
“NO FILE” appears in the
display after the jog lever is
pressed or the lid of the CD
player is closed.
When closing the lid of the
CD player, the CD starts to
rotate.
You cannot operate the CD
player properly using the
remote control.
The LCD display becomes
hard to see or slows down.
“ ” is flashing quickly in
the display, and you cannot
locate the beginning of the
track or the specific point in
the track.
ATRAC
Cause and/or corrective action
c
The CD player is designed to stop the rotation of an ATRAC CD or
MP3 CD during playback to reduce the power consumption. The
player is not malfunctioning.
c There are no ATRAC3plus/ATRAC3/MP3 files in the CD.
c A CD-RW from which the data has been erased is being used.
c The CD is dirty.
c
The CD player is reading the information on the CD. The player is
not malfunctioning.
c The buttons on the CD player are kept pressed by mistake.
c You are using your CD player at high temperatures (above 40°C/
104°F) or at low temperatures (below 0°C/32°F). At room
temperature, the display will return to its normal operating
condition.
c The CD player has entered the Bookmark track play. Press
P MODE/ repeatedly until “ ” disappears from the display.
37-GB
Additional information
Page 38

Specifications
System
Compact disc digital audio system
Laser diode properties
Material: GaAlAs
Wavelength: λ = 780 nm
Emission duration: Continuous
Laser output: Less than 44.6 µW
(This output is the value measured at a distance
of 200 mm from the objective lens surface on
the optical pick-up block with 7 mm aperture.)
D-A conversion
1-bit quartz time-axis control
Frequency response
20 - 20 000 Hz
307)
Output (at 4.5 V input level)
Line output (stereo minijack)
Output level 0.7 V rms at 47 kΩ
Recommended load impedance over 10 kΩ
Headphones (stereo minijack)
Approx. 5 mW + Approx. 5 mW at 16 Ω
Optical digital output (optical output connector)
Output level: –21 - –15 dBm
Wavelength: 630 - 690 nm at peak level
Power requirements
For the area code of the model you
purchased, check the upper left side of the
bar code on the package.
•Two Sony NH-14WM (A) rechargeable
batteries: 1.2 V DC × 2
•Two LR6 (size AA) batteries: 1.5 V DC × 2
•AC power adaptor (DC IN 4.5 V jack):
U, U2, CA, CA2, E92, MX2, TW2 and
CA2/C models: 120 V, 60 Hz
CED, CED/4, CE7, CE7/C, EE, EE1, E, E13
and E13/2 models: 220 - 230 V, 50/60 Hz
CEK model: 230 V, 50 Hz
AU2 model: 240 V, 50 Hz
EU8, EU8/C, JE.W, E18, KR4 and EE8
models: 100 - 240 V, 50/60 Hz
HK4 model: 230 V, 50 Hz
CNA model: 220 V, 50 Hz
• Rated current: 500 mA
+1–2
dB (measured by JEITA CP-
Battery life*1 (approx. hours)
(When you use the CD player on a flat and stable
surface)
Playing time varies depending on how the CD
player is used.
When using two NH-14WM (A) (charged for
about 5 hours*2)
G-PROTECTION
“1” “2”
Audio CD 35 32
ATRAC3plus file*
MP3 file*
3
4
55 55
50 50
When using external battery case (two alkaline
batteries*5)
G-PROTECTION
“1” “2”
Audio CD 55 50
ATRAC3plus file*
MP3 file*
3
4
95 95
85 85
When using two NH-14WM (A) and external
battery case (two alkaline batteries*5)
G-PROTECTION
“1” “2”
Audio CD 90 82
ATRAC3plus file*
MP3 file*
*1 Measured value by the standard of JEITA (Japan
Electronics and Information Technology
Industries Association).
*2 Charging time varies depending on how the
rechargeable battery is used.
*3 Recorded at 48 kbps or 64 kbps
*4 Recorded at 128 kbps
*5 When using Sony alkaline batteries LR6 (SG)
(produced in Japan)
3
4
150 150
135 135
38-GB
Page 39

Operating temperature
5°C - 35°C (41°F - 95°F)
Dimensions (w/h/d) (excluding
projecting parts and controls)
Approx. 135.4 × 135.4 × 15.8 mm
(5 3⁄8 × 5 3⁄8 × 5⁄8 in.)
Mass (excluding accessories)
Approx. 179 g (6.4 oz.)
US and foreign patents licensed from Dolby
Laboratories.
Design and specifications are subject to change
without notice.
Optional accessories
AC power adaptor AC-E45HG
Active speaker system SRS-Z1
Car battery cord DCC-E345
Car battery cord with car connecting pack
DCC-E34CP
Car connecting pack CPA-9C
Earphones MDR-E848SP
MDR-EX71SL
MDR-Q55SL
Your dealer may not handle some of the
accessories listed above. Please ask the
dealer for detailed information about the
accessories in your country.
39-GB
Additional information
Page 40

警告
為防火災或觸電危險,切勿讓機器暴露
於雨中或潮濕處。
別把機器安裝在諸如書櫥或壁櫥等密閉
處。
為防火災,請勿讓裝置的通風孔蓋住報
紙,桌布,窗簾等。也不可在裝置上點放
蠟燭。
為防火災或觸電危險,不可在裝置上擺飾
花瓶等裝滿液體的物體。
一部分國家對於本產品的電源用電池可能
規定有處置的標準。請洽詢當地有關當
局。
注意
• 開著時,將有看不見的雷射線
• 別凝視射線或直接觀看裡面的光學元件
AC 電源轉接器之電源線上的鐵芯係仰制
EMC電磁波干擾用,請勿任意移除。
(備註:AC電源轉接器之電源線的鐵芯為外
接式﹐需在線上纏繞二圈後加以固定。)
CE標誌的有效性,僅限於那些有法律限制
的國家,主要在EEA(歐洲經濟區)國家。
ATRAC3plus和ATRAC3是Sony公司的商標。
2-CT
Page 41

目錄
享用您的 ATRAC CD 隨身聽
製作原創ATRAC CD﹗ ............... 4
可在本CD 播放機上播放的音樂源 .... 6
ATRAC3plus和 ATRAC3 .............. 6
MP3檔案 .......................... 6
ATRAC3plus/ATRAC3和 MP3 之間的差別 8
準備使用
控制器位置 ....................... 9
檢查附帶的附件 .................. 12
播放音訊 CD 或 ATRAC3plus/
ATRAC3/MP3 檔案
1.連接CD唱機。 ................. 13
2.裝入CD光碟。 ................. 13
3.播放CD。..................... 14
播放模式選擇
任意順序播放曲子(隨機播放)..... 19
按任意順序播放選定組中的所有檔案
(組隨機播放)
(只適用於ATRAC CD/MP3 CD)..... 19
給喜歡的曲子加記Bookmarks 以便選播
(播放加記書簽的曲子).......... 20
播放您喜歡的播放列表
(m3u播放列表播放)
(只適用於MP3 CD).............. 21
按照喜歡順序播放曲子
(PGM(程式)播放)............. 22
適用功能
G-PROTECTION功能 ................ 23
檢查CD 的剩餘時間和剩餘曲數
(音訊CD)...................... 23
檢查ATRAC CD 、 MP3 CD 上的資訊 ... 24
加強低音 (SOUND) ................ 24
保護聽覺 (AVLS) ................. 25
鎖定控制器 (HOLD) ............... 25
關掉操作嗶聲 .................... 26
關掉液晶顯示器的背照明 .......... 26
連接 CD 唱機
連接立體聲系統 .................. 27
連接電源
使用充電式電池 .................. 28
使用乾電池 ...................... 31
電源須知 ........................ 32
附加資訊
使用前須注意 .................... 33
保養............................ 34
故障檢修 ........................ 35
規格............................ 38
選購的附件 ...................... 39
CT
3-CT
Page 42

享用您的ATRAC CD 隨身聽
感謝您購買D-NE1 。此 CD隨身聽名為 “ATRAC CD隨身聽”。因為您可以在上面欣賞
“ATRAC CD”。
製作原創ATRAC CD﹗
可以製作自己的ATRAC CD 。
過程非常簡單。只要執行步驟1 、 2 和 3。
步驟 1
安裝
安裝附帶的“SonicStage
Simple Burner”軟體。
怎樣使用 SonicStage Simple Burner
請參看附帶的“SonicStage Simple Burner”手冊。
步驟2
燒錄
製作光碟映像並使用 PC 將其燒錄到
CD-R/RW 上。
聲頻 CD MP3檔案
或
,
用 SonicStage Simple Burner 把音訊資料轉
換成 ATRAC3plus/ATRAC3 格式。
4-CT
Page 43

什麼是ATRAC CD?
ATRAC CD是一張 CD-R/RW ,上面錄有按 ATRAC3plus/ATRAC3格式壓縮的音訊資料。約
30 張聲頻 CD可錄製在一張CD-R/RW 上。* 也可以通過把檔案轉換成 ATRAC3plus/ATRAC3
格式來錄製MP3 檔案。
* 當一張 CD(專集)的總播放時間估計為60分鐘,並且您正在以48 kbps 的速度以ATRAC3plus格式在
700 MB CD-R/RW上錄製時。
步驟 3
收聽
可以在您的 ATRAC CD 隨身聽上欣賞
自己的 ATRAC CD 。
ATRAC CD
享用您的 ATRAC CD 隨身聽
什麼是ATRAC3plus/ATRAC3 格式?
參考本手冊的第6-8 頁。
也可以在您的 CD 隨身聽上欣賞音訊
CD 。
5-CT
Page 44

可在本CD 播放機上播放的音樂源
可以在本CD 播放機上播放下列 3 種音樂源︰
• 音訊CD
• ATRAC3plus/ATRAC3格式檔案
• MP3檔案
可用的光碟格式
只能使用ISO 9660 Level 1/2 和 Joliet extension 格式光碟。
ATRAC3plus和 ATRAC3
“ATRAC3plus”表示“自適應轉換聲音編碼3+”,是一種音訊壓縮技術,從 ATRAC3 格
式發展而來。雖然ATRAC3plus格式可以把音樂內容壓縮到原來大小的1/20,但您仍可欣賞
到高質量的聲音,可用的傳輸比特率為64 kbps 和 48 kbps 。
“ATRAC3”表示“自適應轉換聲音編碼 3”,是一種音訊壓縮技術,它可滿足對高質量
聲音和高壓縮率的要求。ATRAC3格式可以把音樂內容壓縮到原來大小的1/10,有助於減小
介質體積。可用的傳輸比特率為132 kbps 、 105 kbps 和66 kbps。
可用的組和檔案數
• 最大組數︰255
• 最大檔案數︰999
詳細,請參看附帶的“SonicStage Simple Burner”手冊。
將檔案保存到媒介上的注意事項
請勿以其他格式保存檔案或將檔案保存到有ATRAC3plus/ATRAC3檔案存在的光碟上的不
需要的組中。
MP3檔案
MP3表示 MPEG-1 Audio Layer3,由活動圖像專家組(一個ISO(國際標準化組織)工
作組)支持的音訊檔案壓縮標準,可使音訊檔案壓縮到標準小型光碟資料大小的約1/10。
由於 MP3編碼算法是公開的,有各種符合此標準的編碼器/解碼器,包括共享無需付費的。
所以,MP3 標準在電腦領域使用廣泛。
6-CT
Page 45

可接受的光碟格式的主要規格是︰
• 最多目錄層次︰8
• 檔案/ 資料夾名可接受的字元︰ A-Z 、 a-z、 0-9 、 _(下劃線)
註
• 當命名檔案時,務必在檔案名後加上檔案擴展名“mp3”。
• 如果在非 MP3 檔案名上加上擴展名“mp3”,播放機將不能正確識別此檔案。
• 檔案名和 ID3 tag* 不對應。
* ID3 tag 是用於給MP3 檔案添加某些資訊(曲名、專輯名、藝術家名等)的格式。
可用的組數和檔案數
• 最大組數︰100
• 最大檔案數︰400
壓縮和寫入軟體設定
• 本CD播放機支持下列規格的MP3檔案︰傳輸比特率︰16-320 kbps,採樣頻率︰32/44.1/
48 kHz,也支持可變比特率(VBR)。
要把聲源壓縮為MP3檔案,建議把壓縮軟體的傳輸比特率設為“44.1 kHz”、“128 kbps”
和“Constant Bit Rate”。
• 要錄製到最大容量,設為“halting of writing”。
• 要一次性把空白介質錄到最大容量,設為“Disc at Once”。
將檔案保存到媒介上的注意事項
• 請勿以其他格式保存檔案或將檔案保存到有MP3檔案存在的光碟上的不需要的資料夾中。
• 當插入一張光碟時,CD播放機讀取該光碟上的所有資料夾和檔案資訊。如果該光碟上有
多個資料夾,開始播放或開始播放下一個檔案可能要花一段時間。
享用您的 ATRAC CD 隨身聽
7-CT
Page 46

ATRAC3plus/ATRAC3和 MP3 之間的差別
組和資料夾
ATRAC3plus/ATRAC3格式的結構很簡單。它由“檔案”和“組”構成。“檔案”相當於
音訊CD的“曲子”。“組”是檔案的集合,相當於“專輯”。“組”沒有目錄類型結構(新
組不能在現存組裡建立)。本CD唱機把MP3 檔案的資料夾識別為“組”。所以它可以用同
樣的操作播放按ATRAC3plus/ATRAC3 格式錄製的 CD-R/RW 和按 MP3格式錄製的 CD-R/RW 。
顯示曲名等
當在本CD播放機上播放有ATRAC3plus/ATRAC3檔案或MP3檔案的CD時,顯示曲名、藝
術家名和專輯名。本CD 播放機符合 ID3 tag 格式1.1/2.2/2.3版。
註
• 本CD播放機不能在可錄製介質,如CD-R/RW 上錄製音樂內容。
• 按 ATRAC3plus/ATRAC3 格式錄製 CD-R/RW 不能在電腦上播放。
• 播放能力可能隨光碟質量和錄製設備的狀況而變。
8-CT
Page 47

準備使用
控制器位置
詳細,請參看括弧中的頁次。
CD唱機(正面)
1 微調桿(u(播放暫停)•
./>(AMS搜索))
(第13, 14 , 20-22頁)
2 x(停止)/CHARGE(充電)按
鈕•CHARGE(充電)燈
(第14,25,26,28,29頁)
3 VOL(音量)+*/– 按鈕(第 14 頁)
4 i(頭戴耳機)插孔(第13 頁)
5 OPEN 開關(第 13 頁)
6 充電座用端子(第 28 , 34 頁)
CD唱機(裡面)
7 AVLS 開關
(第25 頁)
準備使用
* 按鈕帶有觸感圓點。
8 G-PROTECTION
開關(第23頁)
9 電池室
(第28,30頁)
(接下頁)
9-CT
Page 48

控制器位置
遙控器
qf x(停止)按鈕
(第14,26頁)
q; EXT BATT(外部電池)
DC IN 4.5 V(外部電源輸入)插孔
(第13, 29,31頁)
qa LINE OUT (OPTICAL)(線路輸出
(光頻))插孔(第 27頁)
qs +/– 按鈕
(第14,22頁)
qd HOLD 開關
(第25 頁)
qh 顯示器
(第15 , 18 , 21-25頁)
qj +/– 按鈕
(第14 , 22頁)
qg VOL(音量)+/– 控制
(第14 頁)
ql 夾子(第 11 頁)
w; HOLD(保持)開關
(第25 頁)
wa DISPLAY(顯示)按鈕
(第15,23,24頁)
註
限使用附帶的遙控器。不能用其他CD 唱機所附帶的遙控器去控制操作本CD 唱機。
qk 微調桿(u(播放暫停)•
ENT(輸入)•./>(AMS
搜索))
(第14 , 18 , 20-22頁)
ws SOUND(聲)按鈕
(第24 頁)
wd P MODE/
(播放模式反復)按鈕
(第18-22 , 26 頁)
10-CT
Page 49

要用遙控器的夾子時
請從遙控器上卸下夾子並改變夾子的方向。
要卸下時
要以相反方向裝上時
,
也可讓遙控器導線穿通夾子。
準備使用
利用攜帶軟袋
可利用附帶的攜帶軟袋攜帶您的唱機和電池盒使用。如下圖所示適當地裝插在軟袋中。
11-CT
Page 50

檢查附帶的附件
AC電源轉接器(1)
可充電電池(2)
電池攜帶盒(1)
頭戴耳機/ 耳機(1)
充電座(1)
便攜袋(1)
外部電池盒(1)
AC插頭轉接器(1)*
CD-ROM(SonicStage Simple Burner) (1)
SonicStage Simple Burner的用戶手冊(1)
*僅JEB機型附帶
遙控器(1)
12-CT
Page 51

播放音訊CD 或ATRAC3plus/ATRAC3/MP3
檔案
您也可以使用可充電電池或乾電池作為電源。
1
.連接 CD 唱機。
1 連接 AC 電源轉接器。
2 把遙控器連接在頭戴耳機耳機
上。
附帶有 AC 插頭轉接器的型號用
如果AC 電源轉接器不適合AC 電源插座,即
請利用AC 插頭轉接器。
附帶有遙控器的型號
• 把頭戴耳機耳機的插頭連接到遙控器。
• 須把頭戴耳機耳機接穩於遙控器。連接
鬆動,可能會在播放時發生噪聲。
至EXT BATT/DC IN 4.5 V
至AC電源插座
AC 電源
轉接器
播放音訊 CD 或 ATRAC3plus/ATRAC3/MP3檔案
微調桿
2
.
裝入CD光碟。
1 滑動 OPEN 以揭開 CD唱機蓋。 2裝一張CD 於托盤上,關上唱機
OPEN 開關
蓋。
貼標籤面朝上
至 i(頭戴耳機)
(接下頁)
13-CT
Page 52

3
.
播放CD。
微調桿
VOL +/–
微調桿
VOL +/–
1 按微調桿。
2 按 VOL + 或 – 以調整音量。
1 按微調桿。
2 旋轉 VOL +/– 以調整音量。
要請
播放(從您停止的點開始) 按微調桿。
即從所停止地點開始播放。
播放(從第一首曲子開始) 停止中,請按住微調桿至開始第一曲的播
放。
暫停暫停後的復位播放 按微調桿。
停止 按x(CD 唱機則按 x/CHARGE)。*
找出當前曲子的開頭 (AMS*1)向. 輕按一次微調桿。 *
找出前面曲子的開頭 (AMS) 反復地向.輕按微調桿。*2,*
找出下一首曲子的開頭 (AMS) 向> 輕按一次微調桿。*2,*
找出接下曲子的開頭 (AMS) 反復地向> 輕按微調桿。*2,*
快速倒回 向. 輕按住微調桿。*
快速前進 向> 輕按住微調桿。*
跳到後面的組*
跳到前面的組*
4
4
反復按 + 。
反復按 – 。
2
2
2
2
3
3
3
*1 自動樂曲探測
*2 在放音和暫停中都可作這些操作。
*3 在播放了最後一曲之後,可向> 輕按微調桿以回到第一曲的開頭。同樣地如果是在頭一曲上,也
可向. 輕按微調桿以找出最後一曲。
*4 僅當播放 ATRAC CD或 MP3 CD
14-CT
Page 53

卸下CD
要卸下CD 時,請按著托盤中心的樞軸同時把 CD 取下。
關於CD-R/RW
本CD唱機能播放用CD-DA 格式 *錄製的 CD-R/RW,但播放能力將視光碟的品質和錄音
設備的條件而異。
* CD-DA 是Compact Disc Digital Audio(雷射光碟數碼音訊)的簡稱。它是一種用於音訊CD 的錄音
標準。
用版權保護技術編碼的音樂光碟
本產品設計用於播放符合Compact Disc (CD)標準的光碟。近來,許多錄製公司都出
售各種用版權保護技術編碼的音樂光碟。請注意,這些光碟中可能會有不符合CD標準的光
碟,且可能無法用本產品播放。
關於遙控器顯示屏
當CD唱機播放時,下列顯示出現在顯示屏上。
也可以使用DISPLAY 檢查剩餘時間、曲號等(參見第 23 頁和第 24頁)。
當播放音訊CD 時
播放音訊 CD 或 ATRAC3plus/ATRAC3/MP3檔案
曲號 播放時間
當播放包含CD 文本資訊的音訊 CD 時
曲號
曲名 / 播放時間
當播放ATRAC3plus/ATRAC3/MP3 檔案時
註
• 本CD唱機可以顯示字符A-Z 、a-z 、0-9 和 _ 。
• 播放檔案前,CD唱機讀取CD上所有檔案和組資訊,顯示“READING”。視CD的內容,讀取要花一定時
間。
檔案名 / 播放時間檔案號
(接下頁)
15-CT
Page 54

ATRAC3plus/ATRAC3組和檔案的例子
組
ATRAC3plus/ATRAC3 檔案
1
1
2
3
2
4
5
3
6
7
8
9
4
q;
qa
qs
檔案模式(正常播放)
組模式(當使用P MODE/ 選擇“ ”時(參看第 18 頁))
注
• 最大組數:255
最大檔案數:999
• 當涉及 ATRAC CD 時,“組”相當於“專輯”,“檔案”相當於“曲子”。
從1 , 2 , 3……qa ,qs 播放所有 ATRAC3plus/ATRAC3 檔案。
在選定的組裡播放所有ATRAC3plus/ATRAC3 檔案。
16-CT
Page 55

組結構和播放順序的例子 (MP3 CD)
組和檔案的播放順序如下:
CD-R
CD-RW
1
1
2
3
4
5
6
2
檔案模式(正常播放)
從1 , 2 , 3……9 ,q; 播放所有 MP3 檔案。
組模式(當使用P MODE/ 選擇“ ”時(參看第 18 頁))
在選定的組裡播放所有MP3 檔案。(例:如果選擇組 3, CD 唱機播放檔案
4 。如果選擇組 4 ,CD 唱機播放檔案 5 和 6 。)
3
組
MP3 檔案
4
播放音訊 CD 或 ATRAC3plus/ATRAC3/MP3檔案
5
6
7
8
9
q;
注
• 不包括 MP3 檔案的組被跳過。
• 最大組數:100
最大檔案數:400
• 最多目錄層次:8
• 當涉及 MP3 CD 時,“組”相當於“專輯”,“檔案”相當於“曲子”。
17-CT
Page 56

播放模式選擇
可以利用P MODE/ (播放模式反復)按鈕和微調桿享各種各樣播放選項。
顯示
播放模式
顯示CD文本資訊、ATRAC3plus/ATRAC3/
MP3 檔案資訊、播放時間等。
*1 只適用於 ATRAC CD/MP3 CD
*2 僅當書簽已經加記到曲子檔案
上時
*3 只適用於 MP3 CD
*4 只適用按 MP3 CD 格式錄製的播放
列表 (m3u)
*5 僅當編程的曲子被播放時
微調桿
• 按。
可在曲上加記Bookmark 。也可以輸
入PGM(程式)播放用的選曲。
• 向 > 或. 輕按。
可以選擇PGM 播放模式的曲子。
P MODE/ 按鈕
在播放中您如果按了此按鈕,便能改
變播放模式。
播放中您如果按住此按鈕至出現
“ ”,便能以用P MODE/ 按鈕所選
擇的播放模式去反復播放曲子。
t 無指示
(正常播放)
r
1
“ ”*
(播放選定組中的所有檔案)
r
“1”
(播放單首曲子)
r
“SHUF”
(隨機播放曲子)
r
“ SHUF”*
(隨機播放選定組中的檔案)
“ ”*
(利用Bookmark(書籤)播放曲子)
“ ”*
(播放選定的播放列表 *4)
“PGM”*
(按照喜歡順序播放曲子)
1
r
2
r
3
r
5
18-CT
Page 57

任意順序播放曲子(隨機播放)
播放中,反復按 P MODE/ 至顯示“SHUF”。
在隨機模式,CD 唱機按任意順序播放 CD 上的所有檔案。
按任意順序播放選定組中的所有檔案(組隨機播放)(只適用於ATRAC CD/
MP3 CD)
播放中,反復按 P MODE/ 至顯示“ SHUF”。
CD唱機按任意順序播放選定組中的所有檔案。
播放模式選擇
19-CT
Page 58

給喜歡的曲子加記Bookmarks 以便選播(播放加記書簽的曲子)
當播放音訊CD 時
每張CD 最多能給 99 首曲子加記書簽(最多 10張 CD)。
當播放ATRAC CD 時
每張CD 最多能給 999 首曲子加記書簽(最多5張 CD)。
當播放MP3 CD 時
每張CD 最多能給 400 首曲子加記書簽(最多10張 CD)。
要加記書簽時
1 播放曲子時,在所要加記書簽處按住微調桿至顯示器中閃爍著“ (Bookmark)”。
當成功加記完書簽時,“ ”閃爍即變慢。
2 重複步驟 1給所要的曲子加記書簽。
要利用Bookmark聽曲子時
1 請反復按 P MODE/ 至閃爍著“ ”。
2 按微調桿。
顯示器中即點亮“ ”而開始播放帶有Bookmark(書簽)的曲子。
要去除Bookmark 時
請在播放帶有Bookmark(書簽)的曲子當中,按住微調桿至顯示器中的“ ”消失。
要檢查帶有Bookmark 的曲子時
在播放帶有Bookmark(書簽)的曲子當中,顯示器中的“ ”將閃爍得較慢。
注
• 在播放帶有 Bookmark(書簽)的曲子當中,是以曲號順序播放曲子的,而不是以您加記的順序播放
的。
• 您如果試圖給第 11張CD(當播放ATRAC CD 時為第6張CD)加記書簽,則第1張播放的CD其所加記的
書簽,即被擦去。
• 您如果斷開了所有的電源,則儲存在記憶體中的所有 Bookmark(書簽)都將被擦去。
• 如果在可充電電池沒有充電,甚至顯示“Lobatt”的情況下,繼續播放CD唱機,則儲存在記憶體中的
所有Bookmarks(書簽)都將被擦去。
20-CT
Page 59

播放您喜歡的播放列表(m3u播放列表播放)(只適用於MP3 CD)
可以播放喜歡的m3u 播放列表 * 。
*“m3u播放列表”是一個編碼MP3檔案播放順序的檔案。要使用播放列表功能,請使用支持m3u 格式的
編碼軟體把MP3 檔案錄製到CD-R/RW 上。
播放中,反復按 P MODE/ 至顯示“ ”。
1
播放列表
向 . 或> 輕按微調桿選擇所要的播放列表。
2
按微調桿。
3
注
您只能播放顯示在本CD 唱機螢幕最上部的兩個播放清單。
播放模式選擇
21-CT
Page 60

按照喜歡順序播放曲子(PGM(程式)播放)
可按照所喜歡順序給CD 唱機編程序去播放最多 64 首曲子。
停止期間,按 DISPLAY 。當指示顯示時,反復按 P MODE/ 至顯示“PGM”。
1
音訊 CD ATRAC CD/MP3 CD
向 > 或. 輕按微調桿以選擇曲子。
2
當播放 ATRAC CD/MP3 CD 時,也可使用 + 或 – 選擇一個組。
音訊 CD ATRAC CD/MP3 CD
播放順序 曲號 播放順序 檔案號
要輸入選定的曲子,按住微調杆直到播放順序加 1 。
3
音訊 CD ATRAC CD/MP3 CD
反復步驟 2 和 3 以所喜歡順序選擇曲子。
4
按微調杆開始 PGM 播放。
5
要檢查程序時
編程序中:
在步驟5 之前,反復按微調桿。
停止期間:
按DISPLAY 。當指示顯示時,反復按 P MODE/ 至閃爍著“PGM”,然後反復按微調
桿。
每次按了微調桿,都將出現曲號。
註
• 在步驟 3 當您輸入完第64曲時,顯示器即出現所選第一首曲子(音訊CD)/第一個檔案名(ATRAC CD/
MP3 CD)。
• 選擇 64 首以上曲子時,第一首選曲將被擦去。
22-CT
Page 61

B
適用功能
G-PROTECTION功能
G-PROTECTION功能已發展到能防止跑
步時發生跳音的效能。
當在CD唱機上把G-PROTECTION開關設
定於“2”時,G-PROTECTION功能將比設定
於“1”時更加強化。
步行中用CD 唱機時,如果要利用
G-PROTECTION功能欣賞高音質的 CD 音響
時,請把G-PROTECTION 開關設定於
“1”。當作較激烈的運動時,最好把它設
定於“2”。
註
下列狀況可能會發生跳音:
– 如果CD 唱機受到連續的,意外強大的衝
擊,
– 如果CD 光碟污穢或有刮痕或
– 使用品質差的CD-R/RW ,或所用記錄裝置或
應用軟體有問題時。
檢查CD的剩餘時間和剩餘曲數
(音訊CD)
每次按DISPLAY ,顯示將作如下變化:
對於包含CD文本資訊的音訊CD,括弧
內的資訊也將顯示。
t 曲號和已播放時間
(當前曲名)
r
曲號和當前曲子的剩餘時間
(當前曲名音樂家姓名)
r
CD 上的剩餘曲數 * 和剩餘時間 *
(專輯名音樂家姓名)
* 在單曲播放,隨機播放或 Bookmark(書籤)播
放當中是不顯示的。
適用功能
23-CT
Page 62

檢查ATRAC CD 、MP3 CD 上的
資訊
可以使用DISPLAY 檢查 ATRAC CD/MP3
CD的資訊。
如果檔案已儲存此類資訊,也可以檢
查ID3 tag 資訊。
每次按DISPLAY,顯示將作如下變化﹕
加強低音 (SOUND)
能加強升壓了的低音聲。
按 SOUND 以選擇“SOUND 1”或
“SOUND 2”。
無指示
(正常播放)
t 檔案號、檔案名和已播放時間
r
檔案號,音樂家姓名 /CODEC 資訊 * ,
當前檔案的剩餘時間
r
組名
* 可變位速率和採樣頻率
注
• 如果組沒有組名,顯示屏上出現“ROOT”。
• 如果檔案沒有 ID3 tag 資訊,顯示器上出現
“----”。
“SOUND 1”
“SOUND 2”
顯示所選聲模式。
“SOUND 2”增強低音效果大於
“SOUND 1”。
註
利用SOUND(聲)功能時,如果聲音失真,即請
調小音量。
24-CT
Page 63

保護聽覺 (AVLS)
AVLS(自動音量限制系統)功能限制最
大的音量以保護您的聽覺。
鎖定控制器 (HOLD)
您可以鎖定CD唱機上的控制器以防意
外按捺了按鈕發生誤操作。
把 AVLS(在主機的蓋子下面)設定於
“LIMIT”(限制)。
當調大音量而超過某電平時,即出現
此顯示。
要關掉 AVLS 功能時
請把AVLS 設定於“NORM”(正常)。
沿箭頭所指方向滑動 HOLD 。
您如果在激活(打開)著HOLD(保
留)功能時按了任何按鈕,CHARGE
(充電)燈即將起閃爍。
可從CD唱機和遙控器利用HOLD功能。
當遙控器上的HOLD 是設定於 o ff(關掉)
時,仍可用遙控器去控制操作鎖定著的CD
唱機。
要解鎖控制器時
請相反著箭頭所指方向滑動HOLD 。
註
即使HOLD(保持)功能起著作用,遙控器的顯示
器中也並不顯示“HOLD”。
適用功能
25-CT
Page 64

關掉操作嗶聲
可以關掉當操作CD唱機時在頭戴耳機
耳機上可聽到的嗶聲。
從CD唱機上卸下電源(AC電源轉接
1
器,充電式電池或乾電池)。
按著 x(CD 唱機是 x/CHARGE)同時
2
連接上電源。
關掉液晶顯示器的背照明
利用充電式電池或乾電池電源時,每
當您按了按鈕時,液晶顯示器的背照明都
將點亮大約5 秒。但可關掉此背照明以便
節省電池。
從CD唱機取出充電式電池和乾電池。
1
按著P MODE/ 同時裝入電池。
2
要打開嗶聲時
卸下電源,然後不必按x 或
x/CHARGE而再連接上電源。
要打開液晶顯示器的背照明時
請取出電池,然後不按P MODE/ 而
裝入電池。
關於液晶顯示器的背照明
當使用AC電源轉接器時,液晶顯示器
的背照明都將點亮的。
26-CT
Page 65

B
連接CD唱機
連接立體聲系統
可以通過立體聲系統聽CD放音或把CD
錄到卡帶上或MD(小型光碟)上。詳細參
看所連接裝置附帶的使用說明書。
連接裝置以前,一定請先關掉各該裝
置的電源開關。
至 LINE OUT
(OPTICAL)
連接導線
光學
數位連接
導線
左(白色)
右(紅色)
註
• 要播放CD以前,請轉小所連接裝置的音量以防
損壞連接著使用的揚聲器。
• 請用AC電源轉接器接電錄音。如果用充電式電
池或乾電池電源錄音,可能會在錄音中途耗光
電池造成不完全的錄音。
• 適當調整好所連接裝置的音量以免聲音發生失
真。
• 本CD唱機使用序列拷貝管理系統,只允許進行
第一代數碼拷貝。當使用連接的設備錄製或播
放ATRAC CD/MP3 CD時,只能使用類比連接線。
使用連接導線時
• 不能使用CD唱機或遙控器上的VOL +/–
調節從i 口輸出的音量。
• 如果聲音失真了,則請把裝置連接到i
插孔。
使用光學數位連接導線時
要把CD 錄到MD(小型光碟),DAT等
上面時,必須在錄音操作以前,先讓CD唱
機呈操作暫停狀態。
使用連接導線時的有關 G-PROTECTION 並
SOUND(聲)功能參看下表有關各類型連
接導線的有效功能
• 要錄取高音質的CD 音響時,請把
G-PROTECTION開關設定於“1”。
• SOUND(聲)功能只可在來自 i 插孔的
輸出聲上發生作用,並不能在來自
LINE OUT(OPTICAL)插孔的輸出聲上
發生作用的。
連接 CD 唱機
小型光碟
錄音機, DAT
座等
立體聲系統,磁帶
錄音機,磁帶收
錄音機等
27-CT
Page 66

B
連接電源
可利用下列各種電源:
• 充電式電池
• AC電源轉接器(參看“播放音訊 CD 或
ATRAC3plus/ATRAC3/MP3檔案”)
• LR6(AA,3號)鹼性電池(外附電池盒)
有關充電式電池的使用時間和充電時
間,請參看“規格”。
使用充電式電池
初次使用充電式電池時,必須進行充
電。本CD 唱機限使用下列充電式電池。
• NH-14WM (A)(附帶)
打開 CD 唱機裡面的電池室蓋。
1
將AC電源轉接器連接到所附帶充電座
3
的 DC IN 4.5 V 插孔和 AC電源插座。
然後將 CD唱機放在附帶充電座上面,
讓CD唱機上的V 標誌對準充電座上的
v 標誌。
如果AC 電源轉接器不適合 AC 電源插
座,便請利用AC 插頭轉接器。
CHARGE 燈
裝入 2 個充電式電池使 3 對準電池室
2
中的圖示,然後關上蓋子至卡搭定
位。
首先插入# 端(兩電
池都是)。
至 DC IN 4.5 V
AC 電源轉接器
至AC電源插座
讓 V 對準v 。
28-CT
Page 67

電池開始充電。
遙控器的顯示器中即閃爍著
“Charging”(充電)而 電池指
示燈的段節將接續點亮。CD 唱機上將
點亮CHARGE 指示燈。
當電池完成充電時,顯示器中的所有
指示都將消失,CHARGE 指示燈也將熄
滅。
不利用附帶的充電座而要給充電式電池充
電時
請把AC電源轉接器連接到您的CD唱機
上的EXT BATT/DC IN 4.5 V插孔和AC電源
插座,然後按x/CHARGE 以開始充電。
x/CHARGE按鈕•
CHARGE 指示燈
至EXT BATT/
DC IN 4.5 V
AC 電源轉接器
至AC電源插座
註
• 當使用充電座給充電式電池充電時,一定請卸
下外附電池盒。
• 充電當中, CD 唱機和充電式電池都會變熱。
但這並不會造成危險。
• 在充電當中您如果按了微調桿,即停止充電而
開始播放CD 。
• 如果把正在播放的CD唱機放在充電座上,即停
止播放而開始進行充電。
• 必須把CD唱機適當地放好在充電座上,讓CD唱
機上的V 標誌對準充電座上的v標誌。一定請
確認CD唱機上的CHARGE燈點亮著。放置錯誤,
將妨礙充電或播放。
連接電源
(接下頁)
29-CT
Page 68

要取出充電式電池時
推#(負極端)以卸下電池。
何時須給充電式電池充電
可在顯示器中檢視電池的剩餘電力。
當“ ”閃爍時請更換電池。
t t t t t
Lobatt*
* 嗶聲。
為保持充電式電池原有容量維持長時
間的電池使用時間,請在完全耗盡電力時
才給電池充電。
註
• 的指示段節粗示剩餘電池電力。其一個
段節不一定正確代表電池電力的四分之一。
• 根據操作條件,
可能增加或減少。
的指示段節的使用時間
何時更換電池
當電池使用時間縮短到大約一半時,
即請更換新的充電式電池。
充電式電池須知
如果電池是新的或已長時間不用,它
們可能不能充滿電。此時,請給它們充電
直到CHARGE燈熄滅,然後使用CD唱機直到
電池完全放電(顯示屏上出現“Lobatt”)。
重複此過程數次。
攜帶充電式電池須知
請利用附帶的攜帶盒以防意外生熱。
讓充電式電池和金屬小件物品混合放置,
可能因發生短路而生熱,甚至有起火危
險。
所附帶充電座須知
• 附帶的充電座只能用於此CD唱機。其他
任何型號的唱機都不能用此充電座充電
的。
• 利用附帶的充電座時,只能給NH-14WM
(A)充電式電池進行充電。任何別的充電
式電池都不能給充電的。
• 充電當中,CD唱機和充電式電池都會變
熱。但這並不會造成危險。
• 別把硬幣或其他金屬件放在充電座上。
如果這些金屬件意外地接觸到充電座的
端子即將造成短路而生熱。
30-CT
Page 69

使用乾電池
一定請使用附帶的外附電池盒。
本CD唱機,限使用下列型式的乾電池:
• LR6(AA, 3 號)鹼性電池
如圖所示對準PUSH 下面的直線,然後
1
按著PUSH 同時拉出電池盒。
對準
把外附電池盒連接到CD 唱機。
3
至 EXT BATT/
DC IN 4.5 V
何時更換電池
可在顯示器中檢視電池的剩餘電力。
當“ ”閃爍時請更換電池。
v 標誌面朝下
讓 3 對準電池盒裡的圖示,將 LR6
2
(AA, 3號)鹼性電池裝入電池盒裡。
插回電池盒並沿箭頭所示方向旋轉
LOCK以鎖住電池盒。
t t t t t
Lobatt*
* 嗶聲。
電池耗光時,請換新兩個電池。
CD唱機和外部電池盒裡的電池同時放
電。
註
• 裝外附電池盒時,一定請卸下AC電源轉接器。
• 併用充電式電池和乾電池以延長供電時間時,
請使用完全充滿電的充電式電池和全新乾電
池。
31-CT
連接電源
Page 70

電源須知
當長期不使用CD唱機時,請卸下所有
的電源。
AC電源轉接器須知
• 限使用附帶的AC 電源轉接器。如果 CD
唱機沒有附帶AC 電源轉接器,使用 ACE45HG AC電源轉接器。請別使用任何其
他的AC 電源轉接器。因為可能造成故
障。
插頭極性
• 潮濕著手不要去碰AC 電源轉接器。
• 將AC電源轉接器接插到方便的AC電源插
座。萬一發現AC 電源轉接器有異常時,
請立即從AC電源插座上拔下AC電源轉接
器。
充電式電池和乾電池須知
• 別試圖給乾電池充電。
• 別把電池投入火中。
• 電池不要和硬幣等別的金屬小件混在一
起攜帶。因為電池的+、-極若與金屬
件接觸,將會生熱造成危險。
• 別混用充電式電池和乾電池。
• 別混用新、舊電池。
• 別混用不同類型的電池。
• 長時間不用電池時,請把它卸下保存。
• 電池發生漏液時,須即擦拭乾淨電池室
用沾染的電解液,然後裝用新電池。萬
一皮膚上沾染了漏液時,必須趕快洗
淨。
32-CT
Page 71

B
附加資訊
使用前須注意
安全須知
• 萬一有任何異物或液體掉進CD 唱機內
時,即請立刻卸下電源並找持有資格的
人檢查過以後才可再操作使用。
• 別試圖用任何物體塞入DC IN 4.5 V
(外部電源輸入)插孔。
CD唱機須知
• 須保持CD 唱機上的透鏡乾淨清潔,不要
用手觸摸。否則,透鏡可能受損而CD 唱
機將不能操作正常。
• 別在CD唱機上堆置重物以免壓壞CD唱機
或CD光碟。
• 別把CD 唱機放置靠近熱源或可直接照射
到陽光,或多沙塵、潮濕、淋到雨、有
機械衝擊、不平坦的地方,或緊閉著窗
門的汽車裡面。
• 如果CD 唱機給附近的收音機或電視接收
造成干擾,即請關掉CD 唱機或把它移離
開收音機或電視機遠些使用。
• 本CD唱機不能用於播放不規則形(例如
心形,方形,星形)的光碟。若試圖那
樣做,將可能損壞您的CD 唱機。切勿使
用該類光碟。
CD的管理上須知
• 為維持CD清潔,必須拿CD的邊緣。手不
要接觸到CD 表面。
• 別在CD 光碟上貼紙條或黏膠帶。
頭戴耳機耳機須知
路上安全
開車、騎車、或在操作任何機動車輛
時,請勿使頭戴耳機耳機。因為可能有
造成交通事故的危險。有些地區是禁止使
用的。步行中如果用太大聲聽耳機也會有
潛在危險的,尤其是在橫越馬路時。在有
潛在危險的地方,必須特別注意或暫停使
用。
防止損傷聽覺
避免用大音量聽頭戴耳機耳機。最
好也不要長時間連續使用。如有耳鳴經
驗,更應轉小音量和避免連續用耳機聽。
顧慮他人
請用適當的音量聽。如此則仍可聽到
周圍的聲音並且不至於騷擾到旁邊的人。
不可
• 別讓CD 直接照射到陽光或暴露於熱風管
等熱源,也不要把CD 擺在停放在炎陽下
的汽車中。
附加資訊
33-CT
Page 72

保養
清潔機殼
用軟布蘸濕清水或溫和的洗滌劑溶液
擦拭清潔,不可使用酒精,汽油或稀疏
劑。
要清潔端子時
充電架或C D 唱機上的端子如果變髒
了,便可能不能適當地進行充電。如下圖
所示,請定期地用棉棒或乾布片擦拭清潔
端子。
端子端子
34-CT
Page 73

故障檢修
雖經檢查過這些徵候而問題仍未獲解決時,即請洽詢附近的Sony售店。
徵候
即使反復地往 + 的方向旋轉
VOL+/–(或即使在CD 唱機
上反復地按 VOL+)都不能
增大音量。
不能調整音量。
沒聲,或只聽到噪聲。
某些檔案無法播放。
用乾電池電源時,播放時間
太短。
用充電式電池電源時,播放
時間太短。
顯示器出現“Lobatt”而
CD 不播放。
顯示器顯示“HI dc In”。
原因和或校正方法
c AVLS 開關設定於“NORM”。(第 25頁)
c 頭戴耳機耳機連接在 LINE OUT(OPTICAL)插孔。把它們連
接到i(頭戴耳機)插孔。(第 13 頁)
c 頭戴耳機耳機連接在 LINE OUT(OPTICAL)插孔。把它們連
接到i(頭戴耳機)插孔。(第 13 頁)
c 接穩頭戴耳機耳機插頭。(第 13 頁)
c 插頭髒了。定期用乾軟布擦拭頭戴耳機耳機插頭。
c 您試圖播放以與本CD唱機不相容的格式保存的檔案。(第6頁)
c 檢查一下確實用了鹼性電池而不是錳電池。(第 31 頁)
c 請用新 LR6(AA ,3 號)鹼性電池更換。(第 31 頁)
c 充電、放電使用數次充電式電池。(第 28 ∼30 頁)
c 充電式電池完全耗光了。請加以充電。(第 28 頁)
c 更換新 LR6(AA ,3 號)鹼性電池。(第 31 頁)
c 使用了一個比附帶或推薦的 AC 交流電轉換器額定值高的AC 交
流電轉換器。只能使用附帶的AC 交流電轉換器或“選購附件”
中推薦的汽車蓄電池電線。(第38 、 39頁)
(接下頁)
35-CT
附加資訊
Page 74

故障檢修
徵候
CD 裝入 CD 唱機時,並不播
放CD而在顯示器中出現
“No disc”(無光碟)。
當您按了按鈕時, CD 唱機
上閃爍著 CHARGE(充電)
燈,而並不播放 CD 。
不能用 CD 唱機上的 VOL +/
–調整音量。
用光學數位連接錄音中,不
能錄正確曲號。
充電式電池不能充電。
播放從您的停止點開始。
(復位功能)
可聽到 CD 的沙沙噪聲。
當和連接著的立體聲系統一
起使用時,發生聲音失真或
噪音。
原因和或校正方法
c 按鈕被鎖定。請推回 HOLD 。(第25 頁)
c CD 太髒或損壞。(第 33頁)
c CD 是否讓貼標籤面朝上地裝放。(第 13頁)
c 發生濕氣冷凝。
放置CD 唱機數小時,等水分蒸發乾。
c 關緊電池室蓋。(第 28 頁)
c 確認電池是否安裝正確。(第 28 ,31 頁)
c 把AC電源轉接器接到 AC 電源插孔。(第13 頁)
c 從連接了AC電源轉接器之後,經過一秒或一秒以上之後按微調
桿。
c CD-R/RW 是空白的。
c CD-R/RW ,記錄裝置,或所應用的軟體的品質有問題。
c 兩種或更多格式的檔案已錄製在同一張CD-R/RW上。(第 7 頁)
c 按鈕被鎖定。請推回 HOLD 。(第25 頁)
c CD唱機連接到一聲頻裝置。用所連接裝置上的音量控制器去調
整音量。(第27 頁)
c 用小型光碟, DAT 錄音機等再錄曲號。(第27 頁)
c 參看錄音裝置附帶的使用說明書。(第 27 頁)
c CD 唱機或充電座的端子髒了。請用乾軟布擦拭乾淨。
c 正在播放 CD 。請停止播放。
c 外部電池盒連接在 CD 唱機上。請把它卸下再開始進行充電。
c CD唱機沒有裝放穩定於充電座上。請對準唱機上的V標誌和充
電座上的v 標誌,把唱機裝放穩於充電座。請確認點亮著
CHARGE燈。(第 28 頁)
c 復位功能起作用。如果是要從第一首曲子開始播放,請在停止
中按住微調桿至開始播放第一首曲子,或打開一下CD唱機的機
蓋。或,卸下所有的電源,然後再裝入電池或再接上AC電源轉
接器。(第13 , 28, 31 頁)
c 關緊電池室蓋子。(第 28 頁)
c 請調整一下連接裝置的音量。(第 27 頁)
36-CT
Page 75

徵候
播放 ATRAC CD 或 MP3 CD
時, CD 並不旋轉,但可聽
到正常的聲音。
當按了微調桿或關上了 CD
唱機的蓋子時,顯示器中將
顯示“NO FILE”。
當關上了 CD 唱機的蓋子
時, CD 即開始旋轉。
不能用遙控器順利地操作
CD 唱機。
液晶顯示器變得看不清楚或
減慢。
顯示器中快速地閃爍著
“ ”,而不能找出曲子的
開頭或曲子中的某指定點。
原因和或校正方法
c CD 唱機是設計成播放中,停止著ATRAC CD或 MP3 CD的旋轉以
節省電力。因此,這是正常的現象,唱機並沒有故障。
c CD 中沒有 ATRAC3plus/ATRAC3/MP3檔案。
c 使用了數據已被清除了的 CD-RW 。
c CD 光碟髒了。
c CD 唱機正在讀取 CD上的資訊。不是故障。
c 誤按住著 CD 唱機上的按鈕。
c 在高(超過40℃)或低(0℃以下)氣溫中使用CD 唱機。如果
在正常室溫條件下使用,顯示器即可恢復正常的操作。
c CD 唱機已進入 Bookmark(書簽)曲子播放模式。反復按
P MODE/ 至顯示器中的“ ”消失了顯示。
37-CT
附加資訊
Page 76

規格
系統
CD數位聲頻系統
雷射二極管性質
材料:GaAlAs
波長:λ=780 nm
發射持久性:連續
雷射輸出:小於44.6 μ W
(本輸出值是在距離7 mm光圈的光學拾音元件
的物鏡鏡面200 mm處測得。)
D-A(數 - 模)轉換
1 比特石英時軸控制
頻率響應
20∼20 000 Hz
輸出(4.5 V輸入電平時)
線路輸出(立體聲迷你插孔)
輸出電平0.7 V rms, 47 kΩ時
推獎負載阻抗超過10 kΩ
頭戴耳機(立體聲迷你插孔)
大約5 mW+大約 5 mW, 16Ω
光頻數字輸出(光頻輸出連接器)
輸出電平:–21∼ –15 dBm
波長:630∼ 690 nm,峰值電平
電源
您購入型號的區域碼,請查看包裝上
的條型碼的左上角。
• 用兩 Sony NH-14WM(A)充電式電池:
1.2 V DC× 2
• 兩 LR6(AA, 3 號)電池:1.5 V DC× 2
• AC 電源轉接器(DC IN 4.5 V插孔):
U,U2,CA,CA2,E92 , MX2 ,TW2 和
CA2/C型號:120 V,60 Hz
CED, CED/4, CE7, CE7/C, EE, EE1,
E,E13和 E13/2 型號:220 ∼ 230 V,50/
60 Hz
CEK型號:230 V,50 Hz
AU2型號:240 V,50 Hz
EU8, EU8/C ,JE.W , E18, KR4 和EE8
型號:100∼ 240 V,50/60 Hz
HK4型號:230 V,50 Hz
CNA型號:220 V,50 Hz
+1
dB(由JEITA CP-307 測得)
–2
電池使用時間*1(大約時數)
(在平穩表面使用CD 唱機時)
播放時間因CD 唱機的使用狀況而異。
使用兩 NH-14WM (A)時
(充電大約 5 小時 *2)
G-PROTECTION設定
“1” “2”
音訊CD 35 32
ATRAC3plus檔案 *
MP3檔案 *
3
4
55 55
50 50
使用外附電池盒時(兩個鹼性電池 *5)
G-PROTECTION設定
“1” “2”
音訊CD 55 50
ATRAC3plus檔案 *
MP3檔案 *
3
4
95 95
85 85
使用兩 NH-14WM (A)和外附電池盒時(兩個
鹼性電池 *5)
G-PROTECTION設定
“1” “2”
音訊CD 90 82
ATRAC3plus檔案 *
MP3檔案 *
*1 JEITA (Japan Electronics and Information
Technology Industries Association)(日本
電子和資訊技術產業協會)標準的測量值
*2 充電時間,隨充電式電池的使用狀況而異。
*3當按48 kbps或 64 kbps 錄音時
*4當按128 kbps錄音時
*5 當使用 Sony 鹼性電池 LR6 (SG)(日本製)時
3
4
150 150
135 135
38-CT
Page 77

操作溫度
5℃∼35℃
尺寸(寬高縱深)(不含突起部分和控
制器)
大約135.4 × 135.4× 15.8 mm
質量(不含附件)
大約179 g
由Dolby Laboratories 取得美國與其他國家
之專利授權。
設計和規格有所變更時,恕不另行奉告。
選購的附件
AC電源轉接器 AC-E45HG
有源揚聲器系統 SRS-Z1
汽車電池導線 DCC-E345
帶汽車接線包的汽車電池導線
DCC-E34CP
汽車接線包 CPA-9C
耳機 MDR-E848SP
MDR-EX71SL
MDR-Q55SL
您購買產品的銷售店,可能沒賣部分
上列附件。有關貴國內的以上附件的詳細
銷售資訊,請詢問銷售店。
39-CT
附加資訊
Page 78

警告
为防火灾或触电危险,切勿让机器暴露
于雨中或潮湿处。
别把机器安装在诸如书橱或壁橱等密闭
处。
为防火灾,请勿让装置的通风孔盖住报
纸,桌布,窗帘等。也不可在装置上点放
蜡烛。
为防火灾或触电危险,不可在装置上摆饰
花瓶等装满液体的物体。
一部分国家对于本产品的电源用电池可能
规定有处置的标准。请洽询当地有关当
局。
注意
• 开着时,将有看不见的激光辐射
• 别凝视激光束或直接用光学仪器观看
CE 标志的有效性,仅限于那些有法律限制
的国家,主要在 EEA (欧洲经济区)国
家。
ATRAC3plus 和 ATRAC3 是 Sony 公司
的商标。
2-CS
Page 79

目录
享用您的 ATRAC CD 随身听
制作原创 ATRAC CD! ....................... 4
可在本 CD 播放机上播放的音乐源........ 6
ATRAC3plus 和 ATRAC3 .................. 6
MP3 文件 ............................................... 6
ATRAC3plus/ATRAC3 和
MP3 之间的差别 ................................ 8
准备使用
控制器位置 ............................................. 9
检查随机附件 ....................................... 12
播放声频 CD 或 ATRAC3plus/
ATRAC3/ MP3 文件
1.连接 CD 播放机。 ............................ 13
2. 装入 CD 光盘。 ............................... 13
3.播放 CD。 ........................................ 14
播放模式选择
任意顺序播放曲子(随机播放) ......... 19
按任意顺序播放选定组中的所有文件
(组随机播放)
(只适用于 ATRAC CD/MP3 CD)19
给喜欢的曲子加记 Bookmarks
以便选播(播放加记书签的曲子).. 20
播放您喜欢的播放列表
(m3u 播放列表播放)
(只适用于 MP3 CD).................... 21
按照喜欢顺序播放曲子
(PGM(程式)播放)................... 22
适用功能
G-PROTECTION 功能 ......................23
检查 CD 的剩余时间和剩余曲数
(声频 CD)..................................... 23
检查 ATRAC CD、MP3 CD 上的
信息 .................................................. 24
加强低音(SOUND 功能) ................. 24
保护听觉 (AVLS)................................ 25
锁定控制器 (HOLD) ............................ 25
关掉操作哔声 ....................................... 26
关掉液晶显示器的背照明..................... 26
连接 CD 播放机
连接立体声系统.................................... 27
连接电源
使用充电式电池.................................... 28
使用干电池 ........................................... 31
电源须知 ............................................... 32
附加信息
使用前须注意 ....................................... 33
保养 ...................................................... 34
故障检修 ............................................... 35
规格 ...................................................... 38
选购的附件 ...........................................39
CS
3-CS
Page 80

享用您的 ATRAC CD 随身听
感谢您购买 D-NE1。此 CD 随身听名为“ATRAC CD 随身听”。因为您可以在上面
欣赏“ATRAC CD”。
制作原创 ATRAC CD!
可以制作自己的 ATRAC CD。
过程非常简单。只要执行步骤 1、2 和 3。
步骤 1
安装
安装附带的“SonicStage
Simple Burner”软件。
怎样使用 SonicStage Simple Burner
请参看附带的“SonicStage Simple Burner”手册。
步骤 2
刻录
制作光盘映像并使用 PC 将其刻录到
CD-R/RW 上。
声频 CD MP3 文件
或
,
用 SonicStage Simple Burner 把音讯数据
转换成 ATRAC3plus/ATRAC3 格式。
4-CS
Page 81

什么是 ATRAC CD?
ATRAC CD 是一张 CD-R/RW,上面录有按 ATRAC3plus/ATRAC3 格式压缩的
音讯数据。约 30 张声频 CD 可录制在一张 CD-R/RW 上。* 也可以通过把文件转换成
ATRAC3plus/ATRAC3 格式来录制 MP3 文件。
* 当一张 CD(专辑)总的播放时间估计为 60 分钟,并且按 48 kbps 以 ATRAC3plus 格式录制在 700
MB 大小的 CD-R/RW 上时。
步骤 3
收听
可以在您的 ATRAC CD 随身听上欣
赏自己的 ATRAC CD。
ATRAC CD
享用您的 ATRAC CD 随身听
什么是 ATRAC3plus/ATRAC3 格式?
参考本手册的第 6-8 页。
也可以在您的 CD 随身听上欣赏声频
CD。
5-CS
Page 82

可在本 CD 播放机上播放的音乐源
可以在本 CD 播放机上播放下列 3 种音乐源:
• 声频 CD
• ATRAC3plus/ATRAC3 格式文件
• MP3 文件
可用的光盘格式
只能使用 ISO 9660 Level 1/2 和 Joliet extension 格式光盘。
ATRAC3plus 和 ATRAC3
“ATRAC3plus”表示“自适应转换声音编码 3+”,是一种音讯压缩技术,从
ATRAC3 格式发展而来。虽然 ATRAC3plus 格式可以把音乐内容压缩到原来大小的
1/20,但您仍可欣赏到高质量的声音。可用的传输比特率为 64 kbps 和 48 kbps。
“ATRAC3”表示“自适应转换声音编码 3”,是一种音讯压缩技术,它可满足对
高质量声音和高压缩率的要求。ATRAC3 格式可以把音乐内容压缩到原来大小的 1/10,
有助于减小介质体积。可用的传输比特率为 132 kbps、105 kbps 和 66 kbps。
可用的组和文件数
• 最大组数:255
• 最大文件数:999
详细,请参看附带的“SonicStage Simple Burner”手册。
将文件保存到媒体上的注意事项
请勿以其他格式保存文件或将文件保存到有 ATRAC3plus/ATRAC3 文件存在的光
盘上的不需要的组中。
MP3 文件
MP3 表示 MPEG-1 Audio Layer3,由活动图像专家组(一个 ISO(国际标准化组
6-CS
Page 83

织)工作组)支持的音讯文件压缩标准,可使音讯文件压缩到标准小型光盘数据大小的
约 1/10。由于 MP3 编码算法是公开的,有各种符合此标准的编码器/解码器,包括共享无
需付费的。所以,MP3 标准在计算机领域使用广泛。
可接受的光盘格式的主要规格是:
• 最多目录层次:8
• 文件/文件夹名可接受的字符:A-Z、a-z、0-9、_(下划线)
注
• 当命名文件时,务必在文件名后加上文件扩展名“mp3”。
• 如果在非 MP3 文件名上加上扩展名“mp3”,播放机将不能正确识别此文件。
• 文件名和 ID3 tag* 不对应。
* ID3 tag 是用于给 MP3 文件添加某些信息(曲名、专辑名、艺术家名等)的格式。
可用的组数和文件数
• 最大组数:100
• 最大文件数:400
压缩和写入软件设置
• 本 CD 播放机支持下列规格的 MP3 文件:传输比特率:16-320 kbps,采样频率:32/
44.1/48 kHz,也支持可变比特率 (VBR)。
要把声源压缩为 MP3 文件,建议把压缩软件的传输比特率设为“44.1 kHz”、“128
kbps”和“Constant Bit Rate”。
• 要录制到最大容量,设为“halting of writing”。
• 要一次性把空白介质录到最大容量,设为“Disc at Once”。
将文件保存到媒体上的注意事项
• 请勿以其他格式保存文件或将文件保存到有 MP3 文件存在的光盘上的不需要的文件夹
中。
• 当插入一张光盘时,CD 播放机读取该光盘上的所有文件夹和文件信息。如果该光盘上
有多个文件夹,开始播放或开始播放下一个文件可能要花一段时间。
享用您的 ATRAC CD 随身听
7-CS
Page 84

ATRAC3plus/ATRAC3 和 MP3 之间的差别
组和文件夹
ATRAC3plus/ATRAC3 格式的结构很简单。它由“文件”和“组”构成。“文件”
相当于声频 CD 的“曲子”,“组”是文件的集合,相当于“专辑”。“组”没有目录类
型结构(新组不能在现存组里建立)。本 C D 播放机把 MP3 文件的文件夹识别为
“组”,所以它可以用同样的操作播放按 ATRAC3plus/ATRAC3 格式录制的 CD-R/RW
和按 MP3 格式录制的 CD-R/RW。
显示曲名等
当在本 CD 播放机上播放有 ATRAC3plus/ATRAC3 文件或 MP3 文件的 CD 时,显
示曲名、艺术家名和专辑名。本 CD 播放机符合 ID3 tag 格式 1.1/2.2/2.3 版。
注
• 本 CD 播放机不能在可录制介质,如 CD-R/RW 上录制音乐内容。
• 按 ATRAC3plus/ATRAC3 格式录制的 CD-R/RW 不能在计算机上播放。
• 播放能力可能随光盘质量和录制设备的状况而变。
8-CS
Page 85

准备使用
控制器位置
详细,请参看括弧中的页次。
CD播放机(正面)
1 微调杆(u(播放/暂停)•
./>(AMS/搜索))
(第 13,14,20-22 页)
2 x(停止)/CHARGE(充电)
按钮• CHARGE(充电)灯
(第 14,25,26,28,29 页)
3 VOL(音量)+*/– 按钮(第 14 页)
4 i(头戴耳机)插孔(第 13 页)
5 OPEN 开关(第 13 页)
6 充电座用端子(第 28,34 页)
CD 播放机(里面)
7 AVLS 开关
(第 25 页)
8 G-PROTECTION 开关
(第 23 页)
准备使用
* 按键带触感圆点。
9 电池室
(第 28,30 页)
(接下页)
9-CS
Page 86

控制器位置
CD 播放机(背面)
遥控器
qf x(停止)按钮
(第 14,26 页)
0 EXT BATT(外部电池)/
DC IN 4.5 V(外部电源输入)插孔
(第 13,29,31 页)
qa LINE OUT (OPTICAL)
(线路输出(光频))插孔(第 27 页)
qs +/– 按钮
(第 14,22 页)
qd HOLD 开关
(第 25 页)
qh 显示器
(第 15,18,21-25 页)
qj +/– 按钮
(第 14,22 页)
qg VOL(音量)+/– 控制
(第 14 页)
ql 夹子(第 11 页)
w; HOLD(保持)开关
(第 25 页)
wa DISPLAY(显示)按钮
(第 15,23,24 页)
注
限使用附带的遥控器。不能用其他 CD 播放机所附带的遥控器去控制操作本 CD 播放机。
qk 微调杆(u(播放/暂停)•
ENT(输入)•./>
(AMS/搜索))
(第 14,18,20-22 页)
ws SOUND(声)按钮
(第 24 页)
wd P MODE/
(播放模式/反复)按钮
(第 18-22,26 页)
10-CS
Page 87

要用遥控器的夹子时
请从遥控器上卸下夹子并改变夹子的方向。
要卸下时
要以相反方向装上时
,
也可让遥控器导线穿通夹子。
准备使用
利用携带软袋
可利用附带的携带软袋携带您的播放机和电池盒使用。如下图所示适当地装插在软袋
中。
11-CS
Page 88

检查随机附件
AC 电源转接器
AC-ES455K (1)
可充电电池 (2)
电池携带盒 (1)
头戴耳机/耳机 (1)
充电座 (1)
便携包 (1)
外部电池盒 (1)
AC 插头转接器 (1)*
CD-ROM(SonicStage Simple Burner)
(1)
SonicStage Simple Burner 用户指南 (1)
*仅 JEB 机型附带
遥控器 (1)
12-CS
Page 89

播放声频 CD 或 ATRAC3plus/ATRAC3/
MP3 文件
您也可以使用可充电电池或干电池作为电源。
1
.
连接 CD 播放机。
1 连接 AC 电源转接器。
2 把遥控器连接在头戴耳机/耳机
上。
附带有 AC 插头转接器的型号用
如果 AC 电源转接器不适合 AC 电源插座,
即请利用 AC 插头转接器。
附带有遥控器的型号
• 把头戴耳机/耳机的插头连接到遥控器。
• 须把头戴耳机/耳机接稳于遥控器。连接
松动,可能会在播放时发生噪声。
至 EXT BATT/DC IN 4.5 V
至 AC 电源插座
AC 电源
转接器
播放声频 CD 或 ATRAC3plus/ATRAC3/MP3 文件
2
.
装入 CD 光盘。
1 滑动 OPEN 以揭开 CD 播放机
盖。
OPEN 开关
微调杆
2 装一张 CD 于托盘上,关上播放
机盖。
贴标签面朝上
至i(头戴耳机)
(接下页)
13-CS
Page 90

3
.
播放 CD。
微调杆
VOL +/–
微调杆
VOL +/–
1 按微调杆。
2 按 VOL + 或 – 以调整音量。
1 按微调杆。
2 旋转 VOL +/– 以调整音量。
要请
播放(从您停止的点开始) 按微调杆。
即从所停止地点开始播放。
播放(从第一首曲子开始) 停止中,请按住微调杆至开始第一曲的播
放。
暂停/暂停后的复位播放 按微调杆。
停止 按 x(CD 播放机则按 x/CHARGE)。*
找出当前曲子的开头 (AMS*1)向 . 轻按一次微调杆。*
2
找出前面曲子的开头 (AMS) 反复地向 . 轻按微调杆。*2,*
找出下一首曲子的开头 (AMS) 向 > 轻按一次微调杆。*2,*
3
找出接下曲子的开头 (AMS) 反复地向 > 轻按微调杆。*2,*
快速倒回 向 . 轻按住微调杆。*
快速前进 向 > 轻按住微调杆。*
跳到后面的组*
跳到前面的组*
4
4
反复按 +。
反复按 –。
2
2
2
3
3
*1 自动乐曲探测
*2 在放音和暂停中都可作这些操作。
*3 在播放了最后一曲之后,可向 > 轻按微调杆以回到第一曲的开头。同样地如果是在头一曲上,
也可向 . 轻按微调杆以找出最后一曲。
*4 只有当播放 ATRAC CD 或 MP3 CD 时
14-CS
Page 91

卸下 CD
按住托盘中心的枢轴同时取下 CD。
关于 CD-R/RW
本 CD 播放机能播放用 CD-DA 格式*录的 CD-R/RW。但,播放能力将视光盘的品质
和记录装置的条件而异。
* CD-DA 是 Compact Disc Digital Audio(激光盘数码声频)的简称。是用于声频 CD 的录音标准。
用版权保护技术编码的音乐光盘
本产品设计用于播放符合 Compact Disc (CD) 标准的光盘。近来,许多录制公司都出
售各种用版权保护技术编码的音乐光盘。请注意,这些光盘中可能会有不符和 CD 标准的
光盘,且可能无法用本产品播放。
关于显示
当 CD 播放机播放时,下列指示出现在显示器上。
也可以使用 DISPLAY(参看第 23,24 页)检查剩余时间、曲名等。
当播放声频 CD 时
播放声频 CD 或 ATRAC3plus/ATRAC3/MP3 文件
曲号 播放时间
当播放包含 CD 文本信息的声频 CD 时
曲号
曲名/播放时间
当播放 ATRAC3plus/ATRAC3/MP3 文
件时
文件号
注
• 本 CD 播放机可以显示字符 A-Z、a-z、0-9 和 _。
• 在播放文件之前,CD 播放机读取 CD 上的所有文件和组信息,显示“READING”。
取决于 CD 的内容,读取的时间可能要长一些。
文件名/播放时间
(接下页)
15-CS
Page 92

ATRAC3plus/ATRAC3 组和文件的例子
组
ATRAC3plus/
ATRAC3 文件
1
1
2
3
2
4
5
3
6
7
8
9
4
q;
qa
qs
文件模式(正常播放)
组模式(当使用 P MODE/ 选择“ ”时(参看第 18 页))
注
• 最大组数:255
最大文件数:999
• 当涉及 ATRAC CD 时,“组”相当于“专辑”,“文件”相当于“曲子”。
从 1,2,3……qa,qs 播放所有 ATRAC3plus/ATRAC3 文件。
在选定的组里播放所有 ATRAC3plus/ATRAC3 文件。
16-CS
Page 93

组结构和播放顺序的例子 (MP3 CD)
组和文件的播放顺序如下:
CD-R
CD-RW
1
1
组
MP3 文件
2
3
2
文件模式(正常播放)
从 1,2,3……9,q; 播放所有 MP3 文件。
组模式(当使用 P MODE/ 选择“ ”时(参看第 18 页))
在选定的组里播放所有 MP3 文件。(例:如果选择组 3,CD 播放机播放文
件 4。如果选择组 4,CD播放机播放文件 5 和 6。)
3
4
4
5
6
播放声频 CD 或 ATRAC3plus/ATRAC3/MP3 文件
5
6
7
8
9
q;
注
• 不包括 MP3 文件的组被跳过。
• 最大组数:100
最大文件数:400
• 最多目录层次:8
• 当涉及 MP3 CD 时,“组”相当于“专辑”,“文件”相当于“曲子”。
17-CS
Page 94

播放模式选择
使用 P MODE/ (播放模式/反复)按钮和微调杆可以享用各种播放选项。
显示
播放模式
显示 CD 文本信息、ATRAC3plus/
ATRAC3/MP3 文件信息、播放时间
等。
*1 只适用于 ATRAC CD/MP3 CD
*2 只适用于当书签已添加到曲子/
文件上时
*3 只适用于 MP3 CD
*4 只适用按 MP3 CD 格式录制的
播放列表 (m3u)
*5 仅当编程的曲子被播放时
微调杆
• 按。
可在曲上加记 Bookmark。也可以输
入 PGM(程式)播放用的选曲。
• 向 > 或 . 轻按。
可以选择 PGM 播放模式的曲子。
P MODE/ 按钮
如果按了此按钮,便能在播放期间改
变播放模式。
播放中如果按住此按钮至出现
“ ”,便能以用 P MODE/ 所选
择的播放模式去反复播放曲子。
t 无指示
(正常播放)
r
1
“ ”*
(播放选定组中的所有文件)
r
“1”
(播放单首曲子)
r
“SHUF”
(随机播放曲子)
r
“ SHUF”*
(随机播放选定组中的文件)
r
“ ”*
(播放带 Bookmark(书签)的
曲子)
r
“ ”*
(播放选定的播放列表*4)
r
“PGM”*
(按照喜欢顺序播放曲子)
1
2
3
5
18-CS
Page 95

任意顺序播放曲子(随机播放)
播放中,反复按 P MODE/ 至显示“SHUF”。
在随机模式,CD 播放机按任意顺序播放 CD 上的所有文件。
按任意顺序播放选定组中的所有文件(组随机播放)(只适用于
ATRAC CD/MP3 CD)
播放中,反复按 P MODE/ 至显示“ SHUF”。
CD 播放机按任意顺序播放选定组中的所有文件。
播放模式选择
19-CS
Page 96

给喜欢的曲子加记 Bookmarks 以便选播(播放加记书签的曲子)
当播放声频 CD 时
每张 CD 最多能给 99 首曲子加记书签(最多 10 张 CD)。
当播放 ATRAC CD 时
每张 CD 最多能给 999 首曲子加记书签(最多 5 张 CD)。
当播放 MP3 CD 时
每张 CD 最多能给 400 首曲子加记书签(最多 10 张 CD)。
要加记书签时
1 播放曲子当中,在所要加记书签处按住微调杆至显示器中闪烁着“
(Bookmark)”。
当成功加记完书签时,“ ”闪烁即变慢。
2 反复步骤 1 给所要的曲子加记书签。
要利用 Bookmark 听曲子时
1 请反复按 P MODE/ 至闪烁着“ ”。
2 按微调杆。
显示器中即点亮“ ”而开始播放带有 Bookmark(书签)的曲子。
要去除 Bookmark 时
请在播放带有 Bookmark(书签)的曲子当中,按住微调杆至显示器中的“ ”消失
了显示。
要检查带有 Bookmark 的曲子时
在播放带有 Bookmark(书签)的曲子当中,显示器中的“ ”将闪烁得较慢。
注
• 在播放带有 Bookmark(书签)的曲子当中,是以曲号顺序播放曲子的,而不是以您加记的顺序播
放的。
• 您如果试图给第 11 张 CD(播放 ATRAC CD 时为第 6 张) 加记书签,则第 1 张播放的 CD 其所加
记的书签,即被擦去。
• 您如果断开了所有的电源,则储存在存储器中的所有 Bookmark 都将被擦去。
• 如果在可充电电池没有充电,甚至显示“Lobatt”的情况下,继续播放 CD 播放机,则存储在存储
器中的所有 Bookmarks(书签)都将被擦去。
20-CS
Page 97

播放您喜欢的播放列表(m3u 播放列表播放)(只适用于 MP3 CD)
可以播放喜欢的 m3u 播放列表*。
*“m3u 播放列表”是一个编码 MP3 文件播放顺序的文件。要使用播放列表功能,请使用支持 m3u
格式的编码软件把 MP3 文件录制到 CD-R/RW 上。
播放中,反复按 P MODE/ 至显示“ ”。
1
播放模式列表
向 . 或 > 轻按微调杆选择所要的播放列表。
2
按微调杆。
3
注
您只能播放显示在本 CD 唱机屏幕最上部的两个播放列表。
播放模式选择
21-CS
Page 98

按照喜欢顺序播放曲子(PGM(程式)播放)
可按照所喜欢顺序给 CD 播放机编程序去播放最多 64 首曲子。
停止期间,按 DISPLAY。当指示显示时,反复按 P MODE/ 至显示“PGM”。
1
声频 CD ATRAC CD/MP3 CD
向 > 或 . 轻按微调杆以选择曲子。
2
当播放 ATRAC CD/MP3 CD 时,也可使用 + 或 – 选择一个组。
声频 CD ATRAC CD/MP3 CD
播放顺序 播放顺序曲号
要输入选定的曲子,按住微调杆直到播放顺序加 1。
3
声频 CD ATRAC CD/MP3 CD
反复步骤 2 和 3 以所喜欢顺序选择曲子。
4
按微调杆开始 PGM(程式)播放。
5
要检查程序时
编程序中:
在步骤 5 之前,反复按微调杆。
停止期间:
按 DISPLAY。当指示显示时,反复P MODE/ 至闪烁着“PGM”,然后反复按微调
杆。
每次按了微调杆,都将出现曲号。
注
• 在步骤 3 当您输入完第 64 曲时,显示器即出现所选第一首曲子(声频 CD)/第一个文件名(ATRAC
CD/MP3 CD)。
• 选择 64 首以上曲子时,第一首选曲将被擦去。
文件号
22-CS
Page 99

B
适用功能
G-PROTECTION 功能
G-PROTECTION 功能已发展到能
防止跑步时发生跳音的效能。
当在 CD 播放机上把
G-PROTECTION 开关设定于“2”时,
G-PROTECTION 功能将比设定于“1”
时更加强化。
步行中用 CD 播放机时,如果要利用
G-PROTECTION 功能欣赏高音质的
CD 音响时,请把 G-PROTECTION 开
关设定于“1”。当作较激烈的运动时,
最好把它设定于“2”。
注
下列情况可能会发生跳音:
– 如果 CD 播放机受到连续的,意外强大的冲
击。
– 如果 CD 光盘污秽或有刮痕或
– 当使用质量差的 CD-R/RW,或原始记录装
置或应用软件有问题时。
检查 CD 的剩余时间和剩
余曲数(声频 CD)
每次按 DISPLAY,显示将作如下变
化:
对于包含 CD 文本信息的声频 CD,
括弧内的信息也将显示。
t 曲号和已播放时间
(当前曲名)
r
曲号和当前曲子的剩余时间
(当前曲名/艺术家名)
r
CD 上的剩余曲数*和剩余时间*
(专辑名/艺术家名)
* 在单曲播放、随机播放或带书签曲子播放时不
显示。
适用功能
23-CS
Page 100

检查 ATRAC CD、MP3
CD 上的信息
可以使用 DISPLAY 检查 ATRAC
CD/MP3 CD 的信息。
如果文件已储存此类信息,也可以检
查 ID3 tag 信息。
每次按 DISPLAY,显示将作如下变
化:
t 文件号、文件名和已播放时间
r
文件号,艺术家名/CODEC 信息*,
当前文件的剩余时间
r
组名
加强低音(SOUND 功能)
能加强低音升压声。
按 SOUND 以选择“SOUND 1”或
“SOUND 2”。
无指示
(正常播放)
“SOUND 1”
“SOUND 2”
* 可变位速率和采样频率
注
• 如果组没有组名,显示屏上出现“ROOT”。
• 如果文件没有 ID3 tag 信息,显示器上出现
“----”。
24-CS
显示所选声模式。
“SOUND 2”增强低音效果大于
“SOUND 1”。
注
利用 SOUND(声)功能时,如果声音失真,即
请调小音量。
 Loading...