

Sony DHG-HDD250, DHG-HDD500 Operating Manual

Connecting Additional Equipment
2-176-411-22(1)
High-Definition
Digital Video Recorder
Operation Manual
DHG-HDD250
DHG-HDD500
© 2005 Sony Corporation
User Guide
WARNING
To reduce the risk of fire or electric shock, do not expose the
HD Digital Video Recorder to rain or moisture.
CAUTION
RISK OF ELECTRIC SHOCK
DO NOT OPEN
ATTENTION
RISQUE DE CHOC ELECTRIQUE,
NE PAS OUVRIR
PRECAUCION
RIESGO DE CHOQUE ELECTRICO
NO ABRIR
CAUTION: TO REDUCE THE RISK OF ELECTRIC SHOCK,
DO NOT REMOVE COVER (OR BACK).
NO USER-SERVICEABLE PARTS INSIDE.
REFER SERVICING TO QUALIFIED SERVICE PERSONNEL.
This symbol is intended to alert the user to the
presence of uninsulated “dangerous voltage”
within the product’s enclosure that may be of
sufficient magnitude to constitute a risk of electric
shock to persons.
This symbol is intended to alert the user to the
presence of important operating and maintenance
(servicing) instructions in the literature
accompanying the appliance.
The apparatus shall not be exposed to dripping or splashing
and no objects filled with liquids, such as vases, shall be
placed on the apparatus.
Note to the Cable TV/Satellite Dish Installer
This reminder is provided to call the cable TV system/
satellite dish installer’s attention to Article 820-40 of the
National Electric Code (U.S.A.) that provides guidelines for
proper grounding and, in particular, specifies that the cable
ground shall be connected to the grounding system of the
building as close to the point of cable entry as practical.
SAFETY PRECAUTIONS
❏ Operate the HD Digital Video Recorder only on 120 V
AC.
❏ One blade of the power plug is wider than the other
for safety purposes and will fit into the power outlet
only one way. If you are unable to insert the plug fully
into the outlet, contact your dealer.
❏ If any liquid or solid object falls into the HD Digital
Video Recorder, unplug it and have it checked by
qualified personnel before operating it further.
T
o reduce the risk of electric shock, do not use this
polarized plug with an extension cord, receptacle, or
other outlet unless the blades can be fully inserted to
prevent blade exposure.
✍ You are cautioned that any changes or modifications not
expressly approved in this manual could void your Limited
Warranty.
Regulatory Information: FCC Part 15
This equipment has been tested and found to comply with
the limits for a Class B digital device pursuant to Part 15 of
the FCC Rules. These limits are designed to provide
reasonable protection against harmful interference in a
residential installation. This equipment generates, uses and
can radiate radio frequency energy and, if not installed and
used in accordance with the instructions, may cause
harmful interference with radio communications. However,
there is no guarantee that interference will not occur in a
particular installation. If this equipment does cause harmful
interference to radio or television reception, which can be
determined by turning the equipment off and on, the user is
encouraged to try to correct the interference by one or more
of the following measures:
❏ Reorient or relocate the receiving antennas.
❏ Increase the separation between the equipment and
receiver.
❏ Connect the equipment into an outlet on a circuit
different from that to which the receiver is connected.
❏ Consult the dealer or an experienced radio/TV
technician for help.
This device complies with part 15 of the FCC Rules.
Operation is subject to the following two conditions: (1)
This device may not cause harmful interference, and (2) this
device must accept any interference received, including
interference that may cause undesired operation.
If you have questions about this Sony product, please
contact the Sony Customer Information Service Center at
1-800-222-SONY (7669).
Protecting the HD Digital Video Recorder
❏ To prevent internal heat build-up, do not block the
ventilation openings.
❏ Do not install the HD Digital Video Recorder in a hot
or humid place, or in a place subject to excessive dust
or mechanical vibration.
Owner’s Record
The model and serial numbers are located at the rear of the
HD Digital Video Recorder and also on the HD digital
recorder box (white label). Record these numbers and refer
to them whenever you call upon your Sony dealer
regarding this product.
Model Number:
Serial Number:

Connecting Additional Equipment
CAUTION
Do not attempt to modify this product in any way
without written authorization from Sony Electronics,
Inc. Unauthorized modification could void the user ’s
authority to operate this product. This equipment is
intended to receive and decode signals transmitted
according to ATSC Digital Television Standard A/53
and is intended to be used with an appropriate antenna
and display device that you must provide.
NOTE
This high-definition digital video recorder is capable of
receiving analog basic, digital basic and digital
premium cable television programming by direct
connection to a cable system providing such
programming. A security card (”CableCARD™ device”)
provided by your cable operator is required to view
encrypted subscription digital programming. Certain
advanced and interactive digital cable services such as
video-on-demand, a cable operator’s enhanced
program guide and data-enhanced television services
may require the use of a leased set-top box available
directly from the cable operator. For more information
contact your local cable operator.
This high-definition digital video recorder also includes
a QAM demodulator which should allow you to receive
unencrypted digital cable television programming via
subscription service to a cable TV service provider.
Availability of digital cable television programming in
your area depends on the type of programming and
signal provided by your cable TV service provider.
Trademarks and Copyrights
Sony is a trademark of Sony Corporation.
In the United States, TV Guide On Screen and other
related marks are registered marks of Gemstar-TV
Guide International, Inc. and/or one of its affiliates. In
Canada, TV Guide On Screen is a registered mark of
Transcontinental Inc., and is used under license by
Gemstar-TV Guide International, Inc.
The TV Guide On Screen system is manufactured under
license from Gemstar-TV Guide International, Inc. and/
or one of its affiliates.
The TV Guide On Screen system is protected by one or
more of the following issued United States patents
6,498,895; 6,418,556; 6,331,877; 6,239,794; 6,154,203;
5,940,073; 4,908,713; 4,751,578; 4,706,121.
Manufactured under license from Dolby
Laboratories Licensing Corporation. Dolby
and the double-D symbol are trademarks of Dolby
Laboratories Licensing Corporation.
Multimedia Interface (HDMI™)
technology. HDMI, the HDMI logo
and High-Definition Multimedia Interface are
trademarks or registered trademarks of HDMI
Licensing LLC.
CableCARD™ is a trademark of Cable Television
Laboratories, Inc.
This product incorporates copyright protection
technology that is protected by U.S. patents and other
intellectual property rights. Use of this copyright
protection technology must be authorized by
Macrovision Corporation, and is intended for home and
other limited consumer uses only unless otherwise
authorized by Macrovision. Reverse engineering or
disassembly is prohibited.

User Guide
IMPORTANT SAFETY
INSTRUCTIONS
For your protection, please read these instructions
completely, and keep this manual for future reference.
Carefully observe and comply with all warnings,
cautions and instructions placed on the unit, or
described in the operating instructions or service
manual.
DO NOT REMOVE THE CABINET COVER OR
YOU MAY BE EXPOSED TO DANGEROUS
VOLTAGE. REFER SERVICING TO QUALIFIED
SERVICE PERSONNEL ONLY.
1. Read these instructions.
2.
Keep these instructions.
3. Heed all warnings.
4.
Follow all instructions
5. Do not use this apparatus near water.
6. Clean only with dry cloth.
7. Do not block any ventilation openings. Install
in accordance with the manufacturer’s
instructions
8. Do not install near any heat sources such as
radiators, heat registers, stoves or other apparatus
(including amplifiers) that produce heat.
Do not defeat the safety purpose of the
9.
polarized or grounding-type plug.
10. Protect the power cord from being walked on or
pinched particularly at plugs, convenience
receptacles and the point where they exit from the
apparatus.
11. Only use attachments/accessories specified by
the manufacturer.
Use only with the cart, stand, tripod, bracket, or
12.
table specified by the manufacturer, or sold
with apparatus.
when moving the cart/apparatus combinations
to avoid injury from tip-over.
When a cart is used, use caution
.
Precautions
Hard disk drive precautions
The hard disk has a high storage density which
enables long recording duration and quick access to
the written data. However, it can easily be damaged
by shock, vibration or dust, and should be kept away
from magnets. To avoid losing important data,
observe the following precautions.
• Do not allow the recorder to receive a strong
shock.
• Do not place the recorder in a location subject to
mechanical vibrations or in an unstable
location.
•Do not move the recorder with its main power
cord connected, or any other cords.
• Do not use the recorder in a place subject to
extreme changes in temperature (temperature
gradient greater than 10° C/hour).
• Do not attempt to change the hard disk. This
may result in a malfunction and will void your
warranty.
•
You cannot recover lost data if the hard disk is
damaged. It is recommended that you use the hard
disk as a temporary storage space and dub
important data to a DVD or VCR for backup. Note
that any recordings made cannot be compensated
for should the hard disk drive malfunction.
CAUTION: Unplug the AC power cord from
the outlet and then wait 30 seconds before
moving the HD DVR in any way. The HD
DVR can record programming even when in
power off/standby mode and the spinning
hard drive could be damaged by movement.
13. Unplug this apparatus during lightning storms
or when unused for long periods of time.
Refer all servicing to qualified service
14.
personnel.
apparatus has been damaged in any way, such as
power-supply cord or plug is damaged, liquid
has been spilled or objects have fallen into the
apparatus, the apparatus has been exposed to
rain or moisture, does not operate normally, or
has been dropped.
- Servicing is required when the

Connecting Additional Equipment
Placement precautions
• Inadequate ventilation or proximity to a heat
source will cause decreased performance and
reliability. Although the HD DVR is designed
to automatically power off in extreme heat
conditions, adequate care must be taken to
avoid excessive heat build up.
- Do not place the recorder on a soft surface,
such as a rug and do not place on an uneven
surface in which all four of the feet do not
evenly support the recorder. Such improper
placement may block the ventilation holes on
the bottom of the recorder.
- Do not place the recorder in a confined space
such as a bookshelf or similar unit.
- Do not place the recorder in a location near
heat sources, or in a place subject to direct
sunlight, excessive dust or mechanical shock.
- This recorder will shut automatically to protect the hard disk in extreme heat conditions.
• Do not place the recorder in an inclined
position. It is designed to be operated in a
horizontal or vertical position only.
• Keep the recorder away from the equipment
with strong magnets, such as a microwave
oven, large soundspeakers or other equipment.
• Keep the recorder away from liquid and
moisture source such as kitchen sink, wash
bowl, bath tub, shower, laundry tub or wet
basement. Do not unplug with wet hand.
• Do not place heavy objects on the recorder.
• Do not place objects which may splash or drip
liquids, such as plants or fountains, on or near
the recorder.
• Do not place on top of the TV.
Ventilation Clearance
When installing the unit, please allow enough space on
all sides as indicated in the illustrations.
Also, when placing the unit, make sure it is on a firm,
flat surface. Keep the space below the unit clear, this is
to allow ventilation under the unit.
! IMPORTANT NOTICE
This recorder is capable of holding a still video
image or on-screen display image on your
television screen for an extended period of time. If
you leave a still video image or on-screen display
image displayed on your TV for an extended
period of time you risk permanent damage to your
television screen. Plasma display panels and
projection televisions are especially susceptible to
this. Refer to your TV's operating instructions for
further information.
Care and Maintenance
Unplug the unit from the wall outlet before cleaning.
Use a dry, soft cloth to wipe dust off the unit.
Do not allow dust to accumulate under the unit. Do not
use liquid or aerosol cleaners. Never use strong
solvents such as thinner or benzene for cleaning.
Damage requiring service: Do not attempt to service
the unit by yourself. Opening the cabinet may expose
you to dangerous voltage or other hazards, and will
void your warranty. Unplug the unit from the wall
outlet and refer servicing to qualified service personnel.

User Guide

Connecting Additional Equipment
Table of Contents
Introduction to High-Definition
Digital Video Recorder (HD DVR)
Package Contents ............................... 3
Optional Item .....................................3
Features ..............................................4
Front Panel Indicators and Controls ..5
Display Window ................................ 6
Rear Panel Connectors.......................7
Remote Control..................................9
Programming the Remote Control ..... 12
Manufacturer’s Codes........................14
Using your DVR Remote Control
with Other Equipment .................... 16
Connections
Basic Connection ...............................17
Connecting Additional Equipment ....23
About CableCARD™ Devices ..........26
Auto Setup .........................................28
Changing TV channels with your
HD DVR Remote Control..............29
Using the Menus
How to Access and Navigate in the
Menus.............................................31
Using the Recent Channels Menu......32
Using the Favorite Menu ...................33
Accessing the Recordings List........... 34
Accessing the TV Guide On
Screen™ Feature ............................ 34
Using the Recording History Menu ... 35
Using the Preferences Menu .............. 36
Using the Help Menu ......................... 43
Parental Lock .....................................44
Rating Guidelines...............................46
Digital Video Recorder
Understanding the Status Bar.............49
Pausing TV.........................................50
Using Trick Play Features ..................51
Recording Programs...........................53
Playing Recorded Programs ...............55
Deleting Recorded Programs .............55
Using Chapter Marks .........................56
Using the TV Guide On Screen™
System
TV Guide On Screen System
Components....................................61
Using the LISTINGS Service.............64
Using the SEARCH Service...............65
Using the RECORDINGS Service.....67
Using the SCHEDULE Service..........68
Using the SETUP Service ..................69
Recording a Program from TV
Guide On Screen System................70
References
Learning About Available Video
Services...........................................73
Learning About Screen Modes...........76
TROUBLESHOOTING .....................79
Specifications .....................................84
END-USER LICENSE
AGREEMENT FOR SOFTWARE
INCLUDED WITH YOUR SONY
HIGH-DEFINITION DIGITAL
VIDEO RECORDER .....................85
GNU GENERAL PUBLIC
LICENSE........................................86
Index...................................................93
LIMITED WARRANTY ...................97

User Guide
Introduction to High-Definition Digital Video Recorder (HD DVR)
Introduction to High-Definition Digital
Video Recorder (HD DVR)
Congratulations on your purchase of the Sony® HD Digital Video Recorder. This manual is to be
used for the following models: DHG-HDD250 and DHG-HDD500. Although there is a difference
in the recording capacity between the two models, both models feature the same operation.
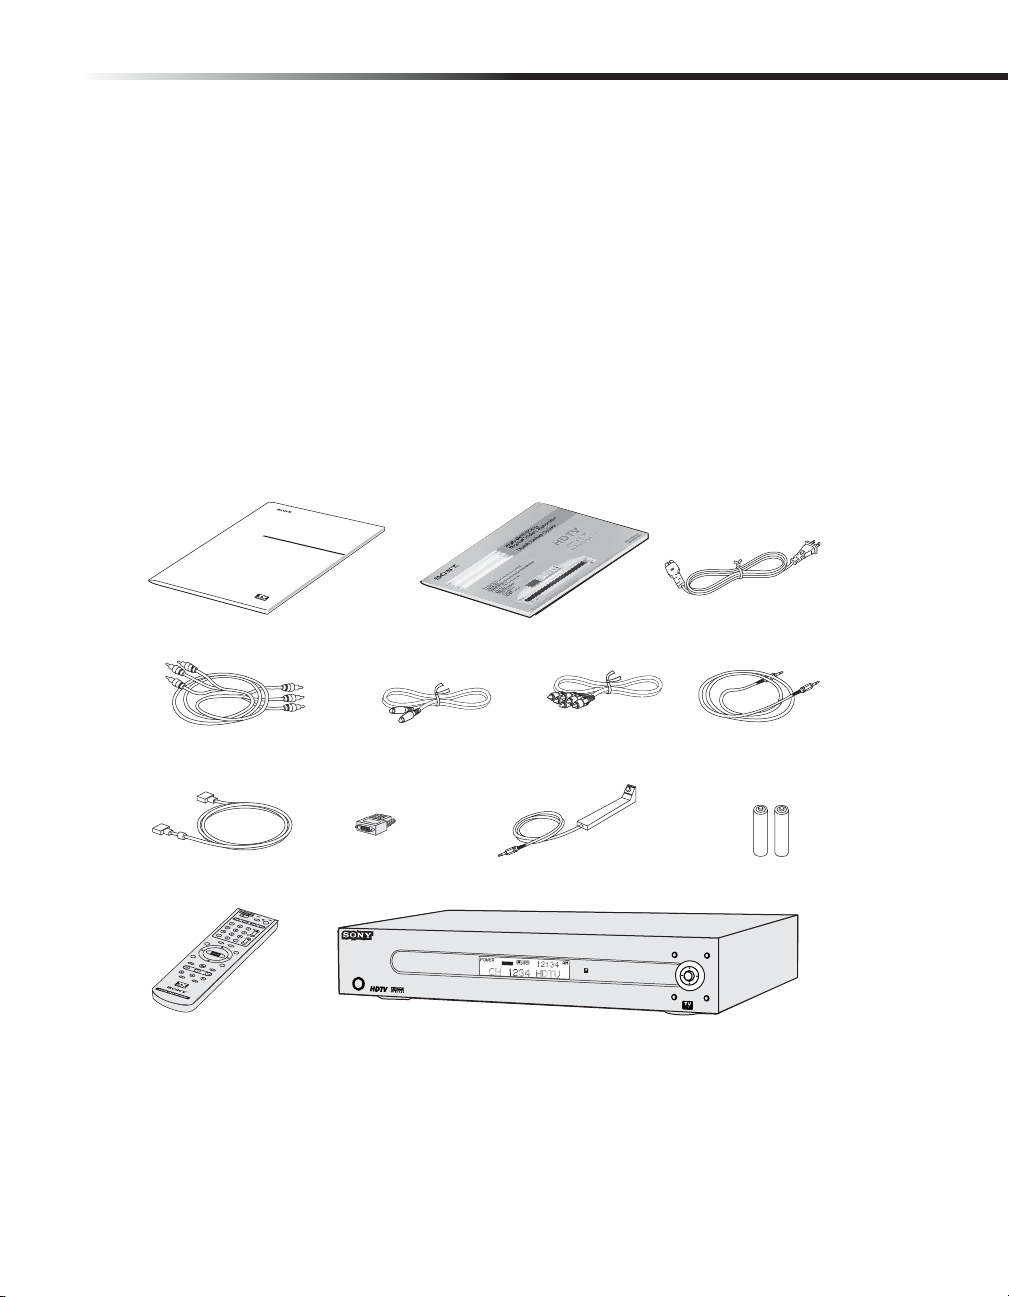
Package Contents
The package contains the following. Be sure to check these items before you start making
connections.
/PERATION-ANUAL
(IGH$EFINITION
$IGITAL6IDEO2ECORDER
/PERATION-ANUAL
$('($$
$('($$
#OMPONENT6IDEO#ABLE
($-)#ABLE
2EMOTE#ONTROL
2%#
02%6
2-9
%8)4
2%0,!9 !$6!.#%
2%7
0!53%
34/0
.%84
46
$62
$6$
!-0
3#2%%.
0/7%2
&/2-!4
!58
-/$%
0)#-/$%
$62
466)$%/
#(
0
!
'
%
6/,
%.4%2
).&/
-%.5
&!6/2)4%
46
'5)$%
053(
3%,%#4
2%#
0,!9
,)34
&&
3,/7
($-)$6)
36IDEO#ABLE
!DAPTER
1UICK3ETUP'UIDE
!UDIO6IDEO#ABLE
',).+)2"LASTER#ABLE
($$IGITAL6IDEO2ECORDER
()'($%&).)4)/.$)')4!,6)$%/2%#/2$%2$('($$()'($%&).)4)/.$)')4!,6)$%/2%#/2$%2$('($$
!#0OWER#ORD
#ONTROL3#ABLE
3IZE!!2
"ATTERIES
Optional Item
A CableCARD™ device can be used with this HD DVR to receive encrypted digital cable
programming from many cable TV service providers. Contact your retailer or cable TV service
provider for information about the availability of CableCARD devices.
3

Operating Instructions
Features
Some of the features you will enjoy with your new HD DVR include:
❏ Digital Reception — You can watch digital television programs and enjoy the improved
audio/video quality offered by these programs. With high-definition signal reception,
you can watch TV signals broadcast in HDTV for the clearest possible broadcast picture.
❏ Digital Video Recorder — Watch TV on your schedule. Pause, rewind and fast forward
shows at the press of a button. With digital video recording you can store at least 30 hours
of high-definition programming or up to 200 hours of standard-definition content (60
hours/400 hours for model DHG-HDD500). The Recordings List provides quick access to
shows available for viewing. You can watch a previously recorded show while
simultaneously recording another show. You can also enjoy Chasing Playback; watching
a show from the beginning while it is being recorded.
❏ TV Guide On Screen™ System— The interactive program guide features up to eight (8)
days of program listings as well as the ability to search and automatically record
programs.
❏ Component Video (Y PB PR) Output — Provides a high-quality video output to many high-
definition capable TVs and displays.
❏ HDMI Video Output — Provides an uncompressed, all-digital audio/video interface
between this HD DVR and any HDMI-equipped TV. HDMI supports enhanced, or highdefinition video, plus up to 5.1 channel digital audio.
❏ CableCARD™ device — Provides cable subscribers with access to digitally encrypted cable
channels that will enable you to receive not only standard definition but also high
definition television. The CableCARD, which is provided by your cable TV service
provider, is inserted into the HD DVR’s rear panel CableCARD slot. (Check with your
cable TV service provider about CableCARD service details, limitations, pricing and
availability. For more information about CableCARD in this manual, see page 25.)
4
Introduction to High-Definition Digital Video Recorder (HD DVR)
4
Front Panel Indicators and Controls
76
1
Control Panel Description
1
POWER button
2
Display Window
3
EXIT button
4
Joystick/SELECT
button
5
FORMAT button
6
TV GUIDE button
Turns the HD DVR on or into inactive standby (off).
Shows the current status of the HD DVR with the following indicators:
Power, Recording, Dolby Digital®, Clock, Channel Number and Name (if
available); see details on page 6.
The Format setting is displayed when pressing the FORMAT button.
Clears on-screen displays and returns to normal viewing.
Navigate on-screen menus and guides by moving the joystick either up,
down, left or right. Press the joystick to select an on-screen item.
Sets the output resolution. Depending on the type of TV that the HD DVR is
connected to, available Format settings may include; 1080i, 720p, 480p,
Native, Variable 1, Variable 2, Variable 3, SD Out and Auto HDMI. Choose
the best format for your TV (See “Learning About Available Video Services”
on page 73.)
Shows the TV Guide On Screen™ interactive program guide (if available)
which contains a list of current and future programs. To return to normal
viewing press TV Guide again or the EXIT button.
✍ The TV Guide™ service requires access to selected broadcasts which may not
be available in all cases.
7
MENU button
Shows the main menu on the screen. To return to normal viewing press the
EXIT button.
2
3
5
5
Operating Instructions
q
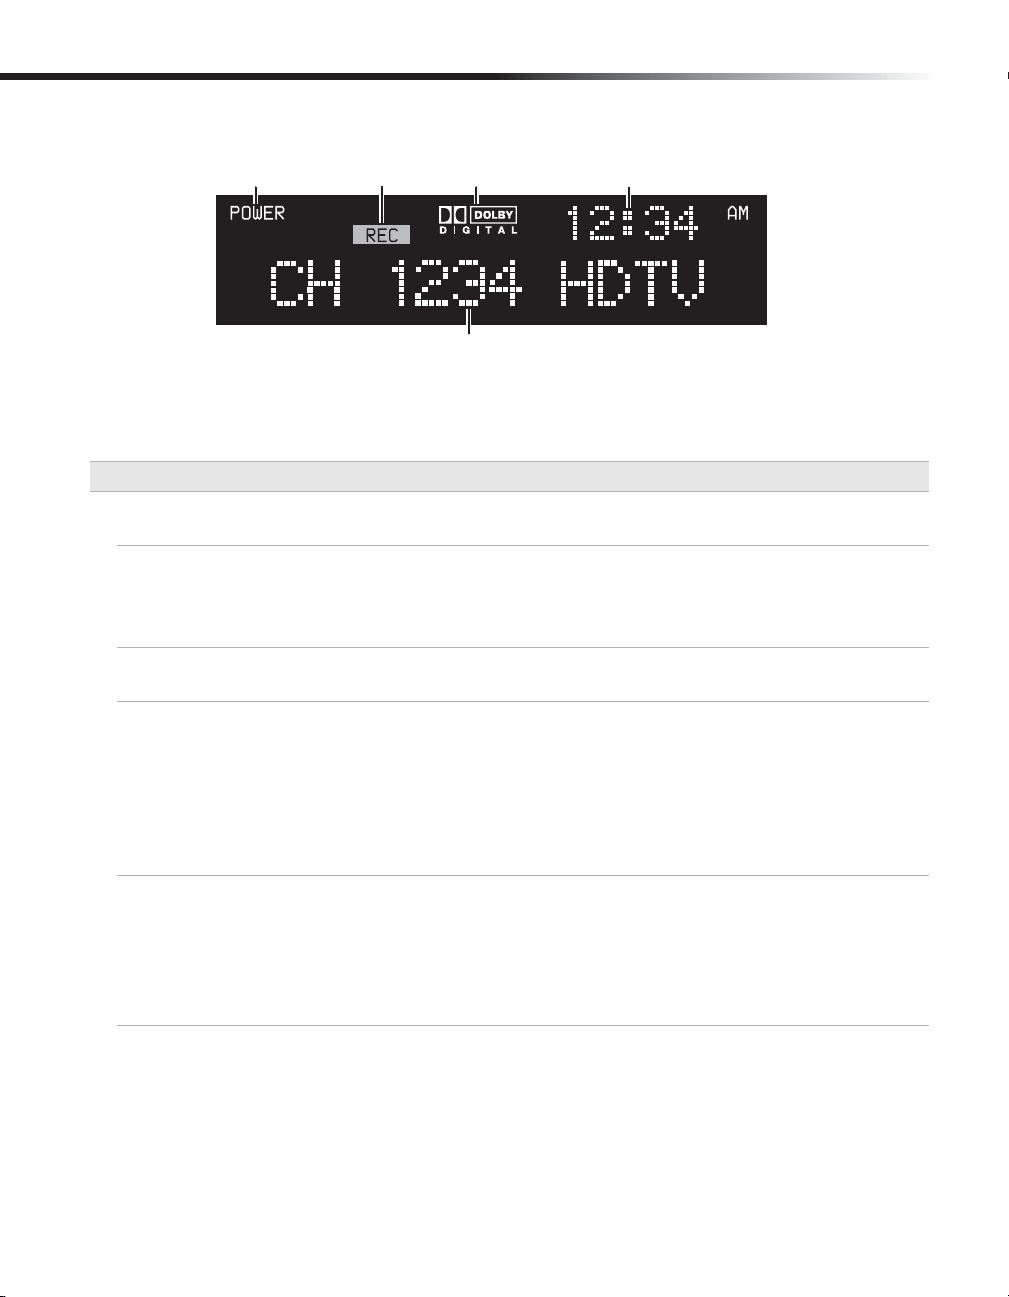
Display Window
8
9
q;
qa
s
Display Description
8Power indicator Shows that the HD DVR is on. Note that your HD DVR may continue
to record programming even when the Power indicator is off.
9REC indicator
q;Dolby Digital
indicator
qaClock Shows time information. The time is automatically set by the TV Guide
qsChannel Number
and Name display
Shows that the HD DVR is currently recording a program. Recorded
programs can be found in the Recordings List by pressing the REC LIST
button or by selecting “RECORDINGS” from the TV Guide On Screen™
system.
Shows when current output is in Dolby Digital ®. For more
information on audio settings, see "Audio" on page 40.
On Screen interactive program guide.
When first installed, the clock will not display time information until
the TV Guide On Screen system can set the time. Leave your HD DVR
connected to an antenna or cable TV service in the standby (off)
position for several hours (such as overnight) to allow the correct time
to be set.
When viewing live programs, channel number and name (if available)
are displayed.
When viewing a program from the RECORDINGS LIST, the program
title (if available) is displayed.
When the FORMAT button is pressed, the format setting is displayed
briefly.
6
Introduction to High-Definition Digital Video Recorder (HD DVR)
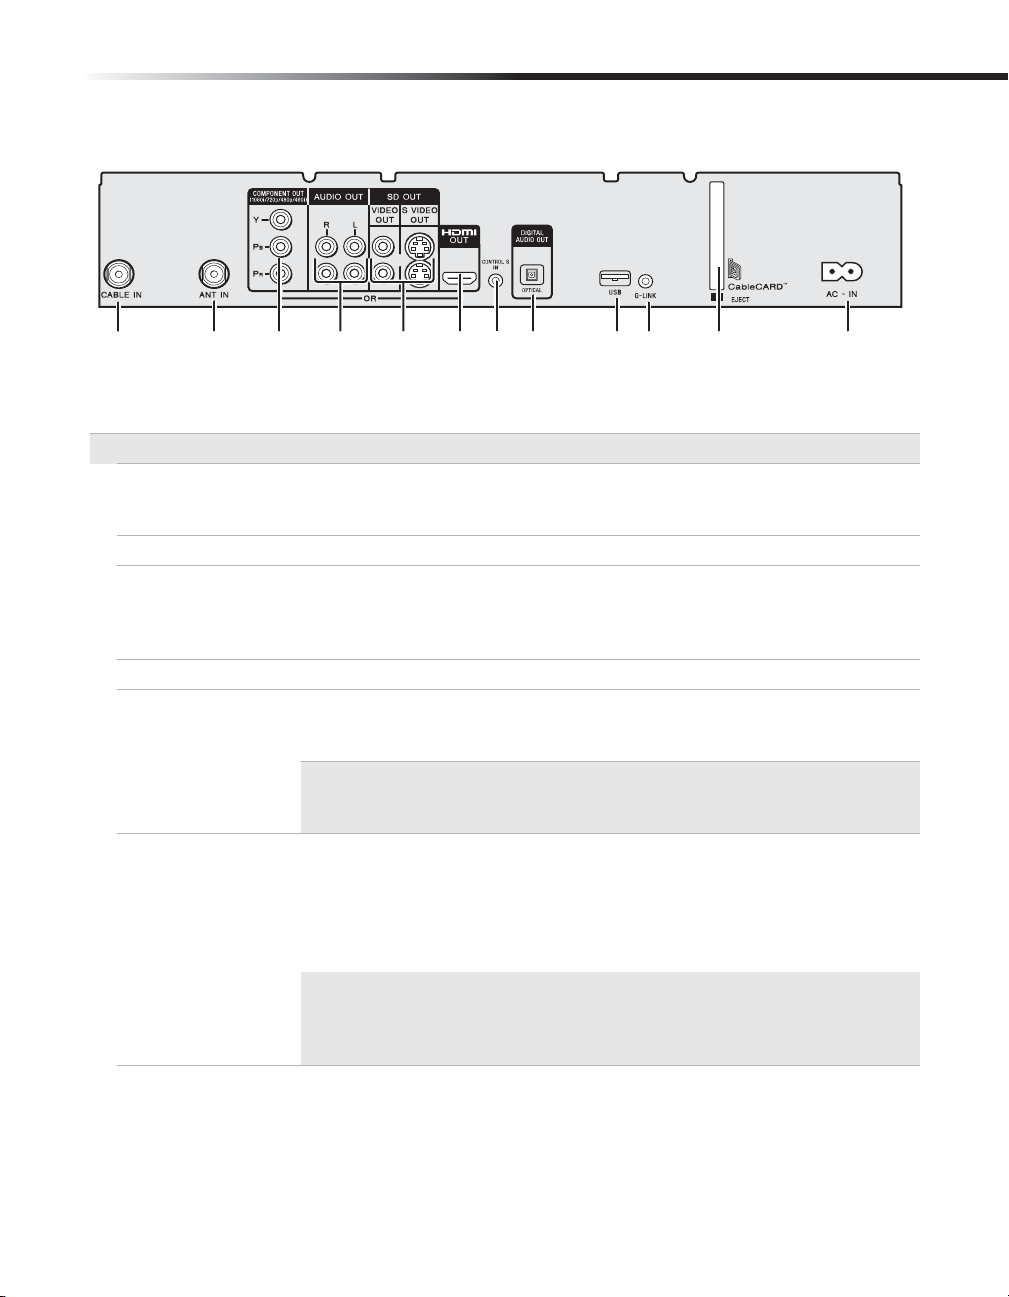
Rear Panel Connectors
RE
RG
Connection Description
CABLE IN
qd
qf ANT IN
qgComponent Video
OUT (Y P
B PR)
qh AUDIO OUT
qjSD OUT: VIDEO
OUT/S VIDEO OUT
qkHDMI OUT
RI
Connects to a coaxial cable coming directly from your cable TV service outlet.
Connection from a cable box that is supplied by your cable TV service
provider is not recommended.
Connects to an over-the-air or terrestrial antenna.
Provides high-definition or standard-definition component video signal to a
Y/P
available if the HDMI OUT connector is connected to an HDMI-compatible
monitor.
Provides analog audio signals to a TV or other device.
Provides standard-definition composite video signal to a DVD-Recorder, VCR
or TV set. For a better quality picture connection, use the S Video jack if it is
available.
RK
B/PR-compatible monitor. The COMPONENT OUT connector is not
✍ Menus and on-screen displays are available from the SD OUT connectors
only when the FORMAT setting is set to SD OUT. With other FORMAT
settings, no menus or on-screen displays are visible.
Provides an uncompressed all-digital audio/video interface between the HD
DVR and an HDMI-compatible monitor. HDMI (High-Definition Multimedia
Interface) supports either standard-definition or high-definition video, plus
up to 5.1 channels of digital audio. You can use the supplied HDMI to DVI
adapter to supply video to a monitor with a DVI-HDTV input. When using
the adapter, a separate audio connection is required.
✍ The HDMI connector has a higher priority when both the HDMI and
COMPONENT outputs are connected to a monitor(s). To enable the
COMPONENT output, disconnect the HDMI cable from the HDMI OUT
connector.
RL
RM
X
XB
XT
XE
XGRH
(continued)
7

Operating Instructions
Connection Description
ql CONTROL S IN
w; DIGITAL AUDIO
OUT
wa USB (Universal
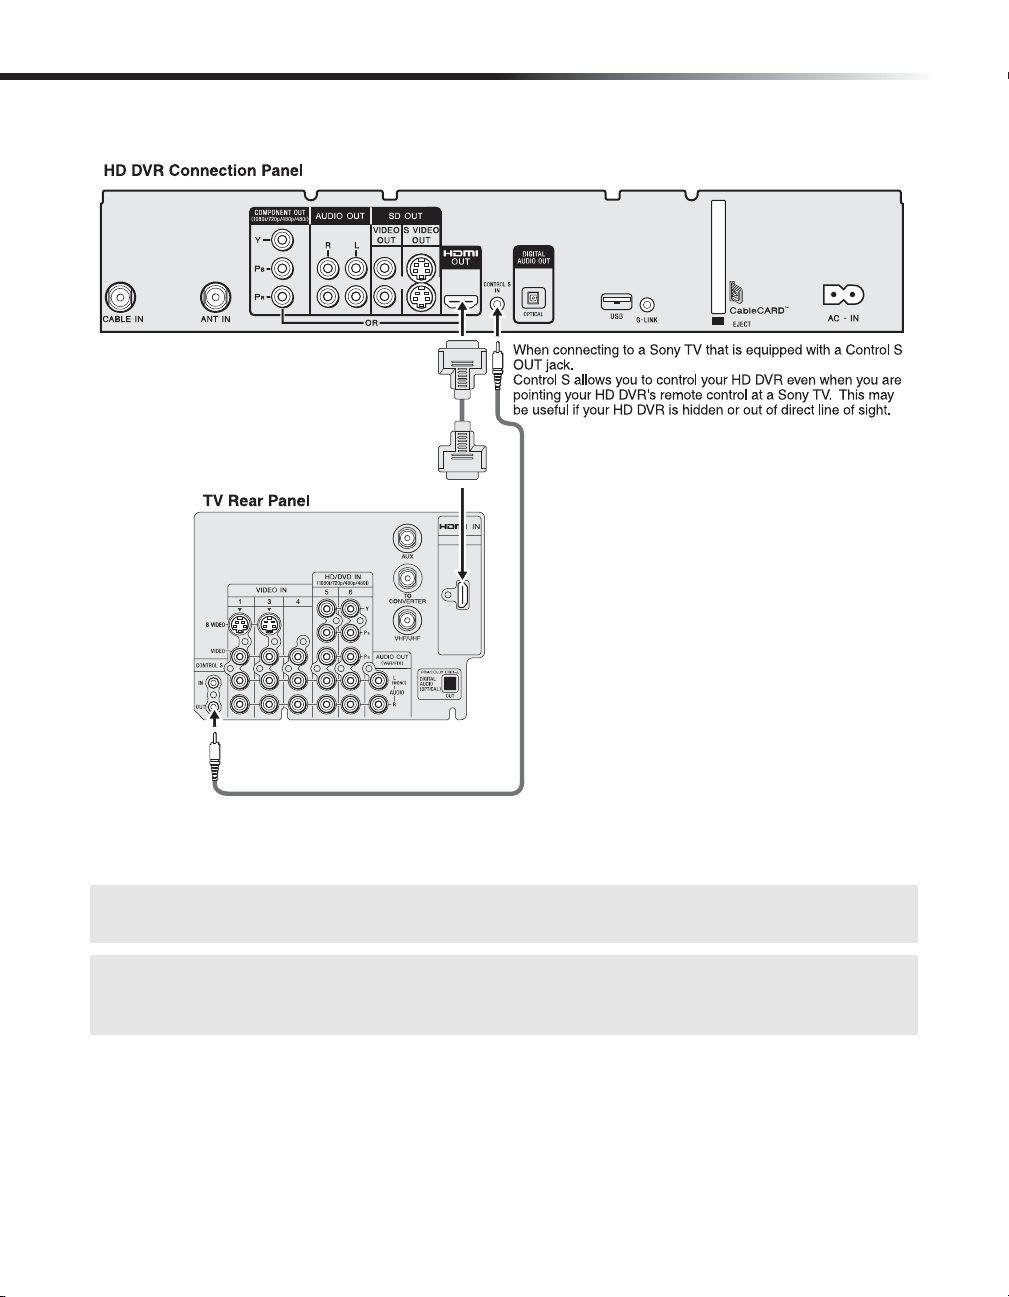
Allows the HD DVR to receive remote control signals from other Sony®
infrared-controlled equipment that have a CONTROL S OUT function. For
example, it may be useful to connect to the CONTROL S OUT jack of a Sony
TV so that you may point your HD DVR remote control at the TV and remote
control commands will be passed directly to your HD DVR.
Use an optical digital audio cable (not supplied) to send a digital audio signal
to an A/V amplifier or other device. The availability of Dolby Digital® or
PCM audio depends on the broadcaster. Use the Dolby Digital audio menu to
select the appropriate audio settings that are best suited for the program
content and the connected equipment. (See “Audio” on page 40.)
Reserved for potential future applications.
Serial Bus)
wsG-LINK IR Blaster
wd CableCARD slot
wfAC IN
Use the supplied G-LINK™ (IR Blaster) to enable automatic recording to a
VCR using the TV Guide On Screen™ system. Connect the IR Blaster to the GLINK connector and place the IR blaster in front of your VCR.
A CableCARD™ device provided by your cable TV service provider can be
inserted in the CableCARD slot. (See “About CableCARD™ Devices” on
page 26.)
Use the supplied AC power cord to connect your HD DVR to a power outlet.
8
Introduction to High-Definition Digital Video Recorder (HD DVR)
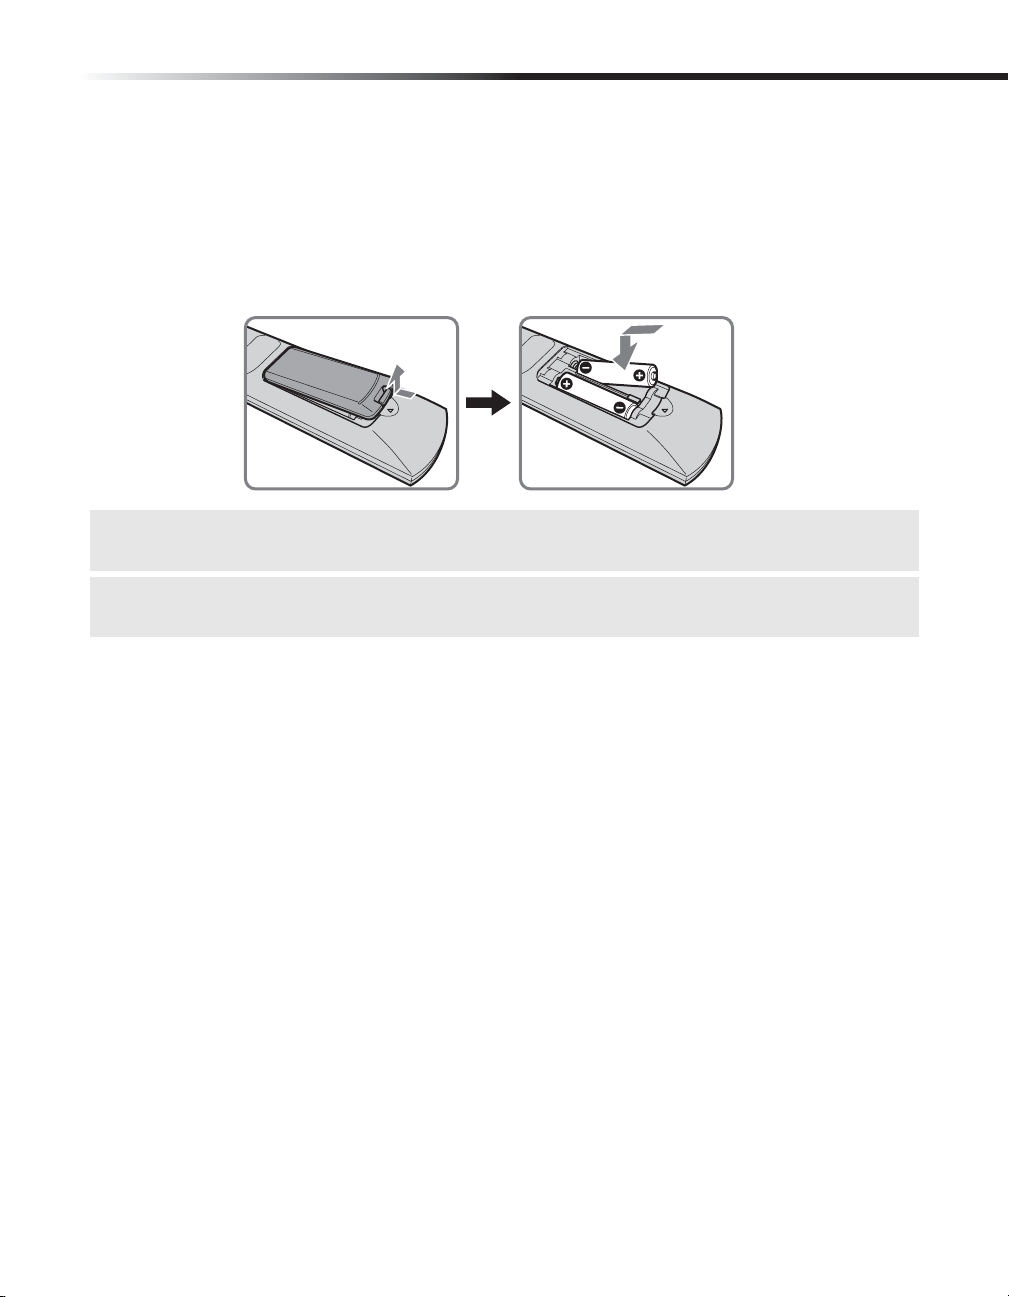
Remote Control
Inserting Batteries
Insert two AA (R6) batteries (supplied) into the remote control as shown in the illustration
below. Be sure to match the + and - terminals on the batteries to the diagram inside the battery
compartment.
1
2
✍ If you anticipate not using the remote control for an extended period of time, remove the batteries to
avoid possible damage from battery leakage.
✍ Avoid exposing the remote control to moisture, placing it in direct sunlight, near a heat source or
where the humidity is high. Handle the remote control with care.
9

Operating Instructions
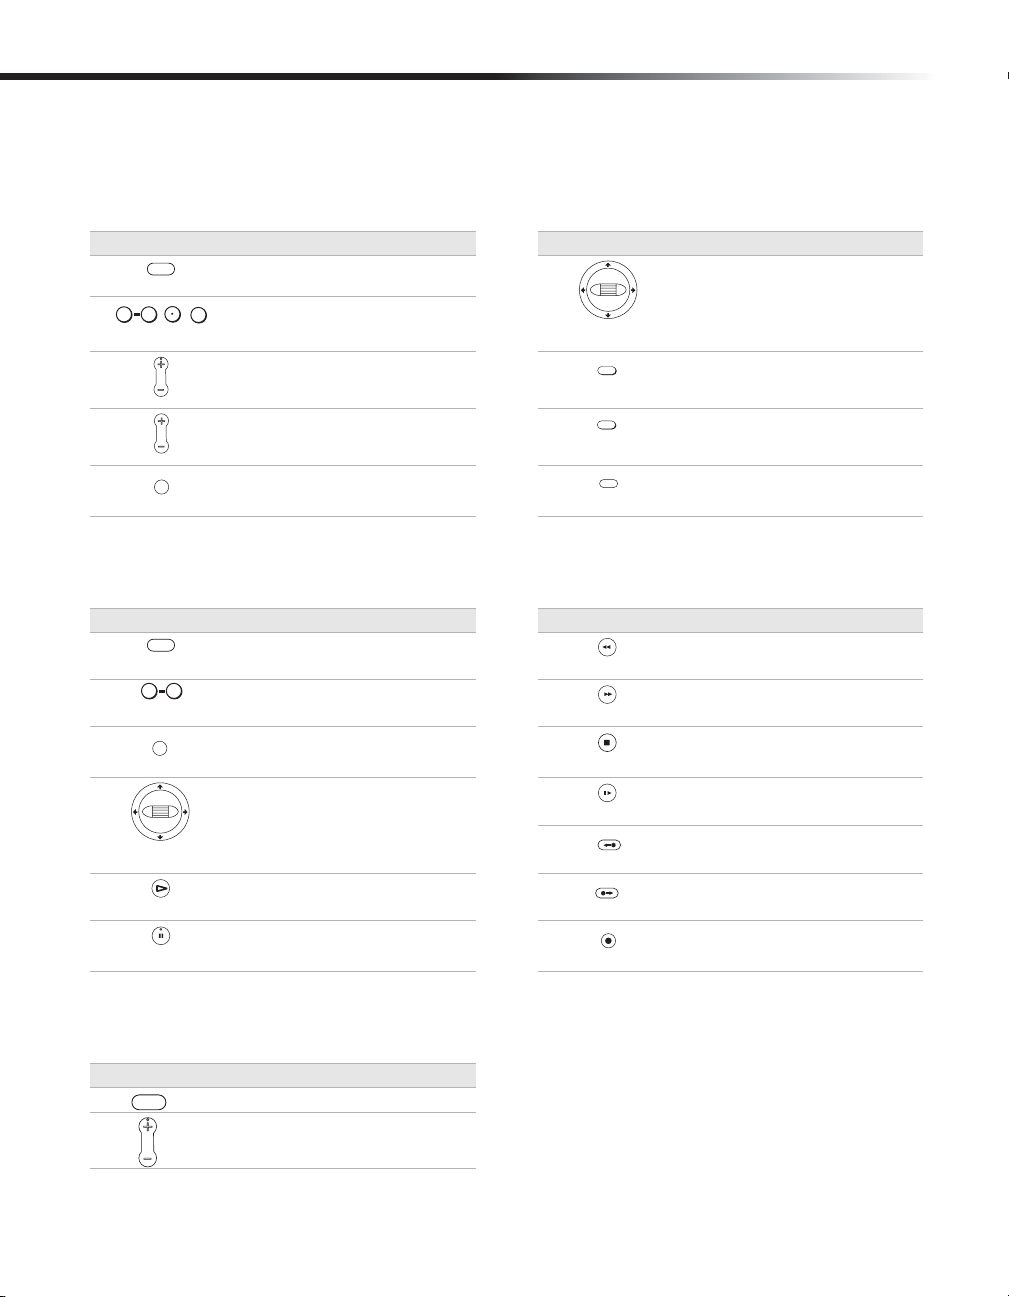
Remote Control Description
1
2
3
4
5
6
7
8
9
q;
qa
qs
qd
qf
qg
qh
qj
TV
DVR
SCREEN
MODE
MENU
EXIT
REPLAY
REW PAUSE
REC
DVD
INFO
PREV
AMP
FORMAT
SELECT
RM-Y823
POWER
AUX
PIC
TV/VIDEO
MODE
P
A
G
E
ENTER
FAVORITE
PUSH
PLAY
ADVANCE
FF
STOP SLOW
NEXT
DVR
CH
VOL
TV
GUIDE
REC
LIST
qk
ql
w;
wa
ws
wd
wf
wg
wh
wj
wk
wl
e;
1
2
3
4
5
6
7
8
9
q;
qa
qs
qd
qf
qg
qh
Button Description
DEVICE SWITCH Select the equipment (DVR, TV, DVD or AMP) that
you want to operate. The section “Using Your
Remote Control to Operate Other Equipment”
describes which buttons are available for each
device.
FORMAT Press to set the output resolution to either 1080i,
720p, 480p, 480i, Native, Variable 1, Variable 2,
Variable 3, SD Out or Auto HDMI formats.
Depending on the type of TV that DVR is connected
to, available Formats may change. Choose the best
format for your TV. (See “Learning About Available
Video Services” on page 73.)
SCREEN MODE Press repeatedly to step through the available screen
mode settings. (See “Learning About Screen Modes”
on page 76.)
0-9 ENTER Press to change channels directly and enter
numerical values in on-screen displays.
. (dot) Use with the 0-9 and ENTER buttons to select
subchannels for certain digital stations (for example,
channel 2.1, if available).
INFO Press to show station and program information (if
available) in the banner at the top of the screen.
MENU Press to open main menu. While in the TV Guide On
Screen™ system menu, press to open sub-menus.
NAVIGATION RING Press the ring up, down, left and right to move the
highlight in on-screen displays.
SCROLL BAR Scroll up or down to move the highlight in on-screen
displays. Press and hold to select an on-screen
option.
EXIT Press to close on-screen displays.
PLAY Press to play a program at normal speed.
REPLAY Press to replay the current program for a set period
of time.
PAU SE Press to pause playback.
REW Press to play a program in fast rewind mode. Press
repeatedly to cycle through the available REW
speeds.
STOP Press to stop the playback of a recorded program.
REC (record) Press and hold the REC button for one second to
start recording the current program.
10

Introduction to High-Definition Digital Video Recorder (HD DVR)
Button Description
PREV Press to replay the current program from the
qj
AUX (Power) Press to turn the selected TV, DVD or AMP on or off.
qk
DVR ( Power) Press to turn the HD DVR on or into stand-by mode.
ql
PIC MODE Press to switch between the Picture Mode settings of
w;
TV/VIDEO Press to switch between the various inputs of your
wa
CH (channel) +/- Press to change channels. When the program guide
ws
VOL (volume) +/- Press to adjust the volume of your TV or AMP. (See
wd
FAVORI TE Press to open the Favorite List.
wf
TV GUIDE Press to open the TV Guide On Screen™ interactive
wg
REC LIST Press to open the RECORDINGS List which contains
wh
ADVANCE Press to advance forward a set period of time when
wj
FF Press to play a program in fast forward mode. Press
wk
SLOW Press to play a program in slow speed. Press
wl
NEXT Press to advance forward to the next Chapter Mark
e;
previous Chapter Mark (if available) or from the
beginning of the Live TV pause time.
(See “Using your DVR Remote Control with Other
Equipment” on page 16.)
The HD DVR may still record previously scheduled
programs even when in stand-by mode.
compatible Sony® TVs.
TV. (See “Using your DVR Remote Control with
Other Equipment” on page 16.)
is open, pressing the CH+/- buttons pages through
the guide channels.
“Using your DVR Remote Control with Other
Equipment” on page 16.)
program guide. Press again to exit the guide.
any programs that may have been recorded and are
available for play back.
playing back a recorded program.
repeatedly to cycle through the available FF speeds.
repeatedly to cycle through the available SLOW
speeds.
(if available) or to Live TV when playing back a
recorded program.
✍ If you lose your remote control, you may use the front panel buttons to operate your HD DVR (see
page 5). Contact your nearest Sony dealer to order a suitable replacement remote control. To find the
dealer nearest you, please refer to “Contacting Sony” on page 79.
11

Operating Instructions
Programming the Remote Control
If you would like to use your HD DVR’s remote control to control other equipment, you may
need to program your remote control. Follow the steps below to program the remote control.
✍ The equipment must have infrared (IR) remote capability in order to be used with the
remote control
Turn to “Manufacturer’s Codes” on page 14 and find the three-digit code number for the
manufacturer of your component. If more than one code number is listed, use the number
listed first.
1 Power on the HD DVR and the device which you want to operate with the HD DVR’s
remote control.
2 Slide the Remote Control's Device Switch to the device you want to program (such as TV
or DVD).
3 Press and hold the AUX POWER and MENU buttons simultaneously for five (5) seconds.
The LED (light emitting diode) will begin to blink slowly.
4 Enter the three-digit code from the Manufacturer's Code list found on pages 14 and 15.
5 Press the SELECT or ENTER button on your remote control to store your code selection.
The LED will illuminate for two (2) seconds if the code is accepted or it will quickly blink
for two (2) seconds if the code was not accepted.
6 The LED will stop flashing once the above step is done.
.
To check if the code number works, aim the HD DVR’s remote control at the device and press
the AUX POWER button to see if the device will turn on and off. If it does not respond, try
using another code listed for that manufacturer.
• You may enter either a DVD or VCR manufacturer’s code under the DVD device switch setting.
The default device for this setting is DVD. If a VCR’s manufacturer code is entered, the DVD
position on the device switch will control the VCR.
• If you enter a new code, it will overwrite the previously entered code.
• In some cases, your device may not be compatible with your remote control; in such cases you will
need to use its remote control to operate the device.
• Whenever the batteries are removed, the codes may revert to factory settings and you will need to
reprogram the remote control.
12

Introduction to High-Definition Digital Video Recorder (HD DVR)
To Search for a Code to Program the Remote Control
If your device is not listed in the Manufacturer’s Code list, try the following:
1 Power on the HD DVR and the device that you want to operate with the HD DVR’s
remote control.
2 Slide the switch at the left top corner of the remote control to the name of the device you
want to program, such as a TV or DVD Player.
3 Press and hold the AUX POWER and MENU buttons simultaneously for five (5) seconds.
The LED will begin to blink slowly.
4 Enter one of the temporarily assigned numbers for your device from the table below.
Device Temporarily Assigned Code
TV 100
DVD 600
VCR 300
AMP 500
5 Try controlling the device with the HD DVR’s remote control (e.g., power, volume, etc.). If
the remote control works, skip to step 7. If not proceed to step 6.
6 Press the NEXT button on the remote control to assign the next available manufacturer
code. Return to step 5. You may continue the process of selecting the next available code
until the LED begins fast blinking. Fast blinking indicates that no additional manufacturer
codes are available to test.
7 Press the SCROLL BAR or ENTER button on your remote control to store your code
selection. The LED will illuminate for two (2) seconds to indicate that the code is accepted.
To Reset to the Factory Default Code Setting
1 Press and hold the AUX POWER and MENU buttons simultaneously for five (5) seconds.
The LED will begin to blink slowly.
2 Enter code 999.
3 Press the SCROLL BAR or ENTER button on your remote control to restore the factory
default code setting. The LED will illuminate for two (2) seconds when the code is
accepted.
13

Operating Instructions
Manufacturer’s Codes
When you are ready to program your HD DVR’s remote control to operate other connected
devices, refer to the list below. If there is more than one code listed under your device, try
entering them one by one until you come to the correct code for that particular device. In some
cases, you may not be able to operate your connected device with the HD DVR’s remote
control. In such cases, use the remote control that came with your device.
As you enter a code number it will overwrite your previously entered code.
When you anticipate not using your remote control for an extended period of time, it is
recommended that the batteries be removed from the remote control. When the batteries are
removed from the remote control, it is possible that the programmed manufacturer's codes may
be lost and would need to be reprogrammed.
TV Codes
Manufacturer Code
Sony 101
Admiral
(M. Wards)
ABC 112
Bell & Howell
(M. Wards)
Broksonic 103, 112
Craig 122, 123, 120,
Croslex 111
Curtis Mathis 103, 119, 123
Daewoo 135, 136, 103
Dayton 116
Dynasty 113
Emerson 122, 113, 120,
Fisher 125
General
Electric
Goldstar 103, 113, 112,
Hitachi 131, 113, 103,
JC Penny 103, 102, 130,
JVC 128, 129
102, 114, 109
114, 109, 138
121
121, 123, 103,
115
102, 118, 103,
107
130
132
107
Manufacturer Code
KTV 133, 113, 103,
123, 134
Loewe 111
LXI (Sears) 102, 103, 111,
125, 119, 112
Magnavox 111, 112 , 113,
Mitsubishi/
MGA
NEC 103, 112
Panasonic 118, 116, 117,
Philco 111 , 118, 109
Philips 111
Pilot 103
Pioneer 137, 118, 119
Portland 103, 108
Quasar 110, 107
Radio Shack 102, 112, 124,
RCA/
PROSCAN
Samsung 126, 112, 113,
Sanyo 125
Scott 123, 112
107
124, 103, 112
107
123
102, 103, 104,
105, 106, 107,
108
103
Manufacturer Code
Sharp 114, 113, 115
Signature 2000
(M. Wards)
Sylvania 111, 112, 108
Symphonic 123, 139
Technika 109
Toshiba 119, 114
Vidtech 131, 103, 112
Wards 113, 103, 115,
Zenith 108, 110
VCR Codes
Manufacturer Code
Sony 301, 302, 303
Aiwa 338
Audio
Dynamic
Bell & Howell
(M. Wards)
Broksonic 317, 319
Canon 309, 308
Citizen 332
114, 109
112
314
330, 343
14
Introduction to High-Definition Digital Video Recorder (HD DVR)
Manufacturer Code
Curtis Mathes 304, 338, 309
Daewoo 341, 312, 309
DBX 314, 336, 337
Dimensia 304
Emerson 319, 320, 316,
Fisher 330, 334, 335,
Funai 338
General
Electric
Go Video 322, 339, 340
Goldstar 332
Hitachi 306, 304, 305,
Instant Replay 309, 308
JC Penney 309, 305, 304,
JVC 314, 336, 337
Kenwood 314, 336, 332,
LXI (Sears) 323, 305, 333,
Magnavox 310, 308, 309
Marantz 314, 336, 337
Marta 332
Memorex 309, 335
Minolta 305, 304
Mitsubishi/
MGA
Multitech 325, 338, 321
NEC 314, 336, 337
Olympic 309, 308
Optimus 327
Panasonic 308, 309, 306,
Pentax 305, 304
Philco 308, 309
Philips 310, 308, 309
Pioneer 308
Quasar 306, 308, 309
317, 318, 341
333
329, 304, 309
338
330, 314, 336,
337
337
334, 330, 335,
338
323, 324, 325,
326
307
Manufacturer Code
RCA/
PROSCAN
Realistic 309, 330, 328,
Sansui 314
Singer 315
Samsung 322, 313, 321
Sanyo 330, 335
Scott 312, 313, 321,
Sharp 327, 325, 328
Shintom 315
Signature 2000
(M. Wards)
Sylvania 310, 308, 309,
Symphonic 338
Ta sh ir o 3 3 2
Tatung 314, 336, 337
Teac 314, 336, 338,
Technics 309, 308
Teknika 338, 342
Tosh i ba 3 12, 3 11
Wards 327, 328, 335,
Yamaha 330, 314, 336,
Zenith 331
DVD Players
Manufacturer Code
Sony 601, 617, 621
JVC 606
Magnavox 603, 607, 608
Panasonic 604, 609, 610
Philips 603, 607, 611,
Pioneer 605, 613, 614
RCA 602
309, 305, 308,
310, 311, 312,
313
335, 324, 338
335, 323, 324,
325, 326
336, 327
338
337
331, 332
337
612
Manufacturer Code
Samsung 615, 616
Toshiba 603, 618
Zenith 619, 620
AMP (Amplifier)
Manufacturer Code
Sony 501, 521
Aiwa 524
Bose 522, 523, 524
B & K 525, 526
Carver 519, 538
Denon 516, 517, 518,
Fosgate 532
Haitai 504
Harmon
Kardon
JVC 506, 507, 508,
Kenwood 504, 505, 534,
Magnavox 537, 538, 542
Marantz 537, 538, 539,
McIntosh 520
NAD 539
Nakamichi 543, 544, 545
Onkyo 512, 513, 546,
Panasonic 549, 550, 551,
Pioneer 502, 503, 553,
Sansui 538
Sharp 534
Technics 509, 510, 511
Yamaha 514, 515, 559,
527, 528, 529
519, 530, 531,
532
533
535, 536
540, 541, 542
547, 548
552
554, 555, 556,
557, 558
560, 561
15
Operating Instructions
Using your DVR Remote Control with Other Equipment
Operating a TV
Move the device switch to the TV position.
Press To Do This... Press To Do This...
0 9
AUX
Power the TV on/off
ENTER
Enter a channel number
Change channels on the TV
Adjust the volume
MENU
SELECT
SCREEN
MODE
MODE
TV/VIDEO
PUSH
PIC
Display TV menu Change the TVs input settings
Operating a DVD Player (or VCR)
Move the device switch to the DVD position.
Press To Do This... Press To Do This...
AUX
0 9
MENU
PUSH
SELECT
Power the DVD on/off Rewind a DVD
Enter numbers Fast Forward a DVD
Display the menu
Use the arrow buttons and
Scroll/Select bar to make
selections and adjustments
Play a DVD
REPLAY
ADVANCE
REC
Pause a DVD
Use the arrow buttons and
Scroll/Select bar to make
selections and adjustments in
the TV menu
Change the TVs Screen Mode
settings
Change the TVs Pic Mode
settings
Stop playing a DVD
Play a DVD in slow speed
Return to the previous DVD
chapter
Advance to the next DVD
chapter
Begin recording a VCR (hold
REC button for 1 second)
Operating an Amplifier
Move the device switch to the AMP position.
Press To Do This...
AUX
Power the Amp on/off
Adjust the volume
16

Connections
Connections
The connections you choose to make will depend on the video services you receive and on the
connections available with your TV, audio amplifier, or recording device (VCR or DVD
Recorder). Select the appropriate examples for your conditions in the following pages.
Basic Connection
Connecting to Antenna/Cable
HD DVR Connection Panel
1 Connect the RF coaxial cable from your antenna to the HD DVR ANT IN connector.
2 Connect the RF coaxial cable from your cable service to the HD DVR CABLE IN
connector.
✍ It is not recommended to connect the RF output of a cable set-top box or other device to your HD
DVR. The available picture quality may be reduced and certain HD DVR features may not be available
in this case.
17
Operating Instructions
Connecting TV/Monitor
Connect the HD DVR’s HDMI output jack to the HD TV’s HDMI input jack using the
HDMI cable (supplied).
✍ If you are connecting an audio system, connect the digital audio optical cable to your audio system
for your home theater.
✍ If the HDMI-equipped TV to which the HD DVR is connected does not support Dolby Digital® audio
input via the HDMI connection select "off" in the Preferences/Audio/Dolby Digital menu. If "Auto
On" is selected, no audio may be heard from the TV.
18
HD TV with DVI connector
Connections
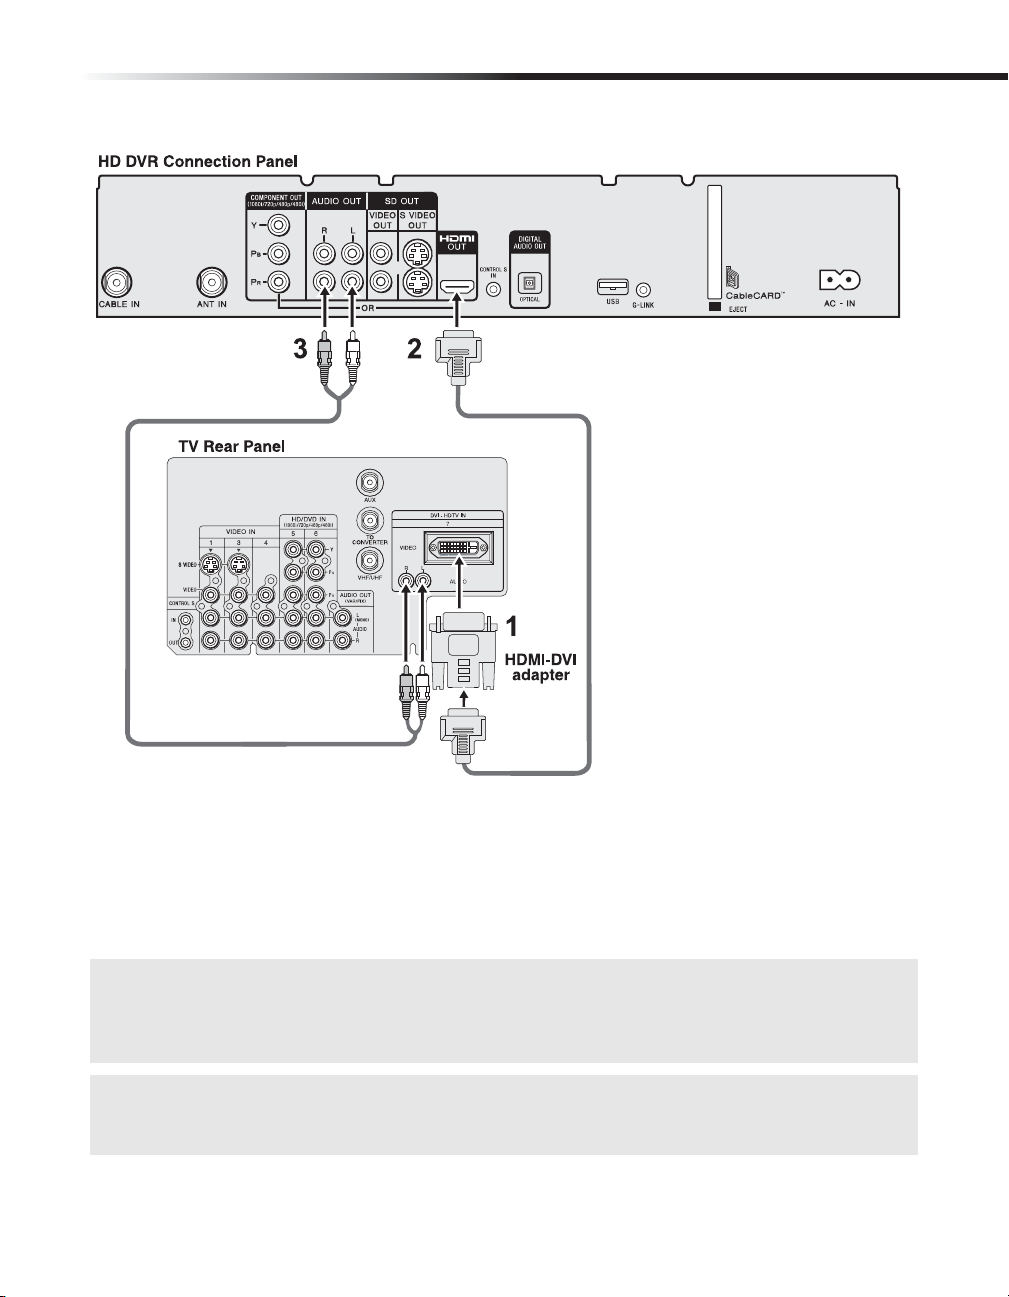
1 Securely connect the DVI adapter (supplied) to the HD TV’s DVI input.
2 Connect the HD DVR’s HDMI output jack to the HDMI-DVI adapter attached to the HD
TV using the HDMI cable (supplied).
3
Connect the HD DVR’s Audio OUT to the HD TV’s Audio IN using an audio cable
.
✍ If you are connecting to an audio system:
•Connect the digital audio optical cable to the HD DVR Digital Audio Optical OUT and to the Digital
Audio Optical IN of your home theater audio system.
•Connect the Audio OUT of your home theater audio system to the HD TV’s Audio IN.
✍ Although the HD DVR's HDMI connector outputs both video and audio, a TV's DVI connector can
only accept video. So it is important to make a separate audio connection to your TV (or audio
system) when using the DVI-HDMI adapter.
19
Operating Instructions
TV with component connector
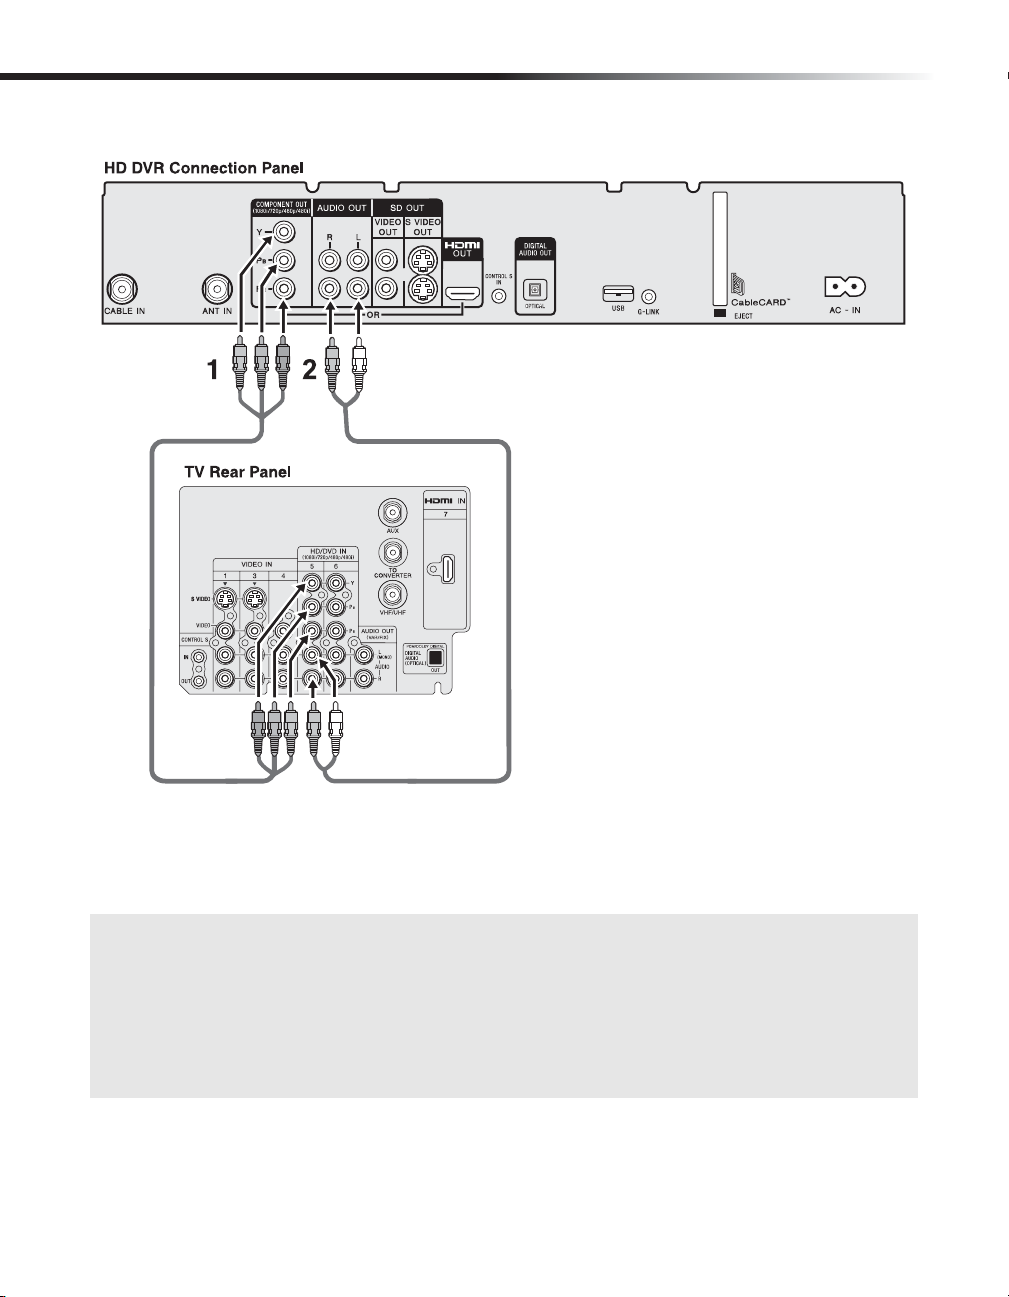
1 Connect the HD DVR’s component output jacks to the TV’s component video input jacks
using a component video cable (Y, P
2
Connect the HD DVR’s Audio OUT to the HD TV’s Audio IN using an audio cable
B, PR)(supplied).
.
✍ If you are connecting to an audio system:
•Connect the digital audio optical cable to the HD DVR Digital Audio Optical OUT and to the Digital
Audio Optical IN of your home theater audio system.
•Connect the Audio OUT of your home theater audio system to the HD TV’s Audio IN.
✍ If your HDTV's component video input does not support certain video formats (such as 1080i or 480i),
use the HD DVR's FORMAT button to select a compatible format (such as 720p). For more
information on the FORMAT feature see page 73.
20
TV with composite connector
Connections
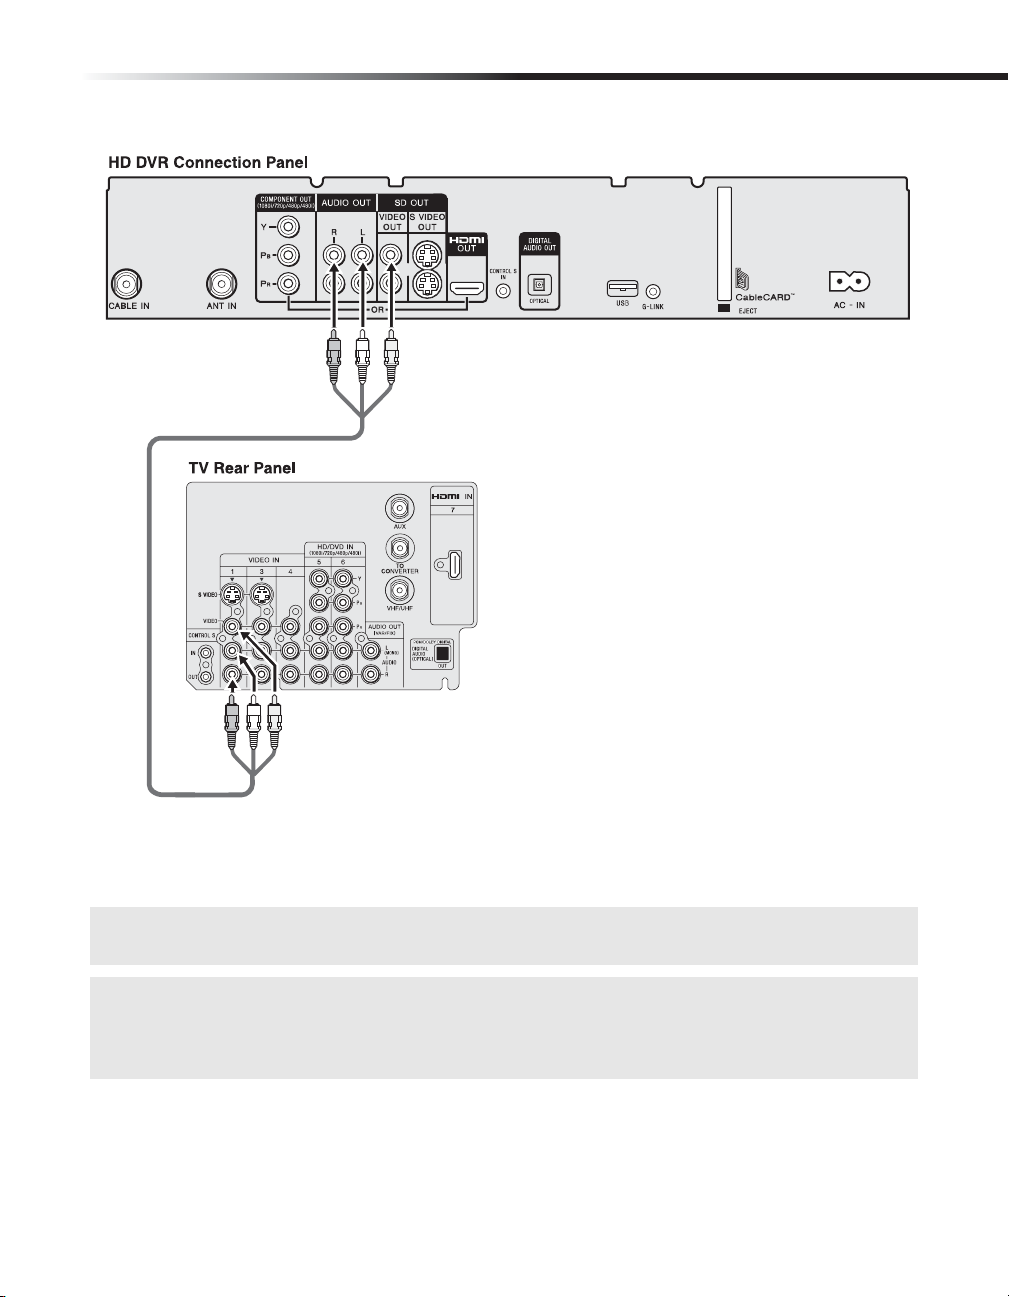
Connect the HD DVR’s composite output jacks to the TV’s composite input jacks using a
composite video cable (supplied).
✍ If your TV comes with an S Video input, use the S Video connection instead of the composite video
connection for better picture quality.
✍ When connecting to a TV with a composite or S Video cable, the FORMAT should be set to SD OUT to
ensure that menus and on-screen displays are visible. With the composite or S Video connections,
any other FORMAT setting will display only video images and no menu or on-screen displays. For
more information on the FORMAT feature see page 73.
21
Operating Instructions
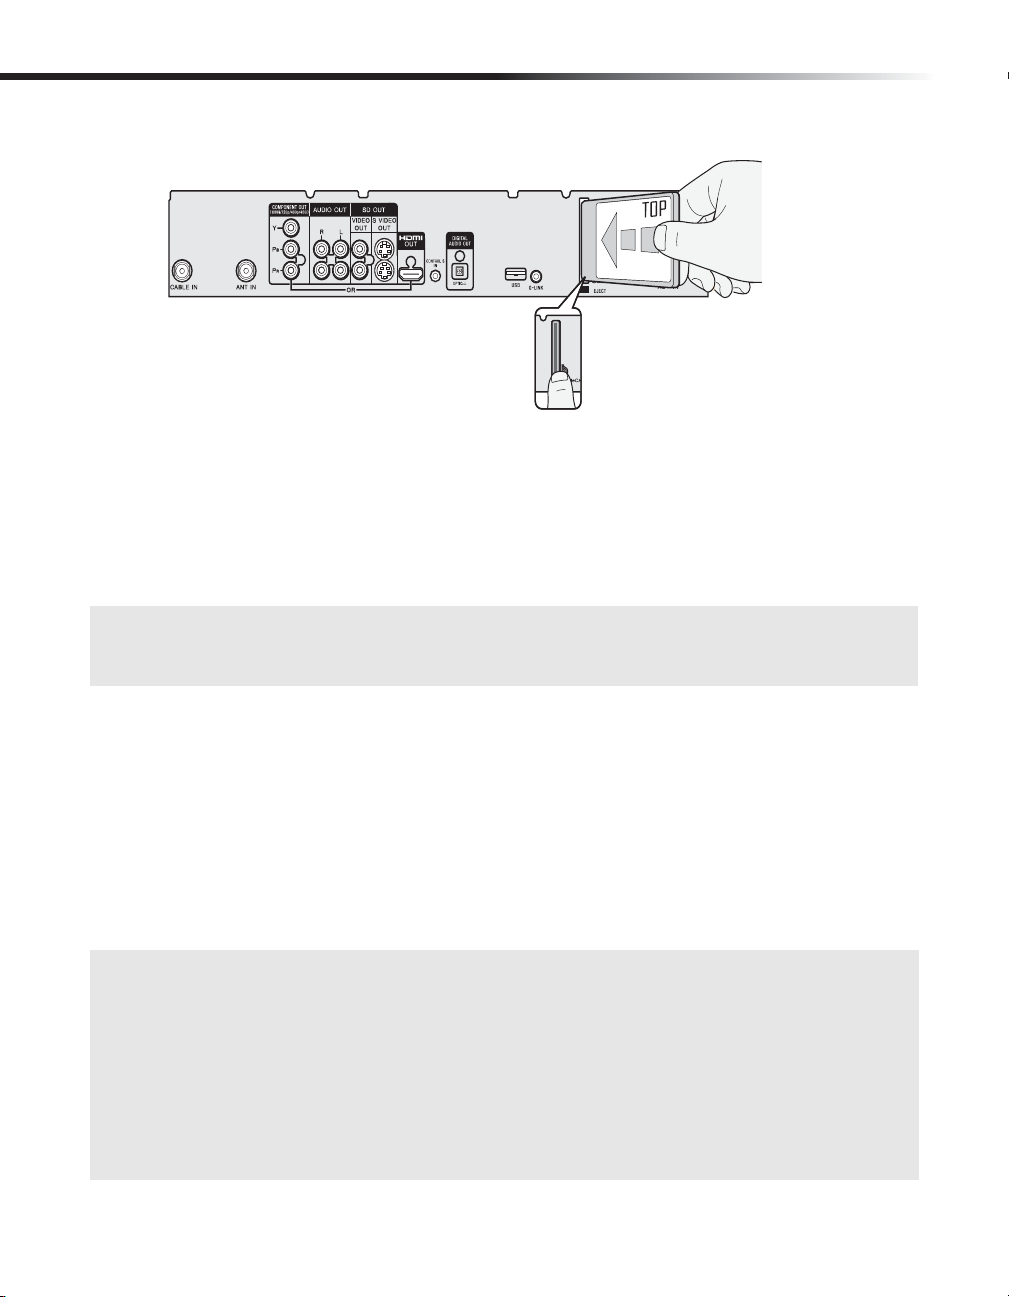
Inserting and Removing a CableCARD™ Device
Inserting a CableCARD device
1 Remove tape and insert the CableCARD into the CableCARD slot on the HD DVR.
2 Gently push the card into the slot until it clicks into place.
For more information about using CableCARD and activation, see “Activating CableCARD Service”
on page 26.
✍ Do not remove the tape covering the CableCARD slot until you are ready to insert the card. This will
prevent any foreign objects from entering into the CableCARD slot. If you use a CableCARD, keep the
card inserted in the slot at all times.
Removing a CableCARD device
In the event you want to cancel your service, contact your cable TV service provider.
1 Turn off t he HD DVR.
2 Push the eject button on the HD DVR’s CableCARD slot to release the card.
3 Pull CableCARD straight out of the slot to remove it.
To install a different CableCARD, follow the instructions in “Activating CableCARD Service”
on page 26.
✍ Once a CableCARD device is removed, your HD DVR will no longer decrypt digital cable TV
programming services that require a CableCARD device.
✍ If you will no longer use CableCARD services, you may need to adjust the cable TV service level or
edit the channels you receive in the TV Guide On Screen™ Setup menu, see page 69.
✍ Always press the "Eject button" to remove the card from the slot. Never pull out the card without
first pressing the "Eject button." Before reinserting the card, be sure to press the "Eject button"
again. This will prepare the CableCARD slot to properly accept the card without damaging either the
CableCARD device or the slot. Do not allow the card to tilt at an angle during insertion. Be sure to
insert the card straight into the slot.
22
Connecting Additional Equipment
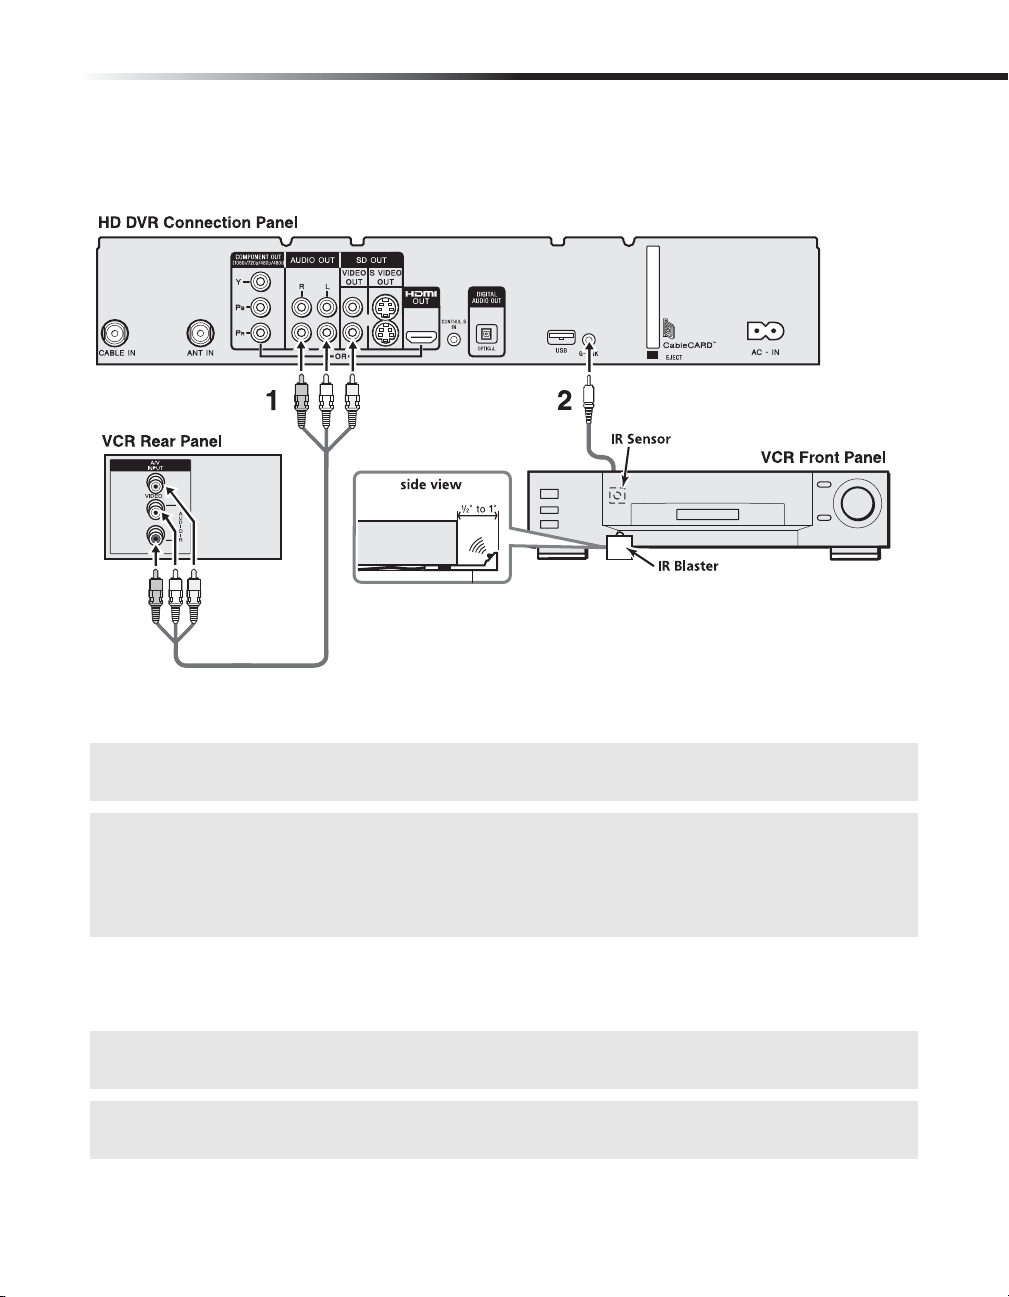
Connecting a DVD Recorder or VCR
Connections
1 Connect your HD DVR’s composite A/V output to your DVD recorder/VCR’s composite
A/V input using the composite A/V cable (supplied).
✍ If your DVD or VCR recorder is equipped with an S Video jack, use the S Video cable to connect to the
HD DVR instead of the composite video cable for better picture quality.
✍ If your DVD recorder is equipped with a component video input (Y,PB,PR), use the component video
cable instead of the yellow composite or S Video cables. When using the component video cable to
connect to a DVD Recorder, the FORMAT setting should be set to either 480i or 480p depending on
which formats the DVD Recorder can accept. For more information on the FORMAT feature see
page 73.
2 Only if connecting to a VCR, connect the IR Blaster to your HD DVR’s G-LINK™ jack,
then place the IR Blaster below and in front of the VCR, about 1/2 ” to 1”. For best results,
place the IR Blaster directly below the VCR’s IR receiving area.
✍ Although it s possible to make recordings from the HD DVR with your DVD Recorder, the HD DVR can
only automatically control VCRs to record with the G-LINK IR Blaster.
✍ If the IR Blaster does not seem to be working correctly, check that the IR Blaster is positioned directly
below the VCR’s IR receiving area.
23
Operating Instructions
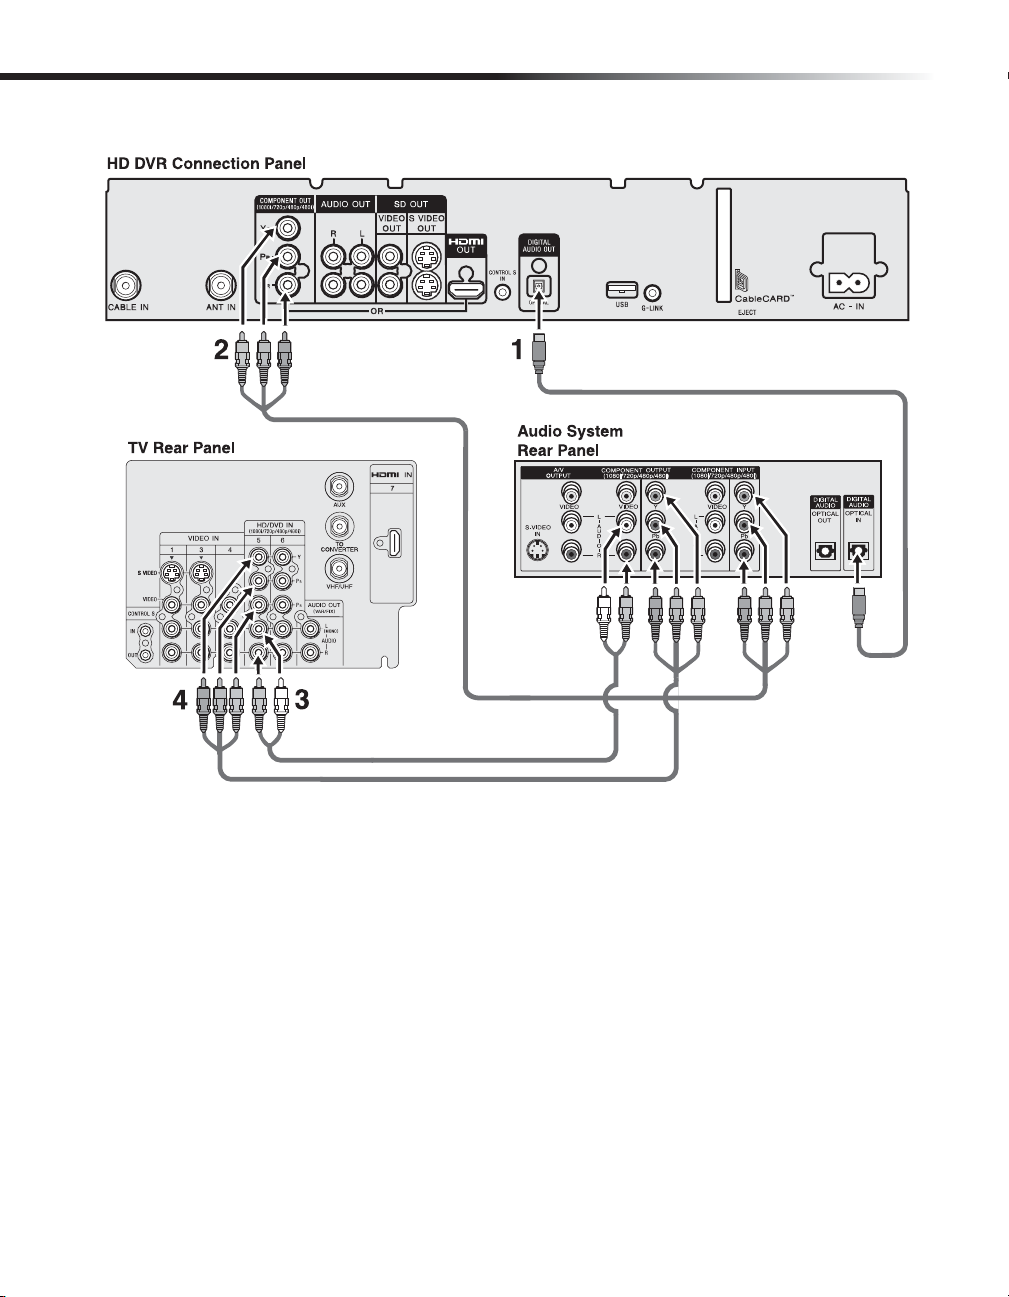
Connecting a Video and Digital Audio System
1 Connect your HD DVR’s Digital Audio Optical OUT to Digital Audio Optical IN of your
audio system using a Digital Audio Optical cable (not supplied).
2 Connect your Audio System’s Audio OUT to Audio IN of your TV using an Audio cable.
3 Connect the HD DVR’s component output jacks to the Audio System’s component input
jacks using a component video cable (Y, P
B, PR).
4 Connect the Audio System’s composite output jacks to the TV’s composite input jacks
using a composite video cable.
24
 Loading...