

Page 1

4-464-708-12(1)
Digital Recording
Binoculars/Jumelles à
enregistrement
numérique
Operating Guide GB
Mode d’emploi FRCA
Manual de
instrucciones
ES
DEV-30/50/50V
Page 2

Read this first
Before operating the unit, please read this
manual thoroughly, and retain it for future
reference.
Owner’s Record
The model and serial numbers are located
on the bottom. Record the serial number
in the space provided below. Refer to these
numbers whenever you call your Sony
dealer regarding this product.
Model No. DEVSerial No.
Model No. ACSerial No.
WARNING
To reduce the risk of fire or electric
shock,
1) do not expose the unit to rain or
moisture.
2) do not place objects filled with
liquids, such as vases, on the
apparatus.
Do not expose the batteries to
excessive heat such as sunshine, fire or
the like.
For customers in the USA
This symbol is intended
to alert the user to the
presence of uninsulated
“dangerous voltage” within
the product’s enclosure
that may be of sufficient
magnitude to constitute
a risk of electric shock to
persons.
This symbol is intended
to alert the user to the
presence of important
operating and maintenance
(servicing) instructions in
the literature accompanying
the appliance.
GB
2
Page 3

IMPORTANT SAFETY INSTRUCTIONS
SAVE THESE INSTRUCTIONS.
DANGER - TO REDUCE THE RISK OF FIRE
OR ELECTRIC SHOCK,
CAREFULLY FOLLOW THESE
INSTRUCTIONS.
Read these instructions.
Keep these instructions.
Heed all warnings.
Follow all instructions.
Do not use this apparatus near water.
Clean only with dry cloth.
Do not block any ventilation openings. Install in accordance with the manufacturer’s
instructions.
Do not install near any heat sources such as radiators, heat registers, stoves, or other
apparatus (including amplifiers) that produce heat.
Do not defeat the safety purpose of the polarized or grounding-type plug. A polarized plug
has two blades with one wider than the other. A grounding type plug has two blades and a
third grounding prong. The wide blade or the third prong are provided for your safety. If
the provided plug does not fit into your outlet, consult an electrician for replacement of the
obsolete outlet.
Protect the power cord from being walked on or pinched particularly at plugs, convenience
receptacles, and the point where they exit from the apparatus.
Only use attachments/accessories specified by the manufacturer.
Use only with the cart, stand, tripod, bracket, or table specified by the manufacturer, or
sold with the apparatus. When a cart is used, use caution when moving the cart/apparatus
combination to avoid injury from tip-over.
GB
Unplug this apparatus during lightning storms or when unused for long periods of time.
Refer all servicing to qualified service personnel. Servicing is required when the apparatus
has been damaged in any way, such as power-supply cord or plug is damaged, liquid has
been spilled or objects have fallen into the apparatus, the apparatus has been exposed to
rain or moisture, does not operate normally, or has been dropped.
If the shape of the plug does not fit the power outlet, use an attachment plug adaptor of the
proper configuration for the power outlet.
GB
3
Page 4

Representative plug of power supply cord of countries/regions around the world.
A Type
(American
Type)
B Type
(British Type)
BF Type
(British Type)
B3 Type
(British Type)
C Type
(CEE Type)
SE Type
(CEE Type)
The representative supply voltage and plug type are described in this chart.
Depend on an area, Different type of plug and supply voltage are used.
Attention: Power cord meeting demands from each country shall be used.
For only the United States
Use a supplied power cord
Europe
Countries/regions Voltage Frequency (Hz) Plug type
Austria 230 50 C
Belgium 230 50 C
Czech 220 50 C
Denmark 230 50 C
Finland 230 50 C
France 230 50 C
Germany 230 50 C
Greece 220 50 C
Hungary 220 50 C
Iceland 230 50 C
Ireland 230 50 C/BF
Italy 220 50 C
Luxemburg 230 50 C
Netherlands 230 50 C
Norway 230 50 C
Poland 220 50 C
Portugal 230 50 C
Romania 220 50 C
Russia 220 50 C
Slovak 220 50 C
Spain 127/230 50 C
Sweden 230 50 C
Switzerland 230 50 C
UK 240 50 BF
Asia
Countries/regions Voltage Frequency (Hz) Plug type
China 220 50 A
Hong Kong 200/220 50 BF
India 230/240 50 C
Indonesia 127/230 50 C
Japan 100 50/60 A
Korea (rep) 220 60 C
Malaysia 240 50 BF
Philippines 220/230 60 A/C
Singapore 230 50 BF
Taiwan 110 60 A
Thailand 220 50 C/BF
Vietnam 220 50 A/C
GB
4
O Type
(Ocean Type)
Page 5

Oceania
Countries/regions Voltage Frequency (Hz) Plug type
Australia 240 50 O
New Zealand 230/240 50 O
North America
Countries/regions Voltage Frequency (Hz) Plug type
Canada 120 60 A
USA 120 60 A
Central America
Countries/regions Voltage Frequency (Hz) Plug type
Bahamas 120/240 60 A
Costa Rica 110 60 A
Cuba 110/220 60 A/C
Dominican (rep) 110 60 A
El Salvador 110 60 A
Guatemala 120 60 A
Honduras 110 60 A
Jamaica 110 50 A
Mexico 120/127 60 A
Nicaragua 120/240 60 A
Panama 110/220 60 A
South America
Countries/regions Voltage Frequency (Hz) Plug type
Argentina 220 50 C/BF/O
Brazil 127/220 60 A/C
Chile 220 50 C
Colombia 120 60 A
Peru 220 60 A/C
Venezuela 120 60 A
Middle East
Countries/regions Voltage Frequency (Hz) Plug type
Iran 220 50 C/BF
Iraq 220 50 C/BF
Israel 230 50 C
Saudi Arabia 127/220 50 A/C/BF
Turkey 220 50 C
UAE 240 50 C/BF
Africa
Countries/regions Voltage Frequency (Hz) Plug type
Algeria 127/220 50 C
Congo (dem) 220 50 C
Egypt 220 50 C
Ethiopia 220 50 C
Kenya 240 50 C/BF
Nigeria 230 50 C/BF
South Africa 220/230 50 C/BF
Tanzania 230 50 C/BF
Tunisia 220 50 C
GB
5
Page 6

CAUTION
Battery pack
If the battery pack is mishandled, the
battery pack can burst, cause a fire or even
chemical burns. Observe the following
cautions.
Do not disassemble.
Do not crush and do not expose the battery
pack to any shock or force such as hammering,
dropping or stepping on it.
Do not short circuit and do not allow metal
objects to come into contact with the battery
terminals.
Do not expose to high temperature above 60°C
(140°F) such as in direct sunlight or in a car
parked in the sun.
Do not incinerate or dispose of in fire.
Do not handle damaged or leaking lithium ion
batteries.
Be sure to charge the battery pack using a
genuine Sony battery charger or a device that
can charge the battery pack.
Keep the battery pack out of the reach of small
children.
Keep the battery pack dry.
Replace only with the same or equivalent type
recommended by Sony.
Dispose of used battery packs promptly as
described in the instructions.
Replace the battery with the specified type
only. Otherwise, fire or injury may result.
AC Adaptor
Do not use the AC Adaptor placed in a
narrow space, such as between a wall and
furniture.
Use the nearby wall outlet (wall socket)
when using the AC Adaptor. Disconnect
the AC Adaptor from the wall outlet (wall
socket) immediately if any malfunction
occurs while using apparatus.
GB
6
Even if this product is turned off, AC power
source (mains) is still supplied to it while
connected to the wall outlet (wall socket)
via the AC Adaptor.
Note on the power cord (mains lead)
The power cord (mains lead) is designed
specifically for use with this product only,
and should not be used with other electrical
equipment.
Excessive sound pressure from earphones
and headphones can cause hearing loss.
For customers in the U.S.A. and CANADA
RECYCLING LITHIUM-ION BATTERIES
Lithium-Ion batteries are
recyclable.
You can help preserve our
environment by returning
your used rechargeable
batteries to the collection and
recycling location nearest you.
For more information
regarding recycling of
rechargeable batteries, call toll
free 1-800-822- 8837, or visit
http://www.rbrc.org/
Caution: Do not handle
damaged or leaking LithiumIon batteries.
Battery pack
This device complies with Part 15 of the
FCC Rules. Operation is subject to the
following two conditions: (1) This device
may not cause harmful interference, and
(2) this device must accept any interference
received, including interference that may
cause undesired operation.
CAN ICES-3 B/NMB-3 B
Page 7

For the customers in the U.S.A.
If you have any questions about this
product, you may call:
Sony Customer Information Center 1-800222-SONY (7669).
The number below is for the FCC related
matters only.
Regulatory Information
Declaration of Conformity
Trade Name: SONY
Model No.: DEV-50V
Responsible Party: Sony Electronics Inc.
Address: 16530 Via Esprillo, San Diego,
CA 92127 U.S.A.
Telephone No.: 858-942-2230
This device complies with Part 15 of the
FCC Rules. Operation is subject to the
following two conditions: (1) This device
may not cause harmful interference,
and (2) this device must accept any
interference received, including
interference that may cause undesired
operation.
interference will not occur in a particular
installation. If this equipment does cause
harmful interference to radio or television
reception, which can be determined by
turning the equipment off and on, the
user is encouraged to try to correct the
interference by one or more of the following
measures:
Reorient or relocate the receiving antenna.
Increase the separation between the
equipment and receiver.
Connect the equipment into an outlet on
a circuit different from that to which the
receiver is connected.
Consult the dealer or an experienced radio/
TV technician for help.
The supplied interface cable must be used
with the equipment in order to comply with
the limits for a digital device pursuant to
Subpart B of Part 15 of FCC Rules.
FOR CUSTOMERS IN EUROPE
CAUTION
You are cautioned that any changes or
modifications not expressly approved in
this manual could void your authority to
operate this equipment.
Note
This equipment has been tested and found
to comply with the limits for a Class B
digital device, pursuant to Part 15 of the
FCC Rules.
These limits are designed to provide
reasonable protection against harmful
interference in a residential installation.
This equipment generates, uses, and
can radiate radio frequency energy and,
if not installed and used in accordance
with the instructions, may cause harmful
interference to radio communications.
However, there is no guarantee that
Hereby, Sony Corporation, declares that
this DEV-50V Digital Recording Binoculars
is in compliance with the essential
requirements and other relevant provisions
of the Directive 1999/5/EC. For details,
please access the following
URL: http://www.compliance.sony.de/
Notice for the customers in the
countries applying EU Directives
This product has been manufactured by
or on behalf of Sony Corporation, 1-7-1
Konan Minato-ku Tokyo, 108-0075 Japan.
Inquiries related to product compliance
based on European Union legislation
shall be addressed to the authorized
representative, Sony Deutschland GmbH,
Hedelfinger Strasse 61, 70327 Stuttgart,
Germany. For any service or guarantee
matters, please refer to the addresses
provided in the separate service or
guarantee documents.
GB
7
Page 8

ATTENTION
The electromagnetic fields at the specific
frequencies may influence the picture and
sound of this unit.
This product has been tested and found
compliant with the limits set out in the
EMC regulation for using connection cables
shorter than 3 meters (9.8 feet).
Notice
If static electricity or electromagnetism
causes data transfer to discontinue midway
(fail), restart the application or disconnect
and connect the communication cable
(USB, etc.) again.
Disposal of Old Electrical
& Electronic Equipment
(Applicable in the European
Union and other European
countries with separate
collection systems)
This symbol on the product or on its
packaging indicates that this product shall
not be treated as household waste. Instead
it shall be handed over to the applicable
collection point for the recycling of
electrical and electronic equipment.
By ensuring this product is disposed of
correctly, you will help prevent potential
negative consequences for the environment
and human health, which could otherwise
be caused by inappropriate waste handling
of this product. The recycling of materials
will help to conserve natural resources.
For more detailed information about
recycling of this product, please contact
your local Civic Office, your household
waste disposal service or the shop where
you purchased the product.
Disposal of waste batteries
(applicable in the European
Union and other European
countries with separate
collection systems)
This symbol on the battery or on the
packaging indicates that the battery
provided with this product shall not be
treated as household waste.
On certain batteries this symbol might
be used in combination with a chemical
symbol. The chemical symbols for mercury
(Hg) or lead (Pb) are added if the battery
contains more than 0.0005% mercury or
0.004% lead.
By ensuring these batteries are disposed of
correctly, you will help prevent potentially
negative consequences for the environment
and human health which could otherwise
be caused by inappropriate waste handling
of the battery. The recycling of the materials
will help to conserve natural resources.
In case of products that for safety,
performance or data integrity reasons
require a permanent connection with an
incorporated battery, this battery should
be replaced by qualified service staff only.
To ensure that the battery will be treated
properly, hand over the product at end-oflife to the applicable collection point for
the recycling of electrical and electronic
equipment.
For all other batteries, please view the
section on how to remove the battery from
the product safely. Hand the battery over
to the applicable collection point for the
recycling of waste batteries.
For more detailed information about
recycling of this product or battery, please
contact your local Civic Office, your
household waste disposal service or the
shop where you purchased the product.
GB
8
Page 9
Notice for customers in the United
Kingdom
A moulded plug complying with BS 1363 is
fitted to this equipment for your safety and
convenience.
Should the fuse in the plug supplied need
to be replaced, a fuse of the same rating as
the supplied one and approved by ASTA or
BSI to BS 1362, (i.e., marked with an
mark) must be used. If the plug supplied
with this equipment has a detachable fuse
cover, be sure to attach the fuse cover after
you change the fuse. Never use the plug
without the fuse cover. If you should lose
the fuse cover, please contact your nearest
Sony service station.
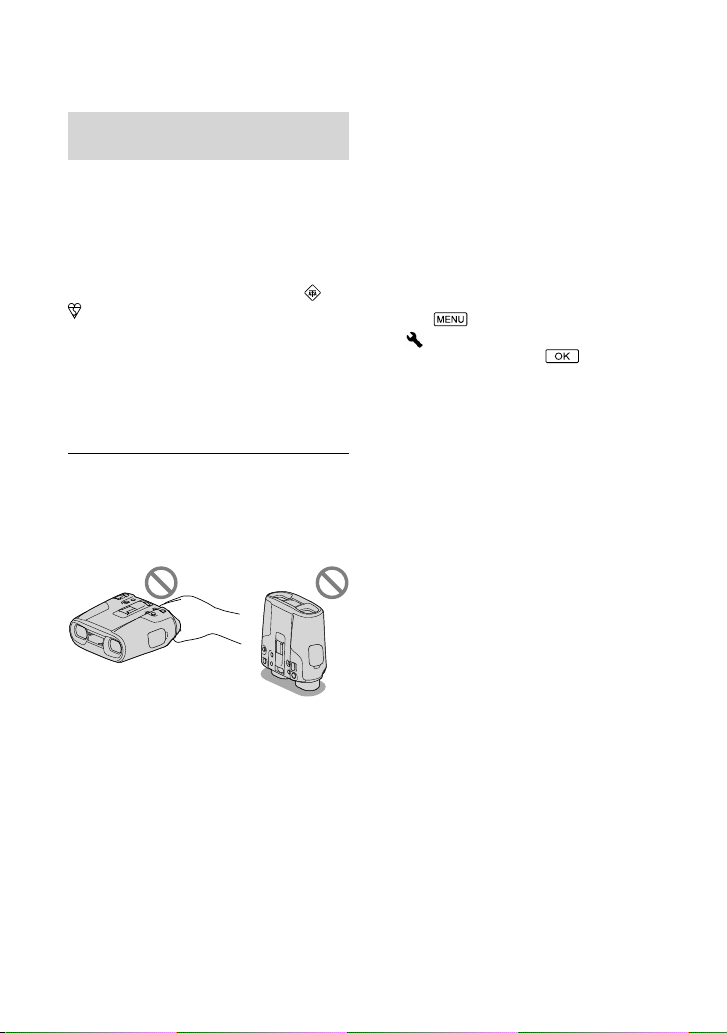
Using this product
Do not hold this product by the viewfinder or
covers. Also, do not place this product with the
viewfinder facing down.
This product is dustproof and rainproof. See
“About dust & rain proof performance of this
product” (p
. 10).
Menu items, viewfinder, and lens
The viewfinder is manufactured using
extremely high precision technology, so over
99.99% of the pixels are operational for effective
use. However, there may be some tiny black
points and/or bright points (white, red, blue,
or green in color) that appear constantly in the
viewfinder. These points are normal results of
the manufacturing process and do not affect the
recording in any way.
or
Exposing the viewfinder or the lens to direct
sunlight for long periods of time may cause
malfunctions.
Do not aim at the sun. Doing so might cause
this product to malfunction. Take images of the
sun only in low light conditions, such as at dusk.
About language setting
The on-screen displays in each local language
are used for illustrating the operating
procedures. To change the screen language,
select
[
a desired language
(MENU) [Setup]
General Settings] [Language Setting]
.
On recording
Before starting to record, test the recording
function to make sure the image and sound are
recorded without any problems.
Compensation for the contents of recordings
cannot be provided, even if recording or
playback is not possible due to a malfunction of
this product, memory card, etc.
TV color systems differ depending on the
country/region. To view your recordings on a
TV, set [60i/50i Sel] to the setting required in
o
ur country/region before recording (p. 15).
y
Television programs, films, video tapes,
and other materials may be copyrighted.
Unauthorized recording of such materials may
be contrary to the copyright laws.
Use this product in accordance with local
regulations.
About this manual, illustrations and
on-screen displays
The example images used in this manual for
illustration purposes are captured using a digital
still camera, and therefore may appear different
from images and screen indicators that actually
appear on this product. And, the illustrations
of this product and its screen indication are
exaggerated or simplified for understandability.
Design and specifications of this product and
accessories are subject to change without notice.
GB
9
Page 10

Viewing 3D video images
Some people may experience discomfort (such
as eye strain, fatigue, or nausea) while watching
3D video images. Sony recommends that all
viewers take regular breaks while watching
3D video images. The length and frequency
of necessary breaks will vary from person to
person. You must decide what works best. If
you experience any discomfort, you should
stop watching the 3D video images until the
discomfort ends; consult a doctor if necessary.
You should also review the instruction manual
of any other device or media used with
this product. The vision of young children
(especially those under six years old) is still
under development. Consult your doctor (such
as a pediatrician or eye doctor) before allowing
young children to watch 3D video images.
Adults should supervise young children to
ensure they follow the recommendations listed
above.
Notes on use
Be careful of your surroundings when using
this product. Especially, do not use this product
while walking. Doing so may cause accidents
or injury.
Do not do any of the following. Otherwise,
the memory card may be damaged, recorded
images may be impossible to play back or may
be lost, or other malfunctions could occur.
ejecting the memory card when the access
mp (p. 17) is lit or flashing
a
l
removing the battery pack or AC Adaptor
from this product, or applying mechanical
shock or vibration to this product when the
(Movie)/ (Photo) lamps (p. 19) or the
access lamp (p. 17) are lit or flashing
About dust & rain proof
performance of this product
The main unit of this product has been proven
(by our performance test) to reach dust & rain
proof performance requirements equivalent to
GB
IEC60529 IP54.
10
Sudden rain or fugitive dust will not affect
operation of this product.
Dustproof performance (IP5x): enclosure
does not allow such ingress of dust as to cause
harmful effects. The enclosure is not completely
dust-tight, however, and is not guaranteed to
protect against extreme dust exposure.
Rainproof performance (IPx4): enclosure
that does not allow splashing of water from
any directions to cause harmful effects. This
product is not protected against pressurized
water, such as from a shower or tap, etc.
When an accessory is attached or the AC
adaptor or cables are connected, the dust &
rain proof performance of this product may be
compromised. Be careful not to allow dust or
water to enter this product.
Do not let the product come in contact with hot
water or that with high mineral content.
Strong shocks such as from dropping of this
product may compromise the rain proof
performance of this product. We recommended
that you contact your Sony dealer or local
authorized Sony service facility (charge applies)
regarding repairs.
Make sure to use this product properly,
observing the following points, as damage
caused by misuse, abuse or failure to properly
maintain this product is not covered by
warranty.
Do not use this product underwater.
This product is not waterproof, and should
not be used underwater. Never immerse this
product in water.
Securely close the battery/memory card cover
or jack covers.
Water is more likely to enter this product if
the cover is open. When using this product in
the rain or with wet or sandy hands, do not
open the battery/memory card cover or jack
covers. Doing so may cause a malfunction.
On use and care
Sand, hair, dirt, etc., trapped in the sealing
gasket of the battery/memory card cover or jack
covers may lead to water entering this product.
Wipe the area clean with a soft cloth that does
not leave fibers.
Page 11

Scratches on and deformation or deterioration
of the sealing gasket may lead to water entering
this product. If the sealing gasket becomes
scratched, deformed or deteriorated, consult
your Sony dealer or local authorized Sony
service facility.
The drains on the bottom of this product are
designed to allow any water or sand entering
via the clearance of the IPD ADJ dial or the
wfinder to escape from the bottom (p. 36).
ie
v
If sand caught in the parts of this product
impairs their movement, remove the sand with
a blower, etc., and then operate them repeatedly.
About manuals for this product
Two manuals have been prepared for this
product, the “Operating Guide” and the
“Digital Recording Binoculars Handbook
(PDF).” The “Operating Guide” introduces
basic operations and the “Digital Recording
Binoculars Handbook (PDF)” explains
details of functions.
How to read Digital Recording
Binoculars Handbook (PDF)
Install the “Digital Recording Binoculars
Handbook” on your computer from the
supplied CD-ROM.
Place the supplied CD-ROM in the
ptical disc drive of your computer.
o
The top page should appear. If the top page
does not appear, double-click the [index.
html] file in the CD-ROM.
Click the CD-ROM manual you want to
read.
The PDF file on the CD-ROM manual will
open.
You need Adobe Reader to read the “Digital
Recording Binoculars Handbook.” If it is not
installed on your computer, you can download
it from the Adobe Systems web page.
http://www.adobe.com/
Table of contents
Read this first . . . . . . . .. . .. . . . . . . . .. . .. . . . . .. . .. . 2
IMPORTANT SAFETY INSTRUCTIONS . . . .. . 3
Getting started
Step 1: Checking the supplied items .. . . . 12
Step 2: Charging the battery pack . . . . . .. . 13
Step 3: Turning the power on, and
setting up this product . . .. . .. . . . . .. . .. . . . . . 14
Step 4: Inserting a memory card . .. . . . . . . . 17
Binoculars/Recording/
Playback
Using this product as binoculars . . .. . . . . . 18
Recording . . . . .. . .. . . . . .. . .. . . . . . . . .. . .. . . . . . .. 19
Playback on this product . .. . .. . . . . . . . .. . .. . 21
Saving movies and photos
with a computer
Playing images on a computer .. . .. . . . . . .. 22
Preparing a computer (Windows) . . . . . .. . 23
Customizing this product
Using menus . . . .. . .. . . . . .. . .. . . . . . . . .. . .. . . . . . 24
Menu lists. .. . . . . . . . .. . .. . . . . . . . .. . .. . . . . .. . .. . .25
Additional information
Troubleshooting . . .. . .. . . . . . .. . .. . . . . .. . .28
Precautions . . .. . .. . . . . . . . .. . .. . . . . .. . .. . . . . . . . 29
Specifications . . . .. . .. . . . . . .. . .. . . . . .. . .. . . . . . . 31
Quick reference
Screen indicators . . .. . . . . .. . .. . . . . . . . .. . .. . . . 34
Parts and controls. . . .. . .. . . . . . . . .. . .. . . . . .. . .35
Table of contents
GB
11
Page 12
Getting started
Step 1: Checking the supplied items
The numbers in ( ) are the supplied
quantity.
Digital Recording Binoculars (1)
AC Adaptor (1)
Power cord (Mains lead) (1)
HDMI cable (1)
Micro USB cable (1)
Rechar
Lens cap (1)
Neck strap (1)
“Operating Guide” (1)
CD-ROM “Manuals for Digital Recording Binoculars” (1)
Notes
The “PlayMemories Home” software and
“PlayMemories Home Help Guide” can be
dow
Only for DEV-50/50V
Carrying case (1)
Finder cap (1)
Lar
ge eyecup (2)
ttery pack NP-FV70 (1)
geable ba
“Digital Recording Binoculars Handbook
(PDF)”
nloaded from the Sony website (p. 23).
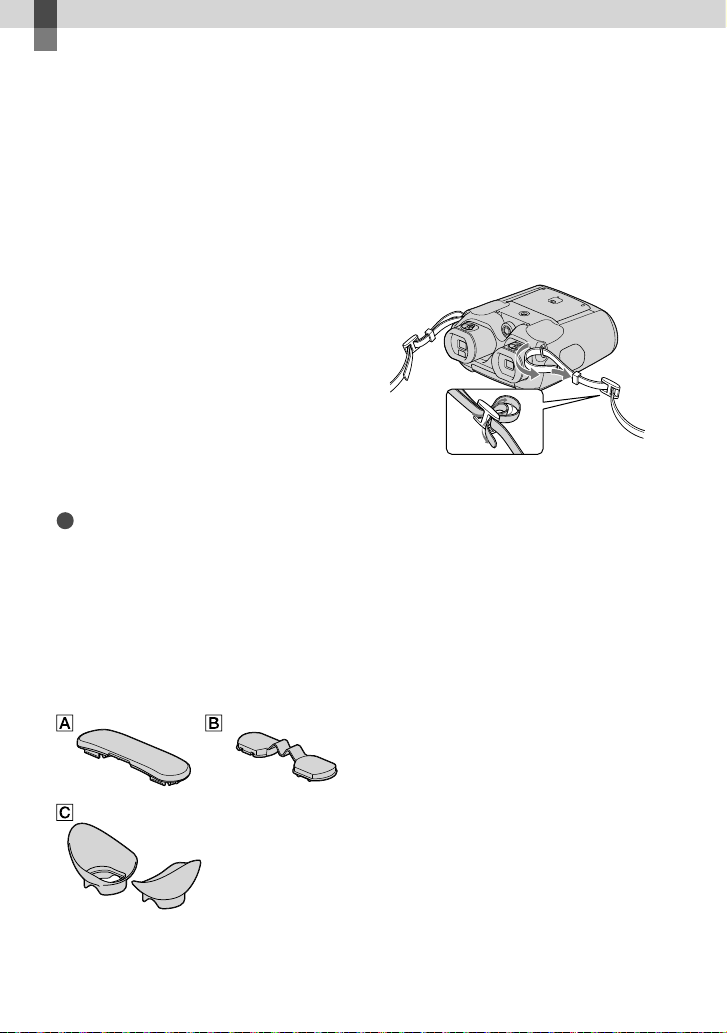
Attaching the neck strap
To avoid dropping this product, attach the
neck strap to the binoculars following the
steps below.
Insert one end of the neck strap into the
strap mount on the binoculars. Then, fasten
the neck strap, placing the end of the neck
strap into the clasp.
Attaching the large eyecup
(DEV-50/50V)
If you cannot see the picture in the
viewfinder clearly under bright light, use
the large eyecup.
12
GB
Page 13
Step 2: Charging the battery pack
You can charge the “InfoLITHIUM” battery
pack (V series).
Notes
You cannot use any “InfoLITHIUM” battery
pack other than NP-FV70/FV100 with this
product.
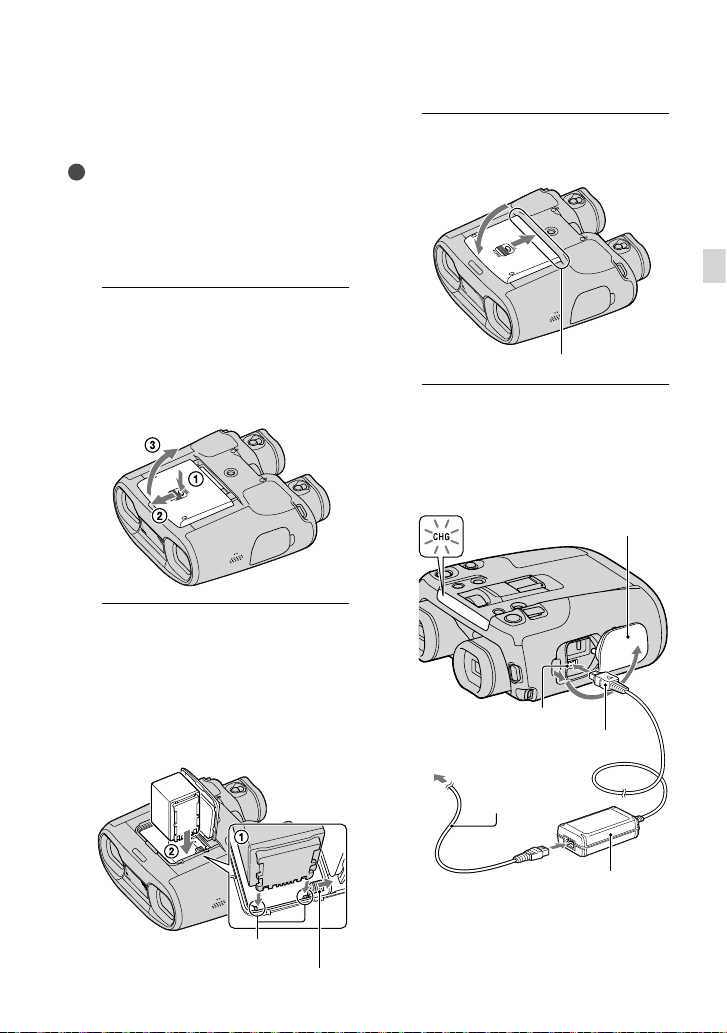
To charge the battery, turn off this product by
pressing the POWER button.
Press the battery/memory card
1
cover button () and slide the
cover in the direction of the
arrow (), then open the cover
().
Align the battery with the
2
grooves in the battery
compartment while pressing
the battery release lever (),
then slide the battery until it
clicks ().
Close the battery/memory card
3
cover.
Slide the cover until there is no gap.
Connect the AC Adaptor and
4
the power cord (mains lead) to
this product and the wall outlet
(wall socket).
CHG (charge) lamp
Open and rotate the cover.
DC IN jack
To the wall outlet
(wall socket)
Power cord
(mains lead)
DC plug
Getting started
Align the battery with the grooves.
Battery release lever
AC Adaptor
The CHG (charge) lamp lights up and
charging starts. The CHG (charge)
lamp turns off when the battery pack
is fully charged.
GB
13
Page 14
When the battery is charged,
5
disconnect the AC Adaptor
from the DC IN jack of this
product.
Tips
When this product is on, you can check the
approximate amount of remaining battery
power (expected recording and playing time)
with the remaining battery indicator at the
upper right on the screen.
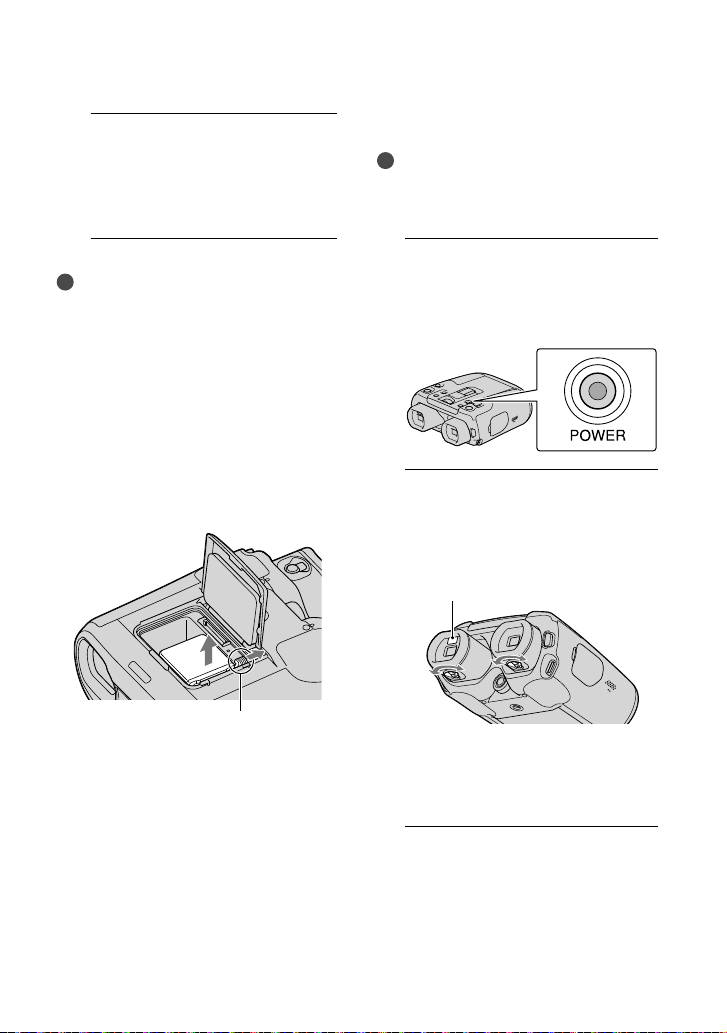
To remove the battery pack
Turn off this product by pressing the
POWER button (p.
battery/memory card cover (p.
Slide the battery release lever and
remove the battery.
14), then open the
13).
Step 3: Turning the power on, and setting up this product
Notes
If this product is used by more than one person,
adjust the diopter and the width whenever a
different person uses it.
1
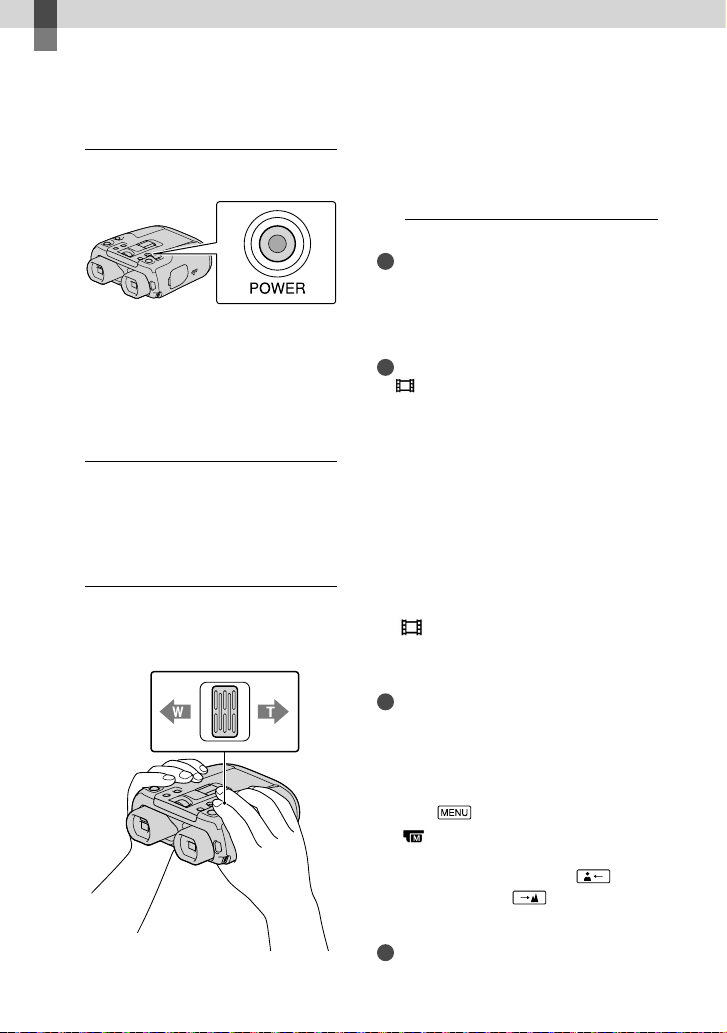
Press the POWER button.
This product is turned on.
To turn off the power, press the POWER
button again.
2
Adjust the diopter until you
can see a clear image with each
eye by turning the diopter
adjustment knob.
Eye sensor
14
Battery release lever
Adjust the diopter for each eye separately.
If you bring your eyes close to the
viewfinder, the eye sensor reacts to display
the viewfinder screen.
3
Adjust the width between the left
and right viewfinder to fit your
eyes using the IPD ADJ dial.
GB
Page 15

Adjust the width so that left and right
images overlap.
Make sure that the image in the viewfinder
does not appear as a double image.
When the viewfinder exceeds the limit of
the adjustable range, you will hear a click.
The viewfinder will not move any further.
4
Set the language, area, summer
time, date & time format, and
date & time using the multiselector, then confirm each
setting.
Using the multi-selector
Move the multi-selector towards
/// to select the desired item, and
then press the center of the selector to
complete the selection.
6
Adjust the relative vertical
position of the right and left
viewfinder.
Make sure that the horizontal line
overlaps the vertical lines.
Image in the left
viewfinder
Image viewed by both eyes
If the horizontal line and the vertical
lines do not overlap, adjust the position
of the image in the right viewfinder by
selecting
overlap, then select
If you see the image below, the device
works correctly.
Image in the right
viewfinder
/ until the lines
.
Getting started
When each setting have been
completed, select [Next].
5
Select [60i (NTSC)] or [50i (PAL)]
to suit the TV color system used
in your country/region, then
select .
When the 60i/50i selection is made,
this product restarts to update the
system.
See page 16 for details on the TV color
system in your country/region.
If you see the image below even after
adjusting the viewfinder, cease using this
product.
The horizontal line and the vertical lines do not
overlap.
If you cannot see images correctly, this
product may be damaged. Contact
your Sony dealer or local authorized
Sony service facility.
GB
15
Page 16
7
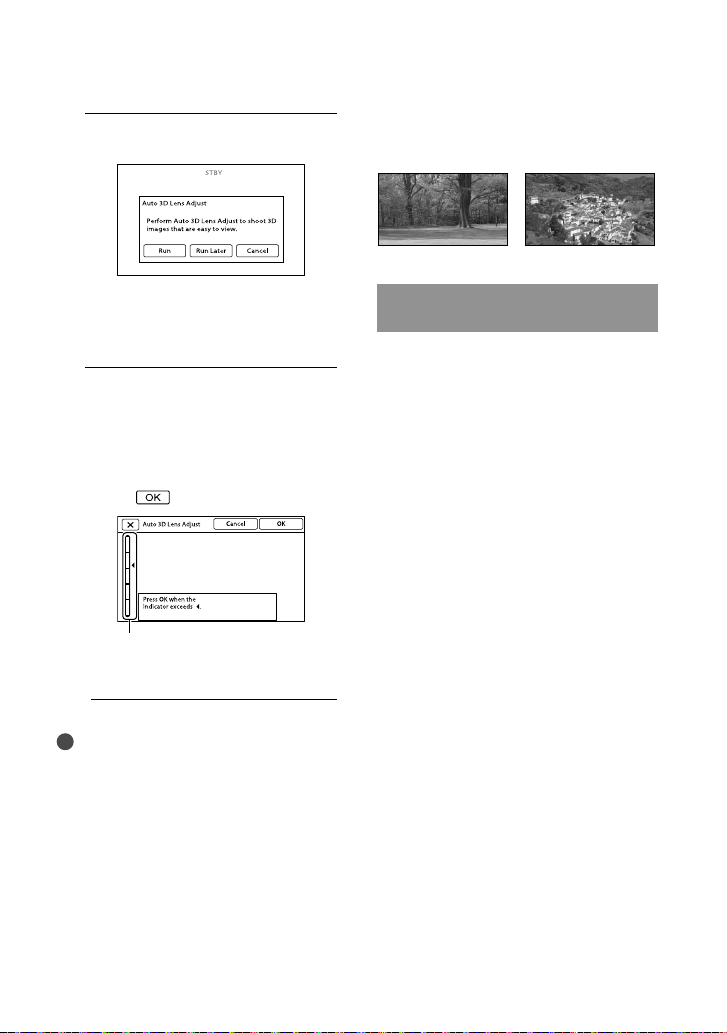
Select [Run].
If you select [Run Later], the recording
mode screen appears. When you turn on
this product next time, the [Auto 3D Lens
Adjust] screen will appear.
8
Adjust the 3D lens.
Aim this product at a subject to display
it on the screen.
View a subject for which the scale of the
indicator exceeds the
select
Scale
Do not change the subject until the
adjustment is completed.
Notes
If this product fails to perform [Auto 3D Lens
Adjust], select [Run Again].
.
mark, and then
Type of subjects that should be
displayed on the screen for [Auto 3D
Lens Adjust]
The scale indicated varies depending on the
subject displayed on the screen.
Subjects that indicate a higher scale:
Distant subjects in bright places such as
outdoors
GB
16
Subjects farther away than 20 m (65 ft.) from
this product
Subjects with various colors and shapes
Watching the recorded movies on
a TV
To watch recorded movies on a TV, record
movies after selecting the appropriate
[60i/50i Sel] setting for the TV color system
of the country/region where you are using
this product.
Countries/regions where you need to set
[60i/50i Sel] to [60i (NTSC)]
Bahama Islands, Bolivia, Canada, Central
America, Chile, Colombia, Ecuador,
Guyana, Jamaica, Japan, Korea, Mexico,
Peru, Surinam, Taiwan, the Philippines, the
USA, Venezuela, etc.
Countries/regions where you need to set
[60i/50i Sel] to [50i (PAL)]
Argentina, Australia, Austria, Belgium,
Bulgaria, Brazil, China, Czech Republic,
Denmark, Finland, France, Germany,
Guiana, Holland, Hong Kong, Hungary,
Iran, Iraq, Italy, Kuwait, Malaysia, Monaco,
New Zealand, Norway, Paraguay, Poland,
Portugal, Russia, Singapore, Slovak
Republic, Spain, Sweden, Switzerland,
Thailand, Ukraine, United Kingdom,
Uruguay, etc.
Page 17
Step 4: Inserting a memory card
Types of memory card you can use with
this product
“Memory Stick
PRO Duo” media
(Mark2)
“Memory Stick
PRO-HG Duo”
media
“Memory Stick
Described in this
XC-HG Duo”
media
SD memory card
SDHC memory
card
SDXC memory
card
Operation with all memory cards is not assured.
“Memory Stick PRO Duo” media of up to
Memory Stick XC-HG Duo” media of
32 GB, “
up to 64 GB and SD cards of up to 64 GB have
been verified to operate with this product.
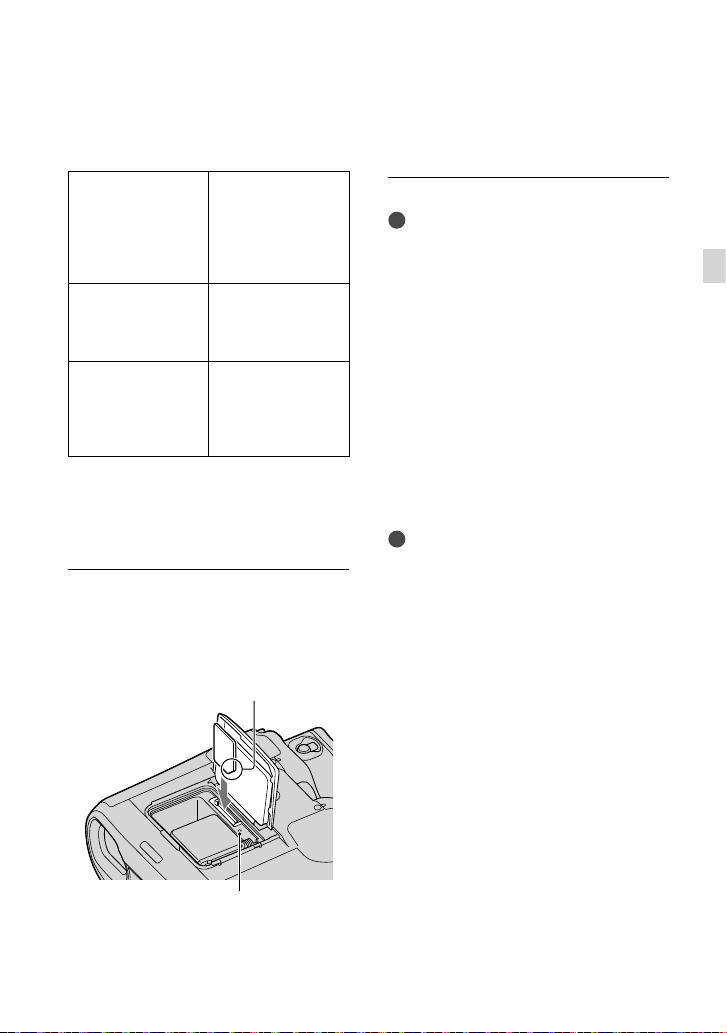
Open the battery/memory card
cover (p. 13), and insert the memory
card with the nothched edge in the
direction as illustrated until it clicks.
Note the direction of notched corner.
Described in this
manual, “Memory
Stick PRO Duo”
media
manual, “Memory
Stick XC-HG Duo”
media
Described in this
manual, SD card
SD Speed Class 4 or
faster is required.
If the [Preparing image database file. Please
wait.] screen is displayed, wait until the screen
disappears.
Notes
If [Failed to create a new Image Database File.
It may be possible that there is not enough free
space.] is displayed, format the memory card.
Confirm the direction of the memory card.
If you forcibly insert the memory card in the
wrong direction, the memory card, memory
card slot, and/or image data may be damaged.
Do not eject the memory card while the access
lamp is lit. Doing so may cause movies and/or
photos to not be saved on the memory card
properly.
To eject the memory card
Open the battery/memory card cover and
lightly push the memory card in once.
Notes
Movies recorded on “Memory Stick XC-HG
Duo” media and SDXC memory cards cannot
be imported to or played back on computers
or AV devices not supporting the exFAT
system by connecting this product to these
devices with the USB cable. Confirm in advance
that the connecting equipment is supporting the
exFAT system. If you connect an equipment not
supporting the exFAT system and the format
screen appears, do not perform the format. All
the data recorded will be lost.
* The exFAT is a file system that is used for the
“Memory Stick XC-HG Duo” media and SDXC
memory cards.
* file
Getting started
Access lamp
Close the battery/memory card cover after
installing the memory card.
GB
17
Page 18
Binoculars/Recording/Playback
Using this product as binoculars
1
Press the POWER button.
This product is turned on.
Some settings screen may appear
depending on the status of this product
when it is turned on. Use this product
after completing any necessary
adjustments.
2
Make sure that the diopter, the
width, and the relative vertical
position of the right and left
viewfinder fit you (p
3
Hold this product with both
hands and aim it at the subject.
Power zoom lever
. 14).
You can magnify images with the
power zoom lever.
This product adjusts the focus
automatically with the auto-focus function
(default setting).
Notes
Be sure to keep your finger on the power zoom
lever. If you move your finger off the power
zoom lever, the operation sound of the power
zoom lever may also be recorded.
Tips
SteadyShot] is set to [Active] in the default
[
setting.
About zooming
The default setting for binoculars
magnification is as noted below.
DEV-30: 0.8 to 15 (approx.)
DEV-50/50V: 0.8 to 25 (approx.)
Binoculars magnification is available if the
following conditions are met.
2D recording mode is activated.
SteadyShot] is set to something
[
other than [Active] and [Digital Zoom]
is set to [On].
Tips
The binoculars magnification indicates how big
the subject looks with the binoculars compared
with your naked eye.
18
To adjust the focus manually
Select (MENU) [Camera/Mic]
[ Manual Settings] [Focus] using the
multi-selector.
elect [Manual], then select
S
(nearby subject) /
several times to adjust the focus.
Tips
GB
To adjust the focus automatically, select [Auto].
(distant subject)
Page 19
Recording
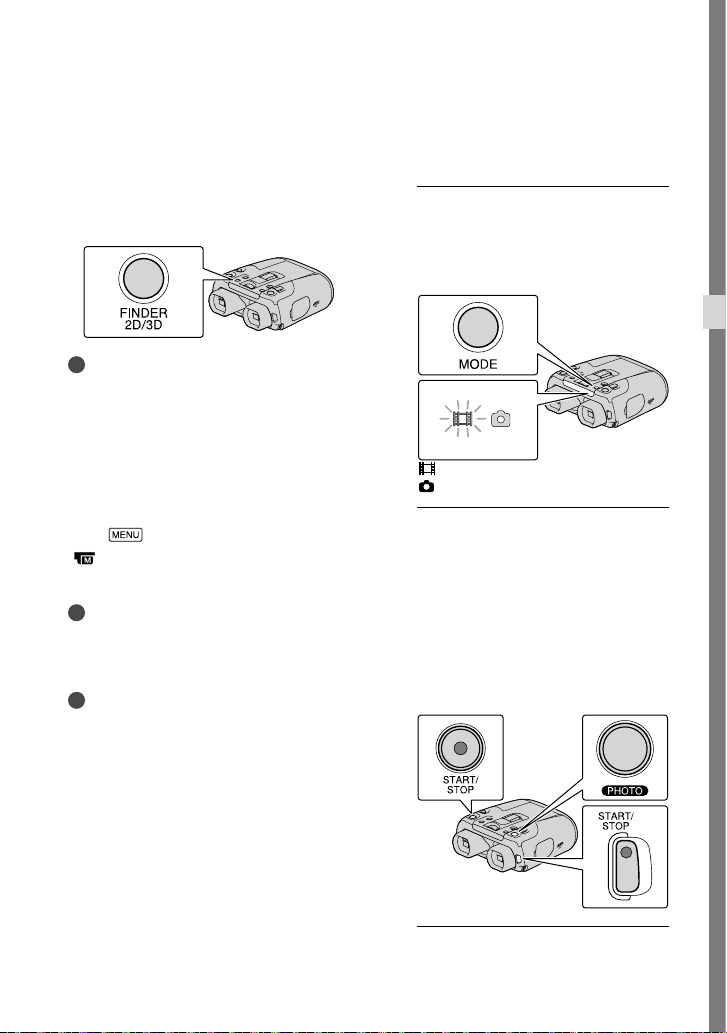
To switch the viewfinder display
between 2D and 3D
Press FINDER 2D/3D to switch the
viewfinder display between 2D and 3D.
At the default setting, images in the
viewfinder are displayed in 3D.
Notes
The recorded image does not change even if you
press the FINDER 2D/3D.
To use this product in dark places
(Hyper Gain)
You can view a subject brightly even in dark
places by increasing the gain.
Select
[ Manual Settings] [Hyper Gain]
[On].
The image quality deteriorates due to noise
when using [Hyper Gain]. In addition, the color
of the image becomes light.
It is recommended that you adjust the focus
manually.
If you turn off this product, [Hyper Gain] is
also set to [Off].
(MENU) [Camera/Mic]
Notes
Tips
In the default setting, images in the
viewfinder are displayed in 3D (p. 19), but
movies are recorded in 2D.
1
With the power on, press the
MODE button to enter the
desired recording mode.
MODE button
(Movie): When recording a movie
(Photo): When recording a photo
2
Movie recording mode:
Press START/STOP to start
recording.
To stop recording, press START/STOP
again.
Photo shooting mode:
Press PHOTO lightly to adjust the
focus, then press it fully.
Binoculars/Recording/Playback
GB
19
Page 20
Notes
The following states will be indicated if data is
still being written onto the memory card after
recording has finished. During this time, do
not apply shock or vibration to this product, or
remove the battery or AC Adaptor.
s lamp (p. 17) is lit or flashing
cces
A
The media icon in the upper right of the
screen is flashing
You cannot shoot photos when [2D/3D Mode
Select] is set to [3D]. Select
[Image Quality/Size] [2D/3D Mode Select]
[2D].
You cannot shoot photos in 3D.
(MENU)
To switch the 2D and 3D recording
mode
You can select a recording mode of either
2D or 3D.
To switch 2D and 3D, select
[Image Quality/Size] [2D/3D Mode
Select].
Recommended distance from the
subject and zooming level
The distance at which you can obtain
good 3D movies varies depending on the
zooming level.
Recommended recording distance (approx.) Zoom
2 m to (9 m) [6 ft. to (30 ft.)]
6 m to (16 m) [20 ft. to (51 ft.)]
24 m to (30 m) [78 ft. to (100 ft.)]
A subject farther away than the
recommended recording distance will
lose 3D depth.
Notes
You should not record a subject closer
than the recommended recording
distance in 3D because an uncomfortable
movie will be recorded. Record the
subject in 2D.
GB
20
(MENU)
When you record 3D movies, the binocular
magnification can be set to up to about 6 . If
you want to view or record a subject at greater
magnification, set [2D/3D Mode Select] to
[2D].
Using menus directly
By registering a favorite menu to the left
part of the viewfinder screen, you can use
the assigned menu directly ([My Button],
.
26).
p
The default settings are [Hyper Gain],
[2D/3D Mode Select] and [VF Brightness].
Controlling the image settings
manually with the MANUAL dial
It is convenient to assigning a menu item to
the MANUAL dial (p. 36).
By pressing the MANUAL button, you can
use the assigned menu. Also, by pressing
and holding the MANUAL button for a few
seconds, you can assign a desired menu
item.
Acquiring location information
using the GPS (DEV-50V)
Set [GPS Setting] to [On] (p. 27).
appears on the screen, and this
product starts acquiring the location
information. The acquired location
information is recorded on movies and
photos.
Page 21
Playback on this product
You can play back images recorded with
this product.
Tips
If you want to play back 3D images, set [2D/3D
Mode Select] to [3D].
1
With the power on, press
(View Images).
The Event Index screen appears after
some seconds.
2
Select an image you want to view
using the multi-selector, then
press the center of the selector.
Playback starts.
previous image / next image
previous event / next event
This product organizes images into a
group that is called an event, based on the
date and time, and information on how
often you record images.
Operations available on the playback
display
Pause/Play
/
Stop
Previous/Next image
/
Fast-reverse/Fast-
/
forward
Play slide show
Volume
Delete
Context
Some buttons may not be displayed depending
on the playback image.
Notes
You may not be able to play back normally
images recorded on this product with other
devices. Also, you may not be able to play back
images recorded on other devices with this
product.
Tips
/ during pause to play back
Select
movies slowly.
As you repeat pressing Enter after selecting
during playback, movies are played as fast
/
as about 5 times about 10 times about 30
times about 60 times.
Binoculars/Recording/Playback
GB
21
Page 22

Saving movies and photos with a computer
Playing images on a computer
The “PlayMemories Home” software allows you to import movies and still images to your
computer to use them in a variety of ways.
What you can do with “PlayMemories Home” software (Windows)
View images
Import images
from this product
“PlayMemories Home” can be downloaded from the following URL.
www.sony.net/pm
Notes
An Internet connection is required to install “PlayMemories Home.”
An Internet connection is required to use online services. The services may not be available in some
countries/regions.
in a calendar
Upload images to
online services
Create a movie disc
Software for Mac
The “PlayMemories Home” software is not supported on Mac computers. To import images
from this product to your Mac and play them, use the appropriate software on your Mac. For
details, visit the following URL.
http://www.sony.co.jp/imsoft/Mac/
GB
22
Page 23
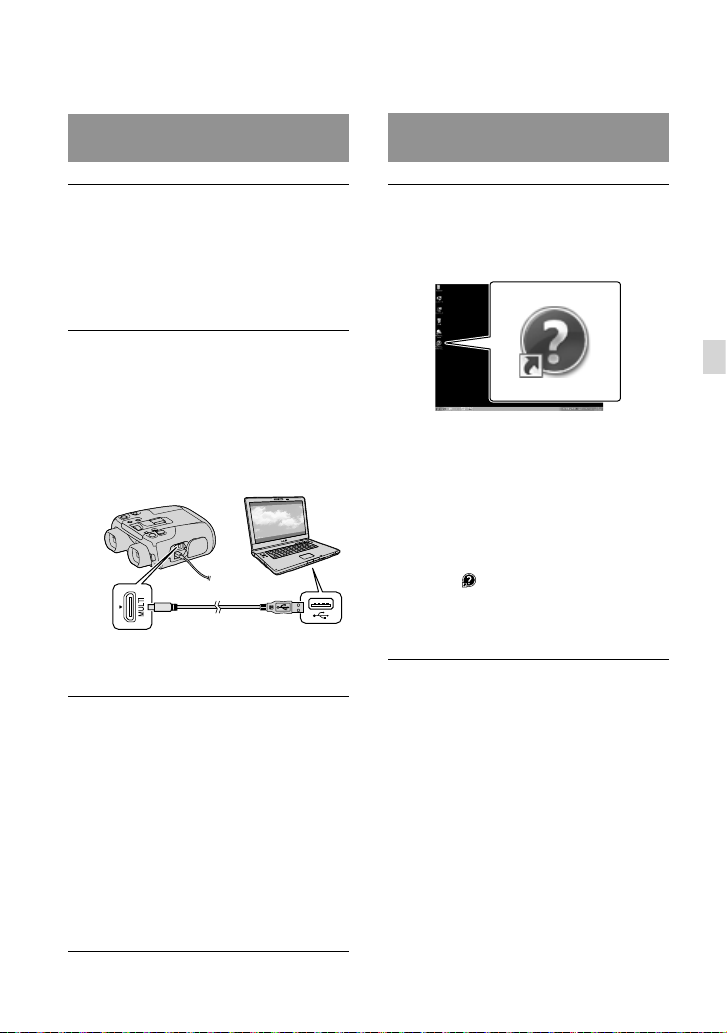
Preparing a computer
(Windows)
Installing the “PlayMemories
Home” software in your computer
Access the following download
site using an Internet browser on
your computer, then click [Install]
[Run].
www.sony.net/pm
Install according to the on-screen
instructions.
When the on-screen instructions
prompting you to connect this product to
a computer appear, connect this product
to your computer with the micro USB
cable (supplied).
Micro USB cable (supplied)
When the installation completes,
“PlayMemories Home” starts up.
View the “PlayMemories Home
Help Guide”
Double-click the “PlayMemories
Home Help Guide” short-cut icon on
the computer screen.
When using Windows 8, select
[PlayMemories Home Help Guide] from
the help menu of “PlayMemories Home.”
If the icon is not displayed on the
computer screen, click [Start] [All
Programs] [PlayMemories Home]
the desired item.
For details on “PlayMemories Home,”
(“PlayMemories Home Help
select
Guide”) on the software or visit the
PlayMemories Home support page (http://
www.sony.co.jp/pmh-se/).
Saving movies and photos with a computer
Notes on installation
If the “PlayMemories Home” software is already
installed on your computer, connect this
product to your computer. Functions that can
be used with this product will then be available.
If the “PMB (Picture Motion Browser)”
software is installed on your computer, it will
be overwritten by the “PlayMemories Home”
software. In this case, you cannot use some
functions that were available with “PMB” with
this “PlayMemories Home” software.
GB
23
Page 24
Customizing this product
Using menus
This product has various menu items under
each of 6 menu categories.
1
Select (MENU).
2
Select a category.
3
Select your desired menu item.
To find a menu item quickly
The [Camera/Mic] and [Setup] menus have
sub-categories. Select the sub-category icon
so that the screen displays the list of menus
in the sub-category selected.
Sub-category icons
When you cannot select a menu item
Grayed out menu items or settings are not
available.
When you select the grayed out menu
item, this product displays the reason why
you cannot select the menu item or the
instruction of under which condition you
can set the menu item.
Notes
Select
return to the previous menu screen.
GB
to finish setting the menu or to
24
Page 25
Menu lists
The available menu items differ between the movie mode ( ) and photo mode ( ).
Shooting Mode
Movie
Photo
Camera/Mic
Manual Settings
White Balance
Exposure
Focus
IRIS
Shutter Speed
AE Shift
White Balance Shift
Low Lux
Hyper Gain
Camera Settings
Auto 3D Lens Adjust
Scene Selection
Self-Timer
Tele Macro
SteadyShot
SteadyShot
Digital Zoom
Auto Back Light
Dial Setting
Face
Face Detection
Microphone
Closer Voice
Auto Wind NR
Micref Level
Records movies.
Shoots photos.
Adjusts the color balance to the recording environment.
Adjusts the brightness of movies and photos.
Focuses manually.
Adjusts the iris.
Adjusts the shutter speed.
Adjusts the exposure based on the results of the automatic
exposure measurement.
Adjusts the white balance manually.
Records bright color images in the dim.
Records bright images in dark places by increasing the
gain.
Automatically corrects the vertical position of the right
and left movies to record 3D movies that can be viewed
comfortably, without blurring.
Selects an appropriate recording setting according to the
type of scene, such as night view or beach.
Sets the self-timer when this product is in photo recording
mode.
Shoots a subject in focus with the background out of
focus.
Sets the SteadyShot function when recording movies.
Sets the SteadyShot function when shooting photos.
Sets the digital zoom.
Adjusts the exposure for backlit subjects automatically.
Assigns a function to the MANUAL dial.
Adjusts the image quality of the face(s) automatically.
Detects human faces and records the associated voice
clearly.
Recognizes the recording conditions and reduces the wind
noise.
Sets the microphone reference level.
Customizing this product
GB
25
Page 26
Shooting Assist
My Button
Grid Line
Display Setting
Image Quality/Size
REC Mode
Frame Rate
2D/3D Mode Select
x.v.Color
Image Size
Playback Function
Edit/Copy
Delete
Protect
Copy
Direct Copy
Setup
Media Settings
Media Info
Format
Repair Img. DB F.
File Number
Playback Settings
Data Code
Volume
Connection
TV Type
HDMI 3D Setting
HDMI Resolution
Assigns functions to My Buttons.
Displays grid lines as a guide to make sure the subject is
horizontal or vertical.
Sets the duration that icons or indicators are displayed in
the viewfinder.
Sets the mode to record movies. When recording fast
moving subject, a high image quality is recommended.
Sets the frame rate to record movies.
Switches the movie recording type between 2D and 3D.
Records wider range of colors.
Sets the photo size.
Plays back movies or photos.
Deletes movies or photos.
Protects movies or photos to avoid deleting.
Copies movies or photos to external media devices.
Copies all movies and photos that have not yet been saved
on an external media device.
Displays memory card information, such as free space.
Deletes all data on the memory card.
Repairs the image database file on a memory card.
Sets how to assign the file number.
Displays the detailed recording data during playback.
Adjusts the volume of playback sound, and the volume of
sound output to monitoring headphones during recording.
Sets the aspect ratio to suit the connected TV.
Select the output format of the right and left images when
you connect this product to a 3D TV with the HDMI cable
(supplied).
Select the output image resolution when connecting this
product to a TV with the HDMI cable (supplied).
26
GB
Page 27
CTRL FOR HDMI
USB Connect
USB LUN Setting
General Settings
VF Brightness
Viewfinder Adjust
GPS Information*
GPS Setting*
REC Lamp
Beep
Language Setting
60i/50i Sel
Battery Info
Power Save
Initialize
Clock Settings
Date & Time Setting
Area Setting
Auto Clock ADJ *
Auto Area ADJ*
* DEV-50V
Sets whether or not the TV’s Remote Commander is to be
used when this product is connected to a “BRAVIA” Sync
compatible TV with the HDMI cable (supplied).
Connects this product to an external device via USB.
Sets this product to improve the compatibility of a USB
connection by restricting some USB functions.
Adjusts the brightness of the viewfinder.
Adjusts the relative vertical position of the right and left
viewfinder.
Displays location information.
Sets the GPS.
Sets the recording lamp to light up or not.
Sets whether this product sounds operation beeps or not.
Sets the display language.
Switch 1080/60i (NTSC-system) and 1080/50i (PAL-
system).
Displays the battery information.
Sets the power to turn off automatically.
Initializes all the settings to the default settings.
Sets the [Date & Time Format], [Summer Time], or [Date
& Time].
Adjusts for a time difference without stopping the clock.
Compensates for time automatically by acquiring location
information from the GPS system.
Compensates for time differences automatically by
acquiring location information from the GPS system.
Customizing this product
GB
27
Page 28
Additional information
Troubleshooting
If you run into any problems using this
product, follow the steps below.
Check the list on this page, and
inspect this product.
Remove the power source, attach
the power source again after about
1 minute, and turn this product on.
Select (MENU) [Setup]
General Settings] [Initialize].
[
If you select [Initialize], all settings,
including the clock setting, are reset.
Contact your Sony dealer or local
authorized Sony service facility if the
issue is not resolved.
See “Digital Recording Binoculars Handbook”
(p. 11) for details on the symptoms of this
product, and “PlayMemories Home Help
uide
” (p. 23) on connecting this product to a
G
computer.
The power does not turn on.
Attach a charged battery pack to this product
(p. 13).
This product does not operate even when
the power is set to on.
Disconnect the AC Adaptor from the wall
outlet (wall socket) or remove the battery
pack, then reconnect it after about 1 minute.
Self-diagnosis display/Warning
indicators
If indicators appear on the viewfinder
screen, check the following.
If the problem persists even after you
have tried to fix a couple of times, contact
your Sony dealer or local authorized Sony
service facility. In this case, when you
contact them, give them all the numbers of
the error code beginning with C or E.
C:04:
The battery pack is not an “InfoLITHIUM”
battery pack V series. Use an “InfoLITHIUM”
ba
ttery pack (V series) (p. 13).
Connect the DC plug of the AC Adaptor to
t
s product securely (p. 13).
hi
C:06:
The battery pack temperature is high. Change
the battery pack or place it in a cool place.
C:13: / C:32:
Remove the power source. Reconnect it and
operate this product again.
E::
Follow the procedure from in
“ Troubleshooting.”
The battery pack temperature is high. Change
the battery pack or place it in a cool place.
This product gets warm.
This product may become warm during
operation. This is not a malfunction.
GB
28
Page 29

Precautions
On use and care
Do not use or store this product and accessories
in the following locations:
Anywhere extremely hot, cold or humid.
Never leave them exposed to temperatures
C (140 °F), such as under direct
b
ove 60
a
sunlight, near heaters or in a car parked in
the sun. They may malfunction or become
deformed.
Near strong magnetic fields or mechanical
vibration. This product may malfunction.
Near strong radio waves or radiation. This
product may not be able to record properly.
Near AM receivers and video equipment.
Noise may occur.
On a sandy beach or anywhere dusty. If sand
or dust gets in this product, it may result in
a malfunction. Sometimes this malfunction
cannot be repaired.
For DC or AC operation, use the accessories
recommended in these operating instructions.
Do not let this product get wet, for example,
from rain or sea water. If this product gets
wet, it may malfunction. Sometimes this
malfunction cannot be repaired.
If any solid object or liquid gets inside the
casing, unplug this product and have it checked
by a Sony dealer before operating it any further.
Avoid rough handling, disassembling,
modifying, physical shock, or impact such
as hammering, dropping or stepping on the
product. Be particularly careful of the lens.
Keep this product turning off when you are not
using this product.
Do not wrap this product with a towel, for
example, and operate it. Doing so might cause
heat to build up inside.
When disconnecting the power cord (mains
lead), pull it by the plug and not the cord (lead).
Do not damage the power cord (mains lead)
such as by placing anything heavy on it.
Do not use a deformed or damaged battery
pack.
Keep metal contacts clean.
If the battery electrolytic liquid has leaked:
Consult your local authorized Sony service
facility.
Wash off any liquid that may have contacted
your skin.
If any liquid gets in your eyes, wash with
plenty of water and consult a doctor.
When not using this product for a long
time
To keep this product in optimum state for a
long time, turn it on and let it run by recording
and playing back images about once a month.
Use up the battery pack completely before
storing it.
On handling the casing
If the casing is soiled, clean this product body
with a soft cloth lightly moistened with water,
and then wipe the casing with a dry soft cloth.
Avoid the following to avoid damage to the
finish:
Using chemicals such as thinner, benzine,
alcohol, chemical cloths, repellent, insecticide
and sunscreen
Handling this product with above substances
on your hands
Leaving the casing in contact with rubber or
vinyl objects for a long period of time
About care and storage of the lens
Wipe the surface of the lens clean with a soft
cloth in the following instances:
When there are fingerprints on the lens
surface
In hot or humid locations
When the lens is exposed to salty air such as
at the seaside
Store in a well-ventilated location subject to
little dirt or dust.
To prevent mold, periodically clean the lens as
described above.
Save all your recorded image data
To prevent your image data from being lost,
save all your recorded images on external media
periodically.
Additional information
GB
29
Page 30

Notes on battery pack/AC Adaptor
Be sure to remove the battery pack or the AC
Adaptor after turning off this product.
Disconnect the AC Adaptor from this product,
holding both this product and the DC plug.
Note on the binoculars/battery pack
temperature
When the temperature of this product or
battery pack becomes extremely high or
extremely low, you may not be able to record or
play back on this product, due to the protection
features of this product being activated in such
situations. In this case, an indicator appears on
the screen.
When this product is connected to a
computer or accessories
Do not try to format the memory card of this
product using a computer. If you do so, this
product may not operate correctly.
When connecting this product to another
device with communication cables, be sure to
insert the connector plug in the correct way.
Pushing the plug forcibly into the terminal
will damage the terminal and may result in a
malfunction of this product.
Notes on optional accessories
We recommend using genuine Sony accessories.
Genuine Sony accessories may not be available
in some countries/regions.
On charging the pre-installed
rechargeable battery
This product has a pre-installed rechargeable
battery to retain the date, time, and other settings
even when this product is turned off. The preinstalled rechargeable battery is always charged
while this product is connected to the wall outlet
(wall socket) via the AC Adaptor or while the
battery pack is attached. The rechargeable battery
will be fully discharged in about 3 months if you
do not use this product at all. Use this product
after charging the pre-installed rechargeable
battery. However, even if the pre-installed
rechargeable battery is not charged, this product
operation will not be affected as long as you are
not recording the date.
Procedures
Connect this product to a wall outlet (wall socket)
using the supplied AC Adaptor, and leave it with
this product turned off for more than 24 hours.
To ensure stable operation of the
memory card
It is recommended that you format the memory
card with this product before using it the first
time. Formatting the memory card will erase
all the data stored on it and the data will be
irrecoverable. Save your important data on your
PC etc.
GB
30
Page 31

Specifications
System
Signal format:
HD TV
NTSC color, EIA standards
PAL color, CCIR standards*
Movie recording format:
AVCHD (AVCHD format Ver.2.0
compatible):
2D Video: MPEG-4 AVC/H.264
3D Video: MPEG-4 MVC/H.264
Audio: Dolby Digital 2ch Dolby Stereo
Creator
Manufactured under license from Dolby
Laboratories.
Photo file format
DCF Ver.2.0 Compatible
Exif Ver.2.3 Compatible
MPF Baseline Compatible
Recording media (Movie/Photo)
“Memory Stick PRO Duo” media
“Memory Stick XC-HG Duo” media
SD card (Class 4 or faster)
Viewfinder: Electronic viewfinder
Picture: 1.3 cm (0.5 type)
Total number of pixels: 2 359 296 (1 024
768)
3 [RGB]
Eye point: 13.9 mm (9/16 in.)
Real field of view
DEV-30:
– 3.6 (2D movie)*
44.7
44.7 – 2.4 (2D movie)*
*
DEV-50/50V:
– 3.0 (2D movie)*
44.7
44.7 – 1.4 (2D movie)*
Apparent field of view*3: 36.9 (16:9), 29.2
(4:3)
ld of view at 1 000 m/yds
Fie
DEV-30:
828 m – 62 m (2 484 ft. – 187
6
*4*
movie)
828 m – 42 m (2 484 ft. – 125 ft.) (2D
7
*4*
movie)
DEV-50/50V:
828 m – 52 m (2 484 ft. – 156 ft.) (2D
6
*4*
movie)
828 m – 25 m (2 484 ft. – 75 ft.) (2D
7
*4*
movie)
Interpupillary distance adjust:
55 mm – 75 mm (2 1/4 in. – 3 in.)
Diopter adjustment: –3.5 to +3.5
1
*
2
2: color
3
:
4*6
4*7
4*6
4*7
3
*
:
ft.) (2D
Image device:
4.6 mm (1/3.91 t
Recording pixels (photo):
Max. 20
(16:9)
oss: Approx. 5 430 000 pixels
Gr
yp
e) CMOS sensor
400 000 pixels
5
*
(6 016 3 384)
2
Lens: G lens
Magnification (approx.):
DEV-30:
– 10 (2D movie)*
0.8
0.8 – 15 (2D movie)*
0.5 – 6 (3D movie)*
4*6
4*7
4
0.5 – 15 (photo)
DEV-50/50V:
– 12 (2D movie)*
0.8
0.8 – 25 (2D movie)*
0.5 – 6 (3D movie)*
4*6
4*7
4
0.5 – 25 (photo)
Zoom ratio (approx.):
DEV-30:
(2D movie)*
13
20 (2D movie)*
12 (3D movie)
(photo)
33
DEV-50/50V:
(2D movie)*
16
33 (2D movie)*
6
7
6
7
Additional information
12 (3D movie)
(photo)
55
F1.8 - F3.4
When converted to a 35 mm still camera
DEV-30:
f=49.8 mm – 661.6 mm (2 in. – 26 1/8 in.)
(2D movie)
f=49.8 mm – 992.3 mm (2 in. – 39 1/8 in.)
(2D movie)
f=33.4 mm – 402.0 mm (1 3/8 in. – 15 7/8 in.)
(3D movie)
f=29.8 mm – 989.4 mm (1 3/16 in. – 39 in.)
6
*4*
7
*4*
4
*
(photo, 16:9)
f=36.3 mm – 1 205.2 mm (1 7/16 in.
– 47 1/2 in.) (ph
oto, 4:3)
DEV-50/50V:
f=49.8 mm – 791.2 mm (2 in. – 31 1/4 in.)
(2D movie)
f=49.8 mm – 1 645.7 mm (2 in. – 64 7/8 in.)
(2D movie)
f=33.4 mm – 402.0 mm (1 3/8 in. – 15 7/8 in.)
(3D movie)
f=29.8 mm – 1 647.9 mm (1 3/16 in. – 65 in.)
6
*4*
7
*4*
4
*
(photo, 16:9)
f=36.3 mm – 2 007.4 mm (1 7/16 in.
– 79 1/16 in.) (ph
oto, 4:3)
GB
31
Page 32

Minimum illumination
11 lx (lux) (in default setting, shutter speed
1/60 second
1
*
, 1/50 second*2)
Minimum focus distance:
2D mo
vie: 1 cm (13/32 in.) (wide)/
80 cm (31 1/2 in.) (te
3D movie: 2 m (6 ft.) (wide)/
24 m (78 ft.) (t
Photo: 1 cm (13/32 in.) (wide)/80 cm
(31 1/2 in.) (telephoto)/38 cm (15 in.) (tele
macro)
1
*
[60i/50i Sel] is set to [60i (NTSC)].
2
*
[60i/50i Sel] is set to [50i (PAL)].
3
*
Diagonal dimension
4
*
[ SteadyShot] is set to [Standard] or [Off].
5
*
The unique pixel array of Sony’s ClearVid and
lephoto)
elephoto)
the image processing system (BIONZ) allow
still image resolution equivalent to the sizes
described.
6
*
[Digital Zoom] is set to [Off ].
7
*
[Digital Zoom] is set to [On].
Input/Output connectors
HDMI jack: HDMI micro connector
Headphone jack: Stereo minijack ( 3.5 mm)
MIC input jack: Stereo minijack ( 3.5 mm)
Multi/Micro USB Terminal
*
Supports Micro USB compatible devices.
*
General
Power requirements: DC 6.8 V (battery pack) DC
8.4 V (AC Adaptor)
Average power consumption:
Monitoring
Recording: 2D: 4.1 W, 3D: 5.0 W
*: 2D: 3.7 W, 3D: 4.0 W
* In this manual, “monitor” means that the
user watches or views a subject without
recording.
erating temperature: 0
Op
C to 40 C (32 °F to
104 °F)
orage temperature: –20
St
C to + 60 C (‒4 °F to
+140 °F)
Dimensions (approx.):
148.5 mm
72.5 mm 157.5 mm (5 7/8 in.
× 2 7/8 in. × 6 1/4 in.) (w/h/d) including the
projecting parts
78.5 mm 202 mm (6 5/8 in.
166 mm
× 3 1/8 in. × 8 in.) (w/h/d) (DEV-50/50V)
including the projecting parts, and the
supplied large eyecup attached
GB
32
Mass (approx.):
b 10
765 g (1 l
DEV-30:
860 g (1 lb 14
battery pack (NP-FV70) and “Memory Stick
oz) main unit only
oz) including the rechargeable
PRO Duo” media
DEV-50/50V:
b 15
890 g (1 l
battery pack (NP-FV70), “Memory Stick
oz) including the rechargeable
PRO Duo” media, and large eyecup
AC Adaptor AC-L200C/AC-L200D
Power requirements: AC 100 V - 240 V,
50 Hz/60 Hz
Current consumption: 0.35 A - 0.18 A
Power consumption: 18 W
Output voltage: DC 8.4 V
*
Operating temperature: 0 C to 40 C (32 °F to
104 °F)
orage temperature: –20
St
C to + 60 C (‒4 °F to
+140 °F)
sions (approx.): 48 mm
Dimen
(1 15/16 in.
1 3/16 in. 3 1/4 in.) (w/h/d)
29 mm 81 mm
excluding the projecting parts
ss (approx.): 150 g (5.3 oz) excluding the
Ma
power cord (mains lead)
* See the label on the AC Adaptor for other
specifications.
Rechargeable battery pack NP-FV70
Maximum output voltage: DC 8.4 V
Output voltage: DC 6.8 V
Maximum charge voltage: DC 8.4 V
Maximum charge current: 3.0 A
Capacity
Typ
ical: 14.0 Wh (2 060 mAh)
Minimum: 13.0 Wh (1 960 mAh)
Type: Li-ion
Design and specifications of this product and
accessories are subject to change without notice.
Page 33

Charging time
Approximate time (min.) required when
you fully charge a fully discharged battery
pack.
Battery pack Charging time
NP-FV70 (supplied) 195
The charging time shown in the table above
is measured when charging this product
at a temperature of 25
C (77 °F). It is
recommended that you charge the battery in
a temperature range of 10
C to 30 C (50 °F
to 86 °F).
Available time with the supplied
battery pack (NP-FV70)
Approximate time available when recording
in 2D mode with fully charged battery
pack.
(unit: minute)
Continuous recording time 185
Typical recording time 95
Continuous monitoring time 210
Playing time 315
Each operating time in the 2D mode is
measured with [
[Standard
Typical recording time shows the time when
REC Mode] set to
].
you repeatedly start/stop recording, switch the
MODE lamp, and zoom.
Times measured when using this product at
C (77 °F). 10 C to 30 C (50 °F to 86 °F) is
25
recommended.
The recording, monitoring, and playback time
will be shorter, depending on the conditions
under which you use this product, such as when
using this product in low temperatures.
emaining battery indicator (p. 34) shows
e r
Th
the expected recording and playing time.
On trademarks
“AVCHD 3D/Progressive” and “AVCHD
3D/Progressive” logo are trademarks of Sony
Corporation and Panasonic Corporation.
“Memory Stick,” “
“
Duo,” “
Stick PRO-HG Duo,” “
,” “Memory Stick XC-HG Duo,”
“
“
Stick” and “MagicGate Memory Stick Duo” are
trademarks or registered trademarks of Sony
Corporation.
“InfoLITHIUM” is a trademark of Sony
Corporation.
“x.v.Color”/“x.v.Colour” is a trademark of Sony
Corporation.
“BRAVIA” is a registered trademark of Sony
Corporation.
Blu-ray Disc
the Blu-ray Disc Association.
Dolby and the double-D symbol are trademarks
of Dolby Laboratories.
The terms HDMI and HDMI High-Definition
Multimedia Interface, and the HDMI Logo are
trademarks or registered trademarks of HDMI
Licensing LLC in the United States and other
countries.
Microsoft, Windows, Windows Vista, and
DirectX are either registered trademarks or
trademarks of Microsoft Corporation in the
United States and/or other countries.
Mac and Mac OS are registered trademarks of
Apple Inc. in the U.S. and other countries.
Intel, Intel Core, and Pentium are trademarks
or registered trademarks of Intel Corporation
or its subsidiaries in the United States and other
countries.
“
” and “PlayStation” are registered
trademarks of Sony Computer Entertainment
Inc.
Adobe, the Adobe logo, and Adobe Acrobat
are either registered trademarks or trademarks
of Adobe Systems Incorporated in the United
States and/or other countries.
SDXC logo is a trademark of SD-3C, LLC.
All other product names mentioned herein may
be the trademarks or registered trademarks of
their respective companies. Furthermore,
are not mentioned in each case in this manual.
,” “Memory Stick Duo,”
,” “Memory Stick PRO
,” “Memory
,” “MagicGate,”
,” “MagicGate Memory
and Blu-ray are trademarks of
and
Additional information
GB
33
Page 34

Quick reference
Screen indicators
Center
Left Right
Bottom
Left
Indicator Meaning
MENU button
Self-timer recording
GPS triangulating status
Center
Indicator Meaning
[STBY]/[REC] Recording status
Face Detection
Manual focus
Scene Selection
White Balance
SteadyShot off
White Balance Shift
Tele Macro
Destination
Intelligent Auto
Slide show set
Warning
Right
Indicator Meaning
Frame rate (60p
60i
60min
20.4 M
0:00:00
00min
9999
(50p)/60i (50i)) and
recording mode (PS/FX/
FH/HQ/LP)
Remaining battery
(expected recording and
playing time)
Photo size
Recording/playback/
editing media
Counter (hour:minute:
second)
Estimated recording
remaining time
Approximate number of
recordable photos and
photo size
2D/3D record or
playback
Bottom
Indicator Meaning
View Images button
MODE (Shooting Mode)
button
Micref Level low
Closer Voice off
Auto Wind NR off
Low Lux
Hyper Gain
Exposure
EV AE Shift
Shutter Speed
IRIS
Indicators and their positions are approximate
and may differ from what you actually see.
Some indicators may not appear, depending on
the model.
Intelligent Auto
Protected image
Automatic
Exposure is set manually.
34
GB
Page 35

Parts and controls
Figures in ( ) are reference pages.
MODE button (19)
POWER button (14)
Accessory shoe
Built-in microphone
Lens
IPD ADJ dial (14)
(View Images) button (21)
FINDER 2D/3D (display) button (19)
START/STOP button (19)
Multi-selector (15)
HDMI OUT jack
(microphone) jack (PLUG IN POWER)
(headphones) jack
CHG (charge) lamp (13)
Camera recording lamp
The camera recording lamp lights up in red
during recording. The lamp flashes when the
remaining memory card capacity or battery
power is low.
(Movie) lamp (19)
(Photo) lamp (19)
Eye sensor (14)
Viewfinder
START/STOP button (19)
PHOTO button (19)
Power zoom lever (18)
Multi/Micro USB terminal
Supports Micro USB compatible devices.
DC IN jack (13)
Quick reference
GB
35
Page 36

Tripod receptacle
Attach a tripod (sold separately) to the
tripod receptacle using a tripod screw (sold
separately: the length of the screw must be less
than 5.5 mm (7/32 in.)).
Depending on the specifications of the tripod,
this product may not attach in the proper
direction.
Battery/memory card cover (13)
Battery/memory card cover button (13)
Speaker
Memory card access lamp (17)
While the lamp is lit or flashing, this product
is reading or writing data.
Memory card slot (17)
Battery pack (13)
Battery release lever (14)
Drains
MANUAL dial (20)
MANUAL button (20)
Diopter adjustment knobs (14)
Strap mount (12)
GB
36
Additional information on this product
and answers to frequently asked questions
can be found at our Customer Support
Website.
http://www.sony.net/
Printed using VOC (Volatile Organic
Compound)-free vegetable oil based ink.
Page 37

GB
37
Quick reference
Page 38

Lisez ceci en premier
Avant d’utiliser l’appareil, lisez
attentivement ce mode d’emploi et
conservez-le pour toute référence
ultérieure.
Aide-mémoire
Les numéros de modèle et de série se
situent sous l’appareil. Prendre en note le
numéro de série dans l’espace prévu cidessous. Se reporter à ces numéros lors des
communications avec le détaillant Sony au
sujet de ce produit.
Modèle no DEVNo de série
Modèle no ACNo de série
AVERTISSEMENT
Afin de réduire les risques d’incendie
ou de choc électrique,
1) n’exposez pas cet appareil à la pluie
ou à l’humidité.
2) ne placez pas d’objets remplis
de liquide, tels que des vases, sur
l’appareil.
N’exposez pas les piles à une chaleur
excessive, notamment aux rayons
directs du soleil, à une flamme, etc.
Ce symbole avise
l’utilisateur de la présence
de pièces « sous tension
dangereuse » non
isolées à l’intérieur du
boîtier de l’appareil; leur
tension est suffisante pour
représenter un risque
d’électrocution pour les
personnes.
Ce symbole avise
l’utilisateur de la
présence d’instructions
importantes concernant
le fonctionnement et
l’entretien (la réparation)
de l’appareil dans
la documentation
accompagnant celui-ci.
À l’intention des clients aux É.- U.
FR
2
Page 39

CONSIGNES DE SÉCURITÉ IMPORTANTES
CONSERVEZ CES INSTRUCTIONS.
DANGER - AFIN DE RÉDUIRE LES RISQUES
D’INCENDIE OU DE CHOC ÉLECTRIQUE,
SUIVEZ SCRUPULEUSEMENT CES
INSTRUCTIONS.
Lisez ces instructions.
Conservez ces instructions.
Respectez tous les avertissements.
Suivez toutes les instructions.
N’utilisez pas cet appareil à proximité de l’eau.
Nettoyez-le uniquement avec un chiffon sec.
N’obstruez pas les orifices de ventilation. Installez-le conformément aux instructions du fabricant.
Ne placez pas l’appareil à proximité d’une source de chaleur, telle qu’un radiateur, registre de chaleur, une
cuisinière ou tout autre appareil (y compris un amplificateur) qui produit de la chaleur.
Ne désactivez pas le dispositif de sécurité de la fiche polarisée ou dotée d’une broche de mise à la terre.
Une fiche polarisée dispose de deux broches dont l’une est plus large que l’autre. Une broche de mise à la
terre dispose de deux broches et d’une troisième pour la mise à la terre. Cette broche plus large ou cette
troisième broche visent à assurer votre sécurité. Si la fiche fournie ne s’adapte pas à votre prise murale,
consultez un électricien afin de remplacer la prise obsolète.
Faites en sorte que le cordon d’alimentation ne puisse être ni piétiné, ni pincé, surtout au niveau des
fiches, de la prise de courant et à l’endroit où il sort de l’appareil.
N’utilisez que les accessoires/fixations spécifiés par le fabricant.
Utilisez uniquement le chariot, le support, le trépied, la fixation ou la table spécifié(e) par le fabricant ou
vendu avec l’appareil. Si vous utilisez un chariot, déplacez l’ensemble avec précaution afin d’éviter toute
blessure si l’appareil bascule.
FR
CA
Débranchez l’appareil pendant les orages ou si vous ne l’utilisez pas pendant une longue période.
Pour toute réparation, adressez-vous à un technicien qualifié. Un travail de réparation est nécessaire
lorsque l’appareil a été endommagé de quelque manière que ce soit, par exemple si le cordon
d’alimentation ou la fiche est endommagé(e), si du liquide ou des objets ont pénétré à l’intérieur de
l’appareil, si ce dernier a été exposé à la pluie ou à l’humidité, s’il ne fonctionne pas correctement ou s’il
a été échappé.
Si la forme de la fiche ne correspond pas à la prise de courant, utilisez un adaptateur de fiche de
branchement de configuration adéquate.
FR
3
Page 40

Représentation des fiches des cordons d’alimentation CA des pays ou régions du
monde
Type A
(américain)
Type B
(anglais)
Type BF
(anglais)
Type B3
(anglais)
Type C
(CEE)
Type SE
(CEE)
Type O
(océanien)
La tension d’alimentation et le type de fiche représentatifs sont décrits dans le tableau suivant.
Il est possible que plusieurs types de fiches et tensions d’alimentation soient utilisés dans une
région.
Attention : il convient d’utiliser un cordon d’alimentation satisfaisant aux exigences de chaque
pays.
Pour les États-Unis uniquement
Utilisez un cordon d’alimentation fourni.
Europe
Pays/régions Tension Fréquence (Hz) Type de fiche
Autriche 230 50 C
Belgique 230 50 C
République tchèque 220 50 C
Danemark 230 50 C
Finlande 230 50 C
France 230 50 C
Allemagne 230 50 C
Grèce 220 50 C
Hongrie 220 50 C
Islande 230 50 C
Irlande 230 50 C/BF
Italie 220 50 C
Luxembourg 230 50 C
Pays-Bas 230 50 C
Norvège 230 50 C
Pologne 220 50 C
Portugal 230 50 C
Roumanie 220 50 C
Russie 220 50 C
Slovaquie 220 50 C
Espagne 127/230 50 C
Suède 230 50 C
Suisse 230 50 C
Royaume-Uni 240 50 BF
Asie
Pays/régions Tension Fréquence (Hz) Type de fiche
Chine 220 50 A
Hong Kong 200/220 50 BF
Inde 230/240 50 C
Indonésie 127/230 50 C
Japon 100 50/60 A
République de Corée 220 60 C
Malaisie 240 50 BF
Philippines 220/230 60 A/C
FR
4
Page 41

Pays/régions Tension Fréquence (Hz) Type de fiche
Singapour 230 50 BF
Taïwan 110 60 A
Thaïlande 220 50 C/BF
Vietnam 220 50 A/C
Océanie
Pays/régions Tension Fréquence (Hz) Type de fiche
Australie 240 50 O
Nouvelle-Zélande 230/240 50 O
Amérique du Nord
Pays/régions Tension Fréquence (Hz) Type de fiche
Canada 120 60 A
États-Unis 120 60 A
Amérique centrale
Pays/régions Tension Fréquence (Hz) Type de fiche
Bahamas 120/240 60 A
Costa Rica 110 60 A
Cuba 110/220 60 A/C
République dominicaine 110 60 A
El Salvador 110 60 A
Guatemala 120 60 A
Honduras 110 60 A
Jamaïque 110 50 A
Mexique 120/127 60 A
Nicaragua 120/240 60 A
Panama 110/220 60 A
Amérique du sud
Pays/régions Tension Fréquence (Hz) Type de fiche
Argentine 220 50 C/BF/O
Brésil 127/220 60 A/C
Chili 220 50 C
Colombie 120 60 A
Pérou 220 60 A/C
Venezuela 120 60 A
Moyen-Orient
Pays/régions Tension Fréquence (Hz) Type de fiche
Iran 220 50 C/BF
Irak 220 50 C/BF
Israël 230 50 C
Arabie Saoudite 127/220 50 A/C/BF
Turquie 220 50 C
EAU 240 50 C/BF
FR
5
Page 42

Afrique
Pays/régions Tension Fréquence (Hz) Type de fiche
Algérie 127/220 50 C
République démocratique
du Congo
Egypte 220 50 C
Ethiopie 220 50 C
Kenya 240 50 C/BF
Nigéria 230 50 C/BF
Afrique du Sud 220/230 50 C/BF
Tanzanie 230 50 C/BF
Tunisie 220 50 C
220 50 C
FR
6
Page 43

ATTENTION
Batterie
Toute erreur de manipulation de la batterie
peut provoquer son explosion, entraîner
un incendie, voire même des brûlures
de substances chimiques. Respectez les
précautions suivantes :
Ne démontez pas la batterie.
N’écrasez et n’exposez pas la batterie à des chocs
ou à une force extérieure. Vous ne devez pas la
frapper avec un marteau, la laisser tomber ou
marcher dessus.
Ne court-circuitez pas les bornes de la batterie
et maintenez-les à l’écart de tout contact avec
des objets métalliques.
N’exposez pas la batterie à des températures
supérieures à 60 °C (140 °F), notamment les
rayons directs du soleil ou l’habitacle d’un
véhicule garé au soleil.
N’incinérez pas la batterie et ne la jetez pas au feu.
Ne manipulez jamais des batteries lithium ion
qui sont endommagées ou présentent une fuite.
Veillez à recharger la batterie à l’aide d’un
chargeur Sony authentique ou d’un appareil
capable de la recharger.
Tenez la batterie hors de la portée des petits
enfants.
Gardez la batterie au sec.
Remplacez-la uniquement par une batterie
de même type ou d’un type équivalent
recommandé par Sony.
Mettez les batteries au rebut sans attendre, de la
manière décrite dans les instructions.
Remplacez la batterie par une batterie
correspondant au type spécifié uniquement.
Sinon vous risquez de provoquer un incendie
ou des blessures.
Remarques sur l’adaptateur CA
N’utilisez pas l’adaptateur CA dans un
espace étroit (entre un mur et un meuble
par exemple).
Branchez l’adaptateur CA à une
prise murale proche. Débranchez
immédiatement l’adaptateur CA de la prise
murale si un problème de fonctionnement
survient lors de l’utilisation de votre
caméscope.
Même si ce produit est hors tension, il est
alimenté tant qu’il est raccordé à la prise
CA (électricité domestique) à l’aide de
l’adaptateur CA.
Remarque sur le câble d’alimentation
Le câble d’alimentation est conçu
spécifiquement pour être utilisé avec ce
produit et ne doit pas l’être avec d’autres
appareils électriques.
Une pression sonore excessive des
écouteurs ou du casque peut provoquer des
pertes d’audition.
Pour les utilisateurs au Canada
RECYCLAGE DES ACCUMULATEURS AUX IONS
DE LITHIUM
Les accumulateurs aux ions de
lithium sont recyclables. Vous
pouvez contribuer à préserver
l’environnement en rapportant
les piles usagées dans un point
de collecte et de recyclage le
plus proche.
Pour plus d’informations sur le
recyclage des accumulateurs,
téléphonez au numéro gratuit
1-800-822-8837 (Etats-Unis
et Canada uniquement), ou
visitez
http://www.rbrc.org/
Avertissement : Ne pas utiliser des
accumulateurs aux ions de lithium qui sont
endommagés ou qui fuient.
Batterie
Cet appareil est conforme à la section 15
des règlements FCC. Son fonctionnement
est soumis aux deux conditions suivantes :
(1) cet appareil ne doit pas provoquer
d’interférences nuisibles, (2) cet appareil
doit accepter toute interférence, y compris
celles susceptibles de provoquer son
fonctionnement indésirable.
CAN ICES-3 B/NMB-3 B
FR
7
Page 44

À l’intention des clients aux É.- U.
Pour toute question au sujet de cet appareil,
appeler :
Sony Centre d’information à la clientèle
1-800-222-SONY (7669).
Le numéro ci-dessous concerne seulement les
questions relevant de la Commission fédérale
des communications des États-Unis (FCC).
Information réglementaire
Déclaration de conformité
Nom commercial : SONY
No de modèle : DEV-50V
Responsable : Sony Electronics Inc.
Adresse : 16530 Via Esprillo, San Diego,
CA 92127 É.-U.
No de téléphone : 858-942-2230
Cet appareil est conforme à la Partie 15
de la réglementation de la FCC des ÉtatsUnis. Son utilisation est sujette aux deux
conditions suivantes : (1) Cet appareil ne
doit pas générer d’interférences nuisibles
et (2) il doit être en mesure d’accepter
toute interférence reçue, y compris
les interférences pouvant générer un
fonctionnement indésirable.
utilisé conformément aux instructions,
il pourrait provoquer des interférences
nuisibles aux communications radio.
Cependant, il n’est pas possible de garantir
que des interférences ne seront pas
provoquées dans certaines conditions
particulières. Si l’appareil devait provoquer
des interférences nuisibles à la réception
radio ou à la télévision, ce qui peut
être démontré en allumant et éteignant
l’appareil, il est recommandé à l’utilisateur
d’essayer de corriger cette situation par l’une
ou l’autre des mesures suivantes :
Réorienter ou déplacer l’antenne réceptrice.
Augmenter la distance entre l’appareil et le
récepteur.
Brancher l’appareil dans une prise ou sur
un circuit différent de celui sur lequel le
récepteur est branché.
Consulter le détaillant ou un technicien
expérimenté en radio/téléviseurs.
Le câble d’interface fourni doit être utilisé
avec l’appareil pour que celui-ci soit
conforme aux critères régissant les appareils
numériques, conformément à la sous-partie
B de la Partie 15 de la réglementation de
la FCC.
AVERTISSEMENT
Par la présente, vous êtes avisé du fait que
tout changement ou toute modification
ne faisant pas l’objet d’une autorisation
expresse dans le présent manuel pourrait
annuler votre droit d’utiliser l’appareil.
Note
L’appareil a été testé et est conforme aux
exigences d’un appareil numérique de
Classe B, conformément à la Partie 15 de la
réglementation de la FCC.
Ces critères sont conçus pour fournir
une protection raisonnable contre
les interférences nuisibles dans un
environnement résidentiel. L’appareil
génère, utilise et peut émettre des
fréquences radio; s’il n’est pas installé et
FR
8
POUR LES CLIENTS EN EUROPE
Par la présente Sony Corporation
déclare que les jumelles à enregistrement
numérique DEV-50V sont conforme
aux exigences essentielles et aux autres
dispositions pertinentes de la directive
1999/5/CE. Pour toute information
complémentaire, veuillez consulter l’URL
suivante:
http://www.compliance.sony.de/
Page 45

Avis aux consommateurs des pays
appliquant les Directives UE
Ce produit a été fabriqué par ou pour le
compte de Sony Corporation, 1-7-1 Konan
Minato-ku Tokyo, 108-0075 Japon. Toutes
les questions relatives à la conformité
des produits basées sur la législation
européenne doivent être adressées à son
représentant, Sony Deutschland Gmbh,
Hedelfinger Strasse 61, 70327 Stuttgart,
Allemagne.
Pour toute question relative au Service
Après-Vente ou à la Garantie, merci de
bien vouloir vous référer aux coordonnées
qui vous sont communiquées dans les
documents «Service (SAV)» ou Garantie.
collecte approprié pour le recyclage des
équipements électriques et électroniques.
En vous assurant que ce produit sont
mis au rebut de façon appropriée, vous
participez activement à la prévention
des conséquences négatives que leur
mauvais traitement pourrait provoquer sur
l’environnement et sur la santé humaine.
Le recyclage des matériaux contribue par
ailleurs à la préservation des ressources
naturelles. Pour toute information
complémentaire au sujet du recyclage de
ce produit, vous pouvez contacter votre
municipalité, votre déchetterie locale ou
le point de vente où vous avez acheté le
produit.
Attention
Le champ électromagnétique à des
fréquences particulières peut avoir une
incidence sur l’image et le son de cet
appareil.
Cet appareil a été testé et jugé conforme aux
limites établies par la réglementation EMC
visant l’utilisation de câbles de connexion
de moins de 3 mètres (9,8 pi.).
Avis
Si l’électricité statique ou les champs
électrostatiques entraînent une interruption
lors du transfert des données (échec),
redémarrez l’application ou débranchez,
puis rebranchez le câble de connexion
(USB, etc.).
Traitement des appareils
électriques et électroniques
en fin de vie (Applicable dans
les pays de l’Union Européenne
et aux autres pays européens
disposant de systèmes de
collecte sélective)
Ce symbole, apposé sur le produit ou sur
son emballage, indique que ce produit
ne doit pas être traité avec les déchets
ménagers. Il doit être remis à un point de
Elimination des piles et
accumulateurs usagés
(Applicable dans les pays
de l’Union Européenne et
aux autres pays européens
disposant de systèmes de
collecte sélective)
Ce symbole, apposé sur les piles et
accumulateurs ou sur les emballages, indique
que les piles et accumulateurs fournis avec ce
produit ne doivent pas être traités comme de
simples déchets ménagers.
Sur certains types de piles, ce symbole
apparaît parfois combiné avec un symbole
chimique. Les symboles pour le mercure
(Hg) ou le plomb (Pb) sont rajoutés lorsque
ces piles contiennent plus de 0,0005% de
mercure ou 0,004% de plomb.
En vous assurant que ces piles et
accumulateurs sont mis au rebut de façon
appropriée, vous participez activement à la
prévention des conséquences négatives que
leur mauvais traitement pourrait provoquer
sur l’environnement et sur la santé humaine.
Le recyclage des matériaux contribue par
ailleurs à la préservation des ressources
naturelles.
Pour les produits qui pour des raisons
de sécurité, de performance ou
d’intégrité de données nécessitent une
FR
9
Page 46

connexion permanente à une pile ou à
un accumulateur, il conviendra de vous
rapprocher d’un service technique qualifié
pour effectuer son remplacement.
En rapportant votre appareil électrique
en fin de vie à un point de collecte
approprié vous vous assurez que la pile
ou l’accumulateur incorporé sera traité
correctement.
Pour tous les autres cas de figure et afin
d’enlever les piles ou accumulateurs en toute
sécurité de votre appareil, reportezvous au
manuel d’utilisation. Rapportez les piles ou
accumulateurs usagés au point de collecte
approprié pour le recyclage.
Pour toute information complémentaire au
sujet du recyclage de ce produit ou des piles
et accumulateurs, vous pouvez contacter
votre municipalité, votre déchetterie locale
ou le point de vente où vous avez acheté ce
produit.
Pour les utilisateurs au Royaume-Uni
Une fiche moulée conforme à BS 1363 est
installée sur cet équipement pour votre
sécurité et commodité.
Si le fusible dans la fiche fournie doit être
remplacé, un fusible de même ampérage
que celui fourni et approuvé par ASTA ou
BSI à BS 1362, (c’est-à-dire portant une
marque
ou ) doit être utilisé.
Si la fiche fournie avec cet équipement
comporte un couvercle de fusible
détachable, assurez-vous de remettre en
place le couvercle de fusible après avoir
remplacé le fusible. N’utilisez jamais la fiche
sans le couvercle de fusible. Si vous perdez
le couvercle de fusible, veuillez contacter le
service après-vente Sony le plus proche.
FR
10
Utilisation de ce produit
Ne tenez pas ce produit par le viseur ou par les
caches. Ne posez pas ce produit avec le viseur
faisant face vers le bas.
Ce produit est étanche à la poussière et à la
pluie. Consultez « À propos de la performance
de l’étanchéité à la poussière et à la pluie de ce
» (p
produit
. 12).
Options de menu, viseur et objectif
Le viseur est fabriqué en utilisant une
technologie de très haute précision, de sorte que
us de 99,99 % des pixels sont opérationnels
pl
pour une utilisation efficace. Cependant, de
minuscules points noirs et/ou points brillants
(blancs, rouges, bleus ou verts) peuvent
apparaître constamment sur le viseur. Ces
points sont normaux et sont issus du processus
b
rication ; ils n’affectent en aucun cas la
de fa
qualité de l’enregistrement.
L’exposition du viseur ou de l’objectif à la
lumière directe du soleil pendant une période
prolongée, peut être la cause de mauvais
fonctionnements.
Évitez de viser le soleil. Cela pourrait
entraîner un mauvais fonctionnement de ce
produit. Effectuez des prises de vue du soleil
uniquement dans des conditions de lumière
faible, comme au crépuscule.
À propos du réglage de la langue
Des captures d’écran dans chaque langue locale
sont utilisées pour illustrer les procédures
d’utilisation. Pour modifier le réglage de
l’écran, sélectionnez
[Configuration] [
[Language Setting] la langue souhaitée
.
(MENU)
Réglages généraux]
Page 47

À propos de l’enregistrement
Avant de commencer à enregistrer, testez la
fonction d’enregistrement pour vous assurer que
l’image et le son sont enregistrés sans problème.
Aucune compensation relative au contenu
de l’enregistrement ne sera accordée, même
si l’enregistrement ou la lecture s’avèrent
impossibles en raison d’un mauvais
fonctionnement de ce produit, de la carte
mémoire, etc.
Les normes de télévision couleur varient d’un
pays ou d’une région à l’autre. Pour afficher
vos enregistrements sur un téléviseur, réglez
[Sélectionner 60i/50i] sur le paramètre requis
dans votre pays ou région avant l’enregistrement
.
17).
(p
Les émissions de télévision, les films, les
cassettes vidéo et les autres enregistrements
peuvent faire l’objet d’une protection des droits
d’auteur. Leur enregistrement non autorisé peut
être contraire aux lois sur les droits d’auteur.
Utilisez ce produit conformément aux
réglementations locales.
À propos de ce manuel, des illustrations
et des captures d’écran
Les exemples d’images utilisés à titre
d’illustration dans ce manuel ont été saisies
aide d’un appareil photo numérique ; et
à l’
par conséquent peuvent donc vous sembler
différentes des images et des témoins d’écran
qui s’affichent sur ce produit. Et, les illustrations
de ce produit et son indication d’écran sont
exagérées ou simplifiées pour aider à la
compréhension.
La conception et les caractéristiques techniques
de ce produit et des accessoires sont modifiables
sans préavis.
Visualisation de vidéos 3D
Certaines personnes peuvent trouver le
visionnage de films en 3D désagréable (fatigue
oculaire, fatigue, nausées).
Sony recommande aux utilisateurs
d’interrompre régulièrement le visionnage de
films en 3D. La durée et la fréquence des pauses
nécessaires peuvent varier d’une personne
à l’autre. Vous devez choisir ce qui vous
convient le mieux. En cas d’inconfort, arrêtez le
visionnage de vidéos en 3D jusqu’à disparition
des signes de fatigue, et consultez un médecin
si nécessaire.
Consultez également le mode d’emploi de tout
appareil ou support utilisé avec ce produit.
La vision des jeunes enfants (particulièrement
avant six ans) se développe encore. Consultez
un médecin (un pédiatre ou un ophtalmologue)
avant de permettre à de jeunes enfants de
regarder des films en 3D.
Les enfants doivent être surveillés par un
adulte afin de s’assurer qu’ils respectent les
recommandations indiquées ci-dessus.
Notes sur l’utilisation
Accordez une attention à votre entourage lors
de l’utilisation de ce produit. N’utilisez surtout
pas ce produit en marchant. Le non-respect de
cette consigne peut causer des accidents ou des
blessures.
Ne faites pas ce qui suit. Sinon, la carte
mémoire peut être endommagée, les images
enregistrées peuvent être impossible à lire ou
peuvent se perdre, ou d’autres problèmes de
fonctionnement peuvent se produire.
Éjecter la carte mémoire lorsque le témoin
’
accès (p. 19) est allumé ou clignote.
d
Enlevez le bloc-piles ou l’adaptateur CA de ce
produit ou appliquer un choc mécanique ou
une vibration à ce produit lorsque les témoins
(Film)/ (Photo) (p. 22) ou le témoin
d’accès (p. 19) sont allumés ou clignotent.
FR
11
Page 48

À propos de la performance de
l’étanchéité à la poussière et à la
pluie de ce produit
Des tests de performance ont montré que l’unité
principale de ce produit est étanche à la pluie et à
la poussière, conformément à la norme IEC60529
IP54.
Une pluie soudaine ou brève n’affectera pas le
fonctionnement de ce produit.
Performance de l’étanchéité à la poussière
: le boîtier protège l’appareil de la
(IP5x)
poussière qui pourrait l’endommager. Il n’est
toutefois pas complètement étanche à la
poussière et la protection n’est pas garantie dans
des conditions extrêmement poussiéreuses.
formance de l’étanchéité à la pluie (IPx4) :
Per
le boîtier protège l’appareil des éclaboussures
de toutes les directions qui pourraient
l’endommager. Ce produit n’est pas protégé
contre l’eau sous pression provenant d’une
douche, d’un robinet, etc.
Lorsqu’un accessoire est fixé ou que l’adaptateur
CA ou des câbles sont branchés, l’étanchéité à
la poussière et à la pluie de ce produit peut être
réduite. Ne laissez pas de poussière ou d’eau
pénétrer à l’intérieur du produit.
Ce produit ne doit pas entrer en contact avec de
l’eau chaude ou à forte teneur en minéraux.
Les chocs importants, par exemple suite à une
chute, peuvent compromettre l’étanchéité à la
pluie de ce produit. Nous vous recommandons
de contacter votre détaillant Sony ou un atelier
de service autorisé Sony (à vos frais) pour le
faire réparer.
Ce produit doit être utilisé correctement et les
recommandations suivantes doivent être suivies,
car tout dommage causé par une mauvaise
utilisation, une utilisation abusive ou un défaut
d’entretien n’est pas couvert par la garantie.
N’utilisez pas ce produit sous l’eau.
Ce produit n’est pas étanche et ne doit pas être
utilisé sous l’eau. Ce produit ne doit pas être
immergé dans l’eau.
Fermez soigneusement le cache du bloc-piles/
de la carte mémoire ou les caches des prises.
De l’eau pourrait pénétrer à l’intérieur du
produit si le cache est ouvert. Lorsque vous
utilisez ce produit sous la pluie, avec de l’eau
ou du sable sur les mains, n’ouvrez pas le
cache du bloc-piles/de la carte mémoire ou les
caches des prises. Cela pourrait entraîner un
problème de fonctionnement.
Utilisation et entretien
Si du sable, des cheveux, de la saleté, etc. se
trouvent dans le joint d’étanchéité du cache du
bloc-piles/de la carte mémoire ou des caches
des prises, de l’eau peut pénétrer à l’intérieur
du produit. Nettoyez cette zone avec un chiffon
doux sans fibres.
En cas de rayures, de déformations ou de
détériorations du joint d’étanchéité, de l’eau
peut pénétrer à l’intérieur de ce produit. Si
le joint d’étanchéité présente des rayures, des
déformations ou s’il est détérioré, contactez
votre détaillant Sony ou votre atelier de service
autorisé Sony.
Les drains situés sous le produit permettent à
l’eau et au sable entrés par le cadran IPD ADJ ou
iseur de s’écouler par le bas (p. 41).
le v
Si du sable entrave le mouvement d’éléments de
ce produit, retirez-le à l’aide d’un séchoir, etc.,
puis actionnez-les plusieurs fois.
12
FR
Page 49

Table des matières
A propos des manuels pour ce
produit
Deux manuels ont été préparés pour ce
produit, le « Mode d’emploi » et le « Guide
d’utilisation des jumelles à enregistrement
um
érique (PDF) ». Le « Mode d’emploi »
n
introduit les fonctionnements de base
et le « Guide d’utilisation des jumelles
à enregistrement numérique (PDF) »
explique les détails des fonctions.
Comment lire le Guide d’utilisation des
jumelles à enregistrement numérique
(PDF)
Installez le « Guide d’utilisation des
jumelles à enregistrement numérique »
sur votre ordinateur à partir du CD-ROM
fourni.
Placez le CD-ROM fourni dans le
cteur de disque optique de votre
le
ordinateur.
La page d’accueil devrait apparaître. Si tel n’est
pas le cas, double-cliquez sur le fichier [index.
html] situé sur le CD-ROM.
Cliquez sur le manuel du CD-ROM que
vous souhaitez lire.
Le fichier PDF du manuel du CD-ROM
.
s’ouvrira
Vous avez besoin de Adobe Reader pour
lire le « Guide d’utilisation des jumelles à
enregistrement numérique ». S’il n’est pas
installé sur votre ordinateur, téléchargez-le à
partir de Adobe Systems de la page Web.
http://www.adobe.com/
Lisez ceci en premier . .. . . . . .. . .. . . . . . . . .. . .. . 2
CONSIGNES DE SÉCURITÉ
IMPORTANTES . . . . . . . .. . .. . . . . . .. . .. . . . . .. . .. . . 3
Comment démarrer
Étape 1 : Vérification des accessoires
fournis . . . . . . . .. . .. . . . . .. . .. . . . . . . . .. . .. . . . . . .. . .14
É
: Charge du bloc-piles. .. . .. . . . . .. . 15
tape 2
: Mise sous tension et réglage
Étape 3
de ce produit . . . .. . .. . . . . . .. . .. . . . . .. . .. . . . . . . 16
Étape 4
: Insérez une carte mémoire . . . . . 19
Jumelles/Enregistrement/
Lecture
Utilisation de ce produit comme des
jumelles . . .. . . . . . . . .. . .. . . . . . .. . .. . . . . .. . .. . . . . . 21
Enregistrement . . . . .. . .. . . . . . . . .. . .. . . . . .. . .. . 22
Lecture sur ce produit . . .. . .. . . . . .. . .. . . . . . . 24
Enregistrement de films
et de photos avec un
ordinateur
Lecture des images sur un ordinateur . .. 26
Préparation d’un ordinateur
(Windows) . .. . .. . . . . .. . .. . . . . . . . .. . .. . . . . . .. . ..27
Personnalisation de ce
product
Utilisation des menus . . . . . .. . .. . . . . . . . .. . .. . 28
Listes des menus . . . . . . . . .. . .. . . . . . . . .. . .. . . . . 29
Informations
complémentaires
Dépannage . . . . . . . . .. . .. . . . . . .. . .. . . . . .. . .32
Précautions . . .. . .. . . . . . . . .. . .. . . . . .. . .. . . . . . . . 33
Spécifications . . .. . . . . . . . .. . .. . . . . . .. . .. . . . . .. . 35
Table des matières
Référence rapide
Icônes d’écran . . . . . .. . .. . . . . .. . .. . . . . . . . .. . .. . 39
Pièces et contrôles . . . . . . .. . .. . . . . . . . .. . .. . . . . 40
FR
13
Page 50

Comment démarrer
Étape 1 : Vérification des accessoires fournis
Les chiffres entre parenthèses ( ) indiquent
les quantités fournies.
Jumelles à enregistrement numérique (1)
Adaptateur CA (1)
Câble d’alimentation (1)
Câble HDMI (1)
Câble micro USB (1)
B
echargeable NP-FV70 (1)
loc-piles r
Capuchon de l’objectif (1)
Sangle (1)
Mode d’emploi » (1)
«
CD-ROM « Manuals for Digital Recording Binoculars » (1)
« Guide d’utilisation des jumelles à
enregistrement numérique (PDF) »
Remarques
Le log
iciel « PlayMemories Home » et le
« Guide d’assistance de PlayMemories Home »
peuvent être téléchargés depuis le site Web Sony
(p.
27).
Fixation de la sangle
Pour éviter de laisser tomber ce produit,
veuillez fixer la sangle aux jumelles en
suivant les étapes ci-dessous.
Insérer une des extrémités de la sangle
dans la monture de la sangle sur les
jumelles. Ensuite, fixez la sangle, en plaçant
l’extrémité de la sangle dans l’agrafe.
Fixation du grand œilleton de viseur
(DEV-50/50V)
Si vous ne voyez pas clairement sous
lumière vive l’image dans le viseur, utilisez
le grand œilleton de viseur.
Uniquement pour DEV-50/50V
Étui de transport (1)
Capuchon du viseur (1)
Gr
and œilleton de viseur (2)
FR
14
Page 51

Étape 2 : Charge du bloc-piles
Vous pouvez charger le bloc-piles
« InfoLITHIUM » (série V).
Remarques
Vous ne pouvez utiliser aucun bloc-piles
InfoLITHIUM » autre que NP-FV70/FV100
«
avec ce produit.
Pour charger le bloc-piles, éteignez ce produit
en appuyant sur le touche POWER.
Appuyez sur le touche du
1
cache du bloc-piles/de la carte
mémoire () et faites glisser le
cache dans le sens de la flèche
(), puis ouvrez le cache ().
Alignez le bloc-piles avec les
2
rainures du compartiment du
bloc-piles tout en appuyant
sur le levier de dégagement de
la pile (), puis faites glisser
le bloc-piles jusqu’à ce qu’il
s’enclenche ().
Fermez le cache du bloc-piles/
3
de la carte mémoire.
Faites glisser le cache jusqu’à ce qu’il n’y ait
plus d’espace.
Branchez l’adaptateur CA et
4
le câble d’alimentation à ce
produit et à la prise murale.
Témoin CHG (charge)
Ouvrez le cache et faites-le tourner.
Prise DC IN
Fiche CC
Vers la prise murale
Câble
d’alimentation
Comment démarrer
Alignez le bloc-piles dans les rainures.
Levier de dégagement de la pile
Adaptateur CA
Le témoin CHG (charge) s’allume et
le chargement commence. Le témoin
CHG (charge) s’éteint lorsque le blocpiles est entièrement chargé.
FR
15
Page 52

Lorsque le bloc-piles est chargé,
5
débranchez l’adaptateur CA de
la prise DC IN de ce produit.
Conseils
Lorsque ce produit est en marche, vous pouvez
vérifier la durée approximative de vie restante
de la pile (temps d’enregistrement et de lecture)
à l’aide de l’indicateur d’énergie restante de la
pile situé au coin supérieur droit de l’écran.
Pour retirer le bloc-piles
Éteignez ce produit en appuyant sur le
touche POWER (p. 16), puis ouvrez le
cache du bloc-piles/de la carte mémoire
15).
(p.
lissez le levier de dégagement de la pile
G
et r
etirez la pile.
Étape 3 : Mise sous tension et réglage de ce produit
Remarques
Si ce produit est utilisé par plus d’une personne,
ajustez la dioptrie et la largeur pour chaque
nouvel utilisateur.
1
Appuyez sur le touche POWER.
Ce produit est allumé.
Pour éteindre l’appareil, appuyez de
nouveau sur le touche POWER.
2
Ajustez la dioptrie jusqu’à ce que
l’image soit nette pour chaque
œil, en tournant le bouton de
réglage de la dioptrie.
Capteur d’œil
16
Levier de dégagement de la pile
Ajustez la dioptrie pour chaque œil
séparément.
Si vous approchez les yeux près du viseur,
le capteur d’oeil réagit en affichant l’écran
du viseur.
3
Ajustez la largeur entre le viseur
gauche et droit pour s’adapter
à vos yeux en utilisant le cadran
IPD ADJ.
FR
Page 53

Ajustez la largeur de sorte que les images
de gauche et de droite se chevauchent.
L’image affichée dans le viseur ne doit pas
apparaître dédoublée.
Lorsque le viseur dépasse la limite de la
plage réglable, un clic se fait entendre. Le
viseur ne pourra plus bouger.
4
Réglez les paramètres de la
langue, de la région, de l’heure
d’été, le format de la date et de
l’heure ainsi que la date et l’heure
actuelle en utilisant le sélecteur
multiple, puis confirmez chaque
réglage.
Utilisation du sélecteur multiple
Déplacez le sélecteur multiple sur
/// pour sélectionner l’élément
désiré, puis appuyez sur le centre du
sélecteur pour valider la sélection.
Lorsque chaque réglage est terminé,
sélectionnez [Suiv.].
5
Sélectionnez le mode [60i (NTSC)]
ou [50i (PAL)] selon le système de
TV en couleur utilisé dans votre
pays ou région, puis sélectionnez
.
Si vous choisissez le mode 60i/50i,
l’appareil redémarre ce produit
redémarre pour mettre à jour le
système.
Voir page 18 pour en savoir plus sur le
système de TV en couleur dans votre pays
ou région.
6
Ajustez la position verticale
relative du viseur de droite et de
gauche.
Assurez-vous que la ligne horizontale
chevauche les lignes verticales.
Image dans le viseur
de gauche
Image perçue par les deux yeux
Si la ligne horizontale et les lignes
verticales ne se chevauchent pas,
ajustez la position de l’image dans le
viseur de droite en sélectionnant
/ jusqu’à ce que les lignes se
chevauchent, puis sélectionnez
Si vous voyez l’image ci-dessous, le
dispositif fonctionne correctement.
Si l’image ci-dessous s’affiche même après
le réglage du viseur, ce produit ne doit plus
être utilisé.
Image dans le viseur
de droite
Comment démarrer
.
FR
17
Page 54

Remarques
Si ce produit ne peut pas effectuer [Régl Auto
Objectif 3D], sélectionnez [Relancer].
La ligne horizontale et les lignes verticales ne se
chevauchent pas.
Si les images ne s’affichent pas
correctement, ce produit est peutêtre endommagé. Contactez votre
concessionnaire Sony ou le centre Sony
de service local autorisé.
7
Sélectionnez [Lancer].
Si vous sélectionnez [Lncer+trd], l’écran
en mode enregistrement s’affiche. Lorsque
vous activez ce produit la prochaine fois
[Régl Auto Objectif 3D] l’écran s’affichera.
8
Réglez l’objectif 3D.
Pointez l’appareil vers un sujet afin de
l’afficher à l’écran.
Visionnez un sujet dont l’échelle de
l’indicateur dépasse la marque
sélectionnez
Échelle
Ne changez pas le sujet jusqu’à la fin de
l’ajustement.
.
, puis
Type de sujets qui devraient être
affichés sur l’écran pour [Régl Auto
Objectif 3D]
L’échelle indiquée varie selon l’objet affiché
à l’écran.
Sujets qui indiquent une échelle plus
le
vée :
é
Sujets distants dans des lieux lumineux, par
exemple en extérieur
jets à une distance supérieure à 20 m
Su
(65 pi) de ce produit
Sujets avec des formes et des couleurs variées
Regarder les films enregistrés sur
un téléviseur
Pour regarder des films enregistrés sur
un téléviseur, enregistrez les films après
avoir sélectionné le réglage approprié
[Sélectionner 60i/50i] pour le système de
télévision couleur du pays/région où vous
utilisez ce produit.
Les pays ou les régions où vous avez
besoin de régler [Sélectionner 60i/50i] à
[60i (NTSC)]
Bahamas, Bolivie, Canada, Amérique
centrale, Chili, Colombie, Équateur,
Guyane, Jamaïque, Japon, Corée, Mexique,
Pérou, Surinam, Taïwan, Philippines, ÉtatsUnis, Venezuela, etc.
18
FR
Page 55

Étape 4 : Insérez une carte mémoire
Les pays ou les régions où vous avez
besoin de régler [Sélectionner 60i/50i] à
[50i (PAL)]
Argentine, Australie, Autriche, Belgique,
Bulgarie, Brésil, Chine, République tchèque,
Danemark, Finlande, France, Allemagne,
Guyane, Hollande, Hong Kong, Hongrie,
Iran, Iraq, Italie, Koweït, Malaisie, Monaco,
Nouvelle-Zélande, Norvège, Paraguay,
Pologne, Portugal, Russie, Singapour,
République slovaque, Espagne, Suède,
Suisse, Thaïlande, Ukraine, Royaume-Uni,
Uruguay, etc.
Types de cartes mémoires pouvant être
utilisées avec ce produit
« Memory Stick
PRO Duo »
(Mark2)
« Memory Stick
PRO-HG Duo »
Décrits dans le
« Memory Stick
XC-HG Duo »
Carte mémoire SD
Carte mémoire
SDHC
Carte mémoire
SDXC
Il est impossible de garantir le fonctionnement
avec toutes les cartes mémoire.
Il a été vérifié que le « Memory Stick PRO
uo » a
llant jusqu’à 32 Go, le « Memory Stick
D
XC-HG Duo » allant jusqu’à 64 Go et les cartes
SD allant jusqu’à 64 Go fonctionnent avec ce
produit.
Décrits dans le
présent manuel,
«
Memory Stick
PRO Duo »
présent manuel,
«
Memory Stick XC-
HG Duo »
Décrits dans le
présent manuel,
carte SD
Vitesse SD de classe
4 ou plus rapide
nécessaire.
Ouvrez le cache du bloc-piles/de la
carte mémoire (p. 15), puis insérez la
carte mémoire avec le bout arrondi
dans la direction illustrée jusqu’à ce
que vous entendiez un clic.
Notez la direction du coin arrondi.
Comment démarrer
Témoin d’accès
FR
19
Page 56

Fermez le cache du bloc-piles/de la carte
mémoire après l’installation de la carte
mémoire.
Si l’écran [Préparation du fichier de la base de
données d’images. Veuillez patienter.] s’affiche,
attendez qu’il disparaisse.
Remarques
Si [Échec de la création d’un nouveau fichier
dans la base de données d’images. L’espace libre
est peut-être insuffisant.] s’affiche, formatez la
carte mémoire.
Assurez-vous d’insérer la carte mémoire dans
le bon sens. En forçant la carte mémoire dans
le mauvais sens, vous risquez d’endommager
la carte mémoire, la fente pour carte mémoire
et/ou les données d’images.
N’éjectez pas la carte mémoire lorsque le témoin
d’accès est allumé. Dans le cas contraire, les
films et/ou les photos pourraient ne pas être
enregistrés correctement sur la carte mémoire.
Pour éjecter la carte mémoire
Ouvrez le cache du bloc-piles/de la carte
mémoire et appuyez une fois sur la carte
mémoire.
Remarques
Les films enregistrés sur les cartes mémoire
« Memory Stick XC-HG Duo » et SDXC
ne peuvent pas être importés ou lus sur les
ordinateurs ou appareils AV ne prenant pas
en charge le système de fichiers exFAT*, en
branchant ce produit aux dispositifs avec
un câble USB. Confirmez à l’avance que
l’équipement connecté prend en charge le
système exFAT. Si vous connectez un appareil
qui ne prend pas en charge le système exFAT et
que l’écran de formatage s’affiche, n’exécutez pas
le formatage. Toutes les données enregistrées
seront perdues.
* Le système exFAT est un système de fichiers
utilisé pour les cartes mémoire « Memory Stick
XC-HG Duo » et SDXC.
FR
20
Page 57

Jumelles/Enregistrement/Lecture
Utilisation de ce produit comme des jumelles
1
Appuyez sur le touche POWER.
Ce produit est allumé.
Un écran de réglages peut s’afficher
selon le statut de ce produit lorsqu’il est
activé. Utilisez ce produit après avoir
terminé les réglages nécessaires.
2
Assurez-vous que le dioptre, la
largeur et la position verticale
relative du viseur de droite et de
gauche vous c
3
Maintenez ce produit avec les
deux mains et dirigez-le vers
l’objet.
onviennent (p. 16).
Manette de zoom motorisé
Vous pouvez agrandir des images à
l’aide de la manette de zoom motorisé.
Ce produit règle la mise au point
automatique avec la fonction de mise au
point automatique (réglage par défaut).
Remarques
Veillez à garder le doigt appuyé sur la manette
de zoom motorisé. Si vous retirez le doigt
de la manette de zoom motorisé, le son de
fonctionnement de cette dernière risque d’être
également enregistré.
Conseils
SteadyShot] est réglé sur [Activé] dans le
[
réglage par défaut.
A propos de zoom
Le réglage par défaut pour l’agrandissement
de la jumelle est indiqué ci-dessous.
V-30 : 0,8 à 15
DE
DEV-50/50V : 0,8 à 25
L’agrandissement de la jumelle est
disponible si les conditions suivantes sont
réunies.
Le mode d’enregistrement en 2D est
activé.
SteadyShot] est réglé sur un autre
[
paramètre que [Activé] et [Zoom
numérique] est réglé sur [Activé].
Conseils
L’agrandissement des jumelles indique la
grosseur du sujet avec les jumelles par rapport à
sa grosseur à l’oeil nu.
(approx.)
(approx.)
Jumelles/Enregistrement/Lecture
Pour régler manuellement la mise au
point
Sélectionnez (MENU)
[Caméra/Micro] [
manuels] [Mise au point] à l’aide du
sélecteur multiple.
Réglages
FR
21
Page 58

22
FR
Enregistrement
Sélectionnez [Manuel], puis sélectionnez
(sujet proche) / (sujet
éloigné) plusieurs fois pour régler la
mise au point.
Conseils
Pour régler la mise au point automatiquement,
sélectionnez [Auto].
Pour changer l’affichage du viseur entre
2D et 3D
Appuyez sur FINDER 2D/3D pour changer
l’affichage du viseur entre 2D et 3D.
Par défaut, les images du viseur s’affichent
en 3D.
Remarques
Les images enregistrées ne changent pas, même
si vous appuyez sur FINDER 2D/3D.
Pour utiliser ce produit dans des
endroits sombres (Hyper gain)
Il est possible d’afficher clairement un
sujet, même dans les endroits sombres en
augmentant le gain.
Sélectionnez
Micro] [
[Hyper gain] [Activé].
Remarques
La qualité de l’image est réduite en raison du
bruit, lors de l’utilisation de [Hyper gain]. De
plus, les couleurs de l’image s’éclaircissent.
Conseils
Il est recommandé de régler la mise au point
manuellement.
Lorsque vous éteignez ce produit, [Hyper gain]
est également réglé sur [Désactivé].
(MENU) [Caméra/
Réglages manuels]
Dans le paramètre par défaut, les images
dans le viseur sont affichées en 3D (p. 22),
mais les films sont enregistrés en 2D.
1
Lorsque l’appareil est sous
tension, appuyez sur le touche
MODE pour choisir le mode
d’enregistrement.
Touche MODE
(Film) : Pendant l’enregistrement d’un
film
(Photo) : Pendant l’enregistrement
d’une photo
2
Mode d’enregistrement de films :
Appuyez sur START/STOP pour
démarrer l’enregistrement.
Pour arrêter l’enregistrement, appuyez
de nouveau sur START/STOP.
Mode de prise de photos :
Appuyez légèrement sur la
touche PHOTO pour faire la
mise au point, puis enfoncez-la
complètement.
Page 59

Remarques
Les conditions suivantes seront indiquées si des
données sont toujours en cours d’écriture sur la
carte mémoire après que l’enregistrement soit
terminé. Durant ce temps, évitez de soumettre
ce produit à des chocs ou à des vibrations, et ne
irez pas la pile ou l’adaptateur CA.
et
r
Le témoin d’accès (p.
L’icône du support dans le coin supérieur
droit de l’écran clignote
Vous ne pouvez pas prendre de photos lorsque
[Sélect. mode 2D/3D] est réglé sur [3D].
Sélectionnez
image/Taille] [Sélect. mode 2D/3D]
[2D].
Vous ne pouvez pas prendre de photos en 3D.
19) s’allume ou clignote
(MENU) [Qualité
Pour changer le mode d’enregistrement
de 2D et 3D
Vous pouvez sélectionner un mode
d’enregistrement de 2D ou 3D.
Pour changer 2D et 3D, sélectionnez
(MENU) [Qualité image/Taille]
[Sélect. mode 2D/3D].
Distance recommandée avec le sujet et
niveau de zoom
La distance à laquelle vous pouvez obtenir
de bons films 3D varie selon le niveau de
zoom.
Distance d’enregistrement recommandée
(approx.)
2
m à (9 m) [6 pi à (30 pi)]
6 m à (16 m) [20 pi à (51 pi)]
24 m à (30 m) [78 pi à (100 pi)]
Si un sujet est situé plus loin que la
distance d’enregistrement recommandée,
la profondeur 3D sera réduite.
Remarques
Il n’est pas judicieux d’enregistrer un sujet situé
plus près que la distance d’enregistrement
recommandée en 3D, le film ne sera pas
agréable à regarder. Enregistrez le sujet en 2D.
Lorsque vous enregistrez des films en 3D,
l’agrandissement de la jumelle peut être réglé
v
iron 6 . Si vous souhaitez visionner ou
à en
enregistrer un sujet avec un agrandissement
plus important, réglez [Sélect. mode 2D/3D]
sur [2D].
Utilisation directe des menus
En enregistrant un menu préféré dans
la partie gauche de l’écran du viseur,
vous pouvez utiliser le menu attribué
e
ctement ([Mon bouton], p. 30).
dir
Les paramètres par défaut sont [Hyper
gain], [Sélect. mode 2D/3D] et [Luminosité
viseur].
Zoom
Jumelles/Enregistrement/Lecture
FR
23
Page 60

24
FR
Lecture sur ce produit
Contrôle des réglages d’image
manuellement avec le cadran
MANUAL
Il est pratique d’attribuer une option de
menu au cadran MANUAL (p. 41).
En appuyant sur le touche MANUAL, vous
pouvez utiliser le menu attribué. En outre,
en maintenant le touche MANUAL appuyé
pendant quelques secondes, vous pouvez
attribuer un élément de menu souhaité.
Acquisition d’informations de
localisation à l’aide du GPS (DEV50V)
Réglez [Réglage du GPS] sur [Activé]
(p. 31).
s’affiche sur l’écran et ce produit
commence à acquérir les informations
de localisation. Les informations sur
l’emplacement acquises sont enregistrées
sur les films et les photos.
Vous pouvez lire les images enregistrées
avec ce produit.
Conseils
Si vous voulez lire les images en 3D, réglez
[Sélect. mode 2D/3D] à [3D].
1
Lorsque l’appareil est sous
tension, appuyez sur (Afficher
Images).
L’écran Index d’événements s’affiche
après quelques secondes.
2
Sélectionnez une image que
vous souhaitez afficher à l’aide du
sélecteur multiple, puis appuyez
au centre du sélecteur.
La lecture commence.
image précédente / image
suivante
événement précédent /
événement suivant
Ce produit organise les images dans un
groupe qui s’appelle un événement, basé
sur la date et l’heure et les informations
sur la fréquence à laquelle vous enregistrez
les images.
Page 61

Opérations disponibles sur l’écran de
lecture
Pause/Faire jouer
/
Arrêt
Image précédente/
/
suivante
Retour rapide/Avance
/
rapide
Lire le diaporama
Volume
Effacer
Contexte
Certains touches peuvent ne pas s’afficher en
raison de l’image de lecture.
Remarques
Il peut s’avérer impossible pour vous de lire
normalement des images enregistrées sur ce
produit avec d’autres appareils. Il peut aussi
s’avérer impossible pour vous de lire des images
enregistrées sur d’autres appareils avec ce
produit.
Conseils
Sélectionnez
les films au ralenti.
Pendant que vous continuez à appuyer sur Enter
après avoir sélectionné
lecture, les films sont lus à une vitesse d’environ
5 fois en
env
iron 60 fois la normale.
/ en mode pause pour lire
/ pendant la
viron 10 fois environ 30 fois
Jumelles/Enregistrement/Lecture
FR
25
Page 62

Enregistrement de films et de photos avec un ordinateur
Lecture des images sur un ordinateur
Le logiciel « PlayMemories Home » vous permet d’importer des vidéos et des images fixes sur
votre ordinateur pour les utiliser comme vous le souhaitez.
Ce que vous pouvez faire avec le logiciel « PlayMemories Home » (Windows)
Visualiser les
images dans
Importer des
images à partir de
ce produit
« PlayMemories Home » peut être téléchargé depuis l’adresse suivante :
www.sony.net/pm
Remarques
Il est nécessaire de disposer d’une connexion à Internet pour installer « PlayMemories Home ».
Il est nécessaire de disposer d’une connexion à Internet pour utiliser les services en ligne. Les services
peuvent ne pas être disponibles dans certains pays et certaines régions.
un calendrier
Télécharger des
images vers des
services en ligne
Créer un disque de
vidéos
Logiciel pour Mac
Le logiciel « PlayMemories Home » n’est pas pris en charge par les ordinateurs Mac. Pour
importer et lire des images provenant de ce produit vers votre Mac, utilisez un logiciel
proprié à votre Mac. Pour plus de détails, visitez l’adresse suivante :
ap
http://www.sony.co.jp/imsoft/Mac/
FR
26
Page 63

Préparation d’un
ordinateur
Installation du logiciel
« PlayMemories Home » sur votre
ordinateur
Accédez au site de
téléchargement suivant à l’aide
d’un navigateur Internet, puis
cliquez sur [Installation]
[Exécuter].
www.sony.net/pm
Procédez à l’installation en
suivant les instructions affichées
à l’écran.
Lorsque les instructions vous demandant
de raccorder ce produit à un ordinateur
s’affichent, raccordez ce produit à votre
ordinateur à l’aide du câble micro USB
(fourni).
Lorsque l’installation est terminée,
« PlayMemories Home » démarre.
Remarques sur l’installation
Si le logiciel « PlayMemories Home » est
déjà installé sur votre ordinateur, connectez
ce produit à votre ordinateur. Les fonctions
pouvant être utilisées avec ce produit seront
alors disponibles.
(Windows)
Câble micro USB (fourni)
Si le logiciel « PMB (Picture Motion Browser) »
est installé sur votre ordinateur, il sera remplacé
r le logiciel « PlayMemories Home ». Dans
pa
ce cas, vous ne pourrez plus utiliser certaines
fo
nctions qui étaient disponibles dans « PMB »
avec ce logiciel « PlayMemories Home ».
Consulter le « Guide d’assistance
de PlayMemories Home »
Double-cliquez l’icône de
raccourci « Guide d’assistance de
PlayMemories Home » sur l’écran de
l’ordinateur.
Si vous utilisez Windows 8, sélectionnez
[Guide d’assistance de PlayMemories
Home] dans le menu d’aide de
PlayMemories Home ».
«
Si l’icône ne s’affiche pas sur l’écran de
l’ordinateur, cliquez sur [Démarrer]
[Tous les programmes] [PlayMemories
Home] l’élément désiré.
ur plus de détails sur « PlayMemories
Po
Home », sélectionnez
d’assistance de PlayMemories Home ») sur
le logiciel ou consultez la page d’aide de
PlayMemories Home (http://www.sony.
co.jp/pmh-se/).
(« Guide
Enregistrement de films et de photos avec un ordinateur
FR
27
Page 64

Personnalisation de ce product
Utilisation des menus
Ce produit comporte diverses options de
menu sous chacune des 6 catégories de
menu.
1
Sélectionnez (MENU).
2
Sélectionnez une catégorie.
3
Sélectionnez l’élément de menu
désiré.
Pour trouver rapidement un élément
de menu
Les menus [Caméra/Micro] et
[Configuration] ont des sous-catégories.
Sélectionnez l’icône de sous-catégorie pour
que l’écran affiche la liste des menus de la
sous-catégorie sélectionnée.
Icônes de sous-catégorie
Lorsqu’il est impossible de sélectionner
un élément de menu
Les options de menu ou les réglages en
grisé ne sont pas disponibles.
Lorsque vous sélectionnez un élément de
menu grisé, ce produit affiche la raison
de son indisponibilité ou une instruction
indiquant dans quelles conditions il est
possible de l’utiliser.
Remarques
Sélectionnez
du menu ou pour revenir à l’écran de menu
précédent.
FR
pour terminer le réglage
28
Page 65

Listes des menus
Les options du menu disponibles diffèrent entre le mode film ( ) et le mode photo ( ).
Mode prise de vue
Film
Photo
Caméra/Micro
Réglages manuels
Balance blancs
Exposition
Mise au point
IRIS
Vitesse d’obturateur
Régl. exposition auto
Réglage bal. blancs
Low Lux
Hyper gain
Réglages caméra
Régl Auto Objectif 3D
Sélection de scène
Minuterie
Télé macro
SteadyShot
SteadyShot
Zoom numérique
Contre-jour automat.
Réglage de la molette
Visage
Détection de visage
Microphone
Voix plus proche
Réd. bruit vent auto
Niv. référence micro
Enregistre les films.
Prend des photos.
Permet de régler la balance des couleurs en fonction de
l’environnement d’enregistrement.
Règle la luminosité des films et des photos.
Effectue la mise au point manuellement.
Ajuste l’iris.
Ajuste la vitesse d’obturation.
Ajuste l’exposition sur la base des résultats de mesure
automatique de l’exposition.
Ajuste le niveau d’équilibre du blanc manuellement.
Enregistre les images aux couleurs vives dans la pénombre.
Enregistre des images claires dans des conditions sombres
en augmentant le gain.
Corrige automatiquement la position verticale des films
à droite et à gauche pour enregistrer des films 3D qui
peuvent être visualisées confortablement, sans flou.
Sélectionne un réglage d’enregistrement selon le type de
scène, comme une prise de vue de nuit ou de plage.
Règle le retardateur lorsque ce produit est en mode photo
d’enregistrement.
Prend en photo un objet sur lequel a été faite la mise au
point avec un arrière-plan flou.
Règle la fonction SteadyShot pendant le tournage des
films.
Règle la fonction SteadyShot pendant la prise de photos.
Définit le zoom numérique.
Régle automatiquement l’exposition pour les sujets en
contre-jour.
Assigne une fonction à la molette cadran MANUAL.
Règle automatiquement la qualité de l’image des visages.
Détecte les visages humains et enregistre la voix
clairement.
Reconnaît les conditions d’enregistrement et réduit le bruit
du vent.
Règle le niveau de référence du microphone.
Personnalisation de ce product
FR
29
Page 66

Assistant prise d. vue
Mon bouton
Quadrillage
Réglage d’affichage
Qualité image/Taille
Mode d’ENR
Img. par seconde
Sélect. mode 2D/3D
x.v.Color
Taille d’image
Fonction lecture
Éditer/Copier
Effacer
Protéger
Copier
Copie Directe
Configuration
Réglages support
Informations support
Formatage
Rép.f.base.don.img
Numérot. Fichiers
Réglages lecture
Code données
Réglage du volume
Attribue des fonctions à Mon bouton.
Affiche un cadre servant de guide, afin de s’assurer que le
sujet est horizontal ou vertical.
Règ
le la durée d’affichage sur le viseur des icônes ou des
témoins.
Règle le mode d’enregistrement des films. Pour les sujets
rapide, il est recommandé d’utiliser une qualité d’image
élevée.
Règle la cadence de prise de vue pour l’enregistrement des
films.
Change le type d’enregistrement de film entre 2D et 3D.
Capture une gamme de couleurs plus étendue.
Règle la taille des photos.
Fait la lecture des films ou des photos.
Supprime des films ou des photos.
Protège les films et les photos afin d’éviter de les
supprimer.
Copie des films ou des photos aux dispositifs multimédia
externes.
Copie tous les films et photos qui n’ont pas encore été
sauvegardés sur un dispositif multimédia externe.
Affiche les informations de la carte mémoire, comme
l’espace disponible.
Supprime toutes les données sur la carte mémoire.
Répare le fichier de la base de données des images sur une
carte mémoire.
Règle le mode d’attribution des numéros de fichier.
Affiche les données d’enregistrement détaillées pendant
la lecture.
Ajuste le volume sonore de la lecture et le volume de sortie
audio au casque de contrôle lors de l’enregistrement.
30
FR
Page 67

Connexion
Type de téléviseur
Réglage 3D HDMI
Résolution HDMI
CTRL POUR HDMI
Connexion USB
Réglage USB LUN
Réglages généraux
Luminosité viseur
Ajustement du viseur
Information GPS*
Réglage du GPS*
Voyant de tournage
Bip
Language Setting
Sélectionner 60i/50i
Informations batterie
Économie d’énergie
Initialiser
Réglages horloge
Régl. date & heure
Réglage zone
AJU auto horloge*
AJU auto zone*
* DEV-50V
Définit l’aspect proportion qui convient au téléviseur
branché.
Sélectionnez le format de sortie des images de droite et de
gauche lors du raccordement de ce produit à un téléviseur
3D avec le câble HDMI (fourni).
Sélectionnez la résolution de l’image de sortie lorsque vous
branchez ce produit à un téléviseur à l’aide du câble HDMI
(fourni).
Règle si la télécommande du téléviseur peut être utilisée
ou non lorsque ce produit est raccordé à un téléviseur
sy
chronisé compatible « BRAVIA » avec le câble HDMI
n
(fourni).
Connecte ce produit à un dispositif externe via USB.
Paramètre ce produit pour améliorer la compatibilité d’une
connexion USB en restreignant certaines fonctions USB.
Ajuste la luminosité du viseur.
Ajuste la position verticale relative du viseur de droite et
de gauche.
Affiche les informations de l’emplacement.
Définit le GPS.
Configure si le témoin d’enregistrement doit être allumé
ou non.
Détermine si le timbre sonore de fonctionnement du
produit est activé ou non.
Règle la langue d’affichage.
Permute 1080/60i (NTSC-systèmem) et 1080/50i (PAL-
système).
Affiche les informations sur la pile.
Règle la mise hors tension automatique.
Initialise tous les paramètres aux réglages par défaut.
Règle le [Format date & heure], [Heure d’été], ou [Date et
heure].
Règle un décalage horaire sans arrêter l’horloge.
Compense l’heure automatiquement par l’obtention des
informations sur la localisation à partir du système GPS.
Compense automatiquement la différence d’heure par
l’obtention des informations sur la localisation à partir du
système GPS.
Personnalisation de ce product
FR
31
Page 68

Informations complémentaires
Dépannage
En cas de problème lors de l’utilisation de
ce produit, exécutez les étapes suivantes.
Vérifiez la liste sur cette page et
inspectez ce produit.
Débranchez la source d’alimentation,
rebranchez-la après environ
minute et mettez ce produit en
1
marche.
Sélectionnez (MENU)
[Configuration] [
Réglages
généraux] [Initialiser].
Lorsque vous sélectionnez [Initialiser],
tous les réglages sont réinitialisés, y
compris ceux de l’horloge.
Contactez votre détaillant Sony ou
un atelier de service autorisé Sony si
le problème persiste.
Consultez le « Guide d’utilisation des jumelles
à enregistrement numérique » (p. 13) pour
obtenir plus de détails sur les symptômes
r
oduit et le « Guide d’assistance
de ce p
de PlayMemories Home » (p.
connexion de ce produit à un ordinateur.
27) pour la
Le produit ne s’allume pas.
Insérez un bloc-piles chargé dans ce produit
(p. 15).
Ce produit ne fonctionne pas, même
lorsqu’il est mis sous tension.
Débranchez l’adaptateur CA de la prise murale
ou retirez le bloc-piles pendant environ
1 minute, puis replacez-le.
Ce produit s’échauffe.
Ce produit peut s’échauffer pendant le
fonctionnement. Il ne s’agit pas d’une défaillance
technique.
Codes d’autodiagnostic et témoins
d’avertissement
Si des témoins s’affichent sur le viseur, vérifiez
ce qui suit.
Si le problème persiste après quelques
tentatives de résolution, communiquez avec
votre détaillant Sony ou un atelier de service
autorisé par Sony. Dans ce cas, lorsque vous
les contactez, donnez-leur tous les chiffres du
code d’erreur commençant par C ou E.
:
C:04
Le bloc-piles n’est pas un bloc-piles
« InfoLITHIUM » (série V). Utilisez un blocpiles « InfoLITHIUM » (série V) (p.
nchez la fiche CC de l’adaptateur CA à ce
Bra
produit en toute sécurité (p.
C:06 :
La température du bloc-piles est élevée. Changez
le bloc-piles ou placez-le dans un endroit frais.
C:13 : / C:32 :
Débranchez la source d’alimentation. Rebranchez
l’alimentation et faites fonctionner ce produit de
nouveau.
E: :
Suivez la procédure de la partie de la section
« Dépannage ».
La température du bloc-piles est élevée. Changez
le bloc-piles ou placez-le dans un endroit frais.
15).
15).
32
FR
Page 69

Précautions
Utilisation et entretien
N’utilisez pas et ne rangez pas ce produit et ses
accessoires dans les endroits suivants :
Dans des endroits extrêmement chauds,
froids ou humides. Ne les exposez jamais à
des tem
pératures supérieures à 60
°F), comme en plein soleil, à proximité de
calorifères ou dans un véhicule stationné
au soleil. Ils pourraient ne pas fonctionner
correctement ou se déformer.
À proximité de forts champs magnétiques ou
de vibrations mécaniques. Ce produit peut
présenter un dysfonctionnement.
À proximité d’ondes radio ou de radiations
fortes. Ce produit pourrait ne pas enregistrer
correctement.
À proximité de récepteurs AM et
d’équipements vidéo. Du bruit pourrait être
audible.
À la plage ou dans les endroits poussiéreux.
Si du sable ou de la poussière pénètre
dans ce produit, celui-ci risque de ne pas
fonctionner correctement. Parfois, ce mauvais
fonctionnement ne peut être réparé.
Utilisez les accessoires recommandés dans ce
mode d’emploi pour le fonctionnement sur
courant alternatif (CA) ou continu (CC).
Évitez que ce produit ne soit mouillé, par
exemple sous la pluie ou dans l’eau de mer. Si
ce produit se mouille, il peut mal fonctionner.
Parfois, ce mauvais fonctionnement ne peut
être réparé.
Si un objet solide ou du liquide pénètre dans
le boîtier, débranchez ce produit et faites-le
vérifier par un Sony concessionnaire avant de
l’utiliser de nouveau.
Évitez toute manipulation brusque de l’appareil,
tout démontage, toute modification ou tout
impact (avec un marteau, le sol, les pieds, etc.).
Prenez particulièrement soin de l’objectif.
Gardez ce produit éteint lorsque vous ne
l’utilisez pas.
N’enveloppez pas ce produit avec un tissu, par
exemple, et le mettre en marche. Cela pourrait
entraîner une surchauffe interne de l’appareil.
C (140
Lorsque vous débranchez le câble
d’alimentation, tirez sur la fiche et non sur le
cordon (fil).
N’abîmez pas le câble d’alimentation en
déposant un objet lourd dessus, par exemple.
N’utilisez jamais de bloc-piles déformé ou
endommagé.
Veillez à ce que les contacts métalliques
demeurent toujours propres.
s de fuite de l’électrolyte d’une pile :
a
En c
communiquez avec un atelier de service
au
torisé par Sony ;
nettoyez la partie de la peau qui est entrée en
con
tact avec le liquide ;
en cas de contact avec les yeux, rincez-les à
grande eau et consultez un médecin.
Si vous n’utilisez pas ce produit
pendant une longue période de temps
Pour conserver ce produit dans un état
optimal pendant une longue période de temps,
mettez-le sous tension et faites-le fonctionner
en enregistrant ou en visualisant des images au
moins une fois par mois.
Déchargez entièrement le bloc-piles avant de
le ranger.
À propos de la manipulation du boîtier
Lorsque le boîtier du produit est sale, nettoyez-
le avec un chiffon doux légèrement imbibé
d’eau, puis essuyez-le avec un chiffon doux et
sec.
o
ur ne pas endommager le boîtier, évitez :
P
D’utiliser les solvants tels que les diluants,
l’essence, l’alcool, les chiffons imprégnés
de produits chimiques, les répulsifs, les
insecticides et les écrans solaires
Manipulation de ce produit avec les
substances mentionnées ci-dessus sur les
mains
De mettre en contact le boîtier avec des objets
en caoutchouc ou en vinyle pendant une
longue période
Informations complémentaires
FR
33
Page 70

À propos de l’entretien et du
rangement de l’objectif
Essuyez la surface de l’objectif avec un chiffon
doux dans les cas suivants :
lorsque la surface de l’objectif présente des
traces de do
lorsque vous utilisez le caméscope dans des
lieux ch
lorsque l’objectif est exposé à l’air salin,
comme à la plage.
Rangez l’objectif dans un lieu bien aéré, à l’abri
de la poussière et de la saleté.
Pour éviter la formation de moisissures,
nettoyez régulièrement l’objectif comme indiqué
ci-dessus.
igts ;
auds ou humides ;
Enregistrement de toutes les données
d’image
Pour éviter la perte de vos données d’image,
enregistrez régulièrement toutes vos images sur
un support amovible.
Remarques sur le bloc-piles et
l’adaptateur CA
Assurez-vous de retirer le bloc-piles ou
l’adaptateur CA après avoir éteint ce produit.
Débranchez l’adaptateur CA du produit en
retenant tant le produit que la fiche CC.
Remarque sur la température des
jumelles et du bloc-piles
Lorsque la température de ce produit ou du
bloc-piles devient très élevée ou très basse,
vous ne pourrez peut-être pas effectuer
d’enregistrement ou de lecture sur ce produit en
raison des ses fonctions de protection qui sont
activées dans de telles situations. Dans ce cas,
un indicateur s’affiche sur l’écran.
Lorsque ce produit est branché à un
ordinateur ou à des accessoires
Ne tentez pas de formater la carte mémoire de
ce produit à l’aide d’un ordinateur. Si vous le
faites, ce produit pourrait ne pas fonctionner
correctement.
Lors du branchement de ce produit à un autre
appareil à l’aide de câbles de communication,
veillez à insérer la prise du connecteur dans le
bon sens. Pousser la prise en la forçant dans la
borne endommagera la borne et peur résulter
en un mauvais fonctionnement de ce produit.
Notes sur les accessoires en option
Nous recommandons l’utilisation d’accessoires
Sony authentiques.
Les accessoires authentiques Sony peuvent ne
pas être disponibles dans votre pays ou votre
région.
Pour assurer un bon fonctionnement
de la carte mémoire
Il est recommandé de formater la carte mémoire
avec ce produit avant la première utilisation. Le
formatage de la carte mémoire effacera toutes
les données qui y sont stockées et celles-ci
seront irrécupérables. Enregistrez vos données
importantes sur votre ordinateur etc.
À propos de la charge de la pile
rechargeable pré-installée
Ce produit est équipé d’une pile rechargeable
pré-installée permettant de conserver en
mémoire la date, l’heure et d’autres réglages,
même lorsque ce produit est éteint. La pile
rechargeable pré-installée est toujours chargée
lorsque ce produit est connecté à une prise
le à l’aide de l’adaptateur CA ou lorsque
ura
m
le bloc-piles est attaché. La pile rechargeable
se déchargera complètement après environ
3
mois si vous n’utilisez pas du tout ce produit.
Utilisez ce produit après avoir chargé la pile
rechargeable pré-installée. Toutefois, même si la
pile rechargeable pré-installée n’est pas chargée, le
fonctionnement de ce produit ne sera pas affecté
tant que vous n’enregistrez pas la date.
Procédures
Branchez ce produit à une prise murale à l’aide de
’
adaptateur CA fourni, et laissez ce produit éteint
l
pendant plus de 24 heures.
34
FR
Page 71

Spécifications
Système
Format du signal :
HD TV
Couleur NTSC, normes EIA
Couleur PAL, normes CCIR*
Format d’enregistrement de film :
AVCHD (AVCHD format Ver.2.0
patible) :
com
Vidéo en 2D : MPEG-4 AVC/H.264
Vidéo en 3D : MPEG-4 MVC/H.264
Audio : Dolby Digital 2 canaux Dolby Stereo
Creator
Fabriqué sous licence de Dolby Laboratories.
Format de fichier photo
Compatible DCF Ver.2.0
Compatible Exif Ver.2.3
Compatible MPF Baseline
Support d’enregistrement (film et photo)
« Memory Stick PRO Duo »
« Memory Stick XC-HG Duo »
Ca
rte SD (classe 4 ou plus rapide)
Viseur : Viseur électronique
Image : 1,3 cm (type 0,5)
Nombre total de pixels : 2 359 296 (1 024
768)
3 [RGB]
Point oculaire : 13,9 mm (9/16 po)
Champ visuel réel
DEV-30 :
– 3,6 (film en 2D)*
44,7
44,7 – 2,4 (film en 2D)*
*
DEV-50/50V :
– 3,0 (film en 2D)*
44,7
44,7 – 1,4 (film en 2D)*
Champ visuel apparent*3 : 36,9 (16:9), 29,2
(4:3)
amp visuel à 1 000 m
Ch
DEV-30 :
828 m – 62 m (2 484 pi à 187 pi) (film en
6
*4*
2D)
828 m – 42 m (2 484 pi à 125 pi) (film en
7
*4*
2D)
DEV-50/50V :
828 m – 52 m (2 484 pi à 156 pi) (film en
6
*4*
2D)
828 m – 25 m (2 484 pi à 75 pi) (film en
7
*4*
2D)
Réglez la distance interpulillaire :
55 mm – 75 mm (2 1/4 po à 3 po)
Réglage du dioptre : –3,5 à +3,5
3
:
1
*
2
2 : couleur
4*6
4*7
4*6
4*7
3
*
:
positif d’image :
Dis
4,6 mm (type 1/3,91 type) capteur CMOS
Pixels d’enregistrement (photo) :
400 000 pixels
Max. 20
(16:9)
ut : Environ 5 430 000 pixels
Br
5
*
(6 016 3 384)
2
Objectif : Objectif G
Agrandissement (approx.) :
DEV-30 :
– 10 (film en 2D)*
0,8
0,8 – 15 (film en 2D)*
0,5 – 6 (film en 3D)*
4*6
4*7
4
0,5 – 15 (photo)
DEV-50/50V :
– 12 (film en 2D)*
0,8
0,8 – 25 (film en 2D)*
0,5 – 6 (film en 3D)*
4*6
4*7
4
0,5 – 25 (photo)
Rapport de zoom (approx.) :
DEV-30 :
(film en 2D)*
13
20 (film en 2D)*
12 (film en 3D)
(photo)
33
DEV-50/50V :
(film en 2D)*
16
33 (film en 2D)*
6
7
6
7
Informations complémentaires
12 (film en 3D)
(photo)
55
F1,8 - F3,4
rsque convertis à une caméra de 35 mm
Lo
DEV-30 :
f = 49,8 mm – 661,6 mm (2 po à 26 1/8 po)
(film en 2D)
f = 49,8 mm – 992,3 mm (2 po à 39 1/8 po)
(film en 2D)
f = 33,4 mm – 402,0 mm (1 3/8 po à
15 7/8 po) (film en 3D)
f = 29,8 mm – 989,4 mm (1 3/16 po à 39 po)
6
*4*
7
*4*
4
*
(photo, 16:9)
mm – 1 205,2 mm (1 7/16 po à
f = 36,3
47 1/2 po) (photo, 4:3)
DEV-50/50V :
f = 49,8 mm – 791,2 mm (2 po à 31 1/4 po)
(film en 2D)
f = 49,8 mm – 1 645,7 mm (2 po à 64 7/8 po)
(film en 2D)
f = 33,4 mm – 402,0 mm (1 3/8 po à
15 7/8 po) (film en 3D)
f = 29,8 mm – 1 647,9 mm (1 3/16 po à 65 po)
6
*4*
7
*4*
4
*
(photo, 16:9)
mm – 2 007,4 mm (1 7/16 po à
f = 36,3
79 1/16 po) (photo, 4:3)
FR
35
Page 72

Éclairage minimum
11 lx (lux) (dans le réglage par défaut, vitesse
d’obturation 1/60 seconde
1
*
, 1/50 seconde*2)
Distance focale minimale :
Fi
lm 2D : 1 cm (13/32 po) (grand angle)/
cm (31 1/2 po) (téléobjectif)
80
Film 3D : 2 m (6 pi) (grand angle)/
m (78 pi) (téléobjectif)
24
Photo : 1 cm (13/32 po) (grand angle)/80 cm
(31 1/2 po) (téléobjectif)/38 cm (15 po) (télé
macro)
1
*
[Sélectionner 60i/50i] est réglé à [60i (NTSC)].
2
*
[Sélectionner 60i/50i] est réglé à [50i (PAL)].
3
*
Angle de vue diagonal.
4
*
[ SteadyShot] est réglé à [Standard] ou à
[Désactivé].
5
*
La matrice de pixels unique ClearVid de Sony
et le système de traitement d’image (BIONZ)
permettent d’obtenir une résolution d’image fixe
qui équivaut aux tailles décrites.
6
*
[Zoom numérique] est réglé à [Désactivé].
7
*
[Zoom numérique] est réglé à [Activé].
Connecteurs entrée/sortie
Prise HDMI : Connecteur micro HDMI
Prise casque d’écoute : Miniprise stéréo
( 3,5
mm)
Prise d’entrée MIC : Miniprise stéréo ( 3,5
Multi/micro connecteur USB
*
Prend en charge les appareils compatibles
*
micro USB.
Général
Alimentation requise : 6,8 V CC (bloc-piles)
8,4 V CC (Adaptateur CA)
Consommation d’énergie moyenne :
Surveillance
Enregistrement : 2D : 4,1 W, 3D : 5,0 W
pérature de fonctionnement : 0
Tem
(32 °F à 104 °F)
pérature de stockage : –20
Tem
à +140 °F)
Dimen
148,5 mm
2 7/8 po × 6 1/4 po) (l/h/p) parties saillantes
comprises
* : 2D : 3,7 W, 3D : 4,0 W
* Dans ce manuel, « surveillance » signifie
que l’utilisateur regarde ou visionne un
sujet sans l’enregistrer.
C à 40 C
C à +60 C (–4 °F
sions (approx.) :
72,5 mm 157,5 mm (5 7/8 po ×
mm)
mm
78,5 mm 202 mm (6 5/8 po ×
166
3 1/8 po × 8 po) (l/h/p) (DEV-50/50V) parties
saillantes comprises dont le grand œilleton de
viseur fourni avec l’appareil
sse (approx.) :
Ma
765 g (1 lb 10 oz) unité principale seulement
DEV-30 :
860 g (1 lb 14 oz) bloc-piles rechargeable (NPFV70) et « Memory Stick PRO Duo » compris
V-50/50V :
DE
890 g (1 lb 15 oz) bloc-piles rechargeable (NPFV70), « Memory Stick PRO Duo » et grand
œilleton de viseur compris
Adaptateur CA AC-L200C/AC-L200D
Alimentation requise : 100 V à 240 V CA,
50 Hz/60 Hz
Consommation de courant : 0,35 A - 0,18 A
Consommation d’énergie : 18 W
Tension de sortie : 8,4 V CC
*
Température de fonctionnement : 0 C à 40 C
(32 °F à 104 °F)
pérature de stockage : –20
Tem
C à +60 C (–4 °F
à +140 °F)
sions (approx.) : 48 mm
Dimen
81 mm (1 15/16 po
29 mm
1 3/16 po 3 1/4 po)
(l/h/p) les parties saillantes non comprises
sse (approx.) : 150 g (5,3 oz) excluant le câble
Ma
d’alimentation
* Voir l’étiquette sur l’adaptateur CA pour d’autres
spécifications.
Bloc-piles rechargeable NP-FV70
Tension de sortie maximale : 8,4 V CC
Tension de sortie : 6,8 V CC
Tension de charge maximale : 8,4 V CC
Courant de charge maximal : 3,0 A
Capacité
Typ
ique : 14,0 Wh (2 060 mAh)
Minimum : 13,0 Wh (1 960 mAh)
Type : Li-ion
La conception et les caractéristiques techniques
de ce produit et des accessoires sont modifiables
sans préavis.
36
FR
Page 73

Durée de charge
Durée approximative (en minutes)
nécessaire à la recharge complète d’un blocpiles à plat.
Bloc-piles Durée de charge
NP-FV70 (fourni) 195
Les durées de charge indiquées dans le tableau
ci-dessus ont été mesurées lors de la recharge de
oduit à une température de 25
ce pr
Il est recommandé de charger le bloc-piles à une
pérature située entre 10
tem
à 86 °F).
C (77 °F).
C et 30 C (50 °F
Temps de fonctionnement avec le blocpiles fourni (NP-FV70)
Durée approximative lorsque vous
enregistrez en mode 2D avec un bloc-piles
entièrement chargé.
(unité : minute)
Durée d’enregistrement
continu
Durée d’enregistrement
typique
Durée de surveillance
continue
185
95
210
Durée de lecture 315
Chaque durée de fonctionnement en mode 2D
est mesurée avec [
[Standard
La durée d’enregistrement typique indique la
durée lorsque vous arrêtez puis recommencez
l’enregistrement, que vous changez de MODE
témoin et que vous utilisez le zoom.
Les durées ont été mesurées en utilisant ce
oduit à 25
r
p
à 86 °F) constitue la plage de température
recommandée.
Les durées d’enregistrement, de surveillance
et de lecture seront plus courtes selon les
conditions dans lesquelles vous utilisez ce
produit, par exemple, si vous l’utilisez lorsque la
température est faible.
Mode d’ENR] réglé à
].
C (77 °F). 10 C à 30 C (50 °F
L’indicateur de pile restante (p. 39) montre la
durée d’enregistrement et de lecture prévue.
Informations complémentaires
FR
37
Page 74

À propos des marques de commerce
« AVCHD 3D/Progressive » et le logo « AVCHD
3D/Progressive » sont des marques déposées de
Sony Corporation et Panasonic Corporation.
Memory Stick », «
«
Duo », «
Stick PRO Duo », «
« Memory Stick PRO-HG Duo »,
«
XC-HG Duo », «
« MagicGate », «
« MagicGate Memory Stick » et « MagicGate
Memory Stick Duo » sont des marques de
commerce ou des marques déposées de Sony
Corporation.
«
InfoLITHIUM » est une marque de commerce
de Sony Corporation.
x.v.Color »/« x.v.Colour » est une marque de
«
commerce de Sony Corporation.
BRAVIA » est une marque déposée de Sony
«
Corporation.
Blu-ray Disc
et Blu-ray sont des marques
de commerce de Blu-ray Disc Association.
Dolby et le symbole double-D sont des marques
de commerce de Dolby Laboratories.
Les termes HDMI et HDMI High-Definition
Multimedia Interface et le logo HDMI sont
des marques de commerce ou des marques
déposées de HDMI Licensing LLC aux ÉtatsUnis et dans d’autres pays.
Microsoft, Windows, Windows Vista, et
DirectX sont des marques de commerce ou des
marques déposées de Microsoft Corporation
aux États-unis et dans d’autres pays.
Mac et Mac OS sont des marques de commerce
de Apple Inc. aux États-Unis et dans d’autres
pays.
Intel, Intel Core et Pentium sont des marques
de commerce et des marques déposées de Intel
Corporation ou de ses filiales aux États-Unis ou
dans d’autres pays.
«
» et « PlayStation » sont des marques
déposées de Sony Computer Entertainment Inc.
Adobe, le logo Adobe et Adobe Acrobat sont
des marques de commerce ou des marques
déposées de Adobe Systems Incorporated aux
États-Unis et dans d’autres pays.
Le logo SDXC est une marque de commerce de
SD-3C, LLC.
», « Memory Stick
», « Memory
», « Memory Stick
»,
»,
Tous les autres noms de produits mentionnés dans
le présent document peuvent être des marques
de commerce ou des marques déposées de leurs
propriétaires respectifs. Par ailleurs, les logos
ne sont pas utilisés chaque fois qu’une marque
»,
est mentionnée dans le présent manuel.
et
38
FR
Page 75

Référence rapide
Icônes d’écran
Centre
Gauche Droite
En bas
Gauche
Icône Signification
Touche MENU
Enregistrement avec le
retardateur
État de la triangulation
GPS
Détection de visage
Mise au point manuelle
Sélection de scène
Balance blancs
SteadyShot désactivé
Réglage bal. blancs
Télé macro
Destination
Automatique intelligent
Centre
Icône Signification
[VEILLE]/
[ENREGISTRE]
État de l’enregistrement
Réglage du diaporama
Avertissement
Droite
Icône Signification
Cadence de prise de vue
60i
60min
20,4 M
0:00:00
00min
9999
(60p (50p)/60i (50i)) et
mode d’enregistrement
(PS/FX/FH/HQ/LP)
Durée de vie restante
de la pile (durée
d’enregistrement et de
lecture prévue)
Taille des photos
Support d’enregistrement,
de lecture ou d’édition
Compteur (heures,
minutes, secondes)
Durée d’enregistrement
restante prévue
Nombre approximatif
de photos pouvant être
enregistrées et taille des
photos
Enregistrement ou
lecture 2D/3D
En bas
Icône Signification
Touche Afficher Images
Touche MODE (Mode
prise de vue)
Niv. référence micro
faible
Voix plus proche
désactivé
Réd. bruit vent auto
désactivé
Low Lux
Hyper gain
Exposition
EV Régl. exposition auto
Vitesse d’obturateur
IRIS
Automatique intelligent
Image protégée
Référence rapide
FR
39
Page 76

40
FR
Pièces et contrôles
Icône Signification
Automatique
L’exposition est réglée
manuellement.
Les icônes et leur position sont fournies à titre
d’indication et peuvent différer de l’affichage
réel à l’écran.
Certaines icônes peuvent ne pas apparaître
selon le modèle.
Les chiffres entre parenthèses ( )
correspondent aux pages de référence.
Touche MODE (22)
Touche POWER (16)
Griffe pour accessoire
Microphone intégré
Objectif
Cadran IPD ADJ (16)
Touche (Afficher Images) (24)
Touche FINDER 2D/3D (affichage) (22)
Touche START/STOP (22)
Sélecteur multiple (17)
Prise HDMI OUT
Prise (microphone) (PLUG IN POWER)
Prise (casque)
Page 77

Témoin CHG (charge) (15)
Témoin d’enregistrement
Le témoin d’enregistrement s’illumine
en rouge pendant le tournage. Le témoin
clignote lorsque la capacité restante de la carte
mémoire ou de l’énergie de la pile est faible.
Témoin (Film) (22)
Témoin (Photo) (22)
Capteur d’œil (16)
Viseur
Touche START/STOP (22)
Touche PHOTO (22)
Manette de zoom motorisé (21)
Multi/micro connecteur USB
Prend en charge les appareils compatibles
micro USB.
Prise DC IN (15)
Réceptacle pour trépied
Fixez le trépied (vendu séparément) au
réceptacle pour trépied à l’aide d’une vis pour
trépied (vendu séparément : la longueur de la
vis doit être inférieure à 5,5 mm (7/32 po)).
Selon les spécifications du trépied, ce produit
peut ne pas se fixer dans le bon sens.
Cache du bloc-piles/de la carte mémoire
(15)
Touche du cache du bloc-piles/de la
carte mémoire (15)
Haut-parleur
Témoin d’accès de carte mémoire (19)
Lorsque le témoin d’accès est allumé ou
clignote, ce produit est en train de lire ou
d’écrire des données.
Fente pour carte mémoire (19)
Bloc-piles (15)
Levier de dégagement de la pile (16)
Drains
Cadran MANUAL (24)
Touche MANUAL (24)
Boutons de réglage de la dioptrie (16)
Sangle (14)
Référence rapide
FR
41
Page 78

42
FR
De plus amples renseignements à propos
de ce produit et des réponses aux questions
fréquemment posées sont disponibles sur le site
Web de l’Assistance à la clientèle.
http://www.sony.net/
Imprimé avec de l’encre à base d’huile végétale
sans COV (composés organiques volatils).
Page 79

FR
43
Référence rapide
Page 80

Lea este apartado en primer lugar
Antes de utilizar la unidad, lea
detenidamente este manual y consérvelo
para futuras consultas.
Nombre del producto: Binoculares con
grabación digital
Modelo: DEV-30/DEV-50/DEV-50V
AVISO
Para reducir el riesgo de incendios o
descargas eléctricas,
1) no exponga la unidad a la lluvia o la
humedad.
2) no coloque sobre el aparato objetos
que contengan líquidos, como, por
ejemplo, jarrones.
No exponga las pilas a fuentes de calor
excesivo, como la luz solar directa, el fuego
o similares.
PRECAUCIÓN
Batería
Si la batería se manipula indebidamente,
puede explotar y causar un incendio o
provocarle quemaduras químicas. Tenga en
cuenta las siguientes precauciones.
No desmonte el producto.
No aplaste ni exponga la batería a impactos tales
como golpes o caídas, ni la deje caer o la pise.
No provoque un cortocircuito en la batería
ni permita que objetos metálicos entren en
contacto con sus terminales.
No exponga la batería a temperaturas superiores
a 60 °C como a la luz solar directa, o en el
interior de un automóvil estacionado al sol.
No la incinere ni la arroje al fuego.
No manipule baterías de iones de litio dañadas
o con fugas.
ES
2
Asegúrese de cargar la batería con un
cargador de baterías original de Sony o con un
dispositivo que pueda cargarla.
Mantenga la batería fuera del alcance de niños
pequeños.
Mantenga la batería seca.
Sustitúyala únicamente por otra del mismo tipo
o equivalente recomendada por Sony.
Deshágase de la baterías usada lo antes posible
según el procedimiento que se describe en las
instrucciones.
Sustituya la batería únicamente por otra del
tipo especificado. De lo contrario, es posible
que se produzcan incendios o lesiones.
Adaptador de alimentación de ca (FUENTE DE
ALIMENTACIÓN)
No utilice el adaptador de ca en un lugar
estrecho (por ejemplo, entre la pared y un
mueble).
Utilice una toma de corriente de la pared
cercana cuando utilice el adaptador
de alimentación de ca (FUENTE DE
ALIMENTACIÓN). Desconecte el
adaptador de alimentación de ca (FUENTE
DE ALIMENTACIÓN) de la toma de
corriente de la pared inmediatamente
si se produce algún malfuncionamiento
mientras utiliza el aparato.
Aunque este producto esté apagado,
seguirá recibiendo energía de la fuente de
alimentación de ca (corriente doméstica)
mientras esté conectado a la toma de pared
mediante el adaptador de alimentación de ca
Nota sobre el cable de alimentación
El cable de alimentación está diseñado
específicamente para utilizarse sólo con
este producto, y no se debe usar con otros
equipos eléctricos.
Un exceso de presión sonora de los
auriculares puede ocasionar la pérdida de la
capacidad auditiva.
Page 81

PARA USUARIOS EN EUROPA
Por medio de la presente Sony Corporation
declara que estos Binoculares con
grabación digital DEV-50V cumplen con
los requisitos esenciales y cualesquiera
otras disposiciones aplicables o exigibles
de la Directiva 1999/5/CE. Para mayor
información, por favor consulte el siguiente
URL: http://www.compliance.sony.de/
Aviso para los clientes de países en los
que se aplican las directivas de la UE
Este producto ha sido fabricado por, o
en nombre de Sony Corporation, 1-7-1
Konan Minato-ku Tokyo, 108-0075
Japón. Las consultas relacionadas con la
conformidad del producto basadas en la
legislación de la Unión Europea deben
dirigirse al representante autorizado,
Sony Deutschland GmbH, Hedelfinger
Strasse 61, 70327 Stuttgart, Alemania.
Para cualquier asunto relacionado con el
servicio o la garantía, por favor diríjase a
la dirección indicada en los documentos
de servicio o garantía adjuntados con el
producto.
Atención
Los campos electromagnéticos a
frecuencias específicas podrán influir en la
imagen y el sonido de esta unidad.
Este producto ha sido probado y cumple
con los límites estipulados por el reglamento
EMC para utilizar cables de conexión de
menos de 3 metro de longitud.
Aviso
Si la electricidad estática o el
electromagnetismo interrumpen la
transmisión de datos (fallo), reinicie
la aplicación o desconecte el cable de
comunicación (USB, etc.) y vuelva a
conectarlo.
Tratamiento de los equipos
eléctricos y electrónicos al
final de su vida útil (aplicable
en la Unión Europea y en
países europeos con sistemas
de tratamiento selectivo de
residuos)
Este símbolo en el equipo o en su
embalaje indica que el presente producto
no puede ser tratado como residuos
doméstico normal. Debe entregarse en
el correspondiente punto de recogida de
equipos eléctricos y electrónicos.
Al asegurarse de que este producto se
desecha correctamente, usted ayuda a
prevenir las consecuencias potencialmente
negativas para el medio ambiente y la
salud humana que podrían derivarse de la
incorrecta manipulación en el momento de
deshacerse de este producto. El reciclaje de
materiales ayuda a conservar los recursos
naturales.
Para recibir información detallada sobre
el reciclaje de este producto, póngase en
contacto con el ayuntamiento, el punto de
recogida más cercano o el establecimiento
donde ha adquirido el producto.
Tratamiento de las baterías al
final de su vida útil (aplicable
en la Unión Europea y en
países europeos con sistemas
de tratamiento selectivo de
residuos)
Este símbolo en la batería o en el embalaje
indica que la batería proporcionada con
este producto no puede ser tratada como
un residuo doméstico normal.
En algunas baterías este símbolo puede
utilizarse en combinación con un símbolo
químico. El símbolo químico del mercurio
(Hg) o del plomo (Pb) se añadirá si la
batería contiene más del 0,0005% de
mercurio o del 0,004% de plomo.
Al asegurarse de que estas baterías se
desechan correctamente, usted ayuda a
ES
ES
3
Page 82

prevenir las consecuencias potencialmente
negativas para el medio ambiente y la
salud humana que podrían derivarse de la
incorrecta manipulación en el momento
de deshacerse de la batería. El reciclaje de
materiales ayuda a conservar los recursos
naturales.
En el caso de productos que por razones de
seguridad, rendimiento o mantenimiento
de datos sea necesaria una conexión
permanente con la batería incorporada, esta
batería solo deberá ser reemplazada por
personal técnico cualificado para ello. Para
asegurarse de que la batería será tratada
correctamente, entregue el producto al final
de su vida útil en un punto de recogida
para el reciclado de aparatos eléctricos y
electrónicos.
Para las demás baterías, consulte la sección
donde se indica cómo extraer la batería
del producto de forma segura. Deposite
la batería en el correspondiente punto de
recogida para el reciclado de baterías.
Para recibir información detallada sobre el
reciclaje de este producto o de la batería,
póngase en contacto con el ayuntamiento,
el punto de recogida más cercano o el
establecimiento donde ha adquirido el
producto.
Uso de este producto
No sujete el producto por el visor ni por las
tapas. Tampoco coloque este producto con el
visor hacia abajo.
Este producto está protegido contra el polvo y
la lluvia. Consulte “Acerca del rendimiento a
prueba de polvo y lluvia del producto” (p
ág. 6).
Elementos de menú, visor y objetivo
El visor se ha fabricado con una tecnología de
muy alta precisión, lo que hace que más del
% de los píxeles sean operativos para
99,99
el uso efectivo. Sin embargo, es posible que
aparezcan constantemente algunos pequeños
puntos negros o brillantes (blancos, rojos,
azules o verdes) en el visor. Estos puntos son el
resultado normal del proceso de fabricación y
no afectan en modo alguno a la grabación.
La exposición del visor o el objetivo a la luz
solar directa durante períodos prolongados
puede provocar fallos de funcionamiento.
No enfoque directamente hacia el sol. Si lo hace,
puede ocasionar fallos de funcionamiento del
producto. Tome fotografías del sol solamente
en condiciones de baja intensidad, como al
atardecer.
Acerca del ajuste del idioma
Para ilustrar los procedimientos operativos se
utilizan indicaciones en pantalla en cada idioma
local. Para cambiar el idioma de la pantalla,
seleccione
[
Setting] el idioma deseado
(MENU) [Configuración]
Ajustes generales] [Language
.
ES
4
Page 83

Acerca de la grabación
Antes de comenzar a grabar, pruebe las
funciones de grabación para asegurarse de que
la imagen y el sonido se graben sin problemas.
No es posible compensar el contenido de
las grabaciones, aunque no sea posible
grabar o reproducir a causa de un fallo de
funcionamiento del producto, la tarjeta de
memoria, etc.
Los sistemas de televisión en color varían
en función del país o la región. Para ver las
grabaciones en un televisor, ajuste [Seleccionar
60i/50i] en el valor requerido para su país o
ión antes de empezar a grabar (pág. 11).
eg
r
Los programas de televisión, películas, cintas de
vídeo y demás materiales pueden estar sujetos a
derechos de autor. La grabación no autorizada
de tales materiales puede ir en contra de las
leyes sobre los derechos de autor.
Respete las normas locales cuando use este
producto.
Acerca de este manual, sus ilustraciones
y las imágenes en pantalla
Las imágenes de ejemplo que se utilizan en este
manual con carácter ilustrativo se han tomado
con una cámara digital de imágenes fijas, por
lo que pueden parecer diferentes a las imágenes
y los indicadores de pantalla que aparecen
en el producto. Asimismo, las ilustraciones
del producto y su indicación en la pantalla se
han exagerado o simplificado para facilitar su
comprensión.
El diseño y las especificaciones del producto y
sus accesorios podrían sufrir cambios sin previo
aviso.
Visualización de imágenes de
vídeo 3D
Algunas personas puede que experimenten
cierto malestar (como dolor de ojos, náuseas
o sensación de cansancio) al ver imágenes de
vídeo 3D.
Sony recomienda que todos los espectadores
tomen descansos regulares al ver imágenes de
vídeo 3D. La duración y la frecuencia de los
descansos necesarios varían en función de la
persona. Usted tiene que decidir lo que más le
conviene. Si experimenta malestar, deje de ver
imágenes de vídeo 3D hasta que se le pase el
malestar; si lo considera necesario, consulte el
asunto con su médico.
También se recomienda que revise el manual
de instrucciones de cualquier otro dispositivo o
soporte que utilice con este producto.
La visión de los niños (en particular la de
aquellos con menos de seis años) todavía está
en estado de desarrollo. Consulte con su médico
(por ejemplo, un pediatra o un oftalmólogo) si
es apropiado que los niños vean imágenes de
vídeo 3D.
Los niños deberían estar supervisados por
adultos para asegurar que se están teniendo en
cuenta las recomendaciones anteriores.
Notas referentes al uso
Atienda a su entorno cuando utilice este
producto. Sobre todo, no use el producto
mientras camina, ya que podría sufrir un
accidente o alguna lesión.
No realice ninguna de las operaciones
siguientes. Si lo hace, podría dañar la tarjeta de
memoria, imposibilitar la reproducción de las
imágenes grabadas o provocar otros fallos de
funcionamiento.
Expulsar la tarjeta de memoria cuando el
dic
ador de acceso (pág. 14) está encendido
in
o parpadeando
ES
5
Page 84

Extraer la batería o el adaptador de ca
del producto o aplicar vibraciones o
golpes mecánicos al producto cuando los
indicadores
(película)/ (fotografía)
(pág. 16) o el indicador de acceso (pág. 14)
tán encendidos o parpadeando
es
Acerca del rendimiento a prueba
de polvo y lluvia del producto
Nuestros tests de rendimiento han logrado
demostrar que la unidad principal del producto
alcanza los requisitos de rendimiento a prueba de
polvo y lluvia equivalentes a IEC60529 IP54.
El funcionamiento del producto no se verá
afectado por una lluvia repentina o polvo no
deseado.
Rendimiento a prueba de polvo (IP5x): su
diseño hermético no permite que el polvo
entre, lo que evita sus efectos dañinos. Sin
embargo, su hermetismo no ha sido diseñado
completamente a prueba de polvo y no se
garantiza que esté protegido de una exposición
intensa al polvo.
Rendimiento a prueba de lluvia (IPx4):
su diseño hermético no permite que las
salpicaduras de agua en cualquier dirección
causen efectos dañinos. Este producto no está
protegido del agua a presión, como la de una
ducha, un grifo, etc.
Es posible que el rendimiento a prueba de
polvo y lluvia de este producto se vea mermado
cuando se instale un accesorio o se conecte el
adaptador de ca u otros cables. Asegúrese de
que no entre polvo ni agua en el producto.
No permita que el producto entre en contacto
con agua caliente ni con agua que tenga un alto
contenido mineral.
El rendimiento a prueba de lluvia del producto
puede verse mermado si se le somete a fuertes
golpes como, por ejemplo, si el producto cae
al suelo. Le recomendamos que se ponga en
contacto con su distribuidor de Sony o con
un centro de servicio técnico local autorizado
de Sony para obtener información sobre la
reparación del producto (servicio de pago
aplicable).
ES
6
Asegúrese de que utiliza este producto
adecuadamente y de observar las siguientes
indicaciones, ya que no están cubiertos por
la garantía los daños causados por un uso
indebido o abuso del producto, o bien si no se le
realiza el mantenimiento necesario.
No utilice el producto bajo el agua.
El producto no tiene un diseño a prueba de
agua y no debe utilizarse bajo el agua. No
sumerja el producto en agua.
Cierre firmemente la tapa de la tarjeta de
memoria/batería y las tapas de las tomas.
Es más probable que entre agua en el
producto si la tapa está abierta. Cuando
utilice el producto bajo la lluvia o tenga las
manos húmedas o con arena, no abra la tapa
de la tarjeta de memoria/batería ni las tapas
de las tomas. De lo contrario, puede ocasionar
un fallo de funcionamiento.
Uso y cuidados
Si queda arena, pelos, suciedad, etc. en la junta
hermética de la tapa de la tarjeta de memoria/
batería o de las tapas de las tomas, es posible
que no pueda evitarse que entre agua en el
producto. Limpie el área con un paño suave del
que no se desprendan fibras.
Si se producen arañazos en la junta hermética o
si esta se deforma o deteriora, es posible que no
pueda evitarse que entre agua en el producto. Si
la junta hermética se raya, deforma o deteriora,
póngase en contacto con su distribuidor de
Sony o el centro de servicio técnico local
autorizado de Sony.
Los orificios de drenaje situados en la parte
inferior del producto se han diseñado para
permitir que el agua o la arena que pueda entrar
a través del espacio del dial IPD ADJ o el visor
ue
dan salir por la parte inferior (pág. 35).
p
Si ha quedado arena en ciertas piezas del
producto que está impidiendo su movimiento,
limpie la arena con un soplador, etc. y, a
continuación, mueva las piezas varias veces.
Page 85

Índice de contenido
Acerca de los manuales de este
producto
Este producto se entrega con dos manuales,
el “Manual de instrucciones” y el “Manual
de los Binoculares con grabación digital
(PDF)”. En el “Manual de instrucciones”
se explican las operaciones básicas y en el
“Manual de los Binoculares con grabación
digital (PDF)” se explican los detalles de las
funciones.
Cómo leer Manual de los Binoculares
con grabación digital (PDF)
Instale el “Manual de los Binoculares con
grabación digital” en su equipo desde el
CD-ROM suministrado.
Coloque el CD-ROM suministrado en la
ad de disco óptico del ordenador.
unid
La página principal debería aparecer. Si no
aparece la página principal, haga doble clic en
el archivo [index.html] del CD-ROM.
Haga clic en el manual del CD-ROM
que desea leer.
Se abrirá el archivo PDF del manual
seleccionado en el CD-ROM.
Necesita Adobe Reader para leer el “Manual de
los Binoculares con grabación digital”. Si no está
instalado en el equipo, puede descargarlo desde
la página Web de Adobe Systems.
http://www.adobe.com/
Lea este apartado en primer lugar . .. . . . . . 2
Introducción
Paso 1: Comprobación de los elementos
suministrados. . .. . .. . . . . .. . .. . . . . . . . .. . .. . . . . . . 8
Paso 2: Carga de la batería .. . .. . . . . . . . .. . .. . 9
Paso 3: Encendido y ajuste del
producto . .. . . . . . . . .. . .. . . . . .. . .. . . . . . . . .. . .. . . . 10
Paso 4: Inserción de una tarjeta de
memoria . . . . . .. . .. . . . . .. . .. . . . . . . . .. . .. . . . . . .. . 13
Binoculares/grabación/
reproducción
Uso de este producto como unos
binoculares . . . . . . . .. . .. . . . . .. . .. . . . . . . . .. . .. . . . 15
Grabación . . . . . .. . .. . . . . . . . .. . .. . . . . . .. . .. . . . . .16
Reproducción con este producto. . . .. . .. . 18
Almacenamiento de
películas y fotografías en
un ordenador
Reproducción de imágenes en un
ordenador . . . . . . .. . .. . . . . .. . .. . . . . . . . .. . .. . . . . .20
Preparación del ordenador
(Windows) . .. . .. . . . . .. . .. . . . . . . . .. . .. . . . . . .. . ..21
Personalizar el producto
Uso de los menús .. . .. . . . . . .. . .. . . . . .. . .. . . . . 22
Listas de menús . . . . . .. . .. . . . . . . . .. . .. . . . . .. . .23
Información
complementaria
Solución de problemas .. . .. . . . . . . . .. . ..26
Precauciones . . .. . .. . . . . .. . .. . . . . . . . .. . .. . . . . .. 27
Especificaciones . . . . . .. . .. . . . . . . . .. . .. . . . . . .. . 29
Índice de contenido
Referencia rápida
Indicadores de la pantalla . . . . .. . .. . . . . .. . .. 33
Piezas y mandos . . .. . .. . . . . . .. . .. . . . . .. . .. . . . 34
ES
7
Page 86

Introducción
Paso 1: Comprobación de los elementos suministrados
Los números entre ( ) corresponden a la
cantidad suministrada.
Binoculares con grabación digital (1)
Adaptador de ca (1)
Cable de alimentación (1)
Cable HDMI (1)
Cable micro USB (1)
B
tería recargable NP-FV70 (1)
a
Tapa de los objetivos (1)
Cinta para el cuello (1)
“Manual de instrucciones” (1)
CD-ROM “Manuals for Digital Recording Binoculars” (1)
“Manual de los Binoculares con grabación
digital (PDF)”
Notas
EL software “PlayMemories Home” y la “Guía
de ayuda de PlayMemories Home” pueden
argarse desde el sitio web de Sony (pág. 21).
desc
Montaje de la cinta para el cuello
Para evitar que se le caiga el producto, ate la
cinta para el cuello a los binoculares como
se explica a continuación.
Inserte un extremo de la cinta en la
montura para la cinta de los binoculares. A
continuación, apriete la cinta para el cuello,
introduciendo el extremo de la cinta por la
hebilla.
Montaje del ocular grande
(DEV-50/50V)
Si no puede ver claramente la imagen en
el visor porque hay demasiada luz, use el
ocular grande.
Solo para DEV-50/50V
Estuche de transporte (1)
Tapa del visor (1)
Oc
ular grande (2)
ES
8
Page 87

Paso 2: Carga de la batería
Puede cargar la batería “InfoLITHIUM”
(serie V).
Notas
No puede utilizar ninguna batería
“InfoLITHIUM” que no sea NP-FV70/FV100
con este producto.
Para cargar la batería, apague el producto
pulsando el botón POWER.
Pulse el botón de la tapa de
1
la tarjeta de memoria/batería
() y deslice la tapa en la
dirección de la flecha () y, a
continuación, abra la tapa ().
Alinee la batería con las ranuras
2
del compartimento de la batería
mientras pulsa la palanca de
liberación de la batería ()
y deslice la batería hasta que
encaje con un clic ().
Cierre la tapa de la tarjeta de
3
memoria/batería.
Deslice la tapa hasta que
no quede más espacio.
Conecte el adaptador de ca
4
y el cable de alimentación
al producto y a la toma de
corriente de pared.
Indicador CHG (carga)
A la toma de
corriente de pared
Cable de
alimentación
Abra y gire la tapa.
Toma DC IN
Introducción
Clavija de cc
Alinee la batería con las ranuras.
Palanca de liberación de la batería
Adaptador de ca
El indicador CHG (carga) se enciende
y comienza a cargarse la batería.
El indicador CHG (carga) se apaga
cuando la batería está totalmente
cargada.
ES
9
Page 88

Paso 3: Encendido y ajuste del producto
Cuando la batería esté cargada,
5
desconecte el adaptador de ca
de la toma DC IN del producto.
Sugerencias
Cuando el producto está encendido, es posible
comprobar la cantidad restante de batería
aproximada (tiempo previsto de grabación y
reproducción), gracias al indicador de batería
restante de la parte superior derecha de la
pantalla.
Para extraer la batería
Apague el producto pulsando el botón
POWER (pág. 10) y, a continuación,
abra la tapa de la tarjeta de memoria/
a
tería (pág. 9).
b
Deslice la palanca de liberación de la
atería y extraiga la batería.
b
Notas
Si el producto lo utiliza más de una persona,
ajuste las dioptrías y la separación en función de
la persona que lo utilice.
1
Pulse el botón POWER.
Se enciende el producto.
Para apagar el producto, pulse el botón
POWER de nuevo.
2
Ajuste las dioptrías hasta que
pueda ver una imagen clara con
cada ojo, girando el mando de
ajuste de dioptrías.
Sensor ocular
10
Ajuste las dioptrías para cada ojo por
Palanca de liberación de la batería
ES
separado.
Si acerca sus ojos al visor, el sensor ocular
reaccionará mostrando la pantalla del
visor.
3
Con el dial IPD ADJ, ajuste la
distancia entre el visor izquierdo
y derecho a la separación de sus
ojos.
Page 89

Ajuste la separación de manera que se
superpongan las imágenes izquierda y
derecha.
Asegúrese de que la imagen del visor no
aparece como una imagen doble.
Cuando el visor exceda el límite del rango
que se puede ajustar, escuchará un clic. El
visor no podrá moverse más allá de ese
límite.
4
Ajuste el idioma, la región, el
horario de verano, el formato
de fecha y hora, y la fecha y
la hora con el multiselector; a
continuación, confirme cada
ajuste.
Uso del multiselector
Mueva el multiselector hacia ///
para seleccionar el elemento deseado y, a
continuación, pulse el centro del selector
para completar la selección.
Tras elegir 60i/50i, el producto se
reiniciará para actualizar el sistema.
En la página 12 puede consultar los
detalles del sistema de televisión en color
de su país o región.
6
Ajuste la posición vertical
relativa de los visores izquierdo y
derecho.
Asegúrese de que la línea horizontal se
superponga a las líneas verticales.
Imagen del visor
izquierdo
Imagen vista con los dos ojos
Si la línea horizontal y las líneas
verticales no están superpuestas, ajuste
la posición de la imagen en el visor
derecho seleccionando
hasta que las líneas se superpongan y
después seleccione
El dispositivo funciona correctamente
cuando aparece la imagen de abajo.
Imagen del visor
derecho
.
Introducción
/
Una vez finalizado cada ajuste,
seleccione [Sig.].
5
Seleccione [60i (NTSC)] o
[50i (PAL)] según el sistema
de televisión en color que se
utilice en su país o región y, a
continuación, pulse .
No utilice este producto si aparece la
imagen de abajo incluso después de haber
ajustado el visor.
ES
11
Page 90

Notas
Si el producto no consigue realizar [Aj. Auto
Objetivo 3D], seleccione [Ejec d nuevo].
La línea horizontal y las líneas verticales no están
superpuestas.
Si no puede ver las imágenes
correctamente, es posible que el
producto esté dañado. Póngase en
contacto con su distribuidor de Sony o
con un centro de servicio técnico local
autorizado de Sony.
7
Seleccione [Ejecutar].
Al seleccionar [Ejec+tard] se muestra
la pantalla del modo de grabación. La
próxima vez que encienda el producto
aparecerá la pantalla [Aj. Auto Objetivo
3D].
8
Ajuste el objetivo 3D.
Enfoque un motivo para que aparezca
en la pantalla.
Apunte a un motivo sobre el cual la escala
del indicador sobrepase la marca
continuación, seleccione
Tipos de motivos que deben mostrarse
en la pantalla para el [Aj. Auto Objetivo
3D]
La escala indicada varía en función del
motivo mostrado en la pantalla.
Motivos que indican una escala más alta:
Motivos lejanos en lugares luminosos como,
por ejemplo, en exteriores
tivos que estén a más de 20 m de este
Mo
producto
Motivos con varias formas y colores
Ver las películas grabadas en un
televisor
Para ver las películas grabadas en un
televisor, grabe las películas después de
seleccionar el ajuste apropiado [Seleccionar
60i/50i] para el sistema de televisión en
color del país o región donde utilice el
producto.
Países y regiones donde [Seleccionar
y, a
.
60i/50i] debe estar ajustado en [60i
(NTSC)]
Bolivia, Canadá, Centroamérica, Chile,
Colombia, Corea, Ecuador, EE. UU.,
Filipinas, Guayana, Islas Bahamas, Jamaica,
Japón, México, Perú, Surinam, Taiwán,
Venezuela, etc.
12
Escala
No cambie el motivo hasta que no haya
finalizado el ajuste.
ES
Page 91

Países y regiones donde [Seleccionar
60i/50i] debe estar ajustado en [50i (PAL)]
Argentina, Australia, Austria, Bélgica,
Bulgaria, Brasil, China, República
Checa, Dinamarca, Finlandia, Francia
Alemania, Guayana, Países Bajos, Hong
Kong, Hungría, Irán, Irak, Italia, Kuwait,
Malasia, Mónaco, Nueva Zelanda, Noruega,
Paraguay, Polonia, Portugal, Rusia,
Singapur, República Eslovaca, España,
Suecia, Suiza, Tailandia, Ucrania, Reino
Unido, Uruguay, etc.
Paso 4: Inserción de una tarjeta de memoria
Tipos de tarjetas de memoria que
pueden utilizarse con el producto
“Memory Stick
PRO Duo”
(Mark2)
“Memory Stick
PRO-HG Duo”
“Memory Stick
Descripción en este
XC-HG Duo”
Tarjeta de
memoria SD
Tarjeta de
memoria SDHC
Tarjeta de
memoria SDXC
No se puede garantizar el funcionamiento con
todas las tarjetas de memoria.
Se ha comprobado que este producto es
compatible con las tarjetas “Memory Stick PRO
uo
” de hasta 32 GB las tarjetas “Memory Stick
D
XC-HG Duo” de hasta 64 GB y las tarjetas SD
de hasta 64 GB
Descripción en este
manual, “Memory
Stick PRO Duo”
manual, “Memory
Stick XC-HG Duo”
Descripción en este
manual, tarjeta SD
Se requiere una
tarjeta SD Speed
Class 4 o más
rápida.
Introducción
ES
13
Page 92

Abra la tapa de la tarjeta de
memoria/batería (pág. 9) e inserte
la tarjeta de memoria con el borde
que tiene una muesca en la dirección
ilustrada hasta que suene un clic.
Observe la dirección de la
esquina con la muesca.
Cierre la tapa de la tarjeta de memoria/batería
después de haber instalado la tarjeta de
memoria.
Si se muestra la pantalla [Preparando archivo
base datos imagen. Espere por favor.], espere
hasta que la pantalla desaparezca.
Notas
Si aparece [Error al crear un nuevo archivo de
base de datos de imágenes. Es posible que no
exista suficiente espacio libre.], formatee la
tarjeta de memoria.
Confirme la dirección de la tarjeta de memoria.
Si inserta la tarjeta de memoria a la fuerza en
la dirección incorrecta, podría dañar la tarjeta,
la ranura para tarjeta de memoria y/o los datos
de imágenes.
No expulse la tarjeta de memoria mientras
el indicador de acceso esté encendido. De lo
contrario, puede provocar que las películas y/o
fotografías no se guarden correctamente en la
tarjeta de memoria.
Indicador de acceso
Para expulsar la tarjeta de memoria
Abra la tapa de la tarjeta de memoria/
batería y presione ligeramente la tarjeta de
memoria de una sola vez.
Notas
Las películas grabadas en tarjetas de memoria
“Memory Stick XC-HG Duo” y SDXC no
pueden importarse ni reproducirse en
ordenadores o dispositivos AV que no sean
compatibles con el sistema de archivos exFAT*
mediante la conexión del producto a estos
dispositivos con el cable USB. Confirme
de antemano que el equipo conectado es
compatible con el sistema de archivos exFAT. Si
conecta un equipo no compatible con el sistema
exFAT y aparece la pantalla de formateo, no
intente formatear. Si lo hace, se perderán todos
los datos grabados.
* exFAT es un sistema de archivos que utilizan
las tarjetas de memoria “Memory Stick XC-HG
Duo” y SDXC.
14
ES
Page 93

Binoculares/grabación/reproducción
Uso de este producto como unos binoculares
1
Pulse el botón POWER.
Se enciende el producto.
Al encender el producto pueden
aparecer algunas pantallas de ajuste,
dependiendo de su estado. Use el
producto después de efectuar los
ajustes que sean necesarios.
2
Ajuste las dioptrías, la separación
de los visores y la posición
vertical relativa de los visores
izquierdo y derecho a sus
necesidades (pág
3
Sujete el producto con las dos
manos y enfoque el motivo.
Palanca del zoom motorizado
. 10).
Es posible ampliar las imágenes con la
palanca del zoom motorizado.
El producto ajuste el enfoque
automáticamente gracias a su función
de enfoque automático (ajuste
predeterminado).
Notas
Mantenga el dedo en la palanca del zoom
motorizado. Si retira el dedo de la palanca del
zoom motorizado, es posible que también se
grabe el sonido de funcionamiento de dicha
palanca.
Sugerencias
SteadyShot] está ajustado en [Activo] en el
[
ajuste predeterminado.
Acerca del uso del zoom
El ajuste predeterminado de ampliación
de los binoculares es el que se indica a
continuación.
DEV-30: 0,8 a 15 (aprox.)
DEV-50/50V: 0,8 a 25 (aprox.)
La ampliación de los binoculares está
disponible si se cumplen las siguientes
condiciones.
El modo de grabación 2D está activado.
SteadyShot] está ajustado en una
[
opción distinta de [Activo] y [Zoom
digital] está ajustado en [Activar].
Sugerencias
La ampliación de los binoculares indica la
comparación entre el tamaño del motivo visto
con los binoculares y a simple vista.
Binoculares/grabación/reproducción
Para enfocar manualmente
Seleccione (MENU) [Cámara/
Micrófono] [
[Enfoque] con el multiselector.
Ajustes manuales]
ES
15
Page 94

16
ES
Grabación
Seleccione [Manual] y, a continuación,
seleccione
(motivo alejado) varias veces para
enfocar.
Sugerencias
Para enfocar automáticamente, seleccione
[Auto].
(motivo cercano) /
Para alternar la visualización en el visor
entre 2D y 3D
Pulse FINDER 2D/3D para alternar la
visualización en el visor entre 2D y 3D.
En el ajuste predeterminado, las imágenes
del visor se muestran en 3D.
Notas
La imagen grabada no cambiará aunque pulse
FINDER 2D/3D.
Para utilizar el producto en lugares
oscuros (Hiperganancia)
Puede ver un motivo con luminosidad
incluso en lugares oscuros aumentando la
ganancia.
Seleccione
Micrófono] [
[Hiperganancia] [Activar].
(MENU) [Cámara/
Ajustes manuales]
Con el ajuste predeterminado, las imágenes
del visor se muestran en 3D (pág. 16), pero
las películas se graban en 2D.
1
Con el producto encendido, pulse
el botón MODE para acceder al
modo de grabación deseado.
Botón MODE
(Película): durante la grabación de
una película
(Fotografía): durante la grabación de
una fotografía
2
Modo de grabación de películas:
Pulse START/STOP para iniciar la
grabación.
Para detener la grabación, pulse
START/STOP de nuevo.
Modo de captura de fotografías:
Pulse PHOTO ligeramente para
enfocar y, a continuación, púlselo
completamente.
Notas
La calidad de la imagen se deteriora al utilizar
[Hiperganancia] debido al ruido. Asimismo, el
color de la imagen se aclarará.
Sugerencias
Se recomienda ajustar el enfoque manualmente.
Si apaga este producto, [Hiperganancia]
también se ajusta en [Desactivar].
Page 95

Notas
Se indican los estados siguientes si todavía se
están grabando datos en la tarjeta de memoria
cuando ha finalizado la grabación. Durante
este tiempo, no someta el producto a golpes o
vibraciones ni extraiga la batería o desconecte el
adaptador de ca
l in
dicador de acceso (pág. 14) está
E
encendido o parpadea
El icono del soporte en la parte superior
derecha de la pantalla parpadea
No puede tomar fotografías cuando [Selecc.
modo 2D/3D] está ajustado en [3D]. Seleccione
(MENU) [Calidad img/Tamaño]
[Selecc. modo 2D/3D] [2D].
No se pueden tomar fotografías en 3D.
Para alternar entre los modos de
grabación 2D y 3D
Puede seleccionar el modo de grabación
2D o 3D.
Para alternar entre 2D y 3D, seleccione
(MENU) [Calidad img/Tamaño]
[Selecc. modo 2D/3D].
Distancia recomendada desde el
motivo y nivel del zoom
La distancia a la que pueden grabarse
películas 3D con buena calidad depende del
nivel del zoom.
Distancia de grabación recomendada (aprox.) Zoom
2 m a (9 m)
6 m a (16 m)
24 m a (30 m)
Los motivos que se encuentren a una
distancia de grabación mayor que la
recomendada perderán profundidad 3D.
Notas
No es recomendable que grabe en 3D un
motivo que se encuentre más cerca de lo
recomendado en las distancias de grabación
porque el resultado será una película que puede
causarle molestias al reproducirla. Grabe el
motivo en 2D.
Cuando se graban películas 3D, la ampliación
de los binoculares puede ajustarse
roximadamente en 6 . Si desea ver o grabar
p
a
un motivo con una mayor ampliación, ajuste
[Selecc. modo 2D/3D] en [2D].
Usar los menús directamente
Puede registrar un menú favorito en la
parte izquierda de la pantalla del visor
para poder utilizar el menú asignado
e
ctamente ([Mi Botón], pág. 24).
dir
Los ajustes predeterminados son
[Hiperganancia], [Selecc. modo 2D/3D] y
[Luminosidad visor].
Controlar manualmente los ajustes
de la imagen con el dial MANUAL
Resulta conveniente asignar un elemento de
menú al dial MANUAL (pág. 35).
Puede utilizar el menú asignado pulsando
el botón MANUAL. Asimismo, puede
asignar un elemento de menú que desee
manteniendo pulsado el botón MANUAL
durante unos pocos segundos.
Binoculares/grabación/reproducción
ES
17
Page 96

18
ES
Reproducción con este producto
Obtener la información de
ubicación con el GPS (DEV-50V)
Ajuste [Ajuste GPS] en [Activar] (pág. 25).
Aparecerá
empezará a adquirir la información de
ubicación. La información de ubicación
adquirida se graba en las películas y las
fotografías.
en la pantalla y el producto
En este producto puede reproducir
imágenes grabadas.
Sugerencias
Para reproducir imágenes 3D, ajuste [Selecc.
modo 2D/3D] en [3D].
1
Con el producto encendido,
pulse (Ver Imágenes).
Aparece la pantalla del índice de
eventos al cabo de unos segundos.
2
Seleccione una imagen
que desea visualizar con el
multiselector y, a continuación,
pulse el centro del selector.
Comienza la reproducción.
imagen anterior / imagen
siguiente
evento anterior / evento
siguiente
Este producto organiza las imágenes en
un grupo llamado evento, basándose en
su fecha y hora y en la información de la
frecuencia de grabación de imágenes.
Page 97

Operaciones disponibles en la pantalla
de reproducción
Pausa/reproducción
/
Detener
Imagen anterior/
/
siguiente
Rebobinado/avance
/
rápido
Reproducción de
presentaciones de
diapositivas
Volumen
Borrar
Contexto
Puede que algunos botones no se muestren en
función de la imagen que se esté reproduciendo.
Notas
Es posible que las imágenes grabadas con
este producto no se puedan reproducir
normalmente en otros dispositivos. Asimismo,
es posible que las imágenes grabadas con otros
dispositivos no se puedan reproducir en este
producto.
Sugerencias
Seleccione
reproducir películas a cámara lenta.
Si pulsa varias veces Enter después de
seleccionar
las películas se reproducirán a una velocidad
5 veces mayor 10 veces mayor 30 veces
mayor 60 veces mayor.
/ durante la pausa para
/ durante la reproducción,
Binoculares/grabación/reproducción
ES
19
Page 98

Almacenamiento de películas y fotografías en un ordenador
Reproducción de imágenes en un ordenador
El software “PlayMemories Home” le permite importar películas e imágenes fijas en un
ordenador para usarlas de diversas formas.
Qué puede hacerse con el software “PlayMemories Home” (Windows)
Visualizar
imágenes en
Importar imágenes
desde este producto
“PlayMemories Home” puede descargarse desde la siguiente URL:
www.sony.net/pm
Notas
Se requiere una conexión a Internet para instalar “PlayMemories Home”.
Se requiere una conexión a Internet para utilizar servicios en línea. Puede que los servicios no estén
disponibles en algunos países o regiones.
un calendario
Cargar imágenes en
servicios en línea
Crear un disco con
una película
Software para Mac
El software “PlayMemories Home” no es compatible con ordenadores Mac. Para importar
imágenes desde este producto a un Mac y poder reproducirlas, utilice en el Mac software
adecuado para ello. Para obtener más información, visite la siguiente URL:
http://www.sony.co.jp/imsoft/Mac/
ES
20
Page 99

Preparación del
ordenador
(Windows)
Instalar el software “PlayMemories
Home” en el ordenador
Acceda al siguiente sitio de
descarga con el navegador
de Internet de su ordenador
y, a continuación, haga clic en
[Instalación]
www.sony.net/pm
[Ejecutar].
Realice la instalación según las
indicaciones en pantalla.
Cuando las indicaciones en pantalla
le soliciten conectar el producto a
un ordenador, conecte el producto
al ordenador con el cable micro USB
(suministrado).
Cable micro USB (suministrado)
Cuando haya finalizado la instalación, se
iniciará “PlayMemories Home”.
Visualizar la “Guía de ayuda de
PlayMemories Home”
Haga doble clic en el icono de
acceso directo “Guía de ayuda de
PlayMemories Home” de la pantalla
del ordenador.
Cuando se esté utilizando Windows
8, seleccione [Guía de ayuda de
PlayMemories Home] desde el menú de
ayuda de “PlayMemories Home”.
Si el icono no aparece en la pantalla del
ordenador, haga clic en [Inicio] [Todos
los programas] [PlayMemories Home]
el elemento deseado.
Si desea más información sobre
“PlayMemories Home”, seleccione
(“Guía de ayuda de PlayMemories
Home”) en el software o visite la página
de asistencia de PlayMemories Home
(http://www.sony.co.jp/pmh-se/).
Almacenamiento de películas y fotografías en un ordenador
Notas referentes a la instalación
Si el software “PlayMemories Home” ya
está instalado en el ordenador, conecte este
producto al ordenador. Las funciones que
pueden utilizarse con el producto pasarán a
estar disponibles.
Si el software “PMB (Picture Motion Browser)”
está instalado en el ordenador, será sobrescrito
por el software “PlayMemories Home”. En
este caso, algunas funciones disponibles con
“PMB” no podrán utilizarse con este software
“PlayMemories Home”.
ES
21
Page 100

Personalizar el producto
Uso de los menús
Este producto ofrece varios elementos de
menú en cada una de las 6 categorías de
menú.
1
Seleccione (MENU).
2
Seleccione una categoría.
3
Seleccione el elemento de menú
deseado.
Para encontrar un elemento de menú
rápidamente
Los menús [Cámara/Micrófono] y
[Configuración] tienen subcategorías.
Seleccione el icono de subcategoría para
mostrar en la pantalla la lista de menús de
la subcategoría seleccionada.
Iconos de subcategoría
Cuando no se puede seleccionar un
elemento de menú
Los elementos de menú o ajustes que
aparecen atenuados no se encuentran
disponibles.
Cuando seleccione un elemento de menú
atenuado, el producto mostrará el motivo
por el cual no puede seleccionarlo o una
explicación de las condiciones en las que
puede elegir el elemento de menú.
Notas
Seleccione
menú o para regresar a la pantalla del menú
anterior.
ES
para terminar de ajustar el
22
 Loading...