

Page 1
4-410-132-11(1)
GB/FR/FRCA/ES/ESUS
Digital Recording
Binoculars/Jumelles à
enregistrement
numérique
Operating Guide GB
Mode d’emploi FR
Mode d’emploi FRCA
Manual de
instrucciones
Guía de operaciones ESUS
ES
2011 Sony Corporation
Printed in Japan
DEV-3/5/5K
Page 2

Owner’s Record
The model and serial numbers are located
on the bottom. Record the serial number
in the space provided below. Refer to these
numbers whenever you call upon your Sony
dealer regarding this product.
Model No. DEVSerial No.
Model No. ACSerial No.
WARNING
To reduce fire or shock hazard, do not
expose the unit to rain or moisture.
Do not expose the batteries to
excessive heat such as sunshine, fire or
the like.
CAUTION
Battery pack
If the battery pack is mishandled, the
battery pack can burst, cause a fire or even
chemical burns. Observe the following
cautions.
Do not disassemble.
Do not crush and do not expose the battery
pack to any shock or force such as hammering,
dropping or stepping on it.
Do not short circuit and do not allow metal
objects to come into contact with the battery
terminals.
Do not expose to high temperature above 60°C
(140°F) such as in direct sunlight or in a car
parked in the sun.
Do not incinerate or dispose of in fire.
Do not handle damaged or leaking lithium ion
batteries.
Be sure to charge the battery pack using a
genuine Sony battery charger or a device that
can charge the battery pack.
Keep the battery pack out of the reach of small
children.
GB
2
Keep the battery pack dry.
Replace only with the same or equivalent type
recommended by Sony.
Dispose of used battery packs promptly as
described in the instructions.
Replace the battery with the specified type
only. Otherwise, fire or injury may result.
AC Adaptor
Do not use the AC Adaptor placed in a
narrow space, such as between a wall and
furniture.
Use the nearby wall outlet (wall socket)
when using the AC Adaptor. Disconnect
the AC Adaptor from the wall outlet (wall
socket) immediately if any malfunction
occurs while using this product.
Even if this product is turned off, AC power
source (mains) is still supplied to it while
connected to the wall outlet (wall socket)
via the AC Adaptor.
Note on the power cord (mains lead)
The power cord (mains lead) is designed
specifically for use with this product only,
and should not be used with other electrical
equipment.
Excessive sound pressure from earphones
and headphones can cause hearing loss.
Page 3
For customers in the USA
This symbol is intended
to alert the user to the
presence of uninsulated
“dangerous voltage” within
the product’s enclosure
that may be of sufficient
magnitude to constitute
a risk of electric shock to
persons.
This symbol is intended
to alert the user to the
presence of important
operating and maintenance
(servicing) instructions in
the literature accompanying
the appliance.
GB
GB
3
Page 4

IMPORTANT SAFETY INSTRUCTIONS
SAVE THESE INSTRUCTIONS.
DANGER - TO REDUCE THE RISK OF FIRE
OR ELECTRIC SHOCK,
CAREFULLY FOLLOW THESE
INSTRUCTIONS.
Read these instructions.
Keep these instructions.
Heed all warnings.
Follow all instructions.
Do not use this apparatus near water.
Clean only with dry cloth.
Do not block any ventilation openings. Install in accordance with the manufacturer’s
instructions.
Do not install near any heat sources such as radiators, heat registers, stoves, or other
apparatus (including amplifiers) that produce heat.
Do not defeat the safety purpose of the polarized or grounding-type plug. A polarized plug
has two blades with one wider than the other. A grounding type plug has two blades and a
third grounding prong. The wide blade or the third prong are provided for your safety. If
the provided plug does not fit into your outlet, consult an electrician for replacement of the
obsolete outlet.
Protect the power cord from being walked on or pinched particularly at plugs, convenience
receptacles, and the point where they exit from the apparatus.
Only use attachments/accessories specified by the manufacturer.
Use only with the cart, stand, tripod, bracket, or table specified by the manufacturer, or
sold with the apparatus. When a cart is used, use caution when moving the cart/apparatus
combination to avoid injury from tip-over.
Unplug this apparatus during lightning storms or when unused for long periods of time.
Refer all servicing to qualified service personnel. Servicing is required when the apparatus
has been damaged in any way, such as power-supply cord or plug is damaged, liquid has
been spilled or objects have fallen into the apparatus, the apparatus has been exposed to
rain or moisture, does not operate normally, or has been dropped.
If the shape of the plug does not fit the power outlet, use an attachment plug adaptor of the
proper configuration for the power outlet.
GB
4
Page 5

Representative plug of power supply cord of countries/regions around the world.
A Type
(American
Type)
B Type
(British Type)
BF Type
(British Type)
B3 Type
(British Type)
C Type
(CEE Type)
SE Type
(CEE Type)
O Type
(Ocean Type)
The representative supply voltage and plug type are described in this chart.
Depend on an area, Different type of plug and supply voltage are used.
Attention: Power cord meeting demands from each country shall be used.
For only the United States
Use a UL Listed, 1.5-3 m (5-10 ft.), Type SPT-2 or NISPT-2, AWG no. 18 power supply
cord, rated for 125 V 7 A, with a NEMA 1-15P plug rated for 125 V 15 A.”
Europe
Countries/regions Voltage Frequency (Hz) Plug type
Austria 230 50 C
Belgium 230 50 C
Czech 220 50 C
Denmark 230 50 C
Finland 230 50 C
France 230 50 C
Germany 230 50 C
Greece 220 50 C
Hungary 220 50 C
Iceland 230 50 C
Ireland 230 50 C/BF
Italy 220 50 C
Luxemburg 230 50 C
Netherlands 230 50 C
Norway 230 50 C
Poland 220 50 C
Portugal 230 50 C
Romania 220 50 C
Russia 220 50 C
Slovak 220 50 C
Spain 127/230 50 C
Sweden 230 50 C
Switzerland 230 50 C
UK 240 50 BF
Asia
Countries/regions Voltage Frequency (Hz) Plug type
China 220 50 A
Hong Kong 200/220 50 BF
India 230/240 50 C
Indonesia 127/230 50 C
Japan 100 50/60 A
Korea (rep) 220 60 C
Malaysia 240 50 BF
Philippines 220/230 60 A/C
Singapore 230 50 BF
Taiwan 110 60 A
Thailand 220 50 C/BF
GB
5
Page 6

Countries/regions Voltage Frequency (Hz) Plug type
Vietnam 220 50 A/C
Oceania
Countries/regions Voltage Frequency (Hz) Plug type
Australia 240 50 O
New Zealand 230/240 50 O
North America
Countries/regions Voltage Frequency (Hz) Plug type
Canada 120 60 A
USA 120 60 A
Central America
Countries/regions Voltage Frequency (Hz) Plug type
Bahamas 120/240 60 A
Costa Rica 110 60 A
Cuba 110/220 60 A/C
Dominican (rep) 110 60 A
El Salvador 110 60 A
Guatemala 120 60 A
Honduras 110 60 A
Jamaica 110 50 A
Mexico 120/127 60 A
Nicaragua 120/240 60 A
Panama 110/220 60 A
South America
Countries/regions Voltage Frequency (Hz) Plug type
Argentina 220 50 C/BF/O
Brazil 127/220 60 A/C
Chile 220 50 C
Colombia 120 60 A
Peru 220 60 A/C
Venezuela 120 60 A
Middle East
Countries/regions Voltage Frequency (Hz) Plug type
Iran 220 50 C/BF
Iraq 220 50 C/BF
Israel 230 50 C
Saudi Arabia 127/220 50 A/C/BF
Turkey 220 50 C
UAE 240 50 C/BF
Africa
Countries/regions Voltage Frequency (Hz) Plug type
Algeria 127/220 50 C
Congo (dem) 220 50 C
Egypt 220 50 C
Ethiopia 220 50 C
Kenya 240 50 C/BF
Nigeria 230 50 C/BF
South Africa 220/230 50 C/BF
Tanzania 230 50 C/BF
Tunisia 220 50 C
GB
6
Page 7

Read this first
Before operating the unit, please read this
manual thoroughly, and retain it for future
reference.
For customers in the U.S.A. and CANADA
RECYCLING LITHIUM-ION BATTERIES
Lithium-Ion batteries are
recyclable.
You can help preserve our
environment by returning
your used rechargeable
batteries to the collection and
recycling location nearest you.
For more information
regarding recycling of
rechargeable batteries, call toll
free 1-800-822- 8837, or visit
http://www.rbrc.org/
Caution: Do not handle
damaged or leaking LithiumIon batteries.
Battery pack
This device complies with Part 15 of the
FCC Rules. Operation is subject to the
following two conditions: (1) This device
may not cause harmful interference, and
(2) this device must accept any interference
received, including interference that may
cause undesired operation.
This Class B digital apparatus complies
with Canadian ICES-003.
For the customers in the U.S.A.
UL is an internationally recognized safety
organization.
The UL Mark on the product means it has
been UL Listed.
If you have any questions about this
product, you may call:
Sony Customer Information Center 1-800222-SONY (7669).
The number below is for the FCC related
matters only.
Regulatory Information
Declaration of Conformity
Trade Name: SONY
Model No.: DEV-3, DEV-5, DEV-5K
Responsible Party: Sony Electronics Inc.
Address: 16530 Via Esprillo, San Diego,
CA 92127 U.S.A.
Telephone No.: 858-942-2230
This device complies with Part 15 of the
FCC Rules. Operation is subject to the
following two conditions: (1) This device
may not cause harmful interference,
and (2) this device must accept any
interference received, including
interference that may cause undesired
operation.
CAUTION
You are cautioned that any changes or
modifications not expressly approved in
this manual could void your authority to
operate this equipment.
Note
This equipment has been tested and found
to comply with the limits for a Class B
digital device, pursuant to Part 15 of the
FCC Rules.
These limits are designed to provide
reasonable protection against harmful
interference in a residential installation.
GB
7
Page 8

8
GB
This equipment generates, uses, and
can radiate radio frequency energy and,
if not installed and used in accordance
with the instructions, may cause harmful
interference to radio communications.
However, there is no guarantee that
interference will not occur in a particular
installation. If this equipment does cause
harmful interference to radio or television
reception, which can be determined by
turning the equipment off and on, the
user is encouraged to try to correct the
interference by one or more of the following
measures:
Reorient or relocate the receiving antenna.
Increase the separation between the
equipment and receiver.
Connect the equipment into an outlet on
a circuit different from that to which the
receiver is connected.
Consult the dealer or an experienced radio/
TV technician for help.
The supplied interface cable must be used
with the equipment in order to comply with
the limits for a digital device pursuant to
Subpart B of Part 15 of FCC Rules.
For the customers in Canada (For DEV-5)
This device complies with RSS-310 of
Industry Canada. Operation is subject to
the condition that this device does not
cause harmful interference.
Notice for customers in the United
Kingdom
A moulded plug complying with BS 1363 is
fitted to this equipment for your safety and
convenience.
Should the fuse in the plug supplied need
to be replaced, a fuse of the same rating as
the supplied one and approved by ASTA or
BSI to BS 1362, (i.e., marked with an
mark) must be used. If the plug supplied
with this equipment has a detachable fuse
cover, be sure to attach the fuse cover after
or
you change the fuse. Never use the plug
without the fuse cover. If you should lose
the fuse cover, please contact your nearest
Sony service station.
FOR CUSTOMERS IN EUROPE
Hereby, Sony Corporation, declares
that this DEV-5/5K Digital Recording
Binoculars is in compliance with the
essential requirements and other relevant
provisions of the Directive 1999/5/EC. For
details, please access the following
URL: http://www.compliance.sony.de/
Notice for the customers in the
countries applying EU Directives
The manufacturer of this product is Sony
Corporation, 1-7-1 Konan Minato-ku
Tokyo, 108-0075 Japan. The Authorized
Representative for EMC and product safety
is Sony Deutschland GmbH, Hedelfinger
Strasse 61, 70327 Stuttgart, Germany. For
any service or guarantee matters please
refer to the addresses given in separate
service or guarantee documents.
ATTENTION
The electromagnetic fields at the specific
frequencies may influence the picture and
sound of this unit.
This product has been tested and found
compliant with the limits set out in the
EMC Directive for using connection cables
shorter than 3 meters (9.8 feet).
Notice
If static electricity or electromagnetism
causes data transfer to discontinue midway
(fail), restart the application or disconnect
and connect the communication cable
(USB, etc.) again.
Page 9
Disposal of Waste Electrical
and Electronic Equipment
for business use (Applicable
in the European Union and
other European countries with
separate collection systems)
(DEV-5K)
This symbol on the product or on its
packaging indicates that this product shall
not be treated as household waste. Instead
it shall be handed over to the applicable
take-back scheme for the recycling of
electrical and electronic equipment.
By ensuring this product is disposed of
correctly, you will help prevent potential
negative consequences for the environment
and human health, which could otherwise
be caused by inappropriate waste handling
of this product. The recycling of materials
will help to conserve natural resources. For
more detailed information about recycling
of this product, please contact your local
Sony office or visit Sony Europe’s web site
for business customers:
http://www.pro.sony.eu/environment
Disposal of Old Electrical
& Electronic Equipment
(Applicable in the European
Union and other European
countries with separate
collection systems) (DEV-3/5)
This symbol on the product or on its
packaging indicates that this product shall
not be treated as household waste. Instead
it shall be handed over to the applicable
collection point for the recycling of
electrical and electronic equipment.
By ensuring this product is disposed of
correctly, you will help prevent potential
negative consequences for the environment
and human health, which could otherwise
be caused by inappropriate waste handling
of this product. The recycling of materials
will help to conserve natural resources.
For more detailed information about
recycling of this product, please contact
your local Civic Office, your household
waste disposal service or the shop where
you purchased the product.
Disposal of waste batteries
(applicable in the European
Union and other European
countries with separate
collection systems)
This symbol on the battery or on the
packaging indicates that the battery
provided with this product shall not be
treated as household waste.
On certain batteries this symbol might
be used in combination with a chemical
symbol. The chemical symbols for mercury
(Hg) or lead (Pb) are added if the battery
contains more than 0.0005% mercury or
0.004% lead.
By ensuring these batteries are disposed of
correctly, you will help prevent potentially
negative consequences for the environment
and human health which could otherwise
be caused by inappropriate waste handling
of the battery. The recycling of the materials
will help to conserve natural resources.
In case of products that for safety,
performance or data integrity reasons
require a permanent connection with an
incorporated battery, this battery should
be replaced by qualified service staff only.
To ensure that the battery will be treated
properly, hand over the product at end-oflife to the applicable collection point for
the recycling of electrical and electronic
equipment.
For all other batteries, please view the
section on how to remove the battery from
the product safely. Hand the battery over
to the applicable collection point for the
recycling of waste batteries.
For more detailed information about
recycling of this product or battery, please
contact your local Civic Office, your
GB
9
Page 10
10
GB
household waste disposal service or the
shop where you purchased the product.
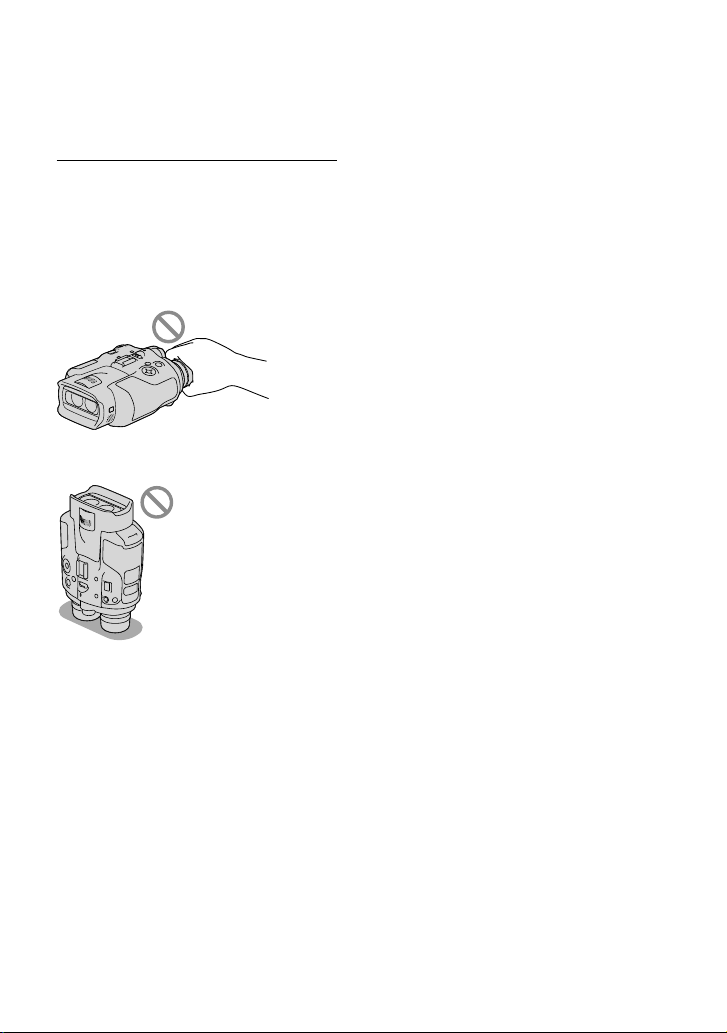
Using this product
Do not hold this product by the following parts,
and also do not hold this product by the jack
covers.
Viewfinder
Do not put this product with the viewfinder
facing down.
This product is not dustproofed, dripproofed or
waterproofed. See “Precautions” (p. 46).
Menu items, viewfinder, and lens
A menu item that is grayed out is not available
under the current recording or playback
conditions.
The viewfinder is manufactured using
extremely high-precision technology, so over
99.99% of the pixels are operational for effective
use. However, there may be some tiny black
points and/or bright points (white, red, blue,
or green in color) that appear constantly in the
viewfinder. These points are normal results of
the manufacturing process and do not affect the
recording in any way.
Exposing the viewfinder or the lens to direct
sunlight for long periods of time may cause
malfunctions.
Do not aim at the sun. Doing so might cause
this product to malfunction. Take images of the
sun only in low light conditions, such as at dusk.
About language setting
The on-screen displays in each local language
are used for illustrating the operating
procedures. Change the screen language before
sing t
his product if necessary (p. 24).
u
On recording
To ensure stable operation of the memory card,
it is recommended to format the memory card
with this product before the first use. formatting
the memory card will erase all the data stored
on it and the data will be irrecoverable. Save
your important data on your PC etc.
Before starting to record, test the recording
function to make sure the image and sound are
recorded without any problems.
Compensation for the contents of recordings
cannot be provided, even if recording or
playback is not possible due to a malfunction of
this product, memory card, etc.
TV color systems differ depending on the
country/region. To view your recordings on a
TV, set [60i/50i Sel] to the setting required in
untry/region before recording (p. 22).
our co
y
Television programs, films, video tapes,
and other materials may be copyrighted.
Unauthorized recording of such materials may
be contrary to the copyright laws.
Because of the way that the image device
(CMOS sensor) reads out image signals, the
following phenomena may occur.
The subjects passing by the frame rapidly
might appear crooked depending on the
recording conditions. (This phenomenon may
be notable in displays having high motion
resolution.)
Horizontal lines appear on the screen during
recording under fluorescent lights. The
phenomena can be reduced by adjusting the
shutter speed.
Page 11
Images on the screen look horizontally
divided when a subject is lighted with a flash.
The phenomena can be reduced by using a
slower shutter speed.
Use this product in accordance with local
regulations.
See page 24 for the memory card you can use
with this product.
Notes on playing back
You may not be able to play back normally
images recorded on this product with other
devices. Also, you may not be able to play back
images recorded on other devices with this
product.
DVD media recorded with high
definition image quality
DVD media recorded with high definition
image quality can be played back with devices
that are compatible with the AVCHD standard.
You cannot play discs recorded with high
definition image quality with DVD players/
recorders as they are not compatible with the
AVCHD format. If you insert a disc recorded
with the AVCHD format (high definition image
quality) into a DVD player/recorder, you may
not be able to eject the disc.
Save all your recorded image data
To prevent your image data from being lost,
save all your recorded images on external media
periodically.
The type of discs or media on which the
images can be saved depend on the [
REC
Mode] selected when the images were recorded.
Movies recorded with [60p Quality
Quality
]) or [Highest Quality ] can be
] ([50p
saved on external media devices or on Blu-ray
discs.
Notes on battery pack/AC Adaptor
Be sure to remove the battery pack or the AC
Adaptor after turning off this product.
Disconnect the AC Adaptor from this product,
holding both this product and the DC plug.
Note on the binoculars/battery pack
temperature
When the temperature of this product or
battery pack becomes extremely high or
extremely low, you may not be able to record or
play back on this product, due to the protection
features of this product being activated in such
situations. In this case, an indicator appears on
the screen.
When this product is connected to a
computer or accessories
Do not try to format the memory card of this
product using a computer. If you do so, this
product may not operate correctly.
When connecting this product to another
device with communication cables, be sure to
insert the connector plug in the correct way.
Pushing the plug forcibly into the terminal
will damage the terminal and may result in a
malfunction of this product.
If you cannot record/play back images,
perform [Format]
If you repeat recording/deleting images for
a long time, fragmentation of data occurs on
the memory card. Images cannot be saved or
recorded. In such a case, save your images on
some type of external media first, and then
perform [Format] by selecting
[Setup] [
[Format]
( Media Settings)]
.
(MENU)
Notes on optional accessories
We recommend using genuine Sony accessories.
Genuine Sony accessories may not be available
in some countries/regions.
About this manual, illustrations and
on-screen displays
The example images used in this manual for
illustration purposes are captured using a digital
still camera, and therefore may appear different
from images and screen indicators that actually
appear on this product. And, the illustrations
of this product and its screen indication are
exaggerated or simplified for understandability.
GB
11
Page 12

12
GB
In this manual, the DVD disc recorded with
high definition image quality is called AVCHD
recording disc.
Design and specifications of this product and
accessories are subject to change without notice.
Viewing 3D video images
Some people may experience discomfort (such
as eye strain, fatigue, or nausea) while watching
3D video images.
Sony recommends that all viewers take regular
breaks while watching 3D video images. The
length and frequency of necessary breaks will
vary from person to person. You must decide
what works best.
If you experience any discomfort, you should
stop watching the 3D video images until the
discomfort ends; consult a doctor if you believe
necessary.
You should also review the instruction manual
of any other device or media used with this
product.
The vision of young children (especially those
under six years old) is still under development.
Consult your doctor (such as a pediatrician or
eye doctor) before allowing young children to
watch 3D video images.
Adults should supervise young children to
ensure they follow the recommendations listed
above.
Notes on use
Be careful of your surroundings when using
this product. Especially, do not use this product
while walking. Doing so may cause accidents
or injury.
Do not do any of the following. Otherwise,
the memory card may be damaged, recorded
images may be impossible to play back or may
be lost, or other malfunctions could occur.
ejecting the memory card when the access
p (p. 25) is lit or flashing
am
l
removing the battery pack or AC Adaptor
from this product, or applying mechanical
shock or vibration to this product when the
(Movie)/ (Photo) lamps (p. 28) or the
access lamp (p. 25) are lit or flashing
When using the neck strap, do not carry this
product on your back. Doing so may cause
injury. And do not allow this product to knock
against another object.
About manuals for this product
Two manuals have been prepared for this
product, the “Operating Guide” and the
“Digital Recording Binoculars Handbook
(PDF).” The “Operating Guide” introduces
basic operations and the “Digital Recording
Binoculars Handbook (PDF)” explains
details of functions.
Operating Guide
This manual introduces the basic
operations of this product, such as
recording and playback.
Digital Recording Binoculars Handbook
(PDF)
This manual explains various operations,
such as how to use the setting menu and
how to save images on other devices.
How to read Digital Recording
Binoculars Handbook (PDF)
Install the “Digital Recording Binoculars
Handbook” on your computer from the
supplied CD-ROM.
For a Windows computer
When the installation screen appears, click
[Handbook] the desired language and
the model name [Install], and follow the
on-screen instructions to install the Handbook.
The short-cut icon is created on the computer
screen.
Page 13

For a Mac
Open the [Handbook] - [GB] folder on the
CD-ROM, then copy [Handbook.pdf] to your
computer.
You need Adobe Reader to read the “Digital
Recording Binoculars Handbook.” If it is not
installed on your computer, you can download
it from the Adobe Systems web page.
http://www.adobe.com/
GB
13
Page 14

Table of contents
IMPORTANT SAFETY INSTRUCTIONS . . . .. . 4
Read this first . . . . . .. . . . . . .. . . . . . .. . . .. . . . . . .. . . 7
Viewing 3D video images . .. . . . . . .. . . .12
Notes on use . . . .. . . . . . .. . . .. . .. . . .. . . . . . 12
About manuals for this product . . . . . 12
Getting started
Step 1: Checking the supplied items . . . . . 15
Attaching the supplied items . . . . . .. . 16
Step 2: Charging the battery pack . . . . .. . .17
Charging the battery pack installed
into this product . . . . .. . .. . . . . . .. . . . . . .. . 17
Charging the battery pack using the
AC Adaptor/Charger (DEV-5K) . . . . . .. 19
Step 3: Turning the power on, and setting
up this product . . .. . . . . . .. . . . . . .. . . .. . . . . . .. . .21
Changing the language setting . . .. . 24
Watching the recorded movies
on a TV . . . . . .. . . . . . .. . . .. . .. . . .. . . . . . .. . . . . 24
Step 4: Inserting a memory card . . . . . . .. . . 24
Binoculars/Recording/
Playback
Using this product as binoculars . . .. . . . . . 26
Recording . . . .. . .. . . .. . . . . . .. . . . . . .. . . . . . .. . . .. 28
Recording movies .. . .. . . .. . .. . . .. . . . . . .28
Shooting photos. .. . .. . . . . . .. . . .. . . . . . .. 29
Controlling the image settings
manually with the MANUAL dial . . .. 30
Acquiring location information
using the GPS (DEV-5/5K) . . . .. . .. . . . . . 31
Selecting the recording mode . . . . . . .31
Playback on this product . . .. . . . . . .. . . .. . . . . 32
Saving movies and photos
Preparing a computer . . .. . . . . . .. . . .. . .. . . .. 34
Step 1 Checking the computer
system . . . . .. . . . . . .. . . .. . .. . . .. . . . . . .. . . . . . 34
Step 2
Installing the supplied
software “PMB”. . . . .. . . . . . .. . . .. . . . . . .. . .34
Starting PMB
(Picture Motion Browser) . . . .. . .. . . . . . .. . . .. 37
Customizing this product
Using menus . . .. . .. . . . . . .. . . . . . .. . . .. . .. . . .. . .38
Operating menus . .. . .. . . .. . .. . . .. . . . . . .38
Menu lists. .. . . . . . .. . . . . . .. . . . . . .. . . .. . . . . . .. . . . 39
Additional information
Troubleshooting . . . .. . . . . . .. . . .. . .. . . .. . .42
Self-diagnosis display/Warning
indicators . . . .. . . . . . .. . . . . . .. . . . . . .. . . .. . .43
Recording time of movies/number of
recordable photos . .. . . .. . . . . . .. . . . . . .. . . .. . .44
Expected operating time with each
battery pack . . . . .. . . .. . . . . . .. . . . . . .. . . . . . 44
Expected recording time of
movies . . . . . . .. . . . . . .. . . .. . . . . . .. . . . . . .. . . . 45
Expected number of recordable
photos .. . .. . . . . . .. . . .. . .. . . .. . . . . . .. . . . . . .45
Precautions . . .. . .. . . . . . .. . . .. . . . . . .. . . . . . .. . . . 46
Specifications . . . .. . . .. . .. . . .. . . . . . .. . . . . . .. . . .48
Quick reference
Screen indicators . . .. . . .. . . . . . .. . . . . . .. . . .. . .51
Parts and controls. . .. . .. . . . . . .. . . .. . .. . . .. . . . 52
Index . . . .. . . . . . .. . . .. . . . . . .. . . . . . .. . . . . . .. . . .. . .54
14
GB
Page 15
Getting started
Step 1: Checking the supplied items
When opening the box for the first time, make sure that all of the supplied items listed below
are included. The numbers in ( ) are the supplied quantity.
Items DEV-3 DEV-5 DEV-5K
Digital Recording Binoculars (1)
Carrying case (1)
Neck strap (1)
Getting started
Lens cover (1)
Finder cap (1)
Large eyecup (2)
AC Adaptor/Battery charger (AC-VQV10) (1)
Connecting cord (DK-225) (1)
AC Adaptor (AC-L200) (1)
Power cord (Mains lead) (1)
Rechargeable battery pack (1)
A/V connecting cable (1)
Component A/V cable (1)
USB cable (1)
USB Adaptor Cable (1)
NP-FV70 NP-FV70 NP-FV100
GB
15
Page 16
Items DEV-3 DEV-5 DEV-5K
CD-ROM Video Camera Application
Software (1)
“PMB” (software, including “PMB Help”)
Digital Recording Binoculars Handbook (PDF)
“Operating Guide” (This manual) (1)
Attaching the supplied items
Attaching the neck strap
To avoid dropping this product, attach the
neck strap to the binoculars following the
steps below.
Insert one end of the neck strap into the
strap mount on the binoculars. Then, fasten
the neck strap, placing the end of the neck
strap into the clasp.
Attaching the lens cover (DEV-5/5K)
When you do not intend to use this
product, store this product with the lens
cover attached.
You can use this product with the lens cover
attached.
Attaching the large eyecup (DEV-5/5K)
If you cannot see the picture in the
viewfinder clearly under bright light, use
the large eyecup.
Align the large eyecup with the eyecup
groove in the viewfinder.
Attaching the finder cap (DEV-5/5K)
When you do not intend to use this
product, store this product with the finder
cap attached.
16
GB
Page 17
Step 2: Charging the battery pack
You can attach the finder cap to the neck
strap as illustrated when it is not being
used.
You can charge the “InfoLITHIUM” battery
pack (V series).
Notes
You cannot use any “InfoLITHIUM” battery
pack other than NP-FV70/FV100 to this
product.
Charging the battery pack installed into this product
Set the POWER switch to OFF
(CHG) b
y pressing the green
button.
Turn the battery cover lock to
OPEN and open the battery
cover.
Getting started
Align the battery with the groove
in the battery compartment (),
and slide the battery until it clicks
().
GB
17
Page 18
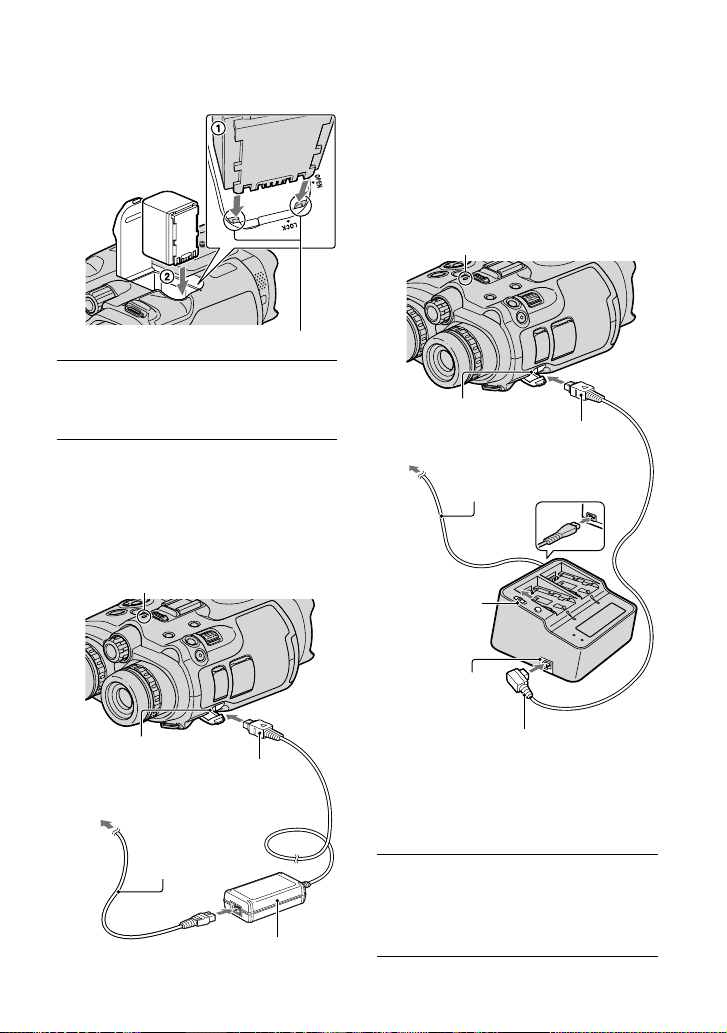
Align the battery with the groove.
Close the battery cover and turn
the battery cover lock to LOCK.
DEV-3/5:
Connect the AC Adaptor and the
power cord (mains lead) to this
product and the wall outlet (wall
socket).
CHG (charge) lamp
DEV-5K:
Connect the power cord and the
connecting cord (DK-225) to the
AC Adaptor/Charger.
Set the mode switch on the AC Adaptor/
Charger to VCR/CAMERA.
CHG (charge) lamp
DC IN jack
To the wall outlet
(wall socket)
Power cord (mains
lead)
Mode
switch
DC OUT jack
DC plug
DC IN jack
To the wall outlet (wall
socket)
GB
18
Power cord (mains
lead)
AC Adaptor
DC plug
Connecting cord (DK-225)
The CHG (charge) lamp lights up and
charging starts. The CHG (charge)
lamp turns off when the battery pack is
fully charged.
When the battery is charged,
disconnect the AC Adaptor from
the DC IN jack of this product.
Page 19
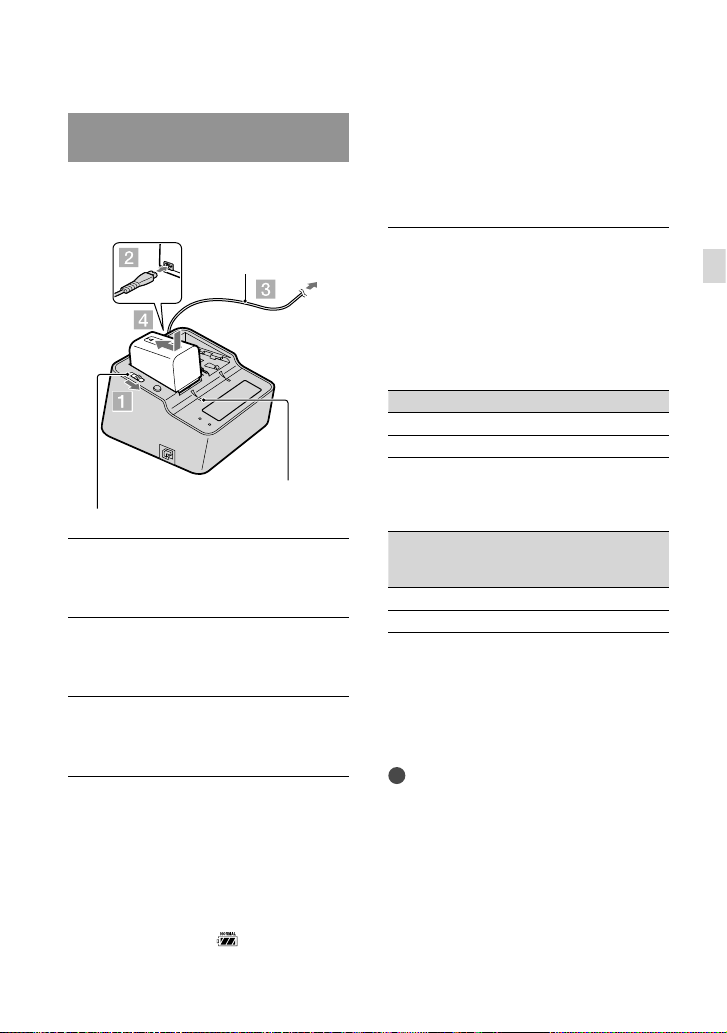
Charging the battery pack using the AC Adaptor/Charger (DEV-5K)
The AC Adaptor/Charger can charge the
battery pack faster than charging it with
this product.
Power cord (mains
lead)
To the wall outlet
(wall socket)
If you continue to charge the battery
after normal charging is complete until
the battery mark shows “FULL,” the
battery pack can be used slightly longer
than when in the normal charged state.
Charging time
Approximate time (min.) required when
you fully charge a fully discharged battery
pack.
Charging with this product
Battery pack Charging time
NP-FV70 195
NP-FV100 390
Getting started
CHARGE lamp
Mode switch
Set the mode switch on the AC
Adaptor/Charger to CHARGE.
Connect the power cord (mains
lead) to the AC Adaptor/Charger.
Connect the power cord (mains
lead) to a wall outlet (wall socket).
Attach the battery pack to the AC
Adaptor/Charger by sliding it in
the direction of the arrow.
The CHARGE lamp lights up and
charging starts.
When charging is complete, the battery
mark is displayed (
).
Charging with AC Adaptor/Charger
(supplied with DEV-5K)
Battery pack
NP-FV70 70 130
NP-FV100 125 185
The charging times shown in the table above
are measured when charging this product
at a temperature of 25
recommended that you charge the battery in
a temperature range of 10
to 86 °F).
Tips
See page 44 on recording and playing time.
When this product is on, you can check the
approximate amount of remaining battery
power (expected recording and playing time)
with the remaining battery indicator at the
upper right on the screen.
Charging
time
(NORMAL)
C (77 °F). It is
Charging
time
(FULL)
C to 30 C (50 °F
GB
19
Page 20
To use a wall outlet (wall socket) as a
power source
Make the same connections as “Step 2:
Charging the battery pack” (p. 17). Even
e battery pack is installed, the battery
if th
pack is not discharged.
To remove the battery pack
Set the POWER switch to OFF (CHG).
Open the battery cover (p. 17).
he battery release lever and
Slide t
ove the battery.
rem
Battery release lever
Charging the battery pack abroad
You can charge the battery pack in any
countries/regions using the AC Adaptor
(supplied with DEV-3/5) or the AC Adaptor/
Charger (supplied with DEV-5K) within the
V - 240 V, 50 Hz/60 Hz range.
C 100
A
Notes
Do not use an electronic voltage transformer.
The CHG (charge) lamp flashes during charging
under the following conditions:
The battery pack is not installed correctly.
The battery pack is damaged.
The temperature of the battery pack is low.
Remove the battery pack from this product
and put it in a warm place.
The temperature of the battery pack is high.
Remove the battery pack from this product
and put it in a cool place.
Notes on the AC Adaptor
Use the nearby wall outlet (wall socket) when
using the AC Adaptor. Disconnect the AC
Adaptor from the wall outlet (wall socket)
immediately if any malfunction occurs while
using this product.
Do not use the AC Adaptor placed in a narrow
space, such as between a wall and furniture.
Do not short-circuit the DC plug of the AC
Adaptor or battery terminal with any metallic
objects. This may cause a malfunction.
Notes on the battery pack
When you remove the battery pack or
disconnect the AC Adaptor, turn this product
off and make sure that the
(Photo) lamps (p. 28), the access lamp (p. 25)
e turned off.
ar
GB
(Movie)/
20
Page 21
Step 3: Turning the power on, and setting up this product
Notes
Do not turn the power on with the USB cable
connected.
Do not connect the USB cable until the
following procedure is completed.
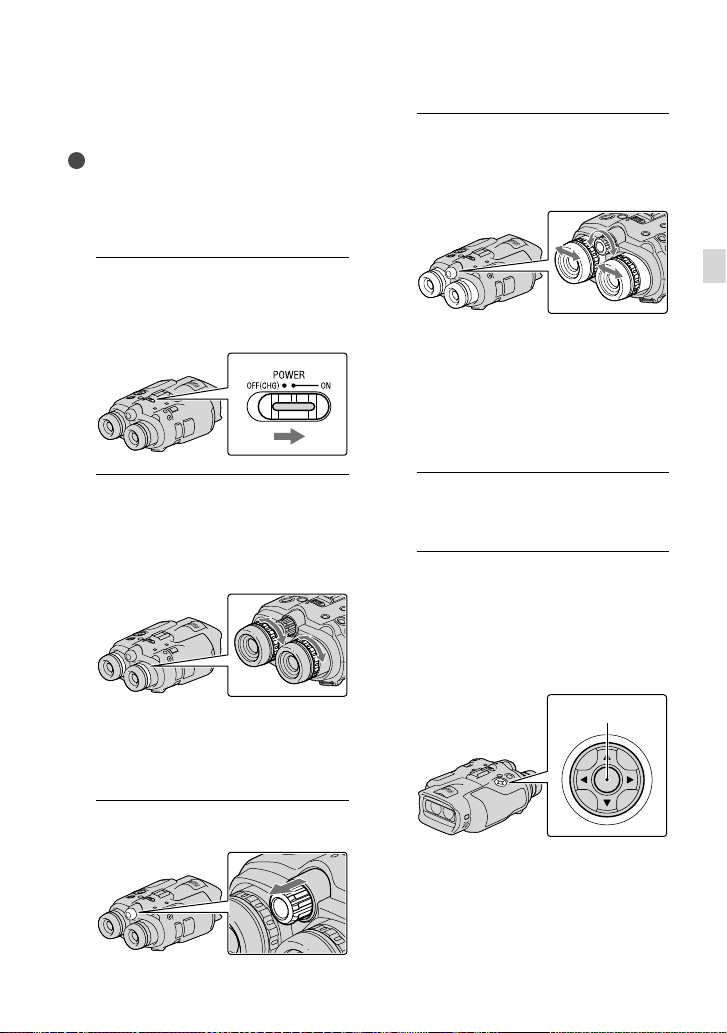
1
Set the POWER switch to ON by
pressing the green button.
This product is turned on.
2
Adjust the diopter until you
can see a clear image with each
eye by turning the diopter
adjustment dial.
4
Adjust the width between the left
and right viewfinder to fit your
eyes using the IPD ADJ dial.
Adjust the width so that left and right
images overlap.
Make sure that the image in the viewfinder
does not look like it has a double image.
If this product is used by more than one
person, adjust the width each time the user
changes.
5
Push the IPD ADJ dial back into
this product.
6
Set the language, area, summer
time, date & time format, and
date & time using the ////
Enter button, then confirm each
setting.
Getting started
If this product is used by more than one
person, adjust the diopter each time the
user changes.
Adjust the diopter for each eye separately.
3
Pull out the IPD ADJ dial.
Enter button
When each setting have been
completed, select [Next] and press
Enter.
GB
21
Page 22
To set the date and time again, select
(MENU) [Setup] [
Clock Settings)] [Date & Time
(
Setting] [Date & Time]. When [Date
& Time] is not on the screen, press
until the item appears.
7
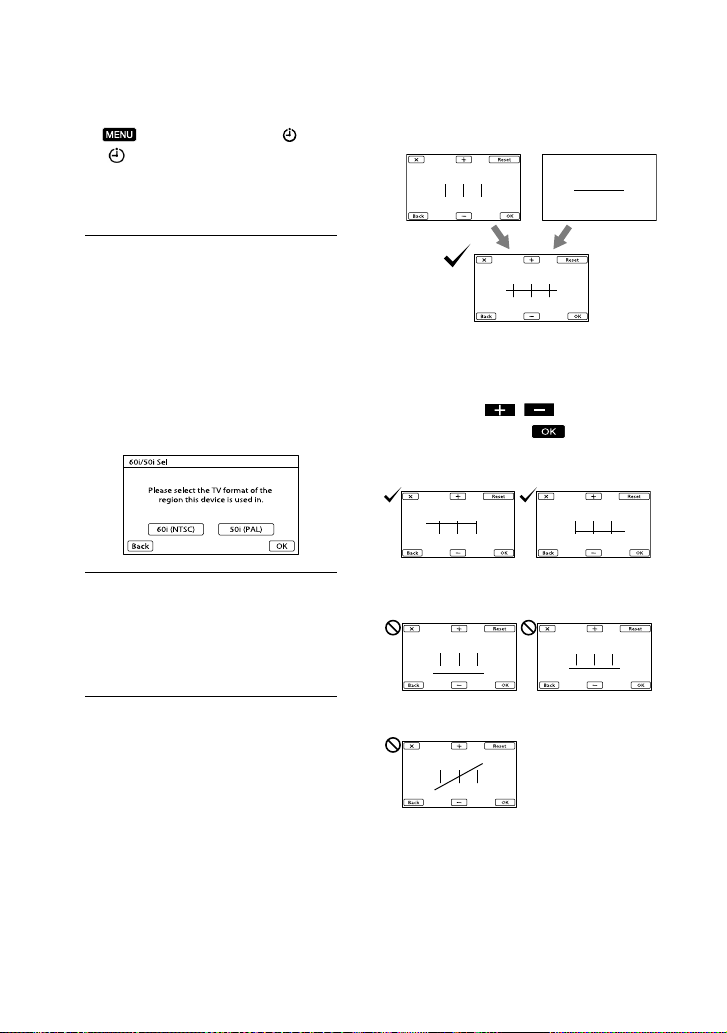
Select [60i (NTSC)] or [50i (PAL)]
to suit the TV color system used
in your country/region, then
press Enter.
When the 60i/50i selection is made,
this product restarts to update the
system.
See page 24 for details on the TV color
system in your country/region.
/
Image in the left
viewfinder
Image viewed by both eyes
If the horizontal line and the vertical
lines do not overlap, adjust the position
of the image in the right viewfinder
by selecting
overlap, then select
If you see the image below, the device
works correctly.
Image in the right
viewfinder
/ until the lines
.
8
Confirm the warning about
continuous use and the warning
about viewfinder adjustment,
then select [Next].
9
Adjust the relative vertical
position of the right and left
viewfinder.
Make sure that the horizontal line
overlaps the vertical lines.
GB
22
If you see the image below, stop using this
product.
The horizontal line and the vertical lines do not
overlap.
The horizontal line is extremely tilted.
If you cannot see images correctly, this
product may be damaged. Contact
your Sony dealer or local authorized
Sony service facility.
Page 23
10
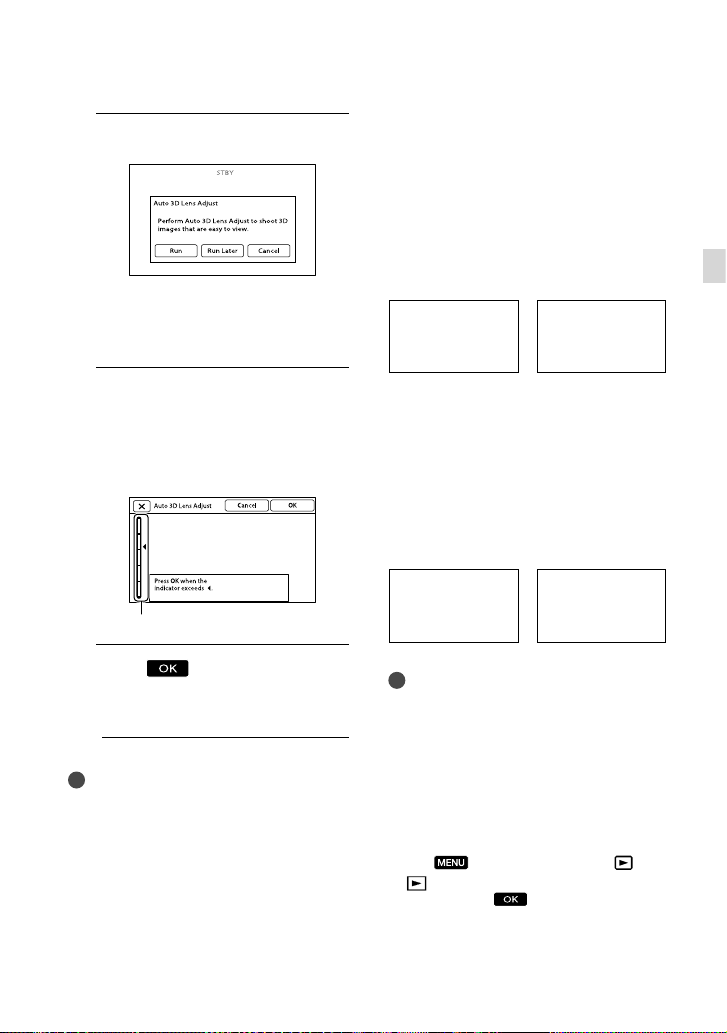
Select [Run].
If you select [Run Later], the recording
mode screen appears. When you turn on
this product next time, the [Auto 3D Lens
Adjust] screen will appear.
11
Adjust the 3D lens.
Aim this product at a subject to display
it on the screen.
Be sure that the subject produces a scale
higher than the
mark.
Scale
12
Select .
Do not change the subject until the
adjustment is completed.
Notes
If this product failed [Auto 3D Lens Adjust],
select [Run Again].
Type of subjects that should be
displayed on the screen for [Auto 3D
Lens Adjust]
The scale indicated varies depending on the
subject displayed on the screen.
Subjects that indicate a higher scale:
Bright subjects, such as objects outdoors in
daylight
Subjects with various colors and shapes
Subjects that indicate a lower scale and
result in adjustment failure:
Dark subjects, such as objects viewed at night
Subjects within 2 m (6 ft. 6 3/4 in.) away from
this product
Plain, non-colorful subjects
Subjects that repeat the same pattern, such as
rows of windows on buildings
Moving subjects
Notes
You may see primary colors, red, blue, or green,
shimmering in the viewfinder when you move
your line of sight. This is not a malfunction.
The shimmering colors will not be recorded on
the memory card.
The date and time does not appear during
recording, but they are automatically recorded
on the memory card, and can be displayed
during playback. To display the date and time,
select
(
[Date/Time]
(MENU) [Setup] [
Playback Settings)] [Data Code]
.
Getting started
GB
23
Page 24
Step 4: Inserting a memory card
To turn off the power
Set the POWER switch to OFF (CHG).
(Movie) lamp flashes for a few
The
seconds and this product is turned off.
Changing the language setting
You can change the on-screen displays to
show messages in a specified language.
Select
[
(MENU) [Setup]
( General Settings)] [Language
Setting] a desired language
.
Watching the recorded movies on a TV
To watch recorded movies on a TV, record
movies after selecting the appropriate
[60i/50i Sel] setting for the TV color system
of the country/region where you are using
this product.
Countries/regions where you need to set
[60i/50i Sel] to [60i (NTSC)]
Bahama Islands, Bolivia, Canada, Central
America, Chile, Colombia, Ecuador,
Guyana, Jamaica, Japan, Korea, Mexico,
Peru, Surinam, Taiwan, the Philippines, the
USA, Venezuela, etc.
Countries/regions where you need to set
[60i/50i Sel] to [50i (PAL)]
Argentina, Australia, Austria, Belgium,
Bulgaria, Brazil, China, Czech Republic,
Denmark, Finland, France, Germany,
Guiana, Holland, Hong Kong, Hungary,
Iran, Iraq, Italy, Kuwait, Malaysia, Monaco,
New Zealand, Norway, Paraguay, Poland,
Portugal, Russia, Singapore, Slovak
Republic, Spain, Sweden, Switzerland,
Thailand, Ukraine, United Kingdom,
Uruguay, etc.
GB
24
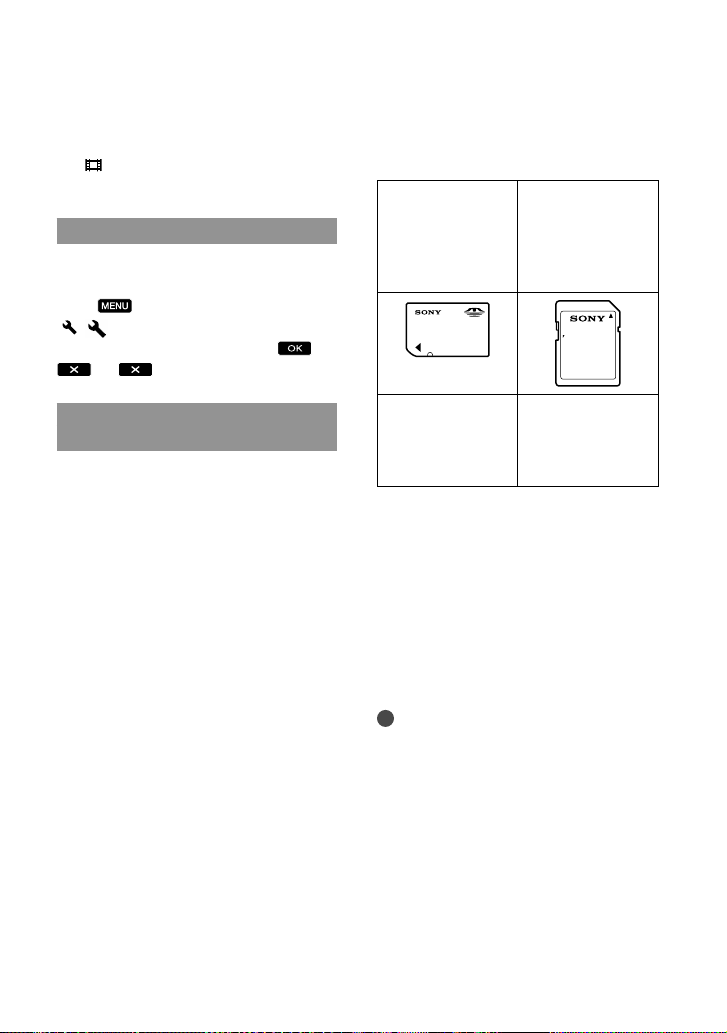
Types of memory card you can use with
this product
“Memory Stick
PRO Duo” media
(Mark2)
“Memory Stick
PRO-HG Duo”
media
Described in this
manual, “Memory
SD memory card*
SDHC memory
card
*
SDXC memory
card
*
Described in this
manual, SD card
Stick PRO Duo”
media
* SD Speed Class 4 or faster is required.
Operation with all memory cards is not assured.
“Memory Stick PRO Duo” media, half the size
of “Memory Stick”, or standard size SD cards
can be used for this product.
Do not attach a label or the like on memory
card or memory card adaptor. Doing so may
cause a malfunction.
“Memory Stick PRO Duo” media of up to 32 GB
and SD cards of up to 64 GB have been verified
to operate with this product.
Notes
A MultiMediaCard cannot be used with this
product.
Movies recorded on SDXC memory cards
cannot be imported to or played back on
computers or AV devices not supporting the
exFAT* file system by connecting this product
to these devices with the USB cable. Confirm
in advance that the connecting equipment is
supporting the exFAT system. If you connect
an equipment not supporting the exFAT system
and the format screen appears, do not perform
the format. All the data recorded will be lost.
* The exFAT is a file system that is used for
SDXC memory cards.
Page 25
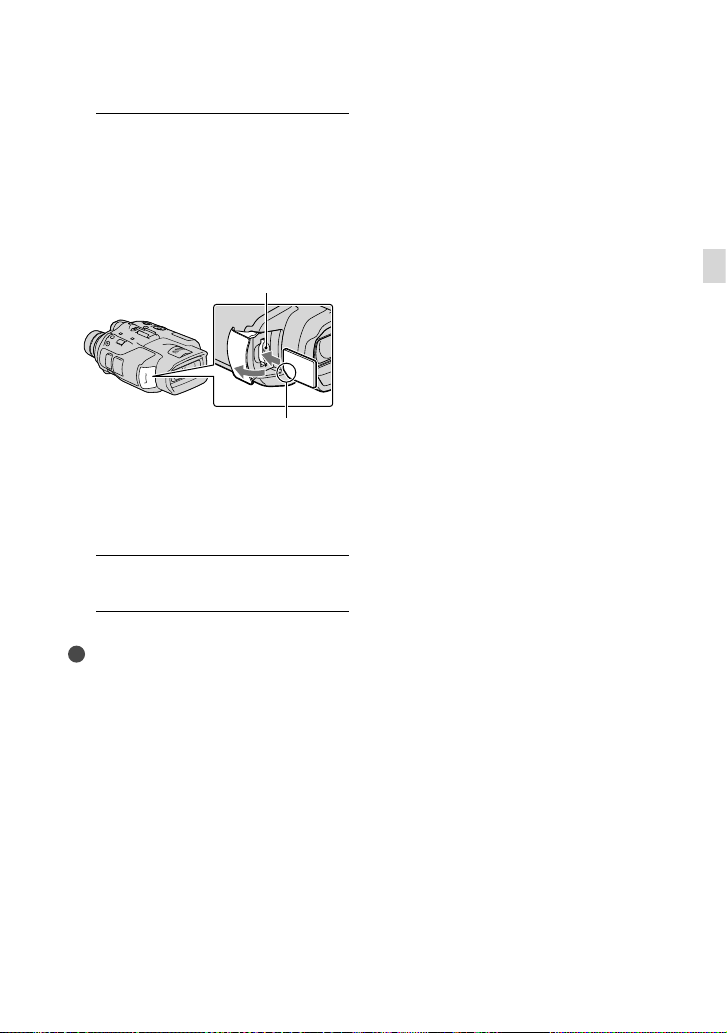
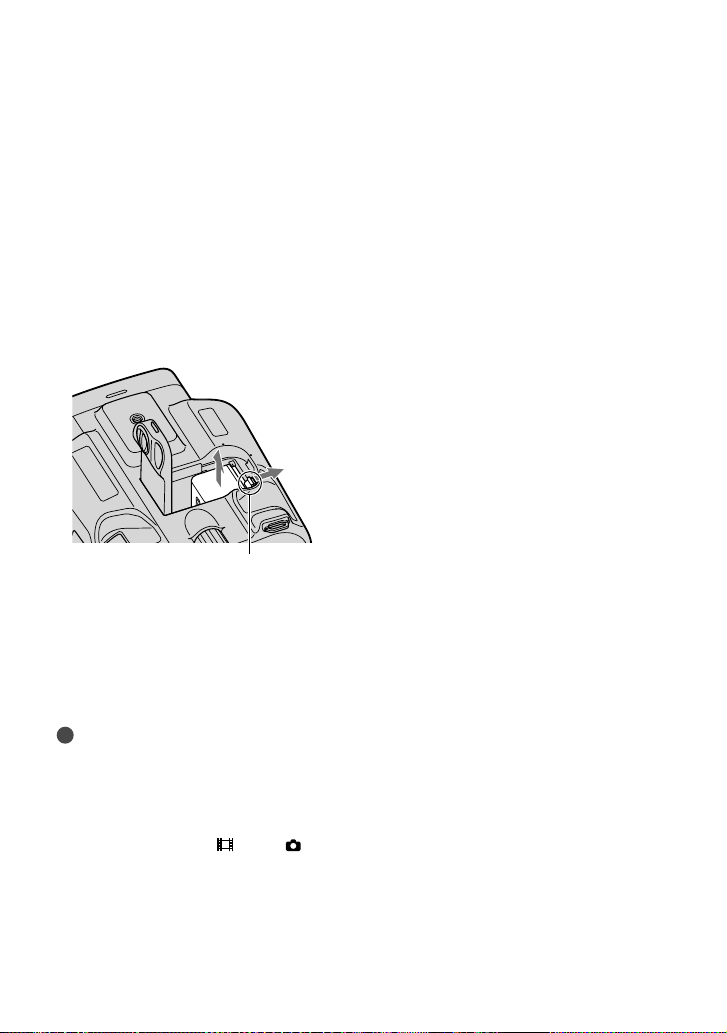
1
Open the cover, and insert the
memory card with the nothched
edge in the direction as
illustrated until it clicks.
Close the cover after inserting the memory
card.
Access lamp
Note the direction of notched corner.
The [Preparing image database file.
Please wait.] screen appears if you
insert a new memory card. Wait until
the screen disappears.
2
Close the cover.
Notes
If [Failed to create a new Image Database File.
It may be possible that there is not enough free
space.] is displayed, format the memory card.
Confirm the direction of the memory card.
If you forcibly insert the memory card in the
wrong direction, the memory card, memory
card slot, or image data may be damaged.
Do not open the cover during recording.
When inserting or ejecting the memory card, be
careful so that the memory card does not pop
out and drop.
To eject the memory card
Open the cover and lightly push the
memory card in once.
Getting started
GB
25
Page 26

Binoculars/Recording/Playback
Using this product as binoculars
1
Set the POWER switch to ON by
pressing the green button.
This product is turned on.
Some settings screen may appear
depending on the status of this product
when it is turned on. Use this product
after completing any necessory
adjustments.
2
Make sure that the diopter, the
width, and the relative vertical
position of the right and left
viewfinder fit you (p.
3
Hold this product with both
hands and aim it at the subject.
You can magnify images with the power
zoom lever.
This product adjusts the focus
automatically with the auto-focus function
(default setting).
GB
26
21).
Tips
SteadyShot] is set to [Active] in the default
[
setting.
About zooming
Magnifications available are as follows.
Binoculars magnification (approx.)
DEV-3 DEV-5/5K
Movie
recording (2D
1
mode)
*
Movie
recording (3D
1
mode)
*
Photo recording
0.8 to
10
0.5 to
5.4
0.5 to
10 (16:9)
0.3 to
7.5 (4:3)
0.8 to
2
20
*
0.8 to
3
10
*
0.5 to
5.4
0.5 to
4
20
*
(16:9)
0.3 to
4
15
*
(4:3)
Zoom ratio (approx.)
DEV-3 DEV-5/5K
12 *
2
*
3
4
*
Movie
recording (2D
mode)
Movie
recording (3D
mode)
Photo
recording
1
*
[ SteadyShot] is set to something other than
[Active]
2
*
[Digital Zoom] is set to [On] (The image
quality decreases when you use the large
magnification)
3
*
[Digital Zoom] is set to [Off]
4
*
The image quality decreases when you use the
large magnification
12 24
10 10
22 44
Page 27
Tips
The binoculars magnification indicates how big
the subject looks with the binoculars compared
with your naked eye.
The zoom ratio indicates the ratio of the focal
lengths between the minimum and maximum
value.
To switch the viewfinder display
between 2D and 3D
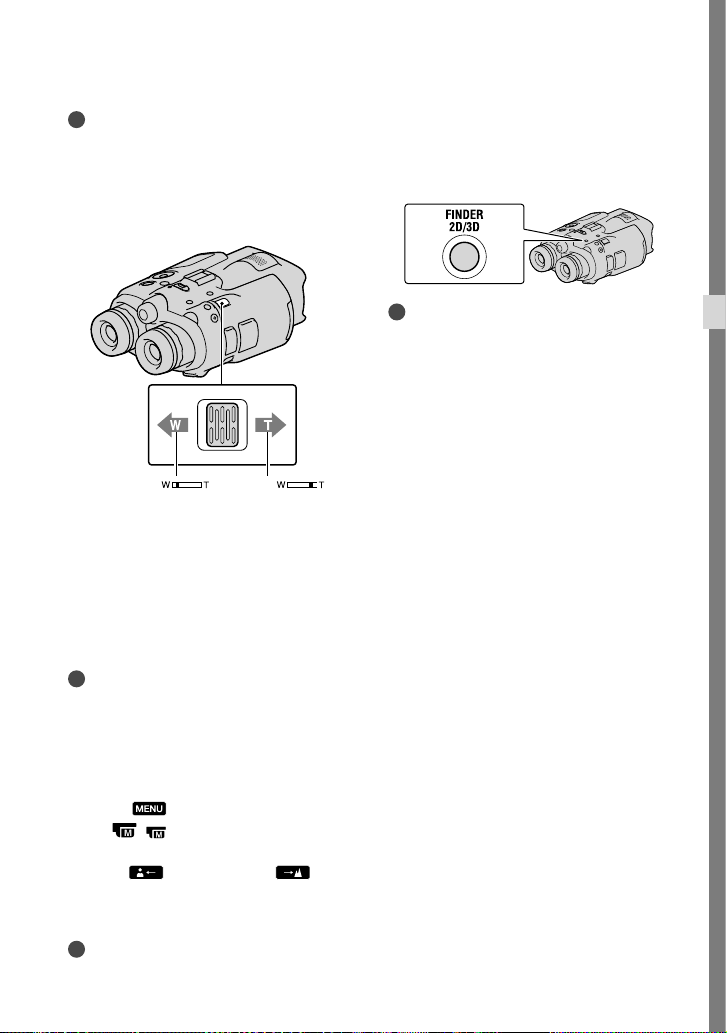
Press FINDER 2D/3D to switch the
viewfinder display between 2D and 3D.
Tips
In the 3D display mode for the viewfinder, this
product displays the image from the left lens in
the left viewfinder, and the image from the right
lens in the right viewfinder. In the 2D display
mode, this product displays the image from the
left lens in both the left and right viewfinder.
Binoculars/Recording/Playback
Wider range of view
(Wide angle)
Close view
(Telephoto)
Move the power zoom lever slightly for a
slower zoom. Move it further for a faster
zoom.
Notes
Be sure to keep your finger on the power zoom
lever. If you move your finger off the power
zoom lever, the operation sound of the power
zoom lever may also be recorded.
To adjust the focus manually
Select (MENU) [Camera/Mic]
( Manual Settings)] [Focus]
[
using the ////Enter buttons.
S
elect
(nearby subject)/
(distant subject) and press Enter several
times to adjust the focus.
Tips
To adjust the focus automatically, select [Auto].
GB
27
Page 28
Recording
In the default setting, images in the
viewfinder are displayed in 3D (p. 27), but
movies are recorded in 2D.
Set the POWER switch to ON by
pressing the green button.
This product is turned on.
Recording movies
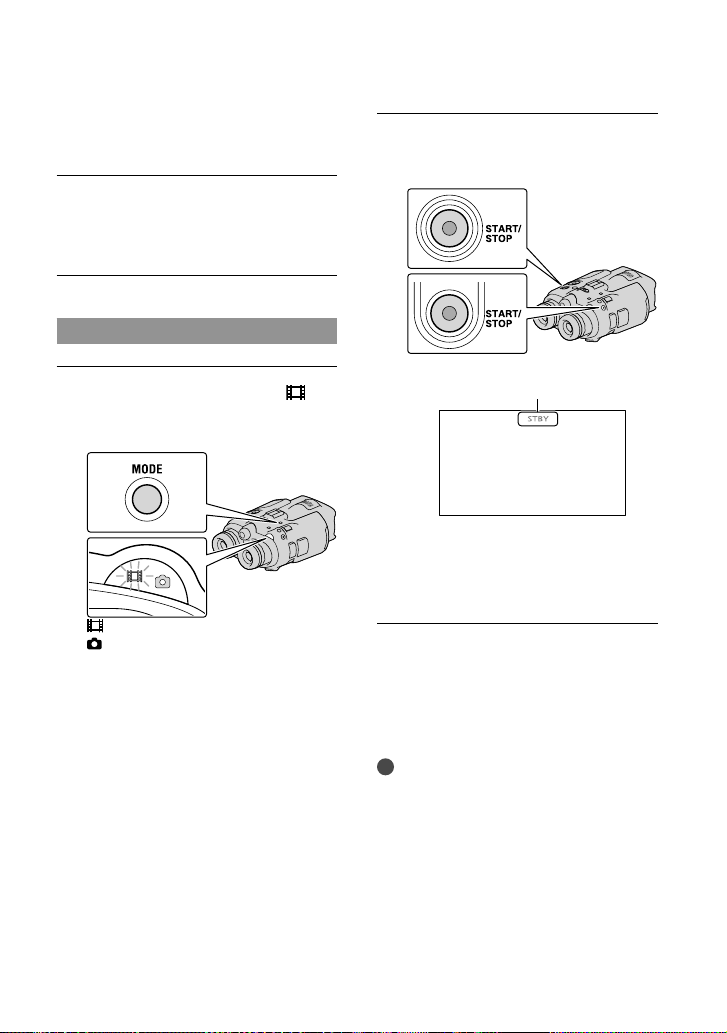
Press MODE to turn on the
(Movie) lamp.
MODE button
(Movie): When recording a movie
(Photo): When recording a photo
Press START/STOP to start
recording.
[STBY] [REC]
The recording lamp lights in red
during recording.
To stop recording, press START/STOP
again.
To display items on the screen again
Press the ////Enter button or any
other button. You can change the settings
using the [Display Setting] menu.
Notes
The maximum continuous recordable time of a
movie is as follows.
2D: about 13 hours
3D: about 6 hours 30 minutes
When a movie file exceeds 2 GB, the next movie
file is created automatically.
It will take several seconds until you can start
recording after you turn on this product. You
cannot operate this product during this time.
28
GB
Page 29
The following states will be indicated if data is
still being written onto the memory card after
recording has finished. During this time, do
not apply shock or vibration to this product, or
remove the battery or AC Adaptor.
amp (p. 25) is lit or flashing
ccess l
A
The media icon in the upper right of the
screen is flashing
Tips
See page 45 on the recordable time of movies.
You can check the recordable time, estimated
remaining capacity, etc., by selecting
(MENU) [Setup] [
Settings)] [Media Info].
( Media
To switch the 2D and 3D recording
mode
You can select a recording mode of either
2D or 3D.
To switch 2D and 3D, select
(MENU)
[Image Quality/Size] [2D/3D Mode
Select].
Tips
When you change the [2D/3D Mode Select]
setting, movies played back on this product and
movies output from the HDMI OUT jack are
changed between 2D and 3D automatically.
Optimum distance from the subject
and zooming level
The distance at which you can obtain
good 3D movies varies depending on the
zooming level.
Distance from the subject Zoom
about 80 cm to 6 m (3 ft. to
20 ft.)
about 2.5 m to 10 m (8 ft. to
32 ft.)
about 7.5 m to 20 m (25 ft. to
65 ft.)
Notes
When you record 3D movies, the binocular
magnification can be set to up to about 5 times.
If you want to monitor
using a larger image, set [2D/3D Mode Select]
to [2D].
* In this manual, ”monitor” means that the user
watches or views a subject without recording.
* or record a subject
Data code during recording
The recording date, time, condition and
coordinates (DEV-5/5K) are recorded
automatically on the memory card. They
are not displayed during recording.
However, you can check them as [Data
Code] during playback. To display them,
select
(
a desired setting
(MENU) [Setup] [
Playback Settings)] [Data Code]
.
Shooting photos
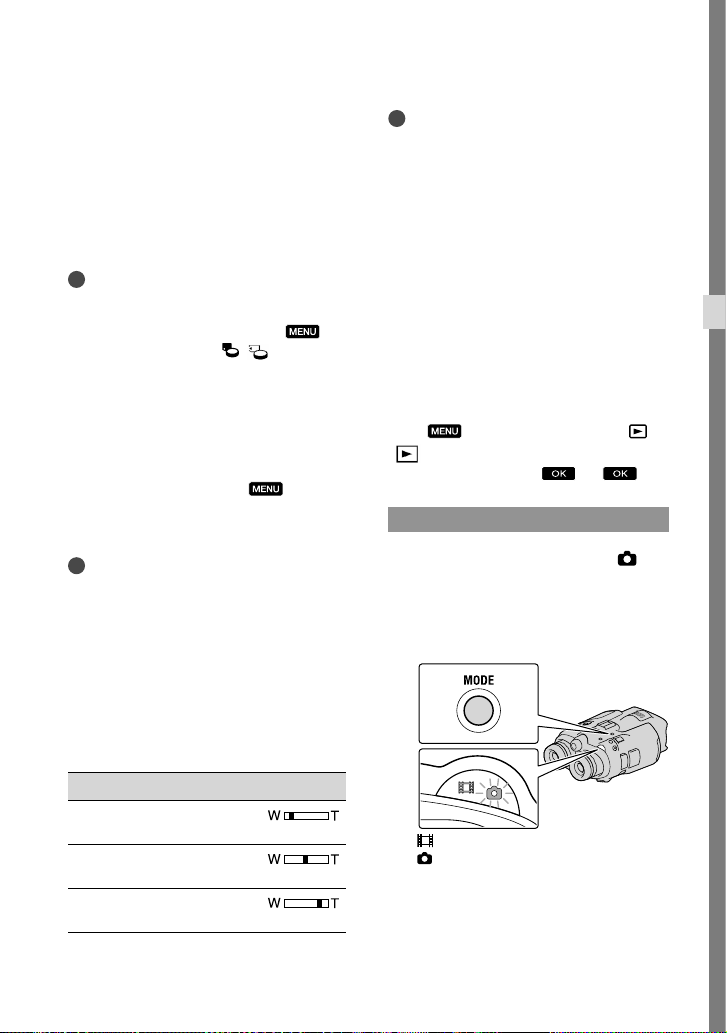
Press MODE to turn on the
(Photo) lamp.
The screen display switches for photo
recording mode.
MODE button
(Movie): When recording a movie
(Photo): When recording a photo
Binoculars/Recording/Playback
GB
29
Page 30
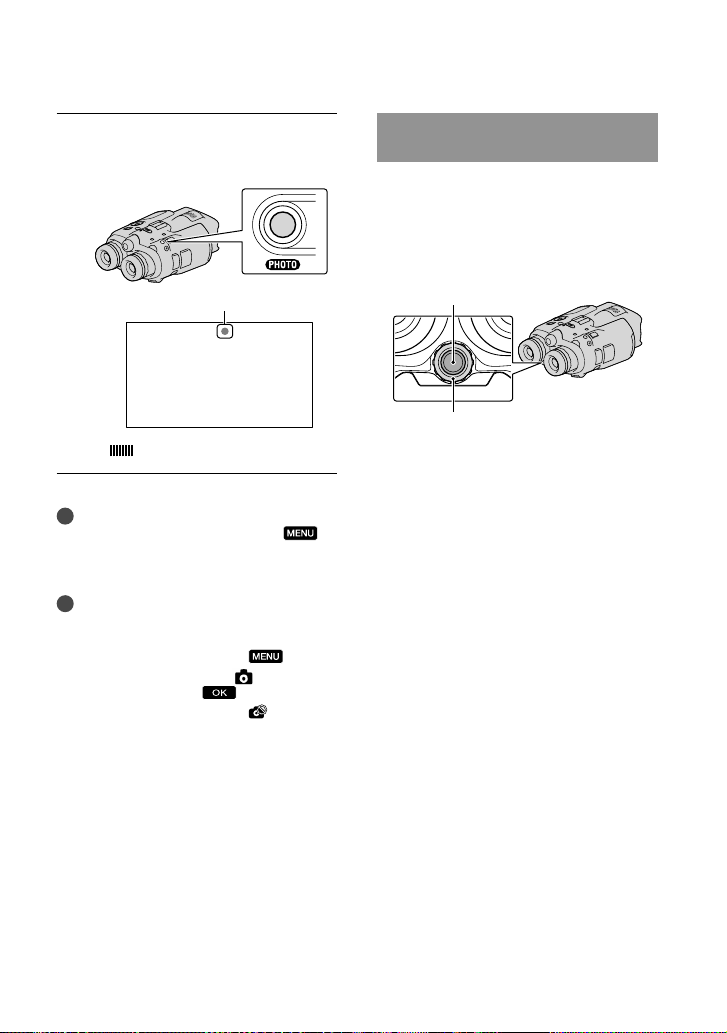
Press PHOTO lightly to adjust the
focus, then press it fully.
Flashes Lights up
When disappears, the photo is recorded.
Note
You cannot shoot photos in 3D. Select
(MENU) [Image Quality/Size] [2D/3D
Mode Select] [2D].
Tips
See page 45 on the recordable number of
photos.
To change the image size, Select
[Image Quality/Size] [
a desired setting
You cannot record photos while
displayed.
(MENU)
Image Size]
.
is
Controlling the image settings manually with the MANUAL dial
It is convenient to assigning a menu item to
the MANUAL dial.
The menu items that can be used differ
between the movie mode and the photo
mode.
MANUAL button
MANUAL dial
Movie recording:
[3D Depth Adjustment], [Focus],
[Exposure], [AE Shift], [White Balance
Shift]
Photo recording:
[Focus], [Exposure], [IRIS], [Shutter
Speed], [AE Shift], [White Balance Shift]
To assign a menu item
Press and hold MANUAL for a few seconds
to display the setting screen. Rotate the
MANUAL dial to assign a menu item.
To use the MANUAL dial
Press MANUAL to use the assigned menu.
Rotate the MANUAL dial to make the
adjustment.
30
GB
Page 31

Acquiring location information using the GPS (DEV-5/5K)
Select (MENU) [Setup] [
General Settings)] [GPS Setting]
(
[On].
this product starts acquiring the location
information. The acquired location
information is recorded on movies and
photos. The indicator changes according to
the strength of GPS signal reception.
Tips
If you import GPS Assist Data from your
computer to this product using the supplied
software “PMB,” the time it takes this product to
acquire your location information. Connect this
product to a computer that is connected to the
Internet. The GPS Assist Data will be updated
automatically.
The GPS Assist Data may not function in the
following cases:
When the GPS Assist Data are not updated
for about 30 days or more
When the date and time of this product are
not correctly set
When this product is moved for a long
distance
appears on the screen, and
Selecting the recording mode
Select (MENU) [Image Quality/
Size] [
movie quality for 2D recording.
Types of media that images can be saved
on will depend on the recording mode
selected.
Types of media
External media
(USB storage
devices)
Blu-ray discs
AVCHD recording
discs
* [PS] can be set only when [ Frame Rate] is
set to [60p] ([50p]).
REC Mode] to change the
Recording mode
3D
FX
PS
*
— — —
FH/
HQ/
LP
Binoculars/Recording/Playback
GB
31
Page 32

Playback on this product
You can play back images recorded with
this product.
Tips
If you want to play back 3D images, set [2D/3D
Mode Select] to [3D].
1
Set the POWER switch to ON by
pressing the green button.
This product is turned on.
2
Press (View Images).
The Event Index screen appears after
some seconds.
3
Select an image you want to view
using ///, then press Enter.
Playback starts.
To the MENU screen
previous image/ next image
previous event/ next event
Change to the movie/photo
recording mode
Event title
GB
32
Total time of movies/Total number
of photos in the event
Switch Image Type button (2D
only) (
Movie
Photo
* If you start playback from the
[
and photos are played back in the mixed
order by shooting date and time.
This product organizes images into a
group that is called an event, based on the
date and time, and information on how
often you record images.
Operations available on the playback
display
Some buttons may not be displayed depending
on the playback image.
MOVIE, PHOTO,
MOVIE/PHOTO*)
MOVIE/PHOTO] screen, movies
Pause/Play
Stop
Previous/Next image
Fast-reverse/Fastforward
Play slide show
Volume
Delete
Context
Page 33

Notes
You may not be able to play back the images
with other devices than this product.
Tips
When playback from the selected image reaches
the last image, the screen returns to the INDEX
screen.
/ during pause to play back
Select
movies slowly.
As you repeat pressing Enter after selecting
/ during playback, movies are
played as fast as about 5 times about 10
times about 30 times about 60 times.
The recording date, time, and shooting
conditions are recorded automatically during
recording. This information is not displayed
during recording, but you can display it during
playback by selecting
[Setup] [
( Playback Settings)]
(MENU)
[Data Code] a desired setting
.
To play a Slideshow, select [
PHOTO] from
the Switch Image Type button on the Event
Index screen. To repeat Slideshow, select
[Slideshow Set].
Binoculars/Recording/Playback
GB
33
Page 34

Saving movies and photos
Preparing a computer
You can perform following operations using
“PMB (Picture Motion Browser).”
Importing images to a computer
Viewing imported images
Uploading images to websites
To save movies using a computer, install
“PMB” from the supplied CD-ROM
beforehand.
Step 1 Checking the computer system
1
OS*
Microsoft Windows XP SP3*2/Windows Vista
3
SP2
*
/Windows 7 SP1
4
*
CPU
Intel Core Duo 1.66 GHz or faster, or Intel
Core 2 Duo 1.66 GHz or faster (Intel Core
2 Duo 2.26 GHz or faster is required when
processing FX, FH, or 3D movies, and Intel
Core 2 Duo 2.40 GHz or faster is required
when processing PS movies.)
However, Intel Pentium III 1 GHz or faster is
sufficient for the following operations:
Importing the movies and photos to the
computer
One Touch Disc Burn
Creating a Blu-ray disc/AVCHD
disc
Copying a disc
Memory
For Windows XP: 512 MB or more (1 GB or
more is recommended.)
For Windows Vista/Windows 7: 1 GB or
more
Hard disk
Disk volume required for installation:
Approximately 500 MB (10 GB or more
may be necessary when creating AVCHD
recording discs. 50 GB maximum may be
necessary when creating Blu-ray discs.)
Display
Minimum 1,024 × 768 dots
recording
Others
USB port (this must be provided as standard,
Hi-Speed USB (USB 2.0 compatible)), Bluray disc/DVD burner (CD-ROM drive is
necessary for installation) Either NTFS or
exFAT file system is recommended as the
hard disk file system.
1
*
Standard installation is required. Operation is
not assured if the OS has been upgraded or in a
multi-boot environment.
2
*
64-bit editions and Starter (Edition) are not
supported. Windows Image Mastering API
(IMAPI) Ver.2.0 or newer is required to use disc
creation function, etc.
3
*
Starter (Edition) is not supported.
4
*
Faster processor is recommended.
Notes
Operation with all computer environments is
not assured.
When using a Mac
The supplied software “PMB” is not
supported by Mac computers. To import
the movies and photos to the computer,
please contact Apple Inc.
Step 2 Installing the supplied software “PMB”
Install “PMB” before connecting this
product to a computer.
Notes
If a version of “PMB” under 5.0.00 has been
installed on your computer, you may be unable
to use some functions of those “PMB” when
installing the “PMB” from the supplied CDROM. Also, “PMB Launcher” is installed from
the supplied CD-ROM and you can start “PMB”
or other software by using the “PMB Launcher.”
Double-click the “PMB Launcher” short-cut
icon on the computer screen to start “PMB
Launcher.”
34
GB
Page 35

Confirm that this product is not
connected to the computer.
Turn on the computer.
Log on as an Administrator for
installation.
Close all applications running on the
computer before installing the software.
Place the supplied CD-ROM in
the disc drive of your computer.
The installation screen appears.
If the screen does not appear, click
[Start] [Computer] (in Windows
XP, [My Computer]), then double-click
[SONYPMB (E:)] (CD-ROM)
* Drive names (such as (E:)) may vary
depending on the computer.
Click [Install].
Select the country or region.
Select the language for the
application to be installed, then
proceed to the next screen.
Read the terms of the license
agreement carefully. If you agree
to the terms, change
then click [Next] [Install].
Follow the instructions that
appear on the computer screen
to continue the installation.
*.
to , and
You may be required to install some
other applications included on the disc at
the same time. If the installation display
appears, follow the instructions that appear
on the screen.
When you are required to restart the
computer, follow the instructions that
appear on the screen and restart it.
Connect this product to the computer
when you are instructed to do so.
Connect this product to the
computer using the USB cable,
then select [USB Connect] on the
screen of this product.
USB cable (supplied)
When the installation is
completed, remove the CD-ROM
from the computer.
Click (PMB icon) that appears on the
desktop of the computer to start up the
software.
Notes
To create discs or use other functions on
Windows XP, Image Mastering API v2.0 for
Windows XP should be installed. If Image
Mastering API v2.0 for Windows XP has not
been installed yet, select it from required
programs on the installation screen and install
it following the procedures displayed. (The
computer must be connected to the internet
for the installation.) You may install Image
Saving movies and photos
GB
35
Page 36

Mastering API v2.0 for Windows XP in
response to the message displayed when you try
to start those functions.
Operation is not guaranteed if you read or
write video data from or to this product using
software other than the supplied “PMB.” For the
information on the compatibility of the software
you are using, consult the manufacturer of the
software.
To disconnect this product from the
computer
Click the icon at the bottom right of the
desktop of the computer [Safely remove
USB Mass Storage Device].
Select [Cancel] [Yes] on the screen of this
product.
Disconnect the USB cable.
If you are using Windows 7, the
not appear on the desktop of the computer.
In this case, you can disconnect this product
from your computer without following the
procedures described above.
Notes
Do not format the memory card in this product
using a computer. If you do this, this product
will not operate correctly.
Do not insert AVCHD recording discs that have
been created using the “PMB” software to DVD
players or recorders, as these devices do not
support the AVCHD standard. If you do, you
may not be able to remove the disc from these
devices.
When you access this product from the
computer, use the supplied software “PMB.” Do
not modify the files or folders on this product
from the computer. The image files may be
damaged or may not be played back.
Operation is not guaranteed, if you operate the
data on this product from the computer.
GB
36
icon may
This product automatically divides an image file
that exceeds 2 GB or larger and saves the parts
as separate files. All image files may be shown as
separate files on a computer, however, the files
will be handled properly by the import function
of this product or the “PMB” software.
Use the supplied “PMB” software when you
import long movies or edited images from
this product to a computer. If you use other
software, the images may not be imported
correctly.
When you delete image files, select
(MENU) [Edit/Copy] [Delete].
You can create a Blu-ray disc from 2D movies
by using a computer with a Blu-ray disc burner.
Install the BD Add-on Software for “PMB.”
Page 37

Starting PMB (Picture
Motion Browser)
1
Double-click the “PMB” short-cut
icon on the computer screen.
The PMB software starts up.
2
Double-click the “PMB Help”
short-cut icon on the computer
screen to see how to use “PMB.”
Notes
If the icon is not displayed on the computer
screen, click [Start] [All Programs] [
PMB] the desired item.
Tips
Double-click “PMB Launcher” on the desktop
of the computer. This allows you to start the
desired function (application) by selecting one
from a list of “PMB” functions.
Saving movies and photos
GB
37
Page 38

Customizing this product
Using menus
You can enjoy using this product more by making good use of menu operations.
This product has various menu items under each of 6 menu categories.
Shooting Mode (Items for selecting a shooting mode) p. 39
Camera/Mic (Items for customized shooting) p. 39
Image Quality/Size (Items for setting up image quality or size) p. 40
Playback Function (Items for playback) p. 32
Edit/Copy (Items for editing) p. 40
Setup (Other setup items) p. 40
Operating menus
Select (MENU) using the ////Enter buttons and set the menu items.
Sub-category icons
The [Camera/Mic] and [Setup] menus have sub-categories. Select the sub-category icon, and
the screen changes to other sub-category menus.
Grayed out menu items or settings are not available.
Notes
You may not be able to set some menu items, depending on the recording or playback conditions.
Select
GB
to finish setting the menu or to return to the previous menu screen.
38
Page 39

Menu lists
The available menu items differ between the movie mode ( ) and photo mode ( ).
Shooting Mode
Movie
Photo
Camera/Mic
( Manual Settings)
White Balance
Exposure
Focus
IRIS
Shutter Speed
AE Shift
White Balance Shift
Low Lux
( Camera Settings)
Auto 3D Lens Adjust
Scene Selection
Self-Timer
Tele Macro
SteadyShot
SteadyShot
Digital Zoom*
Auto Back Light
Dial Setting
( Face)
Face Detection
( Microphone)
Wind Noise Reduct.
Micref Level
Audio Output Timing
Records movies.
Shoots photos.
Adjusts the color balance to the brightness of the
recording environment.
Adjusts the brightness of movies and photos.
Focuses manually.
Adjusts the iris.
Adjusts the shutter speed.
Adjusts the exposure based on the results of the
automatic exposure measurement.
Adjusts the white balance manually.
Records bright color images in the dim.
Automatically corrects the vertical position of the
right and left movies to record 3D movies that can
be viewed comfortably, without blurring.
Selects an appropriate recording setting according
to the type of scene, such as night view or beach.
Sets the self-timer when this product is in photo
recording mode.
Shoots a subject in focus with the background out
of focus.
Sets the SteadyShot function when recording
movies.
Sets the SteadyShot function when shooting
photos.
Sets the digital zoom.
Adjusts the exposure for backlit subjects
automatically.
Assigns a function to the MANUAL dial.
Adjusts the image quality of the face(s)
automatically.
Reduces the wind noise.
Sets the microphone reference level.
Sets the audio output timing to be used when
recording movies.
Customizing this product
GB
39
Page 40

Image Quality/Size
2D/3D Mode Select
Playback Function
Edit/Copy
Delete
Protect
Copy
Direct Copy
Setup
( Connection)
GB
40
( Shooting Assist)
Guide Frame
Display Setting
REC Mode
Frame Rate
x.v.Color
Image Size
( Media Settings)
Media Info
Format
Repair Img. DB F.
File Number
( Playback Settings)
Data Code
Volume
TV Type
Component
Displays the frame to make sure the subject is
horizontal or vertical.
Sets the duration that icons or indicators are
displayed in the viewfinder.
Sets the mode to record movies. When recording
fast moving subject, a high image quality is
recommended.
Sets the frame rate to record movies.
Switches the movie recording type between 2D
and 3D.
Records wider range of colors.
Sets the photo size.
Plays back movies or photos.
Deletes movies or photos.
Protects movies or photos to avoid deleting.
Copies movies or photos to external media devices.
Copies all movies and photos that have not yet
been saved on an external media device.
Displays information on the memory card, such as
free space.
Deletes all data on the memory card.
Repairs the image database file on a memory card.
Sets how to assign the file number.
Displays the detailed recording data during
playback.
Adjusts the volume of playback sound, and the
volume of sound output to monitoring headphones
during recording.
Sets the aspect ratio to suit the connected TV.
Select this option when you connect this product
to a TV with the component input jack.
Page 41

HDMI 3D Setting
HDMI Resolution
CTRL FOR HDMI
USB Connect
Disc Burn
( General Settings)
VF Brightness
Viewfinder Adjust
GPS Information*
GPS Setting*
REC Lamp
Beep
A. Shut Off
Language Setting
60i/50i Sel
Battery Info
( Clock Settings)
Date & Time Setting
Area Setting
Auto Clock ADJ *
Auto Area ADJ*
* DEV-5/5K
Select the output format of the right and left
images when you connect this product to a 3D TV
with the HDMI cable (sold separately).
Select the output image resolution when
connecting this product to a TV with the HDMI
cable (sold separately).
Sets whether or not the TV’s Remote Commander
is to be used when this product is connected to a
“BRAVIA” Sync compatible TV with the HDMI
cable (sold separately).
Connects this product to an external device via
USB.
Selecting this item allows you to save images onto
discs via a computer.
Adjusts the brightness of the viewfinder.
Adjusts the relative vertical position of the right
and left viewfinder.
Displays location information.
Sets the GPS.
Sets the recording lamp to light up or not.
Sets whether this product sounds operation beeps
or not.
Changes the [A. Shut Off] setting.
Sets the display language.
Switch 1080/60i (NTSC-system) and 1080/50i
(PAL-system).
Displays the battery information.
Sets the [Date & Time Format], [Summer Time],
or [Date & Time].
Adjusts for a time difference without stopping the
clock.
Compensates for time automatically by acquiring
location information from the GPS system.
Compensates for time differences automatically
by acquiring location information from the GPS
system.
Customizing this product
GB
41
Page 42

Additional information
Troubleshooting
If you run into any problems using this
product, follow the steps below.
Check the list (p. 42 to 43), and
inspect this product.
Remove the power source, attach
the power source again after about 1
minute, and turn this product on.
Press RESET (p. 53) using a pointed
object, and turn this product on.
If you press RESET, all settings,
including the clock setting, are reset.
The temperature of this product is extremely
high. Turn off this product and leave it for a
while in a cool place.
The temperature of this product is extremely
low. Leave this product with the power turned
on. If you still cannot operate this product,
turn off this product and take it to a warm
place. Leave this product there for a while,
then turn on this product.
This product gets warm.
This product may become warm during
operation. This is not a malfunction.
The power abruptly turns off.
Use the AC Adaptor (p. 20).
Charge the battery pack (p. 17).
Contact your Sony dealer or local
authorized Sony service facility.
See the Digital Recording Binoculars Handbook
(p. 12) for details on the symptoms of this
duct, and “PMB Help” (p. 37) on connecting
pro
this product to a computer.
The power does not turn on.
Attach a charged battery pack to this product
(p. 17).
Connect the plug of the AC Adaptor to the
wa
utlet (wall socket) (p. 20).
ll o
This product does not operate even when
the power is set to on.
It takes a few seconds for this product to be
ready to shoot after the power is turned on.
This is not a malfunction.
Disconnect the AC Adaptor from the wall
outlet (wall socket) or remove the battery
pack, then reconnect it after about 1 minute. If
this product still does not work, press RESET
(p
. 53) using a pointed object. (If you press
RESET, all settings, including the clock setting,
are reset.)
GB
42
Pressing START/STOP or PHOTO does not
record images.
Press MODE to turn on the (Movie) or
(Photo) lamp.
This product is recording the image you have
just shot on the memory card. You cannot
make any new recordings during this period.
The memory card is full. Delete unnecessary
images.
Total number of movie scenes or photos
has exceeded the recordable capacity of this
p
duct (p. 45). Delete unnecessary images.
ro
The recording stops.
The temperature of this product is extremely
high/low. Turn off this product and leave it for
a while in a cool/warm place.
”PMB” cannot be installed.
Check the computer environment or
installation procedure required to install
“PMB” (p
. 34).
”PMB” does not work correctly.
Quit “PMB” and restart your computer.
Page 43

This product is not recognized by the
computer.
Disconnect devices from the USB jack of the
computer other than the keyboard, mouse,
and this product.
Disconnect the USB cable from the computer
and this product, and restart the computer,
then connect the computer and this product
again in an orderly manner.
Self-diagnosis display/Warning indicators
If indicators appear on the viewfinder
screen, check the following.
If the problem persists even after you
have tried to fix a couple of times, contact
your Sony dealer or local authorized Sony
service facility. In this case, when you
contact them, give them all the numbers of
the error code beginning with C or E.
C:04:
The battery pack is not an “InfoLITHIUM”
battery pack V series. Use an “InfoLITHIUM”
bat
tery pack (V series) (p. 17).
Connect the DC plug of the AC Adaptor to
t
roduct securely (p. 17).
his p
C:06:
The battery pack temperature is high. Change
the battery pack or place it in a cool place.
The battery pack temperature is high. Change
the battery pack or place it in a cool place.
When the indicator flashes, there is not
enough free space for recording images. Delete
unnecessary images, or format the memory
card after storing the images on other media.
The Image Database File is damaged. Check
the data base file by selecting
[Setup] [
( Media Settings)]
(MENU)
[Repair Img. DB F.].
The memory card is damaged. Format the
memory card with this product.
Incompatible memory card is inserted (p. 24).
The memory card is write-protected.
Access to the memory card was restricted on
another device.
This product is unsteady. Hold this product
steady with both hands. However, note that
the camera-shake warning indicator does not
disappear.
Additional information
C:13: / C:32:
Remove the power source. Reconnect it and
operate this product again.
E::
Follow the steps from on page 42.
Battery power is low.
The memory card is full. Delete unnecessary
images.
Photos cannot be recorded during processing.
Wait for a while, then record.
GB
43
Page 44

Recording time of movies/number of recordable photos
Expected operating time with each battery pack
Recording time
Approximate time available when you use a
fully charged battery pack.
2D
Battery pack Continuous
recording time
NP-FV70 180 90
NP-FV100 360 180
3D
Battery pack Continuous
recording time
NP-FV70 150 75
NP-FV100 305 150
Monitoring time
Approximate time available when you use a
fully charged battery pack.
2D
Battery pack Continuous monitoring time
NP-FV70 195
NP-FV100 395
(unit: minute)
Typical recording
time
(unit: minute)
Typical recording
time
(unit: minute)
Playing time
Approximate time available when you use a
fully charged battery pack.
(unit: minute)
Battery pack 2D 3D
NP-FV70 290 250
NP-FV100 580 500
Each operating time in the 2D mode is
measured with [
[Standard
Typical recording time shows the time when
you repeatedly start/stop recording, switch the
MODE lamp, and zoom.
Times measured when using this product at 25
C (77 °F). 10 C to 30 C (50 °F to 86 °F) is
recommended.
The recording, monitoring, and playback time
will be shorter when you use this product in low
temperatures.
The recording, monitoring, and playback time
will be shorter depending on the conditions
under which you use this product.
e remaining battery indicator (p. 51) shows
Th
the expected recording and playing time.
REC Mode] set to
].
3D
Battery pack Continuous monitoring time
NP-FV70 185
NP-FV100 370
GB
44
(unit: minute)
Page 45

Expected recording time of movies
Memory card
(unit: minute)
2 GB 4 GB 8 GB 16 GB 32 GB
9
(9)15(15)35(35)75(75)
9
(9)15(15)35(35)75(75)
10
(10)20(20)40(40)90(90)
10
(10)30(30)60(60)
25
(20)50(40)
45
(35)90(75)
Each number is measured when the Sony’s
memory card is used.
Notes
The recordable time and the available
monitoring time may vary depending on the
recording conditions and the subject, [
Mode], and [
The number in ( ) is the minimum recordable
time.
Tips
You can record movies of a maximum of 3,999
scenes with 3D, 3,999 scenes with 2D.
The maximum continuous recordable time of a
movie is as follows.
2D: about 13 hours
3D: about 6 hours 30 minutes
This product uses the VBR (Variable Bit Rate)
format to automatically adjust image quality to
suit the recording scene. This technology causes
fluctuations in the recording time of the media.
Movies containing quickly moving and complex
images are recorded at a higher bit-rate, and this
reduces the overall recording time.
105
(80)
190
(155)
Frame Rate] (p. 40).
120
(120)
215
(165)
380
(310)
150
(150)
150
(150)
180
(180)
245
(245)
440
(330)
770
(630)
REC
Expected number of recordable photos
Memory card
5.3M 7.1M
2 GB 620 560
4 GB 1250 1100
8 GB 2500 2250
16 GB 5000 4550
32 GB 10000 9200
Each number is measured when the Sony’s
memory card is used.
The number of recordable photos of memory
card shown is for both the maximum image size
of this product and the default image size. The
actual number of recordable photos is displayed
e screen during recording (p. 51).
n th
o
The number of recordable photos of memory
card may vary depending on the recording
conditions.
Notes
The unique pixel array of Sony’s ClearVid and
the image processing system allow still image
resolution equivalent to the sizes described.
Tips
The following list shows the bit-rate, pixels and
aspect ratio of each recording mode (movie +
audio, etc.).
3D movie:
Max. 28 Mbps 1,920 1,080 pixels/16:9
2D movie:
PS: Max. 28 Mbps 1,920 1,080 pixels/16:9
FX: Max. 24 Mbps 1,920 1,080 pixels/16:9
FH: Approx. 17 Mbps (average) 1,920 1,080
pixels/16:9
HQ: Approx. 9 Mbps (average) 1,440 1,080
pixels/16:9
LP: Approx. 5 Mbps (average) 1,440 1,080
pixels/16:9
Additional information
GB
45
Page 46

The photo recording pixels and the aspect ratio.
Photo recording mode:
3,072 2,304 dots/4:3
3,072 1,728 dots/16:9
1,600 1,200 dots/4:3
640 480 dots/4:3
GB
46
Precautions
On use and care
Do not use or store this product and accessories
in the following locations:
Anywhere extremely hot, cold or humid.
Never leave them exposed to temperatures
C (140 °F), such as under direct
bo
ve 60
a
sunlight, near heaters or in a car parked in
the sun. They may malfunction or become
deformed.
Near strong magnetic fields or mechanical
vibration. This product may malfunction.
Near strong radio waves or radiation. This
product may not be able to record properly.
Near AM receivers and video equipment.
Noise may occur.
On a sandy beach or anywhere dusty. If
sand or dust gets in this product, it may
malfunction. Sometimes this malfunction
cannot be repaired.
Operate this product on DC 6.8 V/7.2 V
(battery pack) or DC 8.4 V (AC Adaptor).
For DC or AC operation, use the accessories
recommended in these operating instructions.
Do not let this product get wet, for example,
from rain or sea water. If this product gets
wet, it may malfunction. Sometimes this
malfunction cannot be repaired.
If any solid object or liquid gets inside the
casing, unplug this product and have it checked
by a Sony dealer before operating it any further.
Avoid rough handling, disassembling,
modifying, physical shock, or impact such
as hammering, dropping or stepping on the
product. Be particularly careful of the lens.
Keep this product turning off when you are not
using this product.
Do not wrap this product with a towel, for
example, and operate it. Doing so might cause
heat to build up inside.
When disconnecting the power cord (mains
lead), pull it by the plug and not the cord (lead).
Do not damage the power cord (mains lead)
such as by placing anything heavy on it.
Do not use a deformed or damaged battery
pack.
Keep metal contacts clean.
Page 47

If the battery electrolytic liquid has leaked:
Consult your local authorized Sony service
facility.
Wash off any liquid that may have contacted
your skin.
If any liquid gets in your eyes, wash with
plenty of water and consult a doctor.
When not using this product for a long
time
To keep this product in optimum state for a
long time, turn it on and let it run by recording
and playing back images about once a month.
Use up the battery pack completely before
storing it.
On handling the casing
If the casing is soiled, clean this product body
with a soft cloth lightly moistened with water,
and then wipe the casing with a dry soft cloth.
Avoid the following to avoid damage to the
finish:
Using chemicals such as thinner, benzine,
alcohol, chemical cloths, repellent, insecticide
and sunscreen
Handling this product with above substances
on your hands
Leaving the casing in contact with rubber or
vinyl objects for a long period of time
About care and storage of the lens
Wipe the surface of the lens clean with a soft
cloth in the following instances:
When there are fingerprints on the lens
surface
In hot or humid locations
When the lens is exposed to salty air such as
at the seaside
Store in a well-ventilated location subject to
little dirt or dust.
To prevent mold, periodically clean the lens as
described above.
On charging the pre-installed
rechargeable battery
This product has a pre-installed rechargeable
battery to retain the date, time, and other settings
even when this product is turned off. The preinstalled rechargeable battery is always charged
while this product is connected to the wall outlet
(wall socket) via the AC Adaptor or while the
battery pack is attached. The rechargeable battery
will be fully discharged in about 3 months if you
do not use this product at all. Use this product
after charging the pre-installed rechargeable
battery. However, even if the pre-installed
rechargeable battery is not charged, this product
operation will not be affected as long as you are
not recording the date.
Procedures
Connect this product to a wall outlet (wall socket)
using the supplied AC Adaptor, and leave it with
this product turned off for more than 24 hours.
Note on disposal/transfer of memory
card
Even if you delete data in the memory card or
format the memory card on this product or a
computer, you may not delete data from the
memory card completely. When you give the
memory card to somebody, it is recommended
that you delete data completely using data
deletion software on a computer. Also, when you
dispose of the memory card, it is recommended
that you destroy the actual body of the memory
card.
Additional information
GB
47
Page 48

Specifications
System
Signal format:
HDTV 1080/60i, 1080/60p specification
NTSC color, EIA standards
HDTV 1080/50i, 1080/50p specification
PAL color, CCIR standards
Movie recording format:
HD:
2D: MPEG-4 AVC/H.264 AVCHD format
Ver.2.0 compatible
3D: MPEG-4 MVC/H.264 AVCHD format
Ver.2.0 compatible
Audio recording system:
ol
by Digital 2ch (48 kHz 16 bit)
D
Dolby Digital Stereo Creator
Photo file format
DCF Ver.2.0 Compatible
Exif Ver.2.3 Compatible
MPF Baseline Compatible
Recording media (Movie/Photo)
“Memory Stick PRO Duo” media
SD card (Class 4 or faster)
Viewfinder: Electronic viewfinder
Picture: 1.1 cm (0.45 type, aspect ratio 16:9)
Total number of pixels: 1 226 880 (852
480)
3 [RGB]
Eye relief: 14.3 mm (19/32 in.)
Real field of view
DEV-3:
– 3.8 (2D movie)*
43.9
DEV-5/5K:
– 3.8 (2D movie, [Digital Zoom] is
43.9
set to [Off])
43.9 – 1.9 (2D movie, [Digital Zoom] is
set to [On])
Apparent field of view*1: 35.6 (16:9), 29.4
(4:3)
f view at 1 000 m/yds:
Field o
DEV-3:
806 m – 66
*
movie)
DEV-5/5K:
806 m – 66 m (2 419 ft. – 197 ft.) (2D movie,
[Digital Zoom] is set to [Off])
806 m – 33 m (2 419 ft. – 98 ft.) (2D movie,
[Digital Zoom] is set to [On])
Interpupillary distance adjust:
55 mm – 75 mm (2 1/4 in. – 3 in.)
Diopter adjustment: –3.5 to +3.5
Image device:
4.5 mm (1/4 t
Recording pixels (photo):
Max. 7
GB
Gross: Approx. 4 200 000 pixels
48
1
*
:
2
*
2
*
m (2 419 ft. – 197 ft.) (2D
2
ype) CMOS sensor
3
*
100 000 pixels
(3 072 2 304) (4:3)
2
2: color
2
*
2
*
Lens: G lens
Magnification (approx.):
DEV-3:
– 10 (2D movie)*
0.8
0.5 – 5.4 (3D movie)*
2
2
0.5 – 10 (photo, 16:9)
– 7.5 (photo, 4:3)
0.3
DEV-5/5K:
– 10 (2D movie, [Digital Zoom] is set
0.8
2
*
to [Off])
0.8 – 20 (2D movie, [Digital Zoom] is set
2
*
to [On])
0.5 – 5.4 (3D movie)*
2
0.5 – 20 (photo, 16:9)
– 15 (photo, 4:3)
0.3
Zoom ratio (approx.):
DEV-3:
(2D movie)
12
(3D movie)
10
(photo)
22
DEV-5/5K:
(2D movie, [Digital Zoom] is set to
12
[Off])
(2D movie, [Digital Zoom] is set to
24
[On])
(3D movie)
10
(photo)
44
F1.8 - F3.4
When converted to a 35 mm still camera
DEV-3:
f=53.7 mm – 660
movie)
f=34.4 mm – 344 mm (1 3/8 in. – 13 5/8 in.)
(3D movie)
f=29.8 mm – 660 mm (1 3/16 in. – 26 in.)
mm (2 1/8 in. – 26 in.) (2D
2
*
2
*
(photo, 16:9)
f=27.4 mm – 606
mm (1 1/8 in. – 23 7/8 in.)
(photo, 4:3)
DEV-5/5K:
f=53.7 mm – 660
movie, [Digital Zoom] is set to [Off])
f=53.7 mm – 1 320 mm (2 1/8 in. – 52 in.)
(2D movie, [Digital Zoom] is set to [On])
f=34.4 mm – 344 mm (1 3/8 in. – 13 5/8 in.)
(3D movie)
f=29.8 mm – 1 320 mm (1 3/16 in. – 52 in.)
mm (2 1/8 in. – 26 in.) (2D
2
*
2
*
2
*
(photo, 16:9)
f=27.4 mm – 1
213 mm (1 1/8 in. – 47 7/8 in.)
(photo, 4:3)
Minimum illumination
11 lx (lux) (in default setting, shutter speed
1/60 second
4
*
, 1/50 second*5)
Page 49

Minimum focus distance:
2D movie: 1 cm (4 in.) (wide)/
80 cm (31 1/2
3D movie: 80 cm (31 1/2 in.) (wide)/
7.5 m (25
Photo: 1 cm (4 in.) (wide)/80 cm (31 1/2 in.)
in.) (telephoto)
ft.) (telephoto)
(telephoto)/25 cm (9 7/8 in.) (tele macro)
1
*
Diagonal dimension
2
*
[ SteadyShot] is set to [Standard] or [Off].
3
*
The unique pixel array of Sony’s ClearVid and
the image processing system allow still image
resolution equivalent to the sizes described.
4
*
[60i/50i Sel] is set to [60i (NTSC)].
5
*
[60i/50i Sel] is set to [50i (PAL)].
Input/Output connectors
A/V Remote Connector: Component/video and
audio output jack
HDMI jack: HDMI mini Connector
USB jack: mini-AB (output only)
Headphone jack: Stereo minijack ( 3.5
C input jack: Stereo minijack ( 3.5 mm)
MI
mm)
General
Power requirements: DC 6.8 V (battery pack) DC
8.4 V (AC Adaptor)
Average power consumption:
Monitoring: 2D: 3.9 W, 3D: 4.2 W
Recording: 2D: 4.3 W, 3D: 5.0 W
ting temperature: 0
Opera
104 °F)
rage temperature: –20
Sto
+140 °F)
Dimensions (approx.):
155 mm
88 mm 219 mm (6 1/8 in. ×
3 1/2 in. × 8 5/8 in.) (w/h/d) including the
projecting parts
165 mm 270 mm (6 5/8 in. ×
166 mm
6 1/2 in. × 10 3/4 in.) (w/h/d) (DEV-5/5K)
including the projecting parts, and the
supplied lens cover and large eyecup attached
s (approx.): 1 130 g (2 lb 7 oz) main unit only
Mas
DEV-3: 1 230 g (2 lb 11 oz) including the
rechargeable battery pack (NP-FV70) and
“Memory Stick PRO Duo” media
-5: 1 300 g (2 lb 13 oz) including the
DEV
rechargeable battery pack (NP-FV70),
“Memory Stick PRO Duo” media, lens cover,
and large eyecup
C to 40 C (32 °F to
C to + 60 C (‒4 °F to
EV
-5K: 1 400 g (3 lb 1 oz) including the
D
rechargeable battery pack (NP-FV100),
“Memory Stick PRO Duo” media, lens cover,
and large eyecup
AC Adaptor AC-L200C/AC-L200D
(supplied with DEV-3/5)
Power requirements: AC 100 V - 240 V,
50 Hz/60 Hz
Current consumption: 0.35 A - 0.18 A
Power consumption: 18 W
Output voltage: DC 8.4 V
*
Operating temperature: 0 C to 40 C (32 °F to
104 °F)
rage temperature: –20
Sto
C to + 60 C (‒4 °F to
+140 °F)
ns (approx.): 48 mm
Dimensio
(1 15/16 in.
1 3/16 in. 3 1/4 in.) (w/h/d)
29 mm 81 mm
excluding the projecting parts
s (approx.): 170 g (6.0 oz) excluding the
Mas
power cord (mains lead)
* See the label on the AC Adaptor for other
specifications.
AC Adaptor/Charger AC-VQV10
(supplied with DEV-5K)
Power requirements: AC 100 V - 240 V,
50 Hz/60 Hz
Power consumption: 26 W
Output voltage: DC 8.4 V
Operating temperature: 0 C to 40 C (32 °F to
104 °F)
rage temperature: –20
Sto
+140 °F)
ns (approx.): 100 mm
Dimensio
111 mm (4 in.
excluding the projecting parts
s (approx.): 330 g (11.7 oz) excluding the
Mas
power cord (mains lead)
* See the label on the AC Adaptor/Charger for
other specifications.
*
C to + 60 C (‒4 °F to
67 mm
2 3/4 in. 4 3/8 in.) (w/h/d)
Additional information
GB
49
Page 50

Rechargeable battery pack NP-FV70
(supplied with DEV-3/5)
Maximum output voltage: DC 8.4 V
Output voltage: DC 6.8 V
Maximum charge voltage: DC 8.4 V
Maximum charge current: 3.0 A
Capacity
Typic
al: 14.0 Wh (2 060 mAh)
Minimum: 13.0 Wh (1 960 mAh)
Type: Li-ion
Rechargeable battery pack NP-FV100
(supplied with DEV-5K)
Maximum output voltage: DC 8.4 V
Output voltage: DC 6.8 V
Maximum charge voltage: DC 8.4 V
Maximum charge current: 3.0 A
Capacity
Typic
al: 26.5 Wh (3 900 mAh)
Minimum: 25.0 Wh (3 700 mAh)
Type: Li-ion
Design and specifications of this product and
accessories are subject to change without notice.
Manufactured under license from Dolby
Laboratories.
GB
50
On trademarks
“AVCHD 3D/Progressive” and “AVCHD
3D/Progressive” logo are trademarks of Sony
Corporation and Panasonic Corporation.
“Memory Stick,” “
“
PRO-HG Duo,” “
“MagicGate,” “
Memory Stick” and “MagicGate Memory Stick
Duo” are trademarks or registered trademarks
of Sony Corporation.
“InfoLITHIUM” is a trademark of Sony
Corporation.
“x.v.Color”/ “x.v.Colour” is a trademark of Sony
Corporation.
“BRAVIA” is a registered trademark of Sony
Corporation.
“DVDirect” is a trademark of Sony
Corporation.
Blu-ray Disc
the Blu-ray Disc Association.
Dolby and the double-D symbol are trademarks
of Dolby Laboratories.
HDMI, the HDMI logo and High-Definition
Multimedia Interface are trademarks or
registered trademarks of HDMI Licensing LLC
in the United States and other countries.
Microsoft, Windows, Windows Vista, and
DirectX are either registered trademarks or
trademarks of Microsoft Corporation in the
United States and/or other countries.
Mac and Mac OS are registered trademarks of
Apple Inc. in the U.S. and other countries.
Intel, Intel Core, and Pentium are trademarks
or registered trademarks of Intel Corporation
or its subsidiaries in the United States and other
countries.
“ ” and “PlayStation” are registered trademarks
of Sony Computer Entertainment Inc.
Adobe, the Adobe logo, and Adobe Acrobat
are either registered trademarks or trademarks
of Adobe Systems Incorporated in the United
States and/or other countries.
SDXC logo is a trademark of SD-3C, LLC.
MultiMediaCard is a trademark of
MultiMediaCard Association.
All other product names mentioned herein may
be the trademarks or registered trademarks of
their respective companies. Furthermore,
are not mentioned in each case in this manual.
,” “Memory Stick Duo,” “
,” “Memory Stick PRO Duo,”
,” “Memory Stick
,”
,” “MagicGate
and Blu-ray are trademarks of
and
Page 51

Quick reference
Screen indicators
Center
Left Right
Bottom
Left
Indicator Meaning
MENU button
Self-timer recording
GPS triangulating status
Face Detection
Manual focus
Scene Selection
White Balance
SteadyShot off
White Balance Shift
Tele Macro
x.v.Color
Destination
Intelligent Auto
Center
Indicator Meaning
[STBY]/[REC] Recording status
Slide show set
Warning
Playback mode
Right
Indicator Meaning
Frame rate (60p (50p)/60i
(50i)) and recording mode
(PS/FX/FH/HQ/LP)
Remaining battery
(expected recording and
playing time)
Photo size
Recording/playback/
editing media
An external media device
is connected
Counter (hour:minute:
second)
Estimated recording
remaining time
Approximate number of
recordable photos and
photo size
Playback folder
Current playing movie or
photo/Number of total
recorded movies or photos
2D record or playback
3D record or playback
60min
4:3
16:9
4:3
0:00:00
00min
9999
100/112
60i
4:3
Bottom
Indicator Meaning
View Images button
Micref Level low
Low Lux
Exposure
EV AE Shift
Shutter Speed
IRIS
Intelligent Auto
Quick reference
GB
51
Page 52

52
GB
Parts and controls
Indicator Meaning
Slide show button
101-0005
Indicators and their positions are approximate
and may differ from what you actually see.
Some indicators may not appear, depending on
the model.
Data file name
Protected image
3D Depth Adjustment
Automatic
Exposure is set manually.
Figures in ( ) are reference pages.
Accessory shoe
Built-in microphone
Lens
POWER switch (21)
CHG (charge) lamp (17)
(View Images) button (32)
START/STOP button (28)
////Enter buttons
Speakers
Page 53

MODE button (28)
FINDER 2D/3D (display) button (27)
Power zoom lever (26)
PHOTO button (30)
START/STOP button (28)
A/V Remote Connector
HDMI OUT jack
(USB) jack (35)
Memory card access lamp (25)
While the lamp is lit or flashing, this product
is reading or writing data.
Memory card slot (25)
RESET button
Press RESET using a pointed object.
Press RESET to initialize all the settings
including the clock setting.
Camera recording lamp
The camera recording lamp lights up in red
during recording. The lamp flashes when the
remaining memory card capacity or battery
power is low.
IPD ADJ dial (21)
Diopter adjustment dial (21)
Viewfinder
(Movie)/ (Photo) lamps (28)
MIC (PLUG IN POWER) jack
(headphones) jack
DC IN jack (17)
MANUAL dial (30)
MANUAL button (30)
Strap mount (16)
Tripod receptacle
Attach a tripod (sold separately) to the
tripod receptacle using a tripod screw (sold
separately: the length of the screw must be less
than 5.5 mm (7/32 in.)).
Battery cover (17)
Battery cover lock (17)
Quick reference
GB
53
Page 54

Index
B
Battery pack .................................17
Binoculars ....................................26
C
Care ..............................................46
Charging the battery pack .........17
Charging the battery pack
abroad ..........................................20
Clock Set ......................................22
Computer.....................................34
Computer system ........................34
Connecting cord ......................... 18
D
Data Code ..............................23, 33
Date & Time ................................23
E
Event Index ..................................32
F
Fully charged ...............................17
I
Install ............................................34
L
Language Setting ........................24
M
Mac ............................................... 34
Maintenance ................................46
Memory card ...............................24
“Memory Stick” media ...............24
“Memory Stick PRO-HG Duo”
media ............................................24
“Memory Stick PRO Duo”
media ............................................24
Menus ...........................................39
Movies ....................................28, 32
P
Photos ..........................................29
Playback Function ......................32
Playing..........................................32
PMB
(Picture Motion Browser) .........34
Power on ......................................21
Precautions ..................................46
R
Recording ....................................28
Recording and playback time ...44
Recording time of movies/
number of recordable photos .... 44
RESET ..........................................53
S
Screen indicators ........................51
Self-diagnosis display .................43
Setting the date and time ...........21
Software .......................................34
Specifications ..............................48
Supplied items .............................15
T
Tripod...........................................53
Troubleshooting ..........................42
Turning the power on ................21
V
Volume .........................................32
W
Wall outlet (wall socket) ............17
Warning indicators .....................43
Windows ......................................34
You will find the menu lists
on pages 39 to 41.
54
GB
Page 55

Additional information on this product and
answers to frequently asked questions can be
found at our Customer Support Website.
http://www.sony.net/
Quick reference
GB
55
Page 56

Lisez ceci avant tout
Avant d’utiliser cette unité, veuillez lire
attentivement ce manuel et le conserver
pour de futures références.
AVERTISSEMENT
Afin de réduire les risques d’incendie
ou de décharge électrique, n’exposez
pas cet appareil à la pluie ou à
l’humidité.
N’exposez pas les piles à une chaleur
excessive, notamment aux rayons
directs du soleil, à une flamme, etc.
ATTENTION
Batterie
Toute erreur de manipulation de la batterie
peut provoquer son explosion, entraîner
un incendie, voire même des brûlures
de substances chimiques. Respectez les
précautions suivantes :
Ne démontez pas la batterie.
N’écrasez et n’exposez pas la batterie à des chocs
ou à une force extérieure. Vous ne devez pas la
frapper avec un marteau, la laisser tomber ou
marcher dessus.
Ne court-circuitez pas les bornes de la batterie
et maintenez-les à l’écart de tout contact avec
des objets métalliques.
N’exposez pas la batterie à des températures
supérieures à 60 °C (140 °F), notamment les
rayons directs du soleil ou l’habitacle d’un
véhicule garé au soleil.
N’incinérez pas la batterie et ne la jetez pas au
feu.
Ne manipulez jamais des batteries lithium ion
qui sont endommagées ou présentent une fuite.
Veillez à recharger la batterie à l’aide d’un
chargeur Sony authentique ou d’un appareil
capable de la recharger.
Tenez la batterie hors de la portée des petits
enfants.
Gardez la batterie au sec.
FR
2
Remplacez-la uniquement par une batterie
de même type ou d’un type équivalent
recommandé par Sony.
Mettez les batteries au rebut sans attendre, de la
manière décrite dans les instructions.
Remplacez la batterie par une batterie
correspondant au type spécifié uniquement.
Sinon vous risquez de provoquer un
incendie ou des blessures.
Adaptateur secteur
N’utilisez pas un adaptateur secteur situé
dans un espace restreint, par exemple entre
un mur et un meuble.
Branchez l’adaptateur secteur sur la prise
de courant la plus proche. Débranchez
immédiatement l’adaptateur secteur
de la prise de courant si un problème
de fonctionnement se produit pendant
l’utilisation de cet appareil.
Même si votre appareil est mis hors tension,
il est toujours alimenté tant qu’il est
raccordé à la prise secteur via l’adaptateur.
Remarque sur le cordon d’alimentation
Le cordon d’alimentation est conçu pour
être utilisé exclusivement avec cet appareil
et ne doit en aucun cas être utilisé avec un
autre appareil électrique.
Une pression sonore excessive des
écouteurs ou du casque peut provoquer des
pertes d’audition.
Page 57

POUR LES CLIENTS EN EUROPE
Par la présente Sony Corporation déclare
par la présente que les jumelles avec
enregistrement numérique DEV-5/5K
sont conforme aux exigences essentielles
et aux autres dispositions pertinentes de la
directive 1999/5/CE. Pour toute information
complémentaire, veuillez consulter l’URL
suivante: http://www.compliance.sony.de/
Avis aux consommateurs des pays
appliquant les Directives UE
Le fabricant de ce produit est Sony
Corporation, 1-7-1 Konan Minato-ku
Tokyo, 108-0075 Japon. Le représentant
agréé pour la compatibilité
électromagnétique et la sécurité du produit
est Sony Deutschland GmbH, Hedelfinger
Strasse 61, 70327 Stuttgart, Allemagne.
Pour toute question relative à la garantie ou
aux réparations, reportez-vous à l’adresse
que vous trouverez dans les documents
ci-joints, relatifs à la garantie et aux
réparations.
Attention
Le champ électromagnétique à des
fréquences particulières peut avoir une
incidence sur l’image et le son de cet
appareil.
Cet appareil a été testé et jugé conforme
aux limites établies par la directive EMC
visant l’utilisation de câbles de connexion
de moins de 3 mètres.
Avis
Si l’électricité statique ou les champs
électrostatiques entraînent une interruption
lors du transfert des données (échec),
redémarrez l’application ou débranchez,
puis rebranchez le câble de connexion
(USB, etc.).
Elimination des appareils
électriques et électroniques
professionnels en fin de vie
(Applicable dans les pays
de l’Union Européenne et
aux autres pays européens
disposant de systèmes de
collecte sélective) (DEV-5K)
Ce symbole, apposé sur le produit ou sur
son emballage, indique que ce produit
ne doit pas être traité avec les déchets
ménagers. Il doit être déposé dans un point
de collecte spécialisé dans le recyclage des
équipements électriques et électroniques.
En s’assurant que ce produit est bien mis au
rebut de manière appropriée, vous aiderez
à prévenir les conséquences négatives
potentielles pour l’environnement et la
santé humaine. Le recyclage des matériaux
aidera à conserver les ressources naturelles.
Pour toute information supplémentaire
concernant le recyclage de ce produit,
contactez votre centre Sony local ou
consultez le site web de Sony pour l’Europe
destiné aux professionnels:
http://www.pro.sony.eu/environment
Traitement des appareils
électriques et électroniques
en fin de vie (Applicable dans
les pays de l’Union Européenne
et aux autres pays européens
disposant de systèmes de
collecte sélective) (DEV-3/5)
Ce symbole, apposé sur le produit ou sur
son emballage, indique que ce produit
ne doit pas être traité avec les déchets
ménagers. Il doit être remis à un point de
collecte approprié pour le recyclage des
équipements électriques et électroniques.
En vous assurant que ce produit sont
mis au rebut de façon appropriée, vous
participez activement à la prévention
des conséquences négatives que leur
mauvais traitement pourrait provoquer sur
l’environnement et sur la santé humaine.
FR
FR
3
Page 58

Le recyclage des matériaux contribue par
ailleurs à la préservation des ressources
naturelles. Pour toute information
complémentaire au sujet du recyclage de
ce produit, vous pouvez contacter votre
municipalité, votre déchetterie locale ou
le point de vente où vous avez acheté le
produit.
Elimination des piles et
accumulateurs usagés
(Applicable dans les pays
de l’Union Européenne et
aux autres pays européens
disposant de systèmes de
collecte sélective)
Ce symbole, apposé sur les piles et
accumulateurs ou sur les emballages,
indique que les piles et accumulateurs
fournis avec ce produit ne doivent pas
être traités comme de simples déchets
ménagers.
Sur certains types de piles, ce symbole
apparaît parfois combiné avec un symbole
chimique. Les symboles pour le mercure
(Hg) ou le plomb (Pb) sont rajoutés lorsque
ces piles contiennent plus de 0,0005% de
mercure ou 0,004% de plomb.
En vous assurant que ces piles et
accumulateurs sont mis au rebut de façon
appropriée, vous participez activement à la
prévention des conséquences négatives que
leur mauvais traitement pourrait provoquer
sur l’environnement et sur la santé humaine.
Le recyclage des matériaux contribue par
ailleurs à la préservation des ressources
naturelles.
Pour les produits qui pour des raisons
de sécurité, de performance ou
d’intégrité de données nécessitent une
connexion permanente à une pile ou à
un accumulateur, il conviendra de vous
rapprocher d’un service technique qualifié
pour effectuer son remplacement.
En rapportant votre appareil électrique
en fin de vie à un point de collecte
approprié vous vous assurez que la pile
FR
4
ou l’accumulateur incorporé sera traité
correctement.
Pour tous les autres cas de figure et afin
d’enlever les piles ou accumulateurs en
toute sécurité de votre appareil, reportezvous au manuel d’utilisation. Rapportez les
piles ou accumulateurs usagés au point de
collecte approprié pour le recyclage.
Pour toute information complémentaire au
sujet du recyclage de ce produit ou des piles
et accumulateurs, vous pouvez contacter
votre municipalité, votre déchetterie locale
ou le point de vente où vous avez acheté ce
produit.
Utilisation de cet appareil
Ne tenez pas cet appareil par les parties
suivantes ni par le cache des prises.
Viseurs
Ne posez pas cet appareil sur ses viseurs.
Cet appareil n’est pas étanche à la poussière, aux
gouttes d’eau ni aux projections d’eau. Reportez-
s à la section « Précautions » (p. 44).
vou
Page 59

Options de menu, viseurs et objectifs
Si une option de menu est grisée, cela signifie
qu’elle n’est pas disponible dans les conditions
de lecture ou de prise de vue actuelles.
Les viseurs sont issus d’une technologie de très
au
te précision si bien que plus de 99,99 % des
h
pixels sont opérationnels pour une utilisation
efficace. Cependant, des petits points noirs
et/ou lumineux (blancs, rouges, bleus ou verts)
peuvent apparaître en permanence sur les
viseurs. Ces points sont normaux et résultent
u pr
ocessus de fabrication ; ils n’affectent en
d
aucun cas la qualité de l’enregistrement.
Exposer les viseurs ou objectifs à la lumière
directe du soleil pendant une période prolongée
peut entraîner des dysfonctionnements.
Ne filmez pas le soleil directement. Cela
pourrait entraîner un mauvais fonctionnement
de l’appareil. Effectuez des prises de vue du
soleil uniquement dans des conditions de
lumière faible, par exemple au crépuscule.
A propos du réglage de la langue
Des captures d’écran dans votre langue
sont utilisées pour illustrer les procédures
d’utilisation. Si nécessaire, modifiez la langue
d’affichage à l’écran avant d’utiliser cet appareil
.
19).
(p
Enregistrement
Pour garantir un fonctionnement correct de
la carte mémoire, il est recommandé de la
formater avec votre appareil avant la première
utilisation. Le formatage de la carte mémoire
effacera les données qu’elle contient et ces
données seront irrécupérables. Enregistrez les
données importantes sur votre ordinateur, etc.
Avant le début de toute prise de vue, testez cette
fonction pour vous assurer que l’image et le son
sont enregistrés sans problème.
Aucune compensation relative au contenu de
l’enregistrement ne sera accordée, même si la
prise de vue ou la lecture se révèle impossible
en raison d’un mauvais fonctionnement de cet
appareil, de la carte mémoire, etc.
Les standards de télévision couleur sont
différents d’un pays ou d’une région à l’autre.
Pour visionner vos enregistrements sur un
téléviseur, réglez le paramètre [Sélectionner
60i/50i] de votre pays ou région avant
egistrement (p. 17).
’enr
l
Les programmes de télévision, les films, les
cassettes vidéo et autres enregistrements
peuvent être protégés par des droits d’auteur.
Leur enregistrement non autorisé peut être
contraire à la législation sur les droits d’auteur.
En raison de la manière dont le dispositif
d’image (capteur CMOS) lit les signaux d’image,
les phénomènes suivants peuvent se produire.
Les sujets qui traversent rapidement le cadre
peuvent être déformés, selon les conditions
d’enregistrement. (Ce phénomène peut être
remarqué sur les écrans avec une résolution
des mouvements élevée.)
Des lignes horizontales peuvent apparaître
sur l’écran lors d’un enregistrement sous
des lumières fluorescentes. Le phénomène
peut être minimisé en réglant la vitesse
d’obturation.
Les images sur l’écran apparaissent divisées
horizontalement lorsqu’un sujet est éclairé
avec un flash. Le phénomène peut être
minimisé en utilisant une vitesse d’obturation
plus lente.
Utilisez cet appareil conformément aux
réglementations locales.
Reportez-vous à la page 20 pour connaître la
carte mémoire compatible avec cet appareil.
Remarques sur la lecture
Il se peut que vous ne puissiez pas lire
normalement les images enregistrées sur cet
appareil avec d’autres périphériques. De plus, il
se peut que vous ne puissiez pas lire les images
enregistrées sur d’autres périphériques avec cet
appareil.
FR
5
Page 60

Supports DVD enregistrés avec une
qualité d’image haute définition
Les supports DVD enregistrés avec une qualité
d’image haute définition peuvent être lus
avec des appareils compatibles avec la norme
AVCHD. Vous ne pouvez pas lire les disques
enregistrés avec une qualité d’image haute
définition avec les lecteurs/enregistreurs DVD
car ils ne sont pas compatibles avec la norme
AVCHD. Si vous insérez un disque enregistré
au format AVCHD (qualité d’image haute
définition) dans un lecteur/enregistreur DVD, il
se peut que vous ne puissiez pas l’éjecter.
Enregistrez toutes vos données d’image
Pour éviter la perte de vos données d’image,
stockez régulièrement toutes vos images
enregistrées sur un support externe.
Le type de disques ou supports sur lesquels les
images peuvent être sauvegardées dépend du
Mode ENR] sélectionné quand les images
[
ont été enregistrées. Les films enregistrés avec
[Qualité
[Qual. la+élevée
sur un périphérique de stockage externe ou sur
des disques Blu-ray.
60p] ([Qualité 50p]) ou
] peuvent être sauvegardés
Remarques sur la batterie et
l’adaptateur secteur
Veillez à retirer la batterie ou à débrancher
l’adaptateur secteur une fois cet appareil hors
tension.
Débranchez l’adaptateur secteur de cet appareil
en tenant à la fois l’appareil et la fiche CC.
Remarque sur la température des
jumelles/de la batterie
Si la température de cet appareil ou de la
batterie est extrêmement élevée ou faible, il
est possible que l’appareil ne puisse plus lire
ou enregistrer en raison de l’activation de
ses fonctions de protection. Dans ce cas, un
indicateur apparaît sur l’écran.
FR
6
Si cet appareil est raccordé à un
ordinateur ou à des accessoires
N’essayez pas de formater la carte mémoire
insérée dans l’appareil à l’aide d’un ordinateur.
Cela risquerait de provoquer un mauvais
fonctionnement de l’appareil.
Si vous raccordez cet appareil à un
autre périphérique à l’aide de câbles de
communication, veillez à insérer la fiche du
connecteur dans le bon sens. Si vous insérez
la fiche en forçant dans le mauvais sens, vous
risquez d’endommager la borne et de provoquer
un mauvais fonctionnement de l’appareil.
Si vous ne parvenez pas à enregistrer/
lire vos images, utilisez la fonction
[Formater]
Si vous enregistrez ou supprimez des images de
façon répétée pendant une période prolongée,
une fragmentation des données se produit sur
la carte mémoire. Les images ne peuvent pas
être enregistrées ou sauvegardées. En pareil
cas, sauvegardez tout d’abord vos images sur
un support externe, puis utilisez la fonction
[Formater] en sélectionnant
[Configuration] [
[Formater]
(MENU)
( Réglages support)]
.
Remarques sur les accessoires en
option
Nous vous recommandons d’utiliser des
accessoires Sony d’origine.
Il est possible que les accessoires Sony d’origine
ne soient pas disponibles dans certains pays/
certaines régions.
A propos de ce manuel, des illustrations
et des indications à l’écran
Les images d’illustration utilisées dans ce
manuel ont été capturées à l’aide d’un appareil
photo numérique. Elles peuvent donc paraître
différentes des images et indicateurs que vous
voyez réellement sur votre appareil. En outre,
les illustrations de cet appareil et ses indications
à l’écran sont grossies ou simplifiées pour une
meilleure compréhension.
Page 61

Dans ce manuel, les disques DVD
enregistrés avec une qualité d’image haute
définition (AVCHD) sont appelés disques
d’enregistrement.
La conception et les spécifications de votre
appareil et des accessoires peuvent être
modifiées sans avis préalable.
Affichage d’images vidéo 3D
Certaines personnes peuvent être incommodées
(sensation de fatigue, nausée ou fatigue visuelle)
lors de la visualisation d’images vidéo 3D.
Sony recommande de faire des pauses régulières
lors de la visualisation d’images vidéo 3D. La
durée et la fréquence des pauses varient d’une
personne à l’autre. Il vous appartient de décider
ce qui vous convient le mieux.
En cas de gêne, vous devez arrêter de regarder les
images vidéo 3D jusqu’à ce qu’elle disparaisse ;
consultez un médecin si nécessaire.
Vous devez également vous référer au mode
d’emploi de tout autre périphérique ou support
utilisé avec cet appareil.
La vue des jeunes enfants (en particulier celle
nts de moins de 6 ans) est en cours de
des enfa
développement. Consultez un spécialiste (tel
qu’un pédiatre ou un ophtalmologue) avant
d’autoriser de jeunes enfants à regarder des
images vidéo 3D.
Les adultes doivent veiller à ce que les jeunes
enfants respectent les recommandations
décrites ci-dessus.
Remarques sur l’utilisation
Soyez attentif à votre environnement lorsque
vous utilisez cet appareil. En particulier,
n’utilisez pas cet appareil tout en marchant.
Cela pourrait entraîner des accidents ou des
blessures.
Ne faites rien de ce qui suit. Dans le cas
contraire, la carte mémoire pourrait être
endommagée, les images enregistrées
pourraient être impossibles à lire ou perdues, ou
d’autres mauvais fonctionnements pourraient
survenir.
Ejecter la carte mémoire alors que le témoin
d’accès (p. 20) est allumé ou clignote
Retirer la batterie ou l’adaptateur secteur de
cet appareil, ou soumettre ce dernier à un
choc mécanique ou à des vibrations alors
que les témoins
ou le témoin d’accès (p. 20) sont allumés ou
clignotent
Si vous utilisez la sangle, ne portez pas cet
appareil sur votre dos. Cela pourrait entraîner
des blessures. Évitez de heurter cet appareil avec
un autre objet.
(Film)/ (Photo) (p. 24)
À propos des manuels de cet appareil
Deux manuels ont été élaborés pour
cet appareil, le « Mode d’emploi » et le
« Manuel des jumelles avec enregistrement
numérique (PDF) ». Le « Mode d’emploi »
présente les fonctions de base et le
« Manuel des jumelles avec enregistrement
numérique (PDF) » explique les fonctions
en détail.
Mode d’emploi
Ce manuel présente les fonctions de base
de cet appareil, telles que l’enregistrement
et la lecture.
Manuel des jumelles avec
enregistrement numérique (PDF)
Ce manuel explique les différentes
fonctions, telles que l’utilisation du menu
des réglages et la sauvegarde d’images sur
d’autres périphériques.
FR
7
Page 62

Comment lireManuel des jumelles avec
enregistrement numérique (PDF)
Installez « Manuel des jumelles avec
enregistrement numérique » sur votre
ordinateur à partir du CD-ROM fourni.
Sur un ordinateur Windows
Quand l’écran d’installation apparaît, cliquez
sur [Guide pratique] la langue et le
modèle souhaités [Installation], puis
suivez les instructions qui s’affichent à l’écran
pour installer le Guide pratique. Une icône
de raccourci est créée sur l’écran de votre
ordinateur.
Sur un Mac
Ouvrez le dossier [Handbook] - [FR] sur le
CD-ROM, puis copiez le [Handbook.pdf ] sur
votre ordinateur.
Vous avez besoin d’Adobe Reader pour lire le
anuel des jumelles avec enregistrement
M
«
numérique ». S’il n’est pas installé sur votre
ordinateur, vous pouvez le télécharger sur la
page Web d’Adobe Systems.
http://www.adobe.com/
FR
8
Page 63

Table des matières
Lisez ceci avant tout . . . . .. . .. . . .. . .. . . .. . . . . . . 2
Affichage d’images vidéo 3D . . . .. . . . . 7
Remarques sur l’utilisation . .. . . . . . .. . . 7
À propos des manuels de cet
appareil . .. . . . . . .. . . . . . .. . . .. . . . . . .. . . . . . .. . 7
Préparation
Étape 1 : Vérification des éléments
fournis . .. . . . . . .. . . . . . .. . . .. . . . . . .. . . . . . .. . . . . . .. 10
Fixation des éléments fournis . . . .. . . . 11
Étape 2
: Chargement de la batterie . . . .. 12
Chargement de la batterie installée
sur cet appareil . . .. . .. . . . . . .. . . . . . .. . . .. 12
Chargement de la batterie à l’aide
d’un adaptateur secteur/chargeur
(DEV-5K) . . . . . . .. . . . . . .. . . . . . .. . . .. . . . . . .. . 14
Étape 3
: Mise sous tension et réglage de
l’appareil . . . . .. . . .. . .. . . .. . . . . . .. . . . . . .. . . .. . .. . 16
Modification du réglage de la
langue . . .. . . .. . . . . . .. . . . . . .. . . . . . .. . . .. . . . 19
Visionnage des films enregistrés sur
un téléviseur . . . .. . .. . . .. . . . . . .. . . . . . .. . . 19
Étape 4
: Insérer une carte mémoire . .. . .20
Jumelles/Enregistrement/
Lecture
Utilisation de cet appareil en tant que
jumelles . . . .. . . .. . .. . . .. . . . . . .. . . . . . .. . . .. . .. . . .22
Enregistrement . . . . .. . .. . . .. . . . . . .. . . . . . .. . . .. 24
Enregistrement de films. . .. . .. . . . . . .. . 24
Prises de photos .. . . . . . .. . . .. . . . . . .. . . . . 25
Contrôle manuel des réglages
d’images avec la molette
MANUAL . . . .. . .. . . . . . .. . . . . . .. . . .. . . . . . .. 26
Obtention des informations de
localisation à l’aide du GPS
(DEV-5/5K) . .. . .. . . . . . .. . . . . . .. . . .. . . . . . .. 27
Sélection du mode
d’enregistrement . . .. . .. . . .. . .. . . .. . . . . . 27
Lecture sur cet appareil . .. . .. . . . . . .. . . . . . .. . 28
Enregistrement de films ou
de photos
Préparation d’un ordinateur . . . .. . .. . . . . . .30
Étape 1 Vérification du système
informatique . . . . . .. . . . . . .. . . . . . .. . . .. . . . 30
Étape 2 I
« PMB » fourni .. . .. . . .. . . . . . .. . . . . . .. . . .. 31
Démarrage de PMB (Picture Motion
Browser) . .. . . .. . . . . . .. . . . . . .. . . .. . .. . . .. . . . . . .. 33
nstallation du logiciel
Personnalisation de cet
appareil
Utilisation des menus . . . . .. . .. . . . . . .. . . .. . .. 34
Utilisation des menus . . .. . . .. . . . . . .. . .34
Liste des options des menus . . . .. . . . . . .. . .35
Informations
complémentaires
Dépannage . . . . . . .. . . . . . .. . . .. . .. . . .. . . . . . 39
Code d’autodiagnostic/Indicateurs
d’avertissement . .. . . . . . .. . . . . . .. . . .. . .. . 40
Durée de prise de vue pour les films/
nombre de photos pouvant être
enregistrées . . . .. . .. . . .. . . . . . .. . . . . . .. . . . . . .. . . 41
Durée de fonctionnement attendue
pour chaque batterie . . . . .. . .. . . .. . .. . . 41
Durée de prise de vue prévisible
pour les films . . . . .. . . . . . .. . . .. . . . . . .. . . . . 42
Nombre prévisible de photos
pouvant être enregistrées . . . . .. . . . . . .43
Précautions . . .. . .. . . . . . .. . . .. . . . . . .. . . . . . .. . . . 44
Spécifications . . . .. . . .. . .. . . .. . . . . . .. . . . . . .. . . .46
Référence rapide
Indicateurs . . . . . .. . . .. . .. . . .. . . . . . .. . . . . . .. . . .. 50
Eléments et commandes . .. . . . . . .. . . . . . .. . . 51
Index . . . .. . . . . . .. . . .. . . . . . .. . . . . . .. . . . . . .. . . .. . .53
Table des matières
FR
9
Page 64

Préparation
Étape 1 : Vérification des éléments fournis
Lorsque vous ouvrez l’emballage pour la première fois, assurez-vous que tous les éléments
fournis ci-dessous sont inclus. Les numéros entre parenthèses correspondent à la quantité
fournie.
Éléments DEV-3 DEV-5 DEV-5K
Jumelles avec enregistrement numérique (1)
Étui de transport (1)
Sangle (1)
Couvre-objectif (1)
Capuchon de viseurs (1)
Grand œilleton de viseur (2)
Adaptateur secteur/Chargeur (AC-VQV10) (1)
Cordon de raccordement (DK-225) (1)
Adaptateur secteur (AC-L200) (1)
Cordon d’alimentation (1)
Batterie rechargeable (1)
Câble de raccordement A/V (1)
Câble A/V composante (1)
Câble USB (1)
Câble d’adaptateur USB (1)
NP-FV70 NP-FV70 NP-FV100
10
FR
Page 65

Éléments DEV-3 DEV-5 DEV-5K
CD-ROM Video Camera Application
oftware (1)
S
« PMB » (logiciel, comprenant l’« Aide PMB »)
Manuel des jumelles avec enregistrement
numérique (PDF)
« Mode d’emploi » (ce manuel) (1)
Fixation des éléments fournis
Vous pouvez utiliser cet appareil même
quand le couvre-objectif est installé.
Fixation de la sangle
Afin d’éviter de faire tomber l’appareil, fixez
la sangle aux jumelles en procédant comme
suit.
Insérez une des extrémités de la sangle dans
l’anneau prévu à cet effet sur les jumelles.
Attachez ensuite la sangle en plaçant
l’extrémité de la sangle dans l’anneau.
Fixation des grands œilletons de
viseurs (DEV-5/5K)
Si vous n’arrivez pas à voir l’image clairement
dans les viseurs dans des conditions
lumineuses, utilisez les grands œilletons.
Alignez les grands œilletons sur la rainure
prévue à cet effet sur chaque viseur.
Fixation du couvre-objectif (DEV-5/5K)
Quand vous n’utilisez pas cet appareil, fixez
le couvre-objectif sur l’appareil avant de le
stocker.
Préparation
Fixation du capuchon de viseurs
(DEV-5/5K)
Quand vous n’utilisez pas cet appareil, fixez
le capuchon de viseurs sur l’appareil avant
de le stocker.
FR
11
Page 66

Étape 2 : Chargement de la batterie
Vous pouvez accrocher le capuchon de
viseurs sur la sangle comme illustré quand
vous ne l’utilisez pas.
Vous pouvez charger la batterie
« InfoLITHIUM » (série V).
Remarques
Vous ne pouvez pas utiliser de batterie
nfoLITHIUM » autre que NP-FV70/FV100
« I
sur cet appareil.
Chargement de la batterie installée sur cet appareil
Réglez le commutateur POWER
sur OFF (CHG) en appuy
ant sur la
touche verte.
Tournez le verrou du cache de
protection de la batterie sur
OPEN, puis ouvrez-le.
12
Alignez la batterie sur la
rainure qui se trouve dans le
compartiment de la batterie (),
puis faites-la glisser jusqu’à ce
qu’elle s’enclenche ().
FR
Page 67

Alignez la batterie sur la rainure.
Fermez le cache de protection de
la batterie puis faites tourner le
verrou sur LOCK.
DEV-3/5
:
Raccordez l’adaptateur secteur
et le cordon d’alimentation à cet
appareil et à la prise murale.
Témoin CHG (chargement)
DEV-5K :
Raccordez le cordon
d’alimentation et le cordon
de raccordement (DK-225) à
l’adaptateur secteur/chargeur.
Réglez le commutateur Mode de
l’adaptateur secteur/chargeur sur
VCR/CAMERA.
Témoin CHG (chargement)
Prise DC IN
Fiche CC
Vers la prise murale
Cordon
d’alimentation
Commutateur
Mode
Préparation
Prise DC IN
Vers la prise murale
Cordon
d’alimentation
Adaptateur secteur
Fiche CC
Prise DC OUT
Cordon de raccordement (DK-225)
Le témoin CHG (chargement) s’allume
et le chargement commence. Le témoin
CHG (chargement) s’éteint lorsque la
batterie est complètement chargée.
Lorsque la batterie est chargée,
débranchez l’adaptateur secteur
de la prise DC IN de cet appareil.
FR
13
Page 68

Chargement de la batterie à l’aide d’un adaptateur secteur/chargeur (DEV-5K)
L’adaptateur secteur/chargeur permet de
charger la batterie plus rapidement qu’avec
l’appareil.
Cordon
d’alimentation
Lorsque le chargement est terminé, le
symbole de la batterie s’affiche ( ).
Si vous poursuivez le chargement de
la batterie alors que le chargement
normal est terminé, jusqu’à ce que
la mention « FULL » s’affiche, vous
pourrez utiliser la batterie un peu plus
longtemps que lorsqu’elle est dans un
état de chargement normal.
Témoin CHARGE
Commutateur Mode
Réglez le commutateur Mode de
l’adaptateur secteur/chargeur sur
CHARGE.
Branchez le cordon
d’alimentation à l’adaptateur
secteur/chargeur.
Raccordez le cordon
d’alimentation à la prise murale.
Fixez la batterie à l’adaptateur
secteur/chargeur en la faisant
glisser dans le sens de la flèche.
Le témoin CHARGE s’allume et le
chargement commence.
FR
14
Vers la prise murale
Durée de chargement
Temps approximatif (en minutes)
nécessaire au rechargement complet d’une
batterie totalement déchargée.
Chargement de cet appareil
Batterie Durée de chargement
NP-FV70 195
NP-FV100 390
Chargement à l’aide d’un adaptateur secteur/
chargeur (fourni avec le modèle DEV-5K)
Batterie
NP-FV70 70 130
NP-FV100 125 185
Les durées de chargement indiquées dans
le tableau ci-dessus sont mesurées lors du
rechargement de l’appareil à une température
C. Il est recommandé de recharger la
de 25
batterie dans une plage de températures allant
C à 30 C.
de 10
Conseils
Concernant la durée d’enregistrement et de
lecture, reportez-vous à la page 41.
Lorsque l’appareil est sous tension, vous pouvez
vérifier l’autonomie approximative de la batterie
(durée d’enregistrement et de lecture prévisible)
à l’aide de l’indicateur d’autonomie restante situé
dans le coin supérieur droit de l’écran.
Durée de
chargement
(NORMAL)
Durée de
chargement
(FULL)
Page 69

Utilisation d’une prise murale comme
source d’alimentation
Procédez aux raccordements de la manière
décrite à la section « Étape 2 : Chargement
de la batterie
es
t en place, elle ne se décharge pas.
. 12). Même si la batterie
» (p
Retrait de la batterie
Réglez le commutateur POWER sur
OFF (CHG).
uvrez le cache de protection de la
O
b
tterie (p. 12).
a
aites glisser la manette de déblocage de
F
l
atterie, puis retirez la batterie.
a b
Manette de déblocage de la batterie
Chargement de la batterie à l’étranger
Vous pouvez charger la batterie dans
n’importe quel pays ou région avec
l’adaptateur secteur (fourni avec le modèle
DEV-3/5) ou l’adaptateur secteur/chargeur
(fourni avec le modèle DEV-5K) dans la
te de 100
limi
N’utilisez pas de transformateur de tension
électronique.
V - 240 V, 50 Hz/60 Hz.
Remarques
Le témoin CHG (chargement) clignote pendant
le chargement dans les conditions suivantes :
La batterie n’est pas correctement installée.
La batterie est endommagée.
La température de la batterie est basse.
Retirez la batterie de l’appareil et mettez-la
dans un endroit chaud.
La température de la batterie est élevée.
Retirez la batterie de l’appareil et mettez-la
dans un endroit frais.
Remarques sur l’adaptateur secteur
Branchez l’adaptateur secteur sur une prise
murale proche. Débranchez immédiatement
l’adaptateur secteur de la prise murale si
un problème de fonctionnement se produit
pendant l’utilisation de l’appareil.
N’utilisez pas l’adaptateur secteur dans un
endroit exigu, notamment entre un mur et un
meuble.
Ne court-circuitez pas la fiche CC de
l’adaptateur secteur ou les bornes de la batterie
avec un objet métallique. Cela pourrait
entraîner un problème de fonctionnement.
Préparation
Remarques sur la batterie
Lorsque vous retirez la batterie ou l’adaptateur
secteur, éteignez l’appareil et vérifiez que les
témoins
témoin d’accès (p. 20) sont éteints.
(Film)/ (Photo) (p. 24) et le
FR
15
Page 70

Étape 3 : Mise sous tension et réglage de l’appareil
Remarques
Ne mettez pas l’appareil sous tension avec le
câble USB raccordé.
Ne raccordez pas le câble USB tant que la
procédure suivante n’est pas terminée.
1
Réglez le commutateur POWER
sur ON en appuyant sur la touche
verte.
L’appareil est sous tension.
2
Réglez la correction dioptrique
jusqu’à ce que l’image soit nette
pour chaque œil en tournant la
molette de correction dioptrique.
Si plusieurs personnes utilisent l’appareil,
réglez la correction dioptrique à chaque
changement d’utilisateur.
Réglez la correction de dioptrique pour
chaque œil séparément.
3
Sortez la molette IPD ADJ.
FR
16
4
Réglez la largeur entre le viseur
gauche et le viseur droit de façon
à l’adapter à l’écartement de vos
yeux à l’aide de la molette IPD ADJ.
Réglez la largeur de sorte que les images de
gauche et de droite se chevauchent.
Assurez-vous que l’image ne s’affiche pas
en double dans les viseurs.
Si plusieurs personnes utilisent l’appareil,
réglez la largeur à chaque changement
d’utilisateur.
5
Repoussez la molette IPD ADJ
dans l’appareil.
6
Réglez la langue, la zone, l’heure
d’été, le format de la date et
de l’heure, ainsi que la date
et l’heure à l’aide des touches
////Enter, puis confirmez
chaque réglage.
Touche Enter
Lorsque chaque réglage est terminé,
sélectionnez [Suiv.] et appuyez sur
Enter.
Page 71

Pour régler la date et l’heure de nouveau,
sélectionnez
[Configuration] [
horloge)] [Régl. date&heure]
[Date&heure]. Lorsque la mention
[Date&heure] n’apparaît pas sur l’écran,
appuyez sur
apparaisse.
(MENU)
( Réglages
/ jusqu’à ce qu’elle
7
Sélectionnez [60i (NTSC)] ou
[50i (PAL)] en fonction des
standards de téléviseur couleur
utilisés dans votre pays ou région,
puis appuyez sur Enter.
Lorsque la sélection est faite entre
60i/50i, l’appareil redémarre pour
mettre le système à jour.
Pour plus d’informations sur les standards
de téléviseur couleur de votre pays ou
région, reportez-vous à la page 19.
8
Vérifiez l’avertissement
concernant l’utilisation continue
et le réglage des viseurs, puis
sélectionnez [Suiv.].
Image dans le viseur
gauche
Image vue par les deux yeux
Si la ligne horizontale et les lignes
verticales ne se chevauchent pas, réglez
la position de l’image dans le viseur
droit en sélectionnant
jusqu’à ce que les lignes se chevauchent,
puis sélectionnez
Si vous voyez l’une des images ci-dessous,
l’appareil fonctionne correctement.
Si vous voyez l’une des images ci-dessous,
arrêtez d’utiliser l’appareil.
La ligne horizontale et les lignes verticales ne se
chevauchent pas.
Image dans le viseur
droit
/
.
Préparation
9
Réglez la position verticale
relative du viseur droit et du
viseur gauche.
La ligne horizontale et les lignes
verticales doivent se chevaucher.
La ligne horizontale est très inclinée.
Si les images ne s’affichent pas
correctement, l’appareil est peut-être
défectueux. Contactez votre revendeur
Sony ou votre centre de service aprèsvente agréé par Sony.
FR
17
Page 72

10
Sélectionnez [Lancer].
Si vous sélectionnez [Lncer+trd], l’écran
du mode d’enregistrement s’affiche.
À la prochaine mise sous tension de
l’appareil, l’écran [Régl Auto Objectif 3D]
apparaîtra.
11
Réglez l’objectif 3D.
Dirigez l’appareil vers un sujet pour
l’afficher à l’écran.
Veillez à ce que le sujet offre une échelle
supérieure à celle indiquée par le
.
symbole
Type de sujets à afficher sur l’écran pour
un [Régl Auto Objectif 3D]
L’échelle indiquée varie selon le sujet affiché
à l’écran.
ets qui indiquent une échelle supérieure :
Suj
Sujets lumineux, tels que des objets en
extérieur éclairés par la lumière du jour
Sujets qui comportent plusieurs couleurs et
formes
Sujets qui indiquent une échelle inférieure
et qui font échouer le réglage :
Sujets sombres, tels que les objets visionnés
la nuit
ets se trouvant à 2 m de l’appareil
Suj
Sujets unis, non colorés
Sujets qui répètent un même schéma, telles
que les lignes des fenêtres de bâtiments
Sujets en mouvement
Échelle
12
Sélectionnez .
Ne changez pas de sujet tant que le
réglage n’est pas terminé.
Remarques
En cas d’échec du [Régl Auto Objectif 3D],
sélectionnez [Relancer].
FR
18
Remarques
Il est possible que vous voyiez les couleurs
primaires, rouge, bleu ou vert, miroiter dans
les viseurs lorsque vous déplacez votre ligne de
visée. Il ne s’agit pas d’un dysfonctionnement.
Ces couleurs chatoyantes ne seront pas
enregistrées sur la carte mémoire.
La date et l’heure n’apparaissent pas pendant la
prise de vue, mais elles sont automatiquement
enregistrées sur la carte mémoire et peuvent
être affichées pendant la lecture. Pour afficher la
date et l’heure, sélectionnez
[Configuration] [
[Code données] [Date/heure]
(MENU)
( Réglages lecture)]
.
Page 73

Mise hors tension de l’appareil
Réglez le commutateur POWER sur OFF
(CHG).
Le témoin
quelques secondes et l’appareil se met hors
tension.
(Film) clignote pendant
Modification du réglage de la langue
Vous pouvez changer la langue des
indications à l’écran.
Sélectionnez
[Configuration] [
généraux)] [Language Setting] la
langue souhaitée
.
(MENU)
( Réglages
Visionnage des films enregistrés sur un téléviseur
Pour regarder les films enregistrés sur un
téléviseur, enregistrez les films après avoir
sélectionné le paramètre [Sélectionner
60i/50i] correspondant au standard de
téléviseur couleur de votre pays et/ou
région d’utilisation de votre appareil.
Pays et/ou région où vous devez régler
[Sélectionner 60i/50i] sur [60i (NTSC)]
Amérique centrale, Bahamas, Bolivie,
Canada, Chili, Colombie, Corée, Equateur,
Etats-Unis, Guyana, Jamaïque, Japon,
Mexique, Pérou, Philippines, Surinam,
Taïwan, Venezuela, etc.
Pays et/ou région où vous devez régler
[Sélectionner 60i/50i] sur [50i (PAL)]
Argentine, Australie, Autriche, Belgique,
Bulgarie, Brésil, Chine, République
tchèque, Danemark, Finlande, France,
Allemagne, Guyane, Hollande, Hong Kong,
Hongrie, Iran, Irak, Italie, Koweït, Malaisie,
Monaco, Nouvelle-Zélande, Norvège,
Paraguay, Pologne, Portugal, Russie,
Singapour, Slovaquie, Espagne, Suède,
Suisse, Thaïlande, Ukraine, Royaume-Uni,
Uruguay, etc.
Préparation
FR
19
Page 74

Étape 4 : Insérer une carte mémoire
Types de cartes mémoire compatibles
avec l’appareil
«Memory Stick
PRO Duo»
(Mark2)
«Memory Stick
PRO-HG Duo»
Décrite dans ce
manuel, «Memory
Carte mémoire
SD
*
Carte mémoire
SDHC
Carte mémoire
SDXC
*
Décrite dans ce
manuel, carte SD
Stick PRO Duo»
* Une carte SD de classe de vitesse 4 (ou
supérieure) est requise.
Le fonctionnement n’est pas garanti avec toutes
les cartes mémoire.
Des «Memory Stick PRO Duo», deux fois plus
ts qu’une « Memory Stick », ou des cartes
eti
p
SD de taille standard peuvent être utilisés pour
cet appareil.
N’apposez pas d’étiquette ou d’autre objet
similaire sur la carte mémoire ou l’adaptateur
de carte mémoire. Cela pourrait entraîner un
problème de fonctionnement.
es «Memory Stick PRO Duo» jusqu’à 32 Go et
L
les cartes SD jusqu’à 64 Go ont été vérifiés pour
fonctionner avec cet appareil.
Remarques
Une MultiMediaCard ne peut pas être utilisée
avec cet appareil.
Les films enregistrés sur des cartes mémoire
SDXC ne peuvent pas être importés vers ou lus
sur des ordinateurs ou appareils AV ne prenant
pas en charge le système de fichiers exFAT*
en connectant l’appareil à ces périphériques à
l’aide du câble USB. Confirmez au préalable
que le périphérique de connexion prend en
charge le système exFAT. Si vous connectez
un périphérique ne prenant pas en charge le
FR
20
système exFAT et que l’écran de formatage
apparaît, n’effectuez pas le formatage. Toutes les
données enregistrées seront perdues.
* exFAT est un système de fichiers utilisé pour
les cartes mémoire SDXC.
1
*
Ouvrez le cache et insérez la carte
mémoire avec le côté cranté dans
le sens indiqué jusqu’au déclic.
Fermez le cache après l’insertion de la
carte mémoire.
Témoin d’accès
Sens du coin cranté.
L’écran [Préparation du fichier de la
base de données d’images. Veuillez
patienter.] s’affiche si vous insérez une
nouvelle carte mémoire. Patientez
jusqu’à ce que l’écran disparaisse.
2
Fermez le couvercle.
Remarques
Si [Echec de la création d’un nouveau fichier
dans la base de données d’images. L’espace libre
peut être insuffisant.] s’affiche, formatez la carte
mémoire.
Vérifiez le sens de la carte mémoire. Si vous
forcez l’insertion de la carte mémoire dans le
mauvais sens, vous risquez d’endommager la
carte mémoire, le logement de carte mémoire
ou les données d’image.
N’ouvrez pas le cache pendant l’enregistrement.
Page 75

Quand vous introduisez ou éjectez la carte
mémoire, veillez à ce qu’elle ne soit pas éjectée
trop brusquement et ne tombe pas.
Ejection de la carte mémoire
Ouvrez le cache et introduisez délicatement
la carte mémoire en une fois.
Préparation
FR
21
Page 76

Jumelles/Enregistrement/Lecture
Utilisation de cet appareil en tant que jumelles
1
Réglez le commutateur POWER
sur ON en appuyant sur la touche
verte.
L’appareil est sous tension.
L’écran de réglage peut s’afficher en
fonction de l’état de l’appareil quand il
est mis sous tension. Effectuez tous les
réglages nécessaires avant d’utiliser cet
appareil.
2
Vérifiez que la correction
dioptrique, la largeur et la
position verticale relative du
viseur gauche et du viseur droit
vous con
3
Tenez l’appareil à deux mains,
puis dirigez-le vers le sujet.
FR
22
viennent (p. 16).
Vous pouvez agrandir des images à l’aide
de la manette de zoom motorisé.
L’appareil ajuste automatiquement la mise
au point à l’aide de la fonction de mise au
point automatique (réglage par défaut).
Conseils
SteadyShot] est réglé sur [Activé] dans le
[
réglage par défaut.
À propos du grossissement
Les agrandissements disponibles sont les
suivants.
Grossissement des jumelles (environ)
DEV-3 DEV-5/5K
Enregistrement
de film (en
1
2D)
*
Enregistrement
de film (en
1
3D)
*
Enregistrement
de photo
0,8 à
10
0,5 à
5,4
0,5 à
10 (16:9)
0,3 à 7,5
(4:3)
0,8 à
20
*
0,8 à
10
*
0,5 à
5,4
0,5 à
4
20
*
(16:9)
0,3 à
4
15
*
2
3
(4:3)
Rapport de grossissement (environ)
DEV-3 DEV-5/5K
12 *
2
3
4
Enregistrement
de film (en 2D)
Enregistrement
de film (en 3D)
Enregistrement
de photo
1
*
[ SteadyShot] est réglé sur une autre valeur
que [Activé]
2
*
[Zoom numérique] est réglé sur [Act] (La
qualité de l’image diminue lorsque vous
utilisez l’agrandissement large)
12 24 *
10 10
22 44 *
Page 77

3
*
[Zoom numérique] est réglé sur [Désact]
4
*
La qualité de l’image diminue lorsque vous
utilisez l’agrandissement large
Conseils
Le grossissement indique la taille maximale
à laquelle un sujet peut être perçu avec les
jumelles par rapport à l’œil nu.
La rapport de grossissement indique la
proportion de distances focales entre la valeur
minimale et la valeur maximale.
Plan plus large
(Grand angle)
Gros plan
(Téléobjectif)
Déplacez légèrement la manette de zoom
motorisé pour ralentir le zoom. Déplacez-la
davantage pour accélérer le zoom.
Remarques
Laissez le doigt sur la manette de zoom
motorisé. Si vous retirez le doigt de la manette
de zoom motorisé, le son de fonctionnement de
celle-ci risque d’être également enregistré.
Pour régler la mise au point
manuellement
Sélectionnez (MENU) [Caméra/
Micro] [
[Mise au P]
( Réglages manuels)]
à l’aide des touches
////Enter.
électionnez
S
(sujet proche)/
(sujet éloigné) et appuyez plusieurs fois
sur Enter pour régler la mise au point.
Conseils
Pour régler la mise au point automatiquement,
sélectionnez [Auto].
Pour basculer alternativement les
viseurs entre l’affichage 2D et 3D
Appuyez sur FINDER 2D/3D pour basculer
alternativement les viseurs entre l’affichage
2D et 3D.
Conseils
En mode d’affichage 3D, l’appareil affiche
l’image de l’objectif gauche dans le viseur
gauche et l’image de l’objectif droit dans le
viseur droit. En mode d’affichage 2D, l’appareil
affiche l’image de l’objectif gauche à la fois dans
le viseur gauche et dans le viseur droit.
Jumelles/Enregistrement/Lecture
FR
23
Page 78

Enregistrement
Par défaut, les images des viseurs s’affichent
en 3D (p. 23), mais les films sont enregistrés
en 2D.
Réglez le commutateur POWER sur
ON en appuyant sur la touche verte.
L’appareil est sous tension.
Enregistrement de films
Appuyez légèrement sur MODE
pour allumer le témoin
Touche MODE
(Film) : Lors de l’enregistrement d’un
film
(Photo) : Lors de l’enregistrement
d’une photo
(Film).
Appuyez sur START/STOP pour
lancer l’enregistrement.
[VEILLE] [ENREGISTRE]
Le voyant de tournage s’allume en
rouge pendant l’enregistrement.
Pour arrêter l’enregistrement, appuyez
de nouveau sur START/STOP.
Pour afficher de nouveau les options
sur l’écran
Appuyez sur les touches ////Enter
ou sur n’importe quelle autre touche. Vous
pouvez modifier les réglages à l’aide du
menu [Réglage affichage].
Remarques
La durée de prise de vue en continu pour un
t la suivante :
film es
2D : environ 13 heures
3D : environ 6 heures et 30 minutes
Lorsqu’un fichier film dépasse 2 Go, le fichier
de film suivant est créé automatiquement.
24
FR
Page 79

Après la mise sous tension de l’appareil,
quelques secondes sont nécessaires avant de
pouvoir lancer l’enregistrement. Vous ne pouvez
pas utiliser l’appareil pendant ce laps de temps.
Les états suivants seront indiqués si les données
sont toujours en cours d’écriture sur la carte
mémoire après la fin de l’enregistrement.
Pendant ce temps-là, ne soumettez pas l’appareil
à un choc ou à des vibrations, et ne retirez pas la
batterie ou l’adaptateur secteur.
e tém
oin d’accès (p. 20) est allumé ou
L
clignote.
L’icône du support dans le coin supérieur
droit de l’écran clignote.
Conseils
Reportez-vous à la page 42 pour plus
d’informations sur la durée de prise de vue pour
les films.
Vous pouvez vérifier la durée de prise de vue, la
capacité restante estimée, etc. en sélectionnant
(MENU) [Configuration] [
Réglages support)] [Informations
(
support].
Pour basculer alternativement entre les
modes d’affichage 2D et 3D
Vous pouvez sélectionner un mode
d’enregistrement en 2D ou 3D.
Pour basculer entre les modes 2D et 3D,
sélectionnez
(MENU) [Qualité
image/Taille] [Sélect. mode 2D/3D].
Conseils
Lorsque vous modifiez le paramètre [Sélect.
mode 2D/3D], les films lus sur cet appareil et les
films émis par la prise HDMI OUT basculent
automatiquement du 2D au 3D, et inversement.
Distance optimale du sujet et niveau de
grossissement
La distance à laquelle vous pouvez obtenir
une bonne qualité de films en 3D dépend
du niveau de grossissement.
Distance du sujet Zoom
d’environ 80 cm à 6 m
d’environ 2,5 m à 10 m
d’environ 7,5 m à 20 m
Remarques
Lorsque vous enregistrez des films en 3D, le
grossissement des jumelles peut être réglé
us
qu’à 5 fois environ. Si vous voulez observer
j
ou enregistrer un sujet en utilisant une image
plus grande, réglez [Sélect. mode 2D/3D] sur
[2D].
* Dans le présent manuel, « observer » signifie
que l’utilisateur regarde ou visualise un sujet
sans enregistrer.
Code de données pendant
l’enregistrement
La date, l’heure et les conditions
d’enregistrement, ainsi que les
coordonnéesDEV-5/5K, sont
automatiquement enregistrées sur la
carte mémoire. Elles ne sont pas affichées
pendant l’enregistrement. Toutefois,
vous pouvez les vérifier dans [Code
données] pendant la lecture. Pour les
afficher, sélectionnez
[Configuration] [
(MENU)
( Réglages
lecture)] [Code données] le réglage
souhaité
.
Prises de photos
Appuyez sur MODE pour allumer
le témoin
L’affichage de l’écran passe en mode
d’enregistrement de photo.
(Photo).
*
Jumelles/Enregistrement/Lecture
FR
25
Page 80

Touche MODE
(Film) : Lors de l’enregistrement d’un film
(Photo) : Lors de l’enregistrement
d’une photo
Appuyez légèrement sur PHOTO
pour procéder à la mise au point,
puis réappuyez.
Clignote S’allume
Lorsque disparaît, cela signifie que la
Remarque
Vous ne pouvez pas prendre de photos en 3D.
Sélectionnez
image/Taille] [Sélect. mode 2D/3D]
[2D].
FR
photo a été enregistrée.
(MENU) [Qualité
26
Conseils
Reportez-vous à la page 43 pour plus
d’informations sur le nombre de photos
pouvant être enregistrées.
Pour modifier la taille de l’image, sélectionnez
(MENU) [Qualité image/Taille]
Taille Img] le réglage souhaité
[
.
Vous ne pouvez pas enregistrer de photos tant
est affiché.
que
Contrôle manuel des réglages d’images avec la molette MANUAL
Cette fonction est pratique pour affecter
une option de menu à la molette MANUAL.
Les options de menu disponibles varient
entre le mode d’enregistrement de film et le
mode d’enregistrement de photos.
Touche MANUAL
Molette MANUAL
Enregistrement de film :
[Régl. Profondeur 3D], [Mise au P],
[Exposition], [Régl. exposition auto],
[Réglage bal. blancs]
egi
strement de photo :
Enr
[Mise au P], [Exposition], [IRIS], [Vitesse
d’obturateur], [Régl. exposition auto],
[Réglage bal. blancs]
Pour affecter une option de menu
Appuyez et maintenez la pression sur
MANUAL pendant quelques secondes pour
afficher l’écran de réglage. Faites pivoter la
molette MANUAL pour affecter une option
de menu.
Page 81

Pour utiliser la molette MANUAL
Appuyez sur MANUAL pour utiliser
l’option de menu affectée. Faites pivoter la
molette MANUAL pour effectuer le réglage.
Obtention des informations de
localisation à l’aide du GPS (DEV5/5K)
Sélectionnez (MENU)
[Configuration] [
généraux)] [Réglage du GPS]
[Act].
s’affiche sur l’écran et l’appareil
commence à récupérer les informations
de localisation. Les informations de
localisation obtenues sont enregistrées sur
des films ou des photos. L’indicateur change
en fonction de la force de réception du
signal GPS.
Conseils
Si vous importez les données d’assistance GPS
sur votre appareil depuis votre ordinateur à
’a
ide du logiciel « PMB » fourni, le temps qu’il
l
requiert pour obtenir vos informations de
localisation peut être réduit. Branchez l’appareil
à un ordinateur connecté à Internet. Les
données d’assistance GPS seront mises à jour
automatiquement.
Les données d’assistance GPS peuvent ne pas
onctionner dans les cas suivants :
f
lorsqu’elles GPS ne sont pas mises à jour
pend
ant environ 30 jours ou plus ;
lorsque la date et l’heure de l’appareil ne sont
pas co
rrectement réglées ;
lorsque l’appareil est déplacé sur une longue
distance.
( Réglages
Sélection du mode d’enregistrement
Sélectionnez (MENU)
[Qualité image/Taille] [
ENR] pour modifier la qualité du film en
enregistrement 2D.
Les types de supports sur lesquels
les images peuvent être sauvegardées
dépendent du mode d’enregistrement
sélectionné.
Types de supports
Support externe
(appareil de
stockage USB)
Disques Blu-ray
AVCHD Disques
d’enregistrement
* [PS] ne peut être réglé que si [ Img. par
seconde] est réglé sur [60p] ([50p]).
Mode
Mode
d’enregistrement
3D
— — —
FX
PS
*
HQ/
Jumelles/Enregistrement/Lecture
FH/
LP
FR
27
Page 82

Lecture sur cet appareil
Vous pouvez lire les images enregistrées
avec cet appareil.
Conseils
Si vous souhaitez lire les images 3D, réglez
[Sélect. mode 2D/3D] sur [3D].
1
Réglez le commutateur POWER
sur ON en appuyant sur la touche
verte.
L’appareil est sous tension.
2
Appuyez sur
(Afficher
Images).
L’écran d’index des événements
s’affiche au bout de quelques secondes.
3
Sélectionnez l’image que vous
voulez voir à l’aide des touches
///, puis appuyez sur
Enter.
La lecture démarre.
Retour à l’écran MENU
image précédente/ image
suivante
événement précédent/
événement suivant
Permet de changer le mode
d’enregistrement de films/photos
Titre de l’événement
Durée totale de films/Nombre total
de photos dans l’événement
Touche de changement de type
d’image (2D uniquement)
(
FILM, PHOTO, FILM/
*)
PHOTO
Film
Photo
* Si vous démarrez la lecture à partir de
l’écran [
les photos sont lus en fonction de l’heure
et de la date de prise de vue.
Cet appareil organise les images par
groupe, appelé événement, en fonction de
la date et de l’heure, et des informations
sur la fréquence d’enregistrement des
images.
Opérations disponibles depuis l’écran
de lecture
FILM/PHOTO], les films et
28
Pause/Lecture
Arrêt
FR
Page 83

Image précédente/
suivante
Retour rapide/Avance
rapide
Affichage d’un
diaporama
Volume
Effacer
Contexte
Certaines touches peuvent ne pas s’afficher
selon l’image enregistrée.
Remarques
Il se peut que vous ne puissiez pas lire les
images avec d’autres périphériques que cet
appareil.
Conseils
L’écran INDEX réapparaît lorsque la lecture à
partir de l’image sélectionnée atteint la dernière
image.
Sélectionnez
/ en cours de pause pour
lire un film en vitesse lente.
Au fur et à mesure que vous appuyez sur la
touche Enter après avoir sélectionné
pendant la lecture, la vitesse de lecture
augmente environ 5 fois environ 10 fois
on 30 fois environ 60 fois.
envir
ate, l’heure et les conditions
La d
d’enregistrement sont automatiquement
enregistrées pendant la prise de vue. Ces
informations ne sont pas affichées pendant
la lecture, mais vous pouvez les afficher
en sélectionnant
[Configuration] [
(MENU)
( Réglages lecture)]
[Code données] le réglage souhaité
.
Pour lancer un diaporama, sélectionnez
PHOTO] à partir de la touche de
[
changement de type d’images sur l’écran d’index
des événements. Pour répéter un diaporama,
sélectionnez
[Rég. diaporama].
Jumelles/Enregistrement/Lecture
/
FR
29
Page 84

Enregistrement de films ou de photos
Préparation d’un ordinateur
Le logiciel « PMB (Picture Motion
Browser) » vous permet d’effectuer les
opérations suivantes.
Importation d’images sur un ordinateur
Affichage des images importées
Téléchargement d’images vers des sites
Internet
Pour enregistrer des films à l’aide d’un
ordinateur, installez au préalable le logiciel
» à partir du CD-ROM fourni.
« PMB
Étape 1 Vérification du système informatique
1
OS*
Microsoft Windows XP SP3*2/Windows Vista
3
SP2
*
/Windows 7 SP1
4
*
UC
Intel Core Duo 1,66 GHz ou plus, ou Intel
Core 2 Duo 1,66 GHz ou plus (Intel Core 2
Duo 2,26 GHz ou plus est nécessaire lors du
traitement de films FX, FH ou 3D, et Intel
Core 2 Duo 2,40 GHz ou plus est nécessaire
lors du traitement de films PS.)
C
dant, Intel Pentium III 1 GHz ou plus
epen
suffit pour les opérations suivantes :
importation de films et de photos sur
l’ordinateur ;
One Touch Disc Burn ;
Création d’un disque Blu-ray/AVCHD
disque d’enregistrement ;
Copie d’un disque.
Mémoire
Pour Windows XP : 512 Mo ou plus (1 Go ou
plus est conseillé.)
Pour W
indows Vista/Windows 7 : 1 Go ou
plus
Disque dur
Volume de disque nécessaire à l’installation :
environ 500 Mo (10 Go ou plus peuvent être
nécessaires lors de la création de disques
egistrement AVCHD. 50 Go maximum
d’enr
peuvent être nécessaires lors de la création de
disques Blu-ray.)
Affichage
Minimum 1
024 × 768 points
Autres
Port USB (doit être standard, compatible
Hi-Speed USB (USB 2.0)), disque Blu-ray/
graveur DVD (lecteur CD-ROM nécessaire
pour l’installation). Le système de fichiers du
disque dur conseillé est NTFS ou exFAT.
1
*
L’installation standard est nécessaire. Le
fonctionnement n’est pas garanti si le système
d’exploitation a été mis à niveau ou dans un
environnement à démarrage multiple.
2
*
Les éditions 64 bits et Starter (Edition) ne sont
pas prises en charge. Windows Image Mastering
API (IMAPI) version 2.0 ou ultérieure est
nécessaire pour utiliser la fonction de création
de disques, etc.
3
*
Starter (Edition) n’est pas pris en charge
4
*
Un processeur plus rapide est conseillé.
Remarques
Le fonctionnement n’est pas garanti avec tous les
environnements informatiques.
Lors de l’utilisation d’un Mac
Le logiciel fourni « PMB » n’est pas pris
en charge par les ordinateurs Mac. Pour
importer des films et des photos sur
l’ordinateur, veuillez contacter Apple Inc.
30
FR
Page 85

Étape 2 Installation du logiciel « PMB » fourni
Installez « PMB » avant de connecter votre
appareil à un ordinateur.
Remarques
Si une version de « PMB » inférieure à la 5.0.00
a été installée sur votre ordinateur, vous risquez
de ne pas pouvoir utiliser certaines fonctions de
ces « PMB
» lors de l’installation de « PMB » à
partir du CD-ROM fourni. « PMB Launcher »
est aussi installé à partir du CD-ROM fourni et
vou
s pouvez lancer « PMB » ou un autre logiciel
en utilisant « PMB Launcher ». Double-cliquez
sur l’icône de raccourci « PMB Launcher » se
trouvant sur l’écran de l’ordinateur pour lancer
auncher ».
« PMB L
Vérifiez que l’appareil n’est pas
connecté à l’ordinateur.
Mettez l’ordinateur sous tension.
Pour l’installation, ouvrez une session
d’Administrateur.
Fermez toutes les applications exécutées
sur l’ordinateur avant d’installer le logiciel.
Placez le CD-ROM fourni sur le
disque dur de votre ordinateur.
L’écran d’installation apparaît.
Si l’écran ne s’affiche pas, cliquez sur
[Démarrer] [Ordinateur] (dans
Windows XP, [Poste de travail]), puis
double-cliquez sur [SONYPMB (E:)]
(CD-ROM)
* Les noms des lecteurs (comme [E:])
peuvent varier en fonction de l’ordinateur.
*.
Cliquez sur [Installation].
Sélectionnez le pays ou la région.
Sélectionnez la langue de
l’application à installer, puis
passez à l’écran suivant.
Lisez attentivement les
conditions de l’accord de licence.
Si vous les acceptez, mettez
sur , puis cliquez sur [Suivant ]
[Installer].
Suivez les instructions
qui s’affichent à l’écran de
l’ordinateur pour poursuivre
l’installation.
Il se peut que vous deviez installer d’autres
applications incluses sur le disque en
même temps. Si l’écran d’installation
s’affiche, suivez les instructions qui y
figurent.
Lorsqu’il vous est demandé de redémarrer
l’ordinateur, suivez les instructions qui
s’affichent à l’écran et redémarrez-le.
Branchez l’appareil à l’ordinateur lorsque
cette consigne vous est donnée.
Branchez l’appareil à un
ordinateur à l’aide du câble USB,
puis sélectionnez [Connexion
USB] sur l’écran de l’appareil.
Enregistrement de films ou de photos
Câble USB (fourni)
FR
31
Page 86

Une fois l’installation terminée,
retirez le CD-ROM de l’ordinateur.
Cliquez sur (icône PMB) qui s’affiche
sur le bureau de l’ordinateur pour lancer
le logiciel.
Remarques
Pour créer des disques ou utiliser d’autres
fonctions sur Windows XP, l’Image Mastering
API version 2.0 pour Windows XP doit être
installée. Si l’Image Mastering API version 2.0
pour Windows XP n’a pas encore été installée,
sélectionnez-la dans la liste des programmes
nécessaires de l’écran d’installation et installezla en suivant les procédures affichées. (Pour
l’installation, l’ordinateur doit être connecté
à Internet.) Vous pouvez installer l’Image
Mastering API version 2.0 pour Windows XP
en réponse au message affiché lorsque vous
essayez d’utiliser ces fonctions.
Le fonctionnement n’est pas garanti si vous
lisez ou écrivez des données vidéo sur ou
vers l’appareil à l’aide d’un logiciel autre que
iciel «
le log
PMB » fourni. Pour obtenir des
informations sur la compatibilité du logiciel que
vous utilisez, contactez son fabricant.
Pour déconnecter l’appareil de
l’ordinateur
Cliquez sur l’icône en bas à droite
du bureau de l’ordinateur [Retirer
Périphérique de stockage de masse USB en
toute sécurité].
Sélectionnez [Annuler] [Oui] sur l’écran de
l’appareil.
Débranchez le câble USB.
FR
32
Si vous utilisez Windows 7, l’icône peut ne
pas s’afficher sur l’écran de votre ordinateur.
Dans ce cas, vous pouvez débrancher
l’appareil de votre ordinateur sans suivre les
procédures décrites ci-dessus.
Remarques
Ne formatez pas la carte mémoire insérée
dans l’appareil à l’aide d’un ordinateur. Cela
provoquerait un mauvais fonctionnement de
l’appareil.
N’insérez pas de disques AVCHD ayant été
’aide du logiciel « PMB » dans des
éés à l
cr
lecteurs ou enregistreurs DVD car ces appareils
ne prennent pas en charge la norme AVCHD. Si
vous le faites, il se peut que vous ne puissiez pas
retirer le disque de ces appareils.
Lorsque vous accédez à cet appareil depuis
’o
rdinateur, utilisez le logiciel « PMB » fourni.
l
Ne modifiez pas les fichiers ni les dossiers
de l’appareil depuis l’ordinateur. Les fichiers
d’image risquent d’être endommagés et de ne
pas être lus.
Si vous utilisez les données sur l’appareil depuis
votre ordinateur, le fonctionnement n’est pas
garanti.
L’appareil divise automatiquement un fichier
d’images de 2 GB ou supérieur et sauvegarde
les parties dans des fichiers séparés. Tous les
fichiers d’images peuvent être affichés comme
des fichiers séparés sur l’ordinateur, cependant,
les fichiers seront gérés correctement par la
fonction d’importation de l’appareil ou le
PMB ».
iciel «
log
Utilisez le logiciel « PMB » fourni lorsque vous
importez de longs films ou des images éditées
depuis votre appareil vers un ordinateur. Si vous
utilisez un autre logiciel, les images peuvent ne
pas être importées correctement.
Lorsque vous supprimez des fichiers d’images,
sélectionnez
(MENU) [Éditer/
Copier] [Supprimer].
Vous pouvez créer un disque Blu-ray à partir de
films en 2D à l’aide d’un ordinateur équipé d’un
graveur de disques Blu-ray. Installez le Logiciel
plémentaire pour BD pour « PMB ».
up
S
Page 87

Démarrage de PMB
(Picture Motion Browser)
1
Double-cliquez sur l’icône de
raccourci « PMB » se trouvant sur
l’écran de l’ordinateur.
Le logiciel PMB démarre.
2
Double-cliquez sur l’icône
ourci « Aide PMB »
de racc
se trouvant sur l’écran de
l’ordinateur pour lancer « PMB ».
Enregistrement de films ou de photos
Remarques
Si l’icône ne s’affiche pas sur l’écran de
l’ordinateur, cliquez sur [Démarrer] [Tous
les programmes] [
souhaitée.
Conseils
Dou
ble-cliquez sur « PMB Launcher » sur le
bureau de l’ordinateur. Ceci vous permet de
démarrer la fonction (application) souhaitée en
en sélectionnant une dans une liste de fonctions
».
« PMB
PMB] l’option
FR
33
Page 88
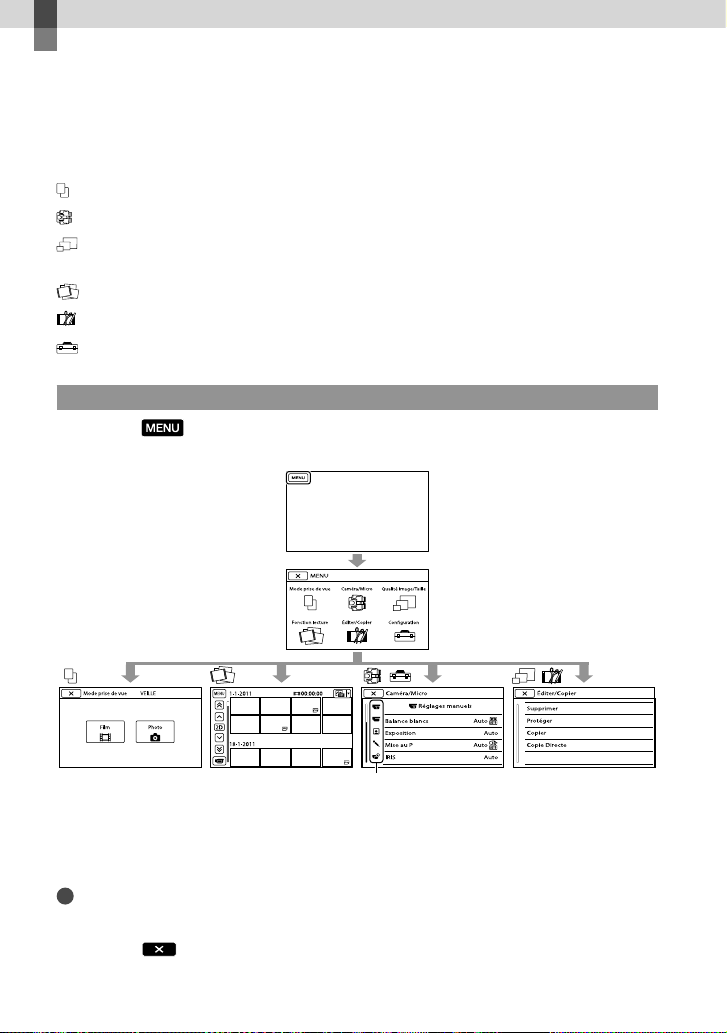
Personnalisation de cet appareil
Utilisation des menus
Vous pouvez pleinement profiter de l’utilisation de votre appareil en utilisant correctement les
fonctions du menu.
L’appareil dispose de différentes options de menu réparties en 6 catégories de menu.
Mode prise de vue (Options de sélection d’un mode de prise de vue) p. 35
Caméra/Micro (Options de prise de vue personnalisée) p. 35
Qualité image/Taille (Options de réglage de la qualité ou de la taille d’image)
p. 36
Fonction lecture (Options de lecture) p. 28
Éditer/Copier (Options de montage) p. 36
Configuration (Autres options de réglage) p. 37
Utilisation des menus
Sélectionnez (MENU) à l’aide des touches ////Enter, puis définissez les options
de menu.
Icônes des sous-catégories
Les menus [Caméra/Micro] et [Configuration] disposent de sous-catégories. Sélectionnez
l’icône de sous-catégorie et l’écran passe aux autres menus de sous-catégorie.
Les réglages ou options de menu grisé(e)s ne sont pas disponibles.
Remarques
Il est possible que vous ne puissiez pas définir certaines options de menu, en fonction des conditions
d’enregistrement ou de lecture.
Sélectionnez
FR
pour finir de régler le menu ou pour revenir à l’écran de menu précédent.
34
Page 89

Liste des options des menus
Les options de menu disponibles varient selon le mode d’enregistrement du film ( ) et le
mode d’enregistrement de photos (
Mode prise de vue
Film
Photo
Caméra/Micro
( Réglages manuels)
Balance blancs
Exposition
Mise au P
IRIS
Vitesse d’obturateur
Régl. exposition auto
Réglage bal. blancs
Low Lux
( Réglages caméra)
Régl Auto Objectif 3D
Sélection scène
Retardateur
Télé macro
SteadyShot
SteadyShot
Zoom numérique*
Contre-jour automat.
Réglage de la molette
( Visage)
Détection de visage
).
Permet d’enregistrer des films.
Permet de prendre des photos.
Permet de régler la balance des couleurs en
fonction de la luminosité de l’environnement
d’enregistrement.
Permet de régler la luminosité des films et photos.
Permet de faire une mise au point manuelle.
Permet de régler l’iris.
Permet de régler la vitesse d’obturation.
Permet de régler l’exposition en fonction des
résultats de la mesure d’exposition automatique.
Permet de régler manuellement la balance des
blancs.
Permet d’enregistrer des images aux couleurs
lumineuses alors que l’éclairage est faible.
Permet de corriger automatiquement la position
verticale (droite et gauche) des films pour
enregistrer des films en 3D qui pourront être
visionnés confortablement, sans flou.
Permet de sélectionner un réglage d’enregistrement
approprié, tel que vues nocturnes ou plage, en
fonction du type de scène.
Permet de régler le retardateur lorsque votre
appareil est en mode d’enregistrement de photos.
Permet de prendre en photo un sujet mis au point
sans que l’arrière plan ne soit mis au point.
Permet de régler la fonction SteadyShot lors de
l’enregistrement de films.
Permet de régler la fonction SteadyShot lors de la
prise de photos.
Permet de régler le zoom numérique.
Règle automatiquement l’exposition des sujets à
contre-jour.
Permet d’attribuer une fonction à la molette
MANUAL.
Permet de régler la qualité d’image du/des visage(s)
automatiquement.
Personnalisation de cet appareil
FR
35
Page 90

( Microphone)
Réduction bruit vent
Niv. référence micro
Chrono Sortie Audio
( Assistant prise d. vue)
Image guide
Réglage affichage
Qualité image/Taille
Mode ENR
Img. par seconde
Sélect. mode 2D/3D
x.v.Color
Taille Img
Fonction lecture
Éditer/Copier
Supprimer
Protéger
Copier
Copie Directe
Permet de réduire le bruit du vent.
Permet de régler le niveau de référence du
microphone.
Permet de régler la temporisation de la sortie audio
à utiliser lors de l’enregistrement de films.
Permet d’afficher le cadre pour vérifier que le sujet
est horizontal ou vertical.
Permet de définir la durée d’affichage des icônes et
indicateurs sur l’écran des viseurs.
Permet de régler le mode pour enregistrer
des films. Lorsque vous filmez des sujets en
mouvement rapide, une qualité d’image haute
définition est recommandée.
Permet de définir la fréquence d’image pour
enregistrer des films.
Permet de basculer le type d’enregistrement de
films alternativement entre le 2D et le 3D.
Permet d’enregistrer une gamme de couleurs plus
vaste.
Permet de définir la taille de la photo.
Permet de lire des films ou des photos.
Permet de supprimer des films ou des photos.
Permet de protéger des films ou des photos afin
d’éviter de les effacer.
Permet de copier des films ou des photos sur des
périphériques de stockage externes.
Permet de copier tous les films et toutes les
photos qui n’ont pas encore été sauvegardés sur un
périphérique de stockage externe.
36
FR
Page 91

Configuration
( Réglages support)
Informations support
Formater
Rép.f.base.don.img
Numéro de fichier
( Réglages lecture)
Code données
Réglages du volume
( Connexion)
Type de téléviseur
Composant
Réglage 3D HDMI
Résolution HDMI
COMMANDE HDMI
Connexion USB
Gravure disque
Permet d’afficher les informations relatives à la
carte mémoire, telles que l’espace disponible.
Permet de supprimer toutes les données de la carte
mémoire.
Permet de réparer le fichier de base de données
d’images sur une carte mémoire.
Permet de définir comment attribuer le numéro
de fichier.
Permet d’afficher les données d’enregistrement
détaillées lors de la lecture.
Permet de régler le volume de lecture et le volume
du son émis par le casque de contrôle lors de
l’enregistrement.
Permet de régler le format en fonction du
téléviseur raccordé.
Sélectionnez cette option lorsque vous raccordez
votre appareil à un téléviseur à l’aide de la prise
d’entrée composante.
Sélectionnez le format de sortie des images de
droite et de gauche lorsque vous raccordez cet
a
pp
areil à un téléviseur 3D à l’aide du câble HDMI
(vendus séparément).
Sélectionnez la résolution de sortie des images
lorsque vous raccordez votre appareil à un
téléviseur à l’aide du câble HDMI (vendu
séparément).
Permet de définir si la télécommande du
téléviseur doit être utilisée ou non lorsque
l’appareil est raccordé à un téléviseur compatible
«
B
RAVIA » Sync à l’aide d’un câble HDMI (vendu
séparément).
Raccordez cet appareil à un périphérique externe
par USB.
Sélectionnez cette option pour sauvegarder des
images sur des disques par le biais d’un ordinateur.
Personnalisation de cet appareil
FR
37
Page 92

( Réglages généraux)
Luminosité viseur
Ajustement du viseur
Information GPS*
Réglage du GPS*
Voyant de tournage
Bip
Arrêt automatique
Language Setting
Sélectionner 60i/50i
Informations batterie
( Réglages horloge)
Régl. date&heure
Réglage zone
AJU auto horloge*
AJU auto zone*
* DEV-5/5K
Permet de régler la luminosité des viseurs.
Permet de régler la position verticale relative du
viseur droit et du viseur gauche.
Permet d’afficher les informations de localisation.
Permet de régler le GPS.
Permet de définir si le voyant de tournage doit
s’allumer ou non.
Permet de définir si les bips sonores de
fonctionnement de l’appareil doivent retentir ou
pas.
Permet de modifier le réglage [Arrêt automatique].
Permet de régler la langue d’affichage.
Permet de basculer entre 1080/60i (système NTSC)
et 1080/50i (système PAL).
Permet d’afficher les informations relatives à la
batterie.
Permet de définir les valeurs [Format date&heure],
[Heure été] ou [Date&heure].
Permet de changer de fuseau horaire sans arrêter
l’horloge.
Permet d’acquérir automatiquement l’heure exacte
en obtenant des informations de localisation du
système GPS.
Permet de s’adapter automatiquement au
décalage horaire en obtenant des informations de
localisation du système GPS.
38
FR
Page 93

Informations complémentaires
Dépannage
Si vous rencontrez un problème lors de
l’utilisation de votre appareil, suivez les
étapes ci-dessous.
Vérifiez la liste (p. 39 à 41) et
inspectez votre appareil.
Retirez la source d’alimentation et
rebranchez-la après environ
1 minute, puis mettez l’appareil sous
tension.
Appuyez sur RESET (p. 52) avec un
objet pointu, puis mettez l’appareil
sous tension.
Si vous appuyez sur RESET, tous les
réglages, y compris le réglage de
l’horloge, sont réinitialisés.
Contactez votre revendeur Sony ou
votre centre de service après-vente
agréé Sony.
Consultez le Manuel des jumelles avec
enregistrement numérique (p. 7) pour plus de
renseignements sur le fonctionnement de votre
pp
areil et l’« Aide PMB » (p. 33) pour obtenir
a
des informations sur le raccordement de votre
appareil à un ordinateur.
Le caméscope ne se met pas sous tension.
Fixez une batterie chargée sur l’appareil (p. 12).
Branchez la prise de l’adaptateur secteur à la
pri
se murale (p. 15).
L’appareil ne fonctionne pas, même
lorsqu’il est mis sous tension.
Un délai de quelques secondes s’écoule après la
mise sous tension, avant que votre appareil ne
soit prêt pour l’enregistrement. Il ne s’agit pas
d’un dysfonctionnement.
Débranchez l’adaptateur secteur de la prise
murale ou retirez la batterie, puis rebranchezle ou rem
ettez-la au bout de 1 minute environ.
Si votre appareil ne fonctionne toujours pas,
uyez sur RESET (p. 52) à l’aide d’un objet
app
pointu. (Si vous appuyez sur RESET, tous les
réglages, y compris le réglage de l’horloge,
seront réinitialisés.)
La température de l’appareil est très élevée.
Éteignez votre appareil et laissez-le au repos
quelques instants dans un endroit frais.
La température de l’appareil est très basse.
Laissez-le allumé. S’il ne fonctionne toujours
pas, éteignez-le et placez-le dans un endroit
chaud. Laissez-le là pendant un moment, puis
mettez-le sous tension.
L’appareil chauffe.
Votre appareil peut chauffer en cours
d’utilisation. Il ne s’agit pas d’un
dysfonctionnement.
Une coupure soudaine de courant se
produit.
Utilisez l’adaptateur secteur (p. 15).
Rechargez la batterie (p. 12).
Une pression sur START/STOP ou PHOTO
n’enregistre aucune image.
Appuyez sur MODE pour allumer le témoin
(Film) ou (Photo).
Votre appareil enregistre l’image que vous
venez de capturer sur la carte mémoire.
Pendant cette opération, vous ne pouvez faire
aucun nouvel enregistrement.
La carte mémoire est pleine. Supprimez les
images superflues.
Le nombre total de scènes de film ou de
photos a dépassé la capacité enregistrable de
v
re appareil (p. 42). Supprimez les images
ot
superflues.
Informations complémentaires
FR
39
Page 94

40
FR
L’enregistrement s’arrête.
La température de l’appareil est très élevée/
basse. Éteignez votre appareil et laissez-le
au repos quelques instants dans un endroit
frais/chaud.
Impossible d’installer « PMB ».
Vérifiez l’environnement informatique ou la
procédure d’installation requise pour installer
« PMB
» (p. 31).
« PMB » ne fonctionne pas correctement.
Fermez « PMB » et redémarrez votre ordinateur.
L’ordinateur ne reconnaît pas l’appareil.
Débranchez les appareils des prises USB de
l’ordinateur, sauf le clavier, la souris et votre
appareil.
Débranchez le câble USB de l’ordinateur et de
votre appareil, redémarrez l’ordinateur puis
reconnectez l’ordinateur et votre appareil, dans
l’ordre.
Code d’autodiagnostic/Indicateurs d’avertissement
Si des indicateurs s’affichent sur l’écran des
viseurs, vérifiez les points suivants.
Si le problème persiste, même après
plusieurs tentatives pour y remédier,
contactez votre revendeur Sony ou votre
centre de service après-vente agréé Sony.
Dans ce cas, lorsque vous le contactez,
donnez-lui tous les chiffres du code d’erreur
qui commence par C ou par E.
C:04:
La batterie utilisée n’est pas une batterie
« InfoLITHIUM » série V. Utilisez une batterie
« InfoLITHIUM » (série V) (p.
Raccordez fermement la fiche CC de
l’adaptateur secteur à votre appareil (p. 12).
12).
C:06:
La température de la batterie est élevée.
Remplacez la batterie ou déposez-la dans une
pièce fraîche.
C:13: / C:32:
Retirez la source d’alimentation. Rebranchez-
la et faites de nouveau fonctionner votre
appareil.
E::
Suivez les étapes à partir de page 39.
La charge de la batterie est faible.
La température de la batterie est élevée.
Remplacez la batterie ou déposez-la dans une
pièce fraîche.
Lorsque l’indicateur clignote, l’espace
disponible pour enregistrer des images
est insuffisant. Effacez les images inutiles,
ou formatez la carte mémoire après avoir
enregistré les images sur un autre support.
Le fichier de base de données d’images est
endommagé. Vérifiez le fichier de base de
données en sélectionnant
[Configuration] [
support)] [Rép.f.base.don.img].
La carte mémoire est endommagée. Formatez
la carte mémoire avec votre appareil.
Une carte mémoire incompatible est insérée
(p. 20).
(MENU)
( Réglages
Page 95

La carte mémoire est protégée en écriture.
L’accès à la carte mémoire a été restreint sur un
autre appareil.
Votre appareil n’est pas stable. Tenez fermement
l’appareil à deux mains. Notez toutefois que
l’indicateur d’avertissement de tremblement du
caméscope ne disparaît pas.
La carte mémoire est pleine. Supprimez les
images superflues.
Il est impossible d’enregistrer des photos
pendant le traitement. Patientez un instant, puis
enregistrez.
Durée de prise de vue pour les films/nombre de photos pouvant être enregistrées
Durée de fonctionnement attendue pour chaque batterie
Durée de prise de vue
Temps approximatif disponible lors de
l’utilisation d’une batterie en pleine charge.
2D
Batterie Durée de prise de
vue en continu
NP-FV70 180 90
NP-FV100 360 180
3D
Batterie Durée de prise de
vue en continu
NP-FV70 150 75
NP-FV100 305 150
Durée d’observation
Temps approximatif disponible lors de
l’utilisation d’une batterie en pleine charge.
2D
Batterie Durée d’observation en continu
NP-FV70 195
NP-FV100 395
(unité : minute)
Durée de prise de
vue type
(unité : minute)
Durée de prise de
vue type
(unité : minute)
Informations complémentaires
3D
(unité : minute)
Batterie Durée d’observation en continu
NP-FV70 185
NP-FV100 370
FR
41
Page 96

42
FR
Durée de lecture
Temps approximatif disponible lors de
l’utilisation d’une batterie en pleine charge.
(unité : minute)
Batterie 2D 3D
NP-FV70 290 250
NP-FV100 580 500
Chaque durée de fonctionnement en mode 2D
est mesurée avec [
[Standard
La durée de prise de vue type correspond à
des prises de vue répétées avec marche/arrêt,
activation du témoin MODE et utilisation du
zoom.
Des durées mesurées avec l’appareil à une
température de 25
recommandé.
La durée de prise de vue, d’observation et de
lecture est raccourcie lorsque vous utilisez votre
appareil à basse température.
La durée de prise de vue, d’observation et de
lecture est raccourcie en fonction des conditions
d’utilisation de votre appareil.
’indicateur d’autonomie restante (p. 50) affiche
L
la durée d’enregistrement et de lecture attendue.
Mode ENR] réglé sur
].
C. 10 C à 30 C est
Durée de prise de vue prévisible pour les films
Carte mémoire
(unité : minute)
2 Go 4 Go 8 Go 16 Go 32 Go
9
(9)15(15)35(35)75(75)
9
(9)15(15)35(35)75(75)
10
(10)20(20)40(40)90(90)
10
(10)30(30)60(60)
25
(20)50(40)
45
(35)90(75)
Chaque nombre est mesuré quand la carte
mémoire Sony est utilisée.
Remarques
Les durées de prises de vue et d’observation
disponibles varient selon le sujet et les
conditions d’enregistrement, [
Img. par seconde] (p. 36).
et [
Le nombre entre parenthèses indique la durée
de prise de vue minimale.
Conseils
Vous pouvez enregistrer des films ayant un
maximum de 3
en 2D.
La durée de prise de vue en continu pour un
film es
2D : environ 13 heures
3D : environ 6 heures et 30 minutes
999 scènes en 3D, 3 999 scènes
t la suivante :
105
(80)
190
(155)
120
(120)
215
(165)
380
(310)
Mode ENR],
150
(150)
150
(150)
180
(180)
245
(245)
440
(330)
770
(630)
Page 97

Votre appareil utilise le format VBR (débit
binaire variable) pour régler automatiquement
la qualité d’image en fonction de la scène
enregistrée. Cette technologie entraîne des
variations de la durée d’enregistrement d’un
support. Les films contenant des images
complexes et comportant des mouvements
rapides sont enregistrés à un débit binaire
supérieur, ce qui entraîne une diminution de la
durée d’enregistrement totale.
Nombre prévisible de photos pouvant être enregistrées
Carte mémoire
5,3M 7,1M
2 Go 620 560
4 Go 1250 1100
8 Go 2500 2250
16 Go 5000 4550
32 Go 10000 9200
Chaque nombre est mesuré quand la carte
mémoire Sony est utilisée.
Le nombre indiqué de photos pouvant être
enregistrées sur la carte mémoire correspond à
la taille d’image maximale de votre appareil et
à la taille d’image par défaut. Le nombre réel de
photos enregistrables s’affiche sur l’écran lors de
’enr
egistrement (p. 50).
l
Le nombre de photos enregistrables sur la
carte mémoire varie selon les conditions
d’enregistrement.
Remarques
La matrice de pixels du capteur Sony ClearVid
et le système de traitement d’image uniques
permettent une résolution des images fixes
équivalente aux tailles décrites.
Conseils
La liste suivante indique le débit binaire, les
pixels et le format d’image de chaque mode
d’enregistrement (film + sons, etc.).
ilm 3D
:
F
maximum 28 Mbps 1 920
Film 2D :
PS : maximum 28 Mbps
1 920
1 080
pixels/16:9
1 080 p
ixels/16:9
FX : maximum 24 Mbps
pixels/16:9
1 080
1 920
FH : environ 17 Mbps (moyenne)
ixels/16:9
1 080 p
1 920
HQ : environ 9 Mbps (moyenne)
ixels/16:9
1 080 p
1 440
LP : environ 5 Mbps (moyenne)
ixels/16:9
1 080 p
1 440
Pixels d’enregistrement photo et format d’image.
’enregistrement de photos :
Mode d
3 072 2 304 p
3 072 1 728 p
1 600 1 200 p
oints/4:3
oints/16:9
oints/4:3
640 480 points/4:3
Informations complémentaires
FR
43
Page 98

44
FR
Précautions
Remarques sur l’utilisation et l’entretien
N’utilisez pas et ne rangez pas l’appareil et ses
accessoires dans les endroits suivants :
dans des endroits extrêmement chauds, froids
ou humides. Ne les exposez jamais à des
temp
ératures supérieures à 60
en plein soleil, à proximité d’un chauffage
ou dans un véhicule stationné au soleil. Ils
pourraient ne pas fonctionner correctement
ou être déformés.
à proximité de forts champs magnétiques ou
de vibrations mécaniques. Cet appareil peut
rencontrer un dysfonctionnement.
à proximité d’ondes radio ou de radiations
fortes. L’appareil pourrait ne pas enregistrer
correctement.
rès de r
écepteurs AM ou d’équipements
p
vidéo. Des parasites sonores pourraient
survenir.
à la plage ou dans des endroits poussiéreux. si
du sable ou de la poussière pénètre dans votre
appareil, celui-ci pourrait ne pas fonctionner
correctement. Ce problème peut parfois être
irréversible.
Faites fonctionner l’appareil sous une tension
V/7,2
de 6,8
V CC (batterie) ou 8,4 V CC
(adaptateur secteur).
Pour le fonctionnement sur secteur (CA) ou sur
courant continu (CC), utilisez les accessoires
recommandés dans ce mode d’emploi.
Ne mouillez pas votre appareil, par exemple,
avec de l’eau de pluie ou de mer. Si l’appareil
est mouillé, il risque de ne pas fonctionner
correctement. Ce problème peut parfois être
irréversible.
Si un solide ou un liquide pénètre dans
l’appareil, débranchez-le et faites-le vérifier
par votre revendeur Sony avant de continuer à
l’utiliser.
Evitez de manipuler le caméscope brusquement,
de le démonter, de le modifier, de lui infliger des
chocs métalliques ou impacts tel que celui d’un
marteau, de le laisser tomber et de le piétiner.
Prenez particulièrement soin de l’objectif.
Laissez l’appareil éteint lorsque vous ne l’utilisez
pas.
C, comme
N’enveloppez pas l’appareil dans un tissu
(serviette, etc.), pendant l’utilisation. Cela
pourrait entraîner une surchauffe interne de
l’appareil.
Pour débrancher le cordon d’alimentation, tirez
sur la fiche du cordon d’alimentation, ne tirez
jamais sur le cordon (fil).
Ne pliez pas de force le cordon d’alimentation et
ne posez pas d’objets lourds dessus.
N’utilisez pas de batterie déformée ou
endommagée.
Maintenez les contacts métalliques propres.
En cas de fuite du liquide électrolytique de la
terie :
at
b
Contactez votre centre de service après-vente
agréé Sony.
Nettoyez la partie de la peau qui a été en
contact avec le liquide.
En cas de contact avec les yeux, rincez-les à
grande eau et consultez un médecin.
Si vous n’utilisez pas votre appareil
pendant une longue période
Pour conserver longtemps votre appareil dans
un état de fonctionnement optimal, environ une
fois par mois mettez-le sous tension et laissez-le
fonctionner en enregistrant et en lisant des
images.
Déchargez entièrement la batterie avant de la
ranger.
Remarques sur la manipulation du boîtier
Si le boîtier est sale, nettoyez la surface de
l’appareil avec un chiffon doux légèrement
humidifié, puis essuyez-le avec un chiffon doux
et sec.
Afin de ne pas abîmer la surface, évitez les
tions suivantes :
péra
o
Utilisation de solvants, tels que des diluants,
de l’essence, de l’alcool, des chiffons imprégnés
de produits chimiques, des répulsifs, de
l’insecticide et du filtre solaire
Manipulation de l’appareil avec les substances
décrites ci-dessus sur les mains
Mise en contact du boîtier avec des objets en
caoutchouc ou en vinyle pendant une longue
période
Page 99

A propos de l’entretien et du stockage
de l’objectif
Essuyez la surface de l’objectif avec un chiffon
doux dans les cas suivants :
lorsqu’il y a des traces de doigts sur la surface
de l’o
bjectif ;
lorsque vous utilisez le caméscope dans des
lieux cha
uds ou humides ;
lorsque l’objectif est exposé à de l’air salé,
comme au bord de la mer.
Rangez l’objectif dans un lieu bien aéré, à l’abri
de la poussière et de la saleté.
Pour éviter la formation de moisissures,
nettoyez régulièrement l’objectif comme indiqué
ci-dessus.
Remarques sur le chargement de la
batterie rechargeable intégrée
L’appareil est équipé d’une batterie rechargeable
intégrée permettant de conserver en mémoire la
date, l’heure et d’autres réglages, même lorsqu’il
est éteint. La batterie rechargeable intégrée est
toujours chargée lorsque l’appareil est raccordé à
la prise murale via l’adaptateur secteur ou lorsque
la batterie est installée. La batterie rechargeable est
tièr
ement déchargée au bout de 3 mois environ
en
si vous n’utilisez pas du tout votre appareil.
Utilisez l’appareil après avoir chargé la batterie
rechargeable intégrée. Néanmoins, même si la
batterie rechargeable intégrée n’est pas chargée, le
fonctionnement de l’appareil n’est pas affecté tant
que vous n’enregistrez pas la date.
Procédures
Branchez votre appareil à une prise murale à l’aide
de l’adaptateur secteur fourni et laissez-le hors
tension pendant plus de 24 heures.
Remarque sur la mise au rebut ou la
cession de la carte mémoire
Même si vous supprimez les données de la carte
mémoire ou que vous la formatez sur votre
appareil ou sur un ordinateur, il se peut que vous
ne puissiez pas effacer entièrement les données
qu’elle contient. Si vous donnez la carte mémoire à
quelqu’un, il est recommandé de supprimer toutes
les données à l’aide d’un logiciel de suppression
de données depuis un ordinateur. Par ailleurs,
lors de la mise au rebut de la carte mémoire, il
est recommandé de détruire le corps de la carte
mémoire.
Informations complémentaires
FR
45
Page 100

46
FR
Spécifications
Système
Format du signal :
spécifications 1080/60i, 1080/60p HDTV
spécifications couleur NTSC, normes EIA
spécifications 1080/50i, 1080/50p HDTV
spécifications couleur PAL, normes CCIR
or
mat d’enregistrement de films :
F
HD :
2D : MP
EG-4 AVC/H.264 compatible format
AVCHD version 2.0
EG-4 MVC/H.264 compatible format
3D : MP
AVCHD version 2.0
ème d’enregistrement audio :
Syst
Dolby Digital 2ch (48 kHz 16 bits)
Dolby Digital Stereo Creator
Format du fichier photo
compatible avec DCF Ver.2.0
compatible avec Exif Ver.2.3
compatible avec MPF Baseline
Format d’enregistrement (film/photo)
«Memory Stick PRO Duo»
Carte SD (classe 4 ou supérieure)
Viseurs : Viseurs électroniques
Image : 1,1 cm (type 0,45, format 16:9)
Nombre total de pixels :
1 226
Dégagement oculaire : 14,3 mm
Champ de vision réel
DEV-3 :
43,9
DEV-5/5K :
43,9
réglé sur [Désact])
43,9 – 1,9 (film 2D, [Zoom numérique] est
réglé sur [Act])
Champ de vision apparent*1 : 35,6 (16:9),
29,4
Champ de vision à 1 000 m :
DEV-3 :
806 m – 66 m (film 2D)
DEV-5/5K :
806 m – 66 m (film 2D, [Zoom numérique]
est réglé sur [Désact])
806 m – 33 m (film 2D, [Zoom numérique]
est réglé sur [Act])
Réglage de la distance interpupillaire :
55 mm – 75 mm
Correction dioptrique : –3,5 à +3,5
Dispositif d’image :
capteur CMOS de 4,5 mm (type 1/4)
ls d’enregistrement (photo) :
Pixe
7 100 000 pixels maximum
(4:3)
t : environ 4 200 000 pixels
Bru
3 [RVB] 480)
880 (852
1
*
:
– 3,8 (film 2D)*
– 3,8 (film 2D, [Zoom numérique] est
(4:3)
2
2
*
2
*
2
*
2
*
2
*
2 : couleur
3
*
(3 072 2 304)
Objectif : Objectif G
Grossissement (environ) :
DEV-3 :
– 10 (film 2D)*
0,8
0,5 – 5,4 (film 3D)*
2
2
0,5 – 10 (photo, 16:9)
– 7,5 (photo, 4:3)
0,3
DEV-5/5K :
– 10 (film 2D, [Zoom numérique] est
0,8
réglé sur [Désact])
0,8 – 20 (film 2D, [Zoom numérique] est
réglé sur [Act])
0,5 – 5,4 (film 3D)*
2
*
2
*
2
0,5 – 20 (photo, 16:9)
– 15 (photo, 4:3)
0,3
Rapport de grossissement (environ) :
DEV-3 :
(film 2D)
12
(film 3D)
10
(photo)
22
DEV-5/5K :
(film 2D, [Zoom numérique] est réglé
12
sur [Désact])
(film 2D, [Zoom numérique] est réglé
24
sur [Act])
(film 3D)
10
(photo)
44
F1,8 - F3,4
Lors de la conversion avec un appareil photo
de 35 mm
EV-3 :
D
f=53,7 mm – 660 mm (film 2D)
f=34,4 mm – 344 mm (film 3D)*
2
*
2
f=29,8 mm – 660 mm (photo, 16:9)
f=27,4 mm – 606 mm (photo, 4:3)
DEV-5/5K :
f=53,7 mm – 660 mm (film 2D, [Zoom
numérique] est réglé sur [Désact])
f=53,7 mm – 1 320 mm (film 2D, [Zoom
numérique] est réglé sur [Act])
f=34,4 mm – 344 mm (film 3D)*
*
2
*
2
f=29,8 mm – 1 320 mm (photo, 16:9)
f=27,4 mm – 1 213 mm (photo, 4:3)
Eclairage minimum
11 lx (lux) (par défaut, la vitesse d’obturation
est de 1/60 seconde
4
*
, 1/50 seconde*5)
Distance de mise au point minimale :
Film 2D : 1 cm (écran large)/80 cm
(téléobjectif)
Film 3D
: 80 cm (écran large)/7,5 m
(téléobjectif)
to : 1 cm (écran large)/80 cm
Pho
(téléobjectif)/25 cm (télé macro)
2
 Loading...