

Page 1

Operation Manual
Mode d’emploi
CD Receiver
Récepteur CD
DEH-P2900MP
English EspañolFrançais
Page 2
Contents
Thank you for buying this Pioneer product.
Please read through these operating instructions so you will know how to operate
your model properly. After you have finished reading the instructions, keep this man-
ual in a safe place for future reference.
Before You Start
Information to User 4
For Canadian model 4
About this unit 4
After-sales service for Pioneer products 4
Visit our website 5
About WMA 5
About MP3 5
About the SAT RADIO READY mark 5
Use and care of the remote control 6
– Installing the battery 6
– Using the remote control 6
Protecting your unit from theft 6
– Removing the front panel 6
– Attaching the front panel 6
Basic Operations
What’s What 8
– Head unit 8
– Remote control 9
Turning the unit on and selecting a
source 9
Adjusting the volume 9
Turning the unit off 9
Tuner
Listening to the radio 10
Introduction of advanced tuner
operation 10
Storing and recalling broadcast
frequencies 10
Storing the strongest broadcast
frequencies 11
Tuning in strong signals 11
Built-in Player
Playing a disc 12
Introduction of advanced built-in CD player
operation 12
Repeating play 13
Playing tracks in random order 13
Scanning tracks or folders 13
Pausing disc playback 13
Using compression and BMX 14
Searching every 10 tracks in the current disc
or folder 14
Displaying text information on disc 14
Multi-CD Player
Playing a CD 15
Introduction of advanced multi-CD player
operation 15
Repeating play 15
Playing tracks in random order 16
Scanning CDs and tracks 16
Pausing CD playback 16
Using compression and bass emphasis 16
Using ITS playlists 17
– Creating a playlist with ITS
programming 17
– Playback from your ITS playlist 17
– Erasing a track from your ITS
playlist 17
– Erasing a CD from your ITS playlist 18
Using CD TEXT functions 18
Audio Adjustments
Introduction of audio adjustments 19
Using balance adjustment 19
Using the equalizer 19
– Recalling equalizer curves 20
– Adjusting equalizer curves 20
– Fine-adjusting equalizer curve 20
Adjusting loudness 21
Using subwoofer output 21
– Adjusting subwoofer settings 21
Using the high pass filter 21
Boosting the bass 22
Front image enhancer (F.I.E.) 22
Adjusting source levels 22
2
En
Page 3

Contents
Other Functions
Adjusting initial settings 23
Setting the clock 23
Switching the auxiliary setting 23
Setting the rear output and subwoofer
controller 23
Turning the clock display on or off 24
Using the AUX source 24
– About AUX connection method 24
– Selecting AUX as the source 24
Introduction of iPod® operation 24
– iPod operation 25
– Displaying text information on
iPod 25
Introduction of XM operation 25
– XM operation 25
– Switching the XM display 25
– Switching the XM channel select
mode 25
Introduction of SIRIUS operation 26
– SIRIUS operation 26
– Switching the SIRIUS channel select
setting 26
– Switching the SIRIUS display 26
– When the game of the selected team
starts 26
– Displaying game information 26
English
Additional Information
Understanding built-in CD player error
messages 28
Handling guideline of discs and player 28
Dual Discs 29
WMA, MP3 and WAV files 29
– Example of a hierarchy 29
– Compressed audio compatibility 29
Specifications 31
En
3
Page 4
Section
01
Before You Start
Information to User
Alteration or modifications carried out without
appropriate authorization may invalidate the
user’s right to operate the equipment.
For Canadian model
This Class B digital apparatus complies with
Canadian ICES-003.
About this unit
The tuner frequencies on this unit are allocated for use in North America. Use in other
areas may result in poor reception.
WARNING
Handling the cord on this product or cords associated with accessories sold with the product
may expose you to chemicals listed on proposition 65 known to the State of California and other
governmental entities to cause cancer and birth
defects or other reproductive harm. Wash hands
after handling.
Also, this unit damage, smoke, and overheat
could result from contact with liquids.
! Keep this manual handy as a reference for op-
erating procedures and precautions.
! Always keep the volume low enough so that
you can hear sounds from outside the vehicle.
! Protect this unit from moisture.
! If the battery is disconnected or discharged,
the preset memory will be erased and must be
reprogrammed.
Important (Serial number)
The serial number is located on the bottom of
this unit. For your own security and convenience,
be sure to record this number on the enclosed
warranty card.
After-sales service for
Pioneer products
Please contact the dealer or distributor from
where you purchased this unit for after-sales
service (including warranty conditions) or any
other information. In case the necessary information is not available, please contact the
companies listed below:
Please do not ship your unit to the companies
at the addresses listed below for repair without
advance contact.
CAUTION:
USE OF CONTROL OR ADJUSTMENT OR
PERFORMANCE OF PROCEDURES
OTHER THAN THOSE SPECIFIED HEREIN
MAY RESULT IN HAZARDOUS RADIATION
EXPOSURE.
CAUTION:
THE USE OF OPTICAL INSTRUMENTS
WITH THIS PRODUCT WILL INCREASE
EYE HAZARD.
CAUTION
! Do not allow this unit to come into contact
with liquids. Electrical shock could result.
4
En
U.S.A.
Pioneer Electronics (USA) Inc.
CUSTOMER SUPPORT DIVISION
P.O. Box 1760
Long Beach, CA 90801-1760
800-421-1404
CANADA
Pioneer Electronics of Canada, Inc.
CUSTOMER SATISFACTION DEPARTMENT
300 Allstate Parkway
Markham, Ontario L3R OP2
1-877-283-5901
Page 5
Before You Start
Section
01
For warranty information please see the Limited Warranty sheet included with this unit.
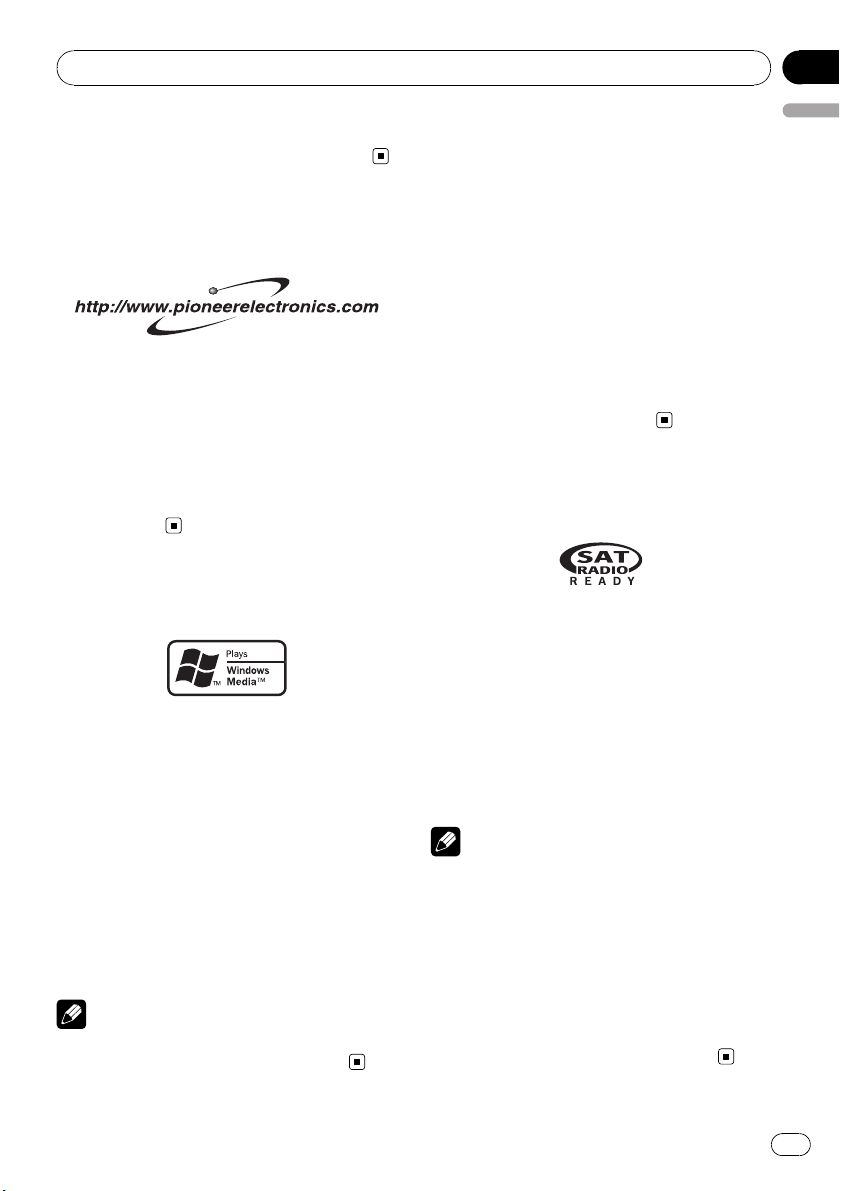
Visit our website
Visit us at the following site:
1 Register your product. We will keep the details
of your purchase on file to help you refer to
this information in the event of an insurance
claim such as loss or theft.
2 Receive updates on the latest products and
technologies.
3 Download owner’s manuals, order product
catalogues, research new products, and
much more.
About WMA
The Windows Media™ logo printed on the box
indicates that this unit can play back WMA
data.
WMA is short for Windows Media™ Audio
and refers to an audio compression technology that is developed by Microsoft Corporation. WMA data can be encoded by using
Windows Media Player version 7 or later.
Windows Media and the Windows logo are trademarks or registered trademarks of Microsoft
Corporation in the United States and/or other
countries.
Note
This unit may not operate correctly depending on
the application used to encode WMA files.
English
About MP3
Supply of this product only conveys a license
for private, non-commercial use and does not
convey a license nor imply any right to use
this product in any commercial (i.e. revenuegenerating) real time broadcasting (terrestrial,
satellite, cable and/or any other media), broadcasting/streaming via internet, intranets and/
or other networks or in other electronic content distribution systems, such as pay-audio or
audio-on-demand applications. An independent license for such use is required. For details, please visit
http://www.mp3licensing.com.
About the SAT RADIO
READY mark
The SAT RADIO READY mark printed on the
front panel indicates that the Satellite Radio
Tuner for Pioneer (i.e., XM tuner and Sirius satellite tuner which are sold separately) can be
controlled by this unit. Please inquire to your
dealer or nearest authorized Pioneer service
station regarding the satellite radio tuner that
can be connected to this unit. For satellite
radio tuner operation, please refer to the satellite radio tuner owner’s manual.
Notes
! The system will use direct satellite-to-receiver
broadcasting technology to provide listeners
in their cars and at home with crystal-clear
sound seamlessly from coast to coast. Satellite radio will create and package over 100
channels of digital-quality music, news,
sports, talk and children’s programming.
! “SAT Radio”, the SAT Radio logo and all re-
lated marks are trademarks of Sirius Satellite
Radio inc., and XM Satellite Radio Inc.
En
5
Page 6
Section
01
Before You Start
Use and care of the remote
control
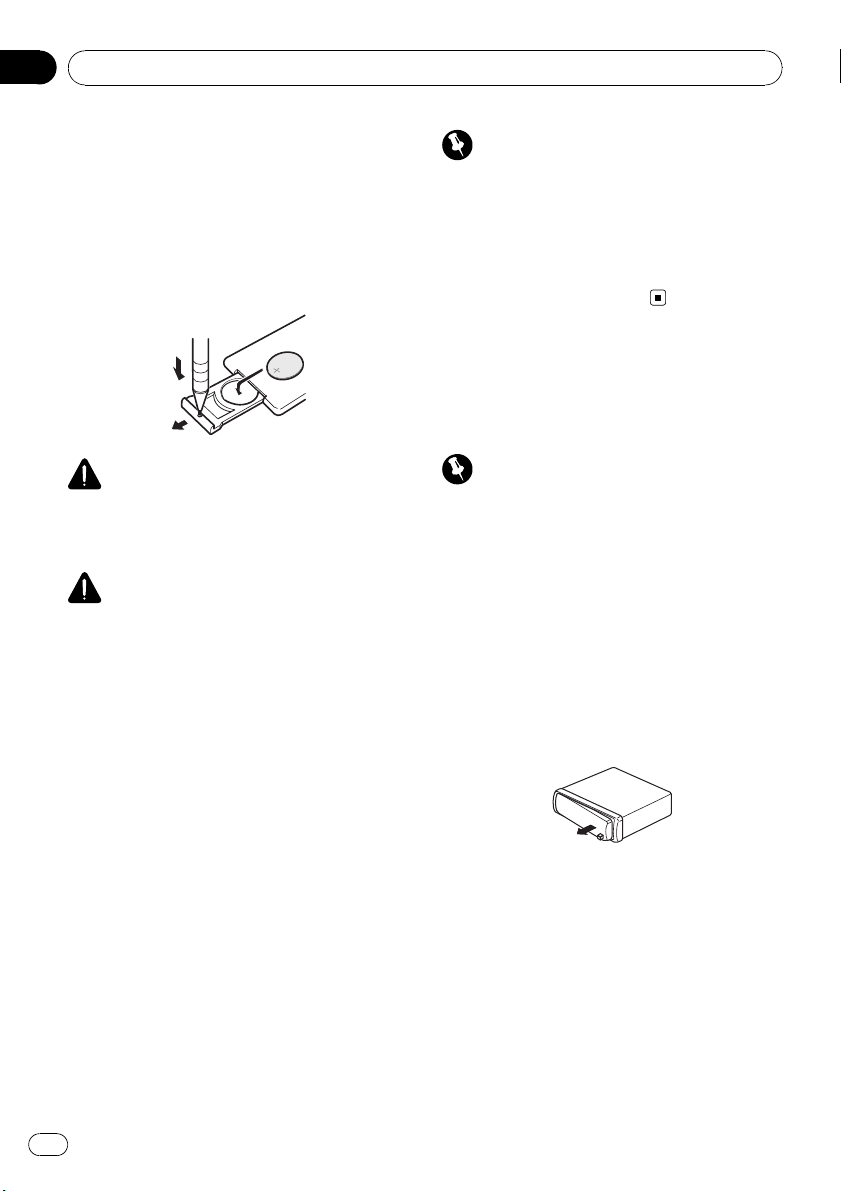
Installing the battery
Slide the tray out on the back of the remote
control and insert the battery with the plus (+)
and minus (–) poles pointing in the proper direction.
WARNING
Keep the battery out of the reach of children.
Should the battery be swallowed, immediately
consult a doctor.
CAUTION
! Use only one CR2025 (3 V) lithium battery.
! Remove the battery if the remote control is not
used for a month or longer.
! Danger of explosion if battery is incorrectly re-
placed. Replace only with the same or equivalent type.
! Do not handle the battery with metallic tools.
! Do not store the battery with metallic materi-
als.
! In the event of battery leakage, wipe the re-
mote control completely clean and install a
new battery.
! When disposing of used batteries, please
comply with governmental regulations or environmental public institutions’ rules that
apply in your country/area.
Using the remote control
Point the remote control in the direction of the
front panel to operate.
Important
! Do not store the remote control in high tem-
peratures or direct sunlight.
! The remote control may not function properly
in direct sunlight.
! Do not let the remote control fall onto the
floor, where it may become jammed under the
brake or accelerator pedal.
Protecting your unit from
theft
The front panel can be detached to deter theft.
Important
! Handle gently when removing or attaching
the front panel.
! Avoid subjecting the front panel to excessive
shocks.
! Keep the front panel out of direct sunlight and
high temperatures.
Removing the front panel
1 Press DETACH to release the front
panel.
2 Grab the front panel and remove.
Attaching the front panel
1 Slide the front panel to the left until it
clicks.
Front panel and the head unit are jointed on
the left side. Make sure that the front panel
has been jointed to the head unit.
6
En
Page 7

Before You Start
Section
01
2 Press the right side of the front panel
until it is firmly seated.
# If you can’t attach the front panel to the head
unit successfully, try again. Front panel may be
damaged if you attach the front panel forcedly.
English
En
7
Page 8
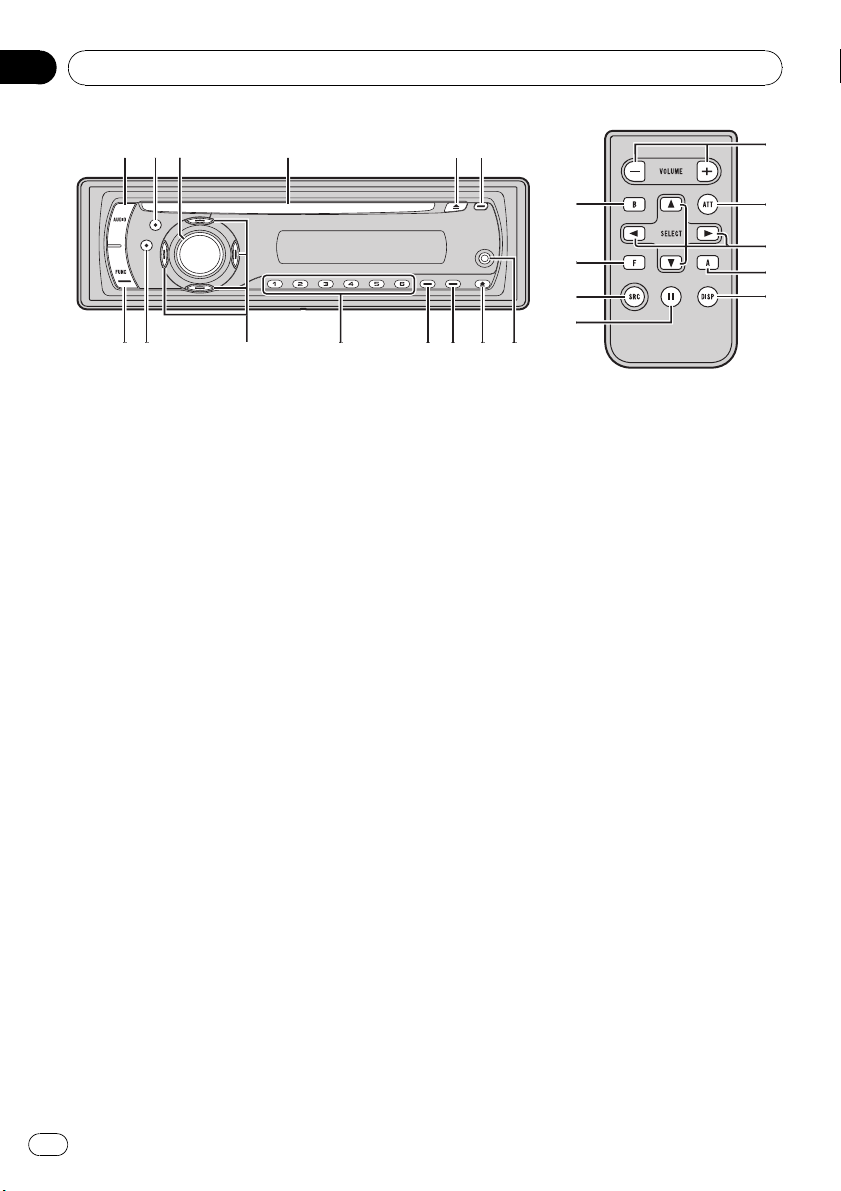
1
8
b
6
243
9
75a
cde
c
g
9
1
h
i
e
d
f
Section
02
Basic Operations
What’s What
Head unit
1 AUDIO button
Press to select various sound quality controls.
2 EQ button
Press to select various equalizer curves.
3 SOURCE button, VOLUME
This unit is turned on by selecting a source.
Press to cycle through all the available
sources.
Rotate it to increase or decrease the volume.
4 Disc loading slot
Insert a disc to play.
5 EJECT button
Press to eject a CD from your built-in CD
player.
6 CLOCK button
Press to change to the clock display. Press
and hold to change the channel select
mode when XM tuner or SIRIUS tuner is selected as the source.
8 DETACH button
Press to remove the front panel from the
head unit.
9 DISPLAY button
Press to select different displays.
a SW button
Press to select the subwoofer setting menu.
Press and hold to select the bass boost setting menu.
b 1 to 6 buttons
Press for preset tuning and disc number
search when using a multi-CD player.
c a/b/c/d buttons
Press to perform manual seek tuning, fast
forward, reverse and track search controls.
Also used for controlling functions.
d BAND button
Press to select among three FM bands and
one AM band and to cancel the control
mode of functions.
e FUNCTION button
Press to select functions.
7 AUX1 input jack (3.5 mm stereo jack)
Use to connect an auxiliary equipment.
8
En
Page 9

Basic Operations
Section
02
Remote control
Operation is the same as when using the buttons on the head unit. See the explanation of
the head unit about the operation of each button with the exception of ATT and PAUSE,
which is explained below.
f VOLUME button
Press to increase or decrease the volume.
g ATT button
Press to quickly lower the volume level, by
about 90%. Press once more to return to the
original volume level.
h PAUSE button
Press to turn pause on or off.
i SOURCE button
This unit is turned on by selecting a source.
Press to cycle through all the available
sources.
Turning the unit on and
selecting a source
You can select a source you want to listen to.
To switch to the built-in CD player, load a disc
in the unit (refer to page 12).
% Press SOURCE to select a source.
Press SOURCE repeatedly to switch between
the following sources:
XM tuner—SIRIUS tuner—Tuner—Television—Built-in CD player—Multi-CD player
—iPod—External unit 1—External unit 2—
AUX1—AUX2
— When the AUX (auxiliary input) is set to off
English
(refer to page 23).
! AUX1 is set to on by default. Turn off the AUX1
when not in use (refer to Switching the auxili-
ary setting on page 23).
! External unit refers to a Pioneer product (such
as one available in the future) that, although
incompatible as a source, enables control of
basic functions by this unit. Two external units
can be controlled by this unit. When two external units are connected, the allocation of
them to external unit 1 or external unit 2 is
automatically set by this unit.
! When this unit’s blue/white lead is connected
to the vehicle’s auto-antenna relay control
terminal, the vehicle’s antenna extends when
this unit’s source is turned on. To retract the
antenna, turn the source off.
Adjusting the volume
% Use VOLUME to adjust the sound
level.
Turning the unit off
% Press SOURCE and hold until the unit
turns off.
Notes
! In the following cases, the sound source will
not change:
— When there is no unit corresponding to the
selected source connected to this unit.
— When there is no disc in the unit.
— When there is no magazine in the multi-
CD player.
En
9
Page 10
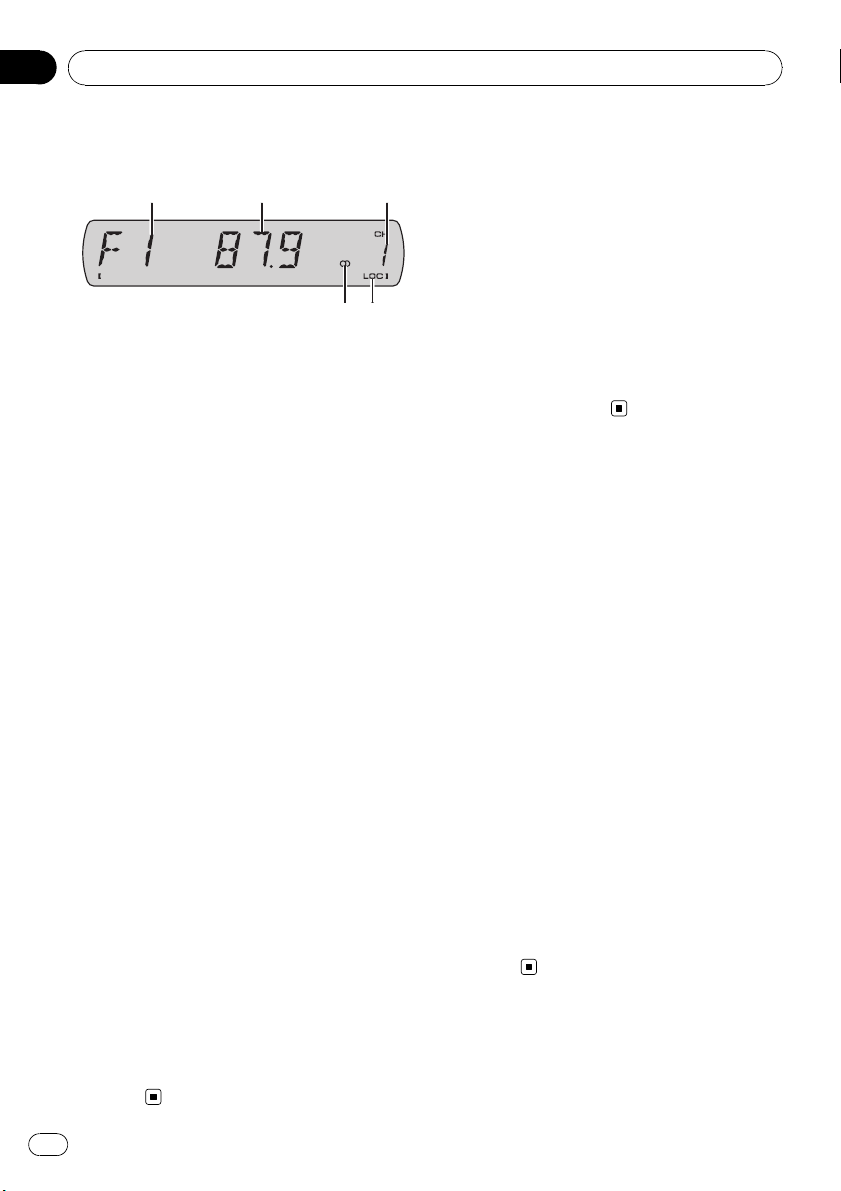
5
4
321
Section
03
Tuner
Listening to the radio
1 Band indicator
Shows which band the radio is tuned to, AM
or FM.
2 Frequency indicator
Shows the frequency to which the tuner is
tuned.
3 Preset number indicator
Shows which preset has been selected.
4 LOC indicator
Shows when local seek tuning is on.
5 Stereo (5) indicator
Shows when the selected frequency is
being broadcast in stereo.
1 Press SOURCE to select the tuner.
Press SOURCE until you see TUNER displayed.
2 Press BAND to select a band.
Press BAND until the desired band (F1, F2, F3
for FM or AM) is displayed.
3 To perform manual tuning, briefly press
c or d.
4 To perform seek tuning, press and hold
c or d for about one second and release.
The tuner will scan the frequencies until a
broadcast strong enough for good reception is
found.
# You can cancel seek tuning by briefly pressing
c or d.
# If you press and hold c or d you can skip sta-
tions. Seek tuning starts as soon as you release
the button.
Introduction of advanced
tuner operation
% Press FUNCTION to display the function
names.
Press FUNCTION repeatedly to switch between the following functions:
BSM (best stations memory)—LOCAL (local
seek tuning)
# To return to the frequency display, press
BAND.
# If you do not operate the function within about
30 seconds, the display is automatically returned
to the frequency display.
Storing and recalling
broadcast frequencies
If you press any of the preset tuning buttons 1
to 6 you can easily store up to six broadcast
frequencies for later recall with the touch of a
button.
! Up to 18 FM stations, six for each of the
three FM bands, and six AM stations can
be stored in memory.
% When you find a frequency that you
want to store in memory, press one of preset tuning buttons 1 to 6 and hold until the
preset number stops flashing.
The number you have pressed will flash in the
preset number indicator and then remain lit.
The selected radio station frequency has been
stored in memory.
The next time you press the same preset tuning button the radio station frequency is recalled from memory.
# You can also use a and b to recall radio sta-
tion frequencies assigned to preset tuning buttons 1 to 6.
10
En
Page 11

Tuner
Storing the strongest
broadcast frequencies
BSM (best stations memory) lets you automatically store the six strongest broadcast frequencies under preset tuning buttons 1 to 6.
Once stored you can tune in to those frequencies with the touch of button.
! Storing broadcast frequencies with BSM
may replace broadcast frequencies you
have saved using buttons 1 to 6.
1 Press FUNCTION to select BSM.
2 Press a to turn BSM on.
Six strongest broadcast frequencies will be
stored in the order of their signal strength.
# To cancel the storage process, press b.
Tuning in strong signals
Local seek tuning lets you tune in only those
radio stations with sufficiently strong signals
for good reception.
Section
03
English
1 Press FUNCTION to select LOCAL.
2 Press a to turn local seek tuning on.
Local seek sensitivity (e.g., LOCAL 2) appears
in the display.
# To turn local seek tuning off, press b.
3 Press c or d to set the sensitivity.
There are four levels of sensitivity for FM and
two levels for AM:
FM: LOCAL 1—LOCAL 2—LOCAL 3—
LOCAL 4
AM: LOCAL 1—LOCAL 2
The LOCAL 4 setting allows reception of only
the strongest stations, while lower settings let
you receive progressively weaker stations.
En
11
Page 12

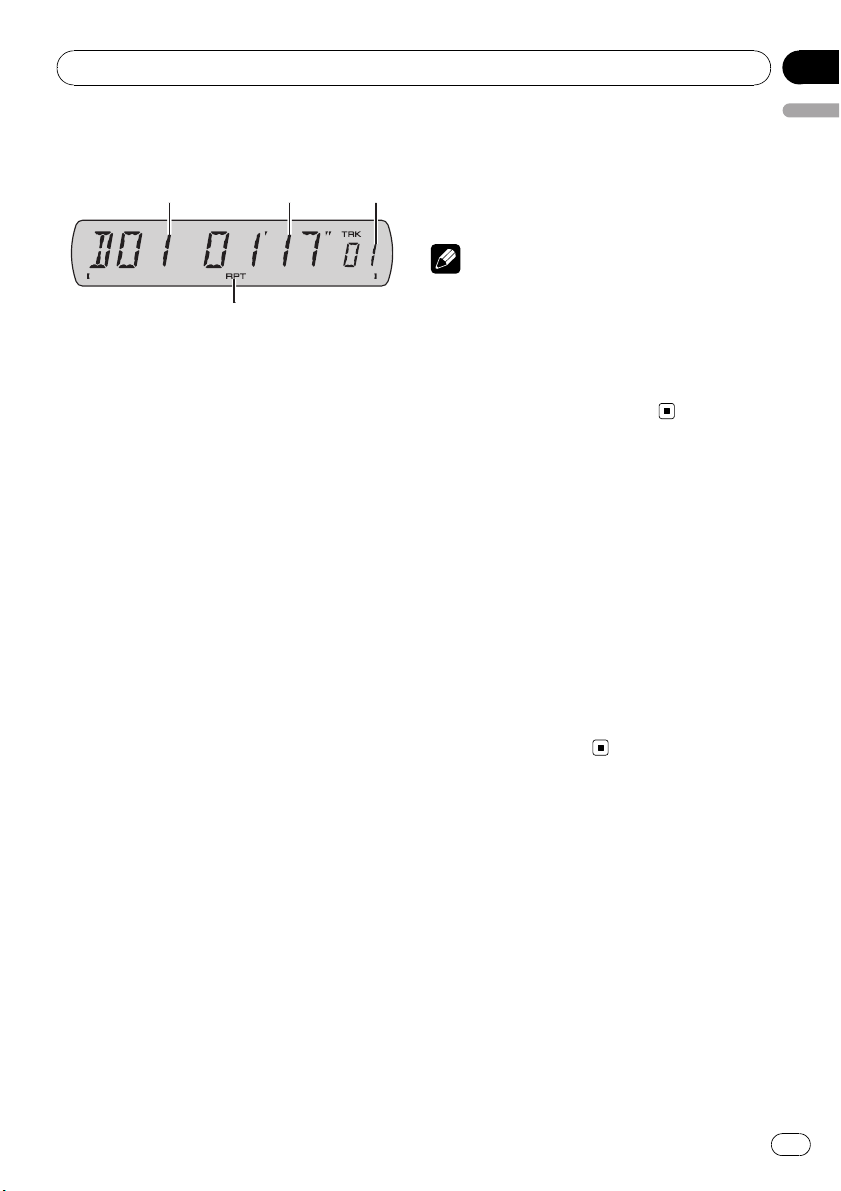
4
3
2
5
6
1
Section
04
Built-in Player
Playing a disc
1 Folder number indicator
Shows the folder number currently playing
when playing a WMA/MP3/WAV disc.
2 Play time indicator
Shows the elapsed playing time of the current track (file).
3 Track number indicator
Shows the track (file) number currently playing.
! If a track number 100 or more is selected,
d on the left of the track number indicator will light.
4 RPT indicator
Shows when repeat range is selected to current track (file).
5 WMA indicator
Shows when a WMA file is playing.
6 MP3 indicator
Shows when an MP3 file is playing.
1 Insert a CD (CD-ROM) into the disc loading slot.
Playback will automatically start.
# Be sure to turn up the label side of a disc.
# After a CD (CD-ROM) has been inserted, press
SOURCE to select the built-in CD player.
# You can eject a CD (CD-ROM) by pressing
EJECT.
2 Press a or b to select a folder when
playing a WMA/MP3/WAV disc.
# You cannot select a folder that does not have
a WMA/MP3/WAV file recorded in it.
# To return to folder 01 (ROOT), press and hold
BAND. However, if folder 01 (ROOT) contains no
files, playback commences with folder 02.
3 To perform fast forward or reverse,
press and hold c or d.
# If you select ROUGH, pressing and holding c
or d enables you to search every 10 tracks in the
current disc (folder). (Refer to Searching every 10
tracks in the current disc or folder on page 14.)
4 To skip back or forward to another
track, press c or d.
Notes
! Read the precautions with discs and player on
page 28.
! If an error message such as ERROR-11 is dis-
played, refer to Understanding built-in CD
player error messages on page 28.
! There is sometimes a delay between starting
up disc playback and the sound being issued.
When being read, FRMTREAD is displayed.
! When playing CD-EXTRA or MIXED-MODE
CDs, WMA/MP3/WAV and CD-DA can be
swithced by pressing BAND.
! If you have switched between WMA/MP3/
WAV files and audio CD-DA, playback starts at
the first track on the disc.
! The built-in CD player can play back a WMA/
MP3/WAV file recorded on CD-ROM. (Refer to
page 29 for files that can be played back.)
! When playing back VBR (variable bit rate) re-
corded files, erapsed play time may not be displayed correctly.
! When playing WMA/MP3/WAV disc, there is
no sound on fast forward or reverse.
Introduction of advanced
built-in CD player operation
% Press FUNCTION to display the function
names.
Press FUNCTION repeatedly to switch between the following functions:
12
En
Page 13

Built-in Player
Section
04
RPT (repeat play)—RDM (random play)—
SCAN (scan play)—PAUSE (pause)—COMP
(compression and BMX)—FF/REV (search
method)
# To return to the playback display, press BAND.
# If you do not operate the function within about
30 seconds, the display is automatically returned
to the playback display.
Repeating play
Repeat play plays the same track/folder within
the selected repeat play range.
1 Press FUNCTION to select RPT.
2 Press c or d to select the repeat range.
DSC – Repeat all tracks
TRK – Repeat just the current track
FLD – Repeat the current folder
# If you select another folder during repeat play,
the repeat play range changes to disc repeat.
# When playing CD, performing track search or
fast forward/reverse cancels the repeat play automatically.
# When playing WMA/MP3/WAV disc, performing track search or fast forward/reverse during
TRK (track repeat) changes the repeat play range
to folder repeat.
# When FLD (folder repeat) is selected, it is not
possible to play back a subfolder of that folder.
English
Note
If you turn random play on during FLD and then
return to the playback display, FRDM appears in
the display.
Scanning tracks or folders
Scan play searches the song within the selected repeat range.
1 Select the repeat range.
Refer to Repeating play on this page.
2 Press FUNCTION to select SCAN.
3 Press a to turn scan play on.
SCAN :ON appears in the display. The first 10
seconds of each track is played.
4 When you find the desired track press
b to tur n scan play off.
# If the display has automatically returned to
the playback display, select SCAN again by pressing FUNCTION.
Notes
! After scanning of a disc (folder) is finished,
normal playback of the tracks will begin
again.
! If you turn scan play on during FLD and then
return to the playback display, FSCN appears
in the display.
Playing tracks in random order
Random play plays tracks in a random order
within the selected repeat range.
1 Select the repeat range.
Refer to Repeating play on this page.
2 Press FUNCTION to select RDM.
3 Press a to turn random play on.
RDM :ON appears in the display. Tracks will
play in a random order.
# To turn random play off, press b.
Pausing disc playback
Pause lets you temporarily stop playback of
the disc.
1 Press FUNCTION to select PAUSE.
2 Press a to turn pause on.
PAUSE:ON appears in the display. Play of the
current track pauses.
# To turn pause off, press b.
En
13
Page 14
Section
04
Built-in Player
Using compression and BMX
Using the COMP (compression) and BMX
functions let you adjust the sound playback
quality of this unit.
1 Press FUNCTION to select COMP.
2 Press a or b to select your favorite setting.
COMP OFF—COMP 1—COMP 2—
COMP OFF—BMX 1—BMX 2
Searching every 10 tracks in
the current disc or folder
You can switch the search method between
fast forward/reverse and searching every 10
tracks. Selecting ROUGH enables you to
search every 10 tracks.
1 Press FUNCTION to select FF/REV.
# If the search method ROUGH has been pre-
viously selected, ROUGH will be displayed.
2 Press d to select ROUGH.
! FF/REV – Fast forward and reverse
! ROUGH – Searching every 10 tracks
# To select FF/REV, press c.
3 Press BAND to return to the playback
display.
4 Press and hold c or d to search every
10 tracks on a disc (folder).
# If the rest of track number is less than 10,
press and hold c or d recalls the first (last)
one.
For CD TEXT discs
Play time—DISC TTL (disc title)—ART NAME
(disc artist name)—TRK TTL (track title)—
ART NAME (track artist name)
For WMA/MP3 discs
Play time—FOLDER (folder name)—FILE (file
name)—TRK TTL (track title)—ART NAME (artist name)—ALBM TTL (album title)—
COMMENT (comment)—Bit rate
For WAV discs
Play time—FOLDER (folder name)—FILE (file
name)—Sampling frequency
Notes
! You can scroll to the left of the title by pressing
and holding DISPLAY.
! Audio CD that contain certain information
such as text and/or number are CD TEXT.
! If specific information has not been recorded
on a disc, NO XXXX will be displayed (e.g.,
NO NAME).
! When playing back VBR-recorded WMA files,
the average bit rate value is displayed.
! When playing back VBR (variable bit rate)-re-
corded MP3 files, VBR is displayed instead of
bit rate value.
! Depending on the version of iTunes
write MP3 files onto a disc, comment information may not be correctly displayed.
— iTunes is a trademark of Apple Computer,
Inc., registered in the U.S. and other countries.
! The sampling frequency shown in the display
may be abbreviated.
®
used to
Displaying text
information on disc
% Press DISPLAY.
Press DISPLAY repeatedly to switch between
the following settings:
14
En
Page 15
4
321
Multi-CD Player
Section
05
Playing a CD
You can use this unit to control a multi-CD
player, which is sold separately.
! This unit does not have a disc title input
function.
! Only those functions described in this man-
ual are supported by 50-disc multi-CD
players.
1 Disc number indicator
Shows the disc number currently playing.
2 Play time indicator
Shows the elapsed playing time of the current track.
3 Track number indicator
Shows the track number currently playing.
4 RPT indicator
Shows when repeat range is selected to current track.
3 To perform fast forward or reverse,
English
press and hold c or d.
4 To skip back or forward to another
track, press c or d.
Notes
! When the multi-CD player performs the pre-
paratory operations, READY is displayed.
! If an error message such as ERROR-11 is dis-
played, refer to the multi-CD player owner’s
manual.
! If there are no discs in the multi-CD player ma-
gazine, NO DISC is displayed.
Introduction of advanced
multi-CD player operation
% Press FUNCTION to display the function
names.
Press FUNCTION repeatedly to switch between the following functions:
RPT (repeat play)—RDM (random play)—
SCAN (scan play)—ITS-P (ITS play)—PAUSE
(pause)—COMP (compression and DBE)
# To return to the playback display, press BAND.
# If you do not operate the function within about
30 seconds, the display is automatically returned
to the playback display.
1 Press SOURCE to select the multi-CD
player.
Press SOURCE until you see MULTI CD displayed.
2 Select a disc you want to listen to with
the 1 to 6 buttons.
For discs 1 to 6, press the corresponding button number.
For discs 7 to 12, press and hold the corresponding numbers, such as 1 for disc 7, until
the disc number appears in the display.
# You can also sequentially select a disc by
pressing a/b.
Repeating play
There are three repeat play ranges for the
multi-CD player: MCD (multi-CD player repeat), TRK (one-track repeat) and DSC (disc repeat).
1 Press FUNCTION to select RPT.
2 Press c or d to select the repeat range.
! MCD – Repeat all discs in the multi-CD
player magazine
! TRK – Repeat just the current track
! DSC – Repeat the current disc
En
15
Page 16
Section
05
Multi-CD Player
Notes
! If you select other discs during repeat play,
the repeat play range changes to MCD.
! If you perform track search or fast forward/re-
verse during TRK, the repeat play range
changes to DSC.
Playing tracks in random order
Random play lets you play back tracks in random order within the repeat range, MCD and
DSC.
1 Select the repeat range.
Refer to Repeating play on the previous page.
2 Press FUNCTION to select RDM.
3 Press a to turn random play on.
RDM :ON appears in the display. Tracks will
play in a random order within the previously
selected MCD or DSC ranges.
# To turn random play off, press b.
Note
If you turn random play on during DSC and then
return to the playback display, DRDM appears in
the display.
Scanning CDs and tracks
While you are using DSC, the beginning of
each track on the selected disc plays for about
10 seconds. When you are using MCD, the beginning of the first track of each disc is played
for about 10 seconds.
1 Select the repeat range.
Refer to Repeating play on the previous page.
2 Press FUNCTION to select SCAN.
3 Press a to turn scan play on.
SCAN :ON appears in the display. The first 10
seconds of each track of the current disc (or
the first track of each disc) is played.
4 When you find the desired track (or
disc) press b to turn scan play off.
# If the display has automatically returned to
the playback display, select SCAN again by pressing FUNCTION.
Notes
! After track or disc scanning is finished, nor-
mal playback of the tracks will begin again.
! If you turn scan play on during MCD and then
return to the playback display, DSCN appears
in the display.
Pausing CD playback
Pause lets you temporarily stop playback of
the CD.
1 Press FUNCTION to select PAUSE.
2 Press a to turn pause on.
PAUSE:ON appears in the display. Play of the
current track pauses.
# To turn pause off, press b.
Using compression and
bass emphasis
You can use these functions only with a multiCD player that supports them.
Using COMP (compression) and DBE (dynamic bass emphasis) functions lets you adjust the sound playback quality of the multiCD player. Each of the functions has a twostep adjustment. The COMP function balances
the output of louder and softer sounds at higher volumes. DBE boosts bass levels to give
playback a fuller sound. Listen to each of the
effects as you select them and use the one
that best enhances the playback of the track
or CD that you are listening to.
16
En
Page 17

Multi-CD Player
Section
05
1 Press FUNCTION to select COMP.
# If the multi-CD player does not support
COMP/DBE, NO COMP is displayed when you attempt to select it.
2 Press a or b to select your favorite setting.
COMP OFF—COMP 1—COMP 2—
COMP OFF—DBE 1—DBE 2
Using ITS playlists
ITS (instant track selection) lets you make a
playlist of favorite tracks from those in the
multi-CD player magazine. After you have
added your favorite tracks to the playlist you
can turn on ITS play and play just those selections.
Creating a playlist with ITS
programming
You can use ITS to enter and play back up to
99 tracks per disc from up to 100 discs (with
the disc titles). (With multi-CD players sold before the CDX-P1250 and CDX-P650, up to 24
tracks can be stored in the playlist.)
1 Play a CD that you want to program.
Press a or b to select the CD.
2 Press FUNCTION and hold to select ITS.
English
Note
After data for 100 discs has been stored in memory, data for a new disc will overwrite the oldest
one.
Playback from your ITS playlist
ITS play lets you listen to the tracks that you
have entered into your ITS playlist. When you
turn on ITS play, tracks from your ITS playlist
in the multi-CD player will begin to play.
1 Select the repeat range.
Refer to Repeating play on page 15.
2 Press FUNCTION to select ITS-P.
3 Press a to turn ITS play on.
ITS-P:ON appears in the display. Playback be-
gins of those tracks from your playlist within
the previously selected MCD or DSC ranges.
# If no tracks in the current range are programmed for ITS play, then EMPTY is displayed.
# To turn ITS play off, press b.
Erasing a track from your ITS
playlist
You can delete a track from your ITS playlist if
ITS play is on.
If ITS play is already on, skip to step 2. If ITS
play is not already on, press FUNCTION.
3 Select the desired track by pressing c
or d.
4 Press a to store the currently playing
track in the playlist.
ITS IN is displayed briefly and the currently
playing selection is added to your playlist. The
display then shows ITS again.
5 Press BAND to return to the playback
display.
1 Play the CD with the track you want to
delete from your ITS playlist, and turn ITS
play on.
Refer to Playback from your ITS playlist on this
page.
2 Press FUNCTION and hold to select ITS.
3 Select the desired track by pressing c
or d.
En
17
Page 18
Section
05
Multi-CD Player
4 Press b to erase the track from your ITS
playlist.
The currently playing selection is erased from
your ITS playlist and playback of the next track
from your ITS playlist begins.
# If there are no tracks from your playlist in the
current range, EMPTY is displayed and normal
play resumes.
5 Press BAND to return to the playback
display.
Erasing a CD from your ITS playlist
You can delete all tracks of a CD from your ITS
playlist if ITS play is off.
1 Play the CD that you want to delete.
Press a or b to select the CD.
2 Press FUNCTION and hold to select ITS.
3 Press b to erase all tracks on the currently playing CD from your ITS playlist.
All tracks on the currently playing CD are
erased from your playlist and ITS CLR is displayed.
4 Press BAND to return to the playback
display.
Play time—DISC TTL (disc title)—ART NAME
(disc artist name)—TRK TTL (track title)—
ART NAME (track artist name)
# If specific information has not been recorded
on a CD TEXT disc, NO XXXX will be displayed
(e.g., NO NAME).
Note
You can scroll to the left of the title by pressing
and holding DISPLAY.
Using CD TEXT functions
You can use these functions only with a CD
TEXT compatible multi-CD player.
Some discs have certain information encoded
on the disc during manufacture. These discs
may contain such information as the CD title,
track title, artist’s name and playback time
and are called CD TEXT discs. Only these specially encoded CD TEXT discs support the
functions listed below.
% Press DISPLAY.
Press DISPLAY repeatedly to switch between
the following settings:
18
En
Page 19
21345
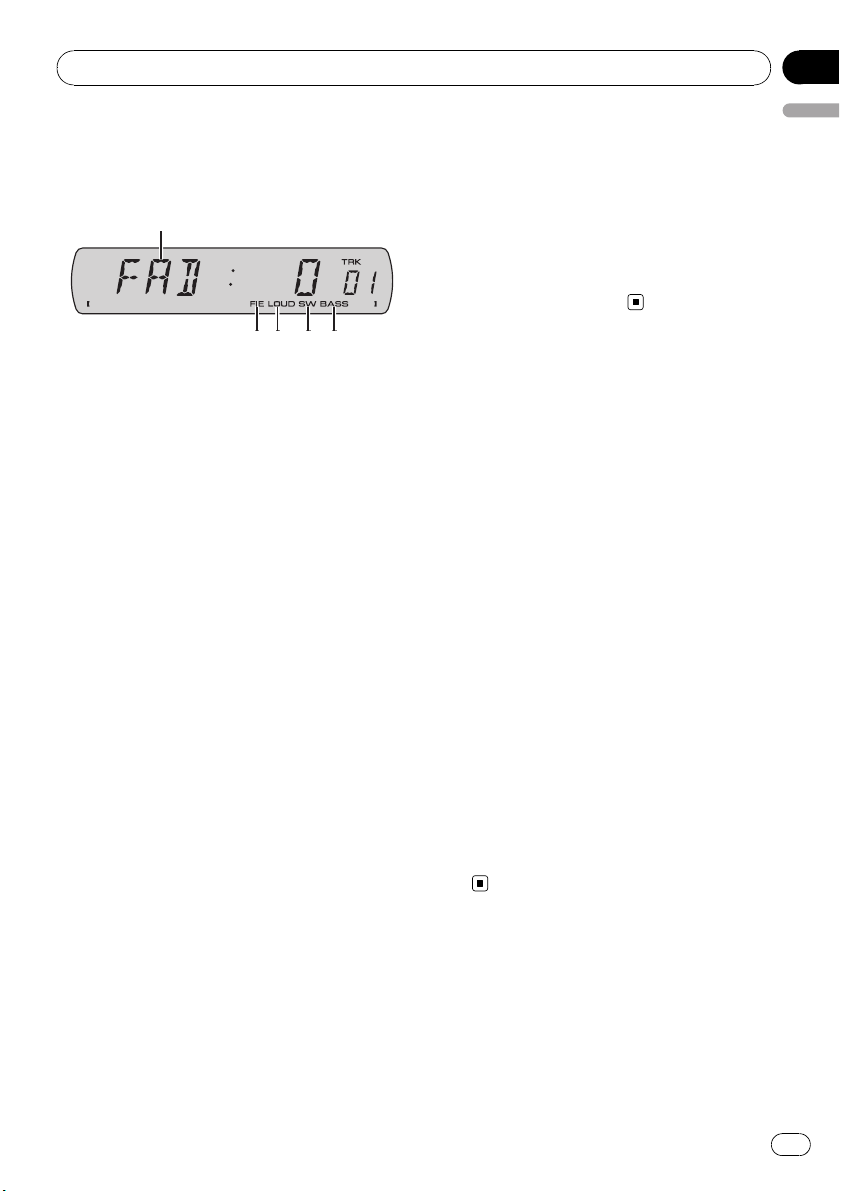
Audio Adjustments
Section
06
Introduction of audio
adjustments
1 Audio display
Shows the audio adjustment status.
2 BASS indicator
Shows when the bass boost is in effect.
3 SW indicator
Shows when the subwoofer output is turned
on.
4 LOUD indicator
Appears in the display when loudness is
turned on.
5 FIE indicator
Shows when the front image enhancer is
turned on.
% Press AUDIO to display the audio function names.
Press AUDIO repeatedly to switch between
the following audio functions:
FAD (balance adjustment)—EQ (equalizer
curve adjustment)—LOUD (loudness)—
SUB.W (subwoofer on/off setting)—80: 0 (subwoofer setting)—HPF (high pass filter)—BASS
(bass boost)—FIE (front image enhancer)—
SLA (source level adjustment)
# When the subwoofer controller setting is
P/O :FUL, you cannot switch to SUB.W. (Refer to
page 23.)
# You can select the 80: 0 only when subwoofer
output is turned on in SUB.W.
# When the F.I.E. function is on, you cannot select HPF.
# When the rear output setting is R-SP :S/W,
English
you cannot select FIE.
# When selecting the FM tuner as the source,
you cannot switch to SLA.
# To return to the display of each source, press
BAND.
# If you do not operate the audio function within
about 30 seconds, the display is automatically returned to the source display.
Using balance adjustment
You can change the fader/balance setting so
that it can provide you an ideal listening environment in all occupied seats.
1 Press AUDIO to select FAD.
# If the balance setting has been previously adjusted, BAL will be displayed.
2 Press a or b to adjust front/rear speaker balance.
FAD :F15 to FAD :R15 is displayed as the
front/rear speaker balance moves from front to
rear.
# FAD : 0 is the proper setting when only two
speakers are used.
# When the rear output setting is R-SP :S/W,
you cannot adjust front/rear speaker balance.
Refer to Setting the rear output and subwoofer
controller on page 23.
3 Press c or d to adjust left/right speaker
balance.
BAL : L15 to BAL : R15 is displayed as the left/
right speaker balance moves from left to
right.
Using the equalizer
The equalizer lets you adjust the equalization
to match car interior acoustic characteristics
as desired.
En
19
Page 20
Section
06
Audio Adjustments
Recalling equalizer curves
There are six stored equalizer curves which
you can easily recall at any time. Here is a list
of the equalizer curves:
Display Equalizer curve
POWERFUL Powerful
NATURAL Natural
VOCAL Vocal
CUSTOM Custom
EQ FLAT Flat
SPR-BASS Super bass
! CUSTOM is an adjusted equalizer curve
that you create. If you make adjustments to
an equalizer curve, the equalizer curve setting will be memorized in CUSTOM.
! When EQ FLAT is selected no supplement
or correction is made to the sound. This is
useful to check the effect of the equalizer
curves by switching alternatively between
EQ FLAT and a set equalizer curve.
% Press EQ to select the equalizer.
Press EQ repeatedly to switch between the following equalizers:
POWERFUL—NATURAL—VOCAL—CUSTOM
—EQ FLAT—SPR-BASS
Adjusting equalizer curves
You can adjust the currently selected equalizer
curve setting as desired. Adjusted equalizer
curve settings are memorized in CUSTOM.
1 Press AUDIO to select EQ.
2 Press c or d to select the equalizer
band to adjust.
EQ-L (low)—EQ-M (mid)—EQ-H (high)
3 Press a or b to adjust the level of the
equalizer band.
+6 to –6 is displayed as the level is increased
or decreased.
# You can then select another band and adjust
the level.
Note
If you make adjustments, CUSTOM curve is updated.
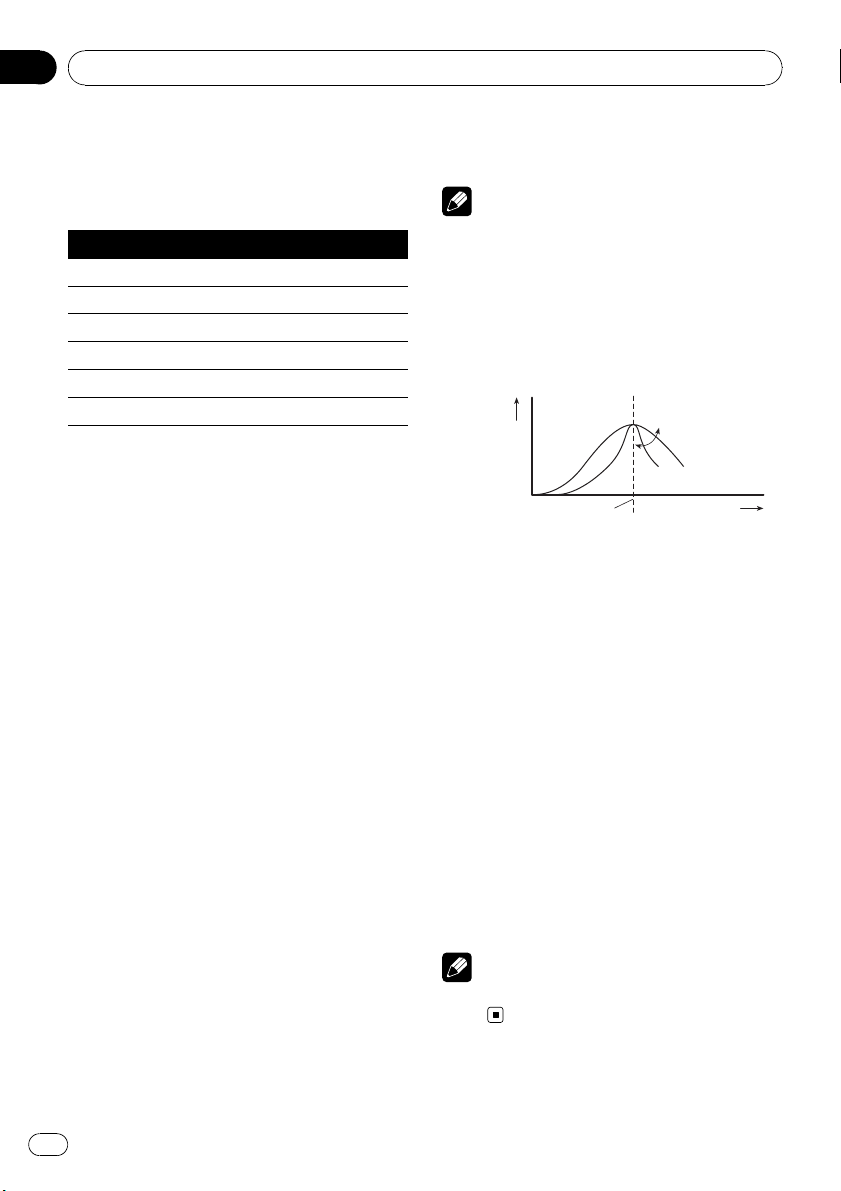
Fine-adjusting equalizer curve
You can adjust the center frequency and the Q
factor (curve characteristics) of each currently
selected curve band (EQ-L/EQ-M/EQ-H).
Level (dB)
Q=2W
Q=2N
Center frequency
1 Press AUDIO and hold until frequency
and the Q factor (e.g., F- 80:Q1W) appears
in the display.
2 Press AUDIO to select the band for adjustment from among low, mid and high.
Press AUDIO repeatedly to switch between
the following functions:
Low—Mid—High
3 Press c or d to select the desired frequency.
Low: 40—80—100—160 (Hz)
Mid: 200—500—1k—2k (Hz)
High: 3k—8k—10k—12k (Hz)
4 Press a or b to select the desired Q factor.
2N—1N—1W—2W
Note
If you make adjustments, CUSTOM curve is updated.
Frequency (Hz)
20
En
Page 21
Audio Adjustments
Section
06
Adjusting loudness
Loudness compensates for deficiencies in the
low- and high-sound ranges at low volume.
1 Press AUDIO to select LOUD.
2 Press a to turn loudness on.
Loudness level (e.g., LOUD :MID) appears in
the display.
# To turn loudness off, press b.
3 Press c or d to select a desired level.
LOW (low)—MID (mid)—HI (high)
Using subwoofer output
This unit is equipped with a subwoofer output
which can be turned on or off.
1 Press AUDIO to select SUB.W.
# You can also select the subwoofer setting
menu by pressing SW on the unit.
# When the subwoofer controller setting is
P/O :FUL, you cannot select SUB.W.
2 Press a to turn subwoofer output on.
SUB.W:NOR appears in the display. Subwoo-
fer output is now on.
# If the subwoofer output phase has been set to
the reverse, SUB.W:REV will be displayed.
# To turn subwoofer output off, press b.
3 Press c or d to select the phase of subwoofer output.
Press c to select reverse phase and REV appears in the display. Press d to select normal
phase and NOR appears in the display.
# When the subwoofer output is on, you can se-
English
lect 80: 0.
# If the subwoofer setting has been previously
adjusted, the frequency of that previously selected will be displayed instead of 80.
2 Press c or d to select cut-off frequency.
50—63—80—100—125 (Hz)
Only frequencies lower than those in the selected range are outputted from the subwoofer.
3 Press a or b to adjust the output level
of the subwoofer.
+6 to –24 is displayed as the level is increased
or decreased.
Using the high pass filter
When you do not want low sounds from the
subwoofer output frequency range to play
from the front or rear speakers, turn on the
HPF (high pass filter). Only frequencies higher
than those in the selected range are outputted
from the front or rear speakers.
1 Press AUDIO to select HPF.
# When the F.I.E. function is on, you cannot select HPF.
2 Press a to turn high pass filter on.
HPF : 80 appears in the display. High pass fil-
ter is now on.
# If the high pass filter has been previously adjusted, the frequency of that previously selected
will be displayed instead of HPF : 80.
# To turn high pass filter off, press b.
Adjusting subwoofer settings
When the subwoofer output is on, you can adjust the cut-off frequency and the output level
of the subwoofer.
1 Press AUDIO to select 80: 0.
# You can also select the subwoofer setting
menu by pressing SW on the unit.
3 Press c or d to select cut-off frequency.
50—63—80—100—125 (Hz)
Only frequencies higher than those in the selected range are outputted from the front or
rear speakers.
En
21
Page 22
Section
06
Audio Adjustments
Boosting the bass
Bass boost function boosts the bass level of
sound lower than 100 Hz. The more the bass
level is increased, the more the bass sound is
emphasized and the entire sound becomes
powerful. When using this function with the
subwoofer, the sound under the cut-off frequency is boosted.
1 Press AUDIO to select BASS.
# You can also select the bass boost setting by
pressing and holding SW.
2 Press a or b to select a desired level.
0 to +6 is displayed as the level is increased or
decreased.
Front image enhancer (F.I.E.)
The F.I.E. (Front Image Enhancer) function is a
simple method of enhancing front imaging by
cutting mid- and high-range frequency output
from the rear speakers, limiting their output to
low-range frequencies. You can select the frequency you want to cut.
Precaution
When the F.I.E. function is deactivated, the rear
speakers output sound of all frequencies, not just
bass sounds. Reduce the volume before disengaging F.I.E. to prevent a sudden increase in volume.
1 Press AUDIO to select FIE.
# When the rear output setting is R-SP :S/W,
you cannot select FIE.
# When the HPF function is on, you cannot select FIE.
2 Press a to turn F.I.E. on.
# To turn F.I.E. off, press b.
3 Press c or d to select a desired frequency.
100—160—250 (Hz)
Notes
! After turning the F.I.E. function on, use the bal-
ance adjustment (refer to page 19) and adjust
front and rear speaker volume levels until they
are balanced.
! Turn the F.I.E. function off when using a 2-
speaker system.
! F.I.E. function is effective only for built-in
amplifier.
Adjusting source levels
SLA (source level adjustment) lets you adjust
the volume level of each source to prevent radical changes in volume when switching between sources.
! Settings are based on the FM tuner volume
level, which remains unchanged.
1 Compare the FM tuner volume level
with the level of the source you wish to adjust.
2 Press AUDIO to select SLA.
3 Press a or b to adjust the source volume.
SLA : +4 to SLA : –4 is displayed as the source
volume is increased or decreased.
Notes
! The AM tuner volume level can also be ad-
justed with source level adjustments.
! The built-in CD player and the multi-CD player
are set to the same source level adjustment
volume automatically.
! XM tuner and SIRIUS tuner are set to the
same source level adjustment volume automatically.
! External unit 1 and external unit 2 are set to
the same source level adjustment volume
automatically.
22
En
Page 23

1
Other Functions
Section
07
Adjusting initial settings
Using the initial settings, you can customize
various system settings to achieve optimal performance from this unit.
1 Function display
Shows the function status.
1 Press SOURCE and hold until the unit
turns off.
2 Press SOURCE and hold again until the
clock appears in the display.
3 Press FUNCTION to select one of the initial settings.
Press FUNCTION repeatedly to switch between the following settings:
Clock—AUX1 (auxiliary input 1)—AUX2 (auxiliary input 2)—R-SP (rear output and subwoofer controller)
Use the following instructions to operate each
particular setting.
# To cancel initial settings, press BAND.
# You can also cancel initial settings by holding
down SOURCE until the unit turns off.
Setting the clock
Use these instructions to set the clock.
1 Press FUNCTION to select clock.
2 Press c or d to select the segment of
the clock display you wish to set.
Hour—Minute
As you select segments of the clock display
the segment selected will blink.
3 Press a or b to set the clock.
English
Pressing a will increase the selected hour or
minute. Pressing b will decrease the selected
hour or minute.
Switching the auxiliary setting
Auxiliary equipments connected to this unit
can be activated individually. Set each AUX
source to ON when using. About connecting
or using auxiliary equipments, refer to Using
the AUX source on the next page.
1 Press FUNCTION to select AUX1/AUX2.
2 Press a or b to turn AUX1/AUX2 on or
off.
Setting the rear output and
subwoofer controller
This unit’s rear output (rear speaker leads output and RCA rear output) can be used for fullrange speaker (R-SP :FUL) or subwoofer
(R-SP :S/W) connection. If you switch the rear
output setting to R-SP :S/W, you can connect
a rear speaker lead directly to a subwoofer
without using an auxiliary amp.
Initially, the unit is set for rear full-range speaker connection (R-SP :FUL). When rear output is
connected to full range speakers (when
R-SP :FUL is selected), you can connect other
full range speakers (P/O :FUL) or a subwoofer
(P/O :S/W) to the RCA rear output.
1 Press FUNCTION to select R-SP.
2 Press a or b to switch the rear output
setting.
Pressing a or b will switch between
R-SP :FUL (full-range speaker) and R-SP :S/W
(subwoofer) and that status will be displayed.
# When no subwoofer is connected to the rear
output, select R-SP :FUL.
# When a subwoofer is connected to the rear
output, set for subwoofer R-SP :S/W.
En
23
Page 24
1
Section
07
Other Functions
# When the rear output setting is R-SP :S/W,
you cannot operate the following procedure.
3 Press c or d to switch the subwoofer
output or rear output.
Pressing c or d will switch between P/O :S/W
and P/O :FUL and that status will be displayed.
Notes
! Even if you change this setting, there is no
output unless you turn the subwoofer output
on (refer to Using subwoofer output on page
21).
! If you change this setting, subwoofer output
in the audio menu return to the factory
settings.
Turning the clock display
on or off
You can turn the clock display on or off.
% Press CLOCK to turn the clock display
on or off.
Each press of CLOCK turns the clock display
on or off.
# The clock display disappears temporarily
when you perform other operations, but the clock
display appears again after 25 seconds.
Note
Even when the sources are off, the clock display
appears on the display. Pressing CLOCK turns
the clock display on or off.
About AUX connection method
You have two methods to connect auxiliary
equipments to this unit.
Stereo mini pin plug cable (AUX1)
When connecting auxiliar y equipment using a
stereo mini plug cable
% Insert the stereo mini plug into the
AUX input jack on this unit.
IP-BUS-RCA interconnector (AUX2)
When connecting auxiliar y equipment using an
IP-BUS-RCA Interconnector (sold separately)
% Use an IP-BUS-RCA Interconnector such
as the CD-RB20/CD-RB10 (sold separetely)
to connect this unit to auxiliary equipment
featuring RCA output.
For more details, refer to the IP-BUS-RCA Interconnector owner’s manual.
# You can only make this type of connection if
the auxiliary equipment has RCA outputs.
Selecting AUX as the source
% Press SOURCE to select AUX (AUX1 or
AUX2) as the source.
Press SOURCE until AUX appears in the display.
# If the auxiliary setting is not turned on, AUX
cannot be selected. For more details, see Switch-
ing the auxiliary setting on the previous page.
Using the AUX source
This unit can control up to two auxiliary equipments such as VCR or portable devices (sold
separately). When connected, auxiliary equipments are automatically read in as AUX
sources and assigned to AUX1 or AUX2. The
relationship between AUX1 and AUX2
sources is explained below.
24
En
Introduction of iPod
®
operation
You can use this unit to control an iPod adapter,
which is sold separately.
Page 25

1
Other Functions
Section
07
For details concerning operation, refer to the
iPod adapter’s operation manuals. This section provides information on iPod operations
with this unit which differs from that described
in the iPod adapter’s operation manual.
! This unit is a head unit group 1 unit.
! iPod is a trademark of Apple Computer,
Inc., registered in the U.S. and other countries.
1 Song title indicator
Shows the title of the currently playing
song.
iPod operation
iPod operation of the following function with
this unit differs.
! Displaying text information on iPod (Refer to
this page.)
Displaying text information on
iPod
Text information recorded on the iPod can be
displayed.
% Press DISPLAY.
Press DISPLAY repeatedly to switch between
the following settings:
Song title—Artist name—Album title—Repeat
play status—Random play status—Play time
# If the characters recorded on the iPod are not
compatible with this unit, those characters will
not be displayed.
Note
You can scroll to the left the text information by
pressing and holding DISPLAY.
English
Introduction of XM operation
You can use this unit to control an XM satellite
digital tuner (GEX-P920XM), which is sold
separately.
For details concerning operation, refer to the
XM tuner’s operation manuals. This section
provides information on XM operations with
this unit which differs from that described in
the XM tuner’s operation manual.
1 XM tuner information
Shows the XM tuner information which has
been selected.
XM operation
XM operation of the following functions with
this unit differs.
! Switching the XM display (Refer to this
page.)
! Switching the XM channel select mode
(Refer to this page.)
This unit does not have the following function.
! Scrolling the text in the display
Switching the XM display
% Press DISPLAY to switch the XM display.
Each press of DISPLAY changes the XM display in the following order:
Channel name—Band/preset channel number
—Artist name—Song title—Channel category
Switching the XM channel
select mode
% Press and hold CLOCK to select the desired channel select setting.
Press and hold CLOCK repeatedly to switch
between the following channel select settings:
En
25
Page 26

1
Section
07
Other Functions
CHNUMBER (channel number select setting)
—CATEGORY (channel category select
setting)
Introduction of SIRIUS
operation
This unit can control a SIRIUS Satellite Radio
tuner (sold separately).
When the SIRIUS tuner is used together with
this unit, some operations differ slightly from
those described in the SIRIUS operation manual. This manual provides information on
these points. For all other information on
using the SIRIUS tuner, please refer to the SIRIUS operation manual.
1 SIRIUS tuner information
Shows the SIRIUS tuner information which
has been selected.
SIRIUS operation
SIRIUS operation of the following functions
with this unit differs.
! Switching the SIRIUS channel select setting
(Refer to this page.)
! Switching the SIRIUS display (Refer to this
page.)
! When the game of the selected team starts
(Refer to this page.)
! Displaying game information (Refer to this
page.)
Switching the SIRIUS channel
select setting
% Press and hold CLOCK to select the desired channel select setting.
Press and hold CLOCK repeatedly to switch
between the following channel select settings:
CHNUMBER (channel number select setting)
—CATEGORY (channel category select
setting)
Switching the SIRIUS display
% Press DISPLAY to switch the SIRIUS display.
Each press of DISPLAY changes the SIRIUS
display in the following order:
Channel name—Category name—Artist name
—Song title/program title—Composer name
When the game of the selected
team starts
When a game of the selected team is about to
start (or is currently playing) on a different station, a game alert is displayed. Press
FUNCTION and hold to switch to that station,
and you can listen to that game.
! If you do not operate the function within
about eight seconds, the display is automatically returned.
Displaying game information
If games of your selected teams are currently
playing, you can display information of the
games and tune to the broadcast channel.
You can display information of the games
while enjoying the sound from currently tuning station. You can also tune to the broadcast
channel when you wish to.
26
1 Press FUNCTION to select GAMEINFO.
The game information of your selected team is
displayed.
En
Page 27

Other Functions
Section
07
2 Press a or b to select a game.
The game is displayd, followed by more detailed game information.
! Game score will be updated automatically.
! If you want to switch to the channel broad-
casting the game, change the channel
manually.
Notes
! If you have not made any team selections,
NOT SET is displayed.
! When games involving your favorite teams are
not currently playing, NO GAME is displayed.
English
En
27
Page 28
Appendix
Additional Information
Understanding built-in CD
player error messages
When you contact your dealer or your nearest
Pioneer Service Center, be sure to record the
error message.
Message Cause Action
ERROR-11, 12,
17, 30
ERROR-11, 12,
17, 30
ERROR-15 The inserted disc
ERROR-10, 11,
12, 15, 17, 30,
A0
ERROR-22, 23 The CD format
NO AUDIO The inserted disc
PROTECT All the files on
SKIPPED The inserted disc
Dirty disc Clean disc.
Scratched disc Replace disc.
does not contain
any data
Electrical or mechanical
cannot be played
back
does not contain
any files that can
be played back
the inserted disc
are secured by
DRM
contains WMA
files that are protected by DRM
Replace disc.
Turn the ignition
ON and OFF, or
switch to a different source, then
back to the CD
player.
Replace disc.
Replace disc.
Replace disc.
Replace disc.
Handling guideline of discs
and player
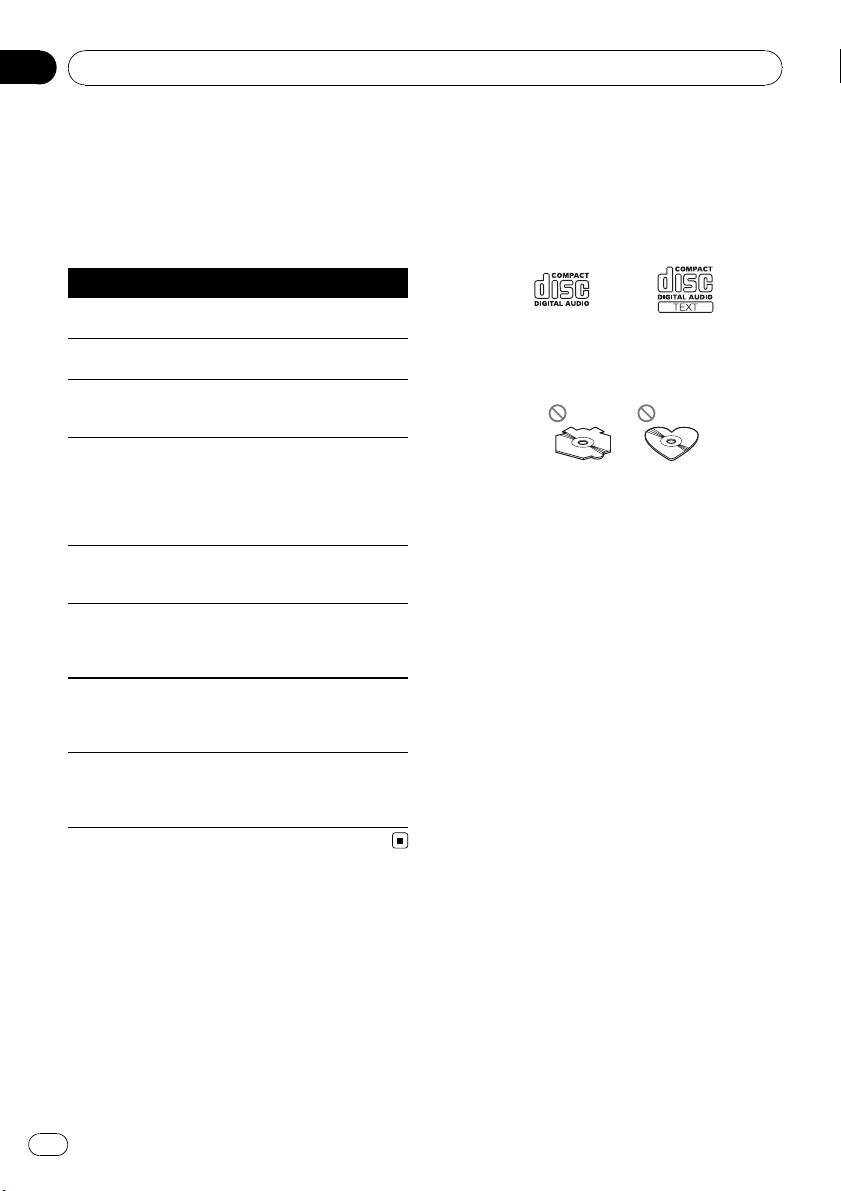
! Use only discs featuring either of following
two logos.
! Use only conventional, fully circular discs.
Do not use shaped discs.
! Use 12-cm or 8-cm CD. Do not use an
adapter when playing 8-cm CDs.
! Do not insert anything other than a CD into
the CD loading slot.
! Do not use cracked, chipped, warped, or
otherwise damaged discs as they may damage the player.
! Unfinalized CD-R/CD-RW disc playback is
not possible.
! Do not touch the recorded surface of the
discs.
! Store discs in their cases when not in use.
! Avoid leaving discs in excessively hot envir-
onments including under direct sunlight.
! Do not attach labels, write on or apply che-
micals to the surface of the discs.
! To clean a CD, wipe the disc with a soft
cloth outward from the center.
! Condensation may temporarily impair the
player’s performance. Leave it to adjust to
the warmer temperature for about one
hour. Also, wipe any dump discs with a soft
cloth.
! Playback of discs may not be possible be-
cause of disc characteristics, disc format,
recorded application, playback environment, storage conditions and so on.
! Text information may not be correctly dis-
played depending on the recorded environment.
28
En
Page 29

1
2
5
6
Additional Information
Appendix
! Road shocks may interrupt disc playback.
! Read the precautions with discs before
using them.
Dual Discs
! Dual Discs are two-sided discs that have a
recordable CD for audio on one side and a
recordable DVD for video on the other.
! Since the CD side of Dual Discs is not phy-
sically compatible with the general CD
standard, it may not be possible to play the
CD side with this unit.
! Frequent loading and ejecting of a Dual
Disc may result in scratches on the disc.
Serious scratches can lead to playback problems on this unit. In some cases, a Dual
Disc may become stuck in the disc loading
slot and will not eject. To prevent this, we
recommend you refrain from using Dual
Disc with this unit.
! Please refer to the information from the
disc manufacturer for more detailed information about Dual Discs.
WMA, MP3 and WAV files
! Depending on the version of Windows
Media Player used to encode WMA files,
album names and other text information
may not be correctly displayed.
! There may be a slight delay when starting
playback of WMA files encoded with image
data.
! ISO 9660 Level 1 and 2 compliant. Romeo
and Joliet file systems are both compatible
with this player.
! Multi-session playback is possible.
! WMA/MP3/WAV files are not compatible
with packet write data transfer.
! Only 64 characters from the beginning can
be displayed as a file name (including the
extension such as .wma, .mp3 or .wav) or a
folder name.
! Folder selection sequence or other opera-
English
tion may be altered depending on the encoding or writing software.
! Regardless of the length of blank section
between the songs of original recording,
WMA/MP3/WAV discs will play with a short
pause between songs.
! File extensions such as .wma, .mp3 or .wav
must be used properly.
Example of a hierarchy
: Folder
: File
3
4
Level 1 Level 2 Level 3 Level 4
! This unit assigns folder numbers. The user
cannot assign folder numbers.
! Folder hierarchy is allowed up to eight tiers.
However, practical hierarchy of folder is
less than two tiers.
! Up to 99 folders on a disc can be played
back.
Compressed audio compatibility
WMA
! Compatible format: WMA encoded by Win-
dows Media Player Ver. 7, 7.1, 8, 9 or 10
! Bit rate: 48 kbps to 320 kbps (CBR), 48 kbps
to 384 kbps (VBR)
! Sampling frequency: 32 kHz to 48 kHz
! Windows Media Audio 9 Professional, Loss-
less, Voice: No
29
En
Page 30

Appendix
Additional Information
MP3
! Bit rate: 8 kbps to 320 kbps
! Sampling frequency: 16 kHz to 48 kHz (32,
44.1, 48 kHz for emphasis)
! Compatible ID3 tag version: 1.0, 1.1, 2.2,
2.3, 2.4 (ID3 tag Version 2.x is given priority
than Version 1.x.)
! M3u playlist: No
! MP3i (MP3 interactive), mp3 PRO: No
WAV
! Compatible format: Linear PCM (LPCM),
MS ADPCM
! Quantization bits: 8 and 16 (LPCM), 4 (MS
ADPCM)
! Sampling frequency: 16 kHz to 48 kHz
(LPCM), 22.05 kHz to 44.1 kHz (MS ADPCM)
30
En
Page 31

Additional Information
Appendix
Specifications
General
Power source ............................. 14.4 V DC (10.8 V to 15.1 V
allowable)
Grounding system ................... Negative type
Max. current consumption
..................................................... 10.0 A
Dimensions (W × H × D):
DIN
Chassis ..................... 178 × 50 × 162 mm
(7 × 2 × 6-3/8 in.)
Nose ........................... 188 × 58 × 14 mm
(7-3/8 × 2-1/4 × 1/2 in.)
D
Chassis ..................... 178 × 50 × 162 mm
(7 × 2 × 6-3/8 in.)
Nose ........................... 170 × 48 × 14 mm
(6-3/4 × 1-7/8 × 1/2 in.)
Weight .......................................... 1.3 kg (2.86 lbs)
Audio
Maximum power output .......50 W × 4
50 W × 2/4 W + 70 W × 1/2
W (for subwoofer)
Continuous power output ...22 W × 4 (50 Hz to 15 000
Hz, 5% THD, 4 W load, both
channels driven)
Load impedance ...................... 4 W to 8 W ×4
4 W to 8 W ×2+2W ×1
Preout max output level/output impedance
..................................................... 2.2 V/1 kW
Equalizer (3-Band Parametric Equalizer):
Low
Frequency ................ 40/80/100/160 Hz
Q Factor .................... 0.35/0.59/0.95/1.15 (+6 dB
when boosted)
Gain ............................ ±12 dB
Mid
Frequency ................ 200/500/1k/2k Hz
Q Factor .................... 0.35/0.59/0.95/1.15 (+6 dB
when boosted)
Gain ............................ ±12 dB
High
Frequency ................ 3.15k/8k/10k/12.5k Hz
Q Factor .................... 0.35/0.59/0.95/1.15 (+6 dB
when boosted)
Gain ............................ ±12 dB
Loudness contour:
Low ....................................... +3.5 dB (100 Hz), +3 dB (10
kHz)
Mid ....................................... +10 dB (100 Hz), +6.5 dB
(10 kHz)
High ..................................... +11 dB (100 Hz), +11 dB
(10 kHz)
(volume: –30 dB)
HPF:
Frequency .......................... 50/63/80/100/125 Hz
Slope .................................... –12 dB/oct
Subwoofer (mono):
Frequency .......................... 50/63/80/100/125 Hz
Slope .................................... –18 dB/oct
Gain ...................................... +6 dB to –24 dB
Phase .................................. Normal/Reverse
Bass boost:
Gain ...................................... +12 dB to 0 dB
CD player
System .......................................... Compact disc audio system
Usable discs .............................. Compact disc
Signal format:
Sampling frequency ..... 44.1 kHz
Number of quantization bits
........................................... 16; linear
Frequency characteristics ...5 Hz to 20 000 Hz (±1 dB)
Signal-to-noise ratio ............... 94 dB (1 kHz) (IHF-A net-
work)
Dynamic range ......................... 92 dB (1 kHz)
Number of channels .............. 2 (stereo)
MP3 decoding format ........... MPEG-1 & 2 Audio Layer 3
WMA decoding format ......... Ver. 7, 7.1, 8, 9, 10 (2ch
audio)
(Windows Media Player)
WAV signal format .................. Linear PCM & MS ADPCM
FM tuner
Frequency range ...................... 87.9 MHz to 107.9 MHz
Usable sensitivity ..................... 8 dBf (0.7 µV/75 W, mono,
S/N: 30 dB)
Signal-to-noise ratio ............... 75 dB (IHF-A network)
Distortion ..................................... 0.3 % (at 65 dBf, 1 kHz,
stereo)
0.1 % (at 65 dBf, 1 kHz,
mono)
Frequency response ............... 30 Hz to 15 000 Hz (±3 dB)
Stereo separation .................... 45 dB (at 65 dBf, 1 kHz)
AM tuner
Frequency range ...................... 530 kHz to 1 710 kHz (10
kHz)
Usable sensitivity ..................... 18 µV (S/N: 20 dB)
Signal-to-noise ratio ............... 65 dB (IHF-A network)
Note
Specifications and the design are subject to possible modifications without notice due to improvements.
English
En
31
Page 32

Table des matières
Nous vous remercions d’avoir acheté cet appareil
Pioneer.
Afin d’utiliser votre appareil correctement, veuillez lire ce mode d’emp loi entièrement. Après avoir lu ce mode d’emploi, conservez-le dans en endroit sûr pour pouvoir
vous y référer ultérieurement.
Avant de commencer
Pour le modèle canadien 34
Quelques mots sur cet appareil 34
Service après-vente des produits Pioneer 34
Visitez notre site Web 34
Quelques mots sur WMA 34
Quelques mots sur MP3 35
A propos de la marque SAT RADIO
READY 35
Utilisation et soin de la télécommande 35
– Installation de la pile 35
– Utilisation de la télécommande 36
Protection de l’appareil contre le vol 36
– Détacher la face avant 36
– Pose de la face avant 36
Opérations de base
Description de l’appareil 37
– Appareil central 37
– Télécommande 38
Mise en service de l’appareil et sélection
d’une source 38
Réglage du volume 38
Mise hors tension de l’appareil 38
Syntoniseur
Écoute de la radio 39
Introduction au fonctionnement détaillé du
syntoniseur 39
Mise en mémoire et rappel des fréquences
de stations 39
Mise en mémoire des fréquences des
émetteurs les plus puissants 40
Accord sur les signaux puissants 40
Lecteur intégré
Lecture d’un disque 41
Introduction au fonctionnement détaillé du
lecteur de CD intégré 42
Répétition de la lecture 42
Écoute des plages musicales dans un ordre
aléatoire 42
Examen des plages ou des dossiers 43
Pause de la lecture 43
Utilisation de la compression et de la
fonction BMX 43
Recherche toutes les 10 plages sur le disque
ou dossier en cours 43
Affichage d’informations textuelles sur le
disque 44
Lecteur de CD à chargeur
Écoute d’un CD 45
Introduction au fonctionnement détaillé du
lecteur de CD à chargeur 45
Répétition de la lecture 45
Écoute des plages musicales dans un ordre
aléatoire 46
Examen du contenu des disques et des
plages 46
Pause de la lecture d’un CD 47
Utilisation de la compression et de
l’accentuation dynamique des graves 47
Utilisation des listes ITS 47
– Création d’une liste de lecture avec la
sélection instantanée des plages
ITS 47
– Lecture à partir de votre liste de lecture
ITS 48
– Suppression d’une plage de votre liste
ITS 48
– Suppression d’un CD de votre liste
ITS 48
Utilisation des fonctions CD TEXT 48
Réglages sonores
Introduction aux réglages sonores 50
Réglage de l’équilibre sonore 50
Utilisation de l’égaliseur 51
– Rappel d’une courbe d’égalisation 51
– Réglage des courbes d’égalisation 51
– Réglage fin de la courbe
d’égalisation 51
Réglage de la correction physiologique 52
32
Fr
Page 33

Table des matières
Français
Utilisation de la sortie haut-parleur
d’extrêmes graves 52
– Réglages du haut-parleur d’extrêmes
graves 52
Utilisation du filtre passe-haut 53
Accentuation des graves 53
Optimiseur d’image sonore avant (F.I.E.) 53
Ajustement des niveaux des sources 54
Autres fonctions
Ajustement des réglages initiaux 55
Réglage de l’horloge 55
Mise en service ou hors service de l’entrée
auxiliaire 55
Réglage de la sortie arrière et du contrôleur
de haut-parleur d’extrêmes graves 56
Mise en service ou hors service de l’affichage
de l’horloge 56
Utilisation de la source AUX 57
– Quelques mots sur les méthodes de
connexion 57
– Choix de l’entrée AUX comme
source 57
Introduction à l’utilisation de l’iPod® 57
– Utilisation de l’iPod 57
– Affichage d’informations textuelles sur
l’iPod 58
Introduction à l’utilisation du XM 58
– Utilisation du XM 58
– Changement de l’affichage XM 58
– Changer le mode de sélection du canal
XM) 58
Introduction à l’utilisation du SIRIUS 58
– Utilisation du SIRIUS 59
– Changement du réglage de sélection
du canal SIRIUS 59
– Changement de l’affichage SIRIUS 59
– Quand le match de l’équipe
sélectionnée commence 59
– Affichage des informations sur les
matchs 59
Informations complémentaires
Explication des messages d’erreur du lecteur
de CD intégré 60
Conseils sur la manipulation des disques et
du lecteur 60
Disques Duaux 61
Fichiers WMA, MP3 et WAV 61
– Exemple de hiérarchie 62
– Compatibilité des formats audio
compressés 62
Caractéristiques techniques 63
33
Fr
Page 34

Section
01
Avant de commencer
Pour le modèle canadien
Cet appareil numérique de la classe B est
conforme à la norme NMB-003 du Canada.
Quelques mots sur cet appareil
Les fréquences du syntoniseur de cet appareil
sont attribuées pour une utilisation en Amérique du Nord. Son utilisation dans d’autres
régions peut se traduire par une réception de
mauvaise qualité.
PRÉCAUTION
! Ne laissez pas cet appareil venir en contact
avec des liquides. Cela pourrait provoquer une
électrocution. Tout contact avec des liquides
pourrait aussi provoquer des dommages, de
la fumée et une surchauffe de l’appareil.
! Conservez ce mode d’emploi à portée de main
afin de vous y référer pour les modes d’opération et les précautions.
! Maintenez toujours le niveau d’écoute à une
valeur telle que vous puissiez entendre les
sons provenant de l’extérieur du véhicule.
! Protégez l’appareil contre l’humidité.
! Si la batterie est débranchée ou déchargée, le
contenu de la mémoire sera effacé et une
nouvelle programmation sera nécessaire.
Service après-vente des
produits Pioneer
Veuillez contacter le revendeur ou le distributeur auprès duquel vous avez acheté cet appareil pour le service après vente (y compris les
conditions de garantie) ou pour toute autre information. Dans le cas où les informations nécessaires ne sont pas disponibles, veuillez
contacter les sociétés indiquées ci-dessous.
N’expédiez pas l’appareil pour réparation à
l’une des adresses figurant ci-dessous sans
avoir pris contact préalable.
ÉTATS-UNIS
Pioneer Electronics (USA) Inc.
CUSTOMER SUPPORT DIVISION
P.O. Box 1760
Long Beach, CA 90801-1760
800-421-1404
CANADA
Pioneer électroniques du Canada, Inc.
Département de service aux consommateurs
300 Allstate Parkway
Markham, Ontario L3R OP2
1-877-283-5901
Pour connaître les conditions de garantie, reportez-vous au document Garantie limitée qui
accompagne cet appareil.
Visitez notre site Web
Rendez-nous visite sur le site suivant :
1 Enregistrez votre produit. Nous conserverons
les détails de votre achat dans nos fichiers
pour vous aider à faire référence à ces informations pour une déclaration d’assurance en
cas de perte ou de vol.
2 Recevez les mises à jour sur les derniers pro-
duits et les plus récentes technologies.
3 Téléchargez les modes d’emploi, commandez
les catalogues des produits, recherchez de
nouveaux produits, et bien plus.
Quelques mots sur WMA
34
Fr
Page 35

Avant de commencer
Section
01
Le logo Windows Media™ imprimé sur le coffret indique que ce produit peut lire les données WMA.
WMA est une abréviation pour Windows
Media™ Audio et fait référence à une technologie de compression développée par Microsoft Corporation. Les données WMA peuvent
être encodées en utilisant Windows Media
Player version 7 ou ultérieure.
Windows Media et le logo Windows sont des
marques commerciales ou des marques
commerciales déposées de Microsoft Corporation aux États-Unis et/ou dans d’autres pays.
Remarque
Cet appareil peut ne pas fonctionner correctement selon l’application utilisée pour encoder les
fichiers WMA.
Quelques mots sur MP3
La fourniture de ce produit comporte seulement une licence d’utilisation privée, non
commerciale, et ne comporte pas de licence
ni n’implique aucun droit d’utilisation de ce
produit pour une diffusion commerciale (c’està-dire générant des revenus) en temps réel
(terrestre, par satellite, câble et/ou tout autre
média), diffusion/streaming via Internet, des
intranets et/ou d’autres systèmes électroniques de distribution de contenu, telles que les
applications audio payante ou audio sur demande. Une licence indépendante est requise
pour de telles utilisations. Pour les détails,
veuillez visiter le site
http://mp3licensing.com.
La marque SAT RADIO READY imprimée sur
la face avant indique que cet appareil peut
contrôler le Syntoniseur Radio Satellite (Satellite Radio Tuner) pour Pioneer (syntoniseur
XM, ou syntoniseur satellite Sirius, vendus séparément). Renseignez-vous auprès de votre
revendeur ou du Centre d’entretien agréé par
Pioneer le plus proche pour savoir quel syntoniseur radio satellite peut être connecté à cet
appareil. Pour avoir des informations sur l’utilisation du syntoniseur radio satellite, reportezvous au mode d’emploi du syntoniseur radio
satellite considéré.
Remarques
! Ce système utilisera une technologie de diffu-
sion directe satellite à récepteur pour offrir un
son de grande pureté aux auditeurs, dans leur
voiture et à leur domicile, sans interruption
sur l’ensemble du territoire.La radio satellite
créera et rassemblera plus de 100 canaux de
programmes de musique, d’informations, de
sports, de discussion et de programmes pour
enfants de qualité numérique.
! “SAT Radio”, le logo SAT Radio et toutes les
marques associées sont des marques
commerciales de Sirius Satellite Radio Inc., et
de XM Satellite Radio Inc.
Utilisation et soin de la
télécommande
Installation de la pile
Sortez le porte-pile de l’arrière de la télécommande et insérez la pile en respectant les polarités (+) et (–).
Français
A propos de la marque SAT
RADIO READY
35
Fr
Page 36

Section
01
Avant de commencer
ATTENTION
Conservez la pile hors de portée des enfants. Au
cas où la pile serait avalée, consultez immédiatement un médecin.
PRÉCAUTION
! Utilisez seulement une pile au lithium
CR2025 (3 V).
! Retirez la pile si la télécommande n’est pas
utilisée pendant un mois ou plus.
! Le remplacement de la pile par une pile inap-
propriée peut provoquer une explosion. Remplacez la pile uniquement par une pile
identique ou de type équivalent.
! Ne manipulez pas la pile avec un outil métal-
lique.
! Ne conservez pas la pile avec des objets mé-
talliques.
! En cas de fuite de la pile, nettoyez soigneuse-
ment la télécommande puis mettez en place
une pile neuve.
! Lors de la mise au rebut des piles usagées,
respectez les règlements nationaux ou les instructions locales en vigueur dans le pays ou la
région en matière de conservation ou de protection de l’environnement.
Utilisation de la télécommande
Pointez la télécommande dans la direction de
la face avant de l’appareil à télécommander.
Important
! Ne laissez pas la télécommande exposée à
des températures élevées ou à la lumière directe du soleil.
! La télécommande peut ne pas fonctionner
correctement en lumière directe du soleil.
! Ne laissez pas la télécommande tomber sur le
plancher, où elle pourrait gêner le bon fonctionnement de la pédale de frein ou
d’accélérateur.
Protection de l’appareil
contre le vol
La face avant peut être enlevée pour décourager les vols.
Important
! Lorsque vous enlevez ou remontez la face
avant, manipulez-la doucement.
! Évitez de heurter la face avant.
! Conservez la face avant à l’abri des tempéra-
tures élevées et de la lumière directe du soleil.
Détacher la face avant
1 Appuyez sur DETACH pour libérer la
face avant.
2 Saisissez la face avant et retirez-la.
Pose de la face avant
1 Faites glisser la face avant vers la gauche jusqu’àcequ’elle s’enclenche en posi-
tion.
La face avant et l’appareil central sont fixés
sur le côté gauche. Assurez-vous que la face
avant soit bien fixée à l’appareil central.
2 Appuyez sur le côté droit de la face
avant jusqu’àcequ’il se loge fermement
dans l’appareil central.
# Si vous ne pouvez pas monter la face avant
sur l’appareil central, réessayez. N’exercez aucune force excessive sur la face avant, cela pourrait l’endommager.
36
Fr
Page 37

1
8
b
6
243
9
75a
cde
c
g
9
1
h
i
e
d
f
Opérations de base
Section
02
Français
Description de l’appareil
Appareil central
1 Touche AUDIO
Appuyez sur cette touche pour choisir les diverses commandes de correction sonore.
2 Touche EQ
Appuyez sur cette touche pour choisir les diverses courbes d’égalisation.
3 Touche SOURCE, VOLUME
Cet appareil est mis en service en sélectionnant une source. Appuyez sur cette touche
pour parcourir les différentes sources disponibles.
Tournez ce bouton pour augmenter ou diminuer le niveau sonore.
4 Fente de chargement des disques
Insérez un disque à lire.
5 Touche EJECT
Appuyez sur cette touche pour éjecter le CD
que contient le lecteur de CD intégré.
6 Touche CLOCK
Appuyez sur cette touche pour modifier l’affichage de l’horloge. Appuyez de façon prolongée sur cette touche pour changer de
mode de sélection du canal quand la source
sélectionnée est un syntoniseur XM ou SIRIUS.
7 Jack d’entrée AUX1 (jack stéréo 3,5
mm)
Utilisez ce jack pour connecter un équipement auxiliaire.
8 Touche DETACH
Appuyez sur cette touche pour retirer la
face avant de l’appareil central.
9 Touche DISPLAY
Appuyez sur cette touche pour choisir un affichage différent.
a Touche SW
Appuyez sur cette touche pour choisir le paramètre du haut-parleur d’extrêmes graves.
Appuyez sur cette touche de façon prolongée pour sélectionner le menu de réglage
de l’accentuation des graves.
b Touches 1 à 6
Appuyez sur ces touches pour choisir une
fréquence en mémoire, ou un disque si
l’installation comprend un lecteur de CD à
chargeur.
c Touches a/b/c/d
Appuyez sur ces touches pour exécuter les
commandes d’accord automatique, avance
rapide, retour rapide et recherche de plage
musicale. Utilisé aussi pour contrôler les
fonctions.
d Touche BAND
Appuyez sur cette touche pour choisir une
des trois gammes FM ou la gamme AM, ou
encore abandonner la commande des fonctions.
37
Fr
Page 38

Section
02
Opérations de base
e Touche FUNCTION
Appuyez sur cette touche pour choisir des
fonctions.
Télécommande
Le fonctionnement est le même qu’avec l’utilisation des touches de l’appareil central. Reportez-vous à la description de l’appareil
central pour des explications sur le fonctionnement de chaque touche à l’exception de
ATT et PAUSE, qui est expliqué ci-dessous.
f Touche VOLUME
Appuyez sur ces touches pour augmenter
ou diminuer le niveau sonore.
g Touche ATT
Appuyez sur cette touche pour diminuer rapidement le niveau du volume d’environ 90
%. Appuyez à nouveau pour revenir au niveau de volume initial.
h Touche PAUSE
Appuyez sur cette touche pour mettre en
service ou hors service la pause.
i Touche SOURCE
Cet appareil est mis en service en sélectionnant une source. Appuyez sur cette touche
pour parcourir les différentes sources disponibles.
Mise en service de l’appareil
et sélection d’une source
Vous pouvez sélectionner la source que vous
voulez écouter. Pour basculer sur le lecteur de
CD intégré, chargez un disque dans l’appareil
(reportez-vous à la page 41).
% Appuyez sur SOURCE pour choisir une
source.
Appuyez de manière répétée sur SOURCE
pour choisir l’une après l’autre les sources suivantes :
Syntoniseur XM—Syntoniseur SIRIUS—
Syntoniseur—Télévision—Lecteur de CD
intégré—Lecteur de CD à chargeur—iPod
—Source extérieure 1—Source extérieure
2—AUX1—AUX2
Remarques
! Dans les cas suivants, la source sonore ne
pourra pas être sélectionnée :
— Aucun appareil correspondant à la source
sélectionnée n’est connecté à cet appareil.
— L’appareil ne contient pas de disque.
— Le lecteur de CD à chargeur ne contient
pas de chargeur.
— L’entrée AUX (entrée pour un appareil auxi-
liaire) est hors service (reportez-vous à la
page 55).
! Par défaut, l’entrée AUX1 est en service. Met-
tez l’entrée AUX1 hors service quand elle n’est
pas utilisée (reportez-vous à la page 55, Mise
en service ou hors service de l’entrée auxiliaire).
! Source extérieure fait référence à un produit
Pioneer (par exemple disponible dans le futur)
qui, bien qu’incompatible en tant que source,
permet la commande de fonctions élémentaires par cet appareil. Cet appareil peut contrôler deux sources extérieures. Quand deux
sources extérieures sont connectées, leur affectation à la source extérieure 1 ou la source
extérieure 2 est effectuée automatiquement
par l’appareil.
! Si le fil bleu/blanc de l’appareil est relié à la
prise de commande du relais de l’antenne
motorisée du véhicule, celle-ci se déploie
lorsque la source est mise en service. Pour rétracter l’antenne, mettez la source hors
service.
Réglage du volume
% Utilisez VOLUME pour régler le niveau
sonore.
Mise hors tension de l’appareil
% Maintenez la pression sur SOURCE jusqu’à ce que l’appareil soit mis hors
tension.
38
Fr
Page 39

5
4
321
Syntoniseur
Section
03
Écoute de la radio
1 Indicateur de gamme
Il signale la gamme d’accord choisie, AM
ou FM.
2 Indicateur de fréquence
Il indique la valeur de la fréquence d’accord
du syntoniseur.
3 Indicateur de numéro de présélection
Il indique le numéro de la présélection choisie.
4 Indicateur LOC
Il indique quand l’accord automatique sur
une station locale est en service.
5 Indicateur de stéréo (5)
Il signale que la station sélectionnée émet
en stéréo.
1 Pour choisir le syntoniseur, appuyez sur
SOURCE.
Appuyez sur SOURCE jusqu’à ce que TUNER
s’affiche.
2 Appuyez sur BAND pour choisir la
gamme.
Appuyez sur BAND jusqu’à ce que la gamme
désirée, F1, F2, F3 en FM ou AM (PO/GO), soit
affichée.
3 Pour effectuer un accord manuel, appuyez brièvement sur c ou d.
4 Pour effectuer un accord automatique,
appuyez sur c ou d pendant environ une
seconde puis relâchez.
Le syntoniseur examine les fréquences jusqu’à
ce que se présente une émission dont la réception est jugée satisfaisante.
# Vous pouvez annuler l’accord automatique en
appuyant brièvement sur c ou d.
# Si vous appuyez sur c ou d et maintenez la
pression, vous pouvez sauter des stations. L’accord automatique démarre dès que vous relâchez
la touche.
Introduction au
fonctionnement détaillé du
syntoniseur
% Appuyez sur FUNCTION pour afficher le
nom de chaque fonction.
Appuyez de manière répétée sur FUNCTION
pour choisir une des fonctions suivantes :
BSM (mémoire des meilleures stations)—
LOCAL (accord automatique sur une station
locale)
# Appuyez sur BAND pour revenir à l’affichage
de la fréquence.
# Si vous ne réglez aucun paramètre de la fonction pendant environ 30 secondes, l’afficheur indique à nouveau la fréquence d’accord.
Mise en mémoire et rappel
des fréquences de stations
Si vous appuyez sur n’importe quelle des touches de présélection 1 à 6 vous pouvez aisément mettre en mémoire six fréquences que
vous pourrez ultérieurement rappeler par une
simple pression sur la touche convenable.
! Vous pouvez enregistrer en mémoire jus-
qu’à 18 stations FM, six pour chacune des
trois gammes FM, et six stations AM.
Français
39
Fr
Page 40

Section
03
Syntoniseur
% Lorsque se présente une fréquence que
vous désirez mettre en mémoire, maintenez la pression sur une des touches de présélection 1 à 6 jusqu’à ce que le numéro de
la présélection cesse de clignoter.
Le nombre sur lequel vous avez appuyé clignote sur l’indicateur de numéro de présélection puis reste allumé. La fréquence de la
station de radio sélectionnée a été enregistrée
en mémoire.
Lorsque vous appuyez à nouveau sur cette
même touche de présélection, la fréquence en
mémoire est rappelée.
# Vous pouvez également utiliser a et b pour
rappeler les fréquences affectées aux touches de
présélection 1 à 6.
Mise en mémoire des
fréquences des émetteurs
les plus puissants
La fonction BSM (Mémoire des meilleures stations) vous permet d’utiliser les touches de
présélection 1 à 6 pour mémoriser les six fréquences des émetteurs les plus puissants.
Une fois qu’elles sont enregistrées, vous pouvez vous accorder sur ces fréquences en appuyant simplement sur une touche.
! La mise en mémoire de fréquences à l’aide
de la fonction BSM peut provoquer le remplacement de fréquences précédemment
enregistrées en utilisant les touches 1 à 6.
Accord sur les signaux
puissants
L’accord automatique sur une station locale
ne s’intéresse qu’aux émetteurs dont le signal
reçu est suffisamment puissant pour garantir
une réception de bonne qualité.
1 Appuyez sur FUNCTION pour choisir
LOCAL.
2 Appuyez sur a pour mettre en service
l’accord automatique sur les stations locales.
Le niveau de sensibilité pour l’accord automatique sur les stations locales (par exemple,
LOCAL 2) apparaît sur l’afficheur.
# Pour mettre l’accord automatique sur les sta-
tions locales hors service, appuyez sur b.
3 Appuyez sur c ou d pour régler la sensibilité.
En FM, la sensibilité peut prendre quatre valeurs ; en AM, deux valeurs :
FM : LOCAL 1—LOCAL 2—LOCAL 3—
LOCAL 4
AM : LOCAL 1—LOCAL 2
La valeur LOCAL 4 permet la réception des
seules stations très puissantes ; les autres valeurs autorisent, dans l’ordre décroissant, la
réception de stations de moins en moins
puissantes.
1 Appuyez sur FUNCTION pour choisir
BSM.
2 Appuyez sur a pour mettre en service
BSM.
Les six fréquences d’émission les plus fortes
seront mémorisées dans l’ordre de la force du
signal.
# Pour annuler la mise en mémoire, appuyez
sur b.
40
Fr
Page 41

4
3
2
5
6
1
Lecteur intégré
Section
04
Lecture d’un disque
1 Indicateur du numéro de dossier
Il indique le numéro de dossier en cours de
lecture lors de la lecture d’un disque WMA/
MP3/WAV.
2 Indicateur du temps de lecture
Il indique le temps de lecture depuis le
début de la plage musicale (fichier) en
cours de lecture.
3 Indicateur du numéro de plage
Il indique le numéro de plage musicale (fichier) en cours de lecture.
! Si un numéro de plage de 100 ou plus
est sélectionné, d à gauche de l’indicateur de numéro de plage s’allume.
4 Indicateur RPT
Il indique que la plage de répétition choisie
est la plage (fichier) en cours de lecture.
5 Indicateur WMA
Il indique quand un fichier WMA est en
cours de lecture.
6 Indicateur MP3
Il indique quand un fichier MP3 est en
cours de lecture.
1 Insérez un CD (CD-ROM) dans le logement pour le disque.
La lecture commence automatiquement.
# Assurez-vous de mettre le côté étiquette
du disque vers le haut.
# Après avoir inséré un CD (CD-ROM), appuyez
sur SOURCE pour sélectionner le lecteur de CD
intégré.
# Vous pouvez éjecter le CD (CD-ROM) en appuyant sur EJECT.
2 Lors de la lecture d’un disque WMA/
MP3/WAV, appuyez sur a ou b pour sélectionner un dossier.
# Vous ne pouvez pas sélectionner un dossier
dans lequel aucun fichier WMA/MP3/WAV n’est
enregistré.
# Pour retourner au dossier 01 (ROOT), appuyez
sur BAND et maintenez la pression. Toutefois, si
le dossier 01 (ROOT) ne contient pas de fichier, la
lecture commence au dossier 02.
3 Pour une avance rapide ou un retour rapide, appuyez sur c ou d et maintenez la
pression.
# Si vous sélectionnez ROUGH, une pression
prolongée sur c ou d vous permet d’effectuer
une recherche par sauts de 10 plages dans le
disque (dossier) en cours. (Reportez-vous à la
page 43, Recherche toutes les 10 plages sur le
disque ou dossier en cours.)
4 Pour atteindre une plage précédente
ou suivante, appuyez sur c ou d.
Remarques
! Lisez les précautions concernant les disques
et le lecteur à la page 60.
! Si un message d’erreur tel que ERROR-11
s’affiche, reportez-vous à la page 60, Explica-
tion des messages d’erreur du lecteur de CD intégré.
! Il y a par fois un délai entre la commande de
lecture d’un disque et le début de l’émission
du son. Au moment de la lecture du format,
FRMTREAD s’affiche.
! Quand vous lisez des CDs CD-EXTRA ou
MIXED-MODE, vous pouvez basculer entre
WMA/MP3/WAV et CD-DA en appuyant sur
BAND.
! Si vous avez basculé entre la lecture de fi-
chiers WMA/MP3/WAV et celle de données
audio (CD-DA), la lecture commence à la première plage du disque.
Français
41
Fr
Page 42

Section
04
Lecteur intégré
! Le lecteur de CD intégré peut lire un fichier
WMA/MP3/WAV enregistré sur un CD-ROM.
(Reportez-vous à la page 61 pour des informations sur les fichiers qui peuvent être lus.)
! Lors de la lecture de fichiers enregistrés en
VBR (débit binaire variable), la durée de lecture écoulée peut ne pas s’afficher correctement.
! Lors de la lecture d’un disque WMA/MP3//
WAV, aucun son n’est émis pendant l’avance
ou le retour rapide.
Introduction au
fonctionnement détaillé du
lecteur de CD intégré
% Appuyez sur FUNCTION pour afficher le
nom de chaque fonction.
Appuyez de manière répétée sur FUNCTION
pour choisir une des fonctions suivantes :
RPT (répétition de la lecture)—RDM (lecture
aléatoire)—SCAN (examen du disque)—
PAUSE (pause)—COMP (compression et
BMX)—FF/REV (méthode de recherche)
# Appuyez sur BAND pour revenir à l’affichage
des conditions de lecture.
# Si vous ne réglez aucun paramètre de la fonction pendant environ 30 secondes, l’afficheur indique à nouveau les conditions de lecture.
FLD – Répétition du dossier en cours de lec-
ture
# Si vous choisissez un autre dossier pendant la
répétition de la lecture, le mode de répétition se
changera en répétition du disque.
# Lors de la lecture d’un CD, l’exécution d’une
recherche de plage ou d’une avance/d’un retour
rapide annule automatiquement la répétition de
la lecture.
# Lors de la lecture d’un disque WMA/MP3/
WAV, l’exécution d’une recherche de plage ou
d’une avance/d’un retour rapide pendant TRK (répétition de plage) change l’étendue de répétition
en répétition de dossier.
# Quand FLD (répétition de dossier) est sélec-
tionné, il n’est pas possible de jouer un sous-dossier de ce dossier.
Écoute des plages musicales
dans un ordre aléatoire
La lecture au hasard lit les plages dans un
ordre aléatoire (au hasard) à l’intérieur de l’étendue de répétition sélectionnée.
1 Choisissez l’étendue de répétition.
Reportez-vous à cette page, Répétition de la
lecture.
2 Appuyez sur FUNCTION pour choisir
RDM.
Répétition de la lecture
La fonction répétition de la lecture lit la même
plage/le même dossier à l’intérieur de l’étendue de répétition sélectionnée.
1 Appuyez sur FUNCTION pour choisir
RPT.
2 Appuyez sur c ou d pour choisir l’étendue de répétition.
DSC – Répétition de toutes les plages
TRK – Répétition de la plage en cours de lec-
ture seulement
42
Fr
3 Appuyez sur a pour activer la lecture
dans un ordre aléatoire.
RDM :ON apparaît sur l’afficheur. Les plages
musicales seront lues dans un ordre aléatoire.
# Appuyez sur b pour mettre hors service la
fonction lecture dans un ordre aléatoire.
Remarque
Si vous mettez en fonction la lecture dans un
ordre aléatoire pendant FLD puis revenez à l’affichage des conditions de lecture, FRDM apparaît
sur l’afficheur.
Page 43

Lecteur intégré
Section
04
Examen des plages ou des
dossiers
L’examen du disque recherche la plage à l’in-
térieur de l’étendue de répétition sélectionnée.
1 Choisissez l’étendue de répétition.
Reportez-vous à la page précédente, Répétition
de la lecture.
2 Appuyez sur FUNCTION pour choisir
SCAN.
3 Appuyez sur a pour activer la lecture
du contenu du disque.
SCAN :ON apparaît sur l’afficheur. Les 10 pre-
mières secondes de chaque plage sont lues.
4 Quand vous trouvez la plage désirée
appuyez sur b pour arrêter la lecture du
contenu du disque.
# Si les conditions de lecture se sont à nouveau
affichées d’elles-mêmes, choisissez SCAN une
fois encore en appuyant sur FUNCTION.
Remarques
! Lorsque l’examen du disque (dossier), est ter-
miné, la lecture normale reprend.
! Si vous mettez en fonction l’examen du disque
pendant FLD puis revenez à l’affichage des
conditions de lecture, FSCN apparaît sur
l’afficheur.
Pause de la lecture
La pause vous permet d’arrêter momentanément la lecture du disque.
Utilisation de la compression
et de la fonction BMX
L’utilisation des fonctions COMP (compres-
sion) et BMX vous permet d’ajuster la qualité
sonore de l’appareil.
1 Appuyez sur FUNCTION pour choisir
COMP.
2 Appuyez sur a ou b pour choisir la correction désirée.
COMP OFF—COMP 1—COMP 2—
COMP OFF—BMX 1—BMX 2
Recherche toutes les 10
plages sur le disque ou
dossier en cours
Vous pouvez choisir entre les méthodes de recherche rapide avant, recherche rapide arrière
et recherche toutes les 10 plages. Sélectionner
ROUGH vous permet d’effectuer une recher-
che toutes les 10 plages.
1 Appuyez sur FUNCTION pour choisir
FF/REV.
# Si la méthode de recherche ROUGH a été sé-
lectionnée précédemment, ROUGH s’affiche.
2 Appuyez sur d pour choisir ROUGH.
! FF/REV – Recherche rapide avant et arrière
! ROUGH – Recherche toutes les 10 plages
# Pour sélectionner FF/REV, appuyez sur c.
3 Appuyez sur BAND pour revenir à l’affichage des conditions de lecture.
Français
1 Appuyez sur FUNCTION pour choisir
PAUSE.
2 Appuyez sur a pour activer la pause.
PAUSE:ON apparaît sur l’afficheur. La lecture
de la plage en cours se met en pause.
# Appuyez sur b pour mettre la pause hors
service.
4 Maintenez le doigt appuyé sur c ou d
pour effectuer une recherche toutes les 10
plages sur un disque (dossier).
# Si le nombre de plages restantes est inférieur
à 10, l’appui de façon prolongée sur c ou d rappelle la première (la dernière) plage.
Fr
43
Page 44

Section
04
Lecteur intégré
Affichage d’informations
textuelles sur le disque
% Appuyez sur DISPLAY.
Appuyez de manière répétée sur DISPLAY
pour passer d’un des paramètres à l’autre :
Pour les disques CD TEXT
Temps de lecture—DISC TTL (titre du disque)
—ART NAME (interprète du disque)—
TRK TTL (titre de la plage musicale)—
ART NAME (interprète de la plage musicale)
Pour les disques WMA/MP3
Temps de lecture—FOLDER (nom du dossier)
—FILE (nom du fichier)—TRK TTL (titre de la
plage)—ART NAME (nom de l’interprète)—
ALBM TTL (titre de l’album)—COMMENT
(commentaire)—Débit binaire
Pour les disques WAV
Temps de lecture—FOLDER (nom du dossier)
—FILE (nom du fichier)—Fréquence d’échan-
tillonnage
Remarques
! Vous pouvez faire défiler l’affichage vers la
gauche du titre en appuyant de façon prolongée sur DISPLAY.
! Les CD Audio qui contiennent des informa-
tions telles que du texte et/ou des numéros
sont les disques CD TEXT.
! Si aucune information spécifique n’a été gra-
vée sur un disque, NO XXXX s’affiche (par
exemple, NO NAME).
! Lors de la lecture de fichiers WMA enregistrés
en mode VBR, le débit binaire moyen est affiché.
! Lors de la lecture de fichiers MP3 enregistrés
en mode VBR (débit binaire variable), VBR est
affiché au lieu de la valeur de débit binaire.
! Selon la version de iTunes
gistrer les fichiers MP3 sur un disque, les informations de commentaire peuvent ne pas
s’afficher correctement.
— iTunes est une marque commerciale de
Apple Computer, Inc. déposée aux ÉtatsUnis et dans d’autres pays.
! La fréquence d’échantillonnage affichée peut
être abrégée.
®
utilisée pour enre-
44
Fr
Page 45

4
321
Lecteur de CD à chargeur
Section
05
Écoute d’un CD
Vous pouvez utiliser cet appareil pour commander un lecteur de CD à chargeur, vendu séparément.
! Cet appareil ne possède pas de fonction sai-
sie de titr e de disque.
! Seules les fonctions mentionnées dans ce
mode d’emploi sont prises en compte par
les lecteurs de CD 50 disques.
1 Indicateur du numéro de disque
Il indique le numéro du disque en cours de
lecture.
2 Indicateur du temps de lecture
Il indique le temps de lecture depuis le
début de la plage en cours de lecture.
3 Indicateur du numéro de plage
Il indique le numéro de la plage en cours de
lecture.
4 Indicateur RPT
Il indique quand l’étendue de répétition
choisie est la plage musicale en cours.
1 Appuyez sur SOURCE pour choisir le
lecteur de CD à chargeur.
Appuyez sur SOURCE jusqu’à ce que
MULTI CD s’affiche.
2 Choisissez le disque que vous désirez
écouter au moyen des touches 1 à 6.
Pour les disques 1 à 6, appuyez simplement
sur la touche correspondante.
Pour les disques 7 à 12, appuyez sur la touche
correspondante, par exemple 1 pour le disque
7, en maintenant la pression jusqu’à ce que le
numéro du disque s’affiche.
# Vous pouvez également utiliser les touches a/
b pour choisir les disques dans l’ordre.
3 Pour une avance rapide ou un retour rapide, appuyez sur c ou d et maintenez la
pression.
4 Pour atteindre une plage précédente
ou suivante, appuyez sur c ou d.
Remarques
! READY s’affiche tandis que le lecteur de CD à
chargeur procède aux opérations préalables à
la lecture.
! Si un message d’erreur tel que ERROR-11
s’affiche, reportez-vous au mode d’emploi du
lecteur de CD à chargeur.
! L’indication NO DISC s’affiche si le lecteur de
CD à chargeur ne contient aucun disque.
Introduction au
fonctionnement détaillé du
lecteur de CD à chargeur
% Appuyez sur FUNCTION pour afficher le
nom de chaque fonction.
Appuyez de manière répétée sur FUNCTION
pour choisir une des fonctions suivantes :
RPT (répétition de la lecture)—RDM (lecture
aléatoire)—SCAN (examen du disque)—ITS-P
(lecture ITS)—PAUSE (pause)—COMP
(compression et DBE)
# Appuyez sur BAND pour revenir à l’affichage
des conditions de lecture.
# Si vous ne réglez aucun paramètre de la fonction pendant environ 30 secondes, l’afficheur indique à nouveau les conditions de lecture.
Répétition de la lecture
Il existe trois étendues de répétition pour le
lecteur de CD à chargeur : MCD (répétition du
lecteur de CD à chargeur), TRK (répétition
d’une plage) et DSC (répétition du disque).
Français
45
Fr
Page 46

Section
05
Lecteur de CD à chargeur
1 Appuyez sur FUNCTION pour choisir
RPT.
2 Appuyez sur c ou d pour choisir l’étendue de répétition.
! MCD – Répétition de tous les disques que
contient le chargeur du lecteur de CD à
chargeur
! TRK – Répétition de la plage en cours de
lecture seulement
! DSC – Répétition du disque en cours de lec-
ture
Remarques
! Si vous choisissez un autre disque pendant la
répétition de la lecture, l’étendue de répétition
changera en MCD.
! Si pendant la répétition TRK, vous recherchez
une plage musicale, ou commandez une
avance rapide ou un retour rapide, l’étendue
de répétition changera en DSC.
Écoute des plages musicales
dans un ordre aléatoire
Les plages musicales sont jouées dans un
ordre aléatoire à l’intérieur de l’étendue de répétition adoptée : MCD ou DSC.
1 Choisissez l’étendue de répétition.
Reportez-vous à la page précédente, Répétition
de la lecture.
2 Appuyez sur FUNCTION pour choisir
RDM.
Remarque
Si vous mettez en fonction la lecture dans un
ordre aléatoire pendant DSC puis revenez à l’affichage des conditions de lecture, DRDM apparaît
sur l’afficheur.
Examen du contenu des
disques et des plages
Quand vous utilisez DSC, le début de chaque
plage du disque sélectionné est joué pendant
environ 10 secondes. Quand vous utilisez
MCD, le début de la première plage de chaque
disque est joué pendant environ 10 secondes.
1 Choisissez l’étendue de répétition.
Reportez-vous à la page précédente, Répétition
de la lecture.
2 Appuyez sur FUNCTION pour choisir
SCAN.
3 Appuyez sur a pour activer la lecture
du contenu du disque.
SCAN :ON apparaît sur l’afficheur. Les 10 pre-
mières secondes de chaque plage musicale
du disque en cours (ou de la première plage
de chaque disque) sont lues.
4 Quand vous trouvez la plage désirée
(ou le disque désiré) appuyez sur b pour
arrêter l’examen du contenu du disque.
# Si les conditions de lecture se sont à nouveau
affichées d’elles-mêmes, choisissez SCAN une
fois encore en appuyant sur FUNCTION.
3 Appuyez sur a pour activer la lecture
dans un ordre aléatoire.
RDM :ON apparaît sur l’afficheur. Les plages
seront jouées dans un ordre aléatoire à l’intérieur des limites MCD ou DSC sélectionnées
précédemment.
# Appuyez sur b pour mettre hors service la
fonction lecture dans un ordre aléatoire.
46
Fr
Remarques
! Lorsque l’examen des plages ou des disques
est terminé, la lecture normale des plages musicales reprend.
! Si vous mettez en fonction l’examen du conte-
nu du disque pendant MCD puis revenez à
l’affichage des conditions de lecture, DSCN
apparaît sur l’afficheur.
Page 47

Lecteur de CD à chargeur
Section
05
Pause de la lecture d’un CD
La pause permet un arrêt momentané de la
lecture du CD.
1 Appuyez sur FUNCTION pour choisir
PAUSE.
2 Appuyez sur a pour activer la pause.
PAUSE:ON apparaît sur l’afficheur. La lecture
de la plage en cours se met en pause.
# Appuyez sur b pour mettre la pause hors
service.
Utilisation de la compression
et de l’accentuation
dynamique des graves
Vous pouvez utiliser ces fonctions lorsque le lecteur de CD à chargeur en est pourvu.
L’utilisation des fonctions COMP (compres-
sion) et DBE (accentuation dynamique des
graves) vous permet d’ajuster la qualité du
son du lecteur de CD à chargeur. Chacune de
ces fonctions possède un réglage en deux étapes. La fonction COMP règle l’équilibre entre
les sons les plus forts et les plus faibles aux
volumes élevés. DBE augmente le niveau des
graves pour donner à la lecture un son plus
riche. Sélectionnez chacun de ces effets et
écoutez-les puis choisissez celui qui améliore
le mieux la lecture de la plage ou du CD que
vous écoutez.
1 Appuyez sur FUNCTION pour choisir
COMP.
# Si le lecteur de CD à chargeur ne possède pas
la fonction COMP/DBE, NO COMP s’affiche
quand vous essayez de la sélectionner.
2 Appuyez sur a ou b pour choisir la correction désirée.
COMP OFF—COMP 1—COMP 2—
COMP OFF—DBE 1—DBE 2
Utilisation des listes ITS
ITS (sélection instantanée des plages) vous
permet de constituer une liste de lecture de
vos plages favorites à partir de celles qui sont
contenues dans le lecteur de CD à chargeur.
Après avoir ajouté vos plages favorites à la
liste de lecture vous pouvez activer la lecture
ITS et jouer seulement ces sélections.
Création d’une liste de lecture
avec la sélection instantanée
des plages ITS
Vous pouvez utiliser la fonction ITS pour entrer
et jouer jusqu’à 99 plages par disque, en provenance d’un maximum de 100 disques (avec
les titres des disques). (Avec les lecteurs de
CD à chargeur vendus avant le CDX-P1250 et
le CDX-P650, la liste de lecture est limitée à 24
plages.)
1 Jouez un CD que vous voulez programmer.
Appuyez sur a ou b pour sélectionner le CD.
2 Appuyez de façon prolongée sur
FUNCTION pour choisir ITS.
3 Sélectionnez la plage désirée en appuyant sur c ou d.
4 Appuyez sur a pour mémoriser la
plage en cours de lecture dans la liste de
lecture.
ITS IN s’affiche brièvement et la sélection en
cours de lecture est ajoutée à votre liste de lecture. L’écran affiche à nouveau ITS.
5 Appuyez sur BAND pour revenir à l’affichage des conditions de lecture.
Remarque
Après l’entrée des données de 100 disques dans
la mémoire, les données pour un nouveau disque
écrasent les données les plus anciennes.
Français
47
Fr
Page 48

Section
05
Lecteur de CD à chargeur
Lecture à partir de votre liste
de lecture ITS
La lecture ITS vous permet d’écouter les plages que vous avez enregistrées dans votre liste
de lecture ITS. Quand vous activez la lecture
ITS, la lecture des plages incluses dans votre
liste de lecture du lecteur de CD à chargeur
commence.
1 Choisissez l’étendue de répétition.
Reportez-vous à la page 45, Répétition de la lecture.
2 Appuyez sur FUNCTION pour choisir
ITS-P.
3 Appuyez sur a pour activer la lecture
ITS.
ITS-P:ON apparaît sur l’afficheur. La lecture
des plages extraites de votre liste de lecture incluses dans les étendues de répétition MCD
ou DSC commence.
# Si aucune plage incluse dans l’étendue de ré-
pétition en cours n’est programmée pour la lecture ITS, EMPTY est affiché.
# Pour mettre la lecture ITS hors service, appuyez sur b.
Suppression d’une plage de
votre liste ITS
Vous pouvez supprimer une plage musicale de
la liste de lecture ITS si la lecture ITS est en
service.
Si ITS est déjà en service, passez à l’opération
2. Si ITS n’est pas en service, appuyez sur
FUNCTION.
3 Sélectionnez la plage désirée en appuyant sur c ou d.
4 Appuyez sur b pour supprimer la plage
de votre liste ITS.
La sélection en cours de lecture est effacée de
votre liste ITS et la lecture de la plage suivante
de votre liste ITS commence.
# S’il n’existe aucune plage incluse dans votre
liste ITS dans l’étendue de répétition en cours,
EMPTY s’affiche et la lecture normale reprend.
5 Appuyez sur BAND pour revenir à l’affichage des conditions de lecture.
Suppression d’un CD de votre
liste ITS
Vous pouvez supprimer toutes les plages d’un
CD de votre liste de lecture ITS quand la lecture ITS est hors service.
1 Jouez le CD que vous voulez supprimer.
Appuyez sur a ou b pour sélectionner le CD.
2 Appuyez de façon prolongée sur
FUNCTION pour choisir ITS.
3 Appuyez sur b pour supprimer toute
les plages du CD en cours de lecture de
votre liste ITS.
Toutes les plages du CD en cours de lecture
sont effacées de la liste de lecture et ITS CLR
est affiché.
4 Appuyez sur BAND pour revenir à l’affichage des conditions de lecture.
1 Jouez le CD qui contient la plage que
vous voulez supprimer de votre liste ITS, et
activez la lecture ITS.
Reportez-vous à cette page, Lecture à partir de
votre liste de lecture ITS.
2 Appuyez de façon prolongée sur
FUNCTION pour choisir ITS.
48
Fr
Utilisation des fonctions CD
TEXT
Vous ne pouvez utiliser ces fonctions que si le
lecteur de CD à char geur est compatible avec
CD TEXT.
Page 49

Lecteur de CD à chargeur
Certains disques disposent d’informations qui
ont été encodées pendant la fabrication du
disque. Ces disques, appelés disques CD
TEXT, peuvent contenir des informations telles
que le titre du CD, le titre des plages, le nom
de l’interprète et le temps de lecture. Seuls
ces disques CD TEXT encodés spécialement
supportent les fonctions indiquées ci-dessous.
% Appuyez sur DISPLAY.
Appuyez de manière répétée sur DISPLAY
pour passer d’un des paramètres à l’autre :
Temps de lecture—DISC TTL (titre du disque)
—ART NAME (interprète du disque)—
TRK TTL (titre de la plage musicale)—
ART NAME (interprète de la plage musicale)
# Si aucune information spécifique n’a été gra-
vée sur le disque CD TEXT, NO XXXX s’affiche
(par exemple, NO NAME).
Remarque
Vous pouvez faire défiler l’affichage vers la gauche du titre en appuyant de façon prolongée sur
DISPLAY.
Section
05
Français
49
Fr
Page 50

21345
Section
06
Réglages sonores
Introduction aux réglages
sonores
1 Affichage des réglages sonores
Il indique l’état des réglages sonores.
2 Indicateur BASS
Il indique quand l’accentuation des graves
est activée.
3 Indicateur SW
Il indique quand la sortie haut-parleur d’extrêmes graves est en service.
4 Indicateur LOUD
Il apparaît sur l’afficheur quand la correction physiologique est en service.
5 Indicateur FIE
Il indique que le renforcement de l’image
avant est en service.
% Appuyez sur AUDIO pour afficher le
nom des fonctions audio.
Appuyez de manière répétée sur AUDIO pour
choisir une des fonctions suivantes :
FAD (réglage d’équilibre sonore)—EQ (réglage
de la courbe de l’égaliseur)—LOUD (correction physiologique)—SUB.W (réglage en/hors
fonction du haut-parleur d’extrêmes graves)—
80: 0 (réglage du haut-parleur d’extrêmes gra-
ves)—HPF (HPF (filtre passe-haut))—BASS
(accentuation des graves)—FIE (optimiseur de
l’image avant)—SLA (réglage du niveau de la
source)
# Quand le réglage du contrôleur de haut-parleur d’extrêmes graves est P/O :FUL, vous ne pouvez pas sélectionner SUB.W. (Reportez-vous à la
page 56.)
# Vous pouvez sélectionner le 80: 0 seulement
quand la sortie haut-parleur d’extrêmes graves
est activée dans SUB.W.
# Quand la fonction F.I.E est en service, vous ne
pouvez pas sélectionner HPF.
# Quand le réglage de la sortie arrière est
R-SP :S/W, vous ne pouvez pas sélectionner FIE.
# Si le syntoniseur FM a été choisi comme
source, vous ne pouvez pas afficher la fonction
SLA.
# Appuyez sur BAND pour revenir à l’affichage
de l’état de chaque source.
# Si vous ne réglez aucun paramètre de la fonction pendant environ 30 secondes, l’afficheur indique à nouveau l’état de la source.
Réglage de l’équilibre sonore
Vous pouvez modifier l’équilibre avant-arrière/
droite-gauche afin d’obtenir un confort d’écoute idéal dans tous les sièges occupés.
1 Appuyez sur AUDIO pour choisir FAD.
# Si le réglage d’équilibre a été effectué précé-
demment, BAL est affiché.
2 Appuyez sur a ou b pour régler l’équilibre des haut-parleurs avant-arrière.
Les valeurs FAD :F15 à FAD :R15 s’affichent
tandis que l’équilibre entre les haut-parleurs
avant et arrière se déplace de l’avant à l’arrière.
# FAD : 0 est le réglage convenable dans le cas
où seulement deux haut-parleurs sont utilisés.
# Si le réglage pour la sortie arrière est
R-SP :S/W, vous ne pouvez pas régler l’équilibre
des haut-parleurs avant-arrière. Reportez-vous à
la page 56, Réglage de la sortie arrière et du contrô-
leur de haut-parleur d’extrêmes graves.
3 Appuyez sur c ou d pour régler l’équilibre des haut-parleurs gauche-droite.
Les valeurs BAL : L15 à BAL : R15 s’affichent
tandis que l’équilibre entre les haut-parleurs
gauche et droit se déplace de la gauche à la
droite.
50
Fr
Page 51

Réglages sonores
Section
06
Utilisation de l’égaliseur
L’égaliseur vous permet de corriger les carac-
téristiques sonores de l’intérieur du véhicule
en fonction de vos goûts.
Rappel d’une courbe d’égalisation
Six courbes d’égalisation sont enregistrées et
vous pouvez les rappeler à n’importe quel moment. Voici la liste des courbes d’égalisation :
Affichage Courbe d’égalisation
POWERFUL Accentuation de la puissance
NATURAL Sonorité naturelle
VOCAL Chant
CUSTOM Correction personnelle
EQ FLAT Absence de correction
SPR-BASS Accentuation des graves
! CUSTOM est une courbe d’égalisation pré-
réglée que vous avez créée. Si vous effectuez des ajustements sur la courbe
d’égalisation, les réglages de la courbe d’égalisation seront enregistrés dans
CUSTOM.
! Quand EQ FLAT est sélectionné aucune ad-
dition ni correction n’est effectuée sur le
son. Ceci est utile pour tester l’effet des
courbes d’égalisation en basculant entre
EQ FLAT et une courbe d’égalisation défi-
nie.
% Appuyez sur EQ pour sélectionner l’é-
galiseur.
Appuyez de manière répétée sur EQ pour choisir l’un des égaliseurs suivants :
POWERFUL—NATURAL—VOCAL—CUSTOM
—EQ FLAT—SPR-BASS
Réglage des courbes d’égalisation
Vous pouvez ajuster comme vous le désirez la
courbe d’égalisation actuellement sélectionnée. Les réglages de la courbe d’égalisation
ajustée sont mémorisés dans CUSTOM.
1 Appuyez sur AUDIO pour choisir EQ.
2 Appuyez sur c ou d pour choisir la
bande de l’égaliseur à régler.
EQ-L (bas)—EQ-M (moyen)—EQ-H (élevé)
3 Appuyez sur a ou b pour régler l’amplitude de la bande de l’égaliseur.
Les valeurs +6 à –6 s’affichent tandis que le niveau augmente ou diminue.
# Vous pouvez ensuite choisir une autre bande
et régler son amplitude.
Remarque
Si vous effectuez des ajustements, la courbe
CUSTOM est mise à jour.
Réglage fin de la courbe
d’égalisation
Vous pouvez ajuster la fréquence centrale et le
facteur Q (caractéristiq ues de la courbe) de
chacune des gammes de fréquence actuellement sélectionnée (EQ-L/EQ-M/EQ-H).
Niveau (dB)
Q=2W
Q=2N
Fréquence centrale
1 Appuyez sur AUDIO et maintenez la
pression jusqu’à ce que la fréquence et le
facteur Q (par exemple F- 80:Q1W) apparaissent sur l’afficheur.
2 Appuyez sur AUDIO pour choisir la
gamme basse, moyenne ou haute à régler.
Appuyez de manière répétée sur AUDIO pour
choisir une des fonctions suivantes :
Bas—Moyen—Elevé
Fréquence (Hz)
Français
51
Fr
Page 52

Section
06
Réglages sonores
3 Appuyez sur c ou d pour sélectionner
la fréquence désirée.
Basse : 40—80—100—160 (Hz)
Moyenne : 200—500—1k—2k (Hz)
Elevée : 3k—8k—10k—12k (Hz)
4 Appuyez sur a ou b pour sélectionner
le facteur Q désiré.
2N—1N—1W—2W
Remarque
Si vous effectuez des ajustements, la courbe
CUSTOM est mise à jour.
Réglage de la correction
physiologique
La correction physiologique a pour objet d’accentuer les graves et les aigus à bas niveaux
d’écoute.
1 Appuyez sur AUDIO pour choisir LOUD.
2 Appuyez sur a pour mettre en service
la correction physiologique.
Le niveau de correction physiologique (par
exemple, LOUD :MID) apparaît sur l’afficheur.
# Appuyez sur b pour mettre hors service la cor-
rection physiologique.
3 Appuyez sur c ou d pour sélectionner
le niveau désiré.
LOW (bas)—MID (moyen)—HI (élevé)
1 Appuyez sur AUDIO pour choisir
SUB.W.
# Vous pouvez aussi sélectionner le menu de réglage du haut-parleur d’extrêmes graves en appuyant sur la touche SW de l’appareil.
# Quand le réglage du contrôleur de haut-parleur d’extrêmes graves est P/O :FUL, vous ne pouvez pas sélectionner SUB.W.
2 Appuyez sur a pour mettre en service
la sortie haut-parleur d’extrêmes graves.
SUB.W:NOR apparaît sur l’afficheur. La sortie
haut-parleur d’extrêmes graves est maintenant
en service.
# Si la phase de la sortie haut-parleur d’extrê-
mes graves a été réglée sur inverse, SUB.W:REV
s’affiche.
# Pour mettre la sortie haut-parleur d’extrêmes
graves hors service, appuyez sur b.
3 Appuyez sur c ou d pour choisir la
phase de la sortie haut-parleur d’extrêmes
graves.
Appuyez sur c pour choisir la phase inverse et
REV apparaît sur l’afficheur. Appuyez sur d
pour choisir la phase normale et NOR apparaît
sur l’afficheur.
Réglages du haut-parleur
d’extrêmes graves
Lorsque la sortie haut-parleur d’extrêmes graves est en service, vous pouvez choisir la fréquence de coupure et régler le niveau de
sortie du haut-parleur d’extrêmes graves.
Utilisation de la sortie hautparleur d’extrêmes graves
Cet appareil est équipé d’une sortie haut-parleur d’extrêmes graves qui peut être mise en
service ou hors service.
52
Fr
1 Appuyez sur AUDIO pour choisir 80: 0.
# Vous pouvez aussi sélectionner le menu de réglage du haut-parleur d’extrêmes graves en appuyant sur la touche SW de l’appareil.
# Quand la sortie haut-parleur d’extrêmes gra-
ves est en service, vous pouvez sélectionner
80: 0.
# Si le réglage du haut-parleur d’extrêmes gra-
ves a été ajusté précédemment, la fréquence de
cet ajustement précédent sera affichée au lieu de
80.
Page 53

Réglages sonores
Section
06
2 Appuyez sur c ou d pour choisir la fréquence de coupure.
50—63—80—100—125 (Hz)
Seules les fréquences inférieures à celles de
la plage sélectionnée sont produites par le
haut-parleur d’extrêmes graves.
3 Appuyez sur a ou b pour régler l’amplitude de sortie du haut-parleur d’extrêmes graves.
Les valeurs +6 à –24 s’affichent tandis que le
niveau augmente ou diminue.
Utilisation du filtre passe-haut
Quand vous ne voulez pas que les sons graves
de la gamme de fréquence de la sortie hautparleur d’extrêmes graves soient émis par les
haut-parleurs avant ou arrière, mettez le filtre
passe-haut (HPF) en service. Seules les fréquences supérieures à celles de la plage sélectionnée sont émises par les haut-parleurs
avant ou arrière.
1 Appuyez sur AUDIO pour choisir HPF.
# Quand la fonction F.I.E est en service, vous ne
pouvez pas sélectionner HPF.
2 Appuyez sur a pour mettre en service
le filtre passe-haut.
HPF : 80 apparaît sur l’afficheur. Le filtre
passe-haut est maintenant en service.
# Si le réglage du filtre passe-haut a été ajusté
précédemment, la fréquence de cet ajustement
précédent sera affichée au lieu de HPF : 80.
# Pour mettre hors service le filtre passe-haut,
appuyez sur b.
3 Appuyez sur c ou d pour choisir la fréquence de coupure.
50—63—80—100—125 (Hz)
Seules les fréquences supérieures à celles de
la plage sélectionnée sont émises par les
haut-parleurs avant ou arrière.
Accentuation des graves
La fonction accentuation des graves augmente le niveau des graves pour les fréquences inférieures à 100 Hz. L’augmentation du
niveau des graves accentue le son des graves
et rend la sonorité globale plus puissante.
Quand cette fonction est utilisée avec le hautparleur d’extrêmes graves, les fréquences en
dessous de la fréquence de coupure sont accentuées.
1 Appuyez sur AUDIO pour choisir BASS.
# Vous pouvez aussi sélectionner le réglage de
l’accentuation des graves en appuyant de façon
prolongée sur SW.
2 Appuyez sur a ou b pour sélectionner
le niveau désiré.
Les valeurs 0 à +6 s’affichent tandis que le niveau augmente ou diminue.
Optimiseur d’image sonore
avant (F.I.E.)
La fonction F.I.E. (optimiseur d’image sonore
avant) est une méthode simple pour améliorer
l’image sonore à l’avant en coupant les médiums et les aigus des haut-parleurs arrière, limitant ainsi leur émission aux basses
fréquences. Vous pouvez sélectionner la fréquence que vous voulez couper.
Précaution
Lorsque la fonction F.I.E. est désactivée, les hautparleurs arrière émettent des sons de toutes les
fréquences, pas seulement des sons graves. Réduisez le volume avant de désactiver la fonction
F.I.E pour éviter une soudaine augmentation du
niveau sonore.
1 Appuyez sur AUDIO pour choisir FIE.
# Quand le réglage de la sortie arrière est
R-SP :S/W, vous ne pouvez pas sélectionner FIE.
# Quand la fonction HPF est en service, vous ne
pouvez pas sélectionner FIE.
Français
53
Fr
Page 54

Section
06
Réglages sonores
2 Appuyez sur a pour mettre en service
la fonction F.I.E.
# Appuyez sur b pour mettre hors service la
fonction F.I.E.
3 Appuyez sur c ou d pour choisir la fréquence souhaitée.
100—160—250 (Hz)
Remarques
! Après avoir mis en service la fonction F.I.E.,
utilisez le réglage d’équilibre sonore (reportezvous à la page 50) et réglez le volume des
haut-parleurs avant et arrière jusqu’àcequ’ils
soient équilibrés.
! Mettez la fonction F.I.E. hors service si vous
utilisez un système à 2 haut-parleurs.
! La fonction F.I.E. est effective seulement pour
l’amplificateur intégré.
Ajustement des niveaux
des sources
L’ajustement des niveaux des sources au
moyen de la fonction SLA (réglage du niveau
de la source sonore) évite que ne se produisent de fortes variations d’amplitude sonore
lorsque vous passez d’une source à l’autre.
! Les réglages sont basés sur le niveau du si-
gnal FM qui lui, demeure inchangé.
! Le lecteur de CD intégré et le lecteur de CD à
chargeur sont automatiquement placés dans
les mêmes conditions de niveau sonore.
! Le syntoniseur XM et le syntoniseur SIRIUS
sont réglés automatiquement sur le même
volume.
! La source extérieure 1 et la source extérieure 2
sont automatiquement réglées sur le même
volume.
1 Comparez le niveau du volume du syntoniseur FM au niveau de la source que
vous voulez régler.
2 Appuyez sur AUDIO pour choisir SLA.
3 Appuyez sur a ou b pour régler le volume de la source.
Les valeurs SLA : +4 à SLA : –4 s’affichent tandis que le niveau de la source augmente ou diminue.
Remarques
! Le niveau du syntoniseur AM peut également
être réglé à l’aide de cette fonction.
54
Fr
Page 55

1
Autres fonctions
Section
07
Ajustement des réglages
initiaux
À partir des réglages initiaux, vous pouvez personnaliser divers réglages du système pour
obtenir un fonctionnement optimal de cet appareil.
1 Afficheur de fonction
Il indique l’état de la fonction.
1 Maintenez la pression sur SOURCE jusqu’à ce que l’appareil soit mis hors tension.
2 Appuyez sur SOURCE et maintenez-la
enfoncée jusqu’à ce que l’horloge apparaisse sur l’afficheur.
3 Appuyez sur FUNCTION pour choisir un
des réglages initiaux.
Appuyez de manière répétée sur FUNCTION
pour passer d’un des paramètres à l’autre :
Horloge—AUX1 (entrée auxiliaire 1)—AUX2
(entrée auxiliaire 2)—R-SP (sortie arrière et
contrôleur de haut-parleur d’extrêmes graves)
Pour de plus amples détails sur chaque réglage, reportez-vous aux instructions qui suivent.
# Appuyez sur BAND pour abandonner les ré-
glages initiaux.
# Vous pouvez également abandonner les réglages initiaux en maintenant la pression sur
SOURCE jusqu’à ce que l’appareil se mette hors
service.
1 Appuyez sur FUNCTION pour sélectionner l’horloge.
2 Appuyez sur c ou d pour sélectionner
le segment de l’affichage de l’horloge que
vous voulez régler.
Heure—Minute
La partie sélectionnée clignote sur l’affichage
de l’horloge.
3 Appuyez sur a ou b pour régler l’horloge.
Appuyer sur a augmente la valeur du réglage
heure ou minute choisi. Appuyer sur b diminue la valeur du réglage heure ou minute
choisi.
Mise en service ou hors
service de l’entrée auxiliaire
Les équipements auxiliaires connectés à cet
appareil peuvent être activés individuellement.
Positionnez chaque source auxiliaire sur ON
(en service) pour l’utiliser. Pour avoir des informations sur la connexion ou l’utilisation des
équipements auxiliaires, reportez-vous à la
page 57, Utilisation de la source AUX.
1 Appuyez sur FUNCTION pour choisir
AUX1/AUX2.
2 Appuyez sur a ou sur b pour mettre la
fonction AUX1/AUX2 en service ou hors
service.
Français
Réglage de l’horloge
Utilisez ces instructions pour régler l’horloge.
55
Fr
Page 56

Section
07
Autres fonctions
Réglage de la sortie arrière
et du contrôleur de hautparleur d’extrêmes graves
La sortie arrière de cet appareil (sortie de
connexion des haut-parleurs arrière et sortie
arrière RCA) peut être utilisée pour connecter
un haut-parleur pleine plage de fréquences
(R-SP :FUL) ou un haut-parleur d’extrêmes graves (R-SP :S/W). Si vous mettez le réglage de
la sortie arrière sur R-SP :S/W, vous pouvez
connecter la prise de sortie arrière directement à un haut-parleur d’extrêmes graves
sans utiliser un amplificateur auxiliaire.
Initialement, cet appareil est réglé pour la
connexion de haut-parleurs pleine plage de
fréquences (R-SP :FUL). Quand la sortie arrière
est connectée à des haut-parleurs pleine
plage de fréquences (quand R-SP :FUL est sélectionné), vous pouvez connecter d’autres
haut-parleurs pleine plage de fréquences
(P/O :FUL) ou un haut-parleur d’extrêmes graves (P/O :S/W) à la sortie arrière RCA.
1 Appuyez sur FUNCTION pour choisir
R-SP.
2 Appuyez sur a ou b pour changer le réglage de la sortie arrière.
Appuyer sur a ou b permet de basculer alternativement entre R-SP :FUL (haut-parleur
pleine plage de fréquences) et R-SP :S/W
(haut-parleur d’extrêmes graves), et l’état est
affiché.
# Quand aucun haut-parleur d’extrêmes graves
n’est connecté à la sortie arrière, choisissez
R-SP :FUL.
# Quand un haut-parleur d’extrêmes graves est
connecté à la sortie arrière, choisissez le réglage
haut-parleur d’extrêmes graves R-SP :S/W.
# Lorsque le réglage pour la sortie arrière est
R-SP :S/W, vous ne pouvez pas utiliser la procédure suivante.
3 Appuyez sur c ou d pour changer la
sortie haut-parleur d’extrêmes graves ou la
sortie arrière.
Appuyer sur c ou d permet de basculer alternativement entre P/O :S/W et P/O :FUL,et
l’état est affiché.
Remarques
! Même si vous modifiez ce réglage, aucun si-
gnal n’est émis aussi longtemps que la sortie
vers le haut-parleur d’extrêmes graves n’est
pas en service (reportez-vous à la page 52, Uti-
lisation de la sortie haut-parleur d’extrêmes graves).
! Si vous modifiez ce réglage, la sortie haut-par-
leur d’extrêmes graves est repositionnée sur
les réglages d’usine dans le menu audio.
Mise en service ou hors service
de l’affichage de l’horloge
Vous pouvez mettre l’affichage de l’horloge en
service ou hors service.
% Appuyez sur CLOCK pour mettre l’affi-
chage de l’horloge en service ou hors service.
Chaque pression sur CLOCK provoque l’affichage de l’horloge ou son extinction.
# L’affichage de l’horloge disparaît momentané-
ment quand une autre opération est réalisée ; il
apparaît à nouveau 25 secondes plus tard.
Remarque
Même quand les sources sont hors service, l’horloge apparaît sur l’afficheur. Appuyer sur CLOCK
met l’affichage de l’horloge en service ou hors
service.
56
Fr
Page 57

1
Autres fonctions
Section
07
Utilisation de la source AUX
Cet appareil peut contrôler un maximum de
deux équipements auxiliaires tels qu’un magnétoscope ou des appareils portables (vendus séparément). Lorsque des équipements
auxiliaires sont connectés, ils sont automatiquement lus en tant que sources AUX et affectés à AUX1 ou AUX2. La relation entre les
sources AUX1 et AUX2 est expliquée ci-dessous.
Quelques mots sur les
méthodes de connexion
Vous disposez de deux méthodes pour
connecter des équipements auxiliaires à cet
appareil.
Câble pour la mini prise stéréo (AUX1)
Lors de la connexion d’équipement auxiliaire
avec un câble à mini prise stéréo
% Insérez la mini prise stéréo dans le jack
d’entrée AUX de cet appareil.
Interconnecteur IP-BUS-RCA (AUX2)
Pour connecter un équipement auxiliaire utilisant un Interconnecteur IP-BUS-RCA (vendu séparément)
% Utilisez un Interconnecteur IP-BUS-RCA
tel que le CD-RB20/CD-RB10 (vendu séparément) pour connecter cet appareil à un
équipement auxiliaire disposant d’une sortie RCA.
Pour avoir plus de détails, reportez-vous au
mode d’emploi de l’Interconnecteur IP-BUSRCA.
# Vous ne pouvez effectuer ce type de connexion que si l’équipement auxiliaire dispose de sorties RCA.
Choix de l’entrée AUX comme
source
% Appuyez sur SOURCE pour choisir AUX
(AUX1 ou AUX2) comme source.
Appuyez sur SOURCE jusqu’à ce que AUX apparaisse sur l’afficheur.
# Si le réglage source auxiliaire n’est pas activé,
vous ne pouvez pas choisir AUX. Pour avoir plus
de détails, reportez-vous à la page 55, Mise en ser-
vice ou hors service de l’entrée auxiliaire.
Introduction à l’utilisation
de l’iPod
Vous pouvez utiliser cet appareil pour commander un adaptateur iPod, vendu séparément.
Pour avoir des détails sur le fonctionnement,
reportez-vous aux modes d’emploi de l’adaptateur iPod. Cette section donne des informations sur les opérations de l’iPod qui diffèrent
sur cet appareil de celles qui sont décrites
dans le mode d’emploi de l’adaptateur iPod.
! Cet appareil est un appareil central groupe
1.
! iPod est une marque commerciale de
Apple Computer, Inc. déposée aux ÉtatsUnis et dans d’autres pays.
1 Indicateur du titre de la plage
Indique le titre de la plage musicale en
cours de lecture.
Utilisation de l’iPod
Le fonctionnement iPod de la fonction suivante est différent avec cet appareil.
! Affichage d’informations textuelles sur l’iPod
(Reportez-vous à la page suivante.)
®
Français
57
Fr
Page 58

1
1
Section
07
Autres fonctions
Affichage d’informations
textuelles sur l’iPod
Vous pouvez afficher les informations textuelles enregistrées sur l’iPod.
% Appuyez sur DISPLAY.
Appuyez de manière répétée sur DISPLAY
pour passer d’un des paramètres à l’autre :
Titre de la plage—Nom de l’interprète—Titre
de l’album—Etat de la répétition de lecture—
Etat de la lecture au hasard—Durée de lecture
# Si les caractères enregistrés sur l’iPod ne sont
pas compatibles avec cet appareil, ils ne seront
pas affichés.
Remarque
Vous pouvez faire défiler l’information textuelle
vers la gauche en appuyant de façon prolongée
sur DISPLAY.
Introduction à l’utilisation
du XM
Vous pouvez utiliser cet appareil pour commander un syntoniseur satellite numérique XM
(GEX-P920XM), vendu séparément.
Pour avoir des détails sur ce mode de fonctionnement, reportez-vous aux modes d’emploi du syntoniseur XM. Cette section donne
des informations sur les opérations XM avec
cet appareil qui diffèrent de celles qui sont décrites dans le mode d’emploi du syntoniseur
XM.
1 Informations sur le syntoniseur XM
Montre les informations sur le syntoniseur
XM qui ont été sélectionnées.
! Changement de l’affichage XM (Reportez-
vous à cette page.)
! Changer le mode de sélection du canal XM)
(Reportez-vous à cette page.)
Cet appareil ne dispose pas de la fonction suivante.
! Défilement du texte sur l’afficheur
Changement de l’affichage XM
% Appuyez sur DISPLAY pour changer l’af-
fichage XM.
Chaque pression sur la touche DISPLAY modifie l’affichage XM dans l’ordre suivant :
Nom du canal—Gamme/numéro de canal présélectionné—Nom de l’interprète— Titre de la
plage—Catégorie du canal
Changer le mode de sélection
du canal XM)
% Appuyez de façon prolongée sur
CLOCK pour choisir le réglage de sélection
du canal désiré.
Appuyez sur CLOCK et maintenez l’appui répétitivement pour parcourir les réglages possibles suivants de sélection du canal :
CHNUMBER (réglage de sélection par numéro
de canal)—CATEGORY (réglage de sélection
par catégorie de canaux)
Introduction à l’utilisation
du SIRIUS
Cet appareil peut contrôler un syntoniseur
Radio Satellite SIRIUS (vendu séparément).
Utilisation du XM
Le fonctionnement XM des fonctions suivantes est différent avec cet appareil.
58
Fr
Page 59

Autres fonctions
Section
07
Quand le syntoniseur SIRIUS est utilisé avec
cet appareil, certaines opérations peuvent différer légèrement de celles qui sont décrites
dans le mode d’emploi du SIRIUS. Ce mode
d’emploi donne des informations sur ces
points de différence. Pour toute autre information sur l’utilisation du syntoniseur SIRIUS,
veuillez vous reporter au mode d’emploi de
celui-ci.
1 Informations sur le syntoniseur SIRIUS
Montre les informations sur le syntoniseur
SIRIUS qui ont été sélectionnées.
Utilisation du SIRIUS
Le fonctionnement SIRIUS des fonctions suivantes est différent avec cet appareil.
! Changement du réglage de sélection du
canal SIRIUS (Reportez-vous à cette page.)
! Changement de l’affichage SIRIUS (Repor-
tez-vous à cette page.)
! Quand le match de l’équipe sélectionnée
commence (Reportez-vous à cette page.)
! Affichage des informations sur les matchs
(Reportez-vous à cette page.)
Changement du réglage de
sélection du canal SIRIUS
% Appuyez de façon prolongée sur
CLOCK pour choisir le réglage de sélection
du canal désiré.
Appuyez sur CLOCK et maintenez l’appui répétitivement pour parcourir les réglages possibles suivants de sélection du canal :
CHNUMBER (réglage de sélection par numéro
de canal)—CATEGORY (réglage de sélection
par catégorie de canaux)
Quand le match de l’équipe
sélectionnée commence
Quand un match de l’équipe sélectionnée est
sur le point de commencer (ou est en cours)
sur une autre station, une alerte de match est
affichée. Appuyez sur FUNCTION de façon
prolongée pour basculer sur cette station, et
vous pouvez écouter le match.
! Si vous n’utilisez pas la fonction dans les
huit secondes environ, l’écran revient à l’affichage précédent.
Affichage des informations sur
les matchs
Si des matchs des équipes sélectionnées sont
en cours, vous pouvez afficher les informations relatives aux matchs et vous accorder
sur les canaux qui les diffusent.
Vous pouvez afficher les informations relatives
aux matchs tout en profitant du son de la station sur laquelle vous êtes accordé. Vous pouvez aussi passer sur le canal qui diffuse les
matchs quand vous le souhaitez.
1 Appuyez sur FUNCTION pour choisir
GAMEINFO.
Les informations sur les matchs des équipes
sélectionnées s’affichent.
2 Appuyez sur a ou b pour sélectionner
un match.
Le match est affiché, suivi d’informations plus
détaillées sur ce match.
! Le score du match sera mis à jour auto-
matiquement.
! Si vous voulez passer sur le canal qui dif-
fuse le match, changez de canal
manuellement.
Français
Changement de l’affichage SIRIUS
% Appuyez sur DISPLAY pour changer
d’affichage SIRIUS.
Chaque pression sur DISPLAY modifie l’affichage SIRIUS dans l’ordre suivant :
Nom du canal—Nom de la catégorie—Nom
de l’interprète—Titre de la plage/titre du programme—Nom du compositeur
Remarques
! Si vous n’avez effectué aucune sélection d’é-
quipes, NOT SET s’affiche.
! Quand aucun match impliquant vos équipes
favorites n’est en cours, NO GAME est
affiché.
Fr
59
Page 60

Annexe
Informations complémentai res
Explication des messages
d’erreur du lecteur de CD
intégré
Quand vous contactez votre distributeur ou le
Service d’entretien agréé par Pioneer le plus
proche, n’oubliez pas de noter le message
d’erreur.
Message Causes possi-
ERROR-11, 12,
17, 30
ERROR-11, 12,
17, 30
ERROR-15 Le disque inséré
ERROR-10, 11,
12, 15, 17, 30,
A0
ERROR-22, 23 Le format de CD
NO AUDIO Le disque inséré
PROTECT Tous les fichiers
SKIPPED Le disque inséré
bles
Disque sale Nettoyez le disque.
Disque rayé Utilisez un autre
ne contient pas
de données
Anomalie électrique ou mécanique
ne peut pas être
lu
ne contient
aucun fichier qui
puisse être lu
sur le disque inséré sont protégés par DRM
contient des fichiers WMA qui
sont protégés par
DRM
Action corrective
disque.
Utilisez un autre
disque.
Mettez et coupez le
contact au moyen
de la clé ou choisissez une autre
source puis revenez au lecteur de
CD.
Utilisez un autre
disque.
Utilisez un autre
disque.
Utilisez un autre
disque.
Utilisez un autre
disque.
Conseils sur la manipulation
des disques et du lecteur
! Utilisez uniquement des disques affichant
l’un ou l’autre des logos suivants.
! Utilisez seulement des disques convention-
nels de forme circulaire. N’utilisez pas de
disques ayant une forme particulière.
! Utilisez un CD 12 cm ou 8 cm. N’utilisez
pas un adaptateur lorsque vous lisez des
CDs 8 cm.
! N’introduisez aucun objet dans le loge-
ment pour CD autre qu’un CD.
! N’utilisez pas de disques fendillés, ébré-
chés, voilés ou présentant d’autres défauts,
car ils peuvent endommager le lecteur.
! La lecture de disques CD-R/CD-RW non fi-
nalisés n’est pas possible.
! Ne touchez pas la surface enregistrée des
disques.
! Rangez les disques dans leur coffret dès
que vous ne les écoutez plus.
! Évitez de laisser les disques dans des envi-
ronnements trop chauds, en particulier
sous la lumière directe du soleil.
! Ne posez aucune étiquette à la surface des
disques, n’écrivez pas sur un disque, n’ap-
pliquez aucun agent chimique sur un
disque.
! Pour nettoyer un CD, essuyez le disque
avec un chiffon doux en partant du centre
vers l’extérieur.
60
Fr
Page 61

Informations complémentai res
Annexe
! La condensation peut perturber temporai-
rement le fonctionnement du lecteur. Laissez celui-ci s’adapter à la température plus
élevée pendant une heure environ. Essuyez
également les disques humides avec un
chiffon doux.
! La lecture de certains disques peut être im-
possible en raison des caractéristiques du
disque, de son format, de l’application qui
l’a enregistré, des conditions de stockage
ou d’autres conditions.
! Les informations textuelles peuvent ne pas
s’afficher correctement en fonction de leur
environnement d’enregistrement.
! Les cahots de la route peuvent interrompre
la lecture d’un disque.
! Lisez les précautions d’emploi des disques
avant de les utiliser.
Disques Duaux
! Les Disques Duaux sont des disques à
deux faces avec un CD enregistrable pour
l’audio sur une face et un DVD enregistrable pour la vidéo sur l’autre.
! Comme la face CD des Disques Duaux
n’est pas physiquement compatible avec le
standard CD général, la lecture de la face
CD sur cet appareil peut ne pas être possible.
! Charger et éjecter fréquemment un Disque
Dual peut provoquer des rayures sur le
disque. Des rayures importantes peuvent
entraîner des problèmes de lecture sur cet
appareil. Dans certains cas, un Disque
Dual peut se retrouver bloqué dans le logement pour CD et ne sera pas éjecté. Pour
éviter cela, nous vous recommandons de
vous abstenir d’utiliser des Disques Duaux
avec cet appareil.
! Pour des informations plus détaillées sur
les Disques Duaux, veuillez vous reporter
aux informations fournies par le fabricant
du disque.
Fichiers WMA, MP3 et WAV
! Selon la version de Windows Media Player
utilisée pour encoder les fichiers WMA, les
noms d’album et les autres informations
textuelles peuvent ne pas s’afficher correctement.
! Il peut se produire un léger retard lors du
démarrage de la lecture de fichiers WMA
encodés avec des données image.
! Conforme à ISO 9660 Niveau 1 et 2. Les sys-
tèmes de fichiers Romeo et Joliet sont tous
deux compatibles avec ce lecteur.
! La lecture de disques multi-session est pos-
sible.
! Les fichiers WMA/MP3/WAV ne sont pas
compatibles avec le transfert de données
en écriture par paquets.
! Seuls les 64 premiers caractères d’un nom
de fichier (incluant l’extension telle que
.wma, .mp3 ou .wav) ou d’un nom de dossier peuvent être affichés.
! La séquence de sélection des dossiers ou
d’autres opérations peuvent différer en
fonction du logiciel de codage ou d’écriture.
! Quelle que soit la durée du silence entre
les plages musicales de l’enregistrement
original, la lecture des disques WMA/MP3/
WAV s’effectuera avec une courte pause
entre les plages musicales.
! Les extensions de fichier telles que .wma,
.mp3 ou .wav doivent être utilisées correctement.
Français
61
Fr
Page 62

1
2
5
6
eau
eau
eau
eau
Annexe
Informations complémentai res
Exemple de hiérarchie
: Dossier
: Fichier
3
4
Niv
1 Niv
2 Niv
3 Niv
4
! Cet appareil attribue les numéros de dos-
sier. L’utilisateur ne peut pas attribuer les
numéros de dossier.
! Huit niveaux maximum sont autorisés pour
la hiérarchie des dossiers. Toutefois, la hiérarchie des dossiers est dans la pratique inférieure à deux niveaux.
! L’appareil peut lire un maximum de 99 dos-
siers sur un disque.
Compatibilité des formats
audio compressés
WMA
! Format compatible: WMA encodé par Win-
dows Media Player Ver. 7, 7.1, 8, 9 ou 10
! Débit binaire : 48 kbit/s à 320 kbit/s (CBR),
48 kbit/s à 384 kbit/s (VBR)
! Fréquence d’échantillonnage : 32 kHz à 48
kHz
! Windows Media Audio 9 Professional, Loss-
less, Voice : Non
! Liste de lecture M3u : Non
! MP3i (MP3 interactif), mp3 PRO : Non
WAV
! Format compatible: PCM Linéaire (LPCM),
MS ADPCM
! Bits de quantification : 8 et 16 (LPCM), 4
(MS ADPCM)
! Fréquence d’échantillonnage : 16 kHz à 48
kHz (LPCM), 22,05 kHz à 44,1 kHz (MS
ADPCM)
MP3
! Débit binaire : 8 kbit/s à 320 kbit/s
! Fréquence d’échantillonnage : 16 kHz à 48
kHz (32, 44,1, 48 kHz pour accentuation)
! Compatible étiquette ID3 version : 1.0, 1.1,
2.2, 2.3, 2.4 (la Version 2.x de l’étiquette ID3
a priorité sur la Version 1.x.)
62
Fr
Page 63

Informations complémentai res
Annexe
Caractéristiques techniques
Généralités
Alimentation .............................. 14,4 V DC (10,8 V à 15,1 V
acceptable)
Mise à la masse ....................... Pôle négatif
Consommation maximale ... 10,0 A
Dimensions (L × H × P):
DIN
Châssis ..................... 178 × 50 × 162 mm
Panneau avant ...... 188 × 58 × 14 mm
D
Châssis ..................... 178 × 50 × 162 mm
Panneau avant ...... 170 × 48 × 14 mm
Poids .............................................. 1,3 kg
Audio
Puissance de sortie maximale
..................................................... 50 W × 4
50 W × 2/4 W + 70 W × 1/2
W (pour le haut-parleur d’ex-
trêmes graves)
Puissance de sortie continue
..................................................... 22 W × 4 (50 Hz à 15 000
Hz, DHT 5%, impédance de
charge 4 W, avec les deux
canaux excités)
Impédance de charge ........... 4 W à8W ×4
4 W à8W ×2+2W ×1
Niveau de sortie max/impédance de sortie de la sortie
préamp ......................................... 2,2 V/1 kW
Égaliseur (Égaliseur paramétrique à 3 bandes):
Grave
Fréquence ............... 40/80/100/160 Hz
Facteur Q ................. 0,35/0,59/0,95/1,15 (+6 dB
si amplifié)
Gain ............................ ±12 dB
Moyenne
Fréquence ............... 200/500/1k/2k Hz
Facteur Q ................. 0,35/0,59/0,95/1,15 (+6 dB
si amplifié)
Gain ............................ ±12 dB
Élevée
Fréquence ............... 3,15k/8k/10k/12,5k Hz
Facteur Q ................. 0,35/0,59/0,95/1,15 (+6 dB
si amplifié)
Gain ............................ ±12 dB
Correction physiologique :
Faible ................................... +3,5 dB (100 Hz), +3 dB (10
kHz)
Moyenne ............................ +10 dB (100 Hz), +6,5 dB
(10 kHz)
Forte ..................................... +11 dB (100 Hz), +11 dB
(10 kHz)
(volume : –30 dB)
HPF:
Fréquence ......................... 50/63/80/100/125 Hz
Pente ................................... –12 dB/octave
Haut-parleur d’extrêmes graves (mono) :
Fréquence ......................... 50/63/80/100/125 Hz
Pente ................................... –18 dB/octave
Gain ...................................... +6 dB à –24 dB
Phase .................................. Normale/Inverse
Accentuation des graves :
Gain ...................................... +12 dB à 0 dB
Lecteur de CD
Système ....................................... Compact Disc Digital Audio
Disques utilisables ................. Disques compacts
Format du signal:
Fréquence d’échantillonnage
........................................... 44,1 kHz
Nombre de bits de quantification
........................................... 16 ; quantification linéaire
Réponse en fréquence .......... 5 Hz à 20 000 Hz (±1 dB)
Rapport signal/bruit ............... 94 dB (1 kHz) (Réseau
IHF-A)
Dynamique ................................. 92 dB (1 kHz)
Nombre de canaux ................. 2 (stéréo)
Format de décodage MP3 ...MPEG-1 & 2 Couche Audio
3
Format de décodage WMA
..................................................... Ver. 7, 7.1, 8, 9, 10 (2can
audio)
(Windows Media Player)
Format du signal WAV .......... PCM Linéaire & MS ADPCM
Syntoniseur FM
Gamme de fréquence ............ 87,9 MHz à 107,9 MHz
Sensibilité utile ......................... 8 dBf (0,7 µV/75 W, mono,
S/B : 30 dB)
Rapport signal/bruit ............... 75 dB (Réseau IHF-A)
Distorsion .................................... 0,3 % (à 65 dBf, 1 kHz, sté-
réo)
0,1 % (à 65 dBf, 1 kHz,
mono)
Réponse en fréquence .......... 30 Hz à 15 000 Hz (±3 dB)
Séparation stéréo .................... 45 dB (à 65 dBf, 1 kHz)
Syntoniseur AM
Gamme de fréquence ............ 530 kHz à 1 710 kHz (10 kHz)
Sensibilité utile ......................... 18 µV (S/B : 20 dB)
Rapport signal/bruit ............... 65 dB (Réseau IHF-A)
Remarque
Les caractéristiques et la présentation peuvent
être modifiées sans avis préalable à fin
d’amélioration.
Français
63
Fr
Page 64

Contenido
Gracias por haber comprado este producto Pioneer.
Lea con detenimiento estas instrucciones sobre el funcionamiento del aparato,
para que pueda darle el mejor uso posible. Una vez que las haya leído, conserve
este manual en un lugar seguro para consultarlo en el futuro.
Antes de comenzar
Acerca de esta unidad 66
Servicio posventa para productos
Pioneer 66
Visite nuestro sitio Web 66
Acerca de WMA 66
Acerca de MP3 67
Acerca de la marca SAT RADIO READY 67
Uso y cuidado del mando a distancia 67
– Instalación de la batería 67
– Uso del mando a distancia 68
Protección del producto contra robo 68
– Extracción de la carátula 68
– Colocación de la carátula 68
Funciones básicas
Qué es cada cosa 69
– Unidad principal 69
– Mando a distancia 70
Encendido de la unidad y selección de una
fuente 70
Ajuste del volumen 70
Apagado de la unidad 70
Sintonizador
Para escuchar la radio 71
Introducción a las funciones avanzadas del
sintonizador 71
Almacenamiento y recuperación de
frecuencias 71
Almacenamiento de las frecuencias de radio
más fuertes 72
Sintonización de señales fuertes 72
Reproductor incorporado
Reproducción de un disco 73
Introducción a las funciones avanzadas del
reproductor de CD incorporado 74
Repetición de reproducción 74
Reproducción de las pistas en orden
aleatorio 74
Exploración de pistas o carpetas 74
Pausa de la reproducción de un disco 75
Uso de la compresión y BMX 75
Búsqueda cada 10 pistas en el disco o
carpeta actual 75
Visualización de información de texto en el
disco 76
Reproductor de CD múltiple
Reproducción de un CD 77
Introducción a las funciones avanzadas del
reproductor de CD múltiple 77
Repetición de reproducción 77
Reproducción de las pistas en orden
aleatorio 78
Exploración de CD y pistas 78
Pausa de la reproducción de un CD 78
Uso de la compresión y del enfatizador de
graves 79
Uso de listas de reproducción ITS 79
– Creación de una lista de reproducción
con la programación ITS 79
– Reproducción de la lista de
reproducción ITS 80
– Borrado de una pista de la lista de
reproducción ITS 80
– Borrado de un CD de la lista de
reproducción ITS 80
Uso de las funciones CD TEXT 81
Ajustes de audio
Introducción a los ajustes de audio 82
Uso del ajuste del balance 82
Uso del ecualizador 83
– Recuperación de las curvas de
ecualización 83
– Ajuste de las curvas de
ecualización 83
– Ajuste preciso de la curva de
ecualización 83
Ajuste de la sonoridad 84
Uso de la salida de subgraves 84
– Configuración de los ajustes de
subgraves 84
Uso del filtro de paso alto 85
Intensificación de los graves 85
Mejora de imagen frontal (F.I.E.) 85
64
Es
Page 65

Contenido
Ajuste de los niveles de la fuente 86
Otras funciones
Configuración de los ajustes iniciales 87
Ajuste del reloj 87
Cambio del ajuste de un equipo auxiliar 87
Ajuste de la salida posterior y del controlador
de subgraves 87
Activación y desactivación de la visualización
del reloj 88
Uso de la fuente AUX 88
– Acerca del método de conexión
AUX 88
– Selección de AUX como la fuente 89
Introducción a las funciones de iPod® 89
– Funcionamiento en el iPod 89
– Visualización de información de texto
en el iPod 89
Información adicional
Comprensión de los mensajes de error del
reproductor de CD incorporado 90
Pautas para el manejo de discos y del
reproductor 90
Discos dobles 91
Ficheros WMA, MP3 y WAV 91
– Ejemplo de una jerarquía 91
– Compatibilidad con audio
comprimido 92
Especificaciones 93
Español
65
Es
Page 66

Sección
01
Antes de comenzar
Acerca de esta unidad
Las frecuencias del sintonizador de esta unidad están asignadas para su uso en América
del norte. El uso en otras áreas puede causar
una recepción deficiente.
PRECAUCIÓN
! No permita que esta unidad entre en contacto
con líquidos, ya que ello puede producir una
descarga eléctrica. Además, el contacto con
líquidos puede causar daños en la unidad,
humo y recalentamiento.
! Conserve este manual a mano para que
pueda consultar los procedimientos de operación y las precauciones cuando sea necesario.
! Mantenga siempre el volumen lo suficiente-
mente bajo como para que pueda escuchar
los sonidos que provienen del exterior del vehículo.
! Proteja esta unidad de la humedad.
! Si se desconecta o se descarga la batería, la
memoria preajustada se borrará y deberá ser
reprogramada de nuevo.
Servicio posventa para
productos Pioneer
Póngase en contacto con el concesionario o
distribuidor al que compró esta unidad para
obtener el servicio posventa (incluidas las condiciones de garantía) o cualquier otra información. En caso de que no esté disponible la
información necesaria, póngase en contacto
con las empresas enumeradas abajo.
No envíe su producto para su reparación a las
empresas cuyas direcciones se indican abajo
sin haberse puesto antes en contacto con
ellas.
EE.UU.
Pioneer Electronics (USA) Inc.
CUSTOMER SUPPORT DIVISION
P.O. Box 1760
Long Beach, CA 90801-1760
800-421-1404
CANADÁ
Pioneer Electronics of Canada, Inc.
CUSTOMER SATISFACTION DEPARTMENT
300 Allstate Parkway
Markham, Ontario L3R OP2
1-877-283-5901
Para obtener información sobre la garantía,
véase la hoja de Garantía limitada adjunta a
este producto.
Visite nuestro sitio Web
Visítenos en el siguiente sitio:
1 Registre su producto. Conservaremos los
datos de su compra archivados para que
pueda consultar esta información en caso de
que deba efectuar un reclamo a la compañía
de seguros por pérdida o robo.
2 Reciba informes actualizados sobre los últi-
mos productos y tecnologías.
3 Descargue manuales de instrucciones, solici-
te catálogos de productos, busque nuevos
productos y disfrute de muchos beneficios
más.
Acerca de WMA
66
Es
Page 67

Antes de comenzar
Sección
01
El logo de Windows Media™ impreso en la
caja indica que esta unidad puede reproducir
datos WMA.
WMA es la abreviatura de Windows Media™
Audio, y se refiere a la tecnología de compresión de audio desarrollada por Microsoft Corporation. Los datos WMA se pueden cifrar con
la versión 7 o posterior del Windows Media
Player.
Windows Media y el logo de Windows son
marcas comerciales o registradas de Microsoft Corporation en los EE.UU. y/o en otros
países.
Nota
Esta unidad puede no funcionar correctamente,
dependiendo de la aplicación utilizada para codificar ficheros WMA.
Acerca de MP3
La venta de este producto sólo otorga una licencia para su uso privado, no comercial. No
otorga ninguna licencia ni concede ningún
derecho a utilizar este producto en transmisiones comerciales (es decir, lucrativas) en tiempo real (terrestres, vía satélite, por cable y/o
por cualquier otro medio), transmisiones/
streaming por Internet, intranets y/u otras
redes o en otros sistemas de distribución de
contenido electrónico, como por ejemplo, aplicaciones de pago por escucha (pay-audio) o
audio bajo demanda (audio-on-demand). Se
necesita una licencia independiente para su
uso comercial. Para obtener más información,
visite la página web
http://www.mp3licensing.com.
La marca SAT RADIO READY impresa en el
panel delantero indica que el Sintonizador de
Radio por Satélite para Pioneer (también conocido como sintonizador XM y sintonizador
por satélite Sirius, que se venden por separado) se puede controlar con esta unidad. Consulte al concesionario o al servicio técnico
oficial Pioneer autorizado más cercano para
obtener información sobre el sintonizador de
radio por satélite que se puede conectar a
esta unidad. Para la operación del producto,
consulte el manual de instrucciones del sintonizador de radio por satélite.
Español
Notas
! El sistema utilizará tecnología de transmisión
directa de satélite a receptor a fin de ofrecer a
los oyentes en sus automóviles y en sus hogares un nivel de sonido supertransparente y sin
interferencias de costa a costa. La radio por
satélite creará y brindará más de 100 canales
de música de calidad digital, noticias, deportes, discusión y programas infantiles.
! “SAT Radio”, el logo de SAT Radio y todas las
marcas relacionadas son marcas comerciales
de Sirius Satellite Radio inc., y XM Satellite
Radio Inc.
Uso y cuidado del mando a
distancia
Instalación de la batería
Deslice y extraiga la bandeja de la parte posterior del mando a distancia y coloque la batería
con los polos positivo (+) y negativo (–)enla
dirección correcta.
Acerca de la marca SAT
RADIO READY
67
Es
Page 68

Sección
01
Antes de comenzar
ADVERTENCIA
Mantenga la batería fuera del alcance de los
niños. En caso de ingestión accidental, consulte
a un médico de inmediato.
PRECAUCIÓN
! Utilice una sola batería de litio CR2025 (3 V).
! Extraiga la batería si no piensa utilizar el
mando a distancia durante un mes o más
tiempo.
! Peligro de explosión si la batería se reemplaza
incorrectamente. Reemplácela sólo con una
del mismo tipo, o equivalente.
! No manipule la batería con herramientas me-
tálicas.
! No guarde la batería con materiales metáli-
cos.
! En el caso de que se produzca una fuga de
fluido de la batería, limpie completamente el
mando a distancia e instale una batería
nueva.
! Para deshacerse de las baterías usadas, cum-
pla con los reglamentos gubernamentales o
las normas de las instituciones públicas ambientales pertinentes, aplicables en su país/
zona.
Uso del mando a distancia
Apunte el mando a distancia hacia la carátula
para hacer funcionar la unidad.
Importante
! No guarde el mando a distancia en lugares ex-
puestos a altas temperaturas o a la luz solar
directa.
! Es posible que el mando a distancia no fun-
cione correctamente si lo expone a la luz solar
directa.
! No deje caer el mando a distancia al piso, ya
que puede quedar atascado debajo del freno
o del acelerador.
Protección del producto
contra robo
Se puede extraer la carátula como medida
antirrobo.
Importante
! Proceda con cuidado al retirar o colocar la ca-
rátula.
! Evite someter la carátula a impactos excesi-
vos.
! Mantenga la carátula fuera del alcance de la
luz solar directa y no la exponga a altas temperaturas.
Extracción de la carátula
1 Presione DETACH para soltar la carátula.
2 Sujete la carátula y extráigala.
Colocación de la carátula
1 Deslice la carátula hacia la izquierda
hasta que oiga un chasquido.
La carátula y la unidad principal quedan unidas por el lado izquierdo. Asegúrese de que la
carátula haya quedado unida a la unidad principal.
2 Presione el lado derecho de la carátula
hasta que asiente firmemente.
# Si no puede fijar con éxito la carátula a la unidad principal, inténtelo de nuevo. Si aplica fuerza
excesiva para fijar la carátula, ésta puede
dañarse.
68
Es
Page 69

1
8
b
6
243
9
75a
cde
c
g
9
1
h
i
e
d
f
Funciones básicas
Sección
02
Qué es cada cosa
Unidad principal
1 Botón AUDIO
Presione este botón para seleccionar los diversos controles de calidad del sonido.
2 Botón EQ
Presione este botón para seleccionar las diversas curvas de ecualización.
3 Botón SOURCE, VOLUME
Esta unidad se enciende al seleccionar una
fuente. Presione este botón para visualizar
todas las fuentes disponibles.
Haga girar el control para aumentar o disminuir el volumen.
4 Ranura de carga de discos
Introduzca el disco para reproducirlo.
5 Botón EJECT
Presione este botón para expulsar un CD
del reproductor de CD incorporado.
6 Botón CLOCK
Presione este botón para cambiar a la visualización del reloj. Manténgalo presionado
para cambiar el modo de selección de canal
cuando el sintonizador XM o el sintonizador
SIRIUS esté seleccionado como fuente.
7 Conector de entrada AUX1 (conector
estéreo de 3,5 mm)
Utilícelo para conectar un equipo auxiliar.
8 Botón DETACH
Presione este botón para extraer la carátula
de la unidad principal.
9 Botón DISPLAY
Presione este botón para seleccionar las diferentes visualizaciones.
a Botón SW
Presione este botón para seleccionar el
menú de ajuste de subgraves. Manténgalo
presionado para seleccionar el menú de
ajustes de intensificación de graves.
b Botones 1 a 6
Presione estos botones para el ajuste de
presintonías y la búsqueda de número de
disco al utilizar el reproductor de CD múltiple.
c Botones a/b/c/d
Presione estos botones para utilizar los controles de sintonización por búsqueda manual, avance rápido, retroceso y búsqueda
de pista. También se usa para controlar las
funciones.
d Botón BAND
Presione este botón para seleccionar entre
tres bandas FM y una banda AM, y para
cancelar el modo de control de funciones.
Español
69
Es
Page 70

Sección
02
Funciones básicas
e Botón FUNCTION
Presione este botón para seleccionar las
funciones.
Mando a distancia
Las funciones se utilizan de la misma manera
que al usar los botones de la unidad principal.
Consulte la explicación de la unidad principal
acerca del uso de cada botón, con excepción
de ATT y PAUSE, que se explican a continua-
ción.
f Botón VOLUME
Presione este botón para aumentar o disminuir el volumen.
g Botón ATT
Presione este botón para bajar rápidamente
el nivel de volumen, aproximadamente el
90%. Presione una vez más para volver al
nivel de volumen original.
h Botón PAUSE
Presione este botón para activar o desactivar la pausa.
i Botón SOURCE
Esta unidad se enciende al seleccionar una
fuente. Presione este botón para visualizar
todas las fuentes disponibles.
Notas
! En los siguientes casos, la fuente sonora no
cambiará:
— Cuando la fuente seleccionada no está co-
nectada a esta unidad.
— Cuando no hay un disco cargado en la uni-
dad.
— Cuando no hay un cargador en el repro-
ductor de CD múltiple.
— Cuando AUX (entrada auxiliar) está desac-
tivada (consulte la página 87).
! AUX1 está activada de forma predeterminada.
Desactive AUX1 cuando no la utilice (consulte
Cambio del ajuste de un equipo auxiliar en la
página 87).
! Por unidad externa se entiende un producto
Pioneer (como el que pueda estar disponible
en el futuro) que, si bien es incompatible
como fuente, permite que este sistema controle funciones básicas. Dos unidades externas se pueden controlar con este sistema.
Cuando se conectan dos unidades externas,
la asignación a la unidad externa 1 o la unidad externa 2 la fija automáticamente este sistema.
! Si el cable azul/blanco de esta unidad está co-
nectado al terminal de control del relé de la
antena automática del vehículo, la antena se
extiende cuando se enciende el equipo. Para
retraer la antena, apague la fuente.
Encendido de la unidad y
selección de una fuente
Puede seleccionar una fuente que desee escuchar. Para cambiar al reproductor de CD incorporado, cargar un disco en la unidad
(consulte la página 73).
% Presione SOURCE para seleccionar una
fuente.
Presione SOURCE repetidamente para cambiar entre las siguientes fuentes:
Sintonizador XM—Sintonizador SIRIUS—
Sintonizador—Televisor—Reproductor de
CD incorporado—Reproductor de CD múltiple—iPod—Unidad externa 1—Unidad
externa 2—AUX1—AUX2
70
Es
Ajuste del volumen
% Utilice VOLUME para ajustar el nivel de
sonido.
Apagado de la unidad
% Mantenga presionado SOURCE hasta
que se apague la unidad.
Page 71

5
4
321
Sintonizador
Sección
03
Para escuchar la radio
1 Indicador de banda
Muestra la banda en que la radio está sintonizada: AM o FM.
2 Indicador de frecuencia
Muestra la frecuencia en que está sintonizada la radio.
3 Indicador del número de presintonía
Muestra la memoria seleccionada.
4 Indicador LOC
Aparece cuando la sintonización por búsqueda local está activada.
5 Indicador de estéreo (5)
Aparece cuando la frecuencia seleccionada
se está transmitiendo en estéreo.
1 Presione SOURCE para seleccionar el
sintonizador.
Presione SOURCE hasta que visualice TUNER.
2 Presione BAND para seleccionar una
banda.
Presione BAND hasta que se visualice la
banda deseada (F1, F2, F3 para FM o AM).
3 Para utilizar la sintonización manual,
presione brevemente c o d.
4 Para utilizar la sintonización por búsqueda, mantenga presionado c o d durante aproximadamente un segundo, y suelte
el botón.
El sintonizador explorará las frecuencias hasta
que encuentre una emisora con señales de suficiente intensidad como para asegurar una
buena recepción.
# Se puede cancelar la sintonización por búsqueda presionando brevemente c o d.
# Si mantiene presionado c o d podrá saltar
las emisoras. La sintonización por búsqueda comienza inmediatamente después de que suelte el
botón.
Introducción a las funciones
avanzadas del sintonizador
% Presione FUNCTION para visualizar los
nombres de las funciones.
Presione FUNCTION repetidamente para cambiar entre las siguientes funciones:
BSM (memoria de las mejores emisoras)—
LOCAL (sintonización por búsqueda local)
# Para volver a la visualización de la frecuencia,
presione BAND.
# Si no se utiliza la función en unos 30 segundos, el display volverá automáticamente a la visualización de la frecuencia.
Almacenamiento y
recuperación de frecuencias
Si se presiona cualquiera de los botones de
ajuste de presintonías 1 a 6, se pueden almacenar con facilidad hasta seis frecuencias de
emisoras para recuperarlas con posterioridad
presionando un solo botón.
! Se pueden almacenar en la memoria hasta
18 emisoras FM, seis por cada una de las
tres bandas FM, y seis emisoras AM.
% Cuando encuentre la frecuencia que
desea almacenar en la memoria, presione
uno de los botones de ajuste de presintonías 1 a 6 y manténgalo presionado hasta
que el número de presintonía deje de destellar.
El número seleccionado destellará en el indicador del número de presintonía y quedará iluminado. La frecuencia de la emisora de radio
seleccionada se ha almacenado en la memoria.
Español
71
Es
Page 72

Sección
03
Sintonizador
La próxima vez que presione el mismo botón
de ajuste de presintonías, la memoria recuperará la frecuencia de la emisora.
# También se pueden usar a y b para recuperar
las frecuencias de las emisoras de radio asignadas a los botones de ajuste de presintonías 1 a
6.
Almacenamiento de las
frecuencias de radio más
fuertes
La función BSM (memoria de las mejores emisoras) permite guardar automáticamente las
seis frecuencias de las emisoras más fuertes
en los botones de ajuste de presintonías 1 a 6.
Una vez almacenadas, podrá sintonizar esas
frecuencias pulsando un solo botón.
! Al almacenar frecuencias con la función
BSM, se pueden reemplazar las frecuencias que ha almacenado con los botones 1
a 6.
1 Presione FUNCTION para seleccionar
BSM.
2 Presione a para activar la función BSM.
Las seis frecuencias de las emisoras más fuertes se almacenarán en orden según la intensidad de las señales.
# Para cancelar el proceso de almacenamiento,
presione b.
2 Presione a para activar la sintonización
por búsqueda local.
La sensibilidad de búsqueda local (p. ej.,
LOCAL 2) aparece en el display.
# Presione b para desactivar la sintonización
por búsqueda local.
3 Presione c o d para ajustar la sensibilidad.
Hay cuatro niveles de sensibilidad para FM y
dos niveles para AM:
FM: LOCAL 1—LOCAL 2—LOCAL 3—
LOCAL 4
AM: LOCAL 1—LOCAL 2
El ajuste LOCAL 4 sólo permite recibir las emisoras con las señales más fuertes, mientras
que los ajustes más bajos permiten recibir de
manera progresiva las emisoras con las señales más débiles.
Sintonización de señales
fuertes
La sintonización por búsqueda local le permite
sintonizar sólo las emisoras de radio con señales lo suficientemente fuertes como para asegurar una buena recepción.
1 Presione FUNCTION para seleccionar
LOCAL.
72
Es
Page 73

4
3
2
5
6
1
Reproductor incorporado
Sección
04
Reproducción de un disco
1 Indicador del número de carpeta
Muestra el número de carpeta que se está
reproduciendo cuando se reproduce un
disco WMA/MP3/WAV.
2 Indicador de tiempo de reproducción
Muestra el tiempo transcurrido de reproducción de la pista (fichero) actual.
3 Indicador de número de pista
Muestra el número de pista (fichero) que se
está reproduciendo actualmente.
! Si se selecciona un número de pista 100
o superior, d se iluminará a la izquierda
del indicador de número de pista.
4 Indicador RPT
Aparece cuando se selecciona la gama de
repetición para la pista (fichero) actual.
5 Indicador WMA
Aparece cuando se está reproduciendo un
fichero WMA.
6 Indicador MP3
Aparece cuando se está reproduciendo un
fichero MP3.
1 Introduzca un CD (CD-ROM) por la ranura de carga de discos.
La reproducción comenzará automáticamente.
# Asegúrese de que el lado de la etiqueta
del disco esté hacia arriba.
# Después de colocar un CD (CD-ROM), presione SOURCE para seleccionar el reproductor de
CD incorporado.
# Se puede expulsar un CD (CD-ROM) presionando EJECT.
2 Presione a o b para seleccionar una
carpeta al reproducir un disco WMA/MP3/
WAV .
# No se puede seleccionar una carpeta que no
tenga un fichero WMA/MP3/WAV grabado.
# Para volver a la carpeta 01 (RAÍZ), mantenga
presionado BAND. Sin embargo, si la carpeta 01
(RAÍZ) no contiene ficheros, la reproducción comienza en la carpeta 02.
3 Para realizar el avance rápido o retroceso, mantenga presionado c o d.
# Si selecciona el método de búsqueda
ROUGH, al mantener presionado c o d podrá
buscar una pista cada 10 pistas en el disco actual
(carpeta). (Consulte Búsqueda cada 10 pistas en
el disco o carpeta actual en la página 75.)
4 Para saltar y retroceder o avanzar hasta
otra pista, presione c o d.
Notas
! Lea las precauciones relativas a los discos y al
reproductor en la página 90.
! Si aparece un mensaje de error como
ERROR-11, consulte Comprensión de los men-
sajes de error del reproductor de CD incorporado en la página 90.
! A veces se produce una demora entre el co-
mienzo de la reproducción de un disco y la
emisión del sonido. Durante la lectura inicial,
se visualiza FRMTREAD.
! Al reproducir CD-EXTRA o CD DE MODO
MIXTO, se puede cambiar entre WMA/MP3/
WAV y CD-DA presionando BAND.
! Si se cambia entre ficheros WMA/MP3/WAV y
CD-DA de audio, la reproducción comienza
en la primera pista del disco.
! El reproductor de CD incorporado puede re-
producir un fichero WMA/MP3/WAV grabado
en CD-ROM. (Consulte la página 91 para los
ficheros que se pueden reproducir.)
Español
73
Es
Page 74

Sección
04
Reproductor incorporado
! Al reproducir ficheros grabados con VBR (ve-
locidad de grabación variable), puede que no
se muestre correctamente el tiempo de reproducción transcurrido.
! Al reproducir un disco WMA/MP3/WAV, no
hay sonido en el avance rápido o en el
retroceso.
Introducción a las funciones
avanzadas del reproductor
de CD incorporado
% Presione FUNCTION para visualizar los
nombres de las funciones.
Presione FUNCTION repetidamente para cambiar entre las siguientes funciones:
RPT (repetición de reproducción)—RDM (reproducción aleatoria)—SCAN (reproducción
con exploración)—PAUSE (pausa)—COMP
(compresión y BMX)—FF/REV (método de
búsqueda)
# Para volver a la visualización de reproducción,
presione BAND.
# Si no se utiliza la función en unos 30 segundos, el display volverá automáticamente a la visualización de reproducción.
Repetición de reproducción
Con la repetición de reproducción se reproduce la misma pista/carpeta dentro de la gama
de repetición de reproducción seleccionada.
1 Presione FUNCTION para seleccionar
RPT.
2 Presione c o d para seleccionar la
gama de repetición.
DSC – Repite todas las pistas
TRK – Sólo repite la pista actual
FLD – Repite la carpeta actual
# Si selecciona otra carpeta durante la repetición de reproducción, la gama de repetición cambia a repetición de disco.
# Al reproducir un CD, realizar una búsqueda
de pista o el avance rápido/retroceso, se cancela
automáticamente la repetición de reproducción.
# Al reproducir un disco WMA/MP3/WAV, si se
realiza una búsqueda de pista o el avance rápido/
retroceso durante TRK (repetición de pista), se
cambia la gama de repetición de reproducción a
repetición de carpeta.
# Cuando se selecciona FLD (repetición de car-
peta), no se puede reproducir una subcarpeta de
esa carpeta.
Reproducción de las pistas
en orden aleatorio
Con la reproducción aleatoria se reproducen
las pistas en un orden aleatorio dentro de la
gama de repetición seleccionada.
1 Seleccione la gama de repetición.
Consulte Repetición de reproducción en esta
página.
2 Presione FUNCTION para seleccionar
RDM.
3 Presione a para activar la reproducción
aleatoria.
RDM :ON aparece en el display. Las pistas se
reproducirán en un orden aleatorio.
# Presione b para desactivar la reproducción
aleatoria.
Nota
Si se activa la reproducción aleatoria en FLD yse
vuelve a la visualización de reproducción, FRDM
aparecerá en el display.
Exploración de pistas o
carpetas
La reproducción con exploración busca la
canción dentro de la gama de repetición seleccionada.
74
Es
Page 75

Reproductor incorporado
Sección
04
1 Seleccione la gama de repetición.
Consulte Repetición de reproducción en la página anterior.
2 Presione FUNCTION para seleccionar
SCAN.
3 Presione a para activar la reproducción
con exploración.
SCAN :ON aparece en el display. Se reproduci-
rán los primeros 10 segundos de cada pista.
4 Cuando encuentre la pista deseada,
presione b para desactivar la reproducción
con exploración.
# Si el display vuelve automáticamente a la visualización de reproducción, seleccione SCAN
de nuevo presionando FUNCTION.
Notas
! Una vez finalizada la exploración de un disco
(carpeta), volverá a comenzar la reproducción
normal de las pistas.
! Si se activa la reproducción con exploración
en FLD y se vuelve a la visualización de reproducción, FSCN aparecerá en el display.
Pausa de la reproducción
de un disco
La pausa le permite detener temporalmente la
reproducción del disco.
1 Presione FUNCTION para seleccionar
PAUSE.
2 Presione a para activar la pausa.
PAUSE:ON aparece en el display. Se detiene
temporalmente la reproducción de la pista actual.
# Para desactivar la pausa, presione b.
Uso de la compresión y BMX
El uso de las funciones COMP (compresión) y
BMX le permiten ajustar la calidad de reproducción de sonido de este reproductor.
1 Presione FUNCTION para seleccionar
COMP.
2 Presione a o b para seleccionar el ajuste favorito.
COMP OFF—COMP 1—COMP 2—
COMP OFF—BMX 1—BMX 2
Español
Búsqueda cada 10 pistas en
el disco o carpeta actual
Se puede cambiar el método de búsqueda
entre las opciones de avance rápido/retroceso
y búsqueda cada 10 pistas. Seleccionar
ROUGH le permite buscar cada 10 pistas.
1 Presione FUNCTION para seleccionar
FF/REV.
# Si se seleccionó anteriormente el método de
búsqueda ROUGH, se visualizará ROUGH.
2 Presione d para seleccionar ROUGH.
! FF/REV – Avance rápido y retroceso
! ROUGH – Búsqueda cada 10 pistas
# Para seleccionar FF/REV, presione c.
3 Presione BAND para volver a la visualización de reproducción.
4 Presione c o d y mantenga presionado
para buscar una pista cada 10 pistas en un
disco (carpeta).
# Si el número de pistas restantes es inferior a
10, mantenga presionado c o d para recuperar
la primera (última).
75
Es
Page 76

Sección
04
Reproductor incorporado
Visualización de información
de texto en el disco
% Presione DISPLAY.
Presione DISPLAY repetidamente para cam-
biar entre los siguientes ajustes:
Para discos CD TEXT
Tiempo de reproducción—DISC TTL (título del
disco)—ART NAME (nombre del artista del
disco)—TRK TTL (título de la pista)—
ART NAME (nombre del artista de la pista)
Para discos WMA/MP3
Tiempo de reproducción—FOLDER (nombre
de la carpeta)—FILE (nombre del fichero)—
TRK TTL (título de la pista)—ART NAME
(nombre del artista)—ALBM TTL (título del
álbum)—COMMENT (comentarios)—Velocidad de grabación
Para discos WAV
Tiempo de reproducción—FOLDER (nombre
de la carpeta)—FILE (nombre de fichero)—frecuencia de muestreo
Notas
! Puede desplazarse hacia la izquierda del títu-
lo, manteniendo presionado DISPLAY.
! Un CD de audio que contiene determinada in-
formación como texto y/o números es un CD
TEXT.
! Si determinada información no se grabó en
un disco, se visualizará NO XXXX (p. ej.,
NO NAME).
! Al reproducir ficheros WMA grabados con
VBR, se visualiza el valor de velocidad de grabación promedio.
! Al reproducir ficheros MP3 grabados con VBR
(velocidad de grabación variable), se visualizará VBR en lugar del valor de velocidad de grabación.
! Según sea la versión de iTunes
grabar ficheros MP3 en un disco, es posible
que no se visualice correctamente la información de comentarios.
— iTunes es una marca comercial de Apple
Computer, Inc., registrada en los EE.UU. y
otros países.
! La frecuencia de muestreo que se visualiza en
el display puede estar abreviada.
®
utilizada para
76
Es
Page 77

4
321
Reproductor de CD múltiple
Sección
05
Reproducción de un CD
Se puede usar esta unidad para controlar un reproductor de CD múltiple, que se vende por separado.
! Esta unidad no tiene la función de ingreso
de títulos de discos.
! Sólo las funciones descritas en este manual
son compatibles con los reproductores de
CD múltiple de 50 discos.
1 Indicador de número de disco
Muestra el número de disco que se está reproduciendo actualmente.
2 Indicador de tiempo de reproducción
Muestra el tiempo transcurrido de reproducción de la pista actual.
3 Indicador de número de pista
Muestra el número de pista que se está reproduciendo actualmente.
4 Indicador RPT
Aparece cuando se selecciona la gama de
repetición para la pista actual.
1 Presione SOURCE para seleccionar el reproductor de CD múltiple.
Presione SOURCE hasta que visualice
MULTI CD.
2 Seleccione el disco que desea escuchar
con los botones 1 a 6.
Para los discos 1 a 6, presione el número del
botón correspondiente.
Para los discos 7 a 12, mantenga presionados
los números correspondientes, como 1 para el
disco 7, hasta que el número del disco aparezca en la pantalla.
# También se puede seleccionar un disco consecutivamente presionando a/b.
3 Para realizar el avance rápido o retroceso, mantenga presionado c o d.
4 Para saltar y retroceder o avanzar hasta
otra pista, presione c o d.
Notas
! Mientras el reproductor de CD múltiple realiza
las funciones preparatorias, se visualiza
READY.
! Si aparece un mensaje de error como
ERROR-11, consulte el manual de instrucciones del reproductor de CD múltiple.
! Si no hay discos en el cargador de CD del re-
productor de CD múltiple, se visualiza
NO DISC.
Introducción a las
funciones avanzadas del
reproductor de CD múltiple
% Presione FUNCTION para visualizar los
nombres de las funciones.
Presione FUNCTION repetidamente para cambiar entre las siguientes funciones:
RPT (repetición de reproducción)—RDM (reproducción aleatoria)—SCAN (reproducción
con exploración)—ITS-P (reproducción ITS)—
PAUSE (pausa)—COMP (compresión y DBE)
# Para volver a la visualización de reproducción,
presione BAND.
# Si no se utiliza la función en unos 30 segundos, el display volverá automáticamente a la visualización de reproducción.
Repetición de reproducción
Hay tres gamas de repetición para la reproducción de un reproductor de CD múltiple:
MCD (repetición de todos los discos del reproductor de CD múltiple), TRK (repetición de
una sola pista) y DSC (repetición de disco).
Español
77
Es
Page 78

Sección
05
Reproductor de CD múltiple
1 Presione FUNCTION para seleccionar
RPT.
2 Presione c o d para seleccionar la
gama de repetición.
! MCD – Repite todos los discos que se en-
cuentran en el cargador del reproductor de
CD múltiple
! TRK – Sólo repite la pista actual
! DSC – Repite el disco actual
Notas
! Si se seleccionan otros discos durante la repe-
tición de reproducción, la gama de repetición
cambia a MCD.
! Si se realiza una búsqueda de pistas o el avan-
ce rápido/retroceso durante la repetición TRK,
la gama de repetición cambia a DSC.
Reproducción de las pistas
en orden aleatorio
La reproducción aleatoria le permite reproducir las pistas en orden aleatorio dentro de la
gama de repetición MCD y DSC.
1 Seleccione la gama de repetición.
Consulte Repetición de reproducción en la página anterior.
2 Presione FUNCTION para seleccionar
RDM.
3 Presione a para activar la reproducción
aleatoria.
RDM :ON aparece en el display. Las pistas se
reproducirán en un orden aleatorio en la
gama de repetición MCD o DSC seleccionada
con anterioridad.
# Presione b para desactivar la reproducción
aleatoria.
Nota
Si se activa la reproducción aleatoria en DSC yse
vuelve a la visualización de reproducción, DRDM
aparecerá en el display.
Exploración de CD y pistas
Cuando esté usando DSC, el comienzo de
cada pista de la carpeta seleccionada se reproduce durante alrededor de 10 segundos.
Cuando esté usando MCD, el comienzo de la
primera pista de cada carpeta se reproduce
durante alrededor de 10 segundos.
1 Seleccione la gama de repetición.
Consulte Repetición de reproducción en la página anterior.
2 Presione FUNCTION para seleccionar
SCAN.
3 Presione a para activar la reproducción
con exploración.
SCAN :ON aparece en el display. Se reproduci-
rán los primeros 10 segundos de cada pista
del disco actual (o la primera pista de cada
disco).
4 Cuando encuentre la pista (o el disco)
deseada(o), presione b para desactivar la
exploración.
# Si el display vuelve automáticamente a la visualización de reproducción, seleccione SCAN
de nuevo presionando FUNCTION.
Notas
! Una vez finalizada la exploración de pistas o
discos, volverá a comenzar la reproducción
normal de las pistas.
! Si se activa la reproducción con exploración
en MCD y se vuelve a la visualización de reproducción, DSCN aparecerá en el display.
Pausa de la reproducción
de un CD
La pausa le permite detener temporalmente la
reproducción del CD.
1 Presione FUNCTION para seleccionar
PAUSE.
78
Es
Page 79

Reproductor de CD múltiple
Sección
05
2 Presione a para activar la pausa.
PAUSE:ON aparece en el display. Se detiene
temporalmente la reproducción de la pista actual.
# Para desactivar la pausa, presione b.
Uso de la compresión y del
enfatizador de graves
Estas funciones sólo se pueden usar con un reproductor de CD múltiple compatible con ellas.
El uso de las funciones COMP (compresión) y
DBE (enfatizador dinámico de graves) le permiten ajustar la calidad de reproducción de
sonido del reproductor de CD múltiple. Cada
una de las funciones tiene un ajuste de dos
pasos. La función COMP equilibra la salida de
los sonidos más fuertes y más suaves a volúmenes altos. La función DBE intensifica los niveles de graves para proporcionar un sonido
de reproducción más completo. Escuche cada
uno de los efectos a medida que los selecciona y utilice la función que realce mejor la reproducción de la pista o del CD que está
escuchando.
1 Presione FUNCTION para seleccionar
COMP.
# Si el reproductor de CD múltiple no es compatible con la función COMP/DBE, se visualiza
NO COMP cuando se intenta seleccionar la función.
2 Presione a o b para seleccionar el ajuste favorito.
COMP OFF—COMP 1—COMP 2—
COMP OFF—DBE 1—DBE 2
Uso de listas de
reproducción ITS
La función ITS (selección instantánea de
pista) le permite crear una lista de reproducción de las pistas favoritas incluidas en el cargador del reproductor de CD múltiple.
Después de añadir sus pistas favoritas a la
lista de reproducción, puede activar la reproducción ITS y reproducir sólo las pistas seleccionadas.
Creación de una lista de
reproducción con la
programación ITS
Puede utilizar la función ITS para ingresar y reproducir hasta 99 pistas por disco en un máximo de 100 discos (incluidos los títulos de los
discos). (Con reproductores de CD múltiple
vendidos antes del CDX-P1250 y el CDX-P650,
es posible guardar hasta 24 pistas en la lista
de reproducción.)
1 Reproduzca el CD que desea programar.
Presione a o b para seleccionar el CD.
2 Presione FUNCTION y mantenga presionado para seleccionar ITS.
3 Seleccione la pista deseada presionando c o d.
4 Presione a para almacenar la pista que
se está reproduciendo actualmente en la
lista de reproducción.
Se visualiza ITS IN por un momento y se agrega la pista actual a la lista de reproducción. El
display muestra nuevamente ITS.
5 Presione BAND para volver a la visualización de reproducción.
Nota
Después que los datos para 100 discos han sido
almacenados en la memoria, los datos para un
nuevo disco se sobreponen a los datos más antiguos.
Español
79
Es
Page 80

Sección
05
Reproductor de CD múltiple
Reproducción de la lista de
reproducción ITS
La reproducción ITS le permite escuchar las
pistas que ha ingresado en su lista de reproducción ITS. Cuando activa la reproducción
ITS, se comenzarán a reproducir las pistas de
la lista de reproducción ITS en el reproductor
de CD múltiple.
1 Seleccione la gama de repetición.
Consulte Repetición de reproducción en la página 77.
2 Presione FUNCTION para seleccionar
ITS-P.
3 Presione a para activar la reproducción
ITS.
ITS-P:ON aparece en el display. La reproduc-
ción de las pistas de la lista comienza en la
gama de repetición MCD o DSC seleccionada
con anterioridad.
# Si no hay pistas programadas en la gama actual de reproducción ITS, se visualiza EMPTY.
# Presione b para desactivar la reproducción
ITS.
Borrado de una pista de la lista
de reproducción ITS
Puede eliminar una pista de la lista de reproducción ITS si la función de reproducción ITS
está activada.
Si la reproducción ITS ya está activada, vaya al
paso 2. Si la reproducción ITS todavía no está
activada, presione FUNCTION.
4 Presione b para borrar la pista de la
lista de reproducción ITS.
La pista que se está reproduciendo se borra
de la lista de reproducción ITS y comienza la
reproducción de la próxima pista de la lista.
# Si no hay pistas de la lista de reproducción en
la gama actual, se visualiza EMPTY y se reanuda
la reproducción normal.
5 Presione BAND para volver a la visualización de reproducción.
Borrado de un CD de la lista de
reproducción ITS
Puede borrar todas las pistas de un CD de la
lista de reproducción ITS, si la función de reproducción ITS está desactivada.
1 Reproduzca el CD que desea borrar.
Presione a o b para seleccionar el CD.
2 Presione FUNCTION y mantenga presionado para seleccionar ITS.
3 Presione b para borrar todas las pistas
del CD que se está reproduciendo de la
lista de reproducción ITS.
Todas las pistas del CD que se está reproduciendo se borran de la lista de reproducción y
se visualiza ITS CLR.
4 Presione BAND para volver a la visualización de reproducción.
1 Reproduzca el CD que tiene la pista que
desea eliminar de la lista de reproducción
ITS y active la reproducción ITS.
Consulte Reproducción de la lista de reproducción ITS en esta página.
2 Presione FUNCTION y mantenga presionado para seleccionar ITS.
3 Seleccione la pista deseada presionando c o d.
80
Es
Page 81

Reproductor de CD múltiple
Uso de las funciones CD TEXT
Estas funciones sólo se pueden usar con un reproductor de CD múltiple compatible con CD
TEXT.
Algunos discos incluyen información cifrada
en el disco durante su fabricación. Estos discos pueden incluir información, tal como el título del CD, el título de pista, el nombre del
artista y el tiempo de reproducción, y se denominan discos CD TEXT. Únicamente estos discos CD TEXT con cifrado especial soportan las
funciones indicadas a continuación.
% Presione DISPLAY.
Presione DISPLAY repetidamente para cam-
biar entre los siguientes ajustes:
Tiempo de reproducción—DISC TTL (título del
disco)—ART NAME (nombre del artista del
disco)—TRK TTL (título de la pista)—
ART NAME (nombre del artista de la pista)
# Si determinada información no se grabó en
un disco CD TEXT, se visualizará NO XXXX (p. ej.,
NO NAME).
Sección
05
Español
Nota
Puede desplazarse hacia la izquierda del título,
manteniendo presionado DISPLAY.
81
Es
Page 82

21345
Sección
06
Ajustes de audio
Introducción a los ajustes
de audio
1 Visualización de audio
Muestra el estado de los ajustes de audio.
2 Indicador BASS
Aparece cuando la intensificación de graves
está en funcionamiento.
3 Indicador SW
Aparece cuando la salida de subgraves está
activada.
4 Indicador LOUD
Aparece en el display cuando se activa la
sonoridad.
5 Indicador FIE
Aparece cuando la función de mejora de
imagen frontal está activada.
% Presione AUDIO para visualizar los
nombres de las funciones de audio.
Presione AUDIO repetidamente para cambiar
entre las siguientes funciones de audio:
FAD (ajuste del balance)—EQ (ajuste de la
curva de ecualización)—LOUD (sonoridad)—
SUB.W (ajuste de subgraves activado/desactivado)—80: 0 (ajuste de subgraves)—HPF (filtro de paso alto)—BASS (intensificación de
graves)—FIE (mejora de imagen frontal)—SLA
(ajuste del nivel de fuente)
# Cuando el ajuste del controlador de subgraves
es P/O :FUL, no se puede cambiar a SUB.W.
(Consulte la página 87.)
# Se puede seleccionar 80: 0 sólo cuando la sa-
lida de subgraves se activa en SUB.W.
# Cuando la función F.I.E. está activada, no se
puede seleccionar HPF.
# Cuando el ajuste de la salida posterior es
R-SP :S/W, no se puede seleccionar FIE.
# Cuando se seleccione el sintonizador de FM
como fuente, no se puede cambiar a SLA.
# Para volver a la visualización de cada fuente,
presione BAND.
# Si no se utiliza la función de audio en unos 30
segundos, el display volverá automáticamente a
la visualización de la fuente.
Uso del ajuste del balance
Se puede cambiar el ajuste de fader/balance,
de manera que proporcione un entorno de
audio ideal en todos los asientos ocupados.
1 Presione AUDIO para seleccionar FAD.
# Si el balance se ajustó con anterioridad, se visualizará BAL.
2 Presione a o b para ajustar el balance
entre los altavoces delanteros/traseros.
Se visualiza FAD :F15 a FAD :R15 mientras el
balance entre los altavoces delanteros/traseros se mueve desde adelante hacia atrás.
# FAD : 0 es el ajuste apropiado cuando se usan
sólo dos altavoces.
# Cuando el ajuste de la salida posterior es
R-SP :S/W, no se puede ajustar el balance entre
los altavoces delanteros/traseros. Consulte Ajuste
de la salida posterior y del controlador de subgraves en la página 87.
3 Presione c o d para ajustar el balance
entre los altavoces izquierdos/derechos.
Se visualiza BAL : L15 a BAL : R15 mientras el
balance entre los altavoces izquierdos/derechos se mueve desde la izquierda hacia la
derecha.
82
Es
Page 83

Ajustes de audio
Sección
06
Uso del ecualizador
El ecualizador le permite ajustar la ecualización de acuerdo con las características acústicas del interior del automóvil.
Recuperación de las curvas de
ecualización
Hay seis tipos de curvas de ecualización memorizadas que se pueden recuperar con facilidad en cualquier momento. A continuación se
ofrece una lista de estas curvas de ecualización:
Visualización Curva de ecualización
POWERFUL Potente
NATURAL Natural
VOCAL Vocal
CUSTOM Personalizada
EQ FLAT Plana
SPR-BASS Supergraves
! CUSTOM es una curva de ecualización
ajustada creada por el usuario. Si le hace
ajustes, la configuración de la curva de
ecualización se memorizará en CUSTOM.
! Cuando se selecciona EQ FLAT no se intro-
duce ningún suplemento ni corrección en
el sonido. Esto es útil para verificar el efecto de los ajustes de ecualización al cambiar
alternativamente entre EQ FLAT y una
curva de ecualización ajustada.
% Presione EQ para seleccionar el ecualizador.
Presione EQ repetidamente para cambiar
entre las siguientes opciones:
POWERFUL—NATURAL—VOCAL—CUSTOM
—EQ FLAT—SPR-BASS
Ajuste de las curvas de
ecualización
Puede configurar el ajuste de la curva de
ecualización seleccionado según lo desee. Los
ajustes de la curva de ecualización configurados se memorizan en CUSTOM.
1 Presione AUDIO para seleccionar EQ.
2 Presione c o d para seleccionar la
banda a ajustar.
EQ-L (bajo)—EQ-M (medio)—EQ-H (alto)
3 Presione a o b para ajustar el nivel de
la banda de ecualización.
Se visualiza +6 a –6 mientras se aumenta o
disminuye el nivel.
# Se puede seleccionar otra banda y ajustar su
nivel.
Nota
Si realiza ajustes, la curva CUSTOM se actualizará.
Ajuste preciso de la curva de
ecualización
Se puede ajustar la frecuencia central y el factor Q (características de la curva) de cada
banda de curvas seleccionada (EQ-L/EQ-M/
EQ-H).
Nivel (dB)
Q=2W
Q=2N
Frecuencia central
1 Mantenga presionado AUDIO hasta
que la frecuencia y el factor Q (p. ej.,
F- 80:Q1W) aparezcan en el display.
Frecuencia (Hz)
Español
83
Es
Page 84

Sección
06
Ajustes de audio
2 Presione AUDIO para seleccionar la
banda para el ajuste entre bajo, medio o
alto.
Presione AUDIO repetidamente para cambiar
entre las siguientes funciones:
Baja—Media—Alta
3 Presione c o d para seleccionar la frecuencia deseada.
Baja: 40—80—100—160 (Hz)
Media: 200—500—1k—2k (Hz)
Alta: 3k—8k—10k—12k (Hz)
4 Presione a o b para seleccionar el factor Q deseado.
2N—1N—1W—2W
Nota
Si realiza ajustes, la curva CUSTOM se
actualizará.
Ajuste de la sonoridad
La sonoridad compensa las deficiencias en
las gamas de sonido bajas y altas cuando se
escucha a un volumen bajo.
1 Presione AUDIO para seleccionar LOUD.
2 Presione a para activar la sonoridad.
El nivel de sonoridad (p. ej., LOUD :MID) aparece en el display.
# Para desactivar la sonoridad, presione b.
3 Presione c o d para seleccionar el nivel
deseado.
LOW (bajo)—MID (medio)—HI (alto)
1 Presione AUDIO para seleccionar
SUB.W.
# También puede seleccionar el menú de ajustes de subgraves pulsando SW en la unidad.
# Cuando el ajuste del controlador de subgraves
es P/O :FUL, no se puede seleccionar SUB.W.
2 Presione a para activar la salida de subgraves.
SUB.W:NOR aparece en el display. Se activa
la salida de subgraves.
# Si la salida de subgraves se ha definido en la
fase inversa, se visualizará SUB.W:REV.
# Para desactivar la salida de subgraves, presione b.
3 Presione c o d para seleccionar la fase
de la salida de subgraves.
Presione c para seleccionar la fase inversa y
REV aparece en el display. Presione d para se-
leccionar la fase normal y NOR aparece en el
display.
Configuración de los ajustes de
subgraves
Cuando la salida de subgraves está activada,
se puede ajustar la frecuencia de corte y el
nivel de salida del altavoz de subgraves.
1 Presione AUDIO para seleccionar 80: 0.
# También puede seleccionar el menú de ajustes de subgraves pulsando SW en la unidad.
# Cuando la salida de subgraves está activada,
se puede seleccionar 80: 0.
# Si se ha configurado un ajuste de subgraves
con anterioridad, se visualizará la frecuencia seleccionada previamente en lugar de 80.
Uso de la salida de subgraves
Esta unidad está equipada con una salida de
subgraves que se puede activar o desactivar.
84
Es
2 Presione c o d para seleccionar la frecuencia de corte.
50—63—80—100—125 (Hz)
Sólo las frecuencias más bajas que las de la
gama seleccionada se generan por el altavoz
de subgraves.
Page 85

Ajustes de audio
Sección
06
3 Presione a o b para ajustar el nivel de
salida del altavoz de subgraves.
Se visualiza +6 a –24 mientras se aumenta o
disminuye el nivel.
Uso del filtro de paso alto
Cuando no desea que se generen los sonidos
bajos de la gama de frecuencias de salida de
subgraves a través de los altavoces delanteros
o traseros, active el filtro de paso alto (HPF).
Sólo las frecuencias más altas que las de la
gama seleccionada se generan a través de los
altavoces delanteros o traseros.
1 Presione AUDIO para seleccionar HPF.
# Cuando la función F.I.E. está activada, no se
puede seleccionar HPF.
2 Presione a para activar el filtro de paso
alto.
HPF : 80 aparece en el display. Se activa el fil-
tro de paso alto.
# Si el filtro de paso alto se ha ajustado con anterioridad, se visualizará la frecuencia previamente seleccionada en lugar de HPF : 80.
# Para desactivar el filtro de paso alto, presione
b.
3 Presione c o d para seleccionar la frecuencia de corte.
50—63—80—100—125 (Hz)
Sólo las frecuencias más altas que las de la
gama seleccionada se generan a través de los
altavoces delanteros o traseros.
Intensificación de los graves
La función de intensificación de graves intensifica el nivel de sonido grave inferior a 100
Hz. Mientras más se aumenta el nivel de graves, más se enfatiza el sonido grave y el sonido completo se vuelve más potente. Al usar
esta función con el altavoz de subgraves, se
intensifica el sonido bajo la frecuencia de
corte.
1 Presione AUDIO para seleccionar BASS.
# También puede seleccionar el ajuste de intensificación de graves manteniendo presionado
SW.
2 Presione a o b para seleccionar el nivel
deseado.
Se visualiza 0 a +6 mientras se aumenta o disminuye el nivel.
Mejora de imagen frontal
(F.I.E.)
La función F.I.E. (mejora de imagen frontal) es
un método sencillo para mejorar la imagen
frontal cortando la salida de la frecuencia de
gamas medias y altas de los altavoces traseros
y limitando su salida a las frecuencias de
gamas bajas. Se puede seleccionar la frecuencia que se desea cortar.
Precaución
Cuando se desactiva la función F.I.E., los altavoces traseros emiten el sonido de todas las frecuencias, no sólo los sonidos graves. Disminuya
el volumen antes de desactivar la F.I.E. para evitar
que el volumen aumente de golpe.
1 Presione AUDIO para seleccionar FIE.
# Cuando el ajuste de la salida posterior es
R-SP :S/W, no se puede seleccionar FIE.
# Cuando la función HPF está activada, no se
puede seleccionar FIE.
2 Presione a para activar la función F.I.E.
# Para desactivar la función F.I.E., presione b.
3 Presione c o d para seleccionar la frecuencia deseada.
100—160—250 (Hz)
Español
85
Es
Page 86

Sección
06
Ajustes de audio
Notas
! Después de activar la función F.I.E., utilice el
ajuste del balance (consulte la página 82) y
ajuste los niveles de volumen de los altavoces
delanteros y traseros hasta que queden equilibrados.
! Desactive la función F.I.E. si utiliza un sistema
de 2 altavoces.
! La función F.I.E. sólo se puede utilizar con el
amplificador incorporado.
Ajuste de los niveles de la
fuente
La función SLA (ajuste del nivel de fuente) le
permite ajustar el nivel de volumen de cada
fuente para evitar cambios radicales en el volumen cuando se cambia entre las fuentes.
! Los ajustes se basan en el nivel de volumen
del sintonizador de FM, que se mantiene
inalterado.
1 Compare el nivel de volumen del sintonizador de FM con el de la fuente que
desea ajustar.
2 Presione AUDIO para seleccionar SLA.
3 Presione a o b para ajustar el volumen
de la fuente.
Se visualiza SLA : +4 a SLA : –4 mientras se
aumenta o disminuye el volumen de la fuente.
Notas
! El nivel del volumen del sintonizador de AM
también se puede regular con el ajuste del
nivel de fuente.
! El reproductor de CD incorporado y el repro-
ductor de CD múltiple se definen automáticamente con el mismo ajuste del nivel de
fuente.
! La unidad externa 1 y la unidad externa 2 se
definen automáticamente con el mismo ajuste del nivel de fuente.
86
Es
Page 87

1
Otras funciones
Sección
07
Configuración de los
ajustes iniciales
Utilizando los ajustes iniciales, puede personalizar varios ajustes del sistema para lograr
un funcionamiento óptimo de esta unidad.
1 Visualización de función
Muestra el estado de la función.
1 Mantenga presionado SOURCE hasta
que se apague la unidad.
2 Presione SOURCE y mantenga presionado nuevamente hasta que el reloj aparezca
en el display.
3 Presione FUNCTION para seleccionar
uno de los ajustes iniciales.
Presione FUNCTION repetidamente para cambiar entre los siguientes ajustes:
Reloj—AUX1 (entrada auxiliar 1)—AUX2 (entrada auxiliar 2)—R-SP (salida posterior y controlador de subgraves)
Siga las instrucciones que se indican a continuación para utilizar cada ajuste en particular.
# Para cancelar los ajustes iniciales, presione
BAND.
# También se pueden cancelar los ajustes iniciales presionando SOURCE hasta que se apague
la unidad.
Ajuste del reloj
Siga estas instrucciones para ajustar el reloj.
1 Presione FUNCTION para seleccionar el
reloj.
2 Presione c o d para seleccionar el segmento de la visualización del reloj que
desea ajustar.
Hora—Minuto
Al seleccionar las horas o los minutos de la visualización del reloj, los dígitos seleccionados
destellarán.
3 Presione a o b para ajustar el reloj.
Al presionar a se aumentará la hora o minuto
seleccionado. Al presionar b se disminuirá la
hora o minuto seleccionado.
Español
Cambio del ajuste de un
equipo auxiliar
Los equipos auxiliares conectados a esta unidad se pueden activar por separado. Al utilizarla, fije en ON cada fuente AUX. Para
obtener información sobre cómo conectar o
utilizar equipos auxiliares, consulte Uso de la
fuente AUX en la página siguiente.
1 Presione FUNCTION para seleccionar
AUX1/AUX2.
2 Presione a o b para activar o desactivar AUX1/AUX2.
Ajuste de la salida posterior y
del controlador de subgraves
La salida posterior de esta unidad (salida de
cables de altavoces traseros y salida RCA posterior) se puede usar para la conexión de altavoces de toda la gama (R-SP :FUL)o
subgraves (R-SP :S/W). Si se cambia el ajuste
de la salida posterior a R-SP :S/W, se podrá conectar el cable de altavoces traseros directamente al altavoz de subgraves sin necesidad
de usar un amplificador auxiliar.
87
Es
Page 88

Sección
07
Otras funciones
Inicialmente, la unidad está ajustada para una
conexión de altavoces traseros de toda la
gama (R-SP :FUL). Cuando se conecta la salida posterior a altavoces de toda la gama
(cuando se selecciona R-SP :FUL), se pueden
conectar otros altavoces de toda la gama
(P/O :FUL) o un altavoz de subgraves
(P/O :S/W) a la salida RCA posterior.
1 Presione FUNCTION para seleccionar
R-SP.
2 Presione a o b para cambiar el ajuste
de la salida posterior.
Al presionar a o b se cambiará entre
R-SP :FUL (altavoz de toda la gama) y
R-SP :S/W (altavoz de subgraves), y se visuali-
zará en el display el estado correspondiente.
# Cuando no se conecta el altavoz de subgraves
a la salida posterior, seleccione R-SP :FUL.
# Cuando se conecta el altavoz de subgraves a
la salida posterior, seleccione R-SP:S/W para el
altavoz.
# Cuando el ajuste de la salida posterior es
R-SP :S/W, no se puede utilizar el procedimiento
siguiente.
3 Presione c o d para cambiar la salida
de subgraves o la salida posterior.
Al presionar c o d se cambiará entre
P/O :S/W y P/O :FUL, y se visualizará en el display el estado correspondiente.
Activación y desactivación
de la visualización del reloj
Se puede activar y desactivar la visualización
del reloj.
% Presione CLOCK para activar o desactivar la visualización del reloj.
Cada vez que se presiona CLOCK, se activa o
desactiva la visualización del reloj.
# La visualización del reloj desaparece momentáneamente cuando se utilizan otras funciones,
pero vuelve a aparecer después de 25 segundos.
Nota
Aunque las fuentes estén apagadas, la visualización del reloj aparece en el display. Al presionar
CLOCK se desactiva o activa la visualización del
reloj.
Uso de la fuente AUX
Esta unidad puede controlar hasta dos componentes auxiliares, como VCR o dispositivos
portátiles (se venden por separado). Cuando
están conectados, los componentes auxiliares
son identificados automáticamente como
fuentes AUX y se asignan a AUX1 o AUX2.La
relación entre las fuentes AUX1 y AUX2 se explica a continuación.
Notas
! Aunque cambie este ajuste, no se producirá
ningún sonido a menos que active la salida
de subgraves (consulte Uso de la salida de
subgraves en la página 84).
! Si cambia este ajuste, la salida de subgraves
vuelve a los ajustes de fábricas en el menú de
audio.
88
Es
Acerca del método de conexión
AUX
Existen dos métodos a su disposición para conectar equipos auxiliares a esta unidad.
Cable miniconector estéreo (AUX1)
Al conectar un equipo auxiliar utilizando un
cable miniconector estéreo
% Inserte el miniconector estéreo en el conector de entrada AUX en esta unidad.
Page 89

1
Otras funciones
Sección
07
Interconector IP-BUS-RCA (AUX2)
Al conectar equipos auxiliares usando un Interconector IP-BUS-RCA (se vende por separado)
% Use un Interconector IP-BUS-RCA como
el CD-RB20/CD-RB10 (se vende por separado) para conectar esta unidad a un equipo
auxiliar provisto de una salida RCA.
Para obtener más detalles, consulte el manual
de instrucciones del Interconector IP-BUSRCA.
# Sólo puede hacer este tipo de conexión si el
equipo auxiliar tiene salidas RCA.
Selección de AUX como la fuente
% Presione SOURCE para seleccionar AUX
(AUX1 o AUX2) como la fuente.
Presione SOURCE hasta que AUX aparezca
en el display.
# Si el ajuste auxiliar no está activado, no es posible seleccionar AUX. Para obtener más detalles, consulte Cambio del ajuste de un equipo
auxiliar en la página 87.
Introducción a las
funciones de iPod
®
! iPod es una marca comercial de Apple
Computer, Inc., registrada en los EE.UU. y
otros países.
1 Indicador del título de la canción
Muestra el título de la canción que se está
reproduciendo actualmente.
Funcionamiento en el iPod
El funcionamiento en el iPod de la siguiente
función con esta unidad es diferente.
! Visualización de información de texto en el
iPod (Consulte esta página.)
Visualización de información
de texto en el iPod
Se puede visualizar la información de texto
grabada en el iPod.
% Presione DISPLAY.
Presione DISPLAY repetidamente para cam-
biar entre los siguientes ajustes:
Título de la canción—Nombre del artista—Título del álbum—Estado de repetición de reproducción—Estado de reproducción aleatoria—
Tiempo de reproducción
# Si los caracteres grabados en el iPod no son
compatibles con esta unidad, no aparecerán en
el display.
Español
Se puede utilizar esta unidad para controlar un
adaptador de iPod, que se vende por separado.
Para obtener más información, consulte los
manuales de instrucciones del adaptador de
iPod. Esta sección proporciona información
acerca de las funciones de iPod con esta unidad que difieren de las descritas en el manual
de instrucciones del adaptador de iPod.
! Esta unidad es un componente del grupo 1
de la unidad principal.
Nota
Puede desplazar la información de texto hacia la
izquierda manteniendo pulsado DISPLAY.
Es
89
Page 90

Apéndice
Información adicional
Comprensión de los
mensajes de error del
reproductor de CD
incorporado
Cuando contacte con su concesionario o con
el servicio técnico Pioneer más cercano, asegúrese de anotar el mensaje de error.
Mensaje Causa Acción
ERROR-11, 12,
17, 30
ERROR-11, 12,
17, 30
ERROR-15 El disco inser-
ERROR-10, 11,
12, 15, 17, 30,
A0
ERROR-22, 23 No se puede re-
NO AUDIO El disco que se
PROTECT Todos los fiche-
SKIPPED El disco que se
Disco sucio Limpie el disco.
Disco rayado Reemplace el
tado no contiene
datos
Problema eléctrico o mecánico
producir el formato del CD
ha colocado no
contiene ficheros
que se puedan
reproducir
ros del disco
están protegidos
con DRM
ha colocado contiene ficheros
WMA protegidos
con DRM
disco.
Reemplace el
disco.
Cambie la llave de
encendido del
automóvil entre las
posiciones de activación y desactivación, o cambie a
una fuente diferente, y después vuelva a activar el
reproductor de CD.
Reemplace el
disco.
Reemplace el
disco.
Reemplace el
disco.
Reemplace el
disco.
Pautas para el manejo de
discos y del reproductor
! Use únicamente discos que tengan uno de
los siguientes dos logos.
! Utilice sólo discos convencionales y com-
pletamente circulares. No use discos con
formas irregulares.
! Utilice un CD de 12 cm u 8 cm. No utilice
un adaptador cuando reproduzca un CD de
8 cm.
! No coloque ningún otro elemento que no
sea un CD en la ranura de carga de CD.
! No use discos trizados, con picaduras, de-
formados o dañados de otro modo, ya que
pueden causar daños al reproductor.
! No es posible reproducir discos CD-R/CD-
RW no finalizados.
! No toque la superficie grabada de los dis-
cos.
! Almacene los discos en sus cajas cuando
no los utilice.
! Evite dejar discos en ambientes excesiva-
mente calientes o expuestos a la luz solar
directa.
! No fije etiquetas, no escriba ni aplique sus-
tancias químicas en la superficie de los
discos.
! Para limpiar un CD, pásele un paño suave
desde el centro hacia afuera.
! La condensación puede afectar temporal-
mente el rendimiento del reproductor. Deje
que se adapte a la temperatura más cálida
durante aproximadamente una hora. Además, si los discos tienen humedad, séquelos con un paño suave.
90
Es
Page 91

1
2
5
6
Información adicional
Apéndice
! Puede ocurrir que no sea posible reprodu-
cir algunos discos debido a sus características, formato, aplicación grabada, entorno
de reproducción, condiciones de almacenamiento u otras causas.
! Dependiendo del entorno en que se grabó
la información de texto, puede que no se visualice correctamente.
! Las vibraciones en las carreteras pueden
interrumpir la reproducción de un disco.
! Lea las advertencias impresas que vienen
con los discos antes de usarlos.
Discos dobles
! Los discos dobles son discos de dos caras
que incluyen CD grabable de audio en una
cara y DVD grabable de vídeo en la otra
cara.
! Debido a que la cara CD de los discos do-
bles no es físicamente compatible con el
estándar CD general, es posible que no se
pueda reproducir la cara CD en esta unidad.
! La carga y expulsión frecuente de un disco
doble puede producir rayaduras en el
disco. Las rayaduras graves pueden producir problemas de reproducción en esta unidad. En algunos casos, un disco doble
puede atascarse en la ranura de carga del
disco y no se expulsará. Para evitarlo, recomendamos que no utilice un disco doble
en esta unidad.
! Consulte la información del fabricante del
disco para obtener más información sobre
los discos dobles.
Ficheros WMA, MP3 y WAV
! Según la versión del Windows Media Player
utilizada para codificar los ficheros WMA,
es posible que no se visualicen correctamente los nombres de álbumes y demás información de texto.
! Es posible que ocurra un pequeño retardo
al iniciar la reproducción de ficheros WMA
codificados con datos de imagen.
! Conforme con ISO 9660 Nivel 1 y 2. Los sis-
temas de archivo Romeo y Joliet son compatibles con este reproductor.
! Es posible la reproducción multi-sesión.
! Los ficheros WMA/MP3/WAV no son com-
patibles con la transferencia de datos en
formato Packet Write.
! Se pueden visualizar sólo 64 caracteres
desde el principio como nombre de fichero
(incluida la extensión, como .wma, .mp3 o
.wav) o nombre de carpeta.
! La secuencia de selección de carpetas u
otras operaciones pueden cambiar, dependiendo del código de codificación o escritura.
! Independientemente de la longitud de la
sección en blanco que haya entre las canciones de la grabación original, los discos
WMA/MP3/WAV se reproducirán con una
breve pausa entre canciones.
! Las extensiones de fichero como .wma,
.mp3 o .wav se deben utilizar adecuadamente.
Ejemplo de una jerarquía
: Carpeta
: Fichero
3
4
Nivel 1 Nivel 2 Nivel 3 Nivel 4
! Esta unidad asigna los números de carpe-
tas. El usuario no puede asignarlos.
Español
91
Es
Page 92

Apéndice
Información adicional
! Se permite una jerarquía de carpetas de
hasta ocho niveles. Sin embargo, la jerarquía práctica de carpetas es de menos de
dos niveles.
! Es posible reproducir hasta 99 carpetas en
un disco.
Compatibilidad con audio
comprimido
WMA
! Formato compatible: WMA codificado por
Windows Media Player Ver. 7, 7.1, 8, 9 o 10
! Velocidad de grabación: 48 kbps a 320 kbps
(CBR), 48 kbps a 384 kbps (VBR)
! Frecuencia de muestreo: 32 kHz a 48 kHz
! Windows Media Audio 9 Professional, Loss-
less, Voice: No
MP3
! Velocidad de grabación: 8 kbps a 320 kbps
! Frecuencia de muestreo: 16 kHz a 48 kHz
(32, 44,1, 48 kHz para énfasis)
! Versiones de etiqueta ID3 compatibles: 1.0,
1.1, 2.2, 2.3, 2.4 (la etiqueta ID3 Versión 2.x
tiene prioridad sobre la Versión 1.x.)
! Lista de reproducción M3u: No
! MP3i (MP3 interactivo), mp3 PRO: No
WAV
! Formato compatible: Lineal PCM (LPCM),
MS ADPCM
! Bits de cuantificación: 8 y 16 (LPCM), 4
(MS ADPCM)
! Frecuencia de muestreo: 16 kHz a 48 kHz
(LPCM), 22,05 kHz a 44,1 kHz (MS
ADPCM)
92
Es
Page 93

Información adicional
Apéndice
Especificaciones
Generales
Fuente de alimentación ........ 14,4 V CC (10,8 a 15,1 V per-
misible)
Sistema de conexión a tierra
..................................................... Tipo negativo
Consumo máximo de corriente
..................................................... 10,0 A
Dimensiones (An × Al × Pr):
DIN
Bastidor .................... 178 × 50 × 162 mm
Cara anterior .......... 188 × 58 × 14 mm
D
Bastidor .................... 178 × 50 × 162 mm
Cara anterior .......... 170 × 48 × 14 mm
Peso ............................................... 1,3 kg
Audio
Potencia de salida máxima
..................................................... 50 W × 4
50 W × 2/4 W + 70 W × 1/2
W (para altavoz de subgraves)
Salida de potencia continua
..................................................... 22 W × 4 (50 Hz a 15 000
Hz, 5% THD, 4 W de carga,
ambos canales activados)
Impedancia de carga ............. 4 W a8W ×4
4 W a8W ×2+2W ×1
Nivel de salida máx. del preamplificador (Pre-out)/impe-
dancia de salida ....................... 2,2 V/1 kW
Ecualizador (ecualizador paramétrico de 3 bandas):
Baja
Frecuencia .............. 40/80/100/160 Hz
Factor Q .................... 0,35/0,59/0,95/1,15 (+6 dB
si intensificado)
Ganancia ................. ±12 dB
Media
Frecuencia .............. 200/500/1k/2k Hz
Factor Q .................... 0,35/0,59/0,95/1,15 (+6 dB
si intensificado)
Ganancia ................. ±12 dB
Alta
Frecuencia .............. 3,15k/8k/10k/12,5k Hz
Factor Q .................... 0,35/0,59/0,95/1,15 (+6 dB
si intensificado)
Ganancia ................. ±12 dB
Contorno de sonoridad:
Bajo ...................................... +3,5 dB (100 Hz), +3 dB (10
kHz)
Medio .................................. +10 dB (100 Hz), +6,5 dB
(10 kHz)
Alto ....................................... +11 dB (100 Hz), +11 dB
(10 kHz)
(volumen: –30 dB)
HPF:
Frecuencia ........................ 50/63/80/100/125 Hz
Pendient e .......................... –12 dB/oct
Altavoz de subgraves (mono):
Frecuencia ........................ 50/63/80/100/125 Hz
Pendient e .......................... –18 dB/oct.
Ganancia ........................... +6 dB a –24 dB
Fase ...................................... Normal/Inversa
Intensificación de graves:
Ganancia ........................... +12 dB a 0 dB
Reproductor de CD
Sistema ........................................ Sistema de audio de discos
compactos
Discos utilizables .................... Disco compacto
Formato de la señal:
Frecuencia de muestreo
........................................... 44,1 kHz
Número de bits de cuantificación
........................................... 16; lineal
Características de la frecuencia
..................................................... 5 Hz a 20 000 Hz (±1 dB)
Relación de señal a ruido .... 94 dB (1 kHz) (red IHF-A)
Gama dinámica ........................ 92 dB (1 kHz)
Número de canales ................ 2 (estéreo)
Formato de decodificación MP3
..................................................... MPEG-1 & 2 Audio Layer 3
Formato de decodificación WMA
..................................................... Ver. 7, 7.1, 8, 9, 10 (audio 2
canales)
(Windows Media Player)
Formato de señal WAV ......... PCM lineal & MS ADPCM
Sintonizador de FM
Gama de frecuencias ............ 87,9 MHz a 107,9 MHz
Sensibilidad utilizable ........... 8 dBf (0,7 µV/75 W, mono,
Señal/ruido: 30 dB)
Relación de señal a ruido .... 75 dB (red IHF-A)
Distorsión .................................... 0,3 % (a 65 dBf, 1 kHz, esté-
reo)
0,1 % (a 65 dBf, 1 kHz,
mono)
Respuesta de frecuencia ..... 30 Hz a 15 000 Hz (±3 dB)
Separación estéreo ................. 45 dB (a 65 dBf, 1 kHz)
Sintonizador de AM
Gama de frecuencias ............ 530 kHz a 1 710 kHz (10 kHz)
Sensibilidad utilizable ........... 18 µV (Señal/ruido: 20 dB)
Relación de señal a ruido .... 65 dB (red IHF-A)
Nota
Las especificaciones y el diseño están sujetos a
posibles modificaciones sin previo aviso.
Español
93
Es
Page 94

PIONEER CORPORATION
4-1, MEGURO 1-CHOME, MEGURO-KU
TOKYO 153-8654, JAPAN
PIONEER ELECTRONICS (USA) INC.
P.O. Box 1540, Long Beach, California 90801-1540, U.S.A.
TEL: (800) 421-1404
PIONEER EUROPE NV
Haven 1087, Keetberglaan 1, B-9120 Melsele, Belgium
TEL: (0) 3/570.05.11
PIONEER ELECTRONICS ASIACENTRE PTE. LTD.
253 Alexandra Road, #04-01, Singapore 159936
TEL: 65-6472-7555
PIONEER ELECTRONICS AUSTRALIA PTY. LTD.
178-184 Boundary Road, Braeside, Victoria 3195, Australia
TEL: (03) 9586-6300
PIONEER ELECTRONICS OF CANADA, INC.
300 Allstate Parkway, Markham, Ontario L3R OP2, Canada
TEL: 1-877-283-5901
PIONEER ELECTRONICS DE MEXICO, S.A. de C.V.
Blvd.Manuel Avila Camacho 138 10 piso
Col.Lomas de Chapultepec, Mexico, D.F. 11000
TEL: 55-9178-4270
先鋒股份有限公司
總公司 : 台北市中山北路二段44 號 13樓
電話 : (02) 2521-3588
先鋒電子(香港)有限公司
香港九龍尖沙咀海港城世界商業中心
9樓901-6室
電話 : (0852) 2848-6488
<KMMZX> <06H00000>
Published by Pioneer Corporation.
Copyright © 2006 by Pioneer Corporation.
All rights reserved.
Publié par Pioneer Corporation. Copyright
© 2006 par Pioneer Corporation. Tous
droits réservés.
Printed in China
Imprimé en Chine
<YRD5077-A/U> UC
 Loading...