

Page 1

SONY.
3-800-561-21 (1)
Digital Video
Camera
Digital
Video
Recorder DiT
Operation Manual
Before operating the unit, please read this manual thoroughly,
and retain it for future reference.
Owner's Record
The model and serial numbers are located on the bottom. Record the
serial number in the space provided below. Refer to these numbers
whenever you call upon vour Sony dealer regarding this product.
Cassette
I
Mtxtol No. DCR-VX700
Serial No.
_____________
Handycam
DCR-VX700
Vi 1995 by Sony Corporation
Model No AC-V515
Serial Ni.v
__________
Page 2

C(.)n^r<ilulnlions on your purcbaso of this Sony Oiv;ital I laniiycanu*^' tsuncordiM . With your
Welcome to digital video
Handycam, you can capture file's precious nioments witli sujXM'ior picture and sound >.|ualit\'.
Your Mandvcam is loaded witii advanced features, but at (he same fime it is very easy to use. You
will soon be producing liome video (fiat you can enjo\’ for vears to C(mie.
I
WARNING
To prevent fire or shock hazard,
do not expose the unit to rain or
moisture.
CAUTION
CAUTION : TO REDUCE THE RISK OF ELECTRIC SHOCK,
DO NOT REMOVE COVER (OR BACK),
NO USER*SERViCEABLE PARTS INSIDE.
REFER SERVICING TO QUALIFIED SERVICE PERSONNEL.
This symbol is intended to alert
(he user to the presence of
uninsulated "dangerous voltage"
within the product's enclosure
that may be of sufficient
magnitude to constitute a risk
electric shock to persons.
This symbol is intended to alert
the user to the presence of
important operating and
maintenance (servicing)
instructions in the literature
accompanying the appliance.
DISPOSAL OF LITHIUM ION BATTERY.
LfTHiUM fON BATTERY.
DISPOSE OF PROPERLY.
You can return your unwanted lithium ion batteries to
your nearest Sony Service Center or Factory Service
Center.
Note: In some areas the disposal of lithium ion batteries
in household or business trash may be prohibited.
For the Sony Service Center nearest you call
1-800-222-SONY (United States only).
For the Factor\' Ser\'ice Center nearest vou call
416'499-SONY (Canada onlv).
Caution; Do init handle damaged or le.iking lithium ion
batteries.
For the Customers in the U.S.A.
WARNING
This equipment has been tested and louiid to comply
with the limits for a Class H digital device, pursuant to
Part 15 of the FCC Rules. Tliese limits are designed to
prtn-ide reasonable protection against harmful
interference in a residential installation. This equipment
generates, uses, and can radiate radio frequency energy
and, if not installed and used in acct>rdance with the
instructions, may cause harmful liiterference to radi<,i
communications. However, there is no guarantee that
interference will not occur in a particular installation. If
this equipment does cause harmful interference to radio
or television reception, which can be determined by
turning the equipment off and on, the user is
encouraged to try to correct the interference bv one or
more of the following measures:
— Reorient or relcKate the receiv ing antenna.
— Increase the separation between tlK* equipment and
receiver.
— Connect the equipment into an outlet on a circuit
different from that to which the receiver is connected
— Consult the dealer or an experienced radio/TV
technician for help.
Caution
You are cautioned that any changes or modifications ii(>t
expressiv approved in this manual could void vour
authority to oper<)te this equipmeiit.
The shielded Interface cable recommended in this
manual must be used with the equipment in order to
comply u’ith the limits for a digital device pursuant to
Subpart B of Part 15 of FCC Rules.
For the Customers in CANADA
CAUTION
TO PREVENT ELECTRIC SHOCK, ITO NOT USE THIS
POLARIZED AC PLUG WITH AN EXTENSION CORD,
RECEPTACLE OR OTHER OUTLET UNLESS THE
BLADES CAN BE EULLY INSERTED TO PREVENT
BLADE EXPOSURE.
Page 3

Table of Contents
Before You Begin
Notes <ind Precautions 4
Checking Supplied Accessories 5
Getting Started
Charging and Inserting the Battery Pack 6
Inserting a Cassette 9
Basic Operations
Camera Recording 11
Hints for Better Shooting 14
Checking the Recorded Picture 15
Connections for Playback 16
Playing Back a Tape 17
Advanced Operations
Using Alternate Power Sources 19
Changing the Mode Settings 21
< for Camera Recording >
Fade-in and Fade-out 24
Re-recording a Picture in the Middle of a Recorded Tape 26
Photo Recording 28
Interval Recording 29
Cut Recording 30
< for Automatic/Manual Adjustment >
Enjoying Digital Effect 31
Focusing Manually 32
Using the PROGRAM AE Function 34
Adjusting the Exposure 36
Adjusting the White Balance 38
Releasing the Steady Shot Function 40
< for Playback/Editing >
Searching the Recorded Picture 41
Checking the Information for the Recorded Picture 43
Editing onto Another Tape 44
Additional Information
Replacing the Lithium Battery in the Camcorder 46
Resetting the Date and Time 48
Usable Cassettes 49
Tips for Using the Battery Pack 50
Maintenance Information and Precautions 53
Using Your Camcorder Abroad 56
Trouble Check 57
Specifications 60
Identifying the Parts 61
Warning Indicators 72
Glossary 73
Index 75
As you read through this manual, buttons and
settings on the camcorder are shown in capital
letters.
e.g. Set the POWER switch to CAMERA.
The beep sound is indicated with S' in the
illustrations.
Page 4

DeTore YOU Begin
Notes and Precautions
Note on TV Color Systems
TV I'olo?' systems ililter liom country to country. If you \ tew the plavbnck picture on a TV, you need an
l’S(' svsti'jii based TV. When you want to tise a I’AI, M system based TV', you rvill need an NTSC/
I’/TI', .V1 Iranscoder (as this is an NTSC s\'sieni based camcorder). I’lease check the list on page 56 to see
llu- TV color svslenr r)l your ctruntrv.
Precaution on Copyright
Television programs, films, video tapes, and other materials may be copyrighted.
Unauthorized recording of such materials may be contrary to the prov ision of the copyright laws.
Precautions on Camcorder Care
• Do not let the camcorder get wet. Keep the camcorder from rain or sea water. It may cause a
malfunction and sometimes the malfunction cannot be repaired, [a]
• Do not let sand get into the camcorder. When you use the camcorder on a sandy beach or
dusty place, protect it from the sand or dust. Sand or dust may cause the unit to malfunction
and sometimes the malfunction cannot be repaired, [bj
• Never leave the camcorder under temperatures above 140° F (60 °C), such as in a car parked in the
sun or under direct sunlight, [c]
I
Contents of the recording cannot be compensated if recording or playback is not made due to a
malfunction of the camcorder, video tape, etc.
See "Precautions" as well (p. 55).
Page 5

Checking Supplied Accessories
Chock that iho following accossorios arc supplied with vour camcorder.
¡T] Wireless Remote Commander (1) (p. 66)
[2] NP-720 Battery Pack (1)(p. 6)
[3] AC-V515 AC power adaptor and DK-715 connecting cord (1) (p. 6, 20)
¡4] A/V connecting cable (1) (p. 16)
[U S video connecting cable (1) (p. 16)
[6] Shoulder strap (1) (p. 65)
[7] Size AA (R6) batteries for Remote Commander (2) (p. 67)
[U "mini DV" cassette (1) (p. 9)
Page 6

Getting Started
Charging and Inserting the Battery Pack
Before using your camcorder, you first need to charge and install the battery pack. To charge the
battery pack, use the supplied AC power adaptor.
Charging the Battery Pack
Charge the batterv pack on a flat place without vibration.
(1) Connect the AC power adaptor to a wall outlet.
(2) Align the surface of the battery pack indicated by the ► mark with the edge of the terminal shutter
of the AC power adaptor. Then fit and slide the battery pack in the direction of the arrow.
The CHARGE lamp (orange) lights up. Charging begins.
When charging is completed, the CHARGE lamp goes out. Unplug the unit from the wall outlet, then
remove the battery pack and install it on the camcorder.
Charging Time
Battery Pack
NP-720 (supplied)
Approximate minutes to charge an empty pack using the supplied AC power adaptor (Lower
temperatures require a longer charging time.)
Charging time*
190
fj
M
îfe
Page 7

Battery Life
I
Battery Pack
NP-720 (supplied)
* Approximate minutes when recording while you repeat recording start/sfop, zooming and turning
tlie power on/off. The actual battery life may be shorter.
** Approximate continuous recording and playing back time indoors.
Removing the Battery Pack
Slide the battery pack in the direction of the arrow.
Notes on charging the battery pack
• The POWER lamp will remain lit for a while even if the battery pack is removed and the power cord is
unplugged after charging the battery pack. This is normal.
• If the POWER lamp does not light, disconnect the power cord. After about one minute, reconnect the
power cord again.
• You cannot operate the camcorder using the AC power adaptor while charging the battery pack.
• When a fully charged battery pack is installed, the CHARGE lamps will light once, then go out.
Typical recording time* Continuous using time**
55
110
Page 8
Charging and Inserting the Battery Pack
Inserting the Battery Pack
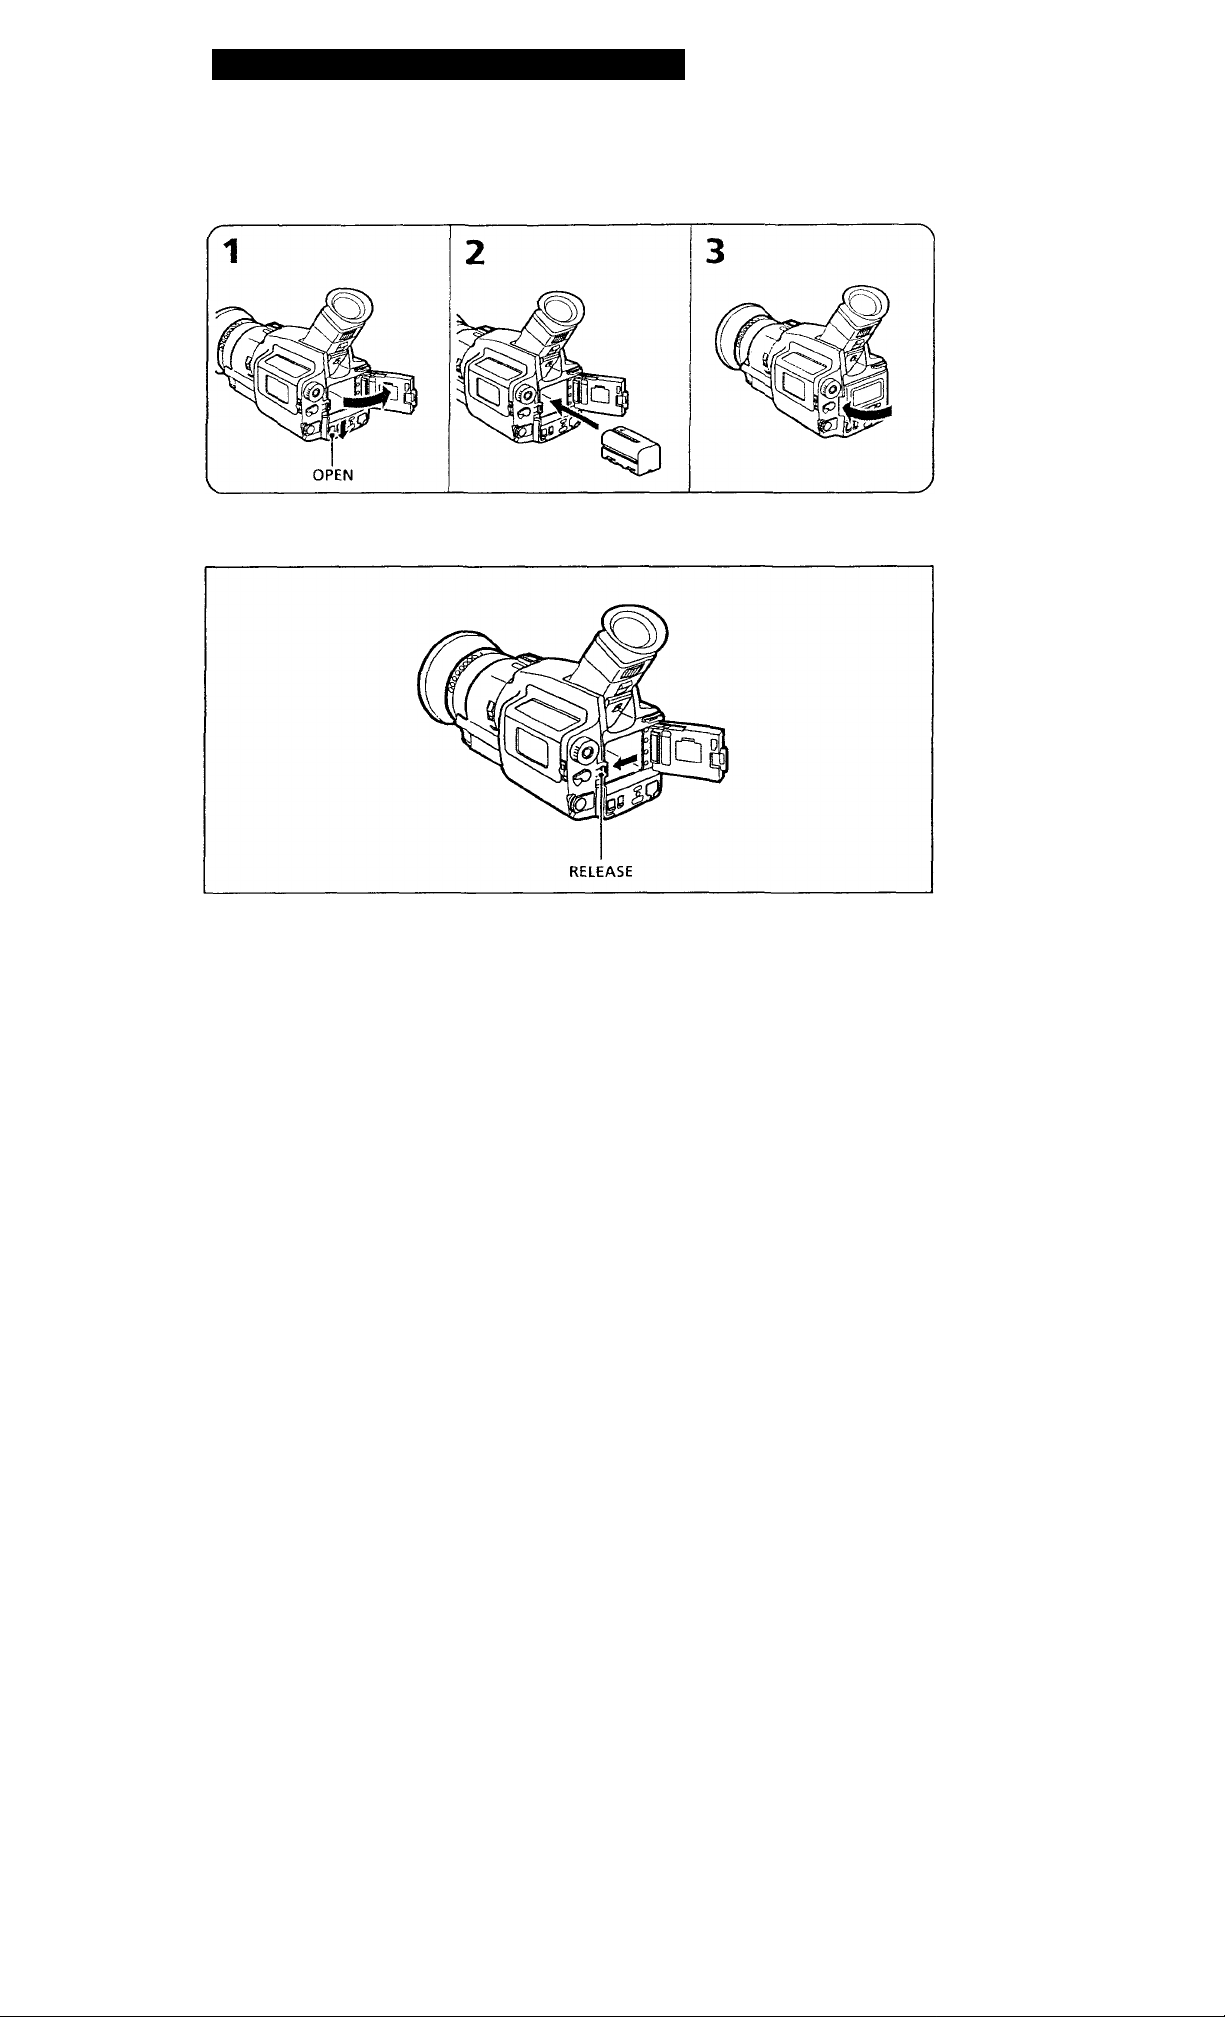
(V SlidgOPHN nnd open the battery cover.
(2) 1 nsert (he battery p<u к until it is hooked b\’ t)u' KHLHASE knob.
(3) Close the co\’er.
To Remove the Battery Pack
Slide the RELEASE knob leftward.
Note on battery pack
You cannot use NP-520 or NP-500H battery pack.
8
Page 9

Inserting a Cassette
1
You can use miniOV cassette with ""’IV logti" only.
Make sure that a power source is insorteci.
(1) Slide HJHCT, The cassette compartment auloma(ical]\’ lifts up aiid opens.
(2) insert a cassette (supplied) with tlie window facing out.
(3) Press the outside of the cassette compartment cover to dose the compartment. The cassette
compartment automaticallv retracts.
(4) After the cassette compartment cover has completely retracted, press the upper cassette
compartment cover until it clicks.
* C/^/ are trademarks.
f
<
I
I
«
EJECT
To Eject the Cassette
Slide EJECT. After the cassette compartment opens, take out the cassette.
You cannot eject the cassette while C MEMORY appears in the \ iewfinder because the camcorder is
still writing information to the cassette memory-mounted miniD\' cassette (p. 41). In this case, the
cassette compartment automatically lifts up and opens after C MEMORY disappears.
Page 10

Inserting a Cassette
To Prevent Accidental Erasure
Slide and open tlu’ tab (^n the cassette to expose the ri'd mark. It you trv to rect>rd with the red mark
exposed, the and ^ indicati^rs iiasii in th<' x’iewlinder, and you cannot record on the tape. To
rerecord-on this tape, slide and close the tab to cover the’ red mark.
10
Page 11
Basic Operations
Camera Recording
Make sure tlial a power source and a cassette are inserted. You can hear the beep sound, indicated
with J' in the illustrations, which confirms your operation. Before vou record one-time events, you
may want to make a trial recording to make sure that vou are using the camcorder correctly.
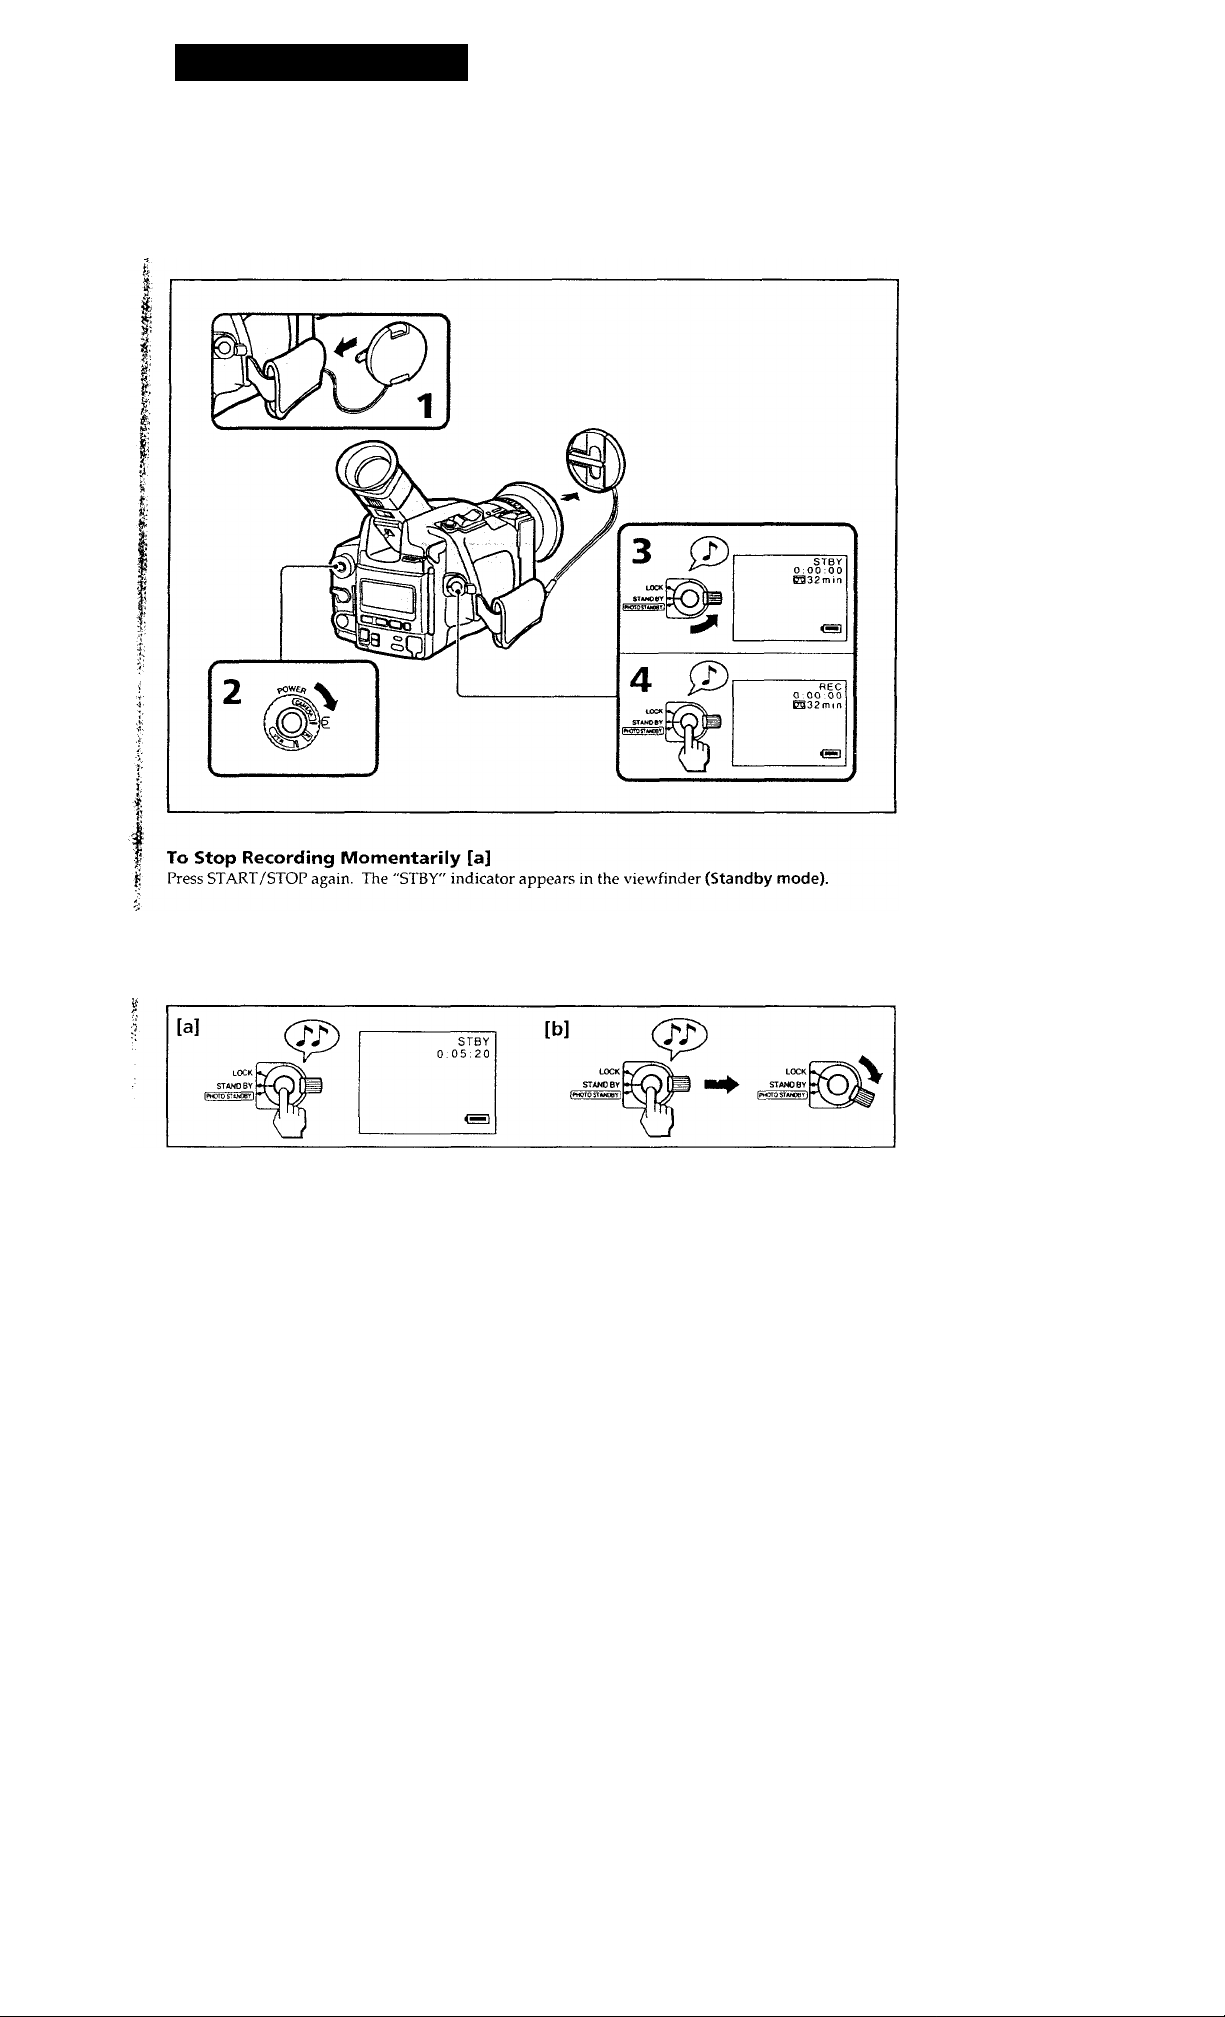
(1) Remov^e the hood cap, and attach it to the grip strap.
(2) While pressing the center button on the POWER switch, set it to CAMERA.
(3) Turn STANDBY up.
(4) Press START/STOP. The camcorder starts recording. The "REC" indicator appears in the
viewfinder, and the red lamps on the front and back ol the camcorder and in the viewfinder light.
n
Û)
3
I
To Finish Recording [b]
Press START/STOP to stop recording. Turn STANDBY to LOCK. Turn the POWER switch to OFF.
Then, eject the cassette and battery (p. 8, 9).
11
Page 12

Camera Recording
Note on Standby mode
If you leave tlie camcorder for 5 minutes or more with a cassette inserted ij^ Standby mode< the camcorder
goys off automatically. This prevents wearing down the battery and wearing out the tape. To resume
Standby mode, turn STANDBY down once and up again. To start recording, press START/STOP.
Notes on the time code
• The time code indicates the recording or playback time, "0;00;00" (hours : minutes ; seconds) in CAMERA
mode, and ’’0:00:00:00" (hours : minutes : seconds : frames) in VTR mode. TIk^ timde code of (his camcorder
is the drop-frame mode (p. 74).
• Be sure not to make a blank portion when recording, because you cannot rewrite the time code on the tape
if there is a blank portion between pictures.
• If there is a blank portion between pictures, the time code starts from 0.
Note on power sources
Disconnecting the power sources or removing the battery pack during recording or playback may damage the
inserted tape. If this happens, restore the power supply again immediately.
To Focus the Viewfinder Lens
If the viewfinder is not in focus at all or when you use the camcorder after someone else has used it,
focus the viewfinder lens. Turn the viewfinder lens adjustment ring so that the indicators in the
viewfinder come into sharp focus.
Note on the viewfinder
The color viewfinder employs LCD screen made with high-precision technology.
However, black points or bright points of light (red, blue or green) may appear constantly on the color
viewfinder screen. These points are not recorded on the tape. This is not a malfunction. (Effective dots; more
than 99.99 %)
Note on beep sound
As indicated with in the illustrations, a beep sounds when you turn the power on or when you start
recording and two beeps sound when you stop recording, confirming the operation. Several beeps also sound
as a warning of any unusual condition of the camcorder (p. 72). Note that the beep sound is not recorded on
the tape. If you do not want to hear the beep sound, set the BEEP to OFF in the menu system (p. 22).
To record through an external microphone
Connect a microphone (not supplied) to the MIC jack. In this case, sound from the built-in microphone will
not be recorded.
12
&
Page 13
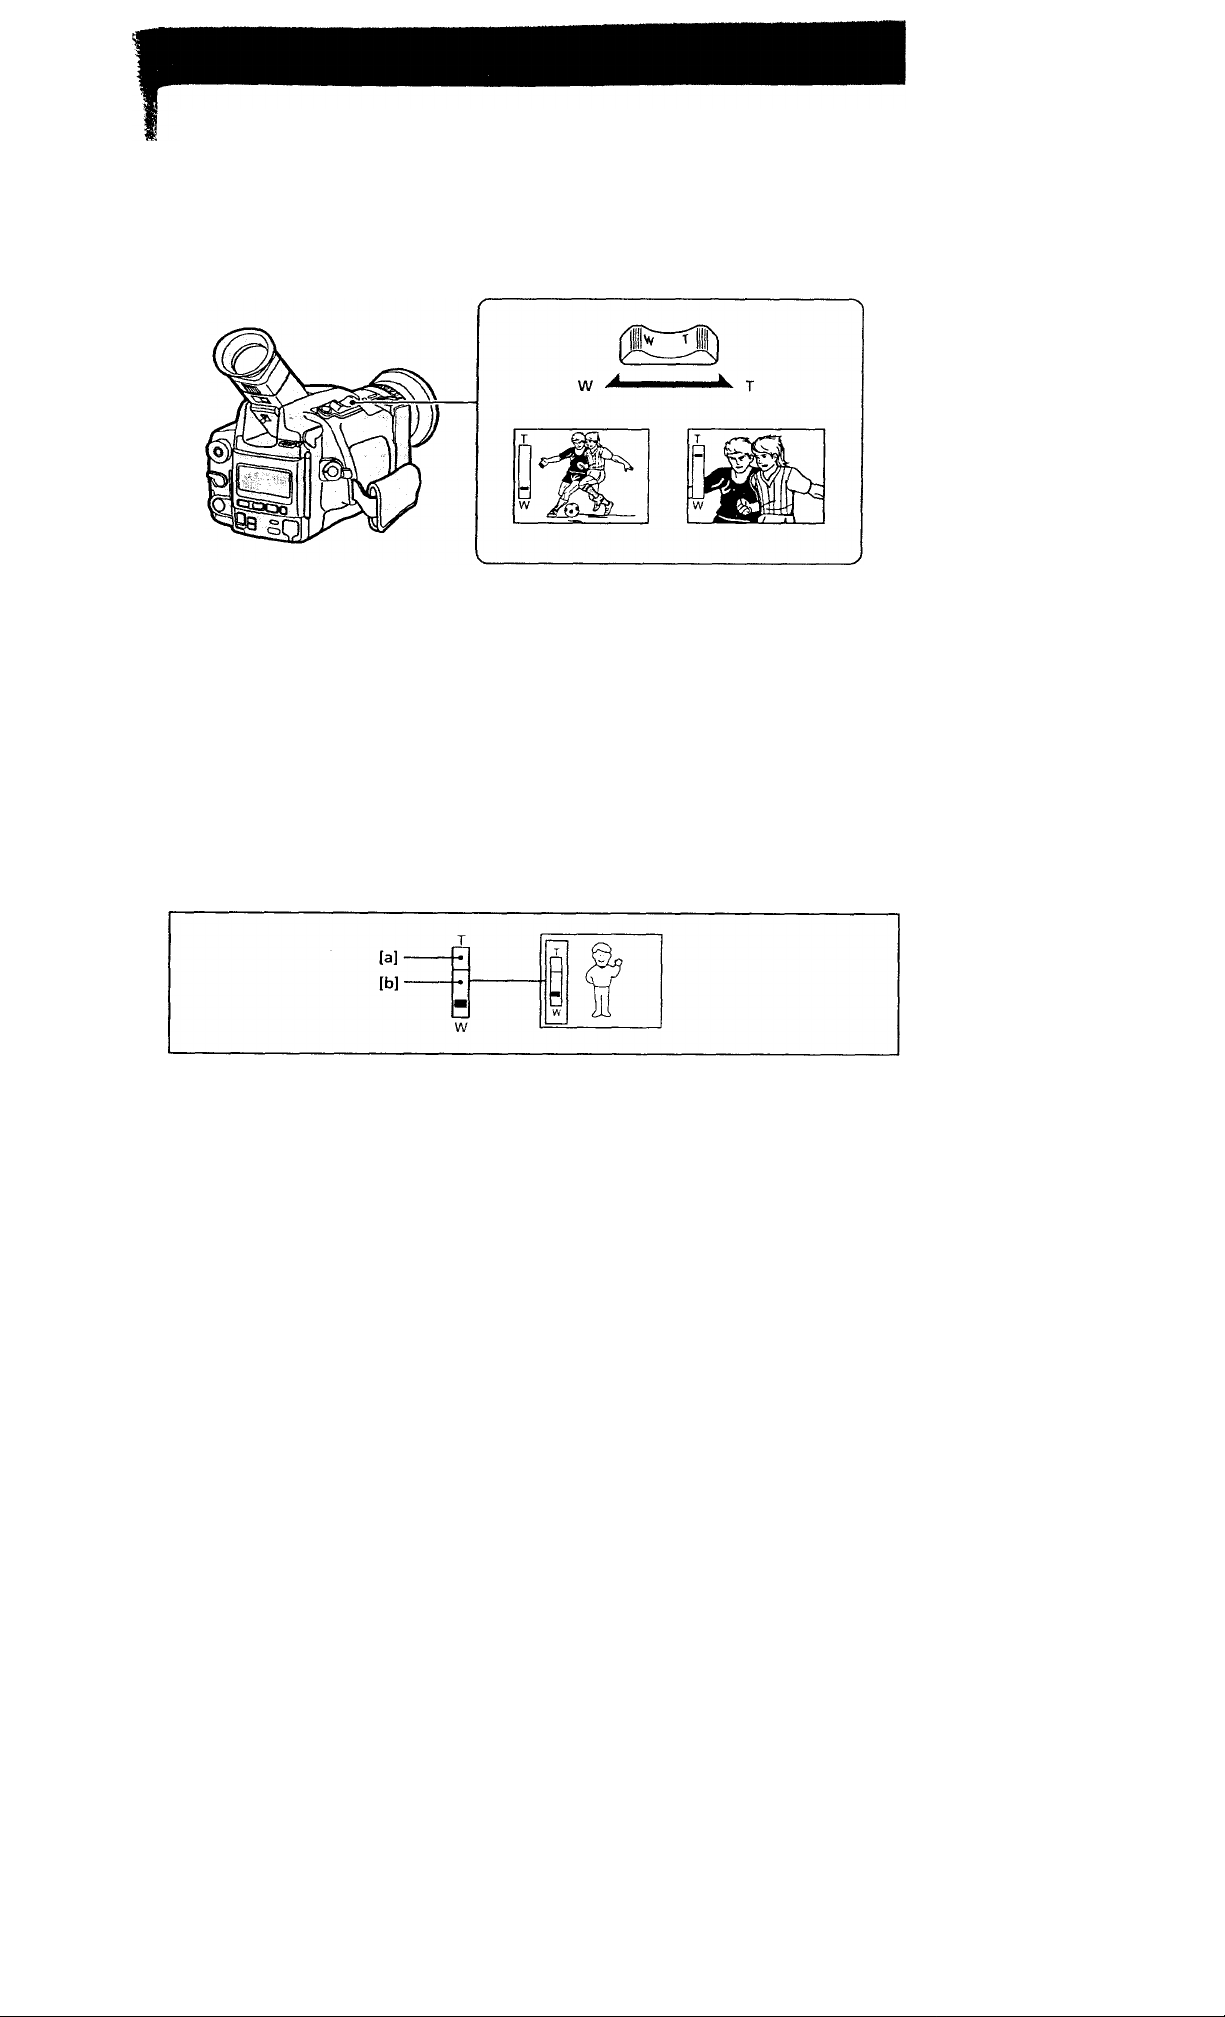
Using the Zoom Feature
Zooming is a recording technique that lets you change the size of the subject in the scene. For more
Is professioTtahlooking recordings, use the zoom sparingly.
I' Set DIGITAL MODE to ZOOM, and press tlie zoom button.
;; T side: for telephoto (subject appears closer)
ij W side: for wide-angle (subject appears farther away)
Zooming Speed
Press the zoom button firmly for high-speed zoom. Press it softly for relatively slow zooming.
Note on the focus range
You can shoot a subject that is at least 3 feet (about 1 m) in the telephoto position, 0.5 inch (about 1 cm) in the
wide position away from the lens surface.
Notes on Digital Zoom
• More than lOx zoom is performed digitally, and the picture quality deteriorates as you go toward the T
side. If you do not want to use the digital zoom, set the D ZOO.M function to OFF in the menu system (p.
22).
• The horizontal bar in the power zoom indicator separates the digital zooming zone (above the bar [a]) and
the optical zooming zone (under the bar [b]). If you set the D ZOOM function to OFF, the part above the
bar disappears.
13
Page 14

Hints for Better Shooting
ln)r iiand-hold sIkHs, ytui'll got better results holding the camcorder according to the tollowing
suggestions;
• Hold the camcorder firmly and secure it with the grip strap so that you can easily manipulate the
controls with your thumb [a].
• Place your right elbow against your side.
• Place your left hand under the camcorder to support it.
• Keep your fingers away from the built-in microphone.
• Place your eye firmly against the viewfinder eyecup.
• Use the viewfinder frame as a guide to determine the horizontal plane.
• You can record in a low position to get an interesting recording angle. Lift the viewfinder up to
record from a low position (you can turn it up to about 80 degrees.) [b]. In this case, it's rrseful to use
REC START/STOP located on the top of the camcorder.
Caution on the viewfinder
• Do not pick up the camcorder by the vieu findor. [c]
• Do not place the camcorder so as to point the viewfinder toward the sun. The inside ol the viewfinder may
be deformed. Be careful in placing the camcorder under sunlight or bv the window, [d]
Place the camcorder on a flat surface or use a tripod
Try placing the camcorder on a table top or any other flat surface of suitable lieiglit. If you have a tripod lor a
still camera, vou can also use it with the camcorder. .Make sure the tripiid screw is shorter than 9/32 inch (6.5
mm).
14
Page 15

Checking the Recorded Picture
The editsearch function is used to view the recorded picture for a moment during recording.
Using EDITSEARCH, you can review the last recorded scene or check the recorded picture in the
viewfinder.
In standby mode, press the - (©) side of EDITSEARCH momentarily; the last few seconds of the
recorded portion plays back (Rec Review). You can also monitor the sound by using headphones (not
supplied).
Hold down the - side of EDITSEARCH until the camcorder goes back to the scene you want. The last
recorded portion is played back. To go forward, hold down the + side (Editsearch).
I
I; To Begin Rerecording
.S: Press START/STOP. Provided you do not eject the cassette, the transition between the last scene you
recorded and the next scene you record will be smooth.
15
Page 16

Connections for Playback
You cnn use this camcorder as a VCR by connecting it to your TV tor plavhack. It is recommended to
use the lioiise current as the power source (p. 20).
Connecting Directly to a TV
Connect the camcorder to your TV by using the supplied A/V connecting cable. Set the TV/VCR
selector to VCR on the TV.
If you are going to connect the camcorder using the S video cable [a], vou do not need to connect the
yellow (video) plug of the A/V connecting cable (b].
I
If a VCR is connected to the TV
Connect the camcorder to LINE IN on the VCR by using the supplied connecting cable. Set the input
selector on the VCR to LINE. Set the TV/VCR selector to VCR on the TV.
If your TV or VCR is monaural type
Connect only the white plug for audio on the TV or the VCR. With this connection, the .sound is
monaural, and the sound from the headphones jack on the camcorder is also monaural.
To connect a TV or a VCR without audio/video input jacks
Use the RFU-95UC RFU adaptor (not supplied).
16
Page 17

Playing Back a Tape
You can monitor tlu' playback piclurc in llie viewfinder. You can also watch it on a TV screen, after
connecting the camcorder to a TV or VCK (p. 16). You can control playback using the supplied Remote
Commander (p. 66).
(1) While ptessing the center button tin the POWER switch, turn it to VTR.
(2) Insert the recorded tape with tire window facing out.
(3) Press to rewind the tape
(4) Press t>. Playback starts.
To mark the portion you want to monitor
Press ZERO SET MEMORY while playing back. After you finish playing back, press •
rewinds to the position you want (0.00:00) and stops.
See the next page for further information.
t. The tape
17
Page 18

Playing Back a Tape
Various Playback Modes
To view a still picture (playback pause)
Tress il d uring playback. To resume playback, press II or O. When still picture mode lasts for 5
minutes or more, the camcorder automatically enters stop mode. To playback again, press O again.
To locate a scene (Picture Search)
Keep pressing ◄◄ or ►► during playback. To resume normal playback, release the button.
To monitor the high-speed picture while advancing the tape or rewinding (Skip scan)
Keep pressing while rewinding or ►► while advancing the tape. To resume normal playback,
press l>.
To view the picture at 1/5 speed (Slow Playback)
Press < or > to select direction, then press I»- SLOW during playback. To resume normal playback,
press O. 1/ slow playback lasts for about 1 minute, it shifts to normal speed automatically.
To view the picture at double speed
Press < or > to select direction, then press x2 on the Remote Commander during playback. To
resume normal playback, press O.
To view the picture frame by frame
Press > during playback pause mode.
Press < in reverse direction during playback pause mode.
To view the picture in reverse direction
Press < during playback.
Notes on playback
• The sound is muted in the various playback modes.
• The pre\ ious scene may appear like mosaic noise during slow playback or playback pause. This is
not malfunction.
■ S
;
-i i
To display the indicators
Press DISPLAY. Tape counter, remaining battery indicator and other indicators appear on the
connected TV' screen. To erase the indicators, press DISPLAY again.
18
Page 19

MQvancea «jptiraiions
Using Alternate Power Sources
I
You cun choose any of flic following power sources for your camcorder: battery pack (p.6), the house
current, and 12/24 V car batterv. Choose the appropriate power source depending on where you want
to use your camcorder.
I
Place
Indoors
Outdoor
In a car
You cannot connect to this camcorder using the connecting cord supplied with AC-V515 or DC-V515.
Use the connecting cord supplied with this camcorder.
9 C
Power source
House current
Battery pack
12 V or 24 V car battery
This mark indicates that this product is a genuine accessory for Sony video products.
A When purchasing Sony video products, Sony recommends that you purchase
accessories with this "GENUINE VIDEO ACCESSORIES" mark.
Accessory to be used
AC power adaptor AC-V515 and connecting cord DK-715
(supplied)
Battery pack NP-720 (supplied)
DC pack DC-V515
19
Page 20

Using Alternate Power Sources
Using the House Current
To use Uu' supplied AC' power adaptor:
(1) tJonnect the power cord to a wall outlet.
(2) Connect the camcorder and the AC power adaptor using the supplied connecting cord.
You can charge the battery inserted in the camcorder by connecting the AC power adaptor to the
camcorder and turning the pow'er switch to OFF.
Charging time of the supplied NP-720 battery pack is approx. 150 minutes. While charging, the battery
indicator appears in the display window:
|-1 , iJ ♦ ^ igpj ^
I
After charging finishes, the indicator disappears. You can also charge two batteries at a time by
installing the battery pack and connecting the AC power adaptor. It takes about 4 hours to charge the
batteries.
WARNING
Power cord must only be changed at qualified service shop.
Precaution
The set is not disconnected from the house current as long as it is connected to the wall outlet, even if
the set itself has been turned off.
Notes on the POWER lamp
• The POWER lamp will remain lit for a while even if the unit is unplugged after use. This is normal.
• If the POWER lamp does not light, disconnect the power cord. After about one minute, try again.
Using a Car Battery
Use the DC-V515 pack (not supplied). Connect the cord of the DC pack to the cigarette lighter socket
of a car (12 V or 24 \'). Connect the DC pack in the same wav as the AC power adaptor.
Use the connecting cord supplied with this camcorder.
20
Page 21

Changing the Mode Settings
You can change tlie mode soilings in the menu system to iurther enjoy l!io features and function of the
camcorder.
See the next page for the items in the menu system.
21
Page 22

Changing the Mode Settings
Setting the Mode of Each Item
Select RETURN to return to main menu (item select).
Items in CAMERA and VTR Modes
COMMANDER <VTR4/OFF/ID/ID SET>
• Normally select VTR4.
• Select OFF when not using the Remote Commander.
• Select ID when using the Remote Commander with the ID number set.
• Select ID SET to register the ID number so that the camcorder responds only to the supplied Remote
Commander, and not to other Remote Commanders. To set the ID, see page 68.
HEADPHONE <LOW/MID/HIGH>
• Normally select LOW.
• Select MID to slightly raise the volume of the headphones.
• Select HIGH to raise the volume of the headphones.
BEEP <ON/OFF>
• Normally select ON.
• Select OFF to turn the beep sound off.
EVF MODE <COLOR/BRIGHT>
• Select this item and change the level of the indicator by pressing f or + to adjust the color intensity
and brightness of the picture in the viewfinder.
CLOCK SET
• Select this item to reset the date or time. See page 48.
I
Items in CAMERA Mode only
REC LAMP <ON/OFF>
• Select ON to turn on the recording lamp on the front panel during recording.
• Select OFF otherwise.
D ZOOM <ON/OFF>
• Select ON to activate digital zooming. The zooming ability becomes 20x.
• Select OFF otherwise. The zooming ability becomes lOx.
FRAME REC <OFF/ON>
• Normally select OFF.
• Select ON for cut recording {p. 30).
When you remove the power source, the setting becomes OFF.
INT REC <SET/INTERVAL/REC TIME>
• When you make interval recording , select SET and then select ON (p. 29). Otherwise, select OFF.
• Select INTERVAL to set or change the waiting time for interval recording.
• Select REC TIME to set or change the recording time for interval recording.
When you remove the power source, the setting becomes OFF, but the waiting time and recording time
are retained.
22
ft'
i:
Page 23

if: Items in VTR Mode only
A MIX BAL
• Select this item end ch.inge the level of the indicator by pressiiii; f or 4- to ad|u-.t (he x'olume bal.nice
between audio mode S Id and Sl'2.
SEARCH <C MEMORY/OFF>
• Normally select C MhMORY to activate cassette memory searcli tiinction,
• Select OFF otherwise. In this case, the recorded picture is searched without cassette memory
function.
j When DIGITAL MODE is set to OVERLAP
jl' You cannot set D ZCXdM to ON. Once you set DIGITAL MODE to OVERLAI’, D ZOOM sellinj; is changed to
OFF automatically.
About FRAME REC and INT REC setting
Both settings are automatically set tt) oft when;
,, • Power switch is set to OFF or VTR.
• Power source is disconnected.
i: • STANDBY is set to PHOTO STANDBY.
Other settings retains as long as lithium battery is installed even if power source is disconnected.
I
23
Page 24

Fade-in and Fade-out
You can lade in or out lo give v'our nvordmg .i prolcssional appearance.
When lading in, the piclure gradiiallv ladis in Imin hlack whik- the sound incre<is(_‘s. When lading out,
(he picture gradually lades to black while iIk* sound decreases.
With the.^n'iTlap tuncli<ni, the piclure gradually lades in o\’or Uie still picture v>t the last scene recorded
With the slide junction, tiie still picture of the last scene recorded slides (Hit and the scene being shot
appears.
Using the Fader and Overlap Function
When Fading in [a]
(1) Set DIGITAL .MODE to ZOOM.
(2) While the camcorder is in Standby mode, press FADHR/OV'ERLAIL The fade indicator starts
flashing.
(3) Press START/STOP to start recording. The fade indicator stops flashing, fading in and recording
starts.
When Fading out [b]
(1) Set DIGITAL MODE to ZOOM.
(2) During recording, press FADER/OVERI.A)’. The fade indicator starts flashing.
(3) Press START/STOP to stop recording. The fade indicator stops flashing, fading out starts, and then
recording stops.
[alBuOn
gVn
___
[b]
24
vU 11 (/
FADER C
C|| I I A
Page 25

When Using Overlap or Slide
(1) Set DIGITAL MOOT to OVLRLAIL
(2) Press FADiiK/OVliRLAP repeatedly until the desired effect indicator appears in the viewfinder.
(3) Press START/STOP to start recording.
With the OVERLAP effect, the scene being shot gradually fades in over the still picture of the last
recorded scene. With the SLIDE effect, the scene being shot gradually appears while the still picture of
the last recorded scene is sliding out.
OVERLAP
SLIDE
SLIDE 4
:faderC
u
o
o G c
o
\»l H Í/
^»ii 1
\H M U/
ÍOVERLAPC
‘^ILLLLil-
\tl M
RjEIUc.
ÍSLIDE X í:
u
^ni I n\
u
<
<
1 ^
<
To cancel the fade-in/fade-out function
Before pressing START/STOP, press FADER/OVERLAP until the fade indicator disappears.
To use the fading function repeatedly
Start from step 1 each time.
Notes on the fading, overlap and sliding function
• You cannot fade in, fade out, or use the overlap/slide function while you record with interval recording,
cut recording or photo recoring.
• When you set the camcorder to standby mode from a mode other than recording and select OVERLAP or
SLIDE, the camcorder starts Rec Rc^’iew automatically to store the last scene on the tape.
25
Page 26

e-recoraing a Picture in
Recorded Tape
You can re-rocord a scene in (lie middle of a recorded tape by sotting the starting [a] and ending [b]
points. The previously recorded portion will be erased.
(1) Kress START/STOP while recording.
The camcorder enters Standby mode.
(2) Hold down the +(forward) or -(reverse) side of EDITSHARCH until the camcorder ^oes to (he
point where you want to end the insertion.
The camcorder enters Standby mode again [b].
(3) Press ZERO SET MEMORY.
The counter is reset to "0:00:00". "ZERO SET MEMORY" flashes, and the ending point is stored in
memory.
<4) Hold down the - side of EDITSEARCH until the camcorder goes back to the point where you want
to start the insertion [a].
The camcorder enters Standby mode again.
(5) Press START/STOP to start re-recording.
The insert recording stops automatically at the counter zero point, and the camcorder enters Standby
mode again. Zero set memory resumes automatically.
I
26
Page 27

To change the end point
Press ZERO SET MEMORY so that "ZERO SET MEMORY'
Repeat steps 2 to 4.
Notes on editsearch
• The picture may be distorted at the end of the inserted portion when it is played back.
• Zero set memory may not function when there is a blank portion on a tape.
• You can re-record without using the ZERO SET MEMORY. Skip steps 2 and .2. Press STOPD to stop
recording.
To use the insert recording repeatedly
Start from step 1 each time.
disappears.
27
Page 28

Photo Recording
You can record a still picture like a photograph lor about seven seconds. This mode is useful when
you want to enjoy a picture such as a photograph or when you print a picture using a video printer.
Shutter speed is automatically adjusted up to 1 /1000 depending on the exposure.
(1) ,Turn STANDBY to PHOTO STANDBY.
(2) Keep pressing PHOTO lightly until a still picture apftears in the viewfinder. (You cannot use the
PHOTO button on the Remote Commander for this operation.)
To change the still picture, release PHOTO, select other picture and keep pressing PHOTO again.
(3) Press PHOTO deeper.
The still picture in the viewfinder is recorded for about seven seconds. The sound during those seven
seconds is also recorded. You cannot turn off the powder or turn STANDBY down to LOCK while
recording.
When using the video printer
The Remote Commander (supplied) is useful when printing the picture using the CVP-Ml Video printer (not
supplied). After connecting each LANC control jack using a control cable and selecting the desired picture to
print, press PRINT on the supplied Remote Commander instead of pressing CAPTURE and PRINT on the
video printer.
Refer to the instruction manual of the video printer also.
28
Page 29

Interval Recording
You can make a time-lapse recording by setting the camcorder to automatically record and standby
seiiuentiallv. You can achieve an excellent recording for flowering, emergence, etc., with this function.
(1) Slide OPEN and open the battery cover winic the camcorder is in Standby mode. Press MENU to
display thejnenu in the viewfinder.
(2) Press t or I- to select INT REC, then press EXECUTE.
(3) Press ♦ or ♦ to select SET, then press EXECUTE.
(4) Press ♦ or ♦ to select ON, then press EXECUTE.
(5) Press ♦ or 4' to select INTERVAL, then press EXECUTE.
(6) Press 4 or 4 to select the desired waiting time, then press EXECUTE.
The time: 30SEC c-> IMIN 5MIN lOMIN.
(7) Press 4 or 4 to select REC TIME, then press EXECUTE.
(8) Press 4 or 4 to select the desired recording time, then press EXECUTE.
The time: 0.2SEC 0.5SEC <-> ISEC <-> 2SEC.
(9) Press MENU to erase the menu display.
(10) Press START/STOP to start interval recording.
Note on interval recording
You cannot do interval recording with photo recording.
29
Page 30

Cut Recording
You can make a recording with a stop-motion animated effect using cut recording. I'o create this effect,
alternately move the subject a little and make a cut recording. Secure the camcorder and use the
Remote Commander for effective cut recording.
(1) <6!ide Ol^kN and open the battery cover while the camcorder is in Standbv mode. Press MENU to
display the menu in the viewfinder.
(2) Press ♦ or ♦ to select FRAME RFC, then press EXECUTE.
(3) Press ♦ or ♦ to select ON, then press EXECUTE,
(4) Press MENU to erase the menu display.
(5) Press START/STOP on the camcorder or the Remote Commander to start cut recording.
The camcorder records about six frames (about 0.2 sec.), then enters in recording standby mode.
(6) Move the subject, and repeat step 5.
I
During cut recording
FRAME REC appears in the viewfinder.
To cancel the cut recording
• Set the FRAME REC mode to OFF in the menu system.
• Turn STANDBY down to LOCK.
• Turn the POWER switch to OFF.
Notes on cut recording
• The last portion of cut recording may be longer than six frames.
• You cannot do cut recording with photo recording.
• Remaining tape indicator may not be accurate if you do cut recording repeatedly.
30
Page 31

Enjoying Digital Effect
Yoo c.in make iiUorosting piciures using the flash picture and slow shutter recording
' (1) Set Dir.lTAl . MOOF. to ZOOM.
(2) Fress Al. hF'FFX' l' repeatedly to select the desired eltect
Fach time you press the button, the indicator inside the viewfinder changes:
FFASHl FLAS!^2 —► SSHUITERI — SSHUTTHR2 —\o indicator
A (3) Press START/STOP to start recording.
|; To cancel the digital effect
* Press DIGITAL EFFECT repeatedly until the indicator disappears.
Flash intervals
FLASH! mode: 1 /7.5 second
FLASH2 mode: 1 /2 second
Slow shutter speeds
S SHUTTER! mode: 1/15 second
S SHUTTER2 mode: 1 /3.75 second
31
o
Q.
to
o
Page 32

Focusing Manually
activ*iU’ <uito locuMng, \ ory bright condition and pi\)por contrast arc required. Use manual focus
according (o the conditions, ^'ou can focus manually even il the 1101.0/AU IX') LOCK selector is set to
AUTO LCX'K {.Automatic .Viode).
When to Use Manual Focus
In the following cases you should obtain better re.sults by adjusting the focus manually.
• Insufficient light [a]
• Subjects with little contrast — walls, sky, etc. [b]
• Too much brightness behind the subject [c]
• Horizontal stripes [d]
• Bright subject or subject reflecting light
• Shooting a stationary subject when using a tripod
Focusing Manually
When focusing manually, first focus in telephoto before recording, and then re.set the shot length.
(1) Set FOCUS to MANUAL while the camcorder is recording or in Standby mode.
@ appears in the viewfinder.
(2) Keep pressing the "T" (telephoto) side of the zoom button until the zooming stops.
(3) Turn the focus ring to achieve a sharp focus.
(4) Set the desired shot length using the zoom button.
1«
AUTO
MANUAL
When or i appears
When appears Focus is al inlinitv.
When ¿n appears Subject is too dose to focus
i
32
P
I
Page 33

To Reactívate Auto Focusing
Sot I'OCUS to AUTO to turn off in thc viowliiuior.
Shooting^n relatively dark places
Shoot in wide angle after focusing in telephoto.
Shooting a scene with lots of movement in bright light
Set the zoom fully to the wide-angle position.
Close-ups (Macro)
Set the zoom fully to the wide-angle position.
Focusing to infinity
Focus to infinity when the camcorder focuses on a nearby subject while you want on focus to a distant
subject.
Slide FOCUS in the direction of the arrow (INFINITY) to focus to infinity.
When you release FOCUS, manual focus resumes.
Shooting with Auto Focusing Momentarily
Set FOCUS to MANUAL and press PUSH AUTO.
The auto focus functions while you are pressing PUSH AUTO.
Use this switch to focus on one subject and then another with smooth focusing.
When you release PUSH AUTO, manual focusing resumes.
33
Page 34

Using the PROGRAM AE Function
^ Oil «.‘<1 n soK\'! t rom lou I I 'i\C K i !\ /\ \ I , \ (Auto 1:\ p('si ii'o) nuKio'' lo il \ ou i '~li
voi! ii->o Pl\(X ris,A\1 .'\I . von i .in 0,1'1 ,i I'oi 11 jit ol loot (Iho sili'iiool is 1 n toon-- ,ino
o\ t(H'iis). o<ip(iiro hiph-spnoJ aofion oi roooivi niphl viows.
Selecting the Best Mode
Soloot tmc ot ti>ur nioclos, rotornni; fo tho lolK>\\'ini;.
' ' ‘■ 'i
\
V
iki Portrait mode
• a\ still subject such as a person or flower
• Zoominp, in on <1 subject in the lelephoti^ mode
• .A subject behind an obstacle such as a net
^ Sports mode
• Outdoor sports scenes such as football, tennis, golt or skiing
• A landscape in a nio\'ing car
'‘t High-speed shutter mode
• A golf swing or tennis match in fine weather with the ball captured cleai K
• Pla\ ing back certain scenes with high-speed movements in clear, sharp piclino
!•, Whon
O 1 S , 11 11
^ Twilight mode
• Recording night \ ie\\s, luxm signs or lireworks
34
Page 35

Using the PROGRAM AE Function
(1) Set HOLD/AUTO LOCK selector to the center (.into lin k, release) position while the camcorder is
in Standby mode.
(2) Press PROGRAM AE repeatedly iiiilil the desired I’KCXjRAM AH indicator appears in the
viewfinder.
(3) Press START/STOP to start recording.
To return to automatic mode
Set HOLD/AUTO LOCK selector to AUTO LOCK or press PROGRAM AE repeatedly until no
indicator appears in the viewfinder.
Note on shutter speed
The shutter speed in each PROGRAM AE mode is as follows:
Portrait mode — between i /60 to 1 /2000
Sports mode — between 1 /60 to 1 / 500
High-speed shutter mode — 1 /4000
Twilight mode —1/60
If you use the slow shutter recording
You cannot use the PROGRAM AE function.
i
>
‘ii I
c
30
o
Q
7’ »
35
Page 36

Adjusting the White Bdlahce
White b,i i.uu'e ,ui|t I >11 neni ni<i kes u li ilc h|et t- i< " e-. >\ h i ii i m I ,i i Is *\\ s nis m v n, 111 n .11 11 'i< 'i I m Li ns e U h
s .imei'.i iees'i‘slin_;. \s>! nuM\ u hile I'.il.iiu.iii!-':n.ilu .iil\ ,ui|ii-^(s si 'i ou , ,m s'lilnin hi'ltei i s'-^ull'- in
jJ )u--'l in_i; the u h 1 le h,i In iis e mn nun! I \' \\ hen 1 i;h 1 n n-.: . < n \ u :i - s ¡in ue.s' s ] 11 u kl \ sM v\'hen res i u s,i 1 iit;
outJi'oi'-: i'-:.;., nesm I iix'vv (irk".
Selecting the Appropriate Mode
Seles.1 the .ippiopn,Ut‘ white bnlnnee mode iindvT the f('l i« n\ ins; etuulhisin'-.
I
[a]
ib]
{c]
' '• ■- ■ e’''
lAiTunniiiAi
HOLD Hold mode
• MtMuiciiromntic subject or Kick^^round [a]
Outdoor mode
• Under a cokir matchini; fluorescent lamp
• Rectirding a sunset/sunvi^e, just after sunset, just before sunrise [b], nooir si^n'^, tir fireworks [c]
-A- Indoor mode
• Lighting condition changes quicklx'. [d]
•Too bright place such as pliolograplrv stinhos
• Under sodium lamps or mercurv lamps
id]
¿7 rl ./ / ' • . • /
ViP
•it ^
38
Page 37

Setting the White Balance
(1) Set HOLD/AU IO LOCK selector to (he center i.uito Uh L release) position u’hile the camcorder is in
Standby mcxic.
(2) Press WI IT BAL repeatedly to select the appropriate white balance mode.
Each time you press the button, the indicator inside the \ iewfinder changes:
HOLD (outdoor) -6c (indoor) -4 No indicator (auto)
■ I
n
‘■1
To return to automatic white balance mode
Set HOLD/AUTO LOCK selector to AUTOLOCK or press WHT BAL repeatedly until no indicator
appears in the viewfinder.
Notes on white balance
• When you shoot with studio lighting or video lighting, use the -,6c (indoor) mode.
• When you shoot with fluorescent lighting, use automatic white balance mode. If you use the mode,
white balance may not be adjusted appropriately.
Shooting when the lighting condition changes
• When you adjust the exposure (iris) manually, and niove from indoors to outdoor or vice-versa, set
HOLD/AUTO LOCK selector to AUTO LOCK, then set it to the center position again.
• When you move from indoors to outdoors or vice-versa, or detach the battery for replacement while
shooting in automatic white balance mode, point the camcorder at a white subject about 10 seconds before
you start recording.
'I
M
rl
39
Page 38

Releasing the Steady Shot Function
When you shoot, the '(0)' indicator appears in the viewfinder. This indicates that the Steady Shot
function is \vorking and the camcorder compensates for camera-shake.
You can release the Steady Shot function such as when shooting stationary object with a tripod.
(1) Slide OPEN and open the battery cover.
(2) Set STEADY SHOT to OFF so that the «0>> indicator disappears.
E
I
I
iy
To activate the Steady Shot function again
Set STEADY SHOT to ON to display the 'O' indicator.
Notes on the Steady Shot function
• The Steady Shot function will not correct excessive camera-shake.
• The Steady Shot function becomes less effective when using a teieconversion lens (not supplied) or wide
teleconversion lens (not supplied).
40
Page 39

Searching the Recorded Picture
VVlion you use a cassette memory-mounted miniDV cassette which can store the recorded date or time,
etc., you can search the recorded picture with the date or time using the Remote Commander
(Cassette memory search). You carr also search the photo-recorded pictures only, or the recorded
picture in tl*e backward and forward direction from the present position without cassette memory.
Searching the recorded picture with the date or time - Cassette memory search
(1) Turn the POWER switch to VTR.
(2) Set SEARCH to C MEMORY in the menu system.
(3) Press SEARCH SELECT on the Remote Commander to select date search (search with the date) or
photo search (search the photo-recorded pictures only).
(4) Press OW for upward or IKK for downward on the Remote Commander to select the desired
picture.
Cassette memory search starts.
3 SEARCH
SELECT
I
b
About the cassette memory search
You can search up to 6 days for date search and 43 pictures for photo search when you use the 4K-bit cassette
memory.
Note on the cassette memory search
You cannot use cassette memory search function even if you set the SEARCH to C MEMORY in the menu
system, when you use a miniDV cassette lacking the cassette memory.
^ r’
_ <T>
to vt
o 5*
Q2 3*
41
Page 40

Searching the Recorded Picture
Searching the recorded picture without using cassette memory
(1) Turn (lie POWER switch to VTR.
(2) SeUhe SEARCH to OFF in the menu system.
(3) Press SEARCH SELECT on the Remote Commander to select DATE or PHOTO.
(4) Press IKM for backward or >011 for forward on the Remote Commander to select the desired
picture.
Each lime you press KM or C>011, the camcorder searches for the next scene.
To stop searching
Press DSTOP.
Notes on searching
• The camcorder may not search for the recorded picture correctly if the recorded tape has blank portions
between pictures.
• Be sure to install the lithium battery when you use the cassette with cassette memory.
• The camcorder may not search if the beginning of the search portion is too close to the tape head position.
• When you use date search, the camcorder plays back the search picture, and when you use photo search,
the camcorder enters playback pause at the point.
42
Page 41

c^necKing the information tor Picture
You can display the recorded date and time or the various settings in the v iewfinder while playing
back the tape.
I’ress DA1*A CODH on the Remote Commander while playing back. Each time vou pre.ss the button,
the indicator changes; recorded date and time —> various settings —> No indicator, c)’clicallv in the
viewfinder.
'—:—:—" appears when
• the camcorder can't read the data code because of a damaged tape or noise.
» the tape was recorded without setting the date and time.
o 2Î
3 9-
33 Q.
<D <©
n Q.
5 -O
CL ?;•
ro ^
CL C
-V fD
43
Page 42

Editing onto Another Tape
You can create your own video program by editing with any other DV, mini-DV, 0 8 nim, Hi0 Hi8,
VMS VHS, SVMS’ S-VHS, 'VMS0 VHSC, SiVMSS S-VIHSC, ra Betamax, or HD (?eta VCR that has
video/audio inputs.
The deterioration of edited picture and sound quality will be minimized by using the DV connecting
cable.
Before Editing
Connect the camcorder to the VCR using the supplied A/V connecting cable, or the DV connecting
cable (not supplied).
Using the AV Connecting Cable
Set the input selector on the VCR to LINE.
Using the DV Connecting Cable
Simplv connect the DV IN/OUT jacks of the player and the recorder with the DV connecting cable.
I
About DV connecting cable
You can record picture, sound and system data at the same time on the DV products bv using the DV
connecting cable only.
44
if
I
I
SI-
Page 43

starting Editing
(1) Insert a blank tape (or a tape yon ivant to record o\ er) into the recording VCR. Then insert your
recorded tape intcTthe camcorder,
(2) Play back the recorded tape on the camcorder until you locate the point where you want to start
editing. Then set the camcorder to playback pause mode.
(3) Set the recording VCR to recording pause mode.
(4) Press II on the camcorder and VCR simultaneouslv to start editing.
To Edit More Scenes
Repeat steps 2 to 4.
To Stop Editing
Press STOP □ on the camcorder and VCR.
For fine synchro-editing function
You can edit precisely by connecting a control cable to the LANC jack of this camcorder and other v'ideo
equipment having fine synchro-editing function.
Note on editing when using the AV connecting cable
Press DISPLAY on the Remote Commander while editing onto another tape to turn off the display indicators.
Otherwise, the indicators will be recorded on the tape.
If your VCR is a monaural type
Connect only the white plug for audio on both the camcorder and the VCR. With this connection, the sound
is monaural.
Notes on editing when using the DV connecting cable
• You can connect one VCR only.
• Connect the LANC jacks when controlling this camcorder from another VCR for editing.
• If you record playback pause picture via the DV jack, the recorded picture becomes rough.
45
Page 44

I Additional Information
Replacing the Lithium Battery in the Camcorder
Your comcordor is supplied with tile lithiuiii b.iltery iiisitilled. When the battery becomes weak or
dead, indicator flashes in the \’iewfinder for about 5 seconds when you set the POWER switch to
CAMEI^. In this case, replace the battery with the Sony CR2025 or OuracefI DL-2025
lithium battery. Use of another battery may present a risk of fire or explosion.
The lithium battery installed at the factory may not last I year.
Note on Lithium Battery
Note that the lithium battery has a positive (+) and a negative (-) terminals as illustrated. Be sure to
install the lithium battery so that terminals on the battery match the terminals on the
camcorder.
WARNING
The battery may explode if mistreated. Do not recharge, disassemble, or dispose of in fire.
Caution
Keep the lithium battery out of the reach of children. Should the battery be swallowed, consult a
doctor immediately.
46
Page 45

Replacing the Lithium Battery
When replacing the lithium battery, keep the battery pack (ir other p<nver s<Hirce attachtxi. Otiierwise,
vou will need- to reset the date and time.
(1) Slide OPEN ;ind open the battery cover.
(2) Push tlie battery down once and pull it out from the holder.
(3) Install tlie lithium battery with the positive (+) side facing out. Close the holder. Close the battery
cover.
47
!%»i *■'
Page 46

Resetting the Date and Time
You con rosol Ihc dntc or time in the menu s\ stem
(1) Slide Ol’HN ond open tlie bntterv cin ei (2) Press MHNU to display the menu in the viewlindei-
(3) Select CLCX^'K SET, then press EXiiCUTli.
(4) Press «■ or ♦ to adjust the year, and then press PXIiCUTH
(5) Using ♦, ♦ and EXECUTE as step 4, adjust the month, day, hour and minutes. Note that when you
hold down ♦ or ♦ the indications in the menu display advance faster.
(6) Press ME NU to erase the menu display.
/
---------------
o
cxfcorf
4
©
2 3
ll> iooM ->ON
V
_________
©
Evf vr>s r
INT MfC
Ictoc« 50 S
O
The year indicator changes as follows:
1993 — 1996 —------► 2025 — 1995
Note on the time indicator
The internal clock of the camcorder operates on a 12-hour cycle.
12:00:00 AM stands for midnight.
12:00:00 PM stands for noon.
©
©t)
©t)
CO)
©t>
©
©"t)
.ECl;
o
o
o
o
48
Page 47

Usable Cassettes
You can use the mini-DV cassette only. You cannot use anv other 0 8 mm, HiH 1IÌ8, VIIS VHS, SVIlS
S-VHS, IVIISH VHSC, SIVIISH S-VHSC , ra Betamax or ESiSj hi:) lieta cassette.
When You Play Back
You can play back the sound recorded in any audio mode.
To get the higher quality pictures of the DV format, connect the camcorder to the TV using the S video
cable.
Using this camcorder, you cannot play back a tape that has recorded a copyright control signals for
copyright protectin of software. "COPY INHIBIT" appears on the T\' or in the viewfinder if you try to
play back such a tape. This camcorder does not record copyright control signals on the tape when it
records.
We recommend to use an ME cassette
You can get the highest quality pictures with this camcorder using an .VIE cassette which is the highest
quality cassette.
You may not get as good quality with lesser quality cassettes.
49
Page 48

Tips for Using the Battery Pack
This section shows you how you can get the most out of your battery pack.
Prepairing the Battery Pack
Always Carry Additional Batteries
Have sufficient battery pack power to do 2 to 3 times as much recording as you have planned.
Battery Life is Shorter in Cold Environment
Battery efficiency is decreased and the battery will be used up more quickly if you are recording in cold
environment.
To Save Battery Power
Turn the STANDBY switch on the camcorder down when not recording to save battery power, [a]
A smooth transition between scenes can be made even if recording is stopped and started again. While
positioning the subject, selecting an angle, or looking at the viewfinder, the lens moves automatically
and the battery is used. The battery is also used when a cassette is inserted or removed.
When to Replace the Batteiy Pack
While you are using your camcorder, the remaining battery indicator decreases gradually as battery
power is used up.
¥
$
When the remaining battery indicator reaches the lowest point, the tXi indicator appears and starts
flashing in the viewfinder, [b]
When the <Xi indicator in the viewfinder changes from slow flashing to rapid flashing while you are
recording, set the POWER switch to OFF on the camcorder and replace the battery pack. Leave the tape
in the camcorder to obtain smooth transition between scenes after the battery' pack is replaced.
50
I
-0
Page 49

Caution
Never leai^c the battery pack under temperatures above 140 ‘F (60 ‘O, such as in a car parked in the
sun or under direct sunlight.
The Battery Heats Up
During charging or recording, the battery pack heats up. This is caused by energ\ that has been
generated and a chemical change that has occurred inside the battery pack. This is not cause (or
concern.
Battery Care
• Remove the battery pack from the camcorder after using the battery pack, and keep it in a cool place.
When the battery pack is attached to the camcorder, a small amount of current flows to the
camcorder even if the POWER switch is set to OFF, which shortens battery life.
• The battery pack is always discharging even when it is not in use after charging. Therefore, you
should charge the battery right before using the camcorder.
The Switch on the Battery Pack
This switch is provided to help you remember the charging status of the batterv. Set the sivitch to the
"green mark" position after charging. (When detached from the Charge adaptor, the switch exposes
the green mark. When detached from your camcorder, no mark is indicated.) [c]
I
The Life of the Battery Pack
If the <Xi indicator flashes rapidly just after turning on the camcordrer with a fully charged battery
pack, the battery pack should be replaced with a new fully charged one.
Charging Temperature
You should charge batteries at temperatures from 50°F to 86“F (from lO'C to 30°C). Lower
temperatures require a longer charging time.
51
Page 50

i :!
Tips for Using the Battery Pack
Notes on Charging
A Brand-new Battery
A brand-new battery pack is not charged. Before using the battery pack, charge it completely.
Recharge the Battery Pack Whenever You Like
You do not have to discharge it before recharging. If you charged the battery pack fully but you did
not use it or a long time, it becomes discharged. So recharge the battery pack before use.
Notes on the Terminals
Keep the Terminals Clean
If a foreign object comes into the terminals, remove it with a soft stick and repeat installing and
removing the battery pack. This improves the contact condition.
Be Sure to Observe the Following
• Keep the battery pack away from fire.
• Keep the battery pack dry.
• Do not open nor convert the battery pack.
• Do not expose the battery pack to any mechanical shock.
52
iv
I
Page 51

Maintenance Information and Precautions
Moisture Condensation
ll Iho ainiLorder is brougiU dircctiv from ,i cold place lo a warm place, moisture may condense inside
the camcorder, on the siu lace of the tape, or on the lens, ll this happens, the tape may slick to the head
drum and be damaged or the camcorder may not operate correctly. To prevent possible damage under
these circumstances, the camcorder is furnished with moisture sensors. However, take the following
prccavitions.
Inside the Camcorder
When ffl and ± indicators flash in the viewfinder, moisture has condensed inside the camcorder. If this
happens, none of the functions except cassette ejection will work.
Eject the cassette, turn oft the camcorder, and leave it with the cassette compartment open for
about 1 hour.
If the E indicator does not light up) when you turn on the power, you can use the camcorder again.
On the Surface of the Tape
If there is moisture on the surface of the tape, when you insert cassette and press a tape transport
button (OPLAY, etc.), the — indicator flashes in the viewfinder. If this happens, none of the functions
except cassette ejection will rvork.
Eject the cassette and leave it for about 1 hour.
If the — indicator does not light up when you insert the cassette and press a tape transp^ort button, you
can use the camcorder again.
On the Lens
No indicator will appear, but the picture becomes dim. Turn off the power and do not use the
camcorder for about 1 hour.
How to Prevent Moisture Condensation
When bringing the camcorder from a cold place to a warm place, put the camcorder in a plastic bag
and allow it to adapt to room conditions over a period of time.
(1) Be sure to tightly seal the plastic bag containing the camcorder.
(2) Remove the bag when the air temperature inside it has reached the temperature surrounding it
(after about I hour).
53
Page 52

Maintenance Information and Precautions
Removing Dust from Inside the Viewfinder
(1) Wbil^ liolding down the hook, slide the evecup in the direction of the arrow and remove it out.
(2) Clean the surface with a cominercialiy available blower.
To reattach the eyecup
Do step 1 above in the reverse direction of the arrow.
Video Head Cleaning
To ensure normal recording and clear pictures, clean the video heads often. When the O indicator
flashes in the viewfinder or mosaic noise appears on the playback picture or part of the previous
picture remains, the video heads may be dirty.
I
i.;
[a] Slight contamination
[b] Critical contamination
If this happens, clean the video heads with the Sony DVM12CL cleaning cassette (not supplied). After
checking the picture, if it is still "noisy", repeat cleaning. (Do not repeat cleaning more than 5 times )
Caution
Do not use a commercially available wel-type cleaning cassette. It may damage the video heads.
Note
If the DVM12CL cleaning cassette (not supplied) is not available in your area, consult your nearest Sony
dealer.
54
Page 53

Precautions
Camcorder Operation
• Operate tlte camcorder using 7.2 V (battery pack), or 6.5 V (AC power adaptor).
• For DC or AC operation, use only the accessories recommended in this manual.
• Should any solid object or liquid fall into the casing, unplug the camcorder and have it checked by
your nearest Sony dealer before operating it any further.
• Avoid rough handling or mechanical shock. Be particularly careful of the lens.
• Keep the POWER switch set to OFF when not using the camera.
• Do not wrap up the camcorder and operate it since heat may build up internally.
• Keep the camcorder away from strong magnetic fields or mechanical vibration.
On Handling Tapes
• Do not insert anything into the small holes on the cassette.
• Do not open the tape protect cover or touch the tape.
• Avoid touching or damaging the terminals. To remove dust, clean the terminals with a soft cloth.
Camcorder Care
• When the camcorder is not to be used for a long time, disconnect the power source and remove the
cassette. Periodically turn on the power, operate the CAMERA and VTR sections and play back a
tape for about 3 minutes.
• Clean the camcorder body with a soft dry cloth, or a soft cloth lightly moistened with a mild
detergent solution. Do not use any type of solvent which may damage the finish.
AC Power Adaptor
Charging
• Use only a lithium ion type battery.
• Charge the battery on a flat place without vibration.
• The battery will get hot during charging. However, this is normal.
Others
• Unplug the unit from the wall outlet when not in use for a long time. To disconnect the cord, pull it
out by the plug. Never pull the cord itself.
• Do not operate the unit with a damaged cord or if the unit has been dropped or damaged.
• Do not bend the power cord forcibly, or put a heavy object on it. This will damage the cord and may
cause a fire or an electrical shock.
• Be sure that nothing metallic comes into contact with the metal parts of the connecting plate. If this
happens, a short may occur and the unit may be damaged.
• Always keep the metal contacts clean.
• Do not disassemble the unit.
• Do not apply mechanical shock or drop the unit.
• While the unit is in use, particularly during charging, keep it away from AM receivers and video
equipment because it will disturb AM reception and video operation.
• The unit becomes warm while in use. This is normal.
• Do not place the unit in locations that are:
- Extremely hot or cold
- Dusty or dirty
- Very humid
- Vibrating
If any difficulty should arise, unplug the unit and contact your nearest Sony dealer.
55
Page 54

Using Your Camcorder Abroad
Bach country has its own olcclricilv and TV color systems. Before using your camcorder abroad, check
the following points;
Power Sources
You can use your camcorder in any country with the supplied AC power adaptor within 100 V to 240
V AC, 50/60 Hz. Use commercially available AC plug adaptor, it necessary, depending on the design
of the wall outlet.
Wall outlet
AC-V515
.
................
Difference in Color Systems
This camcorder is an NTSC system-based camcorder. If you want to vietv the playback picture on a TV,
it must be an NTSC system based TV. When you want to use a PAL M system based TV, you will need
an NTSC/PAL M trancoder. Check the following alphabetical list.
NTSC system countries
Bahama Islands, Bolivia, Canada, Central America, Chile, Colombia, Ecuador, Jamaica, Japan, Korea,
Mexico, Peru, Surinam, Taiwan, the Philippines, the U.S.A., Venezuela, etc.
-Tfrih*» .. ^ fl^ fm ^
^ 1 • y
AC plug adaptor
PAL system countries
Australia, Austria, Belgium, China, Denmark, Finland, Germany, Great Britain, Holland, Hong Kong,
Italy, Kuwait, Malaysia, New Zealand, Norway, Portugal, Singapore, Spain, Sw'eden, Switzerland,
Thailand, etc.
PAL M system country
Brazil
PAL N system countries
Argentina, Paraguay, Uruguay
SECAM system countries
Bulgaria, Czech Republic, France, Guyana, Hungary, Iran, Iraq, Monaco, Poland, Russia, Slovak
Republic, Ukraine, etc.
56
Page 55

1 Tk’ouble Check
1 i voii 1 iin into any problem using the c.amcordei', use the lollou nig nib'e It) tr<'uble>hoot thi‘ problem.
Camcorder
Power
Symptom Cause and/or Corrective Actions
1 1k' power is not on.
The power goes off. • While being operated in C .\\1i:R.A mtide, the camcorder has
The battery pack is quickly
discharged.
• Insert llie batter\'pack, 'p .''i
• Tlie batter\' is de<ui
Use a charged batteiA eack (p. n'
• Connect the AC power ad.iplor to a wall outlet, (p. 20)
been in the Standb\' mode tor more than 5 minutes.
Turn STANDEE down tmce and turn it up again, (p. 12)
• The batterv is dead.
Use a charged battcTN pack. (p. o)
• TIk* ambient temperature i" too low. (p. 30)
• Charge the batter\' pack again, (p. oi
• The batterv pack is complctelv dead and cannot be
recharged.
Use another batter'.’ pack. (p. 31)
Operation
Symptom
START/STOP does not operate.
The cassette cannot be removed from tlie
holder.
No function except for cassette ejection
^yorks.
The tape does not move when a tape
transport button is pressed.
The STEADY SHOT function does not
activate.
Cause and/or Corrective Actions
• The tape is stuck to the drum.
-> Eject the tape, ip.^)
• Rewind the tape or u>e a neu- one (p. 17)
• Set the I’OWER switch to CAMERA, (p. 11)
• The tab on the cassette is out (red).
4 Use a new tape or slide the tab. tp. 10)
• Set the Standby switch to ST.'W'DBV. (p. 11)
• Insert the batter\’pack. tp.
• The batterv is dead.
•> Use a charged batterv pack or the .AC power adaptor.
(p. 6,20) '
• Moisture condensation has occurred.
Remove the cas^ette and leave the camcorder for at least
an hour. (p. 5.3)
• Set the POWER switch to \ TR. (p. 17)
• Rewind the tape or use a new one. (p. 17)
• The camcorder is updating the cassette memory
data (The cassette memory mounted miniDV
cassette only).
Eject the cassette after C MEMORY indicator disappears,
{p. 9)
• Set STliAD'i' SHOT to 0\ ip. 40)
n
Q}
3
>
cr
57
Page 56

Trouble Check
I
Symptom
Tlio autokvus iunction docs n<it .u tiv.itc
0 ZOOM mode in the menu system
cannot be set to ON.
Tlie overlap or slide iunction does not
activate.
Picture/Sound
Symptom
The image on the viewfinder screen is not
clear.
The playback picture is not clear or cannot
be monitored.
A vertical hand appears when a subject
such as lights or a candle flame is shot
against a dark background.
The picture is "noisy" or hardly visible.
0 indicator flashes in the viewfinder.
Battery remaining indicator does not
indicates full when you insert the
charged battery pack.
Cause and/or Corrective Actions
Sci tlic I'OC'IjS swiich lo Al-'Ti). (p. c’ì)
Slìoclinc, condili(m i-> not pood cnouph (o lOi'l
.Ì uk>malical!\’.
Focus manu.illy. (p M)
• Si-t tlio DIGITAI, modi; to ZOOM. (p. H)
• Set tlu’DIGITAL MOD10oO\ i:KI_Ar (p. 2S)
Cause and/or Corrective Actions
• Adjust the viewfinder lens. <p.l2)
* Select liie program positii'n or input for the camcorder
correctly on the T\'. <p. Ua
• The contrast between the subject and background is too
high. The camcorder is n<k malfunctioning.
Change locations.
• The video heads ma\' be dirlv.
Clean the heads using the 5i)ny OVM12CL cleaning
cassette (not supplied), (p. 54)
• The video heads mav be dirtv.
Clean the heads using the Sony DV.M12CF cleaning
cassette (not supplied), (p. 54)
• The ambient temperature is tc>o low.
others
Symptom
The supplied Remote Commander does
not work.
58
Cause and/or Corrective Actions
• Set the COMMANDER to VTR4 or ID in the menu system.
ip. 22)
• Something is blocking the infrared rays.
Remove the obstacle.
• The batteries are dead.
Insert new ones. (p. 67)
Page 57

AC Power Adaptor
Symptom Cause and/or Corrective Actions
The POWER lamp does not light. • Disconnect the AC power cord. Atter abt)ut one minute, try
The CHARGE lamp flashes.
When the CHARGE Lamp Flashes
Check through the following chart.
again, (p. 20)
• See the following chart.
59
Page 58

Specifications
Video Camera Recorder
System
Video recording system
Two rotarv heads, Helical
scanning system
Audio recording system
Rotarv heads, PCM system
Video signal
NTSC color, EIA standards
Usable cassette
niiniDV cassette with logo
printed
Tape speed
Approx. Vs inch (18.81 mm)/s
Recording time
1 hour(DVM60ME)
Playback time
1 hour (DVM60ME)
Fast forward/rewind time
Approx. 2 min. 30 s
(DV.M60ME)
Image device
ICCD (Charge Coupled
De\ice)
Viewfinder
Electric viewfinder (color)
Lens
lOx (optical)
f = '/j to 2'/’ inches (6.1 to 61
mm)
T' Vio to 16Vs inches (42 to 420
mm) when converted into a 35-
mm still camera
Filter diameter 2 Vs inches (52
mm)
TTL autofocus system
Inner focus wide macro system
Color temperature
Au to / H old / Indoors(3200K) /
Outdoors (5800K)
Minimum illumination
3 lx (F 1.6)
Illumination range
3 lx to 100,000 lx
(recommended more than 100
K)
Shutter speed control
1 /4 to 1 /4000
Input and output
connectors
S video output
4-pin mini DIN
Luminance signal: 1 Vp-p, 75D,
unbalanced, sync negative
Chrominance signal: 0.286 Vp>p, 75Q, unbalanced
Video output
RCA pin jack, 1 Vp-p, 75i2,
unbalanced, sync negative
Audio output
RCA pin jacks (2: stereo L and
R) 327 mV, (at load impedance
47 ki2) impedance less than 2.2
ka
RFU DC OUT
Special mini-jack, DC 5 V
Headphones jack
Stereomini-jack (o 3.5 mm)
LANC control jack
Stereomini-mini-jack (o 2.5
mm)
MIC jack
Stereo minijack, 0.388 mV low
impedance with 2.5 to 3 V
DC output, impedance 6.8 ki2
(0 3.5 mm)
DC IN
4-pin connector
DV IN/OUT
4-pin special connector
General
Power requirement
On battery mounting surface
7.2 V (battery pack)
6.5 V (AC power adaptor)
Average power consumption
7.9 W (camera recording)
Installation
Vertically, horizontally
Operating temperature
32 °F to 104 °F (0 °C to 40 °C)
Storage temperature
-4 °F to 140 °F (-20 °C to 60 °C)
Dimensions
Approx. 4^/s X 4'/2 X 11 inches
(w/h/d) (110 X 114x278.5
mm)
Mass
Approx. 2 lb ill o/ (1.2 kg)
cvcludittg the baitcio' pack,
cassette
Approx. 3 lb I 07 (1.4 kg)
including the battery pack
NP-720, lithium battery
CR2025, cassette DVM60ME,
and shoulder strap
Microphone
Electret condenser microphone,
stereo type
AC Power Adaptor
Power requirements
100-240V AC, 50/60HZ
Power consumption
22 W
Output voltage
DC OUT: 6.5 V, 2 A in
operating mode
Battery charge terminal: 8.4 V,
1.4 A in charging mode
Application
Sony battery pack N P-720
lithium ion type
Operating temperature/
Storage temperature
Same specilications as video
camera recorder.
Dimensions
Aprprox. 2^/s X TV-i X 3'/s
inches (w/h/d) (72 x 44 x 96
mm) including pirojecting parts
and controls
Mass
Approx. 10.6 oz (300 g)
Design and specification are
subject to change without
notice.
60
Page 59

Identifying the Parts
Camcorder
T RELEASE knob (p. 8)
[2; POWER switch (p. 11, 17)
^ HOLD/AUTO LOCK selector (p. 35, 36, 39)
EXPOSURE button and dial (p. 36)
¡5] OPEN knob (p. 8, 21, 40)
DIGITAL MODE switch (p. 13, 24, 25, 31)
J_ Viewfinder lens adjustment ring (p. 12)
^ Hooks for shoulder strap (p. 65)
^ STEADY SHOT switch (p. 40)
^ Menu operation buttons (p. 21)
11 Lithium battery compartment (p. 47)
12 Camera recording/battery lamp (rear)
H DV IN/OUT jack (p. 44)
11 Remote sensor (p. 69)
61
Page 60

identifying the Parts
Lens hood
When you nttnch a wide teleconversion lens (not supplied), remo\ e the iens hood
Display window (p. 71)
EJECT switch (p. 9)
Tripod receptacle (p. 14)
Attach a tripod (not supplied) here.
Zoom button (p. 13, 32)
Eyecup
If you wear glasses or you cannot view the corners, fold back the eyecup.
ZERO SET MEMORY button (p. 26)
DIGITAL EFFECT button (p. 31)
WHT BAL (white balance) button (p. 39)
PROGRAM AE button (p. 35)
I
62
Page 61

REC START/STOP button for low-position recording (p. 14)
EDITSEARCH buttons (p. 15)
Focus ring (p. 32)
Camera recording/battery lamp (front) (p. 22)
Remote sensor (p. 69)
Microphone
Hooks for shoulder strap (p. 65)
Tape transport buttons (p. 17,18)
<ll/ll►> FRAME (direction select/frame-by-frame), l»-SLOW (slow speed playback),
□STOP, ◄◄REW (rewind), OPLAY (playback), ►►FF (fast-forward), IIPAUSE, • REC
(recording)
FOCUS switch and PUSH AUTO button (p. 32, 33)
FADER/OVERLAP button (p. 24, 25)
63
Page 62

Identifying the Parts
PHOTO button (p. 28)
CLANC control jack
C stands for Local Application Control Bus System. The C control jack is used for controlling the
tape transport of video equipment and peripherals connected to it. This jack has the same function
as the jack indicated as CONTROL L or RE.VIOTH.
i37|
0 (headphones) jack (p. 17)
START/STOP button (p. 11)
Standby selector (p. 11, 28)
MIC (PLUG IN POWER) jack
Connect an external microphone (not supplied). This jack also accepts a "plug-in-power"
microphone.
S VIDEO output jack (p. 16, 44)
Sg
DC IN jack (p. 20)
43|
RFU DC OUT jack
Audio/Video output jacks (p. 16, 44)
SI
43
Grip strap (p. 14)
64
Page 63

Attaching the shoulder strap
Attach the supplied shoulder strap to the hooks for the shoulder strap ([8] and on page 61 and 63).
65
Page 64

eiitifying th^ Parts
Remote Commander
JL Transmitter
Point toward the remote sensor to control the camcorder after turning on the POWER switch on
tlie camcorder.
riJ PRINT button (p. 28)
y PHOTO button (p. 28)
T ZERO SET MEMORY button (p. 26)
y DATA CODE button (p. 43)
JJ DISPLAY button (p. 18, 45)
y VTR4/ID/HOLD selector (p. 68)
Select "VTR4" or "ID" according to the camcorder's setting. Select HOLD to prevent the buttons
from being accidentally pressed.
y START/STOP button (p. 11)
y Zoom button (p. 13)
Tire zooming speed is unchangeable on the Remote Commander,
y Tape transport buttons (p. 17, 18)
IIPAUSE, l»-SLOVV (slow' speed palayback), x2 (double speed playback)
li SEARCH SELECT/KW/OIXI buttons (p. 41, 42)
(rewiitd), Ol’LAY (playback), ►►FI-(fast-forward), □STC>P, ►ll.dl^ (franie-by-framc),
66
Page 65

Preparing the Remote Commander
I'o ust- llu’ \'ou must insert two si/e A/\ (R6) batteries. Use the supplied size A A
tl\0) bnlteries(1) Remov e rlie batterv cover Irom the Remote Commander.
(2) insert bv'th ol tlu' size AA (ICv) batteries with correct polarity.
(3) I’ut the batterv cover back onto the Remote Commander.
To avoid damage from possible battery leakage
Remove the batteries when vou will not use the Remote Commander for a long time.
Using the Remote Commander
Make sure that the COMMANDER mode is not set to OFF in the menu svstem.
67
Page 66

identifying the Parts
About the ID of the Remote Commander
You c<in ronitito ciintrol mis(iporation t'mm othor VC.'Ks bv setting; the \'TI\^/lD/I iOLD sok'ctor
(o 10.11.S0 tin’ suppiu'd KonioU' Ct>mnmndor when \'ou sel ilie VTR-i/IÎ’)/hR')I O selector to ID. When
YOU ii'>e Keiru^te Cojoin.inder for the first time, you need register the ID ns follows:
(1) Slide OPbN; and open the battery cover.
(2) Press V1P\U to display the menu in the \ ieu'fmder.
(3) I’ress f or 4- to seleel COMMANDER, then press EXECUTE.
(4) IVess t or 4 to seleel ID SET.
(5) Set the VTR4/ID/I lOl.D selector on the Remote Commander to ID
(6) Press STOP on the Remote Commander.
Alter the beep) sound, the ID of the Remote Commander is registered, and the COMMANDER is set to
ID in the menu system.
(7) Press MtiNILi to erase the menu display.
I
When the BEEP is set to OFF in the menu system
The beep does not sound at stop 6.
68
Page 67

Remote Control Direction
Aim tlu’ Romote Commomicr to tlio romolo sensor.
1 ho operntivo range r)l the ¡\eniotc‘ C\>mm.iiKior is about 16 feet (n m) indoors. D(.‘penviing on tir
angle, Renioh; Commander mav not aetivale the camcorder.
Notes on the Remote Commander
• Keep the remote sensor away from strong light sources such as direct sunlight or illumination.
Otherwise, the remote control may not be effective.
• Be sure that there is no obstacle between the remote sensor and the Remote Commander.
• This camcorder works at commander mode VTR 4 or ID. The commander modes (VTR 4 or ID) arc-
used to distinguish this camcorder from other Sony VCRs to avoid remote control misoperation. If
you use another Sony VCR at commander mode ID, we recommend you change the commander
mode or cover the remote sensor tif the VCR with black paper.
• You need to register the Remote Commander's ID to the camcorder only once. Set the ID in the
menu system and you can use the Remote Commander with the HOLD switch set to "ID".
I
To Watch the Demonstration
You can watch a brief demonstration of pictures with various functions, such as fade-in/fade-out.
If the demonstration appears when you turn on the camcorder for the first time, exit the Demo mode to
use your camcorder.
To enter Demo mode
(1) Eject the cassette and turn the POWER switch to VTR,
(2) Turn STANDBY up.
(3) While holding down PLAYO, turn the POWER switch to CA.MERA. Demonstration starts. The
demonstration stops when you insert the cassette.
Note that once you enter Demo mode, this mode is retained as long as the lithium batterv is in place.
Therefore, demonstration starts automatically 10 minutes later every time you turn the POWER switch
to CAMERA, or after you eject the cassette.
To exit Demo mode
(1) Turn the POWER switch to V'TR.
(2) Turn STANDBY up.
(3) While holding down STOPD, turn the POWER switch to CAMERA.
69
Page 68

Identifying the Parts
In the Viewfinder
Manual focus indicator (p. 32)
ffl
PROGRAM AE mode indicator (p. 34)
White balance indicator (p. 38)
Steady shot indicator (p. 40)
s
Zoom/Exposure indicator (p. 13, 36)
Digital effect/Fading indicators (p. 24, 25, 31)
Warning indicators (p. 72)
Infinity/near indicator (p. 32)
Time code/tape counter (p. 12)
Tape transport mode (p. 11)
Remaining tape indicator (p. 11)
0
Audio mode indicator (p. 73)
PHOTO/INTERVAL/FRAME REC recording, search mode or cassette memory indicators (p. 28,
29, 30, 41)
Remaining battery indicator (p. 50)
70
Page 69

In the Display Window
[3j a[5j m
ImemoryI iOA
_ Ci’QO-OO n
UUU UUl
HOLD
«’¿if
iof -,0c
t J
m E]
m Time code/tape counter (p. 12)
MEMORY indicator (p. 26)
Same as ZERO SET MEMORY indicator in the viewfinder.
[3] Warning indicators (p. 72)
0] Remaining battery indicator (p. 51)
[s] Lights up while cassette is inserted
[6] Remaining tape indicator
[7] MANUAL EXPOSURE indicator (p. 36)
[g SLOW SHUTTER mode indicator (p. 31)
S8.88 88-88AMPM\
[g FLASH MOTION mode indicator (p. 31)
Hi Date and time
111] White balance indicators (p. 38)
Hi PROGRAM AE mode indicators (p. 34)
-7T
-[9]
m
*,' ..-fs i
71
y' ■■
s
Page 70

Warning Indicators
If indicators flash in the viewfinder, or a caulion lamp on the camcorder Hashes, check tlie following:
J': You can hear the beep sound when the Bhl'.r is set to 0\ (p. 22),
[T] Battery Remaining
Slow flashing: The battery is weak.
Fast flashing: The battery is dead.
[2] The tape is near the end.
[3] The tape has run out.
Fast flashing
[4] No tape has been inserted.
[5] The tab on the tape is out (red), (p. 10)
Slow flashing
[6] Moisture condensation has occurred, (p. 53)
[7] The video heads may be contaminated, (p. 55)
0 Some other trouble has occurred.
Eject the cassette. If it remains lit, disconnect the power source and contact your Sony dealer or
local authorized facility.
[U The lithium battery is weak or the lithium battery is not installed, (p. 46)
This indicator flashes five times when the porver is turned on, then disappears.
001 Updating the cassette memory data. Use after C MEMORY indicator disappears.
The cassette compartment automatically lifts up and opens after the indicator disappears.
72
Page 71

Glossary
Audio mode
I'lio aroa on the tape where audio signals are recorded. There arc two modes on DV tormat:
• 12-bil mode which records two stereo sounds.
• 16-lHt mode which records a stereo sound with high quality
Tire number of audio tracks depend on the selected mode.
This camcorder records with 12-bit mode only and can play back a tape recorded with both modes.
Though the DV recording system records two stereo sounds to stereo 1 and 2, this camcorder records
the sound to stereo 1 only. You can adjust the playback sound balance between stereo 1 and 2 (p. 23).
Cassette memory (p. 41)
Cassette memory-mounted DV format cassette can store:
- Index information such as recorded date or time,
- Standard tape information that can also be stored on a DV format cassette lacking cassette memory,
etc.
DV format
Newly developed consumer digital VCR format. For higher quality pictures and sound, video and
audio signals are recorded on a tape as digital signals.
ID-2 system
ID-2 system records a copyright control signal to pro\'ide copyright protection of software when using
the AV connecting cable.
Iris (p. 36)
Same as lens diaphragm. Adjustable lens-opening mechanism.
NTSC system (p. 56)
TV color system standard used in the USA and other parts of the world. An NTSC-recorded tape
cannot be played back on the PAL or SECAM system VCR.
I
PROGRAM AE (p. 34)
The selectable recording mode to fit the subject or shooting situation
In this camcorder, five PROGRAM AE modes (auto mode is included) are selectable.
Remote Commander mode (p. 68)
The type of Remote control signal. There are five types (VTRl, VTR2, VTR3, VTR4, and ID) to prevent
misoperation between the Remote Commanders of Sony video products. Select VTR4 or ID to control
this camcorder. Normally select VTR4, and select ID to prevent misoperation.
RFU adaptor (p. 16)
Converts video and audio signals into a television wave signal to playback a picture at a TV program
position.
S video jack (p. 16)
Separates the video signal into chrominance and luminance (black and white) signals to get a clear
picture.
Standby mode (p. 12)
The camcorder is ready to start recording, recording standby mode. To set standby mode, turn
STANDBY up.
73
Page 72

Glossary
Time code (p. 12)
Tho time code indicates the frame-by-frame position of the tape as a serial number of hour, minute,
second, and frame. As the picture and counter reading are identical, you can locate a desired scene
precisely with the counter.
This camcorder uses the drop frame mode which adjusts the difference between the logical time code
(running at 30 frames/s) and real NTSC system time code (running at 29.97 frames/s) so that the two
are in sync.
White balance (p. 38)
Adjusts the color balance so that white subjects look white. In this camcorder, automatic adjustment,
HOLD, -itHoutdoor), and --flr(indoor) are selectable.
I
74
Page 73

Index
A, B
AC power ad.Tptor
Adjusting viewfinder
Aud4o balance
A/V cojinecting cable
Battery lamp
Battery pack
Beep sound
Brightness
C________________________
Camera recording
Cassette memory
Charging battery
Cleaning video heads
Clock set.............................48
Close ups............................33
Color intensity.....................22
COMMANDER
Connection
Cut recording
D
_______________________
DATA CODE
Date/time
Display window
Double speed playback....... 18
DV connecting cable
Digital zooming...................13
E, f, G
Editing
EDITSEARCH
EJECT
Eyecup
Exposure
Fader
Fast-forward
Flash picture
Focus
Frame-by-frame
H, I, J, K
Headphones
High-speed shutter.............34
ID number
ID system
Interval recording
Iris.......................................36
............................
___________________
................................
..................................
...............................
............................
..................................
.................................
_________________
...........................
..........
............
.................
.........
.......................
.........................
.......................
..........................
.............
..............
...................
..........
...................
.........................
......................
......................
.................
..........
....................
.......................
......................
.................
.......................
..........................
...............
6, 20
12
23
16
50
6
12
22
11
41
6
54
22
16
30
43
48
71
44
44
15
9
62
36
24
17
31
32
18
17
22
73
29
L, M. N
LANC
.................................
Lithium battery
Menu system
MIC (microphone) jack........64
O. P. Q
Overlap
Photo recording
Playback on TV..................17
Playback pause
Portrait
Power sources
PROGRAM AE
R
_______________________
Recording lamp
Rec. Review...................... 15
Remote Commander
Rewind
RFU adaptor
S
_______________________
Shoulder strap
Slide
...................................
Slow shutter.......................31
Sports.................................34
Standby mode................... 12
Steady shot
Supplied accessories
S video connecting cable
T,U,V
________________
Time code
Tripod mounting
Trouble check
Twilight...............................34
Viewfinder......................12,70
Video printer.......................28
VTR 4
W,X,Y.Z
Warning..............................72
White balance
ZERO SET MEMORY........26
Zoom..................................13
...................
.....................
________________
..............................
.................
.................
...............................
..................
..................
.................
...............................
......................
...................
........................
..........................
.................
....................
.................................
_________________
....................
.........
...........
....
64
46
21
25
28
18
34
19
34
22
66
17
16
65
25
40
12
14
__
5
16
57
68
38
75
 Loading...