

Sony DCR-SR85, DCR-SR46 Owner’s Manual
S OIN'Y2_ 3286667,,/.
Digital Video Camera Recorder
Operating Guide
Guia de operaciones
DCR-SR45/$R46/$R65/$R85
_ _10 InfoLITHIUM
M_URY 5rlEK _,
For details on the advanced operations, please ret}r to
"Handycam Handbook" (PDF).
SERI_S
[Ij._
Para obtener m,'is informaci6n acerca de las t\mciones
avanzadas, consulte la "Guia prfictica de Handycam" (PDF).
¢_2008 SonyCorporation

To reducefire orshockhazard,donot expose
the unit to rainor moisture,
Donotexposethe batteriesto excessive
heat suchassunshine,fireor the like.
CAUtIOn: rO REaUCEr_E RISKOFELECTRIOSHC_K
DO_OT_EMOVECOVEa(On BACK)¸
_O US_a-SEnVlCEABLE_AnTSIN£1DE_
a_E_ _E_VlCI_ TO QUALI;IEDSERVICEPErSOnNEL
This symbol is intended to
alert the user to the presence
of unmsulated "dangerous
voltage" within the product's
enclosure that may be of
sufficient magnitude to
constitute a risk of electric
shock to persons.
This symbol is intended to
alert the user to the presence
of important operating and
maintenance (servicing)
instructions in the literature
accompanying the appliance.
IMPORTANT
SAFEGUARDS
For your protection, please read these
sa_ instructions complete_ be%re
operating the appliance, and kee I) this
manual _r _ture re_rence.
Care_lN observe all warnings, precautions
and instructions on the appliance, or the
one described in the operating instructions
and adhere to them.
PowerSources
This set should be operated only fi'om the type
of power source indicated on the marking label.
If you are not sure of the type of electrical power
supplied to your home, consult your dealer or
local power company. For those sets designed
to operate from battery power, or other sources,
rear to the operating in_ructions.
Polarization
_J_isset may be equipped with a polarized ac
power cord plug (a plug having one blade wider
than the other).
ltais plug will fit into the power outlet only one
way. This is a safety f;gature. If you are unable to
insert the plug fully into the outlet, tU reversing
the plug. If the plug should still [idl to fit, contact
your electrician to have a suitable outlet installed.
Do not de[)at the sa[ety purpose of the polarized
plug by ti_rcing it in.
Overloading
Do not oveHoad wall outlets, extension cords or
convenience receptacles beyond their capacity,
since this can result in fire or electric shock.
Object and Liquid Entry
Never push objects otany Mnd into the set
through opelfings as they may touch dangerous
voltage points or short out parts that could result
in a fire or electric shock. Never spill liquid of any
kind on the set.
Attachments
Do not use attachments not recommended by the
manuti_cturer, as they may cause hazards.
Cleaning
Unplug the set from the wall outlet beR_re
cleaning or polishing it. Do not use liquid

cleanersoraerosolcleaners.Useaclothlightly duetolighnlingand power-line surges.
dampened with water ior cleaning the exterior
of the set.
Damage Requiring Service
Water and Moisture
Do not itse power-line operated sets near water
for example, near a bathtub, washbowl, kitchen
sink, or laundry tub, in a wet basement, or near a
swimming pool, etc.
Power-Cord Protection
Route tile power cord so that it isnot likely to be
walked on or pinched _ items placed upon or
against them, paying particular attention to the
plugs, receptacles, and the point where the cord
exits from the appliance.
Accessories
Do not place the set on an unstable cart, stand,
tripod, bracket, or table. Tile set may thll,
causing serious inju U to a child or an adult, and
serious damage to the set. Use only a cart, stand,
tripod, bracket, or table recommended by the
illan ufhcturer.
Ventilation
The slots and openings in the cabinetare
provided tbr necessal T ventilation. To ensure
reliable operation of the set, and to protect it from
overheating, these slots and openings must never
be blocked or covered.
Never cover the slots and openings with a cloth
or other materials.
Never block the slots and openings by placing
the set on a bed, sofa, rug, or other similar
surfilce.
Never place the set in a confined space, such as
a bookcase, or built-in cabinet, unless proper
ventilation is provided.
Do riot place the set near or over a radiator or
heat register, or where it is exposed to direct
sunlight.
Lightning
For added protection _r this set during a
lightning storm, or when it is left unattended and
unused for long periods of time, unplug it from
the wall outlet and disconnect the antenna or
cable system. This will prevent damage to the set
Unplug the set fi'om tile wall outlet and ret_r
servicing to qualified service personnel under the
following conditions:
When the power cord or plug is damaged or
frayed.
If liquid has been spilled or objects have fhllen
into the set.
If the set has been exposed to rain or water.
If the set has been subject to excessive shock
by being dropped, or tile cabinet has been
damaged.
If the set does not operate normally when
following tile operating instructions. Adjust
only those controls that are specified in the
operating instructions, hnproper adjustment
of other controls may result in damage and
will often require extensive work by a qualified
technician to restore the set to normal
operation.
When the set exhibits a distinct change in
performance this indicates a need fi_r service.
Servicing
Do not attempt to ser_ce tile set yourself as
opening or removing covers may expose you to
dangerous voltage or other hazards.
Ret)r all servicing to qualified sela,ice personnel.
Replacement parts
When replacement parts are required, be sure
the service technician has used replacement parts
specified by the manuthcturer that have the same
characteristics as the original parts.
Unauthorized substitutions may result in fire,
electric shock, or other hazards.
Safety Check
Upon completion of any service or repairs to tile
set, ask tile service technician to perform routine
safi:ty checks (as specified by the manufi_cturer)
to determine that the set is in sate operating
condition.
Readthisfirst
BeIbre operating the unit, please read this
manual thoroughly, and retain it tbr filture
reI}rence.
Replace the battery with the specified
type only. Otherwise, fire or injury may
result.
RECYCLINGLITHIUM-IONBATTERIES
Lithium-Ion batteries are
recyclable.
You can help preserve our
environment by returning
}'our used rechargeable
batteries to the collection
and recycling location
nearest you.
For more int_rmation
regarding recycling of
rechargeable batteries, call
toll tree 1-800-822- 8837, or
visit http://www.rbrc.org/
Caution: Do not handle damaged or
leaking Lithium-Ion batteries.
Owner'sRecord
The model and serial numbers are located
on the bottom. Record the serial number
in the space provided below. Ret)r to these
numbers whenever you call your Sony
dealer regarding this product.
Model No. DCR
Serial No.
Model No. AC
Serial No.
If you have any questions about this
product, you may call:
Sony Customer Information Center l 800
222 SONY (7669).
The number below is t_r the FCC related
matters only.
RegulatoryInformation
Declaration of Conformity
Trade Name: SONY
Model No.: DCR SR45, DCR-SR46
Responsible Party: Sony Electronics Inc.
Address: 16530 Via Esprillo, San Diego,
CA 92127 U.S.A.
Telephone number: 858-942-2230
This device complies with Part 15 of the
FCC Rules. Operation is subject to the
lbllowing two conditions: (1) This device
may not cause harmful interference,
and (2) this device nmst accept any
interl}rence received, including
interference that may cause undesired
operation.
Declaration of Conformity
Trade Name: SONY
Model No.: DCR SR65, DCR-SR85
Responsible Party: Sony Electronics Inc.
Address: 16530 Via Esprillo, San Diego,
CA 92127 U.S.A.
Telephone number: 858-942-2230
This device complies with Part 15 of the
FCC Rules. Operation is subject to the
lbllowing two conditions: (1) This device
may not cause harmful interference,
and (2) this device must accept any
interl}rence received, including
interference that may cause undesired
operation.
Note
• DCR-SR65/SR85 is to be used with the
Handycam Station Model DCRA-C200 and AC
Adaptor Model AC-L200/L200B.
CAUTION
You are cautioned that ally changes or
modifications not expressly approved ill
this manual could void your authoriW to
operate this equipment.
Note
This equipment has been tested and %und
to comply with the limits Ibr a Class B
digital device, pursuant to Part 15 of tile
FCC Rules.
These limits are designed to provide
reasonable protection against harmful
interference in a residential installation.
This equipment generates, uses, and
can radiate radio frequency energy and,
if not installed and used in accordance
with the instructions, may cause harmful
interference to radio communications.
However, there is no guarantee that
interference will not occur in a particular
installation. If this equipment does cause
harmful interference to radio or television
reception, which can be determined
by turning the equipment off and on,
the user is encouraged to try to correct
the intert}rence by one or more of the
following measures:
Reorient or relocate the receiving antenna.
Increase the separation between the
equipment and receiver.
Connect the equipment into an outlet on
a circuit different h'om that to which the
receiver is conllected.
Consult the dealer or an experienced radio/
TV teclmician %r help.
Tile' supplied interface cable' must be used
with tlle equipment in order to comply
with the limits for a digital device pursuant
to Subpart B of Part 15 of FCC Rules.
For the State of California, USA only
Perchlorate Material special handling may
apply, See
xs_v.dtsc.ca.gov/hazardouswaste/
_erchlorate
Perchlorate Material: Lithium batter},,
contains perchlorate.
Batterypack
This device complies with Part 15 of the
FCC Rules. Operation is subject to the
following two conditions:(1 ) This device
may not cause harmtkd interference, and
(2) this device nmst accept ally interference
received, including interference that may
cause undesired operation.
This Class B digital apparatus complies
with Canadian ICES-003.
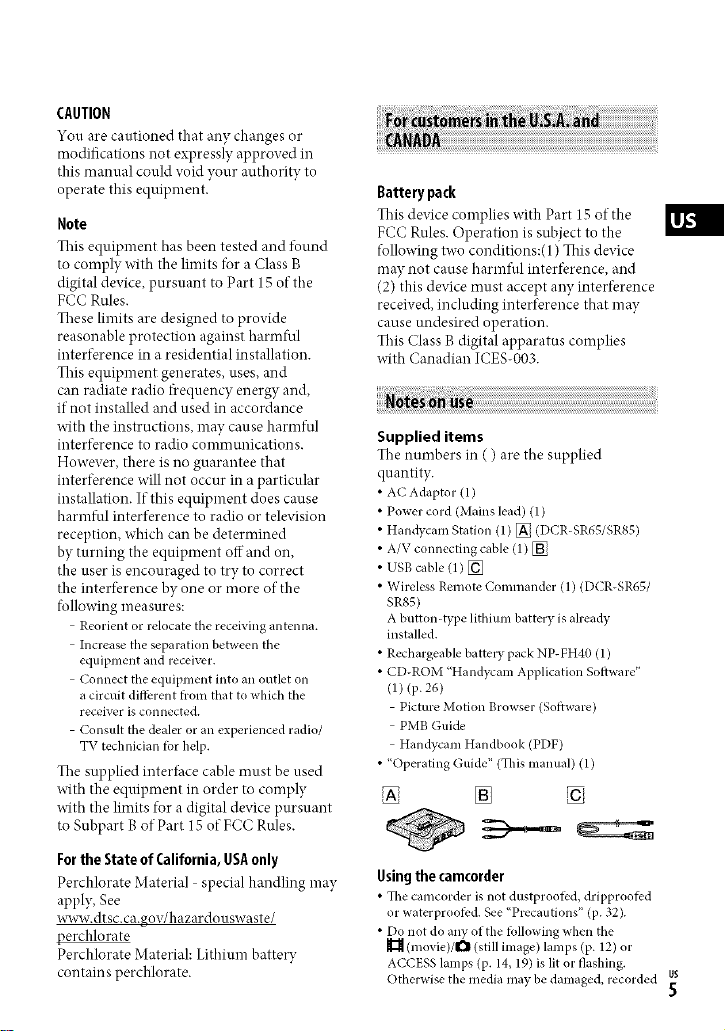
Supplied items
The numbers in ( ) are the supplied
quantity.
AC Adaptor (1)
Power cord (Mains lead) (1)
Handycam Station (1) [_ (DCR-SR65/SR85)
A/V connecting cable (1) [_
USB cable (1) [_
Wireless Remote Commander (1) (DCR-SR651
SR85)
A button-type lithimn battery is already
installed.
• Rechargeable battel T pack NP-FH40 (1)
• CD-ROM "Handycam Application Software"
(1) (p. 26)
Picture Motion Browser (Software)
PMB Guide
Handycam Handbook (PDF)
• "Operating Guide" (This manual) (1)
V;2
Using the camcorder
• The camcorder is not dustproo_d, dripproofed
or waterproofiM. See "Precautions" (p. 32).
• Do not do any otthe tollowing when the
(movie)/l_ (still image) lamps (p. 12) or
ACCESS lamps (p. 14,19) is lit or flashing.
Otl_erwise the media may be damaged, recorded us
5
images may be lost or other malfunctions could
occur.
Remove the "Memory Stick PRO Duo."
Remove the battel T pack or AC Adaptor Irom
the ognlcorder.
Apply mechanical shock or vibration to tile
camcorder.
• When connecting your camcorder to another
device with a cable, be sure to insert the
connector plug in the correct way. Pushing the
plug Iorcibly into the terminal will damage the
ternfinal and may result in a malhmction of
your camcorder.
• Do not apply" shock or vibration to your
camcorder. The hard disk of the camcorder may
not be recognized, or recording or playback
may not be possible.
• Do not use your camcorder in very loud areas.
The hard disk of the camcorder may not be
recognized, or recording may not be possible.
• To protect the internal hard disk from shock
by dropping, the camcorder has drop sensor
function*. When a drop occurs, or under a non-
gravity condition, the block noise made when
this function is activated by the camcorder may
also be recorded. If the drop sensor catches a
drop repeatedly, recording/play back may be
stopped.
• When the temperature of the camcorder
becomes extremely high or extremely low, you
may not be able to record or play back on the
camcorder, due to the protection l_:atures of the
camcorder being activated in such situations.
In this case, an indicator appears on the LCD
screen (p. 30).
• Do not turn oil the camcorder in a low-pressure
area, where tile altitude is more than 3,000
meters (9,800 feet). Doing so may damage the
hard disk drive of your camcorder.
• If you repeat recording/deleting images tbr a
long time, t?agmentation of data occurs on the
media. Images cannot be saved or recorded. In
such a case, save your images (Ill SOIlle type of
external media first, and then perform [MEDIA
FORMAT] *.
• Fasten the grip belt and hold your camcorder
correctly while recording.
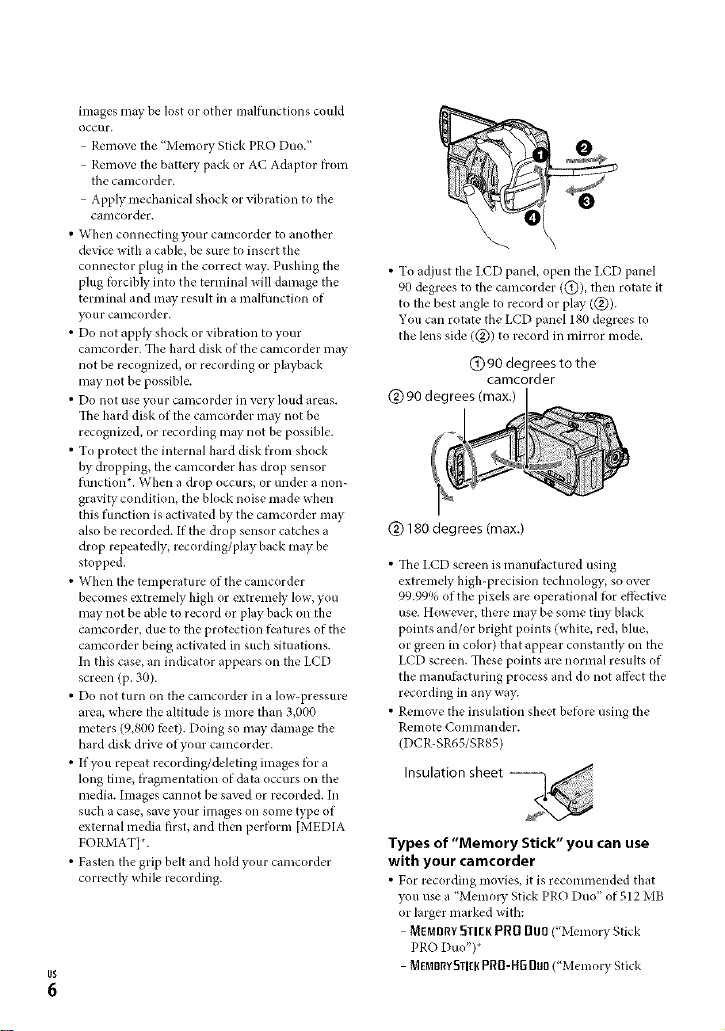
• To adjust the LCD panel, open tile I,CD panel
90 degrees to the camcorder ((_)), then rotate it
to the best angle to record or play (@).
You can rotate the LCD panel 180 degrees to
the lens side (@) to record in mirror mode.
(_)90 degrees to the
(_) 90 degrees (max.)
@ 180 degrees (max.)
• The LCD screen is manufi_ctured using
extremely high-precision technology, so over
99.99% of the pixels are operational Ior efi_:ctive
use. However, there may be some tiny black
points and/or bright points (white, red, blue,
or green in color) that appear constantly on the
LCD screen. These points are normal results of
the manufilcturing process and do not affect tile
recording in any way.
• Remove the insulation sheet betore using the
Remote Commander.
(DCR-SR65/SR85)
Insulation sheet
Types of "Memory Stick" you can use
with your camcorder
• For recording movies, it is recommended that
you use a "Memol T Stick PRO Duo" of 512 MB
or larger marked with:
MEMIIRYSII[K PR0 BUO ("Memory Stick
PRO Duo")*
Memorvstl[gPRfl-HGDuo("Memory Stick
camcorder
PRO-HG Duo")
* Marked with Mark2 or not are available.
• A "Memo1T Stick PRO Duo" of up to 8 GB has
been confirmed to operate correctly with this
camcorder.
• See page 13 for tile recordable time of a
"Memory Stick PRO Duo."
• "Memory Stick PRO Duo" and "Menmry Stick
PRO-HG Duo" are both called as "Memory
Stick PRO Duo" ill this manual.
On recording
• Before starting to record, test the recording
function to make sure the image and sound are
recorded without ally problems.
• Compensation for fidlure or loss of recording
cannot be provided, even if recording or
playback is not possible due to a malfunction of
the camcorder, recording media, etc.
• TV color systems difl;grdepending on the
country/region. To view your recordings on a
TV, you need an NTSC system-based TV.
• Television programs, fihns, video tapes,
and other materials may be copyrighted.
Unauthorized recording of such materials may
be contra W to the copyright laws.
Save all your recorded image data
• To prevent your image data fi'onl being lost,
save all your recorded images on external media
periodically. It is recommended that you save
the image data on a disc such as a DVD-R using
your computer*. Also, you call save your image
data using a VCR, or a DVD/HDD recorder*.
When the camcorder isconnected to a
computer
• Do not try to format the hard disk of the
camcorder using a computer. If you do so, your
camcorder may not operate correctly.
About language setting
• Tile on-screen displays in each local language
are used for illustrating the operating
procedures. Change the screen language before
using your camcorder ifnecessary (p. 12).
About this manual
• The LCD screens and indicators shown in this
manual were taken with a digital still camera,
and may look dilSgrent from what you actually
see.
• In this Operating Guide, the hard disk and
"Memory Stick PRO Duo" are called "media."
• Unless otherwise specifically indicated,
illustrations in this manual are based on DCR-
SR85.
• Tile screenshots are from Windows Vista, and
may vavr" depending on tile operating system of
the computer.
* Refer also to "Handycam Handbook" (PDF)
and "PMB Guide."
Note on disposal/transfer
• If you per_rm [MEDIA FORMAT}* to _rmat
the hard disk of the camcorder, data may not be
completely deleted from the hard disk. When
you transfer tile camcorder, it is recommended
that you perform [ eB EMPTY]* to prevent the
recovery of your data.
In addition to the above, when you dispose of
the camcorder, it is recommended that you
destroy the actual body of the camcorder.

Table of contents
IMPORTANT SAFEGUARDS........................2
Read this first .................................................4
Step 1: Charging the battery pack .........9
Step 2: Turning the power on, and
setting the date and time ....................12
Changingthe language setting...............12
Step 3: Selecting the media ...................13
Recording ..................................................... 15
Playback ........................................................ 16
Playingtheimage on a TV...........................17
Other parts and functions of the
camcorder .................................................18
Indicators displayed during recording/
playback .....................................................20
Performing various functions -
"11_HOME" and ,,0___-OPTION"..............22
Saving images ............................................24
Deleting images .........................................25
Performing with a computer .................26
Handbook/software to beinstalled 26
Installing"PictureMotion Browser" 2d
Troubleshooting ........................................ 29
Self diagnosis display/Warning
indicators ............................................................30
Precautions ..................................................32
Specifications ..............................................34

Step 1: Charging the battery pack
DCR-SR65/SR85
CHG lamp
Battery pack
DC IN jack
AC Ada
DCR-SR45/SR46
DC plug
With tile • mark on the right
3
Open the jack cover.
AC Ada
POWER switch
DC plug
With the • mark
on tile top
Power cord
(Mains lead)
4
To the wall outlet
(wall socket)
DClNjack
Power cord
(Mains lead)
To tile wall outlet
(wall socket)
You can charge the "InfoLITHIUM"
battery pack {H series) after attaching
it to your camcorder.
_,_ Notes
• Your camcorder operates only with all
"InfoI,ITHIUM" battel y pack (H series).
1 Turn the POWER switch in the
direction of the arrow to OFF (CHG)
(the default setting).
2 Attach the battery pack by sliding it
in the direction of the arrow until it
clicks.
For DCR-SR65/SR85:
Connect the AC Adaptor to the DC
IN jack on the Handycam Station.
For DCR-SR45/SR46:
Connect the AC Adaptor to the DC
IN jack on your camcorder.
Open the jack cover and connect the
DC plug of the AC Adaptor to the DC
IN jack.
4 For DCR-SR65/SR85:
Connect the power cord (mains
lead) to the AC Adaptor and the
wall outlet (wall socket). Insert
the camcorder into the Handycam
Station securely, all the way to the
bottom.
• When setting the camcorder onto the
Hand3_am Station, close tile DC IN jack
cover.
For DCR-SR45/SR46:
Connect the power cord (mains
lead) to the AC Adaptor and the wall
outlet (wall socket).
The CHG (charge) lamp lights up arm
charging starts.
g.
The CHG (charge) lamp turns offwhen
the battery is fully charged.
Disconnect the AC Adaptor from the
DC IN jack holding both the DC plug
and the Handycam Station (DCR-SR65/
SR85) or your camcorder (DCR SR45/
SR46).
"_" Tips
• For DCR-SR65/SR85:
Same as DCR-SR45/SR46, you can charge the
battery pack by connecting the AC Adaptor to
your camcorder.
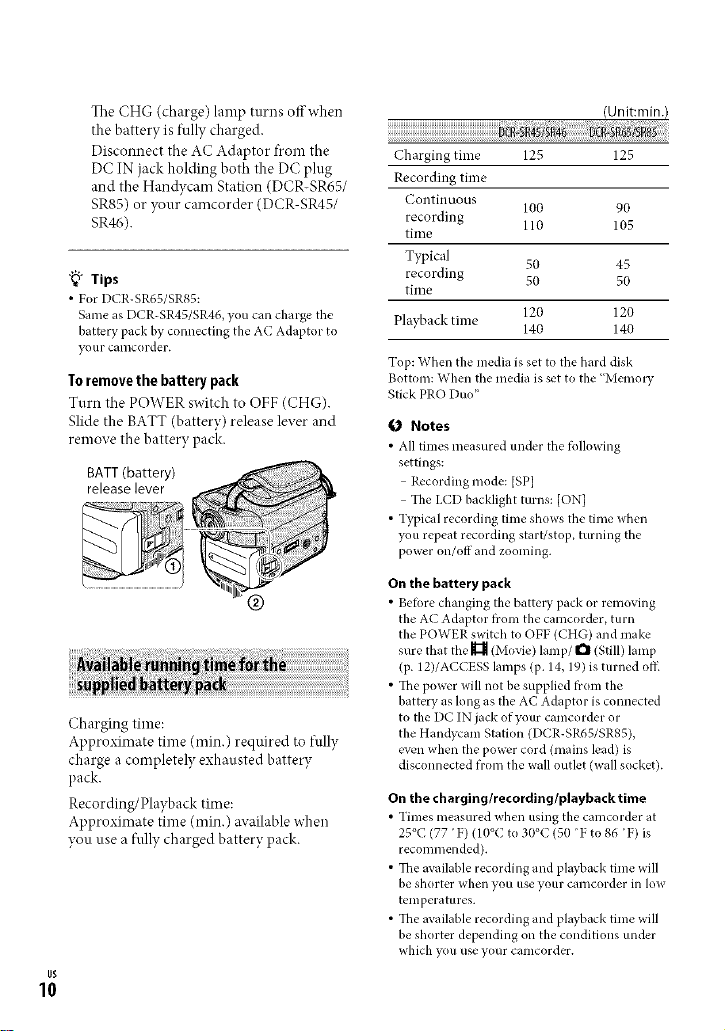
To remove the battery pack
Turn the POWER switch to OFF (CHG).
Slide the BATT (battery) release lever and
remove the battery pack.
BATT (battery)
release lever
®
Charging time:
Approximate time (rain.) required to fully
charge a completely exhausted battery
pack.
Recording/Playback time:
Approximate time (rain.) available when
you use a fully charged battery pack.
US
10
(Unit:min.)
45/i
Charging time 125 125
Recording time
Continuous
recording 110 105
time
100 90
Typical 50 45
recording 50 50
time
Playback time 140 140
Top: When the media is set to the hard disk
Bottom: When the media is set to the "Memo D"
Stick PRO Duo"
120 120
{,J Notes
• All times measured under the following
settings:
Recording mode: [SP]
The I.CD backlight turns: [ON]
• Typical recording time shows the time when
you repeat recording start/stop, turning the
power on/off and zooming.
On the battery pack
•Betore changing the battel T pack or removing
the AC Adaptor t_om the camcorder, turn
the POWER switch to OFF (CHG) and make
sure that tile _ (Movie/ lamp/ I_ (Still) lamp
(p. 12)/ACCESS lamps (p. 14,19) is turned off-
• The power will not be supplied from the
battery as long as tile AC Adaptor is connected
to the DC IN jack of your camcorder or
the Handycam Station (DCR-SR65/SR85),
even when tile power cord (mains lead) is
disconnected from the wall outlet (wall socket).
On the charging/recording/playback time
• Times measured when using the camcorder at
25°C (77 F) (10°C to 30°C (5(1 F to 86 'F) is
recommended).
• The available recording and playback time will
be shorter when you use your camcorder ill low
temperatures.
• The available recording and playback time will
be shorter depending on the conditions under
which you use your camcorder.
On the AC Adaptor
• Use the nearby wall outlet (wall socket) when
using the AC Adaptor. Disconnect the AC
Adaptor h'om the wall outlet (wall socket)
immediately if any malfunction occurs while
lasing yolar calilcorder.
• Do not use the AC Adaptor placed in a narrow
space, such as between a wall and furniture.
• Do not short-circuit the DC plug of the AC
Adaptor or battel T terminal with any metallic
objects. This may cause a malfunction.
• Even if your camcorder is turned off, AC power
source (mains) is still supplied to it while
connected to the wall outlet (wall socket) via the
AC Adaptor.
$
g.
us
11
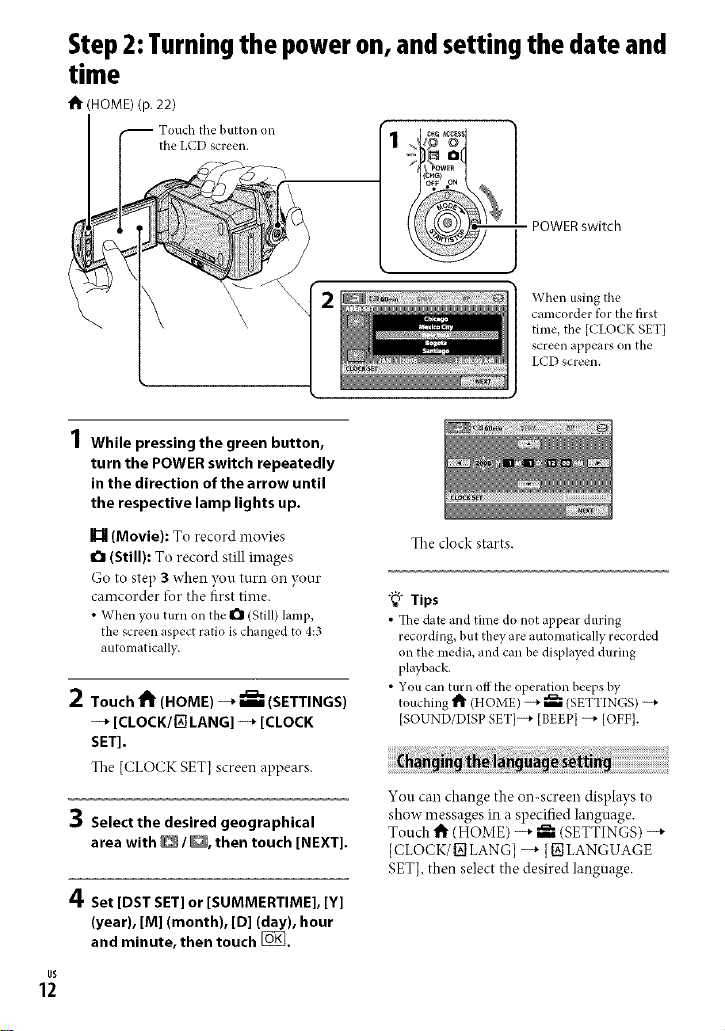
Step2:Turningthe poweron,andsetting the date and
time
t1_ (HOME) (p. 22)
- POWER switch
When using the
camcorder tk_rthe first
time, the [CLOCK SET]
screen appears on the
I.CD screen.
1 While pressing the green button,
turn the POWER switch repeatedly
in the direction of the arrow until
the respective lamp lights up,
I_ (Movie): To record movies
O (Still): To record still images
Go to step 3 when you turn on your
camcorder for the first time.
• When you turn on the O (Still)lamp,
the screen aspect ratio is changed to 4:3
automatically.
2 Touch t1_ (HOME) --_ _ (SETTINGS)
--_ [CLOCK/{_ LANG] --* [CLOCK
SET],
The [CLOCK SET] screen appears.
3 Select the desired geographical
area with D / D, then touch [NEXT],
The clock starts.
"_" Tips
• _fl_edate and time do not appear during
recording, but they are automatically recorded
on the media, and can be displayed during
playback.
• You can turn off the operation beeps by
touching _ (HOME) --+ _ (SETTINGS)
[SOUND/DISP SET]--+ [BEEP] _ [OFF].
You can change the on-screen displays to
show messages in a specified language.
Touch 1_ (HOME) --_ _ (SETTINGS) --_
[CLOCK/_ LANG] -q" {_ LANGUAGE
SET], then select the desired language.
4 Set [DST SET] or [SUMMERTIME], [Y]
(year), [M1 (month), [D1 (day), hour
and minute, then touch [_,
US
12

Step 3: Selecting the media
You can select the hard disk or "Memory
Stick PRO Duo" as the recording/i)layback/
editing media on your camcorder. Select
the media lbr movies and still images
separately.
The defimlt setting is hard disk tbr movies
and still images.
Hard disk
U
Movie
"Memory Stick"
Notes
• You can do recording/playback/editing
operations tot the selected media only. When
you want to change, reselect the media.
• The recordable time with [SPI recording mode
(the detimlt setting) is as ti_dlows (approx):
The internal hard disk:
DCR-SR45:10 hours 40 minutes
DCR-SR46/SR65:14 hours 30 minutes
DCR-SR85:21 hours 50 minutes
"Memory Stick PRO Duo" (4 GB) made by
Sony Corporation: 80 minutes
• Check the nmnber of recordable still images on
the LCD screen of your camcorder (p. 20).
1 Touch 1_ (HOME) -+ I_ (MANAGE
MEDIA) tab on the screen,
The media setting screen appears.
3 Select the media you want to set,
4 Touch [YES] -_ _.
The media is changed.
To confirm the recording media setting
Turn the POWER switdl repeatedly to light
up the _ll (Movie)/I'_ (Still) lamp, depending
on which media setting you want to check.
_) Checl( the media icon on tile screen.
_°_ IZ3 : "Memory
Stick PRO Duo"
Prepare a "Memory Stick PRO Duo" if
[MEMORY STICK] has been selected as
the media.
For types of"Memory Stick" ynu can use in
your camcorder, see page 6.
;g
g.
2 Touch [MOVIE MEDIA SET] to select
the media for movies, and touch
[PHOTO MEDIA SET] to select the
media for still images.
1 Insert a "Memory Stick PRO Duo,"
(_) Open the Memory Stick Duo cover in the
direction of tile arrow.
@ Insert a "Memory Stick PRO Duo" into
the Memory Stick Duo slot ill the right
orientation until it clicks.
@ (;lose the Memm T Stick Duo cover.
US
13

ACCESS lain
("Memm T Stick
PRO Duo")
2 Ifyou have selected [MEMORY
STICK] as the movie media, turn the
POWER switch until the I_ ]Movie]
lamp lights up.
The [Create a new Image Database File.]
screen appears on the LCD screen when
you insert a new "Memory Stick PRO
Duo 2
Notes
• Do not open the Memory Stick Duo cover while
recording.
• Inserting a "Memory Stick PRO Duo" tbrcibly
in the wrong direction may cause a malhmction
to the "Memol T Stick PRO Duo," Memory Stick
Duo slot or image data.
• If [Failed to create a new" hnage Database File.
It may be possible that there is not enough tree
space.] appears in step 3, ff_rmat the "Memory
Stick PRO Duo." All recorded data on the
"Memory Stick PRO Duo" will be deleted when
you/brmat.
• Be carehd not to allow the "Memory Stick PRO
Duo" to pop out and hdl when you push on and
remove it.
3 Touch [YESI.
To record only still images on a
"Memory Stick PRO Duo," touch [NO1.
To remove the "Memory Stick PRO
Duo"
Open the Memory Stick Duo cover and
lightly push on the "Memory Stick PRO
us Duo,"
14

Recording
Tile images are recorded on tile media selected on tile media setting (p. 13).
Tile deIhult setting is hard disk for both movies and still images.
1 LENSCOVERswitch 3
START/STOP[]
_1 POWER switch
]_:To record movies
I1_: To record still images
PHOTO
[STBY] _ [REC]
o
START/STOP [_]
1 Slide the LENS COVER switch to open.
Flashing --+ Lights tip
2 Turn the POWER switch until the respective lamp lights up.
Press tile green button only when tile POWER switch is in tile OFF (CHG) position.
3 Start recording.
Press START/STOP [] (or _).
To stop recording, press START/STOP
again.
"_" Tips
• You can check the flee media space by touching
_" (HOME) _ _ (MANAGE MEDIA) --_
[MEDIA INFOf
Press PHOTO lightly to adjust the focus
(a beep sounds), then press it fully
0 (a shutter click sounds).
Mill appearsbeside6 or _]. When Mill
disappears, the image has been recorded.
• The mrcdmum continuous recordable time of
movies is approximately 13 hours.
• When a movie file exceeds 2 GB, the next movie
file is created automatically.
US
15
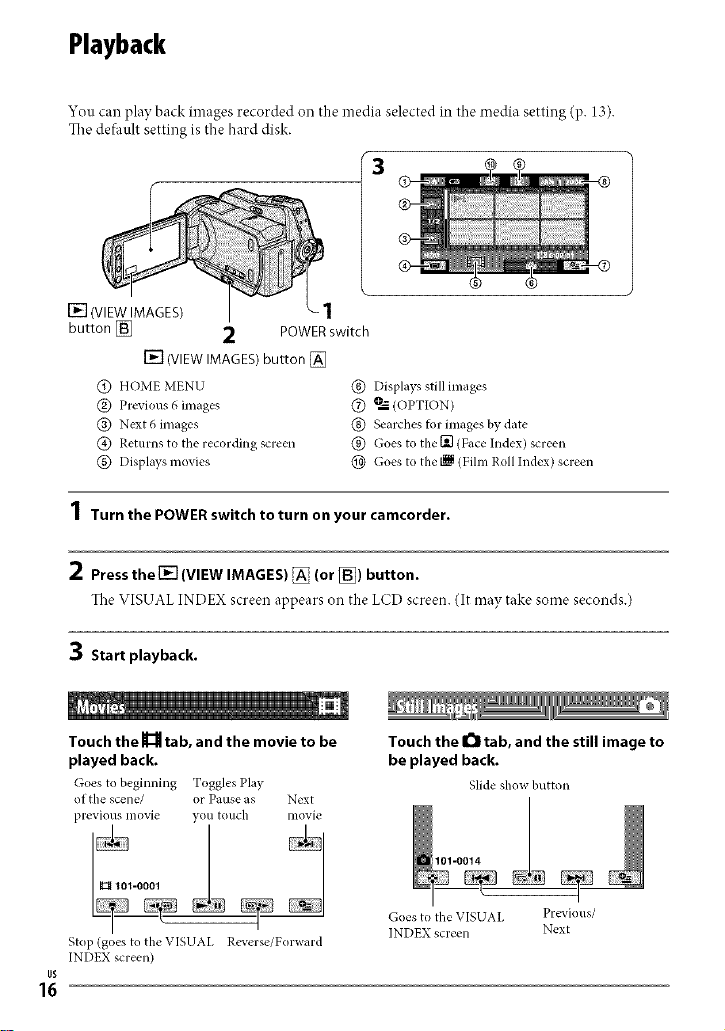
Playback
You can play back images recorded on the media selected in tile media setting (p. 13).
Tile defimlt setting is tile hard disk.
13
[] (VIEW IMAGES)
button [_
[] (VIEW IMAGES) button []
@ HOME MENU
@ Previous 6 images
@ Next 6 images
@ Returns to the recording screen
@ Displays movies
_1 POWER switch
1
@ Displays still images
(_) _ (OPTION)
@ Searches for images by date
@ Goes to the Igl (Face Index) screen
@ Goes to the _ (Fihn Roll Index) screen
1 Turn the POWER switch to turn on your camcorder.
2 Pressthe [] (VIEW IMAGES) _ (or [_) button.
Tile VISUAL INDEX screen appears on the LCD screen. (It may take some seconds.)
3 Start playback.
Touch the _ tab, and the movie to be
played back.
Goes to beginning Toggles Play
of the scene/ or Pause as Next
previous movie you touch movie
I_101-0001
Touch the I_1 tab, and the still image to
be played back.
Slide show button
101-0014 2
Stop (goes to the VISUAL Reverse/Forward
INDEX screen)
US
16
/
Goes to the VISUAL Previous/
INDEX screen Next

Toadjustthevolumeofmovies
When pla_ng back a movie, touch
(OPTION) -+ _ tab -_" [VOLUME],then
adjust the volume with E_E_/_.
"_" Tips
• Ill"_l/l" appears with the image on each of the
tab that was lastly played back/recorded. When
you touch image marked with I1_1/I,-, you can
pl W it back trom the point you have stopped
previously.
Connect your camcorder to the input jack
ofa TV or VCR using the A/V connecting
cable [] (supplied) or an A/V connecting
cable with S VIDEO [] (optional). For
details, see"Handycam Handbook" (PDF).
DCR-SR45/SR46
A/V Remote
Connector
DCR-SR65/SR85 A/V OUTjack
SVIDEO
@
VIDEO
(Yellow)
(White)
AUDIO
(Yellow)
, '::, : Signal flow
(Red)
VCRorTVs
o
"o
US
17
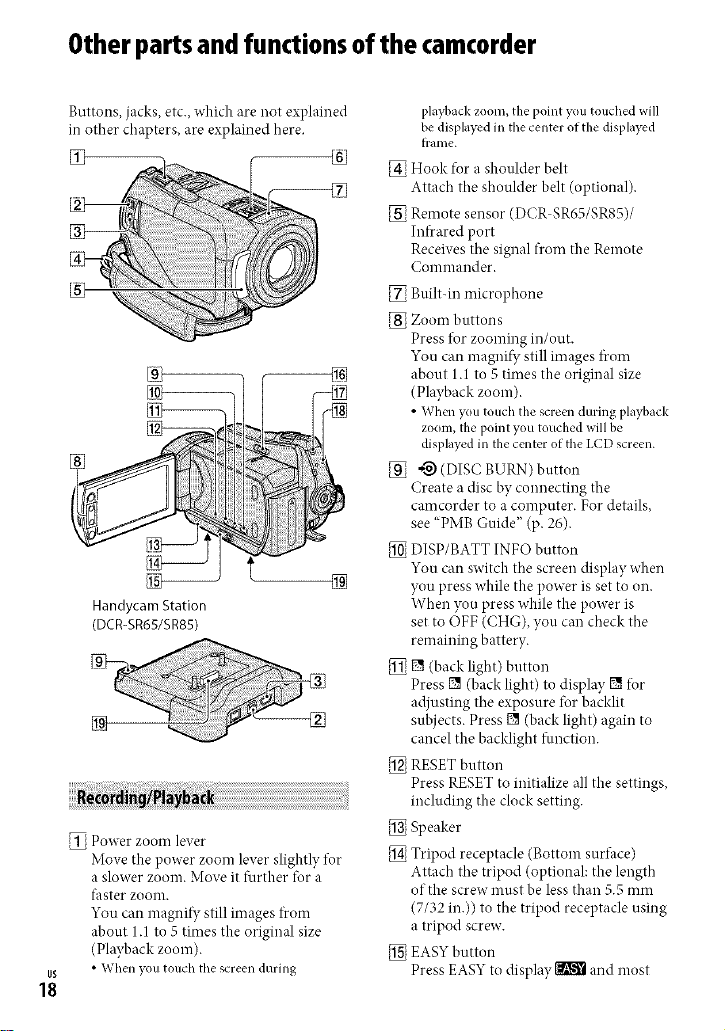
Otherpartsand functionsof the camcorder
Buttons,jacks, etc., which are not explained
in other chapters, are explained here.
Handycam Station
(DCR-SR65/SR85)
_ Power ZOOIn lever
Move the power zoom lever slightly for
a slower zoom. Move it further tbr a
faster zoom.
You can magnify still images from
about 1.1 to 5 times the original size
(Playback zoom).
• When you touch the screen during
US
18
playback zoom, the point y(m touched will
be displayed in the center of the displayed
%
tranle.
Hook tor a shoulder belt
Attach the shoulder belt (optional).
Remote sensor (DCR SR65/SR85)/
Infrared port
Receives tile signal from the Remote
Colnulauder.
Built-in microphone
Zoom buttons
Press *br zooming in/out.
You can magnify still images from
about 1.1 to 5 times the original size
(Playback zoom).
• When you t(mch the screen dm'ing playback
zoom, thepoint you touched will be
displayedin the center of the LCDscreen.
_) (DISC BURN) button
Create a disc by connecting tile
camcorder to a computer. For details,
see "PMB Guide" (p. 26).
DISP/BATT INFO button
You can switch tile screen display when
you press w _ile t _e power s set to o 1
\\r le 1you press w 1 le the power is
set to OFF (CHG), you can check tile
remai ling battery
[] (back light) button
Press [] (back light) to display [] tbr
adjusting tile exposure for backlit
subjects. Press [] (back light) again to
cancel the backlight tuuctiou.
RESET button
Press RESET to initialize all the settings,
including the clock setting.
Speaker
IT "7
rlt od receptacle (Bottom surtace)
Attach tile tripod (optional: the length
of the screw must be less than 5..> ulnl
(7/32 m.)) to tile tripod receptacle using
a tripod screw.
EAS'_ button
Press EASY to display _k-_ and most
ofthesettingsaresetautomaticallylbr
easyrecording/playback.Tocancel,
pressEASYagain.
[] NIGHTSHOTPLUSswitch
SettheNIGHTSHOTPLUSswitch
toON([_appears)torecordindark
places.
[] QUICKONbutton
TheQUICKONlampflashesandyour
camcordergoestopowersavingmode
(sleepmode).PressQUICKONagain
tostartrecordingnexttime.Your
camcorder returns to recording standby
in approximately I second.
With [QUICK ON STBY], you can set
the time when the camcorder turns off
in sleep mode.
[] ACCESS lamp (Hard disk)
When the ACCESS lamp is lit or
flashing, your camcorder is writing/
reading data.
[] A/V Remote Connector / A/V OUT
jack
Connect with the A/V connecting cable.
[] _ (USB)jack
Connect with the USB cable.
[] Active Interlhce Shoe N {g_,%_>0_(DCR
SR65/SR85)
The Active Interface Shoe supplies
power to optional accessories such as
a video light, a flash, or a microphone.
The accessory can be turned on or offas
you operate the POWER switch on your
camcorder.
[] Interface connector
Connectyour camcorder and the
Handycam Station.
(DCR SR65/SR85)
US
19
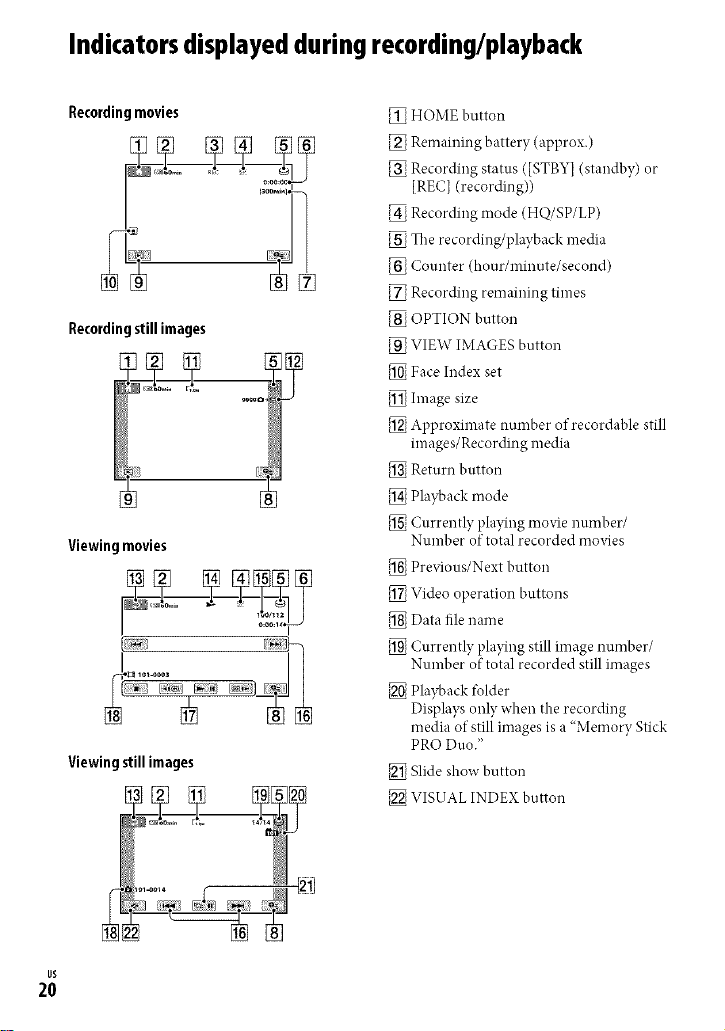
Indicatorsdisplayedduringrecording/playback
Recordingmovies
Recordingstillimages
Viewing movies
Viewing still images
HOME button
Remaining battery (approx.)
Recording status ([STBYI (standby) or
[REC] (recording))
Recording mode (HQ/SP/LP)
The recordi _g/pla)back nedia
Counter (hour/minute/second)
Recording remaining times
OPTION button
VIEW IMAGES button
Face Index set
hnage size
Apt)roxlmate number ol recordable stdl
images/Recording media
Return button
Playback mode
Curre _tly playi _g movie mmber/
Number of total recorded movies
Pre_qous/Next button
Video operation buttons
Data file name
Curre _tly playi _g still image number/
Number of total recorded still images
Playback tolder
Dist)lays only when the recording
media of still images is a "Memory Stick
PRO Duo."
Slide show button
VISUAL INDEX button
US
2O

Following indicators appear during
recording/playback to indicate the settings
of your camcorder.
Upper left Upper right
Center
ni
_[_,OMV[--vGALor_ _IMAGE SIZE
C,D Slide show set
[] Nightghot plus
S[_ Super NightShot plus
[_] Color Slow Shutter
[] PictBridge connecting
c\_[1_[,l,,3
@ _1 "_lllr'I_ Warning
Bottom (]enter
Upper left
x(_) SellLtimer recording
(_ _+ _- Flash/REDEYE REDUC
W_ MICREF LEVEL low
4:3 WIDE SELECT
._ BLT-IN ZOOM MIC
Upper right
WHITE BLACK Fader
FADER FADER
"g-d_F LCD backlight off
_BFF Drop sensor off
_;3 Drop sensor activated
0-@ a-E3
The media selected tbr
still images
Bottom
nii
Picture effect
JD+, Digital effect
@ IA_ Manual lbcus
@ [] -'_ @ SCENE SELECTION
[] Back light
_ _ _m_ White balance
'_ SteadyShot off
-E::::::::::::E::=_+
T_ TELE MACRO
1_] Face Index
"_" Tips
• Indicators and their positions are approximate
and difli:r from what you actually see. See
"Handycam Handbook" (PDF) tot details.
• The recording date and time is recorded
automatically on the media. They are not
displayed while recording. However, you can
check them as [DATA CODE] during playback.
EXPOSURE /
SPOT METER
o
=.
"o
US
21
 Loading...