

Sony DCRSR32E.C User Manual
3-098-549-12(1)
Digital Video Camera Recorder
Operating Guide
DCR-SR32E/SR33E/SR42E/SR52E/SR62E/SR72E/
SR82E/SR190E/SR200E/SR290E/SR300E
For details on the advanced operations, please refer
to “Handycam Handbook” (PDF).
© 2007 Sony Corporation

Read this first
Before operating the unit, please read this
manual thoroughly, and retain it for future
reference.
WARNING
To reduce fire or shock hazard, do not
expose the unit to rain or moisture.
CAUTION
Replace the battery with the speci fied
type only. Otherwise, fire or injury may
result.
Notice for customers in the
United Kingdom
A moulded plug complying with BS1363 is
fitted to this equipment for your safety and
convenience.
Should the fuse in the plug supplied need to
be replaced, a fuse of the same rating as the
supplied one and approved by ASTA or BSI
to BS1362 (i.e., marked with or mark)
must be used. If the plug supplied with this
equipment has a detachable fuse cover, be
sure to attach the fuse cover after you change
the fuse. Never use the plug without the fuse
cover.
If you should lose the fuse cover, please
contact your nearest Sony service station.
FOR CUSTOMERS IN EUROPE
ATTENTION
The electromagnetic fields at the specific
frequencies may influence the picture and sound of
this unit.
This product has been tested and found compliant
with the limits set out in the EMC Directive for
using connection cables shorter than 3 meters. (9.8
feet)
Disposal of Old Electrical &
Electronic Equipment
(Applicable in the European
Union and other European
countries with separate
collection systems)
This symbol on the product or on its
packaging indicates that this product shall
not be treated as household waste. Instead it
shall be handed over to the applicable
collection point for the recycling of electrical
and electronic equipment.
By ensuring this product is disposed of
correctly, you will help prevent potential
negative consequences for the environment
and human health, w hich could otherwise be
caused by inappropriate waste handling of
this product. The recycling of materials will
help to conserve natural resources.
For more detailed information about
recycling of this product , please contact your
local Civic Office, your household waste
disposal service or the shop where you
purchased the product.
Applicable Accessories: Remote
Commander (DCR-SR52E/SR62E/SR72E/
SR82E/SR190E/SR200E/SR290E/
SR300E)
Notice
If static electricity or elec tromagnetism causes data
transfer to discontinue midway (fail), restart the
application or disconnect and connect the USB
cable again.
2

Notes on use
• The camcorder is not dustproofed, dripproofed or
waterproofed. See “Precautions” (p.30).
• To prevent the hard disk from being broken or
recorded images from being lost, do not do the
following when either of the respective lamps of
the POWER switch (p.9) or the access lamp* is on:
– to remove the battery pack or AC Adaptor from
the camcorder.
– to apply mechanical shock or vibration to the
camcorder.
On recording
• Before starting to record, test the recording
function to make sure the image and sound are
recorded without any problems.
• Compensation for the contents of recordings
cannot be provided, even if recording or playback
is not possible due to a malfunction of the
camcorder, recording media, etc.
• TV color systems differ depending on the
countries/regions. To view your recordings on a
TV, you need a PAL system-based TV.
• Television programs, films, video tapes, and other
materials may be copyrighted. Unauthorized
recording of such materials may be contrary to
the copyright laws.
Save all your recorded image data
• To prevent your image data from being lost, save
all your recorded images on external media. It is
recommended that you save the image data on a
disc such as DVD-R using your computer*. Also,
you can save your image data using a VCR, or a
DVD/HDD recorder*.
• It is recommended that you save your image data
periodically, after recording.
Do not apply shock or vibration to your
camcorder
• The hard disk of the camcorder may not be
recognized, or recording or playback may not be
possible.
On the drop sensor
• To protect the internal hard disk from the shock
by dropping, the camcorder has the drop sensor
function*. When a drop occurs, or under a nongravity condition, the block noise to protect the
camcorder may also be recorded. If the drop
sensor catches a drop repeatedly, recording/play
back may be stopped.
Note on operational temperatures
• When the temperature of the camcorder becomes
extremely high or extremely low, you may not be
able to record or play back on the camcorder, due
to the protection features of the camcorder being
activated in such situations. In this case, an
indicator appears on the LCD screen (p.28).
When the camcorder is connected to a
computer
• Do not try to format the hard disk of the camcorder
using a computer. If you do so, your camcorder
may not operate correctly.
Note on using the camcorder at high
altitudes
• Do not turn on the camcorder in a low-pressure
area, where the altitude is more than 3,000 meters
(9,800 feet). Doing so may damage t he hard disk
drive of your camcorder.
Note on disposal/transfer
• If you perform [ FORMAT]* or formatting the
hard disk of the camcorder, you may not delete
data from the hard disk completely. When you
transfer the camcorder, it is recommended that
you perform [ EMPTY]* to prevent the
recovery of your data.
In addition to the above, when you dispose of the
camcorder, it is recommended that you destroy
the actual body of the camcorder.
About language setting
• The on-screen displays in each local language are
used for illustrating the operating procedures.
Change the screen language before using your
camcorder if necessary (p.9).
About this manual
• The LCD screens and indicators shown in this
manual were taken with a digital still camera, and
may look different from what you actually see.
• Design and specifications of recording media and
other accessories are subject to change without
notice.
• Unless otherwise specially in dicated, illustrations
in this manual are based on DCR-SR300E.
• The screenshots are from Windows XP. The
scenes may vary depending on the operating
system of the computer.
* Refer to “Handycam Handbook” (PDF).
3

Table of Contents
Read this first............................................................................................2
Notes on use............................................................................................. 3
Getting Started
Step 1: Checking supplied items...............................................................5
Step 2: Charging the battery pack ............................................................7
Step 3: Turning the power on, and setting the date and time ................... 9
Changing the language setting ..................................................................... 9
Step 4: Preparing for recording............................................................... 10
Recording/Playback
Recording................................................................................................11
Playback .................................................................................................13
Parts and functions used for the camcorder ........................................... 15
Indicators displayed during recording/playback......................................18
Saving images ........................................................................................20
Deleting images ......................................................................................20
Playing the image on a TV...................................................................... 21
Performing with a computer....................................................................22
Performing various functions - “ HOME” and “ OPTION” .............. 24
Troubleshooting
Troubleshooting ......................................................................................27
Warning indicators .................................................................................. 28
Additional Information
Precautions.............................................................................................30
Specifications..........................................................................................31
4
Step 1: Checking supplied items
Make sure that you have the following items
supplied with your camcorder.
The number in the parentheses indicates the
number of that item supplied.
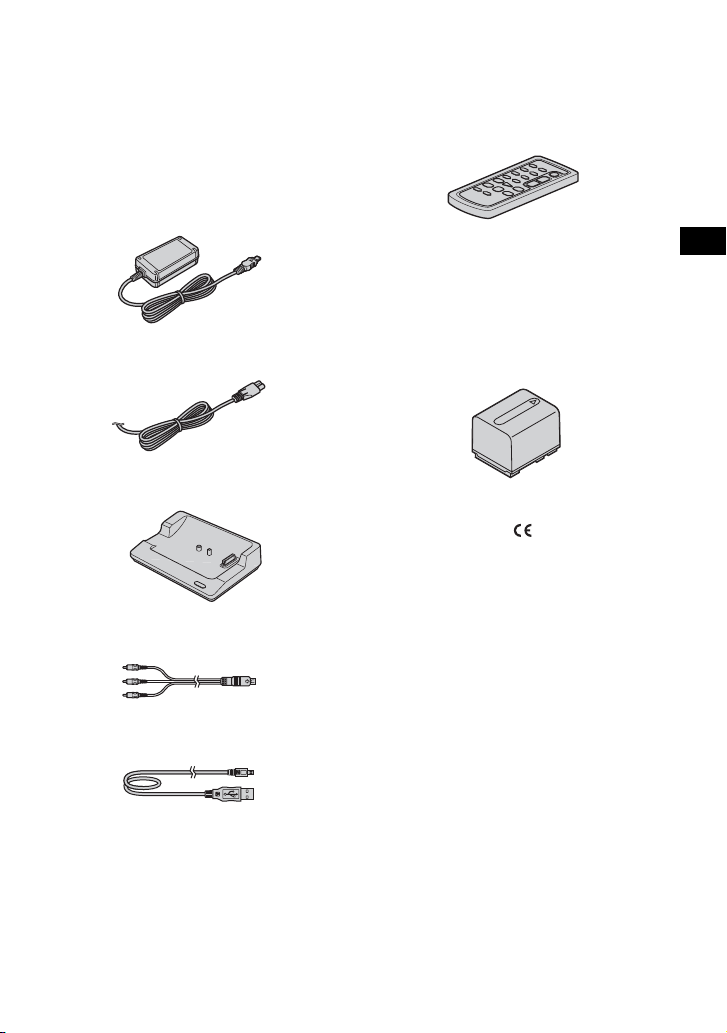
AC Adaptor (1) (p.7)
Mains lead (1) (p.7)
Handycam Station (1) (p.7)
A/V connecting cable (1) (p.21)
Wireless Remote Commander (1)
(except for DCR-SR32E/SR33E/SR42E)
A button-type lithium battery is already installed.
Rechargeable battery pack
NP-FH40 (1) (p.7) (DCR-SR32E/SR33E/
SR42E/SR52E/SR62E/SR72E/SR82E)
NP-FH60 (1) (p.7) (DCR-SR190E/SR200E/
SR290E/SR300E)
21-pin adaptor (1)
For the models with the mark printed on their
bottom surfaces only.
CD-ROM “Handycam Application
Software” (1) (p.22)
– Picture Motion Browser (Software)
– Handycam Handbook (PDF)
“Operating Guide” (This manual) (1)
Getting Started
USB cable (1) (p.23)
5
On the Remote Commander
(except for DCR-SR32E/SR33E/
SR42E)
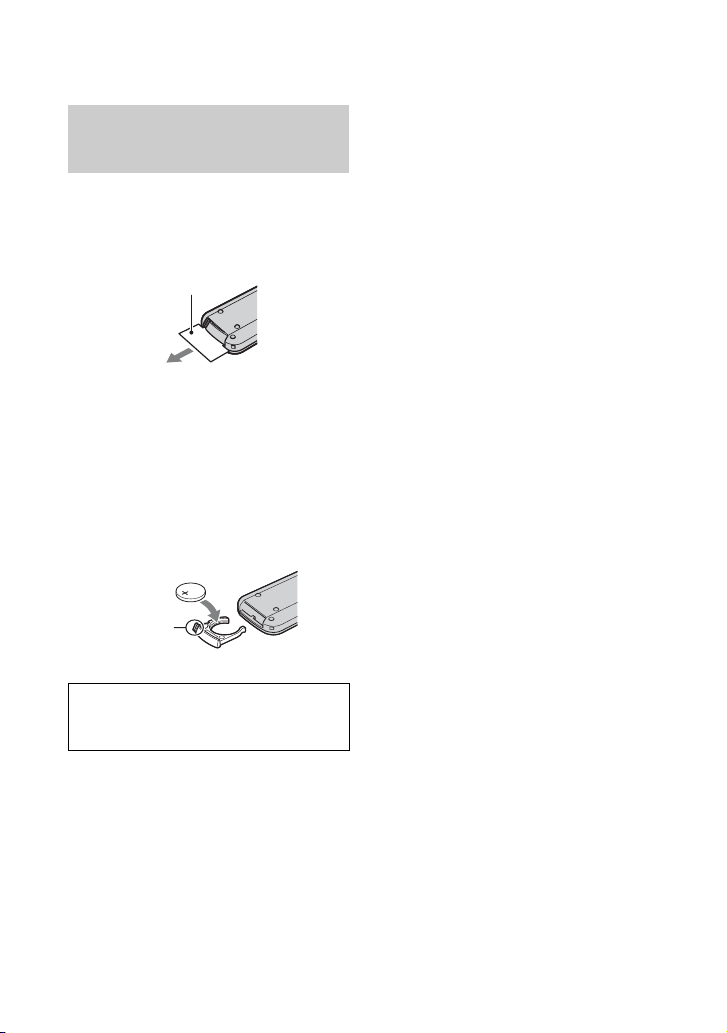
Using the Remote Commander for the
first time
Remove the insulation shee t before using the
Remote Commander.
Insulation sheet
To change the battery of the Remote
Commander
1 While pressing on the tab, inset your
fingernail into the slit to pull out the battery
case.
2 Place a new batte ry with the + side facing up.
3 Insert the battery case back into the Remote
Commander until it clicks.
Ta b
WARNING
Battery may explode if mistreated. Do not
recharge, disassemble or dispose of in fire.
• When the lithium battery becomes weak, the
operating distance of the Remote Commander
may shorten, or the Remote Commander may not
function properly. In this case, replace the battery
with a Sony CR2025 lithium battery. Use of
another battery may present a risk of fire or
explosion.
6
Step 2: Charging the battery pack
POWER
switch
Getting Started
Battery pack
DC IN jack
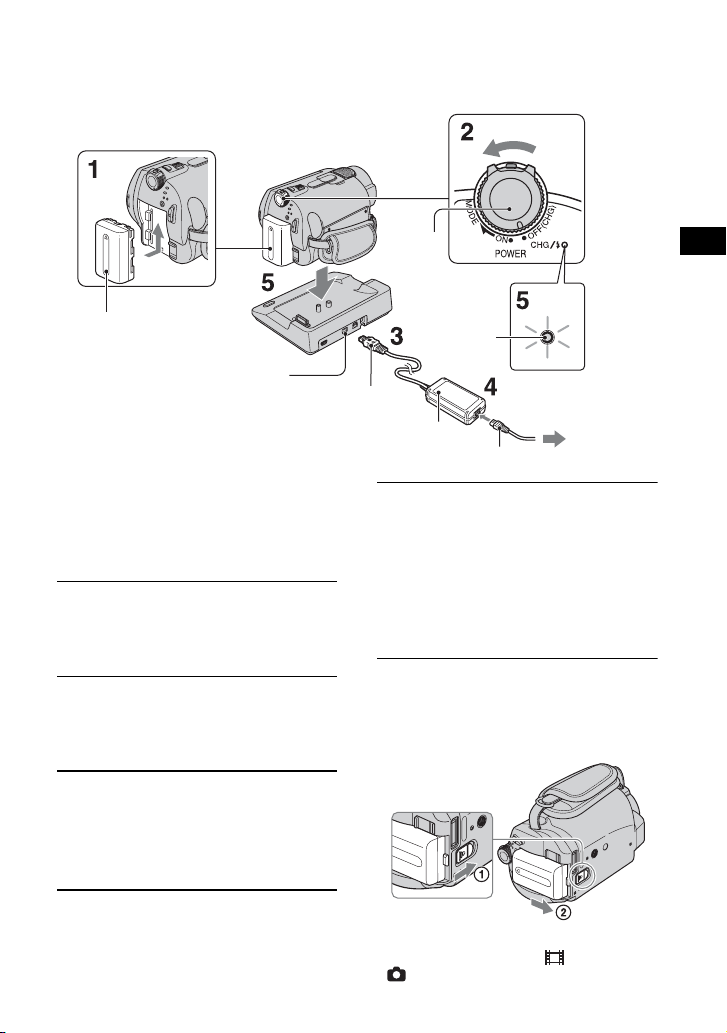
You can charge the “InfoLITHIUM”
battery pack (H series) after attaching
it to your camcorder.
• Your camcorder operates only with an
“InfoLITHIUM” battery pack (H series).
1 Attach the battery pack by sliding
it in the direction of the arrow until
it clicks.
2 Turn the POWER switch in the
direction of the arrow to OFF (CHG)
(The default setting).
3 Connect the AC Adaptor to the DC
IN jack on the Handycam Station.
Be sure that the v mark on the DC plug
is facing up.
CHG
lamp
DC plug
AC Adaptor
Mains lead
5 Set the camcorder onto the
Handycam Station securely.
The CHG (charge) lamp lights up and
charging starts. The CHG (charge) lamp
turns off when the battery pack is fully
charged. Remove the camcorder from the
Handycam Station.
To remove the battery pack
Turn the POWER switch to OFF (CHG).
Slide the BATT (battery) release lever and
remove the battery pack.
BATT (battery)
release lever
To t he
wall socket
4 Connect the mains lead to the AC
Adaptor and the wall socket.
• When you remove the battery pack or the AC
Adaptor, make sure that the (Movie) lamp/
(Still) lamp (p.9) is turned off.
7
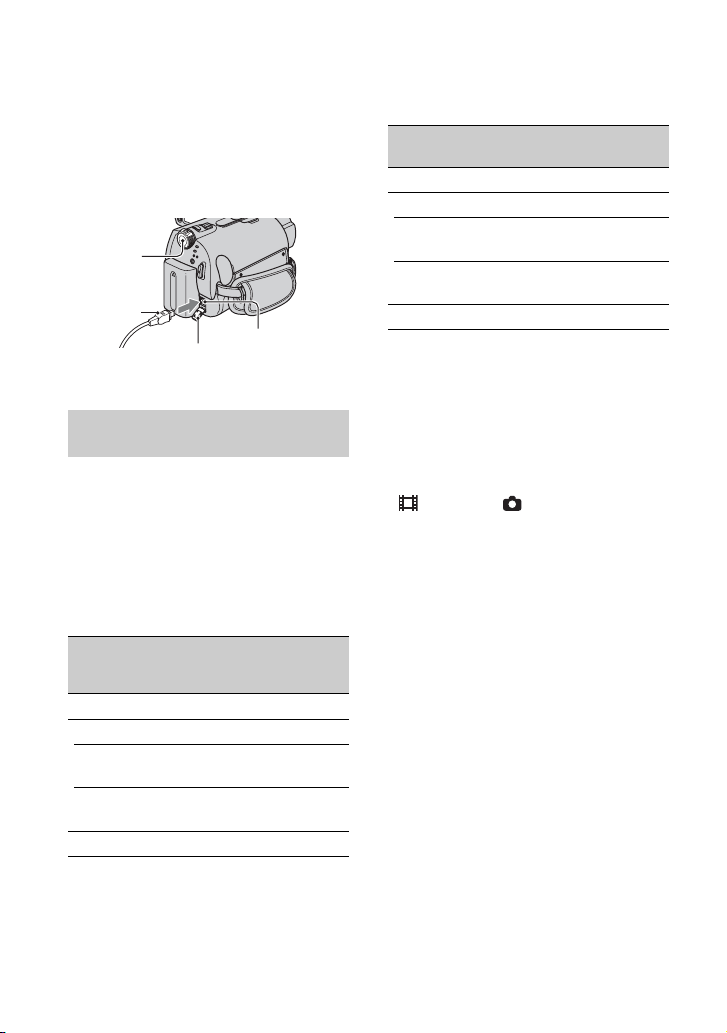
To charge the battery pack using only
the AC Adaptor
Turn the POWER switch t o OFF (CHG), the n
connect the AC Adaptor directly to the DC
IN jack on the camcorder.
POWER
switch
DC plug
DC IN jack
Open the jack
cover
Available running time for the
supplied battery pack
Charging time:
Approximate time (m in.) required when you
fully charge a completely exhausted battery
pack.
Recording/Playback time:
Approximate time (min.) available when you
use a fully charged battery pack.
NP-FH40:
Charging time
Recording time*
Continuous
recording time
Typ ic al
recording time
Playback time
DCR-SR32E/
SR33E/
SR42E
1
4
*
125 125
105
50
120 110*
(Unit:min.)
DCR-SR52E/
SR62E/
SR72E/SR82E
100*
8
90*
45*
50*
NP-FH60: (Unit:min.)
DCR-SR190E/
SR200E
Charging time
Recording time*
1
Continuous
recording time
Typ ic al
recording time
Playback time *
*1When [REC MODE] is set to [SP].
2
*
When the LCD backlight turns on.
3
When the LCD backlight turns off.
*
4
*
Typical recording time shows the time when you
repeat recording start/stop, turning the power on/
off and zooming.
On the battery pack
• Before changing the battery pack, turn the
POWER switch to OFF (CHG) and turn off the
(Movie) lamp/ (Still) lamp (p.9).
• The power will not be supplied from the battery
as long as the AC Adaptor is connected to the DC
IN jack of your camcorder or the Handycam
Station, even when the mains lead is disconnected
from the wall socket.
On the charging/recording/playback time
• Times measured when using the camcorder at
25°C (77°F) (10°C to 30°C (50°F to 86°F) is
recommended).
• The available recording and playback time will
be shorter when you use your camcorder in low
temperatures.
• The available recording and playback time will
2
3
2
3
2
be shorter depending on the conditions under
which you use your camcorder.
On the AC Adaptor
• Use the nearby wall socket when using the AC
Adaptor. Disconnect the AC Adaptor from the
wall socket immediately if any malfunction
occurs while using your camcorder.
• Do not use the AC Adaptor placed in a narrow
space, such as between a wall and furniture.
• Do not short-circuit the DC plug of the AC
Adaptor or battery terminal with any metallic
objects. This may cause a malfunction.
• Even if your camcorder is turned off, AC power
(mains) is still supplied to it while connected to
the wall socket via the AC Adaptor.
4
*
2
DCR-SR290E/
SR300E
135 135
2
115*
125*
55*
60*
165 160
100*
3
105*
2
3
50*
50*
2
3
2
3
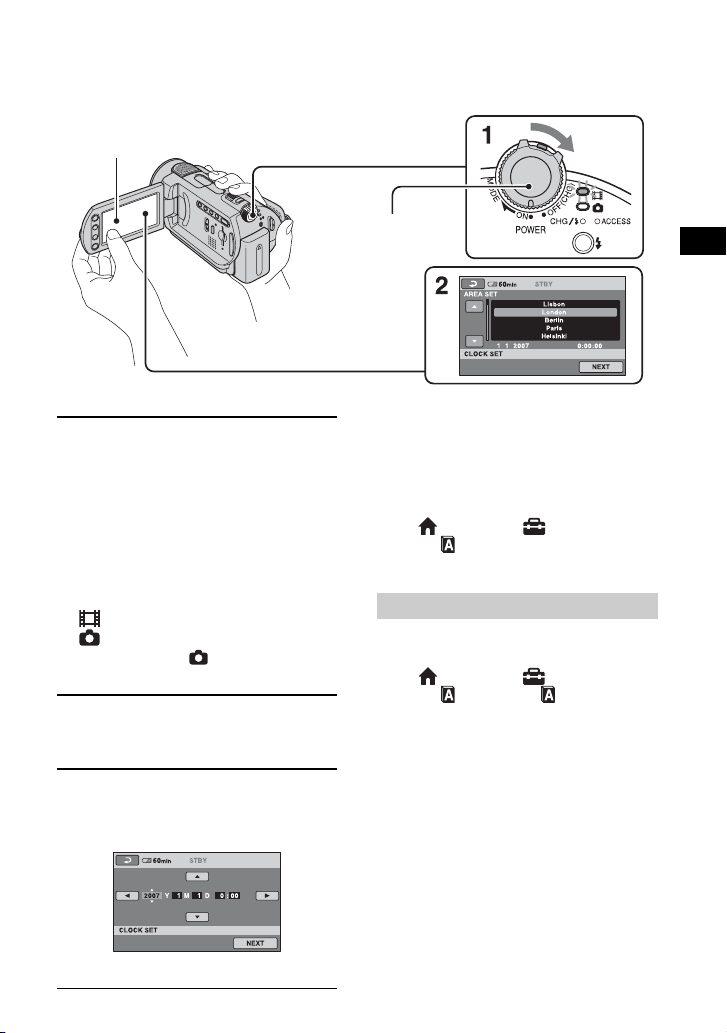
Step 3: Turning the power on, and setting the date and time
Touch the button on the
LCD screen.
POWER switch
When using the
camcorder for the
first time, the
[CLOCK SET]
screen appears on
the LCD screen.
1 While pressing the green button,
turn the POWER switch repeatedly
in the direction of the arrow until
the respective lamp lights up.
When you record or play back an image,
turn the POWER switch in the direction
of the arrow repeatedly until the
respective lamp lights up.
(Movie): To record movies
(Still): To record still images
• When you turn on (Still) lamp, the screen
aspect ratio is changed to 4:3 automatically.
2 Select the desired geographical
area with
v/V, then touch [NEXT].
3 Set [SUMMERTIME], [Y] (year), [M]
(month), [D] (day), hour and
minute.
Getting Started
• The date and time does not appear during
recording, but they are automatically recorded on
the hard disc, and can be displayed during
playback.
To reset the date and time
Touch (HOME) t (SETTINGS) t
[CLOCK/ LANG] t [CLOCK SET], and
set the date and time.
Changing the language setting
You can change the on-screen displays to
show messages in a specified language.
Touch (HOME) t (SETTINGS) t
[CLOCK/ LANG] t [ LANGUAGE
SET], then select the desired language.
The clock starts.
9
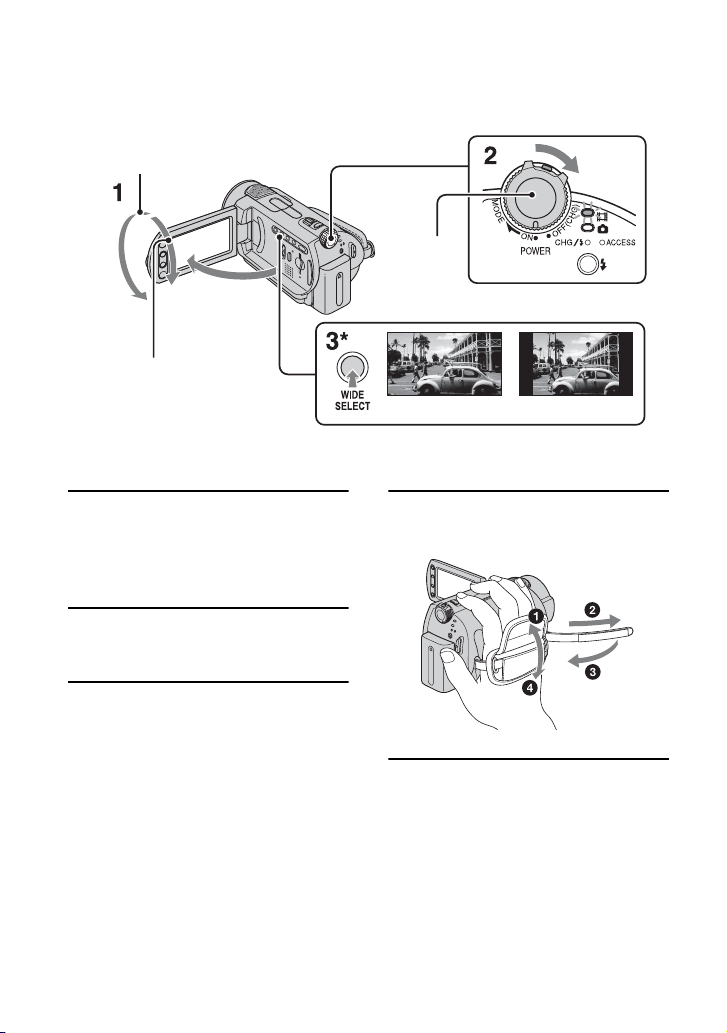
Step 4: Preparing for recording
2 180 degrees (max.)
POWER
switch
1 90 degrees
to the
camcorder
2 90 degrees
(max.)
16:9 (wide)
* Except for DCR-SR32E/SR33E/SR42E.
4:3
1 Adjust the LCD panel.
Open the LCD panel 90 degrees to the
camcorder (1), then rotate it to the best
angle to record or play (2).
2 Turn the POWER switch to turn on
your camcorder.
3 Press WIDE SELECT repeatedly to
select the desired screen aspect
ratio (except for DCR-SR32E/
SR33E/SR42E).
10
4 Fasten the grip belt and hold your
camcorder correctly.
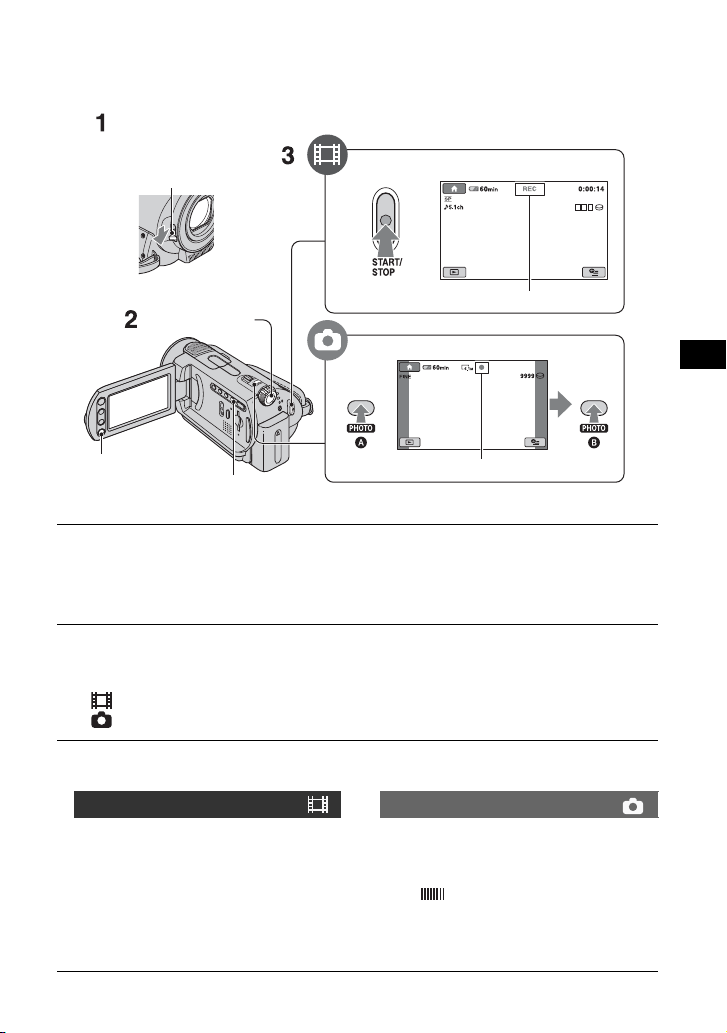
Recording
Lens cover switch
(DCR-SR32E/SR33E/
SR42E/SR52E/SR62E/
SR72E/SR82E)
POWER switch
START/STOP A
[STBY] t [REC]
PHOTO
START/STOP B
EASY button
Flashing t Lights up
1 Slide the lens cover switch to open (DCR-SR32E/SR33E/SR42E/SR52E/SR62E/
SR72E/SR82E).
• For DCR-SR190E/SR200E/SR290E/SR300E, the lens cover opens and closes automatically.
2 Turn the POWER switch until the respective lamp lights up.
Press the green button only when the POWER switch is in the OFF (CHG) position.
• (Movie): To record movies
• (Still): To record still images
3 Start recording.
Movies Still Images
Press START/STOP A (or B).
To stop recording, press START/STOP
again.
Press PHOTO lightly to adjust the
focus A (a beep sounds), then press
it fully B (a shutter click sounds).
When disappears, the image has been
recorded.
• Still images are recorded on the hard disk in the
default setting.
Recording/Playback
11
 Loading...