

Sony DCR-SR100 Owner’s Manual

CameraOperating
Guide
Getting Started
Additional information on this product and
answers In frequently asked quesliens can be
found at our Cuslemer Support Website.
http:i/www.sony.net/
_ Printed on 100% recycled paper using
VOC (Volatile Organic Compeund)-free
vegetable oil based ink.
Printed in Japan
2672377120
US
Digital Video Camera Recorder
DCR-SRIO0
_ MfoLITHIUM 0
© 2006 Sony Corporation
Using the Setup items a
Additional Information
_; For connecting to
your computer,
see "Computer
Application
Guide".
Editing images a
Dubbing, Printing /
Troubleshooting
Glossary, Index
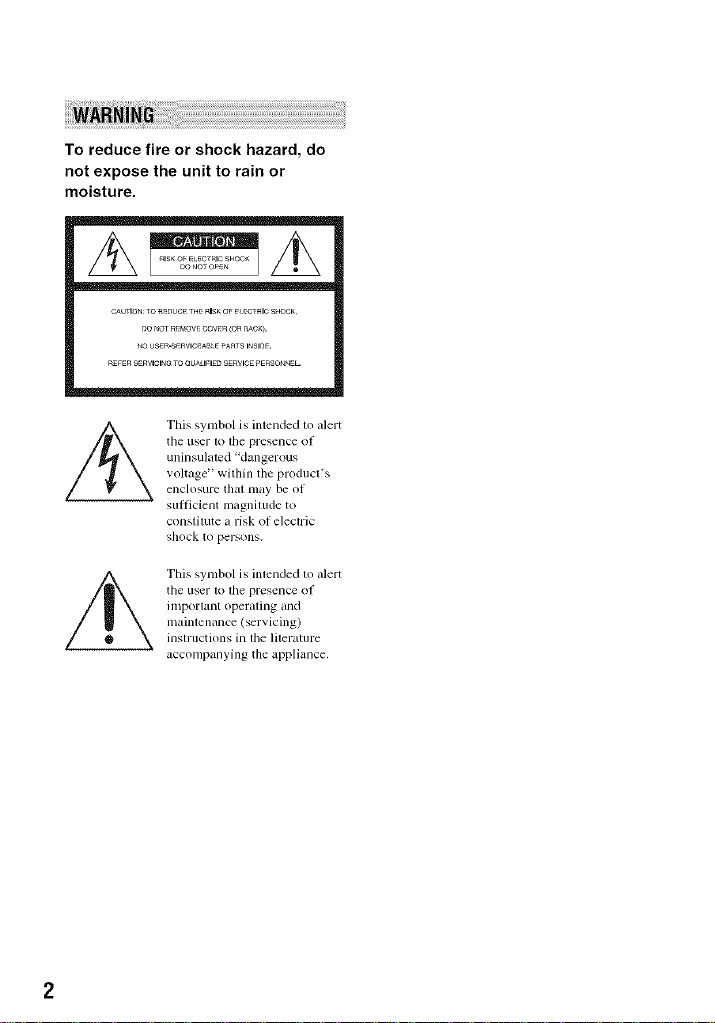
To reduce fire or shock hazard, do
not expose the unit to rain or
moisture.
CAUTIONTO_UC_ THERISKOF_ _CT_ICS_IOCK
nO _omREMOWCOVER(O__AC_.
_OUSER-SEaVlC_A_EPA_TSI_SI_F.
REFERSERVlClN_TOOU_IFIED SERVICEPERSO_E[-
This symbol is intended to alert
tile user to file presence of
uninsulated 'dangerous
voltage" within the product's
enclosure that nmy be of
sut_icient magnJlude to
constitute a risk <if electric
s]lock to persons.
This symbol is intended to alert
the user lvllhe presence of
important operating and
maintenance (servicing)
instructions in tile lilerature
accompanying the appliance.
IMPORTANTSAFEGUARDS
For your protection, please read these safety
instructions completely before operating
the appliance, attd keep this manual for
future reference.
Carefully observe all warnittgs, precautiotts
and ittstructions oil the appliattce, or the otte
described iu the operating instructions :rod
adhere to them.
PowerSources
This set sllould be operaled ()Ill}' li'om the lype ol
power source indicaled on tile marking label. It
you are not sure oI tile type of electrical power
supplied to your home. consull your dealer or
local power conlpany. For those sets designed to
operate lronl baUel y power, or ot]ler sources, l'e|_r
to tile operaling instruclions,
Polarization
This set may be equipped wilh a polarized ac
power coM phlg (a phlg Ila_ing one blade wider
titan the olher).
This plug will Ill inlo the power outlel only one
way. This is a salcty leature. If you are unable to
insert tile plug hdly into lhe oullet, lly reversing
the plug. If the plug sbould still lifil to fil, conlact
your electrician to have a suitable outlet installed.
Do not delirat tile salcty purpose of tile polarized
plug by lbrcing il in.
Overloading
Do noI o_.erload wall oullets, extensioll cords or
comenience receptacles beyond their c_,pacity,
since lids C_lll result ill lirc or electric shock.
ObjectandLiquidEntry
Ne_er push objects of any kind into lhe set
through openings as they may touch dangerous
_,olliJge points Ill" short OUt parts t]lglt could rcsu][
in a fire or electric shock. Never spill liquid of any
kind on lhe set.
Attachments
Do noI use att_lcblllents llOt reCOlllnlended by tile
ii/anultlc[urcr, as they may cause Ilazards,
Cleaning
Unplug the sel fi'om the wall outlet belore
cleaning or polishing il. Do not use liquid cleaners
or aerosol cleaners. Use a clolll lightly dampened
with w_tter lor cleaning tile exterior ol tile set.
Water andMoisture
Do not use power-line operi/ted _ts neilr waler
lor example, near a bathtub, washbowl, kilchen
sink, or lmmdry tub, in it wet basemenl, or near _l
swimming pool, etc.
Power-CordProtection
Route tile power cord so thilt it is llot likely to be
walked on or pinched by items placed upon or
against tllem_ paying particular attention to lhe
plugs, lX:ccptacles, and tile point where tile cord
exils lr<nn the appliance.
Accessories
Do not place tile set Oil illl/instilble carl, slain(I,
tripod, bracket, or table. The sel may lall. causing
serious inju W to a child or an adult, and serious
danltlge to tile set. Use only a carl, stand, tripod,
brackel, or lable recommended by lhe
ii/anul_lclur_2 r,
Ventilation
The slols and openings in llle cabinet arc prm ided
lor necessmy velailatkm. To ensure reliable
operation OI tile set, and to protect it h'oln
overhealing, lhese slots and openings nmsl never
be blocked or covered.
Never cover tile slols and openings wilh a cloth
or other nlalerials.
Never block tile slots and openings by placing
tile set on a bed, sol_,, rug, or other similar
sur|_lce.
Never place the set in a confined space, such as
a bookcase, or buill-in cabinel, unless proper
venlilation is provided.
Do not place lhe set near or over a radiator or
Ileal register, or wllerc il is exposed to direct
sunlig]a,
Contmued='_ 3
_MPOR_NT SAFEGUARDS{c0_ti_÷_}
Lightning
For _ldded protection for this _t during _Llighming
Slol'm, or when it is let_ unatlended and unused lor
long periods ol time, unplug it from tile w_dl
oul]et _lnd disconnect file illllenlla or c_tble system.
This will prevent damage to tile set due to
lighming and power-line surges.
DamageRequiringService
Unplug the sel fiom tile xw,ll outlel and rclPr
sel_icing to qualified svlvice personnel under file
Lollowing conditions:
When the power cord or plug is d_ml_lgedor
If liquid II_tsbeenspilled or objects Ila_e fallen
into tile set.
If the _t has been exposed to rain or waler.
If the set has been subjecl to excessive shock by
being dropped, or file cabinet has been
damaged.
If the set does not opert_te normally when
Iollowing the operaling instructions. A_ljust
only l]lose conlrols lhal are specified in the
operating instructions, hnproper adjuslment of
other controls may resull in damage and will
ofien require exlensive work by a qualified
technician lw reglore the set to norlnal operalion,
When the set exhibits a distinct change in
perlormance this indicates a need lbr service.
Servicing
Do 11o1attelnpl to ser_,ice tile sel yourse]t as
opening or rt:nloving covers may expose you to
dangerous voltage or olher hazards.
Reier all servicing to qualified service personnel,
Replacementparts
When replacement paris m'e required, be sure lhe
sel'_ ice technician has used replm.vlnent pmts
specified bythe manufacturer lll_lt have tile same
chari,cteristics as tile original parls.
Unauthorized substitutions may rcsull in fire,
electric shock, or olher hazards.
SafetyCheck
Upon completion of rely selvice or repairs to tile
sel. ask the service lechniciiul to perl_)rnl ro/itine
salary checks (as specified by file manulacmrcr)
to determine thai the set is in sale operating
condilion,

Readthis first
Before operating the unit, please read this
manual thoroughly, and retain it for future
reference.
Replace the battery with the
specified type only. Otherwise, fire
or injury may result.
RECYCLINGLITHIUM-IONBATTERIES
Lithiuna-lon batteries are .-f_P_Fi_.
recyclable. You can hel l) preserve
our ellvirolllllelll by relurllillg
your used rechargeable batteries
to the colleclion and recycling
location nearcsl you.
For morn inlormation regarding recycling ol
rechargeable batteries, call toll l)ee 1-800-822-
8837. or visit hop://www.rbrc.org/
Caution: Do not handle damaged or leaking
Lilhiuu/-kln bal*eries.
If you have any questions about this
product, you may call:
Sony (!ustomer Information (!enter 1-80(I-
222-SONY (7669).
The number below is for the F(!(! related
matters only.
RegulatoryInformation
Declaration of Conformity
Trade Name: SONY
Model No.: DCR-SR 100
Responsible Parly: Sony Eleclronics Inc.
Address: 16530 Via Esprillo, San Diego, CA
92127 U.S.A
Telephone number: 858-942-2230
This device complies with Part 15of the FCC
Rules.
Operation is su_iecl 1olhe l_lllowing two
conditions:
(1) This device may not cause harmlul
intcrl_mnce, and (2) this device must accept any
interl_rence received, including interlcrence
lhal may cause undesired operation.
CAUTION
You are cautioned thai _my ch_ulges or
moditic_tions not expressly _pproved in tills
manual could void your authority to opelale this
equipmenl.
Continued ='_ 5
Note
Tbis equipment has been tested and Ibund to
comply with the limits Ior a ('lass B digital
device, pursuanl to Part 15 of the FCC Rules.
Tbese linlils are designed lo provide reasonable
protection againsl harnfful interlcmncc ill a
residential inslallation. This equipnlent generates,
uses. and call radiale radio Irequency energy and.
if nol installed and used in accordance with the
Jnslruclions, inay cause barll]lll] illtcrlt2rclll2e to
radio comnnmications.
However, tbelv is no guarantee thai interlelvnce
will not occur in a particular installation. If this
equipment does cause harmhfl interlbrcnce to
radio or television reception, which can be
deternlined by turning file equipment oil and on,
tile user is encouraged to tit' to correct tile
interlbrence by one or nlorc of tile Iollowing
Illeasures:
Reorient or relocate the receiving antenna.
Increase the separation belween file equipnlent
and receiver.
Conllect tile equipment hllo all oullel Oll a
circuit ditllrrent Ironl that to whicb file receiver
is connected.
Consult tbe dealer or an experienced radio/TV
lechnician R_r help.
Tile supplied intcllm.v cable inusl be used with the
equipmenl ill order 1o conlply with file limits lot a
digilal device pursuanl to Subparl B of Parl 15 of
FCC Rules.
Owner'sRecord
Tile model and serial nunlbers are located on tile
bottom. Record tile serial nunlber ill tile space
provided below. Reli:r to these nunlbers whene_ er
you call your Sony dealer regarding Ibis product.
Model No. DCR-SR 100
Serial No.
Model No. AC-
Serial No.
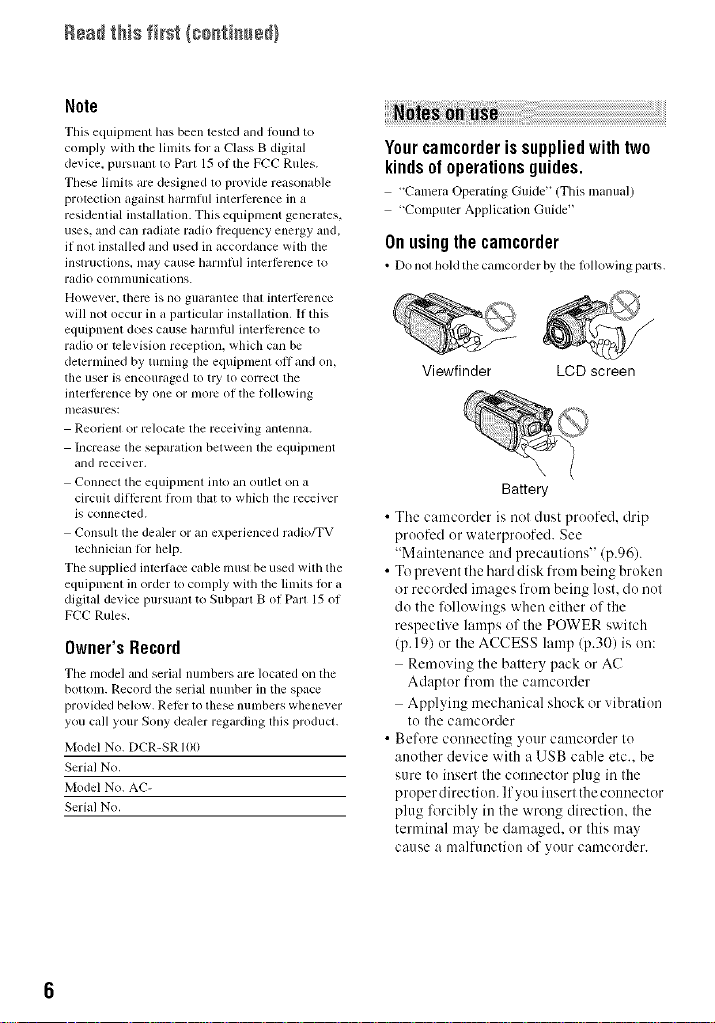
Yourcamcorderissuppliedwithtwo
kindsofoperationsguides.
"Camera Operating Guide' (This u/allua])
"Conlpuler Applicalion Guide"
Onusingthe camcorder
• Do nol boM tile canlcorder by tile lollowing part',.
Viewfinder LCD screen
Battery
• The camcorder is not dust proofed, drip
proofed or waterproofed. See
"Maintenance attd precautions" (p.96).
• To prevent the hard disk from being broken
or recorded images from beittg lost. do not
do the followittgs when either of the
respective lamps of the POWER switch
(p. 191 or the ACCESS lamp (p.30) is on:
Removing the battery pack or AC
Adaptor from the camcorder
Applyittg mechanical shock or vibration
to the camcorder
• Before connecting your camcorder to
another device with a USB cable etc.. be
sure to insert the cotmector plug in the
proper directiott, lfyou ittsert the cotmector
plug %rcibly in the wrong direction, the
terminal may be damaged, or this may
Cause a nl_l]f/lnctioll of yo/lr catllcorder.
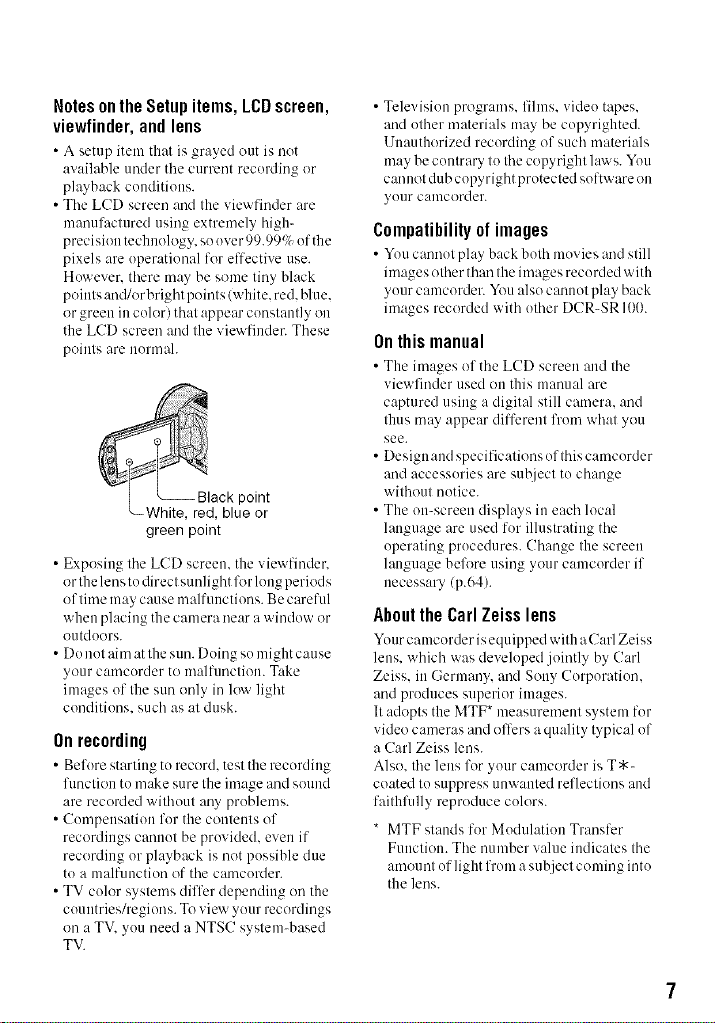
Notes on the Setup items, LCD screen,
viewfinder,and lens
• A setup item that is grayed out is not
available under tile current recording or
playback conditions.
• Tile LCD screen and the viewfinder are
manufactured using extremely high-
precision technology, so uver99.99% of the
pixels are uperational for effective use.
Huwever. there may be some tiny black
points and/orbright points (white. red. blue.
or green in colorl that appear constantly on
the LCD screen and the viewfinder. These
poiuts are uormah
"--White, red, blue or
green point
• Exposing the LCD screen, the viewfinder,
or the lens to direct sunlight l\_r long period s
of time may cause malfunctions. Be careful
when placing the camera near a window or
outdoors.
• Do not aim at the sun. Doing su might cause
your camcurcler to malfunction. Take
images of the sun only in lo'_ light
conditiuns, such as at dusk.
point
Onrecording
• Befure starting tu record, test the recuMiug
function tu make sure the image and sound
are recorded without any problems.
• Cumpeusation for the contents of
recordings cannut be provided, even if
recording or playback is not pussible due
to a malfunction of the camcorder.
• TV color systems differ depending on the
cuuutries/regions. To view your recordings
on a TV. yuu need a NTSC system-based
TV.
• Televisiun programs, fihns, vide() tapes,
and uther materials may be copyrighted.
Unauthorized recording of such materials
may be cuutrary to the copyright l:r_ s. You
can not dub copyright protected software on
yuur caulcorder.
Compatibility of images
• Yuu cannot gla> back both mux ies and still
images other than the images recurded with
your camcorder. You alsu cannot play back
images recorded with uther DCR-SR 100.
Onthismanual
• The images of the LCD screen and the
viewfinder used on this manual are
captured using a digital still camera, and
thus may appear different frum what you
see.
• Design aud specifications of this camcorder
and accessories are subject to change
without notice.
• The on-screen displays in each local
language are used for illustrating the
operating prucedures. Change the screen
language befl_re using your camcorder if
necessary (p.64).
About the Carl Zeiss lens
Yuur cmncurder isequipped with a Cmi Zeiss
lens. which was developed jointly by Carl
Zeiss. in Germany, and Sony Corporation.
and pruduces superiur images.
It adopts the MTF* measurement system fur
video cameras and offers a quality typical uf
a Carl Zeiss lens.
Also. the lens for your camcorder is T*-
coated to suppress unwanted reflections and
faithfidly reproduce colors.
* MTF stands fur Mudulatiuu Transfer
Function. The number value indicates the
amount uflight from a subject coming into
the lens.
Notesonusingthe HardDiskDriveHandycam
Saveall yourrecordedimage data
• hi tile case of your inlage data being dmnaged,
sa_e all your recorded images. It is recon/mended
that you save tile image data on a DVD using your
computer (see "Computer Application Guide).
Also, you can save it using VCPJDVD device
(p.71).
• II is icconnnended lhal you save your inlage dala
periodically aller recording.
Donotapplyshockorvibrationtoyour
camcorder
• Tile hm'd disk of tile cmncorder may not be
recogni/cd, or recording or playback nlay not be
possible.
• Especially, during recording/playback, do not
apply shock. After recording, do not apply
vibration or shock to the canlcorder, while the
ACCESS lanlp is lit.
• While using tile shoulder belt (not supplied), do
not crash tile camera against a subject.
Onthe dropsensor
• To protect the internal hard disk h'om tile shock
by dropping, tile cmncorder has tile drop sensor
Ihnction (p.60). When _ldrop occurs, or under a
non-gravity condition, the block noise to protect
the camcorder may also be recorded. If the drop
_nsor catches a drop repeatedly, rccording/play
back maybe slopped.
Notes on BatteryPack/ACAdaptor
• While tile ACCESS lamp is lit, be sure to avoid
tile Rdlo',vings. They may cause nlldhulctions.
Renloving tile baltely pack
Renloving tile A(-" Adaptor/whi]e chm'ging
using file AC Adaptor)
• Be sure to retllo_,e tile battery pack or tile At-"
Adaptor after turning off tile POWER switch.
Note on operationaltemperatures
• When tile temperatulv otthe camcorder beconles
extremely high or exnvmely low, you may not
record or playback tile cmncorder to provide
protection to tile Calllcorder. hi case of this, it
nlessage appears on tile LCD screen (p.89).
Note on usingthe camcorder in
highlands
• Yo/i CallllOl use tile C_lillcorder in _1h)vv-press/irc
area, where its allimde is nlore lhan 3A)00 nlelers
19,800 lPet).
Noteondisposal/transfer
• If you perti)rn_ [HDD FORMAT] (p.59) or
ILwnlatting tile camcorder, you may not delete data
l)'onl tile hard disk completcly. When you translcr
tile camcorder, it is rcconlnlended that you
perlorm [EMPTY HDD] (p.60) to nlake it
dilficull to recover your data. In addition to tile
above, when you dispose of tile canlcorder, it is
reconnnended that you destroy tile actual body of
tile camcorder. This may prevent data recovery
on tile hard disk of tile calncorder.
Ifyoucannotrecord/playbackimages,
perform[HDDFORMAT]
• If you repeat rccording/deleting imnges lor a long
Iinle. Iraglllelllalion occ/irs, hDages cannol be
saved/recorded. Ill s/Ich case, sitve the inl21ges to
pertorm [HDD FORMAT] (p.59).
Fragmentation _" Glossm'y (p.101 )
TableofContents
IMPORTANT SAFEGUARDS ................................................................... 3
Read this first ............................................................................................ 5
Notes on using the Hard Disk Drive Handycam ........................................ 8
What you can do with your Hard Disk Drive Handycam .......................... 12
Using your Hard Disk Drive Handycam ................................................... 14
Step 1: Checking supplied items ............................................................. 15
Step 2: Charging the battery pack ........................................................... 16
Step 3: Turning the power on, and holding your camcorder ................... 19
Step 4: Adjusting the LCD screen and viewfinder ................................... 20
Step 5: Using the touch panel ................................................................. 21
Step 6: Setting the date and time ............................................................ 22
Step 7: Selecting the aspect ratio (16:9 or 4:3) of the recording
image .......................................................................................... 23
Using Easy Handycam operation ............................................................ 24
Recording with ease ................................................................................ 26
Playback with ease .................................................................................. 28
Recording ................................................................................................ 30
Playback .................................................................................................. 31
Searching for the desired images by date (Date Index) ............................ 32
Functions used for recording/playback, etc ............................................. 34
Recording
To use zoom
To use the flash
Contmuedm_ g
TaNe of Ce_te_ts/ce_ti_÷_}
To record in dark places (NightShot)
To adjust the exposure for backlit subjects (BACK LIGHT)
To record sound with more presence (5.1ch surround recording)
To adjust the focus for an off center subject
To fix the exposure for the selected subject
To add special effects
To record in mirror mode
To use a tripod
To attach the shoulder belt
Playback
To play back a series of still images (Slide show)
To use Playback zoom
Recordingtplayback
To check the remaining battery
Check the available free hard disk space
To turn off the operation confirmation beep
To initialize the settings (Reset)
Other part names and functions
Checking/Deleting the last scene (Review/Review deleting) .................. 38
Indicators displayed during recording/playback ...................................... 39
Remote Commander ............................................................................... 41
Playing the image on a TV ...................................................................... 42
Saving images ........................................................................................ 44
Deleting images ...................................................................................... 45
10
Using the Setup items ............................................................................. 48
Setup items ............................................................................................. 50
_ CAMERA SET ................................................................................... 52
Settings to adjust your camcorder to the recording conditions
(EXPOSURE/WHITE BAL./STEADYSHOT, etc.)
[] STILL SET ......................................................................................... 56
Settings for still images
(BURST/QUALITY/IMAGE SIZE, etc.)
PICT. APPLI .................................................................................... 57
Special effects on images or additional functions on recording/playback
(PLOT.EFFECT/D. EFFECT, etc.)
HDD SET .......................................................................................... 59
Settings for the hard disk (HDD FORMAT/HDD INFG, etc.)
_ STANDARD SET ............................................................................. 61
Settings while recording or other basic settings
(REC MODE/LCD/VF SET/USB SPEED, etc.)
"J'@ TIME/LANGU ................................................................................... 64
(CLOCK SET/AREA SET/LANGUAGE, etc.)
Customizing Personal Menu ................................................................... 65
Creating the Playlist ................................................................................ 67
Playing the Playlist .................................................................................. 69
Setting image protection (Protection) ...................................................... 69
Dubbing to VCR/DVD devices ................................................................. 71
Recording images from a TV or VCR/DVD device .................................. 73
Printing recorded still images (PictBridge compliant printer) .................. 75
Jacks to connect external devices ........................................................... 77
Troubleshooting ....................................................................................... 78
Warning indicators and messages .......................................................... 88
Using you r camcorder abroad ................................................................. 92
Files on the camcorder hard disk/folder structure ................................... 94
About the "InfoLITHIUM" battery pack ..................................................... 95
Maintenance and precautions ................................................................. 96
Specifications .......................................................................................... 99
Glossary ................................................................................................ 101
Index ...................................................................................................... 103
11
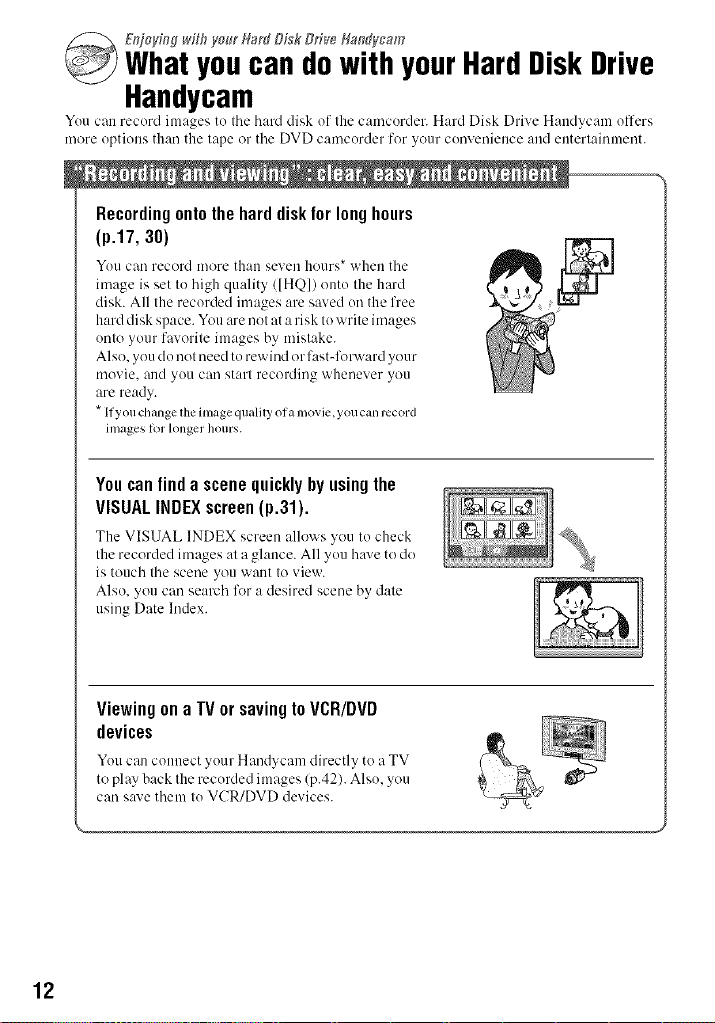
Et_joy&g _,i_flycmr Ha€# Disk Drive Hamfycam
Whatyoucan dowith yourHardDiskDrive
Handycam
You can record images to tile hard disk of the camcorder. Hard Disk Drive Haudycam offers
more options than the tape or tile DVD camcorder for your convenience and entertainmm]t.
U
Recordingontothe hard diskfor longhours
(p.17,30)
YOU c_m record more thLm seveu ho/lrs* wheu the
image is set to high quality ([HQ]) onto file hard
disk. All Ihe recorded images are saved on the free
hard disk space. You are not at a risk to write images
onto your favorite images by mistake.
Also, you do not need to rewind or f:_st-forward your
movie, aud yo/1 can start recording whenever yo/1
are ready.
*If you change the image quality of a movie, you can record
images k_l longer hours.
Youcanfindascenequicklybyusingthe
VISUALINDEXscreen(p.31).
The VISUAL INDEX screen allo_ s _ou to check
the recorded images _lta ghmce. All you h_lve to do
is touch tile scene you want to view.
Also, you can se_wch lkw _J desired scram by d_Jte
using Date Index.
12
Viewingona IV orsavingtoVCR/DVD
devices
You can connect yo/lr Hand?cam directly to a TV
to play back the recorded images (p.42). Also, you
can s:e,'e them to VCR/DVD devices.
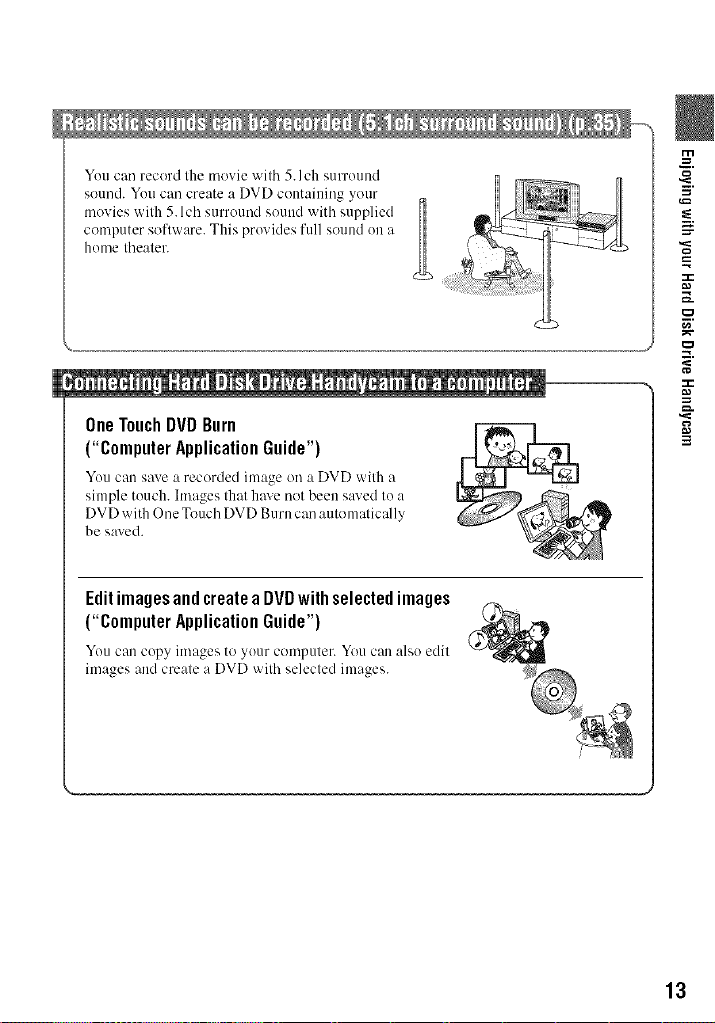
Yuu can record the movie with 5.lch surround
sound. You can create a DVD containing your
movies with 5. lch surround sound with supplied
computer software. This provides full sound on a
home theater.
OneTouchDVDBurn
("ComputerApplicationGuide")
Yuu can save a recorded image oil a DVD with a
simple touch, hnages that have not been saved to a
DVD with One Touch DVD Burn can automatically
be saved.
Editimagesandcreate a DVDwithselectedimages
("ComputerApplicationGuide")
Yuucan copy images to your computer. Youc:malso edit
images and create a DVD with selected images.
/
13
UsingyourHardDiskDriveHandycam
Images are recorded oil tile internal hard disk. When tile hard disk becomes full. you canuut
record nc'_ images. It is recommended that you save tile image data periudically, then delete
the utmecessary images from the hard disk of your camcurder.
• Ifyou delete the images, you can record imageson thelree hard disk spaceagain.
Preparing(p.15)
Recording(p.3O)
ViewingonyourHardDiskDriveRandycam
• Viewingonthe LCDscreen (p.3l)
• ViewingonaTV (p.42)
Saving
Save recorded images on a DVD or :dike.
• SavingimagesonaDVDusingacompuler ("Coml)uterApplication
Guide").
• Copying images to a computer ("Compuler Ai)l)licalionGuide").
• Dubbing on VCR/DVD devices (p.71).
14
Deleting images
Delete tile image data that has been saved on your camcorder.
If yuu delete the images, you can record new images on the
free hard disk space again.
• Selectimage and delete il (p,45).
• Deleleall llle images ([HDDFORMAT], 17.59).
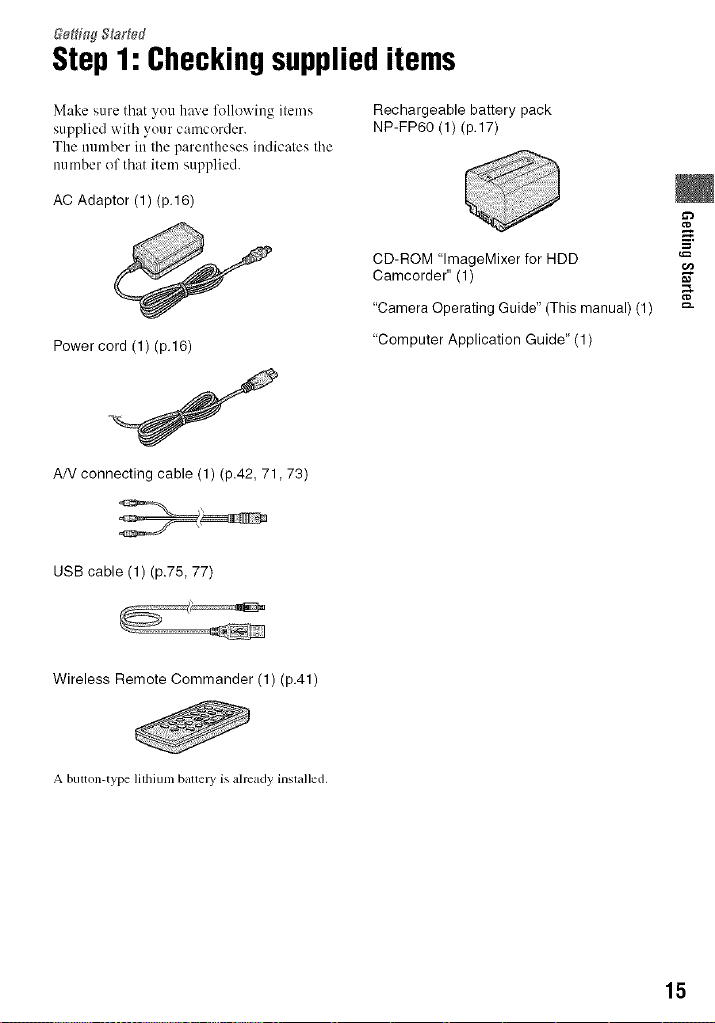
Step1: Checkingsupplieditems
Make _,ure that you haxe lkfilowiug items
supplied with your camcorder.
The nmnber in the parentheses indicates the
number of that item supplied.
AC Adaptor (1) (p.16)
Power cord (1) (p.16)
AN connecting cable (1) (p.42, 71,73)
USB cable (1) (p.75, 77)
Wireless Remote Commander (1) (p.41)
Rechargeable battery pack
NP-FP60 (1)(p.17)
CD-ROM "lmageMixer for HDD
Camcorder" (1)
"Camera Operating Guide" (This manual) (1)
"Computer Application Guide' (1)
A button-type lithium baltely is already installed.
15
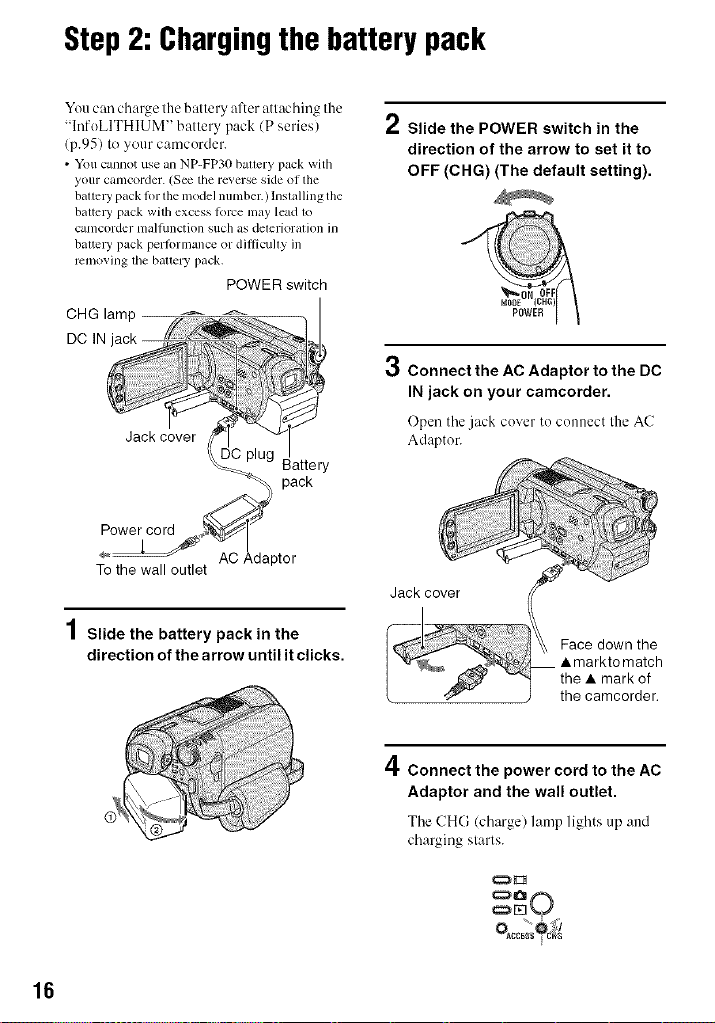
Step2: Chargingthe batterypack
You can charge the battery after attaching the
"InfoLITHIUM" battery pack (P series)
(p.95) to your camcorder.
• Youcannot use an NP-FP30 battery pack with
yourcamcorder. (See tile reverse side of the
baucWpack lot the modelnumber.)lnslalling the
balte W pack with excess torte may lead 1o
calllcorder [nall/inctk)n such as delerioralk)n ill
halle W pack perlormance or diflicully ill
removing lhe baltery pack.
POWER switch
CHG lamp
DC N ack //
Power cord
To the wall outlet
4
/ Slide the battery pack in the
direction of the arrow until it clicks.
.................1
__' _ Battery
pack
AC Adaptor
et
/ Slide the POWER switch in the
direction of the arrow to set it to
OFF (CHG) (The default setting).
3 Connect the AC Adaptor to the DC
IN jack on your camcorder.
Open the jack cover to connect the AC
Adaptor.
Jack cover
Face down the
• markto match
the • mark of
the camcorder.
16
4Connect the power cord to the AC
Adaptor and the wall outlet.
The CHG (charge) lamp lights up and
charging slarls.
_O
E"
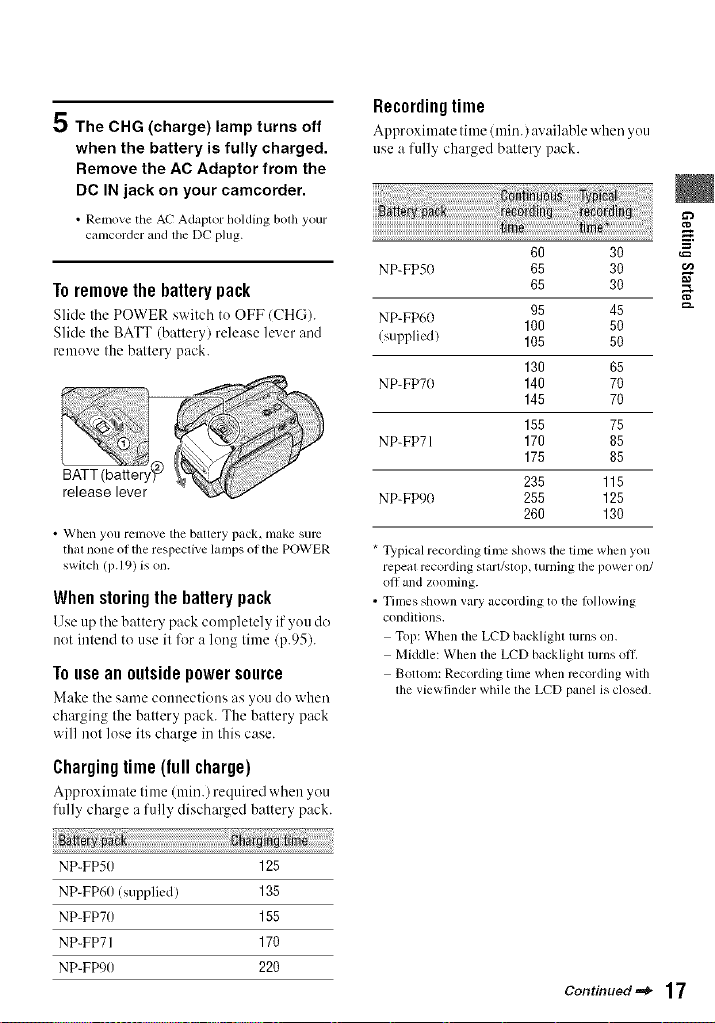
;D The CHG (charge) lamp turns off
when the battery is fully charged.
Remove the AC Adaptor from the
DC IN jack on your camcorder.
• Remove the AC Adaptor holding bolh your
cmncorder mM lhe DC plug.
Toremovethe battery pack
Slide tile POWER switch to OFF (CH(;).
Slide tile BATT (battery) release lever and
remove the battery pack.
• When yoll relllO_,'ethe battery pack, nlake sure
that none ol the respective lamps ol the POWER
switch (p.I 9) is on.
Whenstoringthebatterypack
Use up the battery pack c'omplelely if you do
not intend to use it for a long lime (p.95).
Touseanoutsidepowersource
Make the same connections as you do when
charging the battery pack. The battery pack
will not lose its charge in this case.
Chargingtime(fullcharge)
Approxilnale lime (rain.) required when you
fully charge a fully' discharged battery pack.
Recordingtime
Approxilnate lilne (rain.) available when you
use a fully' charged battery pack.
NP-FP50 65 30
NP-FP60
Isupplied) 105 50
NP-FP70 140 70
NP-FP71 170 85
NP-FP90 255 125
* Typical recording time shows tile time when you
repeal recording starl/_qop, turning lhe power (711/
oll and zooming.
• Times shown vary according to the lollowing
conditions.
Top: When file LCD backligla lurns on,
Middle: When lhe LCD backlight lurns o11.
Bottom: Recording time when recording with
the viewfinder while the LCD panel is closed.
60 30
65 30
95 45
100 50
130 65
145 70
155 75
175 85
235 115
260 130
NP-FP50 125
NP-FP60 (supplied) 135
NP-FP70 155
NP-FP71 170
NP-FPg0 220
Continued =_ 17
S'_÷p2: Chargingthebatterypack (co_i_ed/
Playbacktime
Approximate titne (rain.) available'Mien you
use a fully charged battery pack.
NP-FP50 105 125
NP-FP60
(supplied)
NP-FP70 225 265
NP-FP71 270 315
NP-FPg0 400 475
* When tile LCD backlight turns on.
On the battery pack
• Before changing lhe baite D' pack, slide tile
POWER switch to OFF (CHG).
• The CHG (charge) lanlp flashes during charging,
or BATTERY INFO (p.37) will not be correcl/y
displayed under lhe lollowing conditions.
The battery pack is not altached correcl]y.
Tile baltery pack is damaged.
Tile batlel T pack is hilly discharged.
(For BATTERY INFO only.)
• The power will not be supplied flom the battel T
as long as the AC Adaptor is connected to the DC
IN jack of your camcorder, even when lhe power
cord is removed h'om die wall outlet.
• '_¥k recommend that you use an NP-FP70, NP-
FP71 or NP-FP90 battery pack when a vide{) lighl
(oplkmal) is atlached.
On the charging/recording/playback time
• Times measured wilh lhe canlcorder at 25 _'(-"
177°F). (10-30°¢ ` (50-86°F) is recommended.)
• Available recording and playback time will be
shorter when you use your canlcorder in low
lelnperal urcs.
• The available recording and playback time will
be shorter depending on the condilions under
wbic]l yOU II_ your cat/lcorder.
160 190
On the AC Adaptor
• ¢'onnect tile A_:"Adaptor to an easily accessible
wall outlet close by. If any trouble occurs while
using the adaptor, immediately shut oflthe power
by remm big the phlg fl'om the wall outlet,
• Do not usethe AC Adaptor placed in a narrow
space, such as between a wall and lurniture.
• Do not sholt-circuit the DC plug ol the AC"
Adaptor or battery terminal with any nletallic
ob.iects. This may cause a malhmction.
PRECAUTION
• Even if your camcorder is turned oil AC power
(house current) is still supplied lo it while
connecled to the wall oullet via file AC Adaplor.
18
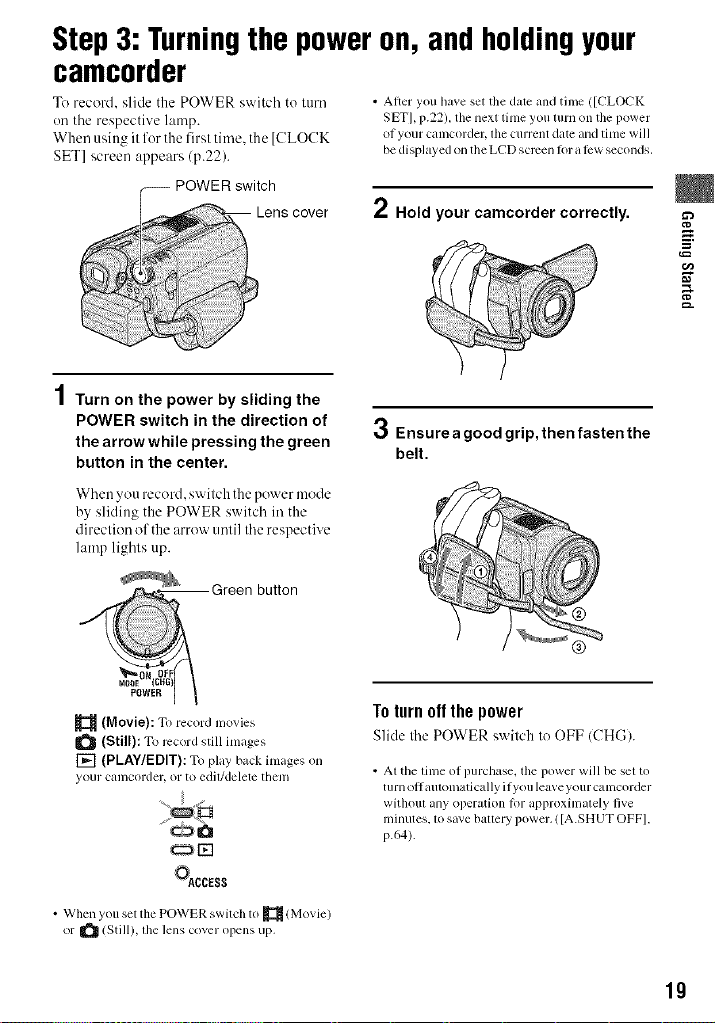
Step3: Turningthe poweron, andholdingyour
camcorder
To record, slide the POWER switch to turn
oil tile respective lamp.
When using it for the first time. the [CLOCK
SET] screen appears (p.22).
POWER switch
• After you have set the date and time ([CLOCK
SET], p.22h the next time you ltlrn on the power
of your camcorder, lhe current date and time will
be displayed on the LCD screen lot a lbw seconds.
2 Hold your camcorder correctly.
4
/ Turn on the power by sliding the
POWER switch in the direction of
the arrow while pressing the green
button in the center.
When you record, switch the power mode
by sliding the POWER switch in the
direction of the arrow until the respective
lamp lights up.
button
3 Ensurea good grip, then fasten the
belt.
E
(Movie): To record movies
(Still): To record still images
[_] (PLAY/EDIT): To play back images on
your camcorder, or to edil/delete them
_CCESS
• When you set the POWER switch to _ (Movie)
or _ (Still), lhe lens cover opens up,
Toturn offthe power
Slide the POWERswilch to OFF (CHG).
• At the time of purchase, the power will be set to
t Ilrll ol | illlt_)ll lilt iC_llly il yOIl le_lve yollr ca ii lcorder
without any operation lor approximately five
minutes. 1osave ballery power. ([A.SHUT OFF].
p.64).
19
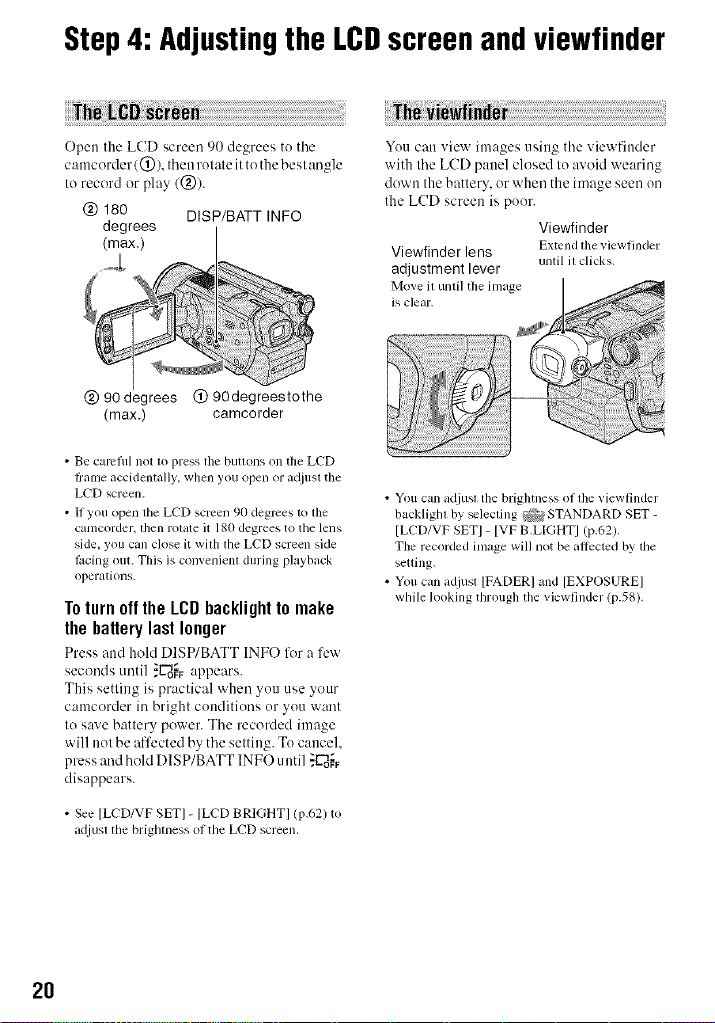
Step4: Adjustingthe LCDscreenandviewfinder
Open the LCD screen 90 degrees to tile
camcorder 1(_)), then rotate it to the best angle
to record or play 1@).
(_) 180 D]SP/BATT ]NFO
degrees
(max.)
(g)90degrees (_ 90degreestothe
(max.) camcorder
• Be calvflll not lo press lhe butlons on the LCD
ffanle accidentally, when you ()pen or acliusl tile
LCD screen.
• If you ()pen the LCD semen 90 degrees to lhe
camcorder, lhen rotate it 180 degrees to the lens
side, you call close it with lhe LCD screen side
I_lcing out. This is convenienl during playback
operations.
To turn off the LCD backlight to make
the battery last longer
Press and hoM D]SP/BATT INFO lk_ra l'c'_x
seconds until _L'_o_Fappears.
This setting is practical when you use your
camcorder in bright conditions or you want
to save battery power. The recorded image
will not be affected by the setting. Tocancel.
press and hold DISP/BATT INFO until :ff'8o_
disappears.
You can vic'_x images using the viewfinder
with the LCD panel closed to avoid wearing
down the battery, or when the image seen on
the LCD screen is poor.
Viewfinder
Viewfinder lens Extend lhe _.iewfinder
adjustment lever
Move il unli] the image
is clear.
• You can adjusl tile brightness of lhe viewfinder
backlighl by _lecling _ STANDARD SET-
[LCD/VF SET] - [VF B.LIGHT] (p.62).
The recorded image will not be aflccled by lhe
setling,
• You call adjusl [FADER] and [EXPOSUREI
while looking through the viewfinder (p.58).
until il clicks.
• See [LCD/VF SET] - [LCD BRIGHT] (p.62) to
a([iusl the brighmess of the LCD screen.
2O
Step5: Usingthe touchpanel
You can play back recorded images (p.28.
31), or change the settings (p.48) using tile
touch paneh
Touch the buttons displayed on the screen.
Support the rearof the LCD panel with
your finger. Then, touch the buttons
displayed on the screen.
Touchtile t)ul_onon tile LCDscreen.
DISP/BATT INFO
• Pcrlorm tile same actions as described ab(we
when you press tile buttons on tile LCD hame.
• Be carelul not to press lhe butlv)ns on lhe LCD
Irame accidenlally while using the touch panel.
• If the buttons on the [ou(2h panel do not work
correctly, adjusl lhe LCD screen
(CALIBRATION) (p.97).
You can change tile on-screen displays to
show messages in a specified language.
Select the screen language in [LANGUAGE]
on the (_ TIME/LANGU. (p.641.
To hide the screen indicators
Press DISP/BATT INFO to hide or show the
screen indicators (counler. elc./.
21
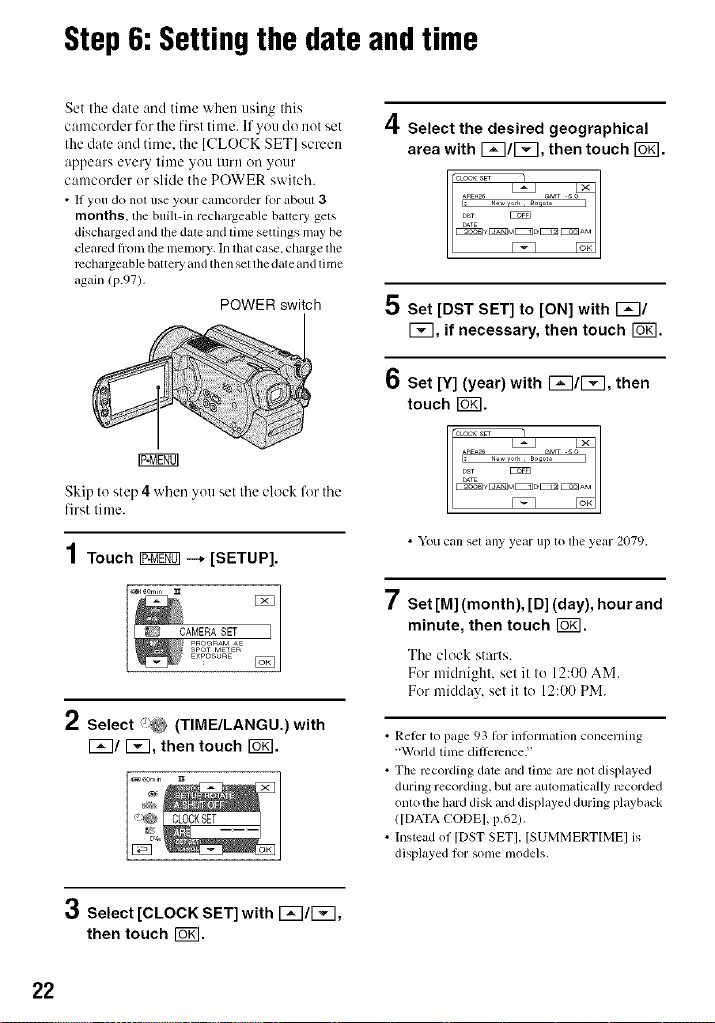
Step6:Settingthe date andtime
Set the date and time when using this
camcorder for the first time. If you do not set
the date and tinm. the [CLOCK SET] screen
appears every time you turn oil your
camcorder or slide the POWER switch.
• If you do not use your camcorder tor about 3
months, the built-in rechargeable battcl T gets
discharged and the date and time settings may be
cleared lioln the nlemory. In thatcase. charge the
rcchargeable battel T and then set the date and tili/e
again (p.97).
POWER switch
4Select the desired geographical
area with I_q/l_q, then touch Iogl,
5 set [DST SET] to [ON] with F_I/
[_, if necessary, then touch [_.
6 Set [Y] (year) with I_q/F_q, then
touch rs_].
Skip to step 4 when you set Ihe clock for Ihe
first lime.
• You can set any year up m tile year 2079.
"7
! Set [M] (month), [D] (day), hour and
minute, then touch FGfil.
Tile clock starts.
For midnight, set it to 12:00 AM.
For midday, set it to 12:00 PM.
2 Select i;_ (TIME/LANGU.)with
F_q/F_q, then touch rs_.
• Refer 1o page 93 for intormalion concerning
"World time diflemnceY
• The recording date and time am nol displayed
during recording, bul am automatically recorded
onlo the hard disk and displayed during playback
(]DATA CODE], p.62).
• Instead of [DST SETI. [SUMMERTIME] is
displayed tk)r some models.
3 Select [CLOCK SET] with 1_7/1_7,
then touch rOKI.
22
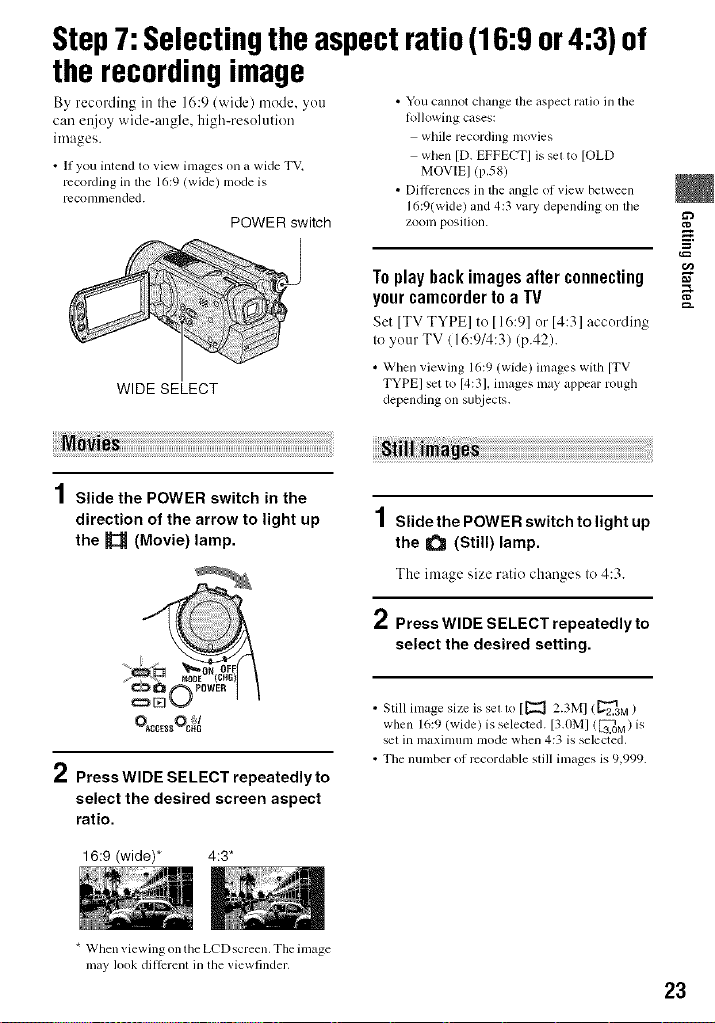
Step7: Selectingtheaspectratio(16:9or4:3)of
the recordingimage
By recording in tile 16:9 (wide) mode, you
can ettjoy wide-angle, high-resolution
images.
• If you intend to view images on a wide TV,
rccoMing in the 16:9 (wide) mode is
rcconni/ended.
POWER switch
WIDE SELECT
• You cannot change lhe aspect ratio in tile
lollowing cases:
while recording movies
when [D. EFFECT] is sel to [OLD
MOVIE] (p.581
• Dillerenccs in the angle of view between
16:9(wide) and 4:3 vary depending on lhe
zoonl positioll.
Toplay backimages after connecting
your camcorderto a TV
Set [TVTYPE] to [16:9]or 14:3] according
to your TV (16:914:3)(p.42).
• When viewing 16:9 (wide) images with [TV
TYPE] set to 14:31, images may appear rough
depending on subjects.
1Slide the POWER switch in the
direction of the arrow to light up
the _ (Movie) lamp.
1Slidethe POWER switch to light up
the U_ (Still) lamp.
The image size ratio changes to 4:3.
2 Press WIDE SELECT repeatedly to
select the desired setting.
E
2 Press WIDE SELECT repeatedly to
select the desired screen aspect
ratio.
16:9 (wide)* 4:3*
* When viewing on the LCD screen, The image
may look dill_2renl ill tile viewfinder,
• Still image size is set to [1_ 2.3M1 (_2.2.3M)
when 16:9 (wide) is selected. [3.0MI (3[7..0M)is
set in maxinmn_ mode when 4:3 is selected,
• The number of rccordable still images is 9,999.
23
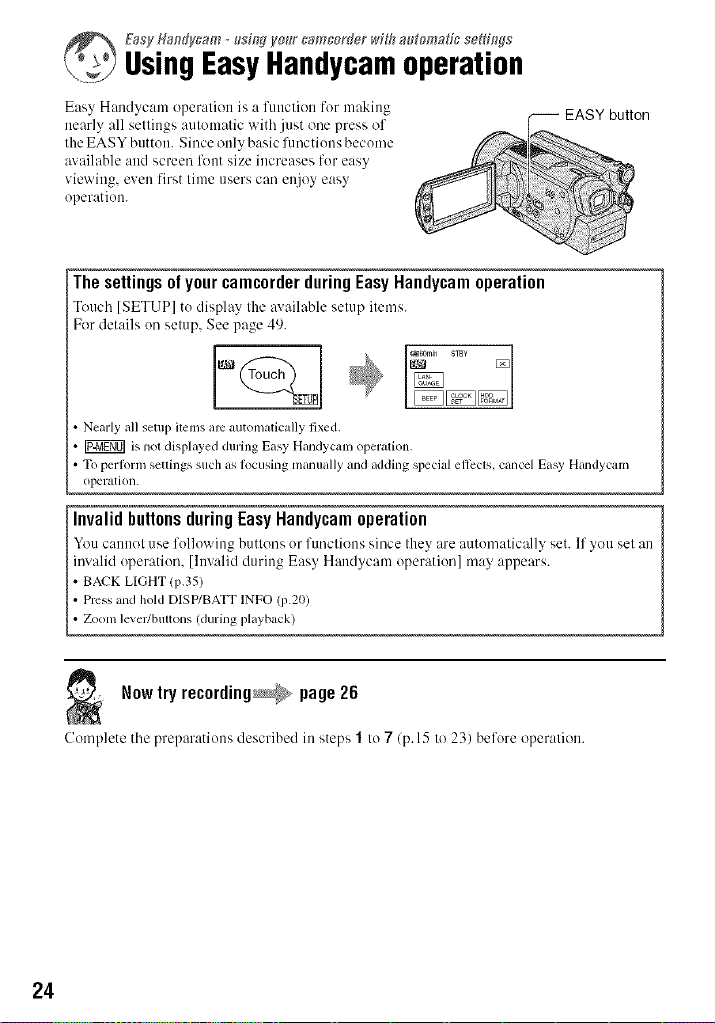
_ Easy fla,d-ycam _sind yo_lr camcorder with a_omag_ sefth_ds
UsingEasyHandycameperatien
Easy Handycam operation is a function for making
nearly all settings automatic witb just one press of
the EASY button. Since only basic functions become
available and screen lk_nt size increases for easy
viewing, even first time users can enjoy easy
operation.
-- EASY button
The settingsof your camcorderduringEasy Handycamoperation
Tom.'b [SETUP] to display the ax ailable setup items.
For details on setup, See page 49.
Nearly all setup i(ems arc automatically fixed.
is not displayed during Easy Handycam operation.
To perlorm settings such as lk}cusing manually and adding special el]ects, cancel Easy Handycam
ol?eration.
lnvalid buttonsduringEasyHandycamoperation
YOU c:lnllot/lse folluwing buttons or funclions since Ihey are :mk)matic:dly set. If you sel an
invalid operation, [Invalid during Easy Handycam operation] may appears.
• BACK LIGHT (p,35)
• Press and hold DlSP/BATT INFO (p.20)
Zoom lever/bultons (during playback)
Nowtry recording_ page26
Complete tbe preparations described in steps 1 tu 7 (p. 15 to 23) before operation.
24

25
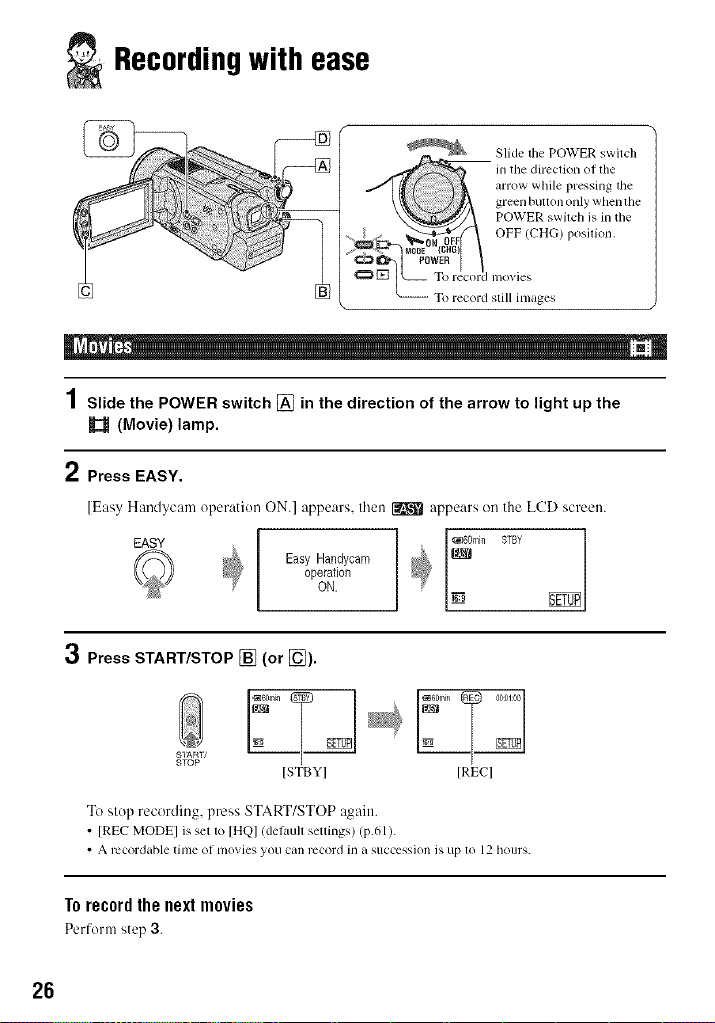
Recordingwith ease
!:i_iiii! /
LM: _ _ To record still images
POWER switch is in tile
OFF (CHG) posmon,
green buttl n only henthe
1Slide the POWER switch [] in the direction of the arrow to light up the
(Movie) lamp.
2 Press EASY.
[Easy Handycam operation ON.] appears, then _ appears on the LCD screen.
operation
EASY I _ _ee_mill STBY
3 Press START/STOP [] (or [_).
SIARI/
STOP
Easy Handycam
o.. I_
ISTBYI IRECI
To slop recording, press START/STOP again.
• [REC MODE] is set to [HQ] (del)tull settings) (p.61).
• A recordable til/le ot lll()vies yoLI Call I'CCol'd il] a SIICCCsSiol] is up 1o 12 hOIIl'S.
Torecordthenextmovies
Perforna step 3.
26
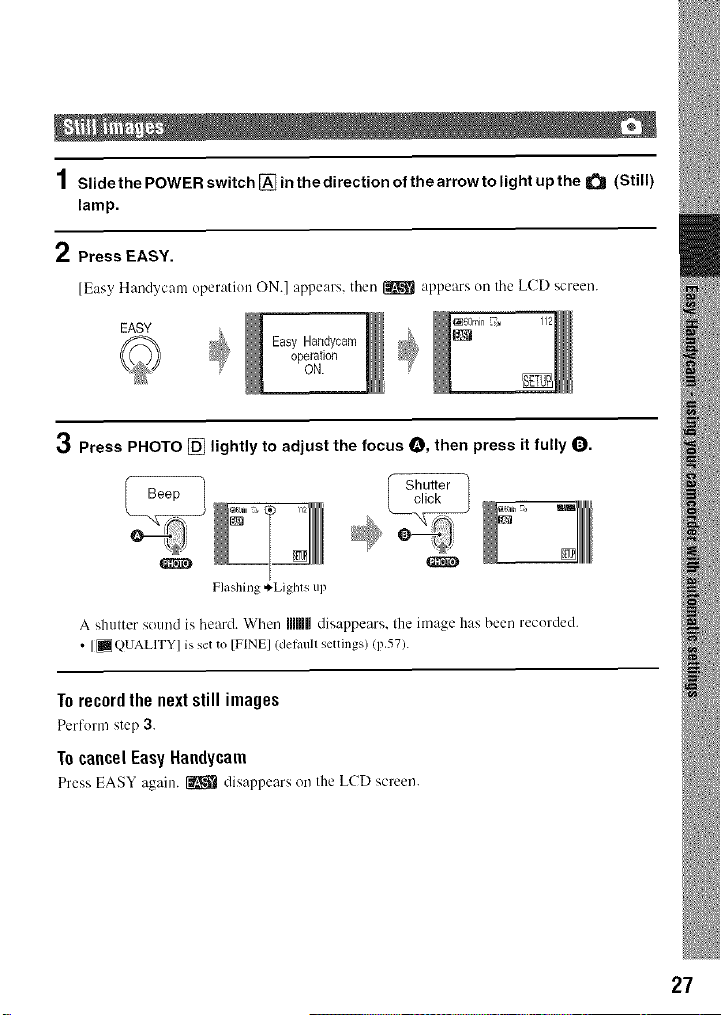
1SlidethePOWERswitch[_inthedirectionofthearrowtolightupthe_ (Still)
lamp.
2 Press EASY.
[Easy Handycam operation ON.] appears, then _ appears on tile LCD screen.
EASY
Easy Handycam
operation
ON.
_60min _ 112
3 Press PHOTO [] lightly to adjust the focus O, then press it fully Q.
%E
Flashinge.Liglas up
A shutter sound is heard. When iIIUIildisappears, the image has been recorded.
• [_QUALITY] isset to [FINE] (det_mll settings) (p.57).
Torecordthenextstillimages
Perform step 3.
1ocancelEasyHandycam
Press EASY again. _ disappears on the LCD screen.
27
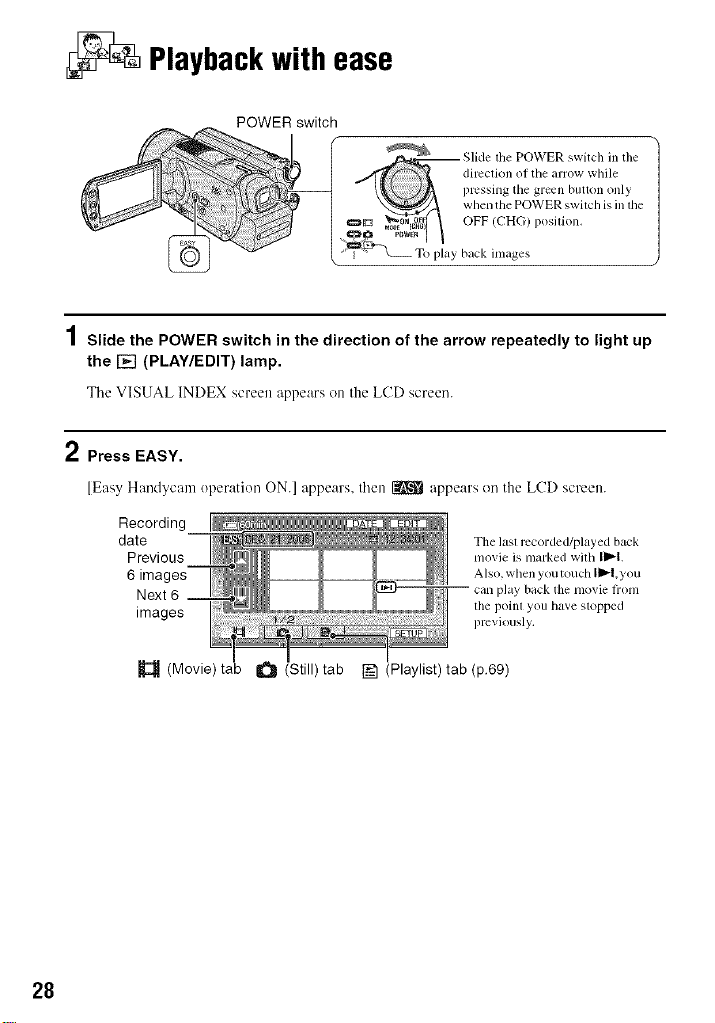
Playbackwith ease
POWER switch
_ Slide tile POWER switch in tile
._ow_g_ | OFF (CHG) p(silk n,
'_-_ T[, l_ay back images
pressing tile green btltton only
when tile POWER switch is in tile
direclion ol the arrow while
/
1Slide the POWER switch in the direction of the arrow repeatedly to light up
the [] (PLAY/EDIT) lamp,
Tile VISUAL INDEX screen appears on the LCD screen.
2 Press EASY.
[Easy Handycam operation ON.] appears, then _ appears on the LCD screen.
Recording
date The lasl recorded/played back
Previous movie is marked with I1_1.
6 images Also, when youtouch II_l,you
Next 6 can phty back tile nlovie fiom
images previously,
(Movie) tab (Still) tab F_ (Playlist) tab (p.69)
tile poinl you have stopped
28
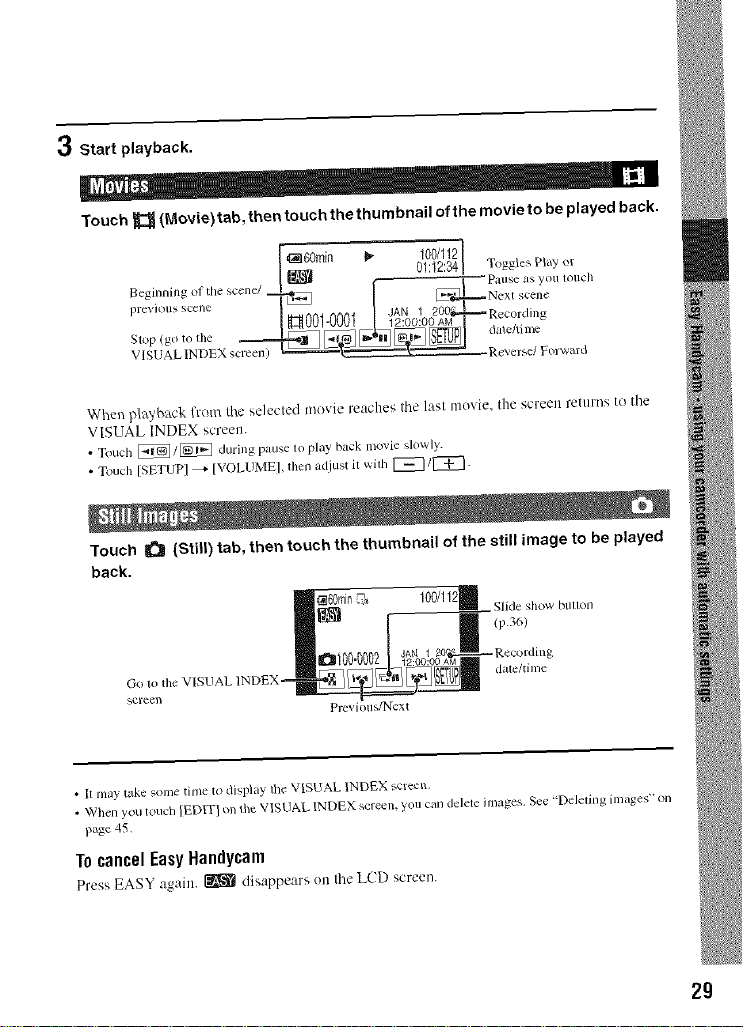
3 Start playback.
Touch _ (Movie)tab, then touchthethumbnail of the movieto be played back.
[ ,l_160m n _ 100/112 ,_
_egit_nit_g ol lhe _cene/_ [ [ P&IIs¢ as ylltl lOtlch
I revIOll gc_D_ i i p:i(_(2[
• " "" ) _"_+_"""''"=_ Rever'_e/Forv+ard
When piggyback from the selected movie reaches the last movie, the screen returns to the
VISUAL INDEX scrcett.
• Touch _/_ during pause to play back movie slowly.
• Touch ISETUP] _ IVOLUME], fllen a<!just it with I_/r'_.
Touch _ (Still) tab, then touch the thumbnail of the still image to be played
back.
(;o to tile VISUAL INDEX=
scl'e6_
I _ 01:12:34I Toggle Pla_ or
Slide show blllloll
1p.36)
Previolls/Ncxt
• It/nay take some time tO display lh¢ VISUAL INDEX screen.
• When you touch )EDIT} on the VISUAL INDEX screen, you can delele images, Set: "Deleling im_es" on
p_#: 45.
TocancelEasyNandycam
Press EASY agaul. _ dis _ppear_ otl Ihc LCD screen.
2g
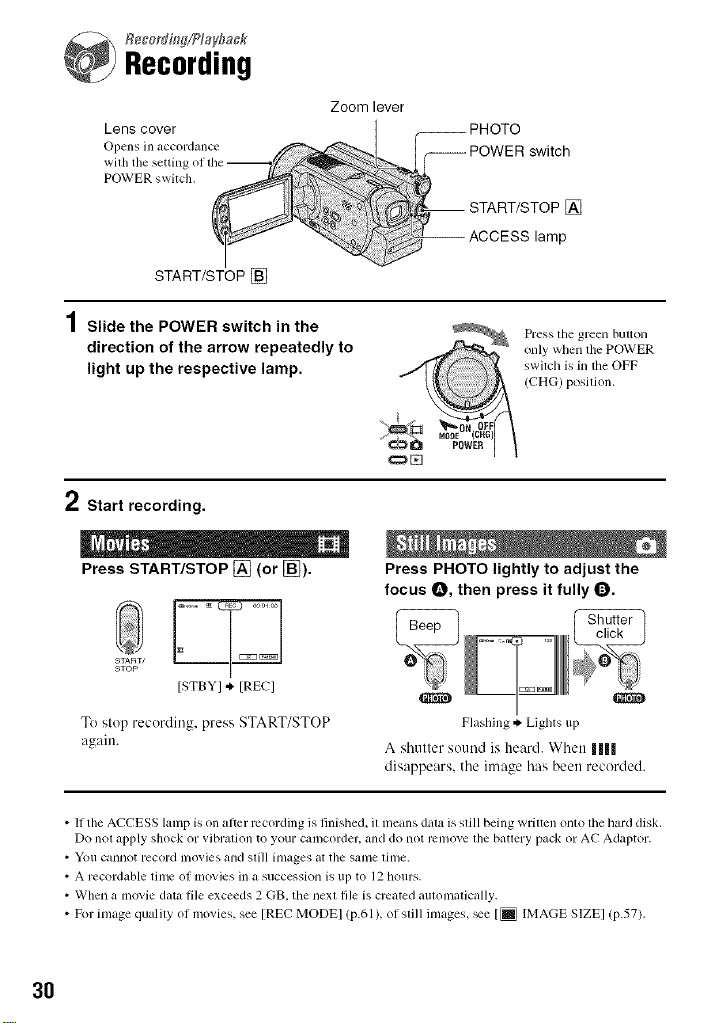
Recording
Lens cover
START/STOP []
Zoom lever
_ _;OT_ switch
AOOESS,amp
f START/STOP[]
1Slide the POWER switch in the
direction of the arrow repeatedly to
light up the respective lamp.
Press tile green button
only when the POWER
switch is in the OFF
(CHG) position.
2 Start recording.
Press START/STOP [] (or [_).
START/
STOP
ISTBYI ,k. IRECI
To slop recording, press START/STOP
again.
• If the ACCESS lamp is on alter recording is finished, it means data is still being written onto the hard disk.
Do not apply shock or vibration to your camcorder, and do not remove the battery pack or AC Adaptor.
• VoIl cannot record ill(ivies and still images at the s_lnle lilne.
• A recordable time of movies in a succession is up to 12 hours.
• When a movie data file exceeds 2 GB. the next file is created automatically.
• For image qualdy of movies, see [REC MODEl (p.61), of still images, _e [_ IMAGE SIZEI (p.57).
Press PHOTO lightly to adjust the
focus O, then press it fully O.
Flashing*, Lights up
A shutter sound is heard. When 1|||
disappears, the image has been recorded.
3O
 Loading...