

Congratulations on your purchase of this Sony Handycam. With your Handycam, you can capture life’s
precious moments with superior picture and sound quality. Your Handycam is loaded with advanced
features, but at the same time it is very easy to use. You will soon be producing home video that you can
enjoy for years to come.
WARNING
To prevent fire or shock hazard, do
not expose the unit to rain or
moisture.
This symbol is intended to alert
the user to the presence of
uninsulated “dangerous voltage”
within the product’s enclosure
that may be of sufficient
magnitude to constitute a risk of
electric shock to persons.
This symbol is intended to alert
the user to the presence of
important operating and
maintenance (servicing)
instructions in the literature
accompanying the appliance.
Welcome!
2

Declaration of Conformity
Trade Name: SONY
Model No.: DCR-DVD200
Responsible Party:Sony Electronics Inc.
Address: 680 Kinderkamack Road,
Oradell, NJ 07649 U.S.A.
Telephone No.: 201-930-6972
This device complies with Part 15 of the
FCC Rules. Operation is subject to the
following two conditions.: (1) This device
may not cause harmful interference, and (2)
this device must accept any interference
received, including interference that may
cause undesired operation.
Declaration of Conformity
Trade Name: SONY
Model No.: DCR-DVD300
Responsible Party:Sony Electronics Inc.
Address: 680 Kinderkamack Road,
Oradell, NJ 07649 U.S.A.
Telephone No.: 201-930-6972
This device complies with Part 15 of the
FCC Rules. Operation is subject to the
following two conditions.: (1) This device
may not cause harmful interference, and (2)
this device must accept any interference
received, including interference that may
cause undesired operation.
CAUTION
You are cautioned that any changes or
modifications not expressly approved in this
manual could void your authority to operate
this equipment.
Note:
This equipment has been tested and found to
comply with the limits for a Class B digital
device, pursuant to Part 15 of the FCC Rules.
These limits are designed to provide
reasonable protection against harmful
interference in a residential installation. This
equipment generates, uses, and can radiate
radio frequency energy and, if not installed
and used in accordance with the instructions,
may cause harmful interference to radio
communications. However, there is no
guarantee that interference will not occur in a
particular installation. If this equipment does
cause harmful interference to radio or
television reception, which can be determined
by turning the equipment off and on, the user
is encouraged to try to correct the interference
by one or more of the following measures:
— Reorient or relocate the receiving antenna.
— Increase the separation between the
equipment and receiver.
— Connect the equipment into an outlet on a
circuit different from that to which the
receiver is connected.
— Consult the dealer or an experienced radio/
TV technician for help.
The supplied interface cable must be used with
the equipment in order to comply with the
limits for a digital device pursuant to Subpart
B of Part 15 of FCC Rules.
Getting Started
Certain countries may regulate disposal of the
battery used to power this product. Please
consult with your local authority.
3
Read this first
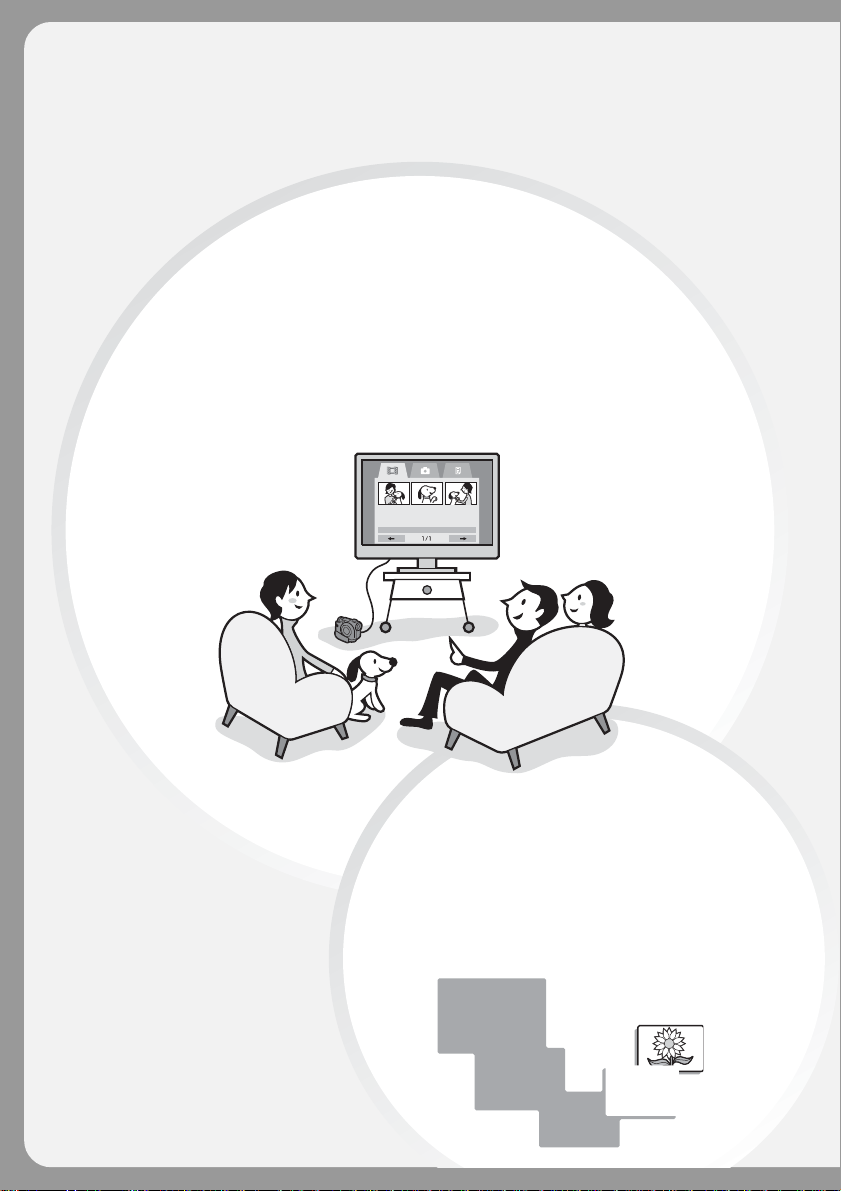
What you can do with your DVD Handycam
Your DVD Handycam uses DVD-R and DVD-RW as a recording media.
You can enjoy your DVD Handycam in ways that are new and different from those
of a tape media-based camcorder. Read the next few pages to find out how.
You can find a scene quickly using
a Visual Index display.
The Visual Index display shows thumbnails of movies and still
images recorded on the disc in your DVD Handycam. You can
find the desired scene quickly using this convenient index.
4
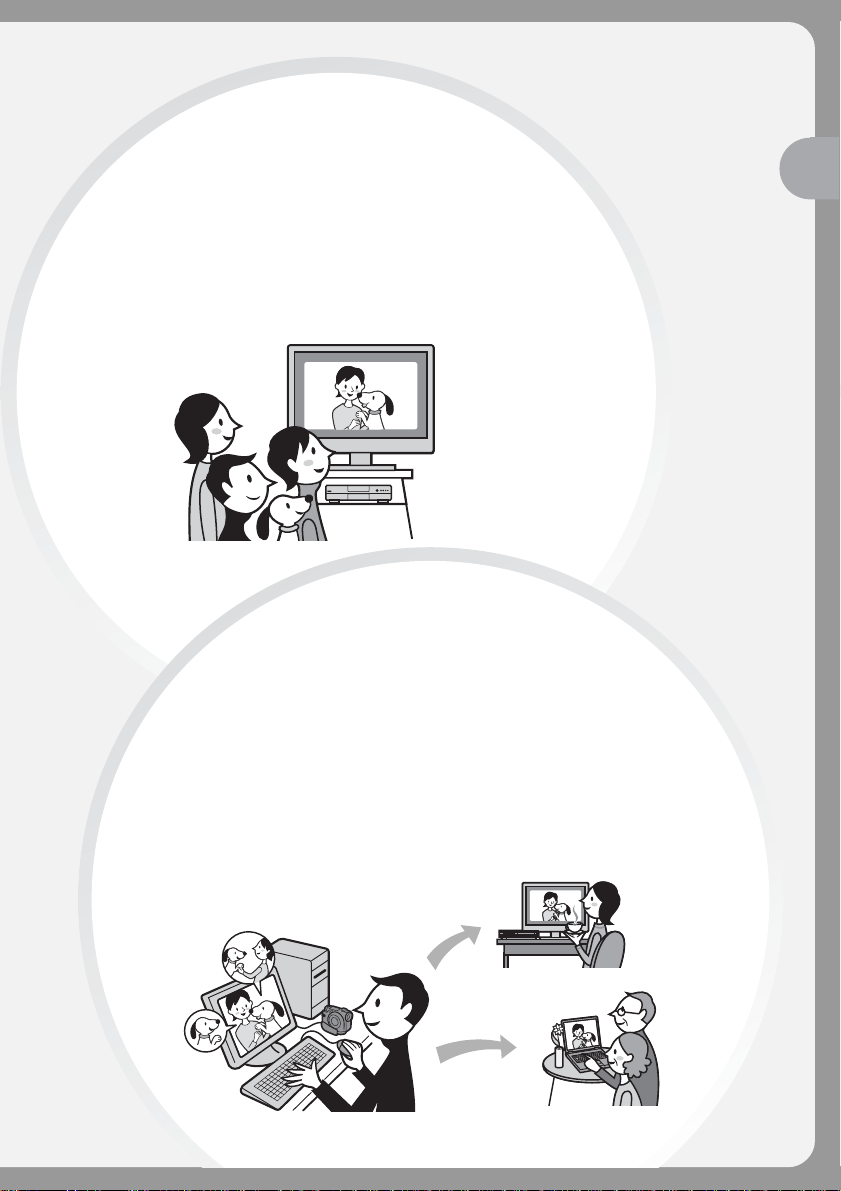
You can play back a disc
recorded with your DVD
Handycam on your DVD
player.
You can play back a disc recorded with your
DVD Handycam on DVD players that can play
back DVD-R/DVD-RW.
You can edit and copy a disc easily
by connecting your DVD
Handycam to your computer.
You can edit and copy a disc easily on your computer
using the supplied ImageMixer Ver.1.5 for Sony DVD
Handycam software. It also enables you to produce
your own original DVD disc.
Read this first
5
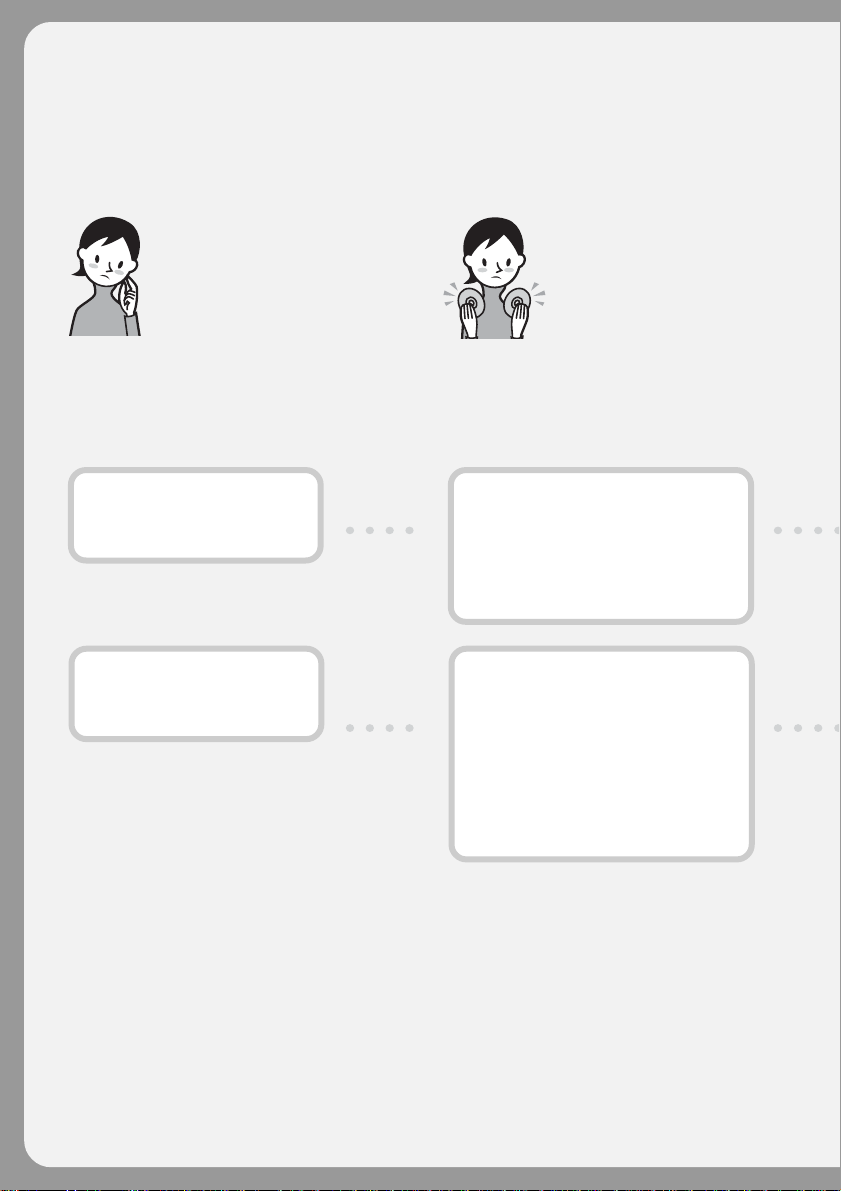
What is the difference between DVD-R and DVD-RW?
Two types of discs are available and they are different in the following ways.
Which disc
can I use?
8cm DVD-Rs and 8cm DVD-RWs are
available.
8cm DVD-R
You can use the following discs:
• DMR30 (single-sided disc)
• DMR60 (double-sided disc)
8cm DVD-RW
You can use the following discs:
• DMW30 (single-sided disc)
• DMW60 (double-sided disc)
How can I
choose
between these
two discs?
The number of recordable times is
different for the two discs. Choose the
one that meets your needs.
DVD-Rs can be recorded
only once.
It is suitable for permanent records
and for making a backup copy.
Recorded in VIDEO mode.
DVD-RWs can be
overwritten repeatedly.
It is suitable for source gathering and
temporary recordings.
You can choose VIDEO mode or VR
mode to make your recordings (see
page 26).
Discs other than these two types are
cannot be used in your DVD
Handycam.
Examples of incompatible discs
• 12cm DVD-R
• 12cm DVD-RW
• DVD+R
• DVD-RAM
• DVD+RW
• DVD-ROM
• CD-R
• CD-RW
6
What kind of player can I use for
playback?
You can play back a disc you have recorded on your DVD Handycam on other players by
finalizing the disc (see page 63).
The following list shows examples of players that can play back a disc recorded by your
DVD Handycam. However, playback compatibility is not guaranteed with all players.*
DVD-R
(VIDEO mode only)
Players compatible
with the DVD Video format.
Read this first
DVD-RW
(in VIDEO mode)
Players that can play back DVD-RWs.
Computer with a
DVD drive installed
DVD-RW
(in VR mode)
Players that can play back DVD-RWs in
VR mode.
In VIDEO mode and VR (Video Recording) mode
VIDEO mode: A disc has wide compatibility with other players.
VR mode: A disc can be edited on DVD Handycam but the players are limited.
* DVD-R/RW discs recorded by Sony DVD Handycam camcorders are designed to be compatible with
and may be played back on most home DVD players, computer DVD drives, and PlayStation 2 video
game consoles.**
** Playback on all home DVD players, computer DVD drives, and PlayStation 2 consoles cannot be
guaranteed. Some players, drives, and video game consoles lack the ability to read due to the optical
reflection standards of DVD-R/RW discs and/or due to encoding incompatibilities. Refer to the
specifications of your playback equipment for additional compatibility information.
7
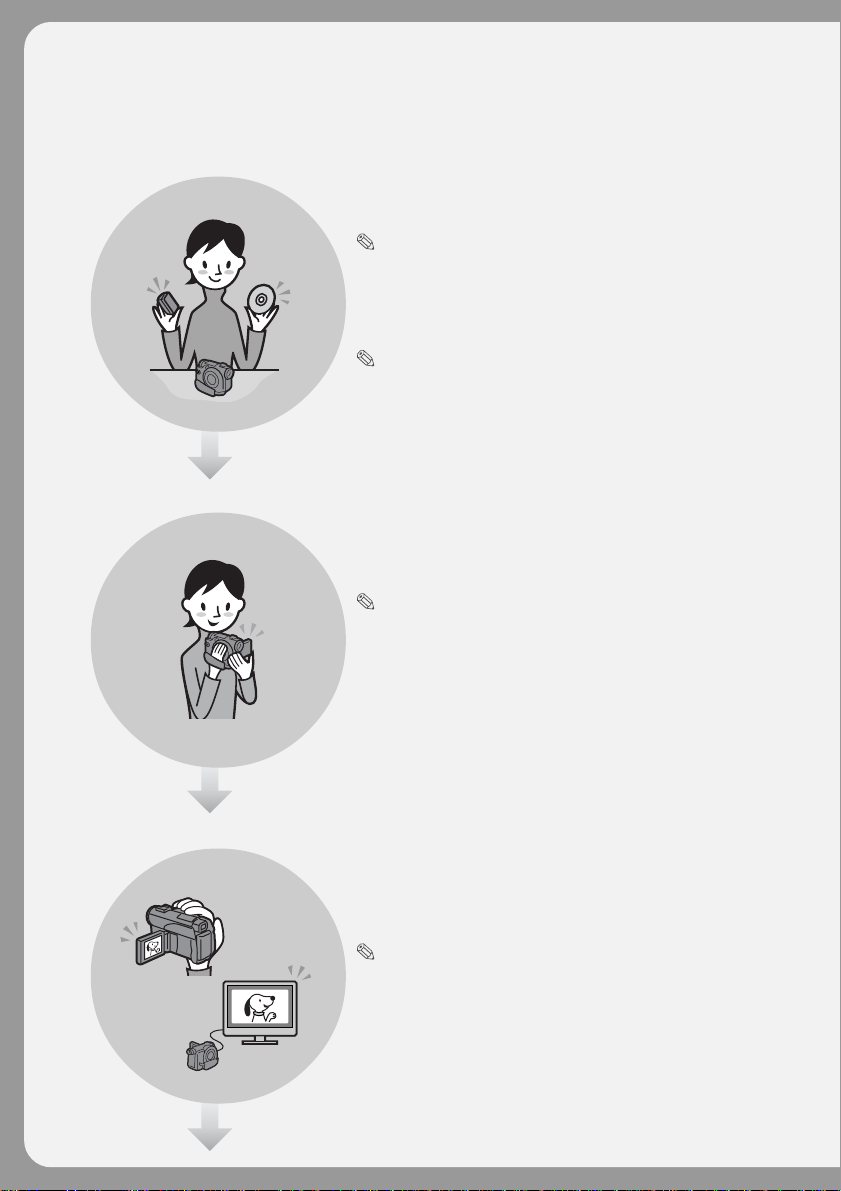
How to prepare and use your DVD Handycam
Preparing
Prepare a new disc.
• You can start recording promptly with a DVD-R.
• You need to format a DVD-RW before recording.
Formatting is required also when using a once recorded
DVD-RW again.
Select a recording format (either VIDEO mode
or VR mode) when using DVD-RW.
Shooting
Both movies and still images can be recorded
on a single disc.
Because your movies and still images are recorded in free areas
on the disc automatically, important recordings are not
overwritten.
Playing back
Select a scene to play back from the Visual
Index display.
Continued on the right page.
8
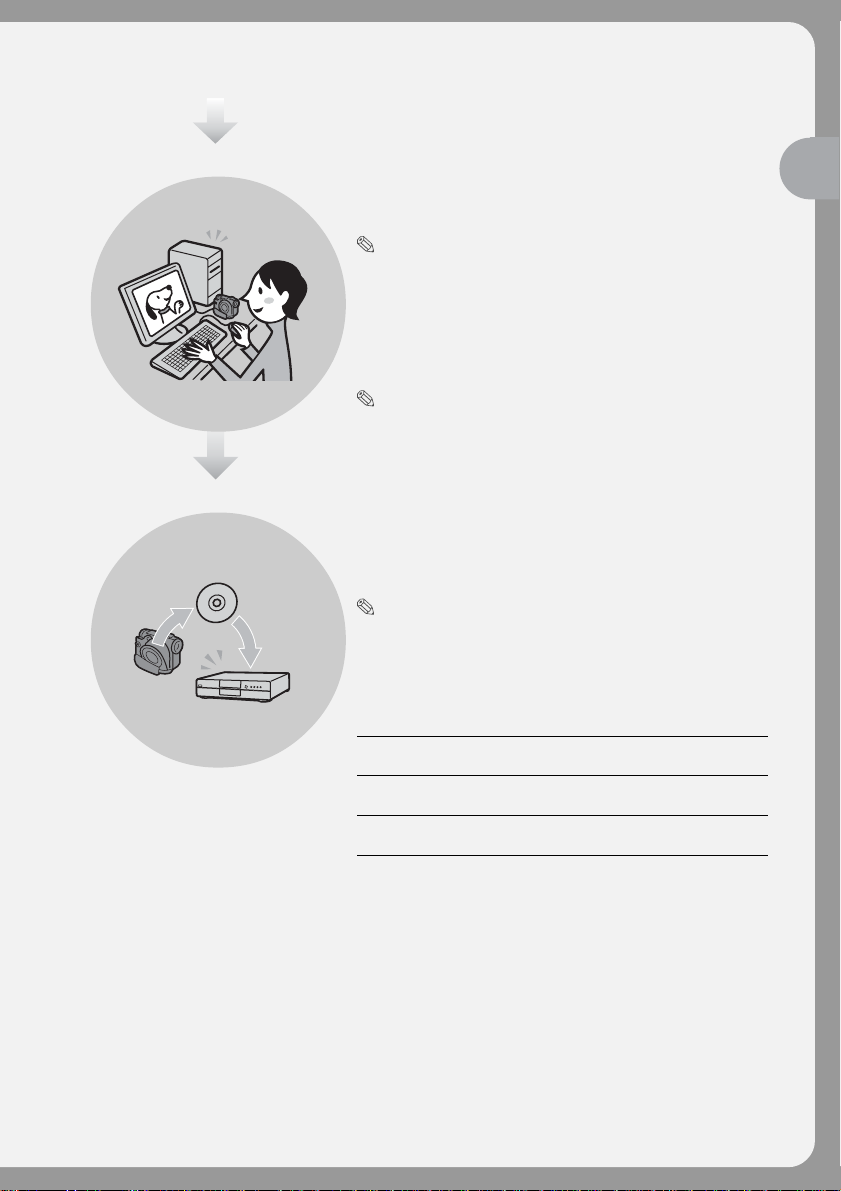
Editing
Finalizing
You can make a copy of a disc you have
recorded by connecting your DVD
Handycam to your computer with the
supplied software.
For the recommended computer system environment, see
page 89.
You can produce an original DVD by
editing your movies/still images on your
computer.
Finalize the disc so that it is compatible
with other DVD players.
You may not overwrite, edit, or format a disc after finalizing
it.
Overwrite Edit Format
DVD-R No No No
(VIDEO mode)
DVD-RW Yes*
(VIDEO mode)
DVD-RW Yes*
(VR mode)
1
2
No Yes*
2
Yes*
Yes*
3
3
Read this first
*1 Unfinalizing a disc is required.
*2 Unfinalizing a disc is not required.
*3 Recorded data will be erased.
9

Table of contents
Read this first
What you can do with your
DVD Handycam ............................... 4
What is the difference between
DVD-R and DVD-RW? .................... 6
How to prepare and use your DVD
Handycam ......................................... 8
Getting Started
Using this manual ................................. 12
Checking the supplied accessories ..... 14
Step 1 Preparing the power source ... 15
Installing/removing the battery
pack............................................ 15
Charging the installed battery
pack............................................ 16
Showing the remaining battery time
– BATTERY INFO .................... 18
Connecting to a wall outlet ........... 18
Step 2 Opening the LCD screen ......... 19
Step 3 Turning on the power.............. 20
Step 4 Setting the date and time ........ 21
Simple setting of the clock using a
time difference ......................... 23
Step 5 Adjusting the LCD screen and
the viewfinder................................. 24
Adjusting the brightness of the LCD
screen ......................................... 24
Adjusting the viewfinder .............. 25
Step 6 Preparing a disc for recording. 26
Shooting movies/still images
Shooting movies/still images ............. 28
Before shooting ............................... 28
Shooting movies ............................. 29
Shooting still images ...................... 34
Shooting techniques to match your
circumstances .................................. 41
Shooting backlit subjects
– BACK LIGHT ........................ 41
Shooting in the dark
– NightShot/Super NightShot/
Color Slow Shutter .................. 41
Shooting with the subject checking
the image – Mirror mode........ 43
Self-timer recording ....................... 43
Adjusting the white balance
manually ................................... 44
Shooting for the wide-screen TV
– Wide mode ............................ 45
10
Optimizing the camera
automatically
– PROGRAM AE...................... 47
Adjusting the exposure manually 48
Focusing manually ......................... 49
Shooting with special effects .............. 50
Using fader (for movies only)....... 50
Using special effects – Picture
effect/Digital effect ................. 51
Other functions...................................... 53
Checking the last scene – Review 53
Deleting the last scene
(DVD-RWs only)...................... 53
Changing the disc title ................... 54
Viewing the recordings
Playing a disc on your camcorder ...... 55
Choosing and viewing a recording
– Visual Index........................... 55
Various playback modes ............... 57
To display the indicators during
playback – Display .................. 58
Magnifying recorded images
– PB ZOOM .............................. 60
Playing still images automatically
– Slide Show ............................. 61
Viewing recordings on TV................... 62
If your TV is already connected to a
VCR............................................ 62
If your TV or VCR is a monaural
type ............................................ 62
Finalizing a disc for other
players
Finalizing a disc..................................... 63
Playing back a finalized disc on other
players.............................................. 66
Playing back a disc on DVD
players ....................................... 66
Playing back movies on a computer
with a DVD drive installed .... 68
Showing still images on a computer
with a DVD drive installed .... 68
Structures and file names of movies
and still images ........................ 69
Recording on a finalized disc
– Unfinalizing
(VIDEO mode DVD-RWs only) ... 70
Recording again on a used disc
– Formatting
(DVD-RWs only) ............................ 72

Table of contents
Using a disc in VR mode
(DVD-RWs only)
Selecting the playing order on your
camcorder – Playlist ....................... 74
Registering movies or still images
to the Playlist ............................ 74
Saving all the still images on a
disc to a movie file ................... 77
Erasing unnecessary scenes from
the Playlist ................................ 78
Changing the order within the
Playlist ....................................... 80
Dividing a movie within the
Playlist ....................................... 82
Playing the Playlist......................... 84
Editing the original data ...................... 85
Dividing a movie ............................ 85
Deleting movies/still images ....... 87
Viewing/dubbing discs/
editing the recordings on your
computer
Connecting your camcorder to your
computer – Introduction ............... 89
System requirements ..................... 89
Installing the USB driver ............... 90
Installing software.......................... 91
Connecting your camcorder to
the computer ............................ 92
Consulting the on-line help
(operating instructions) of
ImageMixer Ver.1.5 for Sony
DVD Handycam ...................... 97
Viewing scenes recorded on your
computer.......................................... 98
Viewing scenes on the disc ........... 98
Making a disc copy – Disc Dubbing. 100
Making a disc copy ...................... 100
Editing and saving scenes.................. 101
Editing movies .............................. 101
Saving the movie on your
computer ................................. 101
Creating an original disc .................... 102
Making a menu ............................. 102
Editing the contents ..................... 103
Recording on a disc ...................... 104
Connecting your camcorder to
a TV and a VCR
Dubbing a disc to a tape..................... 105
Connecting your camcorder to
a VCR....................................... 105
Dubbing to a tape ......................... 106
Dubbing a TV program or video
tape onto a disc ............................. 107
Connecting your camcorder to a
TV or a VCR............................ 107
Dubbing onto a disc ..................... 107
Customizing your camcorder
Changing the SETUP display............ 108
Selecting the option of each
item. ......................................... 109
Troubleshooting
Types of trouble and corrective
action .............................................. 116
Self-diagnosis display......................... 123
Warning indicators ............................. 124
Warning messages .............................. 125
Additional information
About the “InfoLITHIUM” battery
pack ................................................ 127
Glossary................................................ 128
Using your camcorder abroad .......... 129
Maintenance information and
precautions .................................... 130
Specifications ....................................... 134
Parts and controls/Index
Identifying parts and controls........... 136
Index ..................................................... 144
Getting Started
11

— Getting Started —
Using this manual
The instructions in this manual are for the three models listed in the table below. Before
you start reading this manual and operating your camcorder, check the model number
by looking at the bottom of your camcorder. The DCR-DVD200 is the model used for
illustration purposes. Otherwise, the model name is indicated in the illustrations. Any
differences in operation are clearly indicated in the text, for example, “DCR-DVD200
only”.
Types of differences
Model DVD100 DVD200 DVD300
Image device CCD, gross approx. CCD, gross approx. CCD, gross approx.
LCD screen 6.2 cm (2.5 type) 6.2 cm (2.5 type) 8.8 cm (3.5 type)
Note on TV color systems
TV color systems differ depending on the country or region. To view your recordings
on a TV, you need an NTSC system-based TV.
Copyright precautions
4.5mm (1/4 type) 3.8 mm (1/4.7 type) 3.8 mm (1/4.7 type)
680 000 pixels 1 070 000 pixels 1 070 000 pixels
12
Television programs, films, video tapes, and other materials may be copyrighted.
Unauthorized recording of such materials may be contrary to copyright laws.
You cannot dub copyright protected software on your camcorder.
Contents of the recording cannot be compensated if recording or playback is not made due to a
malfunction of the camcorder, storage media, etc.

Using this manual
Camcorder care
LCD screen/finder
The LCD screen and the finder are manufactured using extremely high-precision
technology, so over 99.99 % of the pixels are operational for effective use.
However, there may be some tiny black points and/or bright points (white, red,
blue or green in color) that appear constantly on the LCD screen and the finder.
These points are normal in the manufacturing process and do not affect the
recording in any way.
Disc compatibility with other players
Discs recorded on your camcorder must be finalized to play with other players. For
details on how to finalize a disc, see “Finalizing a disc” (page 63).
Discs recorded in VIDEO mode
You must finalize a disc after all the recording is finished. You cannot record again on a
disc recorded in VIDEO mode once you finalize it. On DVD-RW, you can record again
by unfinalizing it.
Compatible players: DVD players
Discs recorded in VR mode
Only DVD-RWs can be recorded in VR mode. Finalizing is required only when other
DVD-RW compatible players cannot play the disc. You can record again with your
camcorder on a finalized disc recorded in VR mode.
Compatible players: DVD players that can play back DVD-RWs in VR mode
Note
You may not be able to play certain finalized discs, depending on the disc and the
players.
Getting Started
13

Checking the supplied accessories
Make sure that the following accessories are supplied with your camcorder.
12
4
8
1 Wireless Remote Commander (1)
(page 141)
2 AC-L15A AC adaptor (1),
Power cord (1) (page 16)
3 Size AA (R6) battery for the Remote
Commander (2) (page 142)
4 NP-FM50 rechargeable battery pack
(1) (page 15)
5
7
5 A/V connecting cable (1)
6 Shoulder strap (1)
7 Lens cap (1) (page 29)
8 USB cable (1) (page 92)
9 DVD-R (DMR30) (1)
q; CD-ROM (SPVD-011 USB Driver) (1)
qa Cleaning cloth (1)
14
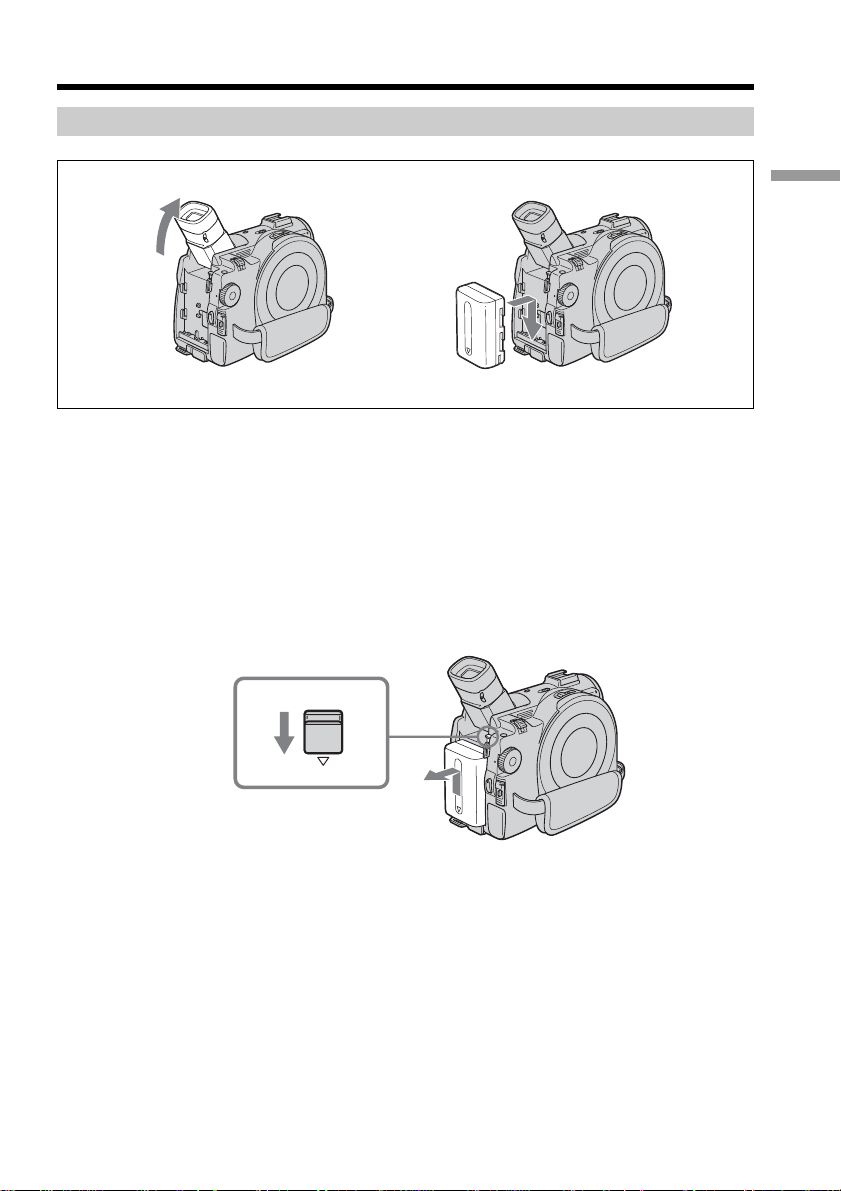
Step 1 Preparing the power source
Installing/removing the battery pack
1
2
1 Lift up the viewfinder.
2 Slide the battery pack in and down until it clicks.
To remove the battery pack
1 Lift up the viewfinder.
2 Slide the battery pack up and out in the direction of the arrow while pressing
BATT down.
BATT
Getting Started
BATT release button
15
Step 1 Preparing the power source
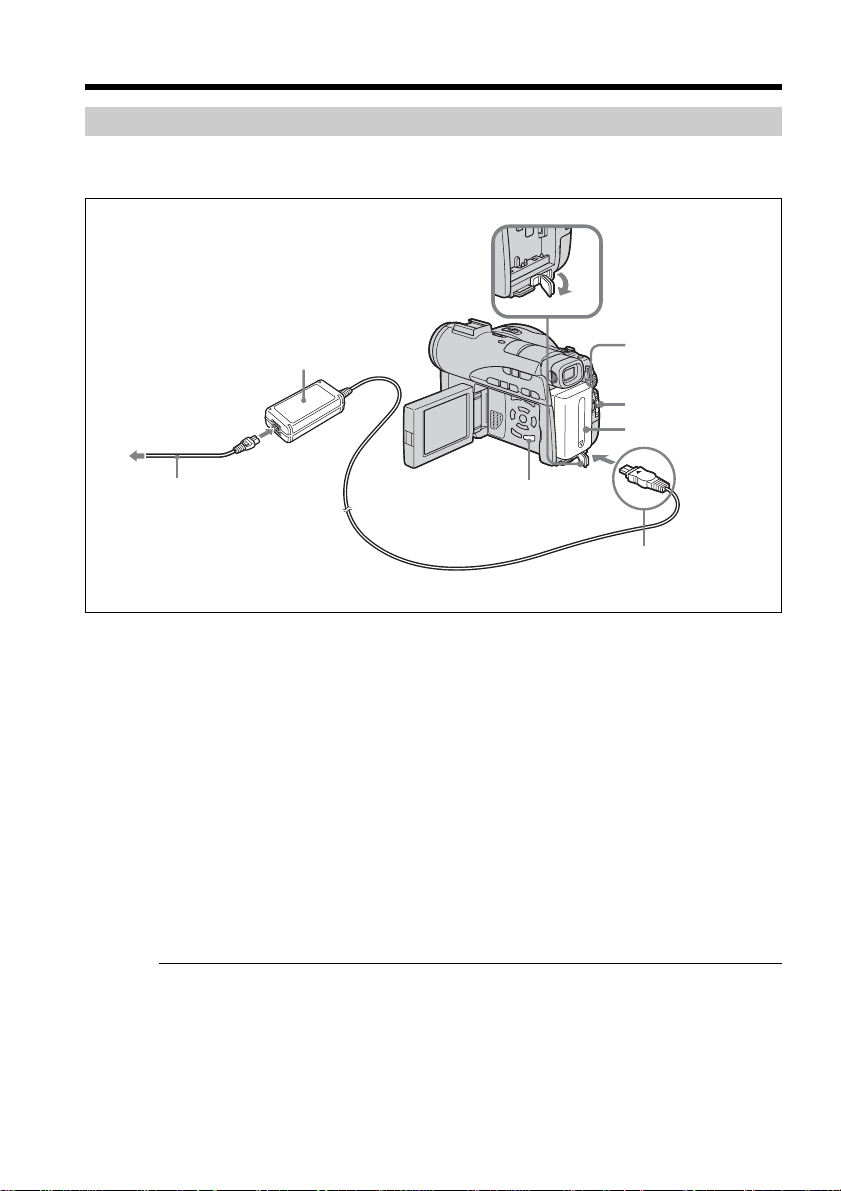
Charging the installed battery pack
Your camcorder operates only with the “InfoLITHIUM” battery pack (M series).
See page 127 for more information on the “InfoLITHIUM” battery pack.
Open the DC IN
jack cover.
AC adaptor
3
4
POWER/CHG lamp
5
1
2
Power cord
DISPLAY/BATT INFO
button
With the v
mark facing up
1 Make sure that the battery pack is installed on the camcorder.
2 Open the DC IN jack cover, then connect the AC adaptor supplied with your
camcorder to the DC IN jack on your camcorder with the plug’s v mark facing
up.
3 Connect the power cord to the AC adaptor.
4 Connect the power cord to the wall outlet.
5 Slide the POWER switch downward while pressing the green button in the
center.
Charging begins. The POWER/CHG lamp lights in orange during the charge,
then turns off when the charge is completed (full charge).
After charging the battery pack
Disconnect the AC adaptor from the DC IN jack on your camcorder.
16
Notes on the AC adaptor
•Prevent metallic objects from coming into contact with the metal parts of the DC plug
of the AC adaptor. This may cause a short-circuit, damaging the AC adaptor.
•Place the AC adaptor near a wall outlet. If any trouble occurs with this unit while
using the AC adaptor, disconnect the plug from the wall outlet as soon as possible to
cut off the power.
•The POWER/CHG lamp may flash if the battery pack is not installed correctly or the
battery pack is damaged.

Step 1 Preparing the power source
Charging time (full charge)
Battery pack
NP-FM50 (supplied) 150
NP-FM70 240
NP-QM71/QM71D 260
NP-FM91/QM91/QM91D 360
Approximate number of minutes required at 25°C (77°F) to charge an empty battery
pack. The charging time may increase if the battery’s temperature is extremely high or
low because of the ambient temperature.
Recording time with the viewfinder
Battery pack
NP-FM50 (supplied) 85 75 75 40 35 35
NP-FM70 185 170 170 90 85 85
NP-QM71/QM71D 215 195 195 105 95 95
NP-FM91/QM91/QM91D 325 295 295 160 145 145
Continuous Typical
DVD100 DVD200 DVD300 DVD100 DVD200 DVD300
Recording time with the LCD screen
Battery pack
NP-FM50 (supplied) 70 65 65 35 30 30
NP-FM70 155 145 140 75 70 70
NP-QM71/QM71D 180 165 160 90 80 80
NP-FM91/QM91/QM91D 275 255 245 135 125 120
Approximate number of minutes you can record when using a fully charged battery pack.
Continuous Typical
DVD100 DVD200 DVD300 DVD100 DVD200 DVD300
Getting Started
* Approximate number of minutes you can record, including starting/stopping,
zooming and turning the power on/off. The actual battery life may be shorter.
Playing time
Battery pack
NP-FM50 (supplied) 80 80 75 100 100 100
NP-FM70 175 175 170 210 210 210
NP-QM71/QM71D 205 205 195 245 245 245
NP-FM91/QM91/QM91D 305 305 295 375 375 375
Approximate number of minutes of playing time when using a fully charged battery pack.
Notes
•If the power goes off even though the remaining battery time indicator indicates that
the battery pack has enough power to operate, charge the battery pack fully again so
that the indication on the remaining battery time indicator is correct.
•Battery pack performance decreases in low-temperature surroundings and recording
may not be possible even though the battery time remaining may be as much as 20
minutes. Recharge the battery pack fully in this case.
•NP-FM30 is not recommended because of its short recording time when used with
your camcorder.
Playing time on LCD screen Playing time with LCD closed
DVD100 DVD200 DVD300 DVD100 DVD200 DVD300
17

Step 1 Preparing the power source
Showing the remaining battery time – BATTERY INFO
1 Open the LCD screen while pressing OPEN.
2 Press DISPLAY/BATT INFO.
The remaining battery time appears for a while on the LCD display.
BATTERY INFO
BATTERY CHARGE LEVEL
0% 50%
REC TIME AVAILABLE
LCD SCREEN
VIEWFINDER::5260
100%
min
min
During charging
Notes
•The remaining battery time may not be indicated in the following cases:
– The battery pack is not installed correctly.
– The battery pack is damaged.
– The battery pack is empty.
•The number displayed as Battery Info is the approximate recording time.
•While the remaining battery time is being calculated, “CALCULATING BATTERY
INFO...” is displayed.
•It may take some time to display the remaining battery time after DISPLAY/BATT
INFO is pressed.
Connecting to a wall outlet
When you use your camcorder for a long time, it is recommended that you power it
from a wall outlet using the AC adaptor.
1 Open the DC IN jack cover, then connect the AC adaptor supplied with your
camcorder to the DC IN jack on your camcorder with the plug’s v mark facing
up.
2 Connect the power cord to the AC adaptor.
3 Connect the power cord to a wall outlet.
See page 16 for details.
BATTERY INFO
BATTERY CHARGE LEVEL
0% 50% 100%
REC TIME AVAILABLE
LCD SCREEN
VIEWFINDER::6575
min
min
Fully charged
18
WARNING
Your camcorder is not disconnected from the AC power source (house current) as long
as it is connected to the wall outlet, even if your camcorder itself has been turned off.
Notes
•The AC adaptor can supply power even if the battery pack is attached to your
camcorder.
•The DC IN jack has “source priority”. This means that the battery pack cannot supply
any power if the AC adaptor is connected to the DC IN jack, even when the power
cord is not plugged into a wall outlet.
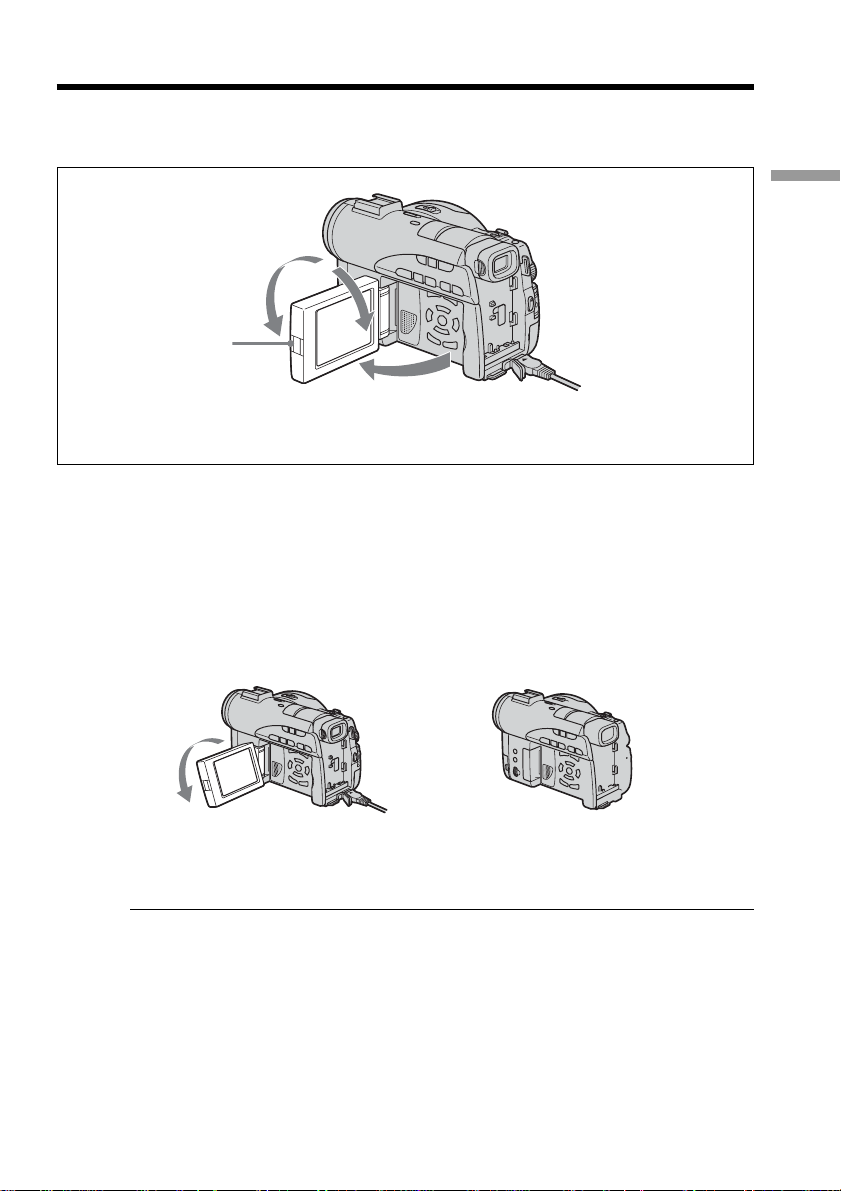
Step 2 Opening the LCD screen
LCD screen is used for such as changing settings, shooting images in various angles,
and reviewing recorded images.
2
OPEN button
1
1 Open the LCD screen while pressing OPEN.
2 Adjust the direction of the LCD screen to the desired position.
When you adjust the angle of the LCD screen, make sure if the LCD screen is
opened up to 90 degrees.
You can turn the LCD screen over and move it back to the camcorder body
with the LCD screen facing out as shown below.
Getting Started
Notes
•When closing the LCD screen, set it vertically until it clicks, then swing it into the
camcorder body.
•When the LCD screen is moved back to the camcorder while recording or while in
standby to record, the screen backlight is fixed to the [BRT NORMAL].
19
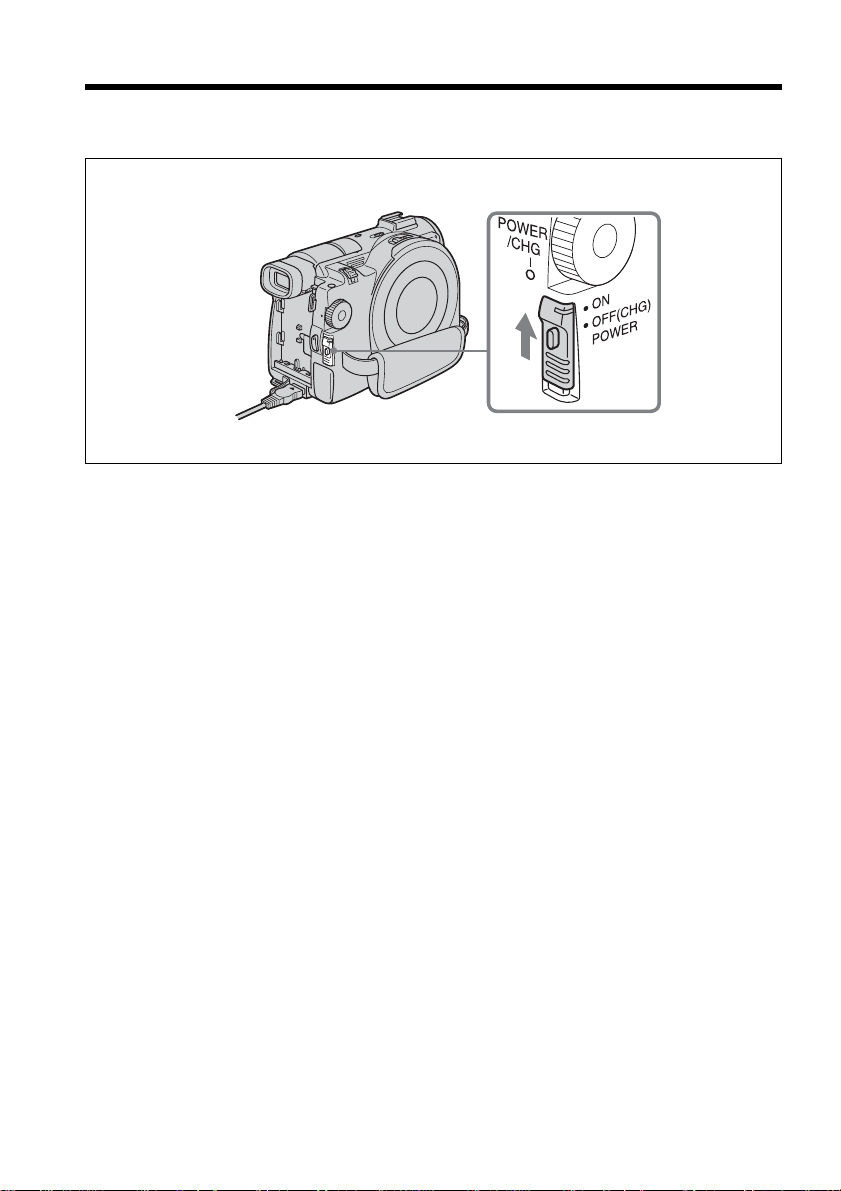
Step 3 Turning on the power
Slide the POWER switch upward while pressing the green button in the center.
Your camcorder turns on and the POWER/CHG lamp lights up in green.
To turn off the power
Slide the POWER switch downward while pressing the green button in the center.
When the POWER/CHG lamp turns off, the power cuts off.
20
Step 4 Setting the date and time
Set the date and time when you use your camcorder for the first time. Set the
geographical area, then the daylight savings time, the year, the month, the day, the hour
and then the minute, in that order.
If you do not use your camcorder for about 3 months, the date and time settings may
be cleared from memory (bars may appear) because the built-in rechargeable battery in
your camcorder will have been discharged during that time. In that case, charge the
built-in rechargeable battery by connecting the AC adaptor, and set the date and time
again (page 16, 132).
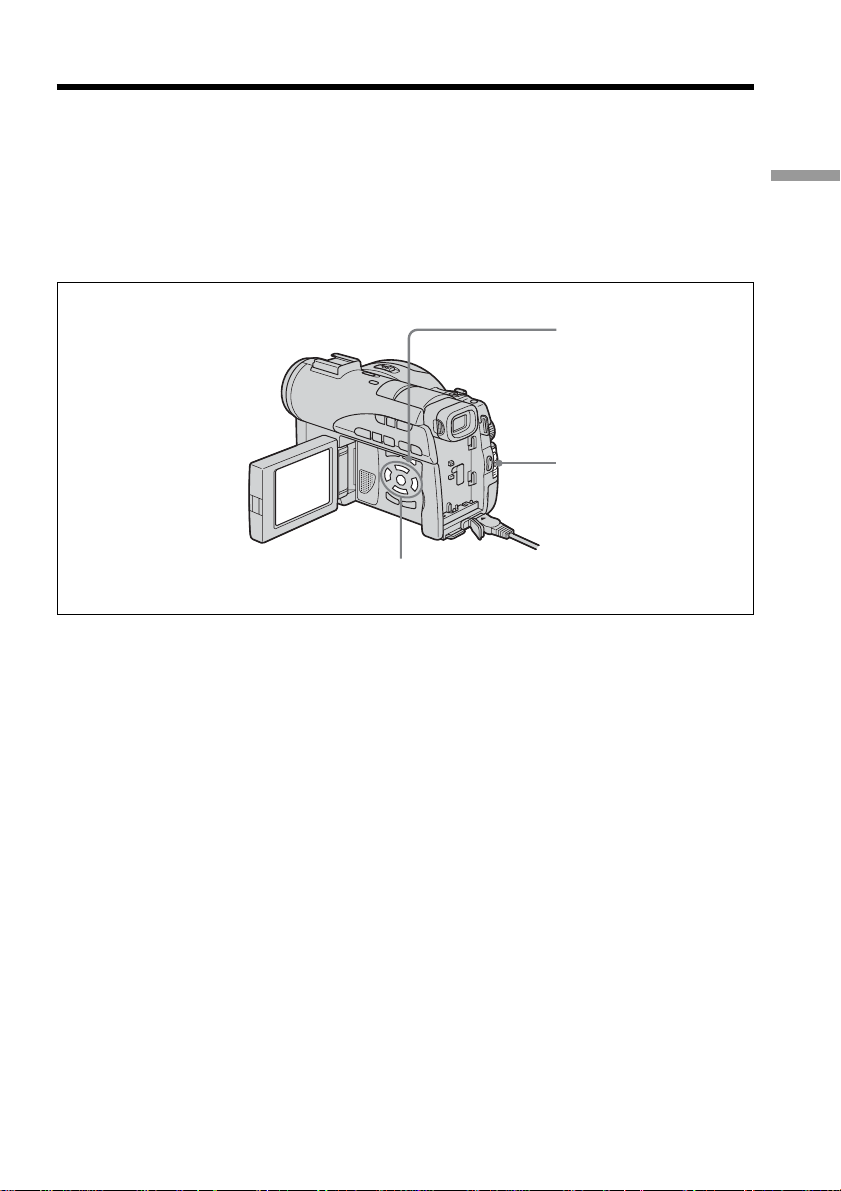
SETUP button
POWER switch
b/v/V/B/ENTER buttons
Getting Started
1 Open the LCD screen while pressing OPEN.
2 Turn the power on by sliding the POWER switch upward while pressing the
green button.
The CLOCK SET display appears.
3 Select the desired geographical area with v/V, and press ENTER.
21

Step 4 Setting the date and time
4 Set daylight savings time ([DST]) to [ON] with v/V if necessary.
CLOCK SET
AREA 26 -5.0GMT
New York,Bogota
DST OFF
DATE Y M D
2003 JAN 1
[ ENTER ] : NEXT ITEM
12 : 00
AM
5 Select the desired year with v/V, and press ENTER.
CLOCK SET
AREA 26 -5.0GMT
New York,Bogota
DST OFF
DATE Y M D
2003 JAN 1
[ ENTER ] : NEXT ITEM
12 : 00
AM
6 Set the month, day, hour and minute with the same procedure as in step 5.
Set the minute using a time signal, etc., with v/V, and press ENTER.
The clock starts to move.
The internal clock of your camcorder operates on a 12-hour cycle.
•12:00 AM stands for midnight.
•12:00 PM stands for noon.
Tips
•If the CLOCK SET display does not appear in step 2, press SETUP, then select
(SETUP MENU), then [CLOCK SET] with v/V.
•If the SETUP display appears after step 6, press SETUP.
The SETUP display disappears.
22
Step 4 Setting the date and time
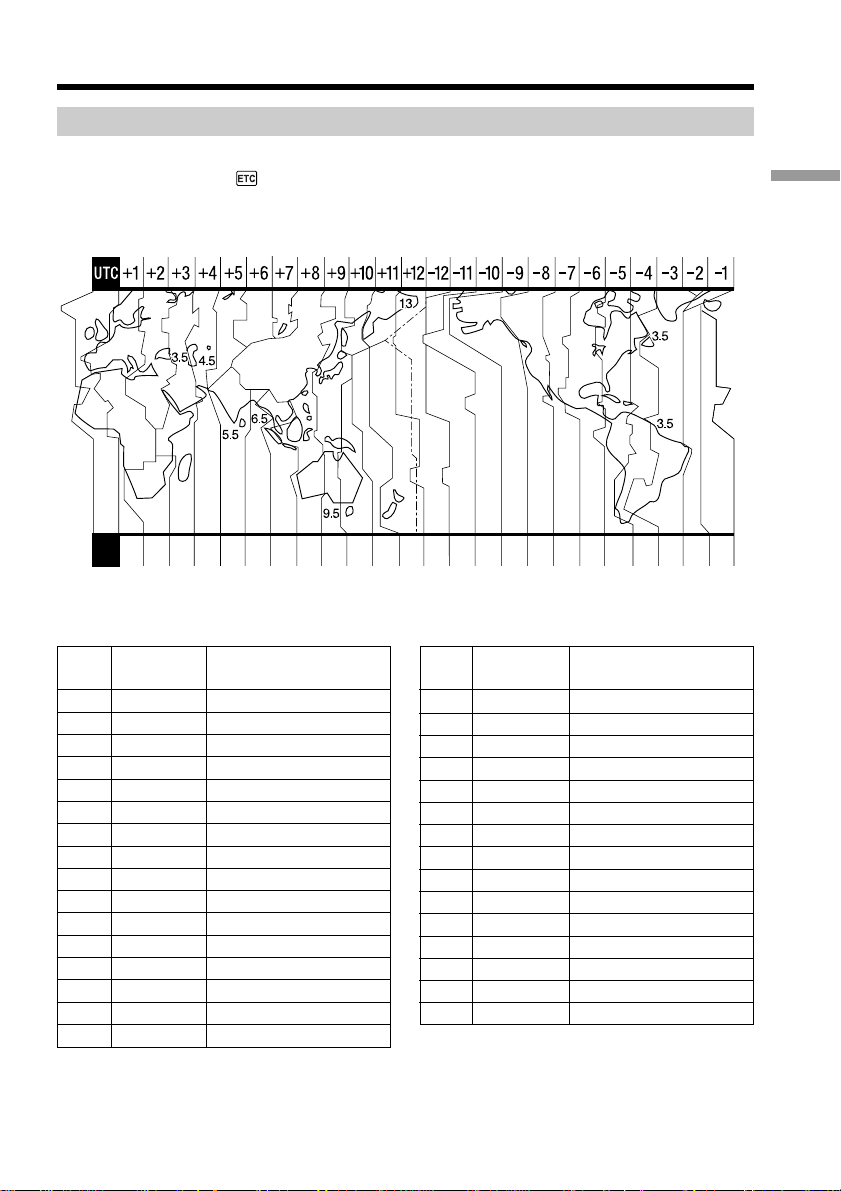
Simple setting of the clock using a time difference
You can easily set the clock to the local time by setting a time difference. In the SETUP
display, select (OTHERS) then [AREA SET] with v/V/ENTER.
World time difference
1 234681012131416171819 20 2122 23 2425 26 27293031
Getting Started
Area Time-zone
code differences
GMT
1
+01:00
2
+02:00
3
+03:00
4
+03:30
5
+04:00
6
+04:30
7
+05:00
8
+05:30
9
+06:00
10
+06:30
11
+07:00
12
+08:00
13
+09:00
14
+09:30
15
+10:00
16
Area setting
Lisbon, London
Berlin, Paris
Helsinki, Cairo
Moscow, Nairobi
Tehran
Abu Dhabi, Baku
Kabul
Karachi, Islamabad
Calcutta, New Delhi
Almaty, Dhaka
Rangoon
Bangkok, Jakarta
HongKong, Singapore
Seoul, Tokyo
Adelaide, Darwin
Melbourne, Sydney
Area Time-zone
code differences
+11:00
17
+12:00
18
–12:00
19
–11:00
20
–10:00
21
–09:00
22
–08:00
23
–07:00
24
–06:00
25
–05:00
26
–04:00
27
–03:30
28
–03:00
29
–02:00
30
–01:00
31
Area setting
Solomon Is.
Fiji, Wellington
Eniwetok, Kwajalein
Midway Is., Samoa
Hawaii
Alaska
LosAngeles, Tijuana
Denver, Arizona
Chicago, MexicoCity
New York, Bogota
Santiago
St. John’s
Brasilia, Montevideo
Fernando de Noronha
Azores
23
Step 5 Adjusting the LCD screen and the viewfinder
Adjusting the brightness of the LCD screen
Adjust the brightness of the LCD screen properly in your sight.
1 Open the LCD screen while pressing OPEN.
2 Turn the power on by sliding the POWER switch upward while pressing the
green button.
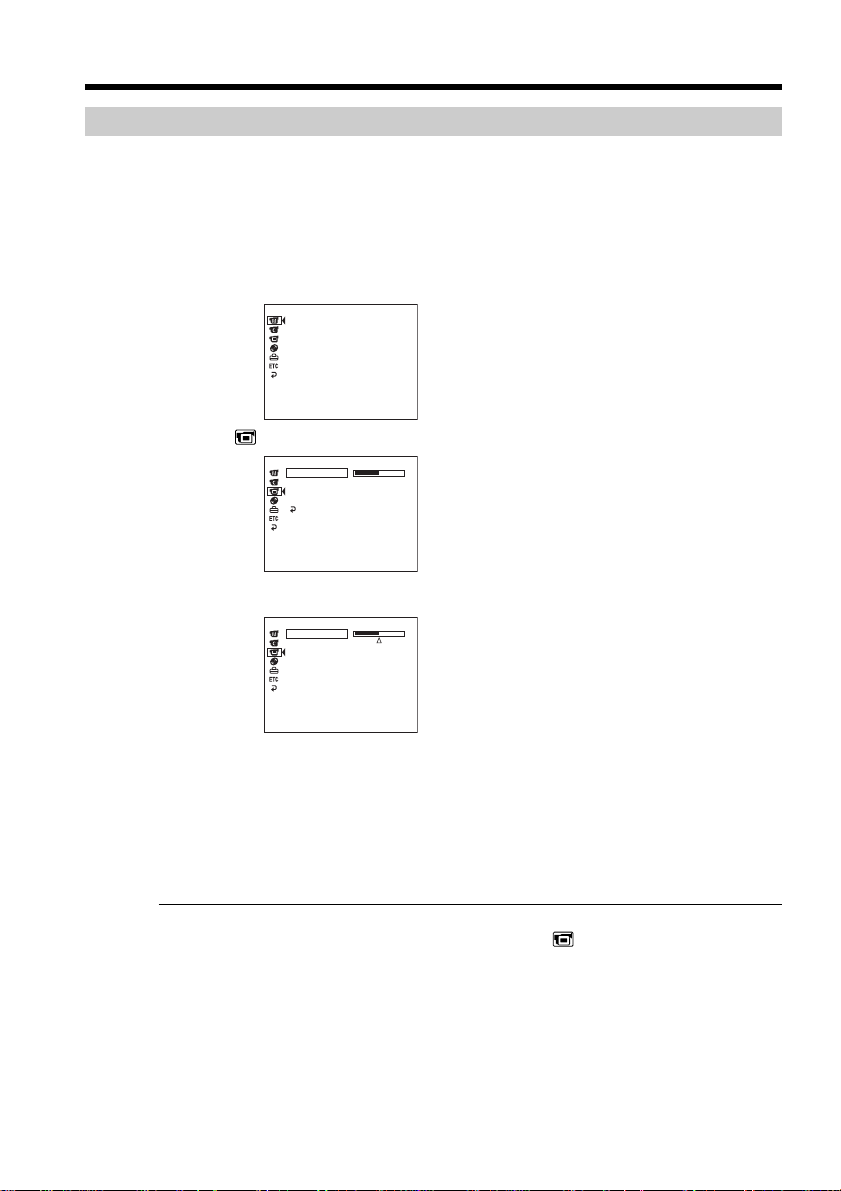
3 Press SETUP.
The SETUP display appears.
MANUAL SET
PROGRAM AE
P EFFECT
D EFFECT
WHT BAL
AUTO SHTR
[ SETUP ] : END
4 Select (LCD/VF SET) with v/V, and press ENTER.
LCD / VF SET
LCD BRIGHT
LCD B. L.
LCD COLOR
VF B. L.
RETURN
[ SETUP ] : END
5 Select [LCD BRIGHT] with v/V, and press ENTER.
LCD / VF SET
LCD BRIGHT
24
[ SETUP ] : END
6 Adjust the brightness of the LCD screen with b/B, and press ENTER.
b: Get darker
B: Get brighter
The LCD screen brightness is adjusted.
7 Press SETUP.
The SETUP display disappears from the LCD display.
Tips
•You can change the brightness of the backlight. Select (LCD/VF SET) then [LCD
B.L.] in the SETUP display when using the battery pack (page 111).
•The [LCD BRIGHT] and [LCD B.L.] settings do not affect the brightness of the image
when you are recording.

Step 5 Adjusting the LCD screen and the viewfinder
Adjusting the viewfinder
When recording pictures with the LCD screen closed, check the picture with the
viewfinder. Adjust the viewfinder lens to accommodate your eyesight so that the image
in the viewfinder comes into sharp focus.
Getting Started
2
Viewfinder lens
adjustment lever
1
1 Lift up the viewfinder.
2 Move the viewfinder lens adjustment lever as you can see the characters in the
viewfinder clearly.
Tips
•If you install an NP-FM70/QM71/QM71D/FM91/QM91/QM91D battery pack in
your camcorder, extend and lift up the viewfinder and adjust the angle of it.
•You can change the brightness of the viewfinder backlight. Select [VF B.L.] in the
SETUP display when using the battery pack (page 111).
•The [VF B.L.] setting does not affect the brightness of the image when you are
recording.
•Recording pictures with the viewfinder is recommended in the following cases:
– When the picture seen on the LCD display is poor.
– When you want to save on battery consumption.
25
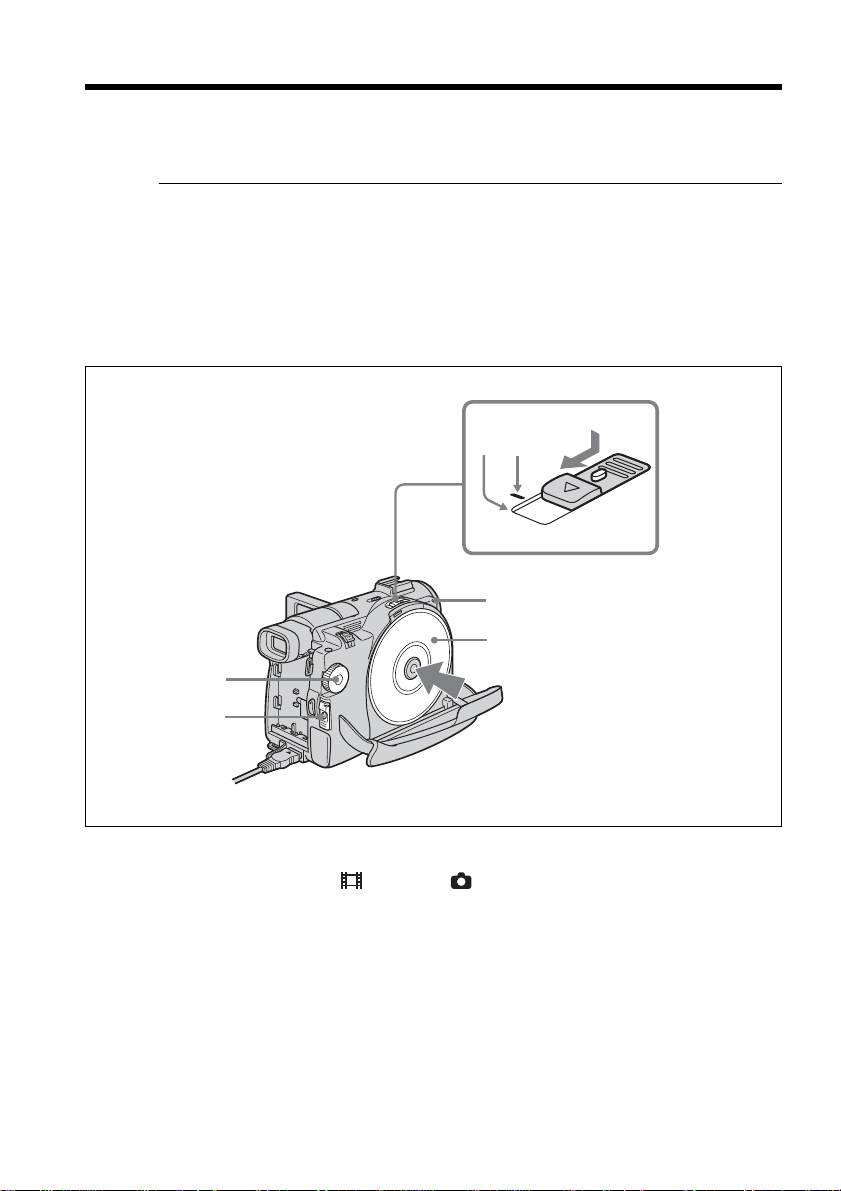
Step 6 Preparing a disc for recording
A new DVD-R or DVD-RW is required for recording. You cannot overwrite or delete
data recorded on a DVD-R, but you can delete data and record again with a DVD-RW.
The preparation procedure is different depending on the type of disc you use.
Note
You can open the disc cover only while the Access/Open lamp is lit in green. The cover
will be locked after about 30 seconds if you do not open the disc cover. When the lamp
turns off, slide the disc cover OPEN switch again.
Tips
•The camcorder is set in the VIDEO mode as the default setting.
•Formatting is required when a DVD-RW is used for the first time.
3
4
Access/Open lamp
5
26
1
2
1 Set the mode dial to (Movie) or (Still).
2 Turn the power on by sliding the POWER switch upward while pressing the
green button.
3 Slide the disc cover OPEN switch to the mark.
The beep sounds and PREPARING TO OPEN COVER appears on the LCD
display. After a while, the beep sound changes and the Access/Open lamp
lights in green, and SLIDE [OPEN] appears.
4 Slide the disc cover OPEN switch again to the end.
The disc cover opens.
5 Set the disc with the label side facing up, then press firmly to seat it on the
center spindle until it clicks.
Make sure that the disc is not exposed to fingerprints and dust.

Step 6 Preparing a disc for recording
6 Close the disc cover.
Your camcorder starts recognizing the inserted disc.
With a DVD-R, you can start recording immediately after DISC ACCESS
disappears on the LCD display. See page 29 for details on shooting movies and
see page 34 for details on shooting still images.
The FORMAT display appears when you insert a DVD-RW. Proceed to step 7.
FORMAT
REC FORMAT
EXECUTE
EST. PROCESS TIME : 7sec
REC FORMAT : VIDEO
VIDEO
7 When recording in VIDEO mode, select [EXECUTE] and [YES] with b/v/V/
B, then press ENTER.
When recording in VR mode (page 7):
1 Select [REC FORMAT] with v/V, then press ENTER.
2 Select [VR] with v/V, then press ENTER.
3 Select [EXECUTE] with v/V, then press ENTER.
4 Select [YES] with v/V, then press ENTER.
The disc formatting starts. When the formatting is completed, you can start
recording on the DVD-RW.
Notes
•If you close the disc cover with the disc set incorrectly, it may cause your camcorder to
malfunction.
•Do not shock or vibrate your camcorder during “DISC ACCESS” appearing.
•It may take some time to recognize the disc depending on the disc type and condition.
•You may hear the motor running when the disc cover is closed without a disc being
set. This is not a malfunction.
•Do not remove the battery pack or disconnect the AC adaptor while formatting.
•See page 133 for details on disc handling.
Getting Started
To eject the disc
1 Perform the steps 3 and 4 on page 26.
2 Take out the disc after the disc spin stops completely.
Note
You can open the disc cover only while the Access/Open lamp is lit in green.
On disc information
When you replace a disc, disc information such as the date you started to use it and
information on previously recorded areas appears for about 5 seconds. The information
on previously recorded areas may not be displayed correctly depending on the
condition of the disc.
27
— Shooting movies/still images —
Shooting movies/still images
Before shooting
To shoot movies/still images correctly, note the following:
– Do not vibrate your camcorder during shooting.
– Do not expose the disc to dirt and dust.
– Do not scratch the disc.
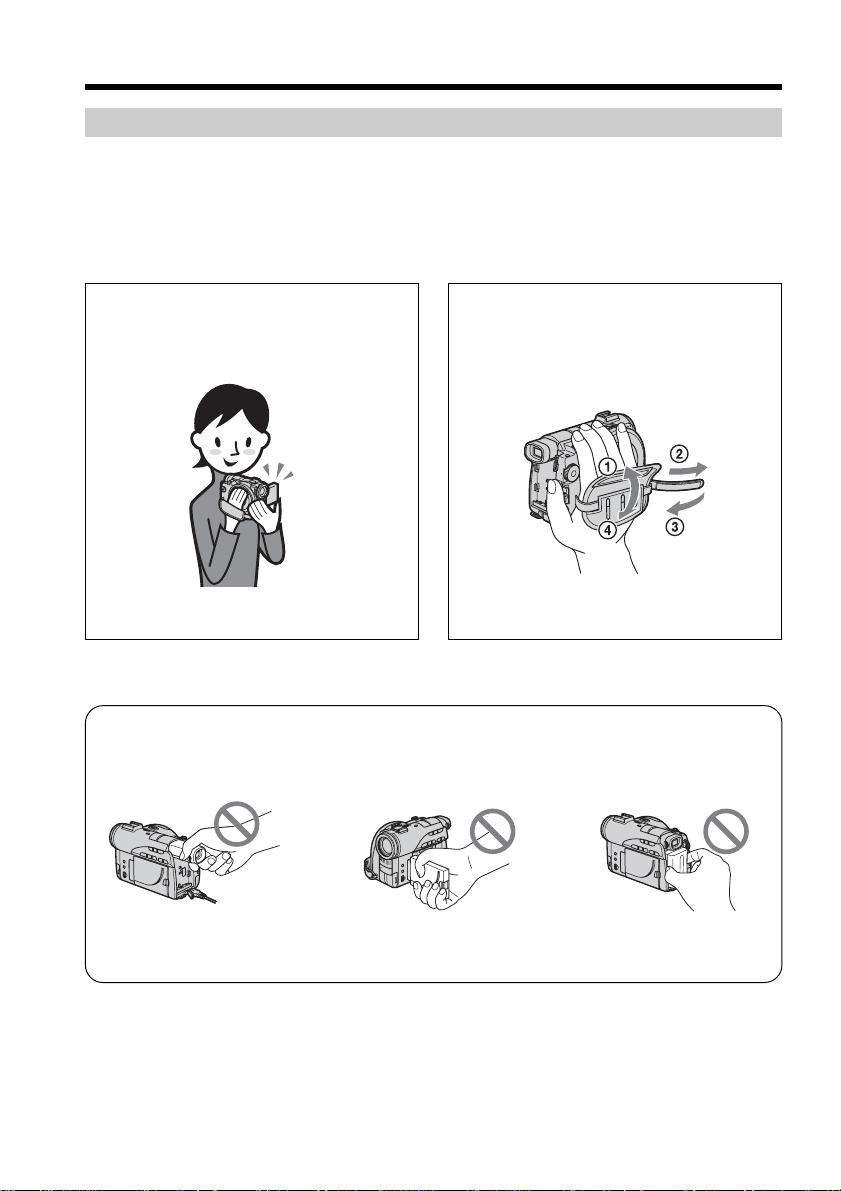
You can shoot stable images by holding the camcorder correctly.
To hold your camcorder
Hold your camcorder with your fingers
inserted through the grip belt.
Note
Do not pick up your camcorder by the viewfinder, the LCD screen, or the battery pack.
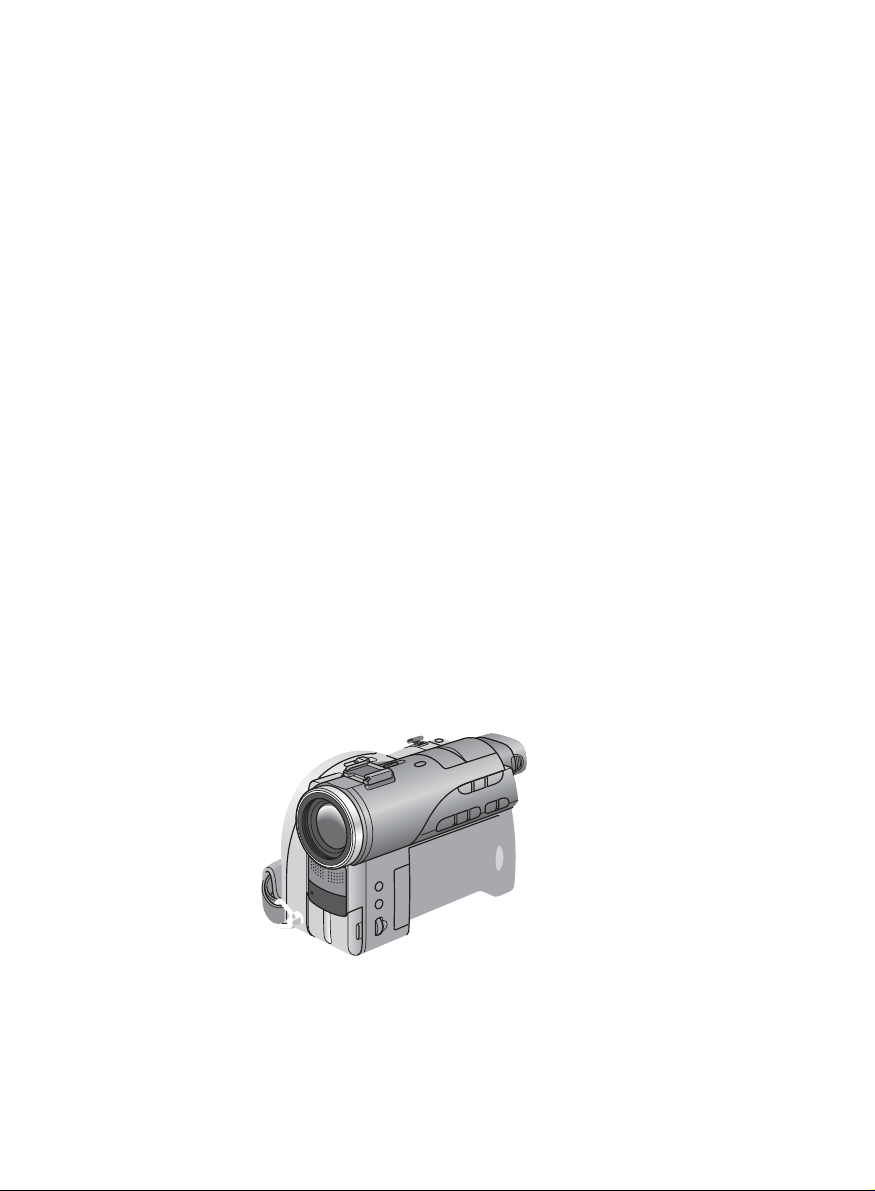
To fasten the grip belt
Fasten the grip belt firmly following the
illustration below.
Viewfinder LCD screen Battery pack
28
Shooting movies
Perform “Getting Started” from step 1 to 6 beforehand (page 15).
The following operation is common with VIDEO mode and VR mode.
1 Remove the lens cap by pressing both knobs on the sides of the cap.
Shooting movies/still images
2 Install the battery pack or connect the AC adaptor (page 15).
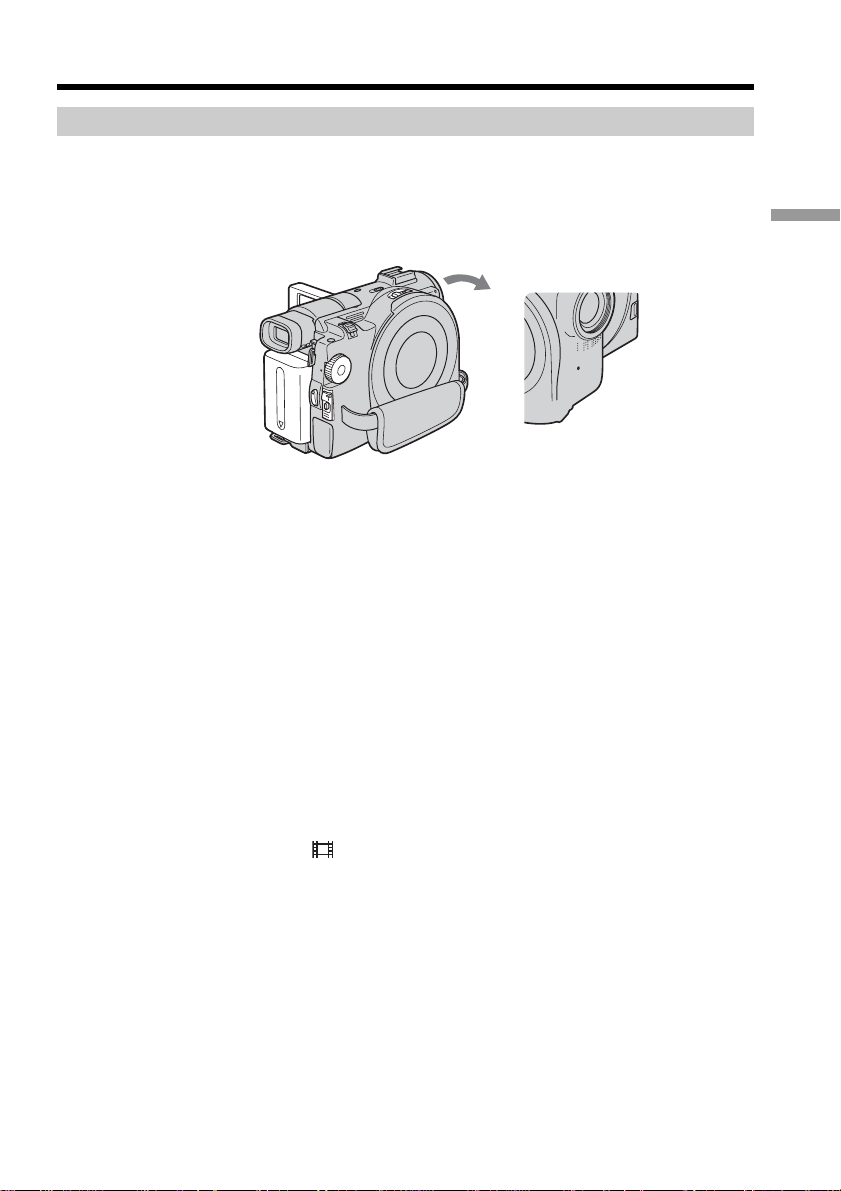
3 Open the LCD screen while pressing OPEN.
The image is not displayed in the viewfinder when the LCD screen opens.
4 Set the mode dial to (Movie).
5 Turn the power on by sliding the POWER switch upward while pressing the
green button.
6 Insert a disc (page 26).
This sets your camcorder to standby.
29

Shooting movies/still images
7 Press START/STOP (z).
Your camcorder starts recording. The REC indicator appears on the LCD
display. The camera recording lamp located on the front of your camcorder
lights up. To stop recording, press START/STOP again.
REC 0:00:01
Notes
•Do not touch the built-in microphone during recording.
•When the Access/Open lamp lights in red, data is being recorded on the disc. Take
note of the following when data is being recorded, or the data or the disc may be
damaged.
– Do not shock or vibrate the camcorder.
– Do not turn the power off.
– Do not remove the battery pack or disconnect the AC adaptor.
– Do not open the disc cover.
•The time to access the disc for recording may vary depending on the type of movies.
•There may be time difference between the point when you press START/STOP and
the actual point that the recording stops.
Tip
If you leave your camcorder powered by battery pack for 5 minutes while a disc is
inserted, your camcorder automatically turns off. This is to save battery power and to
prevent battery wear. Set the POWER switch to OFF (CHG) once, then set to ON, and
your camcorder is set to a standby mode. You can cancel the automatic power-off by
setting the (SETUP MENU) – [A. SHUT OFF] menu item to [NEVER] in the SETUP
display.
-
R
VIDEO
30
After recording
1 Eject the disc (page 27).
2 Turn the power off by sliding the POWER switch downward while pressing
the green button.
3 Close the LCD screen.
4 Remove the battery pack or disconnect the AC adaptor.
 Loading...