

Sony CSK002 Users Manual
3-088-727-11 (1)
Setting up your
1
CLIÉ™ handheld
Basic operations of
2
your CLIÉ™ handheld
Supplied
3
applications
Read
This
First
Operating Instructions
Personal Entertainment Organizer
Using CLIÉ Manuals
4
with your computer
Troubleshooting
CLIÉ™ handheld
components
PEG-TJ37
PEG-TJ27
© 2004 Sony Corporation

The following manuals are included with your CLIÉ handheld.
Refer to the following together with this manual.
Printed manual
* If your CLIÉ handheld was purchased in Europe, the manual is not in printed
format, but is included as a PDF file on the
Installation CD-ROM.
Read This First (Operating Instructions), this manual*
Explains setup and operation of your CLIÉ handheld.
For safe use, make sure you read the supplied “Safety & Regulations
Guide”.
Internet Connection Guide (for PEG-TJ37 only)
Explains how to use the wireless LAN features of your CLIÉ handheld to the Internet.
Manuals to be read on your computer
The following manuals are automatically installed on your computer after you set up
your CLIÉ handheld and computer.
b For details on each manual, refer to “Using CLIÉ Manuals with your computer” on page 42.
Handbook (PDF format*)
Explains the operation and features of your CLIÉ handheld.
CLIÉ Application Manual (HTML format**)
Explains how to use the supplied applications in detail.
Troubleshooting Q&A (PDF format*)
Helps in solving common problems that you may have while using your CLIÉ
handheld.
* You can read the manual on your computer using Adobe Reader.
If Adobe Reader is not installed on your computer, install it from the supplied
Installation CD-ROM.
** You can read the manual on your computer using an Internet browser.
For questions about operations, refer to CLIE FAQ by tapping (HOME)
and then tap (CLIE FAQ) on your CLIÉ handheld.
2

Before use
Caution
IN NO EVENT SHALL SONY BE LIABLE FOR
ANY INCIDENTAL, INDIRECT OR
CONSEQUENTIAL DAMAGES OR OTHER
DAMAGES INCLUDING WITHOUT
LIMITATION LOSS OF PROFITS, LOSS OF
REVENUE, LOSS OF DATA, LOSS OF USE
OF THE PRODUCT OR ANY ASSOCIATED
EQUIPMENT, DOWNTIME, AND
PURCHASER’S TIME RELATED TO OR
ARISING OUT OF THE USE OF THIS
PRODUCT, ITS HARDWARE AND/OR ITS
SOFTWARE.
On the supplied software
• Copyright laws prohibit reproducing the
software or the software manual in whole or
in part or renting the software without the
permission of the copyright holder.
• In no event will SONY be liable for any
financial damage or loss of profits, including
claims made by third parties, arising out of
the use of the software supplied with this
product.
• In the event a problem occurs with this
software as a result of defective
manufacturing, SONY will replace it at
SONY’s option or issue a refund. However,
SONY bears no other responsibility.
• The software provided with this product
cannot be used with equipment other than
that which it is designated for use with.
• Please note that, due to continued efforts to
improve quality, the software specifications
may be changed without notice.
• The software library incorporated in the
CLIÉ handheld is base d in part on the work of
the Independent JPEG Group.
NOTES
• Sony does not support third party add-on
applications. If you have a problem with a
third party application, please contact the
developer or publisher of that software.
• The illustrations in this manual may differ
from the actual software.
• Explanations in this manual assume that you
are familiar with basic operations of
®
Windows
and operating system, please refer to their
respective manuals.
Program © 2004 Sony Corporation, © 2004
PalmSource, Inc., or its subsidiaries. All rights
reserved.
Documentation © 2004 Sony Corporation
. For how to use your computer
3

Table of Contents
Setting up your CLIÉ™ handheld
Confirming the package
contents . . . . . . . . . . . . . . . . 6
Setting up
your CLIÉ™ handheld . . . . . . . 8
Charging your CLIÉ handheld. . . . . . . . . . . . . 8
Performing the initial setup after turning on
your CLIÉ handheld for the first time. . . . . 9
Using your CLIÉ™ handheld with
your computer . . . . . . . . . . . .16
Installing the software on your computer. . . 16
Registering your CLIÉ handheld. . . . . . . . . . 18
Connecting your CLIÉ handheld and computer
via the USB cable. . . . . . . . . . . . . . . . . . . 19
Entering a user name for
your CLIÉ handheld . . . . . . . . . . . . . . . . . 20
Installing the supplied applications
on your CLIÉ™ handheld . . . . .21
Basic operations of your CLIÉ™
handheld
Turning on/off
your CLIÉ™ handheld . . . . . . .22
Turning on your CLIÉ handheld . . . . . . . . . . 22
Using the Jog Dial™ navigator and
/ (the Left/Right buttons) . . . . . 23
Starting an application . . . . . . .23
Other ways to start an application . . . . . . . . 25
Using Graffiti
®
2 writing to enter text. . . . . . 27
Entering text. . . . . . . . . . . . . . .27
Other ways to enter text. . . . . . . . . . . . . . . . 29
Synchronizing data between your
CLIÉ handheld and computer
®
(the HotSync
operation). . . . .30
Using the camera . . . . . . . . . . .33
Restarting
your CLIÉ™ handheld . . . . . . .35
Supplied applications
Using CLIÉ Manuals with your
computer
Manuals Overview . . . . . . . . . . . . . . . . . . . . 42
Opening CLIÉ Manuals . . . . . . . . . . . . . . . . 44
Reading the PDF manuals on
your computer. . . . . . . . . . . . . . . . . . . . . 45
Reading the HTML manual on your computer
(CLIÉ Application Manual). . . . . . . . . . . . 46
Troubleshooting
Making a backup of the data or
applications on your CLIÉ handheld . . . . 48
Frequently Asked Questions. . . . . . . . . . . . . 49
Customer Support and
Customer Registration. . . . . . . . . . . . . . . 59
Notes on use . . . . . . . . . . . . . . . . . . . . . . . . 60
Specifications . . . . . . . . . . . . . . . . . . . . . . . 63
CLIÉ™ handheld components
Front panel. . . . . . . . . . . . . . . . . . . . . . . . . . 67
Back panel . . . . . . . . . . . . . . . . . . . . . . . . . . 69
Locating the components of
the CLIE Launcher. . . . . . . . . . . . . . . . . . 74
INDEX. . . . . . . . . . . . . . . . . . . .80
4

Notes on this manual
• This manual supports PEG-TJ37 and PEG-TJ27.
– The illustrations in this manual are for PEG-TJ37, unless specified otherwise.
– Differences between PEG-TJ37 and PEG-TJ27 are specified in each corresponding
section.
• Screen shots in this manual may be different from the actual displays in the supplied
software.
• The contents of this manual are written for users with a working knowledge of
Windows
®
. For details on computer operations, refer to your computer manual.
LCD display and camera lens
The LCD of your CLIÉ handheld is designed with precision technology. In some cases,
individual pixels may remain lit or may not light at all. Brightness of the display may
appear inconsistent, depending on the angle of view. Such anomalies are caused by the
nature of the LCD and do not indicate a malfunction.
Please note that Sony does not guarantee a replacement or refund for such cases.
Do not expose the LCD or camera lens to direct sunlight for prolonged periods. It may
result in a malfunction. Do not store your CLIÉ handheld in areas subject to sunlight, such
as near windows, and be careful when using outdoors.
The CCD of the built-in camera
The CCD of the built-in camera is designed with precision technology. In some cases,
individual pixels may remain on the LCD lit or may not light at all. Brightness of the
display on the LCD may appear inconsistent. Such anomalies are caused by the nature of
the CCD and do not indicate a malfunction.
Before taking pictures (CLIE Camera)
Sony recommends taking a test picture to confirm settings, etc., before actual shooting.
Take a test shot, save it, and view it to check the result. Experiment with the camera for
best results.
No guarantee for lost or damaged data
Sony does not provide guarantee against lost or damaged data.
Copyrights
Television programs, films, video tapes, and other materials may be copyrighted.
Unauthorized recording of such materials may violate copyright laws.
5
Setting up your CLIÉ™ handheld
This chapter explains how to charge your CLIÉ handheld, perform the initial setup, and use
it with your computer.
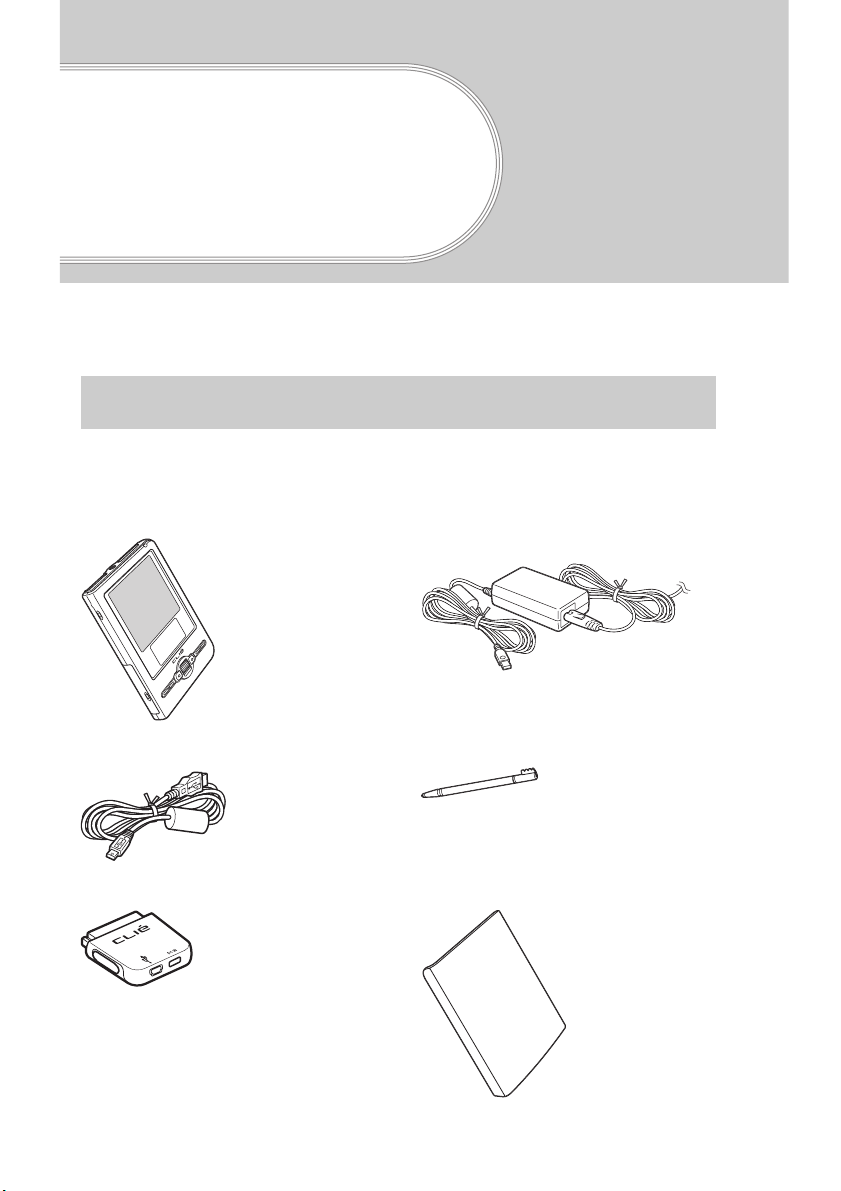
Confirming the package contents
Please confirm that all the following accessories are included in the package before
setting up your CLIÉ handheld.
CLIÉ handheld (1) AC power adapter (1)
(including AC cord)
USB cable (1) Stylus (1)
The stylus is inserted into your CLIÉ
handheld at the factory.
Plug adapter (1) Protective soft cover (1)
6
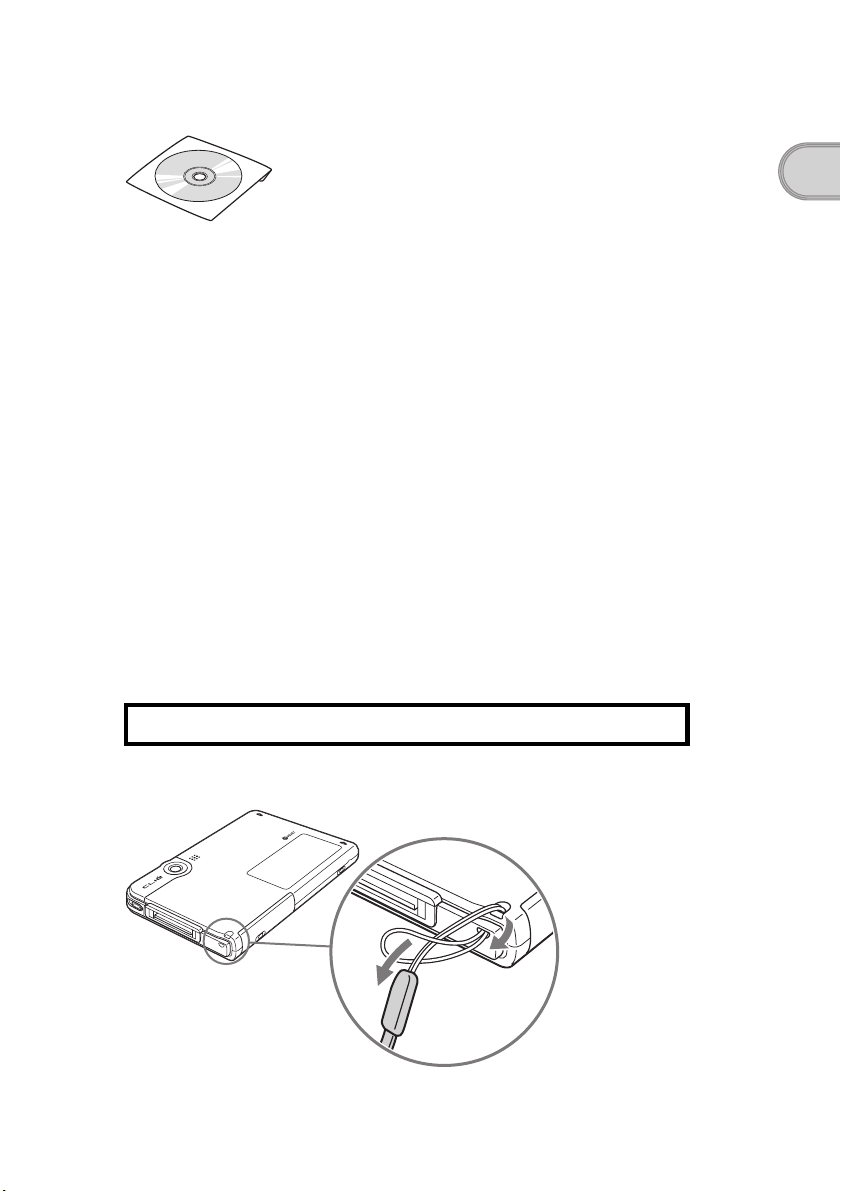
Installation CD-ROM (1)
Strap (1)
Refer to the illustration below to attach the strap.
Read This First - Operating Instructions (1, this manual)*
Safety & Regulations Guide (1)
Internet Connection Guide (1, for PEG-TJ37 only)
Software license agreement (1)
Graffiti 2 Card (1)
Other printed materials
* If your CLIÉ handheld was purchased in Europe, the manual is not in printed format, but is included as a PDF file on
the
Installation CD-ROM.
Make sure the package contains all of the above contents. If any item is missing, contact
the Sony Customer Information Service Center or a Sony dealer.
Setting up your CLIÉ™ handheld
Use the strap to avoid dropping your CLIÉ handheld
Attaching the strap
7
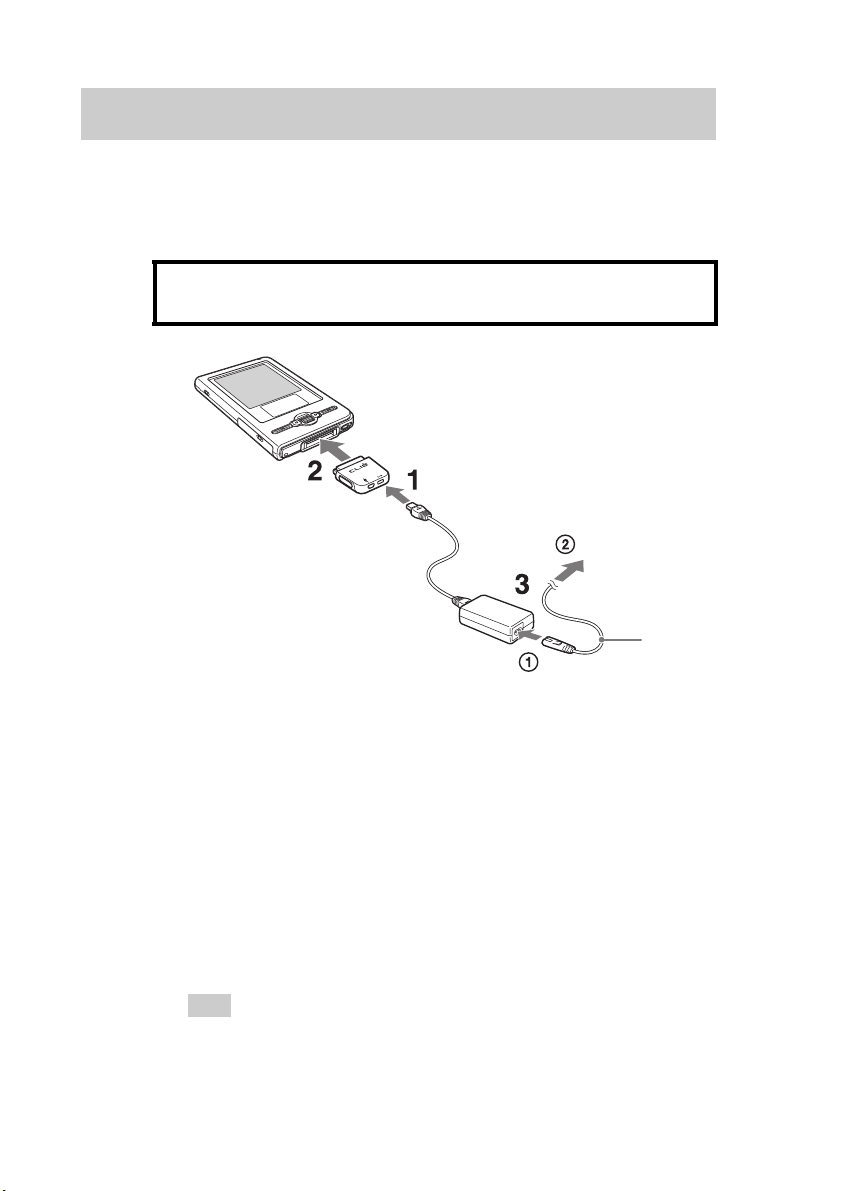
Setting up your CLIÉ™ handheld
The following operations are required before use.
Step 1: Charging your CLIÉ handheld
Before using your CLIÉ handheld for the first time,
make sure you fully charge the battery.
To a wall
outlet
1
Connect the AC power adapter to the DC IN connector of
the plug adapter.
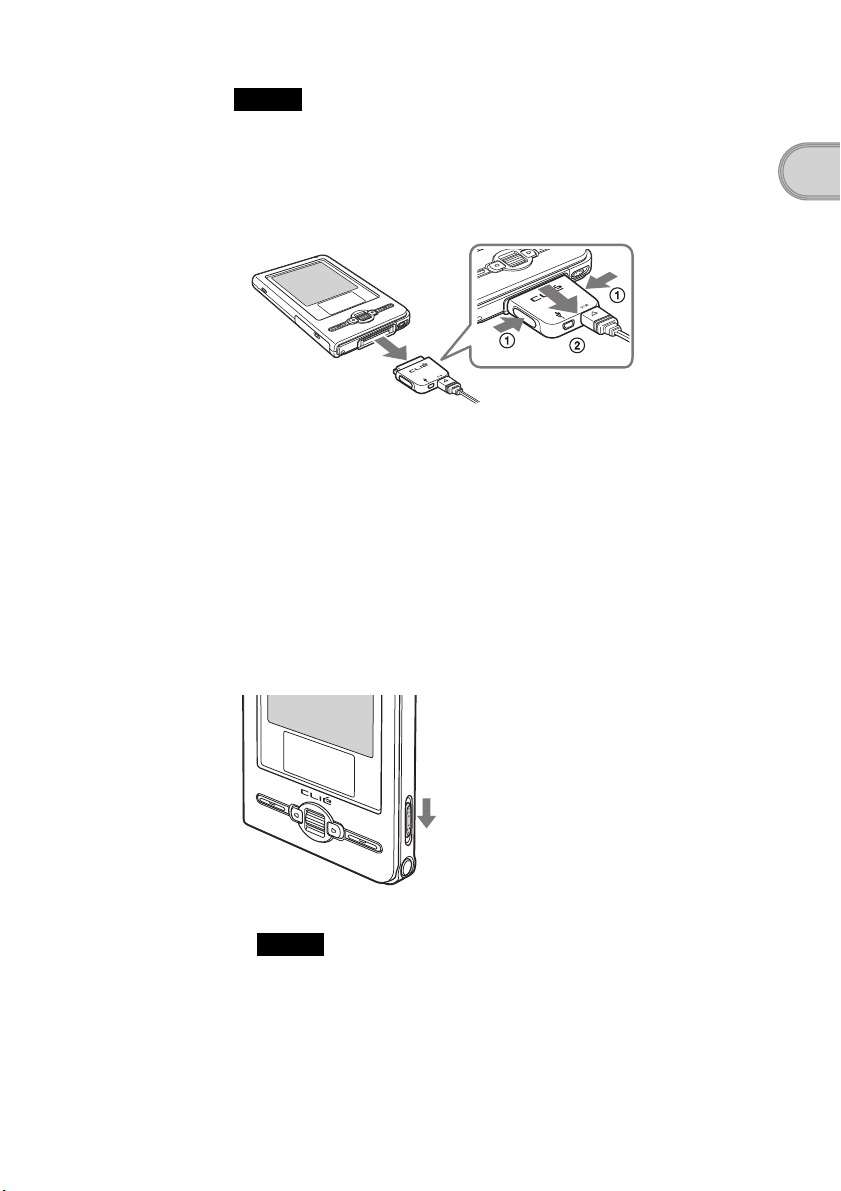
2
Connect the plug adapter to the interface connector of
your CLIÉ handheld .
3
Connect the AC cord to the AC power adapter (1). Then,
plug the AC cord into a wall outlet (2).
The POWER LED of your CLIÉ handheld turns on when charging starts.
It takes about four hours to fully charge your CLIÉ handheld for the first time.
The POWER LED turns off when charging is complete.
Tip
Subsequent charges will require less time if you charge your CLIÉ handheld
frequently.
8
Note
If the battery of your CLIÉ handheld is completely discharged, all user data stored
on your CLIÉ handheld will be lost.
How to remove the plug adapter
Remove by pressing the plug adapter on both sides as illustrated.
Step 2: Performing the initial setup after
turning on your CLIÉ handheld for
the first time
The first time you turn on your CLIÉ handheld, you need to make some initial
settings. Follow the on-screen instructions to complete the initial setup and to
become familiar with operations of your CLIÉ handheld.
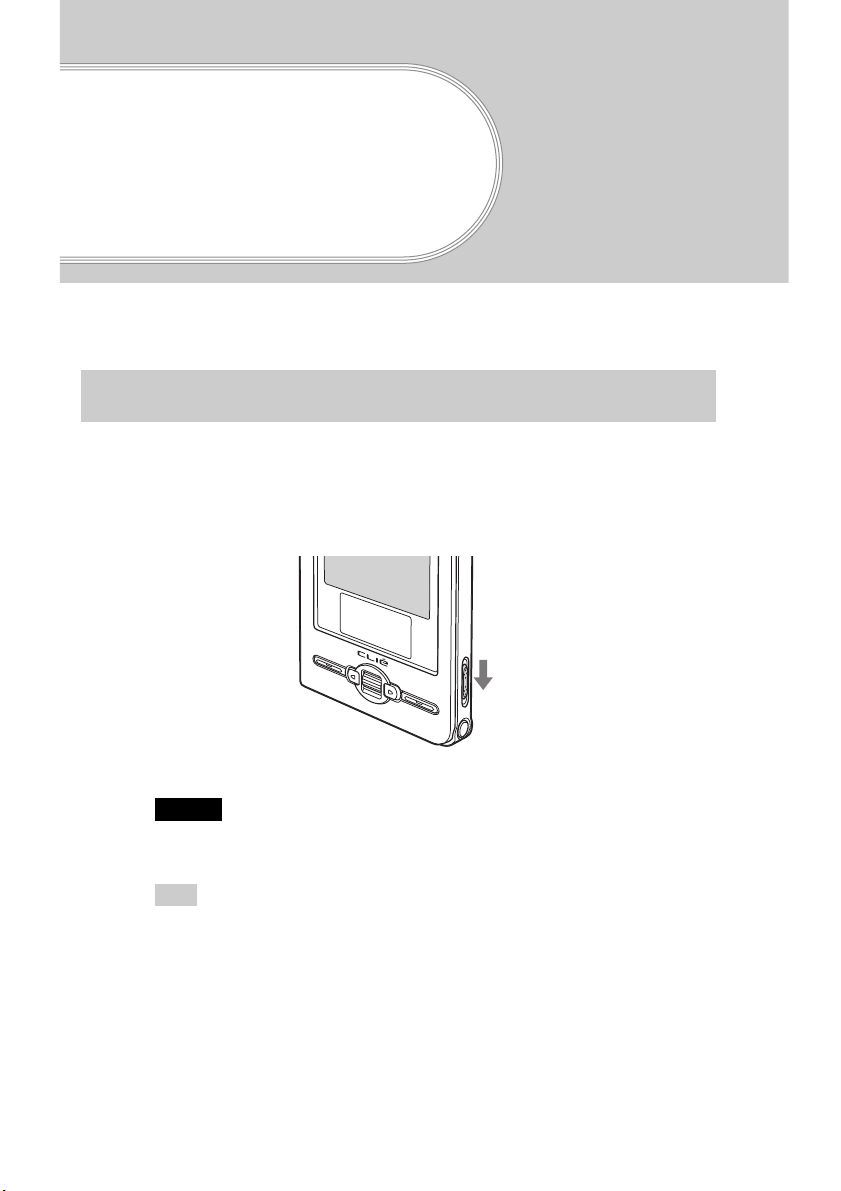
1
Slide down the POWER/HOLD switch.
Your CLIÉ handheld turns on, and the Setup screen is displayed.
Setting up your CLIÉ™ handheld
Slide down the POWER/HOLD switch
Note
When you slide and hold the POWER/HOLD switch for more than 2seconds,
the backlight of the LCD display switches on or off.
Continued on next page
• • • • • • • • • • • • • • • • • • • • • • • • • • •
9
Tips
If you cannot turn on your CLIÉ handheld
• Did you charge your CLIÉ handheld as described on page 8?
b For details, refer to “Frequently Asked Questions: I cannot turn on my
CLIÉ handheld” on page 51.
• Perform a soft reset if you cannot turn on your CLIÉ handheld even after
charging it (page 35).
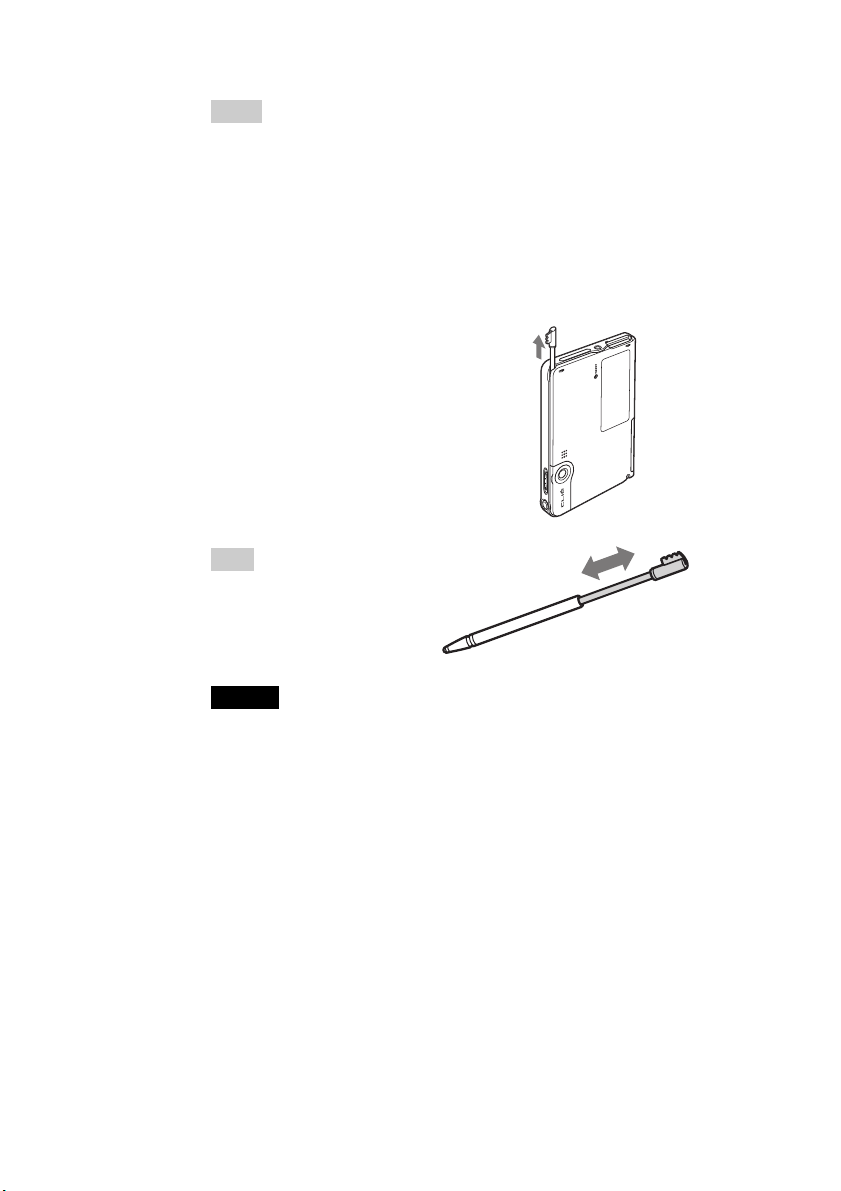
2
Take out the stylus.
You can use the stylus to enter text
or to select applications.
Tip
You can extend or shorten the
stylus, as shown in the
illustration.
Take out the stylus
10
Notes
• Never use a writing pen, pencil, or other sharp object instead of the stylus to
write on your CLIÉ handheld, as the screen may get scratched.
• When you put the stylus back in its holder, push it in into place completely.
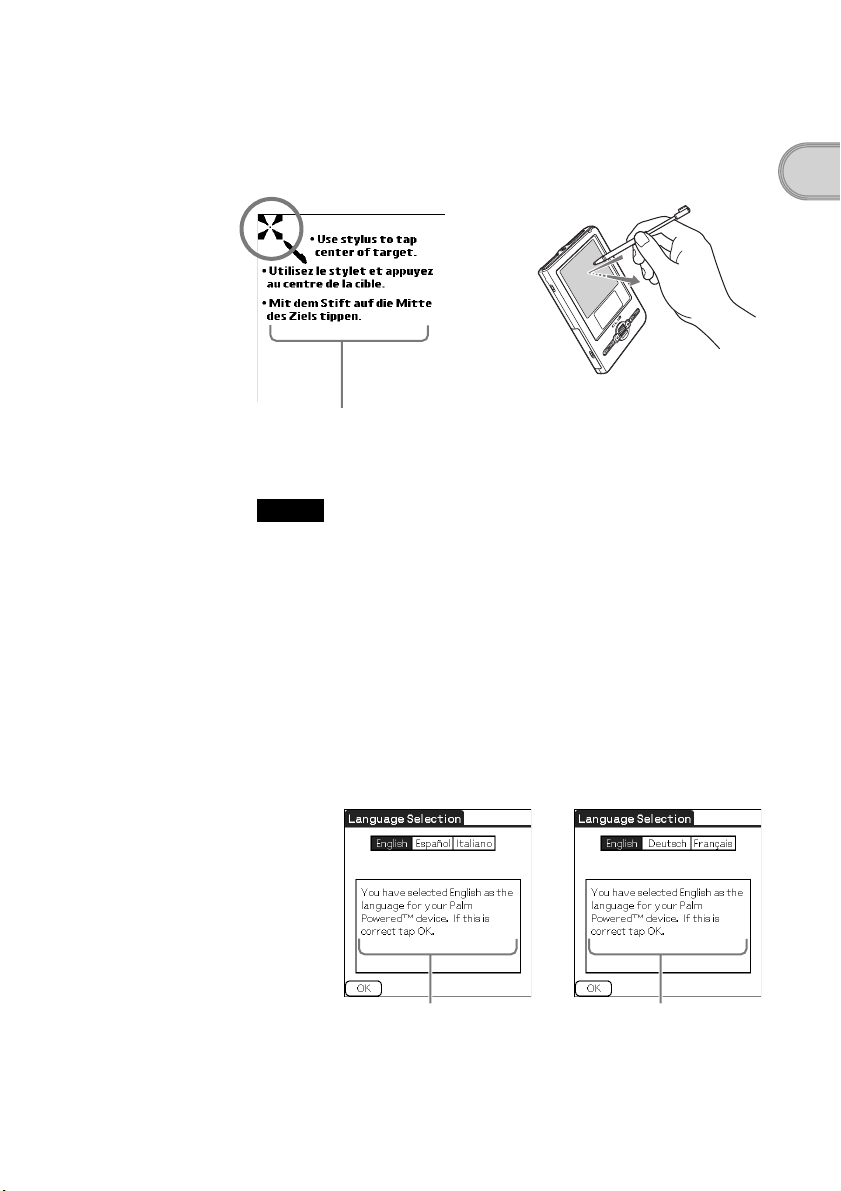
3
Following the on-screen instructions. Tap exactly in the
center of the displayed mark.
Tap the next targets, which are displayed at the bottom right and then in the
center of the screen.
Press lightly on the screen (Tap)
The display in the screen depend on
what country or region your CLIÉ
handheld was purchased.
Note
If the stylus digitizer is not configured correctly, the scroll bar may not operate
properly, “tapping” may not work as expected, or other problems may occur.
b For details on reconfiguring the stylus digitizer, refer to “Customizing your
CLIÉ™ handheld (Preferences): Adjusting the Digitizer” in the “Handbook”
(PDF format).
After the stylus adjustment is complete, a screen for selecting
your language is displayed. (Only available for certain models
or areas.)
Setting up your CLIÉ™ handheld
4
Select your language.
(Only available for certain models or areas.)
The Important screen is displayed.
The display in the screen depend on what
country or region your CLIÉ handheld was
purchased.
Continued on next page
• • • • • • • • • • • • • • • • • • • • • • • • • • •
11
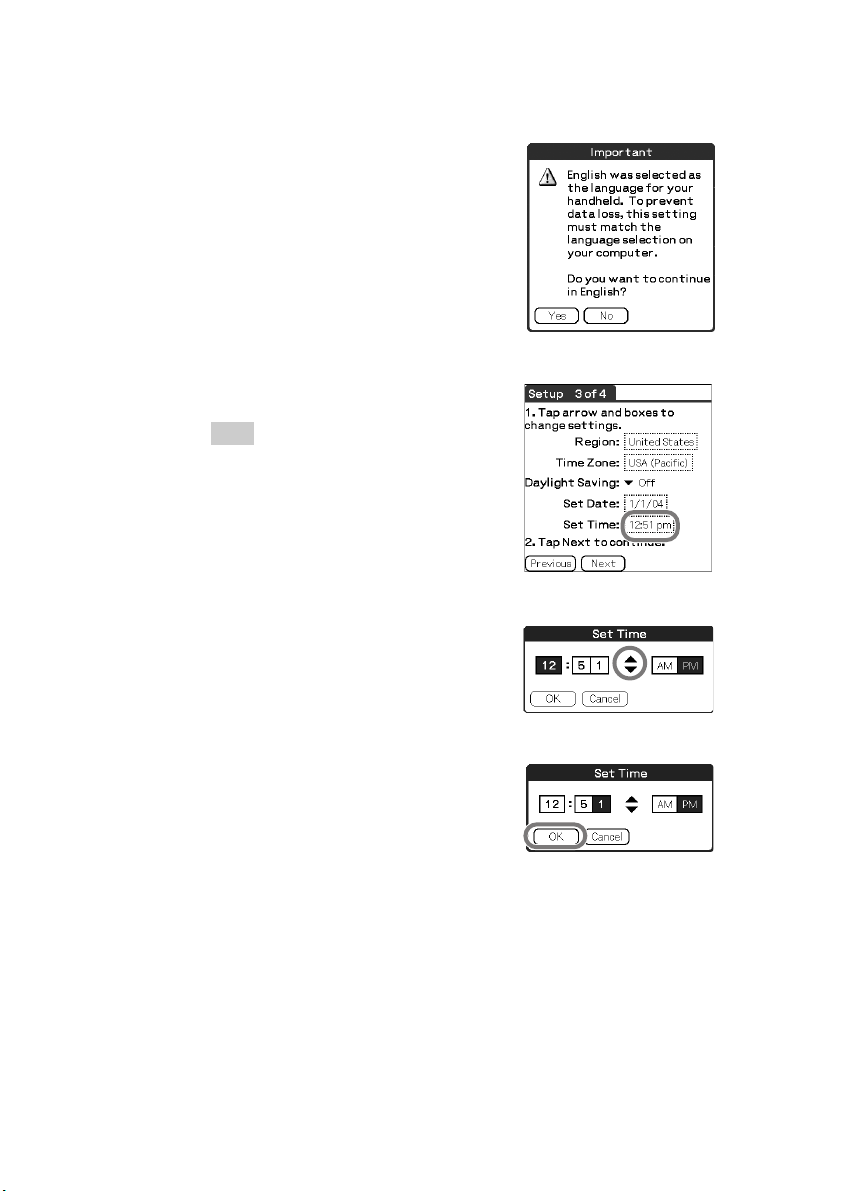
5
Click [Yes] to confirm.
(Only available for certain models or areas.)
6
Tap the box next to [Set Time:].
The Set Time dialog box is displayed.
Tip
You can reconfigure the date and time
settings in the Preferences screen.
b For details, refer to “Customizing your
CLIÉ™ handheld (Preferences): Setting
up the Date & Time preferences” in the
“Handbook” (PDF format).
7
Tap v or V to set the current time.
Tap each box to set the hour and
minute.
12
8
Tap [OK].
The current time is set and the
Setup screen is displayed.

9
Tap the box next to [Set Date:].
The Set Date screen is displayed.
10
Tap b or B to select the current year.
11
Tap the current month, then tap the current date.
The Set Date screen closes.
12
Tap the box next to [Time Zone:].
The Set Time Zone screen is displayed.
Setting up your CLIÉ™ handheld
Continued on next page
• • • • • • • • • • • • • • • • • • • • • • • • • • •
13
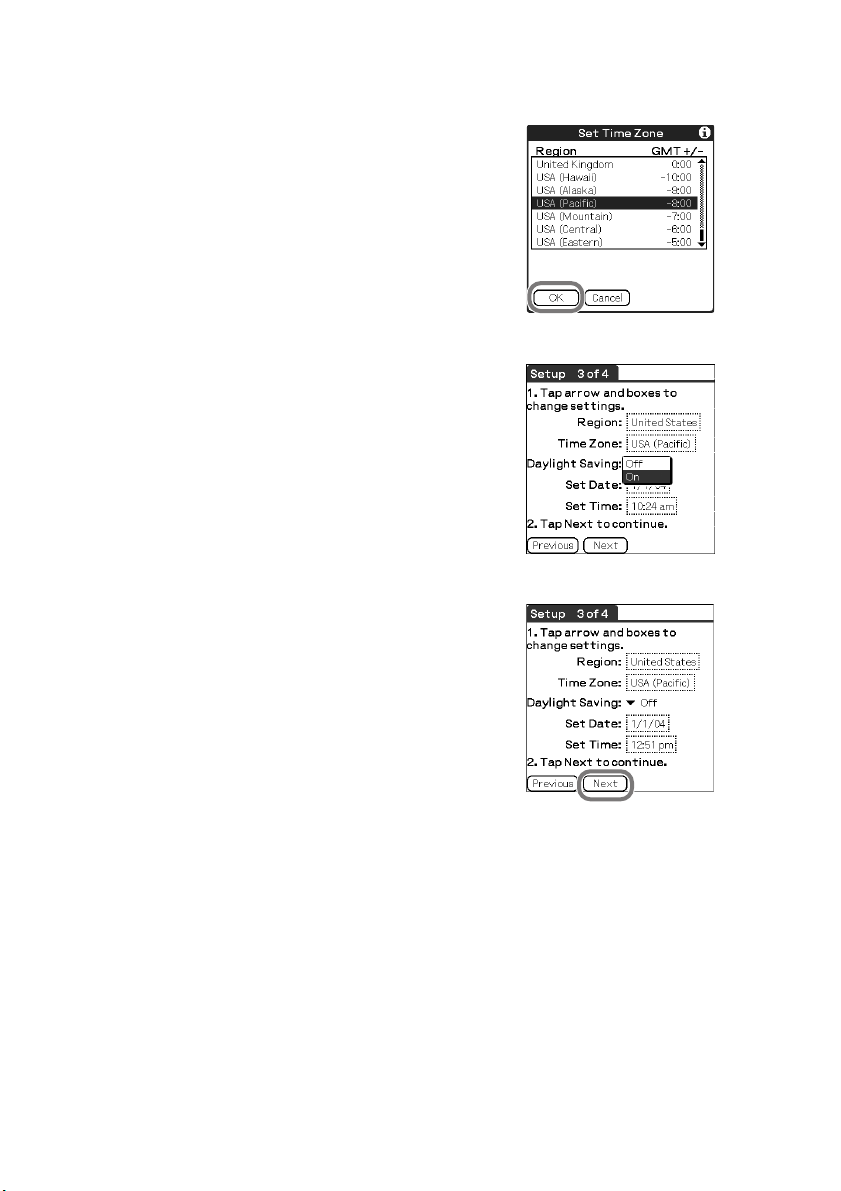
13
Tap the region to set the time zone, then tap [OK].
14
Tap V next to [Daylight Saving:] and select [On] or [Off].
15
Tap [Next].
14
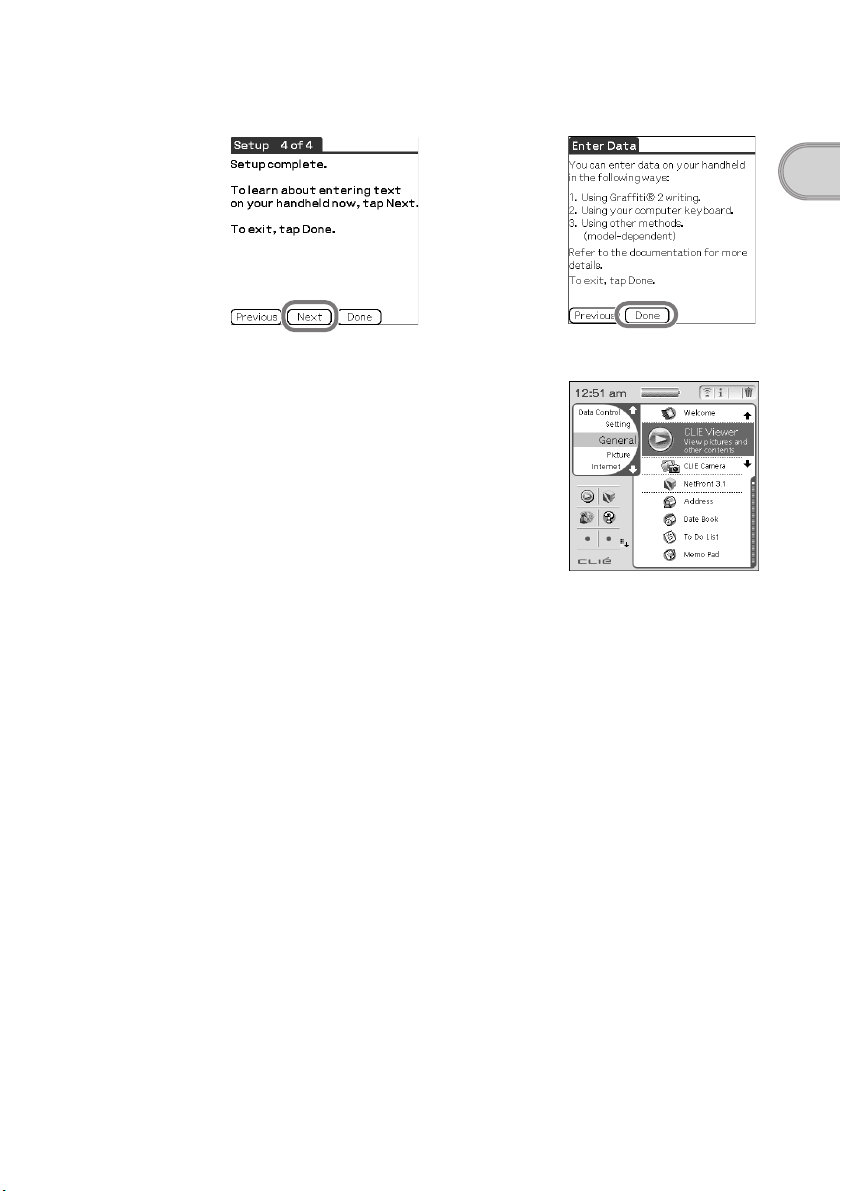
16
Tap [Next] and [Done].
The CLIE Launcher is displayed.
The initial setup is complete.
Setting up your CLIÉ™ handheld
b
15
Using your CLIÉ™ handheld with your computer
Palm™ Desktop for CLIÉ stored on the supplied Installation CD-ROM
must be installed on your computer. The software is used for data transfer
between your CLIÉ handheld and computer, and handling data on your
computer such as Address Book.
b For details on the system requirements of computer, refer to “System requirements”
on page 66.
When Palm™ Desktop for CLIÉ is installed on your computer, CLIÉ
Manuals is also installed on your computer.
b For details on CLIÉ Manuals, refer to “Using CLIÉ Manuals with your computer”
(page 42).
Step 1: Installing the software on your
computer
Do not connect your CLIÉ handheld to your computer
before installing the software. Otherwise, the
software may not be installed properly.
Notes
• Do not simply copy the Palm™ Desktop for CLIÉ folder from the supplied
Installation CD-ROM to your computer. To install the software properly, follow
the installation procedure described below.
16
• If you use Windows 2000 Professional or Windows XP, log on with a username
in the Administrators group before installing the software.
• If you have more than one CLIÉ handheld and an older version of Palm™
Desktop for CLIÉ has already been installed on your computer, follow the
installation procedure below to upgrade to the new version.
* If you are using PEG-N710C Series or PEG-S300 Series, refer to your CLIÉ
handheld support website. (Refer to the URL shown on the back cover of this
manual.)
b For details, refer to “Transferring data from another CLIÉ™ handheld” in the
“Handbook” (PDF format).

1
Quit all applications running on Windows®.
2
Insert the supplied Installation CD-ROM into the CD-ROM
drive of your computer.
The Installation CD-ROM window is displayed.
3
Select your language.
(Only available for certain models or areas.)
4
Click [Next] or [CLIÉ Basic], then click [Install] to install
Palm™ Desktop for CLIÉ.
The setup program starts and the
Note
If you try to install Palm™ Desktop for CLIÉ when an older version of
Palm™ Desktop for CLIÉ has already been installed on your computer, a
dialog box appears on your computer window.
Follow the instruction of the dialog box to install the new version of Palm™
Desktop for CLIE supplied with your CLIÉ handheld.
5
Click [Next].
The InstallShield Wizard window for [Setup Type] is displayed.
6
Select the setup type, [Complete] or [Custom].
When you select [Custom], you need to specify which software you want
to install and where to be installed.
The following steps explain when you select [Complete].
InstallShield Wizard
window is displayed.
Setting up your CLIÉ™ handheld
7
Click [Next].
The InstallShield Wizard window for [Select User] is displayed.
8
Enter a user name and click [Next].
The InstallShield Wizard window for [Ready to Install the Program] is
displayed after entering any user name you prefer.
Note
If you have more than one CLIÉ handheld
Enter a user name that is different from the one you use for another CLIÉ handheld.
If you set an identical user name for multiple CLIÉ handhelds, errors will occur.
Tip
If you want to transfer data between CLIÉ handhelds
Refer to “Transferring data from another CLIÉ™ handheld” in the “Handbook”
(PDF format).
Continued on next page
• • • • • • • • • • • • • • • • • • • • • • • • • • •
17

9
Click [Install].
Installation of Palm™ Desktop for CLIÉ starts.
“InstallShield Wizard Completed” message is displayed in the
InstallShield Wizard window when the installation is complete.
10
Click [Finish].
The Sony CLIÉ Handheld Registration window is displayed for
models for the U.S.A., Canada, and Europe only.
Tip
If you do not want to sign up for the customer service, click to deselect
[Register your CLIÉ].
Installation of Palm™ Desktop for CLIÉ on your computer
is complete.
If you want to register your CLIÉ handheld, go to “Step 2:
Registering your CLIÉ handheld”.
Step 2: Registering your CLIÉ handheld
You can register your CLIÉ handheld after installing Palm™ Desktop for
CLIÉ by following the on-screen instructions.
With your permission, Sony will keep you informed of special opportunities.
Also, your registration information helps Sony assist you if you call for
customer support.
All of the information you provide is confidential.
18
Note
• To register your CLIÉ handheld online, you need to have an access to the Internet.
• You need to register again if you purchase a another CLIÉ handheld.
Tip
If you want to register your CLIÉ handheld later, click at the top right of the
Sony CLIÉ Handheld Registration window to close.
When you complete the registration and close the Sony CLIÉ Handheld
Registration window, the Installation CD-ROM window is displayed.
Another way to register your CLIÉ handheld
You can register your CLIÉ handheld online by clicking [Start], selecting
[Programs] ([All Programs] for Windows XP)-[Sony Handheld]-[About PEGTJ37] or [About PEG-TJ27], and clicking [CLIÉ Registration].
Step 3: Connecting your CLIÉ handheld and
computer via the USB cable
You can synchronize data between your CLIÉ handheld and computer by
connecting them with the supplied USB cable after installing Palm™
Desktop for CLIÉ.
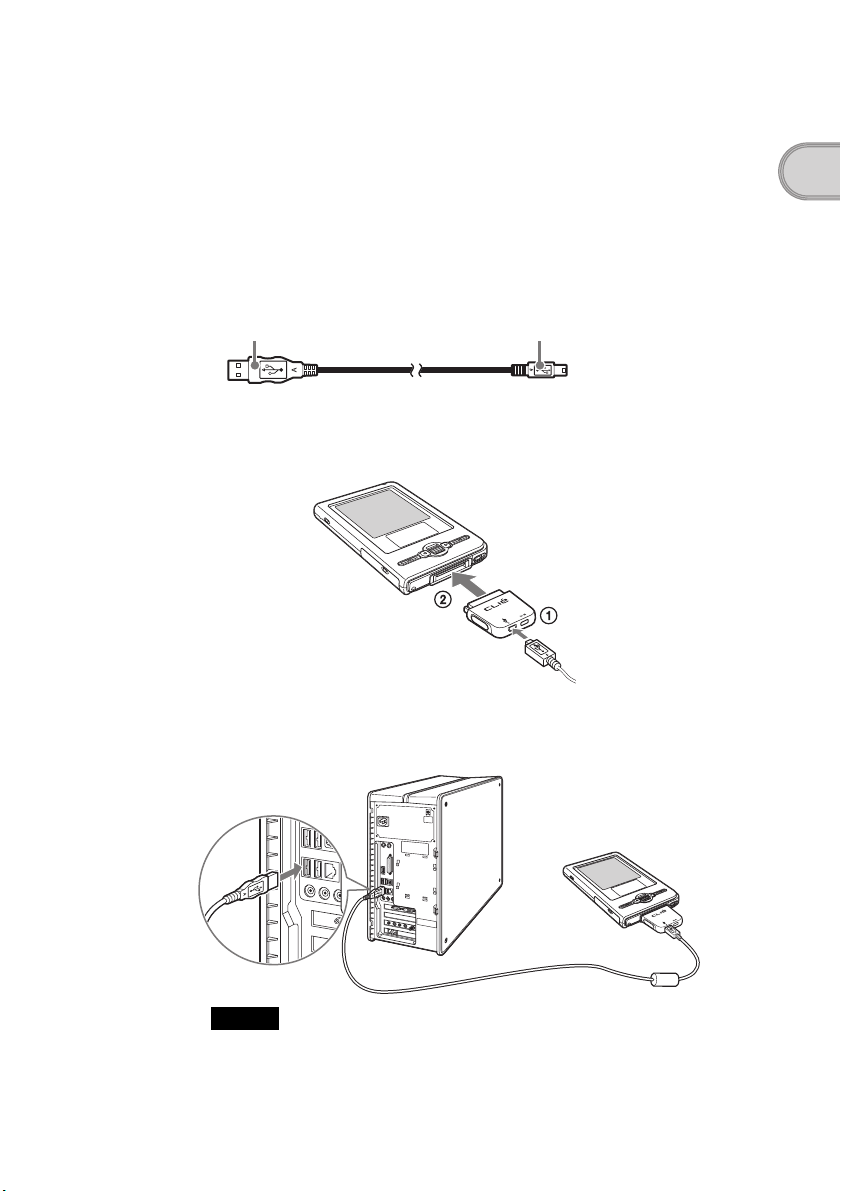
About the USB cable
The supplied USB cable has two connectors. Connect the “A” plug to the USB
port of your computer and the mini “B” plug to the plug adapter.
“A” plug mini “B” plug
1
Connect the mini “B” plug of the USB cable to the plug
adapter (1), then connect the plug adapter to the
interface connector of your CLIÉ handheld (2).
Setting up your CLIÉ™ handheld
2
Connect the “A” plug of the USB cable to the USB port of
your computer.
To the USB port of
your computer
Note
Make sure you connect the USB cable directly to a USB port of your computer.
If the USB cable is connected to a computer via another device, such as a USB
hub, the HotSync
®
operation may not work properly.
19

Step 4: Entering a user name for your CLIÉ
handheld
1
Rotate the Jog Dial™ navigator to select (HotSync) on
the CLIE Launcher and press the Jog Dial™ navigator.
The HotSync screen is displayed.
Tip
You can also tap (HotSync) to display the HotSync screen.
2
Tap (HotSync) in the HotSync screen.
The HotSync® operation starts. The Applications required for setup are
installed automatically.
3
Click [OK] when your user name is displayed in the Users
window of your computer.
A beep is heard and the HotSync® operation starts.
Your user name entered for Palm™ Desktop for CLIÉ is also registered
in your CLIÉ handheld.
When the setup is complete, “HotSync operation complete.” will be
displayed on your CLIÉ handheld.
4
Click [Finish] in the Installation CD-ROM window of your
computer.
The setup is complete.
20
Installing the supplied applications on your CLIÉ™ handheld
You can install applications from the supplied Installation CD-ROM by
following the procedure below.
You must install Palm™ Desktop for CLIÉ on your computer, before
installing the supplied applications on your CLIÉ handheld. Your CLIÉ
handheld must be connected to your computer via the USB cable.
b For details on supplied applications, refer to “CLIÉ Application Manual” (HTML
format).
Note
The supplied applications are designed to operate on your CLIÉ handheld only.
Compatibility with other CLIÉ handhelds or Palm OS
®
PDAs is not guaranteed.
Installing the applications from the
supplied Installation CD-ROM
1
Quit all applications running on Windows®.
2
Insert the supplied Installation CD-ROM into the CD-ROM
drive of your computer.
The Installation CD-ROM window is displayed.
3
Select the type of application you want to install, such as
[CLIÉ Utilities].
4
Click [Install] to install the application.
Follow the on-screen instructions.
Setting up your CLIÉ™ handheld
5
To install the application on your CLIÉ handheld, tap
(HotSync) in the HotSync screen.
The HotSync® operation starts and the selected application is transferred
and installed on your CLIÉ handheld.
6
Click [Finish] in the Installation CD-ROM window of your
computer.
Tip
You can also install applications on your CLIÉ handheld using the function of Palm™
Desktop for CLIÉ.
b For details, refer to “Enhancing features with add-on applications: Installing:
Installing from your computer” in the “Handbook” (PDF format).
21
Basic operations of your CLIÉ™ handheld
This chapter explains how to turn on and off your CLIÉ handheld, start an application, enter
text, and perform a reset.
Turning on/off your CLIÉ™ handheld
Turning on your CLIÉ handheld
Slide down the POWER/HOLD switch.
Your CLIÉ handheld turns on, and the last screen you viewed is displayed.
Slide down the POWER/HOLD switch
Note
When you slide and hold the POWER/HOLD switch for more than 2 seconds,
the backlight of the LCD display switches on or off.
Tip
If you cannot turn on your CLIÉ handheld
Did you fully charge your CLIÉ handheld?
b For details, refer to “Frequently Asked Questions: I cannot turn on my CLIÉ
handheld” on page 51.
To turn off your CLIÉ handheld
Slide down the POWER/HOLD switch again.
22
Starting an application
To work with your CLIÉ handheld, you need to start an application.
The following explains how to start applications from the CLIE Launcher using the Jog
Dial™ navigator.
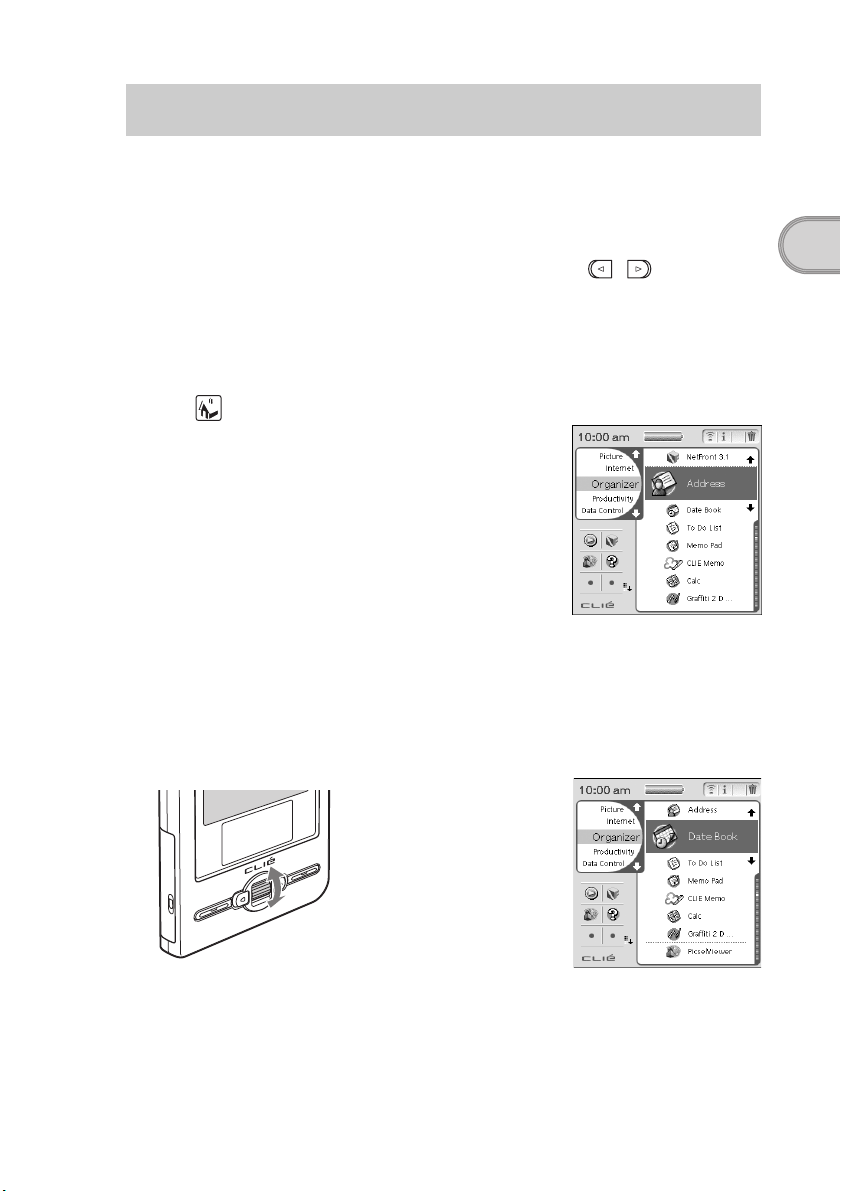
Using the Jog Dial™ navigator and / (the Left/Right buttons)
1 Displaying the CLIE Launcher
1
Tap (Home) (page 74).
The CLIE Launcher is displayed.
2 Selecting an application
1
Rotate the Jog Dial™ navigator to select an application to start.
An application is selected.
Basic operations of your CLIÉ™ handheld
Rotate up or down
b
Continued on next page
• • • • • • • • • • • • • • • • • • • • • • • • • • •
23

2
Press the Jog Dial™ navigator.
The selected application starts.
b
Press
Tip
To select an application by CLIE Launcher groups
If you press (the Left button) while the CLIE Launcher is displayed, you can select the
CLIE Launcher groups in the left side of the screen. Rotate the Jog Dial™ navigator to
select a CLIE Launcher group, and then press (the Right button) to select an
application in that CLIE Launcher group.
b
The CLIE Launcher
groups list
Press
3 Quitting the application
On your CLIÉ handheld, most applications save files automatically, but some
applications do not. In this cases, save the file manually
b For details, refer to “CLIÉ Application Manual” (HTML format).
To switch from one application to another, perform one of the following:
z Return to the CLIE Launcher by tapping
(Home) and start another application.
z Press an application button (page 26) to start
another application (only the application that is
assigned to the application button).
24
Other ways to start an application
You can also start an application using the stylus or application buttons.
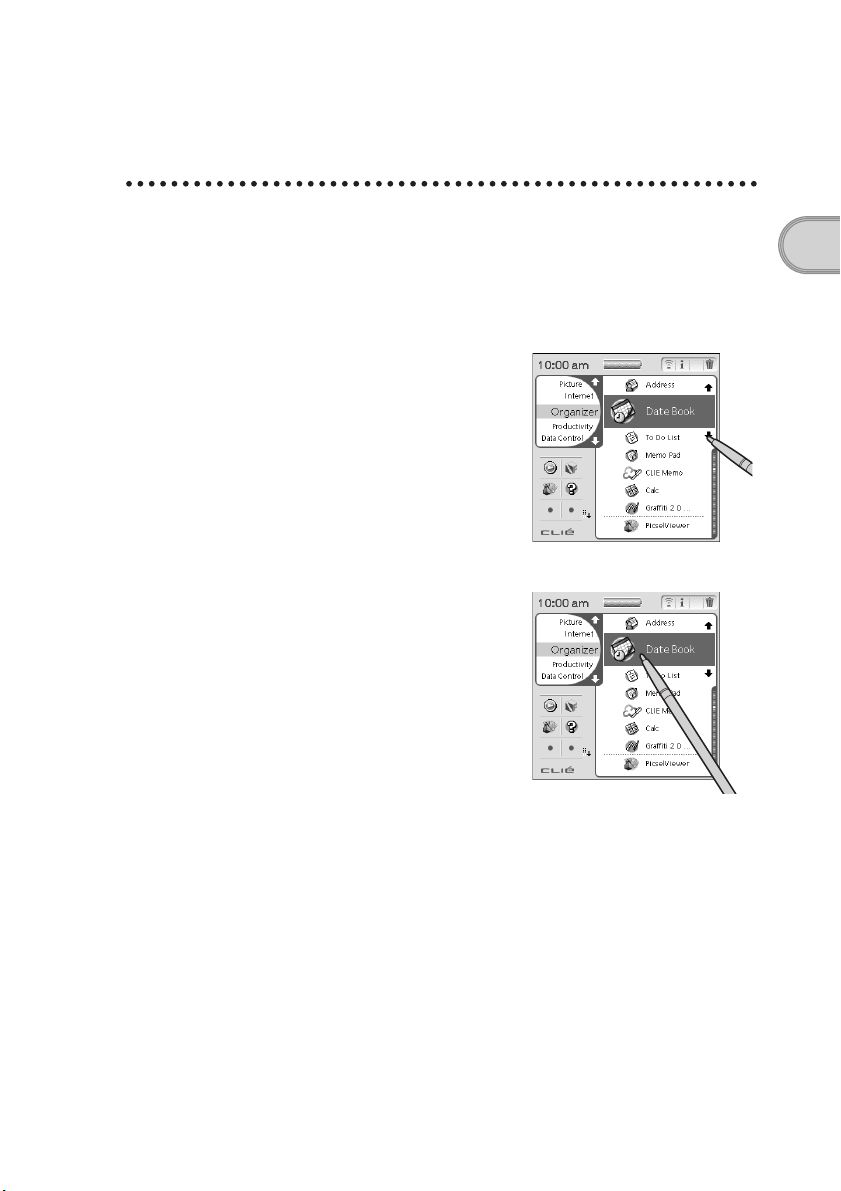
Using the stylus
Start the application by pressing the screen directly with the supplied stylus.
1
Tap M m on the CLIE Launcher to display the application
you want to start.
2
Tap the application icon.
The selected application starts.
Basic operations of your CLIÉ™ handheld
25
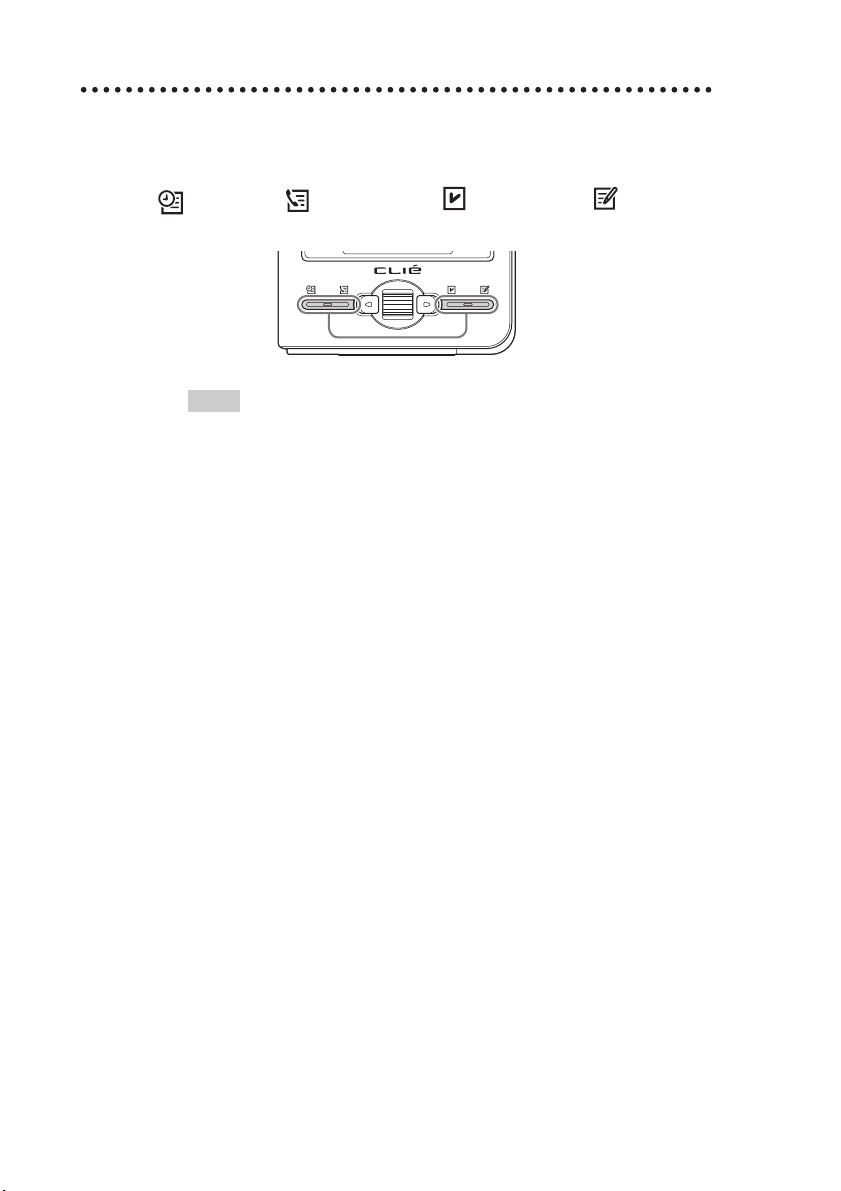
Pressing the application buttons
You can also start the applications by pressing the application buttons.
The default setting of the application buttons are:
Date Book, Address Book, To Do List, and Memo Pad.
Tips
• Even when your CLIÉ handheld is off, you can start an application by pressing
one of the application buttons.
• You can assign your favorite applications to the application buttons.
b For details, refer to “Customizing your CLIÉ™ handheld (Preferences):
Assigning applications to application buttons” in the “Handbook” (PDF
format).
26
 Loading...