

Sony CPJ-A300E Operating Instruction

3-861-467-23 (1)
Color LCD Projector
Operating Instructions
Mode d’emploi
GB
F
CPJ-A300E
© 1997 by Sony Corporation

WARNING
To prevent fire or shock hazard, do not
expose the unit to rain or moisture.
To avoid electrical shock, do not open
the cabinet. Refer servicing to qualified
personnel only.
Do not install the appliance in a
confined space, such as a book case or
build-in cabinet.
NOTICE FOR CUSTOMERS IN THE
UNITED KINGDOM
A moulded plug complying with BS
1363 is fitted to this equipment for your
safety and convenience.
Should the fuse in the plug supplied
need to be replaced, a 5 AMP fuse
approved by ASTA or BSI to BS 1362,
(i.e., marked with 2 or @ mark) must
be used.
2-GB
If the plug supplied with this
equipment has a detachable fuse
cover, be sure to attach the fuse cover
after you change the fuse. Never use
the plug without the fuse cover. If you
should lose the fuse cover, please
contact your nearest Sony service
station.

Table of contents
4 Welcome
5 Precautions
6 Selecting the projecting location
7 Preparations
7 Using the AV Cordless IR system – LASER
8 Connecting directly to video equipment
10 Connecting to external speaker(s)
10 Connecting the mains lead
11 Projecting
11 Turning on the projector
13 Using the AV Cordless IR system – LASER
15 Adjusting the focus
15 Adjusting the volume
16 Using the headphones
16 Turning off the projector
17 Adjusting the picture
20 Maintenance
20 Changing the filter
21 Changing the bulb
22 Specifications
23 Identifying the parts
25 Troubleshooting
LINK
LINK
GB
F
Table of contents
3-GB

Welcome
Congratulations on your purchase of the Sony CPJA300E Color LCD projector. Here are just some of
the features your Sony projector offers.
High resolution picture
You can enjoy AV entertainment with a high
resolution picture of 307,200 pixels.
LASER LINK – Picture and sound
transmission by infrared rays
You can project a picture without connecting the
projector to video equipment.
LASER LINK is a system which transmits and
receives a picture and sound by using infrared rays.
Compact design
Easy to install on a bookshelf.
4-GB
LASER LINK is a trademark of Sony Corporation.
Sony recommends that you use this projector with video
equipment having the mark.
Welcome

Precautions
Installation
• Place the projector so that the lens is
perpendicular to the projected
plane. Otherwise the picture will
become distorted and may be out of
focus.
• You will be able to see the picture
more clearly in a darker place.
• The picture brightness depends on
the quality of the surface of the
projected plane. Select a flat and
white surface.
• The picture gets darker as the
distance to the projected plane
increases.
• Allow adequate air circulation to
prevent internal heat buildup. Do
not place the projector on surfaces
near materials (curtains, draperies)
that may block the ventilation holes.
Leave space of more than 30 cm (12
inches) between the wall and the
projector.
• Do not place the projector near heat
sources such as radiators or air
ducts, or in a place subject to direct
sunlight, excessive dust or
humidity, mechanical vibration or
shock.
• To avoid moisture condensation, do
not place the projector in a location
where the temperature may rise
rapidly.
Operation
• Do not point the lens toward the
sun.
• Do not look into the lens during
projection.
• Should any liquid or solid object fall
into the cabinet, unplug the
projector and have it checked by
qualified personnel before operating
it further.
• Unplug the projector from the mains
when you are not using the
projector.
• To disconnect the mains lead, pull it
out by the plug. Never pull the
mains lead itself.
• Do not use the unit near an AM
radio or tuner.
Cleaning the projector
• Be sure to turn off the power and
disconnect the mains lead from
mains before cleaning.
• Clean the projector with a soft, dry
cloth. If the projector is very dirty,
wipe it off with a soft cloth lightly
moistened with a mild detergent
solution, and then wipe with a soft
dry cloth. Do not apply any type of
solvent as it may damage the finish.
• Wipe the mirror for the IR receiver
carefully.
Cleaning the lens
• Clean the surface of the lens with a
blower brush. Do not rub with a
cloth. Lens cleaning tissue papers
are recommended.
Precautions
5-GB
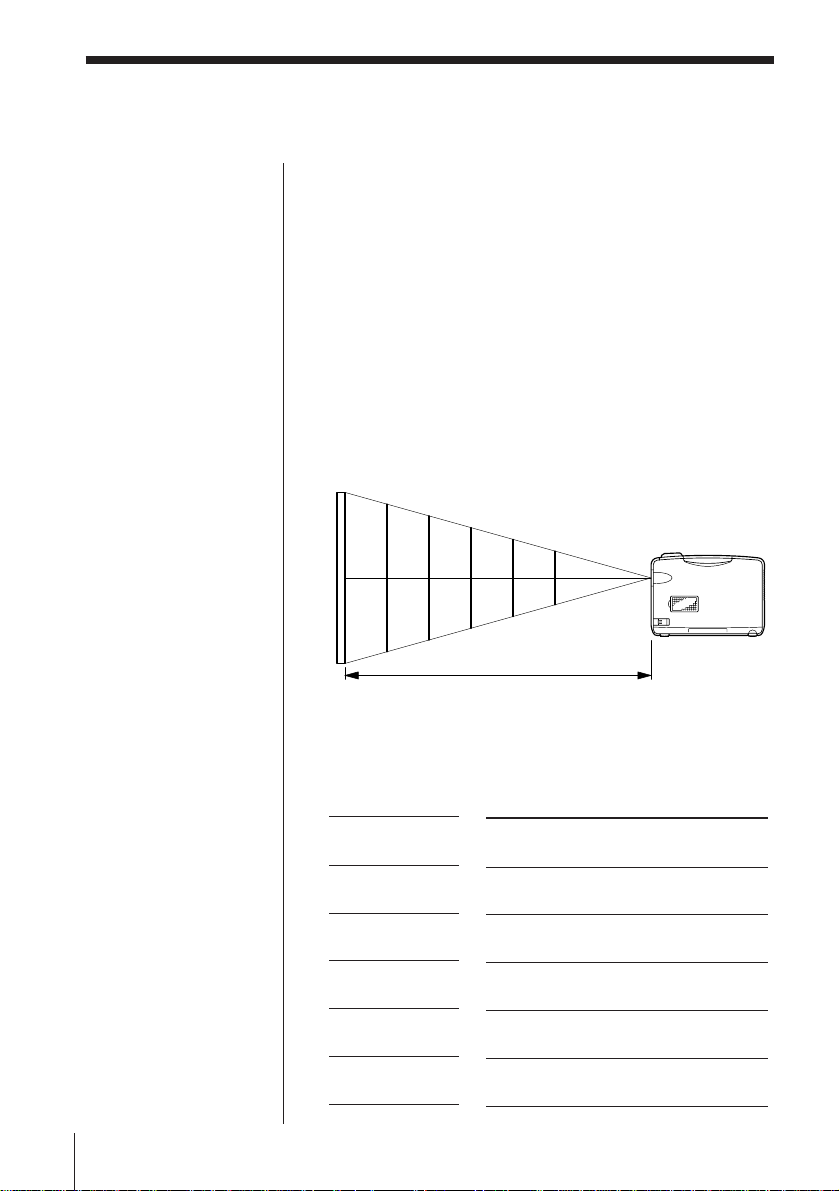
Selecting the
projecting location
The size of the projected plane depends on the
distance from the projector to the projected plane.
Locate the projector with the lens pointed toward
the projected plane referring to the figure and table
below.
We recommend using the projector at a distance of 1
to 3.5 m (3 - 11 feet) from the projected plane.
Diameter of the projected plane (in inches) and
the distance from the projector for each size
A size between 20” and 80” of the projected plane is
recommended.
100”
80”
4.3 3.4 2.5 1.8 0.8 0.45
(14.1)
(11.2)
60”
40”
20”
10”
(8.2) (6.0) (2.6) (1.5)
6-GB
Selecting the projecting location
Distance from the projector to
the projected plane in meters
(feet)
Table of the projected plane size by the distance
from the projector to the projected plane
Distance to the
projected plane
1 m (3 feet)
2 m (6 feet)
2.5 m (8 feet)
3 m (9 feet)
3.5 m (11 feet)
Size of the projected plane
Approx. 480 x 360 mm
(19 x 14 1/4 inches)
Approx. 960 x 720 mm
(37 7/8 x 28 3/8 inches)
Approx. 1200 x 900 mm
(47 1/4 x 35 1/2 inches )
Approx. 1460 x 1100 mm
(57 1/2 x 43 3/8 inches )
Approx. 1670 x 1260 mm
(66 1/4 x 49 5/8 inches )
Preparations
Tip
This projector accepts
the video signals of
both NTSC and PAL
color systems.
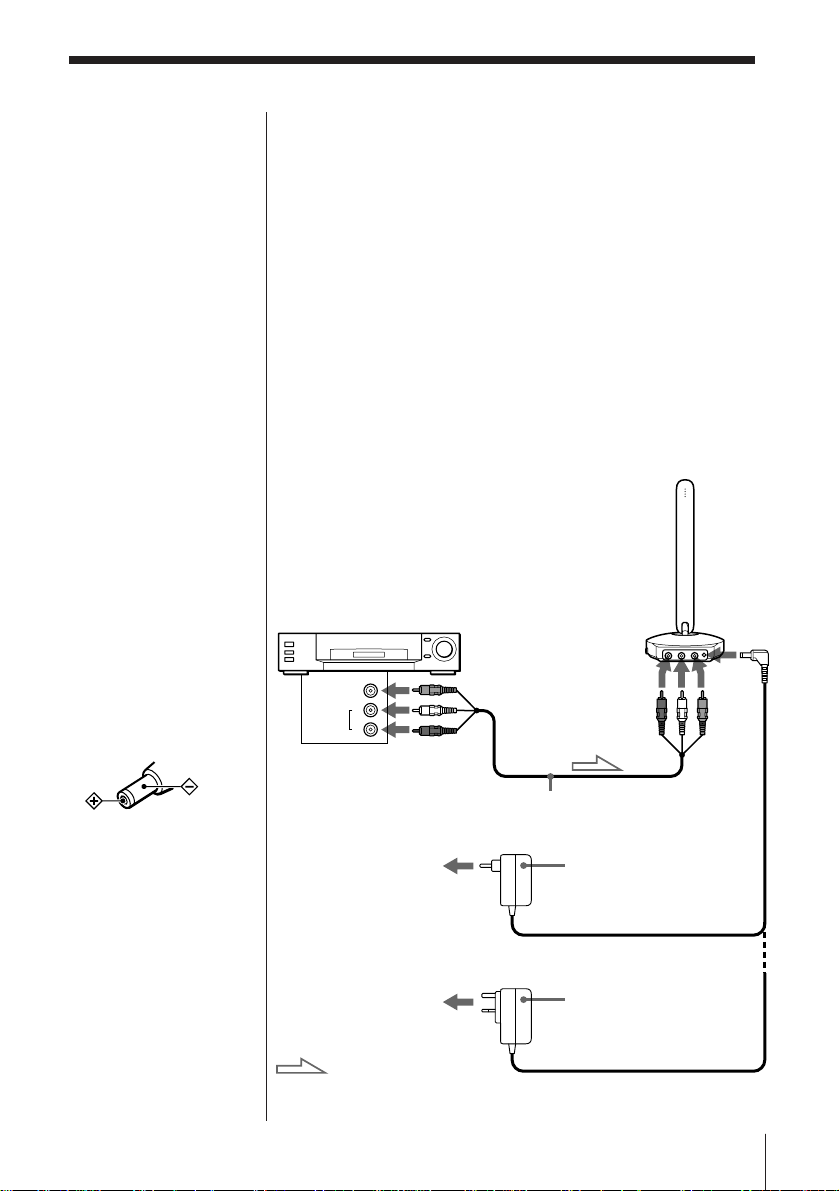
Notes
• Turn off the video
equipment and the
projector before
connecting.
• Refer to the video
equipment’s manual
as well.
• To connect the IR
transmitter to mains
use only supplied AC
power adapter,
because the polarity
of the supplied
adapter is opposite of
conventional
adapters. Do not use
the supplied AC
power adapter for
other electric
appliances with a DC
IN 9 V jack.
Polarity of the plug
There are two ways to receive picture and sound to
be projected from video equipment: by AV Cordless
IR (infrared rays) system or by directly connecting
video equipment.
Using the AV Cordless IR system –
LASER LINK
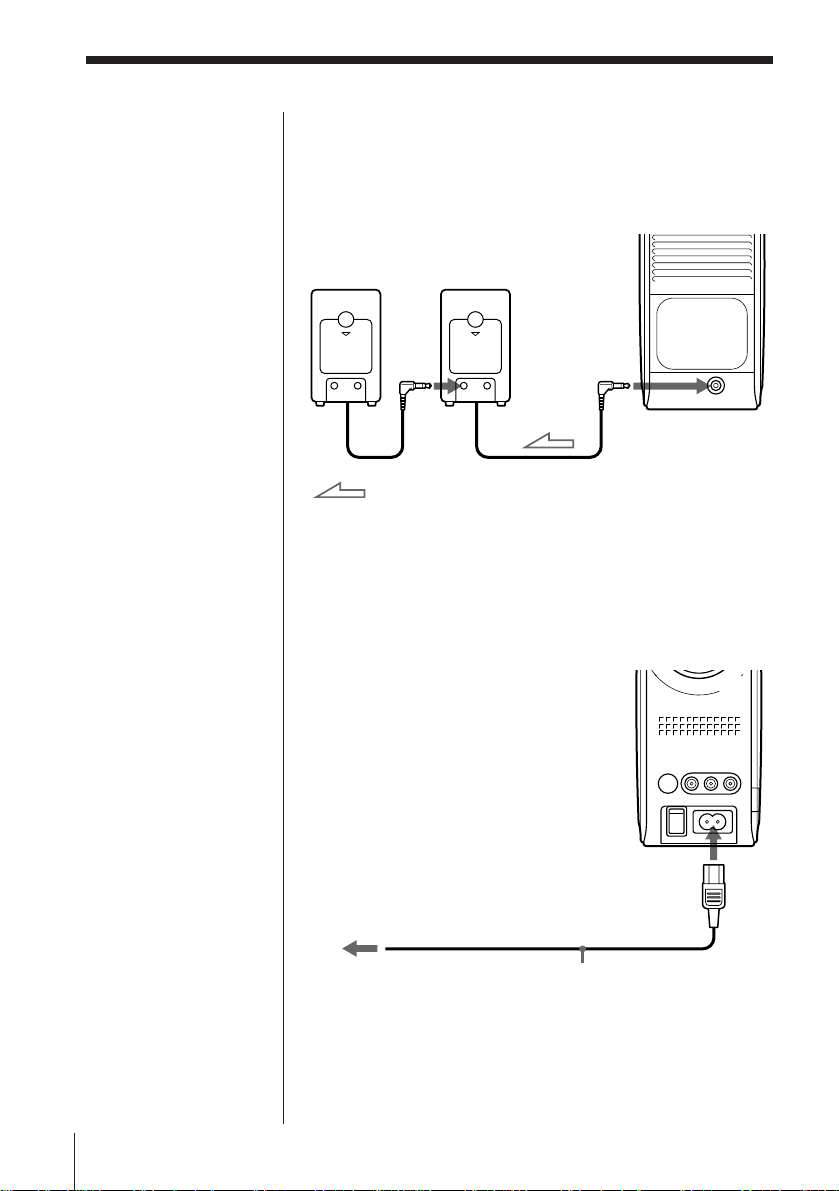
Connect the supplied IR transmitter to video
equipment such as a VCR or video camera recorder
using the supplied A/V connecting cable.
Connect the supplied AC power adapter to DC IN
9V of the IR transmitter and to the mains.
You do not need to connect the projector itself to
video equipment.
IR transmitter
to
DC IN 9V
VIDEO
L
AUDIO
R
to AUDIO OUT
to VIDEO OUT
to
AUDIO IN
A/V connecting cable (supplied)
to mains
AC power adapter
(supplied to the
customers in European
Continent)
to
VIDEO IN
: Signal flow
to mains
AC power adapter
(supplied to the
customers in U.K.)
Preparations
7-GB
Preparations (continued)
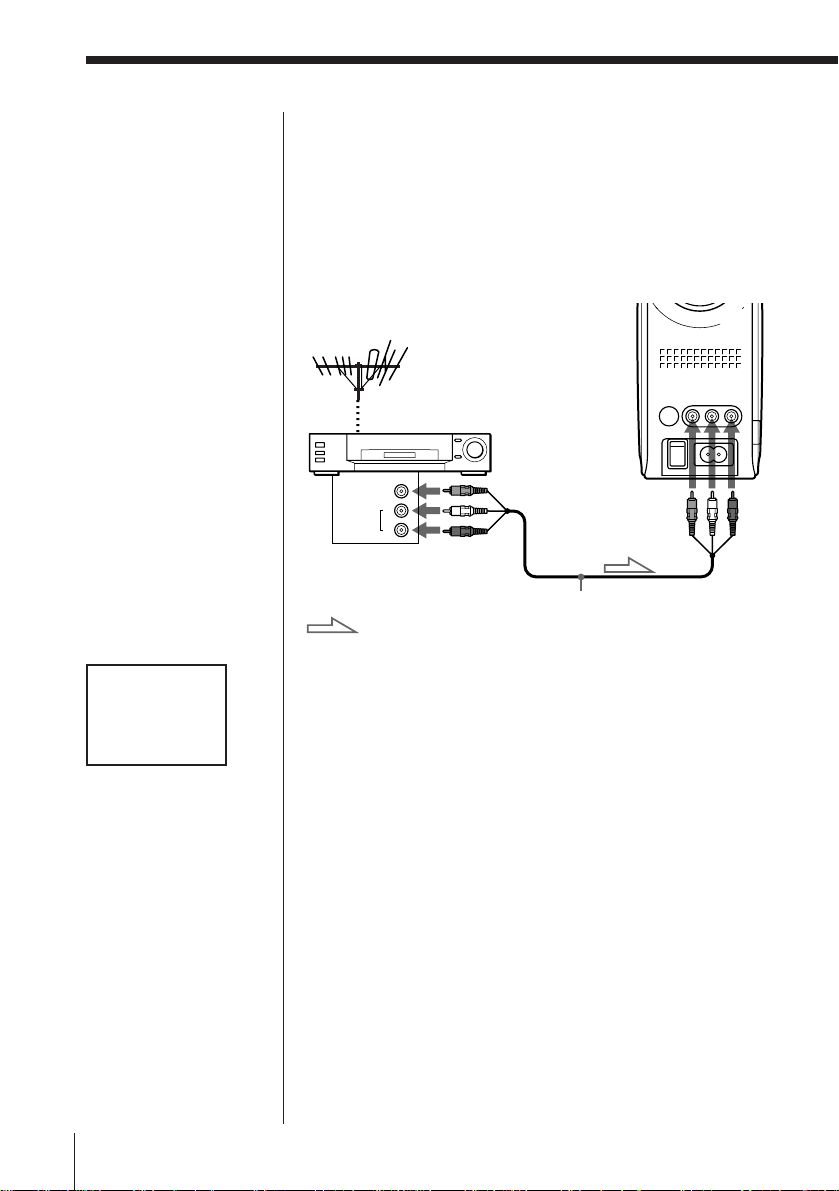
Tip
This projector accepts
the video signals of
both NTSC and PAL
color systems.
Notes
• Turn off the video
equipment and the
projector before
connecting.
• Refer to the video
equipment’s manual
as well.
If you switch from the
LASER LINK system
“VIDEO” appears
when you project the
picture. The display
will go off after 5
seconds.
Connecting directly to video
equipment
Connect video equipment such as a VCR or video
camera recorder using the supplied A/V
connecting cable.
Make sure that the LASER LINK indicator of the
control panel is off.
Front
VIDEO
L
AUDIO
R
to AUDIO OUT
: Signal flow
to VIDEO OUT
to VIDEO IN
A/V connecting cable
(supplied)
to
AUDIO
IN
8-GB
VIDEO
Preparations
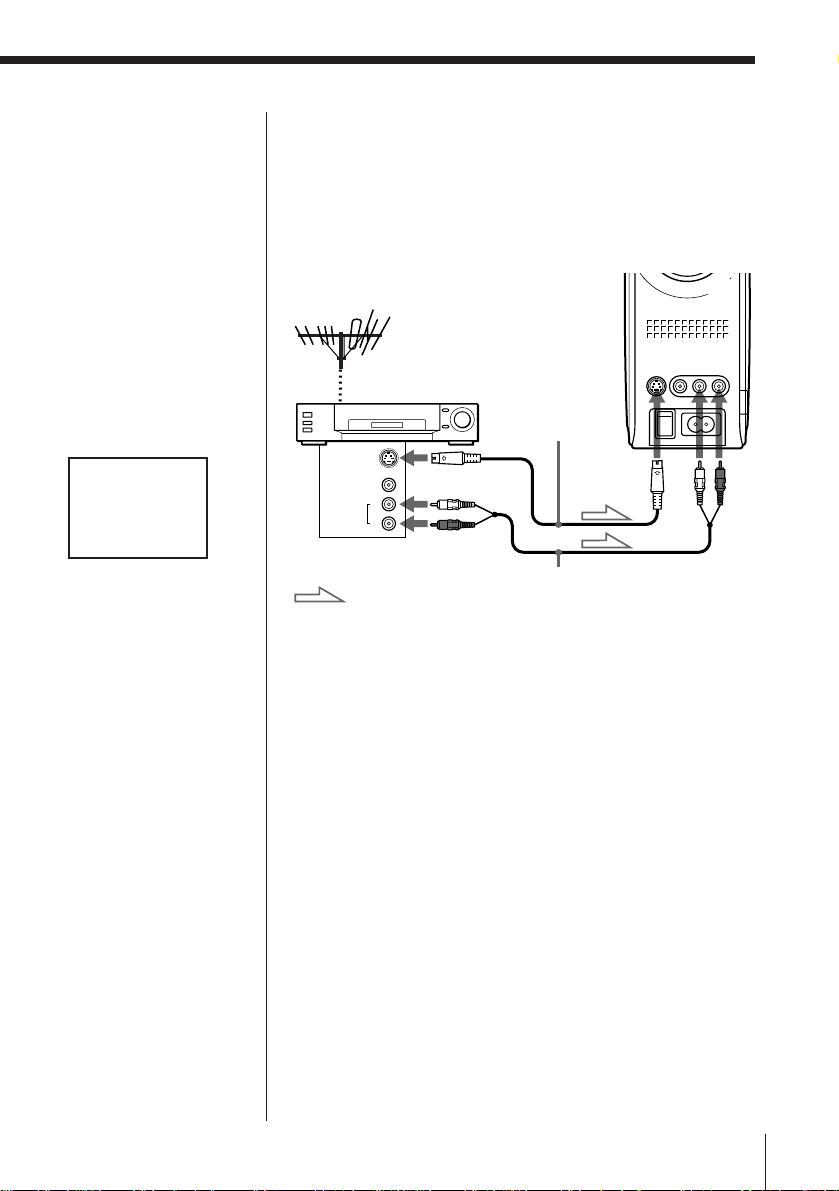
Tip
If S video and video
plugs are both
connected, the S video
signal is automatically
selected.
If you switch from the
LASER LINK system
“S-VIDEO” appears
when you project the
picture. The display
will go off after 5
seconds.
S-VIDEO
If your video equipment has an S video jack
Connect the projector to the video equipment using
an S video cable (not supplied). You can enjoy high
quality pictures.
In this case, you do not need to connect the video
(yellow) plug.
Front
S video cable
(not supplied)
S VIDEO
VIDEO
L
AUDIO
R
to AUDIO OUT
: Signal flow
to S VIDEO OUT
Audio cable
(not supplied)
to S VIDEO
IN
to
AUDIO
IN
Preparations
9-GB
Preparations (continued)
Notes
• Turn off the speaker
and the projector
before connecting.
• Refer to the speaker’s
manual as well.
Note
When the external
speaker is connected,
the projector’s built-in
speaker is turned off.
Connecting to external speaker(s)
When you want to connect external speaker(s) (not
supplied) to the projector, connect to the 2 jack of
the projector.
Rear
Active speakers
to 2 (headphones)
: Signal flow
Connecting the mains lead
10-GB
CAUTION
Never use a DC/AC
converter.
Preparations
Connect the mains lead (supplied) to the projector
and to the mains.
Front
to AC IN
to mains
Mains lead (supplied)
Projecting
If the bulb does not
light up
If you press POWER
again just after turning
it off, the bulb will not
light up. This is because
of the characteristics of
the bulb and is not a
malfunction. In this
case, wait for a while
and press POWER
again. The bulb will
light up.
Notes
• Wait until the
projector is warmed
up. It will take about
one minute until the
projected plane
appears.
• Do not press POWER
while the LAMP
indicator is flashing.
Doing so will cause
malfunction of the
projector.
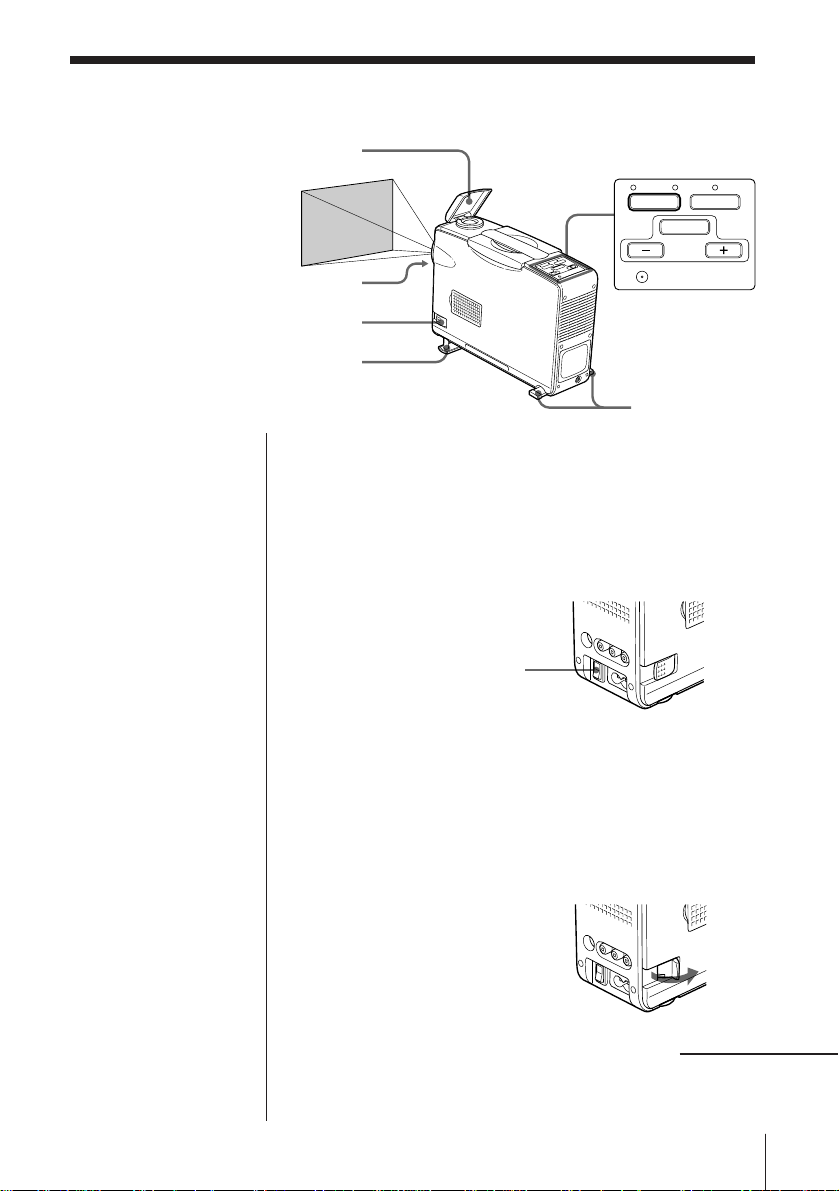
Mirror
FOCUS
LOCK
Front stand
Control panel
ON/STANDBY
POWER
RESET
Side stands
Turning on the projector
1Press the POWER switch on the front to turn on the
power.
When the power is turned on, the ON/STANDBY
indicator lights in red.
POWER
2Press POWER of the control panel.
The ON/STANDBY indicator turns green. The
LAMP indicator starts flashing.
The bulb lights up and the projected plane appears.
3If necessary, adjust the position of the projected
plane using the stand.
1 Unlock the stand.
LAMP
FUNCTION
VOL
LASER LINK
If the ON/STANDBY
indicator keeps
flashing
Turn off the power and
disconnect the mains
lead. Wait for more
than three seconds.
Then reconnect the
mains lead and turn on
the power again.
continued
Projecting
11-GB
Projecting (continued)
Note on the LCD
screen
The LCD screen is
manufactured using
high-precision
technology. However,
there may be some tiny
black points and/or
bright points (red, blue
or green in color) that
constantly appear on
the LCD screen. These
points are normal in the
manufacturing process
and not a malfunction
of the projector. Over
99.99 % are operational
for effective use.
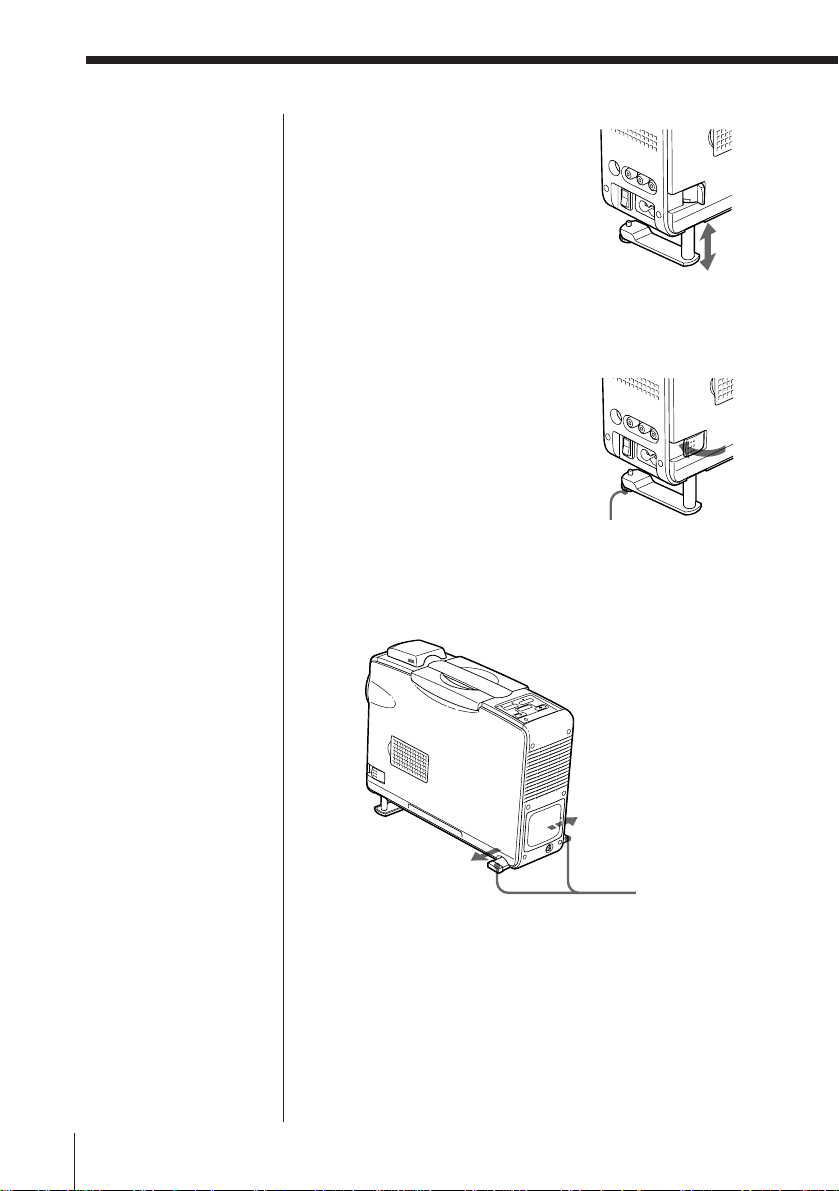
2 Adjust the position.
3 Lock the stand securely so that the stand does
not collapse.
You can adjust the horizontal balance by
turning the spacer.
Spacer
To stabilize the projector
Pull out the side stands at the rear bottom.
12-GB
Side stands
Projecting
Notes
• If the angle of the IR
transmitter or the IR
receiver is adjusted
past the movable
range, it may cause a
malfunction.
• Do not cover the light
emitter of the IR
transmitter or the IR
receiver with your
hand, etc.
• The infrared rays will
not penetrate walls
or opaque glass.
Therefore, the IR
receiver must be
used within the “in
sight” area of the IR
transmitter.
• The brightness of the
light emitter of the IR
transmitter is not
necessarily stable.
This is not a
malfunction and does
not affect the infrared
coverage distance.
• If the IR transmitter
is positioned too
close to the IR
receiver, noise may
appear. You may
eliminate the noise
by adjusting the
mirror.
• Noise appears if the
IR transmitter is out
of the range shown in
the right diagram, or
if the mirror for the
IR receiver comes off.
• Place the IR
transmitter where it
is stable.
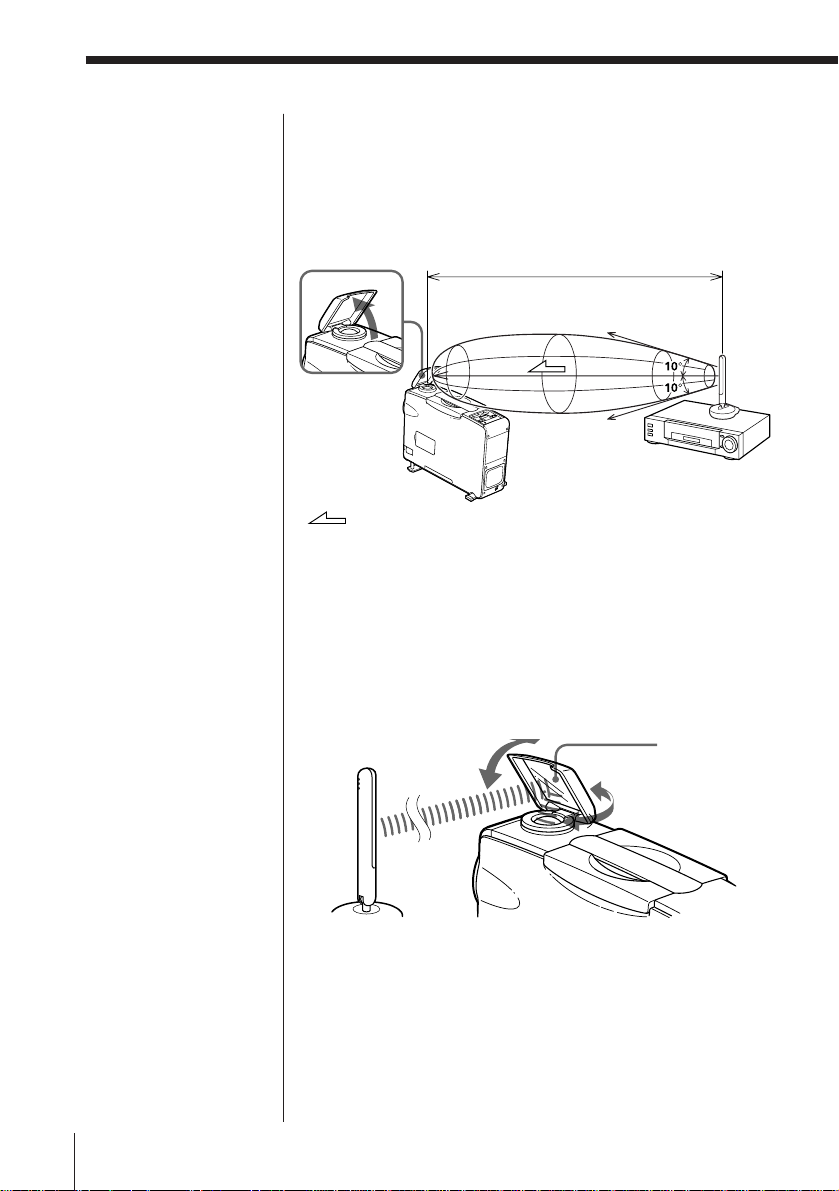
Using the AV Cordless IR system –
LASER LINK
Position the IR transmitter and the IR receiver of the
projector so that they operate effectively.
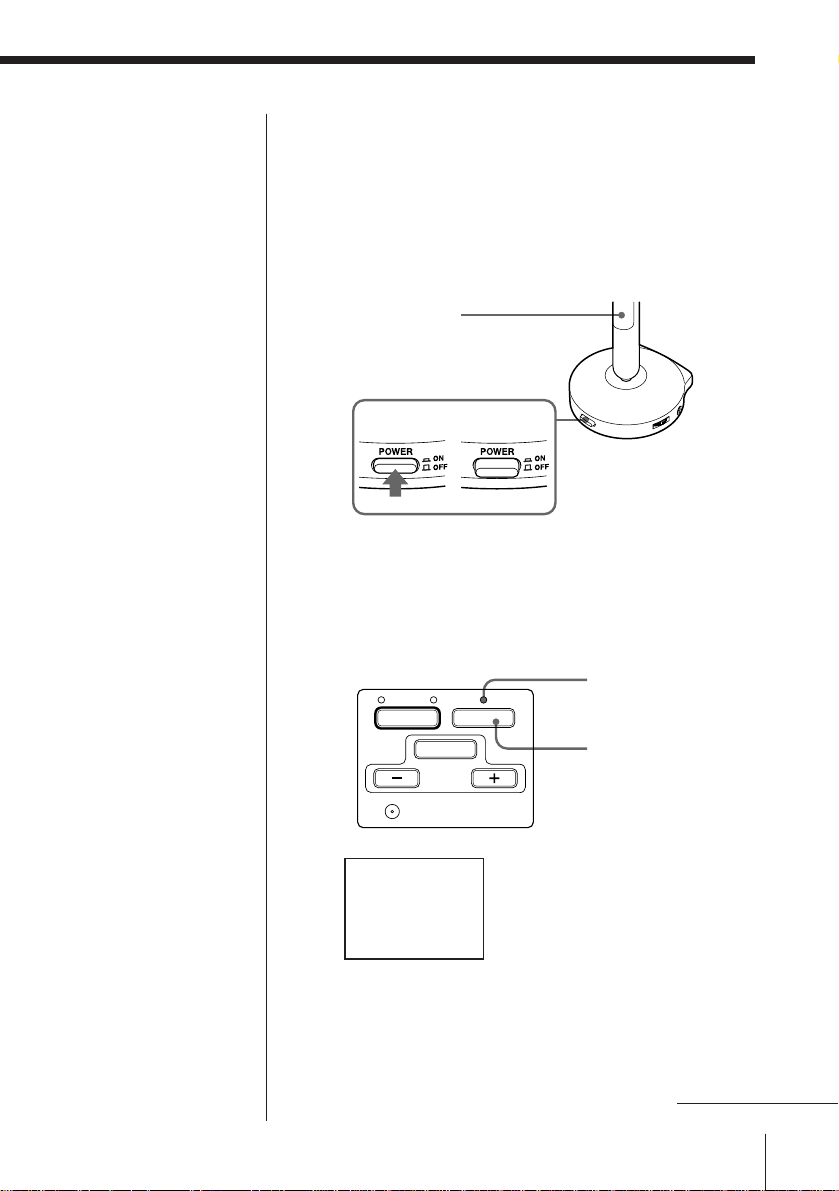
1Press POWER of the IR transmitter (O ON).
IR emitter
ON OFF
2Press LASER LINK to turn on the LASER LINK
indicator.
The LASER LINK indicator lights up in red and
“LASER LINK” appears at the top left corner of the
screen.
ON/STANDBY
LAMP
POWER
RESET
LASER LINK
LASER LINK
FUNCTION
VOL
The display will go off after 5 seconds.
LASER LINK
indicator
LASER LINK
continued
Projecting
13-GB
Projecting (continued)
• Avoid exposing any
part of the IR receiver
to strong rays such as
direct sunlight or
inverter fluorescent
lamp rays or to
another infrared ray
source such as a
remote commander.
Doing so may cause
noise in the picture
and sound.
• Keep the mirror
clean. The dirty
mirror may not
reflect the infrared
rays to the IR receiver
properly.
• If the noise may
appear in the picture
or sound when using
the LASER LINK
system, connect the
projector and video
equipment using the
supplied A/V
connecting cable.
3Open the cover, and point the IR transmitter at the
mirror for the IR receiver.
The diagram illustrates the approximate area
covered by the infrared rays. Position the IR
transmitter and the IR receiver within the area.
Max. 5 m (16 feet)
: Signal flow
4Start playback on the video equipment.
5Adjust the angle of the mirror for the IR receiver so
that the picture and sound are optimum.
You can open the mirror up to 90 degrees and turn
it 360 degrees.
90˚
Mirror
14-GB
360˚
Projecting
Note
The speaker of the
projector is monaural.
If stereo sound is input,
it is mixed and output
from the speaker.
Adjusting the focus
Turn the FOCUS ring.
• To focus on the nearer position, turn to the NEAR
side.
• To focus on the farther position, turn to the FAR side.
U
C
S
O
F
Æ
»
F
R
A
E
N
A
R
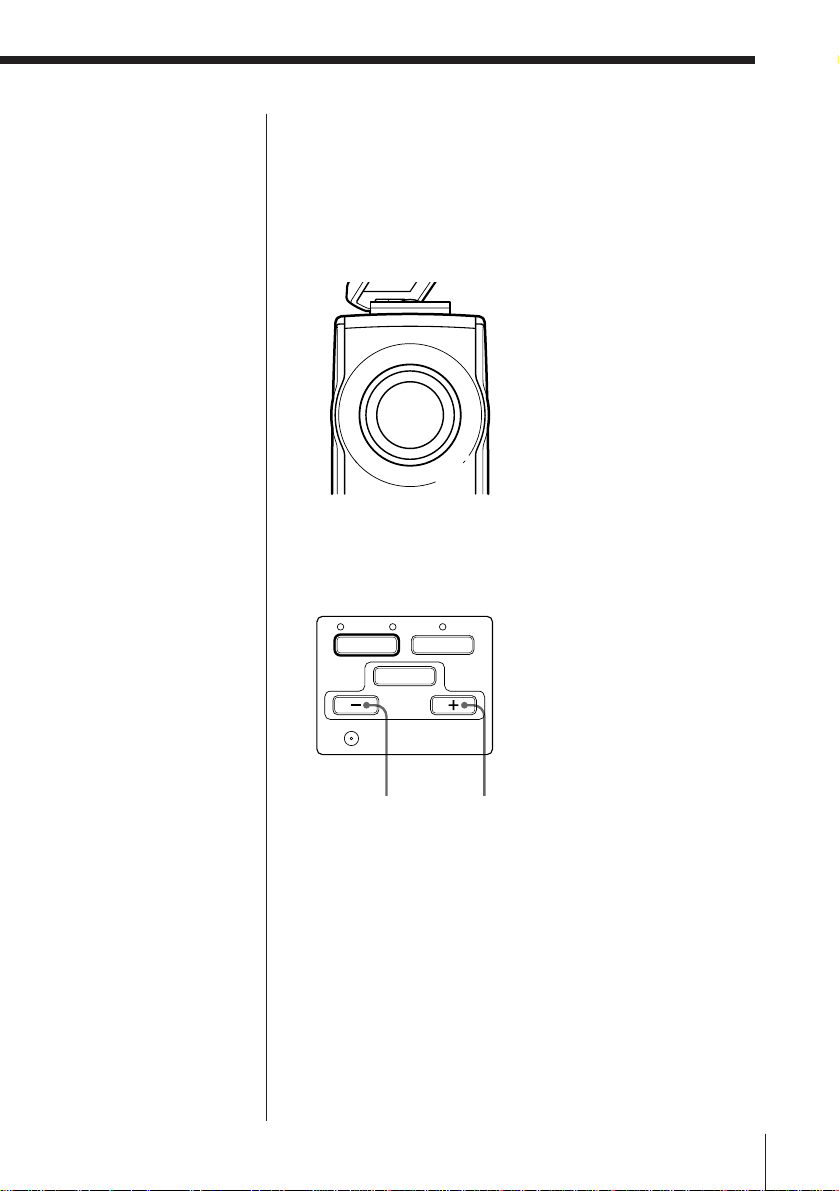
Adjusting the volume
Adjust the volume by pressing VOL + or –.
ON/STANDBY
LAMP
POWER
RESET
LASER LINK
FUNCTION
VOL
+–
Projecting
15-GB
Projecting (continued)
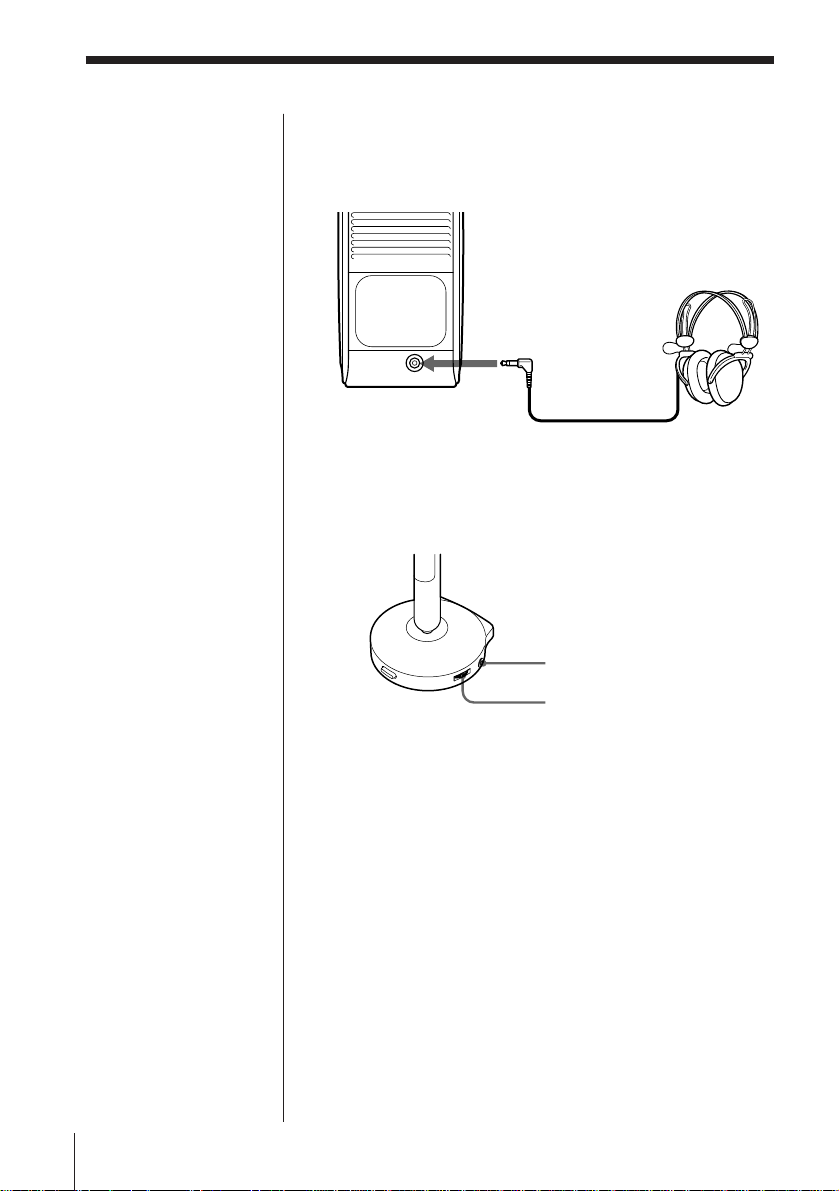
Using the headphones
On the projector
Connect the headphones to the 2 jack.
to 2
On the IR transmitter
Connect the headphones to the PHONES jack.
Adjust the volume with the VOL control.
PHONES
16-GB
Note
Do not disconnect the
mains lead while the
fan is turning. Doing so
may cause malfunction.
Projecting
VOL
Turning off the projector
1Press the POWER button of the control panel.
The fan keeps turning and automatically stops after
a while.
2Press the POWER switch on the front.
3Disconnect the mains lead.
When you used the IR transmitter
Shut the mirror until it clicks.
Press POWER of the IR transmitter (o OFF).
 Loading...