

Page 1

d
OPERATING INSTRUCTIONS
INSTRUCCIONES DE MANEJO
MODE D’EMPLOI
BEDIENUNGSANLEITUNG
ISTRUZIONI PER L’USO
CR-TL70
RADIO RECEIVER
RECEPTOR DE LA RADIO
ENGLISH 1 See Page 2.
ESPAÑOL 1 Consult la Página 3.
FRANÇAIS 1 Voir Page 3.
DEUTSCH 1 Siehe Seite 33.
ITALIANO 1 Vedere Pagina 33.
Page 2

FrançaisEspañol
English
TABLE OF CONTENTS
PRECAUTIONS ................................... 4
INSERTING BATTERIES .................... 6
PREPARATIONS ............................... 10
SETTING THE CLOCK ...................... 12
LISTENING TO THE RADIO ............. 14
CALCULATOR .................................. 16
TELEPHONE DIRECTORY ............... 18
ENTERING CONFIDENTIAL DATA .. 24
MAINTENANCE ................................. 28
SPECIFICATIONS ............................. 30
2
INDICE
PRECAUCIONES ................................ 5
COLOCACION DE LAS PILAS ............ 7
PREPARATIVOS ............................... 11
AJUSTE DE LA HORA ...................... 13
PARA ESCUCHAR LA RADIO ......... 15
CALCULADORA ............................... 17
DIRECTORIO TELEFONICO ............ 19
PARA ENTRAR DATOS
CONFIDENCIALES......................... 25
MANTENIMIENTO ............................. 29
ESPECIFICACIONES ........................ 31
TABLE DES MATIERES
PRECAUTIONS ................................... 5
MISE EN PLACE DES PILES .............. 7
PREPARATIFS .................................. 11
REGLAGE DE L’HORLOGE .............. 13
ECOUTE DE LA RADIO .................... 15
CALCULETTE ................................... 17
REPERTOIRE TELEPHONIQUE ...... 19
ENTREE DE DONNEES
CONFIDENTIELLES ....................... 25
ENTRETIEN ....................................... 29
SPECIFICATIONS ............................. 31
3
Page 3

FrançaisEspañol
English
PRECAUTIONS
To maintain good performance
Do not keep the unit in places which are
extremely hot, cold, dusty or humid. In
particular, do not keep the unit:
•in a high humidity area such as a bathroom
• near a heater
•in an area exposed to direct sunlight (e.g.
inside a parked car, where there could be
a considerable rise in temperature)
4
Note on listening with the headphones
•Listen at moderate volumes to avoid
hearing damage.
• To ensure safety, do not wear the
headphones while driving or cycling.
•Wear them properly: L is left, R is right.
Note
When the malfunction occurs or repairing,
the unit is reset and the registered data
may be erased. We recommend that you
take notes of the important data in advance.
PRECAUCIONES
Para mantenerlo en buenas
condiciones de funcionamiento
No utilice en lugares muy calientes, fríos,
con polvo o humedad. Especialmente, no
deje el aparato:
• en lugares muy húmedos, por ejemplo
en el baño
• cerca de la calefacción
• en un lugar donde quede expuesto a los
rayos directos del sol (por ejemplo, dentro
de un coche estacionado cuyo interior
puede calentarse mucho)
Notas para escuchar con los auriculares
•No escuche con el volumen alto porque
puede dañar su capacidad de audición.
• Para su seguridad, no utilice los
auriculares cuando conduce un coche o
anda en bicicleta.
•Utilice correctamente: L es para la
izquierda y R para la derecha.
Nota
Cuando se produce una avería o después
de la reparación, el aparato vuelve a sus
valores iniciales y los datos registrados
pueden haberse borrado. Se recomienda
mantener un registro de los datos
importantes.
PRECAUTIONS
Pour assurer un bon fonctionnement
Ne laissez pas l’appareil à un emplacement
très chaud, froid, poussiéreux ou humide.
En particulier, ne le laissez pas:
•à un endroit très humide, une salle de
bains par exemple
• près d’un appareil de chauffage
•à un endroit en plein soleil (dans une
voiture garée, où la température peut
considérablement augmenter)
Remarque sur l’écoute avec les
écouteurs
• Ecoutez à volume modéré pour éviter
tout dommage auditif.
• Par mesure de sécurité, n’utilisez pas les
écouteurs en conduisant ou à bicyclette.
• Portez-les correctement: L pour la
gauche, R pour la droite.
Remarque
En cas de panne ou de réparation, l’appareil
est remis à zéro et les données
enregistrées peuvent être effacées. Nous
vous recommandons de noter
préalablement les données importantes.
5
Page 4
FrançaisEspañol
12
English
INSERTING BATTERIES
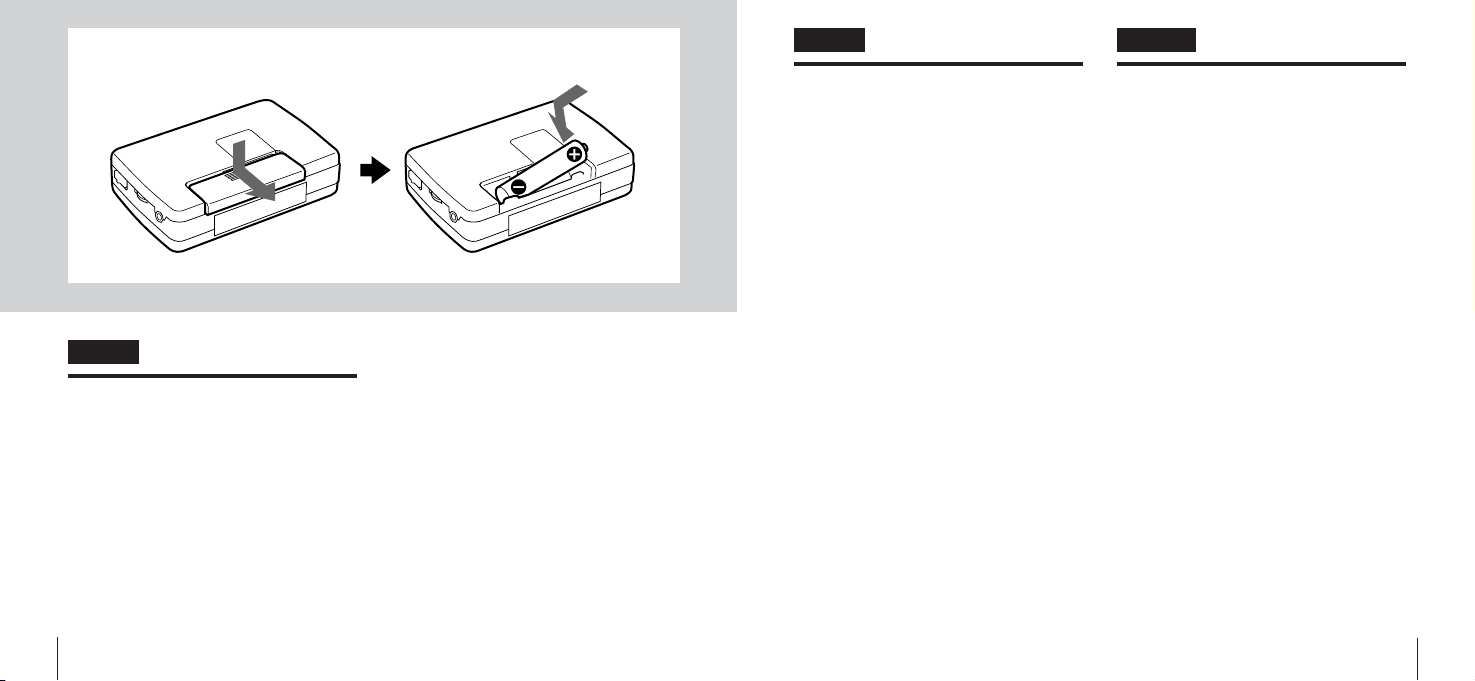
Dry cell battery
Insert a dry cell battery to listen to the
radio.
Insert a dry cell battery R03 (size AAA)
with the 4 and 5 marks correctly
aligned.
Replace the dry cell battery R03 (size
AAA) when volume decreases or sound
distorts.
6
Note on dry cell battery
•Never recharge the battery, apply heat to
it or take it apart.
• If liquid leaks from the battery, wipe
thoroughly to remove.
COLOCACION DE LA PILA
Pila
Instale una pila nueva para escuchar la
radio.
Instale una pila R03 (tamaño AAA) con
las marcas 4 y 5 correctamente
alineadas.
Cambie la pila R03 (tamaño AAA) por otra
nueva cuando el volumen empieza a bajar
o los sonidos se escuchen distorsionados.
Nota sobre la pila
•No recargue, caliente o desarme la pila.
•Si se ha salido el líquido de la pila, limpie
completamente la caja para eliminar todo
rastro de corrosión.
MISE EN PLACE DES
PILES
Pile sèche
Insérez une pile sèche pour écouter la
radio.
Insérez une pile sèche R03 (format AAA)
en respectant les polarités 4/5.
Remplacez la pile sèche R03 (format AAA)
quand le volume baisse ou que le son est
déformé.
Remarques sur les piles sèches
•Ne rechargez pas, ne chauffez pas et ne
démontez pas les piles.
•Si du liquide fuit de la pile, essuyez-le
complètement.
7
Page 5
FrançaisEspañol
123
English
INSERTING BATTERIES
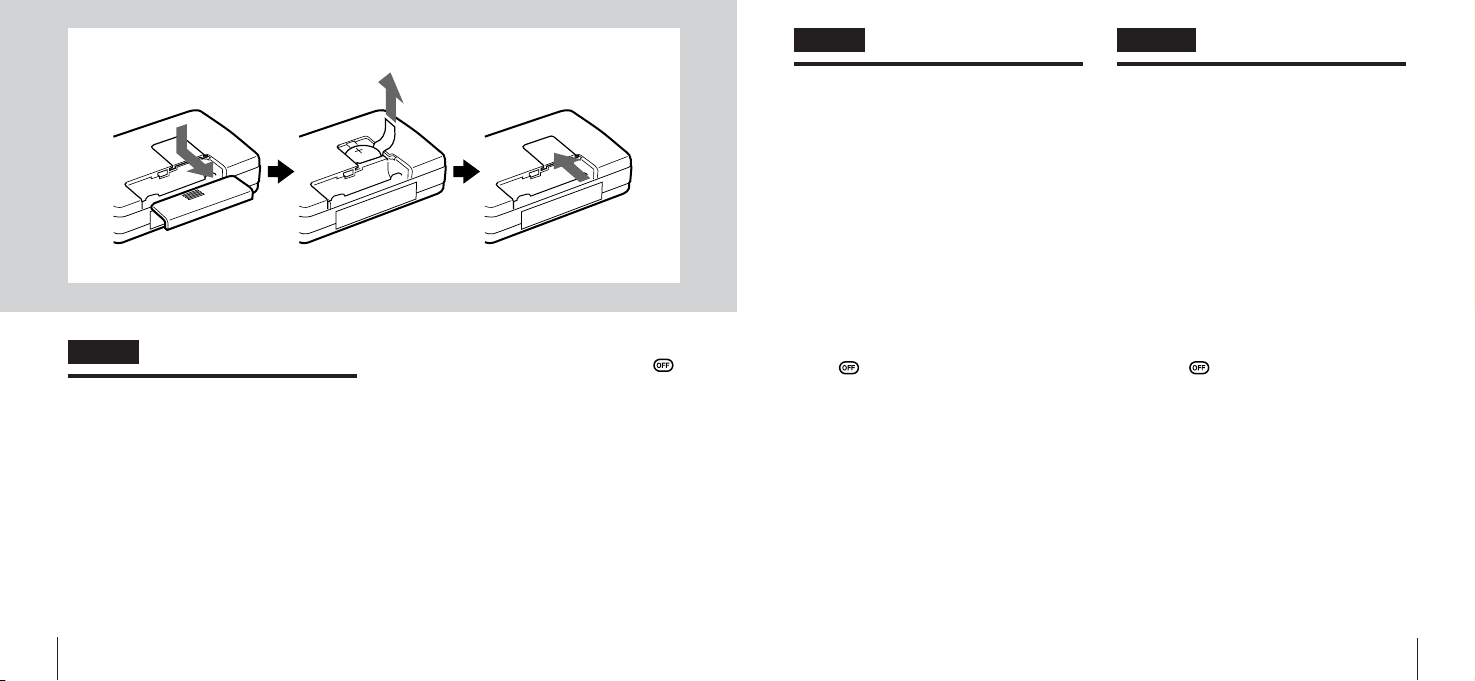
Lithium battery
Insert the lithium battery to use clock,
calculator or telephone directory.
Open the lithium battery compartment
and pull up the ribbon. (Before this
operation, open the cover of the dry cell
battery compartment.)
Battery replacement
Replace the lithium battery (CR 2032) with
a new one when the display becomes
8
fainter. Insert the battery with + side facing
up. Before battery replacement, press
to turn off the power.
• This unit can memorize the data that you
have retained for about 15 seconds during
battery replacement.
Note on lithium battery
• Keep the lithium battery out of the reach
of children.
If someone swallows it, consult a doctor
immediately.
• Insert the battery in the correct direction.
• To prevent a short circuit, never pinch the
battery with metal forceps, etc.
COLOCACION DE LA PILA
Pila de litio
Coloque una pila de litio para que funcione
el reloj o la calculadora y mantener la
memoria del directorio telefónico.
Abra la caja de la pila de litio y tire de la
cinta. (Para ello, abra antes la tapa de la
caja de la pila.)
Cambio de la pila
Cambie por una pila de litio nueva (CR
2032) cuando el visualizador se vuelva
débil. Coloque de tal forma que el + esté
hacia arriba. Pero, primero, presione el
botón para desconectar el aparato.
• Este aparato mantiene en la memoria los
datos memorizados durante unos 15
segundos mientras cambia la pila de litio.
Notas sobre la pila de litio
•No deje una pila de litio en un lugar al
alcance de los niños.
Si uno de ellos se tragara la pila, acuda
inmediatamente a un médico.
•Coloque la pila correctamente.
• Para no crear un cortocircuito, no tome la
pila con pinzas de metal, etc.
MISE EN PLACE DES PILES
Pile au lithium
Insérez la pile au lithium pour utiliser
l’horloge, la calculette ou le répertoire
téléphonique.
Ouvrez le logement de la pile au lithium
et tirez sur le ruban, (Auparavant, ouvrez
le couvercle du logement de la pile sèche.)
Remplacement de la pile
Remplacez la pile au lithium par une neuve
(CR 2032) quand l’affichage s’affaiblit.
Insérez-la, le pôle + dirigé vers le haut.
Auparavant, n’oubliez pas d’appuyer sur
le bouton pour mettre l’appareil hors
tension.
•Il peut mémoriser la date que vous avez
maintenue environ 15 secondes pendant
le changement de la pile au lithium.
Remarques sur la pile au lithium
• Conservez la pile au lithium hors de portée
des enfants. En cas d’avalement,
consultez immédiatement un médecin.
• Insérez la pile dans le sens correct.
• Pour éviter toute décharge électrique, ne
saisissez jamais la pile avec des pincettes
métalliques, etc.
9
Page 6
POWER ON/OFF
FrançaisEspañol
English
PREPARATIONS
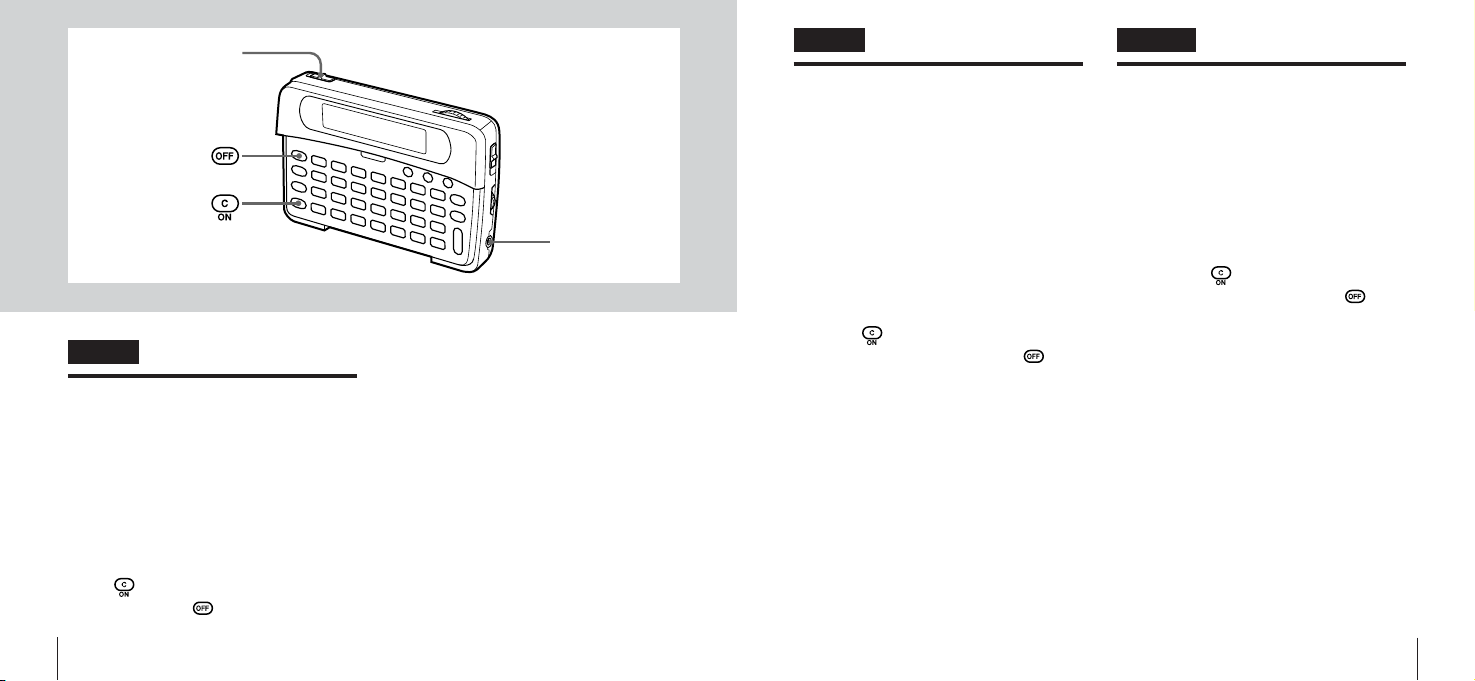
To turn on the radio
Set the POWER switch to ON.
After listening, set the switch to OFF to
turn off the power.
To turn on the clock, calculator or
telephone directory
Press .
After using, press to turn off the power.
10
!
Note
• The clock, calculator and telephone
directory do not turn on during radio
reception.
• If you do not operate for about 3 minutes,
the power will turn off automatically. (Auto
Power OFF function)
PREPARATIVOS
Para escuchar la radio
Mueva el interruptor principal POWER a
ON.
Para dejar de escuchar la radio, presione
el interruptor principal a OFF para
desconectar el aparato.
Para ver la hora, utilizar la
calculadora o consultar el directorio
telefónico
Presione .
Para dejar de utilizar, presione para
desconectar el aparato.
Nota
•No puede ver la hora ni utilizar la
calculadora o el directorio telefónico
mientras está escuchando la radio.
•Si no utiliza estas funciones durante 3
minutos continuos, el aparato se
desconectará automáticamente.
(Función de desconexión automática)
PREPARATIFS
Pour allumer la radio
Réglez l’interrupteur POWER sur ON.
Après l’écoute, réglez-le à OFF pour couper
la radio.
Pour activer l’horloge, la calculette
ou le répertoire téléphonique
Appuyez sur .
Après l’emploi, appuyez sur pour
mettre l’appareil hors tension.
Remarques
•L’horloge, la calculette et le répertoire
téléphonique ne s’activent pas pendant
la réception d’une émission de radio.
•Si l’appareil n’est pas sollicité pendant 3
minutes, il se mettra automatiquement
hors tension. (Fonction de coupure
automatique)
11
Page 7
FrançaisEspañol
1
English
SETTING THE CLOCK
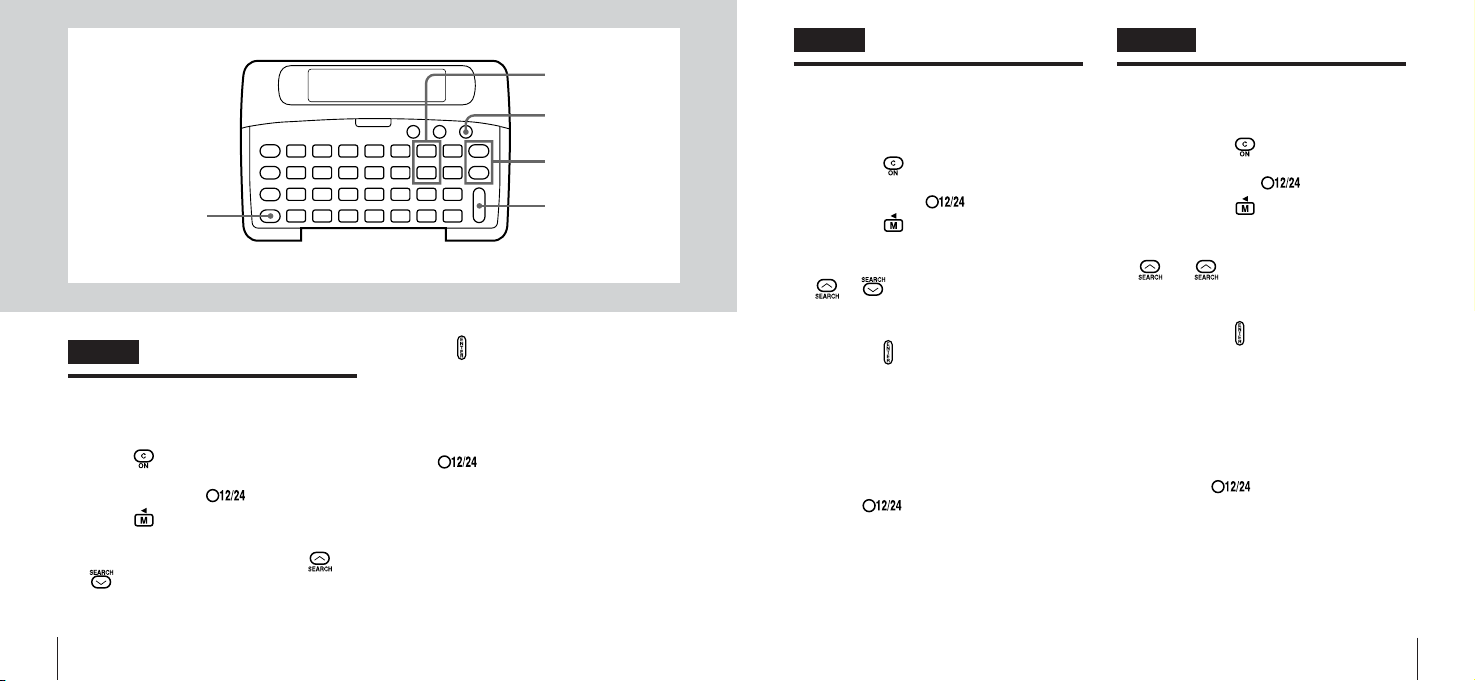
Before setting, insert the lithium battery.
1Press .
Date is displayed. If the date is not
displayed, press .
2Press .
Minute begins to flash.
3 Input the minute by pressing or
.
4Repeat steps 2 and 3 to input the
hour, date and year.
12
2,4
12/24
3,4
5
5Press (ENTER).
Clock starts from 00 second.
To correct the time
Repeat the procedure from the beginning.
To select 12 hours/24 hours standard
Press .
When you choose 12 hours standard, AM
or PM is displayed.
AJUSTE DE LA HORA
Antes de hacer el ajuste, coloque una pila
de litio con carga.
1 Presione .
Aparece la fecha. Si no apareciera la
fecha, presione .
2 Presione .
Empiezan a destellar los minutos.
3Marque los minutos con el botón
o .
4Repita los pasos 2 y 3 para entrar
la hora, la fecha y el año.
5 Presione (ENTER).
El reloj empieza a marcar la hora desde
00 segundo.
Para corregir la hora
Repita el procedimiento desde el principio.
Para seleccionar la indicación del reloj
de 12 horas/24 horas
Presione .
Cuando se seleccione la hora en el modo
de 12 horas, aparecerá AM o PM.
REGLAGE DE L’HORLOGE
Insérez la pile au lithium avant le réglage.
1Appuyez sur .
La date s’affichera. Si elle n’apparaît
pas, appuyez sur .
2Appuyez sur .
Les minutes se mettront à clignoter.
3 Entrez les minutes en appuyant sur
ou .
4Répétez les étapes 2 et 3 pour
entrer l’heure, la date et l’année.
5Appuyez sur (ENTER).
L’horloge se met en marche à partir de
00 seconde.
Pour corriger l’heure
Reprenez la procédure depuis le début.
Pour sélectionner l’indication 12
heures/24 heures
Appuyez sur .
Si 12 heures est choisi, AM ou FM apparaît.
13
Page 8
2
4
FrançaisEspañol
English
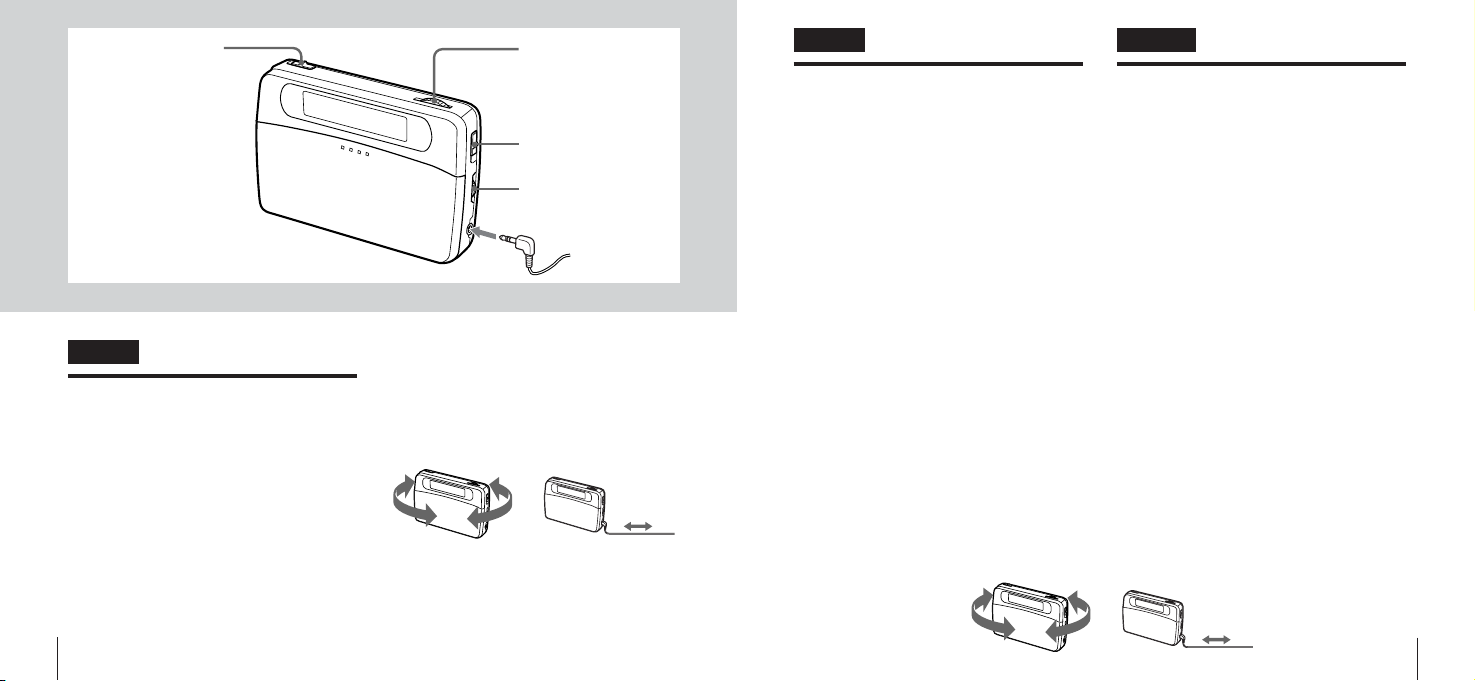
LISTENING TO THE
RADIO
1Connect the headphones to ! jack.
2 Set the POWER switch to ON.
3 Select a band.
4 Turn the TUNING control to tune in
to a station.
5 Turn the VOLUME control to adjust
the volume.
After listening, set the POWER switch to
OFF to turn off the power.
14
3
5
1
!
For better reception
AM: Turn the unit to find the position which
gives the best reception.
FM: The headphone cord functions as the
FM antenna. Keep it extended.
AM FM
PARA ESCUCHAR LA
RADIO
1Conecte los auriculares en la toma
! .
2Mueva el interruptor principal a
POWER a ON.
3 Seleccione la banda de
frecuencias.
4Gire el control TUNING para
sintonizar la emisora deseada.
5Gire el control VOLUME para
ajustar el volumen.
Para dejar de escuchar la radio, mueva el
interruptor POWER a OFF para
desconectar el aparato.
Recepción óptima
AM: Gire el aparato hasta encontrar la
posición en la que la recepción sea
más nítida.
FM: El cable de los auriculares actúa como
antena de FM. Manténgala lo más
extendida posible.
AM FM
ECOUTE DE LA RADIO
1Raccordez les écouteurs à la prise
!.
2Réglez l’interrupteur POWER à ON.
3 Sélectionnez la bande.
4 Tournez la commande TUNING
pour accorder une station.
5 Tournez la commande VOLUME
pour ajuster le volume.
Après l’écoute, remettez l’interrupteur
POWER sur OFF pour couper
l’alimentation.
Pour obtenir une meilleure réception
AM: Tourner l’appareil pour trouver la
position assurant la meilleure
réception.
FM: Le cordon des écouteurs tient lieu
d’antenne FM. Maintenez-le étendu.
15
Page 9
FrançaisEspañol
OFF
1
English
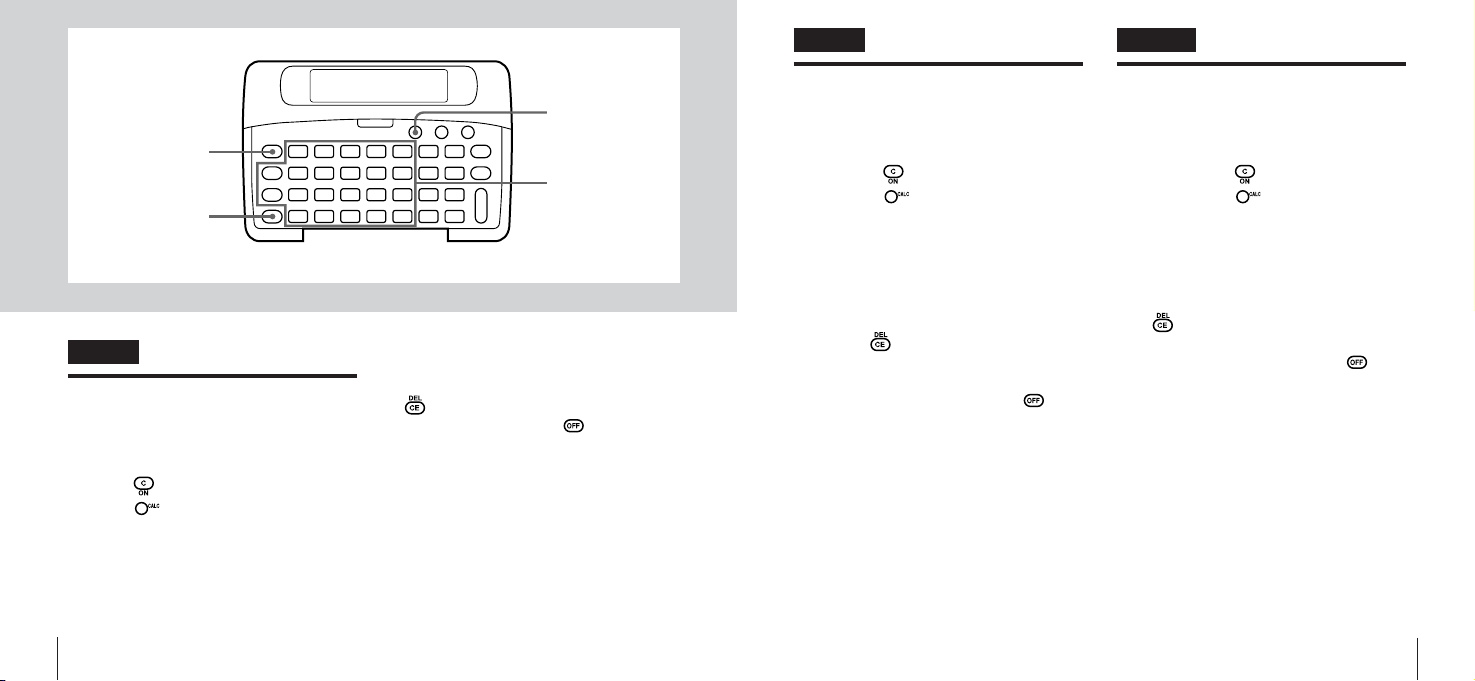
CALCULATOR
You can calculate four operations of 10
figures.
1Press .
2Press .
CAL is displayed.
3 Calculate.
16
2
3
Note
• “E” is displayed if the displayed numbers
or characters exceed 10 figures. Press
to clear “E” and do other calculations.
• After calculating, press to turn off the
power.
CALCULADORA
Se pueden hacer las 4 operaciones
aritméticas con números de hasta 10 cifras.
1 Presione .
2 Presione .
Aparece CAL.
3Haga las operaciones aritméticas.
Nota
• Aparece “E” cuando el número de
espacios ocupados por los números y
letras supera 10.
Presione para que desaparezca la
“E” y haga otros cálculos.
• Una vez hechos todos los cálculos,
presione el interruptor principal para
desconectar el aparato.
CALCULETTE
Vous pouvez effectuer quatre opérations
jusqu’à un total de 10 chiffres.
1Appuyez sur .
2Appuyez sur .
CAL apparaît.
3 Calculez.
Remarques
• “E” s’affiche si les chiffres ou caractères
affichés dépassent 10 chiffres. Appuyez
sur pour effacer “E” et faire d’autres
opérations.
• Après le calcul, appuyez sur pour
mettre hors tension.
17
Page 10
FrançaisEspañol
OFF
1
5
English
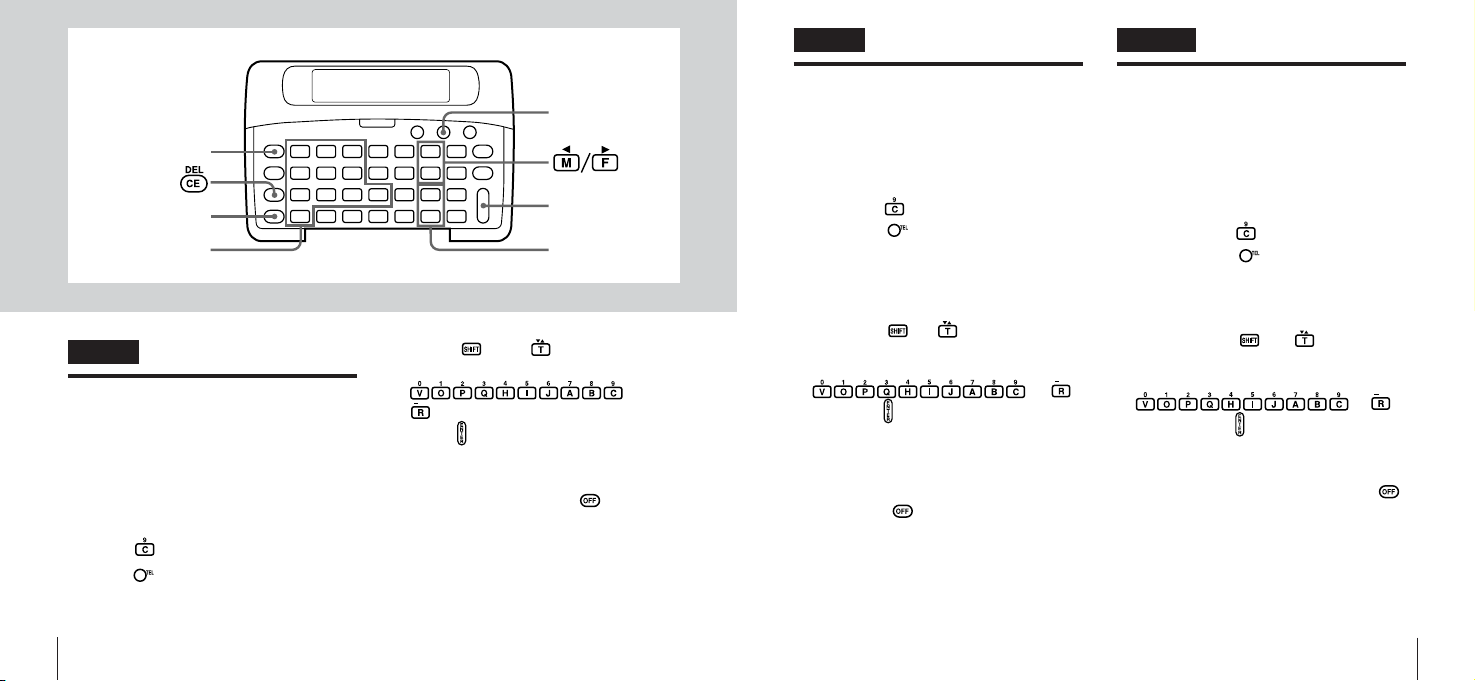
TELEPHONE DIRECTORY
Total of 26 items can be registered in the
memory. When you register 8 alphabetic
characters and 12 numerical characters
for one item.
Registering a name and a phone number
1Press .
2Press .
“TEL” and “NAME?” are displayed.
3 Input a name. Refer to “Input
letters and marks” (See page 22.).
18
2
6
4
4 Press and .
5 Input a phone number by pressing
and
.
6Press (ENTER).
• To input further data, repeat this operation
from step 3.
• After registering, press button to
turn off the power.
• The data will be registered in
alphabetical order automatically.
If “MEMORY FULL!” is displayed
You cannot add a new data. Delete a
needless data to register a new data.
DIRECTORIO TELEFONICO
Se pueden memorizar hasta 26 teléfonos.
Cuando registre hasta 8 letras y un número
de hasta 12 cifras para cada teléfono.
Registro del nombre y número telefónico
1 Presione .
2 Presione .
Aparecen las indicaciones “TEL” y “NAME?”.
3 Entre un nombre. Consulte la
“Entrada de letras y signos” (Lea la
página 23).
4 Presione y .
5Marque un número telefónico
presionando
y .
6 Presione (ENTER).
• Para seguir entrando más datos uno tras
otro, repita desde el paso 3.
• Una vez registrados todos los datos
necesarios, presione el interruptor
principal a para desconectar el
aparato.
• Los datos quedarán registrados
automáticamente en orden alfabético.
Si aparece “MEMORY FULL!”
No se pueden añadir nuevos datos. Borre
los datos que no necesite más para poder
registrar un nuevo dato.
REPERTOIRE TELEPHONIQUE
Il est possible de mémoriser un total de 26
items, avec 8 caractères alphanumériques
et 12 chiffres par item.
Mémorisation d’un nom et d’un numéro
de téléphone
1Appuyez sur .
2Appuyez sur .
“TEL” et “NAME” apparaissent.
3 Entrez un nom. Voir “Entrée de
lettres et chiffres” (page 23).
4Appuyez sur et .
5 Entrez un numéro de téléphone en
appuyant sur
et .
6Appuyez sur (ENTER).
• Pour entrer d’autres données, reprenez
cette procédure à partir de l’étape 3.
• Après la mémorisation, appuyez sur
pour mettre hors tension.
• Les données seront enregistrées
automatiquement par ordre alphabétique.
Si “MEMORY FULL!” apparaît
Il est impossible d’ajouter de nouvelles
données. Effacez des données inutiles
pour en enregistrer des nouvelles.
19
Page 11
FrançaisEspañol
2
SHIFT
English
TELEPHONE DIRECTORY
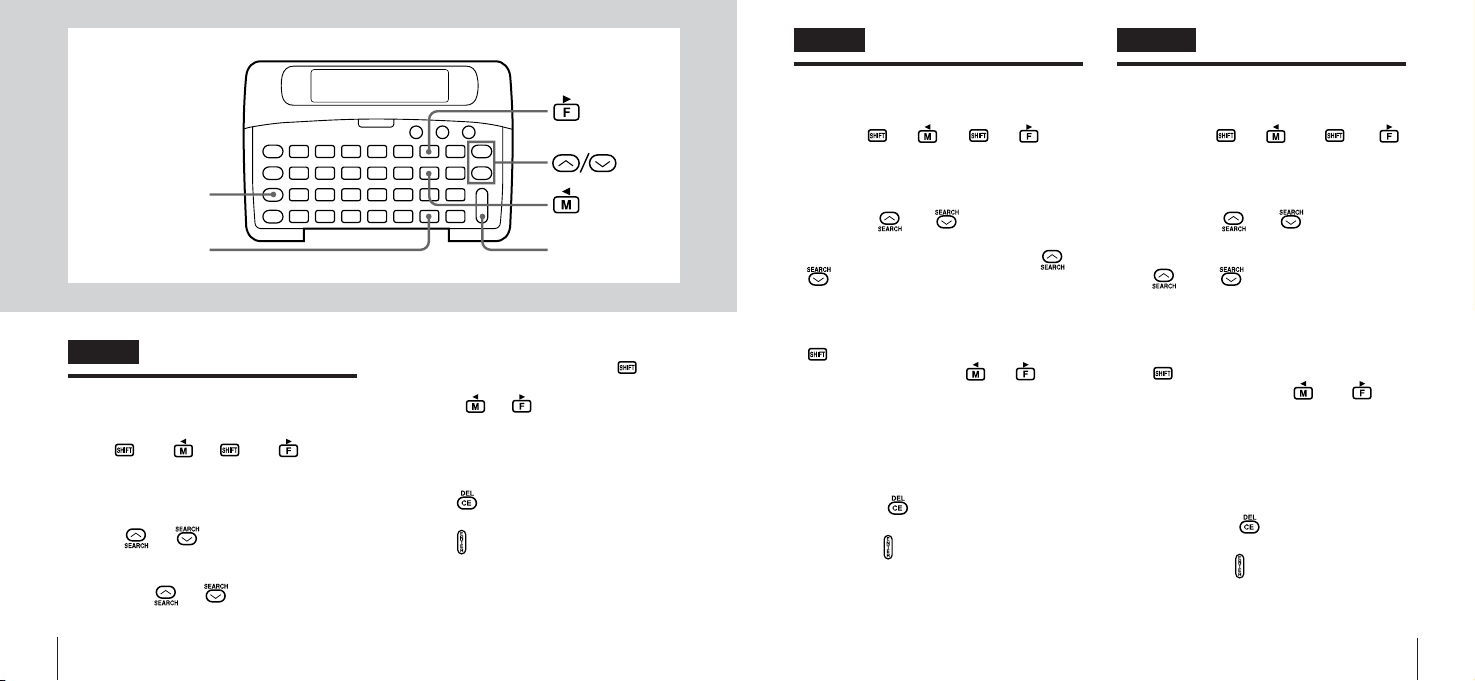
To correct the data
Press and or and to shift
the cursor to the character or number that
you wish to change and input a new one.
Searching for data
• Press or . The data is displayed
in alphabetical order.
•When you press an initial character and
then press or , the display shows
the data that begins with that character.
20
3
•When the data that you input is longer
than twelve characters, press twice
to display “LOCK” and shift the cursor by
pressing or .
Erasing a name and phone number
1Display the name and phone
number that you wish to erase.
2Press .
“DELETE?” is displayed.
3Press (ENTER).
“DELETE!” is displayed and registered
data is erased.
DIRECTORIO TELEFONICO
Para corregir un dato
Presione y o y para
mover el cursor sobre la letra o número
que desea corregir y cámbielo.
Búsqueda de datos
• Presione o . Los datos irán
apareciendo en orden alfabético.
•Si presiona una letra y el botón o
, el visualizador muestra los datos
que empiezan con ese carácter.
•Si el dato entrado es de más de doce
letras o números, presione dos veces
hasta que aparezca “LOCK” y mueva
el cursor presionando o .
Borrado de un nombre y número
telefónico
1Haga que aparezcan el nombre y
número telefónico que desea
borrar.
2 Presione .
“Aparece la indicación DELETE?” .
3 Presione (ENTER).
Aparece la indicación “DELETE!” y
queda borrado el dato que aparecía en
la pantalla.
REPERTOIRE TELEPHONIQUE
Pour corriger les données
Appuyez sur et ou et
pour amener le curseur jusqu’au caractère
ou chiffre à modifier, et entrez le nouveau.
Recherche de données
• Appuyez sur ou . Les données
s’affichent par ordre alphabétique.
• En appuyant sur le caractère initial puis
sur ou , seules les données
commençant par la lettre entrée
s'affichent.
•Si la donnée entrée a plus de 12
caractères, appuyez deux fois
sur pour afficher “LOCK” et déplacer
le curseur en pressant ou .
Effacement d’un nom et numéro de
téléphone
1Affichez le nom et le numéro de
téléphone que vous souhaitez
effacer.
2Appuyez sur .
“DELETE?” apparaît.
3Appuyez sur (ENTER).
“DELETE!” s’affiche et les données
mémorisées sont effacées.
21
Page 12
FrançaisEspañol
English
TELEPHONE DIRECTORY
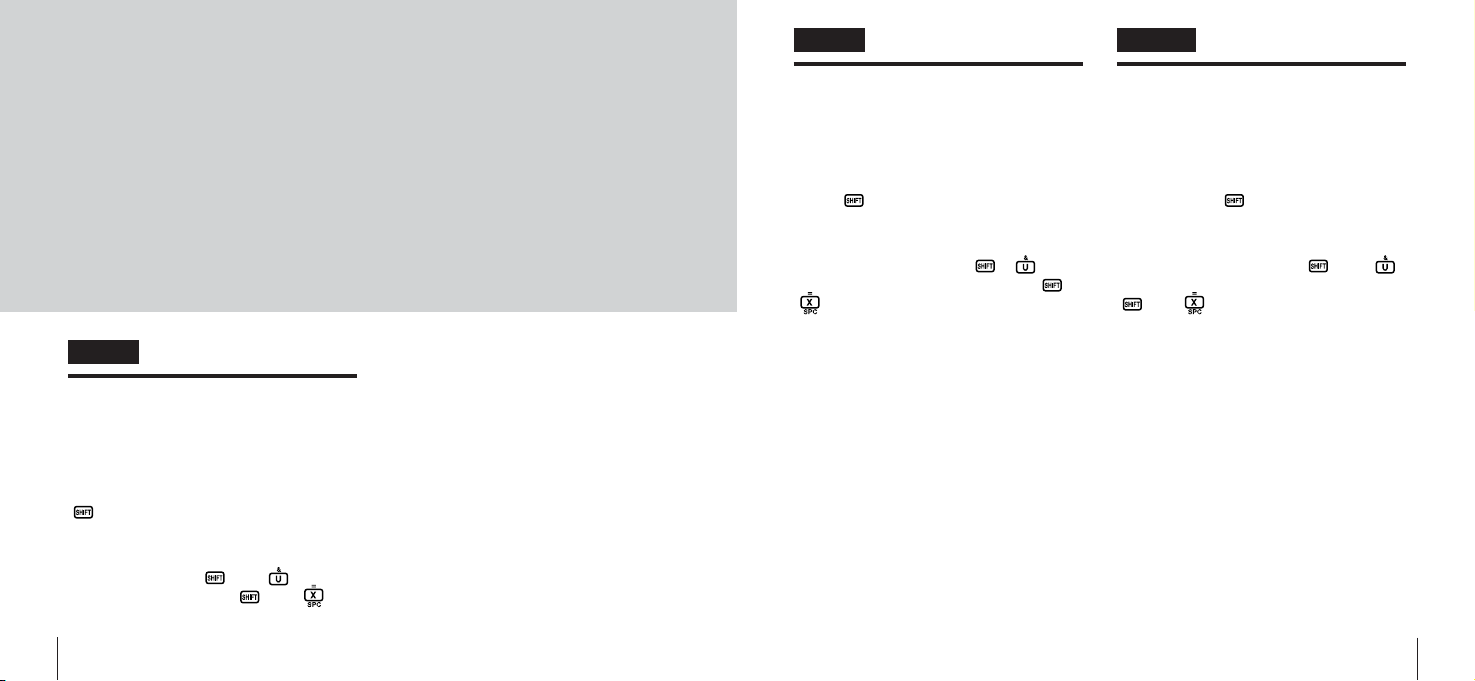
Input letters and marks
Press the alphabet buttons when you input
letters.
For inputting numbers and marks, press
and then press the button that you
wish to input.
Example:
To input “&”, press then .
To input a space, press then .
22
DIRECTORIO TELEFONICO
Entrada de letras y signos
Presione los botónes de alfabeto para
entrar letras.
Para entrar números y signos, presione el
botón y el botón correspondiente al
número y signo que desea entrar.
Ejemplo:
Para entrar “&”, presione y .
Para entrar un espacio, presione y
.
REPERTOIRE TELEPHONIQUE
Entrée de lettres et marques
Appuyez sur les touches alphabétiques
pour entrer des lettres.
Pour entree des numéros et marques,
appuyez sur , puis sur la touche
correspondant à l’item à entrer.
Exemple:
Pour entrer “8”, appuyez sur , puis .
Pour entrer un espace, appuyez sur
puis .
23
Page 13
FrançaisEspañol
1
SHIFT
English
ENTERING CONFIDENTIAL
DATA
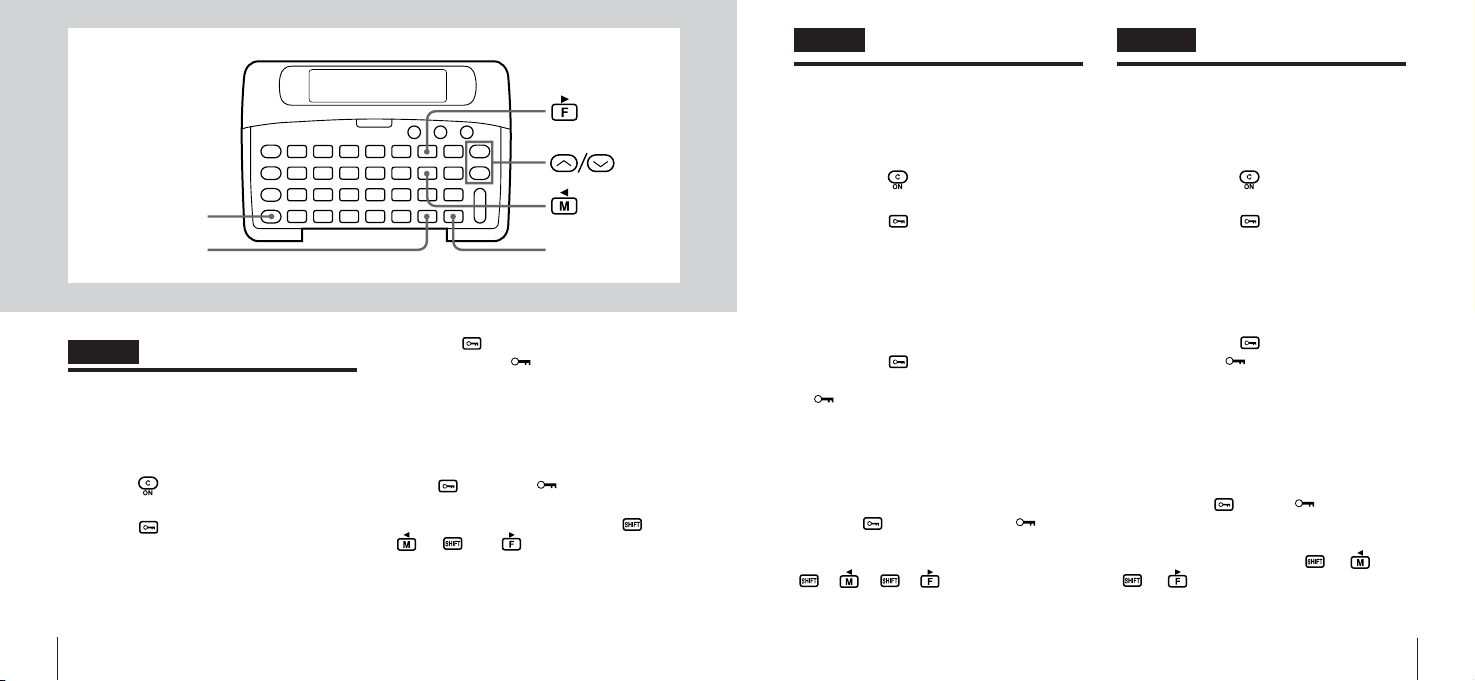
Registering a password
1 Press .
“NAME?” is displayed.
2 Press .
“PASSWORD?” is displayed.
3 Input the password.
You can make a password within 6
characters.
You cannot check the password when it
is registered once.
24
2,4
4 Press .
“NAME?” and are displayed. Input
any confidential data that you do not
want to show other people.
Always input the password before you
search or erase the confidential data.
To change the password
Press when the is displayed.
Password flashes in the display.
Shift the cursor by pressing the and
or and to the character that
you wish to change and input the new
password.
PARA ENTRAR DATOS
CONFIDENCIALES
Registro de una contraseña
1 Presione .
Aparece la indicación “NAME?”.
2 Presione .
Aparece la indicación “PASSWORD?”.
3 Entre la contraseña.
Piense una contraseña de hasta 6
caracteres alfanuméricos.
No podrá volver a confirmar la
contraseña una vez registrada.
4 Presione .
Aparece las indicaciones “NAME?” y
. Entre el dato que desea mantener
confidencial no compartido con otras
personas.
Entre siempre la contraseña antes de
buscar o borrar el dato confidencial.
Para cambiar la contraseña
Presione cuando aparece dato.
Destella la contraseña en la pantalla.
Mueva el cursor presionando el botón
y o y hasta llegar sobre
el carácter que desea cambiar y entre la
nueva contraseña.
ENTREE DE DONNEES
CONFIDENTIELLES
Mémorisation d’un mot de passe
1Appuyez sur .
“NAME?” apparaît.
2Appuyez sur .
“PASSWORD?” apparaît
3 Entrez le mot de passe.
Vous pouvez entrer un mot de passe d’un
maximum de six lettres. Le mot de passe
ne pourra pas être vérifié une fois mémorisé.
4Appuyez sur .
“NAME?” et apparaissent. Entrez
une donnée confidentielle que vous
souhaitez maintenir secrètes. Entrez
toujours le mot de passe avant la recherche ou l’effacement de données
confidentielles.
Pour changer de mot de passe
Appuyez sur quand est affiché.
Le mot de passe clignote dans l’affichage.
Amenez le curseur jusqu’au caractère à
modifier en appuyant sur et , ou
et , puis entrez le nouveau mot de
passe.
25
Page 14
FrançaisEspañol
English
ENTERING SECRET DATA
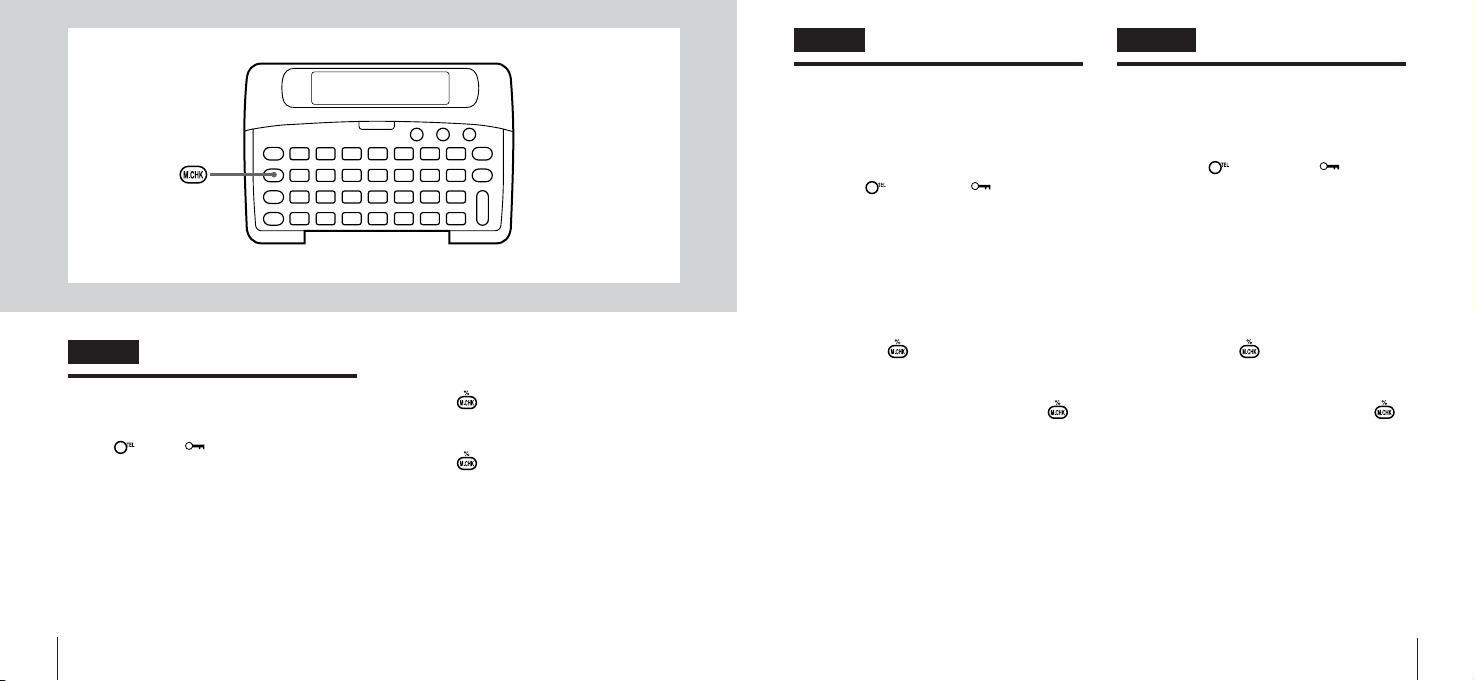
To cancel the confidential function
Press . The mark disappers and
you search or erase the data, except the
confidential data.
26
To check the number of data and
available space
1Press .
“MEMORY REST” and the number is
displayed.
2 Press again.
The number of input data and total
number of input characters are
displayed.
Those checked number includes the
number of confidential data.
PARA ENTRAR DATOS
CONFIDENCIALES
Para cancelar la función de datos
confidenciales
Presione . La marca desaparece
y podrá buscar y borrar los datos, excepto
los datos confidenciales.
Para confirmar el número de datos
entrados y la memoria libre
1 Presione .
Aparecerá la indicación “MEMORY
REST” y el número.
2 Presione nuevamente el botón .
Aparecerá el número de teléfonos
entrados y el número total de caracteres
entrados.
En estos valores se incluirán los ocupados
por los datos confidenciales.
ENTREE DE DONNEES
CONFIDENTIELLES
Pour annuler la fonction confidentielle
Appuyez sur . La marque disparaît
et vous pouvez rechercher ou effacer les
données sauf les données confidentielles.
Pour contrôler le nombre de
données et l’espace disponible
1Appuyez sur .
“MEMORY REST” et le nombre
apparaissent.
2Appuyez une seconde fois sur .
Le nombre de données entrées et le
total de caractères entrés s’affichent.
Ces nombres inclut les données
confidentielles.
27
Page 15
FrançaisEspañol
English
MAINTENANCE
Cleaning the unit
Use a soft and dry cloth. If the surface is
extremely dirty, use a soft cloth lightly
moistened with a mild detergent solution.
Do not use strong solvents such as alcohol,
benzine or thinner.
28
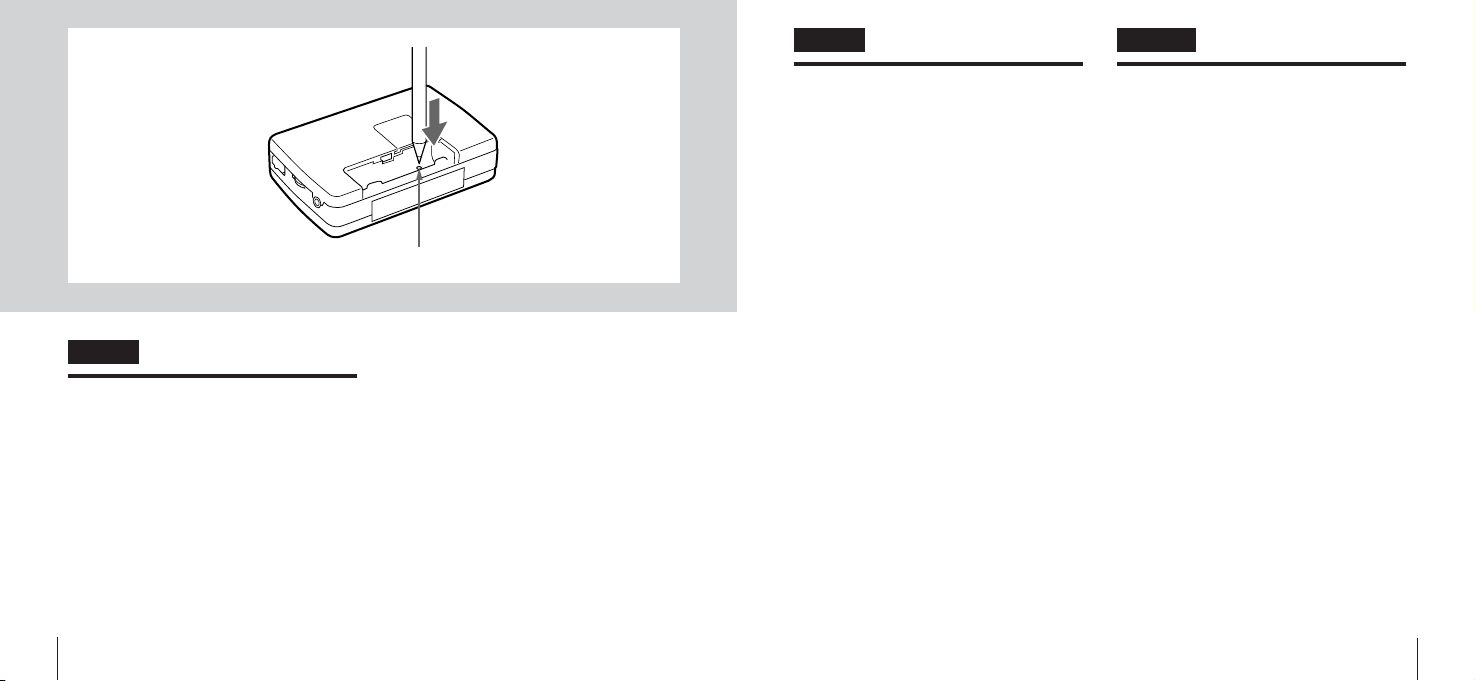
RESET
If an erroneous display or operation
occurs
Reset the unit by pressing the RESET
button inside the dry cell battery
compartment lightly with a thin rod.
When the unit is reset, telephone directory
data will be erased.
MANTENIMIENTO
Limpieza del aparato
Utilice un paño suave, seco. Si la superficie
está muy sucia, utilice un paño suave
empapado ligeramente en una solución
detergente neutra. No utilice líquidos de
limpieza fuertes tales como alcohol,
bencina o diluyente de pintura.
Si aparece una indicación de error o se
hace una operación equivocada
Inicialice el aparato con el botón RESET
dentro de la caja de la pila, empujando con
una punta afilada.
Cuando inicialice el aparato, se borrarán
los números registrados en el directorio
telefónico.
ENTRETIEN
Nettoyage de l’appareil
Utilisez un chiffon doux et sec. Si la surfaces
est très sale, prenez un chiffon doux
légèrement humidifié de solution
détergente douce. N’utilisez pas de
solvants forts, comme l’alcool, la benzine
ou un diluant.
En cas d’erreur d’affichage ou de
fonctionnement
Réinitialisez l’appareil en appuyant sur le
bouton RESET situé dans le logement de
la pile sèche avec une tige fine.
La réinitialisation effacera les données du
répertoire téléphonique.
29
Page 16

FrançaisEspañol
English
SPECIFICATIONS
Common section
Maximum dimensions
Weight Approx. 95g (3.3 oz.) including
Accessories Dry cell battery (R03 size AAA)
Tuner section
Frequency range
30
94.4 × 64.0 × 23.0 mm
3
/4 × 2 5/8 × 29/32 in)
(3
battery
(1), Lithium battery (1), Stereo
headphones (1)
AM: 530 – 1605 kHz
FM: 87.5 – 108 MHz
Output Headphone jack (Stereo mini
Power source DC 1.5V, using a dry cell
Maximum output
Battery life (EIAJ 1mW, using R03 (AAA)
jack)
battery R03 size AAA
10 mW+10 mW (EIAJ 16 Ω)
battery
Approx. 26 hours (when tuning
in AM band)
Approx. 20 hours (when tuning
in FM band)
Calculator section
Figure 10 figures
Calculating system
Power source DC 3V (lithium battery
4 basic arithmetic functions
and percentage competition
CR2032) (1)
ESPECIFICACIONES
General
Dimensiones máximas
Peso Aprox. 95 g con la pila
Accesorios Pila (R03 de tamaño AAA) (1),
Sintonizador
Gama de frecuencias
Salida Toma para auriculares (Mini
Especificaciones eléctricas
Salida máxima 10 mW+10 mW (EIAJ 16 Ω)
Vida útil de la pila
Calculadora
Número 10 cifras
Cálculos 4 operaciones aritméticas
Alimentación eléctrica
94,4 × 64,0 × 23,0 mm
Pila de litio (1),
Auriculares estereofónicos (1)
AM: 530-1605 kHz
FM: 87,5-108 MHz
toma estéreo)
CC de 1.5V, con una pila R03
de tamaño AAA
(EIAJ 1mW con pila R03 AAA)
Aprox. 26 horas (cuando
sintoniza en la banda AM)
Aprox. 20 horas (cuando
sintoniza en la banda FM)
básicas y porcentaje
CC de 3V (pila de litio CR2032)
(1)
SPECIFICATIONS
Section commune
Dimensions maximum
Poids Approx. 95 g, pile incluse
Accessoires Pile sèche (R03 format AAA)
Section tuner
Plage de fréquences
Sortie Prise d’écouteurs (miniprise
Alimentation 1,5 V c.c.. avec une pile sèche
Sortie maximum
Durée de service de la pile
Section calculette
Chiffres 10
Système de calcul
Alimentation Pile au lithium CR2032 3 V c.c.
94,4 × 64,0 × 23,0 mm
(1), pile au lithium (1),
écouteurs stéréo (1)
AM: 530 à 1605 kHz
FM: 87,5 à 108 MHz
stéréo)
R03 format AAA
10 mW + 10 mW (EIAJ 16 Ω)
(EIAJ 1 mW avec une pile R03
(AAA))
Approx. 26 heures (avec tuner
sur la bande AM)
Approx. 20 heures (avec tuner
sur la bande FM)
4 fonctions arithmétiques de
base et calcul du pourcentage
(1)
31
Page 17

ItalianoDeutsch
32
INHALTSVERZEICHNIS
ZUR BESONDEREN BEACHTUNG .. 35
BATTERIEN EINLEGEN .................... 37
VORBEREITUNGEN ......................... 41
EINSTELLEN DER UHRZEIT ............ 43
RADIOEMPFANG ............................. 45
TASCHENRECHNER-FUNKTION .... 47
TELEFONBUCH ................................ 49
EINGABE VERTRAULICHER DATEN
......................................................... 55
PFLEGE UND RENIGUNG ................ 59
TECHNISCHE DATEN ...................... 61
INDICE
PRECAUZIONI .................................. 35
INSERIMENTO DELLE PILE ............. 37
FUNZIONAMENTO ............................ 41
REGOLAZIONE DELL’OROLOGIO ... 43
ASCOLTO DELLA RADIO ................ 45
CALCOLATRICE ............................... 47
RUBRICA TELEFONICA .................. 49
IMMISSIONE DI INFORMAZIONI
SEGRETE ....................................... 55
MANUTENZIONE E CURA ................ 59
CARATTERISTICHE TECNICHE ...... 61
33
Page 18

ItalianoDeutsch
34
ZUR BESONDEREN
BEACHTUNG
Für optimale Leistung
Vermeiden Sie extrem hohe oder niedrige
Temperaturen sowie besonders staubige oder
feuchte Orte. Vermeiden Sie insbesondere
die folgenden Umgebungsbedingungen:
• Orte mit hoher Feuchtigkeit wie z.B.
Badezimmer
• die Nähe von Heizungen und
Warmluftauslässen
• direkte Sonneneinstrahlung (denken Sie
daran, daß die Temperaturen eines in der
Sonne geparkten Fahrzeugs sehr hoch
ansteigen können).
Hinweise zum Kopfhörergebrauch
• Stellen Sie eine gemäßigte Lautstärke ein,
um Gehörschäden zu vermeiden.
• Im Straßenverkehr während des Auto- oder
Radfahrens keine Kopfhörer aufsetzen.
• Kopfhörer korrekt tragen: L für linkes Ohr,
R für rechtes Ohr.
Hinweis
Bei Funktionsstörungen oder im
Reparaturfalle erfolgt eine Rückstellung der
Daten, wobei sämtliche Einträge gelöscht
werden. Machen Sie sich deshalb regelmäßig
Notizen von wichtigen Daten.
PRECAUZIONI
Per ottenere sempre ottime prestazioni
Evitare di tenere l’apparecchio in luoghi
estremamente caldi, freddi, polverosi o
umidi, e in particolare:
•in luoghi particolarmente umidi, come
stanze da bagno
•vicino a caloriferi
•alla luce diretta del sole (ad esempio
all’interno di un’auto parcheggiata al sole,
dove la temperatura può aumentare
notevolmente).
Ascolto con cuffie
• Tenere il volume su un livello basso per
proteggere l’udito.
• Per maggiore sicurezza, non usare le
cuffie durante la guida o in bicicletta.
• Indossare le cuffie in modo corretto: L sta
per sinistra e R per destra.
Nota
Quando si ha un malfunzionamento o si
ripara l’apparecchio, esso si azzera ed il
contenuto della memoria può andare
perduto. Si consiglia di annotare le
informazioni particolarmente importanti
separatamente.
35
Page 19
ItalianoDeutsch
36
12
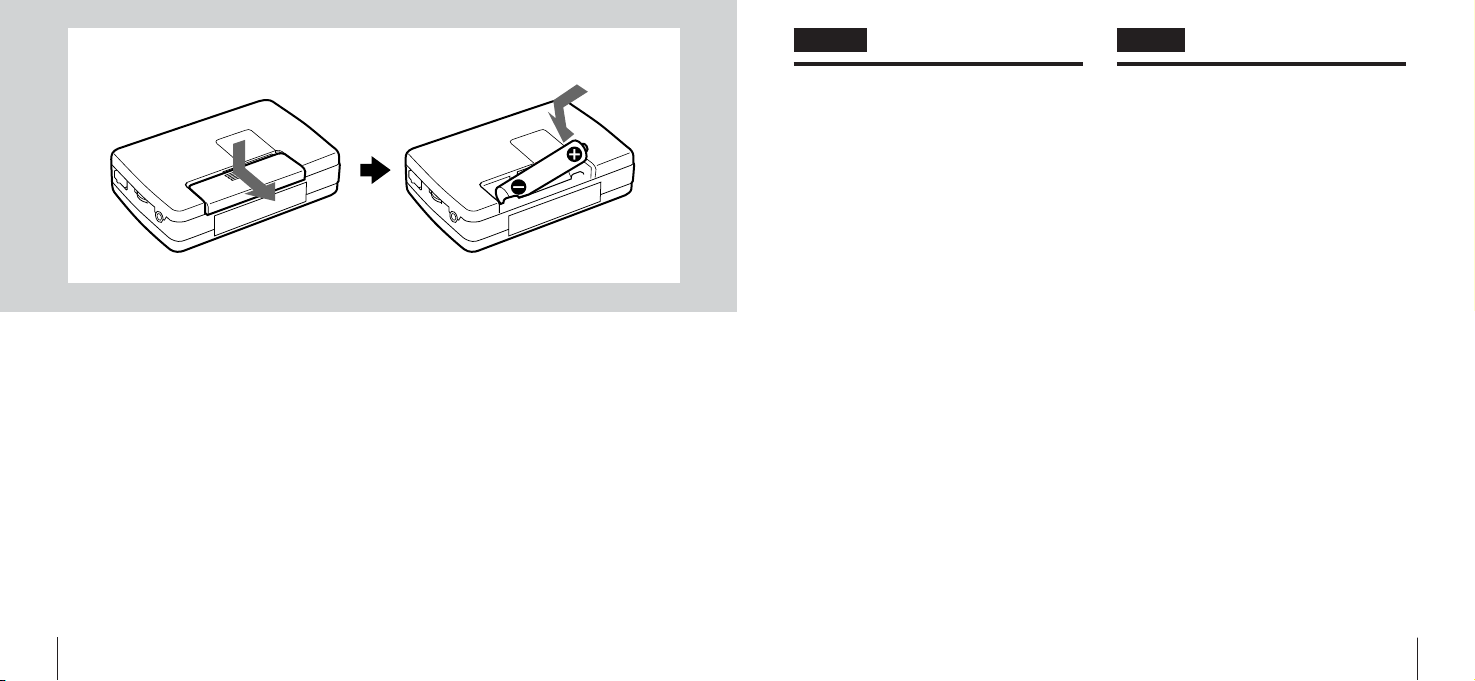
BATTERIEN EINLEGEN
Mikrozelle
Für den Radioempfang eine Mikrozelle
einlegen.
Legen Sie eine Batterie des Typs R03
(Größe AAA) mit korrekter Ausrichtung
der Plus- und Minuspole (4 und 5)
ein.
Die Batterie muß erneuert werden, wenn
die Lautstärke abnimmt oder der Ton
verzerrt wird.
Hinweise zu Batterien
• Batterien niemals aufladen, erwärmen
oder auseinandernehmen.
• Bei auslaufender Batteriesäure, die
Batterie entsorgen und das Batteriefach
gründlich säubern.
INSERIMENTO DELLE
PILE
Pila a secco
La pila a secco fornisce alimentazione alla
radio.
Inserire la pila a secco R03 (formato
AAA) con i segni 4 e 5 correttamente
orientati.
Sostituire la pila a secco R03 (formato
AAA) quando il volume diminuisce o il
suono risulta distorto.
Note sulla pila a secco
•Non ricaricare la pila, né riscaldarla o
aprirla.
• Se dalla pila fuoriesce liquido, pulirla
accuratamente.
37
Page 20
ItalianoDeutsch
38
123
BATTERIEN EINLEGEN
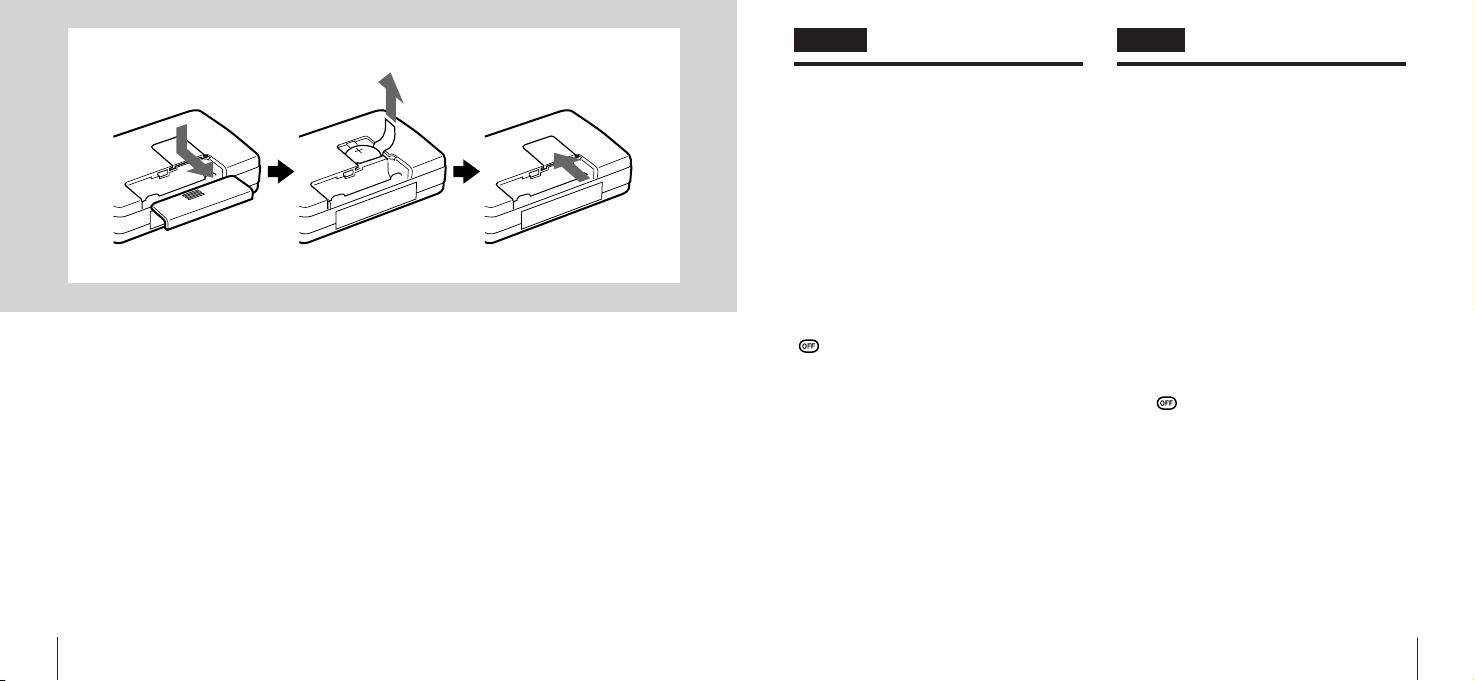
Lithium-Knopfzelle
Für den Betrieb von Uhr, Taschenrechner
und Telefonbuch eine Lithium-Knopfzelle
einlegen.
Öffnen Sie das Batteriefach für die
Lithium-Knopfzelle und ziehen Sie am
Band. (Vorher das Hauptbatteriefach öffnen.)
Auswechseln der Lithium-Knopfzelle
Erneuern Sie die Lithium-Knopfzelle (CR
2032), wenn die Anzeigen schwach
werden. Schalten Sie das Gerät mit der
-Taste aus, und setzen Sie die neue
Knopfzelle mit dem Pluspol (+) nach oben
ein.
•Die Uhrzeit und alle gespeicherten Daten
bleiben ca. 15 Sekunden lang ohne
eingelegte Lithium-Knopfzelle erhalten.
Hinweis zur Lithium-Knopfzelle
• Außer Reichweite von Kleinkindern und
Säuglingen halten.
Bei versehentlichem Verschlucken sofort
einen Arzt aufsuchen.
•Mit korrekter Ausrichtung der Plus- und
Minuspole (+ und –) einlegen.
• Um Kurzschlüsse zu vermeiden, die
Knopfzelle nicht mit einer Metallpinzette
o.ä. handhaben.
INSERIMENTO DELLE PILE
Pila al litio
La pila al litio fornisce alimentazione
all’orologio, alla calcolatrice e alla rubrica
telefonica.
Aprire il comparto della pila al litio e
tirare il nastro verso l’alto. (Prima di
effettuare questa operazione, aprire il
pannello del comparto della pila a secco.)
Sostituzione delle pile
Sostituire la pila al litio con una pila di tipo
CR 2032 quando il display risulta poco
leggibile. Il segno + presente sulla pila
deve essere rivolto verso l’alto. Prima di
compiere questa operazione, premere il
tasto per spegnere l’apparecchio.
•L’apparecchio è in grado di mantenere in
memoria i dati per 15 secondi durante
l’operazione di sostituzione della pila al
litio.
Note sulla pila al litio
• Tenere la pila al litio fuori dalla portata dei
bambini. In caso di ingestione, consultare
immediatamente un medico.
• Inserire la pila come sopra indicato.
• Per evitare cortocircuiti, non afferrare la
pila con pinzette di metallo, pinze, ecc.
39
Page 21
POWER ON/OFF
ItalianoDeutsch
40
!
VORBEREITUNGEN
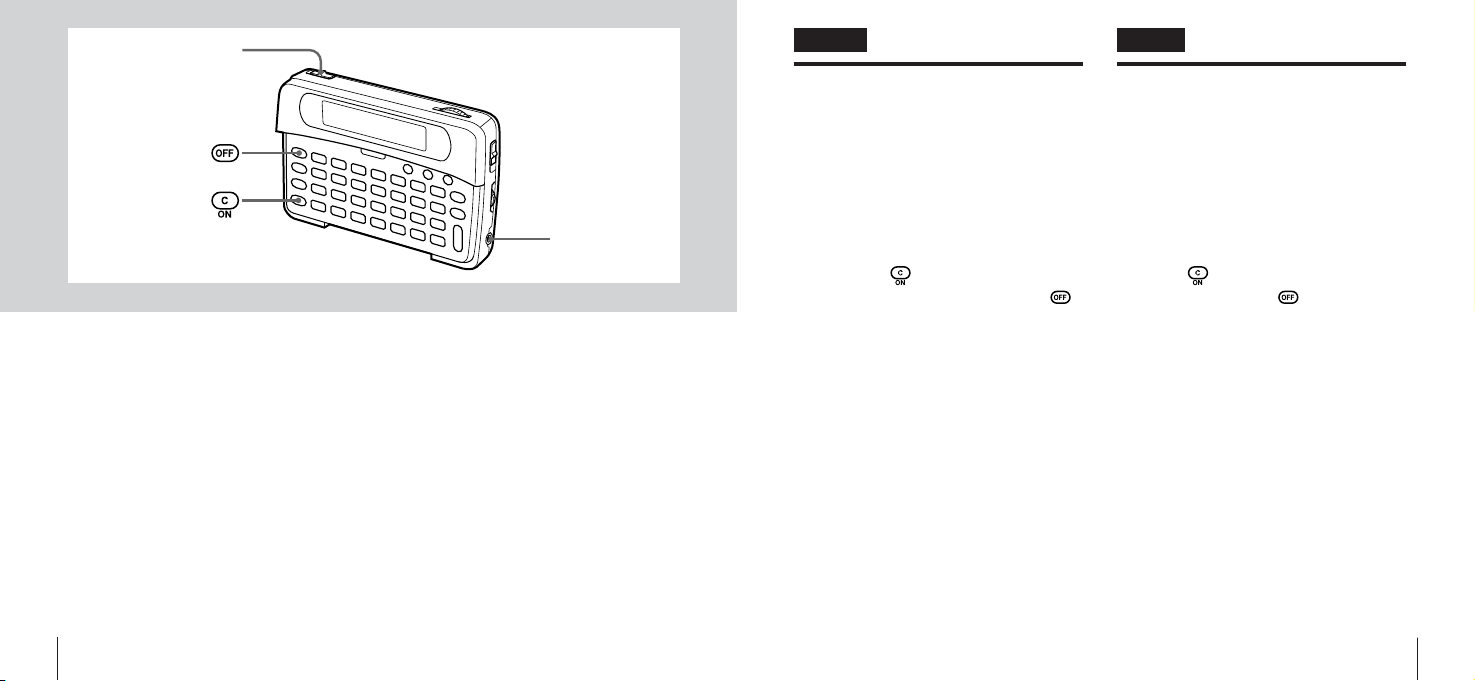
Auf Radioempfang schalten
Stellen Sie den POWER-Schalter auf ON.
Zum Abschalten des Radioempfangs
stellen Sie den POWER-Schalter auf OFF.
Aktivieren von Uhr,
Taschenrechner und Telefonbuch
Drücken Sie .
Zum Ausschalten drücken Sie die Taste.
Hinweise
•Uhr, Taschenrechner und Telefonbuch
bleiben während des Radioempfangs
ausgeschaltet.
•Wenn ca. 3 Minuten lang keine Bedienung
erfolgt, wird das Gerät automatisch
ausgeschaltet. (Stromsparfunktion)
FUNZIONAMENTO
Accensione della radio
Portare il selettore POWER su ON.
Terminato l’ascolto, portare il selettore su
OFF per spegnere l’apparecchio.
Per accendere l’orologio, la
calcolatrice o la rubrica telefonica
Premere .
Dopo l’uso, premere per spegnere
l’apparecchio.
Note
•L’orologio, la calcolatrice e la rubrica
telefonica non si accendono quando la
radio è in funzione.
•Se non viene utilizzato per 3 minuti,
l’apparecchio si spegne automaticamente
(funzione di spegnimento automatico).
41
Page 22
ItalianoDeutsch
42
1
2,4
12/24
3,4
5
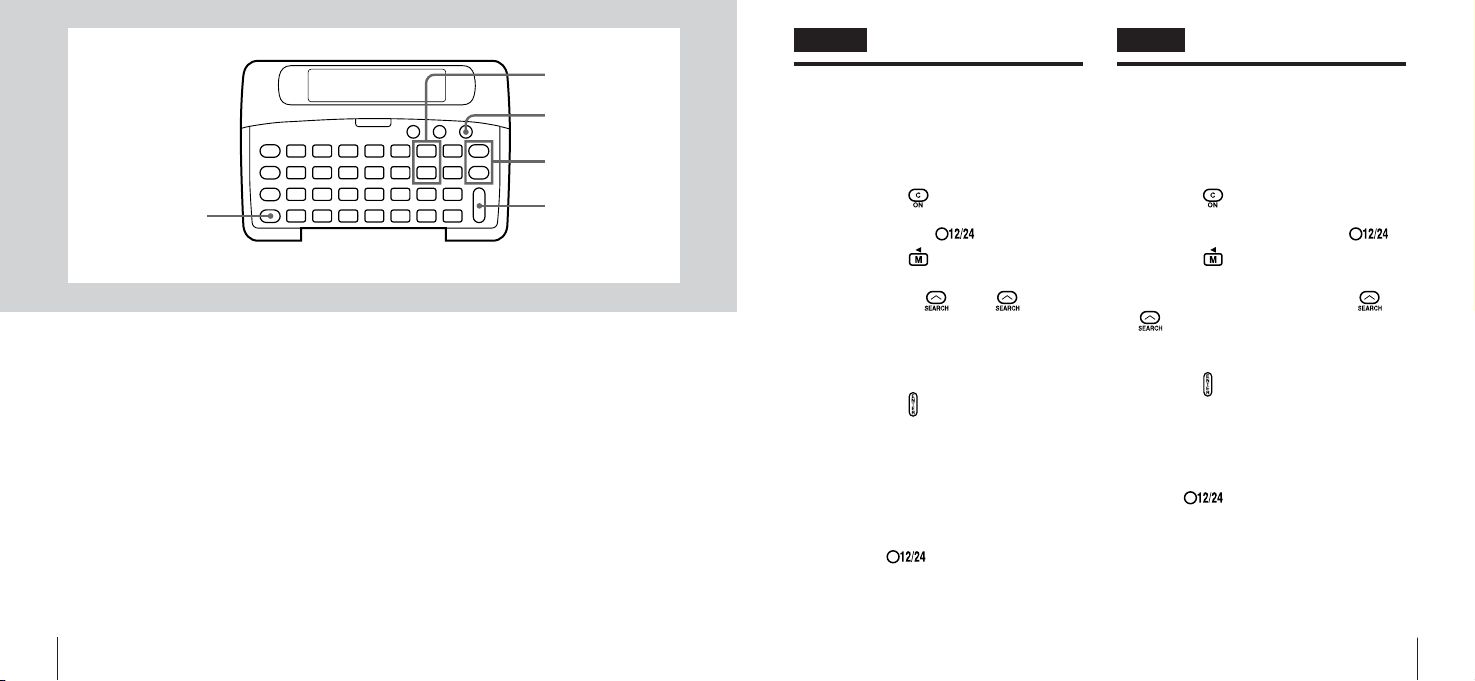
EINSTELLEN VON
UHRZEIT UND DATUM
Sorgen Sie dafür, daß eine LithiumKnopfzelle eingelegt ist.
1Drücken Sie .
Das Datum angezeigt. Ist dies nicht der
Fall, drücken Sie .
2Drücken Sie .
Der Minuten-Block beginnt zu blinken.
3 Stellen Sie mit oder die
aktuelle Minutenzeit ein.
4Wiederholen Sie die Schritte 2 und
3 zur Eingabe der Stundenzeit, des
Jahres und des Datums.
5Drücken Sie (ENTER).
Die Uhr startet zur vollen Minute bei 00
Sekunden.
Korrigieren von Uhrzeit/Datum
Wiederholen Sie alle Schritte von vorne.
Umschalten zwischen 12- und 24Stunden-System
Drücken Sie .
Bei Wahl des 12-Stunden-Systems wird
gleichzeitig AM (Vormittag) und PM
(Nachmittag) angezeigt.
REGOLAZIONE
DELL’OROLOGIO
Prima di regolare l’orologio, inserire la pila
al litio.
1Premere .
Viene visualizzata la data. Se non
venisse visualizzata, premere .
2Premere .
I minuti iniziano a lampeggiare.
3Impostare i minuti premendo o
.
4Ripetere i passaggi 2 e 3 per
impostare l’ora, la data e l’anno.
5Premere (ENTER).
L’orologio parte da 00 secondi.
Modifica dell’ora
Ripetere la procedura dall’inizio.
Selezione del formato 12/24 ore
Premere .
Se si seleziona il formato 12 ore, sul display
comparirà anche la dicitura AM o PM.
43
Page 23
2
4
ItalianoDeutsch
44
!
3
5
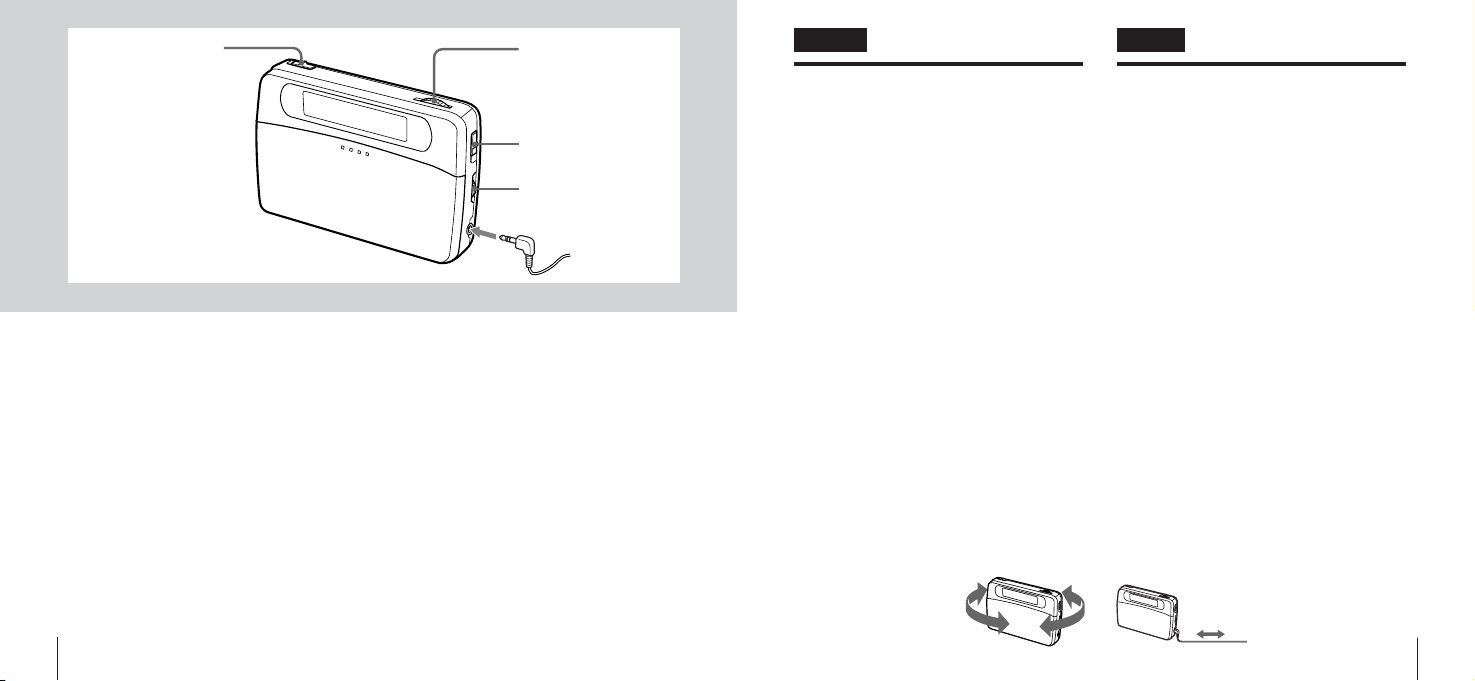
1
RADIOEMPFANG
1 Schließen Sie den Kopfhörer an die
! -Buchse an.
2 Stellen Sie den POWER-Schalter
auf ON.
3Wählen Sie ein Frequenzband.
4 Stellen Sie mit dem TUNING-Regler
den gewünschten Sender ein.
5 Stellen Sie mit dem VOLUME-
Regler die gewünschte Lautstärke
ein.
Zum Abschalten des Radioempfangs
stellen Sie den POWER-Schalter auf OFF.
Für besseren Empfang
AM: Drehen Sie das Gerät in die Stellung,
in der der Empfang am besten ist.
FM: Das Kopfhörerkabel dient gleichzeitig
als UKW-Antenne. Sorgen Sie dafür,
daß es möglichst lang ausgestreckt
ist.
AM FM
ASCOLTO DELLA RADIO
1Collegare le cuffie alla presa !
2 Portare il selettore POWER su ON.
3 Selezionare una banda.
4Ruotare TUNING per sintonizzarsi
sulla stazione radio desiderata.
5Ruotare VOLUME per regolare il
volume.
Terminato l’ascolto, portare il selettore
POWER su OFF per spegnere
l’apparecchio.
Per una migliore ricezione
AM: Sintonizzare l’unità fino a individuare
la posizione che offre la migliore
ricezione.
FM: Il cavo delle cuffie funziona come
antenna FM; si raccomanda pertanto
di tenerlo ben disteso.
45
Page 24
ItalianoDeutsch
46
OFF
1
2
3
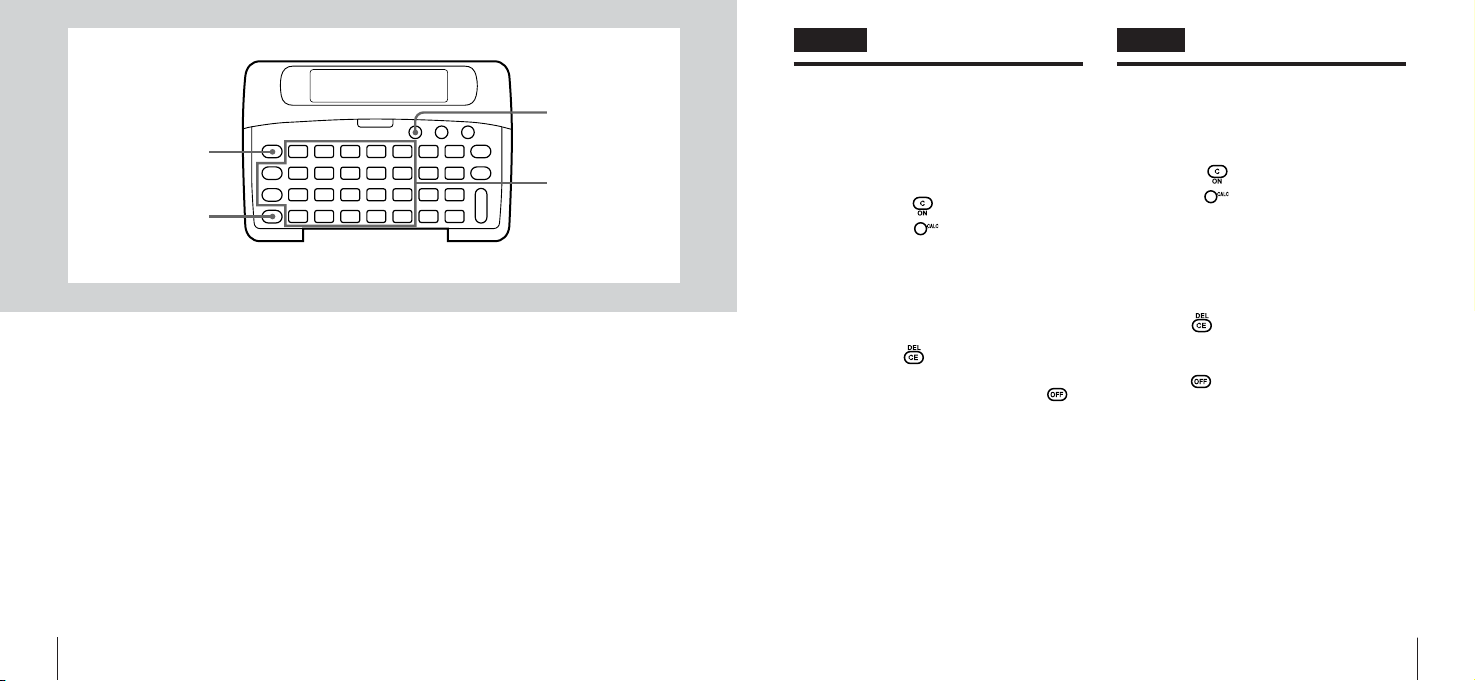
TASCHENRECHNERFUNKTION
Es stehen vier Grundrechenarten für bis
zu 10 stellige Ziffern zur Verfügung.
1Drücken Sie .
2Drücken Sie .
CAL wird angezeigt.
3Rechnen Sie.
Hinweise
• Bei Rechenergebnissen mit mehr als 10
Stellen wird ein „E“ angezeigt.
Drücken Sie , „E“ zu löschen und
weitere Rechnungen vorzunehmen.
• Zum Ausschalten drücken Sie die -
Taste.
CALCOLATRICE
La calcolatrice consente di eseguire le
quattro operazioni con numeri di 10 cifre.
1 Premere .
2Premere .
Viene visualizzato CAL.
3 Eseguire il calcolo desiderato.
Note
• Se il numero visualizzato è più lungo di
10 cifre, viene visualizzata una “E”.
Premere per azzerare ed effettuare
altre operazioni.
• Terminate le operazioni di calcolo,
premere per spegnere l’apparecchio.
47
Page 25
ItalianoDeutsch
48
OFF
1
5
2
6
4
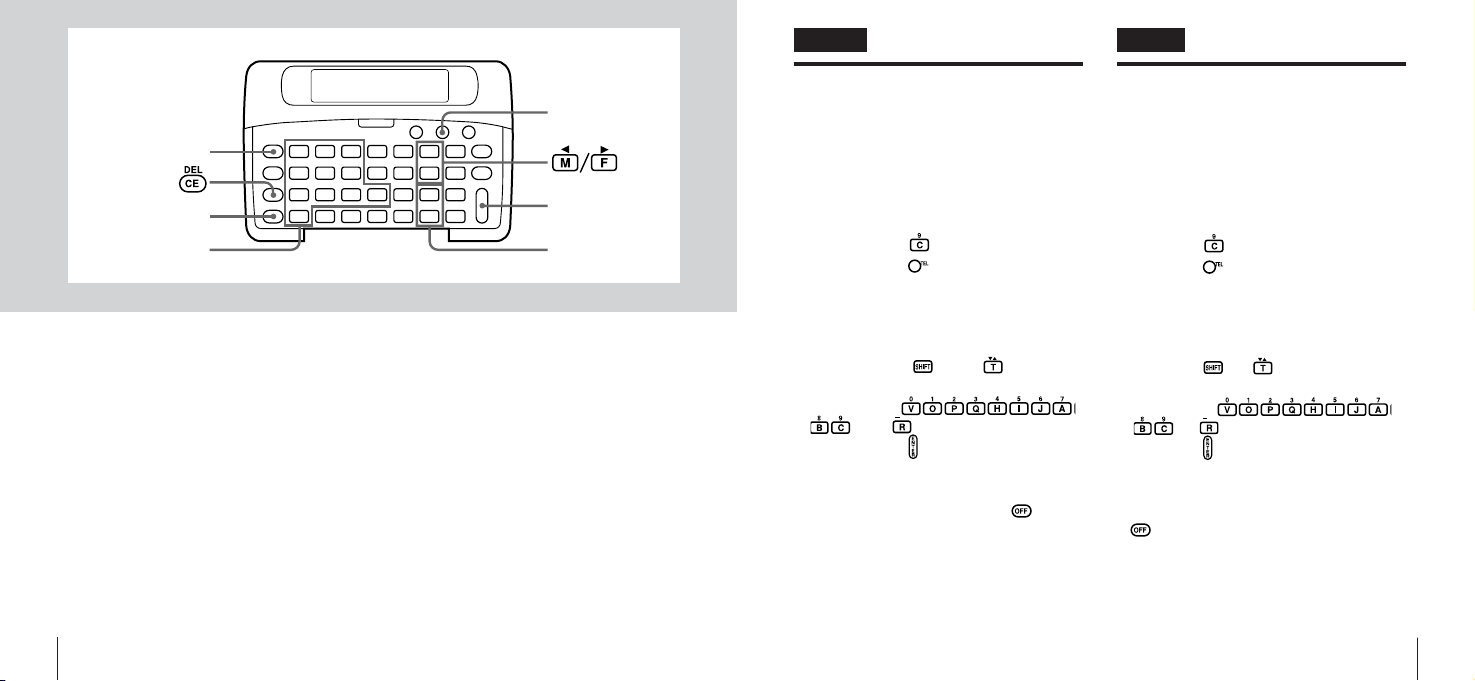
TELEFONBUCH
Sie können insgesamt 26 Telefonnummern
(zu je 12 Stellen) gemeinsam mit
Namenskürzeln (zu je 8 Buchstaben)
abspeichern.
Spreichern von Telefonnummern mit
Namen
1Drücken Sie .
2Drücken Sie .
„TEL“ und „NAME?“ werden angezeigt.
3Geben Sie den Namen ein. Siehe
„Eingabe von Buchstaben und
Symbolen“ auf Seite 53.
4Drücken Sie und .
5Geben Sie die Telefonnummer mit
den Tasten
und ein.
6Drücken Sie (ENTER).
•
Zur Eingabe weiterer Telefonnummern
wiederholen Sie den Vorgang ab Schritt 3.
•
Zum Ausschalten drücken Sie die -Taste.
•
Die Daten werden automatisch in
alphabetischer Reihenfolge abgespeichert.
Wenn “MEMORY FULL!” angezeigt wird
Die Speicherkapazität ist erschöpft, und es
ist keine Eingabe weiterer Daten möglich.
Löschen Sie unnötige Daten, um wieder
neue Daten eingeben zu können.
RUBRICA TELEFONICA
Registrando 8 caratteri alfabetici e 12
caratteri numerici per ciascuna voce della
rubrica telefonica l’apparecchio può
memorizzare fino a 26 voci.
Registrazione di nome e numero di
telefono
1Premere .
2Premere .
Vengono visualizzati “TEL” e “NAME”.
3Immettere un nome (v. sezione
“Immissione di lettere e segni”, a
pag. 53).
4 Premere e .
5Immettere il numero di telefono
premendo
e .
6Premere (ENTER).
• Per immettere altri dati, ripetere
l’operazione dal punto 3.
• Dopo aver registrato i dati, premere
per spegnere l’apparecchio.
•I dati verranno registrati automaticamente
in ordine alfabetico.
Se viene visualizzato “MEMORY FULL!”
Non è possibile registrare altri dati. Occorre
cancellare dati di cui non si ha più bisogno
per poter registrare nuovi dati.
49
Page 26
ItalianoDeutsch
50
SHIFT
2
3
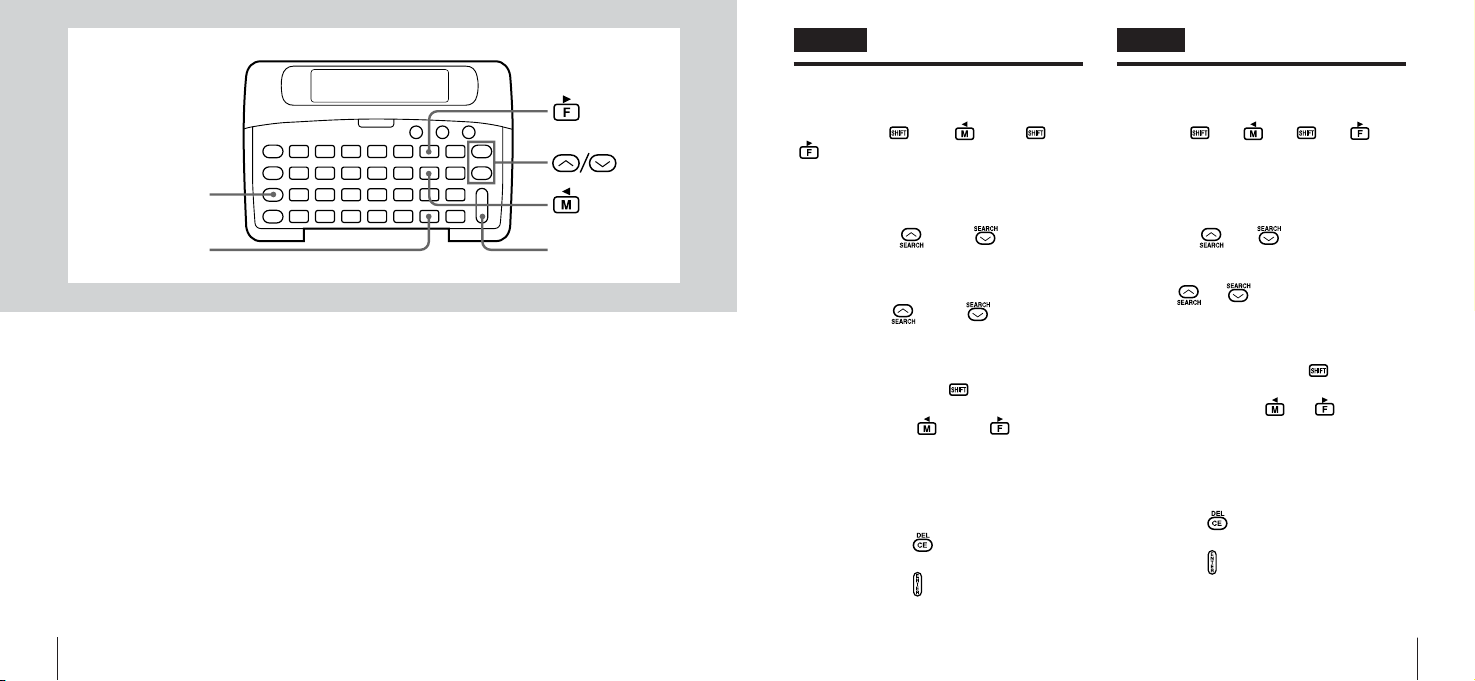
TELEFONBUCH
Korrigieren von Daten
Drücken Sie und oder und
, um den Cursor auf das zu ändernde
Zeichen zu setzen, und geben Sie das
neue Zeichen ein.
Datensuche
•Drücken Sie oder . Die Daten
werden in alphabetischer Reihenfolge
angezeigt.
• Bei Eingabe eines Anfangsbuchstabens
gefolgt von oder , werden die
Daten angezeigt, die mit diesem
Buchstaben beginnen.
•Sind die Daten länger als 12 Zeichen,
drücken Sie zweimal , so daß „LOCK“
im Display erscheint. Bewegen Sie dann
den Cursor mit oder .
Löschen eines Eintrags
1Rufen Sie den zu löschenden
Eintrag (Name und Telefonnummer)
ab.
2Drücken Sie .
„DELETE?“ (Löschen?) wird angezeigt.
3Drücken Sie (ENTER).
„DELETE!“ (Löschen!) wird angezeigt,
und die Daten werden gelöscht.
RUBRICA TELEFONICA
Correzione dei dati
Premere e o e per
passare al carattere o numero da
modificare e quindi immettere il carattere o
numero corretto.
Ricerca dei dati
• Premere o . I dati vengono
visualizzati in ordine alfabetico.
•Quando si preme la lettera iniziale e
quindi o , vengono visualizzati
solo i nomi che iniziano con l’iniziale
selezionata.
•Quando il numero di caratteri immessi è
superiore a 12, premere due volte
per visualizzare “LOCK” e spostare il
cursore premendo o .
Cancellazione di un nome e di un
numero di telefono
1 Visualizzare il nome e il numero di
telefono da cancellare.
2 Premere .
Viene visualizzato “DELETE?”.
3 Premere (ENTER).
Viene visualizzato “DELETE!” e i dati
vengono così cancellati.
51
Page 27
ItalianoDeutsch
52
TELEFONBUCH
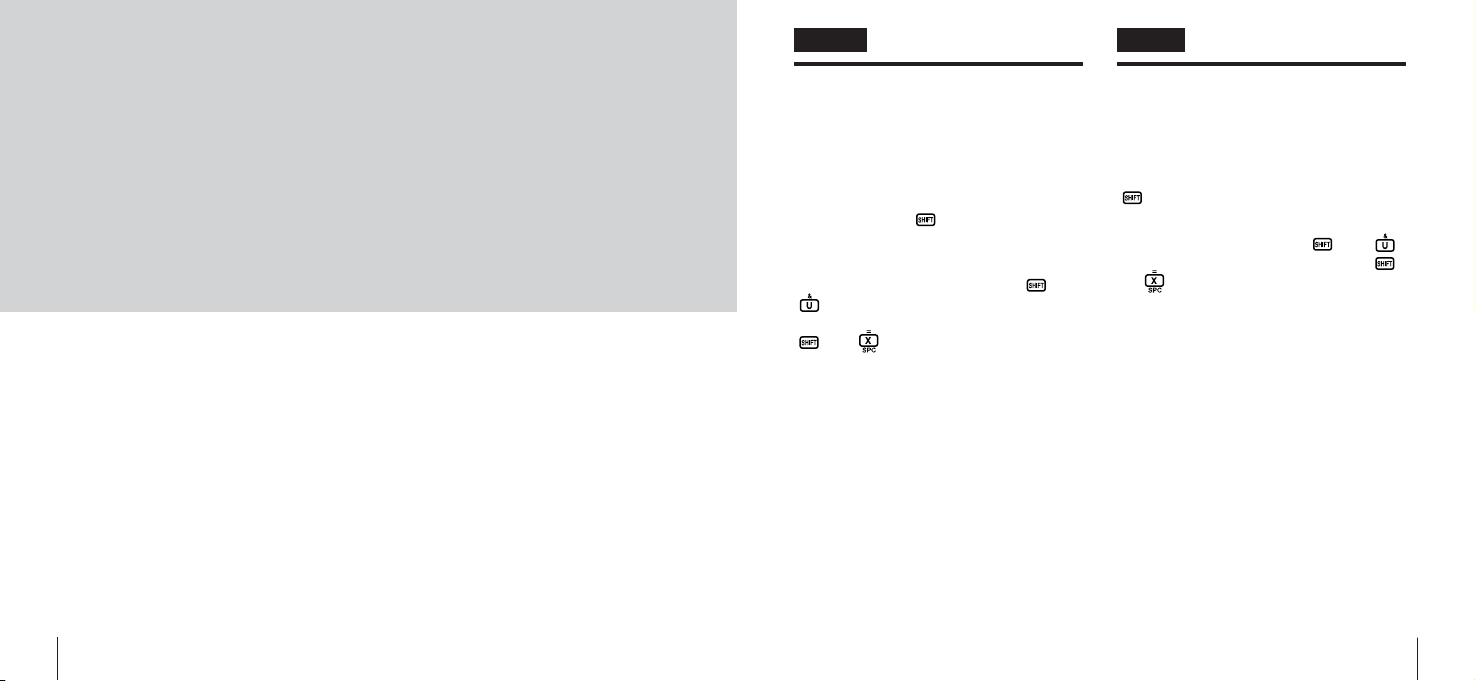
Eingabe von Buchstaben und
Symbolen
Drücken Sie zur Eingabe von Buchstaben
die Alphabet-Taste.
Zur Eingabe von Zahlen und Symbolen
drücken Sie erst , dann die Taste, die
dem gewünschten Zeichen entspricht.
Beispiel:
Zur Eingabe von “&” drücken Sie und
.
Zur Eingabe einer Leerstelle drücken Sie
und .
RUBRICA TELEFONICA
Immissione di lettere e simboli
Per immettere le lettere, premere i tasti
alfabetici.
Per immettere numeri e simboli, premere
e poi il simbolo o il numero desiderato.
Esempio:
Per immettere “&”, premere , poi .
Per immettere uno spazio, premere ,
poi .
53
Page 28
ItalianoDeutsch
54
SHIFT
1
2,4
EINGABE
VERTRAULICHER DATEN
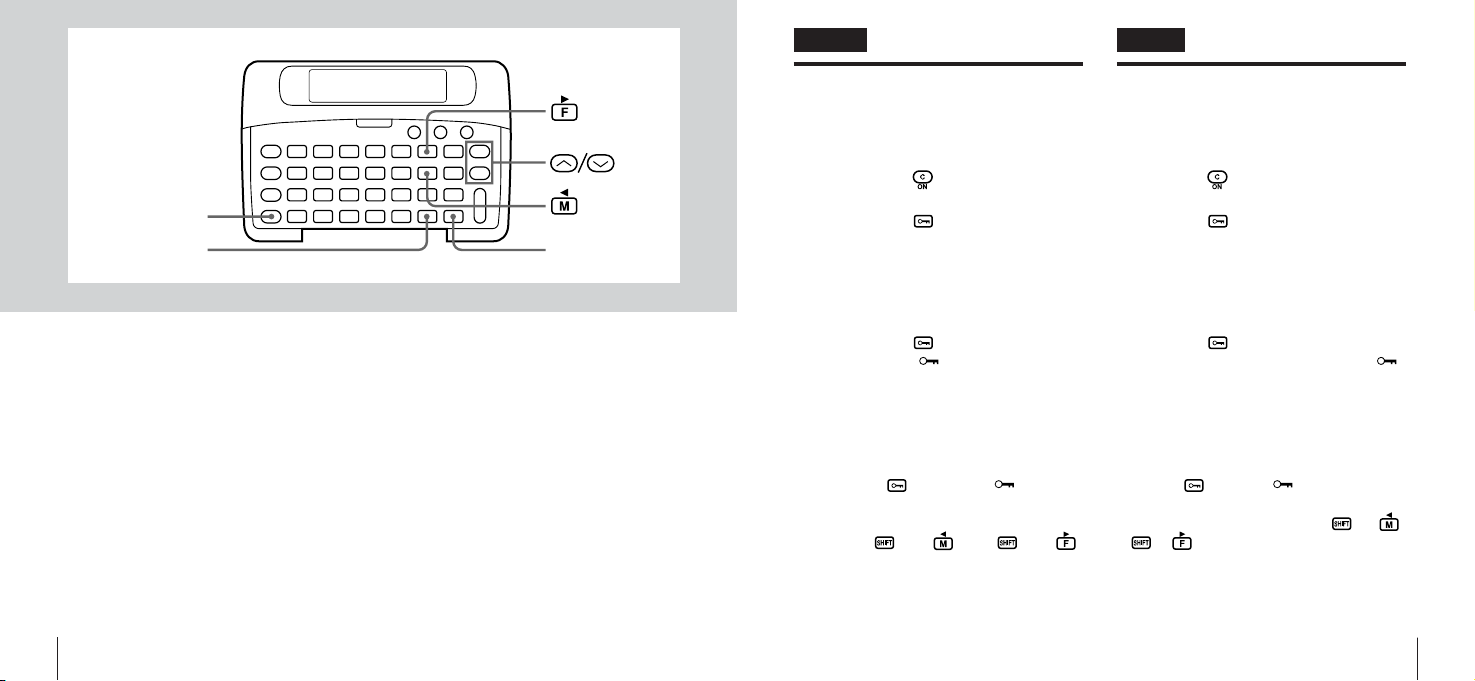
Registrieren eines Paßworts
1Drücken Sie .
„NAME?“ wird angezeigt.
2Drücken Sie .
„PASSWORD?“ wird angezeigt.
3Geben Sie das Paßwort ein.
Ein Paßwort kann aus bis zu 6 Zeichen
bestehen. Ein einmal eingegebenes
Paßwort läßt sich nicht mehr erfragen.
4Drücken Sie .
„NAME?“ und werden angezeigt.
Geben Sie nun die vertraulichen Daten
ein. Zur Abfrage und zum Löschen
vertraulicher Daten müssen Sie vorher
das Paßwort eingeben.
Ändern des Paßworts
Drücken Sie ,wenn das -Symbol
angezeigt wird Das Paßwort erscheint
blinkend im display. Bringen Sie den
Cursor mit und oder und
auf das zu ändernde Zeichen und geben
Sie das neue Zeichen ein.
IMMISSIONE DI
INFORMAZIONI SEGRETE
Registrazione della parola chiave
1 Premere .
Viene visualizzato “NAME?”.
2 Premere .
Viene visualizzato “PASSWORD?”.
3Immettere la parola chiave.
La parola chiave può essere lunga fino
a 6 caratteri, una volta registrata, non è
più possibile controllarla.
4 Premere .
Vengono visualizzati “NAME?” e .
Immettere i dati che si desidera tenere
segreti ad altre persone.
Per ricercare o cancellare i dati segreti
è necessario immettere la parola chiave.
Modifica della parola chiave
Premere quando è visualizzato.
Sul display lampeggia la parola chiave.
Spostare il cursore premendo e
o e fino a giungere al carattere da
modificare e immettere la nuova parola
chiave.
55
Page 29
ItalianoDeutsch
56
EINGABE VERTRAULICHER
DATEN
Abschalten der vertraulichen Funktion
Drücken Sie . Das -Symbol
erscheint, und Einträge, mit Ausnahme
von vertraulichem Daten, können jetzt ohne
Paßwort gesucht und gelöscht werden.
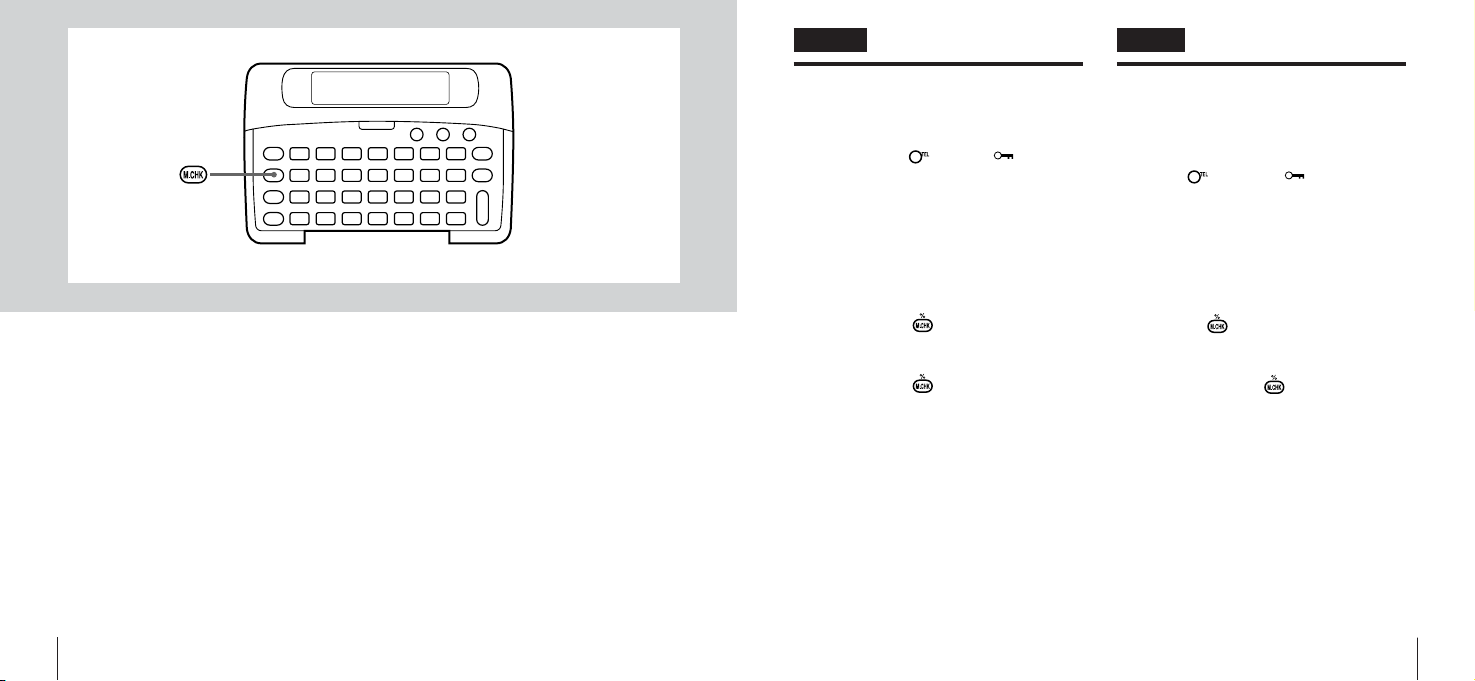
Prüfen der Anzahl der Einträge und
des verbleibenden Speicherplatzes
1Drücken Sie .
„MEMORY REST“ und eine Zahl wird
angezeigt.
2Drücken Sie erneut.
Die Anzahl der Einträge und Gesamtzahl
der eingegebenen Zeichen wird
angezeigt.
Die Angaben enthalten ebenfalls die
vertraulichen Daten.
IMMISSIONE DI INFORMAZIONI
SEGRETE
Per annullare la funzione di segretezza
dei dati
Premere . Il segno scompare; è
così possibile ricercare o cancellare i dati
non segreti.
Controllo del numero di dati
presenti e della memoria libera
1 Premere .
Vengono visualizzati “MEMORY REST”
e il numero di dati presenti”.
2 Premere ancora .
Vengono visualizzati il numero di dati
immessi e il numero totale dei relativi
caratteri.
I dati riportati comprendono anche le
informazioni segrete.
57
Page 30
ItalianoDeutsch
58
RESET
PFLEGE UND REINIGUNG
Reinigung
Reinigen Sie das Gehäuse mit einem
weichen trockenen Tuch. Hartnäckigen
Schmutz können Sie mit einem Tuch
wegwischen, das mit milder
Reinungslösung angefeuchtet ist.
Verwenden Sie unter keinen Umständen
scharfe Reinigungsmittel, Verdünner,
Alkohol oder Waschbenzin.
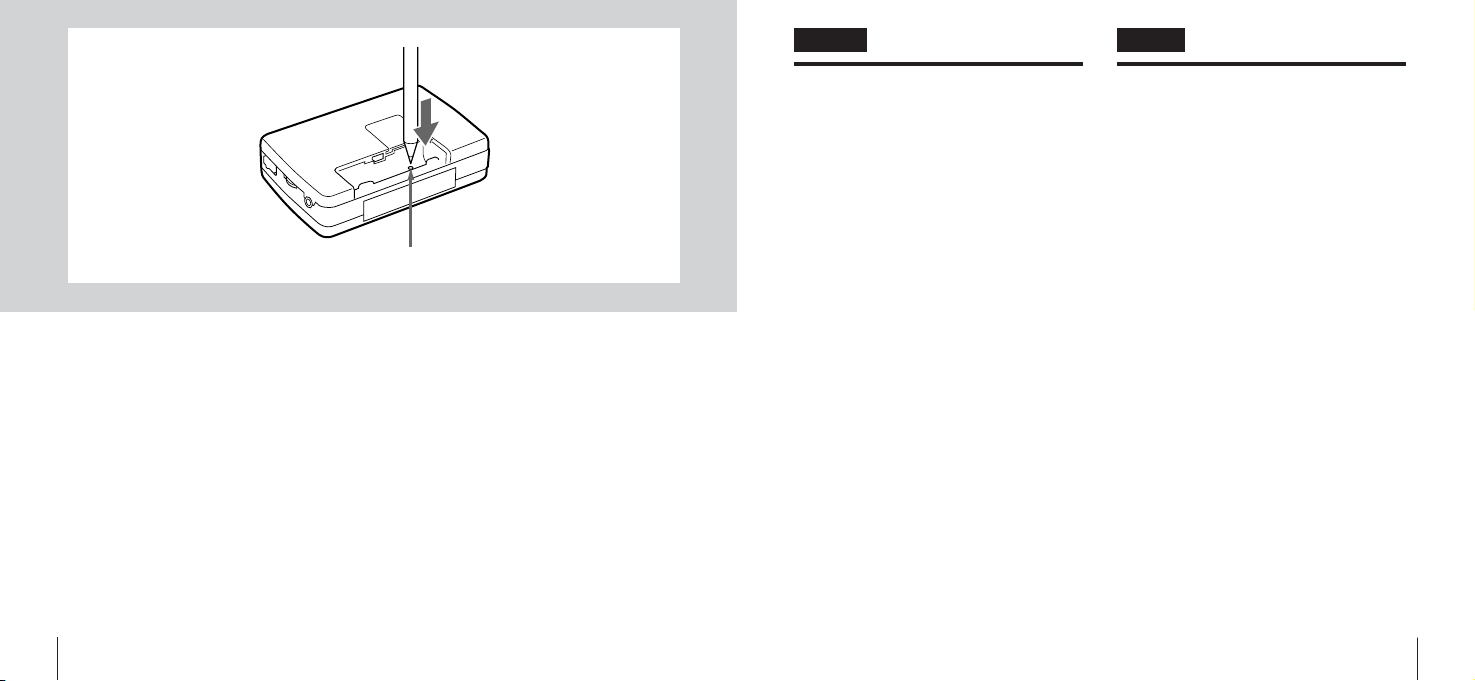
Im Falle fehlerhafter Display-Anzeige
Stellen Sie das Gerät zurück, indem Sie
den RESET-Knopf im Innern des
Batteriefachs mit einem spitzen
Gegenstand drücken. In einem solchen
Fall gehen die gespeicherten Daten
verloren.
MANUTENZIONE E CURA
Pulizia dell’apparecchio
Pulire il rivestimento con un panno morbido
e asciutto. Se l’apparecchio è molto sporco,
passarlo con un panno leggermente
inumidito con una soluzione detergente
delicata. Non usare acquaragia, benzina o
alcool.
In caso di errori o malfunzionamenti
Premere leggermente il tasto RESET posto
all’interno del comparto della pila a secco
utilizzando un oggetto appuntito (ad
esempio la punta di una penna sfera).
Questa operazione cancella tutti i dati
della rubrica telefonica.
59
Page 31

ItalianoDeutsch
60
TECHNISCHE DATEN
Allgemein
Abmessungen (B/H/T)
Gewicht ca. 95 g, einschließlich
Im Lieferumfang
Radioempfangsteil
Frequenzbereiche
Ausgang Kopfhörerbuchse (Stereo-
Stromversorgung
Ausgangsleistung max.
Batterielebensdauer
Taschenrechner
Kapazität 10 Stellen
System 4 Grundrechenarten
Stromversorgung
max. 94,4 x 64,0 x 23,0 mm
Batterien
Mikrozelle (R03, AAA) (1),
Lithium-Knopfzelle (1), StereoKopfhörer (1)
AM: 530-1605 kHz
FM: 87,5-108 MHz
Minibuchse)
1,5-V-Mikrozelle (R03, AAA)
(1)
10 mW + 10 mW (EIAJ, 16 Ω)
(EIAJ, 1mW, Mikrozelle (R03,
AAA)
ca. 26 Stunden (MW-Empfang)
ca. 20 Stunden (UKW-Empfang)
3-V-Lithium-Knopfzelle
CR2032) (1)
CARATTERISTICHE
TECNICHE
Sezione comune
Dimensioni 94,4 x 64,0 x 23,0 mm
Peso Circa 95 g pile comprese
Accessori Pila a secco (R03 formato
Sezione radio
Gamma di frequenze
Uscita Presa per cuffia (mini-presa
Alimentazione 1,5 V CC, tramite pila a secco
Output max 10 mW + 10 mW (EIAJ 16 W)
Durata della pila
Sezione calcolatrice
Cifre 10 cifre
Operazioni 4 operazioni standard e calcolo
Alimentazione 3V CC (pila al litio CR2032) (1)
AAA) (1), Pila al litio (1), Cuffie
stereo (1)
AM: 530-1605 KHz
FM: 87,5-108 MHz
stereo)
R03 formato AAA
(EIAJ 1mW, utilizzando una
pila a secco R03 formato AAA)
Circa 26 ore (se sintonizzati su
banda AM)
Circa 20 ore (se sintonizzati su
banda FM)
percentua
61
Page 32

Page 33

A
85-RC3-904-01
960119AYK-O
 Loading...